Resolume Avenue & Arena Manual
286
1 Resolume Avenue & Arena Manual
-
Upload
khangminh22 -
Category
Documents
-
view
4 -
download
0
Transcript of Resolume Avenue & Arena Manual

1
ResolumeAvenue & ArenaManual

2
Installing 9 ..................................................................................................................................... Registering 10 ...............................................................................................................................
Entering your Serial 10 ............................................................................................................. Updates 12 ................................................................................................................................ Online Verification 13 ................................................................................................................ Offline Registration 13 .............................................................................................................. Unregister 13 ............................................................................................................................ One License, Many Machines 16 ...............................................................................................
Registering Using a Dongle 17 ................................................................................................... Permanent and Irrevocable 18 .................................................................................................. No Internet Required 19 ............................................................................................................ One Dongle per Computer 19 ................................................................................................... Stuff Happens 19 ......................................................................................................................
Yearly Renewals 21 ...................................................................................................................... This is not a subscription! 21 .................................................................................................... Signing up for another Tour 21 ................................................................................................. Beat the System 22 ...................................................................................................................
Basic Vocabulary 23 ..................................................................................................................... Clip 23 ....................................................................................................................................... Layer 23 .................................................................................................................................... Group 23 ................................................................................................................................... Composition 23 ......................................................................................................................... Deck 24 ..................................................................................................................................... Effect 24 .................................................................................................................................... Parameter 24 ............................................................................................................................ Shortcut 24 ...............................................................................................................................
Quickstart Tutorial 25 .................................................................................................................. Trigger Clips 25 ......................................................................................................................... Mixing 26 .................................................................................................................................. Effects 26 .................................................................................................................................. Have a Play! 28 .........................................................................................................................
Clips 29 ........................................................................................................................................... Triggering Clips 29 ....................................................................................................................
29 .............................................................................................................................................. Column Triggering 29 ............................................................................................................... Trigger Settings 30 ................................................................................................................... Resize 32 .................................................................................................................................. Thumbnails 33 .......................................................................................................................... Persistent Clips 33 .................................................................................................................... Cut/Copy/Paste/Rename/Clear 33 ............................................................................................. Show & Strip 34 ........................................................................................................................ Snapshot 34 .............................................................................................................................. Clip Colors 34 ............................................................................................................................ Auto Pilot 34 .............................................................................................................................. Clip Properties 35 ......................................................................................................................
Layers 38 ........................................................................................................................................ Blending and Compositing 38 ................................................................................................... Too Much of a Good Thing 39 ................................................................................................... Eject, Bypass and Solo 44 ......................................................................................................... Layer Order 45 .......................................................................................................................... Layer Transition 45 ...................................................................................................................

3
Previous / Next Clip 45 .............................................................................................................. Layer Properties 46 ................................................................................................................... Layer Transport Controls 47 ...................................................................................................... Trigger Options 47 .................................................................................................................... Mask Layer 48 ........................................................................................................................... Lock Content 48 ........................................................................................................................ Duplicate, Rename, Clear Clips and Remove 49 .......................................................................
Groups 50 ....................................................................................................................................... Creating Groups 50 ................................................................................................................... Adding and Removing Layers 51 ...............................................................................................
52 .............................................................................................................................................. What Happens in the Group, Stays in the Group! 52 ................................................................ Group Blending 52 .................................................................................................................... Group to Slice Routing 53 .........................................................................................................
Composition 54 .............................................................................................................................. Settings 54 ................................................................................................................................ Properties 55 ............................................................................................................................. Crossfader 56 ............................................................................................................................ Direction Controls 58 ................................................................................................................ Trigger Options 58 ....................................................................................................................
Decks 60 ......................................................................................................................................... Adding Content 60 .................................................................................................................... Managing Clips 62 ..................................................................................................................... Using Decks 63 ......................................................................................................................... Organising Decks 63 .................................................................................................................
Video 65 .......................................................................................................................................... Can Resolume play my videos? 65 ............................................................................................ Playback 66 ............................................................................................................................... Playback Options 68 .................................................................................................................. Cue Points 70 ............................................................................................................................ BeatLoopr 70 .............................................................................................................................
Stills 72 ........................................................................................................................................... Options 72 ................................................................................................................................. Image Sequences 73 ................................................................................................................. Triggering Stills and Memory 73 ............................................................................................... More than Content 73 ...............................................................................................................
Sources 74 ...................................................................................................................................... Source Properties 76 ................................................................................................................. Text Animator 77 ...................................................................................................................... Routing 78 ................................................................................................................................. Capture Devices 79 ................................................................................................................... NDI/Spout/Syphon 79 ................................................................................................................
Live Inputs 80 ................................................................................................................................ Capture Devices 80 ................................................................................................................... Native Capture Support 80 ........................................................................................................ Troubleshooting 81 ................................................................................................................... Magewell 82 ..............................................................................................................................
Syphon & Spout 83 ....................................................................................................................... Input 83 ..................................................................................................................................... Output 84 .................................................................................................................................. Advanced Output 85 .................................................................................................................

4
NDI Inputs and Outputs 87 .......................................................................................................... Input 87 ..................................................................................................................................... Output 88 ..................................................................................................................................
89 .............................................................................................................................................. 89 ..............................................................................................................................................
Advanced output 89 .................................................................................................................. 90 ..............................................................................................................................................
PTZ - Pan Tilt Zoom 90 .............................................................................................................. NDI Gotchas 90 ......................................................................................................................... Still To Do 91 .............................................................................................................................
Effects 92 ........................................................................................................................................ Using Effects 92 ........................................................................................................................ Audio Effects 93 ........................................................................................................................ Video Effects 94 ........................................................................................................................ Presets 94 ................................................................................................................................. Animate Effect Bypass 95 ......................................................................................................... Multiple Effects 96 ..................................................................................................................... Rename Effects 97 .................................................................................................................... Effect Clips 97 ........................................................................................................................... More Effects 98 .........................................................................................................................
Transform 99 ................................................................................................................................. Parameters 99 ........................................................................................................................... Multiple Transforms 100 ........................................................................................................... Transform Presets 100 .............................................................................................................. Slice Transform 101 ..................................................................................................................
Output Setup 105 .......................................................................................................................... Setup your computer 105 ......................................................................................................... Setup Resolume 107 ................................................................................................................. Advanced... 108 ........................................................................................................................ Composition output sharing 108 ............................................................................................... Identify Displays 109 ................................................................................................................. Open System Display Preferences 109 ..................................................................................... Show FPS 109 ............................................................................................................................ Show Test Card 110 .................................................................................................................. Show Display Info 110 ............................................................................................................... Snapshot 111 ............................................................................................................................
Advanced Output 112 ................................................................................................................... Multiple Outputs 112 ................................................................................................................. Projection Mapping 112 ............................................................................................................. Getting Started 113 .................................................................................................................. Saving and sharing Presets 113 ................................................................................................
Screens 115 .................................................................................................................................... Types of Outputs 115 ................................................................................................................ Adjustments 119 ....................................................................................................................... Preparing before show 119 .......................................................................................................
Input Selection 120 ....................................................................................................................... Slices 120 .................................................................................................................................. Slice Masks 122 ......................................................................................................................... Polygon Slices 123 .................................................................................................................... Multi Select 124 ........................................................................................................................
Output Transformation 126 .........................................................................................................

5
Transforming 126 ...................................................................................................................... Warping 126 .............................................................................................................................. Masking 131 .............................................................................................................................. Slice Options 132 ......................................................................................................................
DMX Output 134 ............................................................................................................................ Using DMX Lumiverses 134 ....................................................................................................... Using DMX Fixtures 135 ............................................................................................................ Sending DMX to your LED lights 137 ......................................................................................... A word on DMX USB devices 138 .............................................................................................. Patching your Lumiverse 139 .................................................................................................... Aligning your output 140 ...........................................................................................................
Parameters 141 ............................................................................................................................. Sliders 141 ................................................................................................................................ Toggle Buttons 142 ................................................................................................................... Event Buttons 142 ..................................................................................................................... Radio Buttons 143 ..................................................................................................................... Dropdowns 143 ......................................................................................................................... Color 145 .................................................................................................................................. Control 148 ...............................................................................................................................
Parameter Animation 149 ............................................................................................................ Timeline 149 .............................................................................................................................
150 ............................................................................................................................................ BPM Sync 150 ...........................................................................................................................
150 ............................................................................................................................................ Dashboard 150 .......................................................................................................................... Clip Position 150 ....................................................................................................................... Audio Analysis 150 .................................................................................................................... Envelope 153 ............................................................................................................................ Animate Everything! 153 ..........................................................................................................
Keyboard Shortcuts 156 .............................................................................................................. Assigning Keyboard Shortcuts 156 ............................................................................................ Multiple Shortcuts 158 .............................................................................................................. Shortcut Target 159 .................................................................................................................. Shortcut Groups 160 ................................................................................................................. Keyboard Specific Modes 161 ................................................................................................... Shortcut Presets 161 ................................................................................................................. Default 164 ...............................................................................................................................
MIDI Shortcuts 165 ....................................................................................................................... Assigning MIDI Shortcuts 165 .................................................................................................... Multiple Shortcuts 169 .............................................................................................................. Shortcut Target 170 .................................................................................................................. Shortcut Groups 171 ................................................................................................................. MIDI Specific Modes 172 ........................................................................................................... MIDI Out 175 ............................................................................................................................. Multiple MIDI Devices 177 ......................................................................................................... Shortcut Presets 178 ................................................................................................................. Default 180 ...............................................................................................................................
DMX Shortcuts 181 ....................................................................................................................... Setting Up DMX Input 181 ......................................................................................................... Subnet / Universe 182 ............................................................................................................... Assigning DMX Shortcuts 183 ...................................................................................................
6
Shortcut Target 184 .................................................................................................................. Shortcut Groups 185 ................................................................................................................. Shortcut Presets 186 ................................................................................................................. Nitty Gritty Network Setup 188 ................................................................................................. Troubleshooting 192 .................................................................................................................
OSC 194 .......................................................................................................................................... OSC Addresses 194 ................................................................................................................... Sending OSC to Resolume 197 .................................................................................................. OSC Output 200 ........................................................................................................................ Polling 202 ................................................................................................................................
Sync with a DJ 203 ........................................................................................................................ SMPTE 204 ......................................................................................................................................
Setup 204 .................................................................................................................................. Test file 205 .............................................................................................................................. What SMPTE isn't 205 ............................................................................................................... Syncing with a DJ 206 ...............................................................................................................
Sync to Denon DJ Players 207 ..................................................................................................... Technical setup 208 .................................................................................................................. Linking a clip 209 ...................................................................................................................... Options 210 ............................................................................................................................... Player Layer Target 210 ............................................................................................................ Supported Models 211 ..............................................................................................................
BPM 212 .......................................................................................................................................... Beats, Bars and Phrases 212 ..................................................................................................... Setting the BPM 212 .................................................................................................................. Rhythm in Visuals 213 ..............................................................................................................
Dashboard 214 ............................................................................................................................... Control at a Glance 214 ............................................................................................................ Options 214 ............................................................................................................................... Remove 215 ..............................................................................................................................
Envelopes 216 ................................................................................................................................ Using Envelopes 216 ................................................................................................................. Easing 216 ................................................................................................................................ Interpolation Curves 218 ........................................................................................................... Adding and Removing Keyframes 219 ...................................................................................... Adjusting Keyframes 219 .......................................................................................................... Saving Envelopes 220 ...............................................................................................................
Undo 222 ........................................................................................................................................ What is undoable? 222 .............................................................................................................. What is NOT undoable? 222 ...................................................................................................... Scope 222 ................................................................................................................................. Stack 223 ..................................................................................................................................
Preparing Media 224 .................................................................................................................... Installation 224 ......................................................................................................................... Codecs 224 ............................................................................................................................... Preparing Media 224 .................................................................................................................
Rendering to DXV 226 .................................................................................................................. Rendering 226 .......................................................................................................................... Normal Quality vs High Quality 226 .......................................................................................... No Alpha vs With Alpha 226 ...................................................................................................... Performance 226 .......................................................................................................................

7
Exporting .mov files with DXV encoding 227 ............................................................................ DXV export plugins in Adobe CC 2018 231 ...............................................................................
DXV doesn't need Quicktime 231 .............................................................................................. Input Maps 233 ..............................................................................................................................
Single LED screen 233 .............................................................................................................. 4 screen LED wall 235 ............................................................................................................... Projection Mapping 240 ............................................................................................................. Non-geometric objects 245 .......................................................................................................
Edge Blending 248 ........................................................................................................................ Overlap the Input 248 ............................................................................................................... Align the Output 249 ................................................................................................................. Blending 250 ............................................................................................................................. Black Level and Brightness Compensation 251 ........................................................................
Slice Routing 253 .......................................................................................................................... Routing Layers to Slices 253 ..................................................................................................... Routing Groups to Slices 254 .................................................................................................... Routing the Preview to Slices 254 ............................................................................................. Routing Screens to Slices 254 ................................................................................................... When NOT to use slice routing 254 ...........................................................................................
Lots of Outputs 255 ...................................................................................................................... Flowchart 255 ........................................................................................................................... Single computer with a single GPU 257 .................................................................................... Single computer with a single GPU + Datapath 258 ................................................................. Single computer with a single GPU + Blackmagic Quad 2 258 ................................................. Single computer with single GPU + MST hub 259 ..................................................................... Single computer with two GPUs 260 ......................................................................................... Multiple computers synced via external protocol 260 ...............................................................
Media Manager 262 ...................................................................................................................... Clip Reconnect 262 ................................................................................................................... Replace File 264 ........................................................................................................................ Collect Media 265 .....................................................................................................................
Recording 267 ................................................................................................................................ Setup 267 .................................................................................................................................. Action! 267 ................................................................................................................................ To 4K and beyond 267 ..............................................................................................................
Ableton Link 268 ........................................................................................................................... Using Link 268 .......................................................................................................................... Great power, great responsiblity 268 ........................................................................................
Preferences 269 ............................................................................................................................ General Preferences 269 ........................................................................................................... Audio Preferences 270 .............................................................................................................. Video Preferences 271 .............................................................................................................. MIDI Preferences 272 ................................................................................................................ OSC Preferences 273 ................................................................................................................ DMX Preferences 274 ................................................................................................................ Defaults 274 .............................................................................................................................. Feedback 275 ............................................................................................................................ Registration 275 ........................................................................................................................
Tech Specs 277 .............................................................................................................................. Minimum Specs 277 .................................................................................................................. Recommended Specs 277 .........................................................................................................

8
Modifiers and Shortcuts 278 ....................................................................................................... General Shortcuts 278 .............................................................................................................. Key Modifiers 278 ..................................................................................................................... Navigating the Stage 278 ......................................................................................................... Nudging 278 ............................................................................................................................. Slice Shortcuts 278 ................................................................................................................... Mask and Polygon points 278 .................................................................................................... Contextual Menus 279 .............................................................................................................. Input/Output Guides 279 ........................................................................................................... View Options 280 ......................................................................................................................
Fixture Editor 282 ......................................................................................................................... 282 ............................................................................................................................................
Creating a New Fixture 282 ...................................................................................................... Setting up Parameters 282 ....................................................................................................... Channel Distribution 283 .......................................................................................................... Color Space 283 ........................................................................................................................ Gamma Correction 284 .............................................................................................................
Directory List 285 .......................................................................................................................... Application folder 285 ............................................................................................................... User Documents 285 ................................................................................................................. Log files 285 .............................................................................................................................. Thumbnail Previews & Text Atlas 286 ....................................................................................... Registration files 286 ................................................................................................................ DXV plugins 286 ........................................................................................................................

9
InstallingI'm sure you are keen to get started so you'll be pleased to know that the installation process is very simple.
Simply download the installer from the Resolume website, run the install file and follow the instructions.
The website will detect whether you're on a Mac or PC and offer you the correct download for your system.
Are you using a PC and do you need Resolume for Mac? No worries. You can switch in the top right corner.
Also, you can scroll down to the dropdown at the bottom of the page where you will find every Resolume
version under the sun.
Because of the graphical acceleration that is used, Resolume does have some system requirements.
Please check the spec page for the current minimum requirements.

10
RegisteringThe download of Resolume will work in demo mode straight away. You will notice that occasionally the
Resolume logo will appear on the video output and a robotic voice will remind you what software you are
using.
This is the only limitation of the demo. You can use every feature and try all the things Resolume has to
offer.
In order to get out of demo mode and use Resolume for real, you can buy a license from our webshop. Once
you've done that, you will receive a serial number.
Entering your SerialOnce you have a serial number, open the Preferences in Resolume and click the Registration tab. Enter
your serial number into the text box and click 'Register'.

11
Resolume will now use your Internet connection to confirm your serial number. Once this is completed,
Resolume will be fully registered. The audio and video reminders will be gone.

12
UpdatesA Resolume license comes with a year of updates. We work on new features all the time and you get all of
them for a whole year. We release them as updates and you can just download and run them on the same
license.
The registration tab lets you know until when you are eligible for these updates.
Unsure what this is all about? You can read more about this date and how it affects your license here.

13
Online VerificationResolume occasionally needs to check if everything is still in order. It does this automatically every time you
run Resolume on a computer with a working Internet connection.
If you use Resolume on a connected computer, you won't even notice it. If you're using Resolume on an
offline computer, it will remind you to phone home every 30 days.
We take this very seriously and you can read more about the how and why of the online verification here.
Dongle
In the live industry, it's quite common to keep computers completely sealed off from evil driver updates and
nasty system changes. Also, a lot of people use Resolume in fixed art installations without Internet access
or a regular maintenance schedule.
For those cases, you can also register Resolume using a dongle. You can read more about using a dongle
to register Resolume here.
Offline RegistrationYou can register Resolume without having an Internet connection on the machine you install it on.
To do this, select File > Preferences in Resolume and click the Registration tab. Once there, click the Offline
Registration button and take a note of the ID Code that is shown.
You will now need to use a computer that does have an Internet connection to visit: resolume.com/register
On that webpage, you can enter your serial number and the ID Code that you just wrote down. The
Resolume website will then generate a registration key file.
Transfer this file back to the computer that you have installed Resolume on.
Now select File > Preferences in Resolume and click the Registration tab. Click the 'Offline Registration...'
button and then the 'Load registration file...' button. Select the file and Resolume will become fully
registered.
UnregisterWhen you need to re-install your operating system or when you have bought a new computer, make sure
you remove your registration.
To remove your Resolume registration from a computer, go to the Register tab in the Preferences and click

14
on the "Unregister" button. This will remove your serial number from the computer.
Sometimes computers get stolen or damaged. Also, we're all humans and sometimes we tend to forget
things. In short, stuff happens.
When stuff happens, don't worry. You can still use Resolume. Just log in to your account in the shop.
You will see which computers your license is being used on. Simply hit the Unregister button beneath the
computer you want gone, and poof, it's gone.
If you need all those computers to stay licensed after all, you can also upgrade your license to more
computers by hitting Upgrade.

15

16
One License, Many MachinesA multi-seat license will come with a single serial. This serial can be used to have more computers
registered at the same time. So a Resolume license for 3 computers will come with a single serial. That
serial can then be used to keep 3 computers registered simultaneously.
Similarly, when upgrading from Resolume for 1 computers to 2 or more, your serial number will be
'expanded' to be valid on 2 or more computers. It is not possible to split the license into several serial
numbers.
+ 1 Backup
Every Resolume license gets one additional backup.
You can use it to always have a second computer registered and standing by. Or you can use it to register
both your home studio render beast and use the backup for your live laptop. Or you can keep your second
install unused and ready to go when your first computer catches fire. Whatever you prefer.
The ever important small print: when upgrading to a multi-seat license, you still get 1 backup.
So if you have Resolume for 2 computers, you can install it on 2 computers + 1 backup. Then on to 3
computers + 1 backup. Then 4 computers + 1 backup. Etc etc. You see where this is going. We all watched
Sesame Street when we were kids, so you know how Count von Count counts.
The backup is there to tie you over in case of emergency. If your shows are that important that you need full
redundancy, for all your machines, all the time, we kindly ask you to purchase a license for the required
amount of computers.

17
Registering Using a DongleThe process is simple.
First, you need a license for Avenue 7 or Arena 7. You can get those from our shop. The dongle does not
work with version 6 or lower.
Then, you order a Resolume dongle from our shop. You can use the same dongle for both Avenue and
Arena.
Once you receive the dongle, plug that bad boy into your computer and start Resolume. Resolume will
detect that an empty dongle is present and pop open the Preferences.
Fill out your serial number. Resolume will connect to the Internet one last time. If everything is cool, it will
then transfer your license to the dongle.

18
That's it.
From this moment forward, you can plug this dongle into any computer running Resolume, and that
Resolume will work without a watermark. For ever and ever, as long as the dongle is plugged in. No Internet
required.
Permanent and IrrevocableAs always, with great power comes great responsibility. So please pay attention to this next part.
As mentioned during the transfer process, registering your license onto a dongle is permanent andirrevocable.
Let me say that again, because I want to be sure you heard me.
REGISTERING YOUR LICENSE ONTO A DONGLE IS PERMANENT AND IRREVOCABLE!
By putting your license on the dongle, you're saying that you don't want us to keep track of which computer
your license is used on and you will take care of it yourself. Once you've moved your license onto a dongle,
there's no way for you, or for us, to move it back. It will live on your dongle forever.
So when your dongle is lost or stolen, your license is gone along with it. We will have no way of knowing
what happened to it, and we cannot replace it.
Think of this way: you've made that piece of plastic be worth hundreds of euros, so take care of it like you
would a bottle of Clase Azul Tequila or a 2011 Titanium finish RX-78-2 Gundam.

19
No Internet RequiredResolume would like to phone home every 30 days. It does this because that makes it easier for you to
manage your license and to keep track of which computers it's being used on.
For some people, this is not an option. Maybe you're adamant about keeping your show computer offline
because you got burned by a nasty driver update in the past. Other people might be cool with the Internet
touching their machines in places, but are working in art spaces where it's not possible to come back for a
check up every 30 days.
We understand that you have your reasons and this is why the dongle exists. You can download your
license onto a dongle and use the dongle to keep your Resolume registered. No Internet required.
Well, a little...
But just once. When you register the dongle.
It's not possible to use offline registration to transfer a license onto a dongle.
If you really really really want to keep your show computer sealed airtight, you can run Resolume on the
computer you use for browsing porn I mean sending emails and use that to transfer your license onto the
dongle.
Once transferred, you can then use the dongle on your show computer. Then it's really no more Internet.
Forever. Promise.
One Dongle per ComputerA Resolume license for 1 computer can be transferred to one dongle. If you have a license for more
computers, you can order a separate dongle for each.
As you know, every Resolume license also comes with a +1 backup. You can read more about that here,
but for now it is important to know that you cannot transfer this backup to a second dongle.
The backup is there in case of emergency. It's there for the crazy times when both your computer, your
pants and your dog have caught fire, when the inmates have overrun the asylum and the giant ant creatures
from outer space have taken control of the government. It's for when your first plan of attack has failed you
and you need another way in.
So your primary license can live on your dongle. Your backup stays in the cloud.
Stuff HappensWe're all humans dealing with technology. Knowing humans and knowing technology, one of the two will
slip up eventually. Maybe both. Maybe you accidentally format the dongle. Maybe it starts making weird
noises and smoke starts coming out of it. In short, stuff may happen. When stuff happens, it's good to know
we got your back.
Erase or Format
Should your dongle accidentally get erased or formatted, after you've already transferred the license on to
it, don't worry.
First, make sure that the dongle is formatted with MBR partition table, and FAT format, so it will work on
both Mac and PC.

20
Then connect the computer to the Internet and start Resolume. Resolume will recognise the dongle, look up
the license that's associated with it and make everything right again.
After this, your dongle will be good as new and you can live Internet free again.
Damage
Should the dongle get damaged, have a technical malfunction or otherwise become unusable, please send
it back to us. We'll be happy to replace it, no questions asked. We really don't need to know where it's been.
Contact us for the best way to send a return.

21
Yearly RenewalsWe love working on Resolume. Every day we sit behind our computers and work on new features, come up
with new ideas and generally try to make your VJ life easier and more fun.
When we finish these new features, of course we'd like you to go out and use them as soon as possible. We
don't like it when we have to sit on a feature for two years or more, just so we can make a bigger splash
when we finally release a big major update. You're out there doing shows every weekend and we want to
make those shows better today!
So this is where that date in your registration tab comes in.
When you buy a Resolume license, you get Resolume with all the features it currently has. That part goes
without saying.
Along with that, you get a year of new features. Everything we work on and release during that year, will be
available to you as an update. You can just download the new version and use it, all on the same license.
If, after a year, you'd like to keep on receiving these updates, you can renew your license and get another
year of awesome new stuff.
This way we can keep working on making Resolume better every day, and you don't have to wait for us to
release a new major version every couple of years. Everybody wins!
This is not a subscription!"Hold up! Does this mean I have to pay every year to keep using Resolume? That sucks! Once I paid, Idon't want to keep paying all the time."
Don't worry. You bought it, so you own it.
We know what you mean though. It sucks when you've paid for something and then all of a sudden you're
not allowed to use it anymore. So that's not what we're doing.
If you're happy with the current feature set and don't want to renew, no problem. Your Resolume license
remains yours. You can continue to use the current version for as long as you like. It will remain registered
and it will work without watermark for ever and ever.
So you don't have to keep renewing if you don't want to. There's no need to update if you're happy with
what you have. Your license stays yours and watermark free, even past the expiry date.
Only if you download and install a newer update, that is released after your expiry date, will Resolume revert
to the watermark. That makes sense, because that version contains new features that you haven't paid for.
Even then, if you don't want those new features, it is simply a matter of downloading an older version, valid
for your license, to get rid of the watermark again.
Your license really stays yours.
Signing up for another TourIf, after a year, you'd like to keep receiving those awesome new features, you can renew your license.
Resolume will give you a link right from the Registration tab. You can also handle updates via your account
in our shop.
You can simply add the renewal to your cart and proceed to checkout. Once the payment is complete, your

22
license will update automatically and you'll enjoy another year of cool new stuff.
If you're worried about missing out, you can renew your license as early as 180 days before the updates run
out. The extra year is added to your original expiry date, so you always get the full amount of days you paid
for. Even when you renew before the actual expiry date.
Beat the System
If you don't mind waiting, you can save some money by keeping your current license with its current feature
set. Let the updates expire and don't renew. For a year or more, just ignore all the updates we release. Bide
your time. Be content with what you have.
Then, only when we release a feature that you really can't do without, you renew your license. You'll get the
new feature, plus all the updates that we released in between. Just like that.
Or, you could be a cool dude or dudette and support the work we do by renewing yearly. It's up to you. We
think you're awesome either way.

23
Basic VocabularyLet's get some basic Resolume terminology out of the way. This way we can understand each other better
when we get into the nitty gritty of how Resolume works. Don't worry, I promise I'll keep it simple.
Clip
A Clip can consist of a video file or a still image, an audio file, or a combination of those. It could also
contain a Source, like a live camera input. The clip also has many settings that change how the clip is
played and how it looks and sounds.
Layer
Each clip sits in a specific Layer. Only one clip from each layer can play at a time. Layers can be blended
together to create the final output.
GroupLayers can be combined into Groups. Groups are little sub compositions, where multiple layers are
composited together and can be controlled with a single fader.
Groups are available on Arena only.
Composition
A Composition is a complete Resolume setup with sets of clips, assigned effects, parameter settings and

24
control shortcuts. Switching compositions takes some time, so you’ll want to prepare a complete
performance as a single composition.
DeckThe clips in a composition are divided into Decks for easy access to the clips that you want, when you want
them. Switching decks is quick and does not interrupt playback, so you can switch between decks while
performing.
EffectEffects can be added to the whole composition, a specific layer, a specific group, or a single clip. They
change how the output looks or sounds. They're lots of fun and when used wisely, they can be your greatest
asset.
ParameterParameters are used to control everything in Resolume. Everything that can be adjusted, is adjusted with
parameters.
A clip has several parameters like playback speed and playback direction, a layer has parameters like
scale and blend mode, and effects can have loads of different parameters.
You use parameters to fine tune your composition.
ShortcutMIDI, OSC and keyboard shortcuts can be assigned to all the parameters in the interface, so you don't have
to use your mouse to control everything.
See, that wasn't so scary.

25
Quickstart TutorialRight! You've got Resolume installed so let's jump in and see what it can do, shall we?
Run the Resolume application. The Resolume interface will appear. It may look complicated at first but don't
worry - it will soon all make sense.
A new Resolume install comes with an example composition. A composition is what we call a complete
Resolume setup - each composition can include sets of clips, preprogrammed effects and all other settings
that you need for a performance.
Trigger ClipsBelow the menu bar, you should see a set of horizontal rows that each have some controls on the left and a
set of thumbnails. Each thumbnail is a different clip.
Go ahead and click one of the thumbnails now. The clip will start playing. Note that these clips are set up to
be synchronised to the BPM (Beats Per Minute) setting, so the clip may not start playing instantly - it will
wait for the start of the next bar. Don't worry, if you want to launch clips instantly, you can set them up to do
that.
But first things first. You should now see the clip playing in the output window on the left and hear the audio
of the clip. Awesome. You're VJ'ing.
You can take control of the clip that is playing by clicking the Clip tab. The Transport section of this tab is
the bit we are interested in for now.
You can use the Forwards, Backwards and Pause icons to start and stop the clip. You can also grab the
moving blue wedge directly to scratch the clip - wikka wikka wah!
Note that messing with the clip like this will mean that it is no longer synchronised with the BPM - the tempo

26
will be right but it will be out of phase. You can resynchronise it by clicking the clip thumbnail again - it will
start again at the start of the next bar.
MixingPlaying one clip is all very well but mixing clips together is where the fun really starts.
Each of the horizontal rows of clips is a separate layer. Each layer can play one clip at a time. Try clicking
another thumbnail on the same layer as the one that is already playing. You will see that, at the start of the
next bar, the output will change to play the new clip.
Now try clicking a clip from a different layer. This time, the old clip will continue playing and the new clip will
be mixed with it.
Have a look over to the left of the thumbnails. There are
two vertical sliders marked 'A' and 'V'. Try sliding these
up and down on the layers that you have playing.
Logically enough, the 'A' slider fades the audio of the
layer in and out. The 'V' slider does the same for video.
You can also use the 'M' (master) slider to control both at
the same time.
EffectsSo we've got some clips playing. Let's mess with them using some effects. Over on the right hand side of
the interface are some tabs that say 'Files', 'Compositions', 'Effects' and 'Sources'. Select the Effects tab.
Below the tab will now be a list of effects. These are the video effects that are included with Resolume.

27
Pick an effect. Any effect will do, but I recommend Bendoscope as a good one to start with. Now drag it over
to the left where there is a tab called Composition. As you get over there, drop the effect in the area where it
says 'Drop effect or mask here'. You'll know when you're in the right place when you see four colored
corners appear around the Composition tab.
You should immediately see that the output video has been distorted by the effect. Such trippy.
Now, look back to the place where you dropped the effect. You will see that there are two sliders under the
Bendoscope effect.
All video effects have the Opacity slider - it is used to mix the effected video with the original.
Most effects also have additional parameters that you can control. Bendoscope has one - the number of
divisions used in its distortion effect. Try sliding this slider to the left and right to see what effect it has on the
output video. More such trippy.
You can add more effects by dragging them over from the Effects tab. Each effect takes the output of the
one before it and effects it, so you can combine many effects to make something beautiful. Or a great big

28
mess.
If you want to get rid of an effect, just click the x to the right of the Effect's name.
Have a Play!Now is a good time to have a play with Resolume. Play some clips, add some effects. See what happens.
Most of all, have fun!
A useful feature is the Help window in the bottom right of the interface. This will show some brief hints about
how to use whatever the mouse pointer is currently over.
In the other sections of the manual, we will be looking in detail at all of the features of Resolume, so if you
come across anything that interests you, you will be able to find out how to use it.

29
ClipsClips are the real nuts and bolts of Resolume. Without clips we wouldn't have any content to throw at the
screens and speakers.
A clip is usually a video. But it can be a lot more than that. A clip can also be a still image. It could also be an
audio file, or even a combination of audio and video.
Clips can also contain Sources - like a live camera or plugins that generate content on the fly. Basically a
clip is any type of media you create your output with.
Triggering Clips
Triggering a clip is as simple as clicking its thumbnail. When you're sick of a clip, you can either trigger a
new one in its place. Or press the big X to the left of the layer to eject it.
That's it. That's really all a good VJ does. Trigger the right clip at the right time. You can now stop reading
the manual.
Still here? Cool. Because there are loads of options!
Column TriggeringA column is a vertical set of clips.
You can trigger multiple clips at the same time by triggering the column. This is a great way to quickly
switch looks by triggering a set of clips that work well together.
30
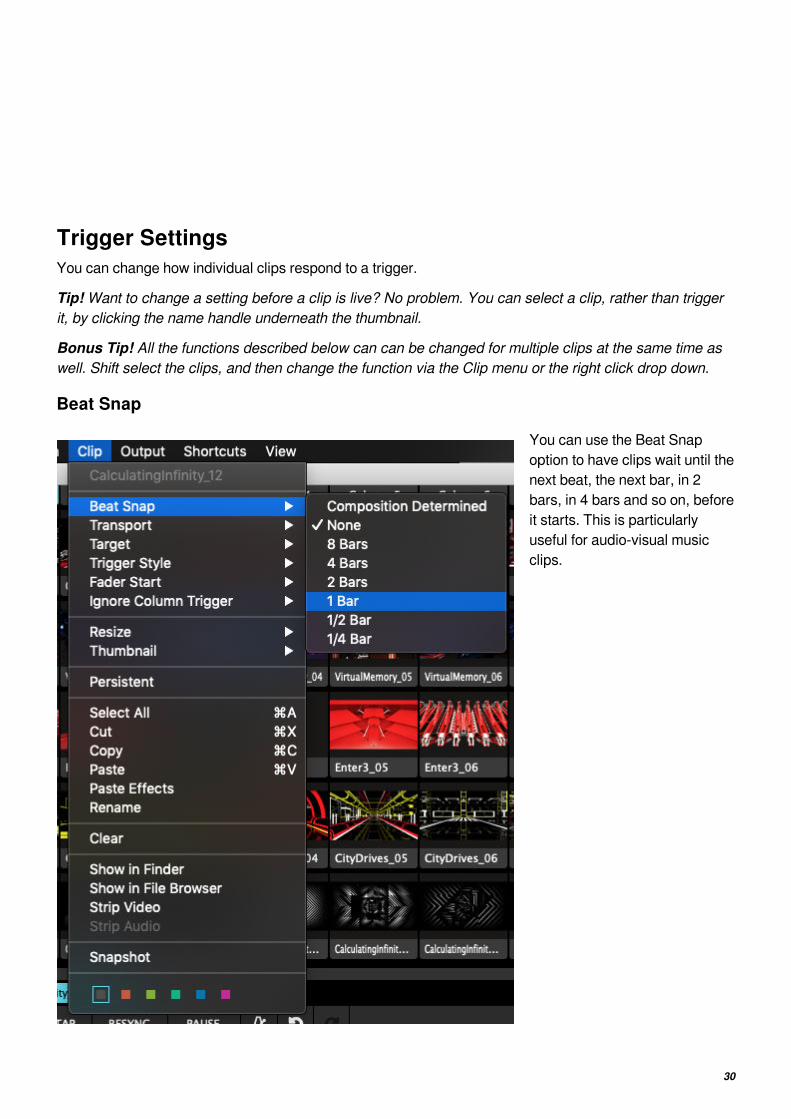
Trigger SettingsYou can change how individual clips respond to a trigger.
Tip! Want to change a setting before a clip is live? No problem. You can select a clip, rather than triggerit, by clicking the name handle underneath the thumbnail.
Bonus Tip! All the functions described below can can be changed for multiple clips at the same time aswell. Shift select the clips, and then change the function via the Clip menu or the right click drop down.
Beat Snap
You can use the Beat Snap
option to have clips wait until the
next beat, the next bar, in 2
bars, in 4 bars and so on, before
it starts. This is particularly
useful for audio-visual music
clips.

31
In some music software, this feature is known as "Quantising".
You can set the Beat Snap option for an individual clip. Select the clip and select the Clip > Beat Snap
menu option.
If you set the clip setting to 'Composition determined', it will use whatever the Composition setting is.
You can set the Beat Snap option for the whole Composition through the Composition > Beat Snap menu
options.
Clip Target
Own Layer
The default thing that happens when you click a clip is that it plays in the layer it is on. This is the most
organised and easy to follow way of triggering.
Active Layer
If you prefer, you can change that so the clip will play in whichever layer you have active at the moment of
triggering. This will let you improvise more quickly with a large set of content.
Free Layer
There's also the option to trigger a clip in whichever layer is free. The Free Layer Clip Target mode is
particularly fun when used with the Piano Trigger Style mode (see below).
You can then play 'chords' of clips with the keyboard or a MIDI device - each of them will be displayed for
as long as it is selected.
Obviously, you will need as many layers as you want to play simultaneous clips.
Composition Determined
Like Beat Snap, you can change this setting for the whole Composition (Composition > Clip Target) and for
individual clips (Clip > Clip Target)
Trigger Style

32
Normally, when you click a clip,
it starts playing and carries on
until you clear the layer or play
another clip.
With the Trigger Style setting, you can also use Piano mode, where the layer is automatically cleared when
you take your finger off the mouse button, or MIDI key or keyboard button if you are using shortcuts.
You can set the Trigger Style for the whole composition through the Composition > Trigger Style menu
option or for each individual clip using the Clip > Trigger Style menu option.
Fader Start
When Fader Start is enabled for a clip or
a layer, the clip will re-start from the
beginning every time you fade up the
layer it's playing in.
This is useful for clips that should start exactly from the time you bring them in, like song lyrics or intro
animations. You can keep them triggered in a layer, ready to go, and when the moment comes, start them
by fading them in.
Tip! In combination with the "pick-up' playmode (described further below), you can also turn this featureinto a Fader Stop. The clip will then remain paused where it was the moment you fade down the layer,and continue where it was when you fade it back up.
Fader Start can be set per clip (Clip > Fader Start), or the whole layer (Layer > Fader Start).
Ignore Column Trigger
This option allows you to 'lock' a clip or entire layer, so that when you trigger another column, that particular
clip will not get replaced and just keeps playing. The option can be found in both the Clip and Layer menus.
This is particularly useful when using a single clip as a background, or when you are using Resolume to
record a video clip, and you want to keep playing a single audio track while you're mixing.
ResizeHere you can quickly set your clips to either
Fill/Fit/Stretch to the current compositions size, or
go back to the original pixel dimensions.
This is not a setting that stays fixed! Rather it's a quick way to make sure all your clips are the same size,
and then you can go into the clip properties and further tweak the values.
Not sure what Fill, Fit and Stretch do exactly? They're explained below, where we talk about the Clip
Properties in greater detail.

33
ThumbnailsOh yes! You can update the
thumbnail of a clip to the current
frame, or even to how it looks with the
clip effects applied. If you're really
picky about your thumbs, you can
even load a still from disk.
Not happy how your thumbnails turned out? You can always revert back to the original.
Persistent ClipsPersistent clips carry over from deck to deck. You can mark one or more clips as persistent via the Clip
menu. When you then switch to another deck, these persistent clips will be loaded in the same slot in every
deck you switch to.
This is useful for longer shows, where you always want to have access to a particular set of clips, but not be
tied down to a single deck. Promotor logos, flashes or live cameras come to mind.
Did you have an important clip in a deck, which is now covered by a persistent clip? Don't
worry!
Resolume will let you know there was another clip in the slot by showing it as a little thumbnail in the top left.
You can use this thumbnail to free the clip. Just by dragging it to an empty slot.
Cut/Copy/Paste/Rename/ClearIf you really don't know what CTRL-c and CTRL-v do, I suggest
sitting down with a good friend and asking him or her to show it
to you.
Also, props to you because I wouldn't have made it through college without copy/pasting stuff from people
that were smarter than me.
Paste Effects
One option that may stand out is 'Paste Effects'. This will let you copy a clip into memory using CTRL-c, and
then paste just the effects onto one or more other clips using Paste Effects. This feature may be familiar to
you from good old Final Cut Pro and it's a really quick way to get the same look on a set of clips.
34
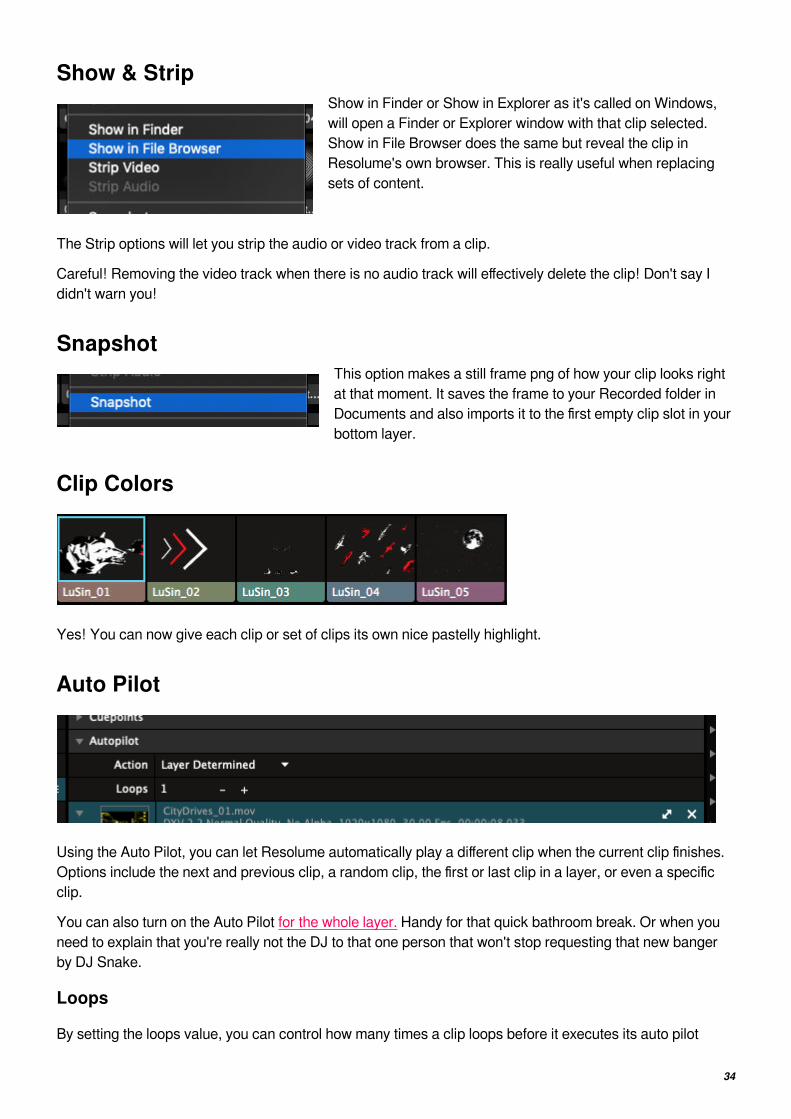
Show & StripShow in Finder or Show in Explorer as it's called on Windows,
will open a Finder or Explorer window with that clip selected.
Show in File Browser does the same but reveal the clip in
Resolume's own browser. This is really useful when replacing
sets of content.
The Strip options will let you strip the audio or video track from a clip.
Careful! Removing the video track when there is no audio track will effectively delete the clip! Don't say I
didn't warn you!
SnapshotThis option makes a still frame png of how your clip looks right
at that moment. It saves the frame to your Recorded folder in
Documents and also imports it to the first empty clip slot in your
bottom layer.
Clip Colors
Yes! You can now give each clip or set of clips its own nice pastelly highlight.
Auto Pilot
Using the Auto Pilot, you can let Resolume automatically play a different clip when the current clip finishes.
Options include the next and previous clip, a random clip, the first or last clip in a layer, or even a specific
clip.
You can also turn on the Auto Pilot for the whole layer. Handy for that quick bathroom break. Or when you
need to explain that you're really not the DJ to that one person that won't stop requesting that new banger
by DJ Snake.
Loops
By setting the loops value, you can control how many times a clip loops before it executes its auto pilot

35
action.
Layer Determined
By default, a clip's Auto Pilot setting is set to Layer Determined. This means that it will look to the layer's
Auto Pilot setting for what to do. So if the layer Auto Pilot is set to play the next clip, all clips that are set to
Layer Determined will play the next clip.
Layer Determined is particularly useful if you want to turn the autopilot on and off as part of your live
performance. You can change the setting in one place, and all clips will automatically follow along.
When using the autopilot to program more complex sequences, you'll probably want to set it per clip.
Clip PropertiesThe clip properties give you important info about the clip. Geeky stuff like the codec and fps, but also useful
stuff like the length and default BPM.
When you toggle down the individual audio and video properties, you get access to some more finetuning
options.
Audio Properties
The audio properties are only visible if your clip has an audio track. Duh.
Use the X button to delete the audio track. You can use this to remove the audio track from a video if you do
not need it.
Using the audio properties, you can set the volume for this clip individually. This is useful for balancing the
volume of clips that will play on a layer. Also, you can pan this clip individually.
Video Properties
Tip! Drag a video clip from the browser over the blue video area. This allows you to replace the content,but keep any effects and parameter changes you had applied to the original!
Use this bad boy to resize the clip to the size of the current composition. This is great when your
content isn't at the right size already.

36
Clicking this multiple times will cycle through a few options available for scaling.
Fill. This will make sure the clip fills the entire composition, while maintaining its aspect ratio. This will
result in the sides or the top and bottom of the clip being cropped off.
Fit. This will make sure your clip is completely visible, while maintaining its aspect ratio. This will
result in black borders being visible on the sides or top and bottom.
Stretch. This stretches the clip to the composition width and height, distorting the clip when
necessary.
Original. This returns the clip to its original size.
Click this to clear the video from the clip, leaving the audio intact.
Use the RGB toggles to subtract colour channels from the clip. Using combinations of these,
you can quickly colorise a clip to the three primary Red, Green and Blue, as well as the
secondary colours Cyan, Magenta and Yellow.
The A toggle can be used to disable transparency in a clip. This will only be available if your clip has an
alpha channel in it.
When you fold open the extended properties, you get access to Opacity, Width & Height, Blend Mode and
Alpha Channel interpretation of a clip.
Opacity
This will fade out your clip's visibility, gradually fading it to black.
Width & Height
Here you can change the resolution of the clip using exact pixels.
Blend Mode
This will let you set which blend mode this clip uses when it's playing in a layer. This will override whatever
blend mode you have selected on the layer, for as long as this clip is playing.
Alpha Type
Here you can tell how to interpret the alpha channel information in your clip. Resolume will default to
"Premultiplied". This is the default setting that After Effects uses for exports with an alpha channel. So most
of the time, you don't even have to worry about this.

37
Are you seeing a weird halo around your edges? Then you probably want to switch to "Straight".

38
LayersThink of your composition as a painting, and you're creating 60 artworks per second. Every layer is a layer
of paint on your canvas.
We start at the bottom, with a blank canvas. Layer 1 is the first layer of paint we put on. Then we add Layer
2, then Layer 3, slowly adding more and more layers on top of it, until we have a masterpiece.
Or a great big mess. Sometimes both. It's your little world, and you can make it as happy as you want it.
Some people think that the first layer should be at the top. I guess that's because we're used to reading abook starting at the top left of the page (in a Western culture anyway).
However, it's very rare to start a painting by applying the top layer first, and then gradually adding morepaint underneath. Since we're artists painting a masterpiece, and not writers writing a novel, the first layeris the bottom layer.
Blending and Compositing
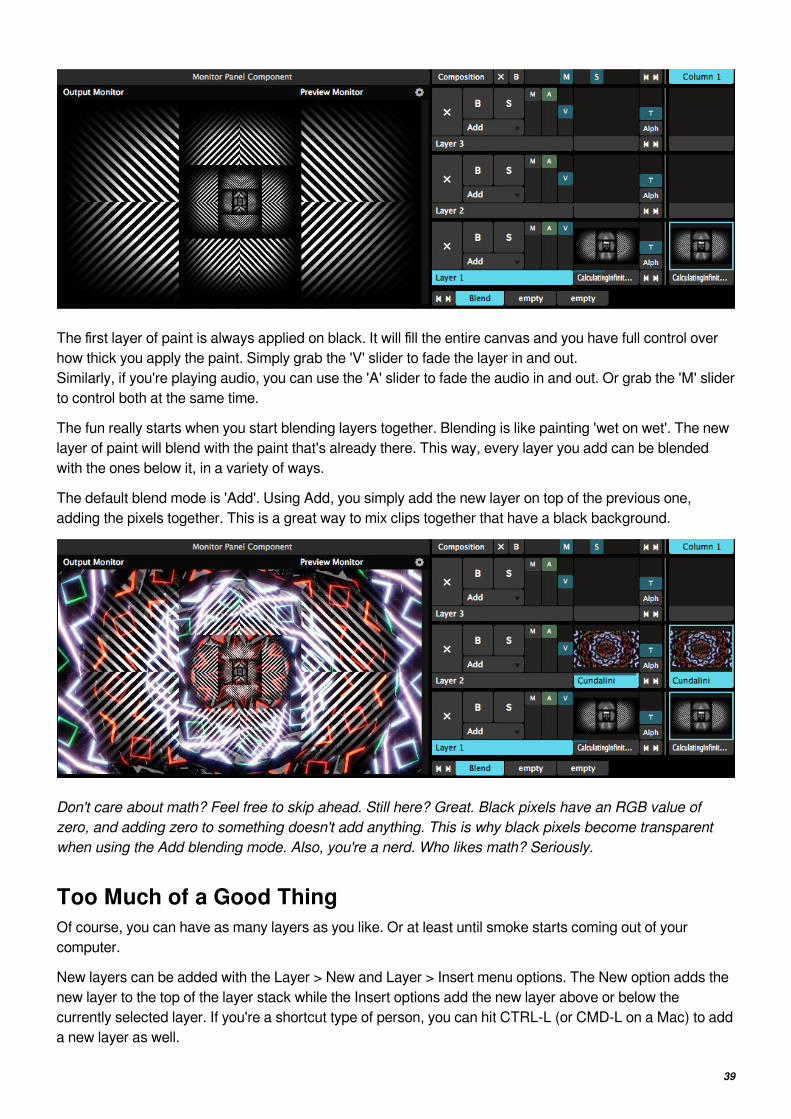
39
The first layer of paint is always applied on black. It will fill the entire canvas and you have full control over
how thick you apply the paint. Simply grab the 'V' slider to fade the layer in and out.
Similarly, if you're playing audio, you can use the 'A' slider to fade the audio in and out. Or grab the 'M' slider
to control both at the same time.
The fun really starts when you start blending layers together. Blending is like painting 'wet on wet'. The new
layer of paint will blend with the paint that's already there. This way, every layer you add can be blended
with the ones below it, in a variety of ways.
The default blend mode is 'Add'. Using Add, you simply add the new layer on top of the previous one,
adding the pixels together. This is a great way to mix clips together that have a black background.
Don't care about math? Feel free to skip ahead. Still here? Great. Black pixels have an RGB value ofzero, and adding zero to something doesn't add anything. This is why black pixels become transparentwhen using the Add blending mode. Also, you're a nerd. Who likes math? Seriously.
Too Much of a Good ThingOf course, you can have as many layers as you like. Or at least until smoke starts coming out of your
computer.
New layers can be added with the Layer > New and Layer > Insert menu options. The New option adds the
new layer to the top of the layer stack while the Insert options add the new layer above or below the
currently selected layer. If you're a shortcut type of person, you can hit CTRL-L (or CMD-L on a Mac) to add
a new layer as well.

40
This is a good moment to talk about composition, as in how you compose your overall visual output.
It's very easy to keep stacking layer upon layer, but as the saying goes, less is often more. 3 layers can
already be more than enough. A good composition gives each layer room to breath, instead of smearing
every pixel shut.
The danger with Add blending is that, well, there's no other way to say it, it adds up.
When using as little as 3 layers together, the result quickly becomes a white soup. Soup tastes great, but
it's not very nice to look at. Also, when you're playing on a LED wall, the people in the front are now acutely
aware of how silly they look and that that one boy they were flirting with is actually a speaker with a coat
hanging from it.
Luckily, Resolume has many different ways to blend, including ways to make the output darker instead of
brighter.
You change the blend mode by clicking on the dropdown marked Add, and choosing one from the big list.
Let's go with Darken for the second layer, and Dodge for the third.
There, much better. We can still see the texture and design of every layer, but the result is not so
overwhelming.
Alpha Blending
By far the cleanest way to paint is to use content with an alpha channel. Clips with an alpha channel have
transparency baked into them, so you can stack layers on top of each other, without mixing the paint. This

41
way, you can precisely control which pixels to show and which ones to hide, while the overall composite
stays crisp and clean.
Most of the content you purchase in the Resolume shop has an alpha channel. If your content doesn't, you
can use the Auto Mask effect to turn the black pixels transparent. You will need to play around with the
Contrast parameter to get the desired result.
A good way to approach a composition with alpha channels is to use a Background / Focus / Frameapproach.
Your first layer will be your Background. You use this layer to paint the entire canvas with a screen filling
loop. This gives your composition texture, and a base to start with. Abstract loops with some kind of pattern
are great for this.
On top of this, you use the second layer to paint a more recognisable element. This is to grab the viewer's
Focus. Faces are always a winner, but you can use anything that has some connection to the music or
theme of the stage. If you're commercial oriented, this would be a great place for the DJ's logo.
The third layer will be used to Frame what's underneath. The layer will be used as a window, blocking some
parts of the content underneath. Often used in movies, blocking the layers below gives a sense of depth to
the overall composition, and constantly hiding and revealing parts of the composition keeps everything
dynamic.
Of course, nothing is stopping you from using more layers, or even using multiple focus points on a more
complex stage design.

42
Types of Blends
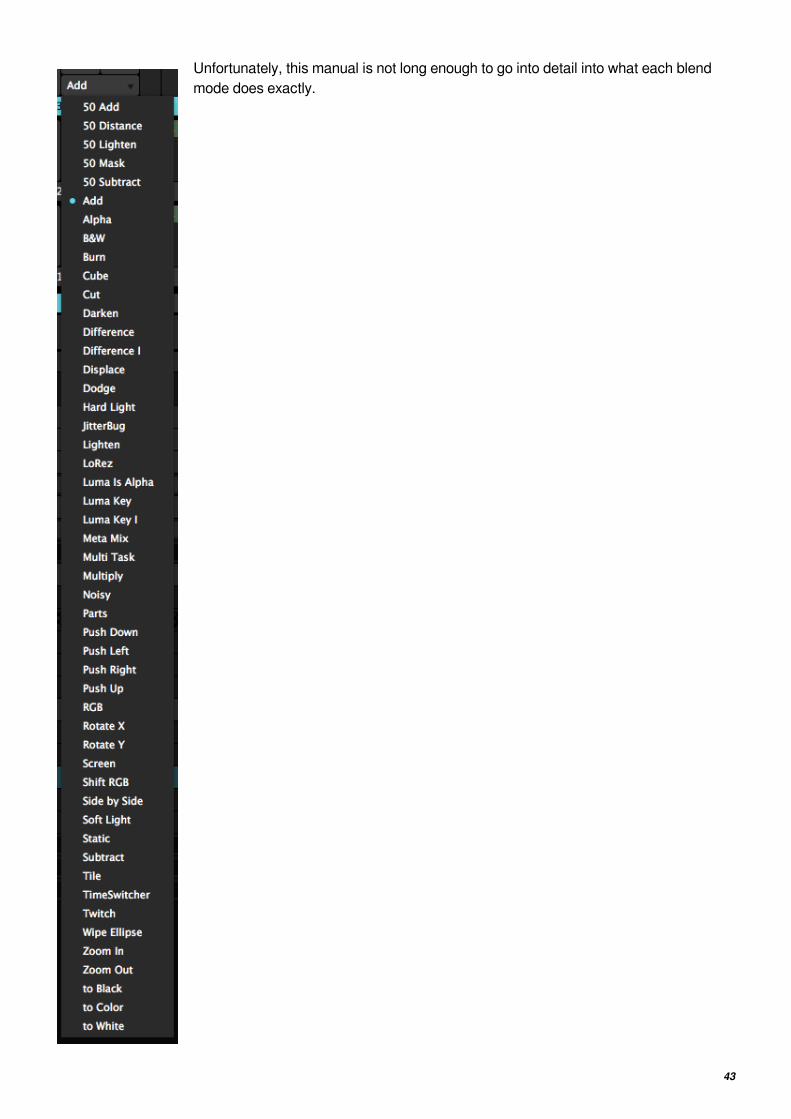
43
Unfortunately, this manual is not long enough to go into detail into what each blend
mode does exactly.

44
Blends
These will blend and mix the paint of your layers. At 50% opacity, they will fully mix the paint with the layers
underneath. At 100% opacity, they will just fully cover the paint underneath, as if you're putting a completely
new layer of paint on your canvas.
Some blends will create a brighter output, like 'Add', 'Lighten' and 'Screen'. Others will darken the output,
like 'Subtract', 'Darken' and 'Multiply'. Some just do weird stuff like 'Difference I' or 'Dodge'.
It's best to just sit down, grab a cup of coffee or tea and try them all out. Get a general feel for what they do.
Remember to try them with different types of content, as that can create very different results, depending on
the blend.
50 Blends
These are special types of blends. They do the same as their regular counterpart, except that they mix their
paints with the opacity at 100%. They're especially useful for doing AV mixing, because you can have both
the audio and video sliders all the way up. Or if you like throwing your midi faders all the way open like a
superstar DJ.
Transitions
Some blends are actually transitions. By fading the layer from 0% to 100%, some sort of transition is
applied.
For instance, 'MultiTask' will do a Cover Flow type of transition, where the new layer will come in from the
side and push the layer below to the back. 'Shift RGB' will bring in the Red, Green and Blue channels of the
new layer in from the left, right and top.
Transitions work best for presentation type of shows, but for instance 'to White' can work great to bring in a
new layer with a bang during a VJ set.
Eject, Bypass and Solo
These three bad boys can be found on the far left of the layer strip.
The X will eject the currently playing clip from the layer.
The B will bypass or Blind the layer, temporarily hiding it from view.
The S will Solo the layer, hiding everything but the current layer. This is useful to quickly focus on a layer
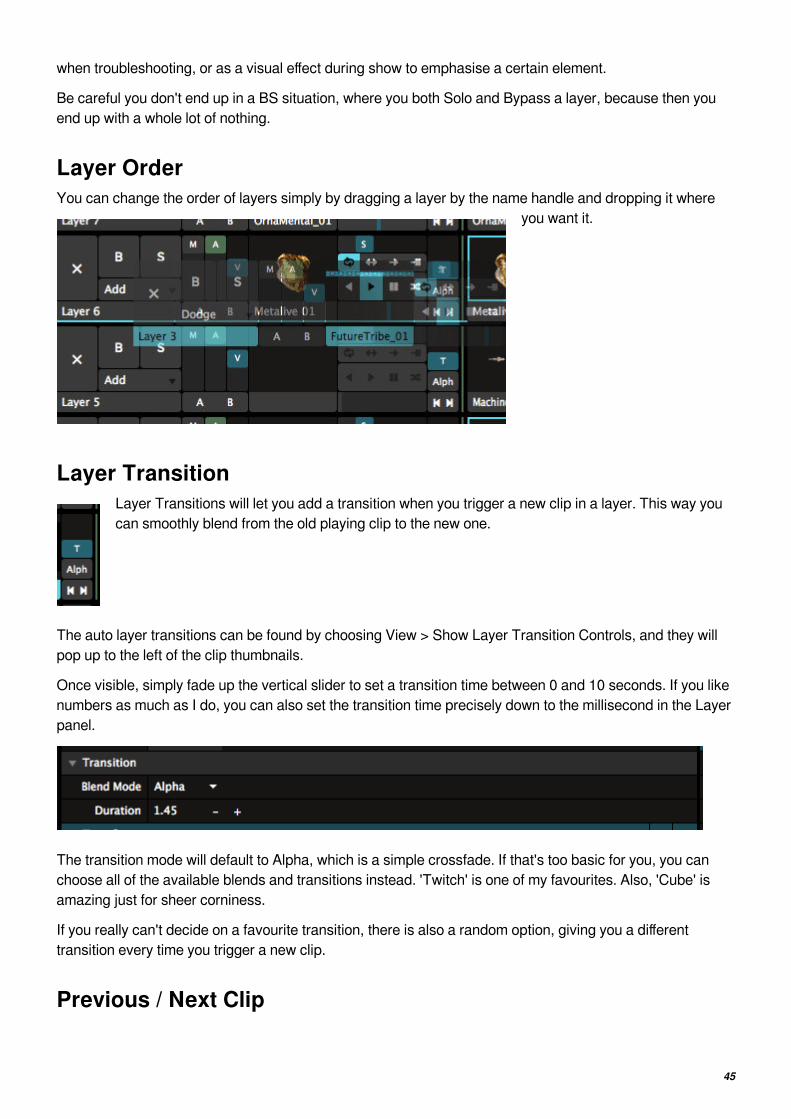
45
when troubleshooting, or as a visual effect during show to emphasise a certain element.
Be careful you don't end up in a BS situation, where you both Solo and Bypass a layer, because then you
end up with a whole lot of nothing.
Layer OrderYou can change the order of layers simply by dragging a layer by the name handle and dropping it where
you want it.
Layer TransitionLayer Transitions will let you add a transition when you trigger a new clip in a layer. This way you
can smoothly blend from the old playing clip to the new one.
The auto layer transitions can be found by choosing View > Show Layer Transition Controls, and they will
pop up to the left of the clip thumbnails.
Once visible, simply fade up the vertical slider to set a transition time between 0 and 10 seconds. If you like
numbers as much as I do, you can also set the transition time precisely down to the millisecond in the Layer
panel.
The transition mode will default to Alpha, which is a simple crossfade. If that's too basic for you, you can
choose all of the available blends and transitions instead. 'Twitch' is one of my favourites. Also, 'Cube' is
amazing just for sheer corniness.
If you really can't decide on a favourite transition, there is also a random option, giving you a different
transition every time you trigger a new clip.
Previous / Next Clip

46
Yes! These buttons will let you trigger the next or previous clip in that layer. Yes, you can also
assign MIDI and keyboard shortcuts to these buttons.
These buttons come as a bonus with the Layer Transition Controls, and can be revealed via View > Show
Layer Transition Controls.
Layer PropertiesTo select a layer, click the area that displays the layer's name, for example Layer 1. The currently selected
layer is highlighted in blue.
Auto Pilot
This will let you play a sequence of clips in a layer. When the current clip has reached the end, Resolume
will trigger the next, previous or a random clip automatically.
Tip! Clicking the Next, Previous or Random button before the current clip has reached the end will forcethe Auto Pilot to do its thing prematurely. Don't worry about it, triggering prematurely happens toeverybody. You were probably just nervous.
The Auto Pilot can also be set on the Clip level. In that case, you have the extra option to target the first, the
last or even a specific clip in the layer directly.
Common
This contains the Master fader for the layer. This fades both the playing audio and video at the same time,
without affecting their individual levels.
Audio
This will let you control the Volume and Pan of the audio playing in the layer.

47
Video
Here you can choose the Blend Mode and Opacity of the layer. These controls are the same as can be
found on the layer strip at the top.
Width & Height will let you change the resolution the layer renders at.
Tip! Lowering the Width & Height can save you considerable render power. For instance, you can rendera 7680x4320 composition, with four layers each set to 3840x2160, positioned in the four corners. Eachlayer will only process at the resolution its set to, instead of processing at the full 8K resolution.
Auto Size is great to make sure your content always matches your layer size. You can set all content to
automatically Fill, Fit or Stretch to the layer size.
Off will keep the content as it is.
Fill will make sure the content fills the entire layer, while maintaining its aspect ratio. This will result in
the sides or the top and bottom of the clip being cropped off.
Fit will make sure your content is completely visible, while maintaining its aspect ratio. This will result
in black borders being visible on the sides or top and bottom.
Stretch stretches the clip to the layer width and height, distorting the content when necessary.
Layer Transport ControlsThe Layer Transport Controls give you quick access to the transport section of the clip
currently playing in that layer.
These will let you quickly change the speed, direction and loop mode of the clip. Also you can grab the
playhead and scratch it. When in BPM Sync mode, you will see the amount of beats instead of the speed.
Practically, these controls can also be found on the transport section on the clip tab, except you can see
and control more than one clip at the same time. Changing anything in one place, will also update it in the
other.
You can show and hide the Layer Transport Controls via View > Show Layer Transport Controls
Trigger Options

48
These will set particular trigger options for all clips in a layer. They can of course be overridden for
individual clips on the clip level.
Ignore Column Trigger
With this enabled, any clips in this layer will keep on playing when a column is triggered. This is useful to
keep clips like live inputs or background around, but change all the other content with a single click.
Trigger first clip on load
After the composition has finished loading, the first clip in the layer will be triggered automatically. After this,
any Auto Pilot actions will be executed normally. You can use this to do basic installations with Resolume,
or to quickly get a test card up and running when you launch the software.
Fader Start
This will retrigger the current clip, every time you bring the opacity up.
Mask LayerA layer can be set to Mask Mode, masking either all
the layers below, or just one layer.
In Mask Mode, the layer will use the black and white values of the content currently playing in the layer to
show or hide the layer(s) below. Alpha will be treated as black.
To give a visual indication of what's going on, Resolume will show the
thumbnails in greyscale. Also, it will show a little corner with a
transparency checkerboard, as a visual reminder this layer is currently
being used as a mask.
All Below will apply the mask to all the layers below the Mask Layer. It's essentially the same as setting the
layer to Mask50.
One Below will apply the mask to just the layer right underneath the Mask Layer, and leave the other
layers unaffected. If you're familiar with After Effects, it's the same as setting a layer to Luma Track Matte.
Disabled will set the layer back to be a normal layer again.
Lock Content

49
This will let you lock the content currently playing in the layer.
All this does is make sure that you cannot accidentally eject the current clip or trigger a different clip into this
layer. Both the layer and clip parameters can still be controlled and changed.
As a visual indication, a lock icon is displayed over the layer thumbnail.
Duplicate, Rename, Clear Clips and RemoveOf course, you can Duplicate, Clear, Remove or Rename a layer as well. I think it's pretty obvious what
Duplicate does.
Rename is kind of special. Obviously, you can use it to rename the layer.
It's special because you can use # as a special character. When displaying the name, Resolume will
replace the # character with the current position the layer has in the stack. So, for instance, naming the
layer "L# Mask", will display the layer name as "L3 Mask", if it's the third layer in the stack. Moving the layer
up or down will automatically update the displayed name.
The difference between Clear Clips and Remove is that Clear Clips just clears out all the content from a
layer, but keeps the layer itself around. Remove will get rid of both the content and the layer in one fell
swoop.

50
GroupsGroups are available on Arena only!
Sometimes, you have a set of clips that work particularly well together. You know, those two or three clips
that, with just the right blend mode, melt together to become a completely new piece of content. Wouldn't it
be great if you could control those clips with one fader, apply effects on them if they were one clip, and
could even move them around and scale them like they were one clip?
That's where groups come in.
Groups are essentially little sub-compositions. You can use them to group layers together, and treat them
as one big, new layer.
Creating GroupsYou create a group by selecting the first layer you want to add to the group, right-clicking it and selecting
Group > New.
This will put the layer in the group. You will see this reflected in the interface, by the layer being slightly
indented, and the newly created group will 'hug' its new baby. Also, the group panel will appear next to the
layer panel.

51
Adding and Removing LayersAt this point, adding and removing layers to and from a group is very easy. You can simply drag them by the
layer name handle, and either drop em in, or throw them out.
Keep in mind! A group can never be empty, as this would mean the group disappears and you could lose all
its effects and settings. So when you drag the last layer out of the group, Resolume will create a new empty
layer in its place.
If you're more of a menu type of person, you
can also use the layer menu to move layers out
of groups.
Group x - If another group is available, selecting it will move the selected layer there directly.
None - This will remove the selected layer from the group.
New - This will create a new group and put the selected layer in it.
You can create as many groups as you like.

52
What Happens in the Group, Stays in the Group!Groups are a hybrid between a little sub composition and a layer.
They have a lot of the same functionality that the composition
has. Groups have their own little column trigger, their own little
master speed slider and playback controls, as well as their
own master bypass, solo and eject buttons.
Of course, you can apply transforms, effects and masks on the group level.
Groups also borrow some functionality from layers, like Ignore Column Trigger and Lock, which are applied
on all layers in that group.
The only difference is that what happens in a group, never leaves that group.
On the one hand, this means obvious things like that group column triggers won't affect layers outside the
group, and pressing the group eject button, only ejects layers in the group.
But it also means less obvious things.
For instance, you can't route layers to a Layer Router outside the group, and you can't crossfade to a layer
in a group if the group itself is on another crossfader bus. This prevents you from accidentally tearing a hole
in the space time continuum. Because that's what will happen when you start doing weird things like that.
And no, you can't put a group in another group. You are not Leonardo Dicaprio and you are not asleep in a
van falling from a bridge in Paris.
Group BlendingGroups start you out with a blank canvas.
Regular layers will blend with the layers beneath them, depending on their blend mode and opacity. Layers
in a group only blend with the other layers in the group.
The first layer of a group is first rendered on a transparent black background. It doesn't blend with the layers
underneath it. The other group layers are blended on top of this first group layer.
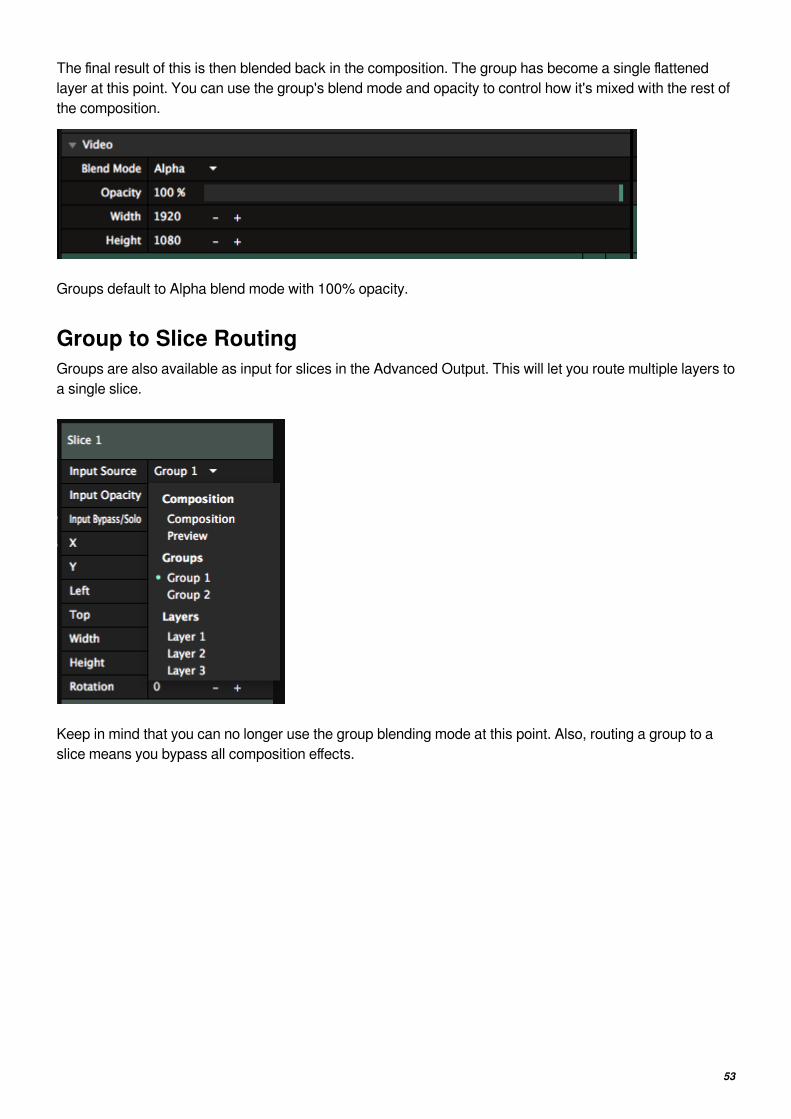
53
The final result of this is then blended back in the composition. The group has become a single flattened
layer at this point. You can use the group's blend mode and opacity to control how it's mixed with the rest of
the composition.
Groups default to Alpha blend mode with 100% opacity.
Group to Slice RoutingGroups are also available as input for slices in the Advanced Output. This will let you route multiple layers to
a single slice.
Keep in mind that you can no longer use the group blending mode at this point. Also, routing a group to a
slice means you bypass all composition effects.

54
CompositionThe composition is your complete performance. It's how you've arranged your content and your layers, the
effects you've applied and how you've set everything up to be automated. Think of your composition as your
stage. It's where you arrange where everything goes and how everything looks.
Your composition composites all your layers together, applies the final effects and then sends it to your
screen. If you're an advanced user, you can use the Advanced Output to further cut up and warp your
composition. Or you can send the end result to other applications via Spout or Syphon, to further process it.
SettingsVia Composition > Settings, you can change a few important details of your masterpiece.
Name
This is how you will recognise this composition. It's also the filename Resolume will use to save it to disk.
"You have strength. You shall be known as Usul, which is the strength of the base of the pillar. This is your
secret name in our troop, but you must choose the name of manhood, which we will call you openly."
Description
Here you can jot down some notes about this composition, which will be saved as metadata.
Size
The resolution that your masterpiece will render at. Via the dropdown, you can select from a list of common
resolutions, the resolutions of currently connected monitors, or you can type in a custom resolution directly.

55
FrameRate
This will limit Resolume's fps to a fixed maximum.
On auto, Resolume will sync to your monitor's refresh rate. So if your monitor is set to 60Hz, Resolume will
render at 60 fps. Rendering more would be silly, because your monitor won't be able to display those
frames, and they would be thrown away.
This is the setting that you'll want to use for the majority of the time.
When you're pushing very high resolutions or when using lots of effects, it can be that your computer can't
keep up with what's going on. In those cases, Resolume will try to keep things at 60fps, but it will start
dipping. Depending on how hard you're pushing things, your fps can start fluctuating between 40 fps and 60
fps.
In those cases, it can be smart to limit your framerate to 30fps. That way, every frame takes exactly the
same time to render. This way, playback will be perceivably smoother. Also, effects like strobes will be
equally divided between on and off, instead of stuttering because they're strobing at 43 fps at one moment
and 57 fps the next.
Tip! For super smoooooth playback, you'll want to match the framerate of your composition to theframerate of your content. 25 fps clips will play silky smooth when the comp is set to 25 as well.
Note! When your computer cannot keep up and is rendering at 23 fps, putting this setting at 60 does not
give it magical powers. It will still have to do the same amount of work on the same hardware, so it will
struggle just as much as before.
Bit Depth
This will let you switch between 8 bits per channel and 16 bits per channel rendering. This will give you
higher color fidelity when doing complex composites or applying intricate effect chains.
Tip! With great power comes great responsibility! This is not a magical switch that makes everything lookbetter. When set to render at 16 bpc, your computer will need to work considerably harder. If your wholeproduction workflow is not 16 bpc, you are not likely to see an immediate difference.
Properties

56
In the top left of the interface, you will find a few powerful controls.
The Composition button will let you preview the composition, even when it's faded down.
The X button will let you eject all playing content in one click.
The B button bypasses the entire output, while the M slider gives you the same control under a fader.
Tip! Because the M slider controls the visibility of everything going out of Resolume, it will show red whennot set to 100%.
The S slider controls the speed of all playing clips at the same time. Note that the global speed control has
no effect on BPM-synced clips, as those are controlled by the master BPM clock instead.
The two arrow icons will let you trigger the previous and next columns. Yay!
Common
Here you can control the master opacity of the composition and the speed of all playing clips at the same
time.
These controls are linked to the ones above. In the composition panel, you have finer control because you
can both set and see the values numerically.
Audio
Gives you control over the master volume and pan.
Video
Fade out the video, independent from the audio.
Crossfader

57
The crossfader will let you assign layers and groups
to a 'bus', and then fade between buses. This way,
you can put layers that look good together on either
side of the crossfader, and mix between them quickly
using a single slider.
You assign layers to a bus, by toggling the A or B buttons to the right of the layer's name.
Resolume will then composite those layers together first. When the crossfader is all the way to the left, it will
only show the layers on the A bus. When it's on the right, it will show the layers on the B bus. When it's
somewhere in the middle, it will blend the two buses together.
In the composition panel, a few options can be set for the Crossfader.
Blend Mode
This determines what blend Resolume will use to composite the buses together. You can choose one of the
many blends that are available.
Behaviour
This determines what happens when you press the A and B buttons to the left and right of the crossfader

58
itself.
Jump will make the crossfader go to that side immediately.
Jump & Return will do the same as Jump. When it's clicked again, it will return to the previous side.
Cut is like Jump & Return set to 'piano', meaning it will return to the previous side when released.
Fade (Legacy) will do a slow fade to the clicked bus over 4 beats.
Curve
This sets a different mixer curve, changing the responsiveness of the
crossfader.
Gotcha!
For the crossfader to work properly, you'll want to have all bused layers right after one anotherin the stack.
The Crossfader is an actual mix. It renders all the layers assigned to buses first. This result is then pulled
down to the first layer present in the crossfader and rendered down as a single layer in the composition
stack.
So when you're combining layers assigned to the crossfader with layers not assigned to the crossfader, you
might get unexpected results. Things get especially weird when unassigned layers are in between assigned
layers.
Direction ControlsWith the global direction controls, you can quickly change the direction for all the clips
that are currently playing. You can switch the direction between forwards, pause or
backwards.
You can find the global speed and direction controls by choosing View > Show Layer Transport Controls,
they then appear in the top left of the interface.
Trigger Options
These are essentially the same as the trigger options for the clip. Except here you can set them for all the
clips in this composition. You can imagine this saves a lot of time on having to set these for every clip

59
individually.
Of course, these setting can then again be overridden by individual clips.

60
Decks
Each composition can contain a number of decks, which you can use to manage your videos, still images,
audio files and sources.
Decks are like the records in a DJs record bag. Keep them organised so you can always reach for the right
selection.
Decks are accessed through the set of buttons just below the clip layers. Each deck has a name. When you
select a deck, all of the clips in the deck are displayed in their layers.
Tip! If you're really adverse to clicking with the mouse, you can assign shortcuts to these two little fellas inthe far left of the deck area and scroll through.
Adding ContentBefore you can start having fun with your content, you need to get it into Resolume. You can do this by
dragging and dropping files from your operating system file browser or you can do it using Resolume's built-
in browser.

61
You will find the browser over
to the right of the display, in
the Files tab.
The main part of the browser enables you to browse through folders by double clicking them.
Tip! If you need to search through a long list of files and you already know the name of the file or folderyou're looking for, type the name into the search box to narrow down the list of possible suspects.
Click the dropdown at the top to show a list of root drives on your system, as well as a list of favourites. You
can add or remove items from the favourites list via the big heart icon in the top right.
Next to the heart is a toggle that enables you to show or hide thumbnail images for media files - really useful
when you can't quite remember what you called that fantastic clip you made last night! Also, you can
double-click a clip name to preview it in the preview window, to be really really sure that it is the fantastic
clip you made last night.
Loading media into a clip is simply a case of dragging it over to a slot in the deck. You can drag an audio file
and a video clip or image file onto the same slot to make a combined clip. If you do this, Resolume will
automatically transpose the video to the length of the audio to make an audio-visual clip.
Check out the Preparing Media page for tips on optimising your content for Resolume.
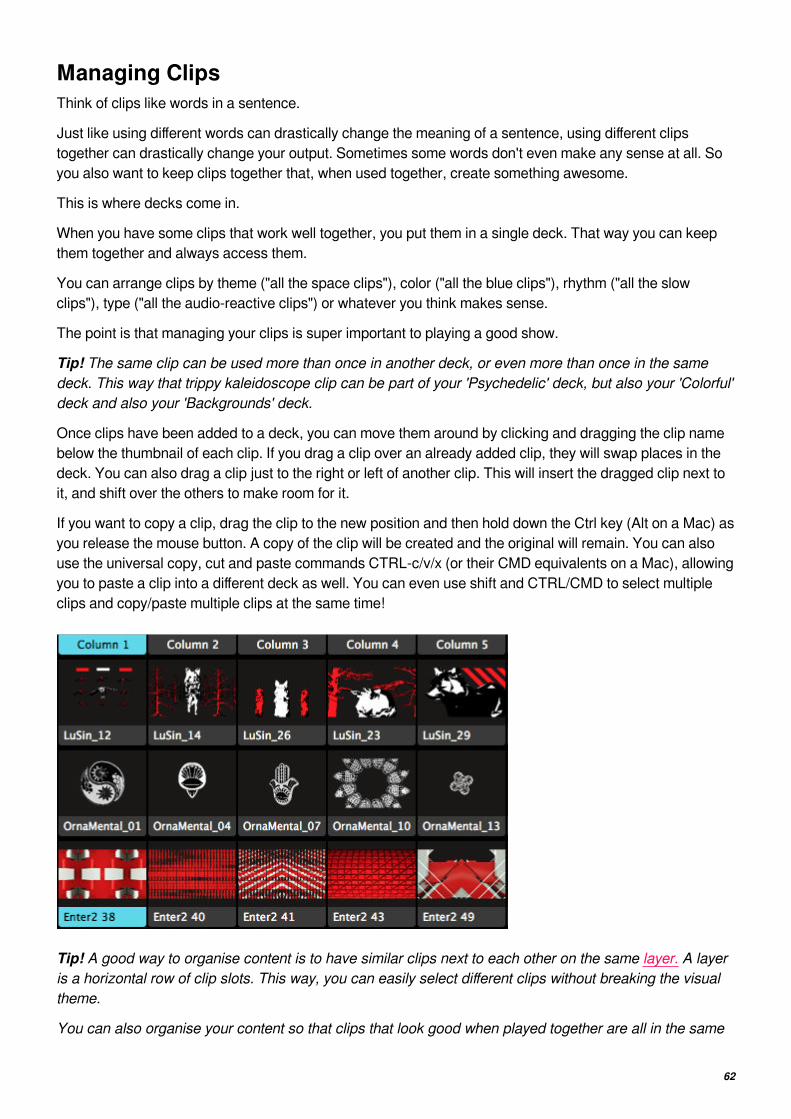
62
Managing ClipsThink of clips like words in a sentence.
Just like using different words can drastically change the meaning of a sentence, using different clips
together can drastically change your output. Sometimes some words don't even make any sense at all. So
you also want to keep clips together that, when used together, create something awesome.
This is where decks come in.
When you have some clips that work well together, you put them in a single deck. That way you can keep
them together and always access them.
You can arrange clips by theme ("all the space clips"), color ("all the blue clips"), rhythm ("all the slow
clips"), type ("all the audio-reactive clips") or whatever you think makes sense.
The point is that managing your clips is super important to playing a good show.
Tip! The same clip can be used more than once in another deck, or even more than once in the samedeck. This way that trippy kaleidoscope clip can be part of your 'Psychedelic' deck, but also your 'Colorful'deck and also your 'Backgrounds' deck.
Once clips have been added to a deck, you can move them around by clicking and dragging the clip name
below the thumbnail of each clip. If you drag a clip over an already added clip, they will swap places in the
deck. You can also drag a clip just to the right or left of another clip. This will insert the dragged clip next to
it, and shift over the others to make room for it.
If you want to copy a clip, drag the clip to the new position and then hold down the Ctrl key (Alt on a Mac) as
you release the mouse button. A copy of the clip will be created and the original will remain. You can also
use the universal copy, cut and paste commands CTRL-c/v/x (or their CMD equivalents on a Mac), allowing
you to paste a clip into a different deck as well. You can even use shift and CTRL/CMD to select multiple
clips and copy/paste multiple clips at the same time!
Tip! A good way to organise content is to have similar clips next to each other on the same layer. A layeris a horizontal row of clip slots. This way, you can easily select different clips without breaking the visualtheme.
You can also organise your content so that clips that look good when played together are all in the same

63
column. A column is a vertical row of clip slots. Then you can play them all at the same time by triggeringthe column, using the column itself as the trigger.
Using DecksInstead of loading a whole composition with all its decks, single decks can be added to the current
composition as well. Just double click the deck in the Composition browser. It will then be added to the
current composition as a new deck.
Very useful for those inevitable moments half way through your set, when you realise you feel like playing
content you didn't prepare.
A good way to be prepared for those
moments, is to keep one or more 'master
compositions'. These master compositions
are not meant for a single performance, but
rather contain your footage, pre-organized
per theme. For instance, one master comp
could contain all your 1080p material.
Every time you have some new 1080p content, you open the 1080p comp and add a new deck with the new
material. Or you could, of course, add the material to already existing decks if they fit the theme of that
deck.
At this point, you can also set clips to be BPM Sync or Timeline, apply effects to clips, and arrange clips
together in columns.
After you've added the new footage, save the comp, close it and leave it be.
Then, during performance, when you realise you feel like playing a certain set of clips, you don't have to
search your computer for them, or add and set them up during show. You can just double-click its deck in
your master comp, and it will load for you in your current show composition, with all the clips in the right
place with the right settings.
Organising Decks

64
A new deck can be created by using the Deck > New or Deck
> Insert Before or After menu options. The New option adds
the new deck to the end of the list while the Insert option adds
it before or after the currently selected deck. You can also
duplicate the current deck.
To change the order of decks, just drag em around.
Closing a deck will remove a deck from view, but keep its contents intact and it will remain part of the
composition. It will remain closed until you open it again.
By default, when you add the first file to a deck, it will get the name of the folder that contains that file. If that
doesn't mean anything to you, you can use the Rename option to give it a more meaningful name.
Clear Clips will clear a deck of all its contents, but keeps the empty deck open. Removing a deck will delete
it in its entirety.
You can also use color coding to mark your decks more clearly.

65
VideoResolume supports loads of movie formats.
Can Resolume play my videos?That's a simple question. The answer gets complex real quick, depending on how technical you want to get.
Let's start with the simple answer:
On Mac and Windows, Resolume supports
.MOV files
.AVI files
.GIF files
.MP4 files.
.MPG and .MPEG files
So if your movie ends in one of those extensions, you're in good shape.
Of course, with computers things are never as easy as that. The file extension says a little, but not
everything about that file. It doesn't say anything about which 'codec' is used. And it turns out the codec is
actually the most important part about playing video.
So let's make it a bit more complex.
If your system's video player can play it, so can Resolume.
The rule of thumb is this: If your file opens and plays in Windows' Movies & TV app or Apple's QuicktimeX, it's going to play in Resolume. This means it supports most common codecs, like h264.
If you need to use VLC or some weird codec pack to see your file, chances are Resolume can't play your
file. If Resolume can't play your file, it'll display it with a big yellow X in its preview.
Tip! If you have trouble playing a file, converting it to DXV is always, always, always the answer to yourproblem. Need help with that? Read all about converting your content.
#Nerd alert!
Now if you're a bit technical minded, you probably want to know the nitty gritty about which codecs are
supported. If you're just here for playing cool videos and actually have a social life, skip ahead.

66
When Resolume opens a file, we first try to open it ourselves. When we see it's DXV or PhotoJPEG
encoded, we use our own player. This means you get hardware accelerated lightning fast playback with
DXV, and turbo fast playback on Photo-JPEG. GIFs are also played back by our own engine. And as a
cherry on top, we now also play back Apple ProRes files on PC.
If we don't recognise the format or codec, we pass it to the big boss, your computer's operating system. On
Windows, we ask MediaFoundation. On Mac, we ask AVFoundation. We ask them kindly if they can play
the file. If they can, we let them handle it for us and just display the frames we get back.
If all that fails, we finally ask FFMPEG if they recognise what's going on and if they can make sense of it.
Unfortunately this doesn't mean that we support the full range of codecs that VLC supports. The licensing
for FFMPEG is actually very complex, and unless you're an open source product like VLC, you are not
allowed to just play all the codecs. When you stick to these rules, there are definite limits to FFMPEG. And
we like to play by the rules.
PlaybackResolume provides loads of ways to control how videos behave.
The Transport section of the Clip tab is where we can change the speed and direction that clips play at.
Timeline
The first thing we will look at in the Transport section is the timeline itself. We can manipulate this directly by
grabbing the blue pointer that moves along it and sliding it around. This gives an effect similar to DJ
scratching.
In and Out Points
The smaller bar below the timeline is also useful. Grab and move the small blue pointers at its end to set the
In and Out points of the clip. This is great for selecting parts of longer clips to use.
Tip! After setting in and out points, hold down Shift while dragging the range. This will let you move therange around, while keeping the length the same.
Time / Time Remaining
In the top right, you can see the clip's current time. Clicking on this number will switch to show you the
remaining time.

67
Speed
You have direct control over the Speed of the clip. You use the Speed slider to make the clip go faster or
slower. This is great for ramping the playback speed up and down during your live show.
The Speed slider has a non-linear response. This is a fancy way of saying that you have more precision in
the values between 0 and 2, where you most likely want to adjust the values more accurately. When you go
towards 10, it ramps up more quickly because that's when you probably want things to flyyyyyyy!
Duration
You can also get precise by setting the exact Duration of how long a clip should play. Let's say you need a
clip to last exactly 8 seconds. Simply enter 8 as the duration and Resolume will do the math for you and
adjust the playback speed so the clip will last exactly 8 seconds. Regardless of how long or short it was
originally.
Note that this doesn't affect the Speed slider! So you still have the same range to improvise live over the
new duration.
Gotcha! Note that when shortening the clip via the In and Out points, the Duration will be adjusted tomatch the new length. Vice versa, when you change the Duration directly, the In and Out points will not beadjusted. That might sound weird when you first read this. Just use it a few times, and you'll see it makesthe most sense from a practical point of view.
BPM Sync
There is another very powerful way to control the speed of a clip. You can switch to it by the drop down at
the top right of the Transport section. It's called BPM Sync and it's awesome.
By switching the transport mode to BPM Sync, Resolume will use the global BPM to control the speed of
the clip. You can read all about BPM in its own chapter. For now, let's assume you have Resolume running
at the perfect BPM, perfectly in time with the DJ. Now all clips that have their transport mode set to BPM
Sync will play at a speed that synchronises them with that BPM.
In order for BPM Synced clips to work right, you will need to set the number of beats that the clip spans in
the Transport section. By default, Resolume will guess the right amount of beats for you based on the length
of the clip. It will guess to the nearest power of 2, so it will set the clip to 1, 2, 4, 8, 16, 32, 64, 128 etc beats
for you. Of course, you can click the number and change it, use the + and - buttons or use the *2 and /2
buttons to quickly multiply or divide the value by 2.

68
Speed
When in BPM Sync mode, you still have access to a Speed modifier. This is so you can ramp a clip up and
down smoothly just like when set to Timeline. The only difference is that the BPM Sync Speed is quantised
to multiples of 2. So you can ramp a clip from 0, 1/8, 1/4, 1/2, 1, 2, 4, 8 to 16 times as fast.
Because you got to stay locked to that beat, yo.
SMPTE & Denon
On Arena, videos can also be set to SMPTE or Denon. Those playmodes are useful for syncing to a DJ set
or show moment. You can dive down the SMPTE rabbit hole here, while you can read more about Denon
here.
Playback OptionsThe Transport section also provides some additional options:
Direction
Use these buttons to set the clip to play forwards or backwards, or pause the
clip. Time is a fluid construct in Resolume and this is how you control it.
Playmode
Use these buttons to control how the clip plays.
Loop
The default mode is to loop, which will just start the clip from the beginning and continue playing for ever
and ever and ever.
Ping Pong
The second option is to ping pong, which means it plays alternately forwards and backwards. Ping pong is
a cheap way to avoid a visible cut on footage that doesn't actually loop.

69
Random
Next is Random. The Random button can be used to jump to random points in your video.
Setting playmode to Random will reveal a few extra options.
Speed and Duration are still the same controls as before.
Interval controls how often the playhead will jump to a new random point. Lower values mean more
jumping, higher values less jumping.
Distance controls the range from which a random point will be picked. Lower values mean the playhead
will only make short jumps, resulting in a subtle glitchy look. Higher values mean it will jump across the
whole timeline, resulting in more abrupt jump cuts.
Just like Speed and Duration, Interval and Distance are measured in seconds or in beats, depending on
which mode you're in.
Such random. Much wow.
Play Once and Eject
Next is play-once-and-eject. You can use this for 'one shot' samples that you want to punch in at the right
time.
Play Once and Hold
The play-once-and-hold mode is pretty much the same, except it will hold the last frame of the clip when it's
done playing. This is very useful for stuff like logo reveals and DJ intros.
Playmode Away
These buttons decide what happens when a clip is triggered when you've been away from it
for a bit.
The first option plays the clip from the start. This is the default option and most of the time, it's what you
want.
The second option, "pick-up", starts the clip from wherever it was when it was last played. This is useful for
cutting between longer clips that are part of a larger narrative.

70
The third option, "relative pick-up", will start the clip at the same relative position the previously played clip
was at. I don't really know what you would use this playmode for. Bart really loves it because Resolume 2
had it and he used it with crash test footage of different cars, and he could change cars mid crash or
something. I guess that must have been like pretty cool. Back in 2002. Like, whatever.
Tip! So, people smarter than myself have figured out that this relative pick-up is actually really useful as abackup during SMPTE playback. The idea is you have two copies of the clip. One is set to SMPTEplayback, the other to regular timeline and relative pick-up. Should the SMPTE signal unexpectedly dropout, you can switch to the copy. It will pick up where the SMPTE clip was and nobody will have noticedwhat happened. Shows how much I know.
Cue Points
You can use the Cue Points section to quickly jump to any part of the clip that you like.
To set a cue point, click the smaller part to the left of one of the cue point buttons. The part you click will turn
blue. If you have a keyboard shortcut assigned to the cue point, it will turn white. This means the cue point
is ready for use.
Now you can click the main button (or press the relevant keyboard key) to jump straight to the point where
you set the cue point.
Tip! When you try to trigger a cue point that's not set yet, Resolume will use the current playhead time asthe cue. So you can set your cue points while playing, without interrupting your flow.
If you want to set cue points precisely, a good way to do it is to pause the clip, drag the Transport timeline
marker to where you want the cue point and then set it.
You can overwrite an existing cue point in exactly the same way as setting it for the first time. Resetting a
cue point to be empty is not really possible. Mostly because we're not sure how that would work or what it
would be useful for.
BeatLoopr
You can tell the Beatloopr is special because we've written it without an "e". You know, like products from
the nineties that were down with the hip lingo of the kids these days.
When a video is set to 'BPM Sync', the BeatLoopr section is displayed. This enables you to have Resolume
automatically loop sections of the clip. This is great for adding climaxes, creating weird vocal combinations
or all kinds of other effects.
To use it, just select one of the options - the clip will loop over the relevant number of beats. When you are
done, just click the selected option again or the Off button. It's really that simple!

71
With 'Catch Up' active, turning the Beatloopr off will continue playback where the playhead would have
been if you hadn't used the Beatloopr. Otherwise, it will just continue wherever the playhead was.
Tip! The Beatloopr will automatically turn off if you jump to a cue point. This way you can very easily builda climax using the Beatloopr and Cue Points. During a climax moment in the music, simply keep choosingshorter and shorter loops until the beat drops again, and then jump to the cue point you want to resumenormal playback at. Reach for the lasers!

72
StillsResolume can also play still images.
It can load and display:
.png files
.jpg and .jpeg files
.tiff, and .tif files
OptionsOnce a still image is loaded, you get a few options for playback.
Transport
Just like a regular video, a still image can be played back in both Timeline and BPM Sync
mode.
This changes what timing the still uses. In BPM Sync mode, it will use the global BPM. When set to
Timeline, it uses Resolume's own internal clock.
Aside from this obvious difference, it also changes how you set the Duration of the still image.
Duration
In Timeline mode, the Duration is set in seconds.
You can use the + and - buttons to nudge it, or just type in a value directly.
Tip! This also works for multiple clips at the same time!
In BPM Sync mode, the Duration is set in beats.
You can use the + and - buttons to nudge up and down by 1 beat, use the /2 and *2 buttons to stick to
multiples, or just type in the exact number of beats directly.
Wait... What?
"Hold up, Resolume. Why are you going on about all this seconds and beats and timeline and stuff? Thisis a still image we're talking about. It has no duration! It can't go faster or slower, because it's not really'going' in the first place."
Yes. You're right. When left to its own devices, stills are literally infinite, and changing their Duration has no
73
visible impact.
That all changes when you start using them with the Auto Pilot. In those cases, the Duration will control how
long it takes before the next Auto Pilot action is triggered.
Also, when you really get down to the nitty gritty details, this also affects parameters that are animated to
Clip Position.
On Arena, you can even sync stills to SMPTE.
It's almost like stills actually have a sort of timeline after all.
Image SequencesResolume can also play image sequences.
Save your sequence in a separate folder, and make sure each image is named sequentially. Drag and drop
the folder into Resolume. Resolume will then figure out these files are supposed to be a sequence and it will
treat them as a single video.
There's a few gotchas here. First of all, if you have any files in that folder that are named the same, but not
sequentially, Resolume will think it's not a sequence after all and just load each file individually. Also,
performance is not as good as with regular video. So for all intents and purposes, if you have to play image
sequences, it's best to use Alley to convert them first.
Triggering Stills and MemoryContrary to what you might think, playing back a still image is actually surprisingly resource intensive.
Although it's just a single frame, this frame has to be loaded into RAM in its entirety before it can be
displayed. This is for instance why Photoshop gets so slow when you're working on a PSD containing lots of
high res stills.
Because Resolume doesn't limit the amount of files you can load, it would be very dangerous to load lots of
high res still images. Dragging in a few megapixel TIFF files straight from your camera would eat through
your available RAM in no time.
This is why we do something called 'deferred loading'.
This is a fancy term that basically means you can load as many stills into a deck as you want. They will only
use RAM at the moment you actually trigger them. This benefit does come at a cost. There can be a slight
hiccup when triggering a still file. A few 1080p images is usually fine, but the hiccup become more
noticeable when you start using 4K or above resolutions.
So if your VJ style depends on lightning fast triggering, it's best to avoid stills completely. Instead, it's better
to convert them to short DXV encoded movie files.
If you're using stills as part of a larger composition that doesn't rely on triggers, for instance as a DJ name
or a background image, it's perfectly fine to use stills. As far as playback is concerned, they're not quicker
or slower than regular movies.
More than ContentA great thing about stills is that they can also be used as masks or as guides in the Advanced Output.

74
SourcesSources are very similar to effects.
The difference is that, while effects change existing audio or video, Sources generate new content on the fly.
Because they generate content, Sources need to be loaded the same way as you would load an audio or
video content file.

75
To use a source, drag it from the Sources panel on the right of the screen, to one of the clip slots. Let's drag
the Rings Generator to an empty clip slot.

76
Source PropertiesOnce placed, the properties for the Source will be available in the Clip tab.
All Sources have a few shared properties.
Duration
Like Stills, Sources have a Duration. This can be set in seconds or beats, depending on the Playback
mode. This can be used to include the Source in an Autopilot sequence.
Transform and Composite
Sources also have the regular options to Scale, Position and Blend the clip like any other Video or Still file.
Source Specifc Properties
Every Source has a few properties unique for that Source.
For instance, Rings has a few obvious ones, like the number of rings, the overall size and the width of the
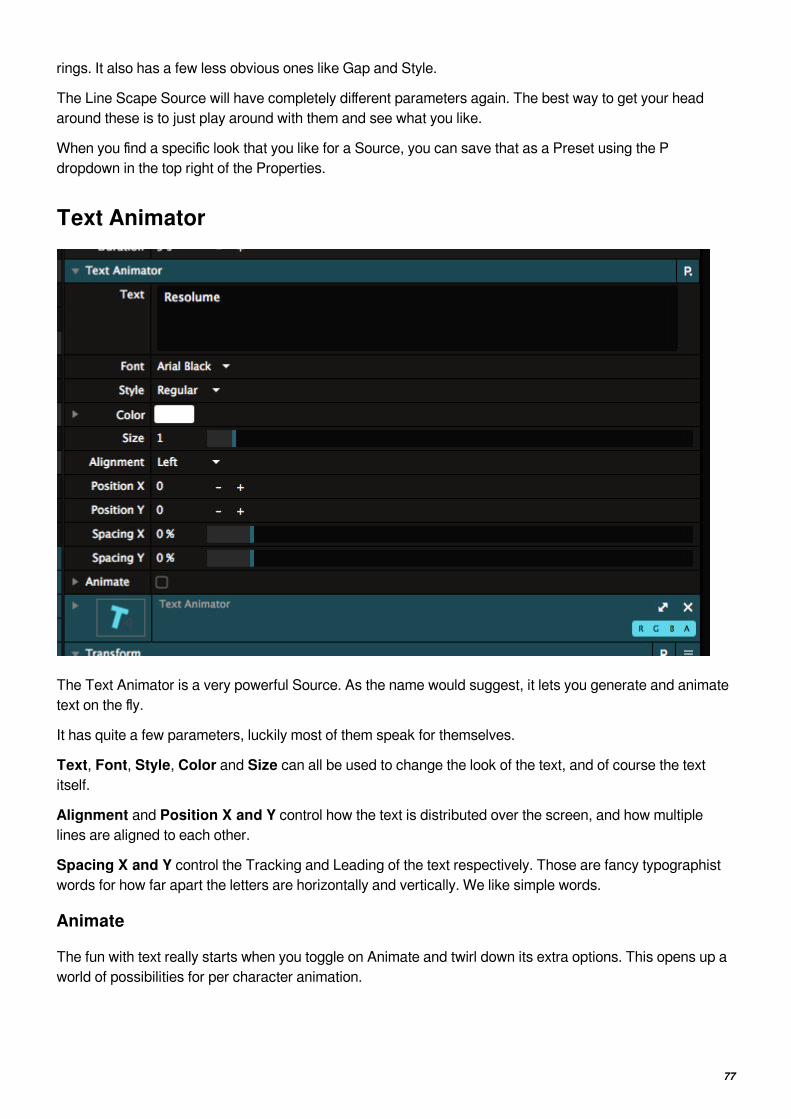
77
rings. It also has a few less obvious ones like Gap and Style.
The Line Scape Source will have completely different parameters again. The best way to get your head
around these is to just play around with them and see what you like.
When you find a specific look that you like for a Source, you can save that as a Preset using the P
dropdown in the top right of the Properties.
Text Animator
The Text Animator is a very powerful Source. As the name would suggest, it lets you generate and animate
text on the fly.
It has quite a few parameters, luckily most of them speak for themselves.
Text, Font, Style, Color and Size can all be used to change the look of the text, and of course the text
itself.
Alignment and Position X and Y control how the text is distributed over the screen, and how multiple
lines are aligned to each other.
Spacing X and Y control the Tracking and Leading of the text respectively. Those are fancy typographist
words for how far apart the letters are horizontally and vertically. We like simple words.
Animate
The fun with text really starts when you toggle on Animate and twirl down its extra options. This opens up a
world of possibilities for per character animation.
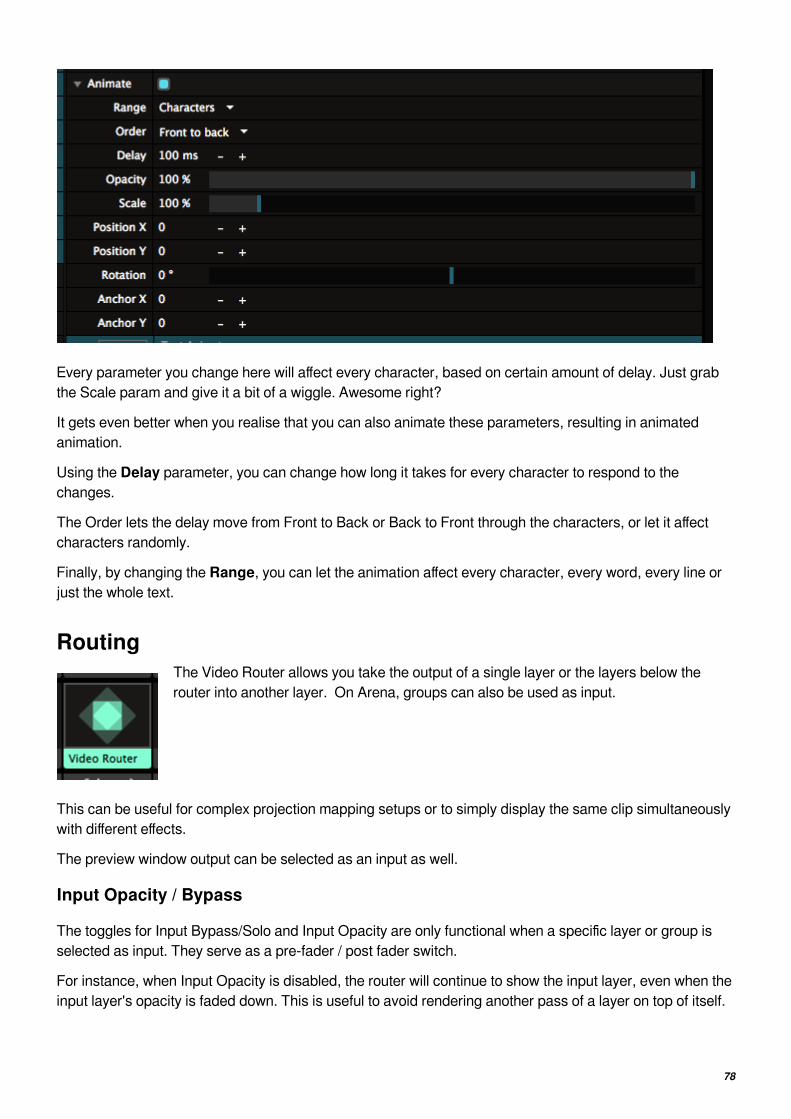
78
Every parameter you change here will affect every character, based on certain amount of delay. Just grab
the Scale param and give it a bit of a wiggle. Awesome right?
It gets even better when you realise that you can also animate these parameters, resulting in animated
animation.
Using the Delay parameter, you can change how long it takes for every character to respond to the
changes.
The Order lets the delay move from Front to Back or Back to Front through the characters, or let it affect
characters randomly.
Finally, by changing the Range, you can let the animation affect every character, every word, every line or
just the whole text.
RoutingThe Video Router allows you take the output of a single layer or the layers below the
router into another layer. On Arena, groups can also be used as input.
This can be useful for complex projection mapping setups or to simply display the same clip simultaneously
with different effects.
The preview window output can be selected as an input as well.
Input Opacity / Bypass
The toggles for Input Bypass/Solo and Input Opacity are only functional when a specific layer or group is
selected as input. They serve as a pre-fader / post fader switch.
For instance, when Input Opacity is disabled, the router will continue to show the input layer, even when the
input layer's opacity is faded down. This is useful to avoid rendering another pass of a layer on top of itself.

79
Capture DevicesCapture devices are used to take input from other hardware into Resolume. For instance, your laptop's
webcam will show up as a capture device.
You can read all about capture devices on the Live Inputs page.
NDI/Spout/SyphonThese are essentially virtual video patch cables. They're so awesome that they got their very own page in
the manual.

80
Live InputsLive inputs will show up in the Sources tab.
Most laptops have a webcam, so on laptops this is usually the first option. Also any USB webcams you
have connected will show up automagically.
To use a live input, simply drag it from the list on an empty clip slot. It will become a clip that you can trigger
and eject. Like regular clips, you can change its properties, apply effects on it, and composite it with other
layers.
Capture DevicesTo go beyond the basics of a webcam, you can use a capture device. Capture devices come in all shapes
and sizes. Some are external boxes that connect via USB or Thunderbolt, some need to be built in to your
computer.
A capture device will take a regular video cable like HDMI, SDI or composite, and convert it to pixels that
Resolume can use. You can connect a proper broadcast camera via SDI to the capture device. Then you
can use the input in Resolume to make PIPs or further process the image.
Of course you can also connect a computer's output via HDMI, and use it to display another VJs output, or
a speaker's Powerpoint presentation.
On a Mac, video capture runs via AV Foundation. On a PC, we use DirectShow. This means that if your
capture device with simple capture applications like Quicktime X, OBS or Skype, it's likely to work in
Resolume.
Native Capture SupportAside from using the system capture system, Resolume also has native support for a few brands of capture
devices. This means you get maximum quality with minimal latency.
Native support means that Resolume gets the image directly from the device. It does not have to be
processed by your computer's CPU first. Skipping this step means that the delay between input and output
is a low as possible.
How low latency is low latency? That depends on the resolution, framerate, the connection type, the device
and your computer hardware. For devices connected via PCIe or Thunderbolt, you can expect something in
60ms-100ms range on 1080p60. For USB3.0 devices, 80ms-120ms is a good ballpark figure.
Tip! Zero latency is a pipe dream. You will get the lowest latency by connecting your camera straight tothe display device. Even then, your display hardware will introduce a little bit of latency.
We support capture devices from
Blackmagic
Datapath
AJA
Native support means that you can use multiple devices at the same time. If the device supports multiple
inputs, you can use all those inputs at the same time.
If your device supports it, Resolume will autodetect the connection, resolution, color space and framerate
it's currently using.

81
If your device does not support autodetect, you will need to enter these things manually. Keep in mind that
this is an exact science, and when your capture settings don't exactly match your source settings, your
capture device is not going to do much.
Additional Settings
Every card will have specific options for that card. Resolume will try to
set these automatically wherever possible.
Some options are not automatic and are up to personal choice. All interlaced sources can be de-interlaced
to fix jaggies.
Blackmagic and AJA cards will let you specify the Color Space and Range for the input, which helps with
guest VJs that don't know how to set their HDMI black level correctly.
AJA will let you decide the source of its genlock sync, and even how many frames it should keep buffered.
TroubleshootingNative support does not mean we can magically make a capture device do things that it can't.
When having problems with a device, the first thing to check is whether the manufacturer's own software
can correctly see the input. If it does not show up there, you are most likely sending an unsupported video
signal.
For instance, Blackmagic expects broadcast specification signals, and if your source is not sending exactly
the correct resolution and framerate, it might ignore it altogether.
Only one application at a time can access a capture device, so, make sure you turn off all other software
that might access a device, before trying your feed in Resolume.

82
MagewellMagewell is a Chinese company that makes very popular capture devices, and they work in Resolume via
DirectShow on PC or AVFoundation on Mac.
We'd love to add native support for Magewell devices. Unfortunately, Magewell does not have a single SDK
that works on all their devices, and we cannot add native support until they do.

83
Syphon & SpoutSyphon (Mac), Spout (PC) are great tools to route the visual output of one program to another.
Syphon and Spout work on the same computer. The output of one application can be picked up by another.
This way, you can for instance get jiggy with your funky Processing sketches, but apply effects and map
them to a surface with Resolume Arena. Or send your Resolume output to another application like
MadMapper.
There's no hard limit to how many applications you can connect like this. At a certain point your computer
will just start smoking.
InputSyphon and Spout input are always enabled in Resolume.

84
Any program that is sending its output will show up under the sources tab. You can add them to a deck like
you would any other live input.
You can use as many inputs at the same time as you want.
Output

85
The moment Syphon, or Spout is enabled via the Output Menu,
Resolume will immediately start broadcasting its main output as well.
Other Syphon/Spout enabled applications running on this computer will now pick up Resolume's
composition output.
For applications that do not auto-detect broadcasting Syphon/Spout servers, Resolume's main output
identifies itself to as follows:
App Name: "Avenue" or "Arena".
Server Name: "Composition" (for the main composition output) or “Screen 1” (when using the Advanced
Output to route a screen).
Advanced OutputResolume Arena allows you to further control this via the
Advanced Output.
Syphon, Spout and NDI outputs can be treated like a
separate physical screen.
This allows you to warp the output before sending it, or to select parts of your composition to send. While
you can still send a different output to your physical screens.

86
You can also change the width and the height of the output as desired.

87
NDI Inputs and OutputsUsing NDI, you can send video from a Mac to a PC and vice versa, over the Network.
You can even use your smartphone to send from it's camera to the network, with Newtek's NDI camera
app.
NDI works the same as Syphon/Spout but over the network, so you can send the output of Resolume
running on one computer to Resolume running on a different computer, without the need for extra hardware.
Just a regular network connection will work.
There's no hard coded limit to how many connections you can set up. Of course your network bandwidth
will get full at one point. Typically a 60 FPS 1080p NDI stream will require at least 150 megabits /seconds
bandwidth.
InputNDI inputs are always enabled in Resolume.

88
Any program that is sending its output will show up under the sources tab. You can add them to a deck, like
you would any other live input.
You can use as many inputs at the same time as you want, as long as your network can handle the data.
Output

89
The moment NDI is enabled via the Output Menu, Resolume will
immediately start broadcasting its main output as well.
Other NDI enabled applications running on this computer or on the same network will now pick up
Resolume's composition output.
When sending NDI from the Composition, the output will have the composition's dimensions.
Advanced outputResolume Arena allows you to further control this via the
Advanced Output.
NDI outputs can also be treated like a separate physical
screen.
This allows you to warp the output before sending it, or to select parts of your composition to send. While
you can still send a different output to your physical screens.
When sending to NDI from the Advanced output, you can change the width and the height of the output as
desired.

90
PTZ - Pan Tilt ZoomDo you have an NDI camera that has Pan - Tilt - Zoom? You can also control these directly from Resolume.
NDI GotchasNetwork Adapter
The NDI protocol doesn't currently have a way to select which network interface it uses to send data. As a
consequence, it will use your Wifi when you have both wireless and wired connections active. Especially on
OSX, it will always default to Wifi when it's available.
As you can imagine, sending video over Wifi is pretty crap. So you'll want to disable your wireless
connection when setting up NDI.
Discovery vs Connection
Sometimes an NDI source is available from the Sources tab, but shows a red Offline mark when used as a
clip. It will also show up as 0x0 in size.
When this happens, in 99% of the cases you have an IP mismatch. Although both computers are physically
connected to the same network and able to 'see' each other, they're not set to the same IP range, so the
pixels can not be delivered.
The best way to troubleshoot it, is to disable all your network adapters except the one you are using for NDI,
and then set each to use a manual but different IP in the same range (ie 192.169.1.100 and 192.169.1.101).
NDI is a professional video over IP protocol. To use it, you need to know how to manage your IPs correctly.
If that sounds really hard, it's because it is. IT is a real job and a completely different ballpark from video, so
maybe it's smart to get help from someone that has experience setting up networks.

91
Still To DoThese are some features in NDI we'd love to also support in Resolume, but need to find the time for them:
Audio in and output via NDI
16 bit video (new in NDI 4)
NDI HX output, (input is supported)
Tally information, and feedback
YUV output support

92
EffectsEffects are super awesome! Everything playing in Resolume can be manipulated by effects. All of the audio
and all of the video.
When you get right down to it, each effect is a small program that changes the audio or visual in some way,
controlled by parameters. You send this little program whatever is currently playing, it does its magic based
on how you have it set up, and then it spits out the result back to Resolume.
Resolume comes with a whole bunch of video effects built-in, more than a 100! It also has a handful of
basic audio effects. If that doesn't cut it for you, you can read more about adding even more effects below.
Using EffectsYou can find all of the effects in the Effects tab, which in turn can be found in the bottom right of the
interface.
To preview an effect, double click its name in the browser. It will show in the Preview Output, applied over
whatever is playing in the composition. You can then tweak its parameters, to see if you can get the look
you’re after.
If you've found the right effect for the right moment, just drag the effect from the Effects tab onto the area of
either the Composition, Layer of Clip tabs. Drop it right where it says 'Drop effect or mask here'. You can
also directly drop it onto a clip or layer.

93
Tip! Hold down ALT while dropping an effect to apply it with its opacity turned all the way down. This wayyou can tweak its parameters, and then bring it into the mix gradually.
Clip effects are applied to the individual clip when it is playing.
Layer effects are applied to whatever clip is playing in the layer, after its clip effects have been applied.
Composition effects are applied to the final output, after the layers have been mixed together.
All effects can be temporarily bypassed (B toggle) or removed (X button).
If you're an Resolume effect ninja and already
know the name of the effect you’re looking for,
you can type its name into the Search box at
the top of the effects browser.
Tip! Hit CTRL-/ (or CMD-/ on a Mac) to focus the box without having to reach for your mouse.
Why the '/' key, you ask? Because it's just like hitting CTRL-?, just without the SHIFT key.
Audio EffectsDepending on the effect, audio effects can have any number of parameters. But there is one that they all
share. The "Dry/Wet" slider controls how much the affected version for the audio is mixed with the original.
When this parameter is moved over all the way to the right, you hear the full result of the effect and none of
the original audio. When its moved to the left, the effect will not be heard at all.

94
Video EffectsSimilarly to audio effects, video effects always have at least two parameters: Opacity and Blend Mode. You
use these to mix the effect with the original video. As with mixing layers, different combinations of blends
and opacity levels can have very different results.
To make sure you see only the result effect and nothing but the effect, select the Alpha blend and turn the
opacity all the way up.
Aside from this, this manual is too short to tell you what every parameter of every effect does or how you
should use it. You can try them out and wiggle a few of the controls to find out yourself. You'll figure out
which ones you like soon enough. Some of our personal favourites are: Vignette, Hue Rotate, Stingy
Sphere, PolkaDot, Goo and Particle System.
Mask
Masks are essentially effects
that create transparency in the
image. Using a still image file,
Resolume will render certain
parts of your content invisible,
based on the pixels in the still
image.
You can create a mask by dragging the Mask effect onto a panel and using the Load... button to load an
image file. You can also drag a still image straight on a panel directly.
Once loaded, you can decide how to create transparency via the Channel dropdown.
By default, this is set to Luminance. This means that where ever there are black pixels in the mask image,
your content will become transparent. Where ever there are white pixels, the content will remain visible.
Grey values mean half transparent, and so on.
By changing the Channel to Red, Blue or Green, Resolume will use the pixel's R, G or B values instead of
the overall Luminance.
When set to Alpha, Resolume will use the mask image's Alpha channel to decide transparency.
Of course, you can also Invert the mask.
When the image used for the mask has a different resolution than the content, Resolume will stretch it to fit.
Would you like to use moving content for your mask? Take a look at the Layer Mask Mode.
Transform
Transforms are your primary tool for composing a beautiful image. Quite often a little scaling on the right
content does so much more for your output than overbearing effects like Kaleidoscope.
Transforms are so important, they got their own little page in the manual.
Presets

95
All effects support the creation of presets. Each preset contains all the settings for an effect - enabling you to
quickly activate an effect, set to just the right sweet spot.
To create a preset, first get the effect working how you want it. Work the controls until the output is juuuuust
right. Then use the Preset drop down above the effect parameters and select the Save option. The Manage
Presets window opens, you can enter a name and hit return to save.
The new preset will now appear in the effects list, under the name of the effect itself. To use a preset, drag it
onto the Composition, Layer or Clip in the same way as you would for the effect itself.
It helps to think of presets as a big octopus. Wait. What? I know you may have seen enough hentai to know
where this is going, but stick with me. It'll make sense in a minute.
When you apply a preset, the octopus uses all its tentacles to quickly set all the parameters to the right
settings in one go. After that it swims away again. The effect doesn't remember which preset was used to
get its current settings. It doesn't even care if the octopus did it, or you did it yourself by setting everything
by hand. So, when you update a preset, other effects that were set to this preset by their octopus don't get
updated with it. The octopus just visits once, and then disappears in a big inky cloud.
Doesn't make sense yet? Well, I tried. Just remember presets are a way to quickly set an effect's
parameters to specific values. Not a way to keep all your effects on the same settings.
Animate Effect BypassYou can also animate the effect bypass switch. When you right-click on the B icon you get a menu with all
the regular parameter animation options. This way you can easily turn an effect on and off to the beat for
instance.

96
Multiple EffectsThus far, we've only talked about applying a single effect. But you can apply as many effect as you want.
You can keep going until everything is one big nasty pool of ugly pixels. Or until smoke comes out of your
computer. Whichever comes first really.
Effects can be stacked together by dropping more than one into the same place. If you do this, they will be
applied in order, starting with the top one in the slot. Each effect will be applied in turn, affecting the output
of the previous effect.
You can change the order of the effects by dragging them up and down by their name.
Changing the effect order can dramatically change the resulting output. For example, you could apply the
PolkaDot effect on a clip, followed by Radar. Looks cool, right?
Now see the difference when you drag Radar above PolkaDot.
The difference is subtle, but extremely important!
First PolkaDot, then Radar.

97
First Radar, then Polkadot.
Tip! Transform is an effect just like all the others. So you can stick transforms anywhere in the renderstack.
Bonus Tip! Because Transform is an effect like all the others, you can also save your own Presets for it.
Rename Effects
Sometimes you'll load the same effect multiple times but use it for different purposes. For this case you can
rename an effect instance to your liking by right-clicking the name of the effect and then selecting Rename.
Effect Clips

98
Effects can also be added to an empty clip. When you do this, you will create an Effect Clip. If you're used to
working with Photoshop or After Effects, you'll know this feature as Adjustment Layers.
Any effects applied on an Effect Clip will be applied to all the clips playing in the layers underneath it. This
way you can very quickly create a sequence of different looks and effects, while still being able to swap out
the footage on the fly.
Even better, this will allow you to assign MIDI or keyboard triggers to effects, or even fade from one effect to
the other using the layer transitions.
Like Sources, Effect Clips can be assigned a duration as well, so you can use them with the Auto Pilot too.
More EffectsThe built-in effects in Resolume are super powerful, and should cover most of your needs. But, still it could
be that you have a need for even more. For audio, Resolume supports VST plugins. For video, Resolume
supports FFGL plugins.
The Juice Bar is a great place to start your journey into external plugins.
We have a thread on our forum where links to plugins are shared among VJ's. Note that for Resolume 6 and
up, the plugin needs to be compiled for 64 bit.
To load a 3rd party plugin, simply copy the .dll (PC) or .bundle (Mac) file to the 'Extra effects' subfolder in
Resolume's user folder in Documents. Restart Resolume, and your plugin will be loaded automatically. If
you like, you can also add your own custom folder to scan during startup.
For VSTs, you can similary add your own folder to scan for VSTs.

99
Transform
Every panel has a default Transform effect applied. Depending on which panel you're looking at, the
Transform effect will let you adjust the position, scale, rotation and anchor point of this composition, this
group, this layer or this specific clip.
ParametersEach Transform effect has several parameters.
Position
Adjust where the content's center point is on the X and Y axes.
Well, actually, *shoves glasses a bit further onto nose.* Actually, it adjusts where the anchor point of the
content is on the X and Y axes. Yes. For all intents and purposes though, let's just say Position means you
can move them pixely things here and there.
Scale
Adjust the size of the content, proportionally to its original size. Expanding the parameter will let you scale
the width and height individually.
Rotation
Measured in degrees, this will let you rotate the content around its anchor point. Expanding the parameter
will let you rotate along each axis individually.

100
Anchor Point
If you don't know what an anchor point is, think of it like sticking a pin in the Justin Bieber poster you have
on your bedroom wall. Okay. Fine. The Justin Bieber poster that "your sister" has on the wall. Whatever,
man. No judging.
Depending on where you've stuck the pin, when you now spin the poster, it will spin around that point. This
is exactly what the anchor point does in Resolume.
The anchor parameter can also be expanded.
Multiple TransformsYou can apply more than one Transform!
Transform is available as an effect in the Effects list, and you can apply it anywhere in the effect chain.
This way, you can do crazy stuff like first scale down and move a layer to the left half of the screen, then
apply a mirror effect, and finally position the result of this in the bottom right of the composition. Options
galore!
Any transform you apply after the first one, will have its own Opacity and Blend Mode, just like an effect.
This way, you can control how the Transform blends with the input texture.
The very first Transform in each panel can not be deleted.
Transform PresetsEach Transform setting can be saved as a preset. This gives you quick access to PIPs and scalings that
you often use.

101
Slice TransformOn Arena, you get access to a very special type of Transform.
It's available as an effect under the moniker Slice Transform, but the best way to access it, is to open the
Slice panel via View > Show Slices.
The Slices panel will show you all the screens and slices you currently have available in the Advanced
Output.

102
Now, by dragging the Screen onto a clip, a layer, a group or the whole composition, you can instantly place
content in every slice in that screen.
The Slice Transform effect works with regular slices, polygon slices and fixtures, takes into account the
orientation of the slice, and respects any input masks applied on the slice.
Changing the slice in the Advanced Output will update the scaling of the content automatically.
Scaling
Fill
By default, the content will be scaled to Fill within the slice. This will fill the slice with the content, and crop
the sides or top and bottom if the aspect ratios don't match.

103
Fit
You can switch to Fit, in which case it will scale the content to be completely visible in the slice, possibly
adding empty pixels on the sides or top and bottom.
Stretch
By using Stretch, the content will be warped to match the shape of the slice exactly.
Mask
In Mask mode, you leave the content as it is, and essentially use the Slice Transform as a mask to show
and hide specific parts of it.
Bypass/Solo/Delete
You can use the B toggles to temporarily hide content for that specific slice. The S button will Solo that slice
and hide the others.
If you don't need content to show in a particular slice, you can hit X to get rid of it.
If you realise you needed it after all, you can simply drag the slice back in from the Slices tab.
Orientation
You can use the Pacman icon to toggle each slice through 4 orientations: Regular, Mirrored Horizontally,
Mirrored Vertically, Mirrored Horizontally and Vertically.
Layering your Stage
Of course, instead of dragging the whole screen to create the Slice Transform effect, you can also drag a
selection of slices instead.
This is a great way to assign content to specific areas of your stage. For instance, you can show the DJ
name, set to Fit on just the main screen and DJ booth, while showing the promotor logo behind it, set to Fill
on the main screen and on the tiles on the roof. Background content can be shown everywhere, masked on
every slice.
Because Slice Transform is an effect, you can use it to apply these looks on specific clips. This way you can
have multiple instances of a clip, each with a specific look.
Also, you can create presets to quickly recall specific looks and switch between them.

104
Missing Slices
Because Slice Transform works with the slices in your Advanced Output, it might be that a particular slice
can't be found. Maybe you accidentally deleted it, maybe you've loaded in another preset.
Whatever the reason, Resolume doesn't panic. It just lets you know something is missing by highlighting the
slice in red. Any remaining slices will continue to display just fine.
This is done to give you an indication that something is up. You can then go in to Advanced Output to do
what needs to be done to correct it, or just delete the slice from the effect if you don't need it anymore.
When you accidentally deleted a slice in the Advanced Output, undoing it will bring it right back, both in the
Advanced Output and in the Slice Transform effect.

105
Output SetupUnless you are just using the recording feature of Resolume to make video clips, at some point you will
want to route the video from Resolume out of your computer, hopefully to a really big screen.
Before you can configure the outputs in Resolume, you will need to set up the displays in your computer's
operating system. You should do this before you run Resolume, in order for the displays to be available in
the Output menu.
So first we make sure the display or projector is recognised by your computer.
Setup your computerWindows
To set up the displays in Windows, open the Display panel via the Control Panel: Settings > System >
Display. Alternatively, you can right-click on the Desktop and select Display Settings from the contextual
menu.
On the settings tab make sure you have at least two displays visible and active. This is usually called
having the two screens in 'extended desktop' mode.

106
Mac OSX
Open the Display Preferences in System Preferences via the Apple menu: System Preferences > Displays.
Then on the Arrangement tab make sure 'mirror displays' is turned off. Now you have two separate displays
on your computer.

107
Setup Resolume

108
Now start Resolume and check out the Output menu. The
Fullscreen and Windowed options enable you to select which
of your computer displays the main Resolume output should
go to.
For a straightforward single screen setup, Fullscreen is usually the option you want. Resolume will fill the
complete window with its output.
Windowed output just fills the second output with a rectangle exactly the size of your composition. This is
sometimes useful if you are using an external scan converter or are working with multiple applications.
You can stop all output by selecting the Disabled option.
Tip! If you accidentally went fullscreen on the main window, you won't be able to access Resolume'scontrols anymore. Don't worry! Just hit CTRL-SHIFT-D (CMD-SHIFT-D on a Mac) to disable all outputand get the interface back.
Advanced...Hidden away in this tiny menu option is an amazing world of possibilities.
Composition output sharingTexture sharing (Syphon or Spout)
This will enable sending your main composition output via the Syphon framework on Mac, or the Spout
framework on PC.
Essentially, this will let you share the image created in Resolume to another application for further
processing.
Read more about Syphon and Spout.

109
Network streaming (NDI)
This will enable sending your main composition output via the NDI protocol to other computers on the same
network.
Identify DisplaysThis will overlay your outputs with a numbered and coloured image. The numbers will match the numbers
your computer has assigned to those monitors.
3-1-2-8-9-11-10-5-6-7-4? Yes, I know those numbers don't match the order of the monitors on the table.No matter which order I plug the cables, Windows seems to assign these numbers randomly. This justproves how much we need a feature like this.
Open System Display PreferencesA quick shortcut to get to your computer's display settings. You know, for when those numbers above
somehow turned out wrong.
Show FPSThis will show a little FPS counter in the top left of the Output Monitor. This is an indication of how far you're
pushing Resolume.
Tip! Higher numbers are better. If this consistently drops below 30, it means you're pushing things toohard.
Bonus Tip! Numbers higher than the refresh rate of your monitor are bad. It means you're not 'v-synced'and you're making your computer do more work than it's actually able to show.

110
Show Test CardShows a handy little test card with color bars, the current resolution and time, and a moving diagonal line.
Show Display InfoThis will overlay each connected display with EDID information, which GPU it's connected to, and which
GPU is currently being used for rendering.
Tip! Don't worry if the GPU listed under 'Gfx Card' is not the most powerful card in your computer. Thisjust tells you which card you are physically plugged in to. The GPU listed under 'Renderer' is what mattersand this should be your most powerful card.

111
SnapshotThis will save a .PNG still image of your output to your Recordings folder and import it to your current
composition.

112
Advanced OutputUsing Resolume's Advanced Output, you can manage all sorts of outputs. You can use physical outputs
like a DVI cable connected to a projector, a HDMI cable to a LED screen, a capture card like a Blackmagic
Intensity, a DMX signal sent to a pixel strip, or even virtual outputs like Syphon or Spout.
Multiple OutputsIf you are spanning your output over several projectors, or using a mix of different outputs like LED screens,
projector and pixel strips, Resolume provides a flexible way to control them all at the same time.
Using the Advanced Output, you can choose which outputs you want to use. And you choose how to use
them by setting up which parts of your composition are sent to which output. This way you can send VJ
content to the main area, while displaying a single line-up still on the monitors in the hall.
Projection MappingIf you are doing a projection mapping show, you will use the Advanced Output to align your projected
content to the physical object you are projecting on. When using LED processors, you can scale and resize
your output to exactly fit the needs of the processor. If you are using DMX controlled lights, you can choose
which fixtures you need to send to.
Basically, the Advanced Output is where the magic happens.

113
Getting StartedThe Advanced Output is available on both Avenue and Arena. To get everything it has to offer, you will need
Arena.
For a quick start on how to use the Advanced Output with LED screens or for projection mapping, check
this chapter on creating input maps:
Working with Input Maps
If you want to know the nitty gritty of all the features of the Advanced Output, everything is covered in the
following chapters:
Screens
Input Selection
Output Transformation
Edge Blending
DMX Output
Key Modifiers and Shortcuts
Saving and sharing PresetsIt's possible to switch between different screen setups. Using
the dropdown in the top left of the Advanced Output window,
you can save and select different setups.
This is especially useful when you are playing weekly gigs at different venues that each require a specific
setup. Using the preset system, you can just select the appropriate setting from the list, without having to
recreate it again.
This also means that your output setup is not tied to a certain composition. You can use different setups
with the same composition, and use different compositions with the same setup.
It also allows you to share presets between computers. After saving, the preset can be found as an .xml file
in the Resolume documents folder:
Mac: Users/~/Documents/Resolume Avenue-Arena 5/presets/screensetup/
PC: C:\Users\[username]\My Documents\Resolume Avenue-Arena 5\presets\screensetup\

114
Tip! Browsing is for suckers. Choose Reveal in Finder or Explorer from the dropdown and you will betaken right to the correct file on your computer.
You can copy this file to the same folder on the other computer. You can then load the preset via the
dropdown. When loading a preset via the dropdown, it will be automatically copied to the correct folder in
Documents.
Tip! Sharing presets also works between Mac and PC!

115
ScreensTo start using the Advanced Output, select the Output > Advanced menu option.
You will see a window that lists the active screens on your computer down the left hand side.
Each screen represents an output going out of Resolume.
To setup a screen, right click on it on the left hand side. You will
see a dropdown of all outputs that are connected to your
computer.
You can choose which output this screen should use. This way you can very quickly assign the correct
screen to the correct output when working with multiple outputs.
The screen will show the output it's sending to under its name, as well as in the Device dropdown menu on
the right. You can also change the name of a screen by double clicking on it.
Types of OutputsConnected Outputs
Any monitors or projectors connected to your computer are automatically available as output for screens.
Resolume will show the name and resolution of this connection.
Keep in mind! Resolume itself does not create outputs. This is handled by your computer. So if you have a
screen connected to your computer, but it doesn't appear here, you will first need to make sure your
computer recognises it correctly. Check if it's set to proper extended desktop mode (PC) and the
arrangement is not set to mirrored (Mac). You can read all about setting up extended displays in the chapter
on setting up outputs.
Every output can only have a single screen associated with it. The poor projector would otherwise get very
confused when you try to send it two whole frames of pixels on every frame. When you select an output
already in use by another screen, Resolume will set the output of the other screen back to virtual.
Tip! If you accidentally select the main monitor as your output, the output will fill the main monitor and youwon't be able to access the interface anymore. Don't worry! Just hit CTRL-SHIFT-D ( CMD-SHIFT-D onMac ) to disable all outputs and get the interface back.

116
Playback Cards
Any connected cards that support playback will show up here as
well.
Depending on the card, this will display various extra options that will let you select things like which port
and what video format to use.
Tip! For fluent playback, choose a Video Format where the update frequency matches both your content'sfps, your composition's fps and your display's refresh rate. Outputting at 50i will not give good resultswhen your monitor is refreshing at 60Hz, your content is 30 fps and your composition is rendering at 60fps. Even when you're in Europe.
Also cards that have both an input and an output can be used for output. Keep in mind that not all cards
support full duplex. Full duplex is a fancy word for simultaneous input and output.
Output via playback cards is only available in Resolume Arena. It has support for playback via Blackmagic,
Datapath and AJA products.

117
Syphon/ Spout
Syphon (Mac) and Spout (PC) are protocols for texture sharing between applications. They will let the
output of one application magically appear as an input in another application running on the same
computer.
Check out the Syphon/Spout/NDI chapter in the manual for more info on Syphon and Spout

118
After you have set a screen to output either via Spout or Syphon, any Spout or Syhpon enabled applications
will pick up Resolume as a sender.
Resolume will use the name you give the screen as the Server Name / Sender Name. By default this would
be 'Screen 1'. You can change it to whatever you like. I would go with 'Charlie Screen'.
Resolume will use either 'Avenue' or 'Arena' as the application name.
You can change the width and height of the screen to change the resolution of the texture you want to
share.
Check out the Syphon/Spout/NDI chapter in the manual for more info on NDI.
NDI
Similar to Syphon/Spout, NDI will let your share your output with other applications that support the NDI
protocol. The added advantage is that NDI works with multiple computers connected to the same network.
You can use this to send a single 1080p output from a VJ laptop to a master server computer, which is used
to scale and position the output to the pixelmap.
When enabling NDI output, Resolume automatically announces itself on the network. Other NDI enabled
applications will pick it up automatically.
You can read more about NDI in its own chapter.
Virtual Outputs
Virtual Outputs are sort of an internal Syphon/Spout, just for Resolume. Screens set to virtual outputs can
be picked as input for slices in other screens.
This allows all sorts of complex scaling and routing possibilities, with a minimal performance hit.
Well, exactly how minimal is minimal? Good question! Virtual Outputs aren't 'free', meaning that Resolume
has to do some extra work when they're active. So throwing them around willy nilly is generally not a good
idea. Use them when you need to, not because you can. Depending on how busy things are, the delay will
be either 0 or 1 frame.

119
You can change the output resolution of a Virtual Output by changing its width and height.
AdjustmentsAdjusting Output Levels and Color
Each screen has Opacity, Brightness and Contrast controls, as well as
individual controls for the Red, Green and Blue channels. You can use
these to adjust mismatched outputs. For instance, you can dim the
brightness on a LED panel while sending the undimmed output to a
projector as well. Or you can remove some red from a projector when it
doesn't match the other projectors you are using.
Adjusting Delay
Each screen can have a delay between 0 and 100 ms, to account for small delays introduced by the signal
chain after the outputs leave Resolume.
Hiding and Folding Screens
You can temporarily turn a screen off and on by clicking the toggle in front of it. This will enable or disable all
output to that screen. This is very useful when identifying which screen is which during troubleshooting or to
temporarily disable a single screen during performance.
You can also fold and unfold a screen by clicking the arrow beneath it. This will keep the output going, while
hiding all the slices contained in the screen. This is useful to prevent slices from getting in the way when
working with lots of screens and slices.
Preparing before showYou can prepare your screens without having them physically connected. This is useful when you need to
prepare for a show before the venue is open.
When you open the Advanced Output without having any secondary screens connected, it will open with a
single Virtual Screen. You can set the resolution of this Virtual Screen using the Width and Height
parameters on the right hand side.
By matching these settings to the resolution that your output will have during show, you can prepare your
setup beforehand. Then, once you are connected to the actual output, you can tell your screen to use that
output instead, via the right-click dropdown.
You can create as many Virtual Screens as you need via the Plus+ menu.

120
Input Selection
After setting up your outputs correctly, you can control how your content is distributed over these outputs
using the Input Selection.
The Input Selection stage shows a preview of your composition output.
On the left hand, it shows all active screens. You can read more about screens in the previous chapter.
SlicesEach screen can have one or more slices. To get your head around
Input Selection and slices, think of your composition as the pie and
your slices as, well, slices of that pie. By defining a slice, you can
control what output will get which parts of your pie.

121
For instance, you can define that the left hand side of the composition will always go the projector on output
1, and the right hand side should go to the projector on output 2. But you're not limited to dividing it
vertically, or even halfway. You can select any part of the composition you want to account for different
output resolutions and aspect ratios.
You are not limited to a single slice per screen. You can create as many slices as you like via the plus+
menu. The sky is the limit.
Ummm. Actually. There is a limit. You can't create more than 1152921504606846975 slices. Of courseyour computer will run out of resources far before that, but on a computer with infinite RAM and infiniteprocessing power, you could create one slice every second for the coming 36558 million years. Or create151 million slices for each person living on Earth right now. Or if you got a penny for every slice, you couldbuy Star Wars back from Disney, 2.5 million times.
Resizing, Moving and Rotating
When you open the Advanced Output, it always has one screen with one slice pre-made.
You select this slice by clicking it on the left hand side. You can then resize it and drag it around on the
Input Selection stage.
You can scale, position or rotate the slice simply by dragging. Rotating the input is very useful for working
with rotated LED panels.
Tip! Slices will snap to the stage edges, the center and to each other. You can temporarily disablesnapping by holding down CTRL.
You can also type precise numbers into the boxes at the right. This is useful if you need the output to show
a precise part of the composition.
Tip! You can use math to let Resolume do calculations for you. Verrrry handy! Let's say you want to makea slice exactly a third of its width, all you need to do is type ”/3” after the width setting and press return.

122
Also you can nudge slices 1 pixel at a time by using the arrow keys. Hold down Shift when pressing the
keys to nudge them 10 pixels at a time.
Right clicking a slice, either in the list or on the stage, will reveal a drop down with some useful presets and
actions. Check the complete list on the Modifiers and Shortcuts page.
Tip! One interesting option is Match Output Shape. This will let the slice take the position and shape thatit has on the Output Transformation stage. This way you can quickly match the aspect ratio andpositioning for pixel perfect pixelmaps.
You can create as many slices as you like. You can duplicate an existing one or create new ones via plus+
menu.
Also you can move slices between screens. Simply drag and drop them to the desired screen. Note that a
screen should always contain at least one slice, so Resolume will stop you when you try to drag the last
slice to another screen.
Slice MasksSlice masks are available on Resolume Arena only!
Slice masks can be used to further narrow down the shape of your slice. For all its options, a regular slice is
limited to a rectangular shape. By using slice masks, you can define exactly which part of the rectangle you
want to see in your output.
To create a slice mask, click on any of the preset options on the right hand side of the Input Selection
screen. You can also click on the pencil to create a completely freeform mask. You can invert a mask to
make it a crop and vice versa. By toggling the Invert button on the right hand side, you can either show
everything inside the mask, or everything outside it.

123
After you have created the mask, you will notice two options in the top right of the Input Selection stage:
Transform and Edit Points.
Transform
In Transform mode, you can move the slice mask around like a regular slice. You have the same options for
scaling, positioning and rotating.
Be careful not to move the slice mask completely out of the slice, because this will result in empty output.
We know less is more, but that's maybe a bit too minimal.
Tip! When using a mask to create a specific shape for mapping, it helps to create your slice at the samescale as the shape you intend to use. As opposed to cutting out a small part of a big slice. Resolume willstill warp the slice based on the corner points of the slice, not the corner points of the mask.
Edit Points
In Edit Points mode, you can edit the individual points of the slice mask. You can move points around by
dragging or nudging them into position with the arrow keys. You can add points to the shape by double
clicking anywhere on its path. Double click on an existing point to remove it.
Here you can also switch the mask between linear and bezier. Linear draws exact straight lines between
the points, bezier lets you draw nicely curved lines. In bezier mode, the point handles will be round. Each
point will get two bezier handles, that you can use to curve the shape to your liking.
Polygon SlicesPolygon slices are available on Resolume Arena only!

124
If you want the ultimate control over the shape of your slice, poly slices are the way to go. Poly slices will
give you complete freedom on the shape and control points of your slice. Triangles, hexagons, stars or
complete freeform, it's all possible with a poly slice.
You create a poly slice via the plus+ menu. You can either create a preset triangle or draw a freehand
polygon by drawing it on the stage.
When drawing a poly slice directly on the stage, start by clicking where you would like your first control point
to be. Now keep clicking around your shape, placing a control point in every corner. When you're done, just
click on the start point or double click anywhere to close the shape.
Once you have created your poly slice, Resolume will triangulate it for you. The same control points that you
have set in the Input Selection stage will be available in the Output Transformation stage as well.
Keep in mind that it's possible to create a shape that's not 'triangulatable', for instance by creating a shape
that crosses its own path. In cases like this, Resolume will draw the outline in red. This is to let you know
what you're trying to do is mathematically impossible in this part of reality. For the same reason, bezier
points are not available on poly slices.
Transform Mode
After you have created your poly slice, you can still modify its scale, rotation and position in Transform
mode. In this mode, the poly slice behaves like a regular slice.
Edit Points Mode
In Edit Points mode, you can still add and remove individual points as well as change their position. In this
mode, the poly slice behaves like a mask.
Multi Select

125
You can move, scale and rotate multiple slices at the same time.
Drag around a group of slices on the stage to lasso them together. You can also shift click individual slices,
either in the list or directly on the stage to add or remove them from the selection.
A bounding box will appear around your selection that you can drag, rotate or scale to your liking. Also the
properties on the right hand side are still available on the right side for precise numerical input. Keep in
mind that the numbers reflect the properties of the bounding box, not the individual slices!

126
Output TransformationThe Output Transformation stage is available on Resolume Arena only!
The Output Transformation stage is where all the magic happens. You use it to align your output to
projection mapping structures or shuffle your pixels for output to a LED processor.
TransformingThe same screens and slices you've configured on the Input Selection stage are available on the Output
Transformation stage.
Just like on the Input Selection stage, on the Output Transformation
stage you can change the size and position of your slices. This is done in
the Transform tab. In this tab, you change the position and scale of your
entire slice. The difference is that now you actually move the pixels
around, as opposed to choosing a different set of pixels to use as input.
This way, you can for instance take the bottom left quarter of your composition, and position it in the top left
of your output.
Warping

127
Additionally, on the Output Transformation stage you can apply screen
warping, which means you can adjust the geometry on the final output.
This is useful for projection mapping the output to an irregularly shaped
surface, or when aligning multiple projectors for a spanned output.
This warping is done in the Edit Points tab. In this tab, you can adjust the individual points that make up
your slice.
There are several ways to warp.
Perspective Warping
You apply perspective warping by changing the four large corner points of your slice.
Perspective warping keeps the perspective of your output correct. For instance, when projecting at an
angle, the light hitting the furthest point of your surface will disperse further than the light hitting the closest
point. This means that your content will get more and more stretched the further along your object it is.
Using perspective warping, Resolume adjusts for this and keeps the scale of your content correct along the
length of your object.

128
Linear warping (left image) vs perspective warping (right image) when projecting on a cube at a 45 degree
angle. Notice how the grid squares are evenly spaced on the right image, but stretched on the left.
For most simple cube mapping work, perspective warping is the mode you want.
Perspective warping is available on regular slices only. Poly slices cannot be perspective warped. Because
the math for that gets really complicated.
Linear and Bezier Warping
Linear warping is applied by the four smaller corner points inside the perspective warper points.
These points work the same way as their bigger brothers, except they do
not adjust for perspective. They have the added advantage that you can
add more points horizontally and vertically for more complex warping.

129
Also you can switch the mode from Linear to Bezier. Each point will then
show two additional bezier handles that you can use to make the warping
curve like a Coca-Cola bottle.

130
Tip! Why choose when you can have both? Use the big corner points for perspective warping and theirbaby brothers for additional bezier warping. This way you can have nice smooth curved mappings whilemaintaining correct perspective.
Linear warping is also available on poly slices. Poly slices are super awesome because they can change
the position of each point of the mesh. Bezier warping is not available on poly slices. Because the math for
that gets really complicated.
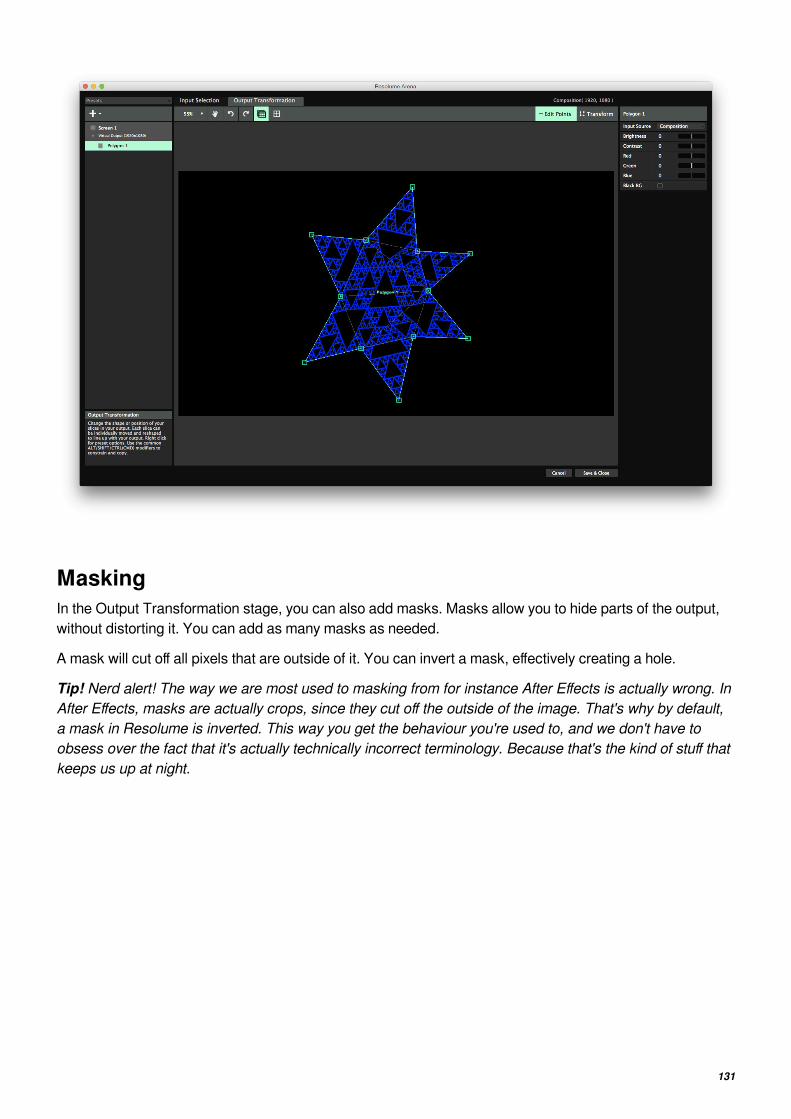
131
MaskingIn the Output Transformation stage, you can also add masks. Masks allow you to hide parts of the output,
without distorting it. You can add as many masks as needed.
A mask will cut off all pixels that are outside of it. You can invert a mask, effectively creating a hole.
Tip! Nerd alert! The way we are most used to masking from for instance After Effects is actually wrong. InAfter Effects, masks are actually crops, since they cut off the outside of the image. That's why by default,a mask in Resolume is inverted. This way you get the behaviour you're used to, and we don't have toobsess over the fact that it's actually technically incorrect terminology. Because that's the kind of stuff thatkeeps us up at night.

132
Masks and crops can have an arbitrary amount of points. By default you can choose from a number of
commonly used preset shapes, but you can make them into stars, the bat-signal, a tri-force or in the shape
of that weird stain on the wall in your attic.
Double click the outline to add a point at that location, double click a point
to remove it. You can make round corners by switching the Point Mode to
Bezier.
Note that masks are applied to all the slices underneath it.
Slice OptionsOn the Output Transformation side, slices have some additional options.
Flips
Using the Pacman icons, you can flip a slice's output horizontally,
vertically or both.
This way you can very easily make a mirrored setup by duplicating a slice, using the right click menu to

133
mirror it across the x-axis and then flipping it using the Pacman icon.
Color Correction
Each slice can have its brightness, contrast and red, green and blue
channels adjusted. You can also multiselect slices and adjust several of
them at the same time.
This way you can adjust for differences between projectors when using a Matrox TripleHead2Go, or to
adjust the brightness levels for different LED panels connected on the same processor.
Is Key
Toggling Is Key will cause this slice to replace the alpha channel with
luminance. It will send out white wherever there are visible pixels and
black where there is transparency.
This is useful to send an alpha channel on a separate output for overlaying graphics using a broadcast
mixer.
Black BG
Black BG is not a racially themed 70s cover band. Toggling it on will
render your slice with a black background, regardless of whether content
is playing in it.
This is useful when you have a slice partially covering another slice, and you don't want to ever reveal the
parts of the slice underneath.

134
DMX OutputDMX Output is only available on Resolume Arena!
Resolume Arena can output the color or brightness of your pixels to LED strips or other light fixtures via
DMX.
This means you can play your videos on low resolution LED strips or other lights that support DMX input.
Make it part of your stage design and take charge of the lights as well as the video.
Using DMX LumiversesTo do anything with DMX Fixures, first you will need to create a DMX
Lumiverse.
A DMX Lumiverse is basically a DMX universe, except it only exists virtually, within Resolume. Like a
regular DMX universe, it consists of 512 channels. You use a Lumiverse to arrange and order your fixtures.
This way, you can prepare your pixel map at home. When it's showtime, you can then quickly assign a
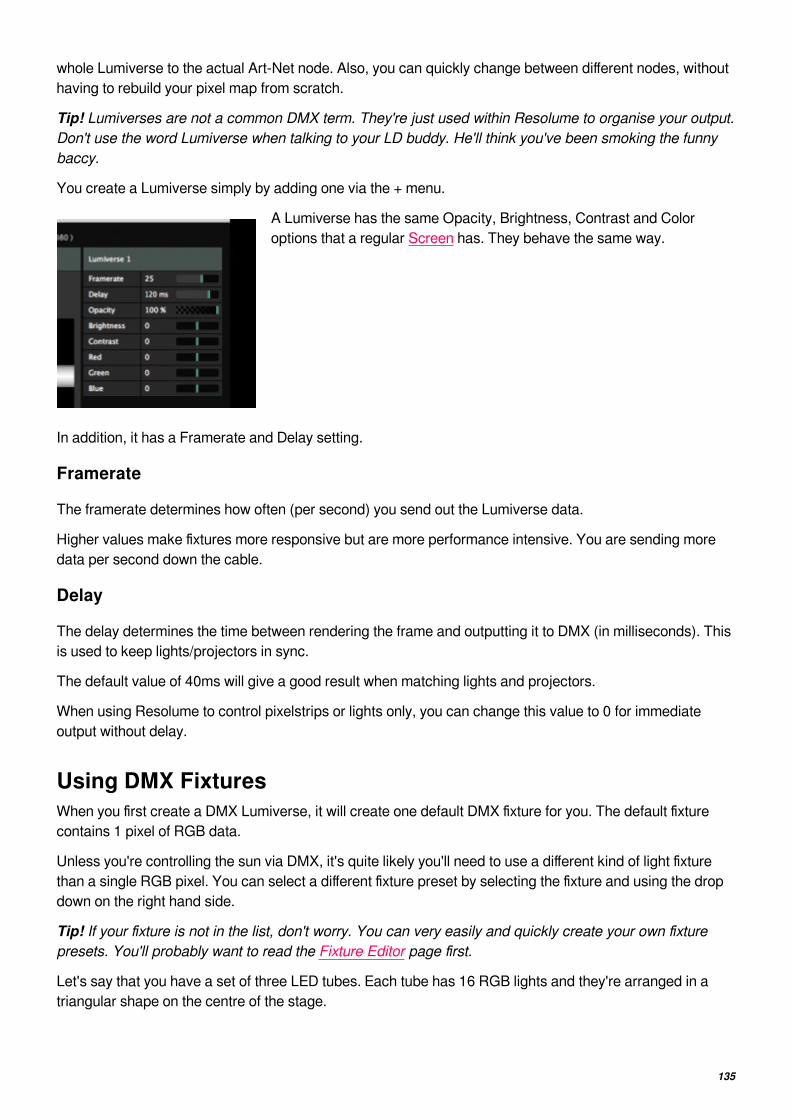
135
whole Lumiverse to the actual Art-Net node. Also, you can quickly change between different nodes, without
having to rebuild your pixel map from scratch.
Tip! Lumiverses are not a common DMX term. They're just used within Resolume to organise your output.Don't use the word Lumiverse when talking to your LD buddy. He'll think you've been smoking the funnybaccy.
You create a Lumiverse simply by adding one via the + menu.
A Lumiverse has the same Opacity, Brightness, Contrast and Color
options that a regular Screen has. They behave the same way.
In addition, it has a Framerate and Delay setting.
Framerate
The framerate determines how often (per second) you send out the Lumiverse data.
Higher values make fixtures more responsive but are more performance intensive. You are sending more
data per second down the cable.
Delay
The delay determines the time between rendering the frame and outputting it to DMX (in milliseconds). This
is used to keep lights/projectors in sync.
The default value of 40ms will give a good result when matching lights and projectors.
When using Resolume to control pixelstrips or lights only, you can change this value to 0 for immediate
output without delay.
Using DMX FixturesWhen you first create a DMX Lumiverse, it will create one default DMX fixture for you. The default fixture
contains 1 pixel of RGB data.
Unless you're controlling the sun via DMX, it's quite likely you'll need to use a different kind of light fixture
than a single RGB pixel. You can select a different fixture preset by selecting the fixture and using the drop
down on the right hand side.
Tip! If your fixture is not in the list, don't worry. You can very easily and quickly create your own fixturepresets. You'll probably want to read the Fixture Editor page first.
Let's say that you have a set of three LED tubes. Each tube has 16 RGB lights and they're arranged in a
triangular shape on the centre of the stage.

136
Select the Fixture
The first thing to do is to change the default fixture to the corresponding entry from the list.
You'll notice that the fixture name has changed. Also the Input Selection area of the fixture has become 16
times as wide. This is because you can now assign colours for 16 pixels, instead of only 1.
Position the Fixture
You can move, scale and rotate the input of this fixture to match the physical location of the light in your
stage design. Let's make it 800x50 pixels. Assign its input to the bottom centre of the composition by
placing it in the bottom centre of the Input Selection window. Resolume will sample the very centre pixel of
each square as input for the RGB channel. You'll see exactly which colours it’s sending in the preview on
the bottom of the slice info.
Tip! Of course changing the input size in pixels doesn't change the size of the LED tube. Also the locationin the composition doesn't change anything to its physical location. But it makes sense that you need tomatch the input size and position of your other stage elements, such as projection surfaces or LED walltiles. This will create a matching picture on all your screens and lights when you start playing video onthem.
More Fixtures!
Create another DMX fixture via the big + drop down menu. You’ll notice that this new fixture is also a 16
pixel LED bar. Resolume will take the previously used fixture as the default for newly created DMX fixtures.
Make this fixture the same width and height as the previous one, but rotate it to -60 degrees. Place it so that
it makes the left leg of a perpendicular triangle.
Create the third fixture by duplicating the second fixture. You do this by right clicking on the fixture, either in
the list on the left or in the Input Selection canvas itself. Rotate it to 60 degrees, and use it to finish off the
triangle.
Tip! Use the scroll wheel or CTRL + and - ( CMD + and - on a Mac ) to zoom in and precisely positionyour fixture slice. You can use the pan tool or hold down spacebar to pan the canvas.

137
Sending DMX to your LED lightsAfter setting up all your inputs, it's time to actually send out some output to your LED tubes.
Right-click on your DMX Lumiverse. Just like with
Screens, Resolume will show a list of the detected Art-Net
nodes on your network.
Simply select the name of the node you want to use and Resolume will fill out the complicated parts like IP
addresses and universes for you.
Tip! If your device doesn't show up in the list, make sure the IP of the device and the computer runningResolume are in the same IP range and are using the same subnet mask.
Picking the right Network Interface
It could be that your computer has both a wired and wireless network interface. If your Art-Net nodes are on
your wired network, but Resolume is looking on the wifi, it won't be able to find anything.

138
You can make sure Resolume is looking on the right network via the DMX tab of the Preferences.
Using a manual IP
It could be that you're using some sort of homebrew Art-Net device, like an Arduino.
In that case, it probably won't show up in the node list, but you will still be able to send Art-Net to it. On the
right hand side, choose IP Address from the Target IP dropdown. You can then fill out the IP manually.
Remember that in this case, you will need to set the Universe and Subnet manually as well. For most
devices, Universe 0 on Subnet 0 is the default setting for the first port.
When sending Art-Net to a specific named node, Resolume will remember that node's name, and keep
sending to it, even if its IP address changes. When sending to a specific IP address, Resolume will keep
sending to that IP, even if the device changes or if there's nothing there anymore.
Using Broadcast
Instead of sending to a specific node, you can also broadcast DMX to all the devices on your network.
If sending to a single node is like addressing a request to a person by name ("Hey Bob, could you take out
the trash please?"), broadcasting is the same as shouting really loud and hoping that someone will listen
("SOMEONE NEEDS TO TAKE OUT THE TRASH! LIKE, NOW!").
When broadcasting, there is no need to set the IP, but you will need to set your Subnet and Universe
accordingly.
When you start hitting 30 universes or more, it's a good idea to stop using broadcast and using gigabit
switches and unicast instead.
A word on DMX USB devicesResolume Arena 6 and up do not support Enttec DMX USB devices. If you'd like to use an EnttecDMX USB device, your only option is to stick with Arena 5.
Without getting too technical, every USB DMX manufacturer uses their own proprietary protocol. This
makes them a nightmare to maintain, if they work properly at all. So we decided to only support Art-Net
based devices. Art-Net is an industry standard. This means that if your device support Art-Net, it will work
in Resolume. Always and forever.
Aside from that, USB boxes are limited to 1 or 2 universes. Big whoop. That's not nearly enough when you
get serious with LED strips.
Showjockey and several other companies have boxes to get up to 8 or even 16 universes of DMX over a
single Art-Net connection. If you're not afraid of some DIY there are also plenty of cheap alternatives.

139
Patching your Lumiverse
Switch back to the Screen Setup, select your Lumiverse and switch over to the DMX Output tab. The DMX
Output is the overview of how your fixtures are arranged in your Lumiverse. You'll see that the first fixture
takes up 48 channels. This makes sense, as it has 16 pixels, each with a R, G and B value ( 16 * 3 = 48 ! ).
The second fixture starts at channel 49, right after the first one finishes. The third fixture starts at 97. These
Start Channels should correspond to how your dip switches are set up on your LED tubes. This way
Resolume knows which set of pixels need to be sent to which tube.
Tip! You know there's 10 kinds of people in the world. For those ofyou that can't count in binary, you can see how your dip switchesshould be set up visually in the bottom of the fixture info tab.
If your LED tubes are set up differently, you can simply drag the fixtures around in the DMX Output window.
You’ll notice the Start Channel and the dip switches update themselves accordingly. If you prefer, you can
adjust your dip switches directly or just type in the Start Channel. Your fixtures will then arrange themselves
in your Lumiverse. Just make sure the channels do not overlap, otherwise you might get weird results.
Resolume will warn you when this happens, by marking the overlapping channels with red.
After you have set up the correct start addresses, your LED tubes should correspond to what you're playing
on them. If one or more tubes were placed upside down or the wrong way round, you can use the Pacman
icons to flip their output. Also you can adjust their brightness and contrast should that be necessary.

140
Aligning your outputTo check whether your outputs line up correctly, you can use the Test Card from the Output menu.
The test card has a diagonal line moving across the screen, so you’ll quickly notice if your LED tubes are
somehow placed different in the physical world, than how you placed them in the Input Selection tab.
If something is wrong, first make sure the Start Channels match up using the DMX Output tab. Also, it might
be necessary to use Pacman to flip the output horizontally and/or vertically before it's sent to the fixture.
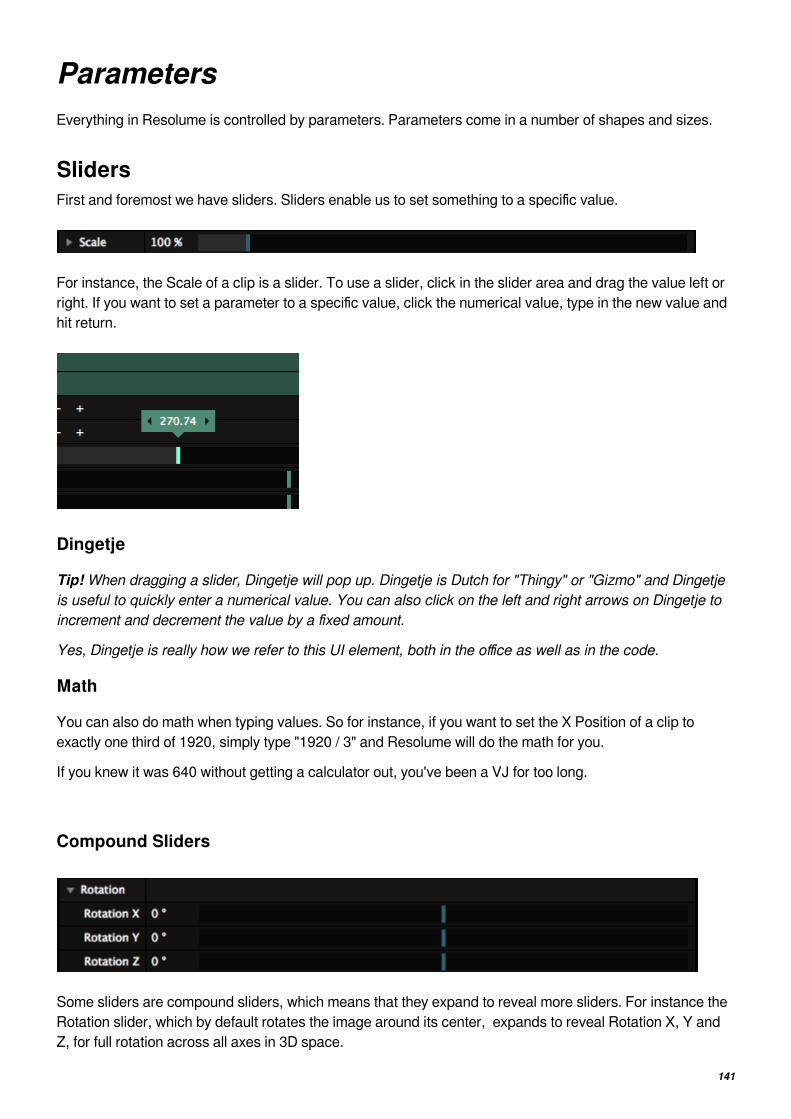
141
ParametersEverything in Resolume is controlled by parameters. Parameters come in a number of shapes and sizes.
SlidersFirst and foremost we have sliders. Sliders enable us to set something to a specific value.
For instance, the Scale of a clip is a slider. To use a slider, click in the slider area and drag the value left or
right. If you want to set a parameter to a specific value, click the numerical value, type in the new value and
hit return.
Dingetje
Tip! When dragging a slider, Dingetje will pop up. Dingetje is Dutch for "Thingy" or "Gizmo" and Dingetjeis useful to quickly enter a numerical value. You can also click on the left and right arrows on Dingetje toincrement and decrement the value by a fixed amount.
Yes, Dingetje is really how we refer to this UI element, both in the office as well as in the code.
Math
You can also do math when typing values. So for instance, if you want to set the X Position of a clip to
exactly one third of 1920, simply type "1920 / 3" and Resolume will do the math for you.
If you knew it was 640 without getting a calculator out, you've been a VJ for too long.
Compound Sliders
Some sliders are compound sliders, which means that they expand to reveal more sliders. For instance the
Rotation slider, which by default rotates the image around its center, expands to reveal Rotation X, Y and
Z, for full rotation across all axes in 3D space.

142
Reset to Default
You can set a slider back to its default value, simply right clicking on the slider or parameter name.
Toggle Buttons
Toggles can be used to turn something on or off. The big B and S buttons on the layer are toggles. They
both control the visibility of the layer. B is Bypass or Blind, and turns the layer off. S is for Solo and turns all
other layers off.
Every effect also has its own bypass toggle.
You will also see toggles as little boxes that can be ticked. For instance, the Flip effect has toggles for
Horizontal and Vertical, which control which axes the image is flipped across.
Event ButtonsEvents are buttons that trigger a certain action.
The big X on the far left of each layer is an event button. When you click it, it will eject the currently playing
clip from that layer. After that, it goes back to being a pretty little X, waiting for you to press it again.

143
Occasionally, you will come across an event button in an effect as well. For instance, the Cube Tiles effect
has an event called Randomize, which randomly re-arranges how the tiles are distributed across the cube.
When you get right down to it, clip triggers are also sort of event buttons. Or are they toggles? Hmmm. This
makes my head hurt.
Radio ButtonsSome buttons are grouped together. These are called "Radio Buttons".
A group of radio buttons can only have one button active at a time. When you click one of the options, the
others will automatically be deselected.
This is how radios worked in, like, the 1940s, so that's why we still call them radio buttons. Because we're
old.
A good example are the playhead controls for a clip, which let you set if the clip plays forward, backward, or
is paused.
Another example is the Autopilot for every layer.
DropdownsDropdowns will reveal a list of possible choices and let you pick the one you want.
The Blend on each layer is a dropdown with a huge list of choices. Like, crazy long.

144

145
Also, a clip can be switched to a number of different playback modes via a dropdown.
Color
Color is a very important aspect of visual performance. Maybe the most important.
Resolume gives you fine grained control over color. Wherever color is used, Resolume will show a special
UI item to set it.
Color Picker
The default view is a standard color picker. Simply move your mouse to pick the exact color that feels right
to you.
Eyedropper
There is also an eyedropper. If you've ever used Photoshop, you know how the eyedropper works. But in
case you've time traveled to the present from 1982, you can use the eyedropper to move your mouse over
any pixel you like and sample its color. Yes, this includes the Output Monitor. Yes, this also includes the

146
actual output.
Don't want to choose a color after all? Hit ESC to exit eyedropper mode.
RGB / HSB Sliders
If you're more of a number person, you can also set the the color using RGB or HSB sliders. In these
modes, you can get the color you want by entering the exact Red, Green and Blue, or Hue, Saturation and
Brightness values. Using sliders gives you the added advantage of parameter animation, and an extra slider
for the alpha value.
Palette
A Color parameter also has the option to show a Palette. On a Palette, you can keep a range of your
favorite colors.
If you want to add a color to the Palette, simply drag it from its preview to an empty swatch on the Palette.
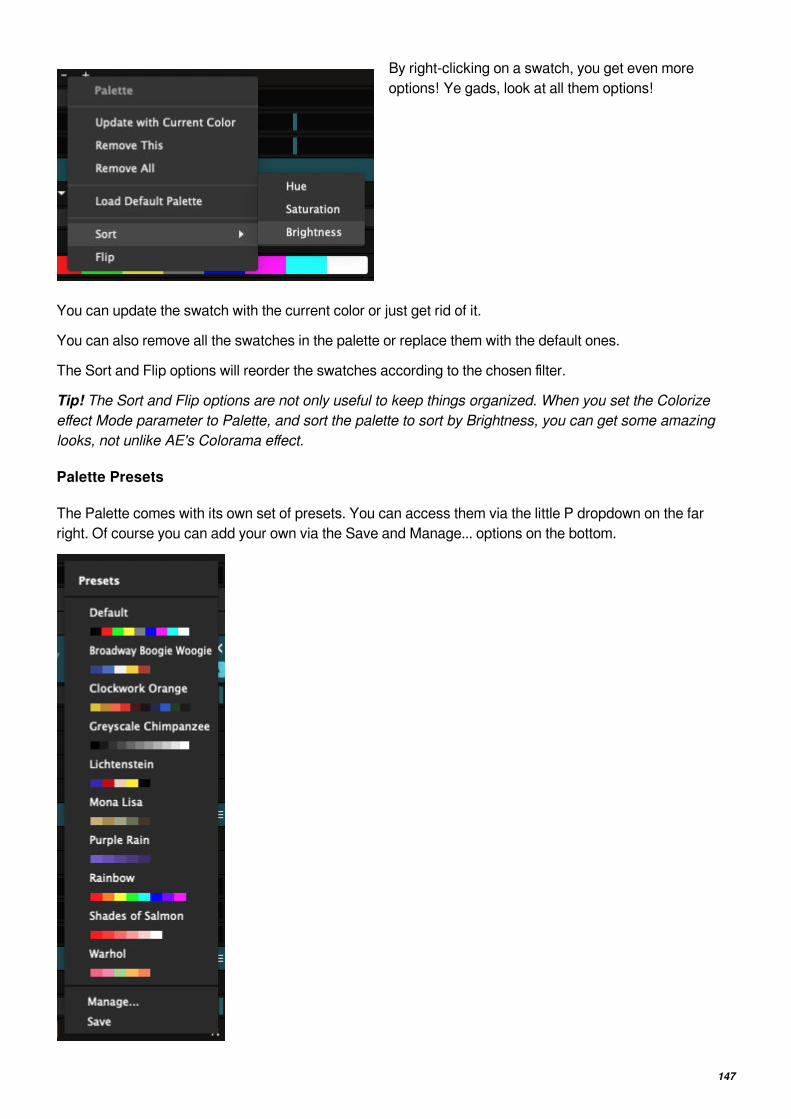
147
By right-clicking on a swatch, you get even more
options! Ye gads, look at all them options!
You can update the swatch with the current color or just get rid of it.
You can also remove all the swatches in the palette or replace them with the default ones.
The Sort and Flip options will reorder the swatches according to the chosen filter.
Tip! The Sort and Flip options are not only useful to keep things organized. When you set the Colorizeeffect Mode parameter to Palette, and sort the palette to sort by Brightness, you can get some amazinglooks, not unlike AE's Colorama effect.
Palette Presets
The Palette comes with its own set of presets. You can access them via the little P dropdown on the far
right. Of course you can add your own via the Save and Manage... options on the bottom.

148
Enabling and Disabling
Does the UI feel cluttered with all those controls? Just click any of the modes to hide them. You can even
click off all of them for the ultimate minimalism.
Need to access them again? They're just one click away.
ControlParameters can be automated in a number of ways. You can read all about this in the section on Parameter
Animation.

149
Parameter AnimationYou have seen how a wide variety of things can be controlled in Resolume by moving parameter sliders,
from the volume of the composition to an individual setting on an effect. You can create amazingly dynamic
looks just by moving a few sliders.
The good news is you don't need to give yourself a repetitive strain injury to achieve this. Instead, you can
set parameters to animate by themselves.
To access these options, click the little grey cogwheel next to the parameter
name. A menu will appear.
The options in the menu will be slightly different depending on whether the parameter you are working with
is for a clip, a layer, a group or the composition. However, they all work in much the same way.
The Dashboard and Envelope get the super special treatment and have their own page.
Timeline
The Timeline option presents you with an interface similar to the timeline you have for videos.
You can play forwards, backwards, control the speed and duration, set in & out points and you have all the
options for looping, pinp-ponging, playing random frames or one-shotting.
Tip! If you need a refresher on all of this, check out the clip transport section.
Duration Changes with In and Out Points
On parameters, duration and in & out points have a special relationship.
By default, when you move the in & out points, the duration will update itself accordingly.

150
However, after setting the duration directly, Resolume will assume you really really want that animation to
last that long. So it will no longer update the duration when you adjust the in & out points.
Should this behavior cramp your style, you can always toggle it via the animation menu. The option you are
looking for is appropriately titled "Duration Changes with In & Out Points" and can be found under
Animation Settings.
Really? "Duration Changes with In & Out Points"? What a mouthful! Is that really the best name you couldcome up with?
Shut up. You're just a voice in my head and my doctor says I shouldn't listen to you.
BPM Sync
Like Timeline, BPM Sync is like the BPM Sync mode on videos.
It works pretty much the same as the timeline mode. The only real difference is that the time is expressed in
beats rather than seconds.
There is one subtle difference though. In BPM Sync mode, changing the in & out points by default won't
update the duration in beats.
Again, if that is not what you want, this behavior can be toggled via the Animation Settings.
DashboardThe dashboard is so special, it's got its own little section in the manual.
Clip PositionThis option is available on clips only.
It lets you sync a parameter to the playhead of the clip. The parameter will run exactly in time with the clip.
You can scrub, skip, change speed, change direction or even beatloop the clip. The parameter will follow
everything.
Audio Analysis

151
Audio analysis enables you to drive parameters directly from the music to
make your visuals dance.
If you are really brave you could also use Audio Analysis to drive audio parameters. Who knows what would
happen?
To activate audio analysis, select one of the FFT options in the control drop-down menu for a parameter:
External FFT
Use the audio device specified in the audio preferences to drive the parameter. This is the one to use if you
want to use a feed from a DJ or band or if you have an external microphone.
You have to select a source if you want to use the external option. This can be done via the audio tab of the
preferences. First choose which Audio Input device you want to use, then select which channel from the list
of its available channels.
I'm going to say that again. Not because I don't think you heard me. But because I just spent 2 minutes not
knowing why it wasn't working myself.
You have to first choose an audio input device in the top right, and then choose which channels you want to
use for external audio FFT in the bottom left.
So first go here:

152
Then go here:
It may feel weird to set this in two places, but it makes sense because FFT is not the only function an audio
input is used for. For instance, on Arena you can also use it for SMPTE input. But yeah, we could at least
put them a bit closer together. Anyway, moving on.
Composition FFT
With this option, whatever audio is playing in the composition will be used to drive the parameter. This

153
option is available on all parameters.
Clip/Layer/Group FFT
With these options, whatever audio is playing in the clip, layer or group will be used to drive the parameter.
Each option is available in its corresponding panel. So Clip FFT is only available on clip parameters, Layer
FFT on layer parameters etc etc.
Using FFT
Once you've selected which input to use, the parameter display will now change to display the Audio
Analysis options.
The first thing you should do is click the small grey arrow to display the full options.
You can now use the L, M and H buttons to select the Low, Middle or High end frequencies to use to drive
the parameter. You can take even finer control of the frequencies used by adjusting the in and out points
below the audio spectrum display.
Use the Gain control to boost the signal until it is having the right amount of effect on the parameter. The
Fall control sets how quickly the value falls back from a peak.
Tip! There's also a master gain in the audio tab of the preferences as well as in the main interface. Toggleit via View > Show Audio Gain, and it becomes visible on the center toolbar.
The buttons on the left enable us to drive the parameter directly from low to high (>), high to low (<) or to
have the audio signal drive the speed the parameter moves at in either direction (- and +).
EnvelopeEnvelopes can be applied on all animations. This is super powerful and explained in greater detail in the
section on Envelopes.
Animate Everything!Thus far, we've only talked about animating sliders. But you can animate all the parameters. Toggles,
events, dropdowns, colors, you name it.
Toggles and Events
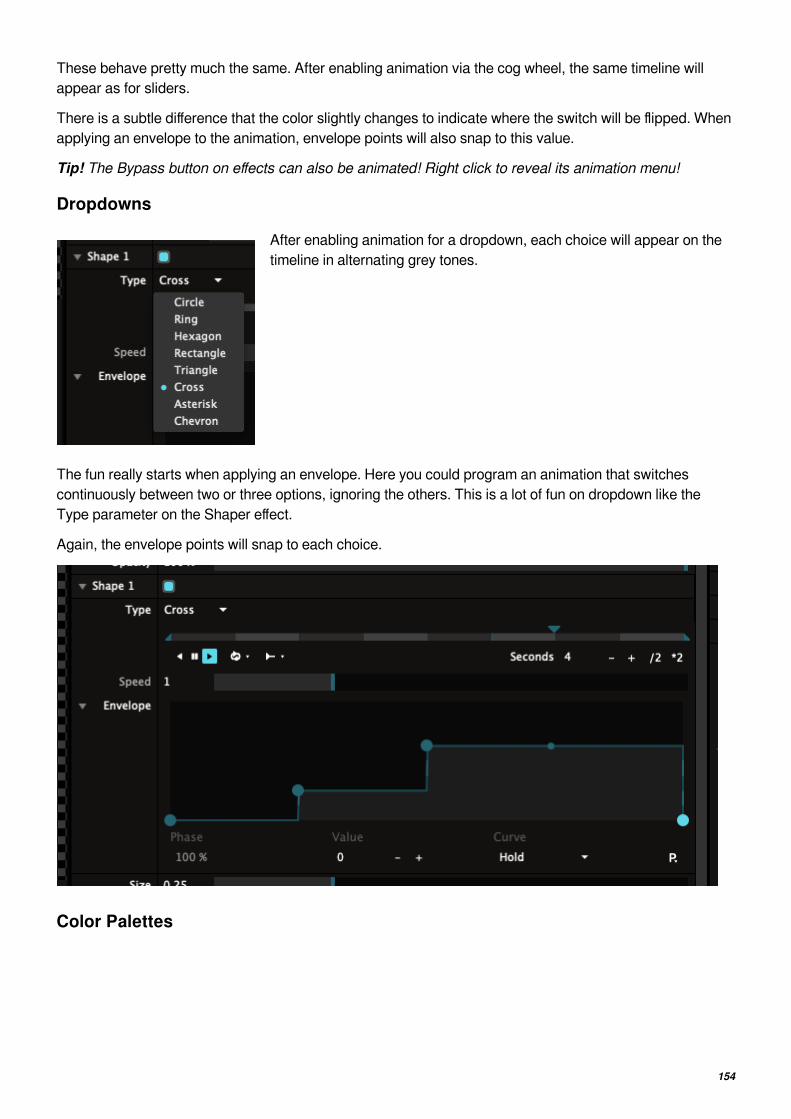
154
These behave pretty much the same. After enabling animation via the cog wheel, the same timeline will
appear as for sliders.
There is a subtle difference that the color slightly changes to indicate where the switch will be flipped. When
applying an envelope to the animation, envelope points will also snap to this value.
Tip! The Bypass button on effects can also be animated! Right click to reveal its animation menu!
Dropdowns
After enabling animation for a dropdown, each choice will appear on the
timeline in alternating grey tones.
The fun really starts when applying an envelope. Here you could program an animation that switches
continuously between two or three options, ignoring the others. This is a lot of fun on dropdown like the
Type parameter on the Shaper effect.
Again, the envelope points will snap to each choice.
Color Palettes

155
This is where Pandora's box really opens.
When enabling animation for a palette, the timeline will cycle through each color. Using the envelope you
can then further refine the selection and order. Bump that cyan to orange on the beat!
Color Interpolation
Want to go completely color crazy? Set the palette to FFT input, enable Color Interpolation for that bad boy
in the Animation Settings and get ready to puke rainbows like the magnificent unicorn you are!
Basic
"Hey Resolume! What's this Basic option when I animate a bypass or dropdown? A weird slider appearsand I don't like weird things!"
Basic mode is essentially the same as for regular sliders. Except instead of controlling the slider value
directly, you use the slider to control the 'phase' of the toggle or the dropdown. So at values lower than 0.5,
the toggle will be off, at values higher than 0.5, the toggle will be on. Same goes for dropdowns, except with
more steps.
If that sounds very technical and nerdy, it's because it is. This behavior is not really new. If you wanted, you
have always been able to control a button with for instance a MIDI fader. This is the same thing. We just
made it explicit so everything works exactly the same and there's no difference between controlling
Resolume via MIDI, OSC or the mouse. This makes you happy and keeps our programmers sane.

156
Keyboard ShortcutsControlling Resolume with the mouse is great. You can access every parameter and set it with precision.
But during a live performance, you'll want to have more control than what the mouse can offer. Sometimes,
you want an exact thing to happen at an exact moment, without having to scroll and search for it with the
mouse. That's where shortcuts come in.
You use shortcuts to assign a button on your computer keyboard or MIDI controller to a control in
Resolume. Sort of like how CTRL-C and CTRL-V are shortcuts for copy-pasting. Except this time, you get
to decide what the shortcuts are.
Resolume supports external control via your computer keyboard, MIDI controllers and OSC messages. If
you're running Arena, you can also use DMX input from a lighting desk.
Assigning Keyboard ShortcutsLet's start with a simple keyboard shortcut. We want the spacebar to be a blackout button. So when we
press spacebar, the whole output should go black. This is useful as a sort of panic button ("oh no, get it off
mah screen!"), or to create tension before a big drop.
You create shortcuts by opening the Shortcuts menu, and choosing which
protocol you want to create a shortcut for. So go to Shortcuts > Edit
Keyboard. The interface will now turn partially blue.
You can also use CTRL-SHIFT-K as a shortcut to enter Shortcut mode. Shortcut-ception!
Toggle
Everything blue can have a shortcut assigned to it. So find the Composition Bypass
button in the top left of the interface and click on it with the mouse. Now press the
spacebar, and voila, you've assigned your first shortcut! If the Bypass button was big
enough, you could even read it had the spacebar assigned to it.
Press the Escape key to exit the Shortcut mode, and you can now bash that spacebar to toggle the
Composition Bypass on and off. On and off. On and off. On and off. Okay. Stop. That's enough.
Piano mode
Let's dig a little deeper. Go back into Keyboard Shortcut mode, and select the Composition Bypass again.
In the bottom right of the interface, you'll see the Shortcuts tab. This tab is only visible while you're in
Shortcuts mode. In this tab, you can see all your keyboard shortcuts in a handy list.
You can also choose different options for your selected control.

157
The Composition Bypass is a very basic control, it
can either be on or off. Still, it has one option,
namely "Piano". All buttons in Resolume can be set
to Piano mode, which means that they will be on for
as long as you hold the key down, and turn off
when you release the key again.
"But Resolume, that's not how a piano works at all!" Yes, you're right. Piano is easy to remember andreminds you that you're playing an instrument. If you prefer, you can call this option Momentary or Flashor whatever floats your boat.
Once you enable Piano mode for a shortcut, you also get the option to Invert. This
will let you turn the control OFF while the button is held, and ON when released.
Range
You can get even further down the rabbit hole when you assign a button shortcut to a slider parameter. Let's
first set up a fun parameter to play with.
Put the Invert RGB effect on a clip. Leave all its parameters alone, but just change the effect's Blend Mode
to TimeSwitcher. You can now strobe the inverted clip, using the Opacity parameter to control the rate.
Pretty cool, right?
Now go into Shortcuts mode, and assign a shortcut to the Opacity of the Invert RGB effect. Let's go with the
']' key.
You will see new options appear in the Shortcuts tab. The biggest one is a big slider called "Range". You're
now assigning a button shortcut to a slider, and a slider has more values than just on and off. With the
Range option, you can see what values the slider should jump to when the button is pressed and released.

158
Let's set the values to 0 and 0.10. You can either drag the in and out point with the mouse, or click the
values and enter them numerically. After you exit Shortcut mode, you can now hit the ] key to strobe the clip
with 10% opacity and off again. Braaaaap!
In this mode, you also have the Piano option. Br-Br-Braaaap!
Value
Instead of just toggling, a button can also be used to set a slider directly to a
specific value. In the shortcuts panel, you can change the Mode from
Toggle to Value. Don't worry, we'll cover Mouse as well. Be patient, young
grasshopper.
In Value mode, you can use the keyboard to set a slider to a specific value. So pressing ] will set the
Opacity of the Invert RGB to 0.10, regardless of what it was set to before. This is great for resetting a
parameter to a certain value.
Multiple Shortcuts
Multiple shortcuts are especially awesome! You can assign more than one shortcut to a parameter. Simply
select the shortcut, right click it and select 'Duplicate Shortcut'.
You will see that ] is now used twice as a shortcut for rotation. By clicking one of them, it becomes selected
and you can change it to whatever you like, just by pressing a different key.
Let's go with [ and ] as the two keys.
Now each shortcut key can have different settings.
Let's set both keys to Toggle Mode, with Piano turned on. Set the range of the first shortcut to 0 and 0.05.
Set the range of the second shortcut to 0 and 0.1. Now you can strobe the invert effect at different rates.
Because they're set to Piano and the minimum range for both shortcuts is 0, releasing any button will
always turn the effect off.

159
Tip! If you're not that big on blinding your audience with epileptic strobing, you can also think of things asusing multiple keys to set the Hue of a Colorize effect to specific values. This way, you can quickly matchthe color of the video to the color of the lights.
Shortcut TargetWhen you assign shortcuts to clip triggers or controls on the layer, clip or group panels, you'll see this target
option. The Target option lets Resolume know exactly how you want to apply the shortcut. There are three
modes:
By Position
This target just applies the shortcut to whatever order the clips or layers are
in. This is the default mode for shortcuts on the layer and group panels.
For instance, shortcuts for Layer Opacity default to By Position. Because you probably always want your
first fader on your MIDI controller to control the first layer in your composition, regardless of how you re-
order the layers afterwards.
This Clip, Layer or Group
This target applies the shortcut to this specific clip, layer or group,
regardless of where you move it.
This way, you can assign a shortcut to always trigger a specific clip, like a color flash. It doesn't matter
whether that clip is in layer 1, column 1 or layer 27, column 95. It will always be triggered by that specific
shortcut.
Beware! When you delete that specific clip, layer or group, of course the shortcut disappears with it!
Selected Clip, Layer or Group
This target applies the shortcut to whatever clip, layer or group is currently
selected. This will always be the clip, layer or group that is currently shown
in its respective panel. This is the default target for any shortcuts you apply
on the clip panel.

160
Wait? What?
"Come on, Resolume! Why you gotta make this so difficult? I just want to set things up and be done withit. Ain't nobody got time for this! Just tell me what to do already!"
If you're unsure about what any of this means, just go with the 'By Position' target for all your shortcuts. It
makes the most sense when working with a fixed controller layout.
The 'Selected' target is very powerful to optimise controller real estate, but you need to be aware of what
you're doing.
The 'This' target is usually only necessary to control a very specific thing on one particular show only.
Shortcut GroupsShortcuts Groups are shortcuts applied to a group of Radio Buttons, or to a Dropdown. Not sure what Radio
Buttons and Dropdowns are exactly? They're explained in detail, with examples, on the Parameter page.
Shortcuts assigned to these type of control are special. A regular control usually has
only two options, On or Off. Shortcut Groups have a lot more.
The Clip Direction controls have four options, Forward, Backward, Pause and Random. The Autopilot has
four also. The Layer Blend Modes have so many options I lost count.
When assigning shortcuts for these controls, you enter a whole new level of sophistication. This is where
you go from someone who mashes buttons to a distinguished shortcut connaisseur.
Direct
The most basic one is assigning a shortcut directly to a particular 'item'. Item sounds a bit strange perhaps.
It simply means you could for instance assign one key to play the clip forwards and another key to play the
clip backwards.
You do this simply by selecting the buttons in the interface, and assigning a key to them. You will see which
state you have assigned in the Mode box.
The same way, you could also assign shortcuts for each Layer Blend Mode that you like, or for the Auto
Size options on the layer.
Piano
Piano is also available as an option when you assign a shortcut directly to an item. When Piano is toggled
on, pressing the shortcut will switch to that item, and releasing it, will switch it back to whatever is was set
to.
This way, you can quickly set the clip to random playback during an especially hectic part in the music, and

161
then release the button to go back to whatever direction it was playing at before.
Next/Previous/Random
It get a bit crazier by using the Select Next Item, Select Previous Item and Random Item options. By
selecting these, you can cycle through every item in that group of controls.
This way, you can for instance cycle through all the layer Blend Modes. You just keep on pressing the same
button until you land on one you like.
Cycling Specific Items
If you really want to get to the nitty gritty of shortcut control, try duplicating the shortcut, and then assigning
it to a different item in a group.
For instance, assigning the same key to both play forwards and play backwards, will let you toggle between
these options with one button. Back and forth. Back and forth. Back and forth. If you really want to go full
control ninja, you can even use Piano in combination with this.
You can assign as many items to the same key as you like. Resolume will cycle to the next assigned item on
every key press.
Keyboard Specific ModesThere is one specific mode that is only available for keyboard shortcuts. It's called Mouse, and I know that
sounds weird, but it's pretty awesome.
Mouse Mode
In Mouse mode, you can use the mouse to control a parameter while you have the shortcut pressed.
For instance, you can assign the P key to a clip's Position X. Switch to Mouse mode and set the range to
-960 and 960, or whatever your composition size is.
When you now press the P key, horizontal mouse movements control the clip's horizontal position.
I bet you know where this is going now, right?
Assign the P key to Position Y also. Switch to Mouse mode, but now switch to Vertical. Set the range to
-540 and 540, assuming you have a 1920x1080 comp.
Now holding the P key will give you full control of the clip's position. Releasing the P key will freeze the clip
where it is and let you use the mouse for pointing and clicking again.
Shortcut PresetsYou can save presets for every shortcut mode. This allows you to save and recall different layout and
shortcut assignment for different occasions.

162
For instance, if you're a gear head, you can have different presets for each controller you own. A normal
person could have have different layouts for the same controller, so you can play different styles of shows
with it. Or you could have a separate preset for that one AV show you do with your musician buddy. The sky
is pretty much the limit.
Every shortcut you assign is automatically saved into the current preset. You can switch presets via the
dropdown in the Shortcuts panel. Here you can also manage your presets via the New.../Saveas.../Remove and Rename... options at the bottom of the list.
Presets are simply XML files stored on your computer. So you can exchange presets between computers,
or share them with your VJ friends. Or share them with other Resolume users on our forum.
Once selected, you will see a list of all assigned shortcuts for this preset.

163
This list contains each and every shortcut you currently have assigned, so it's very useful to troubleshoot
things. If you're a bit of a nerd, you can probably already see what a shortcut is controlling, just by looking at
its name.
By default, the list is organised per shortcut name. You can also sort it per value, which makes it really easy
to spot double assigned shortcuts. These will be marked in red.
You can delete a unwanted shortcut by hitting backspace or selecting Delete from the right-click menu. Bad

164
shortcut. Bad.
DefaultResolume ships with a default shortcuts layout that we think is kind of useful. Of course you're free to
modify it how you see fit, or completely ignore it. Resolume is freedom.
Peep the shortcuts here, yo.

165
MIDI ShortcutsControlling Resolume with the mouse is great. You can access every parameter and set it with precision.
But during a live performance, you'll want to have more control than what the mouse can offer. Sometimes,
you want an exact thing to happen at an exact moment, without having to scroll and search for it with the
mouse. That's where shortcuts come in.
You use shortcuts to assign a button on your computer keyboard or MIDI controller to a control in
Resolume. Sort of like how CTRL-C and CTRL-V are shortcuts for copy-pasting. Except this time, you get
to decide what the shortcuts are.
Resolume supports external control via your computer keyboard, MIDI controllers and OSC messages. If
you're running Arena, you can also use DMX input from a lighting desk.
In this chapter, we'll show you how to control Resolume with a MIDI controller.
Assigning MIDI ShortcutsYou can assign shortcuts for your MIDI controller in exactly the same way as you do for your keyboard.
The only difference is you need to let Resolume know you've got a MIDI
controller connected first. You do this via the MIDI tab of the Preferences.
For now, all you need to do here is toggle on MIDI Input and MIDI Output for the device you want to use.
That's it. We'll worry about the rest later.
Tip! Not sure if your MIDI controller is working or not? Fold out the MIDI monitor on the right of the MIDIPreferences. Resolume will show you all the MIDI messages it's receiving from all enabled controllers. Ifyou're seeing messages come in here, but Resolume is not doing anything with them, something is wrongwith your shortcut setup. If nothing is showing up here, something is wrong with your MIDI controller.

166
Let's start with a simple shortcut. We want a shortcut for the blackout button. So when we use that shortcut,
the whole output should go black. This is useful as a sort of panic button ("oh no, get it off mah screen!"), or
to create tension before a big drop.
You create shortcuts by opening the Shortcuts menu, and choosing which
protocol you want to create a shortcut for.
The interface will now change color. For MIDI shortcuts, we went with a nice pastelly cyan.
Toggle
Everything that has changed color can have a shortcut assigned to it. So find the
Composition Bypass button in the top left of the interface and click on it with the mouse.
Now press the control you want to use for this. I suggest to use a button that's easy to find on your
controller. Ideally you can find it without looking down. Maybe something on the corners of your controller?
Either way, press the button and voila, you've assigned your first shortcut! If the Bypass button was big
enough, you could even read which shortcut was assigned to it.
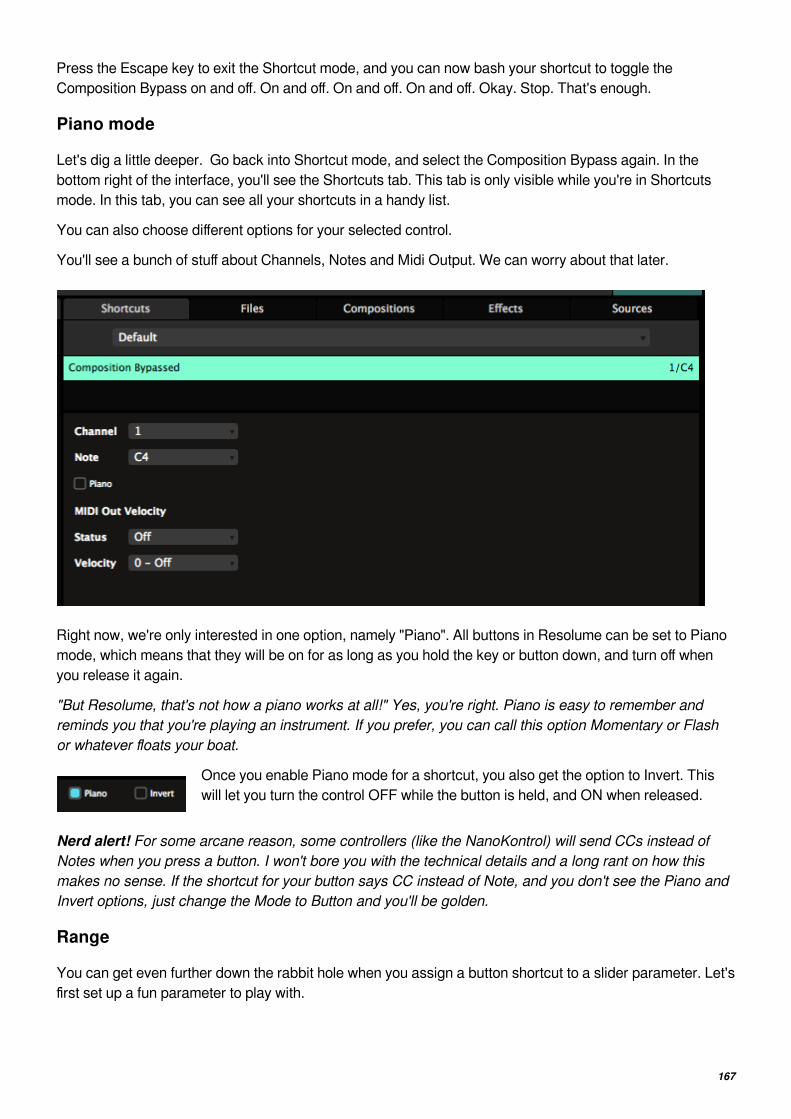
167
Press the Escape key to exit the Shortcut mode, and you can now bash your shortcut to toggle the
Composition Bypass on and off. On and off. On and off. On and off. Okay. Stop. That's enough.
Piano mode
Let's dig a little deeper. Go back into Shortcut mode, and select the Composition Bypass again. In the
bottom right of the interface, you'll see the Shortcuts tab. This tab is only visible while you're in Shortcuts
mode. In this tab, you can see all your shortcuts in a handy list.
You can also choose different options for your selected control.
You'll see a bunch of stuff about Channels, Notes and Midi Output. We can worry about that later.
Right now, we're only interested in one option, namely "Piano". All buttons in Resolume can be set to Piano
mode, which means that they will be on for as long as you hold the key or button down, and turn off when
you release it again.
"But Resolume, that's not how a piano works at all!" Yes, you're right. Piano is easy to remember andreminds you that you're playing an instrument. If you prefer, you can call this option Momentary or Flashor whatever floats your boat.
Once you enable Piano mode for a shortcut, you also get the option to Invert. This
will let you turn the control OFF while the button is held, and ON when released.
Nerd alert! For some arcane reason, some controllers (like the NanoKontrol) will send CCs instead ofNotes when you press a button. I won't bore you with the technical details and a long rant on how thismakes no sense. If the shortcut for your button says CC instead of Note, and you don't see the Piano andInvert options, just change the Mode to Button and you'll be golden.
Range
You can get even further down the rabbit hole when you assign a button shortcut to a slider parameter. Let's
first set up a fun parameter to play with.

168
Put the Invert RGB effect on a clip. Leave all its parameters alone, but just change the effect's Blend Mode
to TimeSwitcher. You can now strobe the inverted clip, using the Opacity parameter to control the rate.
Pretty cool, right?
Now go into Shortcuts mode, and assign a shortcut to the Opacity of the Invert RGB effect. Pick a button on
your controller that makes sense to you.
You will see new options appear in the Shortcuts tab. The biggest one is a big slider called "Range". You're
now assigning a button shortcut to a slider, and a slider has more values than just on and off. With the
Range option, you can see what values the slider should jump to when the button is pressed and released.
Let's set the values to 0 and 0.10. You can either drag the in and out point with the mouse, or click the
values and enter them numerically. After you exit Shortcut mode, you can now hit the ] key to strobe the clip
with 10% opacity and off again. Braaaaap!
In this mode, you also have the Piano option. Br-Br-Braaaap!
Value

169
Instead of just toggling, a button can also be used to set a slider directly to
a specific value. In the shortcuts panel, you can change the Mode from
Toggle to Value. Don't worry, we'll cover Velocity as well. Be patient, young
grasshopper.
In Value mode, you can use your controller to set a slider to a specific value. So pressing the button will set
the Opacity of the Invert RGB to 0.10, regardless of what it was set to before. This is great for resetting a
parameter to a certain value.
Multiple Shortcuts
Multiple shortcuts are especially awesome! You can assign more than one shortcut to a parameter. Simply
select the shortcut, right click it and select 'Duplicate Shortcut'.
You will see that your shortcut is now used twice. By clicking one of them, it becomes selected and you can
change it to whatever you like, just by pressing a different button.
Now each shortcut key can have different settings.
Let's set both keys to Toggle Mode, with Piano turned on. Set the range of the first shortcut to 0 and 0.05.
Set the range of the second shortcut to 0 and 0.1. Now you can strobe the invert effect at different rates.
Because they're set to Piano and the minimum range for both shortcuts is 0, releasing any button will
always turn the effect off.
Tip! If you're not that big on blinding your audience with epileptic strobing, you can also think of things asusing multiple shortcuts to set the Hue of a Colorize effect to specific values. This way, you can quickly

170
match the color of the video to the color of the lights.
Shortcut TargetWhen you assign shortcuts to clip triggers or controls on the layer, clip or group panels, you'll see this target
option. The Target option lets Resolume know exactly how you want to apply the shortcut. There are three
modes:
By Position
This target just applies the shortcut to whatever order the clips or layers are
in. This is the default mode for shortcuts on the layer and group panels.
For instance, shortcuts for Layer Opacity default to By Position. Because you probably always want your
first fader on your MIDI controller to control the first layer in your composition, regardless of how you re-
order the layers afterwards.
This Clip, Layer or Group
This target applies the shortcut to this specific clip, layer or group,
regardless of where you move it.
This way, you can assign a shortcut to always trigger a specific clip, like a color flash. It doesn't matter
whether that clip is in layer 1, column 1 or layer 27, column 95. It will always be triggered by that specific
shortcut.
Beware! When you delete that specific clip, layer or group, of course the shortcut disappears with it!
Selected Clip, Layer or Group
This target applies the shortcut to whatever clip, layer or group is currently
selected. This will always be the clip, layer or group that is currently shown
in its respective panel. This is the default target for any shortcuts you apply
on the clip panel.
Wait? What?
"Come on, Resolume! Why you gotta make this so difficult? I just want to set things up and be done withit. Ain't nobody got time for this! Just tell me what to do already!"
If you're unsure about what any of this means, just go with the 'By Position' target for all your shortcuts. It
makes the most sense when working with a fixed controller layout.
The 'Selected' target is very powerful to optimise controller real estate, but you need to be aware of what
you're doing.

171
The 'This' target is usually only necessary to control a very specific thing on one particular show only.
Shortcut GroupsShortcut Groups are shortcuts applied to a group of Radio Buttons, or to a Dropdown. Not sure what Radio
Buttons and Dropdowns are exactly? They're explained in detail, with examples, on the Parameter page.
Shortcuts assigned to these type of control are special. A regular control usually has only two options, On or
Off. These controls have a lot more.
The Clip Direction controls have four options, Forward, Backward, Pause and Random. The Autopilot has
four also. The Layer Blend Modes have so many options I lost count.
When assigning shortcuts for these controls, you enter a whole new level of sophistication. This is where
you go from someone who mashes buttons to a distinguished shortcut connaisseur.
Direct
The most basic one is assigning a shortcut directly to a particular 'item'. Item sounds a bit strange perhaps.
It simply means you could for instance assign one key to play the clip forwards and another key to play the
clip backwards.
You do this simply by selecting the buttons in the interface, and assigning a key to them. You will see which
state you have assigned in the Mode box.
The same way, you could also assign shortcuts for each Layer Blend Mode that you like, or for the Auto
Size options on the layer.
Piano
Piano is also available as an option when you assign a shortcut directly to an item. When Piano is toggled
on, pressing the shortcut will switch to that item, and releasing it, will switch it back to whatever is was set
to.
This way, you can quickly set the clip to random playback during an especially hectic part in the music, and
then release the button to go back to whatever direction it was playing at before.
Next/Previous/Random
It get a bit crazier by using the Select Next Item, Select Previous Item and Random Item options. By
selecting these, you can cycle through every item in that group of controls.
This way, you can for instance cycle through all the layer Blend Modes. You just keep on pressing the same

172
button until you land on one you like.
Cycling Specific Items
If you really want to get to the nitty gritty of shortcut control, try duplicating your shortcut, and then assigning
it to a different item in a group.
For instance, assigning the same key to both play forwards and play backwards, will let you toggle between
these options with one button. Back and forth. Back and forth. Back and forth. If you really want to go full
control ninja, you can even use Piano in combination with this.
You can assign as many items to the same key as you like. Resolume will cycle to the next assigned item on
every key press.
Using CCs
You can also assign MIDI CC shortcuts to a group. This will let you cycle through every option in the group.
In most cases, this is not so very useful, but it can be fun to cycle through all the layer blends with a rotary.
You can find a special Shortcut Group in front of the clip triggers.
It's revealed when you enter MIDI shortcut mode. When you
assign a shortcut to it, you can trigger all the clips in that layer with
a single control. Assigning a MIDI CC will let you trigger clip 1
through 128 by sending different values on that same CC.
Tip! This works on columns too.
MIDI Specific ModesWhen you're assigning shortcuts for use with a MIDI controller, you get access to a few special modes as
well. Which modes are available depends on whether you're assigning a MIDI Note message or a MIDI
Control Change (CC) message.
Tip! Every MIDI Message allows you to change its Channel and CC or Note values. If you know whatyou're doing, you can use these to manually change the MIDI message associated with the shortcut. Ifyou're just assigning shortcuts for your controller, you don't have to worry about this.
MIDI CC Options
MIDI Control Change sounds very impressive, but it's basically just used for sending values between 0 and
127 from a fader or rotary knob. When assigning a MIDI CC shortcut, your options are Absolute, Button,
Relative and Fake Relative.
Absolute
Absolute is pretty straightforward. It just lets you control the range of the parameter with the range of your
fader or rotary knob. This is the mode you'll want to use on most standard MIDI controllers.

173
For instance, using Absolute mode, you can assign a MIDI fader to the Opacity of a layer. Pushing the fader
up makes the layer fully visible. Pushing the fader down makes the layer invisible. Yes, I'm actually
explaining this to you. I'm nothing if not thorough.
If you want, you can Invert this behaviour, or set a specific Range.
Button
Button is a bit weird.
Some MIDI controllers, like for instance the Korg NanoKontrol series, can send out CCs when you press a
button. This makes very little sense from a logical perspective, but I'm sure they have their reasons.
Using Button mode, you can tell Resolume that this CC is actually being sent by a button. This way,
Resolume no longer thinks you're moving a fader, and you get access to all the cool button specific modes
like Toggle and Value.
Relative
Some rotary knobs don't send out fixed values
between 0 on their left side and 127 on their right
side. Instead of coming to a stop on each end, you
can twist them endlessly in both directions, and they
will keep sending out different values. For instance,
the APC40 MK1 has a relative rotary above the
master fader. The MK2 even has two, the second one is placed on the top right next to the Tap button.
This is very useful for setting parameters with a big range that you need to set precisely, like Position X or
Y, adjusting the BPM. You can also do fun things like scratching the playhead with these type of knobs.
If your controller has a rotary like this, you'll want to use Relative mode for it.
In Relative mode, you can change the responsiveness of the rotary by changing the amount of Steps the
rotary controls, or its Step Size for each turn of the knob. These controls are dependent on each other, so
changing one will update the other. Basically, a higher Step Size will mean fewer Steps, and a bigger
change in value when you turn the knob. A lower Step Size means more steps and a smaller change in
value.
Toggling on Loop will cause the parameter to loop back to the beginning when it reaches the end, so you
can keep on spinning forever. Also, you can Invert the shortcut.
Fake Relative
Fake Relative is not some shady figure claiming to be your uncle at parties.
Some controllers have rotary knobs that you can spin endlessly, but that aren't actually relative rotaries.
Instead, they send out regular values between 0 at the far left and 127 on the far right and you're supposed
to use them like a regular, Absolute rotary.
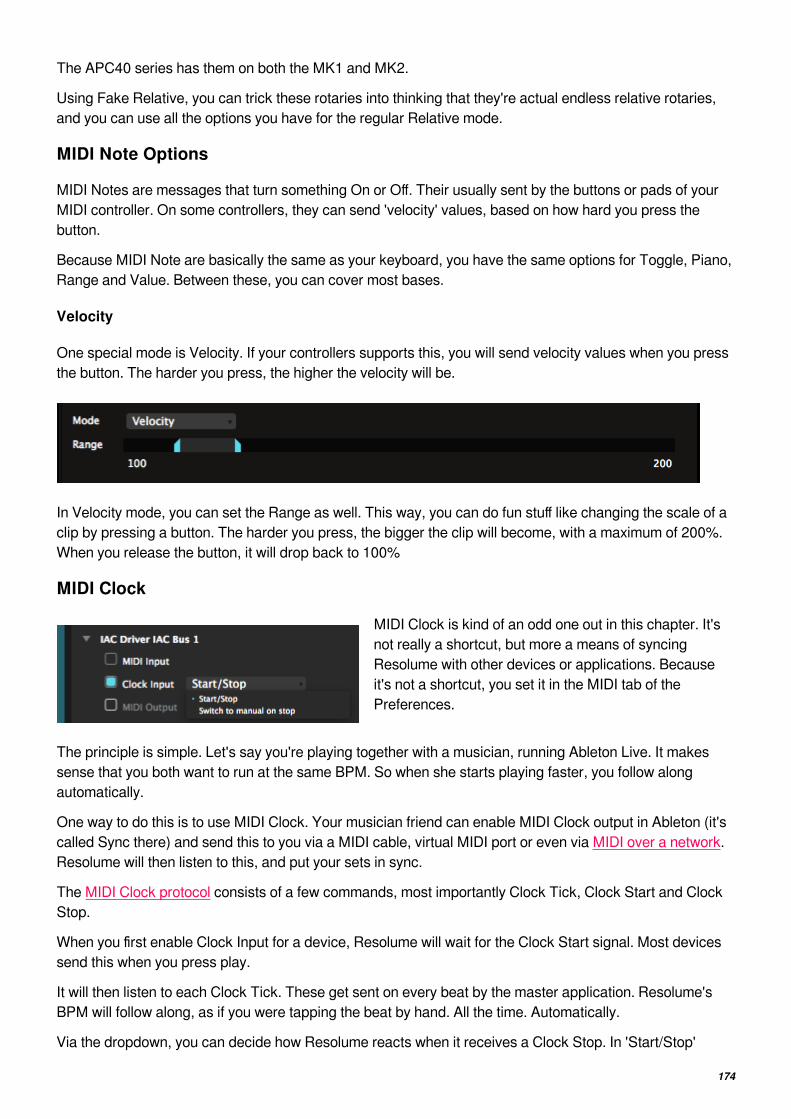
174
The APC40 series has them on both the MK1 and MK2.
Using Fake Relative, you can trick these rotaries into thinking that they're actual endless relative rotaries,
and you can use all the options you have for the regular Relative mode.
MIDI Note Options
MIDI Notes are messages that turn something On or Off. Their usually sent by the buttons or pads of your
MIDI controller. On some controllers, they can send 'velocity' values, based on how hard you press the
button.
Because MIDI Note are basically the same as your keyboard, you have the same options for Toggle, Piano,
Range and Value. Between these, you can cover most bases.
Velocity
One special mode is Velocity. If your controllers supports this, you will send velocity values when you press
the button. The harder you press, the higher the velocity will be.
In Velocity mode, you can set the Range as well. This way, you can do fun stuff like changing the scale of a
clip by pressing a button. The harder you press, the bigger the clip will become, with a maximum of 200%.
When you release the button, it will drop back to 100%
MIDI Clock
MIDI Clock is kind of an odd one out in this chapter. It's
not really a shortcut, but more a means of syncing
Resolume with other devices or applications. Because
it's not a shortcut, you set it in the MIDI tab of the
Preferences.
The principle is simple. Let's say you're playing together with a musician, running Ableton Live. It makes
sense that you both want to run at the same BPM. So when she starts playing faster, you follow along
automatically.
One way to do this is to use MIDI Clock. Your musician friend can enable MIDI Clock output in Ableton (it's
called Sync there) and send this to you via a MIDI cable, virtual MIDI port or even via MIDI over a network.
Resolume will then listen to this, and put your sets in sync.
The MIDI Clock protocol consists of a few commands, most importantly Clock Tick, Clock Start and Clock
Stop.
When you first enable Clock Input for a device, Resolume will wait for the Clock Start signal. Most devices
send this when you press play.
It will then listen to each Clock Tick. These get sent on every beat by the master application. Resolume's
BPM will follow along, as if you were tapping the beat by hand. All the time. Automatically.
Via the dropdown, you can decide how Resolume reacts when it receives a Clock Stop. In 'Start/Stop'

175
mode, Resolume will stop the BPM when the master stops. In 'Switch to Manual' mode, it will continue
running, even when the master has told it to stop.
Tip! MIDI Clock was great in 1996. It's notoriously wavy and not really accurate. Today, Ableton's Linkprotocol gives a much tighter sync, and is way easier to set up.
MIDI OutDo you like pretty colors on your MIDI controller? Of course you do. So this is where the fun begins.
A lot of modern MIDI controllers have colored pads. By changing the velocity value you send to the
controller, you change the color of the pad.
Tip! We have lookup tables for most controllers, so you can select the color of the pad by picking a color,instead of having to figure out what velocity is which color. On the APC40Mk2, we even have previewswatches!

176

177
For a simple Toggle or Value shortcut, you can set which velocity to send for the Off and On states.
For Clip Trigger shortcuts, the party really gets started. As it turns out, a clip in Resolume can have a
whopping 5 states. So you can choose which color to send out for each state.
Multiple MIDI DevicesLet's say you're really into hardware and have more than one MIDI controller. Maybe you're using two Korg
Nanopads for extra triggers. Maybe you're a baller and you have two APC40s decked out. Maybe you get
really deep into knob twiddling and have four color coded Consipracies. The reason doesn't really matter.
You have your kinks and that's cool.
Resolume is able to discern which device a MIDI message came from. This means you can control different
things from each device, even when the devices are sending the same MIDI message on the same channel.
There's no need for Bomes or editors to change channels or anything.
So let's say you have two APC40s connected. You can assign shortcuts to
trigger different clips using the same button on each APC. Resolume will
see which one you pressed and trigger the appropriate clip.
Nitty Gritty Warning! We make the distinction by marking one APC as the first and the other one as thesecond, based on the order they are detected. Not by any real difference in the actual device. So don'tpaint a big 1 and 2 on your devices and expect Resolume to follow that. If you change the order next timethe devices are connected, and the second APC is detected first, the shortcuts will be swapped.
This also works for devices from different brands that share the same channel or notes. Your Launchpad XL
can exist peacefully next to your Traktor F1, even though they both send the same range of notes.
Yaaaas queen.
If you're so inclined, you can still enable input from Any Device. This means Resolume won't make any
distinctions and treat all devices as equal. Marx would be proud.
MIDI Output

178
The same goes for MIDI Output. When creating a MIDI
shortcut on a specific device, Resolume will default to only
send feedback to that device. This way, you're sure that
pressing a button on one controller doesn't mess with the
colors on another.
If you like, you can change the routing via the Output dropdown. You can send the feedback to a particular
different device. You can even send feedback to All Devices, which can be useful for monitoring in more
complex setups.
You also have the option to completely disable MIDI output for a particular shortcut, which is particularly
useful when using multiple shortcuts for the same function, or more complex control situations.
Tip! When Input Device and Output Device are set to the same device, Resolume will change the Outputfor you automatically when you switch Input. Some devices have the bad habit of using different names fortheir Input and Output ports. In those cases, you're on your own.
Shortcut PresetsYou can save presets for every shortcut mode. This allows you to save and recall different layout and
shortcut assignment for different occasions.
For instance, if you're a gear head, you can have different presets for each controller you own. A normal
person could have have different layouts for the same controller, so you can play different styles of shows
with it. Or you could have a separate preset for that one AV show you do with your musician buddy. The sky
is pretty much the limit.
Every shortcut you assign is automatically saved into the current preset. You can switch presets via the
dropdown in the Shortcuts panel. Here you can also manage your presets via the New.../Saveas.../Remove and Rename... options at the bottom of the list.
Presets are simply XML files stored on your computer. So you can exchange presets between computers,

179
or share them with your VJ friends. Or share them with other Resolume users on our forum.
Once selected, you will see a list of all assigned shortcuts for this preset.
This list contains each and every shortcut you currently have assigned, so it's very useful to troubleshoot
things. If you're a bit of a nerd, you can probably already see what a shortcut is controlling, just by looking at
its name.

180
By default, the list is organised per shortcut name. You can also sort it per value, which makes it really easy
to spot double assigned shortcuts. These will be marked in red.
You can delete a unwanted shortcut by hitting backspace or selecting Delete from the right-click menu. Bad
shortcut. Bad.
DefaultResolume ships with a few default shortcut layouts that we think are kind of useful. Of course you're free to
modify them how you see fit, or completely ignore them. Resolume is freedom.
Peep the shortcuts for the APC40Mk2, the APC Mini and the NanoKontrol 2. Yo.

181
DMX ShortcutsControlling Resolume with the mouse is great. You can access every parameter and set it with precision.
But during a live performance, you'll want to have more control than what the mouse can offer. Sometimes,
you want an exact thing to happen at an exact moment, without having to scroll and search for it with the
mouse. That's where shortcuts come in.
You use shortcuts to assign a button on your computer keyboard or MIDI controller to a control in
Resolume. Sort of like how CTRL-C and CTRL-V are shortcuts for copy-pasting. Except this time, you get
to decide what the shortcuts are.
Resolume supports external control via your computer keyboard, MIDI controllers and OSC messages. If
you're running Arena, you can also use DMX input from a lighting desk.
In this chapter, we'll show you how to control Resolume from a lighting desk.
Setting Up DMX InputYou can assign DMX shortcuts exactly the same way as you do for your keyboard or a MIDI controller.
The only difference is you'll use Art-Net instead of MIDI, so you'll need to let Resolume know you're sending
Art-Net to it first. You do this via the DMX tab of the Preferences.
"But Resolume, my desk doesn't support Art-Net. Can't I just send regular DMX?"
Well, I'm pretty sure your computer doesn't have a DMX port either, so if you're sending analog DMX, you're
going to need to convert it to digital one way or another. Instead of mucking about with USB dongles that all
work differently, find yourself a nice little DMX to Art-Net box, and you'll be golden.
"You know you just said 'analog Digtal MultipleX', right?"
Ehm. Yes. That's pretty silly.
To be honest, I had no idea what the abbreviation stood for, and I mistakenly thought that if you send it
along a cable which needs a terminator to avoid reflections, the source is also analog. In my defense, I'm a
video guy and when you say "terminator", I only think of sending a robot back in time to prevent an uprising
in the future, thereby causing a time paradox which results in that very same uprising and a series of
increasingly disappointing sequels.
The point I was trying to make was that if you're sending DMX with a 5 or 3 pin XLR cable, you can't plug
that into your computer anyway. You'll always need a box using a protocol to convert it to something that
your computer can understand. We think that Art-Net over ethernet is the more reliable and future proof
option. Can we get on with it now?
Tip! If configuring Art-Net is completely new to you, there's some nitty gritty technical stuff about IPs,subnet masks and interface adapters below. If you're familiar with configuring Art-Net and all that stuff, justread on for the Resolume side of things.

182
Create a
new DMX
input via
the New
Input
button in
the bottom.
Subnet / UniverseThis will create your first Lumiverse. You can assign which Subnet/Universe Resolume should start
listening for Art-Net. It will default to Subnet/Universe 0:0, which is the first available universe. If you know
which Subnet/Universe your desk is sending on, you can set Resolume to that here. Otherwise, you can set
up your desk to send Art-Net on the same Subnet/Universe.
Tip! After creating a new input, Resolume will let all nodes on the network know that it has an inputavailable. So if your desk supports Artpoll, it should pop right up.
If you need more than 512 channels, you can create another Lumiverse via New Input. And another. And
another. And another. And another. And another. Holy crap, what do you need so many controls for?

183
"Lumiverse? Excuse me? Don't you know it's called Universe? Oh ma gaah, these video guys don't knowanything!"
Yes, you're right. Lumiverses exist only inside Resolume, hence the name Lumi-verse. You use them to
create virtual inputs and configure your signal flow, before you actually connect to any Art-Net nodes. And
when the node is disconnected, your shortcuts don't disappear with it. Also, should you want to switch
Subnet/Universe settings during setup, you'll have to do that only once for each Lumiverse, instead of
updating 512 different shortcuts.
Channel Offset
If you need to offset your first channel because you programmed other fixtures on the same universe, you
can do that using the Channel Offset.
Assigning DMX ShortcutsLet's start with a simple shortcut. We want a flash blackout button. So
when we press that button, the whole output should go black. This is
useful as a sort of panic button ("oh no, get it off mah screen!"), or to
create tension before a big drop.
You create shortcuts by opening the Shortcuts menu, and choosing which protocol you want to create a
shortcut for. The interface will now change color. For DMX shortcuts, we went with a nice pastelly yellow.
Basic Shortcuts
Everything yellow can have a shortcut assigned to it. So find the
Composition Bypass button in the top left of the interface and click
on it with the mouse.
Now you can either use DMX Learn and press the flash button on your desk that you want to use. Press the
button and voila, you've assigned your first shortcut! If the Bypass button was big enough, you could even
read which shortcut was assigned to it.
Personally, I prefer assigning channels manually. Right click on the Bypass button and choose "Create
DMX Shortcut". Resolume will automatically assign the next available channel to this button.
Either way, now press the Escape key to exit the Shortcut mode, and you can now bash your shortcut to
toggle the Composition Bypass on and off. On and off. On and off. On and off. Okay. Stop. That's enough.
Options

184
Let's dig a little deeper. Go back into Shortcut
mode. In the bottom right of the interface, you'll see
the Shortcuts tab. This tab is only visible while you're
in Shortcuts mode. In this tab, you can see all your
shortcuts in a handy list.
At the bottom of the panel, you can choose different options for your selected shortcut.
You can invert the incoming value. Also you can let Resolume know you would like to have 16 bit control
over this channel.
If you like, you can set the channel manually. If you're using more than one Lumiverse, you can change
which Lumiverse this shortcut belongs in.
With the Range you can limit the minimum and maximum value a parameter can become when sending
DMX values. For instance when you set the range of Scale from 100% to 200% it will only scale from 100%
to 200%.
Shortcut TargetWhen you assign shortcuts to clip triggers or controls on the layer, clip or group panels, you'll see this target
option. The Target option lets Resolume know exactly how you want to apply the shortcut. There are three
modes:
By Position
This target just applies the shortcut to whatever order the clips or layers are
in. This is the default mode for shortcuts on the layer and group panels.

185
For instance, shortcuts for Layer Opacity default to By Position. Because you probably always want your
first fader to control the first layer in your composition, regardless of how you re-order the layers afterwards.
This Clip, Layer or Group
This target applies the shortcut to this specific clip, layer or group,
regardless of where you move it.
This way, you can assign a shortcut to always trigger a specific clip, like a color flash. It doesn't matter
whether that clip is in layer 1, column 1 or layer 27, column 95. It will always be triggered by that specific
shortcut.
Beware! When you delete that specific clip, layer or group, of course the shortcut disappears with it!
Selected Clip, Layer or Group
This target applies the shortcut to whatever clip, layer or group is currently
selected. This will always be the clip, layer or group that is currently shown
in its respective panel. This is the default target for any shortcuts you apply
on the clip panel.
Wait? What?
"Come on, Resolume! Why you gotta make this so difficult? I just want to set things up and be done withit. Ain't nobody got time for this! Just tell me what to do already!"
If you're unsure about what any of this means, just go with the 'By Position' target for all your shortcuts. It
makes the most sense when working with a fixed controller layout.
The 'Selected' target is very powerful to optimise controller real estate, but you need to be aware of what
you're doing.
The 'This' target is usually only necessary to control a very specific thing on one particular show only.
Shortcut GroupsShortcuts Groups are shortcuts applied to a group of Radio Buttons, or to a Dropdown. Not sure what Radio
Buttons and Dropdowns are exactly? They're explained in detail, with examples, on the Parameter page.
Shortcuts assigned to these type of control are special. A regular control usually has only two options, On or
Off. Shortcut Groups have a lot more.
The Clip Direction controls have four options, Forward, Backward, Pause and Random. The Autopilot has
four also. The Layer Blend Modes have so many options I lost count.
When assigning a DMX channel to a Shortcut Group, Resolume will distribute the values over the group. So
if the group has four options, like Clip Direction, value 1-63 will set the clip to play backward, 64-128 will be
forward, 128-191 will be pause and 191-255 will be random.

186
Clip Trigger
You can find a special Shortcut Group in front of the clip triggers. It's
revealed when you enter DMX shortcut mode. When you assign a
shortcut to it, you can trigger all the clips in that layer with a single
control. Assigning a DMX channel will let you trigger clip 1 through 255
by sending different values on that same channel.
Tip! This works on columns too.
Shortcut PresetsYou can save presets for every shortcut mode. This allows you to save and recall different layout and
shortcut assignment for different occasions.
For instance, if you're a gear head, you can have different presets for each controller you own. A normal
person could have have different layouts for the same controller, so you can play different styles of shows
with it. Or you could have a separate preset for that one AV show you do with your musician buddy. The sky
is pretty much the limit.
Every shortcut you assign is automatically saved into the current preset. You can switch presets via the
dropdown in the Shortcuts panel. Here you can also manage your presets via the New.../Saveas.../Remove and Rename... options at the bottom of the list.
Presets are simply XML files stored on your computer. So you can exchange presets between computers,
or share them with your VJ friends. Or share them with other Resolume users on our forum.
Once selected, you will see a list of all assigned shortcuts for this preset.
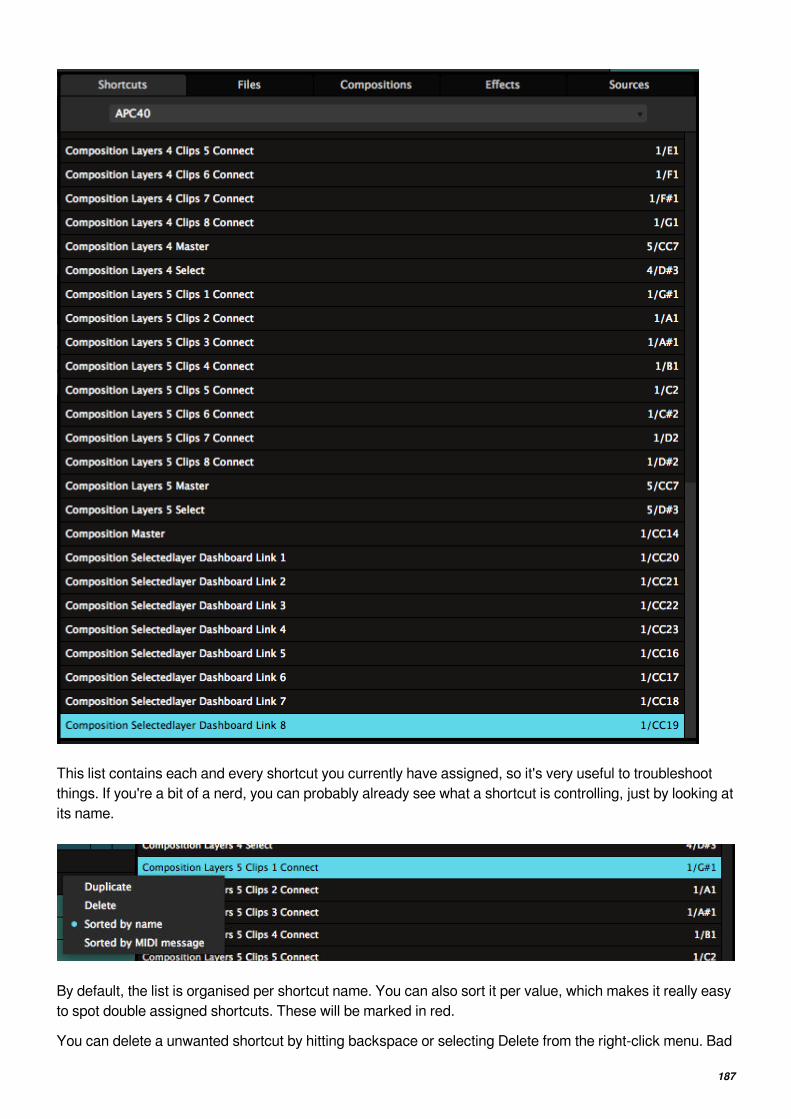
187
This list contains each and every shortcut you currently have assigned, so it's very useful to troubleshoot
things. If you're a bit of a nerd, you can probably already see what a shortcut is controlling, just by looking at
its name.
By default, the list is organised per shortcut name. You can also sort it per value, which makes it really easy
to spot double assigned shortcuts. These will be marked in red.
You can delete a unwanted shortcut by hitting backspace or selecting Delete from the right-click menu. Bad

188
shortcut. Bad.
Where's the Auto-Map Preset?
"Resolume! What happened to the Auto-Map? I can't find it anywhere!"
We took it out. Half of the stuff that was in the Auto-Map was pretty much useless. Who needs control over
Anchor Y? At 8 bit resolution?
Because a Resolume composition is highly configurable, you can't really rely solely on the Auto-Map. You
already missed out on good stuff like effects and BPM synced playback. And now you will miss out on even
more good stuff like groups and envelopes.
"So you're telling me I have to make my own personality now? That's crazy! That's going to be super timeconsuming."
It's really not. If you were using the old Auto-Map, chances you were only using it to trigger clips, control
their intensity and maybe change playback direction or the transition time. The other controls didn't make
much sense anyway. Recreating that's going to take you all of 30 minutes, both in Resolume and on your
desk. After saving that as your own preset, you're set for every show, forever.
Better yet, you can now create your own show file with unique controls, making you a more unique operator
in the process.
Interestingly enough, for VJ's, it's common practice to set up your own personalised show file with your own
controller layout. In fact, it's a bit frowned upon if you don't know how to lay out your own controller.
If you're really stuck with this, there is a user created DMX preset that recreates the Arena 5 Auto-Map in
this forum thread.
Nitty Gritty Network SetupBefore you can use Art-Net in Resolume you first need to make sure your network is configured correctly in
Windows or Mac OX. You need to make sure the device (or software) sending the DMX to Resolume is in
the same IP range as the computer running Resolume.
So which IP do you need? Of course this depends on your other devices. But 10.x.x.x and 2.x.x.x are IP
ranges suggested by the Art-Net spec, and most lighting consoles will be fixed to an IP in this range. The
Subnet Mask should also match and usually is set to 255.0.0.0 or 255.255.255.0.
Your IP address can be configured in
OSX: System Preferences > Network. Choose the connection you want to use and via the Advanced
options, choose to Configure IPv4 > Manually

189
PC: Control Panel > Network and Internet > Network and Sharing Center > Change Adapter Settings.
Double click the connection you want to use and scroll down to Internet Protocol Version 4 (TCP/IPv4) and
set Use the Following IP Address.

190
Network Adapter
Art-Net gets sent over your network. Just like the internet. So to make sure Resolume uses the correct
connection, instead of the WIFI (gasp!), you can choose which adapter to use.
You do this in the DMX Preferences. The Network Adapter dropdown shows you a list of available
adapters. Keep in mind, this selection affects both DMX in- and output.
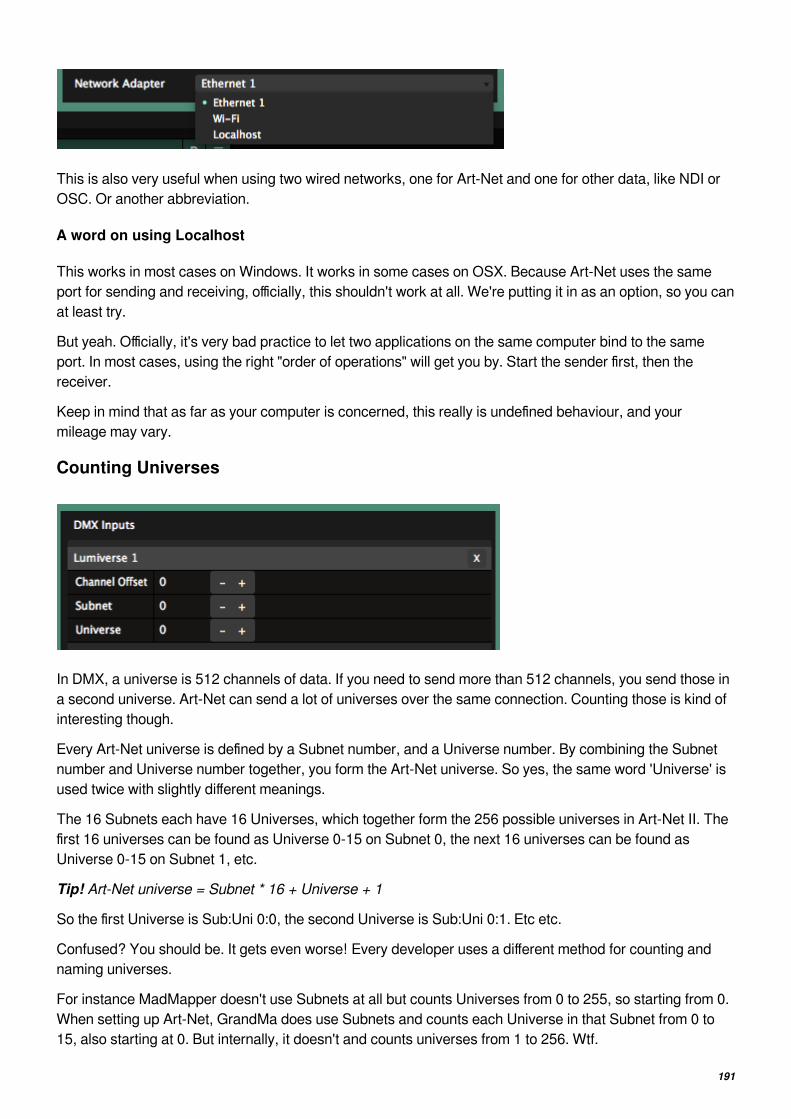
191
This is also very useful when using two wired networks, one for Art-Net and one for other data, like NDI or
OSC. Or another abbreviation.
A word on using Localhost
This works in most cases on Windows. It works in some cases on OSX. Because Art-Net uses the same
port for sending and receiving, officially, this shouldn't work at all. We're putting it in as an option, so you can
at least try.
But yeah. Officially, it's very bad practice to let two applications on the same computer bind to the same
port. In most cases, using the right "order of operations" will get you by. Start the sender first, then the
receiver.
Keep in mind that as far as your computer is concerned, this really is undefined behaviour, and your
mileage may vary.
Counting Universes
In DMX, a universe is 512 channels of data. If you need to send more than 512 channels, you send those in
a second universe. Art-Net can send a lot of universes over the same connection. Counting those is kind of
interesting though.
Every Art-Net universe is defined by a Subnet number, and a Universe number. By combining the Subnet
number and Universe number together, you form the Art-Net universe. So yes, the same word 'Universe' is
used twice with slightly different meanings.
The 16 Subnets each have 16 Universes, which together form the 256 possible universes in Art-Net II. The
first 16 universes can be found as Universe 0-15 on Subnet 0, the next 16 universes can be found as
Universe 0-15 on Subnet 1, etc.
Tip! Art-Net universe = Subnet * 16 + Universe + 1
So the first Universe is Sub:Uni 0:0, the second Universe is Sub:Uni 0:1. Etc etc.
Confused? You should be. It gets even worse! Every developer uses a different method for counting and
naming universes.
For instance MadMapper doesn't use Subnets at all but counts Universes from 0 to 255, so starting from 0.
When setting up Art-Net, GrandMa does use Subnets and counts each Universe in that Subnet from 0 to
15, also starting at 0. But internally, it doesn't and counts universes from 1 to 256. Wtf.

192
In Resolume, although we think starting at 0 with counting is ridiculous, we decided to stick to the Art-Net
spec and go with the Subnet/Universes designation, starting at 0.
Node Name
The node name helps you identify each Resolume instance in the Art-Net network. By default this is set to
"Arena" followed by your computer's name.
You may change it to Donkey or Monkey.
TroubleshootingArena has a built-in Art-Net monitor. If you're familiar with the Artnetominator, you'll recognize its interface.
You access the monitor by folding it open with the arrow in the top right of the DMX Preference.
You will then see a list of 16 Subnets with 16 Universes each. This list will show you all activity on the
currently selected adapter. Subnets with activity will show up in dark green. You can then select that Subnet
to see the active Universes on that Subnet. These will also show up in dark green. In turn, you can select
the Universe to see the data per channel. If you want to get right down to it, you can then see the history for
each channel.
So in this example screenshot, we know that there is activity on Subnet 0 and 2. By clicking on Subnet 0,
we see that there is data being sent on Universe 0, 2 and 4. By clicking on Subnet 2, we could see which
Universes are being sent on that Subnet.
If there is no activity at all anywhere, there is something going wrong with your network setup or the source
of the Art-Net.
If there is activity here, but Resolume is not responding, something is going wrong in Resolume. In that
case, you'll want to make sure your Lumiverses are set to the correct Subnet and Universe, and that you've

193
configured your shortcuts correctly.
Credits
Art-Net is designed by and Copyright Artistic Licence Holdings Ltd. Bla bla bla.

194
OSCOSC offers you the ultimate control over every aspect of Resolume.
OSC stands for Open Sound Control. You can read more about its origins.
The important things to know is that you can send OSC over a network, and you have much finer control
than via MIDI or DMX. You enable OSC in Resolume in the OSC tab of the Preferences.
OSC AddressesEvery item in the Resolume can be controlled via its OSC address. Instead of clicking with the mouse, you
control things by sending messages to a control's address. It's essentially a way of sending an email to
Resolume, telling it to set a certain control to a certain value.
The addresses are all fixed and set up already. This means that with OSC, you can start controlling
everything right away. Unlike MIDI and keyboard shortcuts, that require you to first link a control to a
specific shortcut.
For instance, if you would like to set the opacity of layer 1 to 25%, you send an OSC message to the
address "/composition/layers/1/video/opacity", while specifying 0.25 as a value.
/composition/layers/1/video/opacity 0.25
That's it! That's all you need to do. There's no need to assign any shortcuts or load presets. You can always
use this OSC message to set the opacity of layer one. On every computer running Resolume. All the time.
You can control every UI item the same way.
Let's say we want to set the playhead of clip 8 in layer 2 to the beginning of the clip. We can do that by
sending the following message:
/composition/layers/2/clips/8/transport/position 0.0

195
So how do you figure out what the address is for a particular control? Although there is a certain logic to it,
it's easiest to just enter OSC Shortcut mode (Shortcuts > Edit OSC), and click the desired control.
The Shortcuts panel will show you the correct address. You can click the address itself, ready for
copypasta goodness.
"But Resolume, why don't you have a list of every OSC address in Resolume? That would be superhandy! "
Yeah, kind of, but not really when you think about it. The list of addresses changes depending on how you
have your composition set up. Also, it adds up quickly. Like, really quickly. To give you an idea, here's a list
with the OSC addresses for a composition with only one clip in only one layer, without any effects. Enjoy.
Multiple Addresses
Some controls can be accessed by more than one address. For instance, below are the two addresses by
which you can access the Speed parameter of a Goo effect on Layer one.
Which one you need depends on how you want to use it.
The first one is what we call the absolute address. It controls the Goo effect in the first layer, and the first
layer only.
The second one is the relative address. It always controls the Goo effect, but on a different layer, depending
on which layer is currently selected. So if you have Goo effects on every layer, you can control each of them
with the same OSC address. You just need to switch the selected layer first.
If there is no Goo effect on the currently selected layer, it's still perfectly safe to send to something to this
address. It just won't do anything.
Type Tags and Range
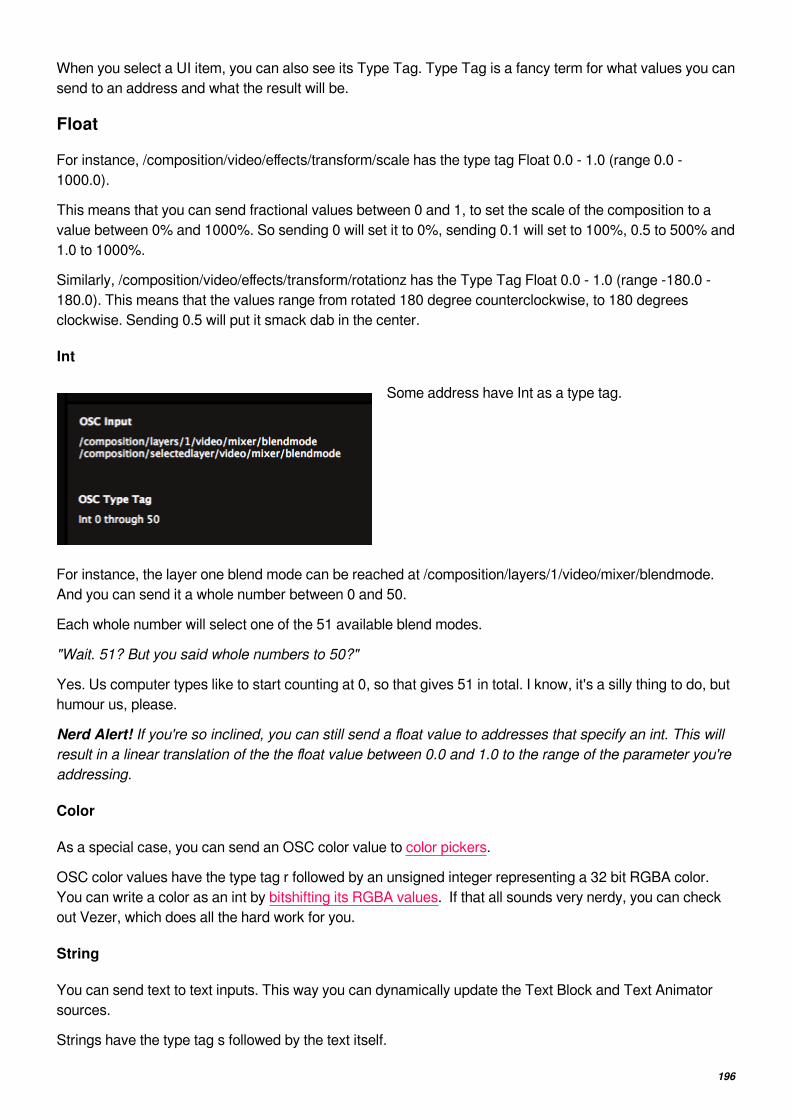
196
When you select a UI item, you can also see its Type Tag. Type Tag is a fancy term for what values you can
send to an address and what the result will be.
Float
For instance, /composition/video/effects/transform/scale has the type tag Float 0.0 - 1.0 (range 0.0 -
1000.0).
This means that you can send fractional values between 0 and 1, to set the scale of the composition to a
value between 0% and 1000%. So sending 0 will set it to 0%, sending 0.1 will set to 100%, 0.5 to 500% and
1.0 to 1000%.
Similarly, /composition/video/effects/transform/rotationz has the Type Tag Float 0.0 - 1.0 (range -180.0 -
180.0). This means that the values range from rotated 180 degree counterclockwise, to 180 degrees
clockwise. Sending 0.5 will put it smack dab in the center.
Int
Some address have Int as a type tag.
For instance, the layer one blend mode can be reached at /composition/layers/1/video/mixer/blendmode.
And you can send it a whole number between 0 and 50.
Each whole number will select one of the 51 available blend modes.
"Wait. 51? But you said whole numbers to 50?"
Yes. Us computer types like to start counting at 0, so that gives 51 in total. I know, it's a silly thing to do, but
humour us, please.
Nerd Alert! If you're so inclined, you can still send a float value to addresses that specify an int. This willresult in a linear translation of the the float value between 0.0 and 1.0 to the range of the parameter you'readdressing.
Color
As a special case, you can send an OSC color value to color pickers.
OSC color values have the type tag r followed by an unsigned integer representing a 32 bit RGBA color.
You can write a color as an int by bitshifting its RGBA values. If that all sounds very nerdy, you can check
out Vezer, which does all the hard work for you.
String
You can send text to text inputs. This way you can dynamically update the Text Block and Text Animator
sources.
Strings have the type tag s followed by the text itself.

197
Absolute values
"Hold up, Resolume. This whole type tag thing sounds needlessly complex. Why I gotta do all this mathand looking up which blend mode is what number. And who in their right mind starts counting at 0 orwrites a color by shifting bits? This is super geeky! Can't I just say what I need like a normal person?"
Good point, and yes, you can. Well, you're a VJ, so by definition you're not a normal person. But yeah, you
can just say what you need. Just not like a normal person.
For instance, for blend modes, you can just send the name of the blend mode you want to use as a string.
/composition/selectedlayer/video/mixer/blendmode "Alpha"
This will set the blend mode of the selected layer to alpha.
If the application that you use to send OSC will let you send multiple arguments, you can do a similar thing
for absolute values.
This makes a lot of sense if you want to position a clip on a specific x and y pixel value. You can do this by
first specifying that you want to use the absolute value. You do this by using "a" as the first argument after
the address, followed by the absolute value itself.
/composition/layers/1/clips/1/video/effects/transform/positionx "a" 320
This will set clip 1 in layer 1 to 320 pixels along the x-axis.
Relative values
It gets even better! You can specify relative changes to a value.
For instance, you can use a "+", "-", or "*" to respectively add, subtract or multiply the current value with the
incoming one:
/composition/layers/1/video/opacity "+" 0.2
Will increase the opacity of layer one by 20%.
Well, actuallllly... It adds a fixed 20% to the opacity value. It doesn't actually increase it by 20%. Thatwould be /composition/layers/1/video/opacity "*" 1.2. But I didn't know how else to say that in a singlesentence that humans can also understand.
Sending OSC to ResolumeOkay, so by now you probably understood the concept of how OSC works in Resolume. But how do you
actually send OSC?
Good question! There are a looooot of applications that can send OSC.
A few of the more famous ones are TouchOSC and Lemur, that are both available for iOS and Android
devices. Both TouchOSC and Lemur let you create your own custom interfaces, making them an ideal
pairing with Resolume's fixed addresses. It means anyone can load up an interface you've created, and it
will work out of the box.
On OSX, there is the amazing Vezer. Vezer is wicked because it lets you create complex keyframe
animation, which can then in turn be used to control every item of Resolume's UI.
And Resolume power user Zoltan Palffy has created his own application which adds functionality to make

198
Resolume more suited for theater show control.
OSC really shines when used in combination with a creative programming language. This will let you create
your own logic or extract data from various processes, and pipe it to Resolume.
Processing, openFrameworks, Arduino, TouchDesigner, JUCE, Max/MSP and tons of others all have
libraries to support sending and receiving OSC messages. You can use Max4Live to send OSC from
Ableton Live. There's even javascript libraries to send OSC right from the browser.
The options are pretty much endless. To get you started, here are two examples of how you could use OSC
in TouchOSC and Processing.
Making Connections
OSC messages get sent over a network. If you want to use OSC between two computers, you first have to
make sure they are connected to the same network. OSC messages are pretty small, so if you're not
sending 1000s of messages per second, a WIFI network can be fine.
Tip! The strength of a WIFI network goes down considerably when 5000 people start snapchatting duringa party.
If you want to send OSC from one computer to another, the sender first needs to know where to send its
messages. When you enable OSC input in Resolume, it will let other computers know where they can send
their messages. It does this via a protocol called ZeroConf, also known as Bonjour on a Mac. If your sender
application has support for this, Resolume will pop right up as a destination.
If your sender application doesn't support ZeroConf/Bonjour, you will need to fill out the IP address and port
number manually.

199
IP addresses are basically a string of numbers that let computers know where they can find each other.
Resolume will let you know the IP address of the computer it's running on in the top of the OSC
Preferences.
Every application can specify the port number on which it would like to receive its OSC messages. By
default, in Resolume this is port number 7000. You can change it to whatever you like.
The OSC Preferences tab has a fold out window to see the last 200 OSC messages that Resolume has
received. This is a great way to check if you are actually receiving anything, and what the messages
actually are.

200
OSC OutputAside from listening to OSC messages, Resolume can also talk back via OSC. OSC Output can be enabled
via the Preferences as well.
There's a few ways that you can manage what messages Resolume sends. The easiest is using OSC
Shortcut presets.
Go into OSC Shortcut mode via Shortcuts > Edit OSC. The Shortcuts panel will appear. Here you can
check your current OSC output setup, and switch between a few presets.
By selecting the "Output All OSC Messages" preset, Resolume will output ALL the OSC messages. Doh-
doi.
This means that everything that changes in the interface will be sent out. Clip triggers, mouse and midi
input, parameter automation, clip playhead position. For everything. On all the addresses. Absolute and
relative.
This is great, because this way, you can monitor the current state of Resolume. For instance, you could be
designing an application that takes a particular action based on clip triggers. Using the Output All preset,
you can quite easily filter the incoming data for the addresses you're interested in and base your logic on
that.
It also means that things can add up quickly. When sending messages over a shifty wireless connection, it's
quite possible you lose a few messages here and there.
To make sure you get the data you need and just the data you need, you can create your own preset. You
do this by selecting New... from the Preset dropdown. After giving it a good name (I like "Leia". Because
she's the princess of presets), you can selectively go through all UI elements that you'd like to send OSC
output for.
Let's say you're only interested in knowing whether the master bypass is enabled. For instance to let your
control application know that it's safe to make certain changes when Resolume is bypassed.
To do this, find the Master Bypass button in the top left. By right
clicking, you can enable OSC output for this and only this button.
Alternatively, you can also enable OSC output for a UI item in the
OSC Shortcuts panel.
By selectively enabling output for just the items you're interested in, you can greatly cut down on network
traffic.
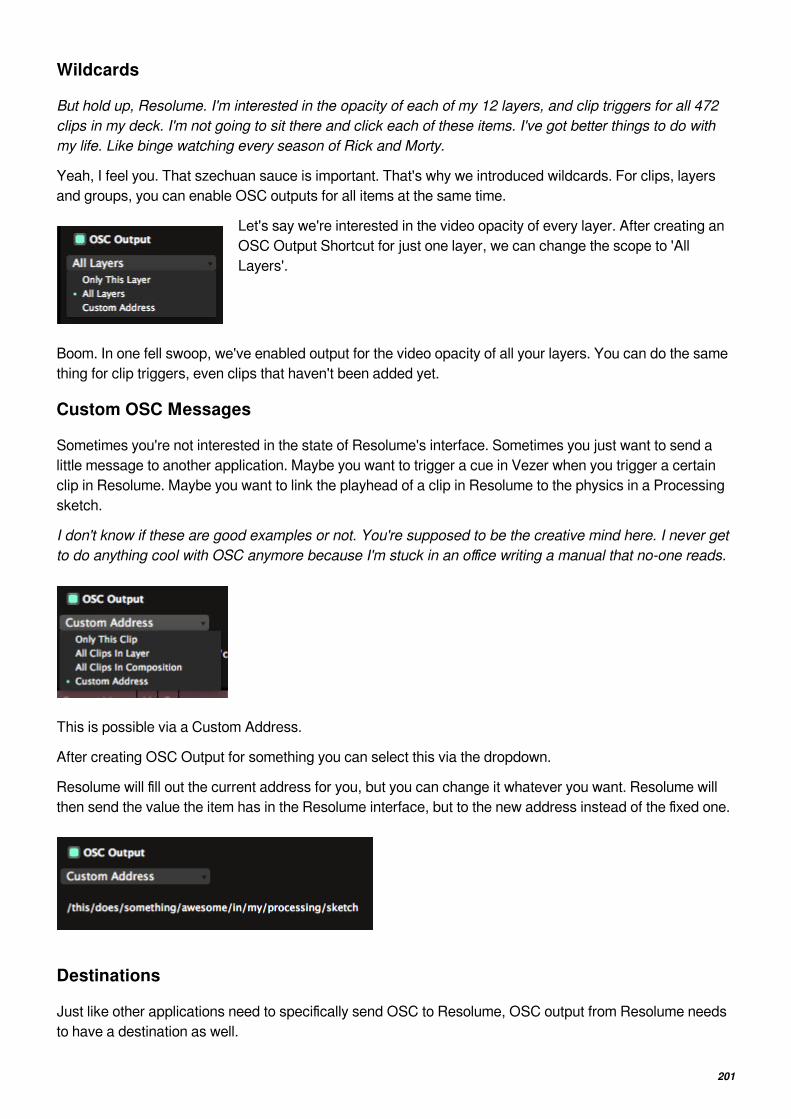
201
Wildcards
But hold up, Resolume. I'm interested in the opacity of each of my 12 layers, and clip triggers for all 472clips in my deck. I'm not going to sit there and click each of these items. I've got better things to do withmy life. Like binge watching every season of Rick and Morty.
Yeah, I feel you. That szechuan sauce is important. That's why we introduced wildcards. For clips, layers
and groups, you can enable OSC outputs for all items at the same time.
Let's say we're interested in the video opacity of every layer. After creating an
OSC Output Shortcut for just one layer, we can change the scope to 'All
Layers'.
Boom. In one fell swoop, we've enabled output for the video opacity of all your layers. You can do the same
thing for clip triggers, even clips that haven't been added yet.
Custom OSC Messages
Sometimes you're not interested in the state of Resolume's interface. Sometimes you just want to send a
little message to another application. Maybe you want to trigger a cue in Vezer when you trigger a certain
clip in Resolume. Maybe you want to link the playhead of a clip in Resolume to the physics in a Processing
sketch.
I don't know if these are good examples or not. You're supposed to be the creative mind here. I never getto do anything cool with OSC anymore because I'm stuck in an office writing a manual that no-one reads.
This is possible via a Custom Address.
After creating OSC Output for something you can select this via the dropdown.
Resolume will fill out the current address for you, but you can change it whatever you want. Resolume will
then send the value the item has in the Resolume interface, but to the new address instead of the fixed one.
Destinations
Just like other applications need to specifically send OSC to Resolume, OSC output from Resolume needs
to have a destination as well.

202
In the OSC Preferences, you can select all the applications
on your network that announce themselves via
ZeroConf/Bonjour.
You can also choose to send to just this computer (Localhost) or to all computers on your network
(Broadcast).
If you want to send to an application that doesn't support ZeroConf/Bonjour, you can also set the IP
Address manually.
In the case of Localhost, Broadcast and manual IP, you also need to set the Outgoing port. This should of
course be the input port of the other application.
To Bundle or not to Bundle
Toggling Use Bundles packs all your messages together and sends them in one big bundle. Most OSC
applications don't really care whether you send bundles or not, but some will prefer having it on or off.
PollingYou can also ask Resolume what a certain parameter is set to. This is great when building complex control
mechanisms, that have different views depending on what's going on in Resolume.
Instead of constantly monitoring what's coming out of Resolume, you can just ask it for the info you need,
when you need it.
You do this by sending a "?" to the address that you want to know about.
For instance, when sending
/composition/layers/1/video/mixer/blendmode "?"
to Resolume, you'll get a reply on the same address with the int value of the current blend mode of layer 1.
Pretty awesome.

203
Sync with a DJYes, you can use Resolume to sync visuals to your tracks. It's what a lot of DJ Mag top DJs do.
The process takes a lot of preparation though. You can't play random songs, put it in some stock video
content, and get a fully synced show. If only it were so easy.
First, you need to have videos for every track that you want to play in your set. These videos need to match
exactly to the music. For instance, you could have a video where the lyrics show up at exactly the same time
as when they're sung in the music.
Once you have all these videos prepared, you can use several ways to sync them. By far the easiest is to
use Denon players and mixers and use Resolume's built-in sync support. If you don't have access to Denon
gear, you can use SMPTE instead.
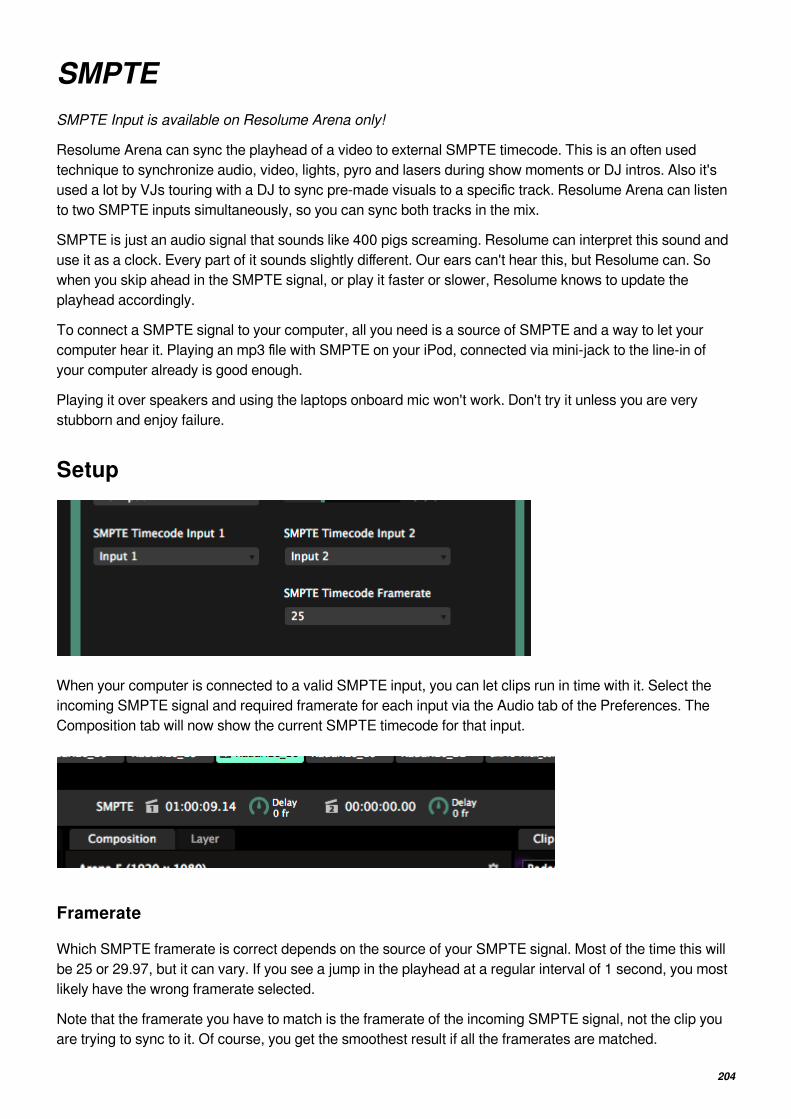
204
SMPTESMPTE Input is available on Resolume Arena only!
Resolume Arena can sync the playhead of a video to external SMPTE timecode. This is an often used
technique to synchronize audio, video, lights, pyro and lasers during show moments or DJ intros. Also it's
used a lot by VJs touring with a DJ to sync pre-made visuals to a specific track. Resolume Arena can listen
to two SMPTE inputs simultaneously, so you can sync both tracks in the mix.
SMPTE is just an audio signal that sounds like 400 pigs screaming. Resolume can interpret this sound and
use it as a clock. Every part of it sounds slightly different. Our ears can't hear this, but Resolume can. So
when you skip ahead in the SMPTE signal, or play it faster or slower, Resolume knows to update the
playhead accordingly.
To connect a SMPTE signal to your computer, all you need is a source of SMPTE and a way to let your
computer hear it. Playing an mp3 file with SMPTE on your iPod, connected via mini-jack to the line-in of
your computer already is good enough.
Playing it over speakers and using the laptops onboard mic won't work. Don't try it unless you are very
stubborn and enjoy failure.
Setup
When your computer is connected to a valid SMPTE input, you can let clips run in time with it. Select the
incoming SMPTE signal and required framerate for each input via the Audio tab of the Preferences. The
Composition tab will now show the current SMPTE timecode for that input.
Framerate
Which SMPTE framerate is correct depends on the source of your SMPTE signal. Most of the time this will
be 25 or 29.97, but it can vary. If you see a jump in the playhead at a regular interval of 1 second, you most
likely have the wrong framerate selected.
Note that the framerate you have to match is the framerate of the incoming SMPTE signal, not the clip you
are trying to sync to it. Of course, you get the smoothest result if all the framerates are matched.

205
You can select your clips to run on SMPTE 1 or SMPTE 2 via the Timeline dropdown. A special icon will
appear in the layer strip to indicate that this clip is now listening for timecode. You can quickly switch inputs
with the buttons in the bottom right.
Note that SMPTE is not available on clips with an audio track.
Offset
You can select a starting timecode for a clip via the offset parameter.
The offset is helpful to differentiate between tracks. When doing several timecoded shows on a single night,
an often used convention is to let each show start at an offset of 1 hour. So Show 1 will start at 01:00:00:00,
Show 2 at 02:00:00:00. This way, you won't accidentally show the wrong show at the wrong time.
Note that the clip has to be active in a layer for it show in the output! The clip trigger itself is not sent via
SMPTE.
Delay
Optionally you can add an delay compensation in frames to account for any lag that may occur in the signal
flow. Light travels faster than sound, so on very big stages the sound will take longer than the video to reach
the majority of the crowd. A negative compensation can help with getting things perfectly lip sync again.
Test fileFor testing, here's a .wav file with 74 minutes of the soothing sounds of SMPTE at 25fps.
Need a different time offset or framerate? You can create your own at http://elteesee.pehrhovey.net/
What SMPTE isn'tSMPTE is not a magical tool that will let you sync up random visuals to random music. You will first need to
have a finished video for a finished audio track for SMPTE to be of any use.
It is purely a technique to make the playhead of a video clip run exactly in time with the playhead of an audio
track.
It is very rare, even for top name DJs, to have a completely synced SMPTE show. Every touring VJ still
relies on his or her own timing and skills to run the majority of the show. SMPTE is only used for very
important show moments that are very difficult to time, or need to be 102% in sync.

206
Syncing with a DJSMPTE can also be used to sync video to a track played by a DJ.
The hard part is actually sending the SMPTE.
There are automated solutions for this. Timecode Live, TC Supply and ProDJLink all provide a similar
service and are used by the visual teams running the shows for Armin van Buuren and Hardwell, among
others.
If you want to get DIY, the easiest way is to split the track. Put your music on the left channel and the
SMPTE on the right channel. The music goes to the speakers on the left channel, the SMPTE goes to
Resolume on the right.
Of course, this means you can only send a single mono channel to the speakers.

207
Sync to Denon DJ PlayersAvailable on Resolume Arena only!
When using a Denon mixer with Denon players, you can automatically sync the audio played by the DJ to a
video in Resolume. Resolume will keep an eye on what track is loaded in the player. When it sees a linked
track, it will sync the video for you. This way, your show will be in sync no matter what.

208
Technical setup
The first thing to make sure is that your players and Resolume are on the same network.
On the stage, make sure that you're connected to the "PC" connection on the Denon X1800 mixer. In front
of house, make sure your computer running Resolume is in the same IP range and subnet mask as the
players. The easiest way to do this, is to use a router that hands out IPs via DHCP and let the router do the
rest.
When connected, start up Resolume. You will see the available players on the toolbar. Up to 4 players can
be connected and synced to at the same time.
Resolume will let you know when it can't find any players at all. At this point, you will want to check your
network setup and firewall status. Resolume will let you know what ports should be open on the firewall, but
maybe it's wisest to just completely open the firewall altogether. You're about to run a fully sync AV set, you
shouldn't be using the laptop to browse the web for questionable content anyway. But hey, no judging.
Tip! If you don't see any Denon related things at all on the toolbar, make sure Denon StageLinQ is enabled
via the View menu.
Toolbar
The toolbar will show important and not so important info about the players.

209
Fader Opacity Shows the state of the fader on the mixer currently assigned to the player
Player Number Up to four Denon DJ players can be connected and synced to simultaneously
Play/Pause/Stop Shows the state of the track currently loaded on the player
Time Remaining How much time is left till the end of the track
Artwork You liek dah perdy picturez?
Track Name / Artist Name Shows which track is currently loaded on the player
Linking a clipTo link a video clip to a track on a player, simply drag the player from the toolbar to the clip.
Resolume will now sync the playhead of the video to the audio. It will also trigger the video when the track is
loaded in the player. All you need to do is sit back and relax.
Resolume will perfectly follow the time of the audio track. You can do whatever you want on the Denon
players, and Resolume will follow along. Scratch, loop or slice, everything will stay sync.
Once you've assigned a video to be linked to a Denon track, Resolume will make sure that as long as that
track is playing on the Denons, it's playing in Resolume as well. This means that you cannot accidentally
trigger a different clip into the same layer, or even eject the video from that layer. Essentially, a layer playing
a Denon clip is locked until the song is finished, or a different linked video is started in the same layer.
Tip! To achieve perfect sync and full audiovisual immersion, of course you need to make sure that youraudio and video are the same length. You can't just use throw any audio on top of any video and expectmagic to happen. Because you're lining up perfectly synced AV material, Resolume will not stretch yourvideo to the length of the audio. So should your video file end before the audio track is over, Resolumewill eject it.
To identify tracks, Resolume will use the ID3 title that the track has on the player. On the off chance that the
track has no proper ID3 title, it will default to the filename itself.
Tip! Don't have the Denon players handy when prepping your set? No problem. Youcan also set a clip to Denon playback manually. Simply switch the playback mode toDenon and fill out the track name manually.
Just like SMPTE playback, Denon playback is only available on clips without an audio track.
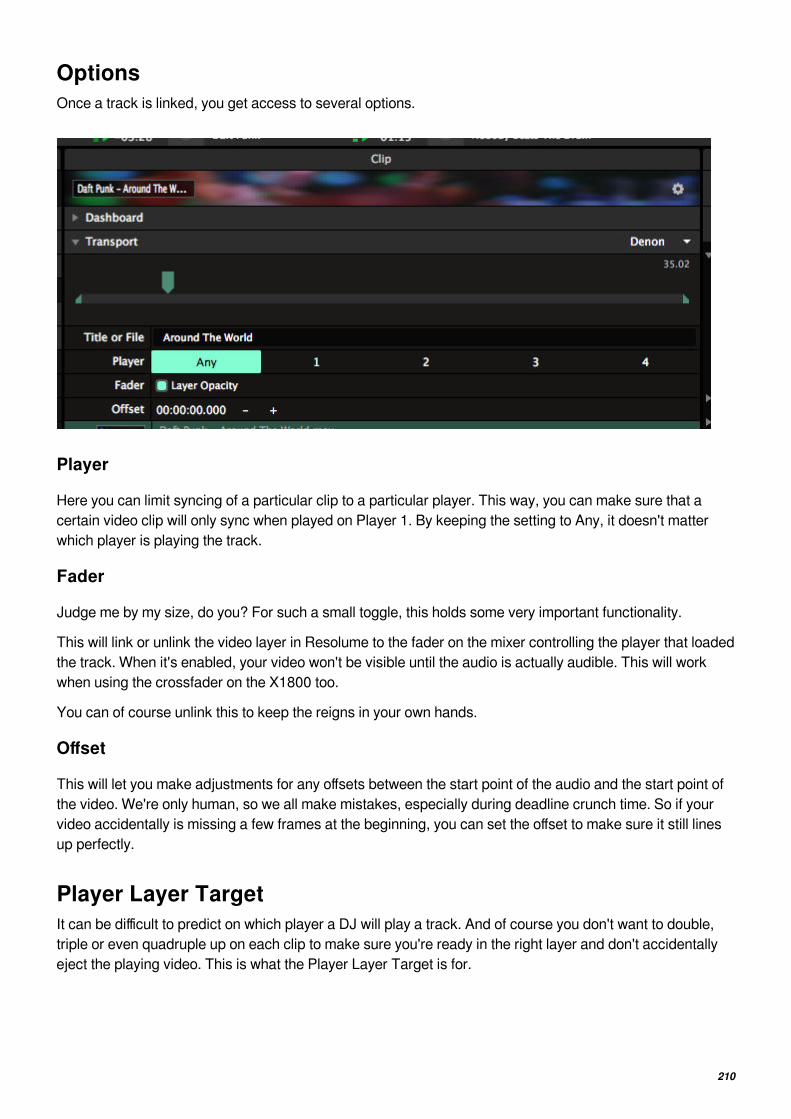
210
OptionsOnce a track is linked, you get access to several options.
Player
Here you can limit syncing of a particular clip to a particular player. This way, you can make sure that a
certain video clip will only sync when played on Player 1. By keeping the setting to Any, it doesn't matter
which player is playing the track.
Fader
Judge me by my size, do you? For such a small toggle, this holds some very important functionality.
This will link or unlink the video layer in Resolume to the fader on the mixer controlling the player that loaded
the track. When it's enabled, your video won't be visible until the audio is actually audible. This will work
when using the crossfader on the X1800 too.
You can of course unlink this to keep the reigns in your own hands.
Offset
This will let you make adjustments for any offsets between the start point of the audio and the start point of
the video. We're only human, so we all make mistakes, especially during deadline crunch time. So if your
video accidentally is missing a few frames at the beginning, you can set the offset to make sure it still lines
up perfectly.
Player Layer TargetIt can be difficult to predict on which player a DJ will play a track. And of course you don't want to double,
triple or even quadruple up on each clip to make sure you're ready in the right layer and don't accidentally
eject the playing video. This is what the Player Layer Target is for.

211
You set the target by right clicking on the player in the toolbar.
Here you can choose which Resolume layer the video should
go, depending on which player is playing the track. So if the
DJ starts a track on player 2, while it's target is set to layer 8,
the video will play in layer 8. If the DJ had started the track on
player 1 while that player's target is layer 7, it would go in layer
7.
For this feature to work, you do need to set the Clip Target for all the clips that you want synced. The
quickest way to do this, is to select all the clips and change their Clip Target to Denon Player Determined
via the right click context menu.
Tip! If you are running a fully synced composition, you can also set the Clip Target on the compositionlevel. This way, newly added content will be set correctly on import.
Time for another baconator layer, player.
Supported ModelsX1800 Mixer
SC5000 Player
SC5000M Player
Prime 4 (from Arena 6.1.2 and higher)

212
BPMBPM is how we indicate the tempo of modern dance music. It stands for Beats Per Minute. A BPM of 120
means you have a beat every 0.5 second. Every musical genre has a typical BPM. Hiphop is around 100,
EDM is typically around 130, trance can go up to 140, while harder genres like hardstyle and drumnbass
like it at 160 and upwards.
Beats, Bars and PhrasesIf this concept of BPM is really foreign to you, put on your favourite dance track. Wait for the part where the
beat kicks in. Now you'll hear this distinct pattern that the kick drum makes: dum-dum-dum-dum-dum-dum-
dum-dum. You're probably nodding your head along to it right now.
Every 'dum' that you hear is what we call a beat. Depending how fast the music is, you will have more or
less of these in a minute. Hence the name BPM or Beats Per Minute.
Now in dance music, every 4 beats make up a 'bar'. In turn, every 8 bars make up a 'phrase'. For a more in-
depth explanation of these concepts, check out the video below.
Okay, with that theory out of the way, let's get back to Resolume! Resolume makes it easy to sync your
content to the BPM that the DJ is currently playing. These BPM controls are so important to VJ'ing, you can
find them on the toolbar in the center of the interface.
Setting the BPMThere's a few ways you can set the BPM.
On the off-chance that you know exactly what BPM the DJ is playing at, you can set a BPM directly by
clicking the BPM value and typing it in.
Now let's say you don't know the DJ's tracklist by heart. In that case, by far the best way to get the BPM is
to just use your ears and tap along to the music. You do this by clicking the 'Tap' button a few times to set
the tempo. Tap the button in time with the beat. 1-2-3-4, 1-2-3-4. After you've done this for a few beats,
click the 'Resync' button on the first beat of the new phrase. When you press 'Resync', everything in
Resolume that is set to BPM Sync will jump back to the first beat of the first bar of the first phrase.
Now keep your eye on the blue square moving clockwise around the slightly bigger blue square. If your
BPM is on right on point, it should hit the top left corner on every first beat. To give you an even better
indication, this square will light up with a little outline every 16 beats, so you can check if you're still in sync
with the phrasing.
When you find the blue square is arriving a little late, it means your BPM is set too slow. At first the
difference won't matter too much, but you'll get further and further out of sync as the song goes on. You can
fix it by increasing the BPM slightly by hitting the 'plus' button a few times. Of course, you can hit the 'minus'
when it's arriving early, or just tap out a new tempo if you're really, really off.
Now hit 'Resync' again on the first beat of the phrase, and see if it drifts again. Repeat till you get it right.

213
This is how DJs beat match records as well, and after a little practice, you'll be able to dial in on the correct
BPM very quickly.
If you don't like the hard cut you get from pressing 'Resync', you can also press the 'Nudge Up' and 'Nudge
Down' buttons. These will temporarily speed the tempo up or down while you have the button pressed, and
set it back to where it was when you let go. This will let you catch up to the music, or let the music catch up
to you.
If you're playing a video only set, you can also send out a metronome to your headphones, so you can beat-
match your visuals using audio.
Later on we will see how we can use MIDI clock or Ableton Link to synchronise the tempo in Resolume with
another program or piece of equipment.
Rhythm in Visuals"But wait," I hear you yell, "what does all this rhythm stuff have to do with visuals? I'm a VJ, not a DJ!"
Well, you're right. You don't necessarily have to beat-match all your visuals to be a good VJ. If you're
playing tunnel fly-throughs that don't really have a visible rhythm, you're fine with the basic speed controls.
But if there's anything obviously rhythmical in your video, it makes sense to have that match with what
happens in the music. And one obvious way of doing that is beat-matching.
For instance, imagine you're playing a short walk-cycle animation of a big Mecha at a dubstep party. If you
hate dubstep and Mecha, that's cool. Just bear with me for a second and pretend you're one of them
annoying kids that need to get off your lawn.
Of course, it makes sense that every step of the Mecha coincides with a kick drum hit. When you play the
video like that, it will look as if the video was made for that track. This is why beat-matching is such a
powerful tool.
So first of all, make sure that every 'event' in your video happens in multiples of 2. So make the robot take 4
steps, 8 steps, 16 steps, 32 steps etc. This way, Resolume will correctly guess the beats for you when
switching the clip playback to BPM Sync. Then all you need to do is keep the BPM in sync, and all your
videos will follow along.
The video linked here is actually a bad example. The robot takes 12 steps, which is great for getting rid ofits alcohol problem, but really bad for syncing. When you download that video, you should either set it toplay back in 12 beats, or trim it so it only takes 8 steps. Or better yet, don't download videos from Youtubeat all and learn to make your own awesome Mecha robot content, with exactly the right amount of steps.
Of course, this doesn't just work for big Mecha's and dubstep. It also works with steampunk machines
pulsing and blowing steam on dark techno tracks, or strange alien creatures emitting telepathic pulses from
their third eye on goa trance music. It even works with abstract animation on big room EDM. Rhythm is life,
and life is rhythm.
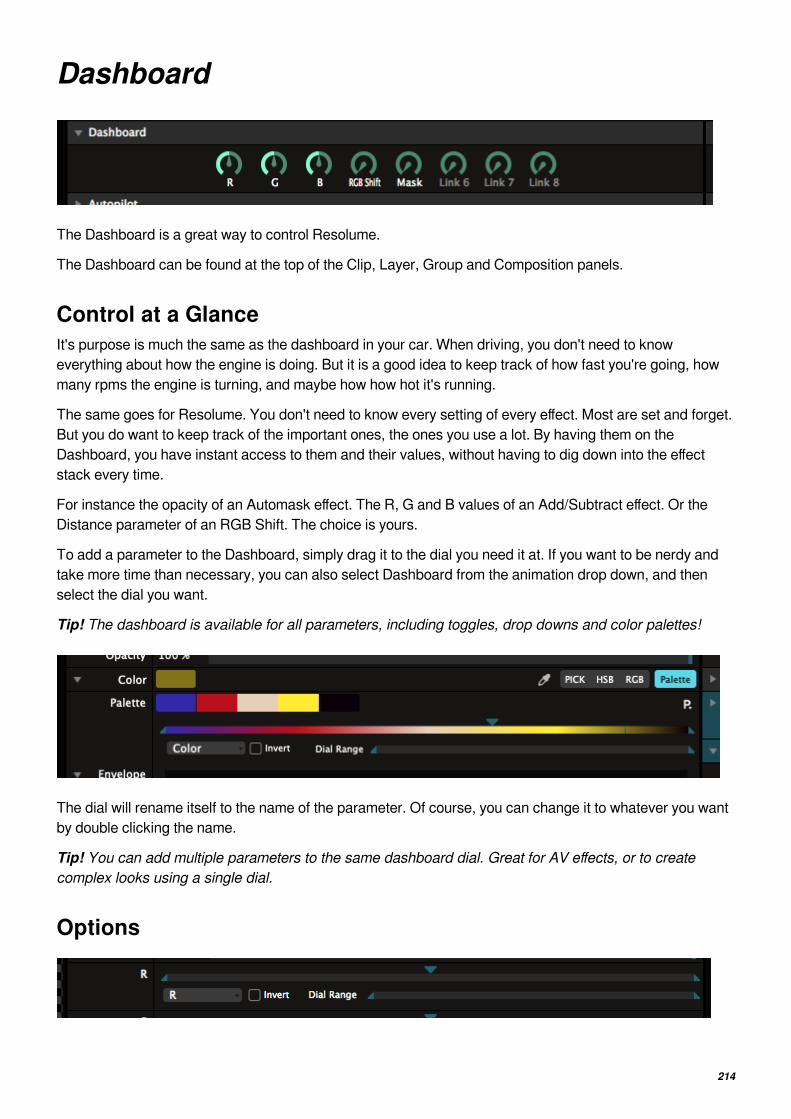
214
Dashboard
The Dashboard is a great way to control Resolume.
The Dashboard can be found at the top of the Clip, Layer, Group and Composition panels.
Control at a GlanceIt's purpose is much the same as the dashboard in your car. When driving, you don't need to know
everything about how the engine is doing. But it is a good idea to keep track of how fast you're going, how
many rpms the engine is turning, and maybe how how hot it's running.
The same goes for Resolume. You don't need to know every setting of every effect. Most are set and forget.
But you do want to keep track of the important ones, the ones you use a lot. By having them on the
Dashboard, you have instant access to them and their values, without having to dig down into the effect
stack every time.
For instance the opacity of an Automask effect. The R, G and B values of an Add/Subtract effect. Or the
Distance parameter of an RGB Shift. The choice is yours.
To add a parameter to the Dashboard, simply drag it to the dial you need it at. If you want to be nerdy and
take more time than necessary, you can also select Dashboard from the animation drop down, and then
select the dial you want.
Tip! The dashboard is available for all parameters, including toggles, drop downs and color palettes!
The dial will rename itself to the name of the parameter. Of course, you can change it to whatever you want
by double clicking the name.
Tip! You can add multiple parameters to the same dashboard dial. Great for AV effects, or to createcomplex looks using a single dial.
Options

215
Once a parameter has been added to a Dashboard, you get access to a few extra options.
Parameter In and Out point
Of course you can set the in and out point for the param. This will let you use the full range of the dial to only
affect a small part of the parameter.
This is great for very sensitive controls, like the Global parameter on Twitch. Especially when combining
multiple parameters together.
Invert
Make the parameter move up when moving the dial down and vice versa.
Dial Range
This is an interesting one. You use it to set which range of the dial controls this parameter. It's like the
inverse of the parameter in and out point.
For instance, by setting the out point of the Dial Range to 0.33, the first third of the dial controls the full
range of the parameter. You can then use the remaining 2/3rds to control other parameters from the same
dial. When combined with the Invert option and the parameter's own in and out point, this gets really freaky.
Tip! If you're so inclined, you could use envelopes for the same purpose. By combining the bypasses ofseveral instances of the same effect to the same dashboard dial, and setting their envelopes accordingly,you could even create a mutex dial that cycles through different settings of the same effect, or better yet,group of effects.
RemoveTo remove a parameter from a dial, right click the parameter.

216
EnvelopesEnvelopes are most awesome!
Envelopes allow you to adjust the exact flow of your parameters. Instead of a regular linear curve,
Resolume can adjust your parameter to have a nice ease in and ease out, a bounce behaviour, or even
multiple keyframes!
Using EnvelopesTo enable an envelope, simply right click a parameter and select Envelope from the dropdown. To get some
direct visual feedback, let's go with a Slide effect and apply the envelope on its X parameter. But you can
use any other parameter you want instead. Resolume is freedom.
By default, a linear envelope is applied. This means you don't see any result, as parameters are linear
themselves.
EasingLet's change that by applying some easing.
Right click on the second keyframe of the envelope, and choose Quadratic In/Out from the drop down.

217
When you now click and drag the X parameter, you will see the quadratic curve is being applied. While
dragging the parameter from left to right, the actual X position of the clip will slowly increase in the
beginning, then pick up speed halfway through, and slow down again towards the end.
Such smooth. Much ease. Very wow.

218
The actual value of the parameter is represented by a smaller vertical line, right next to the usual bigger
vertical line. You can think of the big one as the input, and the smaller one as the output, after the envelope
is applied.
Of course, you can set the parameter to Timeline or BPM Sync animation. The envelope will be
continuously applied and you get a nicely eased curve.
Tip! Resolume will apply the envelope to the input of your parameter. This means any input! So it willmodify a parameter set to Timeline or BPM Sync, but also FFT and mouse input, even parameterscontrolled via MIDI or OSC.
Interpolation CurvesInterpolation is a fancy word for how the line between the keyframes look. You
can choose from a variety of interpolation curves.
Quadratic, Sine, Circular and Exponential do basic easing at various strengths. Elastic, Back and
Bounce let you do some of the harder to master principles of animation without breaking a sweat. Holdsimply holds the value of the previous keyframe until the current one is reached.
Curves are always applied between the keyframe you've selected and the previous one. An In curve will
apply the curve at the start of the interpolation. An Out curve will apply it towards the end. And In/Out will
apply it equally on both sides.

219
Adding and Removing Keyframes
To add a keyframe, double click the curve where you want to add it. Of course you can still adjust it both
vertically and horizontally.
To remove a keyframe, double click it.
Adjusting KeyframesTo adjust a keyframe, simply click and drag it around.
This will update the value the parameter is outputting in realtime.
If your middle name is pixel perfect, you can also use the arrow keys to nudge the keyframe into the sweet
spot. The shift modifier also works for bigger increments. And you can even shift-click to select more than
one keyframe!
If you like your numbers to be perfect, you can also enter the values for each keyframe manually. The
keyframe's phase is where the keyframe sits on the x-axis of the envelope. The other value is the output of
the envelope. It's named the same as the parameter, and it's basically the value of the keyframe along the
y-axis of the envelope.
"But Resolume, why do I have to deal with such a weird concept as 'phase'. This isn't Star Trek. Can't Ijust fill out the time of my keyframe in seconds or frames like I can in After Effects?"
That would be awesome, but in Resolume, parameters can be animated in many different ways so time is
not always expressed in seconds. Parameters can be animated in beats, or even to the FFT of an audio
input. At that point, having time expressed in seconds becomes pretty much meaningless. Also, changing

220
the speed of a regular parameter animation would change at which point in seconds your keyframe will
occur. So, to prevent all sorts of weird rifts in space/time, the x-axis is expressed in phase.
Toggles, Dropdowns and Palettes
These parameters don't have continuous values, but rather jump from one state to another. From OFF to
ON, or from choice to choice.
When applying an envelope on these parameters, you'll see indication in grey of where the jumps occur.
When adjusting a keyframe, it will snap to these points as well.
Saving Envelopes

221
Envelopes have their own presets. So you can draw the perfect envelope,
save it and apply it on every parameter, for all the effects and sources.
Awesome sauce.
To save a preset, hit the little P at the bottom right of the envelope. You get a pop-up that shows you your
previously saved presets and some presets we provided for you.
You can add your own by pressing Save.
You can delete or rename presets by pressing Manage...

222
UndoUndo is like a beautiful guardian angel that watches over you and keeps you from harm. We all know what
UNDO/REDO are and how you use them.
But Resolume is still a live application, so you should know a few things about how undo works exactly.
First of all, CTRL/CMD Z and CTRL/CMD-SHIFT Z work all the time,
everywhere in Resolume. Not just the Advanced Output.
If you like to flaunt your newfound undo powers, you can also find buttons on the toolbar. The added
advantage of having those visible is that you get a little message telling you what you undid.
What is undoable?All actions you do with the mouse, either by moving a slider, clicking on a button or selecting something
from a drop down or menu. Also drag actions like dragging in clips and effects and re-arranging clip, decks
and layers can all be undone.
Basically any changes you make to the state of your composition are undoable and in turn redoable.
What is NOT undoable?Resolume is still a live application, so any changes you make via MIDI, OSC or another form of external
input are not undoable.
Also triggering a clip is not an undoable action. Once that big floppy penis clip goes on the screen,
everybody's seen it and there's no going back.
Actions that happen automatically, like parameter automation and autopilot triggers, are not undoable
either.
ScopeIf you're in the heat of things, you may not remember the exact steps you did. That means you also might
not remember what exactly you're about to undo.
So Resolume will help you at best it can to show you what you've undone.
Let's say you deleted an effect from a clip. When you then press undo, Resolume will select that clip and
show it in the clip panel. Even if you've switched to a different clip in the meantime. It will always try to show
you the effect of the action you're undoing.
This goes as far as switching decks if the action happened in a different deck.
This might seem annoying, but the last thing we want is that you accidentally undo adding a bunch of clips,
and not see that those clips are now gone because you were looking at a different deck when you pressed
undo. Because that would suck.
223
StackUndo and Redo now work everywhere. In the advanced output and in the main interface.
It's good to know that these are all separated. Both undo histories remain available and undoable. They're
just only accessible when you're in that part of the interface.
So when you have the advanced output open, pressing undo will only undo changes you've done there. It
won't undo anything in the main interface. Of course, when you then close the advanced output and hit
undo, you go back to undoing changes you've made in the main interface.
Again, this is to make sure you don't accidentally undo any changes you might not notice until later on.

224
Preparing MediaWhile Resolume is designed to get you up and running quickly, if you are serious about live audio visual
performance then you should really take some steps to get the most out of your computer and your content.
InstallationThe nature of audio-visual performance is that it needs as much processing power as possible, especially if
you want to mix lots of layers, apply loads of audio and video effects and work on a high resolution.
While software like internet firewalls, virus checkers, desktop utilities and so on are really useful for day to
day use, they do consume computer resources and you do not need them running during a performance.
For maximum stability and performance, the best thing to do is to have more than one installation of
Windows or OSX on your computer, with one set up with the bare minimum of software running. You can
then boot into your stripped down, high performance OS when you want to perform with Resolume.
If you don't want to create a separate installation for performance, the next best thing is to set up a user
account that is set up to run less software at startup. This is not as good as a completely separate
installation, but it will help.
To manage users in Windows, open Control Panel from the Start menu, and then double click User
Accounts. Make sure that the User account you create also has Administrator rights!
To manage users in Mac OSX you open the Accounts settings in the System Preferences.
CodecsDo not install codec packs like the K-Lite Codec Pack. They install a lot of codecs and utilities that can
cause more harm than good. Only install the codecs that you actually use.
The next section has loads of advice on what codec to use.
Preparing MediaChoosing how to encode your content is critical in audio-visual performance. You do this by choosing a
'codec'. This stands for COmpressor/DECompressor. Your choice of codec determines how much
processor time is used to decompress each video frame. This in turn will determine how many layers of
smoothly playing video you can use and how many effects you can apply.
Use DXV!
For the very best performance in Resolume you should use the Resolume DXV codec. It is by far the fastest
codec because Resolume can decompress the video frames on the GPU instead of the CPU.
Separate Audio and Video!
We highly recommend rendering the audio and video in separate files and joining them together in a clip in
Avenue instead of rendering a video file that also contains audio.
Keeping the audio and video in separate files is better for your work-flow. If you want to change the audio of
a clip and not the video you only have to re-save the audio file instead of rendering the entire video file with
the audio again.

225
The audio and video is often created using different software, sometimes even by different people. By
combining the audio and video files in Avenue you can create the music in your favourite audio software
and create the video in your video app of choice.
There is another problem with including audio in video files - it limits the BPMs that can be used. When
rendering a video file with audio, the length of the file is quantized to the number of frames of the video. This
makes it impossible for audio to loop seamlessly at certain tempos.
For example, using PAL video format at 25 frames per second, it is not possible to create a one bar AV loop
at 90BPM that will loop perfectly. The closest we can get is a 66 frame long clip, but that will actually be at
around 90.9 BPM
Avenue transposes the video to the length of the audio in a clip to create a perfectly looping audio visual
clip.
Audio Compression
Don't compress audio. Period. Don't do it.
Save it to an uncompressed (linear PCM) .wav file. Avenue needs very fast access to the audio data,
leaving it uncompressed enables this. Uncompressed audio files are relatively small compared to
uncompressed video files so reducing the file size with compression is not necessary.
In most cases using a sample rate of 44,100 kHz and a bit depth of 16 bit is fine.

226
Rendering to DXVThe Resolume DXV Video Codec is a hardware (GPU) accelerated codec. The decompression of the video
frames is done directly on the video card.
Today's video cards have enormous processing power available. The DXV codec means you can work on
much higher resolutions and frame-rates, with much lower CPU and RAM usage.
RenderingRendering movies with the DXV Codec is extremely easy because there is very little to configure. No key-
frames, nothing. It is pre-configured to be as fast as possible.
Normal Quality vs High Quality
We advise to do all encoding at Normal Quality. Only if you notice a lot of banding on gradients, should you
use the High Quality setting.
Expect file size to double when encoding to DXV3 HQ! With great power comes great responsibility, so
don't use High Quality as your default render setting. You'll run out of disk space real quick. Only use it on
files that have visible artefacts when you render them to Normal Quality.
There is no need to re-encode your entire DXV2 library. Especially do not re-encode your DXV2 files to
DXV3 High Quality. Because you are rendering from a DXV2 source, any image artefacts are already
rendered into the file. Your image quality will not be improved at all, the only thing you'll get is bigger files
that look exactly the same. And that's not what you want.
No Alpha vs With AlphaThe DXV codec can also store the alpha channel. Just choose any of the 'With Alpha' options to render with
included alpha channels.
Keep in mind that your original file needs to have an alpha channel for the 'With Alpha' options. Choosing
one of these options will not magically create a transparent background if the source file does not contain it.
When your source does not have alpha channels, it's best to use the 'No Alpha' options to keep file size
down.
PerformancePlayback of video files with the DXV codec is only hardware accelerated when played in Resolume. When a
DXV video is played with any other software, it is not rendered by the videocard so there is no performance
gain in other software except Resolume.

227
Exporting .mov files with DXV encodingResolume Alley
The easiest way to create DXV encoded files is to use Alley. This is by far the easiest and free-est option.
It's so simple the files almost encode themselves, but you can read more about the process in Alley's own
manual page.
Adobe After Effects, Premiere and Media Encoder
Resolume comes with plugins to export directly to DXV3 from the Adobe packages.
These plugins get installed automatically when you install Resolume and you have either After Effects,
Media Encoder or Premiere installed on the same computer.
If you like, you can download the Alley installer to install the plugins separately as well. This way, you can
export to DXV on a computer that does not have Resolume, or when you have just installed any of the
Adobe applications.
When you do not have any of the Adobe apps, the plugins are not installed either, so your system stays
clean.
Once installed, this is how it works in each application:
Adobe After Effects
Choose Composition > Add to Render Queue
Click the Output Module settings (by default this is set to 'Lossless')

228
Choose the following options:
Format > DXV 3
In the Format Options, choose whether you want Normal or High Quality, and with or without
alpha. The channels and color depth will adjust themselves automatically.
Adobe Premiere Pro/Adobe Media Encoder
From Premiere, choose File > Export > Media

229
In Media Encoder, click on the preset name
(From here on, both apps use the same interface).
Choose the following settings:
Format > DXV3
In the Video tab, select the resolution, pixel aspect ratio and frame rate you would like to use.
Under Compression, choose whether you want Normal or High Quality, and with or without
alpha.
Quicktime Player 7 Pro
Choose File > Export
Under Export, choose 'Movie to Quicktime Movie'
Click Options
Click 'Settings' in the 'Video' tab
Choose the following settings:
Compression Type > DXV 3

230
Choose the desired compression setting from the Compression dropdown.

231
DXV export plugins in Adobe CC 2018
TL;DR Download and install the latest version of Resolume or Alley and you can export to DXV3directly from After Effects, Media Encoder and Premiere.
So, Adobe dropped the bomb. On their latest update, they removed support for 3rd party Quicktime codecs.
This also includes our DXV codec, so it is no longer possible to export DXV files via Quicktime.
We can't say that we blame them. Being able to export to .mov files using a 3rd party codec was awesome
in 2008. But Quicktime is 32 bit and hopelessly outdated in 2018. So, good riddance to bad rubbish. Out
with the old, in with the new.
Hold up. Does this mean we won't be able to use DXV anymore? At all? Like ever?
Of course not. Let's clear a few things up.
DXV doesn't need QuicktimeFirst of all, Resolume doesn't need Quicktime to play back DXV files. It's our own codec, so you will always
be able to play DXV files in Resolume. Always and forever.
Second, you don't need Quicktime to encode DXV files in a .mov container. Of course, if you haven't
embraced the Matrix and aren't living your life from inside a compiler, things aren't so easy. But it's very
doable to create .mov containers with a DXV codec without having Quicktime installed.
So, really, when you get right down to it, it's not the end of the world.
Hold on, Resolume. Not so fast. I've just updated my Adobe software and I sure as heck can'tmake DXVs anymore. This is very much the end of the world.
Don't worry, fam. We got you. We've created exporter plugins for the Adobe family. These will let you create
DXV encoded .movs straight from AE, Premiere and Media Encoder. Read all about how they work.

232
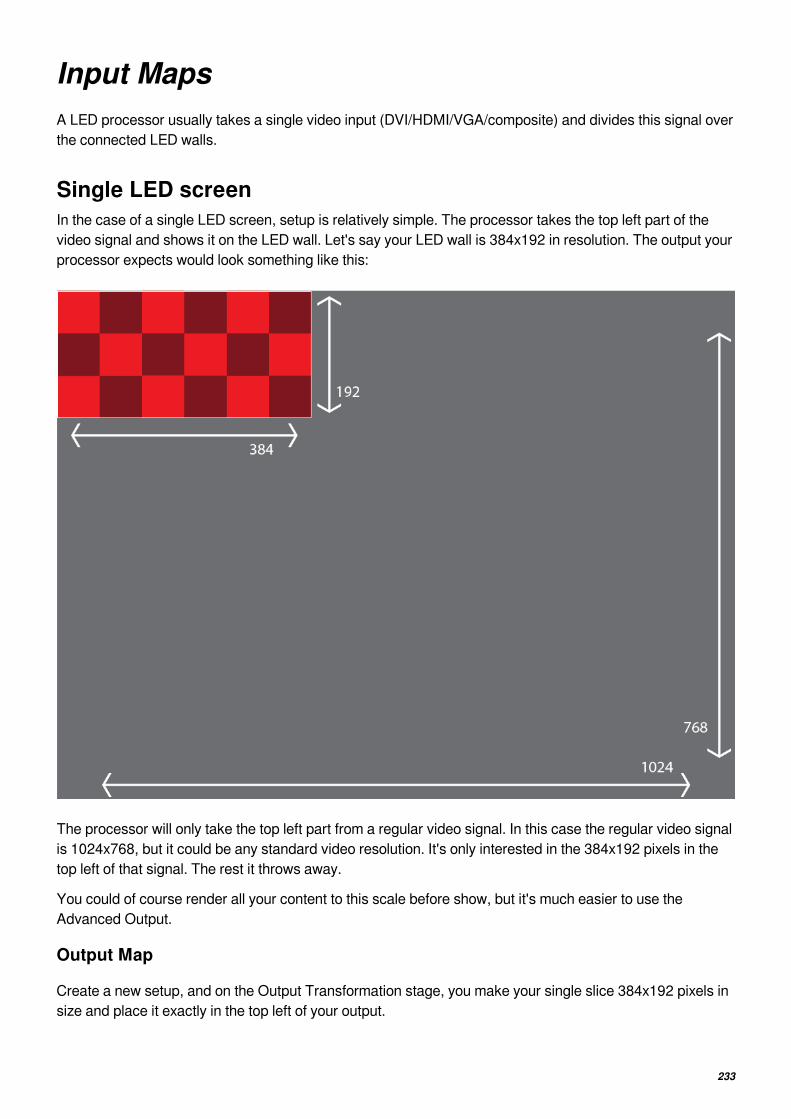
233
Input MapsA LED processor usually takes a single video input (DVI/HDMI/VGA/composite) and divides this signal over
the connected LED walls.
Single LED screenIn the case of a single LED screen, setup is relatively simple. The processor takes the top left part of the
video signal and shows it on the LED wall. Let's say your LED wall is 384x192 in resolution. The output your
processor expects would look something like this:
The processor will only take the top left part from a regular video signal. In this case the regular video signal
is 1024x768, but it could be any standard video resolution. It's only interested in the 384x192 pixels in the
top left of that signal. The rest it throws away.
You could of course render all your content to this scale before show, but it's much easier to use the
Advanced Output.
Output Map
Create a new setup, and on the Output Transformation stage, you make your single slice 384x192 pixels in
size and place it exactly in the top left of your output.
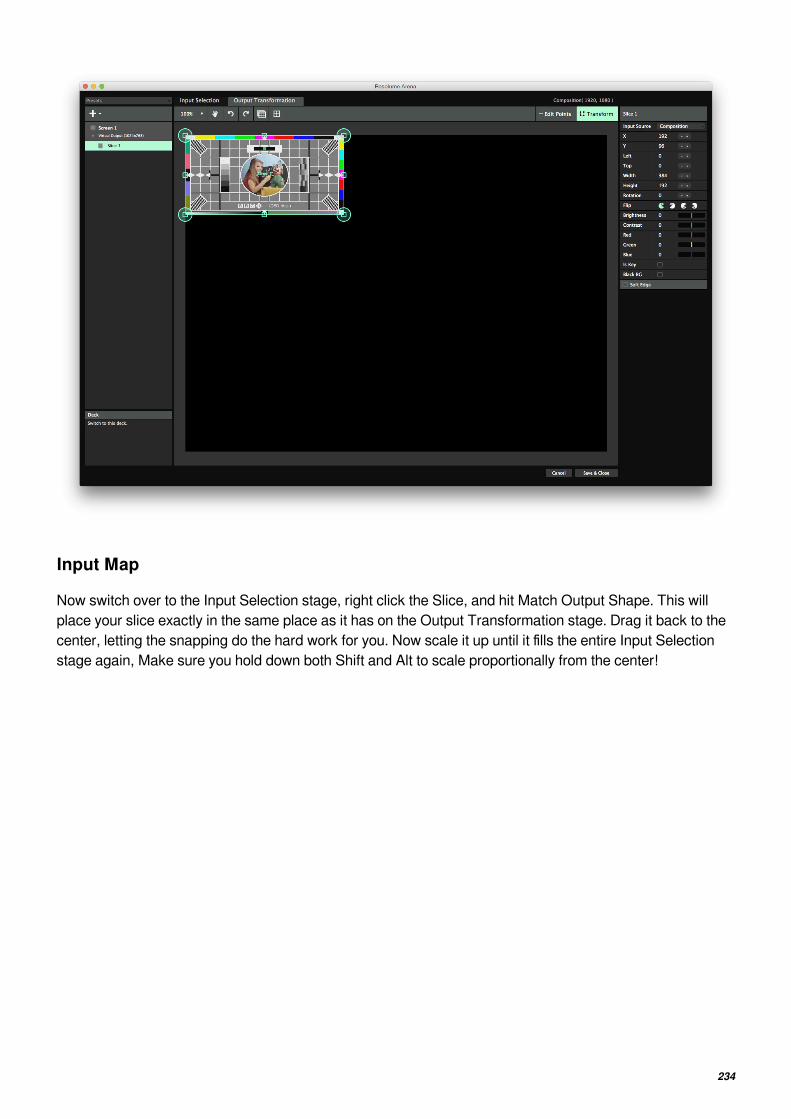
234
Input Map
Now switch over to the Input Selection stage, right click the Slice, and hit Match Output Shape. This will
place your slice exactly in the same place as it has on the Output Transformation stage. Drag it back to the
center, letting the snapping do the hard work for you. Now scale it up until it fills the entire Input Selection
stage again, Make sure you hold down both Shift and Alt to scale proportionally from the center!

235
What you have now is a slice that takes a 2x1 piece of your composition and places it in the top left of your
output. This means that you will exactly see that part on your LED wall. By first matching the output shape,
you've made sure your input slice has the same aspect ratio as your output shape. This means you
probably lose a bit of the top and bottom of your composition, but your circles will still look like circles and
not squished eggs.
4 screen LED wallNow imagine your stage is a bit more complex and looks like this:
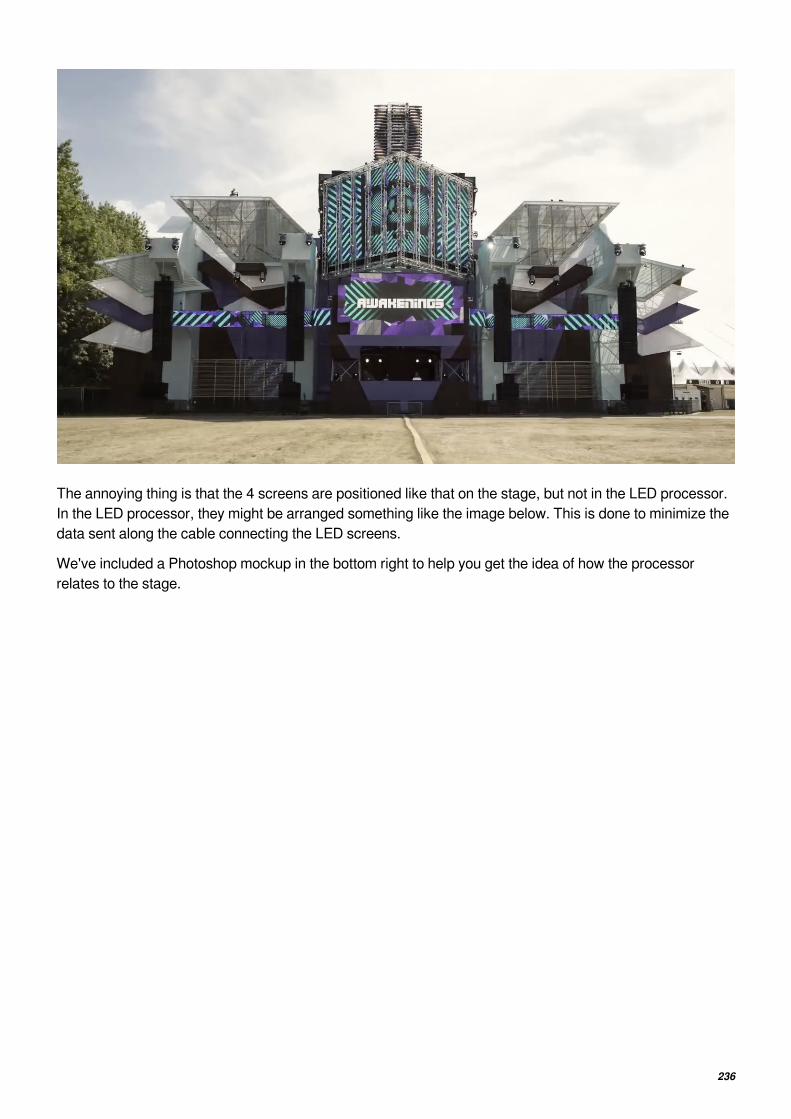
236
The annoying thing is that the 4 screens are positioned like that on the stage, but not in the LED processor.
In the LED processor, they might be arranged something like the image below. This is done to minimize the
data sent along the cable connecting the LED screens.
We've included a Photoshop mockup in the bottom right to help you get the idea of how the processor
relates to the stage.

237
Tip! Keep in mind that 4 screens like this are still controlled by a single LED processor. So you only haveto send out one signal from your computer's output. The processor divides it over the 4 screens. Only onvery complex, high resolution LED stages will you need to use 2 or more processors and thus 2 or moreoutputs.
Output Map
Just like with the single LED screen, first you recreate these slices in the Output Transformation tab of
Resolume's Advanced Output. This way you send the processor the signal that it wants to see. If you're
working with a LED supplier who knows what they're doing, they can give you this 'output mapping' before
show. All you need to do is fill out the numbers that they provide and name the slices to keep things
organized.

238
Input Map
Then, on the input, lasso all four slices to select all of them. Then right click and choose Match Output
Shape. This will pop the 4 slices into the exact same position and scale they have on the output stage.
Place the 'Center' slice exactly in the center of your comp. Place the other slices around it like they are on
the actual stage. Unless you want to break out the tape measure, this usually takes some guesstimating
and eyeballing. In the end it's about selling the illusion to the crowd, so it doesn't matter if you're a few pixels
off.
Tip! Depending on the stage, there's always a certain trade-off between correctness and pixel count.When you're dealing with a few low pixel pitch LEDs combined with a lot of big crude lowres screens, aperspective correct input map could require your comp to run at 4K or above, In those cases, it might be agood idea to sacrifice a bit of correctness for the sake of still having a decent frame rate.
Once you're satisfied with the layout, lasso all the slices and scale everything up till it fills the canvas again.
Shift and Alt are your friends here!

239
Placing Content
Now whatever you play in your composition will translate perfectly to your LED wall. If you want a DJ's name
to only appear on the center wall, all you need is scale it down using the clip properties till it fits.
Or even better, you can use the Slice Transform effect to place content directly in every slice you want.

240
Tip! If you're working with LED walls with mixed pixel pitch, you can scale the lower res tiles up more onthe Input Selection stage. This will keep their output resolution the same, while taking a larger area ofpixels as input. This way, the overall image on the stage will still look perspectively correct.
Projection MappingAs far as the output is concerned, projection mapping is usually a lot more guesstimating and eyeballing
than working with LED screens. Even then, having a good input map is a great time saver.
Let's take the following example of a structure consisting of 8 cubes.
Even though you might not know the exact alignment of the objects on the night itself, you know it's going to
be positioned like this.

241
You can already start working on this before you even arrive at the venue.
To have some creative options on this stage design, you might want to play some content over the entire
structure, and other content only in a single cube or in a combination of cubes,.
We'll use an input map to make this a piece of cake.
Input Map
First thing is to create an input map based on this shape. We start by creating the exact same cube shape,
in the Advanced Output using slices.
First we have to figure out how big to make our composition. If we take a regular HD signal (1920x1080
pixels) as our starting point, we will need 8 slices of 360x360 pixels. We know this, because the object is 3
cubes high and 1080 / 3 = 360.
This means that our Resolume composition will be 1080x1080, because cubes are always square. So set
the composition size to 1080x1080.
Open the Advanced Output and make sure you are working on the Input Selection stage.
Let me repeat this, because I don't think you heard me. Make sure you are working on the Input Selection
stage. We're not interested in the Output Transformation at this point, only in choosing which parts of our
composition to use.
After you've created the first slice, place it exactly in the bottom center of the Input Selection stage. Now
create copies and place them around the stage, in the same positions as the actual cubes. This will go
really quickly, because you can alt-drag to copy the slice, and then the copy wil snap to the original and the
composition edges.

242
Bam. Your input map is done.
Composition
Fullscreen
Now in the composition, we'll make our first layer our Fullscreen layer. This is easy, because the input map
already takes the correct input from the comp. We'll lose some of our 1920x1080 content on the sides, but
we're keeping the aspect ratio intact so our circles stay circles.
Moving right along.

243
Duplicated
Layer 2 will be our Everywhere layer. We'll put 8 copies of our content, one copy on each cube.
From the Slices tab (View > Show Slices), drag Screen 1 onto Layer 2. Bam. Done.
We'll duplicate this layer, and use the Bypass buttons for each slice to create variations. You can create as
many duplicate layers as you want content on specific cubes.

244
Specials
On the last layer we'll add some animated Lines from the Sources tab. Using the LoRez effect with its
Pixelation parameter at almost maximum, we'll have 9 blocks of white turning on and off. We can use this as
a mask or as some stroby bump content.
Aligning the output
When you're at the venue and connected to the projector, go to the Output Transformation stage, lasso all
the slices and right click them. Choose Match Input Shape and all the slices will pop to the place they have

245
on the input stage.
Now move and scale the cube grid roughly into position. Where necessary, drag the individual corner points
to align exactly with projection. After a little work, the projected input map should line up exactly with the
actual object.
Custom content
Because you have created an accurate input map, you can easily mix custom content with your regular VJ
content. As long as you make the cubes in your content exactly 360x360 and the clip itself exactly
1080x1080, it will line up perfectly with your other content.
VJFit has an excellent tutorial on how to make custom content in Cinema 4D for this setup.
An added advantage is that, should you do this show in a different location, you can just re-use the same
animations and input map. All you need is adjust the output to the new projector location and you're good to
go for show!
Non-geometric objectsWhen working with objects that are not geometric, you have to rely on the content to make your input map.
For instance, to map on an inflatable skull like this, you will first have to make the content in Cinema 4D
based on the measurements of the actual skull.
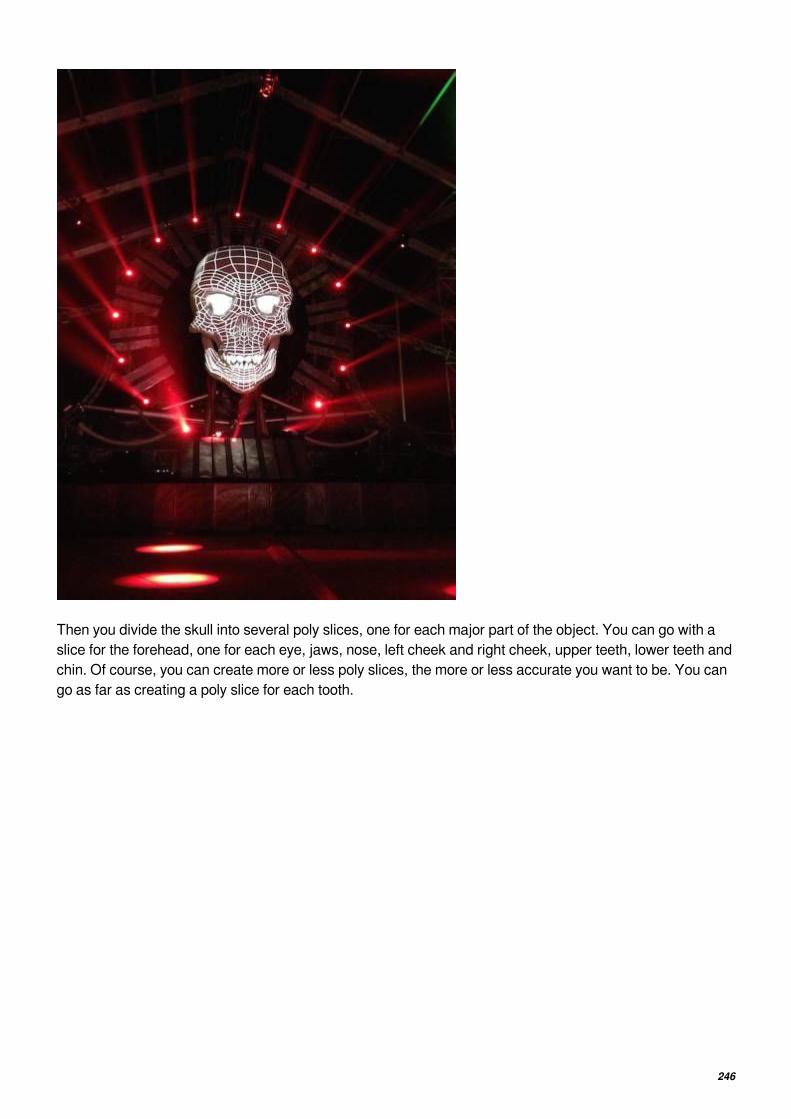
246
Then you divide the skull into several poly slices, one for each major part of the object. You can go with a
slice for the forehead, one for each eye, jaws, nose, left cheek and right cheek, upper teeth, lower teeth and
chin. Of course, you can create more or less poly slices, the more or less accurate you want to be. You can
go as far as creating a poly slice for each tooth.

247
Then you position and scale each poly slice roughly in the projection and fine tune its points to align
perfectly.
Tip! On any projection mapping job, take plenty of breaks, bring a thermos of tea and some good music.A masseuse is optional.

248
Edge BlendingEdge Blending is only available on Resolume Arena!
Edge blending is the dark art of stitching together the output of two or more overlapping projectors and
making one seamless screen out of them.
Resolume will help you do this by gradually fading out the area where the projectors overlap.
Overlap the InputIn order for edge blending to take effect, you need to have your slices partially cover the same area of your
composition. This overlap should mimic the physical overlap of the projectors on your surface. In other
words, you need to make sure that the slices overlap the same way as your physical projectors do in the
real physical world.
Tip! For best results, a minimum of 15% overlap is recommended.

249
You can use the test card ( Output > Show Test Card ) for this. Display your test card on the projector and
keep moving the slices towards each other until the image on the projectors shows the same pixels in the
overlapping area. The test card has diagonal lines on it to help you find the correct spot on the grid.
Align the OutputOn the output side, you need to make sure your projectors are aligned properly. The best way to do this is
to perspective warp each output while projecting the testcard again. Then keep adjusting the corner points

250
one by one until the grid aligns perfectly.
Tip! Perspective warping are the four big corner points of your slice. Make sure you use those and nottheir smaller baby brothers that only do linear warping.
BlendingThen you can turn on edge blending for each slice in turn. Resolume will automatically blend the edge in the
middle. Magic!

251
Finetuning
You can still control the edge by refining the following three parameters:
Gamma Red, Green and Blue: This controls the overall brightness of the red, green and blue channel of
the edge blend overlap area.
Power: This control the slope of the edge blend curve. The higher this number is, the steeper the curve will
be in the center of the fade area.
Luminance: This control the brightness of the center point of your fade. This allows you to further adjust
the slope of the curve.
Gamma: This is the overall brightness of the fade area.
Black Level and Brightness Compensation

252
Since projectors project light, they can never project complete
black. That makes sense, because complete black actually is the
absence of light.
At best, a projector actually projects a very deep grey.
So where two projectors overlap, this causes the problem to double up. In the areas that should be 'blacked
out' by edge blending, they will project deep grey on deep grey.
The result in the overlapping area will be an even lighter grey. The black level compensation is to make up
for this difference, by allowing you to make the non-overlapping areas slightly brighter.
Tip! Black Level Compensation is available on the output tab.

253
Slice RoutingLayer to slice routing is a very powerful tool. It allows you to create
complex setups very easily. It also has significant drawbacks, so
use it with caution.
Routing Layers to SlicesEvery individual layer of a Resolume composition is also available as an input for slices.
By default, slices take the complete Resolume composition as input. You can assign which input is used for
a slice on the Input Source dropdown on the right hand side of the Input Selection stage.
After you have selected a layer as a direct input, you can warp and transform this layer directly, completely
separate from the composition.
This is for instance very useful when you want to display different content on 6 HD displays. In this case,
you can use layer to slice routing to keep your composition size down. You can keep your comp size at
1920×1080, and play each layer in its own slice. This way you don't have to render a huge video containing
your 6 videos in one. This is very efficient and doesn't place too much stress on your computer and graphic
card.
Ignore Opacity and Bypass/Solo
You can choose to bypass both the the layer's opacity and its Solo
and Bypass toggles.
This is useful if you want to see the layer only in this slice. Simply toggle off the Input Bypass/Solo switch,
and then bypass the layer in the composition. The layer will no longer render in the comp, but it will stay
visible in your slice.

254
Routing Groups to SlicesOn Arena you can also create groups.
Just like layers, groups can also be routed to a slice. You will have the same options to ignore the Opacity
and Bypass/Solo.
Routing the Preview to SlicesThis is useful to get the Preview output in a separate external display.
Routing Screens to SlicesThis is some serious slice-ception over here.
You can route the output of a Virtual Screen to a slice in another screen.
This way, you can add more phases to the warping process. For instance, you can edge blend two physical
outputs using the regular blending process. Then, you can let each of these two blended slices take its input
from a virtual screen. In this virtual screen you can then warp and map your content to physical objects,
without having to worry about the overall blend.
There's a few other useful scenarios, most of them get too complex to explain in a single paragraph in a
manual that no one reads.
When NOT to use slice routing"When you have a hammer, not everything is a nail."
Keep in mind that by routing a layer to a slice, you actively decide to bypass the composition completely.
When a layer is routed to a slice, all layer and clip effects will still be applied, but blend modes and
composition effects will not! The slice will simply render all content with straight alpha on top of the other
slices.
Layer to slice routing can let you make setups very quickly, but you can also very quickly paint yourself into
a corner. It's best used to display layers of content on separate screens, when you are sure you never want
to mix them.
Don't use it as a quick way to position content!
Let me repeat that, because I don't think you heard me. Don't. Use it. As a quick way. To positioncontent! You will not be a happy camper.
If that's what you want to do, use the Slice Transform effect instead. We have a whole chapter in this
manual dedicated on how you can create an input map for a complex stage design.

255
Lots of Outputs"I want to run Resolume with eleventeen outputs! What computer do I need?"
We regularly get this question. The number varies, but the gist is always the same. People want to use
Resolume with lots of outputs, and they're looking for the best option. It's not an easy question to answer,
because there is not a clearcut technical solution.
We like to help you choose the right option. This document covers most starting situations and will help you
choose the best solution for your situation. Here is a list of options in order of preference:
A single GPU with x outputs.
A single GPU with Datapath extenders.
A single GPU with multiple Blackmagic cards.
A single GPU with cheap extenders or processors.
Multiple GPUs in the same machine.
Multiple machines synced via an external protocol.
The order of preference is a combination of how well the setup performs and how reliable it is to set up. In
other words, the further down the list you get, the less we recommend using this setup. Keep in mind this
recommendation can vary considerably depending on your particular use-case, requirement and skill level.
FlowchartLet's get started with a simple flowchart:

256
What do you mean, "extending output ports"?
A graphic card has certain limitations. Let's take the Nvidia GTX 1080 as an example:
a maximum amount of ports, in the case of Nvidia, that's 4.

257
a maximum resolution per port, in the case of the GTX 1080, that's 7680x4320
a maximum texture size, which is 16384x16384 on most modern GPUs. This in turn translates to:
don't worry about it.
When using a TripleHead or Datapath, you use up only one of your available ports. These are extenders, so
they take a larger image and then use their own hardware to divide it over its multiple outputs. Since the
max resolution per port of your card is well over 4K, you can extend a single port to four times HD on a
Datapath or three times 720p on a Matrox (if its firmware supports that). Your computer will see the
extender as a single, larger output, in addition to the other outputs you have connected.
When using a MST hub, you can change a single output into three outputs. Each of the outputs will show as
an individual discrete display on your computer. An MST hub does not extend your output. This means you
are still limited to the maximum number of outputs your GPU supports. Adding a 3-way MST hub to an
Nvidia card with a 4 port maximum,means you will only be able to use one other port on the card. The other
two will be disabled. For this reason, MST hubs are better suited to add more outputs to a single output
card, like laptop GPUs.
When in doubt about the max specs of your GPU, contact the manufacturer.
What do you mean, "frame-sync"?
When each output functions as its own independent surface or collection of surfaces, you have nothing to
worry about. Frame-sync will not be an issue. For instance, your stage is made up of 12 LED screens, 8 on
the first output, and 4 on the second. In this case, the outputs don't have to be frame-sync.
If you have a surface which is "stitched" together out of two or more projectors, or out of LED screens
controlled by multiple processors, frame-sync does matter.
Without frame-sync, each output will operate on its own timing. This means each output will refresh a few
milliseconds before or after its neighbour. This will result in "horizontal tearing" between the screens. For a
few milliseconds, one side of the surface will already show the next frame, while the other side is still
showing the previous frame.
Most GPU manufacturers have the option to provide sync between GPUs, either via software (Eyefinity,
Mosaic) or hardware (Quadro Sync). Blackmagic SDI outputs always require an external hardware
reference clock to stay sync.
Single computer with a single GPU
This is always the best, most reliable and best performing option. Resolume does all the rendering on the
GPU that has the monitor that is set as the main display on it. By using a single GPU for all outputs, you get

258
the best possible performance.
The downside is that at the moment, there is no good GPU on the market that has more than 6 outputs,
which limits you to 5 outputs + 1 control monitor for the user interface.
Nvidia has cards with 8 outputs, but those cards don't pack enough render power to run all outputs at full
HD. Matrox has a few cards that have 8 and 16 outputs, but these are for spreadsheet use and don't
support the OpenGL extensions necessary to run Resolume.
Note that even on a single GPU, outputs are not necessarily frame-sync and will still need to be hardware
genlocked or software synced to perfectly match up.
Single computer with a single GPU + Datapath
This is the next best thing. By using extenders like the Datapath Fx4, you can extend a single port to
multiple outputs. Resolume will think your output just got a lot bigger, so all rendering still goes over your
main GPU without any additional performance hits.
Datapath products can either be daisy chained (Fx4) or distributed (X4) and if your GPU has more ports,
you can run multiple Datapaths in parallel.
Of course conditions apply. The Datapath is generally pretty reliable to set up, but you have to be very
attentive to data bandwidth which is a combination of refresh rate resolution and scanning method
(interlaced or progressive). For instance, getting 4K at 60Hz is only available on the Fx4 model and will
require that you use the right DisplayPort cables.
Also keep in mind that a Datapath cannot extend beyond the maximum output resolution of your output port.
When in doubt, please contact your Datapath sales point about compatibility
Single computer with a single GPU + Blackmagic Quad 2

259
Blackmagic has several cards that can output video streams. They have PCIe cards or USB/Thunderbolt
dongles with 1, 2, 4 or 8 outputs in full duplex mode. Cards can also be combined.
The added advantage is that, depending on the card, you get the option to output via 3G, 6G or 12G SDI,
which is not available on any consumer graphic cards.
The downside is that instead of outputting from the GPU directly, the pixel data has to travel to the
Blackmagic device. This will result in a delay of 60 ms or more. Especially when using the Blackmagic
outputs in combination with regular GPU outputs, this will result in noticeable sync differences.
The other downside is that you are limited to broadcast resolutions (PAL, NTSC, 720p, 1080i, 1080p,
2160p). Typical computer resolutions such as XGA (1024x768), WXGA (1280x800) or WUXGA
(1920x1200) are not supported.
Setting up a Duo 2 or Quad 2 card to use all 4 or 8 ports as outputs requires some fiddling in Blackmagic's
own Desktop Video Utility.
Single computer with single GPU + MST hub(or Zotac, or Matrox TripleHead, or USB to HDMI dongles).
These are pretty much value for price and if you can get them to work, they're great! Getting them to work
can be very hit or miss though. What works on one system doesn't necessarily work on another. Some of
them work on both Mac and PC, but only on AMD cards and not Nvidia, while others will support both
Nvidia and AMD but only on PC, some will work with Displayport 1.2 but not Displayport 1.1, some will work
only with HDMI connectors but not via a Displayport to HDMI adapter, etc etc. It's a minefield.
Keep in mind that MST hubs will not give you more outputs than the card natively supports. For instance
you can't use three MST hubs with a GTX 1080 to get 10 outputs. This means not more than 6 outputs in
AMD R9 series and not more than 4 outputs in Nvidia GTX series. Even when you have ports left! This is a
physical limitation of the GPU architecture, and your computer will blue screen when connecting more
outputs than the card supports.
Tip! For Resolume, it makes absolutely zero difference if you are using an extender to create a biggeroutput, or are using multiple discrete outputs via the card itself. On both options, you will be able to use allthe available features for slicing, masking and blending. People that say otherwise don't actually knowwhat they're talking about.
When in doubt, please contact your extender sales point about compatibility.

260
Single computer with two GPUs
This works in most cases. Keep in mind, there is always a performance hit by adding extra cards, and
having two cards doesn't mean you can do twice as much. Quite the opposite.
Resolume let's your operating system decide how to render. This is great, because this means that if your
OS can detect the displays, you can use them in Resolume. New cards will work immediately, and you don't
have to wait on us to add support for them.
There are a few exceptions where multiple AMD cards in a PC will not sit nice with our OpenGLrendering. Creating an Eyefinity group with all cards usually works around these problems, but it's aproblematic set up, because your main monitor becomes part of the Eyefinity group.
Letting the operating system decide how to render also means that the OS decides what card is used for
rendering. Most of the time, this will be the card that has the main monitor on it.
So when using the outputs of the other card, the texture is first rendered on the rendering card. It then has to
be transferred down the PCIe lanes of the rendering card, via the motherboard, up the PCIe lanes of the
other card, and then sent out the ports. This will always result in a performance hit. The more cards you
add, the bigger this hit will be.
Why SLI/Crossfire is a bad idea
SLI / Crossfire is not supported in Resolume. Most people think they can use SLI to get more outputs. This
is not the case.
SLI and Crossfire are designed to let multiple GPUs combine forces for more rendering power and work as
master/slave(s) setups. Using SLI/Crossfire does not give you more outputs. When SLI/Crossfire is
enabled, the outputs of the slave card(s) are disabled, or at least outputs are reconfigured in such a way
that you do not get more outputs than from a single card.
In addition, the extra render power is not really relevant for Resolume. The GPU is used extensively in
Resolume, but it is usually not the bottleneck. Unless you are running a 100% generative set with realtime
raycasting at 4K, or cutting up dozens of 16K by 16K textures, you don't need the extra GPU power for
rendering.
Multiple computers synced via external protocol

261
This can be a great solution, especially when scalability is required.
The downside is that this requires considerable tinkering, and is best achieved using 3rd party control tools.
It's not an "out-of-the-box" solution.
Keep in mind that using protocols such as SMPTE Timecode or OSC to sync the playhead of a clip on each
computer, may not necessarily result in frame synced combined output. Each computer is running its own
processes, so it maybe slightly quicker or slower in decoding the sync signal, fetching the pixel data from
disk, or rendering and outputting the final result.
Especially when edge blending two computers together, or when seamlessly stitching them together in a
single LED wall, there will be noticeable difference between frames.

262
Media ManagerYou know it happens. You have moved files around on your computer. Maybe it happened accidentally.
Maybe you were re-organizing and you did it on purpose. It could be you've switched laptops. Whatever the
reason, files move and moving files is part and parcel of working with digital media.
Now a Resolume composition doesn't contain your media itself. If it did that, the composition files would
become unwieldy massive. Like, terrabyte order of massive. So instead, it just remembers the location of
the files you're using.
So, when you've moved files, Resolume will need to know where you've moved them.
Clip ReconnectIt starts by letting you know which files have gone missing. They'll be marked in red and have a 'Relocate'
button on them.
Clicking on the Relocate button will open the Media Manager. The Media Manager will build a list of all the
files used in your composition, and mark the missing ones in red for you.
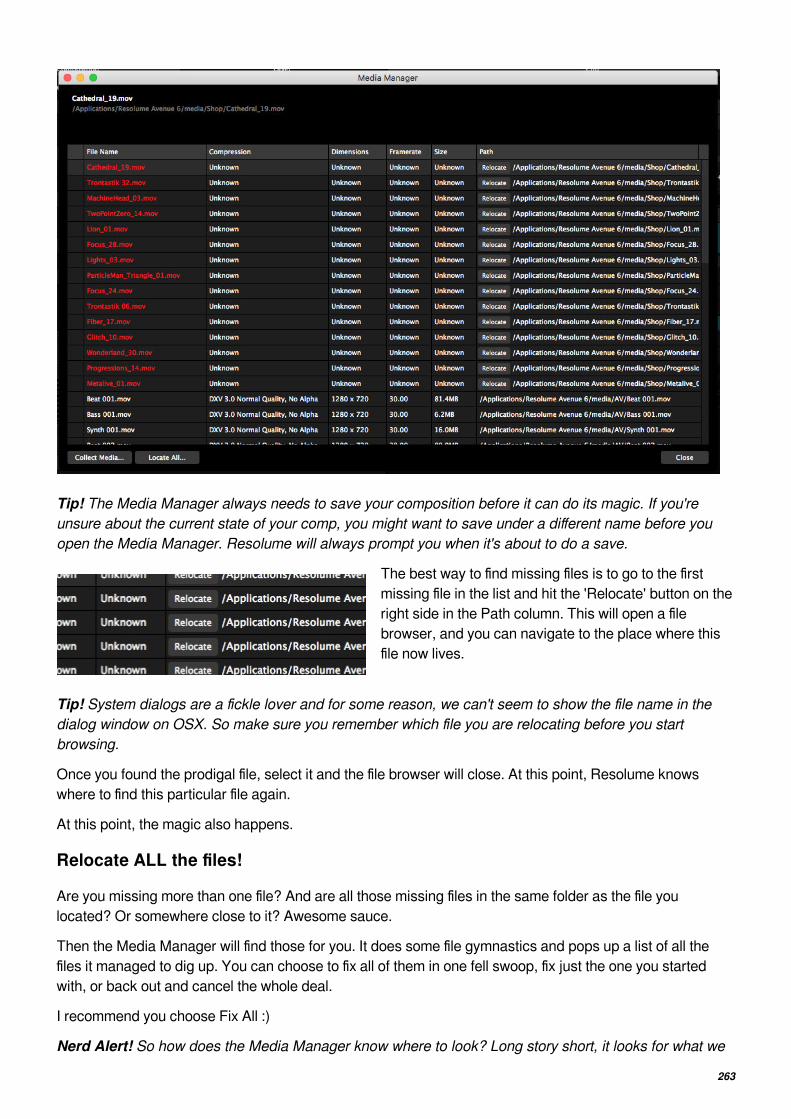
263
Tip! The Media Manager always needs to save your composition before it can do its magic. If you'reunsure about the current state of your comp, you might want to save under a different name before youopen the Media Manager. Resolume will always prompt you when it's about to do a save.
The best way to find missing files is to go to the first
missing file in the list and hit the 'Relocate' button on the
right side in the Path column. This will open a file
browser, and you can navigate to the place where this
file now lives.
Tip! System dialogs are a fickle lover and for some reason, we can't seem to show the file name in thedialog window on OSX. So make sure you remember which file you are relocating before you startbrowsing.
Once you found the prodigal file, select it and the file browser will close. At this point, Resolume knows
where to find this particular file again.
At this point, the magic also happens.
Relocate ALL the files!
Are you missing more than one file? And are all those missing files in the same folder as the file you
located? Or somewhere close to it? Awesome sauce.
Then the Media Manager will find those for you. It does some file gymnastics and pops up a list of all the
files it managed to dig up. You can choose to fix all of them in one fell swoop, fix just the one you started
with, or back out and cancel the whole deal.
I recommend you choose Fix All :)
Nerd Alert! So how does the Media Manager know where to look? Long story short, it looks for what we

264
call sibling files, files that are in the same relative position to each other. What does that mean? Well, let'ssay you had a bunch of files (file1.mov, file2.mov, file3.mov etc etc) in a folder called Old, and you movedthem to a folder called New. By pointing the Media Manager to New/file1.mov, it will of course findNew/file2.mov and the rest. They're in the same folder so they're relative to each other. But it will also lookat subfolders. So if you had files like Old/Sub/file1.mov that also got moved to New/Sub/file1.mov, thosewill be found in the same search. It also looks the other way, and scans for parent folders that are relativeto each other. So relocating a file from ComputerA/Folder1/file1.mov to ComputerB/Folder1/file.mov willfind all the files in all the folders that were in ComputerA and were moved to ComputerB. I realise this isno longer a short story, but basically if you keep your folder structure in tact, pointing Resolume to one filewill mean it finds them all.
So what if it didn't magically find all the files? That can happen if some of the files are in a completely
different place relative to each other. Maybe they were originally all on your desktop, and you've organised
them into subfolders based on content.
In that case, it's a matter of hitting relocate on the next missing file and pointing the Media Manager to it
again. It will do the same file gymnastics to find as many as it can and show you the results. Rinse and
repeat till everything is in its place again.
But it's all different!
But Resolume, why did you change this? I used to be able to just select a folder and it would findeverything. This new way is super time consuming.
I hear you but the old way had a lot of gotchas. If it worked for you, it was great. But it couldn't deal with
finding the same file name in different locations. It didn't prevent you from selecting C: and then you had to
sit there while it spent the next couple of hours going through each and every file on your computer. And
then when it couldn't find it, even though you knew where it was, you were up the creek with no options.
The new way can mean a bit more clicking, but it's super robust because you have total control. And when
you keep everything organised in the same structure, it's so fast it's stupid. So yeah, out with the old, in with
the new.
Applying Changes
The Media Manager will apply the changes when you close it. It's good to know that at this point, it does not
save your composition! So remember to hit save when you're happy with the changes that were made!
Replace FileYou can use the Media Manager to replace a particular file with a
different one. Even when no files are missing.
You can open the Media Manager from the File menu.
Then, right click on the file you'd like to replace and choose Set Path. You can then select the file you'd like
to replace it with. This is a great way to update a particular file with an updated version.
"This time it's really the final version. I promise there will be no more changes. Let's render Intro v17 FinalDef v3 rev11.mov"

265
Collect Media
The Media Manager can also be used to collect and gather the files in your composition in one place.
To do this, select 'Collect Media' from the bottom left.
The Media Manager will show you how many files there currently are in your composition, and how much
space they take up. You can then select a folder where you would like to copy the files to.
The Media Manager always copies! Resolume will never try to delete files. We know your content is holy.
Media
This will copy all your files into a single folder called Media. Inside Media, it will make subfolders for every
deck and copy the content of that deck into it. Files that aren't part of a deck, like masks on the composition,
are copied into their own folder.
It will then make a copy of the current composition, update the file locations and place it next to the Media
folder.
There. You're all set to move your composition with all its content to a separate drive or another computer.
Also, it cleans up the mess that you made when you were being creative and pulled files from 23 different
subfolders on your computer, 12 more subfolders shared from your friend's laptop, 6 subfolders on 2
external drives, 1 file from that Hello Kitty thumb drive you secretly keep under your pillow, 2 files from your
Google Drive and one picture from your mom's Dropbox.
Nerd Alert! Having separate folders for decks does mean that if you're using the same file in two differentdecks, it will be copied twice. We feel this is acceptable because it makes sure you can copy a singledeck and still be sure you have all the files associated with it. The Media Manager is smart enough toknow that when you're using the same file more than once in the same deck, it should only copy it once.
Associated Files
But Resolume. My show is more than my content. I also want you to collect my advanced output, myfixtures, my custom effects, my presets and everything else.
Yes! Good point!
As it is now, managing just your content is already a task that comes with many risks that we have to take
very seriously. Once we feel that we're ready to take on additional responsibilities, we'll start adding all

266
these other files as well.
For now, the best way to make sure you have all your user files, is to just copy the Resolume folder from
Documents. This folder contains all the user settings, preferences and presets that you create.

267
RecordingThe record function records the composition output to disk and immediately imports this movie into
Resolume as a new clip when you stop recording. All this is done without interrupting the video output.
SetupBefore you start recording, you need to go to the General tab of the Preferences window and select the
folder that you would like recorded files to be stored in and whether you would like to record video, audio or
both.
By default the files are stored in Documents/Resolume Avenue/Recorded
Action!To start recording press the 'Record' button on the toolbar. To stop recording press it again.
That was pretty simple huh? The movie you just recorded is saved to disk and inserted in the first empty
clip on the bottom layer so you can directly use it again in your mix.
Note that recording does not interrupt your mixing or the video output so go ahead and go crazy on the
effects and layers while you are recording.
The recorded video files are Quicktime with the Photo Jpeg codec at 100% quality. The audio files are in
uncompressed WAV format.
To 4K and beyondThe recorder is super fast but of course it still depends on your hardware and what you're doing, but
generally you'll have to push it pretty hard to make it run out of memory or get it to stop otherwise.
This bad boy will keep on trucking, even at 4K and beyond.

268
Ableton LinkAbleton Link is an open source protocol that helps musicians keep in time. It's primarily used to sync the
tempo of different devices or software.
It's design is very much like an open jam session. Once it's running, everyone can join the Link session and
control it. It works over network, so anyone connected to the same network will be able to join in.
Using LinkBy default, Link is hidden in the View menu. After making it visible via View > Show Ableton Link, a button
will pop up in the toolbar. You can then click the button to turn Link on.
At this point, Resolume will start looking for any other software in a Link session. If it finds any, it will join
automatically. It will show you how many other devices are currently in the session.
It will now automatically keep the BPM and the current position in the measure in sync between all
connected computers. Change the BPM in Ableton and Resolume will follow. Nudge the BPM forward a bit
in Resolume, and Ableton will follow.
When using Link, the Resync and Pause buttons for the BPM are disabled. It's considered bad musical
practice to do a hard reset of the measure like this, or completely pause the BPM altogether.
Great power, great responsiblity
Link assumes complete equality of everyone in the session. This means you can change the BPM just as
abruptly as anybody else. So when you hit x2 on the BPM to accentuate a musical climax, the BPM on all
other connected softwares will speed up as well.
This is great if you're just using Link to keep multiple VJ computers in sync. But your DJ buddy might not be
so amused by it.

269
Preferences
General Preferences
Record
Here, you can set the directory that Resolume will use to store recordings that you make and whether to
record Video and/or Audio. See the section on Recording for details on how this works.
Clip Panel
Choose whether or not Resolume should update the clip panel when a clip is triggered. You'll want to turn it
off when you are for instance using an external source for triggering a sequence of clips (via MIDI, OSC or
DMX for instance), while you are applying effects on another clip at the same time.
Clip Start Offset
The Clip Start Offset allows you to let a clip start an amount milliseconds further into the timeline of the clip,
to compensate for delays with MIDI triggering and/or long cable runs.
Scrolling
When this is checked, Resolume scrolls the deck to the clip or layer you just selected. Can be handy if you

270
need to see that particular part of the deck. Can also be annoying if you were focused on another part of the
deck. It's a matter of preference, really. Hence this toggle in the Preferences.
Font
The Arial Unicode checkbox changes the font used by Resolume. If you are using non-latin characters, and
having trouble displaying them correctly please enable this.
Quit Confirmation
When Quit Confirmation in enabled, Resolume will wait for you to confirm your choice when you've decided
to quit. With this disabled, Resolume will shut down immediately when you hit CTRL/CMD+Q or choose to
quit via the menu.
Tip!! Turn off the Quit Confirmation in combination with the 'Trigger First Clip when Composition HasLoaded' function found in the Layer menu to use Resolume for fixed installations where the computerstarts up and shuts down automatically.
Audio PreferencesThe audio tab presents you with options
that control how audio should be output
from Resolume.
Audio Output Device
Under Audio Output Device you can select the device that Resolume should use for audio output. If an
ASIO device is selected, an extra button will be displayed that enables access to ASIO settings.

271
Output Channels
You can then select which channels should be used for the main output via Master Output Channels. If you
are using an audio device that supports more than two channels, you can choose the channels used for
monitoring the preview audio via Preview Output Channels.
Sample Rate
Higher sample rates provide higher quality audio but will require more processing, especially if audio effects
are in use. 44100 is a good choice.
Buffer Size
Higher buffer sizes will introduce more latency into the system but setting the buffer size too low may cause
glitches in the audio. 512 or 1024 are usually safe choices.
Audio Input Device
Similar to selecting the output device, here you can select which device Resolume uses for all incoming
audio.
Audio FFT
Under External Audo FFT Input you can the channels that should be used for external audio analysis. You
can boost the gain if the signal is coming too low.
Tip! You can also set the FFT gain in the main interface via View > Show FFT Gain
SMPTE
On Arena, you can select which channels to use for your source of SMPTE sync. You can read all about
this in the SMPTE chapter.
VST Directories
VST Plugin Directories are the directories (folders) that Resolume should look in for VST audio effects and
sources.
Video Preferences

272
FFGL Directories
On the Video tab, you can select the directories that you want Resolume to look in for FFGL effects and
sources.
Resolume always checks the Extra Effects folder in the user's Documents. For a hassle free plugin setup,
install custom plugins there. They will then load automatically on the next startup.
Preview Monitor Background
You can set the preview monitor background to display transparent pixels on a dark checkerboard, a light
checkerboard, or just as black.
DMA Textures
This is a very nerdy setting. You can use it to change how Resolume sends your pixels from your
computer's hard drive to the graphic card.
The recommended setting is Force ON. This is also the default. Only if you are experiencing performance
problems on older or lower end GPUs, should you switch to Force OFF.
Autodetect is a legacy setting. It fails to detect the correct setting in a lot of cases, so that's why we
recommend to just force it on.
MIDI Preferences
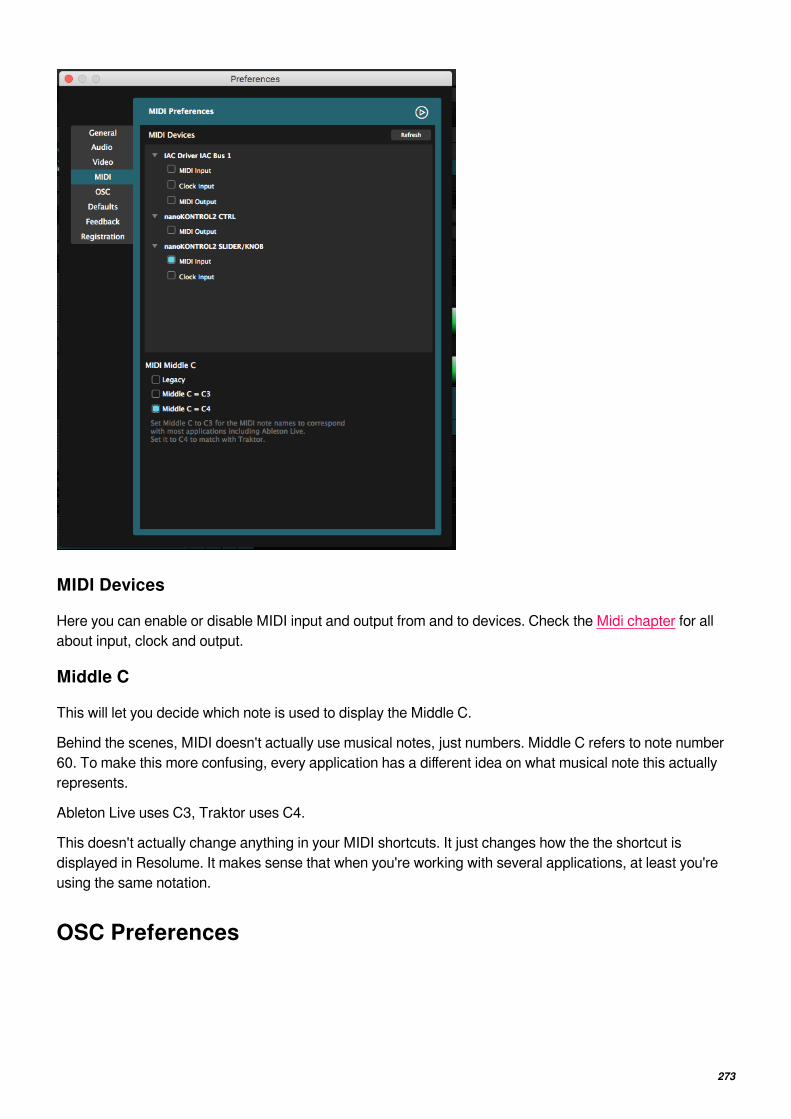
273
MIDI Devices
Here you can enable or disable MIDI input and output from and to devices. Check the Midi chapter for all
about input, clock and output.
Middle C
This will let you decide which note is used to display the Middle C.
Behind the scenes, MIDI doesn't actually use musical notes, just numbers. Middle C refers to note number
60. To make this more confusing, every application has a different idea on what musical note this actually
represents.
Ableton Live uses C3, Traktor uses C4.
This doesn't actually change anything in your MIDI shortcuts. It just changes how the the shortcut is
displayed in Resolume. It makes sense that when you're working with several applications, at least you're
using the same notation.
OSC Preferences

274
Here you can enable or disable OSC
input and output, as well as set the
relevant ports and IP addresses used by
OSC.
For more info check the section on controlling Resolume with OSC.
DMX PreferencesThe DMX preferences tab is available on Arena only.
You can read all about setting up Lumiverses and Art-Net nodes in the DMX chapter of the manual.
Keep in mind! The Network Adapter switches both Art-Net input and output to the selected adapter!
DefaultsThis section allows you to change several
default settings to be used when
importing files or creating a new
composition.
Default Transport and Play Mode
Whatever you choose here, will be the default setting for files that you import from that moment on.
So for instance, if you always use your video clips on BPM Sync and 'play once and eject', you can choose
these as the default settings.
You can choose different settings for video and audio. AV files or videos with a (silent) audio track will use
the settings for audio.
Note that this does not affect clips that were already imported. Also you can still change this setting for
individual clips after importing as well.
Default Blend Mode
Choose which Blend Mode newly created layers will use.

275
Tempo Nudge Range
When nudging the BPM up or down, this sets what percentage of the current BPM it shifts the BPM up or
down with.
10% is good when doing actual audio stuff. Personally I think 25% is more suited when syncing visuals to
music.
You know, this is not actually a default setting. It's not applied as a default for anything. It's a personalpreference, so it should go in the General Preferences. But that page was pretty full. So we put it here. Iguess that is how we roll sometimes.
FeedbackHere you
can contact
us to tell us
how much
we suck. Or
how
awesome
we're doing.
Or a bit of
both.
Either way, we always love to hear from you.
Registration

276
Read all about making your Resolume legit and how to switch your license between computers in the
Registration chapter.

277
Tech Specs
Minimum SpecsWindows
Windows 7 64 bit, SP 1
Nvidia or AMD graphics card
4GB RAM
Mac
OSX 10.9 Mavericks
AMD or Iris Pro graphics card
4GB RAM
Recommended SpecsWindows
Windows 10
i7 Processor, 6 core, 3.7 GHz
Nvidia RTX 2070
M2 SSD
16 GB Ram
Mac
OSX 10.14 Mojave
i7 Processor, 6 core, 2.6 GHz
Radeon Pro 560X
SSD
16 GB Ram

278
Modifiers and ShortcutsOn both the Input Selection and Output Transformation views, there are several shortcuts, key modifiers
and contextual menus to help you move and reshape your slices.
In other words, these shortcuts apply to the Advanced Output, not the regular interface!
General ShortcutsCtrl-Z and Ctrl-Y (Cmd-Z and Cmd-Y on a Mac) undo and redo your last steps.
Key ModifiersHold down Shift while dragging to constrain movement to either the x or y axis.
Hold down Alt while dragging to make a duplicate.
Hold down Ctrl while dragging to temporarily disable snapping.
Hold down Shift while scaling slices to constrain aspect ratio.
Hold down Alt while scaling to scale from the center, rather than the opposite end.
Hold down Shift while rotating to constrain rotation to 45 degree angles.
Navigating the StageCtrl-+ and Ctrl-- (Cmd-+ and Cmd-- on a Mac) zoom in and out.
Mouse scroll wheel zooms in and out.
Hold down spacebar while dragging to pan around the stage.
NudgingUse the keyboard arrow keys to nudge 1 pixel at a time .
Hold down Shift while nudging to nudge 10 pixels at a time.
Slice ShortcutsDuplicate with Ctrl-D (Cmd-D on a Mac).
When first using Alt-Drag to make a transformed copy, Ctrl-D will then duplicate and repeat the
transformation.
Backspace deletes the selected slice(s).
Mask and Polygon pointsDouble click anywhere on the path to add a point there.

279
Double click a point to delete.
Shift-click a point to add/remove it from the selection.
Contextual MenusThese differ per item, but generally will let you quickly access frequently used scalings and positions.
Center X centers the slice on the x-axis.
Center Y centers the slice on the y-axis.
Mirror X places the slice exactly on the opposite side of the center x-axis.
Mirror Y places the slice exactly on the opposite side of the center y-axis.
Left half, Right half, Bottom half, Top half scale the slice to exactly that half.
Whole Area scales the slice to the whole stage. This is handy reset option for when you've messed
things up beyond repair.
Make Triangle creates a triangle shape that fills the entire stage.
Make Circle creates a circle shape that fills the entire stage.
Bring Forwards/Backwards moves the slice up or down in the slice stack. This is essentially the
same as dragging the slice around in the slice list on the left side.
Duplicate duplicates.
Match Input / Output Shape
These are so important and useful, we've singled them out for you. They will let the slice take the position
and shape that it has on the other stage. This way you can quickly match aspect ratios and positioning on
the Input Selection stage to the Output Transformation stage or vice versa.
Input/Output Guides
These will let you load a still image file in the background, to use a guide while lining up your slices.

280
It will load the file at its native resolution and position it in the top left of your screen.
You can adjust the opacity of the input map via the Opacity slider.
Loaded the wrong map to the wrong screen? Replace it via drag and dropping the right one, or remove it
with the 'X' button.
View OptionsShow Slice Grid
This will show the outlines and a grid for the selected slice.
Show 8x8 LED Grid
This will divide the output up into 8x8 pixel lines. When snapping is enabled, your slices will then snap to
this grid. This is useful for making LED pixelmaps, since 99% of LED screens are made up of blocks of 8
pixels.
Identify Slices
This will light up your slices in white when you mouse-over them. In combination with Show in Output, this is
a great way to make sure your input map lines up with your actual stage. Or to quickly make sure which

281
slice you need to adjust.
Show in Output
With this enabled, the Image Guides will show in the actual output. This is
very useful to double check if everything is aligned correctly.
Also, when Slice Grid is enabled, it will show both the grid as well as a red crosshairs on the actual output,
to help you get your bearings.
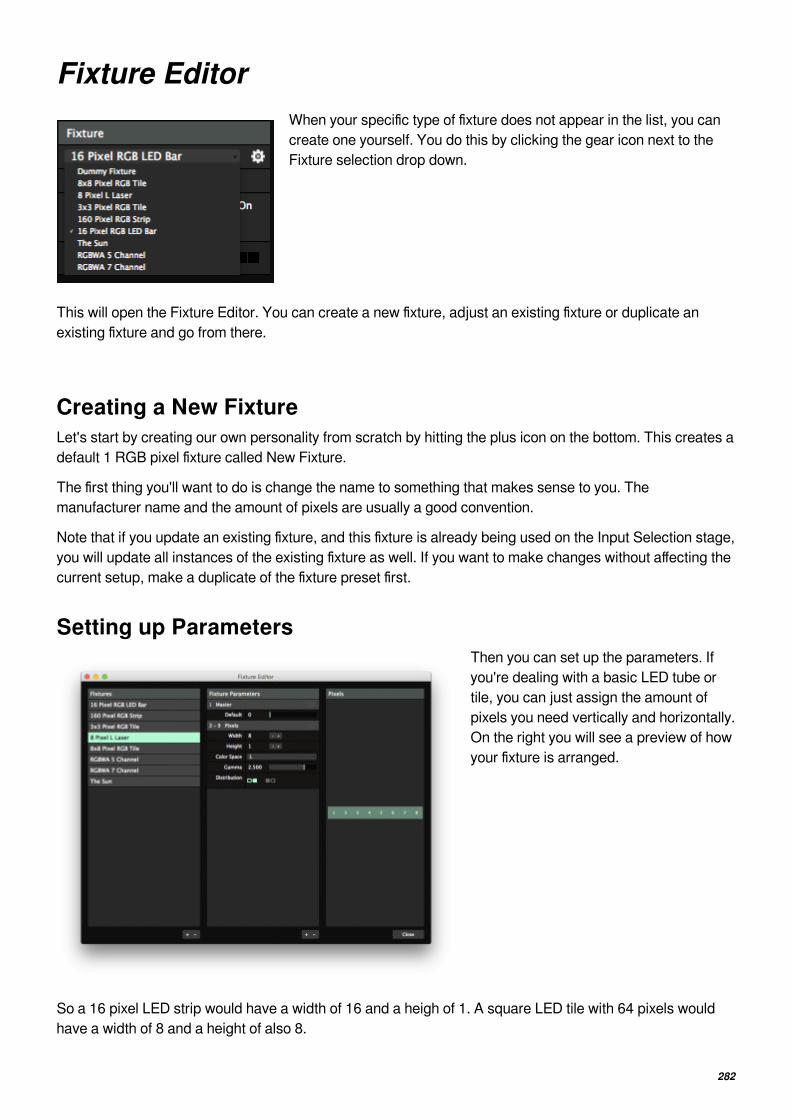
282
Fixture EditorWhen your specific type of fixture does not appear in the list, you can
create one yourself. You do this by clicking the gear icon next to the
Fixture selection drop down.
This will open the Fixture Editor. You can create a new fixture, adjust an existing fixture or duplicate an
existing fixture and go from there.
Creating a New FixtureLet's start by creating our own personality from scratch by hitting the plus icon on the bottom. This creates a
default 1 RGB pixel fixture called New Fixture.
The first thing you'll want to do is change the name to something that makes sense to you. The
manufacturer name and the amount of pixels are usually a good convention.
Note that if you update an existing fixture, and this fixture is already being used on the Input Selection stage,
you will update all instances of the existing fixture as well. If you want to make changes without affecting the
current setup, make a duplicate of the fixture preset first.
Setting up ParametersThen you can set up the parameters. If
you're dealing with a basic LED tube or
tile, you can just assign the amount of
pixels you need vertically and horizontally.
On the right you will see a preview of how
your fixture is arranged.
So a 16 pixel LED strip would have a width of 16 and a heigh of 1. A square LED tile with 64 pixels would
have a width of 8 and a height of also 8.
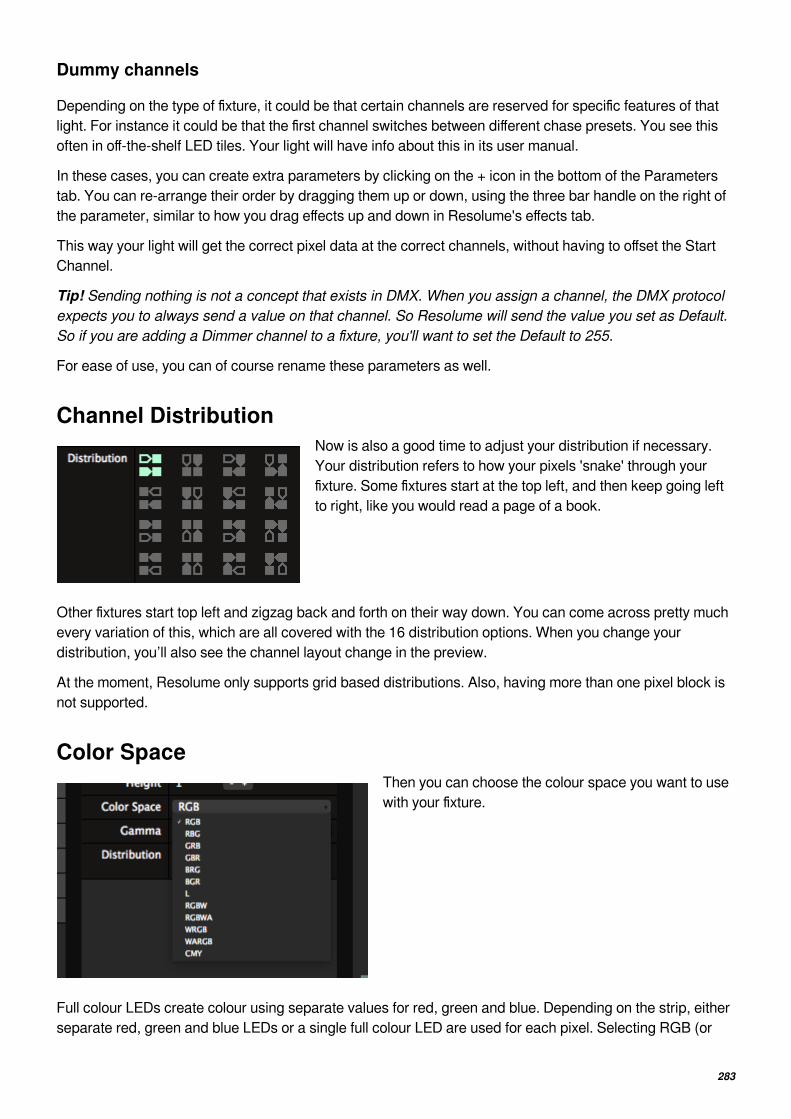
283
Dummy channels
Depending on the type of fixture, it could be that certain channels are reserved for specific features of that
light. For instance it could be that the first channel switches between different chase presets. You see this
often in off-the-shelf LED tiles. Your light will have info about this in its user manual.
In these cases, you can create extra parameters by clicking on the + icon in the bottom of the Parameters
tab. You can re-arrange their order by dragging them up or down, using the three bar handle on the right of
the parameter, similar to how you drag effects up and down in Resolume's effects tab.
This way your light will get the correct pixel data at the correct channels, without having to offset the Start
Channel.
Tip! Sending nothing is not a concept that exists in DMX. When you assign a channel, the DMX protocolexpects you to always send a value on that channel. So Resolume will send the value you set as Default.So if you are adding a Dimmer channel to a fixture, you'll want to set the Default to 255.
For ease of use, you can of course rename these parameters as well.
Channel DistributionNow is also a good time to adjust your distribution if necessary.
Your distribution refers to how your pixels 'snake' through your
fixture. Some fixtures start at the top left, and then keep going left
to right, like you would read a page of a book.
Other fixtures start top left and zigzag back and forth on their way down. You can come across pretty much
every variation of this, which are all covered with the 16 distribution options. When you change your
distribution, you’ll also see the channel layout change in the preview.
At the moment, Resolume only supports grid based distributions. Also, having more than one pixel block is
not supported.
Color SpaceThen you can choose the colour space you want to use
with your fixture.
Full colour LEDs create colour using separate values for red, green and blue. Depending on the strip, either
separate red, green and blue LEDs or a single full colour LED are used for each pixel. Selecting RGB (or

284
one of its variations) assigns 3 channels for each LED in your strip.
Mono coloured LEDs use the weighted luminance value of the sampled pixel. Selecting L will send this
luminance value over a single channel for each LED in your strip.
Some lights prefer to work with CMY values instead of RGB. Here Resolume does a regular 1:1 conversion
from the pixel's RGB values to the CMY color space.
Resolume also supports less common varieties such as RGBW and RGBWA. We approximate the color on
the extra white and/or amber LEDs by dimming the other channels and sending out on this channel instead.
At the moment, Resolume does not support other color spaces like 16 bit, UV or other exotic types.
Gamma CorrectionIf you're dealing with an unusual type of LED, you can tweak the Gamma Correction of the LEDs. Most of
the time the default setting of 2.5 should be fine.

285
Directory ListResolume creates and stores data in several locations on your computer. Here is a list.
When you are messing around with Resolume's preference files and the like, we're going to assume you're
smart enough to replace the part of the directory name that says "Avenue" with "Arena".
Application folderContains the application and licensing information. Has subfolders for
Default: contains fixtures, presets for the GUI, sources and effects, as well as the default shortcut
presets for keyboard and midi.
Docs: contains language files for GUI and help
Licenses: contains licensing info for external libs
Manual: contains the manual. Duh.
Media: contains the included video files.
Plugins: contains the included audio and video plugins.
On Mac, it can be found in Macintosh HD/Applications/Resolume Avenue/
On Windows, it lives in C:\Program Files\Resolume Avenue\
User DocumentsThis contains all the files that you have created.
Compositions: all the Resolume comps you've created
Extra Effects: 3rd party plugins can be installed here and will be loaded automatically
Fixture Library: any custom fixture profiles are stored here
Preferences: these files store how you've layed out your interface, which shortcut presets you were
using, what composition you were using last, etc.
Presets: user presets for sources, effects, GUI and the advanced output
Recorded: all the videos and stills you've recorded
Shortcuts: all the shortcuts for MIDI, keyboard, OSC and DMX you've created
Can each be found in their own subfolder at
MAC: Macintosh HD/Users/[username]/Documents/Resolume Avenue/
Windows: C:\Users\[username]\Documents\Resolume Avenue\
Log filesCan be found at:
MAC: /Users/[username]/Library/Logs/Resolume Avenue/Resolume Avenue log.txt
Windows: C:\Users\[username]\AppData\Roaming\Resolume Avenue\Resolume Avenue log.txt
Alternatively, you can use the Feedback option found in the Preferences, with the logfile checkbox ticked, to
send it to us.

286
Thumbnail Previews & Text AtlasMac: /Users/[username]/Library/Application Support/Resolume Avenue/
Windows: C:\Users\[username]\AppData\Local\Resolume Avenue\
Registration filesMac: Macintosh HD/Library/Application Support/Resolume Avenue/registration
Windows: C:\Users\Public\Public Documents\Resolume Avenue\registration
DXV pluginsQuicktime:
MAC: /Library/QuickTime/DXV3Codec.component
Windows: C:\Program Files (x86)\QuickTime\QTSystem\DXV3Codec.qtx
Adobe DXV plugin (AE, Premiere):
MAC: /Library/Application Support/Adobe/Common/Plug-ins/MediaCore/7.0/Resolume DXV
Windows: C:\Program Files\Adobe\Common\Plug-ins\MediaCore\7.0\Resolume DXV
QuickLook:
MAC: /Library/Quicklook/ResolumeQuicklook.qlgenerator