Publicity House Msunduzi Municipality - SAHRIS
17
Publicity House Repairs March 2014 Specification of Works for the Repairs and Maintenance to Publicity House Chief Albert Luthuli Street, Pietermaritzburg for the Msunduzi Municipality Derek E Osborne MRICS MCIAT KZNIA Affiliate PrSArchT Chartered Building Surveyor 110A Elved Wright Circle, Hayfields, Pietermaritzburg 3201 Tel: 033 396 4567 Fax: 086 592 6851 e-mail [email protected]
-
Upload
khangminh22 -
Category
Documents
-
view
0 -
download
0
Transcript of Publicity House Msunduzi Municipality - SAHRIS
Publicity House Repairs March 2014
Specification of Works
for the
Repairs and Maintenance
to
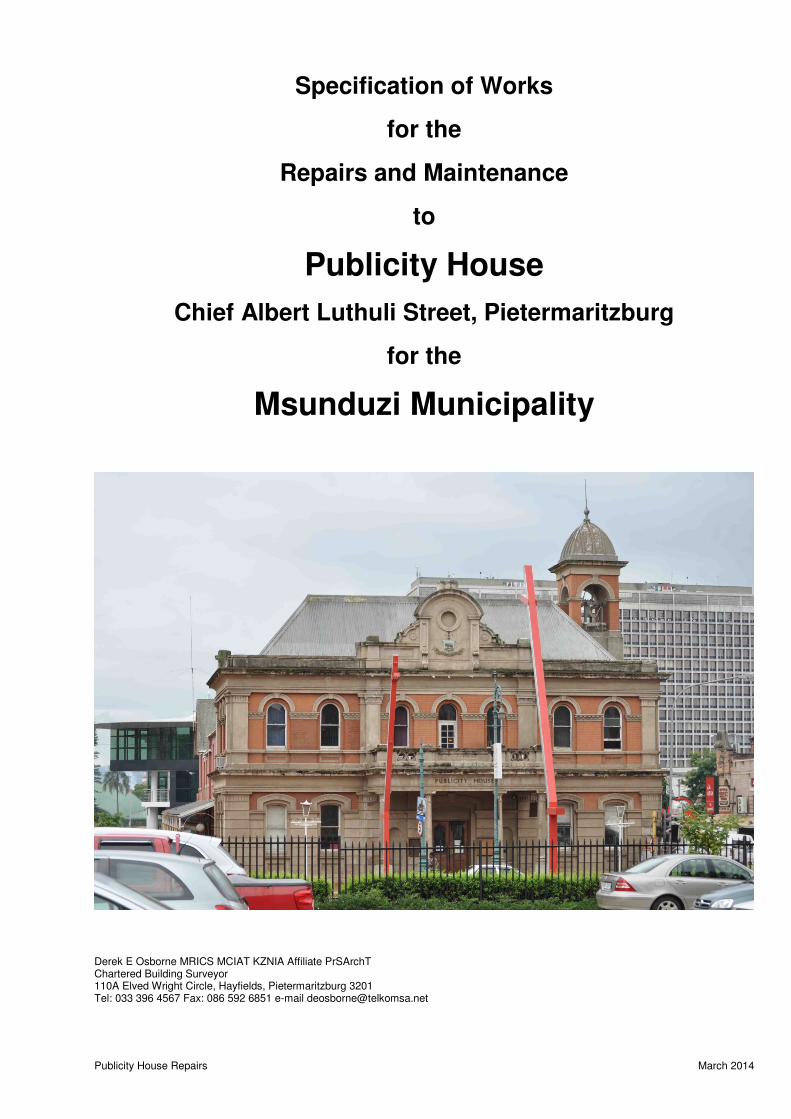
Publicity House
Chief Albert Luthuli Street, Pietermaritzburg
for the
Msunduzi Municipality
Derek E Osborne MRICS MCIAT KZNIA Affiliate PrSArchT Chartered Building Surveyor 110A Elved Wright Circle, Hayfields, Pietermaritzburg 3201 Tel: 033 396 4567 Fax: 086 592 6851 e-mail [email protected]

2 Publicity House Repairs March 2014
Specification Works for the External Repairs and Re-decoration of Publicity House, Chief Albert Luthuli Street, Pietermaritzburg
1 Extent of The Works:
1.1 The extent of the works is the complete repair and re-decoration of all external facades of the building including the yard area.
1.2 The Toilet Block is specifically excluded from this specification.
2 Documents:
2.1 No drawings could be found of the original buildings and therefore none are available for issue for this contract.
2.2 This specification details the various types of work required and in some cases the method of dealing with such. These instructions shall be carefully followed.
2.3 A schedule of works is included which details where the various types of work specified are required supported by photographs showing the general location.
2.4 Photographs have been taken generally in an anti-clockwise direction commencing at the west corner of the building.
2.5 The various zones of the building are reference A through G as follows:
Zone A North-West Façade.
Zone B South-West Façade.
Zone C North-East Façade.
Zone D South-East Façade.
Zone E Yard.
Zone F Bell Tower
Zone G Roof:
3 Provisional Items:
3.1 In some cases provisional items mentioned in this specification can only be decided upon once certain works have been carried out by the Contractor eg. cleaning carried out, access provided for inspection etc.
3.2 Cleaning and access provision relative to these items shall be executed as soon as possible after the works commence on site.
3 Publicity House Repairs March 2014
4 Quality of Work:
4.1 The Contractor is reminded that this is a Heritage Building and all work thereon is required by Amafa to be of a high standard. All work shall therefore be carried out by tradesmen who have experience in the various types of work specified.
4.2 Should there be any operative, in the opinion of the Project Manager, carrying out work which is not of the required standard, the Contractor will be instructed to remove that person from site or move him to work of a lesser nature.
5 Materials:
5.1 No alternatives to materials specified will be permitted without written permission first being obtained from the Project Manager.
6 Buildings Occupied:
6.1 The building will be occupied at all times during the works.
6.2 Should it be necessary to gain access to the building for any particular operation then the Project Manager shall be advised so that any necessary arrangements can be made with the occupants to move elsewhere.
7 Instructions:
7.1 The Contractor shall not take instructions from anyone other than the Project Manager or person so designated by him and these instructions shall be in writing.
7.2 Any work therefore carried out without written instruction will be entirely at the Contractor’s risk.
8 Hoardings:
8.1 Hoardings shall be erected around the site as and when required by the Municipality and to their requirements. These shall be maintained in good order for the duration of the contract and cleared away on completion. Holes in the newly tarred roadway for hoarding supports will not be permitted.
9 Municiple Pavements and Roads:
9.1 The Contractor shall inspect the pavements and roads around the building for damage prior to his commencing works on site and shall report same to the Project Manager supported by photographs. Any damage found at the end of the project which can be attributed to the Contractor shall be made good at his expense.
10 Protection:
10.1 The Contractor shall provide for the protection of all works for which a certificate of practical completion has not been issued and is liable to damage from any causes.

4 Publicity House Repairs March 2014
10.2 Particular protective measures shall be taken when any roof sheeting is removed against damage of the building area from rain and suitable tarpaulins shall be available at all times to cover open roofs.
11 Naked Flames:
11.1 The use of blow lamps or similar equipment where naked flames are required will be permitted when stripping paintwork, varnish etc. from doors and windows or any timberwork. Chemical strippers shall be used in lieu.
11.2 When flame is required for re-bonding torched-on waterproofing a fire extinguisher shall be available at the area of work at all times.
12 Samples:
12.1 Samples of all mortar and plaster mixes shall be made as soon as possible after works commence on site and shall be submitted to the Project Manager for approval.
12.2 To limit the risk of cracking, sand from the Durban area has been found to be less likely to produce this.
12.3 Various sources of sand will need to be investigated so that the finished item is matching the existing in both colour and texture.
13 Electricity and Water:
13.1 The Contractor shall be permitted to use electricity and water services already on site by arrangement with the Municipality.
13.2 All necessary cables, distribution boards, pipework etc. shall be provided by the Contractor and shall be remove on completion.
13.3 Points of connection to these services will be pointed out to the Contractor on site.
14 Specification:
14.1 Brickwork Repairs:
14.1.1 Where brickwork repairs are to be carried out these shall be with old Maritzburg Red face bricks. A small quantity of these bricks is available at Macrorie House Museum at a cost of R2.50 each and will require old mortar removing from same.
14.1.2 Damaged bricks shall be cut out by drilling a series of holes into the brick overlapping one another and then breaking out the remainder with sharp cold chisels and bolsters. Brick joints may be cut into with a small angle grinder taking care not to damage sound bricks.
14.1.3 Pockets in wall shall be thoroughly cleaned out and flushed with a volatile solvent and dampened with clean water before new bricks are inserted.
5 Publicity House Repairs March 2014
14.1.4 Mortar shall be 1:2:9 mix cement, hydraulic lime and sand. Backs of bricks shall be well buttered so that when inserted the mortar is exuded around the sides of the bricks. Complete jointing with mortar packed tightly into joints and finish to match existing.
14.2 Repairs to External Plasterwork to Classical Section of Building including Tops of Cornices and String Courses:
14.2.1 Break away loose plaster and clean out cavity behind. Treat with a Biocide.
14.2.2 Samples shall be supplied of a properly cured mix for approval before the general repairs commence. It is important that the colour and texture of the new plaster is carefully matched to the original work. A quality sand should be used which may require importing from the Durban area as local sand has too much clay content which causes shrinkage cracks.
14.2.3 New plaster shall be of 1:2:9 mix cement, hydraulic lime and sand applied in layers not exceeding 10mm thick. Each layer shall be allowed to cure before the next is applied.
14.2.4 In repairing thick plaster, particularly mouldings, it will be necessary to provide reinforcement. This shall take the form of 3mm dia. stainless steel wire posts fixed into drillings in the structure with a general purpose paste epoxy and stainless steel wire laced between the posts. Rods to be set at not exceeding 250mm centres.
14.2.5 Where moulded plaster is being repaired the new work shall be closely aligned with the old without steps in surface.
14.2.6 New work shall be finished with a wood float.
14.3 Repairs to Painted Plasterwork:
14.3.1 Plaster repairs shall be effected by hacking off areas of badly crazed plaster and re-plastering with a 1:2:9 mix of cement, hydraulic lime and sand.
14.3.2 After removal of old plaster walls shall be dampened with clean water applied with a block brush and surplus allowed to drain off.
14.3.3 New plaster shall have a steel float finish and shall be finished level with adjacent surfaces.
14.4 Repairs to Cracks in External Plasterwork to Classical Section of Building:
14.4.1 Cut out cracks in external plasterwork and fill with a similar mix as prepared for the repairs previously described. Treat with a Biocide.
14.4.2 Cracks may need opening slightly to say 3mm wide to enable proper filling.
14.4.3 Repair mix to be trowelled into joint to fill same and excess cleaned off. A surface application wiped across the crack will not be acceptable.
6 Publicity House Repairs March 2014
14.5 Moulded Plaster Cornice Repairs:
14.5.1 Where plaster to cornices has broken off make good with a 1:2:9 mix cement, hydraulic lime and sand in layers not exceeding 10mm thick.
14.5.2 Clean background using a volatile solvent prior to plaster application.
14.5.3 Thick sections will require reinforcing with 3mm dia. stainless steel wire rods epoxied into drillings into the backing structure and interlaced with stainless steel wire. Rods to be set at not exceeding 250mm centres.
14.6 Removal of Old Facing Material from Cornices and String Courses:
14.6.1 Remove all flaking and loose facing material from cornices and string courses using a wooden scraper to avoid scratching the surface.
14.7 Waterproofing of Tops of Cornices and String Courses:
14.7.1 Clean down surfaces and apply abe Durarep FR Polymer Modified Fibre Reinforced Structural Repair Mortar. Form a nominal fillet between cornice and wall and carry Durarep up face to 30mm. Surface to be finished smooth with a steel float.
14.7.2 Freshly applied Durarep FR shall be cured immediately, once the surface will not be marred, using abe Duracure SBC. Protect adjacent surfaces against over coating.
14.8 Spalling Reinforcement:
14.8.1 Cut back concrete around the exposed reinforcement and to 100mm beyond the extent of rust.
14.8.2 Wire brush reinforcement to remove all rust and scale.
14.8.3 Apply Pro-Struct 688 Zinc Rich Primer ensuring that reinforcement is coated all around. (Check with mirror).
14.8.4 Make good concrete using Pro-Struct 528VO-MCI Five Star Structural Concrete.
14.9 Concrete Coping Repairs:
14.9.1 Where edge of radiused top coping units have broken off exposing reinforcement clean off reinforcement of dirt, rust etc. and cut back concrete to100mm beyond rust. Apply one coat of Pro-Struct 688 Zinc Rich Primer and ensure that coating is applied all around.
14.9.2 Form shutter as required and make good damaged area using Pro-Struct 529-MCI Five Star Structural Concrete.
14.9.3 Where copings are cracked or where joints are open rake out and fill with Pro-Struct 524 General Purpose Repair Mortar.

7 Publicity House Repairs March 2014
14.9.4 Where coping joints have been bandaged over apply abe Super Laycryl Liquid Waterproofing Compound and paint out with walls.
14.10
14.11 Poster Removal from Walls:
14.11.1 The Contractor shall, for poster removal from walls, use the services of a specialist sub-contractor such as Graffiti Removal Services in Durban. Contact Mr Gary Roper on 082 877 5330.
14.11.2 The use of high pressure water for removal should be kept to the absolute minimum to avoid the inducing of efflorescence.
14.11.3 Similarly, chemical cleaners should be used with care to avoid staining.
14.11.4 In the first instance the sub-contractor shall try a sample of his various processes, specifically on a painted wall to see what effects there are before trying on an un-finished plastered or face brick wall.
14.12 Clean Out Roof Void:
14.12.1 Clean out roof void of pigeon debris to classical building and disinfect.
14.13 Cleaning of Brickwork:
14.13.1 Clean down all face brickwork using a nebulous spray of clean water and natural bristle scrubbing brushes. These brushes are not available locally but can be made up to order by Academy Brushware in Germiston. Contact details – Conrad Koekemor on 084 448 5642 or 011 873 1266. Brushes are handmade and take some ten days to assemble.
14.13.2 Only sufficient water should be used to soften dirt. Any stubborn excrescences should be removed using wooden wedges. As a last resort phosphor bronze brushes could be used. Steel scrapers are strictly forbidden.
14.14 Cleaning of External Plasterwork to Classical Section of Building:
14.14.1 All loose and flaking previously applied material shall be removed from cornices, string courses etc. taking care not to damage the profile.
14.14.2 Plasterwork shall then be cleaned down using a nebulous water spray and natural bristle scrubbing brushes all as detailed for brickwork.
14.15 Capping to Cornices etc:
14.15.1 Remove all loose material from surface and clean off dirt, oil, grease, paintwork, cement laitance etc.
14.15.2 To raking top surface of cornices and string courses apply a coating of abe Durarep Surface Repair Mortar.

8 Publicity House Repairs March 2014
14.15.3 Along front edge of cornices and string course mouldings fit a 25 x 25 x 1mm thick aluminium angle bonded on with abe Epidermix 372 General Purpose Epoxy Adhesive as a drip.
14.16 New Timber Windows:
14.16.1 New timber windows to Classical Building shall be manufacture in Oregon Pine and to other buildings, hard red Meranti, to the same detail as the existing window being replaced.
14.16.2 Original sash weights, sash pulleys and sash fasteners shall be re-used.
14.16.3 Sash pulleys and fasteners shall be properly cleaned and lubricated before being fixed.
14.17 Sash Cords, Sash Pulleys and Sash Fasteners:
14.17.1 All sash pulleys shall be inspected, made to be free running, freed from paint and to be suitably lubricated. Any damaged pulleys shall be reported to the Project Manager.
14.17.2 Where new sash cords are required these shall be waxed cotton sash cords 8mm in diameter.
14.17.3 Waxed sash cord is available from:
MultiQuip (Pty) Ltd. Tel: 031 579 4294 2 Cedarfield Close Fax: 031 579 4332 Springfield Park e-mail: [email protected] DURBAN 4091
14.17.4 New sash cords shall be cut to length, weighted and hung over night to take up their initial stretch before being used.
14.17.5 Sash cords shall be fixed to wood sashes with 2No. 25mm long galvanized clout nails and to cast iron sash weights with a figure-of-eight knot.
14.17.6 All new sash cords shall be kept free from paintwork.
14.17.7 Sash fasteners shall be made to be freely operable, free from paint and suitably lubricated. Any damaged fasteners shall be reported to the Project Manager.
14.18 Replacement Glazing:
14.18.1 All new glass in wooden windows shall be 4mm thick Polished Float Glass.
14.18.2 Remove all broken glass, clean out rebates of old putty and apply one coat of Dulux Wood Primer.
14.18.3 Bed new glass in putty suitable for wood windows and strike off both back and face putties level with sight lines.
14.18.4 Clean glass of finger marks etc. on completion.
9 Publicity House Repairs March 2014
14.18.5 All putties that show signs of cracking or failing to harden before handover of site to the Employer shall be replaced.
14.19 Door Furniture:
14.19.1 Mortice locks shall be Union horizontal mortice locks ref. 2077-152 with stainless steel forend and striking plate.
14.19.2 Knob handles shall be Union plastic knobs ref. 5248 complete with plastic escutcheons..
14.19.3 Hinges shall be 100mm steel butt hinges.
14.19.4 Door closers shall be overhead Dorma closers Model TS83 Case and arm to be sprayed gold colour.
14.20 Fire Hose Cupboard:
14.20.1 At base of steel staircase remove the broken fire hose cupboard and replace with new fibreglass cupboard four times bolted to wall with 12mm dia, x 70mm long anchor bolts.
14.21 New S-rib Corrugated Iron Roof Sheeting:
14.21.1 a) New roof sheeting shall be 0.8mm thick s-rib corrugated iron sheeting and in single lengths from ridge to eaves.
14.21.2 Fixings shall be by means of Leak-King roofing screws Type LK-C-75.
14.21.3 Where fixings to purlins are at centres greater than 600mm Leak-King Plugs Type LK-PC shall be fitted at side laps so that no fixing is at centres exceeding 600mm.
14.21.4 Holes in sheeting for fixings shall be drilled using the special drill sets available from the supplier of the fixings, Type LK-D-13.
14.21.5 At ridge and eaves fit Sondor Close Cell Expanded Polyethylene Polyclosures.
14.21.6 At laps fit Sondor 5 x 9mm Self Adhesive Impregnated Polyurethane Foam Lapseal sealing strips set 25mm from edge of sheeting.
14.21.7 Roof sheeting shall be over lapped in the direction of the prevailing wind.
14.21.8 Should there be any holes drilled in incorrect positions these shall be sealed using the Leak-King Plugs Type LK-PC.
14.22 Roof Sheeting Accessories:
14.22.1 Ridge and hip cappings and valley gutters shall be in 0.6mm thick galvanised sheet iron.
14.22.2 Ridge cappings shall have a roll top and extend down sheets each side by 230mm.
10 Publicity House Repairs March 2014
14.22.3 Valley gutters shall be 462mm girth.
14.22.4 All roofing accessories shall be painted as detailed for roof sheeting.
14.23 Roof Space Insulation – Provisional:
14.23.1 Contractor to allow provisionally for 100mm thickness of Factorylite Insulation blanket faced one side with reinforced foil. Insulation to be fitted with foil facing downwards over existing purlins and supported on galvanized wires at 300mm centres stretched ridge to eaves. Overlapping foil edges to be stapled together.
14.24 Roof Sheet Flashings:
14.24.1 Side wall flashings shall be in 0.6mm thick galvanised sheet iron twice bent extending over roof sheets by 230mm and up walls 100mm.
14.24.2 All side wall cover flashings shall be stepped, equally spaced and neatly cut into brick joints, twice bent and secured into joints with coils of sheet iron wedged in tight.
14.24.3 Joints shall then be caulked up with cement and sand mortar 1:3 mix.
14.24.4 All flashings shall be pre-painted as detailed for roof sheeting.
14.25 Roof Purlins - Provisional:
14.25.1 Supply and fit 100 lineal metres of 75 x 50mm SA Pine purlins including removing existing and carting away should this be found necessary when removing old roof sheets.
14.26 Fascias and Bargeboards:
14.26.1 New fascias and bargeboards shall be in hard red Meranti and shall be of dimensions and profile to match the existing.
14.26.2 Fascias and bargeboards shall be twice skew nailed to ends of each rafter foot.
14.26.3 Fascias and bargeboards shall be fully painted on all faces and edges before fixing.
14.26.4 Decorations shall be one coat Dulux Wood Primer, one coat Dulux Trade Universal Undercoat and one coat Dulux Gloss 100 Enamel.
14.27 Eaves Gutters:
14.27.1 All new eaves gutters shall be in extruded pre-coated aluminium sheet of o-gee profile, size 155 x 125mm. Colour – White.
14.27.2 Gutters shall be fixed to fascias with aluminium brackets supporting the base of the gutter. In addition aluminium stays shall be fitted across the top of the gutter to maintain gutter in line.

11 Publicity House Repairs March 2014
14.27.3 Stop ends and angles shall be formed in the same material as the gutter securely pop riveted to gutter and sealed. PVC fittings will not be permitted.
14.28 Rainwater Downpipes:
14.28.1 Rainwater downpipes shall be of pvc and 80mm in diameter. Offsets and rainwater shoes shall be in the same material.
14.28.2 Downpipes shall be fitted to walls with pvc brackets at a maximum of 1800mm centres and shall be fitted truly plumb.
14.29 Fulbore Rainwater Outlet:
14.29.1 Replacement rainwater outlet shall be 100mm Vertical Type “Fulbore “ patent cast iron outlet with adjusting screw, clamping device and dome grating.
14.29.2 Outlet to be set in concrete with outlet set truly plumb for connection to rainwater pipe elsewhere described.
14.29.3 Finish cast iron with two coats of abe Abecote 352 Epoxy Coal Tar Paint.
14.30 Box Gutters:
14.30.1 Clean out all box gutters. Check for free flow of water through downpipes.
14.30.2 Provisional – Have downpipes which are built into the structure pressure cleaned by a specialist sub-contractor.
14.31 RhinoBoard Ceilings:
14.31.1 Ceiling board shall be 6.4mm thick Rhinobord fixed to existing brandering with 32mm long grabber screws at 150mm centres.
14.31.2 New cover strips shall be 50 x 10mm thick Meranti.
14.31.3 Paint new ceiling board with one coat Dulux Trade Alkali Resisting Primer and two coats of Dulux Trade 65 Matt.
14.32 Entrance Gates to Yard from Langalibalele Street:
14.33 Take down the existing steel gates and cart away.
14.34 Fabricate new gates in mild steel sections to match the existing in every respect.
14.35 New gates shall be hot dip galvanized and shall be free from excrescences
14.36 Apply Dulux Galvanised Iron Cleaner and scour with a green Scotchbrite 3M pad. Rinse off with clean water until surface is free from water break. If not free from water break, repeat cleaning operation.
14.37 Apply one coat of Dulux Galvanised Iron Primer, one coat Dulux Trade Universal Undercoat and one coat Dulux Trade Gloss 100 Enamel.
12 Publicity House Repairs March 2014
14.38 Bird Deterrents:
14.38.1 Bird deterrents shall be Ecopic Type E2 with1.3mm dia. x 100mm long stainless steel spikes Ecopic products are available in 320mm lengths from:
Spit Ecopic Line Tel: (33.1) 48.73.14.78 5 Bd. des Deux Communes Fax: (33.1) 48.75.20.35 94120 Fontenay-sous-Bois Contact: Christophe Boyer France
14.38.2 Claen down surfaces by scrubbing with natural bristle brushes to remove all dirt, algae or other contaminants and rinse off with clean water.
14.38.3 When surfaces are dry apply a 6 to 10mm bead of a neutral cure silicone along the centre strip and bed onto the surface ensuring the spikes are plumb. The adhesive should be seen to exude through the triangular holes in the base. Clean off any excess silicone.
14.38.4 Suitable adhesives are:
Dow Corning 794 Silicone Adhesive Dow Corning 895 Silicone Adhesive
General Electric Silplus N Silicone Sealant General Electric Silplus X Silicone Sealant
14.38.5 Ecopic spikes where applied to wide surfaces shall be fitted in rows 80mm apart.
14.39 Re- Waterproofing of Flat Roofs:
14.39.1 Remove existing torched on waterproofing to flat roofs including upstands.
14.39.2 New waterproofing shall be abe Index Fidea P applied by a specialist waterproofer and shall have a 10 year written guarantee to be free from leaks.
14.39.3 Over new waterproofing apply two coats of abe Silvakote at a rate of 6 to 8m² per litre. Silvakote shall be evenly spread over the surface using a brush or roller.
14.40 Re-Waterproofing of Front Balcony Deck:
14.40.1 Remove existing torched on waterproofing to balcony including upstands.
14.40.2 Clean down surfaces of all oil, dirt, grease etc.
14.40.3 Any cracks in screed in excess of 0.3mm shall be opened up to 4mm x 15mm deep and filled with a thick mix of abe Duraflex Elastomeric Cementitious Waterproof Coating. After 12 hours curing bandage over with PP17 Polypropelene cloth saturated with Duraflex
14.40.4 At junctions with walls form a 50 x 50mm cement mortar fillet.
13 Publicity House Repairs March 2014
14.40.5 Duraflex shall be applied to deck and returned up walls to approx. 250mm at a rate of 1.5kg per m²in two applications leaving a minimum thickness of 2mm (3kg per m²). The first coat of the mixed Duraflex shall be poured out into the surface and spread with a steel float. The second coat shall be applied with a notched trowel and immediately levelled with a spiked roller. 12 Hours curing is required between coats. A final coat of Duraflex shall be applied at the rate of 0.5kg per m².
14.40.6 At wall junctions and around Fulbore outlets reinforce Duraflex with PP17 Polypropelene cloth saturated with Duraflex. This shall be applied prior to the main Duraflex application 200mm wide over fillets and 500 x 500mm around outlets.
14.40.7 24 Hours curing is required before trafficking the applied waterproofing.
14.40.8 Apply Duraflex at a rate of 1.5kg per m²
14.40.9 Include in this operation the step across the entrance door.
14.41 Re-decoration of External Plastered and Painted Walls:
14.41.1 Clean down all faces with sugar soap to remove all dirt, grease, rust stains, etc.
14.41.2 Remove all vegetable matter.
14.41.3 Wash down wall surfaces with a fungicide solution to remove all signs of algae and mould growth. Particular attention should be given to areas where vegetable matter has been growing.
14.41.4 Apply one coat of Dulux Alkali Resisting Primer followed by two coats of Dulux Wall Guard.
14.42 Re-decoration of External Painted Brick Walls:
14.42.1 Clean down all faces with sugar soap to remove all dirt, grease, rust stains, etc.
14.42.2 Remove all vegetable matter.
14.42.3 Wash down wall surfaces with a fungicide solution to remove all signs of algae and mould growth. Particular attention should be given to areas where vegetable matter has been growing.
14.42.4 Apply one coat of Dulux Alkali Resisting Primer followed by two coats of Dulux Wall Guard.
14.43 Re-decoration of Painted Timberwork:
14.43.1 :Wash down all timberwork with sugar soap to remove all dirt, grease, loose and flaking paint etc.
14.43.2 Fill all holes and cracks in timberwork with Dulux Fixit Multi Purpose Crack Filler.
14.43.3 Sand down surfaces and dust off.
14 Publicity House Repairs March 2014
14.43.4 Patch prime bare timber with Dulux Wood Primer, apply one coat of Dulux Trade Universal Undercoat and one coat Dulux Trade Gloss 100 Enamel.
14.44 Re-decoration of Painted Steelwork:
14.44.1 Wash down all metalwork with sugar soap to remove all dirt, grease, loose and flaking paint, rust and scale etc.
14.44.2 Sand down surfaces feathering edges of existing paint where painted has chipped off and dust off.
14.44.3 To rusted areas apply Dulux Fixit Rux Rust Convertor.
14.44.4 Patch prime bare areas with Dulux Trade Steel Primer.
14.44.5 To all surfaces apply one coat Dulux Trade Universal Undercoat and one coat of Dulux Trade Gloss 100 Enamel.
14.45 Re-decoration of Varnished Doors and Frames:
14.45.1 Doors and frames shall be stripped of all varnish and thoroughly sanded down taking care not to round off edges of mouldings.
14.45.2 Ensure surfaces are sound and free from dust, dirt, grease and oil and are thoroughly dry. – no more than 12% moisture content.
14.45.3 Apply two coats of Dulux Woodgard Timbapreservative at a spreading rate of approx. 10m² per litre per coat.
14.46 Re-decoration of Steel Staircase:
14.46.1 Wash down with sugar soap and wire brush rusted areas. Treat rust with one coat of Dulux Fixit Rux Rust Convertor, patch prime with Dulux Trade Steel Primer, apply one coat of Dulux Trade Universal Undercoat and one coat of Dulux Trade Gloss 100 Enamel.
14.46.2 Top surface of treads shall be washed down and given rust treatment and re-painted with two Coats of Dulux Trade Floorcote Floor Enamel.
It is required that the side of the string close to wall shall also be included in this painting operation.
14.47 Re-decoration of Previously Painted S-rib Corrugated Iron Sheeting:
14.47.1 Thoroughly sand down existing painted roof sheeting and wash down with sugar soap.
14.47.2 Tighten any loose fixings and replace any missing fixings with Leak-King roof screws Type LK-C-75. Any old screw holes not required to be plugged with Leak-King plugs Type LK-PC.
15 Publicity House Repairs March 2014
14.47.3 Wire brush any rusted areas and treat with Dulux Fixit Rux Rust Convertor .
14.47.4 Patch prime with Dulux Galvanised Iron Primer and apply two coats of Dulux Roofguard. Colour – Abbey Lane.
14.48 Painting of New Roof Sheeting:
14.48.1 All new roof sheeting shall be pre-painted, apart from final coat, prior to being fixed.
14.48.2 Clean down new sheeting with Dulux Galvanised Iron Cleaner painted on and then scoured with a green Scotchbrite 3M pad. Pour water onto the cleaned surface and if water still breaks into bubbles repeat the scouring process until when re-tested the surface is waterbreak free.
14.48.3 Apply one coat of Dulux Galvanised Iron Primer and one coat of Dulux Roofguard.
14.48.4 After erection of sheeting apply one final coat of Dulux Roofguard.
14.48.5 This painting specification shall also apply to all accessories e.g. ridge and hip cappings, flashings etc. Under and overlaps shall also be pre-painted.
14.48.6 It is required that the cleaning process be witnessed by the Project Manager prior to any paint coatings being applied and the Contractor shall give due notice of this process being commenced.
14.49 Decoration of New Timberwork:
14.49.1 Sand down and apply one coat of Dulux Wood Primer, apply one coat of Dulux Trade Universal Undercoat and one coat of Dulux Trade Gloss 100 Enamel.
14.50 Brickwork Repairs:
14.50.1 Where brickwork repairs are to be carried out these shall be with old Maritzburg Red face bricks. A small quantity of these bricks is available at Macrorie House Museum at a cost of R2.50 each and will require old mortar removing from same.
14.50.2 Damaged bricks shall be cut out by drilling a series of holes into the brick overlapping one another and then breaking out the remainder with sharp cold chisels and bolsters. Brick joints may be cut into with a small angle grinder taking care not to damage sound bricks.
14.50.3 Pockets in wall shall be thoroughly cleaned out and flushed with a volatile solvent and dampened with clean water before new bricks are inserted.
14.50.4 Mortar shall be 1:2:9 mix cement, hydraulic lime and sand. Backs of bricks shall be well buttered so that when inserted the mortar is exuded around the sides of the bricks. Complete jointing with mortar packed tightly into joints and finish to match existing.

16 Publicity House Repairs March 2014
14.51 Cleaning of Brickwork:
14.51.1 Clean down all face brickwork using a nebulous spray of clean water and natural bristle scrubbing brushes. These brushes are not available locally but can be made up to order by Academy Brushware in Germiston. Contact details – Conrad Koekemor on 084 448 5642 or 011 873 1266. Brushes are handmade and take some ten days to assemble.
14.51.2 Only sufficient water should be used to soften dirt. Any stubborn excrescences should be removed using wooden wedges. As a last resort phosphor bronze brushes could be used. Steel scrapers are strictly forbidden.
14.52 PVC Rainwater Pipes:
14.52.1 All pvc rainwater pipes on painted wall surfaces shall have the vertical sections painted the same colour as the walls to which they are fixed. Where wall surfaces are in two colours, the pipework shall be the same.
14.52.2 Clean down with sugar soap, apply one coat of Dulux Supagrip, one coat of Dulux Trade Universal Undercoat and one coat of Dulux Trade Gloss 100 Enamel.
14.53 Re-painting of RhinoBoard Ceilings:
14.53.1 Wash down with sugar soap and re-paint two coats of Dulux Trade 65 Matt.
14.54 Lead Work to Bell Tower:
14.54.1 The Contractor is advised that when sanding and removing paintwork from lead roofing it may be necessary to provide breathing apparatus to comply with Health and Safety Regulations. It is the Contractor’s responsibility to confirm whether such is required and inform the Project Manager accordingly.
14.54.2 Before proceeding with re-decorations the Contractor shall advise the Project Manager of any damage to the lead work or its support structure that may exist but which could not be seen from the ground so that further instructions can be given.
14.54.3 Lead work shall be cleaned down to remove all loose and flaking paintwork, oil, grease, dirt etc. and sanded with a wet abrasive paper.
14.54.4 Apply one coat of Dulux Trade Corrocote 1 Metal Etch Primer, one coat Dulux Trade Universal Undercoat and one coat Dulux Gloss 100 Enamel.
14.55 Bell Tower Hatch Cover:
14.55.1 Replace existing hatch cover formed in 1mm thick galvanised sheet iron all to match existing and with down turn around edges lapped at corners and soldered.
17 Publicity House Repairs March 2014
14.55.2 De-grease sheet iron until water-break free using Dulux Trade Galvanised Iron Cleaner scoured on with a green Scotchbrite 3M Pad, prime with Dulux Galvanised Iron Primer, apply one coat Dulux Trade Universal Undercoat and one coat Dulux Trade Gloss 100 Enamel to all faces.
14.56 Bell:
14.56.1 Wash down bell with sugar soap, cleaning off all pigeon droppings.
* * * * *
Derek E Osborne MRICS MCIAT KZNIA Affiliate PrSArchT Chartered Building Surveyor 110A Elved Wright Circle, Hayfields, Pietermaritzburg 3201 Tel: 033 396 4567 Fax: 086 592 6851 e-mail: [email protected]