Professional DotNetNuke ASP.Net Portals
452
-
Upload
khangminh22 -
Category
Documents
-
view
4 -
download
0
Transcript of Professional DotNetNuke ASP.Net Portals


Professional DotNetNuke™ ASP.NET Portals
Shaun Walker, Patrick J. Santry, Joe Brinkman, Daniel Caron, Scott McCulloch, Scott Willhite, and Bruce Hopkins


Professional DotNetNuke™ ASP.NET Portals
Shaun Walker, Patrick J. Santry, Joe Brinkman, Daniel Caron, Scott McCulloch, Scott Willhite, and Bruce Hopkins

Professional DotNetNuke™ ASP.NET PortalsPublished byWiley Publishing, Inc.10475 Crosspoint BoulevardIndianapolis, IN 46256www.wiley.com
Copyright © 2005 by Wiley Publishing, Inc., Indianapolis, Indiana
Published by Wiley Publishing, Inc., Indianapolis, Indiana
Published simultaneously in Canada
ISBN 13: 978-0-7645-9563-9ISBN 10: 0-7645-9563-6
Manufactured in the United States of America
10 9 8 7 6 5 4 3 2 1
1B/SV/QV/QV/IN
Library of Congress Cataloging-in-Publication Data:
Professional DotNetNuke ASP.Net portals / Shaun Walker ... [et al.]. p. cm.
Includes index. ISBN 0-7645-9563-6 (paper/website) 1. Active server pages. 2. Web portals—Design. 3. Microsoft
.NET. I. Walker, Shaun, 1971- . TK5105.8885.A26P78953 2005005.2'76—dc22
2005006846
No part of this publication may be reproduced, stored in a retrieval system or transmitted in any form or by any means, elec-tronic, mechanical, photocopying, recording, scanning or otherwise, except as permitted under Sections 107 or 108 of the 1976United States Copyright Act, without either the prior written permission of the Publisher, or authorization through paymentof the appropriate per-copy fee to the Copyright Clearance Center, 222 Rosewood Drive, Danvers, MA 01923, (978) 750-8400,fax (978) 646-8600. Requests to the Publisher for permission should be addressed to the Legal Department, Wiley Publishing,Inc., 10475 Crosspoint Blvd., Indianapolis, IN 46256, (317) 572-3447, fax (317) 572-4355, e-mail: [email protected] oronline at wiley.com/go/permissions.
LIMIT OF LIABILITY/DISCLAIMER OF WARRANTY: THE PUBLISHER AND THE AUTHOR MAKE NO REPRESEN-TATIONS OR WARRANTIES WITH RESPECT TO THE ACCURACY OR COMPLETENESS OF THE CONTENTS OF THISWORK AND SPECIFICALLY DISCLAIM ALL WARRANTIES, INCLUDING WITHOUT LIMITATION WARRANTIES OFFITNESS FOR A PARTICULAR PURPOSE. NO WARRANTY MAY BE CREATED OR EXTENDED BY SALES OR PROMO-TIONAL MATERIALS. THE ADVICE AND STRATEGIES CONTAINED HEREIN MAY NOT BE SUITABLE FOR EVERYSITUATION. THIS WORK IS SOLD WITH THE UNDERSTANDING THAT THE PUBLISHER IS NOT ENGAGED INRENDERING LEGAL, ACCOUNTING, OR OTHER PROFESSIONAL SERVICES. IF PROFESSIONAL ASSISTANCE ISREQUIRED, THE SERVICES OF A COMPETENT PROFESSIONAL PERSON SHOULD BE SOUGHT. NEITHER THE PUB-LISHER NOR THE AUTHOR SHALL BE LIABLE FOR DAMAGES ARISING HEREFROM. THE FACT THAT AN ORGA-NIZATION OR WEBSITE IS REFERRED TO IN THIS WORK AS A CITATION AND/OR A POTENTIAL SOURCE OFFURTHER INFORMATION DOES NOT MEAN THAT THE AUTHOR OR THE PUBLISHER ENDORSES THE INFOR-MATION THE ORGANIZATION OR WEBSITE MAY PROVIDE OR RECOMMENDATIONS IT MAY MAKE. FURTHER,READERS SHOULD BE AWARE THAT INTERNET WEBSITES LISTED IN THIS WORK MAY HAVE CHANGED OR DIS-APPEARED BETWEEN THEN THIS WORK WAS WRITTEN AND WHEN IT IS READ.
For general information on our other products and services please contact our Customer Care Department within theUnited States at (800) 762-2974, outside the United States at (317) 572-3993 or fax (317) 572-4002.
Trademarks: Wiley, the Wiley logo, Wrox, the Wrox logo, Programmer to Programmer, and related trade dress are trade-marks or registered trademarks of John Wiley & Sons, Inc. and/or its affiliates, in the United States and other countries,and may not be used without written permission. DotNetNuke is a trademark of Perpetual Motion Interactive Systems,Inc. All other trademarks are the property of their respective owners. Wiley Publishing, Inc., is not associated with anyproduct or vendor mentioned in this book.
Wiley also publishes its books in a variety of electronic formats. Some content that appears in print may not be available inelectronic books.

CreditsAcquisitions EditorJim Minatel
Development EditorKenyon Brown
Technical EditorBruce Hopkins
Production EditorAngela Smith
Copy EditorKim Cofer
Editorial ManagerMary Beth Wakefield
Vice President & Executive Group PublisherRichard Swadley
Vice President and PublisherJoseph B. Wikert
Graphics and Production SpecialistsKarl BrandtCarrie A. Foster
Quality Control TechnicianDavid Faust
Permissions EditorLaura Moss
Proofreading and IndexingTECHBOOKS Production Services


About the AuthorsShaun Walker is founder and president of Perpetual Motion Interactive Systems Inc., a solutions com-pany specializing in Microsoft enterprise technologies. Shaun has 15 years professional experience inarchitecting and implementing large scale IT solutions for private and public organizations. Shaun isresponsible for the creation and management of DotNetNuke, an open source content management sys-tem written for the Microsoft ASP.NET platform. Based on his significant community contributions hewas recently recognized as a Microsoft Most Valuable Professional (MVP) in 2004. In addition, he wasrecently added as a featured speaker to the MSDN Canada Speakers Bureau, which allows him to evan-gelize DotNetNuke to User Groups across Canada. Shaun resides in British Columbia, Canada with hiswife and two children.
Patrick Santry, Microsoft MVP (ASP/ASP.NET) holds MCSE, MCSA, MCP+SB, i-Net+, A+, andCertified Internet Webmaster certifications. He has authored and co-authored several books and maga-zine articles on Microsoft and Internet technologies. Patrick is frequent presenter on web technologies,having presented at several events including the Exchange 2000 launch, DevDays 2004 in Pittsburgh,Pennsylvania, and to area .NET SIGs on DotNetNuke module development. In addition, Patrick ownsand maintains http://www.WWWCoder.com, a popular site for news, tutorials, and information for theweb development community. Patrick resides in Girard, Pennsylvania, USA with his wife Karyn, andtheir four children, Katie, Karleigh, P.J., and Danny.
Joe Brinkman, formerly the founder and President of TAG Software Inc, is the Chief Technology Officerfor DataSource Inc. (http://www.datasourceinc.com), a J2EE development company focused on sim-plifying and automating development of N-Tier applications with Java. With more than 22 years of ITexperience and a Computer Science degree from the United States Naval Academy, he brings a broadrange of experience and expertise in a variety of software and hardware architectures. Having workedwith DotNetNuke since February 2003, and a founding Core Team member, Joe currently serves as amember of the DotNetNuke Board of Directors, a Lead Architect and Security Specialist.
Dan Caron is a Lead Application Designer & Developer with MassMutual Financial Group, a Fortune500 global, diversified financial services organization. With MassMutual, Dan designs technical solu-tions for financial web applications using Microsoft and Java technologies. For more than 10 years, Danhas been designing and developing applications with various programming technologies includingMicrosoft ASP.NET, XML/XSL, SQL, Java, and JSP. He has been a major contributor to the DotNetNukeopen-source portal project since the Core Team was founded in 2003. Some of Dan’s noteworthy contri-butions include the exception handling framework, event Logging Provider and the Scheduler. Dan con-tinues to contribute his talent to the project as a Lead Architect, Core Developer, and member of theBoard of Directors. Dan lives in Connecticut, USA with his wife and two children.
Scott McCulloch works as an Application Developer for the Computer Science Corporation, Australia.At 26 years of age, Scott holds a Bachelor and Masters Degree in Computer Science, as well as the threemajor Microsoft Certifications (MCSD, MCDBA, MCSE). Scott has been part of the DotNetNuke commu-nity since the project began (late December, 2002). Today, his role within the DotNetNuke team is con-tributing as an Architect and Core Developer. He currently resides in Wollongong, Australia with hisfiancée, Lenise.
Scott Willhite is an accomplished business and technology professional turned family man. He happilyspends his days working closely with his wife on their personal and community oriented business pur-suits. Scott’s technology pedigree is distinguished, including Bachelor of Science in Computer Science

and MBA in Information Systems Management degrees from Baylor University. Scott has worked asSenior Manager and Technical Architect for Andersen Consulting (now Accenture), Associate Directorfor EnForm Ventures, acting CTO and VP of Technology for 10x Labs, and Program Director for Safeco’sOffice of the CIO. He’s architected, developed, and managed systems built on technologies ranging fromCOBOL to Java and .NET, solving all kinds of real-world business problems without a certification ofany kind. Ever the “Don Quixote” type, Scott’s currently tilting at the windmills of open-source andcommitted to building DotNetNuke (both the software and the community) into something trulyextraordinary. His favorite mantra is the core values developed with his partners for their former startupcompany, 10x Labs: “Speak the truth. Share the wealth. Change the world!” Scott currently lives in WestSeattle with his lovely wife Allison, his young son Kyle, a whiny German Shepherd dog, two very weirdhouse cats, and a cast of wonderful friends and neighbors that he wouldn’t trade for gold.
Bruce Hopkins, Microsoft MVP (ASP.NET), holds a BSCIS from DeVry University and holds certifica-tions as an MCSE and several flavors of Linux. Bruce is currently the IT Director for ChattahoocheeTechnical College in Marietta, Georgia and has held a wide variety of positions in technology through-out his career ranging from programming and web design to network administration and management.Bruce remarks that this varied experience is crucial to determining the correct tool for the task at hand.This is shown by the many varied technologies he uses every day. These include Windows, Unix, SQLServer, Oracle, MySQL, and many different Linux-based applications that are an integral part of main-taining the college’s infrastructure. Bruce makes his home in Marietta, Georgia with his wife and son.

Contents
Preface xv
Chapter 1: An Inside Look at the Evolution of DotNetNuke 1
IBuySpy Portal 2ASP.NET 3IBuySpy Portal Forum 5IBuySpy Workshop 6DotNetNuke (DNN) Web Site 22
Chapter 2: Installing DotNetNuke 29
Preparation 29Objectives 30Hardware Prerequisites 30Software Prerequisites 31Hosting Prerequisites 31
Implementation 31Downloading DotNetNuke 32Extracting the Installation File 32Creating the Database 32Creating the Database User 34Setting Permissions 38Creating the Web Site 39Configuring .NET Nuke 44Testing the Installation 45Common Installation Issues 48
Explanation 49Scenario 1: The Clean Install 50Scenario 2: The Upgrade 51
Installation Templates 51Summary 53
viii
Contents
Chapter 3: Portal Overview 55
What Is a Portal? 55Portal Organizational Elements 56
Parent/Child Portals 56Pages 57Panes 58Containers 59
Modules 60Account Login 61Announcements 61Banners 61Contacts 61Discussions 61Documents 61Events 62FAQ 62Feedback 62IFrame 62Image 62Links 62News Feeds (RSS) 62Search Input 63Search Results 63Text/HTML 63User Accounts 63User Defined Table 63XML/XSL 63Additional Modules 63
User Roles 64Summary 64
Chapter 4: Portal Administration 65
Who Is the Portal Administrator? 65Where Do I Begin? 66The Control Panel 67
The Site Wizard 68The Help Button 75The Preview Button 75
Configuring Your Portal 76Site Settings 76Security Roles 83

ix
Contents
Pages 87Skins 91File Manager 92Languages 95
Maintaining Your Portal 100User Accounts 100Vendors 103Newsletters 106Site Log 107Recycle Bin 108Log Viewer 109
Summary 111
Chapter 5: Host Administration 113
Who Is the Host? 113Where Do I Begin? 114
SuperUsers Accounts 115Configuring Your Installation 116
Host Settings 116Managing Portals as Host 126
Portals 126Skins 130Log Viewer 131
Other Host Tools 133Module Definitions 133File Manager 137Vendors 138SQL 138Schedule 139Languages 144Search Admin 147Lists 148Skins 150Summary 150
Chapter 6: Modules 151
Module Architecture 151Portal 151Page 153Module 153Module Container 154

x
Contents
Types of Modules 155Announcements Module 155Banner Module 161Contacts Module 163Discussions Module 163Documents Module 164Events Module 166FAQs Module 168Feedback Module 169IFrame Module 169Image Module 170Links Module 171News Feed (RSS) 172HTML/Text Module 173User Defined Table Module 174XML/XSL Module 175
Management 176Page Management 176Module Management 178
Installation 183Summary 185
Chapter 7: DotNetNuke Architecture 187
Technologies Used 187Provider Model 188
Provider Configuration 190Custom Business Objects 190
CBO Hydrator 192Architectural Overview 195
Presentation Layer 196Business Logic Layer 197Data Access Layer 198Data Layer 199
Security Model 201Security in ASP.NET 2.0 201DotNetNuke and ASP.NET 2.0 202Security in DotNetNuke 3.0 202
Namespace Overview 205Summary 206

xi
Contents
Chapter 8: Core DotNetNuke APIs 207
Introduction 207Event Logging 208
The API 208Exception Handling 216
The Exceptions Class 217Localization 221
Locales 222Resource Files 222The API 224
Scheduler 230HTTPModules 232
HTTP Modules 101 232DotNetNuke HTTP Modules 235
Module Interfaces 240IActionable 241IPortable 251IUpgradable 253Inter-Module Communication 253ISearchable 254
Summary 257
Chapter 9: Beginning Module Development 259
Planning Your Module Project 259Ready Your Resources 261
Starting Development 261Configuring Your Visual Studio .NET Project 262Configuring DotNetNuke to Interface with Your Module 265
Summary 270
Chapter 10: Developing Modules: The Database Layer 273
Database Design 274Database Structure 274
Database Providers 280SQLDataProvider Class 280
Data Abstraction 285DataProvider Class 286
Summary 287

xii
Contents
Chapter 11: Developing Modules: Business Logic Layer 289
Developing the Business Logic Layer 289Defining the Properties for the Info Class 290Creating Objects Using the Controller Class 293
Custom Business Object Help Class 295Optional Interfaces for the Events Module Controller Class 295
Summary 298
Chapter 12: Developing Modules: The Presentation Layer 299
Module User Interfaces 299View Control 301Settings Control 313Edit Control 316
DotNetNuke Helper Functions 327Error Handling 327Navigation URLs 328
Summary 329
Chapter 13: Skinning DotNetNuke 331
File Organization 332Processing Pages and Loading Skins 332Packaging Skins and Containers 335Creating Your Skin 336
Container Creation 348Summary 352
Chapter 14: Distribution 353
Code Add-Ons 354Modules 354
Module Manifest File 354Packaging Modules 360Resource File 361Installing Modules 362
Skin Objects 365Skin Object Manifest File 368
Providers 369Provider Manifest File 369
Skinning Add-Ons 370

xiii
Contents
Skins 370Packaging Skins 370Skin Configuration Files 372Installing Skins 374
Containers 378Packaging Containers 378Installing Containers 378
Language Add-Ons 378Language Packs 378
Language Pack Manifest File 379Packaging Language Packs 381Installing Language Packs 383
Summary 386
Appendix A: Resources 387
Appendix B: Frequently Asked Questions 391
Appendix C: System Message Tokens 395
Index 401


Preface
This book is aimed at people with development knowledge and for those who are just interested inlearning more about how DotNetNuke works.
Who This Book Is ForExperienced developers of ASP.NET and those who are knowledgeable about DotNetNuke may want toskip Chapters 1–6. These chapters provide an overview of DotNetNuke and its operations. Chapters 7–14get right into DotNetNuke architecture and development. However, we think you’ll gain valuable insightinto how DotNetNuke works by reading the entire book from front to back.
What This Book CoversWe split this book into two primary sections. The first half provides you with insight into how to per-form an installation and the basic operations of a DotNetNuke portal. In addition, you’ll gain insightinto the history of this open source project brought to you by the individuals who developed it from itsbeginnings.
The second half of the book provides you with information on how the application is architected, as wellas how you can extend it by developing modules and skins.
How This Book Is StructuredThis book is broken down into two parts: The first part is aimed at the non-developer or administratortype. We provide you with a history of the project, move on to installing DotNetNuke on the server, andthen show how to manage and administer a DotNetNuke portal.
The second part is for developers. Starting with Chapter 7, we discuss the DotNetNuke applicationarchitecture and how the application works. We then move on to extending the portal framework bydeveloping modules that plug into a DotNetNuke portal. Finally, we cover the flexible skinning capabili-ties of DotNetNuke and how you can create your own unique look for your portal.

xvi
Preface
What You Need to Use This BookIn order to install DotNetNuke and a supporting database you will need either Windows 2003 Server orWindows XP (development only). This book covers a basic install of DotNetNuke using a SQL Serverdatabase as the Data Provider. You will need to have access to either SQL Server 2000 or MSDE (develop-ment only) on the same machine or a remote machine.
To participate in the development chapters, you will need Visual Studio .NET 2003.
ContributorsIn addition to the authors, the DotNetNuke development team is comprised of many individuals working together from around the world. We would like to acknowledge these people and their contri-bution in this section of the book. We’ve listed the DotNetNuke contributors and their role within thecommunity.
Board of DirectorsThe Board of Directors is responsible for managing the long-term strategic vision of the project. They are
Dan Caron, see About the Authors.
Joe Brinkman, see About the Authors.
Patrick Santry, see About the Authors.
Scott Willhite, see About the Authors.
Shaun Walker, see About the Authors.
Core TeamThe Core Team is divided into two levels of participation — an Inner Team and an Outer Team. The twolevels represent different levels of trust and responsibility within the DotNetNuke organization.
Inner Core TeamComprised of individuals who have demonstrated their long-term commitment to the project. Theyhave acted professionally, accepted responsibility, delivered assigned tasks successfully, and are activelyengaged with the community. They act as Managers in key functional areas and manage communicationwith sub-teams of Outer Team members.
Bruce Hopkins, see About the Authors.

xvii
Preface
Charles Nurse has been developing for the World Wide Web using Microsoft Technologies since 1996.While now a Canadian citizen, Charles was born in the UK and has a Bachelor of Arts in Chemistry fromOxford University. In 1978 he moved to Canada and obtained a Ph.D in Chemistry from the University ofBritish Columbia. During his undergraduate and graduate studies he became interested in computer pro-gramming and helped develop a molecular modeling application using Fortran, as well as a number ofsmaller projects in Algol 60. After spending more than 15 years in Chemistry Research and in ScientificInstrumentation Sales, he started his own contract software development business — KeyDanceComputer Services. He lives in Langley, BC, Canada with his wife Eileen and two teenage children.
Christopher Paterra is a member of the Bugs & Enhancements Specialist, Core Developer & LeadRelease Manager Core Team roles. Chris has had involvement in many areas of DotNetNuke and hismore well known enhancement includes the Enhanced Survey to use Personalization for vote trackingand added ability to keep results private. Chris has written several procedure documents for the CoreTeam and helped organize and manage the skinning contest. Former NT MCSE and now studyingMSCAD, Chris has VB.NET, C#, Microsoft SQL Server 2000, C, C++, VB 6 experience.
Chris has implemented DNN with custom modules for use in a school as their lunch inventory/cashcontrol system using swipe card technology. He has also implemented DotNetNuke it in a Call Centerwith custom modules as its intranet. Another exciting project was one of the first releases of the powerof DotNetNuke skinning with the launch of a web site promoting Christina Aguilera.
Dan Caron, see About the Authors.
Joe Brinkman, see About the Authors.
Patrick Santry, see About the Authors.
Philip Beadle (MCAD, MVP) of Byte Information Technology in 2004 (www.byte.com.au). Philip is afoundation member of the DotNetNuke Core Team, a Microsoft Certified Application Developer and isexperienced in the development and commercial application of the DotNetNuke Framework based onMicrosoft’s .NET technology. He has successfully developed and implemented sites for clients inAustralia and overseas and was recently awarded the Microsoft Most Valuable Professional (MVP)award in ASP/ASP.NET.
Scott McCulloch, see About the Authors.
Scott Willhite, see About the Authors.
Shane Colley is a founding DotNetNuke Core Team member who serves the DNN community as anInner Core Team member, Core Developer, and Security Specialist. Shane’s contributions to DNNinclude development of the Provider Model for rich text editing and multiple security enhancements.He is also active in the DNN forums, providing help and interaction with the community.
Shane is a graduate of Computer Science at Iowa State University and over his nine-year career as an ITprofessional he has honed his expertise with a wide variety of programming languages, with specificemphasis on web-based .NET development. Shane lives in Chicagoland with his girlfriend Erin and dogMonk.

xviii
Preface
Shaun Walker, see About the Authors.
Vicenç Masanas works as a Developer and Analyst at the Universitat de Girona, Spain. He has beendeveloping web sites with Microsoft technologies, including ASP, VB, ASP.NET, Access, and SQL Server,since 1998. Vicenç joined the DotNetNuke community in summer 2003 coming from IBS portal. Today,his role within the DotNetNuke team is contributing as a Core Developer, Bugs & EnhancementSpecialist, and DotNetNuke Evangelist for the Spanish area. Currently, Vicenç is working on a numberof projects based on the DotNetNuke platform. Specializing on this platform as a framework for futureworks, Vicenç has also written VS.NET tools and tutorials for DNN developers, which have been highlyacclaimed (available at http://dnnjungle.vmasanas.net). He provides online support and trainingfor DotNetNuke and custom module development and consultancy for DotNetNuke projects.
Geert Veenstra, a member of the DotNetNuke Inner Core team, is currently working for Schmit(http://www.schmit.nl), a company that specializes in Parking solutions as a technical support spe-cialist. In his daily job he works with a multitude of operating systems (both Windows and Unix variants)and databases (such as Oracle, SQL, and MySql Server). He has created the company’s intranet and acustomer bug-reporting web site (now both using DotNetNuke of course). He joined the DotNetNuketeam in mid 2003 and has been working mainly on Localization and Bug Fixing. The first third-partydotnetnuke dataprovider (for MySql) was created by him as well as a DNN installer.
Jeremy White is founder and president of Webstone Technologies, LLC, and a Founding member of theDNN Core Team. He holds a MCSE, MCP+I, and MCT certifications and has many years of experiencein programming, networking, WiFi, VoIP, and CMS technology implementations for a multinationalcompany. Jeremy has been actively involved in designing and developing web solutions with variousMicrosoft Internet technologies including ASP and ASP.NET. He is the author of the popular “Shadow”module for DNN 1.x and 2.x and has been a frequent DNN forums contributor since February 2003.Jeremy resides on Long Island, New York, with his wife and two dogs.
Outer Core TeamThe Outer Core Team is comprised of individuals who have achieved recognition within the DotNetNukecommunity — sometimes based on technical prowess but most often based upon their unselfish actionsassisting other community members. Outer Team members work closely with Inner Team members tohelp manage various aspects of the project. Once an Outer Team member gains a unanimous vote ofrespect and trust in the DotNetNuke Core, they will be offered a promotion to the Inner Team.
Bert Corderman is a Senior Database administrator for Symantec’s Managed Security Services. Bert isrelatively new to programming but has more than seven years of experience in technology. He holds thefollowing certifications: MCSE + Internet (NT 4.0), MCSE(2000), MCDBA, CCNA, and CCDA. He hasbeen involved with the DotNetNuke open-source portal project since May of 2003. He is currently activein the following: Quality Assurance Testers, Bugs & Enhancement Specialists, and Database Developers.
Bo Nørgaard holds a Bachelor degree in Electronic Engineering, is a certified Psion developer and engi-neer, and is a certified Internet Security Systems security engineer. Bo Nørgaard has been programmingsince 1979 and been through Comal 80, Pascal, ANSI C, ADA, PLM, ASM (Intel), OO Pascal, Delphi, C++,Perl, PHP, Visual Basic, Java, and now C#. He started teaching in 1991 at the Copenhagen UniversityCollege of Engineering, and later at the National Theatre School of Denmark. Bo has presented at severalevents including detailed security practices at CA-World in New Orleans. Bo Nørgaard is CEO of Bonosoftand operates the DotNetNuke developer community site (www.dotnetnuke.dk), which has numerousresources for both Visual Basic and Visual C# programmers writing plug-in modules for DotNetNuke.

xix
Preface
Bryan Andrews has been developing web applications since Netscape 1.0 and has worked in many dif-ferent capacities in the past 10 years from infrastructure architecture and management, to the develop-ment of collaborative and knowledge management tools. He is one of the Founders and CTO of anAtlanta headquartered marketing agency (Trend Influence) and an associated development company(ApplicationTheory) that produces marketing and communication tools. DotNetNuke has become theplatform of choice for many of their clients and as such they have developed a complete suite of toolsand agency-specific modules to support these clients.
Cathal Connolly works as a Senior Developer and Consultant with EG Information Consulting(http://www.eg-consulting.com/), based in Belfast, Northern Ireland. Cathal has previouslyworked for IT companies in the UK, U.S., and Austria, developing both web and Client/Server applica-tions using Microsoft technologies. His current focus is the development of secure Banking applicationsand bespoke Smart Client .net products. Cathal is an MCSD and holds a BSc in Computer Science.
Chris Hammond, a web application developer for a small software development company in St. Louis,Missouri and is an active speaker on DotNetNuke topics around the Midwest. On the side, he specializes inportal development and search engine optimization through Christoc.com (http://www.christoc.com).Chris has multiple DotNetNuke endeavors including DnnCart.com (http://www.dnncart.com/) wherehe provides DNN Support and Module development services. He also runs multiple community portalsfocusing around the Sports Car Club of America, (http://www.solo2.org, http://www.sccaforums.com). You can read more about him on his weblog at http://www.chrishammond.com/.
Clem Messerli, with a vision for using DotNetNuke to train persons who are equipped to use new tech-nologies in the service of the Church, Clem’s expertise in web administration and strong background inweb development help to provide debugging support and unique insight into future enhancements.
Driven by the Great Commission, Clem has founded CTC Ministries, which is dedicated to buildinglow-cost Cooperative Ministries in the Central Iowa Region where he is currently employed by RockwellCollins as a Sr. Web Administrator.
David Haggard is an ordained minister, founder of NewCovenant Evangelistic Ministries, an interna-tional ministry of the Christian Gospel and an outreach to widows. He also founded NewCovenantConsulting for support of the ministry. The consulting arm specializes in Internet services to churchesand non-profits, but provides services to all businesses and individuals that are not counter to the min-istry. David’s IT background started with Microsoft in Windows 95 support, and grew into web develop-ment, ASP, and finally .NET. David lives and works out of his rural home near Thurman, Iowa, USA,with his wife Cheryl.
John Mitchell is the Founder and President of Snapsis Software, Inc. (http://www.snapsis.com). Johnhas more than 20 years of development experience and has been working on the leading edge of Internettechnologies for the past seven years, specializing in the architecture, design, development, and imple-mentation of portal/e-commerce applications.
John has led teams in the development of several web sites including http://SamsClub.com andhttp://www.Maytag.com. John has been using and enhancing DotNetNuke since May 2003 and is alsoa founding member of the Tulsa .Net Users Group (http://www.TulsaDnug.org).
Jon Henning is senior consultant with Solution Partners Inc., www.solpart.com, a Chicago-based con-sulting company specializing in Microsoft technologies. He is an MCSD who has been working withVisual Studio .NET since the PDC release. While he has written several articles dealing with all aspects

xx
Preface
of programming, his current love has been found in the development of rich client-side functionality.Most notably is the Solution Partners ASP.NET Hierarchical Menu, which is the default menu that isused within DotNetNuke. Recently for version 3, Jon initiated the development of the DotNetNukeClientAPI, which enables developers to write rich client-side cross-browser logic against a simple API.
Jim Duffy is a Microsoft MVP, self-proclaimed DotNetNuke Evangelist, and the president of TakeNoteTechnologies. TakeNote, a Developer’s Choice Award winner for hands-on training, specializes in train-ing and creating business solutions with Microsoft enterprise technologies. In response to his desire tospread the DotNetNuke word to others, Jim authored two DotNetNuke training classes. One focuses oncreating and administrating a DNN portal and the other focuses on developing custom DNN modules.He has also presented DotNetNuke topics at a number of regional and international developer confer-ences including DevTeach 2004 and DevEssentials. Jim is a popular speaker due to his knowledge,humor, and quick-witted approach. He is an exceptional trainer, skilled developer, and has been pub-lished in a number of leading publications including CoDe Magazine (www.code-magazine.com). Jim’sbackground also includes a Bachelor of Science degree in Computer and Information Systems and morethan 20 years of programming and training experience. Jim is also co-host of Computers 2K4, a weeklycall-in radio show (AM 850 The Buzz) in Raleigh, NC. Jim’s passion for teaching and presenting, cou-pled with his desire to help people meet their professional and personal goals, make him a welcomeaddition to the DNN Core Team.
Leigh Pointer is an accomplished professional with 17 years experience in the IT sector. He is highlyexperienced in user interaction design, web design, software engineering, problem solving, and userrelations. He demonstrates leadership in resource and project management and has an in-depth under-standing of Microsoft development tools. Leigh is results-oriented and thrives in an innovative, creative,challenging, fast-paced workplace. He is also the founder of the Netherlands (http://netherlands.dnn-usergroup.net) and European DNN user groups and worked closely with Microsoft to achievethis. Leigh maintains his own modules for DNN at http://www.subzero-solutions.net along withother interesting topics.
Lorraine Young is a Business Analyst for Byte Information Technology based in Melbourne, Australia(http:/www.byte.com.au). Lorraine is a founding member of the DotNetNuke Core Team who pro-vides assistance in the user experience and documentation areas of the DotNetNuke Project.
Lorraine holds a Bachelor of Arts degree in Professional Writing and Literature and a Post Graduatedegree in Orientation and Mobility for vision impaired adults and children.
Mark Hoskins is the Founder of KodHedZ Software Development (www.KodHedZ.net) based out ofVictoria, BC, Canada where he has been developing ASP.NET Business Management, eCommerce andDynamic Internet Applications for more than three years, primarily using DotNetNuke as the develop-ment platform since its conception in December 2002.
In addition to web applications, Mark has authored many articles and tutorials for developers on imple-menting and developing solutions using DotNetNuke and provides a wealth of resources at his flagshipdomain, www.KodHedZ.net.
Matt Fraser has been developing for the World Wide Web since 1996. He is the owner of LiquidPlatinum Technologies, specializing in custom Internet applications for small businesses using Microsoftproducts and technologies. Previously, Matt has worked as a web developer for Chalk Media and the

xxi
Preface
Bank of Montreal, creating online learning solutions. He also had a key role in designing and buildingthe eyeReturn Voken engine for online advertising and loyalty programs. Matt holds a Bachelor ofComputer Science specializing in Software Engineering from 1999. He is currently residing in LosAngeles, CA.
Nina Meiers is a self-employed DotNetNuke web site skinner whose Core Team roles include UserExperience Specialist, DotNetNuke Evangelist, and Technical Writing & Marketing Specialist. Nina’sexperience in graphics and eye for technical perfection as well as an ability to work well with developersand clients alike has helped find her niche in the DotNetNuke community with over 12,500 downloadsof many quality free skins available from http://www.xd.com.au. Nina also has an extensive portfolioof projects from small business to Fortune 500 companies on her web site.
Nina is married with children and enjoys renovations, reading, writing, and driving her muscle sports car.
Pete Garyga, systems engineer and developer, holds an MSCE, MCSA, MCP, CCNA, and CNA. Pete isemployed by Derbyshire Fire & Rescue Service in the UK (http://www.derbys-fire.gov.uk) as theSystems Support and Development Officer. Pete’s personal web site is http://www.garyga.com; hehas also recently set up http://www.dnnresources.com for the DotNetNuke community.
Phil Guerra is a member of the Bugs & Enhancements Core Team. Phil writes technical articles on vari-ous DNN topics, which are posted on his web site, www.hgworks.com/handcoded, and have beentranslated to several languages for posting on a number of sites worldwide. His targeted audience isASP.NET developers that employ hand-coded methods to build .NET projects. He is a frequent poster onthe ASP.NET DNN forums and offers users advice on enhancing their DNN portals and assists in trou-bleshooting reported DNN issues. His areas of interests include RSS/XML, Graphics, Localization andGlobalization, and general VB.NET topics.
Phil has implemented DNN with custom modules for use in various intranet applications, mostlyhealthcare related. He has worked in the healthcare industry for more than 18 years in various positionsas programmer, analyst, support supervisor, and IT Director. He offers services as a private consultantand developer through his consulting company, HGWorks. Phil currently resides in Mission, Kansas,but looks forward to returning to the Phoenix, Arizona metro area.
Robert Collins is the Founder and President of WillowTree Software, Inc. (http://www.willowtreesoftware.com/). Robert is a veteran developer with more than seven years of web development experi-ence. Specializing in the design, development, and implementation of e-commerce applications, corpo-rate Intranet tools, and high availability data-driven web applications, Robert has established himselfas a leading force in the web development community. Robert founded the successful “Boise .NetDevelopers User Group” (http://www.netdug.com/), a user group dedicated to promotion of theMicrosoft .NET Framework and Services. While with the Microsoft Corporation, Rob was responsible forproviding high availability web and database application solutions for Microsoft internal services andMicrosoft partners.
In addition to web application development, Robert is also an established desktop/client server applica-tions developer, network systems engineer, and cluster services specialist with more than four years ofexperience working as a systems integrator (MCP, MCP+I, MCSE, MCSE+I).

xxii
Preface
Salar Golestanian specializes in skinning and UI, working solely in the DotNetNuke environment. He iscurrently targeting clients wanting content management solutions, and has years of creative designexperience. Salar is working on a number of projects based on the DotNetNuke platform. The links tovarious projects and showcases are available on salaro.com.
Salar’s background is in Internet technology using Microsoft tools. He has a Bachelor of Science andMPhil in Physics. He lives with his fiancée and daughter near London UK.
Shawn Mehaffie holds an MCP (ASP.NET) certification and is working on his MCSD certification.Shawn has 14 years of programming experience in VB.NET, ASP.NET, and C# and has worked with.NET since its release. He was on a team that wrote a Payment Engine web service as part of theMicrosoft .Net Blaze program. As a side job, Shawn owns his own company, PC Resources, LLC(http://www.pcrresourcesllc.com). Shawn has been a part of the DotNetNuke community sincev1.0 and currently uses DotNetNuke to create web sites for his customers. Shawn is the QA Team Leaderand a member of the Bug & Enhancement Team. Shawn is excited about being on the DoteNetNukeCore Team and the positive contributions his team can have on future releases of DotNetNuke. Shawnlives in Blue Springs, Missouri with his wife and two sons (Austin and Tyler).
Steve Fabian (Gooddogs.com), has been designing and developing software solutions for 19 years. Inaddition to programming in more then a dozen different languages, Steve is proficient in graphics andweb design and for the past few years has focused on user interface design, .NET development, bothclient and browser based, and most recently, DotNetNuke. Gooddogs.com provides both free and cus-tom skins for the DotNetNuke community as well as the free Gooddogs Repository Module forDotNetNuke. Steve lives in New Jersey with his wife and his five dogs, Kahlua, Amaretto, Sambucca,Daiquiri, and Whiskey. In his extremely limited free time, Steve and his wife do volunteer work forBARKS, an animal rescue shelter in Byram, New Jersey.
Tam Tran Minh holds an architect degree from HCMC-Vietnam University of Architecture. He is cur-rently Chairman and CIO of TTT Corporation in Vietnam (http://www.tttcompany.com). Since 2003,DotNetNuke is the main content management portal for his company. Tam has developed and con-tributed several DotNetNuke modules to the community.
Tam is currently developing a management and collaboration system for TTT with Visual Basic,Exchange/Outlook, and now VB.NET. He is author of several articles in PC-World Vietnam and haspublished a book titled Architectural Space - Virtual and Reality (winner of the National ArchitecturalAwards 2002 in Vietnam) based on projects of TTT using computer graphic technologies. Tam speaksboth Vietnamese and English.
Todd Mitchell is a Senior Analyst Programmer at Byte Information Technology (http://www.byte.com.au). Prior to joining Byte, Todd ran his own consulting business specializing in IT infrastructureand portal applications for small to medium enterprises, undertaking a range of projects including thecustomization of DotNetNuke for a major portal application in the telecommunications industry.
Todd is an accomplished IT professional who is expert in driving projects and technologies that supportand enhance business growth and has extensive IT infrastructure experience gained in a number ofindustries. Todd is a founding member of the DotNetNuke Core Team. Todd holds an MCAD and is aproficient programmer in a number of languages including HTML, Java Script, VB Script, ASP, VisualBasic VBA, and SQL.

xxiii
Preface
Yarko Tymciurak has been reading code since 1968, and writing software since 1976. He has worked oncontrol systems, compilers, operating systems, and communication systems. He has lead teams ofSoftware Architects and trained engineering, business, and sales teams in communication skills.Currently he is a System Architect of mobile devices. Yarko holds a BSEE in Computer Engineeringfrom the University of Arizona.
Other Members of the Outer Core TeamJason Graves
Josh Weinstein
Richard Cox
Richard Ferguson
Russ Johnson
ConventionsTo help you get the most from the text and keep track of what’s happening, we’ve used a number of con-ventions throughout the book.
Tips, hints, tricks, and asides to the current discussion are offset and placed in italics like this.
As for styles in the text:
❑ We italicize important words when we introduce them
❑ We show keyboard strokes like this: Ctrl+A
❑ We show URLs within the text like so: http://www.dotnetnuke.com
❑ We present code in two different ways:
In code examples we highlight new and important code with a gray background.
The gray highlighting is not used for code that’s less important in the presentcontext, or has been shown before.
Source CodeTo download DotNetNuke to work with as you make your way through this book you can surf directly towww.dotnetnuke.com, or you can link to the DotNetNuke site through the Wrox site at www.wrox.com.
Boxes like this one hold important, not-to-be forgotten information that is directlyrelevant to the surrounding text.

xxiv
Preface
Once at the Wrox site, simply locate the book’s title (either by using the Search box or by using one of thetitle lists) and follow the provided link to www.dotnetnuke.com.
Because many books have similar titles, you may find it easiest to search by ISBN; for this book the 10-digit ISBNis 0-7645-9563-6 and the 13-digit ISBN is 978-0-7645-9563-9.
ErrataWe make every effort to ensure that there are no errors in the text or in the code. However, no one is per-fect, and mistakes do occur. If you find an error in one of our books, like a spelling mistake or faultypiece of code, we would be very grateful for your feedback. By sending in errata you may save anotherreader hours of frustration and at the same time you will be helping us provide even higher qualityinformation.
To find the errata page for this book, go to http://www.wrox.com and locate the title using the Searchbox or one of the title lists. Then, on the book details page, click the Book Errata link. On this page you canview all errata that has been submitted for this book and posted by Wrox editors. A complete book listincluding links to each book’s errata is also available at www.wrox.com/misc-pages/booklist.shtml.
If you don’t spot “your” error on the Book Errata page, go to www.wrox.com/contact/techsupport.shtmland complete the form there to send us the error you have found. We’ll check the information and, if appropri-ate, post a message to the book’s errata page and fix the problem in subsequent editions of the book.
p2p.wrox.comFor author and peer discussion, join the P2P forums at p2p.wrox.com. The forums are a web-based sys-tem for you to post messages relating to Wrox books and related technologies and interact with otherreaders and technology users. The forums offer a subscription feature to e-mail you topics of interest ofyour choosing when new posts are made to the forums. Wrox authors, editors, other industry experts,and your fellow readers are present on these forums.
At http://p2p.wrox.com you will find a number of different forums that will help you not only as youread this book, but also as you develop your own applications. To join the forums, just follow these steps:
1. Go to p2p.wrox.com and click the Register link.
2. Read the terms of use and click Agree.
3. Complete the required information to join as well as any optional information you wish to pro-vide and click Submit.
4. You will receive an e-mail with information describing how to verify your account and com-plete the joining process.
You can read messages in the forums without joining P2P but in order to post your own messages, you must join.

xxv
Preface
Once you join, you can post new messages and respond to messages other users post. You can read mes-sages at any time on the Web. If you would like to have new messages from a particular forum e-mailedto you, click the Subscribe to this Forum icon by the forum name in the forum listing.
For more information about how to use the Wrox P2P, be sure to read the P2P FAQs for answers to ques-tions about how the forum software works as well as many common questions specific to P2P and Wroxbooks. To read the FAQs, click the FAQ link on any P2P page.


Professional DotNetNuke™ ASP.NET Portals
Shaun Walker, Patrick J. Santry, Joe Brinkman, Daniel Caron, Scott McCulloch, Scott Willhite, and Bruce Hopkins


An Inside Look at theEvolution of DotNetNuke
As much as I would like people to believe that DotNetNuke was intentionally created as a premieropen source project for the Microsoft platform, it is unfortunately not the case. As is true withmany open source projects, the software was created with commercial intentions in mind, andonly when it was discovered that its true purpose would not be realized was it reconsidered as anopen source project.
In 2001–2002 I was working for a medium-sized software consulting company that was providingoutsourced software development services to a variety of large U.S. clients specializing primarily ine-Learning initiatives. The internal push was to achieve CMM 3.0 on a fairly aggressive scheduleso that we could compete with the emerging outsourcing powerhouses from India and China. As aresult there was an incredible amount of focus on process and procedure and somewhat less focuson the technical aspects of software engineering. Because the majority of the client base was inter-ested in the J2EE platform, the company had primarily hired resources with Java skills — leavingmyself with my legacy Microsoft background to assume more of an internal development and pro-ject management role. The process improvement exercise consumed a lot of time and energy for thecompany; attempting to better define roles and responsibilities and ensuring proper documentationthroughout the project life cycle. Delving into CMM and the PMBOK were great educational bene-fits for me — skills that would prove to be invaluable in future endeavors. Ultimately the largeU.S. clients decided to test the overseas outsourcing options anyway, which resulted in severedownsizing for the company. It was during these tumultuous times that I recognized the potentialof the newly released .NET Framework (beta) and decided that I would need to take my own ini-tiative to learn this exciting new platform in order to preserve my long-term employment outlook.
For a number of years I had been maintaining an amateur hockey statistics application as a side-line hobby business. The client application was written in Visual Basic 6.0 with a Microsoft Accessbackend, and I had augmented it with a simplistic web publishing service using Active ServerPages 3.0 and SQL Server 7.0. However, better integration with the World Wide Web was quicklybecoming the most highly requested enhancement and I concluded that an exploration into

ASP.NET was the best way to enhance the application, while at the same time acquire the skills neces-sary to adapt to the changing landscape. My preferred approach to learning new technologies is to expe-rience them firsthand rather than through theory or traditional education. It was during a MicrosoftDeveloper Days conference in Vancouver, British Columbia in 2001 that I became aware of a referenceapplication known as the IBuySpy Portal.
IBuySpy PortalRealizing the educational value of sample applications, Microsoft had built a number Source Projects,which were released with the .NET Framework 1.0 Beta to encourage developers to cut their teethon the new platform. These projects included full source code and a very liberal End User LicenseAgreement (EULA) that provided nearly unrestricted usage. Microsoft co-developed the IBuySpyPortal with Vertigo Software and promoted it as a “best practice” example for building applications inthe new ASP.NET environment. Despite its obvious shortcomings, the IBuySpy Portal had some verystrong similarities to both Microsoft Sharepoint as well as other open source portal applications on theLinux/Apache/mySQL/PHP (LAMP) platform. The portal allowed you to create a completely dynamicweb site consisting of an unlimited number of virtual “tabs” (pages). Each page had a standard headerand three content panes — a left pane, a middle pane, and a right pane (a standard layout for mostportal sites). Within these panes the administrator could dynamically inject “modules” — essentiallymini-applications for managing specific types of web content. The IBuySpy Portal application shippedwith six modules designed to cover the most common content types — (announcements, links, images,discussions, html/text, XML) as well as a number of modules for administrating the portal site. As anapplication framework the IBuySpy Portal (see Figure 1-1) provided a mechanism for managing users,roles, permissions, tabs, and modules. With these basic services, the portal offered just enough to whetthe appetite of many aspiring ASP.NET developers.
Figure 1-1
2
Chapter 1

ASP.NETThe second critical item that Microsoft delivered at this point in time was a community Forums page onthe www.asp.net web site (see Figure 1-2). This Forum provided a focal point for Microsoft developersto meet and collaborate on common issues in an open, moderated environment. Prior to the release ofthe Forums on www.asp.net there was a real void in terms of Microsoft community participation in theonline or global sphere, especially when compared to the excellent community environments on otherplatforms.
Figure 1-2
One discussion forum on the www.asp.net site was dedicated to the discussion of the IBuySpy Portalapplication, and it soon became a hotbed for developers to discuss their enhancements, share source codeenhancements, and debate IT politics. I became involved in this Forum early on and gradually increasedmy community participation as my confidence in ASP.NET and the IBuySpy Portal application grew.
In order to appeal to the maximum number of community stakeholders, the IBuySpy Portal was avail-able in a number of different source code release packages. There were VB.NET and C#.NET languageversions, each containing their own VS.NET and SDK variants. Although Microsoft was aggressivelypushing the newly released C# language, I did not feel a compelling urge to abandon my familiar VisualBasic roots. In addition, my experience with classic ASP 3.0 allowed me to conclude that the new code-behind model in VS.NET was far superior to the inline model of the SDK. As luck would have it, I wasable to get access to Visual Studio .NET through my employer. So as a result, I moved forward with the
3
An Inside Look at the Evolution of DotNetNuke

VB.NET/VS.NET version as my baseline framework. This decision would ultimately prove to beextremely important in terms of community acceptance, as I will explain later.
When I first started experimenting with the IBuySpy Portal application I had some very specificobjectives in mind. In order to support amateur sports organizations, I had collected a comprehensiveset of end user requirements based on actual client feedback. However after evaluating the IBuySpyPortal functionality, it quickly became apparent that some very significant enhancements werenecessary if I hoped to achieve my goals. My early development efforts, although certainly not elegantor perfectly architected, proved that the IBuySpy Portal framework was highly adaptable for buildingcustom applications and could be successfully used as the foundation for my amateur sports hostingapplication.
The most significant enhancement I made to the IBuySpy Portal application during these early stageswas a feature that is now referred to as “ multi-portal “ or “site virtualization.” Effectively, this was afundamental requirement for my amateur sports hosting model. Organizations wanted to have a self-maintained web site but they also wanted to retain their individual identity. A number of vendors hademerged with semi-self-maintained web applications but nearly all of them forced the organization toadopt the vendor’s identity (that is, www.vendor.com/clientname rather than www.clientname.com).Although this may seem like a trivial distinction for some, it has some major effects in terms of brandrecognition, site discovery, search engine ranking, and so on. The IBuySpy Portal application alreadypartitioned its data by portal (site) and it had a field in the Portals database table named PortalAlias,which was a perfect candidate for mapping a specific domain name to a portal. It was as if the originalcreators (Microsoft/Vertigo) had considered this use case during development but had not had enoughtime to complete the implementation, so they had simply left the “hook” exposed for future develop-ment. I immediately saw the potential of this concept and implemented some logic that allowed theapplication to serve up custom content based on domain name. Essentially, when a web request wasreceived by the application, it would parse the domain name from the URL and perform a lookup on thePortalAlias field to determine the content that should be displayed. This site virtualization capabilitywould ultimately become the “killer” feature that would allow the application to achieve immediatepopularity as an open source project.
Over the next 8 to 10 months, I continued to enhance and refactor the IBuySpy Portal application as Icreated my own custom implementation (now codenamed SportsManager.Net). I added numerous fea-tures to improve the somewhat limited portal administration and content management aspects. At onepoint I enlisted the help of another developer, John Lucarino, and together we steadily improved theframework using whatever spare time we were able to invest. Unfortunately, since all of this was goingon outside of regular work hours, there was very little time to focus on building a viable commercialventure. So at the end of 2002, it soon became apparent that we did not have enough financial backing ora business model to take the amateur sports venture to the next level. This brought the very commercialnature of the endeavor under scrutiny. If the commercial intentions were not going to succeed, I at leastwanted to feel that my efforts had not been in vain. This forced me to evaluate alternative non-commer-cial uses of the application. Coincidentally, I had released the source code for a number of minor applica-tion enhancements to the www.asp.net community Forum during the year and I began to hypothesizethat if I abandoned the amateur sports venture altogether, it was still possible that my efforts could bene-fit the larger ASP.NET community.
The fundamental problem with the IBuySpy Portal community was the fact that there was no centralauthority in charge of managing its growth. Although Microsoft and Vertigo had developed the initialcode base, there was no public commitment to maintain or enhance the product in any way. Basically
4
Chapter 1
the product was a static implementation, frozen in time, an evolutionary dead-end. However, theIBuySpy Portal EULA was extremely liberal, which meant that developers were free to enhance, license,and redistribute the source code in an unrestricted manner. This led to many developers creating theirown customized versions of the application, sometimes sharing discrete patches with the general com-munity, but more often keeping their enhancements private; revealing only their public-facing web sitesfor community recognition (one of the most popular threads at this time was titled “Show me yourPortal”). In hindsight, I really don’t understand what each developer was hoping to achieve by keepingtheir enhancements private. Most probably thought there was a commercial opportunity in building aportal application with a richer feature set than their competitor. Or perhaps individuals were hoping toestablish an expert reputation based on their public-facing efforts. Either way, the problem was that thismindset was really not conducive to building a community but rather to fragmenting it — a standardtrap that tends to consume many things on the Microsoft platform. The concept of sharing source codein an unrestricted manner was really a foreign concept, which is obviously why nobody thought to stepforward with an organized open source plan.
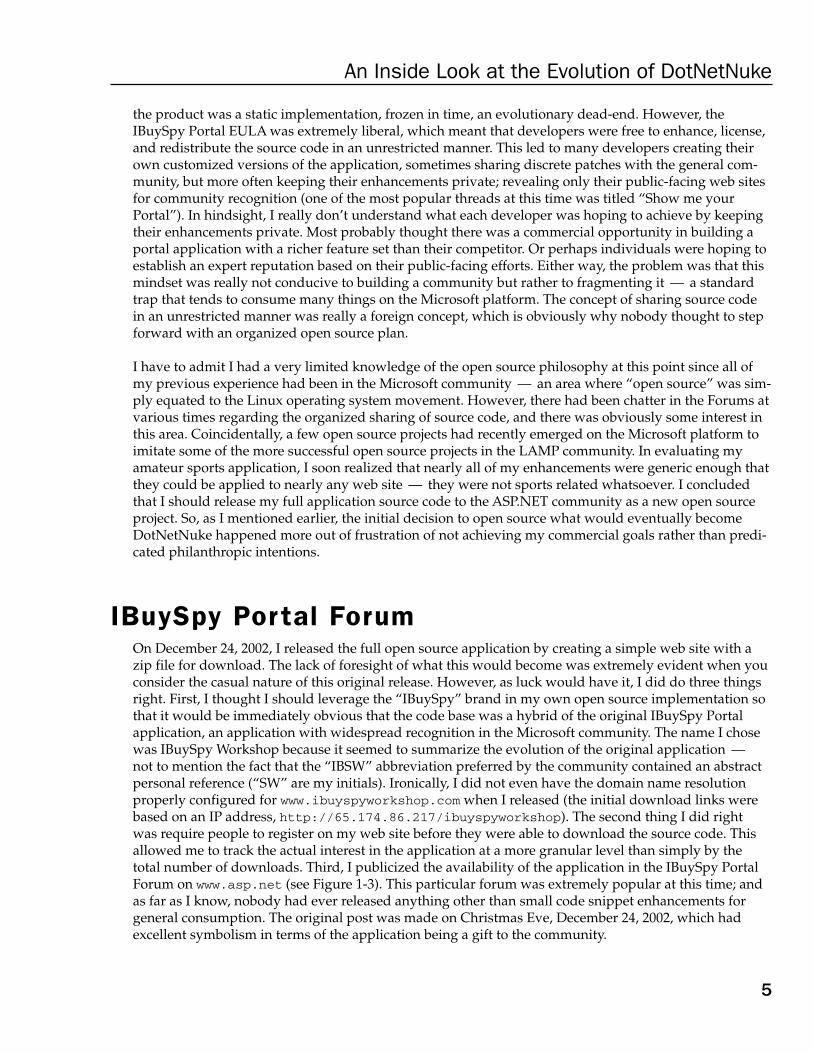
I have to admit I had a very limited knowledge of the open source philosophy at this point since all ofmy previous experience had been in the Microsoft community — an area where “open source” was sim-ply equated to the Linux operating system movement. However, there had been chatter in the Forums atvarious times regarding the organized sharing of source code, and there was obviously some interest inthis area. Coincidentally, a few open source projects had recently emerged on the Microsoft platform toimitate some of the more successful open source projects in the LAMP community. In evaluating myamateur sports application, I soon realized that nearly all of my enhancements were generic enough thatthey could be applied to nearly any web site — they were not sports related whatsoever. I concludedthat I should release my full application source code to the ASP.NET community as a new open sourceproject. So, as I mentioned earlier, the initial decision to open source what would eventually becomeDotNetNuke happened more out of frustration of not achieving my commercial goals rather than predi-cated philanthropic intentions.
IBuySpy Portal ForumOn December 24, 2002, I released the full open source application by creating a simple web site with azip file for download. The lack of foresight of what this would become was extremely evident when youconsider the casual nature of this original release. However, as luck would have it, I did do three thingsright. First, I thought I should leverage the “IBuySpy” brand in my own open source implementation sothat it would be immediately obvious that the code base was a hybrid of the original IBuySpy Portalapplication, an application with widespread recognition in the Microsoft community. The name I chosewas IBuySpy Workshop because it seemed to summarize the evolution of the original application —not to mention the fact that the “IBSW” abbreviation preferred by the community contained an abstractpersonal reference (“SW” are my initials). Ironically, I did not even have the domain name resolutionproperly configured for www.ibuyspyworkshop.com when I released (the initial download links werebased on an IP address, http://65.174.86.217/ibuyspyworkshop). The second thing I did rightwas require people to register on my web site before they were able to download the source code. Thisallowed me to track the actual interest in the application at a more granular level than simply by thetotal number of downloads. Third, I publicized the availability of the application in the IBuySpy PortalForum on www.asp.net (see Figure 1-3). This particular forum was extremely popular at this time; andas far as I know, nobody had ever released anything other than small code snippet enhancements forgeneral consumption. The original post was made on Christmas Eve, December 24, 2002, which hadexcellent symbolism in terms of the application being a gift to the community.
5
An Inside Look at the Evolution of DotNetNuke

Figure 1-3
IBuySpy WorkshopThe public release of the IBuySpy Workshop (see Figure 1-4) created such a surge in Forum activity thatit was all I could do to keep up with the feedback, especially since this all occurred during the Christmasholidays. I had a family vacation booked for the first two weeks of January, and I left for Mexico onJanuary 2, 2003 (one week after the initial IBuySpy Workshop release). At the time, the timing of thisfamily vacation seemed very poor as the groundswell of interest in the IBuySpy Workshop seemed likeit could really use my dedicated focus. However in hindsight, the timing could not have been better,because it proved that the community could support itself — a critical element in any open sourceproject. When I returned home from vacation I was amazed at the massive response the release hadachieved. The IBuySpy Portal Forum became dominated with posts about the IBuySpy Workshop andmy Inbox was full of messages thanking me for my efforts and requesting me for support and enhance-ments. This certainly validated my decision to release the application as an open source project, butalso emphasized the fact that I had started a locomotive down the tracks and it was going to take somesignificant engineering to keep it on the rails.
Over the coming months I frantically attempted to incorporate all community suggestions into the appli-cation while at the same time keep up with the plethora of community support questions. Because I wasworking a day job that prevented effort on the open source project, most of my evenings were consumedwith work on the IBuySpy Workshop, which definitely caused some strain on my marriage and familylife. Four hours of sleep per night is not conducive to a healthy lifestyle but, like I said, the train wasrolling and I had a feeling the project was destined for bigger things.
6
Chapter 1

Figure 1-4
Supporting a user base through upgrades is fundamental in any software product. This is especially truein open source projects where the application can evolve very quickly based on community feedback andtechnical advancements. The popular open source expression is that “no user should be left on an evolu-tionary dead-end.” As luck would have it, I had designed a very reliable upgrade mechanism in theoriginal sports management application, which I included in the IBuySpy Workshop code base. This fea-ture allowed users of the application to easily migrate from one release version to the next — a criticalfactor in keeping the community engaged and committed to the evolution of the product.
In February 2003, the IBuySpy Portal Forum had become so congested with IBuySpy Workshop threadsthat it started to become difficult for the two communities to co-exist peacefully. At this point, I sent ane-mail to the anonymous alias posted at the bottom of the Forums page on the www.asp.net site witha request to create a dedicated forum for the IBuySpy Workshop. Because the product functionality andsource code of the two applications had diverged so significantly, my intent was to try and keep the
7
An Inside Look at the Evolution of DotNetNuke

Forum posts for the two applications separate; providing both communities the means to support theirmembership. I certainly did not have high hopes that my e-mail request was even going to be read —let alone granted. But to my surprise, I received a positive response from none other than Rob Howard(an ASP.NET icon), which proved to be a great introduction to a long-term partnership with Microsoft.Rob created the forum and even went a step further to add a link to the Source Download page of thewww.asp.net site, an event that would ultimately drive a huge amount of traffic to the emergingIBuySpy Workshop community.
There are a number of reasons why the IBuySpy Workshop became so immediately popular when it wasreleased in early 2003. The obvious reason is because the base application contained a huge number ofenhancements over the IBuySpy Portal application that people could immediately leverage to buildmore powerful web sites. From a community perspective, the open source project provided a centralmanagement authority, which was dedicated to the ongoing growth and support of the applicationframework; a factor that was definitely lacking in the original IBuySpy Portal community. This conceptof open source on the Microsoft platform attracted many developers; some with pure philosophicalintentions, and others who viewed the application as a vehicle to further their own revenue-generatinginterests. Yet another factor, which I think is often overlooked, relates to the programming language onwhich the project was based. With the release of the .NET Framework 1.0, Microsoft had spent a lot ofenergy promoting the benefits of the new C# programming language. The C# language was intended toprovide a migration path for C++ developers as well as a means to entice Java developers working onother platforms to switch. This left the Visual Basic and ASP 3.0 developer communities feeling neglectedand somewhat unappreciated. The IBuySpy Workshop, with its core framework in VB.NET, providedan essential community ecosystem where legacy VB developers could interact, learn, and share.
In late February 2003, the lack of sleep, family priorities, and community demands finally came to ahead and I decided that I should reach out for help. I contacted a former employer and mentor, KentAlstad, with my dilemma and we spent a few lengthy telephone calls brainstorming possible outcomes.However, my personal stress level at the time and my urgency to change direction on the project ulti-mately caused me to move too fast and with more aggression than I should have. I announced that theIBuySpy Workshop would immediately become a subscription service where developers would need topay a monthly fee in order to get access to the latest source code. From a personal perspective the intentwas to generate enough revenue that I could leave my day job and focus my full energy on the manage-ment of the open source project. And with 2000 registered users, a subscription service seemed like aviable model (see Figure 1-5).
However, the true philosophy of the open source model immediately came to light and I had to face thewrath of a scorned community. Among other things I was accused of misleading the community, lyingabout the open source nature of the project, and letting my personal greed cloud my vision. For everyone supporter of my decision there were 10 more who publicly crucified me as the evil incarnate.Luckily for me Kent had a trusted work associate named Andy Baron, a senior consultant at MCWTechnologies and a Microsoft Most Valuable Professional since 1995, who has incredible wisdom when itcomes to the Microsoft development community. Andy helped me craft a public apology message (seeFigure 1-6), which managed to appease the community while at the same time restore the IBuySpyWorkshop to full open source status.
8
Chapter 1

Figure 1-5
Coincidentally, the political nightmare I created in the IBuySpy Workshop Forum with my subscriptionannouncement resulted in some direct attention from the Microsoft ASP.NET product team (the main-tainers of the www.asp.net site). Still trying to recover from the damage I had incurred, I received ane-mail from none other than Scott Guthrie (co-founder of the Microsoft ASP.NET Team), asking me toreexamine my decision on the subscription model and making suggestions on how the project couldcontinue as a free, open source venture. It seemed that Microsoft was protective of its evolving commu-nity and did not want to see the progress in this area splinter and dissolve just as it seemed to be gaining
9
An Inside Look at the Evolution of DotNetNuke

momentum. Scott Guthrie made no promises at this point but he did open a direct dialogue that ulti-mately led to some fundamental discussions on sponsorship and collaboration. In fact, this initial e-mailled to a number of telephone conversations and ultimately an invitation to Redmond to discuss thefuture of the IBuySpy Workshop.
Figure 1-6
I still remember the combination of nerves and excitement as I drove from my home in Abbotsford,British Columbia to the Microsoft head office in Redmond, Washington (about a three-hour trek). I reallydid not know what to expect and I had tried to strategize all possible angles. Essentially all of my plan-ning turned out to be moot — my meeting with Scott Guthrie turned out to be far more laid back andtransparent than I could have ever imagined. Scott took me to his unassuming office and we spent thenext three hours brainstorming ideas of how the IBuySpy Workshop fit into the current ASP.NET land-scape. Much of this centered on the evolving vision of ASP.NET 2.0 — an area in which I had little or noknowledge prior to the meeting (the Whidbey Alpha had not even been released at this point).
At the beginning of the meeting, Scott had me demo the current version of the IBuySpy Workshop,explaining its key features and benefits. We also discussed the long-term goals of the project as well asmy proposed roadmap for future enhancements. Scott’s knowledge of both the technical and communityaspects of the ASP.NET platform really amazed me — I guess that’s why he is the undisputed Father ofASP.NET. In hindsight I can hardly believe my good fortune to have received three dedicated hours ofhis time to discuss the project — it really changed my “ivory tower” perception of Microsoft and forgeda strong relationship for future collaboration.
Upon leaving Redmond, I had to stifle my excitement as I realized that, regardless of the direct interac-tion with Microsoft, I personally was still in the exact same situation as before the subscription modelannouncement. Since the subscription model had failed to generate the much-needed revenue thatwould have allowed me to devote 100% of my time to the project, I was forced to examine other possible
10
Chapter 1
alternatives. There had been a number of suggestions from the community and the concept that seemedto have the most potential was related to web hosting.
In these early stages, there were very few economical Microsoft Windows hosting options available thatoffered a SQL Server database — a fundamental requirement for running the IBuySpy Workshop appli-cation. Coincidentally, I had recently struck up a relationship with an individual from New Jersey whowas very active in the IBuySpy Workshop forums on www.asp.net. This individual had a solid back-ground in web hosting and proposed a partnership whereby he would manage the web hosting infras-tructure and I would continue to enhance the application and drive traffic to the business. Initially, a lotof community members signed up for this service; some because of the low-cost hosting option, othersbecause they were looking for a way to support the open source project. It soon became obvious that thecosts to build and support the infrastructure were consuming the majority of the revenue generated.And over time the amount of effort to support the growing client base became more intense. Eventuallyit came to a point where it was intimated that my contributions to the web hosting business were notsubstantial enough to justify the current partnership structure. I was informed that the partnershipshould be dissolved. This is where things got complicated because there had never been any formalagreement signed by either party to initiate the partnership. Without documentation, it made the negoti-ation for a fair settlement difficult and resulted in some bad feelings on both sides. This was unfortunatebecause I think the relationship was formed with the best intentions, but the demands of the businesshad resulted in a poor outcome. In any case, this ordeal was an important lesson I needed to learn;regardless of the open source nature of the project, it was imperative to have all contractually bindingitems properly documented.
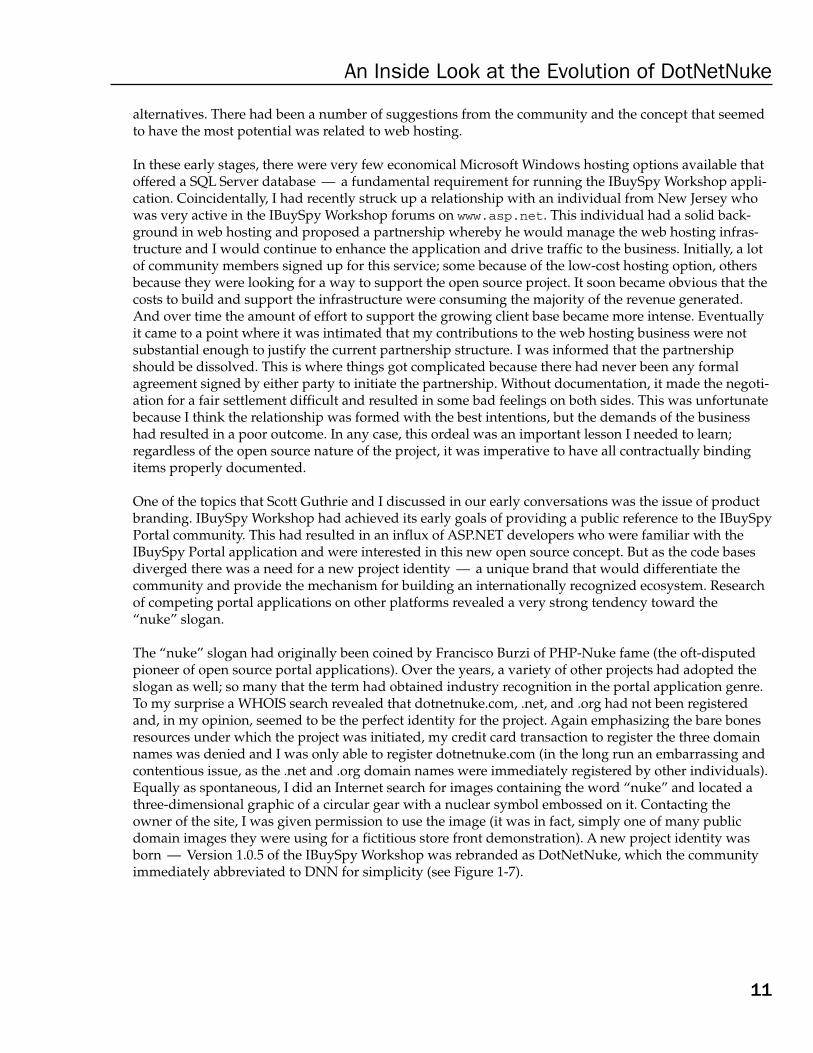
One of the topics that Scott Guthrie and I discussed in our early conversations was the issue of productbranding. IBuySpy Workshop had achieved its early goals of providing a public reference to the IBuySpyPortal community. This had resulted in an influx of ASP.NET developers who were familiar with theIBuySpy Portal application and were interested in this new open source concept. But as the code basesdiverged there was a need for a new project identity — a unique brand that would differentiate thecommunity and provide the mechanism for building an internationally recognized ecosystem. Researchof competing portal applications on other platforms revealed a very strong tendency toward the“nuke” slogan.
The “nuke” slogan had originally been coined by Francisco Burzi of PHP-Nuke fame (the oft-disputedpioneer of open source portal applications). Over the years, a variety of other projects had adopted theslogan as well; so many that the term had obtained industry recognition in the portal application genre.To my surprise a WHOIS search revealed that dotnetnuke.com, .net, and .org had not been registeredand, in my opinion, seemed to be the perfect identity for the project. Again emphasizing the bare bonesresources under which the project was initiated, my credit card transaction to register the three domainnames was denied and I was only able to register dotnetnuke.com (in the long run an embarrassing andcontentious issue, as the .net and .org domain names were immediately registered by other individuals).Equally as spontaneous, I did an Internet search for images containing the word “nuke” and located athree-dimensional graphic of a circular gear with a nuclear symbol embossed on it. Contacting theowner of the site, I was given permission to use the image (it was in fact, simply one of many publicdomain images they were using for a fictitious store front demonstration). A new project identity wasborn — Version 1.0.5 of the IBuySpy Workshop was rebranded as DotNetNuke, which the communityimmediately abbreviated to DNN for simplicity (see Figure 1-7).
11
An Inside Look at the Evolution of DotNetNuke

Figure 1-7
A secondary issue that had not been addressed during the early stages of the project was licensing. Theoriginal IBuySpy Portal had been released under a very liberal Microsoft EULA license, which allowedfor unrestricted usage, modification, and distribution. However, the code base had undergone such amajor transformation, it could hardly be compared with its predecessor. Therefore, when the IBuySpyWorkshop application was released I had not included the original Microsoft EULA; nor had I includedany copyright or license of my own. Essentially this meant that the application was in the public domain.This is certainly not the most accepted approach to an open source project and eventually some of themore legal-savvy community members brought the issue to a head. I was forced to take a hard look atopen source licensing models to determine which license was most appropriate to the project.
In stark contrast to the spontaneous approach taken to finding a project identity, the licensing issue hadmuch deeper ramifications. Had I not performed extensive research on this subject, I would have likelychosen a GPL license because it seemed to dominate the vast majority of open source projects in exis-tence. However, digging beneath the surface, I quickly realized that the GPL did not seem to be a goodcandidate for my objectives of allowing DotNetNuke to be used in both commercial and non-commercialenvironments. Ultimately, the selection of a license for an open source project is largely dependent uponyour business model, your product architecture, and understanding who owns the intellectual propertyin your application. The combination of these factors prompted me to take a hard look at the opensource licensing options available.
If you have not researched open source software, you would be surprised at the major differencesbetween the most popular open source licensing models. It is true that these licenses all meet the stan-dards of the Open Source Definition, a set of guidelines managed by the Open Source Initiative (OSI) atwww.open-source.org. These principles include the right to use open source software for any purpose,the right to make and distribute copies, the right to create and distribute derivative works, the right toaccess and use source code, and the right to combine open source and other software. With such funda-mental rights shared between all open source licenses it probably makes you wonder why there is needfor more than one license at all. Well, the reason is because each license has the ability to impose addi-tional rights or restrictions on top of these base principles. The additional rights and restrictions havethe effect of altering the license so that it meets the specific objectives of each project. Because it is gener-ally bad practice to create brand new licenses (based on the fact that the existing licenses have gained
12
Chapter 1

industry acceptance as well as a proven track record), people generally gravitate toward either a GPL orBSD license.
The GPL (or GNU Public License) was created in 1989 by Richard Stallman, founder of the Free SoftwareFoundation. The GPL is what is now known as a “copyleft” license, a term coined based on its contro-versial reciprocity clause. Essentially this clause stipulates that you are allowed to use the software oncondition that any derivative works that you create from it and distribute must be licensed to all underthe same license. This is intended to ensure that the software and any enhancements to it remain in thepublic domain for everyone to share. While this is a great humanitarian goal, it seriously restricts theuse of the software in a commercial environment.
The BSD (or Berkeley Software Distribution) was created by the University of California and wasdesigned to permit the free use, modification, and distribution of software without any return obligationwhatsoever on the part of the community. The BSD is essentially a “copyright” license, meaning that youare free to use the software on condition that you retain the copyright notice in all copies or derivativeworks. The BSD is also known as an “academic” license because it provides the highest degree of intel-lectual property sharing.
Ultimately I settled on a standard BSD license for DotNetNuke; a license that allows the maximumlicensing freedom in both commercial and non-commercial environments — with only minimal restric-tions to preserve the copyright of the project. The change in license went widely unnoticed by thecommunity because it did not impose any additional restrictions on usage or distribution. However,it was a fundamental milestone in establishing DotNetNuke as a true open source project.
DotNetNuke - http://www.dotnetnuke.comCopyright (c) 2002-2005by Shaun Walker ([email protected]) of Perpetual Motion Interactive SystemsInc. (http://www.perpetualmotion.ca)
Permission is hereby granted, free of charge, to any person obtaining a copy ofthis software and associated documentation files (the “Software”), to deal in theSoftware without restriction, including without limitation the rights to use, copy,modify, merge, publish, distribute, sublicense, and/or sell copies of the Software,and to permit persons to whom the Software is furnished to do so, subject to thefollowing conditions:
The above copyright notice and this permission notice shall be included in allcopies or substantial portions of the Software.
THE SOFTWARE IS PROVIDED “AS IS”, WITHOUT WARRANTY OF ANY KIND, EXPRESS OR IMPLIED,INCLUDING BUT NOT LIMITED TO THE WARRANTIES OF MERCHANTABILITY, FITNESS FOR APARTICULAR PURPOSE AND NONINFRINGEMENT. IN NO EVENT SHALL THE AUTHORS OR COPYRIGHTHOLDERS BE LIABLE FOR ANY CLAIM, DAMAGES OR OTHER LIABILITY, WHETHER IN AN ACTIONOF CONTRACT, TORT OR OTHERWISE, ARISING FROM, OUT OF OR IN CONNECTION WITH THESOFTWARE OR THE USE OR OTHER DEALINGS IN THE SOFTWARE.
The next major milestone in the project’s open source evolution occurred in the summer of 2002. Upuntil this point I had been acting as the sole maintainer of the DotNetNuke code base; a task that wasconsuming 110% of my free time as I feverishly fixed bugs and enhanced the framework based on com-munity feedback. Yet still I felt more like a bottleneck than a provider, in spite of the fact I was churningout at least one significant release every month leading up to this point. The more active community
13
An Inside Look at the Evolution of DotNetNuke

members were becoming restless due to a lack of direct input into the progress of the project. In fact,a small faction of these members even went so far as to create their own hybrid or “fork” of theDotNetNuke code base, which attempted to forge ahead and add features at a more aggressive pacethan I was capable of on my own. These were very challenging times from a political standpoint becauseI was eventually forced to confront all of these issues in a direct and public manner — flexing my“Benevolent Dictator” muscles for the first time; an act I was not the least bit comfortable performing.Luckily for me, I had a number of very loyal and trustworthy community members who supported myposition and ultimately provided the backing to form a very strong and committed Core Team.
As a result of the single-threaded issues I mentioned earlier, most successful open source projects arecomprised of a number of community volunteers who earn their positions of authority within the com-munity based on their specific expertise or community support activities. This is known as a meritoc-racy; a term which means that an individual’s influence is directly proportional to the ability that theindividual demonstrates within the project. It’s a well-observed fact that individuals with more experi-ence and skills will have less time to devote to volunteer activities; however, their minimal contributionsprove to be incredibly valuable. Similarly, individuals with less experience may be able to invest moretime but may only be capable of performing the more repetitive, menial tasks. Building a healthy bal-ance of these two roles is exactly what is required in every successful open source project; and in fact, isone of the more challenging items to achieve from a management perspective.
The original DotNetNuke Core Team was selected based on their participation and dedication to theDotNetNuke project in the months leading up to the team’s formation. In most cases this was solelybased on an individual’s public image and reputation that had been established in the DotNetNukeForum on the www.asp.net web site. And in fact, in these early stages, the online persona of each indi-vidual proved to be a good indicator of the specific skills they could bring to the project. Some memberswere highly skilled architects, others were seasoned developers, yet others were better at discussingfunctionality from an end-user perspective and providing quality support to their community peers.
In order to establish some basic structure for the newly formed Core Team, I attempted to summarizesome basic project guidelines. My initial efforts combined some of the best Extreme Programming (XP)rules with the principles of other successful open source projects. This became the basis of theDotNetNuke Manifest document:
❑ Development is a Team Effort: The whole is exponentially greater than the sum of its parts.Large-scale open source projects are only viable if a large enough community of highly skilleddevelopers can be amassed to attack a problem. Treating your users as co-developers is yourmost effective option for rapid code improvement and effective debugging.
❑ Build the right product before you build the product right: Focus should be directed at under-standing and implementing the high-level business requirements before attempting to constructthe perfect technical architecture. Listen to your customers.
❑ Incremental Development: Every software product has infinite growth potential if managed cor-rectly. Functionality should be added in incremental units rather than attempting a monolithicimplementation. Release often but with a level of quality that instills confidence.
❑ Law of Diminishing Return: The majority of the effort should be invested in implementing fea-tures that have the most benefit and widest general usage by the community.
DotNetNuke version 1.0.10 was the proving grounds for the original Core Team. The idea was to estab-lish the infrastructure to support disconnected team development by working on a stabilization release
14
Chapter 1

of the current product. A lot of debate went into the selection of the appropriate source control systembecause, ironically enough, many of the Core Team had never worked with a formal source control pro-cess in the past (a fact that certainly emphasized the varied professional background of the Core Teammembers). The debate centered on whether to use a CVS or VSS model.
CVS is a source control system that is very popular in the open source world that allows developers towork in an unrestricted manner on their local project files and handles any conflicts between versionswhen you attempt to commit your changes to the central repository. Visual SourceSafe (VSS) is aMicrosoft source control system that is supported by the Microsoft development tool suite, whichrequires developers to explicitly lock project files before making modifications to prevent version con-flicts. Ultimately, the familiarity with the Microsoft model won out and we decided to use the freeWorkSpaces service on the GotDotNet web site (a new developer community site supported byMicrosoft). GotDotNet also provided a simplistic Bug Tracker application that provided us with a meansto manage the tracking of issues and enhancement requests. With these infrastructure components inplace we were able to focus on the stabilization of the application; correcting known defects and addingsome minor usability enhancements. It was during this time that Scott Willhite stepped forward toassume a greater role of responsibility in the project; assisting in management activities, communication,prioritization, and scheduling.
A significant enhancement that was introduced in this stabilization release came from a third party thathad contacted me with some very specific enhancements they had implemented and wished to con-tribute. The University of Texas at El Paso had done extensive work making the DotNetNuke applica-tion compliant with the guidelines of the American Disabilities Association (ADA) and Section 508 of theUnited States Rehabilitation Act. The United States government had made compliancy mandatory formost public organizations; therefore, this was a great enhancement for DotNetNuke because it allowedthe application to be used in government, educational, and military scenarios. Bruce Hopkins becamethe Core Team owner of this item in these early stages; a role that required a great deal of patience as therest of the team came to grips with the new concept.
Establishing and managing a team was no small challenge. On one hand there were the technical chal-lenges of allowing multiple team members, all in different geographic regions, to communicate and col-laborate in a cost-effective, secure environment. Certainly this would have never been possible withoutthe Internet and its vast array of online tools. On the other hand there was the challenge of identifyingdifferent personality types and channeling them into areas where they would be most effective. Becausethere are limited financial motivators in the open source model, people must rely on more basic incen-tives to justify their volunteer efforts. Generally this leads to a paradigm where contributions to the pro-ject become the de facto channel for building a reputation within the community — a primarymotivator in any meritocracy. As a result of working with the team, it soon became obvious that therewere two extremes in this area — those who would selflessly sacrifice all of their free time (often to theirown detriment) to the open source project, and those who would invest the minimal effort and expectthe maximum reward. As the creator and maintainer of the project it was my duty to remain objectiveand put the interests of the community first. This often caused me to become frustrated with the behav-ior of specific individuals, but in nearly all cases these issues could be resolved without introducing anyhard feelings on either side. This was true in all cases except one.
Early in the project history I had been approached by an individual from Germany with a request tomaintain a localized DotNetNuke site for the German community. I was certainly not naïve to the dan-gers of forking at this point and I told him that it would be fine so long as the site stayed consistent withthe official source code base, which was under my jurisdiction. This was agreed upon and in the coming
15
An Inside Look at the Evolution of DotNetNuke

months I would have periodic communication with this individual regarding his localization efforts.However, as time wore on, he became critical of the manner in which the project was being managed; inparticular the sole maintainer aspect, and began to voice his disapproval in the public Forum. There wasa group who believed that there should be greater degree of transparency in the project; that developersshould be able to get access to the latest development source code at anytime, and that the maintenanceof the application should be conducted by a team rather than an individual. He was able to convince anumber of community members to collaborate with him on a modified version of DotNetNuke; a ver-sion that integrated a number of the more popular community enhancements available, and called itDotNetNuke XXL.
Now I have to admit that much of this occurred due to my own inability to respond quickly and form aCore Team. In addition, I was not providing adequate feedback to the community regarding my goalsand objectives for the future of the project. The reality is, the background management tasks of creatingthe DotNetNuke Core Team and managing the myriad other issues had undermined my ability todeliver source code enhancements and support to the. The combination of these factors resulted in anunpleasant situation; one that I should have mitigated sooner but was afraid to act upon due to thefragility of the newly formed community. And you also need to remember that the creator of the XXLvariant had broken no license agreement by creating a fork; it was completely legal based on the free-dom of the BSD open source license.
Eventually the issue came to a head when members of the XXL group began promoting their full sourcecode hybrid in the DotNetNuke Forum. Essentially piggy-backing on the primary promotion channel forthe DotNetNuke project, they were able to convince many people to switch to the XXL code base. Thishad some very bad consequences for the DotNetNuke community. Mainly it threatened to splinter theemerging community on territorial boundaries; an event I wanted to avoid at all costs. This situationwas the closest attempt of project hijacking that I can realistically imagine. The DotNetNuke XXL forkseemed to be fixated on becoming the official version of DotNetNuke and assuming control of the futureproject roadmap. The only saving grace was that I personally managed the DotNetNuke infrastructureand therefore had some influence over key aspects of the open source environment.
In searching for an effective mechanism to protect the integrity of the community and prevent the XXLfork from gaining momentum, some basic business fundamentals came into play. Any product or serviceis only as successful as its promotion or marketing channel. The DotNetNuke Forum on thewww.asp.net web site was the primary communication hub to the DotNetNuke community. Thereforeit was not difficult to realize that restricting discussion on XXL in the Forum was the simplest method tomitigate its growth. In probably the most aggressive political move I have ever been forced to make, Iintroduced some bold changes to the DotNetNuke project. I established some guidelines for Core Teamconduct that included, among other things, restrictions on promoting competing open source hybrids ofthe DotNetNuke application. I also posted some policies on the DotNetNuke Forum that emphasizedthat the Forum was dedicated solely to the discussion of the official DotNetNuke application and thatdiscussion of third-party commercial or open source products was strictly forbidden. This was an espe-cially difficult decision to make from a moral standpoint because I was well aware that the DotNetNukeapplication had been introduced to the community via the IBuySpy Portal Forum. Nonetheless, the com-bination of these two announcements resulted in both the resignation of the XXL project leader from theCore Team as well as the end of discussion of the XXL fork in the DotNetNuke Forum.
The unfortunate side effect, about which I had been cautioning members of the community for weeks,was that users who had upgraded to the XXL fork were effectively left on an evolutionary dead-end —a product version with no support mechanism or promise of future upgrades. This is because many of
16
Chapter 1

the XXL enhancements were never going to be integrated into the official DotNetNuke code base (eitherdue to design limitations or inapplicability to the general public). This situation, as unpleasant as it mayhave been for those caught on the dead-end side of the equation, was a real educational experience forthe community in general as they began to understand the longer term and deeper implications of opensource project philosophy. In general, the community feedback was positive to the project changes, withonly occasional flare ups in the weeks following. In addition, the Core Team seemed to gel more as aresult of these decisions because it provided some much-needed policies on conduct, loyalty, and dedi-cation, as well a concrete example of how inappropriate behavior would be penalized.
Emerging from the XXL dilemma, I realized that I needed to establish some legal protection for the long-term preservation of the project. Because standard copyright and the BSD license offered no realinsurance from third-party threats, I began to explore intellectual property law in greater detail. Aftermuch research and legal advice, I decided that the best option was to apply for a trademark for theDotNetNuke brand name. Registering a trademark protects a project’s name or logo, which is often aproject’s most valuable asset. Once the trademark was approved it would mean that although an indi-vidual or company could still create a fork of the application, they legally could not refer to it by theDotNetNuke trademark name. This appeared to be an important distinction so I proceeded with trade-mark registration in Canada (since this is the country in which Perpetual Motion Interactive Systems Inc.is incorporated).
I must admit the entire trademark approval process was quite an educational experience. Before you canregister your trademark you need to define a category and description of your wares and/or services.This can be challenging, although most trademark agencies now provide public access to their databasewhere you can browse for similar items that have been approved in the past. You pay your processingfee when you submit the initial application, but the trademark agency has the right to reject your appli-cation for any number of reasons; whereby, you need to modify your application and submit it again.Each iteration can take a couple of months, so patience is indeed a requirement. Once the trademark isaccepted it must be published in a public trademark journal for a specified amount of time, providingthird parties the opportunity to contest the trademark before it is approved. If it makes it through thisfinal stage, you can pay your registration fee for the trademark to become official. To emphasize thelengthy process involved, the DotNetNuke trademark was initially submitted on October 9, 2003 andwas finally approved on November 15, 2004 (TMA625,364).
In August 2003, I finally came to terms on an agreement with Microsoft regarding a sponsorshipproposal for the DotNetNuke project. In a nutshell, Microsoft wanted DotNetNuke to be enhancedin a number of key areas; the intent being to use the open source project as a means of demonstratingthe strengths of the ASP.NET platform. Because these enhancements were completely congruentwith the future goals of the project, there was little negative consequence from a technical perspective.In return for implementing the enhancements, Microsoft would provide a number of sponsorshipbenefits to the project including web hosting for the www.dotnetnuke.com web site, weekly meetingswith an ASP.NET Team representative (Rob Howard), continued promotion via the www.asp.net website, and more direct access to Microsoft resources for mentoring and guidance. Please note that ittook five months for this sponsorship proposal to come together, which demonstrates the patience andperseverance required to collaborate with such an influential partner as Microsoft. Nonetheless, thiswas potentially a one-time offer and at such a critical stage in the project evolution, it seemed too impor-tant to ignore.
An interesting perception that most people have in the IT industry is that Microsoft is morally againstthe entire open source phenomenon. In my opinion, this is far from the actual truth — and the reality is
17
An Inside Look at the Evolution of DotNetNuke

so much more simplistic. Like any other business that is trying to enhance its market position, Microsoftis merely concerned about competition. This is nothing new. In the past, Microsoft faced competitivechallenges from many other sources: companies, individuals, and governments. However, the currentenvironment makes it much more emotional and newsworthy to suggest that Microsoft is pitted againsta grass roots community movement rather than a business or legal concern. So in my opinion, it ismerely a coincidence that the only real competition facing Microsoft at this point in time is coming fromthe open source development community. And there is no doubt it will take some time and effort forMicrosoft to adapt to the changing landscape. But the chances are probably high that Microsoft willeventually embrace open source to some degree in order to remain competitive.
When it comes to DotNetNuke, many people probably question why Microsoft would be interested inassisting an open source project for which they receive no direct benefit. And it may be perplexing whythey would sponsor a product that competes to some degree with several of their own commercial appli-cations. But you do not have to look much further than the obvious indirect benefits to see why this rela-tionship has tremendous value. First and foremost, at this point in time the DotNetNuke application isonly designed for use on the Microsoft platform. This means that in order to use DotNetNuke you musthave valid licenses for a number of Microsoft infrastructure components (Windows operating system,database server, and so on). So this provides the financial value. In addition, DotNetNuke promotes thebenefits of the .NET Framework and encourages developers to migrate to this new development plat-form. This provides the educational value. Finally, it cultivates an active and passionate community —a network of loyal supporters who are motivated to leverage and promote Microsoft technology on aninternational scale. This provides the marketing value.
So in September 2003, with the assistance of the newly formed Core Team, we embarked on an ambi-tious mission to implement the enhancements suggested by Microsoft. The problem at this point wasthat in addition to the Microsoft enhancements, there were some critical community enhancements,which I ultimately perceived as an even higher priority if the project should hope to grow to the nextlevel. So the scope of the enhancement project began to snowball, and estimated release dates began toslip. The quality of the release code was also considered to be so crucial a factor that early beta packageswere not deemed worthy of distribution. Ultimately the code base evolved so much that there was littlequestion the next release would need to be labeled version 2.0. During this phase of internal develop-ment, some members of the Core Team did an outstanding job of supporting the 1.x community andgenerating excitement about the next major release. This was critical in keeping the DotNetNuke com-munity engaged and committed to the evolving project.
A number of excellent community enhancements for the DotNetNuke 1.0 platform also emerged duringthis stage. This sparked a very active third-party reseller and support community; establishing yetanother essential factor in any largely successful open source project. Unfortunately at this point theunderlying architecture of the DotNetNuke application was not particularly extensible, which made thethird-party enhancements susceptible to upgrade complications and somewhat challenging to integratefor end users. As a Core Team we recognized this limitation and focused on full modularity as a guidingprinciple for all future enhancements.
Modularity is an architecture principle that basically involves the creation of well-defined interfaces forthe purpose of extending an application. The goal of any framework should be to provide interfaces inall areas that are likely to require customization based on business requirements or personalizationbased on individuality. DotNetNuke provides extensibility in the area of modules, skins, templates, dataproviders, and localization. And DotNetNuke typically goes one step beyond defining the basic inter-face; it actually provides the full spectrum of related resource services including creation, packaging,
18
Chapter 1

distribution, and installation. With all of these services available, it makes it extremely easy for develop-ers to build and share application extensions with other members of the community.
One of the benefits of working on an open source project is the fact that there is a very high priorityplaced on creating the optimal solution or architecture. I think it was Bill Gates who promoted the con-cept of “magical software” and it is certainly a key aspiration in many open source projects. This goaloften results in more preliminary analysis and design, which tends to elongate the schedule but alsoresults in a more extensible and adaptable architecture. This differs from traditional application develop-ment, which often suffers from time and budget constraints, resulting in shortcuts, poor design deci-sions, and delivery of functionality before it is has been validated. Another related benefit is that thedevelopers of open source software also represent a portion of its overall user community, meaning theyactually “eat their own dog food,” so to speak. This is really critical when it comes to understanding thebusiness requirements under which the application needs to operate. Far too often you will find com-mercial vendors that build their software in a virtual vacuum; never experiencing the fundamentalapplication use cases in a real-world environment.
One of the challenges in allowing the Core Team to work together on the DotNetNuke application wasthe lack of high-quality infrastructure tools. Probably the most fundamental elements from a softwaredevelopment standpoint were the need for a reliable source code control system and issue managementsystem. Because the project had little to no financial resources to draw upon, we were forced to usewhatever free services were available in the open source community. And although some of these ser-vices are leveraged successfully by other open source projects, the performance, management, and disas-ter recovery aspects are sorely lacking. This led to a decision to approach some of the more successfulcommercial vendors in these areas with requests for pro-bono software licenses. Surprisingly, these ven-dors were more than happy to assist the DotNetNuke open source project — in exchange for some min-imal sponsorship recognition. This model has ultimately been carried on in other project areas to acquirethe professional infrastructure, development tools, and services necessary to support our growingorganization.
As we worked through the enhancements for the DotNetNuke 2.0 project, a number of Core Team mem-bers gained considerable respect within the project based on their high level of commitment, unselfishbehavior, and expert development skills. Joe Brinkman, Dan Caron, Scott McCulloch, and Geert Veenstrasacrificed a heap of personal time and energy to improve the DotNetNuke open source project. And theimportant thing to realize is that they did so because they wanted to help others and make a difference,not because of self-serving agendas or premeditated expectations. The satisfaction of working with otherhighly talented individuals in an open, collaborative environment is reward enough for some develop-ers. And it is this particular aspect of open source development that continues to confound and amazepeople as time goes on.
In October 2003, there was a Microsoft Professional Developers Conference (PDC) in Los Angeles,California. The PDC is the premier software development spectacle for the Microsoft platform; an eventthat only occurs every two years. About a month prior to the event, I was contacted by Cory Isakson, adeveloper on the Rainbow Portal open source project, who informed me that “Open Source Portals” hadbeen nominated as a category for a “Birds of Feather” session at the event. I posted the details in theDotNetNuke Forum and soon the item had collected enough community votes that it was approved as anofficial BOF session. This provided a great opportunity to meet with DotNetNuke enthusiasts and criticsfrom all over the globe. It also provided a great networking opportunity to chat with the most influentialcommercial software vendors in the .NET development space (contacts made with SourceGear andMaximumASP at this event proved to be very important to DotNetNuke as time would tell).
19
An Inside Look at the Evolution of DotNetNuke

In January 2004 another interesting dilemma presented itself. I received an e-mail from an external party,a Web Application Security Specialist, who claimed to have discovered a severe vulnerability in theDotNetNuke application (version 1.0). Upon further research I confirmed that the security hole wasindeed valid and immediately called an emergency meeting of the more trusted Core Team membersto determine the most appropriate course of action. At this point we were fully focused on theDotNetNuke 2.0 development project but also realized that it was our responsibility to serve and protectthe growing DotNetNuke 1.0 community. From a technical perspective, the patch for the vulnerabilityproved to be a simple code modification. The more challenging problem was related to communicatingthe details of the security issue to the community. On the one hand we needed the community to under-stand the severity of the issue so that they would be motivated to patch their applications. On the otherhand, we did not want to cause widespread alarm that could lead to a public perception thatDotNetNuke was an insecure platform. Exposing too many details of the vulnerability would be anopen invitation for hackers to try and exploit DotNetNuke web sites; but revealing too few detailswould downplay the severity. And the fact that the project is open source meant that the magnitude ofthe problem was amplified. Traditional software products have the benefit of tracking and identifyingusers through restrictive licensing policies. Open source projects have licenses that allow for free redis-tribution; which means the maintainer of the project has no way to track the actual usage of the applica-tion and no way to directly contact all community members who are affected. The whole situation reallyput security issues into perspective for me. It’s one thing to be an outsider, expressing your opinions onhow a software vendor should or should not react to critical security issues in their products. It’s quiteanother thing to be an insider, stuck in the vicious dilemma between divulging too much or too littleinformation, knowing full well that both options have the potential to put your customers at evengreater risk. Ultimately, we created a new release version and issued a general security alert that wassent directly to all registered users of the DotNetNuke application by e-mail and posted in theDotNetNuke Forum on www.asp.net.
Subject: DotNetNuke Security Alert
Yesterday we became aware of a security vulnerability in DotNetNuke.
It is the immediate recommendation of the DotNetNuke Core Team that allusers of DotNetNuke based systems download and install this security patchas soon as possible. As part of our standard security policy, no furtherdetailed information regarding the nature of the exploit will be provided tothe general public.
This email provides the steps to immediately fix existing sites and mitigatethe potential for a malicious attack.
Who is vulnerable?
-- Any version of DotNetNuke from version 1.0.6 to 1.0.10d
What is the vulnerability?
A malicious user can anonymously download files from the server. This is notthe same download security issue which has been well documented in the pastwhereby an anonymous user can gain access to files in the /Portals directoryif they know the exact URL. This particular exploit bypasses the filesecurity machanism of the IIS server completely and allows a malicious userto download files with protected mappings (ie. *.aspx).
20
Chapter 1

The vulnerability specifically *does not* enable the following actions:
-- A hacker *cannot* take over the server (e.g. it does not allow hackercode to be executed on the server)
How to fix the vulnerability?
For Users:
{ Instructions on where to download the latest release and how to install }
For Developers:
{ Instructions with actual source code snippets for developers who had divergedfrom the official DotNetNuke code base and were therefore unable to apply a generalrelease patch }
Please note that this public service announcement demonstrates theprofessional responsibility of the Core Team to treat all possible securityexploits as serious and respond in a timely and decisive manner.
We sincerely apologize for the inconvenience that this has caused.
Thank you, we appreciate your support...
DotNetNuke - The Web of the Future
The security dilemma brings to light another often misunderstood paradigm when it comes to opensource projects. Most open source projects have a license that explicitly states that there is no support orwarranty of any kind for users of the application. And while this may be true from a purely legal stand-point, it does not mean that the maintainer of the open source application can ignore the needs of thecommunity when issues arise. The fact is, if the maintainer did not accept responsibility for the applica-tion, the users would quickly lose trust and the community would dissolve. This implicit trust relation-ship is what all successful open source communities are based upon. So in reality, the open sourcelicense acts as little more than a waiver of direct liability for the maintainer. The DotNetNuke project cer-tainly conforms to this model because we take on the responsibility to ensure that all users of the appli-cation are never left on an evolutionary dead-end and security issues are always dealt with in aprofessional and expedient manner.
After six months of development, including a full month of public beta releases and community feed-back, DotNetNuke 2.0 was released on March 23, 2004. This release was significant because it occurredat VS Live! in San Francisco, California — a large-scale software development event sponsored byMicrosoft and Fawcette publications. Due to our strong working relationship with Microsoft, I wasinvited to attend official press briefings conducted by the ASP.NET Team. Essentially this involved 6–8private sessions with the leading press agencies (Fawcette, PC Magazine, Computer Wire, Ziff Davis,and others) where I was able to summarize the DotNetNuke project, show them a short demonstration,and answer their specific questions. The event proved to be spectacularly successful and resulted in asurge of new traffic to the community (now totaling more than 40,000 registered users).
DotNetNuke 2.0 was a hit. We had successfully delivered a high quality release that encapsulated themajority of the most requested product enhancements from the community. And we had done so in a
21
An Inside Look at the Evolution of DotNetNuke

manner that allowed for clean customization and extensibility. In particular the skinning solution inDotNetNuke 2.0 achieved widespread critical acclaim.
In DotNetNuke 1.x the user interface of the application allowed for very little personalization; essen-tially all DNN sites looked very much the same, a very negative restriction considering the highly cre-ative environment of the World Wide Web. DotNetNuke 2.0 removed this restriction and opened up theapplication to a whole new group of stakeholders — web designers. As the popularity of portal applica-tions had increased in recent years, the ability for web designers to create rich, graphical user interfaceshad diminished significantly. This is because the majority of portal applications were based on platformsthat did not allow for clear separation between form and function, or were architected by developerswho had very little understanding of the creative needs of web designers. DotNetNuke 2.0 focused onthis problem and implemented a solution where the portal environment and creative design processcould be developed independently and then combined to produce a stunningly harmonious end-userexperience. The process was not complicated and did not require the use of custom tools or methodolo-gies. It did not take very long before we began to see DotNetNuke sites with richly creative and highlygraphical layouts emerge — proving the effectiveness of the solution and creating a “can you top this”community mentality for innovative portal designs.
DotNetNuke (DNN) Web SiteTo demonstrate the effectiveness of the skinning solution, I commissioned a local web design company,Circle Graphics, to create a compelling design for the www.dotnetnuke.com web site (see Figure 1-8).As an open source project, I felt that I could get away with an unorthodox, somewhat aggressive sitedesign and I had been impressed by some of Circle Graphics’ futuristic, industrial concepts I had viewedin the past. It turned out that the designer who had created these visuals had since moved on but waswilling to take on a small contract as a personal favor to the owner. He created a skin that included somestunning 3-D imagery including the now infamous “nuke-gear” logo, circuit board, and plenty oftwisted metallic pipes and containers. The integration with the application worked flawlessly and thecommunity was wildly impressed with the stunning result. Coincidentally, the designer of theDotNetNuke skin, Anson Vogt, has since gone on to bigger and better things, working with rapperEminem as Art Director — 3-D Animation on the critically acclaimed Mosh video.
One of the large-scale enhancements that Microsoft had insisted upon for DotNetNuke 2.0 also provedto be very popular. The data access layer in DotNetNuke had been re-architected using an abstract fac-tory model, which effectively allowed it to interface with any number of relational databases. Microsofthad coined the term “provider model” and emphasized it as a key component in the future ASP.NET 2.0framework. Therefore, getting a reference implementation of this pattern in use in ASP.NET 1.x hadplenty of positive educational benefits for Microsoft and DotNetNuke developers. DotNetNuke 2.0included both a fully functional SQL Server and MS Access version, and the community soon steppedforward with mySQL and Oracle implementations as well. Again the extensibility benefits of goodarchitecture were extremely obvious and demonstrated the direction we planned to pursue in all futureproduct development.
Upon review of the DotNetNuke 2.0 code base it was very obvious that the application bore very littleresemblance to the original IBuySpy Portal application. This was a good thing because it raised the barsignificantly in terms of n-tiered, object-oriented, enterprise-level software development. However, itwas also bad in some ways because it alienated some of the early DotNetNuke enthusiasts who were in
22
Chapter 1

fact “hobby programmers,” using the application more as a learning tool than a professional product.This is an interesting paradigm to observe in many open source projects. In the early stages, the devel-oper community drives the feature set and extensibility requirements which, in turn, results in a muchhigher level of sophistication in terms of system architecture and design. However, as time goes on,this can sometimes result in the application surpassing the technical capabilities of some of its earlyadopters. DotNetNuke had ballooned from 15,000 lines of managed code to 46,000 lines of managedcode in a little over six months. The project was getting large enough that it required some seriouseffort to understand its organizational structure, its dependencies, and its development patterns.
When researching the open source phenomenon, I found that there are a few fundamental details areoften ignored in favor of positive marketing rhetoric. I would like to take the opportunity to bring someof these to the surface because they provide some additional insight into some of the issues we face inthe DotNetNuke project.
Figure 1-8
23
An Inside Look at the Evolution of DotNetNuke

The first myth surrounds the belief that open source projects basically have an unlimited resource poolat their immediate disposal. While this may be true from a purely theoretical perspective, the reality isyou still require a dedicated management structure to ensure all of the resources are channeled in an effi-cient and productive manner. An army of developers without some type of central management author-ity will never consistently produce a cohesive application; and more likely, their efforts will result intotal chaos. As much as the concept is often despised by hard core programmers, dedicated managementis absolutely necessary to set expectations and goals, ensure product quality, mitigate risk, recognize crit-ical dependencies, manage scope, and assume ultimate responsibility. You will find no successful opensource project that does not have an efficient and highly respected management team.
Further to the unlimited resourcing myth, there are in fact very few resources who become involved inan open source project that possess the level of competency and communication skills required to earn ahighly trusted position in the meritocracy. More often, the resources who get involved are capable ofhandling more consumer-oriented tasks such as testing, support, and minor defect corrections. And thisis not to say that these resources do not play a critical role in the success of the project; every focusedounce of volunteer effort certainly helps sustain the health of the project. But my point is that there isusually a relatively small group on most open source projects who are responsible for the larger scalearchitectural enhancements.
Yet another myth is related to the belief that anyone can make a direct and immediate impact on an opensource project. While this may be true to some degree, you generally need to build a trusted reputationwithin the community before you are granted any type of privilege. And there are very few individualswho are ever awarded direct write access to the source code repository. Anyone has the ability to submita patch or enhancement suggestion; however, this does not mean it is guaranteed to be added to theopen source project code base. In fact, all submissions are rigorously peer reviewed by trusted resources,and only when they have passed all validation criteria are they introduced to the source code repository.From a control standpoint, this is not much different than a traditional software project. However, theopen source model does significantly alter this paradigm in the fact that everyone is able to review thesource code. As a result, the sheer volume of patches submitted to this process can be massive.
There are also some interesting interpretations of open source philosophy that occasionally result in dif-ferences of opinion and, in the worst cases, all-out community revolts. This generally occurs because theguidelines for open source are quite non-explicit and subjective. One particularly hot topic that relates toDotNetNuke is related to source code access.
Some open source projects provide anonymous read-only access to the development source code baseat all times. This full transparency is appreciated by developers who want to stay abreast of the latestdevelopment efforts — even if they are not trusted members of the inner project team. These developersaccept the fact that the development code may be in various stages of stability on any given day; yetthey appreciate the direct access to critical fixes or enhancements. Although this model does promotemore active external peer review it can often lead to a number of serious problems. If a developerdecides to use pre-release code in a production environment, they may find themselves maintaining aninsecure or unstable application. This can lead to a situation where the community is expected to sup-port many hybrid variants rather than a consistent baseline application. Another issue that can happenis that a developer who succumbs to personal motivations may be inclined to incorporate some of thedevelopment enhancements into the current production version and release it as a new application ver-sion. While the open source license may allow this, it seriously affects the ability for official project main-tainer to support the community. It is the responsibility of the project maintainer to always ensure amanaged migration path from one version to the next. This model can only be supported if people are
24
Chapter 1

forced to use the official baseline releases offered by the project maintainer. Without these constants tobuild from, upgrades become a manual effort and many users are left on evolutionary dead-ends. Forthese reasons, DotNetNuke chooses to restrict anonymous read access to the development source coderepository. Instead we choose to issue periodic point releases that allow us to provide a consistentupgrade mechanism as the project evolves.
Following the success of DotNetNuke 2.0 we focused on improving the stability and quality of the appli-cation. Many production issues had been discovered after the release that we would have never antici-pated during internal testing. As an application becomes more extensible, people find new ingeniousways to apply it, which can often lead to unexpected results. We also integrated some key Roadmapenhancements, which had already been developed in isolation by Core Team members. These enhance-ments were actually quite advanced as they added a whole new level of professional features to theDotNetNuke code base, transforming it into a viable enterprise portal application.
It was during this time that Dan Caron single-handedly made a significant impact on the project. Basedon his experience with other enterprise portals, he proceeded to add integrated exception handling andevent logging to the application. This added stability and “auditability”; two major factors in most pro-fessional software products. He also added a complex, multithreaded scheduler to the application. TheScheduler was not just a simple hard-coded implementation like I had seen in other ASP.NET projects,but rather it was fully configurable via an administration user interface. This powerful new featurecould be used to run background housekeeping jobs as well as long-running tasks. With this in place,the extensibility of the application improved yet again.
An interesting concern that came to our attention at this time was related to our dependence on externalcomponents. In order to provide the most powerful application, we had leveraged a number of richthird-party controls for their expert functionality. Because each of these controls was available under theirown open source license, they seemed to be a good fit for the DotNetNuke project. But the fact is, thereare some major risks to consider. Some open source licenses are viral in nature and have the potential toalter the license of the application they are combined with. In addition, there is nothing that prevents athird party from changing their licensing policy at any time. If this situation occurred, then it is possiblethat all users of the application who reference the control could be in violation of the new license terms.This is a fairly significant issue and certainly not something that can be taken lightly. Based on thisknowledge, we quickly came up with a strategy that was aimed at minimizing our dependency on third-party components. We constructed a policy whereby we would always focus on building the functional-ity ourselves before considering an external control. And in the cases where a component was tooelaborate to replicate, we would use a provider model, much like we had in the database layer, toabstract the application from the control in such a way that it would allow for a plug-in replacement.This strategy protects the community from external license changes and also provides some additionalextensibility for the application.
With the great publicity on the www.asp.net web site following VS Live! and the consistent release ofpowerful new enhancements, the spring of 2004 brought a lot of traffic to the dotnetnuke.com commu-nity web site. At this point, the site was very poorly organized and sparse on content due to a lack ofdedicated effort. Patrick Santry had been on the Core Team since its inception and his experience withbuilding web sites for the ASP.NET community became very valuable at this time. We managed to makesome fairly major changes to improve the site, but I soon realized that a dedicated resource would berequired to accomplish all of our goals. But without the funding to secure such a resource, many of theplans had to unfortunately be shelved.
25
An Inside Look at the Evolution of DotNetNuke

The summer of 2004 was a restructuring period for DotNetNuke. Thirty new community members werenominated for Core Team inclusion and the Core Team itself underwent a reorganization of sorts. Theteam was divided into an Inner Team and an Outer Team. The Inner Team designation was reserved forthose original Core Team individuals who had demonstrated the most loyalty, commitment, and valueto the project over the past year. The Outer Team represented individuals who had earned recognitionfor their community efforts and were given the opportunity to work toward Inner Team status. Amongother privileges, write access to the source code repository is the pinnacle of achievement in any sourcecode project, and members of both teams were awarded this distinction to varying degrees.
In addition to the restructuring, a set of Core Team guidelines was established that helped formulizethe expectations for team members. Prior to the creation of these guidelines it was difficult to penalizenon–performers because there were not objective criteria by which they could be judged. In addition tothe new recruits, a number of inactive members from the original team were retired; mostly to demon-strate that Core Team inclusion was a privilege — not a right. The restructuring process also brought tolight several deficiencies in the management of intellectual property and confidentiality among teammembers. As a result, all team members were required to sign a retroactive nondisclosure agreement aswell as an intellectual property contribution agreement. All of the items exemplified the fact that the pro-ject had graduated from its “hobby” roots to a professional open source project.
During these formative stages, I was once again approached by Microsoft with an opportunity to show-case some specific ASP.NET features. Specifically, a Membership API had been developed by Microsoftfor Whidbey (ASP.NET 2.0), and they were planning on creating a backported version for ASP.NET 1.1,which we could leverage in DotNetNuke. This time the benefits were not so immediately obvious andrequired some thorough analysis. This is because DotNetNuke already had more functionality in theseareas than the new Microsoft API could deliver. So in order to integrate the Microsoft components with-out losing any features, we would need to wrap the Microsoft API and augment it with our own busi-ness logic. Before embarking on such an invasive enhancement, we needed to understand the clearbusiness benefit provided.
Well, you can never discount Microsoft’s potential to impact the industry. Therefore, being one of thefirst to integrate and support the new Whidbey APIs would certainly be a positive move. In recentmonths there had been numerous community questions regarding the applicability of DotNetNuke withthe early Whidbey Beta releases now in active circulation. Early integration of such a core componentfrom Whidbey would surely appease this group of critics. From a technology perspective, the Microsoftindustry had long been awaiting an API to converge upon in this particular area; making applicationinteroperability possible and providing best practice due diligence in the area of user and security infor-mation. Integrating the Microsoft API would allow DotNetNuke to “play nicely” with other ASP.NETapplications; a key factor in some of the larger scale extensibility we were hoping to achieve. Last, butnot least, it would further our positive relationship with Microsoft; a factor that was not lost on most asthe key contributor to the DotNetNuke project’s growth and success.
The reorganization of the Core Team also resulted in the formation of a small group of highly trustedproject resources which, for lack of a better term, we named the Board of Directors. The members ofthis group included Scott Willhite, Dan Caron, Joe Brinkman, Patrick Santry, and myself. The purpose ofthis group was to oversee the long-term strategic direction of the project. This included discussion onconfidential issues pertaining to partners, competitors, and revenue. In August 2004, we scheduled ourfirst general meeting for Philadelphia, Pennsylvania. With all members in attendance, we made someexcellent progress on defining action items for the coming months. This was also a great opportunity to
26
Chapter 1

finally meet in person some of the individuals whom we had only experienced Internet contact with inthe past. With the first day of meetings behind us, the second day was dedicated to sightseeing in thehistoric city of Philadelphia. The parallels between the freedom symbolized by the Liberty Bell and thesoftware freedom of open source were not lost on any of us that day.
Returning from Philadelphia, I knew that I had some significant deliverables on my plate. We beganthe Microsoft Membership API integration project with high expectations of completion within threemonths. But as before there were a number of high-priority community enhancements that had beenpromised prior to the Microsoft initiative, and as a result the scope snowballed. Scope managementis an extremely difficult task to manage when you have such an active and vocal community.
The snowball effect soon revealed that the next major release would need to be labeled version 3.0.This is mostly because of “breaking” changes; modifications to the DotNetNuke core application thatchanged the primary interfaces to the point that plug-ins from the previous version 2.0 release wouldnot integrate without at least some minimal changes. The catalyst for this was due to changes in theMembership API from Microsoft, but this only led to a decision of “if you are forced to back compat-ibility then introduce all of your breaking changes in one breaking release.” The fact is, there had beena lot of baggage that had been preserved from the IBuySpy Portal, which we had been restricted fromremoving due to legacy support considerations. DotNetNuke 3.0 provided the opportunity toreexamine the entire project from a higher level and make some of the fundamental changes we hadbeen delaying for, in some cases, years. This included the removal of a lot of dead code and deprecatedmethods as well as a full namespace reorganization, which finally accurately broke the project API intological components.
DotNetNuke 3.0 also demonstrated another technical concept that would both enrich the functionalityof the portal framework as well as improve the extensibility without the threat of breaking binary com-patibility. Up until version 3.0 the service architecture for DotNetNuke was completely uni-directional.Custom modules could consume the resources and services offered by the core DotNetNuke frameworkbut not vice versa. So although the application managed the secure presentation of custom moduleswithin the portal environment, it could not get access to the custom module content information.Optional interfaces allow custom modules to provide plug-in implementations for defined core portalfunctions. They also provide a simple mechanism for the core framework to call into third-party mod-ules, providing a bi-directional communication channel so that modules can finally offer resources andservices to the core (see Figure 1-9).
Along with its many technological advances, DotNetNuke 3.0 was also being groomed for use by anentirely new stakeholder, Web Hosters. For a number of years the popularity of Linux hosting has beengrowing at a far greater pace than Windows hosting. The instability arguments of early Microsoft webservers were beginning to lose their weight as Microsoft released more resilient and higher qualityserver operating systems. Windows Server 2003 had finally shed its clunky Windows NT 4.0 roots andwas a true force to be reckoned with. So aside from the obvious economic licensing reasons, there wasanother clear reason why Hosters were still favoring Linux over Windows for their clients — the avail-ability of end-user applications.
The Linux platform had long been blessed with a plethora of open source applications running on theApache web server, built with languages such as PHP, Perl, and Python and leveraging open sourcedatabases such as mySQL. The Windows platform was really lacking in this area and was desperatelyin need of applications to fill this void.
27
An Inside Look at the Evolution of DotNetNuke

Figure 1-9
In order for DotNetNuke to take advantage of this opportunity, it needed a usability overhaul to trans-form it from a niche developer–oriented framework to a polished end-user product. This included ausability enhancement from both the portal administration as well as the web host perspectives. SinceRob Howard had left Microsoft in June 2004, my primary Microsoft contact had become Shawn Nandi.Shawn did a great job of drawing upon his usability background at Microsoft to come up with sugges-tions to improve the DotNetNuke end-user experience. Portal administrators received a multi-lingualuser interface with both field-level and module-level help. Enhanced management functions were addedin key locations to improve the intuitive nature of the application. Web Hosters received a customizableinstallation mechanism. In addition, the application underwent a security review to allow it to run in aMedium Trust — Code Access Security (CAS) environment. The end result is a powerful open sourceportal framework that can compete with the open source products on other platforms and offer WebHosters a viable Windows alternative for their clients.
DotNetNuke is an evolving open source platform, with new enhancements being added constantlybased on user feedback. The organic community ecosystem that has grown up around DotNetNuke isvibrant and dynamic, establishing the essential support infrastructure for long-term growth and pros-perity. You will always be able to get the latest high-quality release including full source code fromwww.dotnetnuke.com.
28
Chapter 1
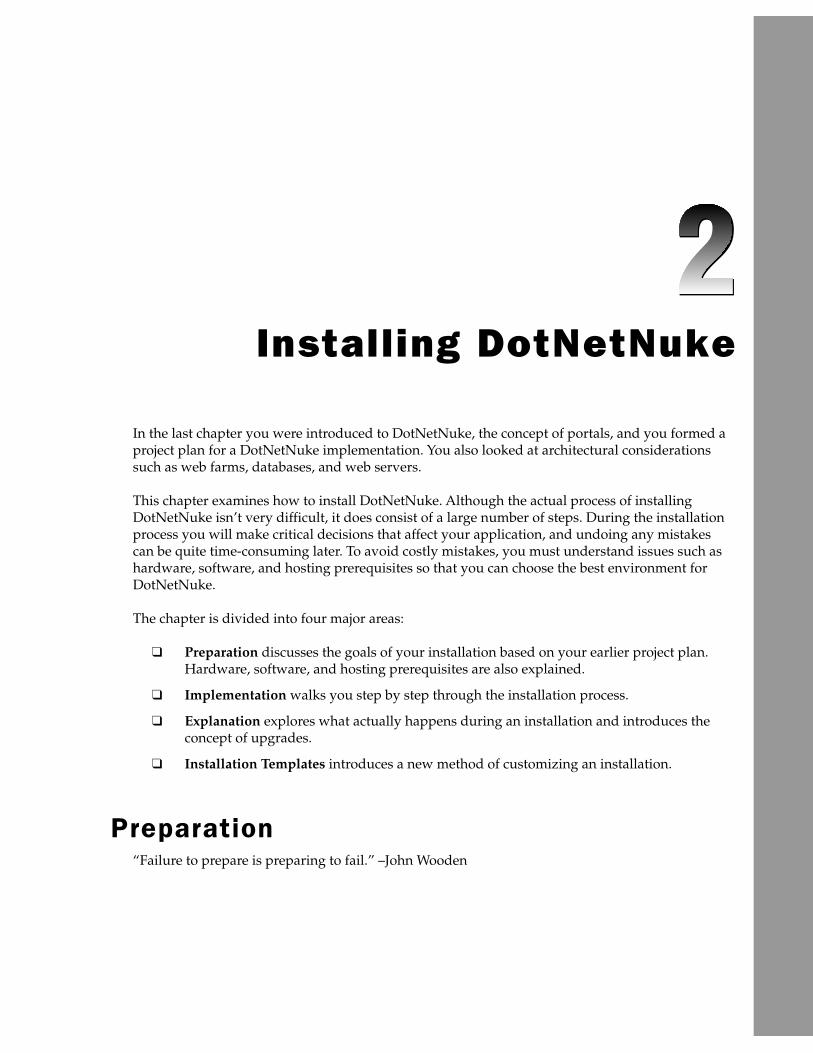
Installing DotNetNuke
In the last chapter you were introduced to DotNetNuke, the concept of portals, and you formed aproject plan for a DotNetNuke implementation. You also looked at architectural considerationssuch as web farms, databases, and web servers.
This chapter examines how to install DotNetNuke. Although the actual process of installingDotNetNuke isn’t very difficult, it does consist of a large number of steps. During the installationprocess you will make critical decisions that affect your application, and undoing any mistakescan be quite time-consuming later. To avoid costly mistakes, you must understand issues such ashardware, software, and hosting prerequisites so that you can choose the best environment forDotNetNuke.
The chapter is divided into four major areas:
❑ Preparation discusses the goals of your installation based on your earlier project plan.Hardware, software, and hosting prerequisites are also explained.
❑ Implementation walks you step by step through the installation process.
❑ Explanation explores what actually happens during an installation and introduces theconcept of upgrades.
❑ Installation Templates introduces a new method of customizing an installation.
Preparation“Failure to prepare is preparing to fail.” –John Wooden

30
Chapter 2
ObjectivesThe objectives of this chapter are straightforward. You will install DotNetNuke so you can create portalsand utilize the application’s abilities.
The DotNetNuke application will be installed as a virtual directory with a URL formatted as
http:// <server name>/DotNetNuke/
The <server name> section of the URL could represent your local machine (localhost), a web server onyour local network (intranet), or a web server external to your network (Internet).
Because many Internet web hosts offer a variety of different tools to manage the server environment, itis virtually impossible to cover all of these tools within the confines of this book. For that reason, we willonly be discussing an installation where you have administrative control over a server and can access iteither physically or remotely (remote desktop access).
Hardware PrerequisitesDotNetNuke does not require any hardware prerequisites per se, but it does require a list of softwareprerequisites, which do require a minimum level of hardware specification.
The following table lists SQL Server’s minimum requirements (www.microsoft.com/sql/evaluation/sysreqs/2000/default.asp).
Processor Intel Pentium or compatible 166-megahertz (MHz) or higher processor
Memory (RAM) • Enterprise Edition: 64 megabytes (MB) of RAM; 128 MB recommended• Standard Edition: 64 MB• Evaluation Edition: 64 MB; 128 MB recommended• Developer Edition: 64 MB• Personal Edition: 128 MB for Windows XP; 64 MB for Windows 2000;
32 MB for other operating systems• MSDE: 128 MB for Windows XP; 64 MB for Windows 2000; 32 MB for other
operating systems
Hard Disk Enterprise, Standard, Evaluation, Developer, and Personal Editions require• 95–270 MB of available hard disk space for the server; 250 MB for a typical
installation.• 50 MB of available hard disk space for a minimum installation of Analysis
Services; 130 MB for a typical installation.• 80 MB of available hard disk space for English Query.
MSDE requires 44 MB of available hard disk space.
Because DotNetNuke is a web application, it is preferable for your server to have a large amount ofRAM (1 GB or greater) to avoid disk paging.

Software PrerequisitesChapter 1 introduced a number of keywords such as web server and database. Both of these items aresoftware prerequisites for DotNetNuke.
Web Server Microsoft Internet Information Server 5 or greater (contained inWindows 2000 Server, Windows XP Professional, Windows 2003Server)
Microsoft .NET Runtime ASP.NET 1.1 or later (Note: At the time of writing this book, DotNetNuke will not rununder the beta version of ASP.NET 2.0, although we are workingtoward compatibility as it nears release.)
Database Microsoft SQL Server 2000 or greater(Note: DotNetNuke does run under a number of other databasesprovided by third parties; see www.dotnetnuke.com for moreinformation.)
Hosting PrerequisitesAlthough we have already discussed the hardware and software prerequisites required by DotNetNuke,it is important to list the additional prerequisites that you should look for in third-party hosts. Youshould ask a prospective host if they support the following items:
File Permissions DotNetNuke requires the account that the ASP.NET process runsunder (see the following note) to have the file permission of FULLCONTROL over the root installation folder.(Note: The account ASP.NET runs under by default in Windows 2000is the <MachineName>\ASPNET account; in Windows 2003 it is NTAUTHORITY\NETWORK SERVICE.)
ImplementationThis section guides you step by step through the installation process. The steps illustrate an installationto a standalone server as discussed in our objectives. Later in this chapter, we discuss installation to agroup of web servers (known as a web farm).
31
Installing DotNetNuke

Downloading DotNetNukeThe first step in the installation process is to obtain the DotNetNuke software. The latest version of thesoftware can be downloaded at the official DotNetNuke web site (www.dotnetnuke.com/).
Note: you must be a registered user to reach the download page.
Extracting the Installation FileThe DotNetNuke distribution arrives as a single zip file. The zip file contains the source code, documen-tation, and database scripts necessary for the application to operate. Extract the entire contents of the zipfile to your chosen installation directory (for example, c:\websites\dotnetnuke\).
To extract a zip file you can either use the built-in zip functionality of Windows XP or a third-party com-pression tool such as WinZip, which you can obtain from www.winzip.com/.
Creating the DatabaseThe next step is to create the database that will contain your data for the DotNetNuke application.
To perform this, you should have the Microsoft Sql Server Client Tools installed, and in particularEnterprise Manager. If you do not have these, they can be installed from the CD that Microsoft SQLServer was installed from.
Note: If you do not have access to Enterprise Manager, for example, if you are using MSDE, you can trya third-party tool such as ASP.NET Enterprise Manager, a web-based interface for Microsoft SQL Serverand MSDE. It is designed to perform many SQL Server and MSDE administration tasks from any com-puter with a web browser. You can get this tool at www.aspenterprisemanager.com/.
Once you have opened Enterprise Manager, you can expand the database server you want to create yourdatabase. If it’s not listed, you will have to register your SQL Server instance with Enterprise Manager.To do this, please refer to the Enterprise Manager help.
Now that you have found your database server — in our case, it is our local machine known as (local) — you can create your database by right-clicking the Databases node under your databaseand selecting New Database, as shown in Figure 2-1.
32
Chapter 2

Figure 2-1
A dialog box appears asking for a database name; you can put in any name. For our example, we’ll putin DotNetNuke, as shown in Figure 2-2. Once you are happy with the name, click OK.
Further configuration options are listed on the dialog (Data Files and Transaction Log), but we willaccept the defaults for the purposes of a quick installation. For further information about these options,please see the help file that comes with Enterprise Manager.
33
Installing DotNetNuke

Figure 2-2
Creating the Database UserThe next step is the creation of a user account to access the database.
Strictly speaking, you have two options:
❑ Windows Security uses the account that your application is running under to access thedatabase. This is the more secure option, but it is not supported in all environments, particularlyin shared hosting.
❑ SQL Server Security uses a username and password combination to access the database. This issupported in most environments, and is most similar to other database servers.
34
Chapter 2

For the purposes of this book, we’ll use SQL Server Security, but we encourage you to explore WindowsSecurity, especially in environments where you control the infrastructure.
To create a user account for the database, you first need to navigate to the Security node located atthe top level of the server you are connecting to (in Enterprise Manager). Expand it, select the Loginsnode, and you should see the list of users who already have access to your database server in the right-hand pane.
Now that you are at the login section, right-click the Logins node and select New Login, as shown inFigure 2-3.
Figure 2-3
35
Installing DotNetNuke

You should see a dialog box appear prompting for details about the account. In this case, create a usercalled DotNetNukeUser as both the username and password. Make sure you select the Sql ServerAuthentication radio option; otherwise it will create an account for Windows Authentication. Figure 2-4shows a sample dialog with the details filled in.
You should also select the default database from the drop-down list; in our case it is the name of ourdatabase (DotNetNuke). The default database allows that database to be selected by default when con-necting as that user.
Before you click OK, there is one more step you need to perform. Even though we have selectedDotNetNuke as our default database, we still need to grant our user access to Read/Write from it. To dothis, select the Database Access tab and check the Permit check box next to the DotNetNuke database.
Figure 2-4
36
Chapter 2

You should also grant the account db_owner privileges by checking that check box in the bottom of thedialog. The account needs db_owner privileges because it will be creating and dropping many databaseobjects.
Figure 2-5 shows the correct settings. Once you have them set, click OK, confirm the password asprompted, and click OK again.
Now that you have created the account, it should appear in the right task pane whenever you select theLogins node, and you can come back here anytime to change details about this account.
Figure 2-5
37
Installing DotNetNuke

Setting PermissionsThe next step in the process is to set the file permissions required by the software. DotNetNuke has thecapability to create many portals in the one installation, in effect becoming a small host itself. To performthis task, it needs to create, delete, and modify directories and files. It is these operations that require theapplication to have extra permissions over files within the application.
To assign these permissions, navigate through File Manager to your installation folder (for example,c:\websites\DotNetNuke\). Right-click the root folder and select the “sharing and security” option.When the dialog appears, select the Security tab. The dialog that appears is shown in Figure 2-6.
Figure 2-6
You should add either the aspnet user account (Windows 2000, Windows XP), the Network Service useraccount (Windows 2003), or if you have changed the account your site runs under (for advanced users),then that is the account to specify. The chosen account should be granted Full Control.
Before clicking OK, click the Advanced button and another dialog will appear allowing extra configura-tion. Ensure that the chosen account listed has a rule of “This folder, subfolders and files.” You can seethe list of rules in the Permission entries section. Figure 2-7 shows the advanced dialog.
Once confirmed, click OK to close the advanced dialog, and click OK again to close the propertiesdialog.
38
Chapter 2

Figure 2-7
Creating the Web SiteSo far you’ve only extracted the files and created a database to store your application’s data. It’s nowtime to register your application with your chosen web server. Registering your files with the web serverallows you to view the site from http://<server name>/DotNetNuke/.
To administer IIS, click the Start Menu; select the Run Command, type in inetmgr, and click OK.Alternatively, you can access it from the Control Panel ➪ Administrative Tools ➪ Internet InformationServices.
The administration console for IIS should appear, showing a node with the local computer’s name;expand this item to reveal the list of web sites on the local computer. Figure 2-8 shows the default config-uration for IIS.
If your IIS is not hosted on the local computer, you can remotely administer IIS by right-clicking theInternet Information Services node, selecting Connect, and following on the on-screen prompts to con-nect to the remote computer.
39
Installing DotNetNuke
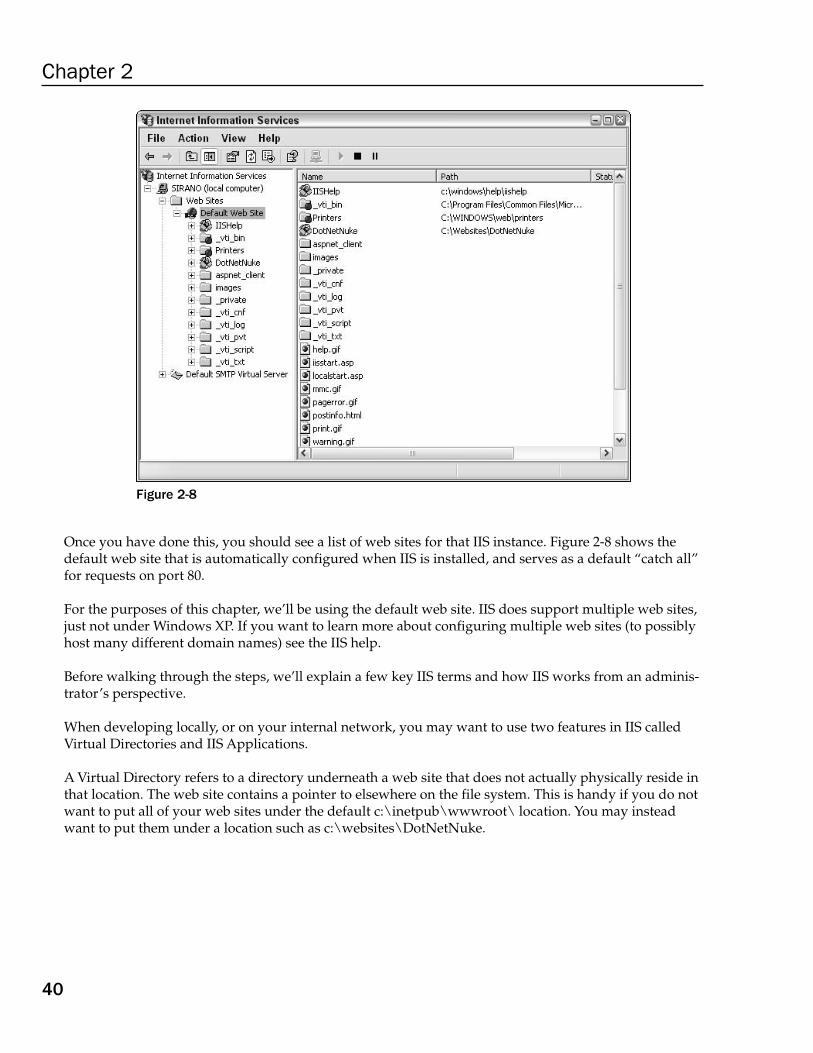
Figure 2-8
Once you have done this, you should see a list of web sites for that IIS instance. Figure 2-8 shows thedefault web site that is automatically configured when IIS is installed, and serves as a default “catch all”for requests on port 80.
For the purposes of this chapter, we’ll be using the default web site. IIS does support multiple web sites,just not under Windows XP. If you want to learn more about configuring multiple web sites (to possiblyhost many different domain names) see the IIS help.
Before walking through the steps, we’ll explain a few key IIS terms and how IIS works from an adminis-trator’s perspective.
When developing locally, or on your internal network, you may want to use two features in IIS calledVirtual Directories and IIS Applications.
A Virtual Directory refers to a directory underneath a web site that does not actually physically reside inthat location. The web site contains a pointer to elsewhere on the file system. This is handy if you do notwant to put all of your web sites under the default c:\inetpub\wwwroot\ location. You may insteadwant to put them under a location such as c:\websites\DotNetNuke.
40
Chapter 2

An IIS Application refers to an entry point of a web application. It allows the ASP.NET runtime to deter-mine where such things as configuration files and assemblies reside for a given application.
So, keeping in mind that you want your URL to look like this:
http:// <server name>/DotNetNuke/
you’ll need to set up a virtual directory that points to your folder where you extracted the DotNetNukesource code files and then set it as an IIS Application.
To do this, right-click the Default Web Site and select New ➪ Virtual Directory. The Virtual DirectoryCreation Wizard appears as shown in Figure 2-9.
Figure 2-9
Click Next to proceed to the next step in the wizard, which is specifying the Portal Alias.
The Virtual Directory Alias refers to the virtual name assigned to IIS that will map to your chosen instal-lation directory.
Remember, you want your URL to look like http://<server name>/DotNetNuke, so your virtualdirectory name would be DotNetNuke. Enter this term in the dialog, as shown in Figure 2-10, andclick Next.
41
Installing DotNetNuke

Figure 2-10
The next step is to select the physical file location for the Virtual Directory. This should point to the loca-tion from which you extracted your .NET Nuke source files. For our example, this is our installationdirectory (for example, c:\websites\DotNetNuke\). Figure 2-11 shows the completed step. Once youhave selected the location, click Next.
Figure 2-11
42
Chapter 2
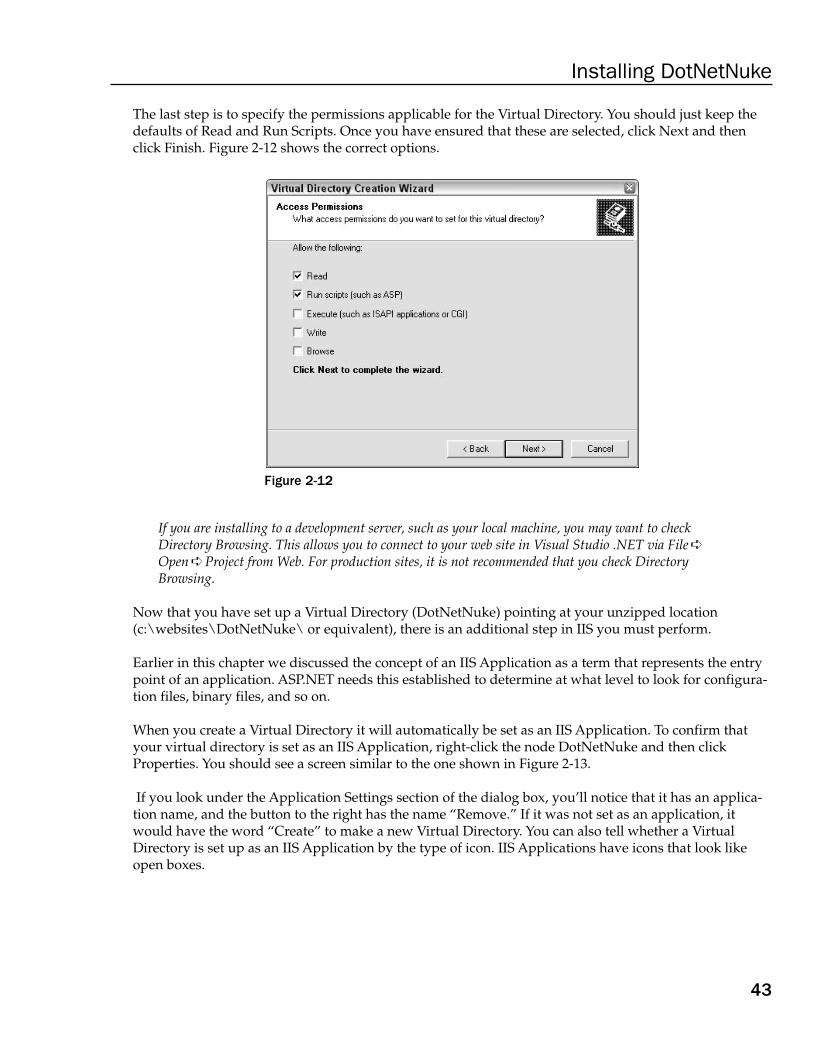
The last step is to specify the permissions applicable for the Virtual Directory. You should just keep thedefaults of Read and Run Scripts. Once you have ensured that these are selected, click Next and thenclick Finish. Figure 2-12 shows the correct options.
Figure 2-12
If you are installing to a development server, such as your local machine, you may want to checkDirectory Browsing. This allows you to connect to your web site in Visual Studio .NET via File ➪
Open ➪ Project from Web. For production sites, it is not recommended that you check DirectoryBrowsing.
Now that you have set up a Virtual Directory (DotNetNuke) pointing at your unzipped location(c:\websites\DotNetNuke\ or equivalent), there is an additional step in IIS you must perform.
Earlier in this chapter we discussed the concept of an IIS Application as a term that represents the entrypoint of an application. ASP.NET needs this established to determine at what level to look for configura-tion files, binary files, and so on.
When you create a Virtual Directory it will automatically be set as an IIS Application. To confirm thatyour virtual directory is set as an IIS Application, right-click the node DotNetNuke and then clickProperties. You should see a screen similar to the one shown in Figure 2-13.
If you look under the Application Settings section of the dialog box, you’ll notice that it has an applica-tion name, and the button to the right has the name “Remove.” If it was not set as an application, itwould have the word “Create” to make a new Virtual Directory. You can also tell whether a VirtualDirectory is set up as an IIS Application by the type of icon. IIS Applications have icons that look likeopen boxes.
43
Installing DotNetNuke

Figure 2-13
You can also change the properties you set during the wizard at any time by returning to this dialog box.For more information about the choices you have available, please consult the IIS help system.
Configuring .NET NukeThe next step is to tell DotNetNuke how to communicate with the database.
To do this, navigate to your folder (for example, c:\websites\DotNetNuke\) and open up theWeb.config found in this directory. You can use your favorite text editor to do this, including VisualStudio .NET.
The Web.config is the central administration file for ASP.NET; it is designed to store configuration set-tings such as connection strings and site-specific settings.
DotNetNuke’s web.config file is used to store the database connection string, as well as a variety ofother settings relating to how DotNetNuke works, and the various application hooks that are designedin the application.
For the purposes of the installation, you want to set a connection string that will tell DotNetNuke how toconnect to your chosen database (Sql Server).
44
Chapter 2
Locate the AppSettings section in the configuration file and then locate the SiteSqlServer element.Change the value attribute to specify the location of your database, the username, and the password.Listing 2-1 shows a sample connection string for a server residing on the localhost.
Once you have made the changes, save the web.config file.
Listing 2-1: Changing the Connection String
<appSettings><add key=”SiteSqlServer”value=”Server=(local);Database=dnnportalbook;uid=dnnportaluser;pwd=dnnportaluser;”/><add key=”MachineValidationKey” value=”F9D1A2D3E1D3E2F7B3D9F90FF3965ABDAC304902”
/> <add key=”MachineDecryptionKey”
value=”F9D1A2D3E1D3E2F7B3D9F90FF3965ABDAC304902F8D923AC” /> <add key=”MachineValidationMode” value=”SHA1” /><add key=”InstallTemplate” value=”DotNetNuke.install” />
</appSettings>
Testing the InstallationHere’s a recap of what you have done during the implementation section of this chapter. You should ver-ify that you have performed these steps:
1. Downloaded and extracted the .NET Nuke source to a directory.
2. Created a database (DotNetNuke) and a database user (DotNetNukeUser).
3. Set the necessary ASP.NET permissions on the extracted folder.
4. Created a Virtual Directory in IIS, and made sure it was set as an IIS Application.
5. Changed the connection string in the Web.Config.
If you have completed all these steps, you should be able to open up your web browser and navigate to
http://<server name>/DotNetNuke/
This request will take some time, so be patient and do not hit Refresh. Here are two reasons why thistakes some time:
❑ ASP.NET will be Just-In-Time compiling the assemblies.
❑ DotNetNuke will be building the database to the latest version. (See the following“Explanation” section.)
45
Installing DotNetNuke

As it is upgrading, you should see some messages appear on the screen as shown in Figure 2-14.These messages are designed to provide immediate feedback about the installation progress to theadministrator.
Figure 2-14
46
Chapter 2

If everything is successful, you should now have a link to visit the first page on your site. Click that linkand you should be presented with a screen similar to that in Figure 2-15.
Figure 2-15
47
Installing DotNetNuke

Common Installation IssuesSome people may have problems when trying to run the application. We have tried to provide screens toassist in diagnosing an issue associated with an installation. This section describes some common issues.
Invalid Connection StringYour connection string is invalid in the web.config file. Confirm that the connection string is correct, thedatabase has been created, and the user has access to the database (see Figure 2-16).
Figure 2-16
Insufficient File PermissionsYou have not correctly set the file permissions. This could be because you have not granted access to theroot of the folder, or you have specified a different account than the account currently running theASP.NET request, as shown in Figure 2-17. See the “Setting Permissions” section earlier in this chapterfor more information.
48
Chapter 2

Figure 2-17
ExplanationThis section takes a step away from the actual installation and discusses the process DotNetNuke goesthrough at installation time.
When you download DotNetNuke, you are essentially getting two types of files.
The first group of files is the source code, binary assemblies, and the associated resource files that belongto any web site. These typically have extensions like .aspx, .ascx, .gif, .jpg, and so on, and you should seethese scattered throughout the folder you unzipped in the preceding section.
The second group is a collection of SQL scripts; these scripts are versioned and correspond to certainreleases issued by the core team.
49
Installing DotNetNuke

Because we have already selected Sql Server as our target database (default choice), let’s take a look atthe SQL Server–specific scripts.
You can find them in the following path from your directory where you extracted your files earlier (forexample, c:\websites\DotNetNuke\):
\Providers\DataProviders\SqlDataProvider
You should see a collection of scripts, ordered in version, from 00.00.00.SqlDataProvider to01.00.00.SqlDataProvider all the way up to the current version. These scripts are actually StructuredQuery Language (SQL) scripts, which when executed will upgrade your database from one version toanother.
In other applications, these files are executed manually by an administrator. DotNetNuke saves you thetime and executes these files during an installation or an upgrade. In a sense, DotNetNuke is responsiblefor keeping your database up to date and in sync with the application code. Following is a look at how itactually works.
As mentioned in the introduction, DotNetNuke is versioned in two places, at the binary level (code) andat the schema level (database). So what does this actually mean? It means at runtime you can ask ques-tions about the versions, and perform an upgrade/installation based on the answers.
The questions essentially are
❑ What assembly version am I?
❑ Does that assembly version match the database version?
The next decision is when to ask these questions and when to perform the corresponding actions; ideallyyou would like to ask them when the application first starts, for example when the first person requestsa page. ASP.NET provides a number of hooks into the pipeline of a request. One hook is an event thatoccurs during the initialization of an application (application_start). The questions (and actions) justmentioned are placed in this event.
To better explain the process, the following sections look at the only two scenarios: a brand new installa-tion and an upgrade from an earlier version.
Scenario 1: The Clean InstallThis scenario examines the process of installing a new install of DotNetNuke on a site that does not cur-rently exist.
When the initial request is sent to DotNetNuke, it checks the version of the assembly. At the time of thiswriting, that version number is 3.0.11. It then checks the version held in the database. This essentiallywould be version 0.0 on a clean install because none of the tables have actually been created.
50
Chapter 2

So, given that the version is 0.0, it will run the SQL scripts in order to build the database. Each versionever released has its own SQL script. Once the database has been upgraded, DotNetNuke will render theInstallation Complete page.
Scenario 2: The UpgradeThe next scenario is very common; the core team has released a new version of DotNetNuke and it hasgreat new features that you want to take advantage of.
You’ve backed up your file structure and your database, and you are ready to upgrade. Once you copythe new files to your site, and the first request is received, DotNetNuke checks the assembly version,which would be the new value (say, 3.0.11), and then it checks the database version (say, 2.1.2). It thenproceeds to execute the scripts between these two values until they match.
Your site will retain the content, skins, and modules it already had, and you have effectively upgradedyour site and can now take advantage of the new features that version offers.
Installation TemplatesOne of the exciting new features in DotNetNuke version 3 is the introduction of installation templates.These are designed to give administrators more control over the installation process and the default con-tent/configuration that is created. This is specifically targeted at web hosts or administrators offering apackaged solution.
These templates allow you to customize aspects of an installation such as the following:
❑ SQL scripts to build the database
❑ User accounts to create
❑ Default settings inside DotNetNuke such as Mail Server, Proxy Server, Friendly Urls, and so on
❑ Portals to create
❑ Modules installed
The DotNetNuke installation source contains a file (dotnetnuke.install.resources), which is an xml filecontaining the various settings discussed above. Figure 2-18 shows an example file.
You can find it in the following path:
“/Portals/_default”
The template itself is broken up into a number of sections, as described next.
51
Installing DotNetNuke

Figure 2-18
The <host> node is the root node of the template. All other nodes are the children of <host>. There areeight immediate children:
❑ <description>: Provides a description of the template.
❑ <schemascript>: Name of the Script file that builds the Database Schema (this file must belocated in the folder indicated by the providerPath attribute of the default Data provider inweb.config).
❑ <datascript>: Name of the Script file that builds the required Database Data (this file must belocated in the folder indicated by the providerPath attribute of the default Data provider inweb.config).
❑ <version>: The database version that the <schemascript>, <datascript> files build. This is usu-ally the current version, but if the version is less than the current version the appropriateupgrade scripts are run to make the database version equal app version.
❑ <superuser>: Information about the superuser (Host Account). This node allows you to specifya default superuser other than the default (Host/Host).
52
Chapter 2

❑ <settings>: The default host settings for the application — the child nodes of this node corre-spond to the HostSettings table in the database, and are managed under the Host/Host Settingsmenu (after installation).
❑ <desktopmodules>: The desktop modules to install for this installation. This can be very usefulwhen you want to reduce the default number of modules a user can see within a portal.
❑ <portal>: The default portal configuration.
If you want to make a new file so you can change the settings, you can point to a new file via theweb.config file using the following element:
<add key=”InstallTemplate” value=”DotNetNuke.install” />
SummaryThis chapter covered a typical DotNetNuke installation. It provided a step-by-step guide toinstalling your own DotNetNuke application, as well as introduced the new method of customizingan installation.
Hopefully by following the steps in this chapter you can perform a successful installation. We hope tomake DotNetNuke a piece of software that requires very little administration by technical people andbecomes more about site administration by end users.
53
Installing DotNetNuke


Portal Overview
This chapter looks at the various sections of the DotNetNuke application from an administratorand user’s view. The application offers 15 content modules natively, which allow a broad range ofcontent to be presented to your visitors, and a wide range of modules that provide an interface foradministering your installation. The base installation of DotNetNuke allows you to set up a fullyfunctional web site that will provide the presentation of information most web sites will need. Youcan also find a wide range of third-party modules that will easily plug into the application andallow you to extend the functionality of DotNetNuke further. Let’s look at some of the featuresavailable to you from a base installation of the application.
What Is a Portal?DotNetNuke uses the term portal to describe a separation between each web site one instance ofthe application may contain. So you might ask, what is a portal? Webster defines a web applicationportal as “a website considered as an entry point to other websites, often by being or providingaccess to a search engine.” This can be true of DotNetNuke, but it is really more than just a door-way to other applications or search engines. It can, in essence, perform these functions as well as ahost of others associated with displaying information to your users.
For the purposes of this discussion we can define a portal as the related data for one web sitehosted within your DotNetNuke installation. The application natively provides the ability to hostmultiple web sites from the same code base, all containing different information and presentedto the user at runtime based on the URL the user uses to access the code base. Exactly how theapplication accomplishes this task is covered in another chapter. For our discussion we can refer totwo types of portals, parent or child portals, which are discussed in detail later in this chapter. Asthe portal administrator you can set up hundreds of various web sites on the same portal. Thesecan be a combination of parent and child portals, and at runtime the application will determine theproper content to display to the user based on the PortalID of the portal that is accessed. This isone of the most powerful features of this application and probably accounts for the rapid growth

of the application since its inception. You define the difference between whether a portal becomes a childor parent portal when you create the portal.
Portal Organizational ElementsThis section examines the organizational elements of a portal.
Parent/Child PortalsLet’s look at the differences in the format of the URL between the two types of portals. A parent portal’sURL takes the format of http://www.YourDomain.com and a child portal takes the format of http://www.YourDomain.com/YourChildPortal. The application installation may contain any combinationof parent or child portals. The only real difference between how you set up the various types of portals ishow you define the portal. Figure 3-1 shows the options available in the Portal administration module.
The Portal module gives you several options when setting up a new portal. Notice the radio buttons forselecting a parent or child portal. Selecting the child portal requires no further configuration outside ofthe application. To set up a parent portal you must perform some additional steps. You first need to setup an additional web site in your IIS Manager with host headers for your domain name and create aDNS record to point to the IP address of your web server. Information on how to perform these tasks isoutside of the scope of this book, so please refer to your IIS and DNS help files for the steps. You can findspecific details on how to use each of the functions for setting up a new portal in Chapter 5, which cov-ers the host functions of DotNetNuke.
Figure 3-1
56
Chapter 3

PagesPages are a relativity new concept in DotNetNuke. Prior to version 3.x these were referred to as tabs.This change was made to allow for a more user-friendly experience for the novice who may not be a pro-grammer by trade. You can think of a page in the same way you think of a static html page. The differ-ence is that the application loads the content based on the parameters passed to it at runtime.
In reality there is really only one page in the application that displays all the content to your users.Exactly how this works is explained in detail in the architecture and API chapters. Figure 3-2 shows theoptions for administering your portal pages.
Figure 3-2
In the left corner you will notice the Page Functions menu. These functions allow you to manage yourpages. These are fairly self-documenting and you can deduce the purpose of each function by its name.Table 3-1 describes each of the available functions.
Table 3-1: Page Functions
Function Description
Add This is where you add a new page to the portal. After you select this menuoption you are presented with the Page Management control, where you candefine your page properties such as Page Name, Title, Keywords, Security,and so on.
Settings The Settings menu allows you to modify a page created earlier. You will betaken to the edit page for the current page and you will be able to modify allthe properties of the page.
Delete Delete allows you to remove the current page from your portal.
Copy Copy defaults to allow copying of the modules located on the current page.You also have the option of duplicating the content in the modules of the cur-rent page. This is a real time-saver when setting up your portal.
Preview Preview allows you to view your page in the same manner your users willview it. This helps you ensure that your users see your content as youintended. This function also produces more questions than any other functionfor novices with DotNetNuke. If you are administering your portal and sud-denly notice you can no longer edit the individual items of your modules,ensure this Preview mode is turned off because it is likely your problem.
As you can see, the name adequately describes each option’s function. DotNetNuke attempts to followthis same structure throughout the application. Figure 3-3 illustrates the options available in the PageManagement page, which you use to add new pages to your portal.
57
Portal Overview

Figure 3-3
As you will see in later chapters, DotNetNuke utilizes an object-oriented approach in all functions wherefeasible. This allows the application to reuse various components of the application, which creates acommon user interface for most of the functions. You will see many of the same options availablethroughout the administration screens. The application utilizes the same user controls in numerousareas, which accomplishes two main functions: it allows a consistent look and feel to the application andit simplifies the amount of code required to perform these functions. One thing new to DNN 3.X is theaddition of field-level help. Notice the question mark images in Figure 3-3. These images expand whenclicked, offering some additional descriptions on the type of information the field expects. This helpsreduce the learning curve associated with managing your content.
PanesPanes are the areas of your skin that hold the various content modules you will drop on each page.These allow you to organize your content in a manner that makes the best use of your site real estate.The number of panes is controlled by your skin design. For a full discussion on creating skins, seeChapter 13. Panes are dynamically populated at runtime with the modules assigned to the page. Thetypes of modules you can use to display your content are discussed in the “Modules” section later in thischapter.
One thing to be aware of when you are changing skins in your portal is that the pane names must matchthe ones in your current skin. Otherwise, you will need to reposition your modules to the proper panebecause a skin change may cause your modules to all become defined in the ContentPane. The
58
Chapter 3

ContentPane is strict requirement for skins and a skin will not function without this pane. DotNetNukeships with several prebuilt skins to help you get started launching your new site.
ContainersContainers allow you to enhance the look of your portal without any design changes to your skin. A con-tainer’s purpose is to surround the content of a module with some design element, which allows you tobring more attention to the content of the module. You have two options for applying containers to yourportal: You can apply a default container to your entire portal or set a container for each individual mod-ule. Let’s add a module to a page and set up a container for a visual reference.
Now, modify the container of the Links module to change the look of the default page. First select theSettings option from the module actions menu as shown in Figure 3-4.
Figure 3-4
Selecting the Settings tab navigates you to the Module Settings page for the Links module. You willnotice the Module Settings page contains many of the same options as the Portal Settings page; this is anexample of maintaining a consistent interface throughout the application through the use of the object-oriented programming we’ve used in DotNetNuke. Scroll down to the Page Settings ➪ Basic SettingsPanel in the Module Setting control (you may need to expand the panels by clicking the + sign for eachpanel and selecting a new container for this module). Currently this module is using one of the defaultcontainers that ship with the application. Select the DNN - Blue - Text Header - White Background con-tainer and update your module. You are then taken back to your original page and you will immediatelysee the difference this one change makes. Go ahead and update all the modules on this page so you canreally see the difference. As you can see in Figure 3-5, the entire look of this page changes with only afew mouse clicks.
59
Portal Overview

Figure 3-5
You can see by this example that the use of containers offers you a lot of flexibility with controlling thedisplay of content to your users. Normally you will want your containers to match the colors and designof your site, and most skins provide these complements as part of the package. Many commercial andfree versions of skins are available for DotNetNuke that you can download or purchase. Refer to theDotNetNuke web site for links to a wide variety of skins and containers. Creating skins and containersis covered extensively in Chapter 13.
ModulesModules are the meat and potatoes of the DotNetNuke application. Modules are the components thatallow DotNetNuke to finally serve its intended purpose of displaying relative, easy-to-update content toyour visitors. The applications for these modules and how to use them to add your content is covered inChapter 6. Hundreds of free and commercial modules are available that you can obtain to extend thefunctionality offered by the application. Just perform a web search for “DotNetNuke Modules” withyour favorite search engine and you will be able to find a module to meet almost any need you mayhave for managing content. This section of the chapter provides an overview of each module and pre-pares you for the detailed information in Chapter 6, which shows you how easy it is to use the modulesto present content to your users. With version 3 of DotNetNuke, all the content modules have beendivided into separate projects, which allows you to pick and choose the modules you need for yourinstallation. So, if your specific business requirement does not need an RSS module, you can remove itfrom your installation without any adverse effects or any modifications of the core code. This is animportant enhancement from a business perspective because it allows you to easily modify the applica-tion to accommodate your unique business rules and needs.
60
Chapter 3

Account LoginThe Account Login module provides the login interface as a module. In can be useful in two scenarios:
❑ The first scenario is when you would like the login dialog to appear on the home page (withoutthe user clicking the login link).
❑ The second scenario is to be used on a login page, which could contain additional modules. Youcan specify any page within your portal as the login page via the administration screens locatedat Admin ➪ Site Settings ➪ Advanced Setting ➪ Page Management.
AnnouncementsAs its name suggests, the Announcements module is used to present a list of announcements. Eachannouncement includes a title, text, and a “read more” link. Optionally, the announcement can be setto expire after a specified date.
BannersDotNetNuke provides a rich set of vendor management tools. One of the tools provided is the Bannersmodule. This module is used to display the advertising banners of vendors created within the portal.Management of these vendors and creation of banners is performed in the administration area located atAdmin ➪ Vendors. The module itself provides facilities to select the number of banners to display andthe banner type.
ContactsThe Contacts module renders contact information for a group of people; some example groups are a pro-ject team, a sporting team, or personnel within your department. The module provides an edit page,which allows authorized users to edit and add contacts.
DiscussionsThe Discussions module is a threaded discussion board; it provides groups of messages threaded on asingle topic. Each message includes a Read/Reply Message page, which allows authorized users to replyto existing messages or add a new message thread. Although this is not a full-fledged forum module, itoffers some functionality that you can use to enable light forum activities on your site.
DocumentsThe Documents module renders a list of documents, including links to browse or download the docu-ment. The module includes an edit page, which allows authorized users to edit or add the informationabout a document (for example, a friendly title).
61
Portal Overview

EventsThe Events module renders a list of upcoming events, including time and location. Individual events canbe set to automatically expire from the list after a particular date. The module includes an edit page,which allows authorized users to edit or add an event.
FAQThe FAQ module allows an authorized user to manage a list of Frequently Asked Questions and theircorresponding answers. This is a great module for reducing support calls to your customer service cen-ter because you can compile a list of the questions you receive about your business or services and pre-sent this data to your users.
FeedbackThe Feedback module allows visitors to send messages to the administrator of the portal. With version 3of the portal software you have the ability to customize this module to send e-mails to various individu-als within your organization depending on the message content. This was not available in previous ver-sions because all e-mails sent from the module were sent to the portal administrator. This is just onemore example of how DotNetNuke allows you to assign different tasks to the correct individuals in yourorganization.
IFrame The IFrame module is an Internet Explorer browser feature that allows you to display content fromanother web site within a frame on your site.
ImageThe Image module renders an image using an HTML IMG tag. This module includes an edit page thatallows an authorized user to specify the location of the image that can reside internal or external to theportal. The authorized user can also specify height and width attributes, which permits you to scalethe image.
LinksThe Links module renders a list of hyperlinks. This module includes an edit page, which allows autho-rized users to edit and add new links. Each link can be customized to launch new windows or captureinformation such as how many times that link has been clicked.
News Feeds (RSS)The News Feed module allows you to consume syndicated news feeds in Rich Site Summary (RSS) for-mat. This module includes an edit page that allows you to specify the location of the news feed and thestyle sheet (XSL) used to transform the news feed.
62
Chapter 3

Search InputThe Search Input module provides the ability to submit a search to a given search results module.
Search ResultsThe Search Results module provides the ability to display search results.
Text/HTMLThe Text/HTML module renders a snippet of HTML or text. This module includes an edit page, whichallows authorized users to edit the HTML or text snippets directly (using the configured rich text editor).
User AccountsThe User Accounts module allows users to register and manage their account.
User Defined TableThe User Defined Table module allows you to create a custom data table for managing tabularinformation.
XML/XSLThe XML/XSL module renders the result of an XML/XSL transform. This module includes an edit page,which allows authorized users to specify a location for the XML document and the XSL style sheet usedfor transformation.
Remember, this is not a definitive list of the modules available within DotNetNuke; you have the optionof installing modules provided by third parties, or to even author your own module. For completeinstructions on how to use each of these modules, refer to Chapter 6, which covers the administration ofthe DotNetNuke base modules. Chapters 9 through 12 cover the aspects associated with authoring yourown modules to solve a unique business need for your organization.
Additional ModulesDotNetNuke also provides some additional modules that are available in the download but not installedby default in the application:
❑ User’s Online: This module allows you to display information about the current number of visi-tors accessing your portal at any given time.
❑ Survey: This module allows you to conduct online surveys with your portal.
63
Portal Overview

At the time of this writing, several other modules are under development that will enhance the usabilityof the application even further. Several members of the DotNetNuke Core Team are developing a full-fledged forum module and a photo gallery module, which will be included in later releases of theapplication.
User RolesDotNetNuke offers a fairly robust method for dealing with the permissions and controlling the tasks aparticular user is allow to perform. It does this with a roles-based security module, where every pageand module in the application is assigned roles that determine what the user is allowed to do within thecontext of the application. As you saw earlier in the chapter, you have the option of setting permissionsat several levels within the portal. A user may be allowed access to edit certain modules, or be givenaccess to edit the entire page as you deem necessary. These functions also apply to actual viewing of amodule’s content or a specific page. Basically, all you need to do is create the necessary security rolesand assign the permissions you want that role to perform to the module or page. Once you have theroles and permissions defined you can then place your users in the appropriate role, which will allow orrestrict their access based on those permissions. This allows very granular control over the actions ofusers in your portal.
SummaryThis chapter introduced the concepts of DotNetNuke terms and basic application functionality. Thechapters that follow dive deeper into these items and introduce the details on how each DotNetNukefunction can be implemented in your unique installation. As you can see from this chapter, the applica-tion offers a lot of functionality from a base installation and will allow you to quickly move your website from conception to production. The next chapter looks at the host functions required to set up theapplication to host your various child and parent portals.
64
Chapter 3

Portal Administration
Chapter 3 introduced basic concepts that define a portal in DotNetNuke. This chapter details therich features and functions available to customize the look, feel, and function of your DotNetNukeportal and maintain it throughout its life.
To make this information more practical, examples in this chapter illustrate a real-worldscenario of building a site for a pee-wee soccer team called The Gators. Where applicable, you’llnot only learn how to do things, but also when and why to do them. As the administrator of aDotNetNuke portal, you now hold the keys to a powerful resource and you’ll want to know howto manage it well.
In Chapter 3 you learned about the concept of hosting multiple portals on a single installation ofDotNetNuke. This chapter assumes no knowledge of any portal in the installation other than theone you are currently administering. As far as the Portal Administrator is concerned, their portalexists alone in its own corner of cyberspace separate from any other.
Who Is the Portal Administrator?When the Host creates your portal, a new user is created as well (see Chapter 5). This user is auto-matically associated with the portal in the Administrator security role and so becomes the defaultPortal Administrator. The features discussed in this chapter are available to users who belong tothe Administrator security role (and SuperUsers such as the Host).
There is only one Portal Administrator — you! However, you have the authority to delegateprivilege to other users to perform administrative tasks. Later in this chapter you’ll learn how togive Administrator access to another user. But regardless of how many users have administrative

privilege, it is the user information of the one Portal Administrator that is used by DotNetNuke. Forexample, it is the Portal Administrator’s e-mail address that will appear as the “from” address for alle-mail sent by the portal and as the default to address for the Feedback module.
Ideally, a Host will not associate the Portal Administrator user with an individual, but rather with anaccount. In this way, the user information can be maintained separately and changed for the specificpurpose of managing the portal (like specifying an appropriate e-mail address). The PortalAdministrator account can be used to create additional users with administrative privileges that areassociated with real people.
Where Do I Begin?Begin at the beginning and go on until you come to the end; then stop. This little piece of advice is aswise today as it was when the King of Hearts delivered it to the White Rabbit. So we’ll take a cue fromLewis Carroll and start at the beginning — logging in. Follow these steps:
1. Navigate to your web site. Our example is located at http://soccer.dotnetnuke.com,although your location will vary.
2. Click the Login link in the upper right-hand corner of the page.
3. Log in to your portal using the Portal Administrator User Name and Password assigned byyour Host. Enter your User Name and Password and click Login (see Figure 4-1).
Figure 4-1
If you’ve entered your User Name and Password correctly, the first thing you will notice upon loggingin is that the screen looks a little bit different than it did before (see Figure 4-2).
Three main differences are immediately visible. The first is the addition of the Control Panel, whichspans the top of the browser window. The second is the layout of the skin panes, and the third is theaddition of the Admin menu. You’ll learn more about panes and skinning in Chapter 13. For now we’llfocus on the Control Panel.
66
Chapter 4

Figure 4-2
The Control PanelThe Control Panel is primarily a palette of shortcuts to frequently used tasks, most of which are accessi-ble from elsewhere on the Admin menu. In DotNetNuke version 3.0 it is divided into three main sectionsfor Page Functions, Adding Modules to the current page, and Common Tasks (see Figure 4-3).
Figure 4-3
In DotNetNuke version 2.1, the Control Panel had far fewer functions and a much thinner profile (seeFigure 4-4). That version of the Control Panel is still an option in version 3.0 at the discretion of the Host.We’ll discuss it briefly before covering the enhanced version in more detail.
Figure 4-4
67
Portal Administration

You’ll note that the main differences between the Classic (version 2.1) and ICONBAR (version 3.0)Control Panels are the addition of extra Page Functions, extra Module Options, and Common Tasks.These differences are pretty straightforward and will become more obvious as you move along. Theremaining difference is the deprecation of the Content check box.
In version 2.1, ill behavior of a poorly written module could result in a rather nasty error messagethat would keep a module from being displayed. In this case, it was virtually impossible for a PortalAdministrator to remove the offending module. The Content check box provided a way to instruct modules not to display their content, which preempted the nasty error message and gave the PortalAdministrator access to the modules settings where it could be deleted from the page. This condition nolonger exists under version 3.0 and so the Content check box does not appear on the ICONBAR versionof the Control Panel. It is no longer necessary.
The only functions on the Control Panel that can’t be accessed through other navigation are the SiteWizard, Help, and Preview.
The Site WizardA slick addition to version 3.0, the Site Wizard is the quickest way to make the most common customiza-tions for someone new to managing their own web site. It takes you through a short conversational pro-cess, step by step, with extensive help and the ability to cancel at any time without saving changes.Standard navigational controls appear on each page of the wizard for Back, Next, Finish, Cancel (with-out saving changes), and Help.
Clicking the Wizard button in the Control Panel brings you to Step 1 (see Figure 4-5).
Step 1: Choose a Template for Your SiteThis optional step gives you the choice of applying a template to your portal. The purpose of a templateis to add predefined functionality and content (pages, modules, and so on) to your site. For example, aHost might provide a variety of commonly used templates to jumpstart your club web site, family website, small business web site, and so on.
Clicking the check box for Build your site from a template (below) enables the list of available templatesjust below it (see Figure 4-6). You select a template from the list by clicking on it. If you do not want toapply a template to your site, simply leave the check box empty.
For advanced users and developers, templates provide a very powerful mechanismfor sharing predefined portal functionality. Templates can carry rich informationincluding portal settings, security roles, pages, modules, permissions, and so on.Template creation is a function available to Host Administrators (see Chapter 5).
68
Chapter 4

Figure 4-5
A group of radio buttons at the bottom of the page tell the wizard how to handle any conflicts that mightbe encountered during application of a template. A conflict is encountered when an existing componentin your site matches a component that is also specified in the template (for example, when a module’stitle matches that of a module specified in the template). Table 4-1 summarizes the effects of each choice.
Site templates are additive. This means that when you apply a template, it will incorporate those ele-ments specified in the template into your existing web site. A template will not remove existing pages,modules, or content except as part of resolving a conflict.
Table 4-1: How to Deal with Duplicate Modules
Ignore If a module of the same name and type as the one in the template alreadyexists, the template definition is ignored.
Replace If a module of the same name and type as the one in the template alreadyexists, it is replaced by the definition in the template.
Merge If a module of the same name and type as the one in the template alreadyexists, the content is appended to the existing module content.
Select the option that best suits your needs. If you are beginning with a new (or empty) portal, theReplace option would be most appropriate. Remember that you can click the Help button at any timefor assistance.
69
Portal Administration

Figure 4-6
Step 2: Select a Skin for Your SiteThis step is where the fun begins! DotNetNuke has powerful skinning capabilities that enable adminis-trators to choose how their site should look. You can scroll though a list of the skins that are availableand select the look you want applied to your site. If the author of the skin has provided an image forpreview, it will be displayed in a thumbnail format (see Figure 4-7). You can click the thumbnail to viewa larger image.
The skin you select will be applied by default to any page that you add to your site. You’ll be able tooverride that choice if you want and we’ll explore that capability a bit later in this chapter. For now justknow that you’ll be able to customize the look of other pages if you want to, even though you have cho-sen a default for all new pages here.
DotNetNuke comes preinstalled with several variations on its default skin (new for version 3.0). Youcan choose a version with vertical or horizontal menus, which display in fixed width or variable(browser) width and in any of five available colors (Blue, Gray, Green, Red, or Yellow). If your Host hasenabled the option for your portal, you can upload additional skins that you can obtain from a variety ofsources or that you can create yourself.
When you have selected the default skin for your site, click Next.
If you are an advanced user or developer, you can find detailed information on how to create and pack-age your own skins in Chapter 13.
70
Chapter 4

Figure 4-7
Step 3: Choose a Default Container for Your SiteIn this step, you are asked to choose a default container (see Figure 4-8). The default container is auto-matically applied to every new module that you add to your pages. Just like with your default skin,you’ll be able to override that choice if you want.
Figure 4-8
71
Portal Administration

The container choices displayed in the wizard represent those that have been specifically packaged forthe skin you chose in the previous step. Because we chose a DNN - Blue skin for our example, the con-tainer choices are DNN - Blue also. However, clicking the check box for Show All Containers displays allavailable containers for every skin that is available to you, so if you want to apply a yellow container asthe default with the blue skin, you are free to do so.
DotNetNuke comes preinstalled with several variations on its default containers for each skin(new for version 3.0). You can choose a version with complementary background shading or white shad-ing for the content area and image or text headers. Image headers provide a gradient fill image as thebackground for the module title, whereas text headers leave the background alone, matching the contentarea shading.
When you have selected the default container for your site, click Next. At this point the wizard hasenough information to display your site if you want to stop, so you could also click Finish.
If you are an advanced user or developer, you can find detailed information on how to create and packageyour own containers in Chapter 13.
Step 4: Add Site DetailsTable 4-2 lists each field and describes how its value affects your portal.
Table 4-2: Site Wizard, Site Details
Name/Title Name/Title is used in a number of places in the operation of your portal.Most notably it is displayed in the title bar of the user’s browser window.It is also used to refer to your portal in outgoing mail for user registration,password reminders, and so on.
Description Description is used as a default value to populate the HTML META tag forDESCRIPTION in each page of your site. This tag is important because itprovides search engines (such as Google, Yahoo, and MSN) with an infor-mative description of your site (or page). The value can be set for each pageindividually; however, if it is omitted this default description will be used.
KeyWords Keywords are also used as a default value to populate the HTML METAtag for KEYWORDS in each page of your site. This tag can be useful to helpimprove search engine placement. Key words and or phrases should beseparated by a comma. The value can be set for each page individually;however, if it is omitted these default keywords will be used.
72
Chapter 4

73
Portal Administration
When you have finished adding details for your site, click Next or Finish (See Figure 4-9).
Figure 4-9
Step 5: Choose a LogoIn this optional step you are invited to select or upload an image for your logo (see Figure 4-10). For thedefault skins provided with DotNetNuke, the logo will appear in the upper left-hand corner of thebrowser window. For this example, leave the logo as unspecified.
Custom skins may place your logo in another location or ignore it altogether (that’s a skin designer’schoice). You’ll want to make sure your logo looks good on any new skin that you choose.
The File Location and File Name drop-downs provide a simple way to locate the available files in yourportal’s root directory. Changing File Location changes the list of files available (note that only web-friendly image files will be listed). If your logo file is on your local computer and not your site, you canchoose to upload it by clicking the Upload New File button. The page will refresh to reveal a standardupload control (see Figure 4-11). Note that you’ll still specify the File Location so the control will knowin which subdirectory to store the image file. Click Save Uploaded File to get the file from your localcomputer to your portal, or click Select An Existing File to return to the previous selector.

Figure 4-10
Figure 4-11
When you have finished choosing the logo for your site, click Finish or Cancel.
Having completed the Site Wizard you can now take a look at your newly configured web site bynavigating to any page (try clicking the Home menu item). Because you applied the Club orOrganization Site template in Step 1, the site will now have some additional pages and example contentinstead of the empty web site that you began with. You can see the sample Gallery page in previewmode in Figure 4-12.
74
Chapter 4

Figure 4-12
The Help ButtonThe Help button is a link that is configured by your Host (see Chapter 5). In the default installation thislink is configured to open the default help page at dotnetnuke.com. Your Host may opt to direct this linkto another site that contains help that is more personalized or relevant to your specific hosting plan.
DotNetNuke has plenty of built-in help for its administrative functions. But the Help button givesHosts some ability to create help completely customized for their (and your) purposes and put it right atyour fingertips. For example, a Host-provided help site might have specific information related to theircustomized templates available through the Site Wizard.
The Preview ButtonThe Administrator’s view of the site differs from a regular user’s view because of the need to see skinpanes, edit icons, module actions, and so on. But sometimes you just need to know how things are goingto look to a non-administrative user; this is what the Preview button on the Control Panel is for.
When you click the Preview button, you will notice two things. First, your view of the portal (below theControl Panel) changes; the pane definitions and the edit options all vanish. Second, the Preview buttonicon changes (a plus becomes visible under the magnifying glass) to indicate that you are in Preview mode.
75
Portal Administration

It can be easy to forget that you are in Preview mode, so don’t forget to toggle this setting back off whenyou no longer need it.
Configuring Your PortalNow that your site has basic navigation, sample content, and a chosen look, you’ll want to begin config-uring other features to make your site special. The Portal Administrator has access to a wealth of config-uration options for customization of the look, content, and behavior of the site. This section discussesmany of the set-it-and-forget-it types of configuration options. These are things that, for the most part,you’ll want to include in your initial planning, set, and then leave alone until your next improvementproject. This section also exposes you to a few tools that serve a purpose in both configuration and main-tenance of your site (which will be covered later in this chapter).
Site SettingsYou can reach your site settings in one of two ways, either by clicking the Settings button in theCommon Tasks area of the toolbar or by selecting Site Settings in the Admin menu. There you will bepresented with a page that contains expandable/collapsible categories of configuration options.
There are two important text buttons at the very bottom of the Site Settings page. Because a number of con-trols on the Site Settings page generate postbacks, you might occasionally be tempted to think that yourchanges have been saved — but no changes are saved until the Update button is clicked. The Submit SiteTo Google button formats and submits a request for Google to add your site to its search index.
Search engine ranking is based on a number of factors. In order to improve your site’s ranking youshould add appropriate Title, Description, and Keyword text to each page before submitting your site toGoogle or any other search engine.
In working with the Site Wizard you already learned about all of the options available under BasicSettings, Details. So we’ll skip those settings here and move on to the rest.
Basic Settings: AppearanceThese settings control the configuration choices that affect the appearance of your site to visitors. Severalof these settings involve the use of a similar selector (see Figure 4-13).
Figure 4-13
This selector utilizes a radio button to specify the source for populating the associated drop-down listbox. The Host may provide skins/containers to all Portal Administrators and/or additional selectionsavailable only to your site (see Table 4-3). If the Host has enabled the Portal Administrator to uploadskins, you’ll be able to add your own and they will be available under the Sites option.
The Preview link button provides a convenient way to see what a skin or container will look like in reallife. Clicking Preview launches another browser window, which opens to the front page of the site usingthe option selected. This window should be closed when you have finished previewing.
76
Chapter 4

Table 4-3: Site Settings, Appearance
Logo See the previous section on the Setup Wizard.
Body Background This value is used in the HTML body tag of every page to render a tiledbackground image. If the selected skin hides background images, this set-ting may appear to have no effect. You should leave this field clear if youdon’t intend to use a background image because it does add unnecessaryweight to the rendered page.
Portal Skin This setting specifies the skin for all non-administrator (and non-host)pages within the site. The skin is applied to all pages in the site whereanother skin has not been specifically chosen on those pages’ individualsettings. It also applies by default to all new pages.
Portal Container Similarly, this setting specifies the standard module container for all non-administrator (and non-host) pages within the site. The same rules of application and inheritance apply for containers as wellas skins. This choice applies to all modules in the site where another con-tainer has not been specifically chosen on those modules’ individual set-tings. It also applies by default to all new modules.
Admin Skin The Admin Skin is the look seen only on administrator (and host) pageswithin the site. Typically your choice of Admin Skin should be lightweight toreduce excessive image transfer and emphasize productivity over pizzazz. There are a few pages that are owned by the portal that face the public, andso retain the Admin Skin. These are the default Login page and the Regis-tration/Membership Services pages. You’ll learn how you can customizethese pages later in this chapter.
Admin Container The Admin Container is the same as the Portal Container but affects onlythe administrator (and host) pages.
If the Host has enabled Skin Upload Permissions for Portals, two additional text buttons will appear atthe bottom of the Basic Settings category (Upload Skin and Upload Container). These functions are cov-ered in detail in Chapter 13.
Advanced Settings: Security SettingsPortal Registration drives fundamental behavior of your site that should be part of your initial design.Through registration, anonymous site visitors can join (or apply to join) the Registered Users role and begranted access to privileged content or site functionality. Because the Registered Users role requires reg-istration and authorization (either explicit or automatic), these functions combine to provide for differentoptions in the registration process (see Figure 4-14).
Figure 4-14
Your choice of registration type should be based on the functional access requirements for visitors toyour site. Table 4-4 summarizes the choices and how they impact site behavior.
77
Portal Administration

Table 4-4: Site Settings, Security, Portal Registration Options
None Registration is not an available option to site visitors. The Login buttonremains visible so that administrative access can be gained; however, theRegistration button is hidden. Often, sites that select this option willchange their skin to move the Login button to a less prominent locationthan it normally appears on the default skin. This setting is appropriate forsites that do not publish privileged content or that process registrationoffline.
Private Registrants apply for privileged access to the site. Until authorization isexplicitly granted, access is limited to that of any anonymous user. This set-ting is appropriate for sites that require approval of registration requests(for example, a private family web site that invites friends and relatives toapply). An e-mail is sent to the registrant advising him or her of the privatenature of the site. An additional e-mail is sent upon authorization (if andwhen performed). It is good practice to explain the process for approval of private registrationprominently on your site.
Public Registration is automatically (and immediately) authorized without valida-tion of the e-mail address. A welcome e-mail is sent to the registrant. Thissetting is appropriate for sites that want to track usage but do not requirevalidation of contact information.
Verified Registration generates a verification code, which is included in the wel-come e-mail sent to the address supplied by the registrant. Authorization isgranted when the user supplies the verification code at the time of firstlogin. This process ensures that all registered users have supplied a valide-mail address.
You can customize the content of the e-mails generated through the registration process by editing theappropriate language resources. You’ll learn explicitly how to do this later in this chapter.
Remember that site registration is only the first step available for managing access to privileged content.Once registered, you can manage a user’s access to pages and modules at a very granular level throughthe application of security roles.
Advanced Settings: Page ManagementEarlier you learned that some standard pages are owned by the portal. These settings give you the abil-ity to customize those pages and a few other aspects of your site’s general navigation (see Figure 4-15).
Figure 4-15
78
Chapter 4

Each of the options consists of a drop-down list box for selecting a custom page within your portal. TheNone Specified selection for any of these configuration options results in default behavior. Table 4-5explains the behavioral impact of each setting.
Table 4-5: Site Settings, Page Management
Splash Page When a visitor reaches your site via its alias (for example, http://www.dotnetnuke.com), the default behavior is to display the Home Page. If aSplash Page is specified, it will be displayed to the visitor instead. Thisaffects only the initial landing page for site navigation or invalid links anddoes not change the location of Home for other purposes. It is left to you to determine the appropriate method and timing of redirec-tion to the Home Page. A typical implementation would be to specify apage that is defined as a link to a Flash introduction (which redirects whenfinished).
Home Page The Home Page is the default target for site navigation (in the absence of aSplash Page). It is also used as the destination link for the site logo as wellas any other default site behavior that results in redirection to the HomePage. If no Home Page is specified, the first page in the navigation orderwill be used.
Login Page The default Login Page is provided for your convenience, however as asystem page it lacks the capability for skinning and may not be consistentwith the look of your site (it retains the admin skin). If specified, the LoginPage will be used as the target for login requests instead of the defaultpage. This allows for full customization and skinning including additionalmodules and page elements. But don’t forget to include the Account Loginmodule on the page and be sure the page and module permissions specifyvisibility to Unauthenticated Users (or All Users). If you make a mistake and find yourself unable to access your custom loginpage, you can force display of the system login page. Simply add the fol-lowing query string value to the address in your browser: ctl=Login (forexample, http://www.dotnetnuke.com/default.aspx?ctl=Login).A simple example of a custom login page would be to include the AccountLogin module on the Home Page, visible only to the UnauthenticatedUsers role.
User Page The User Page displays a user’s registration information and preferences,provides for password changes, and lists available membership services. Itis most readily seen by clicking the Registration button or by clicking onyour username if already logged in (see Figure 4-16). The default User Page is provided for your convenience. As another systempage it has the same skinning limitations and customization characteristicsas the Login Page (see above). When creating a custom User Page, be sure that the User Account moduleis visible to the All Users role. It serves the dual purpose of collecting regis-tration information for Unauthenticated Users and displaying accountinformation for Registered Users.
Table continued on following page
79
Portal Administration

Home Directory This display-only field identifies the path to the directory that holds all theportal’s files. The directory is specified by the Host and represents a loca-tion relative to the web site root (for example, http://www.dotnetnuke.com/Portals/1)
This is an opportune time to set defaults for what information is required for users to enter upon regis-tration. On the User Page, internal functions require that users enter a first and last name, username,password, and e-mail address. Other contact information fields are optional, but you can choose torequire them by clicking the check box next to the field (as seen in Figure 4-16).
Figure 4-16
Advanced Settings: Payment SettingsThese payment settings have been preserved from earlier versions of DotNetNuke for legacy supportpurposes. Only the PayPal(r) option is supported using the POST method to emulate PayPal’s Buy Nowbutton functionality. These settings come into play when public roles are defined with fees or whenonline portal signup is permitted.
Several eCommerce store and/or payment components are available for DotNetNuke through third-party providers. These payment settings will ultimately be deprecated in a future version in favor of amore robust eCommerce API (see Figure 4-17).
80
Chapter 4

Figure 4-17
Since our Gators will offer at least one premium content area for subscription, you’ll sign up for a PayPalaccount and use it to process payments for these services.
Other SettingsThis group of miscellaneous settings (see Figure 4-18) has significant impact on several key display char-acteristics of your portal. Table 4-6 explains the impacts of each setting.
Figure 4-18
Table 4-6: Site Settings, Other Settings
Copyright This setting is used to populate the text of the skin object token[COPYRIGHT]. In each of the default skins, the copyright notice appearsat the bottom of the page. If your skin does not implement the COPYRIGHTskin object, this setting will have no effect. For more information on skinobject tokens, see Chapter 13.
Banner Advertising This setting controls the behavior of the skin object token [BANNER]. TheNone option nullifies the token, resulting in no display of banners. TheSite and Host options select whether banners are displayed from your por-tal’s Vendor List or from the Host’s Vendor List. The Host option providesfor leveraging a single Vendor List across all portals. If your skin doesnot implement the BANNER skin object, this setting will have no effect. If you had applied the DotNetNuke template in the Site Wizard, youwould see a banner on the upper-right side of the default skin, which isa default banner that appears if none exist in the Vendors List.
Administrator Recall that the Portal Administrator’s contact information is used for the“from” address in outgoing e-mail, the default-to address in the Feedbackmodule, and so on. You can choose to designate another portal user (who isalso in the Administrator role) as the primary Portal Administrator.
Table continued on following page
81
Portal Administration

Default Language DotNetNuke supports localization of text, dates, and currency within theportal framework. English and German languages are installed by defaultbut additional language packs are available. The default language is dis-played to anonymous site visitors and Registered Users that have notselected a default language in their own membership settings.
Portal TimeZone DotNetNuke supports localization of time zone similarly to languages. Thedefault time zone is used for anonymous site visitors and Registered Usersthat have not selected a default time zone in their own membership set-tings. This feature is primarily available for support of modules that mayrequire it. Timestamps visible in the Log or for create and update events forindividual records are based on server time, rather than localized time.There are no features in the default installation of DotNetNuke that displaylocalized time.
The footer area of the default skins contains the [COPYRIGHT] skin object token, which displays thecopyright notice specified in Other Site Settings (see Figure 4-19).
Figure 4-19
Changing the default language setting translates all static portal content (labels, admin and host menus,date and currency formats) to the language specified. You can even customize the static labels if desired.Contrast Figure 4-18 and Figure 4-20 to see how the choice of default language affects your portal. Notethat dynamic content (like the text of the Copyright notice) is not translated.
It is worth noting that core support for Multilanguage module content (and versioning) is on the devel-opment roadmap for a future version of DotNetNuke.
Figure 4-20
Stylesheet EditorDotNetNuke supports cascading style sheets so that skin and container designers, as well as moduledevelopers, have a means to customize components they provide. The highest level style sheet islocated in the portal’s Home Directory, appropriately named portal.css. The Stylesheet Editor givesyou a convenient way to quickly update any style supported within the DotNetNuke framework (seeFigure 4-21).
82
Chapter 4

Figure 4-21
If you should ever need it, there is a button to Restore Default Style Sheet, which returns the template toits original settings. Any customizations you have made will be lost, so it’s a good idea to make abackup copy of this file first.
Security RolesThe DotNetNuke architecture allows you to control access to your content both at the page and the mod-ule level through the application of user roles. A role can be thought of as a group with a purpose (forexample, Newsletter Subscriber, Gallery Administrator, or Team Member). You’ll learn to apply roleslater in this chapter, but for planning purposes you should consider that roles should address two typesof purposes (that is, permissions): View and Edit.
Some very important security roles are predefined and you can define others as necessary. You arealready acquainted with (and a member of!) the Administrators role. You’ve also touched briefly on theRegistered Users role, which includes all users that have registered on your site and have been autho-rized, whether by an Administrator, through public access, or verification at login. Figure 4-22 shows theSecurity Roles page and predefined roles for a default portal.
Figure 4-22
83
Portal Administration

Two additional built-in roles you will find useful are the Unauthenticated Users and All Users roles. TheUnauthenticated Users role has no explicit definition because it denotes anonymous users who belong tono real security role at all. Likewise, the All Users role includes both users who are currently logged in aswell as those who are not. You’ll see how both of these roles are used later when working with page andmodule permissions.
Your portal may have additional roles based on the template you specified using the Site Wizard earlierin this chapter.
Creating a New RoleIn designing The Gators web site, it was determined that a couple of additional roles would be needed.You’ll add an opt-out role that all new users are automatically assigned to. The preconfigured Subscribersrole is an example of this, but you’ll create your own in this exercise. You’ll also add a public role for sub-scription to premium services.
Basic SettingsAfter you click Add New Role, you’ll wind up on the Edit Security Role page looking at the basic set-tings (see Figure 4-23). Table 4-7 describes the fields in the basic settings.
Table 4-7: Add New Role, Basic Settings
Role Name and Description The Role Name and Description are visible to Administrators onthe list of Security Roles (see Figure 4-22) and also in the Member-ship Services area of the Account Profile page if the role is definedas Public (see Figure 4-25).
Public Role Roles that are defined as Public show up as user-selectableoptions in the Membership Services area of the Account Profilepage (see Figure 4-25). This is useful to enable user selection ofoptional services.
Auto Assignment If checked, the role is retroactively applied to all existing usersand is automatically assigned to all new users.
You’ll define a role that is used to determine who should receive your monthly newsletter. This role isautomatically assigned to each new user but, as a public role, can be canceled by the user at any time.Figure 4-23 illustrates the setup of your new role.
Figure 4-23
84
Chapter 4

Alternatively, you might choose not to auto-assign the role in favor of allowing your users to opt-inspecifically. This would be a more acceptable option for marketing-oriented communications because thedefault user registration does not currently include the ability to opt-out at the time of signup.
Advanced SettingsYou’ll also define an optional role with a fee, which you’ll use to expose privileged content to paid sub-scribers. The Gators site will provide access to a gallery of photos and for a small fee users can downloadhigh-quality images for printing. For this you’ll need to apply some advanced settings (see Figure 4-24).Table 4-8 describes the fields in the advanced settings area.
Table 4-8: Add New Role, Advanced Settings
Service Fee This is the fee associated with the service that is enabled via the role. Thefee is applied in the currency specified in your portal settings. If you’vespecified PayPal as your payment processor, be sure that your account isset up to accept payments in the chosen currency.
Billing Period (Every) These two fields define how often a user is billed for the service. It maybe a one-time or recurring fee.
Trial Fee You can choose to allow for a trial period for services at a different ratethan the full service amount. Free trial services are often offered for alimited time.
Trial Period These two fields define the duration of the trial period. When a trial roleis granted, it is given an expiration date that is based on this time period.
You’ll apply a small monthly fee to this role. When users subscribe to it they’ll be taken to the PayPalweb site where they can authorize a payment to your account. Upon completion of the process they willbe transferred back to the home page of your web site. The update to the user’s account is processedasynchronously.
Figure 4-24
Remove the preconfigured Subscriber role since you’ve just created your own.
Public Roles and Membership ServicesPublic roles, such as those you defined in the previous section, are made available to users via theMembership Services area of their User Account page (see Figure 4-25).
85
Portal Administration

Figure 4-25
Delegating Authority and/or Assigning PrivilegesRoles that are not public typically define privileged access for users or areas of responsibility for mainte-nance purposes. We’ll assume you’ve already defined such a role for the person(s) that will maintain thefile download area called Gallery Maintenance. You’ll navigate there by clicking the text button ManageUsers In This Role from the Edit Security Roles page (see Figure 4-26).
Figure 4-26
To add a user to the role, simply select the user in the User Name drop-down and click Add Role. Ifappropriate, an expiry date may be specified, after which the role has no effect. The Send Notificationcheck box (if checked) will result in an e-mail being sent from the Portal Administrator to the useradvising them of their addition to the role.
All users currently assigned to the role appear in the list. Clicking the red x next to any user’s name willremove them from the role.
Now that you can create roles and assign users to them you’re ready to put those roles to use. In the nextsection you’ll create a page that your Gallery Subscriber role can access but a normal registered usercannot. Likewise, your Gallery Maintenance role should be able to edit the page while others (exceptAdministrators) cannot.
86
Chapter 4

PagesPages are the building blocks of your DotNetNuke portal. They are the real estate where you depositcontent to create an interesting site. You can see them represented in menu items, bread crumbs, and sitelinks. You’ve already dealt with a number of system pages, but in this section you learn all about creat-ing and managing pages of your own.
Creating New PagesThe quickest way to create a new page is by clicking the Add button in the Page Functions area of theControl Panel. You can also create a page by first navigating to the Page List via the Pages item on theAdmin menu and clicking the Add New Page button. Table 4-9 explains the basic settings.
Table 4-9: Add New Page, Basic Settings
Page Name This value appears as the text in the menu item, Recycle Bin, and anywherethat pages are listed (for example, drop-down selection lists).
Page Title The page title is displayed in the title bar of the user’s browser. It is alsotypically used by search engines as a key indicator of relevance. So be sureto make your page titles fully descriptive of the page content (for example,Soccer Team Photos for Download).
Page Description You already added a default description back when you imported yourportal template (see Table 4-2). However, it is recommended that you add arelevant description for each page within your site.
Key Words You already added default keywords as well (see Table 4-2). But again,unique keywords can improve your ranking for search engines.
Parent Page This property drives the navigation hierarchy of your site*. Any page thatdoes not have a parent specified will appear as a top-level menu item. Anypage that has a parent specified will appear as submenu item to the parentpage.Although a page can only have one parent, it is also possible to create apage that is really just a reference to another (existing) page. So you can ref-erence the same page from more than one place in the menu structure (seeLink URL in Table 4-10).
Permissions Each role in your portal can be explicitly assigned permissions to view oredit the page. Edit permissions are the same as those available to the PortalAdministrator (for page-level actions only). View permissions determinewhether the page is displayed to the role (see Figure 4-28).
* You can take this hierarchy as deep as you like, but conventional wisdom tells us that going more than about two levelsdeep becomes difficult to navigate. Not every page needs to be accessible from the main menu.
When creating a new page, you will also have the option to copy the structure and/or content of anexisting page (see Figure 4-27).
87
Portal Administration

Figure 4-27
If you have created a page that employs a layout of modules that will be common in your site, it may beuseful to begin development of new pages using that same layout. You can specify which page to copyand whether or not the module content should be the same. If Copy Content is selected, the modules onthe new page will be shadows of existing modules on the Copy Modules From page. All of the shadowcopies are linked so that changes to any one will update every instance on each copied page. This can beparticularly helpful for things like links modules used for navigation, banner modules displayed onselected pages, and so on. If unselected, new empty modules will be placed on the page in the same lay-out and with the same permissions as the page specified to copy from.
Table 4-10 explains the fields in the advanced settings area.
Table 4-10: Add New Page, Advanced Settings
Icon Identifies an image that will be displayed beside the page name in themenu. Menu text bottom aligns with the images, so 16x16 icons tend tolook best.
Page Skin This optional setting will associate a skin specifically to this page. This isuseful if you have a skin with special formatting or a functional need toappear different than the rest of your site. If this option is <Not Specified>,the page inherits the default skin as specified in the Site Settings (seeFigure 4-13).
Page Container Likewise, this setting will associate a default container specifically tothis page.
Hidden This option has nothing to do with the visibility of your page (recall thatvisibility is a function of roles that you were introduced to earlier). Youselect this option to keep a page from being added to the menu. You mayhave many pages that are not part of your top-level navigation but that arelinked in other ways throughout your site.
Disabled If a page is disabled, it is not accessible to any user of the site who is not amember of the Administrator role. This feature is useful for suppressingcontent without manipulating roles (for example, universally hiding a pageuntil it is updated).
Start Date Specify a date that the page (and menu item) becomes visible. Before thestart date the page will function as if it were disabled.
End Date Specify a date after which the page (and menu item) is no longer visible.The page will function as if it were disabled.
88
Chapter 4

Link Url This option allows you to change the target of your page. The default is aURL with no specified location, which is interpreted as an internal page. URL: Your menu item will act as a direct link to the target URL specified.Page: Your menu item will act as a link to an existing page in your site.This option enables you to create multiple navigational items that point tothe same place (for example, a descriptive page that applies to multipleproducts).File: Your menu item will act as a link to a file in your portal root (forexample, a link to a PDF document or image).
Securing Privileged ContentEarlier in this chapter you learned to create security roles to logically group users. Page (and module)permissions allow you to give privileges to those groups of users. You’ll note that the built-inAdministrator role always has both View and Edit permissions on every page.
Figure 4-28 illustrates the permissions that you’ll apply to The Gators Gallery page. By giving All UsersView Page permissions, even anonymous users browsing the site will have access to the menu item andthe page. And you’ll give edit access to the Gallery Maintenance role, which will have responsibility forkeeping this page current (for example, adding new photos).
Figure 4-28
The permissions specified in Figure 4-28 only secure the edit privilege of the page. You’ll recall that TheGators also have a paid role for Gallery Subscribers, which should give them access to premium content.When those pages are created, you’ll uncheck All Users and give View Page permissions to the GalleryMaintenance and Gallery Subscriber roles.
Now You See It, Now You Don’tThe Unauthenticated Users role can be quite useful. It allows you to present a completely differentview of your site to an anonymous user than to your registered users. If View Page permissions areassigned only to the Unauthenticated Users role, they will essentially disappear from view once a useris logged in.
89
Portal Administration

90
Chapter 4
One way of applying this concept is to define a splash page (shown previously in Figure 4-15) such thatits View permissions are set only for Unauthenticated Users. This creates a landing page that is nolonger visible once a user is logged in, but preserves the behavior of the home page after login. Further,if the specified home page is set only for Registered Users, its information remains private and thesplash page functions as a home page for the anonymous user.
Take care when planning your site’s navigation using the Unauthenticated User role. You wouldn’twant to hide a menu item if it had submenu items that you wanted to keep visible!
Changing Navigational StructureYou’ve used the Parent Page setting to specify navigational structure. But if that was the only mecha-nism you had to reorganize your site it would be a little challenging. So the other method involves thePages list, which you can reach by selecting Pages from the Admin menu (see Figure 4-29).
Figure 4-29
This list displays all the pages in your site in an organization that closely matches your menu structure.Items at the top of this list are leftmost in your menu, moving right along the menu as you move downin the list. Items that are indented (for example, . . . Subscriber Downloads) is an indication of submenuitems. The buttons available on the right provide a means to change the defined parent of a selectedpage, moving it (and all its children) up or down within the menu hierarchy or changing its (and all itschildren’s) position in the parent/child relationship. You can also choose to Edit or View a page as well.
Regardless of the visibility settings of the page (whether by start/end dates, enable/disable, hidden/unhidden), it will appear in this list. And so the menu hierarchy can become more difficult to see ifyou have a large number of pages on your site. For this reason, it may be advantageous to define a fewphantom pages for organizational purposes. For example, you might define a hidden page calledOrphans and assign it as the parent to pages that are suppressed from the menu.

SkinsThe Skins page, accessible from the Admin menu, gives you the ability to browse and apply skins andcontainers to customize the look of your site (see Figure 4-30). You’ll recall learning a bit about thisfunctionality within the context of the Site Wizard, but you can access this functionality directly throughthis page.
Figure 4-30
You can specify whether the drop-down containers will list Host and/or Site–supplied skins. If yourHost has enabled the option, you may also see buttons to Upload Container and Upload Skin (otherwisethese buttons will not be visible to you). Clicking the Restore Default Skin button changes your site’sdefault settings to those originally specified by your Host.
Selecting a skin or container from their respective drop-downs displays the available selections in agallery format (see Figure 4-31). If provided by the designer, the galleries will include thumbnail pre-views and the skin gallery will include associated containers.
If you’d like to know more about development of custom skins and containers, this topic is coveredextensively in Chapter 13.
From the gallery you can click a thumbnail image to see a larger image (if provided by the designer).You can also see how a skin or container would look on your home page by clicking Preview, or goahead and set it as the default for the portal by clicking Apply. You’ll have the option to specify whetherthis should be applied to Admin and/or Portal pages in a check box below the gallery. If you selected aSite skin from the drop-down, you’ll have the option to delete individual skins and containers as well.
If the skin designer included an about.htm file in their package, you’ll also see an About <skin name>button below the gallery. Clicking this button opens the designer-supplied file.
If you have pages with modules placed just the way you like them, be careful about changing your skin.If you specify a skin that has a different pane layout than the one you are currently using, DotNetNukewon’t know where to put some of those modules and will put them in the ContentPane by default.Changing back to the old skin will not restore the original position because the damage will have alreadybeen done. If you’re experimenting with skins on a page with lots of content, make a copy of your exist-ing page first and experiment on that. Or just stick with the Preview option in the gallery.
91
Portal Administration

Figure 4-31
File ManagerFile management is an area that is radically improved in version 3.0. Prior to introduction of the FileManager, all files were maintained in a flat structure in the portal root directory, which could easilybecome unwieldy. Now files can be managed in subdirectories and those directories can be protectedthrough role-based permissions.
Figure 4-32 shows the basic features of the File Manager. Most operations are intuitive and the interfaceis pretty forgiving, providing feedback if you do something incorrectly. Group file and folder operationsrequire that you select either a group of files or a folder first.
Folder PermissionsIn Figure 4-32 you can see that there are multiple folders within the portal root. By default, only theAdministrator role has permission to either view or write files in all of these folders. So if you want yourGallery Administrator to be able to upload photos, you’ll want to grant that role appropriate permis-sions (see Figure 4-33).
These security settings are applied everywhere that the DotNetNuke file management controls are used.You’ve seen these controls in the Portal Administrators interface in a number of places, including thelogo file selector in the Site Wizard (shown previously in Figure 4-11). These same controls are used inmany modules (for example, the Documents module), which you will learn more about in Chapter 6.
92
Chapter 4

Figure 4-32
Figure 4-33
The Gallery Administrator will need permission to select files from the drop-down in order to add pic-tures to the gallery, and will also need to be able to write to the folder to upload new photos. So be sureto grant both View and Write permissions to the Gallery Maintenance role for the Photo folder.
Note that in Figure 4-34, both the Root and Photo folders are available to the file upload control. Accessto the portal root directory is provided by default to preserve functionality for users upgrading fromversion 2.x to version 3.0. It is recommended that upgraded sites review their file and folder manage-ment policies.
Figure 4-34
93
Portal Administration

Uploading FilesIf you click the Upload button in the File Manager, you’ll find yourself looking at the originalDotNetNuke file upload page. This upload control provides a lot of rich functionality and is used inmany places within DotNetNuke for uploading various component packages like modules, skins, lan-guage packs, and so on. Here you’re looking at the control in its plain vanilla state, waiting for you tospecify generic files to upload (see Figure 4-35).
Figure 4-35
The File Upload control includes a drop-down to specify the target directory and an Add button thatcaptures input from the basic file selector and includes it in a list of files to upload. This feature enablesyou to upload multiple files in one upload step.
The check box for Decompress ZIP Files allows you to upload a zipped file (preserving bandwidth) thatis unzipped for you into the target directory. Note in Figure 4-35 that an invalid file type was stoppedfrom unpacking in this upload. Both individual files and the content of zip files are matched against anallowable file types list, which is configurable by the Host.
Using FTP with File ManagerThe File Manager provides a convenient way to move files through the interface. However, for bulkoperations you may prefer to utilize FTP to transfer files (if permitted by your Host). If files are addedto your site through any means other than the file upload interface, you’ll need to click the SynchronizeDatabase And File System button. This command instructs DotNetNuke to iterate through the portalroot and resolve for any files and folders that may be added or missing. Your Host may have enabled ascheduled job to perform this synchronization for you on a periodic basis, but if you do it yourself you’llsee those files in your drop-down lists immediately.
94
Chapter 4

LanguagesLanguages and localization features are primarily controlled by the Host account; however, the PortalAdministrator does have limited control to override localization strings and to define the default lan-guage for your portal. These settings are specific to your portal and therefore no mechanism is providedto export or import these changes.
Changing Your Default LanguageRecall that you set the default language for your site earlier in this chapter. The default language is usedin cases where the user has not been authenticated, and therefore does not have a preferred language oftheir own. Also, the default language will be used as the default choice for the preferred language whena new user registers on the portal. The default language is controlled from the Site Settings page, asshown previously in Figure 4-18. Once users log on to the site (this includes the Portal Administratorand Host accounts as well), their preferred language will be used instead of the default language.
The Language EditorTo create custom localization strings for the portal, select Languages from the Admin menu. The CustomPortal Locale screen (see Figure 4-36) provides the ability for Administrators to customize resourcestrings for any of the installed locales.
Figure 4-36
The tree on the left-hand side of the screen allows you to easily navigate to any resource file. Eachresource file corresponds to the various controls or shared resources in the portal. The first time youattempt to edit a resource file, you are asked to verify that you want to create a custom resource file(see Figure 4-37). The resource file will be saved in the directory alongside the other resources.
Resource files are named using a standard pattern based on the associated file: [FileName].resx forEnglish resources, [FileName].[Culture].resx for non-English resources. When portal-specificresource files are created, the system prepends the .resx extension with Portal-[PortalID]. In the examplefrom Figure 4-37, the local portal copy of the English resource file would be namedSkinControl.ascx.Portal-0.resx. The German (Deutsch) version would be namedSkinControl.ascx.de-DE.Portal-0.resx.
When the portal-specific localized file is created, all resource strings are included. Once the portalresource file is created, any changes in the comparable host file are overridden by the portal file, even ifthe portal file strings were not changed. In Figure 4-38 the values for Host.Text, Preview.Text, andSite.Text are written to the resource file when the portal file is created.
95
Portal Administration

Figure 4-37
Each resource displays the Resource Name, Default Value, and Localized Value. The Resource Name cor-responds to the key used by the portal for looking up the localized value. The default System Locale forDotNetNuke is English (en-US). The English language resources are used for all default values.
Localized values correspond to the locale selected in the Available Locales drop-down list box. Localizedvalues can be edited directly using the associated textarea boxes. Once you have completed editing thelocalized values, click the Update link button to save your changes.
This works well for simple strings and allows you to edit multiple strings without requiring multiplepostbacks to the server. Long strings, or resource strings that contain HTML are more difficult to editusing the textarea boxes. To edit these resources, click the arrow button to the right of the textarea.
Figure 4-38
96
Chapter 4

Because the button will cause a postback to the server, and we are not yet ready to save changes for theassociated localized value, you may lose any data that has been changed but not updated. To prevent dataloss, DotNetNuke will display a dialog (see Figure 4-39) asking you to confirm that you want to proceed.
Figure 4-39
Click Cancel to return to the main editing screen in order to save any pending changes. Click OK to pro-ceed to the Language Editor screen (see Figure 4-40).
Figure 4-40
97
Portal Administration

The Language Editor uses the HtmlEditorProvider defined in the web.config file. The editor providesadvanced text and HTML editing functionality. (See Chapter 8 for more information about using theHTML Editor.) Once you have completed making changes to the resource string, select Update to saveyour changes and return to the Custom Portal Locale screen, or select Cancel to discard your changesand return.
Customizing Your E-mail TemplatesMost Portal Administrators will choose to keep almost all of the default resource strings for their website. However, you should at least review the standard system messages used for generating e-mails toyour web site users. Previous versions of DotNetNuke provided a central location for managing thee-mail templates used by the system. In DotNetNuke 3.0, these templates were incorporated into theresource files so that they could be localized like other static elements of the portal.
Because static e-mail templates would not be very useful, DotNetNuke supports the use of specialtokens, which will be replaced at runtime with the specified property value. DotNetNuke currently rec-ognizes six different tokens (see Table 4-11) that follow the pattern [TokenName:Property]. Valid proper-ties for each of these tokens are defined in Appendix C.
Table 4-11: E-mail Template Tokens
Token Name Description
Host The Host token provides access to a limited set of HostSettings properties.
Portal The Portal token provides access to the PortalSettings properties. Thistoken also supports the URL property that corresponds to the HTTP Aliasfor the current portal.
User The User token provides access to UserInfo properties. This token also sup-ports the VerificationCode property, which is dynamically generated basedon the Portal ID and User ID in the form [PortalID]-[UserID]. The usertoken is not valid for all templates.
Membership The Membership token provides access to UserMembership properties.This information is specific to the currently selected user. The Membershiptoken can only be used for templates that also support the User token.
Profile The Profile token provides access to the UserProfile properties. This infor-mation is specific to the currently selected user. The Profile token can onlybe used for templates that also support the User token.
Custom The Custom token is used when arbitrary data needs to be included in thetemplate. The data is passed as an ArrayList and is specific to each e-mailtemplate. Not all templates support the use of custom values.
Table 4-12 describes each of the e-mail templates supported by the core portal. These templates can all befound in the global resources file (\App_GlobalResources\GlobalResources.resx).
98
Chapter 4

Table 4-12: Site-Generated E-mail Templates
Resource User Token Custom Token
EMAIL_USER_REGISTRATION_PUBLIC_SUBJECT Yes NoneEMAIL_USER_REGISTRATION_PUBLIC_BODY
Sent to users when they register on a site that is not set to Private Registration. This e-mail is also sent when a registration is manually authorized.
EMAIL_USER_UNREGISTER_SUBJECT Yes NoneEMAIL_USER_UNREGISTER_BODY
Sent to the Portal Administrator when a user is unregis-tered whether by user self-service or through deletion.
EMAIL_SMTP_TEST_SUBJECT No None
Sent to the Host when testing SMTP configuration.
EMAIL_PORTAL_SIGNUP_SUBJECT Yes NoneEMAIL_PORTAL_SIGNUP_BODY
Sent to the new Portal Administrator whenever a portal iscreated, whether by the Host or by a user when they sign up for a portal as a free trial (Host option).
EMAIL_USER_REGISTRATION_PRIVATE_SUBJECT Yes NoneEMAIL_USER_REGISTRATION_PRIVATE_BODY
Sent to the user at the time of registration, only on sites where Private Registration is set. This is the e-mail that should explain your approval policy.
EMAIL_USER_REGISTRATION_ADMINISTRATOR_SUBJECT Yes NoneEMAIL_USER_REGISTRATION_ADMINISTRATOR_BODY
Sent to the Portal Administrator on every registration.
EMAIL_PASSWORD_REMINDER_SUBJECT Yes NoneEMAIL_PASSWORD_REMINDER_BODY
Sent to the user when a reminder is requested.
EMAIL_ROLE_ASSIGNMENT_SUBJECT Yes NoneEMAIL_ROLE_ASSIGNMENT_BODY Yes 0: RoleName
1: Description
Sent to the user when a role is assigned by the Administrator and the Send Notification option is checked.
EMAIL_ROLE_UNASSIGNMENT_SUBJECT Yes None
EMAIL_ROLE_UNASSIGNMENT_BODY Yes 0: RoleName1: Description
Sent to the user when a role is removed by the Administrator and the Send Notification option is checked.
Table continued on following page
99
Portal Administration

100
Chapter 4
EMAIL_AFFILIATE_NOTIFICATION_SUBJECT No None
EMAIL_AFFILIATE_NOTIFICATION_BODY No 0: VendorName1: AffiliateID
Sent to the affiliate when the Send Notification button is clicked on the Edit Vendor page.
The Privacy Statement and Terms of UseLike e-mail templates, the Terms of Use and Privacy Statement resources are also another set of resourcesthat you are likely to need to customize (see Table 4-13). Because these two resources are generic to theentire web site, the User, Membership, Profile, and Custom tokens are not usable. Links to the terms andprivacy statement are included in the default skins (see Figure 4-19).
Table 4-13: Terms of Use and Privacy Statement Resources
Resource User Token Custom Token
MESSAGE_PORTAL_TERMS No None
MESSAGE_PORTAL_PRIVACY No None
Maintaining Your PortalOnce you have your portal set up and working just the way you want it, you’ll start finding good rea-sons to enhance or change things. You’ll delegate maintenance work to others; you’ll pick up some siteadvertising or want to track affiliate referrals; you’ll want to communicate with your registered users;you’ll want to recover work that you’ve previously discarded; and you’ll want to know what kind oftraffic your site is getting.
You’ve already experienced a very feature-rich environment for configuration of your portal’s look, feel,and function. DotNetNuke provides an equally rich suite of tools for maintenance tasks as well.
User AccountsFigure 4-18 introduced you to the User Details page, which provides for user self-management. ThePortal Administrator is also able to manage users from the User Accounts page on the Admin menu.Figure 4-41 shows the list of users as seen on the User Accounts page.
The page supports several methods of finding a user, which is helpful when your number of registeredusers becomes large. Clicking a letter filters the list by username, displaying a maximum of the numberof records specified in the drop-down in the upper-right corner of the page. Standard buttons willappear for First, Previous, Next, and Last if there are enough users in the list to require paging. If youneed to find a specific user, the search box can accept either a username or an e-mail address.

Figure 4-41
Depending on the type of Portal Registration Options you selected (see Table 4-4), you may have partic-ular interest in finding unauthorized users. Private registration requires the Portal Administrator tomanually approve users so the button to list them, the check box to indicate them, and the button todelete them are handy features. Once you’ve listed the unauthorized users and approved the ones you’dlike to permit access, you can click Delete Unauthorized Users to remove the remaining registrationsyou’ve deemed inappropriate for your site.
When you click the pencil icon next to a user’s name you’ll find yourself on the Edit User Accounts page(see Figure 4-42). This page is similar to the User Account page in Figure 4-16, but it differs in a couple ofkey ways. There is a check box to flag the user as Approved or not and the Membership Services controlis missing in favor of a link button to Manage Roles for This User.
In previous versions of DotNetNuke it was possible to change the name of a user, but this feature is notpresent in version 3.0. The default Membership Provider used by DotNetNuke incorporates anASP.NET 2.0 component (MemberRole) with lots of sophisticated security features. One of the securitytenets of this component prohibits changing of a user’s identity once it is set.
In support of the Private Registration option, checking Authorized causes an e-mail to be sent to usersproviding them with their login credentials and a welcome message.
The Preferred Language and Time Zone settings work exactly as they do for the Site Settings (see Table 4-6).These settings will override the default site settings when the user is logged in.
Managing Security RolesEarlier in this chapter you were introduced to managing security roles within the context of the list ofroles (see Figure 4-26). When approaching this task from the list of users, the Manage Roles For ThisUser button brings you to a similar page (see Figure 4-43).
101
Portal Administration

Figure 4-42
Figure 4-43
You can assign a role to your user along with an expiration date (if desired), or remove existing roles.You can also choose whether or not you’d like the user to receive e-mail notification of the change.
102
Chapter 4

VendorsAt some point, you may want to develop partnerships with others in promoting your web site and/orcomplimentary products and services. DotNetNuke provides a number of built-in features to get youstarted in developing these relationships.
The Vendor management features provide a lot of basic functionality, but for enterprising developersthere is also a lot of room to build on this foundation to provide additional services.
Creating a New VendorOpen the Vendor List page by selecting Vendors from the Admin menu (see Figure 4-44). You can selectAdd New Vendor from the bottom of the page or from the action menu.
On the Edit Vendors page (not pictured), you’ll add basic contact information for the vendor as youwould for any user. You’ll also have the option to specify a vendor’s web site, logo, key search words,and classification.
At the time of this writing, most of these optional fields are unused. However, they are reserved forfuture use as DotNetNuke architecture/services continue to develop in this area.
Figure 4-44
Banner AdvertisingOnce a vendor has been added, you can create banners for them that can be displayed on your site.Navigate to the Edit Vendor page for your vendor, expand the Banner Advertising section, and clickAdd New Banner. Table 4-14 explains the settings.
Table 4-14: Edit Banner Settings
Banner Name This value identifies the banner in lists, but it is also used as the ALT textfor graphic banners and as hyperlinked text on text banners.
Banner Type Of the available banner types, only two really impact how the banner fieldsare used. When you place banners on your site with the Banner module,you’ll select which type of banner it should display. Choosing Banner,MicroButton, Button, Block, and Skyscraper just provides logical groupings
Table continued on following page
103
Portal Administration
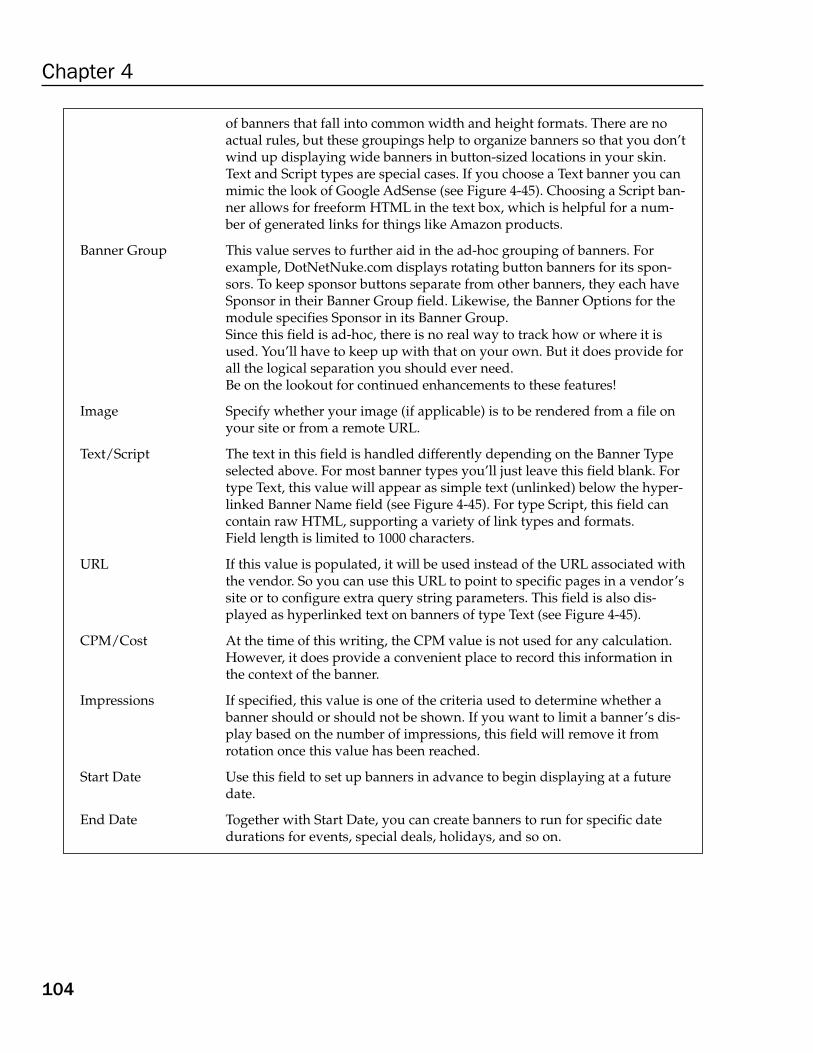
of banners that fall into common width and height formats. There are noactual rules, but these groupings help to organize banners so that you don’twind up displaying wide banners in button-sized locations in your skin. Text and Script types are special cases. If you choose a Text banner you canmimic the look of Google AdSense (see Figure 4-45). Choosing a Script ban-ner allows for freeform HTML in the text box, which is helpful for a num-ber of generated links for things like Amazon products.
Banner Group This value serves to further aid in the ad-hoc grouping of banners. Forexample, DotNetNuke.com displays rotating button banners for its spon-sors. To keep sponsor buttons separate from other banners, they each haveSponsor in their Banner Group field. Likewise, the Banner Options for themodule specifies Sponsor in its Banner Group. Since this field is ad-hoc, there is no real way to track how or where it isused. You’ll have to keep up with that on your own. But it does provide forall the logical separation you should ever need. Be on the lookout for continued enhancements to these features!
Image Specify whether your image (if applicable) is to be rendered from a file onyour site or from a remote URL.
Text/Script The text in this field is handled differently depending on the Banner Typeselected above. For most banner types you’ll just leave this field blank. Fortype Text, this value will appear as simple text (unlinked) below the hyper-linked Banner Name field (see Figure 4-45). For type Script, this field cancontain raw HTML, supporting a variety of link types and formats. Field length is limited to 1000 characters.
URL If this value is populated, it will be used instead of the URL associated withthe vendor. So you can use this URL to point to specific pages in a vendor’ssite or to configure extra query string parameters. This field is also dis-played as hyperlinked text on banners of type Text (see Figure 4-45).
CPM/Cost At the time of this writing, the CPM value is not used for any calculation.However, it does provide a convenient place to record this information inthe context of the banner.
Impressions If specified, this value is one of the criteria used to determine whether abanner should or should not be shown. If you want to limit a banner’s dis-play based on the number of impressions, this field will remove it fromrotation once this value has been reached.
Start Date Use this field to set up banners in advance to begin displaying at a futuredate.
End Date Together with Start Date, you can create banners to run for specific datedurations for events, special deals, holidays, and so on.
104
Chapter 4

Criteria This choice specifies how the Impressions and Date constraints should beenforced. If enforced independently of one another (OR), a banner willcease to display outside of its date constraint or even within its date con-straint if the number of impressions has been reached. If enforced jointly(AND), all criteria must be true for the banner to cease display. The AND option helps to address a lack of throttling control. On a busy sitewith few banners in rotation, a given number of impressions can bechewed up very quickly and so displayed over only a brief time period. Byjointly evaluating the criteria, a more equitable rotation is achieved by pro-viding for additional banner impressions during the time period.
Figure 4-45
You can advise vendors of the status a banner by clicking the Email Status to Vendor button at the bot-tom of the Edit Banner page. This sends an e-mail to the address specified in the Vendor details, whichrelays the banner field information (text, costs, and constraints) and performance (view and click-through counts).
Vendors as AffiliatesJust as your site links to vendors through the use of banners, your vendors may also link to you. If youwould like to be able to track your vendors’ click-through performance to your site, you can click AddNew Affiliate. Define a tracking period and associated cost per click (CPC) and cost per acquisition(CPA) and e-mail the vendor their link information by clicking Send Notification (see Figure 4-46).
Figure 4-46
105
Portal Administration

The CPC information for affiliate referrals will be summarized in the Edit Vendor list, just as click-through is for banners. However the CPA information is currently unused. You can specify multipleaffiliate relationships under a single vendor to provide for tracking during discrete time periods.
At the time of this writing, it is possible to create affiliate referrals with overlapping date ranges. Thiswill produce double counts of vendor performance during the period of overlap. So be sure to end oneaffiliate period before starting another.
NewslettersPeriodically, you’ll want to communicate with your users. The Newsletter page provides a very conve-nient way for you to do this by allowing you to send e-mail to users in specified roles (see Figure 4-47).Remember when you set up the Newsletter Subscribers role? Here’s where you put that to use.
Figure 4-47
Just select the role(s) that you want to be included in the distribution. If a user belongs to more than onerole, they’ll still only get one e-mail. You can also specify additional recipients separated by semicolonsin the Email List field. And you can format your e-mail as either text or HTML.
Figure 4-48 displays the advanced e-mail options, which include sending a file attachment and choosingthe priority setting. The Send Method option allows you to specify whether or not your e-mail is person-alized. Choosing the BCC method sends just one e-mail, which will be delivered to all users. Choosingthe TO method causes your e-mail to be personalized (for example, Dear John Doe).
Using the TO method seems much more personal, but it comes at a cost. First, the processing requiredto create a separate e-mail for each user could be significant (with large user volume). Second, it signifi-cantly increases your bandwidth utilization. The bandwidth associated with the BCC method is mini-mal — just one e-mail. However, the bandwidth associated with the TO version is the product of thesize of the e-mail and the number of users.
You can also choose whether the sending of e-mail is processed synchronously or asynchronously. If youhave a large list of users, asynchronously probably makes the most sense. In either case, a summary e-mailis sent to the Portal Administrator reporting on the number of recipients, number of pieces of e-mail actu-ally sent (1 or n), and the start/stop times for processing the job. DotNetNuke batches e-mail addressesinto groups in the background so you’ll never actually be trying to send an e-mail with thousands of BCCrecipients.
106
Chapter 4

Figure 4-48
Site LogThe Site Log displays text-based reports only, as shown in Figure 4-49.
Figure 4-49
Table 4-15 identifies the available report types.
Table 4-15: Site Log Report Types
Affiliate Referrals Track referrals from vendors who are defined as affiliates. By using theiraffiliate ID numbers in links to your site, you’ll be able to capture how pro-ductive those affiliate links are.
Detailed Site Log This detailed log of site activity includes all users and displays date andtime, user name, referrer, user agent, user host address, and page name.
Table continued on following page
107
Portal Administration

Page Popularity Display the total number of visits to the pages on your site in the periodspecified. Date and time of the last page visit is included.
Page Views By This series of reports provides a summary of the number of visitors(anonymous) and users (logged in) that accessed your site in the intervalsspecified (Day, Day of Week, Hour, Month).
Site Referrals Summary list of web pages (including search engines) that users haveclicked on to lead them to your site.
User Details This series of reports provides a summary of the number of page visitsrecorded according to the characteristic specified (Agents, Frequency, Regis-trations by Country, and Registrations by Date). The Report by Frequency canbe interesting — it identifies your most frequent visitors in any given period.
Logging occurs at the discretion of the Host, who has a number of options for how it is configured. If theHost chooses to generate text-based log files (like IIS logs), these reports will become obsolete becausethey work only with database logging information (at this time). See Chapter 5 for more information onHost settings that control logging.
Recycle BinHave you ever deleted a file on your computer only to experience a panic moment? Portal Administratorsmight feel that too once in a while, which is why DotNetNuke has a Recycle Bin feature (see Figure 4-50).
Figure 4-50
The act of deleting a page or module doesn’t really delete anything; it merely sets a flag that DotNetNukeunderstands internally as deleted and so ignores it in the general interface. Items that have this flag setcan be found (and restored from) the Recycle Bin.
Developers can see this implementation by looking at the database fields Tab.IsDeleted andModules.IsDeleted.
108
Chapter 4

Recycling PagesYou can select single or multiple pages to restore or delete. However, when doing either you must followthe hierarchy of the pages in order for it to work. If you think about this, it makes perfect sense, but it isnot obvious. In the example in Figure 4-50 the Team Info page was the parent to the others (in the menustructure). If you attempt to restore the Game Schedule page first it would have nowhere to go, so youwould receive a warning like that shown in Figure 4-51.
Figure 4-51
Likewise, if you try to permanently delete the top-level page (Team Info) before deleting the child pages,you would receive a warning like the one in Figure 4-52.
Figure 4-52
You’ll note that when a page is deleted its modules do not appear listed individually in the Recycle Bin.That’s because a page is considered to include all of its content (which is restored along with it).
Recycling ModulesWhen modules are deleted, they lose their association to a specific page. So when they are restored youmust select a target page for them to appear on.
Currently, a restored module will have the same view and edit permissions that it did originally.However, this may not be what you have in mind if you are restoring a module that has been in theRecycle Bin for a while. In fact, since there is no convenient way to look at a module that is in the bin,you might be just restoring one to see what it was! The best way to do this is to restore modules to apage that is not visible to your users (a staging page). Then you can check it out for yourself and changewhatever settings are necessary before moving it to its final (visible) home.
Modules are always restored to the ContentPane on the target page (shown previously in Figure 4-12).Because a skin designer can create virtually any number of panes in a skin, DotNetNuke can only relyon the existence of this one required pane. This is one more reason why it’s a good practice to restoremodules to a staging page before relocating them.
Cleaning UpAs you might have gathered, it’s possible to accumulate quite a bit of junk in the Recycle Bin if you doa lot of creating and deleting of pages/modules. It’s a good idea to do a little housecleaning here everyonce in a while so that when you really need it, the Recycle Bin is easier to navigate.
Log ViewerThe Log Viewer gives a Portal Administrator the ability to monitor a variety of events and associated detailsincluding (but not limited to) exceptions. Out of the box, DotNetNuke is configured to log exceptions only;however, any of the (approximately) 48 defined events can be logged at the discretion of the Host.
109
Portal Administration

A single set of logs is implemented as a group of XML files that are located in the default portal rootdirectory. Records from these files are filtered to display only those generated by your portal. The PortalAdministrator can filter the list by event type, limit the size of the list displayed, and even e-mail listcontents to a specified recipient if assistance is needed (as shown in Figure 4-53).
When sending log entries, the body of the e-mail message is populated with the XML text exactly as itappears in the log files.
Figure 4-53
To view the full set of default logs, take a look at the following files:
\Portals\_default\Logs\Application.xml.resources\Portals\_default\Logs\Exception.xml.resources\Portals\_default\Logs\Scheduler.xml.resources\Portals\_default\Logs\Log.xml.resources
For an in-depth review of logging, see Chapter 8.
110
Chapter 4
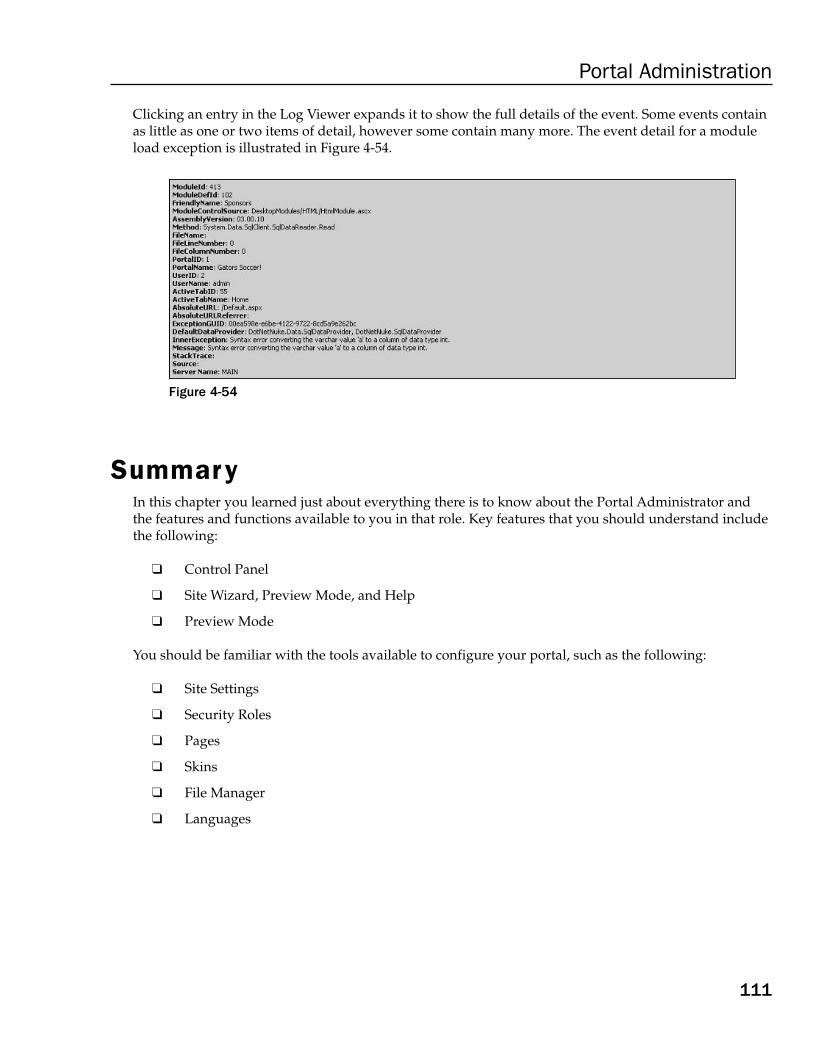
Clicking an entry in the Log Viewer expands it to show the full details of the event. Some events containas little as one or two items of detail, however some contain many more. The event detail for a moduleload exception is illustrated in Figure 4-54.
Figure 4-54
SummaryIn this chapter you learned just about everything there is to know about the Portal Administrator andthe features and functions available to you in that role. Key features that you should understand includethe following:
❑ Control Panel
❑ Site Wizard, Preview Mode, and Help
❑ Preview Mode
You should be familiar with the tools available to configure your portal, such as the following:
❑ Site Settings
❑ Security Roles
❑ Pages
❑ Skins
❑ File Manager
❑ Languages
111
Portal Administration

And the tools available to maintain your portal over time:
❑ User Accounts
❑ Vendors
❑ Newsletters
❑ Site Log
❑ Recycle Bin
You should have some understanding of how to do things, and when and why to do them as well.
112
Chapter 4

Host Administration
In Chapter 4 you learned just about everything there is to know about administering a DotNetNukeportal. In this chapter you learn everything there is to know about administering a collection of por-tals, their environment, and runtime features.
As the Host you function essentially as the “creator” of the DotNetNuke universe in which theportals exist. While a lofty sounding role, it is an accurate description because the Host has abso-lute sway over what portals within their installation can and cannot do. Where each PortalAdministrator is subject to the “laws of nature” established by the Host, the Host has completeauthority to change those laws at will. Some of those laws apply to all portals in the installationuniversally, but others will apply discretely to individual portals.
Understanding the Host role is very important. While the Portal Administrators consider theirportal to be alone in its own corner of the cyber-universe, the Host knows otherwise. Host optionsprovide for differentiation between one installation of DotNetNuke and another. Configurationchoices made by the Host can affect function and performance of all portals and must therefore bemade wisely and with deliberate intent.
Upon completion of this chapter, you’ll know everything you need to know as a Host to effectivelyconfigure and manage an installation of DotNetNuke.
Who Is the Host?Continuing with the Host as “creator” analogy could get you in trouble in some circles (not tomention with your editor!). Since DotNetNuke is an “equal opportunity application,” we’ll findanother way to describe the Host that is less prone to cause this particular brand of excitement.DotNetNuke generates plenty of excitement in business and technology circles and we’re quitecontent with that.

To clearly identify the Host requires us to first review a defining characteristic of DotNetNuke. You’llrecall from Chapter 3 that DotNetNuke is defined as supporting “multiple web sites from the samecodebase.” With one installation of DotNetNuke you can create as many unique portals as you like, eachwith its own URL(s), identity, features, users, data, and so on. You learned in Chapter 4 that each portalhas its own administrator, but this begs the question, “Who administers the creation of portals?” So thisis how the scope of the role first comes into focus. The Host is the user who creates portals. But the Hostdoes a lot more too. So much more that we’ve devoted an entire chapter to the role.
Prior to version 3.0, the Host was alone in his sovereignty, carrying all the responsibility that went alongwith being the only user in that role; big title, big job. There was only one Host account and that was it.Version 3.0 introduces the role of “SuperUser,” so now instead of being forced to play deity a Host canopen ranks to allow for a more “Justice League” approach to configuration and maintenance. AllSuperUsers have “super powers” in the DotNetNuke universe.
So the first thing you’ve learned is that “Host” is already a legacy term in version 3.0, carried forwardfrom previous generations of DotNetNuke. Understanding this, you can now feel free to interchange theterms Host and SuperUser anywhere that you see them — in all but one case. The default installation ofDotNetNuke has one SuperUser account preinstalled whose username actually is “host.”
Where Do I Begin?If you’re going to master a universe, you’ll have to manifest your superpowers and take some cues fromthe most famous “in the beginning” of all! Breathe some life into a new user, or, in keeping with the“Justice League” theme, be a hero and get a “sidekick.”
The very first thing you’ll want to do is to create another SuperUser account. Once that is done, you’llretire the default host account. It’s a prudent security measure in any software installation to retiredefault administrative accounts to thwart dubious hacking efforts. At a minimum, you’ll want to changethe password for the default host account, although you can also delete it entirely.
In version 3.0, DotNetNuke utilizes a version of Microsoft’s ASP.NET 2.0 MemberRole component inthe default Membership Provider. One of the many distinct features of this component is the implemen-tation of user lockout. After a specified number of invalid password attempts a user account will beunable to log in. Although DotNetNuke resets the password lockout after 10 minutes, the nuisance canbe avoided entirely by using a different account and username.
Log in by using your new SuperUser account username and password. You’ll notice that you have thesame view as the Portal Administrator (see Figure 4-2 in Chapter 4) with one small exception: you alsohave an additional top-level menu “Host” as shown in Figure 5-1. You’ll be getting into all the detailsof all these options in this chapter, but right now just concern yourself with the SuperUsers Accountsmenu item.
114
Chapter 5

Figure 5-1
SuperUsers AccountsWhen you navigate to the SuperUsers Accounts page you’ll see a familiar view. The SuperUsersAccounts page (see Figure 5-2) is literally the same control that is used for managing other users’accounts and works in the same way, so if you need a refresher on how this works, consult Chapter 4.
Figure 5-2
To some extent the sorting, searching, and paging functions are unnecessary because you’re not likely tohave more than a couple of SuperUsers, but it does keep the interface consistent and familiar.
115
Host Administration

Configuring Your InstallationAs you’re about to see, the Host has a lot of options and tools for configuring the environment in whichportals live. As you learned in Chapter 4 in the context of the Portal Administrator, some capability isspecifically appropriate for initial configuration, some for routine operations, and some for ongoingmaintenance, reporting, and issue resolution. As we move through each of the Host Settings, we’ll con-sider how they apply to those needs.
Host SettingsHost Settings is broken down into two different categories for the sake of organization. The BasicSettings and Advanced Settings categories each consist of a number of option groups.
As with Site Settings, there is an important text button at the very bottom of the Host Settings page.Despite the fact that a number of controls on the Host Settings page generate postbacks, no changes aresaved until the Update button gets clicked.
There is also a final control at the bottom of the Host Settings page that falls outside of any option group,the Upgrade Log For Version selector and Go button. By choosing a particular version and clicking Go,you can view a log file for that version (if one exists) that contains any errors or warnings recorded dur-ing the install/upgrade process. The log files are created in the folder of the Data Provider, so in thedefault install of DotNetNuke those files are located in
\Providers\DataProviders\SqlDataProvider\*.log
Basic Settings: Site ConfigurationTable 5-1 describes each of the read-only fields displayed in the Site Configuration group under BasicSettings. This group is particularly helpful in identifying the context under which your installation ofDotNetNuke is running. If you are communicating with an ISP or hosting company, these details may bevery helpful in diagnosing any issue you might be investigating.
Table 5-1: Basic Settings, Site Configuration
DotNetNuke Version Indicates what version of DotNetNuke is currently running. Untilversion 3.0, the only way to verify the running version was tocheck a database value or to enable an option to display the ver-sion in the browser’s title bar (see Show Copyright Credits inTable 5-3). The format of a DotNetNuke version number is[Major Version].[Minor Version].[Package Version].Major and minor versions combine to identify which functional ver-sion of DotNetNuke you are using (for example, 3.0). The PackageVersion indicates a particular package that may be an alpha or betatesting release, a public release, a security patch release, and so on.
Data Provider Identifies which Data Provider DotNetNuke is currently using.
116
Chapter 5
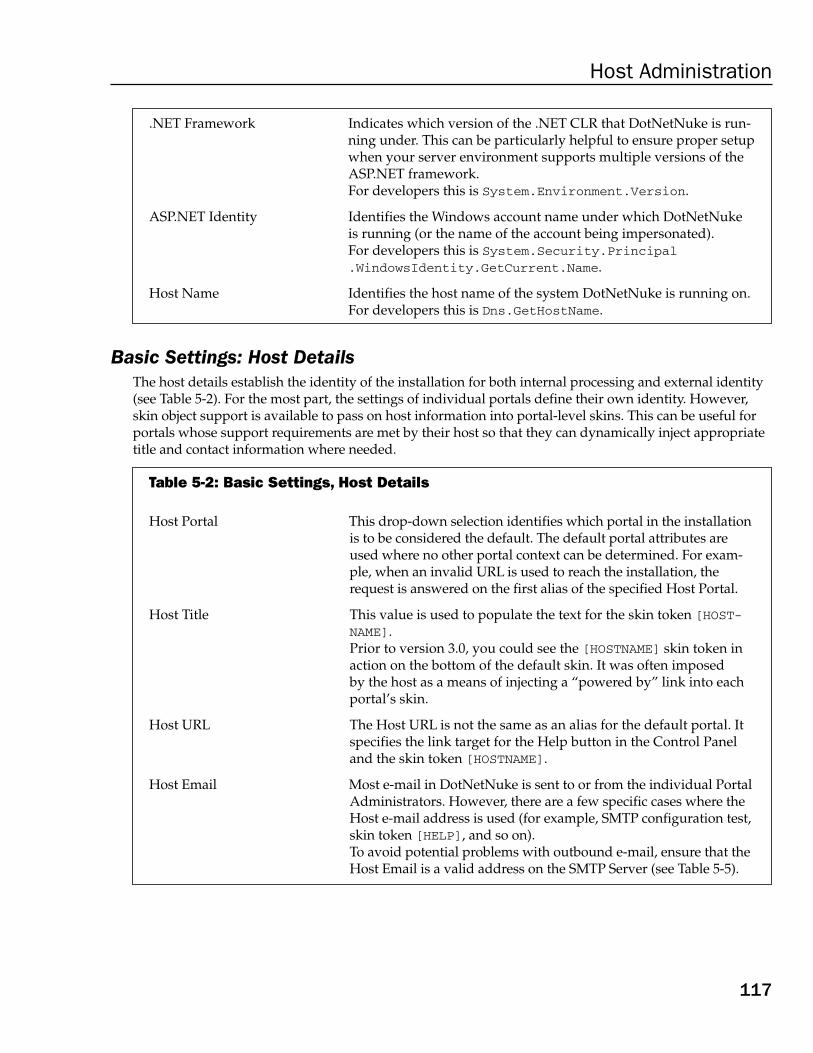
.NET Framework Indicates which version of the .NET CLR that DotNetNuke is run-ning under. This can be particularly helpful to ensure proper setupwhen your server environment supports multiple versions of theASP.NET framework.For developers this is System.Environment.Version.
ASP.NET Identity Identifies the Windows account name under which DotNetNukeis running (or the name of the account being impersonated).For developers this is System.Security.Principal.WindowsIdentity.GetCurrent.Name.
Host Name Identifies the host name of the system DotNetNuke is running on.For developers this is Dns.GetHostName.
Basic Settings: Host DetailsThe host details establish the identity of the installation for both internal processing and external identity(see Table 5-2). For the most part, the settings of individual portals define their own identity. However,skin object support is available to pass on host information into portal-level skins. This can be useful forportals whose support requirements are met by their host so that they can dynamically inject appropriatetitle and contact information where needed.
Table 5-2: Basic Settings, Host Details
Host Portal This drop-down selection identifies which portal in the installationis to be considered the default. The default portal attributes areused where no other portal context can be determined. For exam-ple, when an invalid URL is used to reach the installation, therequest is answered on the first alias of the specified Host Portal.
Host Title This value is used to populate the text for the skin token [HOST-NAME].Prior to version 3.0, you could see the [HOSTNAME] skin token inaction on the bottom of the default skin. It was often imposedby the host as a means of injecting a “powered by” link into eachportal’s skin.
Host URL The Host URL is not the same as an alias for the default portal. Itspecifies the link target for the Help button in the Control Paneland the skin token [HOSTNAME].
Host Email Most e-mail in DotNetNuke is sent to or from the individual PortalAdministrators. However, there are a few specific cases where theHost e-mail address is used (for example, SMTP configuration test,skin token [HELP], and so on).To avoid potential problems with outbound e-mail, ensure that theHost Email is a valid address on the SMTP Server (see Table 5-5).
117
Host Administration

Basic Settings: AppearanceIn Chapter 4 you learned about a number of optional settings for default portal appearance. If thosechoices are left unmade, these host default choices are applied. Additionally, the host has a couple ofother configuration options that will affect the appearance of portals in this installation. Table 5-3 sum-marizes the effects of each choice.
Table 5-3: Basic Settings, Appearance
Show Copyright Credits If checked, this setting inserts the DotNetNuke version numberinto the browser’s title bar and populates the [DOTNETNUKE]skin object. In the default skin this is displayed as a small thinbar across the bottom of the page that displays the DotNetNukecopyright (see bottom of Figure 5-3).
Use Custom Error Messages This setting specifies whether DotNetNuke will intercept mod-ule errors or whether ASP.NET will intercept them. If this optionis selected, DotNetNuke will display only basic friendly mes-sages to non-Admin users. However, if the user encounteringthe error is an Admin (or Host) user, full error information ismade available. Figures 5-4 and 5-5 illustrate the differencebetween the same error messages presented to Users andAdministrators/SuperUsers, respectively. Detailed informationis also retained in the error log.
Host Skin If a skin is not specified in the portal Site Settings, this skin willbe used as the default for each page where a skin is not explicitlyspecified in Page Settings.The Host Skin, Host Container, Admin Skin, and Admin Con-tainer settings work exactly like their counterparts in the PortalAdministrators Site Settings. For more detail, please see Chapter 4.
Host Container If a container is not specified in the portal Site Settings, this con-tainer will be used as the default for each module where a con-tainer is not explicitly specified in Module Settings.
Admin Skin If a skin is not specified in the portal Site Settings, this skin willbe used as the default for admin pages.
Admin Container If a container is not specified in the portal Site Settings, this con-tainer will be used as the default for modules on every adminpage.
Upload Skin Uploading a skin from the Host Settings will load it into theHost’s default folder, which will make it available to all portals.This is in contrast to uploading from Site Settings, where it willload into the Portal Root folder. Skins uploaded from here arelocated in \Portals\_default\Skins.
Upload Container Uploading a container from the Host Settings will load it into theHost’s default folder, which will make it available to all portals.This is in contrast to uploading from Site Settings, where it willload into the Portal Root folder. Containers uploaded from hereare located in \Portals\_default\Containers.
118
Chapter 5

The Show Copyrights setting can be helpful in a development environment for quick reference to therunning version (see Figure 5-3). However, in a production environment it can pose a risk of exposure toanyone trolling specifically to locate DotNetNuke web sites. A simple Google search of the copyrightstatement or “DNN” in the title bar will yield results for sites that have not disabled this option.
Figure 5-3
ASP.NET error messages can be helpful and informative for developers, but the familiar “yellow screenof death” doesn’t do much for the confidence of users and clients. DotNetNuke’s Custom ErrorMessages option intercepts errors and encapsulates them within either the offending module’s containeror, in the case of a non-module error, injects them into the top of the ContentPane (see Figure 5-4).
Figure 5-4
Because the error information is confusing for users but valuable for support personnel, DotNetNukedisplays different error information based on the current user (see Figure 5-5). If the current user is anAdministrator or SuperUser, full detailed information is provided. Other users are spared the gorydetails and presented with a friendlier message.
Figure 5-5
Basic Settings: Payment SettingsYou learned in Chapter 4 that many of these Payment Settings have been preserved from earlier versionsof DotNetNuke for legacy support purposes. For the Host, these settings only come into play as defaultsfor new portal creation or for portal subscription renewal. These Payment Settings will ultimately bedeprecated in a future version in favor of more robust eCommerce APIs (see Table 5-4).
119
Host Administration

Table 5-4: Basic Settings, Payment Settings
Hosting Fee Hosting Fee represents a default monthly charge associated with host-ing a portal. This value is displayed on the Host’s list of portals and isapplied to new portals at the time of their creation. The value can alsobe specified within a portal template, which would override thisdefault value. If subscription renewal is activated, this fee will be usedfor the monthly renewal rate.
Hosting Currency Default host currency is used in conjunction with the specified Pay-ment Processor (for example, as a required parameter for PayPal pro-cessing). This value is applied to new portals at the time of theircreation but can also be overridden within a portal template.
Hosting Space (MB) This value specifies a default disk space limit for new portals. As withmany other portal values, this value can be overridden in a portaltemplate. The value is an enforced limit that is displayed at the base ofthe File Manager in the Portal Administrators view (see bottom of Figure 5-32).As Host, you can change this value in the Site Settings for a specificportal.
Demo Period (Days) If Anonymous Demo Signup is enabled, the Expiry Date for a newportal is set this many days into the future.As Host, you can change this value in the Site Settings for a specific portal.
Anonymous Demo If disabled, only the Host Administrator is able to create a new portal. Signup However, if enabled, this feature allows anonymous users to sign up
and immediately log in as Portal Administrator to their own child portal. You’ll have to create your own link somewhere to reach thesignup page, but you can copy it from your browser’s address barafter clicking Add New Portal on the Portals page. It should have aform like the following:http://soccer.dotnetnuke.com/Default.aspx?ctl=Signup&mid=321This page is not illustrated specifically, but it uses the same control asregular portal signup, which is illustrated in Figure 5-12.This legacy feature of DotNetNuke was originally provided to show-case the ability of DotNetNuke to host private portals for potentialclients. Although this feature is still supported in version 3.0, it is notwithout its share of legacy issues.Demo signup is enabled throughout the installation, not just on theHost Portal. So a clever anonymous user who locates a DotNetNukesite might try the demo portal signup. The Portal Root ensures fileseparation and the host File Upload Extensions protects from unsafefiles, but a malicious user who finds your site could use you as ananonymous download location for the duration of the demo period(or until you caught them). Further, since the user chooses the child
120
Chapter 5

portal name, you could wind up with unpleasantly named folderpaths indexed by search engines that you would rather not have.Since demo signup creates the user as Portal Administrator, a valide-mail address is not even required.Use of this legacy feature is highly discouraged.
The Hosting Space option is included with the Payment Settings because it is recognized as a factor thatcommands premium pricing from a web host, and therefore generally also from a VAR (value addedreseller). If a file upload is attempted that causes the hosting space to be exceeded, an error message isdisplayed (see Figure 5-6).
Figure 5-6
Enforcing the file upload limit protects you from rampant file uploading by well-meaning clients thatdon’t understand the value of limited disk space. It provides the ability to proactively allocate youravailable disk space among clients as well as an opportunity to assess charge-back for additional usage.
File upload capabilities through an HTML Provider may be disabled. Unless the control maker has madeit possible to intercept and filter file upload requests, DotNetNuke cannot ensure integrity of the portalfiles based on hosting space, allowable file extensions, or directory security. By default, all file uploadsshould be performed through the File Manager.
Advanced Settings: Proxy SettingsIn general, DotNetNuke should not require specific Proxy Settings. However, some modules mayaddress additional ports for which Proxy Settings are required in your environment (for example, RSS,FTP, NNTP, and so on). Standard settings are configurable for the Proxy Server Name, Port, UserID,Password, and Timeout duration.
Check with your network administrator about appropriate values for these settings in your location.
121
Host Administration

Advanced Settings: SMTP Server SettingsOutbound e-mail requires that a valid SMTP server is specified. Table 5-5 explains the SMTP ServerSettings in more detail.
Table 5-5: Advanced Settings, SMTP Server Settings
SMTP Server This value must resolve to a valid SMTP server. You can specifythe server by computer name (for example, MYSERVER or Localhost), IP address (for example, 127.0.0.1) or URL (for exam-ple, smtpauth.earthelink.net).
SMTP Authentication Unless your SMTP server is an open relay or filtered by IP, you’llneed to specify an authentication method. Most SMTP serverswill utilize Basic authentication, however MS Exchange serversprefer NTLM.
SMTP Username Login name for the account on the SMTP Server (optional).
SMTP Password Password for the account on the SMTP Server (optional).
Once you have configured the SMTP Settings, you can click the Test button to send a message to theHost Email. If the send operation is successful, you’ll see a message to this effect at the top of the page.If the operation is unsuccessful, you may receive a CDO error (see Figure 5-7). This error is generallyproduced as a result of specifying an SMTP server that cannot be reached.
Figure 5-7
In hosting situations, the web server itself often runs a simple SMTP service for handling outbounde-mail generated by web sites. Although this setup does initiate outbound e-mail, that mail is oftenflagged as SPAM by the target domains (especially domains like Hotmail.com, Yahoo.com, and so on).For best results, the SMTP server you specify should be the one specified in the MX record for yourdomain. Depending on your SMTP server’s configuration, it may be necessary for PortalAdministrators’ e-mail addresses to be recognized on the server as well.
If you are testing from a home network via a broadband connection you should also be aware of yourISP’s policies regarding SMTP servers. Generally speaking, most ISPs will not allow the trafficking ofe-mail from other SMTP servers on their networks (as a SPAM control measure). You’ll either need toconfigure DotNetNuke to use the credentials of your ISP account (just as you would in your local e-mailclient) or configure a local SMTP server to relay through your ISP and specify that local server inDotNetNuke.
122
Chapter 5

Advanced Settings: Other SettingsThis last area covers a lot of ground and includes a number of settings that fall into the category of“superhero” powers. Each setting is described in Table 5-6, but a number of them will be explained ingreater detail in later sections of this chapter that cover the functional aspects of the features that thesesettings control.
Table 5-6: Advanced Settings, Other Settings
Control Panel Select the Control Panel that Portal Administrators will use. Chapter4 contains a full description of the choices (see Figures 4-3 and 4-4).The ability to select the Control Panel exists largely to promote theconcept of creating customized Control Panels for the host. If youcreated your own Control Panel, what would you make it look like?
Site Log Storage This option allows you to specify whether site log information willbe stored in the database or in files. File-based logs are writtenusing the IIS 6 log conventions and are stored in the each portalfolder with the following naming convention: /portals/<portalid>/logs/ex<yymmdd>.log.
Site Log Buffer (Items) This value defines the number of site log entries that are held inmemory before storing them. Setting the buffer to 0 turns loggingoff entirely.Changing the buffer value does not affect the actual I/O cost of log-ging, but it does change where/when the cost is incurred. Forexample, if the log buffer is set to 1, every page request in everyportal will incur the (slight) overhead of the log I/O, whereas if thelog buffer is set to 20, only 1 in 20 requests will incur the overhead,but it will incur the overhead of all 20 I/O requests.If cache is cleared (whether by app restart, in host settings, or byother means) any uncommitted items in the log buffer are lost. Notethat individual buffers are cached for each portal but this settingapplies globally to all of them. Setting this value too high couldresult in data loss for low traffic sites whose cache might expire(and be lost) before reaching the buffer threshold.
Site Log Buffer (Days) DotNetNuke performs site logging on an individual portal leveland retains that information for the number of days specified. Thisvalue represents the default duration that will be applied to eachnew portal created. Changing this value has no effect on currentlogging configuration.As Host, you can change this value in the Site Settings for a specificportal.Expiration of site log data is contingent upon execution of a sched-uled job, which periodically truncates the buffer to the durationspecified. The PurgeSiteLog job must be enabled in the Schedulerfor this to occur; otherwise the SiteLog table can grow unchecked.Job scheduling is covered later in this chapter.
Table continued on following page
123
Host Administration

Disable Users Online “Users Online” is popular functionality in many online portalapplications, tracking and displaying the number of users regis-tered on the site, how many users are currently using the site, andso on. However, this functionality would impose unnecessary pro-cessing overhead on each page request for sites that don’t need it.By checking this option, logic within DotNetNuke that populatesUsersOnline tracking tables and cache objects is bypassed.Setting this option is only half the process required to enable/disable UsersOnline. An essential part of UsersOnline is a corre-sponding scheduled job that performs periodic cleanup on the asso-ciated database tables AnonymousUsers and UsersOnline. If this jobis enabled without UsersOnline in use, it is an unnecessary drain onsystem resources. Conversely, if it is not enabled when UsersOnlineis in use, these tables will grow unchecked. Job scheduling is cov-ered later in this chapter.
Users Online Time UsersOnline tracks the presence of users who have been active on (Minutes) the system within this time period. When the scheduled job runs to
clear the tracking tables, it uses this time period as a basis for deter-mining which records to clear.UsersOnline does not track or log personal information and is not amechanism for “spying” on users. It makes temporary note of whois logged in, what page they are currently visiting (no history), andhow many anonymous users are currently viewing the site. Thedata is deleted after this duration has passed.
File Upload Extensions This comma-separated list specifies the file extensions that are per-missible through the File Manager. It comes prefilled with a varietyof common “safe” file extensions and can be fully customized.The file management utilities within the portal are “intelligent” andreference this allowable file list. So, for example, a file that isrenamed in the File Manager cannot be renamed with an invalidfile extension. Likewise, files with invalid file extensions areignored when unpacking an uploaded zip file.Note that file upload capability in the default HTML EditorProvider is disabled. This is because DotNetNuke file upload exten-sions, directory permissions, and disk space limits cannot beenforced through that interface.
Skin Upload You can enable Portal Administrators to upload their own skin and Permissions container files by selecting Portal. To restrict skin and container
uploads, select Host.
Performance Setting A variety of cache objects in DotNetNuke provide for increased per-formance. These objects do not all have the same duration; theyexpire based on their specific functionality (for example, Userobjects expire more often than Portal objects). But changing this set-ting applies a common multiplier that affects their relative duration(or lifespan). While this duration is enforced within DotNetNuke, itis still subject to external settings that govern the site (such as recy-cling of the ASP.NET worker process). Moderate caching is thedefault setting.
124
Chapter 5

The No Caching option is primarily a developer/support-orientedselection. Without the benefit of the caching features of ASP.NET,the amount of work performed on each page request renders Dot-NetNuke very slow to run and is not recommended. However, thisoption can be very useful if necessary to track down a caching-related issue.
Clear Cache This button enables the Host to manually clear the cache ondemand. Generally this is not required; however, as Host you alsotypically have access to manipulate database tables directly. Tableupdates applied in this way bypass the application and so are notreflected until the cache is updated. You can force update of cacheto reflect your manual changes by clearing it.Note that clearing the cache in this way also dumps buffered logsand so should be performed only when necessary.
Scheduler Mode The Timer Method maintains a separate thread to execute sched-uled tasks while the worker process is alive. Alternatively, theRequest Method triggers periodic execution of tasks as HTTPRequests are made. You can also disable the Scheduler by selectingDisabled. The Scheduler is examined in detail later in this chapter.
Scheduler Polling Rate If the Request Method is selected (above), this setting specifies theinterval between scheduled task execution cycles. The Schedulertask is not invoked on every request, rather just on the first requestwithin the specified interval.
Enable Event Like the site log, the event log can also be buffered for performance Log Buffer? to avoid the overhead associated with logging I/O on every
request. If checked, this setting will cause event log entries to bebuffered into cache and periodically written to the data store. Ifunchecked, log entries are written immediately. Unlike site logging, event log buffering is governed by a scheduledtask (PurgeLogBuffer). If this task is not enabled or if the Scheduleris stopped, this setting will have no effect and logging will occur asif this setting were unchecked. Event Logging is covered in moredetail later in this chapter.
Use Friendly Urls If checked, DotNetNuke will invoke the FriendlyUrl Provider. Bydefault, DotNetNuke installs a provider that will produce “machinefriendly” URLs that provide for better indexing by search engines.For developers, the default provider behavior is controlled by a rulefile (siteurls.config) located in the web root.The default modules provided with DotNetNuke all work well withthis provider. However, you should understand that not every mod-ule may work well with any specific implementation of FriendlyUrls.It is advisable to ensure that any module you employ works withyour FriendlyUrl Provider. For more information on FriendlyUrls,consult Chapter 8.
125
Host Administration

Managing Portals as HostA number of settings defined at the portal level are limited to SuperUser access. Some of these werepointed out in the previous section but there are a few additional ones as well. Since these settings areapplicable on a per-portal basis, you’ll need to be in the context of the portal in question in order tochange them. You can reach the site settings for any portal through the Portals page on the Host menu.Just click the pencil icon next to one of the portal names (see Figure 5-8).
PortalsNavigate to the Portals page on the Host menu as illustrated in Figure 5-8. From this page you’ll be ableto create and maintain portals as well as generate a portal template for import into another DotNetNukeinstallation.
Figure 5-8
At a glance the list enables you to see what portals are configured as well as their portal aliases, numberof registered users, disk space threshold, hosting fee, and expiration date (if set). Clicking the pencil iconnext to any entry takes you to the Site Settings page for that portal (see Chapter 4). While logged on asthe Host you’ll have access to additional configuration items that the Portal Administrator cannot see(see Figure 5-9).
Figure 5-9
126
Chapter 5

Figure 5-10 shows an additional group of configuration items under Advanced Settings. Table 5-7explains how each of these options affects the portal.
Table 5-7: Host-Only Site Settings
Expiry Date When the expiry date for a portal is exceeded, a friendly message isdisplayed in the place of regular content (see Figure 5-10).
Hosting Fee The default for this value was set in the Host Settings. It is primarilya display field, but indicates the value appropriate for monthlyrenewal.
Disk Space The default for this value was set in the Host Settings. It limits theamount of disk space available to a Portal Administrator through theFile Manager.
Site Log History The default for this value was set in the Host Settings. It keeps thesite log for this portal truncated to the number of days indicated.
Premium Modules Modules can be installed for use by any portal or can be limited touse in specific portals by setting them as “premium.” This set of con-trols identifies which premium modules have been applied to thisportal. You’ll learn more about modules later in this chapter.
Figure 5-10
You’ll also see a new control at the bottom of the Site Settings page for maintaining the list of aliases(domain names) for the portal (see Figure 5-11).
Figure 5-11
Prior to version 3.0, all portal aliases were maintained in a comma-delimited string, which restricted thenumber of aliases that could be assigned. Additionally, it made processing based on individual aliasesmore complex and inefficient. In version 3.0 portal aliases are maintained as a list of separate items. Toadd an additional portal alias, simply click Add New HTTP Alias and enter it in the text box provided.A portal can answer to an unlimited number of portal aliases.
127
Host Administration

Adding a New PortalTo create a new portal, simply navigate to the Portals page on the Host menu and click Add New Portalon the bottom of the page (or select it from the action menu). From there you’ll be taken to the Signuppage as illustrated in Figure 5-12.
Figure 5-12
The default root directory for the portal can be overridden. But aside from this, there should be only onefield on this page that might be unfamiliar to you. You’ll learn about Parent and Child portals in the nextsection.
Parent Portals and Child PortalsIn Chapter 3, you were introduced to the concept of Parent and Child portals. Portal setup is where you’llput these concepts into practice by specifying either a Parent or Child portal. The only real distinctionbetween a Parent and a Child portal is that a Parent portal alias has a simple URL attributed to it, whereasa Child portal consists of a URL and subdirectory name. An example of a valid Parent portal name iswww.dotnetnuke.com. Alternatively, you can specify an IP address instead of a domain name (for exam-ple, 216.26.163.25). An example of a valid Child portal name is www.dotnetnuke.com/soccer, andan IP address can be substituted here as well (for example, 216.26.163.25/soccer). A Child portal canbe turned into a Parent portal simply by adding a URL to its list of portal aliases.
128
Chapter 5

When a new Child portal is created, a physical directory is also created in the root of the web site withthe Child portal’s name. A page called subhost.aspx is copied into the directory as default.aspx.This is how DotNetNuke is able to implement addressing of the Child portal by the alias name (forexample, www.dotnetnuke.com/soccer) without making modifications to IIS. Without existence of aphysical path and filename (for example, www.dotnetnuke.com/soccer/default.aspx) IIS wouldnormally process the request without ever handing it to ASP.NET, rendering an HTTP 404 Error or “pagenot found.” You might be tempted to ask why a simple change to IIS would not be a better solution. Itmight be, but DotNetNuke is built to provide the functionality in environments where this level of con-trol may not be available (that is, in a shared hosting environment).
So why would you create a Child portal instead of a Parent anyway? With a single registered domainname you can create an infinite number of cname portals (for example, soccer.dotnetnuke.com) aslong as your ISP will support a DNS wildcard for your domain. The most popular reason for creating aChild portal is the ability to emulate a single sign-on solution where credentials “appear” to be sharedbetween portals. This is a popular implementation in intranets where departmental portals are involved.Because Child portals exist in the same domain as the Parent portal, they share access to a domaincookie, which will preserve their “logged in” status across sub-portals as long as their username andpassword are synchronized.
Portal TemplatesIn Chapter 4 you learned about portal templates in the context of importing one through the Site Wizard.As Host, you have the ability to create your own portal templates, which truly qualifies as a “superpower.” Figure 5-13 illustrates the Export Template function, which is the second component of thePortals page on the Host menu.
This feature allows you to select an existing portal, supply a name and description, and then generate a tem-plate that contains all the information necessary to re-create the portal on another installation (see Listing5-1). Two files are generated in this process (<name>.template and <name>.template.resources).The .template file is a plain-text file that contains a complete XML representation of the portal, its pages,modules, settings, and file structure. The .resources file is just a zip file of the portal root that is exportedas content (if this option was selected).
Figure 5-13
129
Host Administration

Portal templates are a new and powerful capability in DotNetNuke 3.0 — but it is also still “raw.” Thismeans that we’ve yet to provide user interface controls to direct how a template file is exported. At thispoint, template files contain everything including the kitchen sink! If you are creating templates, itwould be wise to actually read through the generated file and make sure that there are no options speci-fied that would be inappropriate for where you intend to apply them. As a standard XML file, this is apretty simple thing to do and simply removing nodes that you don’t want should work fine.
Listing 5-1: Portal Template (Settings Node)
<settings><logofile>logo.gif</logofile><footertext>Copyright 2002-2005 DotNetNuke</footertext><expirydate>0001-01-01T00:00:00.0000000+11:00</expirydate><userregistration>2</userregistration><banneradvertising>1</banneradvertising><currency>USD</currency><hostfee>0</hostfee><hostspace>5</hostspace><backgroundfile /><paymentprocessor>PayPal</paymentprocessor><siteloghistory>60</siteloghistory><defaultlanguage>en-US</defaultlanguage><timezoneoffset>-480</timezoneoffset>
</settings>
For example, a generated template will contain nodes with all the settings for the current portal. As youcan see in Listing 5-1, there are a few nodes here that you might not want to override in a portal thatimports the template; nodes such as <userregistration>, <hostspace>, and <paymentprocessor>.These settings might be appropriate for a new portal, but templates located in the Host Root(/Portals/_default) are available to the Site Wizard and can be applied to existing portals as well.
Templates provide a lot of power and promise for automatic configuration and for sharing of portalinformation. However, they should be used with care until they’re more “fully cooked.”
SkinsThe Portal Administrator and the Host each have their own version of the Skins page. As Host, both arevisible and accessible to you and so it is essential that you understand which one you are working with.
When using the Admin/Skins page, you (as Host) always have access to the Upload Skin and UploadContainer buttons. These are only visible to the Portal Administrator when the Skin Upload Permissionis set to “Portal” (see Table 5-6). This enables you to upload skins and containers that are private to thespecific portal; those files are uploaded to the Portal Root directory (\Portals\<PortalId>). When usingthe Host/Skins page the only difference is the target of the uploaded files. Skins and containersuploaded through the Host/Skins page are installed in the Default Portal directory (\Portals\_default)and so are available to every portal in the installation.
130
Chapter 5

If you want to upload skins for a specific portal only, you’ll want to log in to that specific portal as aSuperUser to do that. A quick way to navigate to any given portal is to go to the Portals list on the Hostmenu and click the portal alias name.
Log ViewerIn Chapter 4 you learned some basic information about the Log Viewer from the Portal Administrator’sperspective. As the Host, there are two specific differences in your view of the logs as well as a few addi-tional features. First, your view includes exceptions (and any other events that are hidden from the PortalAdministrator). Second, your view can contain log entries from all portals (if selected as an option). Youalso have access to some additional functions including the ability to select and delete specific log entries,clear the entire log, and edit the log configuration.
To view the full set of logs, take a look at the following files:
\Portals\_default\Logs\Application.xml.resources\Portals\_default\Logs\Exception.xml.resources\Portals\_default\Logs\Scheduler.xml.resources\Portals\_default\Logs\Log.xml.resources
For an in-depth review of logging, see Chapter 8.
Edit Log ConfigurationsFrom the Log Viewer, select Edit Log Configurations from the bottom of the page or from the actionmenu. You’ll find yourself looking at the Edit Log Settings page as illustrated in Figure 5-14.
Figure 5-14
You’ll notice a number of preconfigured logging events; some enabled and some disabled. For example,because the Scheduler is disabled in the default installation of DotNetNuke, its logging events are alsodisabled. You can add a new configuration or edit an existing one, as shown in Figure 5-15.
131
Host Administration
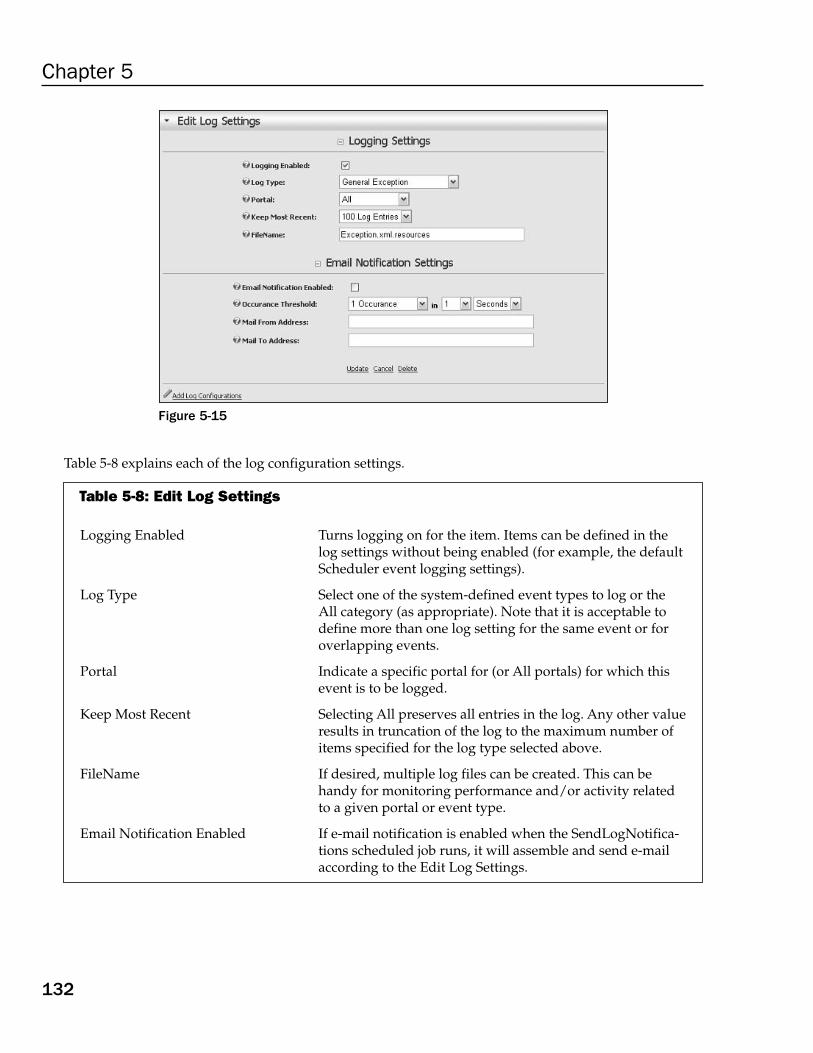
Figure 5-15
Table 5-8 explains each of the log configuration settings.
Table 5-8: Edit Log Settings
Logging Enabled Turns logging on for the item. Items can be defined in thelog settings without being enabled (for example, the defaultScheduler event logging settings).
Log Type Select one of the system-defined event types to log or theAll category (as appropriate). Note that it is acceptable todefine more than one log setting for the same event or foroverlapping events.
Portal Indicate a specific portal for (or All portals) for which thisevent is to be logged.
Keep Most Recent Selecting All preserves all entries in the log. Any other valueresults in truncation of the log to the maximum number ofitems specified for the log type selected above.
FileName If desired, multiple log files can be created. This can behandy for monitoring performance and/or activity relatedto a given portal or event type.
Email Notification Enabled If e-mail notification is enabled when the SendLogNotifica-tions scheduled job runs, it will assemble and send e-mailaccording to the Edit Log Settings.
132
Chapter 5

Occurrence Threshold Specifies how often an event must occur in order to triggere-mail notification.
Mail From Address Sent from address specified on outgoing e-mail.
Mail To Address To address specified on outgoing e-mail.
Other Host ToolsIn addition to the portal-specific settings you’ve just learned about, SuperUsers have access to manyother powerful tools and configuration options. These are not visible to the Portal Administrator andaffect your entire DotNetNuke installation and, therefore, all portals. The level of sophistication of theseconfigurable items is quite deep and will challenge you to think about how best to customize yourinstallation to achieve your unique objectives.
Module DefinitionsThe Module Definitions page serves as the administration area for all of the modules installed inDotNetNuke. This page allows you to edit or delete existing module definitions and to add new mod-ules as well.
DotNetNuke comes preinstalled with a number of basic modules (identified in Chapter 3). Figure 5-16illustrates the Module Definitions page for a default installation. Each module in the list is shown with aname, description, and a true/false option indicating whether or not it is marked as “premium.”
What Is a Premium Module?A module that has been marked “premium” is not freely available to Portal Administrators. Non-premiummodules automatically show up in the selector on the Portal Administrator’s Control Panel, but premiummodules require Host configuration on a per-portal basis (see Figure 5-17). The premium module settingallows you to hide special-purpose modules installed or developed for one client from those installed ordeveloped for another. It also enables you to segment your product offerings, providing extra functionalityat a “premium” rate.
Editing Module DefinitionsTo edit a module definition (for example, if you want to mark an existing module as premium), click thepencil icon next to the module you want to edit (for example, Announcements).
Each module definition is comprised of three sections: the module description (see Figure 5-16), themodule definitions, and the module controls (see Figure 5-17).
The module description settings hold the basic properties of the module. Name is used in the drop-down list of modules available to Portal Administrators on the Control Panel. Description is displayedon pages that describe the modules (for example, Module Definitions page). Version is used by moduledevelopers when issuing updates of their modules. And Premium is used to determine if a module isavailable to all portals or only those specifically given access.
133
Host Administration

Figure 5-16
Figure 5-17
134
Chapter 5

A module can have any number of definitions. A definition directly matches to a single component of amodule. For this reason, most modules usually have only one definition; they only add one componentto the page. The Announcements module, for example, has only one component and it is called“Announcements” as shown in Figure 5-18.
Some modules may add many components to a page, each component providing differing functionalitybut part of a logical group. For example, a blogging module might contain a calendar, a list of blogentries, and a search module. These would be configured as three different definitions, but would stillbelong under the same Module Name (for example, myblog).
In this section you can add definitions by typing in their name and clicking Add Definition.Alternatively, you can select an existing definition from the drop-down list and click Delete Definition.
Figure 5-18
Each definition may have a number of a controls associated with it. These controls directly map toASP.NET user controls and each is marked with a name known as a key. This key allows DotNetNuketo determine which control to load at runtime.
The Announcements module has only two controls, the user control that displays the announcements(announcements.ascx) and the edit announcement page (editannouncements.ascx). Complex mod-ules may have a dozen or more configured controls.
This section allows you to add new controls by clicking the Add Control link; edit an existing control byclicking the pencil icon; or delete a control by editing it first and then clicking Delete on the Edit page.
Installing a New ModuleTwo methods exist for installing new modules into your DotNetNuke environment. The first method isan automated install. The second method is by manually adding your definition. Chapter 14 contains athorough examination of the packaging and installation of modules and other DotNetNuke add-ons, butwe’ll summarize the module installation processes here for the sake of continuity.
The manual method is popularly used by developers during the process of creating new modules. Hoststhat are not involved in module development will probably never use it.
An automated install involves uploading a zip file containing the contents of a module. These zip filesare generally available from independent developers and companies that create them.
135
Host Administration

DotNetNuke is packaged with two sample modules (Survey & Users Online). They are not installed bydefault because they serve as examples for developers. We’ll demonstrate installation of the Surveymodule now, just to show you how it’s done.
Click the Upload New Module button at the bottom of the Module Definitions page or on its action menu(see Figure 5-16). You’ll see the familiar file upload page, only with no options for selecting a target direc-tory. This is because a module’s install locations are not configurable.
Click the Browse button and locate the DotNetNuke.Survey.zip file. At the time of this writing it ispackaged with the DotNetNuke application in the /DesktopModules/Survey folder, although for thepurposes of this example any module zip file will do. Once the selection has been made, click the Addbutton. The filename is added to a list of files that allow you to upload multiple modules at once. Onceyou are happy with the list of files to upload, click the Upload New File button (see Figure 5-19).
Figure 5-19
When the module is installed (or uploaded), a detailed log is displayed showing what happened duringthe install (see Figure 5-20). If any portion of the installation process fails, error messages will appear inthis log highlighted in red. If your module has a red error message, you should contact the moduleprovider for technical support.
If there are no red error messages in the log, your module has been successfully installed and is nowavailable to use within your installation. Figure 5-20 illustrates a portion of what an installation logwould look like for a successful install.
Many modules and other resources are also available at www.dotnetnuke.com.
136
Chapter 5
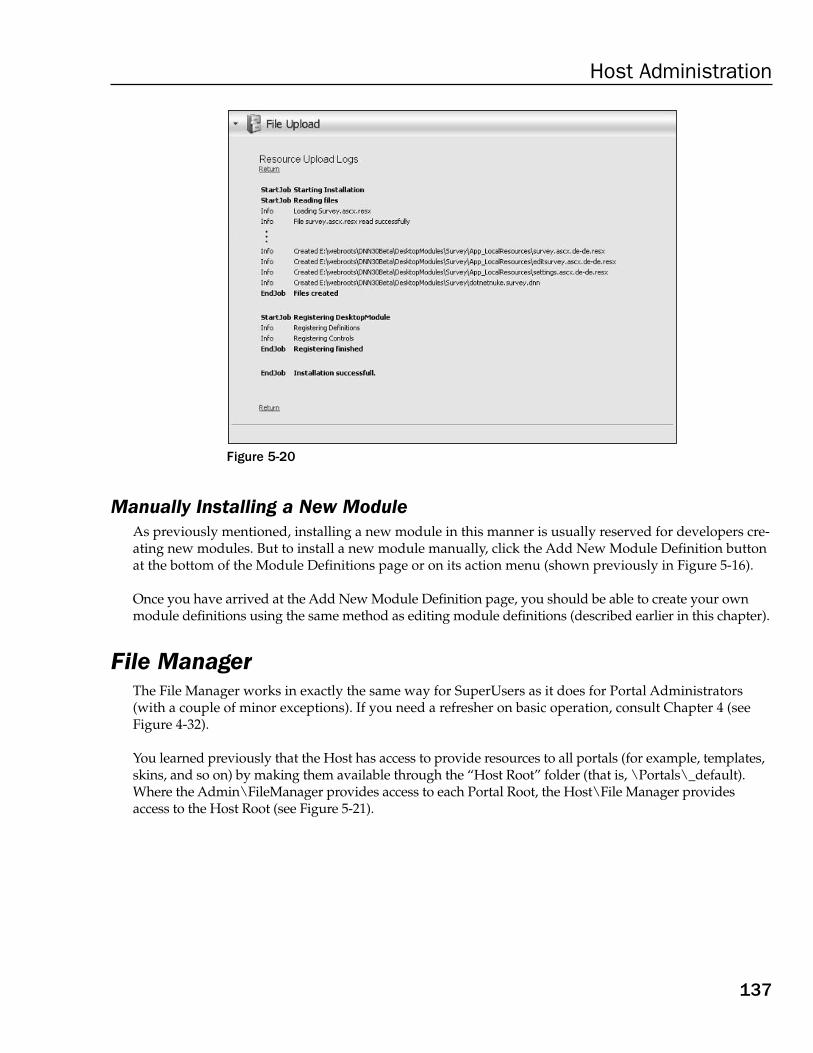
Figure 5-20
Manually Installing a New ModuleAs previously mentioned, installing a new module in this manner is usually reserved for developers cre-ating new modules. But to install a new module manually, click the Add New Module Definition buttonat the bottom of the Module Definitions page or on its action menu (shown previously in Figure 5-16).
Once you have arrived at the Add New Module Definition page, you should be able to create your ownmodule definitions using the same method as editing module definitions (described earlier in this chapter).
File ManagerThe File Manager works in exactly the same way for SuperUsers as it does for Portal Administrators(with a couple of minor exceptions). If you need a refresher on basic operation, consult Chapter 4 (seeFigure 4-32).
You learned previously that the Host has access to provide resources to all portals (for example, templates,skins, and so on) by making them available through the “Host Root” folder (that is, \Portals\_default).Where the Admin\FileManager provides access to each Portal Root, the Host\File Manager providesaccess to the Host Root (see Figure 5-21).
137
Host Administration

Figure 5-21
You’ll also notice that there is no additional control for applying permissions (see Figure 4-33). That’sbecause the Host Root permissions are not configurable; only SuperUsers can add, change, modify, ordelete files in the Host Root.
VendorsLike the File Manager, the Host Vendor page works in exactly the same way for SuperUsers as it does forPortal Administrators. If you need a refresher on basic operation, consult Chapter 4 (see Figure 4-44).
The only difference between the Host Vendor page and the Portal Administrator Vendor page is theunderlying vendor list. You maintain a vendor list separate from the individual portals, which is visibleby all of them. This is a particularly useful feature for Hosts that maintain multiple portals of their own(rather than belonging to clients). One list of vendors can be maintained and used to serve advertisingand/or affiliate relationships with multiple portals. In the Banner module, a Portal Administrator canchoose to display banners from either source (Host or Site)
SQLThe Host SQL page is a handy utility for inquiry or remote maintenance (see Figure 5-22). It provides forthe processing of simple queries and returns results in a tabular format. It is also capable of executingcompound queries and update queries by selecting the Run as Script check box.
Figure 5-22 illustrates a couple of handy queries for managing user accounts locked out by theMemberRole Provider due to invalid password attempts. Although this can be accomplished on a userbasis on each portal’s User page (or by waiting 10 minutes), this method can unlock all users in all por-tals with one query (if so desired) and is a convenient example.
138
Chapter 5

Figure 5-22
ScheduleIn DotNetNuke 2.0 two pieces of functionality were introduced that required recurring operations to beprocessed regularly (Users Online and Site Log), emulating “batch processing.” Ultimately, there are manyapplications for the services of a batch processor and the Scheduler serves that function in DotNetNuke.Figure 5-23 illustrates the list of items available on the Schedule page and their default settings at the timeof installation.
You should carefully assess the items in the default schedule list, their settings, and enabled/disabledstatus to ensure that they meet your specific operating requirements.
Figure 5-23
The Schedule page provides access to edit the settings of each item, or to add a new item by clicking theAdd Item to Schedule button or selecting the action menu item. It also provides appropriate “at aglance” information such as the enabled/disabled status, recurring frequency, next scheduled executiontime, and access to a detailed history report.
139
Host Administration

Schedule Item DetailsClick the pencil icon next to an item to open the Edit Schedule page (see Figure 5-24). Table 5-9 explainseach of the schedule item settings in detail. Setting changes made on the Edit Schedule page take effectimmediately.
Figure 5-24
Table 5-9: Edit Schedule Settings
Available Tasks This drop-down list includes all classes in any assemblies in the /bin directory that inherit from DotNetNuke.Scheduling.SchedulerClient. Assemblies may belong to modules, skin objects,or other components you have installed that leverage the Sched-uler’s programming interface.Installing a component (or module) may actually create a Sched-uler item for you rather than relying on you to create it yourself.You’ll want to read the instructions carefully for any modules orcomponents that you install.
Schedule Enabled Enable or disable the schedule item. If disabled (unchecked), theScheduler ignores this item when processing.
Time Lapse Set the desired frequency for running this item (that is, every xminutes/hours/days).
Retry Frequency If the task fails when it runs according to the specified frequency,it will be retried according to this setting until the next regularlyscheduled start.
Retain Schedule History Each time an item, its success/fail status, and a number of otheruseful information items are logged. This value determines thenumber of log records that are retained in this history. Older itemsare truncated from the log.
140
Chapter 5

Run on Event You can enable a job to run on an event rather than on a schedule.The only event currently supported is APPLICATION_STARTbecause events triggered on APPLICATION_END are not guaran-teed to run in ASP.NET.
Catch Up Enabled If the Scheduler is unable to run when the scheduled start time ofan item passes, the item will not be run. This condition could becaused by any number of things, including a server reboot orrecycling of the ASP.NET worker process. This setting indicateswhether, at the next scheduled start time, an item should run onlyonce according to the schedule or play “catch up” and run oncefor each scheduled start that was missed.Under normal circumstances this setting will not be necessary, butit is available for custom schedule items that require it.
Object Dependencies When the Scheduler Mode is set to the Timer Method (see HostSettings) it executes as a multithreaded process. This requiressome method of protection against possible deadlock conditionsfor simultaneously running threads.This field provides for the specification of one or more comma-separated string values, which serve as semaphores to avoiddeadlock. For example, if one schedule item performs a select onthe Users table and another item performs a massive update onthe Users table, you might want to prevent these two items fromrunning at the same time. So both items should have an objectdependency on the same string value (for example, “LockUsers-Table”). The dependency will suppress start of any other itemsuntil the currently running item has finished.
Schedule HistoryIf you click the History link next to an item, you’ll see the Schedule History page (Figure 5-25). This pagesimply displays a log of results from previous runs of the scheduled item. You’ll recall that the size ofthis log (number of items) was set in the Item Settings.
Figure 5-25
141
Host Administration

Schedule StatusThe Schedule Status page is reached by selecting View Schedule Status from the action menu on any ofthe schedule-related pages (see Figure 5-26).
Figure 5-26
The Schedule Status page gives a detailed view of the current state of the Scheduler and running orpending items (see Figure 5-27). Refreshing the page will illustrate quickly that DotNetNuke is busilyworking in the background to process your scheduled items.
Figure 5-27
There are two display areas on this page; one for Items in Queue and the other for Items Processing.If you refresh while watching the Time Remaining run down to 0 for a specific item, you may catch itactually in execution, which is when it will display in the Items Processing area.
Command buttons at the top of this page allow you to stop/start the Scheduler if necessary. This sus-pends the execution of the jobs though the timers continue to run. Note that these buttons are notenabled if the Scheduler is running under the Request Method (see Table 5-6).
142
Chapter 5

ConfigurationThe Scheduler has a couple of useful settings that can be manipulated in the application’s web.configfile. To locate these settings, look for the section that resembles Listing 5-2. The effect of these settings issummarized in Table 5-10.
Listing 5-2: Schedule Provider Section of web.config
<add name=”DNNScheduler”type=”DotNetNuke.Services.Scheduling.DNNScheduling.DNNScheduler,
DotNetNuke.DNNScheduler”providerPath=”~\Providers\SchedulingProviders\DNNScheduler\” debug=”false”maxThreads=”-1”/>
Table 5-10: Schedule Provider Configuration Settings
Debug When set to “true,” this will cause a lot of log file entries to be gener-ated that help in debugging Scheduler-related development (that is,developing your own Scheduler items). Debugging multithreadedapplications is always a challenge. This is one setting that can helpyou figure out why a task is or isn’t getting run.
maxThreads Specifies the maximum number of threads to use for the Scheduler(when in Timer Method mode). “-1” is the default, which means“leave it up to the Scheduler to figure out.” If you specify a valuegreater than 0, it will use that number as the maximum number ofthread pools to use.
ConsiderationsOne limitation of the Scheduler (mode: Timer Method) is that it cannot run 24/7 without help from anexternal program, the ASP.NET worker process. This is a limitation of ASP.NET, and not DotNetNuke.The worker process used within IIS will periodically recycle according to settings in machine.config.Some hosts may have settings that recycle the worker process every 30 minutes (forced), while othersmay have more complicated settings, such as recycling the worker process after 3000 web site hits, orafter 20 minutes of inactivity. It is this recycling of the worker process that will shut down the Scheduler,until the worker process is started again (that is, by someone hitting the web site, which in turn starts upthe worker process, starting up the Scheduler as well).
This functionality is actually a major benefit to web applications as a whole, in a hosted environment,because it keeps runaway applications from taking down the server. But it isn’t without its drawbacks.
The bottom line is that the Scheduler will run 24/7 (mode: Timer Method) as long as someone is visitingyour web site frequently enough to keep the worker process active. It is during periods of dormancy thatthe worker process could possibly shut down. It is for this reason that you should carefully plan thetypes of tasks you schedule. Make sure that the tasks you schedule are not “time critical,” that is, don’thave to run “every night at midnight” and so on. A more suitable task is one that runs “once per day”or “once every few minutes,” that doesn’t mind if it’s not run during periods of inactivity.
143
Host Administration

The Request Method does not have the same dependency upon the ASP.NET worker process. However,it is entirely dependent upon the timing of visitors to your web site. During periods of inactivity on yourweb site, scheduled jobs will not run.
LanguagesIn Chapter 4 you learned that Portal Administrators have some limited control over the supported languages and localized strings in their portal. The Host has access to a number of other features andconfiguration options. Selecting Languages from the Host menu takes you to the Languages administra-tion page as shown in Figure 5-28.
Figure 5-28
BackgroundSoftware applications are frequently used in many different countries, each with their own unique lan-guage and culture. This is certainly the case with DotNetNuke, which has users from around the globe.In an effort to better support users from other countries and cultures, DotNetNuke implements a local-ization framework to allow the portal to better handle these users’ needs. Not only do other cultureshave different languages, but they also may be in different time zones, have different currencies, andexpress times and dates in a different format. Any localization framework has to take all these factorsinto account in order to be effective.
In developing the localization framework, the DotNetNuke developers examined many different imple-mentations and ultimately chose a solution that closely followed the ASP.NET 2.0 framework. Althoughthe underlying architecture may differ slightly, DotNetNuke uses the same resource file format and filelocations, thereby simplifying the future migration path to ASP.NET 2.0 when it becomes available.
The Languages page is the primary stepping-off point when configuring language support. These settingswill determine the languages available to each portal and the default localized strings. Additionally, theHost controls the definitions of time zones within the associated portals.
To define localized strings, you must first create a locale. A locale identifies the culture associated with agroup of localized strings. This culture is identified by a friendly name and a key value that correspondsto specific culture. The .NET Framework documentation defines the culture as:
144
Chapter 5

The culture names follow the RFC 1766 standard in the format “<languagecode2>-<country/regioncode2>”, where <languagecode2> is a lowercase two-letter code derived from ISO 639-1 and<country/regioncode2> is an uppercase two-letter code derived from ISO 3166. For example, U.S.English is “en-US”.
To define a locale, enter the Name and Key and click the Add link. This will create a new entry in theLocales.xml file and create a localized copy of the TimeZones.xml file as well. Once you have createda new locale definition, you are ready to create localized resource strings.
Select the Language Editor link from the Languages administration screen in Figure 5-28. This will takeyou to the Language Editor. The Language Editor, as shown in Figure 5-29, is the same editor availableto Portal Administrators and was covered in Chapter 4. The only difference is that any localizedresources created by the Host will become the default resource strings for all portals.
If the Portal Administrator edits a resource file, it will override all resources loaded from the defaultresource file. Even if the Host subsequently makes changes to the same set of resource strings, thesechanges will not be reflected in the portal, which has its own copy of the original resources.
Figure 5-29
The standard portal installation includes more than 115 resource files for each locale. After a new localeis added by the host, DotNetNuke must create corresponding localized resource files for the new locale.The portal only creates the new resource file when using the Language Editor (see Figure 5.29) to editthe localized strings. If the resource for the new locale is not edited, then the default locale (English en-US) will be used when localizing content.
So, with 100 plus files to edit, you must be asking yourself “How do I ensure I have created localizedversions of each resource file?” That is where the Resource File Verifier (see Figure 5-30) comes in. Youcan reach the Verifier from the Language Administration screen.
145
Host Administration
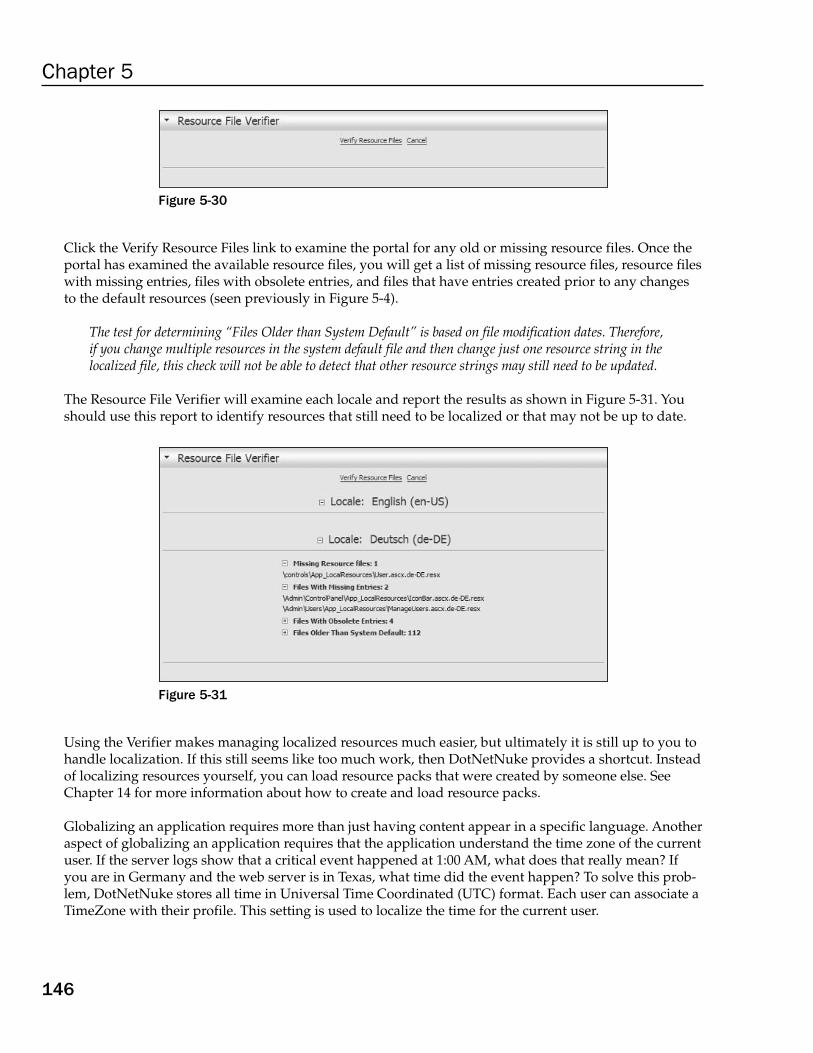
Figure 5-30
Click the Verify Resource Files link to examine the portal for any old or missing resource files. Once theportal has examined the available resource files, you will get a list of missing resource files, resource fileswith missing entries, files with obsolete entries, and files that have entries created prior to any changesto the default resources (seen previously in Figure 5-4).
The test for determining “Files Older than System Default” is based on file modification dates. Therefore,if you change multiple resources in the system default file and then change just one resource string in thelocalized file, this check will not be able to detect that other resource strings may still need to be updated.
The Resource File Verifier will examine each locale and report the results as shown in Figure 5-31. Youshould use this report to identify resources that still need to be localized or that may not be up to date.
Figure 5-31
Using the Verifier makes managing localized resources much easier, but ultimately it is still up to you tohandle localization. If this still seems like too much work, then DotNetNuke provides a shortcut. Insteadof localizing resources yourself, you can load resource packs that were created by someone else. SeeChapter 14 for more information about how to create and load resource packs.
Globalizing an application requires more than just having content appear in a specific language. Anotheraspect of globalizing an application requires that the application understand the time zone of the currentuser. If the server logs show that a critical event happened at 1:00 AM, what does that really mean? Ifyou are in Germany and the web server is in Texas, what time did the event happen? To solve this prob-lem, DotNetNuke stores all time in Universal Time Coordinated (UTC) format. Each user can associate aTimeZone with their profile. This setting is used to localize the time for the current user.
146
Chapter 5

The TimeZone Editor shown in Figure 5-32 is accessible from the Language Administration screen andallows the Host to edit the available TimeZone definitions. Like all other resources, the TimeZone defini-tions are localized. When creating new locales, remember to edit the TimeZones for the new locale as well!
Figure 5-32
Search AdminThe Search Admin page gives you the ability to configure certain aspects of the search engine features.It’s important to remember that you are configuring the search for the entire installation, not just for anyspecific portal. There are just a few options, as shown in Figure 5-33.
Figure 5-33
Setting the Maximum and Minimum Word Lengths can help you keep from indexing unreasonable terms.The internal default values are currently 50 and 4, respectively. If you deselect Include Common Words,
147
Host Administration

the search engine will not bother indexing words that exist in the SearchCommonWords database table. Ifyou look at this table you’ll notice that it has the ability to create common word entries for each locale (formultilanguage customization) although only the English language common words are included bydefault. Likewise, you can choose to Include Numbers or to ignore them when content is indexed.
Clicking the Update button saves your preferences. Clicking Re-Index Content causes the search engineto empty its tables and re-index the full content of all portals in the installation.
Keeping It CurrentWhen you learned about the Scheduler, you may have noticed a scheduled item for the search engine:
DotNetNuke.Services.Search.SearchEngineScheduler
If you want for your portal’s content to be current, it is essential that this job be configured to run peri-odically. As Portal Administrators add content to their web sites, it is not immediately available throughsite search. It will not become available until the new content is indexed the next time this job runs oruntil a SuperUser clicks the button to re-index content.
It is also important to understand that the engine that drives search also drives RSS syndication.Updated content will not be reflected in syndication until the next time the search index is run.
BackgroundPrior to version 2.0, site search functionality was built using complex (and convoluted) database queriesand was limited to use with the built-in modules provided by DotNetNuke. To make search work witha third-party module, you had to manually change the database queries or find an alternative searchimplementation. And its usage was fairly crude by today’s standards, without any configuration optionsor advanced search features.
In version 2.0, the previous implementation became totally obsolete with the introduction of the DataAbstraction Layer and Data Providers. And so the design of a new search engine began in earnest.Before this effort progressed much beyond the design stage, the team development target shiftedfrom version 2.2 to version 3.0, so DotNetNuke version 2 never did get a replacement for its lost searchfunctionality.
In DotNetNuke 3.0, the search engine is fully integrated into the core application and modules are ableto hook into this powerful functionality easily. This means that any third-party module can participate infull site search and/or content syndication, simply by implementing the search API as documented inChapter 8. Currently, the core provides a search input module that performs full site search and a defaultsearch results page. However, by the time this book is published there should be many enhancements tothis first iteration of advanced Search capability!
ListsDotNetNuke includes a common utility for the management of lists. This allows you to manage the con-tent of those lists (where appropriate) and augment them to customize your installation. If you selectLists from the Host menu you will find yourself of a page that looks like Figure 5-34.
148
Chapter 5

Figure 5-34
The List manager is fairly straightforward, providing an index of the lists it is currently tracking as wellas a summary of the entries and the ability to add new entries or edit existing ones.
Not all lists are ones you should edit without an understanding of the potential impacts. For example, ifyou were to remove an entry from the Site Log reports list, it would prevent Portal Administrators fromever running that report on their portal. You might consider this a good thing if it was necessary toremove a report that was adversely affecting performance! However, adding a new item to that listwould result in application errors because the Site Log report would not know how to process them.
One of the first customizations you might make to your installation’s Lists would be to add a newCountry sublist, as illustrated in Figure 5-35.
In this example we’re adding region entries for the British Virgin Islands so that when our users registerfrom there, we can require them to specify their island of residence. DotNetNuke is preconfigured forCanada and the United States, but you are fully capable of customizing your installation for any regionallist that you require.
Figure 5-35
149
Host Administration

SkinsYou should recall from earlier in this chapter that the only difference between working with skins fromthe Admin menu and working with skins from the Host menu is the target location of the upload, whichdetermines availability to other Portal Administrators. For additional information on skins and skinning,see Chapters 4 and 13, respectively.
SummaryIn this chapter you learned just about everything there is to know about administering a collection ofportals, their environment, and runtime features as the Host (or SuperUser) of a DotNetNuke installa-tion. Key Host functions that you should understand include
❑ Host Settings
❑ Portals
❑ Module Definitions
❑ File Managers
❑ Vendors
❑ SQL
❑ Schedule
❑ Languages
❑ Search Admin
❑ Lists
❑ SuperUsers Accounts
❑ Skins
You should have some understanding of which Portal Administrator–level functions contain Host con-figurable settings. These Portal Admin functions include
❑ Site Settings
❑ Skins
❑ Log Viewer
You should understand the location and relevance of the Host Root directory (\Portals\_default) versusthe Portal Root directory (\Portals\<portalid>), and know that Host default settings are used to createindividual portals, but that changing them has no effect on existing portals.
Your SuperUser powers should now be fully enabled and you should be prepared to assume leadershipof your very own DotNetNuke “Justice League” (cape and super hero sidekick not included).
150
Chapter 5

Modules
Now that you are familiar with the Host and Administration capabilities available withinDotNetNuke, this chapter looks at a concept familiar to most portals — modules.
A module is a pluggable user interface component that processes requests and generates dynamiccontent. This definition is similar to that of an ASP.NET page, with the exception that a module canonly appear on an ASP.NET page, and that page can contain any number of module “instances.”
Modules are also defined by another important characteristic known as its type. The module typegoverns what functionality it provides. DotNetNuke provides a number of modules out of thebox; these modules range from FAQs and Announcements to Documents. You can even authoryour own modules that provide alternate functionality.
By the end of the chapter, you should have a good understanding of the architecture surroundingmodules and how they relate to the DotNetNuke Portal System. This chapter also discusses thepractical aspects regarding modules such as management and installation, and provides an intro-duction to each of the modules included within DotNetNuke.
Module ArchitectureThis section explains the concepts of a portal, page, module container, and the module itself.A walkthrough of how a page is constructed is also presented.
PortalAs discussed in earlier chapters, a portal can be defined as a web-based application that providescontent aggregation from different sources and hosts the presentation layer (modules) of informa-tion systems.

Figure 6-1 depicts a portal’s basic architecture. To help explain the diagram, DotNetNuke needs to per-form a number of steps in order to process a page request. The following steps execute during the initial-ization of the page. This event occurs at initialization so that modules can handle their own life cycle andprocess events such as initialization, load, and render.
Figure 6-1
First StepThe first step is to retrieve the modules for the requested page. The retrieval step comprises a number ofimportant pieces of information such as the modules that appear on the page, the section of the page onwhich they will appear (known as content panes), and finally, the security roles associated with eachmodule.
Second StepThe second step is to make some decisions about the security information retrieved in the previous step.By examining the current user roles (whether a registered user or anonymous) and the view roles associ-ated with each module, a list of “authorized” modules is formed for the current page.
Third StepThe third (and final) step is to dynamically inject the “authorized” modules into the corresponding con-tent panes of the page. Once each of the modules has been loaded, each module is then able to executeits own series of events and render content.
HTTP
HTML
Portal Engine
Portal Skin
Content Pane
Modules
Content Pane
Modules
Conent Pane
Modules
152
Chapter 6

PageFigure 6-2 depicts the basic portal page components. The page itself represents a complete markup docu-ment consisting of a number of “content panes,” and in each content pane a number of modules. Inaddition to the modules, a page also consists of navigation areas and site banners. To learn more abouthow to customize the look of these other areas, see Chapter 13.
Figure 6-2
Each module consists of a title, decorations, and the content produced by the module. The decorationscan include buttons, links, and a hover menu that can change the module’s state or perform functional-ity specific to that module.
ModuleAs mentioned previously, a portal is a web-based application that processes requests and generatesdynamic content. Each module produces its own piece of markup (known as a fragment) and togetherwith the skin’s markup shows a complete document.
153
Modules

Because each module produces its own markup, they can be viewed as tiny applications within a largerapplication. Usually, users interact with the content produced by each module by clicking links or sub-mitting forms that are then processed by the portal system, and the actions are passed to the correctmodule.
Module Container The decorations surrounding a module is known as the module container. Through this container, a useris able to interact with the module and perform such actions as minimize/maximize or more advancedfeatures (if the user has edit privileges on that module).
Figure 6-3 shows the module container of a “links” module when logged in as a user with edit access.The diagram shows a number of items, such as the hover menu with a list of administration options(discussed later in this chapter), the title of the module, and the minimize/maximize option.
Figure 6-3
154
Chapter 6

Types of ModulesNow that you are familiar with the concepts surrounding modules, this section examines the 15 user con-tent modules that are bundled with DotNetNuke. Another four modules exist that are not really contentmodules, so we will not discuss the Search or User Account Management modules that you can utilize inyour portal pages. We list each module and include a brief description.
Before starting, however, let’s discuss the core team’s policy surrounding bundled modules. The aim ofthe core team has not been to include every new module within the core, but to provide an extensibleand rich platform. By concentrating on the core platform, third parties have an opportunity to buildupon the functionality that is missing within the bundled modules. However, that being said, the bun-dled modules are designed to meet the majority of needs.
Announcements ModuleThe Announcements module allows you to create short articles for your visitors and even allows you toexpire the older articles as the content becomes obsolete. This module provides an easy-to-use interfacefor keeping your content fresh and rotated. You can use the module as a method of displaying newsreleases, a collection of related articles, or merely as a teaser to other content in your portal. You willnow add an Announcements module to your base installation and see exactly how this module works.Start by opening your web browser to the application and logging in with the administrator account toadd the module to your page. Then you will add some content to your module instance.
We should note here that you do not have to be the administrator in order to accomplish this task. If youwanted, you could set up a role with edit permission to your page and offload this task to another indi-vidual in your organization. This is made possible by the roles-based security the application employs tocontrol access to content and administration.
First, add the module on your page. You use the Add Module function as shown in Figure 6-4 to accom-plish this task. This process will be the same for every type of module you add. For clarity, we areincluding the exact steps you will need to take to add the Announcements module, but as we discussthe other modules available we will just cover the specifics related to the particular module. Look atFigure 6-4 to begin this process.
Figure 6-4
When you log in to your portal and navigate to a page where the user has edit privileges, you will seethe control panel shown in Figure 6-4. You may remember from earlier in the chapter that we used thisinterface to add a new page to our portal using the page functions. You are now going to use the modulesection of this interface to add your Announcements module. This is the interface you will use to addany module to your portal pages. As in the page function section, the titles of the available functions areself-documenting. The Module drop-down control lists all the types of modules you have installed in
155
Modules

your DotNetNuke instance and you will be able to select any available module type from the list. Onething new to version 3 is the ability to add an existing module instance with content to a page. If youselect the Add Existing Module radio button, the content of the Module DDL will change to reflectinstances of other modules you have already added elsewhere in your portal instance. Assume you havea navigation module you need to show only on certain pages to enable navigation to deeper contentareas of your site, but you do not want to show on all pages of the portal. This function allows you toeasily duplicate your navigation for only the pages for which you need the functionality to be available.The Module control enables you to specify the pane where you want the module to appear and how youneed the module aligned inside that pane, with the Pane and Align DDL controls, respectively. Noticethat you can also specify the title for the module instance as you add the instance. The preceding direc-tions do not apply only to the Announcements module; they apply to any module you add to a page.
Now that you understand all the functions available, take a look at Figure 6-5, add the Announcementsmodule, and set the settings of your module instance.
Figure 6-5
156
Chapter 6

You’ve now added your announcements instance and navigated to the settings for your module. Youwill notice the Module Settings control looks familiar to the Page Settings control used earlier in thechapter. This is by design because it decreases the learning curve associated with managing the applica-tion. Notice that this control utilizes the same type of field-level help available in the Page Settings con-trol, which allows you to get a description of the type of content the application expects for this moduleinstance. Table 6-1 describes these associated settings.
Table 6-1: Announcements: Basic and Advanced Module Settings
Setting Description
Module Title As the name suggests, this is the title for your module.
Permissions This is where you set which roles will have access to edit the content inyour module. As you can see, several options are available for controllingthe security of the module’s content.
Display Module Enabling this check box allows you to define a module that will appear On All Pages on all pages within your portal. This is very useful when defining adver-
tising or navigation-type modules you need to display to your usersregardless of the page they are visiting.
Header Here you can define content to display above your module’s content.
Footer Here you can define content to display below your module’s content.
Start Date This is the date you want the content to start displaying to your users.This is very useful for planning content that you only need to appear aftera certain date.
End Date This setting allows you to expire content that is no longer current.
These settings options are pretty much concurrent across all instances of the various modules. Notice thePage Settings panel below the Modules Settings panel. This is where we set our container for the Linksmodule earlier in this chapter. Figure 6-6 shows the panel for the Page Settings of our module, andTable 6-2 explains each of these functions for this area. Note that although this may appear exactly likethe Page Settings covered in Chapter 3, there are some differences and these settings have some uniquesettings just for our current module instance. Figure 6-6 illustrates page settings you will see in the basemodules throughout the application.
157
Modules

Figure 6-6
Table 6-2 lists each of these settings. You will encounter this section throughout the modules in the application.
Table 6-2: Module Page Settings Panel
Setting Description
Icon This is an interesting function that you can use to enhance the dis-play of your module. Setting an icon for your module replaces thetitle with an image. The file you use for this must reside in one of theareas defined in your file manager area. To set the image you use theFile Location and File Name DDLs to specify the file’s location.
Alignment This setting allows you to specify the alignment of your module inthe pane.
Color This setting allows you to specify the background color of the con-tent that appears in this module.
Border This setting allows you to specify a border width for your content inthe module.
158
Chapter 6

Visibility DotNetNuke exposes methods to allow your users to expand andcollapse content to save real estate. These options allow you to definethe default visibility behavior of the module and whether you wantthe users to be able to hide or display the module’s content.
Display Title This check box enables you to display or hide the module’s title fromthe users.
Allow Print This function allows you to expose the print module action, whichdisplays a print icon your users can select to print the module’s con-tent in a print-friendly format.
Allow Syndicate This function allows you to expose your module’s content in an XMLformat, which allows other web authors to consume and displayyour content on another web site.
Module Container Here you can set the container to use for the module’s display in theportal.
Cache Time DotNetNuke utilizes caching to increase the performance of theapplication. Here you can set the number of seconds you would likefor this module to remain cached in memory.
Set As Default Settings This setting allows you to utilize this module’s settings as the defaultfor all the modules you add to your portal.
Apply To All Modules This is a time-saver if you decide you want the default behavior of allmodules to be different than your original settings. You can apply thesettings to one module and push those settings out to all instances ofmodules in the portal.
Move To Page This setting allows you to move this module instance to another pagein the portal.
The settings listed in this section are implemented from the base module settings class, so this informa-tion is pertinent to all modules that inherit the classes, and it is a programming requirement that mod-ules inherit the class. This means that you will have the above functionality no matter which moduleyou are working with, whether it’s a base module or another third-party module you have obtainedfrom one of the many module developers. Now that you have your module settings updated, you cango ahead and add a couple of announcements for your users. Figure 6-7 illustrates the view theAnnouncements module will now contain as a result of your changes to the settings.
Figure 6-7
159
Modules

Because you set up your module to Allow Print and Allow Syndicate, you will notice the XML and Printicons showing up in the module instance. If you had not enabled these options, those icons would not beavailable. Click the Add New Announcement command link, which will navigate you to the edit controlfor your Announcements module. Here, you can define your announcement, as shown in Figure 6-8.
Figure 6-8
Like the other areas of the portal, the names are self-explanatory, but Table 6-3 lists and describes eachoption.
Table 6-3: Adding Announcements
Option Description
Title This is the title that describes the individual announcement. By default thedate the announcement is created is appended to the title you define here.If you do not want this date to appear to your users, uncheck the Add Datecheck box.
Description Here you type the content for your announcement. This module utilizesthe Free Text Box (FTB) control to make it easier for users to format the dis-play of the text. If this particular announcement does not require Rich Textformatting functionality, you can use the text box option, which willdynamically remove the instance of FTB and allow you to only use a textbox for this function.
160
Chapter 6
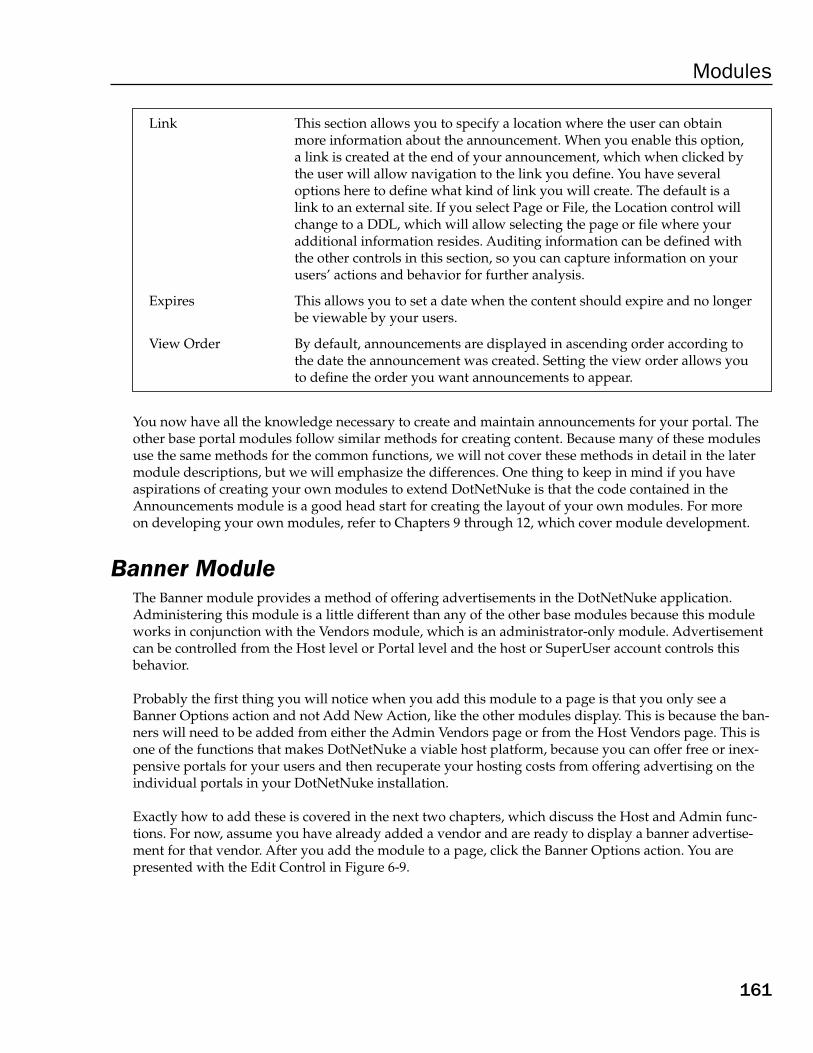
Link This section allows you to specify a location where the user can obtainmore information about the announcement. When you enable this option,a link is created at the end of your announcement, which when clicked bythe user will allow navigation to the link you define. You have severaloptions here to define what kind of link you will create. The default is alink to an external site. If you select Page or File, the Location control willchange to a DDL, which will allow selecting the page or file where youradditional information resides. Auditing information can be defined withthe other controls in this section, so you can capture information on yourusers’ actions and behavior for further analysis.
Expires This allows you to set a date when the content should expire and no longerbe viewable by your users.
View Order By default, announcements are displayed in ascending order according tothe date the announcement was created. Setting the view order allows youto define the order you want announcements to appear.
You now have all the knowledge necessary to create and maintain announcements for your portal. Theother base portal modules follow similar methods for creating content. Because many of these modulesuse the same methods for the common functions, we will not cover these methods in detail in the latermodule descriptions, but we will emphasize the differences. One thing to keep in mind if you have aspirations of creating your own modules to extend DotNetNuke is that the code contained in theAnnouncements module is a good head start for creating the layout of your own modules. For moreon developing your own modules, refer to Chapters 9 through 12, which cover module development.
Banner ModuleThe Banner module provides a method of offering advertisements in the DotNetNuke application.Administering this module is a little different than any of the other base modules because this moduleworks in conjunction with the Vendors module, which is an administrator-only module. Advertisementcan be controlled from the Host level or Portal level and the host or SuperUser account controls thisbehavior.
Probably the first thing you will notice when you add this module to a page is that you only see aBanner Options action and not Add New Action, like the other modules display. This is because the ban-ners will need to be added from either the Admin Vendors page or from the Host Vendors page. This isone of the functions that makes DotNetNuke a viable host platform, because you can offer free or inex-pensive portals for your users and then recuperate your hosting costs from offering advertising on theindividual portals in your DotNetNuke installation.
Exactly how to add these is covered in the next two chapters, which discuss the Host and Admin func-tions. For now, assume you have already added a vendor and are ready to display a banner advertise-ment for that vendor. After you add the module to a page, click the Banner Options action. You arepresented with the Edit Control in Figure 6-9.
161
Modules
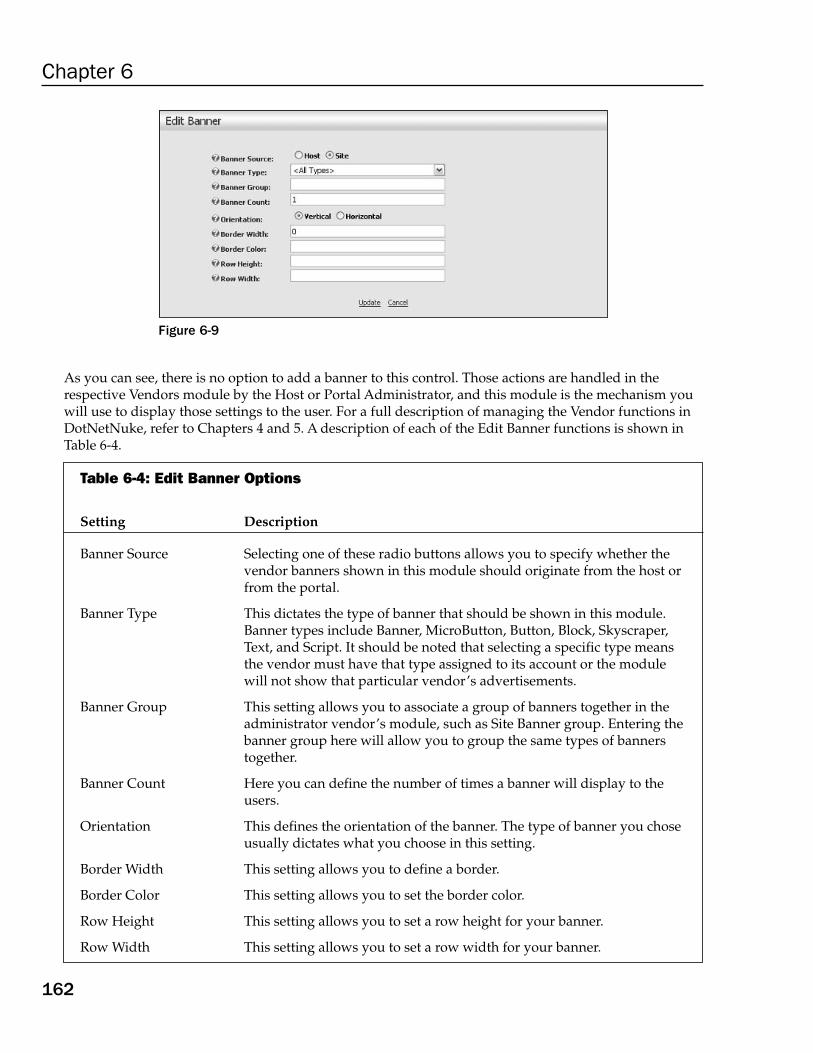
Figure 6-9
As you can see, there is no option to add a banner to this control. Those actions are handled in therespective Vendors module by the Host or Portal Administrator, and this module is the mechanism youwill use to display those settings to the user. For a full description of managing the Vendor functions inDotNetNuke, refer to Chapters 4 and 5. A description of each of the Edit Banner functions is shown inTable 6-4.
Table 6-4: Edit Banner Options
Setting Description
Banner Source Selecting one of these radio buttons allows you to specify whether thevendor banners shown in this module should originate from the host orfrom the portal.
Banner Type This dictates the type of banner that should be shown in this module.Banner types include Banner, MicroButton, Button, Block, Skyscraper,Text, and Script. It should be noted that selecting a specific type meansthe vendor must have that type assigned to its account or the modulewill not show that particular vendor’s advertisements.
Banner Group This setting allows you to associate a group of banners together in theadministrator vendor’s module, such as Site Banner group. Entering thebanner group here will allow you to group the same types of bannerstogether.
Banner Count Here you can define the number of times a banner will display to theusers.
Orientation This defines the orientation of the banner. The type of banner you choseusually dictates what you choose in this setting.
Border Width This setting allows you to define a border.
Border Color This setting allows you to set the border color.
Row Height This setting allows you to set a row height for your banner.
Row Width This setting allows you to set a row width for your banner.
162
Chapter 6
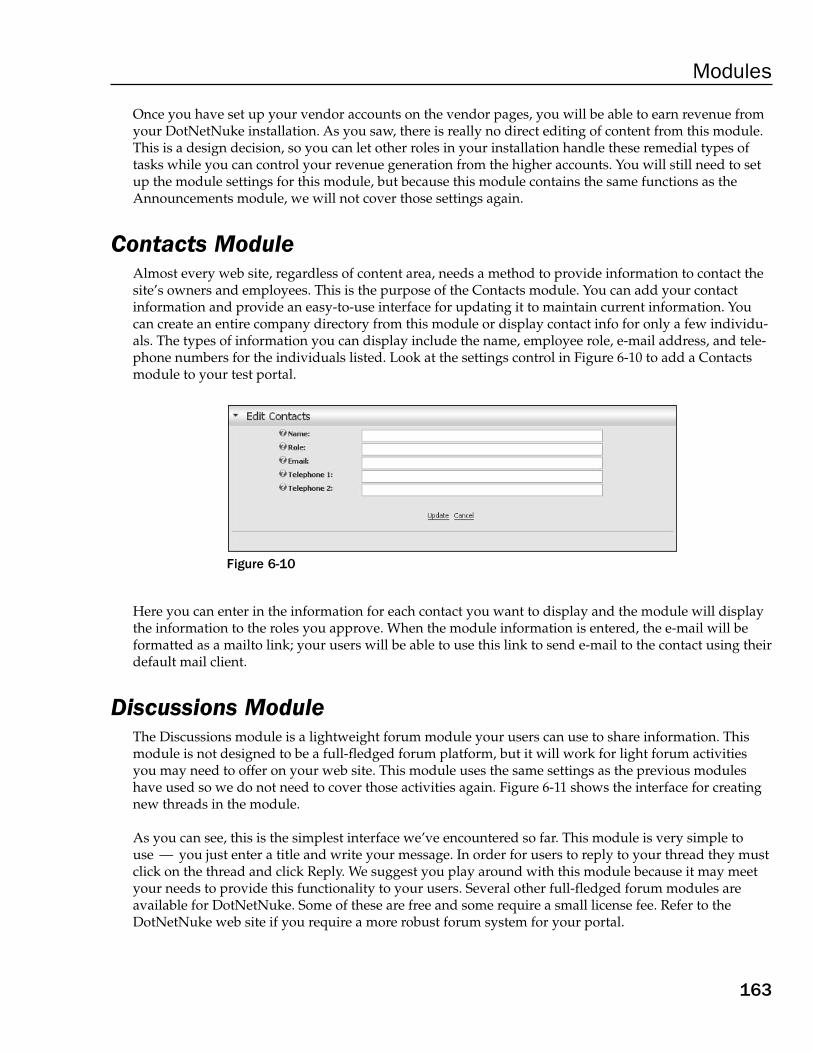
Once you have set up your vendor accounts on the vendor pages, you will be able to earn revenue fromyour DotNetNuke installation. As you saw, there is really no direct editing of content from this module.This is a design decision, so you can let other roles in your installation handle these remedial types oftasks while you can control your revenue generation from the higher accounts. You will still need to setup the module settings for this module, but because this module contains the same functions as theAnnouncements module, we will not cover those settings again.
Contacts ModuleAlmost every web site, regardless of content area, needs a method to provide information to contact thesite’s owners and employees. This is the purpose of the Contacts module. You can add your contactinformation and provide an easy-to-use interface for updating it to maintain current information. Youcan create an entire company directory from this module or display contact info for only a few individu-als. The types of information you can display include the name, employee role, e-mail address, and tele-phone numbers for the individuals listed. Look at the settings control in Figure 6-10 to add a Contactsmodule to your test portal.
Figure 6-10
Here you can enter in the information for each contact you want to display and the module will displaythe information to the roles you approve. When the module information is entered, the e-mail will beformatted as a mailto link; your users will be able to use this link to send e-mail to the contact using theirdefault mail client.
Discussions ModuleThe Discussions module is a lightweight forum module your users can use to share information. Thismodule is not designed to be a full-fledged forum platform, but it will work for light forum activitiesyou may need to offer on your web site. This module uses the same settings as the previous moduleshave used so we do not need to cover those activities again. Figure 6-11 shows the interface for creatingnew threads in the module.
As you can see, this is the simplest interface we’ve encountered so far. This module is very simple to use — you just enter a title and write your message. In order for users to reply to your thread they mustclick on the thread and click Reply. We suggest you play around with this module because it may meetyour needs to provide this functionality to your users. Several other full-fledged forum modules areavailable for DotNetNuke. Some of these are free and some require a small license fee. Refer to theDotNetNuke web site if you require a more robust forum system for your portal.
163
Modules

Figure 6-11
Documents ModuleThe Documents module allows you to offer files that your users can download from your site. This is afairly useful module because you will likely need to offer examples or additional information in theform of Word documents or other types of files to your users. The types of files you can use with thismodule is controlled by the file type settings under the Host Settings page. By default, DotNetNuke willallow the following extensions:
❑ .jpg
❑ .jpeg
❑ .jpe
❑ .gif
❑ .bmp
❑ .png
❑ .doc
❑ .xls
❑ .ppt
❑ .txt
164
Chapter 6

❑ .xml
❑ .xsl
❑ .css
❑ .zip
If you require additional file types not allowed by default, you will need to add the extension under theHost Settings page in the File Upload Extensions field. If you are going to allow your users to uploadfiles, you should be careful as to the type of files allowed because it’s possible users may introduceviruses or other undesirable files into your portal file system. The application offers no default protec-tion in this area, so diligence is needed to protect the integrity of the system.
Figure 6-12 shows the interface you use to add new documents to this module. As in other areas of the appli-cation, the files you make available through this module will reside in your portal default file directory.
Figure 6-12
Here you will enter the title, link, and category for your module. You may notice the Link section appearsalmost exactly like the links control in the Announcements module. Here is another example of the object-oriented programming of DotNetNuke at work. We attempt to reuse code wherever possible to enable asimpler user interface for the user and to promote best programming practices when possible. You willnotice there are some differences between the links control in the Announcements module and this one inthe Documents module. The only difference between the two is that in the Announcements module youhave an option to select a page in your portal as one of the links. Because it should never be necessary tooffer a page for download, this option is not included in the Documents module. You will also notice thatlike the Announcements module, the Documents module allows the tracking of your users’ actions so youwill be able to determine the content that your users are most interested in receiving. The Category fieldoffers you the ability to logically group the files in this module. This category will be displayed as part ofthe Documents module so your users will understand the type of file they are about to download or view.
165
Modules

Events ModuleThe Events module allows you to list upcoming events to announce to your users. This module hassome additional settings that control the display of the module. The rest of the module settings are thesame as the ones we have already covered, so we will only look at the settings that are unique to thismodule. See Figure 6-13.
Figure 6-13
As you can see from Figure 6-13, the Events module can be displayed as either a list or a calendar controldepending on your needs. The other two options are pertinent only if you select the Calendar option.Selecting the List option will format the information you enter into the module into a sequential list ofthe upcoming events you have entered. Once you’ve decided on the view for the events, you can add theevent as shown in Figure 6-14.
You will notice you have many of the same functions available in this module as you do in the othermodules. It should be noted that if you use the calendar view you will want to limit the amount of textin the description, because there is only limited room in the calendar view for events. If your eventsneed a longer description to convey the meaning to your users, you will need use the list view for theEvents module. Table 6-5 explores each of the options available in this module.
166
Chapter 6

Figure 6-14
Table 6-5: Edit Events Module
Settings Description
Title Here you can enter the title of your individual event.
Description Here you can enter a description for your event that will provide your userwith detailed information that is not included elsewhere in the module.
Image You can select an image to be associated with your event. This is usuallyused to easily convey more information about your event to your users.
Alternate Text This is information describing your image. This is important for meeting508 accessibility for visually challenged users who may access your siteusing screen readers.
Occurs Every Here you can define how often this event will occur. Options are to set theevent to occur periodically based on day, week, month, or year. This is atime-saver because if you have recurring events to announce, you onlyneed to set the event once and the module will take care of the rest for you.
Table continued on following page
167
Modules

Start Date This is the first date your event will occur. We should note that unlike theAnnouncements module your content will be visible before the date youenter here. This date signifies the start of your event.
Time This is the time of day your event will occur.
Expiry Date The last day of your event. This is useful when you are using the OccursEvery function and you no longer need to show the event, but would liketo keep earlier events of this type for reference.
As you can see, the Events module is very useful, and you are sure to find many other uses for it as well.
FAQs ModuleYou can use the FAQs or Frequently Asked Questions module to answer questions your users may haveabout your web site or products. This is a very useful module for disseminating information that youreceive questions about on an ongoing basis. This is one of the simpler modules in DotNetNuke, but itis also one of the more powerful ones because it will save you many hours of replying to e-mails if youutilize its functionality. The interface for adding a new FAQ is very simple and warrants little discussion.Basically, you enter a question you want to provide an answer for and then enter the answer for that ques-tion. The module offers the ability to utilize the Rich Text editor so that you can format your questionsand answers in a way that is easy for your users to understand and to convey the intended message.Figure 6-15 shows the interface for the Edit functions of the module.
Figure 6-15
168
Chapter 6

Feedback ModuleThe Feedback module offers you a mechanism for allowing users to contact you without exposing youre-mail address to the many SPAM Bots that regularly scan the Internet. The module does not have anAdd function like the other modules we have explored because the purpose of the module does notneed this functionality. Basically users are adding feedback when they send you feedback. The moduledoes contain some settings you can use to control the display of the module to users and to specify thee-mail address to which you want the e-mails created from the module to be sent. Prior to version 3 ofthe portal, the only option to send these requests to was the administrator account. With this version youhave the option to change this behavior. One thing to be aware of is that this module relies on the mailserver settings on the Host Settings page to function properly. Ensure you have successfully added yourmail server and tested the settings before attempting to utilize this module’s functionality. You willnotice in Figure 6-16 that you also have the option of setting the width and rows of this module, whichcontrols the display of the module to your users.
Figure 6-16
IFrame ModuleThe IFrame module allows you to display web pages from other web sites in your portal. When you setthe page, the module should display and add an IFrame tag to your page and load the remote site intothe frame. One of the main uses for this module mentioned in the DotNetNuke forums is to utilizelegacy applications that were created with ASP or some other dynamic language that must still be usedfor some functionality. This allows companies to take advantage of the benefits of DotNetNuke whilestill utilizing other functionality they had in previous applications. This is usually a short-term fix peo-ple employ. As they become more familiar with DotNetNuke module development, they can converttheir legacy applications to fully compliant DotNetNuke modules to take advantage of full integrationwith DotNetNuke roles and user control functions. The settings available for the IFrame module areillustrated in Figure 6-17.
169
Modules

Figure 6-17
The Source of the IFrame module is the location of the web page you would like to add to display in yourmodule. The Width and Height fields determine the size of the IFrame and should be adjusted to fit thepage you need to display. These fields can be entered either as pixels or a percent depending on yourneeds. Title is a little confusing here because the title is not the module title, nor will it be shown to normalusers. This title is a requirement for 508 accessibility compliance and you should enter a descriptive valuein this field. Scrolling determines whether the IFrame should add scrollbars for the frame. This is importantif the target web page is larger than you can show in your portal without impeding the display or omittingcertain content of the target page. Your options are auto, yes, and no. Auto is usually the best choice herebecause the module will determine whether or not the bars are needed based on the target page dimen-sions. The last option is to define whether you want a border to appear around your target page.
Image ModuleThe Image module offers you an easy way to add images to your portal. The module allows you to addan image to a page where it would not make sense to have a skin element and you do not require theability to link to another site from the image. The image you display can reside either in your portal filesystem or on an external resource. Figure 6-18 shows the options available for adding a link.
Figure 6-18
170
Chapter 6

You will notice the same familiar file picker interface you have seen in other modules. Selecting the URLoption for the link type will produce a post back and present you with a text box to enter in the path tothe remote image. If you want to use an image that resides in your portal directories, you can select theimage from the drop-down lists. This interface also allows you to enter in the Alternate Text for theimage and specify the Width and Height of the image. Leaving the proportion text boxes blank willcause the image to be displayed in its actual size.
Links ModuleThe Links module is probably one of the most used modules in DotNetNuke installations; it probably isonly used less than the HTML/Text and Announcements modules. As its name suggests, this moduleallows you to add links your users can use to navigate to other areas of your site or to remote web sites.This module has a few unique settings you need to be familiar with. Figure 6-19 shows the ModuleSettings pane for the Links Settings.
Figure 6-19
As you can see, you have several options for controlling the behavior and view of the Links module.Selecting the Control Type will allow you to define whether the link list will display as a drop-down listor a normal data-bound list. You also have the option of displaying the orientation of the list with theList Display Format option. The last option available is whether you want to show the user a shortdescription of the web page where the link navigates to. This is a useful option to allow some additionalkeywords to be associated with the link. Figure 6-20 shows your options for adding links to your mod-ules. For this example, just accept the defaults in the Link Settings in Figure 6-19 and move on to addingyour link as shown in Figure 6-20.
171
Modules

Figure 6-20
The title is what users will see as the link. You also use the file picker control in this module and youhave the options of defining an external, page, or internal file in your module. The audit controls on thismodule let you track your visitors’ behavior. The Description is the information we mentioned earlier iswhere you select the info link in the settings then the user will see an additional link where they canread the information you enter in this field. The View Order allows you to organize the order in whichyour links are displayed in the module.
News Feed (RSS)The News Feed module allows you to consume RSS content from another resource and display it to yourusers. Many web sites offer syndicated feeds that you can consume and display relevant content foryour portal. Many of these resources are available on the Internet, some of which are free and some thatrequire a fee to consume. The News Feed module allows you to consume both of these types of feedsand display the information according to your feed style sheet, as shown in Figure 6-21.
The Source is the location of the source you want to consume. You also have the option of specifying thestyle sheet to use with the feed. Most news feeds provide a style sheet especially for their feed that youcan use or you can specify your own style sheet. DotNetNuke offers the flexibility to use the style sheetthat meets your business needs. Some feeds require you to present credentials authorizing access to theircontent before you can consume a feed. The Username and Password text boxes are where you enter thistype of authentication information.
172
Chapter 6

Figure 6-21
HTML/Text ModuleThe HTML/Text module, or HTML mod for short, is probably one of the most used modules inDotNetNuke portals. It allows you to format your content with the easy-to-use Free Text Box editorand it also allows for a large amount of content to be displayed. This module also fits with what mostwebmasters need for their content display. You have the option of using the editor or, if you’re a hard-core HTML programmer, you can type in your HTML directly with out relying on the controls renderingyour markup. The HTML/Text interface is very straightforward and includes only two controls, asshown in Figure 6-22.
The first option is where you will enter your content to be displayed in the module and the second is asearch summary. The DotNetNuke 3 search functions have the ability to index all the content in thismodule. The type of content entered in this module may become quite large, so the core team felt itwould be pertinent to allow a mechanism for the module administrator to add a summary of the contentfor the search engine to utilize. This accomplishes two functions. First, it allows you to provide the gistof the content that will be displayed to users when they search for similar content and, second, it helpswith the performance of the search engine because there is no need to index all of the content that mayappear in this type of module.
173
Modules

Figure 6-22
User Defined Table ModuleThe User Defined Table is a catch-all type of module. This module allows you to define your own datatype and display this information to your users in an organized manner. The easiest way to understandthe use of this module is through an example. Suppose you need an additional field for your portal’scontacts. You could open up the Contacts project and modify the code to add your field and then recom-pile, but you could also use the User Defined module to accomplish the same task. First, add the moduleto your page and open the Manage User Defined Table action item. Click the Add New Column link.You are presented with the screen shown Figure 6-23.
Figure 6-23
174
Chapter 6

As you can see, you have the ability to add your own defined fields in the module. For simplicity,assume you only need to display the person’s name, title, and birthday in your Contacts module. So,you add three fields of these types and now have your fields defined as in Figure 6-24.
Figure 6-24
You not only have the ability to add your own unique fields, but you also have the ability to specify thedata type. Your data type options for this module include text, integer, decimal, date, and Boolean. Thesetypes give you the ability to create some pretty interesting scenarios out of this module. Figure 6-25shows the finished user defined table. To add a new item to the module you can now select the AddNew Row action from the module menu.
Figure 6-25
As you can see, you can display information in a manner that was previously not available with the por-tal, and you have accomplished your goals with just a few clicks and without ever opening up an IDE todisplay your data. We suggest you spend some time exploring the functionality of this module and seewhat other functions it may allow you to perform.
XML/XSL ModuleThe XML/XSL module allows you to display XML data from an external data source and display it inyour portal according to the accompanying XSL transformation file. This module further increases thetype of data you can display in your portal and is only limited by the XML technology and your imagi-nation. Figure 6-26 shows the Edit settings of this module.
175
Modules

Figure 6-26
You can see from the figure that this module utilizes the file picker controls available in other modules toallow you to select the source of your XML data and the transformation file you will use to describe thatdata. This module enables DotNetNuke to consume data from a wide variety of sources, because mostmodern data sources enable a method for exporting its data to XML format.
ManagementNow that we have discussed the architecture and explored the modules bundled within DotNetNuke,it’s time to examine the management functionality surrounding modules. This section discusses themodule options that appear in the top toolbar, such as adding a module to a page, and also discussesthe options surrounding a module, such as minimize/maximize, site settings, delete, and so on.
Page ManagementFigure 6-27 shows the module section of the administration toolbar that appears for portal administra-tors or users with sufficient edit permissions.
This toolbar has two modes of operation, depending on the radio option you select. The default mode ofoperation is Add New Module, as shown in Figure 6-27. This mode allows you to add new modules tothe current page. To add a new module, select the desired module from the drop-down list, specify thepane to inject the module into, specify a title for the desired module, and choose the alignment for thetext within the module. Click the Add button to inject the module into the current page.
176
Chapter 6

Figure 6-27
The other mode of operation is Add Existing Module, as shown in Figure 6-28. This mode allows you toadd the exact same instance of a module that appears on another page. This means that any updatesdone to the module will automatically appear in both locations no matter which page the update wasperformed on. To add an existing module, select the desired page from the drop-down list, specify thepane to inject the module into, select the module (populated from the page selected) you want to add tothe current page, and choose the alignment for the text within the module. Click the Add button to injectthe module into the current page.
Now that you have added a module to a page, you may notice a red border around the module with thekeyword “Administrators.” The red border dictates that this module is not publicly viewable. The processhas been designed so that only the administrators of the current page can see newly added modules. Tomake it publicly viewable, see “Settings” under “Hover Menu” in the following section.
177
Modules

Figure 6-28
Module ManagementNow that you are able to add modules to pages, this section discusses the options available to you oncea module is on the page. Earlier in this chapter we discussed the concept of a module container:
“Each module consists of a title, decorations, and the content produced by the module. The decorationscan include buttons, links, and a hover menu that can change the module’s state, or perform functional-ity specific to that module.”
This section explains the various decorations (buttons, links, and hover menu) that are available in eachmodule (providing the user is an authorized role). The following features are described:
❑ Drag and Drop: Allows you to reorganize modules on a single page.
❑ Hover Menu: Provides a variety of options.
❑ Minimize/Maximize: Allows a user to control the visibility of module’s content.
Drag and Drop Drag and Drop is a relatively new feature in DotNetNuke. It allows an authorized user to select a mod-ule for relocation, drag the module to the new location (content pane), and unclick to drop the moduleinto its new location.
178
Chapter 6

To relocate a module, select the title of a module with your left mouse button, hold down the button,and drag the module to the new location, as shown in Figure 6-29. The pane you are dragging the mod-ule to should highlight, indicating that it is okay to drop it (unclick the mouse button).
Figure 6-29
Using Drag and Drop provides a time-efficient method of reorganizing content once it is on a page.
Hover MenuThe hover menu contains a variety of options and is ordered in a similar fashion for all modules. Thefirst one or two options available in the menu are module-specific.
Figure 6-30 shows the Announcements module and its hover menu. As you can see, the first option isAdd New Announcement, which is specific to the Announcements module. In this section, we won’t bediscussing options that are specific to a module, but rather the general options available to all modules.
179
Modules

Figure 6-30
Import ContentThe Import Content option allows you to import a module’s content from another portal. Be aware thatnot all third-party modules support this option.
Export ContentThe Export Content option allows you export a module’s content to a single file. Be aware that not allthird-party modules support this option.
SyndicateThe Syndicate option links to a Rich Site Summary (RSS) feed for that module.
HelpThe Help option links to the configured help for that module. Module authors have a number of mecha-nisms for providing help, and this option will link to the mechanism they have selected.
PrintThe Print option takes you to a screen containing only that module for printing purposes.
180
Chapter 6

SettingsThe Settings section is the most important menu option in the hover menu, as discussed earlier in this chap-ter. It takes you to an edit screen for that module where you can edit various options about the selected mod-ule. The Basic Settings options include the title and permissions for the module, as shown in Figure 6-31.
The Advanced Settings options (also shown in Figure 6-31) include the option to provide a header orfooter for the module, a start and end date for display purposes, and finally, the option to show the mod-ule on all pages.
Figure 6-31
The Page Settings options (as shown in Figure 6-32) include options for controlling the look of the mod-ule, such as icon, color, border, alignment, and visibility. Other options include Display Title, AllowPrint, Allow Syndication, Override Container, and a Cache Time option that allows output caching of themodule’s content, which is particularly useful on high-traffic sites. The last section of this area allowsthe authorized user to apply these settings to all modules, or move the module to another page.
181
Modules
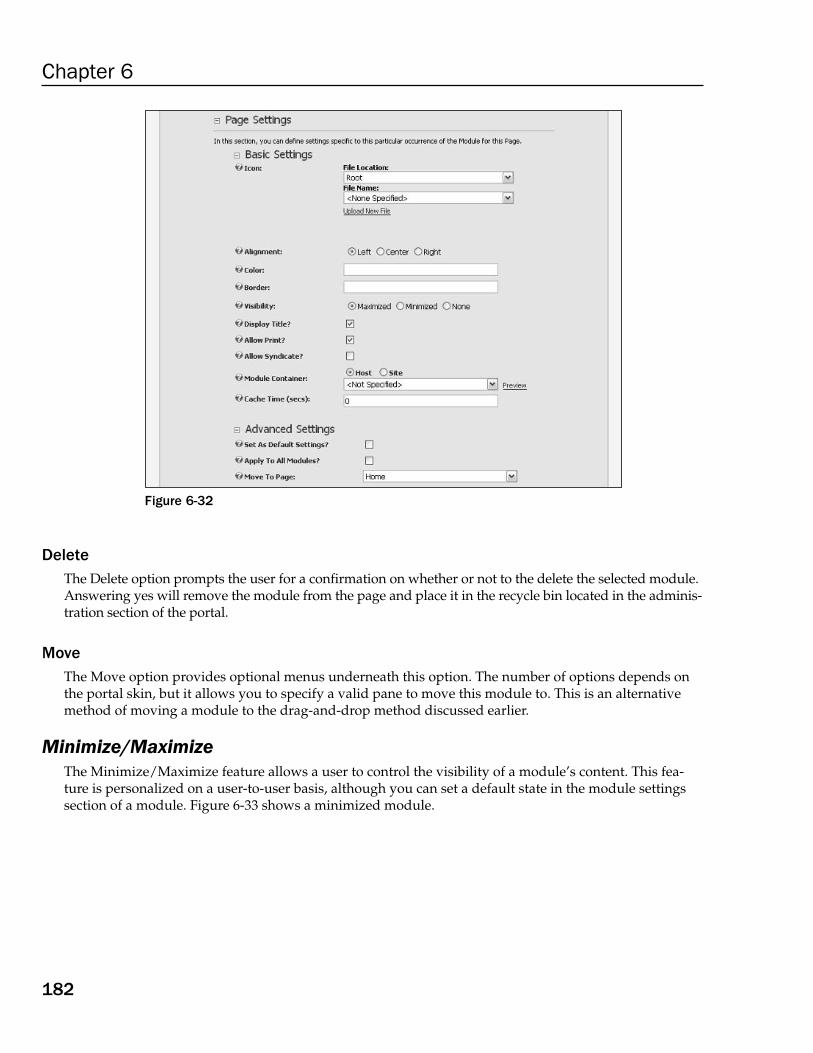
Figure 6-32
DeleteThe Delete option prompts the user for a confirmation on whether or not to the delete the selected module.Answering yes will remove the module from the page and place it in the recycle bin located in the adminis-tration section of the portal.
MoveThe Move option provides optional menus underneath this option. The number of options depends onthe portal skin, but it allows you to specify a valid pane to move this module to. This is an alternativemethod of moving a module to the drag-and-drop method discussed earlier.
Minimize/MaximizeThe Minimize/Maximize feature allows a user to control the visibility of a module’s content. This fea-ture is personalized on a user-to-user basis, although you can set a default state in the module settingssection of a module. Figure 6-33 shows a minimized module.
182
Chapter 6
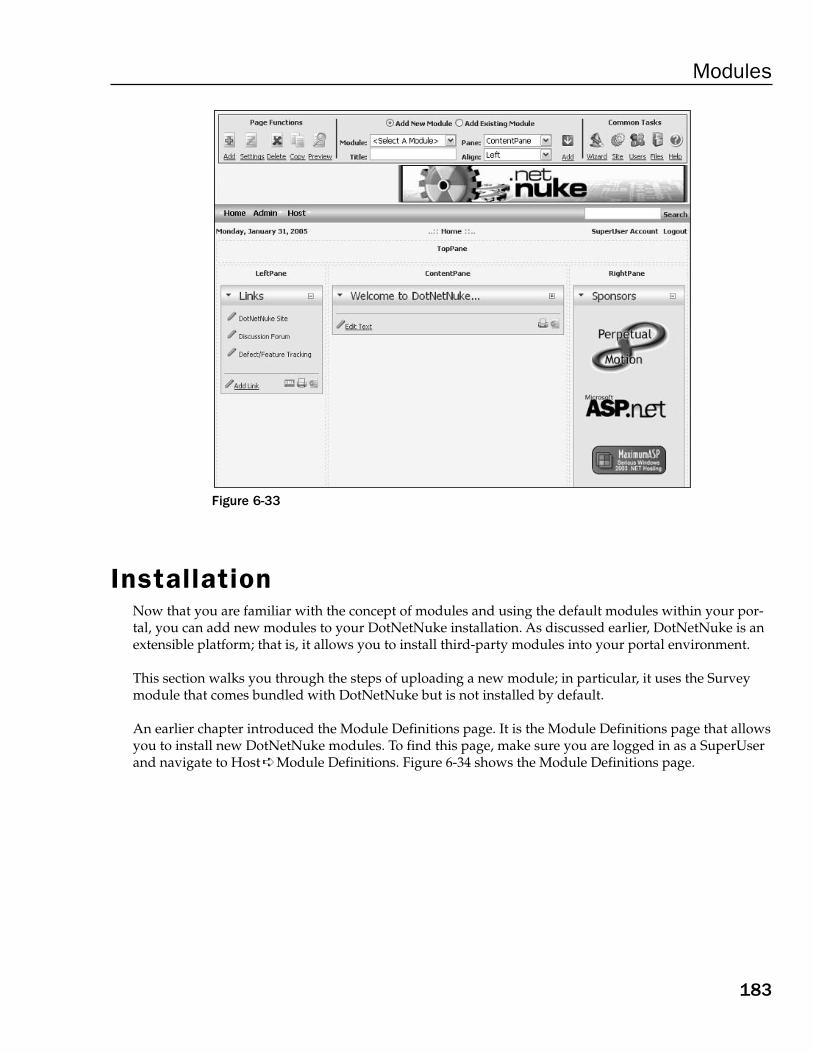
Figure 6-33
InstallationNow that you are familiar with the concept of modules and using the default modules within your por-tal, you can add new modules to your DotNetNuke installation. As discussed earlier, DotNetNuke is anextensible platform; that is, it allows you to install third-party modules into your portal environment.
This section walks you through the steps of uploading a new module; in particular, it uses the Surveymodule that comes bundled with DotNetNuke but is not installed by default.
An earlier chapter introduced the Module Definitions page. It is the Module Definitions page that allowsyou to install new DotNetNuke modules. To find this page, make sure you are logged in as a SuperUserand navigate to Host ➪ Module Definitions. Figure 6-34 shows the Module Definitions page.
183
Modules

Figure 6-34
To add a new module from the Module Definitions page, move your mouse over the hover menuand select Upload New Module. Once on this screen, you are presented with the screen the shown inFigure 6-35.
To upload the module, click the Browse button and choose your module install file, which should be azip file. The Survey module zip file is located at the following path:
<DotNetNuke Installation Directory>/DesktopModules/Survey/DotNetNuke.Survey.Zip
Once the file has been selected, click Add and then Upload New File.
The resulting screen presents a series of log entries showing you what happened during the installationof the module. Once you are happy with the installation (for example, there are no glaring red error mes-sages), click the Return hyperlink or navigate to any page within your portal system. This page hit maytake some time since the cache has been flushed by installing a new module.
To confirm that the module has been installed successfully, you should now see it in the drop-down listin the top toolbar. In this particular case, you should see an entry named “CompanyName – Survey” inthe module drop-down list.
184
Chapter 6

Figure 6-35
SummaryThis chapter introduced the concept of modules, and discussed their architecture in a portal context. Youshould now be familiar with the terms portal, page, module, and module container.
The chapter also discussed the types of modules included with DotNetNuke and the management ofthose modules from a site administrator’s perspective. It also examined management from a page per-spective and examined the various controls, such as the hover menu, that are included within a module.
Lastly, it discussed the installation of third-party modules and walked through the installation of theSurvey module that is bundled within DotNetNuke.
185
Modules


DotNetNuke Architecture
The architecture of DotNetNuke has evolved from a rewrite of the IBuySpy Portal into a best prac-tice example of design patterns and coding standards. This chapter explains the components of thearchitecture behind DotNetNuke.
Before diving deep into the architectural overview, you should understand some key technologiesthat DotNetNuke employs. The following section covers several interesting technologies anddesign patterns used in the DotNetNuke 3.0 architecture.
Technologies UsedAs covered in Chapter 1, DotNetNuke was originally derived from the IBuySpy Portal SolutionKit. IBuySpy was written in VB.NET and showcased some interesting design concepts. If you lookunder the hood of DotNetNuke 3.0 today, though, it doesn’t even resemble IBuySpy. We havetaken the best concepts from IBuySpy and applied many best practice design patterns and codingstandards that have evolved as the .NET Framework has evolved.
DotNetNuke 3.0 uses several key technologies in its architecture:
❑ Windows 2000 Server, Windows 2003 Server
❑ ASP.NET
❑ Visual Basic .NET
❑ Web Forms
❑ Microsoft Internet Information Services
❑ ADO.NET
❑ Microsoft SQL Server 2000

In addition, DotNetNuke showcases several key design patterns and concepts that differentiate itfrom many other portal applications. These design patterns and concepts provide a foundation thatdemonstrates and encourages best practices programming:
❑ Provider Model
❑ Custom Business Objects and Controllers
❑ Centralized Custom Business Object Hydration
❑ Membership/Roles/Profile Providers using ASP.NET 2.0 API
❑ Localization framework that mirrors the ASP.NET 2.0 implementation
The DotNetNuke application has attracted a lot of attention in its use of these key design patterns. Animportant driver to that attention has been the ability for developers to learn many of the ASP.NET 2.0features before ASP.NET 2.0 is released. Developers have also learned from DotNetNuke about theextensibility of the Provider Model and how it can help them construct better applications.
Provider ModelThe Provider Model is a design pattern that is used in the DotNetNuke architecture to allow core func-tionality to be replaced without modifying core code. The introduction of the Provider Model startedwith Microsoft in its need to provide a simple and extensible API in .NET. The Provider Model has beenformalized in ASP.NET 2.0 as a best practice design pattern. The purpose of the Provider Model is toprovide an easy-to-understand and well-documented API that has the benefits of simplicity and thepower of extensibility.
To provide both simplicity and extensibility, the API is separated from the implementation of the API.A provider is a contract between an API and the business logic that establishes the functionality that theimplementation of the API must provide. When a method in the API is called, it is the implementation ofthe API that fulfills the request. Simply, the API doesn’t care “how” the job is done, as long as it is done.If there is one useful concept garnered from this section, let it be this oversimplification of the purpose ofthe Provider Model:
“Build things so they do not depend on the details of other things.”
This fundamental design concept was recognized well before the Provider Model came to fruition, but ittruly speaks to what the Provider Model brings to developers. The API in the Provider Model does notdepend on the details of the implementation of the API. It is because of this that the implementation ofthe API can be changed very easily, and the API itself is unaffected due to the abstraction.
Several areas in DotNetNuke use the Provider Model:
❑ Data Provider
❑ Scheduling Provider
❑ Logging Provider
188
Chapter 7

❑ HTML Editor Provider
❑ Search Provider
❑ Friendly URL Provider
The first implementation of the Provider Model in DotNetNuke was the Data Provider. DotNetNukeoriginally supported only Microsoft SQL Server. The core of the portal was tightly coupled with the datatier. Many requests came from the community to extend DotNetNuke to support other data stores, so weneeded a way to support a diverse array of data stores while maintaining a simple data access layer andallowing for extensibility. This is when the concept of the Provider Model was first introduced intoDotNetNuke.
Figure 7-1 shows that the Data Provider API is not dependent on a tightly coupled implementation ofthe API. Instead, the Data Provider API doesn’t even know what kind of data store is being used untilyou configure an XML setting in the web.config file. Other than the settings in web.config, the only otherrequirement of the Data Provider API is that the implementation of the API must fulfill its contract byproviding the necessary functionality defined in the base class. For example, all methods marked withMustOverride in the Data Provider API must be overridden in the implementation of the API.
Figure 7-1
CBO ControllerClass
Data ProviderAbstract Base
Class
Data ProviderAPI
OR
Implementation ofData Provider API
MicrosoftSQL Server
Data Provider
OR
OR
mySQLData Provider
OracleData Provider
SQL Server
OtherData Provider
Other
mySQL
Oracle
189
DotNetNuke Architecture

Provider ConfigurationThe Provider API has to be configured to work with the implementation of the API. The API needs to beconfigured to know which type and assembly to use for the implementation of the API. As mentioned inthe previous section, this is configured in the web.config file.
The configuration settings are in XML in the web.config file. There is no standard for naming conventionsor the structure of the configuration settings in the Provider Model in general. However, DotNetNuke hasfollowed a consistent pattern in each Provider Model API and the associated configuration settings.
Each API may have different requirements for configuration settings. For instance, the Data ProviderAPI needs a connection string defined in its configuration settings. The XML Logging Provider needs itslog configuration file location defined in its configuration settings. So each API will have configurationsettings that are specific to that API.
The DotNetNuke core providers store the Provider Model API configuration settings in web.config underthe /configuration/dotnetnuke node. When a Provider Model API is first instantiated, it collects these set-tings, which allows it to use the specified implementation of the API. The configuration settings are thencached so that in subsequent requests the configuration settings are retrieved more quickly. Listing 7-1shows a section of the web.config file that contains the Data Provider API’s configuration settings.
Listing 7-1: Data Provider Configuration Settings
<data defaultProvider=”SqlDataProvider”><providers>
<clear /><add name=”SqlDataProvider”type=”DotNetNuke.Data.SqlDataProvider, DotNetNuke.SqlDataProvider”connectionStringName=”SiteSqlServer”upgradeConnectionString=””providerPath=”~\Providers\DataProviders\SqlDataProvider\”objectQualifier=””databaseOwner=”dbo” />
</providers></data>
The Provider Model has brought great value to DotNetNuke in the way that it allows for functionality tobe replaced without modifying the core code. In DotNetNuke, like most open-source applications, thecore code should not be modified by its consumers if at all possible. The Provider Model helps to enforcethis fundamental standard of open-source application development. It also provides a new level ofabstraction between the data access layer and the data store.
Custom Business ObjectsCustom Business Objects (CBOs) are essentially a blueprint, or representation, of an object that is important to the application. In DotNetNuke, an example of a CBO is an instance of theDotNetNuke.Services.FileSystem.FileInfo class found in /components/FileSystem/FileInfo.vb.An instance of this class contains information about a single file, as shown in Listing 7-2.
190
Chapter 7

Listing 7-2: The FileInfo CBO Class
<XmlRoot(“file”, IsNullable:=False)> Public Class FileInfoPrivate _FileId As IntegerPrivate _PortalId As IntegerPrivate _FileName As StringPrivate _Extension As StringPrivate _Size As IntegerPrivate _Width As IntegerPrivate _Height As IntegerPrivate _ContentType As StringPrivate _Folder As String
<XmlIgnore()> Public Property FileId() As IntegerGet
Return _FileIdEnd GetSet(ByVal Value As Integer)
_FileId = ValueEnd Set
End Property<XmlIgnore()> Public Property PortalId() As Integer
GetReturn _PortalId
End GetSet(ByVal Value As Integer)
_PortalId = ValueEnd Set
End Property<XmlElement(“filename”)> Public Property FileName() As String
GetReturn _FileName
End GetSet(ByVal Value As String)
_FileName = ValueEnd Set
End Property<XmlElement(“extension”)> Public Property Extension() As String
GetReturn _Extension
End GetSet(ByVal Value As String)
_Extension = ValueEnd Set
End Property<XmlElement(“size”)> Public Property Size() As Integer
GetReturn _Size
End GetSet(ByVal Value As Integer)
_Size = ValueEnd Set
End Property<XmlElement(“width”)> Public Property Width() As Integer
191
DotNetNuke Architecture

GetReturn _Width
End GetSet(ByVal Value As Integer)
_Width = ValueEnd Set
End Property<XmlElement(“height”)> Public Property Height() As Integer
GetReturn _Height
End GetSet(ByVal Value As Integer)
_Height = ValueEnd Set
End Property<XmlElement(“contenttype”)> Public Property ContentType() As String
GetReturn _ContentType
End GetSet(ByVal Value As String)
_ContentType = ValueEnd Set
End Property<XmlElement(“folder”)> Public Property Folder() As String
GetReturn _Folder
End GetSet(ByVal Value As String)
_Folder = ValueEnd Set
End PropertyEnd Class
The FileInfo class has no methods, only properties. This is an important distinction to recognize —CBOs only have properties. The methods to manage the CBO are in a CBO Controller class specific tothe CBO. A CBO Controller class contains the business logic necessary to work with its associated CBOclass. For instance, there is a FileController class found in /components/FileSystem/FileController.vbthat contains business logic for the FileInfo CBO. For the sake of the core File Manager module, theFileInfo data is stored in the database. Therefore, the FileController class contains the logic necessary tohydrate the FileInfo object (or a collection of FileInfo objects) with data retrieved from the database.
CBO HydratorOne very powerful core service is the CBO Hydrator, which can be found in the CBO class in /components/Shared/CBO.vb. The CBO Hydrator is a collection of methods that provide a centralizedmeans of hydrating a CBO or a collection of CBOs.
Figure 7-2 shows how a CBO Controller class makes a call to the CBO Hydrator by sending in an openDataReader and the type of object to fill. Depending on the method called within the CBO Hydrator, itwill return either a single hydrated object or a collection of hydrated objects. When the CBO Hydrator
192
Chapter 7

fills an object’s properties, it discovers the properties of the CBO using reflection. Then it caches theproperties that it has discovered so the next time an object of the same type is hydrated, the propertieswill not need to be discovered. Instead, they will be pulled from the cache.
Figure 7-2
To hydrate a collection of CBOs, use the DotNetNuke.Common.Utilities.CBO.FillCollectionmethod. The method accepts an IDataReader and a type as input parameters. It returns an ArrayList ofobjects of the type specified in the objType parameter. For example, the code-behind for the Portalsmodule ($AppRoot/admin/Portal/Portals.ascx.vb) needs a collection of PortalInfo objects so it candisplay a list of Portals in the portal module’s rendered output. The code-behind calls DotNetNuke.Entities.Portals.PortalController.GetPortals() to get an ArrayList of PortalInfo objects.That ArrayList is filled by the DotNetNuke.Common.Utilities.CBO.FillCollection method, whichconverts an iDataReader object (from a database query) into a collection of hydrated PortalInfoobjects. The DotNetNuke.Common.Utilities.CBO.FillCollection method signature is as follows:
Public Shared Function FillCollection(ByVal dr As IDataReader, ByVal objType As _Type) As ArrayList
To hydrate a single CBO rather than a collection, use the CBO.FillObject method. This method acceptsthe same input parameters, but returns a single object. For example, in the code-behind for the SiteSettings module ($AppRoot/Admin/Portal/SiteSettings.ascx.vb) needs a PortalInfo object to displaythe portal settings in the module’s rendered output. The code-behind gets the PortalInfo object from acall to DotNetNuke.Entities.Portals.PortalController.GetPortal. The GetPortal methoduses the DotNetNuke.Common.Utilities.CBO.FillObject method to convert an iDataReaderobject (from a database query) into a hydrated PortalInfo object. The method signature forDotNetNuke.Common.Utilities.CBO.FillObject is as follows:
Public Shared Function FillObject(ByVal dr As IDataReader, ByVal _objType As Type) As Object
The FileController shown in Listing 7-3 is an example of a CBO Controller that utilizes the CBO Hydrator.
CBO ControllerClass
iDataReader +
CBOHydrator
1. Open Data Reader and Type to Hydrate
2. Hydrated Object or Collection
GetType(FileInfo)
FileInfo
FileInfo
FileInfo
193
DotNetNuke Architecture

Listing 7-3: The FileController CBO Controller Class
Public Class FolderControllerPublic Function GetFoldersByPortal(ByVal PortalID As Integer) As ArrayList
Return _CBO.FillCollection(DataProvider.Instance().GetFoldersByPortal(PortalID), _GetType(Services.FileSystem.FolderInfo))
End FunctionPublic Function GetFolder(ByVal PortalID As Integer, ByVal FolderPath As _String) As FolderInfo
Return CType(CBO.FillObject(DataProvider.Instance().GetFolder(PortalID, _FolderPath), GetType(Services.FileSystem.FolderInfo)), FolderInfo)
End FunctionPublic Function GetFolder(ByVal PortalID As Integer, ByVal FolderID As Integer)As ArrayList
Return CBO.FillCollection(DataProvider.Instance().GetFolder(PortalID, _FolderID), GetType(Services.FileSystem.FolderInfo))
End FunctionPublic Function AddFolder(ByVal objFolderInfo As FolderInfo) As Integer
Return DataProvider.Instance().AddFolder(objFolderInfo.PortalID, _objFolderInfo.FolderPath)
End FunctionPublic Sub UpdateFolder(ByVal objFolderInfo As FolderInfo)
DataProvider.Instance().UpdateFolder(objFolderInfo.PortalID, _objFolderInfo.FolderID, objFolderInfo.FolderPath)
End SubPublic Sub DeleteFolder(ByVal PortalID As Integer, ByVal FolderPath As String)
DataProvider.Instance().DeleteFolder(PortalID, FolderPath)End Sub
End Class
Using the CBO Hydrator significantly reduces the amount of code needed to fill an object or collection ofobjects. Without using the CBO Hydrator, you would have to code at least one line per CBO property inorder to fill that object with the contents of a DataReader as shown in Listing 7-4. This is an example offilling a single FileInfo object without using the CBO Hydrator.
Listing 7-4: Traditional Method of Filling an Object
Dim dr As IDataReaderTry
dr = DataProvider.Instance().GetFolder(PortalID, FolderPath)Dim f As New FileInfof.ContentType = Convert.ToString(dr(“ContentType”))f.Extension = Convert.ToString(dr(“Extension”))f.FileId = Convert.ToInt32(dr(“FileId”))f.FileName = Convert.ToString(dr(“FileName”))f.Folder = Convert.ToString(dr(“Folder”))f.Height = Convert.ToInt32(dr(“Height”))f.PortalId = Convert.ToInt32(dr(“PortalId”))f.Size = Convert.ToInt32(dr(“Size”))f.Width = Convert.ToInt32(dr(“Width”))Return f
194
Chapter 7

FinallyIf Not dr Is Nothing Then
dr.Close()End If
End Try
Instead of writing all of that code, the CBO Hydrator can be used to greatly simplify things. The codesnippet in Listing 7-5 does the same thing as the code in Listing 7-4, only it uses the CBO Hydrator.
Listing 7-5: Filling an Object Using the CBO Hydrator
Return CType(CBO.FillObject(DataProvider.Instance().GetFolder(PortalID, _FolderPath), GetType(Services.FileSystem.FolderInfo)), FolderInfo)
This section covered how Custom Business Objects are used throughout DotNetNuke to create a trulyobject-oriented design. The objects provide for type safety and enhance performance by allowing code towork with disconnected collections rather than with DataReaders, DataTables, or DataSets. Use the CBOHydrator whenever possible to reduce the amount of coding and to enhance the maintainability of theapplication.
Architectural OverviewThe DotNetNuke architecture permits the application tiers to be distributed across two servers: the webserver and the database server, as shown in Figure 7-3. The web server contains the presentation, busi-ness logic, and data access layers. The database server contains the data layer.
Figure 7-3
Clients
BrowserModule
(User Control)
Custom BusinessObjects (CBO)
ExceptionManagement
CBO Controllers
Business Logic
Caching Services
Localization
Event Logging
Personalization
Search
Common DataProvider
Microsoft SQLData Provider
Implementation
Other DataProvider
Implementation
Data Access Data
Database Server
Skin &Skin Objects
Containers
Default.aspx
Presentation
MicrosoftSQL Server
Other DataStore
Web Server
195
DotNetNuke Architecture

Presentation LayerThe presentation layer provides an interface for clients to access the portal application. This layer con-sists of the following elements:
❑ Web Forms: The primary web form is the Default.aspx. This page is the entry point to the por-tal. It is responsible for loading the other elements of the presentation layer. You can findDefault.aspx in the root installation directory.
❑ Skins: The Default.aspx web form loads the skin for the page based on the settings for eachpage or portal. You can find the base Skin class in /admin/Skins/Skin.vb.
❑ Containers: The Default.aspx web form also loads the containers for the modules based on thesettings for each module, page, and portal. You can find the base Container class in /admin/Containers/Container.vb.
❑ Module User Controls: Modules will have at least a single user control that is the user interfacefor the module. These user controls are loaded by Default.aspx and embedded within the con-tainers and skin. You can find the module user controls in .ascx files in /DesktopModules/[module name].
❑ Client-Side Scripts: Several client-side JavaScript files are used by the core user-interface frame-work. For instance, the /DotNetNuke/controls/SolpartMenu/spmenu.js script file is used by theSolPartMenu control. Custom modules can include and reference JavaScript files as well. You canfind client-side JavaScript files that are used by the core in the /js folder. Some skins may useclient-side JavaScript and in this case you would find the scripts in the skin’s installation directory.Any client-side scripts used by modules are located under the module’s installation directory.
Rendering the PresentationWhen visiting a DotNetNuke portal, the web form that loads the portal page is Default.aspx. The code-behind for this page ($AppRoot/Default.aspx.vb) loads the selected skin for the active page. The Skin isa user control that must inherit from the base class DotNetNuke.UI.Skins.Skin. The Skin class is wheremost of the action happens for the presentation layer.
First, the Skin class iterates through all of the modules that are associated with the portal page. Eachmodule has a container assigned to it; the container is a visual boundary that separates one module fromanother. The container can be assigned to affect all modules within the entire portal, all modules withina specific page, or a single module. The Skin class loads the module’s container and injects the modulecontrol into the container.
Next, the Skin class determines whether the module implements the DotNetNuke.Entities.Modules.iActionable interface. If it does, the Skin class discovers the actions that the module has defined andadds them to the container accordingly.
Next, the Skin class adds references to the module’s style sheets to the rendered page. It looks for a filenamed module.css in the specific module’s installation directory. If it exists, it adds an HtmlGenericControlto the page to reference the style sheet for the module.
All of this happens within the Skin class in the Init event as shown in Figure 7-4. The final rendering ofthe contents of a module is handled within each module’s event life cycle.
196
Chapter 7

Figure 7-4
Finally, the code-behind ($AppRoot/Default.aspx.vb) renders the appropriate cascading style sheet linksbased on the configuration of the portal and its skin. See Chapter 13 for more details on style sheets andthe order they are loaded in.
Business Logic LayerThe business logic layer provides the business logic for all core portal activity. This layer exposes manyservices to core and third-party modules. These services include
❑ Localization
❑ Caching
❑ Exception Management
❑ Event Logging
❑ Personalization
Default.aspx
Skin
LoadModules
CSS StyleSheets Module Info
Module Actions Skin Pane
Container
1. Load Skin1. Load Skin
2. Load and Render Modules2. Load and Render Modules
7. Add Module7. Add ModuleCSS StylesheetsCSS Stylesheets
3. Get Module3. Get ModuleInfoInfo
5. Inject Module Into5. Inject Module IntoContainer andContainer and
Add to Skin PaneAdd to Skin Pane
4. Load4. LoadContainerContainer
6. Add Module6. Add ModuleActionsActions
1. Load Skin
2. Load and Render Modules
7. Add ModuleCSS Stylesheets
3. Get ModuleInfo
5. Inject Module IntoContainer and
Add to Skin Pane
4. LoadContainer
6. Add ModuleActions
197
DotNetNuke Architecture

❑ Search
❑ Installation & Upgrades
❑ Security
The business logic layer is also home to custom business objects that represent most entities that collec-tively make up the portal. Custom business objects are discussed in more detail later in this chapter. Fornow it is important to understand that the fundamental purpose of custom business objects is to storeinformation about an object.
Data Access LayerThe data access layer provides data services to the business logic layer. This layer allows for data to flowto and from a data store.
As described earlier in this chapter, the data access layer uses the Provider Model to allow DotNetNuketo support a wide array of data stores. The data access layer consists of two elements:
❑ Data Provider API: This is an abstract base class that establishes the contract that the implemen-tation of the API must fulfill.
❑ Implementation of Data Provider API: This class inherits from the Data Provider API class andfulfills the contract by overriding the necessary members and methods.
The core DotNetNuke release provides a Microsoft SQL Server implementation of the DataProvider API.
Beginning with the CBO Controller class, the following code snippets show how the Data Provider APIworks with the Implementation of the Data Provider API. Listing 7-6 shows how the IDataReader that issent into CBO.FillObject is a call to DataProvider.Instance().GetFolder(PortalID, FolderPath).
Listing 7-6: The FolderController.GetFolder Method
Public Function GetFolder(ByVal PortalID As Integer, ByVal FolderPath As String) AsFolderInfo
Return CType(CBO.FillObject(DataProvider.Instance().GetFolder(PortalID, _FolderPath), GetType(Services.FileSystem.FolderInfo)), FolderInfo)
End Function
Figure 7-5 breaks down each of the elements in this method call.
Figure 7-5
DataProvider
API
ReturnsInstance of theImplementation
of the DataProvider API
Method that is required bythe Data Provider API
contract.
DataProvider.Instance().GetFolder(PortalID, FolderPath)
198
Chapter 7

The Instance() method is returning an instance of the implementation of the Data Provider API, and istherefore executing the method in the provider itself. The GetFolder method called in Listing 7-6 is anabstract method that is detailed in Listing 7-7.
Listing 7-7: The DataProvider.GetFolder Abstract Method
Public MustOverride Function GetFolder(ByVal PortalID As Integer, _ByVal FolderPath As String) As IDataReader
This abstract method is part of the contract between the API and the implementation of the API. It isoverridden in the implementation of the API as shown in Listing 7-8.
Listing 7-8: The SQLDataProvider.GetFolder Method
Public Overloads Overrides Function GetFolder(ByVal PortalID As Integer, ByVal _FolderPath As String) As IDataReader
Return CType(SqlHelper.ExecuteReader(ConnectionString, DatabaseOwner & _ObjectQualifier & “GetFolders”, GetNull(PortalID), -1, FolderPath), _IDataReader)
End Function
Microsoft Data Access Application BlockListing 7-8 shows a reference to the SqlHelper class. This class is part of the Microsoft Data AccessApplication Block. DotNetNuke uses the Data Access Application Block to improve performance andreduce the amount of custom code required for data access. The Data Access Application Block is a .NETcomponent that works with ADO.NET to call stored procedures and execute SQL commands onMicrosoft SQL Server.
Data LayerThe data layer provides data to the data access layer. The data store used in the data layer must be sup-ported by the implementation of the Data Provider API to fulfill the data requests.
Because the DotNetNuke Data Provider model is so extensible, several Data Providers are available.These include both core-released Data Providers and providers released by third-party developersincluding Microsoft SQL Server, Microsoft Access, mySQL, and Oracle providers. The core DotNetNukerelease provides a Microsoft SQL Server implementation of the Data Provider API.
Installation ScriptsAlong with the implementation of the API is a collection of scripts that create the database in the data layerduring the installation process. These scripts collectively create the database tables, stored procedures, anddata necessary to run DotNetNuke. The installation scripts are run only during a new installation and arerun from the DotNetNuke.Services.Upgrade.Upgrade.InstallDNN method. Following are the scripts:
❑ DotNetNuke.SetUp.SqlDataProvider: This script prepares the database for the installation bydropping some key tables.
❑ DotNetNuke.Schema.SqlDataProvider: This script installs the tables and stored procedures.
❑ DotNetNuke.Data.SqlDataProvider: This script fills the tables with data.
199
DotNetNuke Architecture

Upgrade ScriptsFor subsequent upgrades performed after the initial installation, a collection of scripts are run that mod-ify the schema or data during the upgrade process. These scripts are run from the DotNetNuke.Services.Upgrade.Upgrade.UpgradeDNN method. There is one script per baseline version of DotNetNuke.A baseline version is a working version of DotNetNuke that represents some internal milestone. Forinstance, after the core team integrates a major new feature, such as the Member Role provider, the codeis tested, compiled, and zipped up for distribution among the core team. This doesn’t necessarily meanthere is one script per released version of DotNetNuke because behind the scenes we may have severalbaseline versions before a formal public release.
The file naming convention includes the version of the script followed by the “SqlDataProvider” extension.The extension must be the same name as found in the DefaultProvider attribute of the Data Provider’s con-figuration settings in the web.config file. For example, the filename for the upgrade script for upgradingfrom baseline version 3.0.11 to 3.0.12 is 03.00.12.SqlDataProvider.
When the DotNetNuke application is upgraded to another version, these scripts will be executed in logi-cal order according to the version number. Only the scripts with a version number that is less than orequal to the value of the constant DotNetNuke.Common.Globals.glbAppVersion will be run. This con-stant is defined in the /components/Shared/Globals.vb file.
Script SyntaxThese scripts are written in SQL; however, two non-SQL tags are used in the scripts that are importantto understand. These tags are {databaseOwner} and {objectQualifier}. Both of these tags represent a pro-grammatically replaceable element of the script. Earlier in this chapter, Listing 7-1 showed that the configuration settings for the Microsoft SQL Server Data Provider implementation include two XMLattributes named databaseOwner and objectQualifier. The databaseOwner attribute defines the databaseowner to append to data objects in the scripts. The objectQualifier attribute defines a string to prefix thedata objects within the scripts.
As an example, take a look at how we create the GetSearchSettings stored procedure in the03.00.04.SqlDataProvider script (see Listing 7-9).
Listing 7-9: A SqlDataProvider Upgrade Script
CREATE PROCEDURE {databaseOwner}{objectQualifier}GetSearchSettings@ModuleID int
ASSELECT tm.ModuleID,
settings.SettingName, settings.SettingValue
FROM {objectQualifier}Tabs searchTabs INNER JOIN{objectQualifier}TabModules searchTabModules
ON searchTabs.TabID = searchTabModules.TabID INNER JOIN{objectQualifier}Portals p
ON searchTabs.PortalID = p.PortalID INNER JOIN{objectQualifier}Tabs t
ON p.PortalID = t.PortalID INNER JOIN{objectQualifier}TabModules tm
ON t.TabID = tm.TabID INNER JOIN
200
Chapter 7
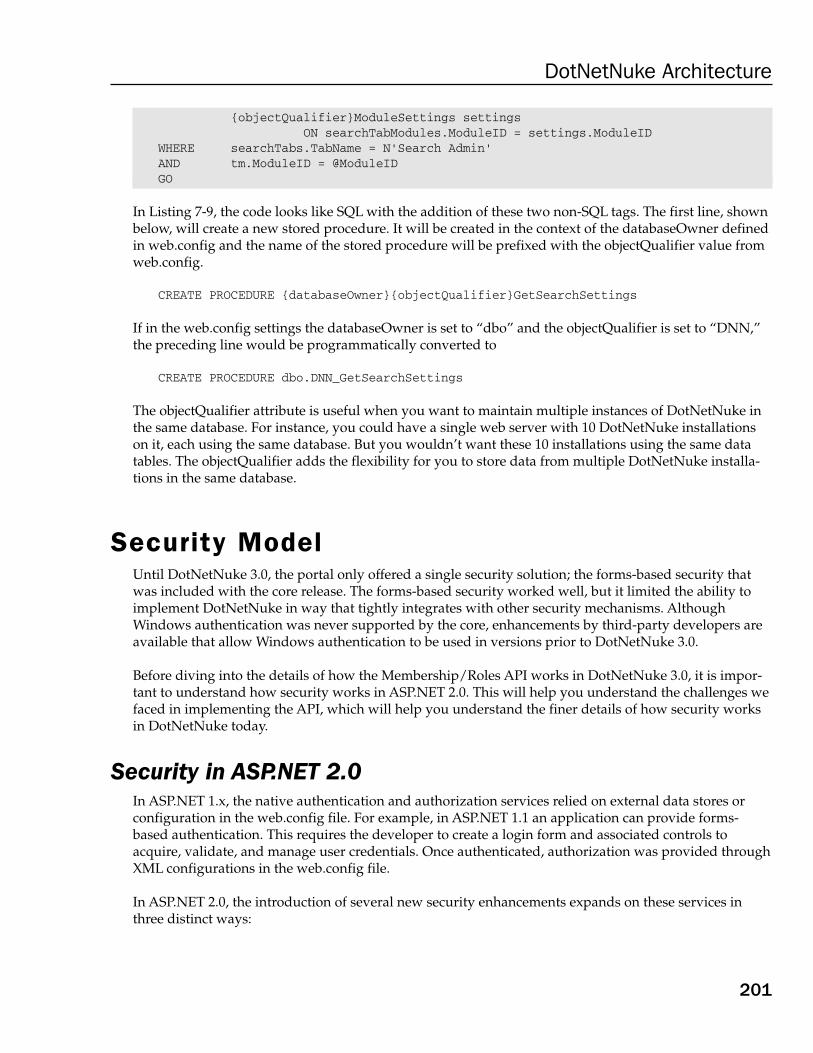
{objectQualifier}ModuleSettings settingsON searchTabModules.ModuleID = settings.ModuleID
WHERE searchTabs.TabName = N’Search Admin’AND tm.ModuleID = @ModuleIDGO
In Listing 7-9, the code looks like SQL with the addition of these two non-SQL tags. The first line, shownbelow, will create a new stored procedure. It will be created in the context of the databaseOwner definedin web.config and the name of the stored procedure will be prefixed with the objectQualifier value fromweb.config.
CREATE PROCEDURE {databaseOwner}{objectQualifier}GetSearchSettings
If in the web.config settings the databaseOwner is set to “dbo” and the objectQualifier is set to “DNN,”the preceding line would be programmatically converted to
CREATE PROCEDURE dbo.DNN_GetSearchSettings
The objectQualifier attribute is useful when you want to maintain multiple instances of DotNetNuke inthe same database. For instance, you could have a single web server with 10 DotNetNuke installationson it, each using the same database. But you wouldn’t want these 10 installations using the same datatables. The objectQualifier adds the flexibility for you to store data from multiple DotNetNuke installa-tions in the same database.
Security ModelUntil DotNetNuke 3.0, the portal only offered a single security solution; the forms-based security thatwas included with the core release. The forms-based security worked well, but it limited the ability toimplement DotNetNuke in way that tightly integrates with other security mechanisms. AlthoughWindows authentication was never supported by the core, enhancements by third-party developers areavailable that allow Windows authentication to be used in versions prior to DotNetNuke 3.0.
Before diving into the details of how the Membership/Roles API works in DotNetNuke 3.0, it is impor-tant to understand how security works in ASP.NET 2.0. This will help you understand the challenges wefaced in implementing the API, which will help you understand the finer details of how security worksin DotNetNuke today.
Security in ASP.NET 2.0In ASP.NET 1.x, the native authentication and authorization services relied on external data stores orconfiguration in the web.config file. For example, in ASP.NET 1.1 an application can provide forms-based authentication. This requires the developer to create a login form and associated controls toacquire, validate, and manage user credentials. Once authenticated, authorization was provided throughXML configurations in the web.config file.
In ASP.NET 2.0, the introduction of several new security enhancements expands on these services inthree distinct ways:
201
DotNetNuke Architecture
❑ Login & User Controls: A new suite of login and user controls provide plenty of functionalityout of the box, which reduces the need for each application to provide its own login and usercontrols. For instance, it is easy to generate a set of pages for registering a new user, allowing anexisting user to log in, and even handle forgotten passwords by simply placing the appropriatecontrols on a page and setting a few properties.
❑ User Management: ASP.NET 2.0 provides a new configuration interface for each applicationthat allows for easy management of that application. One feature of the configuration interfaceis the ability to manage security for the application. For instance, you can easily create a newuser and a new role, and then add the user to the role all within the ASP.NET 2.0 native configu-ration interface. As an alternative to the configuration interface, security can be managed bywriting a custom management tool to access the same functionality programmatically.
❑ Membership/Roles Provider: This new provider is the conduit between the presentation layer(specifically the login/user controls and the configuration interface) and the persistence mecha-nism. It encapsulates all of the data access code required to manage users and roles.
Together these three components reduce the amount of code that is required to provide authenticationand authorization services and persist the data to a data store.
DotNetNuke and ASP.NET 2.0To build an application that fully supports authentication and authorization in ASP.NET 2.0, theMembership/Roles provider should be integrated into the application. Several benefits exist to usingthis provider in an application. First, it can reduce the amount of code that is written to bring these ser-vices to the application. This is true as long as the business requirements fall within the functionalitythat the default Membership/Roles provider provides. Second, implementing the Membership/Rolesprovider can allow other applications to share user and role information with the application. Withregard to security, this provides seamless integration between diverse applications.
Because ASP.NET 2.0 was not released at the time of the DotNetNuke 3.0 development cycle, we lever-aged a backported version of the Membership/Roles provider created by Microsoft. This backportedversion conforms to the same API as is found in ASP.NET 2.0, except it will run in ASP.NET 1.1. This hasbeen a great addition to DotNetNuke for many reasons, but one key benefit is that it allows DotNetNuketo conform to several ASP.NET 2.0 specifications even before ASP.NET 2.0 is released.
Security in DotNetNuke 3.0Security in DotNetNuke 3.0 has been implemented with quite a bit of forward thinking. We have combinedthe best features of prior versions of DotNetNuke with the features of the ASP.NET 2.0 Membership/RolesProvider. The result is a very extensible security model that aligns DotNetNuke closely with best practicesecurity models that will be in ASP.NET 2.0.
Portals and ApplicationsDotNetNuke supports running many portals from a single DotNetNuke installation. Each portal has itsown users and roles that are not shared with any other portals. A portal is identified by a unique key, thePortalID.
202
Chapter 7
Because the default Membership/Role Provider implementation is a generic solution, it does notnatively support the concept of having multiple portals, each with their own users and roles. The defaultMembership/Role Provider implementation was designed in a way that only supports a single portalsite in a DotNetNuke installation. The Membership/Role Provider refers to the DotNetNuke installationas an “application,” and without customization that application can only support a single set of usersand roles (a single portal instance).
To overcome this limitation, a wrapper was needed for the SQL data providers that were provided withthe Membership/Role Providers. This customization allows us to support application virtualization. Theend result is that the Membership/Role Providers, as implemented in DotNetNuke, can support multi-ple applications (multiple portal instances in a single DotNetNuke installation). We mapped PortalID inDotNetNuke to the ApplicationName in the Membership/Role Provider. When a call is made to theMembership/Role Provider, the ApplicationName is switched on-the-fly to match the PortalID of theportal instance.
The custom implementations of the SQL data providers for the Membership/Role Providers can befound in
❑ $AppRoot\Providers\MembershipProviders\CoreProvider\DataProviders\DNNSQLMembershipProvider
❑ $AppRoot\Providers\ProfileProviders\CoreProvider\DataProviders\DNNSQLProfileProvider
❑ $AppRoot\Providers\RoleProviders\CoreProvider\DataProviders\DNNSQLRoleProvider
Data Model for Users and RolesIn order to achieve the full benefit from the Membership/Roles Provider, it is important to recognizethat User and Role information can be externalized from DotNetNuke and stored in a data store that isindependent of the main data store. For instance, DotNetNuke may use Microsoft SQL Server as itsdatabase to store content and system settings, but the Membership/Roles Provider may use Windowsauthentication, LDAP, or another mechanism to handle authentication and authorization. Because secu-rity can be externalized using the Provider Model, it was important to ensure that the implementationof the Membership/Roles Provider didn’t customize any code or database tables used by the provider.The data tables used by the provider had to be independent from the other core DotNetNuke tables. Wecould not enforce referential integrity between DotNetNuke data and the Membership/Roles Providerdata, nor could we use cascade deletes or other data-level synchronization methods. In a nutshell, all ofthe magic had to happen in the business layer.
One challenge we faced in implementing the Membership/Roles Provider was dealing with the fieldsthat DotNetNuke currently supports but the Membership/Roles Provider does not support. Ideally, wewould have completely replaced the DotNetNuke authentication/authorization-related tables with thetables used by the Membership/Roles Provider. We could not achieve this goal because the authentica-tion/authorization tables in DotNetNuke were already tied to so many existing and necessary featuresof the application. For instance, the DotNetNuke “Users” table has a column named “UserID,” which isa unique identifier for a user. This UserID is used in nearly all core and third-party modules as well asthe core. The most significant problem with UserID was that it doesn’t exist in the Membership/RolesProvider. Instead, the Membership/Roles Provider uses the username as the unique key for a userwithin an application. The challenge was that we needed a way to maintain the UserID to preserve theDotNetNuke functionality that depended on it. This is just one example of an attribute that cannot behandled by the default Membership/Roles Provider provided by Microsoft.
203
DotNetNuke Architecture

Ultimately, we decided that we would need to maintain satellite tables to support the DotNetNukeattributes that could not be managed by the Membership/Roles Provider. The goal was to maintainenough information in the DotNetNuke tables so that functionality was not lost, and offload whateverdata we can to the Membership/Roles Provider tables. The end result is a data model that mirrors theMembership/Roles Provider data tables, as shown in Figure 7-6.
Figure 7-6
Note in Figure 7-6 that none of the tables on top have database relationships to the any of the tables onthe bottom. The lines connecting them simply show their relationship in theory, not an actual relation-ship in the database.
UserId
aspnet_Membership
Password
PasswordFormat
PasswordSalt
MobilePIN
LoweredEmail
PasswordQuestion
PasswordAnswer
IsApproved
IsLockedOut
CreateDate
ApplicationName
aspnet_Applications
LoweredApplicationName
ApplicationId
Description
UserId
aspnet_Profile
PropertyNames
PropertyValuesString
PropertyValuesBinary
LastUpdatedDate
ApplicationId
aspnet_Users
UserId
UserName
LoweredUserName
MobileAlias
IsAnonymous
LastActivityDate
PortalId
Portals
PortalName
LogoFile
FooterText
ExpiryDate
UserRegistration
BannerAdvertising
AdministratorId
Currency
HostFee
HostSpace
AdministratorRoleId
RoleId
Roles
PortalId
RoleName
Description
ServiceFee
BillingFrequency
TrialPeriod
TrialFrequency
BillingPeriod
TrialFee
IsPublic
AutoAssignment
UserId
Users
PortalId
UserName
FirstName
LastName
IsSuperUser
AffiliateId
UserRoleId
UserRoles
UserId
RoleId
ExpiryDate
IsTrialUsed
ProfileId
Profile
UserId
PortalId
ProfileData
CreatedDate
ApplicationId
aspnet_Roles
RoleId
RoleName
LoweredRoleName
Description
UserId
aspnet_UsersInRoles
RoleId
Synchronization and Aggregation
204
Chapter 7

Because the data for portals, profiles, users, and roles is stored in multiple unrelated tables, the businesslayer is responsible for aggregating the data. For instance, you cannot get a complete representation of auser without collecting data from both the aspnet_Users table (from the Membership/Roles Provider)and the Users table (native DotNetNuke table). Therefore, the business layer is responsible for combin-ing the data from both data structures.
In addition to aggregation, synchronization must also be done to automatically synchronize databetween the tables used by the Membership/Roles Provider and the native DotNetNuke tables. Earlierin this chapter you learned that the Membership/Roles Provider supports a wide array of data stores,and in ASP.NET 2.0 the data in those data stores can be managed through a common application config-uration utility. If a user is added through this common application configuration utility, the user will notbe added to the native DotNetNuke tables. Also, if your Membership/Roles Provider uses an LDAPimplementation, for instance, a user could be added to LDAP and the user would not be added to thenative DotNetNuke tables. It is for this reason that we need to provide synchronization services betweenthe two data structures.
In DotNetNuke 3.0, the introduction of the Membership/Roles API has brought extensibility to the secu-rity framework. We have purposely positioned DotNetNuke 3.0 to implement several ASP.NET 2.0 fea-tures so we can convert to ASP.NET 2.0 more quickly and easily. This also provides a great opportunityto learn about some new features found in ASP.NET 2.0 early on.
Namespace OverviewPrior to DotNetNuke 3.0 the namespace overview would have been fairly concise, considering nearlyall classes fell under the root DotNetNuke namespace. In DotNetNuke 3.0, we brought structure to thenamespace hierarchy by completely reorganizing the namespaces and class locations. Figure 7-7 showsthe second-level namespaces that fall under the root “DotNetNuke” namespace, and the list that followsexplains each one.
Figure 7-7
❑ DotNetNuke.Common: This namespace is used for all classes that are used throughout theentire DotNetNuke application. For example, the global constants that are used throughoutthe application are found in the DotNetNuke.Common.Globals class.
❑ DotNetNuke.Data: This namespace is used for any classes relating to the data access layer. Forexample, the DataProvider base class for the Data Provider API is in the DotNetNuke.Datanamespace.
205
DotNetNuke Architecture

❑ DotNetNuke.Entities: This namespace is used for the classes that represent and manage thefive entities that make a portal. They are Host, Portals, Tabs, Users, and Modules. Note that theModules namespace that falls under DotNetNuke.Entities is home to the functionality behindmanaging modules. The actual modules themselves have their own second-level namespacedefined below (DotNetNuke.Modules).
❑ DotNetNuke.Framework: This namespace is home to several base classes and other utilitiesused by the DotNetNuke application.
❑ DotNetNuke.Modules: This namespace is used for organizing portal modules. There is a childnamespace in the core named DotNetNuke.Modules.Admin, which is where the classes for allof the core admin modules reside. For instance, the Host Settings module is found in theDotNetNuke.Modules.Admin.Host.HostSettingsModule class.
❑ DotNetNuke.Security: This namespace is used for authorization and authentication classes.This includes tab permissions, module permissions, folder permissions, roles, and other portalsecurity classes.
❑ DotNetNuke.Services: This namespace is used for any services the core provides for modules.In this namespace the child namespaces for exception management, localization, personalization,search, and several others reside.
❑ DotNetNuke.UI: This namespace is used for any user interface classes. For example, the Skinand Container classes are found in DotNetNuke.UI.Skins.Skin and DotNetNuke.UI.Containers.Container, respectively.
SummaryThis chapter covered the architecture of the DotNetNuke application. Here are key points to understandabout the architecture:
❑ The Provider Model design pattern has enhanced DotNetNuke with greater extensibility with-out having to make core changes to realize that extensibility.
❑ The use of Custom Business Objects along with the CBO Hydrator has created a foundation fordevelopers to code using best practice standards that allow them to build more maintainablemodules and providers that perform well.
❑ The n-tier architecture of the DotNetNuke application provides exceptional layer abstractionand better application maintainability.
❑ The Membership/Role Provider in DotNetNuke has created a very extensible security modelthat showcases an API that mirrors the API found in ASP.NET 2.0.
❑ The namespace model is organized in a logical hierarchy, making it easy to find the classes usedmost often.
The next chapter covers the DotNetNuke API to familiarize you with many of the powerful services theDotNetNuke core application provides developers.
206
Chapter 7

Core DotNetNuke APIs
IntroductionDotNetNuke provides significant capability straight out of the box. Just install and go. Sometimes,however, you may need to extend the base framework. DotNetNuke provides a variety of integra-tion points: from HTTP Modules to providers to custom modules. In order to fully take advantageof the framework, it is important to understand some of the base services and APIs provided byDotNetNuke.
This chapter examines some of the core services provided by DotNetNuke. These services can beused from within your own code. Since most of the core services are built using the Providerdesign pattern, it is also possible to swap out the base functionality. If you need your eventslogged to a custom database or the Windows Event Logs, then just create your own provider.
The second part of this chapter covers several HTTP Modules that are installed with DotNetNuke.These modules provide features like Friendly URLs, Exception Management, and Users Online.Many of the providers installed with DotNetNuke use HTTP Modules to hook into the requestprocessing pipeline. By examining the code used in the core HTTP Modules, you can build yourown custom extensions that can be used in DotNetNuke as well as other ASP.NET applications.
The final section examines some of the core interfaces that you can implement in your own mod-ules. These interfaces simplify the process of adding common features to your module, whether itis the module menu, searches, importing and exporting, or even custom upgrade logic. All of theseservices can be implemented using core interfaces. By using these interfaces in your modules youcan provide some of the same features you see in the core DotNetNuke modules with very littlecoding effort.

Event Logging The Logging Provider in DotNetNuke provides a very configurable and extensible set of logging services.It is designed to handle a wide array of logging needs including exception logging, event auditing, andsecurity logging. As you may have gathered from its name, the Logging Provider uses the Provider modeldesign pattern. This allows the default XML Logging Provider to be replaced with another logging mech-anism without having to make changes to the core code. This section covers the ways you can use theLogging Provider to log events in custom modules.
Before we dive into the details of how to use the Logging Provider API, it is important to understandsome concepts and terminology that will be used in this section:
❑ Log Classification: There are two different types of log classifications in the Logging Provider.The first is the event log classification. This encapsulates all log entries related to some type of eventwithin DotNetNuke. For example, you can configure the Logging Provider to write a log entrywhen a login attempt fails. This would be considered an event log entry. The second log classifica-tion is the exception log classification. You can configure the Logging Provider to log exceptionsand stack traces when exceptions are thrown within DotNetNuke. These two classifications aredistinct only because they have different needs in terms of what type of information they log.
❑ Log Type: A log type defines the type of event that creates the log entry. For example, an eventlog type is LOGIN_FAILURE. The Logging Provider can react differently for each log type. Youcan configure the Logging Provider to enable or disable logging for each of the log types. In thedefault XML Logging Provider, you can also configure it to log each log type to a different fileand optionally send e-mail notifications upon creating new log entries for that log type.
❑ Log Type Configuration: The Logging Provider is configured via a module that is accessiblefrom the Log Viewer screen (the Edit Log Configuration module action). This allows you to con-figure each log type to be handled differently by the Logging Provider.
The APIThe Logging Provider functionality lives in the DotNetNuke.Services.Log.EventLog namespace. In thisnamespace you will find the classes that comprise the Logging Provider API. These are listed in Table 8-1.
Table 8-1: Logging Provider Classes
Class Description
EventLogController This class inherits from LogController. It provides the methodsnecessary to write log entries with the event log classification.
ExceptionLogController This class inherits from LogController. It provides the methods nec-essary to write log entries with the exception log classification.
LogController This class provides the methods that interact with the LoggingProvider. It provides the basic methods for adding, deleting, andgetting log entries.
LogDetailInfo This class holds a single key/value pair of information from a logentry.
208
Chapter 8

Class Description
LoggingProvider This abstract class provides the bridge to the implementation ofthe Logging Provider.
LogInfo This class is a container for the information that goes into a logentry.
LogInfoArray This holds an array of LogInfo objects.
LogProperties This holds an array of LogDetailInfo objects.
LogTypeConfigInfo This class is a container for the configuration data relating to howlogs of a specific log type are to be handled.
LogTypeInfo This class is a container for the log type information.
PurgeLogBuffer This is a Scheduler task that can be executed regularly if LogBuffering is enabled.
SendLogNotifications This is a Scheduler task that can be executed regularly if any logtype is configured to send e-mail notifications.
The two controller classes, EventLogController and ExceptionLogController, are the two that bring themost functionality to custom modules. Many of the other classes are used in concert with the controllers.
EventLogControllerThe EventLogController provides the methods necessary to log significant system events. This controllerclass also defines the EventLogType enumeration that lists each log type that is handled by theEventLogController. The enumerations are shown in Listing 8-1.
Listing 8-1: EventLogController.EventLogType Enumeration
Public Enum EventLogTypeUSER_CREATEDUSER_DELETEDLOGIN_SUPERUSERLOGIN_SUCCESSLOGIN_FAILURECACHE_REFRESHEDPASSWORD_SENT_SUCCESSPASSWORD_SENT_FAILURELOG_NOTIFICATION_FAILUREPORTAL_CREATEDPORTAL_DELETEDTAB_CREATEDTAB_UPDATEDTAB_DELETEDTAB_SENT_TO_RECYCLE_BINTAB_RESTOREDUSER_ROLE_CREATED
(continued)
209
Core DotNetNuke APIs

Listing 8-1: (continued)
USER_ROLE_DELETEDROLE_CREATEDROLE_UPDATEDROLE_DELETEDMODULE_CREATEDMODULE_UPDATEDMODULE_DELETEDMODULE_SENT_TO_RECYCLE_BINMODULE_RESTOREDSCHEDULER_EVENT_STARTEDSCHEDULER_EVENT_PROGRESSINGSCHEDULER_EVENT_COMPLETEDAPPLICATION_STARTAPPLICATION_ENDAPPLICATION_SHUTTING_DOWNSCHEDULER_STARTEDSCHEDULER_SHUTTING_DOWNSCHEDULER_STOPPEDADMIN_ALERTHOST_ALERT
End Enum
The EventLogController.AddLog() method has several method overloads that allow a developer to log just about any values derived from an object or its properties. Each of the overloadedEventLogController.AddLog() methods are detailed below.
1. To log the property names and values of a Custom Business Object, use the following method:
Public Overloads Sub AddLog(ByVal objCBO As Object, ByVal _PortalSettings As _PortalSettings, ByVal UserID As Integer, ByVal UserName As String, ByVal _objLogType As Services.Log.EventLog.EventLogController.EventLogType)
Parameter Type Description
objCBO Object This is a Custom Business Object.
_PortalSettings PortalSettings This is the current PortalSettings object.
UserID Integer This is the UserID of the authenticated user of the request.
UserName String This is the UserName of the authenticated user of the request.
objLogType EventLogType This is the event log type.
2. To add a log entry that has no custom properties, use the following method. This is useful if yousimply need to log that an event has occurred, but you have no requirement to log any furtherdetails about the event.
Public Overloads Sub AddLog(ByVal _PortalSettings As PortalSettings, ByVal UserID _As Integer, ByVal objLogType As _Services.Log.EventLog.EventLogController.EventLogType)
210
Chapter 8
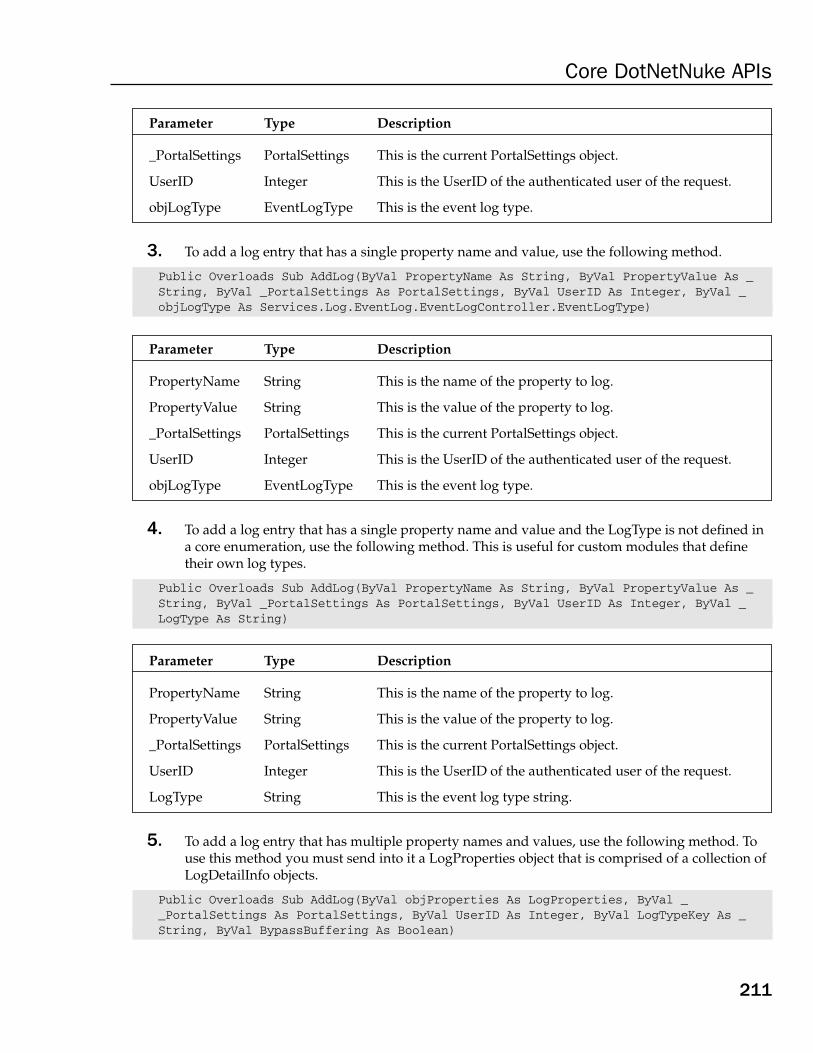
Parameter Type Description
_PortalSettings PortalSettings This is the current PortalSettings object.
UserID Integer This is the UserID of the authenticated user of the request.
objLogType EventLogType This is the event log type.
3. To add a log entry that has a single property name and value, use the following method.
Public Overloads Sub AddLog(ByVal PropertyName As String, ByVal PropertyValue As _String, ByVal _PortalSettings As PortalSettings, ByVal UserID As Integer, ByVal _objLogType As Services.Log.EventLog.EventLogController.EventLogType)
Parameter Type Description
PropertyName String This is the name of the property to log.
PropertyValue String This is the value of the property to log.
_PortalSettings PortalSettings This is the current PortalSettings object.
UserID Integer This is the UserID of the authenticated user of the request.
objLogType EventLogType This is the event log type.
4. To add a log entry that has a single property name and value and the LogType is not defined ina core enumeration, use the following method. This is useful for custom modules that definetheir own log types.
Public Overloads Sub AddLog(ByVal PropertyName As String, ByVal PropertyValue As _String, ByVal _PortalSettings As PortalSettings, ByVal UserID As Integer, ByVal _LogType As String)
Parameter Type Description
PropertyName String This is the name of the property to log.
PropertyValue String This is the value of the property to log.
_PortalSettings PortalSettings This is the current PortalSettings object.
UserID Integer This is the UserID of the authenticated user of the request.
LogType String This is the event log type string.
5. To add a log entry that has multiple property names and values, use the following method. Touse this method you must send into it a LogProperties object that is comprised of a collection ofLogDetailInfo objects.
Public Overloads Sub AddLog(ByVal objProperties As LogProperties, ByVal __PortalSettings As PortalSettings, ByVal UserID As Integer, ByVal LogTypeKey As _String, ByVal BypassBuffering As Boolean)
211
Core DotNetNuke APIs

Parameter Type Description
objProperties LogProperties This is a collection of LogDetailInfo objects.
_PortalSettings PortalSettings This is the current PortalSettings object.
UserID Integer This is the UserID of the authenticated user of the request.
LogTypeKey String This is the event log type.
BypassBuffering Boolean Specifies whether to write directly to the log (true) or to uselog buffering (false) if log buffering is enabled.
Two of the most used overloaded methods for EventLogController.AddLog() are discussed in the fol-lowing section. To exemplify the flexibility of this method, Listing 8-2 shows an example of how you cansend in a Custom Business Object and automatically log its property values.
Listing 8-2: EventLogController.AddLog Example
Private Sub TestUserInfoLog()Dim objUserInfo As New UserInfoobjUserInfo.FirstName = “John”objUserInfo.LastName = “Doe”objUserInfo.UserID = 6objUserInfo.Username = “jdoe”Dim objEventLog As New Services.Log.EventLog.EventLogControllerobjEventLog.AddLog(objUserInfo, PortalSettings, UserID, UserInfo.Username, _
Services.Log.EventLog.EventLogController.EventLogType.USER_CREATED)End Sub
The resulting log entry written by the default XML Logging Provider for this example includes eachproperty name and value in the objUserInfo object as shown in the <properties/> XML element inListing 8-3.
Listing 8-3: EventLogController.AddLog Log Entry
<logs><log LogGUID=”92ca39e4-a135-475a-8c0c-7e4949c359b7” LogFileID=”b86359bb-
e984-4483-891b-26a2b95bf9bd”LogTypeKey=”USER_CREATED” LogUserID=”-1” LogUserName=”” LogPortalID=”0”
LogPortalName=”DotNetNuke”LogCreateDate=”2005-02-04T14:33:46.9318672-05:00”
LogCreateDateNum=”20050204143346931”LogServerName=”DNNTEST”><properties>
<property><name>UserID</name><value>6</value>
</property><property>
<name>FirstName</name><value>John</value>
</property>
212
Chapter 8

<property><name>LastName</name><value>Doe</value>
</property><property>
<name>UserName</name><value>jdoe</value>
</property></properties>
</log></logs>
This example logs each of the properties of a Custom Business Object. There are other overloadedEventLogController.AddLog() methods available if you need to log less information, or informationthat isn’t stored in a Custom Business Object. The example in Listing 8-4 shows how you can use theEventLogController.AddLog() method to add a single key/value pair to the log.
Listing 8-4: EventLogController.AddLog Example
Private Sub TestCreateRole()
Dim objRoleController As New RoleControllerDim objRoleInfo As New RoleInfo
‘create and add the new roleobjRoleInfo.RoleName = “Newsletter Subscribers”objRoleInfo.PortalID = 5objRoleController.AddRole(objRoleInfo)
‘log the eventDim objEventLog As New Services.Log.EventLog.EventLogControllerobjEventLog.AddLog(“Role”, objRoleInfo.RoleName, PortalSettings, _UserId, objEventLog.EventLogType.USER_ROLE_CREATED)
End Sub
In this case, the key Role and the value Newsletter Subscribers will be logged. The resulting log entrywritten by the default XML Logging Provider for this example is shown in the <properties/> XML ele-ment in Listing 8-5.
Listing 8-5: EventLogController.AddLog Log Entry
<logs><log LogGUID=”2145856a-1e4a-4974-86f6-da1f0ae5dcca” LogFileID=”b86359bb-
e984-4483-891b-26a2b95bf9bd”LogTypeKey=”ROLE_CREATED” LogUserID=”1” LogUserName=”host”
LogPortalID=”0” LogPortalName=”DotNetNuke”LogCreateDate=”2005-02-04T22:00:22.0413424-05:00”
LogCreateDateNum=”20050204220022041”LogServerName=”DNNTEST”><properties>
<property><name>RoleName</name>
(continued)
213
Core DotNetNuke APIs

Listing 8-5: (continued)
<value>Newsletter Subscribers</value></property>
</properties></log>
</logs>
ExceptionLogControllerThe ExceptionLogController exposes the methods necessary for adding information about exceptionsto the log. This controller class also defines the ExceptionLogType enumeration. Some examples ofExceptionLogTypes defined in the enumeration are GENERAL_EXCEPTION, MODULE_LOAD_EXCEPTION, and PAGE_LOAD_EXCEPTION. By defining different log types for exceptions, the configu-ration of the Logging Provider can treat each exception log type differently with regards to how and if theexceptions get logged.
We will cover exceptions in more detail in the next section. For now, we will focus on how to log theexceptions. The ExceptionLogController.AddLog() method has three overloaded methods that allow youto pass in various types of exceptions. The first method allows you to send in a System.Exception or anyexception that inherits System.Exception, as shown in Listing 8-6.
Listing 8-6: ExceptionLogController.AddLog Example
Public Sub test()Try
If 1 = 1 ThenThrow New Exception(“Oh no, an exception!”)
End IfCatch exc As Exception
Dim objExceptionLog As New Services.Log.EventLog.ExceptionLogControllerobjExceptionLog.AddLog(exc)‘a shortcut to this is simply “LogException(exc)”
End TryEnd Sub
In this case, the properties of the System.Exception will be logged along with a collection of propertiesthat are specific to the request. For instance, it will log the filename, line, and column number the excep-tion occurred in if it is available. The resulting log entry written by the default XML Logging Providerfor this example is shown in Listing 8-7.
Listing 8-7: ExceptionLogController.AddLog Log Entry
<logs><log LogGUID=”39c72059-bcd1-42ca-8886-002363d1c9dc” LogFileID=”6b780a60-
cf46-4588-8a76-75ae9c577277”LogTypeKey=”GENERAL_EXCEPTION” LogUserID=”-1” LogUserName=””
LogPortalID=”-1” LogPortalName=””LogCreateDate=”2005-02-04T23:25:44.6873456-05:00”
LogCreateDateNum=”20050204232544687”LogServerName=”DNNTEST”><properties>
<property><name>AssemblyVersion</name><value>03.00.10</value>
214
Chapter 8

</property><property>
<name>Method</name><value>DotNetNuke.Framework.CDefault.test</value>
</property><property>
<name>FileName</name><value>c:\public\dotnetnuke\Default.aspx.vb</value>
</property><property>
<name>FileLineNumber</name><value>481</value>
</property><property>
<name>FileColumnNumber</name><value>21</value>
</property><property>
<name>PortalID</name><value>0</value>
</property><property>
<name>PortalName</name><value>DotNetNuke</value>
</property><property>
<name>UserID</name><value>-1</value>
</property><property>
<name>UserName</name><value />
</property><property>
<name>ActiveTabID</name><value>36</value>
</property><property>
<name>ActiveTabName</name><value>Home</value>
</property><property>
<name>AbsoluteURL</name><value>/DotNetNuke/Default.aspx</value>
</property><property>
<name>AbsoluteURLReferrer</name><value />
</property><property>
<name>ExceptionGUID</name><value>128455d6-064a-4222-993f-b54fd302e21e</value>
</property><property>
<name>DefaultDataProvider</name>
(continued)
215
Core DotNetNuke APIs

Listing 8-7: (continued)
<value>DotNetNuke.Data.SqlDataProvider,DotNetNuke.SqlDataProvider</value>
</property><property>
<name>InnerException</name><value>Oh no, an exception!</value>
</property><property>
<name>Message</name><value>Oh no, an exception!</value>
</property><property>
<name>StackTrace</name><value> at DotNetNuke.Framework.CDefault.test() in
c:\public\dotnetnuke\Default.aspx.vb:line 481</value></property><property>
<name>Source</name><value>DotNetNuke</value>
</property></properties>
</log></logs>
Notice that Listing 8-7 does not tell you the portal module that the exception was thrown from. This isbecause a general exception was thrown (System.Exception). If a ModuleLoadException is thrown, moredetails about the portal module that throws the exception will be logged. The next section discussesmore on the topic of handling exceptions properly in DotNetNuke.
Exception HandlingThe exception handling API in DotNetNuke provides a framework for handling exceptions uniformlyand gracefully. Exception handling is primarily handled through four methods, most of which have sev-eral overloaded methods. Through these four methods, developers can gracefully handle exceptions, logthe exception trace and context, and display a user-friendly message to the end user.
The exception handling API lives under the DotNetNuke.Services.Exceptions namespace. Table 8-2 liststhe classes that comprise the Exception Handling API.
Table 8-2: Exception Handling Classes
Class Description
BasePortalException This class inherits from System.Exception and contains many otherproperties specific to the portal application.
ErrorContainer This class generates formatting for the error message that will bedisplayed in the web browser.
216
Chapter 8

Class Description
ExceptionInfo This class stores information from the stack trace.
Exceptions This class contains most of the methods that are used in custommodules. It contains the methods necessary to process each type ofportal exception.
ModuleLoadException This class inherits from BasePortalException. It is an exception typefor exceptions thrown within portal modules.
PageLoadException This class inherits from BasePortalException. It is an exception typefor exceptions thrown within pages.
SchedulerException This class inherits from BasePortalException. It is an exception typefor exceptions thrown within the Scheduling Provider.
The Exceptions ClassAlthough there are many classes in the exception handling namespace, the primary class that moduledevelopers deal with regularly is the Exceptions class. This class contains all of the methods necessary togracefully handle exceptions in DotNetNuke. The most widely used method for exception handling isDotNetNuke.Services.Exceptions.ProcessModuleLoadException().
ProcessModuleLoadException MethodThe ProcessModuleLoadException method serves two primary functions. The first is to log the excep-tions that are thrown from within a module to the Logging Provider. The second is to display a friendlyerror message in place of the module that threw the exception. Note the friendly error message will onlybe displayed if the host option Use Custom Error Messages is enabled on the Host Settings page (seeChapter 4).
This ProcessModuleLoadException method has seven overloaded methods:
1. To process an exception that occurs in a portal module, use the following method. If the CustomError Messages option has been enabled in Host Settings, this method will also handle display-ing a user-friendly error message to the client browser.
Public Sub ProcessModuleLoadException(ByVal ctrlModule As _Entities.Modules.PortalModuleBase, ByVal exc As Exception)
Parameter Type Description
ctrlModule PortalModuleBase This is the portal module object.
Exc Exception This is the exception that was thrown.
2. This method is the same as the previous one, although it provides the ability to suppress theerror message from being displayed on the client browser.
Public Sub ProcessModuleLoadException(ByVal ctrlModule As _Entities.Modules.PortalModuleBase, ByVal exc As Exception, ByVal _DisplayErrorMessage As Boolean)
217
Core DotNetNuke APIs

Parameter Type Description
ctrlModule PortalModuleBase This is the portal module object.
Exc Exception This is the exception that was thrown.
DisplayErrorMessage Boolean This indicates whether the portal should renderan error message to the client browser.
3. This is the same as the previous method; however, it adds the ability to provide a customfriendly message to the client browser.
Public Sub ProcessModuleLoadException(ByVal FriendlyMessage As String, ByVal _ctrlModule As Entities.Modules.PortalModuleBase, ByVal exc As Exception, _ByVal DisplayErrorMessage As Boolean)
Parameter Type Description
FriendlyMessage String This is a friendly message to display to the clientbrowser.
ctrlModule PortalModuleBase This is the portal module object.
Exc Exception This is the exception that was thrown.
DisplayErrorMessage Boolean This indicates whether the portal should renderan error message to the client browser.
4. Use this overloaded method if you are handling exceptions in a control that isn’t directly in aportal module. For instance, if your portal module uses a server control, you can use thismethod to handle exceptions within that server control. It will display a friendly error messageif custom error messages are enabled.
Public Sub ProcessModuleLoadException(ByVal FriendlyMessage As String, _ByVal UserCtrl As Control, ByVal exc As Exception)
Parameter Type Description
FriendlyMessage String This is a friendly message to display to the clientbrowser.
UserCtrl Control This is the control. It can be anything that inher-its from System.Web.UI.Control.
Exc Exception This is the exception that was thrown.
5. This is the same as the previous method; however, it adds the ability to specify whether to dis-play an error message to the client browser (the Host Settings option to Use Custom ErrorMessages takes precedence over this value).
Public Sub ProcessModuleLoadException(ByVal FriendlyMessage As String, _ByVal ctrlModule As Control, ByVal exc As Exception, _ByVal DisplayErrorMessage As Boolean)
218
Chapter 8

Parameter Type Description
FriendlyMessage String This is a friendly message to display to the client browser.
ctrlModule Control This is the control. It can be anything that inherits fromSystem.Web.UI.Control.
Exc Exception This is the exception that was thrown.
DisplayErrorMessage Boolean This indicates whether the portal should render an errormessage to the client browser.
6. This is a simple method that has only two parameters. It will display a generic error message tothe client browser if custom error messages are enabled.
Public Sub ProcessModuleLoadException(ByVal UserCtrl As Control, _ByVal exc As Exception)
Parameter Type Description
UserCtrl Control This is the control. It can be anything that inherits fromSystem.Web.UI.Control.
Exc Exception This is the exception that was thrown.
7. This is the same as the previous method except it provides the ability to suppress the error mes-sage that is displayed in the client browser (the Host Settings option to Use Custom ErrorMessages takes precedence over this value).
Public Sub ProcessModuleLoadException(ByVal UserCtrl As Control, _ByVal exc As Exception, ByVal DisplayErrorMessage As Boolean)
Parameter Type Description
UserCtrl Control This is the control. It can be anything that inherits fromSystem.Web.UI.Control.
Exc Exception This is the exception that was thrown.
DisplayErrorMessage Boolean This indicates whether the portal should render an errormessage to the client browser.
ProcessPageLoadException MethodSimilar to the ProcessModuleLoadException method, the ProcessPageLoadException method serves twoprimary functions. The first is to log the exceptions thrown from outside of a module to the LoggingProvider. The second is to display a friendly error message on the page. Note the friendly error messagewill only be displayed if the host option Use Custom Error Messages is enabled on the Host Settingspage (see Chapter 5).
219
Core DotNetNuke APIs

This ProcessPageLoadException method has two overloaded methods that are detailed below.
1. To process an exception that occurs in an ASPX file or in logic outside of a portal module, usethe following overloaded method. If the Use Custom Error Messages option has been enabled inHost Settings, this method will also handle displaying a user-friendly error message to the clientbrowser.
Public Sub ProcessPageLoadException(ByVal exc As Exception)
Parameter Type Description
Exc Exception This is the exception that was thrown.
2. This is the same as the previous method; however, you must send in the URL parameter to redi-rect the request after logging the exception.
Public Sub ProcessPageLoadException(ByVal exc As Exception, _ByVal URL As String)
Parameter Type Description
Exc Exception This is the exception that was thrown.
URL String This is the URL to redirect the request to.
LogException MethodThe LogException method is used for adding exceptions to the log. It does not handle displaying anytype of friendly message to the user. Instead, it simply logs the error without notifying the client browserof a problem. This method has four overloaded methods that are detailed below.
1. To log an exception thrown from a module, use the following overloaded method.
Public Sub LogException(ByVal exc As ModuleLoadException)
Parameter Type Description
Exc ModuleLoadException This is the exception that was thrown.
2. To log an exception thrown from a page or other logic outside of a module, use the followingoverloaded method.
Public Sub LogException(ByVal exc As PageLoadException)
Parameter Type Description
Exc PageLoadException This is the exception that was thrown.
220
Chapter 8

3. To log an exception thrown from within a Scheduling Provider Task, use the following over-loaded method.
Public Sub LogException(ByVal exc As SchedulerException)
Parameter Type Description
Exc SchedulerException This is the exception that was thrown.
4. If you need to log an exception of another type, use the following overloaded method.
Public Sub LogException(ByVal exc As Exception)
Parameter Type Description
Exc Exception This is the exception that was thrown.
ProcessSchedulerException MethodThe ProcessSchedulerException method is used to log exceptions thrown from within a scheduled task.This method simply logs the error.
To log an exception thrown from a scheduled task, use the following overloaded method.
Public Sub LogException(ByVal exc As ModuleLoadException)
Parameter Type Description
Exc ModuleLoadException This is the exception that was thrown.
The exception handling API abstracts developers from the complexity of logging exceptions and pre-senting error messages gracefully. It provides several powerful methods that handle all of the logicinvolved in working with the Logging Provider and the presentation layer. The next section covers thevarious interfaces that module developers can take advantage of to bring more core features to life intheir modules.
LocalizationThe localization API in DotNetNuke provides developers with an interface for performing multilingualtranslations in custom portal modules. As of the writing of this book, DotNetNuke includes only staticlocalization features. In other words, only text labels and other static strings are localized by the core.Localization of any dynamic content in a module is the responsibility of the module developer.
221
Core DotNetNuke APIs

LocalesA locale is the combination of a country code and a language code. For the sake of accurate translations,it is important to use both a country code and a language code to perform localization. Many languagesare spoken in more than one country, and dialects may differ from country to country. For instance,speaking French in Canada is different from speaking French in France. A locale accounts for this differ-entiation. DotNetNuke supports four types of locales:
❑ System Locale: This is the locale (en-US) that DotNetNuke is natively coded to. This locale is asystem locale and cannot be changed.
❑ Default Portal Locale: This is the portal’s default locale that is specified in the Site Settingsscreen (see Chapter 5). This locale will be automatically selected for any users who have not yetdefined their default locale.
❑ User Selected Locale: This is the locale that a user selects from the Registration or UserAccount page.
❑ Custom Locale: A custom locale allows for customized translations to be defined for each por-tal. The localization framework manages this by appending the PortalID onto the locale. Forinstance, if Portal 2 has configured custom German translations, the custom locale for de-DE forPortal 2 is de-DE.Portal-2.
Resource FilesTo align closely to the ASP.NET 2.0 localization implementation, DotNetNuke uses the WindowsResource Files (RESX) format to store translations. This file format uses XML tags to store key/valuepairs of string values. In the root App_Resources directory, there is a file named Template.resx.Developers often use this file as a starting place to create their resource files.
The format of the data elements of a resource file looks like the following. This is an example of the DataProvider: form field on the Host Settings page.
. . .<data name=”plDataProvider.Text”>
<value>Data Provider:</value></data><data name=”plDataProvider.Help”>
<value>The provider name which is identified as the default dataprovider in the web.config file</value>
</data>. . .
Each name attribute is referred to as a resource key. Notice each of the two resource keys has an exten-sion. DotNetNuke uses a number of extensions, which help to identify translations more easily.
❑ .Text: Used for the text properties of controls (default if not included in resource key)
❑ .Help: Used for help text
❑ .Header: Used for the headertext properties of DataGrid columns
222
Chapter 8

❑ .EditText: Used for the edittext properties of DataGrids
❑ .ErrorMessage: Used for the ErrorMessage property of Validator controls
There are three types of static translations in DotNetNuke. They are Application Resources, LocalResources, and Global Resources. Each of these types of static translations is defined in the followingsections.
Application ResourcesThese translations are shared throughout many controls in DotNetNuke. This is the storage area forgeneric translations. For instance, to localize the words True and False, you would store the translationsin the Application Resources files. Other examples of Application Resources are Yes, No, Submit, andContinue.
Application Resources are stored in the App_GlobalResources directory, which is directly under theDotNetNuke root installation directory. The filename for the system locale (en-US) for ApplicationResources is SharedResources.resx. The file naming convention for other locales is SharedResources.[locale].resx. For instance, the German Application Resource file is named SharedResources.de-DE.resx.
Local Resources These translations are unique to a user control. For instance, to localize the Announcements module’suser control, you would store the translations in a Local Resource file that lives in a child directorybeneath the Announcements module’s directory.
If the Announcements module has static translations, which are generic in nature (such as True andFalse), the translations should be gathered from Application Resources.
Local Resource files are stored in a directory named App_LocalResources. Each directory that containslocalized user controls must have a directory named App_LocalResources. The filename for the SystemLocale follows this naming convention:
[control_directory]/App_LocalResources/[user_control_file_name].resx.
For instance, for the en-US locale, the resource file for the Announcements module would be
Announcements/App_LocalResources/Announcements.ascx.resx.
The filename for other locales follows this naming convention:
[control_directory]/App_LocalResources/[control_files_name].[locale].resx.
Global ResourcesThese translations are for localizing strings from components that do not have Local Resource files, andare not necessarily shared translations. Therefore they do not fit in the first two categories. Because allLocal Resources are associated with a user control or a page, there is no place to store translations forcomponents. For this reason, we added this third category for resource files. An example of GlobalResource usage is in the component admin/Containers/ActionBase.vb, which needs to localize theword Help in the module action lists.
223
Core DotNetNuke APIs

Global Resources are stored in the same directory as Application Resources (/App_Resources). The file-name for the system default locale is /App_Resources/GlobalResources.resx. For locales other than thesystem default, the naming convention is
/App_Resources/GlobalResources.[locale].resx
The APIThe primary focus of this section is on the DotNetNuke.Services.Localization.Localization class. Thisclass provides the methods necessary for localizing strings, as shown in Table 8-3.
Table 8-3: Localization Methods
Method Description
AddLocale This is used for adding a locale to the list of supported locales inthe App_GlobalResources/Locales.xml file.
GetHelpUrl This is used to replace the string [LANGUAGE] in a Help URLwith the user’s locale (or the portal’s default locale if the user hasnot specified a default locale).
GetResourceFile The returns the path and filename of the resource file for a speci-fied control.
GetString This returns the localized string based on the resource key specified.
GetSupportedLocales This returns the list locales from the App_GlobalResources/Locales.xml file.
GetSystemMessage This localizes a string and also replaces system tokens with per-sonalized strings.
GetTimeZones This returns a key/value pair collection of time zones.
LoadCultureDropDownList This will fill a DropDownList control with the supported cultures.
LoadTimeZoneDrop This will fill a DropDownList control with the list of time zones.DownList
LocalizeDataGrid This will localize the headers in a DataGrid control.
LocalizeRole This localizes the three system roles.
The GetString MethodOf the methods in Table 8-3, the most widely used is the GetString method. The GetString method per-forms localization based on the resource key passed into it. The GetString method has four overloadedmethods as detailed below.
224
Chapter 8

1. To localize a string value that has a translation in an Application Resource file, use the followingmethod. The resource file to be used will be automatically selected based on the currently activelocale. This will automatically use the currently active PortalSettings object to derive the portal’sdefault locale.
Public Shared Function GetString(ByVal name As String) As String
Parameter Type Description
Name String This is the string to be localized.
2. This is identical to the previous method, except you can send in a PortalSettings object to derivethe portal’s default locale.
Public Shared Function GetString(ByVal name As String, ByVal objPortalSettings_
As PortalSettings) As String
Parameter Type Description
Name String This is the string to be translated.
objPortalSettings PortalSettings This is the PortalSettings object for the current context.
3. To localize a string value that has a translation in a Local Resource file, use the followingmethod. This method accepts an incoming parameter (ResourceFileRoot) from which theresource file to use is derived. This will automatically use the currently active PortalSettingsobject to derive the portal’s default locale.
Public Shared Function GetString(ByVal name As String, ByVal ResourceFileRoot _As String) As String
Parameter Type Description
Name String This is the string to be translated.
ResourceFileRoot String This is the value of a module’s LocalResourceFile property. Itis used to derive the resource file to be used for the translation.
4. This method allows you to specify the key name to translate, and both the resource file and por-tal settings to use for the translation.
Public Shared Function GetString(ByVal name As String, ByVal ResourceFileRoot _As String, ByVal objPortalSettings As PortalSettings) As String
225
Core DotNetNuke APIs

Parameter Type Description
Name String This is the string to be translated.
ResourceFileRoot String This is the value of a module’s LocalResourceFile property. Itis used to derive the resource file to be used for the translation.
objPortalSettings PortalSettings This is the PortalSettings object for the current context.
The GetSystemMessage MethodThis method is used throughout the core code to produce localized and personalized strings. For example, it is used frequently to send e-mail to registered users. The user registration page calls theGetSystemMessage method to localize the content of the e-mail that gets sent to the user. The e-mail thatgets sent to the user contains personalized content, too. Therefore, rather than concatenating severaldozen strings using the GetString method and wrapping them around personalized data, theGetSystemMessage method takes care of all of this with just one call.
This section first covers the overloads for the GetSystemMessage method, and then discusses the userregistration example.
1. Use this method if you need to localize and personalize a string when the personalization can bederived from either the objPortal or objUser properties. By using this method, the translationmust be stored in the Application Resource file.
Public Shared Function GetSystemMessage(ByVal objPortal As PortalSettings, _ByVal MessageName As String, ByVal objUser As UserInfo) As String
Parameter Type Description
ObjPortal PortalSettings This is the PortalSettings object for the current context. It isused to derive any personalized content within the localizedsystem message string.
MessageName String This is the resource key used to get the localized system mes-sage from the resource file.
ObjUser UserInfo This is the UserInfo object to derive any personalized contentwithin the localized system message string.
2. Use this method if you need to localize and personalize a string when the personalization can bederived from either the objPortal or objUser properties. In this method you must specify theresource file to retrieve the translation from.
Public Shared Function GetSystemMessage(ByVal objPortal As PortalSettings, _ByVal MessageName As String, ByVal objUser As UserInfo, ByVal ResourceFile _As String) As String
226
Chapter 8

Parameter Type Description
ObjPortal PortalSettings This is the PortalSettings object for the current context. It isused to derive any personalized content within the localizedsystem message string.
MessageName String This is the resource key used to get the localized system mes-sage from the resource file.
ObjUser UserInfo This is the UserInfo object to derive any personalized contentwithin the localized system message string.
ResourceFile String This is the resource file that the localized system messageis stored in. It is usually the value of the module’s LocalResourceFile property.
3. This method is the similar to the previous method; however, you can specify an ArrayList ofstrings that can be used in the personalization of the localized string.
Public Shared Function GetSystemMessage(ByVal objPortal As PortalSettings, _ByVal MessageName As String, ByVal objUser As UserInfo, ByVal ResourceFile As _String, ByVal Custom As ArrayList) As String
Parameter Type Description
ObjPortal PortalSettings This is the PortalSettings object for the current context. It isused to derive any personalized content within the localizedsystem message string.
MessageName String This is the resource key used to get the localized system mes-sage from the resource file.
ObjUser UserInfo This is the UserInfo object to derive any personalized contentwithin the localized system message string.
ResourceFile String This is the resource file that the localized system message isstored in. It is usually the value of the module’s LocalRe-sourceFile property.
Custom ArrayList This is a collection of strings that can be used for personaliz-ing the system message.
4. Use this method if you need to localize and personalize a string when the personalization can bederived from the objPortal property values. Also, you must specify the resource file to use forthe translation.
Public Shared Function GetSystemMessage(ByVal objPortal As PortalSettings, _ByVal MessageName As String, ByVal ResourceFile As String) As String
227
Core DotNetNuke APIs

Parameter Type Description
ObjPortal PortalSettings This is the PortalSettings object for the current context. It isused to derive any personalized content within the localizedsystem message string.
MessageName String This is the resource key used to get the localized system mes-sage from the resource file.
ResourceFile String This is the resource file that the localized system message isstored in.
5. Use this method if you need to localize and personalize a string when the personalization can bederived from the objPortal object’s properties and the Custom ArrayList collection items. Also,you must specify the resource file to use for the translation.
Public Shared Function GetSystemMessage(ByVal objPortal As PortalSettings, _ByVal MessageName As String, ByVal ResourceFile As String, ByVal Custom As _ArrayList) As String
Parameter Type Description
ObjPortal PortalSettings This is the PortalSettings object for the current context. It isused to derive any personalized content within the localizedsystem message string.
MessageName String This is the resource key used to get the localized system mes-sage from the resource file.
ResourceFile String This is the resource file that the localized system message isstored in.
Custom ArrayList This is a collection of strings that can be used for personaliz-ing the system message.
When using the GetSystemMessage method, you can specify several system tokens in the localized string.These tokens are used as keys to render property values from either the UserInfo or PortalSettingsobjects. The following is an example of this:
DotNetNuke.Services.Localization.Localization.GetSystemMessage(PortalSettings, _“EMAIL_USER_REGISTRATION_PRIVATE_BODY”, objNewUser, Me.LocalResourceFile)
This code calls the GetSystemMessage method to localize and personalize the body of an e-mail messagethat is sent to a newly registered user. This code is found in the Admin/Security/Register.ascx portalmodule. The MessageName parameter value is EMAIL_USER_REGISTRATION_PRIVATE_BODY. Thisis the resource key to lookup the system message in the resource file. The resource key and associatedtranslation from the resource file /Admin/Security/App_LocalResources/Register.ascx.resx is shown inListing 8-8.
228
Chapter 8
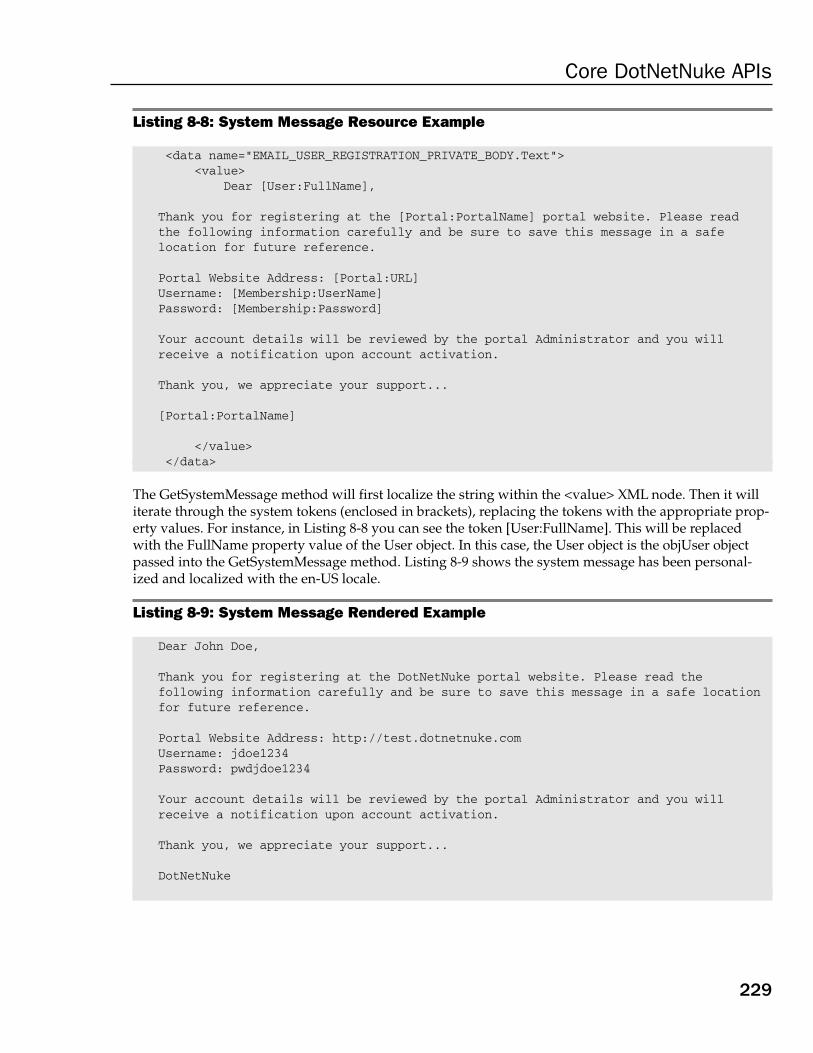
Listing 8-8: System Message Resource Example
<data name=”EMAIL_USER_REGISTRATION_PRIVATE_BODY.Text”><value>
Dear [User:FullName],
Thank you for registering at the [Portal:PortalName] portal website. Please readthe following information carefully and be sure to save this message in a safelocation for future reference.
Portal Website Address: [Portal:URL]Username: [Membership:UserName]Password: [Membership:Password]
Your account details will be reviewed by the portal Administrator and you willreceive a notification upon account activation.
Thank you, we appreciate your support...
[Portal:PortalName]
</value></data>
The GetSystemMessage method will first localize the string within the <value> XML node. Then it williterate through the system tokens (enclosed in brackets), replacing the tokens with the appropriate prop-erty values. For instance, in Listing 8-8 you can see the token [User:FullName]. This will be replacedwith the FullName property value of the User object. In this case, the User object is the objUser objectpassed into the GetSystemMessage method. Listing 8-9 shows the system message has been personal-ized and localized with the en-US locale.
Listing 8-9: System Message Rendered Example
Dear John Doe,
Thank you for registering at the DotNetNuke portal website. Please read thefollowing information carefully and be sure to save this message in a safe locationfor future reference.
Portal Website Address: http://test.dotnetnuke.comUsername: jdoe1234Password: pwdjdoe1234
Your account details will be reviewed by the portal Administrator and you willreceive a notification upon account activation.
Thank you, we appreciate your support...
DotNetNuke
229
Core DotNetNuke APIs

SchedulerThe Scheduler in DotNetNuke is a mechanism that allows developers to schedule tasks to run at definedintervals. It is implemented using the Provider pattern; therefore, it can easily be replaced without modi-fying core code. Creating a scheduled task is a fairly simple process that we will cover in this section.First, it is important to understand which types of tasks are suitable for the Scheduler.
Since the Scheduler is run under the context of the web application, it is prone to the same types ofapplication recycles as a web application. In a web-hosting environment, it is a common practice to con-serve resources by recycling the worker process for a site periodically. When this happens, the Schedulerstops running. Therefore, it is important to understand that the tasks run by the Scheduler do not run 24hours a day, 7 days a week. Instead, the tasks are executed according to a defined schedule, but they canonly be triggered when the worker process is alive. For this reason, you cannot specify that a task shouldrun every night at midnight. It is not possible in the web environment to meet this type of use case.Instead, you can specify how often a task is run by defining the execution frequency for each task. Theexecution frequency is defined as every x minutes/hours/days.
To create a scheduled task, you must create a class that inherits from DotNetNuke.Services.Scheduling.SchedulerClient. This class must provide a constructor and a DoWork method. An example of a sched-uled task is shown in Listing 8-10. This sample scheduled task will move all event log files to a foldernamed with the current date. By configuring this scheduled task to run once per day, the log files will beautomatically archived daily, which keeps the log file sizes manageable.
Listing 8-10: Scheduled Task Example
Public Class ArchiveEventLogInherits DotNetNuke.Services.Scheduling.SchedulerClientPublic Sub New(ByVal objScheduleHistoryItem As _
DotNetNuke.Services.Scheduling.ScheduleHistoryItem)MyBase.new()Me.ScheduleHistoryItem = objScheduleHistoryItem ‘REQUIRED
End SubPublic Overrides Sub DoWork()
Try‘notification that the event is progressing‘this is optionalMe.Progressing() ‘OPTIONAL‘get the directory that logs are written toDim LogDirectory As StringLogDirectory = Common.Globals.HostMapPath + “Logs\”
‘create a folder with today’s dateDim FolderName As StringFolderName = LogDirectory + Now.Month.ToString + “-” + _
Now.Day.ToString + “-” + Now.Year.ToString + “\”If Not IO.Directory.Exists(FolderName) Then
IO.Directory.CreateDirectory(FolderName)End If
‘get the files in the log directoryDim s As String()
230
Chapter 8

s = IO.Directory.GetFiles(LogDirectory)‘loop through the filesDim i As IntegerFor i = 0 To s.Length - 1
Dim OldFileInfo As New IO.FileInfo(s(i))‘move all files to the new folder except the file‘used to store pending log notificationsIf OldFileInfo.Name <> _
“PendingLogNotifications.xml.resources” ThenDim NewFileName As StringNewFileName = FolderName + OldFileInfo.Name‘check to see if the new file already existsIf IO.File.Exists(NewFileName) Then
Dim errMessage As StringerrMessage = “An error occurred archiving “ + _
“log file to “ + _NewFileName + “. The file already exists.”
LogException(New _BasePortalException(errMessage))
ElseIO.File.Move(OldFileInfo.FullName, NewFileName)Me.ScheduleHistoryItem.AddLogNote(“Moved “ + _
OldFileInfo.FullName + _“ to “ + FolderName + _OldFileInfo.Name + “.”) ‘OPTIONAL
End IfEnd If
Next
Me.ScheduleHistoryItem.Succeeded = True ‘REQUIRED
Catch exc As Exception ‘REQUIRED
Me.ScheduleHistoryItem.Succeeded = False ‘REQUIRED
Me.ScheduleHistoryItem.AddLogNote(String.Format( _“Archiving log files failed.”, _exc.ToString)) ‘OPTIONAL
‘notification that we have erroredMe.Errored(exc) ‘REQUIRED
‘log the exceptionLogException(exc) ‘OPTIONAL
End TryEnd Sub
End Class
Once the class has been compiled into the bin directory, the task can be scheduled from the Schedulingmodule under the Host tab (see Chapter 6 for details). It is important to include each of the lines of codein Listing 8-7 that is labeled required. These collectively ensure both the exception handling and sched-ule management are handled uniformly throughout all scheduled tasks.
231
Core DotNetNuke APIs

HTTPModulesASP.NET provides a number of options for extending the path that data takes between client and server(known as the HTTP Pipeline). A popular method to extend the pipeline is through the use of customcomponents known as HTTP Modules. An HTTP module allows you to add pre- and post-processing toeach HTTP Request coming into your application.
DotNetNuke implements a number of HTTP Modules to extend the pipeline. These modules includefeatures such as URL Rewriting, Exception Management, Users Online, Profile, AnonymousIdentification, Role Management, DotNetNuke Membership, and Personalization. This sectiondiscusses each in turn.
Originally, a lot of the previously mentioned HTTP Modules were implemented inside the core applica-tion (global.asax.vb). There were a number of reasons why the functionally was moved to HTTPModules:
1. Administrators can optionally enable/disable an HTTP module.
2. Developers can replace or modify HTTP Modules without altering the core application.
3. Provides templates for extending the HTTP Pipeline.
HTTP Modules 101Before we explore each HTTP module within DotNetNuke, let’s further examine the concepts of HTTPmodules so you’ll know when and where to implement them. To understand how HTTP modules work,it’s necessary to understand the HTTP Pipeline and how ASP.NET processes incoming requests. Figure8-1 shows the HTTP Pipeline.
When a request is first made, it passes through a number of stages before it is actually handled by yourapplication. The first participant in the pipeline is Microsoft Internet Information Server (IIS); its job is toroute ASP.NET requests to the ASP.NET runtime. Once an ASPX file is requested (or any other ASP.NETfile), IIS will forward the request to the ASP.NET runtime (via an ISAPI extension).
Now that the request has been received by ASP.NET, it must pass through an instance of HttpApplication.The HttpApplication object handles application-wide methods, data, and events. It is also responsible forpushing the request through one or more HTTP module objects. The ASP.NET runtime determines whichmodules to load by examining the configuration files located at either machine level (machine.config) orapplication level (web.config). Listing 8-11 shows the HTTP modules configuration section ofDotNetNuke.
232
Chapter 8

Figure 8-1
Listing 8-11: HTTP Modules Configuration Section
<httpModules><add name=”UrlRewrite” type=”DotNetNuke.HttpModules.UrlRewriteModule,
DotNetNuke.HttpModules.UrlRewrite” />
<add name=”Exception” type=”DotNetNuke.HttpModules.ExceptionModule,DotNetNuke.HttpModules.Exception” />
<add name=”UsersOnline” type=”DotNetNuke.HttpModules.UsersOnlineModule, DotNetNuke.HttpModules.UsersOnline” />
<add name=”Profile” type=”Microsoft.ScalableHosting.Profile.ProfileModule, MemberRole, Version=1.0.0.0, Culture=neutral, PublicKeyToken=b7c773fb104e7562” />
<add name=”AnonymousIdentification”type=”Microsoft.ScalableHosting.Security.AnonymousIdentificationModule,
MemberRole, Version=1.0.0.0,
(continued)
Request
IIS
aspnet_isapi.dll
HttpApplication
HttpHandler
HttpModules
233
Core DotNetNuke APIs

Listing 8-11: (continued)
Culture=neutral, PublicKeyToken=b7c773fb104e7562” />
<add name=”RoleManager” type=”Microsoft.ScalableHosting.Security.RoleManagerModule,
MemberRole, Version=1.0.0.0, Culture=neutral, PublicKeyToken=b7c773fb104e7562” />
<add name=”DNNMembership” type=”DotNetNuke.HttpModules.DNNMembershipModule,DotNetNuke.HttpModules.DNNMembership” />
<add name=”Personalization” type=”DotNetNuke.HttpModules.PersonalizationModule, DotNetNuke.HttpModules.Personalization” />
</httpModules>
To invoke each HTTP module, the Init method of each module is invoked. At the end of each request, thedispose method is invoked to allow each HTTP module to clean up its resources. In fact, the two meth-ods mentioned form the interface (IHttpModule) each module must implement. Listing 8-12 shows theIHttpModule interface.
Listing 8-12: The IHttpModule Interface Implemented By Each HTTP Module
Public Interface IHttpModuleSub Init(ByVal context As HttpApplication)Sub Dispose()
End Interface
During the Init event, each module may subscribe to a number of events raised by the HttpApplicationobject. Table 8-4 shows the events that are raised before the application executes. The events are listed inthe order in which they occur.
Table 8-4: HTTP Module Events (before application executes)
Event Description
BeginRequest Signals a new request; guaranteed to be raised on each request.
AuthenticateRequest Signals that the request is ready to be authenticated; used by the Secu-rity module.
AuthorizeRequest Signals that the request is ready to be authorized; used by the Securitymodule.
ResolveRequestCache Used by the Output Cache module to short-circuit the processing ofrequests that have been cached.
AcquireRequestState Signals that per-request state should be obtained.
PreRequestHandler Signals that the request handler is about to execute. This is the last Execute event you can participate in before the HTTP handler for this request
is called.
234
Chapter 8

Table 8-5 shows the events that are raised after an application has returned. The events are listed in theorder in which they occur.
Table 8-5: HTTP Module Events (after application has returned)
Event Description
PostRequest Signals that the HTTP handler has completed processing the request.HandlerExecute
ReleaseRequestState Signals that the request state should be stored because the applicationis finished with the request.
UpdateRequestCache Signals that code processing is complete and the file is ready to beadded to the ASP.NET cache.
EndRequest Signals that all processing has finished for the request. This is the lastevent called when the application ends.
In addition, there are three per-request events that can be raised in a nondeterministic order. Theyappear in Table 8-6.
Table 8-6: HTTP Module Events (nondeterministic)
Event Description
PreSendRequest Signals that HTTP headers are about to be sent to the client. This pro-Headers vides an opportunity to add, remove, or modify the headers before
they are sent.
PreSendRequest Signals that content is about to be sent to the client. This provides an Content opportunity to modify the content before it is sent.
Error Signals an unhandled exception.
After the request has been pushed through the HTTP modules configured for your application, theHTTP handler responsible for the requested file’s extension (.ASPX) handles the processing of that file.If you are familiar with ASP.NET development, you’ll be familiar with the handler for an ASPX page,that is, System.Web.UI.Page. The HTTP handler then handles the life cycle of the page-level request rais-ing events such as Page_Init, Page_Load, and so on.
DotNetNuke HTTP ModulesAs stated earlier, DotNetNuke (like ASP.NET) comes with a number of HTTP modules. These modulesallow developers to customize the HTTP Pipeline to provide additional functionality on each request.This section investigates each HTTP module provided, and discusses its purpose and possibilities forextension.
235
Core DotNetNuke APIs

URL RewriterThe URL rewriter is an HTTP module that provides a mechanism for mapping virtual resource names tophysical resource names at runtime. In other words, provide a URL that is friendly. The term “friendly”has two aspects; we solved one with the default implementation, but not the other. Instead we providedan extensible architecture to allow you to implement the second at a possible cost of performance.
The first aspect of the term friendly is to make the URL search engine friendly. The main requirementof the enhancement is most search engines ignore URL parameters. Since DotNetNuke relies on URLparameters to navigate to portal tabs, the current application is not search engine friendly. In order toeffectively index your site we need a parameter-less mechanism for constructing URLs that searchengines will process.
If you browse to a DotNetNuke site that is version 3.0 or greater, you may notice different URLs fromearlier versions. Traditionally, a DotNetNuke URL may look something like the following:
http://www.dotnetnuke.com/default.aspx?tabid=622
With friendly URLs enabled you might see the preceding URL like so:
http://www.dotnetnuke.com/RoadMap/Friendly URLs/tabid/622/default.aspx
Earlier, we explored the HTTP Pipeline and the events that are raised during the processing of a request.Our URL rewriter is invoked during this process and can optionally subscribe to application-wideevents. The particular event we are interested in for this module is the BeginRequest event. This eventallows us to modify the URL before the Page HTTP handler is invoked and make it believe the URLrequested was that of the old non-friendly format.
The transformation process occurs through the use of regular expressions defined in SiteUrls.config inthe root of your DotNetNuke installation. This file contains a number of expressions to LookFor and acorresponding URL to SendTo. Listing 8-13 shows the default SiteUrls.config.
Listing 8-13: SiteUrls.config
<?xml version=”1.0” encoding=”utf-8” ?><RewriterConfig><Rules>
<RewriterRule><LookFor>.*/TabId/(\d+)(.*)/Logoff.aspx</LookFor><SendTo>~/Admin/Security/Logoff.aspx?tabid=$1</SendTo>
</RewriterRule><RewriterRule>
<LookFor>.*/TabId/(\d+)(.*)/rss.aspx</LookFor><SendTo>~/rss.aspx?TabId=$1</SendTo>
</RewriterRule><RewriterRule>
<LookFor>.*/TabId/(\d+)(.*)</LookFor><SendTo>~/Default.aspx?TabId=$1</SendTo>
</RewriterRule></Rules></RewriterConfig>
236
Chapter 8
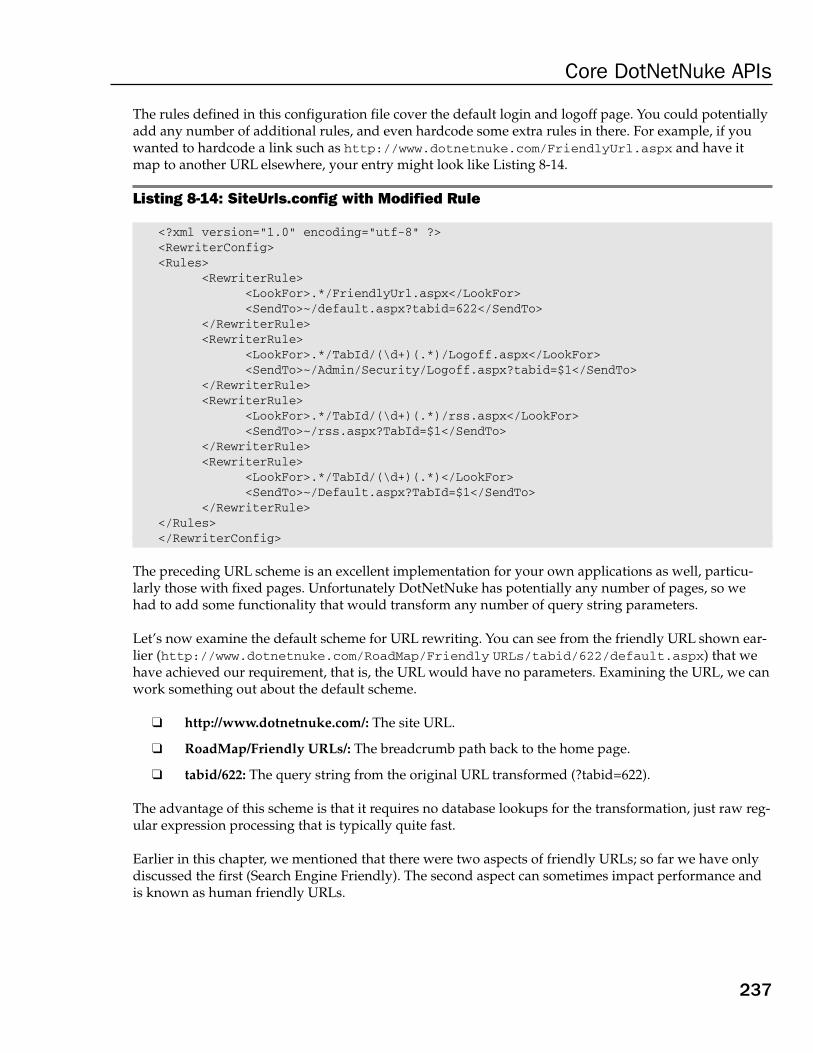
The rules defined in this configuration file cover the default login and logoff page. You could potentiallyadd any number of additional rules, and even hardcode some extra rules in there. For example, if youwanted to hardcode a link such as http://www.dotnetnuke.com/FriendlyUrl.aspx and have itmap to another URL elsewhere, your entry might look like Listing 8-14.
Listing 8-14: SiteUrls.config with Modified Rule
<?xml version=”1.0” encoding=”utf-8” ?><RewriterConfig><Rules>
<RewriterRule><LookFor>.*/FriendlyUrl.aspx</LookFor><SendTo>~/default.aspx?tabid=622</SendTo>
</RewriterRule><RewriterRule>
<LookFor>.*/TabId/(\d+)(.*)/Logoff.aspx</LookFor><SendTo>~/Admin/Security/Logoff.aspx?tabid=$1</SendTo>
</RewriterRule><RewriterRule>
<LookFor>.*/TabId/(\d+)(.*)/rss.aspx</LookFor><SendTo>~/rss.aspx?TabId=$1</SendTo>
</RewriterRule><RewriterRule>
<LookFor>.*/TabId/(\d+)(.*)</LookFor><SendTo>~/Default.aspx?TabId=$1</SendTo>
</RewriterRule></Rules></RewriterConfig>
The preceding URL scheme is an excellent implementation for your own applications as well, particu-larly those with fixed pages. Unfortunately DotNetNuke has potentially any number of pages, so wehad to add some functionality that would transform any number of query string parameters.
Let’s now examine the default scheme for URL rewriting. You can see from the friendly URL shown ear-lier (http://www.dotnetnuke.com/RoadMap/Friendly URLs/tabid/622/default.aspx) that wehave achieved our requirement, that is, the URL would have no parameters. Examining the URL, we canwork something out about the default scheme.
❑ http://www.dotnetnuke.com/: The site URL.
❑ RoadMap/Friendly URLs/: The breadcrumb path back to the home page.
❑ tabid/622: The query string from the original URL transformed (?tabid=622).
The advantage of this scheme is that it requires no database lookups for the transformation, just raw reg-ular expression processing that is typically quite fast.
Earlier in this chapter, we mentioned that there were two aspects of friendly URLs; so far we have onlydiscussed the first (Search Engine Friendly). The second aspect can sometimes impact performance andis known as human friendly URLs.
237
Core DotNetNuke APIs

A URL that is human friendly is easily remembered by the human or able to be worked out. For exam-ple, if I had a login to DotNetNuke.com and I wanted to visit the profile page without navigating to it,I might expect the URL to be
http://www.dotnetnuke.com/profile/smcculloch.aspx
The preceding URL could easily be remembered, but would require additional processing on the requestfor two reasons:
❑ The URL contains no TabID. We would have to lookup the TabID for the profile page for thatportal.
❑ The URL contains no UserID. We would have to perform a lookup on smcculloch to find thecorresponding UserID.
For these reasons, this approach was not chosen but is still possible.
So far, we’ve only explained how incoming requests are interpreted but not how outgoing links aretransformed into the friendly URL scheme. A number of options were explored on how to transform theoutgoing links, but the best option was to implement a provider-based component that would transforma given link into the chosen scheme. Figure 8-2 shows the URL rewriter architecture.
Figure 8-2
Luckily, DotNetNuke had used two shortcut methods already for building links within the application(NavigateUrl and EditUrl). It was relatively simple to place a call to the provider from each of thesemethods, effectively upgrading the site to the new URL format instantly.
This approach also tightly coupled the HTTP module and the provider together. For this reason you canfind them in the same assembly (DotNetNuke.HttpModules.UrlRewrite.dll).
You can see from the architecture that it is quite plausible for you to write your own URL rewritingscheme. If it was more important for your site to have human friendly URLs, you could write a schemeby writing a new provider to format outgoing URLs, and a new HTTP module to interpret the incomingrequests.
Request
Portal Engine
FriendlyUrlProvider
UrlRewriterHttpModule
238
Chapter 8

Writing a new provider involves providing new implementations of the methods in the base class of theFriendlyUrlProvider. Listing 8-15 shows these methods.
Listing 8-15: Friendly URL Provider Methods
Public MustOverride Function FriendlyUrl(ByVal objtab as TabInfo, ByValpath As String) As String
Public MustOverride Function FriendlyUrl(ByVal objtab as TabInfo, ByValpath As String, ByVal pageName As String) As String
Public MustOverride Function FriendlyUrl(ByVal objtab as TabInfo, ByValpath As String, ByVal pageName As String, ByVal settings As PortalSettings) AsString
Public MustOverride Function FriendlyUrl(ByVal objtab as TabInfo, ByValpath As String, ByVal pageName As String, ByVal portalAlias As String) As String
As you can see, there are only four methods to implement so that you can write our URLs in yourdesired format. The most important part will be to come up with a scheme and to find an efficient andreliable way of interpretation by your HTTP module. Once you have written your provider, you can addan additional entry in the providers section of web.config as shown in Listing 8-16. Make sure to set thedefaultProvider attribute.
Listing 8-16: Friendly URL Provider Configuration
<friendlyUrl defaultProvider=”CustomFriendlyUrl”><providers>
<clear /><add name=”DNNFriendlyUrl”
type=”DotNetNuke.Services.Url.FriendlyUrl.DNNFriendlyUrlProvider,DotNetNuke.HttpModules.UrlRewrite” />
<add name=”CustomFriendlyUrl”type=”CompanyName.FriendlyUrlProvider,
CompanyName.FriendlyUrlProvider” /></providers>
</friendlyUrl>
Exception ManagementThe exception management HTTP module subscribes to the error event raised by the HttpApplicationobject. Any time an error occurs within DotNetNuke, the error event is called. During the processing of thisevent the last error to have occurred is captured and sent to the exception logging class. This class then callsthe Logging Provider that handles the writing of that exception to a data store (the default is XML).
Users OnlineUsers Online was implemented during version 2 of DotNetNuke. It allows other modules to interrogatethe applications’ data store for information regarding who is online, both expressed as registered usersor anonymous users. Previously it had been a custom add-on and was session based. Before the additionof the functionality to the core (like many add-ons incorporated into the core), research was undertakento investigate the best way to not only handle registered users, but anonymous users.
The module subscribes to the AuthorizeRequest event. This event is the first chance an HTTP modulehas to examine details about the user performing the request. The HTTP module examines the request
239
Core DotNetNuke APIs
and determines whether the user is anonymous or authenticated, then proceeds to store the request incache. Anonymous users are also given a temporary cookie so they are not counted twice in the future.A scheduled job from the Scheduler executes every minute on a background thread pulling the relevantdetails out of cache and updating them in the database; it will also clear up any old records. The recordsare stored within two tables, AnonymousUsers and UsersOnline.
This HTTP module is a good module to disable (comment out of config) if you do not need this informa-tion within your portal. Alternatively you can just disable it in Host Settings.
DNNMembershipThe DNNMembership HTTP module performs tasks around the security of a user. It stores role informa-tion about a user in an HTTP cookie to save requesting the same information again and performs securitychecks for users switching portals.
There is no real need to extend this module because it is critical to DotNetNuke’s operation.
PersonalizationThe personalization HTTP module is very similar to the Microsoft-provided Profile HTTP module, andin fact, was based on the same concept, just integrated much earlier. It loads a user’s personalized infor-mation into a serialized XML object at the beginning of the request, and saves it at the end of the request.
If you are interested in storing personalized information about a user, see the personalization classesunder /Components/Personalization/.
Module Interfaces Modules represent a discrete set of functionality that can extend the portal framework. In past versionsof DotNetNuke, module interactions with the portal were primarily limited to making method calls intothe core portal APIs. While this one-way interaction provides some ability to utilize portal services andmethods within the module, it limits the ability of the portal to provide more advanced services.
In order to provide two-way interactions with modules, the portal needs to have a mechanism to makemethod calls into the module. There are several distinct mechanisms for allowing a program to callmethods on an arbitrary set of code, where the module code is unknown at the time the portal is beingdeveloped. Three of these “calling” mechanisms are used within DotNetNuke:
❑ Inheritance
❑ Delegates
❑ Interfaces
As discussed previously, every module inherits from the PortalModuleBase class (located in the compo-nents/module directory). This base class provides a common set of methods and properties that can beused by the module as well as the portal to control the behavior of each module instance. Because themodule must inherit from this class, the portal has a set of known methods that it can use to control themodule. The portal could extend the base class to add additional methods to handle new services. Onedownside to this approach is that there is not an easy mechanism for determining whether a subclass
240
Chapter 8

implements custom logic for a specific method or property. Because of this restriction, inheritance is gen-erally limited to providing services that are needed or required for every subclass.
A second method for interacting with the modules involves the use of delegates. A delegate is essentiallya pointer to a method that has a specific set of parameters and return type. Delegates are useful whena service can be implemented with a single method call and are the underlying mechanism behindVB.NET’s event handling. DotNetNuke uses delegates to implement callback methods for the ModuleAction menu action event. Although delegates are very useful in some situations, they are more difficultto implement and understand than alternative methods.
The third calling mechanism used by DotNetNuke is the use of interfaces. An interface defines a set ofmethods, events, and properties without providing any implementation details for these elements. Anyclass that implements an interface is then responsible for providing the specific logic for each method,event, and property defined in the interface. Interfaces are especially useful for defining optional ser-vices that a module may implement. The portal is able to detect if a class implements a specific interfaceand is then able to call any of the methods, events, or properties defined in the interface.
DotNetNuke 3.0 significantly extends its use of module interfaces. This section examines the six maininterfaces that are intended for use by modules:
❑ IActionable
❑ IPortable
❑ IUpgradable
❑ IModuleCommunicator
❑ IModuleListener
❑ ISearchable
IActionableEvery module has a menu that contains several possible action items for activities like editing modulesettings, module movement, and viewing help. These menu items are called Module Actions. The mod-ule menu can be extended with your own custom actions. When your module inherits from thePortalModuleBase class, it receives a default set of actions. These actions are defined by the portal tohandle common editing functions. Your module can extend these actions by implementing theIActionable interface.
InterfaceAs shown in Listing 8-17, the IActionable interface consists of a single method that returns a collection ofmodule actions. The ModuleActions property is used when DotNetNuke renders the module.
Listing 8-17: IActionable Interface Definition
Namespace DotNetNuke.Entities.ModulesPublic Interface IActionable
ReadOnly Property ModuleActions() As Actions.ModuleActionCollectionEnd Interface
End Namespace
241
Core DotNetNuke APIs

Listing 8-18 shows an example usage as implemented in the Announcements module. Let’s break thisdown. The first two lines tell the compiler that this method implements the ModuleAction method of theIActionable interface. This is a read-only method and therefore we only need to provide a getter func-tion. The first step is to create a new collection to hold our custom actions. Then we use the collection’sAdd method to create a new action item in our collection. Finally we return our new collection.
Listing 8-18: IActionable.ModuleActions Example
Public ReadOnly Property ModuleActions() As ModuleActionCollection _Implements IActionable.ModuleActionsGet
Dim Actions As New ModuleActionCollection
Actions.Add(GetNextActionID, _Localization.GetString(ModuleActionType.AddContent, _
LocalResourceFile), _ModuleActionType.AddContent, _“”, _“”, _EditUrl(), _False, _Security.SecurityAccessLevel.Edit, _True, _False)
Return ActionsEnd Get
End Property
This is a simple example that demonstrates the basic steps to follow for your own custom modulemenus. DotNetNuke provides extensive control over each module action.
ModuleAction APITo take full advantage of the power provided by module actions and the IActionable interface, we needto examine the classes, properties, and methods that make up the ModuleAction API.
Table 8-7 lists the classes that comprise the ModuleAction API.
Table 8-7: Module Action Classes
Class Description
ModuleAction A module action is used to define a specific function for a given mod-ule. Each module can define one or more actions that the portal willpresent to the user. Each module container can define the skin objectused to render the module actions.
ModuleActionType The ModuleActionType class defines a set of constants used for distin-guishing common action types.
ModuleActionCollection This is a collection of Module Actions.
242
Chapter 8

ModuleActionEvent This class is used for holding callback information when a module Listener registers for Action events.
ActionEventArgs The ActionEventArgs class is used for passing data during the clickevent that is fired when a module action is selected by the user.
ActionEventHandler The ActionEventHandler is a delegate that defines the method signa-ture required for responding to the Action event.
ActionBase The ActionBase class is used for creating ModuleAction skin objects.The core framework includes three different implementations: SolPartActions.ascx, DropDownActions.ascx, and LinkActions.ascx.
The ModuleAction class is the heart of the API. Tables 8-8 and 8-9 show the properties and methodsavailable in the ModuleAction class. Each menu item in the Module Action menu is represented by a sin-gle ModuleAction instance.
Table 8-8: ModuleAction Properties
Property Name Property Type Description
Actions ModuleAction The Module Action API supports hierarchical Collection menu structures. Every skin object that inherits from
ActionBase may choose how to render the menu basedon the ability to support hierarchical items. For examplethe default SolpartActions skin object supports sub-menus, while the DropDownActions skin object onlysupports a flat menu structure.
Id Integer Every module action for a given module instance mustcontain a unique Id. The PortalModuleBase class definesthe GetNextActionId method, which can be used to gen-erate unique module action IDs.
CommandName String The CommandName property is used to distinguishwhich Module Action triggered an action event. DotNet-Nuke includes 19 standard ModuleActionTypes thatprovide access to standard functionality. Custom mod-ule actions can use their own string to identify com-mands recognized by the module.
Command String CommandArguments are used to provide additionalArgument information during action event processing. For example,
the DotNetNuke core uses the CommandArgument topass the ModuleID for common commands like Delete-Module.Action.
Title String The Title property sets the text that is displayed in theModule Action menu.
Table continued on following page
243
Core DotNetNuke APIs

Property Name Property Type Description
Icon String This is the name of the Icon file to use for the ModuleAction item.
Url String When set, the URL property allows a menu item to redi-rect the user to another web page.
ClientScript String The Javascript that will be run during the menuClickevent in the browser. If the ClientScript property is pre-sent then it is called prior to the postback occurring. If theClientScript returns false, then the postback is canceled.
UseAction Boolean The UseActionEvent causes the portal to raise an Event ActionEvent on the server and notify any registered
event listeners. If UseActionEvent is false, then the por-tal will handle the event, but will not raise the eventback to any event listeners. The following Command-Names will prevent the ActionEvent from firing: ModuleHelp, OnlineHelp, ModuleSettings, DeleteModule,PrintModule, ClearCache, MovePane, MoveTop, MoveUp,MoveDown and MoveBottom.
Secure SecurityAccess The Secure property determines the required Level security level of the user. If the current user does not
have the necessary permissions, then the Module Actionwill not be displayed.
Visible Boolean If the visible property is set to false, then the ModuleAction will not be displayed. This property allows youto control the visibility of a Module Action based on cus-tom business logic.
Newwindow Boolean The Newwindow property will force an action to openthe associated URL in a new window. This property isnot used if UseActionEvent is True or if the followingCommandNames are used: ModuleHelp, OnlineHelp,ModuleSettings, PrintModule.
Table 8-9: ModuleAction Methods
Method Name Return Type Description
HasChildren Boolean HasChildren returns true if the ModuleAction.Actionsproperty has any items (Actions.Count > 0).
DotNetNuke includes several standard module actions that are provided by the PortalModuleBase classor that are used by several of the core modules. These ModuleActionTypes are shown in Listing 8-19.ModuleActionTypes can also be used to access localized strings for the ModuleAction.Title property.This helps promote a consistent user interface for both core and third-party modules.
244
Chapter 8

Listing 8-19: ModuleActionTypes
Public Class ModuleActionTypePublic Const AddContent As String = “AddContent.Action”Public Const EditContent As String = “EditContent.Action”Public Const ContentOptions As String = “ContentOptions.Action”Public Const SyndicateModule As String = “SyndicateModule.Action”Public Const ImportModule As String = “ImportModule.Action”Public Const ExportModule As String = “ExportModule.Action”Public Const OnlineHelp As String = “OnlineHelp.Action”Public Const ModuleHelp As String = “ModuleHelp.Action”Public Const PrintModule As String = “PrintModule.Action”Public Const ModuleSettings As String = “ModuleSettings.Action”Public Const DeleteModule As String = “DeleteModule.Action”Public Const ClearCache As String = “ClearCache.Action”Public Const MoveTop As String = “MoveTop.Action”Public Const MoveUp As String = “MoveUp.Action”Public Const MoveDown As String = “MoveDown.Action”Public Const MoveBottom As String = “MoveBottom.Action”Public Const MovePane As String = “MovePane.Action”Public Const MoveRoot As String = “MoveRoot.Action”
End Class
DotNetNuke provides standard behavior for the following ModuleActionTypes: ModuleHelp,OnlineHelp, ModuleSettings, DeleteModule, PrintModule, ClearCache, MovePane, MoveTop, MoveUp,MoveDown, and MoveBottom. All ModuleActionTypes in this subset will ignore the UseActionEventand Newwindow properties. The ModuleActionTypes can be further subdivided into three groups:
❑ Basic Redirection: The following ModuleActionTypes will perform a simple redirection andcause the user to navigate to the URL identified in the URL property: ModuleHelp, OnlineHelp,ModuleSettings, and PrintModule.
❑ Module Movement: The following ModuleActionTypes will change the order or location ofmodules on the current page: MovePane, MoveTop, MoveUp, MoveDown, and MoveBottom.
❑ Custom Logic: The following ModuleActionTypes have custom business logic that will use coreportal APIs to perform standard module-related actions: DeleteModule and ClearCache.
DotNetNuke uses a custom collection class when working with Module Actions. The ModuleActionCollection inherits from the .Net System.Collections.CollectionBase class and provides a strongly typedcollection class. Using a strongly typed collection minimizes the possibility of typecasting errors that canoccur when using generic collection classes like the ArrayList.
Most module developers will only need to worry about creating the ModuleActionCollection in order toimplement the IActionable interface. Listing 8-20 shows the two primary methods used for addingModuleActions to the collection. These methods simplify adding ModuleActions by wrapping theModuleAction constructor method calls.
245
Core DotNetNuke APIs
Listing 8-20: Key ModuleActionCollection Methods
Public Function Add(ByVal ID As Integer, _ByVal Title As String, _ByVal CmdName As String, _Optional ByVal CmdArg As String = “”, _Optional ByVal Icon As String = “”, _Optional ByVal Url As String = “”, _Optional ByVal UseActionEvent As Boolean = False, _Optional ByVal Secure As SecurityAccessLevel = SecurityAccessLevel.Anonymous, _Optional ByVal Visible As Boolean = True, _Optional ByVal NewWindow As Boolean = False) _As ModuleAction
Public Function Add(ByVal ID As Integer, _ByVal Title As String, _ByVal CmdName As String, _ByVal CmdArg As String, _ByVal Icon As String, _ByVal Url As String, _ByVal ClientScript As String, _ByVal UseActionEvent As Boolean, _ByVal Secure As SecurityAccessLevel, _ByVal Visible As Boolean, _ByVal NewWindow As Boolean) _As ModuleAction
The first method in Listing 8-20 uses optional parameters that are not supported by C#. This method islikely to be deprecated in future versions in order to simplify support for C# modules and its use is notrecommended.
The ModuleAction framework makes it easy to handle simple URL redirection from a module action. Justlike the Delete and ClearCache actions provided by the DotNetNuke framework, your module mayrequire the use of custom logic to determine the appropriate action to take when the menu item is clicked.To implement custom logic, the module developer needs to be able to respond to a Menu click event.
In the DotNetNuke architecture, the ModuleAction menu is a child of the module container. The moduleis also a child of the container. This architecture allows the framework to easily change out the menuimplementation; however, it complicates communication between the menu and module. The menu neverhas a direct reference to the module and the module does not have a direct reference to the menu. This is aclassic example of the Mediator design pattern. This pattern is designed to allow two classes withoutdirect references to communicate. Figure 8-3 shows the steps involved to implement this pattern.
Let’s examine the steps involved in making this work. During this discussion you will also discoverways you can to extend the framework.
246
Chapter 8

Figure 8-3
Step 1: Register the Event HandlerThe first step to implementing the Mediator pattern is to provide a mechanism for the module to registerwith the portal. The portal will use this information later when it needs to notify the module that a menuitem was selected. Handling the click event is strictly optional. Your module may choose to use standardMenuActions, in which case you can skip this step. Because the module does not contain a direct refer-ence to the page on which it is instantiated, you need to provide a registration mechanism.
The Skin class, which acts as our mediator, contains the RegisterModuleActionEvent method, whichallows a module to notify the framework of the event handler for the action event (see Listing 8-21).This registration should occur in the module’s Page_Load event to ensure that registration occurs beforethe event could be fired in the Skin class. The code in Listing 8-21 is taken from the HTML module andprovides a working example of module-based event registration for the ModuleAction event. While wecould have used another interface to define a known method to handle the event, the registration mech-anism turns out to be a much more flexible design when implementing a single method.
Listing 8-21: Registering an Event Handler
‘----------------------------------------------------------------------------------‘- Menu Action Handler Registration -‘----------------------------------------------------------------------------------‘This finds a reference to the containing skinDim ParentSkin As UI.Skins.Skin = UI.Skins.Skin.GetParentSkin(Me)
‘We should always have a ParentSkin, but need to make sureIf Not ParentSkin Is Nothing Then
‘Register our EventHandler as a listener on the ParentSkin so that it may ‘tell us when a menu has been clicked.ParentSkin.RegisterModuleActionEvent(Me.ModuleId, AddressOf ModuleAction_Click)
End If‘----------------------------------------------------------------------------------
Skin
4
ModuleActionSkin Object Module
3
2 1
247
Core DotNetNuke APIs

Listing 8-22 shows the ModuleAction_Click event handler code from the HTML module.
Listing 8-22: Handling the Event
Public Sub ModuleAction_Click(ByVal sender As Object, _ByVal e As Entities.Modules.Actions.ActionEventArgs)
‘We could get much fancier here by declaring each ModuleAction with a‘Command and then using a Select Case statement to handle the various‘commands.If e.Action.Url.Length > 0 Then
Response.Redirect(e.Action.Url, True)End If
End Sub
The DotNetNuke framework uses a delegate (see Listing 8-23) to define the method signature for theevent handler. The RegisterModuleActionEvent requires the address of a method with the same signa-ture as the ActionEventHandler delegate.
Listing 8-23: ActionEventHandler Delegate
Public Delegate Sub ActionEventHandler(ByVal sender As Object, _ByVal e As ActionEventArgs)
Step 2: Display the MenuNow that we have a way for the skin (the mediator class) to communicate with the module, we need amechanism to allow the menu to communicate with the skin as well. This portion of the communicationchain is much easier to code. Handling the actual click event and passing it to the skinning class is theresponsibility of the ModuleAction rendering code.
Like much of DotNetNuke, the ModuleAction framework supports the use of custom extensions. In thiscase, we rely on skin objects to handle rendering the module actions. Each ModuleAction skin objectinherits from the DotNetNuke.UI.Containers.ActionBase class. The skin class retrieves the moduleaction collection from the module by calling the IActionable.ModuleActions property and passes thiscollection to the ModuleAction skin object for rendering. The ActionBase class includes the code neces-sary to merge the standard module actions with the collection provided by the Skin class.
Each skin object includes code in the pre-render event to convert the collection of ModuleActions into anappropriate format for display using an associated server control. In the case of SolPartActions.ascx, theserver control is a menu control that is able to fully support all of the features of ModuleActions includ-ing submenus and icons. Other skin objects like the DropDownActions.ascx may only support a subsetof the module action features (see Table 8-10).
248
Chapter 8
Table 8-10: ModuleAction Skin Objects
Action Skin Object Menu Separator Icons Submenus Client-Side JavaScript
Actions or SolPartActions Yes Yes Yes Yes
DropDownActions Yes No No Yes
LinkActions No No No No
Step 3: Notify the Portal of a Menu Item SelectionEach skin object handles the click event of the associated server control. This event, as shown in Listing8-24, calls the ProcessAction method, which is inherited from the ActionBase class. The ProcessActionmethod is then responsible for handling the event as indicated by the ModuleAction properties. If youcreate your own ModuleAction skin object, you should follow this same pattern.
Listing 8-24: Click Event Handler
Private Sub ctlActions_MenuClick(ByVal ID As String) Handles ctlActions.MenuClickTry
ProcessAction(ID)Catch exc As Exception ‘Module failed to load
ProcessModuleLoadException(Me, exc)End Try
End Sub
Step 4: Notify the Module That a Custom ModuleAction Was ClickedIf the UseActionEvent is set to True, then the ProcessAction method (see Listing 8-25) will call theOnAction method to handle actually raising the event (see Listing 8-26). This might seem like an extramethod call when ProcessAction could just raise the event on its own. The purpose of the OnActionmethod is to provide an opportunity for subclasses to override the default event handling behavior.While not strictly necessary, it is a standard pattern in .NET and is a good example to follow whendeveloping your own event handling code in your applications.
Listing 8-25: ProcessAction Method
Public Sub ProcessAction(ByVal ActionID As String)If IsNumeric(ActionID) Then
Dim action As ModuleAction = GetAction(Convert.ToInt32(ActionID))Select Case action.CommandName
Case ModuleActionType.ModuleHelpDoAction(action)
Case ModuleActionType.OnlineHelpDoAction(action)
Case ModuleActionType.ModuleSettingsDoAction(action)
Case ModuleActionType.DeleteModuleDelete(action)
(continued)
249
Core DotNetNuke APIs

Listing 8-25: (continued)
Case ModuleActionType.PrintModuleDoAction(action)
Case ModuleActionType.ClearCacheClearCache(action)
Case ModuleActionType.MovePaneMoveToPane(action)
Case ModuleActionType.MoveTop, _ModuleActionType.MoveUp, _ModuleActionType.MoveDown, _ModuleActionType.MoveBottom
MoveUpDown(action)Case Else
‘ custom actionIf action.Url.Length > 0 And action.UseActionEvent = False Then
DoAction(action)Else
ModuleConfiguration))End If
End SelectEnd If
End Sub
Listing 8-26: OnAction Method
Protected Overridable Sub OnAction(ByVal e As ActionEventArgs)RaiseEvent Action(Me, e)
End Sub
Because the skin maintains a reference to the ModuleAction skin object, the Skin class is able to handlethe Action event raised by the skin object. As shown in Listing 8-27, the Skin class will iterate throughthe ActionEventListeners to find the associated module event delegate. Once a listener is found, the codeinvokes the event, which notifies the module that the event has occurred.
Listing 8-27: Skin Class Handles the ActionEvent
Public Sub ModuleAction_Click(ByVal sender As Object, ByVal e As ActionEventArgs)‘Search through the listenersDim Listener As ModuleActionEventListenerFor Each Listener In ActionEventListeners
‘If the associated module has registered a listenerIf e.ModuleConfiguration.ModuleID = Listener.ModuleID Then
‘Invoke the listener to handle the ModuleAction_Click eventListener.ActionEvent.Invoke(sender, e)
End IfNext
End Sub
You are now ready take full advantage of the entire ModuleAction API to create custom menu items for yourown modules, handle the associated Action event when the menu item is clicked, and to create your own custom ModuleAction skin objects.
250
Chapter 8

IPortable DotNetNuke 3.0 provides the ability to import and export modules within the portal. Like many fea-tures in DotNetNuke, this feature is implemented using a combination of core code and module-specificlogic. The IPortable interface defines the methods required to implement this feature on a module-by-module basis (see Listing 8-28).
Listing 8-28: IPortable Interface Definition
Public Interface IPortableFunction ExportModule(ByVal ModuleID As Integer) As String
Sub ImportModule(ByVal ModuleID As Integer, _ByVal Content As String, _ByVal Version As String, _ByVal UserID As Integer)
End Interface
This interface provides a much needed feature to DotNetNuke and is a pretty straightforward interfaceto implement. To fully support importing and exporting content, you need to implement the interface intwo places within your module.
As modules are being loaded by the portal for rendering a specific page, the module is checked to deter-mine whether it implements the IPortable interface. This check is based on the current module controlthat is being loaded (remember each module can consist of many user controls). Typically, you will wantthe portal to add the import and export Module Actions to your primary module control. If the controlimplements the IPortable interface, DotNetNuke will automatically add the Import Content and ExportContent menu items to your Module Action menu (see Figure 8-4). You do not need to supply any logicfor the interface methods since we are only using it as a marker interface. See Listing 8-29 for a sampleimplementation of the ExportModule method. The ImportModule method would contain the same stubimplementation.
Figure 8-4
A marker interface is used to indicate that a class implements or requires a certain service. A truemarker interface does not include any properties or methods. In this case we chose to re-use an existinginterface rather than create a new one.
Listing 8-29: ExportModule Stub
Public Function ExportModule(ByVal ModuleID As Integer) As String _Implements Entities.Modules.IPortable.ExportModule
‘Included as a stub only so that the core knows this module ‘ Implements Entities.Modules.IPortable
End Function
251
Core DotNetNuke APIs

Each module should include a controller class that is identified in the BusinessControllerClass propertyof the portal’s ModuleInfo class. This class is identified in the module manifest file discussed in Chapter14. The controller class is where we will implement many of the interfaces available to modules.
Implementing the IPortable interface requires implementing logic for the ExportModule and ImportModulemethods shown in Listing 8-30 and Listing 8-31, respectively. The complexity of the data model for yourmodule will determine the difficulty of implementing these methods. Let’s take a look at a simple case asimplemented by the HTMLText module.
The ExportModule method is used to serialize the content of the module to an xml string. DotNetNukewill save the serialized string along with the module’s FriendlyName and Version. The xml file is savedinto the portal directory.
Listing 8-30: ExportModule Stub
Public Function ExportModule(ByVal ModuleID As Integer) As String _Implements Entities.Modules.IPortable.ExportModule
Dim strXML As String = “”
Dim objHtmlText As HtmlTextInfo = GetHtmlText(ModuleID)If Not objHtmlText Is Nothing Then
strXML += “<htmltext>”strXML += “<desktophtml>{0}</desktophtml>”strXML += “<desktopsummary>{1}</desktopsummary>”strXML += “</htmltext>”
String.Format(strXML, _XMLEncode(objHtmlText.DeskTopHTML), _XMLEncode(objHtmlText.DesktopSummary))
End If
Return strXML
End Function
The ImportModule method (see Listing 8-31) reverses the process by deserializing the xml string createdby the ExportModule method and replacing the content of the specified module. The portal will pass theversion information stored during the export process along with the serialized xml string.
Listing 8-31: ImportModule Stub
Public Sub ImportModule(ByVal ModuleID As Integer, _ByVal Content As String, _ByVal Version As String, _ByVal UserId As Integer) _
Implements Entities.Modules.IPortable.ImportModule
Dim xmlHtmlText As XmlNode = GetContent(Content, “htmltext”)
Dim objText As HtmlTextInfo = New HtmlTextInfo
252
Chapter 8

objText.ModuleId = ModuleIDobjText.DeskTopHTML = xmlHtmlText.SelectSingleNode(“desktophtml”).InnerTextobjText.DesktopSummary = xmlHtmlText.SelectSingleNode(“desktopsummary”).InnerTextobjText.CreatedByUser = UserIdAddHtmlText(objText)
End Sub
The IPortable interface is a straightforward interface to implement but provides much needed function-ality to the DotNetNuke framework. This interface is at the heart of the Templating capability forDotNetNuke and therefore is definitely an interface that all modules should implement.
IUpgradableOne of DotNetNuke’s greatest features is the ability to easily upgrade from one version to the next. Theheart of this capability is the creation of script files that can be run sequentially to modify the databaseschema and migrate any existing data to the new version’s schema. In later versions DotNetNuke addeda mechanism for also running custom logic during the upgrade process. Unfortunately, this mechanismwas not provided for modules. Therefore, third-party modules were forced to create their own mecha-nism for handling custom upgrade logic.
This is finally fixed in DotNetNuke 3.0. The IUpgradeable interface (see Listing 8-32) provides a standardupgrade capability for modules, and uses the same logic as used in the core framework. The interfaceincludes a single method, UpgradeModule, which allows the module to execute custom business logicdepending on the current version of the module being installed.
Listing 8-32: IUpgradeable Interface
Public Interface IUpgradeableFunction UpgradeModule(ByVal Version As String) As String
End Interface
The UpgradeModule method is called once for each script version included with the module. If an ear-lier version of the module is already installed, then this method is only called for script versions that arelater than the version of the currently installed module.
Inter-Module CommunicationDotNetNuke includes the ability for modules to communicate with each other through the Inter-ModuleCommunication (IMC) framework. Originally the IMC framework allowed a module to pass simplestrings to another module on the same page. This was enhanced in DotNetNuke 2.0 to allow modules topass objects rather than simple strings. Additionally, other properties were added that allowed a moduleto identify the Sender, the Target, and the Type of message. Let’s take a look at the two main interfacesthat provide this functionality to your module.
IModuleCommunicatorThe IModuleCommunicator interface defines a single event, ModuleCommunication, for your moduleto implement (see Listing 8-33).
253
Core DotNetNuke APIs

Listing 8-33: IModuleCommunicator Interface
Public Interface IModuleCommunicatorEvent ModuleCommunication As ModuleCommunicationEventHandler
End Interface
To communicate with another module, first implement the IModuleCommunicator interface in yourmodule. You should have an event declaration in your module as shown in Listing 8-34.
Listing 8-34: ModuleCommunication Event Implementation
Public Event ModuleCommunication(ByVal sender As Object, _ByVal e As ModuleCommunicationEventArgs) _Implements IModuleCommunicator.ModuleCommunication
IModuleListenerWhereas the IModuleCommunicator is used for sending messages, the IModuleListener interface (seeListing 8-35) is used for receiving messages.
Listing 8-35: IModuleListener Interface
Public Interface IModuleListenerSub OnModuleCommunication(ByVal s As Object, _
ByVal e As ModuleCommunicationEventArgs)End Interface
This interface defines a single method, OnModuleCommunication, which is called when anIModuleCommunicator on the same page raises the ModuleCommunication event. What you do inresponse to this event notification is totally up to you.
DotNetNuke does not filter event messages. Any module that implements the IModuleListener interfacewill be notified when the event is raised. It is the responsibility of the module to determine whether ornot it should take any action.
ISearchableDotNetNuke 3.0 provides a robust search API for indexing and searching content in your portal. TheDotNetNuke search API is broken down into three distinct parts:
1. Core search engine
2. Search data store
3. Search indexer
Like the ModuleAction framework, the search framework also implements a Mediator pattern. Whencombined with the Provider pattern, this framework provides lots of flexibility. In Figure 8-5 you can seethe relationship between these patterns and the three framework elements listed above.
254
Chapter 8

Figure 8-5
The core search engine provides a simple API for calling the IndexProvider and then storing the resultsusing a SearchDataStoreProvider. This API is currently intended for use by the core framework. Futureversions of the API will be extended to allow modules greater control over the indexing process.
DotNetNuke includes a default implementation of the SearchDataStoreProvider. The default implemen-tation is meant to provide basic storage functionality, but could be replaced with a more robust searchengine. Like other providers, it is anticipated that third-party developers will implement providers formany of the current search engines on the market.
The IndexingProvider provides an interface between the core search engine and each module.DotNetNuke includes a default provider that indexes module content. This provider could be replacedto provide document indexing, web indexing, or even indexing legacy application content stored inanother database. If you decide to replace the IndexingProvider, keep in mind that DotNetNuke onlyallows for the use of a single provider of a given type. This means that if you want to index content frommultiple sources, you must implement this as a single provider. Future versions of the framework maybe enhanced to overcome this limitation.
When using the ModuleIndexer, you can incorporate a module’s content into the search engine datastore by implementing the ISearchable interface shown in Listing 8-36.
Listing 8-36: ISearchable Interface
Public Interface ISearchableFunction GetSearchItems(ByVal ModInfo As ModuleInfo) As SearchItemInfoCollection
End Interface
SearchEngine.vb
Core Search Engine
DataProvider
Search Data Store
SearchDataStoreProvider[SearchDataStore]
Search Indexer
IndexingProvider[ModuleIndexer]
Your ModuleImplements ISearchable
255
Core DotNetNuke APIs
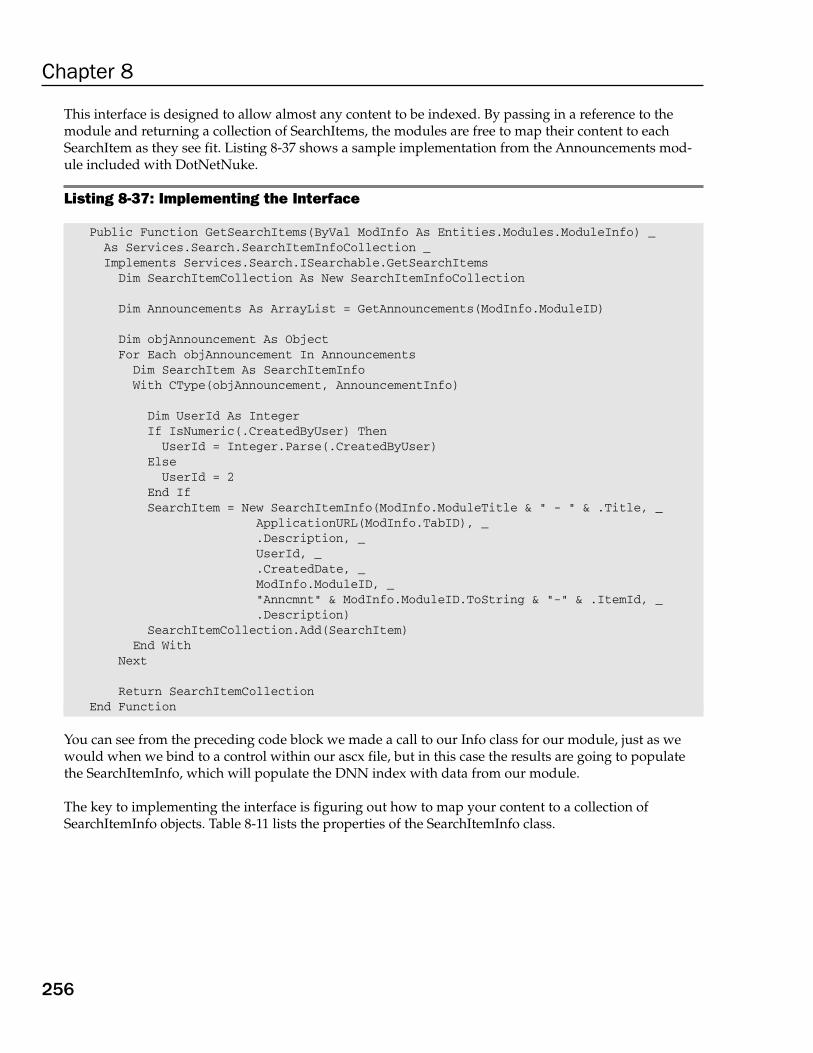
This interface is designed to allow almost any content to be indexed. By passing in a reference to themodule and returning a collection of SearchItems, the modules are free to map their content to eachSearchItem as they see fit. Listing 8-37 shows a sample implementation from the Announcements mod-ule included with DotNetNuke.
Listing 8-37: Implementing the Interface
Public Function GetSearchItems(ByVal ModInfo As Entities.Modules.ModuleInfo) _As Services.Search.SearchItemInfoCollection _Implements Services.Search.ISearchable.GetSearchItems
Dim SearchItemCollection As New SearchItemInfoCollection
Dim Announcements As ArrayList = GetAnnouncements(ModInfo.ModuleID)
Dim objAnnouncement As ObjectFor Each objAnnouncement In Announcements
Dim SearchItem As SearchItemInfoWith CType(objAnnouncement, AnnouncementInfo)
Dim UserId As IntegerIf IsNumeric(.CreatedByUser) Then
UserId = Integer.Parse(.CreatedByUser)Else
UserId = 2 End IfSearchItem = New SearchItemInfo(ModInfo.ModuleTitle & “ - “ & .Title, _
ApplicationURL(ModInfo.TabID), _.Description, _UserId, _.CreatedDate, _ModInfo.ModuleID, _“Anncmnt” & ModInfo.ModuleID.ToString & “-” & .ItemId, _.Description)
SearchItemCollection.Add(SearchItem)End With
Next
Return SearchItemCollectionEnd Function
You can see from the preceding code block we made a call to our Info class for our module, just as wewould when we bind to a control within our ascx file, but in this case the results are going to populatethe SearchItemInfo, which will populate the DNN index with data from our module.
The key to implementing the interface is figuring out how to map your content to a collection ofSearchItemInfo objects. Table 8-11 lists the properties of the SearchItemInfo class.
256
Chapter 8

Table 8-11: SearchItemInfo Properties
Property Description
SearchItemId This is an ID that is assigned by the search engine and is used when deletingitems from the data store.
Title The Title is a string that is used when displaying search results.
Description The Description is a summary of the content and is used when displayingsearch results.
Author The content author.
PubDate This is a date that allows the search engine to determine the age of the content.
ModuleId The ID of the module whose content is being indexed.
SearchKey This is a unique key that can be used to identify each specific search item forthis module.
Content This is the specific content that will be searched. The default search data storedoes not search on any words that are not in the content property.
GUID The GUID is another unique identifier that is used when syndicating content inthe portal.
ImageFileId The ImageFileID is an optional property that is used for identifying image filesthat accompany a search item.
HitCount The HitCount is maintained by the search engine, and is used for identifyingthe number of times that a search item is returned in a search.
Now that the index is populated with data, users of your portal will be able to search your module’sinformation from a unified interface within DNN.
SummaryThis chapter examined many of the core APIs that provide the true power behind DotNetNuke. Byleveraging common APIs, you can extend the portal in almost any direction. Replace core functions orjust add a custom module; the core APIs are what makes it all possible. Now that you know how to usemost of the core functions, the next several chapters examine how to create your own custom modulesto really take advantage of this power.
257
Core DotNetNuke APIs


Beginning ModuleDevelopment
This chapter begins the tour of module development in DotNetNuke. As you have read,DotNetNuke provides a large amount of functionality right out of the box, but we also realizethat each one is going to have separate business requirements that DotNetNuke may not meet.Fortunately, DotNetNuke provides developers and third-party independent software vendors(ISVs) to extend the core framework by developing modules.
This chapter focuses on the architecture of one of those specific modules, namely, the Events mod-ule. Chapters 10 through 12 cover various other aspects of module development. This chapterstarts out with setting up DotNetNuke to interface with your module development in VisualStudio .NET 2003. In addition to configuring DotNetNuke to interface with the development,it also discusses some issues when configuring your development environment.
Planning Your Module ProjectOf course to succeed in any project, you should plan out that project before you start writing evenone line of code. You’re going to have to ask yourself or project team a few questions before begin-ning your application development.
Can the development effort justify the savings that your application will provide?
Many factors may come into play: skills of in-house staff, costs associated with obtaining the skills,and many others that you will have to account for. This leads into the next question — as with anyproject, you may be confronted with the choice of developing in-house or outsourcing your project.

Can the module be purchased from a third party?
DotNetNuke has grown in popularity over the past couple of years, and the outlook is continuedgrowth. More independent software vendors are developing modules, so more than likely there is noneed to develop a module to accomplish a specific task; you can purchase it for very little cost. As of thiswriting, more than 250 modules are currently available for sale, and many more are available as a freedownload.
Is training required for developers?
Module development does require some additional skills. DotNetNuke module development is doneusing the standard tools you would use to do any ASP.NET development, but knowing how to takeadvantage of the interfaces available will require some insight into the inner workings of the framework.Many resources are available for learning about DotNetNuke (in addition to this book you’re reading) ifyou want to investigate further.
Should you hire an outside resource to do the development?
Training becomes less of an issue when you have your development done by an outside resource.DotNetNuke’s popularity has increased at such a phenomenal rate that many solution providers are outthere specializing in module development.
What infrastructure issues are there?
How many developers are going to be working on the same code base? The more developers workingon the same code, the more there will be a need for source control. Scalability may also be something toconsider. In addition, if you have to access resources over the Web, you’ll need to read some of the appli-cation settings configured at a host level in DotNetNuke.
Do we need to develop multiple data providers for the module?
What database are you going to use for the backend? DotNetNuke supports a Provider Model thatenables developers to abstract out the physical database interaction, allowing the actual DotNetNukecore and module logic to be separate from the database logic. DotNetNuke supports SQL Server out ofthe box, but a provider can be developed for basically any database backend. How many physicaldatabases you need to support will determine how many providers you will need to develop. Refer toChapter 7 on DotNetNuke architecture to learn more about abstraction and the Provider Model. Moduledevelopment closely mirrors the DotNetNuke architecture, and you should create a provider for eachplatform you wish to support. If you’re going to distribute your module on various DotNetNuke installswith different databases like SQL Server, Oracle, or MySQL, then you will need to develop a provider tosupport those individual databases.
Do we need to support different versions of DotNetNuke?
DotNetNuke is becoming a mature product with several versions released. There have been many majorarchitectural changes going from version 1.x to 2.x and to 3.x. If your module needs to be available onthese various versions of DotNetNuke, you will need to determine this and manage the various codebases to accommodate all the required versions.
260
Chapter 9

What resources are needed for ongoing support of the module?
This may not be as much of an issue for modules purchased or developed by an outside party. You maybe able to obtain adequate support from the vendor. If you developed in-house you’ll need to set asideresources to provide ongoing support of the module.
Of course this list of sample questions is not all-inclusive. You’ll have to determine this for your ownapplication.
Ready Your ResourcesNow that you have decided to begin module development, you will need to ready your developmentenvironment. The entire source and project files are available in the DotNetNuke distribution file thatyou can download from www.dotnetnuke.com. Just as you installed DotNetNuke on the productionserver in Chapter 2, you will need to configure a development machine with the source code. Again,this process is the same as it would be for configuring a production machine as in Chapter 2.
Ensure that your development environment is configured with Visual Studio .NET 2003, SQL Server2000, or MSDE (or your specific data provider). In addition, if you are working with your source files ina location other than the DotNetNuke default (c:/dotnetnuke), you may need to change the solution file(dotnetnuke.sln) and the web information contained within the solution (dotnetnuke.webinfo). By mak-ing the changes within these files to point to the location of the virtual directory for your environment,you will ensure that you can open the solution correctly in Visual Studio .NET.
You may want to consider installing Visual Source Safe, or some other source control to ensure integrity ofyour project source code. Installing Source Safe is beyond the scope of this book, but it is recommendedthat you use some sort of source control to protect your development.
Another item to note is the publishing process from your development environment to your productionenvironment. Because DotNetNuke is ASP.NET-compiled into several assemblies, the most it takes topublish to production is simply copying the development assemblies, user controls, the associated aspx,and resource files to production. Ensure that you compile as release mode in Visual Studio .NET beforeplacing into production.
In many environments, an extra stage in the development process is added in by placing a sandbox ortesting server in between development and production. This testing server should mirror your produc-tion environment as closely as possible; you should then install your module to the testing server andtest first. Once the business units review the functionality and ensure it is according to specifications, itgets published out to the production servers.
Starting DevelopmentWe have covered some topics that will lead you to your development decisions, and it’s time to begindeveloping your module. In this example, you are going to work with the Events module that isincluded in the DotNetNuke distribution. This chapter and the next three chapters provide an in-depthstudy of this module and the code to make it work.
261
Beginning Module Development

Configuring Your Visual Studio .NET ProjectDotNetNuke is broken down into several solutions; the primary solution located in the root directory ofthe distribution file contains all the projects that make up the entire core. This includes any controls, webforms, class files, and any other files required for the core application. With the release of DNN 3, wehave changed the solution organization to break them up into more manageable pieces for each specificsection of DotNetNuke. For module developers there is the module solution located within the <approot>\Solutions\DotNetNuke.DesktopModules directory. Open the DotNetNuke.DesktopModules.sln file toopen the module solution in Visual Studio .NET. You will see a solution containing approximately 30projects. These projects are the individual modules that make up DotNetNuke.
When you open the solution you should see the project listings shown in Figure 9-1.
Figure 9-1
Create Your ProjectIn order to begin module development you will need to create a module project within theDesktopModules solution. Several projects are already included in the solution, and in this example youwill be using the Events module. To create your own project, step through the following process:
262
Chapter 9

1. With the Visual Studio .NET DotNetNuke.DesktopModules solution open, right-click the solu-tion at the top of the Solution Explorer. Select Add ➪ New Project from the context menu. Thisbrings up the Add New Project dialog.
2. Select Class Library from the Templates section, provide a name for your module in the Nametext box, and click Browse to pick a location for the project files. For module development select<approot>\DesktopModules\ for the project directory (see Figure 9-2). You should now seeyour module listed at the bottom of the Solution Explorer.
Figure 9-2
3. Notice BuildSupport project within this solution. This project is what helps you to compile yourassemblies to the bin directory of the main DotNetNuke project. By compiling to the bin direc-tory of the main DotNetNuke core project, any time you make a change in your developmentcode and compile, those changes will be displayed within your module when you view itwithin your portal in a web browser. This eliminates the need to copy the dll file intoDotNetNuke’s bin directory every time you make a change and recompile. You accomplish thisby adding a reference to your module project to the BuildSupport project as in Figure 9-3.
4. As you can see in Figure 9-3, a reference is created to each of the module projects in DNN.For the example used in this and the next three chapters, you can see a reference to the Eventsmodule — SQLDataProvider (more about this in the next chapter).
Once your module project has been created, you will need to follow the same procedure in order to cre-ate your SQLDataProvider project. The only difference for the Data Provider project is the name, whichwill be ModuleName.SQLDataProvider (depending on your physical provider; if you were usingAccess, it would be AccessDataProvider). It is generally acceptable to place the Data Provider projectin a subdirectory off of your module, so the full path would be <approot>\DesktopModules\ModuleName\Providers\DataProviders\SQLDataProvider\. You would then create a directory for each physi-cal database you plan on supporting for your module.
263
Beginning Module Development

Figure 9-3
Add ControlsNow that your project has been created, you need to add some controls for your users to interface withand some classes for data operations.
There is a limitation with Visual Studio .NET in adding user controls in class projects, user controls(ascx) cannot be added to a class project. In many cases developers will copy an existing ascx controlfrom another module project and then paste it into the newly created project.
For most modules you will need to create three controls:
❑ View Control: This is the default view users will see when they first access your module.
❑ Edit Control: This is for updating the data contained in the module’s tables within the database.
❑ Settings Control: This is for specifying unique values for a particular instance of a module.
264
Chapter 9

The Events module example has the Events.ascx (View Control), EditEvents.ascx (Edit Control), and theSettings.ascx (Settings Control).
A member of the DNN Core Team has created templates that you can use to install into your VisualStudio .NET application to ease the process of creating controls, as well as project files. They can befreely downloaded from http://dnnjungle.vmasanas.net/. In addition, you can download CodeSmith templates that will reduce the amount of code you will need to write in order to create a dataprovider for your module.
Create Your ClassesNow that you have your controls, you also need to create the supporting classes within the module. Inmost modules you will have three classes contained in your main module project:
❑ DataProvider Class: This class contains methods that provide your abstraction layer with thedatabase. These methods will be overridden by your data provider class in the Data Providerproject (see Chapter 11).
❑ Controller Class: This class contains the methods for manipulating and obtaining data from theabstraction layer (see Chapter 11).
❑ Info Class: This class contains properties that define your objects (see Chapter 11).
Contained within the Data Provider project is one class, the DataProvider Class. It contains the actualmethods for obtaining and updating the data contained within a specific vendor’s database (seeChapter 10).
In the Events module the classes are the DataProvider.vb, EventsController.vb, EventsInfo.vb, andfinally the SQLDataProvider.vb in the Data Provider project. We’ll get into more detail on what theseclasses do in subsequent chapters, but for now we just want to cover what files need to be created inorder to begin a module development project.
Configuring DotNetNuke to Interface with Your ModuleNow that you have your Visual Studio .NET 2003 projects configured, you need to let DotNetNukeknow about your module so you can test your development within your portal. DotNetNuke needs toknow where your user controls are located in order to display them within the portal. In addition tolocation, each control type needs to be defined, that is, View, Edit, or Settings. The following sectionwalks through configuring each control located within a module project.
Creating a Module Definition in DotNetNukeIn order to manually configure your modules in DotNetNuke you will need to log in as the host account.The first thing you need to do is navigate to the Module Definitions page in the portal:
1. Select Module Definitions from the Host menu.
2. In the Module Definitions page, select Add New Module Definition from the menu options (seeFigure 9-4).
265
Beginning Module Development

Figure 9-4
3. Enter in a Name and Description for your module. Select the check box for Premium if thismodule requires an additional payment in order for each portal admin to use the module.
4. Click the Update link button. Additional text boxes appear for you to enter in a definition forthe Desktop Module (see Figure 9-5).
266
Chapter 9

Figure 9-5
5. Provide a name for your module definition. The controls listing will now appear below theDefinitions text box (see Figure 9-6).
267
Beginning Module Development
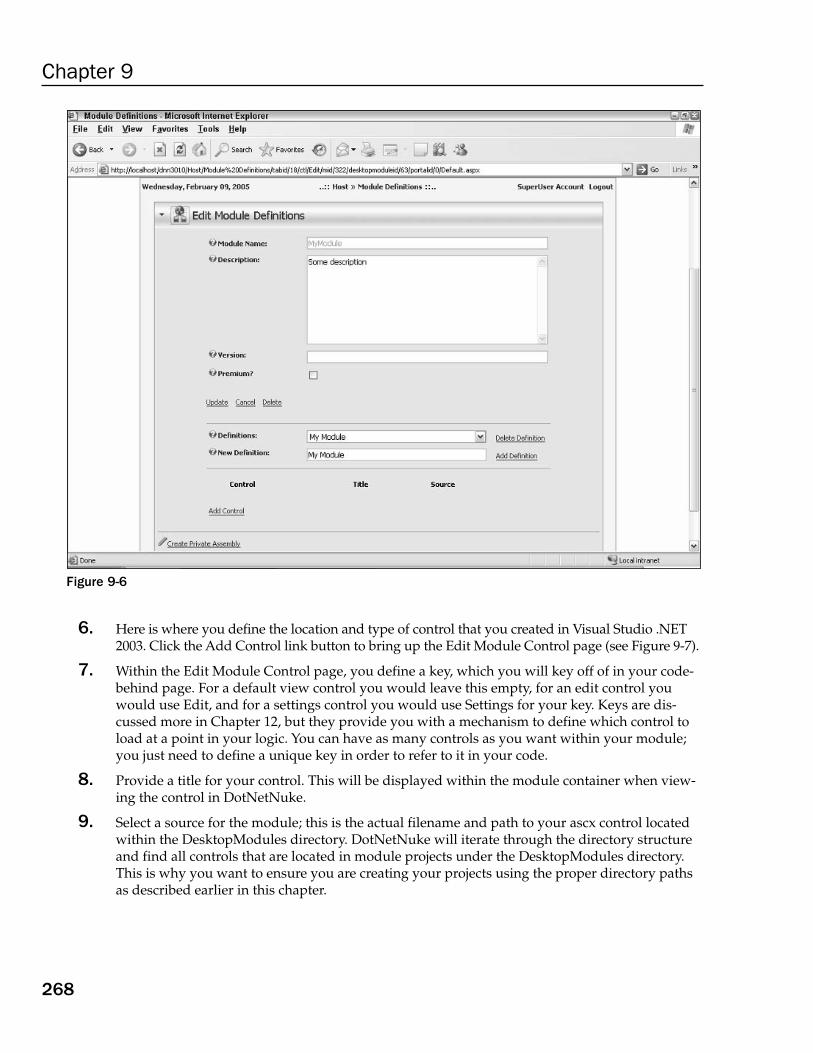
Figure 9-6
6. Here is where you define the location and type of control that you created in Visual Studio .NET2003. Click the Add Control link button to bring up the Edit Module Control page (see Figure 9-7).
7. Within the Edit Module Control page, you define a key, which you will key off of in your code-behind page. For a default view control you would leave this empty, for an edit control youwould use Edit, and for a settings control you would use Settings for your key. Keys are dis-cussed more in Chapter 12, but they provide you with a mechanism to define which control toload at a point in your logic. You can have as many controls as you want within your module;you just need to define a unique key in order to refer to it in your code.
8. Provide a title for your control. This will be displayed within the module container when view-ing the control in DotNetNuke.
9. Select a source for the module; this is the actual filename and path to your ascx control locatedwithin the DesktopModules directory. DotNetNuke will iterate through the directory structureand find all controls that are located in module projects under the DesktopModules directory.This is why you want to ensure you are creating your projects using the proper directory pathsas described earlier in this chapter.
268
Chapter 9

Figure 9-7
10. Select the type of control: Skin Object, Anonymous, View, Edit, Admin, or Host (more on this inChapter 12).
11. You can enter in an optional View Order for the control.
12. You can select an optional icon to be displayed next to your control. You must first upload theimage file to your portal for it to be displayed in the drop-down menu.
13. Finally, there is an option for the Help URL, which allows you to provide online help for yourmodule.
14. Click Update and your control will now be listed. Go through each control that makes up yourmodule project and add a definition. You can see an example of the definition for the Eventsmodule in Figure 9-8.
269
Beginning Module Development

Figure 9-8
Another item you will notice on the Module Definitions screen is the ability to create a private assembly.A private assembly allows you to distribute your module to other portals using an automated setup.This is covered in more detail in Chapter 14.
Once your module is defined, place an instance within a page in your development DotNetNuke. Youshould see the initial view control after placing the module in the page, enabling you to view and debugyour module within a live portal installation. Any changes that you now do and then compile will beinstantly seen in this development page.
SummaryThis chapter discussed some of the issues you will need to address before you begin any module devel-opment project. If, after weighing the options, you decide to develop your own module, you learnedhow to create your development environment.
270
Chapter 9

The chapter then went on to discuss creating Visual Studio .NET projects and provided an overview ofthe DesktopModules solution file contained in the DotNetNuke distribution. Once the module project iscreated, you learned to define in your development DotNetNuke portal how to interface with the con-trols that make up the module.
The next three chapters cover each layer of module development in detail; these are the Data Provider,Business Logic, and User layers. For the purposes of the example in this book, we will use the Eventsmodule located in the DesktopModules solution as a guide for module development.
271
Beginning Module Development


Developing Modules:The Database Layer
Now that you understand the concept of modules and are getting ready to develop your own, thischapter guides you on how to begin development starting with the database layer. As in most appli-cation development, you want to build a database structure for your application. This chapter cov-ers some basic database development and how to expose your data to a DotNetNuke module.
Chapter 7 introduced the concept of the Provider Model and how DotNetNuke uses it to abstractthe business layer logic from the physical database. In this chapter you develop your modules bymodeling the three-tier architecture of DotNetNuke.
The following sections on creating tables and stored procedures review some basic SQL Serverdevelopment concepts. From there you learn how to expose the stored procedures via a customData Provider that you will develop for your module. Extending on the DotNetNuke architecture,you will continue on to develop an abstraction layer for the module to provide a separation fromthe physical database for your module.
Developing with SQL Server is beyond the scope of this book, but this chapter covers how youexpose your database’s structure to DotNetNuke. We will cover table structure and stored proce-dures, but this will be for reference on how the structure relates to your module development.
Again, the Events module is used in the example for this chapter and the next two chapters on mod-ule development. The Events module project is located within the DotNetNuke. DesktopModulessolution in the Solutions directory contained off of the root of the DotNetNuke distribution package.
Database DesignThis section reviews the tables and stored procedures that make up the backend database for the Eventsmodule.
The DotNetNuke (DNN) development team wanted a module that could track events, provide a timefor the event, and expire the event so it would no longer show after the expiration date was met. Inorder to accomplish this, we needed to create a database structure to store event information, associatethe information with DNN, and then create stored procedures to add, update, and delete event informa-tion. In the next couple of sections you learn the structure of the database tables for the module and thestored procedures for performing actions on the data.
For your database manipulation you can use SQL Enterprise Manager, Query Analyzer, or Visual Studio.NET. The examples in this chapter use Visual Studio .NET 2003 for module development and databasedesign. The idea behind this chapter and the next three on module development is to do a comprehen-sive review of the module structure contained within the DNN distribution that you can review.
As discussed in the DotNetNuke chapter, keep in mind that you are not bound by the underlying physi-cal database. You can use any other database as your backend for module development, and you candevelop modules for whatever database your DotNetNuke install is using. We’re using SQL Server 2000throughout the book because DotNetNuke natively supports SQL Server 2000 out of the box. The pointof this exercise is to understand the physical database structure and how it applies to the databaseprovider and abstraction layer you will create for your modules.
Database StructureThis section covers the tables used to store the information. Once a table is created you can begin writingstored procedures to manipulate the data. One table is used for storing the event information: the Eventstable.
Events TableThe Events table stores your event information for the module; it is defined as in Figure 10-1.
The most important field contained within the structure as far as DNN integration goes is the ModuleIDfield. This field contains an integer value that is assigned by DNN when you create an instance of yourmodule. Any values you store specific to this module instance will key off of the value contained in thisfield. You will see this as you go through creating the stored procedures. The other fields within thedatabase are specific to the module itself, and all depend on how you structure your application.
The ItemID field is for identifying the primary key of a specific item within your table. The main concepthere, however, is to fully integrate and create a unique instance of your module with unique instanceitems. You will need to specify a ModuleID value that relates to the key provided by DotNetNuke forevery module instance. The following list describes each item in the Events table:
❑ ItemID: The primary key of the event information within the table.
❑ ModuleID: As mentioned, because DNN can contain many instances of a module all with dif-ferent information, this key consolidates all event information into the one module instance.
274
Chapter 10
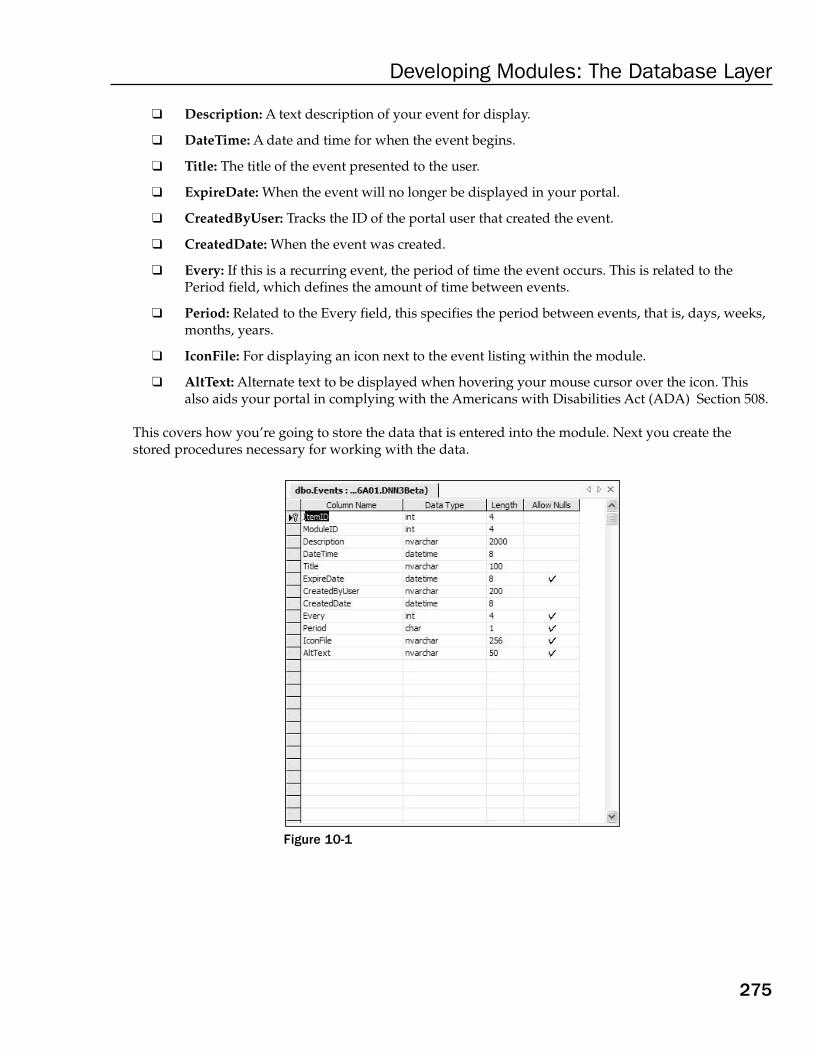
❑ Description: A text description of your event for display.
❑ DateTime: A date and time for when the event begins.
❑ Title: The title of the event presented to the user.
❑ ExpireDate: When the event will no longer be displayed in your portal.
❑ CreatedByUser: Tracks the ID of the portal user that created the event.
❑ CreatedDate: When the event was created.
❑ Every: If this is a recurring event, the period of time the event occurs. This is related to thePeriod field, which defines the amount of time between events.
❑ Period: Related to the Every field, this specifies the period between events, that is, days, weeks,months, years.
❑ IconFile: For displaying an icon next to the event listing within the module.
❑ AltText: Alternate text to be displayed when hovering your mouse cursor over the icon. Thisalso aids your portal in complying with the Americans with Disabilities Act (ADA) Section 508.
This covers how you’re going to store the data that is entered into the module. Next you create thestored procedures necessary for working with the data.
Figure 10-1
275
Developing Modules: The Database Layer

AddEvent Stored ProcedureThe first stored procedure you’re going to create for this module is AddEvent (see Listing 10-1). Thisprocedure used to add an event to the Events table.
Listing 10-1: The AddEvent Stored Procedure for the Events Module
ALTER procedure dbo.AddEvent
@ModuleID int,@Description nvarchar(2000),@DateTime datetime,@Title nvarchar(100),@ExpireDate datetime = null,@UserName nvarchar(200),@Every int,@Period char(1),@IconFile nvarchar(256),@AltText nvarchar(50)
as
insert into Events ( ModuleID,Description,DateTime,Title,ExpireDate,CreatedByUser,CreatedDate,Every,Period,IconFile,AltText
)values (
@ModuleID,@Description,@DateTime,@Title,@ExpireDate,@UserName,getdate(),@Every,@Period,@IconFile,@AltText
)
select SCOPE_IDENTITY()
There is nothing special about this stored procedure — it’s a basic insert statement, and it acceptsparameters from your database provider for populating the event information. One thing to keep in
276
Chapter 10

mind throughout all the stored procedures is that the parameter of ModuleID is always passed whencreating a new record that is associated with your module. Later in this book you learn how to obtainthe module ID from DotNetNuke and pass it to your stored procedure.
DeleteEvent Stored ProcedureThe DeleteEvent stored procedure (see Listing 10-2) is for deleting an event previously added toDotNetNuke.
Listing 10-2: The DeleteEvent Stored Procedure for the Events Module
ALTER procedure dbo.DeleteEvent
@ItemId int
as
deletefrom Eventswhere ItemId = @ItemId
There is no need to pass a parameter value for ModuleID in this procedure. Because you’re only concernedabout performing a delete operation on the data, you only need to determine the PK of the specific eventrecord.
GetEvent Stored ProcedureThe GetEvent stored procedure (see Listing 10-3) is for getting a single event’s information.
Listing 10-3: The GetEvent Stored Procedure for the Events Module
ALTER procedure dbo.GetEvent
@ItemId int,@ModuleId int
as
select Events.ItemId,Events.ModuleId,
Events.Description,Events.DateTime,Events.Title,Events.ExpireDate,‘CreatedByUser’ = Users.FirstName + ‘ ‘ + Users.LastName,Events.CreatedDate,Events.Every,Events.Period,‘IconFile’ = case when Files.FileName is null then Events.IconFile else
Files.Folder + Files.FileName end,
(continued)
277
Developing Modules: The Database Layer

Listing 10-3: (continued)
Events.AltTextfrom Eventsleft outer join Users on Events.CreatedByUser = Users.UserIdleft outer join Files on Events.IconFile = ‘fileid=’ +convert(varchar,Files.FileID)where ItemId = @ItemIdand ModuleId = @ModuleId
Here, you are passing the ModuleID parameter along with the specific ItemID for the event. This storedprocedure is used for obtaining a single event for modification or display.
GetEvents Stored ProcedureThe GetEvents stored procedure (see Listing 10-4) is used for obtaining several events for a listing of aspecific module instance.
Listing 10-4: The GetEvents Stored Procedure for the Events Module
ALTER procedure dbo.GetEvents
@ModuleId int
as
select Events.ItemId,Events.ModuleId,Events.Description,Events.DateTime,Events.Title,Events.ExpireDate,Events.CreatedByUser,Events.CreatedDate,‘IconFile’ = case when Files.FileName is null then Events.IconFile else
Files.Folder + Files.FileName end,Events.AltText,‘MaxWIdth’ = (select max(WIdth) from Events left outer join Files on
Events.IconFile = ‘fileid=’ + convert(varchar,Files.FileID) where ModuleId =@ModuleId and (ExpireDate > getdate() or ExpireDate is null))from Eventsleft outer join Files on Events.IconFile = ‘fileid=’ +convert(varchar,Files.FileID)where ModuleId = @ModuleIdand (ExpireDate > getdate() or ExpireDate is null)order by DateTime
The only parameter passed to this stored procedure is the ModuleID value. This will pull all events forone module instance.
GetEventsByDate Stored ProcedureThe GetEventsByDate stored procedure (see Listing 10-5) pulls all events within a specified date rangefor a specific module instance.
278
Chapter 10

Listing 10-5: The GetEventsByDate Stored Procedure for the Events Module
ALTER procedure dbo.GetEventsByDate
@ModuleId int,@StartDate datetime,@EndDate datetime
as
select Events.ItemId,Events.ModuleId,Events.Description,Events.DateTime,Events.Title,Events.ExpireDate,Events.CreatedByUser,Events.CreatedDate,Events.Every,Events.Period,‘IconFile’ = case when Files.FileName is null then Events.IconFile else
Files.Folder + Files.FileName end,Events.AltText
from Eventsleft outer join Files on Events.IconFile = ‘fileid=’ +convert(varchar,Files.FileID)where ModuleId = @ModuleIdand ( (Period is null and (DateTime >= @StartDate and DateTime <= @EndDate)) orPeriod is not null )order by DateTime
UpdateEventThe final stored procedure for the Events module is the UpdateEvent module (see Listing 10-6). Thisallows you to update an existing event’s information.
Listing 10-6: The UpdateEvent Stored Procedure for the Events Module
ALTER procedure dbo.UpdateEvent
@ItemId int,@Description nvarchar(2000),@DateTime datetime,@Title nvarchar(100),@ExpireDate datetime = null,@UserName nvarchar(200),@Every int,@Period char(1),@IconFile nvarchar(256),@AltText nvarchar(50)
as
(continued)
279
Developing Modules: The Database Layer

Listing 10-6: (continued)
update Eventsset Description = @Description,
DateTime = @DateTime,Title = @Title,ExpireDate = @ExpireDate,CreatedByUser = @UserName,CreatedDate = getdate(),Every = @Every,Period = @Period,IconFile = @IconFile,AltText = @AltText
where ItemId = @ItemId
That’s it for your database procedures. The next section covers how to wrap this up and create your ownphysical database provider for DotNetNuke.
Database ProvidersModule development closely mirrors DotNetNuke architecture. Each module should provide its ownabstraction to the underlying database. This enables you to change physical databases without having tochange or recompile the underlying code of DotNetNuke and your module. Remember, if you want tosupport multiple databases with your module, you will need to create a physical provider for eachdatabase you want to support. So even if your DotNetNuke implementation is using a provider otherthan the one included in SQL Support, such as Oracle, for example, you will need to create a providerfor your module to support Oracle as well.
The only direct interaction with the previous stored procedures contained in your database will be done in the provider project. In the modules solution of DotNetNuke, you will see that all modules have a corresponding project for a SQL Data Provider. For example, the main module project calledDotNetNuke.Events is contained in the DesktopModules solution; in addition to this project we alsohave the DotNetNuke.Events.SQLDataProvider project. This project contains the class and methodsnecessary to interact with the stored procedures covered earlier in this chapter. The following sectionscover this class and the methods it contains in order to create a provider for this module.
SQLDataProvider ClassThe SQLDataProvider class for the Events module, and all modules within the DotNetNuke.DesktopModules solution, closely mirrors the structure of the DotNetNuke core architecture. Therefore, youwill see the same methods contained with this project as you would see in the main DotNetNuke.SQLDataProvider project included in the solutions directory within the DotNetNuke distribution.
280
Chapter 10
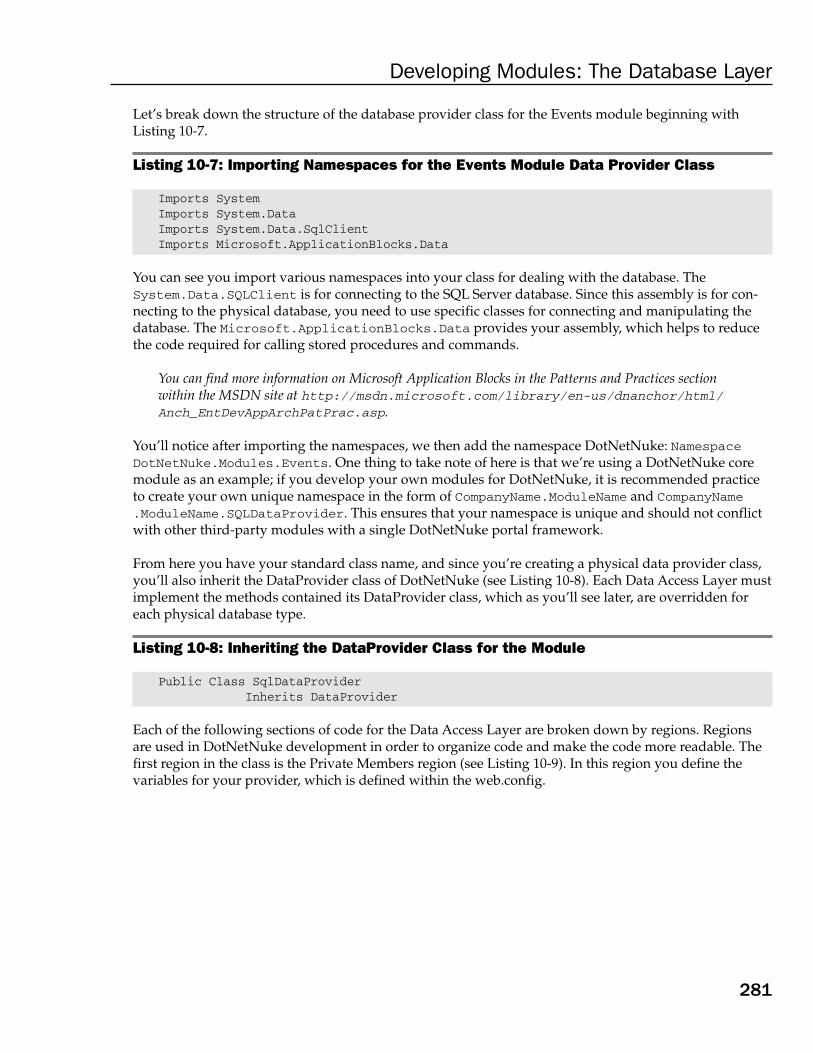
Let’s break down the structure of the database provider class for the Events module beginning withListing 10-7.
Listing 10-7: Importing Namespaces for the Events Module Data Provider Class
Imports SystemImports System.DataImports System.Data.SqlClientImports Microsoft.ApplicationBlocks.Data
You can see you import various namespaces into your class for dealing with the database. TheSystem.Data.SQLClient is for connecting to the SQL Server database. Since this assembly is for con-necting to the physical database, you need to use specific classes for connecting and manipulating thedatabase. The Microsoft.ApplicationBlocks.Data provides your assembly, which helps to reducethe code required for calling stored procedures and commands.
You can find more information on Microsoft Application Blocks in the Patterns and Practices sectionwithin the MSDN site at http://msdn.microsoft.com/library/en-us/dnanchor/html/Anch_EntDevAppArchPatPrac.asp.
You’ll notice after importing the namespaces, we then add the namespace DotNetNuke: NamespaceDotNetNuke.Modules.Events. One thing to take note of here is that we’re using a DotNetNuke coremodule as an example; if you develop your own modules for DotNetNuke, it is recommended practiceto create your own unique namespace in the form of CompanyName.ModuleName and CompanyName.ModuleName.SQLDataProvider. This ensures that your namespace is unique and should not conflictwith other third-party modules with a single DotNetNuke portal framework.
From here you have your standard class name, and since you’re creating a physical data provider class,you’ll also inherit the DataProvider class of DotNetNuke (see Listing 10-8). Each Data Access Layer mustimplement the methods contained its DataProvider class, which as you’ll see later, are overridden foreach physical database type.
Listing 10-8: Inheriting the DataProvider Class for the Module
Public Class SqlDataProviderInherits DataProvider
Each of the following sections of code for the Data Access Layer are broken down by regions. Regionsare used in DotNetNuke development in order to organize code and make the code more readable. Thefirst region in the class is the Private Members region (see Listing 10-9). In this region you define thevariables for your provider, which is defined within the web.config.
281
Developing Modules: The Database Layer

Listing 10-9: The Private Members of the Data Access Layer
#Region “Private Members”
Private Const ProviderType As String = “data”Private _providerConfiguration As Framework.Providers.ProviderConfiguration =
Framework.Providers.ProviderConfiguration.GetProviderConfiguration(ProviderType)Private _connectionString As StringPrivate _providerPath As StringPrivate _objectQualifier As StringPrivate _databaseOwner As String
#End Region
As in the overall DotNetNuke architecture, the code will refer to the provider configuration within thedata section of the web.config (see Listing 10-10). In this section you define the values for properties inthe SQLDataProvider class.
Listing 10-10: Defining the Default Data Provider in the Web.config
<data defaultProvider=”SqlDataProvider”><providers>
<clear /><add name=”SqlDataProvider” type=”DotNetNuke.Data.SqlDataProvider, DotNetNuke.SqlDataProvider”connectionStringName=”SiteSqlServer”upgradeConnectionString=”” providerPath=”~\Providers\DataProviders\SqlDataProvider\” objectQualifier=”” databaseOwner=”dbo” />
</providers></data>
Next is the Constructors region, where you read the web.config and then populate the values from thedata section to your private members within your class (see Listing 10-11).
Listing 10-11: Constructors Regions in the SQLDataProvider Class of the Events Module
#Region “Constructors”
Public Sub New()‘ Read the configuration specific information for this providerDim objProvider As Framework.Providers.Provider = _
CType(_providerConfiguration.Providers(_providerConfiguration.DefaultProvider),_ Framework.Providers.Provider)
‘ Read the attributes for this providerIf objProvider.Attributes(“connectionStringName”) <> “” AndAlso _
System.Configuration.ConfigurationSettings.AppSettings(objProvider.Attributes(“connectionStringName”)) <> “” Then
_connectionString =System.Configuration.ConfigurationSettings.AppSettings(objProvider.Attributes(“connectionStringName”))
Else
282
Chapter 10
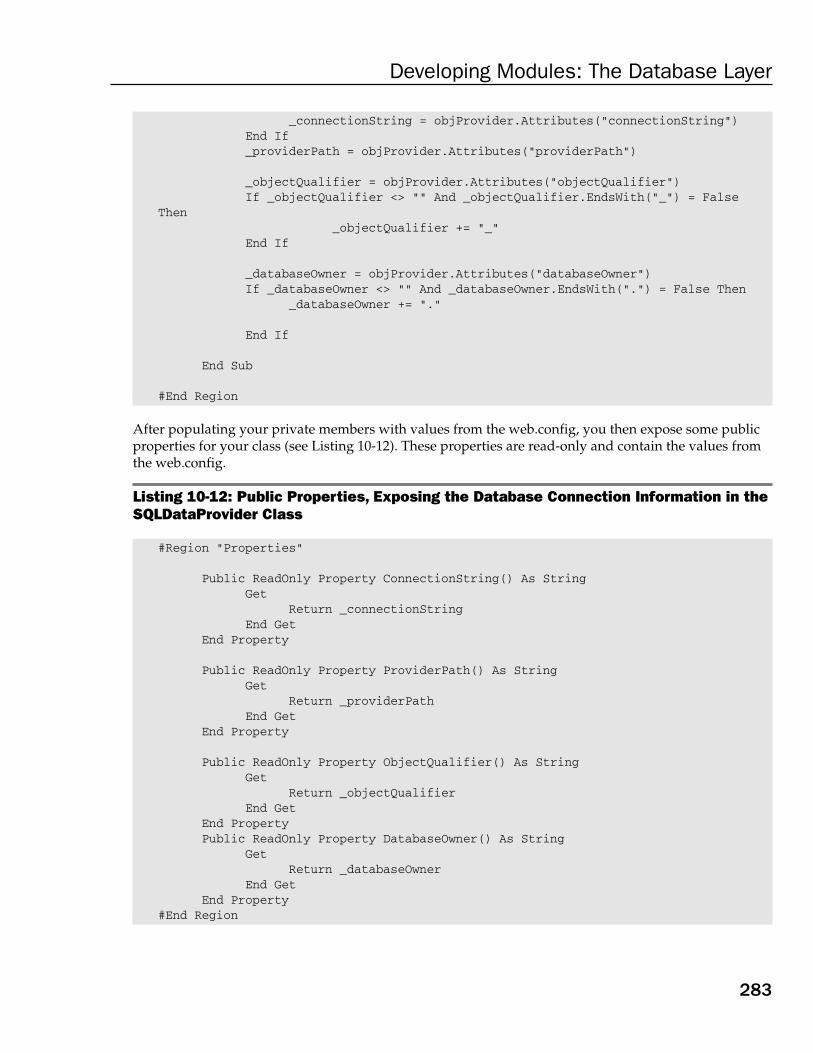
_connectionString = objProvider.Attributes(“connectionString”)End If_providerPath = objProvider.Attributes(“providerPath”)
_objectQualifier = objProvider.Attributes(“objectQualifier”)If _objectQualifier <> “” And _objectQualifier.EndsWith(“_”) = False
Then_objectQualifier += “_”
End If
_databaseOwner = objProvider.Attributes(“databaseOwner”)If _databaseOwner <> “” And _databaseOwner.EndsWith(“.”) = False Then
_databaseOwner += “.”
End If
End Sub
#End Region
After populating your private members with values from the web.config, you then expose some publicproperties for your class (see Listing 10-12). These properties are read-only and contain the values fromthe web.config.
Listing 10-12: Public Properties, Exposing the Database Connection Information in theSQLDataProvider Class
#Region “Properties”
Public ReadOnly Property ConnectionString() As StringGet
Return _connectionStringEnd Get
End Property
Public ReadOnly Property ProviderPath() As StringGet
Return _providerPathEnd Get
End Property
Public ReadOnly Property ObjectQualifier() As StringGet
Return _objectQualifierEnd Get
End PropertyPublic ReadOnly Property DatabaseOwner() As String
GetReturn _databaseOwner
End GetEnd Property
#End Region
283
Developing Modules: The Database Layer

Finally, the database operations of your class are contained within the Public Methods region (seeListing 10-13). Remember the stored procedures discussed earlier? Now you’re going to expose thoseprocedures to your module so you can do your add, update, and delete operations, as well as obtainthe data so it can be displayed in your module.
Listing 10-13: Public Methods within the SQLDataProvider Class
#Region “Public Methods”
Private Function GetNull(ByVal Field As Object) As ObjectReturn Common.Utilities.Null.GetNull(Field, DBNull.Value)
End Function
Public Overrides Function AddEvent(ByVal ModuleId As Integer, _ByVal Description As String, ByVal DateTime As Date, _ByVal Title As String, ByVal ExpireDate As Date, _ByVal UserName As String, ByVal Every As Integer, _ByVal Period As String, ByVal IconFile As String, _ByVal AltText As String) As Integer
Return CType(SqlHelper.ExecuteScalar(ConnectionString, _DatabaseOwner & ObjectQualifier & “AddEvent”, ModuleId, _Description, DateTime, Title, GetNull(ExpireDate), _UserName, GetNull(Every), GetNull(Period), _GetNull(IconFile), GetNull(AltText)), Integer)
End Function
Public Overrides Sub DeleteEvent(ByVal ItemId As Integer)SqlHelper.ExecuteNonQuery(ConnectionString, DatabaseOwner & _
ObjectQualifier & “DeleteEvent”, ItemId)End Sub
Public Overrides Function GetEvent(ByVal ItemId As Integer, _ByVal ModuleId As Integer) As IDataReader
Return CType(SqlHelper.ExecuteReader(ConnectionString, _DatabaseOwner & ObjectQualifier & “GetEvent”, ItemId, _ModuleId), IDataReader)
End Function
Public Overrides Function GetEvents(ByVal ModuleId As Integer) As _IDataReader
Return CType(SqlHelper.ExecuteReader(ConnectionString, _DatabaseOwner & ObjectQualifier & “GetEvents”, ModuleId), _IDataReader)
End Function
Public Overrides Function GetEventsByDate(ByVal ModuleId As Integer, _ByVal StartDate As Date, ByVal EndDate As Date) As IDataReader
Return CType(SqlHelper.ExecuteReader(ConnectionString, _DatabaseOwner & ObjectQualifier & “GetEventsByDate”, _ModuleId, StartDate, EndDate), IDataReader)
End Function
284
Chapter 10

Public Overrides Sub UpdateEvent(ByVal ItemId As Integer, _ByVal Description As String, ByVal DateTime As Date, _ByVal Title As String, ByVal ExpireDate As Date, _ByVal UserName As String, ByVal Every As Integer, _ByVal Period As String, ByVal IconFile As String, _ByVal AltText As String)SqlHelper.ExecuteNonQuery(ConnectionString, DatabaseOwner & _
ObjectQualifier & “UpdateEvent”, ItemId, Description, _DateTime, Title, GetNull(ExpireDate), UserName, _GetNull(Every), GetNull(Period), GetNull(IconFile), _GetNull(AltText))
End Sub
#End Region
You can see there is a one-to-one relationship within this class, so each method has a correspondingstored procedure within your SQL database. So let’s break down a method here and explain what is happening. We’ll use the GetEvents method.
Each event is a public method that overrides a corresponding method within the base class (DataProvider),which you inherited in the beginning of the class. So not only do you have a corresponding method in thisclass for each stored procedure, you also have a corresponding method in the base DataProvider class,which is located in the main module project. The method within the base class is an abstracted method thatyour module only deals with; this enables you to totally separate the physical database interactions fromyour module assembly.
Next you’ll notice that all parameters that the stored procedure accepts are passed to your methods aswell. In addition, you then execute the command and pass the database connection information such asthe connection string, database owner account, object qualifier, name of the stored procedure, and theparameters it accepts.
The method then returns an IDataReader (if appropriate, as in SQL select statements) containing theresult set from the database using the SQLHelper.ExecuteReader provided by the Microsoft DataAccess Application Block you imported at the beginning of the class.
Finally, in order to handle null values returned from the database, DotNetNuke provides the GetNullmethod. When you create a method for your database, as was done in AddEvent and UpdateEvent inListing 10-13, you should wrap the parameters with the GetNull method. This will prevent errors frombeing raised in your Data Provider due to the null values.
That’s it for the Data Access Layer. Remember this layer is compiled into its own assembly binary sepa-rate from the module’s main assembly. By maintaining this separation you can easily plug in providersfor other databases. In addition, no recompile to your base class is necessary when changing databaseoperations, or when replacing physical providers.
Data AbstractionThe next part of the module for data operations is the creation of the abstraction class. Remember in theData Access Layer you created methods that overrode the base class? Well now we need to cover thatbase class and gain some insight on how you provide an abstraction class for the Events module.
285
Developing Modules: The Database Layer
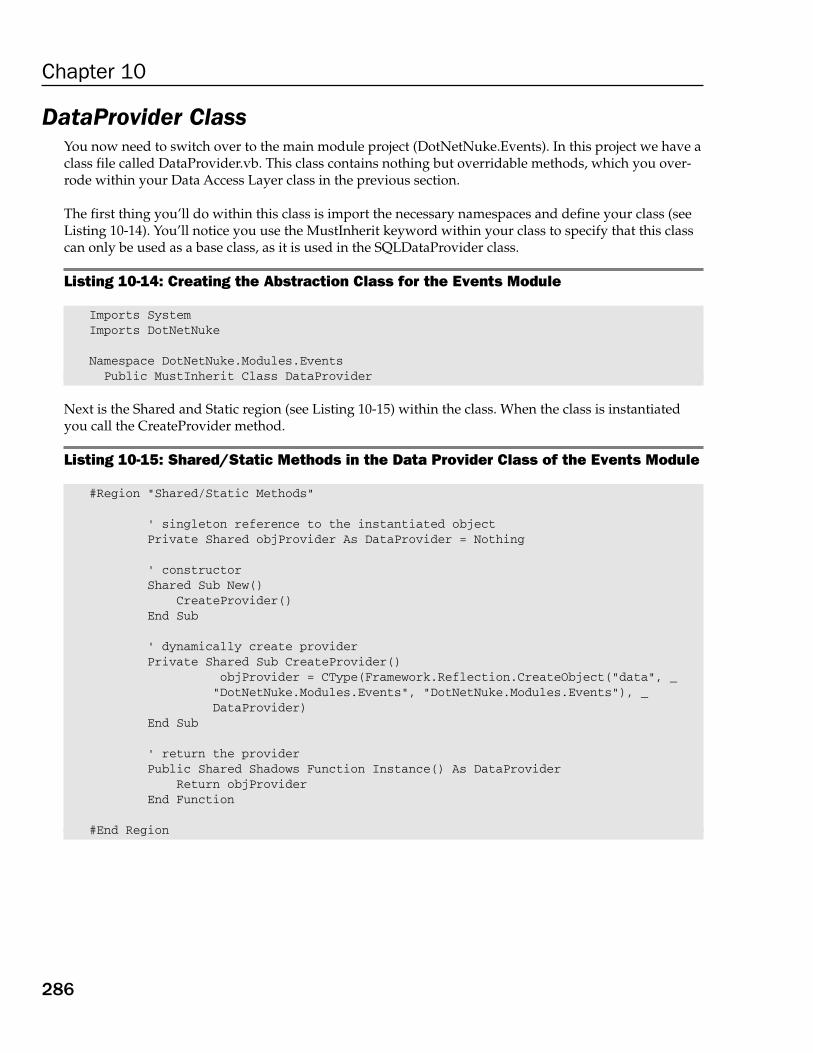
DataProvider ClassYou now need to switch over to the main module project (DotNetNuke.Events). In this project we have aclass file called DataProvider.vb. This class contains nothing but overridable methods, which you over-rode within your Data Access Layer class in the previous section.
The first thing you’ll do within this class is import the necessary namespaces and define your class (seeListing 10-14). You’ll notice you use the MustInherit keyword within your class to specify that this classcan only be used as a base class, as it is used in the SQLDataProvider class.
Listing 10-14: Creating the Abstraction Class for the Events Module
Imports SystemImports DotNetNuke
Namespace DotNetNuke.Modules.EventsPublic MustInherit Class DataProvider
Next is the Shared and Static region (see Listing 10-15) within the class. When the class is instantiatedyou call the CreateProvider method.
Listing 10-15: Shared/Static Methods in the Data Provider Class of the Events Module
#Region “Shared/Static Methods”
‘ singleton reference to the instantiated object Private Shared objProvider As DataProvider = Nothing
‘ constructorShared Sub New()
CreateProvider()End Sub
‘ dynamically create providerPrivate Shared Sub CreateProvider()
objProvider = CType(Framework.Reflection.CreateObject(“data”, _“DotNetNuke.Modules.Events”, “DotNetNuke.Modules.Events”), _DataProvider)
End Sub
‘ return the providerPublic Shared Shadows Function Instance() As DataProvider
Return objProviderEnd Function
#End Region
286
Chapter 10

Finally, within the abstraction class you have what provides the abstraction, the abstraction methods (seeListing 10-16). Remember these methods from your SQLDataProvider? Each method contained in thisbase class has a corresponding method within your Data Access Layer’s class. You’ll notice each methoduses the MustOverride keyword to specify that its method will be overridden by the class inheriting theabstraction class.
Listing 10-16: The Abstraction Methods in the Data Provider Class of the Events Module
#Region “Abstract methods”
Public MustOverride Function AddEvent(ByVal ModuleId As Integer, _ByVal Description As String, ByVal DateTime As Date, _ByVal Title As String, ByVal ExpireDate As Date, _ByVal UserName As String, ByVal Every As Integer, _ByVal Period As String, ByVal IconFile As String, _ByVal AltText As String) As Integer
Public MustOverride Sub DeleteEvent(ByVal ItemID As Integer)Public MustOverride Function GetEvent(ByVal ItemId As Integer, _
ByVal ModuleId As Integer) As IDataReaderPublic MustOverride Function GetEvents(ByVal ModuleId As Integer) _
As IDataReaderPublic MustOverride Function GetEventsByDate(ByVal ModuleId As Integer, _
ByVal StartDate As Date, ByVal EndDate As Date) As IDataReaderPublic MustOverride Sub UpdateEvent(ByVal ItemId As Integer, _
ByVal Description As String, ByVal DateTime As Date, _ByVal Title As String, ByVal ExpireDate As Date, _ByVal UserName As String, ByVal Every As Integer, _ByVal Period As String, ByVal IconFile As String, _ByVal AltText As String)
#End Region
End Class
End Namespace
Now you should see the separation of the module from the physical database. Module developmentclosely mirrors DotNetNuke architecture; all aspects of the application are totally separated from theunderlying physical database.
SummaryThis chapter covered the physical database creation all the way to the abstraction class contained in yourmodule project. Here are points to remember when developing your database and data classes for yourmodule:
❑ In addition to a primary key for module records, add a module ID field, because each moduleinstance is assigned a unique module ID by the DotNetNuke framework.
❑ Each stored procedure will have a corresponding method contained within the Data Access Layer.
287
Developing Modules: The Database Layer

288
Chapter 10
❑ Each physical database provider will be created in its own assembly project in the same name-space as the module.
❑ Each abstraction base class will contain duplicate method names in the Data Access Layer thatmust be overridden.
That’s it for the abstraction class. The next chapter covers the Business Logic Layer (BLL), in which youtake the data from your database and create objects that you later bind to your user controls for display.

Developing Modules:Business Logic Layer
Previous chapters covered how to create a physical database provider for your module, and howall the methods contained in the provider directly correlate to stored procedures within thedatabase. Once the provider was completed, you created an abstraction class that abstracts themethods contained in the physical database in order to be used by the Business Logic Layer (BLL).
In this chapter, you take the database portion and transform the record set into a collection ofobjects that is provided by the Business Logic Layer within your module. We will continue withconcepts that were introduced in Chapter 7 on the DNN architecture, because module architecturemirrors the architecture provided by DNN.
The idea here is to totally separate the physical database from the module or application logic thatyou create. Separating the two enables plug-and-play extensibility when you want to change adatabase provider. Because the provider is abstracted from the actual business logic, you can usethe same code, but different data stores, and since they’re compiled separately, there is no need torecompile the application in order to change database providers.
We will now continue this provider architecture to the business logic of the application. Here youcreate a collection of objects with specific properties that will be exposed to your user layer, whichis covered in Chapter 12.
Developing the Business Logic LayerStart by opening the Events module project located in the DotNetNuke.DesktopModules solution inthe Solutions directory contained off of the root of the .NET Nuke distribution package. Open thesolution in Visual Studio .NET 2003 to view the module projects; specifically, the DotNetNuke.Eventsmodule project you were working with in the previous chapter.

As you’ll recall, the DataProvider.vb class within this project is the abstraction class, and it containsoverridable methods for each method contained in the physical provider class. Now you will take thesemethods and wrap them with additional classes in order to populate an array of objects with specificproperties.
Defining the Properties for the Info ClassThis section covers the EventsInfo.vb class contained in the project folder. This class is what describesyour objects for the Events module that will be returned from the database.
At the top of the class file, we’ll do our imports as in the following code.
Imports SystemImports System.ConfigurationImports System.Data
Following this we have our namespace. For this example, you’ll stay within the DotNetNuke namespace,but if you were creating your own modules separate from DNN, you could use a custom namespace inthe form of CompanyName.ModuleName.
Namespace DotNetNuke.Modules.Events
Listing 11-1 shows the Private Members region at the top of the class. Here you define private variablesand their types. These variables will be used to store the values for each property for your class.
Listing 11-1: The Private Members Region of the EventInfo Class
Public Class EventInfo
#Region “Private Members”
Private _ItemId As IntegerPrivate _ModuleId As IntegerPrivate _Description As StringPrivate _DateTime As DatePrivate _Title As StringPrivate _ExpireDate As DatePrivate _CreatedByUser As StringPrivate _CreatedDate As DatePrivate _Every As IntegerPrivate _Period As StringPrivate _IconFile As StringPrivate _AltText As StringPrivate _MaxWidth As Integer
#End Region
Below the Private Members region is the Constructors region (see Listing 11-2). In object-oriented pro-gramming, the constructor is a special method for this class that must be present in order for the objectto be instantiated; in the Events module with VB.NET it is New. If you needed to write special initializa-tion code for the EventInfo class, you would do so here in order to ensure the code is executed.
290
Chapter 11

Listing 11-2: The Constructors for the EventInfo Class
#Region “Constructors”
Public Sub New()End Sub
#End Region
Next are the public properties of the EventInfo class, which are used to define your object (see Listing 11-3).For example, an event has an ItemID, ModuleID, Description, and other properties. These correspond tothe fields contained within the database for this module (see Chapter 10).
Listing 11-3: The Public Properties for the EventInfo Class
#Region “Properties”
Public Property ItemId() As IntegerGet
Return _ItemIdEnd GetSet(ByVal Value As Integer)
_ItemId = ValueEnd Set
End Property
Public Property ModuleId() As IntegerGet
Return _ModuleIdEnd GetSet(ByVal Value As Integer)
_ModuleId = ValueEnd Set
End Property
Public Property Description() As StringGet
Return _DescriptionEnd GetSet(ByVal Value As String)
_Description = ValueEnd Set
End Property
Public Property DateTime() As DateGet
Return _DateTimeEnd GetSet(ByVal Value As Date)
_DateTime = ValueEnd Set
End Property
(continued)
291
Developing Modules: Business Logic Layer

Listing 11-3: (continued)
Public Property Title() As StringGet
Return _TitleEnd GetSet(ByVal Value As String)
_Title = ValueEnd Set
End Property
Public Property ExpireDate() As DateGet
Return _ExpireDateEnd GetSet(ByVal Value As Date)
_ExpireDate = ValueEnd Set
End Property
Public Property CreatedByUser() As StringGet
Return _CreatedByUserEnd GetSet(ByVal Value As String)
_CreatedByUser = ValueEnd Set
End Property
Public Property CreatedDate() As DateGet
Return _CreatedDateEnd GetSet(ByVal Value As Date)
_CreatedDate = ValueEnd Set
End Property
Public Property Every() As IntegerGet
Return _EveryEnd GetSet(ByVal Value As Integer)
_Every = ValueEnd Set
End Property
Public Property Period() As StringGet
Return _PeriodEnd GetSet(ByVal Value As String)
_Period = ValueEnd Set
End Property
292
Chapter 11

Public Property IconFile() As StringGet
Return _IconFileEnd GetSet(ByVal Value As String)
_IconFile = ValueEnd Set
End Property
Public Property AltText() As StringGet
Return _AltTextEnd GetSet(ByVal Value As String)
_AltText = ValueEnd Set
End Property
Public Property MaxWidth() As IntegerGet
Return _MaxWidthEnd GetSet(ByVal Value As Integer)
_MaxWidth = ValueEnd Set
End Property
#End Region
End Class
End Namespace
Notice that each property you expose for your object corresponds to a field name within the Events tablein DotNetNuke.
Creating Objects Using the Controller ClassNow that you have the properties defined for your objects, you need to populate the objects with valuesfrom your database. This object population begins with the Controller class. In this case the controller iscontained in the EventsController.vb class file in the module project. Let’s open up this file and reviewits contents.
Again, at the top of the file are the library imports:
Imports DotNetNuke.Services.SearchImports SystemImports System.ConfigurationImports System.DataImports System.XML
293
Developing Modules: Business Logic Layer

Following this you again have to specify your namespace:
Namespace DotNetNuke.Modules.Events
Next, you implement a couple of interfaces after you define your class (see Listing 11-4). In this moduleyou implement the Entities.Modules.ISearchable and Entities.Modules.IPortable. These are two inter-faces that provide your module with the ability to tie into the search mechanism and the ability to exportdata from your module and import it into another instance of your module on another page within theportal. We’ll cover these interfaces in more detail later in this chapter.
Listing 11-4: Defining the Controller Class for the Events Module
Public Class EventControllerImplements Entities.Modules.ISearchableImplements Entities.Modules.IPortable
Listing 11-5 shows the public methods within the Controller class that are used to populate an ArrayListof objects from the record set received from your abstraction class.
Listing 11-5: Public Methods of the EventsController Class
#Region “Public Methods”
Public Sub AddEvent(ByVal objEvent As EventInfo) _DataProvider.Instance().AddEvent(objEvent.ModuleId, _objEvent.Description, objEvent.DateTime, objEvent.Title, _objEvent.ExpireDate, objEvent.CreatedByUser, objEvent.Every, _objEvent.Period, objEvent.IconFile, objEvent.AltText)
End Sub
Public Sub DeleteEvent(ByVal ItemID As Integer)DataProvider.Instance().DeleteEvent(ItemID)
End Sub
Public Function GetEvent(ByVal ItemId As Integer, _ByVal ModuleId As Integer) As EventInfo
Return CType(CBO.FillObject(DataProvider.Instance().GetEvent(ItemId, _ModuleId), GetType(EventInfo)), EventInfo)
End Function
Public Function GetEvents(ByVal ModuleId As Integer, _ByVal StartDate As Date, ByVal EndDate As Date) As ArrayList
If (Not Common.Utilities.Null.IsNull(StartDate)) And _(Not Common.Utilities.Null.IsNull(EndDate)) ThenReturn _ CBO.FillCollection(DataProvider.Instance().GetEventsByDate(ModuleId, _
StartDate, EndDate), GetType(EventInfo))Else
Return _CBO.FillCollection(DataProvider.Instance().GetEvents(ModuleId), _
GetType(EventInfo))End If
End Function
294
Chapter 11

Public Sub UpdateEvent(ByVal objEvent As EventInfo)DataProvider.Instance().UpdateEvent(objEvent.ItemId, _
objEvent.Description, objEvent.DateTime, objEvent.Title, _objEvent.ExpireDate, objEvent.CreatedByUser, objEvent.Every, _objEvent.Period, objEvent.IconFile, objEvent.AltText)
End Sub
#End Region
In Listing 11-5, notice that each method — AddEvent, DeleteEvent, GetEvent, GetEvents, andUpdateEvent — are all methods in the Data Abstraction class (DataProvider.vb) in the Events moduleproject of the solution. Each method creates an instance of the DataProvider class, and calls its corre-sponding event. Recall from Chapter 10 that each method in the abstraction class (DataProvider.vb inthe Events module project) also has a corresponding method in the physical provider (SQLDataProviderproject) as a wrapper to the stored procedures contained in the SQL Server database. Each methodaccepts a value that corresponds to values passed to parameters contained in the stored procedure. Forexample, the DeleteEvent stored procedure contains a parameter of ItemID for specifying the primarykey of the event contained in the Events table. As such, the sub DeleteEvent in the Controller classaccepts an ItemID of type integer.
Custom Business Object Help ClassAs an item of note here, DotNetNuke provides the Custom Business Object (CBO) helper class. The classfile is located in the <webroot>\Components\Shared\CBO.vb class file.
This class provides several methods, but for our area of concern we want to focus on two: the FillObject,which creates an object with one item as in the case with the GetEvents method in Listing 11-5, and theFillCollection method, which creates an ArrayList of objects from matching records returned from thedatabase.
Optional Interfaces for the Events Module Controller ClassThe last code region in the EventsController class is the Optional Interfaces region. Contained in thisregion are methods for interacting with the ISearchable and IPortable interfaces provided byDotNetNuke. You do not have to use these methods, but it is recommended in order to provide a fullyfunctional module that is capable of exposing all the features of DotNetNuke.
ISearchableListing 11-6 defines properties of the individual events from your module to be placed in the search cata-log of the DotNetNuke index.
Listing 11-6: Defining Search Items of the Module for DotNetNuke Search
Public Function GetSearchItems(ByVal ModInfo As Entities.Modules.ModuleInfo) As _Services.Search.SearchItemInfoCollection Implements _Entities.Modules.ISearchable.GetSearchItems
Dim SearchItemCollection As New SearchItemInfoCollectionDim Events As ArrayList = GetEvents(ModInfo.ModuleID, _
(continued)
295
Developing Modules: Business Logic Layer

Listing 11-6: (continued)
Convert.ToDateTime(Common.Utilities.Null.NullDate), _Convert.ToDateTime(Common.Utilities.Null.NullDate))
Dim objEvents As ObjectFor Each objEvents In Events
Dim SearchItem As SearchItemInfoWith CType(objEvents, EventInfo)
Dim UserId As Integer = Null.NullIntegerIf IsNumeric(.CreatedByUser) Then
UserId = Integer.Parse(.CreatedByUser)End IfSearchItem = New SearchItemInfo(ModInfo.ModuleTitle & _
“ - “ & .Title, .Description, UserId, .CreatedDate, _ModInfo.ModuleID, .ItemId.ToString, .Description, “ItemId=” & _.ItemId.ToString)
SearchItemCollection.Add(SearchItem)End With
NextReturn SearchItemCollection
End Function
Listing 11-6 contains a function called GetSearchItems, which will return a type of SearchItemInfoCollectionthat contains the values from the Events module when you call the GetEvents method. You loop through theevents returned from calling GetEvents and create a new object of SearchItem. You then define the proper-ties of the SearchItem by using the SearchItemInfo. You’ll pass the values for the object to the SearchItem,which will be populated into the DotNetNuke catalog for searching. If you do not want to make the itemssearchable in the portal, simply do not implement the interface and include the GetSearchItems function.
This should sound very familiar after getting to this point in the book. Module development closely mir-rors the architecture of DotNetNuke. Not only does the core application support abstraction classes andthe Provider Model extensively, but you should also duplicate this methodology in your own develop-ment. This ensures your development is consistent with other modules contained in DotNetNuke, andalso eases the process of upgrading for future versions of DotNetNuke.
Note that the SearchItemInfo class exposes properties for the SearchItem object, similar to the Eventsclass. This structure is consistent throughout the DotNetNuke architecture and in module developmentas well.
IPortableAnother interface provided by DotNetNuke that the Events module implements is the IPortable inter-face. This interface provides the module the ability to export the data contained for that module instanceto another module instance.
Listing 11-7 looks at how you export data from the module instance.
Listing 11-7: The ExportModule Function for the EventsController Class
Public Function ExportModule(ByVal ModuleID As Integer) As _String Implements Entities.Modules.IPortable.ExportModule
Dim strXML As String = “”
296
Chapter 11

Dim arrEvents As ArrayList = GetEvents(ModuleID, _Convert.ToDateTime(Common.Utilities.Null.NullDate), _Convert.ToDateTime(Common.Utilities.Null.NullDate))
If arrEvents.Count <> 0 ThenstrXML += “<events>”Dim objEvent As EventInfoFor Each objEvent In arrEvents
strXML += “<event>”strXML += “<description>” & XMLEncode(objEvent.Description) & _
“</description>”strXML += “<datetime>” & XMLEncode(objEvent.DateTime.ToString) & _
“</datetime>”strXML += “<title>” & XMLEncode(objEvent.Title) & “</title>”strXML += “</event>”
NextstrXML += “</events>”
End IfReturn strXML
End Function
Again as in the population of the search catalog, you call the GetEvents method to obtain all events forthis particular instance of the module. You then loop through the results and generate an XML string,which will be returned by the function. Later in your user layer you will implement the method that willthen be called based on the user action.
Listing 11-8 looks at how you import the data from the previously generated XML string.
Listing 11-8: The ImportModule Function for the EventsController Class
Public Sub ImportModule(ByVal ModuleID As Integer, ByVal Content As String, _ByVal Version As String, ByVal UserId As Integer) _Implements Entities.Modules.IPortable.ImportModule
Dim xmlEvent As XmlNodeDim xmlEvents As XmlNode = GetContent(Content, “events”)For Each xmlEvent In xmlEvents.SelectNodes(“event”)
Dim objEvent As New EventInfoobjEvent.ModuleId = ModuleIDobjEvent.Description = xmlEvent.Item(“description”).InnerTextobjEvent.DateTime = Date.Parse(xmlEvent.Item(“datetime”).InnerText)objEvent.Title = xmlEvent.Item(“title”).InnerTextobjEvent.CreatedByUser = UserId.ToStringAddEvent(objEvent)
Next
End Sub
As you can see in Listing 11-7, you process the XML that was generated earlier by the ExportModuleroutine. This time, you call the AddEvent method of the EventController to populate an event for an ele-ment in the XML file.
297
Developing Modules: Business Logic Layer

SummaryThis chapter completed the process of obtaining data from your database. In Chapter 10 you learnedhow to write a provider for a physical database, and in this chapter you converted the data to a collec-tion of objects that will get bound to user controls in your modules.
In building your business logic layer for your modules, you can take advantage of two interfaces pro-vided by the DotNetNuke core: IPortable and ISearchable. IPortable provides your modules with theability to export the data and settings of one module instance over to another module instance withinyour portal. ISearchable enables your modules to take advantage of the full-text indexing capabilitiesthat are native to DotNetNuke to provide your portal with a search mechanism.
Chapter 12 covers the user interface of the module. You’ll take the collections created by the BusinessLogic Layer and bind them to controls on your module.
298
Chapter 11

Developing Modules:The Presentation Layer
Now you’re at a point where you can start making your presentation layer for your desktop mod-ule. You have learned how to pull data from the database, provide abstraction, and then transformthe data to a collection of objects from your controller class. This chapter provides you with exam-ples on how to display, modify, and work with the various controls that make up your desktopmodule in DotNetNuke.
The examples in this chapter first illustrate how to make a call to the business object to obtain theinformation, and then you’ll create an edit control to update the data and to specify settings thatare specific to the module instance.
From there the chapter moves on to the various user controls and interfaces that you can use toyour advantage in your module development.
Module User InterfacesChapter 9 introduced you to module structure and how to manually create references to controlsin order to define your module. Each module consists of a couple of user controls that enable theuser to interface with your application logic. These controls provide a means to view and modifythe data contained in the database supporting the module. DotNetNuke provides you with theability to define these controls, and how to interface them into your application using a ModuleDefinition.
Table 12-1 lists the files that make up a module, their keys (see Chapter 9), and their function. Thisexample continues with the Events module as in previous chapters.

Table 12-1: Module Definitions and Relation to the Events Module
Type File Name (Events Module) Key Description
View DesktopModules/Events This is the control that your users /Events.ascx will see on the first request to the
module. You can define multipleview controls for your module; themain thing to keep in mind is thatthe purpose of the view is to allowyour data to be displayed.
Edit DesktopModules/Events Edit This control is used to edit informa-/EditEvents.ascx Settings tion contained in the database. ADesktopModules/Events DesktopModule can consist of sev-/Settings.ascx eral edit controls based on the com-
plexity of the module. Security foredit permissions is normally doneat the module level containedwithin a specific page.
Admin N/A N/A Not used in the Events moduleexample, but this control will bedisplayed to administrators for aportal.
Anonymous N/A N/A Use this control for an anonymousview of your data for your Desktop-Module.
Host N/A N/A For displaying a host-only controlfor your module.
As you can see from Table 12-1, several controls are available that you can make use of in your develop-ment. The defined types are specific to the user role within a portal. For module development, there maybe data that you want to allow certain roles to access. For example, if the module manipulates the appli-cation settings or file system, you would want to restrict that functionality to the host who has controlover the overall application instance. Your module may modify settings configured at a portal level, likethe banner ad management system; in this case you could restrict the control to just administratorswithin a portal.
You can select many different configurations when doing module development. For now, our focus is tocontinue the Events module development covered in the previous two chapters.
Table 12-1 covered the controls specific to the Events module. The Events module consists of three primaryuser controls for displaying and manipulating data:
❑ View Control (DesktopModules/Events/Events.ascx): Displays the events either in a listingformat sorted by event date or in a calendar format.
300
Chapter 12

❑ Edit Control (DesktopModules/Events/EditEvents.ascx): For adding and updating infor-mation for each specific event.
❑ Edit Control (DesktopModules/Events/Settings.ascx): For configuring module-specificsettings like the display.
The next few sections break down each control, and display data from the collection that was defined inthe Business Logic Layer covered in Chapter 11.
View ControlIn the Events module the View control is located in the DesktopModules/Events directory and is calledEvents.ascx. Open the Events project and look at the user interface to see the controls contained within.You’ll see two primary controls, one is a datalist control and the other is a calendar control. These twocontrols provide the module with two different views on the events data based on what is configuredvia the edit control (we’ll discuss this later in this chapter). Listing 12-1 reviews the datalist control fromthe Events.ascx file.
Listing 12-1: The DataList Control in the Events.ascx Page
<asp:datalist id=”lstEvents” runat=”server” EnableViewState=”false” summary=”EventsDesign Table”>
<itemtemplate><table summary=”Events Design Table”>
<tr><td id=”colIcon” runat=”server” valign=”top” align=”center”
rowspan=”3” width=’<%# DataBinder.Eval(Container.DataItem,”MaxWidth”) %>’><asp:Image ID=”imgIcon” AlternateText=’<%#
DataBinder.Eval(Container.DataItem,”AltText”) %>’ runat=”server” ImageUrl=’<%#FormatImage(DataBinder.Eval(Container.DataItem,”IconFile”)) %>’ Visible=’<%#FormatImage(DataBinder.Eval(Container.DataItem,”IconFile”)) <> “” %>’></asp:Image>
</td><td>
<asp:HyperLink id=”editLink” NavigateUrl=’<%#EditURL(“ItemID”,DataBinder.Eval(Container.DataItem,”ItemID”)) %>’ Visible=”<%#IsEditable %>” runat=”server”><asp:Image id=”editLinkImage”ImageUrl=”~/images/edit.gif” Visible=”<%# IsEditable %>” AlternateText=”Edit”runat=”server” /></asp:HyperLink>
<asp:Label ID=”lblTitle” Runat=”server”Cssclass=”SubHead” text=’<%# DataBinder.Eval(Container.DataItem,”Title”)%>’></asp:Label>
</td></tr><tr>
<td><asp:Label ID=”lblDateTime” Runat=”server”
Cssclass=”SubHead” text=’<%#FormatDateTime(DataBinder.Eval(Container.DataItem,”DateTime”)) %>’></asp:Label>
</td></tr><tr>
(continued)
301
Developing Modules: The Presentation Layer

Listing 12-1: (continued)
<td><asp:Label ID=”lblDescription” Runat=”server”
CssClass=”Normal” text=’<%# DataBinder.Eval(Container.DataItem,”Description”)%>’></asp:Label>
</td></tr>
</table></ItemTemplate>
</asp:datalist>
You are going to bind the DataList to values from your database that are returned from a stored proce-dure, and then up to the provider covered in Chapter 10. The field names are MaxWidth, AltText,IconFile, ItemID, Title, DateTime, and Description.
The calendar control contained in the page provides an alternative view for the module (see Listing 12-2).
Listing 12-2: The Calendar Control within the Events.ascx Provides Another View
<asp:calendar id=”calEvents” runat=”server” BorderWidth=”1” CssClass=”Normal”SelectionMode=”None” summary=”Events Calendar Design Table”><dayheaderstyle backcolor=”#EEEEEE” cssclass=”NormalBold”
borderwidth=”1”></DayHeaderStyle><daystyle cssclass=”Normal” borderwidth=”1” verticalalign=”Top”></DayStyle><othermonthdaystyle forecolor=”#FFFFFF”></OtherMonthDayStyle><titlestyle font-bold=”True”></TitleStyle><nextprevstyle cssclass=”NormalBold”></NextPrevStyle>
</asp:calendar>
View Control Code-Behind ClassNow that you have some controls on the form, you need to bind some data to them for display. Recallfrom Chapter 11 that you can take data from an abstraction class, which DotNetNuke can then convert toa collection of objects via the Custom Business Object (CBO) helper class (see Chapter 7). Now you needto take the ArrayList of objects and bind them to your controls in the code-behind file Events.ascx.vb,located in the Events project.
At the top of your class you first need to do your name imports, declare your namespace, and defineyour class:
Imports DotNetNukeImports System.Web.UI.WebControls
Namespace DotNetNuke.Modules.EventsPublic MustInherit Class Events
Inherits Entities.Modules.PortalModuleBase
PortalModuleBase ClassNotice you inherit from the Entities.Modules.PortalModuleBase class. The PortalModuleBase class pro-vides you with the ability to use a large collection of properties and methods within DotNetNuke. The
302
Chapter 12

PortalModuleBase class file is located in the main DotNetNuke project in the <webroot>/Components/Modules/PortalModuleBase.vb file. In addition to inheriting from the UserControl class of ASP.NET,this class is very important to your module development efforts. It provides several important methodsand properties for your module (see Table 12-2).
Table 12-2: PortalModuleBase Class Exposed Methods and Properties
Property Type Description
IsEditable Boolean Can be used as a reference to check and see if the current user haspermissions to edit the module. This is defined in the propertiesfor the DesktopModule in DotNetNuke. For example:
If IsEditable ThentxtEditField.Visible = True
End If
LocalResource String Contains the path value of the resource file that is being used for File the module. This allows you to support localization for your
modules. This is covered in more detail in Chapter 8.
HelpFile String Contains a value to a local path for a text file containing helpinformation.
HelpURL String Contains a value for a URL for an external help file for the spe-cific module.
Module Module Provides information about a specific module.Configuration Info
PortalId Integer The ID of the current portal that the request is for. This is an inte-ger value that is generated by DotNetNuke when a host creates anew portal.
TabId Integer The ID of the current page that the request is going to. This isgenerated by DotNetNuke when an admin creates a new pagewithin the portal.
TabModuleId Integer This contains a value of module within a tab. Multiple tab mod-ules can point to the same Module ID, allowing two instances ofa module to point to the same date.
ModuleId Integer Returns the current ID of a specific module instance. This is aninteger value that is generated by DotNetNuke when you add anew instance of a module into a page.
UserInfo UserInfo Contains information for the portal users.
UserId Integer Returns the ID of the current logged-on user.
PortalAlias Portal Contains various information pertaining to the current portal.AliasInfo
PortalSettings Portal Contains setting information specific to a portal, such as the Settings admin e-mail.
Table continued on following page
303
Developing Modules: The Presentation Layer

Property Type Description
Settings Hash The Settings hash table is very important to module develop-Table ment, and is probably one of the most common tools you’ll use.
Consider it analogous to the registry in Windows. You can usethe Settings hash to store and retrieve a key/value pair specific toyour module instance. For example, to retrieve a value from thesettings hash:
Dim myVar As String = Settings(“mykey”).ToStringTo set a value:
Dim objModules As NewEntities.Modules.ModuleController
objModules.UpdateTabModuleSetting(TabModuleId,“mykey”, myVar)
Container Control Provides a container to wrap a module (see Chapter 6 to learnControl about what a container is).
HasModule Boolean Checks permissions for a specific module instance, such as edit Permission and view.
DotNetNuke Optional InterfacesRight below your class declaration, you implement several interfaces:
Implements Entities.Modules.IActionableImplements Entities.Modules.IPortableImplements Entities.Modules.ISearchable
These interfaces provide you with the ability to tie into the menu control for your module. As covered pre-viously in this book, each module contains a menu with a list of action items. In order to add items to themenus you need to implement the IActionable interface. This is also so with the IPortable interface, whichprovides an export and import function for the module, and the ISearchable interface, which enables yourmodule to take advantage of the integrated search engine within DotNetNuke (see Chapter 8 on the DNNAPI for more information on these interfaces).
These interfaces are optional, and at the bottom of the Events.ascx.vb class file, you see a code regionwith the name “Optional Interfaces.” Within this region is the code showing you how to implementthese interfaces (see Listing 12-3).
Listing 12-3: Optional Interfaces Region of the Events Module
#Region “Optional Interfaces”
Public ReadOnly Property ModuleActions() As _Entities.Modules.Actions.ModuleActionCollection Implements _Entities.Modules.IActionable.ModuleActions
GetDim Actions As New _
Entities.Modules.Actions.ModuleActionCollection
304
Chapter 12

Actions.Add(GetNextActionID, _Localization.GetString(Entities.Modules.Actions.ModuleActionType.AddContent, _LocalResourceFile), Entities.Modules.Actions.ModuleActionType.AddContent, _“”, “”, EditUrl(), False, Security.SecurityAccessLevel.Edit, True, False)
Return ActionsEnd Get
End Property
Public Function ExportModule(ByVal ModuleID As Integer) As String _Implements Entities.Modules.IPortable.ExportModule‘ included as a stub only so that the core knows this ‘ module Implements Entities.Modules.IPortable
End Function
Public Sub ImportModule(ByVal ModuleID As Integer, _ByVal Content As String, ByVal Version As String, ByVal UserId As _Integer) Implements Entities.Modules.IPortable.ImportModule‘ included as a stub only so that the core knows ‘ this module Implements Entities.Modules.IPortable
End Sub
Public Function GetSearchItems(ByVal ModInfo As _Entities.Modules.ModuleInfo) As _Services.Search.SearchItemInfoCollection Implements _Entities.Modules.ISearchable.GetSearchItems‘ included as a stub only so that the core knows this ‘ module Implements Entities.Modules.ISearchable
End Function
#End Region
As you can see in Listing 12-3, the first method is ModuleActions. Here you implement the IActionableinterface in order to add items into the menu for the module. You have a collection of menu items, withan accompanying action. In this example you add a menu item using the Actions.Add method. You cansee that instead of passing an absolute value for the menu listing, you’re using a localized string usingthe Localization.GetString method. By using the localization interface provided by DotNetNuke (seeChapter 8), you can have menu items displayed in the language of the current user’s profile. Becausethis action is going to be for editing the module, you will pass EditURL as the action property for thisitem. This will load your Edit control when the user selects this option from the menu. In addition tolocalization and the control to load properties, there are security parameters to pass as well. By specify-ing the security type for the item display, you can restrict the functionality to specific roles configuredwithin your portal. In this example, you check for users with edit permissions for the module by passingthe value Security.SecurityAccessLevel.Edit.
Below the menu action item method in Listing 12-3 are the methods covered in Chapter 11 for imple-menting search and import/export functionality for the module. Recall that these methods make a callto the GetEvents method within the BLL class. You then iterate through all the events for this moduleinstance and either load them into the search or generate an XML feed for export. Now, you need toimplement a stub for these methods in order for the core to know that the module implements the inter-faces. DotNetNuke will then execute the corresponding methods contained in your BLL class.
305
Developing Modules: The Presentation Layer

Code-Behind RegionsNow you need to break your class into several regions. You’ll notice DotNetNuke makes use of namedregions throughout the code in order to provide some organization to the code, and for better readabil-ity. Let’s break down the code regions for this specific module. The first of these regions are the Controlsand Private Members regions. As in any ASP.NET development, you need to declare your web controlsin order to expose the actions, properties, and methods that they contain. In addition, for this specificexample there are some private members — an array of events defined and an integer value for the cur-rent month (see Listing 12-4).
Listing 12-4: The Controls and Private Members Regions of the Events Module
#Region “Controls”Protected WithEvents lstEvents As System.Web.UI.WebControls.DataListProtected WithEvents calEvents As System.Web.UI.WebControls.Calendar
#End Region
#Region “Private Members”Dim arrEvents(31) As StringDim intMonth As Integer
#End Region
Following these two regions you begin to get into some code that is going to do something. This code iscontained in the Private Methods region. Normally, your private methods are going to contain methodsthat will obtain your data and bind to your controls. In this example there is one method called theGetCalendarEvents subroutine, which accepts a start date and an end date for obtaining informationfrom your database (see Listing 12-5). Chapter 10 covered the various stored procedures for this module,and this method is what calls that process of obtaining a collection from the Business Logic Layer bycalling the GetEvents method. With abstraction, the BLL then calls the abstraction layer, which contains amethod that is overridden by the physical provider class that calls the SQL stored procedure GetEvents.The stored procedure then returns the fields matching the query to the physical provider, which finallyis converted by DotNetNuke’s Custom Business Object helper class to a collection of objects you definein the BLL. This collection, or ArrayList, is then bound to the controls that were placed on the page, inthis case either a calendar or datalist control.
Listing 12-5: The GetCalendarEvents Method of the Events Module
#Region “Private Methods”Private Sub GetCalendarEvents(ByVal StartDate As String, ByVal _
EndDate As String)Try
Dim objEvents As New EventControllerDim strDayText As StringDim datTargetDate As DateDim datDate As DateDim blnDisplay As BooleanArray.Clear(arrEvents, 0, 32)Dim Arr As ArrayList = objEvents.GetEvents(ModuleId, _
Convert.ToDateTime(StartDate), _Convert.ToDateTime(EndDate))
Dim i As IntegerFor i = 0 To Arr.Count - 1
306
Chapter 12

Dim objEvent As EventInfo = CType(Arr(i), EventInfo)‘While dr.Read()If objEvent.Period.ToString = “” Then
strDayText = “<br>”If Not objEvent.IconFile = “” Then
strDayText += “<img alt=””” & objEvent.AltText & “”” _src=””” & FormatImage(objEvent.IconFile) & “”” _border=””0””><br>”
End IfIf IsEditable Then
strDayText += “<a href=””” & _CType(Common.Globals.ApplicationPath, String) & _“/” & glbDefaultPage & “?tabid=” & TabId & _“&mid=” & ModuleId & “&ctl=Edit” & “&ItemID=” & _objEvent.ItemId & “&VisibleDate=” & _calEvents.VisibleDate.ToShortDateString & _“””><img alt=””Edit”” src=””” & _CType(Common.Globals.ApplicationPath, String) & _“/images/edit.gif”” border=””0””></a> ”
End IfstrDayText += “<span class=””ItemTitle””>” & _
objEvent.Title & “</span>”If objEvent.DateTime.ToString(“HH:mm”) <> “00:00” Then
strDayText += “<br><span class=””Normal””>” & _objEvent.DateTime.ToShortTimeString & “</span>”
End IfstrDayText += “<br><span class=””Normal””>” & _
Server.HtmlDecode(objEvent.Description) & “</span>”arrEvents(CDate(objEvent.DateTime).Day) += strDayText
Else ‘ recurring eventdatTargetDate = CType(objEvent.DateTime, Date)
datDate = Date.Parse(StartDate)While datDate <= Date.Parse(EndDate)
blnDisplay = FalseSelect Case objEvent.Period
Case CType(“D”, Char) ‘ dayIf DateDiff(DateInterval.Day, datTargetDate.Date, _
datDate) Mod objEvent.Every = 0 ThenblnDisplay = True
End IfCase CType(“W”, Char) ‘ week
If DateAdd(DateInterval.WeekOfYear, _DateDiff(DateInterval.WeekOfYear, _datTargetDate.Date, datDate), _datTargetDate.Date) = datDate Then
If DateDiff(DateInterval.WeekOfYear, _datTargetDate.Date, datDate) Mod _objEvent.Every = 0 ThenblnDisplay = True
End IfEnd If
Case CType(“M”, Char) ‘ month
(continued)
307
Developing Modules: The Presentation Layer
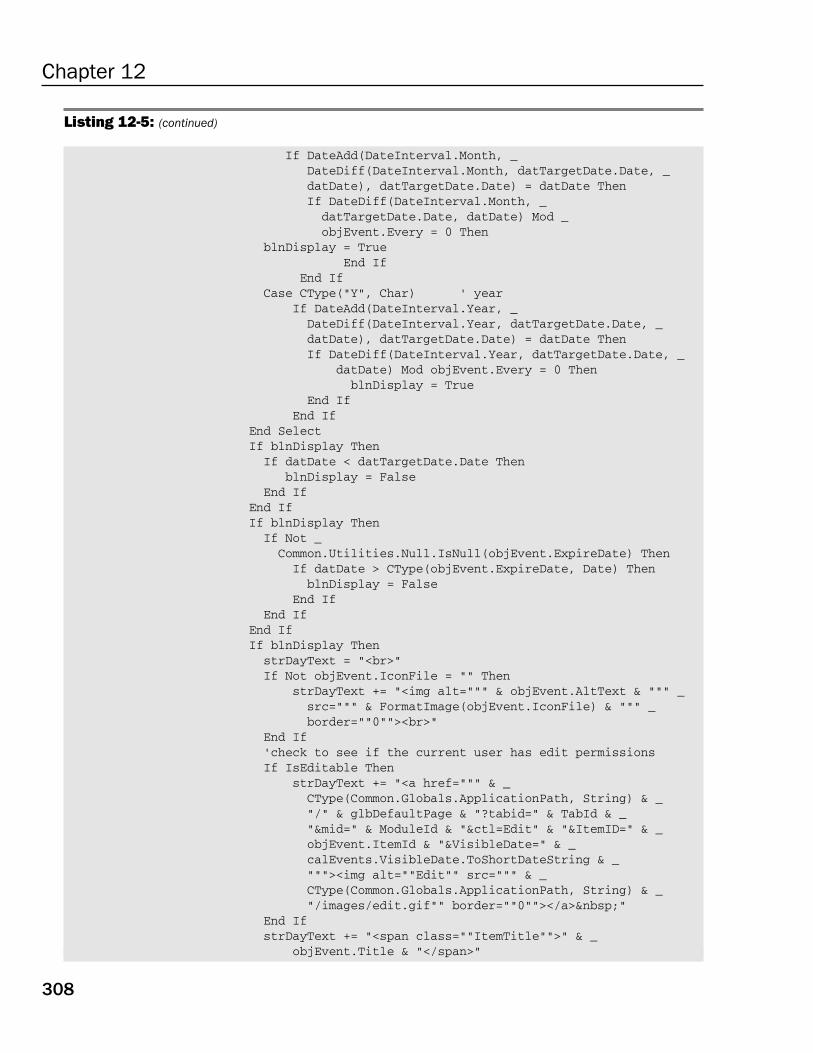
Listing 12-5: (continued)
If DateAdd(DateInterval.Month, _DateDiff(DateInterval.Month, datTargetDate.Date, _datDate), datTargetDate.Date) = datDate ThenIf DateDiff(DateInterval.Month, _
datTargetDate.Date, datDate) Mod _objEvent.Every = 0 Then
blnDisplay = TrueEnd If
End IfCase CType(“Y”, Char) ‘ year
If DateAdd(DateInterval.Year, _DateDiff(DateInterval.Year, datTargetDate.Date, _datDate), datTargetDate.Date) = datDate ThenIf DateDiff(DateInterval.Year, datTargetDate.Date, _
datDate) Mod objEvent.Every = 0 ThenblnDisplay = True
End IfEnd If
End SelectIf blnDisplay Then
If datDate < datTargetDate.Date ThenblnDisplay = False
End IfEnd IfIf blnDisplay Then
If Not _Common.Utilities.Null.IsNull(objEvent.ExpireDate) Then
If datDate > CType(objEvent.ExpireDate, Date) ThenblnDisplay = False
End IfEnd If
End IfIf blnDisplay Then
strDayText = “<br>”If Not objEvent.IconFile = “” Then
strDayText += “<img alt=””” & objEvent.AltText & “”” _src=””” & FormatImage(objEvent.IconFile) & “”” _border=””0””><br>”
End If‘check to see if the current user has edit permissionsIf IsEditable Then
strDayText += “<a href=””” & _CType(Common.Globals.ApplicationPath, String) & _“/” & glbDefaultPage & “?tabid=” & TabId & _“&mid=” & ModuleId & “&ctl=Edit” & “&ItemID=” & _objEvent.ItemId & “&VisibleDate=” & _calEvents.VisibleDate.ToShortDateString & _“””><img alt=””Edit”” src=””” & _CType(Common.Globals.ApplicationPath, String) & _“/images/edit.gif”” border=””0””></a> ”
End IfstrDayText += “<span class=””ItemTitle””>” & _
objEvent.Title & “</span>”
308
Chapter 12

If objEvent.DateTime.ToString(“HH:mm”) <> “00:00” ThenstrDayText += “<br><span class=””Normal””>” & _
objEvent.DateTime.ToShortTimeString & “</span>”End IfstrDayText += “<br><span class=””Normal””>” & _
Server.HtmlDecode(objEvent.Description) & “</span>”arrEvents(datDate.Day) += strDayText
End IfdatDate = DateAdd(DateInterval.Day, 1, datDate)
End WhileEnd If
NextintMonth = CDate(StartDate).MonthcalEvents.DataBind()
Catch exc As Exception ‘Module failed to loadProcessModuleLoadException(Me, exc)End Try
End Sub
#End Region
The majority of the code in Listing 12-5 is specific to what we’re doing for displaying the data. In a simplemodule you would simply bind the result set to a control, like so:
Dim objEvents As New EventsControllermyDatalist.DataSource = objEvents.GetEvents(ModuleId, _
Convert.ToDateTime(StartDate), _Convert.ToDateTime(EndDate))
myDataList.DataBind
But since you have some criteria on how you want to display events, you load the result set into anArrayList, which you then iterate through and format the data for display.
Other items to note in Listing 12-5 include the use of the IsEditable Boolean value to check to see if theuser has permissions to edit content for the module. If the value is true, you then display an edit icon toallow the user to edit events that are displayed.
Finally, in the exception catching you’ll notice a call to ProcessModuleLoadException. This method isprovided by the DotNetNuke framework for error trapping, which is discussed this later in this chapter.
The next region in this example is the Public Methods region. This is where you expose any methodsthat you want to make available outside of this class. Here you’re dealing primarily with formattingmethods and calculating the day of the month (see Listing 12-6).
Listing 12-6: Public Methods Contained in the Events Module
#Region “Public Methods”Public Function FormatDateTime(ByVal DateTime As Date) As String
TryFormatDateTime = DateTime.ToLongDateString
(continued)
309
Developing Modules: The Presentation Layer

Listing 12-6: (continued)
If DatePart(DateInterval.Hour, DateTime) <> 0 Or _DatePart(DateInterval.Minute, DateTime) <> 0 Or _DatePart(DateInterval.Second, DateTime) <> 0 ThenFormatDateTime = FormatDateTime & “ at “ & _DateTime.ToShortTimeString
End IfCatch exc As Exception ‘Module failed to load
ProcessModuleLoadException(Me, exc)End Try
End Function
Public Function FormatImage(ByVal IconFile As String) As StringTry
If Not IconFile = “” ThenFormatImage = PortalSettings.HomeDirectory & IconFile.ToString
End IfCatch exc As Exception ‘Module failed to load
ProcessModuleLoadException(Me, exc)End Try
End Function
Public Function GetFirstDayofMonth(ByVal datDate As Date) As StringTry
Dim datFirstDayofMonth As Date = DateSerial(datDate.Year, _datDate.Month, 1)Return GetMediumDate(datFirstDayofMonth.ToString)
Catch exc As Exception ‘Module failed to loadProcessModuleLoadException(Me, exc)
End TryEnd Function
Public Function GetLastDayofMonth(ByVal datDate As Date) As StringTry
Dim intDaysInMonth As Integer = Date.DaysInMonth(datDate.Year, _datDate.Month)Dim datLastDayofMonth As Date = DateSerial(datDate.Year, _
datDate.Month, intDaysInMonth)Return GetMediumDate(datLastDayofMonth.ToString)
Catch exc As Exception ‘Module failed to loadProcessModuleLoadException(Me, exc)
End TryEnd Function
#End Region
The next region in the code is the Event Handlers section. As you know from ASP.NET programming,events handlers are methods that respond to a certain action, be it an action performed by a user, such asa click event, or a system action such as the page loading. In this Events module example you are con-cerned with three events. The first is the page load event. The page load in your module is usually whereyou determine the initial state of your application. For example, you may check to see if the request is apostback, which means the user clicked on a link button or form button to call the module again. Listing12-7 looks at the code in the Event Handlers section to see how the page load is handled in this module.
310
Chapter 12

Listing 12-7: The Event Handlers Region in the Events Module
#Region “Event Handlers”Private Sub Page_Load(ByVal sender As System.Object, ByVal e As _System.EventArgs) Handles MyBase.Load
TryDim EventView As String = CType(Settings(“eventview”), _String)
If EventView Is Nothing ThenEventView = “C” ‘ calendar
End If
Dim objEvents As New EventControllerSelect Case EventView
Case “L” ‘ listlstEvents.Visible = TruecalEvents.Visible = FalselstEvents.DataSource = objEvents.GetEvents(ModuleId, _Convert.ToDateTime(Common.Utilities.Null.NullDate), _Convert.ToDateTime(Common.Utilities.Null.NullDate))
lstEvents.DataBind()Case “C” ‘ calendar
lstEvents.Visible = FalsecalEvents.Visible = True
If Not Page.IsPostBack ThenIf Not Request.QueryString(“VisibleDate”) _Is Nothing Then
calEvents.VisibleDate = _CType(Request.QueryString(“VisibleDate”), _Date)
ElsecalEvents.VisibleDate = Now
End IfIf CType(Settings(“eventcalendarcellwidth”), _
String) <> “” ThencalEvents.Width = _
System.Web.UI.WebControls.Unit.Parse(CType(Settings(“eventcalendarcellwidth”), _String) & “px”)
End IfIf CType(Settings(“eventcalendarcellheight”), _
String) <> “” ThencalEvents.Height = _
System.Web.UI.WebControls.Unit.Parse(CType(Settings(“eventcalendarcellheight”), _String) & “px”)
End IfElse
If calEvents.VisibleDate = #12:00:00 AM# ThencalEvents.VisibleDate = Now
End IfEnd If
Dim StartDate As String = _GetFirstDayofMonth(calEvents.VisibleDate) & “ 00:00”
(continued)
311
Developing Modules: The Presentation Layer

Listing 12-7: (continued)
Dim EndDate As String = _GetLastDayofMonth(calEvents.VisibleDate) & “ 23:59”GetCalendarEvents(StartDate, EndDate)
End SelectCatch exc As Exception ‘Module failed to load
ProcessModuleLoadException(Me, exc)End Try
End Sub
Private Sub calEvents_DayRender(ByVal sender As Object, ByVal e As _System.Web.UI.WebControls.DayRenderEventArgs) Handles _calEvents.DayRenderTry
If e.Day.Date.Month = intMonth ThenDim ctlLabel As Label = New LabelctlLabel.Text = arrEvents(e.Day.Date.Day)e.Cell.Controls.Add(ctlLabel)
End IfCatch exc As Exception ‘Module failed to load
ProcessModuleLoadException(Me, exc)End Try
End Sub
Private Sub calEvents_VisibleMonthChanged(ByVal sender As Object, _ByVal e As System.Web.UI.WebControls.MonthChangedEventArgs) Handles _calEvents.VisibleMonthChanged
TryDim StartDate As String = GetFirstDayofMonth(e.NewDate.Date) & _“ 00:00”Dim EndDate As String = GetLastDayofMonth(e.NewDate.Date) & _“ 23:59”GetCalendarEvents(StartDate, EndDate)
Catch exc As Exception ‘Module failed to loadProcessModuleLoadException(Me, exc)
End TryEnd Sub
#End Region
In the Page_Load event, one of the first things you do is check the value contained within the Settingshash. Remember from Table 12-2 that the Settings hash is similar to the Windows registry where youcan store key/value pairs. For example, you first check to see the view:
Dim EventView As String = CType(Settings(“eventview”), String)
This is the purpose of the Settings hash — it allows you to have unique values for each module’sinstance. This provides maximum code reuse to similar functions. In the Events module example, youcan specify different displays for events for each instance. This could be applied to any module in orderto provide maximum flexibility for your application. You can see throughout this method there are vari-ous keys checked for this module to obtain values.
312
Chapter 12

Continuing through Listing 12-7, you can see some of the private methods covered earlier in this chapterare called for displaying of date information. In addition, you also make a call to the EventsController inorder to bind to your Datalist. This is based on the value contained within your Settings(“eventview”)key. If you’re in list view, “L,” then you will bind to the controller, and call the GetEvents method.Remember just as before, you bring the data from the various layers starting with the physical databaseprovider to the BLL.
Dim objEvents As New EventController::::lstEvents.DataSource = objEvents.GetEvents(ModuleId, _
Convert.ToDateTime(Common.Utilities.Null.NullDate), _Convert.ToDateTime(Common.Utilities.Null.NullDate))
lstEvents.DataBind()
You’ll also notice the call to the Common.Utilities.Null.NullDate. This provides you with a null object ofthe date type to pass to your method in order to return all events rather than just events within a speci-fied range, as you did previously in this chapter.
We covered the basic structure of a view control for a DesktopModule, but there are a couple items weneed to deal with in order to complete the module. For instance, several times in the view control’s code-behind class we made calls to values contained within a Settings hash. These values are going to be configured within the edit control, which is used for configuring the settings for this specific moduleinstance. The Settings.ascx control was defined in the module definition in DotNetNuke for the Eventsmodule (see Chapter 9).
Settings ControlNow you need to create a control that enables you to customize your module. In the Events module, thiswill set the values contained in the Settings hash table. The keys you create are primarily for definingthe display of the module. You set options for defining whether to display events in a list format or a cal-endar format.
Listing 12-8 reviews the user control for this module. This file is located in the Events project foldercalled Settings.ascx.
Listing 12-8: The Settings User Control for the Events Module
<%@ Control language=”vb” CodeBehind=”Settings.ascx.vb” AutoEventWireup=”false”Explicit=”True” Inherits=”DotNetNuke.Modules.Events.Settings” %><%@ Register TagPrefix=”dnn” TagName=”Label” Src=”~/controls/LabelControl.ascx” %><table cellspacing=”0” cellpadding=”2” summary=”Edit Events Design Table”border=”0”>
<tr><td class=”SubHead” width=”175”><dnn:label id=”plView” runat=”server”
controlname=”optView” suffix=”:”></dnn:label></td><td valign=”bottom” width=”125”>
<asp:radiobuttonlist id=”optView” runat=”server” repeatdirection=”Horizontal”cssclass=”NormalTextBox”>
(continued)
313
Developing Modules: The Presentation Layer

Listing 12-8: (continued)
<asp:listitem resourcekey=”List” value=”L”>List</asp:listitem><asp:listitem resourcekey=”cmdCalendar” value=”C”>Calendar</asp:listitem>
</asp:radiobuttonlist></td>
</tr><tr valign=”top”>
<td class=”SubHead” width=”175”><dnn:label id=”plWidth” runat=”server”controlname=”txtWidth” suffix=”:”></dnn:label></td>
<td valign=”bottom” width=”125”><asp:textbox id=”txtWidth” runat=”server”cssclass=”NormalTextBox” columns=”5”></asp:textbox></td>
</tr><tr valign=”top”>
<td class=”SubHead” width=”175”><dnn:label id=”plHeight” runat=”server”controlname=”txtHeight” suffix=”:”></dnn:label></td>
<td valign=”bottom” width=”125”><asp:textbox id=”txtHeight” runat=”server”cssclass=”NormalTextBox” columns=”5”></asp:textbox></td>
</tr></table>
You can see the various controls here to display data; most are standard ASP.NET controls. One excep-tion to this is the use of the DNN Label control. By using DotNetNuke intrinsic controls you are able totake advantage of localization within your modules.
In addition to the DNN Label control, you can see how to specify the Settings hash table values for theview type. If you review Listing 12-7 you can see we checked the value of the Settings (“eventview”) todetermine in the view control how the events would be displayed. In the Settings.ascx control you cansee the form field optView, which has options for how to display the events in the module. You readthese values in your code-behind page for the Settings.ascx control and then pass the values to theSettings hash, which you then use to check the view for the module.
Settings Control Code-Behind ClassIf you look through the code-behind, you’ll notice this file is much smaller than the code-behind for theview control because you’re primarily concerned with specifying how you want the module to look.Listing 12-9 shows the class imports and the class definition in the Settings.ascx.vb file.
Listing 12-9: Defining the Settings Control for the Events Module
Imports DotNetNuke
Namespace DotNetNuke.Modules.EventsPublic MustInherit Class Settings
Inherits Entities.Modules.ModuleSettingsBase
You can see here you inherit the Entities.Modules.ModuleSettingsBase class. This class is provided byDotNetNuke and inherits the PortalModuleBase as discussed earlier (see Table 12-2), but it extends thePortalModuleBase to include some additional properties. The ModuleSettingsBase class provides meth-ods and properties specific to configuring values for the module instance. Table 12-3 reviews what thisclass provides for your module development.
314
Chapter 12

Table 12-3: ModuleSettingsBase Class
Name Type Description
ModuleId Integer ID of a specific single Module instance.
TabModuleId Integer ID of the module container within a tab. For example, twomodule instances in two different tabs could point to thesame Module ID allowing them to mirror data.
ModuleSettings Hashtable Configuration options that affect all instances of a module.
TabModuleSettings Hashtable Affects only a specific instance of a module. This allowsyou to display the same information for a module, but in adifferent way.
One item to clarify here is the difference between the two module IDs (ModuleID and TabModuleID)and the two hash tables (ModuleSettings and TabModuleSettings). This is provided so you can use thesame data in two different module instances. So, for example, if you want to update the event view forall instances of the same type of module, you would do so the following way:
Dim objModules As New Entities.Modules.ModuleControllerobjModules.UpdateModuleSetting(ModuleId, “eventview”, _
optView.SelectedItem.Value)
In Listing 12-10, you update the specific instance using the UpdateTabModuleSettings method. Thisupdates the view of all module containers pointing to the same data for a specific module, which is identified by its Module ID.
Code-Behind RegionsNext in the Settings class the various code sections are broken down into code regions. You’ll noticethroughout DotNetNuke certain standards are applied for coding conventions. As a module developeryou should strive to emulate the DotNetNuke coding style for easier readability and management.
The first and only section in the Settings.ascx.vb file is the Base Method Implementations region (seeListing 12-10). Here you have two methods, one method called LoadSettings to load settings from yourhash table, and another method called UpdateSettings to update the settings values in the hash table.
Listing 12-10: The Base Method Implementations of the Events ModuleSettings.ascx.vb File
#Region “Base Method Implementations”Public Overrides Sub LoadSettings()
TryIf (Page.IsPostBack = False) Then
If CType(TabModuleSettings(“eventview”), String) <> “” ThenoptView.Items.FindByValue(CType(TabModuleSettings(“eventview”), _
String)).Selected = True
(continued)
315
Developing Modules: The Presentation Layer

Listing 12-10: (continued)
ElseoptView.SelectedIndex = 1 ‘ calendar
End IftxtWidth.Text = _CType(TabModuleSettings(“eventcalendarcellwidth”), String)
txtHeight.Text = _CType(TabModuleSettings(“eventcalendarcellheight”), String)
End IfCatch exc As Exception ‘Module failed to load
ProcessModuleLoadException(Me, exc)End Try
End Sub
Public Overrides Sub UpdateSettings()Try
Dim objModules As New Entities.Modules.ModuleControllerobjModules.UpdateTabModuleSetting(TabModuleId, “eventview”, _
optView.SelectedItem.Value)objModules.UpdateTabModuleSetting(TabModuleId, _
“eventcalendarcellwidth”, txtWidth.Text)objModules.UpdateTabModuleSetting(TabModuleId, _
“eventcalendarcellheight”, txtHeight.Text)Catch exc As Exception ‘Module failed to loadProcessModuleLoadException(Me, exc)End Try
End Sub#End Region
That’s all it takes to configure the settings for your module. The next section covers the second edit con-trol for editing events for the module.
Edit ControlSince you’re displaying events in your module, you need a way to add and update events in thedatabase in order to display them. Again, as in the view control you’re going to make a call to your BLLin order to pass an update or insert SQL command to your physical provider.
Open the EditEvents.ascx control contained in the Events module project to look at the user interface foradding your events data (see Listing 12-11).
Listing 12-11: Registering Controls for the EditEvents.ascx Control
<%@ Register TagPrefix=”dnn” TagName=”Label” Src=”~/controls/LabelControl.ascx” %><%@ Register TagPrefix=”Portal” TagName=”URL” Src=”~/controls/URLControl.ascx” %><%@ Register TagPrefix=”Portal” TagName=”Audit”Src=”~/controls/ModuleAuditControl.ascx” %><%@ Register TagPrefix=”dnn” TagName=”TextEditor”Src=”~/controls/TextEditor.ascx”%><%@ Control language=”vb” CodeBehind=”EditEvents.ascx.vb” AutoEventWireup=”false”Explicit=”True” Inherits=”DotNetNuke.Modules.Events.EditEvents” %>
316
Chapter 12

You’ll notice you’re registering several DotNetNuke intrinsic controls. You did this with the label controlin your Settings class, but now you’re implementing several more in this file. Table 12-4 lists the controlsprovided by DotNetNuke and explains their purpose.
Table 12-4: DotNetNuke Controls and Their Description
Control Location Description
Label Control <approot>/controls Provided by the DotNetNuke framework, /LabelControl.ascx supports features provided by DNN such as
multiple languages based on user profile.
URL Control <approot>/controls Additional support for multi-language support /URLControls.ascx of DotNetNuke based on profile.Portal structure,
security, and other DNN intrinsic information.
Audit <approot>/controls Provides information on who created the/ModuleAuditControl.ascx information and the creation date.
Text Editor <approot>/controls Provides both a text-based and WYSIWYG /TextEditor.ascx environment for editing text and HTML for your
module.
Address <approot>/controls Provides an address entry form; this is being /Address.ascx used in the user registration within
DotNetNuke.
Dual List <approot>/controls Provides two lists for passing values from one Control /DualListControl.ascx list to the other. An example of this control is
implemented in the security settings for a mod-ule or page.
Help <approot>/controls Provides inline help for your controls. Supports /Help.ascx localization.
Section Head <approot>/controls Provides expandable areas for sections of your Control /SectionHeadControl.ascx module. This is implemented throughout Dot-
NetNuke.
Skin Control <approot>/controls A drop-down list of skins installed for a portal. /SkinControl.ascx Primarily used in framework applications like
under the admin and host menus.
Skin Thumbnail <approot>/controls Generates a thumbnail image of the skin. You Control /SkinThumbnail can view the functionality in the DotNetNuke
Control.ascx skins section under the Admin menu.
URL Tracking <approot>/controls Supports localization and click tracking.Control /URLTrackingControl.ascx
As you can see from Table 12-4, DotNetNuke provides several controls, all of which you can use in yourown development. Because DotNetNuke is open source, you can easily open any of the pages of code tofind an implementation of these controls. This example covers controls specific to this module.
317
Developing Modules: The Presentation Layer

Now that the controls have been registered in the page and your code-behind declared, let’s continueon with the rest of the control and remove some of the formatting parameters for readability (seeListing 12-12).
Listing 12-12: The EditEvents.ascx Control
<asp:panel id=”pnlContent” runat=”server”><TABLE width=”600” summary=”Edit Events Design Table”>
<TR vAlign=”top”><TD>
<dnn:label id=”plTitle” runat=”server” controlname=”txtTitle” suffix=”:”></dnn:label></TD>
<TD width=”450”><asp:textbox id=”txtTitle” runat=”server></asp:textbox>
<asp:requiredfieldvalidator id=”valTitle” runat=”server”resourcekey=”valTitle.ErrorMessage” controltovalidate=”txtTitle”errormessage=”Title Is Required”display=”Dynamic”></asp:requiredfieldvalidator></TD>
</TR><TR vAlign=”top”>
<TD><dnn:label id=”plDescription” runat=”server”
controlname=”txtDescription” suffix=”:”></dnn:label></TD><TD width=”450”>
<dnn:texteditor id=”teDescription” runat=”server”></dnn:texteditor><asp:requiredfieldvalidator id=”valDescription” runat=”server”
resourcekey=”valDescription.ErrorMessage” controltovalidate=”teDescription” errormessage=”Description Is Required” display=”Dynamic”></asp:requiredfieldvalidator></TD>
</TR><TR vAlign=”top”>
<TD><dnn:label id=”plImage” runat=”server” controlname=”cboImage”
suffix=”:”></dnn:label></TD><TD width=”450”>
<portal:url id=”ctlImage” runat=”server” showtabs=”False” showurls=”False” urltype=”F” showtrack=”False” showlog=”False” required=”False”></portal:url></TD>
</TR><TR>
<TD><dnn:label id=”plAlt” runat=”server” controlname=”txtAlt”
suffix=”:”></dnn:label></TD><TD width=”450”>
<asp:textbox id=”txtAlt” runat=”server”></asp:textbox><asp:requiredfieldvalidator id=”valAltText” runat=”server”
resourcekey=”valAltText.ErrorMessage” controltovalidate=”txtAlt” errormessage=”<br>Alternate Text Is Required” display=”Dynamic”></asp:requiredfieldvalidator></TD>
</TR><TR>
<TD><dnn:label id=”plEvery” runat=”server” controlname=”txtEvery”
suffix=”:”></dnn:label></TD>
318
Chapter 12

<TD width=”450”><asp:textbox id=”txtEvery” runat=”server”></asp:textbox> <LABEL style=”DISPLAY: none”
for=”<%=cboPeriod.ClientID%>”>Period</LABEL><asp:dropdownlist id=”cboPeriod” runat=”server”>
<asp:listitem value=””></asp:listitem><asp:listitem resourcekey=”Days” value=”D”>Day(s)</asp:listitem><asp:listitem resourcekey=”Weeks”
value=”W”>Week(s)</asp:listitem><asp:listitem resourcekey=”Months”
value=”M”>Month(s)</asp:listitem><asp:listitem resourcekey=”Years”
value=”Y”>Year(s)</asp:listitem></asp:dropdownlist></TD>
</TR><TR>
<TD class=”SubHead” width=”125”><dnn:label id=”plStartDate” runat=”server”
controlname=”txtStartDate” suffix=”:”></dnn:label></TD><TD width=”450”>
<asp:textbox id=”txtStartDate” runat=”server” columns=”20”></asp:textbox>
<asp:hyperlink id=”cmdStartCalendar” runat=”server” resourcekey=”Calendar”>Calendar</asp:hyperlink>
<asp:requiredfieldvalidator id=”valStartDate” runat=”server” resourcekey=”valStartDate.ErrorMessage”
controltovalidate=”txtStartDate” errormessage=”<br>Start Date Is Required” display=”Dynamic”></asp:requiredfieldvalidator>
<asp:comparevalidator id=”valStartDate2” runat=”server” resourcekey=”valStartDate2.ErrorMessage”
controltovalidate=”txtStartDate” errormessage=”<br>Invalid start date!” display=”Dynamic” type=”Date”
operator=”DataTypeCheck”></asp:comparevalidator></TD></TR><TR>
<TD class=”SubHead” width=”125”><dnn:label id=”plTime” runat=”server” controlname=”txtTime” suffix=”:”></dnn:label></TD>
<TD width=”450”><asp:textbox id=”txtTime” runat=”server”></asp:textbox></TD>
</TR><TR>
<TD class=”SubHead” width=”125”><dnn:label id=”plExpiryDate” runat=”server”
controlname=”txtExpiryDate” suffix=”:”></dnn:label></TD>
<TD width=”450”><asp:textbox id=”txtExpiryDate” runat=”server”></asp:textbox> <asp:hyperlink id=”cmdExpiryCalendar” runat=”server”
resourcekey=”Calendar”>Calendar</asp:hyperlink><asp:comparevalidator id=”valExpiryDate” runat=”server”
resourcekey=”valExpiryDate.ErrorMessage”
(continued)
319
Developing Modules: The Presentation Layer
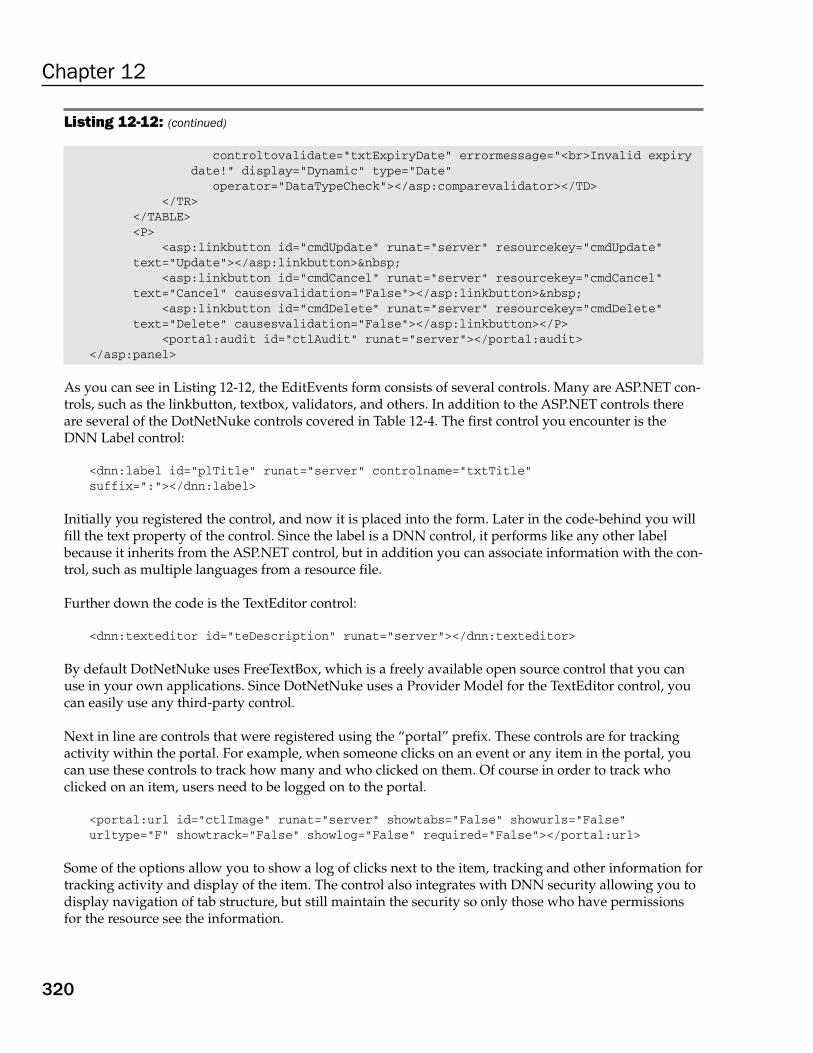
Listing 12-12: (continued)
controltovalidate=”txtExpiryDate” errormessage=”<br>Invalid expiry date!” display=”Dynamic” type=”Date”
operator=”DataTypeCheck”></asp:comparevalidator></TD></TR>
</TABLE><P>
<asp:linkbutton id=”cmdUpdate” runat=”server” resourcekey=”cmdUpdate” text=”Update”></asp:linkbutton>
<asp:linkbutton id=”cmdCancel” runat=”server” resourcekey=”cmdCancel” text=”Cancel” causesvalidation=”False”></asp:linkbutton>
<asp:linkbutton id=”cmdDelete” runat=”server” resourcekey=”cmdDelete” text=”Delete” causesvalidation=”False”></asp:linkbutton></P>
<portal:audit id=”ctlAudit” runat=”server”></portal:audit></asp:panel>
As you can see in Listing 12-12, the EditEvents form consists of several controls. Many are ASP.NET con-trols, such as the linkbutton, textbox, validators, and others. In addition to the ASP.NET controls thereare several of the DotNetNuke controls covered in Table 12-4. The first control you encounter is theDNN Label control:
<dnn:label id=”plTitle” runat=”server” controlname=”txtTitle”suffix=”:”></dnn:label>
Initially you registered the control, and now it is placed into the form. Later in the code-behind you willfill the text property of the control. Since the label is a DNN control, it performs like any other labelbecause it inherits from the ASP.NET control, but in addition you can associate information with the con-trol, such as multiple languages from a resource file.
Further down the code is the TextEditor control:
<dnn:texteditor id=”teDescription” runat=”server”></dnn:texteditor>
By default DotNetNuke uses FreeTextBox, which is a freely available open source control that you canuse in your own applications. Since DotNetNuke uses a Provider Model for the TextEditor control, youcan easily use any third-party control.
Next in line are controls that were registered using the “portal” prefix. These controls are for trackingactivity within the portal. For example, when someone clicks on an event or any item in the portal, youcan use these controls to track how many and who clicked on them. Of course in order to track whoclicked on an item, users need to be logged on to the portal.
<portal:url id=”ctlImage” runat=”server” showtabs=”False” showurls=”False”urltype=”F” showtrack=”False” showlog=”False” required=”False”></portal:url>
Some of the options allow you to show a log of clicks next to the item, tracking and other information fortracking activity and display of the item. The control also integrates with DNN security allowing you todisplay navigation of tab structure, but still maintain the security so only those who have permissionsfor the resource see the information.
320
Chapter 12

Finally at the bottom of the page is an audit control for tracking activity of the module. The portal auditcontrol will provide you with information on who created the information and the created date.
<portal:audit id=”ctlAudit” runat=”server”></portal:audit>
Now let’s check out the code-behind to see how to work with the data and the controls. For the mostpart you have dealt with displaying data from the BLL; now that you’re going to be adding and updat-ing information, you’ll need to pass parameters to your stored procedures in SQL. Refer to Chapters 10and 11 to see how this all comes together.
Edit Events Code-Behind ClassNow that we covered the front-end control that the user interacts with, let’s look at the code-behind fileand see how the class is structured. As before, you import the namespaces and define the class:
Imports DotNetNukeImports System.Web.UI.WebControls
Namespace DotNetNuke.Modules.EventsPublic MustInherit Class EditEvents
Inherits Entities.Modules.PortalModuleBase
You’ll notice again you inherit from the PortalModuleBase class as you did in the view control. Sincethis control is for adding data specific to your application, you’ll inherit the PortalModuleBase. Justto be clear on the difference between this control and the Settings control, which inherits from theModuleSettingsBase class of DotNetNuke, the Settings control is specific to the operation of the module,not the item data that is entered in tables that you create. The Settings data is stored within internaltables native to DotNetNuke, so you need to inherit from the ModuleSettingsBase, which is focused onthis task. An Edit control is specific to your application so it inherits from the PortalModuleBase.
Edit Events Code RegionsAgain, each section in the class is broken down into code regions for readability and organization. Let’sreview the regions specific to the EditEvents.ascx.vb file.
The first region is the Controls region, where you declare the controls you have created in your webform in the EditEvents.ascx control (see Listing 12-13).
Listing 12-13: The Controls Region of the EditEvents.ascx.vb File
#Region “Controls”
Protected WithEvents pnlContent As System.Web.UI.WebControls.PanelProtected plTitle As UI.UserControls.LabelControlProtected WithEvents txtTitle As System.Web.UI.WebControls.TextBoxProtected WithEvents valTitle As _
System.Web.UI.WebControls.RequiredFieldValidatorProtected plDescription As UI.UserControls.LabelControlProtected WithEvents teDescription As UI.UserControls.TextEditorProtected WithEvents valDescription As _
System.Web.UI.WebControls.RequiredFieldValidator
(continued)
321
Developing Modules: The Presentation Layer

Listing 12-13: (continued)
Protected plImage As UI.UserControls.LabelControlProtected WithEvents ctlImage As UI.UserControls.UrlControlProtected plAlt As UI.UserControls.LabelControlProtected WithEvents txtAlt As System.Web.UI.WebControls.TextBoxProtected WithEvents valAltText As _
System.Web.UI.WebControls.RequiredFieldValidatorProtected plEvery As UI.UserControls.LabelControlProtected WithEvents txtEvery As System.Web.UI.WebControls.TextBoxProtected WithEvents cboPeriod As System.Web.UI.WebControls.DropDownListProtected plStartDate As UI.UserControls.LabelControlProtected WithEvents txtStartDate As System.Web.UI.WebControls.TextBoxProtected WithEvents cmdStartCalendar As _
System.Web.UI.WebControls.HyperLinkProtected WithEvents valStartDate As _
System.Web.UI.WebControls.RequiredFieldValidatorProtected WithEvents valStartDate2 As _
System.Web.UI.WebControls.CompareValidatorProtected plTime As UI.UserControls.LabelControlProtected WithEvents txtTime As System.Web.UI.WebControls.TextBoxProtected plExpiryDate As UI.UserControls.LabelControlProtected WithEvents txtExpiryDate As System.Web.UI.WebControls.TextBoxProtected WithEvents cmdExpiryCalendar As _
System.Web.UI.WebControls.HyperLinkProtected WithEvents valExpiryDate As _
System.Web.UI.WebControls.CompareValidator‘tasksProtected WithEvents cmdUpdate As System.Web.UI.WebControls.LinkButtonProtected WithEvents cmdCancel As System.Web.UI.WebControls.LinkButtonProtected WithEvents cmdDelete As System.Web.UI.WebControls.LinkButton‘footerProtected WithEvents ctlAudit As _
DotNetNuke.UI.UserControls.ModuleAuditControl#End Region
As you can see from the code listing, most of the controls are ASP.NET controls as covered in Listing 12-12.In addition, you can see where you declare the DotNetNuke controls covered earlier.
The label controls:
Protected plTitle As UI.UserControls.LabelControlProtected plDescription As UI.UserControls.LabelControlProtected plImage As UI.UserControls.LabelControlProtected plEvery As UI.UserControls.LabelControlProtected plTime As UI.UserControls.LabelControlProtected plExpiryDate As UI.UserControls.LabelControl
The URL control:
Protected WithEvents ctlImage As UI.UserControls.UrlControl
322
Chapter 12

And the audit control:
Protected WithEvents ctlAudit As DotNetNuke.UI.UserControls.ModuleAuditControl
The next region is the Private Members region for storing an item ID value (see Listing 12-14). Becauseyou’re in the module’s edit control, you use this to add and update individual items. This variable isused to store the primary key of the individual event contained in the Events table.
Listing 12-14: The Private Members Region of the Edit Control
#Region “Private Members”
Private itemId As Integer = -1
#End Region
The next region is the Event Handlers region for dealing with click events and the Page_Load event forthe control. We’ll start with the Page_Load event first and then describe what is happening in each eventfor the Edit control of the Events module (see Listing 12-15).
Listing 12-15: The Events Handlers Region of the Edit Control -- Page Load Event
Private Sub Page_Load(ByVal sender As System.Object, ByVal e As _System.EventArgs) Handles MyBase.Load
Try‘ Determine ItemId of Events to Update
If Not (Request.QueryString(“ItemId”) Is Nothing) ThenitemId = Int32.Parse(Request.QueryString(“ItemId”))End If
‘this needs to execute always to the ‘client script code is registered in InvokePopupCalcmdStartCalendar.NavigateUrl = _
CType(Common.Utilities.Calendar.InvokePopupCal(txtStartDate), String)cmdExpiryCalendar.NavigateUrl = _
CType(Common.Utilities.Calendar.InvokePopupCal(txtExpiryDate), String)‘ If the page is being requested the first time, determine if an‘ event itemId value is specified, and if so populate page‘ contents with the event detailsIf Page.IsPostBack = False Then
cmdDelete.Attributes.Add(“onClick”, “javascript:return confirm(‘“ & _Localization.GetString(“DeleteItem”) & “‘);”)
If Not Common.Utilities.Null.IsNull(itemId) Then‘ Obtain a single row of event informationDim objEvents As New EventControllerDim objEvent As EventInfo = objEvents.GetEvent(itemId, ModuleId)‘ Read first row from databaseIf Not objEvent Is Nothing Then
txtTitle.Text = objEvent.TitleteDescription.Text = objEvent.DescriptionctlImage.FileFilter = glbImageFileTypesctlImage.Url = objEvent.IconFile
(continued)
323
Developing Modules: The Presentation Layer

Listing 12-15: (continued)
If Not objEvent.IconFile = “” ThenvalAltText.Visible = False
ElsevalAltText.Visible = True
End IftxtAlt.Text = objEvent.AltTexttxtEvery.Text = objEvent.Every.ToStringIf txtEvery.Text = “1” Then
txtEvery.Text = “”End IfIf objEvent.Period <> “” Then
cboPeriod.Items.FindByValue(objEvent.Period).Selected = _True
ElsecboPeriod.Items(0).Selected = True
End IftxtStartDate.Text = objEvent.DateTime.ToShortDateStringtxtTime.Text = objEvent.DateTime.ToShortTimeStringIf objEvent.DateTime.ToString(“HH:mm”) = “00:00” Then
txtTime.Text = “”End IfIf Not Common.Utilities.Null.IsNull(objEvent.ExpireDate) Then
txtExpiryDate.Text = objEvent.ExpireDate.ToShortDateStringElse
txtExpiryDate.Text = “”End IfctlAudit.CreatedByUser = objEvent.CreatedByUserctlAudit.CreatedDate = objEvent.CreatedDate.ToString
Else ‘ security violation attempt to ‘ access item not related to this Module
Response.Redirect(NavigateURL(), True)End If
ElsecmdDelete.Visible = FalsectlAudit.Visible = FalsevalAltText.Visible = False
End IfEnd If
Catch exc As Exception ‘Module failed to loadProcessModuleLoadException(Me, exc)
End TryEnd Sub
The first thing the Page_Load event does is to check the query string to determine if you’re workingwith an existing item in the events table or if this is a new item.
Further down you check for a null value by using the Common.Utilities.Null.IsNull method and passingit the itemID value. If the event ID is not null, you then instantiate the EventsController class and exe-cute the GetEvent method. Remember, this GetEvent method is contained in the Business Logic Layer,which then executes a call to the abstraction class, and eventually the physical provider that executes thecorresponding stored procedure within the SQL database.
324
Chapter 12

Dim objEvents As New EventControllerDim objEvent As EventInfo = objEvents.GetEvent(itemId, ModuleId)
Here you pass not only the itemID value to the stored procedure, but when you add a record you alsoadd a value for ModuleID. Remember, the ModuleID is being provided by the PortalModuleBase,which exposes the current module instance’s ID to your class. The ID is a unique identifier provided byDotNetNuke that is generated each time a module is placed in the page. This ID provides the developerwith a means to reuse modules, but have unique data for each instance.
Further down in the Page_Load event you can see another DotNetNuke-specific item, and that is whereyou populate your audit control with the information on the user creating the new event item:
ctlAudit.CreatedByUser = objEvent.CreatedByUserctlAudit.CreatedDate = objEvent.CreatedDate.ToString
This provides tracking internally so you can see who performed what action in your module. All thesecontrols are totally optional for you to use in your module development.
Now let’s move on to button action events. Listing 12-16 contains click events for cmdCancel,cmdDelete, and cmdUpdate link buttons.
Listing 12-16: Handling Linkbutton Events in the EditEvents Class
Private Sub cmdCancel_Click(ByVal sender As Object, ByVal e As EventArgs) _Handles cmdCancel.ClickTry
Response.Redirect(NavigateURL(), True)Catch exc As Exception ‘Module failed to load
ProcessModuleLoadException(Me, exc)End Try
End Sub
Private Sub cmdDelete_Click(ByVal sender As Object, ByVal e As EventArgs) _Handles cmdDelete.ClickTry
Dim objEvents As New EventControllerobjEvents.DeleteEvent(itemId)objEvents = Nothing‘ Redirect back to the portal home pageResponse.Redirect(NavigateURL(), True)
Catch exc As Exception ‘Module failed to loadProcessModuleLoadException(Me, exc)
End TryEnd Sub
Private Sub cmdUpdate_Click(ByVal sender As Object, ByVal e As EventArgs) _Handles cmdUpdate.ClickTry
Dim strDateTime As String‘ Only Update if the Entered Data is ValidIf Page.IsValid = True Then
(continued)
325
Developing Modules: The Presentation Layer

Listing 12-16: (continued)
strDateTime = txtStartDate.TextIf txtTime.Text <> “” Then
strDateTime += “ “ & txtTime.TextEnd IfDim objEvent As New EventInfoobjEvent.ItemId = itemIdobjEvent.ModuleId = ModuleIdobjEvent.CreatedByUser = UserInfo.UserID.ToStringobjEvent.Description = teDescription.TextobjEvent.DateTime = Convert.ToDateTime(strDateTime)objEvent.Title = txtTitle.TextIf txtEvery.Text <> “” Then
objEvent.Every = Convert.ToInt32(txtEvery.Text)Else
objEvent.Every = 1End IfobjEvent.Period = cboPeriod.SelectedItem.ValueobjEvent.IconFile = ctlImage.UrlobjEvent.AltText = txtAlt.TextIf txtExpiryDate.Text <> “” Then
objEvent.ExpireDate = Convert.ToDateTime(txtExpiryDate.Text)End If‘ Create an instance of the Event DB componentDim objEvents As New EventControllerIf Common.Utilities.Null.IsNull(itemId) Then
‘ Add the event within the Events tableobjEvents.AddEvent(objEvent)
Else‘ Update the event within the Events tableobjEvents.UpdateEvent(objEvent)
End IfobjEvents = Nothing‘ Redirect back to the portal home pageResponse.Redirect(NavigateURL(), True)
End IfCatch exc As Exception ‘Module failed to load
ProcessModuleLoadException(Me, exc)End Try
End Sub
The first event you’re handling in Listing 12-16 is the cmdCancel_Click event. Basically all you want todo here is redirect the user back to where they started from, which is the default view of the module. Inthis case it would be the View control we talked about earlier in the chapter. One thing you’ll notice hereis the use of NavigateURL, which is a function that returns a string for your module’s view page. TheNavigateURL function is provided by the DotNetNuke framework to provide navigation through yourmodule logic to load the appropriate controls based on the module’s key that you defined when youfirst configured DotNetNuke to interface with the module (see Chapter 9). Another key feature to thenavigation methods provided by DotNetNuke is the support of friendly URLs (which we’ll talk aboutlater in this chapter), which eliminates query strings being passed in the URL and uses a directory struc-ture for passing parameters.
326
Chapter 12

The second event is the cmdDelete_Click event. This event captures when the user deletes a specificevent from the listing. You make another call to your EventsController, and pass the ID of the event youwant deleted so eventually the stored procedure will be called and delete the event. After the event isdeleted you then redirect back to the initial view control of the module.
The final event is the cmdUpdate_Click event. This event handler contains a little more code than theprevious methods. Initially you create an instance of the EventController class, and populate the proper-ties for an EventInfo object. These values are passed from the user controls contained in the web form onthe web control. Once the values are populated you check to see if this is an existing event by looking atthe item ID. If it’s an existing event you call the UpdateEvent method of the controller class. If you’readding an event you then call the AddEvent method of the EventController class. Finally, you use theNavigateURL function and redirect to the initial view control of the module.
That completes the architectural review of a DotNetNuke module. Chapter 14 covers packaging up amodule for easy distribution in other DotNetNuke portals.
DotNetNuke Helper FunctionsIn the previous code samples you may have noticed several functions provided by the DotNetNuke coreframework to ease your module development. These helper functions consist of error handling and URLnavigation. This section provides some quick examples on what these functions do and how to utilizethem in your own modules. More detail is provided in Chapter 8 on the DotNetNuke API, but we’regoing to review common methods that were used in the examples in this chapter.
Error Handling If you’ve been developing ASP.NET for any length of time, I’m sure you’ve seen the yellow error dumpon a web page when something goes wrong. This isn’t a very nice sight for your users to see, and some-times it displays a little more information about your application than you would like. Sometimes youdon’t even realize there is a problem. You could write your own error handling routines, but withDotNetNuke you don’t have to. The core framework provides module developers with the ability tocheck a logged-on user’s security level, and display an appropriate error based on who is logged on. Forexample, an administrator can be presented with a little bit more detail about what specifically erredout, and an average user can just be presented with a friendly error informing them that something iswrong. In addition, combined with the Logging Provider in DotNetNuke you can view a log of theerrors that occurred within a timeframe. This ensures you can see what has been happening with yourportal, and any errors your modules may have raised.
You probably have noticed in this chapter that the code examples call a method calledProcessModuleLoadException. For example:
Try‘some logic
Catch exc As ExceptionProcessModuleLoadException(Me, exc)
End Try
327
Developing Modules: The Presentation Layer

By using this method you raise the error to DotNetNuke built-in error handling. To view any errors,logon as an admin or host level account, and select Admin ➪ Log Viewer from the menu options avail-able. This brings up the Log Viewer screen. Errors will be presented with a red entry by default. Justdouble-click on the entry to view the error information.
Navigation URLsAnother item covered in the sample code was the use of the NavigateURL and EditURL functions. Theseprovide two major functions: one is to load the appropriate control based on the key being passed to thefunction, and the other is the support for friendly URLs in your module. Friendly URLs allow yourmodule to eliminate the need to pass query strings in the URL. By using friendly URLs, you make it eas-ier for spiders to spider your site, and it is an overall easier method to display and remember URLs tovarious pages in your site. For example, instead of using something like http://www.dotnetnuke.com/default.aspx?tabid=233 to navigate to a page within a portal, friendly URLs would provide youwith http://www.dotnetnuke.com/tabid/233/default.aspx as a path to the page. You can findmore about the friendly URLs interface in Chapter 8.
Loading the Appropriate ControlNavigateURL provides you with the ability to load the appropriate control. This function is providedby DotNetNuke.Common.Globals.NavigateURL, located within the Globals.vb file in the <approot>/components/shared/ directory in the DotNetNuke solution. This method accepts a TabID, which is theunique identifier of a page in your portal; ControlKey, which is the unique key you defined when youconfigured your module definition — it identifies which user control to load for the module; and thefinal parameter (AdditionalParameters), which is for additional parameters. The additional parametersare a string array of the query string parameters you may need to pass in the URL. By using theAdditionalParameters you easily implement friendly URLs for your module because DotNetNuke willconvert the string array to a directory structure to be displayed in the URLs.
For example, the following code snippet sets the NavigateURL property of a link button control usingthe DotNetNuke.Common.Globals.NavigateURL method:
hypRegister.NavigateUrl = NavigateURL(PortalSettings.ActiveTab.TabID, “Edit”, _“mid=” & objModules.GetModuleByDefinition(PortalSettings.PortalId, _“User Accounts”).ModuleID, “UserId=” & objUserInfo.UserID)
You can see how you pass the ID of the currently active page to the URL, and the control you want toload is the control with the Edit key. In addition, you pass several parameters for the control such as theModule ID and current User ID.
EditURL is another function for building navigation for your module, in addition to the features pro-vided by the NavigateURL method, and is provided by the PortalModuleBase. This method does notaccept a Tab ID value, because it assumes it is being used for the module instance currently in use. Forexample, if you list a record set and you want to edit a particular item, you would pass the key ofItemID, and then the value. The EditURL would pass the information to the Edit control:
328
Chapter 12

<asp:HyperLink id=”editLink” NavigateUrl=’<%#EditURL(“ItemID”,DataBinder.Eval(Container.DataItem,”ItemID”)) %>’ Visible=”<%#IsEditable %>” runat=”server”><asp:Image id=”editLinkImage”ImageUrl=”~/images/edit.gif” Visible=”<%# IsEditable %>” AlternateText=”Edit”runat=”server” /></asp:HyperLink>
In this example, you’re listing the events in a view user control and displaying an edit link to the user ifhe or she has edit permissions using the IsEditable (see Table 12-2) Boolean value.
SummaryThis chapter finalized our series on module development and architecture. In Chapter 10 you developedyour physical provider class, which provides methods to expose your stored procedures in the database.From there you moved on to creating an abstraction class, and finally exposing the result set of recordsas a collection of objects from your Business Logic Layer (see Chapter 11).
In this chapter you combined those classes and then bound them to controls in your module controls.Modules consist of several types of controls. The more common ones are the view control, for the firstinitial view of a module; the settings control, for configuring properties of a module instance; and theedit control, for editing information specific to your business logic for the module application.
Finally, you learned the various helper functions that you can use in your own projects to reduce theamount of custom code.
This should provide you with enough information to begin developing your own module forDotNetNuke. In Chapter 14, you learn how to package up these modules for distribution in otherDotNetNuke portals.
329
Developing Modules: The Presentation Layer


Skinning DotNetNuke
The ability to skin DotNetNuke was introduced in version 2 of the application and was a much-anticipated addition. The term skinning refers to an application’s ability to change the look of thedesign by a setting in the application. This allows for the separation of the application logic fromthe user interface or object abstraction. As you learned in previous chapters, DotNetNuke utilizesa three-tier object-oriented design approach, with the user interface segmented as its own tier. Thisis what allows skinning to work and the application to be able to present a unique feel dependingon the parameters passed to the page. This chapter looks at the finer points of skinning and pro-vides you with the tools to start building your own skins for DotNetNuke.
DotNetNuke utilizes templates to accomplish this because they allow for the separation of the pre-sentation and layout attributes from the application logic required to display content to the user.We studied various approaches to allow this functionality and have created a solution that willallow both developers and designers independence when implementing DotNetNuke sites. Thisallows for faster deployment times and, more importantly, reduced expense with getting your por-tal functional and performing its intended purpose.
The abstraction of the user interface elements from a page can be accomplished using differentmethodologies. The method chosen includes some degree of parsing to merge the presentationwith the business logic. Therefore, defining where, when, and how this parsing will take placebecomes critical to the success of the entire solution.
The use of tokens or identifiers in the user interface files to represent dynamic functionality is apopular technique employed in many skinning solutions. DotNetNuke utilizes this approach in itsskinning engine solution — as the page is processed the token is replaced to the proper skin objector control for the function the token identifies. This is accomplished when you install the skin intothe application, which we will discuss later.
DotNetNuke allows you to create skins using your favorite editor, which gives you as a skindeveloper a good amount of flexibility — you only need to follow the rules for creating a skin;the tool you use to create it is up to you. You can either create an .ascx or .html skin. The type you
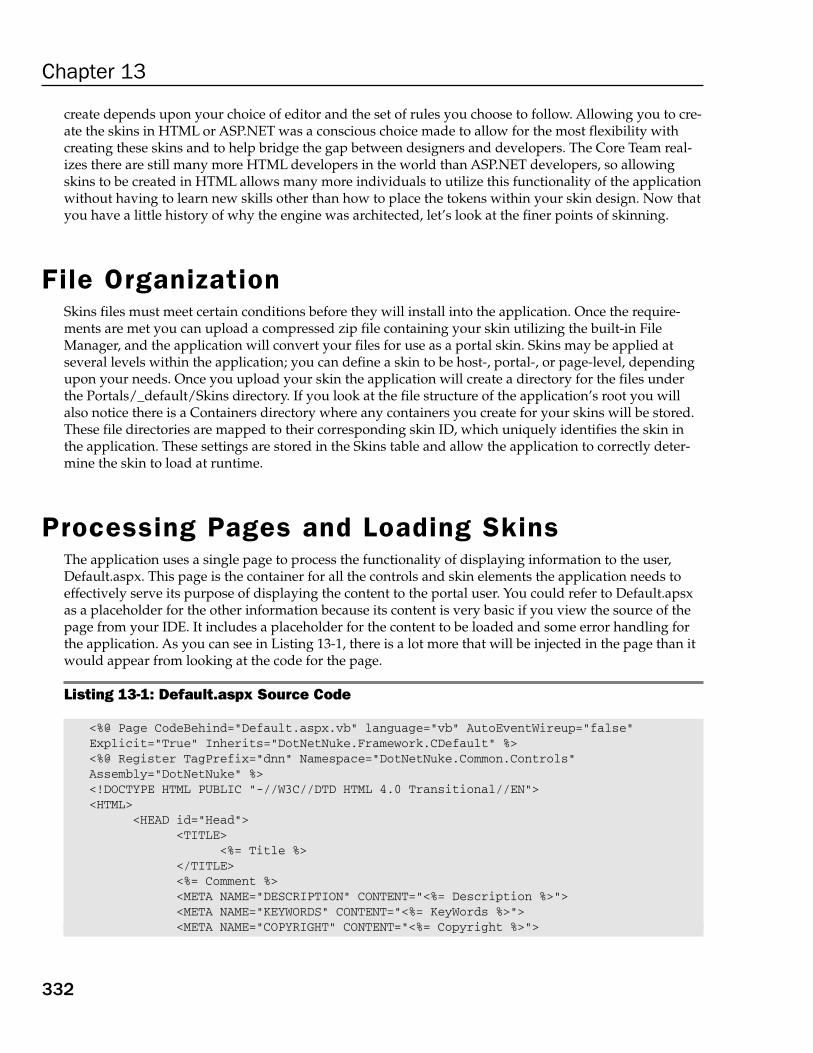
create depends upon your choice of editor and the set of rules you choose to follow. Allowing you to cre-ate the skins in HTML or ASP.NET was a conscious choice made to allow for the most flexibility withcreating these skins and to help bridge the gap between designers and developers. The Core Team real-izes there are still many more HTML developers in the world than ASP.NET developers, so allowingskins to be created in HTML allows many more individuals to utilize this functionality of the applicationwithout having to learn new skills other than how to place the tokens within your skin design. Now thatyou have a little history of why the engine was architected, let’s look at the finer points of skinning.
File OrganizationSkins files must meet certain conditions before they will install into the application. Once the require-ments are met you can upload a compressed zip file containing your skin utilizing the built-in FileManager, and the application will convert your files for use as a portal skin. Skins may be applied at several levels within the application; you can define a skin to be host-, portal-, or page-level, dependingupon your needs. Once you upload your skin the application will create a directory for the files underthe Portals/_default/Skins directory. If you look at the file structure of the application’s root you willalso notice there is a Containers directory where any containers you create for your skins will be stored.These file directories are mapped to their corresponding skin ID, which uniquely identifies the skin inthe application. These settings are stored in the Skins table and allow the application to correctly deter-mine the skin to load at runtime.
Processing Pages and Loading SkinsThe application uses a single page to process the functionality of displaying information to the user,Default.aspx. This page is the container for all the controls and skin elements the application needs toeffectively serve its purpose of displaying the content to the portal user. You could refer to Default.apsxas a placeholder for the other information because its content is very basic if you view the source of thepage from your IDE. It includes a placeholder for the content to be loaded and some error handling forthe application. As you can see in Listing 13-1, there is a lot more that will be injected in the page than itwould appear from looking at the code for the page.
Listing 13-1: Default.aspx Source Code
<%@ Page CodeBehind=”Default.aspx.vb” language=”vb” AutoEventWireup=”false”Explicit=”True” Inherits=”DotNetNuke.Framework.CDefault” %><%@ Register TagPrefix=”dnn” Namespace=”DotNetNuke.Common.Controls”Assembly=”DotNetNuke” %><!DOCTYPE HTML PUBLIC “-//W3C//DTD HTML 4.0 Transitional//EN”><HTML>
<HEAD id=”Head”><TITLE>
<%= Title %></TITLE><%= Comment %><META NAME=”DESCRIPTION” CONTENT=”<%= Description %>”><META NAME=”KEYWORDS” CONTENT=”<%= KeyWords %>”><META NAME=”COPYRIGHT” CONTENT=”<%= Copyright %>”>
332
Chapter 13

<META NAME=”GENERATOR” CONTENT=”<%= Generator %>”><META NAME=”AUTHOR” CONTENT=”<%= Author %>”><META NAME=”RESOURCE-TYPE” CONTENT=”DOCUMENT”><META NAME=”DISTRIBUTION” CONTENT=”GLOBAL”><META NAME=”ROBOTS” CONTENT=”INDEX, FOLLOW”><META NAME=”REVISIT-AFTER” CONTENT=”1 DAYS”><META NAME=”RATING” CONTENT=”GENERAL”><style id=”StylePlaceholder” runat=”server”></style><asp:placeholder id=”CSS” runat=”server”></asp:placeholder><asp:placeholder id=”FAVICON” runat=”server”></asp:placeholder><script src=”<%= Page.ResolveUrl(“js/dnncore.js”) %>”></script>
</HEAD><BODY ID=”Body” runat=”server” ONSCROLL=”__dnn_bodyscroll()” BOTTOMMARGIN=”0”
LEFTMARGIN=”0”TOPMARGIN=”0” RIGHTMARGIN=”0” MARGINWIDTH=”0” MARGINHEIGHT=”0”><noscript></noscript><dnn:Form id=”Form” runat=”server” ENCTYPE=”multipart/form-data”
style=”height:100%;><asp:Label ID=”SkinError” Runat=”server” CssClass=”NormalRed”
Visible=”False”></asp:Label><asp:placeholder id=”SkinPlaceHolder” runat=”server” /><INPUT ID=”ScrollTop” runat=”server” NAME=”ScrollTop”
TYPE=”hidden”> <INPUT ID=”__dnnVariable” runat=”server” NAME=”__dnnVariable”
TYPE=”hidden”></dnn:Form>
</BODY></HTML>
So how does all this work? When a URL is requested and the user enters the application the request isinspected and the proper skin is determined from the database tables. Once the proper skin is identifiedthe user controls are injected based on the definitions in the skin. The logic that allows this functionalityis defined in the Admin/Skins/skin.vb file. Listing 13-2 looks at the logic that allows the skin to bedetermined and loaded.
Listing 13-2: Skin.vb Init_Page Directives
Private Sub Page_Init(ByVal sender As System.Object, ByVal e As System.EventArgs)Handles MyBase.Init
‘‘ CODEGEN: This call is required by the ASP.NET Web Form Designer.‘InitializeComponent()
‘ set global page settingsInitializePage()
‘ process the current requestManageRequest()
‘ load skin controlDim ctlSkin As UserControlDim objSkins As New UI.Skins.SkinController
(continued)
333
Skinning DotNetNuke

Listing 13-2: (continued)
‘ skin previewIf (Not Request.QueryString(“SkinSrc”) Is Nothing) Then
PortalSettings.ActiveTab.SkinSrc = _objSkins.FormatSkinSrc(QueryStringDecode(Request.QueryString(“SkinSrc”)) & “.ascx”,PortalSettings)
ctlSkin = LoadSkin(PortalSettings.ActiveTab.SkinSrc)End If
‘ load assigned skinIf ctlSkin Is Nothing Then
If IsAdminControl() = True Or PortalSettings.ActiveTab.IsAdminTab _Then
Dim objSkin As UI.Skins.SkinInfoobjSkin = objSkins.GetSkin(SkinInfo.RootSkin, _
PortalSettings.PortalId, SkinType.Admin)If Not objSkin Is Nothing Then
PortalSettings.ActiveTab.SkinSrc = _objSkins.FormatSkinSrc(objSkin.SkinSrc, PortalSettings)
ElsePortalSettings.ActiveTab.SkinSrc = “”
End IfElseIf PortalSettings.ActiveTab.SkinSrc <> “” Then
PortalSettings.ActiveTab.SkinSrc = _objSkins.FormatSkinSrc(PortalSettings.ActiveTab.SkinSrc, PortalSettings)
End If
If PortalSettings.ActiveTab.SkinSrc <> “” ThenctlSkin = LoadSkin(PortalSettings.ActiveTab.SkinSrc)
End IfEnd If
‘ error loading skin - load defaultIf ctlSkin Is Nothing Then
‘ could not load skin control - load default skinIf IsAdminControl() = True Or PortalSettings.ActiveTab.IsAdminTab _
ThenPortalSettings.ActiveTab.SkinSrc = Common.Globals.HostPath & _
SkinInfo.RootSkin & glbDefaultSkinFolder & glbDefaultAdminSkinElse
PortalSettings.ActiveTab.SkinSrc = Common.Globals.HostPath & _SkinInfo.RootSkin & glbDefaultSkinFolder & glbDefaultSkin
End IfctlSkin = LoadSkin(PortalSettings.ActiveTab.SkinSrc)
End If
‘ set skin pathPortalSettings.ActiveTab.SkinPath = _
objSkins.FormatSkinPath(PortalSettings.ActiveTab.SkinSrc)
‘ set skin id to an explicit short name to reduce page payload and makeit standards compliant
ctlSkin.ID = “dnn”
334
Chapter 13

‘ add CSS linksManageStyleSheets(False)
‘ add FaviconManageFavicon()
‘ add skin to pageSkinPlaceHolder.Controls.Add(ctlSkin)
‘ add CSS linksManageStyleSheets(True)
End Sub
As you can see in Listing 13-2, you first call the ManageRequest function, which determines the URL ofthe requesting user and information about who is requesting the resource. This not only allows you todetermine the URL of the request, but also allows you to determine whether the user should have accessto the page they are requesting. After learning the identity of the user and which resource they arerequesting, you can determine the skin you need to use for this request from the database. So you createthe new object ctlSkin and determine the skin you need to load for the page. Then you look at the otherattributes and load the proper style sheet and Icon, if they are defined, and finally bind the skin usercontrol and attributes to the page the user has requested. This is what allows DotNetNuke to performdynamic re-allocation of the application’s look on the fly. You should note there is a performance hitwith these DB calls and allowing the portal to utilize this dynamic skinning solution, as there is with anyapplication that can change its appearance on the fly, but it is one of the killer features DotNetNuke con-tains and more than worth the additional overhead the process requires.
Packaging Skins and ContainersNow that you understand the process of getting skin bound to the proper page, let’s look at the differentparts of a skin package. The package is a compilation of the files and definitions you will use to containthe files and tell DotNetNuke to process your skin when you install it into your application instance.A skin or container package can contain the following file types:
❑ *.htm,*.html files: These files can contain the layout representing how you want the variousskin objects to be located in your design. These files will be converted to *.ascx files upon instal-lation to the application.
❑ *.ascx files: These are skin definition user controls that are precompiled in the format the skinning engine requires.
❑ *.css files: These files contain the style sheet definitions you will use to define the files in yourskin or container.
❑ *.gif, *.jpeg, *.jpg, *.png: These file extensions are used in support of the graphics files includedin your skin.
❑ *.* Other files: You can use any other resource files in your package, but these must be of anallowed file type in the host allowed file settings on the Host Settings page.
335
Skinning DotNetNuke

A package can contain multiple skins or containers. This allows you to create complementing skins for asite in one package. Since the layout will allow for various panes that contain the module content at run-time, this is a powerful feature because you may not want the same layout for all pages in a site, but youwill probably want common graphics and defined styles throughout the same site. This ability of pack-aging multiple skins and containers allows you to install all of the skins for a portal in one installation.
A skin package should make use of a manifest file to identify the various files and elements to beincluded in the skin. Including this file allows you to combine all the files into one package and give theapplication the needed instructions for processing the skin to your specifications. Although the manifestfile adds some overhead to the skin creation process, it does greatly enhance the abilities of the installa-tion process and allows greater control in a single step. We will discuss the finer points of creating mani-fest files later in this chapter because this is a very important control mechanism for controlling theinstallation of your skins.
Creating Your SkinYou have two methods for creating your skin. The method you choose will depend upon your comfortlevel with the technology and your personal preference. Skins can be created using HTML, or if you pre-fer, you can create *.ascx skins with VS.NET. This allows you to develop your skin in a comfortable envi-ronment and provides flexibility while creating skins. If you are more of a designer who has developedtraditional web sites in the past, you may prefer creating your skins in HTML using your favorite editor,but if you are more of a programmer type, you may prefer to use ASP.NET code and develop your skinwith Visual Studio. Both these methods are basically the same except you will use the tokens whendeveloping in HTML and you will utilize the user controls when creating your skin. Of course the fileextension will change depending upon your choice of methods.
At a minimum you will want to develop at least two skins for each package, one to display to your usersand another to display the administrative modules discussed in Chapters 4 and 5. The reason for this isthat the user content areas will likely need multiple panes to properly lay out the content as your busi-ness needs require, but the administrative areas will likely only display a single module per page, sothese two layouts will need to be architected differently to adequately serve the purpose of the area.
There are several different steps to creating a skin. The order in which you perform these steps is notimportant, but we find the following a valid method to get everything accomplished and your skin intoproduction.
To simplify the development of skin files as well as expedite the packaging process later, it is recom-mended that you use the following organizational folder structure:
\Skins\SkinName (this is the package you are developing)
... (this is where you create the skin package zip files for deployment)\containers (this is a static name to identify the container files for the skin package)... (this will contain all resource files related to your containers)
\skins (this is a static name to identify the skin files for the skin package... (this will contain all resource files related to your skins)
336
Chapter 13

This provides an easy structure to develop your skins and you will find this structure also simplifiespreparing your package for deployment and installation into your portal. The free-form nature of skin-ning provides you a level of creative freedom within designing your skins. Designers may wish to createthe initial site designs as full graphical images and then slice the images to meet their needs after theconcept is mature. One thing to be aware of when creating skins is that you need to include all userinterface elements in your design. This includes static elements such as graphics and text, and it shouldalso include active elements such as Login links, a navigation/menu system, and the other skin objectsrequired for DotNetNuke to adequately display your content to your users.
This is where you need to be aware of the technical issues that will arise in terms of how to most effec-tively divide the graphical elements into the HTML representation you need. HTML layout is very dif-ferent from free-flow graphics, and the translation from a graphical image to an HTML representationwill determine the layout of the final design. Decisions such as what resolution you want to target yoursite for will need to be made at this stage. If you want the site to remain fixed regardless of resolution ofthe user’s browser or if the design should adapt to the resolution, you should decide these items andmake adjustments to your design based on those decisions. Several example skins are included in thedownload that show the differences between fixed-width skins and full-width skins, so you can see thedifferences between these two approaches.
Now that you have your design completed, you will need to actually build the skin. As mentioned ear-lier, you can use any HTML editor, Visual Studio, or if you prefer, even your favorite text editor to buildthe skin for your design. The one thing to remember is the HTML in your skin must be well formed orthe process will fail. This means you must ensure you close any HTML tags you open, including imagetags. Image tags do not normally have closing tags so you should include the trailing / after the imagecontent and before you end the tag. Most modern HTML editors will handle the process of ensuring tagsare closed for you, but you should still double-check your work to make sure a bug is not introducedinto your skin with a missing tag.
This brings us to the location of images and support files to be used in your skin. Normally you will wantto include your support files within the same folder as the rest of your skin elements, but this is not arequirement and you can place them in any folder you wish, but care must be taken to ensure the pathswill remain valid after the skin upload process. As part of the upload process the skinning engine will addan explicit path to your images for you. This is to help with the performance of your skin during runtime.The skinning image will automatically append a path of /Portals/_default/YourSkinName/ to yourimage paths you have specified. One thing to watch out for with this when you are building the contentfor your site is that if these paths change between development and production, your image paths will beincorrect and the image will not show properly.
An example of when this can happen is when you are building a site on your local machine in a virtualdirectory of http://localhost/VirtualDirectory and then you decide to move to production to alocation of http://www.YourDomain.com. The easiest way to make this move is to back up your localdatabase, then restore it to your production database, ftp your files to your production system, andmake the appropriate changes to the Portal Alias and web.config file. But what you will find when youmove the site to production is that the image paths will no longer work. If you run into this issue youhave two methods to correct it. You can install the skin again, effectively overwriting the original skin, oryou can choose to directly edit your skin file and correct the image paths manually. The best thing is totake these types of items into account before you start building a development site and plan accordingly.
337
Skinning DotNetNuke

Now that you have your design and a good idea of how your skin will be architected, you need to addthe skin objects to the proper location in your skin file. This is so DotNetNuke will know where to insertthe various content panes, portal elements, and navigation objects. Depending on the method you choseto create your skin, this process will change to meet the method. If you are using ASCX skins, then youwill need to specify the @Register and the actual user control tag in your skin. For example, <dnn:Loginrunat=”server” id=”dnnlogin”> will insert the login user control in the section of your skin where youspecify the control. If you are using HTML skins, then you will simply need to include the token for theaccompanying skin element. So for HTML skins you will simply add [Login] in the location you wouldlike the login control to appear and the engine will replace it with the actual control when the skin isparsed during upload. Each of the different skin objects has their own unique functions, and you mustunderstand the use of each to build a functional skin. Table 13-1 lists each of these objects and describestheir purpose, as well as provides an example of their use in each of the two methods.
Table 13-1: Skin Objects
Token Control Description
[SOLPARTMENU] < dnn:SolPartMenu runat=”server” Displays the hierarchical naviga-id=”dnnSolPartMenu”> tion menu (formerly [MENU]).
[LOGIN] < dnn:Login runat=”server” Dual state control — displaysid=”dnnLogin”> “Login” for anonymous users and
“Logout” for authenticated users.
[BANNER] < dnn:Banner runat=”server” Displays a random banner ad.id=”dnnBanner”>
[BREADCRUMB] < dnn:Breadcrumb runat=”server” Displays the path to the currently id=”dnnBreadcrumb”> selected tab in the form of Page-
Name1 > PageName2 > PageName3.
[COPYRIGHT] < dnn:Copyright runat=”server” Displays the copyright notice for id=”dnnCopyright”> the portal.
[CURRENTDATE] < dnn:CurrentDate runat=”server” Displays the current date.id=”dnnCurrentDate”>
[DOTNETNUKE] < dnn:DotNetNuke runat=”server” Displays the Copyright notice for id=”dnnDotnetNuke”> DotNetNuke (not required).
[HELP] < dnn:Help runat=”server” Displays a link for Help, which will id=”dnnHelp”> launch the user’s e-mail client and
send mail to the portal Administrator.
[HOSTNAME] < dnn:HostName runat=”server” Displays the Host Title linked to id=”dnnHostName”> the Host URL.
[LINKS] < dnn:Links runat=”server” Displays a flat menu of links id=”dnnLinks”> related to the current tab level and
parent node. This is useful for searchengine spiders and robots.
[LOGO] < dnn:Logo runat=”server” Displays the portal logo.id=”dnnLogo”>
338
Chapter 13

Token Control Description
[PRIVACY] < dnn:Privacy runat=”server” Displays a link to the Privacyid=”dnnPrivacy”> Information for the portal.
[SIGNIN] < dnn:Signin runat=”server” Displays the signin control for id=”dnnSignin”> providing your username and
password.
[TERMS] < dnn:Terms runat=”server” Displays a link to the Terms and id=”dnnTerms”> Conditions for the portal.
[USER] < dnn:User runat=”server” Dual state control — displays a id=”dnnUser”> “Register” link for anonymous users
or the user’s name for authenticatedusers.
[CONTENTPANE] <div runat=”server” Injects a placeholder for moduleid=”ContentPane”> content.
These are the skin objects available for use in your skin creation, and there are also some additionalobjects available for use in the creation of containers. You can place these objects anywhere in your skinand control the placement of the portal elements. We should note that not all these elements are required,but you should choose the elements you need to accomplish your purpose. Each skin must have at leastone content pane, and it must be identified as the content pane or the modules will not display correctly.
Quite a few attributes are also available for use in the skin creation process. These attributes will bedefined in the skin.xml or the manifest file we mentioned earlier in the chapter. This file is where youwill tell DotNetNuke how you want to utilize the various skin objects. For example, you may want yournavigation menu to display horizontally in your skin; this setting will be set in the skin.xml file so theengine will know how to properly insert the menu into the skin. Table 13-2 lists the attributes availableto you for use in the manifest file for the skin objects.
Table 13-2: Skin Attributes
Token Attribute Default Description
[SOLPARTMENU] separatecss true CSS defined in a style sheet (values:true, false)
backcolor #333333 Background color
forecolor white Forecolor of menu item when selected
highlightcolor white Color of top and left border to give ahighlight effect
iconbackground #333333 Background color in area where icon is color displayed
Table continued on following page
339
Skinning DotNetNuke

Token Attribute Default Description
selectedb Color of border surrounding selected ordercolor menu item
selectedcolor #CCCCCC Background color of menu item whenselected
selectedforecolor white Forecolor of menu item when selected
display horizontal Determines how the menu is displayed,horizontal or vertical (values: vertical,horizontal)
menubarheight 16 Menu bar height in pixels
menuborderwidth 1 Menu border width in pixels
menuitemheight 21 Menu item height in pixels
forcedownlevel false Flag to force the downlevel menu todisplay (values: true, false)
moveable false Flag to determine if menu can bemoved (values: true, false)
iconwidth 0 Width of icon column in pixels
Menueffects dimgray Color of the shadowshadowcolor
menueffectsmouse 500 Number of milliseconds to wait until outhidedelay menu is hidden on mouse out
(0 = disable)
mouseouthide 1 Number of milliseconds to wait until delay menu is hidden on mouse out
(0 = disable)
menueffectsmouse Highlight Adjusts effect when mouse moves overdisplay over menu bar item (values: Outset,
Highlight, None)
menueffects true Makes menu expand on mouse-over mouseoverexpand (unlike any menu found within the
Windows environment) (values: true,false)
menueffectsstyle filter:progid: IE-only property for SubMenu stylesDXImage and transitionsTransform.Microsoft.Shadow(color=’DimGray’,Direction=135, Strength=3) ;
340
Chapter 13

Token Attribute Default Description
fontnames Arial
fontsize 12
fontbold false
Menueffects 3 Determines how many pixels the shadowstrength shadow extends
Menueffects None Determines which direction the menutransition shadow will fall (values: None,
AlphaFade, AlphaFadeBottomRight,Barn, Blinds, Checkerboard, Constant-Wave, Fade, GradientWipe, Inset, Iris,RadialWipe, Random, RandomBars,Slide, Spiral, Stretch, Strips, Wave,Wheel, Zigzag)
menueffectsmenu 0.3 Number of seconds the transition transitionlength will take
Menueffects Lower Right Determines which direction the shadowdirection shadow will fall (values: None, Top,
Upper Right, Right, Lower Right, Bot-tom, Lower Left, Left, Upper Left)
menucontainer MainMenu_ Menu Container CSS Classcssclass Menu
Container
menubarcssclass MainMenu_ Menu Bar CSS ClassMenuBar
menuitemcssclass MainMenu_ Menu Item CSS ClassMenuItem
menuiconcssclass MainMenu_ Menu Icon CSS ClassMenuIcon
menuitems MainMenu_ Menu Item CSS Class for mouse-overelcssclass MenuItemSel
menubreakcssclass MainMenu_ Menu Break CSS ClassMenuBreak
submenucssclass MainMenu_ SubMenu CSS ClassSubMenu
menuarrowcssclass MainMenu_ Menu Arrow CSS ClassMenuArrow
menuroot MainMenu_ Menu Root Arrow CSS Classarrowcssclass MenuRoot
Arrow
Table continued on following page
341
Skinning DotNetNuke

Token Attribute Default Description
forcefullmenulist false Displays the full menu as an indentedlist of normal hyperlinks (like asitemap) {true|false}
useskinpath false Use arrow images located in the skin arrowimages and not those in the /images folder
{true|false}
userootbread true Use a breadcrumb arrow to identifycrumbarrow the root tab that is listed in the bread-
crumb ArrayList {true|false}
usesubmenu false Use a breadcrumb arrow to identify breadcrumbarrow the submenu tabs that are listed in the
breadcrumb ArrayList {true|false}
Rootbread Image used for root-level menu crumbarrow breadcrumb arrows – i.e., file.gif
submenubread Image used for submenu menu crumbarrow breadcrumb arrows – i.e., file.gif
usearrows Use arrows to indicate child submenus
downarrow menu_ Arrow image used for downward-down.gif facing arrows indicating child
submenus
rightarrow bread Arrow image used for right-facing crumb.gif arrows indicating child submenus
level Root Root level of the menu in relationshipto the current active tab{Root|Same|Child}
rootonly false Indicator to turn off submenus{true|false}
rootmenuitem CSS class used for root menu items breadcrumb when they are found in thecssclass breadcrumb ArrayList
submenuitem CSS Class used for submenu items breadcrumb when they are found in the cssclass breadcrumb ArrayList
Rootmenuitem CSS class used for root menu itemscssclass
rootmenuitem CSS class used for root menu items activecssclass when they are the active tab
submenuitem CSS class used for submenu items activecssclass when they are the active tab
342
Chapter 13

Token Attribute Default Description
rootmenuitem CSS class used for root menu items selectedcssclass when they are moused-over
submenuitem CSS Class used for submenu items selectedcssclass when they are moused-over
separator The separator between root-levelmenu items. This can include customskin images, text, and HTML (i.e.,<![CDATA[ <imgsrc=”file.gif”> ]]>)
separatorcssclass CSS class used for the root-level menuitem separator
Rootmenuitem HTML text added to the beginning of lefthtml the root menu items
rootmenuitem HTML text added to the end of therighthtml root menu items
Submenuitem HTML text added to the beginning of lefthtml the submenu items
Submenuitem HTML text added to the end of the righthtml submenu items
tooltip Tooltips added to the menu items.These come from the tab object proper-ties, which are filled from the tabstable {Name|Title|Description}
leftseparator The separator used just before a root-level menu item. A use for this might bea left edge of a tab image, for example.
rightseparator The separator used just after a root-level menu item. A use for this mightbe a right edge of a tab image, forexample.
Leftseparator The separator used just before an active active root-level menu item
Rightseparator The separator used just before an active active root-level menu item
leftseparator The separator used just before a root-breadcrumb level menu item found in the bread-
crumb ArrayList
Table continued on following page
343
Skinning DotNetNuke
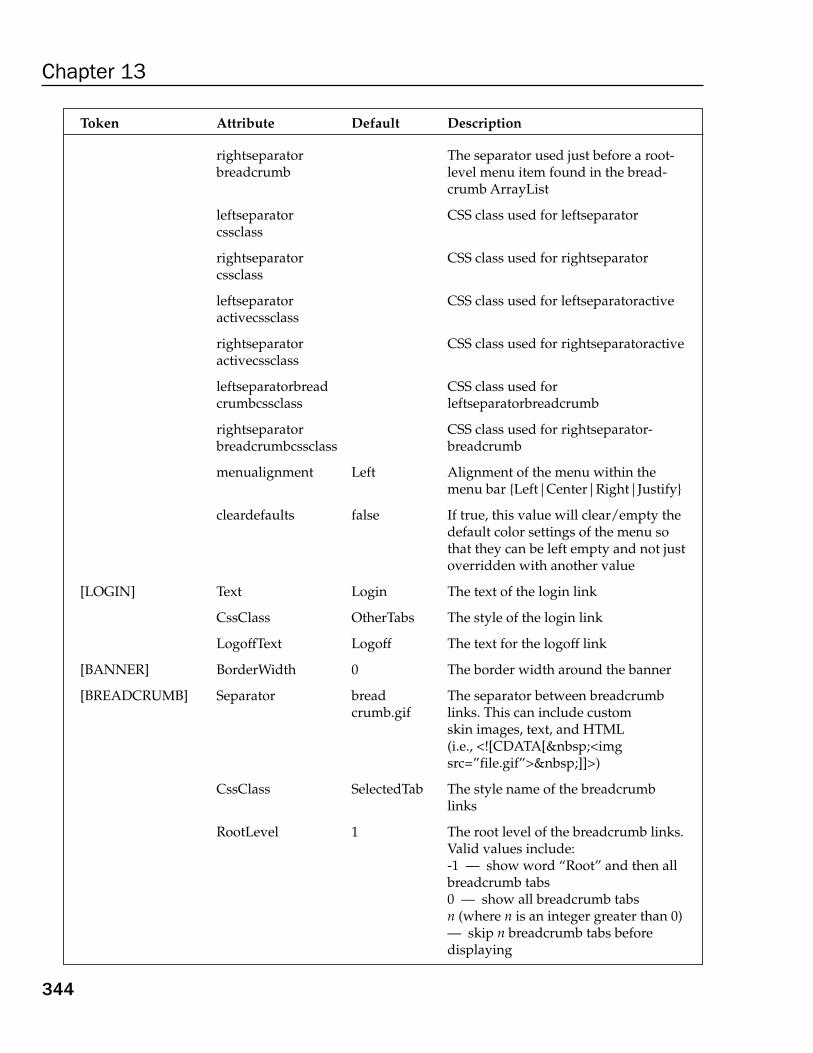
Token Attribute Default Description
rightseparator The separator used just before a root-breadcrumb level menu item found in the bread-
crumb ArrayList
leftseparator CSS class used for leftseparatorcssclass
rightseparator CSS class used for rightseparatorcssclass
leftseparator CSS class used for leftseparatoractiveactivecssclass
rightseparator CSS class used for rightseparatoractiveactivecssclass
leftseparatorbread CSS class used for crumbcssclass leftseparatorbreadcrumb
rightseparator CSS class used for rightseparator-breadcrumbcssclass breadcrumb
menualignment Left Alignment of the menu within themenu bar {Left|Center|Right|Justify}
cleardefaults false If true, this value will clear/empty thedefault color settings of the menu sothat they can be left empty and not justoverridden with another value
[LOGIN] Text Login The text of the login link
CssClass OtherTabs The style of the login link
LogoffText Logoff The text for the logoff link
[BANNER] BorderWidth 0 The border width around the banner
[BREADCRUMB] Separator bread The separator between breadcrumb crumb.gif links. This can include custom
skin images, text, and HTML(i.e., <![CDATA[ <imgsrc=”file.gif”> ]]>)
CssClass SelectedTab The style name of the breadcrumblinks
RootLevel 1 The root level of the breadcrumb links.Valid values include:-1 — show word “Root” and then allbreadcrumb tabs0 — show all breadcrumb tabsn (where n is an integer greater than 0)— skip n breadcrumb tabs before displaying
344
Chapter 13

Token Attribute Default Description
[COPYRIGHT] CssClass SelectedTab The style name of portal copyright link
[CURRENTDATE] CssClass SelectedTab The style name of date text
DateFormat MMMM The format of the date textdd, yyyy
[DOTNETNUKE] CssClass Normal The style name of DotNetNuke portalengine copyright text
[HELP] CssClass OtherTabs The style name of help link
[HOSTNAME] CssClass OtherTabs The style name of Host link (PoweredBy xxxxxxxxx)
[LINKS] CssClass Command The style name of the linksButton
Separator & The separator between links. This can nbsp; include custom skin images, text, and
HTML (i.e., <![CDATA[ <imgsrc=”file.gif”> ]]>).
Alignment Horizontal The links menu style (“Horizontal” or“Vertical”)
Level Same Determines the menu level to display(“Same”, “Child”, “Parent”, “Root”)
[LOGO] BorderWidth 0 The border width around the logo
[PRIVACY] Text Privacy The text of the privacy linkStatement
CssClass OtherTabs The style name of privacy link
[SIGNIN]
[TERMS] Text Terms of The text of the terms linkUser
CssClass OtherTabs The style name of terms link
[USER] Text Register The text of the register/user link
CssClass OtherTabs The style name of register/user link
[CONTENTPANE] ID Content The content pane key identifier to be Pane displayed in the user interface and
stored in the database.
As you can see there are quite a few attributes for each skin object. This complicates the process of creat-ing skins a bit, but it is very important that you learn to utilize the attribute functions of each skin objectto adequately realize the true power and flexibility of the DotNetNuke skinning engine. You may noticethe menu control monopolizes the majority of the available attributes — this shows the flexibility of the
345
Skinning DotNetNuke
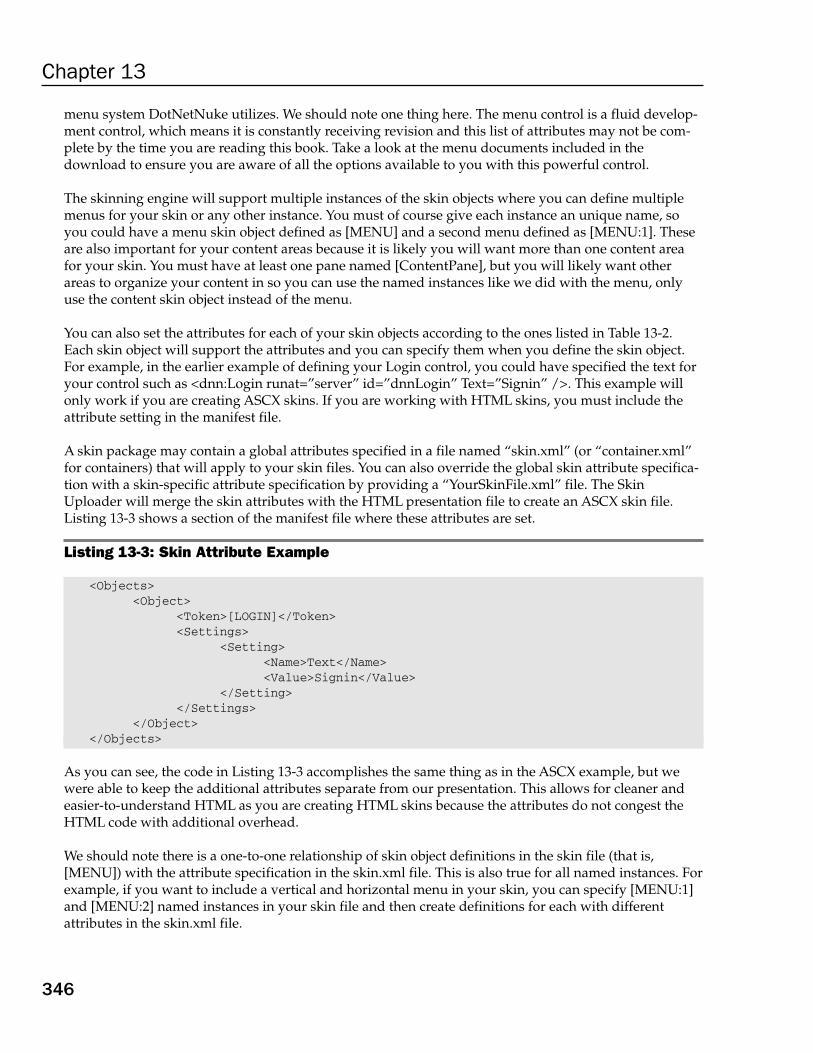
menu system DotNetNuke utilizes. We should note one thing here. The menu control is a fluid develop-ment control, which means it is constantly receiving revision and this list of attributes may not be com-plete by the time you are reading this book. Take a look at the menu documents included in thedownload to ensure you are aware of all the options available to you with this powerful control.
The skinning engine will support multiple instances of the skin objects where you can define multiplemenus for your skin or any other instance. You must of course give each instance an unique name, soyou could have a menu skin object defined as [MENU] and a second menu defined as [MENU:1]. Theseare also important for your content areas because it is likely you will want more than one content areafor your skin. You must have at least one pane named [ContentPane], but you will likely want otherareas to organize your content in so you can use the named instances like we did with the menu, onlyuse the content skin object instead of the menu.
You can also set the attributes for each of your skin objects according to the ones listed in Table 13-2.Each skin object will support the attributes and you can specify them when you define the skin object.For example, in the earlier example of defining your Login control, you could have specified the text foryour control such as <dnn:Login runat=”server” id=”dnnLogin” Text=”Signin” />. This example willonly work if you are creating ASCX skins. If you are working with HTML skins, you must include theattribute setting in the manifest file.
A skin package may contain a global attributes specified in a file named “skin.xml” (or “container.xml”for containers) that will apply to your skin files. You can also override the global skin attribute specifica-tion with a skin-specific attribute specification by providing a “YourSkinFile.xml” file. The SkinUploader will merge the skin attributes with the HTML presentation file to create an ASCX skin file.Listing 13-3 shows a section of the manifest file where these attributes are set.
Listing 13-3: Skin Attribute Example
<Objects><Object>
<Token>[LOGIN]</Token><Settings>
<Setting><Name>Text</Name><Value>Signin</Value>
</Setting></Settings>
</Object></Objects>
As you can see, the code in Listing 13-3 accomplishes the same thing as in the ASCX example, but wewere able to keep the additional attributes separate from our presentation. This allows for cleaner andeasier-to-understand HTML as you are creating HTML skins because the attributes do not congest theHTML code with additional overhead.
We should note there is a one-to-one relationship of skin object definitions in the skin file (that is,[MENU]) with the attribute specification in the skin.xml file. This is also true for all named instances. Forexample, if you want to include a vertical and horizontal menu in your skin, you can specify [MENU:1]and [MENU:2] named instances in your skin file and then create definitions for each with differentattributes in the skin.xml file.
346
Chapter 13

When creating HTML skins and specifying multiple ContentPanes, you will need to specify the “ID”attribute in the attributes file. This will allow DotNetNuke to identify the proper pane to insert yourmodules into while you are administering the portal. This also gives you the ability to add some friendlydescriptive names to the various panes you may require. For example, look at Listing 13-4 and you willsee how the ID of the pane is defined in the manifest file. You can define as many nodes of these variouspane IDs as required to accomplish your design.
Listing 13-4: Content Pane Attributes
<Objects><Object>
<Token>[CONTENTPANE:1]</Token><Settings>
<Setting><Name>ID</Name><Value>RightPane</Value>
</Setting>
</Settings>
</Object></Objects>
As you can see you now will have a pane named RightPane that you can use to display content to theuser. You could also define a LeftPane or NavigationPane; basically whatever your business rulesrequire you to include in the skin. This shows some of the flexibility this solution provides because youare able to utilize the number of panes necessary to accomplish your design. The solution allows you tocreate a layout to utilize the application as you need. By utilizing a combination of the code within yourskin and the attributes file you can create almost any iteration of a skin design you can imagine.
Since you have an understanding of the way skins are designed, we will now look at building a cascad-ing style sheet for your skin. The CSS file will need to be defined and saved in your skin directory alongwith your other resource files. DotNetNuke utilizes an external style sheet specification, which allowsyou to define your styles separate from your skin files, and there are several levels of these files. Thismeans it is not essential for you to create a CSS file for your skin because one of the other files will definethe styles for you, but to keep a unique look to your skin design you will want to build a style sheet spe-cific for your skin design. The multiple style sheets in the application are structured in a hierarchalnature, so one style sheet’s definitions may override another. There is a distinct priority of the order inwhich overriding of styles can occur. The cascading order of the style sheets is summarized in the fol-lowing list with the previous item overriding the next:
❑ Modules: The modules style sheet determines the styles that can be used in the individual module.
❑ Default: This is the default style sheet for the host-level styles and the styles are defined indefault.css.
❑ Skin: These are the skin styles you will create and apply to your skin.
❑ Container: Each container can contain styles unique to its design.
❑ Portal: These are custom styles defined by the Portal Administrator and named portal.css.
347
Skinning DotNetNuke

You can define your skin’s style sheet in one of two ways. You can create a style sheet named skin.cssand place it in your skin directory. This file will apply to all skins that may reside in the skin package.You can also name your style sheet with the format of skinname.css and it will apply to the skin file withthe same name as the one you define here. You can add any style definitions you need, but at the mini-mum you should override the default styles with those that complement the design of your skin.
Now that you have the skin created you need to create an image so you will be able to display the skinin the preview gallery. In order to do this you need to create a high-quality image file with a .jpg exten-sion, and it must be named the same as your skin file. For example, if your skin is named mySkin.ascx,then your image file must be named mySkin.jpg. This same concept is also true of container files youmay have created as part of your skin design.
The last step in skin creation is to package the skin for deployment. The compressed file must be a *.zipfile. You can utilize any number of third-party compression utilities, such as Winzip or Windows XP’sbuilt-in utility. One thing to watch out for when zipping your package is to ensure there are no buriedfolders between your skin files and the first-level compressed folder. This is a common mistake and willcause the upload process to fail.
In many cases you will want to package a complementary set of skin files and container files in one distribution file. In order to do this you need to package your container files in a compressed *.zip filenamed “containers.zip.” Similarly, you must package your skin files in a compressed *.zip file named“skins.zip.” Then you need to package these two files into a single *.zip file that is named after yourskin. This will allow people to install the full skin package (skins and containers) by uploading a singlefile through the Skin Uploader.
Container CreationThis section looks at the procedures associated with creating a container for your skin. Containers arebasically skin definitions applied at the container level. The process for creating a container is very simi-lar to the process for creating a skin, with the only real difference being the attributes and skin objectsavailable for a container.
One requirement of creating a container is you must include an Actions control so you will be able toadminister the module’s functions. The Actions control is a mechanism that allows binding of the modulefunctionality to the portal framework. It is essentially the user control the module will require to do themodule’s intended work. Each module can define its own actions, but generally you will have functionsto add and edit the module’s content as well as the portal-level functions to move the module betweenpanes and pages and edit the module settings including permissions, title, and so on. These are the mini-mum actions required, but the module developer can also create additional actions to perform uniquefunctions of the module in question. For a complete description of adding your own actions, please referto Chapters 9 through 12. The default actions menu utilizes the SolPartActions control, which functions asa pop-up menu when you hover over the edit icon located in the module container. This menu really onlyworks well on the latest browsers and will perform most reliably when using Internet Explorer 6+. Thereis a downlevel version of the control that will produce a drop-down box when you connect with one ofthe older browsers that will not support the advanced browser capabilities.
348
Chapter 13

As we’ve mentioned throughout this chapter, you will want your skins and containers to complement oneanother and produce a consistent look throughout your design. So it’s best to design the skin and contain-ers in conjunction with one another. The process is probably a little easier if you do develop them in conjunction even though they are really separate entities. Now that you have the basics, let’s look at anexample for a container manifest file. You will recall the manifest is where you define the attributes youwant to define for the associated skin objects. To simplify this operation and provide a higher degree ofgranularity, a concept known as Pane Level skinning is also available. Pane Level skinning can only beconfigured at design-time when the skin designer constructs the skin. It involves the use of some customattributes, which can be included in the markup for the pane. The ContainerType, ContainerName, andContainerSrc attributes can be used to identify a specific container to be used with all modules injectedinto the pane. In order for this to work correctly, the container must exist in the location specified, other-wise the default container will be displayed. Listing 13-5 demonstrates a basic example of this concept.
Listing 13-5: Pane Level Skinning
<Objects><Object>
<Token>[CONTENTPANE:1]</Token><Settings>
<Setting><Name>ID</Name><Value>LeftPane</Value>
</Setting><Setting>
<Name>ContainerType</Name><Value>G</Value>
</Setting><Setting>
<Name>ContainerName</Name><Value>DNN</Value>
</Setting><Setting>
<Name>ContainrSrc</Name><Value>standard.ascx</Value>
</Setting></Settings>
</Object></Objects>
As you can see from this example it is possible to define standard containers for each section of theskin’s design. You can also set the default container at the portal level, which will apply to any newmodules created in the portal. The preceding example makes the process of adding content less timeintensive because you will not need to set the container after the module is added to the page.
As you can see, the container functionality in DotNetNuke is just as powerful as the skinning processand distinct looks of your design can be accomplished utilizing this technology. Table 13-3 showcasesthe skin objects available to you when you are developing your containers.
349
Skinning DotNetNuke

Table 13-3: Container Skin Objects
Token Control Description
[SOLPARTACTIONS] < dnn:SolPartActions runat= Pop-up module actions menu ”server” id=”dnnSolPart (formerly [ACTIONS])Actions”>
[DROPDOWNACTIONS] < dnn:DropDownActions Simple drop-down combo box runat=”server” id=”dnnDrop for module actionsDownActions”>
[LINKACTIONS] < dnn:LinkActions runat= Links list of module actions”server” id=”dnnLinkActions”>
[ICON] < dnn:Icon runat=”server” Displays the icon related to id=”dnnIcon”> the module
[TITLE] < dnn:Title runat=”server” Displays the title of the moduleid=”dnnTitle”>
[VISIBILITY] < dnn:Visibility runat=”server” Displays an icon representing id=”dnnVisibility”> the minimized or maximized
state of a module
[PRINTMODULE] < dnn:PrintModule runat= Displays a new window with ”server” id=”dnn PrintModule “> only the module content
displayed
[CONTENTPANE] <div runat=”server” Injects a placeholder for id=”ContentPane”> module content
As you can see you have some of the same functions available to your skinning functions, but we have alsoadded a few additional objects, which do not make sense from a page level but become very important ona module level. These are very powerful objects and can really increase the use of your modules and con-tainers, so you should take some time to experiment with the various uses of these skin objects. Table 13-4covers the associated attributes you can utilize in conjunction with the skin objects for containers.
Table 13-4: Container Skin Object Attributes
Token Attribute Default Description
[SOLPARTACTIONS]
[DROPDOWNACTIONS]
[LINKACTIONS]
[ICON] BorderWidth 0 The border width around the icon
[TITLE] CssClass Head The style name of title
350
Chapter 13

Token Attribute Default Description
[VISIBILITY] BorderWidth 0 The border width around the icon
MinIcon min.gif The custom min icon file located inthe skin file
MaxIcon max.gif The custom max icon file located inthe skin file
[PRINTMODULE] PrintIcon print.gif The custom print icon file located inthe skin file
[CONTENTPANE] ID Content The content pane key identifier to be Pane displayed in the user interface and
stored in the database
Now that the objects and attributes are defined, let’s look at an example container for the DotNetNukeproject. Listing 13-6 displays the DNN-Blue container from the default install. You will see this containerutilizes the same attributes we have discussed previously.
Listing 13-6: Example Container
<TABLE class=”containermaster_blue” cellSpacing=”0” cellPadding=”5” align=”center”border=”0”>
<TR><TD class=”containerrow1_blue”>
<TABLE width=”100%” border=”0” cellpadding=”0” cellspacing=”0”><TR>
<TD valign=”middle” nowrap><dnn:ACTIONS runat=”server”id=”dnnACTIONS” /></TD>
<TD valign=”middle” nowrap><dnn:ICON runat=”server” id=”dnnICON”/></TD>
<TD valign=”middle” width=”100%” nowrap> <dnn:TITLErunat=”server” id=”dnnTITLE” /></TD>
<TD valign=”middle” width=”20” nowrap><dnn:VISIBILITYrunat=”server” id=”dnnVISIBILITY” /></TD>
</TR></TABLE>
</TD></TR><TR>
<TD id=”ContentPane” runat=”server” align=”center”></TD></TR><TR>
<TD><HR class=”containermaster_blue”><TABLE width=”100%” border=”0” cellpadding=”0” cellspacing=”0”>
<TR><TD align=”left” valign=”middle” nowrap><dnn:ACTIONBUTTON1
runat=”server” id=”dnnACTIONBUTTON1” CommandName=”AddContent.Action”DisplayIcon=”True” DisplayLink=”True” /></TD>
(continued)
351
Skinning DotNetNuke

Listing 13-6: (continued)
<TD align=”right” valign=”middle” nowrap><dnn:ACTIONBUTTON2runat=”server” id=”dnnACTIONBUTTON2” CommandName=”SyndicateModule.Action”DisplayIcon=”True” DisplayLink=”False” /> <dnn:ACTIONBUTTON3 runat=”server”id=”dnnACTIONBUTTON3” CommandName=”PrintModule.Action” DisplayIcon=”True”DisplayLink=”False” /> <dnn:ACTIONBUTTON4 runat=”server” id=”dnnACTIONBUTTON4”CommandName=”ModuleSettings.Action” DisplayIcon=”True” DisplayLink=”False” /></TD>
</TR></TABLE>
</TD></TR>
</TABLE><BR>
The example in Listing 13-6 is a simple container that will really help the display and feel of a portalwith a blue-colored theme. You may notice we have included an ASCX container option here. If youwere going to utilize this container, you would need to add the Register directive for each of the controlswe have added.
SummaryThis chapter looked at the basics of creating skins with DotNetNuke. Basically the point of all this is ifyou can design and program in HTML and can follow the few simple rules enforced by the skinningengine, then you can build beautiful designs for your DotNetNuke site. Many examples of both free andcommercial skins are available for you to use as references when creating your skins and containers.There are quite a few examples on the DotNetNuke web site and in the solution as well as a multitudeof resource sites in the DotNetNuke directory. We urge you to download some of these examples and,coupled with the knowledge contained in this chapter, you will create high-quality skins of your own inno time. If you can imagine it, then you can build it with the DotNetNuke skinning engine. The nextchapter shows you how to take your finished skins and containers, as well as the modules you havebuilt as a result of the information in the preceding chapters, and package them for distribution.
352
Chapter 13

Distribution
This chapter examines how DotNetNuke add-ons can be distributed and installed. As DotNetNukehas progressed, we have continued to add functionality to allow developers to package and dis-tribute extensions to the DotNetNuke framework. These add-ons allow the administrators andusers to customize the portal to suit their particular needs. Add-ons can provide additional func-tionality or can alter the visual presentation style for the portal. DotNetNuke uses zip files to pack-age and redistribute add-ons. Each add-on type defines the specific files that may be included in thepackage. These custom add-ons are broken down into three major categories:
1. Code add-ons
❑ Modules
❑ Skin Objects
❑ Providers
2. Skinning add-ons
❑ Skins
❑ Containers
3. Language add-ons
❑ Language Packs
There are many aspects to consider in the distribution of add-ons. As we look at each of these add-on types, we answer the following questions:
❑ What is the format of the manifest or configuration files for the add-on?
❑ How do you package all of the elements that go into a single add-on?
❑ How do you install the add-on?

Code Add-OnsDotNetNuke provides mechanisms to extend the core portal functionality through the use of code add-ons. These add-ons can be packaged for easy distribution and installation. DotNetNuke supportsthree types of redistributable code packages: modules, skin objects, and providers. While these are notthe only mechanisms available for extending portal functionality, they are the only officially supportedmechanism for distributing code add-ons.
ModulesA module, also known as a DotNetNuke Private Assembly (PA), represents a discrete set of applicationcode that is used to extend the functionality of the DotNetNuke portal. A module provides a user inter-face for managing and displaying custom content in the portal. Unlike the other DotNetNuke code add-ons, skin objects and providers, modules are designed to be easily added to a page by the administrator.Each module may be comprised of one or more ASP.NET user controls and compiled assemblies. Likethe main portal application, the module can take advantage of the Data Provider model to packageproviders for multiple database management systems. In addition to user controls and assemblies, amodule may use additional resources including images, xml files, SQL scripts, text files, cascading stylesheets, and Resource archives.
Module Manifest FileThe module manifest file is an XML file that is included in the module package to delineate the variouselements that comprise a module package. The manifest file is organized to allow the portal to easilyidentify the module files, and to determine the appropriate database entries necessary for the properfunctioning of the module. Listing 14-1 shows the basic manifest file format. DotNetNuke recognizesboth version 2.0 and version 3.0 manifest files.
Listing 14-1: Module Manifest File Format
<?xml version=”1.0” encoding=”utf-8” ?><dotnetnuke version=”D.D” type=”Module”>
<folders> -- Contains one or more folder nodes<folder>
<name /><description /><version /><businesscontrollerclass /> -- V3.0 only<resourcefile /><modules> -- Contains one or more module nodes
<module><friendlyname /><controls> -- Contains one or more control nodes
<control><key /><title /><src /><iconfile /><type />
354
Chapter 14

<vieworder /><helpurl /> -- V3.0 only<helpfile /> -- V2.0 only
</control></controls>
</module></modules><files> -- Contains one or more file nodes
<file><path /><name />
</file></files>
</folder></folders>
</dotnetnuke>
Let’s break this down and examine the individual xml nodes.
The root element is the dotnetnuke node. This node contains two attributes: version and type.
<dotnetnuke version=”D.D” type=”Module”>
The version attribute takes a numeric value. DotNetNuke supports two versions — “2.0” and “3.0.”Version 1.0 modules are no longer supported in DotNetNuke 3.x.
The type attribute must be set to “Module” for both v2 and v3 formats but may contain additional val-ues to distinguish between the different manifest file formats used by skin objects and providers. Thesetwo additional formats will be discussed later in this chapter.
The manifest provides a <folders> element for identifying a collection of individual module folders.A folder node represents a single DotNetNuke module. The folder node may contain seven child ele-ments as defined in Table 14-1.
Table 14-1: Folder Elements
Element Name Description Required Versions Supported
Name The name element defines both the name Yes 2.0, 3.0of the module as well as the name of the directory that DotNetNuke will create in the DesktopModules folder. This folder becomes the root from which all other module files are installed (dll files are a special exception to this rule since they must be installed to the application \bin directory).
description The description element is used for creating Yes 2.0, 3.0the module description that is presented to the host when viewing modules on the Module Definitions page.
Table continued on following page
355
Distribution

Element Name Description Required Versions Supported
version The version element is the version of the Yes 2.0, 3.0module. This element must be in the format XX.XX.XX where X is a digit from 0 to 9. This version number is used to determine which dataprovider scripts to execute. During installation, any script that has a higher version number than the currently installed module version will be executed. If this is the first time the module has been installed, then all script files will be executed. Scripts are executed in the order of their version numbers.
business The businesscontrollerclass defines the No 3.0controllerclass qualified name of the primary business
controller in the module. If the IPortable, ISearchable, or IUpgradeable interfaces are implemented by the module, then they must be implemented in this class. This entry uses the format [namespace].[class name], [assembly name]. An example entry would look like < businesscontrollerclass>DotNetNuke.Modules.Survey.SurveyController, DotNetNuke.Modules.Survey</ businesscontrollerclass>.
resourcefile The resourcefile identifies a zip file that is No 2.0, 3.0included in the module package. The resource file may contain any number of files, which will be installed using folder information defined in the resource file. Files placed in the resource file do not need to be delineated in the files collection of the manifest.
modules The modules element defines a collection Yes 2.0, 3.0of modules that are installed in the current folder. These modules will be associated with the Desktop Module defined by the current folder. See Table 14-2 for a description of each module element.
files The files element defines a collection of Yes 2.0, 3.0files that are installed in the current folder. See Table 14-4 for a description of each file element.
Additionally, the folder node contains two collection child elements: Modules and Files, which aredescribed in Tables 14-2, 14-3, and 14-4, respectively.
356
Chapter 14

Table 14-2: Module Elements
Element Name Description Required Versions Supported
friendlyname The friendlyname element defines the name Yes 2.0, 3.0of the current module. This element is used primarily for display purposes to distinguish between multiple modules in a single Desktop Module.
controls The controls element defines a collection of Yes 2.0, 3.0user controls that are installed as part of the current module. These controls may provide different user or administrative screens for this specific module. See Table 14-3 for a description of each control element.
Table 14-3: Control Elements
Element Name Description Required Versions Supported
Key The key element is a unique identifier that No 2.0, 3.0distinguishes each control in a single module. The primary view control does not use the key element and must not be included in the control definition. The module can use these key values to determine the appropriate screen to display for the current module state. The portal will display this control on the Module Settings screen if the control key is set to “Settings.”
Title The title element defines the text displayed No 2.0, 3.0in the module title bar for the module edit screen associated with the current control. The title is not used for the primary view control.
Src The src element is the filename of the Yes 2.0, 3.0ASP.NET user control corresponding to the current control definition. The filename includes any path information relative to the current module folder.
iconfile The iconfile element defines the icon file to No 2.0, 3.0display in the module title bar. The iconfile setting is ignored for the primary view control and a control with a key of “Settings.”
Table continued on following page
357
Distribution

Element Name Description Required Versions Supported
type The type element defines the security Yes 2.0, 3.0access level required to view the current control. This level is defined as a subset of the SecurityAccessLevel enumeration. Valid values include Anonymous, View, Edit, Admin, Host.
vieworder The vieworder element is used to order No 2.0, 3.0the controls when they are injected into the admin UI when multiple controls are associated with the module using the same key.
helpurl The helpurl element defines a URL No 3.0for help information related to the current control.
helpfile The helpfile element defines a file for help No 2.0information related to the current control. The file location is relative to the current module folder. This element was deprecated in 3.0 and has been replaced through the use of LocalResources.
Table 14-4: File Elements
Element Name Description Required Versions Supported
path The path element defines a relative path No 2.0, 3.0to the module folder. The file defined by this node will be installed in this folder.
name The name element is the name of the file Yes 2.0, 3.0in the module package. If the file does not exist in the module package, then an error will be logged.
Listing 14-2 shows the manifest file for the Survey module. The Survey module is included withDotNetNuke as an example of how to build, package, and deploy modules. The module packageand source code can be found in the /desktopmodules/survey directory of the standard DotNetNukeinstallation.
Listing 14-2: Sample Manifest for the Survey Module
<?xml version=”1.0” encoding=”utf-8” ?><dotnetnuke version=”3.0” type=”Module”>
<folders><folder>
358
Chapter 14

<name>Survey</name><description>
Survey allows you to create custom surveys to obtain public feedback</description><version>01.00.00</version><businesscontrollerclass>
DotNetNuke.Modules.Survey.SurveyController, DotNetNuke.Modules.Survey</businesscontrollerclass><resourcefile>SurveyResources.zip</resourcefile><modules>
<module><friendlyname>DotNetNuke.Survey</friendlyname><controls>
<control><src>Survey.ascx</src><type>View</type><helpurl>http://www.dotnetnuke.com</helpurl>
</control><control>
<key>Edit</key><title>Create Survey</title><src>EditSurvey.ascx</src><iconfile>icon_survey_32px.gif</iconfile><type>Edit</type><helpurl>http://www.dotnetnuke.com</helpurl>
</control><control>
<key>Settings</key><title>Survey Settings</title><src>Settings.ascx</src><iconfile>icon_survey_32px.gif</iconfile><type>Edit</type><helpurl>http://www.dotnetnuke.com</helpurl>
</control></controls>
</module></modules><files>
<file><name>Survey.ascx</name>
</file><file>
<name>EditSurvey.ascx</name></file><file>
<name>Settings.ascx</name></file><file>
<name>DotNetNuke.Modules.Survey.dll</name></file><file>
<name>DotNetNuke.Modules.Survey.SqlDataProvider.dll</name></file>
(continued)
359
Distribution
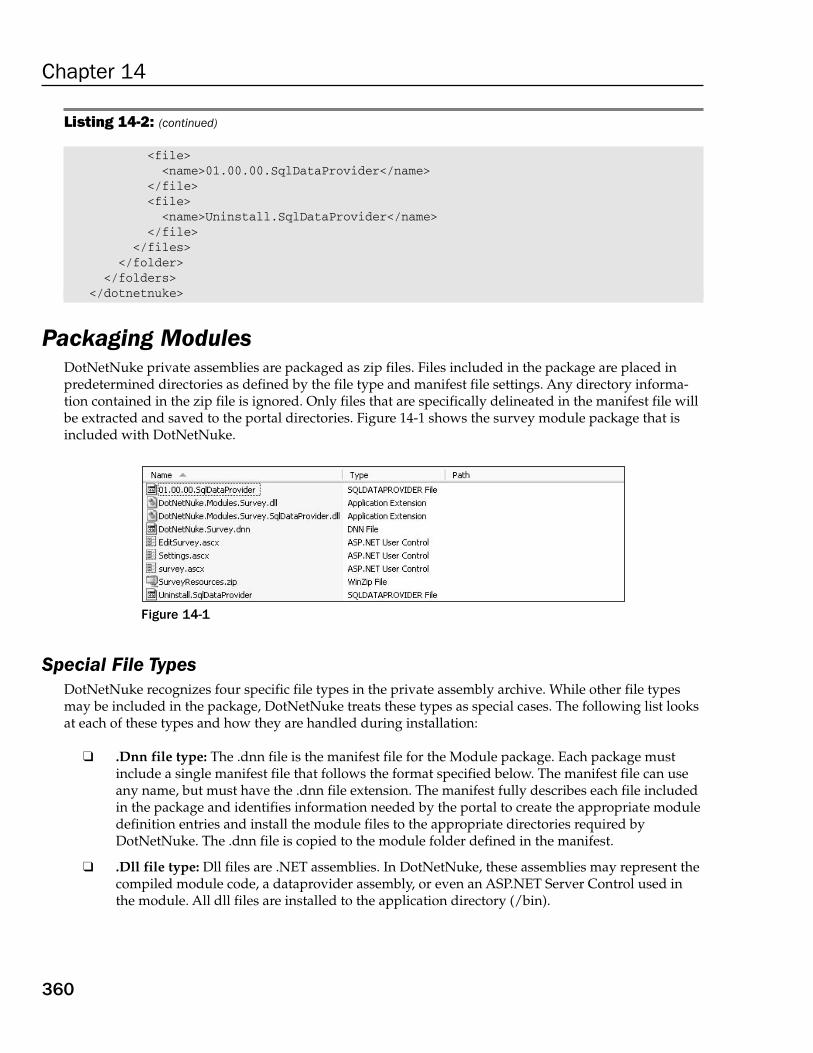
Listing 14-2: (continued)
<file><name>01.00.00.SqlDataProvider</name>
</file><file>
<name>Uninstall.SqlDataProvider</name></file>
</files></folder>
</folders></dotnetnuke>
Packaging ModulesDotNetNuke private assemblies are packaged as zip files. Files included in the package are placed inpredetermined directories as defined by the file type and manifest file settings. Any directory informa-tion contained in the zip file is ignored. Only files that are specifically delineated in the manifest file willbe extracted and saved to the portal directories. Figure 14-1 shows the survey module package that isincluded with DotNetNuke.
Figure 14-1
Special File TypesDotNetNuke recognizes four specific file types in the private assembly archive. While other file typesmay be included in the package, DotNetNuke treats these types as special cases. The following list looksat each of these types and how they are handled during installation:
❑ .Dnn file type: The .dnn file is the manifest file for the Module package. Each package mustinclude a single manifest file that follows the format specified below. The manifest file can useany name, but must have the .dnn file extension. The manifest fully describes each file includedin the package and identifies information needed by the portal to create the appropriate moduledefinition entries and install the module files to the appropriate directories required byDotNetNuke. The .dnn file is copied to the module folder defined in the manifest.
❑ .Dll file type: Dll files are .NET assemblies. In DotNetNuke, these assemblies may represent thecompiled module code, a dataprovider assembly, or even an ASP.NET Server Control used inthe module. All dll files are installed to the application directory (/bin).
360
Chapter 14

❑ .Ascx file type: Ascx files are the visual portion of a user control in ASP.NET. This file definesthe layout of the user interface for the specific module. This file will be copied to the modulefolder and a special entry is made in the DotNetNuke system tables as specified in the manifestfile. The Ascx file may represent a single “module control” or may be a constituent control thatis used on multiple screens within the module. All module controls should be defined in themanifest, while constituent controls should only appear in the manifest file list.
❑ Dataprovider script file type: Dataprovider files contain SQL scripts that define the database-specific code for the module. This file type uses a file extension that follows a standardpattern — .[DataProviderType]DataProvider, where [DataProviderType] corresponds to theprovider type defined in the DotNetNuke web.config file (“Access,” “Sql,” “Mysql,” “Oracle,”and so on). New dataproviders may be written by third-party vendors, and in that case newdataprovider script file types will be defined by the vendor. Dataprovider scripts are installed toa subdirectory of the Providers/DataProviders folder. The subdirectory is created with the samename as the dataprovider type (for example, SQLDataProvider files are installed in theproviders/dataproviders/sqldataprovider directory).
Resource File In addition to the predefined file types, the module package also allows for the inclusion of a resource file.A resource file is a zip file that may contain any file that is not one of the special types defined earlier.Unlike the main module zip file, all directory information in the resource file will be used to determinethe appropriate directory in which to place the individual resources. Any directory that is defined will becreated relative to the main module directory as defined in the manifest. Files that are placed in theresource file should not be delineated in the manifest file; however, the resource file must be specified inthe manifest. Figure 14-2 shows the contents of the SurveyResources.zip defined in the survey modulemanifest in Listing 14-2.
Figure 14-2
Notice that the *.resx files included in the resource file include path information. These files will beinstalled in the [module folder]/App_LocalResources directory.
Unlike earlier versions DotNetNuke 3.0 only includes a dataprovider for MicrosoftSQL Server. The Microsoft Access Provider was removed from the distribution tosimplify maintenance of the core framework. Additional providers, including aMicrosoft Access Provider, are available from third-party vendors.
361
Distribution

Installing ModulesOnce you have created a manifest file and properly packaged your module, it is now ready for installa-tion. The use of the zip file format and a well-defined manifest format greatly simplifies module installa-tions over earlier versions of DotNetNuke. Because of the potential security risk, only the Portal Hosthas permissions to install modules. DotNetNuke supports two distinct methods for installing modulesas well as other add-ons: web-based file upload or FTP-based file upload. These two methods differ pri-marily in the mechanism used for transferring the file to the server. Once DotNetNuke receives the fileall processing is the same.
Web-Based File UploadFollow these four simple steps to install a new module into your portal using the web-based installer.
Step 1Log in with the Host account and go to the Module Definitions page from the Host menu (see Figure 14-3).Only the Host account is authorized to install modules because modules have full access to the portalincluding file and database access.
Figure 14-3
Modules can pose a security risk since they have unlimited access to the portal.Module code has the same security privileges as the core application. This meansthat modules could alter key portal tables, manipulate application files, or even gainaccess to other server resources. Modules should be fully tested in a “safe” environ-ment prior to installation in a production system. In addition, the portal should runin a partial trust environment, which would limit the ability of any module to accessrestricted resources.
362
Chapter 14

Step 2On the Module Definitions page, select the Upload New Module menu item from the module actionmenu (see Figure 14-4).
Figure 14-4
Step 3The File Upload screen provides a simple interface for uploading one or more modules (see Figure 14-5).The File Upload screen provides a common user interface for uploading different add-on types. Browseto the desired module package, click OK on the Browse dialog, and click the Add link on the file uploadpage. Use the Upload New File link button to finish installing the module.
Figure 14-5
363
Distribution

Step 4After installing a new module, you should review the upload logs (see Figure 14-6). Errors will be high-lighted in red. If no errors are shown, the module is ready for use in your portal.
Figure 14-6
FTP-Based installationDotNetNuke 3.0 includes support for file-based installation of all defined add-on types. The frameworkincludes a scheduled task that runs every minute to check installation folders for new add-ons to install. Ifyou do not need this service, you can disable the scheduled task from the Schedule page in the Host menu.
To install a new module using FTP or any file manager, copy the module into the Install/Module direc-tory of your DotNetNuke installation. When the ResourceInstaller task runs, it will install this moduleusing the standard module installation code. If an error occurs it will be noted in the task history,which is available by selecting the History link for the ResourceInstaller task on the Schedule page (seeFigure 14-7).
364
Chapter 14

Figure 14-7
Skin ObjectsSkins objects, like modules, are active elements designed to programmatically extend the functionality ofDotNetNuke. Skin objects are used in skins and containers to produce a dynamic user interface. A num-ber of default skin objects are included with DotNetNuke (see Table 14-5) for common portal functionssuch as login, status, and navigation.
Table 14-5: Standard Skin Objects
HTML Token ASCX Control Usage Description
[ACTION < dnn: ActionButton runat= Container Displays a list of link buttons BUTTON] ”server” id=”dnnAction that correspond to Action menu
Button”> items with a specified commandname.
[ICON] < dnn:Icon runat=”server” Container Displays an icon for the module.id=”dnnIcon”> If the icon module was not set
on the Module Settings page,then no icon is displayed.
[PRINT < dnn: PrintModule runat= Container Displays an image button for MODULE] ”server” id=”dnnPrintModule”> printing module contents.
[ACTIONS] < dnn: Actions runat=”server” Container Displays the module action id=”dnnActions”> menu using the Solpart Menu
control.
Table continued on following page
365
Distribution

HTML Token ASCX Control Usage Description
[SOLPART < dnn:SolpartActions runat= Container Displays the module action ACTIONS] ”server” id=”dnnSolpart menu using the Solpart Menu
Actions”> control. This is the same as the[ACTIONS] skin object.
[DROPDOWN < dnn: DropDownActions Container Displays the module action ACTIONS] runat=”server” id=”dnnDrop menu items using a
DownActions”> dropdownlist.
[LINK < dnn: LinkActions runat= Container Displays the module actionACTIONS] ”server” id=”dnnLinkActions”> menu items using a series of
link buttons.
[TITLE] < dnn:Title runat=”server” Container Displays the module title.id=”dnnTitle”>
[VISIBILITY] < dnn:Visibility runat= Container Displays the expand/collapse ”server” id=”dnnVisibility”> button for hiding or displaying
module contents.
[SIGNIN] < dnn:Signin runat=”server” Skin Displays the signin control for id=”dnnSignin”> providing your username and
password.
[BANNER] < dnn:Banner runat=”server” Skin Displays a random banner ad.id=”dnnBanner”>
[BREAD < dnn:Breadcrumb runat= Skin Displays the path to the CRUMB] ”server” id=”dnnBreadcrumb”> currently selected page in the
form of PageName1 > Page-Name2 > PageName3.
[CONTENT <div runat=”server” id= Skin A placeholder for content PANE] ”ContentPane” > modules.
[COPYRIGHT] < dnn:Copyright runat= Skin Displays the copyright notice ”server” id=”dnnCopyright”> for the portal.
[CURRENT < dnn:CurrentDate runat= Skin Displays the current date.DATE] ”server” id=”dnnCurrentDate”>
[DOTNET < dnn:DotNetNuke runat= Skin Displays the Copyright notice NUKE] ”server” id=”dnnDotNetNuke”> for DotNetNuke.
[HELP] < dnn:Help runat=”server” Skin Displays a link for Help that id=”dnnHelp”> will launch the user’s e-mail
client and send mail to the por-tal administrator.
[HOSTNAME] < dnn:HostName runat= Skin Displays the Host Title linked ”server” id=”dnnHostName”> to the Host URL.
366
Chapter 14

HTML Token ASCX Control Usage Description
[LINKS] < dnn:Links runat=”server” Skin Displays a flat menu of links id=”dnnLinks”> related to the current tab level
and parent node. This is usefulfor search engine spiders androbots.
[LOGIN] < dnn:Login runat=”server” Skin Dual state control — displays id=”dnnLogin”> “Login” for anonymous users
and “Logout” for authenticatedusers.
[LOGO] < dnn:Logo runat=”server” Skin Displays the portal logo.id=”dnnLogo”>
[PRIVACY] < dnn:Privacy runat=”server” Skin Displays a link to the Privacy id=”dnnPrivacy”> Information for the portal.
[SEARCH] < dnn:Search runat=”server” Skin Displays a search input box id=”dnnSearch”> and link button.
[MENU] < dnn:Menu runat=”server” Skin Displays the hierarchical id=”dnnMenu”> navigation menu.
[SOLPART < dnn:SolpartMenu runat= Skin Displays the hierarchical MENU] ”server” id=”dnnSolpartMenu”> navigation menu. This is the
same as the [MENU] skin object.
[TERMS] < dnn:Terms runat=”server” Skin Displays a link to the Terms and id=”dnnTerms”> Conditions for the portal.
[TREEVIEW] < dnn:TreeView runat=”server” Skin Displays a tree-based menu of id=”dnnTreeView”> links for the portal pages. The
menu can be set to limit the treeto various menu levels.
[USER] < dnn:User runat=”server” Skin Dual state control — displays a id=”dnnUser”> “Register” link for anonymous
users or the user’s name forauthenticated users.
Custom skin objects are packaged and installed using the same processes as custom modules. All of thenecessary skin object resource files are combined with a DotNetNuke manifest file (* .dnn) and packagedinto a compressed zip file. Follow the installation steps outlined in the “Installing Modules” section earlier in the chapter. The primary difference between modules and skin objects is with the manifest fileformat.
367
Distribution

Skin Object Manifest FileThe skin object manifest file format (see Listing 14-3) is derived from version 2 of the module manifestformat (shown in Listing 14-1 previously). Changes are highlighted.
Listing 14-3: Skin Object Manifest File Format
<?xml version=”1.0” encoding=”utf-8” ?><dotnetnuke version=”D.D” type=”SkinObject”> -- Changed type value
<folders> <folder>
<name /><description /> -- Not used<version /> -- Not used<resourcefile /><modules>
<module><friendlyname /> -- Not used<controls>
<control><key /><title /><src /><iconfile /><type /> -- Changed valid values<vieworder />
</control></controls>
</module></modules><files>
<file><path /><name />
</file></files>
</folder></folders>
</dotnetnuke>
The type attribute of the root dotnetnuke node must be set to “SkinObject.” Unlike modules, skinobjects ignore the version value. The version must still be a decimal number in the format D.D where Dis a single digit.
The description, version, and friendlyname elements are no longer used but are still allowed in themanifest file without causing a validation error. The type element must be set to “SkinObject.”
While there is no restriction on the actual number, it should be set to “2.0” to pre-vent conflicts with future versions of the skin object format.
368
Chapter 14

ProvidersProviders are a third mechanism for extending the functionality of the DotNetNuke portal framework.The primary difference between modules, skin objects, and providers is in the usage pattern. Modulesprovide a mechanism for extending system functionality. No two modules are guaranteed to provide theexact same functionality or implementation. Skin objects follow this same behavior with each skin objectbeing free to implement whatever functionality desired. Providers are unique in that each provider of agiven type must implement the exact same functionality. The implementation details may change butthe basic functionality (that is, the programming interface) is defined by the portal.
Provider Manifest FileBecause providers are a programmatic extension to the portal framework, they use the same packagingand installation mechanism defined for modules. Like skin objects, providers have their own manifestfile format (see Listing 14.4), which is derived from the module manifest format.
Listing 14-4: Provider Manifest File Format
<?xml version=”1.0” encoding=”utf-8” ?><dotnetnuke version=”D.D” type=”Provider”> -- Changed type value
<folder><name /><type /><files>
<file><path /><name />
</file></files>
</folder></dotnetnuke>
The type attribute of the root dotnetnuke node must be set to “Provider.” Providers follow the samerules as skin objects for the version attribute. Tables 14-6 and 14-7 show the manifest file elements.
Table 14-6: Provider Manifest Folder Elements
Element Name Description Required
Name The name element defines the name of the provider. This Yesname will be used to create the folder in the appropriate provider directory.
Type The type element is the provider type. This element may be Yeseither “DataProviders” or “LoggingProviders.” Additional provider types will be supported in future releases.
Files The files element defines a collection of files that are installed Yesin the current folder. See Table 14-7 for a description of each file element.
369
Distribution

Table 14-7: Provider Manifest File Elements
Element Name Description Required
Path The path element defines a relative path to the provider folder. No
Name The name element is the name of the file in the provider Yespackage. If the file does not exist in the provider package, then an error will be logged.
Files in the provider package will be installed as
[DotNetNuke RootFolder]/Providers/[ProviderType]/[FolderName]/[FilePath]/[FileName]
Skinning Add-OnsWhile code add-ons are designed to extend the functionality of the portal, skinning add-ons are aimed atgiving the portal administrator complete control over the visual appearance of the portal. In order tosimplify development and maintenance of these skinning packages, no manifest files are required.Instead, skinning packages rely on zip files to package and group the files to be installed in support of askin. While not utilizing manifest files, skinning packages include support for XML-based configurationfiles. Configuration files allow the designer to set properties on individual skin elements that are identi-fied inside the skinning source files. These skin elements include all skin objects as well as content panesdefined within the skin definition file.
DotNetNuke uses two mechanisms for grouping content in the portal: pages and modules. Skins providea method for changing the appearance of individual pages, while containers provide this function foreach module instance placed on a page. Let’s first take a look at how skins are packaged and deployed.
SkinsAs discussed in Chapter 13, skins provide the primary method for controlling the appearance of individ-ual portal pages. One of the primary goals for the DotNetNuke skinning solution was to create a simplethe process for developing and packaging skins. This process should allow web designers as well asdevelopers to create skins using a variety of tools: from simple HTML editors to complex IDEs likeVisual Studio .NET. This separation of form and function is one of the strengths of the DotNetNuke skinning solution.
Packaging SkinsA skin package is comprised of multiple files that constitute a complete skin:
❑ htm, .html files: Abstract skin definition files that will be processed by the Skin Uploader to cre-ate an .ascx file.
370
Chapter 14

❑ .ascx files: Skin definition user controls that are written in the format required by the skinengine.
❑ .css files: Styles sheets that are related to skins.
❑ .gif, .jpg, .jpeg, .png: Support graphics files.
❑ .xml files: Abstract skin properties files that will be combined with the abstract skin definitionfiles during the upload processing.
❑ .zip files: Skin and container packages that are named according to the parent package.
A skin package can contain multiple skin files. This allows you to create skins that leverage the samegraphics but vary slightly based on layout. Obviously the more skin files you have in a package, themore maintenance will be required when you want to make a general change to the presentation inthe future.
When packaging files for the skin, files should be zipped using relative file paths to the skin definitionfiles. When unpacked, all file paths in the definition file will be corrected to point at the new file loca-tions in the portal. Files will be unzipped using the file path information contained in the skin package.
The following example shows two different graphic images from an abstract skin definition file:
<IMG src=”top_left.gif” height=”10” width=”10” border=”0”><IMG src=”images/top_right.gif” height=”10” width=”10” border=”0”>
The files should be included in the package as indicated in Figure 14-8.
Figure 14-8
If this snippet was contained in a package called MySkin.zip, the resulting image tags after installationwould look this:
<IMG src=”/Portals/_default/Skins/MySkin/top_left.gif” height=”10” width=”10”border=”0”><IMG src=”/Portals/_default/Skins/MySkin/images/top_right.gif” height=”10”width=”10” border=”0”>
You should make sure that relative file path information in the zip file matches therelative path information in the skin definition files.
You can include any additional files needed by the skin, however these files must beone of the allowable file types defined in the Host File Upload Extensions setting.
371
Distribution

Skin packages may contain files that are applied to all skin definition files in the package or that are spe-cific to an individual skin definition as outlined in Table 14-8. Any properties or styles set in the globalfile (if present) will be overwritten with the value from the corresponding file that is specific to an indi-vidual skin. Graphics and any additional files stored in the skin package are global in scope and may bereferenced by any skin definition file included in the package.
Table 14-8: Skin Filenames
File Type Global Name Individual Skin Name
Configuration File Skin.xml [skin filename].xml
Style Sheet Skin.css [skin filename].css
In many cases you will want to package a complementary set of skin files and container files in one distribution file. In order to do this you need to package your container files in a zip file named “containers.zip.” Similarly, you must package your skin files in a zip file name “skins.zip.” Then youneed to package these two files into a single zip file that is named after your skin. This will allow peopleto install the full skin package (skins and containers) by uploading a single file through the Skin Uploader.
DotNetNuke contains a Skin Gallery for previewing skins installed in the portal. In order for the skin tobe viewable in the Skin Gallery, you need to create a high-quality screen shot of your skin. For each skinor container definition file (both html- and ascx-based definitions) you should also have a correspondingscreen shot stored with a .jpg file extension (that is, if your skin file is named myskin.html, then yourscreen shot needs to be named myskin.jpg).
Skin Configuration FilesWhen creating abstract skin definition files (htm or html files) the designer places tokens in the skin todesignate locations for skin objects or content panes. In order to control the behavior and appearance ofthe skin objects and panes, the author may optionally choose to include one or more configuration filesin the skin package. Any public property or field of a skin object or content pane may be set using theconfiguration file. As noted earlier, the global Skin.xml file property settings will be applied to all skins.If present, these property settings may be overridden by a skin-specific configuration file as well.
The skin configuration file uses a simple format, as shown in Listing 14-5.
Listing 14-5: Skin Configuration File Format
<Objects><Object>
<Token /><Settings>
<Setting><Name /><Value />
</Setting></Settings>
</Object></Objects>
372
Chapter 14

Table 14-9 describes the relevant elements from the skin configuration file.
Table 14-9: Configuration File Elements
Element Name Description
Objects The Objects element contains one or more Object nodes that provide propertysettings for the individual skin element.
Token The Token element defines the skin element to update with the associated settings. This value must match a token that exists in the associated skin definition file(s).
Settings The Settings element contains one or more Setting nodes that provide the indi-vidual name/value pairs for a single skin element property.
Name The Name element is the name of the skin object property/attribute. If theskin object does not support this attribute, an error may be thrown when theskin is used in the portal.
Value The Value element is the value to assign to the skin object attribute. If this isan invalid value, then an error may be thrown when the skin is used.
This format allows the author to easily set one or more attributes for each token included in the skin.Each skin object has its own set of supported attributes, as shown in Chapter 13. The Skin Uploader willmerge the skin attributes with the HTML presentation file to create an ASCX skin file.
Please note there is a one-to-one correspondence of skin object declarations in your skin file with theattribute specification in the XML file. This is also true for named instances. For example, if you want toinclude a vertical and horizontal set of navigation links in your skin, you can specify [LINKS:1] and[LINKS:2] named instances in your skin file and then create definitions for each with different attributesin your XML file.
Listing 14-6 shows a sample configuration file that is used in the PHPDupe skin.
Listing 14-6: Skins Configuration File Format
<Objects><Object>
<Token>[LINKS:1]</Token><Settings>
<Setting><Name>Separator</Name><Value><![CDATA[ | ]]></Value>
(continued)
If you are creating ASCX skins, you will need to specify the attribute directly inyour skin file (that is, <dnn:Login runat=”server” id=”dnnLogin” Text=”Signin” />)and no configuration file is necessary.
373
Distribution

Listing 14-6: (continued)
</Setting><Setting>
<Name>Level</Name><Value>Root</Value>
</Setting></Settings>
</Object><Object>
<Token>[LINKS:2]</Token><Settings>
<Setting><Name>Level</Name><Value>Child</Value>
</Setting><Setting>
<Name>Alignment</Name><Value>Vertical</Value>
</Setting><Setting>
<Name>Separator</Name><Value><![CDATA[<b><big> · </big></b>]]></Value>
</Setting></Settings>
</Object><Object>
<Token>[DOTNETNUKE]</Token><Settings>
<Setting><Name>CssClass</Name><Value>Copyright</Value>
</Setting></Settings>
</Object></Objects>
When settings are applied to the abstract skin file they are injected in the control tag as attributes andtake the form Name=”Value”. So based on the skin objects defined in Table 14-5 when the preceding con-figuration file is used, the [DOTNETNUKE] token will be replaced with the following control reference:
< dnn:DotNetNuke runat=”server” id=”dnnDotNetNuke” CssClass=”Copyright”>
Installing SkinsUnlike code add-ons, skins can be installed by both portal administrators as well as hosts. Skins alsosupport web-based file upload or FTP based-file upload.
Web-Based File UploadFollow these four steps to install a new skin into your portal using the web-based installer. Dependingon whether you install the skin from the Admin or the Host menu will determine where the skin files aresaved and which portals in a multi-portal site will have access to the skin.
374
Chapter 14

Step 1Log in with an Admin or Host account. If you are installing a skin for the current portal, go to theAdmin/Site Settings menu (see Figure 14-9). Skin files will be stored in the individual portal directory.If multiple portals upload the same skin, then duplicate files will exist in the portal directories.
Figure 14-9
If you want all of the portals in a multi-portal installation to have access to the skin, make sure to log inwith the Host account and select the Host/Host Settings menu (see Figure 14-10).
Figure 14-10
375
Distribution

Step 2Figures 14-11 and 14-12 show the key portions of the Portal Settings and Host Settings screens. Select theUpload Skin link to go the File Upload screen.
Figure 14-11
Figure 14-12
Step 3The File Upload screen provides a simple interface for uploading one or more skins (see Figure 14-13).Browse to the desired skin package, click OK on the Browse dialog, and click the Add link on the FileUpload page. Use the Upload New File link button to finish installing the module.
Step 4After installing a new skin package, you should review the upload logs (see Figure 14-14). Errors will behighlighted in red. If no errors are shown, then the skin is ready for use in your portal. The location ofthe installation directory will be displayed at the top of the logs. Note that the directory matches thename of the skin package and will only vary based on whether the skin is installed from the Adminmenu or the Host menu.
376
Chapter 14

Figure 14-13
Figure 14-14
FTP-Based InstallationTo install a new skin using FTP or any file manager, copy the module into the Install/Skin directory ofyour DotNetNuke installation. When the ResourceInstaller task runs, it will install this skin using thestandard skin installation code. If an error occurs it will be noted in the task history, which is availableby selecting the History link for the ResourceInstaller task on the Schedule page (shown in Figure 14-7previously).
377
Distribution

ContainersContainers, like skins, provide the ability to control the appearance of portal. While skins work at the“page” level, containers are designed for wrapping individual modules that appear on the page. Eachmodule on a given page may use any one of the installed containers. Containers follow many of thesame packaging and installation processes as skins and differ primarily in the allowable content insidethe html or ascx definition files. Let’s take a look at these differences.
Packaging ContainersContainers follow all of the same packaging rules as skins. Container packages may contain files that areapplied to all container definition files in the package or that are specific to an individual container defi-nition as outlined in Table 14-10. The behavior and purpose of these files is the same as for skins, andonly the names of the files are different.
Table 14-10: Container Filenames
File Type Global Name Individual Container Name
Configuration File Container.xml [container filename].xml
Style Sheet Container.css [container filename].css
Installing ContainersContainers follow the same procedures for web- and FTP-based installations. For web-based installa-tions, in Step 2, select the Upload Container link instead of the skin link (shown in Figures 14-11 and14-12 previously). Containers will be installed in the Portal or Host containers directory. To install con-tainers using FTP, place the container package in the Install/Container directory.
Language Add-OnsDotNetNuke 3.0 added support for multiple languages. The DotNetNuke implementation loosely fol-lows the localization architecture and naming conventions of the upcoming ASP.NET 2.0 framework.DotNetNuke 3.0 only recognizes a single type of language add-on: a Language Pack. This will likelychange in future DotNetNuke versions as the Language Pack is split into Core Language Packs andModule Language packs.
Language PacksThe multi-language architecture poses a unique challenge for creating and installing Language Packsdue to the number of directories and files involved. Like code add-ons, Language Packs utilize a mani-fest file to manage the meta-data necessary to get all of the files installed to the correct directory.
378
Chapter 14

Language Pack Manifest FileThe Language Pack manifest file follows a very simple format, as shown in Listing 14-7.
Listing 14-7: Language Pack Manifest File Format
<?xml version=”1.0”?><LanguagePack xmlns:xsd=”http://www.w3.org/2001/XMLSchema”xmlns:xsi=”http://www.w3.org/2001/XMLSchema-instance” Version=”3.0”>
<Culture Code=”” DisplayName=”” /><Files>
<File FileName=”” FileType=”” ModuleName=”” FilePath=””/></Files>
</LanguagePack>
The Language Pack manifest file relies more on the use of attributes, which is a more compact formatthan using simple elements. Table 14-11 lists the key elements of the manifest file.
Table 14-11: Manifest File Elements
Element Name Description
LanguagePack The LanguagePack element is the root element for the manifest file. This ele-ment must be created exactly as shown in Listing 14-7. The installation codewill validate the file against the listed schemas.
Culture The Culture element defines the culture information associated with the cur-rent Language Pack. The Culture contains two attributes: Code and Display-Name. The Code attribute takes a value corresponding to a valid culturename as defined by the .NET Framework System.Globalization.CultureInfoclass. The DisplayName defines the name to display when selecting lan-guages in the portal framework.
Files The Files element contains one or more File nodes that provide the informa-tion necessary to properly install the individual resource file identified by theFile node. See Table 14-10 for more information about the individualattributes of the File element.
Each language resource included in the Language Pack must be identified by a corresponding file ele-ment in the manifest (see Table 14-12). The files will be saved based on predefined rules depending onthe file type.
Table 14-12: Manifest File Elements
Attribute Name Description Required
FileName The FileName attribute defines the name of the physical file. YesThe filename should not include any path information.
Table continued on following page
379
Distribution

Attribute Name Description Required
FileType The FileType attribute defines the type of file identified by Yesthis node and is used by the portal to determine the root directory where the file will be installed. The FileType must be one of four values: GlobalResource, AdminResource, ControlResource, or LocalResource. See Table 14-11 for more information on these file types.
ModuleName The ModuleName attribute is required for files marked as NoAdminResource or LocalResource. This value identifies the name of the Admin or DesktopModule that is associated with this file. The ModuleName is the same as the directory name where the module is installed.
FilePath The FilePath attribute defines a path relative to the default Noresource path. The file path where the file will be saved is: [RootPath]\[ModuleName]\[FilePath]\[ResourceDirectory]. The RootPath and ResourceDirectory values are determined by the file type and are defined in Table 14-11.
The FileType attribute will be used to determine the appropriate RootPath and Resource directory (seeTable 14-13). The RootPath value corresponds to specific directories defined by DotNetNuke. Adminmodules, Controls, and DesktopModules are the only DotNetNuke elements that are permitted to havelocal language resources. All other elements should use the Global resources. The Resource directory isdefined to correspond to ASP.NET 2.0 values and are subject to change before the final ASP.NET 2.0release.
Table 14-13: FileType Values
FileType Description RootPath Resource Directory
GlobalResource Shared resources \ App_GlobalResources
AdminResource Admin module resources \admin App_LocalResources
ControlResource Control resources \controls App_LocalResources
LocalResource DesktopModule resources \Desktopmodules App_LocalResources
To simplify the creation of the manifest file, DotNetNuke includes the ability to generate the LanguagePack including the manifest file. Although the manifest file may be hard to maintain by hand, it is a for-mat that lends itself well to automatic generation and is easily read during the installation process.Listing 14-8 shows a partial listing of the generated Deutsch (German) manifest file.
Listing 14-8: German Language Pack Manifest
<?xml version=”1.0”?><LanguagePack xmlns:xsd=”http://www.w3.org/2001/XMLSchema”xmlns:xsi=”http://www.w3.org/2001/XMLSchema-instance” Version=”3.0”>
380
Chapter 14

<Culture Code=”de-DE” DisplayName=”Deutsch” /><Files>
<File FileName=”GlobalResources.de-DE.resx” FileType=”GlobalResource” /><File FileName=”SharedResources.de-DE.resx” FileType=”GlobalResource” /><File FileName=”TimeZones.de-DE.xml” FileType=”GlobalResource” /><File FileName=”Announcements.ascx.de-DE.resx” FileType=”LocalResource”
ModuleName=”Announcements” /><File FileName=”EditAnnouncements.ascx.de-DE.resx” FileType=”LocalResource”
ModuleName=”Announcements” />..................
<File FileName=”Address.ascx.de-DE.resx” FileType=”ControlResource” /><File FileName=”DualListControl.ascx.de-DE.resx” FileType=”ControlResource” />......<File FileName=”Classic.ascx.de-DE.resx” FileType=”AdminResource”
ModuleName=”ControlPanel” /><File FileName=”IconBar.ascx.de-DE.resx” FileType=”AdminResource”
ModuleName=”ControlPanel” />......
</Files></LanguagePack>
Packaging Language PacksA Language Pack includes three different types of files:
❑ Language Resource File: A language resource file is a standard .NET resource file that includesa key name and the localized value. A call to the DotNetNuke method GetString(key) returnsthe value that corresponds to the key.
❑ Time Zones File: The TimeZones file includes a list of time zones that are recognized by theDotNetNuke portal.
❑ Manifest File: The manifest file identifies the resource files included in the Language Pack.
DotNetNuke includes the ability to generate Language Packs for any of the languages/cultures that arecurrently installed on your portal. Given the number of files and directories involved in creating a com-plete Language Pack, the generator is the recommended method for creating Language Packs. Not onlydoes it simplify the creation process, but it also ensures that all necessary files are included and that themanifest file is properly formatted. Follow these simple steps to create a Language Pack.
Step 1Log in with the Host account and go to the Languages page on the Host menu (see Figure 14-15).Although the Admin account has some ability to edit language resources, they do not have the necessarypermissions to Generate or Import Language Packs.
381
Distribution

Figure 14-15
Step 2The Languages screen provides a number of options for adding new Locales/Languages to your portal.If you want to generate a Language Pack for a language that does not show up in the Supported Localeslist, you must first add the language to your portal. (See Chapter 4 for more information about addingadditional languages.) Select Create Language Pack from the Action menu or from the links at the bot-tom of the screen as shown in Figure 14-16.
Figure 14-16
Step 3Select the Locale for which you want to create a Language Pack and then click the Create link (seeFigure 14-17).
382
Chapter 14

Figure 14-17
Step 4After the Language Pack has been created, you will be presented with a complete log showing all of thefiles added to the Language Pack (see Figure 14-18). You should review the logs for errors, which will behighlighted in red. Additionally, the log shows you important information about the directory where thegenerated Language Pack is stored. The log also provides a link to the File Manager so that you candownload the Language Pack from the portal server.
Figure 14-18
Installing Language PacksJust like code and skinning add-ons, Language Packs also support two installation methods: web-basedand FTP-based. Language Packs can include hundreds of files, which must be properly referenced inthe manifest file. Any mismatch between the files identified in the manifest and files included in theLanguage Pack will result in an error. Additionally, the manifest file controls where each resource will beinstalled. An error in the manifest could result in a resource file being installed into the wrong directory.If the DotNetNuke Language Pack Generator was used to create the Language Pack, the likelihood oferrors during installation is significantly reduced.
383
Distribution

Web-Based File UploadFollow these four steps to install a new language into your portal using the web-based installer.
Step 1Log in with the Host account and go to the Languages page on the Host menu (shown previously inFigure 14-15). Although the Admin account has some ability to edit language resources, it does not havethe necessary permissions to Generate or Import Language Packs.
Step 2The Languages screen provides a number of options for new Locales/Languages. If you want to gener-ate a Language Pack for a language that does not show up in the Supported Locales list, then you mustfirst add the language to your portal. (See Chapter 4 for more information about adding additional lan-guages.) Select Upload Language Pack from the Action menu or from the links at the bottom of thescreen (see Figure 14-19).
Figure 14-19
Step 3The File Upload screen appears (see Figure 14-20). Select the file you want to upload and then click theUpload New File link.
Step 4After the Language Pack has been uploaded, you will be presented with another File Upload screen.This screen displays the complete Resource Upload Logs showing all of the files that have beenuploaded (see Figure 14-21). You should review the logs for errors, which will be highlighted in red.Additionally, the log shows you important information about the directory where the generatedLanguage Pack is stored, and the log provides a link to the File Manager so that you can downloadthe Language Pack from the portal server.
384
Chapter 14

Figure 14-20
Figure 14-21
FTP-Based InstallationTo install a new Language Pack using FTP or any file manager, copy the Language Pack into theInstall/Language directory of your DotNetNuke installation. When the ResourceInstaller task runs, itwill install this Language Pack using the standard skin installation code. If an error occurs it will benoted in the task history, which is available by selecting the History link for the ResourceInstaller taskon the Schedule page (shown in Figure 14-7 previously).
385
Distribution

SummaryThis chapter completes our discussion of DotNetNuke development. We have progressed from adminis-tering standard DotNetNuke installations to creating DotNetNuke modules and skins, and finished bydocumenting the steps needed to package, distribute, and install these add-ons. You are now ready tobegin work on using DotNetNuke to build professional web sites that fully take advantage of the power,flexibility, and extensibility provided by the portal.
386
Chapter 14

Resources
The following sections list many helpful resources that bring value to the development or businessaspects of using DotNetNuke. A list of great developer tools are shown in Table A-1. Many of thesetools are used by the DotNetNuke community and Core Team members. Some of these developertools are free and others have fees. In Table A-2, several useful custom third-party modules areshown. As of the date of the publication of this book, each of these modules was free.
Table A-1: Developer Tools
Tool Description
Beyond Compare This tool is helpful for comparing files and by Scooter Software folders to identify changes in code and to keep http://www.scootersoftware.com/ directories in synch.
Reflector for .NET This is a class browser for .NET assemblies. It by Lutz Roeder includes call and called graphs, code viewers http://www.aisto.com/roeder/ for IL, Visual Basic, Delphi, and C#, dependency dotnet/ trees, and more.
Nunit This is a powerful unit-testing framework for all by James W. Newkirk, Michael C. Two, .NET languages. It is a port of the Unit Java Alexei A. Vorontsov, Philip A. Craig, utility.and Charlie Poolehttp://www.nunit.org/
SQL Compare This tool compares the structures of Microsoft by Red-Gate SQL Server databases and generates scripts to http://www.red-gate.com synchronize the databases objects.
Table continued on following page
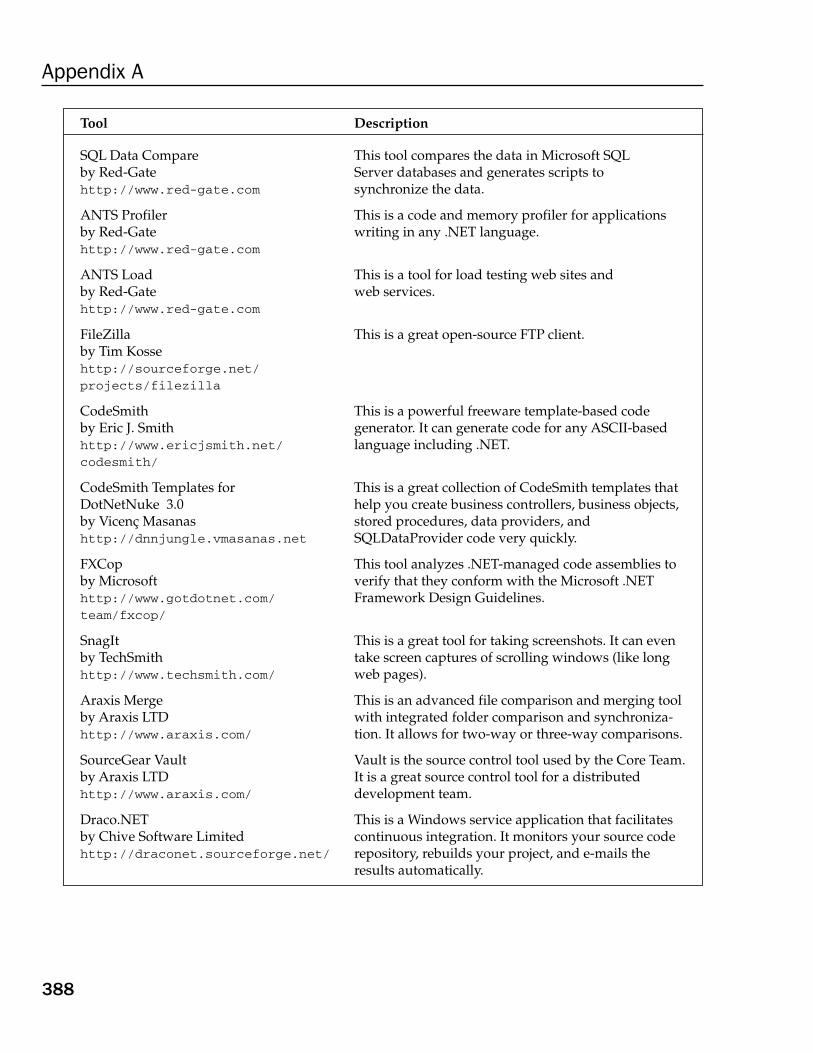
Tool Description
SQL Data Compare This tool compares the data in Microsoft SQLby Red-Gate Server databases and generates scripts to http://www.red-gate.com synchronize the data.
ANTS Profiler This is a code and memory profiler for applications by Red-Gate writing in any .NET language.http://www.red-gate.com
ANTS Load This is a tool for load testing web sites and by Red-Gate web services.http://www.red-gate.com
FileZilla This is a great open-source FTP client.by Tim Kossehttp://sourceforge.net/projects/filezilla
CodeSmith This is a powerful freeware template-based code by Eric J. Smith generator. It can generate code for any ASCII-basedhttp://www.ericjsmith.net/ language including .NET.codesmith/
CodeSmith Templates for This is a great collection of CodeSmith templates that DotNetNuke 3.0 help you create business controllers, business objects, by Vicenç Masanas stored procedures, data providers, and http://dnnjungle.vmasanas.net SQLDataProvider code very quickly.
FXCop This tool analyzes .NET-managed code assemblies to by Microsoft verify that they conform with the Microsoft .NET http://www.gotdotnet.com/ Framework Design Guidelines.team/fxcop/
SnagIt This is a great tool for taking screenshots. It can evenby TechSmith take screen captures of scrolling windows (like long http://www.techsmith.com/ web pages).
Araxis Merge This is an advanced file comparison and merging tool by Araxis LTD with integrated folder comparison and synchroniza-http://www.araxis.com/ tion. It allows for two-way or three-way comparisons.
SourceGear Vault Vault is the source control tool used by the Core Team. by Araxis LTD It is a great source control tool for a distributed http://www.araxis.com/ development team.
Draco.NET This is a Windows service application that facilitates by Chive Software Limited continuous integration. It monitors your source code http://draconet.sourceforge.net/ repository, rebuilds your project, and e-mails the
results automatically.
388
Appendix A

Table A-2: Modules
Module Description
SQLView This module displays the results from any by DNN Stuff SQL query in tabular format.http://www.dnnstuff.com
Multi Page Content This module can show multiple pages of content by BonoSoft within a single module. It is helpful for displaying http://www.dotnetnuke.dk long articles and tutorials in a condensed format.
DnnBB This is an open-source bulletin board/forum module by Bonosoft and Nimo Software that is easy to use and easy to install.http://dnnbb.net/
SiteMap The SiteMap module is ideal for displaying a tree by Speerio, Inc. view of your web site. It only displays links to pages http://www.speerio.net the user has access to and also creates a hidden list of
hyperlinks for search-engine spiders to crawl.
NewsWire This is a complete solution for managing and by Speerio, Inc. publishing RSS feed channels. You can publish http://www.speerio.net categorized RSS feed channels that aggregate portal
and external content.
PhotoViewer This is a photo viewer with a lightbox and integration by Speerio, Inc. with photo printing services.http://www.speerio.net
Navigator This is a hierarchical HTML content and link by Speerio, Inc. organizer for creating categorized documentation http://www.speerio.net and/or link/newsfeed collections.
Das Blog for DNN Complete port of the popular Das Blog blogger by Speerio, Inc. (http://www.dasblog.net) for DotNetNuke.http://www.speerio.net
PhoneGenie This module allows you to look up names and postal by Inspector IT addresses by typing in a phone number to look up.http://inspectorit.com/iit/
CSSInclude This module allows you to add a cascading style sheet by DNN Stuff to a specific tab. This is helpful if you want to over-http://www.dnnstuff.com ride a skin or container’s CSS on a specific tab.
Enhanced Feedback This is a more configurable feedback module that by Slalom Services adds some useful features.http://www.slalomservices.com
Table continued on following page
389
Resources

Module Description
Private Messages for DotNetNuke 3.0 This is a messaging module that allows you to send by Scott McCulloch messages to other users of the portal.http://www.smcculloch.net/
Reviews This module can be used to include a list of items on by Vicenç Masanas your site and allow users to review them. The item’s http://dnnjungle.vmasanas.net type can be defined in each module. For any module
instance you can define a different set of fields, andconfigure the properties for posting and approval ofreviews and comments.
InfoMap This module can be used to dynamically display by Vicenç Masanas information on a picture. It can position user contact http://dnnjungle.vmasanas.net lists on a map. InfoMap presents a clickable map with
“hot” areas where some information has been entered.Upon clicking in any given area, the list of contacts forthis area is displayed.
SimpleDownload This module is like the core Documents module but by Vicenç Masanas with a very simple user interface. It just shows a title http://dnnjungle.vmasanas.net and an icon for the download. For the rest of the mod-
ule it’s the same as Documents.
TemplatePrint, PagePrint These are skin objects to enhance the printing by Vicenç Masanas capabilities of DNN. Let you define skins and http://dnnjungle.vmasanas.net containers for the printing.
390
Appendix A

Frequently Asked Questions
The Core Team spends quite a lot of time answering questions in the support forums. Althoughthere is always a wide array of topics in the forums, some questions about DotNetNuke are askedagain and again. Each released version of DotNetNuke tends to create a new set of frequentlyasked questions. The following includes many of the questions that are often asked in the supportforums.
Q: What folder permissions are necessary to run DotNetNuke?
A: You need to grant the account that ASP.NET runs as FULL CONTROL over the root folder ofDotNetNuke. For further information, see Chapter 2, “Installing DotNetNuke.”
Q: Are there any Windows services that tend to interfere with DotNetNuke?
A: The Indexing Service sometimes causes strange errors to surface in ASP.NET. You may see anerror that reads something like “Access is denied: SharpZipLib.” This is usually fixed by disablingthe Indexing Service in the Services management console in Windows.
Q: How can I change the default date format?
A: You can change date format by selecting the locale of the country that matches your date for-mat. For example, if you wanted an Australian date format (DD/MM/YYYY) you would need toselect the en-AU language in your portal’s site settings.
At the writing of this publication, DotNetNuke currently only has two languages distributed withthe core. These are en-US (English-American) and de-DE (Deutsch). So en-AU would not appearin our Site Settings list for selecting a portal’s default language.
To create an Australian language, navigate to Host Settings ➪ Languages. In the Add New Localesection type Australian for the name, en-AU for the key, and click Add. You should see theAustralian language appear in the list of defined locales. Because en-AU is an English-based culture, it will use the English locale files, but the Australian date format.
You can now navigate to Admin ➪ Site Settings of the portal and select Advanced ➪ Other Settings, spec-ifying the default language for the portal. You can find a complete list of cultures at http://msdn.microsoft.com/library/default.asp?url=/library/en-us/cpref/html/frlrfSystemGlobalizationCultureInfoClassTopic.asp.
Q: What is a portal alias?
A: A portal alias is combination of a domain name and the folder that is entered as the URL to access aportal site. An example of a portal alias is “www.dotnetnuke.com” or even“www.dotnetnuke.com/myportal.” Portal aliases map a URL to a portal site.
Q: What does the error message “Multiple controls with the same ID ‘ctr_DD’ were found.FindControl requires that controls have unique Ids” mean?
A: This message may be displayed when a portal module’s user control (.ascx) file has a syntax error init. For instance, this error will be displayed when a server-side control doesn’t have an end tag.
Q: What does the error message “ERROR: Could not connect to database specified inconnectionString for SqlDataProvider” mean?
A: The problem is likely that the connection string has not been set in web.config. Otherwise, thedatabase may not be accessible, possibly due to network connectivity problems or improper databaselogin credentials.
Q: What does the error message “Not associated with a trusted SQL Server connection” mean?
A: If your SQL Server security authentication is set to Windows Only and you try to connect with a SQLServer login, you will see this message. You may see this message if the user specified in the connectionstring (in web.config) does not have the proper permissions. See Microsoft support article 889615 formore information.
Q: What does the error message “Access to the path “C:\WebSites\DotNetNuke\Portals\0\portal.css” is denied” mean?
A: This is usually caused by one of two problems. The permissions may not be set correctly on thePortals directory. See Chapter 2 for details. This can also happen when a source control application isopen while trying to install DotNetNuke. Try closing the source control application before installingDotNetNuke.
Q: How do I set the default language for all portals?
A: The best way to set the default language for all portals is to make a Site Template and specify the cul-ture in the template. The easiest way is to modify the default template (located at /Portals/_default/DotNetNuke.Template), or at least create a copy of it and modify the default language tag as follows:
<defaultlanguage>en-AU</defaultlanguage>
You can now use that template when creating new portals.
392
Appendix B
Q: Why am I receiving the following error when trying to debug in Visual Studio?“Error while trying to run project: Unable to start debugging on the web server. The project is not
configured to be debugged.”
A: This could be caused by one of a few possible issues. First check web.config to make sure you haveset “debug” to true in the Compilation node. Also, if you’ve installed Microsoft’s URLScan filter on yourmachine (or are using win2003 where it is automatically installed), then you will have to edit theurlscan.ini file and add “DEBUG”(case sensitive) into the “[allowverbs]” section. See Microsoft supportarticle 310588 for more details.
URLScan is often installed as part of the larger IIS Lockdown tool. This is an issue with Visual Studiodebugging and not a DotNetNuke issue.
393
Frequently Asked Questions


System Message Tokens
Table C-1: Standard HostSettings Properties
Property Name Description
ControlPanel This setting determines whether the new 3.0 Control Panel is dis-played or the version 2.0.
Copyright Display the copyright information in the Page Title. (Y/N)
DemoPeriod The number of days that a demo portal will be active.
DemoSignup Allow users to sign up for a demo portal. (Y/N)
DisableUsersOnline Disable the UsersOnline scheduler tasks. (Y/N)
FileExtensions List of acceptable file extensions that can be uploaded to the siteusing any of the file upload mechanisms.
HostCurrency The default currency used when making payments for Host services.
HostEmail The e-mail address of the Portal Host.
HostFee Enter the base fee for site hosting.
HostPortalId The Id of the default portal.
HostSpace The amount of file space allowed for an account in megabytes.
HostTitle The name of the Hosting Account. This name is used throughoutthe site for identifying the Host.
HostURL The URL for the Host web site.
Table continued on following page

Property Name Description
PaymentProcessor The Payment Processing gateway used for handling payments fromclient sites.
PerformanceSetting Determines the optimization level for site performance vs. memory con-sumption. (1-4)
ProxyPort The port number of the proxy server.
ProxyServer The server used for proxying web requests.
SchedulePollingRate Defines the interval is between scheduled task execution cycles.
SchedulerMode Setting for determining which method to use for executing scheduledtasks in the Scheduling Provider.
SiteLogBuffer How many items to hold in the SiteLog before purging the log to disk.
SiteLogHistory The number of days of activity to keep in the SiteLog.
SiteLogStorage Identifies storage location for the SiteLog (File or Database).
SkinUpload Determines whether skins can be uploaded by Portal Administrators.
SMTPAuthentication The SMTP authentication method: Anonymous, Basic, or NTLM.
SMTPServer The URL of the SMTP server used for sending e-mail messages.
SMTPUsername The name of user account used for sending messages.
UseCustomError Determines whether the portal displays the standard DotNetNuke Messages custom error messages or whether raw ASP.NET errors are shown.
UseFriendlyUrls Enable or disable the URL rewriter used for implementing FriendlyURLs.
UsersOnlineTime The length of the user’s online buffer in minutes. If a user is inactive forthis period of time, they will be marked as offline.
Table C-2: Standard PortalSettings Properties
Property Name Description
PortalId The id of the current portal.
PortalName The name of the current portal. This name is used for branding the portal.
HomeDirectory The folder name associated with the current portal. The name is a rela-tive path to the portal root directory.
LogoFile The graphic file used for displaying the Portal Logo.
FooterText The information displayed in the Copyright skin object.
ExpiryDate The date that the hosting contract for the portal expires.
396
Appendix C

Property Name Description
UserRegistration Determines whether user registration is required and whether the regis-tration is private (accounts created by the Portal Administrator), public(users can register for their own account and gain immediate access), orverified (users can register their own account but only get access afterverification of e-mail address).
BannerAdvertising Enables or disables use of default banner ads.
Currency Default currency used for Portal services.
AdministratorId The ID of the primary Portal Administrator.
Email E-mail address for the Portal Administrator (this is generally set to asupport e-mail address).
HostFee The monthly charge the portal pays for hosting services.
HostSpace The maximum amount of disk space allocated to this web site.
AdministratorRoleId The RoleId of the Administrators role for the portal.
AdministratorRoleName The RoleName of the Administrators role for the portal.
RegisteredRoleId The RoleId of the Registered Users role for the portal.
RegisteredRoleName The RoleName of the Registered Users role for the portal.
Description Web site description. This information will be included in the meta tagsused by search engines.
KeyWords Specific meta tag keywords.
BackgroundFile A graphic file used for the portal background.
SiteLogHistory How many days to keep the SiteLog history for the portal.
AdminTabId The Page Id of the Admin page (PageId is the DotNetNuke 3 equivalentof TabID). This is the parent page for all Portal Administration pages.
SuperTabId The Page Id of the Host page. This is the parent page for all HostAdministration pages.
SplashTabId The Page Id to use when no page is specified in the URL.
HomeTabId The Page Id to use as the portal Home page. If no SplashTabId is desig-nated, the HomeTabId is used.
LoginTabId The Page Id to use when the user selects the login link. This page shouldinclude the Login module.
UserTabId The Page Id to use when registering users or editing user profiles.
DefaultLanguage The default locale of the web site. This will determine the language usedwhen anonymous users visit the site.
TimeZoneOffset The time zone where the web server is located.
Version The build number for the current portal application.
397
System Message Tokens

Table C-3: Standard UserInfo Properties
Property Name Description
UserID Unique identifier for a specific portal user.
Username The logon name of the specific user.
FirstName The user’s first name.
LastName The user’s last name.
FullName First name and last name with a single space between.
PortalID The PortalID to which this user belongs.
IsSuperUser Does the user have “Host” permissions?
AffiliateID The unique AffiliateID identifying the link used to navigate to the por-tal. When a user follows an affiliate link and then registers on the portal,the AffiliateID is then associated with the user.
Table C-4: Standard UserMembership Properties
Property Name Description
Password The user’s password if available.
Email E-mail address of the user.
Username The login name of the user.
LastLoginDate The last date/time the user logged in to the portal.
CreatedDate The date/time when the user account was created.
Approved If the user’s account has been approved for access to the web site.
LockedOut If the user’s account has been locked due to potential security issues.
Table C-5: Standard UserProfile Properties
Property Name Description
FirstName User’s first name.
LastName User’s last name.
Street Street address.
City City.
398
Appendix C

Property Name Description
Region State, Province, or Region for the user. Primarily used for U.S. andCanada.
PostalCode The postal code for the user’s mailing address.
Country The country where the user lives.
Unit The apartment, post office box, or suite for the user’s address.
Telephone Telephone number for the user.
Cell Mobile phone number.
Fax Fax number.
Website A personal or corporate web site for the user.
IM Instant messenger contact ID.
TimeZone The user’s default time zone. This is used for translating times from theSiteLog.
PreferredLocale The user’s preferred locale. This determines the language used for allstatic content on the portal.
399
System Message Tokens


Inde
x
Index
Aabstraction, data, 285–287“Access to the path ...portal.css” error, 392Account Login module, 61accounts
host account, 114SuperUser accounts, 114, 115user accounts, 100–101Windows account used to run DotNetNuke, 117
AcquireRequestState event, HTTP modules, 234ActionBase class, 243[ACTIONBUTTON] object, 365ActionEventArgs class, 243ActionEventHandler class, 243Actions control, 348actions, customized. See IActionable interface[ACTIONS] object, 365ADA (American Disabilities Association), 15Add function, Page Functions menu, 57AddEvent stored procedure,
Events module, 276–277AddLocale() method, Localization class, 224add-ons, 353. See also code add-ons
language add-ons (language packs)definition of, 378file types for, 381installing, 383–385manifest file for, 379–381packaging for deployment, 381–383
skinning add-onscontainers, packaging and installing, 378skins, configuration file for, 372–374
skins, file types for, 370–371skins, installing, 374–377skins, packaging, 370–372
Address control, 317administrator
Hostcreating SuperUser account for, 114definition of, 113–114e-mail address for, setting, 117title for, setting, 117URL, setting, 117
Portal Administratorchoosing, 81Control Panel used by, 123definition of, 65–66
administrator pagescontainer for, 77skin for, 77, 336
Administrator rolefolder permissions for, 92page viewing and editing permissions for, 89for Portal Administrator, 65, 81predefined in Security Roles page, 83
AdministratorId property, PortalSettings, 397AdministratorRoleId property,
PortalSettings, 397AdministratorRoleName property,
PortalSettings, 397AdminTabId property, PortalSettings, 397advertising banners
adding to page, 161–163creating for vendors, 103–105

AffiliateID property, UserInfo, 398affiliates
adding vendors as, 105–106tracking, 107
aliases for portals, 127, 392Alignment attribute, [LINKS], 345alignment, of modules, 158All Users role, 84Alstad, Kent (mentor), 8American Disabilities Association (ADA), 15Announcements module. See also Events module
adding to page, 155–161definition of, 61, 155description (content) of, 160expiration date for, 161link in, 161order for viewing, 161settings specific to, 157, 160–161title for, 160
ANTS Load (Red-Gate), 388ANTS Profiler (Red-Gate), 388Appearance
Host Settings page, 118–119Site Settings page, 76–77
Application Blocks (Microsoft), 281Application Resources, 223Approved property, UserMembership, 398Araxis LTD
Araxis Merge, 388SourceGear Vault, 388
Araxis Merge (Araxis LTD), 388architecture
of containers, 154of DotNetNuke
Business Logic layer, 195, 197–198Data Access layer, 195, 198–199Data layer, 195, 199–201description of, 195Presentation layer, 195, 196–197
of modules, 151–154of pages, 153of portals, 152
.ascx filename extensionfor private assembly archives
(module add-ons), 361for skin and container packages, 335, 371for skins, 331
ASP.NETaccount name being used to run
DotNetNuke, 117Forums page for, 3IBuySpy Portal as example of, 2version 2.0, using with DotNetNuke, 202version requirements for, 31worker process required for Scheduler, 143
ASP.NET Enterprise Manager, 32Audit control, 317AuthenticateRequest event, HTTP modules, 234AuthorizeRequest event, HTTP modules, 234Available Tasks, Scheduler, 140
Bbackcolor attribute, [SOLPARTMENU], 339BackgroundFile property, PortalSettings, 397banner advertising
adding to page, 161–163creating for vendors, 103–105
Banner Advertising setting, 81Banner module
adding to page, 161–163border for, 162definition of, 61, 161groups of, 162number of times to display, 162orientation of, 162row dimensions for, 162settings specific to, 162source of banner, 162types of, 162
[BANNER] object, 338, 344, 366BANNER skin object, 81BannerAdvertising property, PortalSettings, 397Baron, Andy (MCW Technologies), 8Base Method Implementations region, Settings
control, 315–316BasePortalException class, 216BeginRequest event, HTTP modules, 234Berkeley Software Distribution (BSD) license, 13Beyond Compare (Scooter Software), 387Board of Directors, Core Team, 26body background, for portal, 76BonoSoft
DnnBB, 389Multi Page Content, 389
402
AffiliateID property, UserInfo

borderfor Banner module, 162for modules, 158
BorderWidth attribute[BANNER], 344[LOGO], 345
[BREADCRUMB] object, 338, 344, 366Brinkman, Joe (Core Team), 19, 26BSD (Berkeley Software Distribution) license, 13Burzi, Francisco (“nuke” slogan), 11Business Logic layer
definition of, 195, 197–198development of, 289–297
Ccaching
in Business Logic layer, 197of modules, 159settings for, 124–125
Calendar control, 302Caron, Dan (Core Team), 19, 25, 26cascading style sheet, for skins, 347–348Catch Up Enabled, Scheduler, 141CBO Controller class, 192CBO Hydrator, 192–195CBOs (Custom Business Objects), 190–195, 295Cell property, UserProfile, 399child portals, 56, 128–129Chive Software Limited, Draco.NET, 388City property, UserProfile, 398cleardefaults attribute, [SOLPARTMENU], 344client-side scripts, in Presentation layer, 196code add-ons
module add-onsdefinition of, 354file types for, 360–361FTP-based installation of, 364installing, 362–365module manifest file for, 354–360packages for, 360–361resource files for, 361third-party modules, 260, 389–390web-based installation of, 362–364
provider add-ons, 369–370skin object add-ons
list of, 365–367manifest file for, 368
code-behind classEdit control, 321Settings control, 314–315View control, 302–304
code-behind regionsEdit control, 321–323Settings control, 315–316View control, 306
CodeSmith (Eric J. Smith), 388CodeSmith Templates for DotNetNuke 3.0
(Vicenç Masanas), 265, 388color, of modules, 158compressed files
decompressing on upload, 94for module add-ons, 360, 361for skins, 348, 371
configuration file (web.config)database connection string in, 44–45, 392default data provider in, 282Provider Model API settings in, 190Scheduler settings in, 143
configuration of DotNetNuke, 44–45connection string, database, 44–45, 48, 392Contacts module, 61, 163. See also Feedback
modulecontainer add-ons, 378container package, 335–336containers
for administrator pages, 77applying to web site, 91architecture of, 154default
for host, choosing, 118for pages, 88for portal, choosing, 71–72
definition of, 59–60, 154for host, uploading, 118manifest file for, 349for module, 159in Presentation layer, 196for skins, 348–352uploading, permissions for, 124, 130–131
ContentPane, 58–59[CONTENTPANE] object, 338, 345, 350,
351, 366control elements, module manifest file, 357–358Control Panel
definition of, 67–68Help button, 75
403
Control Panel
Inde
x

Control Panel (continued)Preview button, 75setting, for Portal Administrators, 123Site Wizard, 68–74
Controller class, 265, 293–297ControlPanel property, HostSettings, 395controls, user
definition of, 202Edit control
code regions, 321–323code-behind class, 321definition of, 264, 301EditEvents control, 316–321Event Handlers region, 323–327Private Members region, 323user controls, list of, 316–317
in Events module, list of, 300–301syntax errors in, 392View control
Calendar control, 302code-behind class, 302–304code-behind regions, 306DataList control, 301–302definition of, 264, 300Event Handlers region, 310–313optional interfaces, 304–305Private Methods region, 306–309Public Methods region, 309–310
Copy function, Page Functions menu, 57copyright credits, in browser title bar, 118, 119[COPYRIGHT] object, 338, 345, 366Copyright property, HostSettings, 395Copyright setting, 81, 82COPYRIGHT skin object, 81Core Team, DotNetNuke, 13–14, 15–17, 19, 26“Could not connect to database specified”
error, 392Country property, UserProfile, 399Craig, Philip A. (Nunit), 387CreatedDate property, UserMembership, 398.css filename extension, 335, 371CssClass attribute
[BREADCRUMB], 344[COPYRIGHT], 345[CURRENTDATE], 345[DOTNETNUKE], 345[HELP], 345[HOSTNAME], 345[LINKS], 345[LOGIN], 344
[TERMS], 345[USER], 345
CSSInclude (DNN Stuff), 389currency, default for host, 120Currency property, PortalSettings, 397[CURRENTDATE] object, 338, 345, 366Custom Business Objects (CBOs), 190–195, 295custom locale, 222Custom Portal Locale screen, 95–96Custom token, e-mail templates, 98
DDas Blog for DNN (Speerio, Inc.), 389data abstraction, 285–287Data Access Application Block (Microsoft), 199Data Access layer
definition of, 195, 198–199development of, 280–285in version 2.0 of DotNetNuke, 22
Data layer, 195, 199–201data model for users and roles, 203–205Data Provider
configuring, 190in Data Access layer, 198definition of, 189determining, 116in module add-ons, 361SQLDataProvider class for, 280–285
databaseconnection string
invalid, 48in web.config file, 44–45, 392
creating at installation, 32–34design of, for modules, 274–280planning requirements for, 260providers, 280–285stored procedures for Events module, 276–280,
284–285tables for Events module, 274–275user for, creating at installation, 34–37
database server, architecture of, 195database software requirements, 31{databaseOwner} tag, 200DataList control, 301–302DataProvider class, 265, 281, 286–287<datascript> node, installation template, 52DateFormat attribute, [CURRENTDATE], 345date format, changing, 391–392Debug setting, web.config file, 143
404
Control Panel

debuggingerror message during, 393for schedule items, 143
default portal locale, 222Default.aspx page
definition of, 196skins processed by, 332–333
DefaultLanguage property, PortalSettings, 397delegates, 241Delete function, Page Functions menu, 57DeleteEvent stored procedure,
Events module, 277Demo Signup, 120DemoPeriod property, HostSettings, 395DemoSignup property, HostSettings, 395description (content), of Announcements
module, 160<description> node, installation template, 52description of web site, choosing, 73Description property, PortalSettings, 397design pattern used by DotNetNuke, 188–190<desktopmodules> node, installation
template, 53developer tools, 387–388development of modules
business logic for, 289–297data abstraction for, 285–287database design for, 274–280database providers for, 280–285Edit control
code regions, 321–323code-behind class, 321definition of, 264, 301EditEvents control, 316–321Event Handlers region, 323–327Private Members region, 323user controls, list of, 316–317
modules, DotNetNuke interface to, 265–270planning, 259–261resource requirements, 261user controls, list of, 300–301View control
Calendar control, 302code-behind class, 302–304code-behind regions, 306DataList control, 301–302definition of, 264, 300Event Handlers region, 310–313optional interfaces, 304–305
Private Methods region, 306–309Public Methods region, 309–310
Visual Studio .NET project, configuring, 262–265directory, installation, 30disabled pages, 88DisableUsersOnline property, HostSettings, 395Discussions module, 61, 163–164disk space limit for portal, 127display attribute, [SOLPARTMENU], 340.dll filename extension, 360DNN. See DotNetNuke.dnn filename extension, 360DNN Stuff
CSSInclude, 389SQLView, 389
DnnBB (BonoSoft and Nimo Software), 389DNNMembership HTTP module, 240Documents module, 61, 164–165DotNetNuke (DNN). See also add-ons; installation
of DotNetNukearchitecture of
Business Logic layer, 195, 197–198Data Access layer, 195, 198–199Data layer, 195, 199–201description of, 195Presentation layer, 195, 196–197
branding of IBuySpy Workshop as, 11compliance with ADA, 15Core Team for, 13–14, 15–17, 19, 26development challenges, 18–19hardware requirements, 30licensing options for, 12–13Manifest document for, 14Microsoft sponsoring, 17–18Microsoft’s interest in, 26software requirements, 31source control system for, 15technologies used by, 187–188trademark for, 17upgrading, 51, 253version 1.0 release, 18version 2.0 release, 21–22version 3.0 release, 27version of
determining, 116supporting multiple, 260in title bar, 118
web site for, 22–28XXL fork of, 16–17
405
DotNetNuke (DNN)
Inde
x

[DOTNETNUKE] object, 338, 345, 366DotNetNuke.Common namespace, 205DotNetNuke.Data namespace, 205DotNetNuke.Data.SqlDataProvider script, 199DotNetNuke.Entities namespace, 206DotNetNuke.Framework namespace, 206DotNetNuke.Modules namespace, 206DotNetNuke.Schema.SqlDataProvider script, 199DotNetNuke.Security namespace, 206DotNetNuke.Services namespace, 206DotNetNuke.Services.Exceptions
namespace, 216DotNetNuke.Services.Log.EventLog
namespace, 208DotNetNuke.SetUp.SqlDataProvider script, 199DotNetNuke.UI namespace, 206downarrow attribute, [SOLPARTMENU], 342downloading DotNetNuke, 32Draco.NET (Chive Software Limited), 388drag and drop, for modules, 178, 179[DROPDOWNACTIONS] object, 350, 366Dual List control, 317
EEdit control
code regions, 321–323code-behind class, 321definition of, 264, 301EditEvents control, 316–321Event Handlers region, 323–327Private Members region, 323user controls, list of, 316–317
Edit Log Settings page, 131–132Edit Schedule page, 140–141EditEvents class, 321–327EditEvents control, 316–321.EditText filename extension, 223EditURL function, 328–329e-mail
of Host, setting address for, 117newsletters, 106–107notification of log events, 132–133
Email propertyPortalSettings, 397UserMembership, 398
e-mail templates, 98–100end date, for modules, 157EndRequest event, HTTP modules, 235
Enhanced Feedback (Slalom Services), 389Error event, HTTP modules, 235error handling, helper functions for, 327–328error messages. See also troubleshooting
“Access to the path ...portal.css”, 392“Could not connect to database specified”, 392displaying based on type of user, 118, 119“Error while trying to run project: Unable to start
debugging...”, 393in log for module installation, 136“Multiple controls with the same ID”, 392“Not associated with a trusted SQL Server
connection”, 392“Error while trying to run project: Unable to start
debugging...” error, 393ErrorContainer class, 216.ErrorMessage filename extension, 223Event Handlers region
Edit control, 323–327View control, 310–313
event log classification, 208event logging
API classes for, 208–209buffering, 125in Business Logic layer, 197definition of, 208history of development of, 25log classifications for, 208log types for, 208, 209–210logging events, 210–214monitoring with Log Viewer, 109–111
EventInfo class, 290–293EventLogController class, 209–214Events module. See also Announcements module
alternate text for, 167Controller class, 265, 293–297data abstraction class for, 285–287database stored procedures for,
276–280, 284–285database tables for, 274–275definition of, 62, 166–167description of, 167Edit control
code regions, 321–323code-behind class, 321definition of, 264, 301EditEvents control, 316–321Event Handlers region, 323–327Private Members region, 323user controls, list of, 316–317
406
[DOTNETNUKE] object

EventInfo class, 290–293expiry date for, 168frequency of, 167image for, 167Settings control, 313–316SQLDataProvider class for, 280–285start date for, 168time of day for, 168title for, 167user controls, list of, 300–301View control
Calendar control, 302code-behind class, 302–304code-behind regions, 306DataList control, 301–302definition of, 264, 300Event Handlers region, 310–313optional interfaces, 304–305Private Methods region, 306–309Public Methods region, 309–310
Events table, Events module, 274–275EventsController class, 293–297exception handling
adding exceptions to log, 220–221API classes for, 216–217, 224–229definition of, 216history of development of, 25logging exceptions, 214–216logging exceptions thrown outside
a module, 219–220logging exceptions thrown within
a module, 217–219logging exceptions thrown within
a scheduled task, 221exception log classification, 208exception logging, 109–111, 214–221Exception Management HTTP module, 239exception management, in Business
Logic layer, 197ExceptionInfo class, 216ExceptionLogController class, 214–216Exceptions class, 217–221expiry date
for Announcements module, 161for Events module, 168portal, 127
ExpiryDate property, PortalSettings, 396exporting content to a file, 180
ExportModule() method, IPortable interface,251, 252
extensions. See add-ons; filename extensions
FFAQs module, 62, 168Fax property, UserProfile, 399Feedback module, 62, 169. See also Contacts
modulefees
hosting fee, 120, 127service fees for user roles, 80–81, 85
field-level help, 58fields, adding to module, 174–175file elements, module manifest file, 358File Manager
folder permissions, 92–93FTP, using with, 94Host view of, 137–138uploading files, 94
file permissionsof host, 31insufficient file permissions, 48–49setting, 38–39
FileController CBO class, 194FileExtensions property, HostSettings, 395FileInfo CBO class, 191–192filename extensions
for downloading, 164–165for portal templates, 129for private assembly archives (module add-ons),
360–361for resource files, 95, 222–223for skin and container packages, 335, 348,
370–371for skins, 331for uploading, 124
filesdocuments for download by users, 61, 164–165uploading, 94, 124
FileZilla (Tim Kosse), 388FirstName property
UserInfo, 398UserProfile, 398
folder elements, module manifest file, 355–356folder permissions, 92–93, 391fontbold attribute, [SOLPARTMENU], 341fontnames attribute, [SOLPARTMENU], 341
407
fontnames attribute, [SOLPARTMENU]
Inde
x

fontsize attribute, [SOLPARTMENU], 341footer, for modules, 157FooterText property, PortalSettings, 396forcedownlevel attribute, [SOLPARTMENU], 340forcefullmenulist attribute, [SOLPARTMENU], 342forecolor attribute, [SOLPARTMENU], 339Forums page, ASP.NET, 3frames, displaying another web site’s content in,
62, 169–170FriendlyUrl Provider, enabling, 125FTP
installing language add-ons, 385installing module add-ons, 364installing skinning add-ons, 377transferring files, 94
FullName property, UserInfo, 398FXCop (Microsoft), 388
GGetCalendarEvents method, Events
module, 306–309GetEvent stored procedure, Events
module, 277–278GetEvents stored procedure, Events module, 278GetEventsByDate stored procedure, Events
module, 278–279GetHelpUrl() method, Localization class, 224GetResourceFile() method, Localization
class, 224GetString() method, Localization class, 224–226GetSupportedLocales() method, Localization
class, 224GetSystemMessage() method, Localization class,
224, 226–229GetTimeZones() method, Localization class, 224.gif filename extension, 335, 371Global Resources, 223–224globalization
languagesdefault, 82, 95, 392e-mail templates for, 98–100for Privacy Statement, 100resource files for, 95–98support for, 144for Terms of Use, 100verifying resource files for, 145–146
localecreating, 144–145date formats and, 391–392
definition of, 222time zone for, 146–147types of, 222
localizationin Business Logic layer, 197translations, 222–224, 224–229
GNU Public License, 12, 13GotDotNet web site, 15GPL (GNU Public License), 12, 13graphics (images)
adding to pages, 62, 170–171for Events module, 167for skins, 337, 348
Guthrie, Scott (ASP.NET), 9–10, 11
Hhardware requirements, 30.Header filename extension, 222header, for modules, 157help
field-level help, 58Help button, Control Panel, 75for modules, 180
Help button, Control Panel, 75Help control, 317.Help filename extension, 222[HELP] object, 338, 345, 366helper functions
error handling, 327–328navigation URLs, 328–329
hidden pages, 88highlightcolor attribute, [SOLPARTMENU], 339history of log results, 141Home Directory, path for, 79Home Page, choosing, 79HomeDirectory property, PortalSettings, 396HomeTabId property, PortalSettings, 397Hopkins, Bruce (Core Team), 15Host
creating SuperUser account for, 114definition of, 113–114e-mail address for, setting, 117title for, setting, 117URL, setting, 117
host account, 114Host Details, Host Settings page, 117Host menu, 114–115host name for system running DotNetNuke, 117<host> node, installation template, 52
408
fontsize attribute, [SOLPARTMENU]

Host Settings pageAppearance settings, 118–119container uploads, enabling, 124Control Panel, setting, 123file upload extensions, setting, 124FriendlyUrl Provider, enabling, 125Host Details settings, 117Payment Settings, 119–121performance settings, 124–125Proxy Settings, 121scheduled task settings, 125Site Configuration settings, 116–117site log storage, settings for, 123skin uploads, enabling, 124SMTP Server Settings, 122updating settings in, 116upgrade logs, viewing, 116UsersOnline settings, 124
Host token, e-mail templates, 98HostCurrency property, HostSettings, 395HostEmail property, HostSettings, 395HostFee property
HostSettings, 395PortalSettings, 397
hosting fee, 120, 127hosting requirements, 31[HOSTNAME] object, 338, 345, 366HostPortalID property, HostSettings, 395HostSettings properties, 395–396HostSpace property
HostSettings, 395PortalSettings, 397
HostTitle property, HostSettings, 395HostURL property, HostSettings, 395Hover menu for modules, 178, 179–182Howard, Rob (ASP.NET), 8, 17, 28.htm filename extension, 335, 370HTML
creating skins using, 336–337, 338, 346–347rendering with Text/HTML module, 63, 173–174
.html filename extension, 331, 335, 370HTTP modules
configuration for, 232–234definition of, 232DNNMembership, 240events common to, 234–235Exception Management, 239Personalization, 240URL Rewriter, 236–239Users Online, 239–240
HTTP Pipeline, 232–233HttpApplication object, 232
IIActionable interface
definition of, 241–242displaying menu, 248–249Module Action API classes, 242–243ModuleAction class, 243–244ModuleActionCollection class, 246ModuleActionType class, 245notify module of action, 249–250in Optional Interfaces region, Events Module,
304–305registering event handler, 247–248
IBuySpy Portaldescription of, 2enhancements to, 4forum on ASP.NET for, 3history of development of, 2–5
IBuySpy Workshopinitial popularity of, 6–8initial release of, 5Microsoft’s interest in, 9–10rebranding of, as DotNetNuke (DNN), 11subscription service for, 8–9
iconfor modules, 158for pages, 88
[ICON] object, 350, 365iconbackgroundcolor attribute,
[SOLPARTMENU], 339iconwidth attribute, [SOLPARTMENU], 340ID attribute, [CONTENTPANE], 345IFrame module, 62, 169–170IHttpModule interface, 234IIS Applications, 40–41, 43IIS (Internet Information Services), creating
web site using, 39–44IM property, UserProfile, 399Image module, 62, 170–171images
adding to pages, 62, 170–171for Events module, 167for skins, 337, 348
IMC (Inter-Module Communication), 253–254IModuleCommunicator interface, 253–254IModuleListener interface, 254
409
IModuleListener interface
Inde
x

importing content from another portal, 180ImportModule() method, IPortable interface, 252Indexing Service, causing ASP.NET errors, 391IndexProvider, 255inetmgr command, 39Info class, 265, 290–293InfoMap (Vicenç Masanas), 390inheritance, 240–241Inspector IT, PhoneGenie, 389installation of DotNetNuke
in Business Logic layer, 198clean install, 50–51configuration, 44–45database, creating, 32–34database user, creating, 34–37downloading DotNetNuke, 32file permissions, setting, 38–39hardware requirements, 30hosting requirements, 31installation file, extracting, 32process followed by DotNetNuke during, 49–51software requirements, 31templates for, 51–53testing, 45–47troubleshooting, 48–49, 116upgrade logs for, viewing, 116upgrading, 51, 253virtual directory for, 30web site, creating, 39–44
installation scripts, in Data layer, 199insufficient file permissions, 48–49interfaces, 241. See also module interfacesInter-Module Communication (IMC), 253–254Internet Information Server (Microsoft), 31Internet Information Services (IIS), creating web
site using, 39–44invalid connection string, 48IPortable interface
definition of, 251–253implemented by Events module, 296–297in Optional Interfaces region, Events Module,
304–305Isakson, Cory (Rainbow Portal), 19ISearchable interface
definition of, 254–257implemented by Events module, 295–296in Optional Interfaces region, Events Module,
304–305
IsSuperUser property, UserInfo, 398IUpgradable interface, 253–254
JJavaScripts, client-side, 196.jpeg filename extension, 335, 371.jpg filename extension, 335, 371
Kkeywords for web site, choosing, 73KeyWords property, PortalSettings, 397Kosse, Tim (FileZilla), 388
LLabel control, 317, 320language add-ons (language packs)
definition of, 378file types for, 381installing, 383–385manifest file for, 379–381packaging for deployment, 381–383
Language Editor screen, 97–98language packs. See language add-onslanguage resource file, 381languages. See also locale; localization
defaultfor all portals, 392changing, 95choosing, 82
e-mail templates for, 98–100for Privacy Statement, 100resource files for, 95–98support for, 144for Terms of Use, 100verifying resource files for, 145–146
Languages page, 144LastLoginDate property, UserMembership, 398LastName property
UserInfo, 398UserProfile, 398
leftseparator attribute, [SOLPARTMENU], 343Leftseparatoractive attribute,
[SOLPARTMENU], 343leftseparatorbreadcrumb attribute,
[SOLPARTMENU], 343
410
importing content from another portal

leftseparatorbreadcrumbcssclass attribute,[SOLPARTMENU], 344
leftseparatorcssclass attribute,[SOLPARTMENU], 344
Level attribute, [LINKS], 345level attribute, [SOLPARTMENU], 342licensing options for DotNetNuke, 12–13[LINKACTIONS] object, 350, 366links
adding to web sites, 62, 171–172in Announcements module, 161
Links moduledefinition of, 62, 171–172modifying container of, 59
[LINKS] object, 338, 345, 367Lists page, 148–149LoadCultureDropDownList() method,
Localization class, 224LoadtimeZoneDropDownList() method,
Localization class, 224Local Resources, 223locale. See also languages
creating, 144–145date formats and, 391–392definition of, 222time zone for, 146–147types of, 222
localization. See also languagesin Business Logic layer, 197translations
performing, 224–229resource files containing, 222–224
Localization class, 224–229LocalizeDataGrid() method, Localization
class, 224LocalizeRole() method, Localization class, 224LockedOut property, UserMembership, 398log classification, 208log types, 208, 209–210Log Viewer
configuring, 131–133Host view of, 131using, 109–111
LogController class, 208LogDetailInfo class, 208LogException() method, Exceptions class,
220–221
loggingEdit Log Settings page, 131–132e-mail notification of log events, 132–133event logging
API classes for, 208–209buffering, 125in Business Logic layer, 197definition of, 208history of development of, 25log classifications for, 208log types for, 208, 209–210logging events, 210–214monitoring with Log Viewer, 109–111
exception logging, 214–221history of log results, 141log for installation of modules, 136, 184log types, 208, 209–210Site Log
number of days to truncate to, 127report types for, 107–108storage options for, setting, 123
upgrade logs, viewing, 116viewing logs in Log Viewer, 109–111, 131–133
logging inprocedure for, 66–67security and, 202user lockout for failed attempts, 114
Logging Providerclasses in, list of, 208–209EventLogController class, 209–214ExceptionLogController class, 214–216
LoggingProvider class, 209[LOGIN] object, 338, 344, 367login page, 61, 79LogInfo class, 209LogInfoArray class, 209LoginTabId property, PortalSettings, 397logo for web site, choosing, 73–74[LOGO] object, 338, 345, 367LogoffText attribute, [LOGIN], 344LogoFile property, PortalSettings, 396LogProperties class, 209LogTypeConfigInfo class, 209LogTypeInfo class, 209Lucarino, John (developer), 4
M“magical software” (Gates, Bill), 19Manifest document, DotNetNuke, 14
411
Manifest document, DotNetNuke
Inde
x

manifest filefor container, 349for module
control elements in, 357–358definition of, 354–355example of, 358–360file elements in, 358folder elements in, 355–356module elements in, 357
for providers, 369–370for skin objects, 368
Masanas, VicençCodeSmith Templates for DotNetNuke 3.0, 388InfoMap, 390PagePrint object, 390Reviews, 390SimpleDownload, 390TemplatePrint object, 390
maxThreads setting, web.config file, 143McCulloch, Scott (Core Team)
contributions of, 19Private Messages for DotNetNuke 3.0, 390
Membership Services, 85–86Membership token, e-mail templates, 98Membership/Role Provider, 202–205[MENU] object, 367menualignment attribute, [SOLPARTMENU], 344menuarrowcssclass attribute,
[SOLPARTMENU], 341menubarcssclass attribute,
[SOLPARTMENU], 341menubarheight attribute, [SOLPARTMENU], 340menuborderwidth attribute,
[SOLPARTMENU], 340menubreakcssclass attribute,
[SOLPARTMENU], 341menucontainercssclass attribute,
[SOLPARTMENU], 341Menueffectsmenutransition attribute,
[SOLPARTMENU], 341menueffectsmenutransitionlength attribute,
[SOLPARTMENU], 341menueffectsmouseouthidedelay attribute,
[SOLPARTMENU], 340menueffectsmouseoverdisplay attribute,
[SOLPARTMENU], 340menueffectsmouseoverexpand attribute,
[SOLPARTMENU], 340
Menueffectsshadowcolor attribute,[SOLPARTMENU], 340
Menueffectsshadowdirection attribute,[SOLPARTMENU], 341
Menueffectsshadowstrength attribute,[SOLPARTMENU], 341
menueffectsstyle attribute, [SOLPARTMENU], 340menuiconcssclass attribute,
[SOLPARTMENU], 341menuitemcssclass attribute,
[SOLPARTMENU], 341menuitemheight attribute, [SOLPARTMENU], 340menuitemselcssclass attribute,
[SOLPARTMENU], 341menurootarrowcssclass attribute,
[SOLPARTMENU], 341Microsoft
interest in IBuySpy Workshop, 9–10sponsoring DotNetNuke, 17–18
Microsoft Application Blocks, 281Microsoft Data Access Application Block, 199Microsoft FXCop, 388Microsoft Internet Information Server, 31Microsoft .NET Runtime, 31Microsoft PDC (Professional Developers
Conference), 2003, 19Microsoft SQL Server, 30, 31Microsoft URLScan filter, 393minimize/maximize, for modules, 178, 182–183modularity, 18–19Module Action API
classes in, 242–243methods in, 244properties in, 243–244
module add-onsdefinition of, 354file types for, 360–361FTP-based installation of, 364installing, 362–365module manifest file for, 354–360packages for, 360–361resource files for, 361third-party modules, 260, 389–390web-based installation of, 362–364
module containersfor administrator pages, 77applying to web site, 91architecture of, 154
412
manifest file

defaultfor host, choosing, 118for pages, 88for portal, choosing, 71–72
definition of, 59–60, 154for host, uploading, 118manifest file for, 349for module, 159in Presentation layer, 196for skins, 348–352uploading, permissions for, 124, 130–131
Module Definitions page, 133–134, 183–184,265–270
module elements, module manifest file, 357module interfaces
definition of, 240–241IActionable interface, 241–250, 304–305IPortable interface, 251–253, 296–297,
304–305ISearchable interface, 254–257, 295–296,
304–305IUpgradable interface, 253–254list of, 241
Module Settings page, 59module user controls, 196ModuleAction class
definition of, 242methods for, 244properties for, 243–244
ModuleActionCollection class, 242, 246ModuleActionEventListener class, 243ModuleActionType class, 242, 245ModuleLoadException class, 217modules. See also development of modules;
HTTP modulesadding definitions to, 135adding to page, 155–160, 176–177alignment of, 158architecture of, 151–154border for, 158caching of, 159color of, 158container for, 159definition of, 60, 153–154definitions in, 133–135deleting, 108, 182displaying on all pages, 157, 181DotNetNuke interface to, 265–270drag and drop feature of, 178, 179
duplicate, in templates, handling, 69end date for, 157, 181exporting content to a file, 180exporting modules within portal, 251–253footer for, 157, 181header for, 157, 181help for, 180Hover menu for, 178, 179–182icon for, 158importing content from another portal, 180importing modules within portal, 251–253installing new modules, 135–137, 183–185Inter-Module Communication (IMC), 253–254list of, 61–64log for installation of, 136, 184minimize/maximize feature of, 178, 182–183moving, 182permissions for, 157, 181planning development of, 259–261premium, limited to specific portals, 127, 133premium modules, 127, 133printing, 159, 181settings for, 157–159start date for, 157, 181syndication of, enabling, 159, 180third-party modules, 260, 389–390title for, 157, 159, 181visibility of, 159, 177Visual Studio .NET project for, 262–265XML format of, exposing, 159
ModuleSettingsBase class, 314–315mouseouthidedelay attribute,
[SOLPARTMENU], 340moveable attribute, [SOLPARTMENU], 340Multi Page Content (BonoSoft), 389“Multiple controls with the same ID” error, 392multi-portal (site virtualization) feature,
IBuySpy Portal, 4multithreaded scheduler, 25
Nname of web site, choosing, 72Nandi, Shawn (Microsoft), 28NavigateURL function, 328–329navigation URLs, helper functions for, 328–329Navigator (Speerio, Inc.), 389.NET CLR, version of, determining, 117.NET Framework, version of, determining, 117
413
.NET Framework
Inde
x

.NET Nuke. See DotNetNuke (DNN)
.NET Runtime (Microsoft), 31Newkirk, James W. (Nunit), 387News Feeds (RSS) module, 62, 172–173newsletters, 106–107NewsWire (Speerio, Inc.), 389Nimo Software, DnnBB, 389“Not associated with a trusted SQL Server
connection” error, 392“nuke” slogan, 11Nunit (Newkirk, Two, Vorontsov, Craig, Poole),
387
OObject Dependencies, Scheduler, 141{objectQualifier} tag, 200Open Source Initiative (OSI), licensing and, 12open source projects
DotNetNuke as, 1, 28individual’s impact on, 14, 24resources for, 24source code access, 24–25upgrades and, 7
OSI (Open Source Initiative), licensing and, 12
PPA (Private Assembly). See module add-onspackages, 335–336Page Functions menu, 57Page Management, Site Settings page, 78–80PageLoadException class, 217PagePrint object (Vicenç Masanas), 390pages
adding modules to, 176–177architecture of, 153creating, 87–89default container for, 88definition of, 57–58, 87, 153deleting, 108description of, 87disabled, 88end date for, 88hidden from menu, 88Home Page, 79icon for, 88keywords for, 87Login Page, 79
managing, 176–178name of, 87navigational structure for, 90parent page for, 87, 90permissions required to view or edit, 87, 89popularity of, 108recycling (restoring), 109skin for, 88Splash Page, 79start date for, 88target of, changing, 89title of, 87for Unauthenticated Users, 89–90User Page, 79
Pane Level skinning, 349panes, 58–59. See also skinparent page, 87parent portals, 56, 128–129Password property, UserMembership, 398Payment, Host Settings page, 119–121Payment, Site Settings page, 80–81PaymentProcessor property, HostSettings, 396payments
Host settings for, 119–121Site settings for, 80–81
PayPal support, 80, 85PDC (Professional Developers Conference),
2003, 19performance settings, 124–125PerformanceSetting property, HostSettings, 396permissions
fileof host, 31insufficient file permissions, 48–49settings for, 38–39
folder permissions, 92–93, 391for modules, 157, 181for uploading containers or skins, 124, 130–131for viewing or editing pages, 87, 89
Personalization HTTP module, 240personalization, in Business Logic layer, 197PhoneGenie (Inspector IT), 389PhotoViewer (Speerio, Inc.), 389.png filename extension, 335, 371Poole, Charlie (Nunit), 387portal. See also containers; pages; panes
aliases for, 127, 392architecture of, 152body background for, 76
414
.NET Nuke

child portals, 56, 128–129contact information on, 61, 163container for, 76copyright for, 81, 82creating, 39–44, 128default, setting, 117definition of, 55–56, 151–152description of, 73disk space limit, 120, 121, 127expiry date for, 127Host settings for, 126–127hosting fee, 120, 127keywords for, 73language, default for, 82, 95, 392links in, 62, 171–172list of, displaying, 126locale for, 144–147, 222logging in, 66–67, 114, 202logo for, 73–74name of, 72page management for, 78–80parent portals, 56, 128–129payment options, 80–81, 119–121templates for, 129–130time zone for, 82title for, 72
Portal Administratorchoosing, 81Control Panel used by, 123definition of, 65–66
Portal Module, 56<portal> node, installation template, 53Portal token, e-mail templates, 98PortalId property, PortalSettings, 396PortalID property, UserInfo, 398PortalModuleBase class, 302–304PortalName property, PortalSettings, 396Portals page, 126PortalSettings properties, 396–397PostCode property, UserProfile, 399PostRequestHandlerExecute event, HTTP
modules, 235PreferredLocale property, UserProfile, 399premium modules, 127, 133PreRequestHandlerExecute event, HTTP
modules, 234PreSendRequestContent event, HTTP
modules, 235
PreSendRequestHeaders event, HTTP modules, 235
Presentation layer, 195, 196–197Preview button, Control Panel, 75Preview function, Page Functions menu, 57Preview link, Site Settings page, 76printing of modules, enabling, 159, 181[PRINTMODULE] object, 350, 351, 365[PRIVACY] object, 338, 345, 367Privacy Statement, 100Private Assembly (PA). See module add-onsPrivate Members region, Edit control, 323Private Messages for DotNetNuke 3.0 (Scott
McCulloch), 390Private Methods region, View control, 306–309private registration, 78ProcessModuleLoadException() method,
Exceptions class, 217–219, 327–328ProcessPageLoadException() method, Exceptions
class, 219–220ProcessSchedulerException() method,
Exceptions class, 221Professional Developers Conference (PDC),
2003, 19Profile token, e-mail templates, 98provider add-ons, 369–370Provider Model, 188–190Proxy, Host Settings page, 121ProxyPort property, HostSettings, 396ProxyServer property, HostSettings, 396Public Methods region, View control, 309–310public registration, 78Public roles, 84, 85–86PurgeLogBuffer class, 209
Qquestion mark images (field level help), 58
RRecycle Bin, 108–109Red-Gate
ANTS Load, 388ANTS Profiler, 388SQL Compare, 387SQL Data Compare, 388
Reflector for .NET (Lutz Roeder), 387Region property, UserProfile, 399
415
Region property, UserProfile
Inde
x

Registered Users role, 83RegisteredRoleId property, PortalSettings, 397RegisteredRoleName property,
PortalSettings, 397registration, types of, 77–78ReleaseRequestState event, HTTP modules, 235reports, 107–108ResolveRequestCache event, HTTP modules, 234resource files, localization
creating, 95–100format of, 222–224verifying, 145–146
resource keys, 222resources, development, 261.resources filename extension, 129.resx filename extension, 95, 361RESX format, 222Retain Schedule History, Scheduler, 140Retry Frequency, Scheduler, 140Reviews (Vicenç Masanas), 390Rich Site Summary (RSS) format, 62, 172–173rightarrow attribute, [SOLPARTMENU], 342rightseparator attribute, [SOLPARTMENU], 343Rightseparatoractive attribute,
[SOLPARTMENU], 343rightseparatorbreadcrumb attribute,
[SOLPARTMENU], 344rightseparatorbreadcrumbcssclass attribute,
[SOLPARTMENU], 344rightseparatorcssclass attribute,
[SOLPARTMENU], 344Roeder, Lutz (Reflector for .NET), 387Role Provider, 202–205roles. See user rolesRootbreadcrumbarrow attribute,
[SOLPARTMENU], 342RootLevel attribute, [BREADCRUMB], 344rootmenuitemactivecssclass attribute,
[SOLPARTMENU], 342rootmenuitembreadcrumbcssclass attribute,
[SOLPARTMENU], 342Rootmenuitemcssclass attribute,
[SOLPARTMENU], 342Rootmenuitemlefthtml attribute,
[SOLPARTMENU], 343rootmenuitemrighthtml attribute,
[SOLPARTMENU], 343rootmenuitemselectedcssclass attribute,
[SOLPARTMENU], 343
rootonly attribute, [SOLPARTMENU], 342RSS (News Feeds) module, 62, 172–173Run on Event, Scheduler, 141
SSantry, Patrick (Core Team), 25, 26Schedule Enabled, Scheduler, 140Schedule History page, 141Schedule page, 139Schedule Status page, 142scheduled tasks. See SchedulerSchedulePollingRate property, HostSettings, 396Scheduler
ASP.NET worker process required for, 143creating scheduled tasks, 230–231debugging schedule items, 143default settings for, 139editing schedule items, 140–141history of development of, 25history of log results, 141logging exceptions for scheduled tasks, 221search engine task in, 148settings for, 125status of schedule items, 142web.config file settings for, 143
SchedulerException class, 217SchedulerMode property, HostSettings, 396<schemascript> node, installation
template, 52Scooter Software, Beyond Compare, 387scripts
client-side, 196installation scripts, 199SQL Server-specific scripts, 49–50syntax for (SQL), 200–201upgrade scripts, 200
Search Admin page, 147–148search API. See ISearchable interfaceSearch Input module, 63[SEARCH] object, 367Search Results module, 63SearchDataStoreProvider, 255searching. See also ISearchable interface
in Business Logic layer, 198configuring search engine, 147–148indexing content of Text/HTML module, 173search engine task in Scheduler, 148
SearchItemInfo class, 256–257
416
Registered Users role
Section Head control, 317security
for ASP.NET 2.0, 201–202in Business Logic layer, 198deleting default host account, 114login features for, 202registration settings, 77–78security hole in version 1.0, 20–21user controls for, 202user management of applications, 202in version 3.0 of DotNetNuke, 202–205
Security Roles pagecreating new roles, 84–85definition of, 83roles, list of, 83–84
Security, Site Settings page, 77–78selectedbordercolor attribute,
[SOLPARTMENU], 340selectedcolor attribute, [SOLPARTMENU], 340selectedforecolor attribute,
[SOLPARTMENU], 340SendLogNotifications class, 209separatecss attribute, [SOLPARTMENU], 339Separator attribute
[BREADCRUMB], 344[LINKS], 345
separator attribute, [SOLPARTMENU], 343separatorcssclass attribute,
[SOLPARTMENU], 343Settings control, 264, 301, 313–316Settings function, Page Functions menu, 57Settings hash, 312<settings> node, installation template, 53[SIGNIN] object, 338, 345, 366Signup page, 128SimpleDownload (Vicenç Masanas), 390Site Configuration, Host Settings page, 116–117Site Log
number of days to truncate to, 127report types for, 107–108storage options for, setting, 123
Site Log Storage, Host Settings page, 123Site Settings page
accessing, 75Administrator, choosing, 81Appearance settings, 76–77Banner Advertising setting, 81Copyright setting, 81, 82Default Language setting, 82
Page Management settings, 78–80Payment settings, 80–81Portal Time Zone setting, 82Security settings, 77–78Stylesheet Editor, restoring default style
sheet, 82–83site virtualization (multi-portal) feature, IBuySpy
Portal, 4Site Wizard
default container, choosing, 71–72default skin, choosing, 70–71definition of, 68description of web site, choosing, 73keywords for web site, choosing, 73logo for web site, choosing, 73–74name/title of web site, choosing, 72template, applying, 68–70
SiteLogBuffer property, HostSettings, 396SiteLogHistory property
HostSettings, 396PortalSettings, 397
SiteLogStorage property, HostSettings, 396SiteMap (Speerio, Inc.), 389skin. See also panes
for administrator pages, 77, 118applying to web site, 91cascading style sheet for, 347–348compressing for deployment, 348, 371container for, 348–352creating
attributes for, 339–345examples of, 345–347methods for, 336–337objects for, 338–339
defaultfor host, choosing, 118for portal, choosing, 70–71restoring, 91
definition of, 331–332file format for, 331–332, 335–336file organization for, 332, 336–337for host, uploading, 118image files for, 337, 348for pages, 88Pane Level skinning, 349in Presentation layer, 196processing of, 332–335support files for, 337uploading, permissions for, 124, 130–131
417
skin
Inde
x

skin add-onsconfiguration file, 372–374file types, 370–371installing, 374–377packaging, 370–372
Skin control, 317skin object add-ons
list of, 365–367manifest file for, 368
skin package, 335–336Skin Thumbnail control, 317skinning add-ons
containers, packaging and installing, 378skins
configuration file for, 372–374file types for, 370–371installing, 374–377packaging, 370–372
Skins page, 91–92SkinUpload property, HostSettings, 396skin.vb file, 333–335Slalom Services, Enhanced Feedback, 389Smith, Eric J. (CodeSmith), 388SMTP Server, Host Settings page, 122SMTPAuthentication property, HostSettings, 396SMTPServer property, HostSettings, 396SMTPUsername property, HostSettings, 396SnagIt (TechSmith), 388software. See add-ons; developer toolssoftware requirements, 31SolPartActions control, 348[SOLPARTACTIONS] object, 350, 366[SOLPARTMENU] object, 338, 339–344, 367source code access, 24–25source control system, 15SourceGear Vault (Araxis LTD), 388Speerio, Inc.
Das Blog for DNN, 389Navigator, 389NewsWire, 389PhotoViewer, 389SiteMap, 389
Splash Page, choosing, 79SplashTabId property, PortalSettings, 397SQL Compare (Red-Gate), 387SQL Data Compare (Red-Gate), 388SQL page, 138–139SQL Server (Microsoft), 30, 31SQL Server Security, 34
SQL Server-specific scripts, 49–50SQL syntax for scripts, 200–201SQLDataProvider class, 280–285SQLView (DNN Stuff), 389Stallman, Richard (GPL), 13start date, for modules, 157stored procedures, for Events module, 276–280,
284–285Street property, UserProfile, 398style sheet
for containers, 378for news feeds, 62, 172–173for skins, 196–197, 335, 347–348, 372XML/XSL module, 63
Stylesheet Editor, 82–83submenubreadcrumbarrow attribute,
[SOLPARTMENU], 342submenucssclass attribute,
[SOLPARTMENU], 341submenuitemactivecssclass attribute,
[SOLPARTMENU], 342submenuitembreadcrumbcssclass attribute,
[SOLPARTMENU], 342Submenuitemlefthtml attribute,
[SOLPARTMENU], 343Submenuitemrighthtml attribute,
[SOLPARTMENU], 343submenuitemselectedcssclass attribute,
[SOLPARTMENU], 343subscription service, IBuySpy Workshop, 8–9SuperTabId property, PortalSettings, 397SuperUser account, 114, 115. See also Host<superuser> node, installation template, 52SuperUsers Accounts page, 115Survey module, 63syndication of modules, enabling, 159, 180system locale, 222
Ttables
custom, 63, 174–175for Events module, 274–275
tabs, 57. See also pagestechnologies used by DotNetNuke, 187–188TechSmith, SnagIt, 388Telephone property, UserProfile, 399.template filename extension, 129
418
skin add-ons

TemplatePrint object (Vicenç Masanas), 390Template.resx file, 222templates
applying to web site, 68–70duplicate modules in, handling, 69installation templates, 51–53for portals, 129–130
[TERMS] object, 338, 345, 367Terms of Use, 100Text attribute
[LOGIN], 344[TERMS], 345[USER], 345
Text Editor control, 317, 320.Text filename extension, 222Text/HTML module, 63, 173–174third-party modules, 260, 389–390Time Lapse, Scheduler, 140time zone
for locales, 146–147, 224, 381for portal, 82
TimeZone property, UserProfile, 399TimeZoneOffset property, PortalSettings, 397TimeZones file, 381title
for Announcements module, 160for Host, setting, 117for modules, 157, 159for web site, choosing, 72
[TITLE] object, 350, 366tooltip attribute, [SOLPARTMENU], 343trademark for DotNetNuke, 17translations
performing, 224–229resource files containing, 222–224
[TREEVIEW] object, 367troubleshooting
“Access to the path ...portal.css” error, 392“Could not connect to database specified”
error, 392debugging schedule items, 143“Error while trying to run project: Unable to start
debugging...” error, 393Indexing Service, causing ASP.NET errors, 391installation problems, 48–49, 116insufficient file permissions, 48–49invalid connection string, 48“Multiple controls with the same ID” error, 392
“Not associated with a trusted SQL Serverconnection” error, 392
URLScan filter, problems with, 393Windows services interfering with
DotNetNuke, 391Two, Michael C. (Nunit), 387
UUnauthenticated Users role, 84, 89–90Unit property, UserProfile, 399UpdateEvent stored procedure, Events module,
279–280UpdateRequestCache event, HTTP modules, 235upgrade logs, viewing, 116upgrade scripts, in Data layer, 200upgrading DotNetNuke, 51, 253URL control, 317URL Rewriter HTTP module, 236–239URL Tracking control, 317URLs. See also web sites
friendly, providing, 236–239FriendlyUrl Provider, enabling, 125for Host, setting, 117for parent and child portals, 128
URLScan filter (Microsoft), 393usearrows attribute, [SOLPARTMENU], 342UseCustomErrorMessages property,
HostSettings, 396UseFriendlyUrls property, HostSettings, 396User Accounts module, 63User Accounts page, 100–101user controls
definition of, 202Edit control
code regions, 321–323code-behind class, 321definition of, 264, 301EditEvents control, 316–321Event Handlers region, 323–327Private Members region, 323user controls, list of, 316–317
in Events module, list of, 300–301syntax errors in, 392View control
Calendar control, 302code-behind class, 302–304code-behind regions, 306DataList control, 301–302
419
user controls
Inde
x

user controls (continued)View control (continued)
definition of, 264, 300Event Handlers region, 310–313optional interfaces, 304–305Private Methods region, 306–309Public Methods region, 309–310
User Defined Table module, 63, 174–175user management of applications, 202[USER] object, 338, 345, 367User Page, 79user roles. See also Host; Portal Administrator
Administrator rolefolder permissions for, 92page viewing and editing permissions for, 89for Portal Administrator, 65, 81predefined in Security Roles page, 83
assigning users to, 86creating, 84–85data model for, 203–205definition of, 64, 83DNNMembership HTTP module, 240list of, 83–84managing, 101Membership Services for, 85–86Public roles, 84, 85–86Registered Users role, 83service fees for, 80–81, 85
user selected locale, 222User token, e-mail templates, 98UserID property, UserInfo, 398UserInfo properties, 398UserMembership properties, 398Username property
UserInfo, 398UserMembership, 398
userootbreadcrumbarrow attribute,[SOLPARTMENU], 342
UserProfile properties, 398–399UserRegistration property, PortalSettings, 397users
assigning to roles, 86changing name of, 101data model for, 203–205database access for, 34–37feedback from, 62, 169finding, 100information required for registration, 80
managing accounts for, 100–101unauthorized, finding, 101
Users Online HTTP module, 239–240User’s Online module, 63UsersOnline
definition of, 63, 239–240disabling, 124, 240tracking time for, setting, 124
UsersOnlineTime property, HostSettings, 396UserTabId property, PortalSettings, 397useskinpatharrowimages attribute,
[SOLPARTMENU], 342usesubmenubreadcrumbarrow attribute,
[SOLPARTMENU], 342
VVeenstra, Geert (Core Team), 19Vendor List page, 103, 138vendors
as affiliates, 105–106banner advertising for, 103–105, 161–163creating, 103
verified registration, 78<version> node, installation template, 52version of DotNetNuke
determining, 116supporting multiple, 260in title bar, 118
Version property, PortalSettings, 397version 1.0 release of DotNetNuke, 18version 2.0 release of DotNetNuke, 21–22version 3.0 release of DotNetNuke, 27View control
Calendar control, 302code-behind class, 302–304code-behind regions, 306DataList control, 301–302definition of, 264, 300Event Handlers region, 310–313optional interfaces, 304–305Private Methods region, 306–309Public Methods region, 309–310
Virtual Directory, IIS, 40–43virtual directory, installation, 30[VISIBILITY] object, 350, 351, 366visibility, of modules, 159visitors, number of. See UsersOnlineVisual SourceSafe (VSS), 15
420
user controls

Visual Studio .NET projectclasses, creating, 265configuring, 262–265controls, adding, 264–265creating, 262–263
Vogt, Anson (designer), 22Vorontsov, Alexei A. (Nunit), 387VSS (Visual SourceSafe), 15
Wweb application portal. See portalweb forms, 196Web Hosters, 27–28web server, architecture of, 195Web Server software, 31web site (portal). See portalweb sites
ANTS Load (Red-Gate), 388ANTS Profiler (Red-Gate), 388Araxis Merge (Araxis LTD), 388ASP.NET Enterprise Manager, 32Beyond Compare (Scooter Software), 387CodeSmith (Eric J. Smith), 388CodeSmith Templates for DotNetNuke 3.0
(Vicenç Masanas), 388CSSInclude (DNN Stuff), 389Das Blog for DNN (Speerio, Inc.), 389displaying content from another web site, 62,
169–170DnnBB (BonoSoft and Nimo Software), 389DotNetNuke (DNN), 22–28Draco.NET (Chive Software Limited), 388Enhanced Feedback (Slalom Services), 389FileZilla (Tim Kosse), 388FXCop (Microsoft), 388GotDotNet (WorkSpaces service), 15InfoMap (Vicenç Masanas), 390Multi Page Content (BonoSoft), 389Navigator (Speerio, Inc.), 389NewsWire (Speerio, Inc.), 389Nunit (Newkirk, Two, Vorontsov, Craig, Poole), 387PagePrint object (Vicenç Masanas), 390PhoneGenie (Inspector IT), 389PhotoViewer (Speerio, Inc.), 389Private Messages for DotNetNuke 3.0 (Scott
McCulloch), 390Reflector for .NET (Lutz Roeder), 387Reviews (Vicenç Masanas), 390
SimpleDownload (Vicenç Masanas), 390SiteMap (Speerio, Inc.), 389SnagIt (TechSmith), 388SourceGear Vault (Araxis LTD), 388SQL Compare (Red-Gate), 387SQL Data Compare (Red-Gate), 388SQLView (DNN Stuff), 389TemplatePrint object (Vicenç Masanas), 390WinZip, 32
web-based installationof language add-ons, 383–385of module add-ons, 362–364of skinning add-ons, 374–377
web.config filedatabase connection string in, 44–45, 392default data provider in, 282Provider Model API settings in, 190Scheduler settings in, 143
Website property, UserProfile, 399Whidbey APIs, 26Willhite, Scott (Core Team), 15, 26Windows account used to run DotNetNuke, 117Windows Security, creating database user, 34Windows services, interfering with
DotNetNuke, 391WinZip, 32worker process, ASP.NET, 143WorkSpaces service, GotDotNet web site, 15
X.xml filename extension, 371XML format of modules, enabling, 159XML/XSL module, 63, 175–176XXL fork, DotNetNuke, 16–17
ZZIP files (.zip filename extension)
decompressing on upload, 94for module add-ons, 360, 361packaging skins and containers in, 348, 371for skins, 348, 371Index 595636/Professional Dot Net Nuke
ASP.NET Portals
421
ZIP files
Inde
x