
Pinnacle Series™ Deployment Guide - Eagle Point Software
27
Deployment Guide
-
Upload
khangminh22 -
Category
Documents
-
view
0 -
download
0
Transcript of Pinnacle Series™ Deployment Guide - Eagle Point Software

Deployment Guide

Pinnacle Series ™ Deployment Guide Information in this reference manual is subject to change without notice and does not represent a commitment on the part of any vendor. The software described in this reference manual is furnished under various license agreements and may be used or copied only in accordance with the terms of those agreements.
Eagle Point has carefully prepared this program package, including research, development, and testing to ascertain its effectiveness and accuracy. However, no warranty of any kind is made with respect to this program package or its related material, except as may be expressly stated in the licensing agreement or other contractual document. In no event is Eagle Point or its partners liable for incidental or consequential damages in connection with, or arising out of, the furnishing, performance, or use of this program package.
Eagle Point and Pinnacle Series logos are unregistered trademarks of Eagle Point.
All other registered or unregistered trademarks are the property of their respective holders.
Copyright © 2007-2018, by Eagle Point Software Corporation. All rights reserved.
Pinnacle Series Deployment Guide Page 1
Pinnacle Series ™ Deployment Guide
Pinnacle Series ................................... ....................................................................................... 2
Overview ................................................................................................................................. 3
System Requirements ............................................................................................................ 4
Management Utility (Desktop Application) .................................................................................................. 4
Pinnacle Series Command Launcher ......................................................................................................... 4
Installing Pinnacle Series........................................................................................................ 5
Installation Steps .................................................................................................................... 6
Install the Management Utility to Administrator’s Workstation ..................................................................... 6
Add Users and configure Job Roles & Permissions .................................................................................... 7
Configure Web Settings for Pinnacle Series Home Page ........................................................................... 7
Establish Content Version Visibility ............................................................................................................ 7
Create Deployment Package for Management Utility ................................................................................. 8
Deploy the Pinnacle Series Management Utility ......................................................................................... 11
Create Deployment Package for Pinnacle Series Command Launcher ....................................................... 11
Deploy Pinnacle Series Command Launcher to all users ........................................................................... 11
Email Login Information to Users ............................................................................................................... 12
Technical Support ................................................................................................................... 12
Troubleshooting ...................................................................................................................... 12
Additional User Documentation .............................................................................................. 13
Pinnacle Series Administrator Utility ............. .......................................................................... 14
Users Tab ............................................................................................................................... 15
Permissions Tab ..................................................................................................................... 19
Expertise Tab ......................................................................................................................... 21
Updates & Live Usage Tab ..................................................................................................... 21
Web Settings Tab ................................................................................................................... 23

Pinnacle Series Deployment Guide Page 2
PINNACLE SERIES In this chapter:
Overview ......................................................................................... 3
System Requirements ...................................................................... 4
CHAPTER
1

Pinnacle Series Deployment Guide Page 3
Overview Pinnacle SeriesTM provides a single source for Learning and Knowledge Sharing, designed to help individuals and organizations become more efficient and productive with their technology tools.
Pinnacle Series is a web based portal that connects to the Microsoft® Windows Azure Cloud Platform. Through an Internet connection, users have access to a comprehensive library of public and private customer content. This means users can log into Pinnacle Series from virtually any machine or mobile device that has an internet connection.
Public, “read-only” content that is delivered to users includes Workflows, Cheat Sheets, Videos and Learning Paths. Chat Support and Desktop Assistance is delivered through a combination of Windows Azure services and Citrix® GoToMeeting/GoToAssist services.
Customer specific content resides in a private tenant within SQL Azure Databases and is accessible only to users you authorize.
In order to gain access to Pinnacle Series resources, Email and password information is securely transmitted to the Windows Azure Pinnacle Web service to verify that a user is authorized as a valid customer with an active subscription. This connection is performed at Sign-in. Once that information is verified, the user has access to consume both public and private content.
Platform Administrators and Managers require a "thin client application" (Windows Based) to be installed onto their workstations. The Pinnacle Series Management Utility is required for user administration, platform branding, content customization, course enrollments, and reporting. All other users will access Pinnacle Series through their preferred web browser.
Review the Security and Privacy document for detailed information on System Architecture, Security and Privacy.
The general steps for successfully deploying Pinnacle Series are summarized below.
• Install Pinnacle Series Management Utility to Administrator’s Workstation
• Add Users and configure Job Roles & Permissions
• Configure Web Settings for Pinnacle Series Home Page
• Establish Content Version Visibility
• Create Deployment Package for Pinnacle Series Management Utility
• Deploy Pinnacle Series Management Utility to Platform Administrators and Managers
• Create Deployment Package for Pinnacle Series Command Launcher
• Deploy Pinnacle Series Command Launcher to all users
• Email login information to users from Administrator Utility
• Uninstall old versions of Pinnacle Series
Review the System Requirements outlined below for installing Pinnacle Series to individual client workstations.

Pinnacle Series Deployment Guide Page 4
System Requirements
Pinnacle Series Management Utility (Desktop Applica tion) The system requirements for end user (client) workstations are listed below.
• One of the following Operating Systems
ο Windows 7 (any edition) (recommended)
ο Windows 8.1 (any edition) (recommended)
ο Windows 10 (any edition) (recommended)
• 512 MB+ RAM
• 65 MB free hard drive space
• Internet access for Workflow, Cheat Sheet, Video, Chat and Training resources.
o http://pinnacleweb.eaglepoint.com
o http://pinnacleonecloud.cloudapp.net
o http://pinnacle.blob.core.windows.net
• Microsoft Windows .NET Framework 4.0 (already installed with Autodesk 2012+ versions)
• Microsoft Windows Media Player version 11.0
• Citrix® GoToMeeting/GoToAssist plugin (installed on first use)
• Supported Autodesk Product Versions
o AutoCAD Civil 3D, 2012, 2013, 2014, 2015, 2016, 2017, 2018
o Autodesk Revit Architecture, Structure, MEP 2012, 2013, 2014, 2015, 2016, 2017, 2018
• Full registry rights to the Eagle Point software key
Pinnacle Series Command Launcher (Browser Add-on) The system requirements for end user (client) workstations are listed below.
• Web Browser
o Internet Explorer
o Microsoft Edge
o Google Chrome
o Mozilla Firefox
o Safari
• Administrative permissions to install software

Pinnacle Series Deployment Guide Page 5
Installing Pinnacle Series In this chapter:
Installation Steps ............................................................................. 6
Technical Support .......................................................................... 12
Troubleshooting ............................................................................. 12
Additional User Documentation ...................................................... 13
CHAPTER
2
Pinnacle Series Deployment Guide Page 6
Installation Steps The following sections describe the steps required to properly install and configure the Pinnacle Series.
For first time installations, refer to Install Pinnacle Series Management Utility to Administrator’s Workstation below to begin the installation process.
Before you get started in your deployment of Pinnacle Series, determine who your Pinnacle Series Administrators and Managers will be. You will need to deploy a "thin client application" onto their systems to give them access to tools needed for configurating and maintaining the platform. Ensure these users meet the System Requirements documented under the Pinnacle Series Management Utility on page 4 of this document.
The initial tasks in the Pinnacle Series installation involve setup, configuration, and branding. These tasks can be completed by your lead Pinnacle Series Administrator, with consultation from others on the implementation team. To create deployment packages and deploy the client applications, you'll need your IT/IS team involved.
The general steps for successfully deploying Pinnacle Series are summarized below.
• Install Pinnacle Series Management Utility to Administrator’s Workstation
• Add Users and configure Job Roles & Permissions
• Configure Web Settings for Pinnacle Series Home Page
• Establish Content Version Visibility
• Create Deployment Package for Management Utility
• Deploy the Pinnacle Series Management Utility
• Create Deployment Package for
• Deploy Pinnacle Series Command Launcher to all users
• Email Login Information to Users
• Uninstall old Pinnacle Series desktop software
Install Pinnacle Series Management Utility to Admin istrator’s Workstation To install the Pinnacle Series Management Utility, download the installer from your Pinnacle Series Home page. You will find the download in the right sidebar.
Note: Only Pinnacle Series Administrators & Managers have access to the Management Utility download.
After accepting the Subscription License Agreement for your organization, click Next to step through the installation wizard. Select the Finish button to complete the installation. Use the Pinnacle Series desktop shortcut to open the Pinnacle Series Management Utility.
Pinnacle Series Deployment Guide Page 7
Add Users and configure Job Roles & Permissions Individual user logins are required to access Pinnacle Series. This allows for specific permissions and enables users to access their specific content and features (like Managing Content, limiting training class attendance, restricting chat, etc.). Before deploying the Pinnacle Series to end user workstations, User access must be defined using the Administrator Utility from the Management Utility.
On the Users tab in the Administrator Utility you can add users individually using the New User button or by importing a list of users from Microsoft Windows Active Directory. When adding users, be sure to specify a Job Role. Three types of Job Roles are predefined for your convenience.
Use the “Standard User” role for individuals that will only be accessing the main Pinnacle Series interface.
Use the “Content Manager” role for individuals within your organization who will be able to add/change content.
Refer to the Users Tab on page 15 for additional information on adding users and Synchronizing the users list with Active Directory.
For further explanation of controlling access, refer to Permissions Tab on page 19 for information on establishing roles, permissions and assigning areas of expertise.
Configure Web Settings for Pinnacle Series Home Pag e The Pinnacle Series Home Page that users land on when accessing the platform can be configured and branded for your company using the Web Settings in the Administrator Utility. Access the Administrator Utility from the Management Utility.
On the Web Settings tab, add you company logo to the top menu bar of the Pinnacle Series Home Page. Under Company News you can add Hyperlinks to connect users to other internet pages, like your company's intranet. Include a Header Image to showcase a recent project or achievement at your company.
When you are finished making changes to the Web Settings, refresh your Pinnacle Series Home Page to view your changes.
Establish Content Version Visibility Pinnacle Series comes preloaded with content for Autodesk applications starting with the 2012 versions of Civil 3D, Revit, etc. Based on the products and versions in your organization, you may want to hide/disable access to certain applications and versions of Autodesk products.
You can control the specific product/version public content by using the Set Public Content Visibility command found within the Manage Content interface. On the Manage Content Visibility dialog box, use the check boxes to show/hide Workflow, Cheat Sheet and Video folders. Unchecked folders will not appear in the corresponding Resource tabs in the Manage Content interface and will not be displayed in Search Results while in the Browser.
Toggling the checkmark establishes visibility of these folders for your entire organization. If you wish to control the visibility of Public content to individual users, highlight the desired folder to limit and use the Folder Visibility button at the bottom of the dialog box. On the Visibility Settings dialog box, you can set visibility for individual users or roles that users are assigned.

Pinnacle Series Deployment Guide Page 8
Create Deployment Package for Management Utility To install the Pinnacle Series Management Utility onto individual client workstations, the same Pinnacle.msi file you originally ran will be used. Make sure the setup file is placed in a location that minimally has read access for all of your users. If you are allowing access to Pinnacle Series Management Utility on individual’s home computers, this file must be placed in a location where those machines can access the installer.
Configuring Default Settings By default, running the Pinnacle.msi file on individual’s workstations will prompt users through the installation wizard and deploy the necessary files.
You can optionally control the deployment so that it runs silently (without prompts) when running the Pinnacle.msi on client workstations. Additionally, you can set certain default options and control how Pinnacle Series connects to the web services if proxy server settings dictate a special connection.
Note: The Public Properties listed in the configuration options below were intended for previous versions of Pinnacle Series and may not applicable to Pinnacle Series 2018.
To deploy the Pinnacle.msi file with these additional options, command line switches can be used to set/override certain aspects of the installation. The table below indicates the configurable switches (Public Properties) for the Pinnacle Series MSI file as well as some of the common switches used by the MSIEXE.
Common MSI Switches Switch Values
/q Controls whether or not the user is prompted during the installation process. Use this switch to have no user involvement during the deployment.
/i When using command line switches, this option must be used to install the application. It must immediately precede the .MSI file specification.
/x Uninstalls the application. Use this switch along with /q switch to have no user involvement during the removal.
Additional options available For additional help on MSI command line options refer to MSI Command Line Options.
Public Properties (Switches) Switch/Setting Values
INSTALLDIR Default Value: %Program Files%\Pinnacle Series
Specify the location where the Pinnacle Series will be installed.
INSTALLSTARTUP true or false. Default Value: false
Specifies whether or not the Pinnacle Series application is automatically run at Windows Startup.
AUTOLAUNCHAUTODESK true or false. Default Value: false
Specifies whether or not Pinnacle Series launches automatically when an Autodesk program is launched.
Pinnacle Series Deployment Guide Page 9
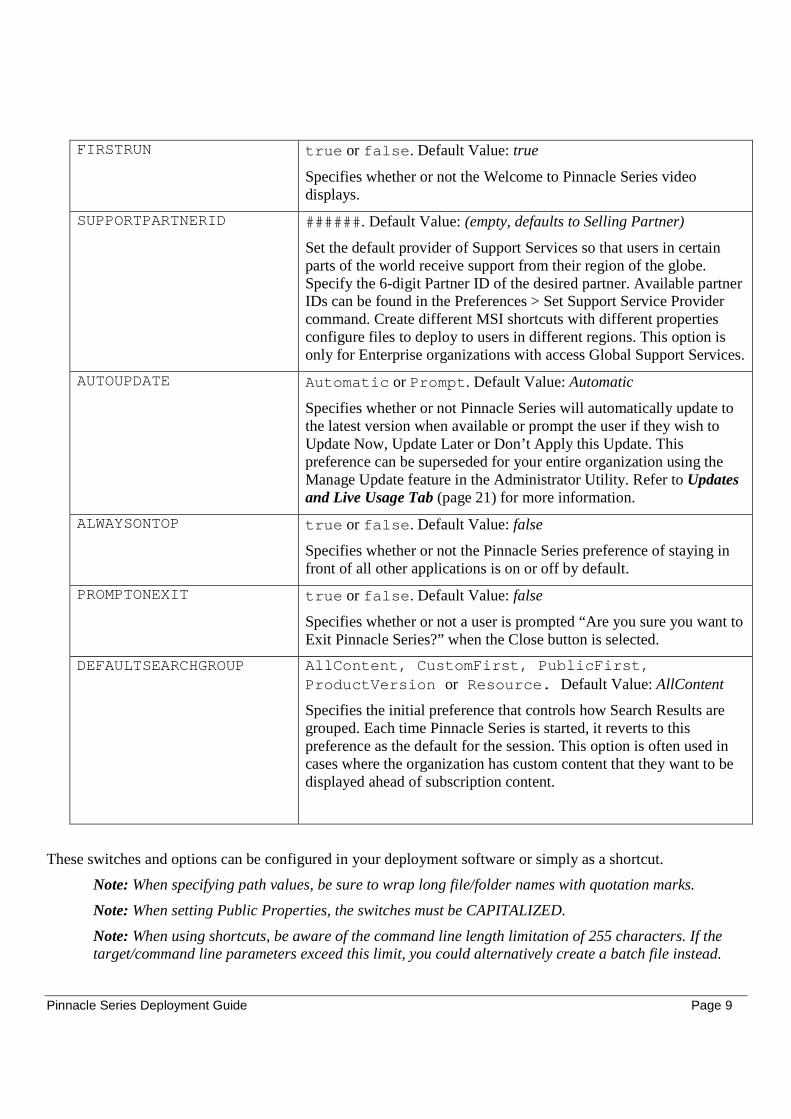
FIRSTRUN true or false. Default Value: true
Specifies whether or not the Welcome to Pinnacle Series video displays.
SUPPORTPARTNERID ######. Default Value: (empty, defaults to Selling Partner)
Set the default provider of Support Services so that users in certain parts of the world receive support from their region of the globe. Specify the 6-digit Partner ID of the desired partner. Available partner IDs can be found in the Preferences > Set Support Service Provider command. Create different MSI shortcuts with different properties configure files to deploy to users in different regions. This option is only for Enterprise organizations with access Global Support Services.
AUTOUPDATE Automatic or Prompt. Default Value: Automatic
Specifies whether or not Pinnacle Series will automatically update to the latest version when available or prompt the user if they wish to Update Now, Update Later or Don’t Apply this Update. This preference can be superseded for your entire organization using the Manage Update feature in the Administrator Utility. Refer to Updates and Live Usage Tab (page 21) for more information.
ALWAYSONTOP true or false. Default Value: false
Specifies whether or not the Pinnacle Series preference of staying in front of all other applications is on or off by default.
PROMPTONEXIT true or false. Default Value: false
Specifies whether or not a user is prompted “Are you sure you want to Exit Pinnacle Series?” when the Close button is selected.
DEFAULTSEARCHGROUP AllContent, CustomFirst, PublicFirst, ProductVersion or Resource. Default Value: AllContent
Specifies the initial preference that controls how Search Results are grouped. Each time Pinnacle Series is started, it reverts to this preference as the default for the session. This option is often used in cases where the organization has custom content that they want to be displayed ahead of subscription content.
These switches and options can be configured in your deployment software or simply as a shortcut.
Note: When specifying path values, be sure to wrap long file/folder names with quotation marks.
Note: When setting Public Properties, the switches must be CAPITALIZED.
Note: When using shortcuts, be aware of the command line length limitation of 255 characters. If the target/command line parameters exceed this limit, you could alternatively create a batch file instead.
Pinnacle Series Deployment Guide Page 10
For example:
To install pinnacle.msi from the j:\apps\ folder silently (no user interface displayed) while setting the Pinnacle Series user preference of “Always on Top” off, use the following syntax:
msiexec /q /i j:\apps\pinnacle.msi ALWAYSONTOP=false
To install pinnacle.msi from the j:\apps\ folder silently (no user interface displayed) while setting the Pinnacle Series option of “Always on Top” off and the “Prompt on Exit” option on, use the following syntax:
msiexec /q /i j:\apps\pinnacle.msi ALWAYSONTOP=false PROMPTONEXIT=true
To silently uninstall (no user interface displayed) use the following syntax:
msiexec /q /x j:\apps\pinnacle.msi
Additionally, some organizations may require a change to the application configuration file (pinnacle.exe.config) that will be deployed to every workstation. Typically, this is due to specific proxy server settings within your organization. If modifications to this file are necessary, you can place a copy of the modified file into the same folder as the MSI package so that the modified file will be installed to the individual client workstations during the deployment. Before making any changes to this file, please contact Eagle Point Technical Support from your Pinnacle Series Home Page, Support button.
Configuring Automatic Updates Pinnacle Series can be configured to automatically update when new versions become available. In order for updates to be successful, the current user must have permissions to write/modify the Pinnacle Series program files folder (typically c:\Program Files (x86)\Pinnacle Series). If users don’t have these permissions, updates will not be attempted.
Automatic Updates are not delivered via an installation mechanism and therefore don’t require full administrative rights. When newer files are posted, they are copied to sub-folders in the “\Program Files (x86) Pinnacle Series\Updates” folder and applied at next sign in.
To aid in timely updates and to lessen the administrative burden of deploying new releases through MSI, it is highly recommended that the Pinnacle Series program folder be configured with Write and Modify rights (including child folders). If users are restricted from installing application (i.e Standard Windows User), it is recommended to enable/configure these rights through deployment mechanisms/scripts, Group Policy or other means. By only configuring the Pinnacle Series program folders for these rights, you are not compromising the security in place for a “Standard User”.
Administratively, you can control when the update is applied automatically to allow time to validate the new version in a test environment. Refer to Updates and Live Usage Tab – Manage Updates (page 22) for more information.
Note: If you have configured Automatic Updates to be delayed until testing has occurred, you may deploy some user workstations using the MSI package for the latest release. The Automatic Updates feature will not “revert” to the previous (Approved) application version.
Note: Automatic updates will not update Pinnacle Series 2016 desktop application to 2018. Once Pinnacle Series 2018 desktop application is installed, any new updates to 2018 will be applied with the Automatic Updates enabled.
Pinnacle Series Deployment Guide Page 11
Deploy the Pinnacle Series Management Utility Once the Management Utility deployment setup files are available and configured on your network share, the next step is to install the application onto Pinnacle Series Administrators and Managers machines.
Note: The Management Utility is required to Administer Users & Permissions, Configure Pinnacle Series Home Page, Manage Custom Content, Enroll others into Learning, and for Reporting. Only deploy the Management Utility to those users who require these platform features.
You can use automated “push” deployment software to schedule the deployments to occur when you desire (i.e. at login, a specific time, etc.). Most application deployment software uses a shortcut to the Pinnacle.msi file with additional configuration options. Be sure to have the deployments installed under the user’s Windows profile with Administrative rights to ensure proper installation and registry access.
Depending on your automated deployment software, you may want to adjust folder rights during this deployment to take advantage of the Automatic Updates feature. Refer to Configuring Automatic Updates above for more information.
If you are not using deployment software, users must execute the Pinnacle.msi file you placed on your network share. It is recommended to create a shortcut link to the pinnacle.msi file and use the available command line parameters as switches to limit the user intervention as much as possible. Refer to Configuring Default Settings page 8, for more information about running the deployment with preset options.
If you direct users to the deployment folder location and have them double-click on the Pinnacle.msi, they will be prompted through the installation wizard to deliver the required files to their machine.
Note: User workstations need to be logged into their account with Administrative privileges for the installation to be successful. Administrative rights are not required to run the Pinnacle Series application.
Create Deployment Package for Pinnacle Series Comma nd Launcher The Pinnacle Series Command Launcher is a Browser Add-on that enables the use of hyperlinks for launching Autodesk tools and for accessing documents that are saved on local and/or network folders. If the Pinnacle Command Launcher is not installed, users will be prompted to download the Add-on when attempting to click these links in Pinnacle Series.
Users can download and install the Pinnacle Series Command Launcher as needed, or you can "push" the installation to all user workstations using a deployment package. Regardless of which approach you take, users will need to have Administrative permissions to install software.
To access the Add-on, download the setup file from your Pinnacle Series Home Page and make sure the file is placed in a location that minimally has read access for all of your users. Build a deployment package to "push" the Pinnacle Command Launcher installation to all user workstations.
Deploy Pinnacle Series Command Launcher to all user s Push the Pinnacle Command Launcher to all user workstations. This can be scheduled or triggered manually.

Pinnacle Series Deployment Guide Page 12
If users are installing the Pinnacle Series Command Launcher as needed, they can access the download in their browser when a hyperlink is triggered in Pinnacle Series. Users will need to click through the installation prompts.
Note: After the Pinnacle Series Command Launcher has been installed, users will get a message/notification when attempting to access an Autodesk tool or document for the first time. This message will vary depending to the Web Browser used. Users can toggle the option to bypass future warnings triggered by the Add-on.
Email Login Information to Users In order for people to sign-in into Pinnacle Series, they will need to use their Email Address and Password. Use the Pinnacle Administrator Utility, in the Management Utility to send this information to users via email. You can select multiple users on the Users Tab and click the Email button to send sign-in information.
Refer to Users Tab on page 15 for information on emailing login information.
Technical Support You can reach Technical Support personnel using the Support button from within the Pinnacle Series application. You can also contact Eagle Point Technical Support by e-mail at [email protected].
Be sure to have your version information and hardware specifications available for the technical support representative along with a description of the problem. Software version information can be obtained by selecting the “About” command from the Options menu.
Troubleshooting This section provides information on troubleshooting the problems that can occur with during installation or when Pinnacle Series attempts to communicate with Windows Azure Cloud Services. If this section does not resolve the issue you are having, contact Eagle Point Technical Support at [email protected] .
Pinnacle Series unable to communicate with Server
Problem:
After attempting to run Pinnacle Series, you receive the error: “Pinnacle Series could not communicate with its Server.”
Solution:
This error message indicates you do not have access to connect to the web services that are needed for Pinnacle Series. While this could be simply due to lack of an Internet connection, often times this indicates some sort of Firewall prevention or the use of a Proxy Server.
If you do have Internet access and still receive the error above, you will need to contact your IT Department/System Administrator and have them enable access for the Pinnacle application to the following domains:

Pinnacle Series Deployment Guide Page 13
• pinnacleweb.eaglepoint.com
• pinnacleonecloud.cloudapp.net
• pinnacle.blob.core.windows.net
Video Codec Problems
Problem:
While in Pinnacle Series, clicking on a video from the Videos Resource displays a message about not being able to find a codec or specific video file.
Solution:
Pinnacle Series requires Windows Media Player 11 or greater in order to play the videos. Visit the Windows Media player webpage to download the latest version for your operating system.
Additional User Documentation Additional documentation describing how to use Pinnacle Series is included within various resources built into Pinnacle Series. The Pinnacle Series folder in the Workflows Resource contains written documentation to help users learn Pinnacle Series. Users responsible for adding/modifying content should review the Managing Pinnacle Content and Developing Custom Workflows/Processes to learn the techniques for managing your own customer content. In addition to the written workflow information, video documentation can also be found in the Videos Resource

Pinnacle Series Deployment Guide Page 14
PINNACLE SERIES ADMINISTRATOR UTILITY In this chapter:
Users Tab ...................................................................................... 15
Permissions Tab ............................................................................ 19
Expertise Tab ................................................................................ 21
Updates & Live Usage Tab ............................................................ 21
CHAPTER
3
Pinnacle Series Deployment Guide Page 15
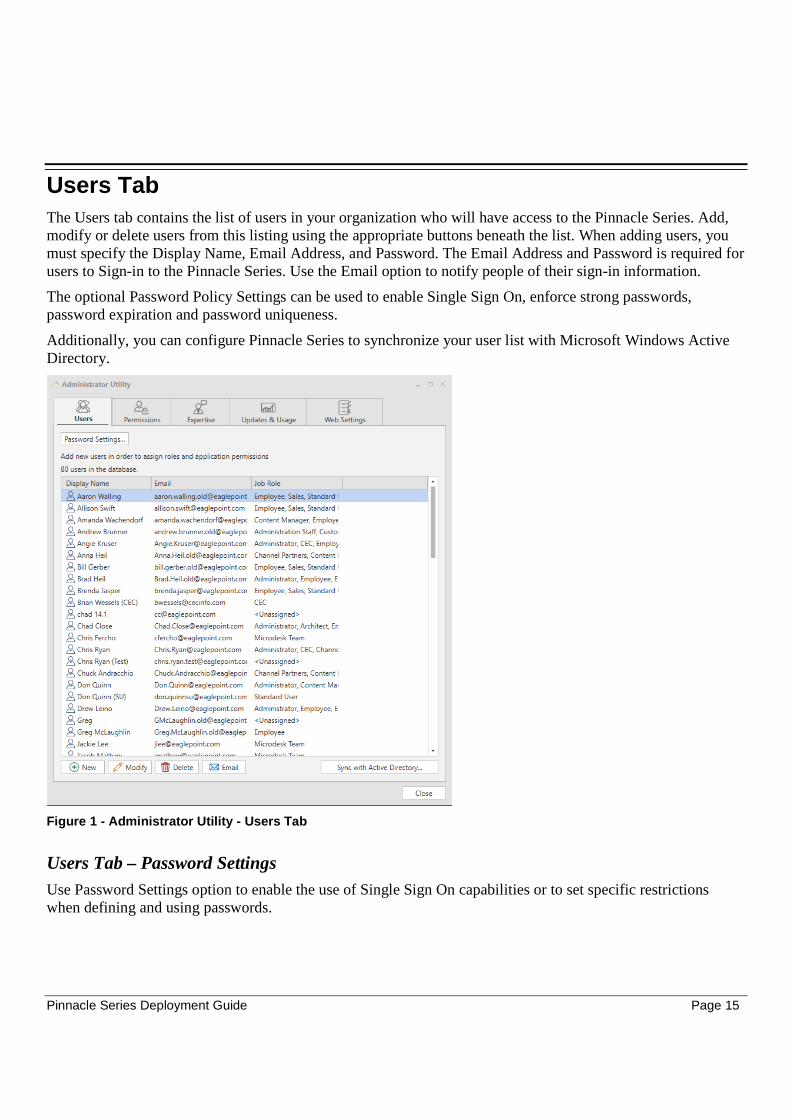
Users Tab The Users tab contains the list of users in your organization who will have access to the Pinnacle Series. Add, modify or delete users from this listing using the appropriate buttons beneath the list. When adding users, you must specify the Display Name, Email Address, and Password. The Email Address and Password is required for users to Sign-in to the Pinnacle Series. Use the Email option to notify people of their sign-in information.
The optional Password Policy Settings can be used to enable Single Sign On, enforce strong passwords, password expiration and password uniqueness.
Additionally, you can configure Pinnacle Series to synchronize your user list with Microsoft Windows Active Directory.
Figure 1 - Administrator Utility - Users Tab
Users Tab – Password Settings Use Password Settings option to enable the use of Single Sign On capabilities or to set specific restrictions when defining and using passwords.

Pinnacle Series Deployment Guide Page 16
Figure 2 - Administrator Utility – Password Setting s
As an option, your organization can choose to configure Pinnacle Series to utilize Single Sign On (SS0) technology. This eliminates the need to remember a separate password when signing into Pinnacle Series whether people are in the office, at home or on a mobile device. Users simply supply their Windows (Active Directory) password when signing into the Pinnacle Series applications.
Pinnacle Series SSO utilizes your organization’s implementation of Exchange Web Services (EWS) and Outlook Web Access (OWA). You must be using Microsoft Exchange Server 2007 or greater and enable EWS and OWA and use Secure Sockets Layer (SSL) for encryption. Microsoft Office 365 email users can also utilize the Single Sign On feature. Additionally, the Synchronize with Active Directory feature within Pinnacle Series must be used to keep user lists in sync.
The SSO method of authentication bypasses the storing of passwords in the Pinnacle Series Cloud Platform. At sign-in, users supply their email address and Windows password to gain access to Pinnacle Series. Multiple validation methods are used in order to authorize/validate user credentials. This is to accommodate both on-premises deployments of Exchange Server as well as organizations utilizing Microsoft Office 365 for email. At no time is Pinnacle Series accessing/requesting any user specific information (passwords, email, calendars, files, etc.) from the email server.
How Pinnacle Series SSO Works
With the location of your organization’s Exchange Web Services known (Auto Discovered or administrator specified), calls are made to the Exchange Server to test the user credentials.
Pinnacle Series Deployment Guide Page 17
Note: Pinnacle Series SSO can attempt multiple types of authentication to allow for hybrid Office 365 deployments (where some users access email through an on-premises server while others access email from the cloud).
Prior to testing the credentials, the Microsoft Data Protection API (DPAPI) is used to encrypt the password. Next, the validity of the Exchange server's SSL certificate is checked (certificate is valid/not expired).
Upon the certificate passing validation, a request is made to return a list of members in an empty group. Because valid credentials are required in order to make this innocuous request, it will become known whether or not the supplied credentials are of an authenticated user of your organization.
Note: By using an empty group name in the query, no user/company information is passed back to the Pinnacle Series Web service.
When making this request, an exception is thrown if the credentials are invalid and the user will not be allowed to sign into the Pinnacle Series. If the credentials are valid, the user is allowed to sign in.
In addition, you can organizationally enable the “Check Windows Authentication first” option for users accessing Pinnacle Series while authenticated to your Windows Domain (typically while “in office”). This option will first check if the user attempting to sign into Pinnacle Series is already authenticated in your Windows Domain through the Microsoft Active Directory API. If authenticated, that user would not even have to supply password credentials to be allowed access into Pinnacle Series.
Because password policy will be managed by your organization, enabling the SSO feature disables all other forms of Pinnacle Series password policies.
Toggle on Use Complex Passwords to mandate the use of strong passwords when adding users to the system and when users change their own passwords. Complex passwords require passwords to be at least eight (8) characters long and include the use of at least one uppercase character (A-Z), at least one lowercase character (a-z) and at least one non-alphanumeric character (e.g. !, #, $, %).
You can also set the maximum password age by toggling on the Password expires every x days option. Enabling this option forces users to change their password after the specified number of days.
Often used in conjunction with expiring passwords, the Password must be different from last y passwords setting allows you to set the number of unique passwords required before an old password can be reused.
Toggle on the User must change password at first Sign In to force users to establish their own password the very first time they Sign In.
Users Tab – Sync with Active Directory The Sync with Active Directory feature enables you to bypass manually entering Pinnacle users by first “importing” users from specific Active Directory domain groups into Pinnacle Series. Additionally, by creating this association, you can keep your Pinnacle Users list up-to-date with user changes made to your Microsoft Windows Active Directory (e.g. people left, people hired, etc.).
Click the “Sync with Active Directory” button to display the interface to specify the domain groups that contain the users you wish to synchronize.

Pinnacle Series Deployment Guide Page 18
Figure 3 - Administrator Utility – Sync with Active Directory
Use the Add Groups button to include specific Active Directory domain groups of users that you want to be users of Pinnacle Series. After specifying the Domain name, the Groups droplist populates with all Security Groups defined in Active Directory. Select the Group that contains the users you want to synchronize and specify the Default Industry, Default Job Role and Default Password.
Note: The Default Password is required, but you can toggle on User must change password at first sign in the Password Policy Settings to force users to establish their own unique password.
Note: If users exist in more than one group, the first group they are found in (alphabetically) during the synchronization process is used and the Default Industry, Job Role and Password are set accordingly.
Use the Remove Groups option to exclude certain users from the synchronization process.
Once the list of groups is established, click the Sync Now button to display a summary of the synchronization that is about to happen.
Pinnacle Series Deployment Guide Page 19
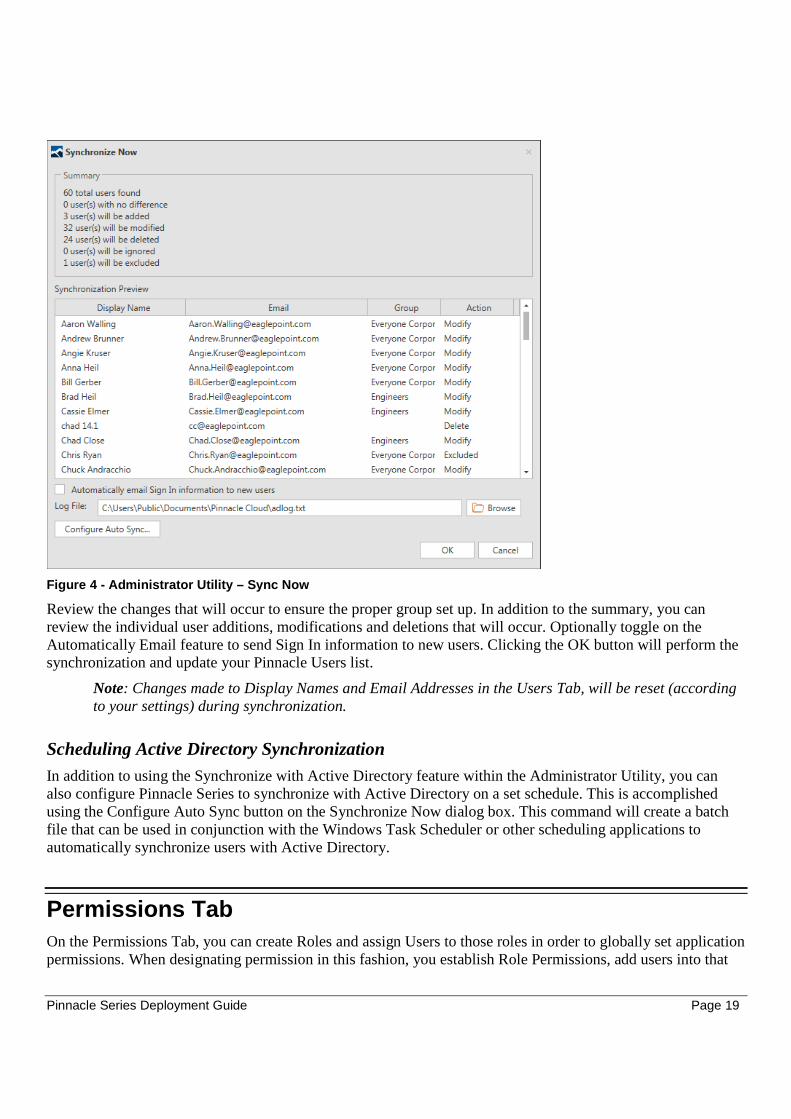
Figure 4 - Administrator Utility – Sync Now
Review the changes that will occur to ensure the proper group set up. In addition to the summary, you can review the individual user additions, modifications and deletions that will occur. Optionally toggle on the Automatically Email feature to send Sign In information to new users. Clicking the OK button will perform the synchronization and update your Pinnacle Users list.
Note: Changes made to Display Names and Email Addresses in the Users Tab, will be reset (according to your settings) during synchronization.
Scheduling Active Directory Synchronization In addition to using the Synchronize with Active Directory feature within the Administrator Utility, you can also configure Pinnacle Series to synchronize with Active Directory on a set schedule. This is accomplished using the Configure Auto Sync button on the Synchronize Now dialog box. This command will create a batch file that can be used in conjunction with the Windows Task Scheduler or other scheduling applications to automatically synchronize users with Active Directory.
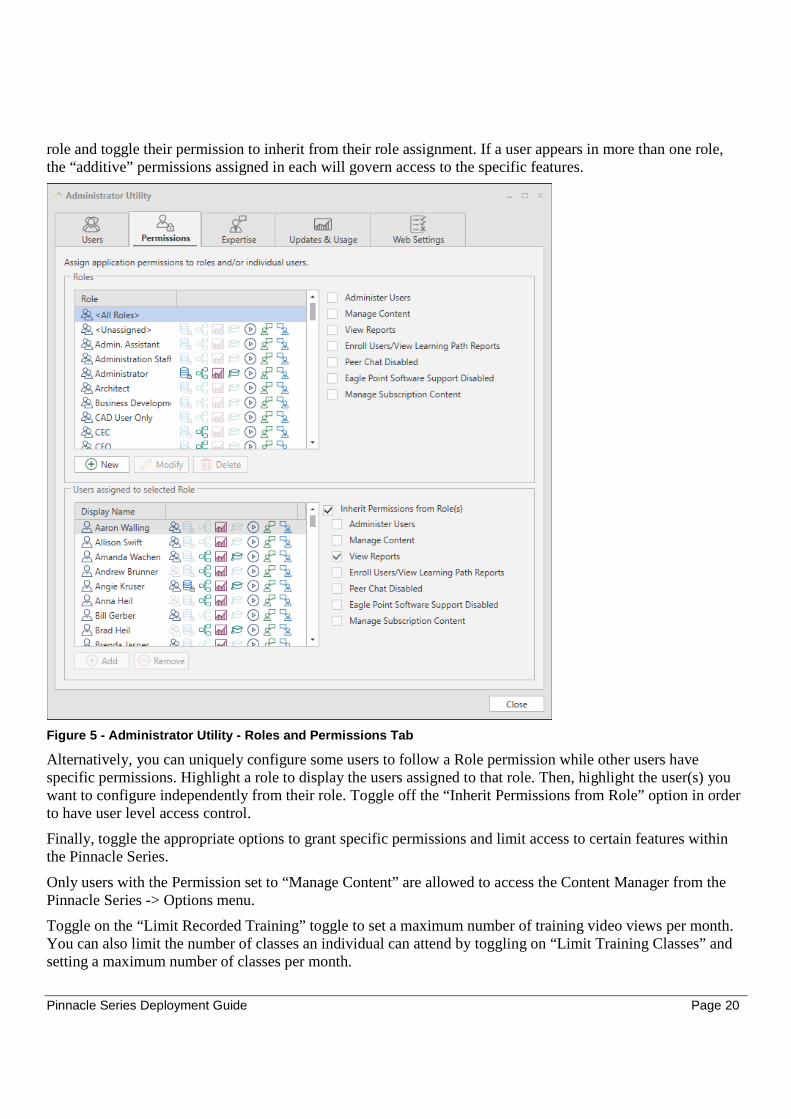
Permissions Tab On the Permissions Tab, you can create Roles and assign Users to those roles in order to globally set application permissions. When designating permission in this fashion, you establish Role Permissions, add users into that
Pinnacle Series Deployment Guide Page 20
role and toggle their permission to inherit from their role assignment. If a user appears in more than one role, the “additive” permissions assigned in each will govern access to the specific features.
Figure 5 - Administrator Utility - Roles and Permis sions Tab
Alternatively, you can uniquely configure some users to follow a Role permission while other users have specific permissions. Highlight a role to display the users assigned to that role. Then, highlight the user(s) you want to configure independently from their role. Toggle off the “Inherit Permissions from Role” option in order to have user level access control.
Finally, toggle the appropriate options to grant specific permissions and limit access to certain features within the Pinnacle Series.
Only users with the Permission set to “Manage Content” are allowed to access the Content Manager from the Pinnacle Series -> Options menu.
Toggle on the “Limit Recorded Training” toggle to set a maximum number of training video views per month. You can also limit the number of classes an individual can attend by toggling on “Limit Training Classes” and setting a maximum number of classes per month.

Pinnacle Series Deployment Guide Page 21
You can limit chat access to Eagle Point Experts by toggling on “Eagle Point Support Disabled”.
Note: Peer Chat has been turned off in Pinnacle Series 2018 and is not accessible in the Browser.
Expertise Tab Add the Areas of Expertise you wish to establish and optionally denote the individuals with that expertise. The Experts will be associated to Pinnacle Series content so others within the organization can identify them and contact with a question, if necessary.
Note: Peer Chat has been turned off in Pinnacle Series 2018 wherein nullifying the setting to Declare Expertise.
Updates & Live Usage Tab Use this tab to control how Automatic Updates are applied and to review the current license usage.

Pinnacle Series Deployment Guide Page 22
Figure 6 - Administrator Utility – Live Usage Tab
Updates & Live Usage Tab – Manage Updates Use the “Manage Updates” button on this tab to access Administrative controls for Automatic Updates feature. By default, end user workstations will automatically update to the latest version of Pinnacle Series without the need to perform a software installation. Once installed, the application will check if an update is available and apply the new version without any administrative or user intervention. Users must have Write and Modify rights to the application folder and its children (\Program Files (x86)\Pinnacle Series) in order to receive the updates. If users don’t have these permissions, updates will not be attempted.
Automatic Updates are not delivered via an installation mechanism and therefore don’t require full administrative rights. When newer files are posted, they are copied to sub-folders in the “\Program Files (x86) Pinnacle Series\Updates” folder and applied at next sign in.
To aid in timely updates and to lessen the administrative burden of deploying new releases through MSI, it is highly recommended that the Pinnacle Series program folder be configured with Write and Modify rights

Pinnacle Series Deployment Guide Page 23
(including child folders). If users are restricted from installing applications (i.e Standard Windows User), it is recommended to enable/configure these rights through deployment mechanisms/scripts, Group Policy or other means. By only configuring the Pinnacle Series program folders for these rights, you are not compromising the security in place for a “Standard User”.
If corporate policy requires that new software versions must be controlled administratively and only delivered through approved corporate mechanisms, you can disable automatic updating from occurring on all users’ workstations by toggling on “Disable Updates”.
If you wish to take advantage of Automatic Updates but need to “Approve” the latest version prior to users receiving it, you can choose to delay the automatic updating until you have validated the version in testing environments. Toggle on the “Specify Version” option and at the point the version is approved, use the “Update Version to” droplist to specify what version you’d like users’ workstations to be running. Once set, Pinnacle Series will automatically begin the update process at next sign in.
Note: If you have configured Automatic Updates to be delayed until testing has occurred, you may deploy some user workstations using the MSI package for the latest release. The Automatic Updates feature will not “revert” to the previous (Approved) application version.
Updates & Live Usage Tab – Live Usage The two lists in this area of the tab allow you to see how many licenses you have available and which users are currently signed in to Pinnacle Series. The user listing reports the sign in date/time, the current version that users are running and the name of their workstation. Additionally, this listing displays the expiration date on your licenses. Use the Refresh button to update to see the most recent usage.
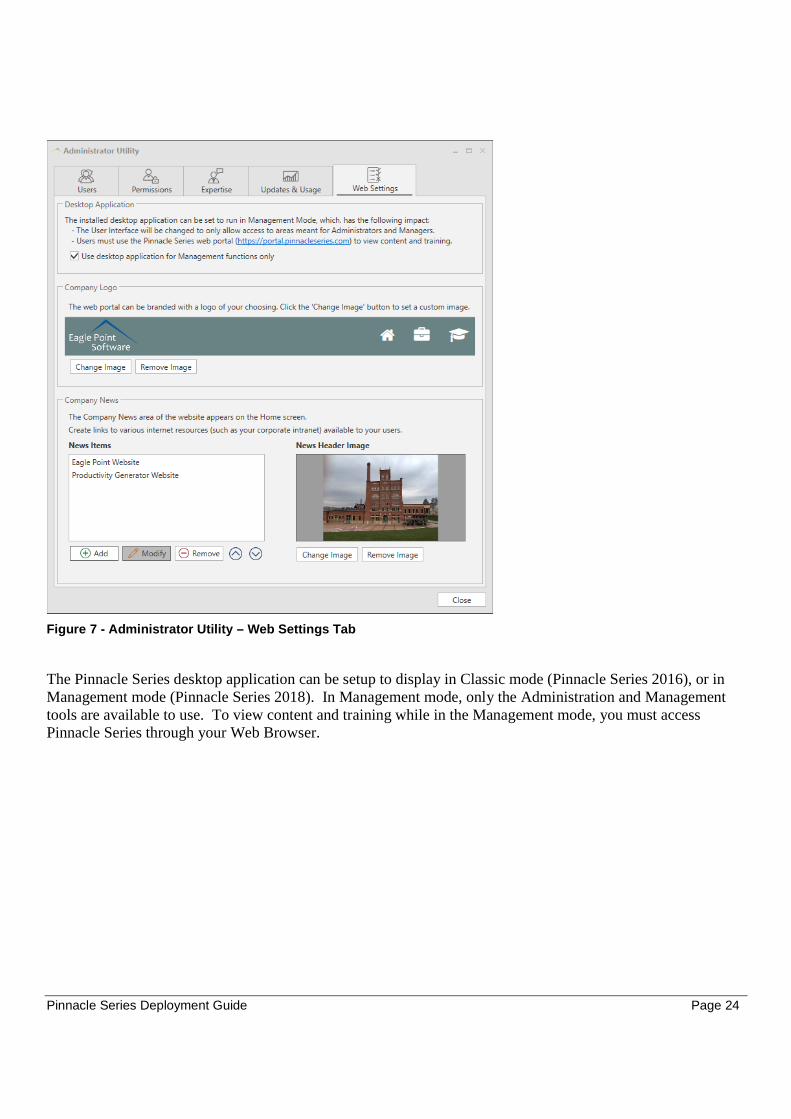
Web Settings Tab The Web Settings Tab is used to configure the Pinnacle Series platform for your organization. On this tab you can configure how the desktop interface will appear for those using the Pinnacle Series desktop version, and the appearance of your organization's Pinnacle Series Home Page.
Pinnacle Series Deployment Guide Page 24
Figure 7 - Administrator Utility – Web Settings Tab
The Pinnacle Series desktop application can be setup to display in Classic mode (Pinnacle Series 2016), or in Management mode (Pinnacle Series 2018). In Management mode, only the Administration and Management tools are available to use. To view content and training while in the Management mode, you must access Pinnacle Series through your Web Browser.
Pinnacle Series Deployment Guide Page 25
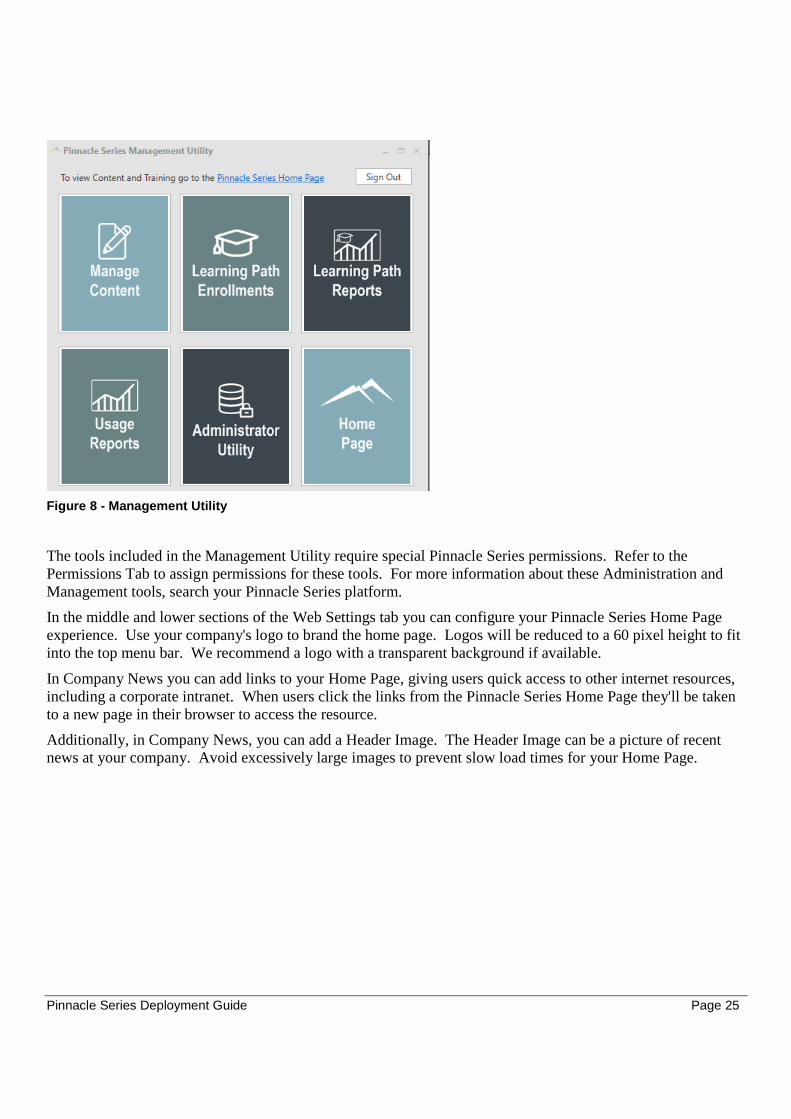
Figure 8 - Management Utility
The tools included in the Management Utility require special Pinnacle Series permissions. Refer to the Permissions Tab to assign permissions for these tools. For more information about these Administration and Management tools, search your Pinnacle Series platform.
In the middle and lower sections of the Web Settings tab you can configure your Pinnacle Series Home Page experience. Use your company's logo to brand the home page. Logos will be reduced to a 60 pixel height to fit into the top menu bar. We recommend a logo with a transparent background if available.
In Company News you can add links to your Home Page, giving users quick access to other internet resources, including a corporate intranet. When users click the links from the Pinnacle Series Home Page they'll be taken to a new page in their browser to access the resource.
Additionally, in Company News, you can add a Header Image. The Header Image can be a picture of recent news at your company. Avoid excessively large images to prevent slow load times for your Home Page.