physical readiness handbook
69
WISCONSIN DEPARTMENT OF JUSTICE TRAINING & STANDARDS BUREAU PHYSICAL READINESS TRAINING HANDBOOK February, 2015
-
Upload
khangminh22 -
Category
Documents
-
view
1 -
download
0
Transcript of physical readiness handbook

WISCONSIN DEPARTMENT OF JUSTICE TRAINING & STANDARDS BUREAU
PHYSICAL READINESS TRAINING HANDBOOK
February, 2015

FitForce/WITSB/AppB/0215 2
PHYSICAL READINESS HANDBOOK
Table of Contents
Section Page
1 Background 3 2 Preparation for Testing 6 3 Physical Readiness Test 11 4 Setting Fitness Goals 27 5 Designing a Training Program 30 Training Forms 62

FitForce/WITSB/AppB/0215 3
SECTION: 1 BACKGROUND The Law Enforcement Standards Board (LESB) requires incumbent law enforcement officers (officers) to have a minimum level of physical readiness in order to perform the essential physical functions of the job. To ensure that officers can safely perform those physical tasks, the LESB has validated a Physical Readiness Test (PRT) with standards that predict the minimum levels of safe and effective performance. This Handbook presents information about the abilities necessary to perform physically demanding functions on the job.
The LESB conducted a validation study to identify the physically
demanding tasks of its officers. Fitness experts then determined the underlying physical abilities or fitness areas required to perform those tasks. The most physically demanding tasks include the following:
• Walking and standing for extended periods
• Pursuit running for short and long distances, over uneven terrain, and up stairs
• Light, moderate and heavy lifting and carrying
• Pulling, pushing and dragging heavy objects (to include vehicles) and people
• Climbing over, under and around obstacles
• Vaulting and jumping over low and high obstacles
• Bending and reaching
• Crawling and stooping and dodging around obstacles
• Balancing oneself
• Ability to use force for short and long periods of time
• Use of control holds, restraining devices and hands and feet for self defense
• Forced entry using pushing and pulling The inability to perform these tasks would obviously mean you are unable to perform your duty. Perhaps less obviously, that lack of physical readiness would also place yourself and others at risk for potential injuries and loss of life. The PRT is job-related. It measures the underlying physical abilities necessary to train for and perform essential job tasks. The standards predict the ability to perform the essential and critical physical tasks of the job at a minimum level of safety and effectiveness. WHY IS PHYSICAL READINESS/FITNESS IMPORTANT?
First, physical readiness or fitness is important because it determines an individual's capability to perform strenuous job tasks. It is job related. As such, physical fitness is a bona fide occupational qualification (BFOQ).
Secondly, maintaining a professional image has a direct impact on how the public judges law enforcement officers. This judgment affects how effectively “officer presence” produces a deterrent effect. Your physical appearance is related to your fitness.

FitForce/WITSB/AppB/0215 4
Thirdly, physical fitness is important to minimize risk for a variety of health problems, many of which can also affect job performance. The fitness areas required to do the job are the same necessary for good health. Cardiovascular disease, high blood pressure, lung cancer, colon cancer, and diabetes are almost at epidemic proportions in our country. These conditions are not communicable illnesses from viruses or bacteria; they are conditions related to poor fitness and lifestyle choices. How you eat, whether you exercise, how you deal with stress, and other factors in your daily life influence whether you develop medical problems. You can do something to combat them. The major causes of death and disability are well documented—sedentary living, poor nutrition, obesity, stress, tobacco smoking, and substance abuse - all of which you have some control over. Total fitness addresses all these areas. WHAT PHYSICAL FITNESS AREAS ARE IMPORTANT?
Law enforcement officers must be physically ready to perform the strenuous and critical physical tasks of the job. Researchers have identified six specific components of physical fitness that underlie the ability to perform those tasks. 1. Aerobic power or cardiovascular endurance. Your heart and
cardiovascular system must be efficient enough so that you can perform physical tasks over a sustained period of time. It is an important area for performing job tasks such as conducting foot pursuits and engaging in use of force situations lasting more than two minutes.
2. Anaerobic power. You must have the ability to make short intense bursts
of effort. This an important area for performing job tasks such as short foot pursuits.
3. Upper body absolute strength. Some essential tasks require having
enough upper body strength to make maximal efforts against a resistance. This is important for performing physical tasks that require lifting, carrying, pulling, dragging and pushing.
4. Upper body and trunk muscular endurance. Other tasks require the
capability to make repeated muscular contractions with the trunk and upper body without getting fatigued. This is important for use of force job situations.
5. Agility. This is the ability to make quick movements while sprinting. This is
important for making movements and changes of direction around obstacles during pursuits.

FitForce/WITSB/AppB/0215 5
6. Explosive Leg Power. Occasionally you are required to jump with power or make short intense bursts of effort. This an important area for performing job tasks such as jumping over obstacles and sprinting in pursuit situations.
There are other areas of physical fitness to include upper body muscular strength, body composition and flexibility. Those areas are important for overall readiness however, they have not been found to be predictive of how well an individual can perform the duties of LESB personnel. HOW WILL PHYSICAL FITNESS BE MEASURED? There are seven physical fitness tests with standards in the Physical Readiness Test.
1. Vertical Jump. This measures the explosive muscular power of the entire body. 2. Bench press. This measures the absolute muscular strength of the upper body.
3. Agility run. This measures ability to change direction while sprinting. The test consists of sprinting while dodging around obstacles (traffic cones) over a 180-foot course. 4. Sit up test. This measures the muscular endurance of the trunk. The test consists of doing as many correct sit ups in sixty seconds.
5. 300 meter run. This measures anaerobic power or the ability to make an
intense bursts of effort for a short time period or distance. The test consists of running 300 meters as fast as possible.
6. Push up test. This measures the muscular endurance of the upper body.
The test consists of doing as many push ups from the front leaning rest position with no time limit.
7. 1.5 mile run. This measures aerobic power or cardiovascular endurance, the ability to sustain rhythmic movement of large muscle groups for a period of time. The test consists of running/walking 1.5 miles as fast as possible.

FitForce/WITSB/AppB/0215 6
WHAT TEST STANDARDS MUST I MEET?
The tests will be administered in the following sequence. There will be rest periods between each event. Each test is scored separately and you must meet the standard on all of them. The standards are as follows:
Vertical Jump
(inches)
Agility Run (sec)
1 RM Bench Press Ratio
(WP/BW)
Sit Ups
(count)
300
Meter Run (sec)
Push Ups
(count)
1.5 Mile Run
(min:sec)
14.0 19.5
.83
30
68
23
16:57
The physical demands of the job are the same for all law enforcement officers. Likewise, from a legal perspective a single standard is required. Therefore, the LESB readiness standards are the same regardless of gender or age.
SECTION 2: PREPARATION FOR TESTING
The Training and Standards Bureau and the Law Enforcement Standards Board have made a commitment to the total fitness of law enforcement officers in Wisconsin. The fitness testing is intended to compliment a total fitness approach to the physical readiness of personnel. Total fitness requires the development and maintenance of an active lifestyle to include exercise, nutrition, and stress management.
You must first prepare yourself to undergo the fitness testing.
HOW DO I PREPARE FOR THE TESTS?
The first step is to see if you are physically ready to safely engage in physical activity. Individuals who are apparently healthy can usually participate in mild or moderate exercise (such as walking) without any problems and without the need of a medical examination. The term “apparently healthy” refers to the absence of chronic diseases such as hypertension, heart disease, diabetes and the like. There is a simple questionnaire that will provide an index of whether getting a medical examination or physician’s clearance may be needed. Fill out the questionnaire and then follow the suggestions at the bottom of the form.

FitForce/WITSB/AppB/0215 7
PAR-Q ADAPTATION
YES NO ___ ___ 1. Has your doctor ever said that you have a heart condition and
that you should only do physical activity recommended by a doctor?
________________________________________________________________ ___ ___ 2. Do you feel pain in your chest when you do physical activity? ________________________________________________________________ ___ ___ 3. In the past month, have you had chest pain when you were not
doing physical activity? ________________________________________________________________
___ ___ 4. Do you lose your balance because of dizziness or do you ever lose consciousness?
________________________________________________________________
___ ___ 5. Do you have a bone or joint problem (for example, back, knee, or hip) that could be made worse by a change in your physical activity?
________________________________________________________________
___ ___ 6. Is your doctor currently prescribing drugs (for example, water pills) for your blood pressure or heart condition? ________________________________________________________________ __ ___ 7. Do you know of any other reason why you should not do physical
activity? ________________________________________________________________ “I have read, understood and completed this questionnaire. Any questions I had were answered to my full satisfaction.” Name: ________________________ Date: ______________
Signature: _____________________
Cleared for testing: Yes ____ No ___ Coordinator: ______________________

FitForce/WITSB/AppB/0215 8
WHERE DO I START? If you answered no to all the questions and have been exercising on a regular basis (at least 3 times a week engaging in strenuous activity that increases your heart rate and perspiration) then you may move on the Section 3- Fitness Assessments. If you answered yes to any of the questions and have not been exercising then you first may want to consider getting a health or medical screening. You also can initiate a starter program. That program has two components: incorporating activity into daily living and a walking pre- assessment program. Incorporating activity into daily living This involves nothing more than looking for opportunities to expend energy in physical activity. Examples are taking the stairs instead of an elevator. Move around the house or office whenever possible and instead of calling people in other rooms, get up to see them. Throw away the TV remote. Rather than employing someone to always do the yard work, occasionally do it yourself. Some people will deliberately park their car several blocks from work so that they have to walk to the office. If you think through a typical day you will find ample opportunities to expend more energy. Another approach to being more active is to try to decrease sedentary activities. A simple guideline is to stand instead of sitting and walk instead of standing. While there is nothing wrong with sedentary activities such as reading and watching TV, there are substitute activities. For example, you could get books on tape and listen to a book while walking. Instead of sitting around and talking when visiting friends try doing a “walk and talk” together The bottom line is that by seeking opportunities to be more active and expend energy, a movement habit will develop which helps to set the stage for more formal and structured activity. Walking pre-assessment starter program
If you answered yes to one or more of the PARQ questions or if you had some additional screening that suggests that you may have some activity risk, we recommend that you begin your training with an eight week walking starter program before taking the fitness assessments. The walking program below is a progressive program. Each time you walk:
• Warm up before you start your walk by swinging the arms and performing mild stretches.
• Start slowly then pick up the pace. Walk briskly without getting out of breath
• Slow your pace for the last two minutes to serve as a cool down.
• The LESB important dimension is the duration (time) but try to cover the recommended distance for a given time.

FitForce/WITSB/AppB/0215 9
_____________________________________________________________ Sample Walking Program
Warm Up Activity Cool Down Total
Time
WEEK 1
Session A Walk slowly 5 min.
Then walk briskly 5 min.
Then walk slowly 5 min.
15 min.
Session B Repeat above pattern
Session C Repeat above pattern
Continue with at least three walking sessions during each week of the program.
WEEK 2 Walk slowly 5 min.
Then walk briskly 7 min.
Then walk slowly 5 min.
17 min.
WEEK 3 Walk slowly 5 min.
Then walk briskly 9 min.
Then walk slowly 5 min.
19 min.
WEEK 4 Walk slowly 5 min.
Then walk briskly 11 min.
Then walk slowly 5 min.
21 min.
WEEK 5 Walk slowly 5 min.
Then walk briskly 13 min.
Then walk slowly 5 min.
23 min.
WEEK 6 Walk slowly 5 min.
Then walk briskly 15 min.
Then walk slowly 5 min.
25 min.
WEEK 7 Walk slowly 5 min.
Then walk briskly 18 min.
Then walk slowly 5 min.
28 min.
WEEK 8 Walk slowly 5 min.
Then walk briskly 20 min.
Then walk slowly 5 min.
30 min.
WEEK 9 Walk slowly 5 min.
Then walk briskly 23 min.
Then walk slowly 5 min.
33 min.
WEEK 10 Walk slowly 5 min.
Then walk briskly 26 min.
Then walk slowly 5 min.
36 min.
WEEK 11 Walk slowly 5 min.
Then walk briskly 28 min.
Then walk slowly 5 min.
38 min.
WEEK 12 AND BEYOND
Walk slowly 5 min.
Then walk briskly 30 min.
Then walk slowly 5 min.
40 min.
From: Your Guide to Lowering High Blood Pressure, NHLBI Publication

FitForce/WITSB/AppB/0215 10
________________________________________________________________ If you find that the plan for week 1 is too easy, start the program at a level
you are comfortable with. Once you have completed week 12, test yourself with the 1-mile walk test. Based on the results you can determine if you are ready for the regular fitness assessments.
One-Mile Walk
In this test you measure the time it takes to walk a mile and your heart rate at the end of the test.
Equipment
• Stopwatch • 400 meter track or marked level course (1 mile = 4 laps + 30 feet, on a
400meter track)
Procedural tasks
1. Walk 1 mile as fast as possible. Running or jogging is not permitted.
2. When you finish the mile, note your time and immediately find either your radial or carotid pulse. Take the pulse for 6 seconds, and multiply the count by 10. It is critical that you record your pulse as soon as you cross the finish line in order to get an accurate exercise heart rate.
3. Cool down by walking slowly for 5 minutes.
4. Compare your time and heart rate with the norms in Table 2.2. Find your post-test pulse rate on the left side of the chart. Read across until you reach the column corresponding to your age and gender. Adjust that time for your body weight by adding or subtracting 15 seconds for every 10 pounds under or over 175 pounds for men and 125 pounds for women.
5. Note that for a given heart rate there are different times based on age
and gender. This is because maximal heart rate decreases with age. A younger person is working at a lower percentage of his or her maximum cardiovascular endurance than an older individual would be at the same heart rate.
6. Here’s an example of how to use Table 2.2. A 35 year-old female
weighing 135 pounds completes the one mile walk in 16:20. Her six-second pulse at the end of the run was 13. She multiplies 13 by 10, for a post-test heart rate of 130. Reading across the table from 130 to the column for females age 30-39, we find a time of 18:48. Since our subject weighs 135 pounds, we subtract 15 seconds to find her “standard” is 18:33. She can safely take the fitness tests in Chapter 3.
7. If your time for the 1 mile walk is equal to or less than the time on the
chart for your post-test heart rate then you can safely take the fitness

FitForce/WITSB/AppB/0215 11
tests in Chapter 3. If not we recommend that you stay with week 8 program for an additional four weeks and retest.
________________________________________________________________
ONE MILE WALK NORMS Male Female Age 20-29 30-39 40-49 50-59 60+ 20-29 30-39 40-49 50-59 60+ *Assumes body weight of 175 lbs. *Assumes body weight of 125 lbs..
Heart Rate 110 19:36
18:21 18:05 17:49 17:55 20:57 19:46 19:15 18:40 18:00
120 19:10
17:52 17:36 17:20 17:24 20:27 19:18 18:45 18:12 17:30
130 18:35
17:22 17:07 16:51 16:57 20:00 18:48 18:18 17:42 17:01
140 18:06
16:54 16:38 16:22 16:28 19:30 18:18 17:48 17:18 16:31
150 17:36
16:26 16:09 15:53 15:59 19:00 17:48 17:18 16:48 16:02
160 17:19
15:58 15:42 15:26 15:30 18:30 17:18 16:48 16:18 15:32
170 16:39
15:28 15:12 14:56 15:04 18:00 16:54 16:18 15:48 15:04
____________________________________________________________________ Weight ______ Time ______ * adjusted for weight
Heart rate ______ Met norm ______ did not meet norm ______
SECTION 3: PHYSICAL READINESS TEST
If you are a regular exerciser or have completed the starter program the next step is to see where you stand on the Physical Readiness Test standards. The program provided below is for all fitness parameters and not just those represented by the standards. HOW DO I ASSESS MYSELF ON THE FITNESS TESTS?

FitForce/WITSB/AppB/0215 12
Once you have been following the training programs for six weeks you should be ready to assess yourself on the fitness tests. You can take the tests all at one time, which is the process you will undergo when the agency administers the tests, or you can space them out over several days. If you take them in one day we recommend the following sequence: 1. Review the test protocols
Warm up for approximately 10 minutes
2. Vertical jump
3. Bench press
4. Illinois agility run
Rest 5 minutes and review the test protocol
5. Sit up test
Rest 5 minutes and review the test protocol
6. 300 meter run
Rest 10 minutes and review the test protocol
7. Push up
Rest 20 minutes and review the test protocol
Warm up and stretch for 10 minutes
9. 1.5 mile run
Walk for 5 minutes to recover then sit down and gently stretch. Remember to hydrate. TEST PROTOCOLS Vertical jump test Equipment:
• Vertec OR
• Yardstick secured to the wall Vertec Protocol:
a) Stand under the apparatus and reach up as high as possible to mark your standing reach
b) Have somebody adjust the stack of tabs to a point immediately above the tips of your fingers (Figure 1)

FitForce/WITSB/AppB/0215 13
c) Step back with either foot (Figure 2), step forward then jump as high as possible and strike the tabs OR you may jump with both feet and not take a step (Figure 3)
d) Score is the inches jumped to the nearest ½ inch. (Figure 4) e) The best of three (3) trials is the score.
Figure 1
Figure 2

FitForce/WITSB/AppB/0215 14
Figure 3
Figure 4 Yardstick protocol:
a) Stand against the wall, arm overhead, with the side of your body flush to the wall from foot to the tips of the fingers.
b) Reach to the highest point on the yardstick and record the number reached.
c) Take a half a step away from the wall.
FitForce/WITSB/AppB/0215 15
d) Step back with either foot, step forward then jump was high as possible and touch the yardstick OR you may jump with both feet and not take a step.
Bench Press Equipment:
• Bench
• Bar and weights
Procedural tasks
a) Use three spotters. (Figure 5) b) “Do you have an idea of your single repetition maximum in the bench
press?” c) If there is an estimated weight, start with about one-half of that
estimated weight. If not, a weight between the bar alone – 45 lbs., up to one half of your body weight should be used.
d) Performs 3- 5 repetitions with that weight as a warm up. e) You may receive a ‘lift off’ by one of the spotters or you may remove
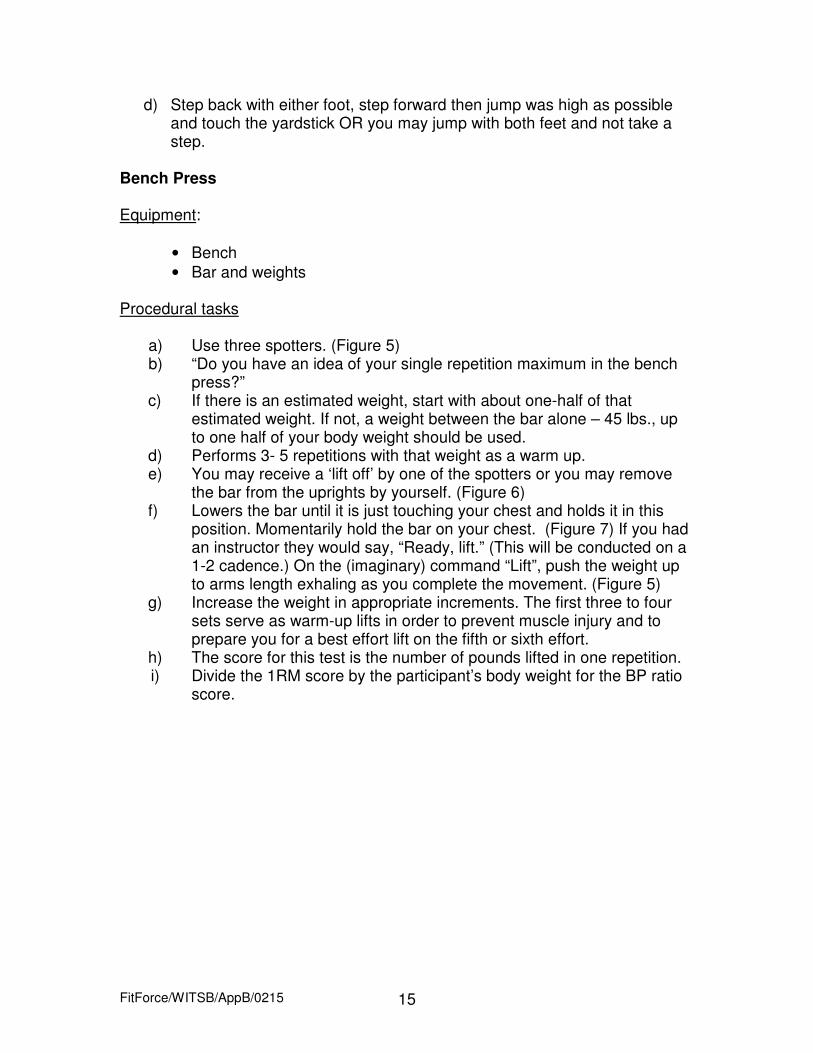
the bar from the uprights by yourself. (Figure 6) f) Lowers the bar until it is just touching your chest and holds it in this
position. Momentarily hold the bar on your chest. (Figure 7) If you had an instructor they would say, “Ready, lift.” (This will be conducted on a 1-2 cadence.) On the (imaginary) command “Lift”, push the weight up to arms length exhaling as you complete the movement. (Figure 5)
g) Increase the weight in appropriate increments. The first three to four sets serve as warm-up lifts in order to prevent muscle injury and to prepare you for a best effort lift on the fifth or sixth effort.
h) The score for this test is the number of pounds lifted in one repetition. i) Divide the 1RM score by the participant’s body weight for the BP ratio
score.

FitForce/WITSB/AppB/0215 16
Figure 5
Figure 6
FitForce/WITSB/AppB/0215 17
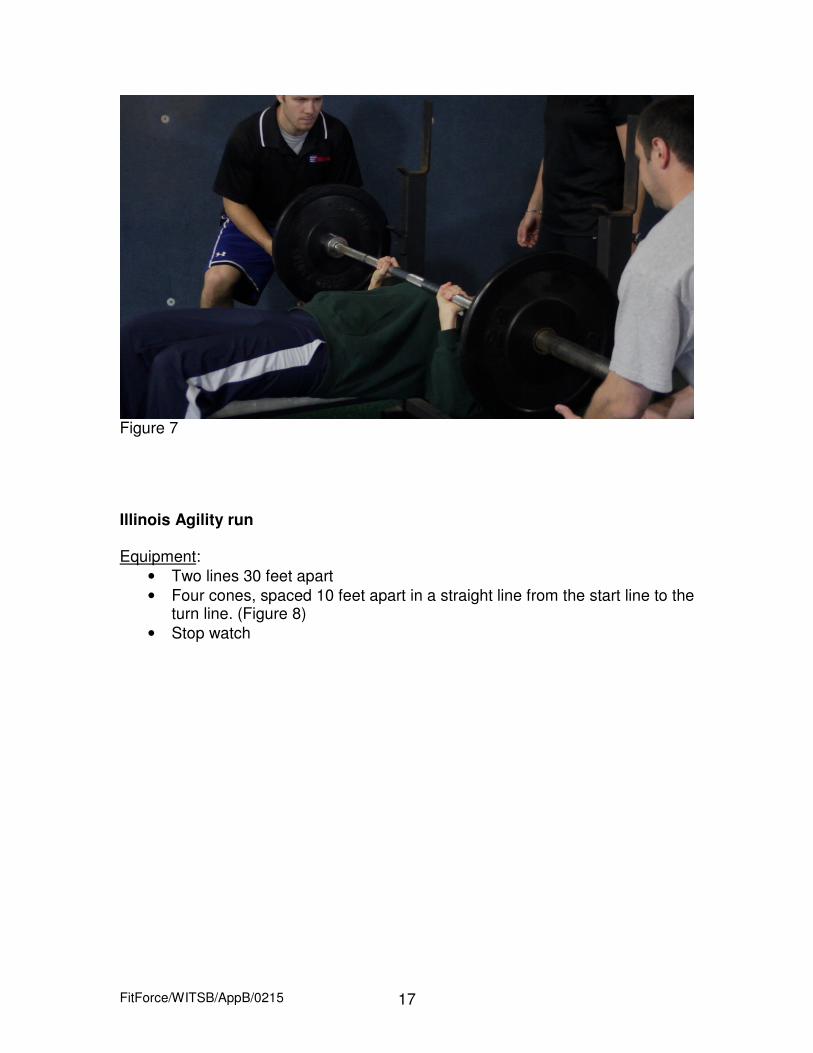
Figure 7 Illinois Agility run Equipment:
• Two lines 30 feet apart
• Four cones, spaced 10 feet apart in a straight line from the start line to the turn line. (Figure 8)
• Stop watch

FitForce/WITSB/AppB/0215 18
Figure 8
Protocol: a) Have somebody act as a ‘testor’ b) Lie on the ground to the left of the first cone with fingertips behind the start
line. (Figure 9) c) At the command “Go’, stand up, sprint to the turn line, place one foot over
the line then sprint back to the start line. d) Make a left turn around the first cone then zig zag in a figure eight fashion
around the four cones to the turn line and back to the start line. (Figure 10) e) Sprint up and back as described in (b). f) Score is time in seconds and tenths. g) Do two trials. Score is the faster time.

FitForce/WITSB/AppB/0215 19
Figure 9
Figure 10 Sit up test Equipment:
• Mat
• Stopwatch

FitForce/WITSB/AppB/0215 20
Protocol: a) Begin by lying on your back, knees bent, and heels flat on the floor.
Keep your finger tips behind your ears. (Figure 11) b) Secure your feet or have a partner hold your feet down. c) Perform as many correct sit-ups as possible in one minute. d) Start in the down position; lift your trunk by bending at the waist; touch
or extend past your knees with your elbows, then return your shoulder blades to the ground before starting the next sit up. You may rest momentarily in the ‘up’ position but the goal is to keep moving. (Figure 12)
e) You cannot raise your buttocks from the ground and when returning to the down position your shoulder blades must touch the ground.
f) Score is total number of correct sit-ups in 1 minute.
Figure 11

FitForce/WITSB/AppB/0215 21
Figure 12 300 meter run Equipment:
• Marked course of 300 meters (328 yards or 984 feet). On a 440 yard track the 300 meter line would be 112 yards (336 ft.) from the finish line. (Figure 13)
• Stop watch

FitForce/WITSB/AppB/0215 22
Figure 13 Protocol:
a) Warm up thoroughly before test. b) Run the 300 meters as fast as possible. c) Record the time it took to complete the run.
Push Up Test Procedure:
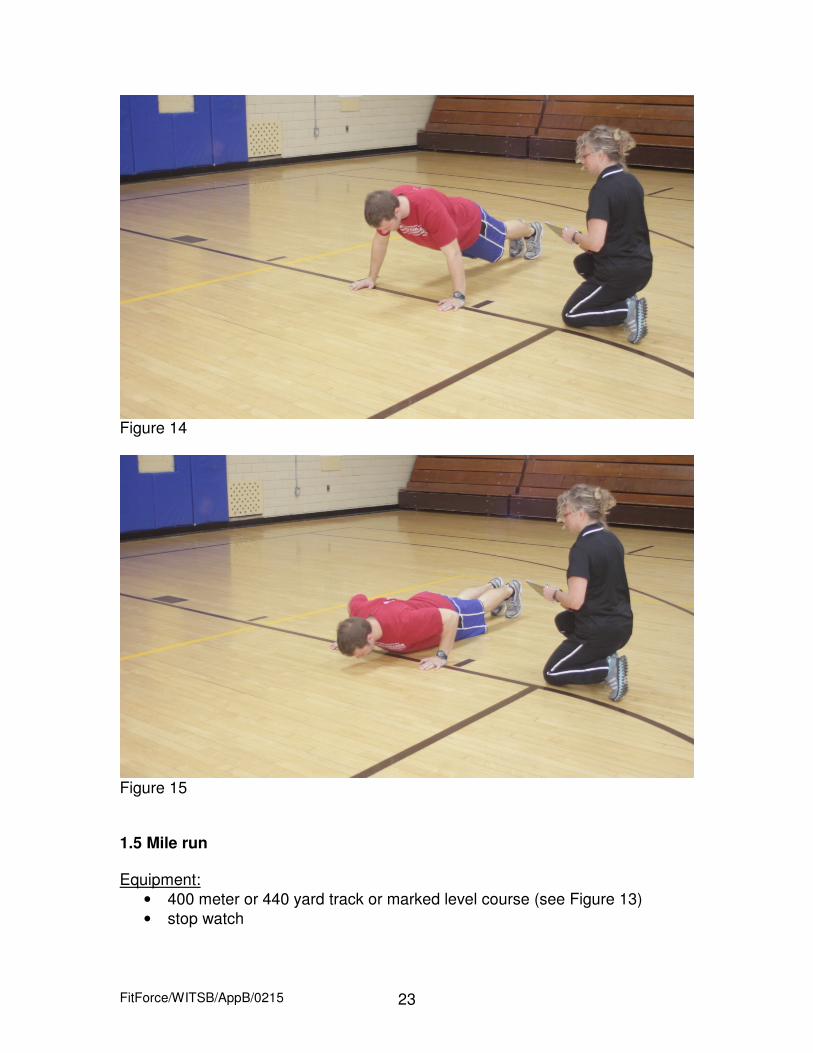
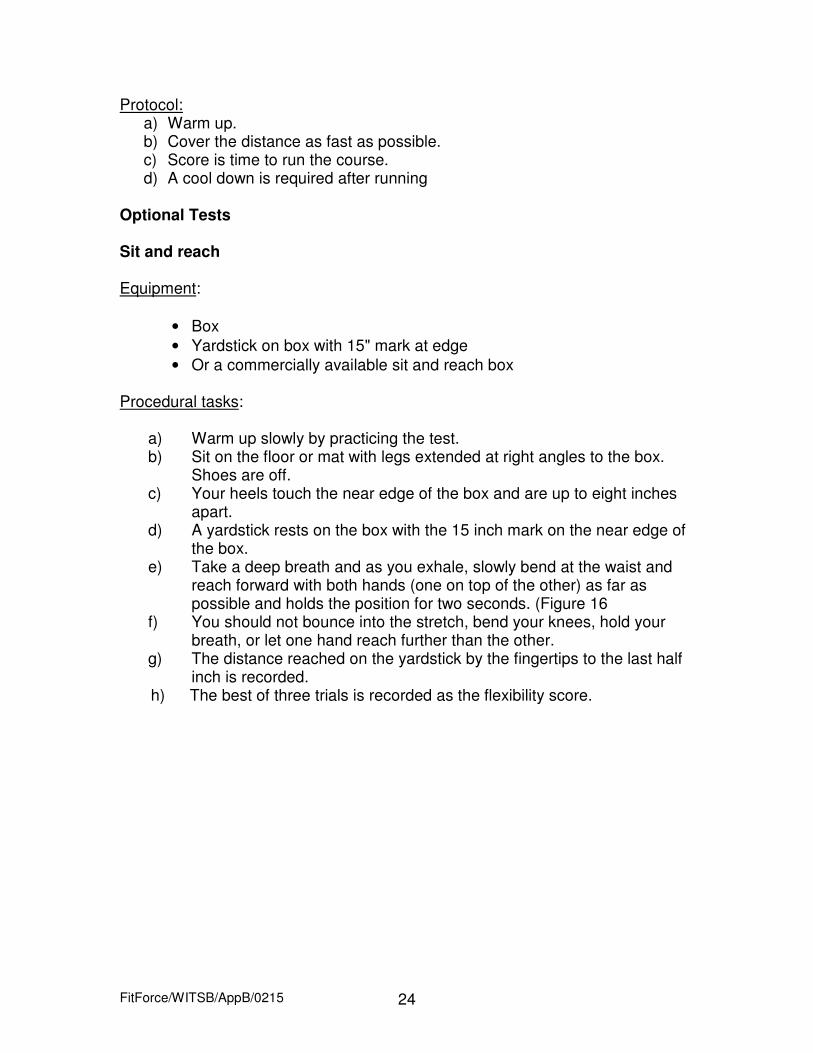
a) Start in the front leaning rest position, with your body in a generally straight line from your shoulders to your ankles. Hands are slightly more than shoulder width apart, feet are up to 12" apart. (Figure 14)
b) Lower yourself until the upper arms are parallel to the ground, then push up again until your arms are fully extended. Softly lock your elbows each time. You may rest momentarily in the up position but the goal is to keep moving for the entire test. (Figure 15)
c) Perform as many correct push ups as possible. There is no time limit.
FitForce/WITSB/AppB/0215 23
Figure 14
Figure 15 1.5 Mile run Equipment:
• 400 meter or 440 yard track or marked level course (see Figure 13)
• stop watch
FitForce/WITSB/AppB/0215 24
Protocol: a) Warm up. b) Cover the distance as fast as possible. c) Score is time to run the course. d) A cool down is required after running
Optional Tests Sit and reach Equipment:
• Box
• Yardstick on box with 15" mark at edge
• Or a commercially available sit and reach box Procedural tasks: a) Warm up slowly by practicing the test. b) Sit on the floor or mat with legs extended at right angles to the box.
Shoes are off. c) Your heels touch the near edge of the box and are up to eight inches
apart. d) A yardstick rests on the box with the 15 inch mark on the near edge of
the box. e) Take a deep breath and as you exhale, slowly bend at the waist and
reach forward with both hands (one on top of the other) as far as possible and holds the position for two seconds. (Figure 16
f) You should not bounce into the stretch, bend your knees, hold your breath, or let one hand reach further than the other.
g) The distance reached on the yardstick by the fingertips to the last half inch is recorded.
h) The best of three trials is recorded as the flexibility score.

FitForce/WITSB/AppB/0215 25
Figure 16 Pull up test Equipment
• Free-standing or wall-mounted pull up bar Procedural tasks
a) Stand under the bar; you may jump, climb, or be lifted to the bar to facilitate a good grip.
b) Squeeze the bar while bending the arms at the elbows; pull yourself up until your chin ‘clears’ the bar.
c) Return to a straight arm (dead hang) position and repeat d) You may not ‘kip’ up to the bar. e) Score is the correct number of pull-ups.

FitForce/WITSB/AppB/0215 26
PHYSICAL READINESS TEST - SCORE SHEET Name: ______________________________ Date: __________ Height
______ - ______ Feet Inches
Weight
____________ lbs
Vertical jump
____________ inches
Bench Press (Opt.)
Raw
_____________ lbs
Ratio
Wt pressed / body weight ______ / _______ = __________ ratio
Agility run
____________ seconds
Sit ups
_____________ count
300 meter run
_____________ seconds
Push ups
_____________ count
1.5 mile run
_____________ min:sec
Pull ups (Optional)
_____________ count
Sit and Reach (Opt.)
____________ inches
FitForce/WITSB/AppB/0215 27
SECTION 4: SETTING FITNESS GOALS Most of us perform better when we have a specific goal to work toward. A goal gives meaning to our actions, helps establish intermediate benchmarks to check progress, and provides motivation. Studies have shown that people have greater adherence to programs when they set goals, and the adherence is even stronger when they write their goals down. Goal setting should be an ongoing, systematic, and progressive process.
Your fitness assessment scores tell you where you are, and the standards tell you where you eventually need to be. Goals are the intermediate steps to aim for.
The CHAMPS Goal Setting Approach Through the years we have learned how to make goal setting more effective. These concepts are relatively simple, and to help you remember them we have developed an acronym – CHAMPS. CHAMPS represents these principles of effective goal setting in that goals should be - Challenging, Homed-in, Attainable, Measurable, Performance oriented, and be Short-, Mid-, and Long Range .
Challenging. To be effective, goals must challenge the individual. To set a goal of losing one pound is not challenging, and will not cause a person to maintain interest in accomplishing that goal. Homed-in. We often hear officers state goals of “getting in shape” or “toning up.” While those goals may be challenging, they are not specific enough to develop a plan of action.
Attainable. A goal of winning the Olympic Marathon is challenging and homed-in, but only attainable for an extremely limited group of elite endurance athletes. A more attainable goal might be to someday run a marathon. Measurable. In addition to lacking specificity, goals such as “getting in shape” aren’t necessarily measurable. A goal to become more active or change body composition is measurable. Performance. Examples of performance goals are to walk five days a week, get to the weight room three times a week, and make ten food substitutions a week. You have complete control to accomplish performance goals. You are probably more familiar with “outcome” goals, such as losing ten pounds, improving your bench press to 225 pounds, or improving your time on the 1.5 mile run by 30 seconds. Outcome goals may be appropriate for more experienced officers. But they can discourage a beginner. For example, an

FitForce/WITSB/AppB/0215 28
officer sets a goal to lose 8 pounds in 30 days – challenging, homed-in, attainable, and measurable. In spite of increasing activity levels and consuming fewer calories, the officer loses only six pounds. The mind set may be, “I did everything I was supposed to, and I failed.” Officers having this experience are more apt to drop out of the program. On the other hand, if the officer’s goals were to walk five days a week, lift three times a week, and make 50 food substitutions, he has complete control whether or not he meets those goals. If he attains those goals, the chances are three things are going to happen. One, he will lose some weight. Two, he will start developing some new habits. And, three, he will feel a sense of accomplishment for having successfully attained his goals.
Short-, mid-, and long-range goals. An officer who is currently running ten miles a week sets a goal of running a marathon. It is highly unlikely this officer will go from a long run of two miles to being able to complete a marathon without some intermediate goals. She might decide to plan backward from the date of the race: Be able to run 20 miles four weeks before the race; do a half-marathon (13.1 miles) four months prior to the race; run ten miles six months prior; and double the length of her long run to four miles then add one mile a month until reaching ten miles.
Use of the Goal Setting Chart For those who exercise regularly following the training guidelines in the next section it will take 3 to 4 weeks to achieve improvement in each component of fitness. Untrained persons may see some improvements in shorter times. You can expect between 15-20 % gains in cardiovascular endurance in 12 weeks. Once you are used to training you can expect a 4% gain in strength every 1-2 weeks and a 15-20 % gain in flexibility over a 12-week period. Expect a 5%-10% gain every 12 weeks in explosive strength, anaerobic power and agility. To fill out the goal-setting sheet, follow these steps:
1. Make several copies of the Goal Setting Chart because you will periodically reassess your goals.
2. From your assessment sheet, fill in the scores on each of the tests. 3. The standard for each test is already on the chart. 4. Once you have decided on a short-term goal for each of the events,
record it in the immediate goal column. 5. Decide on how much time you are going to give yourself to achieve each
goal, and record it in the appropriate space. Allow 4-12 weeks between retesting. Remember the guidelines on how long it takes to achieve a training effect, and time your goal accordingly. Allow enough time to ensure that there will be some improvement, but don’t set times so far out that you lose interest.
6. Post a copy of your goals where you will see them several times every day.

FitForce/WITSB/AppB/0215 29
Goal setting is important in everything that you do. It’s virtually impossible to accomplish anything worthwhile if you do not know what it is you are trying to achieve. Use the information here and in the next chapter to give yourself a realistic road map to get you where you want to go, and an idea of what roadblocks may get in your way. ________________________________________________________________
GOAL SETTING CHART Test Current
Raw Score Standard (Circle)
Intermediate Goal
Time to Intermediate Goal
Vertical jump
14.0”
Bench Press Raw (lbs)
83% of
Body weight
Bench Press Ratio (lbs/bw)
Agility run
19.5 seconds
Sit ups
30
300 meter run
68 seconds
Push ups
23
1.5 mile run
16:57
Pull ups
Sit and reach
________________________________________________________________

FitForce/WITSB/AppB/0215 30
SECTION 5: DESIGNING A TRAINING PROGRAM HOW DO I TRAIN FOR THE TESTS?
Once you have determined that it is safe to exercise and where you currently stand on the fitness standards the next step is start a training program to increase each fitness area to meet the standards. While the focus is on increasing your fitness level to meet the physical readiness standard, the program is also designed to increase your total fitness to sustain throughout your career. There are eleven proven principles of exercise for following a fitness program. These principles of exercise tell you how to exercise correctly and safely. Principle #1: Regularity
The weekend-warrior approach to fitness training will probably produce more injuries than desirable results. To be effective, a fitness program must be followed regularly. Trying to get all the training you need in irregular bursts doesn’t work. Rather, your training should be consistent throughout the week, the month, the year, and your life. Fitness research indicates that it takes a minimum of three exercise sessions per week to achieve cardiovascular training. There are indications that as few as two strength and anaerobic training sessions per week are necessary to see gains in that area. Experts tell us that an energy system or muscle group will begin to de-condition after 96 hours of inactivity. While this change will be imperceptible, it does give us a parameter for regularity. As a rule of thumb, plan your workouts so there is no more than 96 hours between hard training sessions for the same energy system or muscle group. Principle #2: Recovery
The body needs time to recover between hard exercise sessions. As a general rule, allow 48 hours for that recovery between hard exercise sessions. For example, if you lift weights for the upper body on Monday, you should wait until Wednesday before training those muscles again. However, working out the lower body on Tuesday will not violate this principle. The threshold values for the frequency of training, e.g., three times a week for aerobic power, were developed using a convention familiar to everyone. However, defining a week as a seven day period beginning on Sunday and ending on Saturday is not always applicable to law enforcement officers. Your training week may be seven, eight or even nine days long. The key is that you it is regular and provides enough recovery time.

FitForce/WITSB/AppB/0215 31
Principle #3: Reversibility
Fitness is a “use it or lose it” proposition, and most training adaptations are reversible. It takes longer to achieve a level of fitness than it does to lose it. Some setbacks in your training regimen are almost unavoidable. So the more “money in the bank” that you have stored up, the more able you will be to withstand those periods when you are unable to train. You must maintain your training. Principle #4: Overload
For a training program to have an effect, the demands placed on the body must be greater than those of your day-to-day activities. You’ll never improve your cardiovascular endurance if your most strenuous exercise is walking from the patrol car to the headquarters building (although a brisk walk might produce a training effect). Nor will you increase your strength if you never overcome any more resistance than lifting a coffee cup. For each part of your program, as your fitness level improves you must increase the demands of your training to ensure overload.
Principle #5: Progression
There are two aspects of progression. One, as noted, is that as your level of fitness improves, you must increase the overload. The second is that these changes should be gradual. To improve your cardiovascular endurance, you must systematically train faster and/or longer. To improve your strength, you must increase the resistance your muscles must overcome. As your body adapts to the current overload, you must progressively increase that overload to continue to improve. Principle #6: Balance
To achieve total fitness, you must avoid concentrating on just one component. Sometimes people tend to concentrate on what they enjoy the most or do the best. Therefore, if you really enjoy running but don’t enjoy strength training, you may tend to sacrifice the strength training and do more running. That’s not bad, but you would be better off to do some training for all of the components of physical fitness, especially since all components are required of the job. Balance is also important when it comes to injury prevention. Training a muscle while ignoring its antagonist, e.g., working the biceps but not the triceps, makes the weaker muscle more susceptible to injury. Principle #7: Variety
Variety ties in with balance, recovery, and specificity. Even the most die-hard fitness enthusiasts would get bored if they did the same exercises every
FitForce/WITSB/AppB/0215 32
day. Vary your routine to reduce the chance of boredom. For example, if you like to swim and have access to a pool, use both swimming and running to develop aerobic power and keep you excited about exercising. Find different places to train. Explore different weight training routines so that part of your program doesn’t become stale. Principle #8: Specificity
Specificity in the fitness context means that you get good at what you practice. Running or other cardiovascular activities will not improve your muscular strength, and vice versa. It also means that you will show the greatest improvement in whatever activity you use for training. Running to improve your cardiovascular endurance won’t improve your swimming or cycling as much as it will improve your running ability. Principle #9: Adaptation
The body adjusts to the effects of training, but does it in small increments. Over time, these small increments cause major changes in your body. For example, the increases in muscle mass from strength training don’t happen overnight. But one day you will discover that you need a new uniform because the old one doesn’t fit the same way anymore. Only by comparing periodic measurements can you truly appreciate the day-to-day adaptations that are occurring. Understanding that fitness is a long-term investment is important to avoid frustration and disappointment. Principle #10: Individuality
Each person will respond somewhat differently to the same training routine. These differences are due to several factors, including heredity, eating and sleeping habits, the environment, illnesses and injuries, level of fitness, and motivation.
The principle of individuality means that some of you are more likely to become more fit in a cardiovascular way than you are to become really strong. Some are more likely to be good runners, others good swimmers, and yet others better bikers. And each of you has a different individual potential for how good you can be. Principle #11: Moderation
Too much of anything can be bad. For best results, you must be dedicated to your program, but temper that dedication with common sense and good judgment. Don’t train when you are injured. Also, more is not necessarily better. Too much distance, speed, weight, or time can all lead to deterioration rather

FitForce/WITSB/AppB/0215 33
than development. Moderation in all things, not just physical training, is a good rule for life. FITT Principles
To design a fitness program, you must consider all the exercise principles. LESB importantly, you need to know how often, how hard, and how long to exercise and what activities will produce a training effect. To help you remember this information, use the acronym FITT: Frequency, Intensity, Time, and Type of exercise which incorporates all the principles.
All of the information you need to develop a prescription for your fitness
training can be summarized using the acronym FITT:
F — Frequency. How often to perform the type of exercise. Frequency incorporates the principles of regularity, recovery, and reversibility.
I — Intensity. How hard to exercise. Intensity incorporates the principles of overload and progression.
T — Time. How long the exercise session should be. Time also incorporates the principles of overload and progression.
T — Type. What types or modes of activities train each component. Type incorporates the principles of balance, variety, and specificity.
WHAT ARE THE SPECIFIC TRAINING PROGRAMS TO INCREASE PERFORMANCE ON THE DODGE CITY POLICE DEPARTMENT PHYSICAL READINESS TESTS? Each fitness area has unique FITT elements. A specifically designed program is provided for you to improve performance on each test in the PRT battery. Cardiovascular endurance – the 1.5 mile run test Cardiovascular training is necessary to improve on the 1.5 mile run to meet the standard. The general FITT guidelines are:
FITT GUIDELINES FOR CVE TRAINING
Frequency = 3-5 days per week Intensity = Train at between 60-85% of your maximum heart rate range Time = 20-30 minutes Type = Fast paced walking and jogging

FitForce/WITSB/AppB/0215 34
Cardiovascular training is exercise that stimulates changes in the oxygen transport system. For cardiovascular changes to occur, the body must be forced to perform a physical effort that requires large amounts of oxygen to be consumed. That is why cardiovascular activities are also called aerobic exercise, since aerobic means “with oxygen or air”.
Aerobic activities are exercises that, by forcing the body to use more oxygen, enable us to produce more energy. Oxygen comes into our body through the air we take in through our lungs and passes into the bloodstream. The heart pumps that oxygenated blood through the arteries to the working muscles where the oxygen combines with the stored sugars and fats (fuels) in the muscle to produce energy. The better trained our lungs are to intake oxygen, the better trained our heart is to pump the oxygenated blood and the better trained our muscles are to use the oxygen, then the more efficient the entire cardiovascular system is at making energy and sustaining endurance activity.
Your heart rate is a practical indicator of how much oxygen is being consumed. When our oxygen consumption goes up so does our heart rate in a parallel manner. So, monitoring your heart rate can be a good method to determine if you are exercising correctly to increase cardiovascular endurance. The training method for accomplishing this is called Heart Rate training. The following Heart Rate Training Plan can be used to apply these guidelines to design your program. It is used as follows:
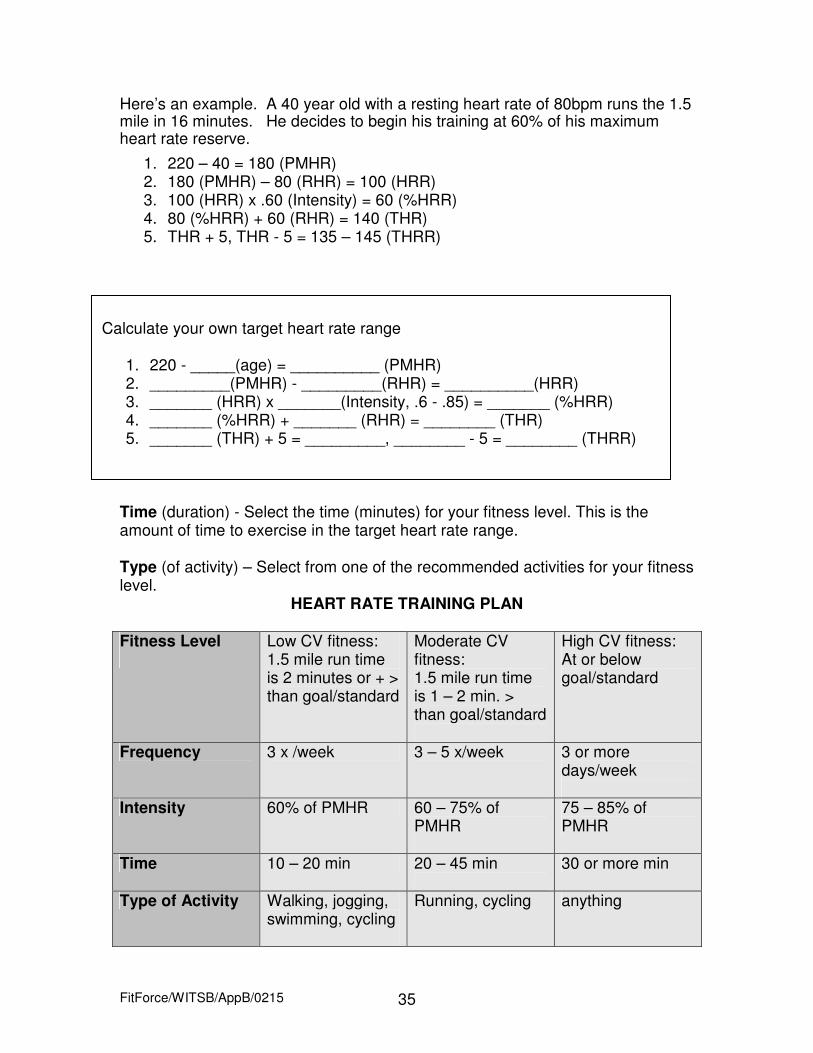
Fitness level – Based on your time for the 1.5 mile run, identify your CVE fitness level. Frequency –For your fitness level, select a number of days for CVE training. Intensity – Select an intensity for your fitness category. Target heart rate - Calculate the target heart rate for the selected intensity. There are five steps: 1. Determine your predicted maximum heart rate (PMHR) by subtracting your age from 220. 2. Subtract your resting heart rate from your PMHR to get your heart rate reserve (HRR). 3. Multiply the HRR by the selected intensity of exercise, expressed as a percent of maximum heart rate – usually between 60 and 85% or .60 - .85) to get the percent of HRR. 4. Add the percent of HRR to the resting heart rate to get the target heart rate (THR). 5. Add and subtract five beats to that amount to establish a target heart rate range (THRR). Maintain your heart rate in that range while exercising.
FitForce/WITSB/AppB/0215 35
Here’s an example. A 40 year old with a resting heart rate of 80bpm runs the 1.5 mile in 16 minutes. He decides to begin his training at 60% of his maximum heart rate reserve.
1. 220 – 40 = 180 (PMHR) 2. 180 (PMHR) – 80 (RHR) = 100 (HRR) 3. 100 (HRR) x .60 (Intensity) = 60 (%HRR) 4. 80 (%HRR) + 60 (RHR) = 140 (THR) 5. THR + 5, THR - 5 = 135 – 145 (THRR)
Time (duration) - Select the time (minutes) for your fitness level. This is the amount of time to exercise in the target heart rate range. Type (of activity) – Select from one of the recommended activities for your fitness level.
HEART RATE TRAINING PLAN Fitness Level
Low CV fitness: 1.5 mile run time is 2 minutes or + > than goal/standard
Moderate CV fitness: 1.5 mile run time is 1 – 2 min. > than goal/standard
High CV fitness: At or below goal/standard
Frequency 3 x /week 3 – 5 x/week 3 or more days/week
Intensity 60% of PMHR 60 – 75% of PMHR
75 – 85% of PMHR
Time 10 – 20 min 20 – 45 min
30 or more min
Type of Activity Walking, jogging, swimming, cycling
Running, cycling anything
Calculate your own target heart rate range
1. 220 - _____(age) = __________ (PMHR) 2. _________(PMHR) - _________(RHR) = __________(HRR) 3. _______ (HRR) x _______(Intensity, .6 - .85) = _______ (%HRR) 4. _______ (%HRR) + _______ (RHR) = ________ (THR) 5. _______ (THR) + 5 = _________, ________ - 5 = ________ (THRR)

FitForce/WITSB/AppB/0215 36
The best way to know if you are staying within your THR range is to use a heart rate monitor. If you don’t have a heart rate monitor, after you have been exercising for three to five minutes, stop and take your pulse rate for 10 seconds. Multiply that pulse rate by 6. If your pulse rate is within 5 beats above or below your target heart rate your effort (pace) is about right. If your pulse is too high, slow down or if it is too low, speed up your effort. To specifically prepare for the 1.5 mile run the running program below should help you attain the goal. ________________________________________________________________
Week
Activity
Distance
Time
Frequency
1 Walk 1 mile 17 – 20 min 3 – 5x/week
2 Walk 1.5 mile 25 – 29 min 3 – 5x/week
3 Walk 2 miles 32 – 35 min 3 – 5x/week
4 Walk 2 miles 28 – 30 min 3 – 5x/week
5 Walk/jog 2 miles 27 min 3 – 5x/week
6 Walk/jog 2 miles 26 min 3 – 5x/week
7 Walk/jog 2 miles 25 min 3 – 5x/week
8 Walk/jog 2 miles 24 min 3 – 5x/week
9 Jog 2 miles 23 min 3 – 5x/week
10 Jog 2 miles 22 min 3 – 5x/week
11 Jog 2 miles 21 min 3 – 5x/week
12 Jog 2 miles 20 min 3 – 5x/week
________________________________________________________________ Resistance strength training for the push up and 1RM bench press tests
This training is required to improve the 1RM bench press, and push up scores to meet the respective standards.
Muscular strength and endurance (MSE) is the ability of a muscle or a
group of muscles to generate and sustain force. Absolute strength is the maximal amount of force that a muscle can generate in one contraction. Dynamic strength

FitForce/WITSB/AppB/0215 37
is the ability of a muscle to make repeated contractions. Strength and endurance are developed by forcing the muscle to contract against a resistance.
The same general principles apply as with aerobic training only the overloading of the muscle is done by either increasing the resistance or the number of repetitions of a given exercise. There are several training modes for increasing strength depending upon the access to equipment. The first type MSE training is a calisthenic routine. Calisthenic routine for the push up
The most effective resistance training is that done with weight machines or free weights, because it is possible to vary the resistance (weight) for each exercise. However calisthenic exercises which use the same resistance (body weight) are a more practical means for some people to increase strength and muscular endurance. They do not require equipment or much space to perform them. The FITT recommendations for strength and muscular endurance development using calisthenic exercise are as follows:
As noted, the time factor is defined in terms of repetitions and sets. A
repetition is the number of times you do an exercise. For example, an individual completes 20 push ups in one minute. She will start her push up training by doing 10 repetitions per set. A set is the number of times she will do the 10 repetitions.
Calisthenic exercises, sometimes called free body exercises, have been used for centuries. Your body weight and gravity provide the resistance. Consequently the only variables are the numbers of sets and repetitions.
The following Calisthenics Training Plan applies these guidelines and can
be used to design your program. Feel free to add exercises to this list to work all the major muscle groups. ________________________________________________________________
FITT GUIDELINES FOR CALISTHENIC TRAINING
Frequency = 3 or 4 times a week on alternate days Intensity = Body weight. You can increase the resistance by holding
weights, wearing a weighted vest or having a partner resist your movement through the range of motion
Time = 1 to 3 sets of 50% of repetitions that can be done for each exercise in 1 minute
Type = Calisthenic exercises

FitForce/WITSB/AppB/0215 38
CALISTHENIC EXERCISES
Muscle Group
Exercise
Description
Erector Spinae (lower back)
Back extension
Begin flat on stomach, arms bent, hands behind head. Exhale and arch back, lift trunk off floor, gradually lift chin high off floor.
Pectorals/ Deltoids
Push up
Begin in the front leaning rest position, back straight, hands on the floor approximately shoulder width, fingers in line with the body, inhale, bend the elbows and lower body until upper arms and back are parallel to floor, extend up arms lifting body until arms ‘softly lock’ at the top.
Latissimus Dorsi/ Rhomboids
Modified row
Place a loaded bar on a rack or use a secure bar set at approximately belly height. Grasp the bar in an overhand grip, maintain a straight body posture with heels on the ground, exhale, flex the arms and pull chest up to the bar, slowly return and repeat.
Triceps
Dip
Using either a dip station or chair backs or a bench, grasp the apparatus with hands slightly outside shoulder width and assume an arms straight starting position, inhale, bend the elbows, and lower body, exhale, extend arms until straight and repeat.
Biceps
Pull up
Grasp a chinning bar with a palms away grip, begin from the hanging position, exhale, bend the arms lifting the body until the chin is above the bar, slowly lower the body until the arms are straight and repeat.
Rectus
Sit up
Begin flat on your back, knees bent,

FitForce/WITSB/AppB/0215 39
Abdominis heels flat on the floor, feet secured, arms bent, hands cupping the ears, exhale, bend at the waist, raise trunk until elbows touch the knees or go beyond them, slowly return the shoulder blades to the floor and repeat.
Quadriceps
Squat
Assume a shoulder width or more foot position, toes slightly pointed out, knees in line with the toes, lift the chest, place the back of one hand in the small of the back and slightly arch the lower back, take a small breath in, begin the squat by bending the knees and sitting to the rear as if ‘looking’ for a seat, keep the chest up, back slightly arched, knees in line with the toes and descend to the deepest position possible while maintaining this posture (you may gradually increase the range of motion throughout the set), exhale and return to the starting position, lifting the head up first and fast and repeat.
Biceps Femoris
Single leg deadlift
Begin standing upright, place all of the body’s weight on one leg, leaving the other foot ‘empty’. Maintain a very slight bend in the loaded knee, keep the back straight, eyes straight ahead, inhale slightly, bend at waist, extend the empty foot to the rear until the upper body is parallel to the floor and the rear leg is straight forming a line from heel to head, the arms may hang and the hands may touch the floor for balance. Exhale, push the ball of the foot into the floor and slowly lift the body and lower the leg until straight and upright, repeat.
Gastrocnemius
¼ Squat heel raise
Begin with a feet shoulder width or slightly more position, feet straight or toes slightly to the outside, knees in line with the toes, chest up, lower back slightly arched, begin by bending the knees and pushing buttocks to the rear

FitForce/WITSB/AppB/0215 40
until the legs are bent in approximately ¼ of the way, exhale, and rapidly stand up, rising to the tops of the toes, repeat.
*These exercises maybe contraindicated for those who have back problems. Check with your doctor.
In the calisthenic training program, perform each set as a circuit. In other
words, do one set of each exercise in sequence, then start again with the first exercise and proceed through the sequence for the second set, then again for the third set. To develop a calisthenic training plan, use the Calisthenics Strength Training Plan following this sequence:
1. Select the exercises listed below or substitute ones that work the same
muscle groups. 2. Determine the number of repetitions of each exercise you can do in 1
minute. This is your one minute max (1MM) 3. Follow the sequence on the form, starting with large muscle groups and
moving to smaller ones. This sequence orders the exercises first for the upper body, then the lower body. Alternate pushing and pulling movements.
4. During week 1, perform one set of maximum repetitions for each exercise, i.e., the 1MM.
5. For week 2, divide the number of repetitions for each exercise by one half. This is your calisthenic exercise dosage (CED). Add a second set.
6. For weeks 3 and 4, add a third set of repetitions, again performing half of the repetitions done in the first week.
7. At the beginning of week 5, perform as many repetitions of each exercise as you can in one minute. This is your new 1MM. Calculate a new CED.
8. Maintain at 3 sets but recalculate your 1MM and CED every four weeks. 9.
CALISTHENIC STRENGTH TRAINING PLAN
Exercise
Week 1 1MM/ CED
Week 2 2 x CED
Week 3 3 x CED
Week 4 3 x CED
Back extension
Push up

FitForce/WITSB/AppB/0215 41
Modified row Dip
Pull up
Sit up
Squat
Single leg deadlift
¼ Squat heel raise
This routine will not only provide total body muscular endurance conditioning, but will also improve your push up score.
Weight training routine for 1 RM bench press
While the calisthenics routine will aid in developing muscle endurance it is not as efficient in developing absolute strength since the resistance cannot be varied as much. Weight training, whether with free weights or machines, is the LESB efficient method.
For a muscle to increase strength or endurance, you must place a higher workload on the muscle than is provided by your normal daily activity. The workload variables consist of the resistance, the number of sets, and the number of repetitions in each set of exercises.
FITT GUIDELINES FOR MSE TRAINING
Frequency = 3 or 4 times a week on alternate days Intensity = % age of 1RM maximum weight
muscular endurance = 40-60% muscular strength= 80-95% both = 60-80% Time = sets and reps muscular endurance = 15-20 reps 1 to 3 sets muscular strength = 2-6 reps both = 8-12 reps Type = weight machines, free weights, resistance bands, or
partner resisted

FitForce/WITSB/AppB/0215 42
A method often used for determining intensity is to work with percentages of the most weight you can lift in one all-out effort, called one-repetition maximum (1RM). This was the process you used to assess the 1RM bench press. As part of your weight-training program you could do this for all the exercises. A safer method is to reverse-engineer your starting weight. For example, an individual decides to train for a combination of muscular strength and endurance. Using the 1RM approach, he would see how much weight he could lift for each exercise, and start training with 60-80% of that resistance. Or he could estimate the amount he resistance he could overcome for 8-12 correct repetitions. If he could perform more than 12 correct repetitions with a weight, he’d add some resistance. On the other hand, he would lower the resistance if he found he couldn’t do at least eight reps. This approach could take several iterations to find the correct starting weight. But if you start by underestimating the starting weight, you will greatly reduce the chance of injury. This trial and error approach will also enable you to become more familiar with the exercises if you are a beginner. Continuing with this example, this officer would add resistance once he could perform 12 correct repetitions. Depending on the starting weight, you may add 5-25% as your strength improves.
__________________________________________________________________
WEIGHT TRAINING EXERCISES Exercise
Machines
Free Weights
Quadriceps/ Gluteals
Leg press
Squat
Biceps Femoris
Leg curl
Single leg deadlift (dumbbells)
Gastrocnemius
Seated heel raise
¼ Squat heel raise (barbell)
Pectorals
Bench press
Bench press (dumbbells or barbells)
Latissimus Dorsi/ Rhomboids
Seated row
Bent over row (dumbbell or barbell)
Deltoids
Military press
Military press (dumbbells or barbell)
Latissimus Dorsi
Lat pull down
Pull up

FitForce/WITSB/AppB/0215 43
Triceps
Tricep extension
Tricep extension (dumbbell or barbell)
Biceps
Curls
Curls (dumbbells or barbell)
Erector Spinae
Back extension
Good morning exercise (bodyweight, barbell)
Rectus Abdominis
Insert abdominal exercises throughout the weight training session, in between, or before BUT not after.
Free weight exercises are described below:
__________________________________________________________________
FREE WEIGHT DESCRIPTIONS
Squat
Same as the calisthenic version however, a barbell may be placed across the back of the shoulders, dumbbells may be held in each hand, or a single dumbbell may be held at chest height in both hands. Caution: Always use a rack and one or more spotters when using a barbell. Single leg deadlift Same as the calisthenic version; begin with very light dumbbells, held on end and use for balance. As fitness improves, use progressively heavier dumbbells in each hand. ¼ Squat heel raise Same as the calisthenic version however, a barbell may be placed across the back of the shoulders, dumbbells may be held in each hand, or a single dumbbell may be held at chest height in both hands. Caution: Always use a rack and one or more spotters when using a barbell. Bench press This may be performed in the same manner as the test, with a barbell, or a dumbbell may be used in each hand. Caution: When training with a barbell and heavy weights, ALWAYS have one or more spotters.
FitForce/WITSB/AppB/0215 44
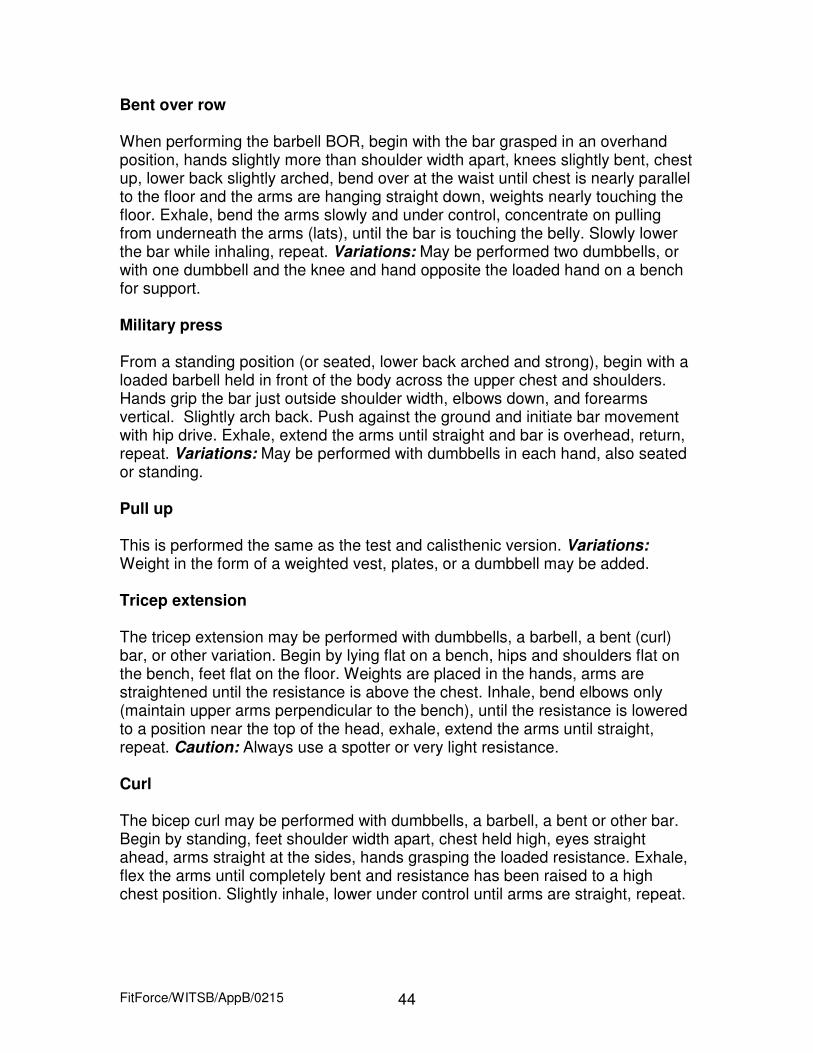
Bent over row When performing the barbell BOR, begin with the bar grasped in an overhand position, hands slightly more than shoulder width apart, knees slightly bent, chest up, lower back slightly arched, bend over at the waist until chest is nearly parallel to the floor and the arms are hanging straight down, weights nearly touching the floor. Exhale, bend the arms slowly and under control, concentrate on pulling from underneath the arms (lats), until the bar is touching the belly. Slowly lower the bar while inhaling, repeat. Variations: May be performed two dumbbells, or with one dumbbell and the knee and hand opposite the loaded hand on a bench for support. Military press From a standing position (or seated, lower back arched and strong), begin with a loaded barbell held in front of the body across the upper chest and shoulders. Hands grip the bar just outside shoulder width, elbows down, and forearms vertical. Slightly arch back. Push against the ground and initiate bar movement with hip drive. Exhale, extend the arms until straight and bar is overhead, return, repeat. Variations: May be performed with dumbbells in each hand, also seated or standing. Pull up This is performed the same as the test and calisthenic version. Variations: Weight in the form of a weighted vest, plates, or a dumbbell may be added. Tricep extension The tricep extension may be performed with dumbbells, a barbell, a bent (curl) bar, or other variation. Begin by lying flat on a bench, hips and shoulders flat on the bench, feet flat on the floor. Weights are placed in the hands, arms are straightened until the resistance is above the chest. Inhale, bend elbows only (maintain upper arms perpendicular to the bench), until the resistance is lowered to a position near the top of the head, exhale, extend the arms until straight, repeat. Caution: Always use a spotter or very light resistance. Curl The bicep curl may be performed with dumbbells, a barbell, a bent or other bar. Begin by standing, feet shoulder width apart, chest held high, eyes straight ahead, arms straight at the sides, hands grasping the loaded resistance. Exhale, flex the arms until completely bent and resistance has been raised to a high chest position. Slightly inhale, lower under control until arms are straight, repeat.

FitForce/WITSB/AppB/0215 45
Good morning Begin by standing upright, feet shoulder width apart, knees slightly bent, chest high, lower back slightly arched, looking straight ahead. A bar may be held at the upper back as if to squat or both hands may hold a medicine ball behind the head at the base of the neck. Inhale, bend at the waist until the chest is parallel to the floor, maintain a slight arch to the lower back, exhales, stand upright, repeat. Caution: Only use light to moderate loads with the barbell. ________________________________________________________________
Use the Weight Training Chart to set up the program.
1. Determine the 1 repetition maximum (1RM) for each exercise. Use 1RM testing or the estimated procedure.
2. Determine if you are going to train for strength, endurance or a combination. Calculate 40%, 60% or 80% of the 1RM depending on your goal. This is your training weight (TW).
3. Perform the number of repetitions shown in the chart for each exercise. 4. Perform the routine 3 days a week. 5. Week 1 do 1 set for each body part. 6. Week 2 do 2 sets. 7. Week 3 do 3 sets. 8. After week 3, maintain 3 sets but add weight as you reach the upper limit
of repetitions for your goal, i.e., 6 reps for strength, 20 reps for endurance, 12 reps for a combination of strength and endurance.
________________________________________________________________
WEIGHT TRAINING CHART Muscle Group
1 RM
Training Weight
Week 1 1 x set
Week 2 2 x set
Week 3 3 x set
Week 4 3 x set
Quad/ Glute
Biceps Femoris
Gastroc
Pectorals
Lat / Rhomboids
Deltoids

FitForce/WITSB/AppB/0215 46
Latissimus
Triceps
Biceps
Erector Spinae
There are a number of additional tips that will make your training safer and more effective.
1. Warm up with calisthenics and stretching for 3 to 5 minutes before doing a resistance workout.
2. Start with the largest muscle groups and work down to the smallest. This sequence orders the exercises first for the upper body, then the lower body.
3. Exercise the muscles through the full range of motion (FROM).
4. Control the weight, and avoid fast and jerky movements.
5. Exercise a muscle to momentary failure. A muscle consists of thousands of individual fibers. For each bout of work, only as many fibers as are required to accomplish the work are “recruited” for the job. To ensure maximum participation of the fibers, it is necessary to work the muscle to exhaustion.
6. Rest between each set of exercises: for endurance, 1.5 to 2 minutes; for strength, 3 to 5 minutes; for both, 30 to 60 seconds.
7. Practice proper form. For most people it is more comfortable to exhale while lifting the weight and inhale while lowering the weight. Do not hold your breath or hyperventilate. If training with free weights, keep the weights close to the body.
Whenever possible, work with a partner. There are three advantages to this. One is that you are more likely to push yourself when someone is there with you. Another is that you can more easily accomplish negative work. Finally, it is safer to work with a partner. Anaerobic training for the 300 meter run, vertical jump and agility run tests
Anaerobic activities are those that are done in the absence of oxygen. That is, they use energy sources that are already present in the muscle. This source of energy is limited, and so anaerobic activities are of relatively short duration. For example, sprinting, jumping, dodging, pushing or pulling an object a

FitForce/WITSB/AppB/0215 47
short distance, are anaerobic activities. The 300 meter run, agility run and vertical are the fitness tests that measure these three anaerobic areas: speed sprinting, agility speed movements and explosive leg power. So while all three of these activities are anaerobic in nature, we have divided anaerobic training into three sub sections:
• Anaerobic running
• Lower body explosive power
• Agility running
The general FITT guidelines are as follows: Anaerobic sprinting for the 300 meter run To improve the overall anaerobic system, your training activities must be done at a faster pace than you would normally use for the activity. For example, for running, your anaerobic training would be short sprints done at a faster speed than your long runs. The sprinting program will directly affect your time on the 300 meter run assessment test. There are five variables to consider in this part of the plan:
• Distance
• Speed
• Repetitions
• Rest between each repetition
• Frequency
If you have access to a running track, you can use it to run known distances such as a quarter, half and full lap. Or you might run the length of a football field, a city block, or any distance that you can use repeatedly. It isn’t a requirement to cover known distances, but it does make charting your progress easier. Instead of a known distance you can also run for a certain period of time.
FITT GUIDELINES FOR ANAEROBIC TRAINING
Frequency = Once a week Intensity = Anaerobic and agility running - speed of the activity
Lower body explosive power – height of hops, jumps, bounds
Time = Anaerobic and agility running - length of each exercise bout
Lower body explosive power – number of repetitions Type = Sprinting, plyometric jumping and bounding, dodging

FitForce/WITSB/AppB/0215 48
For example, you might decide to see how far you can go during a 30 second run.
To develop your Anaerobic Sprint Training plan, refer to the sprint training
chart below:
The first step is to time an all out effort for a given distance. You will first start with 60 meters. We’ll call the distance your training initial training distance (ITD) and the time your initial time or IT.
The second step is to multiply the IT by 1.25 to get your starting training time. Whenever you change the ITD, calculate the IT for the new distance. Follow the schedule below:
________________________________________________________________
ANAEROBIC SPRINT TRAINING
Week Distance Repetitions Training Time
Recovery Time
Frequency
1 60 meters 8-10 TBD* 60 sec 1x/week
2 60 meters 10-12 TBD 60 sec 1x/week
3 100 meters 7-8 TBD 120 sec 1x/week
4 100 meters 8-10 TBD 120 sec 1x/week
5 100 meters 10-12 TBD 120 sec 1x/week
6 150 meters 8-10 TBD 120 sec 1x/week
7 150 meters 10-12 TBD 120 sec 1x/week
8 200 meters 8-10 TBD 120 sec 1x/week
*TBD = to be determined IT = IT multiplied by 1.25 =
________________________________________________________________ Explosive power training for the vertical jump This will be a very different type of training for most officers reading this handbook. Those who have participated in organized sports, particularly at the collegiate level, may have done “plyometric” training for your sport. Plyometric training involves jumping, bounding, skipping, hopping and lunging. Because this training puts extra stress on the lower extremities, we recommend that you build

FitForce/WITSB/AppB/0215 49
a base of lower body muscular strength and anaerobic running before starting you lower body explosive power program. We suggest a minimum of six weeks of training for each of those components of fitness. Plyometric training will directly impact your vertical jump score of that fitness assessment test. Use the Plyometric training plan for your training.
1. Plyometrics should be done early in your workouts, after a thorough warm up.
2. Properly move and stretch before exercising; avoid sitting and stretching before plyometric training.
3. Rest intervals in the beginning should be about 60 seconds between sets; this can be reduced down to 0-30 seconds as fitness allows.
4. Always wear appropriate footwear and clothing and perform plyometric drills on turf, rubberized court or track, or level grass field.
Wks 1 - 2 3 – 4 5 – 6 7 – 8 9 – 10 10 – 12 Exercise
Ankle hops in place
3 x 30 sec
Ankle hops front/back
2-3 x 30 sec
Ankle hops side/side
2-3 x 30 sec
One foot ankle hop in place
2-3 x 30sec
3 x 30 sec
One foot ankle hop front/back
2-3 x 30 sec
3 x 30 sec
3 x 30 sec
One foot ankle hop side/side
2-3 x 30 sec
3 x 30 sec
3 x 30 sec
Pogo
2-3 x 8 3 x 8 3 x 8 1 x 8 1 x 8 1 x 8
Split Squat jump
2-3 x 8 each
2-3 x 8 3 x 8 3 x 8 1 x 8 1 x 8
Vertical jump
2-3 x 8 2 x 8 2 x 8 2-3 x 8
Star jump
2 x 8 2 x 8 2-3 x 8
Prancing
1-2 x 10m
2-3 x 10m
3 x 10m 3 x 10m 3 x 10m
Galloping
1-2 x 2-3 x 3 x 10m 3 x 10m 3 x 10m

FitForce/WITSB/AppB/0215 50
10m 10m Ankle flips
2-3 x 10m
2-3 x 10m
2-3 x 10m
3 x 10m 3 x 10m 3 x 10m
Knee tuck jumps
1-2 x 8 2-3 x 8
Lateral bound (SR)
1-2 x 3 each leg
2-3 x 3 each leg
10m = 10 meters (@ 11 yds)
________________________________________________________________
PLYOMETRIC TRAINING DRILL DESCRIPTIONS
Ankle hops Beginner hops such as two- and one-foot ankle hops are low amplitude exercises which develop the ability to absorb and redirect forces. There is minimal displacement of the body’s center of gravity, i.e. you don’t jump very high or far with hops. Practice good landing: ankles, knees, hips are slightly bent, heels slightly off the ground, back straight, chest over the knees. These can be done in place, with a forward/backward movement or a lateral or side/side movement. These may also be done over a distance. Eventually, hops can be performed for speed, with obstacles such as banana hurdles, or with agility ladders. Set up
• Begin in an athletic posture: feet hip/shoulder width apart
• Ankles, knees, and hips slightly bent
• Back straight, chest over the knees, eyes forward
• Arms at the sides of the body, elbows bent to 90 degrees Action
• Perform a small countermovement by sitting down slightly and swinging the arms down and back just a little
• Push off with both feet simultaneously (or one foot) while swinging both arms
• Land on both feet simultaneously (or on one foot)
• And immediately repeat the sequence for the prescribed distance or time
Pogo Pogo is an introduction to plyometric jumps. The goal is to train the landing position described above. Begin the drill in an athletic posture with the feet hip/shoulder width apart. Using a slight countermovement, sit down slightly while pulling the arms down towards the hips then quickly reverse direction using an

FitForce/WITSB/AppB/0215 51
upward arm swing to project the body vertically. While in the air, flex the ankles, knees, and hips to prepare to land. ‘Stick’ the landing, don’t sink upon landing. This trains the body to use its own musculature and not gravity and its joints to absorb the forces. The emphasis should be on good mechanics, particularly preparing to land while in the air; the emphasis is not on height of jump. Set up
• Begin in an athletic posture: feet hip/shoulder width apart
• Ankles, knees, and hips slightly bent
• Back straight, chest over the knees, eyes forward
• Arms at the sides of the body, elbows bent to 90 degrees Action
• Perform a slight countermovement by sitting down to a ¼ squat position while swinging the arms down and back
• Immediately reverse direction by pushing off against the ground while swinging the arms up and extending the body vertically into the air
• While in the air, flex the ankles, knees and hips to prepare for the landing
• Stick the landing; don’t sink on landing thereby allowing the body’s joints to absorb the forces
Split squat jump The split squat jump is similar in scope and goal to pogos: low amplitude and practice landing. The difference is that one foot is forward and the other back at starting and landing. Countermove by sitting slightly and swinging both arms down and back. Immediately push against the ground with both feet and use arm swing to assist in achieving height. Perform eight repetitions with the left foot forward then switch feet and perform eight more reps with the right foot forward. Set up
• Place one foot forward and the other back in split squat stance
• Knees should be slightly bent
• Chest is up, eyes forward, back straight
• Body weight balanced on the balls of the feet
• Arms at the sides, elbows bent to 90 degrees Action
• Perform a slight countermovement by sitting down to a ¼ squat position while swinging the arms down and back
• Immediately reverse direction by pushing against the ground while swinging the arms up and extending the body vertically into the air
• Prepare to land while in the air
• Stick the landing and repeat

FitForce/WITSB/AppB/0215 52
• SSJs may also be done rapidly once a higher levels of fitness are achieved
Vertical jump The vertical jump trains and conditions the vertical jump test. The goal is to get as high as possible with each repetition by explosively coordinating upper and lower body. Always look up when jumping and prepare to land each time as above. Each repetition is performed explosively but care should be taken not to rush through the set of repetitions. Because greater displacement of the body’s center of gravity is achieved, care should be given to good landing mechanics. There will be a slight yielding upon contact as opposed to strictly sticking the landing. Continue to use muscular strength and not simply joint structure when landing. Set up
• Begin in an athletic posture: feet hip/shoulder width apart
• Ankles, knees, and hips slightly bent
• Weight evenly distributed over the balls of the feet, heels slightly off the ground (should be able to slip a dollar bill under the heels)
• Back straight, chest over the knees, eyes forward
• Arms are held out in front of the body at chest height, elbows slightly bent, and palms facing down
Action
• Perform a more aggressive countermovement by squatting to a ¼ or lower position with the hips moving back and down
• Keep the back straight and the chest over the knees; don’t pike at the waist
• Simultaneously pull the arms down and back behind the hips
• Immediately reverse direction by explosively pushing against the ground
• Drive through the ankles, knees and hips while simultaneously swinging the arms back up and through the same arc
• Look up while jumping
• Fully extend the body into a vertical position (straight line)
• Attempt to reach as high as possible
• Yield upon landing
• Repeat after initial set up for the prescribed repetitions Star jump The goal with the star jump is also to jump as high as possible and land safely each time. Begin the exercise in an athletic posture. Perform a slight countermovement by squatting down. Bend the elbows and bring the hands in to the midline of the chest. Explosively reverse direction, jumping vertically. As you

FitForce/WITSB/AppB/0215 53
jump up, throw the arms and legs out simultaneously finishing in a five-pointed star position (or the midpoint of the jumping jack or side straddle hop). Bring the arms and legs in, prepare the body to land. As with the vertical jump there will be a slight yielding with the feet hip to shoulder width as at the start; do not land with the feet spread wide. Set up
• Begin in an athletic posture: feet hip/shoulder width apart
• Ankles, knees, and hips slightly bent
• Chest is up, eyes forward, back straight
• Weight evenly distributed over the balls of the feet, heels slightly off the ground (should be able to slip a dollar bill under the heels)
• Back straight, chest over the knees, eyes forward
• Arms are held out in front of the body at chest height, elbows slightly bent, and palms facing down
Action
• Perform a more aggressive countermovement by squatting to a ¼ or lower position with the hips moving back and down
• Keep the back straight and the chest over knees
• Simultaneously pull the arms in by bending the elbows, bringing the hands into the middle of the chest
• Immediately reverse direction by explosively pushing against the ground
• Drive through the ankles, knees and hips while simultaneously swinging the arms back up and through the same arc
• Look up while jumping
• Fully extend the arms and legs out to the side creating a five-pointed star position in mid-air
• Attempt to reach as high as possible
• Bring the hands and feet back in
• Land with the feet again hip/shoulder-width apart
• Yield slightly upon landing
• Repeat after initial set up for the prescribed repetitions Prancing Prancing is a low level plyometric drill intended to train running speed. Begin in a split stance with one foot forward and the other back, elbows bent to 90 degrees and arms in good running posture. Push off the ground, project the hips forward and up and switch arm and leg positions. The knees remain slightly bent throughout the drill. Land with the opposite leg/arm forward and immediately project forward again without stopping for the prescribed distance. Prancing

FitForce/WITSB/AppB/0215 54
resembles an exaggerated, explosive running with rhythm. Do not let the heels strike the ground. Set up
• Place one foot forward and the other back in split squat stance
• Knees should be slightly bent
• Chest is up, eyes forward, back straight
• Body weight balanced on the balls of the feet
• Arms at the sides, elbows bent to 90 degrees
• Arms are opposite the legs to set up a good running posture Action
• Perform a slight counter movement by sinking and pulling the arms down
• Push against the ground with both feet while simultaneously swinging the arms in opposition
• Project the body forward and slightly up
• Swing arms and legs; change leg/arm position in mid-air as if running
• Land both feet simultaneously and immediately repeat for the prescribed distance
Galloping Like prancing, galloping is an essential drill for training speed. Galloping looks a lot like what we did as kids, without the horse sounds! Begin in a split squat position with the back leg mostly straight and arms as above. Begin the movement with a double arm swing, push off the ground, project the hips forward and up. Do not bring the legs together when galloping; attempt to keep the feet equidistant the entire time. Land with the feet in the starting position and immediately project the body forward and up. Repeat for the prescribed distance. Switch feet and repeat. Set up
• Place one foot forward and the other back
• The rear leg is held mostly straight, maintain just a slight bend
• Chest is up, eyes forward, back straight
• Arms are relaxed, at the sides of the body, elbows bent to 90 degrees Action
• Shift the bodyweight back onto the rear leg while slightly lifting the front foot
• Drop the front foot to the ground while simultaneously pushing against the ground with the rear foot
• Slightly swing the arms
• Project the body forward with little vertical displacement

FitForce/WITSB/AppB/0215 55
• The footwork is a quick one-two step, heels do not touch the ground
• Keep the feet apart throughout the drill; avoid bringing the feet in close to each other under the body
• Repeat for the prescribed distance Ankle flips Ankle flips are essentially straight leg running but not for speed; the goals is more foot falls. Begin in a running position with one foot slightly forward, legs mostly straight. Elbows are bent to 90 degrees with one arm forward opposite the forward leg. Rise up on the balls of the feet, push off the ground and begin a short stride, straight leg run with good arm mechanics. Do not let the heels touch the ground during the drill. Set up
• Begin in a slightly staggered foot stance with one forward of the other, legs mostly straight
• Arms at the sides in opposition to the legs, elbows bent to 90 degrees
• Chest is up, eyes forward, back straight Action
• Rise up onto the balls of the feet
• Keep the body and legs mostly straight
• Lean forward from the ankles (don’t pike at the waist)
• Push against the ground while swinging the arms in opposition to the legs
• Keep the chest up, maintain slight forward body lean
• Commence straight leg running
• Goal is a quick feet motion (not speed) using the ankles and feet to project the body forward
• Do not let the heels contact the ground
• Continue for the prescribed distance using good running mechanics Knee tuck jumps Knee tuck jumps introduce intermediate intensity to plyometric training due to greater vertical displacement of the center of gravity and the explosive flexing of the ankles, knees and hips. Begin in an athletic posture: feet hip/shoulder width apart, on the balls of the feet. Ankles, knees and hips are slightly flexed, back is straight, chest is over the knees, and eyes are forward. Arms are slightly bent and raised to a chest height position, palms facing down. Perform a slight countermovement by squatting. Immediately reverse direction and explosively jump up as high as possible. While jumping, bring the knees high in an attempt to touch them to the outstretched hands at chest height. Practice good landing techniques. Repeat for the prescribed repetitions.

FitForce/WITSB/AppB/0215 56
Set up
• Begin in an athletic posture: feet hip/shoulder width apart
• Ankles, knees, and hips slightly bent
• Chest is up, eyes forward, back straight
• Weight evenly distributed over the balls of the feet, heels slightly off the ground (should be able to slip a dollar bill under the heels)
• Back straight, chest over the knees, eyes forward
• Arms are held out in front of the body at chest height, elbows slightly bent, and palms facing down
Action
• Perform a slight countermovement by sitting down and back to a ¼ squat position or less
• The arms are mostly held high; they do not contribute as much to movement in this drill
• Immediately reverse direction by explosively pushing against the ground with the balls of the feet
• Drive through the ankles, knees, and hips and extend the body up as high as possible
• Continue to drive the knees high by flexing at the hips
• Touch the knees to the outstretched hands held at chest height
• Prepare to land; stick the landing
• Set up and execute for the prescribed repetitions Lateral bound – Single response Lateral bounds introduce another more advanced element to plyometric training: explosive lateral movement with one foot landing. Begin in an athletic pLESBure. When jumping to the right, perform a slight countermovement to the left, pulling the arms down at the same time. Slightly lift the right foot, push off the ground with the left foot and explosively reach out with the right leg/foot. The bound is performed in a one-two motion; avoid the temptation to jump and land on two feet. Perform three repetitions in one direction; each repetition is performed explosively but allow a set up in between reps. Gather yourself and perform three repetitions to the left, using the opposite sequence. Set up
• Begin in an athletic posture: feet hip/shoulder width apart
• Ankles, knees, and hips slightly bent
• Chest is up, eyes forward, back straight
• Weight evenly distributed over the balls of the feet, heels slightly off the ground (should be able to slip a dollar bill under the heels)
• Back straight, chest over the knees, eyes forward
• Arms are held out in front of the body at chest height, elbows slightly bent, and palms facing down

FitForce/WITSB/AppB/0215 57
Action
• (When bounding to the right) Perform a slight countermovement to the left and bring the arms/hands in
• Keep the hips and shoulder square to the front
• Sit and shift the bodyweight slightly to the left foot
• Slightly bend the right knee and lift the right foot just off the ground
• Explosively push against the ground with the left foot while aggressively extending and reaching to the right side with the leg
• Use both arms simultaneously to aid in covering as much horizontal distance as possible
• Perform the bound in a one-two motion; do not attempt to jump or land on two feet
• Set up and repeat for the prescribed repetitions in one direction
• Gather yourself and repeat the bounds in the other direction Agility training for the agility run
The training principles for the development of agility are similar to the principles of training for anaerobic sprinting. Ideally, you would perform a specific agility routine at least one day each week. However, with limited time available for performing all the other exercise routines (strength, cardiovascular, anaerobic sprinting, stretching) it may make more sense, from a time management perspective, to incorporate the agility training with the other programs. There are five different training strategies that can be applied. 1. Practicing the components of agility run test. Use the Agility Training form.
Step 1: Time yourself for an all out effort with 4 obstacles (chairs, traffic cones, or anything to serpentine around) in a line 10 feet apart for a total of 30 feet.
• Sprint 30 feet
• Turn and serpentine around obstacles for 30 feet
• Turn and serpentine back through obstacles
• Turn and sprint back to starting line
• This is called initial time or IT. Step 2: Multiply the IT by 1.25 to get a training time. Then follow the schedule: The total training distance is 120 feet (four 30 foot sprints/serpentines).

FitForce/WITSB/AppB/0215 58
AGILITY TRAINING Week Training
Distance Repetitions Training
Time Recovery Time
Frequency
1 & 2 120 feet 4 1.25 x IT 60 sec 1x/week
3 & 4 120 feet 5 1.25 x IT –
(1-2 sec)
60 sec 1x/week
5 & 6 120 feet 6 1.25 x IT –
(3-4 sec)
60 sec 1x/week
7 & 8 120 feet 4 1.25 x IT –
(4-5 sec)
60 sec 1x/week
9 & 10 120 feet 4 1.25 x IT –
(5-6 sec)
60 sec 1x/week
Successive
Weeks
120 feet 4 1.25 x IT –
(6-8 sec)
60 sec 1x/week
IT = IT multiplied by 1.25 =
________________________________________________________________ 2. Adding an agility component to your cardiovascular routine. With this approach you would do some agility drills about half way through your CVE run. For example, you could set up 10 obstacles such as chairs, traffic cones, or anything to serpentine around about 10 feet apart in a line. As you approach the obstacles you would sprint as fast as possible around them, then jog back to the first obstacle and repeat the serpentine running another two or three times. Then use the remainder of your CVE run as a cool down. 3. Adding an agility component to your anaerobic sprinting routine. This would be identical to adding it to the cardiovascular routine except that you would be doing it after the last sequence of sprints.
4. Incorporating change of direction movement to cardiovascular or anaerobic running routines. Rather than setting up a set course of obstacles perform 10 quick changes of direction while doing the sprint or jogging work. Turn left and sprint toward the side of the track, then quickly turn right toward the right side and repeat 10 times. This could be done once during each lap or several times during the last lap of sprinting or jogging. 5. Creating an agility/anaerobic circuit. During circuit training you move from one exercise to another with a set rest period or activity such as running, between

FitForce/WITSB/AppB/0215 59
exercises. The same principles can be applied to anaerobic training where you vary sprints, plyometrics and agility drills into one routine. In this routine you could identify selected points where you would do the 10 change of direction movements described in # 4 and three stations where you would perform plyometrics. This way you could get agility and explosive leg strength work in one routine. An example is below:
• Sprint 20 yards then do 10 change of direction sprints
• Sprint 20 yards then do 10 - 20 repetitions of a plyometric hop
• Walk 30 yards then do 10 change of direction sprints
• Sprint 20 yards then do 8 - 10 repetitions of a plyometric jump
• Walk 30 yards then do 10 change of direction sprints
• Sprint 20 yards then do 8 - 10 repetitions of a plyometric bound
• Walk 30 yards then do 10 change of direction sprints
• Sprint 20 yards then do 8 - 10 repetitions of a plyometric jump
• Walk 30 yards then do 10 change of direction sprints HOW DO I EXERCISE SAFELY? Whether taking a fitness test or following a training program there our certain safety procedures you should follow. Your safety and the safety of others depends on your awareness of several factors. These are important to minimize the risk of injury, undue fatigue and medical emergencies:
Warm up/cool down. It is always important to gradually prepare your body for strenuous exercise. You should warm up for about five minutes or until your heart rate has been elevated before doing the core exercise routine. You can do fast paced walking or jogging. Swinging the arms, taking deep breathes and doing the stretching exercise both statically and ballistically is also important. Cooling down after exercise is just as important to prevent soreness and cramping. Basically it is identical to the warm up activities only at a slower pace and effort. Monitoring yourself. Periodically monitor your effort by taking your heart rate. A simple test is the “talk test”. If you cannot carry on a conversation the exercise is probably too hard. You also should be aware of certain warning signs while exercising to include: chest pain, dizziness, pain or numbness in part of the body, or blurred vision. If you experience these you should stop exercising and consult a physician. The timing of exercise. You should wait at least one hour after eating before exercising. Exercise clothing and apparel. Wear lose fitting and comfortable clothing. A good pair of shoes is important if walking, running or playing sports. They should have good heel cup support and solid soles.

FitForce/WITSB/AppB/0215 60
Environmental Guidelines
The type of environmental conditions that you train in can have a significant impact on exercise safety and performance. We adapt to training within a specific environment under specific conditions. An adjustment or acclimatization period is required, normally 30 days, if our training environment changes. The more fit we are, the quicker the acclimatization. There are four conditions to be aware of.
Heat and Humidity: The combination of both can cause serious medical problems and even death. Heat exhaustion followed by heat stroke is a serious medical emergency. A heat index combining temperature and humidity is used to express heat stress situations. When the heat stress is in the moderate or high categories, it is best not to exercise except early in the day or in an air conditioned environment. Drink plenty of water, wear lose clothing and lower your intensity when it is extremely hot and humid. Cold: Cold weather can also cause serious medical problems that could lead to death. It places a burden on the body for temperature regulation and circulation. Cold stress can cause frLESBbite to peripheral body parts, or to the central core, causing life-threatening hypothermia. Be aware of the wind chill factor. The combination of wind and cool temperature increases the cold stress. Wear clothing in layers and drink plenty of water even if it is cold. Wear protective gear for the head, ears and hands. Altitude: We have to work harder to maintain a given level of activity at higher elevations because there is less oxygen in the air. Altitude starts to have a major impact on the body at 5,000 feet. The body adapts to a higher altitude by developing more red blood cells so more of the limited oxygen can be distributed. Decrease workout intensity until you become acclimatized. Altitude sickness causes the blood pressure to rise, resulting in nausea and weakness. It occurs when someone is physically active at an altitude he or she hasn’t adapted to yet. Apply the same precautions as noted for exercise in cold weather. Pollution: Pollution poses a similar problem to that of altitude in that there is not enough oxygen in the air. However, the cause is different because the pollutants push out the oxygen. This lack of oxygen makes exercise more demanding. Breathing the pollutants is harmful as well. It makes exercising uncomfortable because of eye, nose, and lung irritation and like altitude it makes any effort more difficult. The problem is that we can not eventually adapt or acclimatize to pollution. To minimize the pollution effect exercise early in the day when traffic is low or exercise in a controlled environment such as a gym or mall.

FitForce/WITSB/AppB/0215 61
CONCLUSION
The Law Enforcement Standards Board requires that applicants, recruits and incumbents be physically fit. The information in this Handbook has provided you with the knowledge and skills to train to meet the physical readiness standards that you will have to meet to be selected and to maintain your law enforcement status. It is now up to you to prepare yourself.

FitForce/WITSB/AppB/0215 62
TRAINING FORMS
PAR-Q ADAPTATION

FitForce/WITSB/AppB/0215 63
The PAR-Q Adaptation is designed to help you help yourself. Many health benefits are associated with regular exercise and the completion of the questionnaire is a sensible first step to take if you are planning to increase the amount of physical activity in your life. For most people physical activity should not pose any problem or hazard. The questionnaire has been designed to identify the small number of adults for whom physical activity might be inappropriate or those who should have medical advice concerning the type of activity most suitable for them. Common sense is your best guide in answering these seven questions. Please read them carefully and check YES or NO for each question as it applies to you. In the space below each question, record the information about the “Yes” response. If you have any reservations about clearing the individual for participation, consult with the fitness coordinator.
PAR-Q ADAPTATION YES NO

FitForce/WITSB/AppB/0215 64
___ ___ 1. Has your doctor ever said that you have a heart condition and that you should only do physical activity recommended by a doctor?
________________________________________________________________ ___ ___ 2. Do you feel pain in your chest when you do physical activity? ________________________________________________________________ ___ ___ 3. In the past month, have you had chest pain when you were not
doing physical activity? ________________________________________________________________
___ ___ 4. Do you lose your balance because of dizziness or do you ever lose consciousness?
________________________________________________________________
___ ___ 5. Do you have a bone or joint problem (for example, back, knee, or hip) that could be made worse by a change in your physical activity?
________________________________________________________________
___ ___ 6. Is your doctor currently prescribing drugs (for example, water pills) for your blood pressure or heart condition? ________________________________________________________________ __ ___ 7. Do you know of any other reason why you should not do physical
activity? ________________________________________________________________ “I have read, understood and completed this questionnaire. Any questions I had were answered to my full satisfaction.” Name: ________________________ Date: ______________
Signature: _____________________
Cleared for testing: Yes ____ No ___ Coordinator: ______________________
PHYSICAL READINESS TEST SCORE SHEET
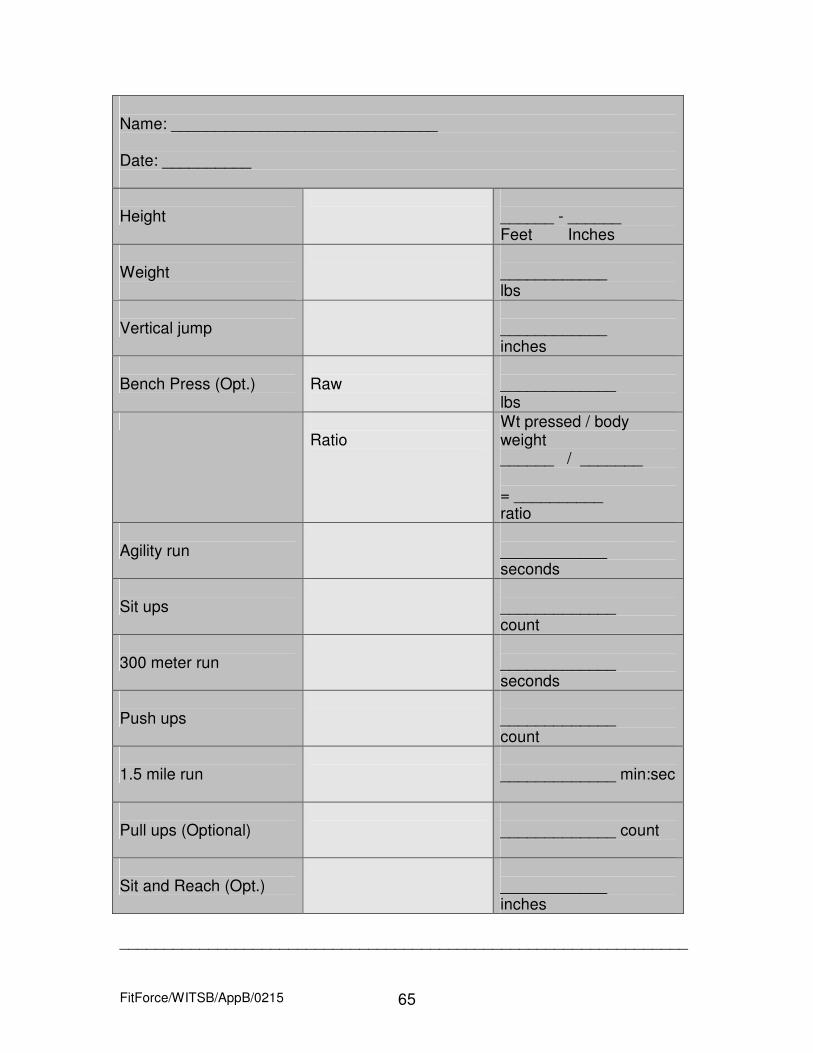
FitForce/WITSB/AppB/0215 65
Name: ______________________________ Date: __________ Height
______ - ______ Feet Inches
Weight
____________ lbs
Vertical jump
____________ inches
Bench Press (Opt.)
Raw
_____________ lbs
Ratio
Wt pressed / body weight ______ / _______ = __________ ratio
Agility run
____________ seconds
Sit ups
_____________ count
300 meter run
_____________ seconds
Push ups
_____________ count
1.5 mile run
_____________ min:sec
Pull ups (Optional)
_____________ count
Sit and Reach (Opt.)
____________ inches
________________________________________________________________

FitForce/WITSB/AppB/0215 66
GOAL SETTING CHART
Test Current
Raw Score Standard (Circle)
Intermediate Goal
Time to Intermediate Goal
Vertical jump
10.5/14.0”
Bench Press Raw (lbs)
.50/.83
Bench Press Ratio (lbs/bw)
Agility run
21.1/19.5 seconds
Sit ups
20/30
300 meter run
84/68
seconds
Push ups
5/23
1.5 mile run
20:57/16:57
Pull ups
Sit and reach
________________________________________________________________

FitForce/WITSB/AppB/0215 67
CALISTHENIC STRENGTH TRAINING PLAN
Exercise
Week 1 1MM/ CED
Week 2 2 x CED
Week 3 3 x CED
Week 4 3 x CED
Back extension
Push up
Modified row
Dip
Pull up
Sit up
Squat
Single leg deadlift
¼ Squat heel raise
________________________________________________________________
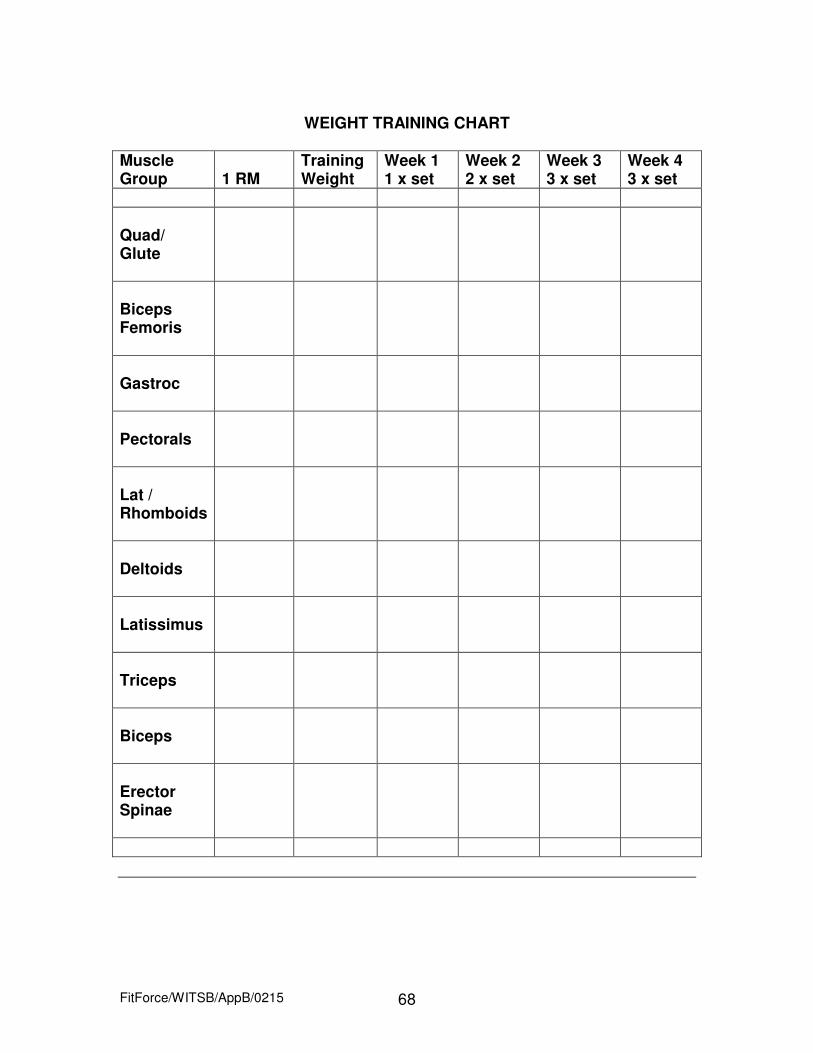
FitForce/WITSB/AppB/0215 68
WEIGHT TRAINING CHART
Muscle Group
1 RM
Training Weight
Week 1 1 x set
Week 2 2 x set
Week 3 3 x set
Week 4 3 x set
Quad/ Glute
Biceps Femoris
Gastroc
Pectorals
Lat / Rhomboids
Deltoids
Latissimus
Triceps
Biceps
Erector Spinae

FitForce/WITSB/AppB/0215 69
THIS PAGE INTENTIONALLY LEFT BLANK.