PeopleTools 8.42 Administration Tools PeopleSoft ...
134
PeopleTools 8.42 Administration Tools PeopleSoft Administration Tools November 2002
-
Upload
khangminh22 -
Category
Documents
-
view
6 -
download
0
Transcript of PeopleTools 8.42 Administration Tools PeopleSoft ...
PeopleTools 8.42Administration ToolsPeopleSoft Administration Tools
November 2002

PeopleTools 8.42Administration ToolsPeopleSoft Administration ToolsSKU TOOLS842ADM-B 1102
PeopleBooks Contributors: Teams from PeopleSoft Product Documentation and Development.Copyright 1988-2002 P eo ple S oft, In c. All r ig h t s r e ser ve d.
Printed in the United States.
All material contained in this documentation is proprietary and confidential to PeopleSoft, Inc. ("PeopleSoft"),protected by copyright laws and subject to the nondisclosure provisions of the applicable PeopleSoftagreement. No part of this documentation may be reproduced, stored in a retrieval system, or transmittedin any form or by any means, including, but not limited to, electronic, graphic, mechanical, photocopying,recording, or otherwise without the prior written permission of PeopleSoft.
This documentation is subject to change without notice, and PeopleSoft does not warrant that the material containedin this documentation is free of errors. Any errors found in this document should be reported to PeopleSoft in writing.
The copyrighted software that accompanies this document is licensed for use only in strict accordancewith the applicable license agreement which should be read carefully as it governs the terms of useof the software and this document, including the disclosure thereof.
PeopleSoft, PeopleTools, PS/nVision, PeopleCode, PeopleBooks, PeopleTalk, and Vantive are registeredtrademarks, and Pure Internet Architecture, Intelligent Context Manager, and The Real-Time Enterprise aretrademarks of PeopleSoft, Inc. All other company and product names may be trademarks of their respectiveowners. The information contained herein is subject to change without notice.
Open Source Disclosure
This product includes software developed by the Apache Software Foundation (http://www.apache.org/). Copyright(c) 1999-2000 The Apache Software Foundation. All rights reserved. THIS SOFTWARE IS PROVIDED“AS IS’’ AND ANY EXPRESSED OR IMPLIED WARRANTIES, INCLUDING, BUT NOT LIMITEDTO, THE IMPLIED WARRANTIES OF MERCHANTABILITY AND FITNESS FOR A PARTICULARPURPOSE ARE DISCLAIMED. IN NO EVENT SHALL THE APACHE SOFTWARE FOUNDATION OR ITSCONTRIBUTORS BE LIABLE FOR ANY DIRECT, INDIRECT, INCIDENTAL, SPECIAL, EXEMPLARY, ORCONSEQUENTIAL DAMAGES (INCLUDING, BUT NOT LIMITED TO, PROCUREMENT OF SUBSTITUTEGOODS OR SERVICES; LOSS OF USE, DATA, OR PROFITS; OR BUSINESS INTERRUPTION) HOWEVERCAUSED AND ON ANY THEORY OF LIABILITY, WHETHER IN CONTRACT, STRICT LIABILITY,OR TORT (INCLUDING NEGLIGENCE OR OTHERWISE) ARISING IN ANY WAY OUT OF THE USEOF THIS SOFTWARE, EVEN IF ADVISED OF THE POSSIBILITY OF SUCH DAMAGE.
PeopleSoft takes no responsibility for its use or distribution of any open source or shareware software ordocumentation and disclaims any and all liability or damages resulting from use of said software or documentation.
Contents
General PrefaceAbout This PeopleBook ..... . . . . . . . . . . . . . . . . . . . . . . . . . . . . . . . . . . . . . . . . . . . . . . . . . . . . . . . . . . . . . . . . . . . . . . . . . . . . . . . . .ixPeopleSoft Application Prerequisites.. . . . . . . . . . . . . . . . . . . . . . . . . . . . . . . . . . . . . . . . . . . . . . . . . . . . . . . . . . . . . . . . . . . . . . . . . . . . . . . .ixPeopleSoft Application Fundamentals.. . . . . . . . . . . . . . . . . . . . . . . . . . . . . . . . . . . . . . . . . . . . . . . . . . . . . . . . . . . . . . . . . . . . . . . . . . . . . . .ixRelated Documentation.. . . . . . . . . . . . . . . . . . . . . . . . . . . . . . . . . . . . . . . . . . . . . . . . . . . . . . . . . . . . . . . . . . . . . . . . . . . . . . . . . . . . . . . . . . . . . . . . .x
Obtaining Documentation Updates.. . . . . . . . . . . . . . . . . . . . . . . . . . . . . . . . . . . . . . . . . . . . . . . . . . . . . . . . . . . . . . . . . . . . . .. . . . . . . . . .xOrdering Printed Documentation.. . . . . . . . . . . . . . . . . . . . . . . . . . . . . . . . . . . . . . . . . . . . . . . . . . . . . . . . . . . . . . . . . . . . . . . .. . . . . . . . . .x
Typographical Conventions and Visual Cues.. . . . . . . . . . . . . . . . . . . . . . . . . . . . . . . . . . . . . . . . . . . . . . . . . . . . . . . . . . . . . . . . . . . . . . .xiTypographical Conventions.. . . . . . . . . . . . . . . . . . . . . . . . . . . . . . . . . . . . . . . . . . . . . . . . . . . . . . . . . . . . . . . . . . . . . . . . . . . . . .. . . . . . . . .xiVisual Cues.. . . . . . . . . . . . . . . . . . . . . . . . . . . . . . . . . . . . . . . . . . . . . . . . . . . . . . . . . . . . . . . . . . . . . . . . . . . . . . . . . . . . . . . . . . . . . . . . .. . . . . . . . .xii
Comments and Suggestions.. . . . . . . . . . . . . . . . . . . . . . . . . . . . . . . . . . . . . . . . . . . . . . . . . . . . . . . . . . . . . . . . . . . . . . . . . . . . . . . . . . . . . . . . .xiiiCommon Elements in These PeopleBooks .. . . . . . . . . . . . . . . . . . . . . . . . . . . . . . . . . . . . . . . . . . . . . . . . . . . . . . . . . . . . . . . . . . . . . . .xiii
PrefaceAdministration Tools Preface... . . . . . . . . . . . . . . . . . . . . . . . . . . . . . . . . . . . . . . . . . . . . . . . . . . . . . . . . . . . . . . . . . . . . . . . . . . .xvPeopleSoft Data Mover.. . . . . . . . . . . . . . . . . . . . . . . . . . . . . . . . . . . . . . . . . . . . . . . . . . . . . . . . . . . . . . . . . . . . . . . . . . . . . . . . . . . . . . . . . . . . . . .xvPeopleSoft Configuration Manager. . . . . . . . . . . . . . . . . . . . . . . . . . . . . . . . . . . . . . . . . . . . . . . . . . . . . . . . . . . . . . . . . . . . . . . . . . . . . . . . . .xvPeopleSoft Data Archive Manager.. . . . . . . . . . . . . . . . . . . . . . . . . . . . . . . . . . . . . . . . . . . . . . . . . . . . . . . . . . . . . . . . . . . . . . . . . . . . . . . . . .xvi
Chapter 1PeopleSoft Data Mover... . . . . . . . . . . . . . . . . . . . . . . . . . . . . . . . . . . . . . . . . . . . . . . . . . . . . . . . . . . . . . . . . . . . . . . . . . . . . . . . . . . . . .1Understanding Data Mover.. . . . . . . . . . . . . . . . . . . . . . . . . . . . . . . . . . . . . . . . . . . . . . . . . . . . . . . . . . . . . . . . . . . . . . . . . . . . . . . . . . . . . . . . . . . . .1Understanding the Data Mover Interface.. . . . . . . . . . . . . . . . . . . . . . . . . . . . . . . . . . . . . . . . . . . . . . . . . . . . . . . . . . . . . . . . . . . . . . . . . . . . .2
Starting Data Mover.. . . . . . . . . . . . . . . . . . . . . . . . . . . . . . . . . . . . . . . . . . . . . . . . . . . . . . . . . . . . . . . . . . . . . . . . . . . . . . . . . . . . . . .. . . . . . . . . .2Operating Modes.. . . . . . . . . . . . . . . . . . . . . . . . . . . . . . . . . . . . . . . . . . . . . . . . . . . . . . . . . . . . . . . . . . . . . . . . . . . . . . . . . . . . . . . . . .. . . . . . . . . .2Signing On to the Development Environment.. . . . . . . . . . . . . . . . . . . . . . . . . . . . . . . . . . . . . . . . . . . . . . . . . . . . . . . . .. . . . . . . . . .2Understanding the Data Mover Window... . . . . . . . . . . . . . . . . . . . . . . . . . . . . . . . . . . . . . . . . . . . . . . . . . . . . . . . . . . . . . .. . . . . . . . . .3Understanding the Menu Options.. . . . . . . . . . . . . . . . . . . . . . . . . . . . . . . . . . . . . . . . . . . . . . . . . . . . . . . . . . . . . . . . . . . . . . .. . . . . . . . . .4Understanding the Toolbar Options.. . . . . . . . . . . . . . . . . . . . . . . . . . . . . . . . . . . . . . . . . . . . . . . . . . . . . . . . . . . . . . . . . . . . .. . . . . . . . . .4
Understanding Data Mover Scripts.. . . . . . . . . . . . . . . . . . . . . . . . . . . . . . . . . . . . . . . . . . . . . . . . . . . . . . . . . . . . . . . . . . . . . . . . . . . . . . . . . . . .4Command Types... . . . . . . . . . . . . . . . . . . . . . . . . . . . . . . . . . . . . . . . . . . . . . . . . . . . . . . . . . . . . . . . . . . . . . . . . . . . . . . . . . . . . . . . . .. . . . . . . . . .4Syntax Rules.. . . . . . . . . . . . . . . . . . . . . . . . . . . . . . . . . . . . . . . . . . . . . . . . . . . . . . . . . . . . . . . . . . . . . . . . . . . . . . . . . . . . . . . . . . . . . . .. . . . . . . . . .5Creating and Editing Scripts.. . . . . . . . . . . . . . . . . . . . . . . . . . . . . . . . . . . . . . . . . . . . . . . . . . . . . . . . . . . . . . . . . . . . . . . . . . . . . .. . . . . . . . . .6
PeopleSoft Proprietary and Confidential iii
Contents
Preparing to Run Export Scripts.. . . . . . . . . . . . . . . . . . . . . . . . . . . . . . . . . . . . . . . . . . . . . . . . . . . . . . . . . . . . . . . . . . . . . . . . .. . . . . . . . . .7Running Scripts.. . . . . . . . . . . . . . . . . . . . . . . . . . . . . . . . . . . . . . . . . . . . . . . . . . . . . . . . . . . . . . . . . . . . . . . . . . . . . . . . . . . . . . . . . . . .. . . . . . . . . .7
Using Database Setup.. . . . . . . . . . . . . . . . . . . . . . . . . . . . . . . . . . . . . . . . . . . . . . . . . . . . . . . . . . . . . . . . . . . . . . . . . . . . . . . . . . . . . . . . . . . . . . . . . .8Accessing Database Setup... . . . . . . . . . . . . . . . . . . . . . . . . . . . . . . . . . . . . . . . . . . . . . . . . . . . . . . . . . . . . . . . . . . . . . . . . . . . . .. . . . . . . . . .9Using the Database Setup Screen.. . . . . . . . . . . . . . . . . . . . . . . . . . . . . . . . . . . . . . . . . . . . . . . . . . . . . . . . . . . . . . . . . . . . . .. . . . . . . . . .9Using the Select PeopleSoft Application Screen.. . . . . . . . . . . . . . . . . . . . . . . . . . . . . . . . . . . . . . . . . . . . . . . . . . . . . .. . . . . . . . . .9Using the Database Parameters Screen.. . . . . . . . . . . . . . . . . . . . . . . . . . . . . . . . . . . . . . . . . . . . . . . . . . . . . . . . . . . . . . .. . . . . . . .10Checking the Generated Script. . . . . . . . . . . . . . . . . . . . . . . . . . . . . . . . . . . . . . . . . . . . . . . . . . . . . . . . . . . . . . . . . . . . . . . . . . .. . . . . . . .11
Using the Data Mover Command Line Interface.. . . . . . . . . . . . . . . . . . . . . . . . . . . . . . . . . . . . . . . . . . . . . . . . . . . . . . . . . . . . . . . . . .11Understanding the Data Mover Command Line Interface.. . . . . . . . . . . . . . . . . . . . . . . . . . . . . . . . . . . . . . . . . . . .. . . . . . . .11Getting Started (on UNIX).. . . . . . . . . . . . . . . . . . . . . . . . . . . . . . . . . . . . . . . . . . . . . . . . . . . . . . . . . . . . . . . . . . . . . . . . . . . . . . . .. . . . . . . .12Running a Data Mover Script from the Command Line.. . . . . . . . . . . . . . . . . . . . . . . . . . . . . . . . . . . . . . . . . . . . . .. . . . . . . .12Understanding the Command Line Parameters.. . . . . . . . . . . . . . . . . . . . . . . . . . . . . . . . . . . . . . . . . . . . . . . . . . . . . . .. . . . . . . .13Using a Parameter File.. . . . . . . . . . . . . . . . . . . . . . . . . . . . . . . . . . . . . . . . . . . . . . . . . . . . . . . . . . . . . . . . . . . . . . . . . . . . . . . . . . .. . . . . . . .14
Understanding Data Mover Commands.. . . . . . . . . . . . . . . . . . . . . . . . . . . . . . . . . . . . . . . . . . . . . . . . . . . . . . . . . . . . . . . . . . . . . . . . . . . .14Data Mover Commands.. . . . . . . . . . . . . . . . . . . . . . . . . . . . . . . . . . . . . . . . . . . . . . . . . . . . . . . . . . . . . . . . . . . . . . . . . . . . . . . . . .. . . . . . . .14SQL Commands.. . . . . . . . . . . . . . . . . . . . . . . . . . . . . . . . . . . . . . . . . . . . . . . . . . . . . . . . . . . . . . . . . . . . . . . . . . . . . . . . . . . . . . . . . . .. . . . . . . .15Standard SQL Commands With DMS Scripts. . . . . . . . . . . . . . . . . . . . . . . . . . . . . . . . . . . . . . . . . . . . . . . . . . . . . . . . . .. . . . . . . .15Standard SQL Commands with SQL Files.. . . . . . . . . . . . . . . . . . . . . . . . . . . . . . . . . . . . . . . . . . . . . . . . . . . . . . . . . . . . .. . . . . . . .16Non-Standard SQL Commands.. . . . . . . . . . . . . . . . . . . . . . . . . . . . . . . . . . . . . . . . . . . . . . . . . . . . . . . . . . . . . . . . . . . . . . . . .. . . . . . . .16Command Matrix. . . . . . . . . . . . . . . . . . . . . . . . . . . . . . . . . . . . . . . . . . . . . . . . . . . . . . . . . . . . . . . . . . . . . . . . . . . . . . . . . . . . . . . . . . .. . . . . . . .17
Data Mover Command Reference.. . . . . . . . . . . . . . . . . . . . . . . . . . . . . . . . . . . . . . . . . . . . . . . . . . . . . . . . . . . . . . . . . . . . . . . . . . . . . . . . . .18CHANGE_ACCESS_PASSWORD... . . . . . . . . . . . . . . . . . . . . . . . . . . . . . . . . . . . . . . . . . . . . . . . . . . . . . . . . . . . . . . . . . . . .. . . . . . . .18CREATE_TEMP_TABLE... . . . . . . . . . . . . . . . . . . . . . . . . . . . . . . . . . . . . . . . . . . . . . . . . . . . . . . . . . . . . . . . . . . . . . . . . . . . . . . .. . . . . . . .19CREATE_TRIGGER... . . . . . . . . . . . . . . . . . . . . . . . . . . . . . . . . . . . . . . . . . . . . . . . . . . . . . . . . . . . . . . . . . . . . . . . . . . . . . . . . . . . .. . . . . . . .19ENCRYPT_PASSWORD... . . . . . . . . . . . . . . . . . . . . . . . . . . . . . . . . . . . . . . . . . . . . . . . . . . . . . . . . . . . . . . . . . . . . . . . . . . . . . . .. . . . . . . .20EXPORT... . . . . . . . . . . . . . . . . . . . . . . . . . . . . . . . . . . . . . . . . . . . . . . . . . . . . . . . . . . . . . . . . . . . . . . . . . . . . . . . . . . . . . . . . . . . . . . . . . .. . . . . . . .20IMPORT... . . . . . . . . . . . . . . . . . . . . . . . . . . . . . . . . . . . . . . . . . . . . . . . . . . . . . . . . . . . . . . . . . . . . . . . . . . . . . . . . . . . . . . . . . . . . . . . . . . .. . . . . . . .21REM, REMARK, - - . . . . . . . . . . . . . . . . . . . . . . . . . . . . . . . . . . . . . . . . . . . . . . . . . . . . . . . . . . . . . . . . . . . . . . . . . . . . . . . . . . . . . . . .. . . . . . . .23RENAME... . . . . . . . . . . . . . . . . . . . . . . . . . . . . . . . . . . . . . . . . . . . . . . . . . . . . . . . . . . . . . . . . . . . . . . . . . . . . . . . . . . . . . . . . . . . . . . . . . .. . . . . . . .24REPLACE_ALL... . . . . . . . . . . . . . . . . . . . . . . . . . . . . . . . . . . . . . . . . . . . . . . . . . . . . . . . . . . . . . . . . . . . . . . . . . . . . . . . . . . . . . . . . . .. . . . . . . .26REPLACE_DATA... . . . . . . . . . . . . . . . . . . . . . . . . . . . . . . . . . . . . . . . . . . . . . . . . . . . . . . . . . . . . . . . . . . . . . . . . . . . . . . . . . . . . . . . .. . . . . . . .26REPLACE_VIEW... . . . . . . . . . . . . . . . . . . . . . . . . . . . . . . . . . . . . . . . . . . . . . . . . . . . . . . . . . . . . . . . . . . . . . . . . . . . . . . . . . . . . . . . .. . . . . . . .27RUN... . . . . . . . . . . . . . . . . . . . . . . . . . . . . . . . . . . . . . . . . . . . . . . . . . . . . . . . . . . . . . . . . . . . . . . . . . . . . . . . . . . . . . . . . . . . . . . . . . . . . . . .. . . . . . . .27SET... . . . . . . . . . . . . . . . . . . . . . . . . . . . . . . . . . . . . . . . . . . . . . . . . . . . . . . . . . . . . . . . . . . . . . . . . . . . . . . . . . . . . . . . . . . . . . . . . . . . . . . . .. . . . . . . .28SWAP_BASE_LANGUAGE... . . . . . . . . . . . . . . . . . . . . . . . . . . . . . . . . . . . . . . . . . . . . . . . . . . . . . . . . . . . . . . . . . . . . . . . . . . . .. . . . . . . .28SET IGNORE_ERRORS... . . . . . . . . . . . . . . . . . . . . . . . . . . . . . . . . . . . . . . . . . . . . . . . . . . . . . . . . . . . . . . . . . . . . . . . . . . . . . . .. . . . . . . .29SET BASE_LANGUAGE .... . . . . . . . . . . . . . . . . . . . . . . . . . . . . . . . . . . . . . . . . . . . . . . . . . . . . . . . . . . . . . . . . . . . . . . . . . . . . . .. . . . . . . .30
Data Mover Command Modifiers.. . . . . . . . . . . . . . . . . . . . . . . . . . . . . . . . . . . . . . . . . . . . . . . . . . . . . . . . . . . . . . . . . . . . . . . . . . . . . . . . . . . .30AS.... . . . . . . . . . . . . . . . . . . . . . . . . . . . . . . . . . . . . . . . . . . . . . . . . . . . . . . . . . . . . . . . . . . . . . . . . . . . . . . . . . . . . . . . . . . . . . . . . . . . . . . . . . . . . . . . .31
iv PeopleSoft Proprietary and Confidential
Contents
IGNORE_DUPS.. . . . . . . . . . . . . . . . . . . . . . . . . . . . . . . . . . . . . . . . . . . . . . . . . . . . . . . . . . . . . . . . . . . . . . . . . . . . . . . . . . . . . . . . . . .. . . . . . . .32WHERE... . . . . . . . . . . . . . . . . . . . . . . . . . . . . . . . . . . . . . . . . . . . . . . . . . . . . . . . . . . . . . . . . . . . . . . . . . . . . . . . . . . . . . . . . . . . . . . . . . . .. . . . . . . .32
When Data Mover Issues COMMITs.. . . . . . . . . . . . . . . . . . . . . . . . . . . . . . . . . . . . . . . . . . . . . . . . . . . . . . . . . . . . . . . . . . . . . . . . . . . . . . . .33SET Parameter Reference.. . . . . . . . . . . . . . . . . . . . . . . . . . . . . . . . . . . . . . . . . . . . . . . . . . . . . . . . . . . . . . . . . . . . . . . . . . . . . . . . . . . . . . . . . . .34
COMMIT... . . . . . . . . . . . . . . . . . . . . . . . . . . . . . . . . . . . . . . . . . . . . . . . . . . . . . . . . . . . . . . . . . . . . . . . . . . . . . . . . . . . . . . . . . . . . . . . . . .. . . . . . . .34CREATE_INDEX_BEFORE_DATA.... . . . . . . . . . . . . . . . . . . . . . . . . . . . . . . . . . . . . . . . . . . . . . . . . . . . . . . . . . . . . . . . . . . .. . . . . . . .34DBSPACE... . . . . . . . . . . . . . . . . . . . . . . . . . . . . . . . . . . . . . . . . . . . . . . . . . . . . . . . . . . . . . . . . . . . . . . . . . . . . . . . . . . . . . . . . . . . . . . . .. . . . . . . .35DDL... . . . . . . . . . . . . . . . . . . . . . . . . . . . . . . . . . . . . . . . . . . . . . . . . . . . . . . . . . . . . . . . . . . . . . . . . . . . . . . . . . . . . . . . . . . . . . . . . . . . . . . . .. . . . . . . .36EXECUTE_SQL... . . . . . . . . . . . . . . . . . . . . . . . . . . . . . . . . . . . . . . . . . . . . . . . . . . . . . . . . . . . . . . . . . . . . . . . . . . . . . . . . . . . . . . . . .. . . . . . . .37EXTRACT... . . . . . . . . . . . . . . . . . . . . . . . . . . . . . . . . . . . . . . . . . . . . . . . . . . . . . . . . . . . . . . . . . . . . . . . . . . . . . . . . . . . . . . . . . . . . . . . .. . . . . . . .37IGNORE_DUPS.. . . . . . . . . . . . . . . . . . . . . . . . . . . . . . . . . . . . . . . . . . . . . . . . . . . . . . . . . . . . . . . . . . . . . . . . . . . . . . . . . . . . . . . . . . .. . . . . . . .38INPUT... . . . . . . . . . . . . . . . . . . . . . . . . . . . . . . . . . . . . . . . . . . . . . . . . . . . . . . . . . . . . . . . . . . . . . . . . . . . . . . . . . . . . . . . . . . . . . . . . . . . . .. . . . . . . .38INSERT_DATA_ONCE... . . . . . . . . . . . . . . . . . . . . . . . . . . . . . . . . . . . . . . . . . . . . . . . . . . . . . . . . . . . . . . . . . . . . . . . . . . . . . . . . . .. . . . . . . .39LOG... . . . . . . . . . . . . . . . . . . . . . . . . . . . . . . . . . . . . . . . . . . . . . . . . . . . . . . . . . . . . . . . . . . . . . . . . . . . . . . . . . . . . . . . . . . . . . . . . . . . . . . .. . . . . . . .39NO DATA... . . . . . . . . . . . . . . . . . . . . . . . . . . . . . . . . . . . . . . . . . . . . . . . . . . . . . . . . . . . . . . . . . . . . . . . . . . . . . . . . . . . . . . . . . . . . . . . . .. . . . . . . .40NO INDEX... . . . . . . . . . . . . . . . . . . . . . . . . . . . . . . . . . . . . . . . . . . . . . . . . . . . . . . . . . . . . . . . . . . . . . . . . . . . . . . . . . . . . . . . . . . . . . . . .. . . . . . . .41NO RECORD.... . . . . . . . . . . . . . . . . . . . . . . . . . . . . . . . . . . . . . . . . . . . . . . . . . . . . . . . . . . . . . . . . . . . . . . . . . . . . . . . . . . . . . . . . . . . .. . . . . . . .41NO SPACE... . . . . . . . . . . . . . . . . . . . . . . . . . . . . . . . . . . . . . . . . . . . . . . . . . . . . . . . . . . . . . . . . . . . . . . . . . . . . . . . . . . . . . . . . . . . . . . .. . . . . . . .41NO TRACE... . . . . . . . . . . . . . . . . . . . . . . . . . . . . . . . . . . . . . . . . . . . . . . . . . . . . . . . . . . . . . . . . . . . . . . . . . . . . . . . . . . . . . . . . . . . . . . .. . . . . . . .42NO VIEW... . . . . . . . . . . . . . . . . . . . . . . . . . . . . . . . . . . . . . . . . . . . . . . . . . . . . . . . . . . . . . . . . . . . . . . . . . . . . . . . . . . . . . . . . . . . . . . . . .. . . . . . . .42OUTPUT... . . . . . . . . . . . . . . . . . . . . . . . . . . . . . . . . . . . . . . . . . . . . . . . . . . . . . . . . . . . . . . . . . . . . . . . . . . . . . . . . . . . . . . . . . . . . . . . . . .. . . . . . . .43SIZING_SET.. . . . . . . . . . . . . . . . . . . . . . . . . . . . . . . . . . . . . . . . . . . . . . . . . . . . . . . . . . . . . . . . . . . . . . . . . . . . . . . . . . . . . . . . . . . . . . .. . . . . . . .43SPACE... . . . . . . . . . . . . . . . . . . . . . . . . . . . . . . . . . . . . . . . . . . . . . . . . . . . . . . . . . . . . . . . . . . . . . . . . . . . . . . . . . . . . . . . . . . . . . . . . . . . .. . . . . . . .44START.. . . . . . . . . . . . . . . . . . . . . . . . . . . . . . . . . . . . . . . . . . . . . . . . . . . . . . . . . . . . . . . . . . . . . . . . . . . . . . . . . . . . . . . . . . . . . . . . . . . . . .. . . . . . . .44STATISTICS... . . . . . . . . . . . . . . . . . . . . . . . . . . . . . . . . . . . . . . . . . . . . . . . . . . . . . . . . . . . . . . . . . . . . . . . . . . . . . . . . . . . . . . . . . . . . . .. . . . . . . .45VERSION... . . . . . . . . . . . . . . . . . . . . . . . . . . . . . . . . . . . . . . . . . . . . . . . . . . . . . . . . . . . . . . . . . . . . . . . . . . . . . . . . . . . . . . . . . . . . . . . . .. . . . . . . .45
Script Examples.. . . . . . . . . . . . . . . . . . . . . . . . . . . . . . . . . . . . . . . . . . . . . . . . . . . . . . . . . . . . . . . . . . . . . . . . . . . . . . . . . . . . . . . . . . . . . . . . . . . . . . .46Exporting a Database.. . . . . . . . . . . . . . . . . . . . . . . . . . . . . . . . . . . . . . . . . . . . . . . . . . . . . . . . . . . . . . . . . . . . . . . . . . . . . . . . . . . . .. . . . . . . .46Building a Microsoft SQL Server Database.. . . . . . . . . . . . . . . . . . . . . . . . . . . . . . . . . . . . . . . . . . . . . . . . . . . . . . . . . . . .. . . . . . . .46Recreating All Views.. . . . . . . . . . . . . . . . . . . . . . . . . . . . . . . . . . . . . . . . . . . . . . . . . . . . . . . . . . . . . . . . . . . . . . . . . . . . . . . . . . . . . .. . . . . . . .47Importing With REPLACE_ALL With a Commit Level. . . . . . . . . . . . . . . . . . . . . . . . . . . . . . . . . . . . . . . . . . . . . . . . .. . . . . . . .47Combining SQL Commands and IMPORT... . . . . . . . . . . . . . . . . . . . . . . . . . . . . . . . . . . . . . . . . . . . . . . . . . . . . . . . . . . .. . . . . . . .47
Chapter 2PeopleSoft Configuration Manager... . . . . . . . . . . . . . . . . . . .. . . . . . . . . . . . . . . . . . . .. . . . . . . . . . . . . . . . . . . . . . . . . . . . .49Understanding PeopleSoft Configuration Manager.. . . . . . . . . . . . . . . . . . . . . . . . . . . . . . . . . . . . . . . . . . . . . . . . . . . . . . . . . . . . . . .49Working with the Configuration Manager Interface.. . . . . . . . . . . . . . . . . . . . . . . . . . . . . . . . . . . . . . . . . . . . . . . . . . . . . . . . . . . . . . .50Startup.. . . . . . . . . . . . . . . . . . . . . . . . . . . . . . . . . . . . . . . . . . . . . . . . . . . . . . . . . . . . . . . . . . . . . . . . . . . . . . . . . . . . . . . . . . . . . . . . . . . . . . . . . . . . . . . . . .51
Signon Defaults. . . . . . . . . . . . . . . . . . . . . . . . . . . . . . . . . . . . . . . . . . . . . . . . . . . . . . . . . . . . . . . . . . . . . . . . . . . . . . . . . . . . . . . . . . . . .. . . . . . . .51
PeopleSoft Proprietary and Confidential v
Contents
Numeric Keypad - Enter Key Tabs to Next Field. . . . . . . . . . . . . . . . . . . . . . . . . . . . . . . . . . . . . . . . . . . . . . . . . . . . . . .. . . . . . . .53User Can Override... . . . . . . . . . . . . . . . . . . . . . . . . . . . . . . . . . . . . . . . . . . . . . . . . . . . . . . . . . . . . . . . . . . . . . . . . . . . . . . . . . . . . . . .. . . . . . . .53Cache Files.. . . . . . . . . . . . . . . . . . . . . . . . . . . . . . . . . . . . . . . . . . . . . . . . . . . . . . . . . . . . . . . . . . . . . . . . . . . . . . . . . . . . . . . . . . . . . . . . .. . . . . . . .54
Display.. . . . . . . . . . . . . . . . . . . . . . . . . . . . . . . . . . . . . . . . . . . . . . . . . . . . . . . . . . . . . . . . . . . . . . . . . . . . . . . . . . . . . . . . . . . . . . . . . . . . . . . . . . . . . . . . . .54Language... . . . . . . . . . . . . . . . . . . . . . . . . . . . . . . . . . . . . . . . . . . . . . . . . . . . . . . . . . . . . . . . . . . . . . . . . . . . . . . . . . . . . . . . . . . . . . . . . .. . . . . . . .55Page Display.. . . . . . . . . . . . . . . . . . . . . . . . . . . . . . . . . . . . . . . . . . . . . . . . . . . . . . . . . . . . . . . . . . . . . . . . . . . . . . . . . . . . . . . . . . . . . . .. . . . . . . .55Font... . . . . . . . . . . . . . . . . . . . . . . . . . . . . . . . . . . . . . . . . . . . . . . . . . . . . . . . . . . . . . . . . . . . . . . . . . . . . . . . . . . . . . . . . . . . . . . . . . . . . . . . .. . . . . . . .56Business Process Display.. . . . . . . . . . . . . . . . . . . . . . . . . . . . . . . . . . . . . . . . . . . . . . . . . . . . . . . . . . . . . . . . . . . . . . . . . . . . . . . .. . . . . . . .57
Crystal/Business Interlink ... . . . . . . . . . . . . . . . . . . . . . . . . . . . . . . . . . . . . . . . . . . . . . . . . . . . . . . . . . . . . . . . . . . . . . . . . . . . . . . . . . . . . . . . . . .57Crystal Options... . . . . . . . . . . . . . . . . . . . . . . . . . . . . . . . . . . . . . . . . . . . . . . . . . . . . . . . . . . . . . . . . . . . . . . . . . . . . . . . . . . . . . . . . . . .. . . . . . . .58Business Interlink Driver Options.. . . . . . . . . . . . . . . . . . . . . . . . . . . . . . . . . . . . . . . . . . . . . . . . . . . . . . . . . . . . . . . . . . . . . . . .. . . . . . . .58
Trace .. . . . . . . . . . . . . . . . . . . . . . . . . . . . . . . . . . . . . . . . . . . . . . . . . . . . . . . . . . . . . . . . . . . . . . . . . . . . . . . . . . . . . . . . . . . . . . . . . . . . . . . . . . . . . . . . . . .59Workflow... . . . . . . . . . . . . . . . . . . . . . . . . . . . . . . . . . . . . . . . . . . . . . . . . . . . . . . . . . . . . . . . . . . . . . . . . . . . . . . . . . . . . . . . . . . . . . . . . . . . . . . . . . . . . . .60Remote Call/AE... . . . . . . . . . . . . . . . . . . . . . . . . . . . . . . . . . . . . . . . . . . . . . . . . . . . . . . . . . . . . . . . . . . . . . . . . . . . . . . . . . . . . . . . . . . . . . . . . . . . . . .61Client Setup.. . . . . . . . . . . . . . . . . . . . . . . . . . . . . . . . . . . . . . . . . . . . . . . . . . . . . . . . . . . . . . . . . . . . . . . . . . . . . . . . . . . . . . . . . . . . . . . . . . . . . . . . . . . .63
Shortcut Links.. . . . . . . . . . . . . . . . . . . . . . . . . . . . . . . . . . . . . . . . . . . . . . . . . . . . . . . . . . . . . . . . . . . . . . . . . . . . . . . . . . . . . . . . . . . . . .. . . . . . . .64ODBC Setup.. . . . . . . . . . . . . . . . . . . . . . . . . . . . . . . . . . . . . . . . . . . . . . . . . . . . . . . . . . . . . . . . . . . . . . . . . . . . . . . . . . . . . . . . . . . . . . .. . . . . . . .64Install Workstation.. . . . . . . . . . . . . . . . . . . . . . . . . . . . . . . . . . . . . . . . . . . . . . . . . . . . . . . . . . . . . . . . . . . . . . . . . . . . . . . . . . . . . . . . .. . . . . . . .64
Import/Export . . . . . . . . . . . . . . . . . . . . . . . . . . . . . . . . . . . . . . . . . . . . . . . . . . . . . . . . . . . . . . . . . . . . . . . . . . . . . . . . . . . . . . . . . . . . . . . . . . . . . . . . . . .65Profile. . . . . . . . . . . . . . . . . . . . . . . . . . . . . . . . . . . . . . . . . . . . . . . . . . . . . . . . . . . . . . . . . . . . . . . . . . . . . . . . . . . . . . . . . . . . . . . . . . . . . . . . . . . . . . . . . . . .66
Database/Application Server.. . . . . . . . . . . . . . . . . . . . . . . . . . . . . . . . . . . . . . . . . . . . . . . . . . . . . . . . . . . . . . . . . . . . . . . . . . . . .. . . . . . . .67Process Scheduler. . . . . . . . . . . . . . . . . . . . . . . . . . . . . . . . . . . . . . . . . . . . . . . . . . . . . . . . . . . . . . . . . . . . . . . . . . . . . . . . . . . . . . . . .. . . . . . . .69nVision .. . . . . . . . . . . . . . . . . . . . . . . . . . . . . . . . . . . . . . . . . . . . . . . . . . . . . . . . . . . . . . . . . . . . . . . . . . . . . . . . . . . . . . . . . . . . . . . . . . . . . .. . . . . . . .72Common Tab... . . . . . . . . . . . . . . . . . . . . . . . . . . . . . . . . . . . . . . . . . . . . . . . . . . . . . . . . . . . . . . . . . . . . . . . . . . . . . . . . . . . . . . . . . . . . .. . . . . . . .73
Command Line Options.. . . . . . . . . . . . . . . . . . . . . . . . . . . . . . . . . . . . . . . . . . . . . . . . . . . . . . . . . . . . . . . . . . . . . . . . . . . . . . . . . . . . . . . . . . . . . .74Import File.. . . . . . . . . . . . . . . . . . . . . . . . . . . . . . . . . . . . . . . . . . . . . . . . . . . . . . . . . . . . . . . . . . . . . . . . . . . . . . . . . . . . . . . . . . . . . . . . . .. . . . . . . .75Export File. . . . . . . . . . . . . . . . . . . . . . . . . . . . . . . . . . . . . . . . . . . . . . . . . . . . . . . . . . . . . . . . . . . . . . . . . . . . . . . . . . . . . . . . . . . . . . . . . . .. . . . . . . .75Run Client Setup.. . . . . . . . . . . . . . . . . . . . . . . . . . . . . . . . . . . . . . . . . . . . . . . . . . . . . . . . . . . . . . . . . . . . . . . . . . . . . . . . . . . . . . . . . . .. . . . . . . .75Run Client Setup “Quietly”. . . . . . . . . . . . . . . . . . . . . . . . . . . . . . . . . . . . . . . . . . . . . . . . . . . . . . . . . . . . . . . . . . . . . . . . . . . . . . . . .. . . . . . . .75Install ActiveX controls.. . . . . . . . . . . . . . . . . . . . . . . . . . . . . . . . . . . . . . . . . . . . . . . . . . . . . . . . . . . . . . . . . . . . . . . . . . . . . . . . . . . .. . . . . . . .75Install Crystal Runtime Files.. . . . . . . . . . . . . . . . . . . . . . . . . . . . . . . . . . . . . . . . . . . . . . . . . . . . . . . . . . . . . . . . . . . . . . . . . . . . . .. . . . . . . .75Install MSS DSN... . . . . . . . . . . . . . . . . . . . . . . . . . . . . . . . . . . . . . . . . . . . . . . . . . . . . . . . . . . . . . . . . . . . . . . . . . . . . . . . . . . . . . . . . .. . . . . . . .75Disable ODBC Driver Manager Installation. . . . . . . . . . . . . . . . . . . . . . . . . . . . . . . . . . . . . . . . . . . . . . . . . . . . . . . . . . . . .. . . . . . . .76Disable PeopleSoft ODBC Driver Installation.. . . . . . . . . . . . . . . . . . . . . . . . . . . . . . . . . . . . . . . . . . . . . . . . . . . . . . . . . .. . . . . . . .76Uninstall Workstation.. . . . . . . . . . . . . . . . . . . . . . . . . . . . . . . . . . . . . . . . . . . . . . . . . . . . . . . . . . . . . . . . . . . . . . . . . . . . . . . . . . . . . .. . . . . . . .76Help.. . . . . . . . . . . . . . . . . . . . . . . . . . . . . . . . . . . . . . . . . . . . . . . . . . . . . . . . . . . . . . . . . . . . . . . . . . . . . . . . . . . . . . . . . . . . . . . . . . . . . . . . . .. . . . . . . .76
Setting Up the PeopleTools Development Environment.. . . . . . . . . . . . . . . . . . . . . . . . . . . . . . . . . . . . . . . . . . . . . . . . . . . . . . . . . .76Verify <PS_HOME> Access.. . . . . . . . . . . . . . . . . . . . . . . . . . . . . . . . . . . . . . . . . . . . . . . . . . . . . . . . . . . . . . . . . . . . . . . . . . . . . .. . . . . . . .77Verify Connectivity. . . . . . . . . . . . . . . . . . . . . . . . . . . . . . . . . . . . . . . . . . . . . . . . . . . . . . . . . . . . . . . . . . . . . . . . . . . . . . . . . . . . . . . . . .. . . . . . . .77Verify Supporting Applications.. . . . . . . . . . . . . . . . . . . . . . . . . . . . . . . . . . . . . . . . . . . . . . . . . . . . . . . . . . . . . . . . . . . . . . . . . . .. . . . . . . .77
vi PeopleSoft Proprietary and Confidential

Contents
Understanding the User Settings.. . . . . . . . . . . . . . . . . . . . . . . . . . . . . . . . . . . . . . . . . . . . . . . . . . . . . . . . . . . . . . . . . . . . . . . .. . . . . . . .78Running Client Setup.. . . . . . . . . . . . . . . . . . . . . . . . . . . . . . . . . . . . . . . . . . . . . . . . . . . . . . . . . . . . . . . . . . . . . . . . . . . . . . . . . . . . . .. . . . . . . .78
Chapter 3PeopleSoft Data Archive Manager... . . . . . . . . . . . . . . . . . . . . . . . . . . . . . . . . . . . . . . . . . . . . . . . . . . . . . . . . . . . . . . . . . . . . .81Understanding Data Archiving.. . . . . . . . . . . . . . . . . . . . . . . . . . . . . . . . . . . . . . . . . . . . . . . . . . . . . . . . . . . . . . . . . . . . . . . . . . . . . . . . . . . . . . .81Choosing an Archiving Strategy.. . . . . . . . . . . . . . . . . . . . . . . . . . . . . . . . . . . . . . . . . . . . . . . . . . . . . . . . . . . . . . . . . . . . . . . . . . . . . . . . . . . . .81
Determining an Archive Strategy.. . . . . . . . . . . . . . . . . . . . . . . . . . . . . . . . . . . . . . . . . . . . . . . . . . . . . . . . . . . . . . . . . . . . . . . .. . . . . . . .82Archiving to History Tables.. . . . . . . . . . . . . . . . . . . . . . . . . . . . . . . . . . . . . . . . . . . . . . . . . . . . . . . . . . . . . . . . . . . . . . . . . . . . . . .. . . . . . . .82Creating History Tables.. . . . . . . . . . . . . . . . . . . . . . . . . . . . . . . . . . . . . . . . . . . . . . . . . . . . . . . . . . . . . . . . . . . . . . . . . . . . . . . . . . .. . . . . . . .83Archiving to Flat Files.. . . . . . . . . . . . . . . . . . . . . . . . . . . . . . . . . . . . . . . . . . . . . . . . . . . . . . . . . . . . . . . . . . . . . . . . . . . . . . . . . . . . .. . . . . . . .83
Creating an Archive Template. . . . . . . . . . . . . . . . . . . . . . . . . . . . . . . . . . . . . . . . . . . . . . . . . . . . . . . . . . . . . . . . . . . . . . . . . . . . . . . . . . . . . . . .84Record Criteria Page.. .. . . . . . . . . . . . . . . . . . . . . . . . . . . . . . . . . . . . . . . . . . . . . . . . . . . . . . . . . . . . . . . . . . . . . . . . . . . . . . . . . . . .. . . . . . . .84Join Record Criteria Page.. . . . . . . . . . . . . . . . . . . . . . . . . . . . . . . . . . . . . . . . . . . . . . . . . . . . . . . . . . . . . . . . . . . . . . . . . . . . . . . .. . . . . . . .85SQL Designer Page... . . . . . . . . . . . . . . . . . . . . . . . . . . . . . . . . . . . . . . . . . . . . . . . . . . . . . . . . . . . . . . . . . . . . . . . . . . . . . . . . . . . . .. . . . . . . .86
Working With the Archives.. . . . . . . . . . . . . . . . . . . . . . . . . . . . . . . . . . . . . . . . . . . . . . . . . . . . . . . . . . . . . . . . . . . . . . . . . . . . . . . . . . . . . . . . . . .88Archive Security Page.. . . . . . . . . . . . . . . . . . . . . . . . . . . . . . . . . . . . . . . . . . . . . . . . . . . . . . . . . . . . . . . . . . . . . . . . . . . . . . . . . . . .. . . . . . . .88Archive Utilities Page... . . . . . . . . . . . . . . . . . . . . . . . . . . . . . . . . . . . . . . . . . . . . . . . . . . . . . . . . . . . . . . . . . . . . . . . . . . . . . . . . . . . .. . . . . . . .89
Working With Data.. . . . . . . . . . . . . . . . . . . . . . . . . . . . . . . . . . . . . . . . . . . . . . . . . . . . . . . . . . . . . . . . . . . . . . . . . . . . . . . . . . . . . . . . . . . . . . . . . . . .89Data Finder Page... . . . . . . . . . . . . . . . . . . . . . . . . . . . . . . . . . . . . . . . . . . . . . . . . . . . . . . . . . . . . . . . . . . . . . . . . . . . . . . . . . . . . . . . .. . . . . . . .90Data Transfer Input Page.. . . . . . . . . . . . . . . . . . . . . . . . . . . . . . . . . . . . . . . . . . . . . . . . . . . . . . . . . . . . . . . . . . . . . . . . . . . . . . . . .. . . . . . . .90Data Transfer Output Page.. . . . . . . . . . . . . . . . . . . . . . . . . . . . . . . . . . . . . . . . . . . . . . . . . . . . . . . . . . . . . . . . . . . . . . . . . . . . . . .. . . . . . . .92
Running Data Archival Processes.. . . . . . . . . . . . . . . . . . . . . . . . . . . . . . . . . . . . . . . . . . . . . . . . . . . . . . . . . . . . . . . . . . . . . . . . . . . . . . . . . . .92Archive Data Page.... . . . . . . . . . . . . . . . . . . . . . . . . . . . . . . . . . . . . . . . . . . . . . . . . . . . . . . . . . . . . . . . . . . . . . . . . . . . . . . . . . . . . . .. . . . . . . .92Archive Online to Flat Files Page... . . . . . . . . . . . . . . . . . . . . . . . . . . . . . . . . . . . . . . . . . . . . . . . . . . . . . . . . . . . . . . . . . . . . . .. . . . . . . .94Export History to Flat Files Page... . . . . . . . . . . . . . . . . . . . . . . . . . . . . . . . . . . . . . . . . . . . . . . . . . . . . . . . . . . . . . . . . . . . . . .. . . . . . . .95Import From Flat Files Page... . . . . . . . . . . . . . . . . . . . . . . . . . . . . . . . . . . . . . . . . . . . . . . . . . . . . . . . . . . . . . . . . . . . . . . . . . . . .. . . . . . . .96
Running Data Archival Reports and Audits. . . . . . . . . . . . . . . . . . . . . . . . . . . . . . . . . . . . . . . . . . . . . . . . . . . . . . . . . . . . . . . . . . . . . . . . .97Running an Archive Report. . . . . . . . . . . . . . . . . . . . . . . . . . . . . . . . . . . . . . . . . . . . . . . . . . . . . . . . . . . . . . . . . . . . . . . . . . . . . . . .. . . . . . . .97Creating an Audit Inquiry.. . . . . . . . . . . . . . . . . . . . . . . . . . . . . . . . . . . . . . . . . . . . . . . . . . . . . . . . . . . . . . . . . . . . . . . . . . . . . . . . .. . . . . . . .98Audit Report Page.. . . . . . . . . . . . . . . . . . . . . . . . . . . . . . . . . . . . . . . . . . . . . . . . . . . . . . . . . . . . . . . . . . . . . . . . . . . . . . . . . . . . . . . . .. . . . . . . .99
Archiving Tips and Techniques .. . . . . . . . . . . . . . . . . . . . . . . . . . . . . . . . . . . . . . . . . . . . . . . . . . . . . . . . . . . . . . . . . . . . . . . . . . . . . . . . . . . . .100Understanding Business Requirements.. . . . . . . . . . . . . . . . . . . . . . . . . . . . . . . . . . . . . . . . . . . . . . . . . . . . . . . . . . . . . . . .. . . . . . .100Archiving from Online to History Table Process.. . . . . . . . . . . . . . . . . . . . . . . . . . . . . . . . . . . . . . . . . . . . . . . . . . . . . . .. . . . . . .100Rolling Back History Table Data.. . . . . . . . . . . . . . . . . . . . . . . . . . . . . . . . . . . . . . . . . . . . . . . . . . . . . . . . . . . . . . . . . . . . . . . . .. . . . . . .101Archiving From History Table to a Flat File.. . . . . . . . . . . . . . . . . . . . . . . . . . . . . . . . . . . . . . . . . . . . . . . . . . . . . . . . . . . . .. . . . . . .101Restoring Archived Data From Flat Files. . . . . . . . . . . . . . . . . . . . . . . . . . . . . . . . . . . . . . . . . . . . . . . . . . . . . . . . . . . . . . . .. . . . . . .101Understanding Commits.. . . . . . . . . . . . . . . . . . . . . . . . . . . . . . . . . . . . . . . . . . . . . . . . . . . . . . . . . . . . . . . . . . . . . . . . . . . . . . . . . .. . . . . . .102Gaining Increased Performance.. . . . . . . . . . . . . . . . . . . . . . . . . . . . . . . . . . . . . . . . . . . . . . . . . . . . . . . . . . . . . . . . . . . . . . . . .. . . . . . .102
PeopleSoft Proprietary and Confidential vii
Contents
Modifying Indexes.. . . . . . . . . . . . . . . . . . . . . . . . . . . . . . . . . . . . . . . . . . . . . . . . . . . . . . . . . . . . . . . . . . . . . . . . . . . . . . . . . . . . . . . . .. . . . . . .102
Glossary of PeopleSoft Terms...... . . . . . . . . . . . . . . . . . . . . . . . . . . . . . . . . . . . . . . . . . . . . . . . . . . . . . . . . . . . . . . . . . . . . . . .103
Index .... . . . . . . . . . . . . .. . . . . . . . . . . . . . . . . .. . . . . . . . . . . . . . . . . .. . . . . . . . . . . . . . .. . . . . . . . . . . . . . .. . . . . . . . . . . . . . . .. . . . . . . . .115
viii PeopleSoft Proprietary and Confidential
About This PeopleBook
PeopleBooks provide you with the information that you need to implement and use PeopleSoft applications.
This preface discusses:
• PeopleSoft application prerequisites.
• PeopleSoft application fundamentals.
• Related documentation.
• Typographical elements and visual cues.
• Comments and suggestions.
• Common elements in PeopleBooks.
Note. PeopleBooks document only page elements that require additional explanation. If a page element is notdocumented with the process or task in which it is used, then either it requires no additional explanation or itis documented with common elements for the section, chapter, PeopleBook, or product line. Elements thatare common to all PeopleSoft applications are defined in this preface.
PeopleSoft Application PrerequisitesTo benefit fully from the information that is covered in these books, you should have a basicunderstanding of how to use PeopleSoft applications.
See Using PeopleSoft Applications.
You might also want to complete at least one PeopleSoft introductory training course.
You should be familiar with navigating the system and adding, updating, and deleting information byusing PeopleSoft windows, menus, and pages. You should also be comfortable using the World WideWeb and the Microsoft Windows or Windows NT graphical user interface.
These books do not review navigation and other basics. They present the information that you needto use the system and implement your PeopleSoft applications most effectively.
PeopleSoft Application FundamentalsEach application PeopleBook provides implementation and processing information for your PeopleSoftdatabase. However, additional, essential information describing the setup and design of your systemappears in a companion volume of documentation called the application fundamentals PeopleBook.Each PeopleSoft product line has its own version of this documentation.
PeopleSoft Proprietary and Confidential ix

General Preface
The application fundamentals PeopleBook consists of important topics that apply to many or allPeopleSoft applications across a product line. Whether you are implementing a single application,some combination of applications within the product line, or the entire product line, you shouldbe familiar with the contents of this central PeopleBook. It is the starting point for fundamentals,such as setting up control tables and administering security.
Related DocumentationThis section discusses how to:
• Obtain documentation updates.
• Order printed documentation.
Obtaining Documentation UpdatesYou can find updates and additional documentation for this release, as well as previous releases,on the PeopleSoft Customer Connection Website. Through the Documentation section ofPeopleSoft Customer Connection, you can download files to add to your PeopleBook Library.You’ll find a variety of useful and timely materials, including updates to the full PeopleSoftdocumentation that is delivered on your PeopleBooks CD-ROM.
Important! Before you upgrade, you must check PeopleSoft Customer Connection for updates to theupgrade instructions. PeopleSoft continually posts updates as the upgrade process is refined.
See AlsoPeopleSoft Customer Connection Website, http://www.peoplesoft.com/corp/en/login.asp
Ordering Printed DocumentationYou can order printed, bound volumes of the complete PeopleSoft documentation that is deliveredon your PeopleBooks CD-ROM. PeopleSoft makes printed documentation available for eachmajor release shortly after the software is shipped. Customers and partners can order printedPeopleSoft documentation by using any of these methods:
• Web
• Telephone
WebFrom the Documentation section of the PeopleSoft Customer Connection Website, access the PeopleSoftPress Website under the Ordering PeopleBooks topic. The PeopleSoft Press Website is a joint venturebetween PeopleSoft and Consolidated Publications Incorporated (CPI), the book print vendor. Use acredit card, money order, cashier’s check, or purchase order to place your order.
x PeopleSoft Proprietary and Confidential

General Preface
TelephoneContact CPI at 800 888 3559.
EmailSend email to CPI at [email protected].
See AlsoPeopleSoft Customer Connection Website, http://www.peoplesoft.com/corp/en/login.asp
Typographical Conventions and Visual CuesThis section discusses:
• Typographical conventions.
• Visual cues.
Typographical ConventionsThe following table contains the typographical conventions that are used in PeopleBooks:
Typographical Convention or Visual Cue Description
Bold Indicates PeopleCode function names, method names,language constructs, and PeopleCode reserved words thatmust be included literally in the function call.
Italics Indicates field values, emphasis, and PeopleSoft or otherbook-length publication titles. In PeopleCode syntax,italic items are placeholders for arguments that yourprogram must supply.
We also use italics when we refer to words as words orletters as letters, as in the following: Enter the number 0,not the letterO.
KEY+KEY Indicates a key combination action. For example, a plussign (+) between keys means that you must hold downthe first key while you press the second key. For ALT+W,hold down the ALT key while you press W.
Monospace font Indicates a PeopleCode program or other code example.
(quotation marks) Indicate chapter titles in cross-references and words thatare used differently from their intended meanings.
PeopleSoft Proprietary and Confidential xi

General Preface
Typographical Convention or Visual Cue Description
. . . (ellipses) Indicate that the preceding item or series can be repeatedany number of times in PeopleCode syntax.
{ } (curly braces) Indicate a choice between two options in PeopleCodesyntax. Options are separated by a pipe ( | ).
[ ] (square brackets) Indicate optional items in PeopleCode syntax.
& (ampersand) When placed before a parameter in PeopleCode syntax,an ampersand indicates that the parameter is an alreadyinstantiated object.
Ampersands also precede all PeopleCode variables.
(ISO) Information that applies to a specific country, to the U.S.federal government, or to the education and governmentmarket, is preceded by a three-letter code in parentheses.
The code for the U.S. federal government is USF;the code for education and government is E&G, andthe country codes from the International StandardsOrganization are used for specific countries. Here is anexample:
(GER) If you’re administering German employees,German law requires you to indicate special nationalityand citizenship information for German workers usingnationality codes established by the German DEUEVDirective.
Cross-references PeopleBooks provide cross-references either belowthe heading See Also or on a separate line precededby the word See. Cross-references lead to otherdocumentation that is pertinent to the immediatelypreceding documentation.
Visual CuesPeopleBooks contain the following visual cues.
NotesNotes indicate information that you should pay particular attention to as you work with the PeopleSoft system.
Note. Example of a note.
A note that is preceded by Important! is crucial and includes information that concernswhat you must do for the system to function properly.
xii PeopleSoft Proprietary and Confidential
General Preface
Important! Example of an important note.
WarningsWarnings indicate crucial configuration considerations. Pay close attention to warning messages.
Warning! Example of a warning.
Comments and SuggestionsYour comments are important to us. We encourage you to tell us what you like, or whatyou would like to see changed about PeopleBooks and other PeopleSoft reference andtraining materials. Please send your suggestions to:
PeopleSoft Product Documentation Manager PeopleSoft, Inc. 4460 Hacienda Drive Pleasanton, CA 94588
Or send email comments to [email protected].
While we cannot guarantee to answer every email message, we will pay careful attentionto your comments and suggestions.
Common Elements in These PeopleBooksAs of Date The last date for which a report or process includes data.
Business Unit An ID that represents a high-level organization of business information.You can use a business unit to define regional or departmentalunits within a larger organization.
Description Enter up to 30 characters of text.
Effective Date The date on which a table row becomes effective; the date that an actionbegins. For example, to close out a ledger on June 30, the effective datefor the ledger closing would be July 1. This date also determines whenyou can view and change the information. Pages or panels and batchprocesses that use the information use the current row.
Once, Always, and Don’tRun
Select Once to run the request the next time the batch process runs. After thebatch process runs, the process frequency is automatically set to Don’t Run.
Select Always to run the request every time the batch process runs.
Select Don’t Run to ignore the request when the batch process runs.
PeopleSoft Proprietary and Confidential xiii
General Preface
Report Manager Click to access the Report List page, where you can view report content,check the status of a report, and see content detail messages (which showyou a description of the report and the distribution list).
Process Monitor Click to access the Process List page, where you can view thestatus of submitted process requests.
Run Click to access the Process Scheduler request page, where you can specify thelocation where a process or job runs and the process output format.
Request ID An ID that represents a set of selection criteria for a report or process.
User ID An ID that represents the person who generates a transaction.
SetID An ID that represents a set of control table information, or TableSets.TableSets enable you to share control table information and processing optionsamong business units. The goal is to minimize redundant data and systemmaintenance tasks. When you assign a setID to a record group in a businessunit, you indicate that all of the tables in the record group are shared betweenthat business unit and any other business unit that also assigns that setID tothat record group. For example, you can define a group of common job codesthat are shared between several business units. Each business unit that sharesthe job codes is assigned the same setID for that record group.
Short Description Enter up to 15 characters of text.
See AlsoUsing PeopleSoft Applications
PeopleSoft Process Scheduler
xiv PeopleSoft Proprietary and Confidential

Administration Tools Preface
In this book we’ll show you how to use the following Administration PeopleTools:
• Data Mover
• Configuration Manager
• Data Archive Manager
Note. This PeopleBook documents only elements that require additional explanation. If a page element is notdocumented with the process or task in which it is used, then either it requires no additional explanation or it isdocumented with common elements for the section, chapter, PeopleBook, or product line.
PeopleSoft Data MoverPeopleSoft Data Mover enables you to perform the following tasks:
• Transfer application data between PeopleSoft databases.
• Move PeopleSoft databases across operating systems and database platforms.
• Execute SQL statements against any PeopleSoft database, regardless of the underlyingoperating system or database platform.
• Control database security and access.
• Create, edit, and run scripts. These scripts may include any combination of SQL commandsand Data Mover commands for exporting and importing data.
See Chapter 1, “PeopleSoft Data Mover,” page 1.
PeopleSoft Configuration ManagerPeopleSoft Configuration Manager simplifies workstation administration by enabling youto adjust the PeopleSoft registry settings from one central location. It lets you set up oneworkstation to reflect the environment at your site, and to then export the configuration file,which can be shared among all the workstations at your site.
See Chapter 2, “PeopleSoft Configuration Manager,” page 49.
PeopleSoft Proprietary and Confidential xv
Preface
PeopleSoft Data Archive ManagerPeopleSoft Data Archive Manager enables you to select the rows of data you no longer needin your online system and move these rows in history/staging tables or in a flat file format.Keeping the data in the system in history/staging tables keeps the data available for queries andreporting. Using PeopleSoft Data Archive Manager you can:
• Remove the historical data from your online tables to improve overall performance
• Create an archive strategy
• Run archive reports and audits
See Chapter 3, “PeopleSoft Data Archive Manager,” page 81.
xvi PeopleSoft Proprietary and Confidential

CHAPTER 1
PeopleSoft Data Mover
This chapter provides an overview of PeopleSoft Data Mover and discusses the following topics:
• Data Mover interface
• Using Data Mover
• Data Mover scripts
• Database Setup functionality
• Data Mover command line interface
• Data Mover commands
• Data Mover set parameters
• Sample Data Mover scripts
Understanding Data MoverPeopleSoft Data Mover enables you to perform the following tasks:
• Transfer application data between PeopleSoft databases.
• Move PeopleSoft databases across operating systems and database platforms.
• Execute SQL statements against any PeopleSoft database, regardless of the underlyingoperating system or database platform.
• Control database security and access.
• Create, edit, and run scripts. These scripts may include any combination of SQL commandsand Data Mover commands for exporting and importing data.
The Data Mover development interface, or GUI, runs only on Windows. However, the Data Mover commandline interface, which is mainly intended for UNIX servers, runs on Windows and UNIX operating systems.
Warning! PeopleSoft Data Mover runs in two-tier mode only. You must sign on to thedatabase directly, not through an application server.
Throughout this chapter, we use the following typographical conventions to distinguish betweendifferent elements of the command statement syntax:
italic Italic items are placeholders for arguments that your program must supply.
PeopleSoft Proprietary and Confidential 1
PeopleSoft Data Mover Chapter 1
... Ellipses indicate that the preceding item or series can be repeatedany number of times.
{ } Group of items, from which you must choose one item, areenclosed in curly brackets.
[ ] Optional items are enclosed in square brackets.
| An upright slash separates item choices within curly and square brackets.
Understanding the Data Mover InterfaceBefore you begin using PeopleSoft Data Mover to create and run your database scripts, you’llwant to become familiar with the PeopleSoft Data Mover interface.
Starting Data MoverThere are two ways to start PeopleSoft Data Mover:
• Using the Data Mover short cut in your PeopleSoft program group, as in Start, Programs, <PeopleSoftGroup>, Data Mover. This access method only applies to the Windows Development Environment.
• Using the command line interface. This executes PeopleSoft Data Mover in a console for Windows and atelnet session for UNIX. The command line interface is discussed in more detail later in this document.
Operating ModesOperating modes refer to how you are connected to the database. You use PeopleSoft DataMover in one of the following modes: regular or bootstrap.
Regular Mode Most of the time you will sign onto PeopleSoft Data Mover in regularmode. To do this, you simply enter your PeopleSoft user ID and passwordat the signon screen. In regular mode, all commands are valid.
Bootstrap Mode At times, you need to signon on to PeopleSoft Data Mover in bootstrap mode,which means using the database access ID and password at the signon screen.Typically, using bootstrap mode is necessary for database loading becausethere are no PeopleSoft security tables established yet. Bootstrap mode is alsoused for running some security commands, such as, ENCRYPT_PASSWORD.
Note. In bootstrap mode, the following commands are not valid: EXPORT, RENAME, and REPLACE_VIEW.
Signing On to the Development EnvironmentTo start Data Mover in the Development Environment:
1. Select Start, Programs, <PeopleSoft Group>, Data Mover.
2 PeopleSoft Proprietary and Confidential
Chapter 1 PeopleSoft Data Mover
Where <PeopleSoft Group> refers to the program group containing your PeopleSoft programs.If you don’t have a Data Mover short cut, you can add one to the desktop. The executable tolaunch is as follows: %PS_HOME%\bin\client\winx86\PSDMT.EXE.
2. Sign on using the appropriate ID and password.
In regular mode, these would be your User ID and password. In bootstrap mode, you usethe system access ID and access password, such as SYSADM.
Understanding the Data Mover WindowThe PeopleSoft Data Mover interface is split horizontally into two panes: an input pane and an output pane.
The input pane is on the top of the screen and the output pane is on the bottom.
The status bar at the bottom of the screen reveals the following:
• Database Name. QEDMO, PT840HR, and so on.
• Database Type. Oracle, Sybase, and so on.
• Operating Mode. Regular or Bootstrap mode.
• Trace Status. On or off.
The input pane (window) is where the script you’ve opened appears. This is whereyou view and edit PeopleSoft Data Mover scripts.
The output window displays the results after running a script. If you encounter any errors,the output window shows where the script failed. In a multi-database environment, alwayscheck the information at the top of the output to ensure that you’ve run the script against theappropriate database. Specifically, refer to the "Database:" line.
Note. The results shown in the output window are saved to the file DATAMOVE.LOG bydefault, which is written to the default log directory as specified in the Configuration Manager(Profile, Common tab). You can also specify your own file name.
SQL Trace status appears in the far right portion of the status bar. PeopleSoft recommends usingPeopleSoft Data Mover with tracing turned off. You can disable SQL Trace (for the Windowsenvironment) before starting PeopleSoft Data Mover in a number of places:
• Configuration Manager
• PeopleTools Options
• Data Mover Command (NO TRACE)
The operating mode display on the status bar lets you know if you’re in regular mode or in bootstrap mode.If you are connected to the database in regular mode, the status shows a “blank” operating mode. Theoperating mode displays BootStrap if you signed on using the access ID and password.
Note. Make sure you know the mode you are using. Most commands require regular mode to run successfully.
PeopleSoft Proprietary and Confidential 3

PeopleSoft Data Mover Chapter 1
See AlsoPeopleSoft Server Tools Administration, “PeopleTools Utilities,” PeopleTools Options
Chapter 1, “PeopleSoft Data Mover,” Operating Modes, page 2
Understanding the Menu OptionsThere are four menu bar items in the PeopleSoft Data Mover window: File, Edit, View, and Help.
File Contains options to Create, Open, Save, and Run scripts. You alsolaunch Database Setup from this menu. These options are discussedlater in this document in the proper context.
Edit Contains menu items similar to those of most text editors: Undo, Cut, Copy,Paste, and Clear. Also, you will find Select All, Find, Replace, and Repeat.
View Using the View menu list, you can opt to hide the Toolbar and/orthe Status Bar. Both appear by default.
Help Contains the Standard PeopleSoft help options.
Understanding the Toolbar OptionsThe toolbar offers the standard Microsoft Windows buttons to use in place of selecting menu optionsfor the following actions: New, Open, Save, Cancel, Cut, Copy, Paste, and Help. The only buttonthat is specific to PeopleSoft Data Mover is the Run Script button.
Understanding Data Mover ScriptsThis section covers:
• Command types
• Syntax rules
• Creating and editing scripts
Command TypesA PeopleSoft Data Mover script can contain two types of commands:
• Data Mover commands. Used to export and import database information and to otherwisemodify the database. Data Mover commands also control script execution, call otherPeopleSoft Data Mover files, and enter comments.
• SQL commands. These include both standard and non-standard SQL commands used to modify the database.
4 PeopleSoft Proprietary and Confidential
Chapter 1 PeopleSoft Data Mover
Syntax RulesIf you plan to create or edit Data Mover scripts, keep the following syntax rules in mindto make sure your commands run successfully.
Rule 1With the exception of double-dash (--) comment statements, every command statementmust be followed by a delimiter.
Valid delimiters are:
• Semicolon (;). A semicolon can reside on the same line as the command itself, or byitself on the line immediately following a command statement. For example, the followingtwo uses of the semicolon delimiter are valid:
SET OUTPUT c:\temp\abc.dat;
SET LOG c:\temp\new.log
;
• Forward slash (/). This delimiter can be used only on a line by itself, in column 1, on a lineimmediately following a command statement. For example:
IMPORT *
/
Rule 2With the exception of double-dash (--) comment statements, statements may span multiple lines. For example:
EXPORT absence_hist
WHERE absence_type = ‘A’;
Rule 3A double-dash (--) comment statement does not require a delimiter termination. However,each statement can’t span more than one line. Also, make sure you add a space after the(--) before you start your comment. For example:
Correct:
-- This script imports the information stored in
-- the ABC.DAT file.
Incorrect:
--This script imports the information stored in
the ABC.DAT file.
Rule 4Command statements may contain any amount of white space between items.
Rule 5Statement text is case insensitive. For example,
PeopleSoft Proprietary and Confidential 5

PeopleSoft Data Mover Chapter 1
IMPORT *
is equivalent to
import *
Note. In this chapter, we show commands in UPPERCASE to help set them apart from other statement text.
Rule 6String constants are case-sensitive and must be surrounded by single quotes. For example,‘ABC’ is treated differently than ‘Abc’ or ‘abc’.
Rule 7In PeopleSoft Data Mover, when a record name needs to be specified as one of the elements in thecommand statement syntax, as in an IMPORT statement, you can specify either the record name or thecorresponding table name. For example, the following IMPORT statements are equivalent:
Correct:
IMPORT job;
Correct:
IMPORT ps_job;
However, when a table name is required for one of the elements in the command statement syntax,you must use the table name—not the record name. For example:
Correct:
IMPORT job AS ps_process;
Incorrect:
IMPORT job AS process;
Creating and Editing ScriptsWhen you want to use PeopleSoft Data Mover to manipulate the information in your database, you can eitherwrite a new script, or open and edit an existing script that is similar to the one you want to create.
The default file extension for scripts is DMS, which stands for Data Mover Script.
To create a new script:
1. Select File, New.
When you first launch Data Mover, this is the default mode; you don’t need to select File, New.
2. Enter the script text (code) in the input (top) pane.
Using proper Data Mover syntax, enter the command statements you want the script to execute.
3. Save the script.
6 PeopleSoft Proprietary and Confidential
Chapter 1 PeopleSoft Data Mover
Select File, Save. On the Save As dialog box select the Save as Unicode checkbox(if appropriate) and click Save.
To edit an existing Data Mover script
1. Select File, Open.
2. Choose the file you want and click OK.
By default, you view only .DMS files. You can also choose All Files from the Files of type drop-down listand view all file types. After you open a script, it appears in the PeopleSoft Data Mover input pane.
3. Make the desired changes to the script.
If the file you opened was not a .DMS type, be sure to check that it conforms to the requiredsyntax rules and that it doesn’t contain any unsupported SQL commands.
4. Save the script with a new name, if desired.
Select File, Save As.
On the Save As dialog, enter a File name, select the Save as Unicode checkbox if appropriate and click Save.
If the script is edited in Unicode format, then the default save is Unicode. However, if thefile is opened in ASCII format then the default will be ASCII.
Preparing to Run Export ScriptsBefore running a PeopleSoft Data Mover export script, you must first prepare yourdatabase, by completing the following steps:
To prepare for an export
1. Load DDL model information by running all DDL*.DMS files through PeopleSoft Data Mover.
2. If you need to change your DDL model information, use the DDL Model Defaultsutility in PeopleTools Utilities.
3. Run the DDDAUDIT.SQR and fix any errors it finds.
4. Run the SYSAUDIT.SQR and fix any errors it finds.
5. Use Application Designer to SQL Alter all tables.
Either let the files alter in place or run the script that it generates to alter any tables it finds out of sync.
6. Use Application Designer to SQL Create all records, using the If table exists... Never recreate option.
See AlsoPeopleSoft Server Tools Administration, “PeopleTools Utilities”
Running ScriptsThis section discusses running scripts with PeopleSoft Data Mover. Through PeopleSoft Data Mover,you can run DDL, DML, and SQL scripts created with the following tools:
• Data Mover (DMS scripts).
• Application Designer’s Build SQL functionality (SQL scripts).
PeopleSoft Proprietary and Confidential 7
PeopleSoft Data Mover Chapter 1
• Platform-specific SQL utility (SQL scripts).
Note. You can also schedule Data Mover scripts through Process Scheduler. This can be usefulin scheduling audit routines or extracting data from the PS database. Additionally, logs and datafiles generated by Data Mover can be posted to the Process Scheduler Report Repository so thatthey can be viewed either through Process Monitor or Report Manager.
When running scripts through Data Mover, keep the following items in mind:
• PeopleSoft strongly recommends running PeopleSoft Data Mover scripts when SQL Trace is set to Off.If SQL Trace is enabled, turn it off on the Trace tab in the Configuration Manager before you run thescript. You can also enter the SET NO TRACE statement within your scripts whenever possible. Thisdisables SQL Trace for the DMS script even if it is enabled in the Configuration Manager.
• Records defined using Data Mover EXPORT and IMPORT commands can have a maximum of 250 totalcolumns and multiple long columns within the limitations for long columns set by your database platform.Check with your database vendor for restrictions on the number of long columns allowed for your platform.
• On DB2 platforms, locks can occur on system catalogs. In that case, you should not let PeopleSoft DataMover sessions run unattended, and be sure to close your session as soon as all scripts complete.
• If you want to run a SQL script, you must open it using File, Open so that the SQL executes properly.Do not copy and paste SQL from another source into PeopleSoft Data Mover.
Note. If you are planning on importing or exporting files greater than 2GB on UNIX, you willneed to enable large file support at the operating system level.
To run a script:
1. Select File, Open.
2. Choose one of the following types of script to run.
• PeopleSoft Data Mover Files (.DMS). These are the files created using PeopleSoft Data Mover.
• Q uery Files (.SQL). These are the files c reated using the Build SQL functionality menu in ApplicationDesign er or using an R DBMS-specific query tool, such as PL/SQL o n Oracle.
• All Files. Enables you to view all available files in a directory. Only .DMS and .SQLfiles are valid file types for PeopleSoft Data Mover.
• SELECT commands are not supported. When performing upgrades, use the SQL utility fory o ur p latfo rm s to run S QL sc ripts , no t P eo ple S oft D ata M o v er.
3. Select File, Run. You can monitor the script’s progress in PeopleSoft Data Mover’s output pane, whichreveals any error messages and a message saying “Script Completed” when processing has ended.
Using Database SetupTypically, Database Setup is used during PeopleSoft installations and upgrades, notnecessarily on a daily basis. You use Database Setup to create PeopleSoft Data Mover importscripts that load data into your PeopleSoft database.
8 PeopleSoft Proprietary and Confidential
Chapter 1 PeopleSoft Data Mover
In this section we discuss how to:
• Accessing Database Setup
• Using the Database Setup Wizard
Note. If you are performing an installation, use the documentation included in your PeopleSoftInstallation guide, which provide specific details regarding your applications, languages, and RDBMS.This section provides a general overview, not specific to the installation procedure.
Accessing Database SetupTo Access the Database Setup Utility:
1. Signon on to PeopleSoft Data Mover in bootstrap mode.
Use the access ID and password rather than your PeopleSoft user ID and password.
2. Select File, Database Setup.
Note. If you sign on to Data Move using the regular mode, not bootstrap mode,the Database Setup menu option is disabled.
Using the Database Setup ScreenThe following controls are on the Database Setup screen.
Select Target Database From the drop-down list, select the RDBMS you intend to run thedatabase setup script against. For instance, if the database you arecreating is to run on an Oracle server, select Oracle.
Database Type PeopleSoft supports Non-Unicode (ANSI) and Unicode database types.Make sure you select the appropriate type for your system. For someRDBMS types, Unicode is not an option.
Select Character Set Depending on what RDBMS you selected previously, the valid character setsappear in this drop-down list. Select the appropriate option for your system.
Using the Select PeopleSoft Application ScreenThe following controls are on the PeopleSoft Application screen.
PeopleSoft Application Only the applications that you have licensed appear. Select the applicationsfor which you want to create PeopleSoft Data Mover scripts. To addapplications selectively, use the Add button. To add all applicationsavailable, use the Add All button. The Add All button is enabledwhen multiple applications appear. You add the applications to thePeopleSoft Data Mover Scripts to Create edit box.
Data Mover Scriptsto Create
Contains the applications you added from the PeopleSoft Application listbox. Use the Remove button to remove a single application, and use theRemove All button to clear the list box if multiple applications appear. TheRemove All button resets the PeopleSoft Application list.
PeopleSoft Proprietary and Confidential 9

PeopleSoft Data Mover Chapter 1
Database Type Specify what the result of running the script should be. There are two databasecodes: PT for PeopleTools and EP for PeopleSoft applications.
• Demo. For creating a demonstration database.
• System. For creating a system database.
• Add New Language. For adding support of new languagesto and existing database.
• Add New Product. To add an new PeopleSoft product to the current system.With this option selected only non-PT Database Codes appear.
Using the Database Parameters ScreenThe following controls are on the Database Parameters screen.
Database Name Enter the name of the database against which you intend to run the script.Note that the database name that appears is the database for which youare currently signed on. If the script you are creating will be run againstanother database, make sure to specify the appropriate name here. If electto generate a script for a database other than the current database, thesystem uses a default database using the following convention, XXDMOfor demonstration databases, and XXSYS for system databases. TheXX represents the product code, such as HR.
Symbolic ID This is used as the key to retrieve Access ID and access password. Forinitial installation set it equal to the Database Name.
Access ID The PeopleSoft Access ID is the RDBMS ID with which PeopleSoftapplication(s) are ultimately connected to your database once thePeopleSoft System validates the User or Connect ID. It typicallyhas all the RDBMS privileges necessary to access and manipulatedata for an entire PeopleSoft application.
Access Password The password associated with the access ID.
Connect ID The ID used for the initial connection to the database. Any two-tier connectionrequires a Connect ID. A Connect ID is a valid user ID that, when used duringlogin, takes the place of PeopleSoft User IDs for the logon process.
Table Owner (DB2 for OS390) Populates the CREATOR field in the systemcatalog table SYSIBM.SYSTABLES. You determined the name ofthe table owner ID during the initial insta llation u sing the PeopleTo olsInstallation Guide for your platform.
Index Storage Group (DB2 for OS390) The storage group where the index spaces will be created.
Table Space Storage Group (DB2 for OS390) The storage group for tablespaces. This valuemust be the same as that used in the XXDDL.SQL script when youcreated tablespaces during your installation.
10 PeopleSoft Proprietary and Confidential
Chapter 1 PeopleSoft Data Mover
Checking the Generated ScriptAfter running Database Setup, check the output directory for the generated script if you are interested inviewing it. Notice that some commands are added that call other scripts and perform various functions.These commands are added to reduce the number of scripts and commands you need to run manually.For example, notice that the following commands appear at the end of the script:
• REPLACE_VIEW. Creates views for the new database.
• CREATE_TEMP_TABLE. Creates any necessary temporary table images. The number of temporarytables to create is determined by the value Temp Table Instances setting in PeopleTools Options (Utilities,Administration, PeopleTools Options) plus the number of Application Engine temporary table(s).
• SWAP_BASE_LANGUAGE. If you selected a base language other than English, this commandmodifies your system to recognize that language as the base language. The default PeopleToolslanguage is English if PSSTATUS table is not available.
• RUN. This command executes the CURRXXX.DMS script, to load your system with the appropriate currencyinformation, and this command executes MSGTLXXX.DMS to load your system with the appropriatePeopleTools messages (error and informational messages). Where ’XXX’ represents the language code, suchas FRA for French. The system runs these scripts only if you have selected a base language other than English.
Note. After each DDL create table, import data, and DDL create indexes, PeopleSoft Data Moverissues an UPDATE STATISTICS command (except on OS/390), which improves the performanceof subsequent commands, such as the REPLACE_VIEW command.
See AlsoChapter 1, “PeopleSoft Data Mover,” CREATE_TEMP_TABLE, page 19
Chapter 1, “PeopleSoft Data Mover,” SWAP_BASE_LANGUAGE, page 28
Using the Data Mover Command Line InterfaceThe following section gives an overview of the command line feature and discusses:
• Running scripts from the command line.
• Command line parameters.
• Using a parameter file ("parm file").
Understanding the Data Mover Command Line InterfaceThe PeopleSoft Data Mover command line interface enables you to run PeopleSoft Data Mover scripts fromthe command line in UNIX and Windows environments. Keep in mind that the command line interface isdesigned only for running scripts, not creating and editing scripts. You create and edit scripts using thePeopleSoft Data Mover Development Environment, which is supported on Windows only.
When using the command line interface the results of the script run appear in the command line window muchlike the contents of the output pane in theWindows GUI. The system also writes this information to the LOG file.
PeopleSoft Proprietary and Confidential 11
PeopleSoft Data Mover Chapter 1
PeopleSoft Data Mover supports $PS_HOME, for UNIX, and %PS_HOME%, for Windows NT.
Note. The command line interface also runs on Windows machines, however, in mostcases you would use the PeopleSoft Data Mover Windows GUI to run scripts on Windowsmachines. This documentation is geared towards UNIX.
Note. The PeopleSoft Data Mover command line on UNIX is intended to increase the performancewith large database loads during installation. It is recommend that you use the PeopleSoftData Mover Windows interface for other types of scripts.
Getting Started (on UNIX)Before running the PeopleSoft Data Mover command line on UNIX, be aware of the following items:
• BEA Tuxedo is required for PeopleSoft Data Mover to run on UNIX, and it must be installedbefore you use the UNIX PeopleSoft Data Mover interface.
• Run psconfig.sh first to set the UNIX and PeopleTools environment variables before running PSDMTX.
• PeopleSoft supplies default UNIX environment variables for PeopleSoft Data Mover in thePSCONFIG.SH shell program. If you need to modify the default environment variables, youneed to edit the PSCONFIG.SH or manually change the environment. For example, to changethe PeopleSoft Data Mover environment variables modify the following:
export PS_DM_DATA=<new data path>
export PS_DM_SCRIPT=<new script path>
export PS_DM_LOG=<new log path>
Configuration Setting Description
$PS_DM_DATA Use this environment variable to specify the directorywhere PeopleSoft Data Mover should search for itsinput data files (.DAT). When running a PeopleSoftData Mover script, if no explicit path is specified forthe file named in the set input lines, then PeopleSoftData Mover searches directories for the .DAT file in thefollowing order. The default is $PS_HOME/data.
$PS_DM_SCRIPT Use this environment variable to specify the location ofyour PeopleSoft Data Mover scripts files. The default is$PS_HOME/scripts.
$PS_DM_LOG Use this environment variable to specify the location ofyour PeopleSoft Data Mover log files. The default is$PS_HOME/log.
Running a Data Mover Script from the Command LineTo run a script from the command line:
12 PeopleSoft Proprietary and Confidential
Chapter 1 PeopleSoft Data Mover
1. Launch the command prompt.
2. Navigate to the %PS_HOME%\bin\client\winx86 directory for Windows and$PS_HOME/bin directory for UNIX.
For example,
Windows. %PS_HOME%\bin\client\winx86>
UNIX. $PS_HOME/bin
3. Enter the name of the program to launch, which is PSDMTX.
For example,
Windows. %PS_HOME%\bin|client\winx86\psdmtx
UNIX. $PS_HOME/bin/psdmtx
4. Enter all the appropriate command line arguments.
To invoke PeopleSoft Data Mover to run a script from the command line, you need tospecify the PeopleSoft Data Mover executable (PSDMTX.EXE) followed by the requiredparameters, as shown in the following example:
psdmtx -CT <dbtype> -CS <server> -CD <database name> -CO <user ID> -CP <password> -⇒CI <connect ID> -CW <connect password> -FP <Filename>
See the following section for a complete description of all the command line parameters.
5. Press ENTER.
Understanding the Command Line ParametersThe following command line arguments are available to pass to PSDMTX.EXE forrunning PeopleSoft Data Mover Scripts.
-CT Database type. Valid values are ORACLE, INFORMIX, SYBASE,MICROSFT, DB2, DB2ODBC, DB2UNIX. For example,
-CT ORACLE
-CS Server name. The name of the database server for the database to which you’reconnecting. This setting is required for some database types. For example,
-CS pt-sun05
-CD Database name. The name of the database to connect to, as you wouldenter at the PeopleSoft signon. For example,
-CD HR840DMO
-CO The PeopleSoft user ID to use to login. For example,
-CO TOM2
-CP The password for the specified user ID. For example,
-CP SAWYER2
PeopleSoft Proprietary and Confidential 13

PeopleSoft Data Mover Chapter 1
-CI Connect ID. The ID used to connect to the database server. For example,
-CI HUCK
-FP Filename. The name of the PeopleSoft Data Mover script to run. For example,
-FP $PS_HOME/scripts/test.dms
/help Help. Shows the command line arguments and their descriptionin your command prompt.
Using a Parameter FileRather than submitting the arguments manually on the command line you can also have PeopleSoft DataMover read a file that contains the appropriate parameters. PeopleSoft provides a sample parm file (parameterfile) for you to use as a template, which you can find in $PS_HOME/setup directory.
If you submit a filename to PeopleSoft Data Mover as the first parameter in the commandline, PeopleSoft Data Mover reads the contents of the file and interprets the contents as if itwere parameters entered on the command line. For example,
psdmtx $PS_HOME/setup/myparmfile.txt
Note. You must enter the full path to the parameter file.
Note. For security reasons, after PeopleSoft Data Mover interprets the contents of theparm file, it immediately deletes the parm file.
Understanding Data Mover CommandsIn this section we briefly discuss each of the commands that you can use in a PeopleSoft Data Mover script andwhat you can expect them to accomplish. After reading this section, you will know all the valid PeopleSoftData Mover commands and SQL commands that you can include in your PeopleSoft Data Mover scripts.
Data Mover CommandsPeopleSoft Data Mover commands are platform-independent and are unique to PeopleSoft Data Mover. Youcan use PeopleSoft Data Mover commands for importing, exporting, and other tasks, such as controlling therun environment, renaming fields and records, database security administration, and denoting comments.
The following list presents the PeopleSoft Data Mover commands and methods to indicate comments:
ENCRYPT_PASSWORD Encrypts one or all users’ passwords (operator and access) definedin PSOPRDEFN for operators.
EXPORT Instructs PeopleSoft Data Mover to select record information anddata from a record or records and places the result set in a file. Youcan use the export file generated as input for migrating to anotherplatform. This file is portable between ASCII and EBCDIC charactersets, and also supports double-byte characters.
14 PeopleSoft Proprietary and Confidential
Chapter 1 PeopleSoft Data Mover
IMPORT Inserts data into a table or tables using the information in an exportfile. If a tablespace or table does not exist, this command createstablespace, table, and indexes for the record, using the informationin the export file, and inserts the data.
REM, REMARK, -- Use this to denote comment statements.
RENAME Renames a PeopleSoft record, a field in one record, or a field in all records.
REPLACE_ALL A variation of the IMPORT command. If a table already exists, use thiscommand to drop the table and its indexes from the database and create thetable and indexes using the information in the export file. Then, it insertsdata into the table using the information in the export file.
REPLACE_DATA A variation of the IMPORT command. Deletes data in existing table(s)and inserts the corresponding data from the export file.
REPLACE_VIEW Recreates specified views found in the database.
RUN Executes a specified .DMS file from within a PeopleSoft Data Moverscript. The file can not contain nested RUN commands.
SET When followed by valid SET parameters, it forms statements that establishthe conditions under which PeopleSoft Data Mover executes the PeopleSoftData Mover and/or SQL commands that follow.
SWAP_BASE_LANGUAGE
Swaps all the language tables from PSRECDEFN.
SET IGNORE_ERRORS Optional. If the command is set then all errors during the swap baselanguage will be ignore. Otherwise, it stops on error.
SET BASE_LANGUAGE Used to swap individual language tables. You should swap individualtable only when there is an error with any of the table after theSWAP_BASE_LANGUAGE command.
SQL CommandsWith PeopleSoft Data Mover, you can use supported SQL commands in scripts on any supported databaseplatform. Except where noted otherwise (in the Standard SQL Commands topics), you can use all thesupported SQL commands with the following PeopleSoft Data Mover SET statements:
• SET LOG
• SET NO COMMIT
• SET NO TRACE
Standard SQL Commands With DMS ScriptsPeopleSoft Data Mover supports the following standard SQL commands:
• ALTER
• COMMIT
PeopleSoft Proprietary and Confidential 15
PeopleSoft Data Mover Chapter 1
• CREATE
• DELETE
• DROP
Note. With DROP commands, any drop errors are ignored. The script continues,but the errors are reported in the log.
• GRANT
• INSERT
Note. INSERT cannot be used with SET NO COMMIT or SET NO TRACE.
• ROLLBACK
• UPDATE
Warning! PeopleSoft Data Mover does not support SELECT statements becausethey require a SQL FETCH function.
Standard SQL Commands with SQL FilesPeopleSoft Data Mover supports all SQL commands and other database specific functioncalls that are supported by the database engine.
Note. PeopleSoft Data Mover only runs files with the extension .SQL.
Non-Standard SQL CommandsAlso available for use with PeopleSoft Data Mover are some non-standard SQL commandscreated by PeopleSoft—PSCOPY, STORE, and ERASE.
Note. In previous versions of PeopleSoft, we supported a command called PSCOPY, whichwas an Oracle-specific command to support altering records that have a long field in anINSERT statement subquery. Now you should be running Oracle scripts generated by theBuild feature in Application Designer through SQL*Plus.
STORETo change COBOL SQL statements in PS_SQLSTMT_TBL, you use two non-standard,PeopleSoft SQL commands: STORE and ERASE.
The STORE command first deletes the existing stored statement from PS_SQLSTMT_TBL,then inserts the new statement using the following syntax:
STORE progname_type_stmtname
For example:
STORE PTPEMAIN_S_MSGSEQ
SELECT MAX (MESSAGE_SEQ), PROCESS_INSTANCE
16 PeopleSoft Proprietary and Confidential
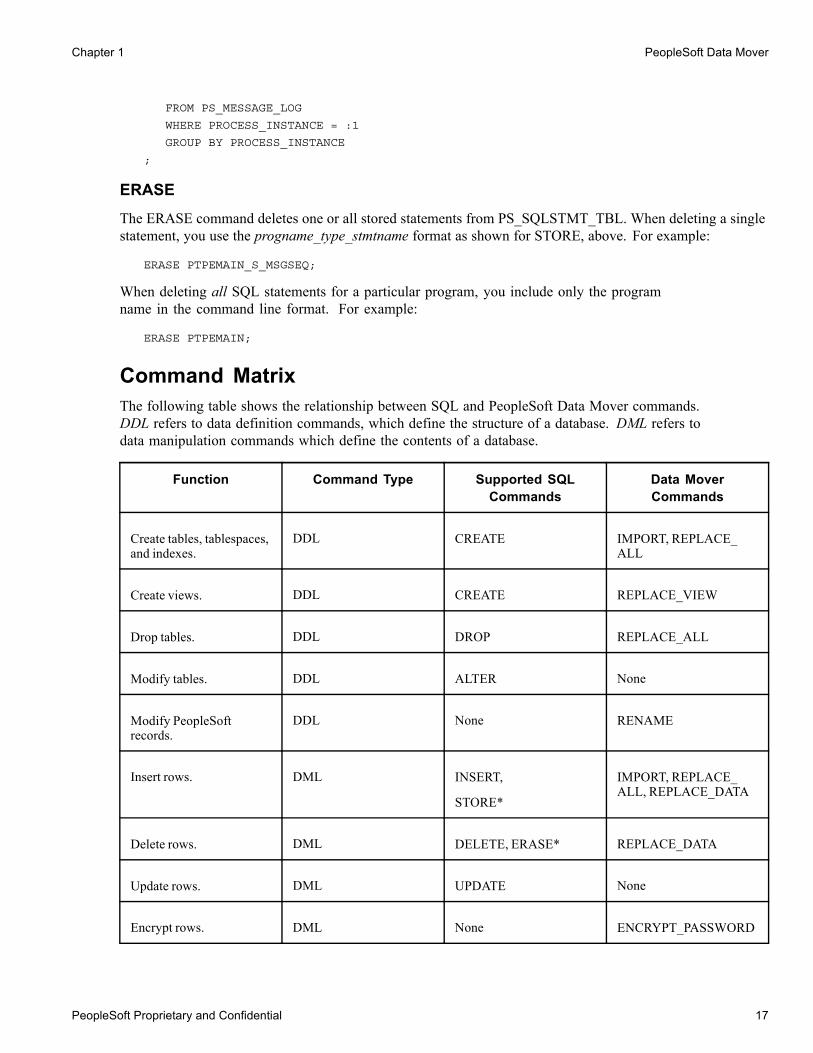
Chapter 1 PeopleSoft Data Mover
FROM PS_MESSAGE_LOG
WHERE PROCESS_INSTANCE = :1
GROUP BY PROCESS_INSTANCE
;
ERASEThe ERASE command deletes one or all stored statements from PS_SQLSTMT_TBL. When deleting a singlestatement, you use the progname_type_stmtname format as shown for STORE, above. For example:
ERASE PTPEMAIN_S_MSGSEQ;
When deleting all SQL statements for a particular program, you include only the programname in the command line format. For example:
ERASE PTPEMAIN;
Command MatrixThe following table shows the relationship between SQL and PeopleSoft Data Mover commands.DDL refers to data definition commands, which define the structure of a database. DML refers todata manipulation commands which define the contents of a database.
Function Command Type Supported SQLCommands
Data MoverCommands
Create tables, tablespaces,and indexes.
DDL CREATE IMPORT, REPLACE_ALL
Create views. DDL CREATE REPLACE_VIEW
Drop tables. DDL DROP REPLACE_ALL
Modify tables. DDL ALTER None
Modify PeopleSoftrecords.
DDL None RENAME
Insert rows. DML INSERT,
STORE*
IMPORT, REPLACE_ALL, REPLACE_DATA
Delete rows. DML DELETE, ERASE* REPLACE_DATA
Update rows. DML UPDATE None
Encrypt rows. DML None ENCRYPT_PASSWORD
PeopleSoft Proprietary and Confidential 17
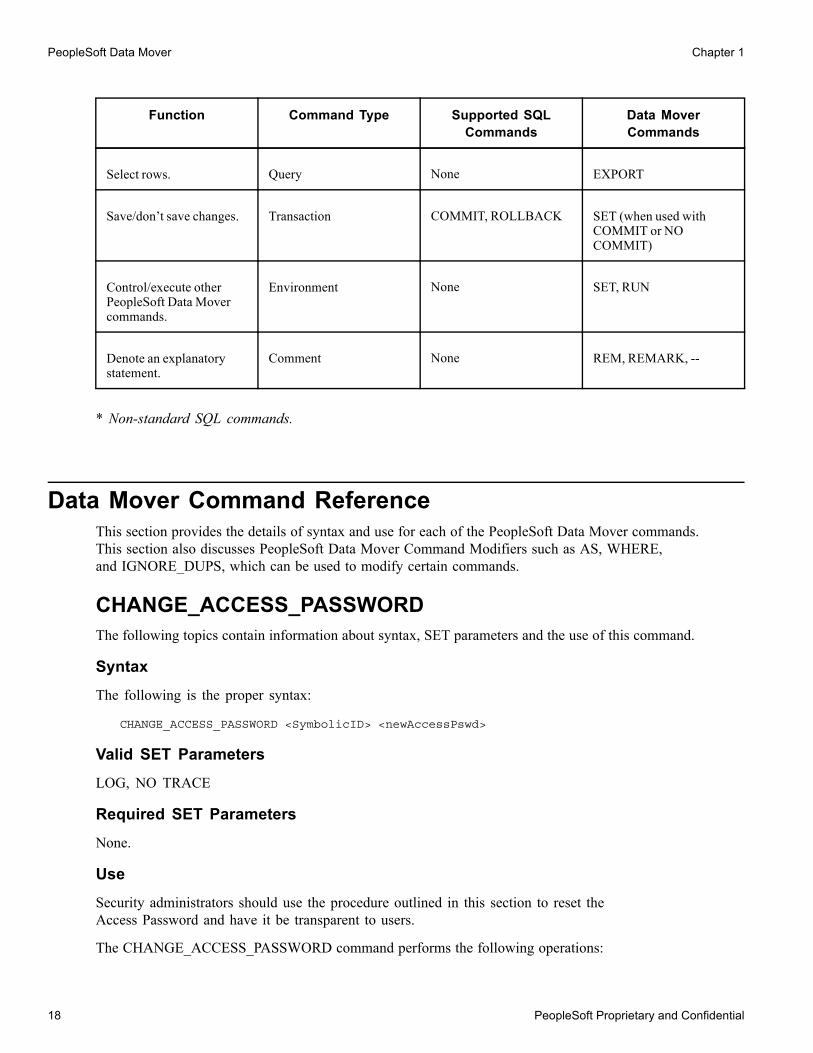
PeopleSoft Data Mover Chapter 1
Function Command Type Supported SQLCommands
Data MoverCommands
Select rows. Query None EXPORT
Save/don’t save changes. Transaction COMMIT, ROLLBACK SET (when used withCOMMIT or NOCOMMIT)
Control/execute otherPeopleSoft Data Movercommands.
Environment None SET, RUN
Denote an explanatorystatement.
Comment None REM, REMARK, --
* Non-standard SQL commands.
Data Mover Command ReferenceThis section provides the details of syntax and use for each of the PeopleSoft Data Mover commands.This section also discusses PeopleSoft Data Mover Command Modifiers such as AS, WHERE,and IGNORE_DUPS, which can be used to modify certain commands.
CHANGE_ACCESS_PASSWORDThe following topics contain information about syntax, SET parameters and the use of this command.
SyntaxThe following is the proper syntax:
CHANGE_ACCESS_PASSWORD <SymbolicID> <newAccessPswd>
Valid SET ParametersLOG, NO TRACE
Required SET ParametersNone.
UseSecurity administrators should use the procedure outlined in this section to reset theAccess Password and have it be transparent to users.
The CHANGE_ACCESS_PASSWORD command performs the following operations:
18 PeopleSoft Proprietary and Confidential
Chapter 1 PeopleSoft Data Mover
• Selects the ACCESSPSWD field from PSACCESSPRFL for <SymbolicID>.
• Changes the Access ID’s database password to <newAccessPswd> (Oracle, Sybaseand Microsoft SQL Server only).
• Updates PSACCESSPRFL for <SymbolicID> with <newAccessPswd>.
CREATE_TEMP_TABLEThe following topics contain information about syntax, SET parameters and the use of this command.
SyntaxThe following is the proper syntax:
CREATE_TEMP_TABLE {record | *}
Valid SET ParametersNone.
Required SET ParametersNone.
UseCreates temporary table images for use with Application Engine programs. To customize thenumber of temporary tables you need to modify the PeopleTools Options page or updatedthe PSOPTIONS table using the following SQL:
UPDATE PSOPTIONS SET TEMPTBLINSTANCE = <#>
You also need to review the number of temporary tables allotted for Application Engine programs.
Note. This command is disabled for OS/390.DMS script generated by Database Setup due to security issues.
See PeopleSoft Server Tools Administration, “PeopleTools Utilities,” PeopleTools Options.
CREATE_TRIGGERThe following topics contain information about syntax, SET parameters and the use of this command.
SyntaxThe following is the proper syntax:
CREATE_TRIGGER {* | <RECNAME>
Valid SET ParametersNone.
Required SET ParametersNone.
PeopleSoft Proprietary and Confidential 19

PeopleSoft Data Mover Chapter 1
UseCreates database triggers on the specified table.
Note. If using CREATE_TRIGGER in bootstrap mode, the system automatically activates SETIGNORE ERROR. This enables PeopleSoft Data Mover to continue processing until all of theview definitions have been processed and all errors have been written to the current .LOG file (oran error log file). This is similar to the REPLACE_VIEW behavior.
ENCRYPT_PASSWORDThe following topics contain information about syntax, SET parameters and the use of this command.
SyntaxThe following is the proper syntax:
ENCRYPT_PASSWORD {userID | *};
Valid SET ParametersLOG, NO COMMIT, NO TRACE
Required SET ParametersNone
UseEncrypts one or all user passwords (user passwords and access passwords). When encrypting asingle user’s password, that user ID must be present in PSOPRDEFN. You can use an asteriskinstead of a name to encrypt all passwords in PSOPRDEFN.
Here’s an example of how to encrypt a single user password (FS) already listed in PSOPRDEFN:
ENCRYPT_PASSWORD FS;
To encrypt all user passwords in PSOPRDEFN, enter:
ENCRYPT_PASSWORD *;
EXPORTThe following topics contain information about syntax, SET parameters and the use of this command.
SyntaxThe following is the proper syntax:
EXPORT {record | *} [WHERE condition(s)];
Valid SET ParametersLOG, NO COMMIT, NO DATA, NO TRACE, NO VIEW, OUTPUT
20 PeopleSoft Proprietary and Confidential
Chapter 1 PeopleSoft Data Mover
Note. SET NO VIEW is only valid with EXPORT *.
Required SET ParametersNone.
Note. If SET OUTPUT is not used, PeopleSoft Data Mover writes to the default file name, DATAMOVE.DAT.
UseCreates a single export file containing the database contents specified—a result set that can containany of the following: a single PeopleSoft record, a group of records, or the entire database. Youcan use the export file as input for PeopleSoft Data Mover’s IMPORT command if you wantto migrate the data within the platform, or to another platform.
Note. This command is not available in Bootstrap mode.
Records exported using EXPORT can have a maximum of 250 total columns and multiple long columnswithin the limitations for long columns set by your database platform. Check with your databasevendor for restrictions on the number of long columns allowed for your platform.
When you export all records using EXPORT*, PeopleSoft Data Mover orders them alphabetically, with theexception of PSLOCK; it is the last record exported. After each record, PeopleSoft Data Mover indicateshow many records remain. After all the tables are exported, then the views are exported.
To export a single record, use an EXPORT command for that specific record. For example:
EXPORT PS_JOB;
Note. When specifying a particular record in the EXPORT command (as shown in the previousexample), the specified record must be a table, not a view.
To export all PeopleSoft records—including views—type:
EXPORT *;
IMPORTThe following topics contain information about syntax, SET parameters and the use of this command.
Note. The system will not allow the use of the Data Mover command IMPORT X AS Y where X tablecontains a trigger definition. This command is valid for tables without trigger definitions.
See PeopleSoft Application Designer, Building SQL Tables and Views
SyntaxThe following is the proper syntax:
IMPORT {record | *} [IGNORE_DUPS]
[AS new_table_name];
PeopleSoft Proprietary and Confidential 21
PeopleSoft Data Mover Chapter 1
Valid SET ParametersAll except OUTPUT
Note. IGNORE_DUPS is only valid in Bootstrap mode.
Required SET ParametersINPUT
UseIMPORT creates database spaces, creates non-existing records and indexes, and appendsnon-duplicate rows to records. It will also create the views if the export file was createdusing EXPORT * and imported using IMPORT *.
Warning! All duplicate row checking depends on the existence of a unique index. If no uniqueindexes are created before loading the data, there is a potential for duplicate data.
In the IMPORT statement, the AS clause is only valid if you specify a particular record; it is not valid andshould not be used with IMPORT*. Also, the table name that you specify after the just after the AS commandmodifier must not exceed 18 characters (including the ps_ prefix). If you do specify a table_name that exceeds18 characters the following error will appear: “Error: Unable to process create statement…”.
Records defined using IMPORT can have a maximum of 250 total columns and multiple long columnswithin the limitations for long columns set by your database platform. Check with your databasevendor for restrictions on the number of long columns allowed for your platform. There are also twovariations of IMPORT that you can use—REPLACE_ALL and REPLACE_DATA.
To import a single record from an export file, use an IMPORT command for that record. For example:
SET INPUT file_name;
IMPORT PS_JOB;
To import all PeopleSoft records from an export file, including views, type:
SET INPUT file_name;
IMPORT *;
Globalization ConsiderationsIn previous releases, PeopleSoft Data Mover required multiple .DAT files for base and non-base languages.PeopleSoft Data Mover now offers a base-language-independent method for moving application databetween databases. PeopleSoft Data Mover loads a single DAT file, detects the target database baselanguage, and inserts the data into the correct base or related language table.
This means that if PeopleSoft provides a software fix, you don’t need to swap the base language beforeimporting it into a database with a different base language. For example, suppose a fix is sent with the baselanguage being English (ENG) and a related language of Japanese (JAP). In this case, you can import thisfile directly into a database where the base language is JAP and the related language is ENG.
Upon EXPORT, the system adds the LANGUAGE_CD (Language Code) to thegenerated DAT file. For example,
22 PeopleSoft Proprietary and Confidential
Chapter 1 PeopleSoft Data Mover
SET DAM_VERSION 8.4:1:0
SET BASE_LANGUAGE {ENG, FRA, …}
Then, when you use the IMPORT command to import the generated DAT file, the system detects theLANGUAGE_CD in the DAT file and automatically resolves the base language/related language issues.
Keep the following items in mind when running the IMPORT command.
• This feature is not optional; it’s enabled whenever you import a DAT file.
• There may be some unavoidable performance impact when running the IMPORT command.
See Chapter 1, “PeopleSoft Data Mover,” REPLACE_ALL, page 26 and Chapter 1,“PeopleSoft Data Mover,” REPLACE_DATA, page 26.
REM, REMARK, - -The following topics contain information about syntax, SET parameters and the use of this command.
SyntaxThe following is the proper syntax:
REM Comments;
REMARK Comments;
-- Comments
Valid SET ParametersNot applicable
Required SET ParametersNot applicable
UseEach of these three command variations denotes explanatory text in a PeopleSoft Data Moverscript. Here are three examples explaining the use of each:
REM This example demonstrates the use of the REM command to set off script⇒comments. These statements can span multiple lines and must be terminated with a⇒valid delimiter;
REMARK The REMARK command variation has the same restrictions as REM
/
-- This example demonstrates the use of two dashes to denote script
-- comments. No delimiters are required, but statements can not
-- exceed one line without using another double-dash.
When using a double-dash (--) in the third example, you need at least one space after the double-dash—beforethe start of the actual text of the comment. Otherwise you will receive a syntax error.
PeopleSoft Proprietary and Confidential 23
PeopleSoft Data Mover Chapter 1
When used in conjunction with a comment prefixed by REM or REMARK, the forward-slash delimiter (/)should be by itself on the last line of that comment. In such cases: instead of using a forward-slash (/),you can also use a semi-colon (;) by itself on this last line. The forward-slash (/) can also be used by itselfwithout a REM or REMARK statement, in lieu of blank lines, which are also allowed in a script.
RENAMEThe following topics contain information about syntax, SET parameters and the use of this command.
SyntaxThe following is the proper syntax:
RENAME {RECORD record | FIELD {field | record.field}} AS new_name;
Valid SET ParametersLOG, NO COMMIT, NO TRACE
Required SET ParametersNone
UseRenames a PeopleSoft record, a field in one record, or a field in all records.
Note. This command is not available in BootStrap mode.
Warning! Using RENAME only modifies an object in the PeopleSoft tables. To write the change tothe system tables you must either use Application Designer to Alter the affected tables (for recordand field renames), or you must run TLSCOPY.SQR (for recfield renames.)
To rename a recfield, you must qualify the original name of the field with the record name. If you don’t qualifythe record name, PeopleSoft Data Mover will try to globally change the field name in all records.
Here’s an example of how to rename a record:
RENAME RECORD absence_hist AS absent_hist;
Here’s an example of how to globally rename a field:
RENAME FIELD effdt AS currdate;
Here’s an example of how to rename a recfield:
RENAME FIELD course_tbl.duration_days AS duration_d;
Renaming a record field is only possible through PeopleSoft Data Mover, and you mustcomplete the following steps for the rename to be complete.
To rename a record field:
1. Perform the rename in PeopleSoft Data Mover.
24 PeopleSoft Proprietary and Confidential
Chapter 1 PeopleSoft Data Mover
For example,
RENAME FIELD RECORD.FIELD AS NEWFIELD; COMMIT;
2. In Application Designer create a project which contains the record that contains thefield that you renamed, and save the project.
In the case of a subrecord field rename, the subrecord along with all tables which containthat subrecord must be inserted into the project.
3. Select Build, Settings.
• Select the Alter tab.
• Check Adds and Renames.
• Deselect Changes and Deletes.
• Drop Column and Change Column Length do not apply so it doesn’t matter what is selected.
• Select the Scripts tab and select desired output settings.
• Specify an output file and click OK.
4. Select Build, Project.
• Select Alter Tables (Create Indexes will automatically be checked).
• Click Build.
• Click Yes to continue the build process.
5. Run the generated SQL script using your query tool.
This adds the new field to the table(s) within the project.
To remove the old field from the table(s):
1. In Application Designer, open the project you created the previous steps.
• Select Build, Settings.
• Select the Alter tab.
• Select Drop column if data present.
• Check Deletes.
• Deselect Adds and Renames.
• Select the Scripts tab.
• Give the output file a different name and click OK.
2. Select Build, Project.
• Check Alter Tables (Create Indexes will automatically be checked).
• Click Build.
• Click Yes to continue the build process.
3. Run the generated SQL script using your query tool.
The old field should no longer appear on the table(s) included in the project.
PeopleSoft Proprietary and Confidential 25
PeopleSoft Data Mover Chapter 1
REPLACE_ALLThe following topics contain information about syntax, SET parameters and the use of this command.
SyntaxThe following is the proper syntax:
REPLACE_ALL {record | *}
[AS new_table_name];
Valid SET ParametersAll except IGNORE_DUPS, OUTPUT
Required SET ParametersINPUT
UseA variation of the IMPORT command. If a table already exists, drops the table and its indexes fromthe database and creates the tables and indexes using the information in the export file. Then, thecommand inserts data into the table using the information in the export file.
In the REPLACE_ALL statement, the AS clause is only valid if you specify a particular record.It is not valid and should not be used with REPLACE_ALL *.
The table_name you specify after the AS command modifier should not have more than 18 characters(including the ps_ prefix). Specifying a table_name that is greater than 18 characters will invokethe following Error message: “Error: Unable to process create statement…”.
Note. Records defined using REPLACE_ALL can have a maximum of 250 total columns and multiplelong columns within the limitations for long columns set by your database platform. Check with yourdatabase vendor for restrictions on the number of long columns allowed for your platform.
REPLACE_DATAThe following topics contain information about syntax, SET parameters and the use of this command.
SyntaxThe following is the proper syntax:
REPLACE_DATA {record | *};
Valid SET ParametersCOMMIT, EXECUTE_SQL, EXTRACT, INPUT, INSERT_DATA_ONCE, LOG, NO COMMIT,NO TRACE, NO VIEW, SIZING_SET, SPACE, START, VERSION
Required SET ParametersINPUT
26 PeopleSoft Proprietary and Confidential
Chapter 1 PeopleSoft Data Mover
UseA variation of the IMPORT command. Deletes data in existing table(s) and inserts thecorresponding data from the export file.
REPLACE_VIEWThe following topics contain information about syntax, SET parameters and the use of this command.
SyntaxThe following is the proper syntax:
REPLACE_VIEW {view | *};
Valid SET ParametersLOG, NO COMMIT, NO TRACE, START
Required SET ParametersNone
Note. If using REPLACE_VIEW in bootstrap mode, the system automatically activates SET IGNOREERROR. This enables PeopleSoft Data Mover to continue processing until all of the view definitionshave been processed and all errors have been written to the current .LOG file.
UseRecreates one or all specified views in the database.
RUNThe following topics contain information about syntax, SET parameters and the use of this command.
SyntaxThe following is the proper syntax:
RUN dms_file_name;
Valid SET ParametersNot applicable
Required SET ParametersNot applicable
UseExecutes a DMS file from within a script. The specified file can contain any supported SQL commands,PeopleSoft Data Mover commands, or SET statements, but it can not contain any RUN commands.
PeopleSoft Proprietary and Confidential 27

PeopleSoft Data Mover Chapter 1
The RUN command cannot contain a directory path. The RUN command uses the same directoryas the current PeopleSoft Data Mover script in which RUN is being used.
SETThe following topics contain information about syntax, SET parameters and the use of this command.
SyntaxThe following is the proper syntax:
SET parameter_1;
SET parameter_2; ...
SET parameter_n;
Valid SET ParametersNot applicable
Required SET ParametersNot applicable
UseThe SET command, when combined with valid SET parameters, creates statements that establishthe conditions under which PeopleSoft Data Mover executes a script.
A SET statement controls the processing environment for the commands in a script until another SET statementintervenes between commands. At that point, all SET parameters are reset to their default values. For example:
SET LOG c:\temp\new.log
SET OUTPUT c:\temp\new.dat;
/
EXPORT absence_hist;
EXPORT employee_tbl
/
SET NO DATA
/
REMARK All other SET parameters will be reset to their default values at this⇒point
;
EXPORT bank_branch_tbl;
In the above script, the specified log and output files (NEW.LOG and NEW.DAT) are used forthe first two EXPORTs. Then, because SET NO DATA interrupts the script commands, all otherSET parameters are reset to their default values. So, for the third EXPORT and any subsequentPeopleSoft Data Mover or SQL commands, the log file used is the default log file, DATAMOVE.LOG,and the output file used is the default output file, DATAMOVE.DAT.
SWAP_BASE_LANGUAGEThe following topics contain information about syntax, SET parameters and the use of this command.
28 PeopleSoft Proprietary and Confidential

Chapter 1 PeopleSoft Data Mover
SyntaxThe following is the proper syntax:
SWAP_BASE_LANGUAGE <NEW LANGUAGE_CD>;
SWAP_BASE_LANGUAGE <RECNAME>;
Valid SET ParametersNot applicable
Required SET ParametersNot applicable
UseUse this command when you want to install any language other than English. For instance, if youwanted to swap English for Canadian French, enter the following:
SWAP_BASE_LANGUAGE CFR
Where CFR is the new language code (LANGUAGE_CD).
The command swaps all the language tables from PSRECDEFN. Gets all table names that containrelated table, swaps one table at a time. Copies base table into the relate table, updates related recordinto the base table, and then deletes related record from the related table.
If successful it will update the PSOPTIONS SET LANGUAGE_CD = new base language.
Note. Run the command SWAP_BASE_LANGUAGE <NEW LANGUAGE_CD> beforeyou attempt to swap the individual record names.
Note. During the initial installation, Database Setup generates a script that automatically swaps the baselanguage if while in the Database Setup interface you selected a base language other than English.
SET IGNORE_ERRORSThe following topics contain information about syntax, SET parameters and the use of this command.
SyntaxThe following is the proper syntax:
SET IGNORE_ERRORS;
SWAP_BASE_LANGUAGE <LANGUAGE_CD>;
Valid SET ParametersNot applicable
Required SET ParametersNot applicable
PeopleSoft Proprietary and Confidential 29

PeopleSoft Data Mover Chapter 1
UseUsed in conjunction with the SWAP_BASE_LANGUAGE command.
Here’s an example of how to swap one table, without the SET IGNORE_ERRORS command, it will stop on error.
SWAP_BASE_LANGUAGE <LANGUAGE_CD>;
Here’s an example of how to ignore all errors and swap all tables.
SET IGNORE_ERRORS;
SWAP_BASE_LANGUAGE <LANGUAGE_CD>;
When the SWAP_BASE_LANGUAGE command is run after SET IGNORE_ERRORS, the PSOPTIONS SETLANGUAGE_CD will automatically be updated with new base language even if errors were recorded.
When the command has run, you should then examine the log, and swap the individual record namesthat failed using SWAP_BASE_LANGUAGE <RECNAME> command.
SET BASE_LANGUAGEThe following topics contain information about syntax, SET parameters and the use of this command.
SyntaxThe following is the proper syntax:
SWAP_BASE_LANGUAGE <NEW LANGUAGE_CD>;
SET BASE_LANGUAGE <CURRENT LANGUAGE_CD>;
SWAP_BASE_LANGUAGE <RECNAME>;
Valid SET ParametersNot applicable
Required SET ParametersNot applicable
UseSwap individual table is used only when there is an error with any of the table after theSWAP_BASE_LANGUAGE <NEW LANGUAGE_CD>.
Note. Never run SET BASE_LANGUAGE <CURRENT LANGUAGE_CD>, SWAP_BASE_LANGUAGE<RECNAME> commands before SWAP_BASE_LANGUAGE <NEW LANGUAGE_CD>.
Data Mover Command ModifiersThe following commands allow you to modify a PeopleSoft Data Mover command to either limitits scope, rename the item being processed, or control error messaging.
30 PeopleSoft Proprietary and Confidential
Chapter 1 PeopleSoft Data Mover
ASThe following topics contain information about syntax and use of this command modifier.
SyntaxThe following is the proper syntax:
{IMPORT | REPLACE_ALL} record
AS table_name;
Valid Data Mover CommandsIMPORT, REPLACE_ALL
UseChanges the name of a record, then imports it. When using this modifier, keep the following items in mind:
• If used with an IMPORT, the record will not be imported if the table_name specified inthe IMPORT command) already exists in the database.
• When using the AS command modifier, you can specify either the record or table_name for therecord/table specified preceding the AS. However, you must always specify the table_name (notthe record_name) for the record/table specified following the AS. The name specified followingthe AS is the actual name that will be used for the table to be created.
• This modifier is not supported for records containing trigger definitions. All otherrecords with no trigger definition are allowed.
The following example imports a new record/table originally named PS_JOB and creates it as PS_PROCESS:
IMPORT job
AS ps_process;
Also Correct:
IMPORT ps_job
AS ps_process;
Incorrect:
IMPORT ps_job
AS process;
Incorrect:
IMPORT job
AS process;
The incorrect examples are wrong because process is specified, instead of ps_process. This means thatthe table created will be named PROCESS, when it should be named PS_PROCESS to comply with theconvention that all non-PeopleTools tables should be prefixed with PS_. Therefore, ps_process—notprocess—should have been specified in the last two examples above.
PeopleSoft Proprietary and Confidential 31
PeopleSoft Data Mover Chapter 1
The table_name you specify following the AS command modifier should not have more than 18characters (including the ps_ prefix). Specifying a table_name that is greater than 18 characters willinvoke the following Error message: “Error: Unable to process create statement…”.
When you import a record in this way, it is only created in the system tables, not in the PeopleSoft tables. So,you must also create it in the PeopleSoft tables, such as PSRECDEFN, by completing the following steps.
To create a table after running the IMPORT command:
1. Launch Application Designer
2. Create, or clone, the new record.
Using the Job/Process example from the previous discussion: open JOB and then selectFile/Save As and rename the record to PROCESS.
Note. The PS_ does not appear in the Application Designer.
3. Select Build, Current Object.
4. On the Build dialog, select Create Tables under Build Options.
You may also want to make sure that all the appropriate options are set in the Build Settings tabs.
IGNORE_DUPSThe following topics contain information about syntax and use of this command modifier.
SyntaxThe following is the proper syntax:
SET IGNORE_DUPS;
IMPORT {record | *};
Valid Data Mover CommandsIMPORT
UseIgnores “duplicate row” error messages from the database, which means that the IMPORT processwill continue despite any “duplicate rows” errors displayed in the output window and log file. WhenIGNORE_DUPS is set, bulk loading—the ability to load more than one row at a time—is turned off. Bydefault, bulk loading is on and inserts many (100) rows into a table at a time. Because turning off bulkloading slows performance, we suggest that you use this feature only when required.
Note. SET IGNORE_DUPS is only valid in Bootstrap mode.
WHEREThe following topics contain information about syntax and use of this command modifier.
32 PeopleSoft Proprietary and Confidential

Chapter 1 PeopleSoft Data Mover
SyntaxThe following is the proper syntax:
EXPORT {record | *} WHERE
condition(s)[;var#1_type,_var#1_value,var#2_type,var#2_value,...
var#n_type,var#n_value];
Warning! In an EXPORT statement, the WHEREmodifier must be on the same line as the EXPORT command.
Valid Data Mover CommandsEXPORT
Use: ExportsExports a partial set of rows from a record. The syntax and conditions of a Data Mover WHEREclause in an EXPORT are similar to a WHERE clause in SQL. You can write the WHERE clause withcomparison operands “inline” or as bind variables. You can also use sub-SELECTs.
Here’s an example of a WHERE clause using both an inline operand and bind variables in an EXPORT script:
EXPORT JOB WHERE
EFFDT > :1 AND
HOURLY_RT > :2
AND GRADE = ‘ADV’;DATE,1994-01-01,NUMBER,100;
Note that there are no single or double quotation marks around the bind data, as they are not necessary, andnotice that dates are formatted as YYYY-MM-DD. The valid data types for binding are CHAR, NUMBER,DATE, TIME, DATETIME, LONG, and IMAGE. Not all database platforms support LONG or IMAGEdata types in the WHERE clause, so you should not use WHERE clauses with these data types.
The following operators are supported in an Import WHERE clause: =, < >, <, >,< =, > =, andsimple uses of AND and OR. For example, in the following formula, if A, B, and C are true,or if D is true, or if E is true, then the whole statement is true:
WHERE
A = :1 AND B = :2 AND C = :3
OR D = :4
OR E = :5;NUMBER,10,NUMBER,20,NUMBER,30,NUMBER,0,NUMBER,1;
When Data Mover Issues COMMITsPeopleSoft Data Mover issues COMMIT statements after most successful SQL commands,except for EXPORT * and IMPORT *. For EXPORT * and IMPORT *, PeopleSoft Data Moverissues a COMMIT after each record. With IMPORT *, there is a SET COMMIT n commandthat performs a COMMIT after the system inserts every n rows.
PeopleSoft Proprietary and Confidential 33
PeopleSoft Data Mover Chapter 1
If you are executing native SQL in PeopleSoft Data Mover and no COMMITs exist in the SQL script,PeopleSoft Data Mover issues a COMMIT after each successful SQL statement. For example, if yourun a PeopleSoft Data Mover script that contains three update commands and the third command fails,the first and second update commands are committed, but the third command is not.
SET Parameter ReferenceThe following parameters can be appended to a SET command to create a valid SET statement.
COMMITThe following topics contain information about syntax and use of this parameter.
SyntaxThe following is the proper syntax:
SET COMMIT #of_rows;
Valid Data Mover CommandsIMPORT, REPLACE_ALL, REPLACE_DATA
Valid SQL CommandsNone
UseSets the commit level only for inserting rows and not for DDL statements. If the level is setto 0, commits will only be done when all rows for a record are inserted. Due to the expenseof recompiling and rebinding after a commit, the default is 0.
CREATE_INDEX_BEFORE_DATAThe following topics contain information about syntax and use of this parameter.
SyntaxThe following is the proper syntax:
SET CREATE_INDEX_BEFORE_DATA;
Valid Data Mover CommandsIMPORT, REPLACE_ALL
Valid SQL CommandsNone
34 PeopleSoft Proprietary and Confidential
Chapter 1 PeopleSoft Data Mover
UseCreates the index before inserting rows into a record. The default method is to insertrows into a record and then create the index.
DBSPACEThe following topics contain information about syntax and use of this parameter.
SyntaxThe following is the proper syntax:
SET DBSPACE {<old dbname>.<old spcname>} AS {<new_dbname>.<new spcname>};
Valid Data Mover CommandsIMPORT, REPLACE_ALL
Valid SQL CommandsNone
UseThe DBSPACE command is similar to the SPACE command in use, but it is designed to handle thecombination of DBNAME.DDLSPACENAME. On DB2, the DBNAME or DDLSPACENAME alone isnot necessarily unique. However, the combination of the two (DBNAME.DDLSPACENAME) provides aunique relationship. For example, DBSPACE would be needed in the following scenario:
Note. This command is supported only on DB2 for OS/390. You use this command inplace of the SPACE command used on other platforms.
PSFSDMO.HRAPP
PSHRDMO.HRAPP
PSPTDMO.HRAPP
The wild card (*) character is permitted for the <dbname> and <spc name> parameters to apply toall values being processed for the specific parameter in which the wild card character is used. Thefollowing are examples of using this command to achieve one of the following:
• To change a specific DBNAME/DDLSPACENAME combination to a single new combination:
SET DBSPACE <old dbname>.<old spcname> AS <new dbname>.<new spcname>
• To keep the current DBNAMEs the same but change the specific DDLSPACENAME to a new name:
SET DBSPACE <*>.<old spcname> AS <*>.<new spcname>
• To keep the current DDLSPACENAMEs the same, but change the specific DBNAME to a new name:
SET DBSPACE <old dbname>.<*> AS <new dbname>.<*>
PeopleSoft Proprietary and Confidential 35

PeopleSoft Data Mover Chapter 1
Warning! Because of the large number of objects delivered in the PeopleSoft logical databases, we stronglyadvise that you do not override all “old” dbname or spcname values to a single “new” dbname or spcnamevalue when building a SYS or DMO database. The functionality to do so, is delivered, however, and maybe useful in working with smaller data files that contain a smaller number of objects.
For large databases, the following commands are not recommended:
SET DBSPACE <*>.<*> AS <new dbname>.<new spcname>
SET DBSPACE <*>. <*> AS <*>.<new spcname>
SET DBSPACE <*>.<*> AS <new dbname>.<*>
You can use multiple SET DBSPACE statements to override the DDLSPACENAME in the .DAT file. Thisenables you to override multiple databases in the same section of the script. For example,
SET DBSPACE PSFSDMO.* AS MYFSDMO1.*;
SET DBSPACE PSFSDMOF.* AS MYFSDMO2.*;
SET DBSPACE PSFSDMOD.* AS MYFSDMO3.*;
SET DBSPACE PSFSDMOM.* AS MYFSDMO4;
DDLThe following topics contain information about syntax and use of this parameter.
SyntaxThe following is the proper syntax:
SET DDL {RECORD | INDEX | UNIQUE INDEX | SPACE} {object_name | *}
INPUT parm AS value;
Valid Data Mover CommandsIMPORT, REPLACE_ALL
Valid SQL CommandsNone
UseSubstitutes values for the parameters specified in the DDL template commands. Substitutes the parm andvalue placeholders for an actual parameter and its value. If an asterisk is used instead of an object name, aSQL update on PSDDLDEFPARMS is performed on the parameter and value upon successful completion ofthe IMPORT or REPLACE_ALL command that corresponds to the SET DDL statement.
Below are some examples of DDL template SET commands from a DB2 import script:
SET DDL RECORD * INPUT dbname AS pt750dg0;
SET DDL INDEX * INPUT stogroup AS wps04sg;
SET DDL SPACE * INPUT stogroup AS wps04sg;
36 PeopleSoft Proprietary and Confidential
Chapter 1 PeopleSoft Data Mover
EXECUTE_SQLThe following topics contain information about syntax and use of this parameter.
SyntaxThe following is the proper syntax:
SET EXECUTE_SQL [AFTER] sql_statement;
Valid Data Mover CommandsIMPORT, REPLACE_ALL, REPLACE_DATA
Valid SQL CommandsNone
UseExecutes the sql_statement specified at the beginning of a transaction. Typically, this command is used to setupa specific cursor environment before PeopleSoft Data Mover begins processing. For example, in DB2, use thiscommand to set the current SetID, or for Oracle, use this command to designate a specific rollback segment.
This command doesn’t execute for DDL SQL statements. For example, in DB2, you cannot setthe current SetID before creating spaces, tables, indexes, or views.
EXTRACTThe following topics contain information about syntax and use of this parameter.
SyntaxThe following is the proper syntax:
SET EXTRACT {COMMAND | DDL | INPUT | SPACE | OUTPUT file_name};
Valid Data Mover CommandsIMPORT, REPLACE_ALL
Valid SQL CommandsNone
UseExtracts various types of information from an export file (the .DAT file specified in the corresponding SETINPUT command that precedes the IMPORT or REPLACE ALL command) and writes this informationto the user defined output file specified in the SET EXTRACT OUTPUT file_name statement.
Note. You must use SET EXTRACT OUPUT before issuing any other SET EXTRACT statements.
PeopleSoft Proprietary and Confidential 37

PeopleSoft Data Mover Chapter 1
EXTRACT INPUT writes out any statements from the .DAT file that are associated with the table(s) beingimported. EXTRACTDDL writes out any CREATE TABLE, CREATE INDEX, or CREATE UNIQUE INDEXstatements from the .DAT file. EXTRACT COMMANDwrites out the EXPORT statements from the .DAT file.
When EXTRACT statements are issued, no SQL CREATE or INSERT statements will be executed. Theassociated IMPORT or REPLACE_ALL command is not actually executed, so no import is performed.
IGNORE_DUPSThe following topics contain information about syntax and use of this parameter.
SyntaxThe following is the proper syntax:
SET IGNORE_DUPS;
Valid Data Mover CommandsIMPORT
Note. The command “SET IGNORE_DUPS” is only valid in Bootstrap mode. This prevents the lostof data during a PeopleSoft Data Mover import of a language table in user mode.
Valid SQL CommandsNone
UseIgnores “duplicate row” error messages from the database; the IMPORT process will continue despiteany “duplicate row” errors displayed in the output window and log file. You can set this command forthe entire import script or by record, using IGNORE_DUPS as a command modifier.
When IGNORE_DUPS is set, bulk loading—the ability to load more than one row at a time—is turnedoff (to allow checking for duplicates, so that duplicate rows can be ignored/bypassed). By default, bulkloading is on and inserts many (100) rows into a table at a time. Because turning off bulk loading slowsperformance, we suggest that you use this feature only when required and/or by record.
See Chapter 1, “PeopleSoft Data Mover,” IMPORT, page 21 and Chapter 1, “PeopleSoftData Mover,” IGNORE_DUPS, page 32.
INPUTThe following topics contain information about syntax and use of this parameter.
SyntaxThe following is the proper syntax:
SET INPUT file;
38 PeopleSoft Proprietary and Confidential
Chapter 1 PeopleSoft Data Mover
Valid Data Mover CommandsIMPORT, REPLACE_ALL, REPLACE_DATA
Valid SQL CommandsNone
UseSpecifies the name of the exported file to import; typically this file will have a .DAT extension, though this isnot a requirement. Because this statement is required to do an import, there is no default file.
If you don’t specify a path for this file, PeopleSoft Data Mover searches for the file inthe following locations in the order presented:
• The Data Mover Input Directory as defined in the Configuration Manager on the Common tab.
• If the Input Directory is set to blank (not set) on the Common tab, PeopleSoft DataMover will search the C:\TEMP directory.
INSERT_DATA_ONCEThe following topics contain information about syntax and use of this parameter.
SyntaxThe following is the proper syntax:
SET INSERT_DATA_ONCE record;
Valid Data Mover CommandsIMPORT, REPLACE_ALL, REPLACE_DATA
Valid SQL CommandsNone
UseInstructs PeopleSoft Data Mover to skip (bypass importing) the specified record if there is already one or morerows in the table corresponding to that record. If the table is empty, only a single row will be inserted.
LOGThe following topics contain information about syntax and use of this parameter.
SyntaxThe following is the proper syntax:
SET LOG file;
PeopleSoft Proprietary and Confidential 39

PeopleSoft Data Mover Chapter 1
Note. You must specify a file name for the SET LOG statement or else a log file will not be created. If youdo not want to specify a log file name, you should omit the SET LOG statement completely.
Valid Data Mover CommandsAll
Valid SQL CommandsAll
UseAllows you to specify a user-defined filename for the log file that will be created when runninga PeopleSoft Data Mover script or command. If the SET LOG statement is omitted completely,a default log file will be created with the name DATAMOVE.LOG. Data Mover will write thisDATAMOVE.LOG file to the default log directory, which is determined as follows:
• The PeopleSoft Data Mover log directory specified on the Common tab in the Configuration Manager.
• If the previous setting is blank, the log file will be written to C:\TEMP.
Note. If you use the SET LOG statement but do not specify a filename and path, PeopleSoft Data Mover willwrite the user-defined log file to the default log directory according to the same rule defined above.
When checking the DATAMOVE.LOG file in a multi-database environment, always make sure you areexamining the correct log file. At the top of the output file, check the date and the database name to confirm.
Logging status in C:\TEMP\datamove.log
Started: Fri Mar 17 13:47:15 2001
Data Mover Release: 8.4
Database: HR702U40
…….
Ended: Fri Mar 17 13:47:20 2001
Successful completion
NO DATAThe following topics contain information about syntax and use of this parameter.
SyntaxThe following is the proper syntax:
SET NO DATA;
Valid Data Mover CommandsEXPORT, IMPORT, REPLACE_ALL
Valid SQL CommandsNone
40 PeopleSoft Proprietary and Confidential
Chapter 1 PeopleSoft Data Mover
UseDuring an export, the NO DATA command prevents data from being exported. In an import,this command prevents data from being inserted.
NO INDEXThe following topics contain information about syntax and use of this parameter.
SyntaxThe following is the proper syntax:
SET NO INDEX;
Valid Data Mover CommandsIMPORT, REPLACE_ALL
Valid SQL CommandsNone
UsePrevents indexes from being created during an IMPORT or a REPLACE_ALL command.
NO RECORDThe following topics contain information about syntax and use of this parameter.
SyntaxThe following is the proper syntax:
SET NO RECORD;
Valid Data Mover CommandsIMPORT, REPLACE_ALL
Valid SQL CommandsNone
UsePrevents records from being created during an import.
NO SPACEThe following topics contain information about syntax and use of this parameter.
SyntaxThe following is the proper syntax:
PeopleSoft Proprietary and Confidential 41

PeopleSoft Data Mover Chapter 1
SET NO SPACE;
Valid Data Mover CommandsIMPORT, REPLACE_ALL
Valid SQL CommandsNone
UsePrevents tablespaces from being created. This is the default setting. You can use this statementto reset the default after executing a SET SPACE statement.
NO TRACEThe following topics contain information about syntax and use of this parameter.
SyntaxThe following is the proper syntax:
SET NO TRACE;
Valid Data Mover CommandsAll
Valid SQL CommandsAll except INSERT
UseSets the PeopleSoft trace flag (TraceSQL) in the Configuration Manager to “off” for the commands thatfollow, until the next SET statement. This is the recommended method of executing commands. Thismeans that if SET NO TRACE is specified, then no trace file will be created, even if you specify a TraceFile in the is Configuration Manager on the Trace tab. Commands that you run without specifying SETNO TRACE, will trace SQL if SQL tracing is enabled in the Configuration Manager.
Note. This statement cannot be used with an INSERT command.
NO VIEWThe following topics contain information about syntax and use of this parameter.
SyntaxThe following is the proper syntax:
SET NO VIEW;
42 PeopleSoft Proprietary and Confidential
Chapter 1 PeopleSoft Data Mover
Valid Data Mover CommandsEXPORT * only, IMPORT * only, REPLACE_ALL * only, REPLACE_DATA * only
Valid SQL CommandsNone
UsePrevents views from being created.
OUTPUTThe following topics contain information about syntax and use of this parameter.
SyntaxThe following is the proper syntax:
SET OUTPUT file;
Note. You must specify a file name for the SET OUTPUT statement or else a log file will not be created. Ifyou do not want to specify a log file name, you should omit the SET OUTPUT statement completely.
Valid Data Mover CommandsEXPORT
Valid SQL CommandsNone
UseAllows you to specify a user-defined filename for the output file that will be created by the correspondingEXPORT statement. If the SET OUTPUT statement is omitted completely, a default output file with the nameDATAMOVE.DAT will be created. The location that the output file is created is determined by the following:
• The PeopleSoft Data Mover Output Directory specified on the Common tab in the Configuration Manager.
• If the previous setting is blank, the output file will be generated to the C:\TEMP directory.
Note. If you use the SET OUTPUT statement but do not specify a filename and path, PeopleSoft Data Moverwill write the user-defined log file to the default log directory according to the same rule defined above.
SIZING_SETThe following topics contain information about syntax and use of this parameter.
SyntaxThe following is the proper syntax:
SET SIZING_SET n;
PeopleSoft Proprietary and Confidential 43
PeopleSoft Data Mover Chapter 1
Valid Data Mover CommandsIMPORT, REPLACE_ALL
Valid SQL CommandsNone
UseSpecifies the Sizing Set number—as defined in the DDL Model Defaults page. Default is 0. To usethis parameter, the specified sizing set must be defined in the export file.
See PeopleSoft Server Tools Administration, “PeopleTools Utilities,” DDL Model Defaults.
SPACEThe following topics contain information about syntax and use of this parameter.
SyntaxThe following is the proper syntax:
SET SPACE old spcname AS new_spcname;
Valid Data Mover CommandsIMPORT, REPLACE_ALL
Valid SQL CommandsNone
UseUsed for all operating systems other than OS/390.
Renames the default space names to customized space names. To name all record default spacenames to a single space name, substitute * for a space name. For example:
SET SPACE * AS PS;
STARTThe following topics contain information about syntax and use of this parameter.
SyntaxThe following is the proper syntax:
SET START [AFTER] record;
Valid Data Mover CommandsIMPORT, REPLACE_ALL, REPLACE_DATA, REPLACE_VIEW
44 PeopleSoft Proprietary and Confidential

Chapter 1 PeopleSoft Data Mover
Valid SQL CommandsNone
UseDesignates where in the export file to start the import process. The default is to start at the beginningof the file. If you want to start immediately after a particular PeopleSoft record in the file, use SETSTART AFTER. This SET statement is useful for restarting a script after an error.
If the AFTER parameter is omitted, the import process starts at the record that’s specified inthe SET START statement. If the AFTER parameter is specified, the import process startsafter the record that’s specified in the SET START statement.
Note. If the same record name appears multiple times in the same .DAT file, the SET START AFTERcommand begins after the last occurrence of the record name in the .DAT file.
When using the SET START command with REPLACE_VIEW and no .DAT file specified, this designateswhat view in the database to start at or after. Views are created in alphabetical order.
STATISTICSThe following topics contain information about syntax and use of this parameter.
SyntaxThe following is the proper syntax:
SET STATISTICS { ON | OFF };
Valid Data Mover CommandsIMPORT, REPLACE_ALL
Valid SQL CommandsNone
UseTurns UPDATE STATISTICS on or off. The default value is on. Turns value to off, if you do not wantto update statistics after an IMPORT. This command works only in bootstrap mode.
VERSIONThe following topics contain information about syntax and use of this parameter.
SyntaxThe following is the proper syntax:
SET VERSION sql_table.column condition;
PeopleSoft Proprietary and Confidential 45
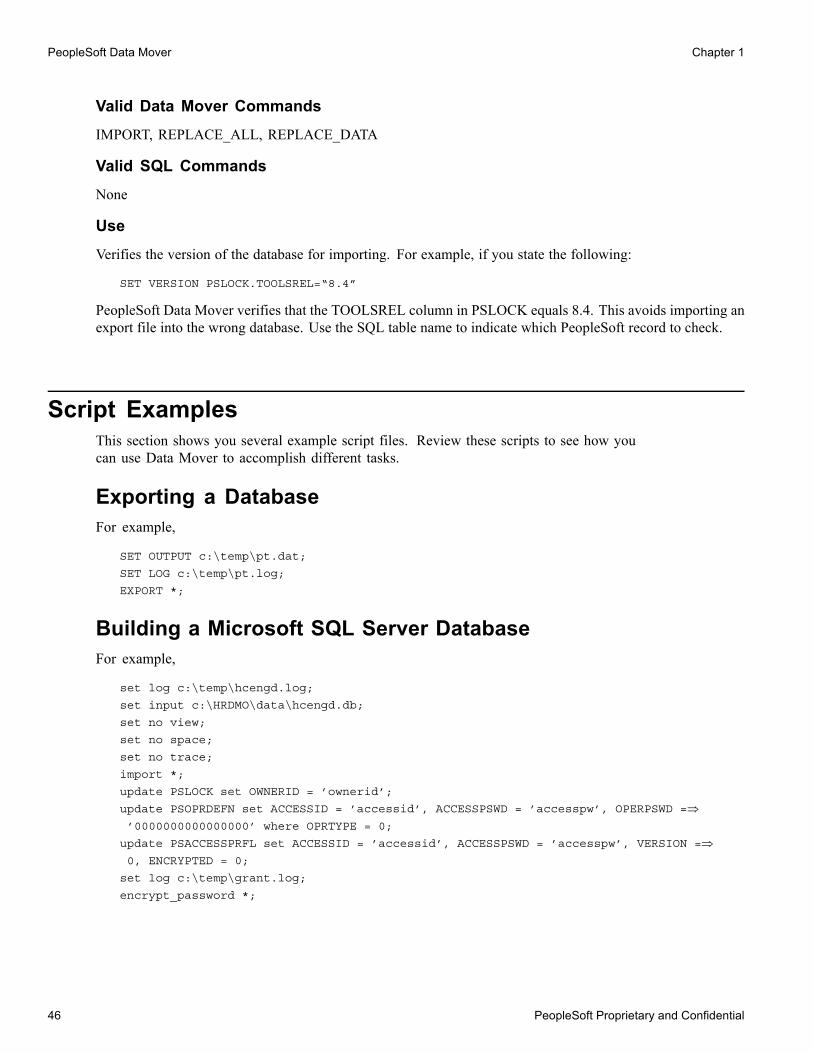
PeopleSoft Data Mover Chapter 1
Valid Data Mover CommandsIMPORT, REPLACE_ALL, REPLACE_DATA
Valid SQL CommandsNone
UseVerifies the version of the database for importing. For example, if you state the following:
SET VERSION PSLOCK.TOOLSREL=“8.4”
PeopleSoft Data Mover verifies that the TOOLSREL column in PSLOCK equals 8.4. This avoids importing anexport file into the wrong database. Use the SQL table name to indicate which PeopleSoft record to check.
Script ExamplesThis section shows you several example script files. Review these scripts to see how youcan use Data Mover to accomplish different tasks.
Exporting a DatabaseFor example,
SET OUTPUT c:\temp\pt.dat;
SET LOG c:\temp\pt.log;
EXPORT *;
Building a Microsoft SQL Server DatabaseFor example,
set log c:\temp\hcengd.log;
set input c:\HRDMO\data\hcengd.db;
set no view;
set no space;
set no trace;
import *;
update PSLOCK set OWNERID = ’ownerid’;
update PSOPRDEFN set ACCESSID = ’accessid’, ACCESSPSWD = ’accesspw’, OPERPSWD =⇒’0000000000000000’ where OPRTYPE = 0;
update PSACCESSPRFL set ACCESSID = ’accessid’, ACCESSPSWD = ’accesspw’, VERSION =⇒0, ENCRYPTED = 0;
set log c:\temp\grant.log;
encrypt_password *;
46 PeopleSoft Proprietary and Confidential
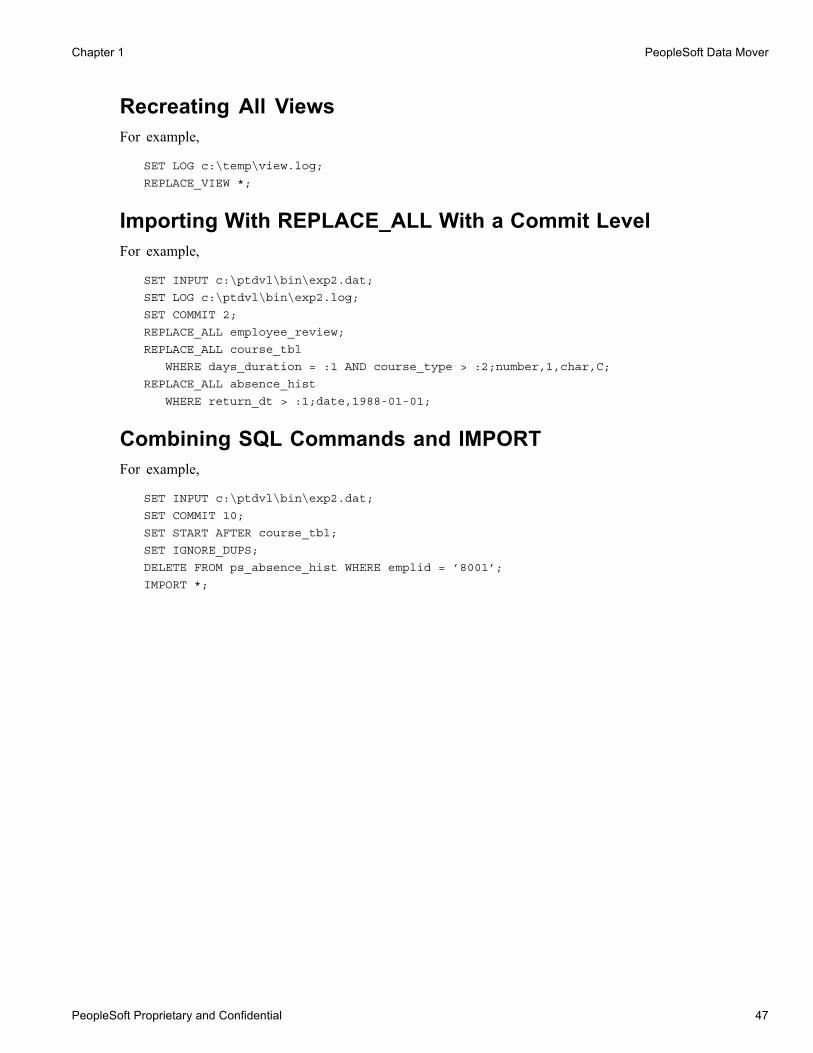
Chapter 1 PeopleSoft Data Mover
Recreating All ViewsFor example,
SET LOG c:\temp\view.log;
REPLACE_VIEW *;
Importing With REPLACE_ALL With a Commit LevelFor example,
SET INPUT c:\ptdvl\bin\exp2.dat;
SET LOG c:\ptdvl\bin\exp2.log;
SET COMMIT 2;
REPLACE_ALL employee_review;
REPLACE_ALL course_tbl
WHERE days_duration = :1 AND course_type > :2;number,1,char,C;
REPLACE_ALL absence_hist
WHERE return_dt > :1;date,1988-01-01;
Combining SQL Commands and IMPORTFor example,
SET INPUT c:\ptdvl\bin\exp2.dat;
SET COMMIT 10;
SET START AFTER course_tbl;
SET IGNORE_DUPS;
DELETE FROM ps_absence_hist WHERE emplid = ’8001’;
IMPORT *;
PeopleSoft Proprietary and Confidential 47

PeopleSoft Data Mover Chapter 1
48 PeopleSoft Proprietary and Confidential

CHAPTER 2
PeopleSoft Configuration Manager
This chapter describes what PeopleSoft Configuration Manager is and how to use it.
• Configuration Manager interface.
• Startup page.
• Display page.
• Crystal/Business Interlink page.
• Trace page.
• Workflow page.
• Remote Call page.
• Client Setup page.
• Import/Export page.
• Profile page.
• Command line options.
• Set up the development environment.
Understanding PeopleSoft Configuration ManagerPeopleSoft Configuration Manager simplifies workstation administration by enabling youto adjust the PeopleSoft registry settings from one central location. It lets you set up oneworkstation to reflect the environment at your site, and to then export the configuration file,which can be shared among all the workstations at your site.
The Configuration Manager contains a variety of controls that let you set up your workstationsfor connecting to the database, using workflow, and so on. It allows you to define separate"profiles" for connecting to different PeopleSoft databases.
The following sections describe each tab in the Configuration Manager’s interface andexplain the environment settings you can specify.
PeopleSoft Proprietary and Confidential 49
PeopleSoft Configuration Manager Chapter 2
Working with the Configuration Manager InterfaceConfiguration Manager allows you to access PeopleSoft-specific registry settings from a centrallocation—saving you from hunting through the registry on your own. It’s also easy to use due toits familiar interface—a Windows dialog box consisting of multiple tabs.
Configuration Manager
You can start Configuration Manager by double-clicking the Configuration Manager shortcut in yourPeopleSoft program group. You can also start the program online by selecting Edit, Preferences,Configuration from within a PeopleSoft Windows application.
The various PeopleSoft configuration parameters are grouped on the dialog tabs accordingto the function, feature, or PeopleTools application that they control. The label on the tabidentifies the kind of parameters you can expect to find there.
The following buttons appear for each folder tab.
OK Saves your settings and exits Configuration Manager.
Cancel Closes Configuration Manager without saving any changes you have made.
Apply Saves your changes without exiting.
50 PeopleSoft Proprietary and Confidential

Chapter 2 PeopleSoft Configuration Manager
Note. The changes you make within Configuration Manager do not take effect untilthe next time you start PeopleSoft.
StartupThe options on the Startup tab enable you to customize the default values that appear on the signon screen.Users do not need to change any values unless they do not want to accept the defaults.
Startup Tab
Signon DefaultsThese options let you customize the defaults shown on the signon screen. Users only need to change the valuesif they do not want the defaults. They will, of course, need to be authorized to make any changes to the signondefaults. As an example, here’s a PeopleSoft Signon dialog containing the values from the previous Startup tab.
PeopleSoft Proprietary and Confidential 51
PeopleSoft Configuration Manager Chapter 2
PeopleSoft Signon Dialog
Database Type This is where you select the name of the database—Microsoft SQL Server,Oracle, Informix, and so on—that you want to appear as a default on thePeopleSoft Signon window. You can also choose Application Server tolog on to an application server instead of a database. For a list of thepossible choices, view the drop-down list. To allow users to changetheir Database Type selection in the signon dialog, you must select theDatabase Type option in the User Can Override group.
Note. When you select Application Server from the Database Type drop-down list, the Server Name andDatabase Name controls are d isabled. The sys tem obtains these v alues from the application s erver.
Application Server Name If you selected Application Server from the Database Type drop-down list, youneed to specify the application server’s name in this field. You must havealready configured your application server and registered it on the Profile tab.
Server Name Enter the name of the default database server in the Server Name field.This parameter is only enabled for Informix, Sybase, and Microsoft SQLServer, and refers to the instance to which the user connects.
• Informix. The Server Name must be entered in lowercase.
• Microsoft SQL Server. The Server Name value is used to automaticallycreate your ODBC data source name.
Database Name Enter a default database name. You can choose any valid PeopleSoftdatabase name. As with Database Type, you must select the appropriateoption in the User Can Override group to allow users to override thedefault database name selection at signon.
52 PeopleSoft Proprietary and Confidential

Ch apter 2 Pe op leSo ft Co nfigu r ation M ana ge r
U ser I D The Us er ID pa rameter lets you s pe cify the default u ser I D thatwill be used to log on to PeopleSoft. This parameter—like allthe Startup parameters—is optional.
You can use the User ID parameter in conjunction with a PSUSERmodule containing a user-defined logon process. The PSUSER code,if present, can evaluate and modify the User ID value before youattempt to log on to the selected database.
Connect ID and ConnectPassword
PeopleSoft uses the Connect ID for the initial connection to the database. Usethe Connect Password field to define a default connect ID password.
See PeopleTools Security, “Understanding PeopleSoft Security”.
Note. The Connect ID edit box must contain a value or the user can’t sign on tothe system in a two-tier environment.
See PeopleTools 8.42 Installation Guide for Your Database Platform
Numeric Keypad - Enter Key Tabs to Next FieldIn Microsoft Windows applications, pressing the ENTER key in a dialog box selects the defaultaction button. For example, in the PeopleSoft Signon dialog box, pressing ENTER is the same asclicking the OK button. Selecting the Numeric keypad...check box overrides this default behaviorfor t he ENT ER key o n the numeric keypad: ins tead of selecting the action button, pressing theENTER ke y m oves the cursor to the next field in the dialog box.
Note. This check box affects the ENTER key on the numeric keypad, but not theENTER key on the main keyboard.
User Can OverrideSome PeopleSoft sites use multiple database types and names. Using the check boxes in the User Can Overridegroup, you can enable users to enter a database type, database name, or user ID other than the defaultprovided at logon. Of course, in most cases, you will use these controls to prevent users from attemptingto signon onto any database other than the default. The settings in this group work as follows:
Database Ty pe If you sele ct Da t abas e Type u sers c an ch oose a d atabas e o the r tha n the d efault.Selecting this option selects the Database Name and User ID optionsautomatically. You cannot deselect Database Name or User ID without firstdeselecting Database Type. When configuring a workstation to connect inboth two-tier and three-tier, you must select this option. The user will need tospecify a two-tier or three-tier connection from the PeopleSoft Signon dialog.
Database Name If you just select Database Name, the User ID check box is selected bydefault. However, you can deselect User ID by clicking on it. To disableDatabase Name, you must deselect the Database Type check box.
User ID If you want to let users override only the User ID submitted at logon, justselect User ID. You cannot disable User ID if Database Type is selected.
PeopleSoft Proprietary and Confidential 53

PeopleSoft Configuration Manager Chapter 2
Cache FilesEnter the parent directory that holds your cache file directories. For example:
C:\PS\CACHE
Note. Cache files store database object information locally and are automatically downloaded thefirst time you open a PeopleSoft database object. They are also downloaded automatically if themaster copy of the object on the database server is changed. There is one cache file directorythat stores the cache files for each PeopleSoft database that you use.
Clicking Purge Cache Directories, brings up a dialog with your existing cache file directories.
Purge Cache Directories Dialog
You can select a single directory and press Delete, or you can press Delete All to remove all the directories. If acache file directory is missing (after you delete it), the system will automatically rebuild it the next time cachefiles are downloaded. After you delete the appropriate cache directory, press Close to return to the Startup tab.
DisplayThe Display tab allows you to customize the appearance of your PeopleSoft Graphical User Interface (GUI).For instance, you can adjust the width and height of your pages to fit in with the other elements on your desktop.
54 PeopleSoft Proprietary and Confidential

Chapter 2 PeopleSoft Configuration Manager
Display Tab
LanguageIn the Language drop-down list, specify which language you want to display on yourPeopleSoft pages. The default setting is US English.
Note. The Language drop-down list lets you choose from the languages that PeopleSoft delivers.However, you are not limited to those choices, and can customize your applications to appear inanother language. However, you cannot switch to such languages via the Configuration Manager.You instead have to switch to them by manually changing the registry setting.
Page DisplayYou can customize the way PeopleSoft pages appear on the screen. You can adjust theentire display size or just the page height and width.
Display Size, Width,and Height
You specify the Display Size (in pixels) of your screen. This affects thedefault size of the PeopleSoft window—as displayed in the correspondingWidth and Height fields. The drop-down list provides four options:
• 640 X 480 (Window size defaults to 640 x 448)
• 800 X 600 (Window size defaults to 800 x 576)
PeopleSoft Proprietary and Confidential 55
PeopleSoft Configuration Manager Chapter 2
• 1024 X 768 (Window size defaults to 1024 x 744)
• Custom (You can manually set default window size by specifyingWidth and Height values)
Note. Changing these parameters does not affect any open windows. And, if either value is eitherblank or zero, the values will be reset to the 640 X 480 display size.
Page Sizing You can specify the way pages are displayed if they were designed for adifferent size window than is opened. You have the following two options:
• C LIP. Page controls are a lways d isplayed in their normal size. If apage is too large for the window, the page information will be clippedalong the right and bottom edges of the window, but window scrollbars will let you view the remainder of the page.
• SCALE. Pages are scaled to fit the window as necessary. For example, ifyour Display Size is set to 640 X 480 and you open a page designed to displayin an 800 X 600 window, the page controls will be scaled down so that allpage information appears. Conversely, if you open a 640 x 480 page in alarger window, the page controls will be scaled to fill the window completely.
Show Page in Navigator Select this check box if you want to see the navigator tree viewand the page view at the same time.
Highlight Popup MenuFields
This check box lets you specify whether fields with associated popup menusare highlighted. By default, this option is disabled. In most cases, it’s a goodidea to indicate which fields contain popup menus. The visual cue that denotesa popup menu is a black rectangle surrounding the perimeter of a page control.
See PeopleCode Developer’s Guide, “Understanding PeopleCode and Events”.
Show Database Name The Show Database Name check box is especially useful if you are runningmultiple instances of PeopleTools. When you have a PeopleSoft page openand Show Database Name is selected, the name of the database to which youare connected appears in the Status bar at the bottom of the page, in addition tothe current page name and the activity that normally appear. For example,the Status bar might read PTDMO, Job Data 1, Add—in that order.
Note. The database name may be abbreviated to fit on the screen.
FontThe Font options enable you to customize the way the PeopleSoft text appears on the screen.
You specify the font by clicking on the Font button to bring up a standard font selectionpop-up menu. Select the font you want from that menu.
56 PeopleSoft Proprietary and Confidential
Chapter 2 PeopleSoft Configuration Manager
Font dialog box
Business Process DisplayThere are three options for Business Process Display:
• On. The Navigator will appear with each menu group you open.
• Off. The Navigator will not be displayed. The user will have to launch it manually.
• First. The Navigator will only appear on the very first instance of PeopleSoft. Subsequentinstances will not display the Navigator.
Crystal/Business InterlinkThe Crystal/Business Interlink tab contains the necessary settings for Crystal Reports in thePeopleSoft environment and for Business Interlinks.
PeopleSoft Proprietary and Confidential 57
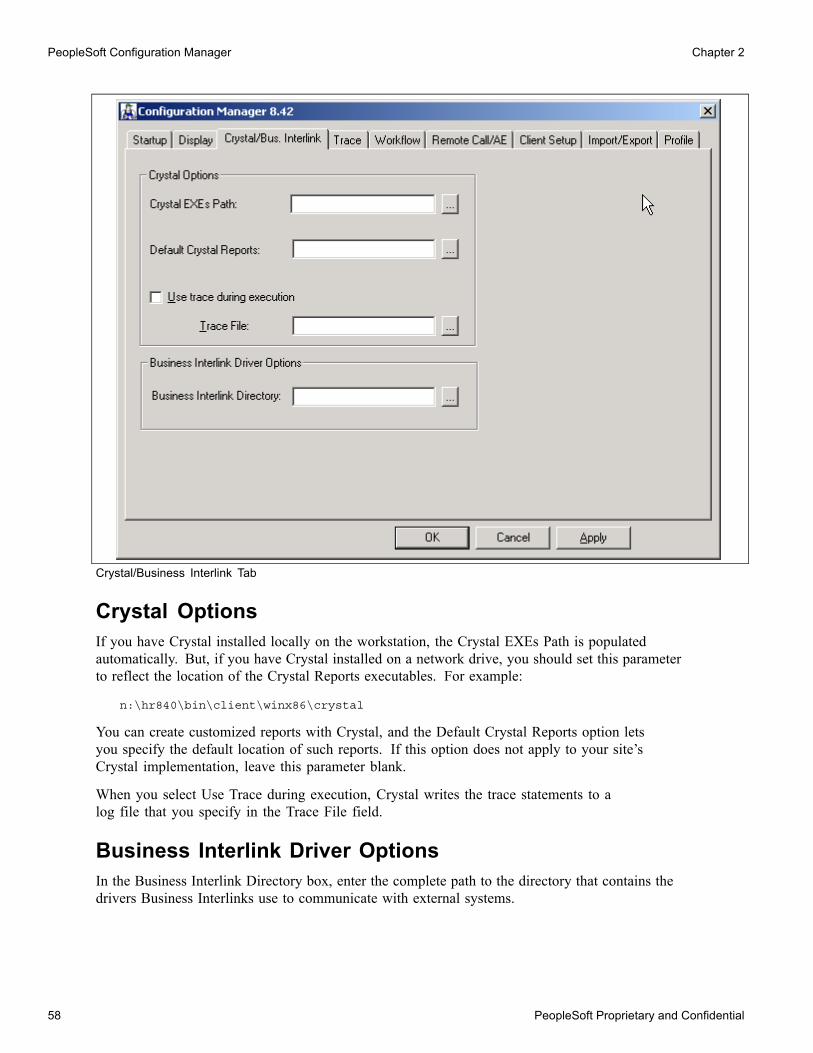
PeopleSoft Configuration Manager Chapter 2
Crystal/Business Interlink Tab
Crystal OptionsIf you have Crystal installed locally on the workstation, the Crystal EXEs Path is populatedautomatically. But, if you have Crystal installed on a network drive, you should set this parameterto reflect the location of the Crystal Reports executables. For example:
n:\hr840\bin\client\winx86\crystal
You can create customized reports with Crystal, and the Default Crystal Reports option letsyou specify the default location of such reports. If this option does not apply to your site’sCrystal implementation, leave this parameter blank.
When you select Use Trace during execution, Crystal writes the trace statements to alog file that you specify in the Trace File field.
Business Interlink Driver OptionsIn the Business Interlink Directory box, enter the complete path to the directory that contains thedrivers Business Interlinks use to communicate with external systems.
58 PeopleSoft Proprietary and Confidential
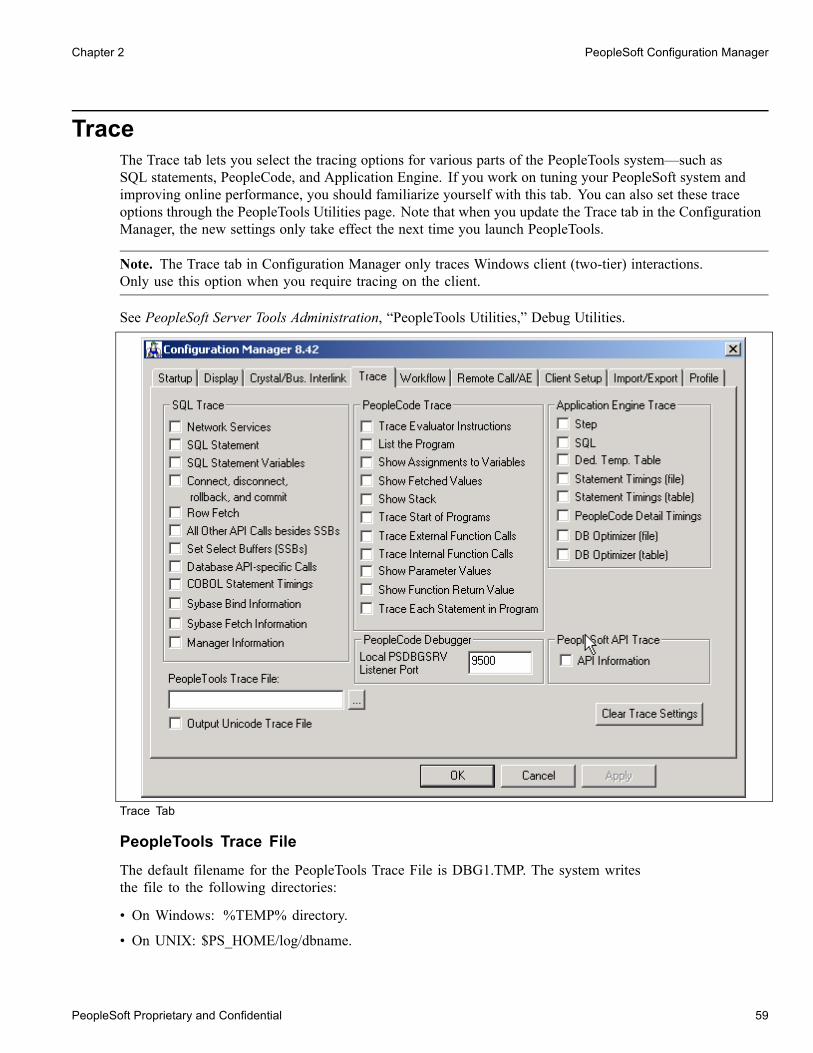
Chapter 2 PeopleSoft Configuration Manager
TraceThe Trace tab lets you select the tracing options for various parts of the PeopleTools system—such asSQL statements, PeopleCode, and Application Engine. If you work on tuning your PeopleSoft system andimproving online performance, you should familiarize yourself with this tab. You can also set these traceoptions through the PeopleTools Utilities page. Note that when you update the Trace tab in the ConfigurationManager, the new settings only take effect the next time you launch PeopleTools.
Note. The Trace tab in Configuration Manager only traces Windows client (two-tier) interactions.Only use this option when you require tracing on the client.
See PeopleSoft Server Tools Administration, “PeopleTools Utilities,” Debug Utilities.
Trace Tab
PeopleTools Trace FileThe default filename for the PeopleTools Trace File is DBG1.TMP. The system writesthe file to the following directories:
• On Windows: %TEMP% directory.
• On UNIX: $PS_HOME/log/dbname.
PeopleSoft Proprietary and Confidential 59
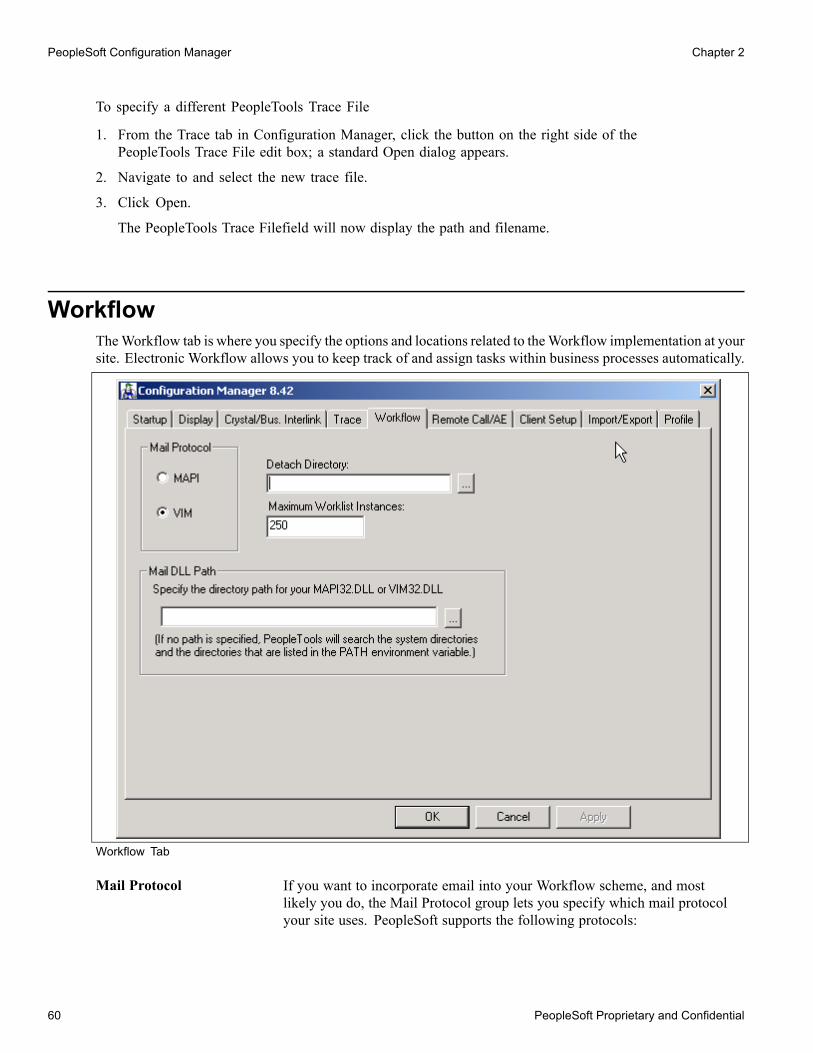
PeopleSoft Configuration Manager Chapter 2
To specify a different PeopleTools Trace File
1. From the Trace tab in Configuration Manager, click the button on the right side of thePeopleTools Trace File edit box; a standard Open dialog appears.
2. Navigate to and select the new trace file.
3. Click Open.
The PeopleTools Trace Filefield will now display the path and filename.
WorkflowTheWorkflow tab is where you specify the options and locations related to theWorkflow implementation at yoursite. Electronic Workflow allows you to keep track of and assign tasks within business processes automatically.
Workflow Tab
Mail Protocol If you want to incorporate email into your Workflow scheme, and mostlikely you do, the Mail Protocol group lets you specify which mail protocolyour site uses. PeopleSoft supports the following protocols:
60 PeopleSoft Proprietary and Confidential
Chapter 2 PeopleSoft Configuration Manager
• MAPI, or Mail API, is a programming interface that allows you to sendand receive mail over the Microsoft Mail messaging system. If yoursite uses this mail protocol , select this option to configure your clientto perform PeopleSoft Workflow email generation.
• VIM, or Vendor Independent Messaging Interface, is a programminginterface that enables you to send and receive email over a VIM-compliantmessaging system, such as cc:Mail. If your site uses this mailprotocol, select this option to configure your client to performPeopleSoft Workflow email generation.
Mail DLL Path After you have specified what Mail Protocol your site uses, enterthe location of the mail DLL. For example:
C:\Windows\System
Detach Directory This is where you specify the directory into which PSNOTES.EXEdetaches any file attachments on the forms it receives. This is also wherePSNOTES.EXE places any files that it does not deliver to the Message Agent.
Maximum WorklistInstances
To set limits on the number of worklist instances or entries thatwill display when viewing worklists, use the Maximum WorklistInstances control. The default value is 250. If you do not want anyrows returned, leave the edit box blank.
See AlsoPeopleSoft Workflow, “Defining Worklist Records”
Remote Call/AESome of PeopleSoft’s applications make use of Tuxedo’s Remote Call feature, which invokes data-intensivetransactions on a remote server. This helps to alleviate heavy processing on the client.
PeopleSoft Proprietary and Confidential 61
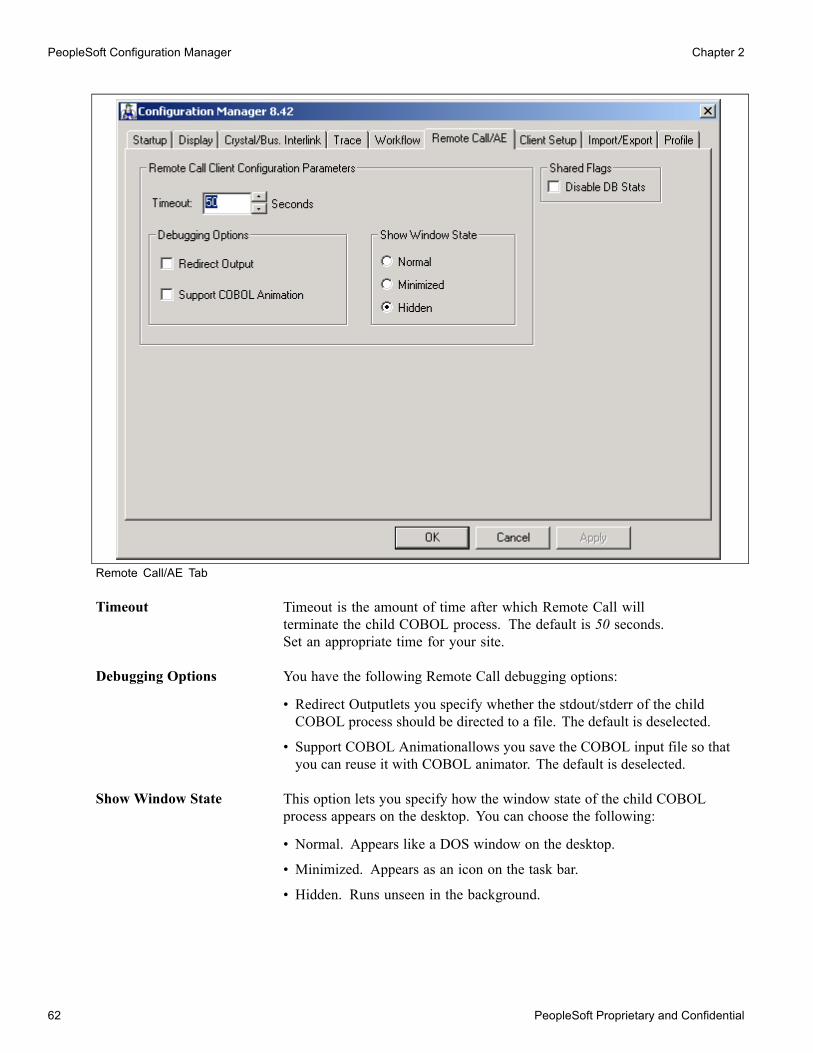
PeopleSoft Configuration Manager Chapter 2
Remote Call/AE Tab
Timeout Timeout is the amount of time after which Remote Call willterminate the child COBOL process. The default is 50 seconds.Set an appropriate time for your site.
Debugging Options You have the following Remote Call debugging options:
• Redirect Outputlets you specify whether the stdout/stderr of the childCOBOL process should be directed to a file. The default is deselected.
• Support COBOL Animationallows you save the COBOL input file so thatyou can reuse it with COBOL animator. The default is deselected.
Show Window State This option lets you specify how the window state of the child COBOLprocess appears on the desktop. You can choose the following:
• Normal. Appears like a DOS window on the desktop.
• Minimized. Appears as an icon on the task bar.
• Hidden. Runs unseen in the background.
62 PeopleSoft Proprietary and Confidential
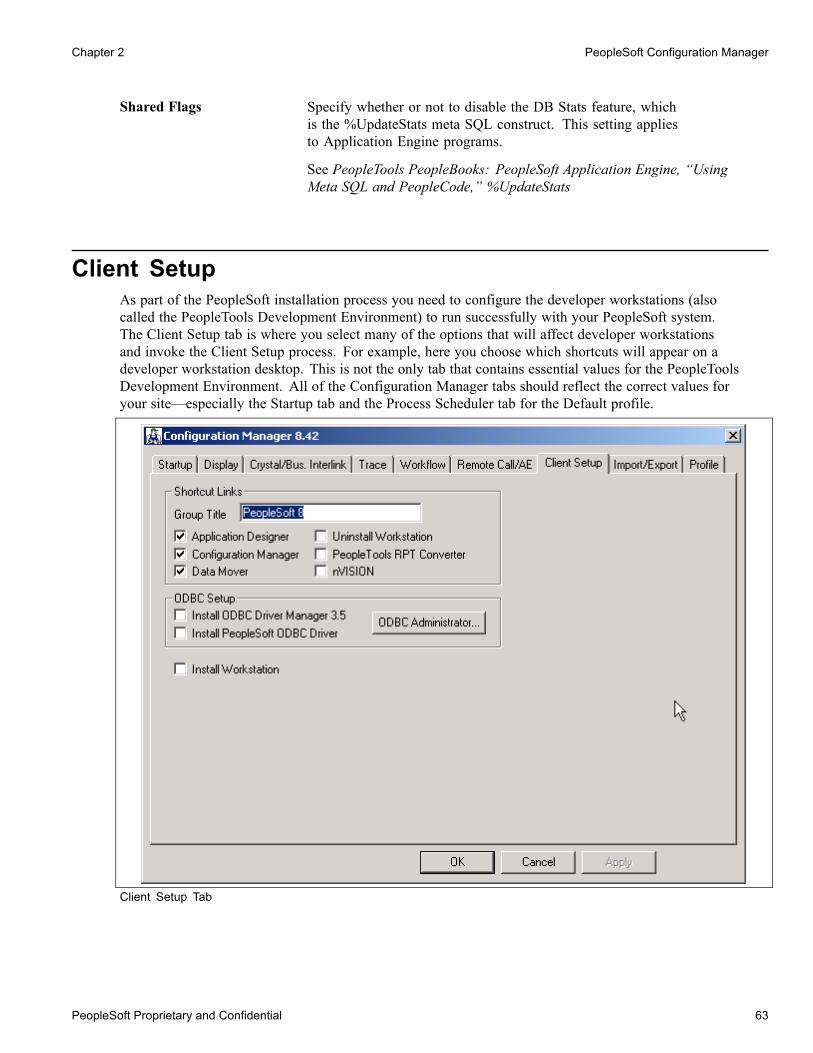
Chapter 2 PeopleSoft Configuration Manager
Shared Flags Specify whether or not to disable the DB Stats feature, whichis the %UpdateStats meta SQL construct. This setting appliesto Application Engine programs.
See PeopleTools PeopleBooks: PeopleSoft Application Engine, “UsingMeta SQL and PeopleCode,” %UpdateStats
Client SetupAs part of the PeopleSoft installation process you need to configure the developer workstations (alsocalled the PeopleTools Development Environment) to run successfully with your PeopleSoft system.The Client Setup tab is where you select many of the options that will affect developer workstationsand invoke the Client Setup process. For example, here you choose which shortcuts will appear on adeveloper workstation desktop. This is not the only tab that contains essential values for the PeopleToolsDevelopment Environment. All of the Configuration Manager tabs should reflect the correct values foryour site—especially the Startup tab and the Process Scheduler tab for the Default profile.
Client Setup Tab
PeopleSoft Proprietary and Confidential 63
PeopleSoft Configuration Manager Chapter 2
Shortcut LinksHere are the various shortcut links:
Application Designer Adds a shortcut for the main PeopleTools development environment.
Configuration Manager Adds a shortcut for the PeopleSoft Configuration Manager, which allowsyou to edit registry settings relevant to PeopleSoft.
Data Mover Adds a shortcut that will launch Data Mover.
Uninstall Workstation Adds a shortcut for Uninstall Workstation, which uninstallsthe most recent Client Setup.
PeopleTools RPTConverter
Adds a shortcut to a stand-alone program that converts your RPTfiles from the format PeopleSoft used in previous releases to thePeopleTools 8 format. You only need to run this program if you areupgrading from previous versions of PeopleTools.
nVISION Adds an nVision menu item to the PeopleSoft 8 menu groupin the Windows Start menu.
Note. We recommend that you back up your previous RPT files before you run theconverter program, which significantly alters them.
ODBC SetupYou need to specify one or both of the ODBC Setup options to run PeopleSoft Open Query.
• Install ODBC Driver Manager 3.5. This option installs the Microsoft ODBC drivers that you need torun in conjunction with the PeopleSoft ODBC Driver to enable PeopleSoft Open Query. If you alreadyhave the Microsoft ODBC drivers installed on your client, this is an optional component.
• Install PeopleSoft ODBC Driver. You need to install this driver to enable PeopleSoft Open Query.
Note. If you already have the Microsoft ODBC drivers installed, you will overwrite your current driver.Client Setup installs the ODBC Driver Manager version 3.510.3711. Any preceding versions of the ODBCdriver will be overwritten, and any versions higher than 3.510.3711 will not be overwritten.
Install WorkstationYou m ust have the Install Workstation check box enable d to engage the Client Setup function. Only select thecheck box after specifying all the appropriate selections on all Configuration Manager tabs. If you do notcheck this option, Client Setup will not run. After you click the check box, click either OK or Apply.
64 PeopleSoft Proprietary and Confidential
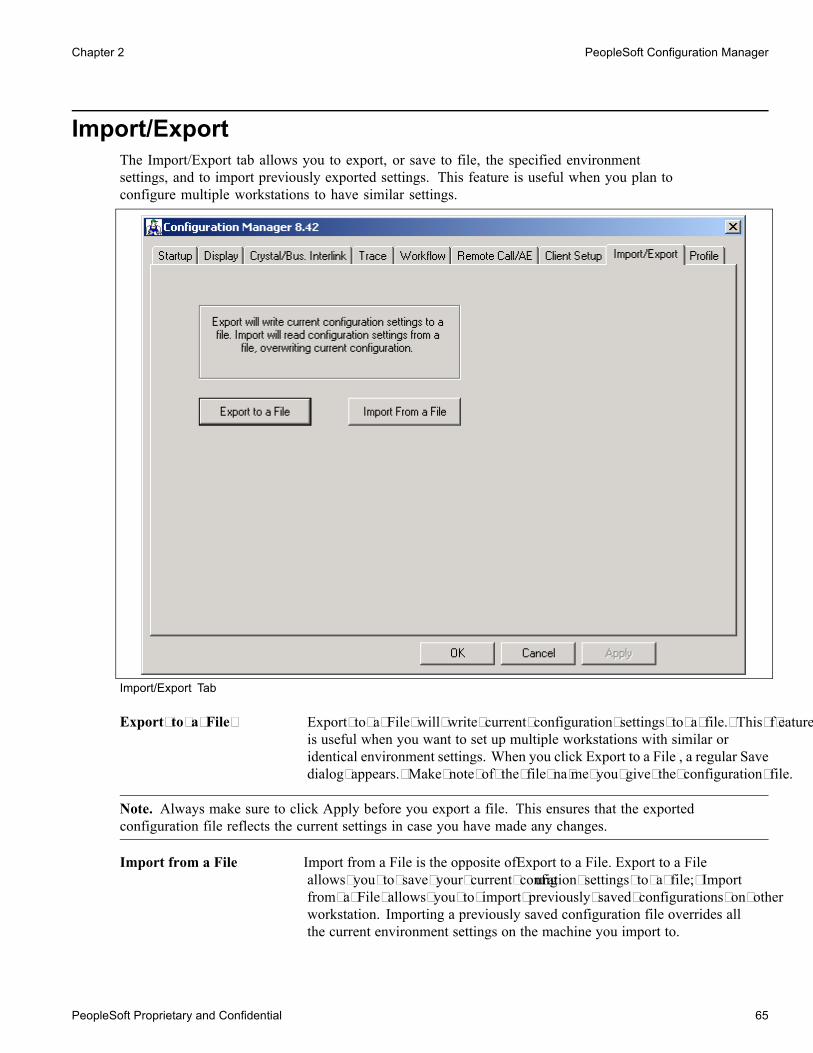
Chapter 2 PeopleSoft Configuration Manager
Import/ExportThe Import/Export tab allows you to export, or save to file, the specified environmentsettings, and to import previously exported settings. This feature is useful when you plan toconfigure multiple workstations to have similar settings.
Import/Export Tab
Export to a File Export to a File will write current configuration settings to a file. This f eatureis useful when you want to set up multiple workstations with similar oridentical environment settings. When you click Export to a File , a regular Savedialog appears. Make note of the file na me you give the configuration file.
Note. Always make sure to click Apply before you export a file. This ensures that the exportedconfiguration file reflects the current settings in case you have made any changes.
Import from a File Import from a File is the opposite ofExport to a File. Export to a Fileallows you to save your current configuration settings to a file; Importfrom a File allows you to import previously saved configurations on otherworkstation. Importing a previously saved configuration file overrides allthe current environment settings on the machine you import to.
PeopleSoft Proprietary and Confidential 65

PeopleSoft Configuration Manager Chapter 2
When you click Import From a File a normal Open dialog appears.Navigate to the directory containing the appropriate configurationfile, select the proper file, and click Open.
ProfileThe Profile tab lets you define one or more user profiles, each of which specifies connectionparameters and file location information for a PeopleSoft installation.
Many PeopleSoft installations include multiple databases. For example, there may be one database for trackingfinancial information such as expense reports and another database for HR processes such as benefitsenrollment. Each of these databases has its own set of supporting files—SQR reports, COBOL processes, andso on. PeopleTools locates these files by referring to the Windows registry. By defining multiple profiles, youcan tell PeopleTools to use different directory paths depending on which database the user is connecting to.
Profile Tab
When you first open the Configuration Manager, the Profile tab displays a single profile named Default.To set the parameters for this profile, make sure it’s highlighted and click the Edit button. The EditProfile dialog box appears. The sections that follow describe each tab of this dialog box.
66 PeopleSoft Proprietary and Confidential

Chapter 2 PeopleSoft Configuration Manager
Each workstation must have a default profile, which is used when the user signs on to a database orapplication server that isn’t listed in any profile. If the workstation requires only one set of profilesettings, you can just use the default profile. You can also set up multiple Configuration Manager profiles.Profiles give you a way of configuring a workstation to access multiple PeopleSoft 8 applications. Theprofiles are set for the Windows workstation, and are shared by all workstation users.
Note. The Profiles feature lets you easily switch between applications.
Database/Application ServerThe Database/Application Servers tab is where you specify the configured databases and applicationservers associated with this profile. When a user enters one of these databases or application servers in thePeopleSoft Signon dialog box, PeopleTools uses the registry settings associated with this profile.
Note. You can assign multiple databases and application servers to a single profile. However, each databaseand application server must be assigned to only one profile. If you try to add a database to a second profile,Configuration Manager asks you if you want to remove it from the previous profile and add it to the current one.
Database/Application Server Tab
Note. Before you enter a database or application server on this tab, you should have already installed andconfigured it as documented in the PeopleSoft Installation book for your database platform.
PeopleSoft Proprietary and Confidential 67
PeopleSoft Configuration Manager Chapter 2
Application Server NameEnter a name for an application server that you have configured. This is the name thatwill appear in the drop-down list on the PeopleSoft Signon screen. We recommend thatyou choose a name that’s intuitive for your site.
Note. Application server names must not exceed 24 characters.
Machine Name or IP AddressEnter the IP Address or the resolvable server name of the application server you specified in the ApplicationServer Name field. You specified the IP Address in the [Workstation Listener] section of your PSAPPSRV.CFGfile when you installed your PeopleSoft application server. For example, you could enter:
207.135.65.20
or
sp-hp32
Port NumberEnter the Port Number for the application server you specified in the Application Server Name field. Youspecified the port number when you installed and configured the application server using PSADMIN. Aport number is an arbitrary number between 0 and 9999 that is determined by site specifications.
TUXEDO Connect StringThe TUXEDO Connect String is designed for advanced configuration to support dynamic load balancing. Youcan specify a free-form connect string that allows a client to connect to another application server in caseanother is either down or being used to full capacity. The following sections describe the connect string options.
Note. The Tuxedo Connect String can not exceed 1000 characters.
Round Robin Load Balance This option specifies multiple application servers to which the client willarbitrarily connect—the odds being that each application server will receive anequal number of connections. To specify the round robin, use the followingsyntax (where ip = IP Address and port = port number):
(//ip1:port1|//ip2:port2|//ipn:portn)
You can specify the IP Address using either dotted notation orby using the server’s DNS name. Either way, the slashes (//)preceding the IP Address are required.
If the selected application server is unavailable, your connectionattempt will fail and the system will not try to connect you to the otherapplication servers defined within the parentheses.
Spaces are not allowed in any part of the connection string. PeopleSoft willautomatically remove embedded spaces before storing the value in the registry.
68 PeopleSoft Proprietary and Confidential
Chapter 2 PeopleSoft Configuration Manager
Round Robin with Failover Like Round Robin Load Balance, this option allows you to definea failover connection string. Use the following syntax (where ip= IP Address and port = port number):
(//ip1:port1|//ip2:port2),(//ip3:port3)
If the application server selected from the first group of parentheses (ip1and ip2) is unavailable, the system automatically attempts to connect to anapplication server defined in the second group (ip3). If that application serverfails, the system attempts to connect to the next group to the right, sequentially.
If multiple application servers are defined within any group, the system willround-robin between them. If the selected application server fails, the systemwill attempt to connect to the next application server to the right, if any. Thefollowing are three separate examples, showing a range usage:
(//sp-ibm01:8000|//sp-ibm02:8000),(//sp-nt01:8000)
(//208.136.78.88:8000|//208.136.78.88:8050|//208.136.78.88:⇒8080)
(//sp-sun01:8000),(//sp-sun02:8000),(//sp-sun03:8000)
Set and Delete ButtonsWhen you click Set, your application server information is displayed in the grid at the top of the dialog. Atthis point you can enter a new application server name and set up a different server if you like.
Note. The settings in the grid are not saved until you press Apply or OK. If you press Cancel withoutfirst pressing Apply or OK, you will lose all the information in the grid.
To remove an application server configuration, select its Application Server Name in the grid and click Delete.
Process SchedulerThe Process Scheduler tab lets you specify all of the directories that are associated with yourProcess Scheduler jobs, such as your SQR and COBOL directories.
PeopleSoft Proprietary and Confidential 69
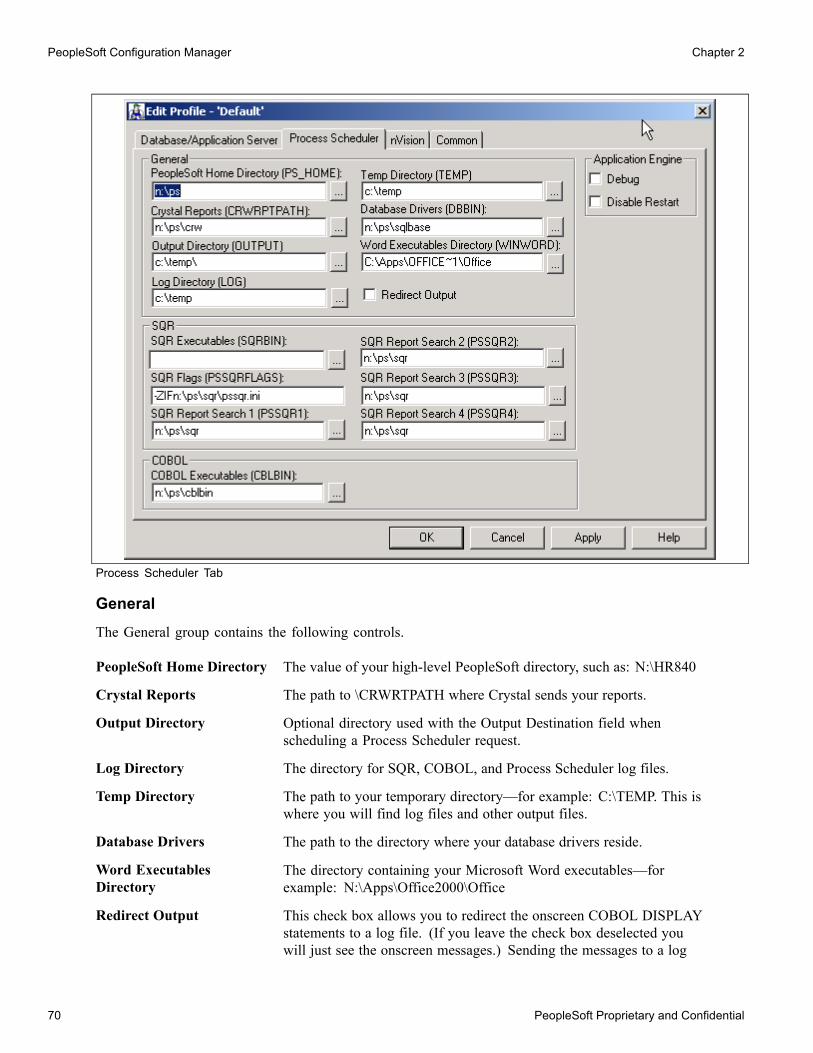
PeopleSoft Configuration Manager Chapter 2
Process Scheduler Tab
GeneralThe General group contains the following controls.
PeopleSoft Home Directory The value of your high-level PeopleSoft directory, such as: N:\HR840
Crystal Reports The path to \CRWRTPATH where Crystal sends your reports.
Output Directory Optional directory used with the Output Destination field whenscheduling a Process Scheduler request.
Log Directory The directory for SQR, COBOL, and Process Scheduler log files.
Temp Directory The path to your temporary directory—for example: C:\TEMP. This iswhere you will find log files and other output files.
Database Drivers The path to the directory where your database drivers reside.
Word ExecutablesDirectory
The directory containing your Microsoft Word executables—forexample: N:\Apps\Office2000\Office
Redirect Output This check box allows you to redirect the onscreen COBOL DISPLAYstatements to a log file. (If you leave the check box deselected youwill just see the onscreen messages.) Sending the messages to a log
70 PeopleSoft Proprietary and Confidential

Chapter 2 PeopleSoft Configuration Manager
file is useful for debugging purposes. The log file will be created in%TEMP%\PS_HOME\DBNAME directory. In addition to the outputgenerated by COBOL DISPLAY statements, the log file will containany errors generated by the COBOL Run Time System.
Note. To use the Application Engine debug feature, you must deselect the Redirect Output check box.
Application EngineThe Application Engine group includes the following controls.
Debug Select this check box to enable the Application Engine command-line debugger.
Disable Restart Select this check box to disable the Application Engine restart feature, whichlets you restart an abnormally terminated Application Engine program.With Disable Restart selected, Application Engine programs start fromthe beginning. The Disable Restart option is useful during debugging.It should not be selected in a production environment.
Warning! Select the Debug check box only when you are testing and troubleshooting client-side processes. Ifyou select Debug and submit a process request to the server, the process will hang, waiting for a user command.
SQRThe following controls apply to the SQR group.
SQR Executables Enter the path to the directory where your SQR executables reside.
SQR Flags Enter the SQR flags that Process Scheduler should pass on thecommand line to the SQR executables. The following SQR flagsare required for launching SQR reports:
• -i specifies the path to SQC files.
• -m specifies the path to the ALLMAXES.MAX file.
• -f specifies the output path.
• -o directs log messages to the specified file.
• -ZIF sets full path to the and name of the SQR initialization file, SQR.INI.
SQR Report Search Enter the directory paths the SQR executable should use to locateSQR reports. SQR Report Search 1 will be searched first, followedby SQR Report Search 2, and so on.
COBOLThe COBOL group includes the following control.
COBOL Executables Enter the path to \CBLBIN—where your COBOL executables reside.
PeopleSoft Proprietary and Confidential 71
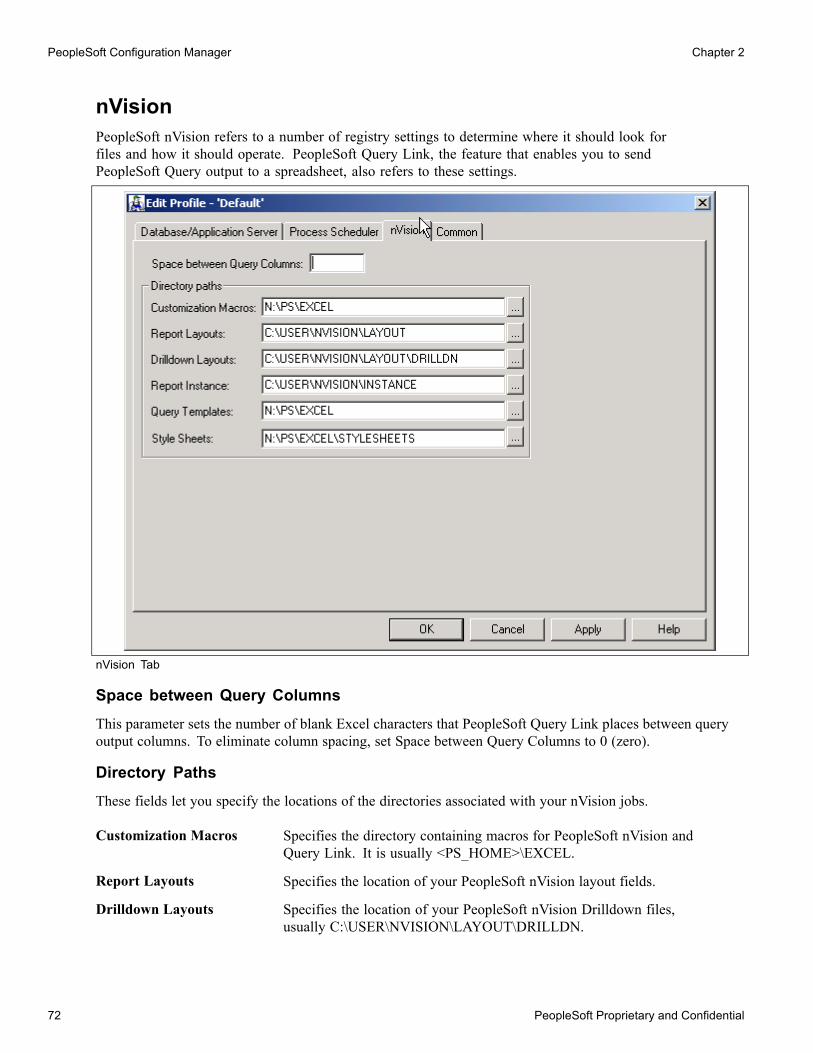
PeopleSoft Configuration Manager Chapter 2
nVisionPeopleSoft nVision refers to a number of registry settings to determine where it should look forfiles and how it should operate. PeopleSoft Query Link, the feature that enables you to sendPeopleSoft Query output to a spreadsheet, also refers to these settings.
nVision Tab
Space between Query ColumnsThis parameter sets the number of blank Excel characters that PeopleSoft Query Link places between queryoutput columns. To eliminate column spacing, set Space between Query Columns to 0 (zero).
Directory PathsThese fields let you specify the locations of the directories associated with your nVision jobs.
Customization Macros Specifies the directory containing macros for PeopleSoft nVision andQuery Link. It is usually <PS_HOME>\EXCEL.
Report Layouts Specifies the location of your PeopleSoft nVision layout fields.
Drilldown Layouts Specifies the location of your PeopleSoft nVision Drilldown files,usually C:\USER\NVISION\LAYOUT\DRILLDN.
72 PeopleSoft Proprietary and Confidential

Chapter 2 PeopleSoft Configuration Manager
Report Instance Specifies the directory in which nVision places report instances—forexample: C:\USER\NVISION\INSTANCE.
Query Templates Specifies where to look for the QUERY.XLT file, which defines the Excel stylesused to format your output. The default is the <PS_HOME>\EXCEL folder.
Style Sheets Specifies where the NVSUSER Style Wizard locates nPlosion style sheets.
Common TabThe common tab enables you to set various system settings.
Common Tab
Sybase Packet SizeThis option allows you to specify a TCP Packet Size. The minimum value is 512 and the maximum value is65538. The default packet size is 512. If you change the packet size, make sure to make the correspondingchanges to the Sybase server. Your Sybase reference manuals and “Sybase Tuning and Administration” underRDBMSTuning and Administration on Customer Connection contain more information about TCP packet sizes.
PeopleSoft Proprietary and Confidential 73
PeopleSoft Configuration Manager Chapter 2
Application Designer Image ConversionWhen you upgrade to newer version of PeopleTools, you’ll need to convert images to a new format, whichmay require more storage space. If the images exceed the record size limit of your platform, you can shrinkthe images to conform to this limit. When doing so, you have the following options:
Convert and Shrink Imagesto Platform Limit.
This option both converts and shrinks images to fit your selected databaseplatform limit, as shown in the Image Size Limit field.
Convert and Shrink Imagesto Image Size Limit.
This option applies of you are upgrading to a different database platform.Select this option and specify the correct value in the Image Size Limit field.
Don’t Convert, but ShrinkImages to Image Size Limit.
This option is useful for images that have already been converted, butneed to be converted so they meet the platform size limits.
Data Mover DirectoriesThere are several Data Mover settings that you can control through Configuration Manager.
Input Directory Use this field to specify the directory where Data Mover should search forits input data (.DB) files. If no explicit path is specified for the file namedin the set input lines when running a Data Mover script, Data Mover willsearch directories for the database file in the following order.
1. Specified output directory.
2. C:\TEMP
Output Directory Specifies the directory where your Data Mover scripts will be created.The default is <PS_HOME>\DATA.
Log Directory
This parameter specifies the location of your Data Mover log files.The default is <PS_HOME>\DATA.
See AlsoChapter 1, “PeopleSoft Data Mover,” page 1
Command Line OptionsIn addition to its GUI interface, the Configuration Manager offers the command line options described inthis section. They may be useful for implementing your PeopleSoft system and for everyday tasks suchas signon. The syntax for the Configuration Manager command line options is as follows:
pscfg -<command>
For example,
pscfg -import:n:\config\hr840.cfg
74 PeopleSoft Proprietary and Confidential

Chapter 2 PeopleSoft Configuration Manager
Import FileTo import configuration settings from a named file, enter:
-import:<filename>
Export FileTo export the current configuration settings, enter:
-export:<filename>
Run Client SetupTo run Client Setup, enter:
-setup
Note. You must use the -setup command in conjunction with the -import switch ifyou are setting up a new workstation.
Run Client Setup “Quietly”To run Client Setup “quietly,” without displaying any messages or dialog boxes, enter:
-quiet
Note. All of the output messages will be written to a log file: %temp%\PSINSTAL.LOG.
Install ActiveX controlsTo register ActiveX controls, enter:
-activex
Note. ActiveX controls are registered during Client Setup. −activex allows you to register theActiveX controls without running the entire Client Setup.
Install Crystal Runtime FilesTo install Crystal runtime files, enter:
-crystal
Install MSS DSNTo install MSS DSN, enter:
-dsn
PeopleSoft Proprietary and Confidential 75
PeopleSoft Configuration Manager Chapter 2
Disable ODBC Driver Manager InstallationThis command is only valid when used in conjunction with the -setup command. It disables the installationof the ODBC Drivers during the Client Setup process. Use this command when you do not want toinstall the ODBC drivers on the client workstation when using the -setup command.
-noodbc
Disable PeopleSoft ODBC Driver InstallationThis command is only valid when used in conjunction with the -setup command. It disables the installation ofthe PeopleSoft ODBC Driver during the Client Setup process. Use this command when you do not want toinstall the PeopleSoft ODBC driver on the client workstation when using the -setup command.
-nopsodbc
Uninstall WorkstationTo clear the PeopleSoft settings from the registry or uninstall the PeopleSoft workstation, enter:
-clean
The -clean command removes the following items from the workstation:
• PeopleSoft registry settings.
• All cache files from the current \CACHE directory.
• Shortcut links.
• PeopleSoft program group.
Make sure that removing all of these items is acceptable before issuing the -clean command.
HelpTo view the Configuration Manager’s command line options online, enter:
-help
or
-?
Setting Up the PeopleTools Development EnvironmentMost end users use workstations equipped with supported web browsers, but with no special PeopleSoftsoftware installed. At the same time, the “traditional” Windows client—now called the PeopleToolsDevelopment Environment—is still supported, and is primarily used as a development environment.
76 PeopleSoft Proprietary and Confidential

Chapter 2 PeopleSoft Configuration Manager
The PeopleTools Development Environment runs on Windows NT 4.0, Windows 2000, and Windows XP.This chapter describes how to configure these Windows-based clients using Configuration Manager. Asbefore, such clients can connect to the PeopleSoft database directly using client connectivity software (atwo-tier connection), or through a PeopleSoft application server (a three-tier connection).
Verify <PS_HOME> AccessThe workstation must have access to the file server <PS_HOME> directory (that is, the high-leveldirectory to which the PeopleSoft client executables were installed) and have a drive mapped to thedirectory. The workstation user(s) must have read access to the <PS_HOME> directory.
Verify ConnectivityAs mentioned, database connectivity is required on all Windows-based clients that will be making a two-tierconnection to the database. A two-tier connection is required if any of the following is true:
• The user will be signing on to the application in two-tier.
• The user will be running Data Mover scripts.
• The user will be running COBOL and SQR batch processes on the client.
Verify Supporting ApplicationsPeopleSoft requires that a number of supporting applications be installed on any Windows-basedclient on which batch processes will be run locally.
SQROn Windows-based clients, you can install SQR locally, or you can map to a copy installed on the file server.Because SQR does not require any local registry settings, you can execute SQR from any Windows-basedclient once SQR has been installed to a shared directory. Installing SQR locally will result in improvedperformance; over a slow network connection the improvement will be significant.
Crystal ReportsOptionally install Crystal Reports on Windows-based two-tier clients. As with SQR, you can installCrystal locally, or you can map to a copy installed on the file server. Because Crystal does notrequire any local registry settings, you can execute Crystal from any two-tier client once it hasbeen installed to a shared directory. Installing Crystal locally will result in improved performance;over a slow network connection the improvement will be significant.
Crystal Reports requires that you install the PeopleSoft ODBC driver on the workstationwhere Crystal processes are executed.
Microsoft OfficeInstall Microsoft Office on any two-tier client that will be running nVision or Microsoft Word batchprocesses. Microsoft Office must be installed locally, because it requires registry settings.
PeopleSoft Proprietary and Confidential 77

PeopleSoft Configuration Manager Chapter 2
Understanding the User SettingsConfiguration Manager includes the following tabs for setting options for each workstationuser. If multiple users will be signing on to the workstation, you may need to set theseoptions once for each user using the Profile feature.
• Startup. Controls the default values that appear in the PeopleSoft signon screen, as wellas the location of the PeopleSoft cache on the client.
• Display. Controls your language preference and other display options.
Note. The language setting in Configuration Manager determines your language preference for yourPeopleTools Development Environment, regardless of the operator language preference.
• Crystal/Business Interlink. Specifies the locations of Crystal Reports executables and default locationfor Crystal Reports generated via PeopleSoft Query; the latter must be a directory to which the userhas write access. This tab also specifies the location of Business Interlink drivers.
• Trace. Controls SQL, PeopleCode, Application Engine, Message Agent, and PeopleSoft API trace options.
Running Client SetupBefore running Client Setup, you should create all the profiles you need.
The Client Setup tab does the following:
• Installs a PeopleSoft program group on the workstation.
• Sets up a Microsoft SQL Server system data source name using the server and databasename information from the Startup tab.
• Installs the PeopleSoft ODBC driver required for Open Query and Crystal Reports.
• Installs Crystal Reports DLLs on the workstation.
• Configures a PeopleSoft ODBC data source name.
These Client Setup functions are performed when you press OK or Apply from Configuration Manageronly if the Install Workstation check box on the Client Setup tab is selected.
Note. Any files installed by Client Setup on the workstation from the file server, includingODBC driver files, use the paths specified in the default profile.
To run Client Setup
1. Select the Client Setuptab.
2. In the Group Title text box enter the name of the program group for the iconsyou want on the client workstation.
You can call the program group anything you want, but we will refer to it by its default name, PeopleSoft 8.
3. Select check boxes to create shortcut links for any PeopleSoft applications youwant to access from the workstation.
78 PeopleSoft Proprietary and Confidential
Chapter 2 PeopleSoft Configuration Manager
When you run Client Setup, it will uninstall any existing shortcuts in the PeopleSoft 8 programgroup, and install shortcuts for the applications you have selected. If you later want to installor uninstall shortcuts, you can always re-run Client Setup.
4. Select the Install PeopleSoft ODBC Driver check box if you want to install the PeopleSoft ODBC driverand set up a user ODBC data source name required by PeopleSoft Open Query and by Crystal Reports.
5. Select the Install Workstation check box.
This check box determines whether Client Setup runs when you click Apply or OK in ConfigurationManager. If it is not selected, Client Setup will create or update settings in the registry, but itwon’t set up the PeopleSoft 8 program group, or install local DLLs.
6. Click Apply to run Client Setup and apply the other Configuration Manager settings.
• You can press ODBC Administrator to directly access the Microsoft ODBC Administratorto verify the installation and configuration of the ODBC DSN.
• If you install the ODBC Driver Manager 3.5, reboot the workstation after running Client Setup.
7. To view a list of the files installed and actions taken by Client Setup, you can openthe psinstal.log file in your Temp directory.
PeopleSoft Proprietary and Confidential 79

PeopleSoft Configuration Manager Chapter 2
80 PeopleSoft Proprietary and Confidential

CHAPTER 3
PeopleSoft Data Archive Manager
This chapter provides an overview of the PeopleTools Data Archive Manager and discusses how to:
• Create an archive template.
• Work with archived data.
• Run archive processes.
• Run archive reports and audits.
• Use archiving tips and techniques.
Understanding Data ArchivingPeopleSoft applications create and maintain data. Often the data in your online tables is no longerrequired, but you don’t want to simply delete the data just to make room for new data. Managingthis historical data is a time-consuming challenge for many database administrators. However, unlessyou create an archiving strategy, databases increase to unmanageable sizes. Also, removing thehistorical data from your online tables can improve overall performance.
PeopleSoft Data Archive Manager enables you to select the rows of data you no longer need in youronline system and move these rows in history/staging tables or in a flat file format. Keeping the data inthe system in history/staging tables keeps the data available for queries and reporting.
Also, you have the option to archive data directly to a flat file for long-term storage if thehistorical data is no longer needed for reporting. You may consider exporting the data toflat files and delete it completely from the system.
Warning! The Data Archive Manager is a powerful tool. Improper use may result in data lossor corruption of the database. It is strongly recommended that only those who are trained for andfamiliar with the archiving process should use the Data Archive Manager.
Choosing an Archiving StrategyThis section discusses:
• Determining an archive strategy
• Archiving to history tables
PeopleSoft Proprietary and Confidential 81
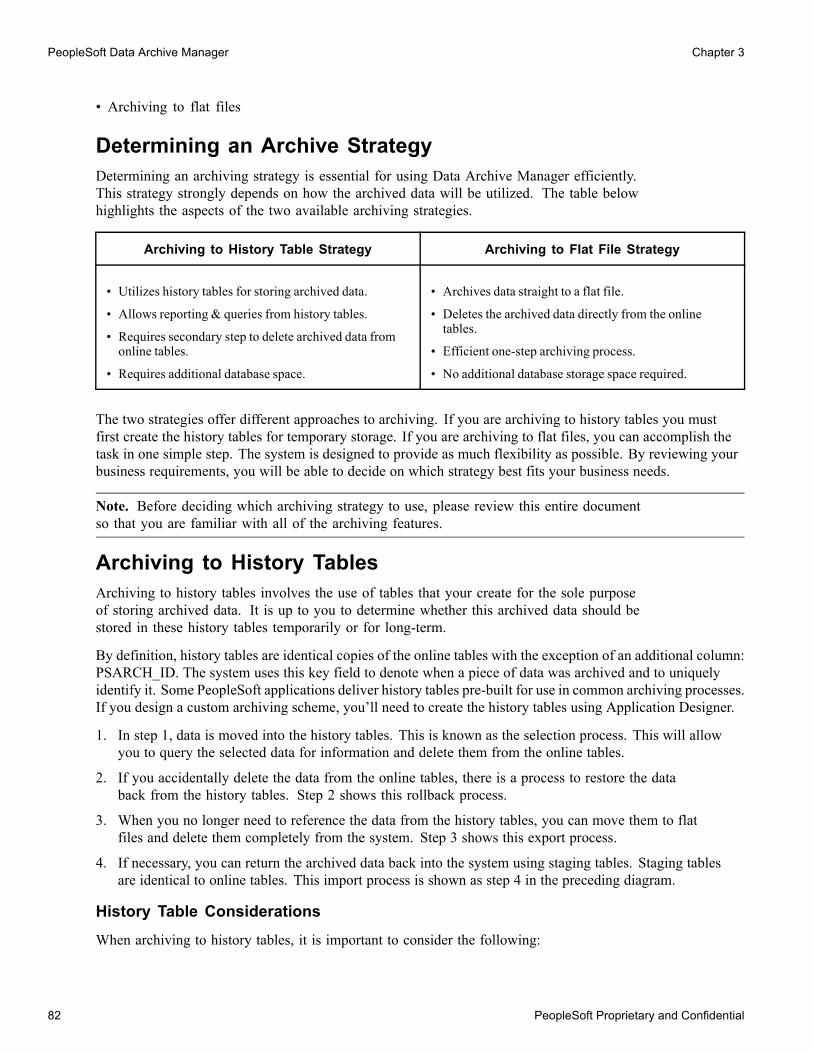
PeopleSoft Data Archive Manager Chapter 3
• Archiving to flat files
Determining an Archive StrategyDetermining an archiving strategy is essential for using Data Archive Manager efficiently.This strategy strongly depends on how the archived data will be utilized. The table belowhighlights the aspects of the two available archiving strategies.
Archiving to History Table Strategy Archiving to Flat File Strategy
• Utilizes history tables for storing archived data.
• Allows reporting & queries from history tables.
• Requires secondary step to delete archived data fromonline tables.
• Requires additional database space.
• Archives data straight to a flat file.
• Deletes the archived data directly from the onlinetables.
• Efficient one-step archiving process.
• No additional database storage space required.
The two strategies offer different approaches to archiving. If you are archiving to history tables you mustfirst create the history tables for temporary storage. If you are archiving to flat files, you can accomplish thetask in one simple step. The system is designed to provide as much flexibility as possible. By reviewing yourbusiness requirements, you will be able to decide on which strategy best fits your business needs.
Note. Before deciding which archiving strategy to use, please review this entire documentso that you are familiar with all of the archiving features.
Archiving to History TablesArchiving to history tables involves the use of tables that your create for the sole purposeof storing archived data. It is up to you to determine whether this archived data should bestored in these history tables temporarily or for long-term.
By definition, history tables are identical copies of the online tables with the exception of an additional column:PSARCH_ID. The system uses this key field to denote when a piece of data was archived and to uniquelyidentify it. Some PeopleSoft applications deliver history tables pre-built for use in common archiving processes.If you design a custom archiving scheme, you’ll need to create the history tables using Application Designer.
1. In step 1, data is moved into the history tables. This is known as the selection process. This will allowyou to query the selected data for information and delete them from the online tables.
2. If you accidentally delete the data from the online tables, there is a process to restore the databack from the history tables. Step 2 shows this rollback process.
3. When you no longer need to reference the data from the history tables, you can move them to flatfiles and delete them completely from the system. Step 3 shows this export process.
4. If necessary, you can return the archived data back into the system using staging tables. Staging tablesare identical to online tables. This import process is shown as step 4 in the preceding diagram.
History Table ConsiderationsWhen archiving to history tables, it is important to consider the following:
82 PeopleSoft Proprietary and Confidential
Chapter 3 PeopleSoft Data Archive Manager
• History tables may reside on the same database as the online tables, or they may also residein separate databases. If the history tables reside in a separate database, you need to setupdatabase links using the proprietary methods for your RDBMS.
• After the archive process moves the data into the history table, the data resides in both the online tablesand in the history table. You then have two options: deleting the archived data from the online tables,or leaving the archived rows in the online tables such that the data exists in parallel.
Staging Table ConsiderationsStaging tables are used in the archiving process as a “holding area” for data. Whenusing staging tables, consider the following:
• Staging tables are exact duplicates of the online tables. They do not contain the PSARCH_ID column.
• Staging tables are often used for reporting purposes.
Creating History TablesBefore you run the archiving process, you must create/ build the history tables first.
You are required to build one history table for each table to be archived. The history table mustbe identical to the archive table, with an extra column PSARCH_ID.
The following example uses the record JRNL_HEADER.
To build a history table:
1. Open PeopleSoft Application Designer.
2. Open the JRNL_HEADER table.
3. Select File, Save As and name the history table your custom name, such as JRNL_HEADER_HST.
4. When prompted to copy the PeopleCode associated to the table, click No.
5. Click Insert > Field and insert the PSARCH_ID field.
6. Save the Record.
7. Build the table by using the Build, Current Object option.
• Select the following Build Options: Create Tables and Create Indexes.
• Select the following Build Execute Options: Execute and Build script.
• Click Build.
Archiving to Flat FilesYou can also archive data directly from online tables to flat files. When you are ready to archive your dataand you no longer need to reference them from the online tables, you can extract them to flat files.
The data is stored in the Comma Separated Values (CSV) format, which enables aportable representation of the online tables and data.
1. Export the selected online rows to a CSV file.
PeopleSoft Proprietary and Confidential 83

PeopleSoft Data Archive Manager Chapter 3
2. If you need to access your archived data in the future, you can restore the data intostaging tables. Step 2 shows this import process.
Note. The data is deleted from the online tables as the data is being archived.
Creating an Archive TemplateThe Archive Designer page is used to create and maintain your archive template. When you create anew archive template, you identify it using the archive ID. This archive ID is then used in the variousarchive processes discussed later. The following section covers the interface that you use to designarchive templates, or projects. It explains how to use the following pages:
• Record Criteria page
• Join Record Criteria page
• SQL Designer page
Record Criteria PageThe process of archiving data begins with the creation of an archiving template, which logically groups all ofthe online tables that are to be archived into a single entity. You associate the online table with its historytable counterpart, and you select the fields to archive and the criteria by which to archive.
Select PeopleTools, Archive Data, Archive Designer, Record Criteria.
Record Criteria page
84 PeopleSoft Proprietary and Confidential

Chapter 3 PeopleSoft Data Archive Manager
Archive ID An Archive ID is used to identify a group of transactions as an archivedefinition during the archiving process.
Description Use up to 30 characters to describe the archive.
Archive to Flat File Enables the user to archive the project directly to a flat file withouthaving to create history tables.
Copy Archive ID Allows the current archive project to be copied to a new archive ID. Alltables, criteria, and other criteria are copied to the new archive ID.
Archiving Record Select the online tables to be archived. You can archive multipleonline tables within one archive ID.
History Record History tables are copies of the online table with the additional PSARCH_IDfield. This is where the archived data will be stored.
Copy Table Copies all criteria to a new row in the existing archive ID. Usefulif you are dealing with multiple tables.
Go to Request Page Transfers you to the Archiving Process page.
Go to Report Page Transfers you to the Report Request page.
FieldName Columns in the online tables to specify archive criteria. Specifyingthe fields and adding the conditions is comparable to the WHEREclause in a SQL statement.
Operator =, <>, <, >, <=, >=, LIKE, NOT LIKE
Value to Match Column value to match against, as in 07/01/1999 or $75,000.
You can also use special parameter markers in the format of %PSPARMnn%where nn can be any number. For example, valid parameter markerscould be %PSPARM1% or %PSPARM18%.
When the system generates the SQL statement, %PSPARMnn% is embeddedin to the SQL statement and substituted with values entered using the runcontrol pages. One example of implementing this is to create an archive projectbased on a business unit and then enter the actual business unit at run time.
Note. Parameter markers are currently not implemented with DATE fields.
A/O Toggle between AND and OR. This button is only visible if youhave added multiple lines to the field list.
Join Record Criteria PageIf there are dependencies from other tables in the archiving template, such as parent/child relationshipsor joining against reference tables, you must insert the criteria into this page. This can also bedone by selecting the Copy Parent Record check box. For this to work correctly, the parent tablecriteria must already exist on the Record Criteria page. You can specify multiple levels, such asgrand parent-to-parent, grand parent-to-parent-to child, and so on.
Select PeopleTools, Archive Data, Archive Designer, Join Record Criteria.
PeopleSoft Proprietary and Confidential 85
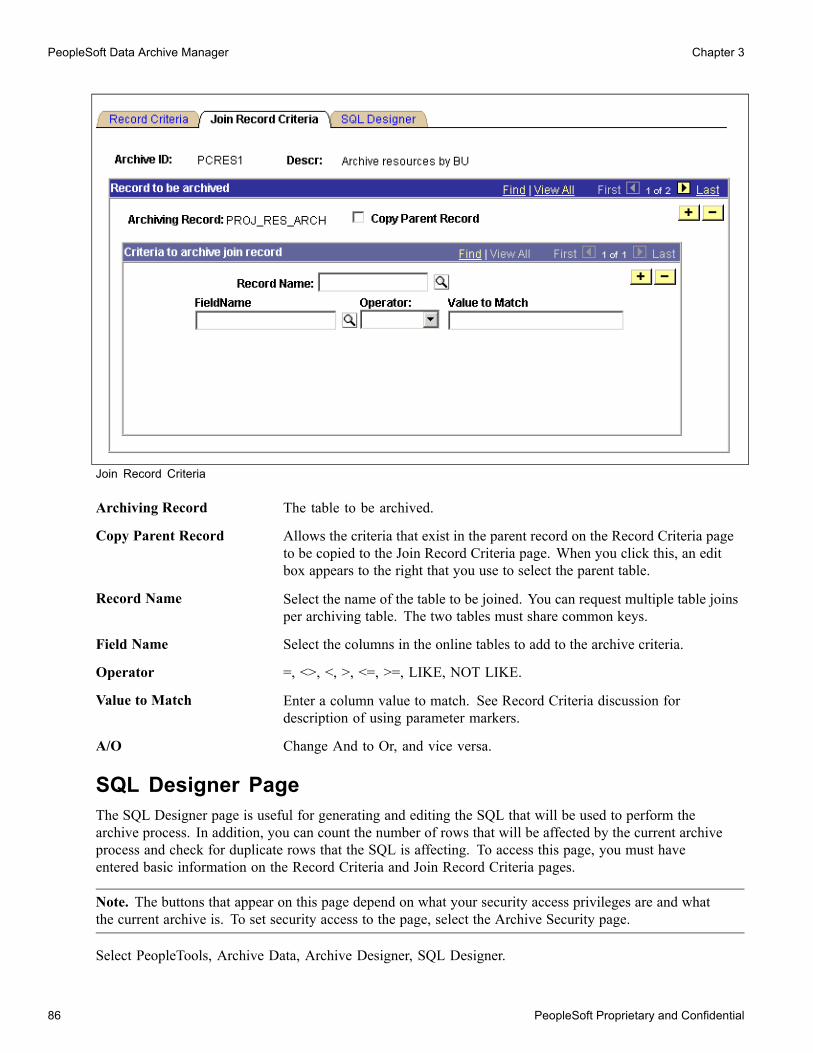
PeopleSoft Data Archive Manager Chapter 3
Join Record Criteria
Archiving Record The table to be archived.
Copy Parent Record Allows the criteria that exist in the parent record on the Record Criteria pageto be copied to the Join Record Criteria page. When you click this, an editbox appears to the right that you use to select the parent table.
Record Name Select the name of the table to be joined. You can request multiple table joinsper archiving table. The two tables must share common keys.
Field Name Select the columns in the online tables to add to the archive criteria.
Operator =, <>, <, >, <=, >=, LIKE, NOT LIKE.
Value to Match Enter a column value to match. See Record Criteria discussion fordescription of using parameter markers.
A/O Change And to Or, and vice versa.
SQL Designer PageThe SQL Designer page is useful for generating and editing the SQL that will be used to perform thearchive process. In addition, you can count the number of rows that will be affected by the current archiveprocess and check for duplicate rows that the SQL is affecting. To access this page, you must haveentered basic information on the Record Criteria and Join Record Criteria pages.
Note. The buttons that appear on this page depend on what your security access privileges are and whatthe current archive is. To set security access to the page, select the Archive Security page.
Select PeopleTools, Archive Data, Archive Designer, SQL Designer.
86 PeopleSoft Proprietary and Confidential
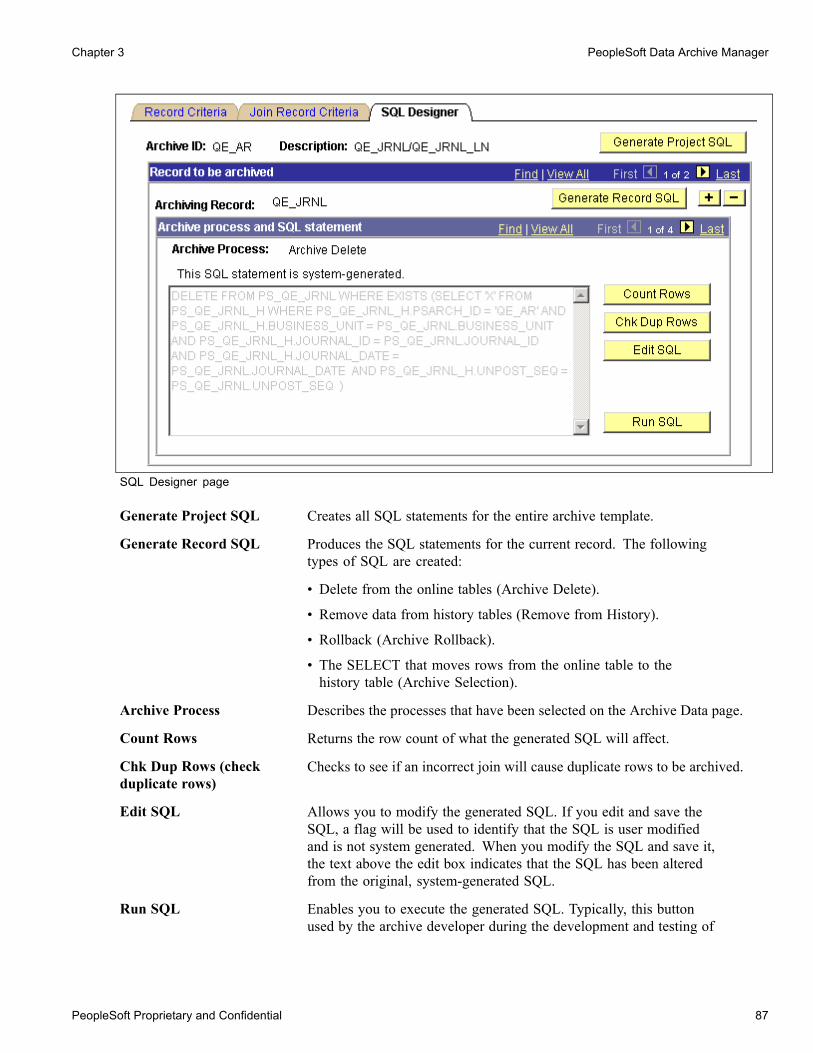
Chapter 3 PeopleSoft Data Archive Manager
SQL Designer page
Generate Project SQL Creates all SQL statements for the entire archive template.
Generate Record SQL Produces the SQL statements for the current record. The followingtypes of SQL are created:
• Delete from the online tables (Archive Delete).
• Remove data from history tables (Remove from History).
• Rollback (Archive Rollback).
• The SELECT that moves rows from the online table to thehistory table (Archive Selection).
Archive Process Describes the processes that have been selected on the Archive Data page.
Count Rows Returns the row count of what the generated SQL will affect.
Chk Dup Rows (checkduplicate rows)
Checks to see if an incorrect join will cause duplicate rows to be archived.
Edit SQL Allows you to modify the generated SQL. If you edit and save theSQL, a flag will be used to identify that the SQL is user modifiedand is not system generated. When you modify the SQL and save it,the text above the edit box indicates that the SQL has been alteredfrom the original, system-generated SQL.
Run SQL Enables you to execute the generated SQL. Typically, this buttonused by the archive developer during the development and testing of
PeopleSoft Proprietary and Confidential 87

PeopleSoft Data Archive Manager Chapter 3
the archive. After the archive template is developed, an ApplicationEngine program executes the SQL in batch.
Working With the ArchivesThis section covers:
• Archive Security
• Archive Utilities
Archive Security PageThis page enables you to grant access rights to the permission lists that use Data Archive Manager.
The permission lists you add need to exist already in PeopleTools Security. The permission list must be theprimary permission list for the user profile in order for the user to have access to the command button.
Select PeopleTools, Archive Data, Archive Security.
Archive Security page
Permission List Select the permission lists to which you want to grant archive data access.
Can Generate SQL? Allows the user to generate SQL on the SQL Designer pages bymaking the Generate SQL button active.
Can Edit SQL? Allows the user to edit the SQL on the SQL Designer page.
Can Run SQL? Allows the user to execute SQL on the SQL Designer page.
Can Purge Audit? Allows the user to purge the audit history on the Archiving Audit page.
Note. PeopleTools delivers a process group ARCHALL that should be added to the appropriatepermission list using PeopleTools Security. You will not be allowed to run any archiveprocesses until this group is added to the permissions list.
88 PeopleSoft Proprietary and Confidential

Chapter 3 PeopleSoft Data Archive Manager
Archive Utilities PageThe Archive Utilities page allows quick archive project administration. These operationsinclude copying, renaming, deleting, exporting and importing.
Select PeopleTools, Archive Data, Archive Utilities.
Archive Utilities page
Select the action you want to perform. The instructions for each action appears in the text box to the right.
Copy Archive Project Creates a copy of the archive template that you specify in the Archive ID fieldand gives it the name you enter in the New Archive ID field.
Rename Archive ID Renames the archive according to the values you enter in theArchive ID and New Archive ID fields.
Delete Archive ID Deletes the archive that you specify in the Archive ID field. Once anarchive is deleted, you can no longer access it.
Generate DM Script Generates both the import and the export PeopleSoft Data Moverscripts for the archive you specify. You can also choose to exportall projects by selecting that check box.
Working With DataThe following sections cover the following:
• Data Finder page.
• Data Input page.
• Data Output page.
PeopleSoft Proprietary and Confidential 89
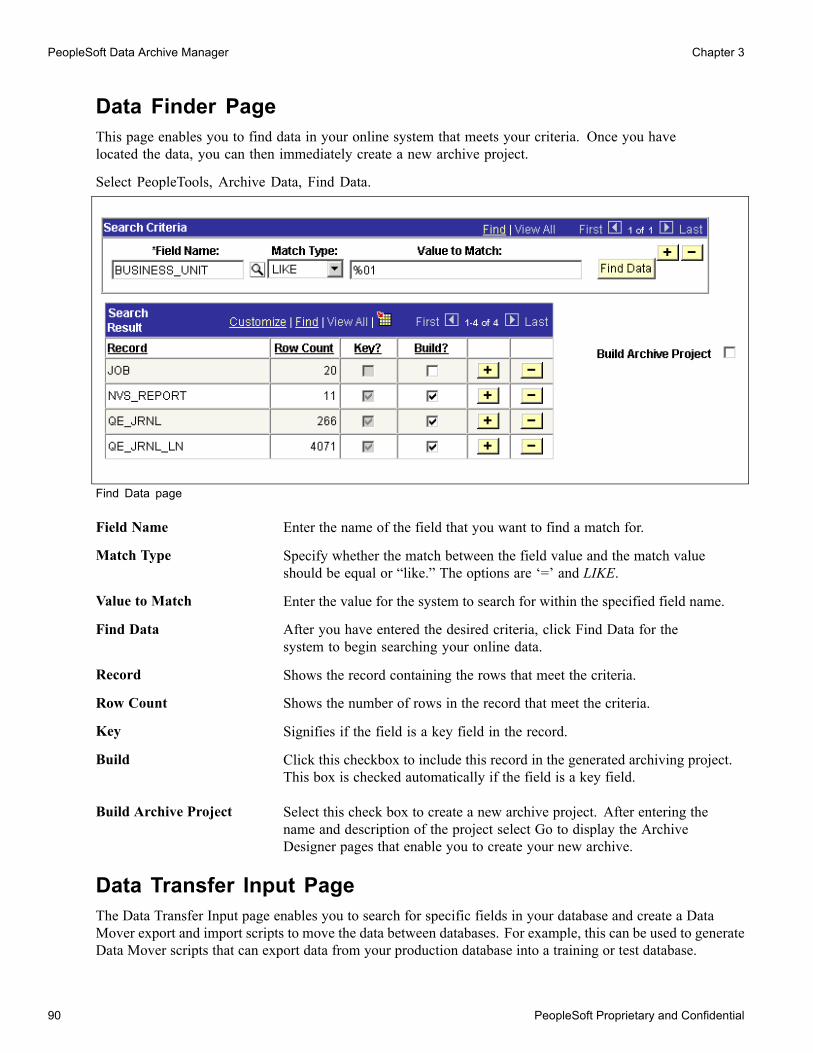
PeopleSoft Data Archive Manager Chapter 3
Data Finder PageThis page enables you to find data in your online system that meets your criteria. Once you havelocated the data, you can then immediately create a new archive project.
Select PeopleTools, Archive Data, Find Data.
Find Data page
Field Name Enter the name of the field that you want to find a match for.
Match Type Specify whether the match between the field value and the match valueshould be equal or “like.” The options are ‘=’ and LIKE.
Value to Match Enter the value for the system to search for within the specified field name.
Find Data After you have entered the desired criteria, click Find Data for thesystem to begin searching your online data.
Record Shows the record containing the rows that meet the criteria.
Row Count Shows the number of rows in the record that meet the criteria.
Key Signifies if the field is a key field in the record.
Build Click this checkbox to include this record in the generated archiving project.This box is checked automatically if the field is a key field.
Build Archive Project Select this check box to create a new archive project. After entering thename and description of the project select Go to display the ArchiveDesigner pages that enable you to create your new archive.
Data Transfer Input PageThe Data Transfer Input page enables you to search for specific fields in your database and create a DataMover export and import scripts to move the data between databases. For example, this can be used to generateData Mover scripts that can export data from your production database into a training or test database.
90 PeopleSoft Proprietary and Confidential
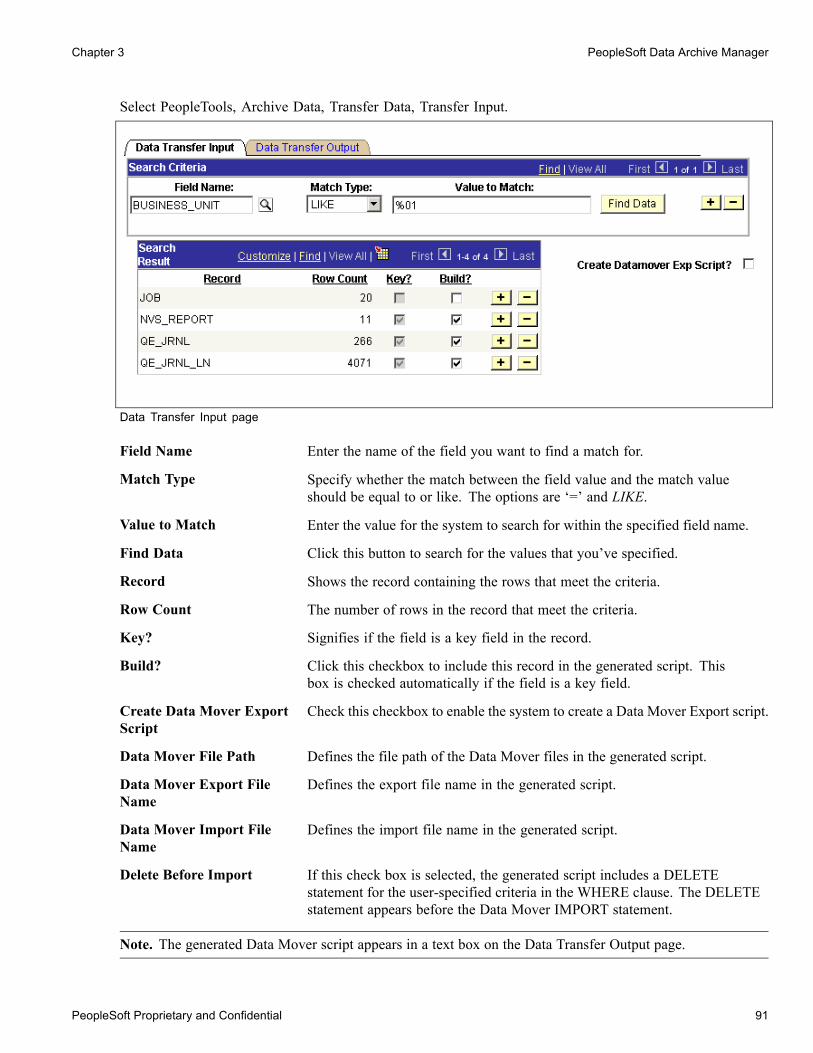
Chapter 3 PeopleSoft Data Archive Manager
Select PeopleTools, Archive Data, Transfer Data, Transfer Input.
Data Transfer Input page
Field Name Enter the name of the field you want to find a match for.
Match Type Specify whether the match between the field value and the match valueshould be equal to or like. The options are ‘=’ and LIKE.
Value to Match Enter the value for the system to search for within the specified field name.
Find Data Click this button to search for the values that you’ve specified.
Record Shows the record containing the rows that meet the criteria.
Row Count The number of rows in the record that meet the criteria.
Key? Signifies if the field is a key field in the record.
Build? Click this checkbox to include this record in the generated script. Thisbox is checked automatically if the field is a key field.
Create Data Mover ExportScript
Check this checkbox to enable the system to create a Data Mover Export script.
Data Mover File Path Defines the file path of the Data Mover files in the generated script.
Data Mover Export FileName
Defines the export file name in the generated script.
Data Mover Import FileName
Defines the import file name in the generated script.
Delete Before Import If this check box is selected, the generated script includes a DELETEstatement for the user-specified criteria in the WHERE clause. The DELETEstatement appears before the Data Mover IMPORT statement.
Note. The generated Data Mover script appears in a text box on the Data Transfer Output page.
PeopleSoft Proprietary and Confidential 91

PeopleSoft Data Archive Manager Chapter 3
Data Transfer Output PageEnables you to view and edit the Data Mover script you created using the Data Transfer Input page.
Select PeopleTools, Archive Data, Transfer Data, Transfer Output.
Data Transfer Output page
TheData Transfer Output page contains twoDataMover scripts: one to export the data and one to import the data.
To run the script using Data Mover, you need to copy the generated script to a text editor(Notepad, for example) and then save it as a DMS file.
Running Data Archival ProcessesThis section discusses the options and processes related to building archives. It explains how to use the:
• Archive Data page
• Archive Online to Flat Files page
• Export History to Flat Files page
Archive Data PageOnce you have created an archive template, you can begin the archiving process. This is whenthe system moves the selected data from your online tables.
Select PeopleTools, Archive Data, Archive Data.
92 PeopleSoft Proprietary and Confidential

Chapter 3 PeopleSoft Data Archive Manager
Archive Data page
Archive ID Select an existing archive ID.
Auto Fill Records Once you’ve selected an archive ID, click this button to display allthe tables to be included in the archive project.
Go to Project Page Transfers you to the Archive Designer interface.
Archive Process Select which archive process you want to run:
• Selection copies the data from the online tables to the history tables.
• Rollback copies the data from the history tables to the online tables.
• Delete removes the data from the online tables, only when they havealready been copied to the history tables.
• Remove from History deletes the data from the history tables.
Commit Processing Select the check box to enable the Commit After option, which specifies howmany rows of data the system processes before issuing a database commit.Otherwise, the system issues a commit after each record has been processed.
Pre/Post AE Processing If you have any custom Application Engine programs that youwant to run against your data either before or after archiving,specify the appropriate program here.
• Pre AE. Select an existing Application Engine program to runbefore the archiving process.
PeopleSoft Proprietary and Confidential 93
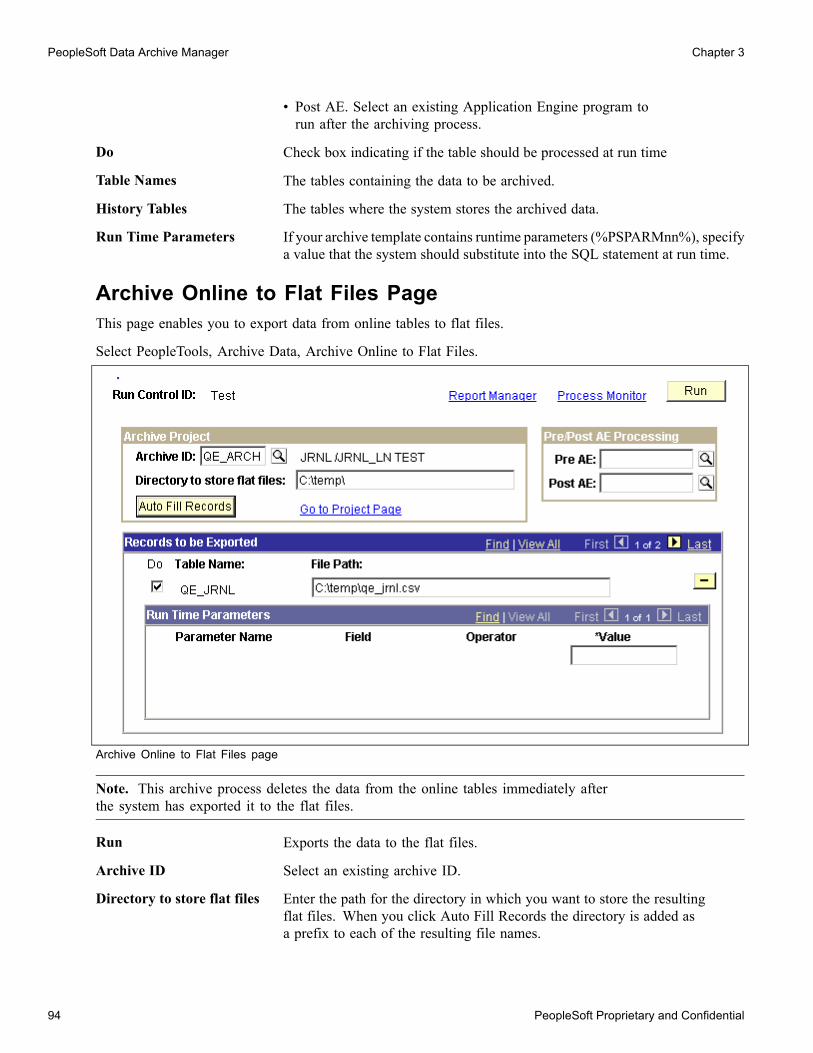
PeopleSoft Data Archive Manager Chapter 3
• Post AE. Select an existing Application Engine program torun after the archiving process.
Do Check box indicating if the table should be processed at run time
Table Names The tables containing the data to be archived.
History Tables The tables where the system stores the archived data.
Run Time Parameters If your archive template contains runtime parameters (%PSPARMnn%), specifya value that the system should substitute into the SQL statement at run time.
Archive Online to Flat Files PageThis page enables you to export data from online tables to flat files.
Select PeopleTools, Archive Data, Archive Online to Flat Files.
Archive Online to Flat Files page
Note. This archive process deletes the data from the online tables immediately afterthe system has exported it to the flat files.
Run Exports the data to the flat files.
Archive ID Select an existing archive ID.
Directory to store flat files Enter the path for the directory in which you want to store the resultingflat files. When you click Auto Fill Records the directory is added asa prefix to each of the resulting file names.
94 PeopleSoft Proprietary and Confidential
Chapter 3 PeopleSoft Data Archive Manager
Auto Fill Records Once you’ve selected an archive ID, click this button to display thetable names associated with the archive. In addition, the user needsto specify the path where the data will be exported.
Go to Project Page Transfers you to the Archive Designer pages.
Pre/Post AE Processing If you have any custom Application Engine programs that youwant to run against your data either before or after archiving,specify the appropriate program here.
• Pre AE. Select an existing Application Engine program to runbefore the archiving process.
• Post AE. Select an existing Application Engine program torun after the archiving process.
Do Specify whether to process this table or not by selecting the check box.
File Path The path and file names to which the data for each table will be writtenare populated by the system. If necessary, you can type over the file pathso that a table can have unique filename and destination.
Run Time Parameters If your archive process contains the runtime parameter markers(%PSPARMnn%), specify a value that the system should substituteinto the SQL statement at run time.
Export History to Flat Files PageThis page enables you to export the data from history tables to flat files.
Select PeopleTools, Archive Data, Export History to Flat Files
PeopleSoft Proprietary and Confidential 95
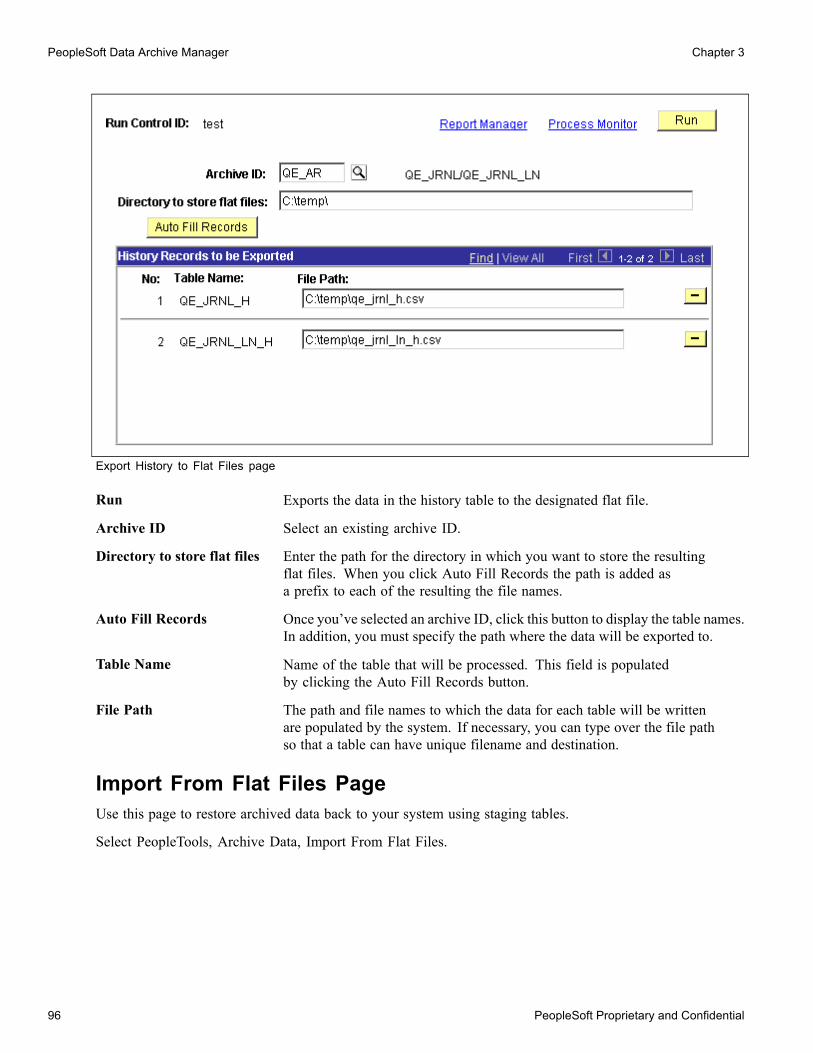
PeopleSoft Data Archive Manager Chapter 3
Export History to Flat Files page
Run Exports the data in the history table to the designated flat file.
Archive ID Select an existing archive ID.
Directory to store flat files Enter the path for the directory in which you want to store the resultingflat files. When you click Auto Fill Records the path is added asa prefix to each of the resulting the file names.
Auto Fill Records Once you’ve selected an archive ID, click this button to display the table names.In addition, you must specify the path where the data will be exported to.
Table Name Name of the table that will be processed. This field is populatedby clicking the Auto Fill Records button.
File Path The path and file names to which the data for each table will be writtenare populated by the system. If necessary, you can type over the file pathso that a table can have unique filename and destination.
Import From Flat Files PageUse this page to restore archived data back to your system using staging tables.
Select PeopleTools, Archive Data, Import From Flat Files.
96 PeopleSoft Proprietary and Confidential
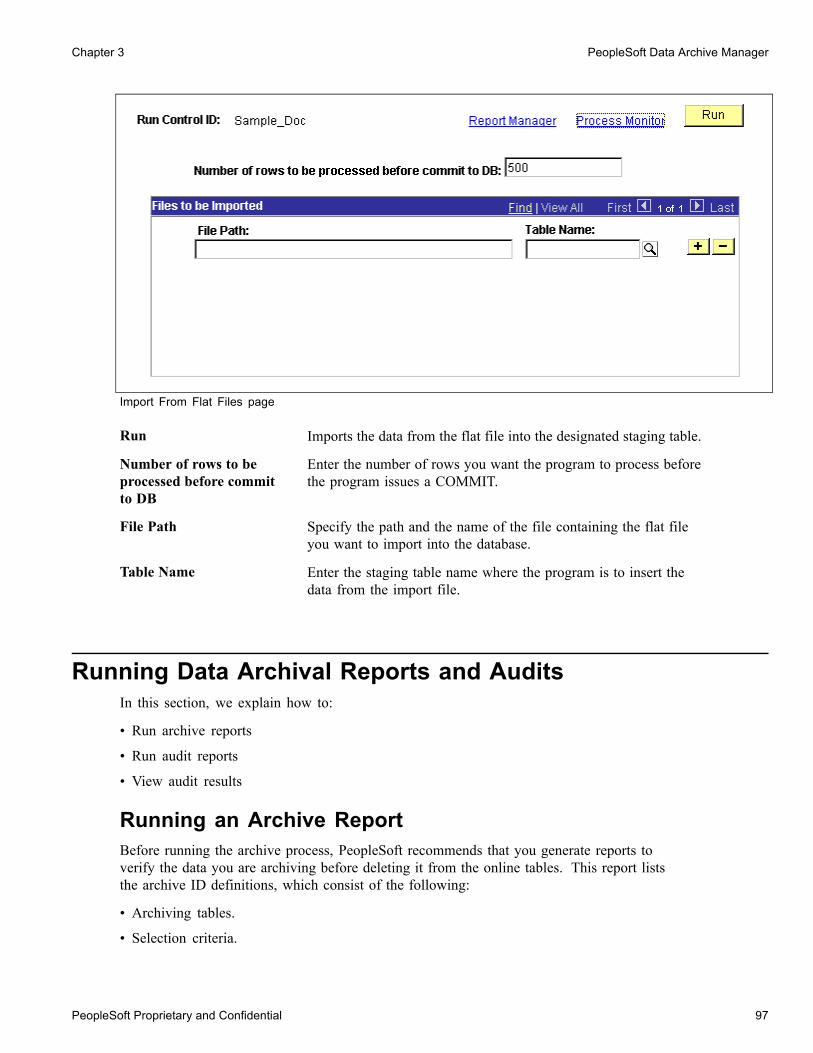
Chapter 3 PeopleSoft Data Archive Manager
Import From Flat Files page
Run Imports the data from the flat file into the designated staging table.
Number of rows to beprocessed before committo DB
Enter the number of rows you want the program to process beforethe program issues a COMMIT.
File Path Specify the path and the name of the file containing the flat fileyou want to import into the database.
Table Name Enter the staging table name where the program is to insert thedata from the import file.
Running Data Archival Reports and AuditsIn this section, we explain how to:
• Run archive reports
• Run audit reports
• View audit results
Running an Archive ReportBefore running the archive process, PeopleSoft recommends that you generate reports toverify the data you are archiving before deleting it from the online tables. This report liststhe archive ID definitions, which consist of the following:
• Archiving tables.
• Selection criteria.
PeopleSoft Proprietary and Confidential 97
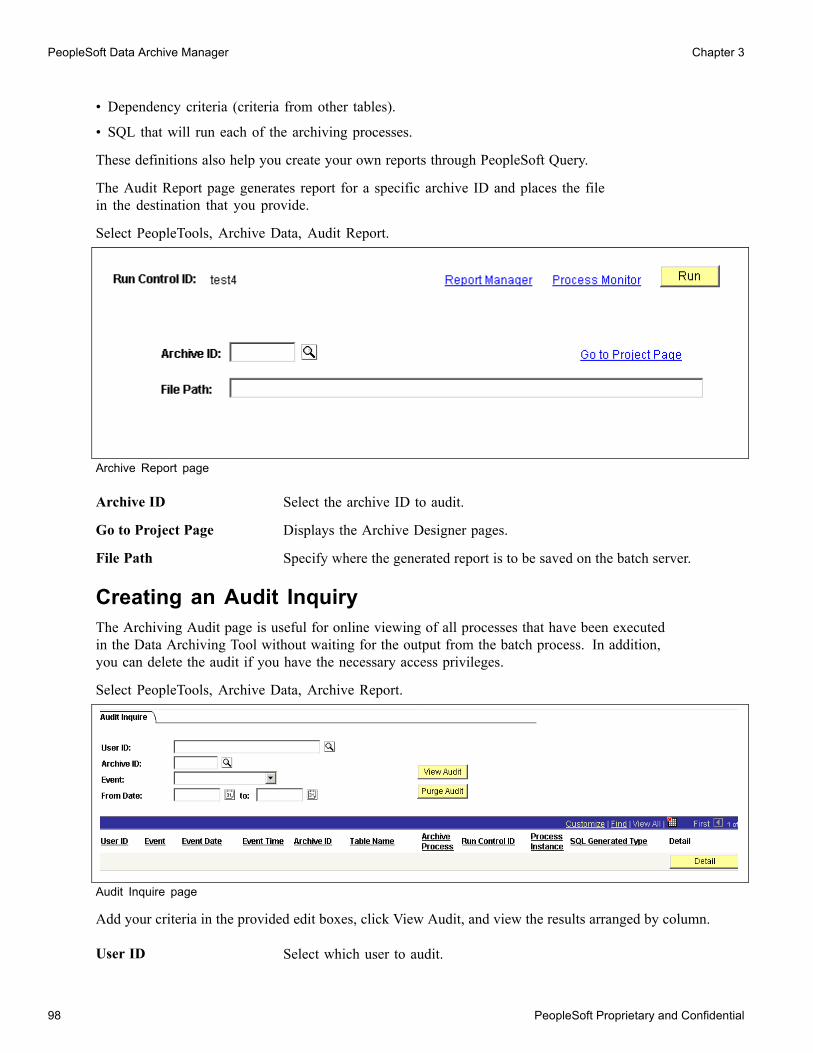
PeopleSoft Data Archive Manager Chapter 3
• Dependency criteria (criteria from other tables).
• SQL that will run each of the archiving processes.
These definitions also help you create your own reports through PeopleSoft Query.
The Audit Report page generates report for a specific archive ID and places the filein the destination that you provide.
Select PeopleTools, Archive Data, Audit Report.
Archive Report page
Archive ID Select the archive ID to audit.
Go to Project Page Displays the Archive Designer pages.
File Path Specify where the generated report is to be saved on the batch server.
Creating an Audit InquiryThe Archiving Audit page is useful for online viewing of all processes that have been executedin the Data Archiving Tool without waiting for the output from the batch process. In addition,you can delete the audit if you have the necessary access privileges.
Select PeopleTools, Archive Data, Archive Report.
Audit Inquire page
Add your criteria in the provided edit boxes, click View Audit, and view the results arranged by column.
User ID Select which user to audit.
98 PeopleSoft Proprietary and Confidential
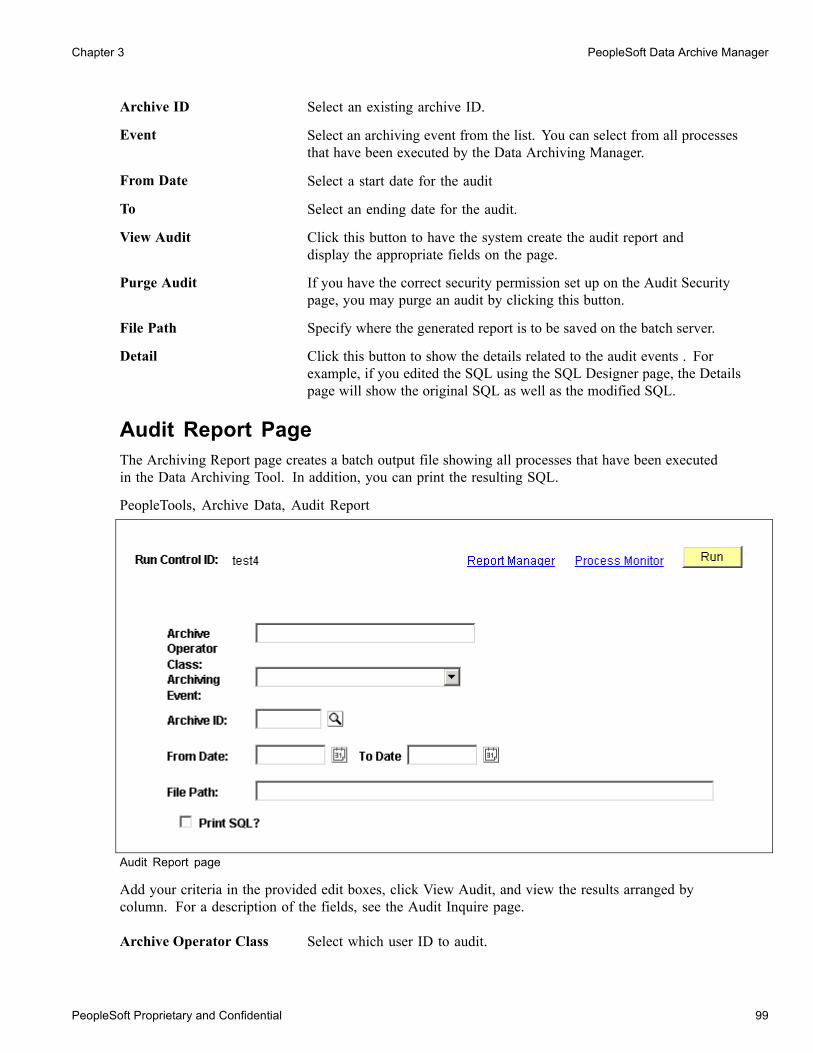
Chapter 3 PeopleSoft Data Archive Manager
Archive ID Select an existing archive ID.
Event Select an archiving event from the list. You can select from all processesthat have been executed by the Data Archiving Manager.
From Date Select a start date for the audit
To Select an ending date for the audit.
View Audit Click this button to have the system create the audit report anddisplay the appropriate fields on the page.
Purge Audit If you have the correct security permission set up on the Audit Securitypage, you may purge an audit by clicking this button.
File Path Specify where the generated report is to be saved on the batch server.
Detail Click this button to show the details related to the audit events . Forexample, if you edited the SQL using the SQL Designer page, the Detailspage will show the original SQL as well as the modified SQL.
Audit Report PageThe Archiving Report page creates a batch output file showing all processes that have been executedin the Data Archiving Tool. In addition, you can print the resulting SQL.
PeopleTools, Archive Data, Audit Report
Audit Report page
Add your criteria in the provided edit boxes, click View Audit, and view the results arranged bycolumn. For a description of the fields, see the Audit Inquire page.
Archive Operator Class Select which user ID to audit.
PeopleSoft Proprietary and Confidential 99
PeopleSoft Data Archive Manager Chapter 3
Archive ID Select an existing archive ID.
Event Select an archiving event from the list. You can select from all processesthat have been executed by the Data Archiving Manager.
From Date Select a start date for the audit
To Select an ending date for the audit.
Print SQL? Select this checkbox if you want the SQL statements for each of thearchiving processes printed in the report
Archiving Tips and TechniquesThe following sections provide additional information to help you get started using the archiving features.
Understanding Business RequirementsIt is very important to devise a business strategy before archiving the data. First, you must identifythe tables you want to archive. This includes identifying all of the parent/child tables associated tothese tables. Failing to identify all of the related tables can cause corruption to the database. Next, youmust know exactly which data you want to archive. It is important to recognize which rows are safeto be removed from the online tables. A factor to remember when doing an archive is to remove onlythe data that are not required to maintain the day-to-day business and reporting.
Let’s use General Ledger (GL) for an example. GL contains the greatest amount of data to be archivedsince it is the module where the majority of reporting is required. There are two sets of data typesthat need to be maintained: balance information, and transactional information. Balance information isretained in the ledger records. You may require balance information for online and reporting purposes tobe available for a three-year period. On the other hand, transactional data is maintained in the journalheader and line tables. Perhaps you may require one year of transactional data to be retained in thesystem for online purposes and three years to be retained for reporting purposes.
Any data beyond the above time frames for balances and transactions can be archived and will onlybe accessed through reports. The data can be archived to history tables, or as flat files to secondarystorage devices. If data were to be archived into history tables, the data would still be available onlinefor reporting purposes. However, it could not be viewed through pages without customizations. Inaddition, reports would need to be modified to access the data in history tables. Archiving to secondarystorage devices is generally used for long-term data retention. This option is preferred for data thatare rarely retrieved, and is usually performed to satisfy legal requirements.
Archiving from Online to History Table ProcessThis process copies the data from the online table to the history tables using the selection processand then removes the data from the online tables using the delete process.
To complete the online to history table process:
1. Create an Archive Project.
Create a project (with a unique Archive ID) that identifies the tables/rows that are to be archived.
100 PeopleSoft Proprietary and Confidential
Chapter 3 PeopleSoft Data Archive Manager
2. Run archiving reports.
Print an archive project definition report to help you verify the data you have selected to archive.
3. Run Archive Data with the Archive Process Selection.
Based on the Archive ID, run the selection process. This copies the data rowsfor archiving to the history tables.
4. Run Archive Data with the Archive Process Delete.
This removes the data from the online tables. Do this only when you are confident that thearchived data has been successfully stored in the history tables.
Rolling Back History Table DataTo roll back history table data:
1. Run Archive Data with the Archive Process Rollback.
This copies the data back from the history tables to the online tables. You use this when the data wasaccidentally deleted from the online tables, and it has already been archived to the history tables.
2. Run Archive Data with the Archive Process Remove from History.
If the Archive Selection has been run, and it you selected the wrong set of data to be copied tohistory tables, run the Remove from History process to remove the misplaced data. This returnsyou to the state where you started prior to the archive selection process.
Archiving From History Table to a Flat FileTo archive from history table to a flat file:
1. Run Export History to Flat Files.
This process copies the data to the flat files.
2. Run Archive Data with the Archive Process Remove from History.
This deletes the data from the history tables. Only run this process after you have verifiedthat the data has been successfully archived to flat files.
Restoring Archived Data From Flat FilesTo restore archived data from flat files:
1. Run Archive Audit Report for the Batch History Process.
This report lists the definition of the history tables at the time the data was archived. Thisreport provides the names of the flat files that contain the data.
2. Create Staging Tables.
The staging table is a clone of the online table. The Import process imports the datafrom the flat files into staging tables.
3. Run Import for Flat Files Process.
4. Run the programs to populate the tables from the flat files.
PeopleSoft Proprietary and Confidential 101

PeopleSoft Data Archive Manager Chapter 3
Understanding CommitsFor both batch and online execution, the Archive Selection, Remove from History,Rollback, and Delete Processes issue commits after each record has been processedunless a commit level has been specified otherwise.
Gaining Increased PerformanceFor better performance and increased speed during archiving processes, try dropping the indexesbefore inserting data from online tables into history tables.
Modifying IndexesYour database platform may have a limitation to the number of columns an index can contain. Somehave a restriction of 16 columns for an index. If the table that you want to archive already has 16 keys,then you cannot add another key (PSARCH_ID) to the corresponding history table.
The first option for solving this situation is to use the Flat File Archiving Strategy. The second option forsolving this situation is to create the history table with the PSARCH_ID as a non-key field. For this situation,it is recommended that you either have different history tables for different archiving projects, or you have astrategy of purging the history tables prior to executing the selection process of another archiving project.
102 PeopleSoft Proprietary and Confidential

Glossary of PeopleSoft Terms
absence entitlement This element defines rules for granting paid time off for valid absences, such as sicktime, vacation, and maternity leave. An absence entitlement element defines theentitlement amount, frequency, and entitlement period.
absence take This element defines the conditions that must be met before a payee is entitledto take paid time off.
account You use an account code to record and summarize financial transactions asexpenditures, revenues, assets, or liabilities balances. The use of this deliveredPeopleSoft ChartField is typically defined when you implement PeopleSoft GeneralLedger.
accounting class In PeopleSoft Enterprise Performance Management, the accounting class defines howa resource is treated for generally accepted accounting practices. The Inventoryclass indicates whether a resource becomes part of a balance sheet account, such asinventory or fixed assets, while the Non-inventory class indicates that the resource istreated as an expense of the period during which it occurs.
accounting date The accounting date indicates when a transaction is recognized, as opposed to the datethe transaction actually occurred. The accounting date and transaction date can be thesame. The accounting date determines the period in the general ledger to which thetransaction is to be posted. You can only select an accounting date that falls within anopen period in the ledger to which you are posting. The accounting date for an itemis normally the invoice date.
accounting entry A set of related debits and credits. An accounting entry is made up of multipleaccounting lines. In most PeopleSoft applications, accounting entries are alwaysbalanced (debits equal credits). Accounting entries are created to record accruals,payments, payment cancellations, manual closures, project activities in the generalledger, and so forth, depending on the application.
accounting split The accounting split method indicates how expenses are allocated or divided amongone or more sets of accounting ChartFields.
accumulator You use an accumulator to store cumulative values of defined items as they areprocessed. You can accumulate a single value over time or multiple values overtime. For example, an accumulator could consist of all voluntary deductions, or allcompany deductions, enabling you to accumulate amounts. It allows total flexibilityfor time periods and values accumulated.
action reason The reason an employee’s job or employment information is updated. The actionreason is entered in two parts: a personnel action, such as a promotion, termination,or change from one pay group to anotherand a reason for that action. Action reasonsare used by PeopleSoft Human Resources, PeopleSoft Benefits Administration,PeopleSoft Stock Administration, and the COBRAAdministration feature of theBase Benefits business process.
activity In PeopleSoft Enterprise LearningManagement, an instance of a catalog item deliverymethodit may also be called a class. The activity defines such things as meeting timesand locations, instructors, reserved equipment and materials, and detailed costs thatare associated with the offering, enrollment limits and deadlines, and waitlistingcapacities.
allocation rule In PeopleSoft Enterprise Incentive Management, an expression within compensationplans that enables the system to assign transactions to nodes and participants. Duringtransaction allocation, the allocation engine traverses the compensation structure
PeopleSoft Proprietary and Confidential 103

Glossary
from the current node to the root node, checking each node for plans that containallocation rules.
alternate account A feature in PeopleSoft General Ledger that enables you to create a statutory chartof accounts and enter statutory account transactions at the detail transaction level, asrequired for recording and reporting by some national governments.
application agent An application agent is an online agent that is loaded into memory with a PeopleSoftpage. It detects when a business rule has been triggered and determines the appropriateaction.
asset class An asset group used for reporting purposes. It can be used in conjunction with the assetcategory to refine asset classification.
attachment In PeopleSoft Enterprise LearningManagement, nonsystem-defined electronicmaterial that supplements a learning resource, such as an equipment items userhandbook or the site map of a large facility.
background process In PeopleSoft, background processes are executed through process-specific COBOLprograms and run outside theWindows environment.
benchmark job In PeopleSoft Workforce Analytics, a benchmark job is a job code for which there iscorresponding salary survey data from published, third-party sources.
branch A tree node that rolls up to nodes above it in the hierarchy, as defined in PeopleSoftTree Manager.
budgetary account only An account used by the system only and not by users; this type of account doesnot accept transactions. You can only budget with this account. Formerly calledsystem-maintained account.
budget check In commitment control, the processing of source transactions against control budgetledgers, to see if they pass, fail, or pass with a warning.
budget control In commitment control, budget control ensures that commitments and expendituresdon’t exceed budgets. It enables you to track transactions against correspondingbudgets and terminate a document’s cycle if the defined budget conditions are not met.For example, you can prevent a purchase order from being dispatched to a vendor ifthere are insufficient funds in the related budget to support it.
budget period The interval of time (such as 12 months or 4 quarters) into which a period is dividedfor budgetary and reporting purposes. The ChartField allows maximum flexibility todefine operational accounting time periods without restriction to only one calendar.
business event In PeopleSoft Sales Incentive Management, an original business transaction or activitythat may justify the creation of a PeopleSoft Enterprise Incentive Management event(a sale, for example).
catalog item In PeopleSoft Enterprise LearningManagement, a specific topic that a learner canstudy and have tracked. For example, Introduction to Microsoft Word. A catalog itemcontains general information about the topic and includes a course code, description,categorization, keywords, and delivery methods.
category In PeopleSoft Enterprise LearningManagement, a way to classify catalog items so thatusers can easily browse and search relevant entries in the learning catalog. Categoriescan be hierarchical.
ChartField A field that stores a chart of accounts, resources, and so on, depending on thePeopleSoft application. ChartField values represent individual account numbers,department codes, and so forth.
ChartField balancing You can require specific ChartFields to match up (balance) on the debit and the creditside of a transaction.
104 PeopleSoft Proprietary and Confidential
Glossary
ChartField combination edit The process of editing journal lines for valid ChartField combinations based onuser-defined rules.
ChartKey One or more fields that uniquely identify each row in a table. Some tables contain onlyone field as the key, while others require a combination.
child In PeopleSoft Tree Manager trees, a child is a node or detail on a tree linked toanother, higher-level node (referred to as the parent). Child nodes can be rolled upinto the parent. A node can be a child and a parent at the same time depending on itslocation within the tree.
Class ChartField A ChartField value that identifies a unique appropriation budget key when youcombine it with a fund, department ID, and program code, as well as a budget period.Formerly called sub-classification.
clone In PeopleCode, to make a unique copy. In contrast, to copymay mean making anew reference to an object, so if the underlying object is changed, both the copy andthe original change.
collection To make a set of documents available for searching in Verity, you must first createat least one collection. A collection is set of directories and files that allow searchapplication users to use the Verity search engine to quickly find and display sourcedocuments that match search criteria. A collection is a set of statistics and pointersto the source documents, stored in a proprietary format on a file server. Because acollection can only store information for a single location, PeopleSoft maintains a setof collections (one per language code) for each search index object.
compensation object In PeopleSoft Enterprise Incentive Management, a node within a compensationstructure. Compensation objects are the building blocks that make up a compensationstructure’s hierarchical representation.
compensation structure In PeopleSoft Enterprise Incentive Management, a hierarchical relationship ofcompensation objects that represents the compensation-related relationship betweenthe objects.
configuration parametercatalog
Used to configure an external system with PeopleSoft. For example, a configurationparameter catalog might set up configuration and communication parameters for anexternal server.
configuration plan In PeopleSoft Enterprise Incentive Management, configuration plans hold allocationinformation for common variables (not incentive rules) and are attached to a nodewithout a participant. Configuration plans are not processed by transactions.
content reference Content references are pointers to content registered in the portal registry. These aretypically either URLs or iScripts. Content references fall into three categories: targetcontent, templates, and template pagelets.
context In PeopleSoft Enterprise Incentive Management, a mechanism that is used todetermine the scope of a processing run. PeopleSoft Enterprise Incentive Managementuses three types of context: plan, period, and run-level.
corporate account Equivalent to the Account ChartField. Distinguishes between the chart of accountstypically used to record and report financial information for management,stockholders, and the general public, as opposed to a chart of statutory (alternate)accounts required by a regulatory authority for recording and reporting financialinformation.
cost profile A combination of a receipt cost method, a cost flow, and a deplete cost method. Aprofile is associated with a cost book and determines how items in that book arevalued, as well as how the material movement of the item is valued for the book.
cost row A cost transaction and amount for a set of ChartFields.
PeopleSoft Proprietary and Confidential 105
Glossary
data acquisition In PeopleSoft Enterprise Incentive Management, the process during which rawbusiness transactions are acquired from external source systems and fed into theoperational data store (ODS).
data elements Data elements, at their simplest level, define a subset of data and the rules by whichto group them.
For Workforce Analytics, data elements are rules that tell the system what measures toretrieve about your workforce groups.
data row Contains the entries for each field in a table. To identify each data row uniquely,PeopleSoft applications use a key consisting of one or more fields in the table.
data validation In PeopleSoft Enterprise Incentive Management, a process of validating and cleansingthe feed data to resolve conflicts and make the data processable.
DAT file This text file, used with the Verity search engine, contains all of the information fromdocuments that are searchable but not returned in the results list.
delivery method In PeopleSoft Enterprise LearningManagement, identifies a learning activitys deliverymethod type. An activity can have one or more delivery methods.
delivery method type In PeopleSoft Enterprise LearningManagement, specifies a method that yourorganization uses to deliver learning activities, for example, scheduled or self-pacedlearning.
distribution The process of assigning values to ChartFields. A distribution is a string of ChartFieldvalues assigned to items, payments, and budget amounts.
double byte character If youre working with Japanese or other Asian employees, you can enter theemployee’s name using double-byte characters. The standard double byte character setname format in PeopleSoft applications is: [last name] space [first name].
dynamic tree A tree that takes its detail valuesdynamic detailsdirectly from a table in the database,rather than from a range of values entered by the user.
edit table A table in the database that has its own record definition, such as the Department table.As fields are entered into a PeopleSoft application, they can be validated against anedit table to ensure data integrity throughout the system.
effective date Amethod of dating information in PeopleSoft applications. You can predateinformation to add historical data to your system, or postdate information in order toenter it before it actually goes into effect. By using effective dates, you don’t deletevalues; you enter a new value with a current effective date.
EIM job Abbreviation for Enterprise Incentive Management job. In PeopleSoft EnterpriseIncentive Management, a collection of job steps that corresponds to the steps in anorganizations compensation-related business process. An EIM job can be stopped toallow manual changes or corrections to be applied between steps, and then resumedfrom where it left off, continuing with the next step. A run can also be restartedor rolled back.
EIM ledger Abbreviation for Enterprise Incentive Management ledger. In PeopleSoft EnterpriseIncentive Management, an object to handle incremental result gathering within thescope of a participant. The ledger captures a result set with all of the appropriate tracesto the data origin and to the processing steps of which it is a result.
equipment In PeopleSoft Enterprise LearningManagement, resource items that can be assignedto a training facility, to a specific training room, or directly to an activity session.Equipment items are generally items that are used (sometimes for a fee) and returnedafter the activity is complete.
106 PeopleSoft Proprietary and Confidential

Glossary
event Events are predefined points either in the application processor flow or in the programflow. As each point is encountered, the event activates each component, triggering anyPeopleCode program associated with that component and that event. Examples ofevents are FieldChange, SavePreChange, and OnRouteSubscription. In PeopleSoftHuman Resources, event also refers to incidents that affect benefits eligibility.
event propagation process In PeopleSoft Sales Incentive Management, a process that determines, through logic,the propagation of an original PeopleSoft Enterprise Incentive Management event andcreates a derivative (duplicate) of the original event to be processed by other objects.Sales Incentive Management uses this mechanism to implement splits, roll-ups, and soon. Event propagation determines who receives the credit.
external system In PeopleSoft, any system that is not directly compiled with PeopleTools servers.
fact In PeopleSoft applications, facts are numeric data values from fields from a sourcedatabase as well as an analytic application. A fact can be anything you want to measureyour business by, for example, revenue, actual, budget data, or sales numbers. Afact is stored on a fact table.
filter In PeopleSoft applications, a filter creates a subset of information. Filters are used intemplates to limit your information from a pick list of attribute values.
generic process type In PeopleSoft Process Scheduler, process types are identified by a generic processtype. For example, the generic process type SQR includes all SQR process types,such as SQR process and SQR report.
group Any set of records associated under a single name or variable in order to runcalculations in PeopleSoft business processes. In PeopleSoft Time and Labor, forexample, employees are placed in groups for time reporting purposes.
homepage Users can personalize the homepage, or the page that first appears when they accessthe portal.
incentive object In PeopleSoft Enterprise Incentive Management, the incentive-related objects thatdefine and support the PeopleSoft Enterprise Incentive Management calculationprocess and results, such as plan templates, plans, results data, user interaction objects,and so on.
incentive rule In PeopleSoft Sales Incentive Management, the commands that act on transactions andturn them into compensation. A rule is one part in the process of turning a transactioninto compensation.
key One or more fields that uniquely identify each row in a table. Some tables contain onlyone field as the key, while others require a combination.
learner group In PeopleSoft Enterprise LearningManagement, a group of learners within the samelearning environment that share the same attributes, such as department or job code.
learning activity See activity.
learning history In PeopleSoft Enterprise LearningManagement, a self-service repository for all of alearner’s completed learning activities.
learning plan In PeopleSoft Enterprise LearningManagement, a self-service repository for all of alearner’s planned and in-progress learning activities.
ledger mapping You use ledger mapping to relate expense data from general ledger accounts toresource objects. Multiple ledger line items can be mapped to one or more resourceIDs. You can also use ledger mapping to map dollar amounts (referred to as rates)to business units. You can map the amounts in two different ways: an actual amountthat represents actual costs of the accounting period, or a budgeted amount that can beused to calculate the capacity rates as well as budgeted model results. In PeopleSoftEnterprise Warehouse, you can map general ledger accounts to the EW Ledger table.
PeopleSoft Proprietary and Confidential 107

Glossary
level A section of a tree that organizes groups of nodes.
library section In PeopleSoft Enterprise Incentive Management, a section that is defined in a plan (ortemplate) and that is available for other plans to share. Changes to a library section arereflected in all plans that use it.
linked section In PeopleSoft Enterprise Incentive Management, a section that is defined in a plantemplate but appears in a plan. Changes to linked sections propagate to plans usingthat section.
linked variable In PeopleSoft Enterprise Incentive Management, a variable that is defined andmaintained in a plan template and that also appears in a plan. Changes to linkedvariables propagate to plans using that variable.
load The feature that initiates a process to automatically load information into a PeopleSoftapplicationfor example, populating the PeopleSoft Benefits database with plan-levelelection information.
local functionality In PeopleSoft HRMS, the set of information that is available for a specific country.You can access this information when you click the appropriate country flag in theglobal window, or when you access it by a local country menu.
location Locations enable you to indicate the different types of addressesfor a company, forexample, one address to receive bills, another for shipping, a third for postal deliveries,and a separate street address. Each address has a different location number. Theprimary locationindicated by a 1is the address you use most often and may be differentfrom the main address.
market template In PeopleSoft Enterprise Incentive Management, additional functionality that isspecific to a given market or industry and is built on top of a product category.
material In PeopleSoft Enterprise LearningManagement, a resource item that can be assignedto the sessions of an activity. Material items are generally consumed during theduration of an activity and not returned, and they may have an associated cost.
message definition An object definition specified in PeopleSoft Application Designer that containsmessage information for PeopleSoft Application Messaging.
meta-SQL Meta-SQL constructs expand into platform-specific SQL substrings. They are used infunctions that pass SQL strings, such as in SQL objects, the SQLExec function, andPeopleSoft Application Engine programs.
metastring Metastrings are special expressions included in SQL string literals. The metastrings,prefixed with a percent (%) symbol, are included directly in the string literals. Theyexpand at run time into an appropriate substring for the current database platform.
multibook Processes in PeopleSoft applications that can create both application entries andgeneral ledgers denominated in more than one currency.
multicurrency The ability to process transactions in a currency other than the business unit’s basecurrency.
objective In PeopleSoft Enterprise LearningManagement, an individual’s learning goal. Anexample of a learning goal is a competency gap.
override In PeopleSoft Enterprise Incentive Management, the ability to make a change to a planthat applies to only one plan context.
pagelet Each block of content on the homepage is called a pagelet. These pagelets displaysummary information within a small rectangular area on the page. The pagelet provideusers with a snapshot of their most relevant PeopleSoft and non-PeopleSoft content.
108 PeopleSoft Proprietary and Confidential
Glossary
parent node A tree node linked to lower-level nodes or details that roll up into it. A node can be aparent and a child at the same time, depending on its location within the tree.
participant In PeopleSoft Enterprise Incentive Management, participants are recipients of theincentive compensation calculation process.
participant object Each participant object may be related to one or more compensation objects.
See also participant object.
payout In PeopleSoft Enterprise Incentive Management, the resulting incentive plancomputation that is provided to payroll.
PeopleCode PeopleCode is a proprietary language, executed by the PeopleSoft applicationprocessor. PeopleCode generates results based upon existing data or user actions. Byusing business interlink objects, external services are available to all PeopleSoftapplications wherever PeopleCode can be executed.
PeopleCode event An action that a user takes upon an object, usually a record field, that is referencedwithin a PeopleSoft page.
PeopleSoft InternetArchitecture
The fundamental architecture on which PeopleSoft 8 applications are constructed,consisting of an RDBMS, an application server, a Web server, and a browser.
performance measurement In PeopleSoft Enterprise Incentive Management, a variable used to store data (similarto an aggregator, but without a predefined formula) within the scope of an incentiveplan. Performance measures are associated with a plan calendar, territory, andparticipant. Performance measurements are used for quota calculation and reporting.
period context In PeopleSoft Enterprise Incentive Management, because a participant typicallyuses the same compensation plan for multiple periods, the period context associatesa plan context with a specific calendar period and fiscal year. The period contextreferences the associated plan context, thus forming a chain. Each plan context has acorresponding set of period contexts.
per seat cost In PeopleSoft Enterprise LearningManagement, the cost per learner, based on thetotal activity costs divided by either minimum attendees or maximum attendees.Organizations use this cost to price PeopleSoft Enterprise Learning Managementactivities.
plan In PeopleSoft Sales Incentive Management, a collection of allocation rules, variables,steps, sections, and incentive rules that instruct the PeopleSoft Enterprise IncentiveManagement engine in how to process transactions.
plan context In PeopleSoft Enterprise Incentive Management, correlates a participant withthe compensation plan and node to which the participant is assigned, enablingthe PeopleSoft Enterprise Incentive Management system to find anything that isassociated with the node and that is required to perform compensation processing.Each participant, node, and plan combination represents a unique plan contextifthree participants are on a compensation structure, each has a different plan context.Configuration plans are identified by plan contexts and are associated with theparticipants that refer to them.
plan section In PeopleSoft Enterprise Incentive Management, a segment of a plan that handles aspecific type of event processing.
plan template In PeopleSoft Enterprise Incentive Management, the base from which a plan is created.A plan template contains common sections and variables that are inherited by all plansthat are created from the template. A template may contain steps and sections thatare not visible in the plan definition.
portal registry In PeopleSoft applications, the portal registry is a tree-like structure in which contentreferences are organized, classified, and registered. It is a central repository that
PeopleSoft Proprietary and Confidential 109
Glossary
defines both the structure and content of a portal through a hierarchical, tree-likestructure of folders useful for organizing and securing content references.
private view A user-defined view that is available only to the user who created it.
process See Batch Processes.
process definition Process definitions define each run request.
process instance A unique number that identifies each process request. This value is automaticallyincremented and assigned to each requested process when the process is submitted torun.
process job You can link process definitions into a job request and process each request seriallyor in parallel. You can also initiate subsequent processes based on the return codefrom each prior request.
process request A single run request, such as an SQR, a COBOL program, or a Crystal report that yourun through PeopleSoft Process Scheduler.
process run control A PeopleTools variable used to retain PeopleSoft Process Scheduler values neededat runtime for all requests that reference a run control ID. Do not confuse these withapplication run controls, which may be defined with the same run control ID, but onlycontain information specific to a given application process request.
product category In PeopleSoft Enterprise Incentive Management, indicates an application in theEnterprise Incentive Management suite of products. Each transaction in the PeopleSoftEnterprise Incentive Management system is associated with a product category.
publishing In PeopleSoft Enterprise Incentive Management, a stage in processing that makesincentive-related results available to participants.
record definition A logical grouping of data elements.
record field A field within a record definition.
record group A set of logically and functionally related control tables and views. Record groupshelp enable TableSet sharing, which eliminates redundant data entry. Record groupsensure that TableSet sharing is applied consistently across all related tables and views.
record input VAT flag Abbreviation for record input value-added tax flag. Within PeopleSoft Purchasing,Payables, and General Ledger, this flag indicates that you are recording input VATon the transaction. This flag, in conjunction with the record output VAT flag, is usedto determine the accounting entries created for a transaction and to determine how atransaction is reported on the VAT return. For all cases within Purchasing and Payableswhere VAT information is tracked on a transaction, this flag is set to Yes. This flagis not used in PeopleSoft Order Management, Billing, or Receivables, where it isassumed that you are always recording only output VAT, or in PeopleSoft Expenses,where it is assumed that you are always recording only input VAT.
record output VAT flag Abbreviation for record output value-added tax flag.
See record input VAT flag.
reference data In PeopleSoft Sales Incentive Management, system objects that represent the salesorganization, such as territories, participants, products, customers, channels, and so on.
reference object In PeopleSoft Enterprise Incentive Management, this dimension-type object furtherdefines the business. Reference objects can have their own hierarchy (for example,product tree, customer tree, industry tree, and geography tree).
reference transaction In commitment control, a reference transaction is a source transaction that isreferenced by a higher-level (and usually later) source transaction, in order to
110 PeopleSoft Proprietary and Confidential

Glossary
automatically reverse all or part of the referenced transaction’s budget-checkedamount. This avoids duplicate postings during the sequential entry of the transaction atdifferent commitment levels. For example, the amount of an encumbrance transaction(such as a purchase order) will, when checked and recorded against a budget, causethe system to concurrently reference and relieve all or part of the amount of acorresponding pre-encumbrance transaction, such as a purchase requisition.
relationship object In PeopleSoft Enterprise Incentive Management, these objects further define acompensation structure to resolve transactions by establishing associations betweencompensation objects and business objects.
results management process In PeopleSoft Sales Incentive Management, the process during which compensationadministrators may review processing results, manually change transactions, processdraws, update and review payouts, process approvals, and accumulate and pushpayments to the EIM ledger.
role user A PeopleSoft Workflow user. A person’s role user ID serves much the same purpose asa user ID does in other parts of the system. PeopleSoft Workflow uses role user IDsto determine how to route worklist items to users (through an email address, forexample) and to track the roles that users play in the workflow. Role users do not needPeopleSoft user IDs.
role Describes how people fit into PeopleSoft Workflow. A role is a class of users whoperform the same type of work, such as clerks or managers. Your business rulestypically specify what user role needs to do an activity.
roll up In a tree, to roll up is to total sums based on the information hierarchy.
routing Connects activities in PeopleSoft Workflow. Routings specify where the informationgoes and what form it takesemail message, electronic form, or worklist entry.
run control A run control is a type of online page that is used to begin a process, such as thebatch processing of a payroll run. Run control pages generally start a program thatmanipulates data.
run control ID A unique ID to associate each user with his or her own run control table entries.
run-level context In PeopleSoft Enterprise Incentive Management, associates a particular run (and batchID) with a period context and plan context. Every plan context that participates in a runhas a separate run-level context. Because a run cannot span periods, only one run-levelcontext is associated with each plan context.
search query You use this set of objects to pass a query string and operators to the search engine.The search index returns a set of matching results with keys to the source documents.
section In PeopleSoft Enterprise Incentive Management, a collection of incentive rules thatoperate on transactions of a specific type. Sections enable plans to be segmented toprocess logical events in different sections.
security event In commitment control, security events trigger security authorization checking, suchas budget entries, transfers, and adjustments; exception overrides and notifications;and inquiries.
self-service application Self-service refers to PeopleSoft applications that are accessed by end users with abrowser.
session In PeopleSoft Enterprise LearningManagement, a single meeting day of an activity(that is, the period of time between start and finish times within a day). The sessionstores the specific date, location, meeting time, and instructor. Sessions are used forscheduled training.
session template In PeopleSoft Enterprise LearningManagement, enables you to set up commonactivity characteristics that may be reused while scheduling a PeopleSoft Enterprise
PeopleSoft Proprietary and Confidential 111
Glossary
Learning Management activitycharacteristics such as days of the week, start and endtimes, facility and room assignments, instructors, and equipment. A session patterntemplate can be attached to an activity that is being scheduled. Attaching a templateto an activity causes all of the default template information to populate the activitysession pattern.
setup relationship In PeopleSoft Enterprise Incentive Management, a relationship object type thatassociates a configuration plan with any structure node.
sibling A tree node at the same level as another node, where both roll up into the same parent.A node can be a sibling, parent, and child all at the same time, depending on itslocation in the tree.
single signon With single signon, users can, after being authenticated by a PeopleSoft applicationserver, access a second PeopleSoft application server without entering a user ID orpassword.
source transaction In commitment control, any transaction generated in a PeopleSoft or third-partyapplication that is integrated with commitment control and which can be checkedagainst commitment control budgets. For example, a pre-encumbrance, encumbrance,expenditure, recognized revenue, or collected revenue transaction.
SpeedChart A user-defined shorthand key that designates several ChartKeys to be used for voucherentry. Percentages can optionally be related to each ChartKey in a SpeedChartdefinition.
SpeedType A code representing a combination of ChartField values. SpeedTypes simplify theentry of ChartFields commonly used together.
SQR See Structured Query Report (SQR).
statutory account Account required by a regulatory authority for recording and reporting financialresults. In PeopleSoft, this is equivalent to the Alternate Account (ALTACCT)ChartField.
step In PeopleSoft Sales Incentive Management, a collection of sections in a plan. Eachstep corresponds to a step in the job run.
Structured Query Report (SQR) A type of printed or displayed report generated from data extracted from a PeopleSoftSQL-based relational database. PeopleSoft applications provide a variety of standardSQRs that summarize table information and data. You can use these reports as is,customize them, or create your own.
Summary ChartField You use summary ChartFields to create summary ledgers that roll up detail amountsbased on specific detail values or on selected tree nodes. When detail values aresummarized using tree nodes, summary ChartFields must be used in the summaryledger data record to accommodate the maximum length of a node name (20characters).
summary ledger An accounting feature used primarily in allocations, inquiries, and PS/nVisionreporting to store combined account balances from detail ledgers. Summary ledgersincrease speed and efficiency of reporting by eliminating the need to summarizedetail ledger balances each time a report is requested. Instead, detail balances aresummarized in a background process according to user-specified criteria and stored onsummary ledgers. The summary ledgers are then accessed directly for reporting.
summary tree A tree used to roll up accounts for each type of report in summary ledgers. Summarytrees enable you to define trees on trees. In a summary tree, the detail values are reallynodes on a detail tree or another summary tree (known as the basis tree). A summarytree structure specifies the details on which the summary trees are to be built.
112 PeopleSoft Proprietary and Confidential

Glossary
table The underlying PeopleSoft data format, in which data is stored by columns (fields) androws (records, or instances).
TableSet sharing Specifies control table data for each business unit so that redundancy is eliminated.
target currency The value of the entry currency or currencies converted to a single currency for budgetviewing and inquiry purposes.
template A template is HTML code associated with aWeb page. It defines the layout of thepage and also where to get HTML for each part of the page. In PeopleSoft, you usetemplates to build a page by combining HTML from a number of sources. For aPeopleSoft portal, all templates must be registered in the portal registry, and eachcontent reference must be assigned a template.
territory In PeopleSoft Sales Incentive Management, hierarchical relationships of businessobjects, including regions, products, customers, industries, and participants.
TimeSpan A relative period, such as year-to-date or current period, that can be used in variousPeopleSoft General Ledger functions and reports when a rolling time frame, ratherthan a specific date, is required. TimeSpans can also be used with flexible formulas inPeopleSoft Projects.
transaction allocation In PeopleSoft Enterprise Incentive Management, the process of identifying the ownerof a transaction. When a raw transaction from a batch is allocated to a plan context,the transaction is duplicated in the PeopleSoft Enterprise Incentive Managementtransaction tables.
transaction loading process In PeopleSoft Enterprise Incentive Management, the process during whichtransactions are loaded into Sales Incentive Management. During loading, the sourcecurrency is converted to the business unit currency while retaining the source currencycode. At the completion of this stage, the transaction is in the first state.
transaction state In PeopleSoft Enterprise Incentive Management, a value assigned by an incentiverule to a transaction. Transaction states enable sections to process only transactionsthat are at a specific stage in system processing. After being successfully processed,transactions may be promoted to the next transaction state and picked up by a differentsection for further processing.
transaction type In PeopleSoft Enterprise Incentive Management, a way to categorize transactions toidentify specific transaction types (for example, shipment, order, opportunity, and soon). Plan sections process only one type of transaction type. Transaction types can bedefined based on a company’s specific processes model.
Translate table A system edit table that stores codes and translate values for the miscellaneous fields inthe database that do not warrant individual edit tables of their own.
tree The graphical hierarchy in PeopleSoft systems that displays the relationship betweenall accounting units (for example, corporate divisions, projects, reporting groups,account numbers) and determines roll-up hierarchies.
unclaimed transaction In PeopleSoft Enterprise Incentive Management, a transaction that is not claimedby a node or participant after the allocation process has completed, usually due tomissing or incomplete data. Unclaimed transactions may be manually assigned to theappropriate node or participant by a compensation administrator.
uniform resource locator (URL) In PeopleSoft, the term URL refers to the entire query string. Thefollowing is an example of a URL: http://serverx/InternetClient/InternetClientServlet?ICType=Script&ICScriptProgramName=WEBLIB_BEN_401k.PAGES.FieldFormula.iScript_Home401k
universal navigation header Every PeopleSoft portal includes the universal navigation header, intended to appear atthe top of every page as long as the user is signed on to the portal. In addition to
PeopleSoft Proprietary and Confidential 113
Glossary
providing access to the standard navigation buttons (like Home, Favorites, and signoff)the universal navigation header can also display a welcome message for each user.
URL See uniform resource locator (URL).
user interaction object In PeopleSoft Sales Incentive Management, used to define the reporting componentsand reports that a participant can access in his or her context. All Sales IncentiveManagement user interface objects and reports are registered as user interactionobjects. User interaction objects can be linked to a compensation structure nodethrough a compensation relationship object (individually or as groups).
variable In PeopleSoft Sales Incentive Management, the intermediate results of calculations.Variables hold the calculation results and are then inputs to other calculations.Variables can be plan variables that persist beyond the run of an engine or localvariables that exist only during the processing of a section.
warehouse A PeopleSoft data warehouse that consists of predefined ETL maps, data warehousetools, and DataMart definitions.
worksheet Away of presenting data through a PeopleSoft Business Analysis Modeler interfacethat enables users to do in-depth analysis using pivoting tables, charts, notes, andhistory information.
workflow The background process that creates a list of administrative actions based on selectioncriteria and specifies the procedure associated with each action.
worklist The automated to-do list that PeopleSoft Workflow creates. From the worklist, youcan directly access the pages you need to perform the next action, and then return tothe worklist for another item.
zero-rated VAT Abbreviation for zero-rated value-added tax. AVAT transaction with a VAT codethat has a tax percent of zero. Used to track taxable VAT activity where no actualVAT amount is charged.
114 PeopleSoft Proprietary and Confidential
Index
Aadditional documentation xapplication fundamentals ixApplication Serverfailover 68high availability 68Tuxedo connect string 68workstation settings 67
Archive Data 81See Also See Data Archiving
Archivesworking with 88
Archivingdata 81techniques 100
AS 31Auditsdata archiving 97
BBootstrap modein Data Mover 2
CCache Filesworkstation settings 54
CHANGE_ACCESS_PASSWORD 18Client Setuprunning in Configuration Manager 78
Command LineConfiguration Manager 74Data Mover 11UNIX 12
Data Mover parameters 13Data Mover scripts 12
Command modifiersData Mover 30
CommandsData Mover 14, 17–18SQLsupported by Data Mover 15
comments, submitting xiiiCOMMIT 34Data Mover 33
common elements xiii
Configurationworkstation 49
Configuration Manager 49Application Servers tab 67Client Setup tab 63command line options 74Crystal tab 57display settings 54Display tab 54folder tabs 50Import/Export tab 65interface 50nVision tab 72Other tab 66Process Scheduler tab 69Remote Call/AE tab 61running Client Setup 78shortcuts 64signon defaults 51starting 50Startup tab 51Trace tab 59user settings 78Workflow tab 60
Connect IDdefault 53
Connectivityverifying 77
Consolidated Publications Incorporated(CPI) xcontact information xiiicountry-specific documentation xiiCREATE_INDEX_BEFORE_DATA 34CREATE_TEMP_TABLE 19CREATE_TRIGGER 19cross-references xiiCustomer Connection Website x
DDataexporting 95importing flat files 96
Data Archiving 81archive process 92audits 97
PeopleSoft Proprietary and Confidential 115
Index
defining criteria 84designer 84exporting history data 95finding data 90history tables 82importing flat files 96join records 85processes 92reports 97security 88SQL 86strategy 82techniques 100to flat files 83, 94to tables 82transferring data 90understanding 81utilities 89working with archives 88working with data 89
Data Base SetupData Moverusing 8
Data Moverbootstrap mode 2command line interface 11command line parameters 13command modifiers 30AS 31IGNORE_DUPS 32WHERE 32
command overview 14command types 4commands 14, 17–18ENCRYPT_PASSWORD 20EXPORT 20IMPORT 21REM 23REMARK 23RENAME 24REPLACE_ALL 26REPLACE_DATA 26REPLACE_VIEW 27RUN 27SET 28
COMMIT 33creating scripts 6database setup 8editing scripts 6ERASE 17
example script files 46export script 21exporting a database 21generated scripts 11icon setup 2IMPORT command 21interface 2menu options 4migrating a database 1operating modes 2overview 1parameter file 14preparing for an export 7running scripts 7running scripts from command line 12scripts 1, 4SET parameters 34COMMIT 34CREATE_INDEX_BEFORE_DATA 34DDL 36EXECUTE_SQL 37EXTRACT 37IGNORE_DUPS 38INPUT 38INSERT_DATA_ONCE 39LOG 39NO DATA 40NO INDEX 41NO RECORD 41NO SPACE 41NO TRACE 42NO VIEW 42OUTPUT 43SIZING_SET 43SPACE 44START 44–45VERSION 45
SQL files 16SQL trace 3starting 2STORE 16supported SQL commands 15–16syntax rules 5toolbar options 4UNIX interface 12window 3workstation settings 74
DatabaseData Mover 1
116 PeopleSoft Proprietary and Confidential
Index
migrating 1Database Namedisplaying 56
Database Setupaccessing 9choosing applications 9parameters 10scripts 11using 8
Database Typedefault 52
DBSPACE 35DDL 36definition of 17
Detach Directory 61Development Environmentsetting up 76
Displaydefaults 54font 56pages 55
DMLdefinition of 17
documentationcountry-specific xiiprinted xrelated xupdates x
EENCRYPT_PASSWORD 14, 20ERASE 17EXECUTE_SQL 37ExportData Moverpreparation 7
EXPORT 14, 20EXTRACT 37
Gglossary 103
IIGNORE_DUPS 38IMPORT 15, 21INPUT 38Installationdevelopment environment 76workstations 64
LLanguage preferenceworkstation settings 55
LOG 39
NNavigatorenabling 57
NO DATA 40NO INDEX 41NO RECORD 41NO SPACE 41NO TRACE 42NO VIEW 42notes xiinVisionworkstation settings 72
OOperatoroverrides 53signon 51
OUTPUT 43
PPagesdisplaying 56displaying in Navigator 56
Parm file 14PeopleBooksordering x
PeopleCode, typographicalconventions xiPeopleSoftregistry settings 49
PeopleSoft application fundamentals ixPeopleSoft Open Queryworkstation settings 64
Popup menushighlighting 56
prerequisites ixprinted documentation xProcess Schedulerworkstation settings 69
Processesdata archives 92
PS_HOME Accessverifying 77
PSARCH_ID 83
PeopleSoft Proprietary and Confidential 117
Index
QQuality Serverworkstation settings 66
RRegistryPeopleSoft settings 49
Regular modein Data Mover 2
related documentation xREM 23REMARK 23RENAME 15, 24REPLACE_ALL 15, 26REPLACE_DATA 15, 26REPLACE_VIEW 15, 27Reportsdata archiving 97
RUN 15, 27
SScriptsData Mover 4creating 6editing 6examples 46running 7
Database Setup 11Securitydata archives 88
SET 15, 28SET BASE_LANGUAGE 15, 30SET IGNORE_ERRORS 15, 29SET parametersData Mover 34
Shortcutscreating 64
Signonconnect ID 53default application server 52default database name 52default database server 52default operator ID 53operator overrides 53setting defaults 51
Signon Defaults 51SIZING_SET 43SPACE 44SQL
data archives 86SQL tracein Data Mover 3
START 44–45STORE 16suggestions, submitting xiiiSupporting Applicationsverifying 77
SWAP_BASE_LANGUAGE 15, 28SyntaxData Mover scripts 5
Tterms 103Three-Tierworkstation settings 67
TracePeopleCode trace settings 59SQL trace settings 59trace settings 59
typographical conventions xi
UUNIXData Mover command line 12
Upgradeimage conversion 74
User IDdefault 53
VVERSION 45visual cues xii
Wwarnings xiiiWHERE 32Workstationsexporting settings 65importing settings 65installing 63setting up 49
118 PeopleSoft Proprietary and Confidential