Payment module integration for Prestashop 1.5, 1.6 and 1.7
46
Payment module integration for Prestashop 1.5, 1.6 and 1.7
-
Upload
khangminh22 -
Category
Documents
-
view
5 -
download
0
Transcript of Payment module integration for Prestashop 1.5, 1.6 and 1.7

Payment module integrationfor Prestashop 1.5, 1.6 and 1.7

Contents
1. RELEASE NOTES.................................................................................................................................3
2. MODULE FEATURES..........................................................................................................................5
3. READ CAREFULLY BEFORE GOING ANY FURTHER.................................................................6
4. INSTALLMENT PAYMENT FEATURES...........................................................................................7
5. PREREQUISITES................................................................................................................................. 8
6. INSTALLATION AND CONFIGURATION OF THE PAYMENT MODULE................................. 96.1. Updating the module................................................................................................................................... 96.2. Adding the payment module..................................................................................................................... 106.3. Installing the payment module..................................................................................................................106.4. Configuring the payment module............................................................................................................. 11
6.4.1. General configuration................................................................................................................. 126.4.2. Standard payment....................................................................................................................... 166.4.3. Payment in installments..............................................................................................................186.4.4. Payment in 3 or 4 installments with Oney................................................................................ 206.4.5. Franfinance payment.................................................................................................................. 226.4.6. Full CB Payment........................................................................................................................ 246.4.7. ANCV payment.......................................................................................................................... 266.4.8. SEPA payment............................................................................................................................286.4.9. PayPal payment.......................................................................................................................... 306.4.10. Sofort Payment......................................................................................................................... 326.4.11. Other payment methods............................................................................................................34
7. SETTING UP THE INSTANT PAYMENT NOTIFICATION URL...............................................367.1. Setting up the Instant Payment Notification.............................................................................................377.2. Setting up notifications in case of abandoned or canceled payments.......................................................387.3. Instant Payment Notification URL on an operation coming from the Back Office..................................397.4. Setting up a notification on batch authorization.......................................................................................407.5. Setting up a notification on batch change................................................................................................ 417.6. Testing the Instant Payment Notification URL........................................................................................ 42
8. PROCEEDING TO TEST PHASE....................................................................................................43
9. SHIFTING THE SHOP TO PRODUCTION MODE..................................................................... 45
10. OBTAINING HELP..........................................................................................................................46Viewing online documentation.........................................................................................................................46Getting in touch with technical support...........................................................................................................46

1. RELEASE NOTES
Version Date Comment
1.15 10/6/2021 New features
• Records the exchange rate in the order_payment table of the Prestashopdatabase.
• Taking currency conversion into account for a refund made via the CMS.
• Addition of configuration for disabling Customer service messages generated atthe end of the payment.
• [Oney 3x/4x] Supports the official Chronopost shipping module.
• The Facilypay Oney sub-module has been deleted.
• The shipping method details are sent for Franfinance.
Bug fixes
• [Full CB] Smarty error when the country France is disabled.
• Refund cancellation used to incorrectly change the transaction status to Cancelled.
• No change in the status of a refunded payment in case of a double call to thenotification URL.
• The order status is incorrect when an order containing several payment methods ismade and then partly refunded with our module.
• [Payment in installments] The list of payments in the Prestashop Back Office is notupdated if all the transactions of the payment in installments are refunded.
1.14.2 7/15/2021 New features
• Create a support ticket via a CMS order.
• The authorized amount is displayed in order details.
• Refunds are compatible with the version 1.7.7.x of Prestashop.
Bug fixes
• The SEPA details did not use to be systematically recorded when the Register arecurring SEPA mandate with direct debit option was enabled.
1.14.1 4/1/2021 New features
• The REST API key configuration section has been reorganized and precisions havebeen added to the parameter description.
Bug fixes
• No refund for payments when the vouchers are generated in PrestaShop 1.6.x toavoid double refunds.
• No recording of payments with a negative amount for PrestaShop 1.7.7.x versions.
1.14 2/10/2021 New features
• The vads_order_info variables have been replaced with vads_ext_info.
• Addition of the Franfinance submodule.
• Create a support ticket via the Module configuration section.
• Perform refunds for payments in installments.
• Embedded form: Customize the label Save my card.
• Possibility to add a payment method manually, if it is not present on the list ofavailable payment methods.
• Embedded form: The pop-in is now customizable in the section Card data entrymode.
• REST Web Services: Cancellation is now handled by Web Service.
Payment module integration for Prestashop 1.5, 1.6 and 1.7
All rights reserved - 3 / 46
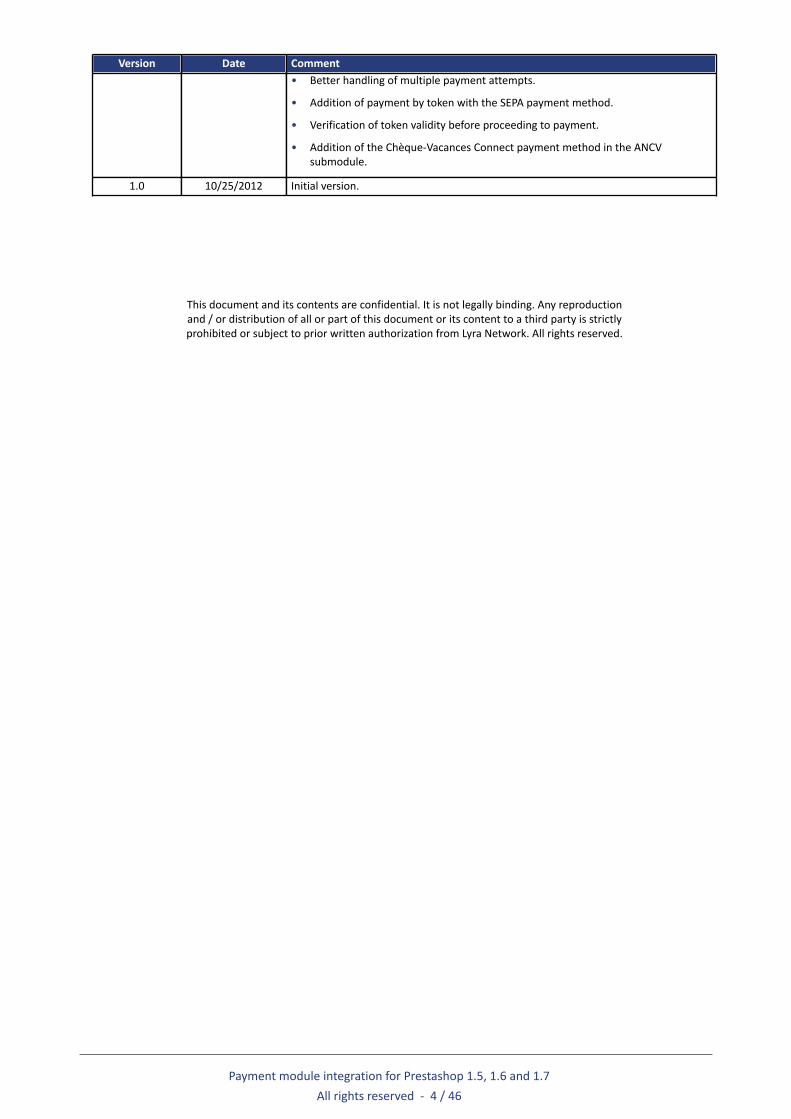
Version Date Comment• Better handling of multiple payment attempts.
• Addition of payment by token with the SEPA payment method.
• Verification of token validity before proceeding to payment.
• Addition of the Chèque-Vacances Connect payment method in the ANCVsubmodule.
1.0 10/25/2012 Initial version.
This document and its contents are confidential. It is not legally binding. Any reproductionand / or distribution of all or part of this document or its content to a third party is strictlyprohibited or subject to prior written authorization from Lyra Network. All rights reserved.
Payment module integration for Prestashop 1.5, 1.6 and 1.7
All rights reserved - 4 / 46

2. MODULE FEATURES
The payment module offers the following functionalities:
• Immediate payment
• Payment in installments with the possibility to offer several options (2, 3, 4 installments, etc.)
• Payment by token (requires subscription to the payment by token option)
• PayPal payment
• Oney 3x 4x payment
• ANCV payment
• SEPA payment (one-off Direct Debit or mandate registration)
• SOFORT Banking payment
• Full CB payment
• Franfinance payment
• Customizable submodule for all payment methods
• Compatibility with PrestaShop version 1.5-1.7
• Multi-language compatibility
• Multi-currency compatibility
• Multi-shop compatibility, with a possibility to configure a different name, URL and theme
• Custom 3D Secure that can be configured by client group depending on the order amount
• Automatic redirection to the shop once the payment is made
• Definition of a minimum/maximum amount for each payment type
• Definition of a minimum/maximum amount for each payment type by client group
• Definition of different capture delay or validation mode for each payment type
• Management of failed payments (possibility to register orders with failed payments)
• Possibility to define the name of the payment method in any language
• Automatic update or orders PrestaShop in case of validation, duplication, cancellation, refund,modification via the Merchant Back Office
• Theme configuration for personalizing the payment page (if the option is enabled)
• Compatibility with the PrestaShop URL rewriting function
• Payment page integrated into the checkout flow (display in an iframe)
• Embedded payment fields (REST API)
• Partial or full refund via your CMS (requires the REST Web Services option)
• Cancel a payment via your CMS (requires subscription to the REST Web Services option)
• Systematic registration of orders at the end of payment via a silent URL (Instant Payment NotificationURL)
Payment module integration for Prestashop 1.5, 1.6 and 1.7
All rights reserved - 5 / 46

3. READ CAREFULLY BEFORE GOING ANY FURTHER
The most frequent error concerns the Instant Payment Notification URL. The Instant Payment NotificationURL is the only way the PayZen gateway can notify you at the end of your payment. The chapter Setting upthe end of payment notification must be read thoroughly and the provided instructions must be respected.It is essential to understand the difference between the Instant Payment Notification URL and the returnURL which is called only if the buyer clicks on “Return to shop”.
Frequent errors:
• Your PrestaShop shop is in maintenance mode
• Your Instant Payment Notification URL is protected by an .htaccess file
• You have blocked the IP addresses of the payment gateway
• You have not encoded the notification URL in the Merchant Back Office
How to check that the Instant Payment Notification URL has been called:
Via the Merchant Back Office, display the payment details (double click), then go to the “Event log” tab.
IMPORTANT: Other topics are also presented in our FAQ which lists the most frequently asked questionsand is regularly updated. The FAQ module is available via the link below in the Payment modules section> PrestaShop 1.5-1.7:
https://payzen.io/en-EN/faq/sitemap.html
Payment module integration for Prestashop 1.5, 1.6 and 1.7
All rights reserved - 6 / 46

4. INSTALLMENT PAYMENT FEATURES
This module also allows you to offer the possibility to pay in installments. In module settings, you canchoose the number of installments and the delay in days between each installment.
This module will allow you to view an order in your PrestaShop Back Office with the total amount that hasbeen paid using the “payment in 3 installments with no fees” module, for instance.
During the first installment payment, an authorization request for the amount of the first installment issent (if the capture date is before the current date + 6). Therefore, you cannot be sure that the upcominginstallments will be honored. Remember to check that the upcoming installments are authorized.
Starting from the second installment, the IPN is no longer called, as PrestaShop does not support suchnotifications for finalized orders. It is needless to resend the IPN from the Back Office.
However, it is possible to be notified by e-mail in case one of the following installment payments is refused.All you need to do is enable and configure the Installment payment rejection e-mail rule. This rule canbe found in the Settings > Notification rules menu > E-mail sent to the merchant tab of the MerchantBack Office.
Additional feature implemented into this module
For installment payments, the PayZen payment gateway allows to also choose the amount of the firstinstallment.
Example:
For an amount of EUR 100 in 3 installments, you can set the percentage of the first payment at 50% ofthe amount. This means that the amount of the first installment will be EUR 50 and that the two otherswill be of EUR 25.
Payment method view
In module settings, you can define the minimum amount starting from which you wish to offer installmentpayment.
You can also set up the maximum amount until which you wish to offer installment payment.
To sum up, you must define a range for enabling payment in installments.
Payment module integration for Prestashop 1.5, 1.6 and 1.7
All rights reserved - 7 / 46

5. PREREQUISITES
Before integrating the payment module, please make sure that you are in possession of the followingelements:
• Payment module file: PayZen_PrestaShop_1.5-1.7_v1.15.x.zip
• Your shop ID
• Test or production key
The Shop ID and the keys are available in the Merchant Back Office (menu: Settings > Shop > Keys)
Reminder, your Merchant Back Office is available at this address:
https://secure.payzen.eu/vads-merchant/
WARNING: All our payment modules are tested, starting from PHP version 5.3.
Therefore, all the previous PHP versions are no longer supported by our modules. If you have an earlierversion, you must ask your hosting provider to install a more recent version on your server prior tocontacting us.
Please note that the 5.3 version is no longer supported by PHP: http://php.net/supported-versions.php
Payment module integration for Prestashop 1.5, 1.6 and 1.7
All rights reserved - 8 / 46

6. INSTALLATION AND CONFIGURATION OF THE PAYMENTMODULE
6.1. Updating the module
This module version offers this configuration: Signature algorithm, which was not present in some previousversions of our modules. By default, this field is set to HMAC-SHA-256 and its value must be the same asin the PayZen Back Office (Settings > Shop > Keys tab). If the algorithm is different, the parameter mustbe changed via the PayZen Back Office.
From Prestashop 1.7:
It is not necessary to uninstall the old version to update the module anymore. Consequently, you can godirectly to the next step.
From Prestashop 1.6:
To update the payment module, you must first delete its previous version.
WARNING: Make sure you save the parameters of your module before you uninstall it and save theproduction key that is no longer visible in the PayZen Back Office.
1. Go to the Modules and Services > Modules and Services menu of the Prestashop Back Office.
2. Search for the PayZen payment module.
3. Click the arrow to get the drop down list displayed, then select Uninstall.
4. Click the arrow to display the drop-down list, then select Delete.
5. You can now install the new module. The steps are described in the next chapter.
Payment module integration for Prestashop 1.5, 1.6 and 1.7
All rights reserved - 9 / 46

6.2. Adding the payment module
The PayZen payment module can be added in two ways. However, it is strongly recommended to use thefirst method:
Automatic installation:
The first method consists in adding the payment module via the PrestaShop Back Office.
From Prestashop 1.7:
1. Go to the Modules > Module Manager menu of the Prestashop Back Office.
2. Click the Install a module button.
3. A pop-up gets displayed, click Select a file.
4. Select the payment module on your hard drive and click the Open button.
From Prestashop 1.6:
1. Go to the Modules and Services > Modules and Services menu of the Prestashop Back Office.
2. Click on the Add a new module button.
3. In the Add a new module section, click the Choose a file button.
4. Select the payment module on your hard drive and click the Upload this module button.
Manual installation:
The second method consists in copying the module via FTP. To do this, copy the payzen folder from themodule archive into the modules folder of your website.
WARNING: In Prestashop 1.7, the first installation of the module must imperatively be done via the BackOffice Prestashop, in case of an update click the Upgrade button that is present in the Modules > ModulesManager menu.
6.3. Installing the payment module
From Prestashop 1.7:
1. The module is automatically installed when adding it, no further action is required.
From Prestashop 1.6:
1. Go to the Modules and Services > Modules and Services menu of the Prestashop Back Office.
2. Search for the PayZen payment module.
3. Click Install.
Payment module integration for Prestashop 1.5, 1.6 and 1.7
All rights reserved - 10 / 46

6.4. Configuring the payment module
From Prestashop 1.7:
1. Go to the Modules > Module Manager menu of the Prestashop Back Office.
2. Search for the PayZen payment module.
3. Click the Configure button.
From Prestashop 1.6:
1. Go to the Modules and Services > Modules and Services menu of the Prestashop Back Office.
2. Search for the PayZen payment module.
3. Click the Configure button.
How do I configure the module in multi-shop mode?
There are no differences for our payment module, it is configured the same way as any other module inPrestaShop.
The shop can be selected in the top left corner in the PrestaShop menu, you can select:
• All shops in order to edit the settings of all the shops.
• A group to edit all the shops of a group.
• A shop to edit the settings of one shop.
Usually the configuration is done for All shops and then edited for each shop. Do not forget to edit the thename and the shop URL in General configuration.
The module also supports the multi-shop mode for the call to the Instant Notification URL. You must enterthe URL provided in the shop module by default in the Merchant Back Office. This step is described in thechapter Setting up the Instant Payment Notification URL of the module documentation.
Payment module integration for Prestashop 1.5, 1.6 and 1.7
All rights reserved - 11 / 46

6.4.1. General configuration
Basic settings
Logs Allows to enable or disable module logs.The logs will be available in the /var/logs, /log or /app/logs/ directory depending onyour version of Prestashop.The module generates 1 log file per month.This parameter is enabled by default.
Access to the payment gateway
Shop ID Indicate the 8-digit shop ID, available in your Merchant Back Office (Menu: Settings> Shop > Keys).
Test key Specify the test key available via your Merchant Back Office (Menu: Settings > Shop> Keys).
Production key Specify the production key available in your Merchant Back Office (Menu: Settings> Shop > Keys).Note that the production key will only become available after the test phase hasbeen completed.
Mode Allows to indicate the operating mode of the module (TEST or PRODUCTION).The PRODUCTION mode becomes available only after the test phase has beencompleted.The TEST mode is always available.
Signature algorithm Algorithm used to compute the signature of the payment form.The algorithm must be the same as the one configured in the Merchant Back Office(Settings > Shop > Keys).If the algorithm is different, the parameter will have to be modified via theMerchant Back Office.
Instant Payment Notification URL URL to copy in your Merchant Back Office (Settings > Notification rules >Instant Payment Notification URL at the end of the payment > Instant PaymentNotification URL of the API form V1, V2 menu).For more information, see the chapter and the sub-chapters on Configuring thenotification URL.
Payment page URL This field is pre-populated by default: https://secure.payzen.eu/vads-payment/
REST API keys
Test password Password allowing to use Web Services or embedded payment fields in test mode.The password is available in your Merchant Back Office (Menu: Settings > Shops >REST API keys).
Production password Password allowing to use Web Services or embedded form in production mode.The password is available in your Merchant Back Office (Menu: Settings > Shops >REST API keys).
IPN URL of the REST API This field is pre-populated by default:https://api.payzen.eu/api-payment/It is recommended to leave the default value.
Public test key The test public key must be filled in if you use the embedded payment fields, suchas Card data entry mode.The public key is available via your Merchant Back Office (Menu: Settings > Shops >REST API keys).
Public production key The production public key be must be filled in if you use the embedded paymentfields, such as Card data entry mode.The public key is available via your Merchant Back Office (Menu: Settings > Shops >REST API keys).
HMAC-SHA-256 test key The test HMAC-SHA--256 key must be filled in if you use the embedded paymentfields, such as the Card data entry mode.The HMAC-SHA-256 key is available from your Merchant Back Office (Menu:Settings > Shops > REST API keys).
HMAC-SHA-256 production key The production HMAC-SHA--256 key must be filled in if you use the embeddedpayment fields, such as the Card data entry mode.The HMAC-SHA-256 key is available from your Merchant Back Office (Menu:Settings > Shops > REST API keys).
Payment module integration for Prestashop 1.5, 1.6 and 1.7
All rights reserved - 12 / 46

REST API keys
REST API Instant Payment NotificationURL
URL to copy in your Merchant Back Office (Settings > Notification rules > InstantPayment Notification URL at the end of the payment > REST API Instant PaymentNotification URL menu).For more information, see the chapter and the sub-chapters on Configuring thenotification URL.
JavaScript client URL This field is pre-populated by default:https://api.payzen.eu/static/It is recommended to leave the default value.
Payment page
Default language This option allows to choose the default language of the payment page in case thelanguage of PrestaShop is not supported by PayZen.If the language(s) used by the PrestaShop is (are) implemented into PayZen, thepayment page will be displayed in the language of PrestaShop when the buyerclicks on “Pay”.
Available languages Allows to customize the language displayed on the payment page.The buyer will be able to select a language when he or she is redirected to thepayment page.If you do not select any language, all languages will be displayed on the paymentpage.To select a language, press and hold the “Ctrl” key and click on the desiredlanguages.Available languages:German, English, Chinese, Spanish, French, Italian, Japanese, Dutch, Polish,Portuguese, Russian, Swedish, Turkish.
Capture delay Indicates the delay (in days) before the capture.By default, this parameter can be configured in your Merchant Back Office (menu:Settings > Shop > Configuration - section: Capture delay).It is recommended to not populate this parameter.
Validation mode Back Office configuration: Recommended value.Allows to use the configuration defined in the Merchant Back Office (menu:Settings > Shop > Configuration section: validation mode).Automatic:This value indicates that the payment will be captured in the bank automaticallywithout any action on the merchant’s part.Manual:This value indicates that the transactions will require manual validation by themerchant via the Merchant Back Office.Warning: if the transaction is not validated by the merchant before the expirationdate of the authorization request, it will never be captured in the bank.Remember to configure the Instant Payment Notification rule on an operationcoming from the Back Office to update the order status in PrestaShop.
Customizing the payment page
Theme configuration Allows to customize the payment page by using specific keywords.If you have created several models in the Merchant Back Office, enter for example:RESPONSIVE_MODEL=Model_2 if you want to use the design of your Model_2.Warning: Some keywords can only be used if the “Advanced customization” optionhas been enabled.
Shop name You can define the name of your shop that will appear in order confirmation e-mails.If the field is empty, the shop name that was registered in the Merchant Back Officewill be the one to appear in the e-mail.
Shop URL You can define the shop URL that will appear on the payment page and in the orderconfirmation e-mail.If the field is empty, the shop URL that was registered in the Merchant Back Officewill be the one to appear on the payment page and in the e-mail.
Payment module integration for Prestashop 1.5, 1.6 and 1.7
All rights reserved - 13 / 46
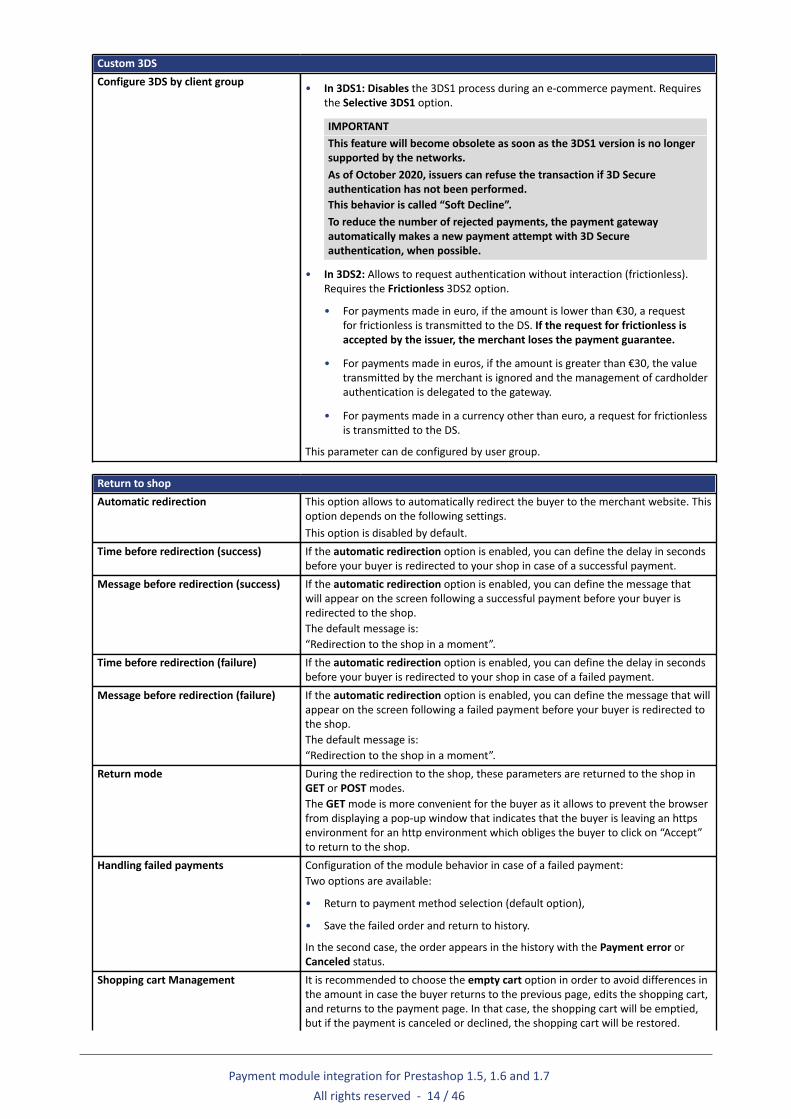
Custom 3DS
Configure 3DS by client group • In 3DS1: Disables the 3DS1 process during an e-commerce payment. Requiresthe Selective 3DS1 option.
IMPORTANTThis feature will become obsolete as soon as the 3DS1 version is no longersupported by the networks.As of October 2020, issuers can refuse the transaction if 3D Secureauthentication has not been performed.This behavior is called “Soft Decline”.To reduce the number of rejected payments, the payment gatewayautomatically makes a new payment attempt with 3D Secureauthentication, when possible.
• In 3DS2: Allows to request authentication without interaction (frictionless).Requires the Frictionless 3DS2 option.
• For payments made in euro, if the amount is lower than €30, a requestfor frictionless is transmitted to the DS. If the request for frictionless isaccepted by the issuer, the merchant loses the payment guarantee.
• For payments made in euros, if the amount is greater than €30, the valuetransmitted by the merchant is ignored and the management of cardholderauthentication is delegated to the gateway.
• For payments made in a currency other than euro, a request for frictionlessis transmitted to the DS.
This parameter can de configured by user group.
Return to shop
Automatic redirection This option allows to automatically redirect the buyer to the merchant website. Thisoption depends on the following settings.This option is disabled by default.
Time before redirection (success) If the automatic redirection option is enabled, you can define the delay in secondsbefore your buyer is redirected to your shop in case of a successful payment.
Message before redirection (success) If the automatic redirection option is enabled, you can define the message thatwill appear on the screen following a successful payment before your buyer isredirected to the shop.The default message is:“Redirection to the shop in a moment”.
Time before redirection (failure) If the automatic redirection option is enabled, you can define the delay in secondsbefore your buyer is redirected to your shop in case of a failed payment.
Message before redirection (failure) If the automatic redirection option is enabled, you can define the message that willappear on the screen following a failed payment before your buyer is redirected tothe shop.The default message is:“Redirection to the shop in a moment”.
Return mode During the redirection to the shop, these parameters are returned to the shop inGET or POST modes.The GET mode is more convenient for the buyer as it allows to prevent the browserfrom displaying a pop-up window that indicates that the buyer is leaving an httpsenvironment for an http environment which obliges the buyer to click on “Accept”to return to the shop.
Handling failed payments Configuration of the module behavior in case of a failed payment:Two options are available:
• Return to payment method selection (default option),
• Save the failed order and return to history.
In the second case, the order appears in the history with the Payment error orCanceled status.
Shopping cart Management It is recommended to choose the empty cart option in order to avoid differences inthe amount in case the buyer returns to the previous page, edits the shopping cart,and returns to the payment page. In that case, the shopping cart will be emptied,but if the payment is canceled or declined, the shopping cart will be restored.
Payment module integration for Prestashop 1.5, 1.6 and 1.7
All rights reserved - 14 / 46

Return to shopTo keep the Prestashop default behavior, select the second option. However, youtake the risk of having differences in the amount of some payments.
Customer service messages Enable or disable the comments added by the payment module in the after-salesservice messages.This setting is enabled by default.
Additional options
Send shopping cart details Select Activate if you wish to send the shopping cart details to the paymentgateway.For some payment methods, such as PayPal, this data is required. In this case, thecart data will be sent anyway, even if the parameter is disabled.
Category association Associate a type with each category in your catalog. This information is required aswell as for risk assessment (the corresponding option must be enabled).You can:• Quickly associate a category with all the products in your catalog• Associate a type with each category in your catalogThe categories are:Food and grocery | Cars | Entertainment | Home and gardening | Householdappliances | Auctions and group purchasing | Flowers and presents | Computersand software | Health and beauty | Services for individuals | Services forcompanies | Sports | Clothes and accessories | Travel | Home audio, photo, video |Telephony
Send advanced shipping details Select “No” if you do not want to send advanced shipping details for each payment(delivery company, type, shipping speed).
Payment method title The payment module will automatically detect all the available transporters on yourwebsite.
Name Defines the name of a transporter.The maximal length is 55 characters.The only authorized special characters are: space, slash, hyphen, apostrophe.
Type Allows to choose the type of transporter from the following options:Delivery company:Transporters (La Poste, Colissimo, UPS, DHL, etc.)Store pick-up:Item pickup directly from the merchant.Relay point:Use of a network of delivery points (Kiala, Alveol, etc.)Pick-up at a station:Item pickup at an airport, a train station or a travel agency.
Speed Shipping speed:Express (less than 24h) or standard.StandardPriority (reserved to Click & Collect)
Delay In case of picking up the item at the shop (Click & Collect) with priority delivery,select the delivery delay from the following options:≤ 1 hour> 1 hourImmediate24/7
Address In case of in-store pickup, populate this field as follows:Address + ZIP Code + City
Once you have completed the configuration, click Save.
Payment module integration for Prestashop 1.5, 1.6 and 1.7
All rights reserved - 15 / 46

6.4.2. Standard payment
Module option
Activation In order to enable the payment method, select Enabled.This mode is set to Enabled by default.
Payment method title This option allows you to define the title of the payment method.The buyer will see this title when choosing a payment method.If your shop is available in several languages, a drop-down list will appear to theright of the method title. Changing the language allows you to enter a different titlein each language.
Restrictions
Supported countries Configure the countries for which the payment method is available:
• All countries: the payment method is available for all countries.
• Specific countries: after choosing this option, the list of Authorized countriesappears. Press and hold “Ctrl” and select the countries of your choice fromthe list of Authorized countries.
Minimum amount This field defines the minimum amount for which you wish to offer this paymentmethod.By defining a minimum amount for ALL GROUPS, the payment method will not beenabled for users with a smaller shopping cart amount.It is also possible to define a minimum amount for each customer group in yourshop.
Maximum amount This field defines the maximum amount beyond which you do not wish to offer thispayment method.By defining a minimum amount for ALL GROUPS, the payment method will not beenabled for users with a greater shopping cart amount.It is also possible to define a maximum amount for each customer group in yourshop.
Payment page
Capture delay Delay (in days) before the capture for this payment method.If you leave this field empty, the value configured in the General configurationsection will be applied.If the Capture delay field of the General configuration is also empty, the valueconfigured in the Merchant Back Office will be applied.
Validation mode Validation mode for this payment method.General configuration of the module: Recommended value.Allows to apply the configuration defined in the General configuration section.Back Office configuration:Allows to use the configuration defined in the Merchant Back Office (menu:Settings > Shop > Configuration – section: validation mode)Automatic:This value indicates that the payment will be captured in the bank automaticallywithout any action on the merchant’s part.Manual:This value indicates that the transactions will require manual validation by themerchant via the Merchant Back Office.Warning: if the transaction is not validated by the merchant before the expirationdate, it will not be captured in the bank.Remember to configure the Instant Payment Notification rule on an operationcoming from the Back Office to update the order status in PrestaShop.
Card types This field allows to indicate the images used for cards that will be displayed on thepayment page or on the merchant website (see “Card data entry”).Warning:The payment types offered to the buyer on the payment page depend on thecontracts and options associated with your PayZen offer.It is recommended to select the ALL value.
Payment module integration for Prestashop 1.5, 1.6 and 1.7
All rights reserved - 16 / 46
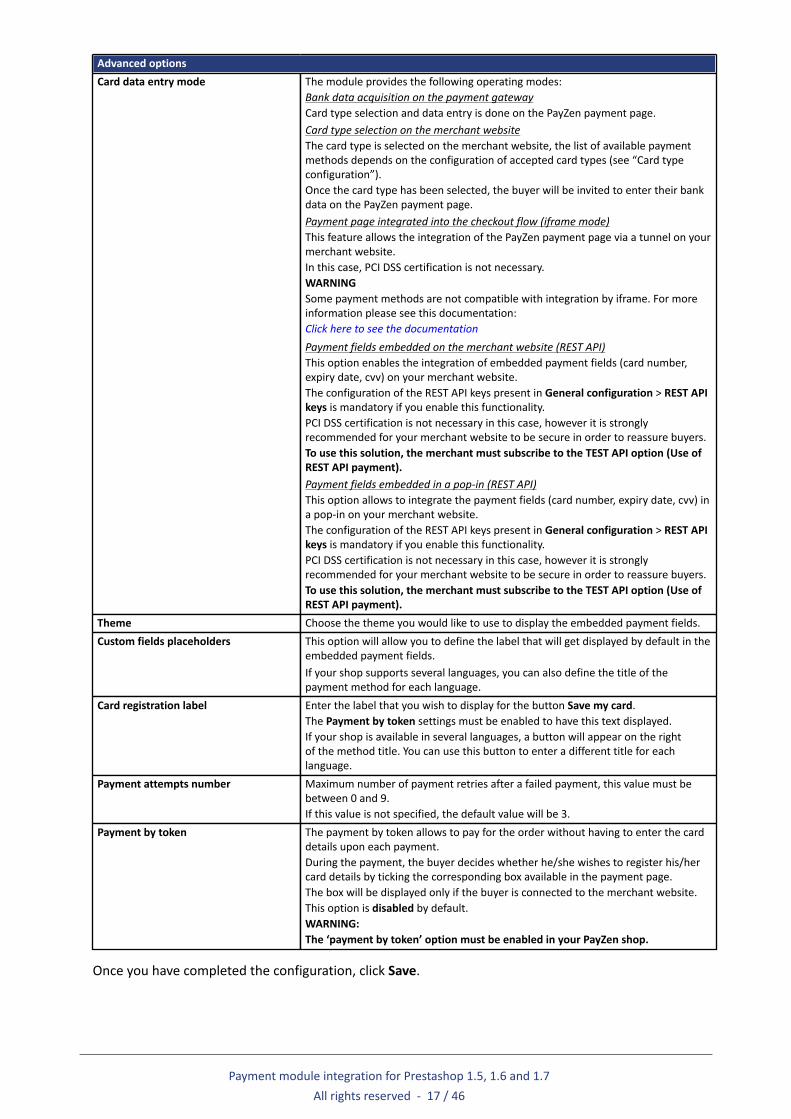
Advanced options
Card data entry mode The module provides the following operating modes:Bank data acquisition on the payment gatewayCard type selection and data entry is done on the PayZen payment page.Card type selection on the merchant websiteThe card type is selected on the merchant website, the list of available paymentmethods depends on the configuration of accepted card types (see “Card typeconfiguration”).Once the card type has been selected, the buyer will be invited to enter their bankdata on the PayZen payment page.Payment page integrated into the checkout flow (iframe mode)This feature allows the integration of the PayZen payment page via a tunnel on yourmerchant website.In this case, PCI DSS certification is not necessary.WARNINGSome payment methods are not compatible with integration by iframe. For moreinformation please see this documentation:Click here to see the documentation
Payment fields embedded on the merchant website (REST API)This option enables the integration of embedded payment fields (card number,expiry date, cvv) on your merchant website.The configuration of the REST API keys present in General configuration > REST APIkeys is mandatory if you enable this functionality.PCI DSS certification is not necessary in this case, however it is stronglyrecommended for your merchant website to be secure in order to reassure buyers.To use this solution, the merchant must subscribe to the TEST API option (Use ofREST API payment).Payment fields embedded in a pop-in (REST API)This option allows to integrate the payment fields (card number, expiry date, cvv) ina pop-in on your merchant website.The configuration of the REST API keys present in General configuration > REST APIkeys is mandatory if you enable this functionality.PCI DSS certification is not necessary in this case, however it is stronglyrecommended for your merchant website to be secure in order to reassure buyers.To use this solution, the merchant must subscribe to the TEST API option (Use ofREST API payment).
Theme Choose the theme you would like to use to display the embedded payment fields.
Custom fields placeholders This option will allow you to define the label that will get displayed by default in theembedded payment fields.If your shop supports several languages, you can also define the title of thepayment method for each language.
Card registration label Enter the label that you wish to display for the button Save my card.The Payment by token settings must be enabled to have this text displayed.If your shop is available in several languages, a button will appear on the rightof the method title. You can use this button to enter a different title for eachlanguage.
Payment attempts number Maximum number of payment retries after a failed payment, this value must bebetween 0 and 9.If this value is not specified, the default value will be 3.
Payment by token The payment by token allows to pay for the order without having to enter the carddetails upon each payment.During the payment, the buyer decides whether he/she wishes to register his/hercard details by ticking the corresponding box available in the payment page.The box will be displayed only if the buyer is connected to the merchant website.This option is disabled by default.WARNING:The ‘payment by token’ option must be enabled in your PayZen shop.
Once you have completed the configuration, click Save.
Payment module integration for Prestashop 1.5, 1.6 and 1.7
All rights reserved - 17 / 46

6.4.3. Payment in installments
Module option
Activation In order to enable the payment method, select Enabled.By default, this method is Disabled.
Payment method title This option allows you to define the title of the payment method.The buyer will see this title when choosing a payment method.If your shop is available in several languages, a drop-down list will appear to theright of the method title. Changing the language allows you to enter a different titlein each language.
Restrictions
Supported countries Configure the countries for which the payment method is available:
• All countries: the payment method is available for all countries.
• Specific countries: after choosing this option, the list of Authorized countriesappears. Press and hold “Ctrl” and select the countries of your choice fromthe list of Authorized countries.
Minimum amount This field defines the minimum amount for which you wish to offer this paymentmethod.By defining a minimum amount for ALL GROUPS, the payment method will not beenabled for users with a smaller shopping cart amount.It is also possible to define a minimum amount for each customer group in yourshop.
Maximum amount This field defines the maximum amount beyond which you do not wish to offer thispayment method.By defining a minimum amount for ALL GROUPS, the payment method will not beenabled for users with a greater shopping cart amount.It is also possible to define a maximum amount for each customer group in yourshop.
Payment page
Capture delay Delay (in days) before the capture for this payment method.If you leave this field empty, the value configured in the General configurationsection will be applied.If the Capture delay field of the General configuration is also empty, the valueconfigured in the Merchant Back Office will be applied.
Validation mode Validation mode for this payment method.General configuration of the module: Recommended value.Allows to apply the configuration defined in the General configuration section.Back Office configuration:Allows to use the configuration defined in the Merchant Back Office (menu:Settings > Shop > Configuration – section: validation mode)Automatic:This value indicates that the payment will be captured in the bank automaticallywithout any action on the merchant’s part.Manual:This value indicates that the transactions will require manual validation by themerchant via the Merchant Back Office.Warning: if the transaction is not validated by the merchant before the expirationdate, it will not be captured in the bank.Remember to configure the Instant Payment Notification rule on an operationcoming from the Back Office to update the order status in PrestaShop.
Card types This field allows to indicate the images used for cards that will be displayed on thepayment page or on the merchant website (see “Card data entry”).Warning:The payment types offered to the buyer on the payment page depend on thecontracts and options associated with your PayZen offer.It is recommended to select the ALL value.
Payment module integration for Prestashop 1.5, 1.6 and 1.7
All rights reserved - 18 / 46

Advanced options
Card type selection The module provides 2 operating modes:On the payment gatewayThe card type is selected on the PayZen payment page.On the merchant websiteThe card type is chosen when the buyer selects the “Pay by credit card ininstallments” payment method.The list of available payment methods depends on the configuration of acceptedcard types (see “Configuration of the card type”).
Payment options
Payment option This module allows you to create as many credit card installment payment optionsas you like.Each payment option will have a different code that will be displayed in the ordertable.To add a payment option, click on Add.When you are done, remember to save your changes.
Label Text describing the installment payment option as it will be offered to the buyer.Example: Pay in 3 installments with no fees
Minimum amount Allows to define the minimum amount required to make the payment optionavailable.
Maximum amount Allows to define the maximum amount required to make the payment optionavailable.
Merchant ID The Merchant ID to use with the option, in case your shop has several MerchantIDs.It is recommended to leave this field empty.
Number Number of installments:3 for payment in 3 installments4 for payment in 4 installmentsetc.
Period Period (in days) between each installment.
First installment Amount of the first installment, expressed as a percentage of the total amount.Example:For an amount of EUR 100 in 3 installments, you canset the percentage of the first payment at 50% of theamount. This means that the amount of thefirst installment will be EUR 50 an that the twoothers will be of EUR 25.For 50% enter 50.If you want the amount of every installment to be the same, leave this field empty.
Once you have completed the configuration, click Save.
Payment module integration for Prestashop 1.5, 1.6 and 1.7
All rights reserved - 19 / 46

6.4.4. Payment in 3 or 4 installments with Oney
For the merchant
• Sign a 3x 4x Oney acceptance contract with Oney.
• Enable the 3x 4x Oney payment option with the customer service of your payment gateway.
For the buyer
• Send a request for online credit to Oney, no supporting paper documents are necessary.
Module option
Activation To enable the Oney 3x 4x payment method, select Enabled.By default, this option is Disabled.
Payment method title This option allows you to define the title of the payment method.The buyer will see this title when choosing a payment method.If your shop is available in several languages, a drop-down list will appear to theright of the method title. Changing the language allows you to enter a different titlein each language.
Restrictions
Supported countries Configure the countries for which the payment method is available:
• All countries: the payment method is available for all countries.
• Specific countries: after choosing this option, the list of Authorized countriesappears. Press and hold “Ctrl” and select the countries of your choice fromthe list of Authorized countries.
Minimum amount This field defines the minimum amount for which you wish to offer this paymentmethod.By defining a minimum amount for ALL GROUPS, the payment method will not beenabled for users with a smaller shopping cart amount.It is also possible to define a minimum amount for each customer group in yourshop.
Maximum amount This field defines the maximum amount beyond which you do not wish to offer thispayment method.By defining a minimum amount for ALL GROUPS, the payment method will not beenabled for users with a greater shopping cart amount.It is also possible to define a maximum amount for each customer group in yourshop.
Payment page
Capture delay Delay (in days) before the capture for this payment method.If you leave this field empty, the value configured in the General configurationsection will be applied.If the Capture delay field of the General configuration is also empty, the valueconfigured in the Merchant Back Office will be applied.
Validation mode Validation mode for this payment method.General configuration of the module: Recommended value.Allows to apply the configuration defined in the General configuration section.Back Office configuration:Allows to use the configuration defined in the Merchant Back Office (menu:Settings > Shop > Configuration – section: validation mode)Automatic:This value indicates that the payment will be captured in the bank automaticallywithout any action on the merchant’s part.Manual:This value indicates that the transactions will require manual validation by themerchant via the Merchant Back Office.Warning: if the transaction is not validated by the merchant before the expirationdate, it will not be captured in the bank.Remember to configure the Instant Payment Notification rule on an operationcoming from the Back Office to update the order status in PrestaShop.
Payment module integration for Prestashop 1.5, 1.6 and 1.7
All rights reserved - 20 / 46

Payment options
Add Click the Add button to configure payment options.This configuration is required for the Oney 3x 4x payment method to work.
Label Enter the label of the option that will be displayed during checkout.
Code Enter the technical code provided by Oney (e.g.: PNF3P).
Minimum amount Enter the minimum amount for which this option can be used.
Maximum amount Enter the maximum amount for which this option can be used.
Number Enter the number of installments (3 for a payment in 3 installments, etc. ).
Interest rate Indicate the interest rate applied to the payments. The indicated value is used onlyfor option label customization.
Important notes
For the order status to be updated in PrestaShop, you must configure the Instant Payment NotificationURL on batch change notification rule (see chapter “Setting up the Instant Payment Notification URL”).
IPN in case of cancellation must be configured in order to prevent PrestaShop from sending the sameorder ID twice.
WARNING: If you change the transporter configuration in the CMS, go to the payment module settings andsave the changes for the new data to be taken into account. This action will allow the module to updatethe changes in our module that were made on the transporter’s side. Otherwise, payments will be rejectedwith one of the following error codes: 94 – SHIP_TO_TYPE or 92 – CUST_STATUS.
Payment module integration for Prestashop 1.5, 1.6 and 1.7
All rights reserved - 21 / 46

6.4.5. Franfinance payment
In order to enable the Franfinance payment method:
1. Sign an acceptance contract with Franfinance.
You will receive an e-mail with the technical elements (Merchant ID and authentication keys for theSandbox mode).
2. Once you have these technical elements, you must add a Franfinance Sandbox MID to your shop.
The process is described in Franfinance documentation.
Module option
Activation To enable the Franfinance payment method, select Enabled.By default, this option is Disabled.Activation redirects the buyer directly to the Franfinance payment page.However, this payment method can also appear on the payment page if the buyerselects the standard payment (if there are no restrictions in General configuration> Card Types).
Payment method title This option allows you to define the title of the payment method.The buyer will see this title when choosing a payment method.If your shop is available in several languages, a drop-down list will appear to theright of the method title. Changing the language allows you to enter a different titlein each language.
Restrictions
Supported countries Configure the countries for which the payment method is available:
• All countries: the payment method is available for all countries.
• Specific countries: after choosing this option, the list of Authorized countriesappears. Press and hold “Ctrl” and select the countries of your choice fromthe list of Authorized countries.
Minimum amount This field defines the minimum amount for which you wish to offer this paymentmethod.By defining a minimum amount for ALL GROUPS, the payment method will not beenabled for users with a smaller shopping cart amount.It is also possible to define a minimum amount for each customer group in yourshop.
Maximum amount This field defines the maximum amount beyond which you do not wish to offer thispayment method.By defining a minimum amount for ALL GROUPS, the payment method will not beenabled for users with a greater shopping cart amount.It is also possible to define a maximum amount for each customer group in yourshop.
Payment options
Label Enter the label of the option that will be displayed during checkout.The default values are:
• Payment in 3 installments
• Payment in 4 installments
Number Enter the number of installments (3 for a payment in 3 installments, etc. ).
Fees The module provides 3 operating modes:PayZen Back Office configuration:It will use the default settings configured in the Merchant Back Office.These values can be viewed and changed via the menu: Settings > Company >Merchant Ids tab.Select your Franfinance contract > Details tab > Default payment option section.No fees:It will force the deactivation of fees for this option.With fees:It will force the activation of fees for this option.
Payment module integration for Prestashop 1.5, 1.6 and 1.7
All rights reserved - 22 / 46

Payment optionsWARNING: Make sure you have correctly filled in the corresponding authenticationstrings in your Franfinance contract, before forcing the application of fees for apayment option.
Minimum amount Enter the minimum amount for each option.
Maximum amount Fill the maximum amount for each option.
Once you have completed the configuration, click Save.
Payment module integration for Prestashop 1.5, 1.6 and 1.7
All rights reserved - 23 / 46
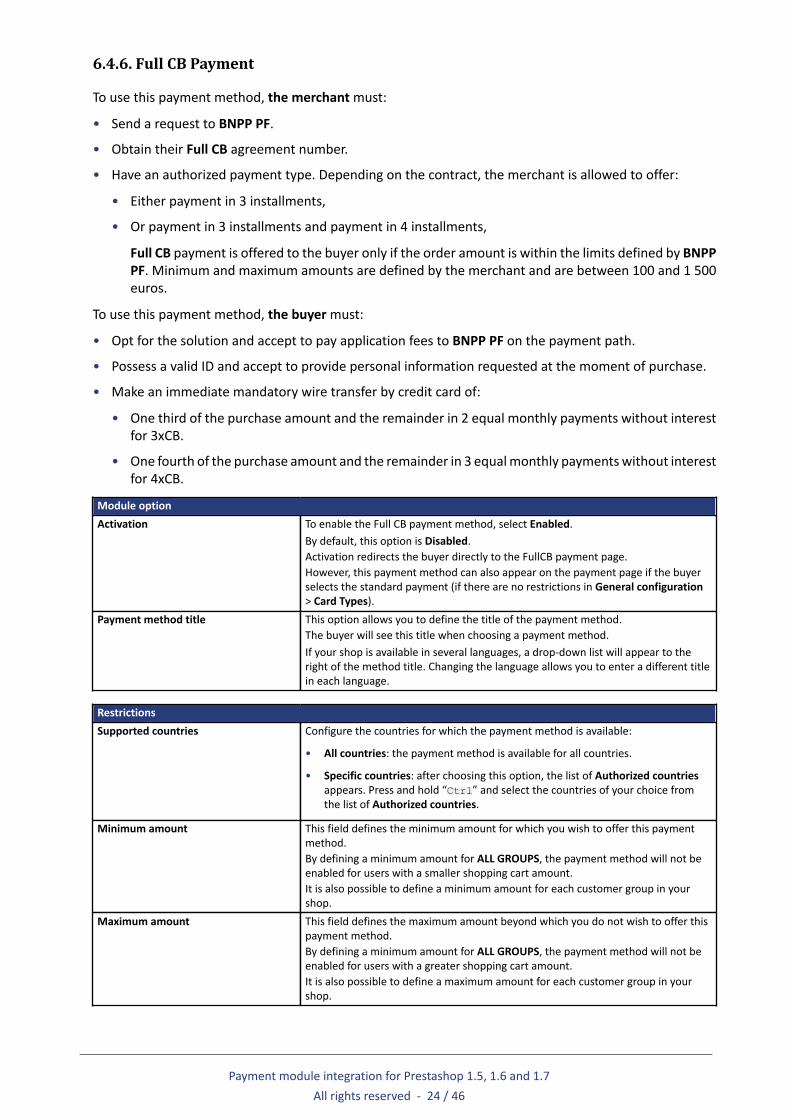
6.4.6. Full CB Payment
To use this payment method, the merchant must:
• Send a request to BNPP PF.
• Obtain their Full CB agreement number.
• Have an authorized payment type. Depending on the contract, the merchant is allowed to offer:
• Either payment in 3 installments,
• Or payment in 3 installments and payment in 4 installments,
Full CB payment is offered to the buyer only if the order amount is within the limits defined by BNPPPF. Minimum and maximum amounts are defined by the merchant and are between 100 and 1 500euros.
To use this payment method, the buyer must:
• Opt for the solution and accept to pay application fees to BNPP PF on the payment path.
• Possess a valid ID and accept to provide personal information requested at the moment of purchase.
• Make an immediate mandatory wire transfer by credit card of:
• One third of the purchase amount and the remainder in 2 equal monthly payments without interestfor 3xCB.
• One fourth of the purchase amount and the remainder in 3 equal monthly payments without interestfor 4xCB.
Module option
Activation To enable the Full CB payment method, select Enabled.By default, this option is Disabled.Activation redirects the buyer directly to the FullCB payment page.However, this payment method can also appear on the payment page if the buyerselects the standard payment (if there are no restrictions in General configuration> Card Types).
Payment method title This option allows you to define the title of the payment method.The buyer will see this title when choosing a payment method.If your shop is available in several languages, a drop-down list will appear to theright of the method title. Changing the language allows you to enter a different titlein each language.
Restrictions
Supported countries Configure the countries for which the payment method is available:
• All countries: the payment method is available for all countries.
• Specific countries: after choosing this option, the list of Authorized countriesappears. Press and hold “Ctrl” and select the countries of your choice fromthe list of Authorized countries.
Minimum amount This field defines the minimum amount for which you wish to offer this paymentmethod.By defining a minimum amount for ALL GROUPS, the payment method will not beenabled for users with a smaller shopping cart amount.It is also possible to define a minimum amount for each customer group in yourshop.
Maximum amount This field defines the maximum amount beyond which you do not wish to offer thispayment method.By defining a minimum amount for ALL GROUPS, the payment method will not beenabled for users with a greater shopping cart amount.It is also possible to define a maximum amount for each customer group in yourshop.
Payment module integration for Prestashop 1.5, 1.6 and 1.7
All rights reserved - 24 / 46

Payment options
Enable option selection Select Yes if you wish to force the use of a payment option available with your FullCB contract.This option is set to No by default.
Activation Check the box to enable the payment method.This mode is set to Enabled by default.
Label Enter the label of the option that will be displayed during checkout.The default values are:
• Payment in 3 installments
• Payment in 4 installments
Minimum amount Enter the minimum amount for each option.
Maximum amount Fill the maximum amount for each option.
Interest rate Indicate the interest rate applied to the payments.The default values are:
• 1.4 for payment in 3 installments.
• 2.1 for payment in 4 installments.
Fee cap Indicate the payment option fee cap.Default values:
• 9 for payment in 3 installments.
• 12 for payment in 4 installments.
Once you have completed the configuration, click Save.
Payment module integration for Prestashop 1.5, 1.6 and 1.7
All rights reserved - 25 / 46

6.4.7. ANCV payment
To use this payment method, the merchant must:
• Work in the tourism and leisure sector.
• Be an ANCV beneficiary, i.e. have signed the ANCV agreement.
• Request the activation of the e-Chèque-Vacances payment method via the payment gateway.
Module option
Activation To enable the ANCV payment method, select Enabled.By default, this method is Disabled.Activation redirects the buyer directly to the ANCV payment page.However, this payment method can also appear on the payment page if the buyerselects the standard payment (if there are no restrictions in General configuration> Card Types).
Payment method title This option allows you to define the title of the payment method.The buyer will see this title when choosing a payment method.If your shop is available in several languages, a drop-down list will appear to theright of the method title. Changing the language allows you to enter a different titlein each language.
Restrictions
Supported countries Configure the countries for which the payment method is available:
• All countries: the payment method is available for all countries.
• Specific countries: after choosing this option, the list of Authorized countriesappears. Press and hold “Ctrl” and select the countries of your choice fromthe list of Authorized countries.
Minimum amount This field defines the minimum amount for which you wish to offer this paymentmethod.By defining a minimum amount for ALL GROUPS, the payment method will not beenabled for users with a smaller shopping cart amount.It is also possible to define a minimum amount for each customer group in yourshop.
Maximum amount This field defines the maximum amount beyond which you do not wish to offer thispayment method.By defining a minimum amount for ALL GROUPS, the payment method will not beenabled for users with a greater shopping cart amount.It is also possible to define a maximum amount for each customer group in yourshop.
Payment page
Capture delay Delay (in days) before the capture for this payment method.If you leave this field empty, the value configured in the General configurationsection will be applied.If the Capture delay field of the General configuration is also empty, the valueconfigured in the Merchant Back Office will be applied.
Validation mode Validation mode for this payment method.General configuration of the module: Recommended value.Allows to apply the configuration defined in the General configuration section.Back Office configuration:Allows to use the configuration defined in the Merchant Back Office (menu:Settings > Shop > Configuration – section: validation mode)Automatic:This value indicates that the payment will be captured in the bank automaticallywithout any action on the merchant’s part.Manual:This value indicates that the transactions will require manual validation by themerchant via the Merchant Back Office.Warning: if the transaction is not validated by the merchant before the expirationdate, it will not be captured in the bank.
Payment module integration for Prestashop 1.5, 1.6 and 1.7
All rights reserved - 26 / 46
Payment pageRemember to configure the Instant Payment Notification rule on an operationcoming from the Back Office to update the order status in PrestaShop.
Once you have completed the configuration, click Save.
Payment module integration for Prestashop 1.5, 1.6 and 1.7
All rights reserved - 27 / 46
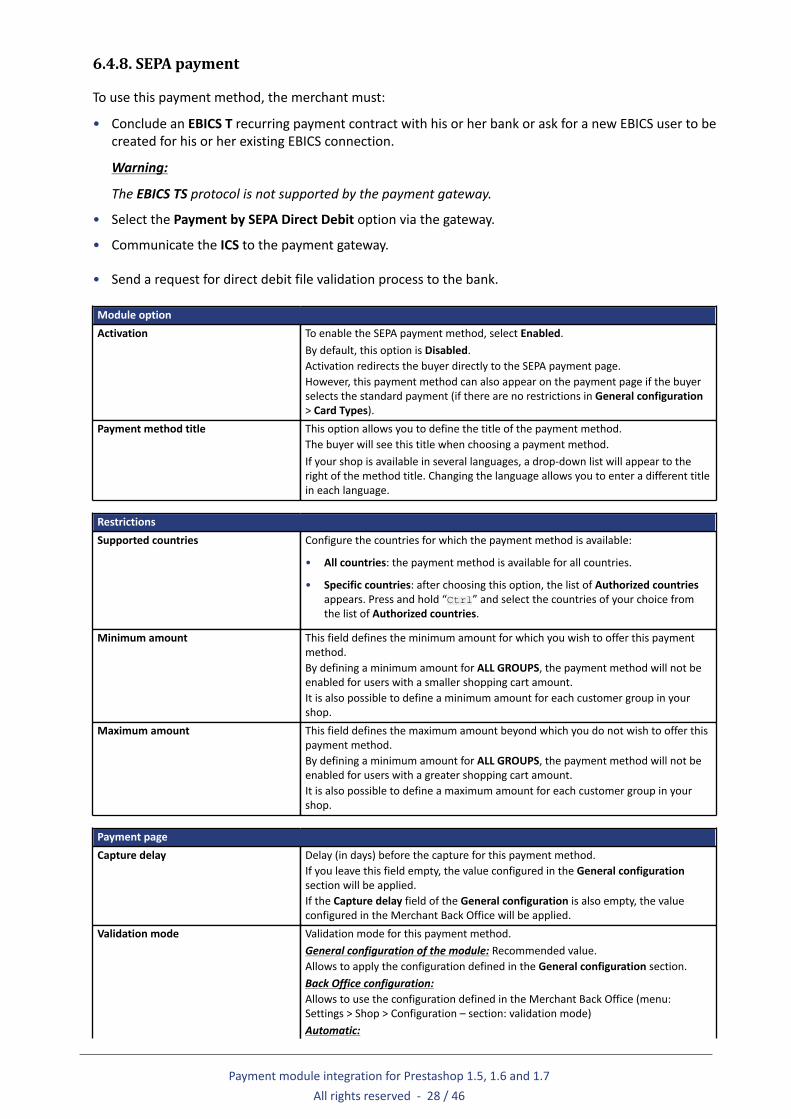
6.4.8. SEPA payment
To use this payment method, the merchant must:
• Conclude an EBICS T recurring payment contract with his or her bank or ask for a new EBICS user to becreated for his or her existing EBICS connection.
Warning:
The EBICS TS protocol is not supported by the payment gateway.
• Select the Payment by SEPA Direct Debit option via the gateway.
• Communicate the ICS to the payment gateway.
• Send a request for direct debit file validation process to the bank.
Module option
Activation To enable the SEPA payment method, select Enabled.By default, this option is Disabled.Activation redirects the buyer directly to the SEPA payment page.However, this payment method can also appear on the payment page if the buyerselects the standard payment (if there are no restrictions in General configuration> Card Types).
Payment method title This option allows you to define the title of the payment method.The buyer will see this title when choosing a payment method.If your shop is available in several languages, a drop-down list will appear to theright of the method title. Changing the language allows you to enter a different titlein each language.
Restrictions
Supported countries Configure the countries for which the payment method is available:
• All countries: the payment method is available for all countries.
• Specific countries: after choosing this option, the list of Authorized countriesappears. Press and hold “Ctrl” and select the countries of your choice fromthe list of Authorized countries.
Minimum amount This field defines the minimum amount for which you wish to offer this paymentmethod.By defining a minimum amount for ALL GROUPS, the payment method will not beenabled for users with a smaller shopping cart amount.It is also possible to define a minimum amount for each customer group in yourshop.
Maximum amount This field defines the maximum amount beyond which you do not wish to offer thispayment method.By defining a minimum amount for ALL GROUPS, the payment method will not beenabled for users with a greater shopping cart amount.It is also possible to define a maximum amount for each customer group in yourshop.
Payment page
Capture delay Delay (in days) before the capture for this payment method.If you leave this field empty, the value configured in the General configurationsection will be applied.If the Capture delay field of the General configuration is also empty, the valueconfigured in the Merchant Back Office will be applied.
Validation mode Validation mode for this payment method.General configuration of the module: Recommended value.Allows to apply the configuration defined in the General configuration section.Back Office configuration:Allows to use the configuration defined in the Merchant Back Office (menu:Settings > Shop > Configuration – section: validation mode)Automatic:
Payment module integration for Prestashop 1.5, 1.6 and 1.7
All rights reserved - 28 / 46
Payment pageThis value indicates that the payment will be captured in the bank automaticallywithout any action on the merchant’s part.Manual:This value indicates that the transactions will require manual validation by themerchant via the Merchant Back Office.Warning: if the transaction is not validated by the merchant before the expirationdate, it will not be captured in the bank.Remember to configure the Instant Payment Notification rule on an operationcoming from the Back Office to update the order status in PrestaShop.
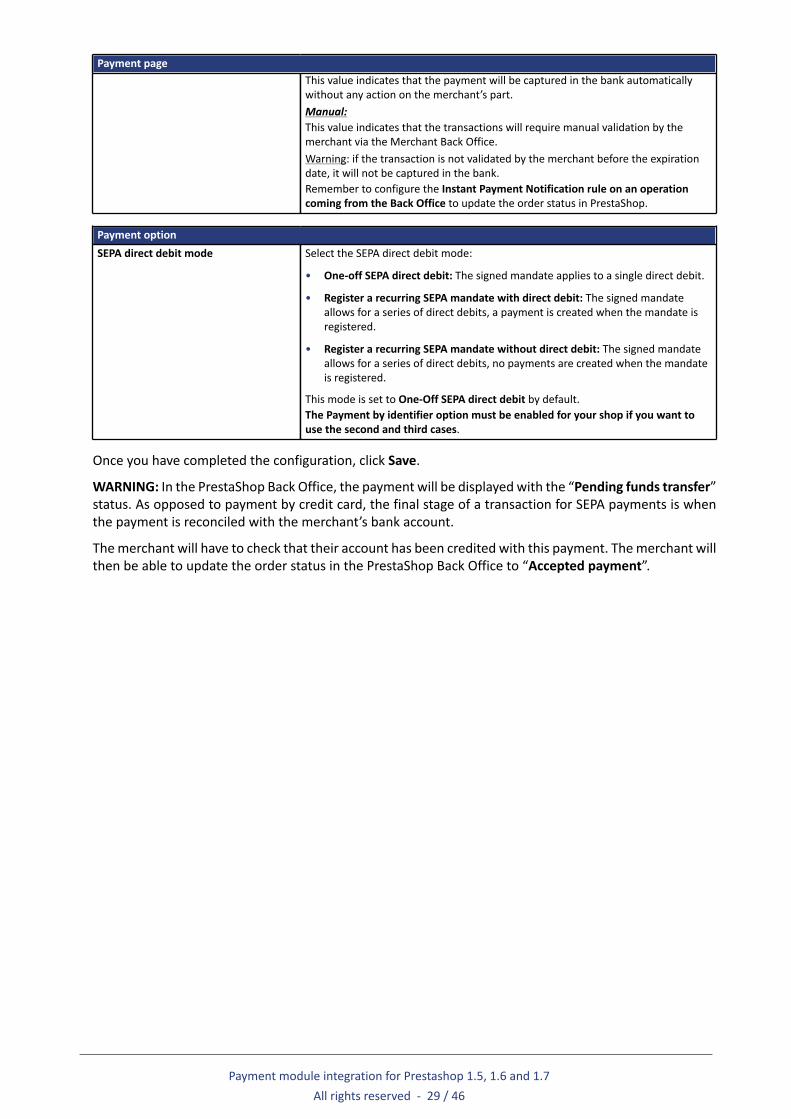
Payment option
SEPA direct debit mode Select the SEPA direct debit mode:
• One-off SEPA direct debit: The signed mandate applies to a single direct debit.
• Register a recurring SEPA mandate with direct debit: The signed mandateallows for a series of direct debits, a payment is created when the mandate isregistered.
• Register a recurring SEPA mandate without direct debit: The signed mandateallows for a series of direct debits, no payments are created when the mandateis registered.
This mode is set to One-Off SEPA direct debit by default.The Payment by identifier option must be enabled for your shop if you want touse the second and third cases.
Once you have completed the configuration, click Save.
WARNING: In the PrestaShop Back Office, the payment will be displayed with the “Pending funds transfer”status. As opposed to payment by credit card, the final stage of a transaction for SEPA payments is whenthe payment is reconciled with the merchant’s bank account.
The merchant will have to check that their account has been credited with this payment. The merchant willthen be able to update the order status in the PrestaShop Back Office to “Accepted payment”.
Payment module integration for Prestashop 1.5, 1.6 and 1.7
All rights reserved - 29 / 46

6.4.9. PayPal payment
For the merchant
The process of adding the PayPal payment option to your merchant website is simple. It consists in:
• Creating a PayPal account if you do not have one.
• Using a PayPal account if you have one.
• Enabling the Payment via PayPal option with the help of your payment gateway sales representative.
For the buyer
You can sign up to PayPal for free on the PayPal website. The buyer must:
• Create a PayPal account by entering an e-mail address and a password.
• Fill in all their personal details, address, etc.
• Fill in all their credit card details.
Module option
Activation To enable the PayPal payment method, select Enabled.By default, this option is Disabled.Activation redirects the buyer directly to the PayPal payment page.However, this payment method can also appear on the payment page if the buyerselects the standard payment (if there are no restrictions in General configuration> Card Types).
Payment method title This option allows you to define the title of the payment method.The buyer will see this title when choosing a payment method.If your shop is available in several languages, a drop-down list will appear to theright of the method title. Changing the language allows you to enter a different titlein each language.
Restrictions
Supported countries Configure the countries for which the payment method is available:
• All countries: the payment method is available for all countries.
• Specific countries: after choosing this option, the list of Authorized countriesappears. Press and hold “Ctrl” and select the countries of your choice fromthe list of Authorized countries.
Minimum amount This field defines the minimum amount for which you wish to offer this paymentmethod.By defining a minimum amount for ALL GROUPS, the payment method will not beenabled for users with a smaller shopping cart amount.It is also possible to define a minimum amount for each customer group in yourshop.
Maximum amount This field defines the maximum amount beyond which you do not wish to offer thispayment method.By defining a minimum amount for ALL GROUPS, the payment method will not beenabled for users with a greater shopping cart amount.It is also possible to define a maximum amount for each customer group in yourshop.
Payment page
Capture delay Delay (in days) before the capture for this payment method.If you leave this field empty, the value configured in the General configurationsection will be applied.If the Capture delay field of the General configuration is also empty, the valueconfigured in the Merchant Back Office will be applied.
Validation mode Validation mode for this payment method.General configuration of the module: Recommended value.Allows to apply the configuration defined in the General configuration section.Back Office configuration:
Payment module integration for Prestashop 1.5, 1.6 and 1.7
All rights reserved - 30 / 46

Payment pageAllows to use the configuration defined in the Merchant Back Office (menu:Settings > Shop > Configuration – section: validation mode)Automatic:This value indicates that the payment will be captured in the bank automaticallywithout any action on the merchant’s part.Manual:This value indicates that the transactions will require manual validation by themerchant via the Merchant Back Office.Warning: if the transaction is not validated by the merchant before the expirationdate, it will not be captured in the bank.Remember to configure the Instant Payment Notification rule on an operationcoming from the Back Office to update the order status in PrestaShop.
Once you have completed the configuration, click Save.
WARNING: In some cases, PayPal retains a transaction because of suspected fraud. If this occurs, we willlabel the order with the “Pending PayPal payment” status in PrestaShop.
For the order status to be updated in PrestaShop once the payment has been validated by PayPal, you mustconfigure the notification rule Instant Payment Notification URL on batch change (see chapter Setting upthe Instant Payment Notification URL).
Payment module integration for Prestashop 1.5, 1.6 and 1.7
All rights reserved - 31 / 46
6.4.10. Sofort Payment
For the merchant
The process of adding the SOFORT Banking payment option to your merchant website is simple. It consistsin:
• Creating a SOFORT account if you do not have an account.
• Using a SOFORT account if you have an account.
• Activating the option Payment via SOFORT Banking with the help of the sales contact of your paymentgateway.
For the buyer
You can sign up to SOFORT Banking for free on the SOFORT website. The buyer must:
• Select the bank where they have an online account.
• Sign in to their bank application.
• Enter the confirmation code received from the bank (via SMS) in order to register or validate a banktransfer.
Module option
Activation To enable the SOFORT payment method, select Enabled.By default, this option is Disabled.Activation redirects the buyer directly to the SOFORT payment page.However, this payment method can also appear on the payment page if the buyerselects the standard payment (if there are no restrictions in General configuration> Card Types).
Payment method title This option allows you to define the title of the payment method.The buyer will see this title when choosing a payment method.If your shop is available in several languages, a drop-down list will appear to theright of the method title. Changing the language allows you to enter a different titlein each language.
Restrictions
Supported countries Configure the countries for which the payment method is available:
• All countries: the payment method is available for all countries.
• Specific countries: after choosing this option, the list of Authorized countriesappears. Press and hold “Ctrl” and select the countries of your choice fromthe list of Authorized countries.
Minimum amount This field defines the minimum amount for which you wish to offer this paymentmethod.By defining a minimum amount for ALL GROUPS, the payment method will not beenabled for users with a smaller shopping cart amount.It is also possible to define a minimum amount for each customer group in yourshop.
Maximum amount This field defines the maximum amount beyond which you do not wish to offer thispayment method.By defining a minimum amount for ALL GROUPS, the payment method will not beenabled for users with a greater shopping cart amount.It is also possible to define a maximum amount for each customer group in yourshop.
Once you have completed the configuration, click Save.
WARNING: In the PrestaShop Back Office, the payment will be displayed with the “Pending funds transfer”status. As opposed to payment by credit card, the final stage of a transaction for SOFORT payments is whenthe payment is reconciled with the merchant’s bank account.
Payment module integration for Prestashop 1.5, 1.6 and 1.7
All rights reserved - 32 / 46

The merchant will have to check that their account has been credited with this payment. The merchant willthen be able to update the order status in the PrestaShop Back Office to “Accepted payment”.
Payment module integration for Prestashop 1.5, 1.6 and 1.7
All rights reserved - 33 / 46
6.4.11. Other payment methods
It is recommended to enable this option if you have configured the card data entry mode with “Embeddedpayment fields”, and if you would like to offer other payment methods than CB, VISA, VISA ELECTRON,MASTERCARD, MAESTRO, AMEX that are not present in the other submodules.
Module option
Activation In order to enable the payment method, select Enabled.This mode is set to Enabled by default.
Payment method title This option allows you to define the title of the payment method.The buyer will see this title when choosing a payment method.If your shop is available in several languages, a drop-down list will appear to theright of the method title. Changing the language allows you to enter a different titlein each language.
Restrictions
Supported countries Configure the countries for which the payment method is available:
• All countries: the payment method is available for all countries.
• Specific countries: after choosing this option, the list of Authorized countriesappears. Press and hold “Ctrl” and select the countries of your choice fromthe list of Authorized countries.
Minimum amount This field defines the minimum amount for which you wish to offer this paymentmethod.By defining a minimum amount for ALL GROUPS, the payment method will not beenabled for users with a smaller shopping cart amount.It is also possible to define a minimum amount for each customer group in yourshop.
Maximum amount This field defines the maximum amount beyond which you do not wish to offer thispayment method.By defining a minimum amount for ALL GROUPS, the payment method will not beenabled for users with a greater shopping cart amount.It is also possible to define a maximum amount for each customer group in yourshop.
Payment options
Group payment methods By enabling this option, all the payment methods added in this section will bedisplayed within the same payment submodule.Otherwise, each payment method will be represented in a different submodule.This parameter is set to Disabled by default.
Label Text describing the payment option as it will be offered to the buyer.The label will be displayed only if the Group payment methods option is disabled.Example: Pay via BancontactIf your shop supports several languages, you can also define the label of thepayment method for each language.
Payment method Choose the payment method you would like to offer.
Authorized countries Select the country that you would like to authorize for the selected paymentmethod.If no countries are selected from the list, all countries will be authorized.Hold down the Ctrl key to select or deselect several countries.
Minimum amount This field defines the minimum amount for which you wish to offer this paymentmethod.
Maximum amount This field defines the maximum amount beyond which you do not wish to offer thispayment method.
Capture delay Delay (in days) before the capture for this payment method.If you leave this field empty, the value configured in the General configurationsection will be applied.If the Capture delay field of the General configuration is also empty, the valueconfigured in the Merchant Back Office will be applied.
Validation mode Validation mode for this payment method.
Payment module integration for Prestashop 1.5, 1.6 and 1.7
All rights reserved - 34 / 46

Payment optionsGeneral configuration of the module: Recommended value.Allows to apply the configuration defined in the General configuration section.Back Office configuration:Allows to use the configuration defined in the Merchant Back Office (menu:Settings > Shop > Configuration – section: validation mode)Automatic:This value indicates that the payment will be captured in the bank automaticallywithout any action on the merchant’s part.Manual:This value indicates that the transactions will require manual validation by themerchant via the Merchant Back Office.Warning: if the transaction is not validated by the merchant before the expirationdate, it will not be captured in the bank.Remember to configure the Instant Payment Notification rule on an operationcoming from the Back Office to update the order status in PrestaShop.
Shopping cart data Check this box if you wish to send the shopping cart details to the paymentgateway.For some payment methods, such as and PayPal, the shopping cart details arerequired.
Add payment methods If you want to create payment methods that are not present in the Paymentmethods list, you can add them manually in the payment module:
1. Click the Add button.
2. Enter the technical code provided by PayZen. This code must be exactly thesame as the one present in the Dictionnaire des données in the Card types(vads_payment_cards) column.If your payment method is not on the list, it is not available in PayZen.
3. Enter the name of the payment method to be added.
4. Save your changes.
5. Once the payment method created, you will have to add and configure it fromthe Payment methods section (previous parameter). The new payment methodwill be displayed at the end of the Payment methods list.
Once you have completed the configuration, click Save.
Payment module integration for Prestashop 1.5, 1.6 and 1.7
All rights reserved - 35 / 46

7. SETTING UP THE INSTANT PAYMENT NOTIFICATION URL
The Merchant Back Office provides several types of notifications. They allow to manage the events thatwill generate a call to the merchant website and to configure the URL of the contact page.
To access notification rule management:
1. Sign in to: https://secure.payzen.eu/vads-merchant/.
2. Go to the following menu: Settings > Notification rules.
Figure 1: Notification rules
Right click > Enable the rule if a red cross appears in the Enabled column of the following rules:
• Instant Payment Notification URL at the end of the payment
• Instant Payment Notification URL on cancellation
• Instant Payment Notification URL on an operation coming from the Back Office
• Instant Payment Notification URL on batch authorization
• Instant Payment Notification URL on batch change
Payment module integration for Prestashop 1.5, 1.6 and 1.7
All rights reserved - 36 / 46
7.1. Setting up the Instant Payment Notification
This notification is required to communicate the result of a payment request.
In your Merchant Back Office, you must set up a URL that will be systematically called after a payment. It willinform the merchant website of the payment result even if your client has not clicked on return to the shop.
This parameter is called Instant Payment Notification URL at the end of the payment.
To set up this notification:
1. Right-click Instant Payment Notification URL at the end of the payment.
2. Select Enable the rule.
3. Right-click Instant Payment Notification URL at the end of the payment once again.
4. Select Manage the rule.
5. Enter the E-mail address(es) to notify in case of failure.
6. To specify several e-mail addresses, separate them with a semi-colon.
7. Set up the parameters for Automatic retry in case of failure.
This option allows to automatically send notifications to the merchant website in case of failure (up to4 times).
A notification will be considered as failed if the HTTP code returned by the merchant server is not onthe following list: 200, 201, 202, 203, 204, 205, 206, 301, 302, 303, 307, 308.
Automatic retry does not apply to notifications manually triggered via the Merchant Back Office.
Call attempts are scheduled at fixed intervals every 15 minutes (00, 15, 30, 45). After each failedattempt, a notification e-mail is sent to the e-mail address specified earlier.
8. Enter the following URL in the fields URL to call in TEST mode and URL to call in PRODUCTION mode(Notification URL of the Hosted payment page V1, V2 section): The URL to copy is present in themodule configuration (Notification URL).
The URL must resemble the one below:
https://www.your-domain.com/modules/payzen/validation.php
Replace your-domain.com with the domain name of your website.
9. If you have enabled the Embedded payment fields (REST API) option as entry mode of card data,enter the URL in the URL to call in TEST mode and URL to call in PRODUCTION mode (Notification ofthe REST API section). The URL to copy is present in the module configuration (REST API notificationURL).
The URL must resemble the one below:
https://www.your-domain.com/modules/payzen/validation.php
Replace your-domain.com with the domain name of your website.
10.Save the changes.
Payment module integration for Prestashop 1.5, 1.6 and 1.7
All rights reserved - 37 / 46

7.2. Setting up notifications in case of abandoned or canceled payments
The payment gateway can systematically notify the merchant website:
• When the buyer abandons/cancels a payment - via the Cancel and return to shop button.
• When the buyer has not completed the payment and the payment session has expired.
The maximum length of a payment session is 10 minutes.
To set up this notification:
1. Right-click Instant Payment Notification URL on cancellation.
2. Select Manage the rule.
3. Enter the E-mail address(es) to notify in case of failure.
4. To specify several e-mail addresses, separate them with a semi-colon.
5. Set up the parameters for Automatic retry in case of failure.
This option allows to automatically send notifications to the merchant website in case of failure (up to4 times).
6. Enter the following URL in the fields URL to call in TEST mode and URL to call in PRODUCTION mode(Notification URL of the Hosted payment page V1, V2 section): The URL to copy is present in themodule configuration (Notification URL).
The URL must resemble the one below:
https://www.your-domain.com/modules/payzen/validation.php
Replace your-domain.com with the domain name of your website.
7. Save the changes.
8. Once again, right-click Instant Payment Notification URL on cancellation.
9. Select Enable the rule.
Payment module integration for Prestashop 1.5, 1.6 and 1.7
All rights reserved - 38 / 46

7.3. Instant Payment Notification URL on an operation coming from theBack Office
In your Merchant Back Office, you lust configure a URL that will be systematically called after an operationmade via the Merchant Back Office. The payment gateway can systematically notify the merchant websiteif the following operations are performed via the Merchant Back Office:
• Cancel
• Refund
• Validate
• Modify
• Duplicate
To set up this notification:
1. Right-click on Instant Payment Notification URL on an operation coming from the Back Office.
2. Select Manage the rule.
3. Enter the E-mail address(es) to notify in case of failure.
4. To specify several e-mail addresses, separate them with a semi-colon.
5. Set up the parameters for Automatic retry in case of failure.
This option allows to automatically send notifications to the merchant website in case of failure (up to4 times).
6. Enter the following URL in the fields URL to call in TEST mode and URL to call in PRODUCTION mode(Notification URL of the Hosted payment page V1, V2 section): The URL to copy is present in themodule configuration (Notification URL).
The URL must resemble the one below:
https://www.your-domain.com/modules/payzen/validation.php
Replace your-domain.com with the domain name of your website.
7. Save the changes.
8. Enable the rule by right-clicking on Instant Payment Notification URL on an operation coming fromthe Back Office and select Enable the rule.
Payment module integration for Prestashop 1.5, 1.6 and 1.7
All rights reserved - 39 / 46

7.4. Setting up a notification on batch authorization
These settings are required for communicating the result of a deferred payment:
• If the payment has been accepted,
• If the payment has been refused.
Example:
For a deferred payment with a capture delay of 60 days, the authorization request is not made at themoment of the payment. The merchant website will be contacted at the moment of the authorizationrequest via the Instant Payment Notification URL on batch authorization rule.
To set up this notification:
1. Right-click on Instant Payment Notification URL on batch authorization.
2. Select Manage the rule.
3. Enter the E-mail address(es) to notify in case of failure.
4. To specify several e-mail addresses, separate them with a semi-colon.
5. Set up the parameters for Automatic retry in case of failure.
This option allows to automatically send notifications to the merchant website in case of failure (up to4 times).
6. Enter the following URL in the fields URL to call in TEST mode and URL to call in PRODUCTION mode(Notification URL of the Hosted payment page V1, V2 section): The URL to copy is present in themodule configuration (Notification URL).
The URL must resemble the one below:
https://www.your-domain.com/modules/payzen/validation.php
Replace your-domain.com with the domain name of your website.
7. Save the changes.
8. Enable the rule by right-clicking on Instant Payment Notification URL on batch authorization andselect Enable the rule.
Payment module integration for Prestashop 1.5, 1.6 and 1.7
All rights reserved - 40 / 46
7.5. Setting up a notification on batch change
It is recommended to enable this notification for PayPal transactions in order to manage theUNDER_VERIFICATION status. The merchant website will be notified about the acceptance or refusal byPayPal.
In case you have enabled the Oney 3x 4x payment method, you must enable this rule for your merchantwebsite to be notified when orders are accepted or rejected by Oney.
If manual validation payment has been configured, you must enable this rule for your merchant websiteto be notified when a transaction expires.
This rule is disabled by default.
To set up this notification:
1. Right-click Instant Payment Notification URL on batch change.
2. Select Manage the rule.
3. Enter the following URL in the fields URL to call in TEST mode and URL to call in PRODUCTION mode(Notification URL of the Hosted payment page V1, V2 section): The URL to copy is present in themodule configuration (Notification URL).
The URL must resemble the one below:
https://www.your-domain.com/modules/payzen/validation.php
Replace your-domain.com with the domain name of your website.
4. Enter the E-mail address(es) to notify in case of failure.
5. To specify several e-mail addresses, separate them with a semi-colon.
6. Set up the parameters for Automatic retry in case of failure.
This option allows to automatically send notifications to the merchant website in case of failure (up to4 times).
7. Save the changes.
8. Enable the rule by right-clicking on Instant Payment Notification URL on batch change and selectEnable the rule.
Payment module integration for Prestashop 1.5, 1.6 and 1.7
All rights reserved - 41 / 46
7.6. Testing the Instant Payment Notification URL
In order to make sure that the Instant Payment Notification functions correctly, follow these steps:
1. Make sure that your URL is available online: your shop must neither be in maintenance mode nor beprotected by an .htaccess file.
2. Make sure that your notification URL is available without any redirection.
a. To do this, paste your notification URL to the address bar of your browser and launch the search.
b. Make sure your URL did not change.
If your URL has changed, for example from "http" to "https" or "http://abc.net" to"http://www.abc.net", it means a redirection is active on your website. Then, copy the URL fromthe address bar and modify the URL filled in the configuration of all notification rules.
3. Make sure that the “Automatic redirection” option is disabled in the payment module settings.
4. Check that the Instant Payment Notification URL at the end of payment is populated in the MerchantBack Office (see above).
5. Make an order on your website and proceed to payment.
6. Do not click on "Return to shop" at the end of payment and close the current tab of your browser.
7. Make sure that the order has been created in the Orders > Orders menu.
If the order has not been created in the PrestaShop Back Office, this means that the call has failed.
If the payment gateway is unable to access the URL of your page, an e-mail will be sent to the shopadministrator.
It contains:
• The HTTP code of the encountered error
• Parts of error analysis
• Its consequences
• Instructions to resend the notification to the URL already specified above from the Merchant Back Office
Payment module integration for Prestashop 1.5, 1.6 and 1.7
All rights reserved - 42 / 46

8. PROCEEDING TO TEST PHASE
Once the payment module has been configured and you have specified the IPN URLs, you can move onto test phase in order to generate the production key.
Different cases of payments can be simulated by using test card numbers specified on the payment page.The Merchant will be able to test all 3D Secure authentication results (if the Merchant is enrolled and 3DSis not disabled).
The list of the tests to perform for generating the production key is provided in the Merchant Back Office,Settings > Shop > Keys menu.
If your store does not have the test control table, it is not necessary to perform tests before going intoproduction. You can directly click the Generate production key button to go into production. However,we recommend to make some payment tests to make sure that the payment solution is correctlyintegrated.
Each row of the list contains card numbers associated with the same scenario (i.e. 2 accepted paymentsand 2 refused payments).
Each column corresponds to a different card type: CB/VISA, MASTERCARD, MAESTRO, VISA ELECTRON.
To perform the test phase:
1. Make an order on your merchant website as if you were one of your buyers.
2. Select the payment method "Payment by credit card".
3. Once redirected to the payment page, select the card type of your choice.
4. Refer to the list of tests to identify the card number to use.
5. Once a test has been validated, its status is updated in the list. Click the Refresh the table button ifthe status has not been updated automatically.
6. Once the 4 tests have been validated, the Generate production key button becomes available.
Payment module integration for Prestashop 1.5, 1.6 and 1.7
All rights reserved - 43 / 46

7. Click the Generate production key button and accept the notification messages that will appear.
The production key is now available.
Payment module integration for Prestashop 1.5, 1.6 and 1.7
All rights reserved - 44 / 46

9. SHIFTING THE SHOP TO PRODUCTION MODE
After you receive a confirmation e-mail informing you that a key has been generated, you can configurethe payment method by following the steps below:
• Retrieve the production key available in the Merchant Back Office (Settings > Shop > Keys).
• In the module configuration parameters:
• Populate the Production key field.
• Switch from TEST to PRODUCTION mode.
• Save the changes.
• Make sure that you have specified the Instant Payment Notification URL in production mode, asdescribed in the chapter Setting up the Instant Payment Notification URL.
Once the production parameters have been configured for your store, we recommend to make a realpayment to make sure that your banking contract is functional.
You will then be able to cancel the payment via the Merchant Back Office.
Note on the production key:
For security reasons, this key will no longer be visible as soon as the first transaction in production modeis made in your shop.
Note on the TEST mode:
Once you shop is in production mode, the TEST mode remains available.
To work in test mode, follow the steps below:
• Switch from PRODUCTION to TEST mode.
• Make sure that the Test key is correct.
• Save the changes.
Payment module integration for Prestashop 1.5, 1.6 and 1.7
All rights reserved - 45 / 46

10. OBTAINING HELP
Viewing online documentation
Looking for help? See our online documentation
France https://payzen.io/en-EN/faq/sitemap.htmlSpain https://payzen.io/es-ES/faq/sitemap.htmlEurope https://payzen.io/en-EN/faq/sitemap.htmlLatin America (except Brazil) https://payzen.io/lat/faq/sitemap.htmlBrazil https://payzen.io/pt-BR/faq/sitemap.htmlIndia https://payzen.io/in/faq/sitemap.html
We are constantly improving the understanding and proper use of our technical documentation. Weappreciate any constructive remarks on your part.
Please send your comments and suggestions about the documentation to the e-mail [email protected].
Getting in touch with technical support
For technical inquiries or support, you can reach us from Monday to Friday, between 9 a.m. and 6 p.m.
By phone By e-mail
France [email protected]
Europe [email protected]
Spain +34932200556 [email protected]
Latin America (except Brazil) N/A [email protected]
Brazil +55 (11) 3336-9217 / 9209 [email protected]
India +91 (022) 33864910 / 911 / 932 [email protected]
and via your Merchant Back Office, Help > Contact support
In view of facilitating the processing of your demands, you will be asked to communicate your shop ID (an8-digit number).
This information is available in the “registration of your shop” e-mail or in the Merchant Back Office(Settings > Shop > Configuration).
Payment module integration for Prestashop 1.5, 1.6 and 1.7
All rights reserved - 46 / 46


![(1.7) Fn+1(c)= D /'[V] - The Fibonacci Quarterly](https://static.fdokumen.com/doc/165x107/632456c0f021b67e74087f49/17-fn1c-d-v-the-fibonacci-quarterly.jpg)