Page 1 - WordPress.com
23
Page 1
-
Upload
khangminh22 -
Category
Documents
-
view
0 -
download
0
Transcript of Page 1 - WordPress.com

Page �1

35 Tips and Tricks for Optimizing your Unity 3D Game
LearnUnityNow.com
ContentsIntroduction
Lighting BAKE SHADOWS 3
LIGHT PROBES 4
VERTEX LIGHTS 5
BAKE REFLECTION PROBES 6
DEFERRED AND FORWARD RENDERING 6
SHADOW DISTANCE 6
Graphics LOW POLY 7
BATCHING 8
IMAGE EFFECTS 9
OCCLUSION CULLING 9
LODS 10
USE QUADS 10
TEXTURE ATLAS 11
TRANSPARENT MATERIALS 11
Scripts USE #PRAGMA STRICT 12
UNITY PROFILER 12
MINIMIZE FIND OPERATIONS 13
AVOID MATH FUNCTIONS 13
FIXED UPDATE 13
CHECK DISTANCE WITH PRIMITIVE COLLIDERS 14
Particles USE QUAD WITH SPRITE SHEET ANIMATION 14
COMBINE PARTICLES 15
Page �2

IntroductionIf you are looking to make your 3D video game run smooth and fast,
you’ve come to the right place. I have researched, tested, and assembled 35 techniques you can use to take your game to the next level.
LightingBAKE SHADOWS
Physics FIXED TIMESTEP 15
SCALE IS IMPORTANT 15
NEVER MOVE STATIC COLLIDERS 16
MESH COLLIDERS NO MORE 16
REDUCE SOLVER ITERATION COUNT 17
RAYCAST CAREFULLY 17
Game Size CRUNCH TEXTURES 18
MESH COMPRESSION 19
OPTIMIZE MESH DATA 19
EDITOR LOG 20
User Interface FRAME DEBUGGER IS YOUR FRIEND 21
SUBCANVASES 22
DON’T USE BEST FIT 22
Page �3

Lightmapping your scene is one of the most important things you can do to massively improve your game's performance and aesthetics. Instead of using realtime shadows and lighting, set your lights to baked. You could also use mixed lighting, which will contribute realtime lighting to dynamic objects, casting realtime shadows onto lightmapped static objects.
Lightmapping can be quite a complex process and it’s beyond the scope of this book for me to go into full detail. However it is an amazing way to get gorgeous soft shadows, global illumination, and ambient occlusion, while vastly increasing your game’s framerate. Note that baking the lighting can take several minutes or even longer, so it can be beneficial to stick with realtime lighting while your game is still in the early stages.
�
LIGHT PROBESDynamic objects such as characters or cars can take advantage of baked lighting with light probes. Light probes take samples of baked lighting at various points in your scene, and the dynamic objects can imitate the lighting samples from the nearest light probes.
To add light probes to your scene, create a Light Probe Group in GameObject > Light > Light Probe Group. From the inspector you can add new light probes and position them in your scene. Light probes will appear in the Scene View as spheres, and will be bright yellow when selected. You can also view the light probes in the Game View if Gizmos is enabled.
Page �4

For your meshes to take advantage of light probes, you need to enable Use Light Probes on the Mesh Renderer component of a gameobject. Where you place your light probes is important. Adding too many probes can use up a lot of memory. You should position your probes where there are interesting changes in lighting. For example, areas with dark shadows, bright lights, colored lights, and bright colored objects should all have light probes near them. For an excellent example of how to use light probes and optimization in general, check out the free Shadowgun: DeadZone Game Master’s Kit on the Unity Asset Store.
�
VERTEX LIGHTSVertex lighting is considerably faster than pixel lighting. It’s also not as pretty as pixel lighting, but you may be surprised at how often you can get away with it. Certain features such as normal mapping, light cookies, and realtime shadows are not supported by vertex lights. If any of those are vital elements in your game, you may have to stick to mostly pixel lighting. You can set the maximum amount of pixel lights allowed in your scene in Edit > Project Settings > Quality, and Unity will convert the rest to vertex lights based on brightness. If your game’s quality level is set to the default Fantastic, the default amount of max pixel lights will be 4.
Unity automatically decides which lights to render as vertex or pixel lights, but you can recommend a particular light to be established as a vertex light by setting the Render Mode (in the Light component) to Not Important. To make your scene completely vertex lit, simply set the pixel light count to zero. In the Viking Village scene, this increases FPS from 30 to 80! Depending on the art style of your game, vertex lighting may be the way to go.
Page �5

�
BAKE REFLECTION PROBESWhenever possible use baked reflection probes. In the Viking Village scene, when using reflection probes that update every frame, the framerate is hardly 10 fps. This may be slightly improved by decreasing the resolution of the probe. However by simply setting the type to Baked, the framerate doubles to 20 fps. If you need realtime reflections probes, avoid updating them every frame. Instead, update on Awake or call the update via script. Note that the reflections from baked reflection probes are only visible on objects marked Reflection Probe Static in the inspector.
�
DEFERRED AND FORWARD RENDERINGIf you have a lot of dynamic lights in your game, it is advantageous to use deferred shading. Otherwise, if you only have a few lights, or your lighting is baked, stick with forward rendering. You can select which rendering path to use in Edit > Project Settings > Player, in Other Settings. Note that deferred shading does not work with older (about 10 years old or older) graphics cards, and it does not support rendering of semi-transparent objects such as glass. Semi-transparent objects will be automatically rendered in a forward rendering pass.
SHADOW DISTANCE
Page �6

If you are using realtime shadows you should adjust your Shadow Distance (found in the Quality Settings) so that shadows for far away objects are not rendered. You could also write a simple script to adjust the shadow distance (and other quality settings) based on the average frame rate.
GraphicsLOW POLYThis is an obvious one, and one of the most well-known practice in optimizing games, especially if you are developing for mobile. However it’s not as common of a problem and some might think. Simply keep your polygon count as low as you can while keeping your meshes as detailed as you need to be. If you are developing for PC and the vertex count is over three million per frame, that is probably too high, but as always, it depends. This is why LOD’s are so important and helpful, as they give creators the freedom to show off beautiful and detailed meshes, but only when the camera is close enough to see the detail. Game developers typically make multiple versions of a model, starting with a high poly model and using retopologizing or mesh reduction/decimation tools to get lower poly versions of the model. These will then be used to create LODs, which you can learn more about on page 10.
Using normal maps will allow you to bake in additional detail onto your mesh while keeping the polygon count low. Normal maps can be created from a high poly mesh or generated from a color texture.
Page �7

�
BATCHINGIt is much more efficient to render a couple huge meshes than many small meshes. Unity does this with static batching. While static batching uses more memory, it improves rendering performance, as it takes the load off the GPU and puts it on the CPU. Objects can only be batched together if they share the same material, do not move, rotate, or scale, and are marked static in the inspector. You can also batch particle systems that share the same material, however other types of rendering components such as cloth and skinned meshes cannot be batched.
For dynamic (moving) objects you should take advantage of Unity’s automatic dynamic batching. Dynamic batching is only applied to to meshes with less than nine hundred verts total, because of the per-vertex overhead. As with static batching, only objects that share the same material will be batched. Additionally, your dynamic objects must not receive realtime shadows. Assuming you are using baked lighting and light probes, that shouldn’t be a problem.
Page �8

�
IMAGE EFFECTSPost processing FX are great, but they can seriously slow down your game, especially if it is a mobile game. See the image below, on the left imaged effects are disabled, and on the right they are enabled, causing the frame rate to drop. To ensure that effects don’t have any negative impact on your frame rate, you can write a script to disable certain effects components when the frame rate is getting too low. Some effects have optimized versions which you can use instead to slightly increase performance.
�
OCCLUSION CULLINGOcclusion culling is a feature which disables the rendering of certain objects which are not seen by the camera because they are behind other objects. You can use occlusion culling to drastically reduce the amount of triangles being rendered in your game, without changing how your game looks at all. You should design your levels with this feature in mind. Using the Overdraw scene rendering mode will show you how much overdraw is occurring.
To take advantage of occlusion culling, a game object must be marked as Occlusion Static in the inspector. Next, open the Occlusion Culling Window
Page �9

under Window > Occlusion Culling. The default baking parameters are typically sufficient for most scenes.
LODSA Level of Detail (LOD) is a less detailed version of a higher polygon mesh. As the player or camera gets further away from an object, the LOD system will switch the object to a less complex version of itself, so the object will only be rendered in full detail when the player is very close to it. Ideally the general shape and silhouette of the object should remain mostly the same across the different levels of detail, resulting in a seamless transition between levels of detail. LODs can be created manually, but there are plenty of amazing tools that can automatically generate lower poly versions of your mesh.
You can see in the image below, there are four trees. LOD 0 is the most detailed tree. It has lots of leaves and branches, and a detailed trunk. LOD 1 is a little less detailed, and at LOD 2, the tree’s trunk is very simple, and there are much fewer leaves. The next step is a billboard, which is a 2D image that always faces the camera. You can setup LODs by adding a LOD group component to your gameobject in Component>Rendering>LOD Group. If your are named with a suffix of _LOD0 or _LOD1, etc., the LOD Group will be setup automatically on import.
�
USE QUADSWhen you need a flat surface such as a wall or decal, don't use a plane. Though they look identical (they’re both squares), a plane is equivalent to 100
Page �10

quads and is therefore more expensive to render. See the wireframe comparison below.
�
TEXTURE ATLASWhen batching meshes, you need them to share the same material, which means they will have to share the same texture as well. So, you need to combine textures. The texture on the right is a vegetation texture from the Viking Village. The stems, leaves, and flowers are all packed into one texture called an atlas. This can be easily done in an image editing program such as Photoshop. There are also many solutions on the Asset Store, both free and paid, to pack the textures automatically. Don’t pack textures with alphas into an atlas that also contains textures without alphas.
TRANSPARENT MATERIALSTransparent (alpha blend) or cutout (alpha test) materials such as decals, leaves, or particles are much more expensive than regular materials because they increase overdraw. Meaning, the less space the alpha material objects
Page �11

take up on the screen, the better. This is especially important when developing for mobile platforms. Common uses of transparent materials include trees and grass, particles, hair and fur, and sprites.
Scripts
USE #PRAGMA STRICTWhen coding with JavaScript, it is not required to declare variable types in your code. That’s called dynamic typing. Dynamically typed code runs a little bit slower than statically typed code. Using #pragma strict forces you to use static typing by disabling dynamic typing, and will give you an error in the Console if you try to use dynamic typing. With #pragma strict you will need to specify variable types. To use it, simply type ‘#pragma strict’ at the very top of your script. If you are coding in C# you do not have to worry about this because C# is a statically typed language.
UNITY PROFILERThe profiler is one of the most important tools for optimization. In the profiler window you can see how much time is spent rendering or calculating scripts and physics. It reveals what things may be causing your game to run slowly. While you are play testing your game, you can view and record game performance. Though it looks daunting, the profiler is fairly uncomplicated. However if you want to gain a more comprehensive understanding of how it works, I suggest you check out the official documentation of the Profiler window at http://docs.unity3d.com/Manual/ProfilerWindow.html.
Page �12

�
MINIMIZE FIND OPERATIONSThere are a bunch of reasons not to use functions such as GameObject.Find and GameObject.FindWithTag. Not only do they create hidden dependencies (you can’t rename a gameobject in your scene without breaking your code), they are quite expensive as well, especially when performed every frame. In most cases you could just define the variable yourself in the Inspector.
For example, instead of using GameObject.FindWithTag(“Player”) in a script to find the player, create a variable: public var player : GameObject; and assign the player gameobject in the inspector. If you must use a find operation, put in the Awake function, so it only runs once at the beginning of the game.
AVOID MATH FUNCTIONSComplex math functions such as sin, tan, cos, pow, exp, log are expensive and should be used rarely in your scripts. You should avoid using them in pixel shader code also.
FIXED UPDATE
Page �13

For physics operations, use the FixedUpdate() function and run it as seldom as possible. The fixed update runs exactly as often as the physics are calculated, which is determined by the fixed timestep in Edit > Project Settings > Time. Whenever you are applying forces or accessing variables of a rigid body via the scripting API, that should be performed inside the FixedUpdate() function.
�
CHECK DISTANCE WITH PRIMITIVE COLLIDERSThere are several ways to find the distance between two gameobjects. Some options include Vector3.Distance, Vector3.sqrMagnitude, or you could use the Pythagorean theorem. In some rare cases you may have to use one of those options, but for most situations there is a simpler and faster solution: primitive colliders. For instance, if you have a sci-fi door that you want to automatically open when the player is near it, simply attach a sphere collider to the door and mark it as a trigger in the inspector. Then, using the OnTriggerEnter function the door could identify that the player has entered the trigger and activate the door open animation.
ParticlesUSE QUAD WITH SPRITE SHEET ANIMATIONIf you are making a fire particle system, instead of emitting a bunch of orange and yellow particles, you could use a sprite sheet and have the particle system cycle through it to create your desired effect. Note that sprite sheet particles might not work as well on effects like rain, where there is a lot of movement.
Page �14

COMBINE PARTICLESInstead of emitting multiple particles from a particle system, combine the particles into one texture. For instance, instead of emitting 100 snow particles, create a new texture in which the snow particle texture is duplicated and randomly scaled or rotated. So instead of 100 individual snow particles, you can emit just 10 or so, which will improve performance. You can also use a script to adjust the amount of particles emitted based on the frame rate by changing the float ParticleSystem.emissionRate.
PhysicsFIXED TIMESTEPThe Fixed Timestep is the interval that determines how often physics calculations and FixedUpdate() events are performed. This setting can be found in Edit > Project Settings > Time.
A lower value means that physics calculations will be performed more often, which will result in generally more precise simulations and increased load on the CPU. A greater value will increase the interval between calculations, which can produce less accurate physics, but will definitely speed up your game. By default the Fixed Timestep is set to 0.02 seconds, which is 20 milliseconds.
�
SCALE IS IMPORTANTUnity units are equivalent to meters, and if your mesh’s scale is inaccurate it can affect physics. Objects that are scaled too large will appear to move in
Page �15
slow motion, and objects that are too small will seem to move too quickly. This can be easily solved by simply ensuring that all your gameobjects are scaled correctly. For example, a tall man is about 2 meters in height, the average car is about 4.5 meters in length, and the Statue of Liberty is about 90 meters tall.
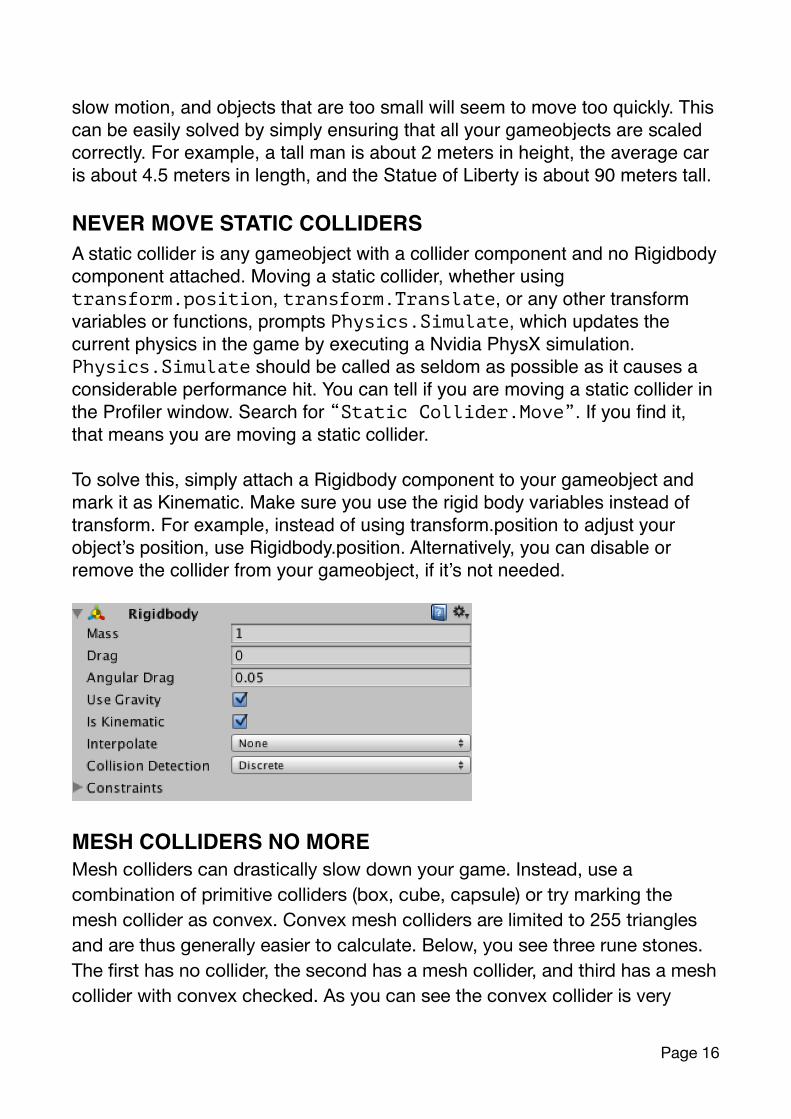
NEVER MOVE STATIC COLLIDERSA static collider is any gameobject with a collider component and no Rigidbody component attached. Moving a static collider, whether using transform.position, transform.Translate, or any other transform variables or functions, prompts Physics.Simulate, which updates the current physics in the game by executing a Nvidia PhysX simulation. Physics.Simulate should be called as seldom as possible as it causes a considerable performance hit. You can tell if you are moving a static collider in the Profiler window. Search for “Static Collider.Move”. If you find it, that means you are moving a static collider.
To solve this, simply attach a Rigidbody component to your gameobject and mark it as Kinematic. Make sure you use the rigid body variables instead of transform. For example, instead of using transform.position to adjust your object’s position, use Rigidbody.position. Alternatively, you can disable or remove the collider from your gameobject, if it’s not needed.
�
MESH COLLIDERS NO MOREMesh colliders can drastically slow down your game. Instead, use a combination of primitive colliders (box, cube, capsule) or try marking the mesh collider as convex. Convex mesh colliders are limited to 255 triangles and are thus generally easier to calculate. Below, you see three rune stones. The first has no collider, the second has a mesh collider, and third has a mesh collider with convex checked. As you can see the convex collider is very
Page �16

accurate but is as low poly as possible. There are also solutions on the Asset Store for more accurate, custom low poly colliders. In most situations though, a primitive collider combination is sufficient. Typically, a box collider would probably be sufficient for the rune stone, but it just depends on the type of game you are making. For example, most FPS games require more precise collisions. Note that sphere colliders are the fastest collider (yes even faster than box colliders) so if you can use a sphere collider rather than any other kind, do so! Wheel colliders are one of the more expensive colliders because they have such a high CPU overhead, so use them carefully. If you ever need to use a mesh collider (without convex), make sure it is on a low poly mesh.
�
REDUCE SOLVER ITERATION COUNTThe solver iteration count (found in Edit > Project Settings > Physics) determines how accurately contacts and joints are resolved. Increasing this value will result in more accurate and stable physics for connected bodies, but it will also become slower. Decreasing this value may speed up your game performance, but can result in some strange and erratic behavior. This value can also be changed at runtime in script using Physics.solverIterationCount.
�
RAYCAST CAREFULLY
Page �17

Keep rays as short as possible. You can do this by setting the maxDistance parameter. If you don’t specify a maximum distance it is by default infinity. For example, Physics.Raycast (transform.position, Vector3.up, hit) will cast an infinite ray upwards. Instead, use something like: Physics.Raycast (transform.position, Vector3.up, hit, 50.0). This will cast a ray 50 meters in the up direction. You should also avoid casting rays against complex colliders such as mesh colliders. Assuming you avoid mesh colliders in the first place, that shouldn’t be an issue.
Game SizeCRUNCH TEXTURESCompressing textures and reducing their maximum size are easy and effective ways to reduce game size. You can find the texture compression settings in the texture import settings, in texture format. If your Texture Type is set to Texture, you should see four options: Compressed, 16 bits, Truecolor, and Crunched. Crunched is a lossy compression format performed on top of the regular DXTR compression. It will give you the smallest file size for your texture. Compressed will be a much larger file size. 16 bit, which is a lower quality truecolor, will be drastically larger, and Truecolor, the highest quality, is the largest of all.
For example, using one of the Viking Village textures, a 4096x4096 texture which when set to Truecolor is 64 MB. If you set the texture format to Compressed, the size decreases to 10.7 MB. Setting the texture to Crunched results in a 1.6 MB texture. The quality has slightly declined from the
Page �18

original, but it is rarely even noticeable.
If you really need to, you can reduce the size even further by setting the maximum size to 2048, which results in a 420 KB texture. It should be noted that the file format of the texture (JPG, PNG, TIF, etc) is irrelevant because Unity recodes imported textures into its own internal format. Also, other textures such as lightmaps and baked reflection probes can be formatted as Crunched. If you experience any bugs or malfunctions with crunched textures, make sure you are using the latest version of Unity.
MESH COMPRESSIONThere is a setting in your Mesh Import Settings for compressing meshes. The Mesh Compression options (Off, Low, Medium, High) will reduce the file size of the mesh, but may present irregularities or distortion in the mesh. These irregularities are rarely noticeable, but it depends. You should use the highest setting that you can without causing observable artifacts in the mesh. Though this setting is often overlooked, it can be vital to reducing your overall game size.
One of the most complex buildings in the Viking Village, build_blacksmith_01.fbx, is 7.9 MB. With the Mesh Compression set to High for that mesh, the size becomes 2.4 MB.
�
OPTIMIZE MESH DATAIn player settings, check the Optimize Mesh Data button. This will remove any unused mesh data and components, such as normals, tangents, colors, or UVs. This will improve both game size as well as runtime performance.
Page �19

�
EDITOR LOGThe Editor Log is a very useful place to find which assets are the biggest. You can only see the asset sizes after you have built your game. Once you have built your game, you can access it from the top-right button in the Console window in Unity (see the button which I have drawn a red circle around in the screenshot below).
�
The log is quite large and you may have to search to find the area you are looking for. Searching for ‘textures’ or ‘meshes’ is a quick way to find it. Once you have found it you will notice you can see the file sizes of all of your asset categories and individual assets. This makes it easy to determine what assets are taking up the most space. You can also see the total file size of your game.
In the screenshot below is the editor log for a Standalone Mac build of the Viking Village demo. Notice that the textures take up 85% of the build size. That’s why the tip about texture compression is so important. You can see that skybox is the largest asset by far, more than six times the nearest largest asset. That’s because the skybox is a 4096 HDR cubemap. Now you know
Page �20

what is impacting your game size the most, and you can make further decisions based on that. For example the size of the HDR sky image can be easily decreased by reducing the Max Size in the texture import settings to 1024, and the size goes from 128 MB to 8 MB without any remarkable decrease in quality. Of course, game size may or may not be as much of an issue depending on what platform you are developing for. For games made for mobile and web platforms, a minimal file size is much better.
�
User InterfaceFRAME DEBUGGER IS YOUR FRIENDThis window (Window > Frame Debugger) allows you to step through the draw calls made for a specific frame. The entire rendering process is listed, including all draw calls generated by a Unity UI. This can be useful for detecting intermediate layers, which is a non-batchable drawable object with a different material, whose bounding box overlaps two otherwise batchable objects, and is placed between the two objects in the hierarchy. If you find an intermediate layer, you can fix it by moving it above or below the batchable
Page �21

objects in the hierarchy, or you can adjust the positions of the objects to eliminate overlapping space.
�
SUBCANVASESWhenever any element on a UI canvas changes, the entire UI must rebuild. Rebuilding includes regenerating UI meshes and rerunning layout code. Since both of those are expensive operations, rebuilding should be avoided as much as possible. To fix this, you should use subcanvases to isolate objects which change often away from static objects. Note that the UI system does not batch across different canvases. Therefore, you should use as few subcanvases as possible while separating static and dynamic UI elements.
�
DON’T USE BEST FITIn the Text component, under Paragraph, there is a setting called Best Fit. It dynamically tweaks the size of a font to be as large as possible within a
Page �22

bounding box. This causes frequent rebuilds of the font atlas, which is extremely costly.
�
Thanks for reading!
Got a question or comment? Email [email protected]
Check out the site!learnunitynow.com
Follow me on Twitter!@learnunitynow
Page �23