Overview Event Templates Events Table of Contents
13
4/26/2019 Events – Technolutions 1/13 Overview Event Templates Events Table of Contents Overview Event Templates Template Management Screen Event Form Create Events Manage Event Instances Event Structure Event Structure A - Use Form Fields Event Structure B - Use Related Events Event Structure C - Use Separate Forms Event Structure - Use a Combination Event Management With the ability to create, schedule and invite attendees to events, as well as send automated emails, the event management system in Slate consolidates and simplifies office processes into a single, straightforward system. Follow the Roadmap! The Slate Roadmap was ordered strategically so that appropriate and related skills are learned to ensure success while implementing Slate. Best Practice: Focus on one type of event to start! Choose a single on-campus event that happens regularly (e.g., a campus tour), and use the following instructions to create a single event template with five test events. Once this has been mastered, then create additional templates and events. Back to Top Event templates save time and effort by allowing configuration for events in a central location. Event templates can be used to add recurring events en masse without the need for any additional configurations. All events that have an event template use that template’s registration form and communications. If changes need to be made to these items after the events have been created, those changes will only need to be made to the event template. It is best practice to use an event template when creating an event, even if only one event would currently use the template. 1. Click Events in the top navigation bar. 2. Click New Template 3. Enter the following User configurations: Template Name - Give template a descriptive name. Include your program in the name. Ex: MBA Info Sessions https://technolutions.zendesk.com/hc/en-us/articles/115001371692-Events Phase Phase I Section
-
Upload
khangminh22 -
Category
Documents
-
view
8 -
download
0
Transcript of Overview Event Templates Events Table of Contents

4/26/2019 Events – Technolutions
1/13
Overview
Event Templates
Events
Table of ContentsOverviewEvent Templates
Template Management ScreenEvent FormCreate EventsManage Event Instances
Event StructureEvent Structure A - Use Form FieldsEvent Structure B - Use Related EventsEvent Structure C - Use Separate FormsEvent Structure - Use a Combination
Event Management
With the ability to create, schedule and invite attendees to events, as well as send automated emails, the event management system in Slate consolidatesand simplifies office processes into a single, straightforward system.
Follow the Roadmap! The Slate Roadmap was ordered strategically so that appropriate and related skills are learned to ensure success whileimplementing Slate.
Best Practice: Focus on one type of event to start! Choose a single on-campus event that happens regularly (e.g., a campus tour), and use thefollowing instructions to create a single event template with five test events. Once this has been mastered, then create additional templates and events.
Back to Top
Event templates save time and effort by allowing configuration for events in a central location. Event templates can be used to add recurring events enmasse without the need for any additional configurations. All events that have an event template use that template’s registration form and communications. Ifchanges need to be made to these items after the events have been created, those changes will only need to be made to the event template. It is bestpractice to use an event template when creating an event, even if only one event would currently use the template.
1. Click Events in the top navigation bar.
2. Click New Template
3. Enter the following User configurations:
Template Name - Give template a descriptive name. Include your program in the name. Ex: MBA Info Sessions
https://technolutions.zendesk.com/hc/en-us/articles/115001371692-Events
Phase
Phase I
Section

4/26/2019 Events – Technolutions
https://technolutions.zendesk.com/hc/en-us/articles/115001371692-Events 2/13
Status - Make template Active.Timezone - The Timezone setting Autodetect from Location will use the information entered on the Location tab to determine the timezone of event.Registrant Limit - If this type of event has a registrant limit, this may be set that at the template level. Events using this template will honor this limitunless a different registrant limit has been set on the individual event. Navigate to the Limits tab to provide a registration limit, if desired. Privacy - Leave this setting unchecked.User - This will default to User's name but may be changed to another user.Admin Notify Email - Skip this setting at this time.
Override Template Info It is possible to override the basic event template settings on an individual event basis. For example, a single informationsession may meet at a different location than usual, and therefore has a lower registration limit. The location and registration limit for that individual eventmay be changed without impacting other events associated with that event template. Since the event is still associated with the event template, theregistration form, event communications, and landing page will still function as normal.
If the event regularly occurs in the same location (for example, a campus tour always begins at the admissions office), enter that location information in theevent template:
Online Event - Leave this box unchecked. Location Name - Enter the location name.Address Information - Enter address information.Preserve Formatting - All addresses are sent to the USPS for validation and standardization. Check this box to prevent the address from beingupdated. This is generally useful for addresses where the USPS abbreviates a city name, or if a building name or room number information should beincluded.

4/26/2019 Events – Technolutions
https://technolutions.zendesk.com/hc/en-us/articles/115001371692-Events 3/13
Include description of your event. This description will display on the event registration page beneath the Title, Time, and Location information:
Any information provided on the Notes tab will only display administratively.
When basic template configurations are saved, the Template Management screen will display next.
The Template Management Screen
The Template Management screen contains resources to configure event template settings, while also providing an at-a-glance view of existing events thatuse the template:

4/26/2019 Events – Technolutions
https://technolutions.zendesk.com/hc/en-us/articles/115001371692-Events 4/13
Event Form
Constructing a registration form for an event template will ensure that the same form is used for every event using that template. For example, if it is decidedlater that one more field should be added to the campus tour registration form, the form associated with the template may be modified and will update theregistration forms for all of the existing campus tour events.
This Looks Familiar! The skills learned building the inquiry form are the same skills needed to build registration forms for events.
On the Template Management screen, click Edit Form.
Special Form Fields - Guests, Attendees, and Email Confirmation
If the registration limit should apply to guests as well, include a form field that is mapped to one of these two special form fields:
Guests
Map Guests on the event form to track the number of people, not including the registrant, that will attend the event with the registrant. If the registrantbrings 2 guests, guests would be 2.
Type - This field uses a prompt list, so use the Form Builder Palette to add a form field that is compatible with prompt lists.System Field - Map field to Special Form Fields and then select the Guests option.Prompts - By default, the prompt options go up to 5. Override system prompts to reduce this number, or even increase it.
Do Guests Count? Guests count toward the registration limit set for an event if "Include guests in registrant limit" is selected for the IncludeGuests setting under the Limits tab of the event settings. For example, the event may have a limit of 10 people. If 5 registrants each bring 1 guest,the limit would be met and the event would be marked as Full.
Attendees
The number of people, including the registrant, that will attend. For example, if the registrant brings 2 guests, attendees would be 3.
Type - This field uses a prompt list, so use the Form Builder Palette to add a form field that is compatible with prompt lists.System Field - Map field to Special Form Fields and then select the Attendees option.Prompts - By default, the prompt options go up to 5. Override system prompts to reduce this number, or even increase it.
Attendee numbers also count toward the limit of the event if "Include guests in registrant limit" is selected for the Include Guests setting.
If the registrant limit is exceeded when guests are added, the registration limit default message or (or custom message if it has been configured) willappear in a pop-up window:

4/26/2019 Events – Technolutions
https://technolutions.zendesk.com/hc/en-us/articles/115001371692-Events 5/13
Email Confirmation
The Email Confirmation system field can be used to ensure accurate email address entry.
System Field - Map field to Special Form Fields and then select the Email Confirmation option.
Note: The second email address entry is unique in that the value will not be stored in any other field other than the form field. This mapping is used onlyto prevent form submission if the Email Confirmation value does not exactly match the Email Address form field that is mapped to the Email system fieldunder the Student Record.
Using Internal Only Fields
Sometimes events require additional administrative processing steps once a student has registered. For example, a registrant for a campus tour mayneed to be assigned to a student guide.
A useful way to manage post-registration work is to add fields to the registration form that are configured as Internal Only. An Internal Only field will notdisplay on the public registration page, but it will display on the administrative registration page. For example, create form field for Tour Guide.
Type - Be sure to select a compatible format type for your question.Label - This text will only display for your Slate administrators.System Field - Internal Only fields can be mapped or unmapped.Export Key - Provide an export key if you choose to keep your field unmapped.Prompts - In this example, the prompts would be the names of the student guides.
Options - Be sure to check the Internal Only box.
Hidden versus Internal? Hidden fields never display on the registration page, even if the registration page is being viewed administratively. Ifyou need to be able to enter data into a field that should only display administratively, then configure the field as Internal Only.
After a student registers for the event, the processing team may open and edit the registration. When editing the event registration, the Internal Onlyfields will be visible to the processing team.
Create Events

4/26/2019 Events – Technolutions
https://technolutions.zendesk.com/hc/en-us/articles/115001371692-Events 6/13
On the Template Management screen, click the button to batch-generate individual events. Provide details for your events:
Page Title - Name the event. This title will appear on the public registration page.Folder - Important: Create a folder for events. Folders are Critical! Events will be publicized based on folder names. Be sure to provide clear and informative folder names (e.g., “Campus Tours”). Important: the first time that you create an event, you should choose 'Other' from the folder drop-down, and in the box type your program. Ex: MBA. Afterward, for every event that you create, you will always choose your program name as the folder. To create a subfolder, choose 'Other' and type the name of the event category in the box.Status - Set the status to Confirmed/Active.Recurrence - If creating more than one event, click the Recurrence box.Date Range - Provide the date range for which events should be created, and the time of the events.Deadline - Provide a deadline, if required. If no deadline is provided, Slate will use the Start Time.Weekdays - Select the days of the week during which event occurs. In this example, a Campus Tour will be scheduled for Monday, Wednesday, Friday, and Saturday at 1:00 pm during for first 10 days in November.Registrant Limit - Navigate to the Limits tab to provide a registration limit, if desired. If template has a limit, that limit will be used once events are created.Privacy - Leave the Privacy setting unchecked.User - Will default to user name.
Provide location information for events on the Location tab. If event template includes this information, the template address information will be used onceevents are created.
A description may be included on the Description tab. This information will display below the page title for an individual event. If the event template includes adescription, the template information will be used once events are created.
After saving, the individual instances of the event will be created and will display on the Template Management screen:

4/26/2019 Events – Technolutions
https://technolutions.zendesk.com/hc/en-us/articles/115001371692-Events 7/13
Different Details? Create separate batches!
Use the same template to create events that occur at various times on different days. For example, a campus tour summer schedule might look like this:
Monday, Wednesday, Friday at 1 pm Tuesday and Thursday at 10 am
Create events for M,W,F events first; then create T, Th events.
Use the same template to create events that occur at various locations. For example, information sessions might be in two different locations on campus,like this:
Building 1 at 1pm Building 2 at 1pm
Create events for Building 1 events first; then create Building 2 events.
Manage Event Instances

4/26/2019 Events – Technolutions
https://technolutions.zendesk.com/hc/en-us/articles/115001371692-Events 8/13
Event Structure
After creating events, they will also appear in the event calendar view:
Override the Template: When an event instance is edited (e.g., the time, event status, registration limit) the new details will override any templateinformation for that event instance only.
Back to Top
There are three basic event structures that are used most often in Slate.
Event Models At a Glance
A.Use Form Fields on main campus visit template to determine if a prospective student willparticipate in additional activities while visiting campus.
B.Use Related Events on main campus visit template to allow the prospective student to registerfor additional events on the same day without submitting additional registration forms.
C. Use separate event registration forms for different on-campus activities.
A combination of the models above may also be used. Please submit a Service Desk request to review which model will work best for a given process.
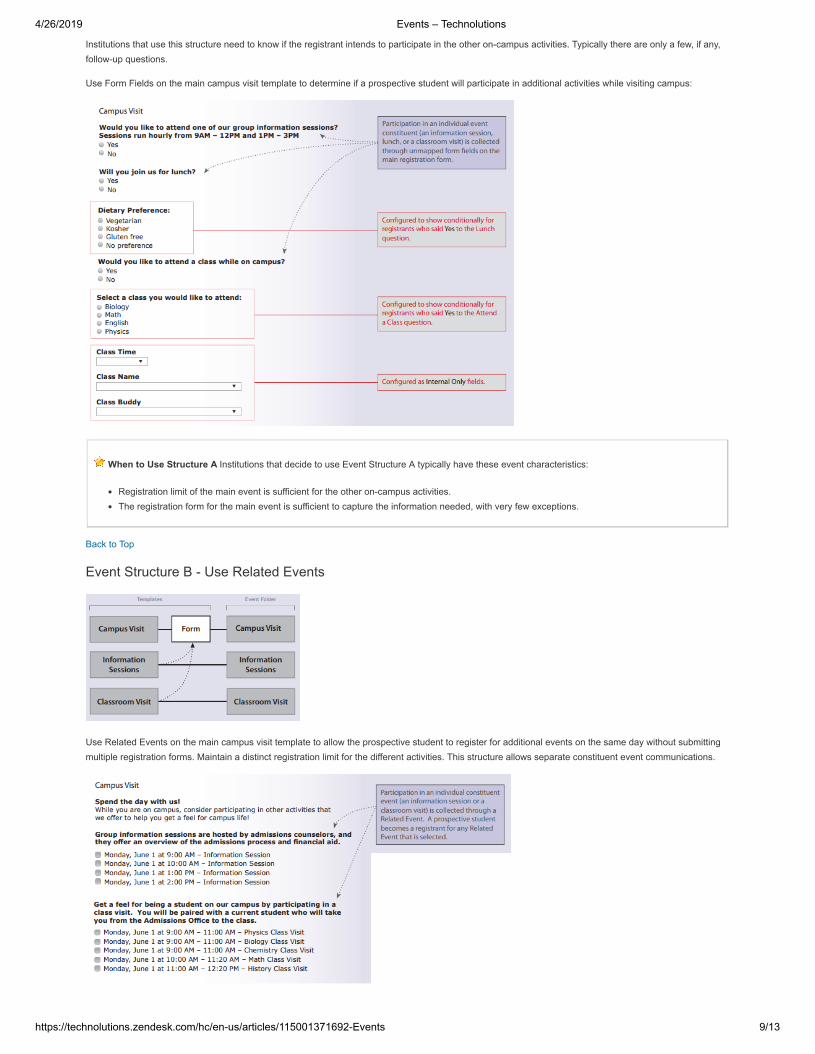
Event Structure A - Use Form Fields
This event structure is often used to allow registration for multiple on-campus activities that occur on the same day on a single registration form. The mainevent’s registration limit is sufficient for all of the possible activities.
4/26/2019 Events – Technolutions
https://technolutions.zendesk.com/hc/en-us/articles/115001371692-Events 9/13
Institutions that use this structure need to know if the registrant intends to participate in the other on-campus activities. Typically there are only a few, if any,follow-up questions.
Use Form Fields on the main campus visit template to determine if a prospective student will participate in additional activities while visiting campus:
When to Use Structure A Institutions that decide to use Event Structure A typically have these event characteristics:
Registration limit of the main event is sufficient for the other on-campus activities.The registration form for the main event is sufficient to capture the information needed, with very few exceptions.
Back to Top
Event Structure B - Use Related Events
Use Related Events on the main campus visit template to allow the prospective student to register for additional events on the same day without submittingmultiple registration forms. Maintain a distinct registration limit for the different activities. This structure allows separate constituent event communications.

4/26/2019 Events – Technolutions
https://technolutions.zendesk.com/hc/en-us/articles/115001371692-Events 10/13
When to Use Structure B Institutions that decide to use Event Structure B typically have these event characteristics:
The additional on-campus activities have set registration limits that differ from the main event.The registration form for the main event is sufficient to capture the information needed for the other on-campus activities, with very few exceptions.The additional on-campus activities require significant changes to the communication plan.
If event processes require administrative setup specific to one of the related events, add Internal Only fields to the form for that related event's template.
Important! Do not delete the basic fields that are pre-populated on the form.
Automated Communications Upon Registration-type communications for the Campus Visit template are sent to registrants. Upon registrationcommunications are never sent for related event registrations.
Communications for related events that use any other triggers, including 'Upon Update' or 'Hours before event,' are all sent for any registrants,regardless of which registration form was submitted.
Back to Top
Event Structure C - Use Separate Forms
This event structure is used for more complex on-campus events, where a single registration form would become cumbersome to collect all of the requiredinformation for each activity.
Prospective students can be directed to Event Landing Pages where each of the on-campus events are listed. Communication plans can be used to marketadditional events to encourage registrants to sign up for those other activities.
When to Use Structure C Institutions that decide to use Event Structure C typically have these event characteristics:
Complex registration forms that cannot be accommodated elegantly on a single registration form.A constituent event requires a complex 'upon registration' communication.
Back to Top

4/26/2019 Events – Technolutions
https://technolutions.zendesk.com/hc/en-us/articles/115001371692-Events 11/13
Event Management
Event Structure - Use a Combination
A hybrid event structure may be used:
Important! To ensure a smooth transition for event processes, discuss event structures in advance before deciding which path to take. Submit aService Desk request to go over event set up.
Back to Top
Settings
Once an event has been created, the screen to manage registrations and edit the event itself resembles the following:

4/26/2019 Events – Technolutions
https://technolutions.zendesk.com/hc/en-us/articles/115001371692-Events 12/13
This event management screen will display the high level settings of the event, including:
The date and time of the eventThe event location (with a map that can be edited). If the location is associated with a dataset record, the name of the location will be linked to therecord.A link to the event templateThe event folderThe user associated with the eventThe status of the eventThe public URL for the event. This URL can be edited to feature a vanity URL.Any documents associated with this event
All of these settings can be adjusted by editing the event using the top right Edit button on the event management screen.
If a Notes form is associated with this event, a Notes tab will be present near the top right of the event management screen.
Edit and Export Options
On the right side of the screen, the following options are available to further edit the event and its components, export data, or view responses:
Option/Button DescriptionNavigates to the overview of communications associated with this event.
Navigates to the registration form associated with this event. If this event has a template, navigate tothe template form to make changes.
Automatically builds and runs a query of all registrants and the data associated with their formresponses for this event.
Automatically renders a PDF of all form responses for this event. Each form response will also displaythe Form User, Form Title, Form Date, Form Status, and Form Submitted Date.
Automatically builds a query of all registrants and the data associated with their form responses forthis event. Additional exports and filters can be inserted as desired.
Automatically builds a report of the event registration data. This report can be saved or exported ifdesired.
If an event survey form is associated with this template, a report of the survey responses can beviewed here.
Registrants and Launching Registration

4/26/2019 Events – Technolutions
https://technolutions.zendesk.com/hc/en-us/articles/115001371692-Events 13/13
Below the event settings, registrants, space available, and check in/registration options show:
Note the following:
The number for the Registrants count does not include guests. The Launch Check In option should be used to mark registrants as Attended or No Show. The Launch Registration option should be used if multiple registrations are submitted sequentially. This is typically used for day-of registrations, assubmitting a registration from this screen will automatically mark this registrant as attended.The Space Available count will subtract the number of registrants and guests from the Limit set on the event.The Pending counts will only show for forms marked as Save for Later.Once at least one registrant is marked as attended, the Total registrants including guests count will display the number of attended registrants, withand without guests.
When an event registration is selected from the event management screen, the form response can be displayed, edited, rescheduled, or deleted.
Back to Top