orderofgamers.com - The Esoteric Order of Gamers
23
Dedicated to immersive, thematic tabletop games. Rules summaries, foamcore plans, battle reports, interviews, reviews, videos, tutorials – and lots more. Sign up to the monthly newsletter on the website! Follow the EOG and Don’t miss a Thing! The Esoteric Order of Gamers orderofgamers.com VIDEOS EsotericOrderGamers PHOTOS orderofgamers TWEETS @EOGamers NEWS EOGamers
-
Upload
khangminh22 -
Category
Documents
-
view
2 -
download
0
Transcript of orderofgamers.com - The Esoteric Order of Gamers

Dedicated to immersive, thematic tabletop games. Rules summaries, foamcore plans, battle reports, interviews, reviews, videos, tutorials – and lots more.
Sign up to the monthly newsletter on the website!
Follow the EOG and Don’t miss a Thing!
The Esoteric Order of Gamersorderofgamers.com
VIDEOSEsotericOrderGamers
PHOTOSorderofgamers
TWEETS@EOGamers
NEWSEOGamers

Since 2004, I’ve been supplying tabletop gamers with hundreds of free high-quality rules summaries! And the Esoteric Order of Gamers features
hundreds of entertaining and informative videos about our excellent hobby.
It takes time and money to do this work, and just a few $ a month really does help me do much more. Join the official EOG community – and get bonus rewards too!

Game: ADEPTUS TITANICUS
Publisher: GAMES WORKSHOP (2020)
ADEPTUS TITANICUS (1988)Page 1: Rules summary frontPage 2: Rules summary back (plus White Dwarf rules for Reavers and Warhounds)Page 3: Play reference x2 frontPage 4: Play reference (damage chart) x2 backPage 5: Titan cardsPage 6: Titan cardsPage 7: Eldar titan cards
CODEX TITANICUS (1989) Titan-relevant rules onlyPage 8: Rules summary frontPage 9: Rules summary back (plus White Dwarf rules for craters)Page 10: Rules summary Ork gargantsPage 11: Rules summary Eldar Phantom titansPage 12: Advanced close combat cards frontPage 13: Advanced close combat cards back
ADEPTUS TITANICUS II (2000) plus updates from Epic 40,000 magazinePage 14: Rules summary frontPage 15: Rules summary backPage 16: Titan cards Imperial battle titansPage 17: Titan cards Imperial emperor titansPage 18: Rules summary Ork gargants / Eldar titansPage 19: Titan cards Ork gargantsPage 20: Titan cards Eldar titans
v1.1Feb 2021
Print on card (ensure you are printing at 100% scale) laminate and trim to size.
These sheets are intended only for the personal use of existing owners of the game for additional reference. Universal Head makes no claim whatsoever to the rights of the publisher and copyright holder, and does not benefit financially from these player aids. Artwork from the original game is copyrighted by the publisher and used without permission. This PDF may not be re-posted online, sold or used in any way except for personal use.
If you need exceptional quality graphic design for your next project, visit universalhead.com
Peter ‘Universal Head’ Gifford The Esoteric Order of Gamers

ADEPTUS TITANICUS ISETUP
Choose a scenario. If there are more than 2 players, split into teams with at least 1 titan per player. Roll a D6 to decide who chooses a side to play. Take it in turns to place a building in the play area until all are placed.
Both sides roll a D6. The winning side chooses one edge of the play area and places their titans within 12cm of it; the other side then places their titans within 12cm of the opposite edge (unless the scenario specifies otherwise).
Take a set of order counters (first fire, advance, charge, and repair) for each titan. The player who set up their titans first is the first player and takes the first player token.
Each titan has a class name (the basic model) and a variant name (depending on the weapons it carries). VSG is the number of void shields the titan starts the game with, marked using the base wheel. SPEED is the distance in cm a titan can move per turn (the first number is the ADVANCE distance and the second is the CHARGE distance). BATTLE RATING is the titan’s points cost.
SEQUENCE OF PLAY1. ORDER PHASE
Each player must place 1 order counter facedown beside each of their titans. A titan without an order cannot move or fire, and any attacks against it receive +1 to hit.
2. MOVEMENT PHASE1. CHARGEAll titans with CHARGE orders may move up to their CHARGE distance with up to 1 turn of 45° at any point during the move.
2. ADVANCEAll titans with ADVANCE orders may move up to their ADVANCE distance with up to 4 turns of 45° each at any point during the move (more than one may be taken at a time).
The titan may move directly backwards, but may only make 1 turn of 45° during the move.
3. FIRST FIREAll titans with FIRST FIRE orders may turn up to 45° but not move.
Titans with FIRST FIRE orders may SNAP FIRE at any point in the movement phase, interrupting an opponent’s move by yelling SNAP FIRE! (complete the move after resolving the attack). All weapons must be fired at 1 target and there is no +1 to hit. A titan that snap fires may only use close combat attacks (or use improvised weapons in the combat phase).
Titans with DAMAGE CONTROL orders cannot move or turn.
Within each segment, titans from each side move alternately, starting with the first player. Once you have moved a titan and removed your hand from it, the move may not be changed.
A titan must always move straight ahead and can only change direction by making a turn. They cannot move through another building or another titan model or base.
A titan enters close combat with another titan by moving so their bases are touching and must stop when it does so. The engaged titan may not move in the same turn it has been engaged in close combat, but it may turn in place. A titan engaged in close combat on a previous turn may attempt to move away.
3. REPAIR PHASE1. REPAIR VOID SHIELDSRoll a D6 for each downed void shield, adding +1 if the titan has a DAMAGE CONTROL order. On a 5+ that shield is repaired (update the titan’s void shield wheel).
2. REPAIR DAMAGED SYSTEMSRoll a D6 for each damaged system: void shield generator (VSG), mind impulse units (MIUs), and reactor. Add +1 if the titan has a DAMAGE CONTROL order. On a 5+ that system is repaired (remove the appropriate damage counter).
3. MALFUNCTION ROLLSRoll a D6 for each damaged system that was not repaired in the last step. On a 6, that system suffers catastrophic damage.
At the end of the repair phase, a player may switch off any of their titans; that titan takes no further part in the game, but does not have to take any more cumulative damage rolls.
4. COMBAT PHASE1. FIRST FIREAll titans with FIRST FIRE orders may fire any or all of their weapons.
2. ADVANCEAll titans with ADVANCE orders may fire any or all of their weapons.
3. CHARGEAll titans with CHARGE orders may fire any or all of their weapons.
4. CLOSE COMBATAll titans engaged in close combat resolve their attacks. A titan in close combat always fights in this segment regardless of its order.
Titans with DAMAGE CONTROL orders cannot fire.
Within each segment, titans from each side fire alternately, starting with the first player.
You cannot save weapons to fire in later phases.
TARGETINGEach titan’s weapons may fire at a different target, though multi-barrelled weapons must fire at the same target. A target must be within the weapon’s fire arc, range, and line of sight (LOS).
Fire arc: Use the weapon arc template to determine which weapons may fire depending on whether they are left arm, right arm, or carapace weapons.
Range: Measure the range and check the weapons table to see if the target is within short or long range for the weapon.
LOS: Draw a straight line from the attacking titan’s head to any part of the target model (except its base). If the line crosses any terrain, the LOS is blocked if the terrain is taller than both titans, or it is taller than one of the titans and the smaller titan’s base is touching the terrain. LOS may be blocked for some weapons but not for others.
FIRINGRoll dice for each weapon in turn with modifiers. A hit is scored for each result equal to or greater than the target number (cross-reference the weapon and the range on the weapons table).
Firer’s orders: FIRST FIRE +1 CHARGE -1
Target’s orders: DAMAGE CONTROL +1
Target in cover: -1
A titan touching a piece of cover is hull down and receives the cover modifier; its targets do not. Two hull down titans firing at each other both receive the cover bonus.
All modifiers are cumulative. A roll of 1 is always a miss. If you need 7+, first roll a 6, then roll a 4+ (if 7 was needed), 5+ (if 8 was needed), or 6 (if 9+ was needed)
Burst circles (B): The attacking player places the burst circle template anywhere on the table subject to the targeting rules, and all titans whose bases are within the burst circle can be attacked. Make separate hit rolls for each target.
Following fire (F): If a following-fire weapon hits, the attacking player can roll to hit again repeatedly until a hit roll is failed.
Plasma weapons (F): Plasma guns and plasma cannon each have 2 entries, one for sustained fire and one for maximal fire. Before firing the weapon, the attacking player must choose one of these fire modes. A titan armed with more than 1 plasma weapon must fire them all on the same setting.
Overloading void shields: A titan with 3 or more void shields may overload their void shields to stop a hit. You may declare that you are overloading void shields as soon as the hits for that turn have been determined and before damage is resolved. Roll a D6 for each hit: on a 1-4, the hit is stopped. On a 5-6, your void shield generator has burned out, all your void shields are destroyed, and the hit goes through.
Merging shields: Friendly titans may merge their shields (as if they were in close combat) if they are in base contact and one has FIRST FIRE orders.
DAMAGEEach successful hit knocks down 1 of the target’s void shields (update the titan’s void shield wheel). If the target has no void shields, the hit does damage. After all a titan’s weapons have been fired, work out the damage for each hit in an order chosen by the attacking player (in general, save the weapons with the lowest critical hit rolls until last).
For every hit that causes damage:1. Roll for level of damage.Roll D6. If the result is equal to or greater than the critical hit roll for the weapon, the hit causes critical damage (always on a roll of 6). If not, it causes superficial damage (always on a roll of 1).
2. Roll for hit location.Roll D6 on the hit location table. If the target is hull down in cover, any hits against locations completely behind the cover are misses. If a weapon location that does not hold any weapons is hit, the body is hit instead.
3. Determine result.Cross-reference the location with the level of damage on the damage table.
4. Determine damage effects.Check the damage effect table to determine what effect the damage has on play, and record it with the appropriate counter. A titan can never have 2 damage counters of exactly the same type; if a location is hit again, roll a D6. On a 1-3, the extra damage has no effect; on a 4-6, the location suffers catastrophic damage.
CLOSE COMBAT Close combat is simultaneous: work out the damage for each titan involved, then apply damage effects at the end of the segment.
A titan which ended the movement phase in base combat with an enemy titan may use the attacks on the close combat weapons table. Normal weapon fire arcs apply.
In the first turn of close combat, a titan may also use its normal armament of ranged weapons against its close combat opponent(s) only. Players may fire in the normal phase matching their order, or in the close combat phase after all firing has finished.
Void shields protect against weapons fired in the normal phase, but not against those fired in the close combat phase.
In the second and subsequent turns, only close combat or improvised attacks may be used. Void shields have merged, so they do not provide protection against close combat attacks.
Improvised attacks: One improvised attack may be made per turn against a target that falls in the arc of fire for carapace-mounted weapons.
Burst circles (B): Weapons with a burst circle affect the attacker as well as the target if they are used in close combat, but with a -1 to hit.
CLOSE COMBAT WEAPONSRoll dice for each weapon, with a +1 bonus if attacking a titan with DAMAGE CONTROL orders. A hit is scored for each result equal to or greater than the to hit roll number:
CC WEAPON TO HIT ROLL DAMAGEPower fist 4+ 1-3 critical hitsChain fist 3+ 1-2 critical hitsLas-cutter 2+ 1 critical hitImprovised 5+ 1 critical hit
Leaving close combat: A titan engaged in close combat on a previous turn may attempt to move away (ie, after 1 turn of close combat). Its opponent is allowed a free attack with any close combat weapons it has. This takes place in the movement phase, and a titan that makes a free attack may still attack normally in the combat phase.
Firing into close combatTo hit modifiers from the firer’s orders are ignored. Any hits will knock down 1 void shield on each of the titans in the close combat.
If only 1 titan has operating shields, they will protect all of the titans involved in the close combat, and hits will only start causing real damage when all of the titans involved have lost all of their shields.
When a hit causes damage, the firer rolls a D6 to see which titan is hit. On a 1-4 the titan nearest to the firer, and on a 5-6 the titan furthest from the firer.
If both are an equal distance away, they instead have an equal chance of being hit. If more than 2 titans are involved, each rolls a D6 and the highest roller takes the damage.
Weapons with a burst circle affect all titans in the close combat.
5. END PHASEThe first player passes the first player token to their opponent, who becomes first player for the next turn.
Both player retrieve their order tokens from the play area.
ENDING THE GAMEThe game ends when:
a. One player has no operational titans left in the play areaA titan is operational if it has not suffered catastrophic damage to its MIUs, legs, or reactor. A titan that leaves the play area may not return. The player with operational titans left in the play area wins.
b. One player concedes defeat
c. One player achieves their victory conditionsIf the scenario has an objective, the game ends when one player achieves their objective.
OPTIONAL RULES (CODEX TITANICUS)Random first player: Players may roll to determine who is first player for the turn instead of passing the first player token at the end of the turn.
Revealing orders: Players reveal their order tokens in the appropriate segment of the movement phase. Titans with FIRST FIRE reveal them at the end of the movement phase. If you do not reveal an order at the appropriate time, the titan loses its orders for that turn, and is treated as having no orders.
Plasma weapons: A titan that wishes to fire a plasma weapon on maximal must have FIRST FIRE orders.

WEAPONSWEAPON SHORT LONG TO HIT: TO HIT: CRIT RANGE RANGE SHORT LONG HIT
HEAVY WEAPONS
Auto-cannon 36cm 72cm 5+ 6+ 6+
Las-cannon 30cm 60cm 4+ 6+ 4+
Multi-launcher B 36cm 72cm 4+ 6+ 5+
Multi-melta 12cm – 5+ – 3+
Plasma gun – sustained 20cm – 6+ – 6+ – maximal 36cm 72cm 4+ 6+ 5+
VERY HEAVY WEAPONS
Defence laser B 72cm – 3+ – 2+
Macro-cannon B 72cm – 3+ – 3+
Plasma cannon – sustained F 20cm – 6+ – 6+ – maximal B 36cm 72cm 3+ 6+ 3+
MISSILES
Blind 72cm – 2+ – –
Haywire 36cm 72cm 3+ 5+ *Mine Dispenser 72cm – 2+ – –
Plasma 72cm – 4+ – 3+
Stasis 36cm 72cm 3+ 5+ *Vortex 36cm 72cm 4+ 6+ *Warp 36cm 72cm 4+ 6+ *
CLOSE COMBAT WEAPONSWEAPON TO HIT DAMAGE
Power fist 4+ 1-3 critical hitsChain fist 3+ 1-2 critical hitsLas-cutter 2+ 1 critical hitImprovised 5+ 1 critical hit
DESIGNING TITANSWarlord titans have 4 weapon mounts: right arm, left arm, right carapace, and left carapace.
Reaver titans have 3 weapon mounts: left arm, right arm, and a single carapace mount.
Warhound titans have 2 weapon mounts: left arm and right arm. They may not carry support missiles.
Each mount can hold 1 of the following:1 heavy weapon with up to 4 barrels or 1 very heavy weapon barrel or 1 close combat weapon.
Close combat weapons may only be mounted on the arms.
WEAPON POINT COST WEAPON POINT COST PER BARREL PER BARREL
Heavy weapons Very heavy weaponsAuto-cannon 5 Defence laser 30Las-cannon 15 Macro-cannon 25Multi-launcher 15 Plasma cannon 20Multi-melta 5 Plasma gun 10 Close Combat Chain fist 10 Las cutter 5 Power fist 10
Void shields cost 10 points each. A battle titan may have up to 6, a reaver titan up to 5, and a warhound titan up to 2.
One your titan is equipped, total the points cost and multiply it by the titan’s points multiplier.
The points multiplier for battle titans and reaver titans is 6 and a warhound’s is 5, but this may be increased if you use any devices.
Move ratesTo find out a titan’s move rates, total the number of weapon barrels it is carrying. Each very heavy weapon counts as 3 barrels and each close combat weapon counts as 2 barrels.
Battle titan # BARRELS ADVANCE RATE CHARGE RATE 1-4 10cm* 20cm* 5-8 8cm 16cm 9-12 7cm 14cm 13-16 6cm 12cm**
* Titans with less than 5 barrels are highly manoeuverable. On CHARGE orders, they may make 2 45° turns (or one 90° turn).
** Titans with more than 12 barrels have limited manoeuverablility. When they have ADVANCE orders, they may make no more than 2 45° turns (or one 90° turn), and they may not turn if they move backwards. When they have CHARGE orders, they may make only 1 45° turn at the end of the move.
Reaver titan # BARRELS ADVANCE RATE CHARGE RATE 1-4 12cm* 24cm* 5-8 10cm 20cm 9-12 8cm 16cm
* Reaver titans with less than 5 barrels are highly manoeuverable. On CHARGE orders, they may make 2 45° turns (both may be made together).
Warhound titan # BARRELS ADVANCE RATE CHARGE RATE 1-3 14cm 28cm 5-6 12cm 24cm
Warhounds are extremely manoeuverable, and have the following number of 45° turns per move:
ORDERS 45° TURNS / MOVECHARGE* 4ADVANCE 6FIRST FIRE 1
* A warhound titan with CHARGE orders may declare it is evading when it moves: it moves only up to its advance rate, but attacks against it in the combat phase are at -1 to hit.
HARD POINTSEach location on a battle titan or reaver titan has 4 hard points to which weapons can be attached. Each location on a warhound titan has 3 hard points.
The number of hard points taken up by a weapon depends on the size of each weapon barrel fitted:
Heavy weapon barrel: 1 hard point.Close combat weapon: 2 hard points.Very heavy weapon: 3 hard points.
You may fit different weapon barrels to the same location, however only 1 close combat weapon may be fitted on each arm, and close combat weapons cannot be fitted to the carapace.
A location with different types of weapon barrels is a mixed weapon. All of the barrels must be fired at the same target.
When a location holds a close combat weapon and 1 or 2 heavy weapons, only one or the other can be used.
SUPPORT MISSILESSupport missile are one-shot weapons that may only be mounted on the carapace location. Once fired, remove them.
If a missile misses its target, place the deviation template over the original target with the 1 arrow pointing towards the firer. Roll D6 for the direction of deviation, and 2D6 for the distance in cms.
BLIND MISSILE When the final point of impact has been determined, draw a straight line from that point back to the firing titan (the flight path). The firer may place 3 blind markers anywhere along the flight path, or at any point within 6cm of the point of impact.
Any LOS that must be drawn through a blind marker is blocked.
During each repair phase, roll D6 for each blind marker; on a 1, the marker is removed from play.
HAYWIRE MISSILE When a haywire missile hits a target that has all of its void shields down, it immediately cause critical damage to the target’s MIUs. Haywire missiles have no effect when they hit a void shield.
MINE DISPENSER MISSILE MDMs can be fired at any point on the table within LOS. When the final point of impact has been determined, draw a straight line from that point back to the firing titan (the flight path).
The firer then places 2 mine counters and 2 dummy counters facedown anywhere along the flight path, or at any point within 6cm of the point of impact. The mines become operational at the end of the movement phase in the following turn.
If any titan moves within 3cm of one of these counters, flip it. Dummy mines have no effect and are discarded. Mines explode (remove the counter), automatically hitting the target, ignoring void shields, and causing critical damage on a D6 roll of 2+.
Optionally, MDMs may carry a single stasis or vortex mine and 3 dummy mines instead. When activated, these mines create the appropriate field instead of exploding.
PLASMA MISSILE Place the burst template at the final point of impact. This is where the first warhead lands; the remaining 5 deviate from this point using the normal deviation procedure.
Any titan under any of the templates suffers a critical hit on a D6 roll of 3+, ignoring modifiers for orders and cover.
STASIS MISSILE When rolling to hit, ignore cover modifiers. Place the stasis field marker at the final point of impact.
Any titan wholly or partially within this field may neither move nor attack (but cannot be attacked). Its orders cannot be changed until the order phase after the field dissipates or moves.
During the repair phase of each turn, roll D6 for each stasis field:
1-2 The field dissipates; remove it from the table.3-4 The field stays in place.5-6 The field moves 2D6 in a random direction (use the deviation procedure). It stops if it comes into contact with a titan.
If 2 stasis fields come into contact, they both dissipate immediately.
A stasis missile that is destroyed before being used explodes, creating a stasis field over the titan carrying it.
VORTEX MISSILE Place the vortex field marker at the final point of impact. Any titan wholly or partially within this field is automatically hit, has all its void shields knocked down, and takes critical damage (roll location normally).
During the repair phase of each turn, roll D6 for each vortex field:
1-2 The field dissipates; remove it from the table.3-4 The field stays in place.5-6 The field moves 2D6 in a random direction (use the deviation procedure). Anything in its path is hit.
A vortex missile that is destroyed before being used explodes, creating a vortex field over the titan carrying it.
WARP MISSILE When rolling to hit, ignore cover modifiers. If the warp missile misses, do not roll for deviation (it disappears).
When a warp missile hits it ignores void shields and automatically causes damage (roll location normally); roll D6:
1 Superficial damage.2-5 Critical damage.6 Inflicts 2 critical hits.
DEVICESEach optional system fitted increases the titan’s points multiplier by 1 point.
CAMELEOLINE Any attacks against a titan fitted with cameleoline are treated as through the range was 10cm greater. This does not apply to attacks which are resolved in the close combat segment of the combat phase.
COBRA COBRA allows a titan to fire 1 segment earlier than normal in the combat phase (though never before the FIRST FIRE segment). It does not affect hit modifiers from the titan’s orders for the turn.
JUMP PACKSJump packs allow a titan with charge orders to move over (but not onto) a building or another titan (move distance is unaffected). The titan ignores dangerous terrain tests unless they end a move in terrain that requires them.
RELAY The titan with RELAY must be within 36cm of the titan(s) firing the missile(s), and have clear LOS to it/them. If so, the range and chance to hit are worked out as if the titan with RELAY was firing the missile(s).
A single RELAY can control any number of missiles at once, but they must all be aimed at the same target. A battle titan can be fitted with up to 3 RELAYs, and can designate one target with each unit if desired. It is possible to set up chains of titans with RELAY.
REAVER TITANSReaver titans have only 1 carapace location. Roll for hit location as normal, but do not roll for left or right after hitting the carapace.
WARHOUND SCOUT TITANSWarhound titans are lightweight: any critical damage rolls made against them get a +1, and the number of critical hits caused by a close combat weapon is increased by 1.
Use this table when rolling for hit location:
D6 HIT LOCATION
1 Left arm2 Right arm3-5 Body6 Legs
Close combat: A warlord or reaver titan attacking a warhound titan in close combat has +1 to hit. A warhound attacking a warlord or reaver titan in close combat has -1 to hit.
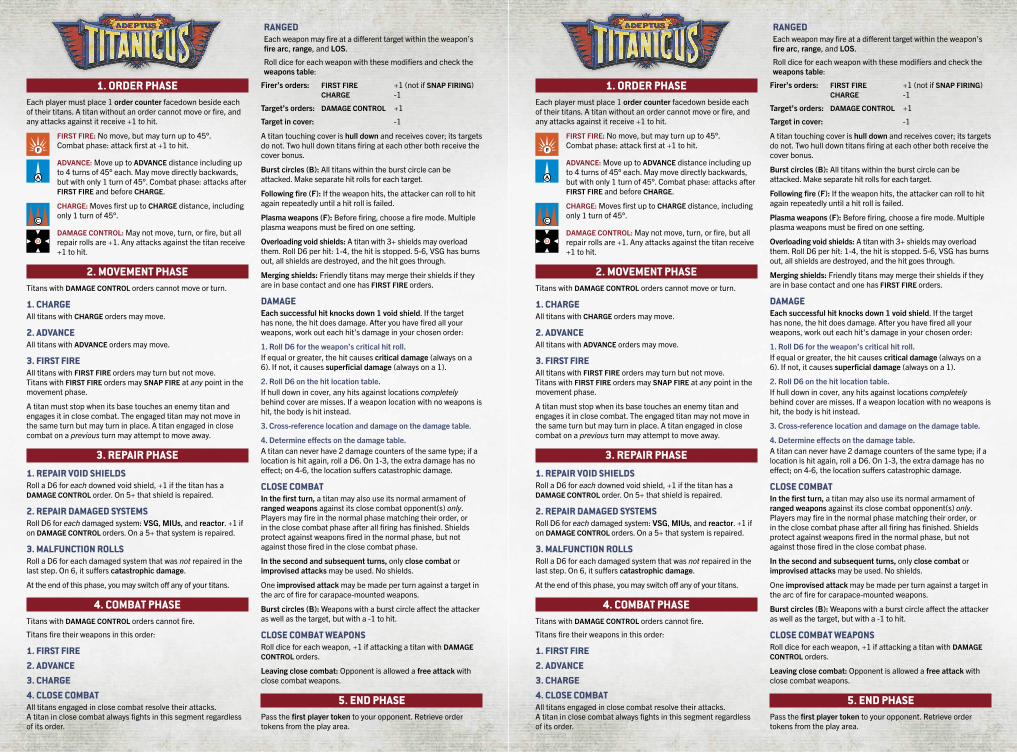
1. ORDER PHASEEach player must place 1 order counter facedown beside each of their titans. A titan without an order cannot move or fire, and any attacks against it receive +1 to hit.
FIRST FIRE: No move, but may turn up to 45°. Combat phase: attack first at +1 to hit.
ADVANCE: Move up to ADVANCE distance including up to 4 turns of 45° each. May move directly backwards, but with only 1 turn of 45°. Combat phase: attacks after FIRST FIRE and before CHARGE.
CHARGE: Moves first up to CHARGE distance, including only 1 turn of 45°.
DAMAGE CONTROL: May not move, turn, or fire, but all repair rolls are +1. Any attacks against the titan receive +1 to hit.
2. MOVEMENT PHASETitans with DAMAGE CONTROL orders cannot move or turn.
1. CHARGEAll titans with CHARGE orders may move.
2. ADVANCEAll titans with ADVANCE orders may move.
3. FIRST FIREAll titans with FIRST FIRE orders may turn but not move. Titans with FIRST FIRE orders may SNAP FIRE at any point in the movement phase.
A titan must stop when its base touches an enemy titan and engages it in close combat. The engaged titan may not move in the same turn but may turn in place. A titan engaged in close combat on a previous turn may attempt to move away.
3. REPAIR PHASE1. REPAIR VOID SHIELDSRoll a D6 for each downed void shield, +1 if the titan has a DAMAGE CONTROL order. On 5+ that shield is repaired.
2. REPAIR DAMAGED SYSTEMSRoll D6 for each damaged system: VSG, MIUs, and reactor. +1 if on DAMAGE CONTROL orders. On a 5+ that system is repaired.
3. MALFUNCTION ROLLSRoll a D6 for each damaged system that was not repaired in the last step. On 6, it suffers catastrophic damage.
At the end of this phase, you may switch off any of your titans.
4. COMBAT PHASETitans with DAMAGE CONTROL orders cannot fire.
Titans fire their weapons in this order:
1. FIRST FIRE2. ADVANCE3. CHARGE4. CLOSE COMBATAll titans engaged in close combat resolve their attacks. A titan in close combat always fights in this segment regardless of its order.
RANGEDEach weapon may fire at a different target within the weapon’s fire arc, range, and LOS.
Roll dice for each weapon with these modifiers and check the weapons table:
Firer’s orders: FIRST FIRE +1 (not if SNAP FIRING) CHARGE -1
Target’s orders: DAMAGE CONTROL +1
Target in cover: -1
A titan touching cover is hull down and receives cover; its targets do not. Two hull down titans firing at each other both receive the cover bonus.
Burst circles (B): All titans within the burst circle can be attacked. Make separate hit rolls for each target.
Following fire (F): If the weapon hits, the attacker can roll to hit again repeatedly until a hit roll is failed.
Plasma weapons (F): Before firing, choose a fire mode. Multiple plasma weapons must be fired on one setting.
Overloading void shields: A titan with 3+ shields may overload them. Roll D6 per hit: 1-4, the hit is stopped. 5-6, VSG has burns out, all shields are destroyed, and the hit goes through.
Merging shields: Friendly titans may merge their shields if they are in base contact and one has FIRST FIRE orders.
DAMAGEEach successful hit knocks down 1 void shield. If the target has none, the hit does damage. After you have fired all your weapons, work out each hit’s damage in your chosen order:
1. Roll D6 for the weapon’s critical hit roll. If equal or greater, the hit causes critical damage (always on a 6). If not, it causes superficial damage (always on a 1).
2. Roll D6 on the hit location table. If hull down in cover, any hits against locations completely behind cover are misses. If a weapon location with no weapons is hit, the body is hit instead.
3. Cross-reference location and damage on the damage table.
4. Determine effects on the damage table. A titan can never have 2 damage counters of the same type; if a location is hit again, roll a D6. On 1-3, the extra damage has no effect; on 4-6, the location suffers catastrophic damage.
CLOSE COMBAT In the first turn, a titan may also use its normal armament of ranged weapons against its close combat opponent(s) only. Players may fire in the normal phase matching their order, or in the close combat phase after all firing has finished. Shields protect against weapons fired in the normal phase, but not against those fired in the close combat phase.
In the second and subsequent turns, only close combat or improvised attacks may be used. No shields.
One improvised attack may be made per turn against a target in the arc of fire for carapace-mounted weapons.
Burst circles (B): Weapons with a burst circle affect the attacker as well as the target, but with a -1 to hit.
CLOSE COMBAT WEAPONSRoll dice for each weapon, +1 if attacking a titan with DAMAGE CONTROL orders.
Leaving close combat: Opponent is allowed a free attack with close combat weapons.
5. END PHASEPass the first player token to your opponent. Retrieve order tokens from the play area.

1: LEFT ARM2: RIGHT ARM3: CARAPACE
1-3: LEFT, 4-6: RIGHT
CRITICAL HIT?NO
SUPERFICIALAlready damaged?
NO DAMAGED
YES CRITICAL
DESTROYED
YES
ROLL D6 FOR CUMULATIVE DAMAGE
1-3 DAMAGEDThe weapon location is damaged; all weapons mounted on that location are unusable until it is repaired.
REPAIRYou may attempt to repair a damaged weapons location during each repair phase. Only 1 roll is necessary for the entire location and all weapons on it.
4-6 DESTROYEDAll the weapons in the hit location are destroyed; remove them from the model. Apply further hits to this location to the body instead.
REPAIRDestroyed locations cannot be repaired.
6: LEGSCRITICAL HIT?
NO SUPERFICIAL
Already damaged?
NO NO EFFECT
YES CRITICAL
Already damaged?
NO DAMAGED
YES YES
ROLL D6 FOR CUMULATIVE DAMAGE
1-3 NO EFFECT
4-6 CATASTROPHIC DAMAGEOne leg gives way; the titan crashes to the ground. Unable to move, and with most of the crew either dead, seriously injured, or unconscious, the titan is considered destroyed.
DAMAGEDThe titan may no longer be given CHARGE orders. If given ADVANCE orders, it may only make one 45° turn during its move. It may still make a 45° turn on FIRST FIRE orders.
REPAIRDamaged legs cannot be repaired.
6: REACTORCRITICAL HIT?
NO SUPERFICIAL
Already damaged?
NO NO EFFECT
YES CRITICAL
Already damaged?
NO DAMAGED
YES YES
ROLL D6 FOR CUMULATIVE DAMAGE
1-3 NO EFFECT
4-6 CATASTROPHIC DAMAGEThe reactor vessel is fractured, and a violent meltdown occurs. The titan is vaporized, and all units within 8cm must roll for damage as if hit by a plasma cannon firing on maximal.
DAMAGEDPower output from the reactor is reduced to a mere trickle. All available power is being channelled into the auto-repair systems. The titan may not be given any orders until the reactor is repaired.
REPAIRYou may attempt to repair a damaged reactor during each repair phase, before you attempt to repair anything else. If you fail to repair the reactor, you may not make any other repair rolls.
Since void shield repairs occur before any other system, void shields cannot be repaired until the turn after the reactor has been repaired.
4-5: MIUsCRITICAL HIT?
NO SUPERFICIAL
Already damaged?
NO NO EFFECT
YES CRITICAL
Already damaged?
NO DAMAGED
YES YES
ROLL D6 FOR CUMULATIVE DAMAGE
1-3 NO EFFECT
4-6 CATASTROPHIC DAMAGEThe MIU goes haywire, overwhelming the crew with a host of random terrifying images. The luckiest crewmembers are killed instantly by psychic shock, the rest are reduced to gibbering lunatics. The titan grinds to a halt and is considered destroyed.
DAMAGEDThe titan receives orders as normal, but may go out of control. Until the MIUs are repaired, roll D6 at the start of each movement phase and each combat phase:
Roll Movement Combat1-3 Move normally Fire normally4-5 May not move May not fire6 Random move Random fire
Random move: Your opponent may move the titan within the restrictions of its order for the turn.
Random fire: The titan fires all of its weapons at the closest target available, friend or foe, within the restrictions of its order for the turn and LOS rules. If there is a choice, your opponent can choose which weapons are used and their targets. The titan will not attack itself.
REPAIRYou may attempt to repair damaged MIUs in each repair phase.
1-3: VSGsDESTROYED
Void shield generators destroyed. All void shields are knocked down and may not be repaired; the titan is without shields from now on. VSGs cannot suffer catastrophic damage.Count any further VSGs DESTROYED results as REACTOR hits instead.
1-3: VSGsDESTROYED
Void shield generators destroyed. All void shields are knocked down and may not be repaired; the titan is without shields from now on. VSGs cannot suffer catastrophic damage.Count any further VSGs DESTROYED results as REACTOR hits instead.
4-5: BODY4-5: BODY

LEFT SHORT LONG TO HIT: TO HIT: CRIT RANGE RANGE SHORT LONG HIT
CARAPACEMacro-cannon (1) B 72cm – 3+ – 3+
ARM Auto-cannon (4) 36cm 72cm 5+ 6+ 6+
RIGHTCARAPACE None
ARMAuto-cannon (4) 36cm 72cm 5+ 6+ 6+
LEFT SHORT LONG TO HIT: TO HIT: CRIT RANGE RANGE SHORT LONG HIT
CARAPACEPlasma cannon (1) – sustained B 20cm – 6+ – 6+ – maximal B 36cm 72cm 3+ 6+ 3+
ARM Power fist TO HIT 4+ DAMAGE 1-3 critical hits
RIGHTCARAPACEPlasma cannon (1) – sustained B 20cm – 6+ – 6+ – maximal B 36cm 72cm 3+ 6+ 3+
ARM Defense laser (1) B 72cm – 3+ – 2+
LEFT SHORT LONG TO HIT: TO HIT: CRIT RANGE RANGE SHORT LONG HIT
CARAPACEPlasma gun (3) – sustained 20cm – 6+ – 6+ – maximal 36cm 72cm 4+ 6+ 5+
ARM Macro-cannon (1) B 72cm – 3+ – 3+
RIGHTCARAPACEPlasma gun (3) – sustained 20cm – 6+ – 6+ – maximal 36cm 72cm 4+ 6+ 5+
ARM Chain fist TO HIT 3+ DAMAGE 1-2 critical hits
LEFT SHORT LONG TO HIT: TO HIT: CRIT RANGE RANGE SHORT LONG HIT
CARAPACENone
ARM Defense laser (1) B 72cm – 3+ – 2+
RIGHTCARAPACEMulti-launcher (2) B 36cm 72cm 4+ 6+ 5+
ARM Las-cutter TO HIT 2+ DAMAGE 1 critical hit
LEFT SHORT LONG TO HIT: TO HIT: CRIT RANGE RANGE SHORT LONG HIT
CARAPACEAuto-cannon (1) 36cm 72cm 5+ 6+ 6+
ARM Defense laser (1) B 72cm – 3+ – 2+
RIGHTCARAPACEMulti-launcher (1) B 36cm 72cm 4+ 6+ 5+
ARM Multi-launcher (2) B 36cm 72cm 4+ 6+ 5+
LEFT SHORT LONG TO HIT: TO HIT: CRIT RANGE RANGE SHORT LONG HIT
CARAPACELas-cannon (3) 36cm 72cm 5+ 6+ 6+
ARM Multi-launcher (2) B 36cm 72cm 4+ 6+ 5+
RIGHTCARAPACE None
ARM Las-cutter TO HIT 2+ DAMAGE 1 critical hit
LEFT SHORT LONG TO HIT: TO HIT: CRIT RANGE RANGE SHORT LONG HIT
CARAPACEMulti-melta (3) 12cm – 5+ – 3+
ARM Auto-cannon (3) 36cm 72cm 5+ 6+ 6+
RIGHTCARAPACE None
ARM Chain fist TO HIT 3+ DAMAGE 1-2 critical hits
LEFT SHORT LONG TO HIT: TO HIT: CRIT RANGE RANGE SHORT LONG HIT
CARAPACENone
ARM Multi-melta (2) 12cm – 5+ – 3+
RIGHTCARAPACE None
ARM Chain fist TO HIT 3+ DAMAGE 1-2 critical hits
SPEED VSG BATTLE RATING
7/14 4 630
SPEED VSG BATTLE RATING
7/14 6 840
SPEED VSG BATTLE RATING
7/14 6 930
SPEED VSG BATTLE RATING
8/16 4 630
SPEED VSG BATTLE RATING
8/16 4 720
SPEED VSG BATTLE RATING
8/16 3 660
SPEED VSG BATTLE RATING
8/16 2 360
SPEED VSG BATTLE RATING
10/20 3 300 HIGHLY MANOEUVRABLE
On CHARGE orders, may make two 45° turns.
WARLORD TITANDEATHBRINGER VARIANT
WARLORD TITANDEATHBRINGER VARIANT
WARLORD TITANDEATHBRINGER VARIANT
WARLORD TITANECLIPSE VARIANT
WARLORD TITANECLIPSE VARIANT
WARLORD TITANECLIPSE VARIANT
WARLORD TITANECLIPSE VARIANT
WARLORD TITANNIGHTGAUNT VARIANT

LEFT SHORT LONG TO HIT: TO HIT: CRIT RANGE RANGE SHORT LONG HIT
CARAPACEMulti-launcher (4) B 36cm 72cm 4+ 6+ 5+
ARM Defense laser (1) B 72cm – 3+ – 2+
RIGHTCARAPACEMulti-launcher (4) B 36cm 72cm 4+ 6+ 5+
ARM Defense laser (1) B 72cm – 3+ – 2+
SPEED VSG BATTLE RATING
6/12 6 1440
WARLORD TITANNEMESIS VARIANT
LIMITED MANOEUVRABILITY On ADVANCE orders, may make no more than 2 45° turns, and
may not turn if moving backwards. When on CHARGE orders, may make only one 45° turn at the end of the move.
LEFT SHORT LONG TO HIT: TO HIT: CRIT RANGE RANGE SHORT LONG HIT
CARAPACEMacro-cannon (1) B 72cm – 3+ – 3+
ARM Chain fist TO HIT 3+ DAMAGE 1-2 critical hits
RIGHTCARAPACEPlasma gun (4) – sustained 20cm – 6+ – 6+ – maximal 36cm 72cm 4+ 6+ 5+
ARM Las-cannon (4) 36cm 72cm 5+ 6+ 6+
LEFT SHORT LONG TO HIT: TO HIT: CRIT RANGE RANGE SHORT LONG HIT
CARAPACELas-cannon (4) 36cm 72cm 5+ 6+ 6+
ARM Power fist TO HIT 4+ DAMAGE 1-3 critical hits
RIGHTCARAPACELas-cannon (4) 36cm 72cm 5+ 6+ 6+
ARM Multi-melta (4) 12cm – 5+ – 3+
SPEED VSG BATTLE RATING
6/12 6 1170
SPEED VSG BATTLE RATING
6/12 4 1140
WARLORD TITANNEMESIS VARIANT
WARLORD TITANNEMESIS VARIANT
LIMITED MANOEUVRABILITY On ADVANCE orders, may make no more than 2 45° turns, and
may not turn if moving backwards. When on CHARGE orders, may make only one 45° turn at the end of the move.
LIMITED MANOEUVRABILITY On ADVANCE orders, may make no more than 2 45° turns, and
may not turn if moving backwards. When on CHARGE orders, may make only one 45° turn at the end of the move.
CARAPACE SHORT LONG TO HIT: TO HIT: CRIT RANGE RANGE SHORT LONG HIT
Multi-launcher (2) B 36cm 72cm 4+ 6+ 5+
LEFT ARM
Multi-melta (2) 12cm – 5+ – 3+
RIGHT ARM
Chain fist TO HIT 3+ DAMAGE 1-2 critical hits
CARAPACE SHORT LONG TO HIT: TO HIT: CRIT RANGE RANGE SHORT LONG HIT
Defense laser (1) B 72cm – 3+ – 2+
LEFT ARM
Multi-launcher (4) B 36cm 72cm 4+ 6+ 5+
RIGHT ARM
Multi-launcher (4) B 36cm 72cm 4+ 6+ 5+
CARAPACE
None
LEFT ARM
SHORT LONG TO HIT: TO HIT: CRIT RANGE RANGE SHORT LONG HIT
Las-cannon (2) 36cm 72cm 5+ 6+ 6+
RIGHT ARM
Las-cannon (2) 36cm 72cm 5+ 6+ 6+
SPEED VSG BATTLE RATING
10/20 4 540
SPEED VSG BATTLE RATING
8/16 5 1200
SPEED VSG BATTLE RATING
12/24 3 540 HIGHLY MANOEUVRABLE
On CHARGE orders, may make two 45° turns.
REAVER TITANHUN VARIANT
REAVER TITANGOTH VARIANT
REAVER TITANVANDAL VARIANT
LEFTCARAPACENone
ARM Power fist TO HIT 4+ DAMAGE 1-3 critical hits
RIGHTCARAPACE None
ARM SHORT LONG TO HIT: TO HIT: CRIT RANGE RANGE SHORT LONG HIT
Las-cannon (2) 36cm 72cm 5+ 6+ 6+
SPEED VSG BATTLE RATING
10/20 2 360 HIGHLY MANOEUVRABLE
On CHARGE orders, may make two 45° turns.
WARLORD TITANNIGHTGAUNT VARIANT
LEFT SHORT LONG TO HIT: TO HIT: CRIT RANGE RANGE SHORT LONG HIT
WINGMulti-launcher (2) B 36cm 72cm 4+ 6+ 5+
ARM Pulse laser (1) B 30cm 60cm 3+ 5+ 4+
RIGHT
WING Las-cannon (2) 36cm 72cm 5+ 6+ 6+
ARM Pulse laser (1) 30cm 60cm 3+ 5+ -1
LEFT SHORT LONG TO HIT: TO HIT: CRIT RANGE RANGE SHORT LONG HIT
WINGMulti-launcher (2) B 36cm 72cm 4+ 6+ 5+
ARM Pulse laser (1) B 30cm 60cm 3+ 5+ 4+1
RIGHT
WING Las-cannon (1) 36cm 72cm 5+ 6+ 6+
ARM Power fist TO HIT 4+ DAMAGE 1-3 critical hits
SPEED VSG BATTLE RATING
8/16 4 960
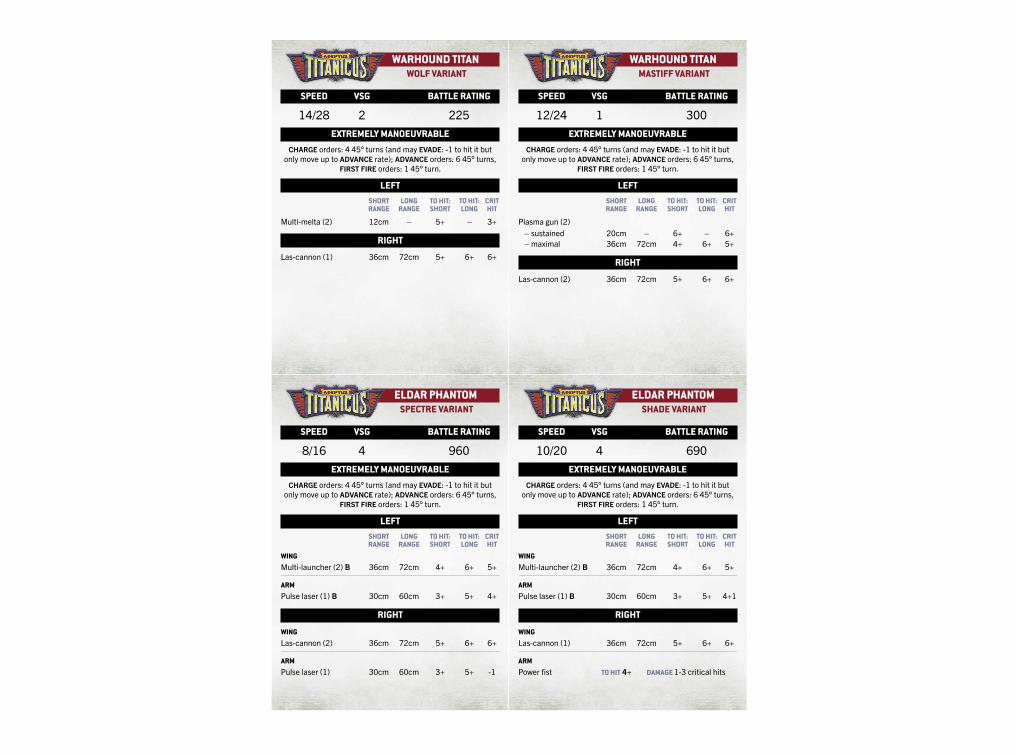
SPEED VSG BATTLE RATING
10/20 4 690
ELDAR PHANTOMSPECTRE VARIANT
ELDAR PHANTOMSHADE VARIANT
EXTREMELY MANOEUVRABLE CHARGE orders: 4 45° turns (and may EVADE: -1 to hit it but only move up to ADVANCE rate); ADVANCE orders: 6 45° turns,
FIRST FIRE orders: 1 45° turn.
EXTREMELY MANOEUVRABLE CHARGE orders: 4 45° turns (and may EVADE: -1 to hit it but only move up to ADVANCE rate); ADVANCE orders: 6 45° turns,
FIRST FIRE orders: 1 45° turn.
LEFT SHORT LONG TO HIT: TO HIT: CRIT RANGE RANGE SHORT LONG HIT
Multi-melta (2) 12cm – 5+ – 3+
RIGHT
Las-cannon (1) 36cm 72cm 5+ 6+ 6+
LEFT SHORT LONG TO HIT: TO HIT: CRIT RANGE RANGE SHORT LONG HIT
Plasma gun (2) – sustained 20cm – 6+ – 6+ – maximal 36cm 72cm 4+ 6+ 5+
RIGHT
Las-cannon (2) 36cm 72cm 5+ 6+ 6+
SPEED VSG BATTLE RATING
14/28 2 225
SPEED VSG BATTLE RATING
12/24 1 300
WARHOUND TITANWOLF VARIANT
WARHOUND TITANMASTIFF VARIANT
EXTREMELY MANOEUVRABLE CHARGE orders: 4 45° turns (and may EVADE: -1 to hit it but only move up to ADVANCE rate); ADVANCE orders: 6 45° turns,
FIRST FIRE orders: 1 45° turn.
EXTREMELY MANOEUVRABLE CHARGE orders: 4 45° turns (and may EVADE: -1 to hit it but only move up to ADVANCE rate); ADVANCE orders: 6 45° turns,
FIRST FIRE orders: 1 45° turn.

CODEX TITANICUSADVANCED CLOSE COMBAT
A titan may not turn in place when another titan moves into base contact with it. Close combat is not necessarily simultaneous.
A titans engaged in close combat may only attack in the close combat segment of the combat phase and must concentrate all available attacks on its opponent. Normal weapon arcs apply and all attacks take place inside void shields (unless started otherwise). Each separate combat is resolved in an order chosen by the first player.
At the start of the segment, each player secretly chooses 1 close combat option card for each of their titans in close combat, then they are revealed simultaneously, compared, and resolved in the order shown. These restrictions apply:
Reactor damaged: The titan may not choose any option and they may not move nor attack.
MIUs damaged: Roll D6 for the titan: 1-3 = may not choose an option and may not move or attack; 4-6 = may choose an option.
Legs damaged: The titan may not choose side-step or disengage options.
Blind-sided: A titan whose opponent (or primary target if outnumbered) is in its rear 180° arc may only choose side-step, turn around, or disengage options.
Check your opponent’s card to see if you attack first or second, which weapons you may use, and if any special rules apply. You may only use the weapons listed for the combination of options (‘close combat weapons’ includes improvised attacks).
The only hit modifiers that apply are those listed on the combat option cards, and the following:
CLOSE COMBAT WEAPONS Attacker has the close combat attack skill +1Battle titan attacking scout titan +1Scout titan attacking battle titan -1Attacker has the close combat attack skill -1
RANGED WEAPONS Attacker has the accuracy skill +1
Opponents without a combat optionIf your opponent is unable to choose a combat option card, do not choose one yourself. Instead, you may:
Attack with close combat weapons orAttack with ranged weapons orTurn around orDisengage.
All weapons automatically hit if you decide to attack.
Ranged weaponsRanged weapons may be used in close combat if the combat option chosen allows it, and the weapon may be brought to bear.
Titans entering close combat may not fire ranged weapons in the segment matching their orders. Titans with FIRST FIRE orders may still snap fire in the movement phase, but this takes place outside the opponent’s void shields, and a titan that snap fired may not attack with a ranged weapon in the close combat segment.
A ranged weapon with a burst circle used in close combat affects the firer as well as the target. Roll to hit the target as normal, then roll at -1 to hit the firer. If used in a multiple close combat, then separately roll at -1 to hit anything in base contact with the target.
Close combat weaponsClose combat weapons may be used if the combat option chosen allows it and the weapon may be brought to bear. Roll to hit and damage using the normal close combat weapons table. Improvised attacks have the same fire arc as caparace-mounted weapons.
Multiple combatsA titan engaged in close combat with multiple opponents must declare one as its primary target after close combat options are chosen, but before they are revealed. Remaining opponents are secondary attackers. The primary opponent must always be an operating titan if possible.
Compare your options with the primary opponent, as usual. All of your titan’s attacks must be directed at the primary opponent.Then compare your options with any secondary attackers, to see if they make their attacks before or after your outnumbered titan makes its attacks on the primary opponent. The attacks are then resolved in sequence.
Leaving close combatThe only way a titan can leave close combat is by choosing the disengage combat option. Disengaging titans may not attack. After resolving any attacks by its opponent, the titan makes a normal charge move (including turns as appropriate), and must end the move out of base contact with its opponent and not end in base contact with any other opponents.
A titan with a damaged reactor or legs may not disengage. A titan with damaged MIUs must roll a 4+ on a D6 before moving; if it fails, it stays in place and may not make any attacks this turn.
CLOSE COMBAT DAMAGESUPERFICIAL DAMAGE2D6 RESULT2 Static: An electro-magnetic pulse surges through the titan’s electrical systems, disrupting them. The titan may not do anything for the rest of this turn or any of the next turn. The damage is automatically repaired in next turn’s end phase.
3 Psychic shock: One of the titan’s moderati suffers a debilitating MIU overload. Roll D6: 1-2 Left arm 3-4 Right arm 5-6 Both carapace (roll again if no carapace mount)
The weapon may not be used for the rest of the game.
4 Left carapace: Any weapons on the left carapace are damaged, but may be repaired. If the titan has only 1 carapace location, this affects it. There is no effect if there are no weapons in the location or they have been destroyed.
5 Weapon sensors: -1 to hit from now on. This may not be repaired and any further hits here have no effect.
6 Left arm: Any weapons on the left arm are damaged, but may be repaired. There is no effect if there are no weapons in the location or they have been destroyed.
7 Systems failure: If the titan’s MIUs or reactor are already damaged, they automatically suffer catastrophic damage. If neither is damaged, no effect.
8 Right arm: As above, but for the right arm.
9 Movement sensors: The number of 45° turns the titan may makes in a turn is reduced by 1 (min 1). This may not be repaired and any further hits here have no effect.
10 Right carapace: As above, but for the right carapace.
11 Repair systems: All future repair rolls suffer a -1. This may not be repaired and any further hits here have no effect.
12 Knockout blow: The head of the titan is severely damaged; the princeps is injured and anti-personnel weapons may no longer be used. This may not be repaired and any further hits here have no effect.
CRITICAL DAMAGE2D6 RESULT2 Reactor damaged: Power output from the reactor is reduced to a trickle. All available power is being channelled into the auto-repair systems. The titan may not be given any orders (including DAMAGE CONTROL orders) until the reactor is repaired, and cannot move or fire.
3 MIUs damaged: Until the MIUs are repaired, roll a D6 at the start of each movement phase and each combat phase:
Roll Movement Combat1-3 Move normally Fire normally4-5 May not move May not fire6 Random move Random fire
Random move: Your opponent may move the titan within the restrictions of its order for the turn.
Random fire: The titan fires all of its weapons at the closest target available, friend or foe, within the restrictions of its order for the turn and LOS rules. If there is a choice, your opponent can choose which weapons are used and their targets. The titan will not attack itself.
4 Left carapace: Any weapons on the left carapace are destroyed. If the titan has only 1 carapace location, this affects it. Roll again if there are no weapons in the location or they have been destroyed.
5 VSGs destroyed: All void shields are knocked down and may not be repaired Count any further hits on this location as reactor damaged hits instead.
6 Left arm: Any weapons on the left arm are destroyed. Roll again if there are no weapons in the location or they have been destroyed.
7 Legs damaged: The titan may no longer be given CHARGE orders. If it is given ADVANCE orders, it may only make 1 45° turn during the move. It may still make a 45° turn if it is given FIRST FIRE orders. Damaged legs may not be repaired.
8 Right arm: As above, but for the right arm.
9 VSGs destroyed: See above.
10 Right carapace: As above, but for the right carapace.
11 MIUs destroyed: See above.
12 Reactor damaged: See above.
EPIC BATTLE DAMAGE (LARGE GAMES)REPAIRRepair and malfunction rolls are combined into a single roll, and only ever made for void shields and damaged reactors.
Add +1 for DAMAGE CONTROL orders. Malfunctions only occur when rolling for a damaged reactor, and cause a reactor meltdown.
MODIFIED D6 HIT LOCATION1 or less Malfunction (reactors only)2-4 Repair unsuccessful5 or more Repair successful
VOLLEYSA titan may only fire 1 volley of shots at 1 enemy titan. Several weapons fired at the same titan are combined into 1 volley.
Each support missile counts as a volley in itself, but the attacker may fire any other weapons at the same target, counting them as a separate volley.
All of a titan’s close combat attacks count as 1 volley.
EPIC BATTLE WEAPONS: TITAN TARGETSWEAPON SHORT LONG TO HIT: TO HIT: SAVE RANGE RANGE SHORT LONG MOD
HEAVY WEAPONS
Auto-cannon 36cm 72cm 5+ 6+ 0
Las-cannon 30cm 60cm 4+ 6+ -1
Multi-launcher B 36cm 72cm 4+ 6+ 0
Multi-melta 12cm 24cm 5+ 6+ -1
Heavy plasma gun 36cm 72cm 4+ 6+ 0
Defence laser B 72cm – 3+ – -3
Macro-cannon B 72cm – 3+ – -2
Plasma cannon F 20cm 72cm 4+ 5+ -1
Pulse laser 30cm 60cm 3+ 5+ -1
Distortion cannon 16cm 32cm 5+ 6+ N/A
Vibro-cannon 36cm – 2+ – –
Gut buster B 72cm – 3+ – -2
Target has FALL BACK orders -1Attacker has CHARGE orders -1
There is no longer a +1 to hit for FIRST FIRE orders.
DAMAGERoll to hit for each grade of weapon fired at the target, looking up the numbered required on the table above and applying modifiers.
For each hit not absorbed by a void shield, the titan must make a saving throw of 3+, modified by the weapon’s saving throw modifier.
If a volley causes any actual damage, roll D6 with the following modifiers (roll once per volley, regardless of the number of hits):
1-6 Roll once on the Minor Damage table.7-9 Roll once on the Major Damage table.10+ Roll once on the Catastrophic Damage table.
Each successful hit from volley +1Each systems failure suffered by target +1Attacker has Marksmanship skill +1
MINOR DAMAGED6 RESULT1-3 Systems failure: Mark 1 systems failure hit on the titan’s roster. It suffers a +1 modifier when rolling for the level of damage for each systems failure hit it has suffered.
4 Weapon sensors: The titan suffers a -1 modifier to hit from now on. This may not be repaired and any further hits in this location have no effect.
5 Movement systems: The number of 45° turns the titan may make in a turn is reduced by 1 (min 1), its advance move is reduced by 1 (min 1cm), and its charge move is reduced by 2 (min 2cm). Any further hits are cumulative, subject to the minimums. This may not be repaired.
6 Static: An electro-magnetic pulse surges through the titan’s electrical systems, disrupting them. The titan may not do anything for the rest of this turn or any of the next turn. The damage is automatically repaired in the end phase of the next turn.
MAJOR DAMAGED6 RESULT1 Left carapace: Any weapons on the left carapace are destroyed. If the titan has only 1 carapace location, this affects it. If there are no weapons in the location or they have been destroyed, apply a systems failure hit instead.

2 Right carapace: As above, but for the right carapace.
3 Left arm: Any weapons on the left arm are destroyed. If there are no weapons in the location or they have been destroyed, apply a systems failure hit instead.
4 Right arm: As above, but for the right arm.
5 Void shield generators destroyed: All void shields are knocked down and may not be repaired. Count any further hits on this location as reactor shutdown hits instead.
6 Reactor shutdown: Power output from the reactor is reduced to a trickle. All available power is being channelled into the auto-repair systems. The titan may not be given any orders (including DAMAGE CONTROL orders) until the reactor is repaired, and cannot move or fire. Any further hits before it is repaired cause a reactor meltdown.
CATASTROPHIC DAMAGED6 RESULT1 Mind burn: The mind impulse system of the titan goes haywire. The luckiest members of the crew are killed instantly by psychic shock; the rest are reduced to gibbering lunatics. The titan is effectively destroyed and grinds to a halt, a grim statue towering over the battlefield. Leave the model standing in place where it was destroyed. It may not do anything for the rest of the game, but it blocks LOS normally and may be salvaged – apart from the MIUs which have been completely destroyed. Subsequent hits affect the titan normally. The crew is treated as killed.
2-3 Crash: There are few sights more impressive in war than that of a titan losing a leg. The metal giant totters for a few seconds, stabilising jets overloading themselves trying to compensate, and finally the sixty-foot figure comes crashing down like a felled tree. Unless able to eject in the few seconds before the titan falls, the crew is killed or seriously injured in the crash. Use the scatter template to decide which way the titan falls, and place it on its side lying in that direction.
4-6 Reactor meltdown: When a titan’s plasma reactor suffers serious damage it will become unstable almost instantly. The titan is vaporised in an unstoppable and spectacular meltdown. It is removed from play. All units within 8cm must roll for damage as if hit by a plasma cannon firing on maximal.
MANOEUVERABILITYA titan’s manoeuverability affects the number of 45° turns it can make during a move:
ORDERS # TURNSHighly manoeuverable FIRST FIRE 1ADVANCE 4CHARGE/EVADE 2
Extremely manoeuverable FIRST FIRE 1ADVANCE 6CHARGE/EVADE 4
Limited manoeuverability FIRST FIRE 0ADVANCE 2CHARGE/EVADE 1** Turns must be made at the end of the move.
EVADE ORDERSHighly manoeuverable or extremely manoeuverable titans may be given EVADE orders. A titan with EVADE orders moves and fires in the charge segment of the appropriate phases, but may only move up to its ADVANCE distance.
Any titan firing on a titan with EVADE orders suffers a -1 to hit. The evading titan itself suffers a -1 to hit, as for CHARGE orders.
CREW SKILLSFor one-off games, roll 2D6 for each titan at the start of the game to generate the crew’s experience level, then roll D66 for skills if necessary.
2D6 EXPERIENCE LEVEL REROLLS SKILLS2-3 Green None None4-7 Experienced 1 None8-9 Veteran 2 None10 Elite 3 None11 Ace 4 112 Ace 4 2
D66 SKILL11-13 Sixth sense: The crew has almost an uncanny ability to anticipate threats, and can react quickly to counter them. The titan may make one extra 45° turn in the movement phase.
14-21 Tactical genius: The princeps of this crew is an exceptionally gifted commander, able to ‘read’ an enemy and react accordingly. This titan may be given 2 order counters in the order phase, and you may choose which orders to follow once orders for other titans have been revealed.
22-25 Very fast: The titan’s princeps is a very gifted pilot, able to coax that little extra performance out of his machine. The titan gains an extra 4cm to both its ADVANCE and CHARGE movement rates.
26-32 Hipshooting: The titan’s moderati are highly skilled at firing on the move, and discount the normal -1 to hit while under CHARGE or EVADE orders.
33-41 Natural leader: This skill may only be used once per game. In the end phase you may decide who will be the first player for the next turn.
42-45 Duckback: The crew’s princeps has the uncanny ability to anticipate incoming fire, and dodge some of the effects. Whenever a shot hits the titan, roll D6:
1-3 Shot takes effect normally.4-5 Shot dodged if titan is in cover, otherwise no effect.6 Shot dodged; it has no effect.
46-52 Fast reactions: The crew may fire one segment earlier than normal in the combat phase (but never before the FIRST FIRE segment). Any hit modifiers for the titan’s orders still apply. This skill may not be used if the titan is fitted with COBRA.
53-56 Close combat attack: The crew is highly adept at landing telling blows in combat. Gain +1 to hit to any attacks made with close combat weapons (cumulative with other modifiers).
57-60 Close combat defence: The crew is highly adept at avoiding close combat attacks. Enemy titans suffer a -1 to hit to any attacks made with close combat weapons against this crew (cumulative with other modifiers).
61-62 Damage control: The crew react quickly and efficiently to minimise damage. Gain a +1 to any repair rolls.
63 Pinpoint gunnery: The crew are deadly gunners, placing shots where they count. All shots fired by this titan have a +1 to their critical hit rolls. When firing into a close combat this modifier is lost, but the chance of hitting a friendly titan is reduced by -1.
64 Accuracy: The titan’s crew is exceptionally good at gunnery. All attacks except close combat attacks gain +1 to hit (cumulative with other modifiers).
65 Marksmanship: The titan’s crew is capable of shooting with great accuracy. After dice have been rolled, you may modify the hit location roll by 1 point in either diirection.
This does not apply to any rolls on the Body Damage table.
If you are using the Advanced Damage Rules, you may modify the roll on the damage table by 1 point after the dice have been rolled.
If you are using the Epic Battle Damage System, modify the level of damage roll by +1 instead (the damage table roll is not modified).
66 Very lucky: This skill is used in conjunction with a reroll, and may only be used once per game. Use the reroll as normal, but you may choose what number is rolled.
CRATERSBefore the game, players may choose to use craters. These are placed before buildings, but in the same way.
MOVEMENT PHASECraters count as difficult terrain.
Titans may move across a crater without risk if they have ADVANCE orders. If a titan has CHARGE or EVADE orders, it must make a dangerous terrain test when they cross the rim of a crater. Roll D6:
UNIT TYPE RESULT NEEDED TO PASS
TitanExtremely manoeuverable 2+Highly manoeuverable 2+Normal manoeuverablity 3+Limited manoeuverablity 4+
If the test is passed, the unit may complete its move normally. If the test is failed, the titan stumbles and ends its move with its base touching the rim of the crater. It may fight and move normally.
Crater sizes 2, 3, and 4 have an area of normal terrain inside the crater rim which is normal terrain; only the rim is difficult terrain. If a model enters and leaves a large crater in the same movement phase, they must make 2 dangerous terrain tests.
COMBAT PHASECraters never interfere with LOS drawn to or from a titan.
Whenever a titan takes a leg hit from a shot which has crossed the rim of a crater, roll D6, +1 if the shot was fired by another titan. If the result is less than or equal to the crater’s size number, the shot has hit the crater rim rather than the titan, and does no damage.
CRATER TYPES (OPTIONAL)After you place a crater in the play area, roll a D6. On a 1-5 it is a normal crater. On a 6, roll again:
D6 CRATER TYPE D6 CRATER TYPE 1 Hot mud 3 Smoke 2 Lava 5 Radiation hotspot 3 Noxious gas 6 Flashpoint
Hot mud: Titans are unaffected by smaller pools of hot mud, but they must make a dangerous terrain test if they enter a size 4 hot mud crater. If the test is failed, the titan is stuck (leave it with its base touching the rim of the crater) and may not move or attack until it has freed itself. Roll a D6 in the order phase of each turn: on a 1-3 the titan remains trapped, and on a 4-6 it is free and may move and fight normally.
Lava: A titan that crosses a lava pool takes automatic superficial damage to the legs each turn it remains in the lava. Void shields do not protect it. Titans with jump packs are only affected if they stop inside the crater.
Noxious gas: No effect on titans.
Smoke: The interior of the crater is impassable terrain for all models, and anything that ends its move in it is destroyed. No LOS may be drawn across the crater.
Radiation hotspot: Titans are unaffected if they have at least 1 functioning void shield. If not, if they are in the crater in the end phase of a turn, roll D6: on a 1 the titan suffers superficial damage.
Flashpoint: There is a risk of eruption if a titan is destroyed in the crater, a support missile comes down in it, or a plasma gun or plasma cannon is fired on maximal into the crater. If so, on a D^ roll of 5-6, the crater erupts.
The crater automatically erupts if a titan’s plasma reactor explodes while it is inside the crater, or a vortex field enters the crater.
When the crater erupts, everything in it is automatically destroyed. It also throws out D6 gobbets of lava; for each, place the deviation template over the crater’s centre, then roll D6 to determine direction and 2D6 for the distance in cms from the centre. Place the plasma burst circle template where each gobbet lands; any model wholly or partially under it takes a single hit as if from a plasma gun firing on maximal.
Thereafter, the crater becomes a lava crater.
CREATING CRATERS (OPTIONAL)To create a crater, a titan must have FIRST FIRE orders, and may not snap fire or turn in place. Fire a very heavy weapon (plasma cannon must be fired on maximal) at a spot of open ground up to 36cm away (you do not have to roll to hit) and place a size 1 crater there.
Plasma cannon produce lava craters, and defence laser produce normal craters.
The titan’s other weapons may fire normally, but no other weapons may be used on the same location as the very heavy weapon being used to make the crater.
When a titan is destroyed as a result of catastrophic damage to its plasma reactor, replace the titan model with a size 3 crater.

ORK GARGANTSSETUPGargants use power field generators (PFGs). Roll D6+2 for each gargant to find the number of operating power fields it has. The boss gargant always has 8 power fields.
If you have a gargant armed with a gut buster belly gun, record its available ammunition.
At the start of the game, Ork players must set up their force before any Imperial or Eldar titans are set up.
ORDER PHASEOrk players use unique order tokens, and each gargant receives 2 orders in the order phase: one for speed, and one for direction.
A gargant may not be given a backward order if it moved at full speed in the previous turn (or vice versa).
Boss gargants have a command radius of 24cm. A gargant not within 24cm of its boss gargant in the order phase is out of command, and rolls D6 for each type of order to see what it receives:
D6 DIRECTION D6 SPEED 1 Ahead 1 Stop 2 Port 2 Stop 3 Starboard 3 Battle speed 4-6 Player’s choice 4-6 Player’s choice
MOVEMENT PHASEGargants always move in the ADVANCE segment of the movement phase, before any Imperial or Eldar titans.
Movement, turns, and hit modifiers are dependent on the gargant’s orders. A gargant cannot move less than its minimum distance, but may turn even if it has STOP orders. The first turn a gargant makes may be made at any time during its move, but its second turn may only be made at the end of its move.
SPEED MIN. MOVE MAX MOVE MODIFIER TO HITFull speed 11cm 15cm -2Battle speed 1cm 10cm -1Stop 0 0 0Backward 1cm 3cm -1
DIRECTION NUMBER OF TURNSPort Up to 2 x 45° turns, left onlyStarboard Up to 2 x 45° turns, right onlyAhead No turns allowed
CollisionsA gargant that collides with an obstacle (such as a building) must stop moving and may damage the gargant:
SPEED PFGs INTACT ALL PFGs GONEReverse or Gargant loses Roll once on the Gargant speed 1 power field Minor Damage table
Full speed Gargant loses Roll twice on the Gargant 2 power fields Minor Damage table
REPAIR PHASEEach snotling rigger unit may attempt to repair 1 damaged system during the repair phase. Allot units of riggers to damaged system as you choose, and any number of them may work on the same damaged system.
Make a D6 repair roll for each unit, with no modifiers: a 6 means the system has been repaired. Power fields cannot be repaired.
Cross off units or riggers as they are killed; if you have lost all your riggers no repair rolls may be made.
Riggers and boyz may be used to fight fires; crew units doing so cannot do anything else in the same turn. Roll D6 for each crew unit that is fire fighting. On a 6, one fire is put out.
If any fires are still burning at the end of the repair phase, roll D6. If the result is less than the number of fires, roll D6 on the Gargant Catastrophic Damage table.
COMBAT PHASEGargants always move in the ADVANCE segment of the combat phase. They may never snap fire.
The belly gun has a 90° forward arc, and the turrets have a 180° fire arc covering the side on which they are mounted. The head turret has a 360° fire arc.
A power field only ever stops 1 hit, as the PFG is destroyed when a hit is stopped.
Close combatOrk titans may choose any advanced close combat option except phase field generator, but may never make more than 2 45° turns, regardless of what the option says.
Gargants with one leg destroyed may only choose all-out attack, attack, defend, or side step options.
Those with both legs destroyed may only choose all-out attack, attack, or defend.
DAMAGEAlways work out damage to gargants using the epic battle damage system. Roll for the level of damage and use the appropriate Gargant Damage table.
Officer casualtiesBoss-mek killed: Roll D6 at the start of each orders phase; on a 1 the gargant must use the same orders as last turn.
Top gunboy killed: Roll D6 each combat phase; on a 1 the gargant may not use its belly gun that turn.
Mate killed: No special effect.
Kaptin killed: The gargant may not be given orders until the kaptin is replaced. In addition, if the kaptin was on a boss-gargant, all other gargants in the mob count as being out of command.
When the kaptin is killed, the mate may replace him in the next repair phase (unless the mate is already dead).
Gunboss killed: Weapons must be fired at the target with the highest battle rating that is within short range of the weapon and can be affected by it. If there are no targets at short range, fire at the target with the highest rating within long range that can be affected. If the gargant is in close combat, it must fire all its weapons at its attackers.
Flagboss killed: The gargant counts as being out of command, even if it is within 24cm of the boss-gargant. If the flagboss was on a boss-gargant, all other gargants in the mob count as being out of command.
Crew casualtiesBelly gun: If there is only 1 unit of gunners left, the gun is -1 to hit. If there are none left, the gun cannot be fired.
Enjun room: If there is only 1 unit of stokers left, the gargant may not move at full speed. If there are none left, the gargant may not move or turn for the rest of the battle.
Riggers: Dead units of riggers cannot be used to make repairs or fight fires.
Boyz: Dead units of boyz cannot be used to fire bolters or fight fires.
BELLY GUNAttacks made with belly-mounted weapons are treated as a separate volley when working out damage, even if the gargant attacks the same target with other weapons.
Gut busterAt the start of the game, record which ammunition is loaded in the gut buster cannon. After firing , it takes a full turn to reload, and may not fire in the next combat phase. You may choose which type of ammunition is loaded each time the gun is reloaded.
Airburst: Airburst shells have a burst circle with a diameter of 12cm. Ignore any modifiers to hit for Eldar defensive screens (EVADE orders modify the hit as normal).
Shell: If the target is a titan with no operating void shields, a gargant with no operating power fields, or a building, the shell loses its burst effect, but causes D6 hits on a successful hit.
Ball: Nominate a target point where the ball will land, following range, LOS, arc of fire rules. The ball skids 2D6 from this point in a straight line drawn from the gargant to the point. When it reaches the end of this distance, it explodes. If it stops on a titan’s base, it ignores that titan’s void shields.
The skidding ball travels through any void shields or power fields in its path without knocking them down. It will stop if it hits a building, titan, or gangant (or anything similar).
Hotshot: Hotshot acts like ball ammunition, but does not explode when it stops. It has no effect on Imperial or Eldar titans, but will damage a gargant normally, and start 1 fire in addition to any other damage.
Chainshot: Chainshot causes no damage to gargants, buildings, or human titans with operational void shields. When it scores a successful hit against an Eldar titan or an unshielded human titan, the titan suffers a crash result (epic battle damage system).
Grapeshot: Grapeshot has a triangular template; place the narrow end against the belly gun muzzle. All targets that fall under the template are attacked.
AMMUNITION RANGE TO HIT ROLL CRITICAL HIT ROLLAirburst B 72cm 3+ 4+Shell 72cm 3+ 3+Ball B 36cm 3+ 3+Hotshot 36cm 3+ 3+Chainshot 24cm 6+ see aboveGrapeshot see above 6+ 6+
SNAPPERThe snapper is a special weapon which can be used as a close combat weapon against titans or gargants, or as a ranged weapon against any target. It may not be used in both roles in the same combat phase.
If a snapper hits a titan or gargant in close combat, it causes an automatic crash result (epic battle damage system).
If used as a ranged weapon, it acts as a grade 6 multi-melta.
DAMAGE TABLES
MINOR DAMAGED6 RESULT1-3 Crew casualty: 1 crew unit is killed. Determine randomly using the D6 rolls on the gargant sheet.
4 Officer casualty: 1 officer and 1 crew unit is killed. Determine randomly using the D6 rolls on the gargant sheet.
5-6 Fire in the hold! 1 fire is started.
MAJOR DAMAGED6 RESULT1-2 Weapon mount destroyed: 1 weapon mount is destroyed; dice randomly for which one is hit, using the D6 rolls on the gargant sheet. Reroll results of 1 if the gargant does not have a head turret. Then roll again: on a D6 roll of 1, the explosion causes a flashback to the magazine and the gargant suffers a magazine explosion.
If the mount is already destroyed, this result starts 1 fire (with no chance of flashback).
3 Leg destroyed: One of the gargant’s legs is destroyed; it may no longer move, but may turn in place. A second leg destroyed result means the gargant may no longer move or turn. Further hits cause D6 crew casualties instead.
4 Enjun room out: The boss-mek and 1 unit of stokers are killed. The gargant may not move or turn until the enjun room is repaired. Further hits before the lcoation is repaired will kill 1 additional unit of stokers and start 1 fire.
5 Belly gun out: The top gunboy and 1 unit of gunners are killed. On a D6 roll of 1, the explosion causes a flashback to the magazine and the gargant suffers a magazine explosion. The belly gun may not fire until it is repaired. Further hits before the location is repaired will kill 1 additional unit of gunners and start 1 fire.
6 Bridge out: All personnel in the bridge are killed. Further hits will start 1 fire.
CATASTROPHIC DAMAGED6 RESULT1-3 Internal explosions: Explosions rake the interior of the gargant, wiping out the crew and officers and starting numerous fires. The gargant may not move or fire for the rest of the game. Any LOS traced across the gargant or its base is blocked by the clouds of smoke pouring from it.
Roll D6 each repair phase: 1-2 Fires out: the gargant blocks LOS normally. 3-5 Fires continue: no change 6 Magazine explodes: see below.
4-6 Magazine explosion: The gargant’s magazine explodes, completely destroying the gargant and killing everybody unboard. Any units within 6cm are hit by the explosion on a 4+ (no modifiers) and must roll for damage as if hit by a macro-cannon.

ELDAR PHANTOM CLASS TITANSORDER PHASEWhen Phantoms fight non-Eldar, the non-Eldar forces must choose and reveal their orders before the Phantoms choose theirs.
MOVEMENT PHASEPhantoms are extremely manoeuverable, and have the following number of 45° turns per move:
ORDERS 45° TURNS / MOVECHARGE/EVADE 4ADVANCE 6FIRST FIRE 1
EVADE ORDERSPhantom titans may be given EVADE orders. It may not be given evade orders if its legs are damaged or it may not move for any reason.
A titan with EVADE orders moves and fires in the charge segment of the movement phase. It may only move up to its ADVANCE distance, but turns as if it had CHARGE orders.
An evading titan fires in the charge segment of the combat phase and suffers a -1 to hit.
REPAIR PHASEAll repair rolls on a Phantom receive a +1 bonus.
COMBAT PHASEDefensive screensEldar titans use defensive screens instead of void shields.
Units firing on a Phantom with defensive screens suffer modifiers to hit depending on the Phantom’s orders that turn.
Use the wheel on a Phantom’s base to keep track of this modifier. At the start of the game, set it to 0. When the titan’s orders are revealed, move the wheel up or down by the appropriate modifier increment. It may never be more than the maximum modifier shown and may never be less than 0.
ORDERS MODIFIER MAXIMUM INCREMENT MODIFIER
EVADE +2 3 CHARGE +1 2 ADVANCE 0 2 FIRST FIRE -1 2 DAMAGE CONTROL -2 1
The number showing on the wheel is subtracted from any attack rolls made against the titan.
Defensive screens may not be damaged, only destroyed. When a Phantom’s defensive screens are destroyed, turn the wheel to the red dot.
Wing-mounted weaponsWing-mounted weapons have the same arc of fire as carapace-mounted weapons on an Imperial titan.
Close combatPhantoms receive a +1 to hit when attacking a non-Eldar titan with close combat weapons.
When engaged in combat, its defensive bonus becomes -1 for the duration of the close combat, so the defensive modifier wheel should be moved to ‘1’.
NEW WEAPONSPulse laserVery heavy weapon. Roll to hit once; a successful hit means the target has been hit by a burst of D6 hits (make separate damage level and hit location rolls for each damaging hit).
Distortion cannonHeavy weapon. May only be fired on FIRST FIRE orders, and does not receive the usual +1 to hit. When successfully hit, a titan with operating void shields is unaffected, but otherwise takes an automatic critical hit.
The grade of a titan-mounted distortion cannon is always 1 less than the heavy weapons grade of the hard point on which it is mounted.
Vibro cannonVery heavy weapon. May only be fired on FIRST FIRE orders. Void shields and power fields provide no protection; a hit always causes damage.
On a hit, the v-cannon remains locked on to the target until:
– the attacker chooses orders other than FIRST FIRE.
– the attacker decides to fire the v-cannon at another target.
– the target moves out of the v-cannon’s range, fire arc, or LOS.
– the target is destroyed.
V-cannon hits cause damage in the end phase of the turn. For each v-cannon locked onto it, a target has its movement reduced by 4cm (min 0), and loses 1 turn of 45° per movement phase (min 0).
When 2 or more v-cannon are locked on, the target also suffers 1 automatic critical hit for each v-cannon apart from the first that locked onto it.
Support missilesPhantom titans cannot carry support missiles.
DAMAGE RESULT CHANGESFor carapace, read wing.
A psychic shock will stun the whole crew for 1 turn, in addition to injuring 1 of them. The titan may not attack, and may not be given orders in the following turn.
A knockout blow only stops the crew ejecting or firing any anti-personnel weapons; it does not affect the titan’s infinity circuit.
A VSGs destroyed result destroys the titan’s defensive screens; set the defensive modifier wheel to 0 for the rest of the game.
DEVICESPhantoms may use any devices except cameleoline.

ALL-OUT ATTACKOPPONENT’S ORDER OF WEAPON CHOICE ATTACK SELECTION NOTES
All-out attack Simultaneous Close combat
Attack Attack first Close combat
Defend Attack first Close combat
Side-step May not attack May not attack
Step back Attack first Close combat
Turn around Attack first Close combat 1
Disengage Attack first Close combat 2
SPECIAL RULESYou may make 2 improvised attacks, and add +1 to the number of critical hits you inflict with any close combat weapons or improvised attacks.
All opponents attack you at +1 to hit with close combat weapons and improvised attacks.
NOTES1. You attack before your opponent can turn. If you are in your
opponent’s rear 180° arc, you gain +1 to hit with all your attacks.
2. You catch your opponent as it attempts to turn around. All of your attacks automatically hit.
DEFENDOPPONENT’S ORDER OF WEAPON CHOICE ATTACK SELECTION NOTES
All-out attack Attack second Close combat
Attack Attack second Close combat
Defend Simultaneous Close combat
Side-step Attack second Close combat
Step back Attack second Ranged weapons
Turn around Attack second Close combat 1
Disengage Attack first Ranged weapons 2
SPECIAL RULESAll opponents using close combat weapons and improvised atacks receive a -2 to hit.
NOTES1. Your opponent is allowed to turn before you can attack. If you
are still in their rear 180° arc, you gain +1 to hit with all your attacks.
2. Your opponent is able to get some way away before you fire, all all your attacks take place outside your opponent’s void shields.
SIDE-STEPOPPONENT’S ORDER OF WEAPON CHOICE ATTACK SELECTION NOTES
All-out attack Attack first Close combat
Attack Attack second Close combat
Defend Attack first Close combat
Side-step Simultaneous Close combat
Step back Attack second Ranged weapons
Turn around Attack second Close combat 1
Disengage Attack first Ranged weapons 2
SPECIAL RULESYou may make one 45° turn immediately before you attack.
NOTES1. Your opponent is allowed to turn before you can attack. If you
are still in their rear 180° arc, you gain +1 to hit with all your attacks.
2. Your opponent is able to get some way away before you fire, all all your attacks take place outside your opponent’s void shields.
DISENGAGEOPPONENT’S ORDER OF WEAPON CHOICE ATTACK SELECTION NOTES
All-out attack Move second May not attack
Attack Move second May not attack
Defend Move second May not attack
Side-step Move second May not attack
Step back Move second May not attack
Turn around Move first May not attack
Disengage See notes May not attack 1
SPECIAL RULESYou may only leave close combat by using this option. You may make a normal CHARGE move, including as many turns as you are allowed. You may not finish the move in base-to-base contact with any enemy model.
You may not disengage if you have damaged legs or a damaged reactor. If you have damaged MIUs you must roll 4+ on a D6 in order to disengage. If you fail the roll you stay in place and may not attack.
NOTES1. Both players roll D6 (reroll ties). The player with the lower
score must move first.
STEP BACKOPPONENT’S ORDER OF WEAPON CHOICE ATTACK SELECTION NOTES
All-out attack Attack second Close combat
Attack Attack second Ranged weapons
Defend Attack first Ranged weapons
Side-step Attack first Ranged weapons
Step back Simultaneous Ranged weapons
Turn around Attack second Ranged weapons 1
Disengage Attack first Ranged weapons 2
SPECIAL RULESNone.
NOTES1. Your opponent is allowed to turn before you can attack. If you
are still in their rear 180° arc, you gain +1 to hit with all your attacks.
2. Your opponent is able to get some way away before you fire, all all your attacks take place outside your opponent’s void shields.
ATTACKOPPONENT’S ORDER OF WEAPON CHOICE ATTACK SELECTION NOTES
All-out attack Attack second Close combat
Attack Simultaneous Close combat
Defend Attack first Close combat
Side-step Attack first Close combat
Step back Attack first Ranged weapons
Turn around Attack first Close combat 1
Disengage Attack first Ranged weapons 2
SPECIAL RULESNone.
NOTES1. You attack before your opponent can turn. If you are in your
opponent’s rear 180° arc, you gain +1 to hit.
2. You are able to fire your ranged weapons before your opponent has got too far away. All your attacks take place inside your opponent’s void shields, and receive a +1 to hit.
TURN AROUNDOPPONENT’S ORDER OF WEAPON CHOICE ATTACK SELECTION NOTES
All-out attack Move second May not attack
Attack Move second May not attack
Defend Move first May not attack
Side-step Move first May not attack
Step back Move first May not attack
Turn around See notes May not attack 1
Disengage Move second May not attack 2
SPECIAL RULESYou may make as many 45° turns as if you had ADVANCE orders, but you may not attack.
NOTES1. Both players roll D6 (reroll ties). The player with the lower
score must move first.
2. Your opponent must make its disengaging move before you turn around.


ADEPTUS TITANICUS IICHARACTERISTICS
TITANSSPEED (SP) The distance in cm the titan can move over open ground.
MANOEUVRE (MAN) How many turns the titan can make during its move. Also used when moving through dangerous terrain.
ARMOUR (ARM) AND DAMAGE TABLES Each titan has 3 damage tables; front, side and rear. The higher the ARM, the better able the titan is to withstand attack.
WEAPONS Where the titan’s weapons are mounted (and therefore what their fire arcs are).
GUNNERY (GUN) Equal or beat this score on a D6 to score a hit with shooting weapons.
CLOSE COMBAT SKILL (CCS) Equal or beat on a roll this score on a D6 to score a hit with close combat weapons.
RANGED WEAPONSRANGE (RGE) The distance in cm that the weapon can fire and still hit its target with enough force to cause damage.
FIREPOWER (FP) Used when firing at vehicles, infantry or war machines that still use the rules from the Epic 40,000 rulebook.
ACCURACY (ACC) Modifies the GUN value when firing a weapon.
RATE OF FIRE (ROF) How many shots you get with a weapon every time it fires.
STRENGTH (STR) How likely the weapon is to punch through armour and inflict damage if it hits.
CLOSE COMBAT WEAPONSSWIFTNESS (SW) A weapon with a higher SW gets a chance to hit before close combat weapons with a lower value.
ACCURACY (ACC) Modifies the CCS when using the weapon.
ATTACKS (ATT) The number of times the weapon can strike in close combat.
STRENGTH (STR) How likely the weapon is to punch through armour and inflict damage if it hits.
1. MOVEMENT PHASEDetermine initiative. The winner has the initiative and decides to move first or second.
Players take it in turns to move a single titan until both players have moved as many titans as they wish to move. Each titan may only move once per movement phase.
You must move your titan with the lowest MAN first. If you start moving a titan then any titans with a lower MAN you have not yet moved cannot move that phase.
A titan may move up to its SPD in cm, and at any point during the movement make one turn up to 45° for each point of MAN. Multiple turns can be combined into a single turn.
A titan that starts the movement phase in close combat may move away from the enemy as normal. A titan may not move within 10cm of an enemy titan in the movement phase.
A titan may move backwards 1cm for each 3cm of movement, but may not move backwards in dangerous terrain.
Dangerous terrainWoods, jungle, rubble, rivers, rocks, lakes, swamps, marshes,
dunes, snow, craters, stepping over low fortifications, very steep inclines etc, are all dangerous terrain.
If a titan starts its movement in dangerous terrain or enters it as part of its move, roll D6 per point of MAN. The total score is the distance the titan can move through the terrain.
If a titan starts in open terrain and moves into dangerous terrain, roll a D6 for each point of MAN it has not spent that phase. This is the total distance it can move through the dangerous terrain, though it can never move further than its total SP.
If you roll enough for a titan to leave the dangerous terrain, the distance rolled is taken off its SP, and any movement left after this may be taken as normal movement. If there is insufficient SP left after this deduction to move any further, the titan stops moving just outside the dangerous terrain.
If a titan moves from one type of dangerous terrain to another, there is no need to roll separately for each type.
If a titan wishes to turn whilst in dangerous terrain, it must give up a point of MAN for each turn, and not roll a D6 for it when determining the distance travelled.
Impassable terrainTitans cannot enter these types of terrain under any circumstances: cliffs, deep lakes, lava flows, buildings etc.
2. SHOOTING PHASEDetermine initiative. The winner has the initiative.
Players take it in turns to choose a titan and shoot with it. Titans in close combat with other titans cannot fire ranged weapons, nor can they be targeted by ranged attacks.
Each ranged weapon on a titan can be fired at a single enemy titan, as long as it is within its fire arc and line of fire. Different weapons can fire at different targets, however those with a ROF of 2+ must direct all their shots at a single target.
Each weapon mount determines the fire arc of the weapon.
All Round (AR): 360°.
Ahead (A): front 90°.
Forward (F): front 180°.
Left/right ahead (LA/RA): 90° arc from straight ahead to a right angle to the appropriate side.
Left/right full (LF/RF): 180° from straight ahead to directly behind.
Rear (R): 90° to the rear.
Rear full (RF): 180° to the rear.
1. Check line of sight (LOS)The titan must be able to trace an unblocked line from the weapon mount to the target. You must be able to see more than just a small part of the model. If you can see up to half of the target, the target receives cover; if you can see more, the titan has a clear shot.
2. Nominate targetsDeclare which weapons are firing at which targets. Although you must declare your targets first, you can resolve the firing of the titan’s weapons in whichever order you wish.
3. Check rangeThe target titan must be within the weapon’s range.
4. Roll to hit Roll D6 for each point of the weapon’s ROF. Each roll that equals or exceeds the titan’s GUN hits. A roll of 1 before modifiers is always a miss and a roll of 6 before modifiers is always a hit.
Stationery target: +1 to hit if the target has not moved this turn.
Stationery firer: +1 to hit if the firing titan has not moved this turn.
Rapidly moving target: -1 to hit if the target has moved 20cm or greater this turn.
Cover: -1 to hit if at least half the target is out of LOS.
Agile target: -1 to hit if target titan has MAN of 3+.
Weapon accuracy: Add or subtract the weapon’s ACC.
5. Resolve damage For every hit, roll D6 and compare it to the appropriate hit location table, depending where the shot came from.
This gives the location hit and its ARM value. Roll D6 and add the weapon’s strength to the roll. Deduct the location’s armour value, look up the result on the Damage Effects table, and apply the results of the damage immediately.
VOID SHIELDSAny hit on a titan knocks down 1 shield or power field; no damage roll is required. If the target has operational void shields any hits must be resolved against them rather than against the titan itself, regardless of the direction from which the attack originated.
Void shields have an ARM value of 8 and if the attack would inflict damage, the void shield is burnt out and is useless until it is repaired.
DAMAGE TABLEWhen marking damage on a titan roster, cross out the appropriate box and all the boxes to the left of it. If the box is already crossed out, apply the damage to the next box on the right that has not yet been crossed out. If all the boxes are crossed out the attack has no effect.
D6+STR-ARM RESULT-1 or less No damage.
0 Armour cracked: No immediate damage. If the location is already suffering armour cracked damage, it now has superficial damage.
1 Superficial damage: See the Damage Effects table. If the location is already suffering superficial damage, it now has major damage.
2 Major damage: See the Damage Effects table. If the location is already suffering major damage, it now has catastrophic damage.
3 Catastrophic damage: See the Damage Effects table.
DAMAGE EFFECTSVOID SHIELD GENERATORS
Superficial: One void shield is destroyed for the rest of the game.
Major: D3 void shields are destroyed for the rest of the game.
Catastrophic: The titan loses all its shields for the rest of the game.
WEAPON
Superficial: The weapon cannot be used until repaired.
Major: The weapon cannot be used for the rest of the game.
Catastrophic: As major damage, plus inflicts superficial damage on one other random location (roll D6 for the facing: 1-2 = front, 3-4 = side, 5-6 = rear, then roll again on the appropriate hit location table).
LEGS
Superficial: Speed is reduced by -5cm. May be repaired.
Major: Speed is reduced by -5cm for the rest of the game.
Catastrophic: The titan crashes and is destroyed.
HEAD
Superficial: The titan cannot move until the damage is repaired.
Major: The titan cannot move or shoot. If repaired, the damage effect becomes superficial.
Catastrophic: The titan crashes and is destroyed.
PLASMA REACTORSuperficial: Roll D6 for each weapon at the start of every turn: on 4+ it can be used, on 1-3 it cannot be used that turn. May be repaired.
Major: As superficial damage, plus the titan can only move on a D6 roll of 4+ (roll at the start of movement phase and again in the assault phase). If repaired, the damage becomes superficial.
Catastrophic: The titan explodes and is destroyed, inflicting D6 STR 7 hits on any other titan within 4D6cm.
3. ASSAULT PHASEDetermine initiative. The winner has the initiative and decides to move first or second.
Titans alternate moving their titans again, then resolve close combat simultaneously after all titans have moved. All movement rules given in the movement phase apply. However, players start moving their highest MAN titans first, rather than the lowest.
A titan can enter close combat by moving into base contact with an enemy titan.
A titan in close combat at the start of its assault movement may make a number of turns equal to its MAN, but cannot move away.
CLOSE COMBATTitans in base contact fight in close combat. Resolve the attacks of each weapon in turn, starting with the highest SW and working down. If two or more weapons have the same SW their attacks are resolved simultaneously.
For each ATT a close combat weapon has, you can make 1 to hit roll. A titan may only use a close combat weapon if the target is within its fire arc.
Roll a D6 for each attack: any that score equal to or over the attacking titan’s CCS score a hit. The ACC of the weapon modifies the dice roll, as with shooting.
For damage, roll D6 + the weapon’s STR, reduced by the target titan’s ARM. Void shields have no effect; all damage is worked out directly against the titan itself.
Improvised attacksAn emperor titan has D3+2 improvised attacks; a battle or reaver titan has D3 improvised attacks, and a warhound titan has 1 improvised attack.
Titans which charged (moved into base contact) this turn gain +1 improvised attack.
Improvised attacks are SW 1, have no ACC modifier, and have a STR of 5.
4. RALLY PHASEA titan with any damaged systems may attempt to repair them.
Roll a D6 for each damaged shield or system on the titan.
The total number of dice you roll may not exceed the number of repair rolls for your titan. An emperor titan has a maximum of 12 rolls, a battle or reaver titan 8 rolls, and a warhound titan 4 rolls.
Each result of 4, 5 or 6 allows the titan to repair 1 damaged system or 1 void shield.
Void shields can be repaired as above. Each successfully repaired void shield is operational from the start of the next turn and can absorb damage as normal.
The effect of repairs to other damage is noted on the Damage Effects table (some types of damage may not be repaired).
Repairing something does not result in the box on the damage table being repaired; it remains crossed off, and subsequent damage will effect the next box to the right as normal.

ADVANCED RULES (OPTIONAL)Overcharging enginesA titan’s commander may forego firing in order to use its reserves of power to gain additional speed; this is called overcharging and must be declared before the titan moves. The overcharged titan may double its SP (MAN stays the same), but may not shoot or use any weapons in the same turn.
Merging void shieldsTitans with void shields that are in base contact can protect each other by merging their shields together. Add the number of remaining void shields each titan has together to see how many void shields are protecting them. If all the void shields are knocked down, the titans can be targeted individually as normal.
Shooting into close combatTitans in close combat count as having their shields merged as above. If you wish to shoot into a close combat, roll to hit as normal; but for each hit scored, randomise which of the combatants is hit.
Damage controlA titan commander can divert power from the weapons to the damage repair systems. The titan may not move or shoot but may reroll any failed repair roll that turn. No roll may be rerolled more than once.
Point blank firingIf a titan is firing at a target within 15cm, use the titan’s CCS to resolve the to hit roll, rather than its GUN. The weapon’s accuracy and other modifiers apply as normal. You may point blank fire at a close combat opponent if you are in contact with an enemy in the shooting phase (this is an exception to the normal restriction on shooting whilst in close combat, and void shields do not protect the target).
OverwatchAt the end of any turn a titan can go onto overwatch for the next turn. During the next turn the titan cannot move or turn at all, but can fire during any part of the turn. You can even interrupt your opponent’s turn to fire. However, you cannot interrupt your opponent once they have started rolling dice to resolve an action.
Overloading void shieldsWhenever a void shield is knocked down you may choose to overload it. Roll D6: on a 3+ the void shield remains operational; on a 1 or 2 all of the titan’s VSGs are blown for the rest of the game as if they had suffered catastrophic damage.
TITAN CLOSE COMBAT WEAPONSWEAPON SW ACC ROF STR
Chainfist 6 – 4 5Powerfist 3 10 +2 1*Wrecker ball 2 8 – 6 Laser burner 4 10 – 2Power ram 3 8 – 2Power saw 5 6 – 2
* If you roll a 6 to hit with a powerfist it makes a tear attack and adds +D3 to its STR.
IMPERATOR TITANIMPERATOR EMPEROR CLASS TITANTower weapons: To allocate hits, roll D6: 1-4 hits the tower weapon of that number, 5 hits the quake cannon, and 6 hits the volcano cannon.
Bastions: Bastions are located on the titan’s legs and manned by squads of troops. They may not shoot at titans but can fire at vehicles or infantry with the FPR shown. Each hit on the titan’s legs reduces the bastion’s FPR by 1 point in addition to any other damage that is inflicted.
WEAPON RANGE FPR ACC ROF STR
Volcano cannon 60cm Death ray – 1 0Quake cannon 90cm Hvy barrage – 1 7*Gun tower 45cm 3 – 1 6 Plasma annihilator 45cm 24 -1 6 8Hellstorm cannon 90cm 3x Hvy barrage – 3 7Bastions 30cm 12 N/A N/A N/A
* Against a titan, a quake cannon always inflicts a minimum of an armour cracked result.
WARMONGER EMPEROR CLASS TITANTower weapons: Hits on tower weapons are allocated randomly. Roll a D6, a roll of 1-4 hits the flak battery of that number, a 5 hits the Lysander and a 6 hits the sensorium.
Bastions: see above.
Head weapons: The head weapons are destroyed and will no longer work if the head suffers major or catastrophic damage.
Sensorium: While the sensorium is functioning, the range of all of the warmonger’s weapons (apart from the bastions) is increased by 30cm. The sensorium is disabled if it suffers minor damage or worse (major or catastrophic damage have no additional effect).
Lysander targeting craft: The Lysander is a flyer used by warmonger titans to spot enemy troops hidden behind blocking terrain. As long as the Lysander is intact, once per battle the warmonger can shoot a support missile as if it was artillery, (no line of fire required). This function can no longer be used if the Lysander suffers superficial damage or worse (major or catastrophic damage have no additional effect).
WEAPON RANGE FPR ACC ROF STR
Flak battery 45cm 4 – 2 4*Gun head 45cm 6 – 2 6Doomstrike battery ** Devastator cannon 90cm 3x Death ray – 2 9Bastions 30cm 12 N/A N/A N/A
* Counts a flak specialist unit (Epic 40,000, p47). However, special orders are not required for the flak batteries to shoot at flyers. Instead, if a flak battery shoots at a flyer, it may not shoot again that turn.
** Pick 8 support missiles from the titan weapon chart. Up to 1 support missiles may be fired per turn.
TITAN GUNSWEAPON RANGE FP/TYPE ACC ROF STR NOTES
Gatling blaster 45cm 8 – 4 5
Inferno gun 30cm 10 +2 1 5 Inflicts an additional D3 hits if it hits its target.
Laser blaster 45cm 8 – 6 4
Melta-cannon 30cm 10 – 2 8
Plasma blastgun 45cm 8 – 2 6 Plasma weapons may be overloaded: add +2 STR for each point of ROF sacrificed.
Turbo lasers 60cm 6 – 2 6
Vulcan mega-bolter 30cm 8 – 8 4
Volcano cannon 60cm Death ray – 1 9
Quake cannon 90cm Mega cannon – 1 7 Against a titan itself, always inflicts a minimum of an armour cracked result.
Plasma destructor 45cm 8 -1 2 8 Plasma weapons may be overloaded: add +2 STR for each point of ROF sacrificed.
Rocket launcher 90cm Hvy barrage -1 D6 5 Roll a D6 every time you fire a rocket launcher to determine the weapon’s ROF.
Support missile Unlimited – N/A 1/battle – Support missiles always hit on a 2+ but can only be fired once per battle. - Vortex Vortex missile 6+D6 Vortex missiles add 2D6 to their STR for damage. - Plasma Vortex missile 6 Inflicts D6+2 hits if it hits its target. - Haywire Vortex missile Speclal Automatically inflicts D3+1 hits. each hit automatically knocks down a void shield or inflicts superficial damage on a titan with no shields left. - Warp Vortex missile 8 Ignores shields and inflicts damage on the titan itself.

WARLORD BATTLE TITAN SPEED MAN GUN CCS SHIELDS
15cm 1 4+ 4+ 6
REAVER BATTLE TITAN SPEED MAN GUN CCS SHIELDS
20cm 2 4+ 4+ 4
WARHOUND BATTLE TITAN SPEED MAN GUN CCS SHIELDS
25cm 3 4+ 4+ 2
WEAPONS
Carapace: Not close combat weapon. Arm: Not support missile.
POINT ARC WPN RANGE/SW ACC ROF FP STR
Left carapace
Right carapace
Left arm
Right arm
WEAPONS
General: Not plasma destructor or wrecker ball. Carapace: Not close combat weapon. Arm: Not support missile.
POINT ARC WPN RANGE/SW ACC ROF FP STR
Carapace
Left arm
Right arm
WEAPONS
General: Not gatling blaster, laser blaster, melta-cannon, volcano cannon,plasma destructor, quake cannon, support missile or close combat weapon.
POINT ARC WPN RANGE/SW ACC ROF FP STR
Left arm
Right arm
HIT LOCATIONS * Hits weapon closest to attacker. HIT LOCATIONS * Hits weapon closest to attacker.
HIT LOCATIONS * Hits weapon closest to attacker.
DAMAGEDAMAGE
DAMAGE
FRONTD6 LOCATION ARM1 Legs 112 Plasma reactor 123 Head 144-5 Arm weapon* 106 Carapace weapon* 10
SIDE D6 LOCATION ARM1 Legs 102 VSGs 133 Head 134-5 Arm weapon* 106 Carapace weapon* 10
REAR D6 LOCATION ARM1 Legs 92 VSGs 133 Head 114-5 Arm weapon* 106 Carapace weapon* 10
FRONTD6 LOCATION ARM1 Legs 102 VSGs 113 Head 134-5 Arm weapon* 96 Carapace weapon* 9
SIDE D6 LOCATION ARM1 Legs 92 Plasma reactor 103 Head 134-5 Arm weapon* 96 Carapace weapon* 9
REAR D6 LOCATION ARM1 Legs 102 VSGs 103 Plasma reactor 104-5 Arm weapon* 96 Carapace weapon* 9
FRONTD6 LOCATION ARM1-2 Legs 103 VSGs 104 Head 115-6 Arm weapon* 9
SIDE D6 LOCATION ARM1-3 Legs 104 Head 95-6 Arm weapon* 9
REAR D6 LOCATION ARM1-2 Legs 103 VSGs 104 Plasma reactor 105-6 Arm weapon* 9
Left carapace weapon Armour cracked Superficial Major Catastrophic
Right carapace weapon Armour cracked Superficial Major Catastrophic
Left arm weapon Armour cracked Superficial Major Catastrophic
Right arm weapon Armour cracked Superficial Major Catastrophic
VSGs Armour cracked Superficial Major Catastrophic
Legs Armour cracked Superficial Major Catastrophic
Head Armour cracked Superficial Major Catastrophic
Plasma reactor Armour cracked Superficial Major Catastrophic
Carapace weapon Armour cracked Superficial Major Catastrophic
Left arm weapon Armour cracked Superficial Major Catastrophic
Right arm weapon Armour cracked Superficial Major Catastrophic
VSGs Armour cracked Superficial Major Catastrophic
Legs Armour cracked Superficial Major Catastrophic
Head Armour cracked Superficial Major Catastrophic
Plasma reactor Armour cracked Superficial Major Catastrophic
IMPROVISED ATTACKS D3 REPAIR ROLLS 8 IMPROVISED ATTACKS 1 REPAIR ROLLS 8
IMPROVISED ATTACKS 1 REPAIR ROLLS 4

IMPERATOR EMPEROR TITAN SPEED MAN GUN CCS SHIELDS
10cm 1 4+ 4+ 12
WARMONGER EMPEROR TITAN SPEED MAN GUN CCS SHIELDS
10cm 1 4+ 4+ 12
WEAPONSLOCATION ARC WPN RANGE/SW ACC ROF FP STR
Towers Quake cannon 90cm - 1 SHW 7
Towers Volcano cannon 60cm - 1 SHW 9
Towers Gun tower 1 45cm - 1 3 6
Towers Gun tower 2 45cm - 1 3 6
Towers Gun tower 3 45cm - 1 3 6
Towers Gun tower 4 45cm - 1 3 6
Left arm Plasma annihilator 45cm -1 6 24 8
Right arm Hellstorm cannon 90cm - 3 3x SHW 7
Bastions Secondary weapons 30cm - - 12 -
WEAPONSLOCATION ARC WPN RANGE/SW ACC ROF FP STR
Towers Flak battery 1 45cm - 2 3 6
Towers Flak battery 2 45cm - 2 3 6
Towers Flak battery 3 45cm - 2 3 6
Towers Flak battery 4 45cm - 2 3 6
Left arm Vengeance cannon 90cm - 2 2x SHW 9
Right arm Doomstrike
Bastions Secondary weapons 30cm - - 12 -
Head Gun head 45cm - 2 6 4
* Hits weapon closest to attacker. HIT LOCATIONS ** Hits random weapon.
* Hits weapon closest to attacker. HIT LOCATIONS ** Hits random weapon.
DAMAGEDAMAGE
FRONTD6 LOCATION ARM1 Legs 102 VSGs 123-4 Arm weapon* 105 Head 126 Towers** 8
SIDE D6 LOCATION ARM1 Legs 102 Plasma reactor 123-4 Arm weapon* 105 Head 126 Towers** 8
REAR D6 LOCATION ARM1 Legs 102-3 Plasma reactor 114-5 Arm weapon* 106 Towers** 8
FRONTD6 LOCATION ARM1 Legs 102 VSGs 123-4 Arm weapon* 105 Head 126 Towers** 8
SIDE D6 LOCATION ARM1 Legs 102 Plasma reactor 123-4 Arm weapon* 105 Head 126 Towers** 8
REAR D6 LOCATION ARM1 Legs 102-3 Plasma reactor 114-5 Arm weapon* 106 Towers** 8
Quake cannon Armour cracked Superficial Major Catastrophic Volcano cannon Armour cracked Superficial Major Catastrophic Gun tower 1 Armour cracked Superficial Major Catastrophic Gun tower 2 Armour cracked Superficial Major Catastrophic Gun tower 3 Armour cracked Superficial Major Catastrophic Gun tower 4 Armour cracked Superficial Major Catastrophic Plasma annihilator Armour cracked Superficial Major Catastrophic Hellstorm cannon Armour cracked Superficial Major Catastrophic VSGs Armour cracked Superficial Major Catastrophic Legs Armour cracked Superficial Major Catastrophic Head Armour cracked Superficial Major Catastrophic Plasma reactor Armour cracked Superficial Major Catastrophic
Sensorium Armour cracked Superficial Major Catastrophic Lysander Armour cracked Superficial Major Catastrophic Flak tower 1 Armour cracked Superficial Major Catastrophic Flak tower 2 Armour cracked Superficial Major Catastrophic Flak tower 3 Armour cracked Superficial Major Catastrophic Flak tower 4 Armour cracked Superficial Major Catastrophic Vengeance cannon Armour cracked Superficial Major Catastrophic Doomstrike Armour cracked Superficial Major Catastrophic VSGs Armour cracked Superficial Major Catastrophic Legs Armour cracked Superficial Major Catastrophic Head Armour cracked Superficial Major Catastrophic Plasma reactor Armour cracked Superficial Major Catastrophic
IMPROVISED ATTACKS D3+2 REPAIR ROLLS 12 IMPROVISED ATTACKS D3+2 REPAIR ROLLS 12

ORK GARGANTSPOWER FIELDSOrk power fields function in the same way as void shields but have an ARM of 7, and once destroyed they cannot be repaired. Tthe number of power fields a gargant has is randomly generated at the start of a battle. A gargant containing an ork warlord always receives the maximum number of power fields.
DAMAGE LOCATIONSIf a location on an ork gargant that has suffered catastrophic damage is hit again, then instead of the damage being ignored, 1 fire is started instead.
Roll D6 separately for each fire at the start of the rally phase. On a 1 the fire reaches the gargant’s magazine and it is destroyed in a huge explosion which inflicts 1 anti tank hit on all units within 4D6 cms of the gargant. Fires may be ‘repaired’ like other damage: each successful repair roll puts out 1 fire.
DAMAGE EFFECTSENGINE ROOMSuperficial: May only move on a D6 roll of 4+. May be repaired.Major: May only move on a roll of 4+. May not be repaired.Catastrophic: May no longer move.
WEAPONSuperficial: The weapon cannot be used until repaired.Major: The weapon cannot be used for the rest of the game.Catastrophic: As major damage, plus inflicts superficial damage on one other random location (roll D6 for the facing: 1-2 = front, 3-4 = side, 5-6 = rear, then roll again on the appropriate hit location table).
FEETSuperficial: Speed is reduced by -5cm. May be repaired.Major: Speed is reduced by -5cm for the rest of the game.Catastrophic: May no longer move, but may turn on the spot.
HEADSuperficial: May only make a turn on a D6 roll of 4+ until the damage is repaired. Roll just before making a turn; on a 1-3 the gargant must move straight ahead for the rest of its move.
Major: As above, and weapons must engage the closest enemy target. If repaired, the damage becomes superficial.Catastrophic: As above, but may not be repaired.
PLASMA REACTORSuperficial: Crew casualties reduce the number of repair rolls the gargant may make by 1.Major: Crew casualties reduce the number of repair rolls the gargant may make by half (round up).Catastrophic: The gargant may only make one repair roll per turn.
WEAPONSKluster bustaA high velocity gun firing a specially hardened 10 metre-long iron spike surrounded by numerous smaller rapid fire kluster guns. The kluster busta can be fitted to great gargants as an arm weapon. The kluster guns and spike gun can engage different targets.
Deth kannonA primitive, heavy smoothbore which fires huge shells at low velocity over considerable distances. The deth cannon can be fitted to gargants and great gargants as an arm weapon.
Slasha zzap gunAn unpredictable and potentially devastating energy discharge. A zzap gun can be mounted as an arm weapon on great gargants or as a belly weapon on gargants. Only 1 slasha can be fitted to a gargant or great gargant.
Gutbuster ammoWhen firing a hull-mounted mega cannon the ammo will normally be explosive shot. Alternatively, before rolling to hit, a gargant with a gutbuster belly gun may declare it is firing with chainshot or solid shot.
GARGANT CLOSE COMBAT WEAPONSWEAPON SW ACC ROF STR
Ripperfist 6 – 1 8Snapper 3 – 3 6Death roller 4 – 3 5
ELDAR TITANSHOLO FIELDSWhen shooting at an Eldar Titan add +1 to GUN if the eldar titan has moved at all that turn (this is cumulative with other modifiers).
REPAIREldar titans receive a +1 bonus to all repair rolls.
DAMAGE EFFECTSHOLO GENERATORSSuperficial: No effect.Major: The projectors flicker in and out. The titan must move over half its speed to gain any holofield bonus.Catastrophic: The projectors fail completely revealing the titan. No bonus is gained anymore for having holofields.
WEAPONSuperficial: The weapon cannot be used until repaired.Major: The weapon cannot be used for the rest of the game.Catastrophic: As major damage, plus inflicts superficial damage on one other random location (roll D6 for the facing: 1-2 = front, 3-4 = side, 5-6 = rear, then roll again on the appropriate hit location table).
LEGSSuperficial: Speed is reduced by -5cm. May be repaired.Major: Speed is reduced by -5cm for the rest of the game.Catastrophic: The titan crashes and is destroyed.
HEADSuperficial: The titan cannot shoot until the damage is repaired.Major: The titan cannot move or shoot. If repaired, the damage effect becomes superficial.Catastrophic: The titan crashes and is destroyed.
WRAITHBONE CORESuperficial: Control of the titan is temporarily lost. Weapons may only fire at the closest enemy target in range. May be repaired.Major: The link is severed; the titan may not move or shoot. If repaired. the damage becomes superficial.
Catastrophic: The titan is completely immobilised and may not move or shoot for the rest of the game (this does not count towards victory unless destroyed).
REACTORSuperficial: Roll D6 for each weapon at the start of every turn: on 4+ it can be used, on 1-3 it cannot be used that turn. May be repaired.Major: As superficial damage, plus the titan can only move on a D6 roll of 4+ (roll at the start of movement phase and again in the assault phase). If repaired, the damage becomes superficial.Catastrophic: The titan explodes and is destroyed, inflicting D6 STR 7 hits on any other titan within 4D6cm.
WEAPONSPulsar and star pulsarThe star pulsar can be fired in one of two modes: burst or sustained. In burst mode it fires D6 shots, and in sustained mode all of the weapons energy is focused into a single lethal shot. At the start of each shooting phase you must declare for each star pulsar which mode you are going to fire in.
Distortion, or d-cannonShields offer no protection against the d-cannon.
Psi-lanceAny titan hit by a psi-lance may not move next turn and may only shoot with half of its weapons, or half of those remaining if it has already taken damage during the game. Shields and damage repairs function as normal. Shields are no defence against psychic attacks; psi-lance hits ignore void shields or energy fields. Other than the disruptive effect to the crew and titan, no other damage is caused.
GARGANT CLOSE COMBAT WEAPONSWEAPON SW ACC ROF STR
Powerfist 6 +1 1 9** If you roll a 6 to hit with a powerfist it makes a tear attack and
adds 4D3 to its STR.
GARGANT GUNSWEAPON RANGE FP/TYPE ACC ROF STR NOTES
Gatling cannon 45cm 8 – 4 5
Deth cannon 45cm 1 +1 1 9 Counts as Death Ray with artillery ability. Against a titan itself, always inflicts a minimum of an armour cracked result.
Klusta-busta 45cm AT +1 1 6
Slash zzap gun 30cm Hvy barrage – 2 4
Gaze of Gork 30cm D6-1 AT shots – 2 2D6 Plasma weapons may be overloaded.
Snapper/ripper fist 30cm Death ray – 1 9
Gutbuster (shell) 45cm 4 – 1 4
Gutbuster (ball) 60cm Mega-cannon – 1 7 Against a titan itself, always inflicts a minimum of an armour cracked result.
Gutbuster (chainshot) 15cm AT – 1 8
Super lifta droppa 45cm 3D6 -1 1 4 Cannot pick up titans.
GARGANT GUNSWEAPON RANGE FP/TYPE ACC ROF STR NOTES
Pulsar 45cm D3 AT shots +1 D3 6
Star pulsar (burst) 60cm D6 AT shots +1 D6 6
Star pulsar (sustained) 60cm Death ray – 1 9
Distortion cannon 45cm 1 – 1 7 Ignores shields and inflicts damage on the titan itself.
Vibro cannon 45cm Artillery, disrupt -1 D6-1 5 Ignores shields and inflicts damage on the titan itself.
Psi-lance 45cm see above – – –

MEGA GARGANT SPEED MAN GUN CCS FIELDS
15cm 1 5+ 3+ 9+D6
GREAT GARGANT SPEED MAN GUN CCS FIELDS
15cm 1 5+ 3+ 6+D6
WEAPONSPOINT ARC WPN RANGE/SW ACC ROF FP STR
Belly Batteries 45cm - 6 27 4
Left arm (top) Super lifta droppa 45cm see special rules
Left arm (low) Slash-zzap gun 30cm - 2 1D6-1 AT 2D6
Right arm Ripper fist 30cm/6 -/- 1/1 4 4/8
Left shoulder Deth cannon 45cm +1 1 SHW 9
Right shoulder 2 x support missiles Unlimited Plasma missile - 6
Head Gaze of Gork 30cm - 1 SHW 9
WEAPONSBelly: Gutbuster or snapper only.
Arms: Gatling kannons, deth kannons, super lifta-droppa, klusta buster, slasha zzap gun or ripper fist.
POINT ARC WPN RANGE/SW ACC ROF FP STR
Belly
Left arm
Right arm
Left shoulder Shoulder battery 45cm - 2 3 4
Right shoulder Shoulder battery 45cm - 2 3 4
Head Gaze of Gork 30cm - 1 1 9
HIT LOCATIONS * Hits weapon closest to attacker. HIT LOCATIONS * Hits weapon closest to attacker.
DAMAGE DAMAGE
FRONTD6 LOCATION ARM1 Feet 122 Belly weapon 103 Belly 104 Arm weapon* 125 Shoulder weapon* 106 Head 13
SIDE D6 LOCATION ARM1 Feet 112-3 Belly 104 Arm weapon* 115 Shoulder weapon* 106 Head 13
REAR D6 LOCATION ARM1 Feet 112 Belly 103 Engine room 104 Arm weapon* 105 Shoulder weapon* 106 Head 12
FRONTD6 LOCATION ARM1 Feet 122 Belly weapon 103 Belly 104 Arm weapon* 125 Shoulder weapon* 106 Head 13
SIDE D6 LOCATION ARM1 Feet 112-3 Belly 104 Arm weapon* 115 Shoulder weapon* 106 Head 13
REAR D6 LOCATION ARM1 Feet 112 Belly 93 Engine room 94 Arm weapon* 105 Shoulder weapon* 106 Head 12
Feet Armour cracked Superficial Major Catastrophic
Right arm weapon Armour cracked Superficial Major Catastrophic
Top left arm weapon Armour cracked Superficial Major Catastrophic
Low left arm weapon Armour cracked Superficial Major Catastrophic
Right shoulder weapon Armour cracked Superficial Major Catastrophic
Left shoulder weapon Armour cracked Superficial Major Catastrophic
Belly weapon Armour cracked Superficial Major Catastrophic
Belly Armour cracked Superficial Major Catastrophic
Engine room Armour cracked Superficial Major Catastrophic
Head Armour cracked Superficial Major Catastrophic
Feet Armour cracked Superficial Major Catastrophic
Right arm weapon Armour cracked Superficial Major Catastrophic
Left arm weapon Armour cracked Superficial Major Catastrophic
Right shoulder weapon Armour cracked Superficial Major Catastrophic
Left shoulder weapon Armour cracked Superficial Major Catastrophic
Left shoulder weapon Armour cracked Superficial Major Catastrophic
Belly weapon Armour cracked Superficial Major Catastrophic
Belly Armour cracked Superficial Major Catastrophic
Engine room Armour cracked Superficial Major Catastrophic
Head Armour cracked Superficial Major Catastrophic
IMPROVISED ATTACKS D3+2 REPAIR ROLLS 8 IMPROVISED ATTACKS D3+1 REPAIR ROLLS 6
GARGANT SPEED MAN GUN CCS FIELDS
15cm 1 5+ 3+ 3+D3
WEAPONS
Belly: Gutbuster (no special ammo due to their more limited magazines), a slasha zzap gun or a snapper close combat weapon. Arm: Gatling kannon or deth kannon only.
POINT ARC WPN RANGE/SW ACC ROF FP STR
Belly
Left arm
Right arm
HIT LOCATIONS * Hits weapon closest to attacker.
DAMAGE
FRONTD6 LOCATION ARM1 Feet 102 Belly weapon 93-4 Belly 105 Arm weapon* 96 Head 13
SIDE D6 LOCATION ARM1 Feet 102-3 Belly 104-5 Arm weapon* 96 Head 12
REAR D6 LOCATION ARM1 Feet 102-3 Belly 104 Engine room 95 Arm weapon* 96 Head 11
Feet Armour cracked Superficial Major Catastrophic
Left arm weapon Armour cracked Superficial Major Catastrophic
Right arm weapon Armour cracked Superficial Major Catastrophic
Engine room Armour cracked Superficial Major Catastrophic
Belly weapon Armour cracked Superficial Major Catastrophic
Head Armour cracked Superficial Major Catastrophic
IMPROVISED ATTACKS D3 REPAIR ROLLS 4

ELDAR REVENANT SCOUT TITAN SPEED MAN GUN CCS SHIELDS
25cm 4 4+ 4+ None
ELDAR PHANTOM TITAN SPEED MAN GUN CCS SHIELDS
20cm 3 4+ 4+ None
WEAPONSPOINT ARC WPN RANGE/SW ACC ROF FP STR
Body Weapons battery 45cm - 4 4 4
Left arm Pulsar 45cm +1 D3 AT shots D3 6
Right arm Pulsar 45cm +1 D3 AT shots D3 6
WEAPONSWings: Weapons battery only.
Arms: Star pulsar, d-cannon, v-cannon or powerfist only. Psi-lance (warlock titan only).
POINT ARC WPN RANGE/SW ACC ROF FP STR
Left wing Weapons battery 45cm - 4 4 4
Right wing Weapons battery 45cm - 4 4 4
Left arm
Right arm
HIT LOCATIONS * Hits weapon closest to attacker.
IMPROVISED ATTACKS 1 REPAIR ROLLS 4
IMPROVISED ATTACKS D3 REPAIR ROLLS 8
HIT LOCATIONS * Hits weapon closest to attacker.
DAMAGE
DAMAGE
FRONTD6 LOCATION ARM1 Legs 102 Wraithbone core 103-4 Head 115 Arm weapon* 96 Body weapon* 8
SIDE D6 LOCATION ARM1 Legs 102 Holo generator 103 Head 114-5 Arm weapon* 96 Body weapon* 10
REAR D6 LOCATION ARM1 Legs 92 Reactor 103 Head 104-5 Arm weapon* 96 Body weapon* 8
FRONTD6 LOCATION ARM1 Legs 102 Wraithbone core 123 Head 144-5 Arm weapon* 106 Wing weapon* 10
SIDE D6 LOCATION ARM1 Legs 102 Holo generator 123 Head 144-5 Arm weapon* 106 Wing weapon* 10
REAR D6 LOCATION ARM1 Legs 92 Reactor 113 Head 114-5 Arm weapon* 106 Wing weapon* 10
Body carapace weapon Armour cracked Superficial Major Catastrophic
Left arm weapon Armour cracked Superficial Major Catastrophic
Right arm weapon Armour cracked Superficial Major Catastrophic
Wraithbone core Armour cracked Superficial Major Catastrophic
Legs Armour cracked Superficial Major Catastrophic
Head Armour cracked Superficial Major Catastrophic
Reactor Armour cracked Superficial Major Catastrophic
Holo generator Armour cracked Superficial Major Catastrophic
Left wing weapon Armour cracked Superficial Major Catastrophic
Right wing weapon Armour cracked Superficial Major Catastrophic
Left arm weapon Armour cracked Superficial Major Catastrophic
Right arm weapon Armour cracked Superficial Major Catastrophic
Wraithbone core Armour cracked Superficial Major Catastrophic
Legs Armour cracked Superficial Major Catastrophic
Head Armour cracked Superficial Major Catastrophic
Reactor Armour cracked Superficial Major Catastrophic
Holo generator Armour cracked Superficial Major Catastrophic