Oracle9iAS Containers for J2EE - Oracle Help Center
276
Oracle9iAS Containers for J2EE User’s Guide Release 2 (9.0.2) April 2002 Part No. A95880-01
-
Upload
khangminh22 -
Category
Documents
-
view
1 -
download
0
Transcript of Oracle9iAS Containers for J2EE - Oracle Help Center
Oracle9 iAS Containers for J2EE
User’s Guide
Release 2 (9.0.2)
April 2002
Part No. A95880-01

Oracle9iAS Containers for J2EE User’s Guide, Release 2 (9.0.2)
Part No. A95880-01
Copyright © 2002 Oracle Corporation. All rights reserved.
Contributing Authors: Sheryl Maring, Mike Sanko, Brian Wright, Timothy Smith
The Programs (which include both the software and documentation) contain proprietary information ofOracle Corporation; they are provided under a license agreement containing restrictions on use anddisclosure and are also protected by copyright, patent and other intellectual and industrial propertylaws. Reverse engineering, disassembly or decompilation of the Programs, except to the extent requiredto obtain interoperability with other independently created software or as specified by law, is prohibited.
The information contained in this document is subject to change without notice. If you find any problemsin the documentation, please report them to us in writing. Oracle Corporation does not warrant that thisdocument is error-free. Except as may be expressly permitted in your license agreement for thesePrograms, no part of these Programs may be reproduced or transmitted in any form or by any means,electronic or mechanical, for any purpose, without the express written permission of Oracle Corporation.
If the Programs are delivered to the U.S. Government or anyone licensing or using the programs onbehalf of the U.S. Government, the following notice is applicable:
Restricted Rights Notice Programs delivered subject to the DOD FAR Supplement are "commercialcomputer software" and use, duplication, and disclosure of the Programs, including documentation,shall be subject to the licensing restrictions set forth in the applicable Oracle license agreement.Otherwise, Programs delivered subject to the Federal Acquisition Regulations are "restricted computersoftware" and use, duplication, and disclosure of the Programs shall be subject to the restrictions in FAR52.227-19, Commercial Computer Software - Restricted Rights (June, 1987). Oracle Corporation, 500Oracle Parkway, Redwood City, CA 94065.
The Programs are not intended for use in any nuclear, aviation, mass transit, medical, or other inherentlydangerous applications. It shall be the licensee's responsibility to take all appropriate fail-safe, backup,redundancy, and other measures to ensure the safe use of such applications if the Programs are used forsuch purposes, and Oracle Corporation disclaims liability for any damages caused by such use of thePrograms.
Oracle is a registered trademark, and Oracle9i is a trademark or registered trademark of OracleCorporation. Other names may be trademarks of their respective owners.
Portions of this software are copyrighted by Data Direct Technologies, 1991-2001.
Contents
Send Us Your Comments ................................................................................................................... xi
Preface .......................................................................................................................................................... xiii
1 J2EE Overview
OC4J Features ...................................................................................................................................... 1-2Set of Pure Java Containers and Runtime Executing on the JDK.......................................... 1-2J2EE Certified ................................................................................................................................ 1-2
Overview of J2EE APIs and OC4J Support.................................................................................... 1-3Java Servlets................................................................................................................................... 1-3JavaServer Pages........................................................................................................................... 1-5Enterprise JavaBeans.................................................................................................................... 1-7Java Database Connectivity Services ....................................................................................... 1-10Java Naming and Directory Interface...................................................................................... 1-12Java Transaction API ................................................................................................................. 1-12Java Messaging Service.............................................................................................................. 1-13JAAS Provider............................................................................................................................. 1-13
Tunneling, Load Balancing, and Clustering Services Provided by OC4J.............................. 1-14RMI Tunneling Over HTTP ...................................................................................................... 1-15Load Balancing and Clustering ................................................................................................ 1-16
Java Plug-In Partners and Third Party Tools Support ............................................................... 1-17Actional Control Broker............................................................................................................. 1-17Blaze Advisor .............................................................................................................................. 1-17Borland JBuilder.......................................................................................................................... 1-18Cacheon Business Service Center............................................................................................. 1-18
iii
Computer Associates Cool:Joe.................................................................................................. 1-18Compuware OptimalJ ................................................................................................................ 1-18Documentum WDK.................................................................................................................... 1-18Empirix BeanTest ........................................................................................................................ 1-19FatWire UpdateEngine............................................................................................................... 1-19ILOG JRules ................................................................................................................................. 1-19Macromedia UltraDev ............................................................................................................... 1-19Mercury Interactive LoadRunner............................................................................................. 1-20Neuvis NeuArchitect.................................................................................................................. 1-20Pramati Studio............................................................................................................................. 1-20Rational Rose ............................................................................................................................... 1-20Sitraka JProbe .............................................................................................................................. 1-21Sonic Software SonicMQ............................................................................................................ 1-21Sun Forte ...................................................................................................................................... 1-21TogetherSoft ControlCenter ...................................................................................................... 1-21VMGear Optimizeit .................................................................................................................... 1-22WebGain Visual Cafe ................................................................................................................. 1-22
2 Configuration and Deployment
OC4J Installation................................................................................................................................. 2-2Using OC4J in an Enterprise or Standalone Environment ......................................................... 2-2
Managing Multiple OC4J Instances in an Enterprise Environment...................................... 2-3Managing a Single OC4J Instance .............................................................................................. 2-3OC4J Documentation Set Assumptions..................................................................................... 2-4
OC4J Communication ........................................................................................................................ 2-5HTTP Communication................................................................................................................. 2-5Requirements................................................................................................................................. 2-6
Starting and Stopping the Oracle Enterprise Manager Web Site .............................................. 2-6Creating or Deleting an OC4J Instance .......................................................................................... 2-7OC4J Home Page ................................................................................................................................. 2-8
General and Status........................................................................................................................ 2-8Deployed Applications ................................................................................................................ 2-9Administration ............................................................................................................................ 2-10
Starting and Stopping OC4J ........................................................................................................... 2-11Testing the Default Configuration ........................................................................................... 2-12
iv
Creating the Development Directory............................................................................................ 2-13Configuring the Pet Store Web Application Demo .................................................................... 2-14
Downloading An OC4J-Ready Pet Store Demo..................................................................... 2-14Explanation of the Changes to the Pet Store Demo............................................................... 2-17
Deploying Applications .................................................................................................................. 2-20Basic Deployment ....................................................................................................................... 2-20
Recovering From Deployment Errors ........................................................................................... 2-29Undeploying Web Applications .................................................................................................... 2-29
3 Advanced Configuration, Development, and Deployment
Configuring OC4J Using Enterprise Manager .............................................................................. 3-2OC4J Instance Level Configuration ........................................................................................... 3-2Application Level Configuration ............................................................................................. 3-17
Overview of OC4J and J2EE XML Files........................................................................................ 3-19XML Configuration File Overview .......................................................................................... 3-19XML File Interrelationships ...................................................................................................... 3-23
What Happens When You Deploy? ............................................................................................... 3-26OC4J Tasks During Deployment.............................................................................................. 3-26Configuration Verification of J2EE Applications................................................................... 3-27
Understanding and Configuring OC4J Listeners ....................................................................... 3-28HTTP Requests............................................................................................................................ 3-28RMI Requests .............................................................................................................................. 3-29
Configuring Oracle HTTP Server With Another Web Context................................................ 3-29Building and Deploying Within a Directory............................................................................... 3-30
4 Data Sources Primer
Introduction ......................................................................................................................................... 4-2Definition of Data Sources................................................................................................................ 4-2Retrieving a Connection From a Data Source ............................................................................... 4-8
5 Servlet Primer
What Is a Servlet?................................................................................................................................ 5-2The Servlet Container................................................................................................................... 5-2Servlet Performance ..................................................................................................................... 5-3
v

Two Servlet Examples ........................................................................................................................ 5-3The Hello World Servlet .............................................................................................................. 5-4The GetEmpInfo Servlet............................................................................................................... 5-6
Session Tracking................................................................................................................................ 5-13Session Tracking Example ......................................................................................................... 5-13
Servlet Filters ..................................................................................................................................... 5-16A Logging Filter .......................................................................................................................... 5-17
Learning More About Servlets ....................................................................................................... 5-20
6 JSP Primer
A Brief Overview of JavaServer Pages Technology ..................................................................... 6-2What Is JavaServer Pages Technology?..................................................................................... 6-2JSP Translation and Runtime Flow ............................................................................................ 6-3Key JSP Advantages ..................................................................................................................... 6-4JSP in Application Architecture.................................................................................................. 6-5
Running a Simple JSP Page .............................................................................................................. 6-6Create and Deploy the JSP........................................................................................................... 6-6Run welcomeuser.jsp ................................................................................................................... 6-6
Running a JSP Page That Invokes a JavaBean .............................................................................. 6-7Create the JSP—usebean.jsp........................................................................................................ 6-8Create the JavaBean—NameBean.java ...................................................................................... 6-9Run usebean.jsp .......................................................................................................................... 6-10
Running a JSP Page That Uses Custom Tags............................................................................... 6-11Create the JSP Page—sqltagquery.jsp...................................................................................... 6-11Set Up Files for Tag Library Support ...................................................................................... 6-12Run sqltagquery.jsp.................................................................................................................... 6-13
Overview of Oracle Value-Added Features for JSP Pages ........................................................ 6-15
7 EJB Primer
Developing EJBs.................................................................................................................................. 7-2Creating the Development Directory......................................................................................... 7-2Implementing the Enterprise JavaBeans ................................................................................... 7-3Creating the Deployment Descriptor......................................................................................... 7-9Archiving the EJB Application.................................................................................................. 7-10
Preparing the EJB Application for Assembly.............................................................................. 7-11
vi
Modifying Application.XML .................................................................................................... 7-11Creating the EAR File................................................................................................................. 7-12
Deploying the Enterprise Application to OC4J .......................................................................... 7-13
8 Security
Overview of Security Functions ...................................................................................................... 8-2Provider Types..................................................................................................................................... 8-3
Using the JAZNUserManager Class .......................................................................................... 8-4Using the XMLUserManager Class............................................................................................ 8-5
Specifying Your User Manager ........................................................................................................ 8-6Specifying Users, Groups, and Roles ............................................................................................. 8-9
Shared Groups, Users, and Roles ............................................................................................... 8-9Application-Specific Groups, Users, and Roles ..................................................................... 8-10Specifying Users and Groups in jazn-data.xml...................................................................... 8-12Specifying Users and Groups in XMLUserManager............................................................. 8-13Permissions.................................................................................................................................. 8-13
Authenticating HTTP Clients......................................................................................................... 8-13Authenticating EJB Clients ............................................................................................................. 8-14
Setting JNDI Properties.............................................................................................................. 8-14Using the Initial Context Factory Classes ............................................................................... 8-16
Authorization In J2EE Applications.............................................................................................. 8-17Specifying Logical Roles in a J2EE Application ..................................................................... 8-18Mapping Logical Roles to Users and Groups......................................................................... 8-19
Creating Your Own User Manager ................................................................................................ 8-21Example of Customer User Manager With the DataSourceUserManager Class .............. 8-23
9 Oracle9 iAS Clustering
About Oracle9iAS Clustering........................................................................................................... 9-2Scalability....................................................................................................................................... 9-2Availability .................................................................................................................................... 9-3Manageability................................................................................................................................ 9-4Component Support..................................................................................................................... 9-5Non-Managed Clustering............................................................................................................ 9-6
Architecture.......................................................................................................................................... 9-8Front-End Load Balancer............................................................................................................. 9-9
vii
Metadata Repository in the Infrastructure.............................................................................. 9-10Farm.............................................................................................................................................. 9-10Cluster .......................................................................................................................................... 9-10Application Server Instance ...................................................................................................... 9-11Management Features ................................................................................................................ 9-13Component Instances................................................................................................................. 9-15J2EE Applications ....................................................................................................................... 9-21
Enterprise Manager Configuration Tree ....................................................................................... 9-22Instance-Specific Parameters .......................................................................................................... 9-23Examples ............................................................................................................................................. 9-24
Software Failure .......................................................................................................................... 9-24Hardware Failure........................................................................................................................ 9-25State Replication.......................................................................................................................... 9-26
Cluster Configuration....................................................................................................................... 9-28Managing an Oracle9iAS Cluster ............................................................................................. 9-28Managing Application Server Instances in a Cluster ............................................................ 9-31OC4J Instance Configuration .................................................................................................... 9-33Configuring Single Sign-On ...................................................................................................... 9-38Configuring Instance-Specific Parameters .............................................................................. 9-40
A DCM Command-Line Utility (dcmctl)
Overview............................................................................................................................................... A-2About dcmctl Commands and Options..................................................................................... A-3Using dcmctl in a Clustered Environment................................................................................ A-5Passing Parameters to the JVM................................................................................................... A-6
Starting and Stopping ........................................................................................................................ A-6Managing Application Server Instances ........................................................................................ A-7Managing Components...................................................................................................................... A-8Managing Clusters.............................................................................................................................. A-8Deploying Applications ................................................................................................................. A-10Saving a Backup ............................................................................................................................... A-11Using the dcmctl Shell .................................................................................................................... A-12Executing dcmctl from a Command File ..................................................................................... A-12
viii
B Additional Information
Description of XML File Contents................................................................................................... B-2OC4J Configuration XML Files................................................................................................... B-2J2EE Deployment XML Files....................................................................................................... B-5
Elements in the server.xml File ........................................................................................................ B-7Configure OC4J............................................................................................................................. B-7Reference Other Configuration Files ......................................................................................... B-8
Configuration and Deployment Examples .................................................................................. B-15
C Third Party Licenses
Apache HTTP Server.......................................................................................................................... C-2The Apache Software License..................................................................................................... C-2
Apache JServ........................................................................................................................................ C-4Apache JServ Public License ....................................................................................................... C-4
Index
ix

x
Send Us Your Comments
Oracle9 iAS Containers for J2EE User’s Guide, Release 2 (9.0.2)
Part No. A95880-01
Oracle Corporation welcomes your comments and suggestions on the quality and usefulness of this
document. Your input is an important part of the information used for revision.
■ Did you find any errors?
■ Is the information clearly presented?
■ Do you need more information? If so, where?
■ Are the examples correct? Do you need more examples?
■ What features did you like most?
If you find any errors or have any other suggestions for improvement, please indicate the document
title and part number, and the chapter, section, and page number (if available). You can send com-
ments to us in the following ways:
■ Electronic mail—[email protected]
■ FAX - 650-506-7225. Attn: Java Platform Group, Information Development Manager
■ Postal service:
Oracle Corporation
Java Platform Group, Information Development Manager
500 Oracle Parkway, Mailstop 4op9
Redwood Shores, CA 94065
USA
If you would like a reply, please give your name, address, telephone number, and (optionally) elec-
tronic mail address.
If you have problems with the software, please contact your local Oracle Support Services.
xi

xii
Preface
This preface introduces you to the Oracle9iAS Containers for J2EE User’s Guide,
discussing the intended audience, structure, and conventions of this document. It
also provides a list of related Oracle documents.
Intended AudienceThis manual is intended for anyone who is interested in using Oracle9iAS
Containers for J2EE (OC4J), assuming you have basic knowledge of the following:
■ Java and J2EE
■ XML
■ JDBC
StructureThe Oracle9iAS Containers for J2EE User’s Guide contains the following chapters and
appendices:
Chapter 1, "J2EE Overview"This chapter describes OC4J primary features, an overview of J2EE APIs and OC4J
support, and tunneling and performance services provided by OC4J.
Chapter 2, "Configuration and Deployment"This chapter discusses how to install OC4J, how to configure Pet Store, the popular
J2EE demo application from Sun Microsystems, and how to deploy a Web
application.
xiii
Chapter 3, "Advanced Configuration, Development, and Deployment"This chapter covers advanced OC4J information. It includes an overview of OC4J
XML configuration files, how they relate to each other, what happens when you
deploy an application, some tips on manual XML configuration file editing for
applications, when OC4J automatic deployment for applications occurs, and
building and deploying within a directory.
Chapter 4, "Data Sources Primer"This chapter documents how to use data sources and the JDBC driver.
Chapter 5, "Servlet Primer"This chapter instructs how to create and use a servlet in OC4J.
Chapter 6, "JSP Primer"This chapter instructs how to create and use a JSP page in OC4J.
Chapter 7, "EJB Primer"This chapter instructs how to create and use an EJB in OC4J.
Chapter 8, "Security"This chapter presents an overview of security features. It describes how to configure
authorization and authentication for security.
Chapter 9, "Oracle9iAS Clustering"
This chapter describes how to cluster application server instances, Oracle HTTP
Servers, and OC4J instances.
Chapter A, "DCM Command-Line Utility (dcmctl)"This appendix describes the DCM command-line utility, which is used to bypass the
Oracle Enterprise Manager for application deployment, starting or stopping
application server instances, and other functions.
Chapter B, "Additional Information"This appendix describes the elements of the server.xml file, OC4J command-line
tool options, and provides configuration and deployment examples.
xiv
Related DocumentsFor more information on OC4J, see the following documentation available from
other OC4J manuals:
■ OC4J Quick Reference Card
■ Oracle9iAS Containers for J2EE Services Guide
■ Oracle9iAS Containers for J2EE Support for JavaServer Pages Reference
■ Oracle9iAS Containers for J2EE JSP Tag Libraries and Utilities Reference
■ Oracle9iAS Containers for J2EE Servlet Developer’s Guide
■ Oracle9iAS Containers for J2EE Enterprise JavaBeans Developer’s Guide andReference
The following documentation may also be helpful in understanding OC4J:
■ Oracle9i Application Server Administrator’s Guide
■ Oracle9i Application Server Performance Guide
■ Oracle9i JDBC Developer’s Guide and Reference
■ Oracle9i SQLJ Developer’s Guide and Reference
■ Oracle HTTP Server Administration Guide
ConventionsIn this manual, Windows refers to the Windows95, Windows98, and Windows NT
operating systems.
In examples, an implied carriage return occurs at the end of each line, unless
otherwise noted. You must press the Return key at the end of a line of input.
This manual also uses the following conventions:
Convention Meaning
. . .
Vertical ellipsis points in an example mean that information notdirectly related to the example has been omitted.
. . . Horizontal ellipsis points in statements or commands mean thatparts of the statement or command not directly related to theexample have been omitted
xv

Documentation AccessibilityOur goal is to make Oracle products, services, and supporting documentation
accessible, with good usability, to the disabled community. To that end, our
documentation includes features that make information available to users of
assistive technology. This documentation is available in HTML format, and contains
markup to facilitate access by the disabled community. Standards will continue to
evolve over time, and Oracle Corporation is actively engaged with other
market-leading technology vendors to address technical obstacles so that our
documentation can be accessible to all of our customers. For additional information,
visit the Oracle Accessibility Program Web site at
http://www.oracle.com/accessibility/
Accessibility of Code Examples in Documentation JAWS, a Windows screen
reader, may not always correctly read the code examples in this document. The
conventions for writing code require that closing braces should appear on an
otherwise empty line; however, JAWS may not always read a line of text that
consists solely of a bracket or brace.
Accessibility of Links to External Web Sites in Documentation This
documentation may contain links to Web sites of other companies or organizations
that Oracle Corporation does not own or control. Oracle Corporation neither
evaluates nor makes any representations regarding the accessibility of these Web
sites.
boldface text Boldface type in text indicates a term defined in the text, the glossary,or in both locations.
< > Angle brackets enclose user-supplied names.
[ ] Brackets enclose optional clauses from which you can choose one ornone.
Convention Meaning
xvi
J2EE Ove
1
J2EE OverviewOracle9iAS provides a complete set of Java 2 Enterprise Edition (J2EE) containers
written entirely in Java that execute on the Java virtual machine (JVM) of the
standard Java Development Kit (JDK). You can run Oracle9iAS Containers for J2EE
(OC4J) on the standard JDK that exists on your operating system. Refer to the
certification matrix on http://otn.oracle.com .
OC4J is J2EE compliant and provides all the containers that J2EE specifies. OC4J is
based on technology licensed from Ironflare Corporation, which develops the Orion
server—one of the leading J2EE containers. Although OC4J is integrated with the
Oracle9iAS infrastructure, the product and some of the documentation still contains
some reference to the Orion server.
This chapter includes the following topics:
■ OC4J Features
■ Overview of J2EE APIs and OC4J Support
In addition to the J2EE overview, the following OC4J services are highlighted.
■ Tunneling, Load Balancing, and Clustering Services Provided by OC4J
■ Java Plug-In Partners and Third Party Tools Support
rview 1-1
OC4J Features
OC4J FeaturesThe features of OC4J are the following:
■ Set of Pure Java Containers and Runtime Executing on the JDK
■ J2EE Certified
Set of Pure Java Containers and Runtime Executing on the JDKThe J2EE containers are implemented completely in Java and have the following
capabilities:
1. Lightweight—It takes less than 25 MB of disk space after being unzipped.
2. Quick installation—The installation, which comes with a default configuration,
requires less than 5 minutes. It comes installed with the Oracle9iAS product.
3. Leverages the JDK JVM—OC4J is certified to run on JDK 1.3.x.x. It leverages the
performance enhancements and features of this JDK release for each operating
system and hardware platform.
4. Easy to use—It supports standard Java development and profiling tools.
5. It is available on all standard operating systems and hardware platforms,
including Solaris, HP-UX, AIX, Tru64, Windows NT, and Linux.
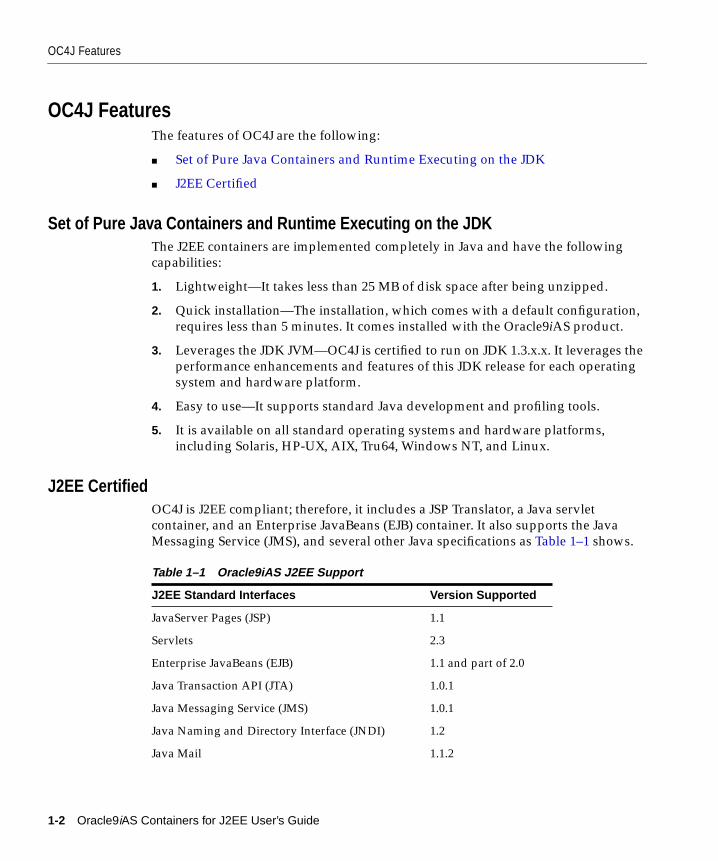
J2EE CertifiedOC4J is J2EE compliant; therefore, it includes a JSP Translator, a Java servlet
container, and an Enterprise JavaBeans (EJB) container. It also supports the Java
Messaging Service (JMS), and several other Java specifications as Table 1–1 shows.
Table 1–1 Oracle9iAS J2EE Support
J2EE Standard Interfaces Version Supported
JavaServer Pages (JSP) 1.1
Servlets 2.3
Enterprise JavaBeans (EJB) 1.1 and part of 2.0
Java Transaction API (JTA) 1.0.1
Java Messaging Service (JMS) 1.0.1
Java Naming and Directory Interface (JNDI) 1.2
Java Mail 1.1.2
1-2 Oracle9iAS Containers for J2EE User’s Guide
Overview of J2EE APIs and OC4J Support
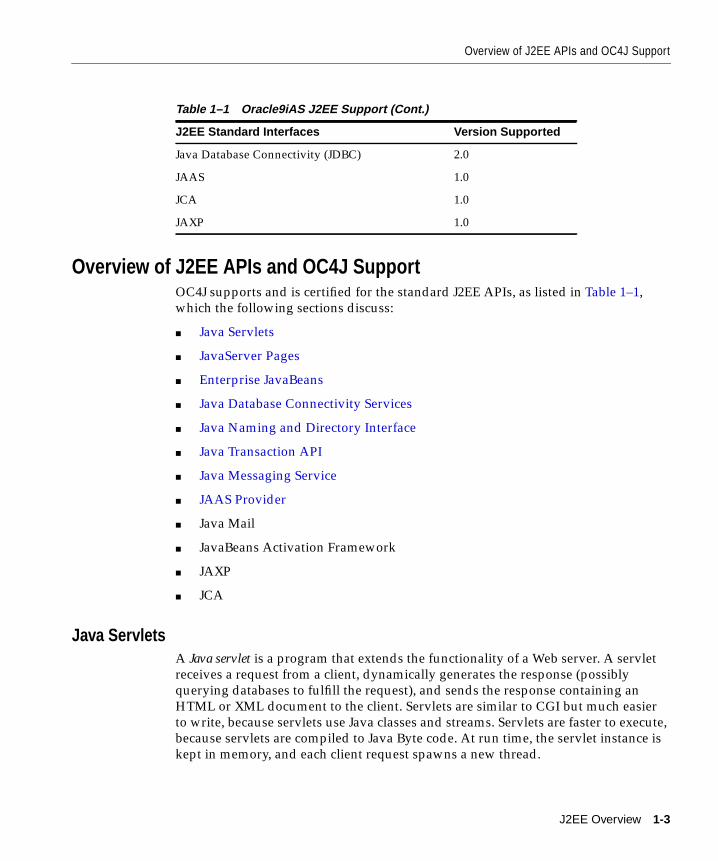
Overview of J2EE APIs and OC4J SupportOC4J supports and is certified for the standard J2EE APIs, as listed in Table 1–1,
which the following sections discuss:
■ Java Servlets
■ JavaServer Pages
■ Enterprise JavaBeans
■ Java Database Connectivity Services
■ Java Naming and Directory Interface
■ Java Transaction API
■ Java Messaging Service
■ JAAS Provider
■ Java Mail
■ JavaBeans Activation Framework
■ JAXP
■ JCA
Java ServletsA Java servlet is a program that extends the functionality of a Web server. A servlet
receives a request from a client, dynamically generates the response (possibly
querying databases to fulfill the request), and sends the response containing an
HTML or XML document to the client. Servlets are similar to CGI but much easier
to write, because servlets use Java classes and streams. Servlets are faster to execute,
because servlets are compiled to Java Byte code. At run time, the servlet instance is
kept in memory, and each client request spawns a new thread.
Java Database Connectivity (JDBC) 2.0
JAAS 1.0
JCA 1.0
JAXP 1.0
Table 1–1 Oracle9iAS J2EE Support (Cont.)
J2EE Standard Interfaces Version Supported
J2EE Overview 1-3
Overview of J2EE APIs and OC4J Support
Servlets make it easy to generate data to an HTTP response stream in a dynamic
fashion. The issue facing servlets is that HTTP is a stateless protocol. That is, each
request is performed as a new connection, so flow control does not come naturally
between requests. Session tracking or session management maintains the state of
specific clients between requests.
OC4J Servlet ContainerThe OC4J servlet container provides the following support:
Support for Servlets The OC4J servlet container provides complete support for the
Servlet 2.3 specification, which is part of the J2EE 1.3 Specification.
100% Application Code Compatible with Tomcat The OC4J servlet container is 100%
application code compatible with the Tomcat servlet container delivered by the
Apache consortium. If you have used Apache and Tomcat to develop your
applications, then you can easily deploy them to the OC4J servlet container. A few
administrative changes, such as updating the application.xml file and
encapsulating the Web Application Archive (WAR) file in an EAR file, are required.
But, no changes to your code is necessary.
Features The following are features used within the OC4J servlet container:
■ Full WAR file-based Deployment—Servlets are packaged and deployed to J2EE
containers using a standard format called a Web Application aRchive (WAR)
file. OC4J offers:
■ A WAR file deployment tool that deploys the resulting WAR file to one or more
OC4J instances. The WAR deployment tool supports cluster deployment, which
enables an archive to be simultaneously deployed to all the OC4J instances
defined within a “cluster”.
■ Auto-Compile, Auto-Deployment of Servlets—OC4J provides automatic
compilation of servlets and automatic deployment where the server receives a
WAR archive. OC4J automatically decompresses the WAR archive and installs
the application. This shortens the develop, compile, deploy cycle of building
J2EE applications.
■ Stateful Failover and Cluster Deployment of Servlets—A cluster is a group of
OC4J servers that coordinate their actions to provide scalable, highly-available
services in a transparent manner. Servlets make use of the HTTP session object
to save their state between method requests, such as the contents of a Web
shopping cart or travel itinerary. OC4J supports an IP-multicast based
clustering mechanism that allows servlets to transparently—that is, without any
1-4 Oracle9iAS Containers for J2EE User’s Guide
Overview of J2EE APIs and OC4J Support
programmatic API changes—replicate servlet session state specifically HTTP
session objects to other OC4J instances.
■ Integration with Single Sign-On through mod_osso and JAAS support.
■ Integration with JAAS using either the Oracle Internet Directory or the XML
UserManager .
■ Integration with Oracle HTTP Server and mod_opmn, which provides
high-availability through instance restart and failover in the event of a JVM
failure.
See the Oracle9iAS Containers for J2EE Servlet Developer’s Guide for more information
on using and configuring servlets in OC4J.
JavaServer PagesJavaServer Pages (JSP) are a text-based, presentation-centric way to develop servlets.
JSPs allow Web developers and designers to rapidly develop and easily maintain
information-rich, dynamic Web pages that leverage existing business systems. JSPs
enable a clean separation and assembly of presentation and content generation,
enabling Web designers to change the overall page layout without altering the
underlying dynamic content. JSPs use XML-like tags and scriptlets, written in the
Java programming language, to encapsulate the logic that generates the content for
the page. Additionally, the application logic can reside in server-based resources,
such as JavaBeans, that the page accesses with these tags and scriptlets. All
formatting (HTML or XML) tags are passed directly back to the response page. By
separating the page logic from its design and display, and supporting a reusable
component-based design, JSP technology is faster and easier when building
Web-based applications. A JSP page looks like a standard HTML or XML page with
additional elements that the JSP engine processes and strips out. Typically, the JSP
generates dynamic content, such as XML, HTML, and WML.
An application developer uses JavaServer Pages as follows:
1. JSP pages with embedded Java scriptlets and directives.
2. JSP pages with JavaBean classes to define Web templates for building a Web site
made up of pages with a similar look and feel. The JavaBean class renders the
data, which eliminates the need for Java code in your template. Ultimately, your
template can be maintained by an HTML editor.
3. JSP pages used by simple Web-based applications. Bind content to the
application logic using custom tags or scriptlets instead of a JavaBeans class.
J2EE Overview 1-5
Overview of J2EE APIs and OC4J Support
Features OC4J provides a JSP 1.1 compliant translator and runtime engine.
■ Full Support for JSP 1.1: The OC4J JSP Translator and runtime offers full
support for JSP 1.1, including support for all JSP Directives and all
core/standard JSP Tags.
■ Simple, Body, Parameterized, and Collaboration Tags: OC4J supports the
following:
– Simple JSP tags, where the body of the tag is evaluated only once.
– Body Tags, where the body of the tag may be evaluated multiple times (as
in an iterator loop).
– Parameterized Tags, where the Tag can accept and display parameters.
– Collaboration Tags, which are a special kind of Parameterized Tag, where
two tags are designed to collaborate on a task. For example, one Tag could
add a certain value to the page scope, and another Tag can then look for this
value for further processing.
■ JSP Caching Tags: Because JSPs are a dynamic Web page generation technology,
you can use caching to improve the performance and scalability of Web sites
that are built with JSPs. The Oracle JSP Translator provides standard syntax,
which allows a JSP developer to indicate whether a specific JSP tag is
cacheable—either in a shared Java cache (when additional XSL-T
transformations, for instance, may need to be applied) or in a Web cache (where
the final pages are cached for access from clients). By indicating at the tag level,
using standard JSP tag syntax, whether specific JSP tags are cacheable, OC4J
simplifies how caching can be used by application developers and also
improves the fine-granularity at which components of Web pages can be cached
(even if the entire page itself cannot be cached). Using the standard scripting
extensions, the cached JSP pages can not only be served from the Oracle9iAS
Web Cache, but also from Internet Content Delivery Networks, such as Akamai.
■ Mail, Search and other Tags: OC4J supplies some additional JSP Tag libraries to
send and receive e-mail, access files (including in the Oracle Internet File
System), embed XML result sets into JSP pages, and execute Web
searches/queries.
■ Full WAR file-based Deployment: OC4J also provides tools to perform the
following:
– Deploy WAR files, using a deployment tool, to one or more OC4J instances.
The WAR deployment tool also supports cluster deployment, enabling a
1-6 Oracle9iAS Containers for J2EE User’s Guide
Overview of J2EE APIs and OC4J Support
specific archive to be simultaneously deployed to all the OC4J instances
that are defined as a “cluster”.
– Support the use of SQLJ in JSPs. SQLJ provides a simple, more productive
means for embedding SQL code into Java than does the JDBC API.
See the Oracle9iAS Containers for J2EE Support for JavaServer Pages Reference for more
information on using and configuring JSPs in OC4J.
Enterprise JavaBeansEnterprise JavaBeans (EJB) are Java components that implement business logic. The
container interposes system services for the EJBs, so that the developer does not
have to worry about implementing such things as database access, transaction
support, security, caching, and concurrency. This functionality is the responsibility
of the EJB container.
An enterprise bean consists of interfaces and classes. Clients access enterprise bean
methods through the home and remote interfaces of the bean. The home interface
provides methods for creating, removing, and locating the enterprise bean, and the
remote interface provides the business methods. At deployment time, the container
creates classes from these interfaces that it uses to provide access to clients seeking
to create, remove, locate, and call business methods on the enterprise bean.
The types of enterprise beans are session beans, entity beans, and message driven
beans.
Session BeansA session bean represents a transient conversation with a client and might execute
database reads and writes. A session bean might invoke JDBC calls, or it might use
an entity bean to make the call. In this case, the session bean is a client to the entity
bean. The fields of a session bean contain the state of the conversation and are
transient. If the server or client crashes, the session bean is lost. Session beans can be
stateful or stateless.
■ Stateless Session Beans: Stateless session beans do not have any state information
for a specific client. They typically provide server-side behavior that does not
maintain any particular state. Stateless session beans require fewer system
resources. A business object that provides a generic service is a good candidate
for a stateless session bean.
■ Stateful Session Beans: A stateful session bean contains conversational state on
behalf of the client. Therefore, there is one stateful session bean instance for
each client. The conversational state is the instance field values of the session
J2EE Overview 1-7
Overview of J2EE APIs and OC4J Support
bean, plus all objects reachable from the session bean's fields. Stateful session
beans do not represent data in a persistent data store, but they can access and
update data on behalf of the client.
Entity BeansAn entity bean is a business entity that represents data in a database, and the
methods to act on that data. Entity beans are transactional and long-lived: as long as
the data remains in the database, the entity bean exists. Entity beans can support
either Container-Managed or Bean-Managed Persistence.
■ Container Managed Persistence (CMP): With CMP, an application developer does
not need to programmatically map the entity bean to the persistent store,
because the EJB container transparently maps and manages the interaction with
the persistent store. As a result, an entity bean using CMP does not require the
developer to use JDBC 2.0 APIs for database access. Thus, CMP is simpler and
easier to use; however, it limits the application developer’s control of the
interaction between the application and the database.
■ Bean Managed Persistence (BMP): In contrast, BMP is used by developers who
want to control the way an enterprise bean stores and reads state from the
persistent store. BMP is more complex than CMP, because the application
developer implements the persistence methods. It uses the JDBC 2.0 API code
to handle loading and storing data and maintaining consistency between the
runtime and persistent database storage. You should use BMP when you want
control over how the persistent data is stored and when the data is backed up to
the persistence store. In addition, a BMP bean is easier to deploy as it does not
require any Object-Relational (O-R) mapping in the deployment descriptor.
Message-Driven BeansOC4J supports Message-Driven Beans (MDB) that are a part of the EJB 2.0
specification. An MDB models a long-running process, invoked asynchronously.
The client posts a message to a JMS queue or topic. The message is captured by the
EJB container and routed to the intended MDB. At this point, the MDB can execute
the request or forward the request to another EJB.
OC4J EJB SupportOC4J provides an EJB container that provides the following:
■ Support for EJB 1.1 and 2.0: The OC4J EJB Container provides full support for
session beans, entity beans, and message-driven beans. In addition, it supports
1-8 Oracle9iAS Containers for J2EE User’s Guide

Overview of J2EE APIs and OC4J Support
Bean Managed Persistence (BMP), Container Managed Persistence (CMP), and
O-R mapping.
■ Container Managed Persistence (CMP) and Bean Managed Persistence (BMP)
Implementations: OC4J provides CMP and BMP for entity beans supporting
object-relational mapping (O-R). OC4J supports one-to-one and one-to-many
object-relational mappings. OC4J contains the following features:
■ Simple O-R Mapping: A facility to automatically map fields of an entity bean
to a corresponding database table. Additionally, users can specify O-R
mappings between EJBs. These mappings are only for simple, primitive,
and serializable objects.
■ Complex O-R Mappings: A common problem is the difficulty of mapping
anything, except for a simple bean with simple fields, to a database table
without writing custom code to do the mapping. OC4J includes an O-R
mapping system that allows complex object models to be mapped to
database tables. It allows practical object models to use CMP. Specifically, it
allows the following types of fields to be mapped within entity beans:
* simple objects and primitives—INT or CHAR
* objects—compound objects
* serializable objects—compound objects that can be serialized and
stored in BLOBs and CLOBs
* entity references—references to another entity bean
* collections
Further, it provides an isolation layer that captures the SQL that is
automatically code-generated, allowing the CMP facilities to target Oracle
and non-Oracle databases.
■ Toplink certification for CMP O-R mapping.
■ Dynamic EJB Stub Generation: An application developer does not need to
pre-compile EJB stubs using ejbc , rmic , or other such facilities into the client
application. Rather, the OC4J EJB container generates EJB stubs on demand as it
needs them. This makes application and system maintenance significantly
simpler than competitor products.
■ Full EAR File-Based Deployment: OC4J provides tools to do the following:
– Deploy the EAR file, using a deployment tool, to one or more OC4J
instances. This tool supports cluster deployment.
J2EE Overview 1-9
Overview of J2EE APIs and OC4J Support
■ Simplified and Automatic Deployment of EJB Applications: In J2EE
applications, there are two kinds of deployment descriptors, or
module-configuration files: the generic J2EE deployment files that all
application servers support and vendor-specific ones.
OC4J supports Application Server-specific deployment information in the
following ways:
■ Auto-Deployment: The Oracle-specific deployment information is
automatically generated when the EAR file is deployed on the server.
■ Simplified Configuration Customizing: Any Oracle-specific configuration
information can be customized by manually editing a set of XML
configuration files, which capture Application Server-specific deployment
and configuration information. These include settings for auto-create and
auto-delete tables for CMP, security role mappings, JNDI namespace access,
session persistence and time-out settings, transaction-retry settings, CMP
and O-R mappings, buffering, character sets, locales, virtual directories,
cluster configuration, session-tracking, and development and debugging
mode settings.
■ Hot Deployment: When an application developer changes an EJB module
that has already been deployed, the developer does not need to redeploy
the EJB or restart the server. The user edits the server.xml configuration
file. Afterward, the server reads the file and automatically picks up the
changes.
See the Oracle9iAS Containers for J2EE Enterprise JavaBeans Developer’s Guide andReference for more information on using and configuring EJBs in OC4J.
Java Database Connectivity ServicesJDBC is essentially a portable bridge to relational databases. It is modeled on ODBC
(Open Database Connectivity) specification and is fairly simple and well
understood. It decouples the database from the program code through the use of
drivers. With Oracle9iAS, Oracle provides connectivity to both Oracle and
non-Oracle databases.
Specifically, it provides enhanced JDBC drivers to access Oracle8.0, Oracle8i, and
Oracle9i databases. Oracle has licensed the DataDirect Connect JDBC drivers to
access non-Oracle databases—specifically IBM DB/2 UDB, Microsoft SQL Server,
Informix, and Sybase databases. These drivers are available for download on:
http://otn.oracle.com .
1-10 Oracle9iAS Containers for J2EE User’s Guide
Overview of J2EE APIs and OC4J Support
See the Oracle9iAS Containers for J2EE Services Guide for more information on using
and configuring data sources in OC4J.
Oracle Database Access Through JDBCOracle9iAS offers two JDBC drivers to access Oracle databases from Java. These two
JDBC drivers are as follows:
■ Oracle Thin JDBC Driver: The Oracle Thin JDBC driver is a 2 MB pure Java (Type
4) JDBC driver that is implemented completely in Java and communicates with
the Oracle database using the Oracle Net Services protocol, which is also
implemented in Java. The Thin JDBC driver can be used during development
and testing. The pure Java call stack facilitates end-to-end debugging. The
driver can be downloaded with Java applets that are communicating directly
with an Oracle database. It is 100 percent compatible with the Oracle JDBC-OCI
driver; the only change necessary is the definition of the connect strings that are
used to connect to the Oracle database.
■ Oracle JDBC-OCI Driver: JDBC-OCI is a Type 2 JDBC driver, which
communicates with the Oracle database using the Oracle OCI library. This is the
default JDBC driver used to communicate from J2EE applications executing in
the Oracle9iAS middle-tier to the Oracle database. It does require installation of
the Oracle client libraries in the middle-tier.
Full JDBC 2.0 SupportThe JDBC drivers comply fully with JDBC 2.0, including the following:
■ DataSource Support
■ JTA and XA Connection Support
■ Complete Data Type Support: Support for advanced data types, such as BLOBs;
CLOBs; character streams; abstract data types; collections; and, with the
Oracle9i Database Release 1, support for abstract data types with inheritance.
■ JDBC 2.0 Connection Pooling: Full support for the JDBC 2.0 Connection Pooling
facilities.
■ Advanced Features: Advanced features, such as support for Transparent
Application Failover (that allows the mid-tier to redirect connections to a
“failed-over” node when an Oracle database fails), scrollable result sets, batch
updates, Unicode support, and several other advanced capabilities.
■ Oracle Version Support: OC4J JDBC drivers are certified with Oracle8i and
Oracle9i Databases.
J2EE Overview 1-11
Overview of J2EE APIs and OC4J Support
Data Direct Connect JDBC DriversTo access non-Oracle databases from the Oracle J2EE Container, Oracle certifies
Type 4 JDBC drivers from Data Direct Technologies, which is an Oracle Partner.
Data Direct Technologies provides JDBC drivers to access Informix, Sybase,
Microsoft SQL-Server, and IBM DB/2 Databases from Oracle9iAS.
SQLJ SupportOC4J also supports the SQLJ language for directly embedding SQL statements in
Java code. This is a simpler, more productive way of accessing the database from
Java than using JDBC.
Java Naming and Directory InterfaceJava Naming and Directory Interface (JNDI) is the standard interface to naming and
directory services. J2EE applications use JNDI to find other distributed objects. The
JNDI Interface has two parts: an application-level interface that is used by
application programs to access naming and directory services, and a service
provider interface to attach a provider of naming and directory services.
OC4J provides a complete JNDI 1.2 implementation. Servlets and Enterprise
JavaBeans in OC4J access names using the standard JNDI programming interfaces.
The JNDI service provider in OC4J is implemented in an XML-based file system.
See the Oracle9iAS Containers for J2EE Services Guide for more information on using
JNDI in OC4J.
Java Transaction APIThe JTA transaction model enables an application developer to specify—at
deployment time—relationships among methods that compose a single transaction.
All methods in one transaction are treated as a single unit. A transaction is a series of
steps that must all be either complete or backed out. For example, you might have a
series of methods in an enterprise bean that moves money from one account to
another—by debiting the first account and crediting the second account. The entire
operation should be treated as one unit—so that if there is a failure after the debit
and before the credit, the debit is rolled back.
You can specify transaction attributes for an application component during
assembly. This groups methods into transactions across application components.
You can easily change application components within a J2EE application and
re-assign the transaction attributes without changing code and recompiling.
1-12 Oracle9iAS Containers for J2EE User’s Guide
Overview of J2EE APIs and OC4J Support
The Java Transaction API (JTA) specification provides transactional support in J2EE
for EJB and JDBC 2.0. OC4J provides a complete implementation of the JTA 1.0.1
specification.
JTA allows programmatic transaction demarcation. This enables work that is
performed by distributed components to be bound by a global transaction. It is a
way of demarcating groups of operations as a single global transaction.
Additionally, you can allow the container to demarcate your transaction. You
specify how the container demarcates the transaction through the deployment
descriptors.
See the Oracle9iAS Containers for J2EE Services Guide for more information on using
JTA in OC4J.
Java Messaging ServiceJava Messaging Service (JMS) is the J2EE mechanism to support the exchange of
messages between Java programs. This is how Java supports asynchronous
communication—where the sender and receiver do not need to be aware of each
other. Thus, each can operate independently. JMS supports two messaging models:
■ Point-to-Point: A message producer sends a message to a queue. A message
consumer can attach itself to a queue to listen for messages. When a message
arrives on the queue, the consumer removes it from the queue and responds to
it. Messages can be sent to just one queue and will be processed by just one
consumer. Consumers have the option to filter messages to specify the exact
message types they want.
■ Publish-and-Subscribe: Producers send messages to a topic, and all the
registered consumers for that topic retrieve those messages. In this case, many
consumers can receive the same message.
OC4J provides a complete implementation of the JMS 1.0 specification. OC4J
certifies other messaging systems. See the Oracle9iAS Containers for J2EE ServicesGuide for more information on using JMS in OC4J.
JAAS ProviderYou can configure application behavior, such as security and transaction
management, at deployment time on Web and enterprise bean components. This
feature decouples application logic from configuration settings that might vary with
assembly. The J2EE security model enables you to configure a Web or enterprise
bean component so that system resources are accessed only by authorized users.
For example, you can configure a Web component to prompt for a user name and
J2EE Overview 1-13
Tunneling, Load Balancing, and Clustering Services Provided by OC4J
password. An EJB component can be configured so that only persons in specific
groups can invoke certain methods. Alternatively, you might configure a servlet
component to have some of its methods accessible to everyone and a few methods
accessible to only certain privileged persons in an organization. You can configure
the same servlet component for another environment to have all methods available
to everyone, or all methods available to only a select few.
OC4J has a powerful Access Control List (ACL) mechanism that allows for
fine-grained control of the usage of components running on the server. You can
define what can or cannot be executed by which user or group of users right down
to the Java method level. This ACL mechanism covers anything that runs on OC4J
except EJBs. EJBs have their own access control mechanism defined in the EJB
specification.
Security realms allow the administrator to import information from existing
authorization or authentication systems into the ACL. You can import information
from the NT security system, from an LDAP system, from the UNIX password file,
or from the database. Oracle9iAS includes all the classes for the following:
■ Secure Sockets Layer (SSL) version 3
■ RSA Encryption
■ X.509 certificate support, version 3
■ JAAS
OC4J supports firewall tunneling, which is the ability to go through firewalls and
proxies using HTTP and HTTPS tunneling. See the Oracle9iAS Containers for J2EEServices Guide for more information on security in OC4J.
Tunneling, Load Balancing, and Clustering Services Provided by OC4JThe other advantages, beyond J2EE support, that OC4J provides are the following:
■ RMI Tunneling Over HTTP
■ Load Balancing and Clustering
See the Oracle9iAS Containers for J2EE Services Guide for more information on RMI
and HTTP tunneling in OC4J. For more information on load balancing and
clustering in OC4J, see Chapter 9, "Oracle9iAS Clustering".
1-14 Oracle9iAS Containers for J2EE User’s Guide
Tunneling, Load Balancing, and Clustering Services Provided by OC4J
RMI Tunneling Over HTTPDeployed J2EE applications are typically divided into the following tiers:
■ the Web server tier, where the HTTP listeners are deployed
■ the Web presentation tier, where the JSPs and servlets are deployed
■ the EJB tier, where the business logic, defined as EJBs, is deployed
Smaller Web sites combine these tiers into one physical middle-tier; larger Web sites
divide these tiers into two or three separate physical tiers for security, scalability,
and load balancing purposes. OC4J takes these architectural issues into
consideration and is designed to meet the following needs:
■ Oracle HTTP Server to JSP/Servlet Container Connectivity
■ JSP/Servlet-to-EJB and EJB-to-EJB Connectivity
■ HTTP and HTTP-S Tunneling
Oracle HTTP Server to JSP/Servlet Container ConnectivityThe Oracle HTTP Server can use either the Apache JServ Protocol (AJP) or HTTP to
direct requests to the JSP/servlet container. As a result, you can place the Oracle
HTTP Server outside a firewall and direct requests to the OC4J servlet container
that exists behind the firewall.
JSP/Servlet-to-EJB and EJB-to-EJB ConnectivityCommunication from the presentation tier to the business tier and between EJBs is
performed using standard RMI, which gives any client or Web tier program that is
accessing an EJB, direct access to the services in the EJB tier. These services include
JNDI for looking up and referencing EJBs, Java Messaging Service (JMS) for sending
and receiving asynchronous messages, and JDBC for relational database access.
HTTP and HTTP-S TunnelingOC4J supports the ability to tunnel RMI over HTTP and HTTP-S protocols. You can
use RMI over HTTP/HTTP-S tunneling for Java-based clients when they must
communicate with OC4J over the HTTP protocol. Typically, HTTP tunneling
simulates a stateful socket connection between a Java client and OC4J and "tunnels"
this socket connection through an HTTP port in a security firewall. HTTP is a
stateless protocol, but OC4J provides tunneling functionality to make the
connection appear to be a stateful RMI connection. Under the HTTP protocol, a
client can make a request and accept a reply from a server. The server cannot
J2EE Overview 1-15
Tunneling, Load Balancing, and Clustering Services Provided by OC4J
voluntarily communicate with the client, and the protocol is stateless. This means
that a continuous two-way connection is not possible. The OC4J HTTP tunneling
simulates an RMI connection over the HTTP protocol, overcoming these limitations.
As a result, the different J2EE components in OC4J can be either deployed on a
single physical tier (typically to optimize performance) or on separate physical tiers
(for redundancy, such as connection rerouting for high availability).
Load Balancing and ClusteringOC4J supports clusters, which can be customized to the specific needs of the user.
The purpose of a cluster is to replicate the configuration and state of the individual
node to all nodes in the cluster. Thus, in case of a failover, the server state is
preserved. The state information is not saved to any persistent storage, but is saved
in memory.
OC4J supports load balancing. The purpose of load balancing is to manage
incoming calls among several OC4J servers.
You can receive failover for Java applications when there is a failure connecting to
one server.
■ Fault Tolerance: The ability of the server to redirect a client to another working
instance of the server in the event of a failure.
■ Load Balancing: A server can handle more load than its own ability by
distributing the request workload among multiple servers.
For more information on clusters, see Chapter 9, "Oracle9iAS Clustering".
1-16 Oracle9iAS Containers for J2EE User’s Guide
Java Plug-In Partners and Third Party Tools Support
Java Plug-In Partners and Third Party Tools SupportMany popular Java development tools and applications support OC4J either
through plug-ins or through built-in support. They are certified to work with OC4J
Check http://otn.oracle.com/products/ias/9iaspartners.html for
the latest updates. The products are as follows:
Actional Control BrokerActional joins with Oracle to extend Oracle9iAS InterConnect beyond the Oracle
environment. It provides connectivity to disparate applications and
technologies—including SAP, PeopleSoft, FTP, CICS, JDE, and Siebel. The Actional
Control Broker was recently selected by eAI Journal as the 2001 Integration Product
of the Year. More information about Actional can be found at
http://www.actional.com .
Blaze AdvisorBlaze Advisor from HNC offers support for Oracle9iAS with QuickDeployer
wizards that generate and package up all the necessary files to deploy a
sophisticated rule service in a given environment. By integrating with Oracle9iAS,
HNC allows Advisor developers to deploy easily and quickly to this
high-performance, feature-rich environment. For more information, visit
http://www.blazesoft.com/ .
■ Actional Control Broker ■ Blaze Advisor
■ Borland JBuilder ■ Cacheon Business Service Center
■ Computer Associates Cool:Joe ■ Compuware OptimalJ
■ Documentum WDK ■ Empirix BeanTest
■ FatWire UpdateEngine ■ ILOG JRules
■ Macromedia UltraDev ■ Mercury Interactive LoadRunner
■ Neuvis NeuArchitect ■ Pramati Studio
■ Rational Rose ■ Sitraka JProbe
■ Sonic Software SonicMQ ■ Sun Forte
■ TogetherSoft ControlCenter ■ VMGear Optimizeit
■ WebGain Visual Cafe
J2EE Overview 1-17
Java Plug-In Partners and Third Party Tools Support
Borland JBuilderOracle9iAS Plug-in for Borland JBuilder allows Borland JBuilder developers to
create and distribute their applications with OC4J. For information and
documentation about both the Oracle9iAS Plug-in for Borland JBuilder and OC4J,
visit the Oracle Technology Network Web site at
http://otn.oracle.com/index.html . For product information and
documentation about Borland JBuilder, visit the Borland JBuilder Web site at
http://borland.com/jbuilder/ .
Cacheon Business Service CenterThe Cacheon BSC Console provides Oracle9iAS implementations with command
and control capability for any production or development environment across
disparate application servers. With Oracle9iAS and the BSC console, systems
integrators can manage new customer applications from assembly, to integration, to
testing, to customization and execution. Go to http://www.cacheon.com/ for
more information.
Computer Associates Cool:JoeComputer Associates has many products that support Oracle9iAS. These products
include Cool:Joe and Unicenter Management for Oracle9iAS. For more information
on products from CA that support Oracle, visit http://www.ca.com/ . To
download the Cool:Joe plug-in for Oracle9iAS, visit
http://esupport.ca.com/public/COOL/joe/downloads/joe-plugins.asp .
Compuware OptimalJOptimalJ is an advanced development environment enabling the rapid design,
development, and deployment of J2EE applications to Oracle9iAS and other
application servers. OptimalJ generates complete, working applications directly
from a visual model, using sophisticated patterns to implement accepted best
practices for coding to the J2EE specs. Visit
http://www.compuware.com/products/optimalj/ for more information.
Documentum WDKDocumentum currently offers its Web Development Kit (WDK) version 4.2 on the
Oracle9iAS platform, running on OC4J. The WDK is included with each
Documentum Developer Studio license, which itself is included with each
1-18 Oracle9iAS Containers for J2EE User’s Guide
Java Plug-In Partners and Third Party Tools Support
Documentum 4i eBusiness Platform Edition. Documentum plans to offer a seamless
integration of the 4i eBusiness Platform with the Oracle9iAS platform, enabling
access to both the Documentum repository and WebCache. This integration enables
the development of applications that reliably support ever-increasing volumes of
personalized interactions, allowing customer Web sites to serve up dynamic,
trusted content that is relevant to each user. Documentum plans to offer a tight
integration of its eContent Services for Portals with the Oracle9iAS Portal. To learn
more about the Documentum content management solution, visit their web site at
http://www.documentum.com .
Empirix BeanTestThe Empirix portfolio of Web test and monitoring solutions provides organizations
with best-in-class products and services for testing business-critical Web
applications. For more information, visit http://www.empirix.com/ .
FatWire UpdateEngineFatWire UpdateEngine runs as a servlet on Oracle9iAS, leveraging the power of the
application server for enterprise performance, personalization, and dynamic
delivery. As a database-centric content management system, UpdateEngine
provides a critical link between the database and the application server as a store
for enterprise content management and delivery. Because of its 100 percent Java
design, integration of this content into Web pages, applications, and other databases
is easy. For more information, visit http://www.fatwire.com/ .
ILOG JRulesILOG JRules enables OC4J customers to embed advanced business rules through a
dynamic Java rules engine. This allows users to implement business rules using the
definition of the syntax and vocabulary of the business language. For more
information on how ILOG JRules work, visit the ILOG Web site at
http://www.ilog.com/products/rules/engines/jrules31 .
Macromedia UltraDevMacromedia UltraDev is a development environment for building Web
applications. It supports Web page layout design and dynamic content generation.
Developers can create dynamic Web pages with JSP as the standard J2EE
mechanism for building those pages. In addition, developers can extend
Macromedia UltraDev to take advantage of server-specific features and behavior,
J2EE Overview 1-19
Java Plug-In Partners and Third Party Tools Support
and to create customized menus and commands. One example of server-specific
behavior is to support using the Oracle JSP tag libraries. Oracle9iAS Extensions for
Macromedia UltraDev is a tag library extension generator. This extension generator
uses standard tag library descriptor files as input to generate Macromedia UltraDev
ServerBehavior extension files. Macromedia Extension Manager packages and
installs these ServerBehavior extension files to enable support for Oracle-specific tag
libraries.
Mercury Interactive LoadRunnerMercury Interactive LoadRunner is a load testing tool used by many organizations
to predict the system behavior and performance of their applications. LoadRunner
has specific performance monitors for monitoring applications running on
Oracle9iAS. These monitors interface with Oracle9iAS DMS (Dynamic Monitoring
Service) to provide accurate and comprehensive metrics, with little or no additional
overhead. For more information about Mercury Interactive LoadRunner, visit
http://www-svca.mercuryinteractive.com/products/loadrunner/ .
Neuvis NeuArchitectNeuArchitect is an integrated visual modeling and automated construction system
that enables organizations to rapidly design and construct all aspects of an
enterprise-class e-business application with exceptional speed, quality, and
flexibility. NeuArchitect-based applications are highly portable across the leading
deployment technologies, including Oracle9iAS, providing customers with
unparalleled protection against technology obsolescence. To know more about
NeuArchitect, go to http://www.neuvis.com/ .
Pramati StudioPramati Studio is an IDE that provides full life cycle support for developing
applications for any J2EE deployment platform. Pramati Studio is packed with
features that are offered only on Enterprise versions of most IDEs. Integration with
Oracle9iAS is built in to Pramati Studio. A migration tool enables the re-use of
codebase across multiple application servers. For more information, please visit
http://www.pramati.com/ .
Rational RoseRational Rose is an integrated software modeling and development environment.
Rational Rose uses the Unified Modeling Language (UML) and visual models to
1-20 Oracle9iAS Containers for J2EE User’s Guide
Java Plug-In Partners and Third Party Tools Support
represent structures and relationships for software systems and business processes,
and to represent programming logic for software designs. Oracle9iAS Plug-in for
Rational Rose enables developers to create and distribute their applications with
OC4J. Using this plug-in, developers can create applications with Rational Rose and
then deploy those applications to OC4J servers. For more information, see OTN and
http://www.rational.com/rose .
Sitraka JProbeIntegrated with OC4J, JProbe offers superior server-side tuning capabilities. JProbe
3.0 allows developers to profile servlets, JSPs, and EJBs running within OC4J for
problem detection. OC4J with the Sitraka integrated suite of JProbe
products—including JProbe Profiler and Memory Debugger, JProbe Threadalyzer,
and JProbe Coverage—ensures the most efficient and reliable Java applications for
mission critical environments. Performance, scalability, and reliability are a
necessity for enterprise applications. For support information on JProbe on OC4J,
please see the JProbe Integration Portal for J2EE at
http://www.sitraka.com/software/support/jprobe/j2ee/oracle.html .
Sonic Software SonicMQSonicMQ is one of the leading messaging servers in the market. In addition to the
Oracle JMS transports of Oracle9iAS, both volatile and non-volatile, applications
developed on Oracle9iAS can also choose to use SonicMQ as the transport for JMS
messaging. For more information on SonicMQ, visit the Sonic Software Web site at
http://www.sonicsoftware.com/products/product_line.htm .
Sun ForteOracle9iAS Plug-in for Sun Forte for Java allows Forte developers to create and
deploy their J2EE applications on OC4J. For the latest update on the Oracle9iAS
Plug-in for Sun Forte for Java, visit the Oracle Technology Network Web site at
http://otn.oracle.com/index.html . For product information and
documentation about Sun Forte for Java, visit the Sun web site at
http://www.sun.com/forte/ .
TogetherSoft ControlCenterTogetherSoft ControlCenter enables teams of business analysts, software architects
and developers to deliver high quality Oracle9iAS applications in shorter
timeframes. ControlCenter's integrated development platform contains J2EE
J2EE Overview 1-21
Java Plug-In Partners and Third Party Tools Support
patterns from Sun Microsystems and LiveSource from TogetherSoft to automate the
deployment of EARs to OC4J. Therefore, companies can combine the performance
of their Java applications running on OC4J with the faster time to deployment of
ControlCenter. Successful companies and developers can be sure of deployment
and performance of any J2EE application with the certified combination of
Oracle9iAS and TogetherSoft ControlCenter. To download the latest Together
ControlCenter Plug-in, visit the Oracle Technology Network Web site at
http://otn.oracle.com/index.html . To learn more about ControlCenter, go
to the TogetherSoft Web site at http://www.togethersoft.com/ .
VMGear OptimizeitThe Optimizeit tools enable you to pinpoint performance and reliability issues early
in the development process, while keeping your code base developed on
Oracle9iAS fast and reliable each step of the way. For more information, go to
http://www.vmgear.com/ .
WebGain Visual CafeOracle9iAS Plug-in for WebGain Visual Cafe allows WebGain Visual Cafe
developers to create and distribute their applications with OC4J. OC4J contains its
own Web server. For information and documentation about both the Oracle9iAS
Plug-in for WebGain Visual Cafe and OC4J, visit the Oracle Technology Network
Web site at http://otn.oracle.com/index.html . For product information
and documentation about WebGain Visual Cafe, visit the WebGain Web site at
http://webgain.com/products/visual_cafe/ .
1-22 Oracle9iAS Containers for J2EE User’s Guide

Configuration and Deploy
2
Configuration and DeploymentThis chapter demonstrates how to configure and execute OC4J as simply and
quickly as possible. You installed OC4J with the Oracle9iAS installation.
Within OC4J, you can execute servlets, JSP pages, EJBs, and SQLJ. As an example of
deploying an application to OC4J, this chapter describes how to configure the
familiar Pet Store demo.
This chapter includes the following topics:
■ OC4J Installation
■ Using OC4J in an Enterprise or Standalone Environment
■ OC4J Communication
■ Starting and Stopping the Oracle Enterprise Manager Web Site
■ Creating or Deleting an OC4J Instance
■ OC4J Home Page
■ Starting and Stopping OC4J
■ Creating the Development Directory
■ Configuring the Pet Store Web Application Demo
■ Deploying Applications
■ Undeploying Web Applications
ment 2-1
OC4J Installation
OC4J InstallationOC4J is a lightweight container that is J2EE-compliant. It is configured with
powerful and practical defaults and is ready to execute after installation. OC4J is
installed with Oracle9iAS; therefore, see the Oracle9i Application Server InstallationGuide for details on OC4J installation.
Using OC4J in an Enterprise or Standalone EnvironmentOC4J is installed within Oracle9iAS with the goal of managing J2EE enterprise
systems. Oracle9iAS can manage multiple clustered OC4J processes. Oracle9iAS,
which includes OC4J, is managed and configured through the Oracle Enterprise
Manager, which can manage and configure your OC4J processes across multiple
application server instances and hosts. Thus, you cannot locally manage your OC4J
process using the admin.jar tool or by hand editing a single OC4J process’
configuration files. This undermines the enterprise management provided by the
Enterprise Manager.
You can still execute OC4J as you have in the past. For those who want a single
OC4J instance for development environments or simple business needs, you can
download OC4J in standalone mode—complete with documentation.
This following sections discusses both management options in the following
sections:
■ Managing Multiple OC4J Instances in an Enterprise Environment
■ Managing a Single OC4J Instance
Also, the following section describes how to understand the OC4J documentation
set:
■ OC4J Documentation Set Assumptions
2-2 Oracle9iAS Containers for J2EE User’s Guide
Using OC4J in an Enterprise or Standalone Environment
Managing Multiple OC4J Instances in an Enterprise EnvironmentYou manage Oracle9iAS, including OC4J, using Enterprise Manager within an
enterprise system. This includes clustering, high availability, load balancing, and
failover.
You configure each OC4J instance and its properties—within the context of an
application server instance—using Enterprise Manager. After configuration, you
start, manage, and control all OC4J instances through Enterprise Manager. You can
group several OC4J processes in a cluster. You must use either the Enterprise
Manager management tool or its command-line tools for starting, stopping,
restarting, configuring, and deploying applications.
This book discusses how to start, stop, manage, and configure OC4J in an enterprise
environment.
Managing a Single OC4J InstanceYou can still use a single OC4J—outside of the Oracle9iAS environment. After
downloading OC4J in oc4j_extended.zip from OTN, you can start, manage,
and control all OC4J instances through oc4j.jar and the admin.jarcommand-line tool. You configure either through the admin.jar command or by
modifying the XML files by hand.
Note: You cannot use the OC4J standalone
tool—admin.jar —for managing OC4J instances created in an
application server instance.
You can modify the XML files locally. If you do so, you must notify
Enterprise Manager that these files have been hand edited through
the Distributed Configuration Managment (DCM) component
tool—dcmctl . The following is the command that you execute
after hand editing an XML file:
dcmctl updateconfig -ct oc4j
DCM controls and manages configuration for Oracle9iAS instances
and its Oracle HTTP Server and OC4J components. For more
information on DCM, see Appendix A, "DCM Command-Line
Utility (dcmctl)".
Configuration and Deployment 2-3
Using OC4J in an Enterprise or Standalone Environment
Any standalone OC4J process is not managed by Enterprise Manager and cannot be
used within an Oracle9iAS enterprise environment. Typically, you would use
standalone for development or for a simple single OC4J instance Web solution.
Download the OC4J Standalone User’s Guide for information on how to start, stop,
configure, and manage your standalone process.
OC4J Documentation Set AssumptionsAside from this book, the rest of the OC4J documentation set was written with a
standalone mindset. These other books may refer to modifying XML files by hand
and to using admin.jar for managing the instance. This book provides a good
overview and familiarization of the Enterprise Manager configuration pages. It also
guides you to understand the relationship of each Enterprise Manager page to its
XML counterpart. Use the familiarity of the Enterprise Manager when reading the
other OC4J books. You should be able to look at an XML representation and match
it to the relevant Enterprise Manager field names.
Also, the Distributed Configuration Management (DCM) utility, dcmctl, provides
a command-line alternative to using Enterprise Manager for some management
tasks. The dcmctl tool uses the same distributed architecture and synchronization
features as Enterprise Manager, thereby providing identical functionality in a
format that is ideal for scripting and automation.
The following functions can be managed through DCM:
■ administration
■ managing application server instances
■ managing components
■ managing clusters
■ deploying applications
For other DCM commands that relate to OC4J, see Appendix A, "DCM
Command-Line Utility (dcmctl)".
2-4 Oracle9iAS Containers for J2EE User’s Guide
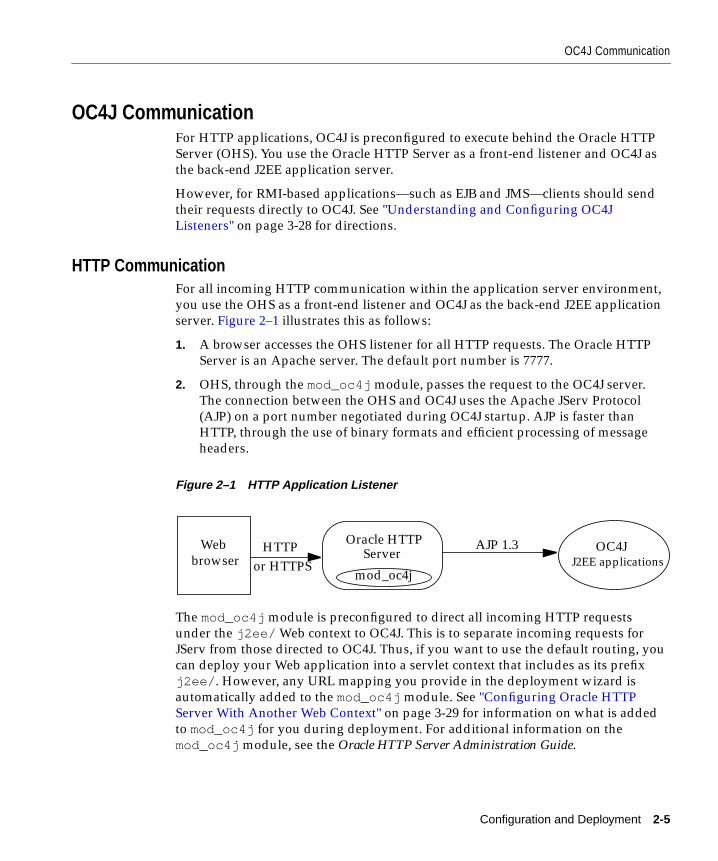
OC4J Communication
OC4J CommunicationFor HTTP applications, OC4J is preconfigured to execute behind the Oracle HTTP
Server (OHS). You use the Oracle HTTP Server as a front-end listener and OC4J as
the back-end J2EE application server.
However, for RMI-based applications—such as EJB and JMS—clients should send
their requests directly to OC4J. See "Understanding and Configuring OC4J
Listeners" on page 3-28 for directions.
HTTP CommunicationFor all incoming HTTP communication within the application server environment,
you use the OHS as a front-end listener and OC4J as the back-end J2EE application
server. Figure 2–1 illustrates this as follows:
1. A browser accesses the OHS listener for all HTTP requests. The Oracle HTTP
Server is an Apache server. The default port number is 7777.
2. OHS, through the mod_oc4j module, passes the request to the OC4J server.
The connection between the OHS and OC4J uses the Apache JServ Protocol
(AJP) on a port number negotiated during OC4J startup. AJP is faster than
HTTP, through the use of binary formats and efficient processing of message
headers.
Figure 2–1 HTTP Application Listener
The mod_oc4j module is preconfigured to direct all incoming HTTP requests
under the j2ee/ Web context to OC4J. This is to separate incoming requests for
JServ from those directed to OC4J. Thus, if you want to use the default routing, you
can deploy your Web application into a servlet context that includes as its prefix
j2ee/ . However, any URL mapping you provide in the deployment wizard is
automatically added to the mod_oc4j module. See "Configuring Oracle HTTP
Server With Another Web Context" on page 3-29 for information on what is added
to mod_oc4j for you during deployment. For additional information on the
mod_oc4j module, see the Oracle HTTP Server Administration Guide.
Web OC4JHTTP AJP 1.3
or HTTPS J2EE applications
Oracle HTTPServer
mod_oc4jbrowser
Configuration and Deployment 2-5
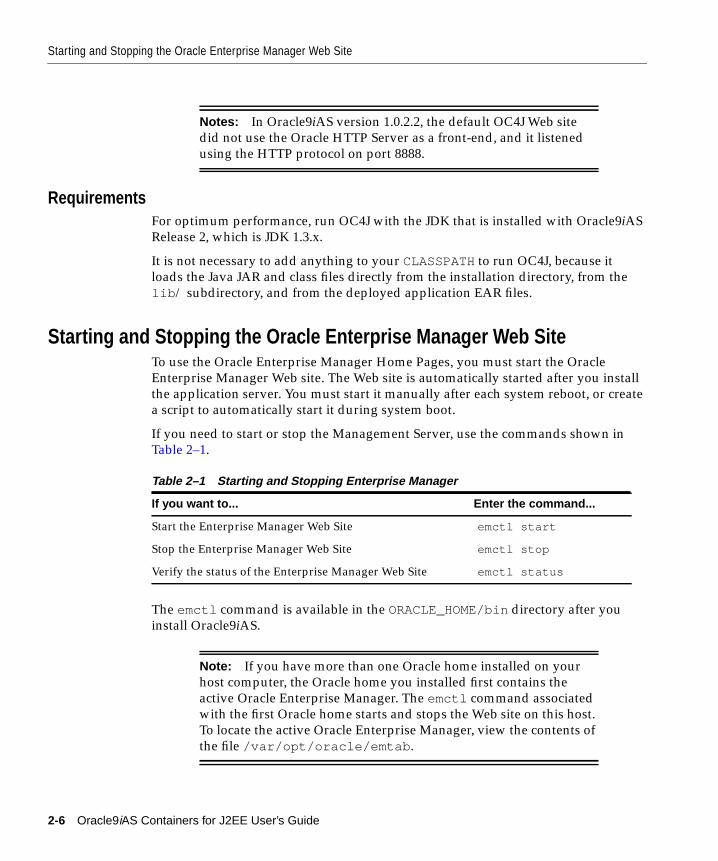
Starting and Stopping the Oracle Enterprise Manager Web Site
RequirementsFor optimum performance, run OC4J with the JDK that is installed with Oracle9iAS
Release 2, which is JDK 1.3.x.
It is not necessary to add anything to your CLASSPATH to run OC4J, because it
loads the Java JAR and class files directly from the installation directory, from the
lib / subdirectory, and from the deployed application EAR files.
Starting and Stopping the Oracle Enterprise Manager Web SiteTo use the Oracle Enterprise Manager Home Pages, you must start the Oracle
Enterprise Manager Web site. The Web site is automatically started after you install
the application server. You must start it manually after each system reboot, or create
a script to automatically start it during system boot.
If you need to start or stop the Management Server, use the commands shown in
Table 2–1.
The emctl command is available in the ORACLE_HOME/bin directory after you
install Oracle9iAS.
Notes: In Oracle9iAS version 1.0.2.2, the default OC4J Web site
did not use the Oracle HTTP Server as a front-end, and it listened
using the HTTP protocol on port 8888.
Table 2–1 Starting and Stopping Enterprise Manager
If you want to... Enter the command...
Start the Enterprise Manager Web Site emctl start
Stop the Enterprise Manager Web Site emctl stop
Verify the status of the Enterprise Manager Web Site emctl status
Note: If you have more than one Oracle home installed on your
host computer, the Oracle home you installed first contains the
active Oracle Enterprise Manager. The emctl command associated
with the first Oracle home starts and stops the Web site on this host.
To locate the active Oracle Enterprise Manager, view the contents of
the file /var/opt/oracle/emtab .
2-6 Oracle9iAS Containers for J2EE User’s Guide
Creating or Deleting an OC4J Instance
You can also verify the Enterprise Manager Web Site is started by pointing your
browser to the Web site URL. For example:
http://hostname:1810
Creating or Deleting an OC4J InstanceA default OC4J instance is installed with the name of OC4J_home. You can create
additional instances, each with a unique name within this application server
instance.
To create a new OC4J instance, do the following:
1. Navigate to the application server instance where you want the new OC4J
instance to reside.
2. Click Create OC4J Instance. This brings up a page that requests a name for the
new instance. Provide a name in the field.
3. Click Create.
A new OC4J instance is created with the name you provided. This OC4J instance
shows up on the application server instance page in the Component section.
To delete an OC4J instance, select the radio button next to the OC4J instance you
wish to delete, then click Delete.
Configuration and Deployment 2-7
OC4J Home Page
OC4J Home PageMost of the configuration and management of your OC4J instance occurs off its
OC4J Home Page. When you create an OC4J instance off of the Oracle9iAS Instance
Home Page, it creates an OC4J Home Page for configuration and management of
your OC4J instance. Each OC4J instance has its own OC4J Home Page.
To navigate to an OC4J Home Page, do the following:
1. Navigate to the application server instance where the OC4J instance resides.
2. Select the OC4J instance by clicking on its name. This brings up the OC4J Home
Page for that OC4J instance.
The OC4J Home Page consists of the following three sections:
■ General and Status
■ Deployed Applications
■ Administration
To navigate to the OC4J instance home page, start Enterprise Manager and navigate
to the application server instance page. From this page, select any configured OC4J
instance or create a new instance.
General and StatusFigure 2–2 shows the General and Status sections of the OC4J Home Page. In this
section, you can view metrics on your OC4J instance and its applications. In
addition, you can start, stop, and restart all OC4J processes configured to this
instance.
2-8 Oracle9iAS Containers for J2EE User’s Guide
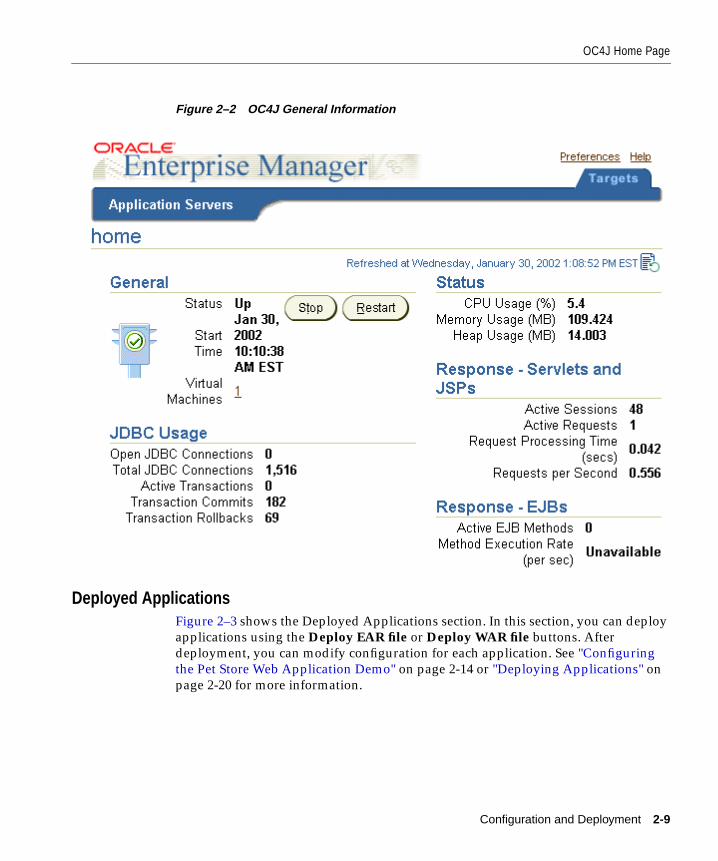
OC4J Home Page
Figure 2–2 OC4J General Information
Deployed ApplicationsFigure 2–3 shows the Deployed Applications section. In this section, you can deploy
applications using the Deploy EAR file or Deploy WAR file buttons. After
deployment, you can modify configuration for each application. See "Configuring
the Pet Store Web Application Demo" on page 2-14 or "Deploying Applications" on
page 2-20 for more information.
Configuration and Deployment 2-9
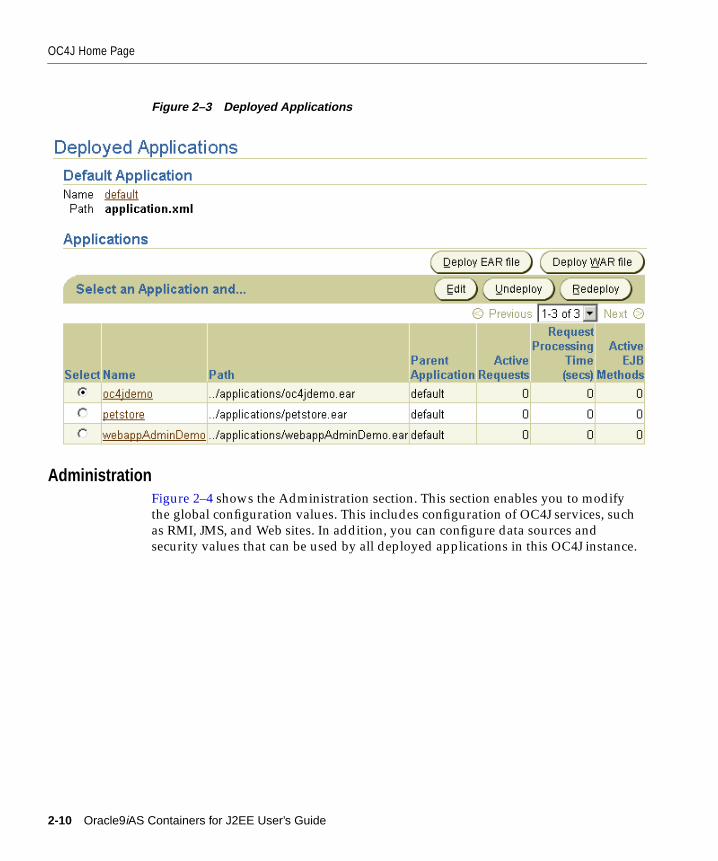
OC4J Home Page
Figure 2–3 Deployed Applications
AdministrationFigure 2–4 shows the Administration section. This section enables you to modify
the global configuration values. This includes configuration of OC4J services, such
as RMI, JMS, and Web sites. In addition, you can configure data sources and
security values that can be used by all deployed applications in this OC4J instance.
2-10 Oracle9iAS Containers for J2EE User’s Guide
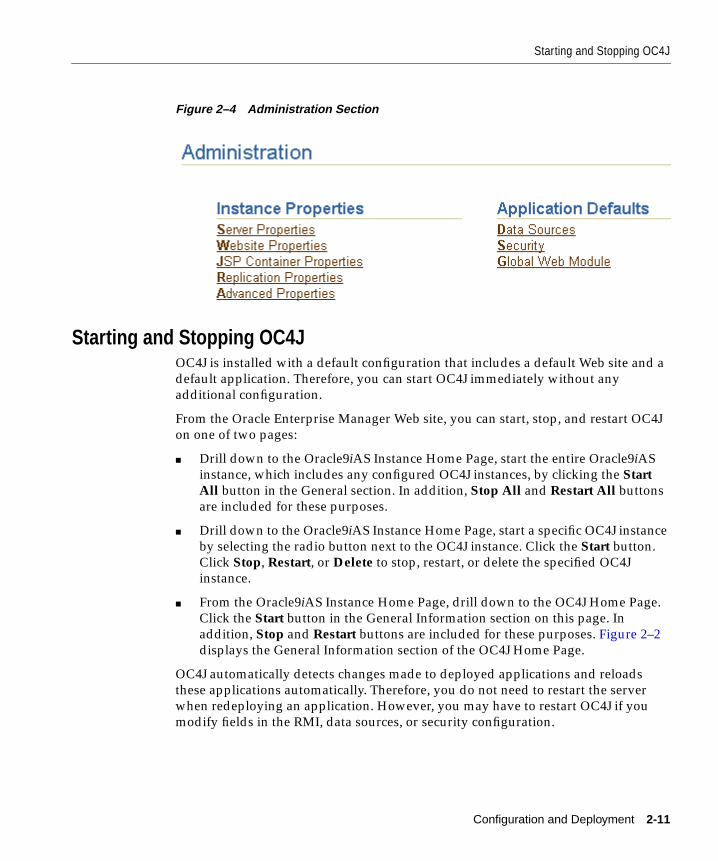
Starting and Stopping OC4J
Figure 2–4 Administration Section
Starting and Stopping OC4JOC4J is installed with a default configuration that includes a default Web site and a
default application. Therefore, you can start OC4J immediately without any
additional configuration.
From the Oracle Enterprise Manager Web site, you can start, stop, and restart OC4J
on one of two pages:
■ Drill down to the Oracle9iAS Instance Home Page, start the entire Oracle9iAS
instance, which includes any configured OC4J instances, by clicking the StartAll button in the General section. In addition, Stop All and Restart All buttons
are included for these purposes.
■ Drill down to the Oracle9iAS Instance Home Page, start a specific OC4J instance
by selecting the radio button next to the OC4J instance. Click the Start button.
Click Stop, Restart, or Delete to stop, restart, or delete the specified OC4J
instance.
■ From the Oracle9iAS Instance Home Page, drill down to the OC4J Home Page.
Click the Start button in the General Information section on this page. In
addition, Stop and Restart buttons are included for these purposes. Figure 2–2
displays the General Information section of the OC4J Home Page.
OC4J automatically detects changes made to deployed applications and reloads
these applications automatically. Therefore, you do not need to restart the server
when redeploying an application. However, you may have to restart OC4J if you
modify fields in the RMI, data sources, or security configuration.
Configuration and Deployment 2-11
Starting and Stopping OC4J
You can also start, stop, and restart using the DCM control command. See
Appendix A, "DCM Command-Line Utility (dcmctl)" for directions.
Testing the Default ConfigurationStart OC4J with the defaults through Enterprise Manager as follows:
1. From the Oracle9iAS Instance Page, start either the whole Oracle9iAS instance
or—at least—the Oracle HTTP Server and OC4J components. To start, click the
Start All button for the Oracle9iAS instance or select the components and click
the Start button.
2. Test OC4J by specifying the following from a Web browser:
http://<ohs_host>:7777/j2ee
Substitute the name of the host where the OHS is installed for <ohs_host> .
This command displays index.html .
3. Test a servlet deployed in OC4J during installation by specifying the following
in a Web browser:
http://<ohs_host>:7777/j2ee/servlet/HelloWorldServlet
This command returns a "Hello World " page. The HelloWorldServlet is
automatically deployed with the OC4J installation.
Note: The examples and URLs in this guide use port 7777, which
is the default port for the OHS Web listener. If you change the
default port number of the OHS, then specify the new port number
after the hostname, as follows:
http://<ohs_host>:<ohs_port>/j2ee/
2-12 Oracle9iAS Containers for J2EE User’s Guide
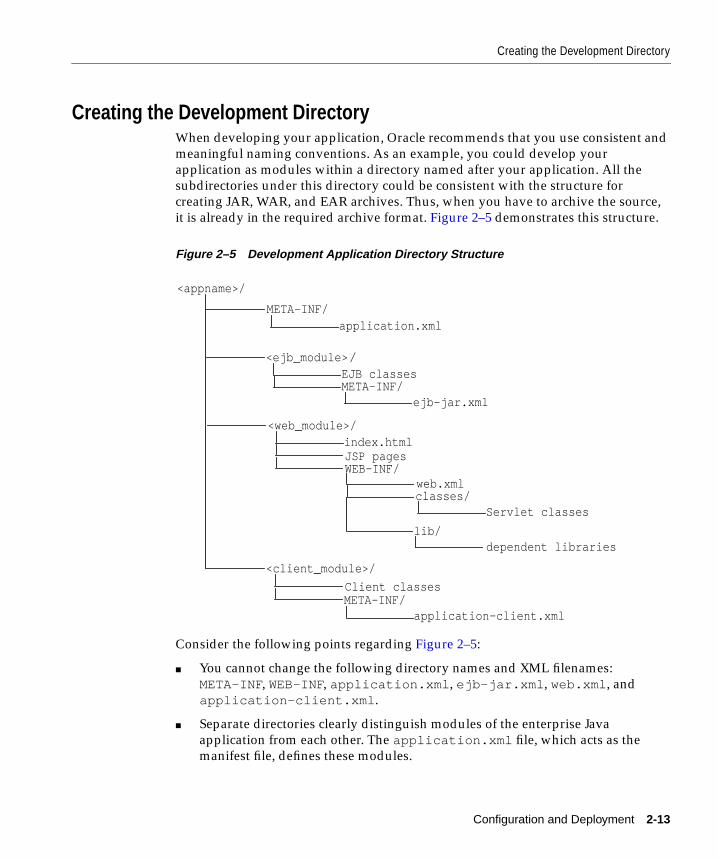
Creating the Development Directory
Creating the Development DirectoryWhen developing your application, Oracle recommends that you use consistent and
meaningful naming conventions. As an example, you could develop your
application as modules within a directory named after your application. All the
subdirectories under this directory could be consistent with the structure for
creating JAR, WAR, and EAR archives. Thus, when you have to archive the source,
it is already in the required archive format. Figure 2–5 demonstrates this structure.
Figure 2–5 Development Application Directory Structure
Consider the following points regarding Figure 2–5:
■ You cannot change the following directory names and XML filenames:
META-INF, WEB-INF, application.xml , ejb-jar.xml , web.xml , and
application-client.xml .
■ Separate directories clearly distinguish modules of the enterprise Java
application from each other. The application.xml file, which acts as the
manifest file, defines these modules.
<appname>/
META-INF/application.xml
<ejb_module>EJB classesMETA-INF/
ejb-jar.xml
<web_module>/index.htmlJSP pagesWEB-INF/
web.xmlclasses/
Servlet classes
<client_module>/
Client classesMETA-INF/
application-client.xml
lib/dependent libraries
/
Configuration and Deployment 2-13
Configuring the Pet Store Web Application Demo
■ The directories containing the separate modules (<ejb_module> ,
<web_module> , and <client_module> ) can have arbitrary names. However,
these names must match the values in the manifest file—the local
application.xml file.
■ The top of the module represents the start of a search path for classes. As a
result, classes belonging to packages are expected to be located in a nested
directory structure beneath this point. For example, a reference to an EJB
package class ’myapp.ejb.Demo’ is expected to be located in
<appname>/<ejb_module>/myapp/ejb/Demo.class .
Configuring the Pet Store Web Application DemoThis section describes how to configure and deploy Pet Store, which is a J2EE demo
application from Sun Microsystems. All OC4J server configuration and
modifications to the Pet Store application configuration have been performed for
you. You can execute the Pet Store demo with minimal effort to see how OC4J
works.
Downloading An OC4J-Ready Pet Store DemoDownload the Pet Store application from OTN at
http://otn.oracle.com/sample_code/tech/java/oc4j/content.html in the
jps112.zip file, which downloads version 1.1.2 of the Pet Store demo. This ZIP
file contains an annotated version of this application, along with preconfigured
OC4J XML files.
You must have a working Oracle database and an OC4J installation. You should use
this installation for demonstration purposes only and not in a production
environment. In this simplified version, we have pre-built the Pet Store demo using
the Oracle database (instead of the default Cloudscape) and edited the
configuration files to make the setup easy.
1. Download the Pet Store application in jps112.zip from OTN at
http://otn.oracle.com/sample_code/tech/java/oc4j/content.html . This
ZIP file contains an annotated version of this application, along with
preconfigured OC4J XML files.
2. Unzip the jps112.zip file, which contains the following:
Note: Displays of the screens for each step of the deployment
wizard are shown in "Deploying Applications" on page 2-20.
2-14 Oracle9iAS Containers for J2EE User’s Guide

Configuring the Pet Store Web Application Demo
a. steps.html —Steps on how to deploy the Pet store demo in standalone
mode. This HTML file does not contain directions on how to deploy using
the Oracle Enterprise Manager. The steps in this manual instruct you on
how to deploy using Enterprise Manager.
b. petstore.ear —The Pet Store demo is contained in petstore.ear .
c. config.zip —OC4J server XML configuration files are provided for you
in config.zip file.
3. Unzip the config.zip file to retrieve the server.xml ,
default-web-site.xml , and data-sources.xml files.
4. Edit the data-sources.xml to point to your database by replacing the host,
port, and sid in the url attribute for the database in this file, as follows:
url="jdbc:oracle:thin:@<host>:<port>:<sid>"
5. Create in your database the user estoreuser , and grant this user privileges to
connect as SYSDBA to your database. You can create the user and grant
privileges through the following command:
SQL> grant connect, resource to estoreuser identified by estore;
6. Navigate to the OC4J Home Page on the Oracle Enterprise Manager Web site.
7. Select default under the Default Application section. The default application is
the automatic parent of each application and it holds global configuration for all
deployed applications, such as the data sources used. You are going to add the
data sources that Petstore uses in the default application.
8. Add data sources. On the default application screen, scroll down to the
Administration section and select Advanced Properties from the Properties
column.
Since the data sources are provided in a data-sources.xml file, add these
data sources using the XML editor within Enterprise Manager. Select
data-sources.xml in the filename column. This brings up a screen with
XML in a text window. Merge in the data sources from the
data-sources.xml that was provided within the config.zip of the
Petstore download into this window. Do not overwrite other data sources
already configured in this file. When finished, click the Apply button.
Configuration and Deployment 2-15
Configuring the Pet Store Web Application Demo
9. Return to the OC4J Home Page and scroll to the Applications section. Click on
the Deploy EAR File button. This starts the application deployment wizard.
10. Read the Introduction to the deployment wizard. Click the Next button.
11. Provide the EAR file and the name of your application in the Select Application
page. Click the Browse button to find the petstore.ear file that you
downloaded to your system. Type "petstore " in the application name field.
Click the Next button.
12. Provide the URL mappings for the servlet context on all Web modules in the
Petstore application. The Petstore demo contains a single Web module, which
should be mapped to the /estore servlet context. Type "/estore " in the URL
mapping field and click the Next button.
13. At this point, the Petstore demo does not need any additional configuration
through the wizard. You can jump to the Summary page by clicking Finish.
14. Read the summary of the Petstore application deployment. Click the Deploybutton to complete the application deployment.
15. On the OC4J Home Page, select "petstore " in the Name column of the
Applications section. This shows the configuration and all deployed modules of
the Petstore demo application. If the OC4J server is started, the application is
automatically started.
16. Execute the Pet Store application in your browser by accessing the OHS, where
the default port is 7777.
http://<ohs_host>:<ohs_port>/estore
The Pet Store splash screen appears. Follow the instructions provided by the Pet
Store application to load the Java Pet Store database tables.
Note: Because you were provided the data-sources.xml file,
you can add/modify this file directly through Advanced
Properties. If you do not have the XML file, you can add the
configuration details through the Data Sources option under the
Resources column.
2-16 Oracle9iAS Containers for J2EE User’s Guide

Configuring the Pet Store Web Application Demo
Explanation of the Changes to the Pet Store DemoYou may be curious as to what is the difference between the 1.1.2 Pet Store demo
available off of the Sun Microsystems site and the modified one we have provided.
This section will discuss the modifications we made.
Although the development of J2EE applications is standardized and portable, the
XML configuration files are not. You may have to configure multiple XML files
before deploying any application to OC4J. The configuration necessary depends on
the services that your application uses. For example, if your application uses a
database, you must configure its DataSource object.
For basic applications, such as Pet Store, you normally deploy the application using
the wizard and configure any DataSource necessary for this application. Before
deployment, you must create a manifest for the application within the
application.xml file. This can be included in addition to or in replacement of a
MANIFEST.MF file. This file must be properly configured and included within the
J2EE EAR file that is to be deployed.
Simple applications—including the Pet Store application—require the following
basic steps:
Basic Step Pet Store Step Description Pet Store Step(s)
1. Create or obtain theapplication.
Create the J2EE application or obtain itfrom another party.
1
2. Make any necessary serverenvironment changes.
Set the JAVA_HOME variable. 2
3. Modify any application XMLconfiguration files.
The Pet Store application should havethe appropriate header in the web.xmlconfiguration file.
4
4. Update the applicationmanifest file.
Place the application.xml file in theappropriate directory.
5
5. Build an EAR file including theapplication—if one does notalready exist.
Use ANT to build an EAR file. 6
6. Deploy application EAR file. On the OC4J Home Page of EnterpriseManager, clicking the Deploy EAR Filebutton starts a deployment wizard.
7
7. Configure the database used. Add the data source to either the global or local data source configuration.
8
Configuration and Deployment 2-17
Configuring the Pet Store Web Application Demo
The following steps describe what modifications to make to deploy the Pet Store
application into OC4J.
1. We asked you to download the Pet Store demo from the Oracle OTN site. You
could download it from the Sun Microsystems site and make these
modifications yourself.
2. Make any necessary server environment changes. You must set the JAVA_HOMEvariable to the base directory of the Java 2 SDK.
3. Modify the errorpage.jsp to import the appropriate IO package. Add <%@page import ="java.io.*" isErrorPage="true" %> to the
jps 1.1.2 /src/petstore/src/docroot/errorpage.jsp file.
This command prevents the Pet Store error page from throwing a
"PrintWriter class not found exception" .
4. Modify any deployment descriptors in the application as necessary.
a. Modify the web.xml configuration file to contain the correct header. In
jps1.1.2/src/petstore/src/docroot/WEB-INF/web.xml , replace
"Java 2 Enterprise Edition Reference Implementation" with
"Oracle9iAS Containers for J2EE ".
This step, which is optional, updates the application server type of OC4J.
b. Change the database type in the EJB deployment descriptor provided with
the Pet Store application. This step enables data-access objects to work with
an Oracle database instead of a Cloudscape database, which is the
configured database type in the Pet Store application.
In jps1.1.2/src/components/customer/src/customer_ejb.xml ,
replace OrderDAOCS with OrderDAOOracle .
5. Update the application manifest file. For the Pet Store application, you must
create an application.xml to act as the manifest file for the Pet Store demo
and place it into the jps1.1.2/src/petstore/src/ directory. OC4J uses
the application.xml file as the manifest file. See the application.xml file
that was downloaded in the jps112.zip from OTN.
6. Build an EAR file including the application. After modifying the key XML files
within this application, rebuild the Pet Store application to integrate these
configuration changes.
a. Modify the contents of /src/petstore/src/build.xml to build the
EAR file with the OC4J modifications.
b. Execute jps1.1.2/src/petstore/src/build.bat in a DOS shell.
2-18 Oracle9iAS Containers for J2EE User’s Guide

Configuring the Pet Store Web Application Demo
You can also double-click on the build.bat file in Windows Explorer to
execute this file. The build.bat file uses ANT. To learn more about the
ANT file, go to the following Jakarta site:
http://jakarta.apache.org/ant/
7. Configure an Oracle database in the OC4J DataSource definition.
a. Copy the data source object definition from the data-sources.xmlfile contained in the config.zip into the Enterprise Manager data
source configuration.
b. Connect as SYS in SQL*Plus to add the estoreuser and grant it privileges
by executing the following SQL command:
grant connect, resource, create session to estoreuseridentified by estore
8. Deploy the application using the deployment wizard off the OC4J Home Page.
9. Start both the OHS and the OC4J server.
For instructions on configuring and starting the OHS, see the Oracle HTTPServer Administration Guide.
10. Open your Web browser and then specify the following URL:
http://<ohs_host>:<ohs_port>/estore
The Pet Store splash screen appears. Follow the instructions provided by the Pet
Store application to load the Java Pet Store database tables.
Configuration and Deployment 2-19
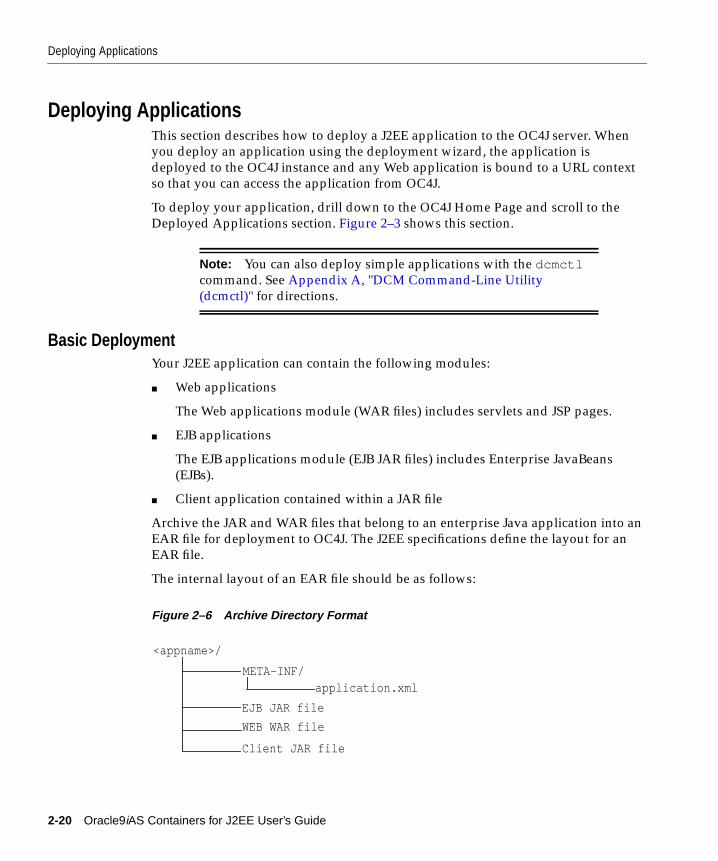
Deploying Applications
Deploying ApplicationsThis section describes how to deploy a J2EE application to the OC4J server. When
you deploy an application using the deployment wizard, the application is
deployed to the OC4J instance and any Web application is bound to a URL context
so that you can access the application from OC4J.
To deploy your application, drill down to the OC4J Home Page and scroll to the
Deployed Applications section. Figure 2–3 shows this section.
Basic DeploymentYour J2EE application can contain the following modules:
■ Web applications
The Web applications module (WAR files) includes servlets and JSP pages.
■ EJB applications
The EJB applications module (EJB JAR files) includes Enterprise JavaBeans
(EJBs).
■ Client application contained within a JAR file
Archive the JAR and WAR files that belong to an enterprise Java application into an
EAR file for deployment to OC4J. The J2EE specifications define the layout for an
EAR file.
The internal layout of an EAR file should be as follows:
Figure 2–6 Archive Directory Format
Note: You can also deploy simple applications with the dcmctlcommand. See Appendix A, "DCM Command-Line Utility
(dcmctl)" for directions.
<appname>/
META-INF/application.xml
EJB JAR file
WEB WAR file
Client JAR file
2-20 Oracle9iAS Containers for J2EE User’s Guide
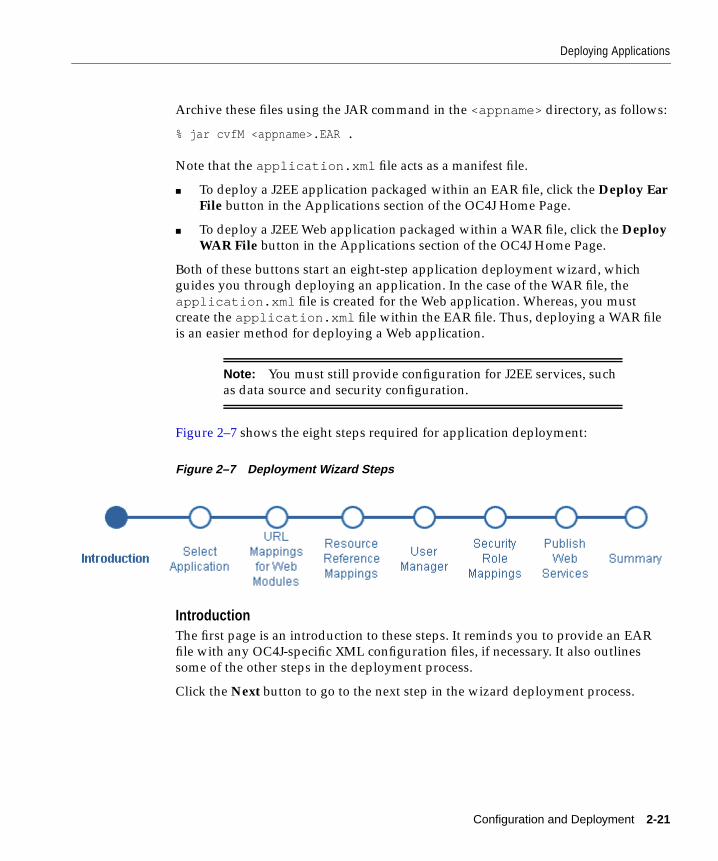
Deploying Applications
Archive these files using the JAR command in the <appname> directory, as follows:
% jar cvfM <appname>.EAR .
Note that the application.xml file acts as a manifest file.
■ To deploy a J2EE application packaged within an EAR file, click the Deploy EarFile button in the Applications section of the OC4J Home Page.
■ To deploy a J2EE Web application packaged within a WAR file, click the DeployWAR File button in the Applications section of the OC4J Home Page.
Both of these buttons start an eight-step application deployment wizard, which
guides you through deploying an application. In the case of the WAR file, the
application.xml file is created for the Web application. Whereas, you must
create the application.xml file within the EAR file. Thus, deploying a WAR file
is an easier method for deploying a Web application.
Figure 2–7 shows the eight steps required for application deployment:
Figure 2–7 Deployment Wizard Steps
IntroductionThe first page is an introduction to these steps. It reminds you to provide an EAR
file with any OC4J-specific XML configuration files, if necessary. It also outlines
some of the other steps in the deployment process.
Click the Next button to go to the next step in the wizard deployment process.
Note: You must still provide configuration for J2EE services, such
as data source and security configuration.
Configuration and Deployment 2-21
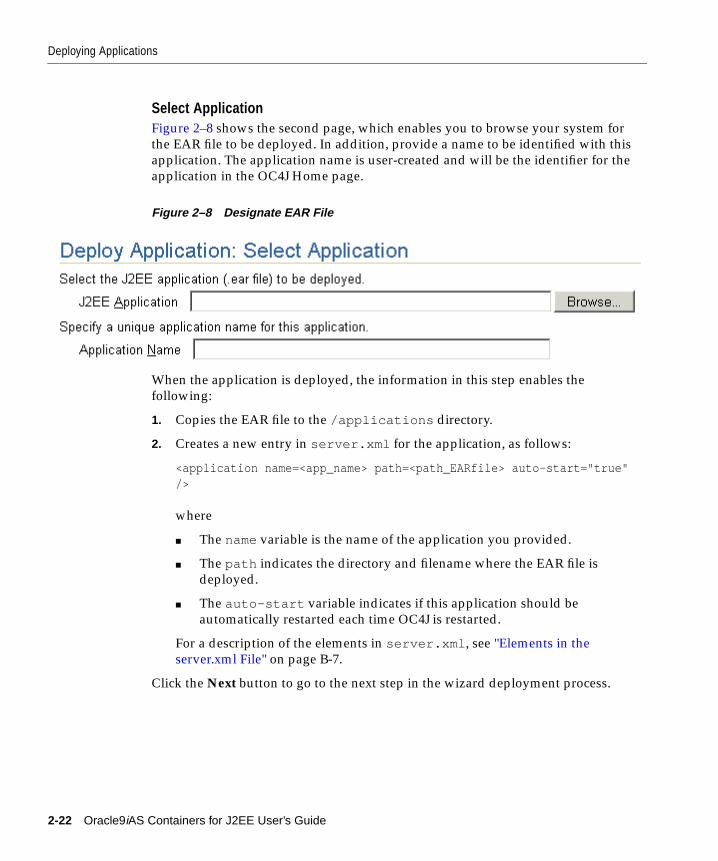
Deploying Applications
Select ApplicationFigure 2–8 shows the second page, which enables you to browse your system for
the EAR file to be deployed. In addition, provide a name to be identified with this
application. The application name is user-created and will be the identifier for the
application in the OC4J Home page.
Figure 2–8 Designate EAR File
When the application is deployed, the information in this step enables the
following:
1. Copies the EAR file to the /applications directory.
2. Creates a new entry in server.xml for the application, as follows:
<application name=<app_name> path=<path_EARfile> auto-start="true"/>
where
■ The name variable is the name of the application you provided.
■ The path indicates the directory and filename where the EAR file is
deployed.
■ The auto-start variable indicates if this application should be
automatically restarted each time OC4J is restarted.
For a description of the elements in server.xml , see "Elements in the
server.xml File" on page B-7.
Click the Next button to go to the next step in the wizard deployment process.
2-22 Oracle9iAS Containers for J2EE User’s Guide
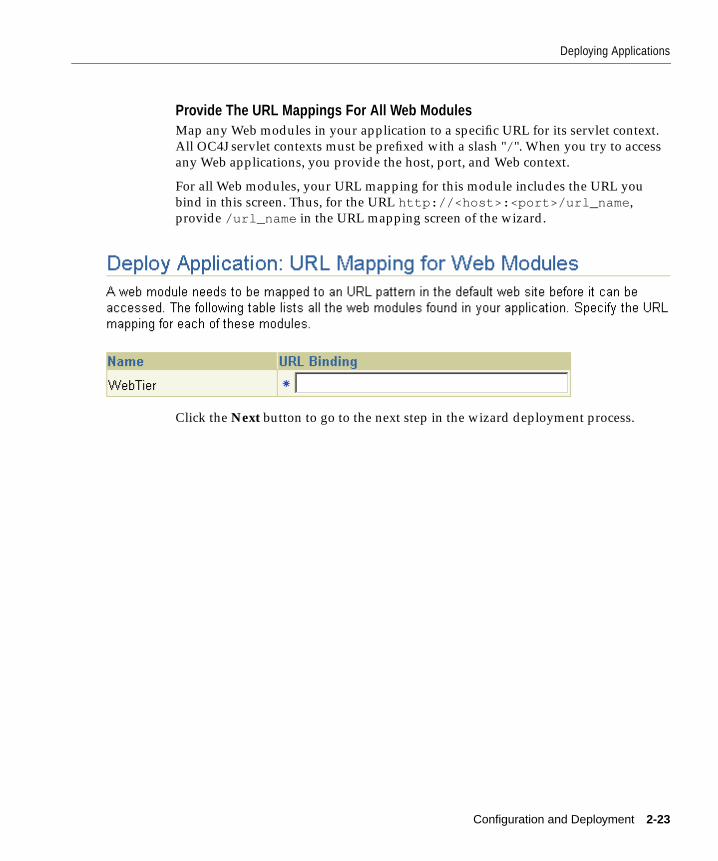
Deploying Applications
Provide The URL Mappings For All Web ModulesMap any Web modules in your application to a specific URL for its servlet context.
All OC4J servlet contexts must be prefixed with a slash "/ ". When you try to access
any Web applications, you provide the host, port, and Web context.
For all Web modules, your URL mapping for this module includes the URL you
bind in this screen. Thus, for the URL http://<host>:<port>/url_name ,
provide /url_name in the URL mapping screen of the wizard.
Click the Next button to go to the next step in the wizard deployment process.
put the third step here... with petstore in fields?
Configuration and Deployment 2-23
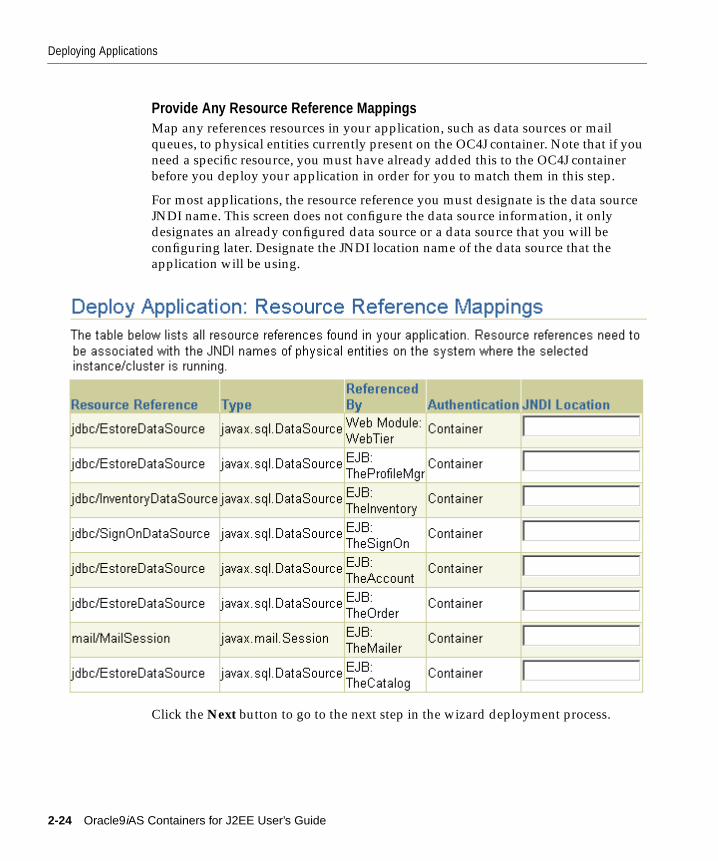
Deploying Applications
Provide Any Resource Reference MappingsMap any references resources in your application, such as data sources or mail
queues, to physical entities currently present on the OC4J container. Note that if you
need a specific resource, you must have already added this to the OC4J container
before you deploy your application in order for you to match them in this step.
For most applications, the resource reference you must designate is the data source
JNDI name. This screen does not configure the data source information, it only
designates an already configured data source or a data source that you will be
configuring later. Designate the JNDI location name of the data source that the
application will be using.
Click the Next button to go to the next step in the wizard deployment process.
put the third step here... with petstore in fields?
2-24 Oracle9iAS Containers for J2EE User’s Guide
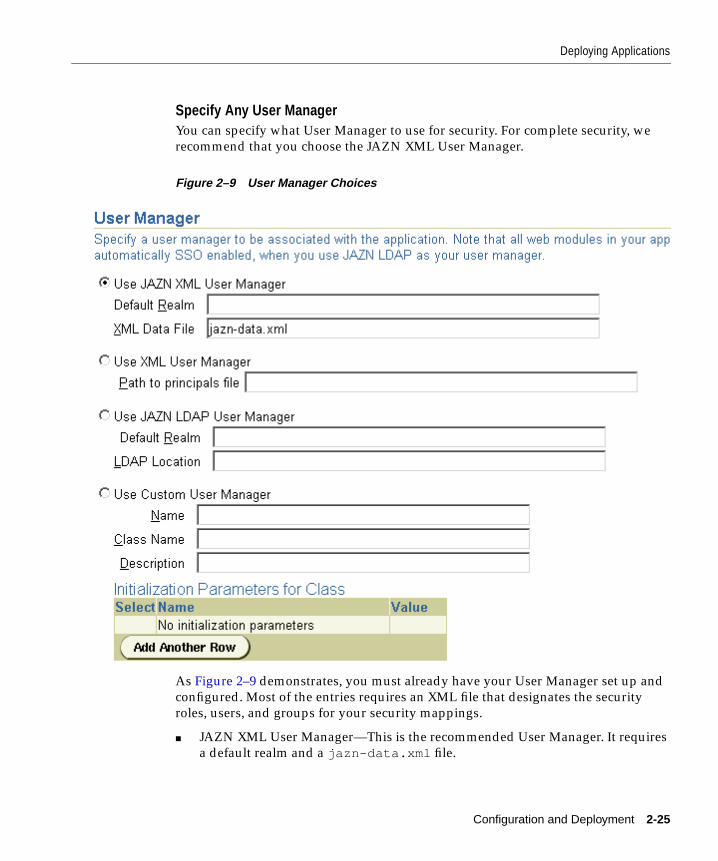
Deploying Applications
Specify Any User ManagerYou can specify what User Manager to use for security. For complete security, we
recommend that you choose the JAZN XML User Manager.
Figure 2–9 User Manager Choices
As Figure 2–9 demonstrates, you must already have your User Manager set up and
configured. Most of the entries requires an XML file that designates the security
roles, users, and groups for your security mappings.
■ JAZN XML User Manager—This is the recommended User Manager. It requires
a default realm and a jazn-data.xml file.
Configuration and Deployment 2-25
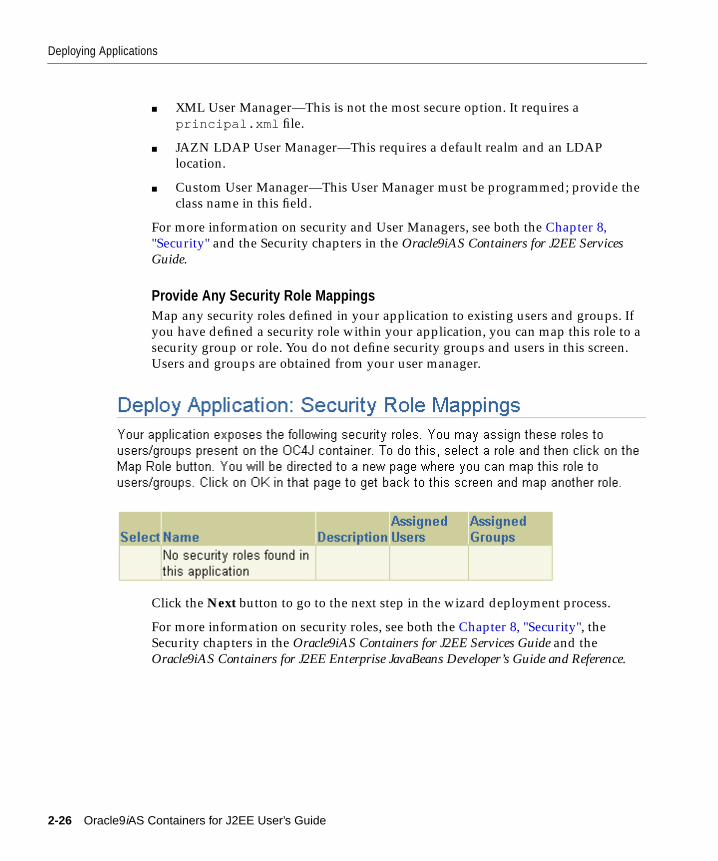
Deploying Applications
■ XML User Manager—This is not the most secure option. It requires a
principal.xml file.
■ JAZN LDAP User Manager—This requires a default realm and an LDAP
location.
■ Custom User Manager—This User Manager must be programmed; provide the
class name in this field.
For more information on security and User Managers, see both the Chapter 8,
"Security" and the Security chapters in the Oracle9iAS Containers for J2EE ServicesGuide.
Provide Any Security Role MappingsMap any security roles defined in your application to existing users and groups. If
you have defined a security role within your application, you can map this role to a
security group or role. You do not define security groups and users in this screen.
Users and groups are obtained from your user manager.
Click the Next button to go to the next step in the wizard deployment process.
For more information on security roles, see both the Chapter 8, "Security", the
Security chapters in the Oracle9iAS Containers for J2EE Services Guide and the
Oracle9iAS Containers for J2EE Enterprise JavaBeans Developer’s Guide and Reference.
put the third step here... with petstore in fields?
2-26 Oracle9iAS Containers for J2EE User’s Guide
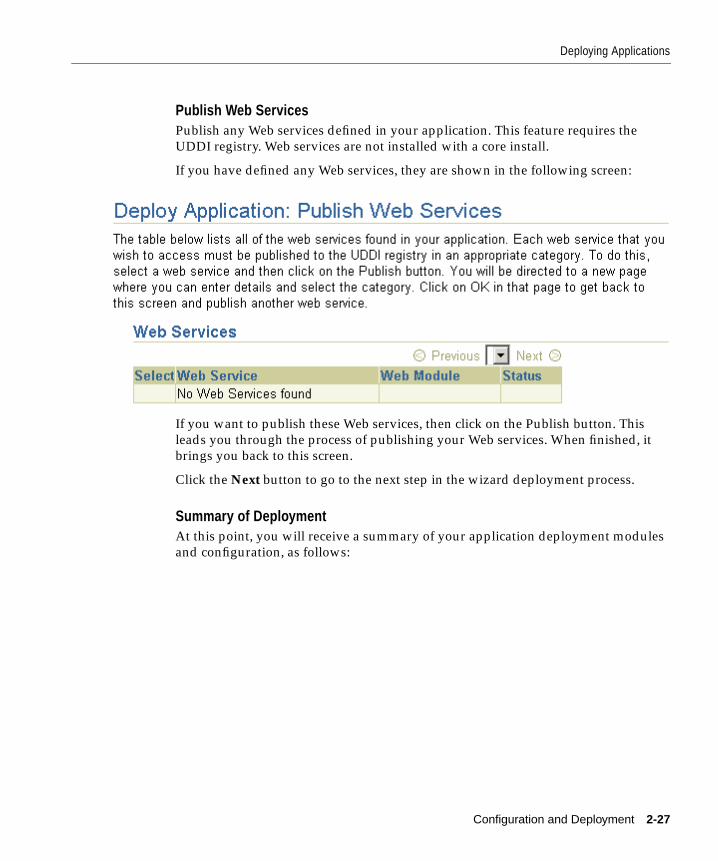
Deploying Applications
Publish Web ServicesPublish any Web services defined in your application. This feature requires the
UDDI registry. Web services are not installed with a core install.
If you have defined any Web services, they are shown in the following screen:
If you want to publish these Web services, then click on the Publish button. This
leads you through the process of publishing your Web services. When finished, it
brings you back to this screen.
Click the Next button to go to the next step in the wizard deployment process.
Summary of DeploymentAt this point, you will receive a summary of your application deployment modules
and configuration, as follows:
put the third step here... with petstore in fields?
Configuration and Deployment 2-27
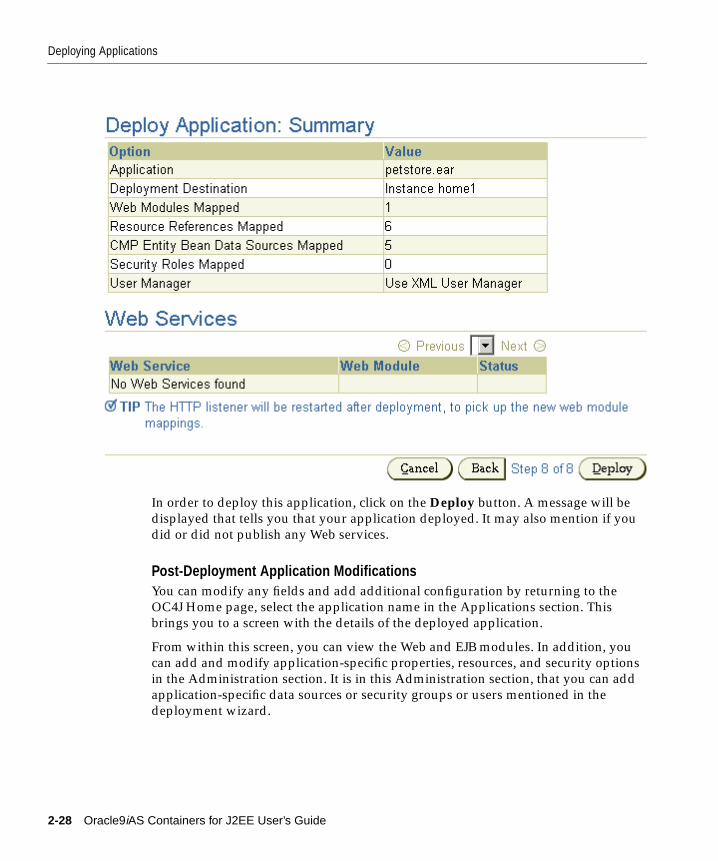
Deploying Applications
In order to deploy this application, click on the Deploy button. A message will be
displayed that tells you that your application deployed. It may also mention if you
did or did not publish any Web services.
Post-Deployment Application ModificationsYou can modify any fields and add additional configuration by returning to the
OC4J Home page, select the application name in the Applications section. This
brings you to a screen with the details of the deployed application.
From within this screen, you can view the Web and EJB modules. In addition, you
can add and modify application-specific properties, resources, and security options
in the Administration section. It is in this Administration section, that you can add
application-specific data sources or security groups or users mentioned in the
deployment wizard.
the deployed application screen
2-28 Oracle9iAS Containers for J2EE User’s Guide
Undeploying Web Applications
Recovering From Deployment ErrorsIf the deployment process is interrupted for any reason, you may need to clean up
the temp directory, which by default is /var/tmp , on your system. The deployment
wizard uses 20 MB in swap space of the temp directory for storing information
during the deployment process. At completion, the deployment wizard cleans up
the temp directory of its additional files. However, if the wizard is interrupted, it
may not have the time or opportunity to clean up the temp directory. Thus, you
must clean up any additional deployment files from this directory yourself. If you
do not, this directory may fill up, which will disable any further deployment. If you
receive an Out of Memory error, check for space available in the temp directory.
To change the temp directory, set the command-line option for the OC4J process to
java.io.tmpdir=<new_tmp_dir> . You can set this command-line option in the
Server Properties page. Drill down to the OC4J Home Page. Scroll down to the
Administration Section. Select the Server Properties page. On this page, Scroll down
to the Command Line Options section and add the java.io.tmpdir variable
definition to the OC4J Options line. All new OC4J processes will start with this
property.
Undeploying Web ApplicationsYou can remove a J2EE Web application from the OC4J Web server by selecting the
application in the Applications section of the OC4J Home Page (see Figure 2–3) and
clicking the Undeploy button. This command removes the deployed J2EE
application and results in the following:
■ The application is removed from the OC4J runtime.
■ All bindings for the Web modules are removed from all the Web sites to which
the Web modules were bound.
■ The application files are removed from both the applications/ and
application-deployments/ directories.
Note: You can also undeploy applications with the DCM
command. See Appendix A, "DCM Command-Line Utility
(dcmctl)" for directions.
Configuration and Deployment 2-29

Undeploying Web Applications
2-30 Oracle9iAS Containers for J2EE User’s Guide
Advanced Configuration, Development, and D
3
Advanced Configuration,Development, and Deployment
Chapter 2, "Configuration and Deployment", discusses basic configuration,
development, and deployment of a J2EE application. This chapter discusses both
global J2EE service configuration and advanced J2EE application configuration.
In the original OC4J product, all configuration was stored in XML files. With this
release, OC4J is integrated with Enterprise Manager. This causes the entire
configuration to be split into two segments:
■ All OC4J server configuration should be managed through Enterprise Manager.
■ J2EE application deployment descriptors and the application.xml file must
still be constructed by hand within XML files.
This chapter discusses the following topics:
■ Configuring OC4J Using Enterprise Manager
■ Overview of OC4J and J2EE XML Files
■ What Happens When You Deploy?
■ Understanding and Configuring OC4J Listeners
■ Configuring Oracle HTTP Server With Another Web Context
■ Building and Deploying Within a Directory
eployment 3-1
Configuring OC4J Using Enterprise Manager
Configuring OC4J Using Enterprise ManagerYou can configure J2EE services, J2EE applications, and Oracle9iAS clusters with
Enterprise Manager. Some aspects are configured at the OC4J instance level; thus,
they provide a global configuration for all deployed applications in the instance.
Other aspects are configured at the application level; thus, this type of configuration
is local and applicable only to the application.
The following sections provide you with an overview of advanced configuration
within Enterprise Manager for OC4J:
■ OC4J Instance Level Configuration
■ Application Level Configuration
OC4J Instance Level ConfigurationThere exists one OC4J Home Page for each OC4J instance configured. Generally, on
the OC4J Home Page, you configure global services and deploy applications to this
instance.
Specifically, from the OC4J Home Page, you can do the following:
■ Deploy Applications
■ Configure Web Site
■ Configure Global JSP Container Parameters
■ Configure Global Web Application Parameters
■ Configure RMI and JMS
■ Configure Data Sources
■ Configure Security
■ Configure UDDI Registry
■ Manipulating XML Files
Deploy ApplicationsYou can deploy, redeploy, or undeploy a J2EE application that exists in an EAR or
WAR file archival format. To deploy an application, click the Deploy EAR File or
Deploy WAR File buttons to deploy in the Deployed Applications section on the
OC4J Home Page.
3-2 Oracle9iAS Containers for J2EE User’s Guide

Configuring OC4J Using Enterprise Manager
This starts the deployment wizard that is covered in "Deploying Applications" on
page 2-20. If you deploy an EAR file, it must contain an application.xml that
describes the application modules; if you deploy a WAR file, the application.xmlfile is created for you automatically.
To undeploy, click the Select radio button for the application and then click the
Undeploy button.
To redeploy, click the Select radio button for the application and then click the
Redeploy button.
Configuring Server PropertiesTo configure OC4J properties, scroll down to the Administration section of the OC4J
Home Page. Select Server Properties in the Instance Properties column. The General
section of this page contains the following fields:
Note: You can also deploy, undeploy, or redeploy simple
applications with the DCM command. See Appendix A, "DCM
Command-Line Utility (dcmctl)" for directions.
put server properties page here.
Advanced Configuration, Development, and Deployment 3-3
Configuring OC4J Using Enterprise Manager
In this section, you can modify OC4J server defaults. These are listed below:
■ Default application—The default application is what most deployed
applications used as its parent. Thus, these deployed applications can see the
classes within the default application.
■ Default application path—There exists a file named application.xml , which is
separate from the application.xml included with each EAR file. This
application.xml file is known as the global application.xml file. It defines
properties that are used across all deployed applications within this OC4J
instance. Some of the properties exist in the rest of this page. If you want to
change the name and the content of this global application.xml file, modify
this field to contain the new XML filename. However, this file must conform to
the DTD that Oracle specifies. The directory is relative to j2ee/home/config .
■ Default Web module properties—These are specified in an XML file called
global-web-application.xml . If you want it to refer to another XML file, you
can change the pointer to this file here. However, this file must conform to the
DTD that Oracle specifies. The directory is relative to j2ee/home/config .
If you want to actually modify elements contained within this file, update
entries in either the Web Site Properties or Advanced Properties section. These
are discussed more in "Configure Web Site" on page 3-6 and "Manipulating
XML Files" on page 3-15.
■ Application and deployment directories—The default directory to place the
"master" EAR file of the deployed application is the /applications directory.
The default directory is where OC4J places modified module deployment
descriptors with added defaults. Currently, this location is in the
/application-deployments directory. You can change the locations of the
default directories in these fields. The directory is relative to j2ee/home/config .
See "What Happens When You Deploy?" on page 3-26 for more information on
the usage of these directories.
The next section, Multiple VM Configuration, is dedicated as part of the cluster
configuration. The following details what each field means; however, the context of
how to configure clusters using this section is discussed fully in Chapter 9,
"Oracle9iAS Clustering".
3-4 Oracle9iAS Containers for J2EE User’s Guide
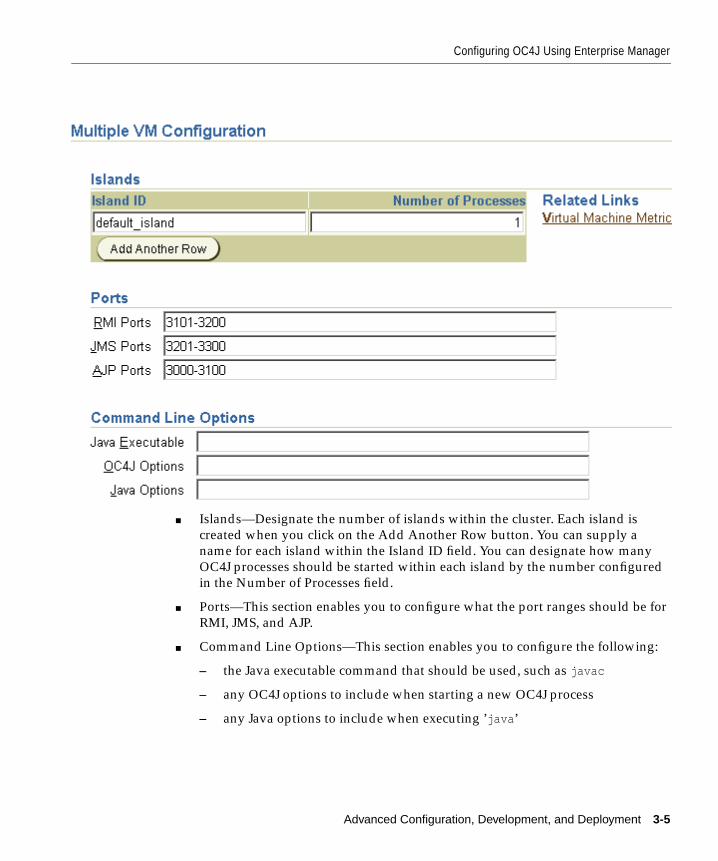
Configuring OC4J Using Enterprise Manager
■ Islands—Designate the number of islands within the cluster. Each island is
created when you click on the Add Another Row button. You can supply a
name for each island within the Island ID field. You can designate how many
OC4J processes should be started within each island by the number configured
in the Number of Processes field.
■ Ports—This section enables you to configure what the port ranges should be for
RMI, JMS, and AJP.
■ Command Line Options—This section enables you to configure the following:
– the Java executable command that should be used, such as javac
– any OC4J options to include when starting a new OC4J process
– any Java options to include when executing ’java ’
Advanced Configuration, Development, and Deployment 3-5
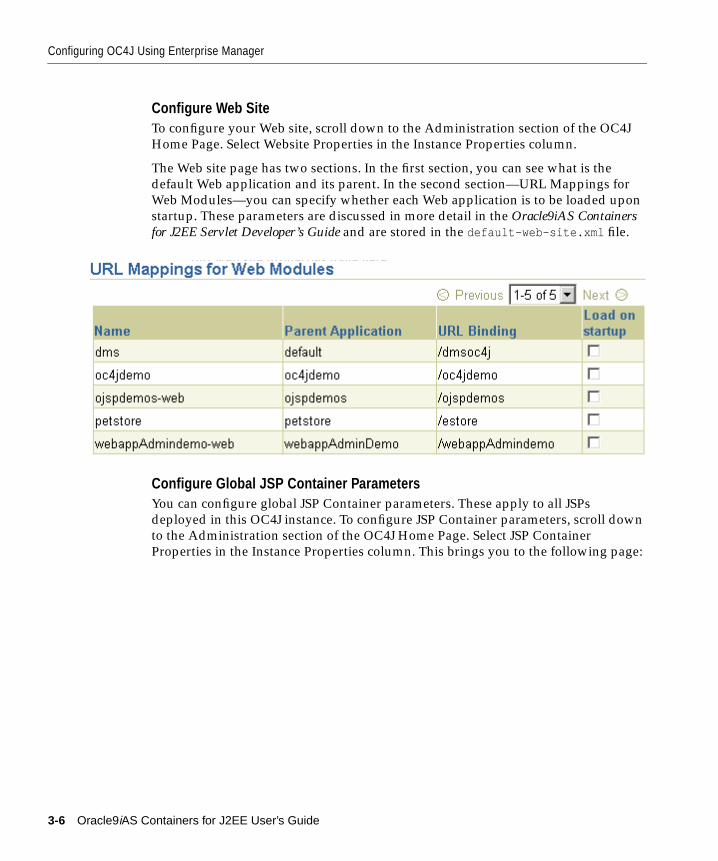
Configuring OC4J Using Enterprise Manager
Configure Web SiteTo configure your Web site, scroll down to the Administration section of the OC4J
Home Page. Select Website Properties in the Instance Properties column.
The Web site page has two sections. In the first section, you can see what is the
default Web application and its parent. In the second section—URL Mappings for
Web Modules—you can specify whether each Web application is to be loaded upon
startup. These parameters are discussed in more detail in the Oracle9iAS Containersfor J2EE Servlet Developer’s Guide and are stored in the default-web-site.xml file.
Configure Global JSP Container ParametersYou can configure global JSP Container parameters. These apply to all JSPs
deployed in this OC4J instance. To configure JSP Container parameters, scroll down
to the Administration section of the OC4J Home Page. Select JSP Container
Properties in the Instance Properties column. This brings you to the following page:
put web site properties page here.
3-6 Oracle9iAS Containers for J2EE User’s Guide
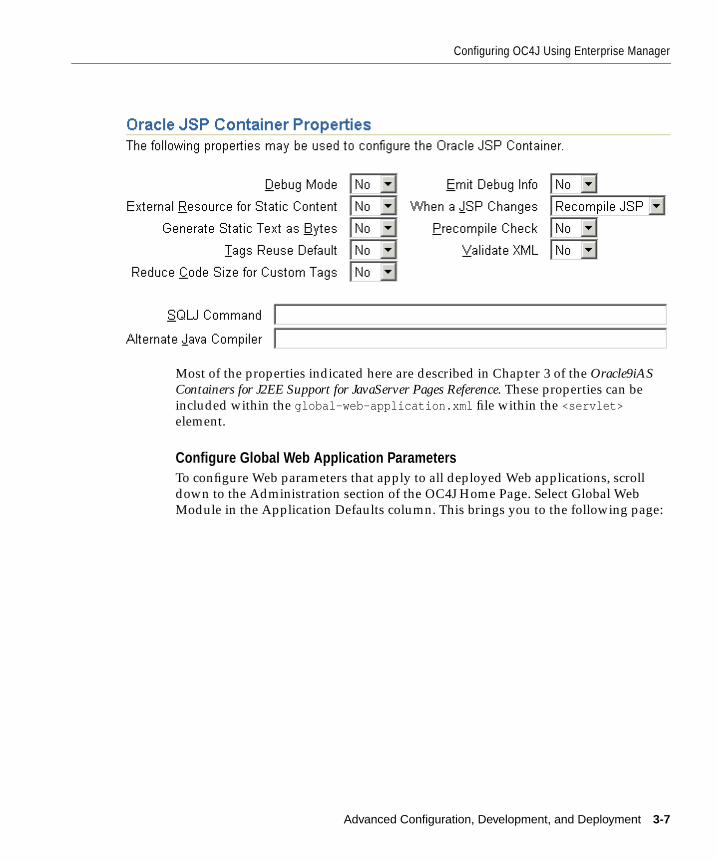
Configuring OC4J Using Enterprise Manager
Most of the properties indicated here are described in Chapter 3 of the Oracle9iASContainers for J2EE Support for JavaServer Pages Reference. These properties can be
included within the global-web-application.xml file within the <servlet>element.
Configure Global Web Application ParametersTo configure Web parameters that apply to all deployed Web applications, scroll
down to the Administration section of the OC4J Home Page. Select Global Web
Module in the Application Defaults column. This brings you to the following page:
put JSP Container properties page here.
Advanced Configuration, Development, and Deployment 3-7
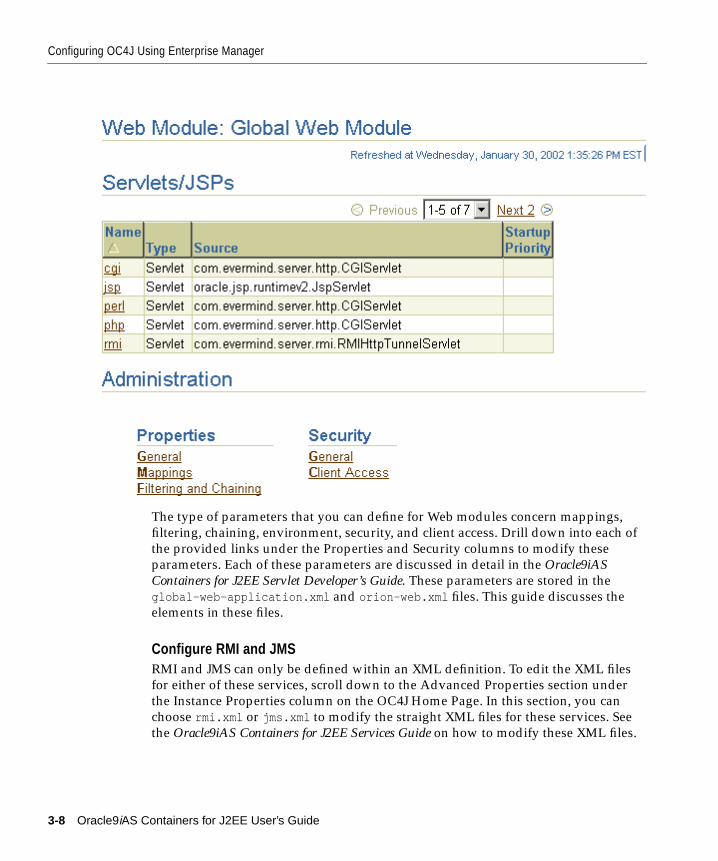
Configuring OC4J Using Enterprise Manager
The type of parameters that you can define for Web modules concern mappings,
filtering, chaining, environment, security, and client access. Drill down into each of
the provided links under the Properties and Security columns to modify these
parameters. Each of these parameters are discussed in detail in the Oracle9iASContainers for J2EE Servlet Developer’s Guide. These parameters are stored in the
global-web-application.xml and orion-web.xml files. This guide discusses the
elements in these files.
Configure RMI and JMSRMI and JMS can only be defined within an XML definition. To edit the XML files
for either of these services, scroll down to the Advanced Properties section under
the Instance Properties column on the OC4J Home Page. In this section, you can
choose rmi.xml or jms.xml to modify the straight XML files for these services. See
the Oracle9iAS Containers for J2EE Services Guide on how to modify these XML files.
put global web module page here.
3-8 Oracle9iAS Containers for J2EE User’s Guide
Configuring OC4J Using Enterprise Manager
Configure Data SourcesYou can configure global or local data sources. A global data source is available to
all deployed applications in this OC4J instance. A local data source is configured
within the deployed application and can only be used by that application.
See Oracle9iAS Containers for J2EE Services Guide for a full explanation of how to
configure a data source and the elements within the data-sources.xml file.
To configure global data sources, select one of the following off of the OC4J Home
Page:
■ Data Sources under the Application Defaults column—This page allows you to
add data source definitions one field at a time. See "Data Source Field Page" on
page 3-9 for a description of this page.
■ Advanced Properties under the Instance Properties column—Select
data-sources.xml on this page. This allows you to add data sources using the
XML definitions. This is useful if you have been provided the XML. You can just
copy in the already configured data sources.
To configure local data sources, you perform the same selection off of the
application page. You must drill down to the particular application that this data
source will be local to. On the application page, choose Data Source under the
Resources column. It displays the same data source field page that is discussed in
"Data Source Field Page" on page 3-9.
Data Source Field Page When you choose Data Source under the Application Defaults
column, you see the Data Sources that are currently configured.
To configure a new Data Source, click Add Data Source. This brings you to a page
where you can enter all configuration details about the data source. This page is
divided up into four sections.
Figure 3–1 shows the General section.
Advanced Configuration, Development, and Deployment 3-9
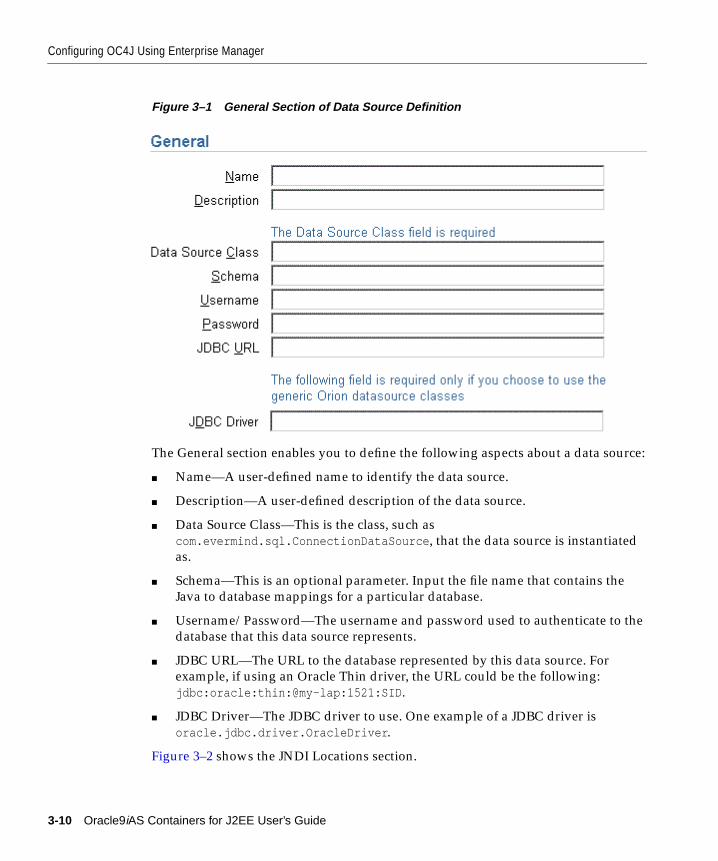
Configuring OC4J Using Enterprise Manager
Figure 3–1 General Section of Data Source Definition
The General section enables you to define the following aspects about a data source:
■ Name—A user-defined name to identify the data source.
■ Description—A user-defined description of the data source.
■ Data Source Class—This is the class, such as
com.evermind.sql.ConnectionDataSource , that the data source is instantiated
as.
■ Schema—This is an optional parameter. Input the file name that contains the
Java to database mappings for a particular database.
■ Username/Password—The username and password used to authenticate to the
database that this data source represents.
■ JDBC URL—The URL to the database represented by this data source. For
example, if using an Oracle Thin driver, the URL could be the following:
jdbc:oracle:thin:@my-lap:1521:SID .
■ JDBC Driver—The JDBC driver to use. One example of a JDBC driver is
oracle.jdbc.driver.OracleDriver .
Figure 3–2 shows the JNDI Locations section.
3-10 Oracle9iAS Containers for J2EE User’s Guide
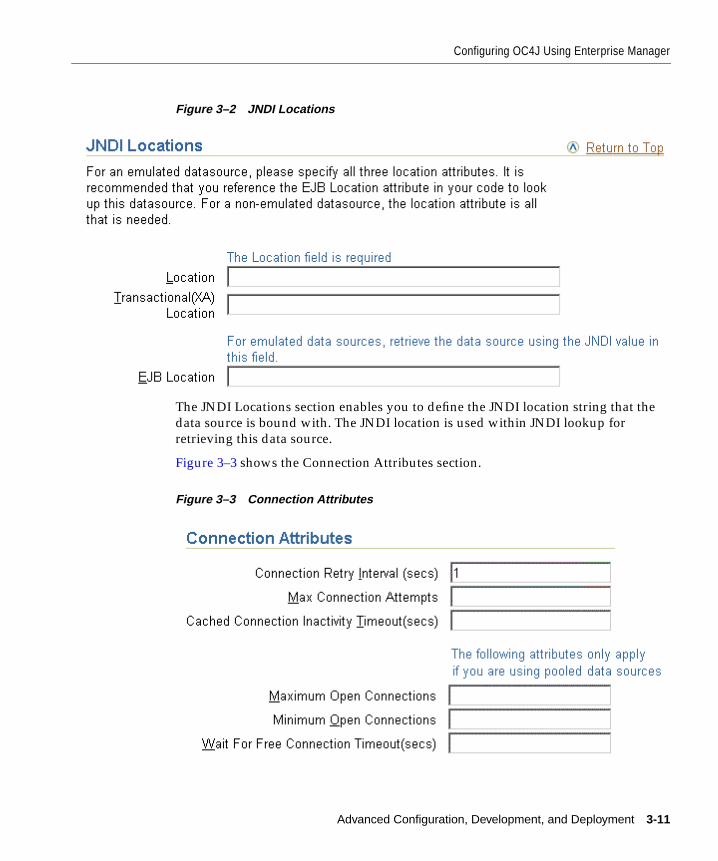
Configuring OC4J Using Enterprise Manager
Figure 3–2 JNDI Locations
The JNDI Locations section enables you to define the JNDI location string that the
data source is bound with. The JNDI location is used within JNDI lookup for
retrieving this data source.
Figure 3–3 shows the Connection Attributes section.
Figure 3–3 Connection Attributes
Advanced Configuration, Development, and Deployment 3-11
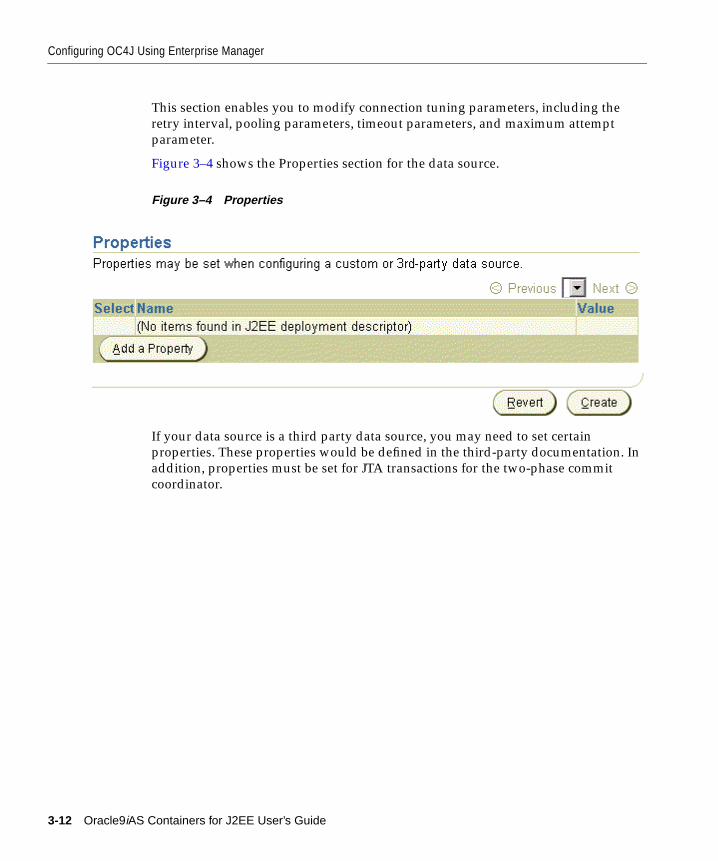
Configuring OC4J Using Enterprise Manager
This section enables you to modify connection tuning parameters, including the
retry interval, pooling parameters, timeout parameters, and maximum attempt
parameter.
Figure 3–4 shows the Properties section for the data source.
Figure 3–4 Properties
If your data source is a third party data source, you may need to set certain
properties. These properties would be defined in the third-party documentation. In
addition, properties must be set for JTA transactions for the two-phase commit
coordinator.
3-12 Oracle9iAS Containers for J2EE User’s Guide
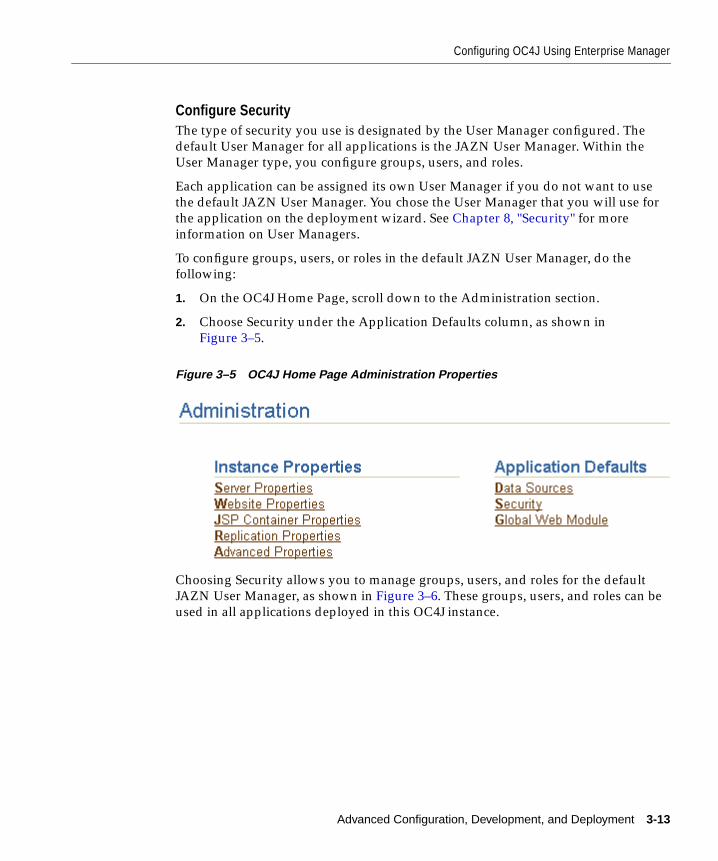
Configuring OC4J Using Enterprise Manager
Configure SecurityThe type of security you use is designated by the User Manager configured. The
default User Manager for all applications is the JAZN User Manager. Within the
User Manager type, you configure groups, users, and roles.
Each application can be assigned its own User Manager if you do not want to use
the default JAZN User Manager. You chose the User Manager that you will use for
the application on the deployment wizard. See Chapter 8, "Security" for more
information on User Managers.
To configure groups, users, or roles in the default JAZN User Manager, do the
following:
1. On the OC4J Home Page, scroll down to the Administration section.
2. Choose Security under the Application Defaults column, as shown in
Figure 3–5.
Figure 3–5 OC4J Home Page Administration Properties
Choosing Security allows you to manage groups, users, and roles for the default
JAZN User Manager, as shown in Figure 3–6. These groups, users, and roles can be
used in all applications deployed in this OC4J instance.
Advanced Configuration, Development, and Deployment 3-13
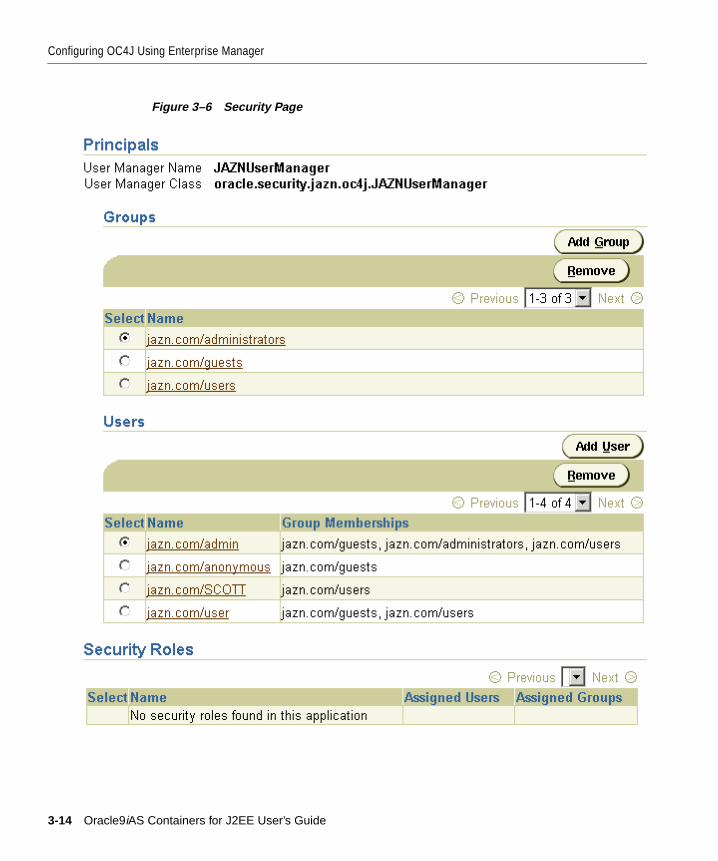
Configuring OC4J Using Enterprise Manager
Figure 3–6 Security Page
3-14 Oracle9iAS Containers for J2EE User’s Guide
Configuring OC4J Using Enterprise Manager
The default User Manager is the JAZN User Manager. However, you can also assign
a separate User Manager for each application.
See Chapter 8, "Security" and Oracle9iAS Containers for J2EE Services Guide for a
discussion of how to configure your security.
Configure UDDI RegistryTo configure the UDDI Registry, scroll down to the Administration section of the
OC4J Home Page. Select the UDDI Registry in the Related Links column.
Manipulating XML FilesIn OC4J version 1.0.2.2, you configured the OC4J server and all deployed
application parameters through XML files. Since the OC4J server existed on a single
node and did not need high availability and clustering management, this worked
well. However, with the integration of OC4J with Oracle9iAS, increased enterprise
management abilities with clustering and high availability options, all configuration
must be accomplished through Enterprise Manager.
For those developers who are used to working with the OC4J XML files and wish to
continue to do so, the Advanced Properties section allows you to continue this
ability.
There are four groups of XML files located within Enterprise Manager:
■ OC4J Server XML files: These include the XML files that configure the server
and its services. The files that are in this group are server.xml ,
global-web-application.xml , rmi.xml , jms.xml , http-web-site.xml , and
default-web-site.xml . Modify any of these XML files in the Advanced
Properties page off of the OC4J Home Page.
■ Global application XML files: These include XML files that apply to all
applications deployed in the OC4J instance. These include the global
application.xml , data-sources.xml , jazn-data.xml and
oc4j-connectors.xml . To modify these XML files, choose default under Default
Application on the OC4J Home Page. On the default application page, scroll
down to the Administration section and choose Advanced Properties.
■ Local application XML files. You can modify XML files that configure the
overall application. These include local data sources, local security, and
OC4J-specific application configuration. These XML files include
data-sources.xml , jazn-data.xml , and orion-application.xml . To modify
these files, drill down to the specific application. On the application screen,
scroll down to the Administration section and choose Advanced Properties.
Advanced Configuration, Development, and Deployment 3-15
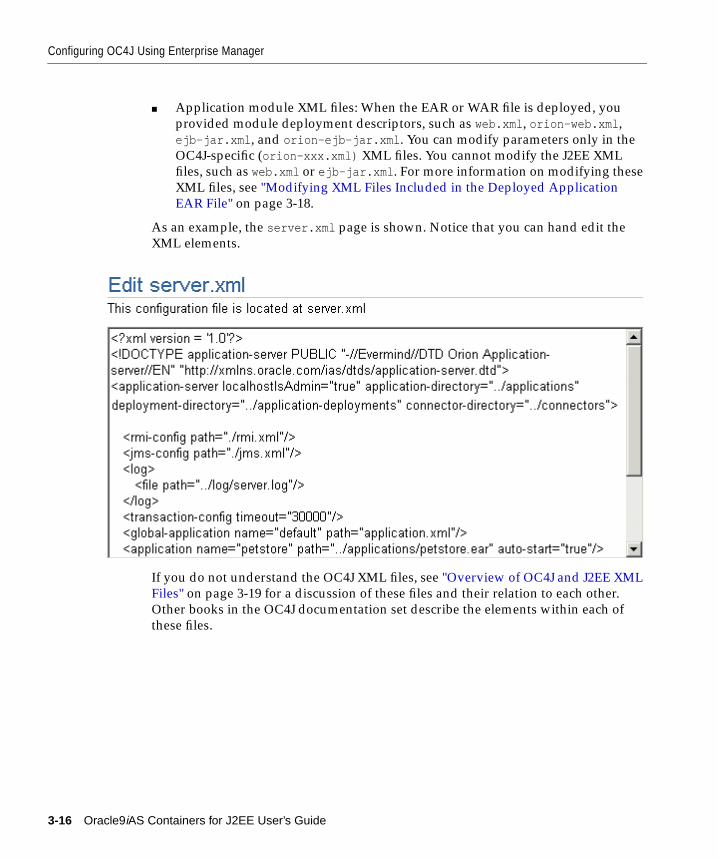
Configuring OC4J Using Enterprise Manager
■ Application module XML files: When the EAR or WAR file is deployed, you
provided module deployment descriptors, such as web.xml , orion-web.xml ,
ejb-jar.xml , and orion-ejb-jar.xml . You can modify parameters only in the
OC4J-specific (orion-xxx.xml) XML files. You cannot modify the J2EE XML
files, such as web.xml or ejb-jar.xml . For more information on modifying these
XML files, see "Modifying XML Files Included in the Deployed Application
EAR File" on page 3-18.
As an example, the server.xml page is shown. Notice that you can hand edit the
XML elements.
If you do not understand the OC4J XML files, see "Overview of OC4J and J2EE XML
Files" on page 3-19 for a discussion of these files and their relation to each other.
Other books in the OC4J documentation set describe the elements within each of
these files.
put server.xml page here.
3-16 Oracle9iAS Containers for J2EE User’s Guide

Configuring OC4J Using Enterprise Manager
Application Level ConfigurationOnce you have deployed your application, you can modify most of the parameters
for this application. To configure application-specific parameters, do the following:
1. On the OC4J Home Page, scroll down to the Application section.
2. Select the application where you want to change the configuration using one of
the following methods:
a. Click the Select radio button for the application and click the Edit button.
b. Select the application name in the Name column in the applications box.
This page is the initiating point for changing general application configuration as
well as configuration specific to a certain part of your deployed application, such as
a WAR file.
The following sections provide a brief overview of these configuration options:
■ Configuring Application General Parameters
■ Configuring Local J2EE Services
■ Modifying XML Files Included in the Deployed Application EAR File
Configuring Application General ParametersIf you scroll down to the Administration section and select the General link, you
can configure a multitude of application details, as follows:
■ persistence path
■ data sources path
■ library paths
■ EJB properties
– automatically create database tables for CMP beans
– automatically delete old database tables for CMP beans
■ default data source (JNDI name)
■ User Manager configuration
Advanced Configuration, Development, and Deployment 3-17

Configuring OC4J Using Enterprise Manager
Configuring Local J2EE ServicesAs described in "Configure Data Sources" on page 3-9 and "Configure Security" on
page 3-13, you can configure data sources and security either for all deployed
applications (global) or only for a specific application (local). See these sections for
directions on how to configure your J2EE services for your application.
Modifying XML Files Included in the Deployed Application EAR FileYou can modify only the OC4J-specific XML files of your application after
deployment. This includes orion-ejb-jar.xml , orion-web.xml , and
orion-application-client.xml . You cannot modify the J2EE XML files, such as
web.xml , ejb-jar.xml , and application-client.xml .
In order to modify the OC4J-specific XML files, do the following:
1. From the application screen, select the JAR or WAR file whose configuration
you are interested in modifying. The application screen is shown.
2. You can modify parameters for the application in one of the following manners:
■ Follow links in the Administration section for modifying parameters.
■ Select the bean or servlet in the section that details the beans, servlets, or
JSPs deployed. This drills down to another level of configuration.
■ The Administration section contains either a Properties or Advanced
Properties section that allows you to modify XML directly for the
OC4J-specific deployment descriptors—orion-ejb-jar.xml ,
orion-web.xml , and orion-application-client.xml .
3-18 Oracle9iAS Containers for J2EE User’s Guide
Overview of OC4J and J2EE XML Files
Overview of OC4J and J2EE XML FilesThis section contains the following topics:
■ XML Configuration File Overview
■ XML File Interrelationships
XML Configuration File OverviewEach XML file within OC4J exists to satisfy a certain role; thus, if you have need of
that role, you will understand which XML file to modify and maintain.
Figure 3–7 illustrates all the OC4J XML files and their respective roles.
■ OC4J server: All XML files within this box are used to set up this instance of the
OC4J server. These files configure things such as listening ports, administration
passwords, security, and other basic J2EE services.
These files configure the OC4J server and point to other key configuration files.
The settings in the OC4J configuration files are not related to the deployed J2EE
applications directly, but to the server itself.
■ Oracle HTTP Server: These files are configuration files within the Oracle HTTP
Server. However, they are included in this diagram because you may need to
modify these to change how requests are handed off to the OC4J server.
■ Web site: These XML files configure listening ports, protocols, and Web contexts
for the OC4J Web site.
■ Application XML files: Each J2EE application type (EJB, servlet, JSP, connector)
requires its own configuration (deployment) files. Each application type has one
J2EE deployment descriptor and one OC4J-specific deployment descriptor,
which is denoted with an "orion- " prefix. In addition, the following are global
configuration files for all components in the application:
– The application.xml as the global application configuration file that
contains common settings for all applications in this OC4J instance.
– The orion-application.xml file contains OC4J-specific global application
information for all applications in this OC4J instance.
– The global-web-application.xml file contains OC4J-specific global Web
application configuration information that contains common settings for all
Web modules in this OC4J instance.
Advanced Configuration, Development, and Deployment 3-19
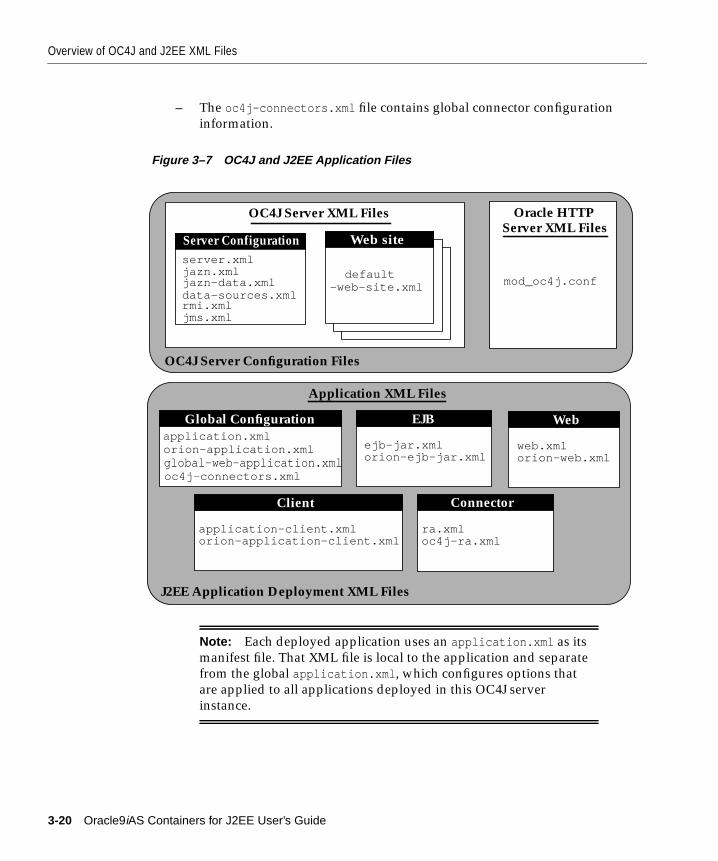
Overview of OC4J and J2EE XML Files
– The oc4j-connectors.xml file contains global connector configuration
information.
Figure 3–7 OC4J and J2EE Application Files
Note: Each deployed application uses an application.xml as its
manifest file. That XML file is local to the application and separate
from the global application.xml , which configures options that
are applied to all applications deployed in this OC4J server
instance.
Oracle HTTPOC4J Server XML Files
J2EE Application Deployment XML Files
OC4J Server Configuration Files
Application XML Files
EJB Web
Client
ejb-jar.xmlorion-ejb-jar.xml
web.xmlorion-web.xml
application-client.xmlorion-application-client.xml
mod_oc4j.conf
Web siteServer XML Files
Connector
ra.xmloc4j-ra.xml
Global Configurationapplication.xmlorion-application.xml
oc4j-connectors.xmlglobal-web-application.xml
server.xmljazn.xml
data-sources.xmlrmi.xmljms.xml
Server Configuration
default-web-site.xmljazn-data.xml
3-20 Oracle9iAS Containers for J2EE User’s Guide
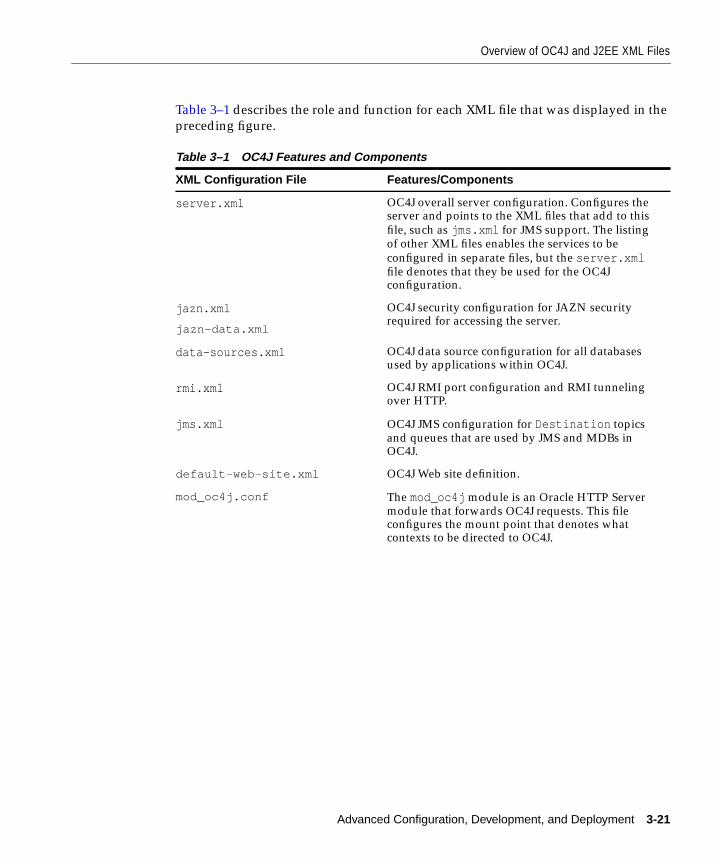
Overview of OC4J and J2EE XML Files
Table 3–1 describes the role and function for each XML file that was displayed in the
preceding figure.
Table 3–1 OC4J Features and Components
XML Configuration File Features/Components
server.xml OC4J overall server configuration. Configures theserver and points to the XML files that add to this
file, such as jms.xml for JMS support. The listingof other XML files enables the services to be
configured in separate files, but the server.xmlfile denotes that they be used for the OC4Jconfiguration.
jazn.xml
jazn-data.xml
OC4J security configuration for JAZN securityrequired for accessing the server.
data-sources.xml OC4J data source configuration for all databasesused by applications within OC4J.
rmi.xml OC4J RMI port configuration and RMI tunnelingover HTTP.
jms.xml OC4J JMS configuration for Destination topicsand queues that are used by JMS and MDBs inOC4J.
default-web-site.xml OC4J Web site definition.
mod_oc4j.conf The mod_oc4j module is an Oracle HTTP Servermodule that forwards OC4J requests. This fileconfigures the mount point that denotes whatcontexts to be directed to OC4J.
Advanced Configuration, Development, and Deployment 3-21
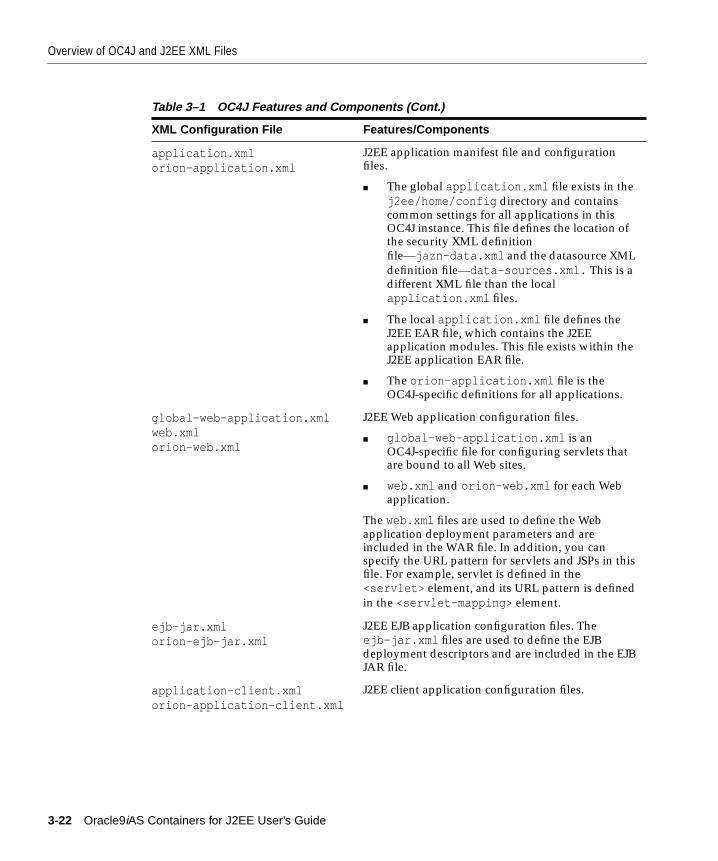
Overview of OC4J and J2EE XML Files
application.xmlorion-application.xml
J2EE application manifest file and configurationfiles.
■ The global application.xml file exists in the
j2ee/home/config directory and containscommon settings for all applications in thisOC4J instance. This file defines the location ofthe security XML definition
file—jazn-data.xml and the datasource XML
definition file—data-sources.xml. This is adifferent XML file than the local
application.xml files.
■ The local application.xml file defines theJ2EE EAR file, which contains the J2EEapplication modules. This file exists within theJ2EE application EAR file.
■ The orion-application.xml file is theOC4J-specific definitions for all applications.
global-web-application.xmlweb.xmlorion-web.xml
J2EE Web application configuration files.
■ global-web-application.xml is anOC4J-specific file for configuring servlets thatare bound to all Web sites.
■ web.xml and orion-web.xml for each Webapplication.
The web.xml files are used to define the Webapplication deployment parameters and areincluded in the WAR file. In addition, you canspecify the URL pattern for servlets and JSPs in thisfile. For example, servlet is defined in the
<servlet> element, and its URL pattern is defined
in the <servlet-mapping> element.
ejb-jar.xmlorion-ejb-jar.xml
J2EE EJB application configuration files. The
ejb-jar.xml files are used to define the EJBdeployment descriptors and are included in the EJBJAR file.
application-client.xmlorion-application-client.xml
J2EE client application configuration files.
Table 3–1 OC4J Features and Components (Cont.)
XML Configuration File Features/Components
3-22 Oracle9iAS Containers for J2EE User’s Guide
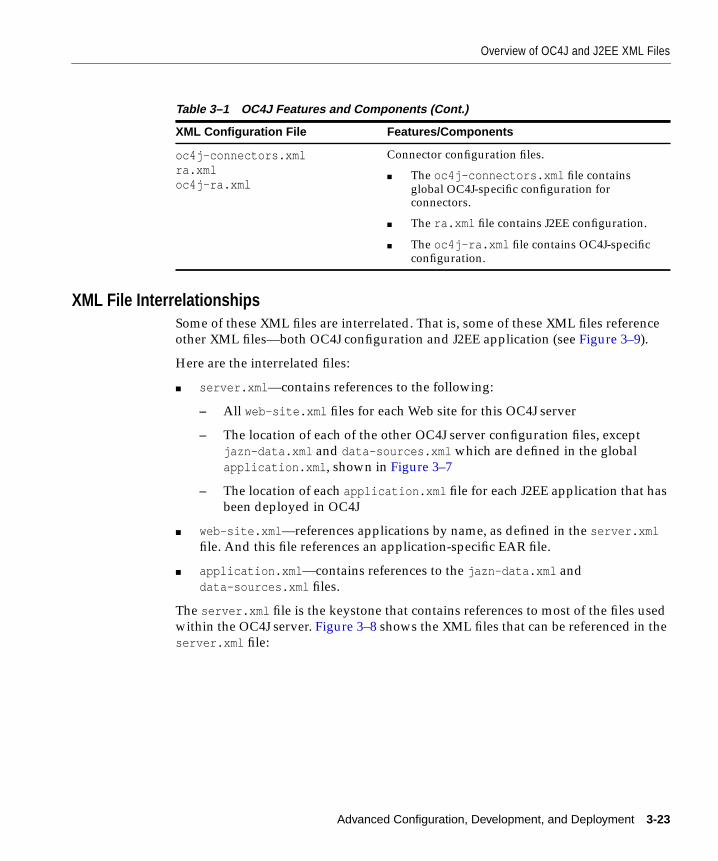
Overview of OC4J and J2EE XML Files
XML File InterrelationshipsSome of these XML files are interrelated. That is, some of these XML files reference
other XML files—both OC4J configuration and J2EE application (see Figure 3–9).
Here are the interrelated files:
■ server.xml —contains references to the following:
– All web-site.xml files for each Web site for this OC4J server
– The location of each of the other OC4J server configuration files, except
jazn-data.xml and data-sources.xml which are defined in the global
application.xml , shown in Figure 3–7
– The location of each application.xml file for each J2EE application that has
been deployed in OC4J
■ web-site.xml —references applications by name, as defined in the server.xmlfile. And this file references an application-specific EAR file.
■ application.xml —contains references to the jazn-data.xml and
data-sources.xml files.
The server.xml file is the keystone that contains references to most of the files used
within the OC4J server. Figure 3–8 shows the XML files that can be referenced in the
server.xml file:
oc4j-connectors.xmlra.xmloc4j-ra.xml
Connector configuration files.
■ The oc4j-connectors.xml file containsglobal OC4J-specific configuration forconnectors.
■ The ra.xml file contains J2EE configuration.
■ The oc4j-ra.xml file contains OC4J-specificconfiguration.
Table 3–1 OC4J Features and Components (Cont.)
XML Configuration File Features/Components
Advanced Configuration, Development, and Deployment 3-23
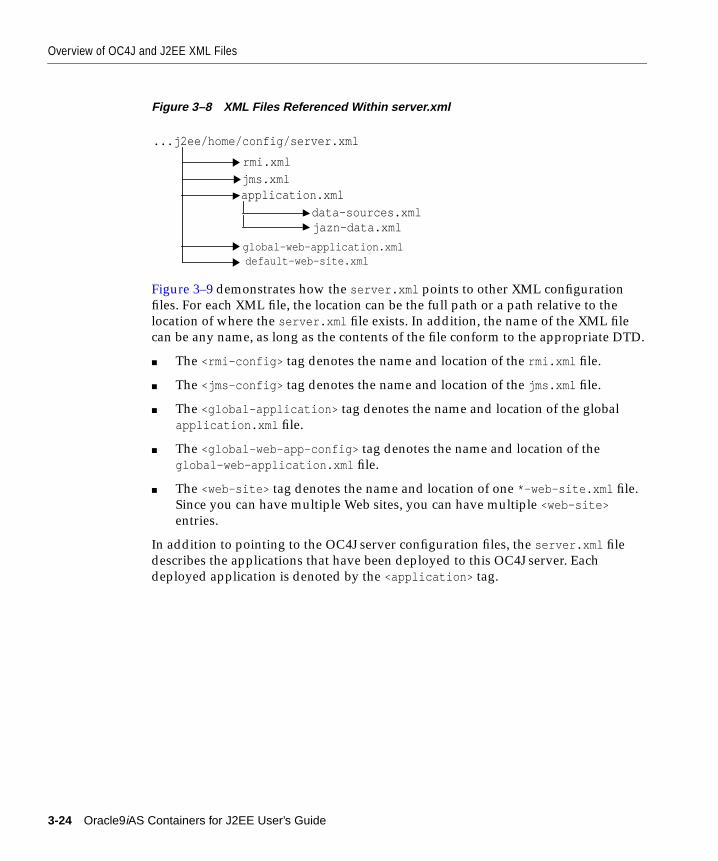
Overview of OC4J and J2EE XML Files
Figure 3–8 XML Files Referenced Within server.xml
Figure 3–9 demonstrates how the server.xml points to other XML configuration
files. For each XML file, the location can be the full path or a path relative to the
location of where the server.xml file exists. In addition, the name of the XML file
can be any name, as long as the contents of the file conform to the appropriate DTD.
■ The <rmi-config> tag denotes the name and location of the rmi.xml file.
■ The <jms-config> tag denotes the name and location of the jms.xml file.
■ The <global-application> tag denotes the name and location of the global
application.xml file.
■ The <global-web-app-config> tag denotes the name and location of the
global-web-application.xml file.
■ The <web-site> tag denotes the name and location of one *-web-site.xml file.
Since you can have multiple Web sites, you can have multiple <web-site>entries.
In addition to pointing to the OC4J server configuration files, the server.xml file
describes the applications that have been deployed to this OC4J server. Each
deployed application is denoted by the <application> tag.
...j2ee/home/config/server.xml
rmi.xmljms.xmlapplication.xml
data-sources.xmljazn-data.xml
global-web-application.xmldefault-web-site.xml
3-24 Oracle9iAS Containers for J2EE User’s Guide

Overview of OC4J and J2EE XML Files
Figure 3–9 Server.xml File and Related XML Files
Other tags for server.xml are described in "Elements in the server.xml File" on
page 3-19.
Note: If you understand the OC4J XML files from previous
releases of OC4J, you can simply change most of the OC4J server
XML configuration files by drilling to the OC4J Home Page, scroll
down to Administration, and click on Advanced Properties. From
here, you can modify the XML files using an Enterprise Manager
editor.
server.xml
<rmi ...> rmi.xml
jms.xml
application.xml
global-web-application.xml
default-web-site.xml
bank_application
inventory_application
<jms ...>
<global-application .. path="application.xml"/>
<global-web-app-config
<web-site path="./default-web-site.xml"/>
<application name="bank_application".../>
<application name="inventory_application ../>
path="global-web-application.xml"/>
Advanced Configuration, Development, and Deployment 3-25
What Happens When You Deploy?
What Happens When You Deploy?When you become more proficient with OC4J and deploying applications, you
should acquaint yourself with what OC4J does for you. The following sections help
you understand these tasks:
■ OC4J Tasks During Deployment
■ Configuration Verification of J2EE Applications
OC4J Tasks During DeploymentWhen you deploy your application, the following occurs:
OC4J opens the EAR file and reads the descriptors.
1. OC4J opens, parses the application.xml that exists in the EAR file. The
application.xml file lists all of the modules contained within the EAR file.
OC4J notes these modules and initializes the EAR environment.
2. OC4J reads the module deployment descriptors for each module type: Web
module, EJB module, connector module, or client module. The J2EE descriptors
are read into memory. If OC4J-specific descriptors are included, these are also
read into memory. The JAR and WAR file environments are initialized.
3. OC4J notes any unconfigured items that have defaults and writes these defaults
in the appropriate OC4J-specific deployment descriptor. Thus, if you did not
provide an OC4J-specific deployment descriptor, you will notice that OC4J
provides one written with certain defaults. If you did provide an OC4J-specific
deployment descriptor, you may notice that OC4J added elements.
4. OC4J reacts to the configuration details contained in both the J2EE deployment
descriptors and any OC4J-specific deployment descriptors. OC4J notes any J2EE
component configurations that require action on OC4J’s part, such as wrapping
beans with their interfaces.
5. After defaults have been added and necessary actions have been taken, OC4J
writes out the new module deployment descriptors to the
application-deployments/ directory. These are the descriptors that OC4J uses
when starting and restarting your application. But do not modify these
descriptors. Always change your deployment descriptors in the "master"
location.
6. OC4J copies the EAR file to the "master" directory. This defaults to the
applications/ directory. You can change the "master" directory in the Server
Properties page off of the OC4J Home Page. In the General section, modify the
3-26 Oracle9iAS Containers for J2EE User’s Guide
What Happens When You Deploy?
Application Directory field to the new location of the "master" directory. The
location of the directory is relative to /j2ee/home/config .
7. Finally, OC4J updates the server.xml file with the notation that this application
has been deployed.
Configuration Verification of J2EE ApplicationsAfter deployment, you can see your application configuration in the server.xmland web-site.xml files, as follows:
■ In server.xml , each existing application contains a line with an
<application name=... path=... auto-start="true" /> entry. The
auto-start attribute designates that you want this application automatically
started when OC4J starts.
■ In web-site.xml , a <web-app...> entry exists for each Web application that is
bound to the Web site upon OC4J startup. Because the name attribute is the
WAR filename (without the .WAR extension), there is one line for each WAR file
included in your J2EE application.
For each Web application binding included in a WAR file, the following line has
been added:
<web-app application="myapp" name="/private/myapp-web" root="/myapp"/>
■ The application attribute is the name provided in the server.xml as the
application name.
■ The name attribute is the name of the WAR file, without the .WAR extension.
■ The root attribute defines the root context for the application off of the Web
site. For example, if you defined your Web site as
"http://<ohs_host>:7777/j2ee" , then to initiate the application, point
your browser at "http://<ohs_host>:7777/j2ee/myapp" .
Note: Each time you deploy this EAR file without removing the
EAR file from the applications/ directory, the new deployment
renames the EAR file prepended with an underscore. It does not
copy over the EAR file. Instead, you can copy over the EAR file.
OC4J notices the change in the timestamp and redeploys.
Advanced Configuration, Development, and Deployment 3-27
Understanding and Configuring OC4J Listeners
Understanding and Configuring OC4J ListenersIncoming client requests use one of three protocols: AJP, HTTP, or RMI. AJP and
HTTP are used for HTTP requests. AJP is used between the OHS and OC4J
components. HTTP is used for HTTP requests directed past OHS to OC4J. RMI is
used for incoming EJB requests.
HTTP RequestsAll HTTP requests, whether through OHS or directly to OC4J, must have a listener
configured in an OC4J Web site. You can have two Web sites for each OC4J instance:
one for each protocol type. That is, one Web site is only for AJP requests and the
other is for HTTP requests. You cannot have one Web site listen for both types of
protocols. Thus, OC4J provides two Web site configuration files:
■ default-web-site.xml —This is the AJP protocol listener and the default for
most HTTP requests that use Oracle9iAS. After installation, the Oracle HTTP
Server front-end forwards incoming HTTP requests over the AJP port. The
OC4J Web server configuration file (default-web-site.xml ) indicates the AJP
listener port. The default-web-site.xml file defines the default AJP port as
zero. This enables OC4J and the Oracle HTTP Server to negotiate a port upon
startup. The range of port values that the AJP port can be is configured in the
OPMN configuration. See the High Availability chapter in the Oracle9iApplication Server Administrator’s Guide for more information on OPMN.
The following shows the entry in the default-web-site.xml for the default AJP
listener:
<web-site host="oc4j_host" port="0" protocol="ajp13" display-name="Default OC4J WebSite">
You can configure the AJP default Web site protocol in two places: Website
Properties or Advanced Properties off of the OC4J Home Page.
■ http-web-site.xml —This is the HTTP protocol listener. If you want to bypass
OHS and go directly to OC4J, you use the port number defined in this file.
However, you must be careful. The AJP port is chosen at random every time
OC4J is started. If it chooses the same port number that is hard-coded in this
Note: Wait for automatic startup to complete before trying to
access the client. The client fails on lookup if it tries to access before
the completion of these processes.
3-28 Oracle9iAS Containers for J2EE User’s Guide
Configuring Oracle HTTP Server With Another Web Context
XML file, there will be a conflict. If you use this method for incoming requests,
verify that the port number you choose is outside of the range for AJP port
numbers, which is defined in the OPMN configuration.
The default HTTP port is 7777. The following shows the entry in the
http-web-site.xml for an HTTP listener with a port number of 7777:
<web-site host="oc4j_host" port="7777" protocol="http" display-name="HTTP OC4J WebSite">
You access the http-web-site.xml file only in the Advanced Properties on the
OC4J Home Page.
RMI RequestsRMI protocol listener is set up in the RMI configuration—rmi.xml . It is separate
from the Web site configuration. EJB clients and the OC4J tools access the OC4J
server through a configured RMI port. The default RMI port is 23791. The following
shows the default RMI port number configured in the rmi.xml file:
<rmi-server port="23791" >
You can modify the rmi.xml file only in the Advanced Properties on the OC4J
Home Page.
Configuring Oracle HTTP Server With Another Web ContextThe mod_oc4j module in the Oracle HTTP Server is configured at install time to
direct all j2ee / context bound applications to the OC4J server. If you want to use a
different context, such as pubs /, you can add another mount for this context in the
mod_oc4j.conf configuration file.
To modify this file, drill down to the Oracle HTTP Server Page and select
mod_oc4j.conf . The file is presented for edits in the right-hand frame.
1. Find the Oc4jMount directive for the j2ee / directory. Copy it to another line.
The mount directive is as follows:
Oc4jMount /j2ee/* OC4Jworker
Note: In a UNIX environment, the port number should be greater
than 1024, unless the process has administrative privileges.
Advanced Configuration, Development, and Deployment 3-29
Building and Deploying Within a Directory
2. Modify the j2ee / context to your desired context. In our example, you would
have another line with a pubs / mount configuration. Assuming that the OC4J
worker name is OC4Jworker , then both lines would be as follows:
Oc4jMount /j2ee/* OC4JworkerOc4jMount /pubs/* OC4Jworker
3. Restart the Oracle HTTP Server to pick up the new mount point.
Then all incoming requests for the pubs/ context will be directed to the OC4J
server. Note that when you deploy an application using the deployment wizard, the
wizard automatically adds a mount point as described here for your URL mapping.
See the Oracle HTTP Server Administration Guide for complete details on the
mod_oc4j module configuration.
Building and Deploying Within a DirectoryWhen developing applications, you want to quickly modify, compile, and execute
your classes. OC4J can automatically deploy your applications as you are
developing them within an expanded directory format. OC4J automatically deploys
applications if the timestamp of the top directory, noted by <appname> in
Figure 3–10, changes. This is the directory that server.xml knows as the "master"
location. Normally, you develop under the j2ee/home/applications directory.
The application must be placed in the "master" directory in the same hierarchical
format as necessary for JAR, WAR, and EAR files. For example, if <appname> is the
directory where your J2EE application resides, Figure 3–10 displays the necessary
directory structure.
Note: The OC4Jworker is defined further down in the
mod_oc4j.conf file to be the OC4J instance.
3-30 Oracle9iAS Containers for J2EE User’s Guide
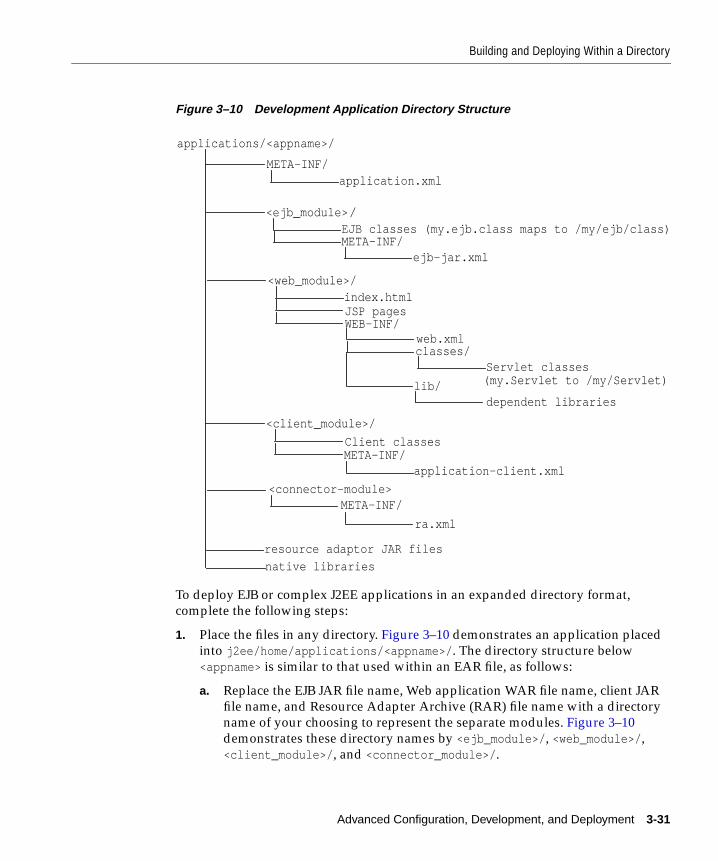
Building and Deploying Within a Directory
Figure 3–10 Development Application Directory Structure
To deploy EJB or complex J2EE applications in an expanded directory format,
complete the following steps:
1. Place the files in any directory. Figure 3–10 demonstrates an application placed
into j2ee/home/applications/<appname>/ . The directory structure below
<appname> is similar to that used within an EAR file, as follows:
a. Replace the EJB JAR file name, Web application WAR file name, client JAR
file name, and Resource Adapter Archive (RAR) file name with a directory
name of your choosing to represent the separate modules. Figure 3–10
demonstrates these directory names by <ejb_module>/ , <web_module>/ ,
<client_module>/ , and <connector_module>/ .
applications/<appname>/
META-INF/application.xml
<ejb_module>EJB classes (my.ejb.class maps to /my/ejb/class)META-INF/
ejb-jar.xml
<web_module>/index.htmlJSP pagesWEB-INF/
web.xmlclasses/
Servlet classes
<client_module>/
Client classesMETA-INF/
application-client.xml
lib/dependent libraries
/
(my.Servlet to /my/Servlet)
<connector-module>META-INF/
ra.xml
resource adaptor JAR filesnative libraries
Advanced Configuration, Development, and Deployment 3-31
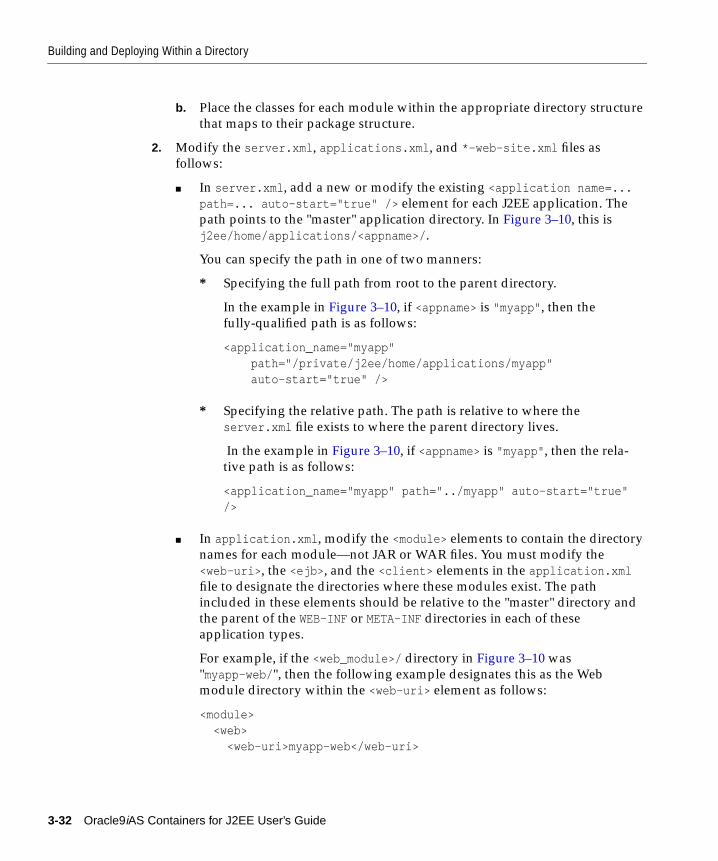
Building and Deploying Within a Directory
b. Place the classes for each module within the appropriate directory structure
that maps to their package structure.
2. Modify the server.xml , applications.xml , and *-web-site.xml files as
follows:
■ In server.xml , add a new or modify the existing <application name=...path=... auto-start="true" /> element for each J2EE application. The
path points to the "master" application directory. In Figure 3–10, this is
j2ee/home/applications/<appname>/ .
You can specify the path in one of two manners:
* Specifying the full path from root to the parent directory.
In the example in Figure 3–10, if <appname> is "myapp" , then the
fully-qualified path is as follows:
<application_name="myapp" path="/private/j2ee/home/applications/myapp" auto-start="true" />
* Specifying the relative path. The path is relative to where the
server.xml file exists to where the parent directory lives.
In the example in Figure 3–10, if <appname> is "myapp" , then the rela-
tive path is as follows:
<application_name="myapp" path="../myapp" auto-start="true"/>
■ In application.xml , modify the <module> elements to contain the directory
names for each module—not JAR or WAR files. You must modify the
<web-uri> , the <ejb> , and the <client> elements in the application.xmlfile to designate the directories where these modules exist. The path
included in these elements should be relative to the "master" directory and
the parent of the WEB-INF or META-INF directories in each of these
application types.
For example, if the <web_module>/ directory in Figure 3–10 was
"myapp-web/ ", then the following example designates this as the Web
module directory within the <web-uri> element as follows:
<module> <web> <web-uri>myapp-web</web-uri>
3-32 Oracle9iAS Containers for J2EE User’s Guide
Building and Deploying Within a Directory
</web></module>
■ In the *-web-site.xml file, add a <web-app...> element for each Web
application. This is important, because it binds the Web application within
the Web site. The application attribute value should be the same value as
that provided in the server.xml file. The name attribute should be the
directory for the Web application. Note that the directory path given in the
name element follows the same rules as for the path in the <web-uri>element in the application.xml file.
To bind the"myapp" Web application, add the following:
<web-app application="myapp" name="myapp/myapp-web" root="/myapp"/>
Note: You achieve better performance if you are deploying with a
JAR file. During execution, the entire JAR file is loaded into
memory and indexed. This is faster than reading in each class from
the development directory when necessary.
Advanced Configuration, Development, and Deployment 3-33

Building and Deploying Within a Directory
3-34 Oracle9iAS Containers for J2EE User’s Guide
Data Sources P
4
Data Sources PrimerThis chapter describes how to use the pre-installed default data source in your OC4J
application. A data source, which is the instantiation of an object that implements
the javax.sql.DataSource interface, enables you to retrieve a connection to a
database server.
This chapter covers the following topics:
■ Introduction
■ Definition of Data Sources
■ Retrieving a Connection From a Data Source
For more information on data sources, see the Data Source chapter in the Oracle9iASContainers for J2EE Services Guide.
rimer 4-1
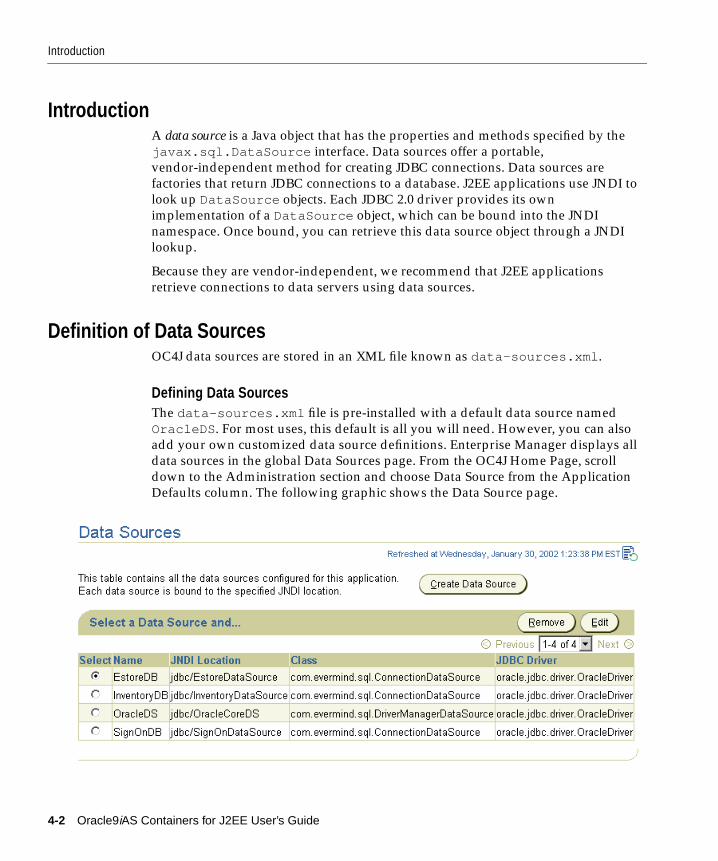
Introduction
IntroductionA data source is a Java object that has the properties and methods specified by the
javax.sql.DataSource interface. Data sources offer a portable,
vendor-independent method for creating JDBC connections. Data sources are
factories that return JDBC connections to a database. J2EE applications use JNDI to
look up DataSource objects. Each JDBC 2.0 driver provides its own
implementation of a DataSource object, which can be bound into the JNDI
namespace. Once bound, you can retrieve this data source object through a JNDI
lookup.
Because they are vendor-independent, we recommend that J2EE applications
retrieve connections to data servers using data sources.
Definition of Data SourcesOC4J data sources are stored in an XML file known as data-sources.xml .
Defining Data SourcesThe data-sources.xml file is pre-installed with a default data source named
OracleDS . For most uses, this default is all you will need. However, you can also
add your own customized data source definitions. Enterprise Manager displays all
data sources in the global Data Sources page. From the OC4J Home Page, scroll
down to the Administration section and choose Data Source from the Application
Defaults column. The following graphic shows the Data Source page.
4-2 Oracle9iAS Containers for J2EE User’s Guide
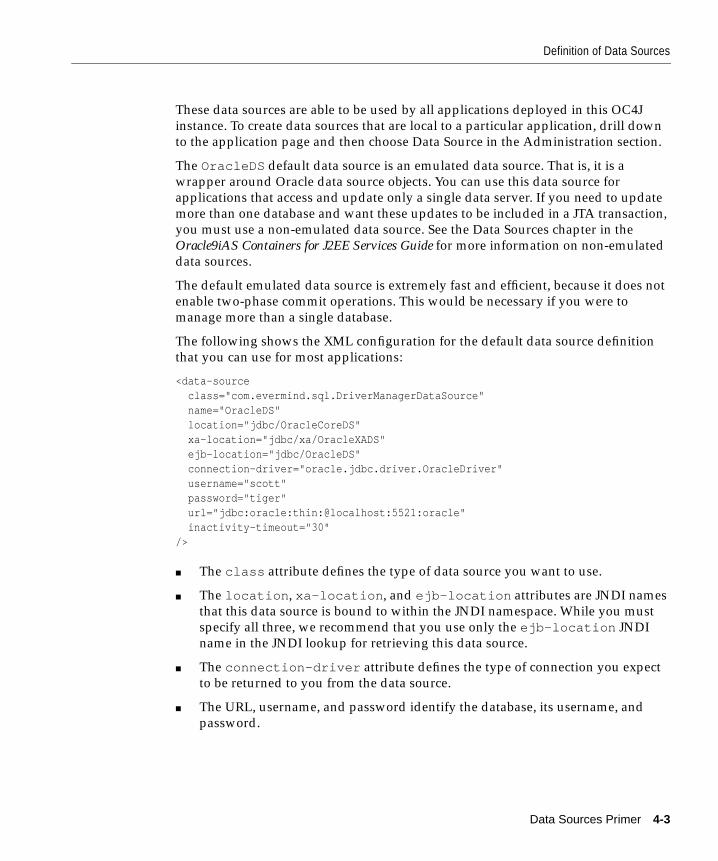
Definition of Data Sources
These data sources are able to be used by all applications deployed in this OC4J
instance. To create data sources that are local to a particular application, drill down
to the application page and then choose Data Source in the Administration section.
The OracleDS default data source is an emulated data source. That is, it is a
wrapper around Oracle data source objects. You can use this data source for
applications that access and update only a single data server. If you need to update
more than one database and want these updates to be included in a JTA transaction,
you must use a non-emulated data source. See the Data Sources chapter in the
Oracle9iAS Containers for J2EE Services Guide for more information on non-emulated
data sources.
The default emulated data source is extremely fast and efficient, because it does not
enable two-phase commit operations. This would be necessary if you were to
manage more than a single database.
The following shows the XML configuration for the default data source definition
that you can use for most applications:
<data-source class="com.evermind.sql.DriverManagerDataSource" name="OracleDS" location="jdbc/OracleCoreDS" xa-location="jdbc/xa/OracleXADS" ejb-location="jdbc/OracleDS" connection-driver="oracle.jdbc.driver.OracleDriver" username="scott" password="tiger" url="jdbc:oracle:thin:@localhost:5521:oracle" inactivity-timeout="30"/>
■ The class attribute defines the type of data source you want to use.
■ The location , xa-location , and ejb-location attributes are JNDI names
that this data source is bound to within the JNDI namespace. While you must
specify all three, we recommend that you use only the ejb-location JNDI
name in the JNDI lookup for retrieving this data source.
■ The connection-driver attribute defines the type of connection you expect
to be returned to you from the data source.
■ The URL, username, and password identify the database, its username, and
password.
Data Sources Primer 4-3
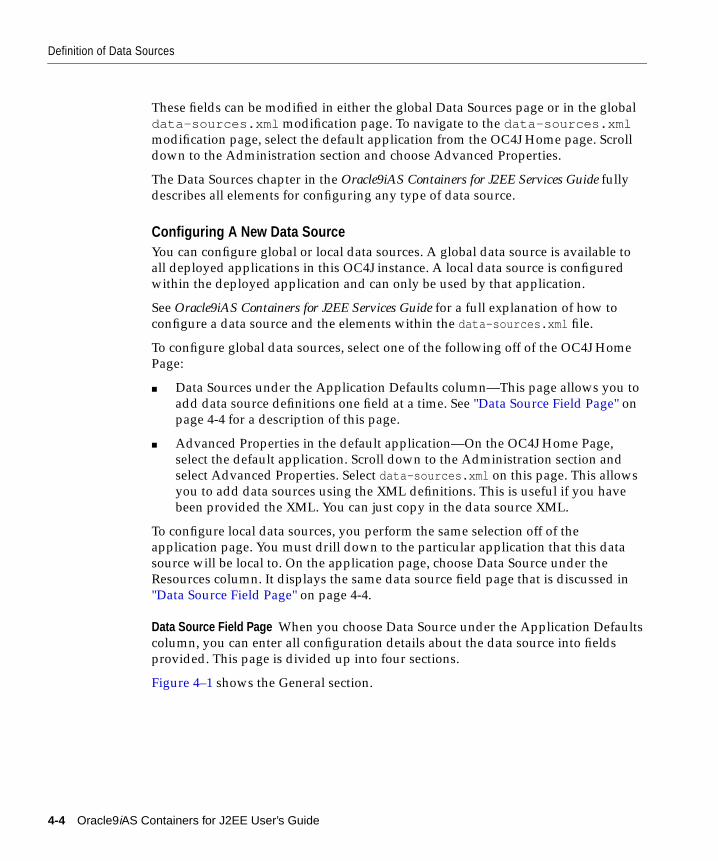
Definition of Data Sources
These fields can be modified in either the global Data Sources page or in the global
data-sources.xml modification page. To navigate to the data-sources.xmlmodification page, select the default application from the OC4J Home page. Scroll
down to the Administration section and choose Advanced Properties.
The Data Sources chapter in the Oracle9iAS Containers for J2EE Services Guide fully
describes all elements for configuring any type of data source.
Configuring A New Data SourceYou can configure global or local data sources. A global data source is available to
all deployed applications in this OC4J instance. A local data source is configured
within the deployed application and can only be used by that application.
See Oracle9iAS Containers for J2EE Services Guide for a full explanation of how to
configure a data source and the elements within the data-sources.xml file.
To configure global data sources, select one of the following off of the OC4J Home
Page:
■ Data Sources under the Application Defaults column—This page allows you to
add data source definitions one field at a time. See "Data Source Field Page" on
page 4-4 for a description of this page.
■ Advanced Properties in the default application—On the OC4J Home Page,
select the default application. Scroll down to the Administration section and
select Advanced Properties. Select data-sources.xml on this page. This allows
you to add data sources using the XML definitions. This is useful if you have
been provided the XML. You can just copy in the data source XML.
To configure local data sources, you perform the same selection off of the
application page. You must drill down to the particular application that this data
source will be local to. On the application page, choose Data Source under the
Resources column. It displays the same data source field page that is discussed in
"Data Source Field Page" on page 4-4.
Data Source Field Page When you choose Data Source under the Application Defaults
column, you can enter all configuration details about the data source into fields
provided. This page is divided up into four sections.
Figure 4–1 shows the General section.
4-4 Oracle9iAS Containers for J2EE User’s Guide
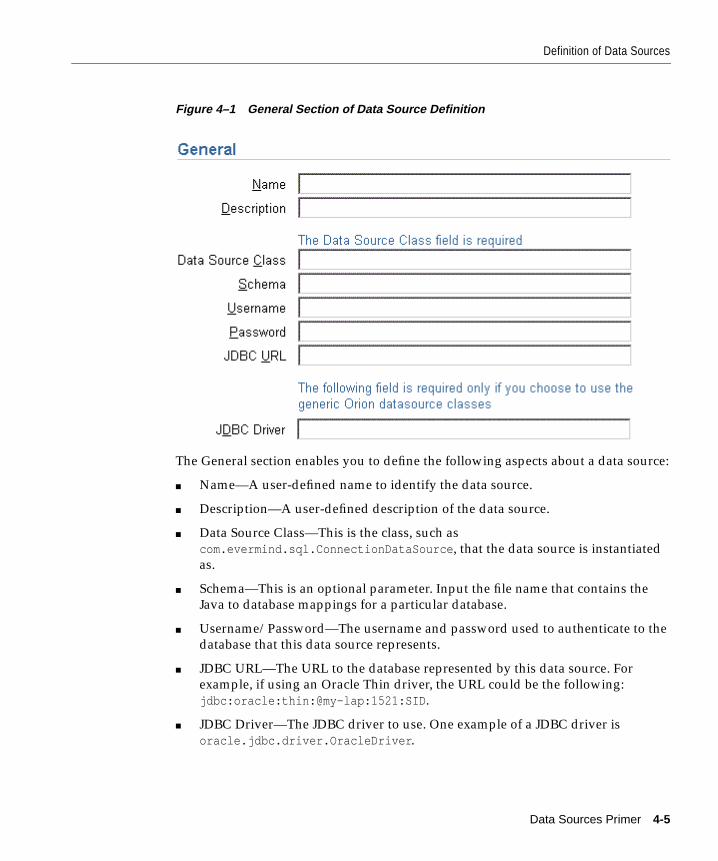
Definition of Data Sources
Figure 4–1 General Section of Data Source Definition
The General section enables you to define the following aspects about a data source:
■ Name—A user-defined name to identify the data source.
■ Description—A user-defined description of the data source.
■ Data Source Class—This is the class, such as
com.evermind.sql.ConnectionDataSource , that the data source is instantiated
as.
■ Schema—This is an optional parameter. Input the file name that contains the
Java to database mappings for a particular database.
■ Username/Password—The username and password used to authenticate to the
database that this data source represents.
■ JDBC URL—The URL to the database represented by this data source. For
example, if using an Oracle Thin driver, the URL could be the following:
jdbc:oracle:thin:@my-lap:1521:SID .
■ JDBC Driver—The JDBC driver to use. One example of a JDBC driver is
oracle.jdbc.driver.OracleDriver .
Data Sources Primer 4-5
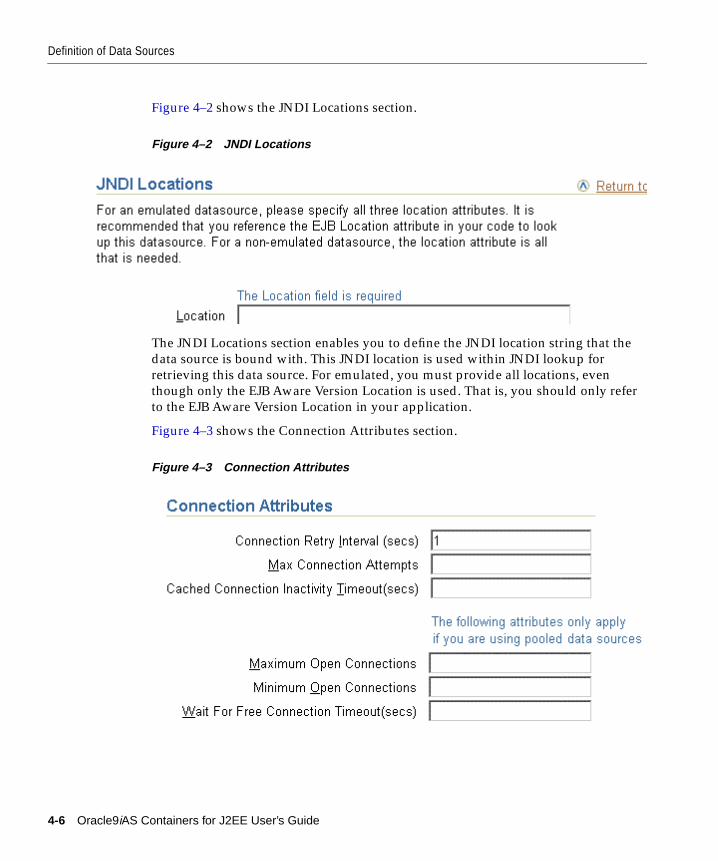
Definition of Data Sources
Figure 4–2 shows the JNDI Locations section.
Figure 4–2 JNDI Locations
The JNDI Locations section enables you to define the JNDI location string that the
data source is bound with. This JNDI location is used within JNDI lookup for
retrieving this data source. For emulated, you must provide all locations, even
though only the EJB Aware Version Location is used. That is, you should only refer
to the EJB Aware Version Location in your application.
Figure 4–3 shows the Connection Attributes section.
Figure 4–3 Connection Attributes
4-6 Oracle9iAS Containers for J2EE User’s Guide
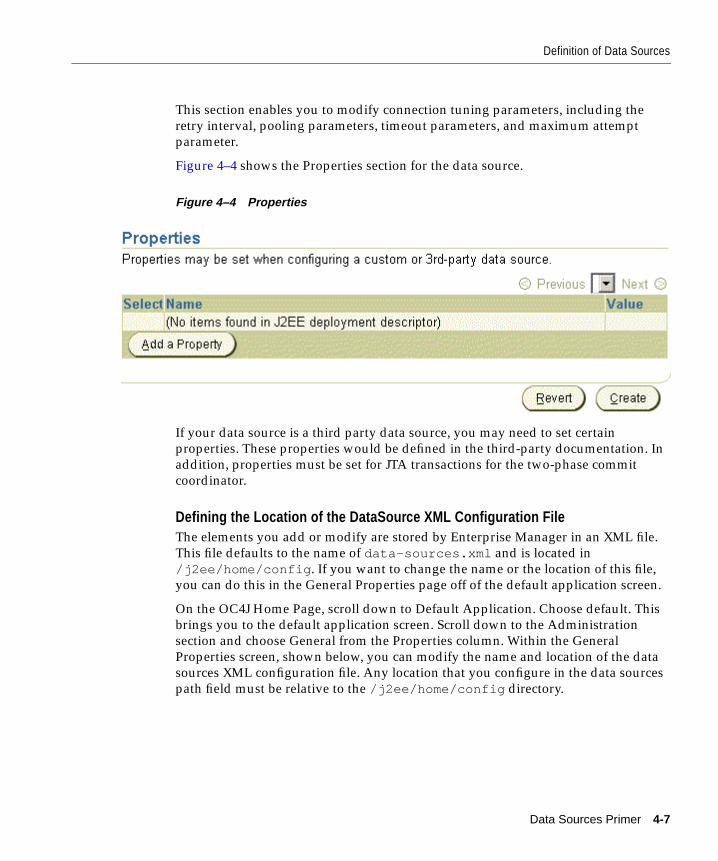
Definition of Data Sources
This section enables you to modify connection tuning parameters, including the
retry interval, pooling parameters, timeout parameters, and maximum attempt
parameter.
Figure 4–4 shows the Properties section for the data source.
Figure 4–4 Properties
If your data source is a third party data source, you may need to set certain
properties. These properties would be defined in the third-party documentation. In
addition, properties must be set for JTA transactions for the two-phase commit
coordinator.
Defining the Location of the DataSource XML Configuration FileThe elements you add or modify are stored by Enterprise Manager in an XML file.
This file defaults to the name of data-sources.xml and is located in
/j2ee/home/config . If you want to change the name or the location of this file,
you can do this in the General Properties page off of the default application screen.
On the OC4J Home Page, scroll down to Default Application. Choose default. This
brings you to the default application screen. Scroll down to the Administration
section and choose General from the Properties column. Within the General
Properties screen, shown below, you can modify the name and location of the data
sources XML configuration file. Any location that you configure in the data sources
path field must be relative to the /j2ee/home/config directory.
Data Sources Primer 4-7
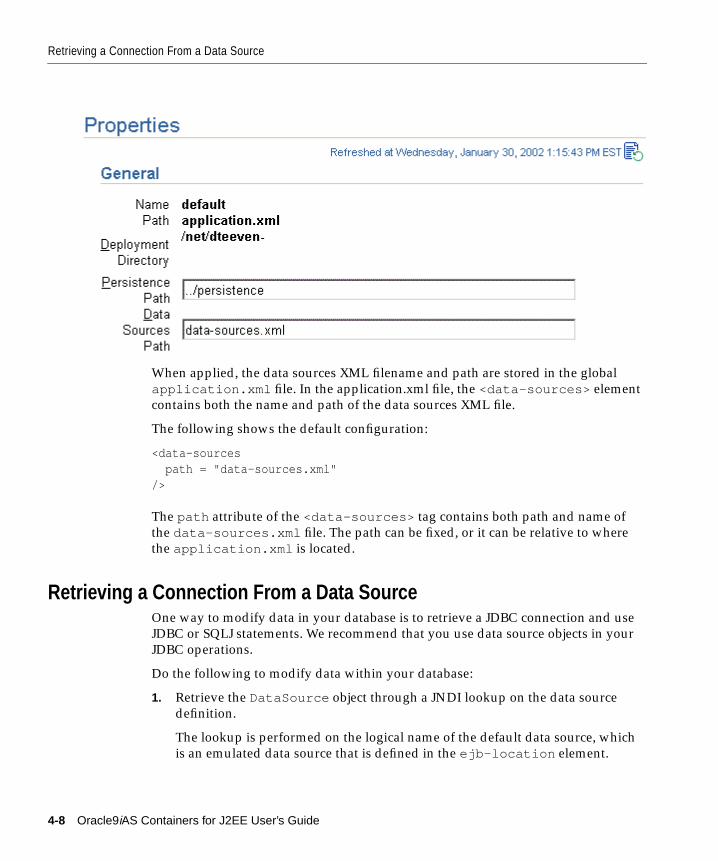
Retrieving a Connection From a Data Source
When applied, the data sources XML filename and path are stored in the global
application.xml file. In the application.xml file, the <data-sources> element
contains both the name and path of the data sources XML file.
The following shows the default configuration:
<data-sources path = "data-sources.xml"/>
The path attribute of the <data-sources> tag contains both path and name of
the data-sources.xml file. The path can be fixed, or it can be relative to where
the application.xml is located.
Retrieving a Connection From a Data SourceOne way to modify data in your database is to retrieve a JDBC connection and use
JDBC or SQLJ statements. We recommend that you use data source objects in your
JDBC operations.
Do the following to modify data within your database:
1. Retrieve the DataSource object through a JNDI lookup on the data source
definition.
The lookup is performed on the logical name of the default data source, which
is an emulated data source that is defined in the ejb-location element.
put default general properties here.
4-8 Oracle9iAS Containers for J2EE User’s Guide
Retrieving a Connection From a Data Source
You must always cast or narrow the object that JNDI returns to the
DataSource , because the JNDI lookup() method returns a Java object .
2. Create a connection to the database represented by the DataSource object.
Once you have the connection, you can construct and execute JDBC statements
against this database specified by the data source.
The following code represents the preceding steps:
Context ic = new InitialContext();DataSource ds = (DataSource) ic.lookup("jdbc/OracleDS");Connection conn = ds.getConnection();
Use the following methods of the DataSource object in your application code to
retrieve the connection to your database:
■ getConnection();
The username and password are those defined in the data source definition.
■ getConnection(String username, String password);
This username and password overrides the username and password defined in
the data source definition.
You can cast the connection object returned on the getConnection method to
oracle.jdbc.OracleConnection and use all the Oracle extensions. This is
shown below:
oracle.jdbc.OracleConnection conn =(oracle.jdbc.OracleConnection) ds.getConnection();
Once retrieved, you can execute SQL statements against the database either through
SQLJ or JDBC.
For more information, see the Data Sources chapter in the Oracle9iAS Containers forJ2EE Services Guide.
Data Sources Primer 4-9

Retrieving a Connection From a Data Source
4-10 Oracle9iAS Containers for J2EE User’s Guide
Servlet Prim
5
Servlet PrimerThis chapter introduces Java servlets and the Oracle9iAS Containers for J2EE
(OC4J). Read this chapter if you are not familiar with servlets or if you want to
refresh your knowledge of servlets. For more extensive information about servlets,
see the Oracle9iAS Containers for J2EE Servlet Developer’s Guide.
This chapter covers the following topics:
■ What Is a Servlet?
■ Two Servlet Examples
■ Session Tracking
■ Servlet Filters
■ Learning More About Servlets
er 5-1
What Is a Servlet?
What Is a Servlet?A servlet is a Java program that runs in a J2EE application server, such as OC4J, and
receives and responds to HTTP requests from clients. Think of a servlet as the
server-side counterpart to a Java applet. A servlet is one of the four application
component types of a J2EE application. Others are applets and application client
programs on the client side, and EJBs on the server side. Servlets are managed by
the OC4J servlet container; EJBs are managed by the OC4J EJB container. These
containers, together with the JavaServer Pages container, form the core of OC4J.
JavaServer Pages (JSP) is another server-side component type. JSP pages also
involve the servlet container, because the JSP container itself is a servlet and is
therefore executed by the servlet container. The JSP container translates JSP pages
into page implementation classes, which are executed by the JSP container but
function similarly to servlets. See Chapter 6, "JSP Primer" and the Oracle9iASContainers for J2EE Support for JavaServer Pages Reference for more information about
JSP pages.
Most servlets generate HTML text, which is then sent back to the client for display
by the Web browser, or sent on to other components in the application. Servlets can
also generate XML, to encapsulate data and send the data to the client or to other
components.
The Servlet ContainerA servlet differs from a Java application client in that is has no static main()method. Therefore, a servlet must execute under the control of a servlet container,
because it is the container that calls the methods of the servlet and provides services
that the servlet might need when executing.
The servlet itself overrides the access methods (implemented in the GenericServletor the HttpServlet classes) that it needs to process the request and return the
response. For example, most servlets override the doGet() and doPost() methods
(or both) of the HttpServlet to process HTTP GET and POST requests.
The servlet container provides the servlet easy access to properties of the HTTP
request, such as its headers and parameters. In addition, a servlet can use other Java
APIs such as JDBC to access a database, RMI to call remote objects, or JMS to
perform asynchronous messaging, plus many other Java and J2EE services.
5-2 Oracle9iAS Containers for J2EE User’s Guide
Two Servlet Examples
Servlet PerformanceBecause servlets are written in the Java programming language, they are supported
on any platform that has a Java virtual machine and a Web server that supports
servlets. You can use servlets on different platforms without recompiling and you
can package servlets together with associated files such as graphics, sounds, and
other data to make a complete Web application. This greatly simplifies application
development.
It also means that your servlet-based application that was developed to run on
another application server can be ported to OC4J with little effort. If your
application was developed for an application server that complies with J2EE, then
the porting effort is minimal.
Servlets outperform earlier ways of generating dynamic HTML, such as server-side
includes or CGI scripts. Once a servlet is loaded into memory, it can run on a single
lightweight thread; CGI scripts must be loaded in a different process for every
request.
A servlet, along with optional servlet filters, relates to the servlet container and a
client, such as a Web browser. When the Web listener is the Oracle HTTP Server,
then the connection to the OC4J servlet container is through the mod_oc4j module.
See the Oracle HTTP Server Administration Guide for details.
Two Servlet ExamplesA good way to learn about servlets and how to code them is to view some simple
servlet examples. This section displays the code for two servlets and annotates the
code with comments. For simplicity, numbered callouts are located beside sections
of code and the corresponding descriptions for each number section appears below
the code example.
Servlet Primer 5-3
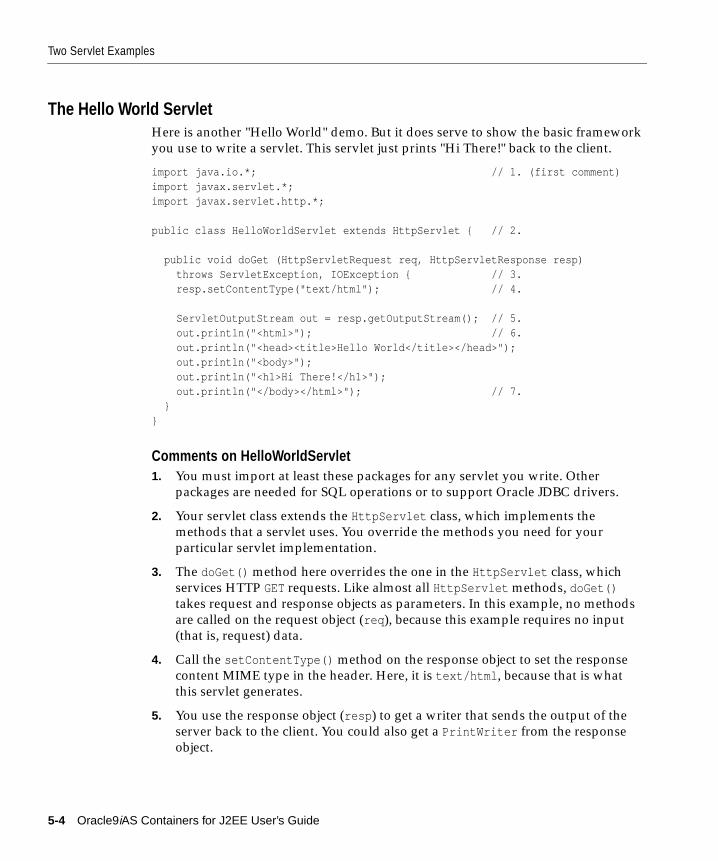
Two Servlet Examples
The Hello World ServletHere is another "Hello World" demo. But it does serve to show the basic framework
you use to write a servlet. This servlet just prints "Hi There!" back to the client.
import java.io.*; // 1. (first comment)import javax.servlet.*;import javax.servlet.http.*;
public class HelloWorldServlet extends HttpServlet { // 2.
public void doGet (HttpServletRequest req, HttpServletResponse resp) throws ServletException, IOException { // 3. resp.setContentType("text/html"); // 4.
ServletOutputStream out = resp.getOutputStream(); // 5. out.println("<html>"); // 6. out.println("<head><title>Hello World</title></head>"); out.println("<body>"); out.println("<h1>Hi There!</h1>"); out.println("</body></html>"); // 7. }}
Comments on HelloWorldServlet1. You must import at least these packages for any servlet you write. Other
packages are needed for SQL operations or to support Oracle JDBC drivers.
2. Your servlet class extends the HttpServlet class, which implements the
methods that a servlet uses. You override the methods you need for your
particular servlet implementation.
3. The doGet() method here overrides the one in the HttpServlet class, which
services HTTP GET requests. Like almost all HttpServlet methods, doGet()takes request and response objects as parameters. In this example, no methods
are called on the request object (req ), because this example requires no input
(that is, request) data.
4. Call the setContentType() method on the response object to set the response
content MIME type in the header. Here, it is text/html , because that is what
this servlet generates.
5. You use the response object (resp ) to get a writer that sends the output of the
server back to the client. You could also get a PrintWriter from the response
object.
5-4 Oracle9iAS Containers for J2EE User’s Guide
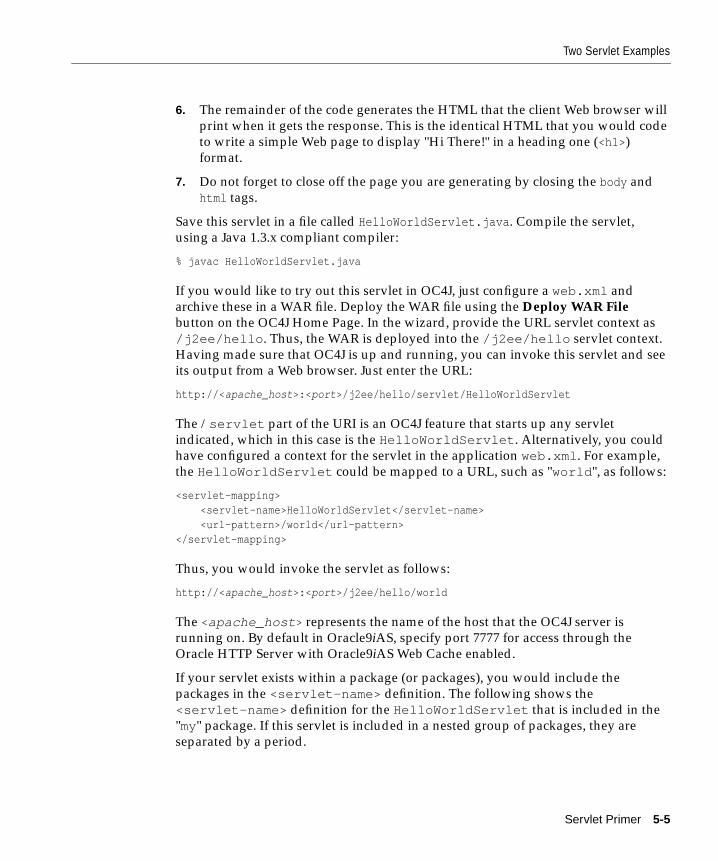
Two Servlet Examples
6. The remainder of the code generates the HTML that the client Web browser will
print when it gets the response. This is the identical HTML that you would code
to write a simple Web page to display "Hi There!" in a heading one (<h1> )
format.
7. Do not forget to close off the page you are generating by closing the body and
html tags.
Save this servlet in a file called HelloWorldServlet.java . Compile the servlet,
using a Java 1.3.x compliant compiler:
% javac HelloWorldServlet.java
If you would like to try out this servlet in OC4J, just configure a web.xml and
archive these in a WAR file. Deploy the WAR file using the Deploy WAR Filebutton on the OC4J Home Page. In the wizard, provide the URL servlet context as
/j2ee/hello . Thus, the WAR is deployed into the /j2ee/hello servlet context.
Having made sure that OC4J is up and running, you can invoke this servlet and see
its output from a Web browser. Just enter the URL:
http://< apache_host >:< port >/j2ee/hello/servlet/HelloWorldServlet
The /servlet part of the URI is an OC4J feature that starts up any servlet
indicated, which in this case is the HelloWorldServlet . Alternatively, you could
have configured a context for the servlet in the application web.xml . For example,
the HelloWorldServlet could be mapped to a URL, such as "world ", as follows:
<servlet-mapping> <servlet-name>HelloWorldServlet</servlet-name> <url-pattern>/world</url-pattern></servlet-mapping>
Thus, you would invoke the servlet as follows:
http://< apache_host >:< port >/j2ee/hello/world
The <apache_host > represents the name of the host that the OC4J server is
running on. By default in Oracle9iAS, specify port 7777 for access through the
Oracle HTTP Server with Oracle9iAS Web Cache enabled.
If your servlet exists within a package (or packages), you would include the
packages in the <servlet-name> definition. The following shows the
<servlet-name> definition for the HelloWorldServlet that is included in the
"my" package. If this servlet is included in a nested group of packages, they are
separated by a period.
Servlet Primer 5-5
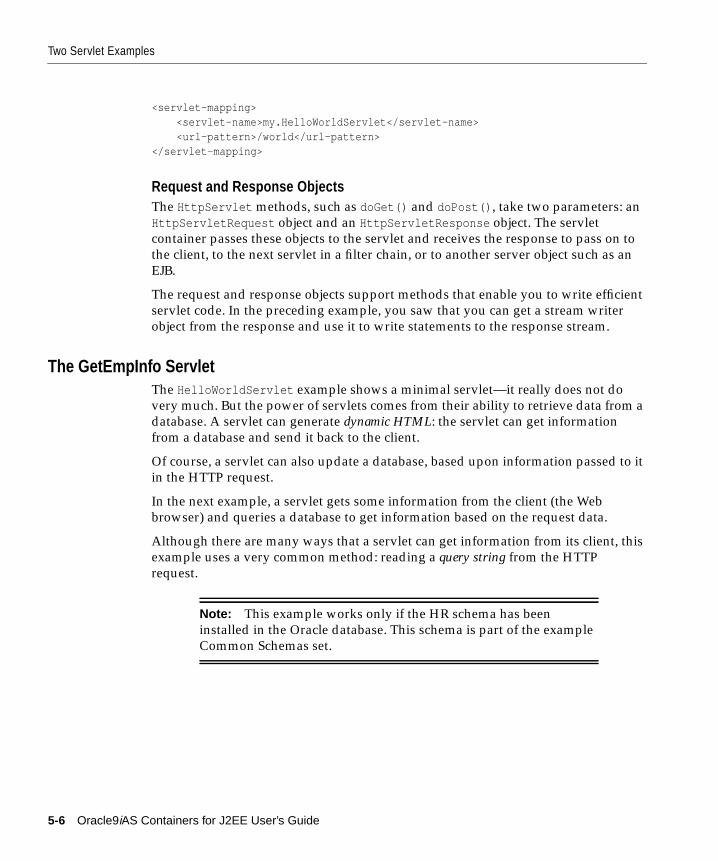
Two Servlet Examples
<servlet-mapping> <servlet-name>my.HelloWorldServlet</servlet-name> <url-pattern>/world</url-pattern></servlet-mapping>
Request and Response ObjectsThe HttpServlet methods, such as doGet() and doPost() , take two parameters: an
HttpServletRequest object and an HttpServletResponse object. The servlet
container passes these objects to the servlet and receives the response to pass on to
the client, to the next servlet in a filter chain, or to another server object such as an
EJB.
The request and response objects support methods that enable you to write efficient
servlet code. In the preceding example, you saw that you can get a stream writer
object from the response and use it to write statements to the response stream.
The GetEmpInfo ServletThe HelloWorldServlet example shows a minimal servlet—it really does not do
very much. But the power of servlets comes from their ability to retrieve data from a
database. A servlet can generate dynamic HTML: the servlet can get information
from a database and send it back to the client.
Of course, a servlet can also update a database, based upon information passed to it
in the HTTP request.
In the next example, a servlet gets some information from the client (the Web
browser) and queries a database to get information based on the request data.
Although there are many ways that a servlet can get information from its client, this
example uses a very common method: reading a query string from the HTTP
request.
Note: This example works only if the HR schema has been
installed in the Oracle database. This schema is part of the example
Common Schemas set.
5-6 Oracle9iAS Containers for J2EE User’s Guide

Two Servlet Examples
The HTML FormThe Web browser accesses a form in a page that is served through the OC4J Web
listener. First, enter the following text into a file. Next, name the file EmpInfo.html .
<html>
<head><title>Query the Employees Table</title></head>
<body><form method=GET ACTION="/servlet/GetEmpInfo">The query is<br>SELECT LAST_NAME, EMPLOYEE_ID FROM EMPLOYEES WHERE LAST NAME LIKE ?.<p>
Enter the WHERE clause ? parameter (use % for wildcards).<br>Example: 'S%':<br><input type=text name="queryVal"><p><input type=submit></form>
</body></html>
The ServletThe servlet that the preceding HTML page calls takes the input from a query string.
The input is the completion of the WHERE clause in the SELECT statement. The
servlet then appends this input to complete the database query. Most of the
complexity of this servlet comes from the JDBC code required to connect to the data
server and retrieve the query rows. If you are not familiar with JDBC, see the
Oracle9i JDBC Developer’s Guide and Reference.
Here is the code for the servlet:
import javax.servlet.*;import javax.servlet.http.*;import javax.naming.*; //1. (see comments below)import javax.sql.*; // 2.import oracle.jdbc.*;
public class GetEmpInfo extends HttpServlet {
Servlet Primer 5-7
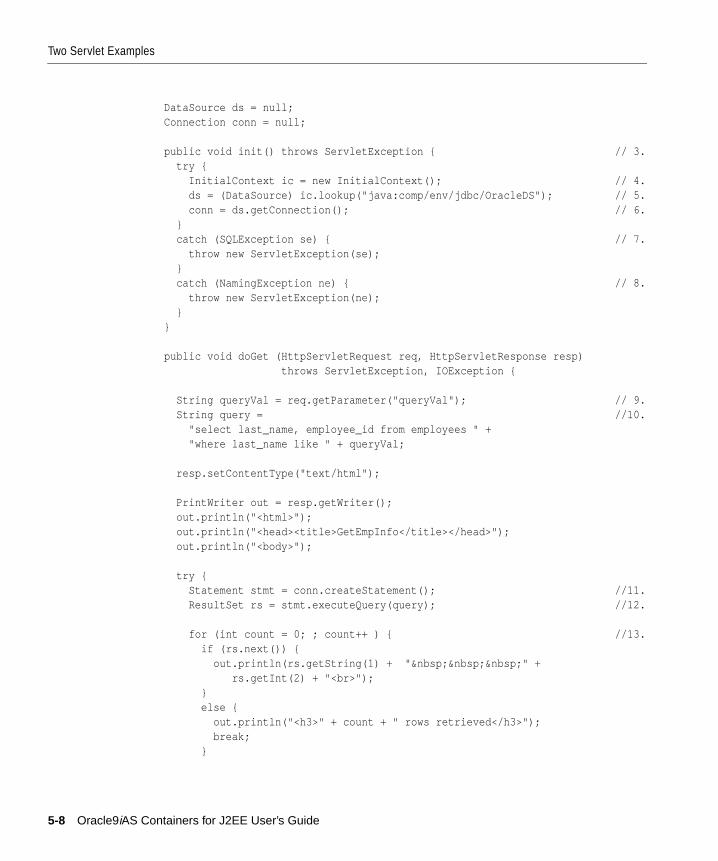
Two Servlet Examples
DataSource ds = null; Connection conn = null;
public void init() throws ServletException { // 3. try { InitialContext ic = new InitialContext(); // 4. ds = (DataSource) ic.lookup("java:comp/env/jdbc/OracleDS"); // 5. conn = ds.getConnection(); // 6. } catch (SQLException se) { // 7. throw new ServletException(se); } catch (NamingException ne) { // 8. throw new ServletException(ne); } }
public void doGet (HttpServletRequest req, HttpServletResponse resp) throws ServletException, IOException {
String queryVal = req.getParameter("queryVal"); // 9. String query = //10. "select last_name, employee_id from employees " + "where last_name like " + queryVal;
resp.setContentType("text/html");
PrintWriter out = resp.getWriter(); out.println("<html>"); out.println("<head><title>GetEmpInfo</title></head>"); out.println("<body>");
try { Statement stmt = conn.createStatement(); //11. ResultSet rs = stmt.executeQuery(query); //12.
for (int count = 0; ; count++ ) { //13. if (rs.next()) { out.println(rs.getString(1) + " " + rs.getInt(2) + "<br>"); } else { out.println("<h3>" + count + " rows retrieved</h3>"); break; }
5-8 Oracle9iAS Containers for J2EE User’s Guide
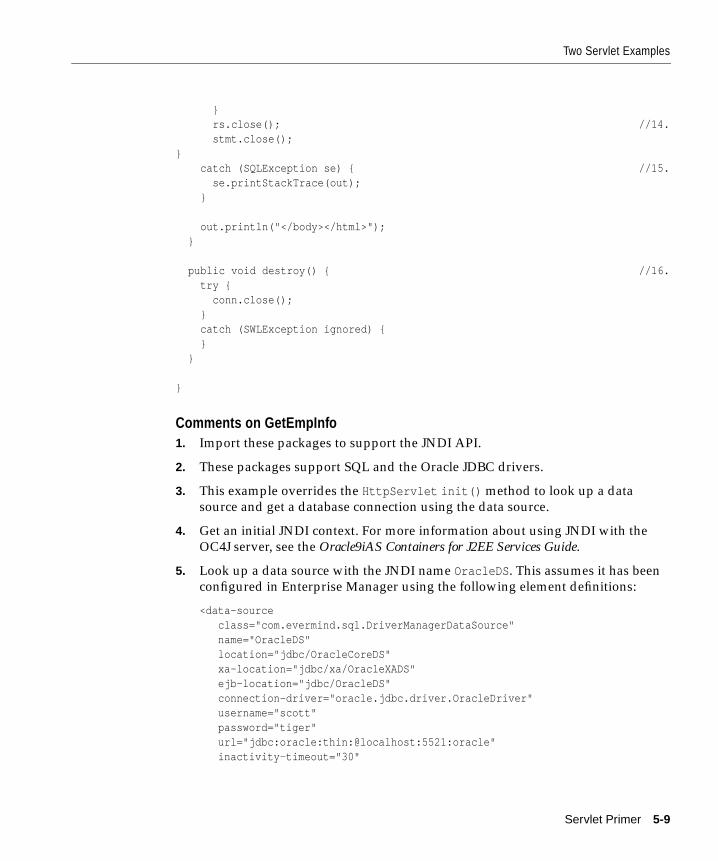
Two Servlet Examples
} rs.close(); //14. stmt.close();} catch (SQLException se) { //15. se.printStackTrace(out); }
out.println("</body></html>"); }
public void destroy() { //16. try { conn.close(); } catch (SWLException ignored) { } }
}
Comments on GetEmpInfo1. Import these packages to support the JNDI API.
2. These packages support SQL and the Oracle JDBC drivers.
3. This example overrides the HttpServlet init() method to look up a data
source and get a database connection using the data source.
4. Get an initial JNDI context. For more information about using JNDI with the
OC4J server, see the Oracle9iAS Containers for J2EE Services Guide.
5. Look up a data source with the JNDI name OracleDS . This assumes it has been
configured in Enterprise Manager using the following element definitions:
<data-source class="com.evermind.sql.DriverManagerDataSource" name="OracleDS" location="jdbc/OracleCoreDS" xa-location="jdbc/xa/OracleXADS" ejb-location="jdbc/OracleDS" connection-driver="oracle.jdbc.driver.OracleDriver" username="scott" password="tiger" url="jdbc:oracle:thin:@localhost:5521:oracle" inactivity-timeout="30"
Servlet Primer 5-9
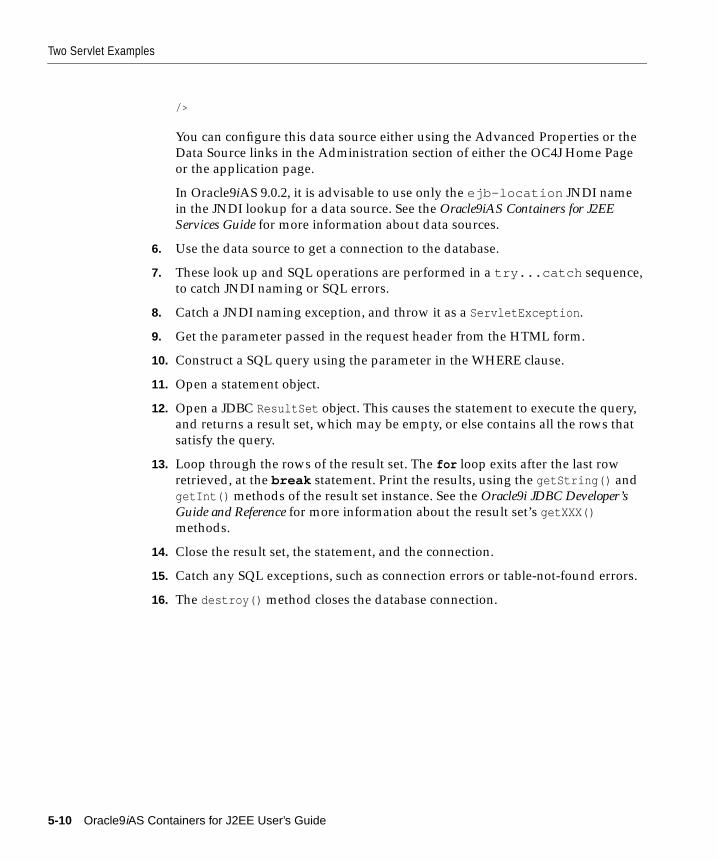
Two Servlet Examples
/>
You can configure this data source either using the Advanced Properties or the
Data Source links in the Administration section of either the OC4J Home Page
or the application page.
In Oracle9iAS 9.0.2, it is advisable to use only the ejb-location JNDI name
in the JNDI lookup for a data source. See the Oracle9iAS Containers for J2EEServices Guide for more information about data sources.
6. Use the data source to get a connection to the database.
7. These look up and SQL operations are performed in a try...catch sequence,
to catch JNDI naming or SQL errors.
8. Catch a JNDI naming exception, and throw it as a ServletException .
9. Get the parameter passed in the request header from the HTML form.
10. Construct a SQL query using the parameter in the WHERE clause.
11. Open a statement object.
12. Open a JDBC ResultSet object. This causes the statement to execute the query,
and returns a result set, which may be empty, or else contains all the rows that
satisfy the query.
13. Loop through the rows of the result set. The for loop exits after the last row
retrieved, at the break statement. Print the results, using the getString() and
getInt() methods of the result set instance. See the Oracle9i JDBC Developer’sGuide and Reference for more information about the result set’s getXXX()methods.
14. Close the result set, the statement, and the connection.
15. Catch any SQL exceptions, such as connection errors or table-not-found errors.
16. The destroy() method closes the database connection.
5-10 Oracle9iAS Containers for J2EE User’s Guide
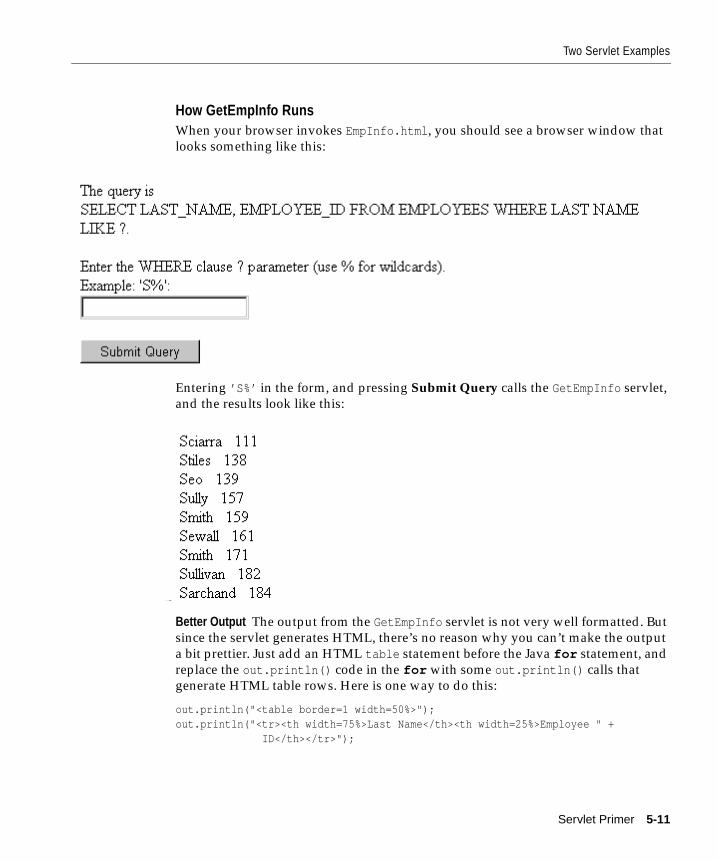
Two Servlet Examples
How GetEmpInfo RunsWhen your browser invokes EmpInfo.html , you should see a browser window that
looks something like this:
Entering ’S%’ in the form, and pressing Submit Query calls the GetEmpInfo servlet,
and the results look like this:
Better Output The output from the GetEmpInfo servlet is not very well formatted. But
since the servlet generates HTML, there’s no reason why you can’t make the output
a bit prettier. Just add an HTML table statement before the Java for statement, and
replace the out.println() code in the for with some out.println() calls that
generate HTML table rows. Here is one way to do this:
out.println("<table border=1 width=50%>");out.println("<tr><th width=75%>Last Name</th><th width=25%>Employee " + ID</th></tr>");
Servlet Primer 5-11
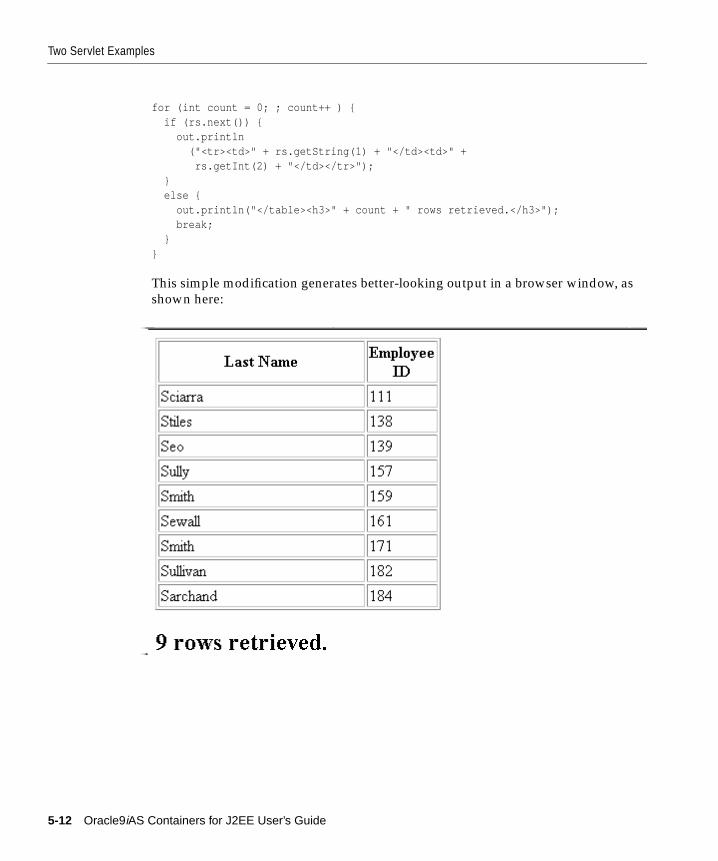
Two Servlet Examples
for (int count = 0; ; count++ ) { if (rs.next()) { out.println ("<tr><td>" + rs.getString(1) + "</td><td>" + rs.getInt(2) + "</td></tr>"); } else { out.println("</table><h3>" + count + " rows retrieved.</h3>"); break; }}
This simple modification generates better-looking output in a browser window, as
shown here:
5-12 Oracle9iAS Containers for J2EE User’s Guide
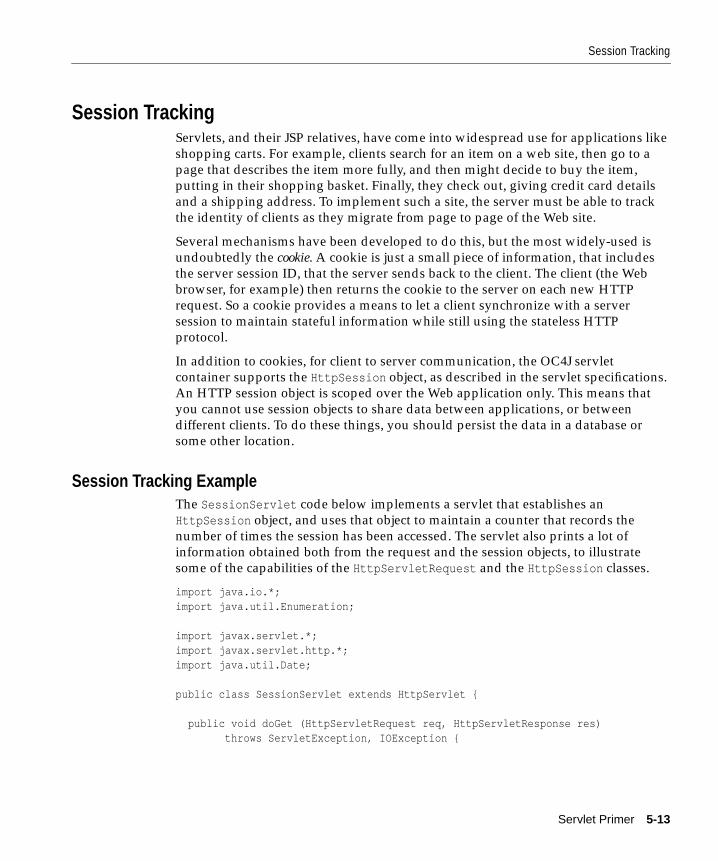
Session Tracking
Session TrackingServlets, and their JSP relatives, have come into widespread use for applications like
shopping carts. For example, clients search for an item on a web site, then go to a
page that describes the item more fully, and then might decide to buy the item,
putting in their shopping basket. Finally, they check out, giving credit card details
and a shipping address. To implement such a site, the server must be able to track
the identity of clients as they migrate from page to page of the Web site.
Several mechanisms have been developed to do this, but the most widely-used is
undoubtedly the cookie. A cookie is just a small piece of information, that includes
the server session ID, that the server sends back to the client. The client (the Web
browser, for example) then returns the cookie to the server on each new HTTP
request. So a cookie provides a means to let a client synchronize with a server
session to maintain stateful information while still using the stateless HTTP
protocol.
In addition to cookies, for client to server communication, the OC4J servlet
container supports the HttpSession object, as described in the servlet specifications.
An HTTP session object is scoped over the Web application only. This means that
you cannot use session objects to share data between applications, or between
different clients. To do these things, you should persist the data in a database or
some other location.
Session Tracking ExampleThe SessionServlet code below implements a servlet that establishes an
HttpSession object, and uses that object to maintain a counter that records the
number of times the session has been accessed. The servlet also prints a lot of
information obtained both from the request and the session objects, to illustrate
some of the capabilities of the HttpServletRequest and the HttpSession classes.
import java.io.*;import java.util.Enumeration;
import javax.servlet.*;import javax.servlet.http.*;import java.util.Date;
public class SessionServlet extends HttpServlet {
public void doGet (HttpServletRequest req, HttpServletResponse res) throws ServletException, IOException {
Servlet Primer 5-13

Session Tracking
HttpSession session = req.getSession(true); // 1.
res.setContentType("text/html"); PrintWriter out = res.getWriter();
out.println("<head><title> " + "SessionServlet Output " + "</title></head><body>"); out.println("<h1> SessionServlet Output </h1>"); Integer ival = (Integer) session.getAttribute("sessionservlet.counter"); // 2. if (ival==null) { ival = new Integer(1); } else { ival = new Integer(ival.intValue() + 1); }
session.setAttribute("sessionservlet.counter", ival); // 3.
out.println(" You have hit this page <b>" + ival + "</b> times.<p>"); // 4. out.println("Click <a href=" + res.encodeURL(HttpUtils.getRequestURL(req).toString()) + ">here</a>"); // 5. out.println(" to ensure that session tracking is working even " + "if cookies aren't supported.<br>"); out.println("Note that by default URL rewriting is not enabled" + " due to its large overhead.");
out.println("<h3>Request and Session Data</h3>"); // 6. out.println("Session ID in Request: " + req.getRequestedSessionId()); out.println("<br>Session ID in Request is from a Cookie: " + req.isRequestedSessionIdFromCookie()); out.println("<br>Session ID in Request is from the URL: " + req.isRequestedSessionIdFromURL()); out.println("<br>Valid Session ID: " + req.isRequestedSessionIdValid());
out.println("<h3>Session Data</h3>"); // 7. out.println("New Session: " + session.isNew()); out.println("<br> Session ID: " + session.getId()); out.println("<br> Creation Time: " + new Date(session.getCreationTime())); out.println("<br>Last Accessed Time: " + new Date(session.getLastAccessedTime()));
5-14 Oracle9iAS Containers for J2EE User’s Guide
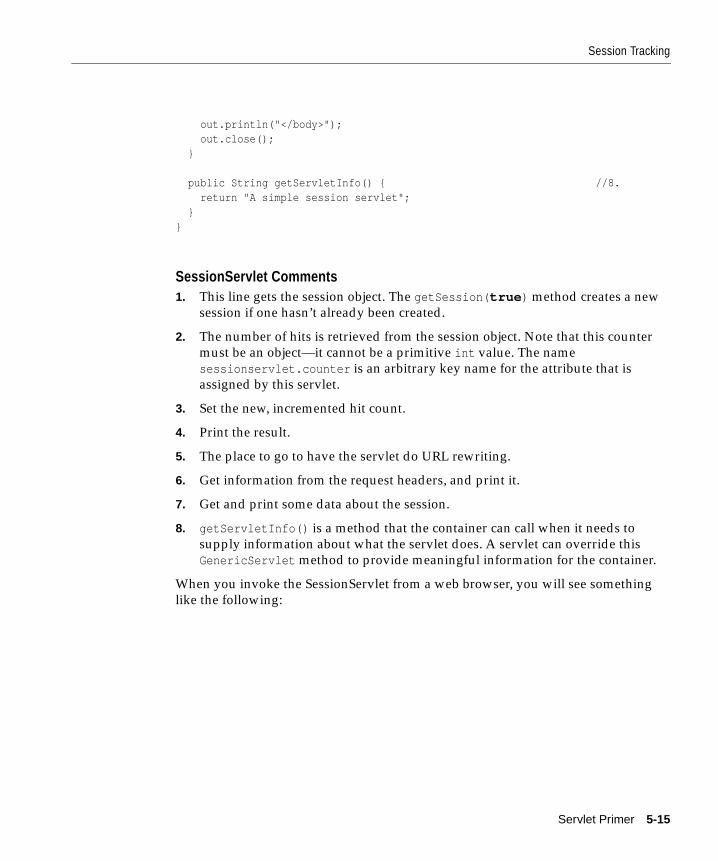
Session Tracking
out.println("</body>"); out.close(); }
public String getServletInfo() { //8. return "A simple session servlet"; }}
SessionServlet Comments1. This line gets the session object. The getSession( true ) method creates a new
session if one hasn’t already been created.
2. The number of hits is retrieved from the session object. Note that this counter
must be an object—it cannot be a primitive int value. The name
sessionservlet.counter is an arbitrary key name for the attribute that is
assigned by this servlet.
3. Set the new, incremented hit count.
4. Print the result.
5. The place to go to have the servlet do URL rewriting.
6. Get information from the request headers, and print it.
7. Get and print some data about the session.
8. getServletInfo() is a method that the container can call when it needs to
supply information about what the servlet does. A servlet can override this
GenericServlet method to provide meaningful information for the container.
When you invoke the SessionServlet from a web browser, you will see something
like the following:
Servlet Primer 5-15
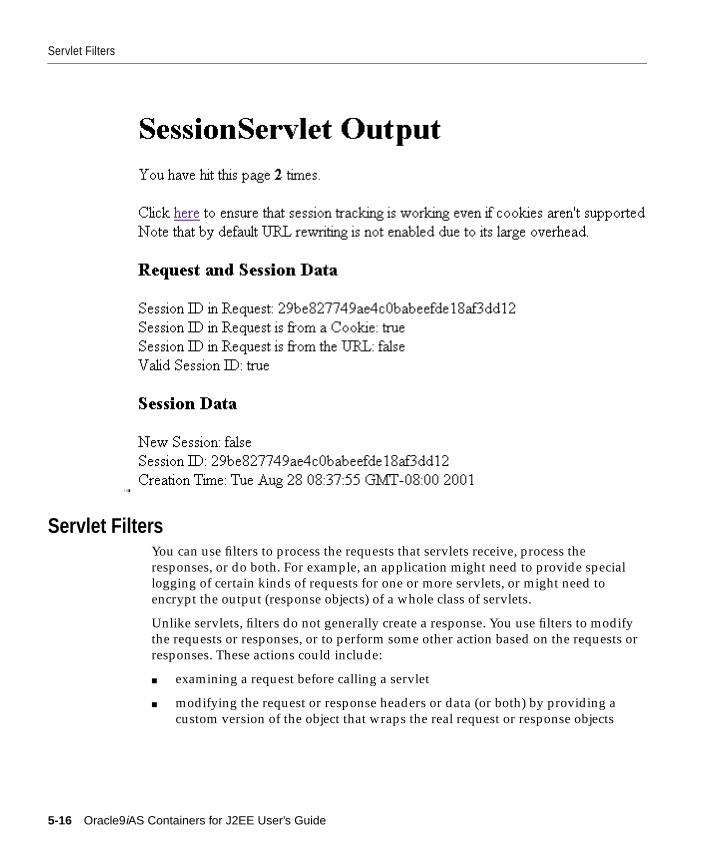
Servlet Filters
Servlet FiltersYou can use filters to process the requests that servlets receive, process the
responses, or do both. For example, an application might need to provide special
logging of certain kinds of requests for one or more servlets, or might need to
encrypt the output (response objects) of a whole class of servlets.
Unlike servlets, filters do not generally create a response. You use filters to modify
the requests or responses, or to perform some other action based on the requests or
responses. These actions could include:
■ examining a request before calling a servlet
■ modifying the request or response headers or data (or both) by providing a
custom version of the object that wraps the real request or response objects
5-16 Oracle9iAS Containers for J2EE User’s Guide
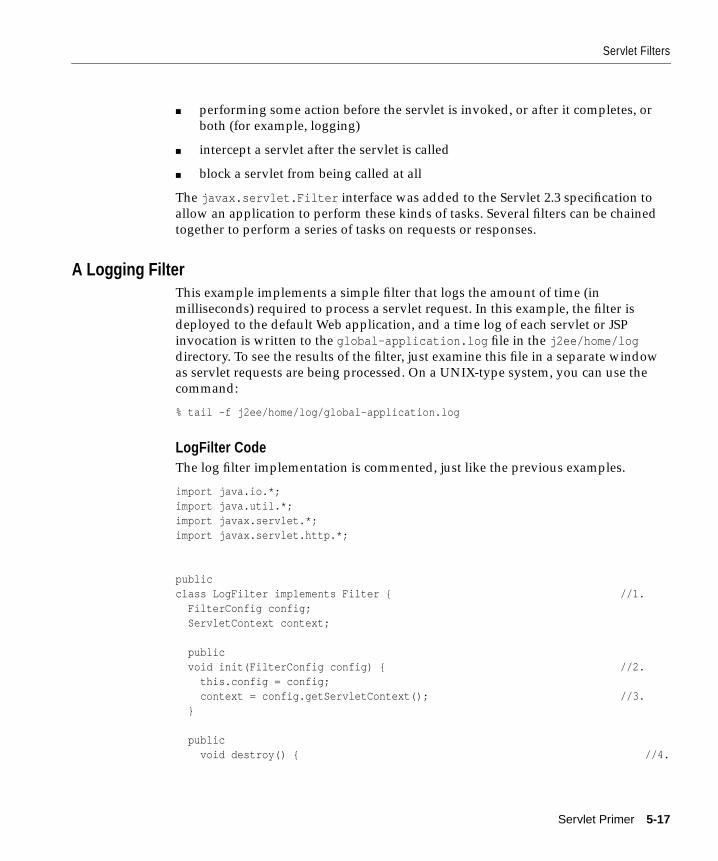
Servlet Filters
■ performing some action before the servlet is invoked, or after it completes, or
both (for example, logging)
■ intercept a servlet after the servlet is called
■ block a servlet from being called at all
The javax.servlet.Filter interface was added to the Servlet 2.3 specification to
allow an application to perform these kinds of tasks. Several filters can be chained
together to perform a series of tasks on requests or responses.
A Logging FilterThis example implements a simple filter that logs the amount of time (in
milliseconds) required to process a servlet request. In this example, the filter is
deployed to the default Web application, and a time log of each servlet or JSP
invocation is written to the global-application.log file in the j2ee/home/logdirectory. To see the results of the filter, just examine this file in a separate window
as servlet requests are being processed. On a UNIX-type system, you can use the
command:
% tail -f j2ee/home/log/global-application.log
LogFilter CodeThe log filter implementation is commented, just like the previous examples.
import java.io.*;import java.util.*;import javax.servlet.*;import javax.servlet.http.*;
publicclass LogFilter implements Filter { //1. FilterConfig config; ServletContext context;
public void init(FilterConfig config) { //2. this.config = config; context = config.getServletContext(); //3. }
public void destroy() { //4.
Servlet Primer 5-17
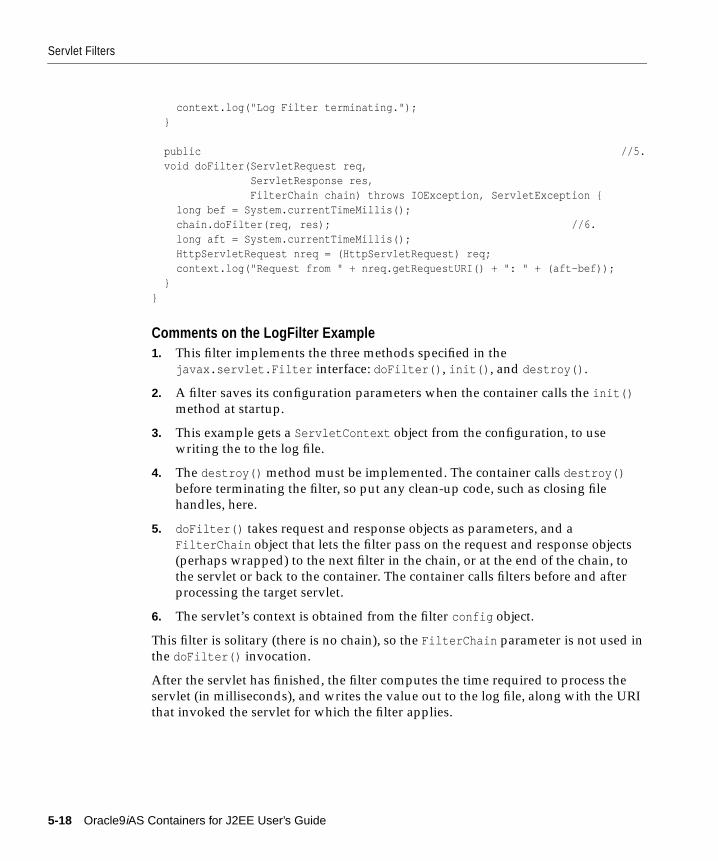
Servlet Filters
context.log("Log Filter terminating."); }
public //5. void doFilter(ServletRequest req, ServletResponse res, FilterChain chain) throws IOException, ServletException { long bef = System.currentTimeMillis(); chain.doFilter(req, res); //6. long aft = System.currentTimeMillis(); HttpServletRequest nreq = (HttpServletRequest) req; context.log("Request from " + nreq.getRequestURI() + ": " + (aft-bef)); }}
Comments on the LogFilter Example1. This filter implements the three methods specified in the
javax.servlet.Filter interface: doFilter() , init() , and destroy() .
2. A filter saves its configuration parameters when the container calls the init()method at startup.
3. This example gets a ServletContext object from the configuration, to use
writing the to the log file.
4. The destroy() method must be implemented. The container calls destroy()before terminating the filter, so put any clean-up code, such as closing file
handles, here.
5. doFilter() takes request and response objects as parameters, and a
FilterChain object that lets the filter pass on the request and response objects
(perhaps wrapped) to the next filter in the chain, or at the end of the chain, to
the servlet or back to the container. The container calls filters before and after
processing the target servlet.
6. The servlet’s context is obtained from the filter config object.
This filter is solitary (there is no chain), so the FilterChain parameter is not used in
the doFilter() invocation.
After the servlet has finished, the filter computes the time required to process the
servlet (in milliseconds), and writes the value out to the log file, along with the URI
that invoked the servlet for which the filter applies.
5-18 Oracle9iAS Containers for J2EE User’s Guide
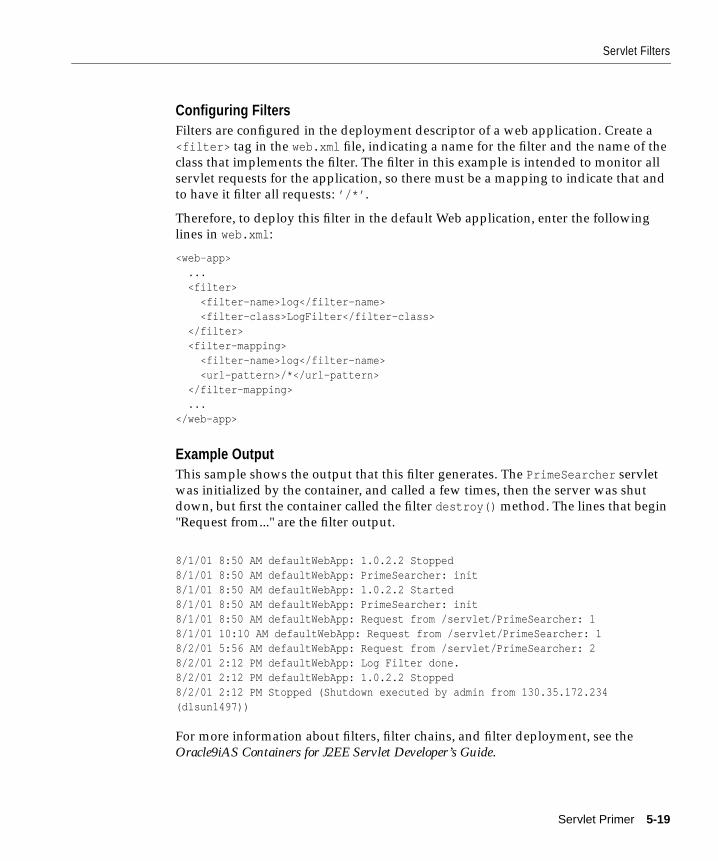
Servlet Filters
Configuring FiltersFilters are configured in the deployment descriptor of a web application. Create a
<filter> tag in the web.xml file, indicating a name for the filter and the name of the
class that implements the filter. The filter in this example is intended to monitor all
servlet requests for the application, so there must be a mapping to indicate that and
to have it filter all requests: ’/*’ .
Therefore, to deploy this filter in the default Web application, enter the following
lines in web.xml :
<web-app> ... <filter> <filter-name>log</filter-name> <filter-class>LogFilter</filter-class> </filter> <filter-mapping> <filter-name>log</filter-name> <url-pattern>/*</url-pattern> </filter-mapping> ...</web-app>
Example OutputThis sample shows the output that this filter generates. The PrimeSearcher servlet
was initialized by the container, and called a few times, then the server was shut
down, but first the container called the filter destroy() method. The lines that begin
"Request from..." are the filter output.
8/1/01 8:50 AM defaultWebApp: 1.0.2.2 Stopped8/1/01 8:50 AM defaultWebApp: PrimeSearcher: init8/1/01 8:50 AM defaultWebApp: 1.0.2.2 Started8/1/01 8:50 AM defaultWebApp: PrimeSearcher: init8/1/01 8:50 AM defaultWebApp: Request from /servlet/PrimeSearcher: 18/1/01 10:10 AM defaultWebApp: Request from /servlet/PrimeSearcher: 18/2/01 5:56 AM defaultWebApp: Request from /servlet/PrimeSearcher: 28/2/01 2:12 PM defaultWebApp: Log Filter done.8/2/01 2:12 PM defaultWebApp: 1.0.2.2 Stopped8/2/01 2:12 PM Stopped (Shutdown executed by admin from 130.35.172.234(dlsun1497))
For more information about filters, filter chains, and filter deployment, see the
Oracle9iAS Containers for J2EE Servlet Developer’s Guide.
Servlet Primer 5-19
Learning More About Servlets
Learning More About ServletsYour first step in learning more about servlets should be to read the Oracle9iASContainers for J2EE Servlet Developer’s Guide. This guide tells you what you need to
know to develop servlets and web-tier applications in the OC4J environment.
To get complete documentation on the servlet APIs, visit the Sun Microsystems Web
site at:
http://java.sun.com/j2ee/docs.html
You can also find a great deal of tutorial information on servlets as well as other
aspects of J2EE application development at this site.
Finally, there are several trade press books that will teach you how to develop
servlets, and deploy them in J2EE-compatible applications. In particular, the books
from O’Reilly & Associates (http://www.oreilly.com ) and Wrox
(http://www.wrox.com ) are very useful.
5-20 Oracle9iAS Containers for J2EE User’s Guide

6
JSP PrimerThis chapter covers the basics of running JavaServer Pages (JSP) applications in the
Oracle9iAS Containers for J2EE (OC4J) environment. It is assumed that you have
installed OC4J and that you have a basic understanding of Java programming and
Web application technology. Although this chapter includes a brief overview, you
should already be familiar with JSP technology. This chapter also introduces Oracle
value-added features for JSP support.
For detailed information about the Oracle JSP implementation, as well as an
overview of standard syntax and key features, please refer to the Oracle9iASContainers for J2EE Support for JavaServer Pages Reference.
This chapter includes the following topics:
■ A Brief Overview of JavaServer Pages Technology
■ Running a Simple JSP Page
■ Running a JSP Page That Invokes a JavaBean
■ Running a JSP Page That Uses Custom Tags
■ Overview of Oracle Value-Added Features for JSP Pages
For a complete description on Web application deployment, see "Deploying
Applications" on page 2-20.
JSP Primer 6-1
A Brief Overview of JavaServer Pages Technology
A Brief Overview of JavaServer Pages TechnologyThis section provides a quick overview of the following:
■ What Is JavaServer Pages Technology?
■ JSP Translation and Runtime Flow
■ Key JSP Advantages
■ JSP in Application Architecture
What Is JavaServer Pages Technology?JSP, a part of the J2EE platform, is a technology that is specified by Sun
Microsystems as a convenient way to generate dynamic content in pages that are
output by a Web application. This technology, which is closely coupled with Java
servlet technology, allows you to include Java code snippets and calls to external
Java components within the HTML code, or other markup code such as XML, of
your Web pages. JSP technology works nicely as a front-end for business logic and
dynamic functionality encapsulated in JavaBeans and Enterprise JavaBeans (EJBs).
JSP syntax within HTML or other code is designated by being enclosed within
<%...%> syntax. There are variations on this: <%=...%> to designate expressions
or <%!...%> to designate declarations, for example.
A JSP page is translated into a Java servlet before being executed, and it processes
HTTP requests and generates responses similarly to any other servlet. JSP
technology offers a more convenient way to code the servlet. Translation usually
occurs "on demand"—that is, as the application is run. The JSP translator is typically
triggered by the .jsp file name extension in a URL. Additionally, as an Oracle
feature, the .sqljsp file name extension, used for SQLJ JSP pages, will also trigger
the JSP translator, as well as the SQLJ translator.
JSP pages are fully interoperable with servlets—a JSP can include output from a
servlet or forward to a servlet, and a servlet can include output from a JSP or
forward to a JSP.
Here is the code for a simple JSP, welcomeuser.jsp :
<HTML><HEAD><TITLE>The Welcome User JSP</TITLE></HEAD><BODY><% String user=request.getParameter("user"); %><H3>Welcome <%= (user==null) ? "" : user %>!</H3><P><B> Today is <%= new java.util.Date() %>. Have a fabulous day! :-)</B></P><B>Enter name:</B>
6-2 Oracle9iAS Containers for J2EE User’s Guide
A Brief Overview of JavaServer Pages Technology
<FORM METHOD=get><INPUT TYPE="text" NAME="user" SIZE=15><INPUT TYPE="submit" VALUE="Submit name"></FORM></BODY></HTML>
This JSP page will produce something like the following output if the user inputs
the name "Amy":
Welcome Amy!
Today is Wed Jun 21 13:42:23 PDT 2000. Have a fabulous day! :-)
JSP Translation and Runtime FlowFigure 6–1 shows the flow of execution when a user runs a JSP page, specifying its
URL in the browser.
Because of the .jsp file name extension, the following steps occur automatically:
1. The JSP translator is invoked, translating Hello.jsp and producing the file
Hello.java . (For a .sqljsp file, it would produce Hello.sqlj and the
SQLJ translator would be invoked to perform SQLJ translation and produce
Hello.java .)
2. The Java compiler is invoked, creating Hello.class .
3. Hello.class is executed as a servlet, using the JSP runtime library.
4. The Hello class accesses the database through JDBC or SQLJ, as appropriate,
and sends its output to the browser.
JSP Primer 6-3
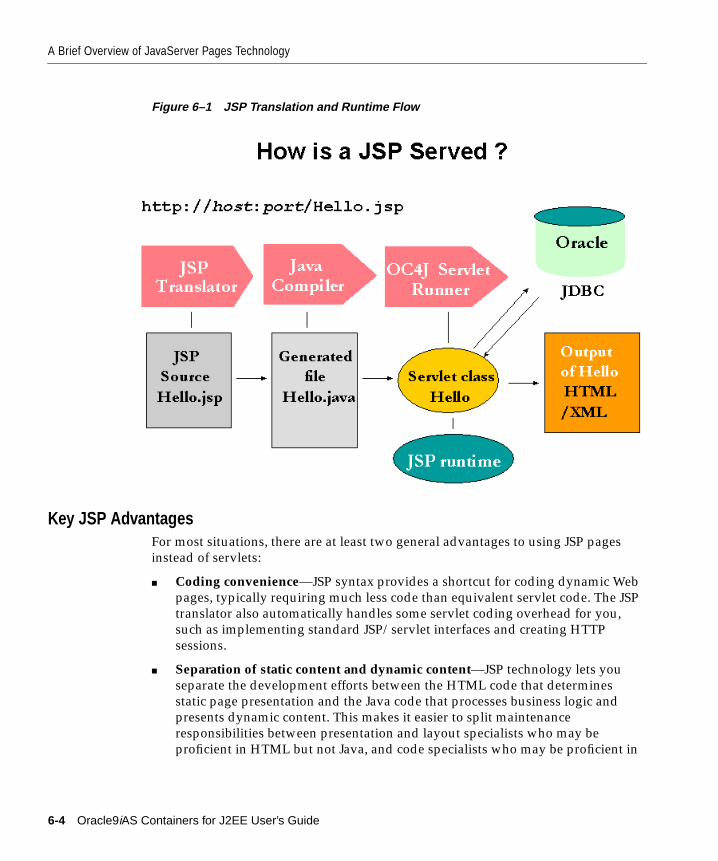
A Brief Overview of JavaServer Pages Technology
Figure 6–1 JSP Translation and Runtime Flow
Key JSP AdvantagesFor most situations, there are at least two general advantages to using JSP pages
instead of servlets:
■ Coding convenience—JSP syntax provides a shortcut for coding dynamic Web
pages, typically requiring much less code than equivalent servlet code. The JSP
translator also automatically handles some servlet coding overhead for you,
such as implementing standard JSP/servlet interfaces and creating HTTP
sessions.
■ Separation of static content and dynamic content—JSP technology lets you
separate the development efforts between the HTML code that determines
static page presentation and the Java code that processes business logic and
presents dynamic content. This makes it easier to split maintenance
responsibilities between presentation and layout specialists who may be
proficient in HTML but not Java, and code specialists who may be proficient in
6-4 Oracle9iAS Containers for J2EE User’s Guide
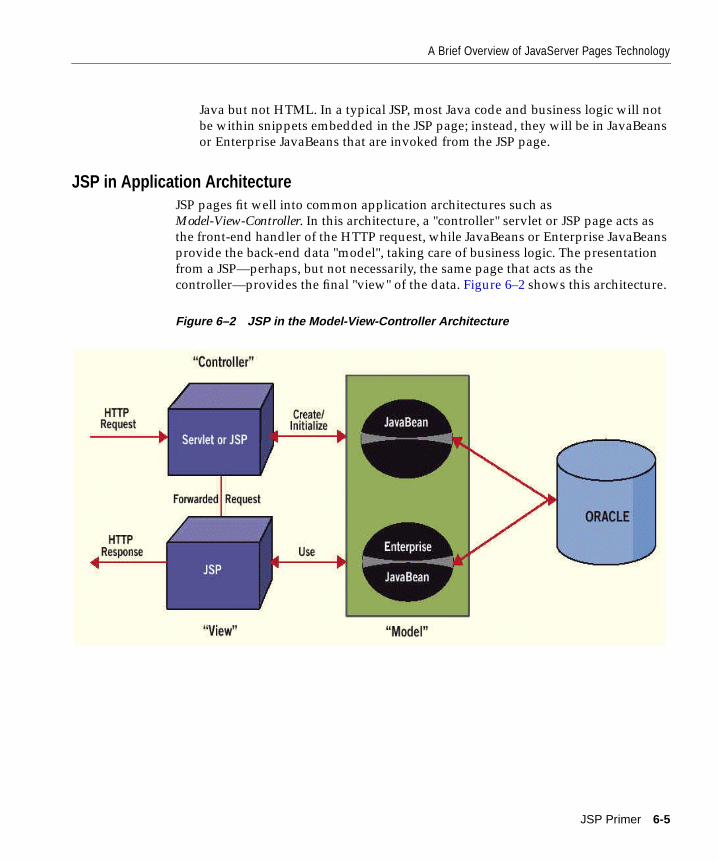
A Brief Overview of JavaServer Pages Technology
Java but not HTML. In a typical JSP, most Java code and business logic will not
be within snippets embedded in the JSP page; instead, they will be in JavaBeans
or Enterprise JavaBeans that are invoked from the JSP page.
JSP in Application ArchitectureJSP pages fit well into common application architectures such as
Model-View-Controller. In this architecture, a "controller" servlet or JSP page acts as
the front-end handler of the HTTP request, while JavaBeans or Enterprise JavaBeans
provide the back-end data "model", taking care of business logic. The presentation
from a JSP—perhaps, but not necessarily, the same page that acts as the
controller—provides the final "view" of the data. Figure 6–2 shows this architecture.
Figure 6–2 JSP in the Model-View-Controller Architecture
JSP Primer 6-5
Running a Simple JSP Page
Running a Simple JSP PageThis section shows you how to run the JSP example from "What Is JavaServer Pages
Technology?" on page 6-2, and assumes the following:
■ You have a working JDK (1.3.x).
■ You have installed the OC4J software.
■ You have started the OC4J Web server.
Create and Deploy the JSPCopy or type the sample code from "What Is JavaServer Pages Technology?" on
page 6-2 into a file, and save it as welcomeuser.jsp . Then, archive
welcomeuser.jsp into a WAR file with an appropriate web.xml and deploy it
using the Enterprise Manager deployment wizard, mapping it to the /wuserservlet context in the URL Mapping screen.
Run welcomeuser.jspWhen specifying a URL to execute an application in Oracle9iAS, note the following:
■ By default in OC4J, use port 7777 to go through the Oracle HTTP Server, with
Oracle9iAS Web Cache enabled.
■ The URL path maps to the directory path beneath the default Web application
directory (or other Web application directory, as applicable).
For example, if you mapped the WAR file containing welcomeuser.jsp to the
/wuser servlet context, you can run the page through the Oracle HTTP Server a
URL such as the following:
http://< apache_host >:< port >/wuser/welcomeuser.jsp
This uses <apache_host > to represent the name of the system where OC4J and
the application are installed. Typically, use 7777 for the port.
If the JSP is not at the top level in the WAR file, but is contained within a
subdirectory below the top level, then this directory must be included in the HTTP
URL separated by a backslash. For example, if the welcomeuser.jsp is located in
the mydir directory in the WAR file, then you would invoke it as follows:
http://< apache_host >:< port >/wuser/mydir/welcomeuser.jsp
When you first run the page, you will see something like the following output:
6-6 Oracle9iAS Containers for J2EE User’s Guide
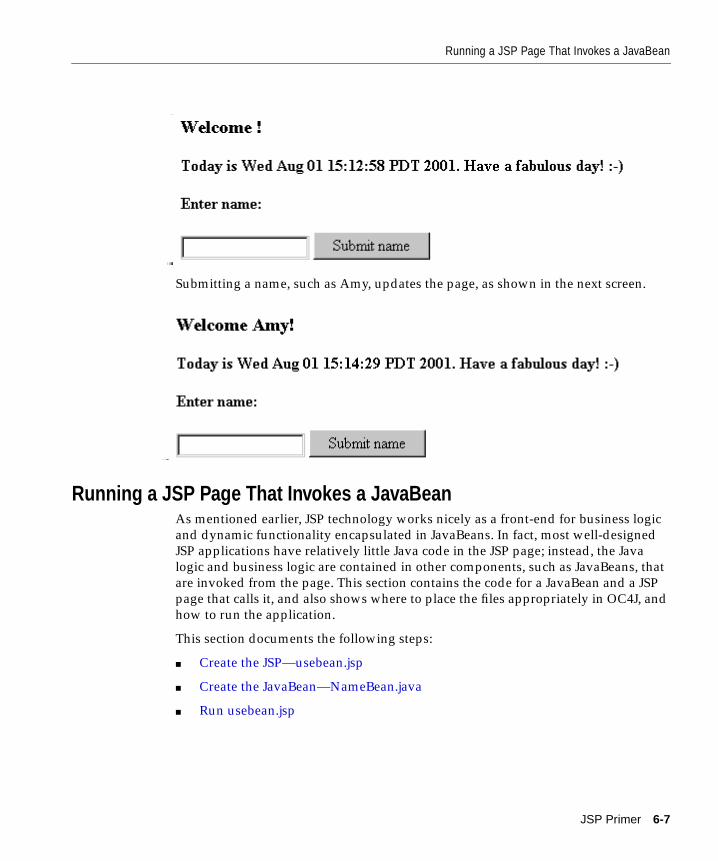
Running a JSP Page That Invokes a JavaBean
Submitting a name, such as Amy, updates the page, as shown in the next screen.
Running a JSP Page That Invokes a JavaBeanAs mentioned earlier, JSP technology works nicely as a front-end for business logic
and dynamic functionality encapsulated in JavaBeans. In fact, most well-designed
JSP applications have relatively little Java code in the JSP page; instead, the Java
logic and business logic are contained in other components, such as JavaBeans, that
are invoked from the page. This section contains the code for a JavaBean and a JSP
page that calls it, and also shows where to place the files appropriately in OC4J, and
how to run the application.
This section documents the following steps:
■ Create the JSP—usebean.jsp
■ Create the JavaBean—NameBean.java
■ Run usebean.jsp
JSP Primer 6-7
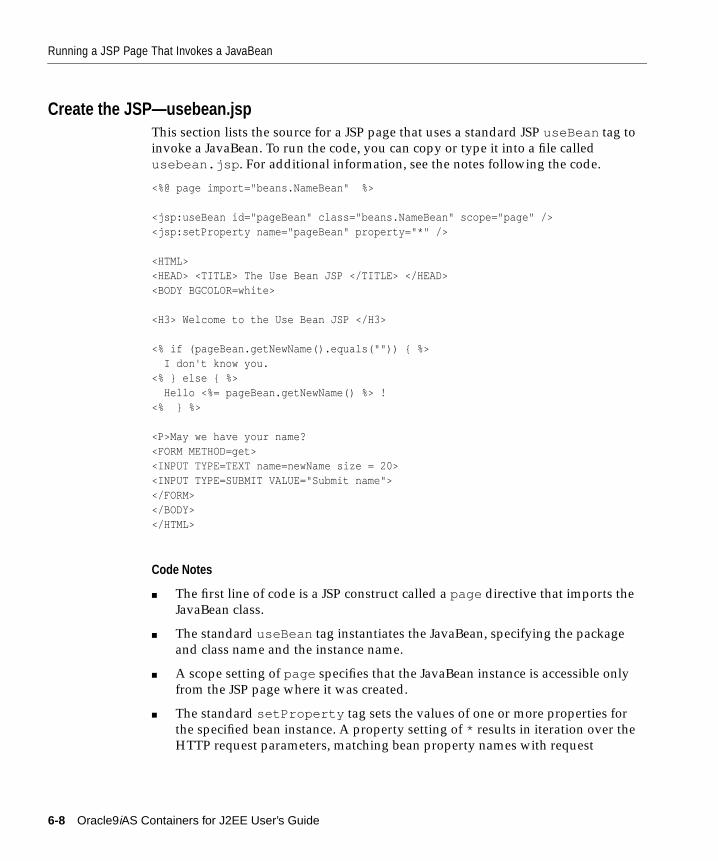
Running a JSP Page That Invokes a JavaBean
Create the JSP—usebean.jspThis section lists the source for a JSP page that uses a standard JSP useBean tag to
invoke a JavaBean. To run the code, you can copy or type it into a file called
usebean.jsp . For additional information, see the notes following the code.
<%@ page import="beans.NameBean" %>
<jsp:useBean id="pageBean" class="beans.NameBean" scope="page" /><jsp:setProperty name="pageBean" property="*" />
<HTML><HEAD> <TITLE> The Use Bean JSP </TITLE> </HEAD><BODY BGCOLOR=white>
<H3> Welcome to the Use Bean JSP </H3>
<% if (pageBean.getNewName().equals("")) { %> I don't know you.<% } else { %> Hello <%= pageBean.getNewName() %> !<% } %>
<P>May we have your name?<FORM METHOD=get><INPUT TYPE=TEXT name=newName size = 20><INPUT TYPE=SUBMIT VALUE="Submit name"></FORM></BODY></HTML>
Code Notes
■ The first line of code is a JSP construct called a page directive that imports the
JavaBean class.
■ The standard useBean tag instantiates the JavaBean, specifying the package
and class name and the instance name.
■ A scope setting of page specifies that the JavaBean instance is accessible only
from the JSP page where it was created.
■ The standard setProperty tag sets the values of one or more properties for
the specified bean instance. A property setting of * results in iteration over the
HTTP request parameters, matching bean property names with request
6-8 Oracle9iAS Containers for J2EE User’s Guide
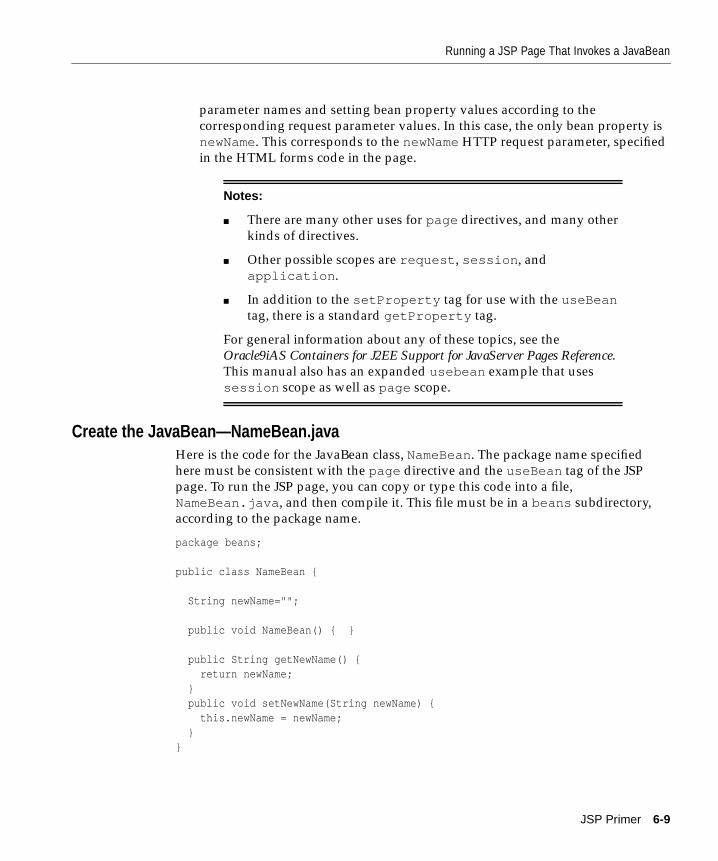
Running a JSP Page That Invokes a JavaBean
parameter names and setting bean property values according to the
corresponding request parameter values. In this case, the only bean property is
newName. This corresponds to the newName HTTP request parameter, specified
in the HTML forms code in the page.
Create the JavaBean—NameBean.javaHere is the code for the JavaBean class, NameBean. The package name specified
here must be consistent with the page directive and the useBean tag of the JSP
page. To run the JSP page, you can copy or type this code into a file,
NameBean.java , and then compile it. This file must be in a beans subdirectory,
according to the package name.
package beans;
public class NameBean {
String newName="";
public void NameBean() { }
public String getNewName() { return newName; } public void setNewName(String newName) { this.newName = newName; }}
Notes:
■ There are many other uses for page directives, and many other
kinds of directives.
■ Other possible scopes are request , session , and
application .
■ In addition to the setProperty tag for use with the useBeantag, there is a standard getProperty tag.
For general information about any of these topics, see the
Oracle9iAS Containers for J2EE Support for JavaServer Pages Reference.This manual also has an expanded usebean example that uses
session scope as well as page scope.
JSP Primer 6-9
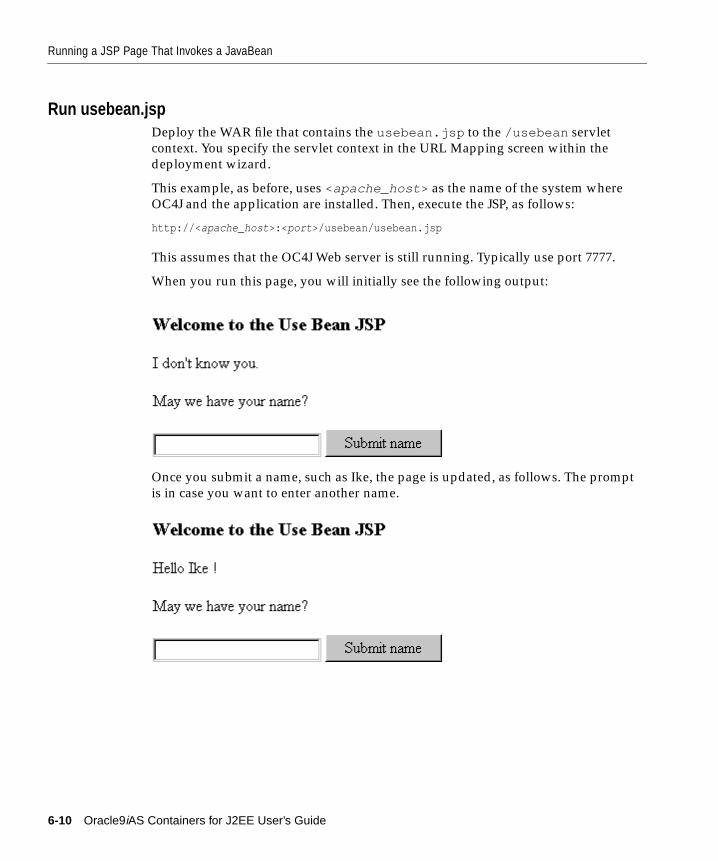
Running a JSP Page That Invokes a JavaBean
Run usebean.jspDeploy the WAR file that contains the usebean.jsp to the /usebean servlet
context. You specify the servlet context in the URL Mapping screen within the
deployment wizard.
This example, as before, uses <apache_host > as the name of the system where
OC4J and the application are installed. Then, execute the JSP, as follows:
http://< apache_host >:< port >/usebean/usebean.jsp
This assumes that the OC4J Web server is still running. Typically use port 7777.
When you run this page, you will initially see the following output:
Once you submit a name, such as Ike, the page is updated, as follows. The prompt
is in case you want to enter another name.
6-10 Oracle9iAS Containers for J2EE User’s Guide
Running a JSP Page That Uses Custom Tags
Running a JSP Page That Uses Custom TagsThe Sun Microsystems JavaServer Pages specification includes standard tags to use
in JSP pages to perform various tasks. An example is the useBean tag employed in
"Running a JSP Page That Invokes a JavaBean" on page 6-7. The JSP 1.1 specification
also outlines a standard framework that allows vendors to offer their own custom
tag libraries in a portable way.
OC4J supplies portable tag libraries with functionality in several areas, including
database access, XML/XSL processing, e-mail, file uploading and downloading,
and programming convenience. These libraries are described in the Oracle9iASContainers for J2EE JSP Tag Libraries and Utilities Reference.
This section shows an example that uses tags from the Oracle SQL tag library to
access and query a database and output the results to the browser.
Here are the steps in using a JSP tag library:
■ Each tag library has a tag library description (TLD) file.
■ Each tag requires support classes, at least a tag handler class with the code to
execute tag semantics, and possibly a tag-extra-info class with additional
processing logic. (These classes implement standard tag interfaces, according to
the JSP specification.) Make these classes available to your Web application.
■ Put a standard taglib directive in your JSP code that specifies the location and
name of the TLD file as well as the tag prefix to use in your code.
This section documents the following steps:
■ Create the JSP Page—sqltagquery.jsp
■ Set Up Files for Tag Library Support
■ Run sqltagquery.jsp
For information about the standard tag library framework, including TLD files, tag
handler classes, and tag-extra-info classes, please refer to the Oracle9iAS Containersfor J2EE Support for JavaServer Pages Reference.
Create the JSP Page—sqltagquery.jspThis section provides the source for a JSP page that uses SQL tags that are supplied
with OC4J to open a database connection, run a simple query, output the results as
an HTML table, and close the connection. To run the code, you can copy or type it
into a file called sqltagquery.jsp . For additional information, see the notes
following the code.
JSP Primer 6-11
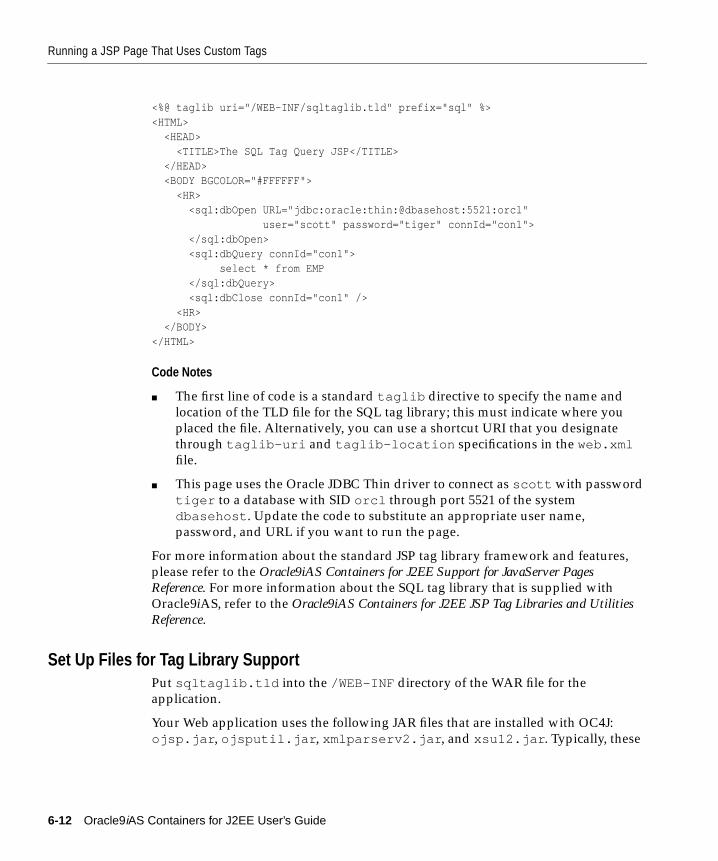
Running a JSP Page That Uses Custom Tags
<%@ taglib uri="/WEB-INF/sqltaglib.tld" prefix="sql" %><HTML> <HEAD> <TITLE>The SQL Tag Query JSP</TITLE> </HEAD> <BODY BGCOLOR="#FFFFFF"> <HR> <sql:dbOpen URL="jdbc:oracle:thin:@dbasehost:5521:orcl" user="scott" password="tiger" connId="con1"> </sql:dbOpen> <sql:dbQuery connId="con1"> select * from EMP </sql:dbQuery> <sql:dbClose connId="con1" /> <HR> </BODY></HTML>
Code Notes
■ The first line of code is a standard taglib directive to specify the name and
location of the TLD file for the SQL tag library; this must indicate where you
placed the file. Alternatively, you can use a shortcut URI that you designate
through taglib-uri and taglib-location specifications in the web.xmlfile.
■ This page uses the Oracle JDBC Thin driver to connect as scott with password
tiger to a database with SID orcl through port 5521 of the system
dbasehost . Update the code to substitute an appropriate user name,
password, and URL if you want to run the page.
For more information about the standard JSP tag library framework and features,
please refer to the Oracle9iAS Containers for J2EE Support for JavaServer PagesReference. For more information about the SQL tag library that is supplied with
Oracle9iAS, refer to the Oracle9iAS Containers for J2EE JSP Tag Libraries and UtilitiesReference.
Set Up Files for Tag Library SupportPut sqltaglib.tld into the /WEB-INF directory of the WAR file for the
application.
Your Web application uses the following JAR files that are installed with OC4J:
ojsp.jar , ojsputil.jar , xmlparserv2.jar , and xsu12.jar . Typically, these
6-12 Oracle9iAS Containers for J2EE User’s Guide
Running a JSP Page That Uses Custom Tags
are installed into the j2ee/home/lib directory, which is included in the
CLASSPATH. The tag handler and tag-extra-info class files are in ojsputil.jar .
Run sqltagquery.jspAs with earlier examples in this chapter, you will use a similar URL to run the page
from a browser. Deploy the WAR file that contains the sqltagquery.jsp to the
/sqltag servlet context. You specify the servlet context in the URL Mapping
screen within the deployment wizard.
This example, as before, uses <apache_host > as the name of the system where
OC4J and the application are installed. Then, execute the JSP, as follows:
http://< apache_host >:< port >/sqltag/sqltagquery.jsp
This assumes that the OC4J Web server is still running. Typically use port 7777.
This page produces output such as the following screen.
Notes:
■ Placing ojsputil.jar into the j2ee/home/lib directory
also gives you access to data-access JavaBeans and other Java
utility classes that come with OC4J. These classes are described
in the Oracle9iAS Containers for J2EE JSP Tag Libraries andUtilities Reference.
■ If you choose to run the demos in the ojspdemos.ear file, the
TLD files are automatically placed in the WEB-INF directory of
the ojspdemos application. (The demos as a whole have their
own application root.)
JSP Primer 6-13
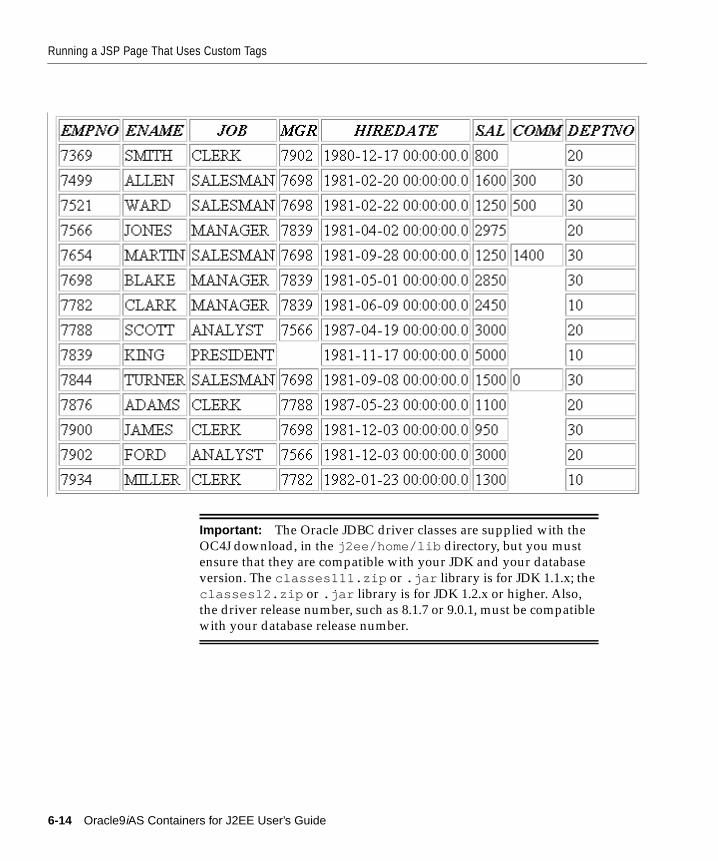
Running a JSP Page That Uses Custom Tags
Important: The Oracle JDBC driver classes are supplied with the
OC4J download, in the j2ee/home/lib directory, but you must
ensure that they are compatible with your JDK and your database
version. The classes111.zip or .jar library is for JDK 1.1.x; the
classes12.zip or .jar library is for JDK 1.2.x or higher. Also,
the driver release number, such as 8.1.7 or 9.0.1, must be compatible
with your database release number.
6-14 Oracle9iAS Containers for J2EE User’s Guide
Overview of Oracle Value-Added Features for JSP Pages
Overview of Oracle Value-Added Features for JSP PagesOC4J JSP provides the following extended functionality through custom tag
libraries and custom JavaBeans and classes that are generally portable to other JSP
environments. These features are documented in the Oracle9iAS Containers for J2EEJSP Tag Libraries and Utilities Reference.
■ extended types implemented as JavaBeans that can have a specified scope
■ JspScopeListener for event handling
■ integration with XML and XSL through custom tags
■ data-access JavaBeans
■ the Oracle JSP Markup Language (JML) custom tag library, which reduces the
level of Java proficiency required for JSP development
■ a custom tag library for SQL functionality (used in "Running a JSP Page That
Uses Custom Tags" on page 6-11)
■ additional utility tags for functionality such as uploading or downloading files
or sending e-mail
In addition, the OC4J JSP container offers integration with caching technologies,
documented in the Oracle9iAS Containers for J2EE JSP Tag Libraries and UtilitiesReference:
■ JESI tags for Edge Side Includes
■ Web Object Cache tags and API
The OC4J JSP container also supports the following Oracle-specific programming
extensions, documented in the Oracle9iAS Containers for J2EE Support for JavaServerPages Reference.
■ support for SQLJ, a standard syntax for embedding SQL statements directly
into Java code
The SQLJ distribution documents and supplies a demo of a SQLJ-specific
connection bean to support simplified connection management for SQLJ code in
JSP pages.
■ extended globalization support
JSP Primer 6-15

Overview of Oracle Value-Added Features for JSP Pages
6-16 Oracle9iAS Containers for J2EE User’s Guide
E
7
EJB PrimerAfter you have installed OC4J and configured the base server and default Web site,
you can start developing J2EE applications. This chapter assumes that you have a
working familiarity with simple J2EE concepts and a basic understanding for EJB
development.
This chapter demonstrates simple EJB development with a basic OC4J-specific
configuration and deployment. Download the stateless session bean example
(stateless.jar ) from the OC4J sample code page at
http://otn.oracle.com/sample_code/tech/java/oc4j/htdocs/oc4jsamplecode/oc4j-demo-ejb.htmlon the OTN site.
Developing and deploying EJB applications with OC4J includes the following:
■ Developing EJBs—Developing and testing an EJB module within the standard
J2EE specification.
■ Preparing the EJB Application for Assembly—Before deploying, you must
modify an XML file that acts as a manifest file for the enterprise application.
■ Deploying the Enterprise Application to OC4J—Archive the enterprise Java
application into an Enterprise ARchive (EAR) file and deploy it to OC4J.
For more information on EJBs in OC4J, see Oracle9iAS Containers for J2EE EnterpriseJavaBeans Developer’s Guide and Reference.
JB Primer 7-1

Developing EJBs
Developing EJBsThe development of EJB components for the OC4J environment is identical to
development in any other standard J2EE environment. The steps for developing
EJBs are as follows:
1. Creating the Development Directory—Create a development directory for the
enterprise application (as shown in Figure 7–1).
2. Implementing the Enterprise JavaBeans—Develop your EJB with its home
interface, remote interface, and bean implementation.
3. Creating the Deployment Descriptor—Create the standard J2EE EJB
deployment descriptor for all beans in your EJB application.
4. Archiving the EJB Application—Archive your EJB files into a JAR file.
Creating the Development DirectoryYou can develop your application in any manner. It is best to use consistent naming
for locating your application easily. One method would be to implement your
enterprise Java application under a single parent directory structure, separating
each module of the application into their own sub-directories.
The employee example was developed using the directory structure described in
"Creating the Development Directory" on page 2-13. Notice in Figure 7–1 that the
EJB and Web modules exist under the employee application parent directory and
are developed separately in their own directory.
7-2 Oracle9iAS Containers for J2EE User’s Guide
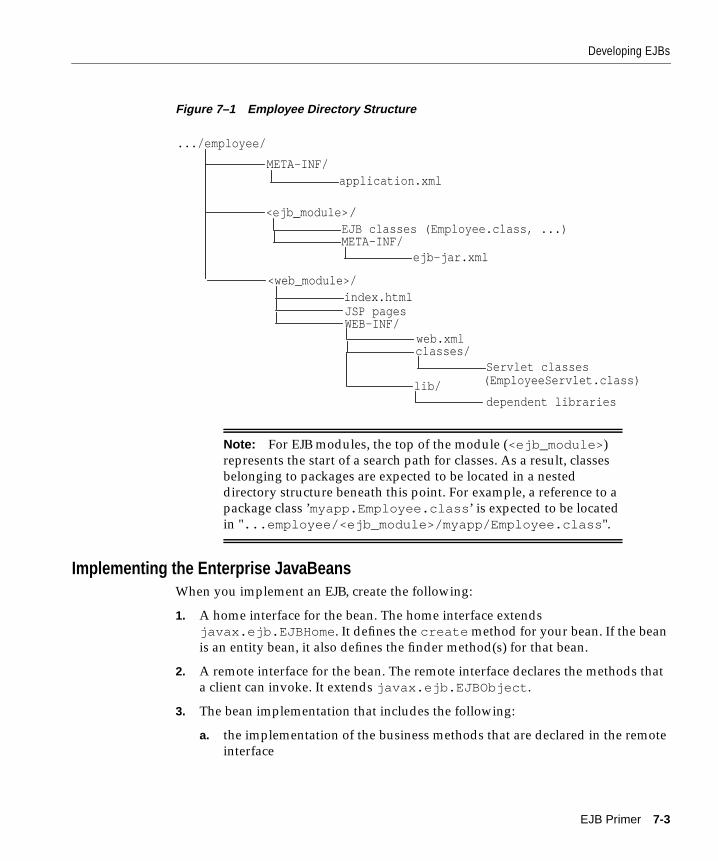
Developing EJBs
Figure 7–1 Employee Directory Structure
Implementing the Enterprise JavaBeansWhen you implement an EJB, create the following:
1. A home interface for the bean. The home interface extends
javax.ejb.EJBHome . It defines the create method for your bean. If the bean
is an entity bean, it also defines the finder method(s) for that bean.
2. A remote interface for the bean. The remote interface declares the methods that
a client can invoke. It extends javax.ejb.EJBObject .
3. The bean implementation that includes the following:
a. the implementation of the business methods that are declared in the remote
interface
Note: For EJB modules, the top of the module (<ejb_module> )
represents the start of a search path for classes. As a result, classes
belonging to packages are expected to be located in a nested
directory structure beneath this point. For example, a reference to a
package class ’myapp.Employee.class ’ is expected to be located
in "...employee/<ejb_module>/myapp/Employee.class ".
.../employee/
META-INF/application.xml
<ejb_module>EJB classes (Employee.class, ...)META-INF/
ejb-jar.xml
<web_module>/index.htmlJSP pagesWEB-INF/
web.xmlclasses/
Servlet classes
lib/dependent libraries
/
(EmployeeServlet.class)
EJB Primer 7-3
Developing EJBs
b. the container callback methods that are inherited from either the
javax.ejb.SessionBean or javax.ejb.EntityBean interfaces
c. the ejbCreate method with parameters matching those of the createmethod as defined in the home interface
Creating the Home InterfaceThe home interface is used to create and destroy the bean instance; thus, it defines
the create method for your bean. Each type of EJB can define the create method
in the following ways:
For each create method, a corresponding ejbCreate method is defined in the
bean implementation. The client invokes the create method that is declared
within the home interface. The container turns around and calls the ejbCreatemethod—with the appropriate parameter signature—within your bean
implementation. You can use the parameter arguments to initialize the state of the
new EJB object.
1. The home interface must extend the javax.ejb.EJBHome interface.
2. All create methods must throw the following exceptions:
■ javax.ejb.CreateException
■ either java.rmi.RemoteException or javax.ejb.EJBException
EJB Type Create Parameters
Stateless Session Bean Can have only a single create method, with no parameters.
Stateful Session Bean One or more create methods, each with its own definedparameters.
Entity Bean Zero or more create methods, each with its own definedparameters. All entity beans must define one or more findermethods, where at least one is a findByPrimaryKey method.
7-4 Oracle9iAS Containers for J2EE User’s Guide
Developing EJBs
ExampleThe following code sample shows a home interface for a session bean called
EmployeeHome .
package employee;
import javax.ejb.*;import java.rmi.*;
public interface EmployeeHome extends EJBHome{ public Employee create() throws CreateException, RemoteException;}
Creating the Remote InterfaceThe remote interface defines the business methods of the bean that the client can
invoke.
1. The remote interface of the bean must extend the javax.ejb.EJBObjectinterface and its methods must throw the java.rmi.RemoteExceptionexception.
2. You must declare the remote interface and its methods as public , because
clients that invoke these methods are remote.
3. The remote interface, all its method parameters, and return types must be
serializable. In general, any object that is passed between the client and the EJB
must be serializable, because RMI marshals and unmarshals the object on both
ends.
4. Any exception can be thrown to the client, as long as it is serializable. Runtime
exceptions, including EJBException and RemoteException , are transferred
back to the client as remote runtime exceptions.
ExampleThe following code sample shows a remote interface called Employee with its
defined methods, each of which will be implemented in the stateless session bean.
package employee;
import javax.ejb.*;import java.rmi.*;import java.util.*;
EJB Primer 7-5
Developing EJBs
public interface Employee extends EJBObject{ public Collection getEmployees() throws RemoteException;
public EmpRecord getEmployee(Integer empNo) throws RemoteException;
public void setEmployee(Integer empNo, String empName, Float salary) throws RemoteException;
public EmpRecord addEmployee(Integer empNo, String empName,Float salary)
throws RemoteException;
public void removeEmployee(Integer empNo) throws RemoteException;}
Implementing the BeanThe bean contains the business logic for your application. It implements the follow-
ing methods:
1. The bean methods defined in the remote interface. The signature for each of
these methods must match the signature in the remote interface.
The bean in the example application consists of one class, EmployeeBean , that
retrieves an employee’s information.
2. The methods defined in the home interface are inherited from the
SessionBean or EntityBean interface. The container uses these methods for
controlling the life cycle of the bean. These include the ejb<Action> methods,
such as ejbActivate , ejbPassivate , and so on.
3. The ejbCreate methods that correspond to the create method(s) that are
declared in the home interface. The container invokes the appropriate
ejbCreate method when the client invokes the corresponding createmethod.
4. Any methods that are private to the bean or package used for facilitating the
business logic. This includes private methods that your public methods use for
completing the tasks requested of them.
7-6 Oracle9iAS Containers for J2EE User’s Guide
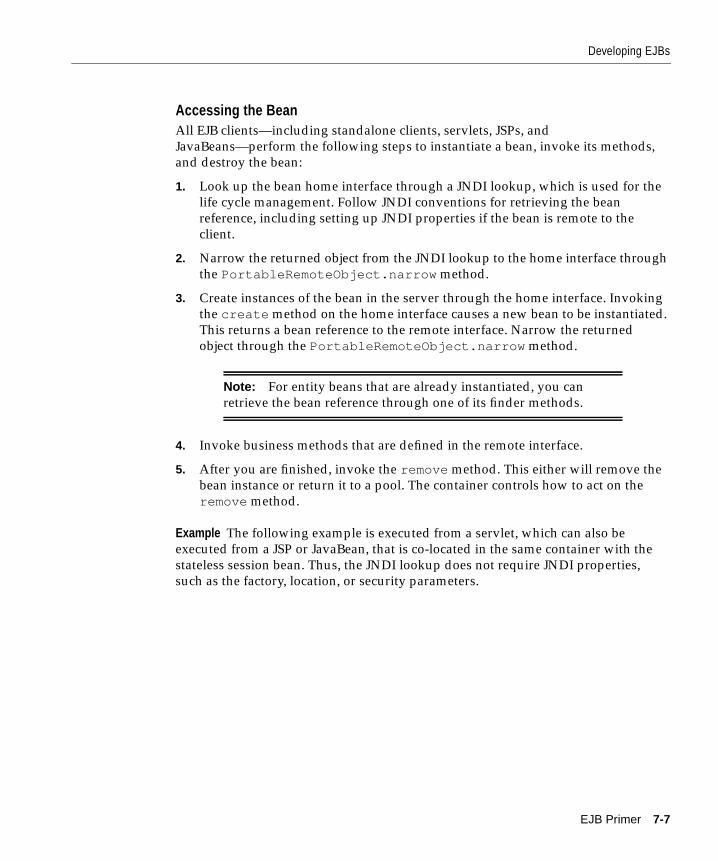
Developing EJBs
Accessing the BeanAll EJB clients—including standalone clients, servlets, JSPs, and
JavaBeans—perform the following steps to instantiate a bean, invoke its methods,
and destroy the bean:
1. Look up the bean home interface through a JNDI lookup, which is used for the
life cycle management. Follow JNDI conventions for retrieving the bean
reference, including setting up JNDI properties if the bean is remote to the
client.
2. Narrow the returned object from the JNDI lookup to the home interface through
the PortableRemoteObject.narrow method.
3. Create instances of the bean in the server through the home interface. Invoking
the create method on the home interface causes a new bean to be instantiated.
This returns a bean reference to the remote interface. Narrow the returned
object through the PortableRemoteObject.narrow method.
4. Invoke business methods that are defined in the remote interface.
5. After you are finished, invoke the remove method. This either will remove the
bean instance or return it to a pool. The container controls how to act on the
remove method.
Example The following example is executed from a servlet, which can also be
executed from a JSP or JavaBean, that is co-located in the same container with the
stateless session bean. Thus, the JNDI lookup does not require JNDI properties,
such as the factory, location, or security parameters.
Note: For entity beans that are already instantiated, you can
retrieve the bean reference through one of its finder methods.
EJB Primer 7-7
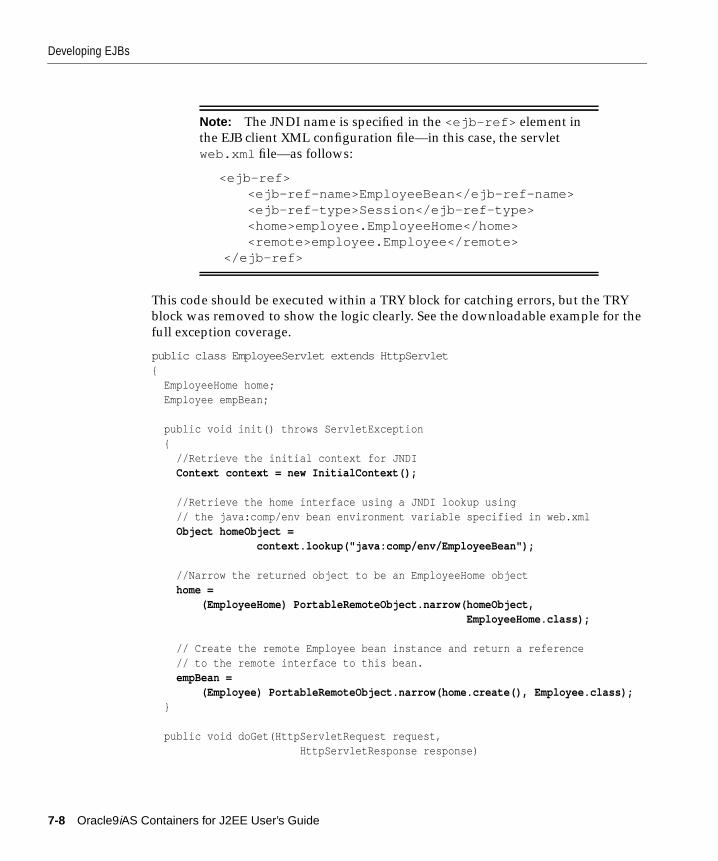
Developing EJBs
This code should be executed within a TRY block for catching errors, but the TRY
block was removed to show the logic clearly. See the downloadable example for the
full exception coverage.
public class EmployeeServlet extends HttpServlet{ EmployeeHome home; Employee empBean;
public void init() throws ServletException { //Retrieve the initial context for JNDI Context context = new InitialContext();
//Retrieve the home interface using a JNDI lookup using // the java:comp/env bean environment variable specified in web.xml Object homeObject = context.lookup("java:comp/env/EmployeeBean");
//Narrow the returned object to be an EmployeeHome object home = (EmployeeHome) PortableRemoteObject.narrow(homeObject, EmployeeHome.class);
// Create the remote Employee bean instance and return a reference // to the remote interface to this bean. empBean = (Employee) PortableRemoteObject.narrow(home.create(), Employee.class); }
public void doGet(HttpServletRequest request, HttpServletResponse response)
Note: The JNDI name is specified in the <ejb-ref> element in
the EJB client XML configuration file—in this case, the servlet
web.xml file—as follows:
<ejb-ref> <ejb-ref-name>EmployeeBean</ejb-ref-name> <ejb-ref-type>Session</ejb-ref-type> <home>employee.EmployeeHome</home> <remote>employee.Employee</remote> </ejb-ref>
7-8 Oracle9iAS Containers for J2EE User’s Guide
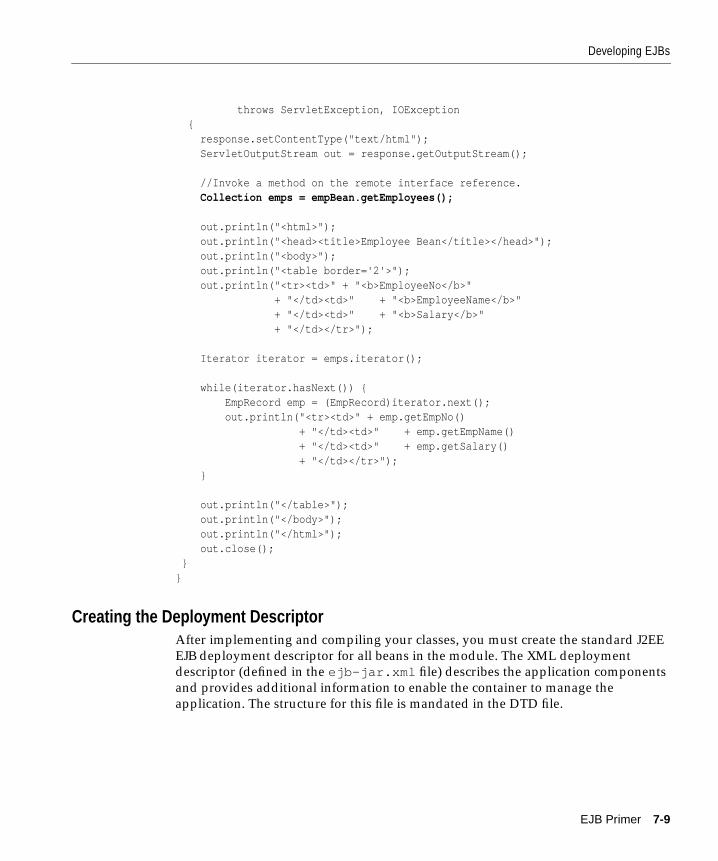
Developing EJBs
throws ServletException, IOException { response.setContentType("text/html"); ServletOutputStream out = response.getOutputStream();
//Invoke a method on the remote interface reference. Collection emps = empBean.getEmployees();
out.println("<html>"); out.println("<head><title>Employee Bean</title></head>"); out.println("<body>"); out.println("<table border='2'>"); out.println("<tr><td>" + "<b>EmployeeNo</b>" + "</td><td>" + "<b>EmployeeName</b>" + "</td><td>" + "<b>Salary</b>" + "</td></tr>");
Iterator iterator = emps.iterator();
while(iterator.hasNext()) { EmpRecord emp = (EmpRecord)iterator.next(); out.println("<tr><td>" + emp.getEmpNo() + "</td><td>" + emp.getEmpName() + "</td><td>" + emp.getSalary() + "</td></tr>"); }
out.println("</table>"); out.println("</body>"); out.println("</html>"); out.close(); }}
Creating the Deployment DescriptorAfter implementing and compiling your classes, you must create the standard J2EE
EJB deployment descriptor for all beans in the module. The XML deployment
descriptor (defined in the ejb-jar.xml file) describes the application components
and provides additional information to enable the container to manage the
application. The structure for this file is mandated in the DTD file.
EJB Primer 7-9

Developing EJBs
The following example shows the sections that are necessary for the Employeeexample.
Example 7–1 XML Deployment Descriptor for Employee Bean
<?xml version="1.0"?><!DOCTYPE ejb-jar PUBLIC "-//Sun Microsystems, Inc.//DTD Enterprise JavaBeans1.1//EN" "http://java.sun.com/j2ee/dtds/ejb-jar_1_1.dtd">
<ejb-jar> <enterprise-beans> <session> <description>Session Bean Employee Example</description> <ejb-name>EmployeeBean</ejb-name> <home>employee.EmployeeHome</home> <remote>employee.Employee</remote> <ejb-class>employee.EmployeeBean</ejb-class> <session-type>Stateless</session-type> <transaction-type>Bean</transaction-type> </session> </enterprise-beans></ejb-jar>
Archiving the EJB ApplicationOnce you have finalized your implementation and have created the deployment
descriptors, archive your EJB application into a JAR file. The JAR file should include
all EJB application files and the deployment descriptor.
For example, to archive your compiled EJB class files and XML files for the
Employee example into a JAR file, perform the following in the
../employee/ejb_module directory:
% jar cvf Employee-ejb.jar .
Note: If you have included a Web application as part of this
enterprise Java application, follow the instructions for building the
Web application in "Building and Deploying Within a Directory" on
page 3-30. Then, modify the *-web-site.xml file, and archive all
Web application files into a WAR file.
7-10 Oracle9iAS Containers for J2EE User’s Guide
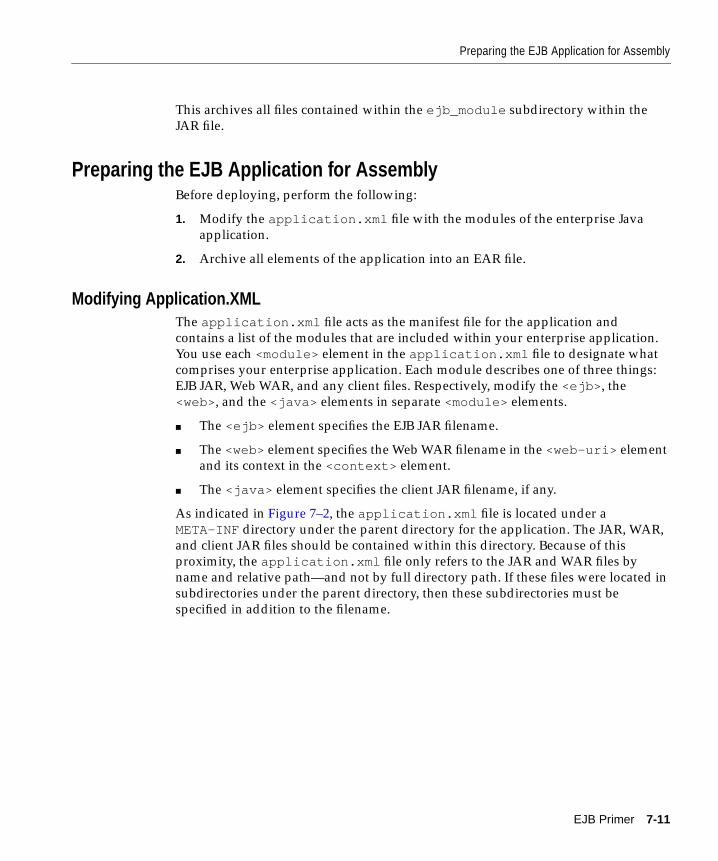
Preparing the EJB Application for Assembly
This archives all files contained within the ejb_module subdirectory within the
JAR file.
Preparing the EJB Application for AssemblyBefore deploying, perform the following:
1. Modify the application.xml file with the modules of the enterprise Java
application.
2. Archive all elements of the application into an EAR file.
Modifying Application.XMLThe application.xml file acts as the manifest file for the application and
contains a list of the modules that are included within your enterprise application.
You use each <module> element in the application.xml file to designate what
comprises your enterprise application. Each module describes one of three things:
EJB JAR, Web WAR, and any client files. Respectively, modify the <ejb> , the
<web>, and the <java> elements in separate <module> elements.
■ The <ejb> element specifies the EJB JAR filename.
■ The <web> element specifies the Web WAR filename in the <web-uri> element
and its context in the <context> element.
■ The <java> element specifies the client JAR filename, if any.
As indicated in Figure 7–2, the application.xml file is located under a
META-INF directory under the parent directory for the application. The JAR, WAR,
and client JAR files should be contained within this directory. Because of this
proximity, the application.xml file only refers to the JAR and WAR files by
name and relative path—and not by full directory path. If these files were located in
subdirectories under the parent directory, then these subdirectories must be
specified in addition to the filename.
EJB Primer 7-11
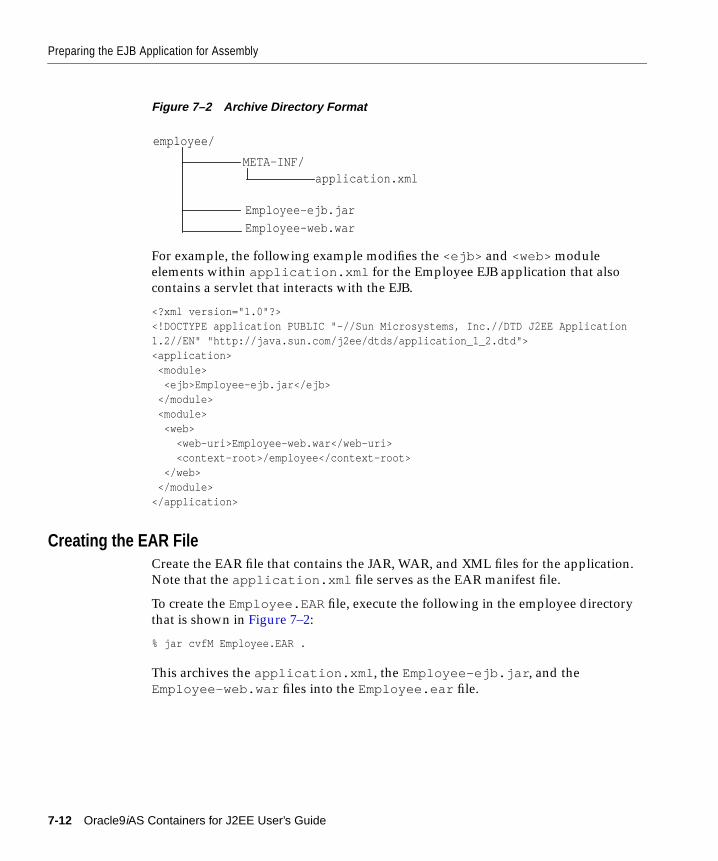
Preparing the EJB Application for Assembly
Figure 7–2 Archive Directory Format
For example, the following example modifies the <ejb> and <web> module
elements within application.xml for the Employee EJB application that also
contains a servlet that interacts with the EJB.
<?xml version="1.0"?><!DOCTYPE application PUBLIC "-//Sun Microsystems, Inc.//DTD J2EE Application1.2//EN" "http://java.sun.com/j2ee/dtds/application_1_2.dtd"><application> <module> <ejb>Employee-ejb.jar</ejb> </module> <module> <web> <web-uri>Employee-web.war</web-uri> <context-root>/employee</context-root> </web> </module></application>
Creating the EAR FileCreate the EAR file that contains the JAR, WAR, and XML files for the application.
Note that the application.xml file serves as the EAR manifest file.
To create the Employee.EAR file, execute the following in the employee directory
that is shown in Figure 7–2:
% jar cvfM Employee.EAR .
This archives the application.xml , the Employee-ejb.jar , and the
Employee-web.war files into the Employee.ear file.
employee/
META-INF/application.xml
Employee-ejb.jar
Employee-web.war
7-12 Oracle9iAS Containers for J2EE User’s Guide
Deploying the Enterprise Application to OC4J
Deploying the Enterprise Application to OC4JAs detailed in "Deploying Applications" on page 2-20, you can use the deployment
wizard to deploy the EAR file containing your EJB application. This adds a line to
the server.xml file of the following form:
<application name=... path=... auto-start="true" />
The path should be the full directory path and EAR filename. For our employee
example, add the following to the server.xml file:
<application name="employee"path="/private/applications/Employee.EAR"auto-start="true" />
If you included a Web application portion, The deployment wizard adds a
<web-app ...> entry to the default-web-site.xml file to bind the Web
application to the Web server. The Web application binding for the employee Web
application is as follows:
<web-app application="employee" name="Employee-web"root="/employee" />
The <application> attribute should be the same value as provided in the
server.xml file. The <name> should be the WAR file, without the WAR extension,
for the Web application.
EJB Primer 7-13

Deploying the Enterprise Application to OC4J
7-14 Oracle9iAS Containers for J2EE User’s Guide
Se
8
SecurityOC4J security employs a user manager to authenticate and authorize users and
groups that attempt to access a J2EE application. User managers differ in
performance and are employed based on the security you require. Confidentiality is
automatically provided by the Oracle HTTP Server.
This chapter describes the following topics:
■ Overview of Security Functions
■ Provider Types
■ Specifying Your User Manager
■ Specifying Users, Groups, and Roles
■ Authenticating HTTP Clients
■ Authenticating EJB Clients
■ Authorization In J2EE Applications
■ Creating Your Own User Manager
For more detail on OC4J security, see the security chapters in the Oracle9iASContainers for J2EE Services Guide. For a broader description of Oracle9iAS security
in middle-tier environments that connect to the Internet, see the Oracle9i ApplicationServer Security Guide.
curity 8-1
Overview of Security Functions
Overview of Security FunctionsOC4J security is based on a two-step process. First, a user or group attempting to
access a J2EE application is authenticated, and then it is authorized. Authentication
and authorization, along with OC4J confidentiality, are introduced below:
■ Authentication: Verifies the identity and credentials of a user.
You define users and groups in a user repository. A user repository is used by a
user manager to verify the identity of a user or group attempting to access a J2EE
application. A user repository can be a file or a directory server, depending on
your environment. The Oracle Internet Directory is an example of a user
repository.
Although the J2EE application determines which user can use the application, it
is the user manager, employing the user name and password, that verifies the
user’s identity, based on information in the user repository.
OC4J supports two types of authentication providers: JAZN and XML. These
are described below in "Provider Types" on page 8-3.
■ Authorization: Permits or denies users and groups access to an application.
You specify authorization for users and groups (identities) in the J2EE andOC4J-specific deployment descriptors. J2EE and OC4J-specific deployment
descriptors indicate what roles are needed to access the different parts of the
application. Roles are the identities that each application uses to indicate access
rights to its different objects. The OC4J-specific deployment descriptors provide
a mapping between the logical roles and the users and groups known by OC4J.
Authorization identities are defined in the XML deployment descriptors for
each application. The application refers to the users, groups, and roles of the
authentication provider (JAZN or XML). The application XML deployment
descriptor modifications are discussed in "Authorization In J2EE Applications"
on page 8-17.
8-2 Oracle9iAS Containers for J2EE User’s Guide
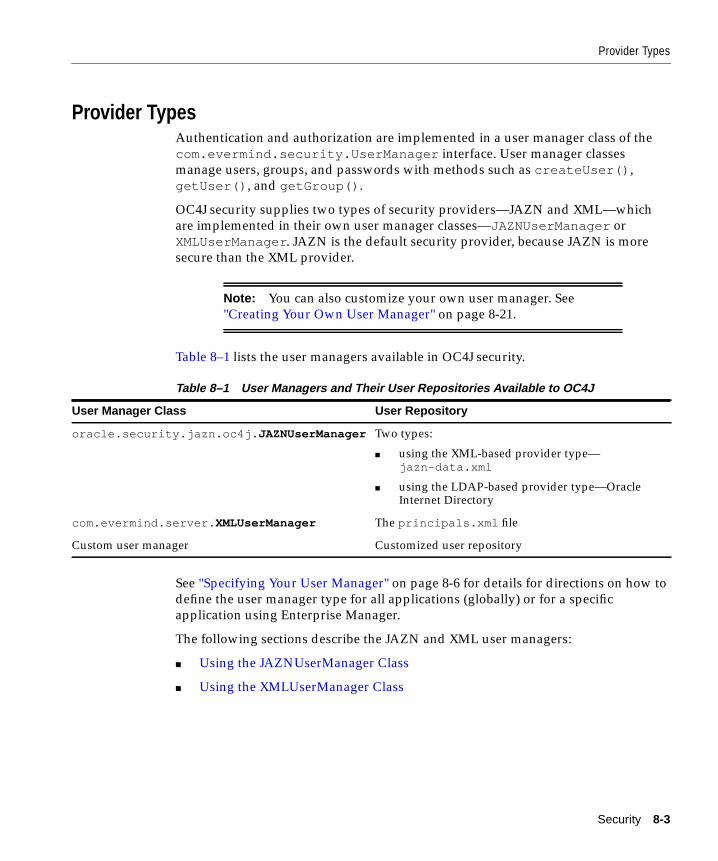
Provider Types
Provider TypesAuthentication and authorization are implemented in a user manager class of the
com.evermind.security.UserManager interface. User manager classes
manage users, groups, and passwords with methods such as createUser() ,
getUser() , and getGroup() .
OC4J security supplies two types of security providers—JAZN and XML—which
are implemented in their own user manager classes—JAZNUserManager or
XMLUserManager . JAZN is the default security provider, because JAZN is more
secure than the XML provider.
Table 8–1 lists the user managers available in OC4J security.
See "Specifying Your User Manager" on page 8-6 for details for directions on how to
define the user manager type for all applications (globally) or for a specific
application using Enterprise Manager.
The following sections describe the JAZN and XML user managers:
■ Using the JAZNUserManager Class
■ Using the XMLUserManager Class
Note: You can also customize your own user manager. See
"Creating Your Own User Manager" on page 8-21.
Table 8–1 User Managers and Their User Repositories Available to OC4J
User Manager Class User Repository
oracle.security.jazn.oc4j. JAZNUserManager Two types:
■ using the XML-based provider type—jazn-data.xml
■ using the LDAP-based provider type—OracleInternet Directory
com.evermind.server. XMLUserManager The principals.xml file
Custom user manager Customized user repository
Security 8-3
Provider Types
Using the JAZNUserManager ClassThe JAZNUserManager class is the default user manager and offers the best
security. The primary purpose of the JAZNUserManager class is to leverage the
JAAS provider as the security infrastructure for OC4J. For a complete description of
the JAAS provider, see the Oracle9iAS Containers for J2EE Services Guide.
By integrating the JAAS provider with OC4J, the following benefits can be achieved:
■ Single Sign-on (SSO)/mod_osso integration
■ SSL/mod_ossl integration
■ Oracle Internet Directory integration (using the LDAP-based provider type)
■ Fine-grained access control using Java2 permissions
■ run-as identity support, delegation support (from servlet to EJB)
■ Secure file-based storage of passwords (using the XML-based provider type)
Use the JAZNUserManager class if you want OC4J security that has secure,
centralized storage, retrieval, and administration of JAAS provider data. This data
consists of realm (user and roles) and JAAS policy (permissions) information.
Figure 8–1 illustrates the architecture of OC4J security under the
JAZNUserManager class.
There are two types of JAZN supplied with OC4J security: XML-based or
Lightweight Directory Access Protocol (LDAP)-based.
■ JAZN-XML is a fast, light weight implementation of the JAAS provider API.
This provider type uses XML to store user names and encrypted passwords.
The user repository is file-based and stored in the jazn-data.xml file.
Select JAZN-XML as the user manager in the Enterprise Manager. Configure its
users, roles, and groups using either the Enterprise Manager or the JAZN
Admintool. You must have a preconfigured jazn-data.xml file before
configuring this user manager. Since this is the default, there is a default
jazn-data.xml file. For directions on the XML elements and how to modify
this file, see the appropriate security chapters in Oracle9iAS Containers for J2EEServices Guide.
■ JAZN-LDAP is more scalable, secure, enterprise-ready, and integrated with
Single Sign-On. You can only support Single Sign-On with JAZN-LDAP.
Select JAZN-LDAP as the user manager in the Enterprise Manager. Configure
its users and groups using the Delegated Administrative Service (DAS) from
Oracle Internet Directory. The user repository is an Oracle Internet Directory,
8-4 Oracle9iAS Containers for J2EE User’s Guide
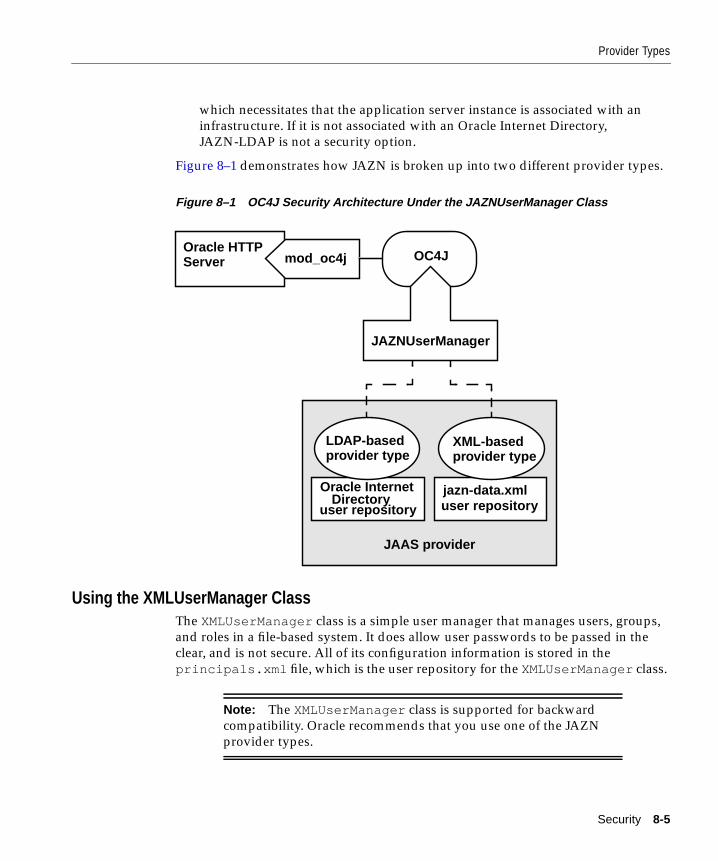
Provider Types
which necessitates that the application server instance is associated with an
infrastructure. If it is not associated with an Oracle Internet Directory,
JAZN-LDAP is not a security option.
Figure 8–1 demonstrates how JAZN is broken up into two different provider types.
Figure 8–1 OC4J Security Architecture Under the JAZNUserManager Class
Using the XMLUserManager ClassThe XMLUserManager class is a simple user manager that manages users, groups,
and roles in a file-based system. It does allow user passwords to be passed in the
clear, and is not secure. All of its configuration information is stored in the
principals.xml file, which is the user repository for the XMLUserManager class.
Note: The XMLUserManager class is supported for backward
compatibility. Oracle recommends that you use one of the JAZN
provider types.
Oracle HTTPServer OC4Jmod_oc4j
JAZNUserManager
JAAS provider
user repositoryuser repository
LDAP-basedprovider type
XML-basedprovider type
jazn-data.xmlOracle InternetDirectory
Security 8-5
Specifying Your User Manager
Specifying Your User ManagerThe user manager, employing the user name and password, verifies the user’s
identity based on information in the user repository. The user manager defines what
type of authentication you will be using. It contains your definitions for users,
groups, or roles. The default user manager is the JAZNUserManager .
You can define a user manager for all applications or for specific applications.
■ Global user manager—The global user manager is inherited by all applications
that have not defined a specific user manager.
■ Specific user manager—This is a user manager that is defined solely for a single
application. It is not used by any other application.
Figure 8–2 shows the Enterprise Manager Security page that enables you to choose
the type of user manager you prefer. This page is the same both for global and
application-specific security definition.
Note: Within a single OC4J instance, you must either use JAZN or
XML. You cannot use both JAZN and XML user managers in the
same OC4J instance. For example, you cannot define the
JAZNUserManager as the global user manager and define the
XMLUserManager as a specific user manager for an application.
Thus, the only time you can define a specific user manager for an
application is when you use JAZN, since it has two provider types,
or if you have a custom user manager.
8-6 Oracle9iAS Containers for J2EE User’s Guide
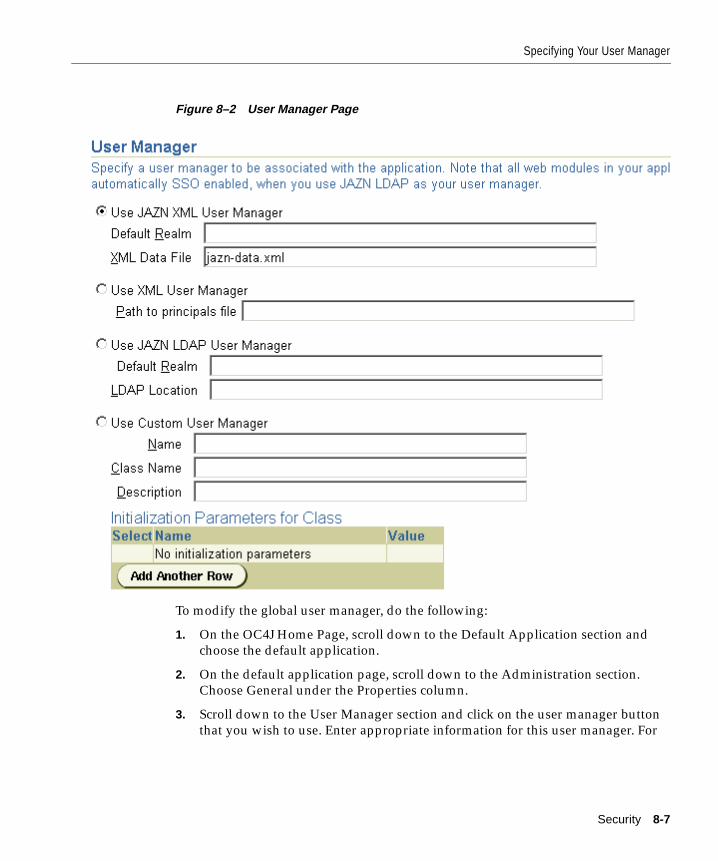
Specifying Your User Manager
Figure 8–2 User Manager Page
To modify the global user manager, do the following:
1. On the OC4J Home Page, scroll down to the Default Application section and
choose the default application.
2. On the default application page, scroll down to the Administration section.
Choose General under the Properties column.
3. Scroll down to the User Manager section and click on the user manager button
that you wish to use. Enter appropriate information for this user manager. For
Security 8-7
Specifying Your User Manager
example, the JAZNUserManager requires that you enter the realm and location
of the jazn-data.xml file.
– For the global security definition, the location of this file is relative to
/j2ee/home/config . This is because the global application resides in this
directory.
– For an application-specific security definition, the location of this file is
relative to where the application is deployed. Typically, the application is
deployed to j2ee/home/application-deployments/<appname> .
4. Click Apply.
Modifying the user manager for a specific application is similar as follows:
1. On the OC4J Home Page, scroll down to the Applications section and choose
the application.
2. On the application page, scroll down to the Administration section. Choose
General under the Properties column.
3. Scroll down to the User Manager section and click on the user manager button
that you wish to use. Enter appropriate information for this user manager.
4. Click Apply.
Once you apply the changes, go back up to the application page and choose
Security. If you chose JAZNUserManager or XMLUserManager , a page is shown
where you can add users, groups, or roles that are appropriate for the user manager.
If you chose one of the JAZN provider types, then the type is designated in the
jazn.xml file that is located in j2ee/home/config . The jazn.xml file is used to
configure the provider type, but you can also add other JAZN configuration
information in this file. See Oracle9iAS Containers for J2EE Services Guide for
information on this file.
The following is a sample jazn.xml file with both provider types. The
JAZN-LDAP provider is commented out.
<?xml version="1.0" encoding="UTF-8" standalone=’yes’?><!DOCTYPE jazn PUBLIC "JAZN Config""http://xmlns.oracle.com/ias/dtds/jazn.dtd">
<jazn provider="XML" location="./jazn-data.xml" />
<!--<jazn provider="LDAP" location="ldap://myoid.us.oracle.com:389" />
8-8 Oracle9iAS Containers for J2EE User’s Guide
Specifying Users, Groups, and Roles
-->
Specifying Users, Groups, and RolesEach provider type enables you to define users, groups, and roles in the following
ways:
■ JAZN-XML—use Enterprise Manager or the JAZN Admintool
■ JAZN-LDAP—use Delegated Administrative Service (DAS) from Oracle
Internet Directory
■ XML—use Enterprise Manager
You manage users, groups, and roles for the JAZN-XML and XML user managers
with the same Enterprise Manager pages. The following sections discusses how to
modify both JAZN-XML and XML provider type users, groups, and roles using
Enterprise Manager.
■ Shared Groups, Users, and Roles—These are defined at the global level. Thus,
these users, groups, and roles can be used by any application in the OC4J
instance.
■ Application-Specific Groups, Users, and Roles—These are defined at the
application level. Thus, these can only be used by the application.
Shared Groups, Users, and RolesShared users and groups are listed in the user repository, which are defined in the
Security section on the OC4J Home Page. The type of user manager as the default
for all applications is defined in the General section of the default application page.
To add groups, users, and roles for all applications, do the following:
1. On the OC4J Home Page, scroll down to the Administration section.
2. On the default application page, scroll down to the Administration section.
Choose Security under the Application Defaults column.
3. Add or remove groups, users, and roles by clicking the following buttons:
Note: See Oracle9iAS Containers for J2EE Services Guide for
information on the JAZN Admintool and the Delegated
Administrative Service.
Security 8-9
Specifying Users, Groups, and Roles
– Click Add Group to add a new group.
– Select the radio button of a group in the group section and click Remove to
remove a specified group.
– Click Add User to add a new user.
– Select the radio button of a user in the user section and click Remove to
remove a specified user.
Application-Specific Groups, Users, and RolesApplication-specific users and groups are listed in the application-specific user
repository, which are defined in the Security section on the application page. The
type of user manager used for this application is defined in the General section of
this application.
Modifying groups, users, and roles for a specific application is similar as follows:
1. On the OC4J Home Page, scroll down to the Applications section and choose
the application.
2. On the application page, scroll down to the Administration section. Choose
Security under the Security column.
3. Add or remove groups, users, and roles by clicking the following buttons:
– Click Add Group to add a new group.
– Select the radio button of a group in the group section and click Remove to
remove a specified group.
– Click Add User to add a new user.
– Select the radio button of a user in the user section and click Remove to
remove a specified user.
Figure 8–3 shows an example of how to specify groups, users, and roles for the
JAZNUserManager .
8-10 Oracle9iAS Containers for J2EE User’s Guide
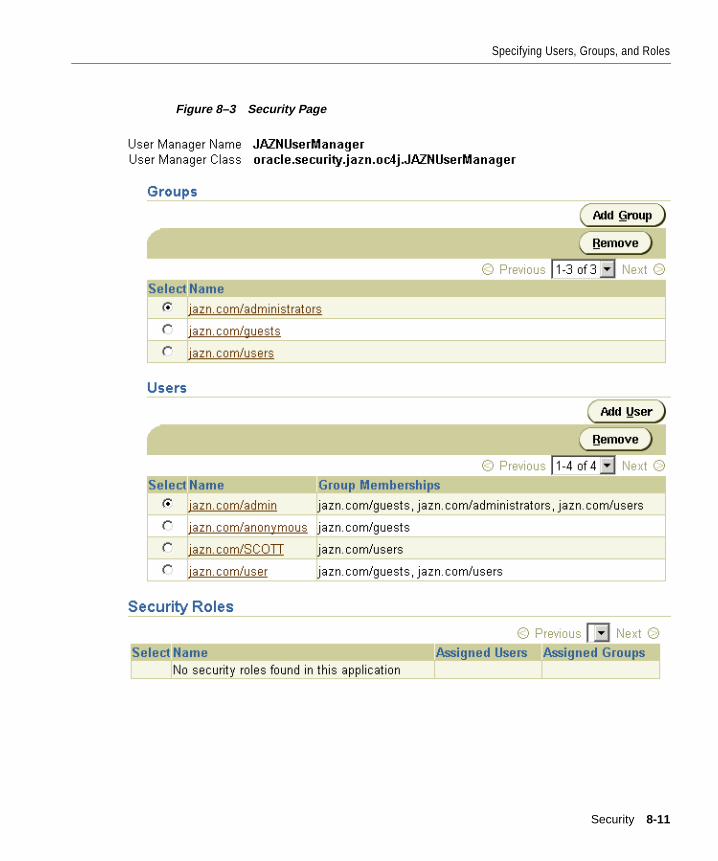
Specifying Users, Groups, and Roles
Figure 8–3 Security Page
Security 8-11
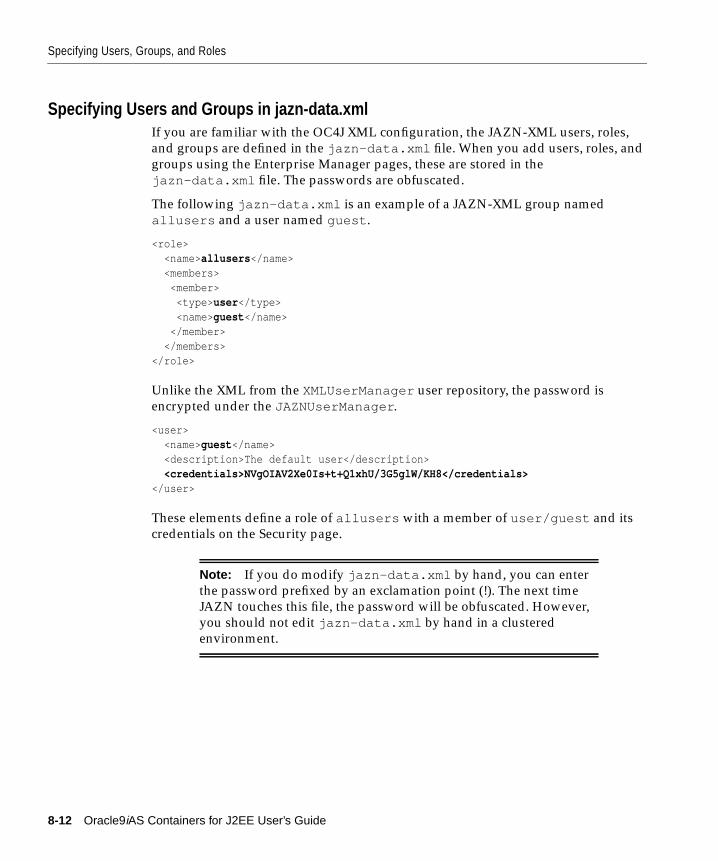
Specifying Users, Groups, and Roles
Specifying Users and Groups in jazn-data.xmlIf you are familiar with the OC4J XML configuration, the JAZN-XML users, roles,
and groups are defined in the jazn-data.xml file. When you add users, roles, and
groups using the Enterprise Manager pages, these are stored in the
jazn-data.xml file. The passwords are obfuscated.
The following jazn-data.xml is an example of a JAZN-XML group named
allusers and a user named guest .
<role><name>allusers </name><members>
<member><type> user </type><name>guest </name>
</member></members>
</role>
Unlike the XML from the XMLUserManager user repository, the password is
encrypted under the JAZNUserManager .
<user><name>guest </name><description>The default user</description><credentials>NVgOIAV2Xe0Is+t+Q1xhU/3G5glW/KH8</credentials>
</user>
These elements define a role of allusers with a member of user/guest and its
credentials on the Security page.
Note: If you do modify jazn-data.xml by hand, you can enter
the password prefixed by an exclamation point (!). The next time
JAZN touches this file, the password will be obfuscated. However,
you should not edit jazn-data.xml by hand in a clustered
environment.
8-12 Oracle9iAS Containers for J2EE User’s Guide

Authenticating HTTP Clients
Specifying Users and Groups in XMLUserManagerThe XMLUserManager users, roles, and groups are defined in the
principals.xml file. The following XML from the principals.xml file (the
user repository for the XMLUserManager class) shows how to define a group
named allusers and a user named guest with password welcome . The guestuser is made a member of the allusers group. The passwords provided in a
principals.xml file are not encoded; thus, they constitute a security risk.
<principals><groups>
<group name="allusers"><description>Group for all normal users</description><permission name="rmi:login" /><permission name="com.evermind.server.rmi.RMIPermission" />
</group>....other groups...
</groups><users>
<user username="guest" password="welcome"><description>Guest user</description><group-membership group="allusers" />
</user></users>
</principals>
Use these elements to define a group of allusers with the correct Permissions,
with a user of guest/welcome on the Security page.
PermissionsThe Enterprise Manager does not enable you to add Permissions. To add
Permissions, use the JAZN Admintool for JAZN-XML and the Delegated
Administrative Service for JAZN-LDAP. See Oracle9iAS Containers for J2EE ServicesGuide for more information.
Authenticating HTTP ClientsMost clients are Web browsers that access OC4J through the Oracle HTTP Server
mod_oc4j module. OC4J requests the client to authenticate itself when accessing
protected URLs. You can achieve authentication through a user name and
password, or in the case of SSL, through an SSL certificate. Although in most cases
Security 8-13
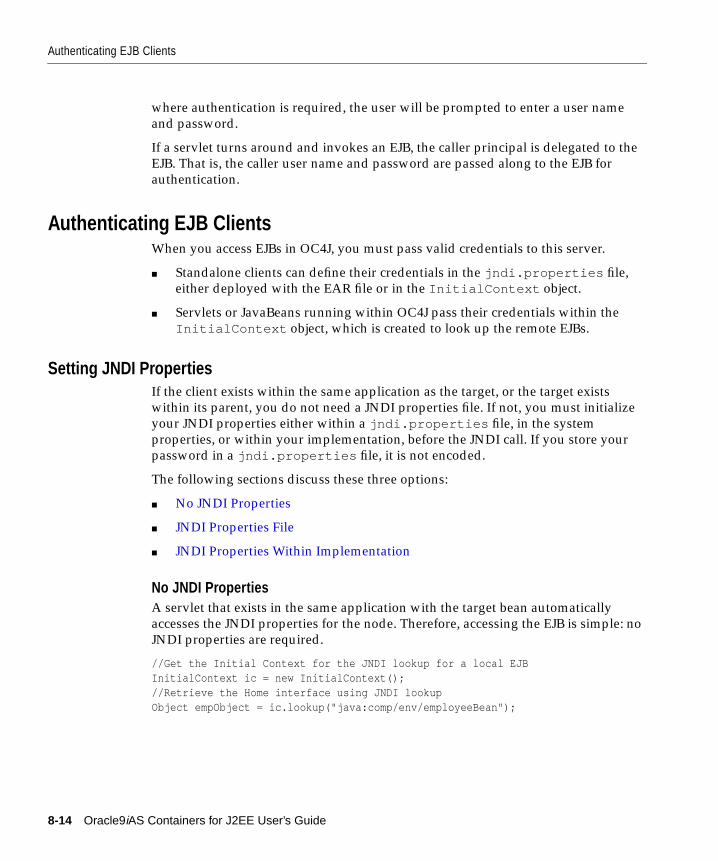
Authenticating EJB Clients
where authentication is required, the user will be prompted to enter a user name
and password.
If a servlet turns around and invokes an EJB, the caller principal is delegated to the
EJB. That is, the caller user name and password are passed along to the EJB for
authentication.
Authenticating EJB ClientsWhen you access EJBs in OC4J, you must pass valid credentials to this server.
■ Standalone clients can define their credentials in the jndi.properties file,
either deployed with the EAR file or in the InitialContext object.
■ Servlets or JavaBeans running within OC4J pass their credentials within the
InitialContext object, which is created to look up the remote EJBs.
Setting JNDI PropertiesIf the client exists within the same application as the target, or the target exists
within its parent, you do not need a JNDI properties file. If not, you must initialize
your JNDI properties either within a jndi.properties file, in the system
properties, or within your implementation, before the JNDI call. If you store your
password in a jndi.properties file, it is not encoded.
The following sections discuss these three options:
■ No JNDI Properties
■ JNDI Properties File
■ JNDI Properties Within Implementation
No JNDI PropertiesA servlet that exists in the same application with the target bean automatically
accesses the JNDI properties for the node. Therefore, accessing the EJB is simple: no
JNDI properties are required.
//Get the Initial Context for the JNDI lookup for a local EJBInitialContext ic = new InitialContext();//Retrieve the Home interface using JNDI lookupObject empObject = ic.lookup("java:comp/env/employeeBean");
8-14 Oracle9iAS Containers for J2EE User’s Guide

Authenticating EJB Clients
This is also true if the target bean is in an application that has been deployed as this
application’s parent. To specify parents, configure the parent application in the
application.xml file in the EAR when deploying the originating application.
JNDI Properties FileIf setting the JNDI properties within the jndi.properties file, set the properties
as follows. Ensure that this file is accessible from the CLASSPATH.
Factoryjava.naming.factory.initial=
com.evermind.server.ApplicationClientInitialContextFactory
LocationThe ORMI default port number is 23791, which can be modified in
j2ee/home/config/rmi.xml . Therefore, set the URL in the jndi.properties ,
in one of the two ways:
java.naming.provider.url=ormi://<hostname>/<application-name>
- or -
java.naming.provider.url=ormi://<hostname>:23791/<application-name>
SecurityWhen you access EJBs in OC4J, you must pass valid credentials to this server.
Standalone clients define their credentials in the jndi.properties file deployed
with the code of the client. When using JAZN, both the realm and the user name are
defined as the principal. If only one realm exists, then the user name can be
specified alone. The assumption is to use the single realm.
java.naming.security.principal=<JAZNrealm/username>java.naming.security.credentials=<password>
Note: The default realm for JAZN-XML is "jazn.com ."
JAZN-LDAP can be initialized with a "jazn.com " realm as a
demo. You can install this demo realm by executing the
j2ee/jazn/install/postinstall.sh shell script. However,
since it is only a demo realm, you should use an actual realm in
your production environment.
Security 8-15
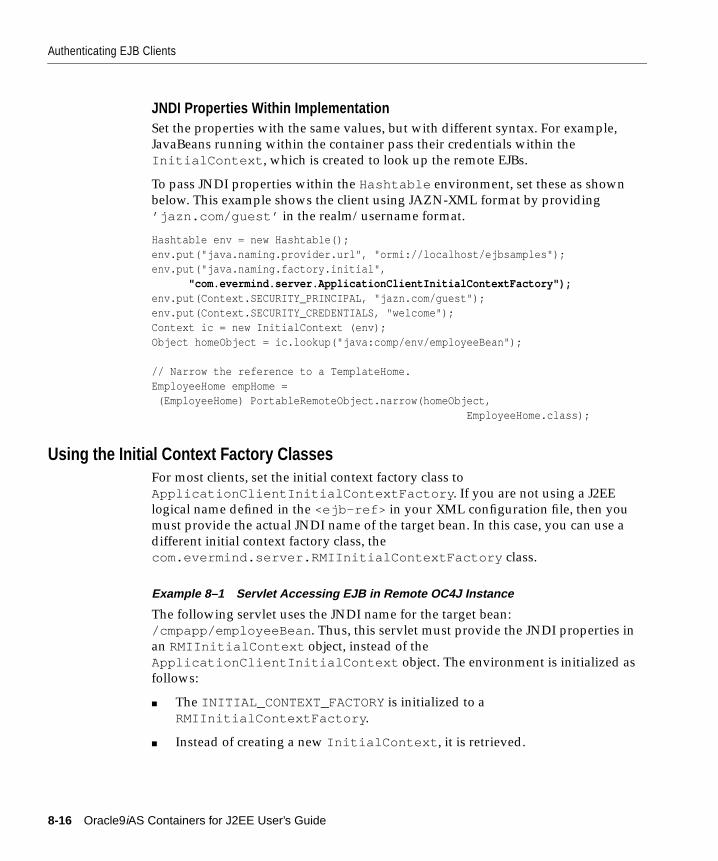
Authenticating EJB Clients
JNDI Properties Within ImplementationSet the properties with the same values, but with different syntax. For example,
JavaBeans running within the container pass their credentials within the
InitialContext , which is created to look up the remote EJBs.
To pass JNDI properties within the Hashtable environment, set these as shown
below. This example shows the client using JAZN-XML format by providing
’jazn.com/guest’ in the realm/username format.
Hashtable env = new Hashtable();env.put("java.naming.provider.url", "ormi://localhost/ejbsamples");env.put("java.naming.factory.initial",
"com.evermind.server.ApplicationClientInitialContextFactory");env.put(Context.SECURITY_PRINCIPAL, "jazn.com/guest");env.put(Context.SECURITY_CREDENTIALS, "welcome");Context ic = new InitialContext (env);Object homeObject = ic.lookup("java:comp/env/employeeBean");
// Narrow the reference to a TemplateHome.EmployeeHome empHome = (EmployeeHome) PortableRemoteObject.narrow(homeObject, EmployeeHome.class);
Using the Initial Context Factory ClassesFor most clients, set the initial context factory class to
ApplicationClientInitialContextFactory . If you are not using a J2EE
logical name defined in the <ejb-ref> in your XML configuration file, then you
must provide the actual JNDI name of the target bean. In this case, you can use a
different initial context factory class, the
com.evermind.server.RMIInitialContextFactory class.
Example 8–1 Servlet Accessing EJB in Remote OC4J Instance
The following servlet uses the JNDI name for the target bean:
/cmpapp/employeeBean . Thus, this servlet must provide the JNDI properties in
an RMIInitialContext object, instead of the
ApplicationClientInitialContext object. The environment is initialized as
follows:
■ The INITIAL_CONTEXT_FACTORY is initialized to a
RMIInitialContextFactory .
■ Instead of creating a new InitialContext , it is retrieved.
8-16 Oracle9iAS Containers for J2EE User’s Guide

Authorization In J2EE Applications
■ The actual JNDI name is used in the lookup.
Hashtable env = new Hashtable();env.put(Context.PROVIDER_URL, "ormi://localhost/cmpapp");env.put(Context.SECURITY_PRINCIPAL, "jazn.com/guest");env.put(Context.SECURITY_CREDENTIALS, "welcome");env.put(Context.INITIAL_CONTEXT_FACTORY,
"com.evermind.server.rmi.RMIInitialContextFactory ");
Context ic =new com.evermind.server.rmi.RMIInitialContextFactory().
getInitialContext(env);
Object homeObject = ic.lookup("/cmpapp/employeeBean");
// Narrow the reference to a TemplateHome.EmployeeHome empHome =
(EmployeeHome) PortableRemoteObject.narrow(homeObject,EmployeeHome.class);
Authorization In J2EE ApplicationsAuthorization is the process of granting or denying a user access to a J2EE
application based on its identity. Authorization is distinct from authentication,
which is the process of verifying that a user is valid.
You specify authorization for users and groups in the J2EE and OC4J-specific
deployment descriptors. The J2EE deployment descriptor is where you specify the
access rules for using logical roles. The OC4J-specific deployment descriptor is
where you map logical roles to actual users and groups, which are defined in a user
repository.
The following sections describe how to define users, groups, and roles:
■ Specifying Logical Roles in a J2EE Application
■ Mapping Logical Roles to Users and Groups
Security 8-17
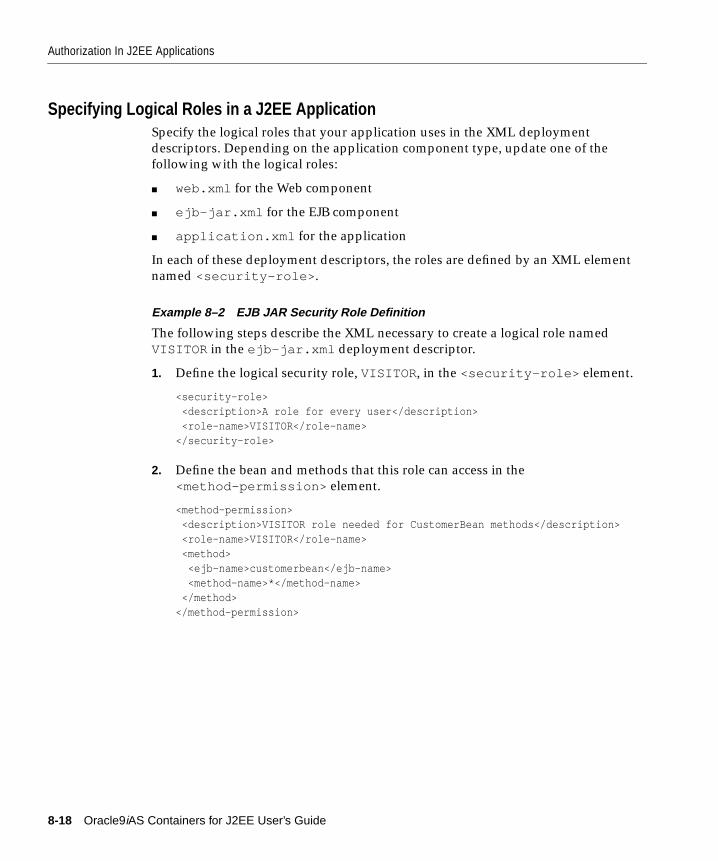
Authorization In J2EE Applications
Specifying Logical Roles in a J2EE ApplicationSpecify the logical roles that your application uses in the XML deployment
descriptors. Depending on the application component type, update one of the
following with the logical roles:
■ web.xml for the Web component
■ ejb-jar.xml for the EJB component
■ application.xml for the application
In each of these deployment descriptors, the roles are defined by an XML element
named <security-role> .
Example 8–2 EJB JAR Security Role Definition
The following steps describe the XML necessary to create a logical role named
VISITOR in the ejb-jar.xml deployment descriptor.
1. Define the logical security role, VISITOR , in the <security-role> element.
<security-role><description>A role for every user</description><role-name>VISITOR</role-name>
</security-role>
2. Define the bean and methods that this role can access in the
<method-permission> element.
<method-permission><description>VISITOR role needed for CustomerBean methods</description><role-name>VISITOR</role-name><method>
<ejb-name>customerbean</ejb-name><method-name>*</method-name>
</method></method-permission>
8-18 Oracle9iAS Containers for J2EE User’s Guide
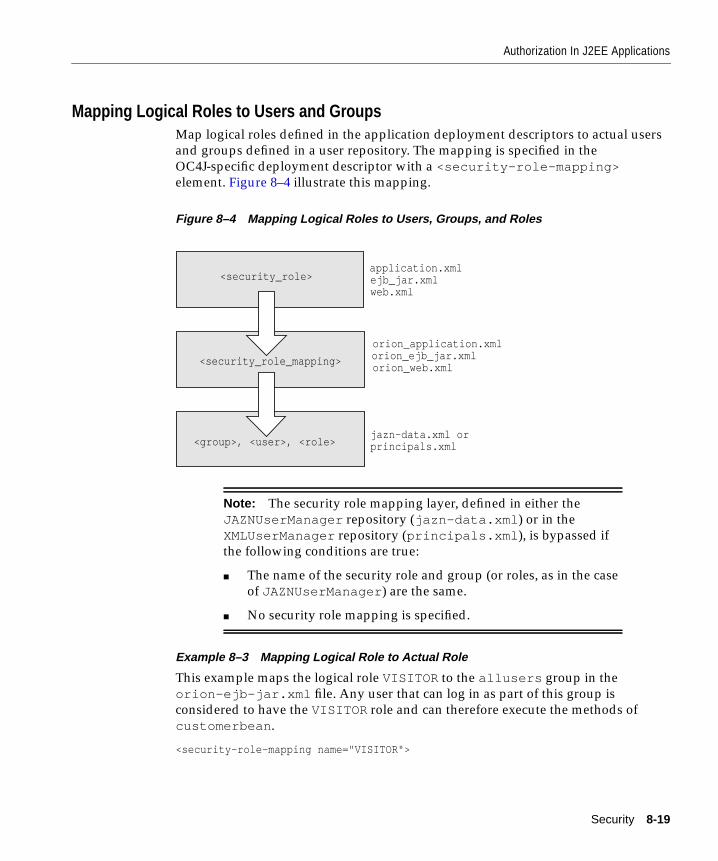
Authorization In J2EE Applications
Mapping Logical Roles to Users and GroupsMap logical roles defined in the application deployment descriptors to actual users
and groups defined in a user repository. The mapping is specified in the
OC4J-specific deployment descriptor with a <security-role-mapping>element. Figure 8–4 illustrate this mapping.
Figure 8–4 Mapping Logical Roles to Users, Groups, and Roles
Example 8–3 Mapping Logical Role to Actual Role
This example maps the logical role VISITOR to the allusers group in the
orion-ejb-jar.xml file. Any user that can log in as part of this group is
considered to have the VISITOR role and can therefore execute the methods of
customerbean .
<security-role-mapping name="VISITOR">
Note: The security role mapping layer, defined in either the
JAZNUserManager repository (jazn-data.xml ) or in the
XMLUserManager repository (principals.xml ), is bypassed if
the following conditions are true:
■ The name of the security role and group (or roles, as in the case
of JAZNUserManager ) are the same.
■ No security role mapping is specified.
application.xmlejb_jar.xmlweb.xml
orion_application.xmlorion_ejb_jar.xml<security_role_mapping>
<security_role>
<group>, <user>, <role>
orion_web.xml
jazn-data.xml orprincipals.xml
Security 8-19
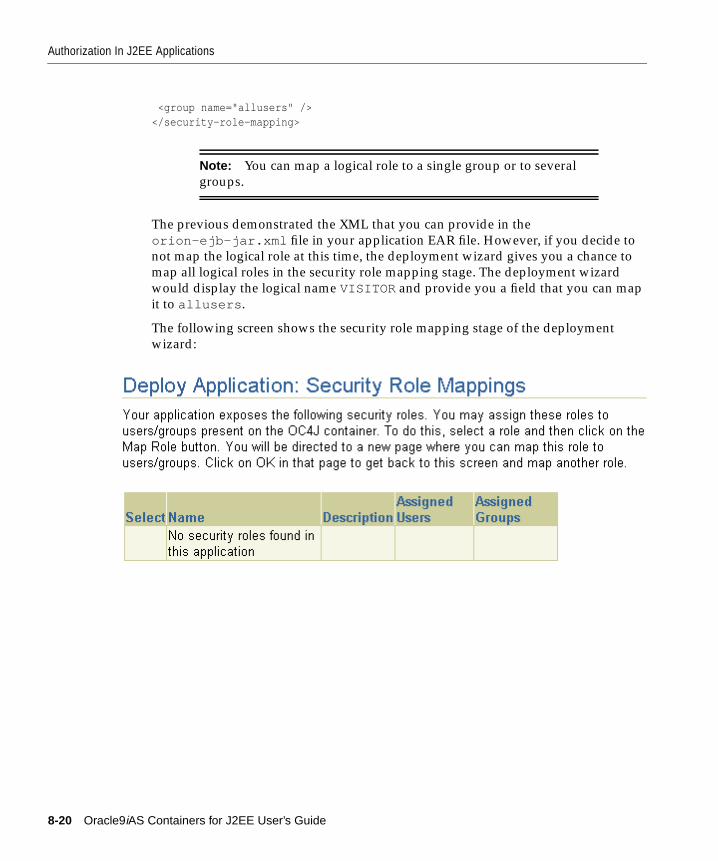
Authorization In J2EE Applications
<group name="allusers" /></security-role-mapping>
The previous demonstrated the XML that you can provide in the
orion-ejb-jar.xml file in your application EAR file. However, if you decide to
not map the logical role at this time, the deployment wizard gives you a chance to
map all logical roles in the security role mapping stage. The deployment wizard
would display the logical name VISITOR and provide you a field that you can map
it to allusers .
The following screen shows the security role mapping stage of the deployment
wizard:
Note: You can map a logical role to a single group or to several
groups.
put security mapping screen here.
8-20 Oracle9iAS Containers for J2EE User’s Guide
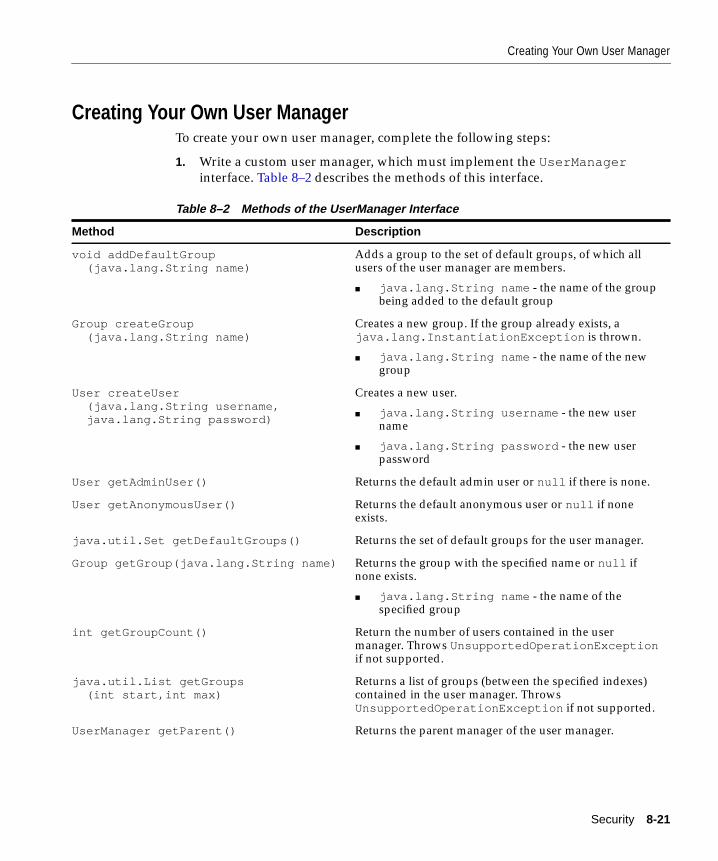
Creating Your Own User Manager
Creating Your Own User ManagerTo create your own user manager, complete the following steps:
1. Write a custom user manager, which must implement the UserManagerinterface. Table 8–2 describes the methods of this interface.
Table 8–2 Methods of the UserManager Interface
Method Description
void addDefaultGroup (java.lang.String name)
Adds a group to the set of default groups, of which allusers of the user manager are members.
■ java.lang.String name - the name of the groupbeing added to the default group
Group createGroup (java.lang.String name)
Creates a new group. If the group already exists, ajava.lang.InstantiationException is thrown.
■ java.lang.String name - the name of the newgroup
User createUser (java.lang.String username, java.lang.String password)
Creates a new user.
■ java.lang.String username - the new username
■ java.lang.String password - the new userpassword
User getAdminUser() Returns the default admin user or null if there is none.
User getAnonymousUser() Returns the default anonymous user or null if noneexists.
java.util.Set getDefaultGroups() Returns the set of default groups for the user manager.
Group getGroup(java.lang.String name) Returns the group with the specified name or null ifnone exists.
■ java.lang.String name - the name of thespecified group
int getGroupCount() Return the number of users contained in the usermanager. Throws UnsupportedOperationExceptionif not supported.
java.util.List getGroups (int start,int max)
Returns a list of groups (between the specified indexes)contained in the user manager. ThrowsUnsupportedOperationException if not supported.
UserManager getParent() Returns the parent manager of the user manager.
Security 8-21
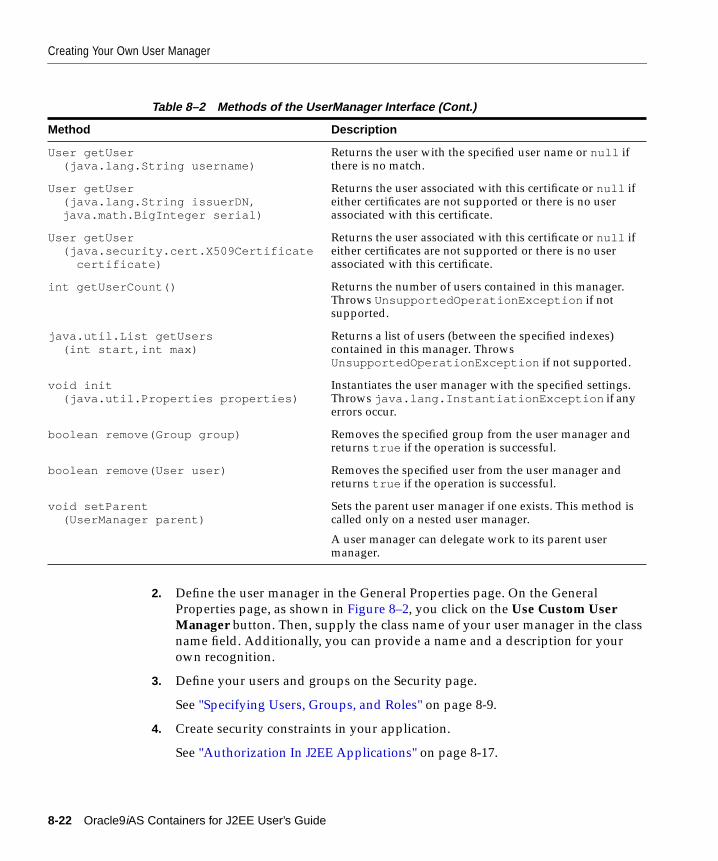
Creating Your Own User Manager
2. Define the user manager in the General Properties page. On the General
Properties page, as shown in Figure 8–2, you click on the Use Custom UserManager button. Then, supply the class name of your user manager in the class
name field. Additionally, you can provide a name and a description for your
own recognition.
3. Define your users and groups on the Security page.
See "Specifying Users, Groups, and Roles" on page 8-9.
4. Create security constraints in your application.
See "Authorization In J2EE Applications" on page 8-17.
User getUser (java.lang.String username)
Returns the user with the specified user name or null ifthere is no match.
User getUser (java.lang.String issuerDN, java.math.BigInteger serial)
Returns the user associated with this certificate or null ifeither certificates are not supported or there is no userassociated with this certificate.
User getUser (java.security.cert.X509Certificate certificate)
Returns the user associated with this certificate or null ifeither certificates are not supported or there is no userassociated with this certificate.
int getUserCount() Returns the number of users contained in this manager.Throws UnsupportedOperationException if notsupported.
java.util.List getUsers (int start,int max)
Returns a list of users (between the specified indexes)contained in this manager. ThrowsUnsupportedOperationException if not supported.
void init (java.util.Properties properties)
Instantiates the user manager with the specified settings.Throws java.lang.InstantiationException if anyerrors occur.
boolean remove(Group group) Removes the specified group from the user manager andreturns true if the operation is successful.
boolean remove(User user) Removes the specified user from the user manager andreturns true if the operation is successful.
void setParent (UserManager parent)
Sets the parent user manager if one exists. This method iscalled only on a nested user manager.
A user manager can delegate work to its parent usermanager.
Table 8–2 Methods of the UserManager Interface (Cont.)
Method Description
8-22 Oracle9iAS Containers for J2EE User’s Guide
Creating Your Own User Manager
Example of Customer User Manager With the DataSourceUserManager ClassOC4J provides an example of a custom user manager—the
DataSourceUserManager class. This class manages the users in a database
specified by the DataSource interface.
Thus, you do not need to implement this class, but only configure it as designated
in steps 2-4 above.
On the General Properties page, choose the Custom User Manager button with the
class of "com.evermind.sql.DataSourceUserManager. " In addition, this
class requires certain input parameters for startup. Thus, at the bottom of the User
Manager section of this page you will enter these parameters and their values in the
Initialization Parameters for Class section. For each of the following parameters,
click the Add Another Row button and enter the parameter name and its value.
■ name="table" value="j2ee_users"
■ name="userNameField" value="username"
■ name="passwordField" value="password"
■ name="dataSource" value="jdbc/OracleCoreDS"
■ name="groupMemberShipTableName" value="second_table"
■ name="groupMemberShipGroupFieldName" value="group"
■ name="groupMemberShipUserNameFieldName" value="userId"
In addition, this DataSourceUserManager class assumes that the following tables
exist in the database:
■ Table "j2ee_users" for usernames and passwords
■ Table "second_table" for userId and group association
Notice that no table exists for the list of groups that are available. Instead, the list of
groups is specified in the principals.xml file. The mappings from groups to
roles is specified in the application.xml .
The user manager is a hierarchical implementation with a parent-child relationship.
The parent of the DataSourceUserManager class is the file-based
XMLUserManager class, which uses the principals.xml user repository.
However, you can change the parent with the setParent() method. The sample
DataSourceUserManager class invokes parent.getGroups() to retrieve all
the available groups.
Security 8-23

Creating Your Own User Manager
8-24 Oracle9iAS Containers for J2EE User’s Guide
Oracle9iAS Clus
9
Oracle9 iAS ClusteringThis chapter discusses concepts of clustering, and provides instructions on how to
manage clusters.
It contains the following topics:
■ About Oracle9iAS Clustering
■ Architecture
■ Enterprise Manager Configuration Tree
■ Instance-Specific Parameters
■ Examples
■ Cluster Configuration
tering 9-1
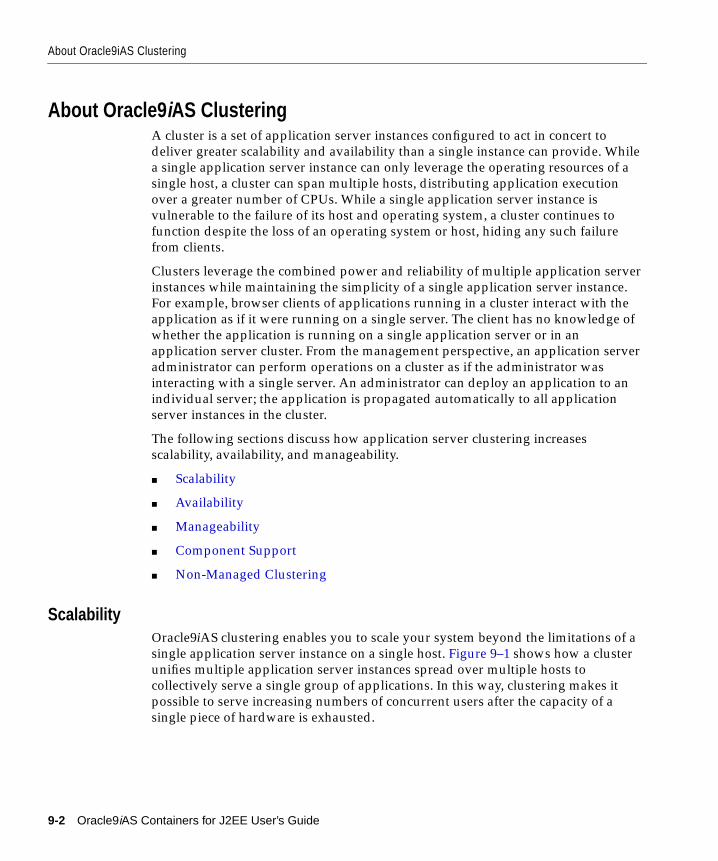
About Oracle9iAS Clustering
About Oracle9 iAS ClusteringA cluster is a set of application server instances configured to act in concert to
deliver greater scalability and availability than a single instance can provide. While
a single application server instance can only leverage the operating resources of a
single host, a cluster can span multiple hosts, distributing application execution
over a greater number of CPUs. While a single application server instance is
vulnerable to the failure of its host and operating system, a cluster continues to
function despite the loss of an operating system or host, hiding any such failure
from clients.
Clusters leverage the combined power and reliability of multiple application server
instances while maintaining the simplicity of a single application server instance.
For example, browser clients of applications running in a cluster interact with the
application as if it were running on a single server. The client has no knowledge of
whether the application is running on a single application server or in an
application server cluster. From the management perspective, an application server
administrator can perform operations on a cluster as if the administrator was
interacting with a single server. An administrator can deploy an application to an
individual server; the application is propagated automatically to all application
server instances in the cluster.
The following sections discuss how application server clustering increases
scalability, availability, and manageability.
■ Scalability
■ Availability
■ Manageability
■ Component Support
■ Non-Managed Clustering
ScalabilityOracle9iAS clustering enables you to scale your system beyond the limitations of a
single application server instance on a single host. Figure 9–1 shows how a cluster
unifies multiple application server instances spread over multiple hosts to
collectively serve a single group of applications. In this way, clustering makes it
possible to serve increasing numbers of concurrent users after the capacity of a
single piece of hardware is exhausted.
9-2 Oracle9iAS Containers for J2EE User’s Guide
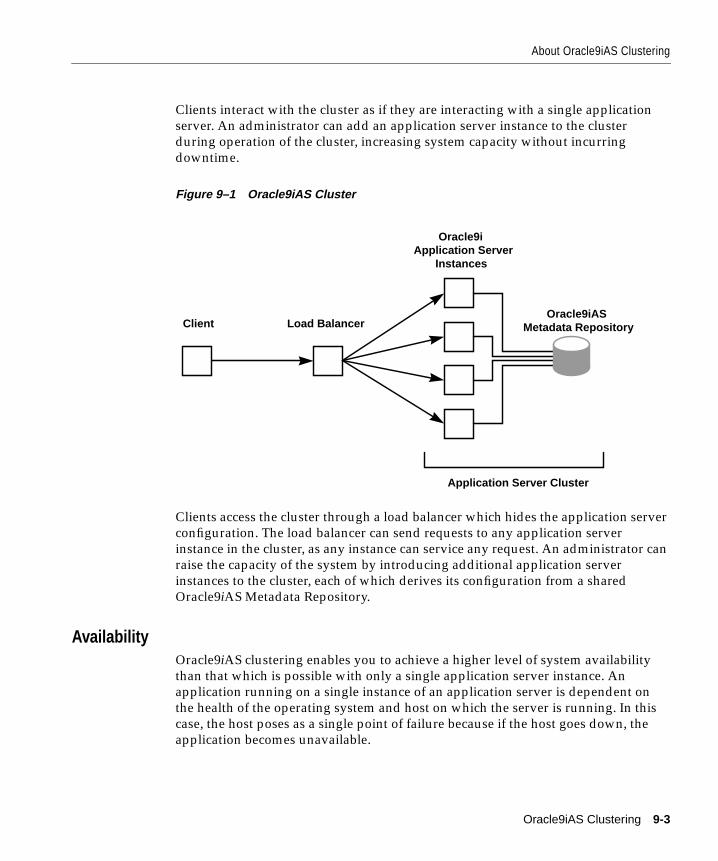
About Oracle9iAS Clustering
Clients interact with the cluster as if they are interacting with a single application
server. An administrator can add an application server instance to the cluster
during operation of the cluster, increasing system capacity without incurring
downtime.
Figure 9–1 Oracle9iAS Cluster
Clients access the cluster through a load balancer which hides the application server
configuration. The load balancer can send requests to any application server
instance in the cluster, as any instance can service any request. An administrator can
raise the capacity of the system by introducing additional application server
instances to the cluster, each of which derives its configuration from a shared
Oracle9iAS Metadata Repository.
AvailabilityOracle9iAS clustering enables you to achieve a higher level of system availability
than that which is possible with only a single application server instance. An
application running on a single instance of an application server is dependent on
the health of the operating system and host on which the server is running. In this
case, the host poses as a single point of failure because if the host goes down, the
application becomes unavailable.
Client Load BalancerOracle9iAS
Metadata Repository
Oracle9iApplication Server
Instances
Application Server Cluster
Oracle9iAS Clustering 9-3
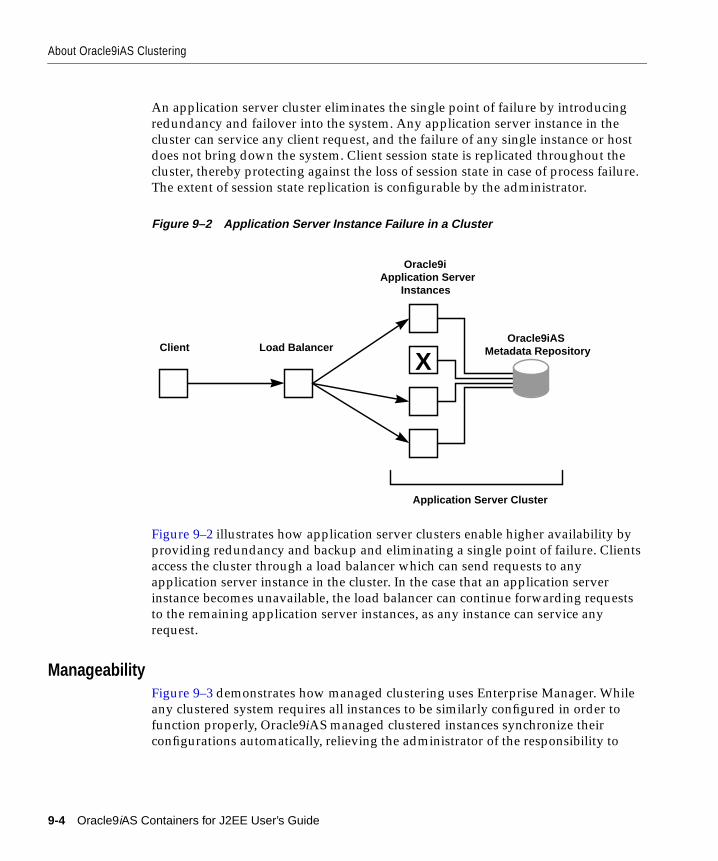
About Oracle9iAS Clustering
An application server cluster eliminates the single point of failure by introducing
redundancy and failover into the system. Any application server instance in the
cluster can service any client request, and the failure of any single instance or host
does not bring down the system. Client session state is replicated throughout the
cluster, thereby protecting against the loss of session state in case of process failure.
The extent of session state replication is configurable by the administrator.
Figure 9–2 Application Server Instance Failure in a Cluster
Figure 9–2 illustrates how application server clusters enable higher availability by
providing redundancy and backup and eliminating a single point of failure. Clients
access the cluster through a load balancer which can send requests to any
application server instance in the cluster. In the case that an application server
instance becomes unavailable, the load balancer can continue forwarding requests
to the remaining application server instances, as any instance can service any
request.
ManageabilityFigure 9–3 demonstrates how managed clustering uses Enterprise Manager. While
any clustered system requires all instances to be similarly configured in order to
function properly, Oracle9iAS managed clustered instances synchronize their
configurations automatically, relieving the administrator of the responsibility to
Client Load Balancer
Oracle9iApplication Server
Instances
Application Server Cluster
XOracle9iAS
Metadata Repository
9-4 Oracle9iAS Containers for J2EE User’s Guide
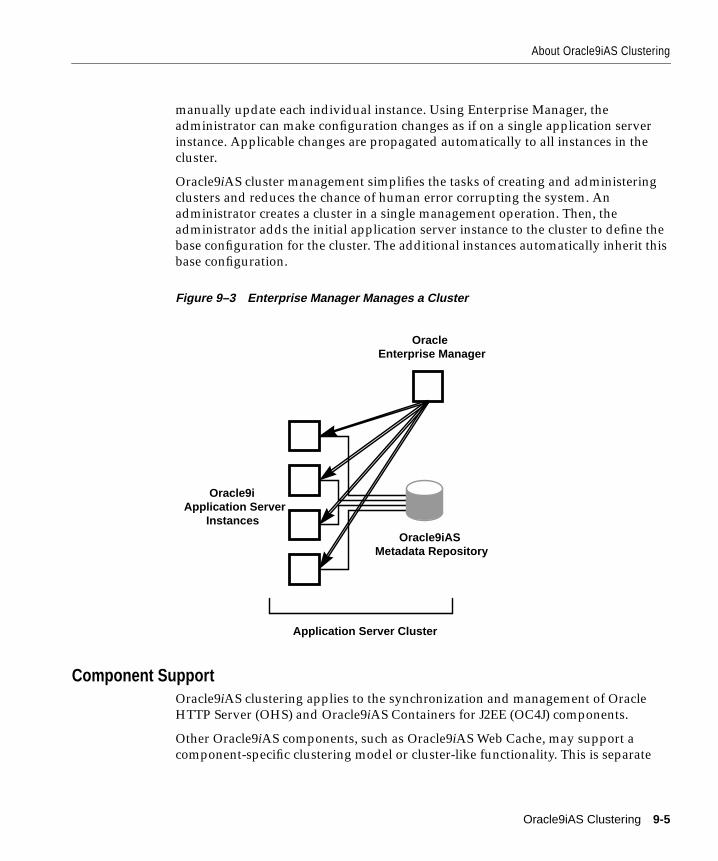
About Oracle9iAS Clustering
manually update each individual instance. Using Enterprise Manager, the
administrator can make configuration changes as if on a single application server
instance. Applicable changes are propagated automatically to all instances in the
cluster.
Oracle9iAS cluster management simplifies the tasks of creating and administering
clusters and reduces the chance of human error corrupting the system. An
administrator creates a cluster in a single management operation. Then, the
administrator adds the initial application server instance to the cluster to define the
base configuration for the cluster. The additional instances automatically inherit this
base configuration.
Figure 9–3 Enterprise Manager Manages a Cluster
Component SupportOracle9iAS clustering applies to the synchronization and management of Oracle
HTTP Server (OHS) and Oracle9iAS Containers for J2EE (OC4J) components.
Other Oracle9iAS components, such as Oracle9iAS Web Cache, may support a
component-specific clustering model or cluster-like functionality. This is separate
Oracle9iASMetadata Repository
Oracle9iApplication Server
Instances
Application Server Cluster
OracleEnterprise Manager
Oracle9iAS Clustering 9-5
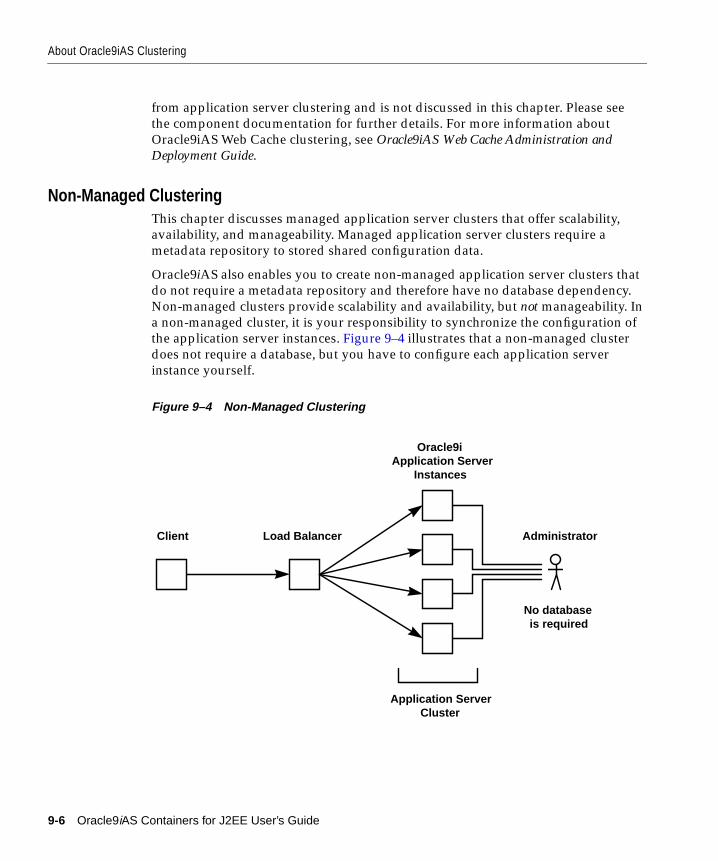
About Oracle9iAS Clustering
from application server clustering and is not discussed in this chapter. Please see
the component documentation for further details. For more information about
Oracle9iAS Web Cache clustering, see Oracle9iAS Web Cache Administration andDeployment Guide.
Non-Managed ClusteringThis chapter discusses managed application server clusters that offer scalability,
availability, and manageability. Managed application server clusters require a
metadata repository to stored shared configuration data.
Oracle9iAS also enables you to create non-managed application server clusters that
do not require a metadata repository and therefore have no database dependency.
Non-managed clusters provide scalability and availability, but not manageability. In
a non-managed cluster, it is your responsibility to synchronize the configuration of
the application server instances. Figure 9–4 illustrates that a non-managed cluster
does not require a database, but you have to configure each application server
instance yourself.
Figure 9–4 Non-Managed Clustering
Client Load Balancer Administrator
Oracle9iApplication Server
Instances
Application ServerCluster
No databaseis required
9-6 Oracle9iAS Containers for J2EE User’s Guide
About Oracle9iAS Clustering
If you want to cluster J2EE applications and do not want to use a metadata
repository, there are two types of non-managed clusters that you can use:
■ Non-managed application server cluster
■ OC4J-only cluster
Non-Managed Application Server ClusterCreate a non-managed application server cluster if you want to use both OHS and
OC4J. In a non-managed application server cluster, mod_oc4j will load-balance
requests to all OC4J instances in the cluster.
For more information on non-managed application server clustering, see the
Oracle9iAS page on OTN at http://otn.oracle.com/products/ias .
OC4J-Only ClusterCreate an OC4J-only cluster if you want to use the standalone OC4J that is available
for download from OTN. In an OC4J-only cluster, the Java load balancer
load-balances requests to all OC4J instances in the cluster. An OC4J-only cluster has
a lightweight disk footprint, but the Java load balancer can be a single point of
failure.
For more information on OC4J-only clustering, see the OC4J page on OTN at
http://otn.oracle.com/tech/java/oc4j .
Oracle9iAS Clustering 9-7
Architecture
ArchitectureA cluster coordinates several application server instances and its components. The
roles of the components included in the cluster are described in the following
sections:
■ Front-End Load Balancer
■ Metadata Repository in the Infrastructure
■ Farm
■ Cluster
■ Application Server Instance
■ Management Features
■ Component Instances
■ J2EE Applications
Figure 9–5 shows the architecture of a farm and a cluster. There are three
application server instances, where each instance shares the same Oracle9iAS
Metadata Repository within an infrastructure. Thus, all three application server
instances are part of the same farm.
Application server instances 1 and 2 are involved in a cluster together. In front of
the cluster is a front-end load balancer. Included within each application server
instance are its manageability features—Oracle Process Management and
Notification (OPMN) and Dynamic Configuration Management (DCM)—and its
installed components—Oracle HTTP Server and Oracle9iAS Containers for J2EE
(OC4J).
9-8 Oracle9iAS Containers for J2EE User’s Guide

Architecture
Figure 9–5 Oracle9iAS Cluster Architecture
Front-End Load BalancerAfter you have created a cluster, you can add a load balancer in front of all
application server instances in the cluster, which provides availability and
scalability for the application server instances.
We recommend that you purchase and install a hardware load balancer for the best
performance. Alternatively, you could use a Web Cache as a load balancer, which
could be a single point of failure. See Oracle9iAS Web Cache Administration andDeployment Guide for instructions on how to set up Web Cache as your load balancer
for your cluster.
Oracle9iAS Clustering 9-9
Architecture
Metadata Repository in the InfrastructureWhen you install Oracle9iAS, you have the option of installing the Oracle9iAS
Infrastructure. An Oracle9iAS Infrastructure provides Oracle Internet Directory,
Oracle9iAS Single Sign-On, and the Oracle9iAS Metadata Repository. The metadata
repository is an Oracle9i database that is used to store the application server
instance information and configuration. The application server instance tables are
created in the metadata repository. Multiple application server instances can share
the metadata repository of the infrastructure.
Application server instances associate with an infrastructure either during
installation or through the Enterprise Manager after installation.
FarmA farm is a group of multiple application server instances that associate with the
same metadata repository. The application server instances that belong to a farm
can be installed anywhere on the network.
■ It is only within the constraint of a farm that you can create a cluster.
■ A farm can host multiple clusters.
ClusterA cluster is a logical group of application server instances that belong to the same
farm. Each application server instance may be part of only one cluster. If an instance
is part of a cluster, then all of its configured components are implicitly part of that
cluster. Each application server instance can only be configured with OHS and OC4J
components to be contained in a cluster. A cluster can include zero or more
application server instances.
All application server instances involved in the cluster have the same "cluster-wide"
configuration. If you modify the configuration on one application server instance,
then the modification is automatically propagated across all instances in the cluster.
Note: This chapter does not define what an infrastructure or a
farm is. See the Concepts chapter in the Oracle9i Application ServerAdministrator’s Guide for a full description.
9-10 Oracle9iAS Containers for J2EE User’s Guide
Architecture
Application Server InstanceAn application server instance consists of a single Oracle HTTP Server and one or
more OC4J instances. It is a single installation in one Oracle home. If you have
multiple application servers on a single host, each is installed into its own Oracle
home and uses separate port numbers.
To manage clusters from Enterprise Manager, the application server uses a
metadata repository for storing its tables and configuration. Each application server
instance in the cluster has the same base configuration. The base configuration
contains the cluster-wide parameters and excludes instance-specific configuration.
If you modify any of the cluster-wide configuration, the modifications are
propagated to all other application server instances in the cluster. If you modify an
instance-specific parameter, it is not propagated as it is only applicable to the
specified application server instance. See "Instance-Specific Parameters" on
page 9-23 for a listing of the instance-specific parameters. The cluster-wide
parameters are all other parameters.
In order for each application server instance to be a part of a cluster, the following
must be true:
■ The application server instances you add to a cluster must be part of the farm
and use a common metadata repository, where the cluster resides. Associate
application server instances with the same metadata repository either during
install time or after installation through Enterprise Manager.
■ Each application server instance in a cluster must be installed on the same type
of operating system, such as UNIX.
■ The first application server instance you add to the cluster must contain only
OC4J and Oracle HTTP Server components. The Web Cache can be configured,
but it will be ignored for clustering operations. If other Oracle9iAS components
are part of the application server instance, Oracle9iAS displays an error and
does not add the application server instance to the cluster.
Note: "Instance-specific" configuration parameter modifications
are not propagated. For a description of these parameters, see
"Instance-Specific Parameters" on page 9-23.
Oracle9iAS Clustering 9-11
Architecture
■ When you install additional application server instances, ensure that only
Oracle HTTP Server, OC4J, and Web Cache are configured. The Web Cache will
be ignored for clustering operations.
■ Each application server instance can contain only one Oracle HTTP Server.
■ Each application server instance can contain one or more OC4J instances.
To cluster application server instances, do the following:
1. Create an empty cluster in the farm. The only requirement for creating a cluster
is a unique name.
2. Add the first application server instance to the cluster. This application server
instance must already belong to the farm. The configuration of this first instance
is used as the base configuration for all additional application server instances.
The base configuration overwrites any existing configuration of subsequent
application server instances that join the cluster.
The base configuration includes the cluster-wide properties. It does not include
instance-specific properties. See "Instance-Specific Parameters" on page 9-23 for
more information about instance-specific properties.
3. Add other application server instances—even if it exists on another host—to the
cluster. Each additional application server instance inherits the base
configuration.
4. If you add application server instances into a cluster, set the base configuration,
then remove all application server instances from a cluster. The cluster is now
empty and the base configuration is not set. Thus, the next application server
instance that you add becomes the source of the base configuration.
5. When added to or removed from the cluster, the application server instance is
stopped. You can restart the added application server instances within the
context of the cluster. You can restart the removed application server instance
from the standalone instances section in the farm.
Once grouped in the same cluster, these application server instances will have the
following properties:
Note: Oracle9iAS Web Cache provides its own clustering
functionality separate from application server clustering. See
Oracle9iAS Web Cache Administration and Deployment Guide for more
information.
9-12 Oracle9iAS Containers for J2EE User’s Guide

Architecture
■ Each application server instance has the same cluster-wide configuration. That
is, if you modify any cluster-wide parameters, the modifications are propagated
to all application server instances in the cluster. For instance-specific
parameters, you must modify these on each individual application server
instance.
■ If you deploy an application to one application server instance, it is propagated
to all application server instances in the cluster. The application is actually
deployed to an OC4J Instance in the application server instance and propagated
to the same OC4J Instance in the other application server instances in the
cluster. You can change some of the configuration for the deployed application,
and this change is propagated to the same OC4J Instance in the other
application server instances in the cluster.
■ Each application server instance is equal in the cluster. You can remove any of
them at any time. The first instance does not have special properties. The base
configuration is created from this instance, but the instance can be removed
from the cluster in the same manner as the other instances.
■ Most of the clustering management, configuration, and application deployment
is handled through the Oracle Enterprise Manager. If you want to use a
command-line tool, you can use the Distributed Configuration Management
(DCM) command-line tool, which is documented in Appendix A, "DCM
Command-Line Utility (dcmctl)".
■ You can remove application server instances from the cluster. The application
server instance is stopped when removed from the cluster. When the last
application server instance is removed, the cluster still remains. You must delete
the cluster itself for it to be removed.
Management FeaturesEach application server instance contains management features that manage and
monitor the application server instance, its components, and how it performs in a
cluster. The management features do the following:
■ propagate the cluster-wide configuration for the application server instances
and its components
■ manage the application server components by starting, stopping, and restarting
these components
■ notice if a component dies and restarts it
■ notifies the OHS if any OC4J instances starts or stops
Oracle9iAS Clustering 9-13
Architecture
All of these activities are provided by the following management features:
■ Distributed Configuration Management (DCM)
■ Oracle Process Management Notification (OPMN)
Distributed Configuration Management (DCM)Distributed Configuration Management (DCM) manages configuration by
propagating the cluster-wide configuration for the application server instances and
its components. When you add the additional application server instances to the
cluster, it is the DCM component that automatically replicates the base
configuration to all instances in the cluster. When you modify the cluster-wide
configuration, DCM propagates the changes to all application server instances in
the cluster.
DCM is a management feature in each application server instance. However, it is
not a process that exists at all times. DCM is invoked either by Enterprise Manager
or manually by a user through dcmctl to do the following:
■ create or remove a cluster
■ add or remove application server instances to or from a cluster
■ synchronize configuration changes across application server instances
■ send application server instance start, restart, and stop requests to OPMN
■ enable automatic re-configuration on system failure
You can also manually execute the DCM command-line tool—dcmctl —to perform
these duties. However, there are restrictions on how to use dcmctl , which are
detailed below:
■ If Enterprise Manager is up and managing the cluster, you can invoke the DCM
command-line tool from any host where a clustered application server instance
exists. DCM informs Enterprise Manager of the requested function. Enterprise
Manager then interfaces with the other DCM management features on the other
application server instances in the cluster to complete the cluster-wide function.
■ If Enterprise Manager is not up and managing the cluster, you must start the
DCM command-line tool in the foreground on each application server instance
in the cluster. Once started in the foreground, DCM in each application server
instance communicates with each other about configuration changes and
deployed applications.
9-14 Oracle9iAS Containers for J2EE User’s Guide
Architecture
Oracle Process Management Notification (OPMN)Oracle Process Management Notification (OPMN) manages Oracle HTTP Server
and OC4J processes within an application server instance. It channels all events
from different components to all components interested in receiving them.
OPMN consists of the following two components:
■ Oracle Process Manager
■ Oracle Notification System
Oracle Process Manager The Oracle Process Manager manages all Oracle HTTP
Server and OC4J related processes and is responsible for starting, restarting,
shutting down, and detecting the death of any Oracle HTTP Server or OC4J process.
The Oracle Process Manager starts or stops each process according to the
characteristics configured in the opmn.xml configuration file or it waits for a
command to start processes from the Enterprise Manager.
Oracle Notification System The Oracle Notification System is the transport mechanism
for failure, recovery, startup, and other related notifications between components in
Oracle9iAS. It operates according to a subscriber-publisher model, wherein any
component that wishes to receive an event of a certain type subscribes to the Oracle
Notification System. When such an event is published, the Oracle Notification
System sends it to all subscribers.
All Oracle HTTP Servers know about all active OC4J processes in the cluster. This
enables the Oracle HTTP Servers to load balance incoming requests to any of the
OC4J processes. This includes the OC4J processes in its own application server
instance as well as in other application server instances in the cluster. The Oracle
Notification System notifies all Oracle HTTP Servers when any OC4J process is
started, dies, restarted, or stopped.
Component InstancesThe application server is installed with several different types of components.
However, to be involved in a cluster, each application server instance can only
contain one Oracle HTTP Server (OHS) and one or more Oracle9iAS Containers for
See Also: Appendix A, "DCM Command-Line Utility (dcmctl)"
for directions on how to do the previous functions with the dcmctltool.
Oracle9iAS Clustering 9-15
Architecture
J2EE (OC4J) components. As noted above, Web Cache can be installed, but it will
not be clustered within this environment. Web Cache has its own clustering model.
Oracle HTTP Server (OHS)The Oracle HTTP Server (OHS) is a Web server for the application server instance. It
serves client requests. In addition, it forwards OC4J requests to an active OC4J
process. Because of this, OHS is a natural load balancer for OC4J instances. When
you have a single application server instance, the OHS handles the incoming
requests for all of the OC4J processes in this sole application server instance.
However, in a clustered environment, the OHS is updated with information about
existing OC4J processes by OPMN in all application server instances in the cluster.
Thus, the OHS can do the following:
■ Forward an incoming stateless request to any OC4J process in the cluster. The
priority is to forward the incoming request first to an OC4J process in its own
application server instance. If none are available, it will forward the request to
any OC4J process in another application server instance in the cluster.
■ Forward an incoming stateful request to the particular OC4J process where the
conversation originated. If the OC4J process has failed, OHS forwards the
request to another OC4J process that has the replicated state of that application.
OPMN starts (or restarts) each OC4J process. OPMN notifies each Oracle HTTP
Server (OHS) in the cluster of each OC4J process. Thus, any OHS can load balance
incoming requests among any OC4J process in the cluster.
Figure 9–6 demonstrates how the two Oracle HTTP Servers in the cluster know
about both of the OC4J processes. It does not matter that one OC4J process exists in
a separate application server instance, which can be installed on a separate host.
The OPMN components in each application server instance notifies both Oracle
HTTP Servers of the OC4J processes when they were initialized.
Note: Other application server components, such as Web Cache,
can be clustered independently from application server clusters. It
is not recommended that a component be part of an independent
cluster as well as an application server instance cluster. For
information on components that can be clustered independently,
see each component administrator’s guide.
9-16 Oracle9iAS Containers for J2EE User’s Guide
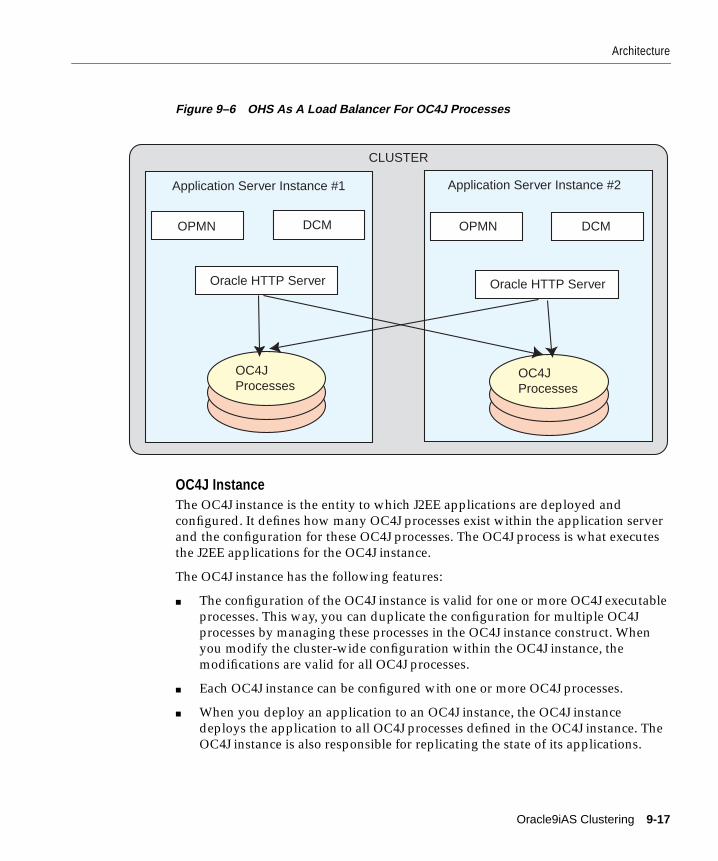
Architecture
Figure 9–6 OHS As A Load Balancer For OC4J Processes
OC4J InstanceThe OC4J instance is the entity to which J2EE applications are deployed and
configured. It defines how many OC4J processes exist within the application server
and the configuration for these OC4J processes. The OC4J process is what executes
the J2EE applications for the OC4J instance.
The OC4J instance has the following features:
■ The configuration of the OC4J instance is valid for one or more OC4J executable
processes. This way, you can duplicate the configuration for multiple OC4J
processes by managing these processes in the OC4J instance construct. When
you modify the cluster-wide configuration within the OC4J instance, the
modifications are valid for all OC4J processes.
■ Each OC4J instance can be configured with one or more OC4J processes.
■ When you deploy an application to an OC4J instance, the OC4J instance
deploys the application to all OC4J processes defined in the OC4J instance. The
OC4J instance is also responsible for replicating the state of its applications.
OPMN DCM DCMOPMN
Oracle HTTP ServerOracle HTTP Server
OC4JProcesses
OC4JProcesses
Application Server Instance #1 Application Server Instance #2
CLUSTER
Oracle9iAS Clustering 9-17
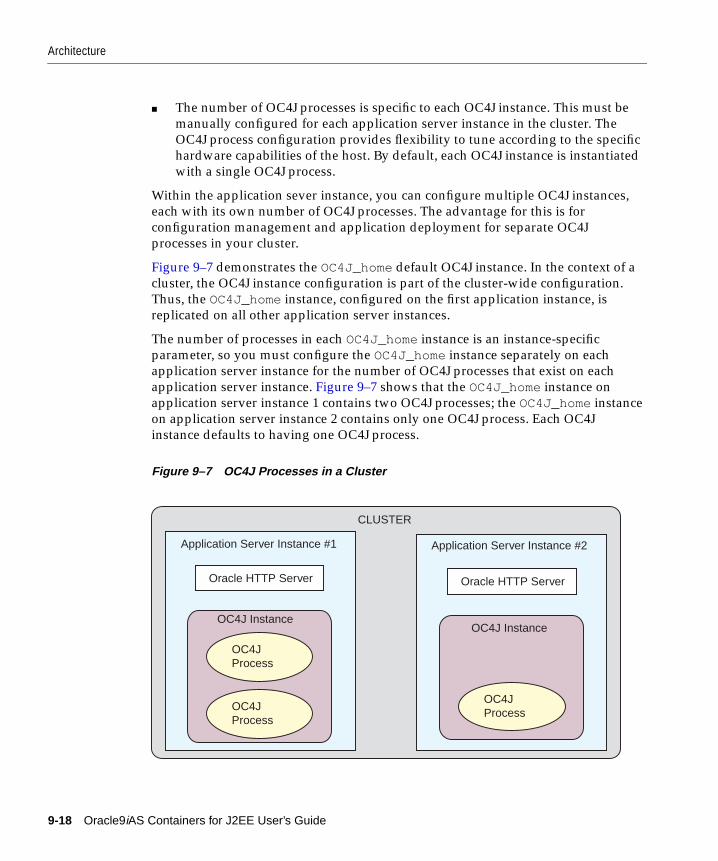
Architecture
■ The number of OC4J processes is specific to each OC4J instance. This must be
manually configured for each application server instance in the cluster. The
OC4J process configuration provides flexibility to tune according to the specific
hardware capabilities of the host. By default, each OC4J instance is instantiated
with a single OC4J process.
Within the application sever instance, you can configure multiple OC4J instances,
each with its own number of OC4J processes. The advantage for this is for
configuration management and application deployment for separate OC4J
processes in your cluster.
Figure 9–7 demonstrates the OC4J_home default OC4J instance. In the context of a
cluster, the OC4J instance configuration is part of the cluster-wide configuration.
Thus, the OC4J_home instance, configured on the first application instance, is
replicated on all other application server instances.
The number of processes in each OC4J_home instance is an instance-specific
parameter, so you must configure the OC4J_home instance separately on each
application server instance for the number of OC4J processes that exist on each
application server instance. Figure 9–7 shows that the OC4J_home instance on
application server instance 1 contains two OC4J processes; the OC4J_home instance
on application server instance 2 contains only one OC4J process. Each OC4J
instance defaults to having one OC4J process.
Figure 9–7 OC4J Processes in a Cluster
Oracle HTTP ServerOracle HTTP Server
Application Server Instance #1 Application Server Instance #2
CLUSTER
OC4JProcess
OC4JProcess
OC4J Instance
OC4JProcess
OC4J Instance
9-18 Oracle9iAS Containers for J2EE User’s Guide
Architecture
OC4J ProcessThe OC4J process is the JVM process that executes J2EE applications. Each OC4J
process is contained in an OC4J instance and inherits its configuration from the
OC4J instance. All applications deployed to an OC4J instance are deployed to all
OC4J processes in the OC4J instance.
You can define one or more OC4J processes within an OC4J instance, so that J2EE
requests can be load balanced and have failover capabilities.
The configuration for the number of OC4J processes is instance-specific. Thus, you
must configure each OC4J instance in each application server instance with the
number of OC4J processes you want to start up for that OC4J instance. The default
is one OC4J process.
Each host that you install the application server instances on has different
capabilities. To maximize the hardware capabilities, configure the number of OC4J
processes in each OC4J instance that will use these capabilities properly. For
example, you can configure a single OC4J process on host A and five OC4J
processes on host B.
When you define multiple OC4J processes, you enable the following:
■ You can serve multiple users with multiple OC4J processes.
■ You can provide failover if the state of the application is replicated across
multiple OC4J processes.
■ OHS provides load balancing for all OC4J processes in the OC4J instance. The
OPMN component notifies each OHS when a new OC4J process is initiated.
Thus, each OHS in the cluster knows of each OC4J process in the cluster.
Replicating Application State The OC4J processes involved in the cluster can replicate
application state to all OC4J processes. Once you configure replication, OC4J
handles the propagation of the application state for you.
If one OC4J process fails, then another OC4J process—which has had the
application state replicated to it—takes over the application request. When an OC4J
process fails during a stateful request, the OHS forwards the request in the
following order:
1. If another OC4J process is active within the same application server instance,
OHS forwards the request to this process.
2. Otherwise, OHS forwards the state request to an OC4J process in another
application server instance in the cluster.
Oracle9iAS Clustering 9-19
Architecture
There are two types of failure that you want to protect against: software failure and
hardware failure.
IslandsAn island is a logical grouping of OC4J processes that allows you to determine
which OC4J processes will replicate state.
In each OC4J instance, you can have more than one OC4J process. If we consider
state replication in a situation where all OC4J processes tried to replicate state, then
the CPU load can significantly increase. To avoid a performance degradation, the
OC4J instance enables you to subgroup your OC4J processes. The subgroup is
called an island.
To ensure that the CPU load is partitioned among the processes, the OC4J processes
of an OC4J instance can be partitioned into islands. The state for application
requests is replicated only to OC4J processes that are grouped within the same
island. All applications are still deployed to all OC4J processes in the OC4J instance.
The only difference is that the state for these applications is confined to only a
subset of these OC4J processes.
The island configuration is instance-specific. The name of the island must be
identical in each OC4J instance, where you want the island to exist. When you
configure the number of OC4J processes on each application server instance, you
can also subgroup them into separate islands. The OC4J processes are grouped
across application server instances by the name of the island. Thus, the application
state is replicated to all OC4J processes within the island of the same name
spanning application server instances.
The grouping of OC4J processes for the state replication is different for EJB
applications than for Web applications. Web applications replicate state within the
island sub-grouping. EJB applications replicate state between all OC4J processes in
the OC4J instance and do not use the island sub-grouping.
Failure Type Avoidance Technique
Software failure occurswhen the OC4J processfails.
Multiple OC4J processes in the same OC4J instance. When oneOC4J process fails, the OHS forwards the request to anotherOC4J process in the same OC4J instance.
Hardware failure occurswhen the host goesdown.
OC4J processes in the cluster configured on separate hosts.When the first host dies, the OC4J process on another host cantake over the request. This requires that you have installed anapplication server instance on another host, which is a part ofthe cluster, and the OC4J instance has at least one OC4J process.
9-20 Oracle9iAS Containers for J2EE User’s Guide
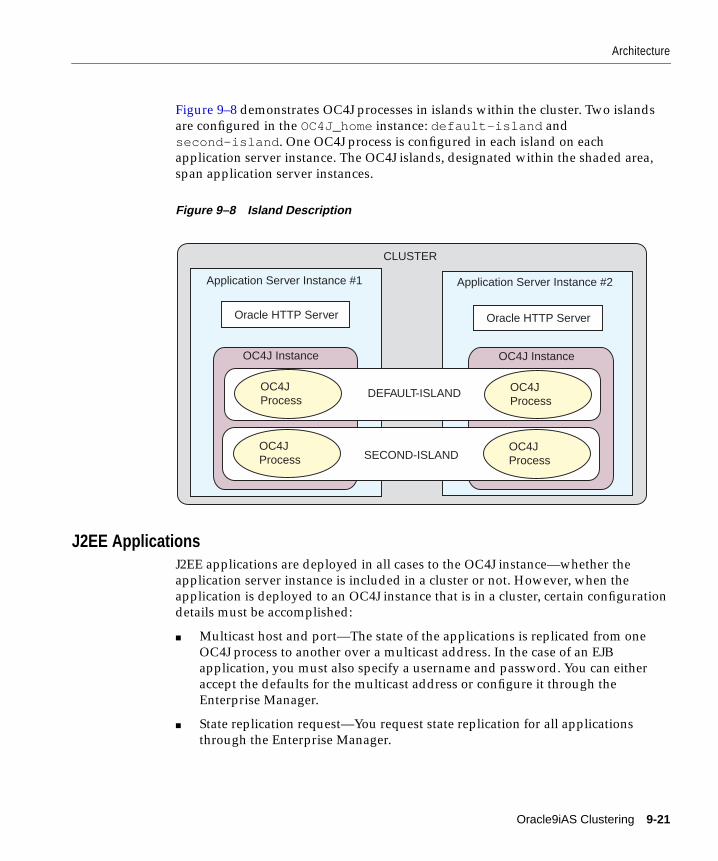
Architecture
Figure 9–8 demonstrates OC4J processes in islands within the cluster. Two islands
are configured in the OC4J_home instance: default-island and
second-island . One OC4J process is configured in each island on each
application server instance. The OC4J islands, designated within the shaded area,
span application server instances.
Figure 9–8 Island Description
J2EE ApplicationsJ2EE applications are deployed in all cases to the OC4J instance—whether the
application server instance is included in a cluster or not. However, when the
application is deployed to an OC4J instance that is in a cluster, certain configuration
details must be accomplished:
■ Multicast host and port—The state of the applications is replicated from one
OC4J process to another over a multicast address. In the case of an EJB
application, you must also specify a username and password. You can either
accept the defaults for the multicast address or configure it through the
Enterprise Manager.
■ State replication request—You request state replication for all applications
through the Enterprise Manager.
Oracle HTTP ServerOracle HTTP Server
Application Server Instance #1 Application Server Instance #2
CLUSTER
OC4J Instance OC4J Instance
OC4JProcess
OC4JProcess
OC4JProcess
OC4JProcess
DEFAULT-ISLAND
SECOND-ISLAND
Oracle9iAS Clustering 9-21
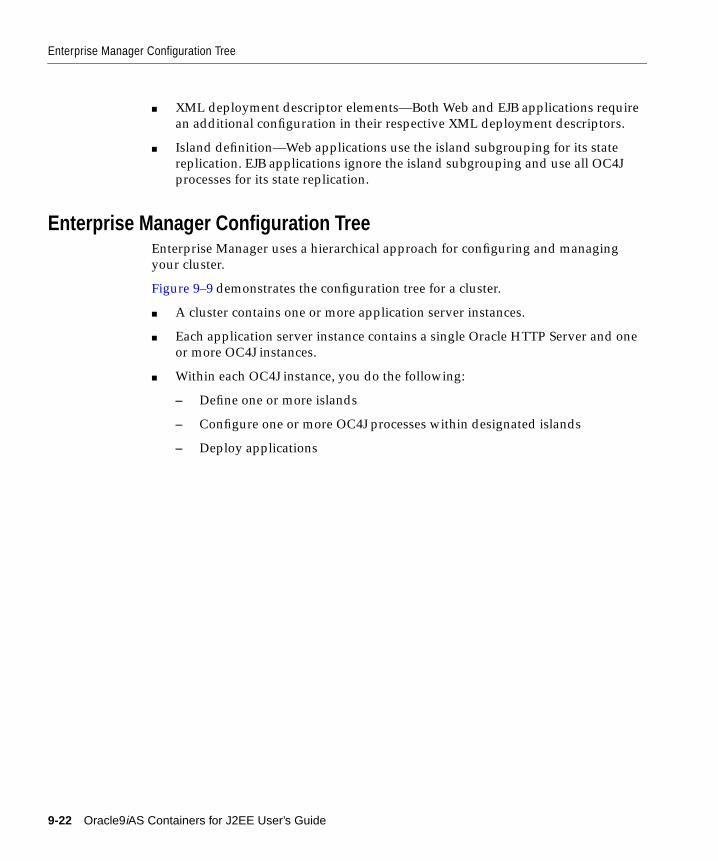
Enterprise Manager Configuration Tree
■ XML deployment descriptor elements—Both Web and EJB applications require
an additional configuration in their respective XML deployment descriptors.
■ Island definition—Web applications use the island subgrouping for its state
replication. EJB applications ignore the island subgrouping and use all OC4J
processes for its state replication.
Enterprise Manager Configuration TreeEnterprise Manager uses a hierarchical approach for configuring and managing
your cluster.
Figure 9–9 demonstrates the configuration tree for a cluster.
■ A cluster contains one or more application server instances.
■ Each application server instance contains a single Oracle HTTP Server and one
or more OC4J instances.
■ Within each OC4J instance, you do the following:
– Define one or more islands
– Configure one or more OC4J processes within designated islands
– Deploy applications
9-22 Oracle9iAS Containers for J2EE User’s Guide
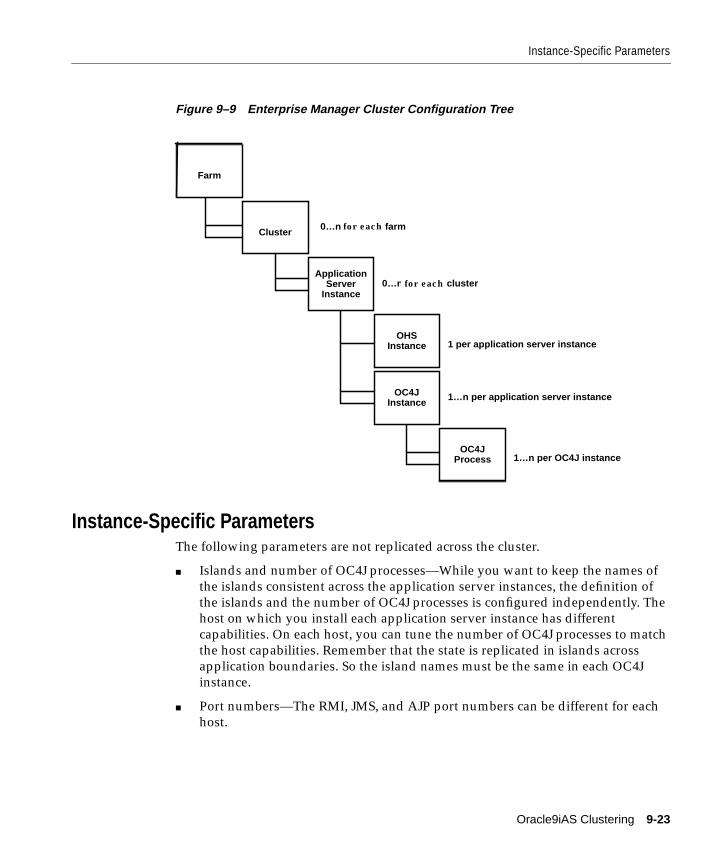
Instance-Specific Parameters
Figure 9–9 Enterprise Manager Cluster Configuration Tree
Instance-Specific ParametersThe following parameters are not replicated across the cluster.
■ Islands and number of OC4J processes—While you want to keep the names of
the islands consistent across the application server instances, the definition of
the islands and the number of OC4J processes is configured independently. The
host on which you install each application server instance has different
capabilities. On each host, you can tune the number of OC4J processes to match
the host capabilities. Remember that the state is replicated in islands across
application boundaries. So the island names must be the same in each OC4J
instance.
■ Port numbers—The RMI, JMS, and AJP port numbers can be different for each
host.
9iASFarm
9iASCluster
ApplicationServer
Instance
OHSInstance
OC4JInstance
OC4JProcess
0…n per 9iAS cluster
1 per application server instance
1…n per application server instance
1…n per OC4J instance
0…n per 9iAS farmfor each
for each
Oracle9iAS Clustering 9-23

Examples
■ Command line options—The command line options you use can be different for
each host.
ExamplesNo matter how many application server instances you add within the cluster, the
cluster-wide configuration is replicated within the cluster. You control protecting
against software and hardware failure with how you configure island and OC4J
processes, which are instance-specific parameters.
Software FailureSuppose you configure more than one OC4J process within your OC4J instance,
then if one of these processes fails, another process can take over the work load of
the failed process. Figure 9–10 shows application server instance 1, which is
involved in the cluster. Within this application server instance, there are two OC4J
processes defined in the default-island in the OC4J_home instance. If the first OC4J
process fails, the other can pick up the work load.
Both of these OC4J processes are on the same host; so, if the host goes down, both
OC4J processes fail and the client cannot continue processing.
9-24 Oracle9iAS Containers for J2EE User’s Guide
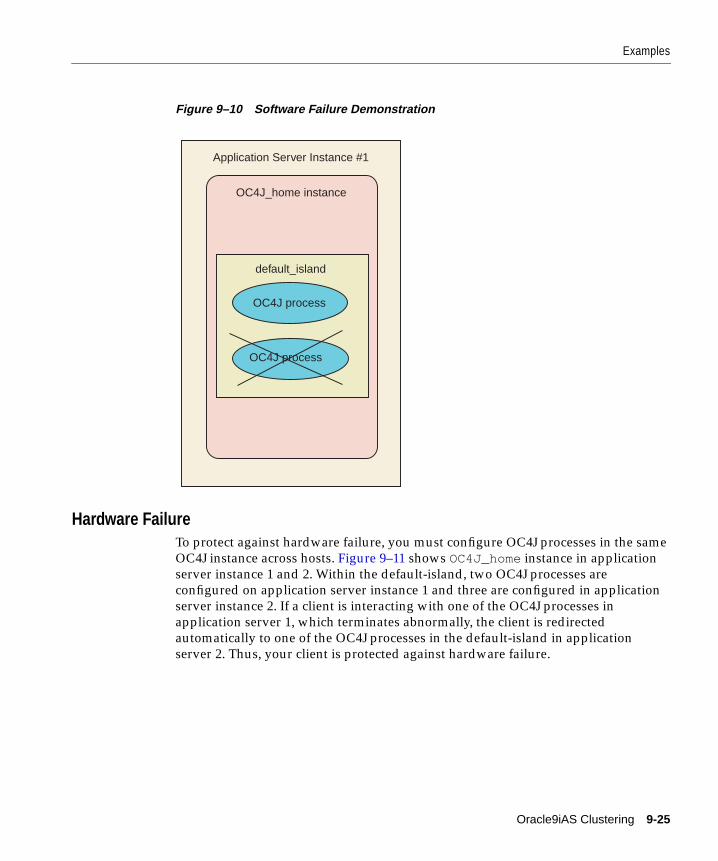
Examples
Figure 9–10 Software Failure Demonstration
Hardware FailureTo protect against hardware failure, you must configure OC4J processes in the same
OC4J instance across hosts. Figure 9–11 shows OC4J_home instance in application
server instance 1 and 2. Within the default-island, two OC4J processes are
configured on application server instance 1 and three are configured in application
server instance 2. If a client is interacting with one of the OC4J processes in
application server 1, which terminates abnormally, the client is redirected
automatically to one of the OC4J processes in the default-island in application
server 2. Thus, your client is protected against hardware failure.
Application Server Instance #1
OC4J_home instance
OC4J process
OC4J process
default_island
Oracle9iAS Clustering 9-25
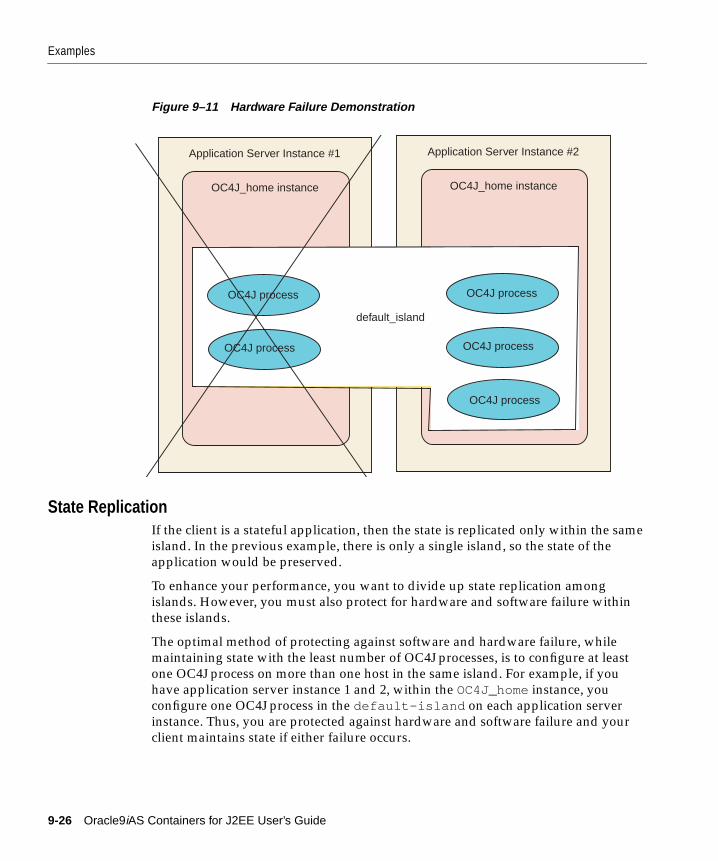
Examples
Figure 9–11 Hardware Failure Demonstration
State ReplicationIf the client is a stateful application, then the state is replicated only within the same
island. In the previous example, there is only a single island, so the state of the
application would be preserved.
To enhance your performance, you want to divide up state replication among
islands. However, you must also protect for hardware and software failure within
these islands.
The optimal method of protecting against software and hardware failure, while
maintaining state with the least number of OC4J processes, is to configure at least
one OC4J process on more than one host in the same island. For example, if you
have application server instance 1 and 2, within the OC4J_home instance, you
configure one OC4J process in the default-island on each application server
instance. Thus, you are protected against hardware and software failure and your
client maintains state if either failure occurs.
Application Server Instance #1
OC4J_home instance
OC4J process
OC4J process
default_island
Application Server Instance #2
OC4J_home instance
OC4J process
OC4J process
OC4J process
9-26 Oracle9iAS Containers for J2EE User’s Guide
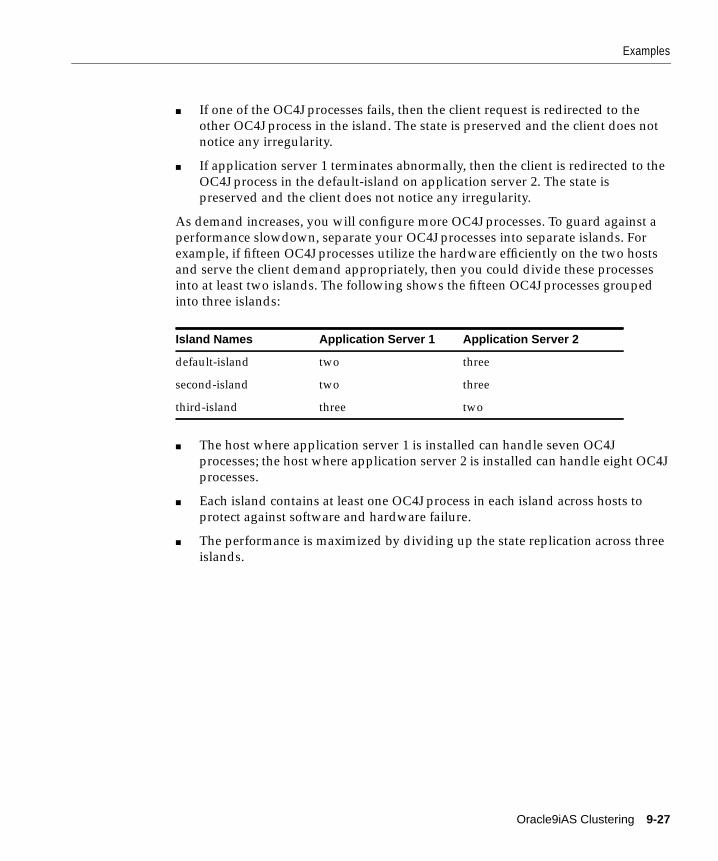
Examples
■ If one of the OC4J processes fails, then the client request is redirected to the
other OC4J process in the island. The state is preserved and the client does not
notice any irregularity.
■ If application server 1 terminates abnormally, then the client is redirected to the
OC4J process in the default-island on application server 2. The state is
preserved and the client does not notice any irregularity.
As demand increases, you will configure more OC4J processes. To guard against a
performance slowdown, separate your OC4J processes into separate islands. For
example, if fifteen OC4J processes utilize the hardware efficiently on the two hosts
and serve the client demand appropriately, then you could divide these processes
into at least two islands. The following shows the fifteen OC4J processes grouped
into three islands:
■ The host where application server 1 is installed can handle seven OC4J
processes; the host where application server 2 is installed can handle eight OC4J
processes.
■ Each island contains at least one OC4J process in each island across hosts to
protect against software and hardware failure.
■ The performance is maximized by dividing up the state replication across three
islands.
Island Names Application Server 1 Application Server 2
default-island two three
second-island two three
third-island three two
Oracle9iAS Clustering 9-27
Cluster Configuration
Cluster ConfigurationThe following sections describe how to create a cluster and add application server
instances to this cluster using Enterprise Manager:
■ Managing an Oracle9iAS Cluster
■ Managing Application Server Instances in a Cluster
■ OC4J Instance Configuration
■ Configuring Single Sign-On
■ Configuring Instance-Specific Parameters
Managing an Oracle9 iAS ClusterFrom the Oracle9iAS Farm Home Page, you can view a list of all the application
server instances that are part of the farm. These application server instances can be
clustered.
For more information, see the following topics:
■ Associating an Instance with an Oracle9iAS Infrastructure
■ Creating the Cluster
■ Figure
Associating an Instance with an Oracle9 iAS InfrastructureIf you have not already done so during installation, you can associate an application
server instance with an infrastructure, as follows:
1. Navigate to the Oracle9iAS Instance Home Page.
2. Scroll down to the Administration section and click Use Infrastructure.
3. Follow the instructions provided by the Use Infrastructure wizard. This is
discussed in more detail in Chapter 9 of the Oracle9i Application ServerAdministrator’s Guide.
Note: As an alternative to using Enterprise Manager, you can
create a cluster, add application server instances to the cluster, and
manage the cluster using the DCM command-line tool. See
Appendix A, "DCM Command-Line Utility (dcmctl)" for
information on the DCM command-line tool.
9-28 Oracle9iAS Containers for J2EE User’s Guide
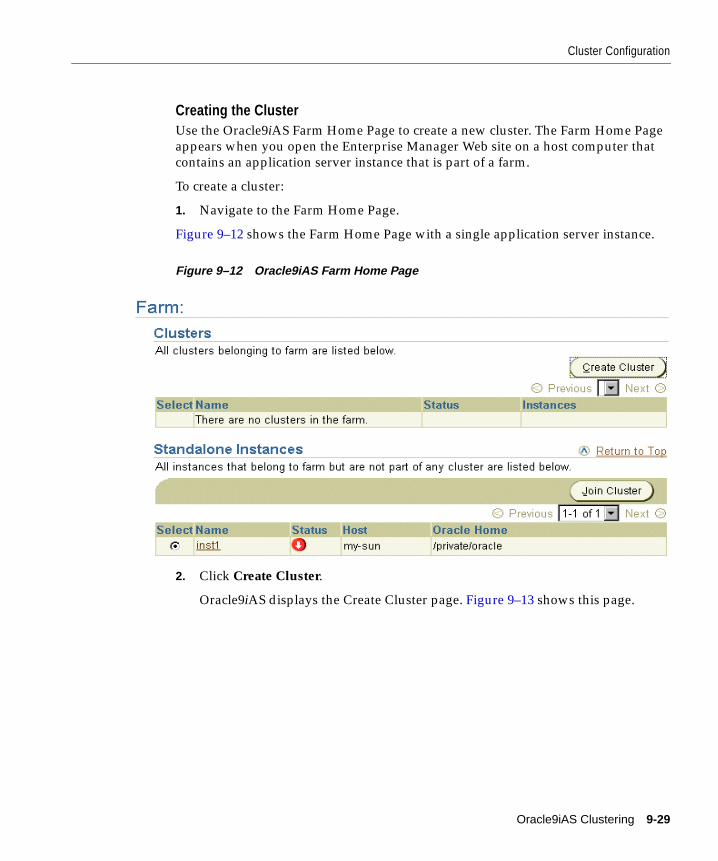
Cluster Configuration
Creating the ClusterUse the Oracle9iAS Farm Home Page to create a new cluster. The Farm Home Page
appears when you open the Enterprise Manager Web site on a host computer that
contains an application server instance that is part of a farm.
To create a cluster:
1. Navigate to the Farm Home Page.
Figure 9–12 shows the Farm Home Page with a single application server instance.
Figure 9–12 Oracle9iAS Farm Home Page
2. Click Create Cluster.
Oracle9iAS displays the Create Cluster page. Figure 9–13 shows this page.
Oracle9iAS Clustering 9-29
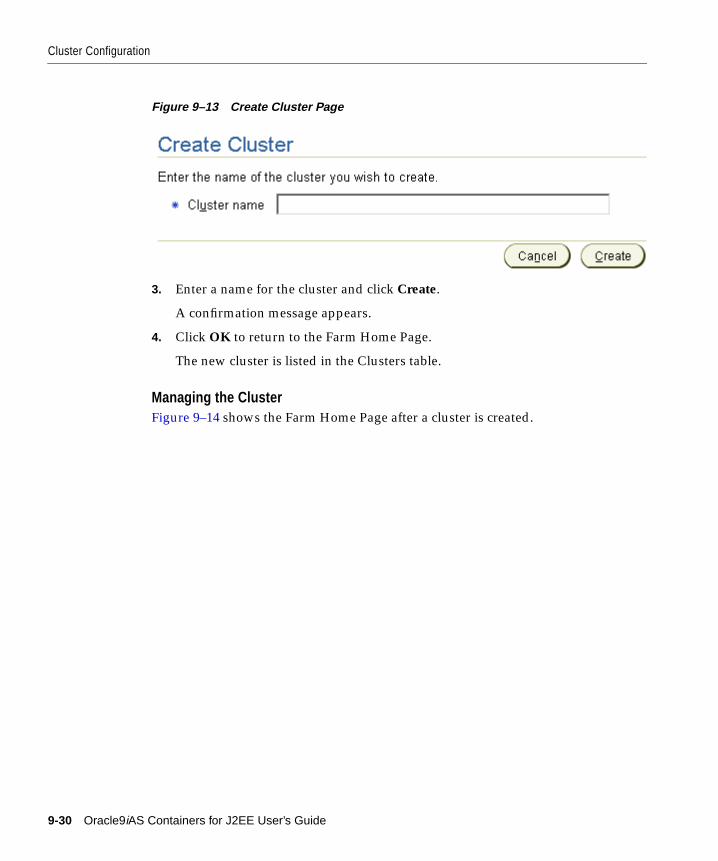
Cluster Configuration
Figure 9–13 Create Cluster Page
3. Enter a name for the cluster and click Create.
A confirmation message appears.
4. Click OK to return to the Farm Home Page.
The new cluster is listed in the Clusters table.
Managing the ClusterFigure 9–14 shows the Farm Home Page after a cluster is created.
add create cluster page screen shot
9-30 Oracle9iAS Containers for J2EE User’s Guide
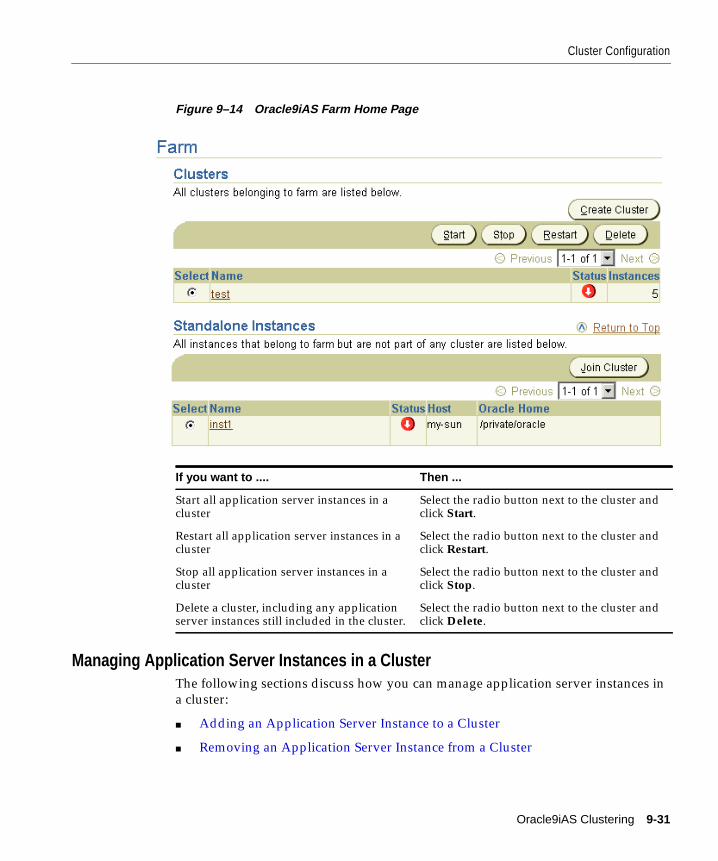
Cluster Configuration
Figure 9–14 Oracle9iAS Farm Home Page
Managing Application Server Instances in a ClusterThe following sections discuss how you can manage application server instances in
a cluster:
■ Adding an Application Server Instance to a Cluster
■ Removing an Application Server Instance from a Cluster
If you want to .... Then ...
Start all application server instances in acluster
Select the radio button next to the cluster andclick Start.
Restart all application server instances in acluster
Select the radio button next to the cluster andclick Restart.
Stop all application server instances in acluster
Select the radio button next to the cluster andclick Stop.
Delete a cluster, including any applicationserver instances still included in the cluster.
Select the radio button next to the cluster andclick Delete.
Oracle9iAS Clustering 9-31
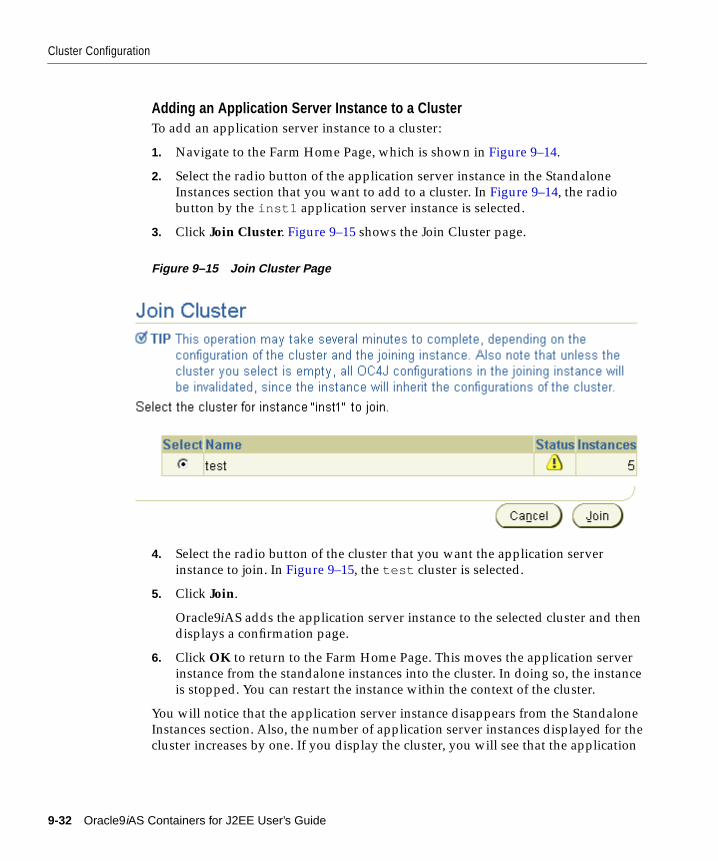
Cluster Configuration
Adding an Application Server Instance to a ClusterTo add an application server instance to a cluster:
1. Navigate to the Farm Home Page, which is shown in Figure 9–14.
2. Select the radio button of the application server instance in the Standalone
Instances section that you want to add to a cluster. In Figure 9–14, the radio
button by the inst1 application server instance is selected.
3. Click Join Cluster. Figure 9–15 shows the Join Cluster page.
Figure 9–15 Join Cluster Page
4. Select the radio button of the cluster that you want the application server
instance to join. In Figure 9–15, the test cluster is selected.
5. Click Join.
Oracle9iAS adds the application server instance to the selected cluster and then
displays a confirmation page.
6. Click OK to return to the Farm Home Page. This moves the application server
instance from the standalone instances into the cluster. In doing so, the instance
is stopped. You can restart the instance within the context of the cluster.
You will notice that the application server instance disappears from the Standalone
Instances section. Also, the number of application server instances displayed for the
cluster increases by one. If you display the cluster, you will see that the application
add join cluster page screen shot
9-32 Oracle9iAS Containers for J2EE User’s Guide

Cluster Configuration
server instance was moved into the cluster. Thus, the Standalone Instances section
displays only those application server instances that are not a part of any cluster.
Repeat these steps for each additional standalone application server instance you
want to add to the cluster.
Removing an Application Server Instance from a ClusterTo remove the application server instance from the cluster, do the following:
1. On the Farm Home page, select the cluster in which you are interested. This
brings you to the cluster page.
2. Select the radio button of the application server instance to remove from the
cluster and click Remove.
When you add or remove an application server instance to or from a cluster, the
application server instance is stopped.
OC4J Instance ConfigurationThe Oracle9iAS Containers for J2EE User’s Guide describes how to configure an OC4J
Instance. The following sections describe how to configure your OC4J Instance for
clustering:
■ Configuring Islands and Processes
■ Configuring Web Application State Replication
■ Configuring EJB Application State Replication
Configuring Islands and ProcessesTo modify the islands and the number of processes each island contains, do the
following:
1. Scroll down to the Administration section of the OC4J Home Page.
2. Select Server Properties in the Instance Properties column.
3. Scroll down to the Multiple VM Configuration section. This section defines the
islands and the number of OC4J processes that should be started on this
application server instance in each island.
Figure 9–16 displays the Multiple VM Configuration section.
Oracle9iAS Clustering 9-33
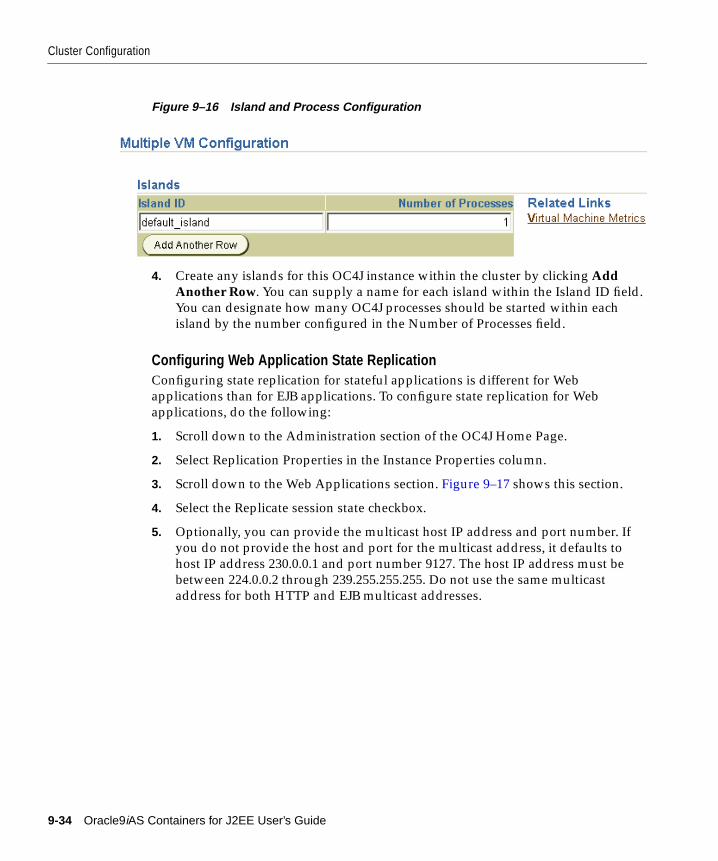
Cluster Configuration
Figure 9–16 Island and Process Configuration
4. Create any islands for this OC4J instance within the cluster by clicking AddAnother Row. You can supply a name for each island within the Island ID field.
You can designate how many OC4J processes should be started within each
island by the number configured in the Number of Processes field.
Configuring Web Application State ReplicationConfiguring state replication for stateful applications is different for Web
applications than for EJB applications. To configure state replication for Web
applications, do the following:
1. Scroll down to the Administration section of the OC4J Home Page.
2. Select Replication Properties in the Instance Properties column.
3. Scroll down to the Web Applications section. Figure 9–17 shows this section.
4. Select the Replicate session state checkbox.
5. Optionally, you can provide the multicast host IP address and port number. If
you do not provide the host and port for the multicast address, it defaults to
host IP address 230.0.0.1 and port number 9127.The host IP address must be
between 224.0.0.2 through 239.255.255.255. Do not use the same multicast
address for both HTTP and EJB multicast addresses.
9-34 Oracle9iAS Containers for J2EE User’s Guide
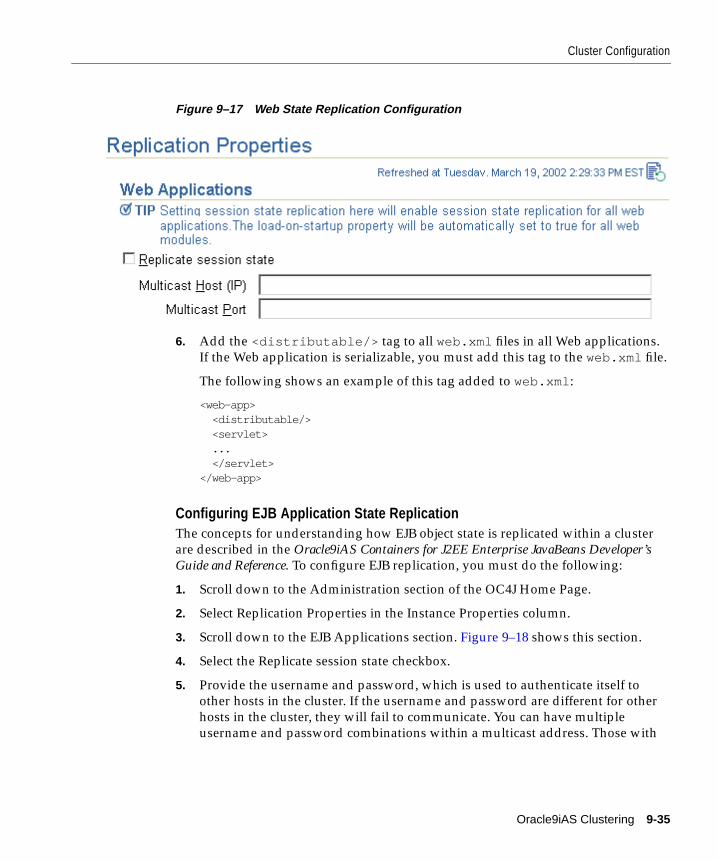
Cluster Configuration
Figure 9–17 Web State Replication Configuration
6. Add the <distributable/> tag to all web.xml files in all Web applications.
If the Web application is serializable, you must add this tag to the web.xml file.
The following shows an example of this tag added to web.xml :
<web-app> <distributable/> <servlet> ... </servlet></web-app>
Configuring EJB Application State ReplicationThe concepts for understanding how EJB object state is replicated within a cluster
are described in the Oracle9iAS Containers for J2EE Enterprise JavaBeans Developer’sGuide and Reference. To configure EJB replication, you must do the following:
1. Scroll down to the Administration section of the OC4J Home Page.
2. Select Replication Properties in the Instance Properties column.
3. Scroll down to the EJB Applications section. Figure 9–18 shows this section.
4. Select the Replicate session state checkbox.
5. Provide the username and password, which is used to authenticate itself to
other hosts in the cluster. If the username and password are different for other
hosts in the cluster, they will fail to communicate. You can have multiple
username and password combinations within a multicast address. Those with
Oracle9iAS Clustering 9-35
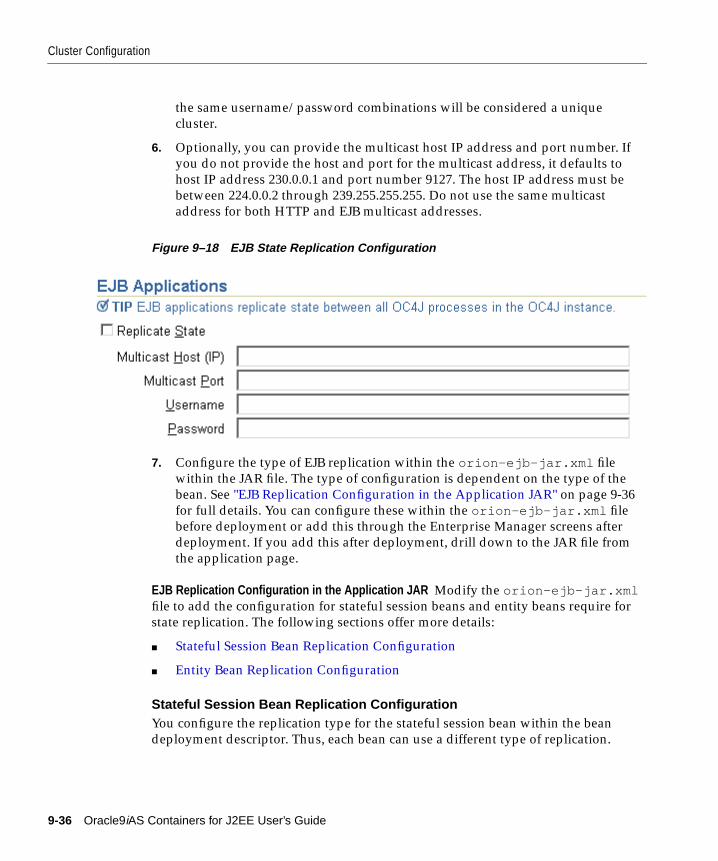
Cluster Configuration
the same username/password combinations will be considered a unique
cluster.
6. Optionally, you can provide the multicast host IP address and port number. If
you do not provide the host and port for the multicast address, it defaults to
host IP address 230.0.0.1 and port number 9127.The host IP address must be
between 224.0.0.2 through 239.255.255.255. Do not use the same multicast
address for both HTTP and EJB multicast addresses.
Figure 9–18 EJB State Replication Configuration
7. Configure the type of EJB replication within the orion-ejb-jar.xml file
within the JAR file. The type of configuration is dependent on the type of the
bean. See "EJB Replication Configuration in the Application JAR" on page 9-36
for full details. You can configure these within the orion-ejb-jar.xml file
before deployment or add this through the Enterprise Manager screens after
deployment. If you add this after deployment, drill down to the JAR file from
the application page.
EJB Replication Configuration in the Application JAR Modify the orion-ejb-jar.xmlfile to add the configuration for stateful session beans and entity beans require for
state replication. The following sections offer more details:
■ Stateful Session Bean Replication Configuration
■ Entity Bean Replication Configuration
Stateful Session Bean Replication ConfigurationYou configure the replication type for the stateful session bean within the bean
deployment descriptor. Thus, each bean can use a different type of replication.
9-36 Oracle9iAS Containers for J2EE User’s Guide
Cluster Configuration
VM Termination Replication Set the replication attribute of the
<session-deployment> tag in the orion-ejb-jar.xml file to
"VMTermination ". This is shown below:
<session-deployment replication="VMTermination" .../>
End of Call Replication Set the replication attribute of the
<session-deployment> tag in the orion-ejb-jar.xml file to "endOfCall ".
This is shown below:
<session-deployment replication="EndOfCall" .../>
Stateful Session Context No static configuration is necessary when using the stateful
session context to replicate information across the clustered hosts. To replicate the
desired state, set the information that you want replicated and execute the
setAttribute method within the StatefulSessionContext class in the server
code. This enables you to designate what information is replicated and when it is
replicated. The state indicated in the parameters of this method is replicated to all
hosts in the cluster that share the same multicast address, username, and password.
Entity Bean Replication ConfigurationConfigure the clustering for the entity bean within its bean deployment descriptor.
Modify the orion-ejb-jar.xml file to add the clustering-schema attribute
to the <entity-deployment> tag, as follows:
<entity-deployment ... clustering-schema="asynchronous-cache" .../>
Oracle9iAS Clustering 9-37
Cluster Configuration
Configuring Single Sign-OnIn order to participate in Single Sign-On functionality, all Oracle HTTP Server
instances in a cluster must have an identical Single Sign-On registration.
■ Each Oracle HTTP Server is registered with the same Single Sign-On server.
■ Each Oracle HTTP Server redirects a success, logout, cancel, or home message
to the public network load balancer. In a clustered environment, each Oracle
HTTP Server should redirect message URLs to the network load balancer. Since
the client cannot access an Oracle HTTP Server directly, the client interacts with
the network load balancer.
As with all cluster-wide configuration, the Single Sign-On configuration is
propagated among all Oracle HTTP server instances in the cluster. However, the
initial configuration is manually configured and propagated. On one of the
application server instances, define the configuration with the ossoreg.jar tool.
Then, DCM propagates the configuration to all other Oracle HTTP Servers in the
cluster.
If you do not use a network load balancer, then the Single Sign-on configuration
must originate with whatever you use as the incoming load balancer—Web Cache,
Oracle HTTP Server, and so on.
To configure a cluster for Single Sign-On, execute the ossoreg.jar command
against one of the application server instances in the cluster. This tool registers the
Single Sign-On server and the redirect URLs with all Oracle HTTP Servers in the
cluster.
Run the ossoreg.jar command with all of the options as follows, substituting
information for the italicized portions of the parameter values.
The values are described fully in Table 9–1.
■ Specify the host, port, and SID of the database used by the Single Sign-On
server.
■ Specify the host and port of the front-end load balancer in each of the redirect
URL parameters—success_url , logout_url , cancel_url , and home_url .
These should be HTTP or HTTPS URLs depending on the site security policy
regarding SSL access to Single Sign-On protected resources.
■ Specify the root user of the host that you are executing this tool on in the -uoption.
See Also: Oracle9iAS Single Sign-On Administrator’s Guide
9-38 Oracle9iAS Containers for J2EE User’s Guide
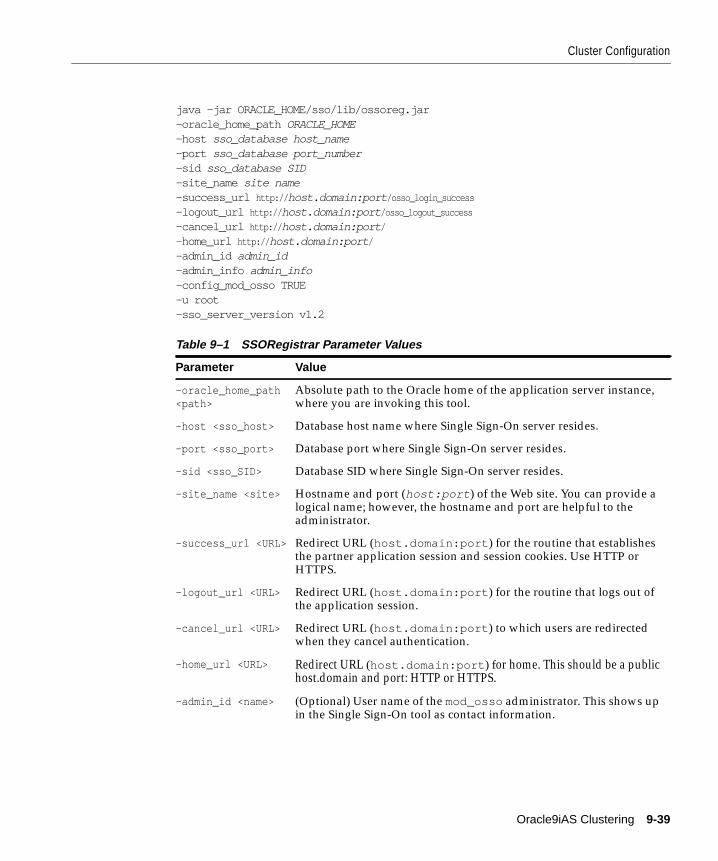
Cluster Configuration
java -jar ORACLE_HOME/sso/lib/ossoreg.jar-oracle_home_path ORACLE_HOME-host sso_database host_name-port sso_database port_number-sid sso_database SID-site_name site name-success_url http:// host.domain:port /osso_login_success
-logout_url http:// host.domain:port /osso_logout_success
-cancel_url http:// host.domain:port /
-home_url http:// host.domain:port /
-admin_id admin_id-admin_info admin_info-config_mod_osso TRUE-u root-sso_server_version v1.2
Table 9–1 SSORegistrar Parameter Values
Parameter Value
-oracle_home_path<path>
Absolute path to the Oracle home of the application server instance,where you are invoking this tool.
-host <sso_host> Database host name where Single Sign-On server resides.
-port <sso_port> Database port where Single Sign-On server resides.
-sid <sso_SID> Database SID where Single Sign-On server resides.
-site_name <site> Hostname and port (host:port ) of the Web site. You can provide alogical name; however, the hostname and port are helpful to theadministrator.
-success_url <URL> Redirect URL (host.domain:port ) for the routine that establishesthe partner application session and session cookies. Use HTTP orHTTPS.
-logout_url <URL> Redirect URL (host.domain:port ) for the routine that logs out ofthe application session.
-cancel_url <URL> Redirect URL (host.domain:port ) to which users are redirectedwhen they cancel authentication.
-home_url <URL> Redirect URL (host.domain:port ) for home. This should be a publichost.domain and port: HTTP or HTTPS.
-admin_id <name> (Optional) User name of the mod_osso administrator. This shows upin the Single Sign-On tool as contact information.
Oracle9iAS Clustering 9-39
Cluster Configuration
The SSORegistrar tool establishes all information necessary to facilitate secure
communication between the Oracle HTTP Servers in the cluster and the Single
Sign-On server.
When using Single Sign-On with the Oracle HTTP Servers in the cluster, the
KeepAlive directive must be set to OFF. The reason is because the Oracle HTTP
Servers are behind a network load balancer. Thus, if the KeepAlive directive is set to
ON, then the network load balancer maintains state with the Oracle HTTP Server
for the same connection, which results in an HTTP 503 error. Modify the KeepAlive
directive in the Oracle HTTP Server configuration. This directive is located in the
httpd.conf file of the Oracle HTTP Server.
Configuring Instance-Specific ParametersThe manageability feature of the cluster causes the configuration to be replicated
across all application server instances in the cluster, which is defined as a
cluster-wide configuration. However, there are certain parameters where it is
necessary to configure them separately on each instance. These parameters are
referred to as instance-specific.
The following parameters are instance-specific parameters, which are not replicated
across the cluster. You must modify these parameters on each application server
instance.
OC4J Instance-Specific ParametersThe following are instance-specific parameters within each OC4J instance:
■ islands
■ number of OC4J processes
■ port numbers
■ command-line options
All other parameters are part of the cluster-wide parameters, which are replicated
across the cluster.
-admin_info <text> (Optional) Additional information about the mod_ossoadministrator, such as e-mail address. This shows up in the SingleSign-On tool as contact information.
Table 9–1 SSORegistrar Parameter Values (Cont.)
Parameter Value
9-40 Oracle9iAS Containers for J2EE User’s Guide
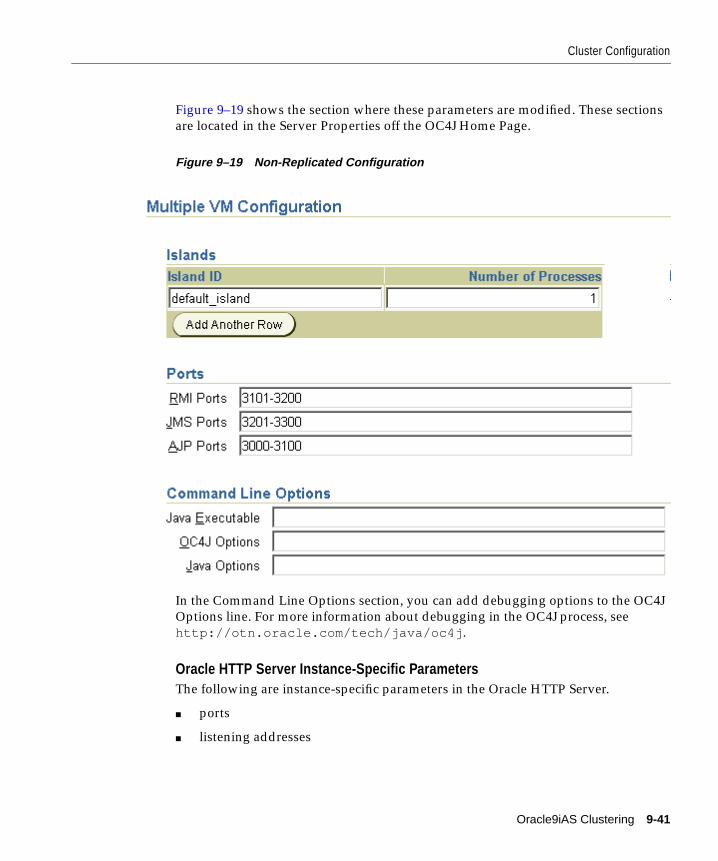
Cluster Configuration
Figure 9–19 shows the section where these parameters are modified. These sections
are located in the Server Properties off the OC4J Home Page.
Figure 9–19 Non-Replicated Configuration
In the Command Line Options section, you can add debugging options to the OC4J
Options line. For more information about debugging in the OC4J process, see
http://otn.oracle.com/tech/java/oc4j .
Oracle HTTP Server Instance-Specific ParametersThe following are instance-specific parameters in the Oracle HTTP Server.
■ ports
■ listening addresses
Oracle9iAS Clustering 9-41
Cluster Configuration
■ virtual host information
The HTTP Server ports and listening addresses are modified on the Server
Properties page off of the HTTP Server Home Page. The virtual host information is
modified by selecting a virtual host from the Virtual Hosts section off of the HTTP
Server Home Page.
9-42 Oracle9iAS Containers for J2EE User’s Guide
DCM Command-Line Utility (dc
A
DCM Command-Line Utility (dcmctl)The Distributed Configuration Management (DCM) utility, dcmctl, provides a
command-line alternative to using Oracle Enterprise Manager for some
management tasks. The dcmctl tool uses the same distributed architecture and
synchronization features as Enterprise Manager Web site, thereby providing
identical functionality in a format that is ideal for scripting and automation.
The following sections describe the tasks you can perform using dcmctl :
■ Overview
■ Starting and Stopping
■ Managing Application Server Instances
■ Managing Components
■ Managing Clusters
■ Deploying Applications
■ Using the dcmctl Shell
■ Executing dcmctl from a Command File
mctl) A-1
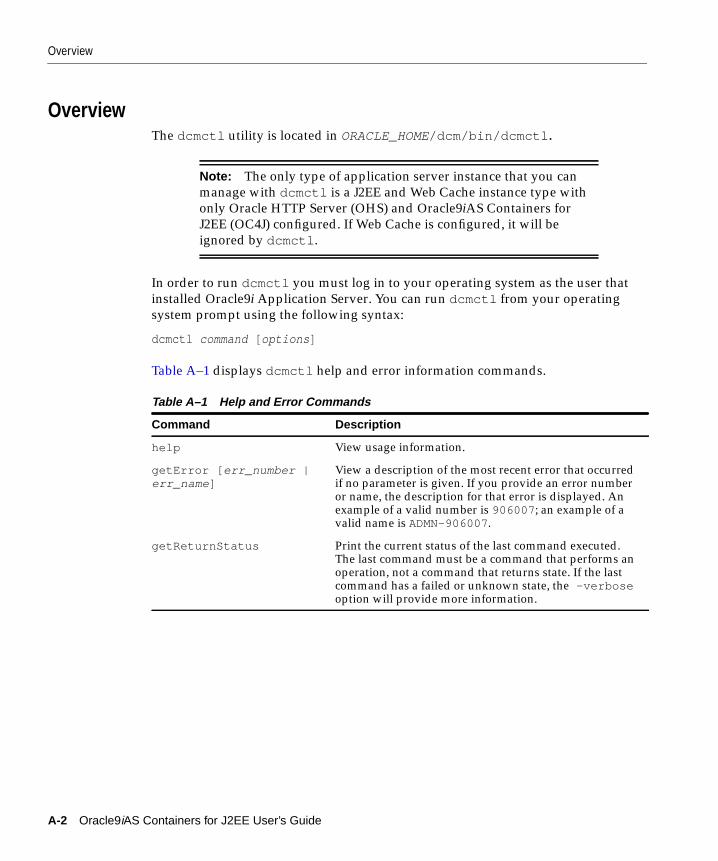
Overview
OverviewThe dcmctl utility is located in ORACLE_HOME/dcm/bin/dcmctl .
In order to run dcmctl you must log in to your operating system as the user that
installed Oracle9i Application Server. You can run dcmctl from your operating
system prompt using the following syntax:
dcmctl command [ options ]
Table A–1 displays dcmctl help and error information commands.
Note: The only type of application server instance that you can
manage with dcmctl is a J2EE and Web Cache instance type with
only Oracle HTTP Server (OHS) and Oracle9iAS Containers for
J2EE (OC4J) configured. If Web Cache is configured, it will be
ignored by dcmctl .
Table A–1 Help and Error Commands
Command Description
help View usage information.
getError [ err_number |err_name ]
View a description of the most recent error that occurredif no parameter is given. If you provide an error numberor name, the description for that error is displayed. Anexample of a valid number is 906007 ; an example of avalid name is ADMN-906007.
getReturnStatus Print the current status of the last command executed.The last command must be a command that performs anoperation, not a command that returns state. If the lastcommand has a failed or unknown state, the -verboseoption will provide more information.
A-2 Oracle9iAS Containers for J2EE User’s Guide
Overview
The following sections describe overall information on how to use dcmctl :
■ About dcmctl Commands and Options
■ Using dcmctl in a Clustered Environment
■ Passing Parameters to the JVM
About dcmctl Commands and OptionsThe dcmctl utility supports many commands, which are described in the
subsequent sections of this appendix. Commands are a single word and are not
case-sensitive. Each dcmctl command supports zero or more options.
Options take the following form:
- option [ argument ]
Option names have a long and short form, and are not case-sensitive. There are two
types of dcmctl options: target and universal.
Target OptionsTable A–2 lists the dcmctl target options that define the target on which to apply
the given command. Subsequent sections of this appendix describe which target
options can be used with each command. On hosts with multiple application server
instances, dcmctl determines the target instance as follows:
■ The target is all instances in the designated cluster with the -cluster or -cloption.
■ The target is the instance supplied with the -instance or -i option.
■ If a cluster or instance is not supplied, then the target is the instance associated
with the -oraclehome universal option.
DCM Command-Line Utility (dcmctl) A-3
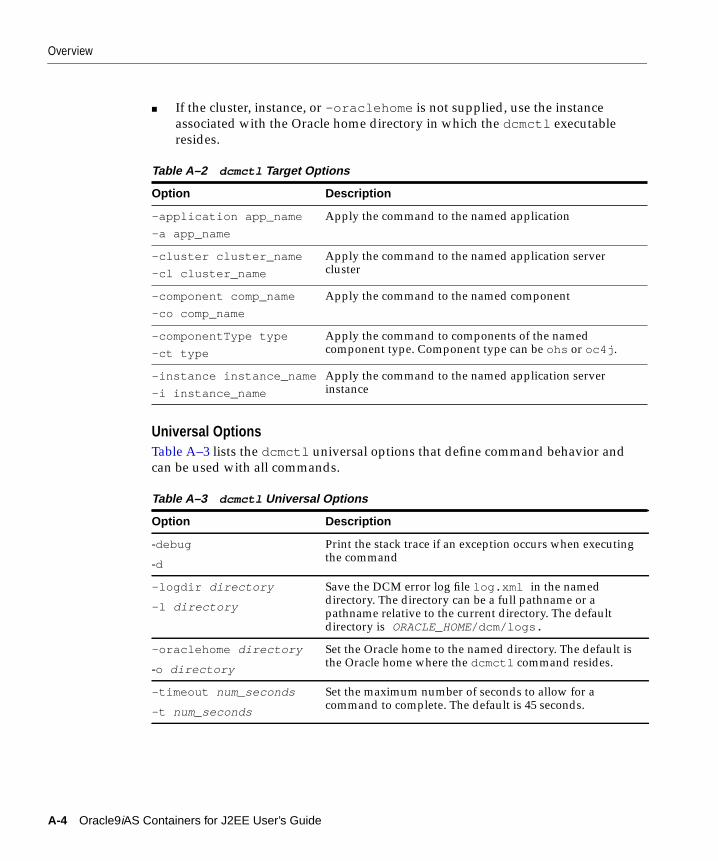
Overview
■ If the cluster, instance, or -oraclehome is not supplied, use the instance
associated with the Oracle home directory in which the dcmctl executable
resides.
Universal OptionsTable A–3 lists the dcmctl universal options that define command behavior and
can be used with all commands.
Table A–2 dcmctl Target Options
Option Description
-application app_name
-a app_name
Apply the command to the named application
-cluster cluster_name
-cl cluster_name
Apply the command to the named application servercluster
-component comp_name
-co comp_name
Apply the command to the named component
-componentType type
-ct type
Apply the command to components of the namedcomponent type. Component type can be ohs or oc4j .
-instance instance_name
-i instance_name
Apply the command to the named application serverinstance
Table A–3 dcmctl Universal Options
Option Description
-debug
-d
Print the stack trace if an exception occurs when executingthe command
-logdir directory
-l directory
Save the DCM error log file log.xml in the nameddirectory. The directory can be a full pathname or apathname relative to the current directory. The defaultdirectory is ORACLE_HOME/dcm/logs.
-oraclehome directory
-o directory
Set the Oracle home to the named directory. The default isthe Oracle home where the dcmctl command resides.
-timeout num_seconds
-t num_seconds
Set the maximum number of seconds to allow for acommand to complete. The default is 45 seconds.
A-4 Oracle9iAS Containers for J2EE User’s Guide
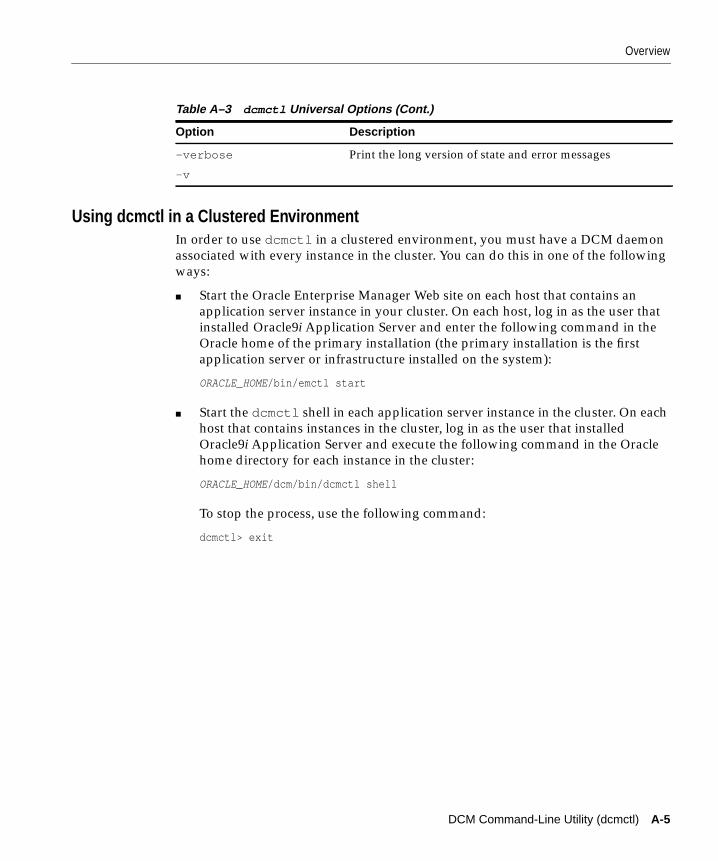
Overview
Using dcmctl in a Clustered EnvironmentIn order to use dcmctl in a clustered environment, you must have a DCM daemon
associated with every instance in the cluster. You can do this in one of the following
ways:
■ Start the Oracle Enterprise Manager Web site on each host that contains an
application server instance in your cluster. On each host, log in as the user that
installed Oracle9i Application Server and enter the following command in the
Oracle home of the primary installation (the primary installation is the first
application server or infrastructure installed on the system):
ORACLE_HOME/bin/emctl start
■ Start the dcmctl shell in each application server instance in the cluster. On each
host that contains instances in the cluster, log in as the user that installed
Oracle9i Application Server and execute the following command in the Oracle
home directory for each instance in the cluster:
ORACLE_HOME/dcm/bin/dcmctl shell
To stop the process, use the following command:
dcmctl> exit
-verbose
-v
Print the long version of state and error messages
Table A–3 dcmctl Universal Options (Cont.)
Option Description
DCM Command-Line Utility (dcmctl) A-5
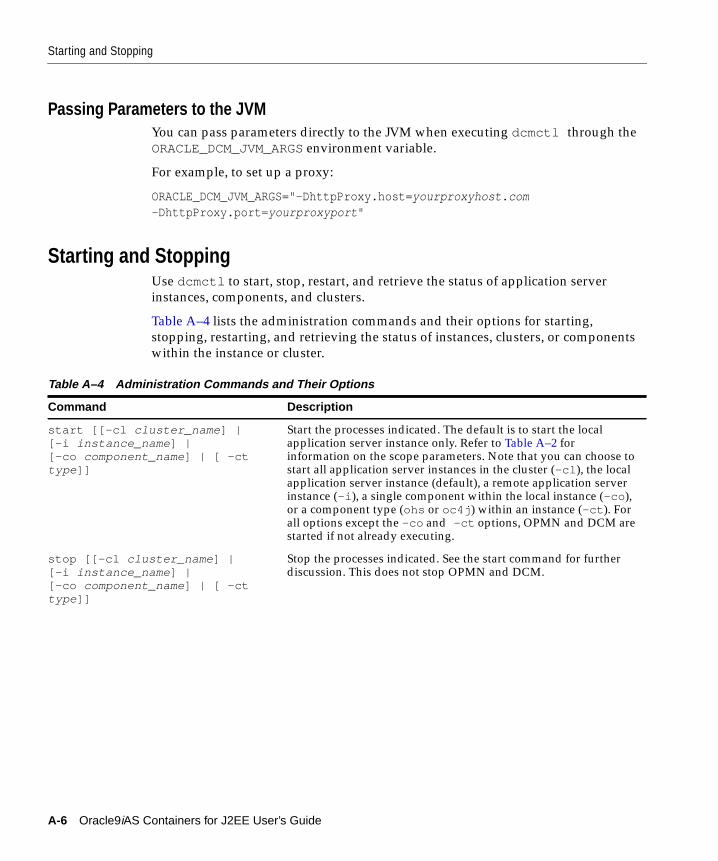
Starting and Stopping
Passing Parameters to the JVMYou can pass parameters directly to the JVM when executing dcmctl through the
ORACLE_DCM_JVM_ARGS environment variable.
For example, to set up a proxy:
ORACLE_DCM_JVM_ARGS="-DhttpProxy.host= yourproxyhost.com-DhttpProxy.port= yourproxyport "
Starting and StoppingUse dcmctl to start, stop, restart, and retrieve the status of application server
instances, components, and clusters.
Table A–4 lists the administration commands and their options for starting,
stopping, restarting, and retrieving the status of instances, clusters, or components
within the instance or cluster.
Table A–4 Administration Commands and Their Options
Command Description
start [[-cl cluster_name ] |[-i instance_name ] |[-co component_name ] | [ -cttype ]]
Start the processes indicated. The default is to start the localapplication server instance only. Refer to Table A–2 forinformation on the scope parameters. Note that you can choose tostart all application server instances in the cluster (-cl ), the localapplication server instance (default), a remote application serverinstance (-i ), a single component within the local instance (-co ),or a component type (ohs or oc4j ) within an instance (-ct ). Forall options except the -co and -ct options, OPMN and DCM arestarted if not already executing.
stop [[-cl cluster_name ] |[-i instance_name ] |[-co component_name ] | [ -cttype ]]
Stop the processes indicated. See the start command for furtherdiscussion. This does not stop OPMN and DCM.
A-6 Oracle9iAS Containers for J2EE User’s Guide
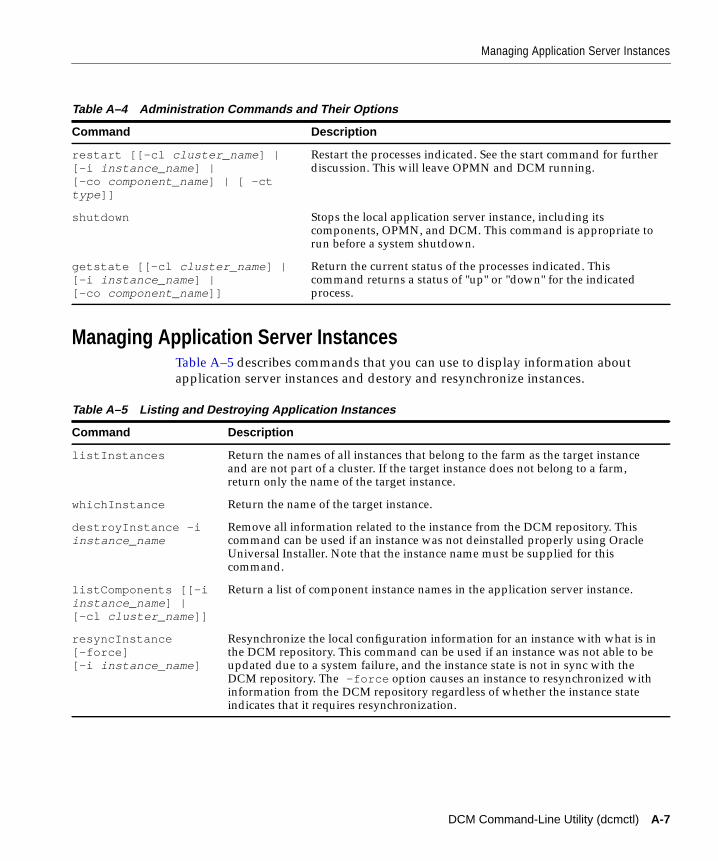
Managing Application Server Instances
Managing Application Server InstancesTable A–5 describes commands that you can use to display information about
application server instances and destory and resynchronize instances.
restart [[-cl cluster_name ] |[-i instance_name ] |[-co component_name ] | [ -cttype ]]
Restart the processes indicated. See the start command for furtherdiscussion. This will leave OPMN and DCM running.
shutdown Stops the local application server instance, including itscomponents, OPMN, and DCM. This command is appropriate torun before a system shutdown.
getstate [[-cl cluster_name ] |[-i instance_name ] |[-co component_name ]]
Return the current status of the processes indicated. Thiscommand returns a status of "up" or "down" for the indicatedprocess.
Table A–5 Listing and Destroying Application Instances
Command Description
listInstances Return the names of all instances that belong to the farm as the target instanceand are not part of a cluster. If the target instance does not belong to a farm,return only the name of the target instance.
whichInstance Return the name of the target instance.
destroyInstance -iinstance_name
Remove all information related to the instance from the DCM repository. Thiscommand can be used if an instance was not deinstalled properly using OracleUniversal Installer. Note that the instance name must be supplied for thiscommand.
listComponents [[-iinstance_name ] |[-cl cluster_name ]]
Return a list of component instance names in the application server instance.
resyncInstance[-force][-i instance_name ]
Resynchronize the local configuration information for an instance with what is inthe DCM repository. This command can be used if an instance was not able to beupdated due to a system failure, and the instance state is not in sync with theDCM repository. The -force option causes an instance to resynchronized withinformation from the DCM repository regardless of whether the instance stateindicates that it requires resynchronization.
Table A–4 Administration Commands and Their Options
Command Description
DCM Command-Line Utility (dcmctl) A-7
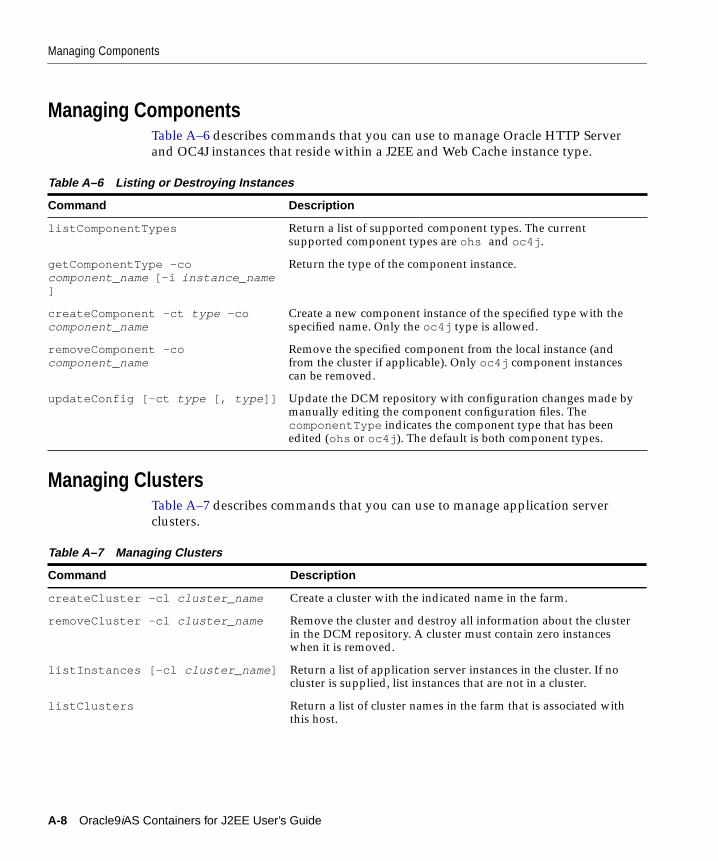
Managing Components
Managing ComponentsTable A–6 describes commands that you can use to manage Oracle HTTP Server
and OC4J instances that reside within a J2EE and Web Cache instance type.
Managing ClustersTable A–7 describes commands that you can use to manage application server
clusters.
Table A–6 Listing or Destroying Instances
Command Description
listComponentTypes Return a list of supported component types. The currentsupported component types are ohs and oc4j .
getComponentType -cocomponent_name [-i instance_name]
Return the type of the component instance.
createComponent -ct type -cocomponent_name
Create a new component instance of the specified type with thespecified name. Only the oc4j type is allowed.
removeComponent -cocomponent_name
Remove the specified component from the local instance (andfrom the cluster if applicable). Only oc4j component instancescan be removed.
updateConfig [-ct type [, type ]] Update the DCM repository with configuration changes made bymanually editing the component configuration files. ThecomponentType indicates the component type that has beenedited (ohs or oc4j ). The default is both component types.
Table A–7 Managing Clusters
Command Description
createCluster -cl cluster_name Create a cluster with the indicated name in the farm.
removeCluster -cl cluster_name Remove the cluster and destroy all information about the clusterin the DCM repository. A cluster must contain zero instanceswhen it is removed.
listInstances [-cl cluster_name ] Return a list of application server instances in the cluster. If nocluster is supplied, list instances that are not in a cluster.
listClusters Return a list of cluster names in the farm that is associated withthis host.
A-8 Oracle9iAS Containers for J2EE User’s Guide
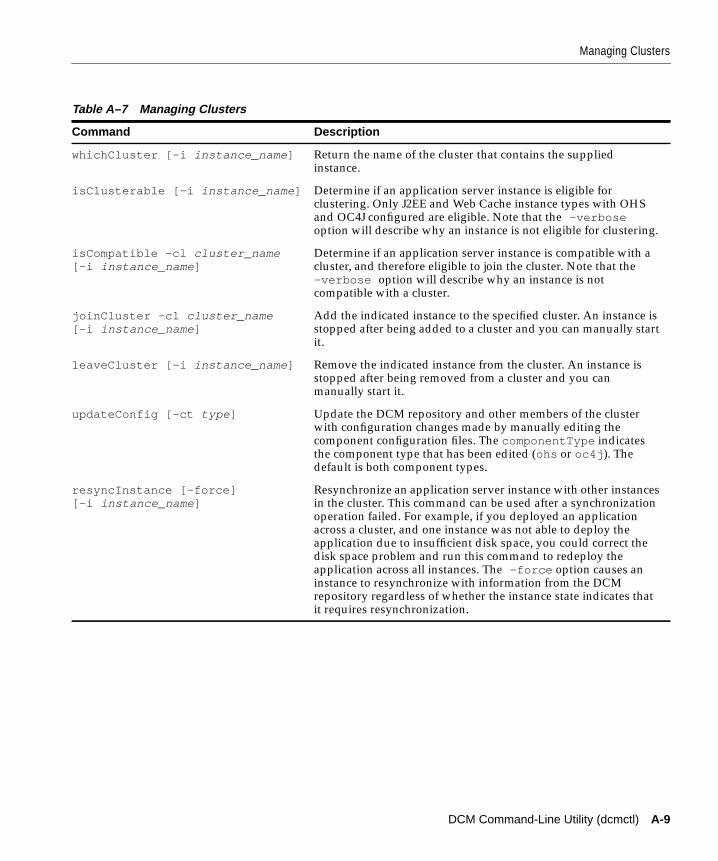
Managing Clusters
whichCluster [-i instance_name ] Return the name of the cluster that contains the suppliedinstance.
isClusterable [-i instance_name ] Determine if an application server instance is eligible forclustering. Only J2EE and Web Cache instance types with OHSand OC4J configured are eligible. Note that the -verboseoption will describe why an instance is not eligible for clustering.
isCompatible -cl cluster_name[-i instance_name ]
Determine if an application server instance is compatible with acluster, and therefore eligible to join the cluster. Note that the-verbose option will describe why an instance is notcompatible with a cluster.
joinCluster -cl cluster_name[-i instance_name ]
Add the indicated instance to the specified cluster. An instance isstopped after being added to a cluster and you can manually startit.
leaveCluster [-i instance_name ] Remove the indicated instance from the cluster. An instance isstopped after being removed from a cluster and you canmanually start it.
updateConfig [-ct type ] Update the DCM repository and other members of the clusterwith configuration changes made by manually editing thecomponent configuration files. The componentType indicatesthe component type that has been edited (ohs or oc4j ). Thedefault is both component types.
resyncInstance [-force][-i instance_name ]
Resynchronize an application server instance with other instancesin the cluster. This command can be used after a synchronizationoperation failed. For example, if you deployed an applicationacross a cluster, and one instance was not able to deploy theapplication due to insufficient disk space, you could correct thedisk space problem and run this command to redeploy theapplication across all instances. The -force option causes aninstance to resynchronize with information from the DCMrepository regardless of whether the instance state indicates thatit requires resynchronization.
Table A–7 Managing Clusters
Command Description
DCM Command-Line Utility (dcmctl) A-9
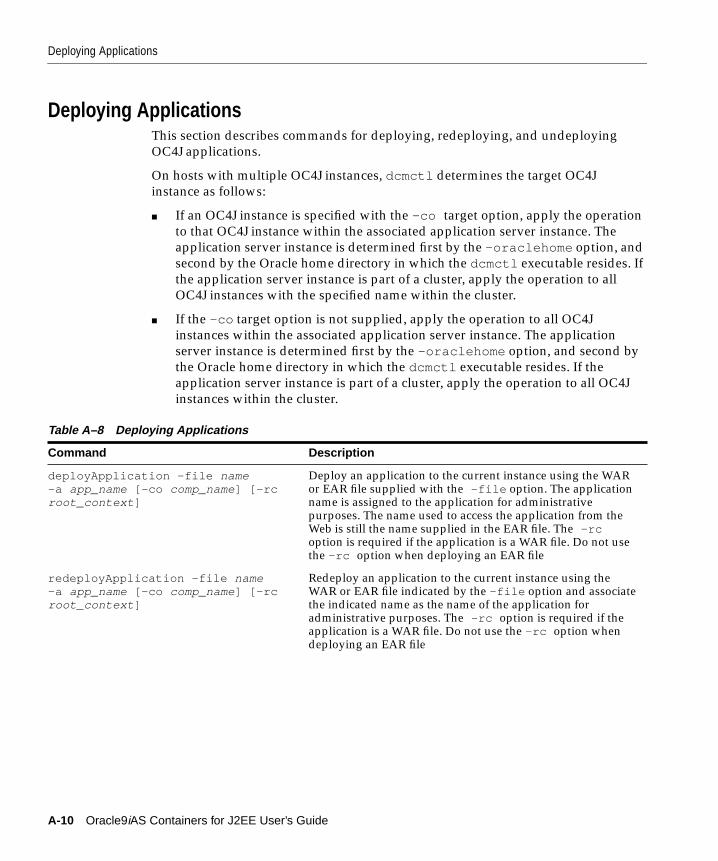
Deploying Applications
Deploying ApplicationsThis section describes commands for deploying, redeploying, and undeploying
OC4J applications.
On hosts with multiple OC4J instances, dcmctl determines the target OC4J
instance as follows:
■ If an OC4J instance is specified with the -co target option, apply the operation
to that OC4J instance within the associated application server instance. The
application server instance is determined first by the -oraclehome option, and
second by the Oracle home directory in which the dcmctl executable resides. If
the application server instance is part of a cluster, apply the operation to all
OC4J instances with the specified name within the cluster.
■ If the -co target option is not supplied, apply the operation to all OC4J
instances within the associated application server instance. The application
server instance is determined first by the -oraclehome option, and second by
the Oracle home directory in which the dcmctl executable resides. If the
application server instance is part of a cluster, apply the operation to all OC4J
instances within the cluster.
Table A–8 Deploying Applications
Command Description
deployApplication -file name-a app_name [-co comp_name] [-rcroot_context ]
Deploy an application to the current instance using the WARor EAR file supplied with the -file option. The applicationname is assigned to the application for administrativepurposes. The name used to access the application from theWeb is still the name supplied in the EAR file. The -rcoption is required if the application is a WAR file. Do not usethe -rc option when deploying an EAR file
redeployApplication -file name-a app_name [-co comp_name] [-rcroot_context ]
Redeploy an application to the current instance using theWAR or EAR file indicated by the -file option and associatethe indicated name as the name of the application foradministrative purposes. The -rc option is required if theapplication is a WAR file. Do not use the -rc option whendeploying an EAR file
A-10 Oracle9iAS Containers for J2EE User’s Guide
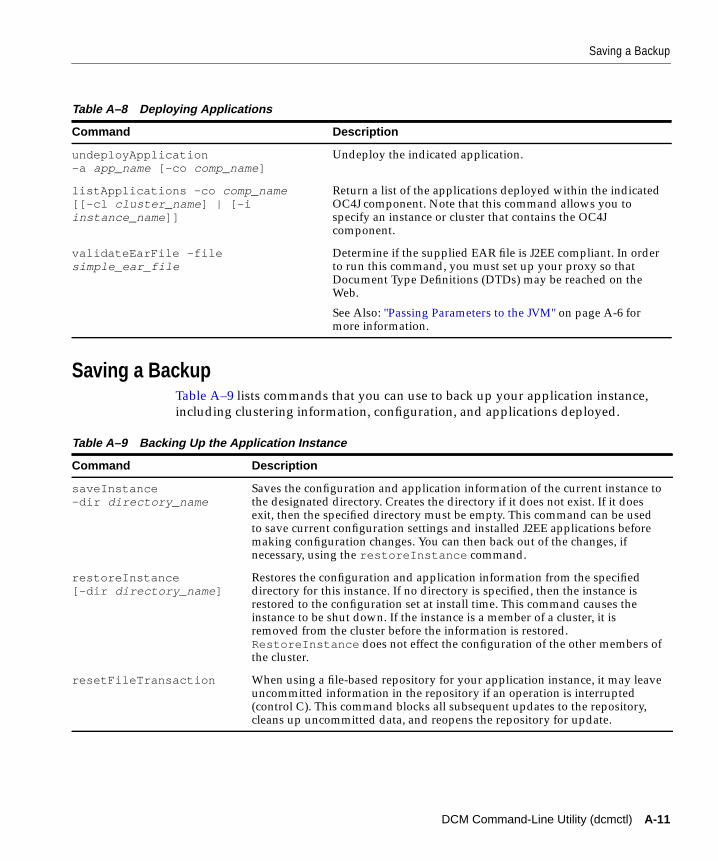
Saving a Backup
Saving a BackupTable A–9 lists commands that you can use to back up your application instance,
including clustering information, configuration, and applications deployed.
undeployApplication-a app_name [-co comp_name]
Undeploy the indicated application.
listApplications -co comp_name[[-cl cluster_name ] | [-iinstance_name ]]
Return a list of the applications deployed within the indicatedOC4J component. Note that this command allows you tospecify an instance or cluster that contains the OC4Jcomponent.
validateEarFile -filesimple_ear_file
Determine if the supplied EAR file is J2EE compliant. In orderto run this command, you must set up your proxy so thatDocument Type Definitions (DTDs) may be reached on theWeb.
See Also: "Passing Parameters to the JVM" on page A-6 formore information.
Table A–9 Backing Up the Application Instance
Command Description
saveInstance-dir directory_name
Saves the configuration and application information of the current instance tothe designated directory. Creates the directory if it does not exist. If it doesexit, then the specified directory must be empty. This command can be usedto save current configuration settings and installed J2EE applications beforemaking configuration changes. You can then back out of the changes, ifnecessary, using the restoreInstance command.
restoreInstance[-dir directory_name ]
Restores the configuration and application information from the specifieddirectory for this instance. If no directory is specified, then the instance isrestored to the configuration set at install time. This command causes theinstance to be shut down. If the instance is a member of a cluster, it isremoved from the cluster before the information is restored.RestoreInstance does not effect the configuration of the other members ofthe cluster.
resetFileTransaction When using a file-based repository for your application instance, it may leaveuncommitted information in the repository if an operation is interrupted(control C). This command blocks all subsequent updates to the repository,cleans up uncommitted data, and reopens the repository for update.
Table A–8 Deploying Applications
Command Description
DCM Command-Line Utility (dcmctl) A-11
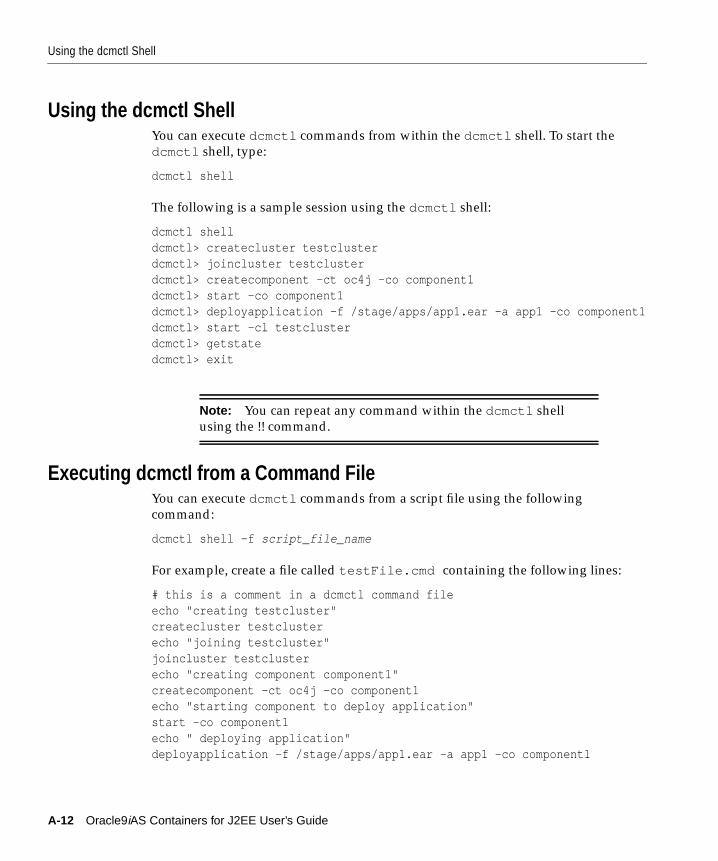
Using the dcmctl Shell
Using the dcmctl ShellYou can execute dcmctl commands from within the dcmctl shell. To start the
dcmctl shell, type:
dcmctl shell
The following is a sample session using the dcmctl shell:
dcmctl shelldcmctl> createcluster testclusterdcmctl> joincluster testclusterdcmctl> createcomponent -ct oc4j -co component1dcmctl> start -co component1dcmctl> deployapplication -f /stage/apps/app1.ear -a app1 -co component1dcmctl> start -cl testclusterdcmctl> getstatedcmctl> exit
Executing dcmctl from a Command FileYou can execute dcmctl commands from a script file using the following
command:
dcmctl shell -f script_file_name
For example, create a file called testFile.cmd containing the following lines:
# this is a comment in a dcmctl command fileecho "creating testcluster"createcluster testclusterecho "joining testcluster"joincluster testclusterecho "creating component component1"createcomponent -ct oc4j -co component1echo "starting component to deploy application"start -co component1echo " deploying application"deployapplication -f /stage/apps/app1.ear -a app1 -co component1
Note: You can repeat any command within the dcmctl shell
using the !! command.
A-12 Oracle9iAS Containers for J2EE User’s Guide
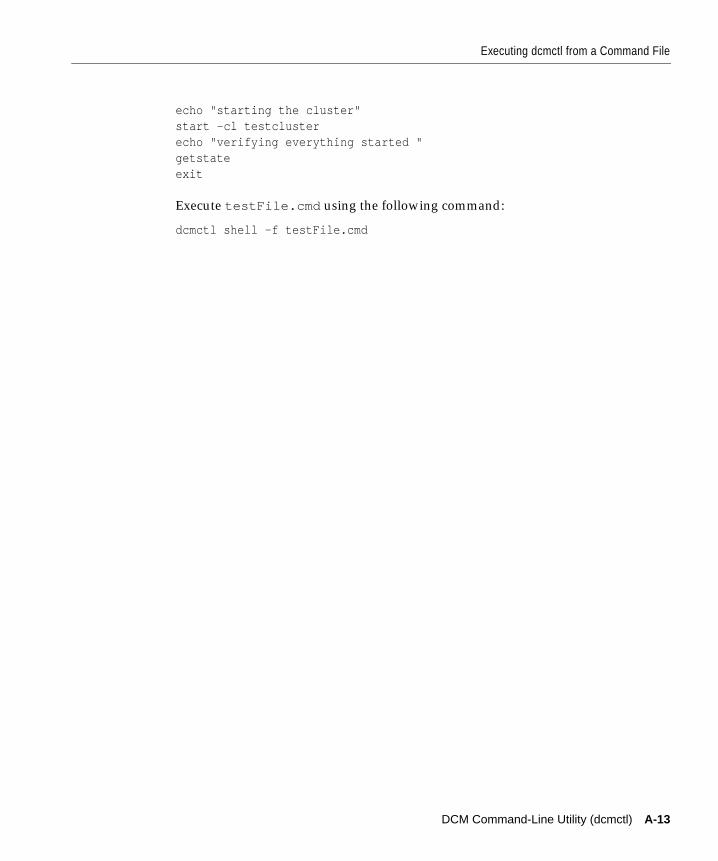
Executing dcmctl from a Command File
echo "starting the cluster"start -cl testclusterecho "verifying everything started "getstateexit
Execute testFile.cmd using the following command:
dcmctl shell -f testFile.cmd
DCM Command-Line Utility (dcmctl) A-13

Executing dcmctl from a Command File
A-14 Oracle9iAS Containers for J2EE User’s Guide
Additional Inform
B
Additional InformationThis appendix contains complete information about the following topics:
■ Description of XML File Contents
■ Elements in the server.xml File
■ Configuration and Deployment Examples
Most of these sections discuss how to modify your XML files. Modify all XML files
only through Enterprise Manager. Do not modify XML files on a single node.
ation B-1

Description of XML File Contents
Description of XML File ContentsOC4J uses configuration and deployment XML files. The following sections describe
each of these types.
OC4J Configuration XML FilesThis section describes the following XML files, which are necessary for OC4J
configuration:
■ server.xml
■ web-site.xml
■ jazn-data.xml
■ data-sources.xml
■ jms.xml
■ rmi.xml
■ httpds.conf
■ mod_oc4j.conf
■ workers.properties
server.xmlThis file contains the configuration for the application server. The server.xml file is
the root configuration file—it contains references to other configuration files. In this
file, you specify the following:
■ The library path, which is located in the application deployment descriptor
■ The global application, the global Web application, and the default Web site
served
■ Maximum number of HTTP connections the server allows
■ Logging settings
■ Java compiler settings
■ Cluster ID
■ Transaction time-out
■ SMTP host
B-2 Oracle9iAS Containers for J2EE User’s Guide
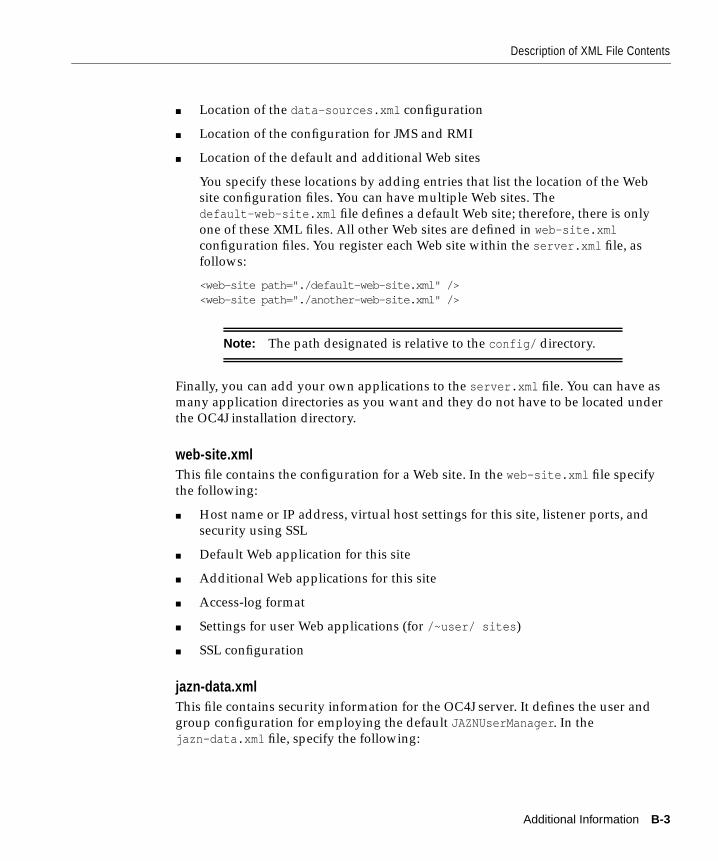
Description of XML File Contents
■ Location of the data-sources.xml configuration
■ Location of the configuration for JMS and RMI
■ Location of the default and additional Web sites
You specify these locations by adding entries that list the location of the Web
site configuration files. You can have multiple Web sites. The
default-web-site.xml file defines a default Web site; therefore, there is only
one of these XML files. All other Web sites are defined in web-site.xmlconfiguration files. You register each Web site within the server.xml file, as
follows:
<web-site path="./default-web-site.xml" /><web-site path="./another-web-site.xml" />
Finally, you can add your own applications to the server.xml file. You can have as
many application directories as you want and they do not have to be located under
the OC4J installation directory.
web-site.xmlThis file contains the configuration for a Web site. In the web-site.xml file specify
the following:
■ Host name or IP address, virtual host settings for this site, listener ports, and
security using SSL
■ Default Web application for this site
■ Additional Web applications for this site
■ Access-log format
■ Settings for user Web applications (for /~user/ sites )
■ SSL configuration
jazn-data.xmlThis file contains security information for the OC4J server. It defines the user and
group configuration for employing the default JAZNUserManager . In the
jazn-data.xml file, specify the following:
Note: The path designated is relative to the config/ directory.
Additional Information B-3
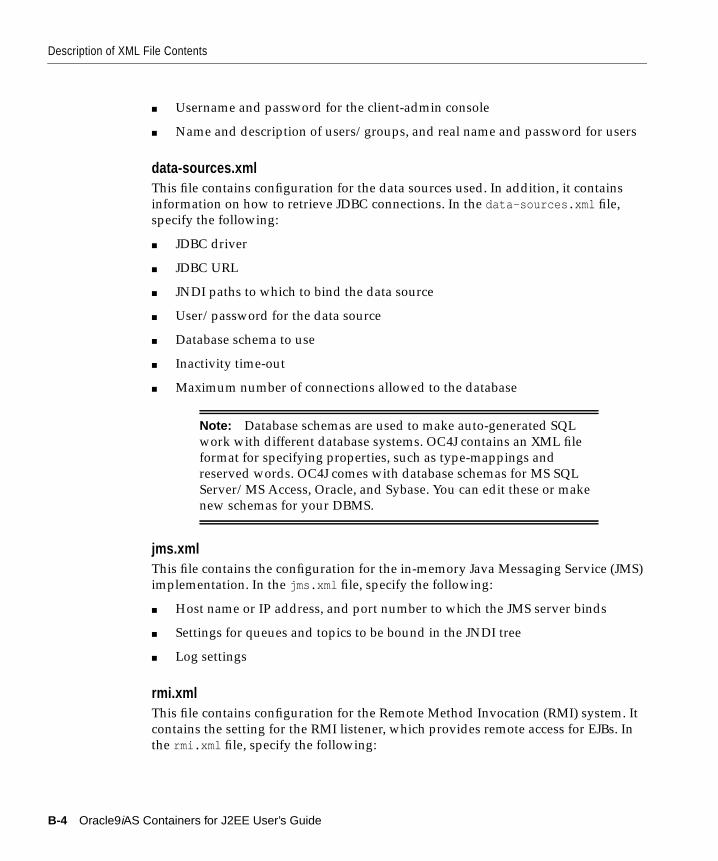
Description of XML File Contents
■ Username and password for the client-admin console
■ Name and description of users/groups, and real name and password for users
data-sources.xmlThis file contains configuration for the data sources used. In addition, it contains
information on how to retrieve JDBC connections. In the data-sources.xml file,
specify the following:
■ JDBC driver
■ JDBC URL
■ JNDI paths to which to bind the data source
■ User/password for the data source
■ Database schema to use
■ Inactivity time-out
■ Maximum number of connections allowed to the database
jms.xmlThis file contains the configuration for the in-memory Java Messaging Service (JMS)
implementation. In the jms.xml file, specify the following:
■ Host name or IP address, and port number to which the JMS server binds
■ Settings for queues and topics to be bound in the JNDI tree
■ Log settings
rmi.xmlThis file contains configuration for the Remote Method Invocation (RMI) system. It
contains the setting for the RMI listener, which provides remote access for EJBs. In
the rmi.xml file, specify the following:
Note: Database schemas are used to make auto-generated SQL
work with different database systems. OC4J contains an XML file
format for specifying properties, such as type-mappings and
reserved words. OC4J comes with database schemas for MS SQL
Server/MS Access, Oracle, and Sybase. You can edit these or make
new schemas for your DBMS.
B-4 Oracle9iAS Containers for J2EE User’s Guide

Description of XML File Contents
■ Host name or IP address, and port number to which the RMI server binds
■ Remote servers to which to communicate
■ Clustering settings
■ Log settings
J2EE Deployment XML FilesThe OC4J-specific deployment XML files contain deployment information for
different components. If you do not create the OC4J-specific files, they are
automatically generated when using automatic deployment. You can edit
OC4J-specific deployment XML files manually. These files are used by OC4J to map
environment entries, resources references, and security-roles to actual
deployment-specific values.
This section describes the following XML files necessary for Web application
deployment:
■ application.xml
■ orion-application.xml
■ ejb-jar.xml
■ orion-ejb-jar.xml
■ web.xml
■ orion-web.xml
■ application-client.xml
■ orion-application-client.xml
application.xmlThis file identifies the Web or EJB applications contained within the J2EE
application. It also identifies the location of the security XML definition
file—jazn-data.xml .
orion-application.xmlThis file configures the global application. In the orion-application.xml file,
specify the following:
■ Whether to auto-create and auto-delete tables for CMP beans
Additional Information B-5
Description of XML File Contents
■ The default data source to use with CMP beans
■ Security role mappings
■ Specifying the user manager
■ JNDI namespace-access rules (authorization)
ejb-jar.xmlThis file defines the deployment parameters for the EJBs in this JAR file.
orion-ejb-jar.xmlThis file is the OC4J-specific deployment descriptor for EJBs. In the
orion-ejb-jar.xml file, specify the following:
■ Time-out settings
■ Transaction retry settings
■ Session persistence settings
■ Transaction isolation settings
■ CMP mappings
■ OR mappings
■ Finder method specifications
■ JNDI mappings
web.xmlThis file contains deployment information about the servlets and JSPs in this
application.
orion-web.xmlThis is the OC4J-specific deployment descriptor for mapping Web settings. This
XML file contains the following:
■ Auto-reloading (including modification-check time-interval)
■ Buffering
■ Charsets
■ Development mode
B-6 Oracle9iAS Containers for J2EE User’s Guide
Elements in the server.xml File
■ Directory browsing
■ Document root
■ Locales
■ Web timeouts
■ Virtual directories
■ Clustering
■ Session tracking
■ JNDI mappings
application-client.xmlThis file contains JNDI information for accessing the server application and other
client information.
orion-application-client.xmlThis OC4J-specific deployment file is for the client application. It contains JNDI
mappings and entries for the client.
Elements in the server.xml FileThe server.xml file is where you perform the following tasks:
■ Configure OC4J
■ Reference other configuration files
■ Specify your J2EE application(s)
Configure OC4JConfiguring the OC4J server includes defining the following elements in the
server.xml file:
■ The library path
■ The global application, the global web application, and the default Web site
■ Maximum number of HTTP connections the server allows
■ Logging settings
Additional Information B-7
Elements in the server.xml File
■ Java compiler settings
■ Cluster ID
■ Transaction time-out
■ SMTP host
Reference Other Configuration FilesReferencing other configuration files in the server.xml file includes specifying the
following:
■ The data-sources.xml location
■ The jazn-data.xml location
■ The jms.xml and rmi.xml locations
Several XML files and directories are defined in the server.xml file. The path to
these files or directories can be relative or absolute. If relative, the path should be
relative to the location of the server.xml file.
<application-server> Element DescriptionThe top level element of the server.xml file is the <application-server>element.
<application-server>
This element contains the configuration for an application server.
Attributes:
■ application-auto-deploy-directory=".../applications/auto"—Specifies the directory from which EAR files are automatically detected and
deployed by the running OC4J server. Also, performs the Web application
binding for the default application.
■ auto-start-applications="true|false" —If set to true , all
applications defined in the <applications> elements are automatically
started when the OC4J server is started. If set to false , the applications are not
started unless their auto-start attribute is set to true . The default for
auto-start-applications is true .
■ application-directory=".../applications" — Specifies a directory to
store applications (EAR files). If none is specified (the default), OC4J stores the
information in j2ee/home/applications .
B-8 Oracle9iAS Containers for J2EE User’s Guide
Elements in the server.xml File
■ deployment-directory=".../application-deployments" —Specifies
the master location where applications that are contained in EAR files are
deployed. This defaults to j2ee/home/application-deployments/ .
■ connector-directory= The location and file name of the
oc4j-connectors.xml file.
■ recovery-procedure="automatic|prompt|ignore"> — Specifies how
the EJB container reacts for recovery if an error occurred in the middle of a
global transaction (JTA). If a CMP bean is in the middle of a global transaction,
the EJB container saves the transactional state to a file. The next time OC4J is
started, these attributes specify how to recover the JTA transaction.
– automatic — automatically attempts recovery (the default)
– prompt — prompts the user (system in/out)
You may notice a prompt for recovery even if no CMP beans were
executing. This is because the OC4J server asks for permission to see if there
was anything to recover.
– ignore — ignores recovery (useful in development environments or if you
are never executing a CMP entity bean)
Elements Contained Within <application-server>Within the <application-server> element, the following elements, which are
listed alphabetically and not by DTD ordering, can be configured:
<application>
An application is a entity with its own set of users, Web applications, and EJB JAR
files.
Attributes:
■ auto-start="true|false" — Specifies whether the application should be
automatically started when the OC4J server starts. The default is true . Setting
auto-start to false is useful if you have multiple applications installed and
want them to start on demand. This can improve general server startup time
and resource usage.
■ deployment-directory=".../application-deployments/myapp" —
Specifies a directory to store application deployment information. If none is
specified (the default), OC4J looks in the global deployment-directory , and
if none exists there, it stores the information inside the EAR file. The path can be
Additional Information B-9
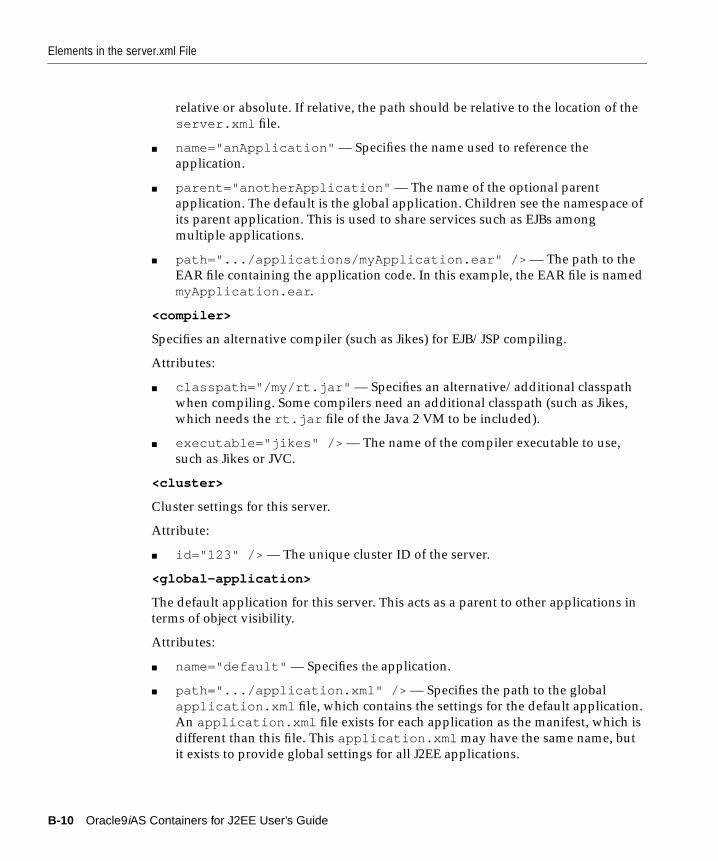
Elements in the server.xml File
relative or absolute. If relative, the path should be relative to the location of the
server.xml file.
■ name="anApplication" — Specifies the name used to reference the
application.
■ parent="anotherApplication" — The name of the optional parent
application. The default is the global application. Children see the namespace of
its parent application. This is used to share services such as EJBs among
multiple applications.
■ path=".../applications/myApplication.ear" /> — The path to the
EAR file containing the application code. In this example, the EAR file is named
myApplication.ear .
<compiler>
Specifies an alternative compiler (such as Jikes) for EJB/JSP compiling.
Attributes:
■ classpath="/my/rt.jar" — Specifies an alternative/additional classpath
when compiling. Some compilers need an additional classpath (such as Jikes,
which needs the rt.jar file of the Java 2 VM to be included).
■ executable="jikes" /> — The name of the compiler executable to use,
such as Jikes or JVC.
<cluster>
Cluster settings for this server.
Attribute:
■ id="123" /> — The unique cluster ID of the server.
<global-application>
The default application for this server. This acts as a parent to other applications in
terms of object visibility.
Attributes:
■ name="default" — Specifies the application.
■ path=".../application.xml" /> — Specifies the path to the global
application.xml file, which contains the settings for the default application.
An application.xml file exists for each application as the manifest, which is
different than this file. This application.xml may have the same name, but
it exists to provide global settings for all J2EE applications.
B-10 Oracle9iAS Containers for J2EE User’s Guide
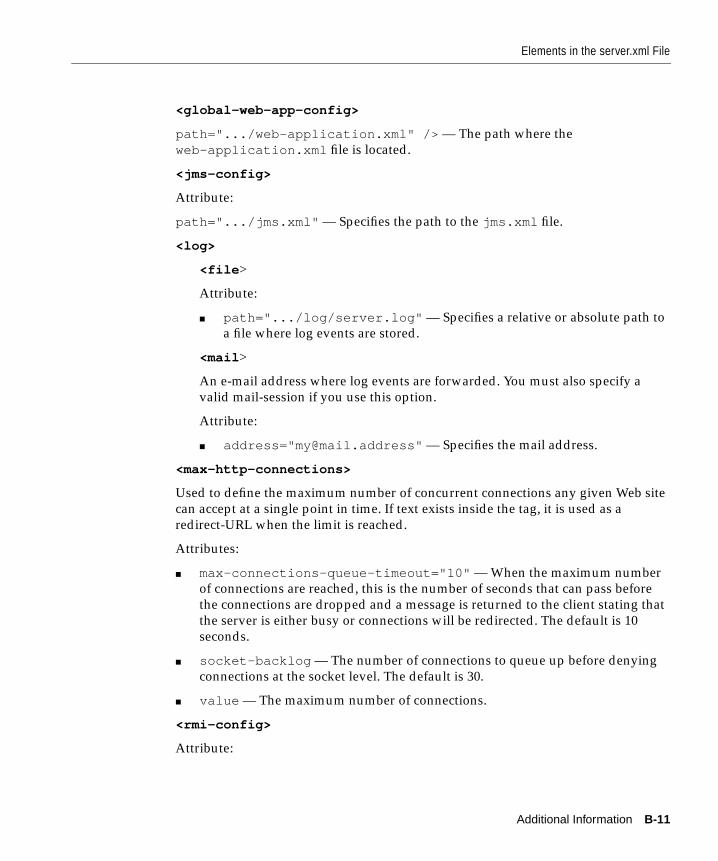
Elements in the server.xml File
<global-web-app-config>
path=".../web-application.xml" /> — The path where the
web-application.xml file is located.
<jms-config>
Attribute:
path=".../jms.xml" — Specifies the path to the jms.xml file.
<log>
<file >
Attribute:
■ path=".../log/server.log" — Specifies a relative or absolute path to
a file where log events are stored.
<mail >
An e-mail address where log events are forwarded. You must also specify a
valid mail-session if you use this option.
Attribute:
■ address="[email protected]" — Specifies the mail address.
<max-http-connections>
Used to define the maximum number of concurrent connections any given Web site
can accept at a single point in time. If text exists inside the tag, it is used as a
redirect-URL when the limit is reached.
Attributes:
■ max-connections-queue-timeout="10" — When the maximum number
of connections are reached, this is the number of seconds that can pass before
the connections are dropped and a message is returned to the client stating that
the server is either busy or connections will be redirected. The default is 10
seconds.
■ socket-backlog — The number of connections to queue up before denying
connections at the socket level. The default is 30.
■ value — The maximum number of connections.
<rmi-config>
Attribute:
Additional Information B-11
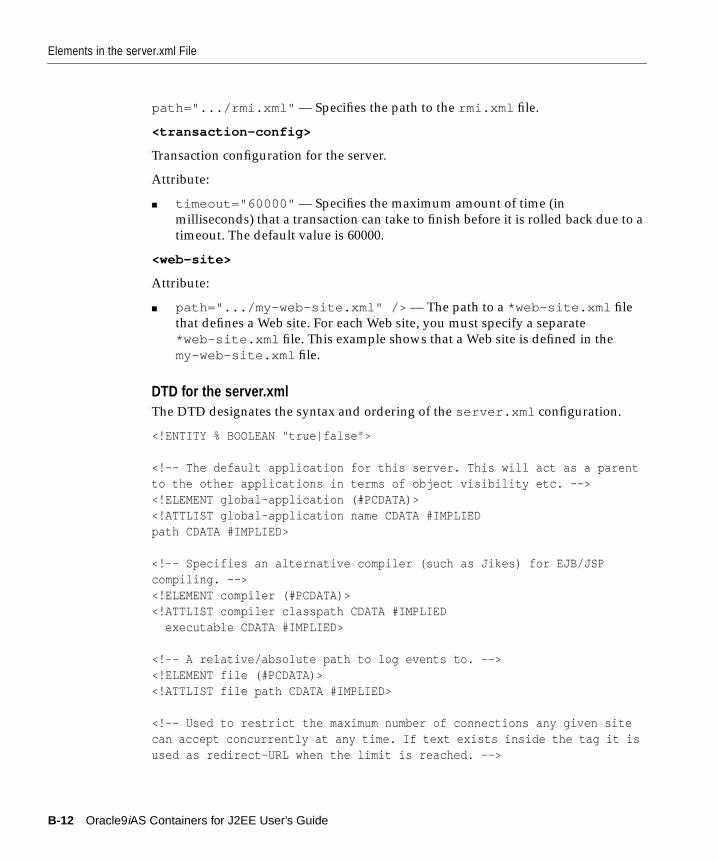
Elements in the server.xml File
path=".../rmi.xml" — Specifies the path to the rmi.xml file.
<transaction-config>
Transaction configuration for the server.
Attribute:
■ timeout="60000" — Specifies the maximum amount of time (in
milliseconds) that a transaction can take to finish before it is rolled back due to a
timeout. The default value is 60000.
<web-site>
Attribute:
■ path=".../my-web-site.xml" /> — The path to a *web-site.xml file
that defines a Web site. For each Web site, you must specify a separate
*web-site.xml file. This example shows that a Web site is defined in the
my-web-site.xml file.
DTD for the server.xmlThe DTD designates the syntax and ordering of the server.xml configuration.
<!ENTITY % BOOLEAN "true|false">
<!-- The default application for this server. This will act as a parentto the other applications in terms of object visibility etc. --><!ELEMENT global-application (#PCDATA)><!ATTLIST global-application name CDATA #IMPLIEDpath CDATA #IMPLIED>
<!-- Specifies an alternative compiler (such as Jikes) for EJB/JSPcompiling. --><!ELEMENT compiler (#PCDATA)><!ATTLIST compiler classpath CDATA #IMPLIED executable CDATA #IMPLIED>
<!-- A relative/absolute path to log events to. --><!ELEMENT file (#PCDATA)><!ATTLIST file path CDATA #IMPLIED>
<!-- Used to restrict the maximum number of connections any given sitecan accept concurrently at any time. If text exists inside the tag it isused as redirect-URL when the limit is reached. -->
B-12 Oracle9iAS Containers for J2EE User’s Guide
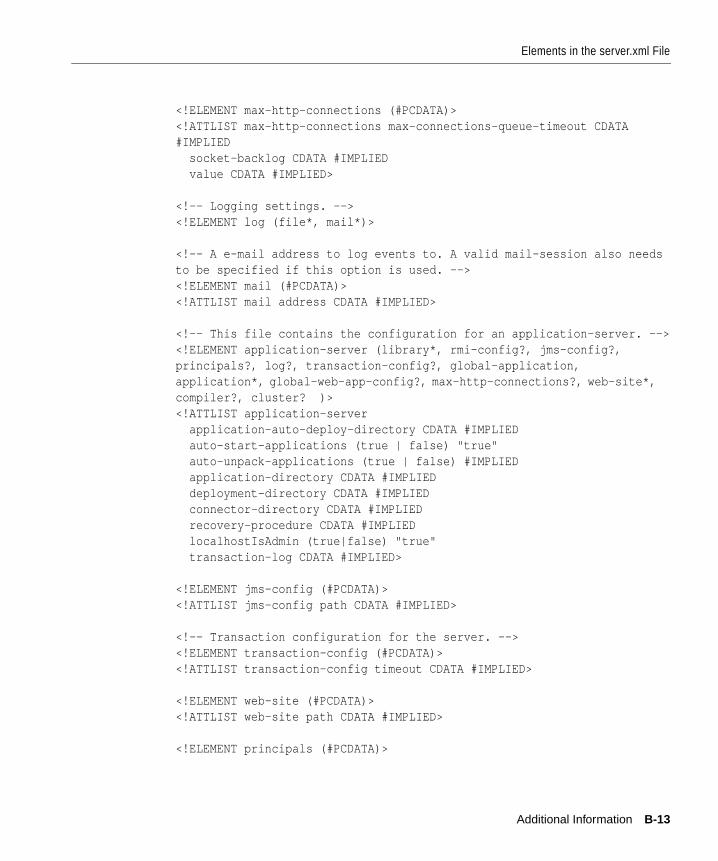
Elements in the server.xml File
<!ELEMENT max-http-connections (#PCDATA)><!ATTLIST max-http-connections max-connections-queue-timeout CDATA#IMPLIED socket-backlog CDATA #IMPLIED value CDATA #IMPLIED>
<!-- Logging settings. --><!ELEMENT log (file*, mail*)>
<!-- A e-mail address to log events to. A valid mail-session also needsto be specified if this option is used. --><!ELEMENT mail (#PCDATA)><!ATTLIST mail address CDATA #IMPLIED>
<!-- This file contains the configuration for an application-server. --><!ELEMENT application-server (library*, rmi-config?, jms-config?,principals?, log?, transaction-config?, global-application,application*, global-web-app-config?, max-http-connections?, web-site*,compiler?, cluster? )><!ATTLIST application-server application-auto-deploy-directory CDATA #IMPLIED auto-start-applications (true | false) "true" auto-unpack-applications (true | false) #IMPLIED application-directory CDATA #IMPLIED deployment-directory CDATA #IMPLIED connector-directory CDATA #IMPLIED recovery-procedure CDATA #IMPLIED localhostIsAdmin (true|false) "true" transaction-log CDATA #IMPLIED>
<!ELEMENT jms-config (#PCDATA)><!ATTLIST jms-config path CDATA #IMPLIED>
<!-- Transaction configuration for the server. --><!ELEMENT transaction-config (#PCDATA)><!ATTLIST transaction-config timeout CDATA #IMPLIED>
<!ELEMENT web-site (#PCDATA)><!ATTLIST web-site path CDATA #IMPLIED>
<!ELEMENT principals (#PCDATA)>
Additional Information B-13
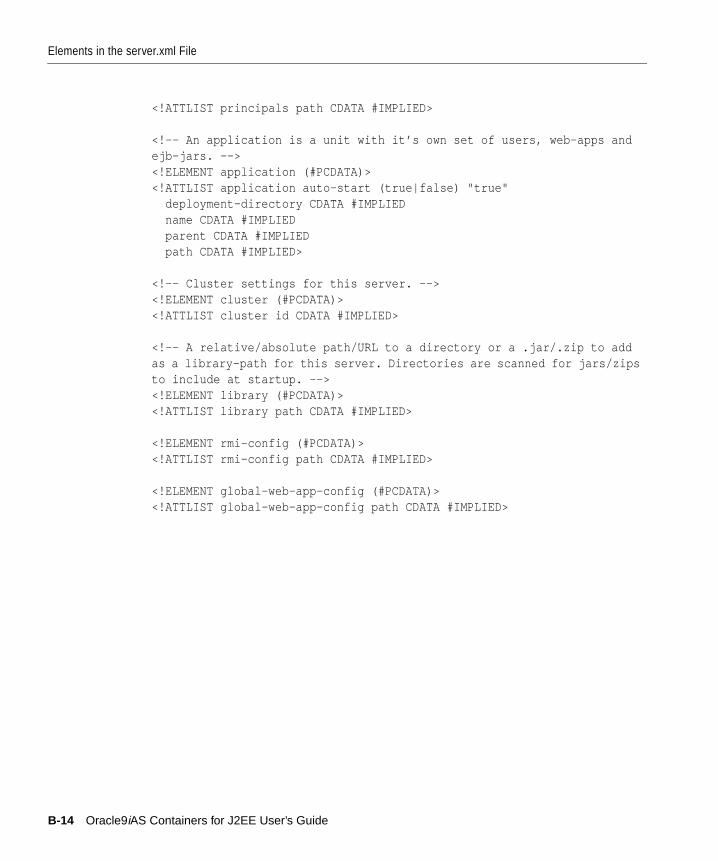
Elements in the server.xml File
<!ATTLIST principals path CDATA #IMPLIED>
<!-- An application is a unit with it’s own set of users, web-apps andejb-jars. --><!ELEMENT application (#PCDATA)><!ATTLIST application auto-start (true|false) "true" deployment-directory CDATA #IMPLIED name CDATA #IMPLIED parent CDATA #IMPLIED path CDATA #IMPLIED>
<!-- Cluster settings for this server. --><!ELEMENT cluster (#PCDATA)><!ATTLIST cluster id CDATA #IMPLIED>
<!-- A relative/absolute path/URL to a directory or a .jar/.zip to addas a library-path for this server. Directories are scanned for jars/zipsto include at startup. --><!ELEMENT library (#PCDATA)><!ATTLIST library path CDATA #IMPLIED>
<!ELEMENT rmi-config (#PCDATA)><!ATTLIST rmi-config path CDATA #IMPLIED>
<!ELEMENT global-web-app-config (#PCDATA)><!ATTLIST global-web-app-config path CDATA #IMPLIED>
B-14 Oracle9iAS Containers for J2EE User’s Guide
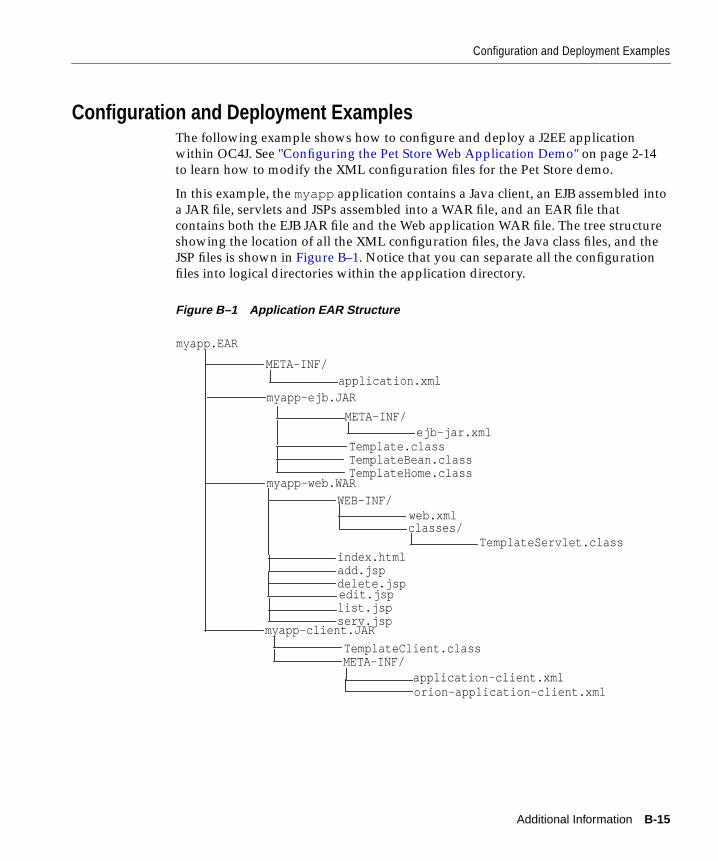
Configuration and Deployment Examples
Configuration and Deployment ExamplesThe following example shows how to configure and deploy a J2EE application
within OC4J. See "Configuring the Pet Store Web Application Demo" on page 2-14
to learn how to modify the XML configuration files for the Pet Store demo.
In this example, the myapp application contains a Java client, an EJB assembled into
a JAR file, servlets and JSPs assembled into a WAR file, and an EAR file that
contains both the EJB JAR file and the Web application WAR file. The tree structure
showing the location of all the XML configuration files, the Java class files, and the
JSP files is shown in Figure B–1. Notice that you can separate all the configuration
files into logical directories within the application directory.
Figure B–1 Application EAR Structure
myapp.EAR
META-INF/application.xml
myapp-ejb.JAR
META-INF/ejb-jar.xml
myapp-web.WAR
index.html
WEB-INF/web.xmlclasses/
myapp-client.JAR
TemplateClient.classMETA-INF/
application-client.xml
TemplateServlet.class
orion-application-client.xml
Template.classTemplateBean.classTemplateHome.class
add.jspdelete.jspedit.jsplist.jspserv.jsp
Additional Information B-15
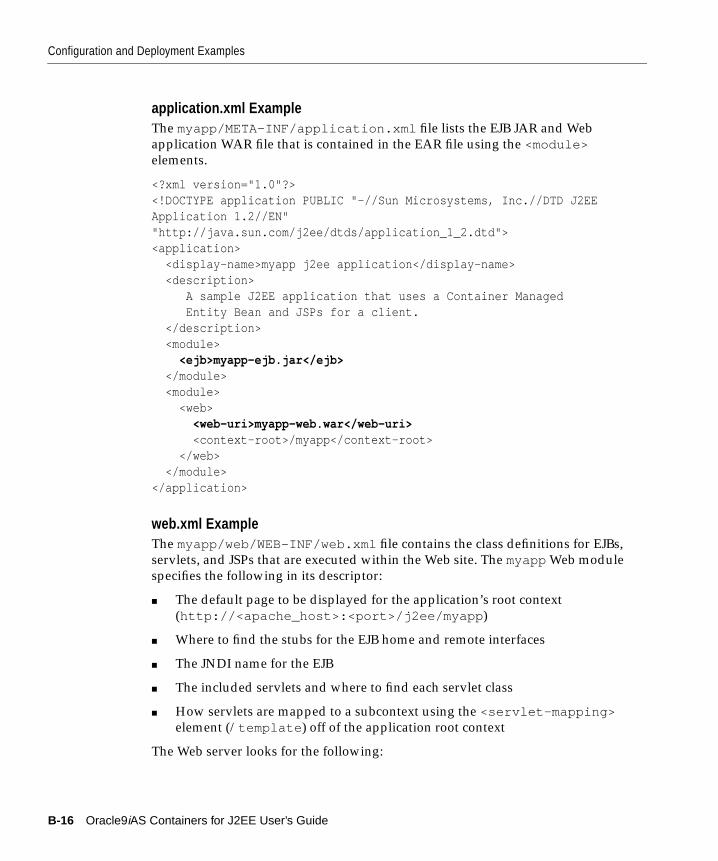
Configuration and Deployment Examples
application.xml ExampleThe myapp/META-INF/application.xml file lists the EJB JAR and Web
application WAR file that is contained in the EAR file using the <module>elements.
<?xml version="1.0"?><!DOCTYPE application PUBLIC "-//Sun Microsystems, Inc.//DTD J2EEApplication 1.2//EN""http://java.sun.com/j2ee/dtds/application_1_2.dtd"><application> <display-name>myapp j2ee application</display-name> <description> A sample J2EE application that uses a Container Managed Entity Bean and JSPs for a client. </description> <module> <ejb>myapp-ejb.jar</ejb> </module> <module> <web> <web-uri>myapp-web.war</web-uri> <context-root>/myapp</context-root> </web> </module></application>
web.xml ExampleThe myapp/web/WEB-INF/web.xml file contains the class definitions for EJBs,
servlets, and JSPs that are executed within the Web site. The myapp Web module
specifies the following in its descriptor:
■ The default page to be displayed for the application’s root context
(http://<apache_host>:<port>/j2ee/myapp )
■ Where to find the stubs for the EJB home and remote interfaces
■ The JNDI name for the EJB
■ The included servlets and where to find each servlet class
■ How servlets are mapped to a subcontext using the <servlet-mapping>element (/template ) off of the application root context
The Web server looks for the following:
B-16 Oracle9iAS Containers for J2EE User’s Guide
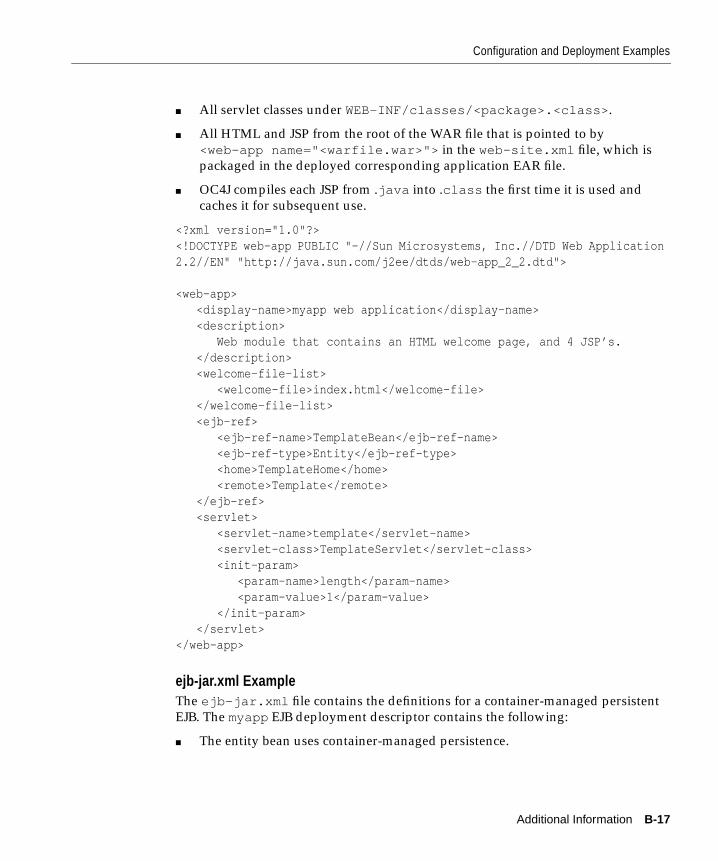
Configuration and Deployment Examples
■ All servlet classes under WEB-INF/classes/<package>.<class> .
■ All HTML and JSP from the root of the WAR file that is pointed to by
<web-app name="<warfile.war>"> in the web-site.xml file, which is
packaged in the deployed corresponding application EAR file.
■ OC4J compiles each JSP from .java into .class the first time it is used and
caches it for subsequent use.
<?xml version="1.0"?><!DOCTYPE web-app PUBLIC "-//Sun Microsystems, Inc.//DTD Web Application2.2//EN" "http://java.sun.com/j2ee/dtds/web-app_2_2.dtd">
<web-app> <display-name>myapp web application</display-name> <description> Web module that contains an HTML welcome page, and 4 JSP’s. </description> <welcome-file-list> <welcome-file>index.html</welcome-file> </welcome-file-list> <ejb-ref> <ejb-ref-name>TemplateBean</ejb-ref-name> <ejb-ref-type>Entity</ejb-ref-type> <home>TemplateHome</home> <remote>Template</remote> </ejb-ref> <servlet> <servlet-name>template</servlet-name> <servlet-class>TemplateServlet</servlet-class> <init-param> <param-name>length</param-name> <param-value>1</param-value> </init-param> </servlet></web-app>
ejb-jar.xml ExampleThe ejb-jar.xml file contains the definitions for a container-managed persistent
EJB. The myapp EJB deployment descriptor contains the following:
■ The entity bean uses container-managed persistence.
Additional Information B-17
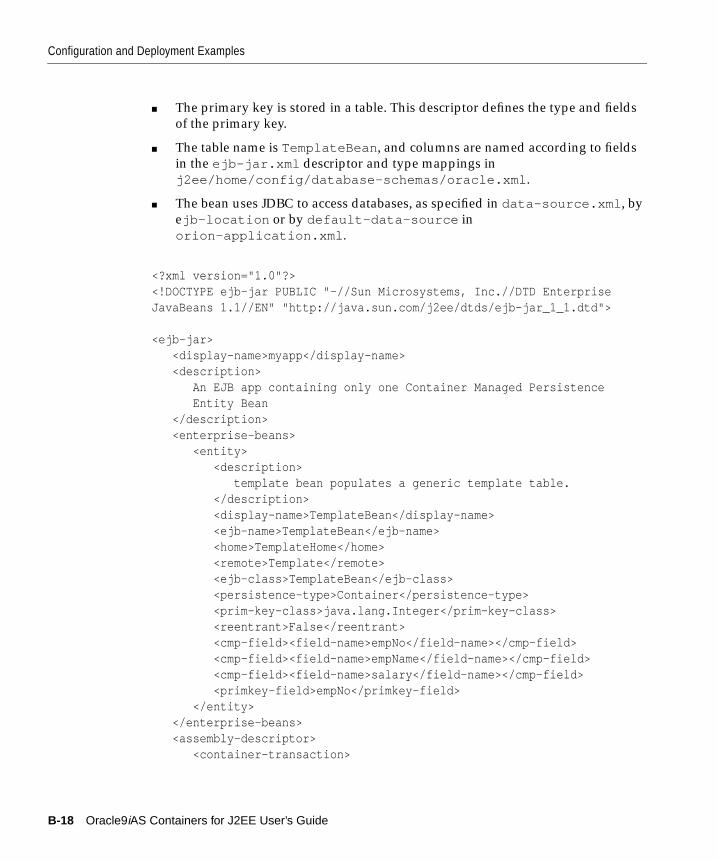
Configuration and Deployment Examples
■ The primary key is stored in a table. This descriptor defines the type and fields
of the primary key.
■ The table name is TemplateBean , and columns are named according to fields
in the ejb-jar.xml descriptor and type mappings in
j2ee/home/config/database-schemas/oracle.xml .
■ The bean uses JDBC to access databases, as specified in data-source.xml , by
ejb-location or by default-data-source in
orion-application.xml .
<?xml version="1.0"?><!DOCTYPE ejb-jar PUBLIC "-//Sun Microsystems, Inc.//DTD EnterpriseJavaBeans 1.1//EN" "http://java.sun.com/j2ee/dtds/ejb-jar_1_1.dtd">
<ejb-jar> <display-name>myapp</display-name> <description> An EJB app containing only one Container Managed Persistence Entity Bean </description> <enterprise-beans> <entity> <description> template bean populates a generic template table. </description> <display-name>TemplateBean</display-name> <ejb-name>TemplateBean</ejb-name> <home>TemplateHome</home> <remote>Template</remote> <ejb-class>TemplateBean</ejb-class> <persistence-type>Container</persistence-type> <prim-key-class>java.lang.Integer</prim-key-class> <reentrant>False</reentrant> <cmp-field><field-name>empNo</field-name></cmp-field> <cmp-field><field-name>empName</field-name></cmp-field> <cmp-field><field-name>salary</field-name></cmp-field> <primkey-field>empNo</primkey-field> </entity> </enterprise-beans> <assembly-descriptor> <container-transaction>
B-18 Oracle9iAS Containers for J2EE User’s Guide
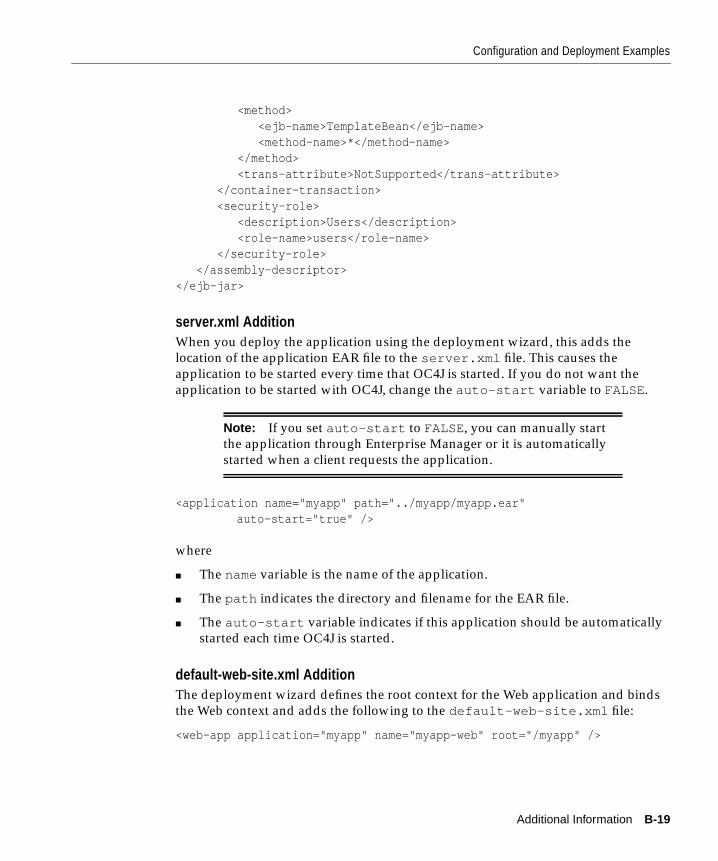
Configuration and Deployment Examples
<method> <ejb-name>TemplateBean</ejb-name> <method-name>*</method-name> </method> <trans-attribute>NotSupported</trans-attribute> </container-transaction> <security-role> <description>Users</description> <role-name>users</role-name> </security-role> </assembly-descriptor></ejb-jar>
server.xml AdditionWhen you deploy the application using the deployment wizard, this adds the
location of the application EAR file to the server.xml file. This causes the
application to be started every time that OC4J is started. If you do not want the
application to be started with OC4J, change the auto-start variable to FALSE.
<application name="myapp" path="../myapp/myapp.ear"auto-start="true" />
where
■ The name variable is the name of the application.
■ The path indicates the directory and filename for the EAR file.
■ The auto-start variable indicates if this application should be automatically
started each time OC4J is started.
default-web-site.xml AdditionThe deployment wizard defines the root context for the Web application and binds
the Web context and adds the following to the default-web-site.xml file:
<web-app application="myapp" name="myapp-web" root="/myapp" />
Note: If you set auto-start to FALSE, you can manually start
the application through Enterprise Manager or it is automatically
started when a client requests the application.
Additional Information B-19
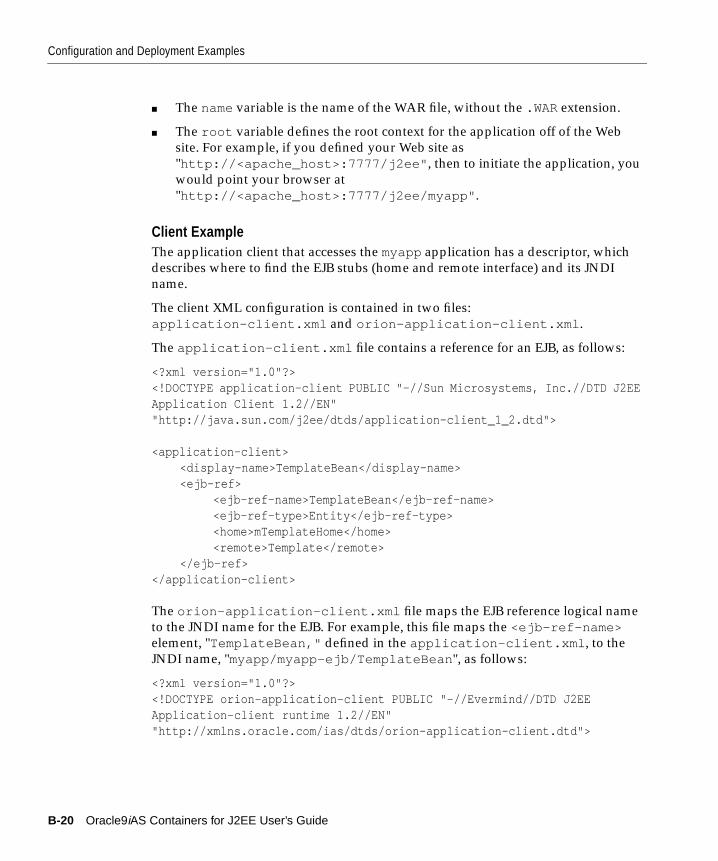
Configuration and Deployment Examples
■ The name variable is the name of the WAR file, without the .WAR extension.
■ The root variable defines the root context for the application off of the Web
site. For example, if you defined your Web site as
"http://<apache_host>:7777/j2ee" , then to initiate the application, you
would point your browser at
"http://<apache_host>:7777/j2ee/myapp" .
Client ExampleThe application client that accesses the myapp application has a descriptor, which
describes where to find the EJB stubs (home and remote interface) and its JNDI
name.
The client XML configuration is contained in two files:
application-client.xml and orion-application-client.xml .
The application-client.xml file contains a reference for an EJB, as follows:
<?xml version="1.0"?><!DOCTYPE application-client PUBLIC "-//Sun Microsystems, Inc.//DTD J2EEApplication Client 1.2//EN""http://java.sun.com/j2ee/dtds/application-client_1_2.dtd">
<application-client><display-name>TemplateBean</display-name><ejb-ref>
<ejb-ref-name>TemplateBean</ejb-ref-name><ejb-ref-type>Entity</ejb-ref-type><home>mTemplateHome</home><remote>Template</remote>
</ejb-ref></application-client>
The orion-application-client.xml file maps the EJB reference logical name
to the JNDI name for the EJB. For example, this file maps the <ejb-ref-name>element, "TemplateBean," defined in the application-client.xml , to the
JNDI name, "myapp/myapp-ejb/TemplateBean ", as follows:
<?xml version="1.0"?><!DOCTYPE orion-application-client PUBLIC "-//Evermind//DTD J2EEApplication-client runtime 1.2//EN""http://xmlns.oracle.com/ias/dtds/orion-application-client.dtd">
B-20 Oracle9iAS Containers for J2EE User’s Guide
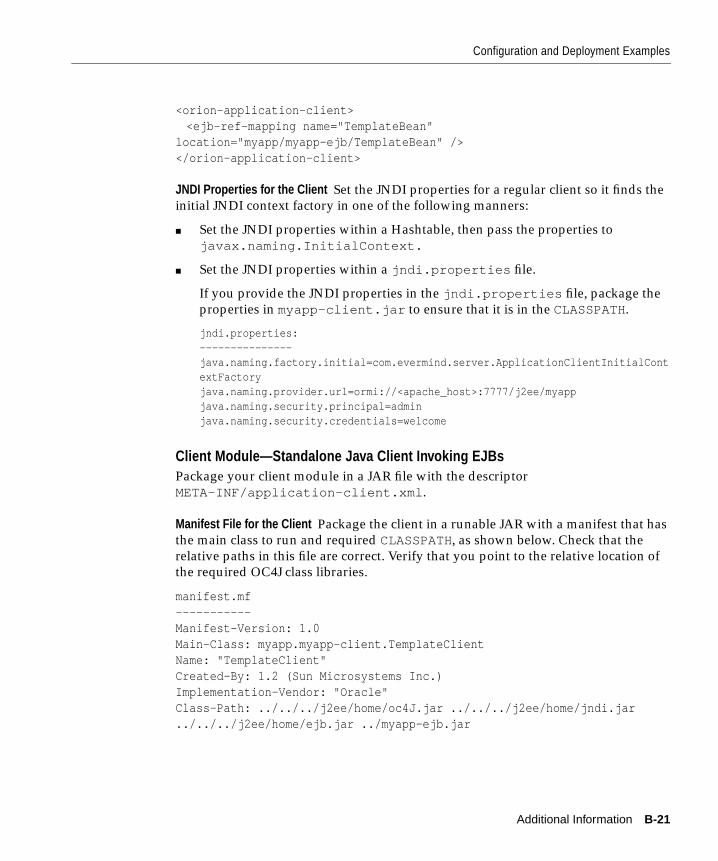
Configuration and Deployment Examples
<orion-application-client><ejb-ref-mapping name="TemplateBean"
location="myapp/myapp-ejb/TemplateBean" /></orion-application-client>
JNDI Properties for the Client Set the JNDI properties for a regular client so it finds the
initial JNDI context factory in one of the following manners:
■ Set the JNDI properties within a Hashtable, then pass the properties to
javax.naming.InitialContext.
■ Set the JNDI properties within a jndi.properties file.
If you provide the JNDI properties in the jndi.properties file, package the
properties in myapp-client.jar to ensure that it is in the CLASSPATH.
jndi.properties:---------------java.naming.factory.initial=com.evermind.server.ApplicationClientInitialContextFactoryjava.naming.provider.url=ormi://<apache_host>:7777/j2ee/myappjava.naming.security.principal=adminjava.naming.security.credentials=welcome
Client Module—Standalone Java Client Invoking EJBsPackage your client module in a JAR file with the descriptor
META-INF/application-client.xml .
Manifest File for the Client Package the client in a runable JAR with a manifest that has
the main class to run and required CLASSPATH, as shown below. Check that the
relative paths in this file are correct. Verify that you point to the relative location of
the required OC4J class libraries.
manifest.mf-----------Manifest-Version: 1.0Main-Class: myapp.myapp-client.TemplateClientName: "TemplateClient"Created-By: 1.2 (Sun Microsystems Inc.)Implementation-Vendor: "Oracle"Class-Path: ../../../j2ee/home/oc4J.jar ../../../j2ee/home/jndi.jar../../../j2ee/home/ejb.jar ../myapp-ejb.jar
Additional Information B-21
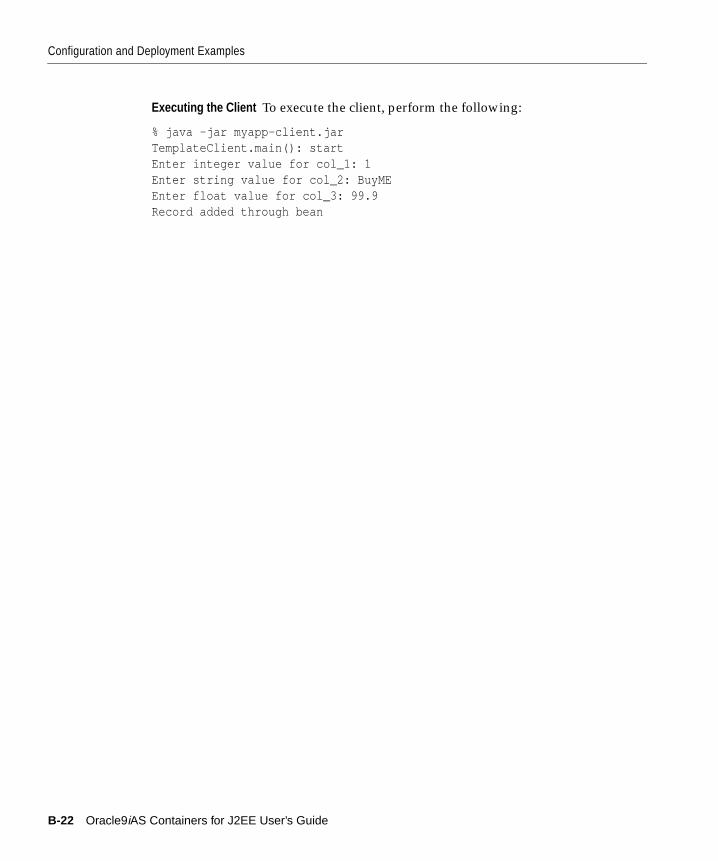
Configuration and Deployment Examples
Executing the Client To execute the client, perform the following:
% java -jar myapp-client.jarTemplateClient.main(): startEnter integer value for col_1: 1Enter string value for col_2: BuyMEEnter float value for col_3: 99.9Record added through bean
B-22 Oracle9iAS Containers for J2EE User’s Guide
Third Party Lice
C
Third Party LicensesThis appendix includes the Third Party License for all the third party products
included with Oracle9i Application Server. Topics include:
■ Apache HTTP Server
■ Apache JServ
nses C-1
Apache HTTP Server
Apache HTTP ServerUnder the terms of the Apache license, Oracle is required toprovide the following
notices. However, the Oracle program license that accompanied this product
determines your right to use the Oracle program, including the Apache software,
and the terms contained in the following notices do not change those rights.
Notwithstanding anything to the contrary in the Oracle program license, the
Apache software is provided by Oracle "AS IS" and without warranty or support of
any kind from Oracle or Apache.
The Apache Software License/* ==================================================================== * The Apache Software License, Version 1.1 * * Copyright (c) 2000 The Apache Software Foundation. All rights * reserved. * * Redistribution and use in source and binary forms, with or without * modification, are permitted provided that the following conditions * are met: * * 1. Redistributions of source code must retain the above copyright * notice, this list of conditions and the following disclaimer. * * 2. Redistributions in binary form must reproduce the above copyright * notice, this list of conditions and the following disclaimer in * the documentation and/or other materials provided with the * distribution. * * 3. The end-user documentation included with the redistribution, * if any, must include the following acknowledgment: * "This product includes software developed by the * Apache Software Foundation (http://www.apache.org/)." * Alternately, this acknowledgment may appear in the software itself, * if and wherever such third-party acknowledgments normally appear. * * 4. The names "Apache" and "Apache Software Foundation" must * not be used to endorse or promote products derived from this * software without prior written permission. For written * permission, please contact [email protected]. * * 5. Products derived from this software may not be called "Apache", * nor may "Apache" appear in their name, without prior written
C-2 Oracle9iAS Containers for J2EE User’s Guide
Apache HTTP Server
* permission of the Apache Software Foundation. * * THIS SOFTWARE IS PROVIDED ‘‘AS IS’’ AND ANY EXPRESSED OR IMPLIED * WARRANTIES, INCLUDING, BUT NOT LIMITED TO, THE IMPLIED WARRANTIES * OF MERCHANTABILITY AND FITNESS FOR A PARTICULAR PURPOSE ARE * DISCLAIMED. IN NO EVENT SHALL THE APACHE SOFTWARE FOUNDATION OR * ITS CONTRIBUTORS BE LIABLE FOR ANY DIRECT, INDIRECT, INCIDENTAL, * SPECIAL, EXEMPLARY, OR CONSEQUENTIAL DAMAGES (INCLUDING, BUT NOT * LIMITED TO, PROCUREMENT OF SUBSTITUTE GOODS OR SERVICES; LOSS OF * USE, DATA, OR PROFITS; OR BUSINESS INTERRUPTION) HOWEVER CAUSED AND * ON ANY THEORY OF LIABILITY, WHETHER IN CONTRACT, STRICT LIABILITY, * OR TORT (INCLUDING NEGLIGENCE OR OTHERWISE) ARISING IN ANY WAY OUT * OF THE USE OF THIS SOFTWARE, EVEN IF ADVISED OF THE POSSIBILITY OF * SUCH DAMAGE. * ==================================================================== * * This software consists of voluntary contributions made by many * individuals on behalf of the Apache Software Foundation. For more * information on the Apache Software Foundation, please see * <http://www.apache.org/>. * * Portions of this software are based upon public domain software * originally written at the National Center for Supercomputing Applications, * University of Illinois, Urbana-Champaign. */
Third Party Licenses C-3
Apache JServ
Apache JServUnder the terms of the Apache license, Oracle is required toprovide the following
notices. However, the Oracle program license that accompanied this product
determines your right to use the Oracle program, including the Apache software,
and the terms contained in the following notices do not change those rights.
Notwithstanding anything to the contrary in the Oracle program license, the
Apache software is provided by Oracle "AS IS" and without warranty or support of
any kind from Oracle or Apache.
Apache JServ Public LicenseRedistribution and use in source and binary forms, with or without modification,
are permitted provided that the following conditions are met:
■ Redistribution of source code must retain the above copyright notice, this list
of conditions and the following disclaimer.
■ Redistribution in binary form must reproduce the above copyright notice, this
list of conditions and the following disclaimer in the documentation and/or
other materials provided with the distribution.
■ All advertising materials mentioning features or use of this software must
display the following acknowledgment:
This product includes software developed by the Java Apache Project for usein the Apache JServ servlet engine project (http://java.apache.org/).
■ The names "Apache JServ", "Apache JServ Servlet Engine" and "Java Apache
Project" must not be used to endorse or promote products derived from this
software without prior written permission.
■ Products derived from this software may not be called "Apache JServ" nor may
"Apache" nor "Apache JServ" appear in their names without prior written
permission of the Java Apache Project.
■ Redistribution of any form whatsoever must retain the following
acknowledgment:
This product includes software developed by the Java Apache Project for usein the Apache JServ servlet engine project (http://java.apache.org/).
THIS SOFTWARE IS PROVIDED BY THE JAVA APACHE PROJECT "AS IS" AND
ANY EXPRESSED OR IMPLIED WARRANTIES, INCLUDING, BUT NOT LIMITED
TO, THE IMPLIED WARRANTIES OF MERCHANTABILITY AND FITNESS FOR
A PARTICULAR PURPOSE ARE DISCLAIMED. IN NO EVENT SHALL THE JAVA
C-4 Oracle9iAS Containers for J2EE User’s Guide
Apache JServ
APACHE PROJECT OR ITS CONTRIBUTORS BE LIABLE FOR ANY DIRECT,
INDIRECT, INCIDENTAL, SPECIAL, EXEMPLARY, OR CONSEQUENTIAL
DAMAGES (INCLUDING, BUT NOT LIMITED TO, PROCUREMENT OF
SUBSTITUTE GOODS OR SERVICES; LOSS OF USE, DATA, OR PROFITS; OR
BUSINESS INTERRUPTION) HOWEVER CAUSED AND ON ANY THEORY OF
LIABILITY, WHETHER IN CONTRACT, STRICT LIABILITY, OR TORT
(INCLUDING NEGLIGENCE OR OTHERWISE) ARISING IN ANY WAY OUT OF
THE USE OF THIS SOFTWARE, EVEN IF ADVISED OF THE POSSIBILITY OF
SUCH DAMAGE.
Third Party Licenses C-5

Apache JServ
C-6 Oracle9iAS Containers for J2EE User’s Guide
Index
Symbols<application> element, 7-13<ejb> element, 7-11
<ejb-ref> element, 8-16
<java> element, 7-11
<method-permission> element, 8-18
<module> element, 7-11
<security-role> element, 8-18
<security-role-mapping> element, 8-19
<web> element, 7-11
AACL
defined, 1-14
administration, 2-11
admin.jar tool
undeployment, 2-29
AJP, 1-15
overview, 2-5
ANT, 2-19
Apache
Oracle HTTP Server, 2-2
Apache JServ protocol, see AJP
application
deployment, 2-20
example, 2-14
undeployment, 2-29
ApplicationClientInitialContextFactory, 8-16
application-client.xml file
example, B-20
application.xml
designating data-sources.xml, 4-7
application.xml file, 7-11
example, 7-12, B-16
overview, 7-11
archiving EJBs, 7-10
EAR file, 7-12
authentication, 8-2, 8-6
authorization, 8-2, 8-17
Bbean
creating, 7-3
implementation, 7-6
removal, 7-7
build.bat, 2-19
CCGI, 5-3
CLASSPATH, 2-6
Cloudscape database, 2-18
clustered environment
dcmctl, A-5
clustering, 9-1 to 9-42
adding application server instance, 9-12
application server instance
role, 9-10
architecture, 9-8
configuration, 9-28
configure replication, 9-34
configuring islands, 9-33
configuring OC4J instance, 9-17
configuring OC4J processes, 9-33
creating a cluster, 9-28
Index-1
DCM, 9-13, 9-14
deleting a cluster, 9-30
EJB applications, 9-20, 9-35
hardware load balancer, 9-9
OC4J instance, 9-19
OHS role, 9-16
removing application server instance, 9-33
replicating application state, 9-19
SSO, 9-38
tuning parameters, 9-23, 9-40
using infrastructure, 9-10
Web applications, 9-20, 9-34
clusters, 1-16
com.evermind.server.RMIInitialContextFactory
class, 8-16
configuration
default, 2-2, 2-12
EJB deployment descriptor, 2-18
server.xml file, 2-22
Web context, 3-29
web.xml file, 2-18
connection pooling, 1-11
create method, 7-7
EJBHome interface, 7-4
createCluster, A-8
createComponent, A-8
CreateException, 7-4
createUser method, 8-3
DDAS, 8-4, 8-9
data source
default, 4-2
definition, 4-2
emulated, 4-2
introduction, 4-1
location of XML file, 4-7
retrieving connection, 4-8
database
retrieving connection, 4-8
DataSource interface, 4-9, 8-23
data-sources.xml
designating location, 4-7
data-sources.xml file
pre-installed definitions, 4-2
DataSourceUserManager class, 8-23
DCM
clustering, 9-15
overview, 2-4, A-1
role in clustering, 9-13, 9-14
DCM command-line utility, A-1
dcmctl, A-1
a app_name, A-4
administration, A-6
application, A-4
backup, A-11
cluster, A-4
cluster capabilities, A-5
clustered environment, A-5
command overview, A-3
commands and options, A-3
target options, A-3
universal options, A-4
component, A-4
componentType, A-4
createCluster, A-8
createComponent, A-8
DCM utility, 2-4, A-1
debug, A-4
deployApplication, A-10
deploying applications, A-10
destroyInstance, A-7
executing from command file, A-12
execution from a file, A-12
execution from a shell, A-12
getComponentTypes, A-8
getError, A-2
getError command, A-2
getReturnStatus, A-2
getstart, A-7
help, A-2
help command, A-2
instance, A-4
isClusterable, A-9
isCompatible, A-9
joinCluster, A-9
leaveCluster, A-9
listApplications, A-11
listClusters, A-8
Index-2
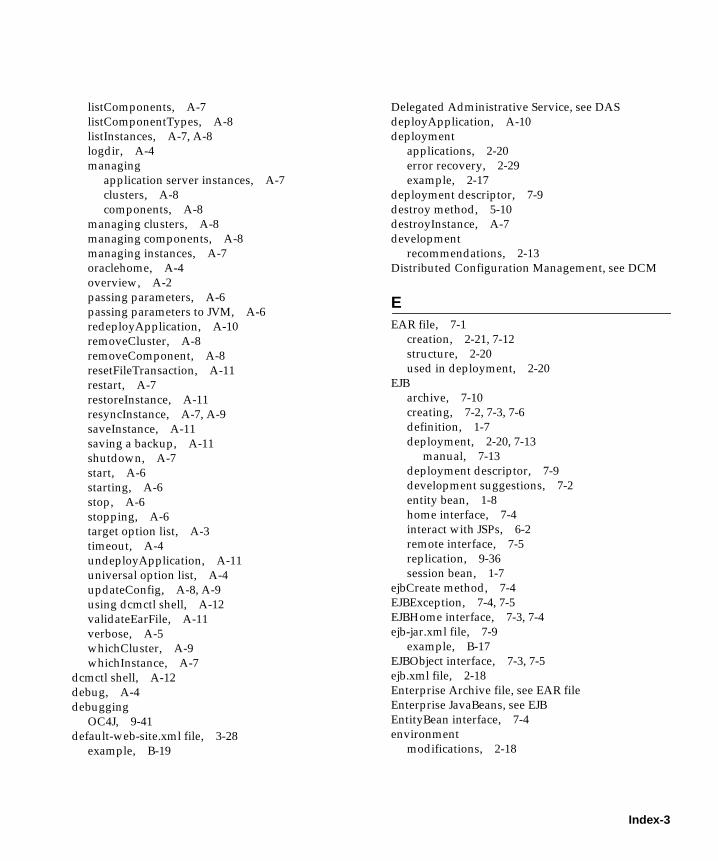
listComponents, A-7
listComponentTypes, A-8
listInstances, A-7, A-8
logdir, A-4
managing
application server instances, A-7
clusters, A-8
components, A-8
managing clusters, A-8
managing components, A-8
managing instances, A-7
oraclehome, A-4
overview, A-2
passing parameters, A-6
passing parameters to JVM, A-6
redeployApplication, A-10
removeCluster, A-8
removeComponent, A-8
resetFileTransaction, A-11
restart, A-7
restoreInstance, A-11
resyncInstance, A-7, A-9
saveInstance, A-11
saving a backup, A-11
shutdown, A-7
start, A-6
starting, A-6
stop, A-6
stopping, A-6
target option list, A-3
timeout, A-4
undeployApplication, A-11
universal option list, A-4
updateConfig, A-8, A-9
using dcmctl shell, A-12
validateEarFile, A-11
verbose, A-5
whichCluster, A-9
whichInstance, A-7
dcmctl shell, A-12
debug, A-4
debugging
OC4J, 9-41
default-web-site.xml file, 3-28
example, B-19
Delegated Administrative Service, see DAS
deployApplication, A-10
deployment
applications, 2-20
error recovery, 2-29
example, 2-17
deployment descriptor, 7-9
destroy method, 5-10
destroyInstance, A-7
development
recommendations, 2-13
Distributed Configuration Management, see DCM
EEAR file, 7-1
creation, 2-21, 7-12
structure, 2-20
used in deployment, 2-20
EJB
archive, 7-10
creating, 7-2, 7-3, 7-6
definition, 1-7
deployment, 2-20, 7-13
manual, 7-13
deployment descriptor, 7-9
development suggestions, 7-2
entity bean, 1-8
home interface, 7-4
interact with JSPs, 6-2
remote interface, 7-5
replication, 9-36
session bean, 1-7
ejbCreate method, 7-4
EJBException, 7-4, 7-5
EJBHome interface, 7-3, 7-4
ejb-jar.xml file, 7-9
example, B-17
EJBObject interface, 7-3, 7-5
ejb.xml file, 2-18
Enterprise Archive file, see EAR file
Enterprise JavaBeans, see EJB
EntityBean interface, 7-4
environment
modifications, 2-18
Index-3
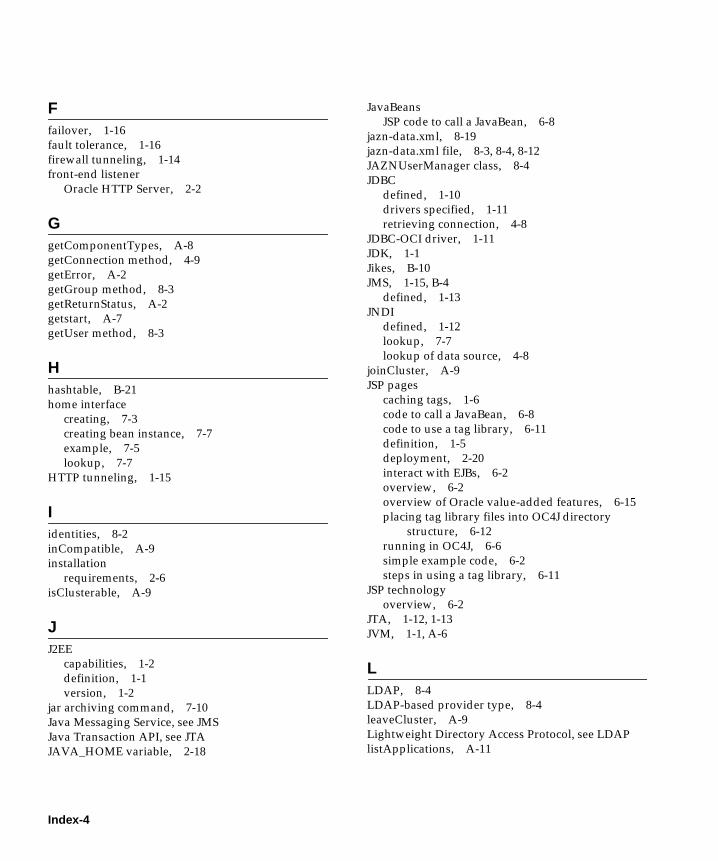
Ffailover, 1-16
fault tolerance, 1-16
firewall tunneling, 1-14
front-end listener
Oracle HTTP Server, 2-2
GgetComponentTypes, A-8
getConnection method, 4-9
getError, A-2
getGroup method, 8-3
getReturnStatus, A-2
getstart, A-7
getUser method, 8-3
Hhashtable, B-21
home interface
creating, 7-3
creating bean instance, 7-7
example, 7-5
lookup, 7-7
HTTP tunneling, 1-15
Iidentities, 8-2
inCompatible, A-9
installation
requirements, 2-6
isClusterable, A-9
JJ2EE
capabilities, 1-2
definition, 1-1
version, 1-2
jar archiving command, 7-10
Java Messaging Service, see JMS
Java Transaction API, see JTA
JAVA_HOME variable, 2-18
JavaBeans
JSP code to call a JavaBean, 6-8
jazn-data.xml, 8-19
jazn-data.xml file, 8-3, 8-4, 8-12
JAZNUserManager class, 8-4
JDBC
defined, 1-10
drivers specified, 1-11
retrieving connection, 4-8
JDBC-OCI driver, 1-11
JDK, 1-1
Jikes, B-10
JMS, 1-15, B-4
defined, 1-13
JNDI
defined, 1-12
lookup, 7-7
lookup of data source, 4-8
joinCluster, A-9
JSP pages
caching tags, 1-6
code to call a JavaBean, 6-8
code to use a tag library, 6-11
definition, 1-5
deployment, 2-20
interact with EJBs, 6-2
overview, 6-2
overview of Oracle value-added features, 6-15
placing tag library files into OC4J directory
structure, 6-12
running in OC4J, 6-6
simple example code, 6-2
steps in using a tag library, 6-11
JSP technology
overview, 6-2
JTA, 1-12, 1-13
JVM, 1-1, A-6
LLDAP, 8-4
LDAP-based provider type, 8-4
leaveCluster, A-9
Lightweight Directory Access Protocol, see LDAP
listApplications, A-11
Index-4
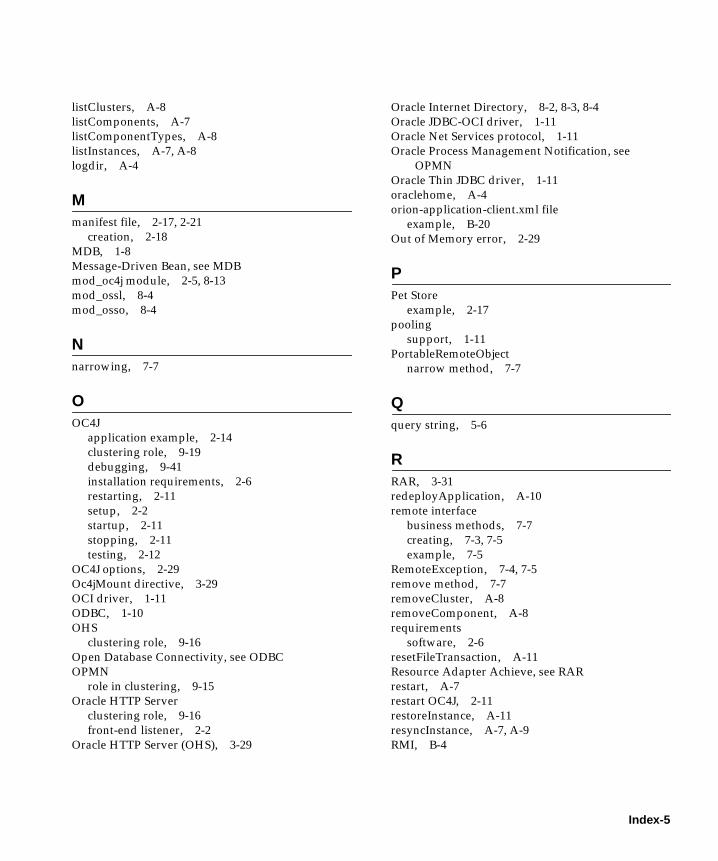
listClusters, A-8
listComponents, A-7
listComponentTypes, A-8
listInstances, A-7, A-8
logdir, A-4
Mmanifest file, 2-17, 2-21
creation, 2-18
MDB, 1-8
Message-Driven Bean, see MDB
mod_oc4j module, 2-5, 8-13
mod_ossl, 8-4
mod_osso, 8-4
Nnarrowing, 7-7
OOC4J
application example, 2-14
clustering role, 9-19
debugging, 9-41
installation requirements, 2-6
restarting, 2-11
setup, 2-2
startup, 2-11
stopping, 2-11
testing, 2-12
OC4J options, 2-29
Oc4jMount directive, 3-29
OCI driver, 1-11
ODBC, 1-10
OHS
clustering role, 9-16
Open Database Connectivity, see ODBC
OPMN
role in clustering, 9-15
Oracle HTTP Server
clustering role, 9-16
front-end listener, 2-2
Oracle HTTP Server (OHS), 3-29
Oracle Internet Directory, 8-2, 8-3, 8-4
Oracle JDBC-OCI driver, 1-11
Oracle Net Services protocol, 1-11
Oracle Process Management Notification, see
OPMN
Oracle Thin JDBC driver, 1-11
oraclehome, A-4
orion-application-client.xml file
example, B-20
Out of Memory error, 2-29
PPet Store
example, 2-17
pooling
support, 1-11
PortableRemoteObject
narrow method, 7-7
Qquery string, 5-6
RRAR, 3-31
redeployApplication, A-10
remote interface
business methods, 7-7
creating, 7-3, 7-5
example, 7-5
RemoteException, 7-4, 7-5
remove method, 7-7
removeCluster, A-8
removeComponent, A-8
requirements
software, 2-6
resetFileTransaction, A-11
Resource Adapter Achieve, see RAR
restart, A-7
restart OC4J, 2-11
restoreInstance, A-11
resyncInstance, A-7, A-9
RMI, B-4
Index-5
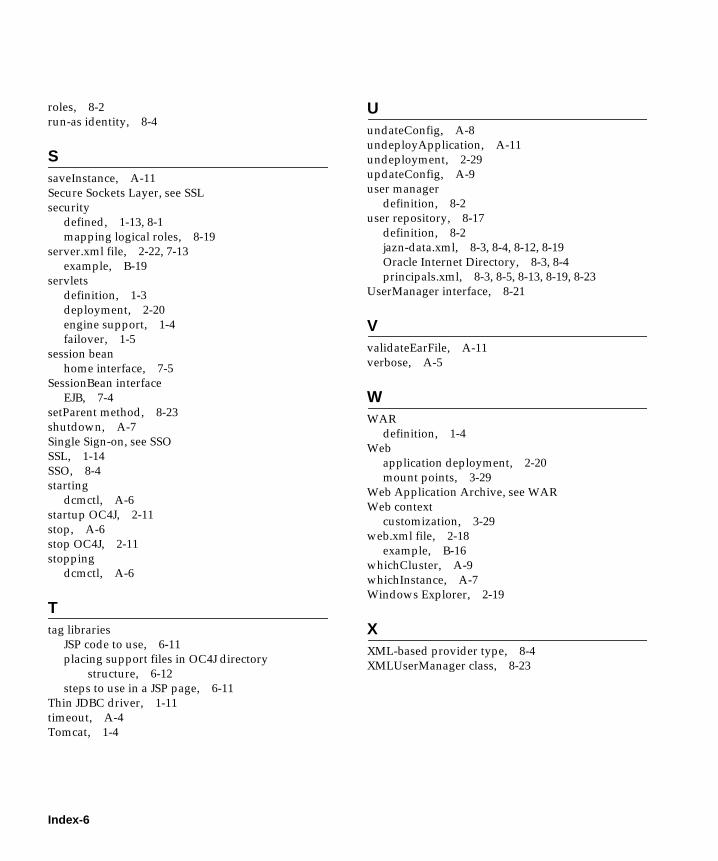
roles, 8-2
run-as identity, 8-4
SsaveInstance, A-11
Secure Sockets Layer, see SSL
security
defined, 1-13, 8-1
mapping logical roles, 8-19
server.xml file, 2-22, 7-13
example, B-19
servlets
definition, 1-3
deployment, 2-20
engine support, 1-4
failover, 1-5
session bean
home interface, 7-5
SessionBean interface
EJB, 7-4
setParent method, 8-23
shutdown, A-7
Single Sign-on, see SSO
SSL, 1-14
SSO, 8-4
starting
dcmctl, A-6
startup OC4J, 2-11
stop, A-6
stop OC4J, 2-11
stopping
dcmctl, A-6
Ttag libraries
JSP code to use, 6-11
placing support files in OC4J directory
structure, 6-12
steps to use in a JSP page, 6-11
Thin JDBC driver, 1-11
timeout, A-4
Tomcat, 1-4
UundateConfig, A-8
undeployApplication, A-11
undeployment, 2-29
updateConfig, A-9
user manager
definition, 8-2
user repository, 8-17
definition, 8-2
jazn-data.xml, 8-3, 8-4, 8-12, 8-19
Oracle Internet Directory, 8-3, 8-4
principals.xml, 8-3, 8-5, 8-13, 8-19, 8-23
UserManager interface, 8-21
VvalidateEarFile, A-11
verbose, A-5
WWAR
definition, 1-4
Web
application deployment, 2-20
mount points, 3-29
Web Application Archive, see WAR
Web context
customization, 3-29
web.xml file, 2-18
example, B-16
whichCluster, A-9
whichInstance, A-7
Windows Explorer, 2-19
XXML-based provider type, 8-4
XMLUserManager class, 8-23
Index-6


![[ Team LiB ] Crawford and Kaplan's J2EE Design Patterns ...](https://static.fdokumen.com/doc/165x107/63168edcf68b807f88034d1f/-team-lib-crawford-and-kaplans-j2ee-design-patterns-.jpg)