Oracle Public Sector Purchasing User's Guide
892
Oracler Public Sector Purchasing User’s Guide Release 11 Volume 1 March 1998
-
Upload
khangminh22 -
Category
Documents
-
view
1 -
download
0
Transcript of Oracle Public Sector Purchasing User's Guide

Oracle� Public SectorPurchasingUser’s GuideRelease 11Volume 1
March 1998
Update
Important revisions have been made to this user's guide. Please choose the corresponding "Updates" link from the Oracle Applications Release 11 documentation table.

Oracle� Public Sector Purchasing User’s GuideRelease 11
The part number for this book is A58266–01.
Copyright � 1996, 1998, Oracle Corporation. All Rights Reserved.
Major Contributors: Louis Bryan, Rick Copeland, Rachel Haas, David Reitan
Contributors: Vance Checketts, George Kellner, Raghav Keshav, Kevin Miller, SusanRamage, Doug Volz
The Programs (which include both the software and documentation) containproprietary information of Oracle Corporation; they are provided under a licenseagreement containing restrictions on use and disclosure and are also protected bycopyright, patent and other intellectual property law. Reverse engineering of thePrograms is prohibited.
The information contained in this document is subject to change without notice. If youfind any problems in the documentation, please report them to us in writing. OracleCorporation does not warrant that this document is error–free. No part of this documentmay be reproduced or transmitted in any form or by any means, electronic or mechanical,for any purpose, without the express written permission of Oracle Corporation.
Restricted Rights LegendPrograms delivered subject to the DOD FAR Supplement are ’commercial computersoftware’ and use, duplication and disclosure of the Programs shall be subject to thelicensing restrictions set forth in the applicable Oracle license agreement. Otherwise,Programs delivered subject to the Federal Acquisition Regulations are ’restrictedcomputer software’ and use, duplication and disclosure of the Programs shall be subject tothe restrictions in FAR 52.227–14, Rights in Data –– General, including Alternate III (June1987). Oracle Corporation, 500 Oracle Parkway, Redwood City, CA 94065.
The Programs are not intended for use in any nuclear, aviation, mass transit, medical, orother inherently dangerous applications. It shall be licensee’s responsibility to take allappropriate fail–safe, back–up, redundancy and other measures to ensure the safe use ofsuch applications if the Programs are used for such purposes, and Oracle disclaimsliability for any damages caused by such use of the Programs.
Oracle is a registered trademark and Oracle8, Oracle Application Object Library, OracleAlert, Oracle Financials, Oracle Quality, Oracle Workflow, Oracle Work in Process,SQL*Forms, SQL*Plus, SQL*AMX, SQL*Report, and SQL*ReportWriter are trademarks orregistered trademarks of Oracle Corporation.
All other company or product names are mentioned for identification purposes only, andmay be trademarks of their respective owners.
iiiContents
Contents
VOLUME I
Preface xi. . . . . . . . . . . . . . . . . . . . . . . . . . . . . . . . . . . . . . . . . . . . . . . . . . . . . . . .
Chapter 1 Setting Up 1 – 1. . . . . . . . . . . . . . . . . . . . . . . . . . . . . . . . . . . . . . . . . . . . . . Setup Overview 1 – 2. . . . . . . . . . . . . . . . . . . . . . . . . . . . . . . . . . . . . . . . . Defining Buyers 1 – 13. . . . . . . . . . . . . . . . . . . . . . . . . . . . . . . . . . . . . . . . . Defining Approval Groups 1 – 15. . . . . . . . . . . . . . . . . . . . . . . . . . . . . . . . Assigning Approval Groups 1 – 18. . . . . . . . . . . . . . . . . . . . . . . . . . . . . . . Annotating Purchasing Documents 1 – 20. . . . . . . . . . . . . . . . . . . . . . . . . Defining Purchasing Options 1 – 29. . . . . . . . . . . . . . . . . . . . . . . . . . . . . . Defining Receiving Options 1 – 40. . . . . . . . . . . . . . . . . . . . . . . . . . . . . . . Defining Requisition Templates 1 – 44. . . . . . . . . . . . . . . . . . . . . . . . . . . . Purchasing Hazardous Materials 1 – 48. . . . . . . . . . . . . . . . . . . . . . . . . . . Defining Lookup Codes 1 – 54. . . . . . . . . . . . . . . . . . . . . . . . . . . . . . . . . . Purchasing Services 1 – 57. . . . . . . . . . . . . . . . . . . . . . . . . . . . . . . . . . . . . . Defining Document Types 1 – 65. . . . . . . . . . . . . . . . . . . . . . . . . . . . . . . . . Controlling Purchasing Periods 1 – 71. . . . . . . . . . . . . . . . . . . . . . . . . . . . Choosing Workflow Options 1 – 73. . . . . . . . . . . . . . . . . . . . . . . . . . . . . . Profile Options in Purchasing 1 – 76. . . . . . . . . . . . . . . . . . . . . . . . . . . . . .

iv Oracle Public Sector Purchasing User’s Guide
Chapter 2 Approval, Security, and Control 2 – 1. . . . . . . . . . . . . . . . . . . . . . . . . . . Setting Up Document Approval and Security 2 – 2. . . . . . . . . . . . . . . . Position Hierarchies 2 – 6. . . . . . . . . . . . . . . . . . . . . . . . . . . . . . . . . . . . . . Document Security and Access 2 – 8. . . . . . . . . . . . . . . . . . . . . . . . . . . . Approval Routing 2 – 13. . . . . . . . . . . . . . . . . . . . . . . . . . . . . . . . . . . . . . . . Approval Authorization Control 2 – 15. . . . . . . . . . . . . . . . . . . . . . . . . . . Assigning Employees 2 – 22. . . . . . . . . . . . . . . . . . . . . . . . . . . . . . . . . . . . . The Document Approval Process 2 – 23. . . . . . . . . . . . . . . . . . . . . . . . . . . Document Control Overview 2 – 37. . . . . . . . . . . . . . . . . . . . . . . . . . . . . . MassCancel 2 – 53. . . . . . . . . . . . . . . . . . . . . . . . . . . . . . . . . . . . . . . . . . . . . Approval Workflows 2 – 63. . . . . . . . . . . . . . . . . . . . . . . . . . . . . . . . . . . . .
Chapter 3 Requisitions 3 – 1. . . . . . . . . . . . . . . . . . . . . . . . . . . . . . . . . . . . . . . . . . . . Overview of Requisitions 3 – 2. . . . . . . . . . . . . . . . . . . . . . . . . . . . . . . . . Overview of Internal Requisitions 3 – 14. . . . . . . . . . . . . . . . . . . . . . . . . . Finding Requisitions 3 – 35. . . . . . . . . . . . . . . . . . . . . . . . . . . . . . . . . . . . . Entering Requisition Preferences 3 – 44. . . . . . . . . . . . . . . . . . . . . . . . . . . Entering Requisition Headers 3 – 49. . . . . . . . . . . . . . . . . . . . . . . . . . . . . . Entering Requisition Lines 3 – 52. . . . . . . . . . . . . . . . . . . . . . . . . . . . . . . . Entering Requisition Distributions 3 – 58. . . . . . . . . . . . . . . . . . . . . . . . . Using Requisition Templates 3 – 61. . . . . . . . . . . . . . . . . . . . . . . . . . . . . .
Chapter 4 Purchase Orders 4 – 1. . . . . . . . . . . . . . . . . . . . . . . . . . . . . . . . . . . . . . . . . Overview of Purchase Orders 4 – 3. . . . . . . . . . . . . . . . . . . . . . . . . . . . . . Purchase Order Defaulting Rules 4 – 11. . . . . . . . . . . . . . . . . . . . . . . . . . . Finding Purchase Orders 4 – 19. . . . . . . . . . . . . . . . . . . . . . . . . . . . . . . . . . Entering Purchase Order Preferences 4 – 33. . . . . . . . . . . . . . . . . . . . . . . Entering Purchase Order Headers 4 – 39. . . . . . . . . . . . . . . . . . . . . . . . . . Entering Purchase Order Lines 4 – 44. . . . . . . . . . . . . . . . . . . . . . . . . . . . Entering Purchase Order Price Reference Information 4 – 48. . . . . . . . . Entering Purchase Order Reference Document Information 4 – 50. . . . Entering Purchase Order Miscellaneous Information 4 – 52. . . . . . . . . . Entering Purchase Agreement Information 4 – 54. . . . . . . . . . . . . . . . . . Entering Currency Information 4 – 56. . . . . . . . . . . . . . . . . . . . . . . . . . . . Entering Purchase Order Details Information 4 – 58. . . . . . . . . . . . . . . . Entering Purchase Order Shipments 4 – 61. . . . . . . . . . . . . . . . . . . . . . . . Entering Purchase Order Receiving Controls 4 – 65. . . . . . . . . . . . . . . . Entering Purchase Order Price Break Information 4 – 68. . . . . . . . . . . .

vContents
Entering Purchase Order Distributions 4 – 70. . . . . . . . . . . . . . . . . . . . . . Entering Outside Processing Information 4 – 75. . . . . . . . . . . . . . . . . . . Entering Purchase Order Notification Controls 4 – 77. . . . . . . . . . . . . . . Entering and Viewing Purchase Order Acceptances 4 – 79. . . . . . . . . . Entering Releases 4 – 81. . . . . . . . . . . . . . . . . . . . . . . . . . . . . . . . . . . . . . . . Automatic Release Generation 4 – 93. . . . . . . . . . . . . . . . . . . . . . . . . . . . . Printed Purchase Order Overview 4 – 96. . . . . . . . . . . . . . . . . . . . . . . . . . Document Revision Numbering 4 – 110. . . . . . . . . . . . . . . . . . . . . . . . . . . Changing Encumbered Documents 4 – 119. . . . . . . . . . . . . . . . . . . . . . . . . Overview of Outside Processing 4 – 120. . . . . . . . . . . . . . . . . . . . . . . . . . . Drop Shipments 4 – 156. . . . . . . . . . . . . . . . . . . . . . . . . . . . . . . . . . . . . . . . . Tax Defaults in Purchasing 4 – 158. . . . . . . . . . . . . . . . . . . . . . . . . . . . . . . . Workflow for Creating Purchase Orders and Releases 4 – 160. . . . . . . . .
Chapter 5 Supply Base Management 5 – 1. . . . . . . . . . . . . . . . . . . . . . . . . . . . . . . . Overview of Sourcing 5 – 2. . . . . . . . . . . . . . . . . . . . . . . . . . . . . . . . . . . . Overview of the Supplier Item Catalog 5 – 7. . . . . . . . . . . . . . . . . . . . . Receiving Price/Sales Catalog Information Electronically 5 – 20. . . . . Approved Supplier List 5 – 22. . . . . . . . . . . . . . . . . . . . . . . . . . . . . . . . . . . Entering RFQs 5 – 32. . . . . . . . . . . . . . . . . . . . . . . . . . . . . . . . . . . . . . . . . . . Entering Quotations 5 – 47. . . . . . . . . . . . . . . . . . . . . . . . . . . . . . . . . . . . . . Copying Quotations from RFQs 5 – 61. . . . . . . . . . . . . . . . . . . . . . . . . . . . Approving Quotations 5 – 63. . . . . . . . . . . . . . . . . . . . . . . . . . . . . . . . . . . . Automatic Sourcing 5 – 69. . . . . . . . . . . . . . . . . . . . . . . . . . . . . . . . . . . . . . Defining Supplier Lists 5 – 76. . . . . . . . . . . . . . . . . . . . . . . . . . . . . . . . . . . Managing Buyer Workload 5 – 78. . . . . . . . . . . . . . . . . . . . . . . . . . . . . . . .
Index

vi Oracle Public Sector Purchasing User’s Guide
VOLUME II
Chapter 6 Documents 6 – 1. . . . . . . . . . . . . . . . . . . . . . . . . . . . . . . . . . . . . . . . . . . . . AutoCreate Documents Overview 6 – 2. . . . . . . . . . . . . . . . . . . . . . . . . .
Chapter 7 Receiving 7 – 1. . . . . . . . . . . . . . . . . . . . . . . . . . . . . . . . . . . . . . . . . . . . . . . Overview of Receiving 7 – 2. . . . . . . . . . . . . . . . . . . . . . . . . . . . . . . . . . . Advance Shipment Notices (ASNs) 7 – 14. . . . . . . . . . . . . . . . . . . . . . . . . Managing Receipts 7 – 21. . . . . . . . . . . . . . . . . . . . . . . . . . . . . . . . . . . . . . . Unordered Receipts 7 – 33. . . . . . . . . . . . . . . . . . . . . . . . . . . . . . . . . . . . . . Receiving Transactions 7 – 37. . . . . . . . . . . . . . . . . . . . . . . . . . . . . . . . . . . Inspections 7 – 51. . . . . . . . . . . . . . . . . . . . . . . . . . . . . . . . . . . . . . . . . . . . . . Returns 7 – 54. . . . . . . . . . . . . . . . . . . . . . . . . . . . . . . . . . . . . . . . . . . . . . . . . Corrections 7 – 59. . . . . . . . . . . . . . . . . . . . . . . . . . . . . . . . . . . . . . . . . . . . . Finding Intransit Shipments 7 – 65. . . . . . . . . . . . . . . . . . . . . . . . . . . . . . . Control Numbers 7 – 68. . . . . . . . . . . . . . . . . . . . . . . . . . . . . . . . . . . . . . . . Receiving Reports 7 – 71. . . . . . . . . . . . . . . . . . . . . . . . . . . . . . . . . . . . . . . . Overview of Receipt Accounting 7 – 73. . . . . . . . . . . . . . . . . . . . . . . . . . . Automatic Offsets in Oracle Public Sector Purchasing 7 – 102. . . . . . . . .
Chapter 8 Inquiries 8 – 1. . . . . . . . . . . . . . . . . . . . . . . . . . . . . . . . . . . . . . . . . . . . . . . Viewing Action History 8 – 2. . . . . . . . . . . . . . . . . . . . . . . . . . . . . . . . . . .
Chapter 9 Reports and Processes 9 – 1. . . . . . . . . . . . . . . . . . . . . . . . . . . . . . . . . . . Accrual Reconciliation Report 9 – 5. . . . . . . . . . . . . . . . . . . . . . . . . . . . . Accrual Write–Off Report 9 – 13. . . . . . . . . . . . . . . . . . . . . . . . . . . . . . . . . Advanced Shipment Notice Discrepant Receipts Report 9 – 16. . . . . . . ASL Upgrade Process 9 – 17. . . . . . . . . . . . . . . . . . . . . . . . . . . . . . . . . . . . Backordered Internal Requisitions Report 9 – 18. . . . . . . . . . . . . . . . . . . Blanket and Planned PO Status Report 9 – 19. . . . . . . . . . . . . . . . . . . . . . Buyer Listing 9 – 21. . . . . . . . . . . . . . . . . . . . . . . . . . . . . . . . . . . . . . . . . . . . Buyer’s Requisition Action Required Report 9 – 23. . . . . . . . . . . . . . . . . Cancelled Purchase Orders Report 9 – 25. . . . . . . . . . . . . . . . . . . . . . . . . Cancelled Requisitions Report 9 – 26. . . . . . . . . . . . . . . . . . . . . . . . . . . . . Contract Status Report 9 – 28. . . . . . . . . . . . . . . . . . . . . . . . . . . . . . . . . . . . Create Internal Sales Orders Process 9 – 29. . . . . . . . . . . . . . . . . . . . . . . . Create Releases Process 9 – 30. . . . . . . . . . . . . . . . . . . . . . . . . . . . . . . . . . .

viiContents
Encumbrance Detail Report 9 – 31. . . . . . . . . . . . . . . . . . . . . . . . . . . . . . . Expected Receipts Report 9 – 33. . . . . . . . . . . . . . . . . . . . . . . . . . . . . . . . . Fill Employee Hierarchy Process 9 – 35. . . . . . . . . . . . . . . . . . . . . . . . . . . Financials/Purchasing Options Listing 9 – 36. . . . . . . . . . . . . . . . . . . . . Internal Requisition Status Report 9 – 37. . . . . . . . . . . . . . . . . . . . . . . . . . Internal Requisitions/Deliveries Discrepancy Report 9 – 39. . . . . . . . . Invoice Price Variance Report 9 – 41. . . . . . . . . . . . . . . . . . . . . . . . . . . . . . Invoice Price Variance by Supplier Report 9 – 43. . . . . . . . . . . . . . . . . . . Item Detail Listing 9 – 45. . . . . . . . . . . . . . . . . . . . . . . . . . . . . . . . . . . . . . . Item Summary Listing 9 – 47. . . . . . . . . . . . . . . . . . . . . . . . . . . . . . . . . . . . Location Listing 9 – 48. . . . . . . . . . . . . . . . . . . . . . . . . . . . . . . . . . . . . . . . . Matching Holds by Buyer Report 9 – 50. . . . . . . . . . . . . . . . . . . . . . . . . . New Supplier Letter Report 9 – 52. . . . . . . . . . . . . . . . . . . . . . . . . . . . . . . Open Purchase Orders Report (by Buyer) 9 – 54. . . . . . . . . . . . . . . . . . . Open Purchase Orders Report (by Cost Center) 9 – 55. . . . . . . . . . . . . . Overdue Supplier Shipments Report 9 – 56. . . . . . . . . . . . . . . . . . . . . . . Overshipments Report 9 – 58. . . . . . . . . . . . . . . . . . . . . . . . . . . . . . . . . . . . Payment on Receipt 9 – 60. . . . . . . . . . . . . . . . . . . . . . . . . . . . . . . . . . . . . . Printed Change Orders Report (Landscape) 9 – 65. . . . . . . . . . . . . . . . . Printed Change Orders Report (Portrait) 9 – 67. . . . . . . . . . . . . . . . . . . . Printed Purchase Order Report (Landscape) 9 – 69. . . . . . . . . . . . . . . . . Printed Purchase Order Report (Portrait) 9 – 71. . . . . . . . . . . . . . . . . . . . Printed RFQ Report (Landscape) 9 – 73. . . . . . . . . . . . . . . . . . . . . . . . . . . Printed RFQ Report (Portrait) 9 – 75. . . . . . . . . . . . . . . . . . . . . . . . . . . . . Printed Requisitions Report 9 – 77. . . . . . . . . . . . . . . . . . . . . . . . . . . . . . . Purchase Agreement Audit Report 9 – 78. . . . . . . . . . . . . . . . . . . . . . . . . Purchase Order Commitment by Period Report 9 – 80. . . . . . . . . . . . . . Purchase Order Detail Report 9 – 82. . . . . . . . . . . . . . . . . . . . . . . . . . . . . . Purchase Order Distribution Detail Report 9 – 84. . . . . . . . . . . . . . . . . . Purchase Order and Releases Detail Report 9 – 86. . . . . . . . . . . . . . . . . . Purchase Price Variance Report 9 – 87. . . . . . . . . . . . . . . . . . . . . . . . . . . . Purchase Requisition Status Report 9 – 89. . . . . . . . . . . . . . . . . . . . . . . . . Purchase Summary Report by Category 9 – 91. . . . . . . . . . . . . . . . . . . . . Purchasing Activity Register 9 – 92. . . . . . . . . . . . . . . . . . . . . . . . . . . . . . Purchasing Database Administration 9 – 94. . . . . . . . . . . . . . . . . . . . . . . Purchasing Documents Open Interface 9 – 95. . . . . . . . . . . . . . . . . . . . . . Purchasing Interface Errors Report 9 – 98. . . . . . . . . . . . . . . . . . . . . . . . . Quality Code Listing 9 – 100. . . . . . . . . . . . . . . . . . . . . . . . . . . . . . . . . . . . . Quotation Action Required Report 9 – 101. . . . . . . . . . . . . . . . . . . . . . . . .

viii Oracle Public Sector Purchasing User’s Guide
RFQ Action Required Report 9 – 103. . . . . . . . . . . . . . . . . . . . . . . . . . . . . . Receipt Accruals – Period–End Process 9 – 105. . . . . . . . . . . . . . . . . . . . . Receipt Adjustments Report 9 – 108. . . . . . . . . . . . . . . . . . . . . . . . . . . . . . . Receipt Traveler 9 – 110. . . . . . . . . . . . . . . . . . . . . . . . . . . . . . . . . . . . . . . . . Receiving Account Distribution Report 9 – 112. . . . . . . . . . . . . . . . . . . . . Receiving Exceptions Report 9 – 114. . . . . . . . . . . . . . . . . . . . . . . . . . . . . . Receiving Interface Errors Report 9 – 116. . . . . . . . . . . . . . . . . . . . . . . . . . Receiving Transaction Processor 9 – 117. . . . . . . . . . . . . . . . . . . . . . . . . . . Receiving Transactions Register 9 – 119. . . . . . . . . . . . . . . . . . . . . . . . . . . . Receiving Value Report 9 – 122. . . . . . . . . . . . . . . . . . . . . . . . . . . . . . . . . . . Receiving Value Report by Destination Account 9 – 125. . . . . . . . . . . . . . ReqExpress Templates Listing 9 – 127. . . . . . . . . . . . . . . . . . . . . . . . . . . . . Requisition Activity Register 9 – 128. . . . . . . . . . . . . . . . . . . . . . . . . . . . . . Requisition Distribution Detail Report 9 – 129. . . . . . . . . . . . . . . . . . . . . . Requisition Import Process 9 – 130. . . . . . . . . . . . . . . . . . . . . . . . . . . . . . . . Requisition Import Exceptions Report 9 – 134. . . . . . . . . . . . . . . . . . . . . . Requisitions on Cancelled Sales Order Report 9 – 136. . . . . . . . . . . . . . . Reschedule Requisitions Process 9 – 137. . . . . . . . . . . . . . . . . . . . . . . . . . . Savings Analysis Report (by Buyer) 9 – 138. . . . . . . . . . . . . . . . . . . . . . . . Savings Analysis Report (by Category) 9 – 140. . . . . . . . . . . . . . . . . . . . . Send Notifications for Purchasing Documents 9 – 142. . . . . . . . . . . . . . . Standard Notes Listing 9 – 143. . . . . . . . . . . . . . . . . . . . . . . . . . . . . . . . . . . Substitute Receipts Report 9 – 144. . . . . . . . . . . . . . . . . . . . . . . . . . . . . . . . Supplier Affiliated Structure Listing 9 – 145. . . . . . . . . . . . . . . . . . . . . . . . Supplier Price Performance Analysis Report 9 – 146. . . . . . . . . . . . . . . . . Supplier Purchase Summary Report 9 – 148. . . . . . . . . . . . . . . . . . . . . . . . Supplier Quality Performance Analysis Report 9 – 150. . . . . . . . . . . . . . Supplier Service Performance Analysis Report 9 – 152. . . . . . . . . . . . . . . Supplier Volume Analysis Report 9 – 154. . . . . . . . . . . . . . . . . . . . . . . . . . Suppliers on Hold Report 9 – 155. . . . . . . . . . . . . . . . . . . . . . . . . . . . . . . . . Tax Code Listing 9 – 156. . . . . . . . . . . . . . . . . . . . . . . . . . . . . . . . . . . . . . . . . Uninvoiced Receipts Report 9 – 157. . . . . . . . . . . . . . . . . . . . . . . . . . . . . . . Unit of Measure Class Listing 9 – 159. . . . . . . . . . . . . . . . . . . . . . . . . . . . . . Unit of Measure Listing 9 – 160. . . . . . . . . . . . . . . . . . . . . . . . . . . . . . . . . . . Unordered Receipts Report 9 – 162. . . . . . . . . . . . . . . . . . . . . . . . . . . . . . . . Workflow Background Process 9 – 163. . . . . . . . . . . . . . . . . . . . . . . . . . . . .

ixContents
Appendix A Windows and Navigator Paths A – 1. . . . . . . . . . . . . . . . . . . . . . . . . . . .
Appendix B Oracle Public Sector Purchasing Alerts B – 1. . . . . . . . . . . . . . . . . . . .
Appendix C Using the Account Generator in Oracle Public Sector Purchasing C – 1. . . . . . . . . . . . . . . . . . . . . . . . . . . . . . . . . . . . . . . . . . . . .
Glossary
Index

x Oracle Public Sector Purchasing User’s Guide

xiPreface
Preface
This user’s guide includes the information you need to work withOracle Public Sector Purchasing effectively. It contains detailedinformation about the following:
• Overview and reference information
• Specific tasks you can accomplish using Oracle Public SectorPurchasing
• Oracle Public Sector Purchasing setup
• Oracle Public Sector Purchasing functions and features
• Oracle Public Sector Purchasing windows
• Oracle Public Sector Purchasing reports and processes
This preface explains how this user’s guide is organized and introducesother sources of information that can help you.

xii Oracle Public Sector Purchasing User’s Guide
About This User’s Guide
This guide contains overviews as well as task and referenceinformation about Oracle Public Sector Purchasing. This guideincludes the following chapters:
• Chapter 1 provides an overview of all the setup steps for OraclePublic Sector Purchasing and describes how Oracle Public SectorPurchasing can be tailored to your needs.
Note: Implementation information and procedures arecontained in this chapter.
• Chapter 2 contains information on the document approvalprocess, security, and document control. It also describes howOracle Public Sector Purchasing uses Oracle Workflowtechnology to route documents for approval.
• Chapter 3 contains information about requisitions, includinginternal requisitions, and explains how to create requisitions.
• Chapter 4 fully explains the creation and details pertaining topurchase orders. It also describes how Oracle Public SectorPurchasing uses Oracle Workflow technology to create purchaseorders and releases from approved requisitions.
• Chapter 5 describes how to manage your supply base throughagreements, sourcing rules, and approved supplier lists. It alsodescribes how to create requests for quotation (RFQs) andquotations, and manage buyer workload.
• Chapter 6 describes the AutoCreate process for purchasingdocuments.
• Chapter 7 contains full information about receiving, includinginspections, returns, and corrections.
• Chapter 8 describes how to view the action history for specificpurchasing documents or document lines.
• Chapter 9 describes Oracle Public Sector Purchasing reports andprocesses.

xiiiPreface
Audience for This Guide
This guide assumes you have a working knowledge of your businessarea’s processes and tools. It also assumes you are familiar with OraclePublic Sector Purchasing. If you have never used Oracle Public SectorPurchasing, we suggest you attend one or more of the Oracle PublicSector Purchasing training classes available through World WideEducation. For more information about Oracle Public SectorPurchasing and Oracle training, see: Other Information Sources.
Do Not Use Database Tools to Modify Oracle Applications Data
Because Oracle Applications tables are interrelated, any change youmake using Oracle Applications can update many tables at once. Butwhen you modify Oracle Applications data using anything other thanOracle Applications, you may change a row in one table withoutmaking corresponding changes in related tables. If your tables get outof synchronization with each other, you risk retrieving erroneousinformation and you risk unpredictable results throughout OracleApplications.
When you use Oracle Applications to modify your data, OracleApplications automatically checks that your changes are valid. OracleApplications also keeps track of who changes information. If you enterinformation into database tables using database tools, you may storeinvalid information. You also lose the ability to track who has changedyour information because SQL*Plus and other database tools do notkeep a record of changes.
Consequently, we STRONGLY RECOMMEND that you never useSQL*Plus or any other tool to modify Oracle Applications data unlessotherwise instructed.
Other Information Sources
Here are some other ways you can increase your knowledge andunderstanding of Oracle Public Sector Purchasing.
Online Documentation
All Oracle Applications documentation is available online onCD–ROM, except for technical reference manuals. There are two online
xiv Oracle Public Sector Purchasing User’s Guide
formats, HyperText Markup Language (HTML) and Adobe Acrobat(PDF).
All user’s guides are available in HTML, Acrobat, and paper. Technicalreference manuals are available in paper only. Other documentation isavailable in Acrobat and paper.
The content of the documentation does not differ from format to format.There may be slight differences due to publication standards, but suchdifferences do not affect content. For example, page numbers andscreen shots are not included in HTML.
The HTML documentation is available from all Oracle Applicationswindows. Each window is programmed to start your web browser andopen a specific, context–sensitive section. Once any section of theHTML documentation is open, you can navigate freely throughout allOracle Applications documentation. The HTML documentation alsoships with Oracle Information Navigator (if your national languagesupports this tool), which enables you to search for words and phrasesthroughout the documentation set.
Related User’s Guides
Oracle Public Sector Purchasing shares business and setup informationwith other Oracle Applications products. Therefore, you may want torefer to other user’s guides when you set up and use Oracle PublicSector Purchasing.
If you do not have the hardcopy versions of these manuals, you canread them online using the Applications Library icon or Help menucommand.
Oracle Applications User’s Guide
This guide explains how to enter data, query, run reports, and navigateusing the graphical user interface (GUI) available with this release ofOracle Public Sector Purchasing (and any other Oracle Applicationsproducts). This guide also includes information on setting userprofiles, as well as running and reviewing reports and concurrentprocesses.
You can access this user’s guide online by choosing ”Getting Startedwith Oracle Applications” from any Oracle Applications help file.

xvPreface
Oracle Applications Demonstration User’s Guide
This guide documents the functional storyline and product flows forGlobal Computers, a fictional manufacturer of personal computersproducts and services. As well as including product overviews, thebook contains detailed discussions and examples across each of themajor product flows. Tables, illustrations, and charts summarize keyflows and data elements.
Oracle Bills of Material User’s Guide
This guide describes how to create various bills of materials tomaximize efficiency, improve quality and lower cost for the mostsophisticated manufacturing environments. By detailing integratedproduct structures and processes, flexible product and processdefinition, and configuration management, this guide enables you tomanage product details within and across multiple manufacturingsites.
Oracle EDI Gateway User’s Guide
This guide describes how Oracle EDI Gateway provides a means toconduct business with trading partners via Electronic Data Interchange(EDI). Data files are exchanged in a standard format to minimizemanual effort, speed data processing and ensure accuracy.
Oracle Inventory User’s Guide
This guide describes how to define items and item information,perform receiving and inventory transactions, maintain cost control,plan items, perform cycle counting and physical inventories, and set upOracle Inventory.
Oracle Order Entry/Shipping User’s Guide
This guide describes how to enter sales orders and returns, copyexisting sales orders, schedule orders, release orders, plan departuresand deliveries, confirm shipments, create price lists and discounts fororders, and create reports.
Oracle Product Configurator User’s Guide
This guide describes how to improve order taking and fulfillmentproductivity by eliminating errors in new sales orders and bills ofmaterials. You can use Oracle Product Configurator to verify product

xvi Oracle Public Sector Purchasing User’s Guide
configurations, automatically select configuration options, and generatemanufacturing bills of materials according to configuration constraints.
Oracle Quality User’s Guide
This guide describes how Oracle Quality can be used to meet yourquality data collection and analysis needs. This guide also explainshow Oracle Quality interfaces with other Oracle Manufacturingapplications to provide a closed loop quality control system.
Oracle Self Service Web Applications User’s Guide
This guide describes how Oracle Self Service Web Applications enablecompanies to provide a self–service and secure web interface for itsemployees, customers and suppliers. Employees can change theirpersonal status, submit expense reports or request supplies; customerscan check on their orders; and suppliers can share productionschedules with their trading partners. This guide is available in HTMLonly.
Oracle Supplier Scheduling User’s Guide
This guide describes how you can use Oracle Supplier Scheduling tocalculate and maintain planning and shipping schedules andcommunicate them to your suppliers.
Oracle Work in Process User’s Guide
This guide describes how Oracle Work in Process provides a completeproduction management system. Specifically this guide describes howdiscrete, repetitive, assemble–to–order, project, flow, and mixedmanufacturing environments are supported.
Oracle Public Sector General Ledger User’s Guide
This guide explains how to plan and define your chart of accounts,accounting period types and accounting calendar, functional currency,and set of books. It also describes how to define journal entry sourcesand categories so you can create journal entries for your general ledger.If you use multiple currencies, use this manual when you defineadditional rate types, and enter daily rates. This manual also includescomplete information on implementing Budgetary Control.

xviiPreface
Oracle Public Sector Payables User’s Guide
This guide describes how accounts payable transactions are createdand entered in Oracle Public Sector Payables. This guide also containsdetailed setup information for Oracle Public Sector Payables.
Oracle Public Sector Receivables User’s Guide
Use this manual to learn how to implement flexible address formats fordifferent countries. You can use flexible address formats in thesuppliers, banks, invoices, and payments windows.
Oracle HRMS User’s Guide
This manual explains how to enter your employees. It also explainshow to set up organizations and site locations. Even if you do notinstall Oracle HRMS, you can set up your employees, site locations,and organization using Oracle HRMS forms.
Oracle Workflow Guide
This manual explains how to define new workflow business processesas well as customize existing Oracle Applications–embedded workflowprocesses. You also use this guide to complete the setup stepsnecessary for any Oracle Applications product that includesworkflow–enabled processes.
Reference Manuals
Oracle Automotive Implementation Manual
This manual describes the setup and implementation of the OracleApplications used for the Oracle Automotive solution.
Oracle Manufacturing, Distribution, Sales and Service OpenInterfaces Manual
This manual contains up–to–date information about integrating withother Oracle Manufacturing applications and with your other systems.This documentation includes open interfaces found in OracleManufacturing.

xviii Oracle Public Sector Purchasing User’s Guide
Oracle Applications Message Reference Manual
This manual describes all Oracle Applications messages. This manualis available in HTML format on the documentation CD–ROM forRelease 11.
Oracle Project Manufacturing Implementation Manual
This manual describes the setup steps and implementation for OracleProject Manufacturing.
Oracle Self–Service Web Applications Implementation Manual
This manual describes the setup steps for Oracle Self–Service WebApplications and the Web Applications dictionary.
Installation and System Administration
Oracle Alert User’s Guide
This guide explains how to define periodic and event alerts to monitorthe status of your Oracle Applications data.
Multiple Reporting Currencies in Oracle Applications
If you use the Multiple Reporting Currencies feature to recordtransactions in more than one currency, use this manual beforeimplementing Oracle Public Sector Purchasing. This manual detailsadditional steps and setup considerations for implementing OraclePublic Sector Purchasing with this feature.
Multiple Organizations in Oracle Applications
If you use the Oracle Applications Multiple Organization Supportfeature to use multiple sets of books for one Oracle Public SectorPurchasing installation, this guide describes all you need to knowabout setting up and using Oracle Public Sector Purchasing with thisfeature.
Oracle Applications Implementation Wizard User’s Guide
If you are implementing more than one Oracle product, you can use theOracle Applications Implementation Wizard to coordinate your setupactivities. This guide describes how to use the wizard.

xixPreface
Oracle Applications Developer’s Guide
This guide contains the coding standards followed by the OracleApplications development staff. It describes the Oracle ApplicationObject Library components needed to implement the OracleApplications user interface described in the Oracle Applications UserInterface Standards. It also provides information to help you build yourcustom Developer/2000 forms so that they integrate with OracleApplications.
Oracle Applications Flexfields Guide
This guide provides flexfields planning, setup and referenceinformation for the Oracle Public Sector Purchasing implementationteam, as well as for users responsible for the ongoing maintenance ofOracle Applications product data. This manual also providesinformation on creating custom reports on flexfields data.
Oracle Applications Installation Manual for Windows Clients
This guide provides information you need to successfully install OracleFinancials, Oracle Public Sector Financials, Oracle Manufacturing, orOracle Human Resources in your specific hardware and operatingsystem software environment.
Oracle Applications Product Update Notes
If you are upgrading your Oracle Applications, refer to the productupdate notes appropriate to your update and product(s) to seesummaries of new features as well as changes to database objects,profile options and seed data added for each new release.
Oracle Applications Upgrade Preparation Manual
This guide explains how to prepare your Oracle Applications productsfor an upgrade. It also contains information on completing theupgrade procedure for each product. Refer to this manual and theOracle Applications Installation Manual when you plan to upgrade yourproducts.
Oracle Applications System Administrator’s Guide
This manual provides planning and reference information for theOracle Public Sector Purchasing System Administrator.
xx Oracle Public Sector Purchasing User’s Guide
Other Sources
Training
We offer a complete set of formal training courses to help you and yourstaff master Oracle Public Sector Purchasing and reach full productivityquickly. We organize these courses into functional learning paths, soyou take only those courses appropriate to your job or area ofresponsibility.
You have a choice of educational environments. You can attendcourses offered by Oracle Education Services at any one of our manyEducation Centers, or you can arrange for our trainers to teach at yourfacility. In addition, Oracle training professionals can tailor standardcourses or develop custom courses to meet your needs. For example,you may want to use your organization structure, terminology, anddata as examples in a customized training session delivered at yourown facility.
Support
From on–site support to central support, our team of experiencedprofessionals provides the help and information you need to keepOracle Public Sector Purchasing working for you. This team includesyour Technical Representative, Account Manager, and Oracle’s largestaff of consultants and support specialists with expertise in yourbusiness area, managing an Oracle8 server, and your hardware andsoftware environment.
About Oracle
Oracle Corporation develops and markets an integrated line ofsoftware products for database management, applicationsdevelopment, decision support, and office automation, as well asOracle Applications, an integrated suite of more than 45 softwaremodules for financial management, supply chain management,manufacturing, project systems, human resources and sales and servicemanagement.
Oracle products are available for mainframes, minicomputers, personalcomputers, network computers and personal digital assistants,allowing organizations to integrate different computers, differentoperating systems, different networks, and even different database

xxiPreface
management systems, into a single, unified computing and informationresource.
Oracle is the world’s leading supplier of software for informationmanagement, and the world’s second largest software company.Oracle offers its database, tools, and applications products, along withrelated consulting, education, and support services, in over 140countries around the world.
Thank You
Thank you for using Oracle Public Sector Purchasing and this user’sguide.
We value your comments and feedback. At the end of this guide is aReader’s Comment Form you can use to explain what you like ordislike about Oracle Public Sector Purchasing or this user’s guide. Mailyour comments to the following address or call us directly at (650)506–7000.
Documentation ManagerWorldwide Government and Education Products DivisionOracle Corporation500 Oracle ParkwayMS 3op7Redwood Shores, CA 94065
Or, send electronic mail to [email protected].

xxii Oracle Public Sector Purchasing User’s Guide

C H A P T E R
1 T
1 – 1Setting Up
Setting Up
his chapter tells you everything you need to know about settingup, including:
• Setup Overview: page 1 – 2
• Defining Buyers: page 1 – 13
• Defining Approval Groups: page 1 – 15
• Assigning Approval Groups: page 1 – 18
• Annotating Purchasing Documents: page 1 – 20
• Defining Purchasing Options: page 1 – 29
• Defining Receiving Options: page 1 – 40
• Defining Requisition Templates: page 1 – 44
• Purchasing Hazardous Materials: page 1 – 48
• Defining Lookup Codes: page 1 – 54
• Purchasing Services: page 1 – 57
• Defining Document Types: page 1 – 65
• Controlling Purchasing Periods: page 1 – 71
• Choosing Workflow Options: page 1 – 73
• Profile Options in Purchasing: page 1 – 76

1 – 2 Oracle Public Sector Purchasing User’s Guide
Setup Overview
This section contains an overview of each step you need to complete toset up Oracle Public Sector Purchasing. For instructions on how tocomplete each task, see the setup sections indicated in each step below.
Some of the steps below are Required, and some are Optional.Required with defaults means that the setup functionality comes withpre–seeded, default values in the database; however, you shouldreview those defaults and decide whether to change them to suit yourpublic sector needs. If you want or need to change them, you shouldperform that setup step.
Some of the steps below you may not need to perform if you’ve alreadyperformed a common–application setup (setting up multiple OracleApplications products).
Oracle Applications Implementation Wizard
If you are implementing more than one Oracle Applications product,you may want to use the Oracle Applications Implementation Wizardto coordinate your setup activities. The Implementation Wizard guidesyou through the setup steps for the applications you have installed,suggesting a logical sequence that satisfies cross–productimplementation dependencies and reduces redundant setup steps. TheWizard also identifies steps that can be completed independently—byseveral teams working in parallel—to help you manage yourimplementation process most efficiently.
You can use the Implementation Wizard as a resource center to see agraphical overview of setup steps, read online help for a setup activity,and open the appropriate setup window. You can also document yourimplementation, for further reference and review, by using the Wizardto record comments for each step.
Set Up Oracle Applications Technology
The setup steps in this chapter tell you how to implement the parts ofOracle Applications specific to Oracle Public Sector Purchasing.
The Implementation Wizard guides you through the entire OracleApplications setup, including system administration. However, if youdo not use the Wizard, you need to complete several other setup steps,including:
• performing system–wide setup tasks such as configuringconcurrent managers and printers

Step 1
1 – 3Setting Up
• managing data security, which includes setting upresponsibilities to allow access to a specific set of business dataand complete a specific set of transactions, and assigningindividual users to one or more of these responsibilities
Also, since Purchasing uses Oracle Workflow to manage the approvaland creation of business documents, and to derive Accounting Flexfieldvalues via the Account Generator, you need to set up Oracle Workflow.
See Also
Oracle Applications Implementation Wizard User’s Guide
Oracle Applications System Administrator’s Guide
Oracle Workflow Guide
Multiple Reporting Currencies
If you plan to use Multiple Reporting Currencies (MRC) with OraclePublic Sector Purchasing, additional setup steps are required. See:Multiple Reporting Currencies in Oracle Applications.
Setup Prerequisites
❑ Before you set up your Purchasing application, you should set upan Oracle Applications System Administrator responsibility. See:Oracle Applications System Administrator’s Guide.
❑ Since Purchasing uses Oracle Workflow technology to performdocument approvals, automatic document creation, and accountgeneration via the Account Generator, you need to set up OracleWorkflow before you can use Purchasing. See: Setting Up OracleWorkflow, Oracle Workflow Guide.
Setup Steps
Set Up System Administrator (Required)
This step involves the following tasks:

Step 2
Step 3
1 – 4 Oracle Public Sector Purchasing User’s Guide
• Set up security. In particular, define user names. See: Overviewof Oracle Applications Security, Oracle Applications SystemAdministrator’s Guide. See: Users Window, Oracle ApplicationsSystem Administrator’s Guide.
• Set up printers (optional). See: Setting Up Your Printers, OracleApplications System Administrator’s Guide.
Set Up Key Flexfields (Required)
See: Oracle Applications Flexfields Guide.
Setting up key flexfields for Purchasing involves the following tasks:
• Set up accounting key flexfields. You may not need to performthis step if you have already installed and set up Oracle PublicSector General Ledger or performed a common–applicationssetup. See also: Oracle Public Sector General Ledger User’s Guide.
• Set up the following Human Resources key flexfields. You maynot need to set up these key flexfields if you have alreadyinstalled and set up Oracle Human Resource ManagementSystems or performed a common–applications setup. See also:Oracle Human Resources User’s Guide.
– Grade flexfield
– Job flexfield
– Position flexfield
– People Group flexfield
• Set up the following Inventory key flexfields. You may not needto set up these key flexfields if you have already installed and setup Oracle Inventory or performed a common–applications setup.See also: Oracle Inventory User’s Guide.
– Item Catalog flexfield
– Item Category flexfield
– System Items flexfield
– Run item flexfield view.
Set Up Calendars, Currencies, and Set of Books (Required)
If you have defined your calendars, currencies, and set of books whilesetting up a different Oracle Applications product, proceed to the nextstep. However, if you are performing a Multi–Org implementation ofPurchasing, you may optionally create more than one calendar,

Step 4
1 – 5Setting Up
currency, or set of books. See: Multiple Organizations in OracleApplications.
This step involves the following tasks:
• Set up calendars:
– Define period types. See: Defining Period Types, OraclePublic Sector General Ledger User’s Guide.
– Define accounting calendar. See: Defining Calendars, OraclePublic Sector General Ledger User’s Guide.
– Define transaction calendar. See: Defining TransactionCalendars, Oracle Public Sector General Ledger User’s Guide.
– Define workday calendar. See: Overview of WorkdayCalendar, Oracle Bills of Material User’s Guide.
– Define exception templates. See: Creating a WorkdayException Template, Oracle Bills of Material User’s Guide.
• Define currencies. See: Defining Currencies, Oracle Public SectorGeneral Ledger User’s Guide.
• Define conversion rate types. See: Defining Conversion RateTypes, Oracle Public Sector General Ledger User’s Guide.
• Assign responsibility to a set of books. See: Oracle Public SectorGeneral Ledger User’s Guide.
• Set up currency rates:
– Define daily rates. See: Entering Daily Rates, Oracle PublicSector General Ledger User’s Guide.
– Define period rates. See: Entering Period Rates, OraclePublic Sector General Ledger User’s Guide.
– Define historical rates. See: Entering Historical Rates, OraclePublic Sector General Ledger User’s Guide.
• Open and close periods. See: Opening and Closing AccountingPeriods, Oracle Public Sector General Ledger User’s Guide.
Set Up Organizations (Required)
You may not need to perform this step if you have already installedand set up Oracle Inventory or performed a common–applicationssetup.
For the following tasks relating to setting up organizations, see: OracleHuman Resources User’s Guide:
Step 5
Step 6
1 – 6 Oracle Public Sector Purchasing User’s Guide
• Define organization QuickCodes.
• Define organizations.
• Define business groups.
• Define human resources organizations.
• Define legal entities organizations.
• Define Oracle users for operating–unit organizations.
• Assign operating units to legal entities.
• Set up inventory organizations. For the following tasks relatingto setting up inventory organizations, see: Oracle Inventory User’sGuide.
– Define inventory organizations.
– Define accounting information for inventory organizations.
– Define customers and suppliers for inventory organizations.
– Define inventory organization parameters.
– Define receiving options for inventory organization. Forthis task, see: Defining Receiving Options: page 1 – 40.
• Define organization hierarchies. See: Oracle Human ResourcesUser’s Guide.
• Assign business groups and operating units to responsibilities.See: Oracle Human Resources User’s Guide.
Set Up Units of Measure (Required)
You may not need to perform this step if you have already installedand set up Oracle Inventory or performed a common–applicationssetup. See: Oracle Inventory User’s Guide.
This step involves the following tasks:
• Define units–of–measure classes.
• Define units of measure.
• Define units–of–measure conversions.
• Define inter–class unit–of–measure conversions
Set Up Items
See: Oracle Inventory User’s Guide.

Step 7
Step 8
1 – 7Setting Up
This step involves the following tasks:
• Define item attribute controls. (Required with defaults)
• Define container type QuickCodes. (Required with defaults)
• Define status. (Required with defaults)
• Define item type QuickCodes. (Required with defaults)
• Define customer item commodity codes. (Optional)
• Define item template. (Optional)
Set Up Personnel
You may not need to perform this step if you have already installedand set up Oracle Human Resource Management Systems orperformed a common–applications setup. See: Oracle Human ResourcesUser’s Guide.
This step involves the following tasks:
• Define employee QuickCodes. (Required with defaults)
• Define supplier and employee numbering. For this step, see:Defining Financials Options, Oracle Public Sector Payables User’sGuide. (Required)
• Define employees. Use the setup window from withinPurchasing for defining employees if you use Purchasingwithout Oracle Human Resource Management Systems. If youuse Purchasing with Oracle Human Resource ManagementSystems, use the setup window for defining employees fromwithin the Human Resource Management Systems application.(Required)
• Define jobs. (Required)
• Define positions. (Optional)
• Define position hierarchies (Optional)
Set Up Oracle Workflow (Required)
Since Purchasing uses Oracle Workflow technology to performdocument approvals, automatic document creation, and accountgeneration via the Account Generator, you need to set up OracleWorkflow, if you haven’t done so already. See: Setting Up OracleWorkflow, Oracle Workflow Guide.

Step 9
Step 10
Step 11
Step 12
1 – 8 Oracle Public Sector Purchasing User’s Guide
Decide How to Use the Account Generator (Required)
The Account Generator process in Purchasing builds a charge, budget,accrual, and variance account for each purchase order, release, andrequisition distribution based on the distribution’s Expense, Inventory,or Shop Floor destination type. You must review the default processthat Purchasing uses to see if it meets your accounting requirements.You can optionally customize the Account Generator for each set ofbooks that you have defined. See: Using the Account Generator inOracle Public Sector Purchasing: page 0 – 2.
Note: This step needs to be performed for each operating unit.
Before you can use the Account Generator default process inPurchasing or customize your own process, you first need to set upOracle Workflow if you haven’t done so already. See: Setting UpOracle Workflow, Oracle Workflow Guide.
Define Manufacturing System and User Profiles (Required)
See: Setting User Profile Options, Oracle Applications SystemAdministrator’s Guide. See: Common User Profile Options, OracleApplications System Administrator’s Guide. See: Profile Options inPurchasing: page 1 – 76.
Note: This step needs to be performed for each operating unit.
Open Inventory and Purchasing Accounting Periods (Required)
This step involves the following tasks.
Note: This step needs to be performed for each operating unit.
• Open Inventory accounting period. See: MaintainingAccounting Periods, Oracle Inventory User’s Guide.
• Open Purchasing accounting period. See: Purchasing Periods:page 1 – 71.
Define Subinventory Locations (Optional)
You may not need to perform this step if you have already installedand set up Oracle Inventory. See: Defining Subinventories, OracleInventory User’s Guide.
Note: This step needs to be performed for each operating unit.

Step 13
Step 14
Step 15
1 – 9Setting Up
Set Up Cross–Reference Types, Tax Names, and Location Associations (Optional)
This step involves the following tasks:
• Define cross–reference types. See: Defining Cross–ReferenceTypes, Oracle Inventory User’s Guide.
• Define tax names. You may not need to perform this step if youhave already installed and set up Oracle Public Sector Payablesor performed a common–applications setup. See: Tax Names,Oracle Public Sector Payables User’s Guide.
Note: This task needs to be performed for each operating unit.
• Define location associations. You only need to perform this stepif you will be creating internal requisitions. See: AssociatingShip–to and Receiving Locations, Oracle Order Entry / ShippingUser’s Guide. See also: Site Locations, Oracle Human ResourcesUser’s Guide. See also: Assigning a Business Purpose to aCustomer Address, Oracle Public Sector Receivables User’s Guide.
Note: This task needs to be performed for each operating unit.
Set Up Approval Information
This step involves the following tasks.
Note: This step needs to be performed for each operating unit.
• Define approval groups. See: Defining Approval Groups: page 1 – 15. (Required)
• Assign approval groups. See: Assigning Approval Groups: page 1 – 18. (Required)
• Fill employee hierarchy. See: Fill Employee Hierarchy Process:page 9 – 35. (Optional)
• Define document types. See: Defining Document Types: page 1 – 65. (Required with defaults)
Set Up Lookups and Classes
This step involves the following tasks:
• Define Purchasing lookups. See: Defining Lookup Codes: page 1 – 54. (Optional)
• Define inspection codes. See: Defining Quality Inspection Codes:page 1 – 56. (Optional)

Step 16
Step 17
Step 18
Step 19
Step 20
1 – 10 Oracle Public Sector Purchasing User’s Guide
• Define hazard classes. See: Defining Hazard Classes: page 1 – 51. (Optional)
• Define United Nations (UN) numbers. See: Defining UNNumbers: page 1 – 52. (Optional)
Define Standard Attachments (Optional)
See: Annotating Purchasing Documents: page 1 – 20. See: AttachingNotes to Purchasing Documents: page 1 – 28.
Set Up Purchasing Flexfields (Required)
See: Oracle Applications Flexfields Guide.
This step involves the following tasks:
• Define Purchasing category flexfield structure.
• Define value sets.
• Define flexfield segments. See also: Item Category FlexfieldStructures, Oracle Inventory User’s Guide.
• Define flexfield segment values.
• Define security rules.
• Assign security rules.
• Define account aliases flexfield.
• Define cross–validation rules.
Define Purchasing Options (Required)
See: Defining Purchasing Options: page 1 – 29.
Note: This step needs to be performed for each operating unit.
Define Buyers (Required)
See: Defining Buyers: page 1 – 13.
Note: This step needs to be performed for each operating unit.
Define Items (Optional)
This step involves the following tasks.
Note: This step needs to be performed for each inventoryorganization.

Step 21
Step 22
Step 23
Step 24
1 – 11Setting Up
• Define items at the master level. See: Master Level vs.Organization Level, Oracle Inventory User’s Guide. See: DefiningItems, Oracle Inventory User’s Guide.
• Define items at the organization level. See: UpdatingOrganization Level Items, Oracle Inventory User’s Guide.
• Define item relationships. See: Defining Item Relationships,Oracle Inventory User’s Guide.
Set Up Document Controls (Required with defaults)
This step involves the following tasks:
• Define line types. See: Defining Line Types: page 1 – 61.
• Start Purchasing Database Administrator. See: PurchasingDatabase Administration: page 9 – 94.
Set Up Financial Options (Required)
See: Defining Financials Options, Oracle Public Sector Payables User’sGuide.
Note: This step needs to be performed for each operating unit.
Set Up Receiving Options (Required)
You may not need to perform this step if you’ve already definedreceiving options in Step 4 Set Up Organizations. See: DefiningReceiving Options: page 1 – 40.
Note: This step needs to be performed for each inventoryorganization.
Set Up Transaction Managers and Resubmission Intervals
This step involves the following tasks:
• Start the following transaction managers. See: AdministerConcurrent Managers Window, Oracle Applications SystemAdministrator’s Guide. (Required)
– Receiving transaction manager
– Document approval manager
• Define resubmission intervals for concurrent processes. See:Defining Managers and Their Work Shifts, Oracle ApplicationsSystem Administrator’s Guide. (Optional)

Step 25
Step 26
Step 27
Step 28
Step 29
1 – 12 Oracle Public Sector Purchasing User’s Guide
Define Suppliers (Required)
You may not need to perform this step if you have already installedand set up Oracle Public Sector Payables or performed acommon–applications setup. See: Entering Suppliers, Oracle PublicSector Payables User’s Guide.
Start ”Send Notifications for Purchasing Documents” Process (Required)
See: Starting the ”Send Notifications for Purchasing Documents”Process: page 1 – 73.
Set Up Document Creation Options (Required with defaults)
See: Choosing Document Creation Options: page 1 – 73.
Note: This step needs to be performed for each operating unit.
Set Up Approval Timeout Feature
See: Deciding If You Want to Use the Timeout Feature: page 1 – 74.
Note: This step needs to be performed for each operating unit.
Modify Change Order Workflow Options (Optional)
See: Modifying Change Order Workflow Options: page 1 – 75.
Note: This step needs to be performed for each operating unit.

1 – 13Setting Up
Defining Buyers
Use the Buyers window to define and maintain your buyers. Buyerscan review all requisitions using the Requisitions window, and onlybuyers can enter and autocreate purchasing documents. See theDocument Types window for rules governing access to documents.See: Defining Document Types: page 1 – 65.
Prerequisites
❑ Define employees before performing this step. See: Enter Person,Oracle Human Resource Management Systems User’s Guide.
❑ Define locations before performing this step. See: Site Locations,Oracle Human Resource Management Systems User’s Guide.
� To define buyers:
1. Navigate to the Buyers window by selecting Buyers from themenu.
2. Enter the Name of an employee who you want to define as a buyer.If the name you want does not appear in the list of values, use theEnter Person window to enter that person as an employee. See:Enter Person, Oracle Human Resource Management Systems User’sGuide.
3. Enter the default purchasing Category of the goods the buyertypically orders. Purchasing defaults this value in the Categoryfield when you are autocreating documents. See: DefiningCategories, Oracle Inventory User’s Guide.

1 – 14 Oracle Public Sector Purchasing User’s Guide
4. Enter the name of the ship–to location for which the buyer typicallycreates purchase orders. Purchasing defaults this value when youare autocreating documents.
5. Enter the Start Date that you want to initiate the responsibilities fora buyer. The default is the current date.
6. Enter the End Date after which the employee is no longer a buyer.
7. Save your work.

1 – 15Setting Up
Defining Approval Groups
Use the Approval Groups window to define and update approvalgroups. Once you have defined an approval group here, you can thenuse it to assign approval functions to jobs or positions in the ApprovalAssignments window. You cannot delete an approval group that isused in an active assignment. You can enable or disable the entireapproval group, or you can enter inactive dates for individual approvalrules.
Prerequisites
❑ Define employees before performing this step. See: Enter Person,Oracle Human Resource Management Systems User’s Guide.
� To define approval groups:
1. Navigate to the Approval Groups window by selecting ApprovalGroups from the menu.
2. Enter the Name of the approval group. You can change existingapproval group names, but names must be unique.
3. Select Enabled to permit the approval group to be assigned to aposition/job in the Approval Assignments window.
4. Choose one of the following Objects:

1 – 16 Oracle Public Sector Purchasing User’s Guide
Account Range – For this option, you enter the accounting flexfieldsfor the Low and High Values. Include Type rules identify accountsthat you want to be included on the document. Exclude Type rulesidentify accounts that you do not want on the document. If you donot enter a rule for an account, the default is to exclude theaccount. The Inactive Date is optional, but you must enter anAmount Limit for Include Type rules.
Document Total – The document total refers to the monetary limit onan individual document. For this option, the Type defaults toInclude, and you can enter only the Amount Limit (required) andthe Inactive Date (optional).
Item Category Range – For this option, you enter the purchasingcategory flexfields for the Low and High Values. Include Typerules identify manufacturing categories that you want to beincluded on the document. Exclude Type rules identify categoriesthat you do not want on the document. If you do not define a rulefor a category, the default is Include. The Inactive Date is optional,but you must enter an Amount Limit for Include Type rules.
Item Range – For this option, you enter the item flexfields for theLow and High Values. Include Type rules identify items that youwant to be included on the document. Exclude Type rules identifyitems that you do not want on the document. If you do not definea rule for an item, the default is Include. The Inactive Date isoptional, but you must enter an Amount Limit for Include Typerules.
Location – The location refers to the deliver–to location on arequisition as well as the ship–to location on purchase orders andreleases. Include Type rules identify locations that you want to beincluded on the document. Exclude Type rules identify locationsthat you do not want on the document. For this option, you enterthe location in the Low Value field. If you do not define a rule for alocation, the default is Include. The Inactive Date is optional, butyou must enter an Amount Limit for Include Type rules.
5. Select the rule Type: Include or Exclude indicates whether to allowobjects that fall within the selected range.
6. Enter the Amount Limit. This is the maximum amount that acontrol group can authorize for a particular object range. This fieldis required only for Include type rules.
7. Enter the Value Low. This is the lowest flexfield (accounting,purchasing category, or item) in the range pertinent to this rule.
1 – 17Setting Up
When the object is Location, enter the location. You cannot enterthis field when the object is Document Total.
8. Enter the Value High. This is the highest flexfield (accounting,purchasing category, or item) in the range pertinent to this rule.You cannot enter this field when the object is Location orDocument Total.
9. Enter the Inactive Date on which Purchasing will no longer use thisrule in formulating the group.
10. Save your work.
See Also
Defining Approval Assignments: page 1 – 18
Approval Authorization Rules: page 2 – 15
Defining Approval Authorization Rules: page 2 – 15
Using Approval Assignments: page 2 – 18

1 – 18 Oracle Public Sector Purchasing User’s Guide
Assigning Approval Groups
Use the Assign Approval Groups window to assign approval groupsand approval functions to positions or jobs. If you are using approvalhierarchies (the Use Approval Hierarchies option in the FinancialsOptions window is enabled), you must first use the Approval Groupswindow to establish rules for your approval groups. Then you canassign approval groups to positions in this window. When you are notusing approval hierarchies, you can use this window to assign approvalgroups and approval functions to jobs within your organization.
Prerequisites
❑ Define approval groups before performing this step. See: DefiningApproval Groups: page 1 – 15.
� To assign approval groups:
1. Navigate to the Assign Approval Groups window by selectingAssignments from the menu.
2. Enter the Position for which you want to assign approval groupsand approval functions. If the Use Approval Hierarchies option inthe Financial Options window is not enabled, this field is notapplicable.
3. If you are not using approval hierarchies, enter the Organization.

☞
1 – 19Setting Up
4. If you are not using approval hierarchies, enter the Job.
5. Select the approval function you want to assign to this position orjob.
6. Enter the approval group that you want to assign to the selectedposition or job. The list of values includes only enabled approvalgroups with at least one approval rule. See: Defining ApprovalGroups: page 1 – 15.
7. Enter the Start Date and End Date for the assignment.
Attention: The start and end dates that you assign here are theeffectivity dates of the assignment. When the system date reachesthe end date of the assignment, the rule no longer applies. There isno explicit warning that the rule is no longer in effect.
8. Save your work.
See Also
Defining Financials Options, Oracle Public Sector Payables User’s Guide
Representing Jobs and Positions, Oracle Human Resource ManagementSystems User’s Guide
Defining Approval Groups: page 1 – 15
Approval Authorization Rules: page 2 – 15
Defining Approval Authorization Rules: page 2 – 15
Using Approval Assignments: page 2 – 18

1 – 20 Oracle Public Sector Purchasing User’s Guide
Annotating Purchasing Documents
Purchasing provides you with powerful features to create attachmentsfor your purchasing documents. You can provide unlimited text,specify who can review the attachments, and print text attachmentsonto your purchase orders. You can even modify existing attachmentsto personalize your messages for different suppliers. You can easilyprovide all the information you need when you create your purchasingdocuments. You should be able to:
• Provide unlimited text attachments on your purchasingdocuments
• Designate the appropriate people who can review theattachments
• Print text attachments on your purchase orders and RFQs for thesupplier to review
• Reuse attachments on different documents
• Copy and modify existing attachments to speed up data entry
• Copy attachments from your requisitions to your RFQs andpurchase orders
• Provide standard attachments for an item that you can referencewhenever you create a purchasing document for that item
Major Features
Copy
You can copy an existing long attachment so that you can customize itwithout having to retype the entire attachment. This feature isparticularly useful if you have a lengthy document that you want tomodify for different suppliers.
Usage
You can indicate who has access to your long attachments. Youindicate whether the attachment is for an approver, receiver, buyer, orsupplier. Or you can indicate that you want the attachment for internaluse only. You can also enter attachments that will be displayed duringinvoice matching in Accounts Payable. To understand how to enterand review attachments for different usages, see: ManagingAttachments: page 1 – 22.

1 – 21Setting Up
Using Brief Notes
You can provide brief notes on most of your documents. Unlikeattachments, you cannot copy notes from one document to the next.You should provide notes when the attachment contains no more than240 characters, you do not want to reuse the note on other documents,or you do not want to format the note. Otherwise, you should useattachments to provide additional text for your documents.
Using Attachments
You can provide as much text as you want for your documents. Youcan provide attachments at the header and line level for the followingdocuments:
• Requisitions
• Standard and Planned Purchase Orders (also shipment level)
• Blanket Purchase Agreements
• Releases (header and shipment levels)
• Contract Purchase Agreements (header level only)
• RFQs
• Quotations
• Receipts (line level only)
• Receiving Transactions (line level only)
You can also provide attachments for your items. When you create anattachment, you designate whether you want the attachment to beavailable to the supplier, receiver, approver, or buyer. Or, you candesignate that you want the attachment to appear to anyone who hasaccess to that particular document on–line. Refer to the section in thisdocument titled Notes Step by Step to understand how to createattachments.
See Also
Attaching Notes to Purchasing Documents: page 1 – 28
Managing Attachments: page 1 – 22

1 – 22 Oracle Public Sector Purchasing User’s Guide
Managing Attachments
Item Attachments
You can provide attachments for your items. When you reference anitem on a purchasing document, Purchasing makes the correspondingitem attachments available for you to review. Purchasing also printstext attachments on your purchase orders and RFQs if you chooseSupplier as the usage when you create the item attachment.
Requisition and Standard Purchase Order Attachments
You can create attachments for your requisition headers and lines.When you AutoCreate a requisition line onto a purchase order,Purchasing copies the attachments from the requisition header and lineto the corresponding purchase order line. As a buyer, you can provideadditional attachments to a purchase order even after you AutoCreatedit from a requisition.
If the purchase order line references more than one requisition line,Purchasing copies only the header and line attachments from therequisition line that is the basis for the purchase order line. Forexample, if you place multiple requisition lines onto a single purchaseorder line, Purchasing copies only the requisition header and lineattachments from the line where you use the Copy option.
For each requisition line copied, the corresponding header levelattachment is copied. For example, you have a requisition with 3 linesand they have 3 line level attachments and a header level attachment.You then AutoCreate this requisition to a purchase order with 3 lines,each of the 3 lines in the purchase order would have the specific lineattachment and the common header attachment.

1 – 23Setting Up
Figure 1 – 1
REQUISITION
Header
Line
Header
LineCopy
Create
Create
Copy
ITEM
View View
Create
Create
STANDARD PURCHASEORDER
autocreate
Blanket Purchase Agreement and Release Notes
You can create long attachments for your blanket purchase agreementsat the header and line level. You can review the blanket purchaseagreement header attachment on the corresponding release header, andyou can enter new attachments on the release header. You can alsoreview the blanket agreement line attachment on the correspondingrelease shipment, and you can enter new attachments for theshipments. Purchasing does not copy requisition attachments to ablanket agreement or release when you AutoCreate a release.
1 – 24 Oracle Public Sector Purchasing User’s Guide
Figure 1 – 2
BLANKET PURCHASEORDER
Header
Line
Header
Shipment
View
ViewITEM
Create
Create
BLANKET RELEASE
View
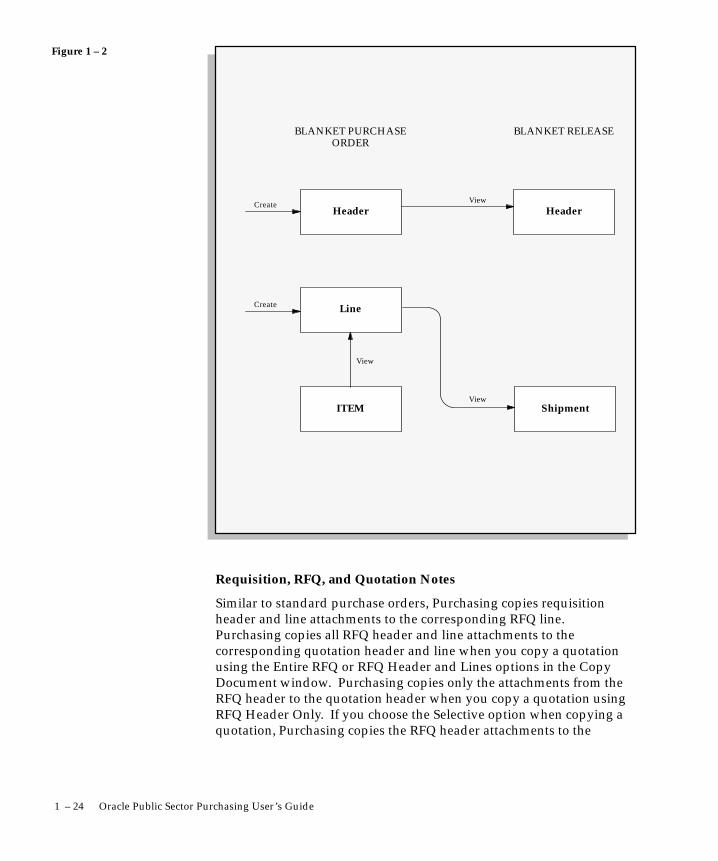
Requisition, RFQ, and Quotation Notes
Similar to standard purchase orders, Purchasing copies requisitionheader and line attachments to the corresponding RFQ line.Purchasing copies all RFQ header and line attachments to thecorresponding quotation header and line when you copy a quotationusing the Entire RFQ or RFQ Header and Lines options in the CopyDocument window. Purchasing copies only the attachments from theRFQ header to the quotation header when you copy a quotation usingRFQ Header Only. If you choose the Selective option when copying aquotation, Purchasing copies the RFQ header attachments to the

1 – 25Setting Up
quotation header and lets you decide which line attachments you wantto copy to the quotation line.
Figure 1 – 3
REQUISITION
Header
Line LineCopy
Create
Create
Copy
View View
Create
Create
RFQ
auto-create
Header
LineCreate
User Specified Copy
Create
Copy
auto-create
QUOTATION
ITEM
Header
Printing Attachments
You can print text attachments on your purchase orders and RFQs. Toprint an attachment on a purchase order or an RFQ, simply designateSupplier as the usage for the attachment. Purchasing prints theseattachments on the corresponding purchase order or RFQ. Purchasingprints as much as possible on each page and continues printing on thenext page where applicable.
Purchasing also prints item attachments and attachments with usageReceiver on the Receipt Traveler.

1 – 26 Oracle Public Sector Purchasing User’s Guide
Usages in Attachments
You can enter unlimited attachments on any requisition, purchaseorder, quotation, or request for quotation (RFQ). You decide whichstandard attachments to print on your documents and reports. You caneasily combine the one–time attachments you enter for a specificdocument with predefined standard attachments. You can even createa new attachment directly from an existing attachment or useattachments to enter long descriptions for the items you purchase.
Understanding Usages
Purchasing provides you with a list of predefined usages you can usedepending on the type of document you create. The following listshows the usages available for each document you can create.
You can use this usage on purchase orders, RFQs,quotations, requisitions, and for items. Purchasingprints all Supplier text attachments on yourdocuments.
You can use this usage on purchase orders,quotations, RFQs, receipts, requisitions, and foritems. Purchasing displays these attachments tothe receiver in the receiving windows and printstext attachments on the Receipt Traveler.
You can use this usage on requisitions. Purchasingdisplays these attachments to the approvers whenthey approve your requisitions.
You can use this usage on requisitions. Purchasingdisplays these attachments to the buyers when theycreate purchase orders from your requisitions.
You can enter these attachments only on a specific[Document]. Reference this usage when you wantto enter information specific to a purchase order,quotation, RFQ, receipt, requisition, or item.Purchasing does not print or display theseattachments outside the window you use to enterthe document. RCV Internal attachments,however, are printed on the Receipt Traveler.
You can use this usage on purchase orders.Purchasing displays these attachments duringinvoice matching in Accounts Payable.
Supplier
Receiver
Approver
Buyer
[Document]Internal
Payables

1 – 27Setting Up
Defining a Standard Attachment
To define a standard attachment, you simply provide the usage for thisattachment, a meaningful and unique name, and the attachment itself.You can also provide a start date and end date to control theavailability of this attachment. Purchasing defaults today’s date as thestart date for standard attachments. You can easily inactivate anattachment by entering an end date for it. You cannot use a standardattachment on a document after the end date has expired. You definestandard attachments in the Documents window. See: DefiningProduct Specific Documents, Oracle Applications User’s Guide.
Referencing a Standard Attachment
After you define your standard attachments, you can reference them onyour documents. You can reference as many standard attachments toyour documents as you want.
See Also
Attaching Notes to Purchasing Documents: page 1 – 28

1 – 28 Oracle Public Sector Purchasing User’s Guide
Attaching Notes to Purchasing Documents
You can attach files, such as notes, comments, spreadsheets, andgraphics to your application data.
For example, in Purchasing, you can attach files to purchasingdocuments.
An attached file may include comments, for example if the buyerwould like to be notified when an item fails inspection.
� To attach notes to purchasing documents:
� Choose the Attachments icon.
See Also
About Attachments, Oracle Applications User’s Guide
Working With Attachments, Oracle Applications User’s Guide
Annotating Documents: page 1 – 20
Managing Attachments: page 1 – 22

1 – 29Setting Up
Defining Purchasing Options
Use the Purchasing Options window to define default values andcontrols for functions throughout Purchasing. You can often overridepurchasing options when you are creating documents.
You can define specific categories of options when you select one of thefollowing:
Define accrual options, such as whether you accrueexpense items at period end or upon receipt. See:Defining Accrual Options: page 1 – 32.
Define control options, such as the receipt closepoint. See: Defining Control Options: page 1 – 33.
Define default options, such as the minimumrelease amount. See: Defining Default Options:page 1 – 29.
Define the required order type and order source forinternal requisitions. You can navigate to thiswindow only when Purchasing, Order Entry, andInventory are installed. See: Defining InternalRequisition Options: page 1 – 35.
Define the numbering method, numbering type,and next number for each of your documents. See:Defining Numbering Options: page 1 – 36.
Define the sources from which purchasingdocuments default tax information. See DefiningTax Defaults Options: page 1 – 38.
Defining Default Options
� To define default options:
1. Navigate to the Default alternative region in the PurchasingOptions window.
Accrual Options
Control Options
Default Options
InternalRequisitionOptions
NumberingOptions
Tax DefaultsOptions

1 – 30 Oracle Public Sector Purchasing User’s Guide
2. Select one of the following ReqImport Group By options forrequisitions imported through the requisition open interface: All(not grouped), Buyer, Category, Item, Location, or Supplier. See:Requisition Import Process: page 9 – 130.
3. Select the currency Rate Type that defaults on requisitions,purchase orders, RFQs, and quotations. If the Rate Type is User,you can override this default for each document line. If either yourfunctional currency (defined in your set of books) or yourtransaction currency (the currency you enter in a purchasingdocument window) is Euro (the European Monetary Unitcurrency), and the other is another European currency, Purchasingdefaults in the appropriate conversion Rate Type, Rate, and RateDate. See: Defining Conversion Rate Types, Oracle Public SectorGeneral Ledger User’s Guide.
4. Enter the Minimum Release Amount that defaults on blanket,contract, and planned purchase orders. This amount is in yourfunctional currency. See: Overview of Multi–CurrencyAccounting, Oracle Public Sector General Ledger User’s Guide.
5. Select Taxable to set the default taxable status to Yes. This is thedefault for new items and for purchase order shipments without anitem number. You can override the taxable status for each item orpurchase order shipment. The taxable status is printed on yourpurchase orders. See: Defining Tax Names, Oracle Public SectorPayables User’s Guide
6. Select the Price Break Type that defaults on blanket and plannedpurchase orders:
Cumulative: Price breaks apply to the cumulative quantity on allrelease shipments for the item.

☞
1 – 31Setting Up
Non–cumulative: Price breaks apply to quantities on individualrelease shipments for the item.
7. Select the Price Type that defaults on purchase orders. Use theLookup Codes window to define price types. See: DefiningLookup Codes: page 1 – 54.
8. Enter the Quote Warning Delay. This is the number of days beforea quotation expires that you want to receive an expiration warning.When a quotation is due to expire within the number of days youprovide here, you receive the following message in theNotifications Summary window: Quotations active or approachingexpiration: [number]. See: Viewing and Responding toNotifications: page 2 – 29.
9. Select RFQ Required to require an RFQ for an item before you canautocreate the corresponding requisition line onto a purchase order.You can override this value for each item or requisition line.
10. Enter the Receipt Close tolerance percentage for your shipments.Purchasing automatically closes a shipment for receiving if it iswithin the receiving close tolerance at the receiving close point. Setthe receiving close point in the Control Options window. You canoverride this option for specific items and orders. See: DefiningControl Options: page 1 – 33.
11. Enter the Invoice Close tolerance percentage for shipments.Purchasing automatically closes a shipment for invoicing if it iswithin the invoicing close tolerance at billing, when Payablesmatches invoices to purchase orders. You can override this optionfor specific items and orders. See: Defining Control Options: page 1 – 33.
12. Select a default Line Type for requisition, RFQ, quotation, andpurchase order lines. When you create any of these documents, theline type is part of your item information. You can override theline type for each document line. See: Defining Line Types: page 1 – 61.
Attention: This field is enterable only when the form is accessedfrom the Purchasing menu.
13. Select one of the following Invoice Match options:
Two–Way: Purchase order and invoice quantities must matchwithin tolerance.
Three–Way: Purchase order, receipt, and invoice quantities mustmatch within tolerance.

☞
1 – 32 Oracle Public Sector Purchasing User’s Guide
Four–Way: Purchase order, receipt, inspection, and invoicequantities must match within tolerance.
See: Receiving Controls, Options, and Profiles: page 7 – 7.
14. Save your work.
Defining Accrual Options
� To define accrual options:
1. Navigate to the Accrual alternative region in the PurchasingOptions window.
2. Choose one of the following Accrue Expense Items options:
On Receipt: Accrue expense items upon receipt. You can overridethis flag in the Shipment Details window when you are enteringpurchase orders and releases.
Period End: Accrue expense items at period end.
Attention: When using Cash Basis Accounting, you should setthis option to Period End, but you will not normally run theReceipt Accrual – Period End process.
3. For Accrue Inventory Items, you currently have only one choice:On Receipt.
4. Enter the default Expense AP Accrual Account.
5. Save your work.

1 – 33Setting Up
Defining Control Options
� To define document control options:
1. Navigate to the Control alternative region in the PurchasingOptions window.
2. Enter the Price Tolerance Percent. This is the percentage by whichthe autocreated purchase order line price cannot exceed therequisition line price. If you select Enforce Price Tolerance, you cancreate, but not approve, purchase orders for which this tolerance isexceeded. There is no restriction on how much a price candecrease.
3. Select Enforce Price Tolerance if you want Purchasing to enforce theprice tolerance percentage.
4. Select one of the following values for the Enforce Full Lot Quantityoption:
None: The requisition quantity is not rounded to the lot quantity.
Automatic: The requisition quantity is forced to the roundedquantity.
Advisory: An advisory message suggesting rounding and asuggested rounding quantity are displayed, but you can override.
Enforce Full Lot Quantity is used for rounding quantities onInternal Requisitions, for example:
System Options Enforce Full Lot Quantities = YesItems Rounding Factor = 75%Items Unit of Issue = DZUnit of Measure on Internal Requisition = Each

1 – 34 Oracle Public Sector Purchasing User’s Guide
If the user enters 6 Each on the Internal Requisition, the quantitywill be rounding to 0. If the user enters 11 Each on the InternalRequisition, the quantity will be rounded to 12 Each.
See: Overview of Requisitions: page 3 – 2.
5. Select Display Disposition Messages if you want to see anydisposition messages defined against inventory items when theyare placed on requisitions.
6. Select the Receipt Close Point, which is when the shipment isclosed for receiving: Accepted (passed inspection), Delivered, orReceived. Note that you need to set the receipt close tolerancepercentage in the Default Options window. See: Defining DefaultOptions: page 1 – 29.
7. Select Notify If Blanket PO Exists if you want to be notified ofexisting blanket purchase agreements when you create a requisitionline for the item. If you sourced the item, you see the followingmessage: Blanket purchase agreement [number] exists for thisitem. Your requestors can directly create a release for the blanketpurchase agreements instead of creating a requisition if you allowyour requestor to enter releases. See: Viewing and Responding toNotifications: page 2 – 29.
8. The Cancel Requisitions options apply only to requisitions fromwhich purchase orders were autocreated. Select one of thefollowing:
Always: When canceling the purchase order, Purchasing alsocancels the requisition.
Never: When canceling the purchase order, Purchasing does notcancel the requisition, so it is again available for inclusion on apurchase order.
Optional: When canceling the purchase order, you are given theoption to cancel the requisition. See: Controlling Documents: page 2 – 48.
9. You can define for each item whether you allow updating of theitem description during the creation of requisition, RFQ, quotation,or purchase order lines. This update affects only the line you arecreating. Select Allow Item Description Update if you want Yes tobe the initial default of the Allow Description Update attributewhen you are defining a new item.
10. Select a Security Hierarchy, which is a position hierarchy from thePosition Hierarchy window. When the Security Level is set to

☞
☞
☞
1 – 35Setting Up
Hierarchy for a document in the Document Controls window, thisposition hierarchy governs access security for the document.
Attention: This field is enterable only when the form is accessedfrom the Purchasing menu.
11. Select Enforce Buyer Name to enforce entry of only your name asthe buyer on purchase orders. Otherwise, you can enter the nameof any active buyer. See: Defining Buyers: page 1 – 13.
12. Select Enforce Supplier Hold if you do not want to be able toapprove purchase orders created with suppliers that are on hold.Use the Enter Supplier window to place suppliers on hold. See:About Suppliers, Oracle Public Sector Payables User’s Guide.
13. Save your work.
Defining Internal Requisition Options
� To define internal requisition options:
1. Navigate to the Internal Requisition alternative region in thePurchasing Options window.
Attention: The following two fields are enterable only when theform is accessed from the Purchasing menu.
2. Select the default Order Type for internal requisitions.
Attention: The Order Type field is visible only if the applicationOracle Order Entry is installed.
3. Select the default Order Source for internal requisitions.
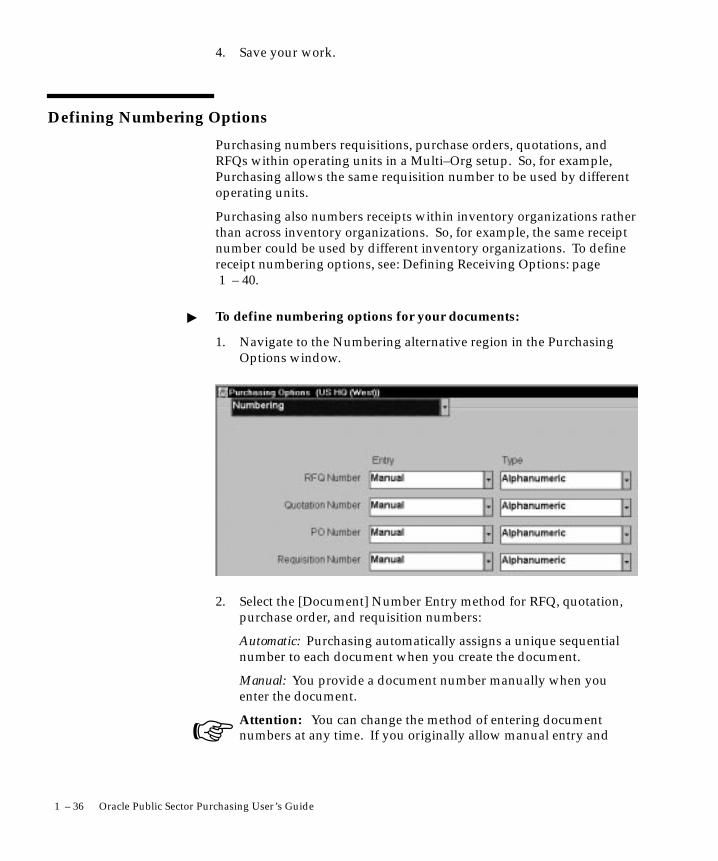
☞
1 – 36 Oracle Public Sector Purchasing User’s Guide
4. Save your work.
Defining Numbering Options
Purchasing numbers requisitions, purchase orders, quotations, andRFQs within operating units in a Multi–Org setup. So, for example,Purchasing allows the same requisition number to be used by differentoperating units.
Purchasing also numbers receipts within inventory organizations ratherthan across inventory organizations. So, for example, the same receiptnumber could be used by different inventory organizations. To definereceipt numbering options, see: Defining Receiving Options: page 1 – 40.
� To define numbering options for your documents:
1. Navigate to the Numbering alternative region in the PurchasingOptions window.
2. Select the [Document] Number Entry method for RFQ, quotation,purchase order, and requisition numbers:
Automatic: Purchasing automatically assigns a unique sequentialnumber to each document when you create the document.
Manual: You provide a document number manually when youenter the document.
Attention: You can change the method of entering documentnumbers at any time. If you originally allow manual entry and

☞
☞
☞
1 – 37Setting Up
switch to automatic entry, make sure to enter a Next Number thatis higher than the highest number you assigned manually.
3. Select the [Document] Number Type you want Purchasing to usefor RFQ, quotation, purchase order, and requisition numbers:Numeric or Alphanumeric.
Attention: If you choose Automatic document number entry, youcan generate only numeric document numbers, but you can stillimport either numeric or alphanumeric values from anotherpurchasing system.
Attention: If you import purchasing documents from a foreignsystem that references alphanumeric numbers, you must chooseAlphanumeric as your number type, regardless of your numberingmethod.
If you choose Manual document number entry, you can choosenumeric or alphanumeric numbers. You can change the documentnumber type from Numeric to Alphanumeric whenever you want.You can change the document number type from Alphanumeric toNumeric only if all your current document numbers are numeric.
Attention: The ordering of numeric values in lists of values canappear random when you use the Alphanumeric number type. Ifyou are using Alphanumeric numbering, consider entering allnumeric values with the same number of digits. For example, ifyou can assume all numeric values contain six digits, you shouldenter the first value as 000001.
4. Enter the Next Number. This is the starting value you wantPurchasing to use for generating unique sequential documentnumbers if you choose Automatic document number entry.Purchasing displays the next document number that will be usedfor a new document when you create the new document. Youcannot enter this field if you choose Manual document numberentry.
If you use Master Scheduling/MRP, Inventory, Work in Process, orany non–Oracle system to create requisitions automatically, youmust also let Purchasing number the corresponding requisitionsautomatically.
5. Save your work.

1 – 38 Oracle Public Sector Purchasing User’s Guide
Defining Tax Defaults Options
The tax defaults you select in this window are used in the followingwindows and processes in Purchasing:
• Shipments window for standard and planned purchase orders
• Purchase order line shipments created by the AutoCreateDocuments window
• Shipments alternative region in the Releases window
• Release shipments created by the Create Releases process
• RFQ Shipments window (for Bid or Standard RFQs) or RFQPrice Breaks window (for Catalog RFQs)
• Quotation shipments window (for Bid or Standard quotations)or Quotation Price Breaks window (for Catalog quotations)
A Tax Name defined in the Purchase Order Preferences windowoverrides any tax defaults you set here. See: Entering Purchase OrderPreferences: page 4 – 33.
Each source you choose below corresponds to a tax name. For moreinformation on defining tax names, see: Defining Tax Names, OraclePublic Sector Payables User’s Guide. See: Site Locations, Oracle HumanResource Management Systems User’s Guide.
1. Navigate to the Tax Defaults alternative region in the PurchasingOptions window.
2. Check one or more of the tax defaults sources from which yourpurchasing documents default tax names.
Ship–To Location – The tax name defaults from the Tax Name youentered in the Location window.

1 – 39Setting Up
Item – The tax name defaults from the Tax Code value you enteredin the Purchasing region of the Master Item or Organization Itemwindows. The tax name defaults first from the item and theship–to organization, if available; if not, it defaults from the itemand inventory organization.
Supplier Site – The tax name defaults from the Invoice Tax Name inthe Invoice Tax region of the Supplier Sites window (accessiblefrom within the Suppliers window).
Supplier – The tax name defaults from the Invoice Tax Name valuein the Invoice Tax region of the Suppliers window.
Financial Options – The tax name defaults from the Tax Name in theFinancials Options window.
3. In the Hierarchy column, enter a ranking number (starting with 1)for each of the tax defaults sources you checked (even if youchecked only one).
Here’s an example:
Hierarchy
Ship–To Location
X Item 3
X Supplier Site 2
X Supplier 1
Financials Options
This example means that when your purchasing documents defaulttax information, they look first for tax information from thesupplier; if that tax information is not found, they look next for taxinformation from the supplier site; if that’s not found, they look fortax information corresponding to the item.
4. Save your work.
See Also
Tax Control Methods, Oracle Public Sector Payables User’s Guide

1 – 40 Oracle Public Sector Purchasing User’s Guide
Defining Receiving Options
Use the Receiving Options window to define options that governreceipts in your system. Most of the options that you set here can beoverridden for specific suppliers, items, and purchase orders. See:Receiving Controls, Options, and Profiles: page 7 – 7.
� To define receiving options:
1. Navigate to the Receiving Options window from the menu.
2. Enter the maximum acceptable number of Days Early and DaysLate for receipts.
3. Enter the Action for Receipt Date Control. This field determineshow Purchasing handles receipts that are earlier or later than theallowed number of days selected above. Choose one of thefollowing options:
None – Receipts may exceed the allowed days early or late.
Reject – Purchasing does not permit receipts outside the selectednumber of days early or late.
Warning – Purchasing displays a warning message but permitsreceipts outside the selected number of days early or late.
4. Enter the maximum acceptable over–receipt Tolerance percentage.

1 – 41Setting Up
5. Enter the Action for Overreceipt Quantity Control. This fielddetermines how Purchasing handles receipts that exceed thequantity received tolerance. Choose one of the following options:
None – Receipts may exceed the selected tolerance.
Reject – Purchasing does not permit receipts that exceed theselected tolerance.
Warning – Purchasing displays a warning message but permitsreceipts that exceed the selected tolerance.
6. Choose an action for ASN Control. This field determines howPurchasing handles receiving against purchase order shipments forwhich an Advance Shipment Notice (ASN) exists. Choose one ofthe following options.
None – Purchasing does not prevent or warn you when you try toreceive against a purchase order shipment for which an ASN exists.
Reject – Purchasing gives you a message and prevents you fromreceiving against a purchase order shipment for which an ASNexists.
Warning – Purchasing gives you a message informing you that anASN exists for the purchase order shipment and lets you decidewhether to receive against the purchase order shipment or its ASN.
7. Check Allow Substitute Receipts if you want to receive substituteitems in place of ordered items. You must define substitute itemsin the Item Relationships window before you can receive them.You can override this option for specific suppliers, items, andorders. See: Defining Item Relationships, Oracle Inventory User’sGuide.
8. Check Allow Unordered Receipts if you want to receive unordereditems. You can later match the unordered receipts to a purchaseorder. If you enable this option, you can override it for specificsuppliers and items.
9. Check Allow Express Transactions to enable express deliveries andreceipts. See: Express Receipts and Receiving Transactions: page 7 – 24.
10. Check Allow Cascade Transactions to enable cascading for receiptsand receiving transactions. See: Cascading Receipts and ReceivingTransactions: page 7 – 22.
11. Select Allow Blind Receiving if you want blind receiving at yoursite. Blind receiving helps you ensure that receivers record theexact amount they receive. With blind receiving, you cannot see

☞
☞
☞
1 – 42 Oracle Public Sector Purchasing User’s Guide
the quantity due or the quantity ordered for shipments when youreceive items. Purchasing ignores all quantity receipt tolerances tohelp ensure that you can receive the exact amount the suppliershipped.
12. Enter the default Receipt Routing that you assign goods: DirectDelivery, Standard Receipt, or Inspection Required. You canoverride this option for specific suppliers, items, and orders if theRCV: Allow Routing Override user profile is set to Yes. See:Profile Options in Purchasing: page 1 – 76.
13. Enter the Enforce Ship To location option to determine whether thereceiving location must be the same as the ship–to location.Choose one of the following options:
None – The receiving location may differ from the ship–to location.
Reject – Purchasing does not permit receipts when the receivinglocation differs from the ship–to location.
Warning – Purchasing displays a warning message but permitsreceipts when the receiving location differs from the ship–tolocation.
14. Choose the Entry method for receipt numbers.
Automatic: Purchasing automatically assigns a unique sequentialnumber to each receipt when you create the receipt.
Manual: You provide a receipt number manually when you enterthe receipt.
Purchasing numbers receipts within inventory organizations ratherthan across inventory organizations. So, for example, the samereceipt number could be used by different inventory organizations.
Attention: You can change the method of entering receiptnumbers at any time. If you originally allow manual entry andswitch to automatic entry, make sure to enter a Next Number thatis higher than the highest number you assigned manually.
15. Choose the receipt number Type you want Purchasing to use forreceipt numbers: Numeric or Alphanumeric.
Attention: If you choose Automatic receipt number entry, you cangenerate only numeric receipt numbers, but you can still importeither numeric or alphanumeric values from another purchasingsystem.
Attention: If you import purchasing documents from a foreignsystem that references alphanumeric numbers, you must choose

☞
1 – 43Setting Up
Alphanumeric as your number type, regardless of your numberingmethod.
If you choose Manual receipt number entry, you can choosenumeric or alphanumeric numbers. You can change the receiptnumber type from Numeric to Alphanumeric whenever you want.You can change the receipt number type from Alphanumeric toNumeric only if all your current receipt numbers are numeric.
Attention: The ordering of numeric values in lists of values canappear random when you use the Alphanumeric number type. Ifyou are using Alphanumeric numbering, consider entering allnumeric values with the same number of digits. For example, ifyou can assume all numeric values contain six digits, you shouldenter the first value as 000001.
16. Enter the Next Receipt Number. This is the starting value youwant Purchasing to use for generating unique sequential receiptnumbers if you choose Automatic receipt number entry.Purchasing displays the next receipt number that will be used for anew receipt when you create the new receipt. You cannot enter thisfield if you choose Manual receipt number entry.
17. Enter the accounting flexfield for the default Receiving AccrualAccount.
See Also
Defining Purchasing Options: page 1 – 29

1 – 44 Oracle Public Sector Purchasing User’s Guide
Defining Requisition Templates
Use the Requisition Templates window to define requisition templates.These templates automate requisitioning of commonly ordered itemslike office supplies. To create a requisition for office supplies,requestors in your organization simply use your template and enter thequantity of each item they want to order.
To create a template, you can specify the items individually or you canreference an existing requisition or purchase order. If you reference anexisting document, Purchasing adds all lines on the document to thetemplate. You can reference multiple documents to add all their linesto the same template.
After you define a template, you can reference the template in theSupplier Item Catalog. When you do so, Purchasing displays alltemplate lines that are valid for the destination organization, and youcan use any of these lines on your requisition. You can createrequisitions with this template as long as the requisition creation date isbefore the template inactive date.
� To define requisition templates:
1. Navigate to the Requisition Templates window by selectingRequisition Templates from the menu.

1 – 45Setting Up
2. Enter the requisition Template name.
3. Enter a Description of the template.
4. Enter the Inactive Date after which you do not want any requestorto create a requisition from this template.
5. Enter the requisition Type: Internal or Purchase. In either case,you can enter individual requisition lines of either type.
� To copy lines to a template:
1. Select the Copy button to open the Base Document window.
2. Enter the Base Document Type: Purchase Order or Requisition.
3. Enter the base document Number from which you want to copylines to the template.
4. Choose the OK button to copy all lines of the base document ontothe template. You can choose the Cancel button to return to theRequisition Templates window without copying.
You can place lines from multiple documents onto the samerequisition template.
� To manually add lines to a template:
1. Use the Lines region to manually add new lines to the template.You can also remove lines that you have copied from a basedocument, and you can change certain information in these lines.
2. Enter a Number in this field to identify the sequence of the line onyour requisition. Purchasing provides default sequence numbers inincrements of one.
3. Enter the line Type. You can enter or change information in thisfield only for new lines. The default is from the PurchasingOptions window. See: Defining Default Options: page 1 – 29.
4. Enter the Item number. You can enter or change information in thisfield only for new lines.
5. For new lines only, you can enter the item Revision number.
6. If you entered an item, Purchasing displays the purchasingCategory, and you cannot change it. Otherwise, you must enter apurchasing category.
7. Purchasing displays the item Description from the document youselected in the Base Document Number field. If you are entering a

1 – 46 Oracle Public Sector Purchasing User’s Guide
new line, the description is from the item master. You can changethe description only if this attribute is active for the item.
8. The Source type determines the source of the requisitioned items.The choice you have in this field is dependent on your user profileoptions and the system profile options. At either level, you may berestricted to one of the following options: Inventory or Supplier.
Note that if you have both options, you can source requisition linesindependently of the requisition type. You can even mix inventoryand supplier sourced requisition lines in the same requisition.Purchasing creates one internal sales order for each inventorysource type requisition line on this requisition. The supplier sourcetype requisition lines go onto purchase orders, either automaticallywith AutoCreate Documents or manually with the Purchase Orderswindow.
9. Enter the default unit of measure.
10. For supplier sourced lines, you can enter the unit price, and thisprice is used in the Requisitions window. For inventory sourcedlines, the cursor does not enter this field, and the price in theRequisitions window is the actual cost from inventory.
11. Save your work.
� To enter sourcing information:
You can enter sourcing information for the current line in the lowerpart of the screen.
1. For supplier source type lines, you can enter the name of the Buyerto whom you want to assign the requisition line. The buyers canquery requisition lines that you assign to them when theyAutoCreate purchase orders.
2. For supplier source type lines, you can select RFQ Required toindicate that you want to require an RFQ before the buyer cancreate a purchase order for the requisition. Purchasing displays awarning message if you try to create a purchase order without arequired RFQ.
3. For supplier source type lines, you can enter a suggested Supplierfor your requisition items. You can choose a supplier from the listof available suppliers. Alternatively, you can suggest a newsupplier by entering the name of the supplier directly.
4. For supplier source type lines, you can enter the supplier Site. Youcan enter this field only if you provide a suggested supplier name.

1 – 47Setting Up
You can choose a supplier site from the list of values. Alternatively,you can enter a new site directly.
5. For supplier source type lines, you can enter the name of yourContact at the supplier site.
6. For supplier source type lines, you can enter the Supplier Itemnumber.
7. For inventory source type lines, you can specify the sourceOrganization.
8. For inventory source type lines, you can optionally specify theSubinventory source. If you do so, Oracle Order Entry uses onlythe specified subinventory for allocation. If the goods do not existat the specified subinventory, Purchasing backorders them, even ifthey do exist in another subinventory.
See Also
Supplier Item Catalog Overview: page 5 – 7

1 – 48 Oracle Public Sector Purchasing User’s Guide
Purchasing Hazardous Materials
Purchasing provides you with flexible features to handle all yourhazardous materials purchasing and receiving requirements. You canclearly identify and classify hazardous materials and print informationon your RFQs and purchase orders to ensure that your suppliers pack,label, and ship hazardous materials according to the regulations. Youcan also review hazardous materials information when receiving itemsand take the required safety precautions.
Use the Hazard Classes window (See: Defining Hazard Classes: page 1 – 51.) to define the hazard classes you need. Use the UN Numberswindow (See: Defining UN Numbers: page 1 – 52.) to define theidentification numbers you use and to assign them to hazard classes.Use the Item window to associate hazard classes and UN numberswith your items. See: Defining Items, Oracle Inventory User’s Guide
Regulation Background
Section 19 of the ISRS (International Safety Rating System) requires thatyou clearly identify and record all orders for hazardous materials. TheUS Department of Transportation provides similar regulations. Theseregulations provide an extensive classification system for hazardousmaterials. The purpose of this classification is to provide detailedrequirements for shipping papers, package marking, labelling, andtransport vehicle placarding applicable to the shipment andtransportation of hazardous materials. For each hazardous material,the classification provides:
Describes the item ordered or shipped. Shippingnames are regulated in some cases.
Examples:
Calcium hydrogen sulfite solution
Epichlorohydrin
Fuel oil
Mercuric oleate, solid
Petroleum Distillate
Small arms ammunition
Shipping Name

1 – 49Setting Up
Categorizes the hazardous material. Mosthazardous materials belong to only one hazardclass. Some materials belong to more than onehazard class and some materials do not belong toany. If a material belongs to more than one hazardclass, you should list these classes in a specificorder.
Examples:
Corrosive Material
Flammable liquid
Forbidden
Combustible liquid
Poison A
ORM–A
Class A explosive
Identifies the hazardous material. Eachidentification number has a description. There aretwo types of identification numbers. Identificationnumbers preceded by ”UN” (United Nations) havedescriptions appropriate for international and USdomestic shipments. Identification numberspreceded by ”NA” (North American) apply only toUS domestic shipments and shipments between theUS and Canada. Identification numbers are notunique. For instance, the same UN Number maycorrespond to two closely related but differenttypes of materials.
Examples:
UN0001 Alarm Devices, Explosives
UN0027 Black powder
UN0180 Rockets
NA1133 Cement
NA2016 Grenade
UN2016 Ammunition
UN2769 Benzoic derivative pesticide, liquid
Hazard Class
IdentificationNumber

1 – 50 Oracle Public Sector Purchasing User’s Guide
UN2769 Benzoic derivative pesticide, solid
Some hazardous materials do not have acorresponding identification number.
Examples:
Fuse, lighter
Propellant, explosive, liquid
In some cases, hazardous materials that youidentify by the same identification number canbelong to two different hazard classes.
Example:
Fuel, aviation, turbine engine has the ID NumberUN1863, but it can be in either the FlammableLiquid or the Combustible Liquid hazard class.
Specifies the labels required for each package of thehazardous material. The regulations providedetailed instruction concerning the format, size,colors, and printing of labels.
Examples:
Flammable liquid
Explosive C
Poison B
Specify the packaging and placarding requirementsand exceptions for the hazardous material.Packaging requirements depend mainly on thehazard class for the hazardous material, but thereare many exceptions to this rule.
Specify the maximum amount of hazardousmaterial you can carry per package depending onthe mode of transportation you use. Also provideadditional shipping, handling, storing, or otherinformation about the hazardous material.
Examples:
Labels Required
PackagingRequirements
ShippingRequirements

1 – 51Setting Up
Keep dry
Keep cool
Store away from acids
Defining Hazard Classes
Use this window to define codes for different classes of hazardousmaterials. You provide the class name, description, and the date afterwhich the class is no longer active. You can assign a hazard class tomultiple UN numbers to identify hazardous items.
Purchasing automatically copies hazardous material information ontoyour documents and prints this information on your purchase orders,RFQs, and Receipt Travelers. Purchasing automatically displayshazardous material information for your receivers.
� To define hazard classes:
1. Navigate to the Hazard Classes window.
2. Enter a unique name for each hazard class you want to define. Forexample, you might provide any of the following classes:Explosive, Poisonous, Toxic.
3. Enter a description for your hazard class. You can use thisdescription to provide a more detailed explanation of the hazardclass.

1 – 52 Oracle Public Sector Purchasing User’s Guide
4. Enter the date your hazard class becomes inactive. You cannot usethe hazard class after this date.
5. Save your work.
See Also
Purchasing Hazardous Materials: page 1 – 48
Defining UN Numbers: page 1 – 52
Defining Items, Oracle Inventory User’s Guide
Defining UN Numbers
Use this window to define United Nations identification numbers forhazardous materials. You can associate a hazard class with multipleidentification numbers. You can also assign an identification numberand a hazard class to each item you define.
Purchasing automatically copies hazardous material information ontoyour documents. Purchasing prints hazardous material information onyour purchase orders, RFQs, and Receipt Travelers and displays thisinformation for your receivers and inspectors.
Prerequisites
❑ Define Hazard Classes before performing this step. See: DefiningHazard Classes: page 1 – 51.
� To define UN numbers:
1. Navigate to the UN Numbers window.

1 – 53Setting Up
2. Enter the UN identification number. You can define multipleinstances of the same UN number as long as the descriptions aredifferent.
3. Enter a Description for your identification number.
4. Enter the Hazard Class you want to associate with theidentification number. This is optional.
5. Optionally enter the Inactive Date for the identification number.
6. Save your work.
See Also
Purchasing Hazardous Materials: page 1 – 48
Defining Hazard Classes: page 1 – 51
Defining Items, Oracle Inventory User’s Guide

☞
1 – 54 Oracle Public Sector Purchasing User’s Guide
Defining Lookup Codes
Use the Lookup Codes window to define lookup codes in Purchasing.
Purchasing uses lookup codes to define lists of values throughout thesystem. You can add your own codes to those initially provided forsome of the lookup codes.
For example, Purchasing supplies the following Supplier Type codes:Employee and Supplier. You might want to define an additional codecalled Consultant to use for the purchase of consulting services.
Attention: You cannot change or delete codes once you haveadded and saved them, but you can change the codedescriptions.
� To define lookup codes:
1. Navigate to the Lookup Codes window from the menu.
2. Enter one of the following predefined code Types: 1099 SupplierException, Acceptance Type, FOB (free on board), Freight Terms,Minority Group, Pay Group, PO/Requisition Reason, Price Type,Quotation Approval Reason, Reply/Receive Via, and SupplierType.
3. Enter up to 25 characters as a unique code you want to add tothose already provided. Purchasing provides the following codesfor the listed code types:
1099 Supplier Exception: Purchasing provides no 1099 SupplierException codes, but you can define your own. These codes are

1 – 55Setting Up
used only in the Payables reports: 1099 Invoice Exceptions Reportand 1099 Supplier Exceptions Report.
Acceptance Type: Purchasing provides Accepted Terms, OnSchedule, and Unacceptable Changes.
FOB: Purchasing provides no FOB codes, but you can define yourown. This code is printed on your purchase orders.
Freight Terms: Purchasing provides no Freight Terms codes, but youcan define your own. This code is printed on your purchaseorders.
Minority Group: Purchasing provides no Minority Group codes, butyou can define your own.
Pay Group: Purchasing provides no Pay Group codes, but you candefine your own.
Price Type: Purchasing provides Cost Plus Fee, Cost PlusPercentage, Fixed, Indexed, and Variable.
Quotation Approval Reason: Purchasing provides Best Delivery, BestDesign, Lowest Price, Only Source, Quality, and Service.
Reply/Receive Via: Purchasing provides no Reply/Receive Viacodes, but you can define your own.
PO/Requisition Reason: Purchasing provides no transactionreason/transaction nature codes for purchase orders, requisitions,RFQs, and quotations, but you can define your own.
Supplier Type: Purchasing provides Employee and Supplier.
4. Enter an Inactive Date on which the code is no longer active.
5. Save your work.

1 – 56 Oracle Public Sector Purchasing User’s Guide
Defining Quality Inspection Codes
Use the Quality Inspection Codes window to define and update yourinspection codes. You can define as many codes for inspection as youwant. Each code must have a corresponding numerical ranking, whichprovides an inspection scale. You use these inspection codes when youreceive and inspect the items you ordered.
� To define quality inspection codes:
1. Navigate to the Quality Inspection Codes window by selectingQuality Inspection Codes on the menu.
2. Enter a Ranking number that corresponds to a specific qualitycode. This value must be between 0 and 100, where 0 representsthe lowest quality. For example, 10 might represent a qualityranking of Poor, while 90 might represent a quality ranking ofExcellent. Purchasing lists these rankings when you inspect yourreceipts.
3. Enter a Quality Code to indicate a particular quality standard. Forexample, you might want to define Excellent Condition orDamaged as quality codes.
4. Enter a description for your quality code. You can use thisdescription to provide a more detailed explanation of the qualitycode.
5. Enter the Inactive Date after which the quality code is no longeractive.
6. Save your work.

1 – 57Setting Up
Purchasing Services
Purchasing provides the line type feature so that you can clearlydifferentiate orders for goods from those for amount–based services oroutside processing.
Background
Requestors and buyers generally order both goods and services byquantity. You order the number of items you need in a specific unit ofmeasure and at a given price. For instance, a buyer could order 10computer terminals at a price of $1500 each. Later, the receiving agentrecords the receipt of one crate of 5 terminals. The accounts payabledepartment receives a bill for 5 terminals, and matches the invoiceagainst the original purchase order. Sometimes, you also need to orderservices in the same way. For example, you purchase 40 hours ofproduct training at a rate of $40 per hour. You simply record the hoursof training ordered and the price per hour. Once you receive thetraining, you record the hours received.
However, you sometimes order services by amount rather than byquantity. For example, a project manager orders $10,000 of consultingservices to install a local area network. In this case, the buyer onlyneeds to record the total amount of the service.
When half of the work is complete, the project manager records areceipt of $5000. The consulting firm may send an invoice for thecomplete amount of the service, or it may send partial invoices. Ineither case, the accounts payable department must match the invoice tothe original purchase order by amount.
Purchasing provides you with the features you need to order bothgoods and services. You should be able to:
• Create your own purchasing document line types. For each linetype, you should be able to specify the value basis: amount orquantity. For both amount and quantity based line types, youcan specify default values for category, unit of measure, andwhether you require receipt. For quantity based line types, youcan specify the unit price, but for amount based line types theunit price defaults to 1. For quantity based lines, you can specifywhether the line type is used for outside processing.
• Create a purchasing document with any combination of linetypes you need.

1 – 58 Oracle Public Sector Purchasing User’s Guide
• AutoCreate purchase order lines from your requisition lines,grouping requisition lines for the same line type and item ontothe same purchase order lines.
• Create amount–based purchase order lines by selecting anamount–based line type, category, item description, and totalamount for the line.
Major Features
Line Type
The line type governs the type of requisition, purchase order, RFQ, andquotation lines you create. Quantity–based line types let you order andreceive and/or invoice based on the quantity of goods or servicesprovided. Amount–based line types let you order and receive and/orinvoice based on the value of the service provided.
Quantity–Based Purchasing
Use quantity–based line types when you want to specify the quantity,unit of measure, and unit price for the items you are ordering.Purchasing provides Goods as an initial quantity–based line type. Youcan modify this line type or create new quantity–based line types tosatisfy your needs.
Amount–Based Purchasing
Use amount–based line types when you want to order services andother items by amount. You create an order for a service by selectingan amount–based line type, category, item description, and totalamount of the service. You can also receive and match services byamount.
Outside Processing Line Types
You can use outside processing line types to enter purchasingdocuments to pay suppliers for outside processing operations.Purchasing provides Outside Processing as an initial outside processingline type, and you can create additional outside processing line types.You cannot use outside processing line types, unless Purchasing, Workin Process, and Bills of Material are installed. See: Overview ofOutside Processing: page 4 – 120.

1 – 59Setting Up
Line Types Step by Step
Defining Line Types
Purchasing provides one initial line type: Goods. If Work in Process isinstalled, Purchasing also provides the line type Outside Processing.You can modify these line types or create new line types in the LineTypes window. To define a new line type, you simply provide a nameand description for lines types with a value basis of quantity oramount. You can then optionally specify a default category, whetherreceipt is required, and unit of measure. The unit price defaults to 1 foramount–based line types but is otherwise optional. You cannot specifya line as outside processing unless the value basis is quantity. You mustprovide a default unit of measure for amount–based line types. Youuse the unit of measure for amount–based lines as referenceinformation only. Purchasing does not perform any unit conversion foramount based lines. You can create a unit of measure such asAMOUNT for amount based line types to help you determine if youordered by amount. See: Defining Line Types, Oracle Inventory User’sGuide.
Creating Purchasing Document Lines
Purchasing lets you specify whether you are creating a document linefor quantity, amount, or outside processing. You simply choose the linetype when you create your document line. You enter the item, itemdescription, quantity, unit of measure, and unit price for quantity baseddocument lines. For amount based document lines, you enter only thecategory, item description, and the amount (in the Quantity field). TheUnit Price defaults to 1 and you cannot change it.
Setting Up a Default Line Type
Since you typically use one line type more than the others, Purchasinglets you define a system default line type in the Purchasing Optionswindow. All new purchasing document lines default to this line type.You can override this value when you need to create document lines ofanother type. You do not have to set up a system default if you usemany different line types. See: Defining Default Options: page 1 – 29.
AutoCreating Purchase Orders
You can use AutoCreate Purchase Orders to convert approvedrequisition lines for items and services into purchase orders andreleases. You can gather requisition lines for the same line type andplace them onto a single purchase order. You can also placerequisitions for different line types onto the same purchase order.

1 – 60 Oracle Public Sector Purchasing User’s Guide
Purchasing combines requisition lines for the same item, line type, unitof measure, and item revision onto a single purchase order line. See:Autocreate Documents Overview: page 6 – 2
Enhanced Document Printing
Purchasing prints your document lines according to their line types.For quantity based line types, Purchasing prints the quantity, unit priceand total amount for purchase orders and RFQs. Purchasing printsonly the amount for amount based document lines.
Enhanced Reporting
The line type feature includes enhanced reporting to differentiatebetween quantity and amount based orders. Purchasing prints the linetype so you can easily determine whether the information is quantity oramount based. For amount based orders, Purchasing prints only thetotal amount of the order.
Purchasing Services Step by Step
Creating Requisitions for Services
Purchasing lets you create requisition lines for services and otheramount based orders. When you choose an amount based line type,Purchasing automatically sets the unit price to 1 for your line andenters the default unit of measure for the line type. You cannot changethe unit price or unit of measure for amount–based requisition lines.You enter the amount of the service in the Quantity field. Your totalline amount is the same as the value displayed in the quantity field.You can use the quantity field in your distributions to allocate the orderamount to multiple accounting flexfields.
Creating Purchase Orders for Services
You can use AutoCreate Purchase Orders to create purchase order linesand releases from approved requisitions. You can gather all requisitionlines for services and review these lines before placing specific ones onpurchase orders. You can also split a requisition line for a service intoseveral requisition lines for goods and services. Purchasing creates apurchase order for all of the requisition lines you choose.
You can also enter purchase orders for services manually by entering aservice line type, the amount (Quantity) of the service, the category,and the item description. Purchasing automatically enters the unitprice and unit of measure.

1 – 61Setting Up
Sourcing Services
When you request a quotation from a supplier for a particular service,you can provide a complete description of the service you arerequesting. You must choose a quotation type of Catalog if you want touse it for sourcing.
If you provide a requested service amount on your RFQ, Purchasingprints ”Amount Requested:” followed by the total amount you entered.For example, you request quotations for the installation of a local areanetwork and you know that you would like to pay $10000. You simplycreate an amount–based RFQ line and one shipment for this line.Purchasing automatically sets the unit price to 1 and fills in your unit ofmeasure. On the RFQ shipment, you enter the amount, 10000, in thequantity field. Purchasing automatically sets the shipment break priceand unit of measure.
When you choose sourcing information for amount–based requisitionand purchase order lines, Purchasing copies the total amount fromyour chosen quotation shipment into the Quantity field of yourpurchasing document. Since you are creating an amount–based lineand the unit price is set to 1, the Quantity field displays the totalamount for the line.
Receiving Services
You receive services the same way you receive goods. When youreceive a service, your quantity fields reflect the amounts of your order.Simply specify the amount you receive, correct, or return in theQuantity fields. Purchasing displays your line type so you candetermine whether you are receiving by amount or quantity. You mustreceive services and other amount–based purchases in the unit ofmeasure specified on the purchase order.
Matching Service Purchase Orders
When matching invoices to services purchase order lines in Payables,you enter the amount invoiced in the Quantity field. Payables defaultsthe unit price to 1 when matching to service orders. You should notchange the unit price. Payables warns you if the unit price is not 1 forservice orders.
Defining Line Types
Use the Line Types window to define and update line types.

1 – 62 Oracle Public Sector Purchasing User’s Guide
When you enter a line on a purchasing document and choose a linetype, Purchasing automatically displays the default information thatyou define here for the line type.
Line types let you distinguish between quantity and amount based lineitems. You use quantity based line items when you know the quantityand price of the line you are ordering. For example, you might buy adozen pens for $10. You use amount based line items when you areordering a service. For example, you might order $5,000 of consultingservices over the next year.
When you are entering amount based document lines in purchasingwindows such as the Purchase Orders window, Purchasing skips theItem and Revision fields, and sets the price to 1. You simply providethe total amount of 5,000 as the quantity. Then, when you record yourreceipts, you can enter the amount you have received as a quantity. Forexample, if you have incurred $300 of a $500 charge, you record aquantity of 300.
You can create line types to reflect different characteristics for the itemsyou purchase. For example, you may want to define one line type foritems you order by quantity and unit price, another line type forservices you order by hour, and yet another that indicates an outsideprocessing operation used in Oracle Work In Process (WIP). You cancreate purchasing document lines and specify whether they are forgoods, services, outside processing, or any other line type you define.
Outside processing line types are necessary when you are using WIPand want to enter purchasing documents for outside processingoperations in WIP. When you choose an outside processing line typeon a purchasing document line, you can enter only outside processingitems and the destination type can be only Shop Floor.
Purchasing automatically provides you with a line type of Goods that isquantity based. If Work in Process is installed, Purchasing alsoprovides you with an Outside Processing line type. You can set upyour purchasing options to copy a default line type for lines you add toevery requisition, purchase order, RFQ, or quotation document. Youcan override the default line type for each document line you create.
Prerequisites
❑ Define categories. See: Defining Categories, Oracle Inventory User’sGuide.
❑ Define units of measure. See: Defining Units of Measure, OracleInventory User’s Guide.

1 – 63Setting Up
� To define line types:
1. Navigate to the Line Types window from the menu.
2. Enter the Name and Description of the line type.
3. Enter the Value Basis for the line type. You cannot update this fieldafter you save your work.
Amount: Receive items by amount. You cannot change the unit ofmeasure and unit price on purchasing document lines.
Quantity: Receive items by quantity. Outside Processing line typesmust have this value basis.
4. Enter the default purchasing Category for items with this line type.You can override this purchasing category on purchasing documentlines.
5. Select Receipt Required if you want this as the default on yourpurchasing document shipments with this line type. You canoverrule the default when you enter the shipment.
6. Enter the default Unit of measure for items with this line type. Youmust enter a default unit when you use the Amount value basis foryour line type. You can override this unit of measure on yourpurchasing document lines only when you use non–OutsideProcessing line types with Quantity value basis.
If you use the Amount value basis, you may want to choose yourfunctional currency as the unit of measure. For example, if yourfunctional currency is US dollars, you may want to define a unit of

1 – 64 Oracle Public Sector Purchasing User’s Guide
measure USD that you can use for your line types with the Amountvalue basis.
7. Enter the default Unit Price for items with this line type.Purchasing automatically enters a unit price of 1 when you use theAmount value basis and prevents you from updating this pricewhen you create your line type. You can override this unit price onyour purchasing document lines only when you use line types withQuantity value basis.
8. Select Outside Processing to restrict this line type to purchasingoutside processing. Also, when you use an outside processing linetype on a purchasing document, your choices for the item arelimited to outside processing items. You can select this check boxonly if the value basis is Quantity and if you are using Work inProcess.
9. Enter the Inactive Date on which the line type is no longer usable.
10. Save your work.
See Also
Purchasing Services: page 1 – 57
Overview of Outside Processing: page 4 – 120

☞
1 – 65Setting Up
Defining Document Types
Use the Document Types window to define access, security, and controlspecifications for all Purchasing documents. You cannot enter newdocument types; you can enter new document subtypes only for RFQsand quotations.
Attention: The document controls that you specify here are fullyoperational during use of the Browse feature.
Prerequisites
❑ Before you use this window to set up your document types, youshould perform the following steps:
• If you want to be able to choose the document approvalhierarchy in this form, you must enable Use ApprovalHierarchies in the Financials Options window. See: DefiningFinancials Options, Oracle Public Sector Payables User’s Guide.
• You must use the Position Hierarchy window to create andupdate the position hierarchies, since Purchasing uses thesehierarchies as document approval routings. See: RepresentingJobs and Positions, Oracle Human Resource Management SystemsUser’s Guide.
� To define document types:
1. Navigate to the Document Types window from the menu. A list ofvalues displays in the Document Types field when the windowopens. If you want to maintain information for an existingdocument type, select it from the list.
Purchasing provides the following Document Types: PurchaseAgreement, Purchase Order, Quotation, Release, Request forQuotation, and Requisition.

1 – 66 Oracle Public Sector Purchasing User’s Guide
2. You can enter user–defined Document Subtypes only for documenttypes Quotation and Request for Quotation. You can deleteQuotation and Request for Quotation document types you havecreated, but only if no actual document exists for the type.Purchasing provides the following document subtypes:
Purchase Agreement – Blanket and Contract
Purchase Order – Planned and Standard
Quotation – Bid, Catalog, and Standard
Release – Blanket and Scheduled
Request for Quotation – Bid, Catalog, and Standard
Requisition – Internal and Purchase
3. Enter your Document Name for the document. The descriptionmust be unique for the given document type. The name that youenter here appears as a list of values choice in the Type field in theappropriate document entry window. For example, it appears,along with the quotation class, as a list of values choice in theQuotation Type field in the Quotations window.
4. The Quotation Class is applicable only for document typesQuotation and Request for Quotation. Choose one of the followingoptions:

☞
1 – 67Setting Up
Bid – The quotation or RFQ is for a specific fixed quantity, location,and date.
Catalog – The quotation or RFQ includes price breaks at differentquantity levels.
5. Check Owner Can Approve to indicate that document preparerscan approve their own documents. This field is not applicablewhen the Document Type is Quotation or RFQ.
Attention: If you are using budgetary control and enable thisoption, you should also enable the Reserve at RequisitionCompletion option in the Financials Options window. Likewise, ifyou disable this option, you should also disable the Reserve atRequisition Completion option.
6. Check Approver Can Modify to indicate that document approverscan modify documents. This field is not applicable when theDocument Type is Quotation or RFQ.
7. Check Can Change Forward–To to indicate that users can changethe person the document is forwarded to. This field is notapplicable when the Document Type is Quotation or RFQ.
8. Check Can Change Forward–From to indicate that users canchange the name of the document creator. This field is applicableonly when the Document Type is Requisition.
9. Check Can Change Approval Hierarchy to indicate that approverscan change the approval hierarchy in the Approve Documentswindow. This field is not applicable when the Document Type isQuotation or RFQ.
10. Check Disable to disable a document type. This field is applicableonly for user–defined quotations and RFQs.
11. For user–defined quotations and RFQs, Purchasing displays as adefault the Security Level of the Standard Quotation or RFQ, andyou cannot enter the field. Otherwise, choose one of the followingoptions:
Hierarchy – Only the document owner and users above the ownerin the defined purchasing security hierarchy may access thesedocuments.
Private – Only the document owner may access these documents.
Public – Any user may access these documents.
Purchasing – Only the document owner and users listed as buyersin the Define Buyers window may access these documents.

1 – 68 Oracle Public Sector Purchasing User’s Guide
12. For user–defined quotations and RFQs, the Access Level is that ofthe Standard Quotation or Standard RFQ, and you cannot enter thefield. Otherwise, choose one of the following Access Level options:
Full – Users can view, modify, cancel, and final close documents.
Modify – Users can only view and modify documents.
View Only – Users can only view documents.
13. The Forward Method field is not applicable when the DocumentType is Quotation or RFQ. The following options apply regardlessof whether you are using position hierarchies or theemployee/supervisor relationship to determine your approvalpaths. Choose one of the following options:
Direct – The defaults for the approver is the first person in thepreparer’s approval path that has sufficient approval authority.
Hierarchy – The default for the approver is the next person in thepreparer’s approval path.
14. The Archive When field is applicable only when the DocumentType is Purchase Agreement, Purchase Order, or Release. Chooseone of the following options:
Approve – The document is archived upon approval. This option isthe default.
Print – The document is archived upon printing.
15. The Default Hierarchy field is not applicable when the DocumentType is Quotation or RFQ. Otherwise, when Use ApprovalHierarchies is enabled in the Financial Options window, you canenter a position hierarchy from the Position Hierarchy window.This hierarchy then becomes the default in the Approve Documentswindow.
� To associate certain workflows with specific document types:
In Purchasing, all approvals are handled in the background by OracleWorkflow technology. The default approval workflow processes inPurchasing use the approval controls and hierarchies you defineaccording to the setup steps in Setting Up Document Approval andSecurity: page 0 – 2. If you created a workflow process of your ownand wanted to associate it with a specific document type, you wouldchoose that workflow process here.
1. Select the Approval Workflow you want to use for this particulardocument type, or use the default that is already provided.

1 – 69Setting Up
The PO Approval workflow is used for approving purchase orders.The PO Requisition Approval workflow is used for approvingrequisitions. If you’ve created a workflow of your own, you canselect that for this document. See: Approval Workflows: page 2 – 63.
2. Select the Workflow Startup Process you want to use for thisparticular document type, or use the default that is alreadyprovided.
Usually the Workflow Startup Process is the highest–level processin a workflow. For example, the highest–level process for the POApproval workflow is the ”PO Approval Top Process.” If you’vecreated a startup process of your own, you can select that for thisdocument.
3. For requisitions only, select the Autocreate Workflow you want touse for automatically creating purchase orders or releases fromapproved requisition lines, or use the default that is provided.
The default workflow that comes with Purchasing is the PO CreateDocuments workflow. If you’ve created a workflow of your own,you can select that for this document. See: Workflow for CreatingPurchase Orders or Releases: page 4 – 160.
4. For requisitions only, select the Autocreate Workflow StartupProcess you want to use, or use the default that is alreadyprovided.
The highest–level process for the PO Approval workflow is the”Overall Document Creation / Launch Approval Process.” Ifyou’ve created a startup process of your own, you can select thatfor this document.
See Also
Defining Financials Options, Oracle Public Sector Payables User’s Guide
Representing Jobs and Positions, Oracle Human Resource ManagementSystems User’s Guide
Enter Person, Oracle Human Resource Management Systems User’s Guide
Budgetary Control and Online Funds Checking, Oracle Public SectorGeneral Ledger User’s Guide
Submitting a Document for Approval: page 2 – 32
Entering Requisition Headers: page 3 – 49

1 – 70 Oracle Public Sector Purchasing User’s Guide
Entering Purchase Order Headers: page 4 – 39
Entering RFQ Headers: page 5 – 32
Entering Quotation Headers: page 5 – 47

1 – 71Setting Up
Controlling Purchasing Periods
Use the Control Purchasing Periods window to control the purchasingperiods defined in the Accounting Calendar window. You usepurchasing periods to create journal entries in your general ledgersystem. Purchasing lets you create journal entries only for transactionsyou enter in an open purchasing period. You create general ledgerjournal entries when encumbering requisitions, purchase orders oraccruing receipts.
If you use encumbrance or budgetary control, Purchasing verifies thatthe GL Dates you provide on purchase order distributions andrequisition distributions are within an open purchasing period. See:Budgetary Control and Online Funds Checking, Oracle Public SectorGeneral Ledger User’s Guide.
Prerequisites
Before using this window you should define your purchasing periodsin the Accounting Calendar window. See: Defining Calendars, OraclePublic Sector General Ledger User’s Guide.
� To control purchasing periods:
1. Navigate to the Control Purchasing Periods window from themenu.
Purchasing displays the Period Status, Period Number, Fiscal Year,Period Name, Begin Date, and End Date for each existing period.

1 – 72 Oracle Public Sector Purchasing User’s Guide
2. In the Period Status field, you have the following options:
Closed – Use this option to close this purchasing period. When youclose a purchasing period, Purchasing does not allow furtheraccruals during this period. Purchasing reverses the status ofaccrued purchase order lines so that you can accrue them in thenext period if you want.
Future – Use this option if you want to open this purchase period inthe future. This option is available only when the current status isNever Opened.
Never Opened – Purchasing displays this default status if you havenot opened this period in the past.
Open – Use this option to open this purchasing period.
Permanently Closed – Use this option if you do not want to open thisperiod in the future. This option is irreversible.
See Also
Defining Purchasing Options: page 1 – 29
Controlling the Status of AP Accounting Periods, Oracle Public SectorPayables User’s Guide

1 – 73Setting Up
Choosing Workflow Options
Starting the ”Send Notifications for Purchasing Documents” Process
In Purchasing, a workflow called ”Send Notifications for PurchasingDocuments” looks for documents that are incomplete, rejected, or inneed of reapproval and sends notifications to the appropriate people ofthe document’s status. You can view and respond to these notificationsthrough the Notifications Summary window. This workflow sendsnotifications for purchase order and requisition approvals, RFQs andquotations, and purchase order acceptances. In order for thesenotifications to be sent, you need to start the concurrent programprocess, Send Notifications for Purchasing Documents, and choosehow frequently you want the process to run. See: Send Notificationsfor Purchasing Documents: page 9 – 142.
For information on the kinds of notifications sent by the SendNotifications for Purchasing Documents process, see: Viewing andResponding to Notifications: page 2 – 29.
Choosing Document Creation Options
Prerequisite
❑ Before you can use or modify any of the workflows in Purchasing,you need to set up Oracle Workflow if you haven’t done so already.See: Setting Up Oracle Workflow, Oracle Workflow Guide.
Purchasing integrates with Oracle Workflow technology to createstandard purchase orders or blanket releases automatically fromapproved requisition lines. The workflow for creating purchasingdocuments automatically is called PO Create Documents. PO CreateDocuments consists of three attributes, the values of which you canchange in the Oracle Workflow Builder:
• Is Automatic Creation Allowed? – The default value of thisattribute is set to ’Y,’ meaning that automatic document creationis allowed for approved requisition lines. You can preventautomatic document creation by setting the default value of thisattribute in the Workflow Builder to ’N’ for No.

☞
☞
1 – 74 Oracle Public Sector Purchasing User’s Guide
• Should Workflow Create the Release? – The default value of thisattribute is set to ’Y,’ meaning that the workflow tries to createthe release; if it cannot, or if the value of this attribute is set to’N’ for No, then the workflow will not create the release; youmust use the AutoCreate Documents window to create therelease.
• Is Automatic Approval Allowed? – The default value of thisattribute is set to ’N’ for No, meaning that documents are notautomatically approved after they are created. If you set it to ’Y’for Yes, then the PO Approval workflow is launched to route thedocuments for approval.
For each of these attributes you can change their values to ’Y’ for Yes or’N’ for No. You make these changes in the Oracle Workflow Builder.See Document Creation Options in: Workflow for Creating PurchaseOrders and Releases: page 4 – 160.
Attention: You need to make these changes for each operatingunit.
Deciding If You Want to Use the Timeout Feature
Prerequisite
❑ Before you can use or modify any of the workflows in Purchasing,you need to set up Oracle Workflow if you haven’t done so already.See: Setting Up Oracle Workflow, Oracle Workflow Guide.
The Timeout feature in the approval workflow enables you to specify aperiod of time after which, if no response has yet come from anapprover, a reminder is sent. You can send up to two reminders to anapprover using the Timeout feature. You can also specify that after acertain period of time, the document is forwarded automatically to thenext approver in the hierarchy. You can optionally setup this featurethrough the Oracle Workflow Builder. See Setting Up the TimeoutFeature in: Approval Workflows: page 2 – 63.
Attention: You need to set up this feature for each operatingunit.
If you don’t set up the Timeout feature, the approval workflow will nottime out; it will simply wait to receive a response from each approver.

☞
1 – 75Setting Up
Modifying Change Order Workflow Options
Prerequisite
❑ Before you can use or modify any of the workflows in Purchasing,you need to set up Oracle Workflow if you haven’t done so already.See: Setting Up Oracle Workflow, Oracle Workflow Guide.
Purchasing integrates with Oracle Workflow technology to let youdefine what changes to purchase orders or releases—for example, toamounts, suppliers, or dates—require reapproval. All of the workflowprocesses and functions relating to change orders can be found withinthe PO Approval workflow. The change order workflow process usesthe same reapproval rules already defined in Purchasing to determinewhether a document, depending on its document type, requiresreapproval. If you want to change the reapproval rules that the changeorder workflow uses, you can change those reapproval rules thatdetermine what percentage change to a unit price, quantity, ordocument total requires reapproval. You can optionally change theserules by modifying their attributes in the Oracle Workflow Builder. Seethe section Customizing the Change Order Workflow in: WorkflowProcesses for Approving Change Orders: page 2 – 73.
Attention: You need to make these changes for each operatingunit.

1 – 76 Oracle Public Sector Purchasing User’s Guide
Profile Options in Purchasing
During implementation, you set a value for each user profile option tospecify how Purchasing controls access to and processes data. The tablebelow also indicates whether you (the ”User”) can view or update theprofile option and at which System Administrator levels the profileoptions can be updated: at the user, responsibility, application, or sitelevels.
A ”Required” profile option requires you to provide a value. An”Optional” profile option already provides a default value, so you onlyneed to change it if you don’t want to accept the default.
Generally, the system administrator sets and updates profile values.See: Setting User Profile Options, Oracle Applications SystemAdministrator’s Guide.
Key
� You can update the profile option.
– You can view the profile option value but you cannot changeit.
leUser System Administrator Requirements
Profile OptionUser User Resp App Site Required? Default
Value
Account Generator: PurgeRuntime Data
� � � � � Optional Yes
MRP: Default SourcingAssignment Set
– � Requiredif usingsourcingrules
none
MRP: Sourcing RuleCategory Set
� � � � � Requiredif usingsourcingrules
none
PO: Allow Buyer Overridein AutoCreate Find
� � � � � Optional Yes
PO: Allow CategoryOverride in AutoCreateFind
� � � � � Optional Yes
PO: AutoCreate GL DateOption
� � � � � Optional AutoCreateDate
PO: Change Supplier Site – � � � Optional none

1 – 77Setting Up
RequirementsSystem AdministratorUser
Profile Option DefaultValueRequired?SiteAppRespUserUser
Profile Option
PO: Default Supplier ItemCatalog Option
� � � � � Optional NegotiatedSources
PO: Display AutoCreatedQuotation
� � � � � Optional Yes
PO: Display theAutocreated Document
� � � � � Optional Yes
PO: Item Cross ReferenceWarning
– � � � Optional Disposition
PO: Legal Requisition Type – � � � Optional Both
PO: Release DuringReqImport
� � � � � Optional No
PO: Supplier PricingMethod
� � � � � Optional Last Price
PO: Warn if RFQ Requiredbefore AutoCreate
� � � � � Optional No
RCV: Allow routingoverride
– � � � Optional No
RCV: Fail All ASN Lines ifOne Line Fails
– � � � Optional No
RCV: Print Receipt Traveler � � � � � Optional No
RCV: Processing Mode � � � � � Optional Online
Account Generator: Purge Runtime Data
Setting this profile option to Yes ensures that the Oracle Workflow dataused to generate accounting flexfield code combinations using theAccount Generator is purged after the Account Generator hascompleted.
This profile option should always be set to Yes unless you aredebugging the Account Generator. It is recommended to set it to Notemporarily at the User level. Running the Account Generator with thisprofile option set to No fills the workflow tables and slowsperformance.
MRP: Default Sourcing Assignment Set
This profile option indicates which sourcing rules assignment set will beused in Purchasing and Supplier Scheduling. Planning allows the userto use multiple Assignment Sets, but Purchasing looks at only a singleAssignment Set. The value of this profile option should be the name of

1 – 78 Oracle Public Sector Purchasing User’s Guide
the Assignment Set used in Purchasing. This profile option must be setif the user is using sourcing rules in Purchasing.
MRP: Sourcing Rule Category Set
This profile needs to be set to display Category andCategory–Organization assignments in the Assignments Sets form.
PO: Allow Buyer Override in AutoCreate Find
Yes or No indicates whether the suggested buyer (from the Enter Personwindow) defaulted into the Find Requisition Lines window can becleared or overridden. The default is Yes.
PO: Allow Category Override in AutoCreate Find
Yes or No indicates whether the category (from the Buyers window)defaulted into the Find Requisition Lines window can be cleared oroverridden.
PO: AutoCreate GL Date Option
Indicates the date used on purchase orders generated by AutoCreate:
The autocreate date is used as the purchase orderdate.
The GL date on the requisition distribution is usedas the purchase order date.
PO: Change Supplier Site
Yes or No indicates whether users can change the supplier site onapproved purchase orders.
PO: Default Supplier Item Catalog Option
Indicates the default source alternative region in the supplier itemcatalog: Negotiated Sources, Prior Purchases, Sourcing Rules, orRequisition Templates.
PO: Display AutoCreated Quotation
Controls the viewing of an autocreated quotation.
PO: Display the Autocreated Document
Yes or No indicates whether Purchasing opens the appropriatetransaction window (Purchase Orders window or RFQs window) anddisplays the created line(s) when you autocreate a document.
AutoCreate Date
Requisition GLDate

1 – 79Setting Up
PO: Item Cross Reference Warning
Indicates the Item Cross Reference Type that you want to use as adisposition warning message for requisitions.
PO: Legal Requisition Type
Indicates whether users can enter internal requisitions sourced fromstock by means of an internal sales order, purchase requisitions sourcedfrom a purchase order, or both types. Available values are Both,Internal, and Purchase.
PO: Release During ReqImport
Yes or No indicates whether Purchasing can automatically createreleases during the Requisition Import process.
PO: Set Debug Workflow ON
This profile option should always be set to No.
PO: Supplier Pricing Method
Indicates the pricing method for lists of values in the Price field inpurchase orders and requisitions:
Pricing is from quotations and blanket purchaseagreements.
Pricing is from the price history.
PO: Warn if RFQ Required before AutoCreate
Yes or No indicates whether you are given a warning message and anopportunity to cancel autocreate if one or more of the requisition linesselected for inclusion requires an RFQ and has not been placed on anRFQ.
RCV: Allow routing override
Yes or No indicates whether the receiving routing assigned duringrequisition or purchase order entry can be overridden at receipt time.
RCV: Fail All ASN Lines if One Line Fails
If you choose Yes, you can reject an entire Advance Shipment Notice(ASN) if any ASN line fails validation or processing. If you choose No,then you can accept an ASN if at least one ASN line is successful.
Catalog Price
Last Price

1 – 80 Oracle Public Sector Purchasing User’s Guide
RCV: Print Receipt Traveler
Yes or No indicates whether Purchasing automatically prints the receipttraveler when you perform a receipt or a receiving transaction, andwhen you match unordered receipts. You can always print receipttravelers from the Submit Requests window.
RCV: Processing Mode
Indicate the processing mode used after you save your work forreceiving transactions:
The transaction goes to the interface table, where itwill be picked up the next time the ReceivingTransaction Processor runs.
The transaction goes to the interface table, and theReceiving Transaction Processor is called for thegroup of transactions that you entered since youlast saved your work.
The Receiving Transaction Processor is calleddirectly.
See Also
Overview of User Profiles, Oracle Applications User’s Guide
Setting User Profile Options, Oracle Applications System Administrator’sGuide
Setting Your Personal User Profile, Oracle Applications User’s Guide
Common User Profile Options, Oracle Applications User’s Guide
Profile Options in Oracle Application Object Library, Oracle ApplicationsUser’s Guide
Batch
Immediate
On–line

C H A P T E R
2T
2 – 1Approval, Security, and Control
Approval, Security, andControl
his chapter tells you what you need to know about Approval,Security, and Control, including:
• Setting Up Document Approval and Security: page 2 – 2
• Position Hierarchies: page 2 – 6
• Document Security and Access: page 2 – 8
• Approval Routing: page 2 – 13
• Approval Authorization Control: page 2 – 15
• Assigning Employees: page 2 – 22
• The Document Approval Process: page 2 – 23
• Mass Forwarding Documents: page 2 – 35
• Document Control Overview: page 2 – 37
• MassCancel: page 2 – 58
• Approval Workflows: page 2 – 63

2 – 2 Oracle Public Sector Purchasing User’s Guide
Setting Up Document Approval and Security
Human Resources with Purchasing
Human Resources and Purchasing share job and position information ifthey are installed together. You should consider your requirementsfrom both perspectives before deciding on an approval/securitystructure.
Human Resources uses jobs to classify categories of personnel in yourorganization, and associates information like the exempt/non–exemptcode and EEO code with individual jobs. Examples of a typical jobinclude Vice President, Buyer, and Manager. Positions representspecific functions within these job categories. Examples of typicalpositions associated with the Vice President job include Vice Presidentof Manufacturing, Vice President of Engineering, and Vice President ofSales.
Human Resources uses position hierarchies to define management linereporting and control access to employee information.
Review your Personnel department’s system requirements before youdecide how you want to use positions, jobs, and position hierarchies inPurchasing.
Using Approval Hierarchies
If you choose to use approval hierarchies, you must set up both jobsand positions, and you must define position approval hierarchies.
If you choose to use employee/supervisor relationships, you defineyour approval routing structures as you enter employees using theEnter Person window. In this case, Purchasing does not require thatyou set up positions.
While positions and position hierarchies require more initial effort toset up, they are easy to maintain and allow you to define approvalrouting structures that remain stable regardless of how frequentlyindividual employees leave your organization or relocate within it.
Using Security Hierarchies
If you want to specify a Security Level of Hierarchy for any of yourdocument types, you must first define all positions which should haveaccess to the documents you want to restrict in this manner. (Even ifyou are using jobs to route documents for approval, you must definepositions before you can enable this Security Level). You then define asecurity position hierarchy, and specify it in the Purchasing Optionswindow.

☞
2 – 3Approval, Security, and Control
Approval Workflow
Purchasing uses Oracle Workflow technology to handle approvals.Workflow works in the background, using the approval controls andhierarchies you define in the setup steps below to route documents forapproval. Because Workflow handles your approval process in thebackground, you can use Oracle Workflow Builder’s easy interface tomodify your approval process. For more information about theapproval workflow in Purchasing, see: Approval Workflows: page2 – 63.
Approval and Security Setup Steps
1. Use the Financials Options window to indicate whether you wantto route documents for approval using approval hierarchies oremployee/supervisor relationships. This decision applies only tothe Business Group you choose for your Purchasing installation inthe Financials Options window. See: About Financials Options,Oracle Public Sector Payables User’s Guide.
If you choose to use approval hierarchies, you must definepositions in addition to jobs. You later build your hierarchies byreferencing these positions.
2. Use the Job window to create each of the job titles in yourorganization (for example: Buyer, Supply Base Engineer). If youare not using positions, you assign one or more employees to eachjob. If you are using positions, you assign one more positions toeach job, and later assign one or more employees to each position.
Attention: You assign authorization rules to jobs or positionsbased on your decision in Step 1. It is important to ensure thatyour job/position infrastructure supports the different approvallevels in your organization.
For example, if your purchasing staff includes a Junior Buyer, aSenior Buyer, a Supply Base Manager, and a Purchasing Manager,all of whom have different authorization levels for differentdocument types, you can define a different job or position for eachrole. If your purchasing department is comprised of fiveemployees with common authorization limits, then a single job orposition of Buyer may suffice. See: Representing Jobs andPositions, Oracle Human Resource Management Systems User’s Guide.
3. Use the Position window to create each of the positions in yourorganization. This step is required if you plan to use either securityor approval hierarchies. See: Representing Jobs and Positions,Oracle Human Resource Management Systems User’s Guide

☞
2 – 4 Oracle Public Sector Purchasing User’s Guide
4. Use the Position Hierarchy window to build and administer yourposition hierarchies. There are two distinct uses for positionhierarchies in Purchasing: 1) document approval routing and 2)document security control. You can use a single position hierarchyfor both purposes. See: Representing Jobs and Positions, OracleHuman Resource Management Systems User’s Guide.
5. Use the Purchasing Options window to choose a single securityhierarchy for your installation if you want to use the documentSecurity Level of Hierarchy for any or all of your document types.See: Defining Control Options: page 1 – 33.
Attention: Note that a security hierarchy controls which positions(and therefore which employees) have access to a particulardocument type. It does not control whether an employee has theauthority to approve a document or perform other actions.An Off–line approver is a valid employee with approval authority,but without access to the relevant form. An On–line approver is anactive employee with approval authorization, and with access tothe relevant form.
6. Use the Document Types window to specify distinct security andapproval controls for each document type/subtype. See: DefiningDocument Types: page 1 – 65.
7. Use the Approval Groups window to define approvalauthorization rules. See: Defining Approval Groups: page 1 – 15.
8. Use the Assign Approval Groups window to associate approvalrules with a specific job or position and a document type. See:Assigning Approval Groups: page 1 – 18.
9. Use the Enter Person window to assign employees to jobs orpositions. If you are not using position approval hierarchies fordocument routing, you must provide the employee’s supervisor.See: Enter Person, Oracle Human Resource Management SystemsUser’s Guide.
10. Run the Fill Employee Hierarchy process. This process creates anemployee–populated representation of your approvals hierarchyand should be run whenever you make a structural or personnelchange to your hierarchies or assignments. You can set up thisprocess to run automatically at predefined intervals. See: FillEmployee Hierarchy Process: page 9 – 35.
Approval and Security Setup Matrix (See next page.)

2 – 5Approval, Security, and Control
Complete
Use Approval Hierarchy: Y� �
CompleteCompleteComplete
Assign Employees
�
Define Positions
� ��
Build Position Hierarchies
� ��
Run Fill Employee Hierarchy
��
SecurityHierarchy?ApprovalHierarchy?
N
N
\ Purchasing Optionswindow
\ Enter Person window
\ Submit Requests window
Assign Approval Groups
� ��
Define Approval Groups
� �� �
Define Document Types
� �� �
Specify SecurityHierarchy
�Specify Security
Hierarchy
�
Define Jobs
� �� �\ Job window
\ Position window
\ Document Types window
\ Approval Groupswindow
\ Assign ApprovalGroups window
\ Position Hierarchywindow
SecurityHierarchy?ApprovalHierarchy?
Y
N
SecurityHierarchy?ApprovalHierarchy?
N
Y
SecurityHierarchy?ApprovalHierarchy?
Y
Y
\ Financials Optionswindow
Figure 2 – 1

2 – 6 Oracle Public Sector Purchasing User’s Guide
Position Hierarchies
Use the Positions window to create each of the positions in yourorganization. This step is required if you plan to use either security orapproval hierarchies. See: Representing Jobs and Positions, OracleHuman Resource Management Systems User’s Guide.
All the positions you want to include in your hierarchies must beincluded in the Business Group you selected in the Financials Optionswindow.
A position can be added to multiple hierarchies.
Use the Position Hierarchy window to build and administer yourposition hierarchies. There are two distinct uses for position hierarchiesin Purchasing: 1) document approval routing and 2) document securitycontrol. You can use a single position hierarchy for both purposes. See:Representing Jobs and Positions, Oracle Human Resource ManagementSystems User’s Guide.
When you build your hierarchies, always begin with the most seniorposition and work down. Use your organization charts and predefinedspecial approval paths to facilitate this process.
While you can include a position in many hierarchies, it can appearonly once within a single hierarchy.
If you want to use the document Security Level of Hierarchy for any orall of your document types, the hierarchy you specify in the PurchasingOptions window must include all the positions in your organizationthat should have access to these documents. See: Defining ControlOptions: page 1 – 33.
If you build multiple hierarchies for use in the approval process, it isuseful to give them meaningful names. This helps employees quicklychoose the appropriate approval path when moving documents fromone approval hierarchy to another.
For example, you can define a special approval hierarchy including aFacilities Manager and Chief Financial Officer for all plant and propertypurchases. Name this hierarchy ”Facilities.” Your default approvalhierarchy for standard purchase orders (called ”Purchasing”) includesonly your procurement staff and a Vice President of Operations, noneof whom have the authority to approve plant and property items.When a buyer attempts to approve a standard purchase order for theseitems, Purchasing will require a forward–to employee. Assuming yoursetup allows changes to the default approval hierarchy for standardpurchase orders, instruct buyers to route these documents to the”Facilities” approval hierarchy.

2 – 7Approval, Security, and Control
Before you can reference your position hierarchies in Purchasing, youmust assign employees to the referenced positions with the EnterPerson window and then use the Submit Requests window to run theFill Employee Hierarchy process. See: Fill Employee HierarchyProcess: page 9 – 35.
See Also
Setting Up Document Approval and Security: page 2 – 2

☞
2 – 8 Oracle Public Sector Purchasing User’s Guide
Document Security and Access
Purchasing lets you control which groups of employees have access toeach document type, and what modification/control actions theseindividuals can take once they gain access. Use the Document Typeswindow to specify your security options. See: Defining DocumentTypes: page 1 – 65.
You can restrict document access based on the following Security Leveloptions for each document type:
All system users can access the document
Only the document owner and subsequentapprovers can access the document
Only the document owner, subsequent approvers,and individuals defined as buyers can access thedocument
Only the document owner, subsequent approvers,and individuals included in the security hierarchycan access the document
Within the installation security hierarchy, you canaccess only those documents that you or yourreporting employees own
Attention: You must define one position hierarchy includingall positions that require access to the document types youwant to control with a Security Level of Hierarchy. You need tospecify this hierarchy in the Purchasing Options window beforeyou can choose a Security Level of Hierarchy for a givendocument type. See: Defining Control Options: page 1 – 33.
In addition to the Security Level, you specify an Access Level to controlwhat modification/control actions you can take on a particulardocument type once you gain access. Document owners always haveFull access to their documents. The Access Level options include:
Accessing employees can only view this document
Accessing employees can view, modify, and freezethis document
Accessing employees can view, modify, freeze,close, cancel, and final–close this document
Both the Security Level and Access Level apply to existing documents.Anyone with menu access to the document entry windows can create adocument. These individuals then become the document owners.
Public
Private
Purchasing
Hierarchy
View Only
Modify
Full

☞
2 – 9Approval, Security, and Control
The Security Level and Access Level work together. For example, ifyou assign a Security Level of Public and an Access Level of Full tostandard purchase orders, then all users can access all standardpurchase orders from document entry, view, and control windows.
Attention: While any document is in the approval process(regardless of Access or Security Level), no one can access itusing an entry window.
If you change the Access Level to View Only for a document type, thenall users (except for the document owner whose Access Level is alwaysFull, and approvers who can optionally modify the document when itis in their approval queue based on the document control ApproverCan Modify) can access these documents in the view windows, but notin the document entry or control windows. If you change the SecurityLevel for a document type to Private, then only the document ownerand subsequent approvers can access these documents.
Finally, the Security Level and Access Level work with the ApproverCan Modify option that you choose in the Document Types window. Ifthis control is set to Yes for a particular document type (even if theAccess Level is View Only), then all approvers can modify documentsin their pending approval queue. Once you approve a document, youcannot make further modifications.
The following matrix describes the effects of all possible Security Leveland Access Level combinations in which groups of employees canaccess documents using the view, entry, or control windows.

2 – 10 Oracle Public Sector Purchasing User’s Guide
The Security Level / Access Level Matrix
DocumentType
AccessLevel
ViewWindows
Entry Windows Control Windows
Doc NOTinApproval
Doc inApproval
Freeze/Close
Cancel/Final Close
Public
View Only All Owner None Owner Owner
Public Modify All All None All Owner
Full All All None All All
Pri ate
View Only OwnerApprover Owner None Owner Owner
Private Modify OwnerApprover Owner None Owner Owner
Full OwnerApprover Owner None Owner Owner
Purchasing
View OnlyOwnerApproverBuyers
Owner None Owner Owner
Purchasing ModifyOwnerApproverBuyers
OwnerApproverBuyers
None OwnerBuyers
OwnerBuyers
FullOwnerApproverBuyers
OwnerApproverBuyers
None OwnerBuyers
OwnerBuyers
ierarch
View OnlyOwnerApproverHierarchy
Owner None Owner Owner
Hierarchy ModifyOwnerApproverHierarchy
OwnerApproverHierarchy
None OwnerHierarchy Owner
FullOwnerApproverHierarchy
OwnerApproverHierarchy
None OwnerHierarchy
OwnerHierarchy
Table 2 – 1 (Page 1 of 1)

2 – 11Approval, Security, and Control
Function Security for Purchasing
Function Security defines the specific access to individual forms andthe business functions of each form. A form can have several businessfunctions associated with it, however some forms and functions maynot be appropriate for each user. Purchasing provides the followingbasic responsibilities: Requestor, Receiver, Buyer, and PO Superuser.You can create new responsibilities or modify the existing ones. Aresponsibility defines an application user’s current privileges whileworking with Oracle Applications.
You can use Function Security to control access to forms (windows)and functions within windows, thereby tailoring each responsibility tothe needs of an individual user. However, if you grant a user access toa window, all the functions within that window are automaticallyincluded in the user’s access. If you want the user to have access to thewindow but not to all the window’s functions, you must exclude accessto each function individually.
For example, if you want a user to be able to view the Purchase OrdersSummary window but not have access to the functions associated withthe New Release, New PO, and Open buttons within that window, youwould grant access to the Purchase Orders Summary window butdisable access to the New Release, New PO, and Open functions.

2 – 12 Oracle Public Sector Purchasing User’s Guide
Window Function Requestor Receiver Buyer POSuperuser
RequisitionSummary SpecialMenu
View Lines
DistributionsPurchase Orders
Sales OrdersAction History
PreferencesControl
X X X
RequisitionSummary window
New X X X
Purchase OrderSummary window
New ReleaseNew PO
OpenButtons
X X
Purchase OrderSummary SpecialMenu
ViewLines
ShipmentsDistributions
Action HistoryInvoicesReceipts
X X X X
AcceptancesControl
Preferences
X X
SupplierSummary window
Open View Only X
New X
See Also
Overview of Function Security, Oracle Applications SystemAdministrator’s Guide
Forms and Subfunctions, Oracle Applications System Administrator’sGuide
Overview of Oracle Application Security, Oracle Applications SystemAdministrator’s Guide

2 – 13Approval, Security, and Control
Approval Routing
Purchasing lets you route documents for approval based on eitherposition hierarchies or employee/supervisor relationships. In bothcases, you control whether documents are routed to the first employeewith enough authority to approve the document, or if they must passthrough each level of the associated hierarchy or reportinginfrastructure regardless of authority. You can also control whetherdocument owners are able to approve the documents they create.
Use the Document Types window to specify routing controls bydocument type. See: Defining Document Types: page 1 – 65.
Prevent or allow document owners to approve thedocuments they create.
Prevent or allow changes to the defaultforward–from employee. This control applies onlyto requisitions.
If you allow changes to the forward–fromemployee, Purchasing restricts the Forward–Fromlist of values in the Approvals window torequestors associated with the requisition you aretrying to approve.
This flexibility allows you to build an approvalhistory including the original requestor rather thanthe preparer.
Prevent or allow changes to the default forward–toemployee.
If you are using position approval hierarchies andthere is more than one employee associated with aparticular position, Purchasing defaults aForward–To employee in the Approvals windowbased on alphabetic order.
If you are using position approval hierarchies andallow changes to the Forward–To employee, the listof values in the Approvals window includes allemployees in the selected hierarchy.
If you are routing documents usingemployee/supervisor relationships and you allowchanges to the Forward–To employee, the list ofvalues in the Approvals window includes all
Owner CanApprove
Allow Change toForward–From
Allow Change toForward–To

☞
2 – 14 Oracle Public Sector Purchasing User’s Guide
employees defined in the Business Group youspecify in the Financials Options window.
This control applies only if you are using positionapproval hierarchies. You must specify a defaultapproval hierarchy for each document type.
This control applies only if you are using positionapproval hierarchies. Prevent or allow changes tothe default approval hierarchy.
If you allow changes to the default approvalhierarchy, the list of values in the Approvalswindow includes all hierarchies defined in theBusiness Group you specify in the FinancialsOptions window.
Attention: When you submit a document for approval,Purchasing verifies that you are included in the default positionhierarchy for your document. If you are not included in thishierarchy, and Allow Change to Approval Hierarchy is set toNo, you cannot approve the document or route it to anotheremployee. If you have enough authority to approve thedocument, you can complete this action regardless of whetheryou are included in the default hierarchy.
Select Direct to route documents to the firstemployee with enough authority to approve them.Select Hierarchy to route documents to the nextperson in the approval hierarchy or reportinginfrastructure regardless of authority
Combine these controls to build an approval routing policy that is asstrict or as flexible as your needs warrant. For example, if you setAllow Change to Approval Hierarchy and Allow Change toForward–To to No, Purchasing forces employees to route all documentsaccording to the approval hierarchy or employee /supervisorrelationships that you define. If you set these controls to Yes,Employees can route documents for approval with a high degree ofautonomy and flexibility within the structures you define.
See Also
About Financials Options, Oracle Public Sector Payables User’s Guide
Submitting a Document for Approval: page 2 – 32
ApprovalHierarchy
Allow Change toApprovalHierarchy
ForwardingMethod

2 – 15Approval, Security, and Control
Approval Authorization Control
You can define flexible groups of authorization rules (ApprovalGroups) which you assign to specific document types and jobs orpositions (based on your implementation). These authorization rulesare comprised of include/exclude and amount limit criteria that youspecify for Document Total, Account Range, Item Range, Item CategoryRange, and Location. You can associate multiple approval groups(collections of authorization rules) with a single document/job orposition combination to create unique approval structures in support ofyour organization’s signature policies. Finally, you link employees toauthorization limits when you assign them to jobs or positions.
When you attempt to approve a document, Purchasing evaluates theauthorization rules associated with your job or position and thedocument type to determine whether you have adequate authority. Ifyou do not have enough authority to approve the document,Purchasing provides default routing information based on yourapproval setup. Depending on the level of routing flexibility youspecify, approvers may or may not be able to change these defaults.
See Also
Defining Approval Groups: page 1 – 15
Assigning Approval Groups: page 1 – 18
Defining Approval Authorization Rules: page 2 – 15
Using Approval Assignments: page 2 – 18
Defining Approval Authorization Rules
An approval group is a set of authorization rules comprised ofinclude/exclude and amount limit criteria for the following ObjectTypes: Document Total, Account Range, Item Range, Item CategoryRange, and Location. For each position or job, you ultimately associatethese approval groups with document types to implement yourauthorization rules.
To build an approval group, first assign a descriptive name that willmake it easy to reference in the Assign Approval Groups window. Youcan then add multiple rules for the same Object Type to your approvalgroup. When you associate two or more rules for the same Object Type

☞
2 – 16 Oracle Public Sector Purchasing User’s Guide
with a single job/position and document type combination, Purchasinguses the most restrictive criteria during the authorization check.
Optionally enter a Document Total rule defining the maximumdocument amount that the approval group can approve. This is notrequired to enable the approval group. If you want to specify aDocument Total, choose this Object Type with an Approval Type ofInclude and enter an Amount Limit.
An Account Range rule defines the distribution accounting flexfieldranges and their amount limits that the approval group can approve,and an Include rule is required for at least one approval groupassociated with each document type in the Assign Approval Groupswindow. To include an account range, choose this Object Type with anApproval Type of Include, enter an Amount Limit, and specify theValue Low and Value High for your range.
Attention: The Amount Limit that you specify for an AccountRange Include rule applies to the sum of all accounts included inthe range. It does not apply to each individual account within therange.
To exclude an account range, choose this Object Type with an ApprovalType of Exclude and specify the Value Low and Value High for yourrange. The approval group will be unable to approve documentsincluding these accounting distributions, even if your enabling Includerule contains these accounts within its upper and lower bounds.
An Item Range rule defines the items and their amount limits that theapproval group can approve. An Item Range rule is not required;approval groups can approve documents for all items by default.
To include an item range, choose this Object Type with an ApprovalType of Include, enter an amount limit, and specify the Value Low andValue High for your range. An Item Range Include rule allows you tospecify approval amount limits for individual items or item ranges, andthe Amount Limit you enter applies to the sum of all items within therange. Also, an Item Range Include rule does not implicitly excludeitems that are not referenced in the rule.
To exclude an Item Range, choose this Object Type with an ApprovalType of Exclude and specify the Value Low and Value High for yourrange. The approval group will be unable to approve documentsincluding these items.
An Item Category Range rule defines the item categories and theiramount limits that the approval group can approve. An Item CategoryRange rule is not required; approval groups can approve documentsfor all item categories by default.

2 – 17Approval, Security, and Control
To include an Item Category Range, choose this Object Type with anApproval Type of Include, enter an Amount Limit, and specify theValue Low and Value High for your range. An Item Category Rangeinclude rule allows you to specify approval amount limits forindividual item categories or item category ranges, and the AmountLimit you enter applies to the sum of all item categories within therange. Also, an Item Category Range include rule does not implicitlyexclude item categories that are not referenced in the rule.
To exclude an Item Category Range, choose this Object Type with anApproval Type of Exclude and specify the Value Low and Value Highfor your range. The approval group will be unable to approvedocuments including these item categories.
A Location rule defines the ship–to and deliver–to locations and theiramount limits that this approval group can approve. Purchasingverifies the ship to location for purchase orders and releases, and thedeliver to location for requisitions. A Location rule is not required;approval groups can approve documents for all ship to and deliver tolocations by default.
To include a Location rule, choose this Object Type with an ApprovalType of Include, enter an Amount Limit, and specify the Location youwant to control using the Value Low field. A Location Include ruleallows you to specify approval amount limits for individual ship to anddeliver to locations. It does not implicitly exclude locations notreferenced in the rule.
To exclude a ship to or deliver to location, choose this Object Type withan Approval Type of Exclude and specify the location using the ValueLow field. The approval group will be unable to approve purchaseorders and releases that include this location as a ship to, orrequisitions that include this location as a deliver to.
To illustrate approval group implementation, assume a Purchasingdepartment is comprised of three kinds of purchasing professionalswith a corresponding position defined for each in Purchasing: SeniorBuyers (who purchase all manufacturing and MRO items/services witha $50,000 document limit), MRO Buyers (who purchase allnon–manufacturing items and services with a $10,000 document limit),and Junior Buyers (who purchase all but one manufacturing itemcategory with a $25,000 document limit).
This organization uses four two–segment item categories:MRO–SERVICE, MRO–SUPPLIES, MFG–GENERAL, andMFG–SPECIAL.

☞
2 – 18 Oracle Public Sector Purchasing User’s Guide
First, define one approval group called ”Buyer Master” containing asingle Account Range Include rule for all accounting distributionranges with a $50,000 Amount Limit.
You can then define a supplementary approval group called ”MROBuyer” containing two rules: 1) a Document Total rule with anAmount Limit of $10,000 and 2) an Item Category Range rule excludingall item categories with MFG as the first segment.
Finally, you can define another supplementary approval group called”Junior Buyer” containing three rules: 1) a Document Total rule withan Amount Limit of $25,000, 2) an Item Category Range rule excludingall item categories with MRO as the first segment, and 3) another ItemCategory Range rule excluding the MFG–SPECIAL category.
See Also
Defining Approval Groups: page 1 – 15
Defining Approval Assignments: page 1 – 18
Approval Authorization Rules: page 2 – 15
Using Approval Assignments: page 2 – 18
Using Approval Assignments
Use the Assign Approval Groups window to associate approval groupswith a specific job or position and a document type including:Purchase Requisition, Internal Requisition, Standard Purchase Order,Planned Purchase Order, Blanket Purchase Agreement, ContractPurchase Agreement, Scheduled Release, and Blanket Release. You canassociate multiple approval groups with a single document type/job orposition combination. Whenever you associate two or more approvalgroups with a single document type/job or position combination,Purchasing uses the most restrictive rule to evaluate authorizationlimits.
Attention: While individual approval groups do not require anenabling Account Range Include rule, every document type foreach job/position must be associated with at least one approvalgroup with this characteristic. Otherwise, employees in theassociated job or position will be unable to approve this documenttype.

2 – 19Approval, Security, and Control
If no approval groups are associated with a particular document typefor a given job or position, then employees assigned to this job orposition will be unable to approve documents of this type.
If you want to specify the approval assignments for the Purchasingdepartment described in the Defining Approval Authorization Rulesdocument (See: Defining Approval Authorization Rules: page 2 – 15),you can begin with the Senior Buyer position. Assuming Senior Buyersshould be able to approve all document types, you can set up thecontrol assignments as follows:
Control Function Approval Group Start Date
Blanket Purchase Agreement Buyer Master dd–MON–yy
Blanket Release Buyer Master dd–MON–yy
Contract Purchase Agreement Buyer Master dd–MON–yy
Internal Requisition Buyer Master dd–MON–yy
Planned Purchase Order Buyer Master dd–MON–yy
Purchase Requisition Buyer Master dd–MON–yy
Scheduled Release Buyer Master dd–MON–yy
Standard Purchase Order Buyer Master dd–MON–yy
Table 2 – 2 (Page 1 of 1)
This plan allows Senior Buyers to approve all document types for allaccount ranges with a maximum amount limit of $50,000. The SeniorBuyer position can approve all locations, items, and item categories bydefault.
If Junior Buyers can approve releases (and no other document types)based on the authorization criteria you specified in the DefiningApproval Authorization Rules document, set up the ControlAssignments as follows for this position:
Control Function Control Group Start Date
Blanket Release Buyer Master dd–MON–yy
Blanket Release Junior Buyer dd–MON–yy
Table 2 – 3 (Page 1 of 2)

☞
2 – 20 Oracle Public Sector Purchasing User’s Guide
Start DateControl GroupControl Function
Scheduled Release Buyer Master dd–MON–yy
Scheduled Release Junior Buyer dd–MON–yy
Table 2 – 3 (Page 2 of 2)
In this case, Junior Buyers can approve up to $25,000 for each Blanketand Scheduled Release including all but one category of manufacturingitems. These employees cannot approve Standard Purchase Orders,Planned Purchase Orders, Purchase Requisitions, Internal Requisitions,Blanket Purchase Agreements, or Contract Purchase Agreementsregardless of document total or content. Finally, Junior Buyers areunable to approve any document type that includes MRO itemcategories.
Attention: Note that we assigned two approval groups to eachdocument type in this example. The Buyer Master approval grouplets Junior Buyers approve releases by providing an enablingAccount Range Include rule. The Junior Buyer approval groupintroduces the specific authorization restrictions for this position.Remember, the most restrictive rules prevail at approval time, soeven though the Buyer Master Account Range Include rule allowsfor a $50,000 Amount Limit, the Junior Buyer Document Total rulewith a $25,000 Amount Limit controls the approval ceiling.
MRO Buyers should be able to approve any document type for up to$10,000 of MRO item categories. Set up the approval assignments asfollows:
Control Function Approval Group Start Date
Blanket Purchase Agreement Buyer Master dd–MON–yy
Blanket Purchase Agreement MRO Buyer dd–MON–yy
Blanket Release Buyer Master dd–MON–yy
Blanket Release MRO Buyer dd–MON–yy
Contract Purchase Agreement Buyer Master dd–MON–yy
Contract Purchase Agreement MRO Buyer dd–MON–yy
Internal Requisition Buyer Master dd–MON–yy
Internal Requisition MRO Buyer dd–MON–yy
Table 2 – 4 (Page 1 of 2)

2 – 21Approval, Security, and Control
Control Function Start DateApproval Group
Planned Purchase Order Buyer Master dd–MON–yy
Planned Purchase Order MRO Buyer dd–MON–yy
Purchase Requisition Buyer Master dd–MON–yy
Purchase Requisition MRO Buyer dd–MON–yy
Scheduled Release Buyer Master dd–MON–yy
Scheduled Release MRO Buyer dd–MON–yy
Standard Purchase Order Buyer Master dd–MON–yy
Standard Purchase Order MRO Buyer dd–MON–yy
Table 2 – 4 (Page 2 of 2)
See Also
Defining Approval Groups: page 1 – 15
Defining Approval Assignments: page 1 – 18
Approval Authorization Rules: page 2 – 15
Defining Approval Authorization Rules: page 2 – 15

☞
2 – 22 Oracle Public Sector Purchasing User’s Guide
Assigning Employees
� To assign employee to jobs or positions:
1. Use the Enter Person window to assign employees to jobs orpositions. If you are not using position approval hierarchies fordocument routing, you must provide the employee’s supervisor.
You can assign an employee to only one job or position.
Attention: If Human Resources is installed, you must maintainemployee information using the Enter Person window for HumanResources. See: Enter Person, Oracle Human Resource ManagementSystems User’s Guide.
2. Before you can reference your position hierarchies in Purchasing,you must run the Fill Employee Hierarchy process. This processcreates an employee–populated representation of your approvalshierarchy and should be run whenever you make a structural orpersonnel change to your hierarchies or assignments. You can setup this process to run automatically at predefined intervals. See:Fill Employee Hierarchy Process: page 9 – 35.
The process creates an error log which lists all positions to whichno employee is assigned, but having such positions is a benignerror that does not hamper system operation.

2 – 23Approval, Security, and Control
The Document Approval Process
Approve Document Window
Purchasing lets you approve requisitions, standard and plannedpurchase orders, blanket and contract purchase agreements, andreleases using a common process. When you complete yourdocuments and are ready to initiate the approval process, select theApprove button in the document entry window to open the ApproveDocument window.
In the Approve Document window, choosing Submit for Approval (andthen choosing OK) approves the document if Owner Can Approve isenabled for the specific document type in the Document Types windowand you have the authority to approve the document. See: DefiningDocument Types: page 1 – 65. If the document requires someone else’sapproval, choosing Submit for Approval (and then choosing OK)automatically submits the document to that person (or routes it tomultiple approvers) for approval, based on your approval hierarchysetup. See: Setting Up Document Approval and Security: page 2 – 2.
Purchasing offers the following document approval actions in theApprove Document window: Reserve or Unreserve (if usingencumbrance / budgetary control), Submit for Approval, and Forward.You can also change the approval hierarchy from within the ApproveDocument window if Allow Change to Approval Hierarchy is selectedfor the document type in the Document Types window. You can alsospecify a Forward To person if you want the document to be approvedby someone outside the approval hierarchy. You can also select thePrint option, and the document will automatically print once it isapproved.
When you select the Approve button in a document entry window,Purchasing performs submission checks to verify that the document iscomplete and in an appropriate state for the action you chose. Statuschecks are performed when you take an approval action. See:Document Submission Checks: page 2 – 25. See: Document StatusChecks: page 2 – 24.
Notifications Summary Window
You can also approve documents through the Notifications Summarywindow. The Notifications Summary window lists all the documentsawaiting your approval, so that you can manage your pendingapproval queue and take approval actions. From this window, you candrill down to the documents themselves, and review them and theiraction histories. You can also modify documents if Approver Can

2 – 24 Oracle Public Sector Purchasing User’s Guide
Modify is enabled for the document type. See: Defining DocumentTypes: page 1 – 65. (After you modify a document, you need to returnto the Notifications Summary window to take an approval action.)
Web or E–Mail
Another way to approve documents is through a notifications Webpage or e–mail. Oracle Applications uses Oracle Workflow technologyto route notifications through the Web or e–mail. This way, anapprover who has easier access to the Web or e–mail than to thePurchasing application can view notifications and take approvalactions. See: Oracle Workflow Guide.
Approval Workflow
Purchasing uses Oracle Workflow technology to handle the entireapproval process. When you take an approval action in the ApproveDocument or Notifications Summary windows, or through the Web ore–mail, you are ”submitting” the approval action to Workflow.Workflow works in the background, using the approval controls andhierarchies you’ve defined to route documents for approval. BecauseWorkflow handles your approval process in the background, you canuse Oracle Workflow Builder’s easy interface to modify your approvalprocess. For more information about the approval workflow inPurchasing, see: Approval Workflows: page 2 – 63.
See Also
Submitting a Document for Approval: page 2 – 32
Viewing and Responding to Notifications: page 2 – 29
Document Status Checks
Purchasing performs a status check on all documents whenever youperform or attempt an approval action. This check verifies that thedocument is in a valid state to perform the selected approval action. Ifyour document fails the status check, Purchasing provides an errormessage in the window in which you are working.
The following matrix describes the valid actions for each documentstate. Generally, lists of values in the document entry and approvalwindows restrict the list of available approval actions based ondocument status, so you should rarely encounter status check failures.

2 – 25Approval, Security, and Control
Document Approval Status Rules
Valid Actions
CurrentDocument
Status
Approve Reserve Forward Reject
Incomplete X X
In Process X X X X
Approved
Pre–Approved X X X
Rejected X X
Returned X X
RequiresReapproval
X X
Not on Hold X X X X
Not Frozen X X X X
Not Cancelled X X X X
Not Reserved X X X X
Open X X X X
Closed X X X X
Table 2 – 5 (Page 1 of 1)
Document Submission Checks
Purchasing performs a submission check on all documents thatsuccessfully complete a status check whenever you perform or attemptan approval action.
The submission check verifies that all mandatory fields have beenentered and that various quantities, amounts, and dates are withinprescribed ranges or limits. If your document fails any of thesubmission check rules, Purchasing automatically brings you to theApproval Errors window where you can review the cause(s) of failure.

2 – 26 Oracle Public Sector Purchasing User’s Guide
You can then return to the document entry window to make requiredcorrections.
The following matrix describes the submission checks that areperformed for each document type.
Submission Check Rules
HEADER Standard Planned Blanket Contract Release Requisition
Document must have asupplier
X X X X
Document must have asupplier site
X X X X
Supplier must not beon hold
X X X X
Supplier must beincluded in currentApproved SupplierList entries for itemsrequiring an approvedsupplier
X X X
Document must have acurrency
X X X X
Foreign currency musthave a rate
X X X X
Foreign currency musthave a rate type
X X X X
Foreign currency musthave a rate date if ratetype is not User
X X X X
Document must have aship–to location
X X X X
Document must have abill–to location
X X X X
Amount limit must begreater than or equal toAmount Agreed
X
Amount limit must begreater than or equal toMinimum ReleaseAmount
X X
Table 2 – 6 (Page 1 of 4)

2 – 27Approval, Security, and Control
RequisitionReleaseContractBlanketPlannedStandardHEADER
Amount limit must begreater than or equal tothe total amountalready released
X X
Amount limit must begreater than or equal tothe standard purchaseorder line totalreferencing thiscontract
X
Related documentcannot be on hold
X
Release date must fallwithin relateddocument effectivitydates
X
Related purchaseagreement cannot beon hold
X
Related documentsupplier cannot be onhold
X
Current release totalmust be greater than orequal to headerminimum releaseamount specified onrelated agreement
X
Current Release totalplus all approvedrelease totals must begreater than or equal tothe related documentamount limit
X
LINE Standard Planned Blanket Contract Release Requisition
Each document musthave at least one line
X X X X
Line quantity mustequal the sum of itsshipment quantities
X X
Table 2 – 6 (Page 2 of 4)

2 – 28 Oracle Public Sector Purchasing User’s Guide
RequisitionReleaseContractBlanketPlannedStandardLINE
If a line references acontract, the contractmust be approved
X X
If a line references acontract, the supplieron the contract must bethe supplier on the POheader
X X
PO line total related toa contract plus existingapproved lines relatingto the same contractcannot exceed contractamount limit
X
Requisition linequantity must equalthe sum of itsdistribution quantities
X
SHIPMENT Standard Planned Blanket Contract Release Requisition
Each PO line musthave at least oneshipment
X X
Shipment quantitymust equal the sum ofits distributionquantities
X X X
Each release must haveat least one shipment
X
Current shipment totalmust be greater than orequal to line minimumrelease amountspecified on relateddocument
X
Price must be withinspecified pricetolerance if EnforcePrice Tolerance is Yesand the release wasAutoCreated from arequisition
X
Table 2 – 6 (Page 3 of 4)

2 – 29Approval, Security, and Control
DISTRIBUTION Standard Planned Blanket Contract Release Requisition
Each shipment musthave at least onedistribution
X X X
Each requisition linemust have at least onedistribution
X
Foreign currencydistributions musthave a rate
X X X X
Foreign currencydistributions musthave a rate type
X X X X
Foreign currencydistributions musthave a rate date if ratetype is not User
X X X X
Table 2 – 6 (Page 4 of 4)
Viewing and Responding to Notifications
Use the Notifications Summary window to manage your pendingapproval queue and take approval actions. You can also submit adocument for approval from the Notifications Summary window if youdidn’t yet do it through the Approve Document window.
Purchasing offers the following document approval actions in theNotifications Summary window: Approve, Approve and Forward,Forward, and Reject. You can also reassign a notification to somebodyelse.
Note: A Reassign action is not recorded in the Action Historywindow, but a Forward action is. See: Viewing Action History:page 8 – 2. When you reassign a notification to anotherapprover, and that approver takes the Approve action, it is theoriginally designated approver (you) who gets recorded as theapprover in the Action History window—not the person towhom you assigned the notification and who actually took theApprove action.

2 – 30 Oracle Public Sector Purchasing User’s Guide
Some reminder notifications include a response of Ignore. Ignoremeans that you are ignoring the notification for now. Purchasing willnot display that notification again until it runs the concurrent programprocess (see: Send Notifications for Purchasing Documents: page9 – 142) for sending notifications.
From the Notifications Summary window, you can also drill down todocuments and modify them if Approver Can Modify is enabled forthe document type. See: Defining Document Types: page 1 – 65. Afteryou modify a document, you need to return to the NotificationsSummary window to actually take an approval action on thedocument. Depending on the function security assigned to yourresponsibility, you have varying levels of access to information. Aresponsibility defines an application user’s current privileges whileworking with Oracle Applications.
Purchasing Notifications
In the Notifications Summary window, notifications for the followingPurchasing documents appear:
• Purchase orders and requisitions that require approval action.
• Purchase orders and releases that require acceptance. (Youindicate on your standard purchase orders, purchaseagreements, and releases whether you require your suppliers toaccept your orders by a specific date by selecting AcceptanceRequired in the Terms and Conditions window.) For purchaseorders and releases that have not been entered as accepted in theAcceptances window, Purchasing notifies you that acceptance isrequired. If the Acceptance Require By date indicates that theacceptance is overdue, Purchasing sends a notification thatacceptance is past due.
• RFQs and quotations with a Status of In Process. Purchasingsends a notification that the document requires completion.
• RFQs for which the Status is Active and the current date isbetween the Due Date and the Close Date on the RFQ.Purchasing sends a notification that the RFQ is approachingexpiration.
• Quotations for which the Status is Active and current date isbetween the Effectivity end date on the Quotation and the QuoteWarning Delay end date in the Default region of the PurchasingOptions window. Purchasing sends a notification that thequotation is approaching expiration.

2 – 31Approval, Security, and Control
For notifications about purchase order acceptances, RFQ expiration,and quotation expiration, you can choose a response of Close. Closecloses the notification, which won’t reappear again (unless you changethe expiration date on the document).
If you receive a notification titled Document Manager Failed:
Open the notification and read the detailed message. You or yoursystem administrator may need to reactivate the PO DocumentApproval Manager. Once the PO Document Approval Manager isreactivated, you can respond to the notification by choosing Retry.
If you receive a notification titled Unable to Reserve Document:
You have several options. You can try to reserve the document again if,for example, more funds have been allocated. Or you can send thedocument back to its preparer for modification; the preparer can then,for example, reduce the quantity on the document and submit it againfor approval. Or you can forward the document to somebody else withauthority to reserve the funds.
Additional Information
For more detailed instructions on how to use the NotificationsSummary window, see: Reviewing Notifications in the NotificationsViewer, Oracle Applications User’s Guide.
You can also view and respond to notifications through the Web ore–mail. Oracle Applications uses Oracle Workflow technology to routenotifications through the Web or e–mail. This way, an approver whohas easier access to the Web or e–mail than to the Purchasingapplication can view notifications and take approval actions. See:Oracle Workflow Guide. See also: Reviewing Notifications via ElectronicMail, Oracle Workflow Guide and Viewing Notifications from a WebBrowser, Oracle Workflow Guide.
See Also
Overview of Function Security, Oracle Applications SystemAdministrator’s Guide
Function Security for Purchasing: page 2 – 11

2 – 32 Oracle Public Sector Purchasing User’s Guide
Submitting a Document for Approval
Use the Approve Document window to take approval actions ondocuments that you create or modify. (You can also use this window tomake changes to encumbered documents. See: Changing EncumberedDocuments: page 4 – 119.)
� To take approval actions:
Navigate to the Approve Document window by selecting the Approvebutton in a document entry window.
1. If you are using encumbrance/budgetary control, Reserve andUnreserve options are available. You can reserve funds now, oryou can select Submit for Approval (and then choose OK), whichreserves funds later, when the approver with the authority toreserve the funds approves the document.
Reserve – You can reserve funds for the document only if you areusing encumbrance/budgetary control. Requisition preparers canchoose this option only if Reserve at Completion in the FinancialsOptions window is enabled and the document is currentlyunreserved. See: Defining Financials Options, Oracle Public SectorPayables User’s Guide. When you select the Reserve option andchoose OK, Purchasing also automatically approves the documentif the document has been preapproved, you’re the appropriateapprover, and no more approvals are required. If you get a

2 – 33Approval, Security, and Control
message that you cannot reserve the funds, forward the documentto an approver who has the authority to reserve them.
Unreserve – You can unreserve funds for the document only if youare using encumbrance/budgetary control and funds are currentlyreserved for that document.
Unreserve Date – Enter an Unreserve Date that falls within an openreserve period.
2. Select Submit for Approval.
3. Select Forward only if you want to forward the document tosomeone outside the default Approval Path. If you select Forward,you must enter a Forward To person. If you don’t select Forward,Purchasing will automatically route the document to theappropriate person in the Approval Path, if you’re not theappropriate approver.
4. If Allow Change to Approval Hierarchy is selected for thedocument type, you can select a new Approval Path. See: DefiningDocument Types: page 1 – 65.
5. Choose OK.
The document is submitted to the approval process, which routesthe document to the appropriate approvers based on the approvalhierarchies and controls you’ve defined. If Owner Can Approve isenabled for the specific document type in the Document Typeswindow and you have the authority to approve the document, thenchoosing OK approves the document.
� To cancel your approval action:
� Choose the Cancel button to cancel your approval action andreturn to your document entry window.
� To change the Forward From person:
� For requisitions only, if you have selected Forward as the actionand if Allow change to Forward–From is enabled for the documenttype in the Document Types window, you can change the ForwardFrom person to the original preparer or to any requestor on a lineof the requisition. See: Defining Document Types: page 1 – 65.
� To change the Forward To person:
� If you have selected Forward as the action and if Allow change toForward–To is enabled for the document type in the Document

2 – 34 Oracle Public Sector Purchasing User’s Guide
Types window, you can change the Forward To person. See:Defining Document Types: page 1 – 65.
The Forward To value is a default from the employee/supervisorrelationship or from the approval hierarchy, depending on whetheryou are using approval hierarchies.
� To enter notes:
� Enter notes in the Note field to record information about yourapproval action or provide instructions for the next approver ifyour document requires additional authorization. See also:Attaching Notes to Purchasing Documents: page 1 – 28.
� To print the document:
� Select Print.
The document will automatically print once it is approved.
See Also
Defining Document Types: page 1 – 65
The Document Approval Process: page 2 – 23
Viewing and Responding to Notifications: page 2 – 29
Setting Up Document Approval and Security: page 2 – 2
Approval Workflows: page 2 – 63

2 – 35Approval, Security, and Control
Mass Forwarding Documents
Use the Forward Documents window to forward all or selecteddocuments awaiting approval from one approver to a new approver.This lets you keep your documents moving when the original approverof a document is unavailable.
� To mass forward documents:
1. Select Forward Documents from the menu. Purchasing displaysthe Enter Approver modal window, where you must provide thename of the original Approver and select OK to display theForward Documents window.
For each document available for forwarding, Purchasing displaysthe Forward Date, document Type, document Number, Currency,Amount, Status, From person, Note, document Description,document Owner, and Creation Date.
2. Select the documents you want to forward.
3. Enter the New Approver to whom you want to forward theselected documents.
4. Save your work.

2 – 36 Oracle Public Sector Purchasing User’s Guide
� To change the original approver:
� Select the Change Approver button to display the Enter Approvermodal window, where you can change the original approver forwhom the Forward Documents window displays documentsavailable to be forwarded.
� To view action history:
� Select View Action History on the Special menu. See: ViewingAction History: page 8 – 2.

☞
2 – 37Approval, Security, and Control
Document Control Overview
Purchasing allows you to control the status of your requisitions,planned and standard purchase orders, blanket and contract purchaseagreements, and releases during the document life cycle.
Purchasing provides you with the features you need to satisfy thefollowing basic needs. You should be able to:
• Delete unapproved documents or unapproved lines, shipments,and distributions that you add to previously approveddocuments
• Terminate existing commitments to buy from suppliers by fullyor partially cancelling your documents
• Indicate that no further internal activity is expected or allowedon completed orders by final closing them
• Freeze or unfreeze documents to control whether modificationsare allowed
• Place documents on hold to prevent printing, receiving,invoicing, and approval until the hold is removed
• Control how Purchasing automatically closes documents forreceiving and invoicing activity
Document Security determines the documents on which you canperform control actions. See: Document Security and Access: page2 – 8.
Document Control Options
Delete
Before documents are approved, you can delete them or theircomponents from the document entry window.
Attention: If you are using automatic numbering, you cannotreuse document numbers that you delete with this option.
You can also use the appropriate entry window to delete unapprovedlines, shipments, and distributions that you added to previouslyapproved documents.
If you use online requisitions, Purchasing returns all requisitionsassociated with your delete action to the requisition pool. You canreassign these unfilled requisitions to other purchase orders or releases
Example
2 – 38 Oracle Public Sector Purchasing User’s Guide
using the AutoCreate Documents window. See: Finding RequisitionLines for AutoCreate: page 6 – 10.
Cancel
Purchasing lets you terminate an existing commitment to buy from asupplier by cancelling document headers, lines, shipments, or releases.
When you cancel a purchase order entity, you are unable to receive orpay for cancelled items and services, however, you can pay for allpreviously received orders. You also cannot modify a cancelled entityor its components. For example, if you cancel a line you cannot modifythe associated shipments and distributions. If you cancel a documentheader, you cannot access the document in the corresponding entryform. You can approve documents that include cancelled entities (linesand shipments), but you cannot approve documents that are cancelledat the header level. You can also print cancelled documents.Purchasing marks these documents with a cancellation notice tohighlight this action to the supplier. Finally, you can Purge documentsthat were cancelled at the header level before the Last Activity Datethat you specify when you submit Purge. See: Printed Purchase OrderOverview: page 4 – 96. See: About Purging Records, Oracle PublicSector Payables User’s Guide .
If you are using encumbrance and budgetary control, Purchasingautomatically creates negative debit encumbrance journal entries inyour general ledger system to reverse the encumbrance thatcorresponds to the document header, lines, or shipments you arecancelling.
If you are using online requisitions, Purchasing returns unfilledrequisitions associated with cancelled purchase order entities to therequisition pool based on the Cancel Requisitions control you specify inthe Purchasing Options window. See: Defining Control Options: page1 – 33.
You order 100 items from a supplier, and after receiving 30 of theseitems, you realize that you no longer have a need for the outstandingbalance. Cancel the remaining 70 items, print the purchase order, andsend it to the supplier to indicate contractually that you do not want totake delivery of these items.
You should cancel documents or their components only if you areabsolutely certain that all desired activities have been completed; youcannot undo a cancel action.
You can cancel an entire requisition or particular requisition lines.However, you cannot cancel a requisition line a buyer placed on a

2 – 39Approval, Security, and Control
purchase order, modified during AutoCreate, or placed on a salesorder.
If a buyer places a requisition line on a purchase order, you cannotcancel the requisition line or the corresponding requisition header untilyou cancel or final close all purchase order lines associated with therequisition.
Similarly, you cannot cancel a requisition if any of its lines are on anactive internal sales order. However, if the related internal sales orderis cancelled, you should cancel the originating requisition line.
When you cancel a requisition related to a cancelled sales order, thequantity cancelled on the requisition line is the same as the quantitycancelled on the sales order line, not the remainder of the requisition.
You cannot cancel a purchase order if there are batch receivingtransactions in the receiving interface awaiting processing against thepurchase order.
If you partially received a shipment corresponding to multipledistributions, Purchasing cannot always cancel the shipment. To makesure Purchasing can cancel a shipment, enter the delivery transactionsfor the receipts you entered against that shipment. You can use expressdelivery to facilitate this process.
Use the Control Document window to cancel a single document or itsentities. Use the Define MassCancel and Run MassCancel windows tocancel many documents by accounting distribution and date range.See: Controlling Documents: page 2 – 48. See: Defining MassCancel:page 2 – 53. See: Running MassCancel: page 2 – 58.
Final Close
Prevent modifications to or actions against completed documents,lines, and shipments by final closing them. Final–closed documents arenot accessible in the corresponding entry forms, and you cannotperform the following actions against final–closed entities: receive,transfer, inspect, deliver, correct receipt quantities, invoice, return tosupplier, or return to receiving. You can approve documents thatinclude final–closed entities, but you cannot approve documents thatare final closed at the header level. You can print final–closeddocuments; this is an internal control action that has no bearing onyour contractual relationship with the supplier. Finally, you can Purgedocuments that were final closed at the header level before the LastActivity Date that you specify when you submit Purge. See: AboutPurging Records, Oracle Public Sector Payables User’s Guide.

2 – 40 Oracle Public Sector Purchasing User’s Guide
You should final close documents or their components only if you areabsolutely certain that all desired activities have been completed; youcannot undo a final–close action.
If you are using encumbrance and budgetary control, final closeautomatically creates credit encumbrance journal entries in yourgeneral ledger system to reverse the encumbrance that corresponds tothe document header, lines, or shipments you are final closing.
If you are using online requisitions, Purchasing does not return unfilledrequisitions associated with final–closed purchase order entities to therequisition pool. You must cancel or final close these requisitions usingthe Control Document window. See: Controlling Documents: page2 – 48.
Payables can also final close documents by matching a final invoicewhen you submit AutoApproval. Use the Allow Final Matching flag inthe System Options and Defaults window to control whether you allowthis action. See: Oracle Public Sector Payables User’s Guide.
You can final close an entire requisition or particular requisition lines.However, you cannot final close a requisition line a buyer placed on apurchase order, modified during AutoCreate, or placed on a salesorder.
If a buyer places a requisition line on a purchase order, you cannot finalclose the requisition line or the corresponding requisition header untilyou cancel or final close all purchase order lines associated with therequisition.
Similarly, you cannot final close a requisition if any of its lines are on anactive internal sales order. If the related internal sales order is closed,you can final close the originating requisition line.
You cannot final close a purchase order if there are batch receivingtransactions in the receiving interface awaiting processing against thepurchase order.
Freeze
Freeze your purchase orders and releases to prevent changes oradditions while maintaining the ability to receive and match invoicesagainst received shipments. You cannot access frozen documents in theentry forms.
Use the Control Document window to freeze or unfreeze a document.See: Controlling Documents: page 2 – 48

Example
2 – 41Approval, Security, and Control
Hold
Place documents on hold to unapprove them while preventingprinting, receiving, invoicing, and future approval until you remove thehold.
After sending a purchase order to a supplier and receiving some items,you discover a severe quality problem with one of the incoming lots.While you wait for corrective action from the supplier, place thedocument on hold until the problem is resolved.
Use the Control Document window to place a document on hold, orremove a hold. See: Controlling Documents: page 2 – 48.
Firm
Close, Close for Receiving, Close for Invoicing
Purchasing automatically closes shipments for receiving and invoicingbased on controls that you specify in the Purchasing Options window.Once all shipments for a given line are closed, Purchasingautomatically closes the line. When all lines for a given header areclosed, Purchasing automatically closes the document.
You can specify closing controls including: Receipt Close Tolerance,Receipt Close Point, and Invoice Close Tolerance. See: DefiningPurchasing Options: page 1 – 29.
• The Receipt Close Tolerance lets you specify a quantitypercentage within which Purchasing closes a partially receivedshipment. For example, if your Receipt Close Tolerance is 5%and you receive 96% of an expected shipment, Purchasingautomatically closes this shipment for receiving.
• The Receipt Close Point lets you choose which receiving action(Received, Accepted, or Delivered) you want to use as the pointwhen Purchasing closes a shipment for receiving based on theReceipt Close Tolerance. For example, if you set a Receipt CloseTolerance of 5% and choose Delivered as your Receipt ClosePoint, Purchasing closes shipments for receiving when you havedelivered 95% or more of the ordered quantity.
• The Invoice Close Tolerance lets you specify a similar quantitypercentage within which Purchasing automatically closespartially invoiced shipments for invoicing.
Purchasing does not include closed shipments in the Open PurchaseOrder reports, and you can purge documents that were closed at theheader level before the Last Activity Date that you specify in the

2 – 42 Oracle Public Sector Purchasing User’s Guide
Submit Purge window. See: About Purging Records, Oracle PublicSector Payables User’s Guide.
You can close and reopen documents and their components forinvoicing and receiving using the Control Document window. You canreopen a document at any time by modifying it or taking another actionagainst it. See: Controlling Documents: page 2 – 48.
Note: The Close for Invoicing status does not prevent you frommatching an invoice to a purchase order.
Purchase Order Control Matrices
The following matrices describes each of the purchase order controlfunctions including information on where the control is specified, whatpurchase order activities can occur when a document is in a given state,the related MRP/ATP effects, related encumbrance effects, and finally,related requisition effects.

2 – 43Approval, Security, and Control
Control Details Actions
Close Close for Invoicing Close for Receiving
Document available topurge?
Yes, if header final closedbefore Last Activity Date
No No
Modify controlled entity? Yes Yes Yes
Action causes revisionchange?
No No No
Print document? Yes Yes Yes
Receive against controlledentity?
Yes Yes Yes
RTV against controlledentity?
Yes Yes Yes
Invoice against controlledentity?
Yes Yes Yes
Approve document? Yes Yes Yes
AutoCreate or Releaseagainst document?
Yes Yes Yes
MRP/ATP Effect Closed quantity nolonger available assupply; supply is
recreated when reopened
No effect Closed quantity nolonger available assupply; supply is
recreated when reopened
Encumbrance Effect No effect No effect No effect
Associated Requisitions No effect No effect No effect
Table 2 – 7 (Page 1 of 1)

2 – 44 Oracle Public Sector Purchasing User’s Guide
l De a lsActions
Control DetailsCancel Finally Close Freeze Hold Firm
Documentavailable topurge?
Yes, if headercancelled
before LastActivity Date
Yes, if headerfinal closedbefore Last
Activity Date
No No No
Modifycontrolled entity?
Cannot modifyentity or belowcancelled entity
Cannot modifyentity or below
final–closedentity
No Yes Yes
Action causesrevision change? Yes No No No No
Print document? Yes Yes Yes No Yes
Receive againstcontrolled entity? No No Yes No Yes
RTV againstcontrolled entity? No No Yes Yes Yes
Invoice againstcontrolled entity?
Yes, againstreceived qty. No Yes No Yes
Approvedocument?
No if header iscancelled; Yes if
line orshipment is
cancelled
No if header isfinal closed; Yes
if line orshipment isfinal closed
NoNo; documentson hold require
reapprovalYes
AutoCreate orRelease againstdocument?
Cannot add reqto cancelleddoc; cannot
create release
Cannot add reqto final–closed
doc; cannotcreate release
Cannot createrelease against
frozenpurchase order
No effect No effect
MRP/ATP Effect
Cancelledquantity no
longer availableas supply
Finally Closedquantity no
longer availableas supply
No effect.MRP cansuggest
rescheduleactions
No effect
MRP will notreschedule inor cancel theorder. (See
Note)
EncumbranceEffect
Outstandingencumbrancereversed as anegative DR
Outstandingencumbrance
reversed as CRNo effect No effect No effect
AssociatedRequisitions
Determined byPurchasing
Options: Never,Always,Optional
Not returned toreq pool; mustmanually finalclose or cancelassociated req
No effect No effect No effect
Table 2 – 8 (Page 1 of 1)

2 – 45Approval, Security, and Control
Note: Within the time fence created by a Firm order, MRP will notsuggest new planned orders, cancellations, or reschedule–in actions;but it will suggest reschedule–out actions.
Document Control Applicability Matrix
The Document Control Applicability matrix describes which controlactions are valid for each document type and entity.
Valid Actions
Current Document Type Cancel FinallyClose
Close Close forInvoice
Close forReceipt
Freeze Hold Firm
Planned PO Header X X X X X X X X
Planned PO Line X X X X X
Planned PO Shipment X X X X X X
Standard PO Header X X X X X X X X
Standard PO Line X X X X X
Standard PO Shipment X X X X X X
Blanket Agreement Header X X X X X X
Blanket Agreement Line X X X
Contract Agreement Header X X X X X
Release Header X X X X X X
Release Shipment X X X X X X
Requisition Header X X
Requisition Line X X
Table 2 – 9 (Page 1 of 1)
Document Control Status Check Matrix
Purchasing performs a status check on all documents when you choosea control action. This check verifies that the document is in a validstate to perform the selected control action. If your document fails the

2 – 46 Oracle Public Sector Purchasing User’s Guide
status check, Purchasing provides an error message in the window inwhich you are working.
The following matrix describes the valid actions for each possibledocument state. Generally, Purchasing restricts the list of availableactions based on document status, so you should rarely encounterproblems in the status check.
Valid Actions
Current DocumentStatus
Cancel FinallyClose
Close Open Closefor
Invoice
Closefor
Receipt
Freeze Hold
Incomplete X X
In Process X X
Approved X X X X X X X
Pre–Approved X X
Rejected X X
Requires Reapproval X
On Hold
Frozen X X
Cancelled
Finally Closed
Reserved X X X X X X X
Open X X X X X X X
Closed X X X X
Closed for Invoicing X X X X X X X
Closed for Receiving X X X X X X X
Table 2 – 10 (Page 1 of 1)
Document Control Submission Check Matrix
Purchasing performs a submission check on each document for whichyou choose a Cancel or Finally Close control action. The submissioncheck verifies that the document satisfies specific conditions for these

2 – 47Approval, Security, and Control
control actions. For example, if you try to cancel a blanket purchaseagreement, the submission check verifies that all releases associatedwith this agreement have been cancelled or final closed. If yourdocument fails any of the submission check rules, Purchasing opens theView Online Report window where you can review the cause(s) offailure.
The following matrix describes the submission checks that Purchasingperforms for each document type.
CANCEL Standard Planned Blanket Contract Release Requisition
Shipment quantity receivedmust be less than or equalto quantity ordered
X X
Shipment quantity billedmust be less than or equalto quantity ordered
X X X
Distribution quantitydelivered must be less thanor equal to quantity ordered
X X
Distribution quantity billedmust be less than or equalto quantity ordered
X X
Delivery quantity mustequal receipt quantity for allreceipts
X X
Cancel date must be withinaccounting distributioneffectivity dates
X X X X
All associated releases mustbe cancelled or final closed
X X
All accounting flexfieldsmust be valid
X X X X
FINALLY CLOSE Standard Planned Blanket Contract Release Requisition
Delivery quantity mustequal receipt quantity for allreceipts
X X
Cancel date must be withinaccounting distributioneffectivity dates
X X X X
Table 2 – 11 (Page 1 of 2)

2 – 48 Oracle Public Sector Purchasing User’s Guide
RequisitionReleaseContractBlanketPlannedStandardFINALLY CLOSE
All associated releases mustbe cancelled or final closed
X X
All accounting flexfieldsmust be valid
X X X X
Table 2 – 11 (Page 2 of 2)
Controlling Documents
Use the Control Documents window to control requisitions andrequisition lines as well as purchase orders, purchase order lines,releases, and shipments. For requisitions, the only available actions areCancel and Finally Close. Only control options appropriate for theselected requisition or purchase order are displayed in the Actionsfield. The following control actions are available in this window:
Cancel – If you use on–line requisitions, and you cancel a purchaseorder you did not receive or pay at all, Purchasing cancels therequisition lines associated with the purchase order if the CancelRequisitions check box is selected. If the Cancel Requisitions check boxis not selected, the requisition lines are not cancelled and are returnedto the pool of available requisitions. You can then assign theserequisition lines to new purchase orders to fulfill your requestors’needs. See: Defining Control Options: page 1 – 33.
If you use on–line requisitions, and you cancel a partially receivedpurchase order line, Purchasing recreates requisition lines for theremainder of the maximum of the billed or received quantity you havenot received. You can assign these requisition lines to a new purchaseorder line to fulfill the requestor’s needs. See: Autocreate DocumentOptions: page 6 – 4.
If you are using encumbrance or budgetary control, Purchasingautomatically creates negative debit entries in your general ledgersystem to cancel the encumbrance that corresponds to the purchaseorder header, lines, or shipments you are cancelling, using the actiondate you specify in Action Date. Purchasing recreates requisitionencumbrances for the requisition lines you used to create the purchaseorder if the Cancel Requisitions check box is not selected. Purchasinguses the distributions from your cancelled purchase order to recreate

2 – 49Approval, Security, and Control
the encumbrance for your requisition. See: Budgetary Control andOnline Funds Checking, Oracle Public Sector General Ledger User’s Guide.
After you partially or completely cancel a purchase order, you need toinform your supplier of the cancellation. You can reprint purchaseorders or releases you partially or completely cancelled. Purchasingautomatically prints a cancellation message on the purchase order,purchase order line, purchase order shipment, or release you cancelled.
You can source a requisition line from a line in the Prior Purchasesregion of the Supplier Item Catalog window. (A line in the PriorPurchases region corresponds to a purchase order line.) However,Purchasing does not automatically update the corresponding sourcinginformation if you cancel a blanket agreement or agreement line withwhich you source requisition lines. If you cancel a blanket agreementor agreement line, be sure to update the corresponding information inthe Requisition Templates or the Sourcing Rules window. See:Defining Requisition Templates: page 1 – 44. See: Automatic Sourcing:page 5 – 69.
Close – You can close at the header, release, line, and shipment levels.
Close for Invoicing – You can close for invoicing at the header, release,line, and shipment levels. Note that if you close for invoicing apurchase order header that is currently open, Purchasing sets the statusof all purchase order shipments to Closed for Invoicing, but thepurchase order lines and header remain open. This status will notprevent you from matching an invoice to the purchase order.
Close for Receiving – You can close for receiving at the header, release,line, and shipment levels. Note that if you close for receiving apurchase order header that is currently open, Purchasing sets the statusof all purchase order shipments to Closed for Receiving, but thepurchase order lines and header remain open.
Finally Close – You can final close at the header, release, line, andshipment levels. Purchasing automatically closes fully billed andreceived purchase orders. However, to prevent further actions on thepurchase order, you should use this form to final close purchase orders.Finally Close prevents modifications to the purchase order. Also, if youare using encumbrance or budgetary control, Finally Closeautomatically creates credit encumbrance journal entries in yourgeneral ledger system to reverse the encumbrance that corresponds tothe purchase order header, lines, or shipments you are closing, usingthe action date you specify in Action Date. See: Budgetary Controland Online Funds Checking, Oracle Public Sector General Ledger User’sGuide.

2 – 50 Oracle Public Sector Purchasing User’s Guide
Freeze – You can freeze only at the header and release level. You freezea purchase order when you want to prevent any future modifications tothe purchase order. When you freeze a purchase order, you can stillreceive and pay for goods you already ordered. If you want to preventfuture receipt or matching invoices against this purchase order, cancelor final close the purchase order instead.
If you use a Requisition template or source to source requisition linesfrom a purchase order line, Purchasing does not automatically updatethe corresponding sourcing information when you freeze a purchaseorder with which you source requisition lines. If you freeze a purchaseorder, be sure to update the corresponding information in theRequisition Templates or the Sourcing Rules window. See: DefiningRequisition Templates: page 1 – 44. See: Automatic Sourcing: page5 – 69.
On Hold – You can place a purchase order on hold only at the headerlevel. This unapproves the purchase order while preventing printing,receiving, invoicing, and future approval until you remove the hold.
Open – You can open at the header, line, and shipment levels.
Open for Invoicing – You can reopen for invoicing at the header, line,and shipment level.
Open for Receiving – You can reopen for receiving at the header, line,and shipment level.
Release Hold – You can release a hold only at the header level.
Unfreeze – You can unfreeze only at the header and release levels.
� To control documents:
1. Navigate to the Control Document window by selecting Controlfrom the Special menu in the Requisition Headers Summary andRequisition Lines Summary windows. For purchase orders, youcan navigate to the Control Document window from the summarywindows titled Purchase Order Headers, Purchase Order Lines,and Purchase Order Shipments.

2 – 51Approval, Security, and Control
2. Select the control Action.
3. If you selected the Cancel action, you can update the Action Date.
Note: If you are using encumbrance or budgetary control, makesure the action date you specify lies in an open period.
4. Optionally enter a Reason for the action.
5. If you are cancelling a purchase order, you can enter a Note toSupplier.
6. The Cancel Requisitions check box appears only when you haveselected the Cancel action for a purchase order. The operation ofthe check box is governed by the Cancel Requisitions flag in thePurchasing Options window. If this flag is set to Never, the checkbox does not appear. If this flag is set to Always, the check boxappears checked when you select the Cancel action, but you cannotupdate the check box. If this flag is set to Optional, the check boxappears unchecked when you select the Cancel action, and you canupdate it. If the check box is checked, requisition lines associatedwith the cancelled purchase order header, line, shipment, or releaseare cancelled. If the check box is unchecked, requisition linesassociated with the cancelled purchase order header, line,shipment, or release are not cancelled and are returned to therequisition pool. See: Defining Control Options: page 1 – 33.

2 – 52 Oracle Public Sector Purchasing User’s Guide
� To cancel control actions:
� Select the Cancel button to cancel your actions and return to theprevious window.
See Also
Document Control Options: page 2 – 37

2 – 53Approval, Security, and Control
MassCancel
Defining MassCancel
Use the Define Mass Cancel window to specify criteria for cancellinggroups of requisitions or purchase orders that you no longer want tohonor.
You can specify a range of Accounting Flexfields for which to cancelrequisitions or purchase orders. You can use this zone to specify arange of accounts, programs, projects, or funds, or one account,program, project, or fund for which to cancel purchase orders orrequisitions. Purchasing selects for cancellation all purchase orders orrequisitions that meet your other selection criteria and havedistributions falling completely or partially within these ranges.
You can define multiple ranges of Accounting Flexfields, each includingboth a low and high value for each key segment. Purchasing excludesall values outside the specified ranges.
When you enter the Include Low field, Purchasing displays a pop–upwindow that contains a prompt for each segment you have defined foryour Accounting Flexfield. You enter both the low and high ends ofeach range in this pop–up window. After you finish entering eachrange, Purchasing displays your low segment values in concatenatedform in the Low field and displays your high segment values, similarly,in the High field.
Note that Purchasing does not perform checking for incompatibleranges, so you must take care to insure that your High value is actuallyhigher than your Low value. Otherwise, no documents will be selectedfor MassCancel.
After you specify your cancellation criteria, Purchasing selects allpurchase orders or requisitions meeting your cancellation criteria andautomatically prints the Define MassCancel Listing. This report listsrequisitions and purchase orders that are not cancellable, that fallpartially within your cancellation criteria, and that fully meet yourcancellation criteria. You can cancel purchase orders or requisitions inthe latter two categories using the Run MassCancel window.
� To define cancellation criteria:
1. Navigate to the Define MassCancel window from the menu.

2 – 54 Oracle Public Sector Purchasing User’s Guide
2. Enter the MassCancel Batch Name. Purchasing displays this namein the Run MassCancel window, where you can choose the batchfor cancellation.
3. Choose one of the following Options:
Requisition – Use this option to submit MassCancel for Requisitions.
Purchase Order – Use this option to submit MassCancel for plannedand standard purchase orders, and blanket purchase agreements.
4. Select Cancel Backing Requisition Lines to indicate that you wantto cancel the backing requisition lines when you cancel a purchaseorder. The cursor enters this field only when you choose thePurchase Order option in this window and then only when theCancel Requisitions option in the Purchasing Options window isset to Optional. In this case, the default is to disable the check box,but you can change it. You cannot disable this option when theCancel Requisitions option is Always or enable this option whenthe Cancel Requisitions option is Never. See: Defining ControlOptions: page 1 – 33.
If you set the Cancel Backing Requisition Lines option to Never,when you complete your MassCancel for purchase ordersPurchasing recreates the requisition (and requisition encumbranceif you use requisition encumbrance or requisition budgetary
Example
2 – 55Approval, Security, and Control
control) from which you created your purchase order. Therefore,you should define and run MassCancel for all your purchase orders beforeyou define and run MassCancel for your requisitions.
5. Enter the Start Date and End Date you want Purchasing to use tochoose requisitions or purchase orders for cancellation. Thecreation date is the date you created your requisitions or purchaseorders. Purchasing selects requisitions or purchase orders forcancellation that have creation dates between the start date andend date you specify here.
6. For requisitions only, enter the Document Type: Internal orPurchase.
7. Enter the Supplier Name for which you want Purchasing to choosepurchase orders for MassCancel. If you specify a supplier name,Purchasing selects for cancellation all purchase orders for thissupplier that also fit your other cancellation criteria. If you do notspecify a supplier name, Purchasing selects all purchase orders thatmeet your other selection criteria. You cannot specify a suppliername if you are cancelling requisitions.
8. Enter the Low and High values of your MassCancel rule range.Neither value has to be a valid Accounting Flexfield value nor doesit have to be made up of valid key segment values.
The lowest and highest possible values in a range are operatingsystem dependent. The lowest possible value is either the number0 or the character A. If the lowest value on your computer is thenumber 0, then the highest possible value is the character Z. If thelowest value on your computer is the character A, then the highestpossible value is the number 0. You must determine whichcombination is correct for your computer. If you enter the incorrectcombination of lowest to highest, Purchasing displays an errormessage so you know your computer accepts the other lowest tohighest range combination. Note that ZZ is a higher value than Z.If you want to specify a single value to include, enter the samevalue in both the Low and High fields.
You want to cancel all purchase orders you charge to project 305.You define your Accounting Flexfield as Fund – Account –Organization – Project. Your computer uses 0 as the lowest value.You specify the Include Low value as 00–0000–000–305 and IncludeHigh as ZZ–ZZZZ–ZZZ–305. Note that if none of the AccountingFlexfield segments are required, you can have a range of all null(empty) segments, which in effect means that all accounts areincluded in the range.

2 – 56 Oracle Public Sector Purchasing User’s Guide
See Also
Overview of Encumbrance Accounting, Oracle Public Sector GeneralLedger User’s Guide
Define MassCancel Listing: page 2 – 56
Running MassCancel: page 2 – 58
Define MassCancel Listing
Use the Define MassCancel Listing to review purchase orders andrequisitions you have selected for cancellation using the DefineMassCancel form. Purchasing prints this report automatically after youdefine your purchase order or requisition cancellation criteria in theDefine MassCancel window and save your work. The report is in foursections: Unable to Cancel Requisitions, Unable to Cancel PurchaseOrders, Partially in Range Documents, and Fully in Range Documents.
The Unable to Cancel Requisitions and Unable to Cancel PurchaseOrders sections print documents which fit your selection criteria, butwhich are not cancellable by MassCancel for a reason that the reportprovides.
Purchasing displays one of the following reasons why you cannotcancel a requisition:
You have matched at least one line of yourrequisition to a purchase order. Therefore, youcannot cancel the entire requisition.
You have one or more purchase orders that havebeen created based on this requisition. Therefore,you cannot cancel the requisition.
The requisition is either incomplete, cancelled, orfinal closed. Therefore you cannot cancel therequisition.
Purchasing displays one of the following reasons why you cannotcancel a purchase order:
You have been billed for more goods or servicesthan you ordered on at least one distribution ofyour purchase order.
Included in PO
One or more POsare created basedon this REQ
REQ is eitherincomplete,cancelled, or finalclosed
Line Overbilled

2 – 57Approval, Security, and Control
If you required receipt, you have been billed formore goods or services than you have recordeddeliveries for at least one distribution of yourpurchase order. Therefore, you cannot cancel thepurchase order in its entirety.
You have recorded deliveries in excess of goods orservices ordered for at least one distribution of thispurchase order. Therefore, you cannot cancel thepurchase order in its entirety.
One of the Accounting Flexfields you use for apurchase order distribution has expired.Therefore, you cannot create a journal entry usingthis Accounting Flexfield. You need to reactivatethe Accounting Flexfield if you wish to cancel thisline.
Purchasing prints this Cannot Cancel Reason onlyif you are using encumbrance or budgetary controlfor purchase orders.
You have received all the goods or services youordered for at least one shipment of your purchaseorder. Therefore, you cannot cancel this purchaseorder in its entirety.
You have been billed for all the goods or servicesfor at least one of your shipments for this purchaseorder. Therefore, you cannot cancel this purchaseorder in its entirety.
If you have been billed for goods or services inexcess of the quantity ordered, Purchasing printsLine Overbilled as the Cannot Cancel Reason.
You have recorded receipts for some goods orservices on at least one shipment for this purchaseorder. You have not recorded delivery of at leastone of these items. Since you have received goodsfor this purchase order, you cannot cancel it in itsentirety.
You have been billed for at least one item of yourpurchase order. Therefore, you cannot cancel theentire purchase order. Purchasing prints thisCannot Cancel Reason only if you are usingencumbrance or budgetary control for purchaseorders.
LineOverdelivered
InvalidAccountingFlexfield
Shipment FullyReceived
Shipment FullyBilled
ShipmentReceived But NotDelivered
Included inInvoice
2 – 58 Oracle Public Sector Purchasing User’s Guide
The Partially in Range Documents section prints purchase orders orrequisitions having distributions which fall partially in the range ofAccounting Flexfields you selected for cancellation. Column headingsprovide you with descriptions of the contents of each column.
The Fully in Range section prints purchase orders or requisitions whichmeet all your selection criteria, and whose distributions fall completelywithin the range of Accounting Flexfields you selected for cancellation.Column headings provide you with descriptions of the contents of eachcolumn.
After you review the Define MassCancel Listing, you can complete theMassCancel process using the Run MassCancel window. You cancancel only purchase orders or requisitions which are Fully in Range orPartially in Range.
Report Submission
Since this report is automatically submitted, it is not available in theSubmit Requests window.
See Also
Defining MassCancel: page 2 – 53
Running MassCancel: page 2 – 58
Running MassCancel
Use the Run MassCancel window to cancel a group of purchase ordersor requisitions you have selected for cancellation, usually as part ofyour year–end processing. When you cancel purchase orders orrequisitions using this window, Purchasing reverses encumbrancesassociated with your requisitions or purchase orders. If you cancel apurchase order you created from a requisition, and you are usingrequisition encumbrance or requisition budgetary control, Purchasingallows you to recreate the requisition encumbrance using thedistributions from your purchase order. Therefore, if you are cancellingboth requisitions and purchase orders as part of your year–end processing, youneed to cancel purchase orders before you cancel requisitions.
When you define your MassCancel criteria, you may select somepurchase orders or requisitions for cancellation that Purchasing is

2 – 59Approval, Security, and Control
unable to cancel for some reason. Purchasing does not display thesepurchase orders or requisitions in this window. However, you canreview the Define MassCancel Listing for purchase orders orrequisitions that cannot be cancelled, together with the reason whythey cannot be cancelled. When the concurrent manager runs theMassCancel process, it checks whether the purchase orders orrequisitions can be cancelled, using the same checks performed by theDefine MassCancel window. The purchase orders or requisitions thatcannot be cancelled are listed separately in the Run MassCancel Listing.
When you enter a batch name in this window, Purchasing displays thepurchase orders or requisitions that can be cancelled. Cancel BackingRequisition Lines is checked if this option was selected for the batch inthe Define MassCancel window. For each document, Purchasingdisplays the document Type (Requisition, Standard Purchase Order,Planned Purchase Order, or Blanket Purchase Agreement), documentNumber, Creation Date, and Supplier Name. Fully in Range is checkedif all the distributions of this entry fall within all the AccountingFlexfield ranges you specify in the Define MassCancel window.
When you run MassCancel, Purchasing cancels all purchase orders orrequisitions that are selected. If you are using encumbrance orbudgetary control, Purchasing creates reversal entries for yourcommitments and obligations (pre–encumbrances and encumbrances)when you cancel requisitions and purchase orders, respectively.
Prerequisites
❑ Defining MassCancel: page 2 – 53
❑ Define MassCancel Listing: page 2 – 56
� To run MassCancel:
1. Navigate to the Run MassCancel window from the menu.
2. Enter the Batch Name of the MassCancel batch you wantPurchasing to use for cancellation. See: Defining MassCancel:page 2 – 53.
3. If you are using budgetary control, enter the Cancel Date that youwant Purchasing to use to create reversing encumbrance entries inyour general ledger. Purchasing uses this date to reapply funds toa specific period. The date you enter must be in an openpurchasing period.

2 – 60 Oracle Public Sector Purchasing User’s Guide
4. Deselect each entry you do not want to cancel. If you save yourwork without running MassCancel, your selections are saved andare redisplayed the next time you query the batch.
5. Select the Run MassCancel button.
� To delete the MassCancel batch:
� Select the Delete MassCancel Batch button to delete the selectedMassCancel batch.
See Also
Defining MassCancel: page 2 – 53
Define MassCancel Listing: page 2 – 56
Run MassCancel Listing: page 2 – 60
Overview of Encumbrance Accounting, Oracle Public Sector GeneralLedger User’s Guide
Run MassCancel Listing
Use the Run MassCancel Listing to review purchase orders andrequisitions you have cancelled or were unable to cancel usingMassCancel. Purchasing prints this report automatically after youcomplete your Run MassCancel process. The listing is in three sections:Unable to Cancel Requisitions, Unable to Cancel Purchase Orders, andCancelled Documents. The Unable to Cancel Requisitions and Unableto Cancel Purchase Orders sections print documents which fit yourselection criteria but which are not cancellable by MassCancel foranother reason, which the report provides.
Purchasing prints one of the following reasons you cannot cancel arequisition:
You have matched at least one line of yourrequisition to a purchase order. Therefore, youcannot cancel the entire requisition.
You have one or more purchase orders that havebeen created based on this requisition. Therefore,you cannot cancel the requisition.
Included inPurchase Order
One or more POsare created basedon this REQ

2 – 61Approval, Security, and Control
The requisition is either incomplete, cancelled, orfinal closed. Therefore you cannot cancel therequisition.
Purchasing prints one of the following reasons you cannot cancel apurchase order:
You have been billed for more goods or servicesthan you ordered on at least one distribution ofyour purchase order.
If you required receipt, you have been billed formore goods or services than you have recordeddeliveries for at least one distribution of yourpurchase order. Therefore, you cannot cancel thepurchase order in its entirety.
You have recorded deliveries in excess of goods orservices ordered for at least one distribution of thispurchase order. Therefore, you cannot cancel thepurchase order in its entirety.
One of the Accounting Flexfields you use for apurchase order distribution has expired.Therefore, you cannot create a journal entry usingthis Accounting Flexfield. You need to reactivatethe Accounting Flexfield if you wish to cancel thisline.
Purchasing prints this Cannot Cancel Reason onlyif you are using encumbrance or budgetary control.
You have received all the goods or services youordered for at least one shipment of your purchaseorder. Therefore, you cannot cancel this purchaseorder in its entirety.
You have been billed for all the goods or servicesfor at least one of your shipments for this purchaseorder. Therefore, you cannot cancel this purchaseorder in its entirety.
If you have been billed for goods or services inexcess of the quantity ordered, Purchasing printsLine Overbilled as the Cannot Cancel Reason.
You have recorded receipts for some goods orservices on at least one shipment for this purchase
REQ is eitherincomplete,cancelled, or finalclosed
Line Overbilled
LineOverdelivered
InvalidAccountingFlexfield
Shipment FullyReceived
Shipment FullyBilled
ShipmentReceived But NotDelivered

2 – 62 Oracle Public Sector Purchasing User’s Guide
order. You have not recorded delivery of at leastone of these items. Since you have received goodsfor this purchase order, you cannot cancel it in itsentirety.
You have been billed for at least one item of yourpurchase order. Therefore, you cannot cancel theentire purchase order. Purchasing prints thisCannot Cancel Reason only if you are usingencumbrance for purchase orders.
When you cancel purchase orders or requisitions and you are usingencumbrance or budgetary control, Purchasing creates relievingencumbrance entries for your purchase orders or requisitions. See:Overview of Encumbrance Accounting, Oracle Public Sector GeneralLedger User’s Guide
Report Submission
Since this report is automatically submitted, it is not available in theSubmit Requests window.
See Also
Defining MassCancel: page 2 – 53
Running MassCancel: page 2 – 58
Included inInvoice

2 – 63Approval, Security, and Control
Approval Workflows
Overview
Whenever you submit a purchase order or requisition for approval ortake an action in the Notifications Summary window, Purchasing usesOracle Workflow technology in the background to handle the approvalprocess. Workflow uses the approval controls and hierarchies youdefine according to the setup steps in Setting Up Document Approvaland Security: page 2 – 2 to route documents for approval. You can useWorkflow Builder’s easy interface to modify your approval process.
Viewable from the Workflow Builder, the following approvalworkflows are available with Purchasing:
• PO Approval, for approving purchase orders
• PO Requisition Approval, for approving requisitions
• Send Notifications for Purchasing Documents, for sendingautomated reminders to approvers through the NotificationsSummary window
Each of these approval workflows consists of processes, which areviewable in the Workflow Builder as a diagram, some of whose objectsand properties you can modify. Each workflow process consists ofindividual functions.
Prerequisite
❑ Before you can use or modify any of the workflows in Purchasing,you need to set up Oracle Workflow if you haven’t done so alreadywhen you set up Purchasing. See: Setting Up Oracle Workflow,Oracle Workflow Guide.
Below is an example of what a workflow process looks like in theWorkflow Builder. For more information on using the WorkflowBuilder to view or modify a workflow, see the Oracle Workflow Guide.

2 – 64 Oracle Public Sector Purchasing User’s Guide
Example Workflow Process in the Workflow Builder
When the Workflows Are Initiated
The PO Approval or PO Requisition Approval workflow is initiated atthe following points in Purchasing:
• When you choose Submit for Approval (and then choose OK) inthe Approve Document window. See: Submitting a Documentfor Approval: page 2 – 32.
• When you respond to a reminder in the Notifications Summarywindow reminding you to submit a document for approval thathas not yet been submitted.
Customizing and Creating Approval Workflows
Prerequisite
❑ Before you can use or modify any of the workflows in Purchasing,you need to set up Oracle Workflow if you haven’t done so alreadywhen you set up Purchasing. See: Setting Up Oracle Workflow,Oracle Workflow Guide.
Use the Oracle Workflow Builder to customize workflows.

☞
2 – 65Approval, Security, and Control
Attention: When you customize a workflow, only thosedocuments that are submitted for approval after you customizeit are affected by the customized workflow.
You can also use the Workflow Builder to create unique approvalworkflows for each document type in your organization. You associateparticular workflows with certain document types in the DocumentTypes window. See: Defining Document Types: page 1 – 65.
For detailed information on how to modify workflows in the OracleWorkflow Builder, see the Oracle Workflow Guide.
Like most workflows, the Purchasing approval workflows consist ofthe following components: processes, functions, messages,notifications, attributes, and lookup types. For detailed definitions ofthese components, see the Oracle Workflow Guide. Some of theseworkflow components are locked; others are unlocked, or available formodification to suit your public sector needs. For example, the MainRequisition Approval process can be customized, so that you couldadd a subprocess or a function of your own. Nearly all functions in theapproval workflow are locked, however, because they corresponddirectly to stored procedures in the Oracle database. Generally, youneed to be experienced with both Purchasing and Workflow beforemodifying a workflow. However, there are some setup–levelmodifications you can make to a workflow, as described in the nextsection.
Setting Up the Timeout Feature
Prerequisite
❑ Before you can use or modify any of the workflows in Purchasing,you need to set up Oracle Workflow if you haven’t done so alreadywhen you set up Purchasing. See: Setting Up Oracle Workflow,Oracle Workflow Guide.
An example of an approval workflow component that you can modifyis a notification associated with a Timeout. Both the PO Approval andPO Requisition Approval workflows contain notifications with aTimeout feature that is enabled only if:
• you modify the notification(s), and
• the Workflow Background process is running (See: WorkflowBackground Process: page 9 – 163).
In a notification associated with the Timeout feature, you can specify aperiod of time after which, if no response has yet come from an

☞
2 – 66 Oracle Public Sector Purchasing User’s Guide
approver, a reminder is sent. You can send up to two reminders to anapprover using the Timeout feature. You can specify that after a certainperiod of time, the document is forwarded automatically to the nextapprover in the hierarchy. The Workflow Background process must berunning in order for the Timeout feature to run.
If you don’t set up the Timeout feature, the approval workflow will nottime out; it will simply wait to receive a response from that approver.
� To set up the Timeout feature:
Attention: You need to set up this feature for each operatingunit.
1. In the Oracle Workflow Builder, open the PO Approval or the PORequisition Approval workflow (also called an ”item type”). See:Opening and Saving Item Types, Oracle Workflow Guide.
2. Open the Notify Approver process and look at the Timeouttransitions between the following three notifications: ”Approve PONotification,” ”PO Approval Reminder 1,” and ”PO ApprovalReminder 2.” (If you’re in the PO Requisition Approval workflow,these will be ”Approve Requisition Notification,” ”RequisitionApproval Reminder 1,” and ”Requisition Approval Reminder 2.”)
It’s helpful to see how these notifications and the Timeout featureappear in the Notify Approver process.
3. In the Navigator, under Notifications for either the PO Approvalworkflow or the PO Requisition Approval workflow, open the”Approve PO Notification” if you’re in the PO Approval workflow,or the ”Approve Requisition Notification” if you’re in the PORequisition Approval workflow.
4. Choose the Details tab in the Control Properties window thatappears.
5. Enter a number or numbers in any of the Timeout fields. Do thesame for ”PO Approval Reminder 1” and ”PO Approval Reminder2” in the Navigator under Notifications. (If you’re in the PORequisition Approval workflow, these will be ”RequisitionApproval Reminder 1” and ”Requisition Approval Reminder 2.”)
Let’s say you entered the Timeout ”days” fields of all threepurchase order notifications as follows:
• Approve PO Notification – 3 days
• PO Approval Reminder 1 – 2 days
• PO Approval Reminder 2 – 1 day

2 – 67Approval, Security, and Control
In this example, ”Approve PO Notification” times out after 3 daysif the approver doesn’t take an action on the notification, and ”POApproval Reminder 1” sends the reminder notification. ”POApproval Reminder 1” times out after 2 days if the approverdoesn’t take an action on the notification, and ”PO ApprovalReminder 2” sends the reminder notification. ”PO ApprovalReminder 2” times out after 1 day if the approver still doesn’t takean action on the notification; then the ”Find Approver” subprocesslooks for the next approver in the hierarchy.
If you leave the Timeout fields of a notification as 0, then theworkflow will not time out at that notification; it will wait toreceive a response from that approver.
See Also
Setting Up Document Approval and Security: page 2 – 2
The Document Approval Process: page 2 – 23
PO Approval Workflow
The PO Approval Workflow consists of the PO Approval Top Processand numerous subprocesses. The two highest–level processes, POApproval Top Process and PO Approval Process, are described here.
PO Approval Top Process
The PO Approval workflow, which approves purchase orders andreleases, consists of a highest–level process called PO Approval TopProcess.
PO Approval Top Process (partial view)
Set Workflow Startup Values (Function)
This function performs general setup functions. The functions ”UpdatePO Header with Workflow Key” and ”Get PO Attributes” also performgeneral setup functions.

2 – 68 Oracle Public Sector Purchasing User’s Guide
Change Order Setup (Function)
This function defines basic setup options for processing changes topurchase orders. See: Workflow Processes for Approving ChangeOrders: page 2 – 73.
Is This a New Document? (Function)
This function checks to see whether the purchase order is new or achange to an existing purchase order. If it’s new, the purchase ordergoes through the PO Approval Process. If it’s a change to an existingpurchase order, it goes through the change order approval process ifthe document type is set to Archive on Approval. See: PO ApprovalProcess: page 2 – 70. See: Workflow Processes for Approving ChangeOrders: page 2 – 73.
PO Approval Top Process, Continued (partial view)
Is Archive on Approval Flag Set to Yes? (Function)
This function checks to see if the document type is set to Archive onApproval or Archive on Print in the Document Types window. See:

2 – 69Approval, Security, and Control
Defining Document Types: page 1 – 65. If it’s set to Archive onApproval and the previously approved document has been modified,then the workflow processes for approving changed purchase orders orreleases begins. See: Workflow Processes for Approving ChangeOrders: page 2 – 73. If it’s set to Archive on Print, then the documentgoes through the full approval process.
Get All Document Changes (Process)
If the purchase order is not new and it is set to Archive on Approval inthe Document Types window, this process identifies the component orcomponents of the purchase order or release that have changed. See:Workflow Processes for Approving Change Orders: page 2 – 73.
Do Changes Require Reapproval? (Process)
This process determines whether the changed components require thedocument to go through the full approval process (find the nextapprover in the approval hierarchy and send notifications, and so on)or if it should be approved immediately. If the changed componentsrequire approval, the PO Approval Process begins. See: PO ApprovalProcess: page 2 – 70. See: Workflow for Approving Changed Orders:page 2 – 73.
PO Approval Process (Process)
This process is described in more detail in PO Approval Process: page2 – 70.
Change Order Reserve Before Approval (Process)
This process checks to see if encumbrance is turned on and if funds forthe document are not yet reserved. If encumbrance is on and funds arenot yet reserved, then the process attempts to reserve funds for thedocument. If it cannot, it sends a notification to the person whocreated or modified the document that it was unable to reserve thefunds. That person can then try to reserve the document again if, forexample, more funds have been allocated; reject the document; modifythe document; or forward the document to somebody else withauthority to reserve the funds.
Approve PO (Process)
If funds are reserved before the approval, this process approves thepurchase order. If while approving the purchase order, validation fails,

2 – 70 Oracle Public Sector Purchasing User’s Guide
this process sends a notification to the buyer that the document failedstate or correctness checks. See Document Status Checks: page 2 – 24.See Document Submission Checks: page 2 – 25.
PO Approved (Function)
If validation succeeds, this function sends a notification to theappropriate individuals that the purchase order has been approved.
See Also
PO Approval Process: page 2 – 70
PO Requisition Approval Workflow: page 2 – 72
PO Approval Process
The PO Approval Process is part of the PO Approval Top Process,which is part of the PO Approval workflow. See: PO Approval TopProcess: page 2 – 67. The PO Approval Process is initiated when a newpurchase order is submitted for approval or when changes to apurchase order require going through the full approval process.
Set PO Status to ”In Process” (Function)
When you submit a purchase order for approval, its Status changes toIn Process.
Verify PO (Process)
This process makes sure the purchase order is complete and theinformation is valid. If the purchase order fails validation, then thisprocess sends a notification to the buyer that the purchase order hasfailed document state or correctness checks. See Document StatusChecks: page 2 – 24. See Document Submission Checks: page 2 – 25. Ifit passes validation, then the function ”Can Owner Approve?” begins.
Can Owner Approve? (Function)
This function checks to see if Owner Can Approve is enabled for thespecific document type in the Document Types window. See: DefiningDocument Types: page 1 – 65. If Yes, then Verify Approval Authoritybegins. If No, then Find Approver begins.

2 – 71Approval, Security, and Control
Verify Approval Authority (Process)
This process checks the approver’s approval authority limits. If theperson has enough authority to approve the document, then ”IsForward–To Provided?” begins. If No, then ”Find Approver” begins.”Find Approver” tries to find the next approver in the approvalhierarchy.
Is Forward–To Provided? (Function)
This function checks to see if a forward–to person was provided in theApprove Document or Notifications Summary windows when thedocument was submitted for approval. If Yes, then ”Approve AndForward PO” begins. If No, then ”Reserve Before Approval” begins.
Reserve Before Approval (Process)
See: Change Order Reserve Before Approval: page 2 – 69 in the section,”PO Approval Top Process.”
Approve PO (Process)
See: Approve PO: page 2 – 69 in the section, ”PO Approval TopProcess.”
PO Approved (Function)
If validation succeeds, this function sends a notification to theappropriate individuals that the purchase order has been approved.
Is PO Pre–Approved? (Function)
This function checks to see if the purchase order has beenpre–approved. A pre–approved document is one that has already beenapproved by the appropriate individual, who also chose to forward itto yet another person for approval.
Find Approver (Process)
This process looks for the next approver in the approval hierarchy if”Verify Approval Authority” determines that the document ownerdoesn’t have the authority to approve the document, or if ”Can OwnerApprove?” finds that Owner Can Approve is not checked for thespecific document type in the Document Types window. See: DefiningDocument Types: page 1 – 65.

2 – 72 Oracle Public Sector Purchasing User’s Guide
Return PO To Submitter (Process)
If ”Find Approver” doesn’t find an approver, this process returns thepurchase order to the buyer and sends the buyer a notification that noapprover was found.
Forward PO (Process)
If ”Find Approver” finds an approver, this process forwards thepurchase order from one approver to the next in the approvalhierarchy.
Approve And Forward PO (Process)
If a forward–to person is provided, this process approves and forwardsthe purchase order in one step. The resulting status of the purchaseorder is ”Pre–Approved.”
Notify Approver (Process)
After ”Forward PO” or ”Approve And Forward PO,” this processsends a notification to the approver that a new document requiresapproval.
Reject PO (Process)
This process records the approver’s rejection of the purchase order andsends the purchase order back to the buyer.
PO Rejected (Function)
After the approver’s rejection is recorded and the purchase order sentback to the buyer, this function sends a notification to the buyer thatthe purchase order has been rejected.
PO Requisition Approval Workflow
The PO Requisition Approval workflow, which approves requisitions,consists of a highest–level process called Main Requisition ApprovalProcess. The Main Requisition Approval Process consists of similarprocesses and activities as are in the PO Approval Process. See: POApproval Process: page 2 – 70.

☞
2 – 73Approval, Security, and Control
The main differences between the PO and Main Requisition approvalprocesses (besides that one is for purchase orders and the other forrequisitions) are as follows:
• After the requisitions are approved, the Main RequisitionApproval Process launches a workflow for the automaticcreation of purchase orders if you’ve allowed automaticapproval for approved requisition lines. (By default inPurchasing, it is allowed.) See: Workflow for Creating PurchaseOrders or Releases: page 4 – 160.
• If you’re using encumbrance, the Main Requisition Approvalprocess attempts to reserve funds for the document at thebeginning of the process.
• The PO Approval Process includes change order workflowprocesses. See: Workflow Processes for Approving ChangeOrders: page 2 – 73.
Send Notifications for Purchasing Documents
The workflow process, Send Notifications for Purchasing Documents,looks for documents that are incomplete, rejected, or in need ofreapproval and sends notifications to the appropriate people of thedocument’s status. You can view and respond to these notificationsthrough the Notifications Summary window.
Attention: In order for these notifications to be sent, you needto start the concurrent program process, Send Notifications forPurchasing Documents, and choose how frequently you wantthe process to run. See: Sending Notifications for PurchasingDocuments: page 9 – 142.
For information on the kinds of notifications sent by the SendNotifications for Purchasing Documents process, see: Viewing andResponding to Notifications: page 2 – 29.
Workflow Processes for Approving Change Orders
Purchasing integrates with Oracle Workflow technology to let youdefine what changes to purchase orders or releases—for example, toamounts, suppliers, or dates—require reapproval. All of the workflowprocesses and functions relating to change orders can be found within

☞
2 – 74 Oracle Public Sector Purchasing User’s Guide
the PO Approval workflow. The processes and functions are describedbelow.
The change order workflow process uses the same reapproval rulesalready defined in Purchasing to determine whether a documentrequires reapproval. It uses different reapproval rules depending onthe document type: standard purchase order, planned purchase order,blanket purchase agreement, contract purchase agreement, blanketrelease, and schedule release. See: Document Reapproval Rules: page4 – 114.
When the Workflow Is Initiated
The change order workflow begins when all of the following is true:
• changes to a purchase order cause its Status to change to’Requires Reapproval,’ and
• the document revision number of the purchase order increases,and
• you select Submit for Approval (and then choose OK) in theApprove Document window or otherwise submit the documentfor approval
Customizing the Change Order Workflow
Prerequisite
❑ Before you can use or modify any of the workflows in Purchasing,you need to set up Oracle Workflow if you haven’t done so alreadywhen you set up Purchasing. See: Setting Up Oracle Workflow,Oracle Workflow Guide.
The change order workflow uses the same reapproval rules alreadydefined in Purchasing. (See: Document Reapproval Rules: page4 – 114.)
Attention: These reapproval rules cause Purchasing tounapprove a document. The copy of these reapproval rulesused by the change order workflow causes a document to gothrough the reapproval process. Changing the reapproval rulesthat the workflow uses does not change the reapproval rulesdescribed in the section, Document Reapproval Rules: page4 – 114, which simply cause Purchasing to unapprove adocument.

☞
2 – 75Approval, Security, and Control
You can use the Workflow Builder to modify percentage tolerances.Some of the reapproval rules that the workflow uses determine whatpercentage change to a unit price, quantity, or document total requiresreapproval. Workflow represents these percentage tolerances asattributes that you can change. For example, you can change anattribute’s value from the unit price tolerance of 0 to the unit pricetolerance of 20. This means that the document will be reapprovedautomatically by the change order workflow if the unit price isincreased or decreased by less than 20 percent.
You can modify the percentage tolerances for the following attributes inthe Workflow Builder.
Attention: You need to make these modifications for eachoperating unit.
• Change Order Header Blanket Total Tolerance
• Change Order Header Amount Limit Tolerance
• Change Order Purchase Order Total Tolerance
• Change Order Line Quantity Tolerance
• Change Order Line Unit Price Tolerance
• Change Order Line Quantity Committed Tolerance
• Change Order Line Agreed Amount Tolerance
• Change Order Line Price Limit Tolerance
• Change Order Shipment Price Override Tolerance
• Change Order Shipment Quantity Tolerance
• Change Order Distribution Quantity Ordered Tolerance
Change Order Processes
In the Workflow Builder, all the change order processes for reapprovingchanged purchase orders or releases can be found within the POApproval workflow. The processes and functions are listed below.
Do Changes Require Reapproval? (Process)
This process uses reapproval rules that are already defined inPurchasing (or that you modify in the Workflow Builder) to determineif the document is required to go through the full PO Approvalworkflow process, or if it can be approved immediately.

2 – 76 Oracle Public Sector Purchasing User’s Guide
Get All Document Changes (Process)
This process compares each document and its previous archivedrevision to find all the changes for each document type.
Get All Blanket PO Changes (Process)
This process compares the document and its previous archived revisionto find all the changes for a blanket purchase order.
Get All Contract PO Changes (Process)
This process compares the document and its previous archived revisionto find all the changes for a contract purchase order.
Get All Planned PO Changes (Process)
This process compares the document and its previous archived revisionto find all the changes for a planned purchase order.
Get All Release Changes (Process)
This process compares the document and its previous archived revisionto find all the changes for a blanket release or scheduled release.
Get All Standard PO Changes (Process)
This process compares the document and its previous archived revisionto find all the changes for a standard purchase order.
Change Order Setup (Function)
This function sets up essential information like purchase order numberand lookup type.
Determine Document Type (Function)
This function looks for the changed document’s document type.
Does the Blanket PO Require Reapproval? (Function)
This function returns the value of ’Yes’ when the blanket purchaseagreement is required to go through the approval process. If it doesn’trequire reapproval, based on the defined reapproval rules inPurchasing, then this function returns the value of ’No.’

2 – 77Approval, Security, and Control
The following functions do the same thing for each of their documenttypes:
• Does the Blanket Release Require Reapproval?
• Does the Contract PO Require Reapproval?
• Does the Planned PO Require Reapproval?
• Does the Scheduled Release Require Reapproval?
• Does the Standard PO Require Reapproval?
Get Distribution Changes (Function)
This function compares a distribution and its previous archivedrevision.
The following functions do the same thing for each of their documentcomponents:
• Get Header Changes
• Get Lines Changes
• Get Release Changes
• Get Shipments Changes
See Also
PO Approval Workflow: page 2 – 67

2 – 78 Oracle Public Sector Purchasing User’s Guide

C H A P T E R
3T
3 – 1Requisitions
Requisitions
his chapter tells you everything you need to know aboutRequisitions, including:
• Overview of Requisitions: page 3 – 2
• Overview of Internal Requisitions: page 3 – 14
• Finding Requisitions: page 3 – 35
• Entering Requisition Preferences: page 3 – 44
• Entering Requisition Headers: page 3 – 49
• Entering Requisition Lines: page 3 – 52
• Entering Requisition Distributions: page 3 – 58
• Using Requisition Templates: page 3 – 61

3 – 2 Oracle Public Sector Purchasing User’s Guide
Overview of Requisitions
Purchasing helps you manage the items you order. With on–linerequisitions, you can easily centralize your purchasing department,source requisitions with the best suppliers, and ensure that you obtainthe appropriate management approval before creating purchase ordersfrom requisitions. You can use Purchasing to create internalrequisitions, which are handled as internal sales orders and are sourcedfrom your inventory rather than from outside suppliers like purchaserequisitions. See: Overview of Internal Requisitions: page 3 – 14.
Purchasing provides you with the features you need to satisfy thefollowing basic requisition needs. You should be able to:
• Create, edit, and review requisition information on–line. Youshould also be able to enter suggested supplier information,delivery instructions, multiple accounting distributions, andnotes to buyers, approvers, and receivers.
• Review the current status and action history of your requisitions.You should always know who approves requisitions andwhether they are in the approval, purchasing, receiving, ordelivery stage.
• Route requisitions according to your approval structure. Youshould also be able to set authorization limits by amount, chargeaccount, item category, and location.
• Review and approve requisitions that need your approval. Youshould also be able to see the full requisition detail and reviewthe action history before you approve a requisition.
• Print requisitions (with status Approved, Cancelled, Rejected, InProcess, Pre–Approved, and Returned) for off–line review andapproval. You should always be able to track the status ofrequisitions through the approval process.
• Import requisitions from other systems such as material ordistributions requirement planning applications
• Perform on–line funds checking before creating requisitions. Youshould always know how your planned expenses compare toyour budget.
• Automatically source requisitions from outstanding blanketpurchase agreements or quotations you have received fromsuppliers
• Create requisitions quickly and easily for commonly purchaseditems

3 – 3Requisitions
• Provide attachments as notes on requisition headers and lines
• Assign requisition lines to buyers and review buyer assignmentsfor requisition lines
• Forward all requisitions awaiting approval from one approver toan alternate approver. Within your security and approvalconstraints, you should be able to reroute requisitions from oneapprover to another whenever you want.
• Record suggested foreign currency information for eachrequisition line
Major Features
Eliminate Paper
With Purchasing, your requestors submit requisitions on–line. Youtherefore eliminate the need for paper requisitions that you canmisplace or lose during the approval process.
Quick Online Entry
With Purchasing, you can easily create requisitions on–line. Completea requisition for any item by simply entering the requestor name, itemdescription, delivery location, price, delivery quantity, and accountingdistribution. Purchasing uses the Account Generator to enter thedistribution automatically whenever possible.
Approval Status
Purchasing automatically displays the approval status of yourrequisition and informs you whether it is Approved, Cancelled, InProcess, Incomplete, Pre–Approved, Rejected, or Returned. You knowwhere your requisition is at all times.
Action History
Purchasing lets you review the action history of requisitions as theymove through the approval process. Purchasing uses your security andapproval structure to help you forward requisitions. On–linenotifications keep your requisitions moving. If someone rejects arequisition, you always know who and why.
Easy Resubmission
Purchasing lets you resubmit a rejected requisition for reconsideration.Depending on how you define system setup options, resubmitted

3 – 4 Oracle Public Sector Purchasing User’s Guide
requisitions return either to the original approver for reconsideration orto an alternate approver that you choose.
Easy Cancellation / Final Close
Purchasing lets you cancel or final close a requisition or requisition linebefore your manager approves it or before a buyer places it on apurchase order.
If you are using encumbrance or budgetary control, Purchasingautomatically creates negative debit encumbrance entries for thecancelled requisitions. When you final close a purchase order,Purchasing creates credit entries which reverse the encumbrances.
Easy Assignment
Purchasing lets you assign requisitions to specific buyers and reviewwhich requisitions are Assigned and Unassigned.
Accurate Accounting
Purchasing uses the Account Generator to automatically supplyaccounting information as part of a requisition. You can allocate lineitem quantities to cost centers, organizations, projects, or departments.You can also create multiple distributions for a single item. Forinstance, you can allocate a computer system purchase across morethan one cost center or organization
Maximum Flexibility
Purchasing provides maximum flexibility by letting requestors createrequisitions quickly and add details later. In the requisition header andon each line item, Purchasing provides space for descriptions and notesto approvers, buyers, and receivers.
Quick Customization
Purchasing lets you use Descriptive Flexfields to tailor the format of therequisition header and line blocks to your unique needs withoutadditional programming.
Online Funds Availability Checking
Purchasing lets you verify whether you have enough funds available inyour budget before you complete a requisition. You can check andreserve funds for a requisition at any level of a requisition.

3 – 5Requisitions
Online Approvals
Purchasing lets you approve or reject requisitions on–line. You canaccess full requisition detail and prior action history to review the fulldetail before making an approval decision. Depending on yourapproval controls, you may be able to update a requisition before youapprove it.
Requisition Templates
This feature, accessible through the Supplier Item Catalog, lets youquickly create requisitions for commonly purchased items. Buyerscreate templates that group commonly ordered items like officesupplies into one place.
Quantity Rounding
If Quantity Rounding for inventory sourced lines is enabled in thePurchasing Options window, Purchasing either displays the roundedquantity you should have entered in a warning message or it updatesthe quantity to the appropriate rounded quantity. The rounding isbased on the Unit of Issue (or primary unit of measure if the Unit ofIssue is not defined) and the Rounding Factor defined for the item inInventory. Rounding is up or down to the nearest whole Unit ofIssue/primary unit of measure using the rounding factor.
Requisition Printing
Purchasing provides a requisition printing capability to provide hardcopy requisitions to approvers who are not on–line users. You canprint requisitions after completing them, or have somebody print anddistribute all requisitions for off–line approval. Use the PrintedRequisitions Report to print the requisitions which have the followingstatus: Approved, Cancelled, Rejected, In Process, Pre–Approved, andReturned. The report does not include requisitions with statusIncomplete.
Quick Access to Particular Requisitions
You can place requisitions that you reference frequently in the OracleApplications Navigator. Placing documents in the Navigator is usefulwhen you need to query large documents with multiple lines,shipments, or distributions. When the requisition is open, choose Placeon Navigator from the Action menu. When you choose the Documentsalternative region in the Navigator, you can then access that documentdirectly from within the Navigator. You can also do this with purchaseorders. See: Using the Navigator’s Documents Region, OracleApplications User’s Guide.

3 – 6 Oracle Public Sector Purchasing User’s Guide
Requisition Import
Using Requisition Import, you can import requisitions from otherOracle Applications or from non–Oracle systems. Requisition Importlets you integrate Purchasing with new or existing applications such asMaterial or Distribution Requirement Planning systems. You canimport requisitions as often as you want. Then, you can review orplace these requisitions on purchase orders. See: Requisition ImportProcess: page 9 – 130
Master Scheduling/MRP, Work In Process, Order Entry/Shipping, andInventory all provide requisition information to the requisitioninterface table from which Requisition Import creates requisitions.While requisitions can be imported with any approval status, they aremost commonly approved since they correspond to specific productionschedules, outside processing, or stock resupply. However, if you areusing requisition encumbrance, Requisition Import changes theApproved status to Pre–Approved so that you can reserve funds forthe requisition.
Requisition Types
Benefits of On–line Requisitions
You can save time, money, and paper by processing requisitionson–line. With a paper system, you must provide forms to therequestor, the requestor must send the form to someone else to beapproved, and the buyer must manually consolidate requisitions toplace on a purchase order. Throughout all of these transactions, youmay generate a number of errors, waste time, and lose money. Some ofthe many problems you may incur with paper requisitions include:
• The requestor may not fill in the requisition completely oraccurately.
• The requestor’s handwriting may be illegible.
• Someone without proper authority can potentially approve arequisition.
• The requestor might have to mail the requisition to an approverat a different location and wait a number of days to get it back.
• The approver or buyer may lose or damage the requisition.
• The buyer may translate the information from the requisition tothe purchase order incorrectly.

3 – 7Requisitions
• You may lose significant quantity discounts if the buyer cannotlocate all the requisitions that reference a particular item.
Implementing On–line Requisitions
Many agencies want to provide on–line requisitions to everyone in theagency. Others want to limit the number of users who have access tothe system. Purchasing is flexible enough to meet the needs of youragency. To give everyone access to the system, simply create a username for each employee in the agency and assign the employee theappropriate responsibilities. You can easily designate a smaller groupof individuals as the requisition preparers if you want to limit thenumber of requestors on the system. These people can createrequisitions for anyone in the agency by identifying the appropriaterequestor directly on the requisition line. You might also want to limitsome preparers to internal requisitions and others to purchaserequisitions. You can also print requisitions to obtain signatureapprovals if some of the approvers do not have access to the system.You can then assign an individual to update the authorization status forthese requisitions.
Purchase Requisitions
Use the Requisitions window to create requisitions. You must choosethe requisition type (internal or purchase). You can also provide adescription, unlimited notes, and defaults for requisition lines. Foreach requisition line, you choose the item you want to order along withthe quantity and delivery location. You can get sourced pricing fromcatalog quotations or open blanket purchase agreements. You can alsochoose a price from a list of historical purchase order prices. In theDistributions window, you can charge the item to the appropriateaccounts, or you can let the Account Generator create the accounts foryou. Once you complete the requisition, you send it through theapproval process. See: Entering Requisition Lines: page 3 – 52. See:Using the Account Generator in Oracle Public Sector Purchasing: page0 – 2.
Internal Requisitions
Unlike purchase requisitions, which are supplied from purchase orders,internal requisitions are supplied from internal sales orders. Internalrequisitions are not picked up when you AutoCreate RFQs or purchaseorders, nor can they be assigned to a buyer in the Assign Requisitionswindow. See: Internal Requisitions Overview: page 3 – 14.

3 – 8 Oracle Public Sector Purchasing User’s Guide
Requisition Templates
Use the Requisition Templates window to define requisition templatesfor items you purchase frequently. For example, if you frequently buycertain office supplies, you can set up an office supplies template foryour requestors. This template consists of a list of all items, prices, andsourcing information you want available to the requestor. When youwant to order items from this template, use the Supplier Item Catalog,choose the office supplies template, and indicate the quantity you wantto order. Purchasing supplies default sourcing and deliveryinformation. See: Defining Requisition Templates: page 1 – 44.
Imported Requisitions
Purchasing lets you import or reschedule requisitions from otherOracle or non–Oracle systems. See: Requisition Import Process: page9 – 130. For example, Work in Process uses Requisition Import tocreate requisitions for outside processing. See: Overview of OutsideProcessing: page 4 – 120. Similarly, Master Scheduling/MRPautomatically creates requisitions using Requisition Import when youmass load purchase requisitions. Master Scheduling/MRP alsoautomatically reschedules existing requisitions by updating theneed–by date during this process. See: Planner Workbench, OracleMaster Scheduling/MRP and Supply Chain Planning User’s Guide. If youare using Inventory, you can send a requisition requirement toPurchasing and then run Requisition Import in Purchasing to create therequisition. See: Overview of Inventory Planning and Replenishment,Oracle Inventory User’s Guide.
Paper Requisitions
You do not need to create a requisition on–line to purchase an item.Instead, you can reference a paper requisition number directly on thepurchase order Distribution Details. See: Entering Purchase OrderDistributions: page 4 – 70. Later, you can use the Purchase Orderswindow to review the status of the purchase orders referencing thepaper requisitions.
Reserving Funds for Requisitions
Purchasing lets you reserve or encumber funds for requisitions. If youare using budgetary control, you can also check to see whether fundsare available before you encumber the requisition. If you haveproblems reserving funds for a requisition, the Approval Errorswindow lets you review the reasons.

3 – 9Requisitions
Purchasing automatically transfers the encumbrance from therequisition to the purchase order when you successfully approve thepurchase order on which you placed the requisition. Purchasing alsoautomatically transfers the encumbrance back to the requisition whenyou cancel the purchase order. See: Overview of EncumbranceAccounting, Oracle Public Sector General Ledger User’s Guide.
See also: Changing Encumbered Documents: page 4 – 119.
Reviewing Requisitions
After you create a requisition, you can query the requisition at any timeto review the status, action history, or problems with encumberingfunds. Use the Requisition Summary windows to review requisitions.If a buyer has already placed the requisition line onto a purchase order,you can review the purchase order number. You can also review thechanges that the buyer made to the requisition and the quantityreceivers have delivered. See: Finding Requisitions: page 3 – 35.
Use the View Action History window to review the action history ofrequisitions. You can navigate to this window from the Special menuin many entry windows. You can see who has approved or rejected therequisition and the corresponding notes the approvers provided. ForInventory sourced lines, you can review the status of the internal salesorder. See: Viewing Action History: page 8 – 2.
Use the Approval Errors window to review reasons you could notcompletely reserve funds for requisitions.
Managing Requisitions
Purchasing lets you manage requisitions to help buyers save moneyand time when creating requisitions.
Sourcing Requisitions
You can suggest buyer and supplier information when creating arequisition. Simply provide the appropriate information in the SourceDetails alternative region of the Requisitions window. A buyer canthen query all requisition lines based on this information to helpconsolidate purchase orders. Alternatively, you can automaticallysource requisition line items by using the Sourcing Rule and ApprovedSupplier List windows. You use the Approved Supplier List window

3 – 10 Oracle Public Sector Purchasing User’s Guide
to list the primary blanket purchase agreement or catalog quotation foreach item you want to order. When you create a requisition line for anyitem that you list in the Sourcing Rule and Approved Supplier Listwindows, Purchasing automatically provides suggested supplier,buyer, and source document information for you. (See: AutomaticSourcing: page 5 – 69. See: Approved Supplier List: page 5 – 22.)Purchasing also automatically provides the sourcing information if youuse Requisition Import to import requisitions from an outside system.See: Requisition Import Process: page 9 – 130.
Assigning Requisitions to a Buyer
Purchasing lets you manage the buyers’ workload by reviewing howmany requisition lines are assigned to a particular buyer andreassigning them to distribute the workload better. You can alsoreview how many unassigned requisitions are urgent or are neededwithin a certain time limit so that you can assign them to theappropriate buyers for immediate ordering. See: Finding RequisitionLines for Review or Assignment: page 5 – 78.
Returning Requisitions
A buyer can return a requisition line to the original preparer instead ofplacing it onto a purchase order. Upon returning the requisition line,the buyer indicates the reason for the return. For example, thepurchase price may exceed the requisition price, or the buyer mayknow that the requested item is no longer being purchased. When abuyer returns an individual requisition line, Purchasing automaticallyreturns all other lines on the same requisition that are not currently ona purchase order. Purchasing returns the other lines to let the preparerdecide whether it is still appropriate to order the rest of the requisitionas is. See: Autocreate Purchase Order Options: page 6 – 4.
Referencing Requisition Reports
You can use the Buyer’s Requisition Action Required Report to reviewall current requisition lines that are not currently on a purchase order.You can choose from a number of report setup options to narrow thesearch to a particular list of approved requisition lines. You can alsoprint reports to review requisition status, requisition distribution detail,and requisition import status. See: Buyer’s Requisition ActionRequired Report: page 9 – 23.

3 – 11Requisitions
Managing Foreign Currency Information
For new requisitions, the initial default is the functional currencyspecified in the Financials Options window. You can specify a differentsuggested foreign currency for each requisition line.
If you source to a foreign currency blanket agreement or catalogquotation, Purchasing retrieves the foreign currency information for thedocument. Your user–defined preferences for currency are overriddenby the currency information on the source document. This is also trueeven if the source document currency is blank (the same as the basecurrency).
Purchasing automatically updates the functional unit price if you enterthe foreign currency unit price using the specified rate. Purchasing alsoupdates the foreign currency price if you update the functional unitprice.
When you AutoCreate new purchase orders, Purchasing converts therequisition price into a purchase order price based on specifiedcurrency and rate information. (See: Entering Currency Information:page 4 – 56.) You cannot specify currency information in AutoCreate ifyou are adding requisition lines to an existing document. See:Entering Document Information and Completing AutoCreate: page6 – 16.
Purchasing performs price tolerance verification for all currencies anduses the requisition total in functional currency to verify authorizationlimits.
Cancelling Requisitions
With Purchasing, you can submit a requisition for approval and thencancel the requisition or a requisition line if you no longer want toorder the item. Use the Control Documents window to cancel theentire requisition or specific requisition lines. Once a buyer places apurchase requisition line onto a purchase order, you can no longercancel the requisition line or the corresponding requisition header.Similarly, you cannot cancel a requisition line that has been modifiedwith the AutoCreate Documents window, or a line that is currently ona sales order. See: Controlling Documents: page 2 – 48.
If you cancel an internal sales order or back order that was generatedby an internal requisition, you get a warning message that the orderline is related to a requisition line that is now awaiting cancellation. Atthis point, you can navigate to the Control Documents window andexplicitly cancel the requisition line. Alternatively, you can continueprocessing sales orders and later use the MassCancel function to cancel

3 – 12 Oracle Public Sector Purchasing User’s Guide
any or all requisition lines awaiting cancellation. See: DefiningMassCancel: page 2 – 53.
When you cancel an internal requisition related to a cancelled salesorder, the quantity cancelled on the requisition is the same as thequantity cancelled on the sales order, not the remainder of therequisition. This is because a quantity of goods may have been shippedbut not yet delivered against the requisition. See: ControllingDocuments: page 2 – 48.
If you are using encumbrance or budgetary control, Purchasingautomatically creates negative debit encumbrance journal entries inyour general ledger system to cancel the encumbrance that correspondsto the requisition header or lines you are cancelling. See: BudgetaryControl and Online Funds Checking, Oracle Public Sector General LedgerUser’s Guide.
Final Closing Requisitions
Use the Control Documents window to final close requisitions andrequisition lines when you no longer need the items. You cannot finalclose a requisition line a buyer placed on a purchase order, a line thathas been modified with the AutoCreate Documents window, or a linethat is currently on a sales order. Purchasing automatically createscredit encumbrance journal entries to reverse the encumbrance thatcorresponds to the requisition header or lines you are final closing.
Updating Requisitions
Updating Incomplete Requisitions
As a requisition preparer, you can change the information on arequisition before you send it through the approval process. To updatea requisition you created using the Requisitions window, simplynavigate to the Find Requisitions window and query up the requisition.Once you send a requisition through the approval process, your accessto it is determined by the security and approval structure.
Recreating Requisitions
When you cancel a purchase order line in the Control Documentswindow, you have the option to either have the referencing requisitionlines cancelled or return them to the requisition pool for placement onanother purchase order. If you have already partially received the item,

3 – 13Requisitions
Purchasing recreates the requisition line for the quantity that was notreceived. See: Controlling Documents: page 2 – 48.
Using Modify to Update Requisitions
A buyer may want to alter a requisition line before placing it onto apurchase order. The buyer can either return the requisition line to thepreparer for changes or simply choose Modify from the Special menuwhile in the AutoCreate Documents window to update the requisitionline. You can split the requisition into multiple lines so that you cansource the requisition across different suppliers. Or, you can changethe requisition line if the preparer did not request the item correctly.For example, the preparer might order a computer, though you knowyou buy computers by ordering the peripherals and keyboardsseparately. The preparer can later review the requisition to see theoriginal requisition line and the changes the buyer made. See:Additional Autocreate Features: page 6 – 8. You cannot modifyrequisition lines if you are using requisition encumbrance or budgetarycontrol. See: Autocreate Purchase Order Options: page 6 – 4.
Updating Requisitions During Approval
Instead of approving a requisition, the approver can reject therequisition and send a note to the preparer to make specific changes.Alternatively, the approver can make changes directly to the requisitionwithout rejecting it. From the Notifications Summary window or anyof the requisitions summary windows, the approver can navigate to theRequisitions window and make the appropriate changes, if ApproverCan Modify is enabled for the document type in the Document Typeswindow. See: Viewing and Responding to Notifications: page 2 – 29.

3 – 14 Oracle Public Sector Purchasing User’s Guide
Overview of Internal Requisitions
Internal Requisitions provide the mechanism for requesting andtransferring material from inventory to other inventory or expenselocations. When Purchasing, Order Entry / Shipping, and Inventoryare installed, they combine to give you a flexible solution for yourinter–organization and intra–organization requests. You should be ableto:
• Set up your supply chain and automatically source yourrequirements from inventory or suppliers
• Define your inter–organization shipping network, and optionallyrequire that you use internal orders for your inter–organizationtransfers
• Use intransit inventory when you want to track items as theymove between organizations
• Reduce warehousing, shipping, and handling costs by requestingitems in fixed lot sizes
• Use the same windows for data entry and inquiry that you usefor purchase requisitions and sales orders
• Take advantage of standard requisition and sales orderfunctionality to suit your individual business requirements
• Automatically generate inventory replenishment requisitionsand fulfill them via internal or external suppliers
• View the status of requests on–line
• Use internal requisitions to move inventory items from oneinventory organization to another, even if that organizationbelongs to a different operating unit, set of books, or chart ofaccounts
Major Features
Complete Item Sourcing Definition
Purchasing and Inventory combine to provide the flexibility you needto define your item sourcing information. You can use the defaultsourcing options to automatically determine the correct source typeand source for your requests. You can specify either Inventory orSupplier as the default source type, as well as the source organizationand subinventory for internal requests.

3 – 15Requisitions
Inter–Organization Shipping Network
Inventory provides the features you need to define yourinter–organization shipping network. For transfers between twoorganizations, you can specify whether to use intransit or directshipments. You can also require internal orders for transfers betweenspecific organizations.
Flexible Processing
You can tailor internal requisition processing to fit your requirements.You can limit on–line interaction by setting up background processes toautomatically perform specific actions such as creating inventoryreplenishment requests and creating internal sales orders in OrderEntry / Shipping. Or, you can take advantage of other features such ason–line requisition approvals, internal sales order cycles, and on–linereceipt and delivery of internally requested items.
Creating Online Requisitions
You can create on–line internal requisitions for both expense andinventory destinations using the same windows you use to createpurchase requisitions. You can combine inventory and suppliersourced requisition lines on the same requisition. Also, Purchasinguses your item sourcing information to default the correct source typeand supplier for the item and destination. You can define requisitiontemplates for commonly requested internally sourced items.
Full Unit of Issue Enforcement
Purchasing offers the option of full unit of issue enforcement in whichquantities entered on internal requisitions are automatically rounded toa full unit of issue defined for the item. You can also set this option torecommend a rounded quantity on requisitions, but leave theopportunity to change the recommended quantity. The quantityrounding is based on the specified unit of issue, if available, otherwiseon the primary unit of measure.
Inventory Replenishment Requisitions
Inventory generates replenishment requisitions through min–maxplanning, reorder point planning, subinventory replenishment, andKanban replenishment. Purchasing uses your item sourcinginformation to create inter–organization or subinventory transferrequests. See: Overview of Inventory Planning and Replenishment,Oracle Inventory User’s Guide. . See: Kanban Replenishments: page3 – 18.

3 – 16 Oracle Public Sector Purchasing User’s Guide
Approvals and Controls
You can control internal requisition approvals and document securityjust as you control purchase requisitions. Purchasing gives you theflexibility you need to set up approvals and limits for internal requests.You can use the same authorization rules, or you can relax or tightencontrols for internal requisitions.
Creation of Internal Sales Orders
When you approve an internal requisition for a stocked item,Purchasing translates the requisition into an internal sales order,providing a link between the end user’s requirement and the physicaldemand against Inventory.
Order Management
Once you create an internal sales order from a requisition, you canmanage internal requisitions just as you manage regular sales orders.You can use Order Entry /Shipping to define order cycles, approvalsand holds to effectively process requisition orders. You can selectivelypick release and otherwise process internal sales orders as easily as youdo regular sales orders.
Complete Requisitions Status Visibility
You get complete visibility on the status of requests through inquiriesand reports. You get on–line visibility to the internal sales ordernumber, as well as the shipment and delivery status for requisitions.You can report on backordered items, internal requisition status, anddelivery discrepancies.
Exception Processing
Internal Requisitions help you manage exceptions to your normalbusiness flow. Order Entry / Shipping automatically backorders yourrequest when you have insufficient supply to fill the internal order.And, you can reschedule orders when the shipment date changes. Forintransit shipments, you can update the expected arrival date as youconfirm the shipment when you encounter delays.
Cancellation of Requisitions
You can easily cancel a request if you have a change in requirements orif you cannot fulfill the entire order. Using Order Entry / Shipping,you can partially or fully cancel the line quantities on the internal salesorder. You complete the cancellation process by cancelling the originalrequisition line in Purchasing.

3 – 17Requisitions
Using Internal Requisitions
Internal Requisitions provide a flexible solution to your inventoryrequisitioning needs. You can eliminate user intervention when you donot need it, such as when you are loading internal requisitions intoOrder Entry / Shipping or placing demand. The following sectionsdescribe the entire business and information flow for internalrequisitions, and identifies opportunities for you to simplifyprocessing.
Demand for Internal Requisitions
Demand for inventory requests can come from several sources. Theprimary sources are:
• Online user’s request for stock items out of inventory
• Inventory Replenishment Requests
• External system’s requests
Online Requests
On–line requisitions give users the choice of supplier or inventorysourced requisitions. Default sourcing information is determined bythe requisition type, the item, and the destination of the request. Whenyou enter a requisition, Purchasing automatically selects the correctsource type and source information for the item and destination.
To restrict certain users to internal requisitions only, set their profilePO: Legal Requisition Type to Internal. Purchasing then requires thatthey source all internally orderable items from inventory. See:Entering Requisition Headers: page 3 – 49.
For frequently requested items, you can define requisition templates tocreate internal requisitions quickly. Requestors can pull up thetemplate they need, fill in the need–by date and destination of therequest, and specify the quantity for each desired item.
Internal Requisitions also use the Account Generator, whichautomatically builds account distributions. You can specify only oneaccounting distribution per inventory sourced line. See: Using theAccount Generator in Oracle Public Sector Purchasing: page 0 – 2.

☞
3 – 18 Oracle Public Sector Purchasing User’s Guide
Inventory Replenishment Requests
Inventory automatically generates requisitions to maintain an item’sstock level. The requisitions may request stock from an internalpredefined source organization or from an outside supplier. See:Overview of Inventory Planning and Replenishment, Oracle InventoryUser’s Guide.
Inventory generates replenishment requests automatically using thefollowing methods:
• Min–Max Planning
• Reorder Point Planning
• Subinventory Replenishments
• Kanban Replenishments
All inventory replenishment methods create requisitions via the OpenRequisitions Interface.
Attention: If the destination subinventory uses locatorcontrol, you must specify a primary locator for directinter–organization and subinventory transfers
Suggestion: You can use hand held collection devices to entercount information and load it into Inventory using theReplenishment Interface. Inventory automatically createsreplenishment requisitions using the source and planningmethod you define.
Kanban Replenishments
In a pull–based system, inventory items for a particular part orassembly area are replenished as soon as they are needed. When theitems are needed, kanban cards in Oracle Inventory change theirSupply Status to Empty, and Inventory generates the kanbanreplenishment request automatically. Then Requisition Import inPurchasing validates and imports replenishment requests asrequisitions. If the Source Type of the request is Supplier, RequisitionImport creates a blanket release (if a blanket agreement exists) or astandard purchase order (if a valid quotation exists) for the item. If theSource Type is Inter–Org, Requisition Import generates an internalrequisition for the item. See: Overview of Kanban Replenishment,Oracle Inventory User’s Guide. See: Requisition Import Process: page9 – 130.

3 – 19Requisitions
Once Purchasing approves the standard purchase order, blanketrelease, or internal requisition, Inventory automatically receives astatus for the kanban card of In Process.
In Purchasing, Kanban replenishment requests look like any otherpurchasing document, and you receive them like you do any othershipment. As soon as you receive the item for delivery through theReceipts or Receiving Transactions windows in Purchasing, Inventoryautomatically receives a status for the kanban request of Full,indicating that the inventory supply has been replenished.
External Systems
You can automatically import internal requisitions from other OracleApplications or existing non–Oracle systems using the OpenRequisitions Interface. This interface lets you integrate the Purchasingapplication quickly with new or existing applications. Purchasingautomatically validates your data and imports your requisitions. Youcan import requisitions as often as you want. Then, you can reviewthese requisitions, approve or reserve funds for them if necessary, andplace them on internal sales orders. See: Requisition Import Process:page 9 – 130.
Internal Requisition Approvals
After you create an internal requisition, you can optionally requireapproval. For on–line requests, you can set up approval rules that arespecific for internal requisitions, or you can share the same rules youuse for purchase requisitions. If you do not require additional approvalsteps, you can set up rules so that you can always complete andapprove the document in the Requisitions window. See: EnteringRequisition Headers: page 3 – 49.
Min–max planning, Reorder Point planning, and MRP generatedrequisitions are loaded as approved requisitions through the OpenRequisitions Interface. If you set the Inventory Profile INV: RCRequisition Approval to Unapproved, you can optionally loadSubinventory Replenishment requisitions as unapproved and use thedocument approval functionality in Purchasing. This profile optionaffects only Subinventory Replenishment requisitions. See: Submittinga Document for Approval: page 2 – 32. See: Oracle Inventory ProfileOptions, Oracle Inventory User’s Guide. An internal requisitioncorresponding to a kanban card in Oracle Inventory enters Purchasingthrough Requisition Import with a status of Approved. (If

3 – 20 Oracle Public Sector Purchasing User’s Guide
encumbrance / budgetary control is on, Purchasing sets the status toPre–Approved.) As soon as the internal requisition is approved,Inventory automatically receives a status for the kanban card of InProcess. See: Kanban Replenishments: page 3 – 18. See: RequisitionImport Process: page 9 – 130.
Requisition supply is created for the destination organization as soonas the requisition is approved. If you create approved requisitionsthrough Requisition Import, supply is created at the time therequisition is created. Master Scheduling/MRP and Inventoryplanning get complete visibility to the incoming internal requisitionsupply so the planning processes do not create additional reorders foritems that you have already requested.
Creation of Internal Sales Orders
Once you approve inventory sourced requisition lines, Purchasingtranslates the requisition into an internal sales order, providing the linkbetween the requestor’s requirement and the physical demand againstinventory. You run two separate batch processes to create the internalsales order from the approved requisition:
• Create Internal Sales Orders. See: Create Internal Sales OrdersProcess: page 9 – 29.
• OrderImport. See: OrderImport, Oracle Order Entry User’s Guide.
Purchasing uses location associations to create internal sales ordersfrom internal requisitions for a given deliver–to location. When youassociate a customer and customer site with a location and then enteran internal requisition with that location as the deliver–to point,Purchasing uses the associated customer and customer site on theinternal sales order that it creates. The associated customer sitebecomes the ship–to site for Order Entry / Shipping’s shipconfirmation. See: Associating Ship–to and Receiving Locations,Oracle Order Entry / Shipping User’s Guide. See also: Site Locations,Oracle Human Resource Management Systems User’s Guide. See also:Assigning a Business Purpose to a Customer Address, Oracle PublicSector Receivables User’s Guide.
If the OE:Reservations profile option is set to Yes, the Create InternalSales Orders process requests that internal sales orders be Demandedrather than Reserved. Note that this process does not pass any revisionor lot number information.
3 – 21Requisitions
The Create Internal Sales Orders process loads the Order Entry /Shipping open interface, OrderImport, using the order type you definein the Purchasing Options window. See: Defining Internal RequisitionOptions: page 1 – 35. OrderImport creates internal sales orders fromthe records in the interface table, and determines the order cycle anddefaults values based on the order type.
When you run OrderImport using the Run Concurrent Programs formin Order Entry / Shipping, you need to choose an OrderImport Sourceas a setup option. Refer to Internal Requisitions Setup Overview: page3 – 25 for more information on how to define these sources.
Note: You should not drop–ship internal sales orders. See: DropShipments: page 4 – 156.
Multi–Org: Creation of Internal Sales Orders Across Operating Units
A Multi–Org implementation of Purchasing enables separate operatingunits within an organization to operate independently of each other.However, you may still need to obtain goods from another operatingunit, and Purchasing supports this. You can create an internal salesorder for an item in another operating unit. When creating this internalsales order, you must create it in the destination organization’soperating unit, and all Order Entry / Shipping activity must take placewithin that destination operating unit. For example, let’s say you havetwo operating units: Operating Unit 1 and Operating Unit 2. You mustuse your Order Entry / Shipping responsibility tied to Operating Unit 1to create an internal sales order for an item in Operating Unit 2. Thenyou must continue to use that responsibility tied to Operating Unit 1 toperform other Order Entry / Shipping functions for that internal salesorder.
Management of Internal Sales Orders
You manage internal sales orders using some of the same windows ascustomer sales orders. Once you import an internal requisition usingOrderImport, you can use the Schedule Orders window to change thereserved quantity, schedule date, schedule status, ship–to contact,freight carrier, and shipment priority. The destination organization hascomplete visibility to any changes in incoming supply based onschedule date changes or partial shipments.
Pricing of internal requisitions is based on item costs as they are passedthrough OrderImport; price lists are irrelevant.

3 – 22 Oracle Public Sector Purchasing User’s Guide
You can demand inventory for internal requisitions either to theorganization, or the organization and subinventory levels. Use theDemand Interface to place demand against your source organizationand/or subinventory in background, or the Schedule Orders windowto place demand on–line.
You cannot view or update internal sales orders in the Sales Orderswindow. Use the View Orders window to view information and theSchedule Orders window to update information.
Order Entry / Shipping does not process internal sales order lines forthe Receivables Interface, even if the Receivables Interface is an actionin the order cycle for the internal sales order.
Note: You should not drop–ship internal sales orders. See: DropShipments: page 4 – 156.
Pick Release for Internal Sales Orders
You can selectively release one internal sales order at a time by enteringthe internal sales order number as a pick release criterion. Or, you canrelease a group of internal sales orders by specifying the internal salesorder, order type, and a range of dates. You can also release internalsales orders with customer orders by entering a range of dates.
When you enter an internal requisition, you must specify the sourceorganization, and you can optionally specify the subinventory source.If you do not enter source subinventory information on an internalrequisition, picking proceeds using the standard inventory pickingrules.
Order Entry / Shipping releases only order lines which meet theprerequisites of the order cycle specific to the internal sales order type.
Ship Confirmation for Internal Sales Orders
Use the Ship Confirm Deliveries window to ship confirm entire orpartial shipments. You can also backorder the internal sales orderwhen you do not have enough on–hand quantity to fulfill the request.
Although you can ship partial quantities, you cannot split internalorder lines into multiple shipment schedules with different deliverydates. If you backorder an internal sales order, you can use theSchedule Orders window to update the schedule date. You cannot

3 – 23Requisitions
change the warehouse on picking lines or the subinventories on thepicking line details.
Order Entry / Shipping automatically prints the requestor and theinternal requisition number on the Pick Slip and Pack Slip that printsfor each shipment. Receiving personnel can use this information toquickly identify the source of the request and record receipts forinter–organization transfers.
When you ship confirm, Order Entry / Shipping updates the InventoryInterface. Inventory automatically updates on–hand quantities toreflect the internally ordered items that you shipped. If you areshipping using intransit inventory, the destination organization getscomplete visibility of the incoming intransit supply. Internalrequisition supply is reduced by the quantity of the shipment.
You can also enter the expected arrival date at ship confirmation toprovide a more accurate supply picture to MRP and inventoryplanning.
Suggestion: When you perform partial shipments, resolve anyproblems with the Inventory Interface as quickly as possible toprevent an inconsistent state of supply and demand.
Management of Internal Requisitions
Update Intransit Information
For inter–organization transfers that use intransit, you can use theMaintain Shipments window to update the expected arrival date.Master Scheduling/MRP and inventory planning get completevisibility to the change in expected arrival date. See: MaintainingShipments: page 7 – 66.
Receive, Inspect and Deliver Items
Use the Receipts and Receiving Transactions windows to processreceipts of inter–organization requests that use intransit. Receivingpersonnel can simply enter the requisition number on the shippingdocumentation and process the entire shipment using express receivingtransactions. For receipt of partial shipments, you can record thequantities for the individual items included in the shipment. You canreceive items into receiving, or you can receive the goods directly to thefinal destination, either an inventory or expense location.

3 – 24 Oracle Public Sector Purchasing User’s Guide
If you receive items into receiving/inspection, you process inspections,transfers, and deliveries for internal requisitions just as you wouldprocess supplier receipts or inventory transfers. See: Overview ofReceiving: page 7 – 2.
View Internal Requisition Status
In Purchasing, you can view the internal sales order and any changes toit, by selecting View Sales Orders on the Special menu in theRequisition Headers and Requisition Lines summary windows. Or,you can access the View Order windows directly in Order Entry /Shipping and query on the specific internal sales order number, or anyother relevant criteria. The View Orders window provides informationabout the cycle status of the internal sales order, quantities shipped,quantities cancelled, quantities backordered, and dates of transactions.
You can also report on requisition status. See: Backordered InternalRequisitions Report: page 9 – 18, Internal Requisitions Status Report:page 9 – 37, Internal Requisitions/Deliveries Discrepancy Report: page9 – 39, and Requisitions on Cancelled Sales Order Report: page 9 – 136.
Cancelling Internal Requisitions
If you cancel an internal sales order or backorder that was generated byan internal requisition, you get a warning message that the order line isrelated to a requisition line that is now awaiting cancellation. You canthen use the Control Document window to cancel the requisition line.See: Controlling Documents: page 2 – 48.
Purchasing lets you cancel or final close an inventory sourcedrequisition line only after you cancel the internal sales order in OrderEntry / Shipping. See: Cancelling Orders, Oracle Order Entry User’sGuide.
Internal Requisitions Processing Summary
Below is a summary of key transactions and processes you use forInternal Requisitions. If you are using inventory replenishment or MRPgenerated internal requisitions, Pick Release and Ship Confirmation arethe only required on–line transactions. If you are creating on–linerequests, you also use the Requisitions window. See: OnlineProcessing Automation for Internal Requisitions: page 3 – 33 forsuggestions on how to implement automated processing and reduceon–line interaction.

3 – 25Requisitions
Step Action Required Window/Process
1 Create Internal Requisition On–line orAutomatic
Requisitions window &Requisition Import process:Inventory replenishment, MRPPlanned Orders, External Sources
2 Approve Requisition Optional Approve Documents window
3 Create Internal Sales Orders Automatic Create Internal Sales Ordersprocess, OrderImport process
4 Modify Order Schedule Optional Schedule Orders window
5 Pick Release Orders On–line Release Sales Orders for Pickingwindow
6 Ship Confirmation On–line Ship Confirm Deliveries window,Ship Confirm – Departurewindow, Update ShippingInformation, Inventory Interface,Inventory Transaction Processor
7 Receive Items Optional Receipts window, ReceivingTransaction Processor
8 Inspect Receipts Optional Receiving Transactions window,Receiving Transaction Processor
9 Deliver Receipts Optional Receiving Transactions window,Receiving Transaction Processor,Inventory Transaction Processor
10 View Requisition Status Optional View Requisitions window, ViewRequisition Summary window
11 Cancelling Internal Orders Optional Cancel Orders window, ControlDocument window, DefineMassCancel window, RunMassCancel window
Table 3 – 1 (Page 1 of 1)
Internal Requisitions Setup Overview
Internal Requisitions provide a solution to a variety of inventoryrequisitioning needs. When you implement this feature, you need tocarefully review the options and configure the applications to supportyour business processes.
For example, if you are using internal requisitions to generateinventory replenishment requisitions and fulfill them via subinventory

3 – 26 Oracle Public Sector Purchasing User’s Guide
transfers within a plant, you may want to limit your on–line interactionto pick release and ship confirmation. You do not have to recordseparate ship, receive, and deliver transactions when the sameemployee actually picks the items out of the source subinventory andplaces them at the destination in one step.
Product Internal Requisition Setup Function
Order Entry / Shipping Update profile options, Define order cycles, Define ordernumber sources, Define OrderImport sources, Update/de-fine standard value rule sets, Define price lists, Defineorder types, Define Concurrent Program Resubmissioninterval for the OrderImport process
Inventory Define internally requested items, Define inter–organiza-tion shipping network, Define item sourcing, Define Con-current Program Resubmission intervals in Inventoryplanning and replenishment windows
Purchasing Define Internal Requisition Deliver–To Sites, Set LegalRequisition Type profile, Define Purchasing Options, De-fine Concurrent Program Resubmission intervals for theRequisition Import and Create Internal Sales Orders pro-cesses
Table 3 – 2 (Page 1 of 1)
Minimum Order Entry / Shipping Setup for Internal Requisitions
You use standard sales order functionality to define the order cycle,defaulting rules, and order type for internal sales orders. You also needto set up a special OrderImport source for internal sales orders. Usethe Purchasing Options window to specify the order type andOrderImport source you use for internal requisitions. See: DefiningInternal Requisition Options: page 1 – 35.
You must perform the following setups in Order Entry / Shipping touse the internal requisition features. You may choose to take advantageof other Order Entry / Shipping features which require additionalsetups. See Setting Up Order Entry / Shipping in the Oracle FinancialsImplementation Manual.
Define Your Order Entry / Shipping Profile Options
You need to set the following profile options:

3 – 27Requisitions
• OE: Set of Books – Defines the set of books for this installation
• OE: Item Flexfield – Defines which structure of the item flexfieldto use
• OE: Item Validation Organization – Defines the Item Masterorganization for this installation.
See: Order Entry / Shipping Profile Options, Oracle Order Entry User’sGuide.
Suggestion: You set the OE: Item Validation Organizationprofile option to the same Item Master organization as yourpurchasing reference organization (set in the Financials Optionswindow). See: About Financials Options, Oracle Public SectorPayables User’s Guide.
Define an Order Cycle For Internal Requisitions
Define order cycles to control the steps that an order must take fromentry to completion.
See: Assigning Cycle Action Results, Oracle Order Entry User’s Guide. See: Defining Order Cycles, Oracle Order Entry User’s Guide.See: Defining Cycle Actions, Oracle Order Entry User’s Guide.See: Defining Cycle Results, Oracle Order Entry User’s Guide.
You may want to include approval actions as part of your order cycles,or see how holds can affect internal sales orders.
Define an Order Entry / Shipping Number Source For InternalRequisitions
Define order number sources to automatically number internal salesorders as you import them. You can use a single order number sourceto assign unique numbers to all your orders, or you can use a differentorder number source within each order type. See: Defining OrderNumber Sources, Oracle Order Entry User’s Guide.
Define an OrderImport Source For Internal Requisition
Define OrderImport sources to import internal sales order informationfrom Purchasing. Define an import source specifically for use withimporting internal requisitions. You choose the OrderImport source asa setup option when you run the OrderImport process from the RunConcurrent Programs form in Order Entry / Shipping.
Suggestion: Define a unique OrderImport source for internalsales orders and set the Use IDs field to Yes. See: DefiningOrderImport Sources, Oracle Order Entry User’s Guide.
3 – 28 Oracle Public Sector Purchasing User’s Guide
Define a Price List For Internal Requisition
Although internal requisitions use the item’s cost as the price, OrderEntry / Shipping requires price lists to process all sales orders. Definea price list for use with the internal requisition order type. You do notneed to add any lines to the price list. See: Defining a Price List, OracleOrder Entry User’s Guide.
Update Standard Value Rule Set
Standard value rules define the defaulting that occurs as orders areentered or imported. Order Entry / Shipping supplies a predefinedrule template for internal sales order called the Internal Sales OrderTemplate. Copy and rename this template and update at least thefollowing fields to ensure that internal requisitions import correctly:
• Channel
• Price List
• Payment Terms
Additional fields are available to help you manage orders but are notrequired. See: Defining Standard Value Rule Sets, Oracle Order EntryUser’s Guide.
Define Order Type for internal sales order
Define order types to classify orders for greater operational efficiencyand control. Order types lend consistency to Order Entry / Shippingoperations by letting you assign standard price lists, navigationpreference sets, standard value rule sets, pricing override policies,approval cycles, payment terms, and freight terms to each type oforder.
Assign the order cycle, price list and standard value rule set youcreated for internal sales orders to the order type. See: Defining OrderTypes, Oracle Order Entry User’s Guide.
Define Inventory Accounting (Account Generator)
Order Entry / Shipping can dynamically create the Cost of Goods Sold(COGS) Account for each shipped or returned item based on rules youdefine. Order Entry / Shipping provides a default Account Generatorprocess to be used in determining the COGS Account during theInventory Interface process.
You can either accept the default COGS Account Generator process orcustomize it to suit your public sector needs. For more information on

☞
3 – 29Requisitions
how to accept or customize this feature, see: Using the AccountGenerator in Order Entry / Shipping, Oracle Order Entry User’s Guide.
Attention: Be sure to have the OE: Set of Books profile option setup before you use this feature. The Account Generator uses the Setof Books ID to obtain your chart of accounts, which determines theCOGS Account structure.
Internal Sales Orders Security (Optional)
Order Entry / Shipping security rules apply to all your sales orders,including internal sales orders imported from Purchasing. Securityrules prevent users from adding, updating, deleting and cancellingorder information beyond certain points in the order cycles. You canuse the System rules Order Entry / Shipping provides, which preventdata integrity violations, or define your own, stricter, rules. See:Defining Security Rules, Oracle Order Entry User’s Guide.
Minimum Purchasing Setup for Internal Requisitions
Define Internal Requisition Deliver–To Sites
Purchasing uses locations to identify the final delivery location for bothinventory and supplier sourced requisitions. As a requestor, you wantto specify the same destination for both purchase and internalrequisitions. As a shipping clerk, you are concerned with the finaldelivery location of the item, regardless whether it is for an internal orexternal customer. Purchasing and Order Entry / Shipping uselocation associations to minimize the decisions you need to make whenyou create internal requests.
Use the Location window to define a location for each site that receiveseither inventory or supplier sourced material. See: Site Locations,Oracle Human Resource Management Systems User’s Guide . For internalrequisition deliver–to locations, you also need to associate the locationswith a customer. Use the Customers window to define a Customer andShip–To site for each deliver–to location. Use the Business Purposesregion in the Customers window to associate your internal locations toyour customers. See: Assigning a Business Purpose to a CustomerAddress, Oracle Public Sector Receivables User’s Guide.
Suggestion: Create an internal customer for each destinationorganization, and customer ship–to site for each deliver–tolocation within the destination organization.

3 – 30 Oracle Public Sector Purchasing User’s Guide
Suggestion: Define the same address for the customer ship–tosite as the deliver–to location. Order Entry / Shipping printsthe ship–to address on the shipping documentation.
Suggestion: Order Entry / Shipping requires both a ship–toand an invoice–to for each order, even though internal orderlines are not invoiced. When you define a customer, eithermake the ship–to address both a ship–to and bill–to businesspurpose and set the Primary flag to Yes on the businesspurpose, or assign the ship–to to a bill–to location.
Set Up Internal Requisition Approvals and Security
You set up approval and security rules for internal requisitions just asyou do for purchase requisitions. Use the Document Types, PositionControls, and Control Groups windows to set up approval and securityoptions for internal requisitions. See: Setting Up Document Approvaland Security: page 2 – 2
Define Purchasing Options for Internal Requisitions
You need to set up these additional purchasing options to use internalrequisitions.
• Order Type
Pick the Order Type you defined in Order Entry / Shipping forinternal sales orders. Purchasing uses this type to create salesorders from internal requisitions. See: Defining InternalRequisition Options: page 1 – 35.
• Order Source
Specify the OrderImport Source you defined in Order Entry /Shipping to use when you transfer internal requisitions fromPurchasing to Order Entry / Shipping. See: Defining InternalRequisition Options: page 1 – 35.
• Enforce Quantity Rounding
In the Purchasing Options window, specify whether you enforcequantity rounding or display advisory messages when youcreate on–line requisitions using the Requisitions window. See:Defining Control Options: page 1 – 33

3 – 31Requisitions
Minimum Inventory Setup for Internal Requisitions
Define Internally Orderable Items
When you define internally orderable items, there are a few attributesthat require extra consideration. See: Defining Items, Oracle InventoryUser’s Guide.
• Inventory and Order Entry regions
Items you use on internal requisitions must be Inventoryenabled, internally orderable and stockable, shippable, andOrder Entry transactable for the source organizations. UnderInventory, you need to set the Inventory Item, Transactable, andStockable attributes to Yes. Under Order Entry, you need to setthe Internal Ordered, Internal Orders Enabled, and OETransactable, and Shippable attributes to Yes.
• Source Type – General Planning region
You can specify a default source type of Inventory or Supplier.
You cannot create intraorganization internal requisitions for MRPplanned items. When you specify sourcing information for MRPplanned items, you need to ensure that you do not define anintraorganization sourcing rule for these items.
• List Price – Purchasing region
Inventory sourced requisitions use item costs for pricing. Youmay still want to specify a list price for items that are sourcedboth from suppliers or inventory.
• Unit of Issue – Purchasing region
You use units of issue to round order quantities, minimizingshipping, warehousing, and handling costs.
Enter the unit of measure you typically use to issue the itemfrom inventory. Purchasing uses this unit of measure as thedefault for internal requisition lines sourced from inventorywhen you create them in the Requisitions window.
• Rounding Factor – Purchasing region
Enter a number between 0 and 1. This factor determines how toround the quantity on an internal requisition that results fromconversions between the requisition line unit of measure and theitem’s Unit of Issue. This factor insures that the unit of issueresolves to an integer, rather than a fractional amount.

3 – 32 Oracle Public Sector Purchasing User’s Guide
Purchasing either performs rounding automatically or advisesyou of the suggested quantity, depending how you set up yourpurchasing options.
Set Up Item Sourcing
Internal requisitions use the sourcing information you specify inInventory. All items, subinventories, and organizations may have itemsourcing information specified for them. At each level, you can choosewhether items are replenished from inventory or purchased from asupplier. In case of a conflict between the levels, internal requisitionsuse the following order of precedence to determine the default sourcetype and source for the item and destination:
– Sourcing information specified in the item–subinventoryrelationship
– Sourcing information specified in the subinventorydefinition
– Sourcing information specified in the item definition
– Sourcing information specified in the organization setupoptions
• Source Type
Specify Inventory as the default source type if you want tosource requests from an internal stock location.
• Source Organization and Subinventory
If you specify an item to be replenished from inventory, youmust specify a source organization; a source subinventory isoptional. When you place an order for this item, Inventorycreates an internal requisition for the item from the sourcelocation.
Define the Inter–Organization Shipping Network
Use the Inter–Organization Shipping Information form to define yourinter–organization network. You must enable the network betweeneach source (shipping) and destination (receiving) organization.
• Require Internal Orders
Set Require Internal Orders to Yes if you want all transfersbetween these two organizations to use internal orders.
• Intransit Type

☞
3 – 33Requisitions
Specify whether you ship material directly, or use intransitinventory for shipments between these two organizations.
Attention: If you use Lot, Serial, or Item Revision Control inboth the source and destination organization, you must useintransit if you ship from an organization with less control (i.e.Lot Control), to an organization with more control (i.e. Lot andSerial Control).
• Primary RCV Routing
For intransit transfers, you can choose from the followingprimary receipt routings: Standard Receipt, Inspection Required,or Direct Delivery.
• FOB Point
Specify whether the destination organization takes ownership oftransferred items when they are issued to intransit (Shipping), orwhen they are received out of intransit (Receiving).
• Inter–Organization Transfer Charge
Specify how you want to apply transfer costs to the destinationorganization. Choose either a predefined or requestedpercentage of the transaction value or a fixed amount thatrepresents an added value.
Set Up a Customer Association
To define your organization as the destination for an internalrequisition, Order Entry / Shipping has to recognize you as a customer.See: Associating Ship–to and Receiving Locations, Oracle Order Entry /Shipping User’s Guide. See also: Site Locations, Oracle Human ResourceManagement Systems User’s Guide. See also: Assigning a BusinessPurpose to a Customer Address, Oracle Public Sector Receivables User’sGuide.
Online Processing Automation for Internal Requisitions
Internal Requisitions provide a number of options to automateprocessing. You can set up the following processes to runautomatically as often as you like to limit on–line interaction andstreamline processing. See: Submitting a Request, Oracle ApplicationsSystem Administrator’s Guide.
• Request Reorder Point Planning Report

3 – 34 Oracle Public Sector Purchasing User’s Guide
• Request Min–Max Planning Report
• Requisition Import.
• Create Internal Sales Orders
• OrderImport
Suggestion: Create a report group to run all requestsback–to–back over specific time intervals when you are usinginternal requisitions for automatic subinventory transfers.

3 – 35Requisitions
Finding Requisitions
Use the Find Requisitions window to:
• Access the Requisitions window.
• Perform requisition inquiries at header, line, and distributionlevels
Depending on the function security assigned to your responsibility, youhave varying levels of access to information. A responsibility definesan application user’s current privileges while working with OracleApplications.
See Also
Overview of Function Security, Oracle Applications SystemAdministrator’s Guide
Function Security for Purchasing: page 2 – 11
� To enter search criteria:
1. Navigate to the Find Requisitions window by selecting RequisitionSummary from the menu. Then enter as many as desired of thesearch criteria described in the following steps.
2. Enter the requisition number. If you enter a requisition number,you can also enter a Line number.

3 – 36 Oracle Public Sector Purchasing User’s Guide
3. Select the requisition Type (Purchase or Internal).
4. Enter the Preparer.
5. Enter the Requestor.
6. Enter the Buyer.
7. Select Yes or No to restrict the search to Modified requisitions.
8. Enter the Reference Number.
9. Enter the Import Source.
10. Enter the Line Type.
11. Use the alternative regions to further restrict the search:
• In the Item region, you can enter the following search criteria:Item number, Revision number, Category, item Description, andSupplier Item number.
• In the Status region, you can limit the search by Approval status(Approved, Incomplete, In Process, Pre–Approved, Rejected, orReturned), Control status (Open, Cancelled, or Finally Closed),or Reserved status (Yes or No).
• In the Date Ranges region, you can enter date ranges for thefollowing dates: Creation, Need By, and Closed.
• In the Sourcing region, you can limit the search by Source(Supplier or Inventory). For Supplier sourced requisitions, youcan further limit the search by Supplier, Site, and Currency. ForInventory sourced requisitions, you can further limit the searchby Organization and Subinventory.
• In the Deliver To region, you can limit the search by DestinationType (Expense, Inventory, or Shop Floor), Organization,Location, and (for Inventory destinations only) Subinventory.
• In the Related Documents region, you can limit the search byDocument Type, Document number and Line Number, PurchaseOrder number, and Sales Order number.
• In the Accounting region, you can limit the search by Period, GLDate, Charge Account, Budget Account, and whether there areActive Encumbrances (Yes or No).
12. Select the Results group (Headers, Lines, or Distributions) todetermine which summary window to open. Depending on thesearch criteria you have specified, all summary windows may notbe available. For example, if you specify criteria in the Accountingregion, only the Distributions summary window is available.

3 – 37Requisitions
13. Select the Find button to initiate the search and open theappropriate Summary window.
� To clear existing search criteria:
� Select the Clear button to clear any existing search criteria.
� To enter a new requisition:
� Select the New button to open the Requisitions window. See:Entering Requisition Headers: page 3 – 49.
See Also
Using the Requisition Headers Summary Window: page 3 – 37
Using the Requisition Lines Summary Window: page 3 – 39
Using the Requisition Distributions Summary Window: page 3 – 41
Using the Requisition Headers Summary Window
Use the Requisition Headers Summary folder window to:
• View requisition header information.
• Drill down to view requisition line and distribution information.
• Access the Requisitions window for entry of new documents.
• Access the Requisitions, Requisition Preferences, and ControlDocument windows for maintenance of existing information.
• View information in the Action History window.
• View purchase order and sales order information, if therequisition has been placed on a purchase or sales order.
� To navigate to the Requisition Headers Summary window:
1. In the Find Requisitions window, select Headers in the Resultsregion and select the Find button to open the Requisition HeadersSummary folder window.

3 – 38 Oracle Public Sector Purchasing User’s Guide
The following information is displayed: requisition Number,Preparer, Status, Description, Total amount, Currency, CreationDate, Type, Cancelled status, Finally Closed status, and Reservedstatus.
� To drill down to view requisition line information:
� Select the Lines button to drill down to the Requisition LinesSummary folder window. You can also select View Lines on theSpecial menu to open this window. See: Using the RequisitionLines Summary Window: page 3 – 39.
� To enter a new requisition:
� Select the New button to open the Requisitions window. See:Entering Requisition Headers: page 3 – 49.
� To open the Requisitions window for the current line:
� Select the Open button to open the Requisitions window and querythe requisition on the current line. Your options in this windowdepend on the status of the requisition and your approval andsecurity options. See: Entering Requisition Headers: page 3 – 49.
� To view requisition distributions information:
� Select View Distributions on the Special menu to open theRequisition Distributions Summary folder window. See: Using theRequisition Distributions Summary Window: page 3 – 41.

3 – 39Requisitions
� To view action history:
� Select View Action History on the Special menu to open the ActionHistory window. See: Viewing Action History: page 8 – 2.
� To view purchase orders:
� Select View Purchase Orders on the Special menu to open the FindPurchase Orders window. See: Finding Purchase Orders: page4 – 19.
� To view sales orders:
� Select View Sales Orders on the Special menu to open the SalesOrders window.
� To enter requisition control information:
• Select Control on the Special menu to open the ControlDocument window for the document on the current line. See:Controlling Documents: page 2 – 48.
� To enter requisition preferences:
� Select Preferences on the Special menu to open the RequisitionPreferences window. See: Entering Requisition Preferences: page3 – 44.
See Also
Customizing the Presentation of Data in a Folder, Oracle ApplicationsUser’s Guide
Finding Purchase Orders: page 4 – 19
Using the Requisition Lines Summary Window
Use the Requisition Lines Summary folder window to:
• View requisition line information.
• Drill down to view requisition distribution information.
• Access the Requisitions window for entry of new documents.
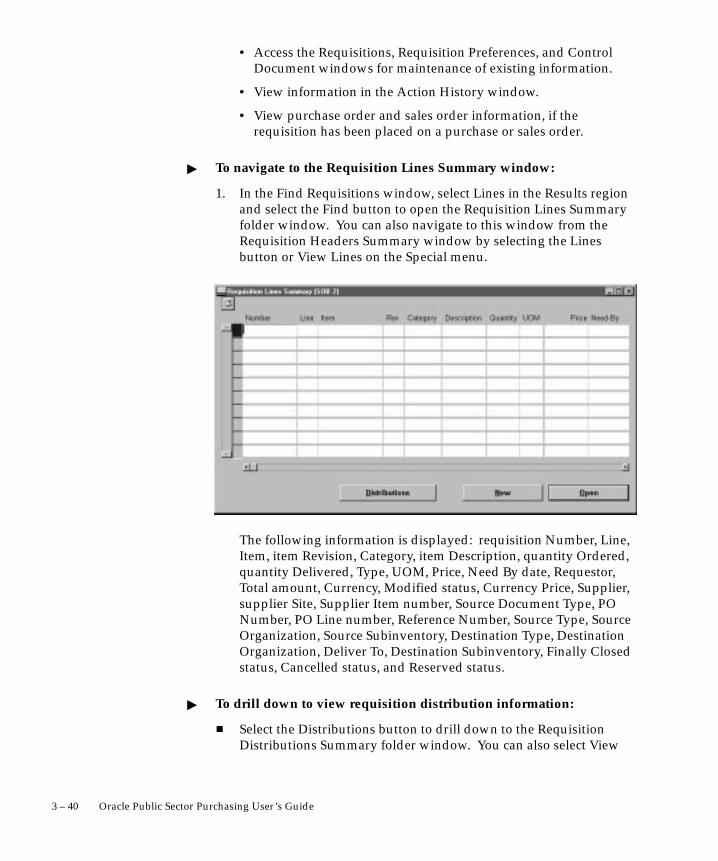
3 – 40 Oracle Public Sector Purchasing User’s Guide
• Access the Requisitions, Requisition Preferences, and ControlDocument windows for maintenance of existing information.
• View information in the Action History window.
• View purchase order and sales order information, if therequisition has been placed on a purchase or sales order.
� To navigate to the Requisition Lines Summary window:
1. In the Find Requisitions window, select Lines in the Results regionand select the Find button to open the Requisition Lines Summaryfolder window. You can also navigate to this window from theRequisition Headers Summary window by selecting the Linesbutton or View Lines on the Special menu.
The following information is displayed: requisition Number, Line,Item, item Revision, Category, item Description, quantity Ordered,quantity Delivered, Type, UOM, Price, Need By date, Requestor,Total amount, Currency, Modified status, Currency Price, Supplier,supplier Site, Supplier Item number, Source Document Type, PONumber, PO Line number, Reference Number, Source Type, SourceOrganization, Source Subinventory, Destination Type, DestinationOrganization, Deliver To, Destination Subinventory, Finally Closedstatus, Cancelled status, and Reserved status.
� To drill down to view requisition distribution information:
� Select the Distributions button to drill down to the RequisitionDistributions Summary folder window. You can also select View

3 – 41Requisitions
Distributions on the Special menu to open this window. See:Using the Requisition Distributions Summary Window: page3 – 41.
� To enter a new requisition:
� Select the New button to open the Requisitions window. See:Entering Requisition Headers: page 3 – 49.
� To open the Requisitions window for the current line:
� Select the Open button to open the Requisitions window and querythe requisition on the current line. Your options in this windowdepend on the status of the requisition and your approval andsecurity options. See: Entering Requisition Headers: page 3 – 49.
See Also
Customizing the Presentation of Data in a Folder, Oracle ApplicationsUser’s Guide
Viewing Action History: page 8 – 2
Finding Purchase Orders: page 4 – 19
Controlling Documents: page 2 – 48
Entering Requisition Preferences: page 3 – 44
Using the Requisition Distributions Summary Window
Use the Requisition Distributions Summary folder window to:
• View requisition distribution information.
• Access the Requisitions window for entry of new documents.
• Access the Requisitions, Requisition Preferences, and ControlDocument windows for maintenance of existing information.
• View information in the Action History window.

3 – 42 Oracle Public Sector Purchasing User’s Guide
� To navigate to the Requisition Distributions Summary window:
1. In the Find Requisitions window, select Distributions in the Resultsregion and select the Find button to open the RequisitionDistributions Summary folder window. You can also navigate tothis window by selecting View Distributions on the Special menu inthe Requisition Headers Summary and Requisition Lines Summarywindows.
The following information is displayed: requisition Number, Linenumber, Distribution number, Item, item Description, UOM, Price,Quantity, Amount, and Charge Account.
� To enter a new requisition:
� Select the New button to open the Requisitions window. See:Entering Requisition Headers: page 3 – 49.
� To open the Requisitions window for the current line:
� Select the Open button to open the Requisitions window and querythe requisition on the current line. Your options in this windowdepend on the status of the requisition and your approval andsecurity options. See: Entering Requisition Headers: page 3 – 49.
See Also
Customizing the Presentation of Data in a Folder, Oracle ApplicationsUser’s Guide

3 – 43Requisitions
Viewing Action History: page 8 – 2
Finding Purchase Orders: page 4 – 19
Entering Requisition Preferences: page 3 – 44

3 – 44 Oracle Public Sector Purchasing User’s Guide
Entering Requisition Preferences
Use the Requisition Preferences window to enter requisition linedefaults (including currency, destination, project, and sourcing defaultinformation). These defaults are applicable during this user session toall new requisition lines you create after you set the defaults until youexit Purchasing. You can override these defaults for specific lines.
� To enter main preferences:
1. Navigate to the Requisitions Preferences window by selectingPreferences on the Special menu in the Requisitions window or inthe Requisitions Headers, Lines, and Distributions Summarywindows. In the Main alternative region, you can enter thedefaults described in the following steps.
2. Enter the Need By date.
3. Enter the GL Date to be used when funds are reserved. You canenter a GL Date only if you set up your financials system options touse encumbrance or budgetary control for requisitions. See: AboutFinancials Options, Oracle Public Sector Payables User’s Guide. See:Budgetary Control and Online Funds Checking, Oracle Public SectorGeneral Ledger User’s Guide.
4. Enter the Charge Account for the cost of the items on therequisition line. The account you enter here is used only for

3 – 45Requisitions
expense destinations, and it overrides any account built by theAccount Generator.
5. Enter a Justification for your requisition line. Buyers andapprovers can review this justification.
6. For Internal requisitions only, enter a Note To Receiver. Forexample, you could note that the receiver should unpack yourrequested items or that only you can accept delivery. For bothinternal and purchase requisitions, you can provide additionalnotes to the receiver by using attachments. See: Attaching Notesto Purchasing Documents: page 1 – 28.
7. Enter the default Reference Number for all requisition lines. Youuse the reference number to match your requisition line with aspecific work, project, etc.
8. Enter the Transaction Nature. See: Defining Lookup Codes: page1 – 54.
9. Check Urgent to indicate that your requisition should be expedited.Buyers have the option to process urgent requisitions faster whenthey AutoCreate purchase orders from requisitions.
10. Enter a default suggested Currency for the requisition lines. Thismust be an enabled code from the Currency window. See:Defining Currencies, Oracle Applications System Administrator’sGuide.
11. Enter the default Rate Type. You can also set this default in thePurchasing Options window. Defining Default Options: page1 – 29. Purchasing supplies you with one of two predefinedcurrency rate types: User or EMU Fixed. A rate type of Usermeans that you can enter a conversion rate between the foreigncurrency (or transaction currency in a document entry window)and the base currency (or functional currency, defined in your setof books). A rate type of EMU Fixed means that if either yourtransaction currency or your functional currency is Euro (theEuropean Monetary Unit currency) and the other is anotherEuropean currency, Purchasing automatically enters a conversionRate Date and Rate for you that you cannot change.
You can define additional currency rate types in the DailyConversion Rate Types window. See: Defining Conversion RateTypes, Oracle Public Sector General Ledger User’s Guide.
12. Enter the default currency Rate Date.
13. Enter the default currency conversion Rate. Purchasing overridesthis default when you are entering requisition lines if the rate type

3 – 46 Oracle Public Sector Purchasing User’s Guide
is not User and if you have established a rate for the rate type anddate. See: Entering Daily Rates, Oracle Public Sector General LedgerUser’s Guide.
14. Enter the Deliver To destination to indicate the final destination ofthe purchased items:
Expense – The goods are delivered to the requestor at an expenselocation.
Inventory – The goods are received into inventory upon delivery.This option is appropriate only if the item is stock enabled in thedeliver–to organization.
Shop Floor – The goods are delivered to an outside processingoperation defined by Work in Process. This option is appropriateonly for outside processing items.
15. Enter the Requestor. This is the employee who requests thequantities on the requisition lines. Purchasing copies this name asthe requestor for every requisition line.
16. Enter the Organization. The default is the requestor’s organization.The List of Values displays all valid receiving organizations.
17. Enter the delivery Location for all requisition lines. The default isthe requestor’s location. You can pick any location that does nothave an organization or any location whose organization matchesthe deliver–to organization. See: Enter Person, Oracle HumanResource Management Systems User’s Guide. See: Site Locations,Oracle Human Resource Management Systems User’s Guide.
If the Deliver–To destination is Inventory, you can also enter theSubinventory. See: Defining Subinventories, Oracle Inventory User’sGuide.
18. Enter the Source type: Inventory or Supplier. If you have bothoptions, you can source requisition lines independently of thedocument type. You can also mix inventory and supplier sourcedrequisition lines in the same requisition. Purchasing creates oneinternal sales order for all Inventory source type requisition lineson this requisition. You can use the Autocreate Documentswindow to place Supplier source type requisition lines ontopurchase orders.
For Inventory source type lines, you can enter a defaultOrganization and Subinventory. If you specify a subinventory foran internal requisition line, Order Entry uses only the specifiedsubinventory for allocation. If the goods do not exist at the

3 – 47Requisitions
specified subinventory, Purchasing backorders them, even if theydo exist in another subinventory.
For Supplier source type lines, you can enter the following defaults:Buyer, Note to Buyer, Supplier, Site, Contact, and Phone. You canalso check RFQ Required to indicate that you want to require anRFQ before the buyer creates a purchase order for the requisition.If RFQs are required and you AutoCreate a purchase order beforecreating an RFQ for the requisition line, Purchasing displays awarning message. You can also set this default in the PurchasingOptions window. See: Defining Default Options: page 1 – 29.
� To enter project information preferences:
You see a Project Information alternative region if one of the followingis true:
• Oracle Projects is installed, or
• Oracle Project Manufacturing is installed and Project ReferenceEnabled is selected in the Organization Parameters window inOracle Inventory
The project information you enter is used by Oracle Projects for DeliverTo destination types of Expense, or by Oracle Project Manufacturing forDeliver To destination types of Inventory or Shop Floor. See: OracleProjects User’s Guide. See: Oracle Project Manufacturing ImplementationManual.
1. Choose the Project Information alternative region.
2. Select a Project Number.
For a Deliver To destination type of Inventory or Shop Floor, youcan optionally enter a Project Number if the Project Control Level isset to Project in the Project Information alternative region of theOrganization Parameters window.
For a Deliver To destination type of Expense, you can alwaysoptionally enter a Project Number.
3. If you entered a Project number, select a Task number.
You must enter a Task number for a Deliver To destination type ofInventory or Shop Floor, if the Project Control Level is set to Task inthe Organization Parameters window and if you have entered aProject number.
4. Enter Expenditure information:

3 – 48 Oracle Public Sector Purchasing User’s Guide
Expenditure information is required only if your Destination Typeis Expense.
• Select the Expenditure Type.
• If you chose an Expenditure Type, enter an ExpenditureOrganization.
• If you chose an Expenditure Organization, select the ExpenditureItem Date.
� To apply your defaults:
� Select the Apply button to apply your defaults. The preferencesentered here will affect new lines entered after you select Applyuntil you exit the application.
See Also
Using the Account Generator in Oracle Public Sector Purchasing: page0 – 2

3 – 49Requisitions
Entering Requisition Headers
Use the Requisitions window to:
• Enter internal and purchase requisitions. Your approval andsecurity setup options determine which types of requisitions youcan enter.
• Take approval actions on individual requisitions online.
• Edit requisitions. Your approval and security setup optionsdetermine which requisitions you can edit. See: ControllingDocuments: page 2 – 48.
� To enter requisition header information:
1. Navigate to the Requisitions window from the menu, by selectingthe New button in the Find Requisitions and requisitions summarywindows, or by selecting the Requisitions button in the Order Padof the Supplier Item Catalog.
The upper part of the Requisitions window has the followingdisplay–only fields:
Preparer – Your employee name from the Application User window.
Status – The requisition status:
3 – 50 Oracle Public Sector Purchasing User’s Guide
Incomplete – The requisition is incomplete, or the preparerhas not yet submitted the requisition to an approver.
Rejected – The approver rejected the requisition.
Returned – A buyer rejected the requisition. Purchasingreturns to the preparer all requisition lines within the samerequisition that are not on a purchase order.
Total – The currency code and the base currency total amount of alllines in this requisition.
2. Enter a unique Requisition number. If automatic requisitionnumber generation is active, the cursor does not enter this field andthe number is generated when you save your work. See: DefiningNumbering Options: page 1 – 36.
3. Choose the Requisition Type:
Purchase Requisition – The requisition lines are usually satisfiedfrom an outside supplier by means of a purchase order.
Internal Requisition – The requisition lines are usually satisfied frominventory by means of an internal sales order.
When you enter requisition lines you can source themindependently of the document type. You can mix inventory andsupplier sourced requisition lines in the same requisition of eitherdocument type. See: Profile Options in Purchasing: page 1 – 76.
� To open the Supplier Item Catalog:
� Select the Catalog button to open the Supplier Item Catalog. See:Supplier Item Catalog Overview: page 5 – 7.
� To take approval actions:
� After completing a requisition, select the Approval button to openthe Approve Documents window. See: Submitting a Document forApproval: page 2 – 32
� To check funds:
� Select Check Funds on the Special menu.

3 – 51Requisitions
� To enter requisition preferences:
� Select Preferences on the Special menu to open the RequisitionPreferences window. See: Entering Requisition Preferences: page3 – 44.
� To place a requisition in the Navigator:
� Choose Place on Navigator from the Action menu. Choose theDocuments alternative region in the Navigator to later access therequisition more quickly. See also: Using the Navigator’sDocuments Region, Oracle Applications User’s Guide.
See Also
Overview of Requisitions: page 3 – 2
Entering Requisition Lines: page 3 – 52

3 – 52 Oracle Public Sector Purchasing User’s Guide
Entering Requisition Lines
Use the Lines alternative region in the Requisitions window to enterrequisition line information.
You can choose a predefined item (See: Defining Items, Oracle InventoryUser’s Guide.) or you can an enter an item without an item number.
� To enter requisition line information:
1. Navigate to the Items alternative region in the Requisitionswindow.
2. Enter a line Type for the requisition line. Line types help youdefine how you want to categorize your items. The default for thisfield is the Line Type from the Purchasing Options window. (See:Defining Default Options: page 1 – 29.) If you change this linetype, defaults from the Line Types window appear in the Category,UOM and Price fields, and the cursor moves to the Category field.See: Defining Line Types: page 1 – 61.
For purposes of requisition line entry, line types are handled inthree classes: amount–based, quantity–based, and outsideprocessing. The defaults that appear when you enter a line type arecleared if you change the line type to a different class. Once youhave committed a line, you can change the line type only to anotherline type of the same class.

3 – 53Requisitions
3. For quantity–based line types and outside processing line types,enter the Item you want to request. Purchasing displays defaultsfor purchasing category, item description, unit of measure, and unitprice for this item. See: Defining Items, Oracle Inventory User’sGuide.
4. Enter the Revision (if any) that corresponds to the item you want toorder.
5. Enter the purchasing Category. You cannot change the category ifyou provide an item number in the Item field.
6. Enter the item Description to explain the item in further detail.When you enter an item number, Purchasing displays the itemdescription from the Items window. You can change thisdescription only if the Allow Description Update attribute for theitem is enabled. See: Defining Items, Oracle Inventory User’s Guide.
7. Enter the Quantity you want to request for the item. You can enterdecimal quantities, but you must enter a value greater than 0.
If there is a source document and a sourcing rule for the item youchoose, you can use list of values in this field to get price breaksfrom quotations or blanket purchase agreements. When youchange the quantity, the unit price is recalculated from the pricebreaks on the document.
If Quantity Rounding is enabled, Purchasing either displays therounded quantity you should have entered in a warning messageor it updates the quantity to the appropriate rounded quantity. Therounding is based on the Unit of Issue (or primary unit of measureif the Unit of Issue is not defined) and the Rounding Factor definedfor the item in Inventory. Rounding is up or down to the nearestwhole Unit of Issue/primary unit of measure using the roundingfactor. See: Overview of Requisitions: page 3 – 2.
8. Enter the unit of measure you want to use for your requisition line.If you enter an item number, Purchasing defaults the unit ofmeasure for this item. If you change this value, the quantity isrounded again if appropriate, and the price is recalculated. If youenter a line type that is amount based, Purchasing uses the unit ofmeasure that you assigned to that line type in the Line Typeswindow. You cannot change the unit of measure of amount baseditems.
9. Enter the unit Price for the item. You can enter the price in decimalformat. You must enter a value greater than or equal to 0. If youenter an item number, Purchasing defaults the list price for thisitem, but you can change this value. If you create a requisition line

3 – 54 Oracle Public Sector Purchasing User’s Guide
for an amount based line type, Purchasing sets the price to 1, andyou cannot change it. Unit prices are in the functional currency.
10. Enter the Need By date for the requested items. This is requiredonly for planned items. You must enter a date greater than orequal to the requisition creation date.
The Charge Account is rolled up from a single distribution after thedistribution is created. If more that one distribution is created forthe line, Multiple is displayed.
The lower part of the screen below the Lines alternative regionconsists of optional fields for which the default can be set in theRequisition Preferences window. See: Entering RequisitionPreferences: page 3 – 44.
11. Enter the Deliver To type:
Expense – The goods are delivered to the requestor at an expenselocation. The destination subinventory is not applicable.
Inventory – The goods are received into inventory upon delivery.
Shop Floor – The goods are delivered to an outside processingoperation defined by Work in Process. Purchasing uses this optionfor outside processing items.
12. Enter the name of the employee who is requesting the item. Youmust provide a Requestor before you can approve the requisition.The default is the requisition preparer.
13. Enter the Organization.
14. Enter the delivery Location for the requested items. Purchasingdefaults the deliver–to location that you assign to the employee inthe Enter Person window. You must provide a deliver–to locationbefore you can approve the requisition. Before the source of theline can be Inventory, the deliver–to location must be linked to acustomer address in the Customer Addresses window. See:Assigning a Business Purpose to a Customer Address, Oracle PublicSector Receivables User’s Guide.
15. Enter the Subinventory. This field applies only when the Deliver Tois Inventory.
16. Enter the Source type. The source type determines the source ofthe requisitioned items. The choice you have in this field isdependent on the PO: Legal Requisition Type profile option. Youmay be able to use either the Inventory or the Supplier source type,or both types. See: Profile Options in Purchasing: page 1 – 76.
3 – 55Requisitions
Note that if you have both options, you can source requisition linesindependently of the document type. You can even mix inventoryand supplier sourced requisition lines in the same requisition.Purchasing creates one internal sales order for all inventory sourcetype requisition lines on this requisition. The supplier source typerequisition lines are placed onto purchase orders with theAutoCreate Documents window.
Even if you are restricted to one type, Purchasing restricts thesource type as appropriate for the item. If you are restricted toInventory but you are requesting a Supplier item (Purchased Itemattribute – Yes, Internal Ordered Item attribute – No), the sourcetype can be only Supplier. Conversely, if you are restricted toSupplier requisitions and you ask for an Inventory item (PurchasedItem attribute – No, Internal Ordered Item attribute – Yes), thesource type can be only Inventory. This is allowed because arequestor may not know the item source type.
17. For the Supplier source type, enter the suggested Supplier, SupplierSite, Contact, and Phone. For the Inventory source type, enter theOrganization and Subinventory.
18. Save your work. If you save a requisition line without entering adistribution, Purchasing tries to generate a distribution line for you,using the Account Generator based on the information you haveentered. If you want your distribution account numbers to begenerated based on project information, you must enter projectinformation in the Requisition Preferences or RequisitionDistributions windows before committing the distribution line. SeeTo enter project information preferences in: Entering RequisitionPreferences: page 3 – 44. See To enter project information in:Entering Requisition Distributions: page 3 – 58.
� To enter line source details for the Supplier source type:
� Navigate to the Source Details alternative region. When the sourcetype is Supplier, you can enter the Note to Buyer, Buyer, RFQRequired, Supplier Item number, source Document Type (Blanketor Quotation), source Document, and document Line Number.
� To enter line details:
� Navigate to the Details alternative region. You can enter aJustification, Note to Receiver, Transaction Nature, ReferenceNumber, UN Number, and Hazard class. See: Defining LookupCodes: page 1 – 54

3 – 56 Oracle Public Sector Purchasing User’s Guide
� To enter line currency information
1. Navigate to the Currency alternative region.
2. Enter a suggested currency for the requisition line. This must be anenabled code from the Currency window. The cursor enters theremaining currency fields only if you have entered a currency here.See: Defining Currencies, Oracle Applications System Administrator’sGuide.
3. Purchasing supplies you with one of two predefined currency ratetypes: User or EMU Fixed. A rate type of User means that you canenter a conversion rate between the foreign currency (ortransaction currency in a document entry window) and the basecurrency (or functional currency, defined in your set of books). Arate type of EMU Fixed means that if either your transactioncurrency or your functional currency is Euro (the EuropeanMonetary Unit currency) and the other is another Europeancurrency, Purchasing automatically enters a conversion Rate Dateand Rate for you that you cannot change.
You can define additional currency rate types in the Define DailyConversion Rate Types form, and you can enter User or one ofyour additional types. See: Defining Conversion Rate Types,Oracle Public Sector General Ledger User’s Guide.
4. Enter the currency rate date.
5. Enter the currency conversion rate. Purchasing overrides thisdefault when you are entering requisition lines if the rate type isnot User and if you have established a rate for the rate type anddate. See: Entering Daily Rates, Oracle Public Sector General LedgerUser’s Guide
� To enter outside processing information:
� Select the Outside Processing button to open the OutsideProcessing window for outside processing line types. See:Entering Outside Processing Information: page 4 – 75
� To open the Supplier Item Catalog:
� Select the Catalog button to open the Supplier Item Catalog. See:Supplier Item Catalog Overview: page 5 – 7.
3 – 57Requisitions
� To enter requisition distributions:
� Select the Distributions button to open the Distributions window.See: Entering Requisition Distributions: page 3 – 58.
� To approve requisitions:
� Select the Approval button to open the Approve Documentswindow. See: Submitting a Document for Approval: page 2 – 32
� To check funds:
� Select Check Funds on the Special menu.
� To enter requisition preferences:
� Select Preferences on the Special menu to open the RequisitionPreferences window. See: Entering Requisition Preferences: page3 – 44.
� To place a requisition in the Navigator:
� Choose Place on Navigator from the Action menu. Choose theDocuments alternative region in the Navigator to later access therequisition more quickly. See also: Using the Navigator’sDocuments Region, Oracle Applications User’s Guide.
See Also
Overview of Requisitions: page 3 – 2
Using the Account Generator in Oracle Public Sector Purchasing, OracleApplications User’s Guide
Entering Requisition Headers: page 3 – 49

3 – 58 Oracle Public Sector Purchasing User’s Guide
Entering Requisition Distributions
Use the Distributions window to enter requisition distributions. Youcan charge the cost of this requisition line to multiple AccountingFlexfields or update the default values you provided in the RequisitionPreferences window. Note that if the line source type is Inventory, youcannot approve the requisition if you enter more than one distributionline.
� To enter requisition distributions:
1. Navigate to the Distributions window by selecting theDistributions button in the Requisitions window. You begin in theAccounts alternative region.
2. Enter the Quantity you want to distribute. The quantity must be indecimal format. Purchasing displays the quantity you have not yetassigned to an Accounting Flexfield. Multiple distributionquantities must total to the requisition line quantity.
Using decimal quantities in this field, you can easily distributecosts across distributions using percentages. For instance, you canhave a simple quantity of one (1) on your requisition line. If youwant to charge one Accounting Flexfield for 30% of the cost of theitem and another Accounting Flexfield for 70% of the cost of theitem, simply enter .3 and .7 as the respective quantities for therequisition distribution lines.
If you have a quantity different from one (1), you can use theCalculator to perform the arithmetic, as illustrated by the followingexample:
• Your requisition line quantity is 5000
• You want to charge 35% of the cost to a first Accounting Flexfield
• You want to charge 65% of the cost to a second AccountingFlexfield
Simply enter (5000x35)/100 = 1750 as the quantity for the firstrequisition distribution and (5000x65)/100 = 3250 as the quantityfor the second requisition distribution.
3. When you enter a Charge Account, Purchasing uses the AccountGenerator to automatically create the following accounts for eachdistribution:
• Accrual: the AP accrual account
• Variance: the invoice price variance account

3 – 59Requisitions
If you are using encumbrance control, Purchasing also creates thefollowing account for each distribution:
• Budget: the encumbrance budget account
The Account Generator creates these accounts based on predefinedrules. See: Using the Account Generator in Oracle Public SectorPurchasing: page 0 – 2.
With one exception, you cannot create or update these accountsmanually. If the requisition line destination type is Expense,however, you can change the default charge account supplied bythe Account Generator.
4. Enter the GL Date that you want to use when you reserve funds.You can enter a GL Date only if you set up your financials optionsto use encumbrance for requisitions. The Reserved check boxindicates whether funds have been reserved. The default is thecurrent date. See: About Financials Options, Oracle Public SectorPayables User’s Guide.
If you enter a date that belongs to two separate accounting periods,Purchasing creates a journal entry in the first accounting periodthat contains this date. See: Controlling Purchasing Periods: page1 – 71.
5. Save your work.
� To enter project information:
You see a Project alternative region if one of the following is true:
• Oracle Projects is installed, or
• Oracle Project Manufacturing is installed and Project ReferenceEnabled is selected in the Organization Parameters window inOracle Inventory
The project information you enter is used by Oracle Projects fordestination types of Expense, or by Oracle Project Manufacturing fordestination types of Inventory or Shop Floor. See: Oracle ProjectsUser’s Guide. See: Oracle Project Manufacturing Implementation Manual.
1. Choose the Project alternative region.
2. Select a Project Number.
For a requisition line Destination Type of Inventory or Shop Floor,you can optionally enter a Project Number if the Project ControlLevel is set to Project in the Project Information alternative regionof the Organization Parameters window.

3 – 60 Oracle Public Sector Purchasing User’s Guide
For a requisition line Destination Type of Expense, you can alwaysoptionally enter a Project Number.
3. If you entered a Project number, select a Task number.
You must enter a Task number for a requisition line DestinationType of Inventory or Shop Floor, if the Project Control Level is setto Task in the Organization Parameters window and if you haveentered a Project number.
4. Enter Expenditure information.
Expenditure information is required only if your Destination Typeis Expense.
• Select the Expenditure Type.
• If you chose an Expenditure Type, enter an ExpenditureOrganization.
• If you chose an Expenditure Organization, select the ExpenditureDate.
5. Note that the distribution Quantity that will be charged to theproject should already be entered for you.
If you change the Quantity here, then the distribution Quantity onthe requisition line changes as well.
6. Save your work.
The Charge, Budget, Accrual, and Variance accounts in theAccount Description region are generated automatically. See:Using the Account Generator in Oracle Public Sector Purchasing:page 0 – 2.
See Also
Budgetary Control and Online Funds Checking, Oracle Public SectorGeneral Ledger User’s Guide
Entering Requisition Lines: page 3 – 52

3 – 61Requisitions
Using Requisition Templates
From the Requisitions window, use the Supplier Item Catalog windowand Requisition Templates to create requisitions more easily.
� To use requisition templates to enter requisitions:
1. Navigate to the Requisitions window by selecting Requisitionsfrom the menu.
2. Enter requisition header information. See: Entering RequisitionHeaders: page 3 – 49.
3. Navigate to the Items alternative region. See: Entering RequisitionLines: page 3 – 52
4. Select Catalog to open the Search Supplier Item Catalog window.See: Finding Supplier Items: page 5 – 10.
5. Select the desired Requisition Template from the list of values. See:Defining Requisition Templates: page 1 – 44.
6. Choose the Find button to open the Supplier Item Catalog windowand display the template lines.
7. Copy the desired lines to the Order Pad. See: Using the SupplierItem Catalog Alternative Regions: page 5 – 14
8. Choose the Select button to close the Supplier Item Catalogwindow and transfer the order pad lines to the requisition.
9. Save your work.
See Also
Supplier Item Catalog Overview: page 5 – 7

3 – 62 Oracle Public Sector Purchasing User’s Guide

C H A P T E R
4T
4 – 1Purchase Orders
Purchase Orders
his chapter tells you everything you need to know about PurchaseOrders, including:
• Overview of Purchase Orders: page 4 – 3
• Purchase Order Defaulting Rules: page 4 – 11
• Finding Purchase Orders: page 4 – 19
• Entering Purchase Order Preferences: page 4 – 33
• Entering Purchase Order Headers: page 4 – 39
• Entering Purchase Order Lines: page 4 – 44
• Entering Purchase Order Price Reference Information: page4 – 48
• Entering Purchase Order Reference Document Information: page4 – 50
• Entering Purchase Order Miscellaneous Information: page 4 – 52
• Entering Purchase Agreement Information: page 4 – 54
• Entering Currency Information: page 4 – 56
• Entering Purchase Order Details Information: page 4 – 58
• Entering Purchase Order Shipments: page 4 – 61
• Entering Purchase Order Receiving Controls: page 4 – 65
• Entering Purchase Order Price Break Information: page 4 – 68

4 – 2 Oracle Public Sector Purchasing User’s Guide
• Entering Purchase Order Distributions: page 4 – 70
• Entering Outside Processing Information: page 4 – 75
• Entering Purchase Order Notification Controls: page 4 – 77
• Entering and Viewing Purchase Order Acceptances: page 4 – 79
• Entering Releases: page 4 – 81
• Automatic Release Generation: page 4 – 93
• Printed Purchase Order Overview: page 4 – 96
• Document Revision Numbering: page 4 – 110
• Changing Encumbered Documents: page 4 – 119
• Overview of Outside Processing: page 4 – 120
• Drop Shipments: page 4 – 156
• Tax Defaults in Purchasing: page 4 – 158
• Workflow for Creating Purchase Orders and Releases: page4 – 160

4 – 3Purchase Orders
Overview of Purchase Orders
Purchasing provides the Purchase Orders window that you can use toenter Standard and Planned purchase orders as well as Blanket andContract purchase agreements. You must be defined as a buyer to usethis window. See: Entering Purchase Order Headers: page 4 – 39. See:Defining Buyers: page 1 – 13.
To create purchasing documents more quickly, use the AutoCreateDocuments window. See: Autocreate Documents Overview: page6 – 2.
Purchasing provides you the features you need to satisfy the followingpurchasing needs. You should be able to:
• Review all of your purchases with your suppliers to negotiatebetter discounts
• Create purchase orders simply by entering a supplier and itemdetails
• Create standard purchase orders and blanket releases from bothon–line and paper requisitions
• Create accurate and detailed accounting information so that youcharge purchases to the appropriate departments
• Check your funds availability while creating purchase orders.
• Review the status and history of your purchase orders at anytime for all the information you need
• Print purchase orders flexibly by using a number of print options
• Inform your suppliers of your shipment schedule requirements
• Record supplier acceptances of your purchase orders. Youalways know whether your suppliers have received andaccepted your purchase order terms and conditions
• Create your purchase orders by providing a quantity and pricefor each item you are ordering. Alternatively, you should also beable to create your purchase order simply by providing anamount if you are ordering a service that you cannot break downby price and quantity

4 – 4 Oracle Public Sector Purchasing User’s Guide
Purchase Order Types
Purchasing provides the following purchase order types: StandardPurchase Order, Planned Purchase Order, Blanket Purchase Agreement,and Contract Purchase Agreement. You can use the Document Namefield in the Document Types window to change the names of thesedocuments. For example, if you enter Regular Purchase Order in theDocument Name field for the Standard Purchase Order type, yourchoices in the Type field in the Purchase Orders window will beRegular Purchase Order, Planned Purchase Order, Blanket PurchaseAgreement, and Contract Purchase Agreement.
Standard Purchase Orders
You generally create standard purchase orders for one–time purchaseof various items. You create standard purchase orders when you knowthe details of the goods or services you require, estimated costs,quantities, delivery schedules, and accounting distributions. If you useencumbrance accounting, the purchase order may be encumbered sincethe required information is known.
Blanket Purchase Agreements
You create blanket purchase agreements when you know the detail ofthe goods or services you plan to buy from a specific supplier in aperiod, but you do not yet know the detail of your delivery schedules.You can use blanket purchase agreements to specify negotiated pricesfor your items before actually purchasing them.
Blanket Releases
You can issue a blanket release against a blanket purchase agreement toplace the actual order (as long as the release is within the blanketagreement effectivity dates). If you use encumbrance accounting, youcan encumber each release.
Contract Purchase Agreements
You create contract purchase agreements with your suppliers to agreeon specific terms and conditions without indicating the goods andservices that you will be purchasing. You can later issue standardpurchase orders referencing your contracts, and you can encumberthese purchase orders if you use encumbrance accounting.

4 – 5Purchase Orders
Planned Purchase Orders
A planned purchase order is a long–term agreement committing to buyitems or services from a single source. You must specify tentativedelivery schedules and all details for goods or services that you wantto buy, including charge account, quantities, and estimated cost.
Scheduled Releases
You can issue scheduled releases against a planned purchase order toplace the actual orders. If you use encumbrance accounting, you canuse the planned purchase order to reserve funds for long termagreements. You can also change the accounting distributions on eachrelease and the system will reverse the encumbrance for the plannedpurchase order and create a new encumbrance for the release.
Purchase Order Types Summary
StandardPurchaseOrder
PlannedPurchaseOrder
BlanketPurchaseAgreement
ContractPurchaseAgreement
Terms and Conditions Known Yes Yes Yes Yes
Goods or Services Known Yes Yes Yes No
Pricing Known Yes Yes Maybe No
Quantity Known Yes Yes No No
Account Distributions Known Yes Yes No No
Delivery Schedule Known Yes Maybe No No
Can Be Encumbered Yes Yes No No
Can Encumber Releases N/A Yes Yes N/A
Table 4 – 1 (Page 1 of 1)

4 – 6 Oracle Public Sector Purchasing User’s Guide
Purchase Order Features
AutoCreate
AutoCreate lets you compose a purchase order or a release fromon–line requisitions in a few keystrokes. See: Autocreate DocumentsOverview: page 6 – 2.
Workflow for Automatic Purchase Order and Release Creation
Purchasing uses Oracle Workflow technology to create purchase ordersand releases automatically from approved requisition lines. Purchaseorders and releases are created automatically only if the approvedrequisition lines are valid (for example, they contain valid sourcedocument information) and if the ”Is Automatic Creation Allowed?”attribute in the Oracle Workflow Builder is set to ’Y’ for Yes. (It is set to’Y’ by default.) See: Workflow for Creating Purchase Orders orReleases: page 4 – 160. See: Choosing Workflow Options: page 1 – 73.See also: Automatic Release Generation: page 4 – 93.
Accurate Accounting
You supply accounting information as part of your purchase order.You can allocate order line quantities and costs to cost centers, projects,or departments.
On–line Funds Availability Checking
You can determine whether you have enough funds available in yourbudget before you complete a purchase order. You can check funds atthe purchase order header, lines, shipments, distributions, and releaselevels. You can also check whether funds are available before youapprove your purchase order. You can even set up your system setupoptions to prevent a buyer from approving a purchase order untilsufficient funds are available.
To use on–line funds checking, you need to implement budgetarycontrols. You can check funds at the detail or summary level. You canalso choose to check your funds for each period, quarter, or year. See:Budgetary Control and Online Funds Checking, Oracle Public SectorGeneral Ledger User’s Guide

4 – 7Purchase Orders
Revising Purchase Orders
To change a standard or planned purchase order, simply query thispurchase order and enter your changes. You can provide additionalpaper requisition information to a standard purchase order. You canalso revise blanket or contract purchase agreements. When you makechanges to a purchase order or release, Purchasing’s change orderworkflow processes determine whether or not the changes requirereapproval and, if so, route the document for the necessaryreapprovals. See: Workflow Processes for Approving Change Orders:page 2 – 73.
To add on–line requisition lines to an existing standard purchase orderor release, use AutoCreate. You can add requisition lines as a newpurchase order line or add to an existing purchase order line. See:Autocreate Document Options: page 6 – 4.
When you change a purchase order, Purchasing automaticallyincrements the revision number. See: Document Revision Rules: page4 – 111.
Shipment Schedules
You can create purchase order lines that have an unlimited number ofship–to locations and delivery dates. Each shipment line has a Ship–ToOrganization and Location, Promise–By Date, Need–By Date, and LastAccept Date. You receive goods and services against each shipmentline.
Acceptances
You can enter purchase order acceptances to verify that your suppliershave agreed to and accepted the details on the purchase orders yousend to them. See: Entering Purchase Order Acceptances: page 4 – 79.
Line Types
Purchasing uses Line Types to distinguish between items you order byquantity and price, and services that you order by amount. Line Typesalso serve to identify outside processing services for which Work inProcess creates requisitions. See: Defining Line Types: page 1 – 61.

4 – 8 Oracle Public Sector Purchasing User’s Guide
Approving Purchase Orders
Purchasing checks purchase orders for accuracy and completenessbefore printing. You can submit purchase orders to the approvalprocess from the Purchase Orders window before you print them.Also, you can use the Notifications Summary window to submitpurchase orders for approval. See: Submitting a Document forApproval: page 2 – 32. See: Viewing and Responding to Notifications:page 2 – 29.
You can also assign an authorization limit to each buyer and decidewhether you want to enforce this limit whenever any buyer approves apurchase order. See: Overview of Purchasing Options: page 1 – 29.See: Defining Buyers: page 1 – 13.
Printing Purchase Orders
You can print purchase orders at the time you approve them. (See:Submitting a Document for Approval: page 2 – 32.) You can reprintpurchase orders as often as you want using the Submit Requestswindow (See: Submitting a Request, Oracle Applications SystemAdministrator’s Guide). You can choose from the following options:
• Print all new and changed purchase orders
• Print all changed purchase orders
• Print all new purchase orders
• Print a particular purchase order or range of purchase orders
• Print a test purchase order
• Landscape or portrait format
Cancelling Purchase Orders
Purchasing lets you cancel a purchase order or purchase order line afteryou have approved it. When you cancel a purchase order or purchaseorder line, you pay only for those goods you received beforecancellation, and you can optionally reassign any unfilled requisitionsto another purchase order. See: Controlling Documents: page 2 – 48.
If you are using encumbrance or budgetary control and if you choose tocancel referencing requisitions, Purchasing creates negative debitentries in your general ledger system to cancel the encumbranceassociated with the purchase order. Purchasing recreates requisitionencumbrances for the requisition lines you used to create the purchaseorder, using the distributions from your cancelled purchase order. See:

4 – 9Purchase Orders
Budgetary Control and Online Funds Checking, Oracle Public SectorGeneral Ledger User’s Guide
Closing and Final Closing Purchase Orders
Purchasing lets you automatically close a purchase order once you havereceived and paid for all items you ordered. This feature lets youconcentrate on those purchase orders that are overdue or partiallyreceived. You can also manually close purchase orders at any time. Ofcourse, you always have the option to review or reopen a purchaseorder by adding new lines or creating additional receipt transactionsuntil the purchase order is final closed. See: Controlling Documents:page 2 – 48.
If you designate an invoice as the final match to a purchase order,Payables final closes the purchase order shipment duringAutoApproval. You cannot update the status of a final–closedpurchase order. See: Approval, Oracle Public Sector Payables User’sGuide.
If you are using encumbrance or budgetary control and if you choose tocancel referencing requisitions, Purchasing automatically creates creditentries in your general ledger system to reverse the encumbrance thatcorresponds to the purchase order are final closing. See: BudgetaryControl and Online Funds Checking, Oracle Public Sector General LedgerUser’s Guide.
Close for Receiving and Close for Invoicing
Purchasing automatically closes shipments for receiving and invoicingbased on controls that you specify in the Purchasing Options window.Once all shipments for a given line are closed, Purchasingautomatically closes the line. When all lines for a given header areclosed, Purchasing automatically closes the document.
You can specify closing controls including: Receipt Close Tolerance,Receipt Close Point, and Invoice Close Tolerance. See: DefiningPurchasing Options: page 1 – 29.
Note: The Close for Invoicing status does not prevent you frommatching an invoice to a purchase order.
Holding and Freezing Purchase Orders
Purchasing lets you freeze a purchase order so that you can preventchanges or additions to it, but still receive and pay for goods already

4 – 10 Oracle Public Sector Purchasing User’s Guide
ordered. You can easily control your purchase order changes becauseyou can freeze or unfreeze a purchase order when appropriate.Likewise, you can place a purchase order on hold to prevent all actionsuntil you remove the order from hold. See: Controlling Documents:page 2 – 48.
Notification Controls (Using Oracle Alert)
For planned purchase orders, blanket purchase agreements, andcontracts, you can establish expiration and release control notificationconditions and specify the number of days before the condition is metthat you want to be notified. In the Notification Controls window,accessible through the Purchase Orders window, you can specify thefollowing notification conditions:
• Amount released by date
• Amount not released by date
• Amount not released
• Amount released
• Expiration date
When the notification conditions are met, Purchasing sends you anAlert (or email) so that you can take appropriate action. See: EnteringPurchase Order Notification Controls: page 4 – 77. See: Using OracleAlert in Oracle Public Sector Purchasing: page 0 – 2.
Quick Access to Particular Purchase Orders
You can place purchase orders that you reference frequently in theOracle Applications Navigator. Placing documents in the Navigator isuseful when you need to query large documents with multiple lines,shipments, or distributions. When the purchase order is open, choosePlace on Navigator from the Action menu. When you choose theDocuments alternative region in the Navigator, you can then accessthat document directly from within the Navigator. You can also do thiswith requisitions. See: Using the Navigator’s Documents Region,Oracle Applications User’s Guide.

4 – 11Purchase Orders
Purchase Order Defaulting Rules
Purchasing uses a comprehensive defaulting mechanism to provide mostrequired purchase order information and minimize document creationtime. For example, when you are entering a standard purchase orderand you want only one shipment and distribution for each purchaseorder line, you do not need to navigate beyond the Lines alternativeregion unless you want to change the default information in theshipments and distributions that Purchasing automatically creates. Ifyou are creating an outside processing line, you must go to theDistributions window to enter outside processing information. Finally,note that the Account Generator may be unable to build accounts for anumber of reasons, for example, if you have entered a one–time item.In this case, you must enter distributions in the Distributions window.
Purchase Order Default Matrix Conventions
The Purchase Order Default Matrix uses the following conventions:
• ”Default” in this context means that Purchasing provides thisinformation for you. It does not mean that you can alwayschange the defaulted information.
• When options are listed as 1–2–3, Purchasing looks first for theoption specified as 1. If new information is provided, or ifinformation is not available in the first source, Purchasing usesthe next source. For example, when defaulting the currency to astandard purchase order header, Purchasing first provides thecurrency specified in the Financials Options window. When youspecify a supplier, Purchasing updates the currency based on thesupplier’s default currency. Finally, when you specify a suppliersite, Purchasing updates the currency accordingly.
• For Releases, ”Source Agreement” refers to Blanket PurchaseAgreements or Planned Purchase Orders, as appropriate.
• The Last Acceptance Date is calculated using the Promised Dateif available. Otherwise, Purchasing uses the Need–By date.
• Purchasing provides a GL Date only if you are usingencumbrance.
• The following abbreviations are used in the matrix:
– OSP Outside Processing
– PO Opt Purchasing Options

4 – 12 Oracle Public Sector Purchasing User’s Guide
Purchase Order Defaulting Rules
Header Standard Planned Blanket Contract Release
PurchaseOrder Type
Value =”Standard”
Value = ”Blanket”
Buyer User name (mustbe buyer)
User name (mustbe buyer)
User name (mustbe buyer)
User name (mustbe buyer)
User name (mustbe buyer)
urrenc
1 Set of Books Set of Books Set of Books Set of Books Source Agreement(not changeable)
Currency 2 Supplier Supplier Supplier Supplier
3 Supplier Site Supplier Site Supplier Site Supplier Site
Supplier Source Agreement(not changeable)
Supplier Site
From supplier ifonly 1
“Purchasing” siteexists
From supplier ifonly 1
“Purchasing” siteexists
From supplier ifonly 1
“Purchasing” siteexists
From supplier ifonly 1
“Purchasing” siteexists
Source Agreement(not changeable)
SupplierContact
From site if only 1contact exists
From site if only 1contact exists
From site if only 1contact exists
From site if only 1contact exists
Confirm Order Value = “No” Value = “No” Value = “No” Value = “No”
Shi o1 Financials Options Financials Options Financials Options Financials Options Source Agreement
(not changeable)Ship ToLocation 2 Supplier Supplier Supplier Supplier
3 Supplier Site Supplier Site Supplier Site Supplier Site
ill o1 Financials Options Financials Options Financials Options Financials Options Source Agreement
(not changeable)Bill ToLocation 2 Supplier Supplier Supplier Supplier
3 Supplier Site Supplier Site Supplier Site Supplier Site
Pa ent1 Financials Options Financials Options Financials Options Financials Options Source Agreement
(not changeable)PaymentTerms 2 Supplier Supplier Supplier Supplier
3 Supplier Site Supplier Site Supplier Site Supplier Site
reight1 Financials Options Financials Options Financials Options Financials Options Source Agreement
(not changeable)FreightTerms 2 Supplier Supplier Supplier Supplier
3 Supplier Site Supplier Site Supplier Site Supplier Site
Shi ia
1 Financials Options Financials Options Financials Options Financials Options Source Agreement(not changeable)
Ship Via 2 Supplier Supplier Supplier Supplier
3 Supplier Site Supplier Site Supplier Site Supplier Site
Table 4 – 2 (Page 1 of 2)

4 – 13Purchase Orders
ReleaseContractBlanketPlannedStandardHeader
O
1 Financials Options Financials Options Financials Options Financials Options Source Agreement(not changeable)
FOB 2 Supplier Supplier Supplier Supplier
3 Supplier Site Supplier Site Supplier Site Supplier Site
Rate Type PurchasingOptions
PurchasingOptions
PurchasingOptions
PurchasingOptions
Source Agreement(not changeable)
Effective Date Source Agreement(not changeable)
ExpirationDate
Source Agreement(not changeable)
MinimumReleaseAmount
PurchasingOptions
PurchasingOptions
NotificationControlExpirationDate
Terms andconditions
expiration date
Terms andconditions
expiration date
Terms andconditions
expiration date
AcceptanceRequired
Value = “No” Value = “No” Value = “No” Value = “No” Source Agreement(not changeable)
ReleaseNumber
Existing number +1
Release Date Today’s date
Table 4 – 2 (Page 2 of 2)
PO Preferences Standard Planned Blanket Contract Release
GL DateToday’s date if invalid period; else
null
Today’s date if invalid period; else
null
PeriodPeriod currently
open in PO & openor future in GL
Period currentlyopen in PO & open
or future in GL
Table 4 – 3 (Page 1 of 2)

4 – 14 Oracle Public Sector Purchasing User’s Guide
ReleaseContractBlanketPlannedStandardPO Preferences
Shi o
1Financials Options’Ship–To location’s
organization
Financials Options’Ship–To location’s
organization
Ship–ToOrganization
2
If 1 is null,Purchasing
Options’ Inventoryorganization
If 1 is null,Purchasing
Options’ Inventoryorganization
3
PO Header’sShip–To Location’sorganization if not
null
PO Header’sShip–To Location’sorganization if not
null
Table 4 – 3 (Page 2 of 2)
Line Standard Planned Blanket Contract Release
Line Type PurchasingOptions
PurchasingOptions
PurchasingOptions
ategor1 Line Type Line Type Line Type
Category2 Item Item Item
UOM1 Line Type Line Type Line Type
UOM2 Item Item Item
Unit Price
1 Line Type Line Type Line Type
Unit Price 2 List Price List Price List Price
3 Auto Sourcing Auto Sourcing Auto Sourcing
UN Number Item Item Item
Hazard Class Item Item Item
OSP UOM Type Item Item Item
List Price Item Item Item
Market Price Item Item Item
Price Type PO Preferences PO Preferences PO Preferences
Allow PriceOverride
Value = “No” Value = “No”
Promised DatePO Preferences PO Preferences PO Preferences Source
Agreement (notchangeable)
Need–By DatePO Preferences PO Preferences PO Preferences Source
Agreement (notchangeable)
Table 4 – 4 (Page 1 of 2)

4 – 15Purchase Orders
ReleaseContractBlanketPlannedStandardLine
Transaction Nature PO Preferences PO Preferences PO Preferences
Price Break Type PO Preferences
Table 4 – 4 (Page 2 of 2)
Shipment Standard Planned Blanket Contract Release
Ship–ToOrganization
1
Financial SystemOptions
Financial SystemOptions
AgreementHeader’s Ship–To
locationsorganization
Source Agreement(not changeable)
Shi oOrganization
2
PO Preferences –Validated against
item
PO Preferences –Validated against
item
AgreementHeader’s Ship–To
locationsorganization
Source Agreement(not changeable)
Ship–To Location
PO Preferences –Validated against
validatedorganization
PO Preferences –Validated against
validatedorganization
Agreement Header Source Agreement(not changeable)
Pro ised ate1 Lines Lines Lines Lines
Promised Date2 PO Preferences PO Preferences PO Preferences PO Preferences
eed ate1 Lines Lines Lines Lines
Need–By Date2 PO Preferences PO Preferences PO Preferences PO Preferences
Receipt Closeolerance
1 PurchasingOptions
PurchasingOptions
PurchasingOptions
Tolerance2 Item Item Item
Invoice Closeolerance
1 PurchasingOptions
PurchasingOptions
PurchasingOptions
Tolerance2 Item Item Item
Invoice Matching3 a
1 PurchasingOptions
PurchasingOptions
PurchasingOptions(2, 3, 4 Way)
2 Line Type Line Type Line Type
3 Item Item Item
Table 4 – 5 (Page 1 of 3)

4 – 16 Oracle Public Sector Purchasing User’s Guide
ReleaseContractBlanketPlannedStandardShipment
ccrue on
1 Yes, if line type isOSP
Yes, if line type isOSP
Yes, if line type isOSP
Accrue onecei t
2
Yes, if item isstockable in
ship–toorganization
Yes, if item isstockable in
ship–toorganization
Yes, if item isstockable in
ship–toorganization
Receipt
3No, if PO Opt
expense accrual is“Period End”
No, if PO Optexpense accrual is
“Period End”
No, if PO Optexpense accrual is
“Period End”
4 Else = ReceiptRequired Value
Else = ReceiptRequired Value
Else = ReceiptRequired Value
a able
1 Purchasing OrderPreferences
Purchase OrderPreferences
Purchase OrderPreferences
a able
2 Ship toOrganization/Item
Ship toOrganization/Item
Ship toOrganization/Item
Taxable 3 InventoryOrganization/Item
InventoryOrganization/Item
InventoryOrganization/Item
4 PurchasingOptions System
Default
PurchasingOptions System
Default
PurchasingOptions System
Default
a a e
1 Purchasing OrderPreferences
Purchase OrderPreferences
Purchase OrderPreferences
Tax Name
2 Tax Name fromplanned purchase
order shipment
3Tax Defaults in
PurchasingOptions window
Tax Defaults inPurchasing
Options window
Tax Defaults inPurchasing
Options window
n orce Shi o1 Receiving Options Receiving Options Receiving Options
Enforce Ship–Toocation 2 Supplier Supplier SupplierLocation
3 Item Item Item
llo Substitute1 Receiving Options Receiving Options Receiving Options
Allow Substituteecei ts 2 Supplier Supplier SupplierReceipts
3 Item Item Item
ecei t outing
1 Receiving Options Receiving Options Receiving Options
Receipt Routing 2 Supplier Supplier Supplier
3 Item Item Item
uantit 1 Receiving Options Receiving Options Receiving OptionsQuantityReceived
olerance2 Supplier Supplier Supplier
Tolerance 3 Item Item Item
Table 4 – 5 (Page 2 of 3)

4 – 17Purchase Orders
ReleaseContractBlanketPlannedStandardShipment
uantit 1 Receiving Options Receiving Options Receiving OptionsQuantityReceived
ce tion2 Supplier Supplier Supplier
Exception 3 Item Item Item
a s arl1 Receiving Options Receiving Options Receiving Options
Days Earlyecei t llo ed 2 Supplier Supplier SupplierReceipt Allowed
3 Item Item Item
a s ate1 Receiving Options Receiving Options Receiving Options
Days Lateecei t llo ed 2 Supplier Supplier SupplierReceipt Allowed
3 Item Item Item
Last Accept Date
Promised Date orNeed By Date +
Late ReceiptTolerance
Promised Date orNeed By Date +
Late ReceiptTolerance
Promised Date orNeed By Date +
Late ReceiptTolerance
ecei t ate1 Receiving Options Receiving Options Receiving Options
Receipt Datece tion 2 Supplier Supplier SupplierException
3 Item Item Item
Shipment Price Source Agreement(not changeable)
Table 4 – 5 (Page 3 of 3)
Distribution Standard Planned Blanket Contract Release
estination e
1 If line type is OSP= “Shop Floor”
If line type is OSP= “Shop Floor”
If line type is OSP= “Shop Floor”
estination e
2If item stockable in
ship–to org. =“Inventory”
If item stockable inship–to org. =“Inventory”
If item stockable inship–to org. =“Inventory”
Destination Type3
If item stockable inship–to org, andpurchasable and
Accrue on Receiptis No =“Expense”
If item stockable inship–to org, andpurchasable and
Accrue on Receiptis No =“Expense”
If item stockable inship–to org, andpurchasable and
Accrue on Receiptis No =“Expense”
4If item is NOT
stockable =“Expense”
If item is NOTstockable =“Expense”
If item is NOTstockable =“Expense”
Requestor PO Preferences PO Preferences
Deliver–Toocation
1PO Preferences ifvalid for ship–to
org and item
PO Preferences ifvalid for ship–to
org and item
Requestor’slocation
Location2 Requestor’s
locationRequestor’s
locationRequestor’s
location
Table 4 – 6 (Page 1 of 2)

4 – 18 Oracle Public Sector Purchasing User’s Guide
ReleaseContractBlanketPlannedStandardDistribution
Project Details PO Preferences PO Preferences PO Preferences
Rate Date PO Header PO Header Source Agreement(not changeable)
GL DatePO Preferences PO Preferences Today’s date if in
valid period; elsenull
Accounts Account Generator Account Generator Account Generator
e uisition1 PO Preferences PO Preferences
RequisitionInformation 2 Source Requisition
(Online)Source Requisition
(Online)Source Requisition
(Online)
Table 4 – 6 (Page 2 of 2)
See Also
Defining Financials Options, Oracle Public Sector Payables User’s Guide
About Suppliers, Oracle Public Sector Payables User’s Guide
Site Locations, Oracle Human Resource Management Systems User’s Guide
Using the Account Generator in Oracle Public Sector Purchasing: page0 – 2
Defining Purchasing Options: page 1 – 29
Defining Receiving Options: page 1 – 40
Profile Options in Purchasing: page 1 – 76
Entering Purchase Order Shipments: page 4 – 61
Entering Purchase Order Distributions: page 4 – 70

4 – 19Purchase Orders
Finding Purchase Orders
Use the Find Purchase Orders window to:
• Access the Purchase Orders window.
• Access the Releases window.
• Perform purchase order inquiries at header, line, shipment, anddistribution levels
Depending on the function security assigned to your responsibility, youhave varying levels of access to information. A responsibility definesan application user’s current privileges while working with OracleApplications.
See Also
Overview of Function Security, Oracle Applications SystemAdministrator’s Guide
Function Security for Purchasing: page 2 – 11
Forms and Subfunctions, Oracle Applications System Administrator’sGuide
� To enter search criteria:
1. Navigate to the Find Purchase Orders window by selectingPurchase Order Summary from the menu. Enter desired searchcriteria as described in the following steps.

4 – 20 Oracle Public Sector Purchasing User’s Guide
2. Enter the purchase order number. If you enter a purchase ordernumber, you can also enter a Release, Line, and/or Shipmentnumber for the purchase order.
3. Select the View Releases check box to include all associated releasesfor blanket purchase agreements and planned purchase orders.Purchasing automatically selects this check box if you specifyselection criteria for which it would be required (for example, ifyou select Scheduled Releases as the purchase order Type). Thischeck box is not available when inappropriate (for example, if youselect Standard PO as the purchase order Type).
4. Select the purchase order Type (Standard purchase order, Blanketpurchase agreement, Planned purchase order, Contract purchaseagreement, Blanket Release, or Scheduled Release.
5. Enter the Currency.
6. Enter the Supplier. If you enter a supplier, you can also enter asupplier Site.
7. Enter the Ship To Organization.
8. Enter the Ship To location.
9. Enter the Bill To location.
10. Enter the Buyer.
11. Enter the Line Type.

4 – 21Purchase Orders
12. Use the alternative regions to further restrict the search:
• In the Item region, you can enter the following search criteria:Item number, Revision number, Category, item Description, andSupplier Item Number.
• In the Date Ranges region, you can enter date ranges for thefollowing dates: Order, Approved, Promised, Need By, andClosed.
• In the Status region, you can limit the search by:
– Order Approval status (Approved, In Process, Incomplete,Pre–Approved, Rejected, or Requires Reapproval)
– Control status (Open, Closed, Finally Closed, Closed forInvoicing, Closed for Receiving, or Cancelled)
– Hold status (Yes or No)
– Frozen status (Yes or No)
– Firmed status (Yes or No)
• In the Related Documents region, you can limit the search bySupplier Quote number, Quote number, Quote Line number,Requisition number, Receipt number, Contract number, Invoicenumber, and Paper Requisition number.
• In the Deliver To region, you can limit the search by destinationType (Expense, Inventory, Shop Floor), Deliver To Person,Organization, Location, and Subinventory.
• In the Accounting region, you can limit the search by Period, GLDate, Charge Account, Budget Account, and whether there areActive Encumbrances (Yes or No).
13. Select the Results summary window (Headers, Lines, Shipments,or Distributions). Depending on the search criteria you havespecified, all summary windows may not be available. Forexample, if you specify criteria in the Accounting region, only thePurchase Order Distributions summary window is available.
14. Select the Find button to initiate the search and open theappropriate summary window.
� To clear existing search criteria:
� Select the Clear button to clear any existing search criteria.

4 – 22 Oracle Public Sector Purchasing User’s Guide
� To enter a new release:
� Select the New Release button to open the Releases window. See:Entering Release Headers: page 4 – 81.
� To enter a new purchase order:
� Select the New PO button to open the Purchase Orders window.See: Entering Purchase Order Headers: page 4 – 39.
� To enter purchase order preferences:
� Select Preferences on the Special menu to open the Purchase OrderPreferences window. See: Entering Purchase Order Preferences:page 4 – 33.
See Also
Overview of Purchase Orders: page 4 – 3
Using the Purchase Order Headers Summary Window: page 4 – 22
Using the Purchase Order Lines Summary Window: page 4 – 25
Using the Purchase Order Shipments Summary Window: page 4 – 28
Using the Purchase Order Distributions Summary Window: page 4 – 30
Using the Purchase Order Headers Summary Window
Use the Purchase Order Headers results folder window to:
• View purchase order header information.
• Drill down to view purchase order line, shipment, anddistribution information.
• Access the Purchase Orders and Releases windows for entry andupdate of documents.
• Access other windows from the Special menu.

☞
☞
☞
4 – 23Purchase Orders
� To navigate to the Purchase Order Headers results window:
� In the Find Purchase Orders window, select Headers in the Resultsregion and select the Find button to open the Purchase OrderHeaders folder window.
� To drill down to view purchase order line information:
� Select the Lines button to drill down to the Purchase Order Linesresults folder window. You can also select View Lines on theSpecial menu to open this window. See: Using the Purchase OrderLines Summary Window: page 4 – 25.
� To enter a new release:
� Select the New Release button to open the Releases window. If thecurrent record is a blanket purchase agreement or a plannedpurchase order, then you can create a release against it.
Attention: Depending on how the Function Security is set foryour user responsibility, you may not have access to the NewRelease button. (With Function Security, a system administratorcan limit people’s access to this function.)
� To enter a new purchase order:
� Select the New PO button to open the Purchase Orders window.See: Entering Purchase Order Headers: page 4 – 39.
Attention: Depending on how the Function Security is set foryour user responsibility, you may not have access to the NewPO button. (With Function Security, a system administrator canlimit people’s access to this function.)
� To open the Purchase Orders or Releases window for the currentorder:
� Select the Open button to open the Purchase Orders window andquery the purchase order on the current line. If the current order isfor a blanket or scheduled release, Purchasing opens the Releaseswindow and queries the current order. Your options in thiswindow depend on the status of the order and your approval andsecurity options. See: Entering Purchase Order Headers: page4 – 39
Attention: Depending on how the Function Security is set foryour user responsibility, you may not have access to the Open

4 – 24 Oracle Public Sector Purchasing User’s Guide
button. (With Function Security, a system administrator canlimit people’s access to this function.)
� To drill down to view purchase order shipment information:
� Select View Shipments on the Special menu to open the PurchaseOrder Shipments results folder window. See: Using the PurchaseOrder Shipments Summary Window: page 4 – 28.
� To drill down to view purchase order distributions information:
� Select View Distributions on the Special menu to open the PurchaseOrder Distributions results folder window. See: Using thePurchase Order Distributions Summary Window: page 4 – 30.
� To view acceptances:
� Select View Acceptances on the Special menu to open the ViewAcceptances window. See: Entering and Viewing Purchase OrderAcceptances: page 4 – 79
� To enter acceptances:
� Select Enter Acceptances on the Special menu to open the EnterAcceptances window. See: Entering and Viewing Purchase OrderAcceptances: page 4 – 79.
� To view action history:
� Select View Action History on the Special menu to open the ActionHistory window. See: Viewing Action History: page 8 – 2.
� To view invoices:
� Select Invoices on the Special menu to view invoice information:See: Invoice Overview, Oracle Public Sector Payables User’s Guide.
� To view receipts:
� Select View Receipts on the Special menu to open the FindReceiving Transactions window. See: Finding ReceivingTransactions (Summary): page 7 – 39.

4 – 25Purchase Orders
� To enter purchase order control information:
• Select Control on the Special menu to open the ControlDocument window. See: Controlling Documents: page 2 – 48.
� To enter purchase order preferences:
� Select Preferences on the Special menu to open the Purchase OrderPreferences window. See: Entering Purchase Order Preferences:page 4 – 33
See Also
Customizing the Presentation of Data in a Folder, Oracle ApplicationsUser’s Guide
Overview of Purchase Orders: page 4 – 3
Finding Purchase Orders: page 4 – 19
Using the Purchase Order Lines Summary Window: page 4 – 25
Using the Purchase Order Shipments Summary Window: page 4 – 28
Using the Purchase Order Distributions Summary Window: page 4 – 30
Using the Purchase Order Lines Summary Window
Use the Purchase Order Lines results folder window to:
• View purchase order line information.
• Drill down to view purchase order shipment and distributioninformation.
• Access the Purchase Orders and Releases windows for entry andupdate of documents.
• Access other windows from the Special menu.
� To navigate to the Purchase Order Lines results window:
� In the Find Purchase Orders window, select Lines in the Resultsregion and select the Find button to open the Purchase Order Linesfolder window. You can also navigate to this window by selecting

4 – 26 Oracle Public Sector Purchasing User’s Guide
View Lines on the Special menu in the Purchase Order Headersresults folder window.
� To drill down to view purchase order shipment information:
� Select the Shipments button to drill down to the Purchase OrderShipments results folder window. You can also select ViewShipments on the Special menu to open this window. See: Usingthe Purchase Order Shipments Summary Window: page 4 – 28
� To enter a new release:
� Select the New Release button to open the Releases window. If thecurrent record is a blanket purchase agreement or a plannedpurchase order, then you can create a release against it.
� To enter a new purchase order:
� Select the New PO button to open the Purchase Orders window.See: Entering Purchase Order Headers: page 4 – 39.
� To open the Purchase Orders or Releases window for the current line:
� Select the Open button to open the Purchase Orders window andquery the purchase order on the current line. If the current line isfor a blanket or scheduled release, Purchasing opens the Releaseswindow and queries the current line. Your options in this windowdepend on the status of the order and your approval and securityoptions. See: Entering Purchase Order Headers: page 4 – 39
� To drill down to view purchase order distributions information:
� Select View Distributions on the Special menu to open the PurchaseOrder Distributions results folder window. See: Using thePurchase Order Distributions Summary Window: page 4 – 30.
� To view acceptances:
� Select View Acceptances on the Special menu to open the ViewAcceptances window. See: Entering and Viewing Purchase OrderAcceptances: page 4 – 79

4 – 27Purchase Orders
� To enter acceptances:
� Select Enter Acceptances on the Special menu to open the EnterAcceptances window. See: Entering and Viewing Purchase OrderAcceptances: page 4 – 79.
� To view action history:
� Select View Action History on the Special menu to open the ActionHistory window. See: Viewing Action History: page 8 – 2.
� To view invoices:
� Select Invoices on the Special menu to view invoice information:See: Invoice Overview, Oracle Public Sector Payables User’s Guide.
� To view receipts:
� Select View Receipts on the Special menu to open the FindReceiving Transactions window. See: Finding ReceivingTransactions (Summary): page 7 – 39
� To enter purchase order control information:
• Select Control on the Special menu to open the ControlDocument window. See: Controlling Documents: page 2 – 48.
� To enter purchase order preferences:
� Select Preferences on the Special menu to open the Purchase OrderPreferences window. See: Entering Purchase Order Preferences:page 4 – 33
See Also
Customizing the Presentation of Data in a Folder, Oracle ApplicationsUser’s Guide
Overview of Purchase Orders: page 4 – 3
Finding Purchase Orders: page 4 – 19
Using the Purchase Order Headers Summary Window: page 4 – 22
Using the Purchase Order Shipments Summary Window: page 4 – 28

4 – 28 Oracle Public Sector Purchasing User’s Guide
Using the Purchase Order Distributions Summary Window: page 4 – 30
Using the Purchase Order Shipments Summary Window
Use the Purchase Order Shipments results folder window to:
• View purchase order shipment information.
• Drill down to view purchase order distribution information.
• Access the Purchase Orders and Releases windows for entry andupdate of documents.
• Access other windows from the Special menu.
Note that this window does not display price breaks.
� To navigate to the Purchase Order Shipments results window:
1. In the Find Purchase Orders window, select Shipments in theResults region and select the Find button to open the PurchaseOrder Shipments folder window. You can also navigate to thiswindow by selecting View Shipments on the Special menu in thePurchase Order Headers and Purchase Order Lines results folderwindows.
� To drill down to view purchase order distribution information:
� Select the Distributions button to drill down to the Purchase OrderDistributions results folder window. You can also select ViewDistributions on the Special menu to open this window. See:Using the Purchase Order Distributions Summary Window: page4 – 30.
� To enter a new release:
� Select the New Release button to open the Releases window. If thecurrent record is a blanket purchase agreement or a plannedpurchase order, then you can create a release against it.
� To enter a new purchase order:
� Select the New PO button to open the Purchase Orders window.See: Entering Purchase Order Headers: page 4 – 39.

4 – 29Purchase Orders
� To open the Purchase Orders or Releases window for the currentshipment:
� Select the Open button to open the Purchase Orders window andquery the purchase order shipment on the current line. If thecurrent shipment is for a blanket or scheduled release, Purchasingopens the Releases window and queries the current shipment.Your options in this window depend on the status of the order andyour approval and security options. See: Entering Purchase OrderHeaders: page 4 – 39
� To view acceptances:
� Select View Acceptances on the Special menu to open the ViewAcceptances window. See: Entering and Viewing Purchase OrderAcceptances: page 4 – 79
� To enter acceptances:
� Select Enter Acceptances on the Special menu to open the EnterAcceptances window. See: Entering and Viewing Purchase OrderAcceptances: page 4 – 79.
� To view action history:
� Select View Action History on the Special menu to open the ActionHistory window. See: Viewing Action History: page 8 – 2.
� To view invoices:
� Select Invoices on the Special menu to view invoice information:See: Invoice Overview, Oracle Public Sector Payables User’s Guide.
� To view receipts:
� Select View Receipts on the Special menu to open the FindReceiving Transactions window. See: Finding ReceivingTransactions (Summary): page 7 – 39.
� To enter purchase order control information:
• Select Control on the Special menu to open the ControlDocument window. See: Controlling Documents: page 2 – 48.

4 – 30 Oracle Public Sector Purchasing User’s Guide
� To enter purchase order preferences:
� Select Preferences on the Special menu to open the Purchase OrderPreferences window. See: Entering Purchase Order Preferences:page 4 – 33
See Also
Customizing the Presentation of Data in a Folder, Oracle ApplicationsUser’s Guide
Overview of Purchase Orders: page 4 – 3
Finding Purchase Orders: page 4 – 19
Using the Purchase Order Headers Summary Window: page 4 – 22
Using the Purchase Order Lines Summary Window: page 4 – 25
Using the Purchase Order Distributions Summary Window: page 4 – 30
Using the Purchase Order Distributions Summary Window
Use the Purchase Order Distributions results folder window to:
• View purchase order distribution information.
• Access the Purchase Orders and Releases windows for entry andupdate of documents.
• Access other windows from the Special menu.
� To navigate to the Purchase Order Distributions results window:
1. In the Find Purchase Orders window, select Distributions in theResults region and select the Find button to open the PurchaseOrder Distributions folder window. You can also navigate to thiswindow by selecting View Distributions on the Special menu in thePurchase Order Headers, Purchase Order Lines, and PurchaseOrder Shipments results folder windows.

4 – 31Purchase Orders
� To enter a new release:
� Select the New Release button to open the Releases window. If thecurrent record is a blanket purchase agreement or a plannedpurchase order, then you can create a release against it.
� To enter a new purchase order:
� Select the New PO button to open the Purchase Orders window.See: Entering Purchase Order Headers: page 4 – 39.
� To open the Purchase Orders or Releases window for the current line:
� Select the Open button to open the Purchase Orders window andquery the purchase order on the current line. If the current line isfor a blanket or scheduled release, Purchasing opens the Releaseswindow and queries the current line. Your options in this windowdepend on the status of the order and your approval and securityoptions. See: Entering Purchase Order Headers: page 4 – 39
� To view acceptances:
� Select View Acceptances on the Special menu to open the ViewAcceptances window. See: Entering and Viewing Purchase OrderAcceptances: page 4 – 79
� To enter acceptances:
� Select Enter Acceptances on the Special menu to open the EnterAcceptances window. See: Entering and Viewing Purchase OrderAcceptances: page 4 – 79.
� To view action history:
� Select View Action History on the Special menu to open the ActionHistory window. See: Viewing Action History: page 8 – 2.
� To view invoices:
� Select Invoices on the Special menu to view invoice information:See: Invoice Overview, Oracle Public Sector Payables User’s Guide.

4 – 32 Oracle Public Sector Purchasing User’s Guide
� To view receipts:
� Select View Receipts on the Special menu to open the FindReceiving Transactions window. See: Finding ReceivingTransactions (Summary): page 7 – 39.
� To enter purchase order preferences:
� Select Preferences on the Special menu to open the Purchase OrderPreferences window. See: Entering Purchase Order Preferences:page 4 – 33
See Also
Customizing the Presentation of Data in a Folder, Oracle ApplicationsUser’s Guide
Overview of Purchase Orders: page 4 – 3
Finding Purchase Orders: page 4 – 19
Using the Purchase Order Headers Summary Window: page 4 – 22
Using the Purchase Order Lines Summary Window: page 4 – 25
Using the Purchase Order Shipments Summary Window: page 4 – 28

4 – 33Purchase Orders
Entering Purchase Order Preferences
Use the Purchase Order Preferences window to enter preferenceinformation for purchase order lines, shipments, distributions, andreleases. You can save time and effort by entering valid default valueshere. When you save your work in the Lines alternative region in thePurchase Orders window, Purchasing creates a shipment using theorganization and ship–to location if you provided valid values in thedefaults region. Then, if it is successful in creating a shipment,Purchasing creates a distribution using these values. Similarly, whenyou save your work in the Purchase Order Shipments window,Purchasing creates a distribution if it does not already exist and if youprovided a valid organization here. You can update these shipmentsand distributions by navigating to the Purchase Order Shipments orPurchase Order Distributions windows.
Purchasing can create shipments only when it has default informationthat meets the following criteria:
• There must be an organization and a location.
• The location must belong to the organization or not be assignedto any organization.
• If the line contains an item (and optionally a revision), that item(and revision) must be valid in the default shipmentorganization.
Purchasing can create distributions only when it has defaultinformation that meets the following criteria:
• If the Destination Type is Inventory, the line must have an itemthat is stock enabled in the ship–to organization. Also, if adefault subinventory has been entered, it must be defined in theship–to organization.
• The Account Generator must be able to supply the accounts. Ifthe Destination Type is Expense, you can enter a default chargeaccount, which overrides any account supplied by the AccountGenerator.
• If you are using encumbrance accounting, you must enter adefault GL date.
Purchasing uses the preferences you enter in this window for thecurrent line and all subsequent purchase order lines that you enterduring this user session. Thus, for existing purchase orders, thedefaults apply only to new lines, shipments, and distributions that youadd during this session. If you want to clear the default information,

4 – 34 Oracle Public Sector Purchasing User’s Guide
either choose Delete Record in the Purchase Order Preferences windowor exit the application. The default values are only valid for the sessionin which you are currently working. The are not saved to the database.
� To enter main preferences:
1. Navigate to the Purchase Order Preferences window by selectingPreferences on the Special menu in most of the purchase orders andreleases windows.
In the Main alternative region, you can enter the defaults describedin the following steps.
2. Select Confirming Order to indicate that this order is confirming aprevious informal order with the supplier.
3. Enter a Price Type from the Lookup Codes window. See: DefiningLookup Codes: page 1 – 54.
4. For planned purchase orders and blanket purchase agreements,enter the Minimum Release Amount for a line.
5. If you are referencing contract purchase agreement on a standardpurchase order, enter the Contract number. The contract must beeffective; that is, the current date has to be within the effective dateand the expired date of the contract.

4 – 35Purchase Orders
If you reference a contract purchase agreement on a standardpurchase order line, Purchasing adds the total amount of thepurchase order line to the total amount of the contract.
6. Enter the Transaction Nature. See: Defining Lookup Codes: page1 – 54.
7. Enter the Need By date when the requestor needs the item. Thisdate is printed on the purchase order if you do not provide apromised–by date. If you are using Purchasing with MasterScheduling/MRP, you must provide either a need–by date or apromised–by date for shipments that correspond to purchase orderlines with Master Scheduling/MRP planned items. A need–by dateis also required for Inventory planned items. See: PlannerWorkbench, Oracle Master Scheduling/MRP and Supply ChainPlanning User’s Guide.
8. Enter the Promised By date when the supplier promised delivery ofthe items. This date is printed on the purchase order.
9. Choose Yes, No, or Null (blank) from Taxable to indicate if the itemis taxable. For taxable items, you can enter the Tax Name. See:Defining Items, Oracle Inventory User’s Guide. See: Defining TaxNames, Oracle Public Sector Payables User’s Guide.
Note: If Null is chosen as the taxable option, then the systemdefaults the item taxable status from the item organizationattribute. If there is no default in the item organization attributethen it derives the taxable status from the Defaults region of thePurchasing Options window. See Defining Purchasing Options:page 1 – 29.
10. Enter the Tax Name for all shipments. The Tax Name overrides thetax defaulting hierarchy defined in the Purchasing Optionswindow. See: Defining Tax Defaults Options: page 1 – 38.
11. Enter the paper Requisition Number for all distributions.Purchasing automatically copies this number to every distributionyou create for this purchase order line. You can later reviewpurchase orders based on paper requisitions using the FindPurchase Orders window. If you enter a requisition number, youcan also enter a Requisition Line number. See: Finding PurchaseOrders: page 4 – 19.
12. Enter the date you want to post expenses in your General Ledgerfor every distribution you create for this purchase order line. Youcan enter a GL Date only if you set up your financials systemoptions to use encumbrance for purchase orders. See: AboutFinancials Options, Oracle Public Sector Payables User’s Guide. See:

4 – 36 Oracle Public Sector Purchasing User’s Guide
Budgetary Control and Online Funds Checking, Oracle Public SectorGeneral Ledger User’s Guide.
13. Enter the Accounting Flexfield that you want to charge for theexpenses. Purchasing uses the account you enter here only forexpense destinations and overrides any account built by theAccount Generator. See: Using the Account Generator in OraclePublic Sector Purchasing: page 0 – 2.
14. Enter the organization. The List of Values displays all validreceiving organizations.
15. Enter the ship–to location for the shipment.
16. Enter the Destination type to indicate the final destination of thepurchased items:
Expense – The goods are delivered to the requestor at an expenselocation. The destination subinventory is not applicable.
Inventory – The goods are received into inventory upon delivery.
17. Enter the Requestor. This is the employee who requests thequantities on the purchase order distribution lines. Purchasingcopies this name as the requestor for every distribution you createfor this purchase order line.
18. Enter the Deliver To location for all distributions. Purchasingcopies this location to every distribution you create for thispurchase order line. The default is the requestor’s location. Youcan pick any location that does not have an organization or anylocation whose organization matches the ship–to organization. See:Enter Person, Oracle Human Resource Management Systems User’sGuide. See: Site Locations, Oracle Human Resource ManagementSystems User’s Guide.
19. If the destination type is Inventory, you can enter the Subinventory.See: Defining Subinventories, Oracle Inventory User’s Guide.
� To enter project information preferences:
You see a Project Information alternative region if one of the followingis true:
• Oracle Projects is installed, or
• Oracle Project Manufacturing is installed and Project ReferenceEnabled is selected in the Organization Parameters window inOracle Inventory

4 – 37Purchase Orders
The project information you enter is used by Oracle Projects fordestination types of Expense, or by Oracle Project Manufacturing fordestination types of Inventory or Shop Floor. See: Oracle ProjectsUser’s Guide. See: Oracle Project Manufacturing Implementation Manual.
1. Choose the Project Information alternative region.
2. Select a Project Number.
For a Destination Type of Inventory or Shop Floor, you canoptionally enter a Project Number if the Project Control Level is setto Project in the Project Information alternative region of theOrganization Parameters window.
For a Destination Type of Expense, you can always optionally entera Project Number.
3. If you entered a Project number, select a Task number.
You must enter a Task number for a Destination Type of Inventoryor Shop Floor, if the Project Control Level is set to Task in theOrganization Parameters window and if you have entered a Projectnumber.
4. Enter Expenditure information.
Expenditure information is required only if your Destination Typeis Expense.
• Select the Expenditure Type.
• If you chose an Expenditure Type, enter an ExpenditureOrganization.
• If you chose an Expenditure Organization, select the ExpenditureItem Date.
� To apply your preference changes.
� Select the Apply button to apply your changes.

4 – 38 Oracle Public Sector Purchasing User’s Guide
See Also
Entering Purchase Order Lines: page 4 – 44
Entering Purchase Order Shipments: page 4 – 61
Entering Purchase Order Distributions: page 4 – 70
Overview of Purchasing Options: page 1 – 29
Purchase Order Defaulting Rules: page 4 – 11

4 – 39Purchase Orders
Entering Purchase Order Headers
Use the Purchase Orders window to:
• Enter standard and planned purchase orders as well as blanketand contract purchase agreements
Note: You can also receive blanket purchase agreement lineselectronically from your suppliers through the PurchasingDocuments Open Interface. See: Receiving Price/Sales CatalogInformation Electronically: page 5 – 20.
• Enter purchase orders from paper requisitions or without arequisition
• Take approval actions on individual purchase orders andagreements on–line
If you want to create a release against a planned purchase order or ablanket purchase agreement, use the Enter Releases window. See:Entering Release Headers: page 4 – 81.
If you want to place on–line requisitions onto a new or existingpurchase order, use the AutoCreate Documents window. See:Autocreate Documents Overview: page 6 – 2.
� To enter purchase order headers:
1. Navigate to the Purchase Orders window from the menu:
• by selecting the New PO button in the Find Purchase Orderswindow or any of its results windows
• by selecting the Open button in any of the Find Purchase Orderresults windows
• by selecting the Open button and then double–clicking the OpenDocuments icon in the Notifications Summary window when thecurrent line is a purchase order
• if the PO: Display the AutoCreated Document profile option isset to Yes, Purchasing opens the Purchase Orders window whenyou have completed AutoCreation of a purchase order. See:Profile Options in Purchasing: page 1 – 76.
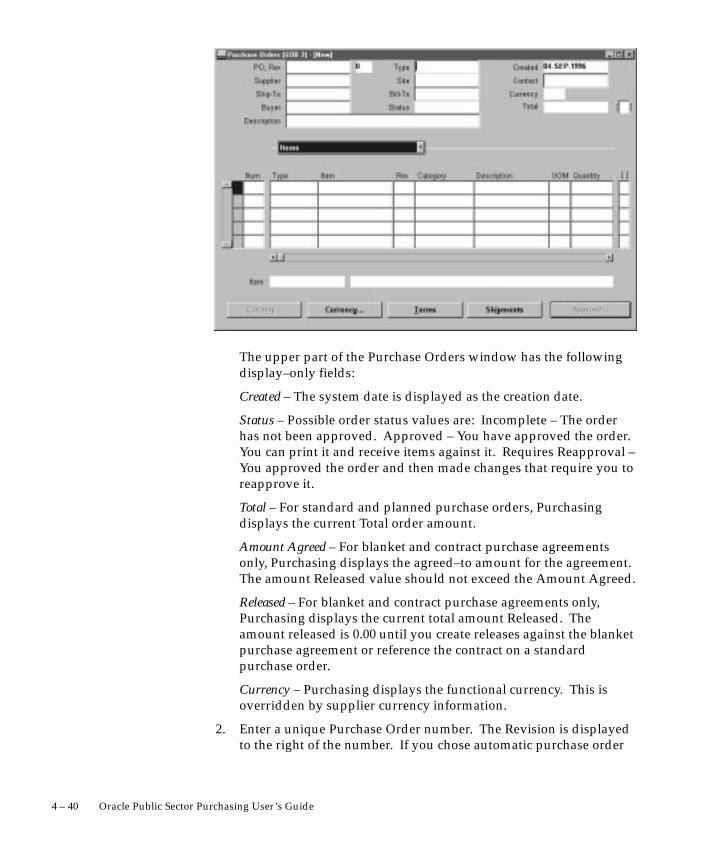
4 – 40 Oracle Public Sector Purchasing User’s Guide
The upper part of the Purchase Orders window has the followingdisplay–only fields:
Created – The system date is displayed as the creation date.
Status – Possible order status values are: Incomplete – The orderhas not been approved. Approved – You have approved the order.You can print it and receive items against it. Requires Reapproval –You approved the order and then made changes that require you toreapprove it.
Total – For standard and planned purchase orders, Purchasingdisplays the current Total order amount.
Amount Agreed – For blanket and contract purchase agreementsonly, Purchasing displays the agreed–to amount for the agreement.The amount Released value should not exceed the Amount Agreed.
Released – For blanket and contract purchase agreements only,Purchasing displays the current total amount Released. Theamount released is 0.00 until you create releases against the blanketpurchase agreement or reference the contract on a standardpurchase order.
Currency – Purchasing displays the functional currency. This isoverridden by supplier currency information.
2. Enter a unique Purchase Order number. The Revision is displayedto the right of the number. If you chose automatic purchase order

☞
☞
4 – 41Purchase Orders
number generation in your Purchasing Options, the cursor does notenter this field and the number is generated when you save yourwork.
3. Choose the purchase order Type: Standard Purchase Order,Planned Purchase Order, Blanket Purchase Agreement, ContractPurchase Agreement. See: Purchase Order Types: page 4 – 4.
Attention: The names of the above purchase order types can bemodified in the Document Types window. See: DefiningDocument Types: page 1 – 65.
4. Enter the name of the Supplier for this purchase order. To approvea purchase order, you must provide a supplier.
Attention: You cannot change the supplier once you approve thepurchase order. The purchase order becomes a legal documentwhen you approve it. To change the supplier after you approve apurchase order, you must cancel the existing purchase order andcreate a new one for the other supplier.
5. Enter the Site of the supplier you want to use for your purchaseorder. If the supplier you choose has only one site, it is defaultedinto this field. Before you can approve a purchase order, you mustprovide a site. Once the purchase order is approved, you canchange the supplier site only if the PO: Change Supplier Site profileoption is set to Yes. If you change the supplier site, the revisionwill be incremented, and will require reapproval. You cannot enterthe supplier site until you have entered a supplier.
You can optionally enter the name of the Contact at the suppliersite. If the supplier you choose has only one contact name, it isdefaulted into this field. You cannot enter a contact until you haveentered a supplier site.
6. Enter the Ship To and Bill To locations for the purchase order. Ifyou entered a supplier and supplier site, the Ship To and Bill Todefaults reflect the locations you assigned to the supplier orsupplier site. You can accept these values or change them to otherlocations. See: Purchase Order Defaulting Rules: page 4 – 11
7. If the Enforce Buyer Name option in your Purchasing Options is setto Yes, your name is displayed as the Buyer, and you cannot changethis value. Otherwise, you can enter the name of any buyer. See:Defining Control Options: page 1 – 33.
8. For blanket and contract purchase agreements only, enter the totalAmount Agreed. This is the amount you have agreed to spendwith the supplier.

4 – 42 Oracle Public Sector Purchasing User’s Guide
9. Enter a Description of the purchase order. These comments are forinternal use only and do not print on the purchase order. You canenter up to 240 characters. If you want to add unlimited notes, usethe Attachments feature. See: Attaching Notes to PurchasingDocuments: page 1 – 28.
10. For standard and planned purchase orders and blanket purchaseagreements, enter line information for the header you have justcreated. See: Entering Purchase Order Line Information: page4 – 44.
� To open the Supplier Item Catalog:
� Select the Catalog button to open the Supplier Item Catalog. See:Supplier Item Catalog Overview: page 5 – 7.
� To enter currency information:
� Select the Currency button to open the Purchase Order Currencywindow. See: Entering Currency Information: page 4 – 56.
� To enter terms and conditions information:
� Select the Terms button to open the Purchase Order Detailswindow. See: Entering Purchase Order Details Information: page4 – 58.
� To enter shipment information:
� Select the Shipments button to open the Purchase Order Shipmentswindow. See: Entering Purchase Order Shipments: page 4 – 61.
� To enter price break information:
� For blanket purchase agreements, you can select the Price Breakbutton to open the Price Breaks window. See: Entering PurchaseAgreement Price Break Information: page 4 – 68.
� To take approval actions:
� Select the Approval button to open the Approve Documentswindow. See: Submitting a Document for Approval: page 2 – 32.
� To check funds:
� Select Check Funds on the Special menu.

4 – 43Purchase Orders
� To enter notification controls:
� Select Notification Control on the Special menu (For plannedpurchase orders, contract purchase agreements, and blanketpurchase agreements). See: Entering Purchase Order NotificationControls: page 4 – 77.
� To enter or view acceptances:
� Select Acceptances on the Special menu to open the Acceptanceswindow. See: Entering and Viewing Purchase Order Acceptances:page 4 – 79
� To view action history:
� Select View Action History on the Special menu to open the ActionHistory window. See: Viewing Action History: page 8 – 2.
� To enter purchase order preferences:
� Select Preferences on the Special menu. See: Entering PurchaseOrder Preferences: page 4 – 33
� To place a purchase order in the Navigator:
� Choose Place on Navigator from the Action menu. Choose theDocuments alternative region in the Navigator to later access thepurchase order more quickly. See also: Using the Navigator’sDocuments Region, Oracle Applications User’s Guide.
See Also
Overview of Purchase Orders: page 4 – 3
Entering Purchase Order Lines: page 4 – 44

4 – 44 Oracle Public Sector Purchasing User’s Guide
Entering Purchase Order Lines
Use the Lines alternative region in the Purchase Orders window tocreate purchase order lines.
When you save your work, Purchasing creates shipments anddistributions if sufficient valid default information is available. Use thePurchase Order Shipments window to review, edit, and create multipleshipment lines for each purchase order line. See: Entering PurchaseOrder Shipments: page 4 – 61.
� To enter a purchase order line:
1. Select the Items alternative region in the Purchase Orders window.
2. Enter the purchase line Number for the purchase order line. If youstart a new purchase order line, Purchasing displays the nextsequential line number available. You can accept this number orenter any line number that does not already exist. This number isused for all alternative regions in the Purchase Orders window.
3. Enter the line Type for the item. When you create your purchaseorder line, you enter a line type as part of your item information.When you enter a line type, Purchasing automatically copies thecorresponding defaults. You cannot change the line type after youhave saved your work. You can enter predefined items for yourpurchase order line only when you specify a quantity based line

4 – 45Purchase Orders
type. If Bills of Material and Work in Process are installed and youhave defined an outside processing line type, you can enter thattype here to purchase outside processing. See: Defining DefaultOptions: page 1 – 29. See: Defining Line Types: page 1 – 61.
4. Enter the Item you want to purchase. If you enter an item,Purchasing displays the purchasing category, item description, unitof measure, and unit price associated with the item. To create apurchase order line for a one–time item, simply skip the itemnumber field and enter a purchasing category and an itemdescription. If you are purchasing outside processing, you canenter only outside processing items. See: Defining Items, OracleInventory User’s Guide.
5. Enter the Revision number for the item on the purchase order line.You can enter a revision number only for items under revisioncontrol. See: Defining Item Revisions, Oracle Inventory User’sGuide.
6. Enter the purchasing Category of the item you want to purchase. Ifyou choose an item, Purchasing displays the purchasing categoryfor the item. You cannot change the purchasing category if youchoose an item. See: Defining Categories, Oracle Inventory User’sGuide.
7. Enter the Description of the item. If you choose an item,Purchasing displays its description. You can change the itemdescription only if you set up the item attributes to let you do so.The full item description for the current line is displayed beneaththe Lines alternative region.
8. Enter the total Quantity you are ordering on the purchase orderline.
9. Enter the UOM of the item. The unit of measure qualifies thequantity you enter on the purchase order line. When you choose aline type, its default unit of measure appears here. When youchoose an item number, its unit of measure overrides the line typedefault. You can change the UOM until the item has been received,billed, or encumbered.
10. Enter the unit Price for the item. If you choose an item, the defaultprice is the list price for the item. Otherwise, the default price isfrom the line type. The Amount field displays the unit pricemultiplied by the quantity.
11. Enter the Promised date that the supplier promised delivery of theitems. This promised–by date is printed on the purchase order.

4 – 46 Oracle Public Sector Purchasing User’s Guide
12. Enter the Need By date when the requestor needs the item. Thisdate is printed on the purchase order if you do not provide apromised–by date. If you are using Master Scheduling/MRP, youmust provide either a need–by date or a promised–by date forshipments that correspond to purchase order lines with MasterScheduling/MRP planned items. A need–by date is also requiredfor Inventory planned items. See: Planner Workbench, OracleMaster Scheduling/MRP and Supply Chain Planning User’s Guide.
13. Optionally enter the Supplier’s Item number for this item.
Multiple distributions, Promised date, and Need–By date displayas ”multiple” at the line level.
14. Select Reserved to reserve funds for the line.
� To place a purchase order in the Navigator:
� Choose Place on Navigator from the Action menu. Choose theDocuments alternative region in the Navigator to later access thepurchase order more quickly. See also: Using the Navigator’sDocuments Region, Oracle Applications User’s Guide.
See Also
Overview of Purchase Orders: page 4 – 3
Entering Purchase Order Headers: page 4 – 39
Supplier Item Catalog Overview: page 5 – 7
Entering Currency Information: page 4 – 56
Entering Purchase Order Details Information: page 4 – 58
Entering Purchase Order Shipments: page 4 – 61
Entering Purchase Agreement Price Break Information: page 4 – 68
Submitting a Document for Approval: page 2 – 32.
Entering Purchase Order Notification Controls: page 4 – 77
Entering and Viewing Purchase Order Acceptances: page 4 – 79

4 – 47Purchase Orders
Viewing Action History: page 8 – 2
Entering Purchase Order Preferences: page 4 – 33

4 – 48 Oracle Public Sector Purchasing User’s Guide
Entering Purchase Order Price Reference Information
Use the Price Reference alternative region in the Purchase Orderswindow to enter pricing information for purchase order lines.
� To enter price reference information:
1. Select the Price Reference alternative region in the Purchase Orderswindow.
2. Enter the List Price for the item. If you have entered an item,Purchasing displays the list price for the item. (See: DefiningItems, Oracle Inventory User’s Guide.) You can accept the default listprice or change it. Use this field to help evaluate your buyers.Purchasing uses the list price you enter here in the savings analysisreports. See: Savings Analysis Report (By Buyer): page 9 – 138 andSavings Analysis Report (By Category): page 9 – 140.
3. Enter the latest Market Price for the item. If you enter an item,Purchasing displays the market price for the item. Use this field tohelp evaluate your buyers. Purchasing uses the price you enterhere in the savings analysis reports if you do not provide a value inthe List Price field.
4. Enter the Price Type from your lookup codes. See: DefiningLookup Codes: page 1 – 54.
5. For planned purchase orders and blanket purchase agreementsonly, check Allow Price Override to indicate that the release pricecan be greater than the price on the purchase agreement line. If youallow a price override, the release price cannot exceed the PriceLimit specified on the line. If you do not allow a price override, therelease price cannot exceed the Unit Price. You cannot enter thisfield if the line type is amount based.
6. If you allow price override, enter the Price Limit. This is themaximum price per item you allow for the item on this agreementline.
7. Select Negotiated to indicate that the purchase price is negotiated.If the actual price is greater than or equal to the list price, then thefield is unchecked as the default. If the actual price is less than thelist price, then the field is checked as the default. You can acceptthe default value or change it.
8. Save your work.

4 – 49Purchase Orders
See Also
Supplier Item Catalog Overview: page 5 – 7
Entering Currency Information: page 4 – 56
Entering Purchase Order Details Information: page 4 – 58
Entering Purchase Order Shipments: page 4 – 61
Entering Purchase Agreement Price Break Information: page 4 – 68
Submitting a Document for Approval: page 2 – 32.
Entering Purchase Order Notification Controls: page 4 – 77
Entering and Viewing Purchase Order Acceptances: page 4 – 79
Viewing Action History: page 8 – 2
Entering Purchase Order Preferences: page 4 – 33

☞
4 – 50 Oracle Public Sector Purchasing User’s Guide
Entering Purchase Order Reference Document Information
Use the Reference Documents alternative region in the Purchase Orderswindow to enter reference document information for purchase orderlines.
Purchasing lets you reference quotation information on your purchaseorders.
� To enter reference document information:
1. Select the Reference Documents alternative region in the PurchaseOrders window.
2. Enter the Contract purchase agreement number. You cannot entera contract number until you have entered a supplier in the header,and the contract must be for this supplier. The contract you choosemust be effective; that is, the current date has to be within theeffective date and the expired date of the contract.
If you reference a contract purchase agreement on a standardpurchase order line, Purchasing adds the total amount of thepurchase order line to the total amount of the contract purchaseagreement. Purchasing lists only those contracts with the samesupplier as the one on your standard purchase order.
Attention: If you have not yet provided a supplier on yourstandard purchase order, you cannot choose any contracts for yourpurchase order lines. If you want to change the supplier on yourstandard purchase order after you reference a contract on yourpurchase order lines, you must remove the references to thecontract purchase agreement, or you will not be able to approve thepurchase order. Purchasing lets you change suppliers only onstandard and planned purchase orders with the status Incomplete.
Purchasing displays the Quotation and Quotation Line numbers,Quotation Type, and Supplier Quotation Number if you select aquotation from the Supplier Item Catalog or Supplier–ItemAttributes windows.
3. Save your work.
See Also
Supplier Item Catalog Overview: page 5 – 7
Entering Currency Information: page 4 – 56

4 – 51Purchase Orders
Entering Purchase Order Details Information: page 4 – 58
Entering Purchase Order Shipments: page 4 – 61
Entering Purchase Agreement Price Break Information: page 4 – 68
Submitting a Document for Approval: page 2 – 32.
Entering Purchase Order Notification Controls: page 4 – 77
Entering and Viewing Purchase Order Acceptances: page 4 – 79
Viewing Action History: page 8 – 2
Entering Purchase Order Preferences: page 4 – 33

4 – 52 Oracle Public Sector Purchasing User’s Guide
Entering Purchase Order Miscellaneous Information
Use the More alternative region in the Purchase Orders window toenter miscellaneous information for purchase order lines.
� To enter miscellaneous information:
1. Select the More alternative region in the Purchase Orders window.
2. Enter a Note to the Supplier for the purchase order header. Youcan enter up to 240 characters. If you want to enter unlimitednotes, use the Attachments feature. See: Attaching Notes toPurchasing Documents: page 1 – 28
3. Enter the UN identification Number for the item on the purchaseorder line. The default, if present, is from the item record. See:Defining UN Numbers: page 1 – 52.
4. Enter the Hazard Class for the item on the purchase order line. Ifyou enter a UN number, Purchasing displays the correspondinghazard class. The default, if present, is from the item record. See:Defining Hazard Classes: page 1 – 51.
5. Select Capital Expense to indicate that the purchase is a capitalexpenditure.
6. Enter the Transaction Nature. See: Defining Lookup Codes: page1 – 54.
7. Save your work.
See Also
Supplier Item Catalog Overview: page 5 – 7
Entering Currency Information: page 4 – 56
Entering Purchase Order Details Information: page 4 – 58
Entering Purchase Order Shipments: page 4 – 61
Entering Purchase Agreement Price Break Information: page 4 – 68
Submitting a Document for Approval: page 2 – 32.
Entering Purchase Order Notification Controls: page 4 – 77
Entering and Viewing Purchase Order Acceptances: page 4 – 79

4 – 53Purchase Orders
Viewing Action History: page 8 – 2
Entering Purchase Order Preferences: page 4 – 33

4 – 54 Oracle Public Sector Purchasing User’s Guide
Entering Purchase Agreement Information
Use Terms in the Purchase Orders window to enter additionalinformation for blanket purchase agreement lines and headers.
� To enter additional agreement information on the header:
1. From the Purchase Orders window, select Terms.
2. Choose the Payment term. An example of a payment term is Net30.
3. Choose a Freight term. An example of a freight term is Prepaid.
4. Choose a Carrier. An example of a carrier is Rail.
5. Choose an FOB point. An example of an FOB point is Origin.
6. Save your work.
� To enter additional agreement line information:
1. In the Agreement alternative region of the Purchase Orderswindow, enter the Minimum Release Amount against this purchaseagreement line.
2. Enter the Quantity Agreed. This is printed on your purchaseorders. Purchasing does not automatically compute the quantity

4 – 55Purchase Orders
agreed from the amount agreed. Use the Amount Agreed field toprovide agreed amounts.
3. Enter the Amount Agreed. Purchasing does not automaticallycompute the amount agreed from the quantity agreed.
4. Select Cumulative Pricing if you want Purchasing to choose theprice break by adding the current release shipment quantity to thetotal quantity already released against the purchase agreement line.Otherwise, Purchasing chooses the price break by using theindividual release shipment quantity.
5. Save your work.
See Also
Supplier Item Catalog Overview: page 5 – 7
Entering Currency Information: page 4 – 56
Entering Purchase Order Details Information: page 4 – 58
Entering Purchase Order Shipments: page 4 – 61
Entering Purchase Agreement Price Break Information: page 4 – 68
Submitting a Document for Approval: page 2 – 32.
Entering Purchase Order Notification Controls: page 4 – 77
Entering and Viewing Purchase Order Acceptances: page 4 – 79
Viewing Action History: page 8 – 2
Entering Purchase Order Preferences: page 4 – 33

4 – 56 Oracle Public Sector Purchasing User’s Guide
Entering Currency Information
Use the Currency window to enter and change currency informationfor purchase orders, RFQs, and quotations.
For purchase orders, you can change currency information until thepurchase order is approved or encumbered. Note that changing thepurchase order supplier to one that uses a different currency overridesany information you have entered in this region.
� To enter currency information:
1. Navigate to the Currency window by selecting the Currency buttonin the Purchase Orders, RFQs, and Quotations windows.
2. Purchasing displays the functional Currency from your Set ofBooks, and you can accept or change the currency. If you changecurrency, prices on existing lines are not converted to the newcurrency.
3. You can enter a Rate Type only if the currency for this document isdifferent from your functional or base currency. The default is thecurrency rate type from the Purchasing Options window.
Purchasing supplies you with one of two predefined currency ratetypes: User or EMU Fixed. A rate type of User means that you canenter a conversion rate between the foreign currency (ortransaction currency in a document entry window) and the basecurrency (or functional currency, defined in your set of books). Arate type of EMU Fixed means that if either your transaction

4 – 57Purchase Orders
currency or your functional currency is Euro (the EuropeanMonetary Unit currency) and the other is another Europeancurrency, Purchasing automatically enters a conversion Rate Dateand Rate for you that you cannot change.
You can define additional currency rate types in the DailyConversion Rate Types window, and you can enter User or one ofyour additional types as the default. Note that you cannot approvea purchase order without a rate type if you are not using yourfunctional currency.
4. You can enter a Rate Date only if the currency for this document isdifferent from your functional currency. The default is the currentdate. Purchasing uses this date to obtain the currency conversionrate from your conversion definitions and displays the rate if itfinds one.
5. If the rate type is User, you can enter the conversion rate betweenthe foreign currency and your functional currency. This ratecorresponds to the value of your foreign currency in yourfunctional currency. For example, if your functional currency is USDollars, the foreign currency is British Pounds, and 1 British Poundequals 2 US Dollars, you should enter 2 in this field. For other ratetypes, when you enter a rate date for which a rate has beendefined, Purchasing displays the rate.
� To cancel your entries and return:
� Select the Cancel button to cancel your entries and return to thewindow from which you accessed the Currency window.
� To apply your entries:
� Select the Done button to apply your entries.
See Also
Purchase Order Defaulting Rules: page 4 – 11
Defining Purchasing Options: page 1 – 29
Defining Currencies, Oracle Applications System Administrator’s Guide
Defining Conversion Rate Types, Oracle Public Sector General LedgerUser’s Guide
Entering Daily Rates, Oracle Public Sector General Ledger User’s Guide

4 – 58 Oracle Public Sector Purchasing User’s Guide
Entering Purchase Order Details Information
Use the Terms and Conditions window to enter terms and conditionsinformation for purchase orders.
� To enter purchase order terms information:
1. Navigate to the Terms and Conditions window by selecting theTerms button in the Purchase Orders window.
2. For planned purchase orders, blanket purchase agreements, andcontract purchase agreements, enter the Starts On date for thepurchase order. A starting date is necessary if you are using awarning delay on notification controls. You cannot associate apurchase order line with a contract that is not yet effective. Youalso cannot create a release with a date that is before thecorresponding blanket purchase agreement or planned purchaseorder effective date.
3. For planned purchase orders, blanket purchase agreements, andcontract purchase agreements, enter the Expires On date for thepurchase order. This date must be later than the starting date andlater than any existing releases. You cannot associate a purchaseorder line with a contract that has expired. You also cannot create a

4 – 59Purchase Orders
release with a date that is after the corresponding blanket purchaseagreement or planned purchase order expiration date.
4. Enter the Payment terms for the purchase order. Purchasingdisplays default payment terms that you can accept or change. See:Defining Payment Terms, Oracle Public Sector Payables User’s Guide.
5. Enter the Freight terms for the purchase order. Purchasing displaysdefault freight terms that you can accept or change. See: DefiningLookup Codes: page 1 – 54
6. Enter the freight Carrier for shipment of the purchase order.Purchasing displays a default freight carrier that you can accept orchange. See: Defining Freight Carriers, Oracle Inventory User’sGuide.
7. Enter the FOB point for the purchase order. Purchasing displays adefault free on board (FOB) designation that you can accept orchange. See: Defining Lookup Codes: page 1 – 54.
8. Select Acceptance Required to indicate that the supplier mustaccept the purchase order. If you select this check box, you canenter the due By date, when you require the supplier to return anacceptance for your purchase order. See: Entering and ViewingPurchase Order Acceptances: page 4 – 79.
9. Select Confirming Order to indicate that the purchase order is aconfirming order. A confirming order is an order that you aresubmitting formally to confirm a verbal order already placed withthe supplier. For confirming orders, Purchasing prints thefollowing on the purchase order header: This is a confirmingorder. Do not duplicate.
10. Select Firm to indicate that the purchase order is firm. Firm yourpurchase order when you want to indicate to MasterScheduling/MRP or your manufacturing application that it shouldnot reschedule this purchase order shipment.
11. For planned purchase orders, blanket purchase agreements, andcontract purchase agreements, enter the Amount Limit (for thetotal of all releases) and the Minimum Release Amount that can bereleased against this purchase order. Enter Effective from and todates to limit the agreement controls by time.
12. Enter a Supplier Note and a Receiver Note. You can enter up to240 characters in these fields.
13. Save your work.

4 – 60 Oracle Public Sector Purchasing User’s Guide
See Also
Purchase Order Defaulting Rules: page 4 – 11

4 – 61Purchase Orders
Entering Purchase Order Shipments
Use the Shipments window to enter multiple shipments for standardand planned purchase order lines and to edit shipments thatPurchasing automatically created for you. A purchase order shipmentspecifies the quantity, ship–to organization and location, and date youwant your supplier to deliver the items on a purchase order line. Whenyou save your work, Purchasing creates distributions if sufficient validdefault information is available and if there are no existingdistributions.
� To enter purchase order shipment information:
1. For standard and planned purchase orders, you can navigate to theShipments window by selecting the Shipments button in thePurchase Orders window.
The first alternative region in the Shipments window is theShipments alternative region. In addition to the enterable fieldsdiscussed in the following steps, this region displays the UOM, theOriginal Promise date (if the Promised date has already beenchanged, the original promised date is displayed here), the ChargeAccount, the line Amount, and a check box to indicate whetherfunds have been Reserved. See: Budgetary Control and OnlineFunds Checking, Oracle Public Sector General Ledger User’s Guide.
2. Enter the line Number for the shipment line. If you enter a newshipment line, Purchasing displays the next sequential line numberavailable. You can enter any line number that does not alreadyexist.

4 – 62 Oracle Public Sector Purchasing User’s Guide
3. Enter the ship–to Organization. If you entered an item, you canpick only organizations in which the item is defined. If you entereda revision number on the purchase order line, then the itemrevision must also be defined in the organization. Note that youcannot update the organization once you have saved your work ifthe shipment has distributions. See: Purchase Order DefaultingRules: page 4 – 11
4. Enter the Ship–To location for the shipment. You can pick anylocation that does not have an organization or any location whoseorganization matches the organization in the previous field. See:Purchase Order Defaulting Rules: page 4 – 11.
5. Enter the Quantity for the shipment. This value must be greaterthan 0. The default is the quantity from the correspondingPurchase Order Line. If you decrease this quantity, Purchasingautomatically defaults the quantity ordered of the next line to thetotal quantity that you have not yet placed on a shipment line. TheUOM is displayed to the right of the Quantity.
6. Enter the date that the supplier Promised delivery of the items.This promised date is printed on the purchase order shipment. Thedefault is from the Purchase Order Preferences window.
7. Enter the Need By date when the requestor needs the item. Thisdate is printed on the purchase order if you do not enter apromised date. The default is from the Purchase Order Preferenceswindow. If you use Purchasing with Master Scheduling/MRP, youmust provide a need–by date for purchase order shipments withMaster Scheduling/MRP planned items. You must also provide aneed–by date for Inventory planned items. See: PlannerWorkbench, Oracle Master Scheduling/MRP and Supply ChainPlanning User’s Guide.
8. Select Taxable to indicate that the item is taxable.
9. Enter or use the default Tax Name for taxable items.
The tax name defaults from the following sources, in the followingorder:
• The Purchase Order Preferences window. If you have specified apreferred tax name in this window, Purchasing defaults this taxname onto the purchase order shipment.
• The Tax Defaults region in the Purchasing Options window. Ifyou have specified a tax defaulting hierarchy in this window,Purchasing searches for and defaults the tax name corresponding

4 – 63Purchase Orders
to that tax defaulting hierarchy. See: Defining Tax DefaultsOptions: page 1 – 38.
You can accept the default tax name or select some other. If youneed additional help with how tax defaulting works in Purchasing,see: Tax Defaults in Purchasing: page 4 – 158.
10. Save your work.
� To display and enter more shipment information:
1. Select the More alternative region in the Purchase Order Shipmentswindow.
2. Enter the Receipt Close Tolerance percent for your shipments.Purchasing automatically closes a shipment for receiving if it iswithin the receiving closing tolerance at the receiving close point.You need to set the receiving close point in the Purchasing Optionswindow. See: Defining Control Options: page 1 – 33.
3. Enter the Invoice Close Tolerance percent for your shipments.Purchasing automatically closes a shipment for invoicing if it iswithin the invoicing closing tolerance at billing, when Payablesmatches invoices to purchase orders. See: Defining ControlOptions: page 1 – 33
4. Select one of the following Invoice Matching options:
Two–Way: Purchase order and invoice quantities must matchwithin tolerance.
Three–Way: Purchase order, receipt, and invoice quantities mustmatch within tolerance.
Four–Way: Purchase order, receipt, accepted, and invoice quantitiesmust match within tolerance.
If you enter an item, the default value for this field comes from theitem information. If you do not enter an item, the default is fromyour Purchasing Options. See: Receiving Controls, Options, andProfiles: page 7 – 7.
5. Select Accrue on Receipt to indicate that the items on this purchaseorder line accrue on receipt. Inventory destined items alwaysaccrue on receipt. For expense items, if the Accrue Expense Itemsflag in the Purchasing Options window is set to Period End, theitems cannot accrue on receipt, and you cannot change theshipment level default. If the Accrue Expense Items flag is set toOn Receipt, the default is to accrue on receipt, but you can changeit to Period End. See: Defining Accrual Options: page 1 – 32.

☞
4 – 64 Oracle Public Sector Purchasing User’s Guide
Attention: If you are using Cash Basis Accounting, you shoulduse the Purchasing Options window to set the Accrue ExpenseItems flag to Period End, and you should not select Accrue onReceipt in this window.
6. Select Firm to firm the purchase order shipment. Firm yourpurchase order when you want to indicate to MasterScheduling/MRP or your manufacturing application that it shouldnot reschedule this shipment.
7. Save your work.
� To display status information:
� Select the Status alternative region in the Purchase OrderShipments window.
For each shipment, Purchasing displays the Status and the quantityOrdered, Received, Cancelled, and Billed.
� To enter receiving control information:
� Select the Receiving Controls button to open the Receiving Controlswindow. See: Entering Purchase Order Receiving Controls: page4 – 65.
� To enter purchase order distribution information:
� Select the Distributions button to open the Distributions window.See: Entering Purchase Order Distributions: page 4 – 70.
See Also
Entering Purchase Order Preferences: page 4 – 33

4 – 65Purchase Orders
Entering Purchase Order Receiving Controls
Use the Receiving Controls window to enter receiving controlinformation for purchase orders and releases. Note that controls youenter here apply to specific purchase orders/releases and override thereceiving controls you enter in the Receiving Options window. See:Receiving Controls, Options, and Profiles: page 7 – 7
� To enter purchase order receiving controls:
1. Navigate to the Receiving Controls window by selecting theReceiving Controls button in the Shipments window for purchaseorders and in the Releases window for releases.
2. Enter the maximum acceptable number of Days Early and DaysLate for receipts.
3. Enter the Action for receipt date control. This field determineshow Purchasing handles receipts that are earlier or later than theallowed number of days selected above. Choose one of thefollowing options:
None – Receipts may exceed the allowed days early or late.

4 – 66 Oracle Public Sector Purchasing User’s Guide
Reject – Purchasing does not permit receipts outside the selectednumber of days early or late.
Warning – Purchasing displays a warning message but permitsreceipts outside the selected number of days early or late.
Purchasing displays the Last Accept Date, which is the last datewhen the shipment can be received. This is the promised date plusthe number of days late allowed.
4. Enter the maximum acceptable over–receipt Tolerance percent.
5. Enter the Action for Overreceipt Quantity control. This fielddetermines how Purchasing handles receipts that exceed thequantity received tolerance. Choose one of the following options:
None – Receipts may exceed the selected tolerance.
Reject – Purchasing does not permit receipts that exceed theselected tolerance.
Warning – Purchasing displays a warning message but permitsreceipts that exceed the selected tolerance.
6. Select Allow Substitute Receipts to indicate that receivers canreceive substitute items in place of ordered items. You must definesubstitute items before you can receive them. See: Defining ItemRelationships, Oracle Inventory User’s Guide
7. Enter the default Receipt Routing that you assign goods: DirectDelivery, Inspection Required, or Standard Receipt. You canoverride this routing during receipt only if the RCV: Allow RoutingOverride user profile option is enabled. See: Profile Options inPurchasing: page 1 – 76.
8. Enter the Enforce Ship To location option to determine whether thereceiving location must be the same as the ship–to location.Choose one of the following options:
None – The receiving location may differ from the ship–to location.
Reject – Purchasing does not permit receipts when the receivinglocation differs from the ship–to location.
Warning – Purchasing displays a warning message but permitsreceipts when the receiving location differs from the ship–tolocation.
� To cancel your entries:
� Select the Cancel button to cancel your entries and return to theoriginal window.

4 – 67Purchase Orders
� To apply your entries:
� Select the OK button to apply your entries and return to theoriginal window.
See Also
Defining Receiving Options: page 1 – 40

4 – 68 Oracle Public Sector Purchasing User’s Guide
Entering Purchase Order Price Break Information
Use the Price Break window to enter price break information forblanket purchase agreement lines.
� To enter price break information:
1. Navigate to the Price Break window by selecting the Price Breakbutton in the Purchase Orders window.
2. Enter a line Number for the shipment line. Purchasing displays thenext available line number as the default.
3. Enter the ship to Organization. If you entered an item, you canselect only organizations in which the item is defined. If youentered a revision number on the purchase order line, then the itemrevision must also be defined in the organization. See: PurchaseOrder Defaulting Rules: page 4 – 11.
4. Enter the Ship To location for the price break. You can select onlylocations for this organization or locations for which noorganization is defined.
5. Enter the minimum Quantity that must to ordered to obtain thisprice break. The shipment quantity is displayed as the default.
6. Enter the Break Price at this quantity. Purchasing calculates theDiscount % for you.
7. You can optionally enter a Discount % to have the Break Pricecalculated for you.

4 – 69Purchase Orders
8. Save your work.
See Also
Entering Purchase Order Lines: page 4 – 44

4 – 70 Oracle Public Sector Purchasing User’s Guide
Entering Purchase Order Distributions
Use the purchase order Distributions window to enter distributioninformation for purchase order shipments and to view distributionsthat Purchasing has automatically created for you. You can entermultiple distributions per shipment line. You can also enterinformation about paper requisitions in this window.
� To enter purchase order distribution information:
1. Navigate to the Distributions window by selecting theDistributions button in the Shipments window. The Shipmentswindow is accessed from the Purchase Orders window. You beginin the Destination alternative region.
2. Enter the line Number for the distribution line. If you enter a newdistribution line, Purchasing displays the next sequential linenumber available. You can enter any line number that does notalready exist.
3. The destination type determines the final destination of thepurchased items. Choose one of the following options:
Expense – The goods are delivered to the requestor at an expenselocation. The destination subinventory is not applicable.
Inventory – The goods are received into inventory upon delivery.You can choose this option only if the item is stock enabled in theship–to organization.
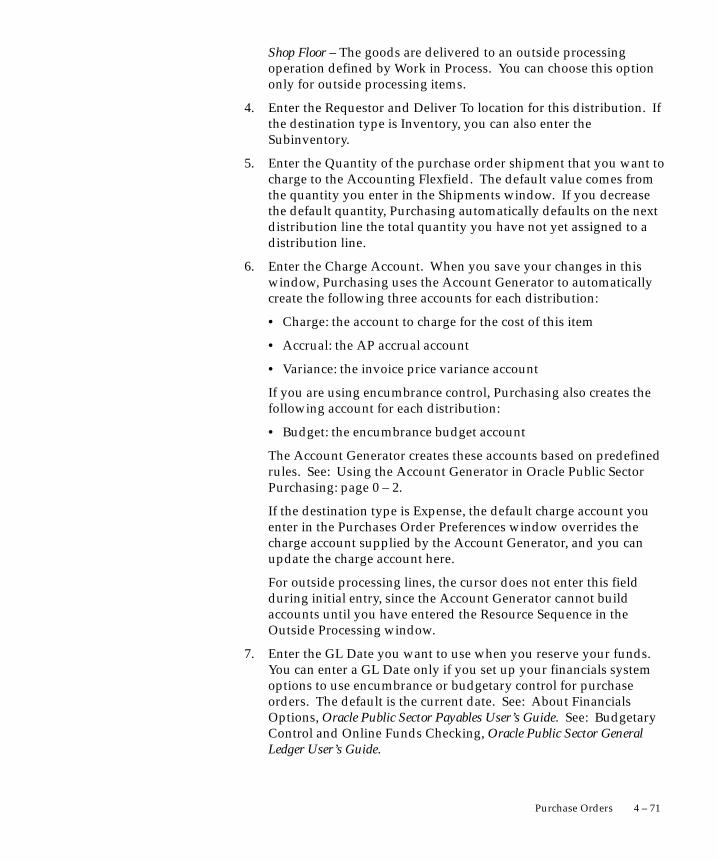
4 – 71Purchase Orders
Shop Floor – The goods are delivered to an outside processingoperation defined by Work in Process. You can choose this optiononly for outside processing items.
4. Enter the Requestor and Deliver To location for this distribution. Ifthe destination type is Inventory, you can also enter theSubinventory.
5. Enter the Quantity of the purchase order shipment that you want tocharge to the Accounting Flexfield. The default value comes fromthe quantity you enter in the Shipments window. If you decreasethe default quantity, Purchasing automatically defaults on the nextdistribution line the total quantity you have not yet assigned to adistribution line.
6. Enter the Charge Account. When you save your changes in thiswindow, Purchasing uses the Account Generator to automaticallycreate the following three accounts for each distribution:
• Charge: the account to charge for the cost of this item
• Accrual: the AP accrual account
• Variance: the invoice price variance account
If you are using encumbrance control, Purchasing also creates thefollowing account for each distribution:
• Budget: the encumbrance budget account
The Account Generator creates these accounts based on predefinedrules. See: Using the Account Generator in Oracle Public SectorPurchasing: page 0 – 2.
If the destination type is Expense, the default charge account youenter in the Purchases Order Preferences window overrides thecharge account supplied by the Account Generator, and you canupdate the charge account here.
For outside processing lines, the cursor does not enter this fieldduring initial entry, since the Account Generator cannot buildaccounts until you have entered the Resource Sequence in theOutside Processing window.
7. Enter the GL Date you want to use when you reserve your funds.You can enter a GL Date only if you set up your financials systemoptions to use encumbrance or budgetary control for purchaseorders. The default is the current date. See: About FinancialsOptions, Oracle Public Sector Payables User’s Guide. See: BudgetaryControl and Online Funds Checking, Oracle Public Sector GeneralLedger User’s Guide.

4 – 72 Oracle Public Sector Purchasing User’s Guide
If you enter a date that belongs to two separate accounting periods,Purchasing automatically creates a journal entry in the firstaccounting period that contains this date. See: ControllingPurchasing Periods: page 1 – 71.
The Reserved check box indicates whether you successfullyreserved funds for this purchase order distribution. You reserveyour distribution when you approve your purchase order. Youcannot change any purchase order distribution that you havealready encumbered. See: About Financials Options, Oracle PublicSector Payables User’s Guide See: Budgetary Control and OnlineFunds Checking, Oracle Public Sector General Ledger User’s Guide.
� To enter distribution detail information:
1. Select the More alternative region.
The Online check box indicates whether this distribution is part ofan on–line requisition. If so, Purchasing displays the requisitionnumber and line number.
2. If this distribution comes from an on–line requisition, Purchasingdisplays the Requisition Number and Line number, you cannotupdate this field. If this distribution does not come from an on–linerequisition, enter the paper requisition number in this field. Thedefault is the paper requisition number from the Purchase OrderPreferences window.
Purchasing displays the Budget Account, Accrual Account, andVariance Account numbers supplied by the Account Generator.
3. Enter the Rate Date for the currency. Purchasing uses this date toobtain the currency conversion rate from your conversiondefinitions. You cannot enter this field when you edit a purchaseorder created in your base currency. See: Defining PurchasingOptions: page 1 – 29. See: Entering Daily Rates, Oracle Public SectorGeneral Ledger User’s Guide.
Note: The Rate Date is a required field for a foreign currencypurchase order, to complete the approval process.
4. You can enter the conversion Rate between the foreign currencyand the base currency only when the rate type is User. If youentered a rate date for which a conversion rate is defined,Purchasing displays that rate and you cannot change it.
� To enter project information:
You see a Project alternative region if one of the following is true:

4 – 73Purchase Orders
• Oracle Projects is installed, or
• Oracle Project Manufacturing is installed and Project ReferenceEnabled is selected in the Organization Parameters window inOracle Inventory
The project information you enter is used by Oracle Projects fordestination types of Expense, or by Oracle Project Manufacturing fordestination types of Inventory or Shop Floor. See: Oracle ProjectsUser’s Guide. See: Oracle Project Manufacturing Implementation Manual.
1. Choose the Project alternative region.
2. Select a Project Number.
For a Destination Type of Inventory or Shop Floor, you canoptionally enter a Project Number if the Project Control Level is setto Project in the Project Information alternative region of theOrganization Parameters window.
For a Destination Type of Expense, you can always optionally entera Project Number.
3. If you entered a Project number, select a Task number.
You must enter a Task number for a Destination Type of Inventoryor Shop Floor, if the Project Control Level is set to Task in theOrganization Parameters window and if you have entered a Projectnumber.
4. Enter Expenditure information.
Expenditure information is required only if your Destination Typeis Expense.
• Select the Expenditure Type.
• If you chose an Expenditure Type, enter an ExpenditureOrganization.
• If you chose an Expenditure Organization, select the ExpenditureDate.
5. Note that the distribution Quantity that will be charged to theproject should already be entered for you.
If you change the Quantity here, then the distribution Quantity onthe purchase order line changes as well.
6. Save your work.
The Charge, Budget, Accrual, and Variance accounts in theAccount Description region are generated automatically. See:

4 – 74 Oracle Public Sector Purchasing User’s Guide
Using the Account Generator in Oracle Public Sector Purchasing:page 0 – 2.
� To enter outside processing information:
� Select the Outside Processing button to open the Purchase OrderOutside Processing window. See: Entering Outside ProcessingInformation: page 4 – 75.
See Also
Entering Purchase Order Shipments: page 4 – 61

4 – 75Purchase Orders
Entering Outside Processing Information
Use the Outside Processing window to review and enter outsideprocessing information for document lines.
� To enter outside processing information:
1. Navigate to the Outside Processing window by selecting theOutside Processing button in the Requisitions window and thePurchase Orders Distributions window when you’ve selected aType of Outside Processing. See: Entering Requisition Lines: page3 – 52. See: Entering Purchase Order Distributions: page 4 – 70.
2. Enter the Job or repetitive Assembly that uses this outsideprocessing operation. For an assembly, you can also enter theproduction Line. Use this to choose a schedule with the earliestfirst unit start date.
3. Enter the operation Sequence number of the outside processingoperation. Purchasing displays the operation Code and theDepartment.
4. Enter the Sequence number of the resource the outside processingoperation uses. Purchasing displays the resource UOM andQuantity. Purchasing also displays the Unit Type and AssemblyQuantity.
� To cancel your entries:
� Select the Cancel button to cancel your entries and return to thewindow from which you came.

4 – 76 Oracle Public Sector Purchasing User’s Guide
� To apply your entries:
� Select the Done button to apply your entries and return to thewindow from which you came.
See Also
Requisitioning Outside Process Items: page 4 – 148
Creating Outside Processing Purchase Orders: page 4 – 150
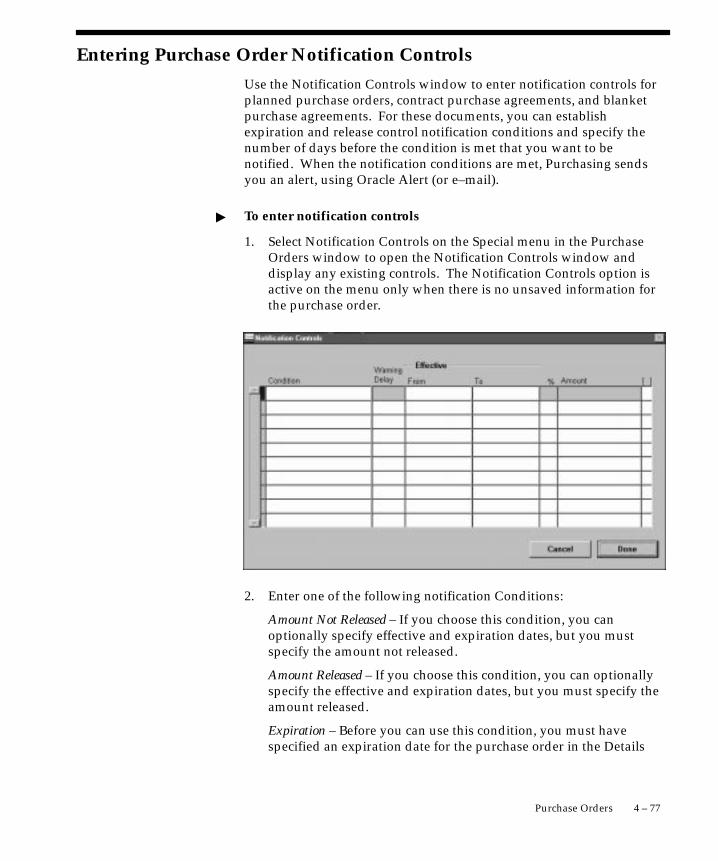
4 – 77Purchase Orders
Entering Purchase Order Notification Controls
Use the Notification Controls window to enter notification controls forplanned purchase orders, contract purchase agreements, and blanketpurchase agreements. For these documents, you can establishexpiration and release control notification conditions and specify thenumber of days before the condition is met that you want to benotified. When the notification conditions are met, Purchasing sendsyou an alert, using Oracle Alert (or e–mail).
� To enter notification controls
1. Select Notification Controls on the Special menu in the PurchaseOrders window to open the Notification Controls window anddisplay any existing controls. The Notification Controls option isactive on the menu only when there is no unsaved information forthe purchase order.
2. Enter one of the following notification Conditions:
Amount Not Released – If you choose this condition, you canoptionally specify effective and expiration dates, but you mustspecify the amount not released.
Amount Released – If you choose this condition, you can optionallyspecify the effective and expiration dates, but you must specify theamount released.
Expiration – Before you can use this condition, you must havespecified an expiration date for the purchase order in the Details

☞
4 – 78 Oracle Public Sector Purchasing User’s Guide
window. If you choose this condition, you must enter an effectivedate, and you can optionally enter an expiration date.
3. Enter the Warning Delay. This is the number of days before theexpiration date that you want to be alerted. The warning delay isapplicable only to the Expiration condition and helps you calculatethe effective date.
4. Purchasing calculates the Effective Date based on your warningdelay and the expiration date, but you can change this date. Theeffective date is required for the Expiration condition.
5. Purchasing displays the Expiration Date from the Terms andConditions region as the default, but you can change this date.
Attention: If you do not enter an expiration date and yourcondition continues to be met, the alert will be issued forever.Therefore, we recommend entry of an expiration date.
6. The Percent field is applicable only when you have already enteredan order line. For the Amount Released (or Not Released)conditions, you can enter a percentage of the order line total, andPurchasing calculates the amount.
7. When the amount released (or not released) reaches the Amountyou enter here, Purchasing sends you an alert. If you have alreadyentered an order line, Purchasing calculates the percentage anddisplays it in the Percent field.
8. Select the Done button to save your work and return to thePurchase Orders window.
� To cancel your entries:
� Select the Cancel button to cancel your entries and return to thePurchase Orders window.
See Also
Using Oracle Alert in Oracle Public Sector Purchasing: page 0 – 2
Entering Purchase Order Headers: page 4 – 39

4 – 79Purchase Orders
Entering and Viewing Purchase Order Acceptances
Use the Acceptances window to view and enter purchase orderacceptances from your suppliers. The original copy of the purchaseorder you send to the supplier is a legal offer to buy. A bindingpurchase contract does not exist until the supplier accepts your offereither by performing the contract or formally accepting the offer byreturning an acceptance document to you.
You indicate on your standard purchase orders, purchase agreements,and releases whether you require your suppliers to accept your ordersby a specific date. Purchasing notifies you in the NotificationsSummary window of the orders for which the suppliers have notresponded by the acceptance due date.
� To view acceptances:
� Navigate to the Acceptances window by selecting Acceptancesfrom the Special menu in the Purchase Orders and Releaseswindows when you do not have a purchase order open.Purchasing displays the Acceptances window with all previouslyaccepted purchase orders for review.
� To enter acceptances:
1. Navigate to the Acceptances window by selecting Acceptancesfrom the Special menu in the Purchase Orders and Releaseswindows.

4 – 80 Oracle Public Sector Purchasing User’s Guide
You can accept only purchase orders and releases that youapproved at least once and that are not closed.
2. In the Action field, enter the results of your supplier follow–up.You can easily record the type of follow–up you performed such asFollow–up telephone call, Follow–up letter, or Fax follow–up. Youcan also use this field to record the outcome of the follow–up suchas Will call back, No answer, Schedule slippage, or Cannot fulfillorder.
3. Enter the Revision number. The default is the current revision.Purchasing removes the notification from the NotificationsSummary window only when you record the acceptance of themost recent revision.
4. Enter the Action Date for the acceptance transaction. Today’s dateis the default, but you can enter any date.
5. Enter the Accepted By person. Your name is the default.
6. Select Accepted to indicate that the supplier accepted the purchaseorder. If you accept the most recent revision, Purchasing removesthe acceptance requirement and the acceptance date from yourpurchase order or release. Purchasing also deletes thecorresponding notification from the Notifications Summarywindow if any late acceptance notification exists for this order.
7. Enter an Acceptance Type for the acceptance. You can define yourown acceptance types, or use one of the following that Purchasingprovides. See: Defining Lookup Codes: page 1 – 54.
Accepted All Terms – The supplier accepted all the terms of thepurchase order.
On Schedule – The supplier agreed to meet the delivery dates on thepurchase order.
Unacceptable Changes – The supplier made modifications to theterms of the purchase order that you do not find acceptable.
See Also
Entering Purchase Order Headers: page 4 – 39
Entering Release Headers: page 4 – 81

4 – 81Purchase Orders
Entering Releases
Entering Release Headers
Use the Releases window to enter, edit, and approve releases againstblanket purchase agreements or planned purchase orders.
� To enter release headers:
1. Navigate to the Releases window by selecting Releases from themenu or selecting the New Release button in the Find PurchaseOrders window.
2. Enter the PO number for the release you want to create. The list ofvalues displays all blanket and planned purchase order numbersthat have been approved, the document type, status, supplier,buyer, and effectivity date range. When you select a purchaseorder, Purchasing displays the Supplier, Site, and Currency for thatorder. Purchasing also displays the Status of the release and thecurrent Total amount of the release.
3. Purchasing displays the next Release number available. You canchange the release number to any number that does not alreadyexist.

4 – 82 Oracle Public Sector Purchasing User’s Guide
4. Enter the Created date. The default is the system date, but you canchange this.
5. If the Enforce Buyer Name option in the Purchasing Optionswindow is set to Yes, your name is displayed as the Buyer, and youcannot change this value. Otherwise, you can enter the name ofany buyer. See: Defining Control Options: page 1 – 33.
6. Select Firmed to firm your release shipment when you want toindicate to Master Scheduling/MRP or your manufacturingapplication that it should not reschedule this release shipmentautomatically.
7. Select Acceptance Required to indicate that you want to require thesupplier to accept your release
8. If acceptance is required, enter the Due–By date when you requirethe supplier to return an acceptance for your purchase order.
9. Enter release shipment line information in the Shipmentsalternative region. See: Entering Purchase Order Shipments: page4 – 61
� To take approval actions:
� Select the Approve button to open the Approve Documentswindow. See: Submitting a Document for Approval: page 2 – 32.
� To enter receiving control information:
� Select the Receiving Controls button to open the Receiving Controlswindow. See: Entering Purchase Order Receiving Controls: page4 – 65.
� To enter release distribution information:
� Select the Distributions button to open the Distributions window.See: Entering Release Distributions: page 4 – 87.
� To enter and view acceptances:
� Select Acceptances on the Special menu to open the Acceptanceswindow. See: Entering and Viewing Purchase Order Acceptances:page 4 – 79

4 – 83Purchase Orders
� To view action history:
� Select View Action History on the Special menu to open the ActionHistory window. See: Viewing Action History: page 8 – 2.
� To enter purchase order preferences:
� Select Preferences on the Special menu. See: Entering PurchaseOrder Preferences: page 4 – 33
See Also
Entering Release Shipments: page 4 – 83
Entering Release Distributions: page 4 – 87
Entering Release Shipments
Use the Shipments alternative region to enter shipment lines forplanned and blanket releases and to edit shipments that Purchasingautomatically generated for you. (See: Automatic Release Generation:page 4 – 93) A purchase order shipment specifies the quantity, ship–tolocation, and date you want your supplier to deliver the items on apurchase order line.
� To enter release shipment information:
1. Navigate to the Shipments alternative region in the Releaseswindow.
The first alternative region is the Shipments region. In addition tothe enterable fields discussed in the following steps, this regiondisplays the UOM, the Originally Promise date (if the Promiseddate has been changed, the original promised date is displayedhere), the Charge Account, the shipment Amount, and a check boxto indicate whether funds have been Reserved. See: BudgetaryControl and Online Funds Checking, Oracle Public Sector GeneralLedger User’s Guide.
2. Enter the line Number for the shipment line. If you enter a newshipment line, Purchasing displays the next sequential line numberavailable. You can enter any line number greater than zero thatdoes not already exist.

4 – 84 Oracle Public Sector Purchasing User’s Guide
3. Enter the source Line number. The list of values includes the itemnumber, revision, and description.
4. For scheduled releases only, you can enter the source Shipment.This is the planned purchase order shipment against which youwant to issue a release. The details from the shipment are used asdefaults for the scheduled release shipment.
5. Enter the ship–to Organization. If you picked a line with an item,you can pick only organizations in which the item is defined. Ifyou picked a revision number on the purchase order line, the itemrevision must also be defined in the organization. For scheduledreleases (against planned purchase orders), you cannot change thedefault organization from the planned purchase order shipment.Note that you cannot update the organization once you have savedyour work.
6. Enter the Ship–To location for the shipment. You can pick anylocation that does not have an organization or any location whoseorganization matches the organization in the previous field. See:Purchase Order Defaulting Rules: page 4 – 11 For blanket releases,Purchasing defaults the ship–to location from the Release Headerzone. For scheduled releases, Purchasing gets default informationfrom the planned purchase order shipment.
7. Enter the Quantity for the shipment. This value must be greaterthan zero.
8. Enter the Price you want to use for this shipment. Purchasingdisplays the actual price for the shipment from the purchase orderline price for the item. The actual price defaults from the purchaseagreement line.
You can use list of values to choose purchase agreement pricebreaks. If your purchase agreement has price breaks, the quantityentered here determines what break price is defaulted into the Pricefield. The cursor does not enter this field when you are editing anexisting line.
If you allow price override for this purchase order line in thePurchase Orders window, the release price cannot exceed the pricelimit specified for the line. If you allow price override but did notenter a price limit, Purchasing does not check the shipment pricefor the releases. If you do not allow price override, Purchasingdisplays the shipment price from the purchase agreement andprevents you from navigating to this field. This field can bedefaulted from the purchase agreement price breaks if you haveentered a sufficient quantity.

4 – 85Purchase Orders
9. Enter the date that the supplier Promised delivery of the items.This promised date is printed on the release.
10. Enter the Need By date when the requestor needs the item. Thisdate is printed on the release if you do not enter a promised date.The default is from the Purchase Order Preferences window. If youuse Purchasing with Master Scheduling/MRP, you must provide aneed–by date or promised date for shipments that correspond topurchase order lines with Master Scheduling/MRP planned items.You must also provide a need–by date or promised date forInventory planned items. See: Planner Workbench, Oracle MasterScheduling/MRP and Supply Chain Planning User’s Guide.
11. Select Taxable to indicate that the item is taxable.
12. Enter or use the default Tax Name for taxable items.
The tax name defaults from the following sources, in the followingorder:
• The Purchase Order Preferences window. If you have specified apreferred tax name in this window, Purchasing defaults this taxname onto the release shipment.
• The planned purchase order shipment. If you are creating arelease shipment from a planned purchase order and a tax nameexists on the planned purchase order shipment, Purchasingdefaults this tax name onto the release shipment.
• The Tax Defaults region in the Purchasing Options window. Ifyou have specified a tax defaulting hierarchy in this window,Purchasing searches for and defaults the tax name correspondingto that tax defaulting hierarchy. See: Defining Tax DefaultsOptions: page 1 – 38.
You can accept the default tax name or select another. If you needadditional help with how tax defaulting works in Purchasing, see:Tax Defaults in Purchasing: page 4 – 158.
13. Save your work.
� To display item information:
� Select the Item alternative region in the Releases window.
For each shipment, Purchasing displays the Item number,purchasing Category, item Description, and the Supplier Itemnumber.

☞
4 – 86 Oracle Public Sector Purchasing User’s Guide
� To display and enter more shipment information:
1. Select the More alternative region in the Releases window.
2. Enter the Receipt Close Tolerance percent for your shipments.Purchasing automatically closes a shipment for receiving if it iswithin the receiving closing tolerance at the receiving close point.You need to set the receiving close point in the Purchasing Optionswindow. See: Defining Control Options: page 1 – 33
3. Enter the Invoice Close Tolerance percent for your shipments.Purchasing automatically closes a shipment for invoicing if it iswithin the invoicing closing tolerance at billing, when Payablesmatches invoices to purchase orders. See: Defining ControlOptions: page 1 – 33
4. Select one of the following Invoice Matching options:
Two–Way Matching: Purchase order and invoice quantities mustmatch within tolerance.
Three–Way Matching: Purchase order, receipt, and invoicequantities must match within tolerance.
Four–Way Matching: Purchase order, receipt, accepted, and invoicequantities must match within tolerance.
If you enter an item, the default value for this field comes from theitem information. If you do not enter an item, the default is fromyour Purchasing Options. See: Receiving Controls, Options, andProfiles: page 7 – 7.
5. Select Accrue on Receipt to indicate that the items on this purchaseorder line accrue on receipt. Shop Floor and Inventory destineditems always accrue on receipt, and you cannot change this default.For expense items, if the Accrue Expense Items flag in thePurchasing Options window is set to Period End, the items cannotaccrue on receipt, and you cannot change the default. If the AccrueExpense Items flag is set to On Receipt, the default is to accrue onreceipt, but you can change it to not accrue on receipt. See:Defining Accrual Options: page 1 – 32.
Attention: If you are using Cash Basis Accounting, you shoulduse the Purchasing Options window to set the Accrue ExpenseItems flag to Period End, and you should not select Accrue onReceipt in this window.
6. Select Firm to firm the shipment to indicate to MasterScheduling/MRP or your manufacturing application that it shouldnot reschedule this release shipment.

4 – 87Purchase Orders
7. Save your work.
� To display status information:
� Select the Status alternative region.
For each shipment, Purchasing displays the Status and the quantityOrdered, Received, Cancelled, and Billed.
� To take approval actions:
� Select the Approve button to open the Approve Documentswindow. See: Submitting a Document for Approval: page 2 – 32.
� To enter receiving control information:
� Select the Receiving Controls button to open the Receiving Controlswindow. See: Entering Purchase Order Receiving Controls: page4 – 65.
� To enter distribution information:
� Select the Distributions button to open the Distributions window.See: Entering Release Distributions: page 4 – 87.
See Also
Entering Release Headers: page 4 – 81
Entering Release Distributions: page 4 – 87
Entering Purchase Order Preferences: page 4 – 33
Viewing Action History: page 8 – 2
Entering Release Distributions
Use the release Distributions window to enter distribution informationfor release shipments. You can enter multiple distributions pershipment line. You can also enter information about paper requisitionsin this window.

4 – 88 Oracle Public Sector Purchasing User’s Guide
� To enter release distribution information:
1. Navigate to the Distributions window by selecting theDistributions button in the Releases window.
2. Enter the line Number for the distribution line. If you enter a newdistribution line, Purchasing displays the next sequential linenumber available. You can enter any line number greater than zerothat does not already exist.
3. For scheduled releases only, enter the Source (the planned purchaseorder distribution you want to release).
4. The Destination Type determines the final destination of thepurchased items. Choose one of the following options:
Expense – The goods are delivered to the requestor at an expenselocation. The destination subinventory is not applicable.
Inventory – The goods are received into inventory upon delivery.You can choose this option only if the item is stock enabled in theship–to organization.
Shop Floor – The goods are delivered to an outside processingoperation defined by Work in Process. You can choose this optiononly for outside processing items.
5. Enter the Requestor and Deliver To location for this distribution. Ifthe destination type is Inventory, you can also enter theSubinventory.
6. Enter the Quantity of the purchase order shipment that you want tocharge to the Accounting Flexfield. The default value comes from

4 – 89Purchase Orders
the quantity you enter in the Shipments region. If you decrease thedefault quantity, Purchasing automatically defaults on the nextdistribution line the total quantity you have not yet assigned to adistribution line. This quantity is printed on the release.
7. Enter the Charge Account. When you save your changes in thiswindow, Purchasing uses the Account Generator to automaticallycreate the following three accounts for each distribution:
• Charge: the account to charge for the cost of this item
• Accrual: the AP accrual account
• Variance: the invoice price variance account
If you are using encumbrance control, Purchasing also creates thefollowing account for each distribution:
• Budget: the encumbrance budget account
The Account Generator creates these accounts based on predefinedrules. See: Using the Account Generator in Oracle Public SectorPurchasing: page 0 – 2.
You cannot create or update these accounts manually unless thedestination type is Expense. In this case, the default charge accountyou enter in the Purchases Order Preferences window overridescharge account supplied by the Account Generator, and you canupdate the charge account in this zone.
For outside processing lines, the cursor does not enter this fieldduring initial entry, since the Account Generator cannot buildaccounts until you have entered the Resource Sequence in theOutside Processing window.
8. Enter the GL Date you want to use when you reserve your funds.You can enter a GL Date only if you set up your financials systemoptions to use encumbrance or budgetary control for purchaseorders. The default is the current date. See: About FinancialsOptions, Oracle Public Sector Payables User’s Guide. See: BudgetaryControl and Online Funds Checking, Oracle Public Sector GeneralLedger User’s Guide.
If you enter a date that belongs to two separate accounting periods,Purchasing automatically creates a journal entry in the firstaccounting period that contains this date. See: ControllingPurchasing Periods: page 1 – 71.
The Reserved check box indicates whether you successfullyreserved funds for this purchase order distribution. You reserveyour distribution when you approve your purchase order. You

4 – 90 Oracle Public Sector Purchasing User’s Guide
cannot change any purchase order distribution that you havealready encumbered. See: About Financials Options, Oracle PublicSector Payables User’s Guide See: Budgetary Control and OnlineFunds Checking, Oracle Public Sector General Ledger User’s Guide.
9. Save your work.
� To enter distribution detail information:
1. Select the More alternative region.
The Online check box indicates whether this distribution is part ofan on–line requisition. If so, Purchasing displays the requisitionnumber and line number.
2. If this distribution comes from an on–line requisition, Purchasingdisplays the Requisition Number and Line number, and you cannotupdate this field. If this distribution does not come from an on–linerequisition, enter the paper requisition number in this field. Thedefault is the paper requisition number from the Purchase OrderPreferences window.
Purchasing displays the Budget Account, Accrual Account, andVariance Account numbers supplied by the Account Generator.
3. Enter the Rate Date for the currency. Purchasing uses this date toobtain the currency conversion rate from your conversiondefinitions. You cannot enter this field when you edit a purchaseorder created in your base currency. See: Defining PurchasingOptions: page 1 – 29. See: Entering Daily Rates, Oracle Public SectorGeneral Ledger User’s Guide.
4. You can enter the conversion Rate between the foreign currencyand the base currency only when the rate type is User. If youentered a rate date for which a conversion rate is defined,Purchasing displays that rate and you cannot change it.
5. Save your work.
� To enter project information:
You see a Project alternative region if one of the following is true:
• Oracle Projects is installed, or
• Oracle Project Manufacturing is installed and Project ReferenceEnabled is selected in the Organization Parameters window inOracle Inventory

4 – 91Purchase Orders
The project information you enter is used by Oracle Projects fordestination types of Expense, or by Oracle Project Manufacturing fordestination types of Inventory or Shop Floor. See: Oracle ProjectsUser’s Guide. See: Oracle Project Manufacturing Implementation Manual.
1. Choose the Project alternative region.
2. Select a Project Number.
For a Destination Type of Inventory or Shop Floor, you canoptionally enter a Project Number if the Project Control Level is setto Project in the Project Information alternative region of theOrganization Parameters window.
For a Destination Type of Expense, you can always optionally entera Project Number.
3. If you entered a Project number, select a Task number.
You must enter a Task number for a Destination Type of Inventoryor Shop Floor, if the Project Control Level is set to Task in theOrganization Parameters window and if you have entered a Projectnumber.
4. Enter Expenditure information.
Expenditure information is required only if your Destination Typeis Expense.
• Select the Expenditure Type.
• If you chose an Expenditure Type, enter an ExpenditureOrganization.
• If you chose an Expenditure Organization, select the ExpenditureDate.
5. Note that the distribution Quantity that will be charged to theproject should already be entered for you.
If you change the Quantity here, then the distribution Quantity onthe release line changes as well.
6. Save your work.
The Charge, Budget, Accrual, and Variance accounts in theAccount Description region are generated automatically. See:Using the Account Generator in Oracle Public Sector Purchasing:page 0 – 2.
4 – 92 Oracle Public Sector Purchasing User’s Guide
See Also
Entering Release Headers: page 4 – 81
Entering Release Shipments: page 4 – 83
Viewing Action History: page 8 – 2
Entering Purchase Order Preferences: page 4 – 33

4 – 93Purchase Orders
Automatic Release Generation
You can minimize purchase order administrative costs by automaticallycreating releases for both manually entered and imported requisitions.
Purchasing provides you with the features you need to satisfy thefollowing basic needs. You should be able to:
• Automatically create a release when you source your items froma single supplier using a single blanket purchase agreement.
• Specify for each blanket agreement whether you want to createapproved releases automatically, create releases automaticallybut require manual approval, or require the use of theAutoCreate Documents window to create releases.
• Run the Create Release process automatically as part of theRequisition Import process.
Major Features
Flexible Sourcing Definitions
When you are defining your sourcing rules and Approved Supplier Listentries, you can also define how you want your releases generated.Automatic Release automatically converts approved requisition lines toapproved blanket purchase releases based on the sourcing rules andApproved Supplier List entries. Automatic Release/Reviewautomatically converts approved requisition lines to blanket releases.Buyers can then review and modify these releases before approvingthem. Release Using Autocreate lets buyers use the AutoCreateDocuments window to collect, review, and optionally modifyrequirements before creating and approving their releases. See:Autocreating Documents Overview: page 6 – 2.
You can define a different release generation method for each item andsupplier. For frequently purchased items, you can set up Purchasing toautomatically create and approve releases. For expensive or criticalitems, you can let Purchasing create the releases, while you review andapprove them in a separate step. For infrequent purchases, yourbuyers can take more control by using the AutoCreate Documentswindow to combine requests.
You must set up a suggested blanket purchase agreement in theApproved Supplier List window so that Purchasing can use the priceand ship–to information when it is generating releases against theagreement. See: Defining the Supplier/Item Attributes: page 5 – 29.

4 – 94 Oracle Public Sector Purchasing User’s Guide
Generate Releases Automatically
The Create Releases process generates releases when the followingcriteria are met:
• The requisition is sourced to an approved blanket purchaseagreement that is not on hold
• The Approved Supplier List entry for the item, supplier, andagreement must be active, and the Release Generation methodmust be Automatic Release or Automatic Release/Review in theApproved Supplier List window
• The source agreement is still active and the release will not putthe agreement over the amount limit
• The release amount must be greater than the minimum linerelease amount
• The supplier on the source agreement is active and not on hold
• The requisition line is Approved (and Reserved, if requisitionencumbrance is active)
• The requisition line is not cancelled, closed, or already on apurchase order
• The line type of the requisition line is quantity based
Note: If the release generation method in the Approved Supplier Listwindow is Automatic Release or Automatic Release/Review, then theCreate Releases process creates the release. If the release generationmethod is Release Using AutoCreate, then the PO Create Documentsworkflow tries to create the release; if it cannot, then you must use theAutoCreate Documents window to create the release.
If the release generation method is Automatic Release, the process setsthe status to Approved and updates the action history. Otherwise, theprocess sets the status to Incomplete and updates the notifications.
Purchasing automatically creates releases for requirements entered byany source: Work in Process, Master Scheduling/MRP, InventoryPlanning, purchase requisitions, or external systems.
For foreign currency blanket purchase agreements, the automaticrelease process uses the rate on the agreement as the default rate for therelease and translates the functional unit price on the requisition intothe foreign currency price. Automatically generated releases use theprice retrieved by sourcing, which is price break sensitive but does notconsider the quantity already released against the blanket purchaseagreement.

4 – 95Purchase Orders
The Create Releases process creates a release for each source blanketpurchase agreement, with a release shipment for each requisition lineand a release distribution for each requisition distribution. If releasearchiving is set to Approve, the process updates the archive table forthe release, shipments, and distributions. See: Create Releases Process:page 9 – 30.
If you’ve set up a tax defaulting hierarchy in the Tax Defaults region ofthe Purchasing Options window, the appropriate tax namesautomatically default onto the release shipments created by the CreateRelease process. See: Defining Tax Defaults Options: page 1 – 38.
Variable Release Generation Frequency
You can determine how often Purchasing creates releases by using theSubmit Requests window to set the Create Releases process to runautomatically at any frequency you desire. You can also use the SubmitRequests window to run the process manually.
Optionally, you can set the profile PO: Release During ReqImport tocreate releases each time you run the Requisition Import process. Forexample, when you implement planned orders as requisitions in theMRP Planner Workbench, you can automatically create the releases atthe same time you create the requisitions. As part of the RequisitionImport process, Purchasing automatically creates (and optionallyapproves) releases for all blanket–sourced, approved requisitions, notjust those created by the Requisition Import run.
See Also
AutoCreate Documents Overview: page 6 – 2
Workflow for Creating Purchase Orders or Releases: page 4 – 160
Profile Options in Purchasing: page 1 – 76
Automatic Sourcing: page 5 – 69
Create Releases Process: page 9 – 30
Requisition Import Process: page 9 – 130
Submitting a Request, Oracle Applications System Administrator’s Guide

4 – 96 Oracle Public Sector Purchasing User’s Guide
Printed Purchase Order Overview
Purchasing formats your purchase orders to be printed on a standardpurchase order form. The following descriptions explain howPurchasing prints the purchase order information. You can use thestandard format or customize the report to meet your needs.
Major Features
Portrait and Landscape Formats
Purchasing lets you print your purchase orders in portrait or landscapeformat. Use the Submit Requests window to choose either the PrintedPurchase Order Report (Landscape) or the Printed Purchase OrderReport (Portrait). The explanations that follow describe both portraitand landscape characteristics. See: Submitting a Request, OracleApplications User’s Guide
Printed Change Orders Report
In addition to the Printed Purchase Order Report, you can also use theSubmit Requests window to choose the Printed Change Orders Reportin portrait or landscape formats. This prints only the changes betweenrevisions of purchase orders, but is otherwise identical to the PrintedPurchase Order Report. When you have purchase orders with manylines, you can print only pertinent change information to send to thesupplier. If a modification to the purchase order shipment causes thepurchase order revision to change, the Printed Change Orders Reportprints the revised shipment, line, and header. If the modification is tothe line, the report prints the revised line and header. If only theheader is modified, the report prints only the header. Note that thereport does not include purchase orders for which only the distributionis modified.
Brief Notes
Purchasing prints the brief notes to supplier that you attach to thepurchase order header or line. These notes can contain up to 240characters. Purchasing automatically wraps the notes after 103characters per line for landscape orientation and 75 for portrait. Thesenotes may wrap in the middle of a word to ensure the correct linecount for each page.

4 – 97Purchase Orders
Attachments
Purchasing prints all attachments with a usage of Supplier on thepurchase order. These notes contain up to 64K characters per note.You can attach as many notes as you want to the purchase orderheaders and lines. Purchasing also prints text attachments to the items.Purchasing prints 78 characters per line and automatically wraps to thenext line. The note appears on the purchase order exactly as you enterit. See: Attaching Notes to Purchasing Documents: page 1 – 28.
Purchase Agreements
Purchasing prints Purchase Agreement on all your blanket purchaseagreements. Purchasing prints Purchase Agreement Release on allyour releases.
Purchasing also prints the following messages on contract and blanketpurchase agreements. If you provide effective dates on your contractor blanket purchase agreements, Purchasing prints EFFECTIVE FROM[start effective date] TO [end effective date]. If you provide aneffective start date without an effective end date, Purchasing printsonly EFFECTIVE FROM [start effective date]. If you provide aneffective end date without an effective start date, Purchasing printsonly EFFECTIVE TO [end effective date].
Cancelled Orders
Purchasing automatically indicates whether you cancelled any part ofyour purchase order. If you cancel the purchase order header,Purchasing prints the following cancellation message at the top of thepurchase order and does not print cancellation messages for lines orshipments:
• This purchase order CANCELLED on: [date]
If you cancel a purchase order release, Purchasing prints the followingcancellation message:
• This release CANCELLED on: [date]
If you cancel a blanket purchase agreement line without cancelling thecorresponding header, Purchasing prints the following cancellationmessages:
• This purchase order line CANCELLED on: [date]
• Original quantity ordered: [quantity]
• Quantity CANCELLED: [quantity]
4 – 98 Oracle Public Sector Purchasing User’s Guide
If you cancel a purchase order shipment without cancelling thecorresponding purchase order line, Purchasing prints the followingmessages. Purchasing also prints these messages for each shipment ifyou cancel the corresponding purchase order line.
• This shipment CANCELLED on: [date]
• Original shipment quantity: [quantity]
• Quantity CANCELLED: [quantity]
See: Controlling Documents: page 2 – 48.
Confirming Orders
You designate whether a purchase order is a confirming order whenyou enter the purchase order header information. If you selectConfirming Order in the Purchase Order Details window, Purchasingautomatically prints CONFIRMATION –– DO NOT DUPLICATE.See: Entering Purchase Order Details Information: page 4 – 58.
Foreign Currency
If you designate that a purchase order is in a different currency thanyour base currency, Purchasing prints All prices and amounts on thisorder are expressed in: [foreign currency]. You designate the currencywhen you create the purchase order.
Acceptances
If you require an acceptance from your supplier, Purchasing prints thefollowing message: Please formally accept this order by: [acceptancedate]. You designate whether you require an acceptance when youcreate the purchase order. When you indicate that you require anacceptance, you also provide an acceptance date by which you expectyour supplier to respond. See: Entering and Viewing Purchase OrderAcceptances: page 4 – 79.
UN Number
If you associate a UN number with a purchase order line, Purchasingprints UN Number: [UN number and description]. The UN numberand description can contain up to 240 characters. Purchasing prints 87characters per line for landscape orientation (60 for portrait) andautomatically wraps to the next line. See: Purchasing HazardousMaterials: page 1 – 48.

4 – 99Purchase Orders
Hazard Class
If you associate a hazard class with a purchase order line, Purchasingprints Hazard Class [hazard class name]. Purchasing prints up to 87characters per line for landscape orientation (60 for portrait). See:Purchasing Hazardous Materials: page 1 – 48.
Contract Purchase Agreement References
Purchasing prints the following message for each standard purchaseorder line that references a contract number: This PO line referencescontract PO# [contract number]. You associate a contract purchaseagreement number with a standard purchase order line when youcreate the purchase order.
Quotation References
Purchasing prints the following message for each purchase order linethat references a quotation number: This PO line referencesQuotation #: [supplier quotation number] Line: [line number] YourQuotation #: [purchase order quotation number]. You associate aquotation number with a purchase order line when you create thepurchase order.
Automatic Table Update
Purchasing automatically updates the item history table when youprint your purchase order for each revision. Purchasing records theitem, supplier, quantity, unit of measure, price, and purchase ordernumber. This information is available when you view last price andhistory information. See: Supplier Item Catalog Overview: page 5 – 7.
Printed Purchase Order Diagram Descriptions
The following descriptions include both portrait and landscapeexplanations.
Purchasing prints the purchase order number. Ifthe order is a release, Purchasing prints a dash (’–’)after the purchase order number followed by therelease number. (12 characters, portrait andlandscape)
Purchasing prints the purchase order revision. (4characters, portrait and landscape)
Purchasing prints the page number. (3 characters,portrait and landscape)
PO Number
Revision
Page

4 – 100 Oracle Public Sector Purchasing User’s Guide
The ship to information contains up to 3 lines ofaddress. After the address, Purchasing prints thecity, state (or province), and zip code on the line 4.On line 5, Purchasing prints the country.Purchasing prints the ship to location even if it isthe same as the bill to location. (portrait – 28characters for line 1 through 4 lines, 25 charactersfor line 5; landscape – 30 characters for lines 1through 4, 25 characters for line 5)
The bill to information contains up to 3 lines ofaddress. After the address, Purchasing prints thecity, state (or province), and zip code on the line 4.On the line 5, Purchasing prints the country.(portrait – 28 characters for line 1 through 4 lines,25 characters for line 5; landscape – 30 charactersfor lines 1 through 5)
Purchasing prints the supplier name on line 1.Purchasing then prints up to 3 lines of address. Online 5, Purchasing prints the city, state (orprovince), and zip code. Purchasing prints thecountry on line 6. (portrait – 40 characters for line1, 35 characters for lines 2 through 4, 42 charactersfor line 5; landscape – 42 characters for line 1, 35characters for lines 2 through 6)
Purchasing prints the number your supplierassociates with your agency. You provide thisnumber in the Supplier window. (portrait – 13characters, landscape – 9 characters) See: AboutSuppliers, Oracle Public Sector Payables User’s Guide.
Purchasing prints the number for your supplier.(portrait – 13 characters; landscape – 9 characters)
Purchasing prints the original buyer and creationdate. (portrait – first initial of first name and 10characters of last name; landscape – first initial offirst name and 11 characters of last name)
If you revise the purchase order and do not changethe name of the original buyer, Purchasing printsthe original buyer’s name and the date of therevision. If you change the buyer’s name, the newname is printed. If you have not yet revised thepurchase order, Purchasing leaves this field blank.(portrait – first initial of first name and 10
Ship To
Bill To
Supplier
CustomerAccount
Supplier No.
Date Of Order/Buyer
Revised Date/Buyer

4 – 101Purchase Orders
characters of last name; landscape – first initial offirst name and 11 characters of last name)
Purchasing prints the payment terms for yourpurchase order. (portrait – 27 characters;landscape – 21 characters)
Purchasing prints the mode of transportation forthe items on the purchase order. (portrait – 22characters; landscape 22 characters)
Purchasing prints the free on board terms.(portrait – 28 characters; landscape 20 characters)
Purchasing prints the freight terms code thatexplains the condition of the freight charges andthe party responsible for the freight. (portrait – 27characters; landscape – 21 characters)
If the standard purchase order is for one requestoronly, Purchasing prints the full first and last nameof the requestor. For multiple requestors,Purchasing prints Many. (portrait – 22 characters;landscape – 52 characters)
Purchasing prints the contact name and contactphone number. (portrait – first initial of first name,up to 10 characters of last name, 15 characters forthe phone number; landscape – 37 characters forfirst and last name combined, 16 characters for thephone number)
Standard/Planned Purchase Order Components
Purchasing prints the main text underneath the Item title on thepurchase order. Purchasing first prints header information followed byline, shipment, and distribution information.
For single shipments with the same ship–to address as the header,Purchasing pulls all information up to the line level and blanks out theshipment level entirely, regardless of other factors. For multipleshipments or a single shipment with a different ship–to address fromthe header, Purchasing prints information at both shipment and linelevels.
Standard and Planned Purchase Order Header
Standard and planned purchase orders print the following headerinformation if it pertains to the purchase order:
Payment Terms
Ship Via
FOB
Freight Terms
Requestor/Deliver To
Confirm/Telephone

4 – 102 Oracle Public Sector Purchasing User’s Guide
• Brief Supplier Note
• Long Supplier Note
• This purchase order CANCELLED on: [date].
• CONFIRMATION –– DO NOT DUPLICATE
• All prices and amounts on this order are expressed in [foreigncurrency].
Standard and Planned Purchase Order Lines
After printing the header information, Purchasing prints the followingline information:
Purchasing prints the purchase order line number.
Purchasing prints your item number first. If youhave an item revision number, Purchasing prints[revision number]. If you specify a supplier itemnumber, Purchasing prints (Your #: [supplier itemnumber]) on the next line. Purchasing then printsthe item description on the following line. (portrait– wraps after 23 characters per line, landscape –wraps after 45 characters per line)
Purchasing prints dates only for single shipments.If you provided a promised date, Purchasing printsthe promised date. If you do not provide apromised date or a last date, but you provide aneed by date, Purchasing prints the need by date.Otherwise, this space is blank.
Purchasing prints the quantity of the item you areordering if the line type is quantity–based (innumber format 999999999 with any existingdecimal places, portrait and landscape)
Purchasing prints the item unit of measure forquantity–based items (4 characters, portrait andlandscape)
Purchasing prints the item unit price if the line typeis quantity–based (in number format 999999999999with any existing decimal places in the precisionassociated with the currency, portrait andlandscape)
Purchasing prints the total amount of the line. Thisnumber is the product of the quantity and unit
Line
Item Number/Description
Delivery Date
Quantity
Unit
Unit Price
Extension

4 – 103Purchase Orders
price. (in number format 9999999999999 with anyexisting decimal places in the precision associatedwith the currency, portrait and landscape). Foramount–based line types, Purchasing prints theprice extension only for single shipments.
For single shipments, Purchasing prints Y or N toindicate whether this is a taxable item.
After printing the first line of the purchase order, Purchasing prints thefollowing if they pertain to the purchase order:
• UN Number: [UN number and description]
• Hazard Class: [hazard class name]
• Brief Supplier Line Note
• Long Supplier Line Notes
• This PO line references contract PO# [contract number]
• This PO line references your Quotation #: [quotation number]
Standard and Planned Purchase Order Shipments
After printing each line, Purchasing prints the following shipmentinformation:
• o (This symbol indicates a distinct shipment)
• SHIP TO: [ship to address]. If the ship to address is the same asthe one for the purchase order header, Purchasing printsAddress at top of page directly below the SHIP TO: notewithout printing the address again. This address contains up to3 lines of address. On line 4, Purchasing prints the city, state (orprovince), state, and zip code. On line 5, Purchasing prints thecountry. (35 characters for lines 1 through 5, portrait andlandscape)
After printing the bullet and address to signify a new shipment,Purchasing prints the following information:
If you provided a promised date, Purchasing printsthe promised date. If you do not provide apromised date or a last date, but you provide aneed by date, Purchasing prints the need by date.Otherwise, this space is blank.
Purchasing prints the quantity of the item you areordering for quantity–based items (in number
Tax
Delivery Date
Quantity

4 – 104 Oracle Public Sector Purchasing User’s Guide
format 999999999 with any existing decimal places,portrait and landscape)
Purchasing prints the item unit of measure forquantity–based items (4 characters, portrait andlandscape)
For multiple shipments of amount–based linetypes, Purchasing prints the total amount of theline. This number is the product of the quantityand item price override. (in number format9999999999999 with any existing decimal places inthe precision associated with the currency, portraitand landscape)
Purchasing prints Y or N to indicate whether this isa taxable item. For amount–based line types,Purchasing prints the tax flag only for multipleshipments.
If you cancelled a shipment, Purchasing prints the followinginformation:
• This shipment CANCELLED on: [date]
• Original shipment quantity: [quantity]
• Quantity CANCELLED: [quantity]
Standard and Planned Purchase Order Distributions
After printing each shipment, Purchasing prints the followingdistribution information:
• DELIVER TO:
• [Last Name], [First Name] [Middle Initial] ([quantity ordered]) ifyou provided a requestor name on your purchase orderdistribution and if there is more than one distribution. (54characters, portrait and landscape)
Agreement/Release Components
Blanket/Contract Purchase Agreement Header
Purchasing prints the following header information if it pertains to thepurchase order:
• Brief Supplier Note
• Long Supplier Notes
Unit
Extension
Tax

4 – 105Purchase Orders
• PURCHASE AGREEMENT
• EFFECTIVE FROM [start effective date] TO [end effective date]or
• EFFECTIVE FROM [start effective date], or
• EFFECTIVE TO [end effective date]
• Total agreement amount: [amount agreed].
• This purchase order CANCELLED on: [date]
• CONFIRMATION –– DO NOT DUPLICATE
• All prices and amounts on this order are expressed in [foreigncurrency].
Blanket Purchase Agreement Lines
After printing the header information, Purchasing prints the followingline information:
Purchasing prints the purchase agreement linenumber
Purchasing prints your item number first. If youhave an item revision number, Purchasing prints[revision number]. If you specify a supplier itemnumber, Purchasing prints (Your #: [supplier itemnumber]) on the next line. Purchasing then printsthe item description on the following line. (portrait– wraps after 23 characters per line, landscape –wraps after 45 characters per line)
Purchasing prints the quantity committed of theitem you are ordering for quantity–based items (innumber format 999999999 with any existingdecimal places, portrait and landscape)
Purchasing prints the item unit of measure forquantity–based items (4 characters, portrait andlandscape)
Purchasing prints the item unit price forquantity–based items (in number format999999999999 with any existing decimal places inthe precision associated with the currency, portraitand landscape)
Purchasing prints the total amount committed forthe line. This number is the product of the
Line
Item Number/Description
Quantity
Unit
Unit Price
Extension

4 – 106 Oracle Public Sector Purchasing User’s Guide
quantity and unit price. (in number format9999999999999 with any existing decimal places inthe precision associated with the currency, portraitand landscape). For amount–based line types,Purchasing prints the price extension only forsingle shipments.
After printing the first line of the purchase order, Purchasing prints thefollowing information if it pertains to the purchase order:
• UN Number: [UN number and description]
• Hazard Class: [hazard class name]
• This purchase order line CANCELLED on: [date]
• Original quantity ordered: [quantity]
• Quantity CANCELLED [quantity]
• Brief Supplier Line Note
• Long Supplier Line Notes
• This PO line references your Quotation #: [quotation number]
Blanket Purchase Agreement Release Header
Purchasing prints the following header information if it pertains to therelease:
• Brief Supplier Note from Blanket Purchase Agreement
• Long Supplier Note from Blanket Purchase Agreement
• BLANKET AGREEMENT RELEASE (for blanket releases)
• PLANNED PURCHASE ORDER RELEASE (for scheduledreleases)
• This release CANCELLED on: [date]
• All prices and amounts on this order are expressed in [foreigncurrency].
Blanket Purchase Agreement Release Lines
After printing the header information, Purchasing prints the followingline information:
Purchasing prints the purchase order line number
Purchasing prints your item number first. If youhave an item revision number, Purchasing prints[revision number]. If you specify a supplier item
Line
Item Number/Description

4 – 107Purchase Orders
number, Purchasing prints (Your #: [supplier itemnumber]) on the next line. Purchasing then printsthe item description on the following line. (portrait– wraps after 23 characters per line, landscape –wraps after 45 characters per line)
Purchasing prints the item unit price forquantity–based items (in number format999999999999 with any existing decimal places inthe precision associated with the currency, portraitand landscape)
After printing the first line of the purchase order, Purchasing prints thefollowing information if it pertains to the purchase order:
• UN Number: [UN number and description]
• Hazard Class: [hazard class name]
• This purchase order line CANCELLED on: [date]
• Original quantity ordered: [quantity]
• Quantity CANCELLED [quantity]
• Brief Supplier Line Note
• Long Supplier Line Notes
• This PO line references your Quotation #: [quotation number]
Blanket Purchase Agreement Release Shipments
After printing each line, Purchasing prints the following shipmentinformation:
• o (This symbol indicates a distinct shipment)
• SHIP TO: [ship to address]. If the ship to address is the same asthe purchase order header address, Purchasing prints Address attop of page directly below the SHIP TO: note without printingthe address again. This address contains up to 3 lines of address.On line 4, Purchasing prints the city, state (or province), and zipcode. On line 5, Purchasing prints the country. (35 characters forlines 1 through 3, 74 characters for line 4, and 25 characters forline 5, portrait and landscape)
After printing the bullet and address to signify a new shipment,Purchasing prints the following information:
If you provided a promised date, Purchasing printsthe promised date. If you do not provide apromised date or a last date, but you provide a
Unit Price
Delivery Date

4 – 108 Oracle Public Sector Purchasing User’s Guide
need by date, Purchasing prints the need by date.Otherwise, this space is blank.
Purchasing prints the quantity of the item you areordering for quantity–based items (in numberformat 999999999 with any existing decimal places,portrait and landscape)
Purchasing prints the item unit of measure forquantity–based items (4 characters, portrait andlandscape)
Purchasing prints the item price override forquantity–based items (in number format999999999999 with any existing decimal places inthe precision associated with the currency, portraitand landscape)
Purchasing prints the total amount of the line. Thisnumber is the product of the quantity and itemprice override. (in number format 9999999999999with any existing decimal places in the precisionassociated with the currency, portrait andlandscape)
Purchasing prints Y or N to indicate whether this isa taxable item.
If you cancelled a shipment, Purchasing prints the followinginformation:
• This shipment CANCELLED on: [date]
• Original shipment quantity: [quantity]
• Quantity CANCELLED [quantity]
Blanket Purchase Agreement Release Distributions
After printing each shipment, Purchasing prints the followingdistribution information:
• DELIVER TO:
• [Last Name], [First Name] [Middle Initial] ([quantity ordered]) ifyou name the requestor. Unspecified ([quantity ordered])otherwise. (45 characters, portrait and landscape)
Quantity
Unit
Unit Price
Extension
Tax

4 – 109Purchase Orders
Total
Purchasing prints Continued at the bottom of every page except for thelast page of the purchase order. Purchasing prints the sum of thepurchase order lines on the bottom of the last page.

4 – 110 Oracle Public Sector Purchasing User’s Guide
Document Revision Numbering
You can create multiple revisions of your purchasing documents(planned and standard purchase orders and blanket and contractpurchase agreements). Use the Document Types window to set whethereach of these documents is archived upon approval or upon printing.All revisions begin at 0, and Purchasing increments this revision numberby 1 when you make changes to controlled information and the currentrevision number is equal to the archived number. As a result, the firstrevision that you print might not be 0 if you are archiving on approval.See: Defining Document Types: page 1 – 65.
The following examples illustrate the difference between archiving onapproval and on printing:
Archiving on Approval
Action Archive Rev Current Rev
Step 1. Create purchase order None 0
Step 2. Approve purchase order 0 0
Step 3. Change controlled information 0 1
Step 4. Approve purchase order 1 1
Step 5. Print purchase order 1 1
Table 4 – 7 (Page 1 of 1)
Archiving on Print
Action Archive Rev Current Rev
Step 1. Create purchase order None 0
Step 2. Approve purchase order None 0
Table 4 – 8 (Page 1 of 2)

4 – 111Purchase Orders
Current RevArchive RevAction
Step 3. Change controlled information None 0
Step 4. Approve purchase order None 0
Step 5. Print purchase order 0 0
Step 6. Change controlled information 0 1
Step 7. Approve purchase order 0 1
Step 8. Change controlled information 0 1
Step 9. Print purchase order 1 1
Table 4 – 8 (Page 2 of 2)
Document Revision Rules
The following table describes the additions and changes that causePurchasing to increment document revision numbers:

4 – 112 Oracle Public Sector Purchasing User’s Guide
Standard Planned Blanket Contract Release
Buyer ✔ ✔ ✔ ✔ ✔
Contact ✔ ✔ ✔ ✔
Confirm ✔ ✔ ✔ ✔
Ship–To ✔ ✔ ✔ ✔
Bill–To ✔ ✔ ✔ ✔
Payment Terms ✔ ✔ ✔ ✔
Freight Carrier /Ship Via
✔ ✔ ✔ ✔
HEADERFOB ✔ ✔ ✔ ✔
Freight Terms ✔ ✔ ✔ ✔
Brief Note toSupplier
✔ ✔ ✔ ✔
Acceptance Re-quired
✔ ✔ ✔ ✔ ✔
Acceptance DueDate
✔ ✔ ✔ ✔ ✔
Amount Limit ✔ ✔ ✔
Effective Date ✔ ✔ ✔
Expiration Date ✔ ✔ ✔
Cancel Flag ✔ ✔ ✔ ✔
Amount Agreed ✔ ✔
Release Number ✔
Release Date ✔
Confirming Order ✔ ✔ ✔ ✔ ✔
Table 4 – 9 (Page 1 of 3)

4 – 113Purchase Orders
ReleaseContractBlanketPlannedStandard
S
Unit Price ✔ ✔ ✔
S
Line Number ✔ ✔ ✔
S
Item ✔ ✔ ✔
S
Item Revision ✔ ✔ ✔
S
Item Description ✔ ✔ ✔
S
Payment Terms ✔ ✔ ✔
S
Quantity ✔ ✔ ✔
S
Unit of Measure ✔ ✔ ✔
S
Source QuotationHeader
✔ ✔ ✔
S
Source QuotationLine
✔ ✔ ✔
LINESHazard Class ✔ ✔ ✔
UN Number ✔ ✔ ✔
Contract Number ✔ ✔ ✔
Supplier ItemNumber
✔ ✔ ✔
Brief Note toSupplier
✔ ✔ ✔
Price Type ✔ ✔ ✔
Quantity Agreed ✔
Amount Agreed ✔
Closed Code ✔ ✔ ✔ ✔ ✔
Cancel Flag ✔ ✔ ✔ ✔ ✔
Table 4 – 9 (Page 2 of 3)

4 – 114 Oracle Public Sector Purchasing User’s Guide
ReleaseContractBlanketPlannedStandard
P
Ship–To Location ✔
PQuantity ✔
PRICEBREAKS Break Price ✔
Price Break Num-ber
✔ ✔ ✔
S PM
Shipment Number ✔ ✔ ✔ ✔
S PM
Ship–To ✔ ✔ ✔ ✔
S PM
Quantity ✔ ✔ ✔ ✔
S PM
Promise Date ✔ ✔ ✔ ✔
SHIPMENT Need–By Date ✔ ✔ ✔ ✔
Last AcceptanceDate
✔ ✔ ✔ ✔
Taxable ✔ ✔ ✔ ✔
Shipment Price ✔
Cancel Flag ✔ ✔ ✔ ✔ ✔
DISTRIBUO
Quantity ✔ ✔ ✔ ✔
TION Requestor ✔ ✔ ✔ ✔
Charge Account ✔ ✔ ✔
Table 4 – 9 (Page 3 of 3)
Document Reapproval Rules
Documents are unapproved when you add or change specificinformation, regardless of whether the revision is incremented. Almostall changes that cause the revision to be incremented also unapprove thedocument, as does placing the document on hold. However, if youchange the line level Brief Note to Supplier, cancel the document or itsentities, or change the Firm Demand flag or receiver note, the documentdoes not require reapproval.

4 – 115Purchase Orders
Controlled changes unapprove either the document header alone, orboth the header and its shipments. However, you can continue toreceive against approved shipments even when the header isunapproved.
You can also control whether—or how much of—a revision (forexample, to Quantity) requires the document to undergo the entireapproval process or to be instantly approved. See: Workflow Processesfor Approving Change Orders: page 2 – 73.
The following table describes the additions and changes you can makethat cause Purchasing to unapprove a document.

4 – 116 Oracle Public Sector Purchasing User’s Guide
Standard Planned Blanket Contract Release
Buyer ✔ ✔ ✔ ✔ ✔
Contact ✔ ✔ ✔ ✔
Confirm ✔ ✔ ✔ ✔
Ship–To ✔ ✔ ✔ ✔
Bill–To ✔ ✔ ✔ ✔
Payment Terms ✔ ✔ ✔ ✔
Ship via ✔ ✔ ✔ ✔
FOB ✔ ✔ ✔ ✔
HEADER:Unapproves
eaderFreight Terms ✔ ✔ ✔ ✔
HeaderBrief Note toSupplier
✔ ✔ ✔ ✔
AcceptanceRequired
✔ ✔ ✔ ✔ ✔
Acceptance DueDate
✔ ✔ ✔ ✔ ✔
Amount Limit ✔ ✔ ✔
Effective Date ✔ ✔ ✔
Expiration Date ✔ ✔ ✔
Amount Agreed ✔
Release Number ✔
Release Date ✔
Table 4 – 10 (Page 1 of 3)

4 – 117Purchase Orders
ReleaseContractBlanketPlannedStandard
Unit Price ✔ ✔ ✔
Line Number ✔ ✔ ✔
Item ✔ ✔ ✔
Item Revision ✔ ✔ ✔
Item Description ✔ ✔ ✔
Item Category ✔ ✔ ✔
Quantity ✔ ✔ ✔
Unit of Measure ✔ ✔ ✔
Source Quota-tion Header
✔ ✔ ✔
Source Quota-tion Line
✔ ✔ ✔
LINEUna ro es
Hazard Class ✔ ✔ ✔
UnapprovesHeader Contract
Number✔ ✔ ✔
Supplier ItemNumber
✔ ✔ ✔
UN Number ✔ ✔ ✔
Price Type ✔ ✔ ✔
Price Limit ✔
Quantity Agreed ✔
Amount Agreed ✔
Brief Note toSupplier
✔ ✔ ✔
Promised Date ✔ ✔ ✔
Need–By Date ✔ ✔ ✔
Capital Expense ✔ ✔ ✔
Table 4 – 10 (Page 2 of 3)

4 – 118 Oracle Public Sector Purchasing User’s Guide
ReleaseContractBlanketPlannedStandard
P
Ship–ToLocation
✔
PRICEBREAKS:Una ro es
Quantity ✔UnapprovesHeader Break Price ✔
Discount ✔
S PM
ShipmentNumber
✔ ✔ ✔
S PM
Ship–To ✔ ✔ ✔
S PM
Quantity ✔ ✔ ✔
SHIPMENT:Una ro es
Promise Date ✔ ✔ ✔UnapprovesHeader andShipment
Need–By Date ✔ ✔ ✔Shipment
Last AcceptanceDate
✔ ✔ ✔
Taxable (Headeronly)
✔ ✔ ✔
Shipment Price ✔
DISTRIBUO
DistributionNumber(Header Only)
✔ ✔ ✔
TION:Unapproves
eader and
Quantity ✔ ✔ ✔
Header andShipment Requestor
(Header Only)✔ ✔ ✔
Charge Account ✔ ✔ ✔
Table 4 – 10 (Page 3 of 3)

4 – 119Purchase Orders
Changing Encumbered Documents
You can make changes to a purchase order for which funds have alreadybeen reserved (or encumbered). You do this by temporarily unreservingthe document, making the desired changes, and reserving the documentagain. The Unreserve action takes place at the header level only; itaffects all lines on a purchase order, and changes the document’s statusto Requires Reapproval.
Note: If the appropriate approver modifies an encumberedrequisition, Purchasing unreserves the requisition automatically.
� To make changes to an encumbered purchase order:
1. Choose the Approve button.
The Approve Document window appears.
2. Select Unreserve.
The Unreserve option is available only if funds are currentlyreserved for at least one line in your document.
3. Enter an Unreserve Date that falls within an open reserve period.
4. Choose OK.
5. Make your changes to the document and choose Approve again.
6. In the Approve Document window that appears, select Reserve toreserve funds again for the document.
7. Select Submit for Approval and choose OK to resubmit thedocument for approval.
See Also
Submitting a Document for Approval: page 2 – 32
Document Reapproval Rules: page 4 – 114
Overview of Encumbrance Accounting, Oracle Public Sector GeneralLedger User’s Guide

4 – 120 Oracle Public Sector Purchasing User’s Guide
Overview of Outside Processing
The competitive advantages of outside processing include:
• using specialized supplier skills in your manufacturing processto help lower engineering and manufacturing costs and increaseproduction quality
• using supplier capacity to temporarily or permanently increaseyour overall production capacity
Oracle Manufacturing allow you to include supplier–sourcedcomponents and resources in your manufacturing processes. Thecomplete life cycle of outside processing from setup through executionis described below.
Outside Processing Items and Outside Resources
You can define outside processing items that representsupplier–sourced items, resources, and services you include in yourbuild process. These items can be non–stocked items which representthe actual supplier contribution in your build process or you can definethe assembly itself as an outside processing item. The outsideprocessing item is the item you enter on your purchase order lines andreceive in your purchase order shipments.
You also define outside resources and associate them with theseoutside processing items. The outside resources are included on yourroutings for scheduling and costing purposes. A job or repetitiveschedule in Work in Process is charged for outside processing throughthese outside resources.
Work in Process automatically requisitions the outside processing itemsassociated with outside resources when you perform move transactionson jobs or repetitive schedules with outside processed assemblies.Purchasing charges outside resources to jobs or repetitive scheduleswhen you receive the outside processing items.
Multiple Outside Resources per Operation
You can assign multiple outside resources to each operation on theroutings of your outside processed assemblies.
Supplier–Sourced Components
You can define supplier–sourced components on your bills of materialto identify components that are provided by suppliers.

4 – 121Purchase Orders
Automatic Requisition Generation
Work in Process automatically generates a purchase requisition whenyou move into Queue of an operation that contains an outside resourcelinked to an outside processing item. You then use Autocreate toconvert these requisitions to purchase orders or releases against blanketagreements.
Manual Outside Resource Requisitions and Purchase Orders
You can manually requisition and/or purchase outside resources thatare not linked to outside processing items by requisitioning and/orpurchasing an outside processing item and referencing a particularoutside resource on a job or repetitive schedule.
Multiple Jobs or Repetitive Schedules per Purchase Order Line
You can define a purchase order with several lines; each line can be fora different outside processing item, and each outside processing itemcan refer to several discrete jobs or repetitive schedules.
View Jobs or Repetitive Schedules Included on a Purchase Order
You can view each of the jobs or repetitive schedules referenced on apurchase order. You can also report purchase order informationassociated with resources on jobs or repetitive schedules.
Outside Processed Assembly Tracking
You can track outside processed assemblies at the supplier usingintraoperation move transactions.
Automatic Resource Charging
Purchasing automatically charges jobs or repetitive schedules foroutside resources when you receive against the outside processingitems linked to outside resources on those jobs or repetitive schedules.
Automatic Move Transactions
Purchasing automatically moves assemblies to Queue of the nextoperation or to To Move of the final operation (if you are at the finaloperation) when you receive outside processing items linked to POMove resources.
Receiving Inspection Options
Oracle Manufacturing gives you several options to handle yourreceiving inspection flow: Supplier Inspection, Shop Floor Inspection,and Receiving Inspection.

4 – 122 Oracle Public Sector Purchasing User’s Guide
Returns and Corrections
You can return outside processed assemblies to suppliers for rework,and you can reverse receiving transactions to correct over–receipts.Oracle Manufacturing reverses accounting charges and movetransactions associated with any correction you make.
Introduction to Outside Processing
Oracle Manufacturing provides complete life cycle support of youroutside processing public sector needs from setup through receipt.
Product Setup Function
Inventory Define outside processing items
Define outside processing item list prices and lead times
Define units of measure
Purchasing Define and assign supplier sourcing rules
Define outside processing line types
Link employees to application users
Define quantity received tolerances and control
Define receiving routing controls
Define ship to, deliver to locations
Define receiving, PPV, IPV, and AP accrual accounts
Bills of Material Define outside resources
Define departments
Define routings
Attach supplier–sourced components to bills of material
Perform cost rollup
Work in Process Define WIP accounting classes
Table 4 – 11 (Page 1 of 1)

4 – 123Purchase Orders
Outside Processing Business Examples
Oracle Manufacturing provides flexible outside processing that you canadapt to match your business flow. You can review the businessexamples in this section to better understand how the OracleManufacturing outside processing features are used in real businessscenarios.
Understanding the Physical Flow of Outside Processed Assemblies
Oracle Manufacturing supports your physical outside processing flowby providing you with the tools necessary to record and charge eachactivity. Before you implement the system, you should understandyour physical material flows to and from your suppliers and then tailoryour implementation to match your physical model.
Setting Up Inventory
You define outside processing items in Inventory. These items can benon–stocked items which represent the actual supplier contribution inyour build process or you can define the assembly itself as an outsideprocessing item. When you create purchase requisitions and purchaseorders, you enter outside processing items on the requisition andpurchase order lines.
You must define all outside processing items in your purchasingorganization. In addition, you must define and maintain these outsideprocessing items in all your work in process organizations. You mustmaintain the outside processing item list price and lead time which areused when automatically creating a purchase requisition. You mustmaintain consistent item attributes for outside processing items youinclude in multiple organizations.
You also define outside processing item and outside resource units ofmeasure in Inventory. You can receive an item in an alternate unit ofmeasure. When Purchasing charges the resource to the job or repetitiveschedule, it converts the receiving unit of measure back to the resourceunit of measure.
Setting Up Bills of Material
You define outside resources, departments, routings, and componentsin Bills of Material. Resources identify the item, resource, or serviceyou are purchasing from a supplier. You must associate an outsideresource with a manufacturing department so you can attach theresource to a routing operation.

4 – 124 Oracle Public Sector Purchasing User’s Guide
When you define your bills of material, you can identify thecomponents supplied by a supplier. You do this by choosing theSupplier supply type for these components on your bill of material.
Setting Up Purchasing
You can define supplier sourcing rules and Approved Supplier Listentries to reference source documents such as blanket purchaseagreements when you requisition outside processing items. Also, thepreparer on a requisition comes from the employee who is linked to theapplication user who enters the move transaction which creates therequisition.
You must also define ship to and deliver to locations which Purchasinguses when receiving outside processing items. The ship to locationrepresents the delivery dock and/or inspection location and the deliverto location represents the destination location, which is work inprocess. The destination location is the same location that youassociate with the department of the outside operation.
You can also enable receiving tolerance percentages as well as receivingrouting controls in Purchasing. Finally, you must specify severalaccounts which Purchasing uses when receiving outside processingitems.
Setting Up Work in Process
You define your standard discrete, non–standard, and repetitiveassembly accounting classes in Work in Process. You must enter anoutside processing account to charge when you receive outsideprocessing items linked to outside resources on jobs and repetitiveschedules.
Planning Outside Resource Load
Capacity plans either rough–cut or detailed resource load for outsideresources with time–based units of measure.
Requisitioning Outside Processing Items
Work in Process automatically requisitions appropriate outsideprocessing items when you move into Queue of an operation with anoutside resource. You can also manually define a purchase requisitionfor an outside processing item and link it to a job or repetitive schedule.
Purchasing Outside Processing Items
You can automatically create a purchase order or blanket release froman outside processing purchase requisition. The purchase order or

4 – 125Purchase Orders
release contains lines referencing outside processing items, shipmentsreferencing delivery information, and distributions referencing jobs orrepetitive schedules and resources to charge. You can also manuallydefine a purchase order for an outside processing item and link it to ajob or repetitive schedule.
Receiving Outside Processing Items
When you receive outside processing items linked to jobs or repetitiveschedules, Purchasing automatically charges your job or repetitiveschedule for the cost of the outside processing item at standard or atthe purchase price, depending upon how you define the outsideresource linked to the outside processing item you are receiving.Purchasing also moves outside processed assemblies to the nextoperation on the shop floor if you defined the resource as To Move.
Managing Returns and Adjustments
You can return outside processed assemblies to suppliers for rework,and you can reverse over–receipts you erroneously transacted.Purchasing reverses move transactions and accounting chargesassociated with the initial transactions.
Outside Processing Business Examples
In general, you use outside processing to facilitate the purchase andcosting of supplier services included in your production activities. Thefollowing are three examples of how you can use outside processing inOracle Manufacturing.
You are not required to manage your outside processing manufacturingactivities exactly as described in the following examples. Rather, theobjective of these examples is to highlight the flexibility of outsideprocessing across a variety of situations.
Oracle recommends that you experiment and review the results ofdifferent approaches to determine the best implementation of theoutside processing functionality for your unique needs. You should usethese examples as a starting point to better understand how you mightuse outside processing at your manufacturing facilities.
A Computer Plating Service Example
You are a computer manufacturer who sends your frame assemblies toa supplier for plating. You have defined a primary routing for yourassemblies that includes a supplier plating operation. Further, you

4 – 126 Oracle Public Sector Purchasing User’s Guide
have created a relationship, a contract, and even blanket purchaseagreements with your plating supplier based on your productioncapabilities and capacity planning.
To support the purchase and costing of the supplier plating service, youdefine an outside resource called ”Plating” with an autocharge type ofPO Move, a UOM of EA for each, and a standard cost. Then you linkthis resource to an outside processing item called ”Plating”. This is theitem that you purchase and receive from your supplier.
When your assemblies are ready for plating, you ship them to yoursupplier and enter a move transaction recording the move to thesupplier plating operation. The move automatically initiates apurchase requisition for the ”Plating” outside processing item based onthe number of assemblies you moved. You create a purchase releasefor the requisition against a blanket order for the ”Plating” outsideprocessing item and send it to the supplier.
You receive the plated assemblies back from the supplier at the nextoperation on your routing. The job or repetitive schedule you use tocontrol your production is automatically charged for the ”Plating”outside resource when you receive the assemblies. The assemblies areautomatically moved to the next operation for inspection to match yourphysical flow.
You perform inspection of the assemblies at the following operationand either move them on or return them to the supplier for rework. Ifyou return them for rework, Oracle Manufacturing automaticallyreverses the charges and performs a reversing move transaction toaccurately track the physical flow of your assemblies.
A Plating Service Setup Example
You are a computer manufacturer who sends your frame assemblies toa supplier for plating. As part of your contract, your supplier chargesthe same setup fee for each job or repetitive schedule, regardless of thenumber of assemblies on the job or repetitive schedule. You havedefined a primary routing for your assemblies that includes a supplierplating operation with a Lot based outside resource for plating setup.
To support the purchase and costing of this setup charge, you define anoutside resource called ”Plating SU” with an autocharge type of POReceipt, a UOM of EA for each, and a standard cost. Then you link thisresource to an outside processing item called ”Plating SU”. Thepurchase quantity is always 1 on a job or repetitive schedule, unlike the”Plating” outside processing item, which was based on the number ofassemblies you shipped.

4 – 127Purchase Orders
When your assemblies are ready for plating, you ship them to yoursupplier and enter a move transaction recording the move to thesupplier plating operation. The move automatically initiates apurchase requisition for a single ”Plating SU” outside processing itemassociated with the ”Plating SU” outside resource. You create apurchase order from the requisition and send it to the supplier.
When you receive the assemblies back from the supplier, there is aseparate line item for ”Plating SU”. The job or repetitive schedule youuse to control your production is automatically charged for the setupcharge when you receive that item. The assemblies are not moved afterthis receipt; rather they are moved when you receive the ”Plating” itemsince the ”Plating” resource’s autocharge type is PO Move.
A Supplier Labor Charging Example
You are a computer manufacturer who sends your frame assemblies toa supplier for plating. Your supplier charges a setup fee for each job orrepetitive schedule and a plating service charge for each assembly heservices. In addition, the supplier has a resource at his plant toperform periodic chemical analysis relating to the assembly platingprocess. Although this service is not a standard part of the platingprocess, you still include this outside resource on your routing so youcan charge it as needed.
To support the purchase and costing of this chemical analysis resource,you define an outside resource called ”Analysis” with an autocharge ofPO Receipt, a UOM of EA for each, and a standard cost of $1.However, you do not link this resource to the ”Analysis” outsideprocessing item.
Since the ”Analysis” resource is not linked to the ”Analysis” outsideprocessing item, your move transaction to the supplier platingoperation never requisitions the resource. However, your buyerincludes this item on purchase orders as necessary to authorize thisperiodic chemical analysis service. The buyer includes the amount heauthorizes (such as 100 EA @ $1 = $100) and the job or repetitiveschedule to charge.
When you receive assemblies back from the supplier, there is a separateline item for ”Analysis” charges. The job or repetitive schedule thebuyer referenced on the purchase order line is automatically chargedfor the chemical analysis service charges when you receive that item.The assemblies are not moved after this receipt.

4 – 128 Oracle Public Sector Purchasing User’s Guide
Understanding the Physical Flow of Outside Processed Assemblies
Oracle Manufacturing gives you the flexibility you need to control youroutside processing flows. This essay highlights some basic outsideprocessing scenarios and discusses all of the options you have tomanage your particular outside processing flows. Before you learn thetransaction flows of Oracle Manufacturing, you should understand thephysical flow assumptions on which they are based. This sectioncovers areas such as consuming material requirements, shippingassemblies to suppliers, tracking assemblies at suppliers, andinspecting outside processed assemblies.

4 – 129Purchase Orders
Figure 4 – 1
SUPPLIER
Autorequisition PurchaseReceipt
Op Seq 20 Op Seq 30 Op Seq 40
ShipAssemblies
ReceiveAssemblies
Define PO orPO Release
ReceiveOutside
ProcessingItem
RequisitionOutside
ProcessingItem
ChargeOutside
Resource
Move to Queue Move to Queue
Physical Flow
System Flow
OUTSIDE PROCESSING FLOW
Kitting Options
An outside operation may have material requirements in addition tolabor or machine requirements. Further, you may have differentmethods for satisfying material requirements at an outside operation.For example, you may kit and ship components to your supplier forassembly. Or, you may let your supplier provide the componentshimself. Regardless, Oracle Manufacturing lets you model and transactto match the way you perform outside processing.

4 – 130 Oracle Public Sector Purchasing User’s Guide
You can use the supply type on your bill to indicate who suppliescomponents and when you record the material transactions in thesystem. For example, if your supplier provides components in additionto labor, you can include the components on your bill with a Suppliersupply type. You can charge a job or repetitive schedule for thesecomponents by including their cost in the standard cost of the outsideresource on your routing. Or, if your supplier charges you separatelyfor these components, you can add another outside resourcespecifically for these costs. Master Scheduling/MRP does not plansupplier–sourced components.
If you kit components to send to a supplier for assembly, you caninclude these components on your bill with a Push supply type. Beforeshipping the assemblies, you can run a Pick List and issue thesecomponents to the job or repetitive schedule using the WIP MaterialTransactions window in Work in Process. The material cost is chargedto the job or repetitive schedule when you issue the components. Youcan ship the components along with the assemblies to the supplier.Master Scheduling/MRP does recognize this component demand.
If you want to backflush the components at an outside operation, youcan identify the components on your bill with either an Operation Pullor Assembly Pull supply type. You must still get the components outof inventory and to the supplier, even if you are delaying the backflushuntil later in your process. You would typically run a pick list toidentify the necessary components and ship these components alongwith the assemblies to the supplier. You would then backflush thecomponents and charge the material cost to a job or repetitive schedulewhen you complete the outside operation or complete the assemblies toinventory. Master Scheduling/MRP also recognizes this componentdemand.
Shipping Options
You have several options for shipping your outside processedassemblies to your supplier. Your supplier may pick up assemblies atyour plant based on a regular schedule, or you may ship assemblies toyour supplier on an as needed basis. In some cases, you may wantyour supplier to drop ship assemblies directly to another supplier foradditional outside processing.
You can use move transactions in Work in Process to record outsideprocessing shipments to your supplier. You can include the specificcosts of shipping as separate resources on your routing. In addition,Purchasing lets you record the FOB point on your purchase orders.And, as discussed in the next section, you can also track assemblies atyour supplier using move transactions in Work in Process.

4 – 131Purchase Orders
If you have sequential outside processing operations and you haveworked out the physical flows between your suppliers, you can use POMove resources to automatically move outside processed assembliesfrom one outside operation to the next one on your routing. You mustenter a receiving transaction in Purchasing confirming completion bythe first supplier and receipt by the second supplier.
Outside Processed Assembly Tracking Options
After your supplier receives and begins work on your assemblies, youcan track his progress by entering intraoperation move transactions inWork in Process. For example, when your supplier confirms the startof work you might want to move assemblies from Queue to Run. Laterwhen your supplier notifies you that the completed assemblies arebeing shipped back, you might want to move the assemblies from Runto To move.
Inspection Options
Oracle Manufacturing provides you with several options for inspectingyour supplier work. In general, either you or your supplier canperform inspection.
If your supplier performs inspection (to your specifications), he canthen ship the assemblies directly to the next operation on your routing.He can include the inspection fee either in his overall fee or as aseparate line item. If he charges you separately, you must define aseparate outside resource on your routing for the inspection.

4 – 132 Oracle Public Sector Purchasing User’s Guide
Figure 4 – 2
Supplier
SupplierInspection
NoInspection
With InspectionResource
NoInspection
With InspectionResource
Receiving
ReceivingInspection
3(PO Receipt)
OutsideOp Seq
NextOp Seq
SUPPLIER INSPECTION
3(PO Move)
1
2
If you perform the inspection internally, you can define an internalinspection resource either at the outside operation or at a separateinspection operation with an inspection resource.

4 – 133Purchase Orders
Figure 4 – 3
Supplier
SupplierInspection
NoInspection
With InspectionResource
NoInspection
With InspectionResource
Receiving
ReceivingInspection
2(PO Receipt)
OutsideOp Seq
NextOp Seq
SHOP FLOOR INSPECTION
2(PO Move)
1
You can also receive the outside processed assemblies into a receivinginspection location in Purchasing and perform your inspectionactivities in receiving inspection. Then, you can deliver the assembliesto the shop floor and charge the job or repetitive schedule for theoutside processing services.

4 – 134 Oracle Public Sector Purchasing User’s Guide
Figure 4 – 4
Supplier
SupplierInspection
NoInspection
With InspectionResource
NoInspection
With InspectionResource
Receiving
ReceivingInspection
3(PO Receipt)
OutsideOp Seq
NextOp Seq
RECEIVING/INSPECTION
3(PO Move)
1
2

4 – 135Purchase Orders
Setting Up Inventory
Use the Items window to define and maintain outside processing items.These items can be non–stocked items which represent the actualsupplier contribution in your build process or you can define theassembly itself as an outside processing item. You must define andmaintain these outside processing items across all organizations thatuse them, including the inventory organization you define inPurchasing. See: Defining Items, Oracle Inventory User’s Guide.
Define Outside Processing Items
When you define outside processing items for outside processing, youmust define certain item attributes in the Items window. (See:Purchasing Attribute Group, Oracle Inventory User’s Guide.) Theseattributes let you link outside resources to the outside processing itemsand then include the items on outside processing requisition andpurchase order lines. For each outside processing item, you mustdefine the following:
Outside Processing Item
Set this attribute to Yes to link an outside processing item with anoutside resource and to include an item on an outside processingpurchase order line.
Purchasable
Set this attribute to Yes to include an item on a purchase order line.
Outside Processing Unit Type
You can requisition outside processing items from Work in Process intwo ways. You can requisition them based on the number ofassemblies you are moving into the outside operation. Or, you canrequisition them based on the extension of the number of assembliestimes the usage rate or amount of the resource. In either case, youalways charge the job or repetitive schedule using the extendedquantity for the associated outside resource.
If you want to requisition one outside processing item for eachassembly you ship to a supplier, then you should set the OutsideProcessing Unit Type to Assembly.
For example, suppose your frame assemblies each require one platingservice. You would set up a ”Plating” outside resource and acorresponding ”Plating” outside processing item to represent thisoutside service. You should also set the unit of measure of the frameassembly and the ”Plating” outside processing item to be EA for each.Finally, you need to assign the ”Plating” outside resource to the frame

4 – 136 Oracle Public Sector Purchasing User’s Guide
assembly routing and enter the appropriate usage rate or amount and abasis of Item.
When you move one EA of the frame assembly into the outsideoperation, Work in Process automatically requisitions one EA of the”Plating” outside processing item. Later, when you receive one EA ofthe plated assembly back from the supplier, Purchasing relieves thepurchase order for one ”Plating” item. Purchasing charges the job orrepetitive schedule one frame assembly times the usage rate or amountof the ”Plating” outside resource using the outside resource’s unit ofmeasure.
If you want to requisition the usage rate or amount of the outsideresource for each assembly you move to an outside operation, youshould set the Outside Processing Unit Type to Resource.
For example, suppose your frame assemblies each require three hoursof plating machine time. You would set up a ”Plating” outside resourceand a corresponding ”Plating” outside processing item to represent thisoutside machine time service. You should also set the unit of measureof the outside resource and the outside processing item to HR forhours. Finally, when you assign the ”Plating” outside resource to theframe assembly routing, you should set the usage rate or amount tothree for three HR of plating machine time per assembly.
When you move one EA of the frame assembly into the outsideoperation, Work in Process automatically requisitions three HR of the”Plating” outside processing item. Later when you receive the platedframe assembly back from the supplier, Purchasing relieves thepurchase order for three ”Plating” outside processing item HR andcharges the job or repetitive schedule for three ”Plating” outsideresource HR.

4 – 137Purchase Orders
Outside Processing UOM Type =Assembly
Outside Processing UOM Type =Resource
Outside Processing Item UOM Equals the job or repetitive scheduleassembly UOM.
Equals the outside resource UOM.
Req/PO/Receipt * Equals the assembly move quantityusing the outside processing itemUOM.
Equals the assembly move quantitytimes the outside resource usagerate or amount using the outsideprocessing item UOM.
Charge work in process job or re-petitive schedule
Charge the receipt quantity timesthe outside resource usage rate oramount using the outside resourceUOM.
Charge the receipt quantity usingthe outside resource UOM.
Table 4 – 12 (Page 1 of 1)
* Assumes the outside resource associated with the item has a basis ofItem
Maintain Outside Processing Items in Multiple Organizations
You must maintain each outside processing item you define across allorganizations that use the item in outside processing. This includes thePurchasing inventory organization that you establish in the FinancialsOptions window (See: About Financials Options, Oracle Public SectorPayables User’s Guide.) as well as each of the work in processorganizations you use for building your assemblies. Each of theseorganizations should be part of the same master organization for easeof maintenance.
When you requisition and purchase an outside processing item,Purchasing validates the item attributes for the item definition in theinventory organization. For example, purchasing makes sure the itemis an outside processing item and that it is purchasable. Purchasingthen enters the work in process organization for the job or repetitiveschedule as the Ship–To organization on the purchase order lineshipment. When you receive against the purchase order line shipmentyou must be logged into the Ship–To organization.
Define Units of Measure (UOM)
When you define outside resources in Bills of Material and outsideprocessing items in Inventory, you must also define a primary UOM foreach entity. See: Defining Units of Measure, Oracle Inventory User’sGuide.

4 – 138 Oracle Public Sector Purchasing User’s Guide
Purchasing always purchases an outside processing item in the item’sUOM and charges the job or repetitive schedule in the resource’s UOM.Purchasing can optionally receive an item in an alternate UOM. See:Creating a Routing, Oracle Bills of Material User’s Guide.
Setting Up Bills of Material
Much of the setup required for outside processing occurs in Bills ofMaterial. You must define outside resources and assign them todepartments and shifts. You must also define routings that includeoperations with outside resources. You can also includesupplier–sourced components on your bills of material.
Define Outside Resources
You must define outside resources and link them to outside processingitems in order to automatically generate purchase requisitions foroutside processing. When you assign outside resources to a routing,you also specify a usage rate or amount that determines the quantityyou are requisitioning and/or charging to work in process jobs orrepetitive schedules. You must define the following resource attributesfor outside resources: See: Defining a Routing, Oracle Bills of MaterialUser’s Guide. See: Defining a Standard Operation, Oracle Bills ofMaterial User’s Guide and Count Point and Autocharge Fields, OracleBills of Material User’s Guide
Autocharge
Use this attribute to determine how you charge a resource to a job orrepetitive schedule. For outside resources you want to automaticallyrequisition, you choose either PO Move or PO Receipt. Purchasingcharges these resources to jobs and repetitive schedules when youreceive against purchase order lines linked to the resources.
In addition, Purchasing enters move transactions when you receiveagainst purchase order lines linked to PO Move resources. Purchasingmoves the outside processed assemblies to Queue of the next operationunless you’re at the final operation. In this case, Purchasing moves theassemblies to the To Move step of the last operation. You shouldchoose PO Move and/or PO Receipt based on your physical flow. Youcan have only one PO move resource per operation. You can overridethe autocharge of a resource when you assign the resource to a routing.
You can manually link a purchase order line to a job or repetitiveschedule and charge any PO Move or PO Receipt resource on therouting.

4 – 139Purchase Orders
Outside Processing Item
Use this attribute to associate an outside resource with the outsideprocessing item you are buying from a supplier. When you enter amove into Queue of an operation with an outside resource, Work inProcess automatically requisitions the outside processing itemassociated with the outside resource.
You may not necessarily want to link an outside processing item withevery outside resource. As discussed earlier in the ”ChemicalAnalysis” resource example, you might want to charge a resource to ajob or repetitive schedule but not create requisitions with each movetransaction.
UOM
Use this attribute to specify the UOM associated with a resource. Ingeneral, the UOM of the resource would be quantity based such as EAfor each plated item since this is the likely unit of measure for items onpurchase orders. However, you can use a time based UOM if youpurchase a quantity of time, such as plating machine hours. If yourresource UOM is time based, you can also schedule the resource andinclude the resource in capacity plans. If the UOM is quantity based,you can define a separate resource for scheduling your jobs orrepetitive schedules and for including outside resource load in capacityplans.
Purchasing always purchases items linked to outside resources usingthe outside processing item’s UOM. Purchasing always charges itemsto jobs or repetitive schedules using the resource’s UOM.
Standard Rate
Use this attribute to control whether you charge an outside resource toa job or repetitive schedule at the standard rate of the resource orwhether you charge the job or repetitive schedule at the actualpurchase order line price. If you charge at standard, then Purchasingwrites any variance between the purchase order actual and the resourcestandard cost to the purchase price variance account of the resource atpurchase order receipt. If you charge at actual, then Work in Processwrites any variance to the outside processing elemental varianceaccount associated with the job or repetitive schedule you are chargingat job or period close. You can override whether you charge a resourceat standard when you assign the resource to a routing.
Absorption and Variance Accounts
You must define a purchase price variance account for each outsideresource you define. This account defaults from the organization’s

4 – 140 Oracle Public Sector Purchasing User’s Guide
purchase price variance account. You must also define an absorptionaccount for each outside resource. The absorption account defaultsfrom the organization’s receiving account, which Purchasing debitswhen it receives an outside processing item and subsequently creditswhen it delivers the item to work in process. Purchasing debits theoutside processing account associated with the accounting class of thejob or repetitive schedule when it delivers the item to work in process.
Cost Element
When you define a resource with an Autocharge of either PO Move orPO Receipt, Bills of Material automatically defaults Outside Processingas the cost element. However, you can also charge PO Move and POReceipt resources to any of the other cost elements, including Material,Material Overhead, Resource, and Resource Overhead.
Assuming you use the Outside Processing cost element, the assemblycost rollup inserts the outside resource standard cost into the outsideprocessing cost element for the assembly. Purchasing charges theoutside processing cost element when you receive against purchaseorders. Work in Process credits the outside processing cost element atstandard when you complete assemblies. See: Overview of Work inProcess Costing, Oracle Work in Process User’s Guide.
Costed
Enter Yes to include an outside resources in your cost rollup. You canenter No if you want to use a resource for other purposes such asscheduling. You cannot override this attribute on the routing.
Default Basis
You can define a default basis of either Lot or Item, which you can thenoverride on the routing. Enter Lot if you schedule or charge theresource once for each job or repetitive schedule. Enter Item if youschedule or charge a resource based upon the job or repetitiveschedule’s assembly quantity.
You might enter Lot for outside resources that represent services suchas setup and teardown. Other services for which a supplier chargesbased on the assembly quantity should have a basis of Item.
Resource Unit Cost
Use the resource unit cost to define the standard cost per UOM for aresource. Bills of Material uses this standard along with the standardlot size, usage rate or amount, and basis on the routing when itcalculates the outside processing elemental standard during anassembly cost rollup. Purchasing also charges jobs and repetitive

4 – 141Purchase Orders
schedules using this cost when you receive against outside processingitems linked to outside resources that charge at standard.
As your buyer negotiates price changes with your suppliers, hemaintains the List Price attribute in the Items window. Purchasingdefaults this price when it creates requisitions and purchase orders(except if you set up a blanket, in which case Purchasing defaults theprice on the blanket.). As the actual purchase price varies from thestandard resource cost, you create variances. You can reduce thesevariances by keeping the resource’s unit cost in line with the list pricefor the outside processing item in the Items window. See: DefiningItems, Oracle Inventory User’s Guide and Defining a Resource, OracleBills of Material User’s Guide.
Define Departments with Delivery Locations
You must define departments with outside resources and valid deliverylocations before you can include outside operations in your routings.You cannot associate an outside resource with an operation on arouting unless the resource is assigned to the operation’s departmentand the department has a location associated with it.
Work in Process passes the department location to Purchasing as theDeliver–To location when requisitioning outside processing items.Purchasing requires a Deliver–To location when you receive outsideprocessing items and deliver them to the shop floor. See: Defining aDepartment, Oracle Bills of Material User’s Guide
Define Routings
Use the Routing window in Bills of Material to associate outsideresources with assemblies requiring outside processing. You can definea routing with one or more outside operations that each include one ormore outside resources. When you associate an outside resource withan operation on a routing, you set the usage rate or amount for thatresource. Work in Process uses the routing to calculate the requisitionquantities and to schedule jobs and repetitive schedules. CostManagement uses the routing to calculate the assembly’s standard cost.See: Creating a Routing, Oracle Bills of Material User’s Guide.
Calculating Requisition Quantities for Outside Processing Unit Type ofResource
When Work in Process requisitions an outside processing item with aOutside Processing Unit Type of Resource, it uses the outsideresource’s usage rate or amount and basis to calculate the requisitionquantity.

4 – 142 Oracle Public Sector Purchasing User’s Guide
If the basis is Item, Work in Process requisitions the usage rate oramount times the move quantity each time you move into Queue of theoutside operation. For example, if you have an outside resource with aUOM of HR and a usage rate or amount of 10, and you move fiveassemblies into the outside operation, Work in Process requisitions 50HR of the outside processing item linked to the outside resource.
For outside resources with a basis of Lot, Work in Process requisitionsthe usage rate or amount of the resource when you move the firstassembly on the job or repetitive schedule into Queue of the outsideoperation.
Calculating Requisition Quantities for Outside Processing Unit Type ofAssembly
When requisitioning items with an Outside Processing Unit Type ofAssembly, Work in Process does not extend the assembly movequantity by the usage rate or amount.
For outside resources with a basis of Item, Work in Process requisitionsthe move quantity each time you move into Queue of the outsideoperation.
For outside resources with a basis of Lot, Work in Process requisitions aquantity of 1 when you move the first assembly on the job or repetitiveschedule into Queue of the outside operation.
Job/ScheduleAssembly
Outside Processing Item Outside Resource Transaction Quantities
MoveQty
UOM OutsideProcessingUnit Type
ListPrice
UOM Basis UsageRate orAmount
StandardRate
UOM Req, PO,ReceiptQuantities
Job/ScheduleChargeAmount
50 EA Assembly $1 EA Item 10 $1 EA 50 EA (50 x 10) @ $1= $500
50 EA Assembly $1 EA Lot 10 $1 EA 1 EA (1 x 10) @ $1= $10
50 EA Resource $1 HR Item 10 $1 HR 500 HR (500 HR @ $1)= $500
50 EA Resource $1 HR Lot 10 $1 HR 10 HR (10 HR @ $1)= $10
Table 4 – 13 (Page 1 of 1)

4 – 143Purchase Orders
Work in Process Scheduling
Work in Process schedules all resources in a routing with Schedulingset to Yes and with a time based unit of measure. If you arerequisitioning outside processing items for outside operations withunits of measure that are not time based, you may want to addresources with time based units of measure to the routing to accuratelyschedule the outside processing work. You can also include time basedoutside resources in capacity planning. See: Overview of Work inProcess Scheduling, Oracle Work in Process User’s Guide and Creating aRouting, Oracle Bills of Material User’s Guide.
Define Supplier–Sourced Components
You can define supplier–sourced components on bills of material bychoosing a supply type of Supplier. Work in Process prints the supplytype on several reports including the Pick Lists and the Routing Sheets.This information signals to your supplier the components that he isresponsible for supplying. Master Scheduling/MRP does not planthese components.
Whether you associate a standard cost with these supplier–sourcedcomponents in the item master depends on how your supplier chargesyou for the item. If your supplier includes the component costs in theprice of his service (the outside resource), then you would not want toalso include the cost in the assembly’s bill. For example, if your platingsupplier provides zinc as part of his plating service, then you mightinclude zinc on your bill at the outside operation but include the cost ofzinc in the plating resource. See: Creating a Bill of Material, Oracle Billsof Material User’s Guide
Cost Rollup
The cost rollup uses the outside resource’s usage rate or amount, unitcost, and basis to calculate the outside processing costs for the primaryrouting of each assembly. Lot based resources are allocated across theassembly’s standard lot size in calculating the assembly’s standardcost. Assuming you associate the Outside processing cost element withyour outside resources, the assembly cost rollup inserts the outsideresource costs into the outside processing cost element. See: RollingUp Assembly Costs, Oracle Cost Management User’s Guide

4 – 144 Oracle Public Sector Purchasing User’s Guide
Setting Up Purchasing
There are several setup steps for outside processing that you mustperform in Purchasing. Some of these steps are optional and can beperformed to help facilitate your outside processing flow. Other stepsare required to be able to link requisitions and purchase orders to jobsor repetitive schedules as well as to receive purchase order shipments.
Define Outside Processing Line Types
Purchasing requires you to enter a line type when you enter arequisition or purchase order line. Purchasing is installed with apredefined line type called Outside Processing, and Work in Processuses this line type when it creates pending requisitions. You can defineadditional line types for outside processing. You may want to use auser defined line type if you manually requisition and purchase anoutside processing item. See: Defining Line Types: page 1 – 61.
Enter Employee and Link to Applications Users
Purchasing requires an employee for all requisitions. When Work inProcess requisitions outside processing items, it includes an employeename for Purchasing to put on the requisition as the preparer. Thisemployee name is the one linked to the applications user who performsthe move transaction that initiates the requisition.
To support this functionality, you must define employees and link themto the applications users who enter move transactions. This includesusers who enter move transactions on–line as well as users associatedwith bar code transactions and other moves you insert into the movetransaction open interface. See: Enter Person, Oracle Human ResourceManagement Systems User’s Guide and Users Window, Oracle ApplicationsUser’s Guide.
Define Sourcing Rules
You can define rules for each outside processing item to help youdetermine from which supplier to source the item. When Work inProcess requisitions an outside processing item, it checks whether asourcing rule exists for that item. If so, then that supplier is defaultedon the requisition. You can override the supplier default on thepurchase order. See: Automatic Sourcing: page 5 – 69.
Define Outside Processing Item List Prices
When you requisition an outside processing item, Purchasing enters adefault price for the item. If there is a blanket purchase agreement,Purchasing uses this price. Otherwise, Purchasing defaults the list

4 – 145Purchase Orders
price from the Items window for the outside processing item. See:Defining Items, Oracle Inventory User’s Guide.
If you have defined source documents in the Approved Supplier List,Purchasing uses the highest ranking document to determine the price.
Define Outside Processing Item Lead Times
When Work in Process requisitions an outside processing item, itcalculates the Need by Date by adding the sum of the preprocessing,postprocessing, fixed lead time, and the variable lead time elements ofthe outside processing item to the move transaction date. You shouldmaintain accurate item lead times for outside processing items in theItems window. See: Defining Items, Oracle Inventory User’s Guide.
Define Overreceipt Tolerance and Control
You can specify a quantity received tolerance percent to limit thequantity you can over receive on a purchase order shipment. You canalso control whether you provide a warning for over–receipts orwhether you prevent over–receipts beyond the percentage you specify.For outside processing, you may want to prevent any over–receipts byspecifying a 0% tolerance. For example, if you purchase assemblyplating for 10 assemblies and receive 11 from the supplier, you areunable to automatically move the assemblies to the next operation.Work in Process prevents move transactions for quantities greater thanwhat exists in an operation. Also, you are adding more costs to a job orrepetitive schedule than you relieve which causes a variance at job orperiod close.
You can define your receiving tolerance in the Receiving Optionswindow in Purchasing and override it at the supplier, item, andpurchase order shipment levels. See: Defining Receiving Options:page 1 – 40.
Control Your Receipt Routing
You can control your receiving routing by specifying one of threeoptions. The first option lets you receive an outside processing itemdirectly into work in process. The second option requires you toreceive to the Ship To location before you can deliver to work inprocess. The third option requires you to deliver to the Ship Tolocation, inspect the outside processing items, and then deliver to workin process.
You can define your receiving routing in the Receiving Optionswindow in Purchasing and override it at the supplier, item, andpurchase order shipment levels. You can also override the receiving

4 – 146 Oracle Public Sector Purchasing User’s Guide
routing at receipt time if the RCV: Allow Routing Override profileoption is set to Yes. See: Defining Receiving Options: page 1 – 40 andProfile Options in Purchasing: page 1 – 76.
Define Ship To and Deliver To Locations
You must define Ship To and Deliver To locations to include on yourrequisitions and purchase orders. When you receive an outsideprocessing item from a supplier, you receive to the Ship To locationspecified on the purchase order shipment. When you deliver theoutside processed items to work in process, you deliver to the purchaseorder destination associated with your purchase order distribution.The destination location is the same as the location associated with thedepartment of the outside operation. See: Site Locations, OracleHuman Resource Management Systems User’s Guide.
Define Accounting Information
You must define a Receiving Account in the Receiving Optionswindow. (See: Defining Receiving Options: page 1 – 40.) Purchasingdebits this account when you receive outside processing items andcredits this account when you deliver outside processing items to workin process. Bills of Material defaults this account into the AbsorptionAccount when you define an outside resource.
In the Organization Parameters window you must define the PurchasePrice and Invoice Price Variance accounts and the Inventory APAccrual account. Bills of Material defaults the Purchase Price Varianceaccount into the Resource Variance Account when you define anoutside resource. Purchasing charges this account when you receive anoutside processing item at a purchase price which differs from thestandard cost of the resource associated with the item and when youcharge the resource at standard. Purchasing credits the Inventory APAccrual Account when you receive outside processing items (andPayables reverses the accrual when you enter the supplier invoice).The Invoice Price Variance account is charged when you enter aninvoice for an amount different from the purchase order price. See:Organization Parameters Window, Oracle Inventory User’s Guide.

4 – 147Purchase Orders
Figure 4 – 5
Supplier
Receiving/Inspection
Invoice
WIP
OutsideProcessing
Items
OutsideProcessing
ItemsDelivery
InvoiceEntry
Dr. Receiving AccountCr. AP Accrual Account
*Dr. OSP Valuation AccountCr. Receiving Account
*Dr. AP Accrual AccountCr. AP Liability
* Assumes no purchase price variance or invoice price variance
Setting Up Other Oracle Products
Though outside processing revolves around your shop floor, the onlyrequired setup step in Work in Process is to define the outsideprocessing valuation and variance accounts in each of your WIPaccounting classes.

4 – 148 Oracle Public Sector Purchasing User’s Guide
Define WIP Accounting Classes
For each accounting class you define, you must enter an outsideprocessing valuation and variance accounting flexfield. This includesstandard discrete, non–standard asset, non–standard expense, andrepetitive assembly accounting classes. See: Defining WIP AccountingClasses, Oracle Work in Process User’s Guide.
Purchasing debits the outside processing valuation account when youreceive outside processing items. It charges this account at eitherstandard or purchase order actual, depending on whether the StandardRate for the outside resource is set to Yes for standard or No for actual.
Master Scheduling/MRP and Capacity require no additional setupsteps to support outside processing.
Planning Outside Resource Load
Capacity performs rough–cut and detailed capacity planning for timebased outside resources. As such, you can analyze your capacity plansfor your outside resources and use these to set load expectations foryour supplier. You can also use capacity planning to help you negotiateprices and volume discounts for outside services.
Capacity does not include resources with non–time based units ofmeasure in its capacity plans. All capacity plans are displayed inhours. So, even resources which have time based units of measureother than hours must have unit of measure conversions defined forhours. For outside resources in units of measure such as EA for each,you can define another resource on your routing to use for schedulingpurposes and to include in your capacity plans.
Requisitioning Outside Processing Items
Work in Process automatically requisitions outside processing itemslinked to outside resources when you move assemblies into Queue ofoperations with outside resources. You can also manually requisitionoutside processing items by including them on requisition lines andlinking each line to a discrete job or repetitive schedule.
Work in Process Move Transactions
When you move assemblies into Queue of an operation with an outsideresource, Work in Process automatically creates a pending requisition

4 – 149Purchase Orders
in the PO_REQUISITIONS_INTERFACE table for the outsideprocessing item linked to the outside resource. If you define severaloutside resources in an operation, Work in Process creates a separatepending requisition for each outside processing item linked to eachresource.
If you move into any intraoperation step other than Queue, Work inProcess does not create a pending requisition. Also, if you movebackwards into Queue, Work in Process does not create a pendingrequisition.
If you have an outside resource in the first operation of your routing,you should manually create a requisition and link it to your job orrepetitive schedule, since Work in Process cannot automaticallygenerate a pending requisition in this case.
Submitting Requisition Import
You can submit the Requisition Import process through the SubmitRequests window in Purchasing to generate approved requisitionscreated by Work in Process. You must specify WIP as the ImportSource when you submit the process. You have several choices forgrouping your requisitions including All, Buyer, Category, Item,Location, and Supplier. For example, you can group your requisitionsby Item to create a separate requisition for each item. Or, you cangroup your requisitions by All to include multiple items on a singlerequisition. Purchasing creates a separate requisition line for each linein the interface table. See: Requisition Import Process: page 9 – 130.
You can specify a default Group By option for Requisition Import in thePurchasing Options window. You can also automate the approval ofpending requisitions by using the resubmit functionality of the SubmitRequests window to automatically submit the Requisition Importprocess at prespecified intervals. See: Defining Default Options: page1 – 29 and Submitting a Request, Oracle Applications SystemAdministrator’s Guide.
Creating Approved Purchasing Requisitions
Purchasing automatically checks for supplier sourcing rules when itcreates a requisition line for an outside processing item. If you defineda supplier sourcing rule, Purchasing defaults the primary supplier youspecified. If you have a blanket purchase agreement active for theitem/supplier combination in the Approved Supplier List, thenPurchasing also defaults the price associated with the outsideprocessing item on the blanket. If no price exists, then Purchasingdefaults the List Price from the item master.

4 – 150 Oracle Public Sector Purchasing User’s Guide
The need by date on the requisition comes from the preprocessing,postprocessing, fixed and variable item lead time elements in the Itemswindow. Work in Process adds the sum of these lead time elements tothe move transaction date and passes the incremented date toPurchasing. If the incremented date is a non–workday, Work in Processpasses the next greatest workday based on the manufacturing calendarof the work in process organization.
The preparer for a requisition is the employee associated with theapplications user who entered the move transaction in Work in Process.
For each requisition line, Purchasing automatically enters accountingflexfield information. The Charge Account for a requisition line comesfrom the outside processing valuation account on the accounting classassociated with the job or repetitive schedule you are charging. TheBudget Account is left null unless you use encumbrance accounting.The Accrual Account comes from the organization Inventory APAccrual Account. And, the Variance Account comes from theorganization Invoice Price Variance Account.
Manually Creating Requisitions
You can manually define a purchase requisition which includes one ormore outside processing items. For each requisition line, you mustspecify a job or repetitive schedule to charge. You can charge anyresource on a job or repetitive schedule which has an autocharge typeof PO Move or PO Receipt. See: Entering Outside ProcessingInformation: page 4 – 75.
Approving Requisitions
Purchasing automatically approves requisitions created by theRequisition Import program. You must approve any requisitions youdefine manually. Only approved requisitions become part of therequisition pool from which AutoCreate Documents creates purchaseorders. See: Autocreate Purchase Order Options: page 6 – 4.
Creating Outside Processing Purchase Orders
You must create a purchase order line for each of the outsideprocessing items you are buying. You can modify purchase order linesto reference jobs or repetitive schedules other than those referenced inthe requisition. You can also add a purchase order line and reference ajob or repetitive schedule. You can even charge multiple jobs orrepetitive schedules for a single purchase order line.

4 – 151Purchase Orders
Automatically Generating Purchase Orders from Requisitions
Use the AutoCreate Documents window to generate purchase ordersfrom approved requisitions. You can specify search criteria to locatethe requisition lines you want to include on a purchase order, and youcan choose whether to create a new purchase order or add to anexisting purchase order. See: Autocreate Purchase Order Options:page 6 – 4.
You can optionally combine multiple requisition lines onto a singlepurchase order line. In this case, Purchasing takes the lowest price ofall the requisition lines for the purchase order line, but you can edit thisprice after you complete the autocreation process.
Manually Creating Purchase Orders and Lines
You can manually define a purchase order which includes one or moreoutside processing items. For each purchase order line, you mustspecify a job or repetitive schedule to charge. You can charge anyresource on a job or repetitive schedule which has an autocharge typeof PO Move or PO Receipt. You can even charge multiple jobs orrepetitive schedules by including several distributions for a purchaseorder line. See: Entering Purchase Order Distributions: page 4 – 70.
Approving Purchase Orders
You must approve a purchase order before you can send it to a supplierto authorize work and before you can receive against it. See:Submitting a Document for Approval: page 2 – 32.
Viewing Purchase Orders
You can view purchase order information including which jobs and/orrepetitive schedules you are charging in the Purchase Orders window.You can view all purchase orders linked to a job or repetitive scheduleby submitting the WIP Outside Processing report. See: WIP OutsideProcessing Report, Oracle Work in Process User’s Guide.
Foreign Currency Purchases
You can manually requisition and purchase outside processing items inforeign currencies. When you receive against purchase ordershipments, Purchasing automatically enters the purchase price in theforeign currency with an exchange rate, and Work in Process convertsthis and charges the job or repetitive schedule in the functionalcurrency of the work in process organization.

4 – 152 Oracle Public Sector Purchasing User’s Guide
Receiving Outside Processing Items
You receive outside processing items using the receiving functions inPurchasing. From a physical flow point of view, you receive theoutside processed assemblies and move them to the nextmanufacturing operation or into inventory. From a transaction point ofview, you actually receive the outside processing items againstpurchase order lines. The receipt transaction relieves the purchaseorder, creates the appropriate payables accrual, charges the job orrepetitive schedule for the outside resource, and optionally moves theoutside processed assembly to the next operation. See: ReceivingTransactions: page 7 – 37.
Direct vs. Standard Receipts
When you receive outside processing items from suppliers, you canoptionally receive them directly into work in process or into areceiving/inspection location before delivering them to work inprocess. If you inspect your assemblies in work in process, forexample, you can enter a direct receipt in the Receipts window toimmediately charge a job or repetitive schedule for the outsideprocessing. A direct receipt also moves the assemblies to the nextoperation in work in process if the outside processing item you arereceiving is linked to a PO Move resource.
Note: The move transactions are processed only if the MoveTransaction Manager is running. See: Transaction Managersand Launching Transaction Managers, Oracle Inventory User’sGuide.
If you enter a standard receipt in the Receipts window, you mustspecify a ship to location. You then use the Receiving Transactionswindow to deliver the outside processing items to work in process. Inthis case, you do not charge and move assemblies in work in processuntil you enter the delivery transaction in the Receiving Transactionswindow. See: Receiving Transactions: page 7 – 37.
Receiving Partial vs. Full Quantities
When you receive outside processing items you can receive full orpartial quantities against a particular purchase order shipment. If youwant to receive a complete shipment, you can use the express option oneither the Receipts or Receiving Transactions windows. If not, you canenter the quantity you want to receive. Purchasing charges work inprocess only for the quantity you receive. For items linked to PO Moveresources, Purchasing moves an assembly quantity equal to thequantity you receive.

4 – 153Purchase Orders
For partial receipts of purchase order shipments linked to multiple jobsor repetitive schedules, you must specify the quantity to receive againsteach job or repetitive schedule. Purchasing does not automaticallyallocate receipt quantities for you.
Receiving Assembly vs. Resource Outside Processing Unit TypeItems
The quantity of outside processing items you receive can relate to theassembly quantity on the job or repetitive schedule in several waysdepending on the outside processing item’s Outside Processing UnitType and the outside resource’s basis.
If the outside processing item has an Outside Processing Unit Type ofAssembly and the outside resource has a basis of Item, you receive oneoutside processing item for each assembly you receive. If the outsideresource has a basis of Lot, you receive one outside processing item foreach job or repetitive schedule.
If the outside processing item has an Outside Processing Unit Type ofResource and the outside resource has a basis of Item, you receive theextended quantity (using the outside resource usage rate or amount) ofthe outside processing item for each assembly you receive. Forexample, if you purchase 3 hours of plating service for each assembly,(usage rate or amount is 3), then you receive a quantity of 3 hours foreach assembly you receive from the supplier. If the outside resourcehas a basis of Lot, you receive 1 outside processing item extended bythe outside resource usage rate or amount for each job or repetitiveschedule.
In all cases, Purchasing charges the job or repetitive schedule using theextended quantity of the associated outside resource.
Work in Process Resource and Move Transactions
When you receive an outside processing item linked to an outsideresource, Purchasing charges the job or repetitive schedule associatedwith the resource at either the standard cost of the resource or theactual purchase order line price.
If you charge an outside resource at standard, any variance between theresource standard cost and the actual purchase price is written to thevariance account associated with the outside resource. If you charge atactual, any variance is charged to the outside processing varianceaccount for the accounting class associated with the job or repetitiveschedule. This outside processing variance is recognized at job orperiod close.

4 – 154 Oracle Public Sector Purchasing User’s Guide
When you receive an outside processing item linked to a resource withan autocharge of PO Move, Purchasing enters a move transaction forthe assembly on the job or repetitive schedule you charge. Purchasingenters a move for the assembly quantity you are receiving. As such,you should use outside processing items with Assembly unit types andPO move resources with a basis of Item. It moves the assemblies toQueue of the next operation or to To Move if the resource is in the finaloperation. You can have only one PO Move resource per operation ona routing.
When Purchasing moves assemblies it is completing the outsideoperation for the quantity it moves. These operation completionsautomatically backflush any material associated with the outsideoperation that has an Operation Pull supply type and charges any WIPMove resources associated with the outside operation. See: Overviewof Material Control, Oracle Work in Process User’s Guide.
You cannot backflush any serial controlled components at an outsideoperation with a PO Move resource since the Receipts window doesnot allow entry of component serial numbers. You can, however,backflush lot controlled components as long as you set your BackflushLot Entry setup option to one of the automatic FIFO options in theParameters window in Work in Process. You must enter movetransactions on–line using the Move Transactions window in Work inProcess if you want to manually record serial and lot numbers forcomponents you backflush. See: Defining WIP Parameters, OracleWork in Process User’s Guide and Performing Move Transactions, OracleWork in Process User’s Guide.
If you receive outside processing items linked to a job or repetitiveschedule with an untransactable status, such as On Hold or Cancelled,Work in Process gives these transactions an error status. You can usethe Pending Move Transactions window in Work in Process to view theerrors and resubmit the transactions. See: Processing Pending MoveTransactions, Oracle Work in Process User’s Guide.
Managing Returns and Corrections
Oracle Manufacturing gives you the tools necessary to correctover–receipts and to return to suppliers outside processed assembliesthat fail your inspection processes.

4 – 155Purchase Orders
Correcting Errors in Receiving
If you receive an outside processing item and enter an incorrectquantity, you can easily adjust the receipt using the Correctionswindow in Purchasing. Purchasing automatically reverses the chargesmade to a job or repetitive schedule based on the corrected quantityyou enter. Purchasing enters a reversing move transaction if you entera correction for an outside processing item linked to a PO Moveresource. Before correcting a receipt for a PO Move resource, youshould make sure that a sufficient quantity of assemblies exists inQueue of the operation immediately following the outside operation.See: Corrections: page 7 – 59.
In general, you may want to prevent the possibility of incorrect receiptsby defining a 0% tolerance on outside processing purchase order lines.
Returning Assemblies to Suppliers
If you want to return to a supplier outside processed assemblies thatfail your internal inspection, you can enter a return to suppliertransaction in the Returns window in Purchasing. Purchasingautomatically reverses the outside resource charges made to a job orrepetitive schedule based on the return quantity you enter. Purchasingenters a reversing move transaction if you enter a return quantity foran outside processing item linked to a PO Move resource. Beforeentering a return quantity for a PO Move resource, you should makesure that a sufficient quantity of assemblies exists in Queue of theoperation immediately following the outside operation. See: Returns:page 7 – 54.

4 – 156 Oracle Public Sector Purchasing User’s Guide
Drop Shipments
Oracle Order Entry and Oracle Public Sector Purchasing integrate toprovide drop shipments. Drop shipments are orders for items thatyour supplier ships directly to the customer either because you don’tstock or currently have the items in inventory, or because it’s morecost–effective for the supplier to ship the item to the customer directly.
Drop shipments are created as sales orders in Order Entry. ThePurchase Release concurrent program in Order Entry creates rows inthe Requisition Import tables in Purchasing. Then Purchasing’sRequisition Import process creates the requisitions. Drop shipmentsare marked with the Source Type of External in Order Entry andSupplier in Purchasing.
When the drop shipment has been sent to the customer, the suppliercan confirm the shipment through a phone call, an invoice, or anElectronic Data Interchange (EDI) document, such as an AdvanceShipment Notice (ASN).
When you receive confirmation of a drop shipment, enter the shipmentas a receipt, even though you have not received the item physically(because your customer has received it directly). If your supplier sendsonly an invoice, you need to enter a passive receipt. This createsinbound and outbound material transactions in your system foraccounting purposes.
You need to associate drop shipments with a receiving location. See:Associating Ship–to and Receiving Locations, Oracle Order Entry /Shipping User’s Guide.
Drop shipments support a Destination Type of Expense or Inventoryonly.
You can handle returns of drop shipments using standard OrderEntry/Shipping or Purchasing functionality. There are different waysyou may want to handle returns depending on whether the customerreturned the item to you or directly to the supplier.
Note: You should not drop–ship internal sales orders.
See Also
Drop Shipments, Oracle Order Entry / Shipping User’s Guide
Drop–Ship Order Flow, Oracle Order Entry / Shipping User’s Guide
Drop–Ship Return Flow, Oracle Order Entry / Shipping User’s Guide

4 – 157Purchase Orders
Purchase Release, Oracle Order Entry / Shipping User’s Guide
Advanced Shipment Notices (ASNs): page 7 – 14
Returns: page 7 – 54
Entering Receipt Header Information: page 7 – 28
Entering Receipt Lines: page 7 – 30
Requisition Import Process: page 9 – 130

4 – 158 Oracle Public Sector Purchasing User’s Guide
Tax Defaults in Purchasing
You can set up Purchasing to default tax names based on your publicsector needs. You set up the Tax Defaults hierarchy in the Tax Defaultsregion of the Purchasing Options window to determine the following:
• Which sources you use for tax names
• The order in which Purchasing searches the sources to find avalid tax value
A Tax Name defined in the Purchase Order Preferences windowoverrides any tax defaults you set in the Tax Defaults region of thePurchasing Options window. See: Entering Purchase OrderPreferences: page 4 – 33.
For instructions on defining the Tax Defaults hierarchy, see: DefiningTax Defaults Options: page 1 – 38
Duplicating Tax Functionality from Previous Releases
Purchasing preserves your tax defaults from previous releases. That is,Purchasing continues to default tax from the ship–to location if youdon’t set a tax defaulting hierarchy in the Tax Defaults region of thePurchasing Options window. (Note that a Tax Name defined in thePurchase Order Preferences window overrides this tax defaultinghierarchy.)
How Tax Defaults Affect Purchasing Documents
The tax defaults you select in the Tax Defaults region of the PurchasingOptions window are used in the following windows and processes inPurchasing:
• Shipments window for standard and planned purchase orders
• Purchase order line shipments created by the AutoCreateDocuments window
• Shipments alternative region in the Releases window
• Release shipments created by the Create Releases process
• RFQ Shipments window (for Bid or Standard RFQs) or RFQPrice Breaks window (for Catalog RFQs)

4 – 159Purchase Orders
• Quotation shipments window (for Bid or Standard quotations)or Quotation Price Breaks window (for Catalog quotations)
These tax defaults in the Tax Defaults region of the Purchasing Optionswindow affect your purchasing documents in the following ways:
• When creating a release from a planned purchase order, the taxname on the planned purchase order shipment overrides any taxdefaults you set in the Tax Defaults region of the PurchasingOptions window.
• If you change the tax name of a tax source (for example, the TaxName in the Invoice Tax alternative region of the Supplier Siteswindow), Purchasing does not update your existing documentswith the new tax name; it updates only new documents youcreate.
• Once you created a purchase order shipment and a tax name hasalready been defaulted onto the shipment, if you change any ofthe tax sources (for example, the Supplier or Site on a purchaseorder header), Purchasing will not automatically update the taxname. For example, if you change a Supplier or Site after a TaxName has already defaulted onto the purchase order shipment,you will have to manually update the Tax Name for the newSupplier or Site you entered.
• If you’ve set up a tax defaulting hierarchy in the Tax Defaultsregion of the Purchasing Options window, the appropriate taxnames automatically default onto the release shipments createdby the Create Releases process.
• If you’ve set up a tax defaulting hierarchy in the Tax Defaultsregion of the Purchasing Options window, the appropriate taxnames automatically default onto documents you autocreate.
See Also
Defining Tax Defaults Options: page 1 – 38
Tax Control Methods, Oracle Applications Payables User’s Guide

4 – 160 Oracle Public Sector Purchasing User’s Guide
Workflow for Creating Purchase Orders and Releases
Overview
Purchasing integrates with Oracle Workflow technology to createstandard purchase orders or blanket releases automatically fromapproved requisition lines. The workflow for creating purchasingdocuments automatically is called PO Create Documents. You canmodify this workflow in the Oracle Workflow Builder to defineadditional business rules that determine when your approvedrequisitions are automatically converted into standard purchase ordersand blanket releases. The PO Create Documents workflow doesbasically the same thing that AutoCreate does, except that it does soautomatically.
In the Workflow Builder, PO Create Documents consists of severalprocesses. Each of these processes is viewable in the Workflow Builderas a diagram whose objects and properties you can modify. Eachworkflow process consists of individual functions.
Prerequisite
❑ Before you can use or modify any of the workflows in Purchasing,you need to set up Oracle Workflow if you haven’t done so already.See: Setting Up Oracle Workflow, Oracle Workflow Guide.
Below is an example of a workflow process in the Workflow Builder.For more information on using the Workflow Builder to view or modifya workflow, see the Oracle Workflow Guide.

4 – 161Purchase Orders
Example Workflow Process in the Workflow Builder
PO Create Documents Processes
The processes in the PO Create Documents workflow are as follows:
• Overall Document Creation / Launch Approval. This is thehighest–level process, which contains the rest of the subprocessesin this list.
• Verify Req Line Information
• Does This Req Line Have Enough Information To AutomaticallyCreate A Document?
• Create and Approve Purchase Order Or Release
• Get Buyer
For each document that is created successfully by the PO CreateDocuments workflow, the PO Approval workflow is called to approvethe document if you have allowed automatic approval. See: ApprovalWorkflows: page 2 – 63.
There are also workflow processes for approving changes to purchaseorders and releases. For more information about the change orderworkflow, see: Workflow Processes for Approving Change Orders:page 2 – 73.

☞
4 – 162 Oracle Public Sector Purchasing User’s Guide
You can use the Workflow Monitor to follow where certain documentsare in a workflow process. See: Workflow Monitor, Oracle WorkflowGuide.
Customizing the Workflow
Prerequisite
❑ Before you can use or modify any of the workflows in Purchasing,you need to set up Oracle Workflow if you haven’t done so already.See: Setting Up Oracle Workflow, Oracle Workflow Guide.
Use the Oracle Workflow Builder to customize workflows.
Attention: When you customize a workflow, only thosedocuments that are created after you customize it are affectedby the customized workflow.
For detailed information on how to modify workflows in the OracleWorkflow Builder, see the Oracle Workflow Guide.
Like most workflows, PO Create Documents consists of the followingcomponents: processes, functions, messages, notifications, attributes,and lookup types. For detailed definitions of these components, see theOracle Workflow Guide. Some of these workflow components arelocked; others are unlocked, or available for modification to suit yourpublic sector needs. Generally, you need to be experienced with bothPurchasing and Workflow before modifying a workflow. However,there are some setup–level modifications you can make to a workflow,as described in the next section.
Choosing Document Creation Options
Prerequisite
❑ Before you can use or modify any of the workflows in Purchasing,you need to set up Oracle Workflow if you haven’t done so already.See: Setting Up Oracle Workflow, Oracle Workflow Guide.
The following three attributes in PO Create Documents can becustomized. For each of these attributes you can change their values to’Y’ for Yes or ’N’ for No. For information on opening workflows (alsocalled ”item types”) in the Workflow Builder so that you can modifythe attribute values, see: Opening and Saving Item Types, OracleWorkflow Guide.

☞
4 – 163Purchase Orders
Attention: You need to make the changes below for eachoperating unit.
• Is Automatic Creation Allowed? – The default value of thisattribute is set to ’Y,’ meaning that automatic document creationis allowed for approved requisition lines. You can preventautomatic document creation by setting the default value of thisattribute in the Workflow Builder to ’N’ for No. For moreinformation on how this attribute is used, see: Overall DocumentCreation / Launch Approval Process: page 4 – 163.
• Should Workflow Create The Release? – The default value of thisattribute is set to ’Y,’ meaning that the workflow tries to createthe release; if it cannot, or if the value of this attribute is set to’N’ for No, then the workflow will not create the release; youmust use the AutoCreate Documents window to create therelease. For more information on how this attribute is used, see:Verify Req Line Information Process: page 4 – 165.
• Is Automatic Approval Allowed? – The default value of thisattribute is set to ’N’ for No, meaning that documents are notautomatically approved after they are created. If you set it to ’Y’for Yes, then the PO Approval workflow is launched toautomatically route the documents for approval. For moreinformation on how this attribute is used, see: Create andApprove Purchase Order Or Release (Process): page 4 – 168.
Overall Document Creation / Launch Approval Process
The Overall Document Creation / Launch Approval process, which isthe highest–level process of the PO Create Documents workflowconsists of the functions and processes described below.
Overall Document Creation / Launch Approval Process (partial view)
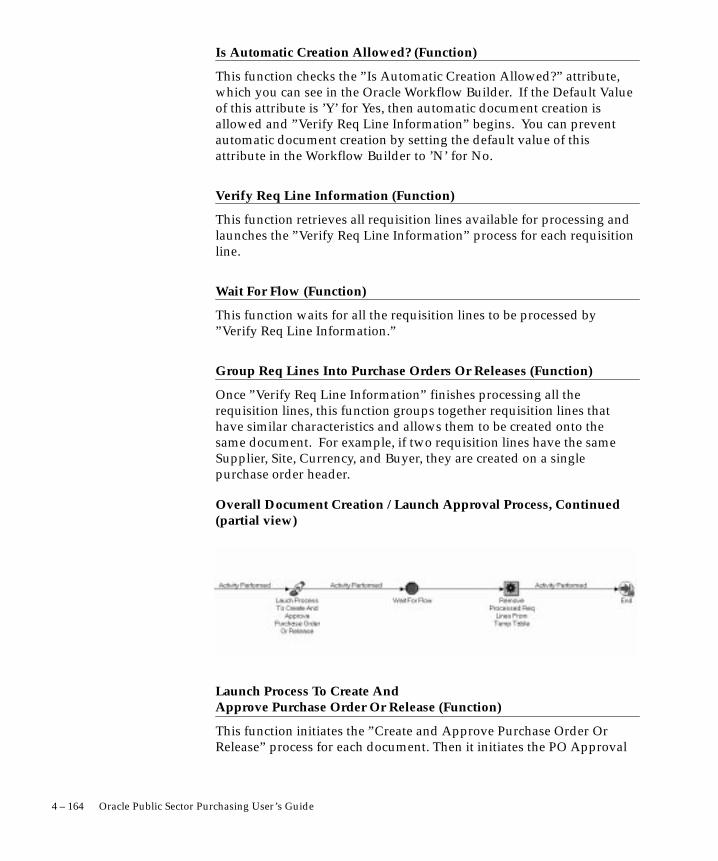
4 – 164 Oracle Public Sector Purchasing User’s Guide
Is Automatic Creation Allowed? (Function)
This function checks the ”Is Automatic Creation Allowed?” attribute,which you can see in the Oracle Workflow Builder. If the Default Valueof this attribute is ’Y’ for Yes, then automatic document creation isallowed and ”Verify Req Line Information” begins. You can preventautomatic document creation by setting the default value of thisattribute in the Workflow Builder to ’N’ for No.
Verify Req Line Information (Function)
This function retrieves all requisition lines available for processing andlaunches the ”Verify Req Line Information” process for each requisitionline.
Wait For Flow (Function)
This function waits for all the requisition lines to be processed by”Verify Req Line Information.”
Group Req Lines Into Purchase Orders Or Releases (Function)
Once ”Verify Req Line Information” finishes processing all therequisition lines, this function groups together requisition lines thathave similar characteristics and allows them to be created onto thesame document. For example, if two requisition lines have the sameSupplier, Site, Currency, and Buyer, they are created on a singlepurchase order header.
Overall Document Creation / Launch Approval Process, Continued(partial view)
Launch Process To Create And Approve Purchase Order Or Release (Function)
This function initiates the ”Create and Approve Purchase Order OrRelease” process for each document. Then it initiates the PO Approval

4 – 165Purchase Orders
workflow. Purchase orders or blanket releases that match pre–definedapproval criteria get approved automatically.
Remove Processed Req Lines From Temp Table (Function)
In the ”Verify Req Line Information” process, there is a function,”Insert Req Line Into Temp Table As A Candidate For Creation.” Thisfunction puts into a temporary table those requisition lines that containenough information to at least attempt autocreation. These lines arepicked up from this table later when certain requisition lines aregrouped onto particular purchase orders or releases. Once thesepurchase orders or releases are created, the lines in this temporary tablecan be purged. That is what this function, ”Remove Processed ReqLines From Temp Table,” does.
Verify Req Line Information Process
The ”Verify Req Line Information” process of the PO CreateDocuments workflow consists of the processes and functions describedbelow.
Get Req Line Info (Function)
This function retrieves information from the requisition line andupdates the PO Create Documents’ attributes with the information.For example, the Currency Code attribute (under Attributes in theWorkflow Builder) gets updated with information from the Currencyfield in the Requisition line.
Does This Req Line Require An RFQ? (Function)
This function checks to see if the following is true: RFQ Required is setto Yes (enabled in the Requisitions window), the profile option PO:Warn if RFQ Required before AutoCreate is set to Yes, and therequisition line has not been autocreated into an RFQ. If all of these aretrue, then this function returns ”Yes.” Otherwise, this function returns”No.”
Does This Req Line Have Enough Information to Automatically Create a Document? (Process)
This process checks to see if the requisition line has enough and thecorrect information to automatically create a purchase order or blanket

4 – 166 Oracle Public Sector Purchasing User’s Guide
release. The individual functions that belong to this process aredescribed in the section Does This Req Line Have Enough Informationto Automatically Create a Document?: page 4 – 167.
Get The Source Document Type (Function)
This function checks for the source document type—blanket agreementor quotation—referenced on the requisition line.
Does the Req Line Have A One–Time Item? (Function)
This function checks for the type of item—one–time orpredefined—used on the requisition line.
Get Release Generation Method From ASL (Function)
If the requisition line has a predefined item, this function checks to seeif an approved supplier list (ASL) entry exists for that particularcombination of item, supplier, and supplier site. Then the functionretrieves the Release Generation Method specified in the approvedsupplier list.
If the Release Generation Method is either Automatic Release orAutomatic Release Review, then the Creates Releases process inPurchasing will create a blanket release for this requisition line. If theRelease Generation Method is Release Using AutoCreate, then theworkflow can continue.
Should Workflow Create The Release? (Function)
This function checks the value of the attribute, ”Should WorkflowCreate The Release?” If the value of this attribute is set to ’Y’ for Yes,then the workflow continues. That is, the workflow tries to create therelease; if it cannot, or if the value of this attribute is set to ’N’ for No,then the workflow will not create the release; you must use theAutoCreate Documents window to create the release.
Insert Req Line Into Temp Table As A Candidate For Creation (Function)
This function puts into a temporary table those requisition lines thatcontain enough information to at least attempt autocreation. Theselines are picked up from this table later when certain requisition linesare grouped onto particular purchase orders or releases. Once thesepurchase orders or releases are created, the lines in this temporary table

4 – 167Purchase Orders
are purged. (The function that does the purging, ”Remove ProcessedReq Lines From Temp Table,” is described in Overall DocumentCreation / Launch Approval Process: page 4 – 163.)
Continue Flow (Function)
This function tells the first ”Wait for Flow” function in the ”OverallDocument Creation / Launch Approval Process” that ”Verify Req LineInformation” for a particular requisition line has been completedsuccessfully. ”Wait for Flow” now has to wait only for the otherrequisition lines to be processed.
Does This Req Line Have Enough Information To Automatically Create A Document?
The process ”Does This Req Line Have Enough Information ToAutomatically Create A Document?” in the PO Create Documentsworkflow consists of the processes and functions described below.
Does The Req Line Have Valid Supplier Information? (Function)
This function checks to see if a valid Supplier and Supplier Site exist forthe requisition line.
Does The Req Line Have Valid Source Document Information? (Function)
This function checks to see if valid source document information (froma blanket agreement or quotation) exists for the requisition line.Specifically, it checks the source document type, the source document,and the source document line.
Get Buyer (Process)
This process retrieves buyer information for the purchase order. Itretrieves a valid buyer’s name from one of the following sources: thebuyer field from the requisition line, the default buyer from the itemdefinition in the Master Item window, or the default category assignedto a buyer in the Define Buyers window. When creating a release, theprocess retrieves the buyer’s name from the blanket agreement. Theprocess is described in more detail in Get Buyer Process: page 4 – 168.

4 – 168 Oracle Public Sector Purchasing User’s Guide
Create and Approve Purchase Order Or Release (Process)
The ”Create and Approve Purchase Order Or Release” process of thePO Create Documents workflow consists of the functions describedbelow.
The ”Create and Approve Purchase Order Or Release” process actuallycreates the documents. For those documents created successfully, anotification is sent to the buyer. If ”Is Automatic Approval Allowed?”is set to ’Y’ for Yes, then the PO Approval workflow is launched.
Create Purchase Order Or Release (Function)
This function creates a standard purchase order or blanket releasedepending on the information on the requisition line.
Purchase Order Or Release Has Been Created (Function)
If the document is created successfully, this function sends anotification to the buyer.
Is Automatic Approval Allowed? (Function)
This function checks the value of the attribute, ”Is Automatic ApprovalAllowed?”. If it’s set to ’Y’ for Yes, then the PO Approval workflow islaunched. The default value for this attribute is ’N’ for No.
Launch Document Approval Process (Function)
This function launches the PO Approval workflow. See ApprovalWorkflows: page 2 – 63.
Continue Flow (Function)
This function tells the second ”Wait for Flow” function in the ”OverallDocument Creation / Launch Approval Process” that the process”Create and Approve Purchase Order Or Release” has completed.”Wait for Flow” now has to wait only for the other documents to beprocessed.
Get Buyer Process
The ”Get Buyer” process tries first to get the buyer from the requisitionline, through the ”Get Buyer From Req Line” function. If that fails,
4 – 169Purchase Orders
then ”Get Buyer From Item” tries to get the buyer assigned to the itemin the Master Items window. If that fails, ”Get Buyer From Category”tries to get the buyer assigned to the Category on the requisition line; ifmore than one or no buyers are assigned, then this function fails.

4 – 170 Oracle Public Sector Purchasing User’s Guide

C H A P T E R
5T
5 – 1Supply Base Management
Supply BaseManagement
his chapter tells you everything you need to know about SupplyBase Management, including:
• Overview of Sourcing: page 5 – 2
• Overview of the Supplier Item Catalog: page 5 – 7
• Receiving Price/Sales Catalog Information Electronically: page5 – 20
• Approved Supplier List: page 5 – 22
• Entering RFQs: page 5 – 32
• Entering Quotations: page 5 – 47
• Copying Quotations from RFQs: page 5 – 61
• Approving Quotations: page 5 – 63
• Automatic Sourcing: page 5 – 69
• Defining Supplier Lists: page 5 – 76
• Managing Buyer Workload: page 5 – 78

5 – 2 Oracle Public Sector Purchasing User’s Guide
Overview of Sourcing
Purchasing provides you with request for quotation (RFQ), andquotation features to handle your sourcing needs. You can create anRFQ from requisitions, match supplier quotations to your RFQ, andautomatically copy quotation information to purchase orders.Purchasing provides complete reporting to control your requests forquotations and evaluate supplier responses.
• Identify requisitions that require supplier quotations andautomatically create a request for quotation.
• Create a request for quotation with or without approvedrequisitions so that you can plan ahead for your futureprocurement requirements.
• Record supplier quotations from a catalog, telephoneconversation, or response from your request for quotation. Youcan also receive quotations electronically.
• Review, analyze, and approve supplier quotations that you wantavailable to reference on purchase orders and requisitions. Youshould be able to evaluate your suppliers based on quotationinformation.
• Receive automatic notification when a quotation or request forquotation approaches expiration.
• Review quotation information on–line when creating purchaseorders or requisitions and copy specific quotation information toa purchase order or requisition.
• Identify a supplier that you want to use only for receiving RFQsand quotations. You should later be able to access purchasehistory to help you decide if the quotations are acceptable.
• Hold all purchasing activity on a supplier at any time. Youshould still be able to match invoices to approved purchaseorders for this supplier. You should be able to release a supplierhold at any time.
• Create, change, and review supplier information on–line. Youshould be able to enter supplier site information, suppliercontacts, and supplier–specific delivery information.
• Review the purchase history for a specific item. You should beable to identify the suppliers you used in the past, quantities youordered, and pricing information. You should be able to matchthis information to specific purchase orders.

5 – 3Supply Base Management
• Simplify the sourcing of commonly purchased items. You shouldbe able to define requisition templates for your commonlypurchased items. Requestors can use these requisitionstemplates to create simple, pre–sourced requisitions.
• Source the items for which you negotiated purchase agreementsautomatically. If you created sourcing rules and ApprovedSupplier List entries for the items, supplier information isentered automatically in the Requisitions window when youcreate requisitions. You should also be able to place supplierinformation for items onto blanket purchase order releases.
Major Features
Electronically Received Catalog Information
You can receive price/sales catalog information electronically fromyour supplier through the Purchasing Documents Open Interface. Theinformation is imported directly as blanket purchase agreement lines orcatalog quotations. See: Receiving Price/Sales Catalog InformationElectronically: page 5 – 20.
Flexible Document Numbers
Purchasing identifies each RFQ or quotation with a unique documentnumber. You decide whether you want to enter document numbersmanually or have the numbers assigned automatically.
Sourcing Power
Purchasing lets you source your items so you can negotiate the bestdeals with your suppliers. You can create requests for quotations,record the results, and reference the corresponding quotation whencreating your purchase order. You can also review historical purchaseprices so that you can evaluate how to purchase your items moreeffectively.
Supplier Defaulting
For each supplier, you can define default preferred ship–to locations,freight terms and carriers, free–on–board information, tax names, andpayment terms to be used when you enter purchase orders. You canalways override any default.
Supplier Purchasing Hold
You can prevent purchasing activity on specific suppliers at any timeby using the Suppliers window to provide a reason for holding the

5 – 4 Oracle Public Sector Purchasing User’s Guide
supplier. You cannot approve any purchase order for a supplier onhold; however, you can receive and match against approved purchaseorders for a supplier on hold. You can release a hold at any time.
AutoCreating RFQ and Quotation Information
You can AutoCreate RFQs directly from requisitions. You can alsoCopy quotations directly from RFQs to facilitate recording responsesfrom your suppliers. See: Copying Quotations from RFQs: page 5 – 61.(If you receive catalog information from your supplier electronically,that information is sent automatically in the form of a catalogquotation. See: Receiving Price/Sales Catalog InformationElectronically: page 5 – 20.)
Request for Quotation Requirement
You can identify whether a request for quotation is necessary for aspecific item or requisition line.
Supplier Lists
Purchasing lets you create supplier lists so that you can predefinegroups of suppliers to whom you want to send RFQs. You canestablish supplier lists according to criteria you define (item,manufacturing category, geographic location, or other) and you cancombine supplier lists to produce many copies of your RFQautomatically.
Note: If the Oracle Public Sector Payables profile optionAP:Enter Alternate Fields is enabled, alternate fields willappear on designated windows like Enter Suppliers.
See: Profile Options in Payables, See Oracle Public Sector Payables User’sGuide
Purchasing History
Purchasing lets you review your purchase price history information tohelp you source your items better. You can either review all historicalprices for a particular item or the last prices you paid for a specific itemby quantity. You can review the detailed information of the purchaseorder corresponding to this last price.
Flexible, Custom Notes
Purchasing lets you quickly add extended Notes and instructions toyour RFQs and quotations. You can include standard notes or createyour own custom notes. You can use as much descriptive text as youneed.

5 – 5Supply Base Management
Automatic Sourcing
Automatic sourcing automatically defaults sourcing information ontothe requisitions, blanket purchase orders, or quotations you create. Youcan easily assign any item with an item number to a specific blanketpurchase agreement or quotation you created. Purchasingautomatically assigns the name of the supplier for the blanket purchaseorder and quotation to any requisition for this item. (If you receivecatalog information from your supplier electronically—and youspecified sourcing rules to be sent electronically also—then thesourcing rule and Approved Supplier List entry for this supplier isentered in your system automatically.) See: Automatic Sourcing: page5 – 69. See: Approved Supplier List: page 5 – 22.
Using Quotation Information on Your Documents
Purchasing lets you use your quotation information when you buildpurchase orders.
Using Quotation Information for a Purchase Order
When you create a purchase order (manually or from requisitions), youcan use the Supplier Item Catalog window to retrieve quotationinformation. (The Supplier Item Catalog window can includequotations sent to you by your supplier through the PurchasingDocuments Open Interface. See: Receiving Price/Sales CatalogInformation Electronically: page 5 – 20.) Purchasing provides all yourapproved quotation shipment information for a specific item ormanufacturing category. You can copy this quotation shipment to anexisting blanket purchase agreement or standard purchase order whenyou add this item or purchasing category to a purchase order line. Youcan sort this quotation information according to your needs, usingcriteria such as price or quantity. You can easily evaluate the sourcethat is best for an item.
After you select the quotation shipment you want to use, Purchasingcopies the item unit price, quantity, unit of measure, supplier productnumber, inspection required status, receipt required status, quotationnumber, quotation type, and supplier quotation number on yourpurchase order. Purchasing also copies the quotation item descriptionon your purchase order if you define your items to do so.
Purchasing automatically warns you when the terms and conditions ofthe quotation are different from the terms and conditions of yourpurchase order. The original purchase order terms and conditionsremain unchanged.

5 – 6 Oracle Public Sector Purchasing User’s Guide
Using Partial Quotation Information on a Requisition
When you enter an item or purchasing category on a requisition line,you can use the Supplier Item Catalog window to access quotationshipment information for the item or category. After you select thequotation shipment you want to use, Purchasing automatically copiesthe item unit price, quantity, unit of measure, supplier product number,supplier name, supplier site, and supplier contact to your requisitionline. Purchasing also copies the quotation item description on yourpurchase order if you define your items to do so.
5 – 7Supply Base Management
Overview of the Supplier Item Catalog
The Supplier Item Catalog provides a simple mechanism for locatingitems and their source information for the purpose of creating purchaseorder and requisition lines. You can open the catalog from an existingrequisition or purchase order and add lines to that document.Alternatively, you can open the catalog from the menu and create newrequisitions.
Search Supplier Item Catalog Window
Purchasing displays the Search Supplier Item Catalog window whetheryou invoke the Supplier Item Catalog from the menu or from arequisition or purchase order.
To invoke the Supplier Item Catalog from a requisition or purchaseorder, select the Catalog button when the cursor is in the Linesalternative region. Whether this button is present for a particulardocument type can be determined by Function Security.
The Supplier Item Catalog does not support Outside Processing.However, you can open the Catalog from an outside processing line in arequisition or a purchase order to find other items.
In the search window, lists of values show only valid values. Forexample, inactive suppliers are not displayed.
The ”Item description contains the words” field is used for keywordsearches. If you search for ”desk executive mahogany”, you get anyitem whose description includes all three words. In this case you couldwiden the search by removing ”mahogany” and/or ”desk.” The wordsin the description do not have to occur in the order listed, so searches on”desk executive” and ”executive desk” would get the same result: allitems whose description included both of the words.
The Deliver To Organization and Location (when invoked from themenu or a requisition) are the Ship To Organization and Location whenthe window is invoked from a purchase order. Lists of values displaydeliver–to or ship–to values, as appropriate. For query purposes, thedeliver–to actually uses the associated ship–to information.
Supplier Item Catalog Window
There are four alternative regions in the upper screen of this folderwindow, but Function Security can be used to determine whether a userwill be able to see all of them. A profile option (PO: Default SupplierItem Catalog Option) determines which of these alternative regions is

5 – 8 Oracle Public Sector Purchasing User’s Guide
the default when the catalog opens from the menu and for the first timein a user session that the catalog opens from a requisition or purchaseorder. If you close the catalog and reopen it from a purchase order orrequisition during the same session, the default source region is the lastone previously open. The regions are:
Long term agreements with a supplier that supportrepetitive buys: Blanket purchase agreements,catalog quotations, and planned purchase orders.This alternative region is a folder.
Actual past buys: Standard purchase orders,scheduled releases, blanket releases. Thisalternative region is a folder.
Sourcing rules. There are + and – iconic buttons justbelow the region box. Select the + icon or ExpandSourcing Rules on the Special menu to displaysource documents for the rule in a folder region.Use the – icon or Collapse Sourcing Rules on theSpecial menu to collapse the region displaying thedocuments. You must be in the documents regionto add to the Order Pad or to select a price.
Requisition Templates. The PO: Legal RequisitionType profile option governs whether templates forsupplier and internally sourced lines are displayed.This alternative region is a folder.
Using the Order Pad
Open the Supplier Item Catalog window by choosing Catalog in theRequisitions or Purchase Orders window to view and use the OrderPad. Use the Add (down arrow) button, select Add to Order Pad on theSpecial menu, or double click to highlight the selected line in a sourceregion and add it to the Order Pad. Validation takes place at this point,and if there is a problem, Purchasing displays a message window withan explanation. Depending on the problem, you may or may not bepermitted to add the line. Also, if Disposition messages are enabled forthe Purchasing Inventory organization, they are displayed as lines andadded to the Order Pad.
When you add to the Order Pad, you must specify the followinginformation. Defaults for this information are defined in the Order PadOptions window.
• Deliver–To organization (if you opened the catalog from themenu or a requisition)
NegotiatedSources
Prior Purchases
Sourcing Rules
RequisitionTemplates

5 – 9Supply Base Management
• Ship–To organization (if you opened the catalog from a purchaseorder)
• Deliver–To location (if you opened the catalog from the menu or arequisition)
• Ship–To location (if you opened the catalog from a purchaseorder)
• Destination Type (Expense or Inventory)
• Subinventory (if the Destination Type is Inventory)
• Need–By date (if the item is planned in the destinationorganization)
• Quantity. The quantity must be greater than zero. It defaults to 1or the quantity on the requisition/purchase order line if aquantity was specified and if the first record was added to theOrder Pad.
If you are adding to the Order Pad from Negotiated Sources orSourcing Rules and enter a quantity less than an existing pricebreak quantity, Purchasing opens a Decision window and askswhether you want to increase the order quantity to reduce theunit price.
Use the Remove (eraser) button, Remove from Order Pad on the Specialmenu, or Clear Record to remove selected lines from the Order Pad.When you remove a line from the Order Pad, Purchasing returns it tothe source region and unhighlights the line. To support return a line toits source alternative region, Purchasing does not permit Clear Record inthe source alternative regions or Clear Block in the Order Pad.
Order Pad Options
Use the Options button when you are on the Order Pad to open theOrder Pad Options window, where you can enter Order Pad defaultsand options. If you have opened the Supplier Item Catalog from apurchase order, the Order Pad Options window includes the CopyOption alternative region, where you can specify the Supplier, SupplierSite, Supplier Contact, FOB, Carrier, Payment Terms, and Freight Termsto be copied to the purchase order header.

5 – 10 Oracle Public Sector Purchasing User’s Guide
Order Pad Total
For each line on the Order Pad, Purchasing displays the extended pricein that line’s currency. To see the total Order Pad amount in yourfunctional currency, open the Order Pad Total window by selecting theOrder Total button.
Select Price Only Option
As a mutually exclusive alternative to the Order Pad, there is a SelectPrice Only check box at the top right of the screen when you haveopened the Supplier Item Catalog from a requisition or a purchase order.If the requisition or purchase order line is saved, when you open theCatalog, you must use Select Price Only. This check box can be enabledonly if nothing has been added to the Order Pad. If this check box isselected, the Add (down arrow), Order Total, and Options buttons aredisabled and the Select button is enabled. You can then select prices forinclusion on a requisition or purchase order.
See Also
Profile Options in Purchasing: page 1 – 76
Customizing the Presentation of Data in a Folder, Oracle ApplicationsUser’s Guide
Finding Supplier Items: page 5 – 10
Using the Supplier Item Catalog Alternative Regions: page 5 – 14
Entering Order Pad Options (from Requisitions): page 5 – 17
Finding Supplier Items
Use the Search Supplier Item Catalog window to enter search criteria forsupplier items.
Depending on the function security assigned to your responsibility, youhave varying levels of access to information. A responsibility defines anapplication user’s current privileges while working with OracleApplications.
If you enter an item with Purchasing Enabled = ’N’ and with InternalOrders Enabled = ’Y’, the item is valid for an internal order, but youcannot search for this item in the Supplier Item Catalog. If you want to

5 – 11Supply Base Management
be able to search the Supplier Item Catalog, the item must havePurchasing Enabled = ’Y’.
See Also
Overview of Function Security, Oracle Applications System Administrator’sGuide
Function Security for Purchasing: page 2 – 11
� To enter search criteria:
1. Navigate to the Search Supplier Item Catalog window by selectingSuppler Item Catalog from the menu. Also, the Search SupplierItem Catalog window is displayed when you select the Catalogbutton in the Requisitions and Purchase Orders windows.
Enter optional search criteria as described in the following steps:
2. Enter the Commodity. This is used to locate matching storedcategories on Purchasing document lines.
3. Enter the Requisition Template. This is enabled only if the windowis accessed from the menu or from the Requisitions window.
4. Enter the Category Set. This is used to find predefined itemsassociated with a specific category set. If you access this windowfrom the Requisitions or Purchase Orders windows, the default is

☞
5 – 12 Oracle Public Sector Purchasing User’s Guide
the Purchasing category set. If you enter a category set, you can alsofurther restrict the search by entering a Category.
5. Enter the Item number. If you access this window from theRequisitions or Purchase Orders window, the default is the item onthe originating document line. If you enter an item, you can alsofurther restrict the search by entering an item Revision number.
6. Enter the item Description. If you access this window from theRequisitions or Purchase Orders window, the default is thedescription on the originating document line.
7. Enter key words separated by spaces in the Item descriptioncontains the words: field to find item descriptions containing all thespecified words. The search is not case sensitive, nor does itconsider the sequence of the words.
8. Enter the Supplier. If you access this window from the Requisitionsor Purchase Orders window, the default is the supplier on theoriginating document line. If you enter a supplier, you can enter asupplier Site.
9. Enter the Supplier Item number. If you access this window from theRequisitions or Purchase Orders window, the default is the supplieritem number on the originating document line.
10. Select Approved Suppliers Only to get only records where thesupplier and the item exist in a current sourcing rule and ApprovedSupplier List entry.
11. Enter the Due Date to get documents that are current as of this dateor future effective. If you access this window from the Requisitionsor Purchase Orders window, the default is the due date on theoriginating document line.
12. Enter the Line Type. If you access this window from theRequisitions or Purchase Orders window, the default is the line typeon the originating document line.
13. Enter the UOM. If you access this window from the Requisitions orPurchase Orders window, the default is the UOM on the originatingdocument line.
Attention: Since catalog quotations in the Negotiated Sources andSourcing Rules alternative regions can have different units ofmeasure on the line and the price break, Purchasing performs thefollowing test on the UOM you enter in this field:
If a UOM exists on the shipment, Purchasing returns rows wherethis matches the search value. If no UOM exists on the shipment,Purchasing returns rows where the line UOM matches the search

5 – 13Supply Base Management
value. We do this because if you add to the Order Pad from a rowwith a different UOM on the price break, this is the UOM we copyto the Order Pad.
14. Enter the Organization. If you access this window from the menu orthe Requisitions window, the field title is Deliver–To Organization.If you access this window from the Purchase Orders window, thefield title is Ship–To Organization. The defaults are from theoriginating document line, deliver–to from the requisition andship–to from the purchase order.
15. Enter the Location. If you access this window from the menu or theRequisitions window, the field title is Deliver–To Location. If youaccess this window from the Purchase Orders window, the field titleis Ship–To Location. The query is based on the ship–to locationassociated with the deliver–to location. The defaults are from theoriginating document line, deliver–to location from the requisitionand ship–to location from the purchase order.
16. Enter the Currency. If you access this window from the PurchaseOrders window, the default is the currency from the purchase orderline.
� To clear existing search criteria:
� Select the Clear button to clear any existing search criteria.
� To initiate the search:
� Select the Find button to initiate the search and open the SupplierItem Catalog window.
� To close the Search Supplier Item Catalog window:
� Select the Close Catalog button to close the Search Supplier ItemCatalog window. This button is available only when you haveaccessed this window from the Requisitions or Purchase Orderswindows; when you close the catalog window, you return to youroriginating document window.
Note that you must select either Find or Close Catalog before youcan return to the originating document. While the Search SupplierItem Catalog window is open, you cannot:
• Exit to the menu
• Navigate to the originating document
• Save your work

5 – 14 Oracle Public Sector Purchasing User’s Guide
See Also
Overview of the Supplier Item Catalog: page 5 – 7
Defining Categories, Oracle Inventory User’s Guide
Defining Category Sets, Oracle Inventory User’s Guide
Defining Items, Oracle Inventory User’s Guide
About Suppliers, Oracle Public Sector Payables User’s Guide
Using the Calendar to Enter Dates, Oracle Applications User’s Guide
Defining Line Types: page 1 – 61
Defining Units of Measure, Oracle Inventory User’s Guide
Representing Internal and External Organizations, Oracle HumanResources User’s Guide.
Site Locations, Oracle Human Resource Management Systems User’s Guide
Defining Currencies, Oracle Applications System Administrator’s Guide
Using the Supplier Item Catalog Alternative Regions
Use the Supplier Item Catalog window to:
• Review results of your search in the alternative regions of theSearch Supplier Item Catalog window.
• Select prices from the alternative regions for placement ontorequisition and purchase order lines.
• Place source lines from the alternative regions onto the OrderPad, where you can modify them before placing them ontorequisition and purchase order lines or onto new requisitions.
The Supplier Item Catalog window has four alternative regions(Negotiated Sources, Prior Purchases, Sourcing Rules, and RequisitionTemplates), but Function Security controls which are present. A profileoption (PO: Default Supplier Item Catalog Option) determines which ofthese alternative regions is the default, but this applies only to regionspermitted by Function Security.

5 – 15Supply Base Management
The query based on your search criteria is executed in the currentlydisplayed alternative results region in the Supplier Item Catalogwindow. As you change alternative regions, a query is executed in eachalternative region using the original search criteria. Search criteria areconsidered only in alternative regions in which they are relevant.
For example, if your original search criteria consisted of a requisitiontemplate and a key word, the query in the Negotiated Sourcesalternative region would ignore the requisition template.
� To review the alternative regions:
� Navigate to the Supplier Item Catalog window by selecting the Findbutton in the Search Suppler Item Catalog window. You can alsonavigate to the Search Supplier Item Catalog window by selectingthe Catalog button in the Requisitions and Purchase Orderswindows.
The Negotiated Sources alternative region is a folder. As installed, itdisplays the Supplier, Item, Commodity, item Description, SupplierItem number, Line UOM, Line Price, Break Quantity, and BreakPrice.
The Prior Purchases alternative region is a folder. As installed, itdisplays the Order Date, Supplier, Item number, Commodity, itemDescription, UOM, Price, Supplier Item number, and Quantity.

5 – 16 Oracle Public Sector Purchasing User’s Guide
The Sourcing Rules alternative region displays the Item number,Rank, Supplier, Rule number, and the rule Effective date range. Youcan expand and collapse sourcing rule lines either by selecting the +and – icons or from options on the Special menu. When you expanda sourcing rule line, Purchasing opens a folder window that, asinstalled, displays the Rank, Commodity, Supplier Item, Line UOM,Line Price, Break Quantity, and Break Price for documentsreferencing the rule.
The Requisition Templates alternative region is a folder. Asinstalled, it displays the Supplier, Item number, Commodity, UOM,Price, Source Type, Supplier Item number, Template name, TemplateDescription, and Buyer.
� To select prices from the alternative regions:
1. Select the Select Price Only check box, if you opened the SupplierItem Catalog from a requisition (the target document.). If youopened the Supplier Item Catalog from a purchase order, the SelectPrice Only check box is already selected, and you cannot deselect it.You cannot use the Order Pad if you have checked Select Price Only.You cannot use the Order Pad if you opened it from a PurchaseOrder window.
2. Move the cursor to the desired line in one of the alternative regions.
3. Select the Select button to copy the price of the current line to yourtarget document.
� To use the Order Pad:
1. Select the Down Arrow to place the current line in the openalternative region onto the Order Pad. The cursor moves to theOrder Pad, where you can select the Eraser icon to return the currentline to its original alternative region.
2. You can enter or edit the following fields for an Order Pad line:Quantity, Price, Need–By date, Organization, Location, DestinationType, and Subinventory.
3. Select the Select button to add the order pad lines to the requisitionor purchase order from which you accessed the catalog. This alsocloses the Supplier Item Catalog window.
� To enter order pad options and defaults:
� Select the Options button to open the Order Pad Options window.See: Entering Order Pad Options (from Requisitions): page 5 – 17.

5 – 17Supply Base Management
� To view the current order pad total:
� Select the Order Total button to open the Order Pad Total window.This window displays the Functional Currency and the current totalamount on the order pad.
� To close the Supplier Item Catalog window:
� Select the Close Catalog button to close the Supplier Item Catalogwindows. This button is available only when you have accessedthis window from the Requisitions or Purchase Orders windows;when you close the Search Supplier Item Catalog and the SupplierItem Catalog windows, you return to your originating documentwindow.
Note that you must either Select information to copy back or CloseCatalog before you can return to the originating document. Whilethe Supplier Item Catalog window is open, you cannot:
• Exit to the menu
• Navigate to the originating document
• Clear the window
• Save your work
See Also
Overview of the Supplier Item Catalog: page 5 – 7
Using the Search Supplier Item Catalog Window: page 5 – 10
Entering Requisition Lines: page 3 – 52
Site Locations, Oracle Human Resource Management Systems User’s Guide
Customizing the Presentation of Data in a Folder, Oracle ApplicationsUser’s Guide
Entering Order Pad Options (from Requisitions)
Use the Order Pad Options window to enter order pad defaults andoptions. You access this version of the window when you have openedthe Supplier Item Catalog from a requisition.
5 – 18 Oracle Public Sector Purchasing User’s Guide
� To enter order pad defaults and options:
1. Navigate to the Order Pad Options window by selecting theOptions button in the Supplier Item Catalog window.
2. Select the default option:
Default From Previous Line – Defaults for Order Pad lines are fromthe previous line on the Order Pad. (The first line on the Order Paduses defaults from this window.)
Default From Options – Defaults for Order Pad records come fromthis window.
3. Enter the default Need–By date.
4. Enter the default Destination Type: Expense or Inventory.
5. Enter the default Organization.

5 – 19Supply Base Management
6. Enter the default Location.
7. Enter the default Requestor.
8. For the Destination Type of Inventory, enter the defaultSubinventory.
9. Enter the default Expense Charge Account.
� To apply the defaults:
� Select the OK button to apply the defaults and return to the SupplierItem Catalog window.
See Also
Overview of the Supplier Item Catalog: page 5 – 7
Site Locations, Oracle Human Resource Management Systems User’s Guide

5 – 20 Oracle Public Sector Purchasing User’s Guide
Receiving Price/Sales Catalog Information Electronically
Your supplier can send you the latest price/sales catalog informationand responses to requests for quotation through the PurchasingDocuments Open Interface. The Purchasing Documents Open Interfaceprocesses catalog data in the Oracle Applications interface tables toensure that it is valid before importing it into Purchasing. One way toimport catalog data into the Purchasing Documents Open Interface,and finally into Purchasing, is through Electronic Data Interchange(EDI). EDI programs import the catalog information into Purchasingdirectly as blanket purchase agreement lines or catalog quotations,whichever you choose. You can also choose to have the programsautomatically populate the item master and/or apply sourcing rules tothe imported item information. If you import price/sales cataloginformation as blanket purchase agreement lines, you can also specifyrelease generation methods.
The catalog information is sent by the supplier in the form of a ”flatfile.” Your supplier can send you flat files with two kinds of actioncodes: Original or Replace. An Original file is one in which all thecatalog information is new to your system. A Replace file replacesalready–created blanket purchase agreement lines or catalog quotationswith new documents containing new price/sales catalog information.(The Purchasing Documents Open Interface program replaces the olddocuments by invalidating their effectivity dates; then it creates newdocuments with the new price/sales catalog information and the oldeffectivity dates.) For EDI Gateway to distinguish between Originaland Replace action codes, you need to set up code–conversioncategories and values in EDI Gateway. See: Defining Code ConversionCategories, Oracle EDI Gateway User’s Guide. See: Defining CodeConversion Values, Oracle EDI Gateway User’s Guide. See also:Overview of Code Conversion, Oracle EDI Gateway User’s Guide.
Allowing updating of the item master enables price changes or anyother changes in part specifications to be quickly communicated toPurchasing. Before you run the EDI Price/Sales Catalog InboundProgram or the EDI Response to Request for Quote Inbound Program,you need to make sure of the following settings if you want to updatethe item master:
• Allow updating of item descriptions. Navigate to the PurchasingOptions window. In the Control options region, check AllowItem Description Update. See: Defining Control Options: page1 – 33.

5 – 21Supply Base Management
• Allow updating of item status codes at the site level. Navigateto the Personal Profiles window. Make sure that INV: DefaultItem Status is set to Active.
See Also
Inbound Price/Sales Catalog (832/PRICAT), Oracle EDI Gateway User’sGuide
Running the EDI Price/Sales Catalog Inbound Program, Oracle EDIGateway User’s Guide
Inbound Response to Request for Quote (843/QUOTE), Oracle EDIGateway User’s Guide
Running the EDI Response to Request for Quote Inbound Program,Oracle EDI Gateway User’s Guide
Purchasing Documents Open Interface: page 9 – 95
Oracle Manufacturing, Distribution, Sales and Service Open InterfacesManual, Release 11

5 – 22 Oracle Public Sector Purchasing User’s Guide
Approved Supplier List
All procurement organizations maintain lists that associate the itemsand services they buy with the organizations who supply them, eitherformally or informally. Data stored in a controlled, global repositorycontaining relevant details about each ship–from/ship–to/itemrelationship, is known as an Approved Supplier List (ASL). Thisrepository includes information about all suppliers with businessstatuses ranging from fully Approved (the supplier has demonstratedthe ability to satisfy rigorous quality, cost, and delivery requirementsover a sustained period) to Debarred (no business is allowed with thissupplier), or New if you have never placed a purchase order with thesupplier. Each status has four business rules associated with it. Youcan prevent or allow certain business rules for each status, change thename of a status, or create a status of your own.
In the Approved Supplier List window, you also specify the blanketpurchase order or catalog quotation for an item–supplier combination.See: Defining the Supplier and Commodity/Item Combination: page5 – 26. See: Defining the Supplier/Item Attributes: page 5 – 29.
See Also
Overview of the Approved Supplier List, Oracle Supplier SchedulingUser’s Guide
Supply Chain Planning, Oracle Master Scheduling/MRP and Supply ChainPlanning User’s Guide
Automatic Sourcing: page 5 – 69
ASL Repository Maintenance
Through maintenance of the Approved Supplier List repository thefollowing goals are realized:
• Supports Supplier Certification programs by providing a singlestore of information regarding a supplier’s current status.
• Helps design engineers achieve higher quality designs at a lowertotal cost through the re–use of preferred suppliers in newdesigns. Avoids supply base proliferation or unnecessary designdependence on ’difficult’ suppliers.

5 – 23Supply Base Management
• Eliminates redundant sourcing efforts within departments, andacross organizations. Facilitates a more global approach tocontract negotiation.
• Provides immediate procurement visibility when a supplier isassigned an unfavorable status. This ’early warning’ can helpprevent problem replication in multiple organizations.
• Complies with external Quality System process requirements likeISO 9001/9002.
• Provides storage for general data attributes that are unique tothe supplier/item intersection.
• Maintains lists of supplier ’candidates’ by commodity or item forfuture consideration.
ASL Public Sector Needs
Using Oracle Public Sector Purchasing Approved Supplier List, youcan:
• Set approval/certification status at the appropriate level for yourbusiness. For example, approve a supplier for a givencommodity (e.g. ’Office Supplies’) for expense purchases whileapproving a specific supplier/site for each production item.
• Approve suppliers (they perform their own manufacturing),distributors (they represent manufacturers), and manufacturers(they manufacture items marketed and sold by distributors).
• Define global or local ASL entries. All organizations should beable to specify their own attributes (information about thesupplier/item relationship) even if the supplier/item status isdefined as a global record. This enables individualship–to–organizations to determine, for example, whether theyare ready to perform supplier scheduling, their purchasing unitof measure, their default item price, etc.
• Link the primary supplier item number with your internal itemnumber. This designated item will default to Purchase Orderand Requisition lines.
• Specify a Review By date indicating a proactive, planned reviewof the business with a longstanding supplier partner.
• Review ASL information in a flexible inquiry format.

5 – 24 Oracle Public Sector Purchasing User’s Guide
• Define your own approval statuses and associate them withspecific business rules.
• Control procurement activity by preventing purchase orderapproval or supplier schedule confirmation for certainsupplier/item combinations. Optionally provide specificindividuals with an override capability for exception buys.
• Control ASL access and modification.
• Control whether Sourcing Rules must be comprised of approvedsuppliers. Quickly create Sourcing Rules based on your ASLentry.
• Define reference information for the supplier/item combination.
• Define ASL entries quickly using existing entries as a template.
See Also
Overview of Supplier Scheduling, Oracle Supplier Scheduling User’sGuide
Sourcing Rules and Bills of Distributions, Oracle Master Scheduling/MRPand Supply Chain Planning User’s Guide
Bucket Patterns, Oracle Supplier Scheduling User’s Guide
Defining Supplier Lists: page 5 – 76
Defining Ship–to Organization Level Defaults and Controls, OracleSupplier Scheduling User’s Guide
Defining Sourcing Rules: page 5 – 71
Defining Bills of Distributions, Oracle Master Scheduling/MRP andSupply Chain Planning User’s Guide
Defining Approved Supplier Statuses
You can create any number of Approved Supplier Statuses to describethe condition of the Approved Supplier. Each Approved Supplier

5 – 25Supply Base Management
Status can have Business Rules applied to manage the characteristics ofthe status. For example, the default status of Approved allows all thedefault business rules: PO Approval, Sourcing, Schedule Confirmation,and Manufacturer Linking. But you could change the Approved statusto prevent one of the Business Rules. Likewise, you can create yourown status with your own combination of Business Rules.
� To define Approved Supplier Statuses:
1. Navigate to the Approved Supplier List Statuses window.
2. Enter a unique Status name.
3. Enter a status Description to convey the meaning of the status.
4. Optionally check Approved Supplier List Default to set this statusas a default.
This is the status that appears as the default for suppliers you addto the Approved Supplier List window. (You can change asupplier’s status from within the Approved Supplier List window.)
Note: You can only have one Approved Supplier Status as adefault.
5. Optionally choose a date for Inactive On to set the time when thestatus will no longer be active.

5 – 26 Oracle Public Sector Purchasing User’s Guide
6. If you choose to apply Business rules to the Approved SupplierStatus, choose a Control. By choosing a Control, you either Allowor Prevent the Business Rule.
7. Select a Business Rule.
• PO Approval – Enables you to allow or prevent purchase orderapprovals sourced to this supplier.
• Sourcing – Enables you to allow or prevent sourcing to thissupplier.
• Schedule Confirmation – Enables you to allow or preventschedule confirmation for this supplier in Supplier Scheduling.
• Manufacturer Link – In the Approved Supplier List window, youchoose a Business from one of the following: Direct (Supplier),Manufacturer, or Distributor. If you have a Distributor definedin the Approved Supplier List window, this Business Ruleenables you to allow or prevent linking to the Manufacturer alsodefined in the Approved Supplier List window.
8. Save your work.
See Also
Defining Planners Oracle Master Scheduling/MRP and Supply ChainPlanning User’s Guide
Defining Supplier Lists: page 5 – 26
Defining the Supplier and Item/Commodity Combination
❑ Before you define define the supplier and item/commoditycombination in the Approved Supplier List window, you shouldperform the following:
• Create blanket purchase agreements. See: Entering PurchaseOrder Headers: page 4 – 39.
• Create and approve quotations. See: Entering QuotationHeaders: page 5 – 47.

5 – 27Supply Base Management
� To define the supplier and item/commodity combination:
1. Navigate to the Approved Supplier List window.
2. In the Organizations window that appears, choose the ship–toorganization for which you want to define Approved Supplier List(ASL) entries.
3. Choose one of the following options to which you want to assign asupplier:
• Item – Assigns a supplier to a particular item.
• Commodity – Assigns a supplier to a group of items belongingto a category (or commodity).
4. Choose a Business from the following:
• Direct (Supplier): Organization sells their products directly toyou
• Direct (Supplier): Organization sells their products directly toyou
• Direct (Supplier): Organization sells their products directly toyou
If you choose Direct, choose the supplier Name and optionally,the Site.

5 – 28 Oracle Public Sector Purchasing User’s Guide
• Manufacturer: Organization manufactures and sells throughdistributors
If you choose Manufacturer, choose the Manufacturer Name.
• Distributor: Organization sells products made by manufacturers
If you choose Distributor, choose the distributor Name andoptionally, the Site. You must associate the Distributor with aManufacturer, meaning you must define a Manufacturer beforeyou define its Distributor.
5. Choose the supplier’s approval Status.
Use one of the default Statuses provided, or choose a status of yourown if you defined other statuses in the Approved Supplier ListStatuses window. See: Defining Approved Supplier Statuses: page5 – 24.
6. Optionally choose the supplier item number.
For Suppliers and Distributors, this supplier item number defaultsto your purchase order and requisition lines, and is used tovalidate the source documents.
7. Optionally choose a Review By date.
You can use this date to determine when a proactive businessreview will be performed for the supplier.
8. Choose the Record Details alternative region.
9. Choose one of the following in Global:
• Yes – This ASL entry is valid for all inventory organizations inyour operating unit.
• No – This ASL entry is local—that is, valid only for theorganization you chose in the Organizations window when youfirst navigated to the Approved Supplier List window.
10. Save your work.
See Also
Automatic Sourcing: page 5 – 69
Defining Sourcing Rules: page 5 – 71
Assigning Sourcing Rules and Bills of Distribution: page 5 – 74
Setting Up and Implementing Sourcing Strategies, Oracle MasterScheduling/MRP and Supply Chain Planning User’s Guide

5 – 29Supply Base Management
Defining the Supplier/Item Attributes: page 5 – 29
Defining the Supplier/Item Attributes
Use the Supplier–Item Attributes window to define the informationaldata attributes for each supplier/item combination.
� To define the supplier and commodity/item attributes:
1. Navigate to the Supplier–Item Attributes window by choosing theAttributes button in the Approved Supplier List window.
2. Choose the Purchasing UOM.
3. Choose the Release Generation Method from the following options:
• Automatic Release/Review: automatically generate releases.
• Automatic Release: automatically generate approved releaseswith a status of ’Incomplete.’
• Release Using AutoCreate: use the AutoCreate window to createreleases.
4. Choose one of the following attribute groupings from thealternative region:
• Source Documents

5 – 30 Oracle Public Sector Purchasing User’s Guide
• Supplier Scheduling: you can choose this option if you specifiedan item and a supplier site.
� If you chose Source Documents:
1. Enter a unique Seq (Sequence) Number.
2. Select a Document Type from the following:
• Blanket
• Quotation
3. Choose a Document Number.
4. Choose a Line Number.
The Status and Effective Dates are displayed.
5. Save your work.
� If you chose Supplier Scheduling:
1. Optionally check Enable Planning Schedules and/or EnableShipping Schedules is you want to build Planning and/or ShippingSchedules.
If you check Enable Planning Schedules and/or Enable ShippingSchedules, you can choose an assigned Scheduler.
2. Check Enable AutoSchedule if you want your scheduleautomatically built.
3. If you check Enable Planning Schedules and Enable AutoSchedule,you must choose the following:
• Plan Bucket Pattern
• Plan Schedule Type
4. If you check Enable Shipping Schedules and Enable AutoSchedule,you must choose the following:
• Ship Bucket Pattern
• Ship Schedule Type
5. If you check Enable Planning Schedules and Enable Authorizations,you can optionally choose up to four Resource Authorizations withtheir associated timefences.
6. Save your work.

5 – 31Supply Base Management
See Also
AutoScheduling, Oracle Supplier Scheduling User’s Guide
Resource Authorizations, Oracle Supplier Scheduling User’s Guide
Defining Sourcing Rules: page 5 – 71
Assigning Sourcing Rules and Bills of Distribution: page 5 – 74
Setting Up and Implementing Sourcing Strategies, Oracle MasterScheduling/MRP and Supply Chain Planning User’s Guide
Defining the Supplier and Commodity/Item Combination: page 5 – 26
View Approved Suppliers
Use the Approved Supplier List Summary window to view all theApproved Supplier List entries. When you select and open a line in theApproved Supplier List Summary window, the Approved Supplier Listwindow for that supplier appears.
� To view the Approved Supplier List:
1. Navigate to the Approved Supplier List Summary window fromthe menu. The Search Approved Supplier List window opens.
2. Optionally choose or enter data into the available fields to furtherdefine your search.
Note: Check Include Global Entries to specify that Global Entriesare to be included.
3. Choose Find to begin the search.
Note: You can choose Clear to erase the data from the form toredefine your search, or choose New to navigate to the ApprovedSupplier List window to define new approved suppliers.
4. Choose a record to view then choose Open to view the ApprovedSupplier List window.

5 – 32 Oracle Public Sector Purchasing User’s Guide
Entering RFQs
Entering RFQ Headers
Use the RFQs window to:
• Enter and edit a request for quotation (RFQ)
• Review and edit an RFQ you autocreated from on–linerequisitions
Each RFQ consists of header, line, and shipment information. You cansend the RFQ to as many suppliers you want and decide how muchitem information to provide to the suppliers.
Note: Whether or not you send an RFQ, suppliers can send youcatalog quotations electronically, through the Purchasing DocumentsOpen Interface. See: Receiving Price/Sales Catalog InformationElectronically: page 5 – 20.
Prerequisites
❑ Before using this window you should perform the following:
• Define suppliers and supplier sites. See: About Suppliers, OraclePublic Sector Payables User’s Guide.
• Define supplier lists. See: Defining Supplier Lists: page 5 – 76.
• Define locations. See: Site Locations, Oracle Human ResourceManagement Systems User’s Guide
• Define buyers. See: Defining Buyers: page 1 – 13.
• Define unit of measure classes. See: Defining Unit of MeasureClasses, Oracle Inventory User’s Guide.
• Define units of measure. See: Defining Units of Measure, OracleInventory User’s Guide.
• Define payment terms. See: Defining Payment Terms, OraclePublic Sector Payables User’s Guide.
� To enter RFQ header information:
1. Navigate to the RFQs window by selecting RFQs from the menu.Purchasing displays today’s date as the Created date and thefunctional Currency from your set of books.
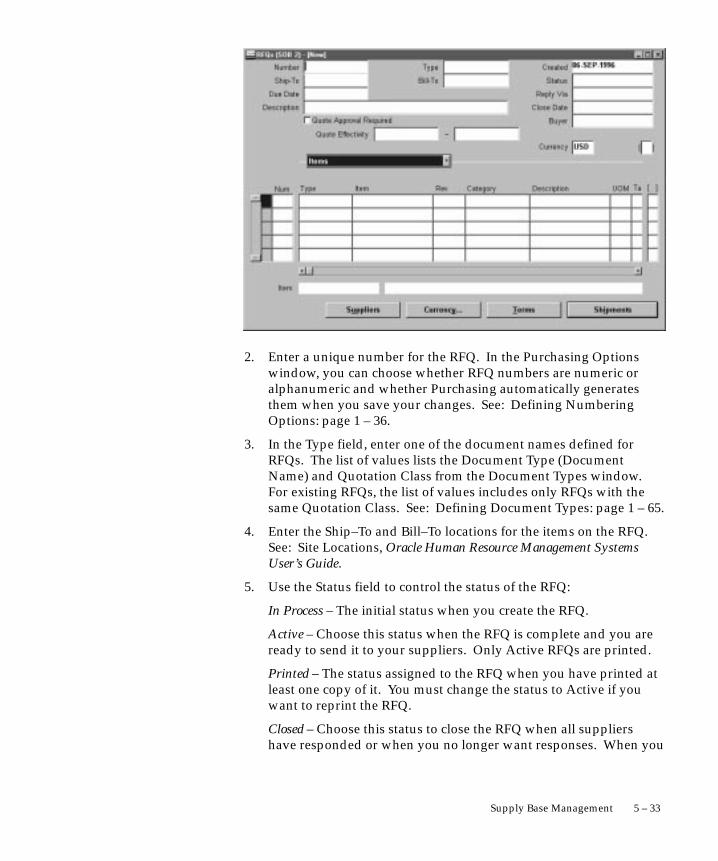
5 – 33Supply Base Management
2. Enter a unique number for the RFQ. In the Purchasing Optionswindow, you can choose whether RFQ numbers are numeric oralphanumeric and whether Purchasing automatically generatesthem when you save your changes. See: Defining NumberingOptions: page 1 – 36.
3. In the Type field, enter one of the document names defined forRFQs. The list of values lists the Document Type (DocumentName) and Quotation Class from the Document Types window.For existing RFQs, the list of values includes only RFQs with thesame Quotation Class. See: Defining Document Types: page 1 – 65.
4. Enter the Ship–To and Bill–To locations for the items on the RFQ.See: Site Locations, Oracle Human Resource Management SystemsUser’s Guide.
5. Use the Status field to control the status of the RFQ:
In Process – The initial status when you create the RFQ.
Active – Choose this status when the RFQ is complete and you areready to send it to your suppliers. Only Active RFQs are printed.
Printed – The status assigned to the RFQ when you have printed atleast one copy of it. You must change the status to Active if youwant to reprint the RFQ.
Closed – Choose this status to close the RFQ when all suppliershave responded or when you no longer want responses. When you

5 – 34 Oracle Public Sector Purchasing User’s Guide
close an RFQ, Purchasing deletes all follow up notificationsassociated with it.
6. Enter the Due Date when you want your suppliers to reply.Purchasing prints the reply due date on the RFQ. Purchasingnotifies you if the current date is between the RFQ reply due dateand the close date and if the RFQ is Active. Purchasing knows thata supplier replied to an RFQ if you enter a quotation for thissupplier referencing the RFQ. See: Viewing and Responding toNotifications: page 2 – 29. See: Entering Quotation Headers: page5 – 47.
7. Enter the Reply/Receive Via code for the method you want thesupplier to use to send the quotation. For example, by mail,telephone, or FAX. See: Defining Lookup Codes: page 1 – 54.
8. Enter the Close Date for the RFQ. Purchasing prints the close dateon the RFQ. Purchasing notifies you if the current date is betweenthe RFQ reply due date and the close date and if the RFQ is Active.Purchasing warns you when you enter a quotation against this RFQafter the close date. See: Viewing and Responding to Notifications:page 2 – 29.
9. Select Require Quote Approval to enforce approval of anyquotation referencing this RFQ before the quotation can be used fora purchase order.
10. Purchasing displays your name as the Buyer. You can forward theRFQ to another buyer by choosing the name of this buyer from thelist of values. The buyer you enter receives all notificationsregarding this RFQ.
11. Enter the beginning and ending Effectivity Dates for the supplierquotation.
12. Enter RFQ lines in the Lines alternative region: See: Entering RFQLines: page 5 – 35.
� To enter supplier information:
� Select the Suppliers button to open the RFQ Suppliers window.See: Entering RFQ Supplier Information: page 5 – 37
� To enter currency information:
� Select the Currency button to open the Currency window. See:Entering Currency Information: page 4 – 56.

5 – 35Supply Base Management
� To enter terms and conditions information:
� Select the Terms button to open the RFQ Terms window. See:Entering RFQ Terms Information: page 5 – 39
� To enter shipment information:
� When the Quotation Class of the header Type is Bid, you can selectthe Shipments button to open the RFQ Shipments window. See:Entering RFQ Shipment Information: page 5 – 40
� To enter price break information:
� When the Quotation Class of the header Type is Catalog, you canselect the Price Break button to open the Price Breaks window. See:Entering RFQ Price Break Information: page 5 – 43
Entering RFQ Lines
Use the Lines alternative region in the RFQs window to enter and editRFQ lines.
� To enter an RFQ line:
1. Select the Lines alternative region in the RFQs window.
2. Enter a unique Number for the RFQ line.
3. Enter the line Type for the item. When you enter a line type,Purchasing automatically copies the corresponding purchasingcategory, unit, and unit price. You can enter predefined items onlywhen you choose a quantity based line type. Purchasing defaultsthe value you define in the Purchasing Options window. See:Defining Default Options: page 1 – 29. See: Defining Line Types:page 1 – 61.
4. Enter the Item for your RFQ line. Purchasing retrieves the itemdescription, purchasing category, and unit of measure. If you donot enter a predefined item, you must provide a purchasingcategory and item description for the RFQ line. For amount basedline types, the cursor does not enter this field. See: Defining Items,Oracle Inventory User’s Guide.
5. Enter the Revision number for the item on the requisition line.

5 – 36 Oracle Public Sector Purchasing User’s Guide
6. Enter the purchasing category for your RFQ line. If you enter apredefined item, Purchasing supplies the purchasing category.
7. Enter the item Description for your RFQ line. If you enter an item,Purchasing supplies the item description. You can set up the itemdefinition so that you can override the item description for thisparticular RFQ. See: Defining Items, Oracle Inventory User’s Guide.
8. Enter the UOM for your RFQ line. If you enter an item number,Purchasing supplies the unit of measure. For amount based linetypes, the cursor does not enter this field.
9. Enter an optional Target Price for the RFQ line. You may want toprovide a target price on the RFQ line for negotiation purposes.For amount based line types, Purchasing uses a target price of 1.
10. Enter the supplier’s number for the item.
11. Save your work.
� To enter additional RFQ line information:
1. Select the More alternative region in the RFQs window. You canenter optional information in the fields described in the followingsteps.
2. Enter a unique line number for your RFQ line. Purchasing defaultsthe next available line number.
3. Enter the UN Number for the item on the RFQ line. See: DefiningUN Numbers: page 1 – 52.
4. Enter the Hazard class for the item on the RFQ line. If you enter aUN number, Purchasing displays the corresponding hazard class ifone has been defined. See: Defining Hazard Classes: page 1 – 51.
5. Enter the Minimum Order Quantity for the item on the RFQ line.
6. Enter the Maximum Order Quantity for the item on the RFQ line.
7. Optionally enter a Project Number.
8. Optionally enter a Task Number.
9. Enter a note to the supplier about this item. This note prints on theRFQ.
10. Save your work.
5 – 37Supply Base Management
� To copy RFQs to quotations:
� Select Copy Document on the Special menu to open the CopyDocument window. See: Copying Quotations from RFQs: page5 – 61.
See Also
Entering RFQ Headers: page 5 – 32
Entering RFQ Supplier Information: page 5 – 37
Entering RFQ Terms Information: page 5 – 39
Entering RFQ Shipment Information: page 5 – 40
Entering RFQ Price Break Information: page 5 – 43
Entering Currency Information: page 4 – 56
Oracle Projects User’s Guide
Oracle Project Manufacturing Implementation Manual
Entering RFQ Supplier Information
Use the RFQ Suppliers window to:
• Enter the suppliers to which this RFQ will be sent. You can alsodelete suppliers from the RFQ until you have printed the RFQfor them.
• Review the supplier activity.
� To enter RFQ supplier information:
1. Navigate to the RFQ Suppliers window by selecting the Suppliersbutton in the RFQs window. For each supplier that you enter,Purchasing displays the Printed and Responded dates as well asthe Count of the number of times the RFQ has been printed. TheResponded date is the receipt date recorded for the quotation fromthe supplier.

5 – 38 Oracle Public Sector Purchasing User’s Guide
The Include In Next RFQ Printing check box is checked when youadd a supplier. You can postpone printing the RFQ for a supplierby deselecting the check box. After you print the RFQ for asupplier, Purchasing deselects this field. If you want to reprint theRFQ for a supplier, you must use this window to select the fieldagain.
2. Enter a unique sequence number for the supplier on the RFQSuppliers list. Purchasing uses this sequence number to print yourRFQs for these suppliers.
3. Enter the name of the active Supplier you want to place on the RFQSupplier list. The list of values displays the supplier name,number, Tax ID number, and VAT number.
4. Enter the Supplier Site you want to place on the RFQ Supplier listfor this supplier. You can choose only sites that you defined asRFQ Only suppliers. You cannot enter the same supplier site twice.
5. Enter the name of the Contact for this site
6. If you want to postpone printing the RFQ for a supplier, you candeselect Select for Printing.
7. Save your work.
� To add suppliers from supplier lists:
1. Select the Add From List button in the RFQ Suppliers window toopen the Supplier Lists modal window. This window is adisplay–only version of the Supplier Lists window, but includesonly the Supplier List name, Description, and a Count of thenumber of suppliers on the list. See: Defining Supplier Lists: page5 – 76
5 – 39Supply Base Management
2. Select any supplier list for which you want to copy all suppliers tothe RFQ. Suppliers already on the RFQ are omitted.
3. Select the Apply button to close the window and add thesesuppliers to the RFQ. Otherwise, you can select the Cancel buttonto return to the RFQ Suppliers window without adding suppliersfrom a list.
4. Save your work.
See Also
Entering Currency Information: page 4 – 56
Entering RFQ Headers: page 5 – 32
Entering RFQ Lines: page 5 – 35
Entering RFQ Terms Information
Use the RFQ Terms window to enter terms and conditions informationfor RFQs.
� To enter RFQ terms and conditions information:
1. Navigate to the RFQ Terms window by selecting the Terms buttonin the RFQs window. All terms and conditions information isoptional. The defaults are from the Financial Options window.See: Defining Financials Options, Oracle Public Sector PayablesUser’s Guide.
2. Enter the Payment terms for the RFQ. Purchasing displays defaultpayment terms that you can accept or change. See: DefiningPayment Terms, Oracle Public Sector Payables User’s Guide.

☞
5 – 40 Oracle Public Sector Purchasing User’s Guide
3. Enter the Freight terms for the RFQ. Purchasing displays defaultfreight terms that you can accept or change. See: Defining LookupCodes: page 1 – 54
4. Enter the freight Carrier for shipment of the RFQ. Purchasingdisplays a default freight carrier that you can accept or change.See: Defining Freight Carriers, Oracle Inventory User’s Guide.
5. Enter the FOB point for the RFQ. Purchasing displays a defaultfree on board (FOB) designation that you can accept or change.See: Defining Lookup Codes: page 1 – 54.
6. Enter a Note To Supplier. You can enter up to 240 characters in thisfield.
7. Save your work.
See Also
Entering RFQ Headers: page 5 – 32
Entering RFQ Lines: page 5 – 35
Entering RFQ Shipment Information
Use the RFQ Shipments window to enter and review shipmentinformation for Bid RFQs.
Attention: Use this window to request as many shipmentquotations as you want. You might want to provide multipleshipments if you want to receive quotations from your suppliersfor different ship–to locations, quantities, or other criteria.
� To enter RFQ shipment information:
1. Navigate to the RFQ Shipments window by selecting theShipments button in the RFQs window. This button is availableonly when the RFQ header Type has a Quotation Class of Bid. See:Entering RFQ Headers: page 5 – 32.

5 – 41Supply Base Management
2. In the Shipments alternative region, enter the shipment Number.Purchasing supplies shipment numbers in increments of one.
3. Enter the Organization.
4. Enter the Ship–To location for the quotation shipment. Purchasingdefaults the ship–to location from the RFQ header.
5. Enter the Quantity for which you want to receive a quotation fromyour supplier.
6. Enter the shipping UOM for the RFQ shipment line. You may wantthe supplier to ship the item in different units of measuredepending on the quantity ordered. Purchasing defaults the unit ofmeasure from the RFQ line. For amount based line types, the fieldis not applicable.
7. Enter the unit Price for the RFQ shipment line. Leave this fieldblank if you want the supplier to provide a price independent ofthe price you want. For amount based line types, the cursor doesnot enter this field, and the price is set to 1.
8. Enter the Last Accept Date.
9. Enter the Need–By date.
10. Select Firm to indicate that the bid is firmed.
The Approved check box indicates that there is an approvedquotation shipment referencing this line.
11. Save your work.

5 – 42 Oracle Public Sector Purchasing User’s Guide
� To enter additional RFQ shipment information:
1. Select the More alternative region in the RFQ Shipments window.
2. Enter the shipment number. Purchasing provides shipmentnumbers in increments of one.
3. Select Taxable to indicate that the item is taxable. If you entered anitem in the RFQ Lines window, Purchasing defaults the taxablestatus from the item record. If you do not enter a predefined item,Purchasing defaults this value from the Default region of thePurchasing Options window. See: Defining Items, Oracle InventoryUser’s Guide. See: Defining Default Options: page 1 – 29.
4. Enter or use the default Tax Name for taxable items.
The tax name defaults from the following sources, in the followingorder:
• The Purchase Order Preferences window. If you have specified apreferred tax name in this window, Purchasing defaults this taxname onto the RFQ shipment.
• The Tax Defaults region in the Purchasing Options window. Ifyou have specified a tax defaulting hierarchy in this window,Purchasing searches for and defaults the tax name correspondingto that tax defaulting hierarchy. See: Defining Tax DefaultsOptions: page 1 – 38.
You can accept the default tax name or select another. If you needadditional help with how tax defaulting works in Purchasing, see:Tax Defaults in Purchasing: page 4 – 158.
5. Choose the Invoice Matching option. The default is from thePurchasing Options window. See: Defining Default Options: page1 – 29.
Two–Way – Purchase order and invoice quantities must matchwithin tolerance.
Three–Way – Purchase order, receipt, and invoice quantities mustmatch within tolerance.
Four–Way – Purchase order, receipt, inspection, and invoicequantities must match within tolerance.
6. Enter the Quantity Received Tolerance. The default is from theReceiving Options window. See: Defining Receiving Options: page1 – 40.
7. Enter the Quantity Received Exception option. See: DefiningReceiving Options: page 1 – 40.

☞
5 – 43Supply Base Management
None – Receipts may exceed the selected tolerance.
Reject – Receipts cannot exceed the selected tolerance.
Warning – The receiver gets a warning message, but receipts canexceed the tolerance.
8. Save your work.
See Also
Entering RFQ Headers: page 5 – 32
Entering RFQ Lines: page 5 – 35
Entering RFQ Price Break Information
Use the RFQ Price Breaks window to enter pricing information forRFQs.
Attention: Use this window to request as many price breaks asyou want. You can provide multiple price breaks if you want toreceive quotations from your suppliers for different terms, ship–tolocations, or quantities.
� To enter RFQ price break information:
1. Navigate to the RFQ Price Breaks window by selecting the PriceBreaks button in the RFQs window. This button is available onlywhen the RFQ header Type has a Quotation Class of Catalog.

5 – 44 Oracle Public Sector Purchasing User’s Guide
2. In the Price Break alternative region, enter the line Number.Purchasing supplies line numbers in increments of one.
3. Enter the Quantity at this price.
4. Enter the shipping UOM for the RFQ price break line. You maywant the supplier to ship the item in different units of measuredepending on the quantity you order. Purchasing defaults the unitof measure from the RFQ line.
5. Enter the unit Price for the RFQ price break line. You might wantto provide price discounts to indicate to the supplier the prices youwould like to receive. Leave this field blank if you want thesupplier to provide a price independent of the price you want
6. Enter the Organization.
7. Enter the Ship–To location for the quotation line shipment.Purchasing defaults the ship–to location from the RFQ header.
8. Enter the Discount percentage from the unit price for the RFQ line.If you enter a unit price and break price for this line, Purchasingdoes not automatically calculate the discount. You should provideeither a break price or a discount, not both. If you enter bothvalues for the RFQ, Purchasing prints only the break price on theRFQ. If you provide a discount without providing a break price,Purchasing prints the discount on the RFQ.
9. Enter the Effective Date when you want to be able to start using thequotation from your supplier. If you leave this field blank,Purchasing applies the quotation effective date from the RFQHeader window. You can also enter lead time information insteadof date information.
10. Enter the Expiration Date when you no longer need the quotationfrom your supplier. If you leave this field blank, Purchasingapplies the expiration date from the RFQ header.
11. Enter the Lead Time for this RFQ line.
12. Enter the UOM you want to use to define the lead time.
13. Enter the Payment Terms for the RFQ. Purchasing prints theseterms on the RFQ only if they are different from the terms on theRFQ header. The default is the payment terms from the RFQheader.
14. Enter the Freight Terms for the RFQ. Purchasing prints these termson the RFQ only if they are different from the freight terms on theRFQ header. The default is the freight terms from the RFQ header.

5 – 45Supply Base Management
15. Enter the FOB point for your RFQ Line. Purchasing prints this FOBpoint on the RFQ only if it is different from the FOB point on theRFQ header. The default is the FOB name from the RFQ header.
16. Enter the freight carrier for your RFQ. Purchasing prints thiscarrier on the RFQ only if it is different from the carrier on the RFQheader. The default is the carrier from the header.
The Approved check box indicates that there is an approvedquotation shipment referencing this line.
17. Save your work.
� To enter additional RFQ price break information:
1. Select the More alternative region in the RFQ Price Breaks window.
2. Enter the line number. Purchasing provides line numbers inincrements of one.
3. Select Taxable to indicate that the item is taxable. If you entered anitem in the RFQ Lines window, Purchasing defaults the taxablestatus from the item record. If you do not enter a predefined item,Purchasing defaults this value from the Default region of thePurchasing Options window. See: Defining Items, Oracle InventoryUser’s Guide. See: Defining Default Options: page 1 – 29.
4. Enter or use the default Tax Name for taxable items.
The tax name defaults from the following sources, in the followingorder:
• The Purchase Order Preferences window. If you have specified apreferred tax name in this window, Purchasing defaults this taxname onto the RFQ shipment.
• The Tax Defaults region in the Purchasing Options window. Ifyou have specified a tax defaulting hierarchy in this window,Purchasing searches for and defaults the tax name correspondingto that tax defaulting hierarchy. See: Defining Tax DefaultsOptions: page 1 – 38.
You can accept the default tax name or select another. If you needadditional help with how tax defaulting works in Purchasing, see:Tax Defaults in Purchasing: page 4 – 158.
5. Choose the Invoice Matching option. The default is from thePurchasing Options window. See: Defining Default Options: page1 – 29.

5 – 46 Oracle Public Sector Purchasing User’s Guide
Two–Way – Purchase order and invoice quantities must matchwithin tolerance.
Three–Way – Purchase order, receipt, and invoice quantities mustmatch within tolerance.
Four–Way – Purchase order, receipt, inspection, and invoicequantities must match within tolerance.
6. Enter the Quantity Received Tolerance. The default is from theReceiving Options window. See: Defining Receiving Options: page1 – 40.
7. Enter the Quantity Received Exception option. See: DefiningReceiving Options: page 1 – 40.
None – Receipts may exceed the selected tolerance.
Reject – Receipts cannot exceed the selected tolerance.
Warning – The receiver gets a warning message, but receipts canexceed the tolerance.
8. Save your work.
See Also
Entering RFQ Headers: page 5 – 32
Entering RFQ Lines: page 5 – 35
5 – 47Supply Base Management
Entering Quotations
Entering Quotation Headers
Use the Quotations window to:
• Enter and edit quotations
• Review and edit quotations you copied from RFQs
Note: You can also receive catalog quotations electronically from yoursuppliers through the Purchasing Documents Open Interface. See:Receiving Price/Sales Catalog Information Electronically: page 5 – 20.
Prerequisites
❑ Before using this window you should perform the following:
• Define suppliers and supplier sites. See: About Suppliers, OraclePublic Sector Payables User’s Guide.
• Define supplier lists See: Defining Supplier Lists: page 5 – 76.
• Define locations. See: Site Locations, Oracle Human ResourceManagement Systems User’s Guide
• Define buyers. See: Defining Buyers: page 1 – 13.
• Define unit of measure classes. See: Defining Unit of MeasureClasses, Oracle Inventory User’s Guide.
• Define units of measure. See: Defining Units of Measure, OracleInventory User’s Guide.
• Define payment terms. See: Defining Payment Terms, OraclePublic Sector Payables User’s Guide.
� To enter quotation header information:
1. Navigate to the Quotations window by selecting Quotations fromthe menu. Purchasing displays the functional Currency from yourset of books.

5 – 48 Oracle Public Sector Purchasing User’s Guide
2. Enter a unique number for the quotation. In the PurchasingOptions window, you can choose whether quotation numbers arenumeric or alphanumeric and whether Purchasing automaticallygenerates them when you save your changes. See: DefiningNumbering Options: page 1 – 36.
3. In the Type field, enter one of the document names defined forquotations. The list of values lists the Document Type (DocumentName) and Quotation Class from the Document Types window.For existing quotations, the list of values includes only quotationswith the same Quotation Class. See: Defining Document Types:page 1 – 65.
4. If you copied this quotation from an existing RFQ, Purchasingdisplays the corresponding RFQ number, which you can override.
You can also manually provide an RFQ number. Purchasingverifies the supplier and supplier site you provide and lets youchoose from a corresponding list of RFQs. If you want to enter aquotation as a response to an RFQ for a supplier you did notprovide on the RFQ supplier list, you need to modify the RFQsupplier list first. If you change the supplier or supplier siteinformation on this quotation after you enter an RFQ number,Purchasing removes the RFQ number, and you must re–enter it.See: Entering RFQ Supplier Information: page 5 – 37.

☞
5 – 49Supply Base Management
If you enter the number of an RFQ for which you already entered aresponse for this supplier and supplier site, Purchasing displays awarning message but permits your entry.
Attention: If you are entering a quotation that is a response to anRFQ you previously sent to the supplier, you need to provide thisRFQ number to indicate to Purchasing that the supplier responded.
5. Enter the Supplier for this quotation. When you enter a suppliername, Purchasing uses the default terms, conditions, and currencyinformation for this supplier in the Quotation Terms and Currencywindows. The list of values displays the supplier name, number,Tax ID number, and VAT number.
6. Enter the supplier Site for this quotation. You do not need toprovide a supplier site for a quotation. When you enter a suppliersite, Purchasing uses the default terms, conditions, and currencyinformation for this supplier site in the Quotation Terms andCurrency windows.
7. Enter a supplier Contact for this quotation.
8. Enter the Ship–To and Bill–To locations for the items on thequotation. See: Site Locations, Oracle Human Resource ManagementSystems User’s Guide.
9. Use the Status field to control the status of the quotation:
In Process – The initial status when you create the quotation.Purchasing sends you notifications that the quotation is awaitingcompletion.
Active – Choose this status when the quotation is complete and youare ready to approve it. Only Active quotations can be approved.
Closed – When you enter a quotation, you provide an expirationdate for it. Purchasing sends you a notification when the quotationapproaches expiration using the warning delay you provided in thequotation header. You can manually close the quotation toacknowledge the notification. If you do not acknowledge thenotification by closing the quotation, the status of your quotation isstill Active. You cannot use Closed quotation information onpurchase orders.
10. Enter the Supplier Quote number.
11. Select Approval Required to indicate that approval is required topurchase goods based on this quotation.

5 – 50 Oracle Public Sector Purchasing User’s Guide
12. The Response Date is the date you actually received the quotation.Purchasing defaults today’s date as the response date, but you canchange this date.
13. Enter the beginning and ending Effective Dates for the quotation.
14. Purchasing displays your name as the Buyer. You can forward thequotation to another buyer by choosing the name of this buyerfrom the list of values. The buyer you enter receives allnotifications regarding this quotation.
15. Enter quotation lines in the Lines alternative region. See: EnteringQuotation Lines: page 5 – 50.
� To approve the quotation:
� Select the Approve button to open the Approve Entire Quotationwindow. See: Approving Entire Quotations: page 5 – 66.
� To enter currency information:
� Select the Currency button to open the Currency window. See:Entering Currency Information: page 4 – 56.
� To enter terms and conditions information:
� Select the Terms button to open the Quotation Terms window. See:Entering Quotation Terms Information: page 5 – 53.
� To enter shipment information:
� When the Quotation Class of the header Type is Bid, you can selectthe Shipments button to open the Quotation Shipments window.See: Entering Quotation Shipment Information: page 5 – 54.
� To enter price break information:
� When the Quotation Class of the header Type is Catalog, you canselect the Price Breaks button to open the Price Breaks window.See: Entering Quotation Price Break Information: page 5 – 57.
Entering Quotation Lines
Use the Lines alternative region in the Quotations window to enter andedit quotation lines.

☞
5 – 51Supply Base Management
Attention: If your supplier gives you a single quotation that isindependent of the quantity you order, you must still provide atleast one shipment quotation since you approve quotationinformation by shipment rather than by line. Therefore, if yoursupplier provides you with a base unit price only, you can enter thebase unit price here, but you must also provide a shipment with thesame base unit price.
� To enter a quotation line:
1. Select the Lines alternative region in the Quotations window.
2. Enter a unique Number for the quotation line.
3. Enter the line Type for the item. When you enter a line type,Purchasing automatically copies the corresponding purchasingcategory, unit, and unit price. You can enter predefined items onlywhen you choose a quantity based line type. Purchasing defaultsthe value you define in the Purchasing Options window. See:Defining Default Options: page 1 – 29. See: Defining Line Types:page 1 – 61.
4. Enter the Item for your quotation line. Purchasing retrieves theitem description, purchasing category, and unit of measure. If youdo not enter a predefined item, you must provide a purchasingcategory and item description for the quotation line. For amountbased line types, the cursor does not enter this field. See: DefiningItems, Oracle Inventory User’s Guide.
5. Enter the Revision number for the item on the requisition line.
6. Enter the purchasing Category for your quotation line. If you entera predefined item, Purchasing supplies the purchasing category.
7. Enter the item Description for your quotation line. If you enter anitem, supplies the item description. You can set up the itemdefinition so that you can override the item description for thisparticular quotation. See: Defining Items, Oracle Inventory User’sGuide.
8. Enter the UOM for your quotation line. If you enter an itemnumber, Purchasing supplies the unit of measure. For amountbased line types, the cursor does not enter this field.
9. Enter the unit Price for the quotation line. For amount based linetypes, Purchasing uses a target price of 1.
10. Enter the supplier’s number for the item.
11. Save your work.

5 – 52 Oracle Public Sector Purchasing User’s Guide
� To enter additional quotation line information:
1. Select the More alternative region in the Quotations window. Youcan enter optional information in the fields described in thefollowing steps.
2. Enter a unique line number for your quotation line. Purchasingdefaults the next available line number.
3. Enter the UN Number for the item on the quotation line. See:Defining UN Numbers: page 1 – 52. If you enter a UN number,Purchasing displays the corresponding hazard class if one has beendefined.
4. Enter the Hazard class for the item on the quotation line. See:Defining Hazard Classes: page 1 – 51.
5. Enter the Minimum Order Quantity for the item on the quotationline.
6. Enter the Maximum Order Quantity for the item on the quotationline.
7. Optionally enter a Project Number.
8. Optionally enter a Task Number.
9. Enter a Note From Supplier about this item.
10. Save your work.
� To approve the quotation:
� Select the Approve button to open the Approve Entire Quotationwindow. The Approve button is disabled if the quotation is notactive and doesn’t have at least one shipment. See: ApprovingEntire Quotations: page 5 – 66.
See Also
Entering Currency Information: page 4 – 56
Entering Quotation Headers: page 5 – 47
Entering Quotation Terms Information: page 5 – 53
Entering Quotation Shipment Information: page 5 – 54
Oracle Projects User’s Guide

5 – 53Supply Base Management
Oracle Project Manufacturing Implementation Manual
Entering Quotation Terms Information
Use the Quotation Terms window to enter terms and conditionsinformation for quotations.
� To enter quotation terms and conditions information:
1. Navigate to the Quotation Terms window by selecting the Termsbutton in the Quotations window. All terms and conditionsinformation is optional. If you created the quotation using theCopy Document window, the defaults are from the RFQ.Otherwise, the defaults are from the supplier site, supplier, or theFinancial Options window. See: Defining Financials Options,Oracle Public Sector Payables User’s Guide.
2. Enter the Payment terms for the quotation. Purchasing displaysdefault payment terms that you can accept or change. See:Defining Payment Terms, Oracle Public Sector Payables User’s Guide.
3. Enter the Freight terms for the quotation. Purchasing displaysdefault freight terms that you can accept or change. See: DefiningLookup Codes: page 1 – 54
4. Enter the freight Carrier for shipment of the quotation. Purchasingdisplays a default freight carrier that you can accept or change.See: Defining Freight Carriers, Oracle Inventory User’s Guide.
5. Enter the FOB point for the quotation. Purchasing displays adefault free on board (FOB) designation that you can accept orchange. See: Defining Lookup Codes: page 1 – 54.
6. Enter a Note To Supplier. You can enter up to 240 characters in thisfield.

5 – 54 Oracle Public Sector Purchasing User’s Guide
7. Enter the method the supplier used to answer to your RFQ. Forinstance, you could ask your supplier to send a quotation by mail,telephone, or FAX. See: Defining Lookup Codes: page 1 – 54.
8. Enter the Warning Delay (in days) that you want Purchasing to usewhen sending you an on–line notification before the quotationexpiration date.
9. Save your work.
See Also
Entering Quotation Headers: page 5 – 47
Entering Quotation Lines: page 5 – 50
Entering Quotation Shipment Information
Use the Quotation Shipments window to enter shipment informationfor bid quotations.
� To enter quotation shipment information:
1. Select the Shipments button to open the Quotation Shipmentswindow. This button is available only when the header Type has aQuotation Class of Bid.
2. In the Shipments alternative region, enter the shipment Number.Purchasing supplies shipment numbers in increments of one.

5 – 55Supply Base Management
3. Enter the Organization.
4. Enter the Ship–To location for the quotation shipment. Purchasingdefaults the ship–to location from the quotation header.
5. Enter the Quantity for which you received a quotation from yoursupplier.
6. Enter the shipping UOM for the quotation shipment line. You maywant the supplier to ship the item in different units of measuredepending on the quantity ordered. Purchasing defaults the unit ofmeasure from the quotation line. For amount based line types, thefield is not applicable.
7. Enter the unit Price for the quotation shipment line. For amountbased line types, the cursor does not enter this field, and the priceis set to 1.
8. Enter the Last Accept Date.
9. Enter the Need–By date.
10. Select Firm to indicate that the bid is firmed.
The Approved check box indicates whether the shipment has beenapproved.
11. Save your work.
� To enter additional quotation shipment information:
1. Select the More alternative region in the Quotation Shipmentswindow.
2. Enter the shipment number. Purchasing provides shipmentnumbers in increments of one.
3. Select Taxable to indicate that the item is taxable. If you entered anitem in the Quotation Lines window, Purchasing defaults thetaxable status from the item record. If you do not enter apredefined item, Purchasing defaults this value from the Defaultregion of the Purchasing Options window. See: Defining Items,Oracle Inventory User’s Guide. See: Defining Default Options: page1 – 29.
4. Enter or use the default Tax Name for taxable items.
The tax name defaults from the following sources, in the followingorder:

5 – 56 Oracle Public Sector Purchasing User’s Guide
• The Purchase Order Preferences window. If you have specified apreferred tax name in this window, Purchasing defaults this taxname onto the quotation shipment.
• The Tax Defaults region in the Purchasing Options window. Ifyou have specified a tax defaulting hierarchy in this window,Purchasing searches for and defaults the tax name correspondingto that tax defaulting hierarchy. See: Defining Tax DefaultsOptions: page 1 – 38.
You can accept the default tax name or select another. If you needadditional help with how tax defaulting works in Purchasing, see:Tax Defaults in Purchasing: page 4 – 158.
5. Choose the Invoice Matching option. The default is from thePurchasing Options window. See: Defining Default Options: page1 – 29.
Two–Way – Purchase order and invoice quantities must matchwithin tolerance.
Three–Way – Purchase order, receipt, and invoice quantities mustmatch within tolerance.
Four–Way – Purchase order, receipt, inspection, and invoicequantities must match within tolerance.
6. Enter the Quantity Received Tolerance. The default is from theReceiving Options window. See: Defining Receiving Options: page1 – 40.
7. Enter the Quantity Received Exception option. See: DefiningReceiving Options: page 1 – 40.
None – Receipts may exceed the selected tolerance.
Reject – Receipts cannot exceed the selected tolerance.
Warning – The receiver gets a warning message, but receipts canexceed the tolerance.
8. Save your work.
� To approve the quotation:
� Select the Approve button to open the Approve Entire Quotationwindow. See: Approving Entire Quotations: page 5 – 66.

5 – 57Supply Base Management
See Also
Entering Quotation Headers: page 5 – 47
Entering Quotation Lines: page 5 – 50
Entering Quotation Price Break Information
Use the Quotation Price Breaks window to enter pricing informationfor catalog quotations.
� To enter quotation pricing information:
1. Select the Price Breaks button to open the Quotation Price Breakswindow. This button is available only when the header Type has aQuotation Class of Catalog.
2. In the Price Break alternative region, enter the price break lineNumber. Purchasing supplies line numbers in increments of one.
3. Enter the Quantity for this price.
4. Enter the shipping UOM for the quotation price break. Thesupplier may ship the item in different units of measure dependingon the quantity you order. Purchasing defaults the unit of measurefrom the quotation line.
5. Enter the unit Price for the quotation price break.
6. Enter the Organization.

5 – 58 Oracle Public Sector Purchasing User’s Guide
7. Enter the Ship–To location for the quotation price break.Purchasing defaults the ship–to location from the quotation header.
8. Enter the Discount percentage from the unit price for the quotationprice break. If you enter a unit price and break price for thisshipment, Purchasing does not automatically calculate thediscount. You should provide either a break price or a discount,not both. If you enter both values for the quotation, Purchasingprints only the break price on the quotation. If you provide adiscount without providing a break price, Purchasing prints thediscount on the quotation.
9. Enter the Effective Date when you want to be able to start usingthis quotation. If you leave this field blank, Purchasing applies thequotation effective date from the Quotation Header window. Youcan also enter lead time information instead of date information.
10. Enter the Expiration Date when you no longer need the quotation.If you leave this field blank, Purchasing applies the expiration datefrom the quotation header.
11. Enter the Lead Time for this price break.
12. Enter the UOM you want to use to define the lead time.
13. Enter the Payment Terms for the quotation. Purchasing printsthese terms on the quotation only if they are different from theterms on the quotation header. The default is the payment termsfrom the quotation header.
14. Enter the Freight Terms for the price break. Purchasing prints theseterms on the quotation only if they are different from the freightterms on the quotation header. The default is the freight termsfrom the quotation header.
15. Enter the FOB point for the price break. Purchasing prints this FOBpoint on the quotation only if it is different from the FOB point onthe quotation header. The default is the FOB name from thequotation header.
16. Enter the freight Carrier for the price break. Purchasing prints thiscarrier on the quotation only if it is different from the carrier on thequotation header. The default is the carrier from the header.
17. Save your work.
� To enter additional quotation pricing information:
1. Select the More alternative region in the Quotation Price Breakswindow.

5 – 59Supply Base Management
2. Enter the line number. Purchasing provides line numbers inincrements of one.
3. Select Taxable to indicate that the item is taxable. If you entered anitem in the Quotation Lines window, Purchasing defaults thetaxable status from the item record. If you do not enter apredefined item, Purchasing defaults this value from the Defaultregion of the Purchasing Options window. See: Defining Items,Oracle Inventory User’s Guide. See: Defining Default Options: page1 – 29.
4. Enter or use the default Tax Name for taxable items.
The tax name defaults from the following sources, in the followingorder:
• The Purchase Order Preferences window. If you have specified apreferred tax name in this window, Purchasing defaults this taxname onto the quotation shipment.
• The Tax Defaults region in the Purchasing Options window. Ifyou have specified a tax defaulting hierarchy in this window,Purchasing searches for and defaults the tax name correspondingto that tax defaulting hierarchy. See: Defining Tax DefaultsOptions: page 1 – 38.
You can accept the default tax name or select another. If you needadditional help with how tax defaulting works in Purchasing, see:Tax Defaults in Purchasing: page 4 – 158.
5. Choose the Invoice Matching option. The default is from thePurchasing Options window. See: Defining Default Options: page1 – 29.
Two–Way – Purchase order and invoice quantities must matchwithin tolerance.
Three–Way – Purchase order, receipt, and invoice quantities mustmatch within tolerance.
Four–Way – Purchase order, receipt, inspection, and invoicequantities must match within tolerance.
6. Enter the Quantity Received Tolerance. The default is from theReceiving Options window. See: Defining Receiving Options: page1 – 40.
7. Enter the Quantity Received Exception option. See: DefiningReceiving Options: page 1 – 40.
None – Receipts may exceed the selected tolerance.

5 – 60 Oracle Public Sector Purchasing User’s Guide
Reject – Receipts cannot exceed the selected tolerance.
Warning – The receiver gets a warning message, but receipts canexceed the tolerance.
8. Save your work.
� To approve the quotation:
� Select the Approve button to open the Approve Entire Quotationwindow. See: Approving Entire Quotations: page 5 – 66.
See Also
Entering Quotation Headers: page 5 – 47
Entering Quotation Lines: page 5 – 50

5 – 61Supply Base Management
Copying Quotations from RFQs
Use the Copy Documents window to create quotations directly fromRFQs. Quotations you receive in response to an RFQ usually match theformat of your RFQ. To create a quotation from an RFQ, open theoriginal RFQ and choose Copy Document from the Special menu. Youcan copy the complete RFQ or part of it to your quotation. You canthen edit the quotation to provide detailed quotation line information.
Project and task information, if any, is carried from an RFQ when youcopy a quotation from it.
� To copy a quotation from an RFQ:
1. In the RFQs window, open the RFQ you want to copy.
1. Navigate to the Copy Document window by selecting CopyDocument on the Special menu. See: Entering RFQ Lines: page5 – 35.
2. Enter the copy–from Action: Entire RFQ, RFQ Header Only, orRFQ Header and Lines.
3. Enter a quotation Number if you are using manual quotationnumber entry. Otherwise, Purchasing assigns a number for you

5 – 62 Oracle Public Sector Purchasing User’s Guide
when you save your work. See: Defining Numbering Options:page 1 – 36.
4. Enter the document Type. This is one of the document namesdefined for RFQs. The list of values lists the Document Type(Document Name) and Quotation Class from the Document Typeswindow. See: Defining Document Types: page 1 – 65.
5. Enter the name of the active Supplier. The list of values displaysthe supplier name, Hold Status, 1099 Number, and VATRegistration Number. See: About Suppliers, Oracle Public SectorPayables User’s Guide.
6. Enter the Supplier Site.
7. Enter the name of the Contact for this site
8. Select Copy Attachments if you want to include the RFQattachments on the quotation.
9. Select the OK button to copy the RFQ. Purchasing displays aconfirmation message and opens the new quotation in theQuotations window.
� To clear your entries and return to the RFQs window:
� Select the Cancel button to clear entries and return to the RFQswindow.
See Also
AutoCreate Documents Overview: page 6 – 2

☞
5 – 63Supply Base Management
Approving Quotations
Finding Quotations for Approval
Use the Find Quotations window to enter search criteria for quotationsthat you want to approve.
� To enter search criteria:
1. Navigate to the Find Quotations window by selecting QuoteAnalysis from the menu. Enter optional search criteria asdescribed in the following steps:
Attention: Provide the item as part of the search criteria if youknow it. If not, you can provide the appropriate purchasingcategory or description. Use the wildcard (%) to help your searchfor the item. For example, to search for all items that haveComputer as part of the description, enter %Computer% in theDescription field. Note that the Description is case sensitive.
2. Enter the Item number. If you enter an item, you can also furtherrestrict the search by entering an item Revision number.
3. Enter the item Description.
4. Enter the Category Set. This is used to find predefined itemsassociated with a specific category set. If you enter a category set,you can also further restrict the search by entering a Category.
5. Enter the RFQ number. If you enter an RFQ number, you can alsoenter an RFQ Line number.
6. Enter the Supplier.

5 – 64 Oracle Public Sector Purchasing User’s Guide
7. Enter the Quotation number.
8. Enter the Quotation Approval status: Yes or No
� To clear existing search criteria:
� Select the Clear button to clear any existing search criteria.
� To initiate the search:
� Select the Find button to initiate the search and open the AnalyzeQuotations window.
See Also
Defining Categories, Oracle Inventory User’s Guide
Defining Category Sets, Oracle Inventory User’s Guide
Defining Items, Oracle Inventory User’s Guide
About Suppliers, Oracle Public Sector Payables User’s Guide
Entering Quotation Headers: page 5 – 47
Approving Quotation Shipments: page 5 – 64
Approving Quotation Shipments
Use the Analyze Quotations window to review and approve general orspecific quotation information for an item or a purchasing category.
You need to approve quotation shipments if you want requestors orbuyers to be able to reference the shipments on purchase orders orrequisitions. Purchasing lets you approve quotation shipment forspecific purposes so that you can control the use of your sourcinginformation.
� To approve quotation shipments:
1. Navigate to the Analyze Quotations window by selecting the Findbutton in the Find Quotations window. Purchasing opens theAnalyze Quotations window and displays in the Quotationsalternative region all shipment lines from active quotations.

5 – 65Supply Base Management
For each shipment line, Purchasing displays the followinginformation: Quotation number, Supplier, Item Number, ItemDescription, Unit Price, Freight Terms, Payment Terms, andDiscount.
In the Shipment Approvals region, Purchasing displays all existingapprovals for the current line. You can delete any of the existingapprovals, or you can add approvals for the current line asdescribed in the following steps.
2. Enter the approval Type. Approval types determine the types ofdocuments on which you can use the approved shipment. Theavailable types are: All Orders (all types of purchase orders andrequisitions), Purchase Agreements, Requisitions, StandardPurchase Orders.
3. Enter an active approval reason. See: Defining Lookup Codes:page 1 – 54.
4. Enter comments about your approval.
5. Enter the name of the Approver. Purchasing defaults your name inthis field.
6. Enter the Effective date range for your approval. You can useapproved quotation shipments on your documents only if thequotation is active and if the current date is within the effectivitydates. If you do not provide an expiration date, you can always

5 – 66 Oracle Public Sector Purchasing User’s Guide
use the shipment for your documents while the quotation is activeand approved.
7. Save your work.
� To approve entire quotations
� To approve/unapprove all shipments from a single quotation atone time, select the Approve Entire Quotations button to open theApprove Entire Quotations window. See: Approving EntireQuotations: page 5 – 66.
See Also
Entering Quotation Shipment Information: page 5 – 54
Entering Quotation Price Break Information: page 5 – 57
Finding Quotations for Approval page 5 – 63
Approving Entire Quotations
Use the Approve Entire Quotations window to approve or unapproveall shipments for a single quotation. You simply provide an approvaltype and reason. Purchasing approves or unapproves all shipments onthe quotation.
You need to approve quotation information if you want to let yourrequestors or buyers reference it on purchase orders or requisitions.You can approve quotation information for specific purposes so thatyou can control the use of your sourcing information.
Use the Quotations window to approve or unapprove individualquotation shipments. See: Approving Quotation Shipments: page5 – 64.
� To approve/unapprove entire quotations:
1. Navigate to the Approve Entire Quotation window by selecting theApprove Entire Quotation button in the Quotations window. Inthis case, your approval action applies to all shipment lines on thequotation behind the current quotation shipment when you selectthe Approve Entire Quotation button. You can also navigate to thiswindow by selecting the Approve button in the Quotations,Quotation Shipments, and Quotation Price Breaks windows.

5 – 67Supply Base Management
2. Select either Approve or Unapprove as the approval action. Youcan approve an entire quotation as often as you want. Each timeyou approve an entire quotation, Purchasing creates a newapproval for each quotation shipment.
If you select Approve, you must enter an approval type and reasonbefore you can save your changes. You can approve a specificquotation several times for different approval types and reasons. Ifyou enter Unapprove, you will be unapproving all shipment linesfor the current quotation.
3. Enter the approval Type for your quotation. Approval typesdetermine the types of documents on which you can use thequotation. The available types are: All Orders (all types ofpurchase orders and requisitions), Purchase Agreements,Requisitions, Standard Purchase Orders.
4. Enter an active approval reason. You can enter this field only whenyou choose Approve as the action. See: Defining Lookup Codes:page 1 – 54.
5. Enter the name of the approver. Purchasing defaults your name inthis field. You can enter this field only when you choose Approveas the action.
6. Enter the Effective date range for your approval. You can useapproved quotation information on your documents only if the

5 – 68 Oracle Public Sector Purchasing User’s Guide
quotation is active and if the current date is within the effectivitydates. If you do not provide an expiration date, you can alwaysuse the quotation for your documents while the quotation is activeand approved.
7. Enter comments about your approval. You can enter this field onlywhen you choose Approve as the action.
8. Select OK to approve/unapprove the quotation.
� To cancel your entries:
� Select the Cancel button to cancel your action and return to thewindow from which you accessed the Approve Entire Quotationwindow.
See Also
Entering Quotation Shipment Information: page 5 – 54
Entering Quotation Price Break Information: page 5 – 57
Approving Quotation Shipments: page 5 – 64

5 – 69Supply Base Management
Automatic Sourcing
Purchasing lets you automatically source on–line requisitions withblanket purchase orders or quotations you create. You can easily assignany item with an item number to a specific blanket purchase agreementor catalog quotation you created. (You can choose only quotations witha quotation class of Catalog.) Purchasing automatically assigns thename of the supplier for the blanket purchase order and quotation toany requisition for this item.
You use the Sourcing Rule and Sourcing Rule / Bill of DistributionAssignments windows to create sourcing rules. You use the ApprovedSupplier List and Supplier–Item Attributes windows to specify sourcedocument information for a particular item–supplier combination.
You can define allocation percentages when creating sourcing rules inthe Sourcing Rule window. Master Scheduling/MRP uses theseallocation percentages when creating planned orders, which Purchasingimports as requisitions through Requisition Import. In a group ofrequisitions imported from Master Scheduling/MRP, those requisitionsshow the percentage allocation you define. In other words, at the endof a planning period, orders—as a group—to those suppliersapproximately equal the percentage split you defined. However, whenyou create a requisition in Purchasing, Purchasing sources to thesupplier with the highest allocated percentage. The Approved SupplierList (ASL) entry for that supplier is then referenced in order to pick upsource document information (from a blanket purchase agreement orcatalog quotation), if source documents exist. You can also rank thesuppliers in the Sourcing Rule window, so that if a percentageallocation is the same for some suppliers, Purchasing sources to the onewith the highest rank.
In the Approved Supplier List and Sourcing Rule windows, you canalso source at an item or commodity level. That is, you can providesourcing information for an item at the item level, or for a category ofitems at the commodity level. You can also perform global or localsourcing. A sourcing rule assigned at the global level in the SourcingRule / Bill of Distribution Assignments window is valid for alloperating units. A global ASL entry in the Approved Supplier Listwindow is valid for all inventory organizations in an operating unit. Alocal sourcing rule or ASL entry is valid only for the operating unityou’re in or the organization you chose.
If you define a blanket purchase agreement or quotation as the sourcedocument for your item, Purchasing provides the following sourcinginformation for your requisition line: Buyer, Supplier, Site, Contact,Phone, Supplier Item Number, Document Type (Blanket or Quotation)

5 – 70 Oracle Public Sector Purchasing User’s Guide
Source Document, Source Line Number, and RFQ Required (Yes orNo). You can later review the sourcing information in the AutoCreateDocuments window before placing the requisition line onto a purchaseorder.
Purchasing defaults sourcing information from the blanket purchaseagreement or quotation except under the following conditions:
• The blanket purchase agreement is frozen or cancelled, or thepurchase agreement line is cancelled.
• The quotation is not active.
• You have copied sourcing information back to the requisitionfrom the Supplier Item Catalog.
Note: You can also receive blanket purchase agreements andquotations electronically from your suppliers through the PurchasingDocuments Open Interface. See: Receiving Price/Sales CatalogInformation Electronically: page 5 – 20.
Creating Sourcing Rules and ASL Entries
If you want source document information from a blanket purchaseagreement or catalog quotation to default in your requisition line for anitem–supplier combination, then you need to create ASL entries in theApproved Supplier List window and create sourcing rules. If you wantjust a supplier and optionally a supplier site to default in yourrequisition line, then it is enough just to create sourcing rules for theitem or commodity.
� To create sourcing rules:
❑ Before you define and assign sourcing rules, you should performthe following:
• Define items. See: Defining Items, Oracle Inventory User’s Guide.
• Create suppliers and supplier sites in the Suppliers window. See:About Suppliers, Oracle Public Sector Payables User’s Guide.
1. Use the Sourcing Rule window to define your sourcing rules. See:Defining Sourcing Rules: page 5 – 71.
Note: Some of the fields in the Sourcing Rule window mayalready be completed for you if your supplier sends youcatalog information electronically.
2. Use the Sourcing Rule/Bill of Distribution Assignments window toassign your sourcing rules to particular items or organizations.See: Assigning Sourcing Rules and Bills of Distribution: page 5 – 74.

5 – 71Supply Base Management
� To create ASL entries:
See: Defining the Supplier and Commodity/Item Combination: page5 – 26. See: Defining the Supplier/Item Attributes: page 5 – 29.
See Also
Setting Up and Implementing Sourcing Strategies, Oracle MasterScheduling/MRP and Supply Chain Planning User’s Guide
Sourcing Rules and Bills of Distribution, Oracle Master Scheduling/MRPand Supply Chain Planning User’s Guide
Defining Sourcing Rules
You can define sourcing rules that specify how to replenish items in anorganization, such as purchased items in plants. Sourcing rules canalso specify how to replenish all organizations, as when the entireenterprise gets a subassembly from a particular organization.
If there is a conflict between a sourcing rule and a bill of distribution,the sourcing rule takes precedence. For instance, if you assign a bill ofdistribution to AUS that tells it to source a part from NYC, AUS canstill define a sourcing rule to source the part from SAC. In this case,the local sourcing rule overrides the bill of distribution.
� To define a sourcing rule:
1. Navigate to the Sourcing Rule window.

5 – 72 Oracle Public Sector Purchasing User’s Guide
2. Enter a unique sourcing rule name.
3. Indicate whether this sourcing rule is used for all organizations(global) or a single organization (local).
If the sourcing rule is local, you must enter an organization name;otherwise, your current organization will be the receivingorganization.
4. Choose Copy From to copy the effectivity dates and shippingorganization from another sourcing rule into this one.
5. Enter effectivity dates. You must enter a start date, but entering anend date is optional.
6. For each range of effectivity dates, you can include multipleshipping organizations. For each shipping organization you wantto include, select a sourcing type to specify whether you make, buy,or internally transfer the item. You can also copy a list of shippingorganizations from an existing sourcing rule.
If you enter a customer organization as the receiving organization,then you cannot select a supplier organization as the shippingorganization.
Note: Suppliers and supplier sites are predefined in Oracle PublicSector Payables. (See: About Suppliers, Oracle Public SectorPayables User’s Guide.)
5 – 73Supply Base Management
7. Enter an allocation percentage for each shipping organization.Allocation percentage includes the number of planned ordersissued to the part for the entire the planning horizon. Your totalallocation may not exceed 100.
If the allocation percentage for all the shipping organizationsincluded within a range of effectivity dates equals 100, PlanningActive is checked. If the sourcing rule is not planning active, theplanning process will use the rule to assign planned orders.
Note: You cannot set the allocation percentage to less than orgreater than 100 for sourcing rules that are already assigned inassignment sets.
8. Enter a numeric rank value to prioritize each sourcing type.
If you have two sources with the same allocation percentage,planned orders are sourced from the highest rank first.
9. Select a shipping method, such as FEDEX, UPS, or rail. (See:Defining Shipping Methods, Oracle Inventory User’s Guide.)
10. Save your work.
� To copy shipping organizations from an existing sourcing rule:
This feature allows you to include long, previously defined lists ofshipping organizations without manual entry.
1. Select a sourcing type to specify whether you make, buy, orinternally transfer the item.
2. Choose Copy Shipping Orgs From.
3. In the Find window, select a sourcing rule that includes theshipping organizations you want to duplicate in this new sourcingrule.
4. Choose OK.
� To purge a sourcing rule:
1. Select a sourcing rule name.
2. Choose Purge.

5 – 74 Oracle Public Sector Purchasing User’s Guide
Assigning Sourcing Rules and Bills of Distribution
Once you have defined your sourcing rules and bills of distribution,you must assign them to particular items and/or organizations. Theseassignments are grouped together in assignment sets. This is whereyour various sourcing strategies define a particular supply chainnetwork.
Each assignment set to represents selection of organizations and/oritems you want planned. To influence the planning process, you mustinclude an assignment set in your plan options.
In an assignment set you can assign your sourcing rules and bills ofdistribution at different levels, as follows:
• an item across all organizations
• a single item in an inventory organization
• all items in an inventory organization
• categories of items
• categories of items in an inventory organization
• all organizations
These levels allow you to assign a replenishment rule to as many or asfew items as possible. For example, a category of items could bedefined as packaging material, and a sourcing rule that identifies thesuppliers could be assigned.
� To assign a sourcing rule or bill of distribution:
1. Navigate to the Sourcing Rule/Bill of Distribution Assignmentswindow.

5 – 75Supply Base Management
2. Enter an assignment set name and description.
3. Select an Assigned To type. See: Assignments Hierarchy, OracleMaster Scheduling/MRP and Supply Chain Planning User’s Guide.
Note: You can assign a sourcing rule or bill of distribution to acategory only if you have updated the profile option. See:MRP:Sourcing Rule Category Set, Oracle Master Scheduling/MRP andSupply Chain Planning User’s Guide.
4. Enter an organization name, if the Assigned To type requires one.
Note: You cannot assign customers modelled as organizations to aglobal sourcing rule.
5. Enter an Item/Category if you selected Item or Item–Org as theAssign To type.
6. Enter the sourcing rule or bill of distribution as the Type.
7. Enter the name of the sourcing rule or bill of distribution.
8. Save your work.
� To purge a sourcing rule or bill of distribution:
1. Select an assignment set name.
2. Choose Purge.

5 – 76 Oracle Public Sector Purchasing User’s Guide
Defining Supplier Lists
Use the Supplier Lists window to enter and edit supplier lists. You cancopy suppliers from the supplier lists onto the RFQ supplier list whenyou create an RFQ.
� To define supplier lists:
1. Navigate to the Supplier Lists window from the menu.
2. Enter the Supplier List Name of the list you want to create. Eachsupplier list name must be unique.
3. Enter a Description for your supplier list.
4. Enter the Inactive Date for the list
5. Enter the Supplier name you want to place on the supplier list. Thelist of values displays the supplier name, number, On Hold,Taxpayer ID, and VAT number. When you copy a supplier list ontoyour RFQ supplier list, Purchasing copies every uniquecombination of supplier and supplier site that does not alreadyappear on the current RFQ supplier list.
5 – 77Supply Base Management
6. Enter the supplier Site you want to place on the supplier list.Purchasing lets you send a request for quotation to different sites ofa same supplier. You cannot enter the same combination ofsupplier and supplier site twice on the same supplier list.
7. Enter the name of the Contact at this supplier site.
See Also
Entering RFQ Headers: page 5 – 32

5 – 78 Oracle Public Sector Purchasing User’s Guide
Managing Buyer Workload
Finding Requisition Lines for Review or Assignment
Purchasing lets you suggest a buyer for each supplier–sourcedrequisition line you create. (See: Entering Requisition Lines: page3 – 52.) When you assign requisitions or requisition lines to buyers, thebuyers can choose the requisition lines assigned to them and placethese lines on purchase orders.
Use the Find Requisition Lines window to choose whether to reviewrequisition assignments or to assign/reassign requisition lines and toenter selection criteria for the lines. Choosing the Review action takesyou to the Review Buyer Workload window, where you can reviewrequisition assignments. You can identify requisition lines thatreference the wrong buyer or that were not assigned to a buyer. Youcan also use this window to analyze buyers’ workloads. (See:Reviewing Buyer Workload: page 5 – 80.) Choosing the Assign actiontakes you to the Assign Requisition Lines window, where you canassign or reassign requisition lines to buyers. See: AssigningRequisition Lines: page 5 – 82.
� To enter search criteria:
1. Navigate to the Find Requisition Lines window by selectingManage Buyer Workload from the menu.
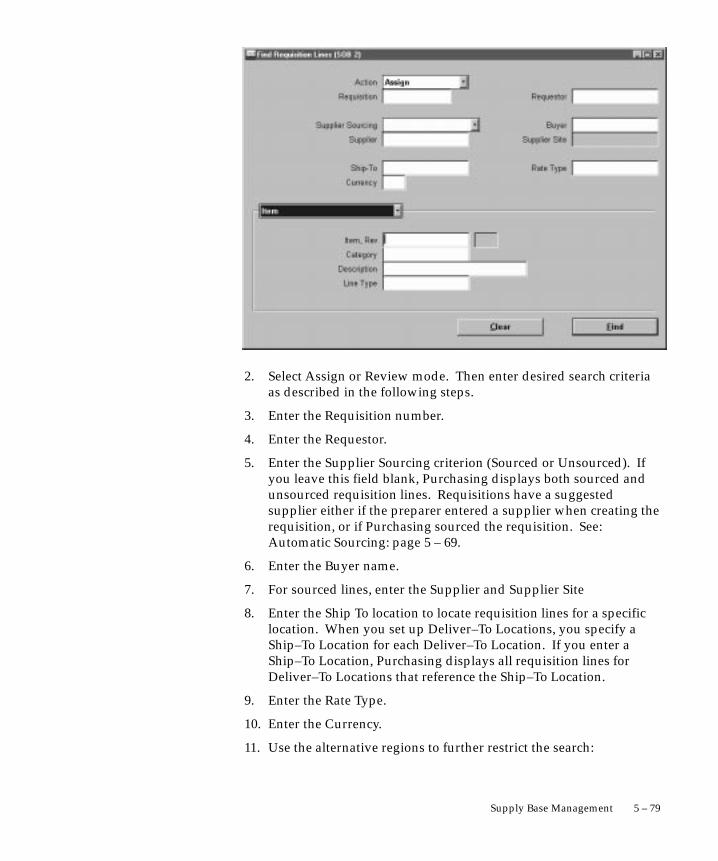
5 – 79Supply Base Management
2. Select Assign or Review mode. Then enter desired search criteriaas described in the following steps.
3. Enter the Requisition number.
4. Enter the Requestor.
5. Enter the Supplier Sourcing criterion (Sourced or Unsourced). Ifyou leave this field blank, Purchasing displays both sourced andunsourced requisition lines. Requisitions have a suggestedsupplier either if the preparer entered a supplier when creating therequisition, or if Purchasing sourced the requisition. See:Automatic Sourcing: page 5 – 69.
6. Enter the Buyer name.
7. For sourced lines, enter the Supplier and Supplier Site
8. Enter the Ship To location to locate requisition lines for a specificlocation. When you set up Deliver–To Locations, you specify aShip–To Location for each Deliver–To Location. If you enter aShip–To Location, Purchasing displays all requisition lines forDeliver–To Locations that reference the Ship–To Location.
9. Enter the Rate Type.
10. Enter the Currency.
11. Use the alternative regions to further restrict the search:

5 – 80 Oracle Public Sector Purchasing User’s Guide
• In the Item region, you can enter the following search criteria:Item number, Revision number, Category, item Description, andLine Type.
• In the Status region, you can limit the search by Late status (Yesor No), Urgent status (Yes or No), Assigned status (Yes or No),RFQ Required status (Yes or No), Approval status (Approved,Incomplete, In Process, Pre–Approved, Rejected, RequiresReapproval, or Returned), or Need By date.
12. Select the Find button to initiate the search and open the ReviewBuyer Workload or the Assign Requisition Lines window, as chosenabove.
� To clear existing search criteria:
� Select the Clear button to clear any existing search criteria.
See Also
Reviewing Buyer Workload: page 5 – 80
Assigning Requisition Lines: page 5 – 82
Reviewing Buyer Workload
Use the Reviewing Buyer Workload window to review requisitionassignments. You can identify requisition lines that reference thewrong buyer or that were not assigned to a buyer. You can also usethis window to analyze buyers’ workloads. Use the Assign RequisitionLines window to assign or reassign requisition lines to buyers.
� To review buyer workload:
1. Navigate to the Review Buyer Workload window by selecting theReview action and then selecting the Find button in the FindRequisitions Line window.

5 – 81Supply Base Management
For each buyer, Purchasing displays information for the requisitionlines that meet the search criteria entered in the Find RequisitionLines window.
Assigned – The number of requisitions lines currently assigned tothe buyer.
Urgent – The number of urgent requisition lines.
Late – The number of requisition lines for which the current date islater than the Need By date less the lead time.
Needed – The number of requisition lines for which the Need Bydate is within the Need By search criteria entered in the FindRequisition Lines window.
Open POs – The number of open purchase orders referencing thebuyer.
At the bottom of the screen, Purchasing displays the total numberof unassigned requisition lines, and the number of these that areUrgent, Late, and Needed (as defined above).
2. Close the window to return to the Find Requisition Lines window.
See Also
Finding Requisition Lines for Review or Assignment: page 5 – 78
Assigning Requisition Lines: page 5 – 82

5 – 82 Oracle Public Sector Purchasing User’s Guide
Assigning Requisition Lines
Use the Assign Requisition Lines folder window to assign or reassignrequisition lines to buyers.
� To assign requisition lines:
1. Navigate to the Assign Requisition Lines window by selecting theAssign action and then selecting the Find button in the FindRequisitions Line window.
For each requisition line meeting the search criteria, Purchasingdisplays the Buyer, Item number, Revision number, itemDescription, Category, Quantity, Unit of Measure, Currency, UnitPrice, Need By Date, Requisition number, requisition Line number,Line Type, Note to Buyer, Source Type, Supplier, Supplier Site,Requestor, Destination Type, Ship To location, Rate Type, Urgentstatus, RFQ Required status, and Encumbered status.
2. Enter the New Buyer to whom you want to assign or reassign therequisition line.
3. Select the requisition lines that you want to assign to the newbuyer.
4. Save your work.

5 – 83Supply Base Management
See Also
Finding Requisition Lines for Review or Assignment: page 5 – 78
Reviewing Buyer Workload: page 5 – 80

5 – 84 Oracle Public Sector Purchasing User’s Guide

Index – 1
IndexAAcceptances, 4 – 7Acceptances window, Entering and Viewing
Purchase Order Acceptances, 4 – 79Access Level Options
full, 2 – 8modify, 2 – 8view only, 2 – 8
Account Generator, using in Oracle PublicSector Purchasing, C – 2
Account Generator:Purge Runtime Data profileoption, 1 – 77
Accrual Process, for period–end accruals,7 – 91
Accrual Reconciliation report, 9 – 5Accrual Write–Off report, 9 – 13Accrual Write–offs, 7 – 98Accrual Write–offs window, Accrual
Write–offs, 7 – 98Accrue Expense Items, option setup, 1 – 32Action History Window
Enter Releases, 8 – 2Purchase Order Distributions, 8 – 2Purchase Order Headers, 8 – 2Purchase Order Lines, 8 – 2Purchase Order Shipments, 8 – 2Requisition Distributions, 8 – 2Requisition Headers, 8 – 2Requisition Lines, 8 – 2View Requisitions, 8 – 2
Action History window, Viewing ActionHistory, 8 – 2
Action History, viewing, 8 – 2Advance Shipment Notice
and CUM management, 7 – 18and Payment on Receipt, 9 – 60application advices, 7 – 16correcting a receipt against, 7 – 59finding expected receipts, 7 – 27finding returns, 7 – 56in Find Intransit Shipments window, 7 – 65in Maintain Shipments window, 7 – 66overview, 7 – 14receiving against, 7 – 18related receiving options, 7 – 16types of, 7 – 17
Alternate Fields, 5 – 4Amount Based Purchasing, 1 – 58Annotating Purchasing Documents, 1 – 20
unlimited text, 1 – 20Approval Actions
cancel, 2 – 33change the forward from person, 2 – 33change the forward to person, 2 – 33enter notes, 2 – 34print, 2 – 34reserve, 2 – 32
Approval and Securitysetup matrix, 2 – 4setup overview, 2 – 2setup steps, 2 – 3
Index – 2
Approval authorization rules, defining, 2 – 15Approval Groups
account range, 1 – 16document total, 1 – 16item category range, 1 – 16item range, 1 – 16location, 1 – 16
Approval groupsassigning, 2 – 18defining, 2 – 15
Approval Groups window, Defining ApprovalGroups, 1 – 15
Approval groups, assigning, 1 – 18Approval groups, defining, 1 – 15Approvals
by Web or e–mail (overview), 2 – 24overview, 2 – 23taking approval actions, 2 – 32workflow initiation, 2 – 64workflow overview, 2 – 63workflow, customizing, 2 – 64
Approve Document window, Taking ApprovalActions, 2 – 32
Approve Entire Quotations window,Approving Entire Quotations, 5 – 66
Approve purchase orders, 4 – 8Approve Quotations window, Approving
Quotation Shipments, 5 – 64Approved Quotations
using on purchase orders, 5 – 64using on purchase orders and requisitions,
5 – 66using on requisitions, 5 – 64
Approved Supplier List, 5 – 22find window, 5 – 31
Approved Supplier List Statuses window,5 – 24
Approved Supplier List Summary, window,5 – 31
Approved Supplier List Summary window,5 – 31
Approved Supplier List window, 5 – 27defining the supplier and item/commodity
combination, 5 – 26ASL Upgrade process, 9 – 17
Assign Approval Groups, Assign ApprovalGroups, 1 – 18
Assign Requisition Lines window, AssigningRequisition Lines, 5 – 82
Attachments, 1 – 28icon, 1 – 28referencing on documents, 1 – 27understanding usages, 1 – 26
AutoApproval, definition, 3 – 6AutoClose, 4 – 9AutoCreate
Add to Document window, 6 – 16Autocreating quotations, 5 – 61modifying requisition lines, 6 – 21New Document Number window, 6 – 17New Document window, 6 – 17
AutoCreate Criteria, selecting, 6 – 13AutoCreate documents
Automatic mode, 6 – 3Manual mode, 6 – 3
Autocreate documents overview, 6 – 2AutoCreate Documents window
Selecting AutoCreation Criteria, 6 – 13Using the Document Builder, 6 – 19
AutoCreate, completing, 6 – 16AutoCreate, entering document information,
6 – 16AutoCreating Purchase Orders, 1 – 59Autocreating quotations, 5 – 61Automatic Release Generation, 4 – 93Automatic sourcing, 5 – 69automatic sourcing, definition, 5 – 5
BBackordered Internal Requisitions report,
9 – 18Blanket and Planned PO Status report, 9 – 19Blanket purchase agreements, 4 – 4
audit report, 9 – 78notify options setup, 1 – 34
Blanket purchase orders, status report, 9 – 19Blanket releases, 4 – 4

Index – 3
Blind receipt, setup, 7 – 9Blind Receiving, option setup, 1 – 41Brief Notes, 1 – 21Budgetary control
on–line funds availability Checking, 3 – 4on–line funds availability checking, 4 – 6
Buyer Listing, 9 – 21Buyer Workload, Reviewing, 5 – 80Buyer’s Requisition Action Required report,
9 – 23Buyers window, Defining Buyers, 1 – 13Buyers, defining, 1 – 13
CCancel, purchase orders, 4 – 8Cancel Requisitions, option setup, 1 – 34Cancelled Purchase Order report, 9 – 25Cancelled Requisition report, 9 – 26Cascade, receipts and receiving transactions,
7 – 22Cascade Transactions, option setup, 1 – 41Cascade transactions, setup, 7 – 9Catalog information, receiving electronically,
5 – 20Change orders workflow, 2 – 73Change orders workflow, customizing, 2 – 74Change orders workflow, initiating, 2 – 74Contract purchase agreements, 4 – 4Contract Status report, 9 – 28Control Documents window, Controlling
Documents, 2 – 50Control Numbers, 7 – 68Control Purchasing Periods window,
Controlling Purchasing Periods, 1 – 71Controlling Documents, 2 – 48
cancel, 2 – 48close, 2 – 49close for invoicing, 2 – 49close for receiving, 2 – 49finally close, 2 – 49freeze, 2 – 50
on hold, 2 – 50open, 2 – 50open for invoicing, 2 – 50open for receiving, 2 – 50release hold, 2 – 50unfreeze, 2 – 50
Controlling Purchasing Periods, prerequisites,1 – 71
Copy Document window, AutoCreatingQuotations, 5 – 61
Copying quotations from RFQs, 5 – 61Corrections, 7 – 59Corrections window, Entering Corrections,
7 – 62Corrections, entering, 7 – 61Corrections, finding, 7 – 60Cost rollup, outside processing, 4 – 143Costing, defining accounting information for
outside processing, 4 – 146Create Internal Sales Orders process, 9 – 29Create Releases process, 9 – 30Creating Purchase Orders for Services, 1 – 60Creating Purchasing Document Lines, 1 – 59Creating Requisitions for Services, 1 – 60Currency, rate type options setup, 1 – 30Currency information, entering, 4 – 56Currency window, Entering Currency
Information, 4 – 56
DDays Early/Late tolerance, option setup, 1 – 40Define MassCancel Listing, 2 – 56Define MassCancel window, 2 – 53
Defining MassCancel, 2 – 53Defining Line Types, 1 – 59Defining MassCancel, report submission,
2 – 58Defining Purchase Order Receipt Accruals,
7 – 102Delivery from receiving inspection to
inventory, standard costing, 7 – 82

Index – 4
Disposition messages, display option, 1 – 34Distributions window, 3 – 58
Entering Purchase Order Distributions,4 – 70
Entering Release Distributions, 4 – 88Document Approval
approval button, 2 – 23Approve button, 2 – 23
Document Approval and SecurityHuman Resources, 2 – 2Using Approval Hierarchies, 2 – 2Using Security Hierarchies, 2 – 2
Document Approval Status Rules, 2 – 25Document Builder in AutoCreate, using, 6 – 19Document Control, 2 – 37
options, 2 – 37Document control
applicability matrix, 2 – 45status check matrix, 2 – 45submission check matrix, 2 – 46
Document Control Optionscancel, 2 – 38close, close for receiving, close for invoicing,
2 – 41delete, 2 – 37final close, 2 – 39firm, 2 – 41freeze, 2 – 40hold, 2 – 41
Document Manager Failed notification, 2 – 31Document Revision Numbering, 4 – 110Document Security and Access
hierarchy, 2 – 8private, 2 – 8public, 2 – 8purchasing, 2 – 8
Document Subtypespurchase agreement, 1 – 66purchase order, 1 – 66quotation, 1 – 66release, 1 – 66request for quotation, 1 – 66requisition, 1 – 66
Document Typesassociating workflow processes with, 1 – 68prerequisites, 1 – 65
Document Types window, Defining DocumentTypes, 1 – 65
Document Types, defining, 1 – 65Documents
approval process overview, 2 – 23approval routing, 2 – 13approval status checks, 2 – 24approval submission checks, 2 – 25authorization rules, 2 – 15controlling, 2 – 37placing purchase orders in the Navigator,
4 – 10placing requisitions in the Navigator, 3 – 5security and access level matrix, 2 – 10security and access levels, 2 – 8
Drop shipments, 4 – 156
EEarly/late receipt tolerance, setup, 7 – 9Employees, assigning to jobs or positions,
2 – 22Encumbrance Detail report, 9 – 31Enforce Buyer Name, options setup, 1 – 35Enforce Ship–To Location, option setup, 1 – 42Enforce ship–to location, setup, 7 – 9Enforce Supplier Hold, options setup, 1 – 35Enhanced Document Printing, 1 – 60Enhanced Reporting, 1 – 60Enter Person, window, 2 – 22Euro
currency rate type in Currency window,4 – 56
currency Rate Type in New Documentwindow, 6 – 18
currency rate type in Requisition Preferenceswindow, 3 – 45
currency rate type in Requisitions window,3 – 56
rate type options setup, 1 – 30Expected Receipts Report, using, 7 – 71Expected Receipts report, 9 – 33Expected Receipts, finding, 7 – 26Expense Accrual, setup, 7 – 8

Index – 5
Expense AP accrual account, setup, 7 – 8Express, receipts and receiving transactions,
7 – 24Express Receipts, entering, 7 – 25Express Transactions, option setup, 1 – 41Express transactions, setup, 7 – 9External Systems, 3 – 19
FFill Employee Hierarchy process, 9 – 35Financials/Purchasing Options Listing, 9 – 36Find Corrections window, Finding Corrections,
7 – 60Find Expected Receipts window
Entering Unordered Receipts, 7 – 34Finding Expected Receipts, 7 – 26
Find In–Transit Shipments window, FindingIn–Transit Shipments, 7 – 65
Find Purchase Orders window, FindingPurchase Orders, 4 – 19
Find Quotations window, Finding quotations,5 – 63
Find Receiving Transactions window, FindingReceiving Transactions, 7 – 46
Find Requisition Lines window (forassignment), Finding Requisition Lines forReview or Assignment, 5 – 78
Find Requisitions window, FindingRequisitions, 3 – 35
Find Returns window, Finding Returns, 7 – 55Finding Requisitions
clear existing search criteria, 3 – 37enter a new requisition, 3 – 37
Flexfields, Account Generator:Purge RuntimeData profile option, 1 – 77
Forms, Enter Purchase Orders, 6 – 10Forward, in Approve Document window,
2 – 33Forward Documents window, Mass
Forwarding Documents, 2 – 35Freeze, purchase orders, 4 – 9Full lot quantities, enforcement options, 1 – 33
Function Security, 2 – 11Funds checking
purchase orders, 4 – 6requisitions, 3 – 4
HHazard Classes window, Defining Hazard
Classes, 1 – 51Hazard Classes, defining, 1 – 51Hazardous Materials
overview, 1 – 48regulation background, 1 – 48
IIn–Transit Shipments, finding, 7 – 65Include In Next RFQ Printing, 5 – 38Inspecting Received Items, 7 – 52Inspection, 7 – 51Inspection Details window, Inspecting
Received Items, 7 – 52Internal Requisition Status Report, 9 – 37Internal Requisitions
approvals and controls, 3 – 16cancellation of requisitions, 3 – 16complete item sourcing definition, 3 – 14complete requisitions status visibility, 3 – 16creating online requistions, 3 – 15creation of internal sales orders, 3 – 16exception processing, 3 – 16flexible processing, 3 – 15full unit of issue enforcement, 3 – 15inter–organization shipping network, 3 – 15inventory replenishment requisitions, 3 – 15Kanban replenishments, 3 – 18order management, 3 – 16
Internal requisitionsapproval, 3 – 19cancelling, 3 – 24demand for, 3 – 17management, 3 – 23minimum inventory setup, 3 – 31minimum purchasing setup, 3 – 29

Index – 6
online processing automation, 3 – 33overview, 3 – 14processing summary, 3 – 24setup overview, 3 – 25updating intransit information, 3 – 23viewing status of, 3 – 24
Internal Requisitions/Deliveries Discrepancyreport, 9 – 39
Internal Sales Orders, across operating units,3 – 21
Internal sales orderscreation, 3 – 20management, 3 – 21pick release, 3 – 22ship confirmation, 3 – 22
Inventory accruals, setting up, 7 – 75Inventory Replenishment Requests, 3 – 18Invoice Close % Tolerance, setup, 7 – 8Invoice Close Tolerance percentage, option
setup, 1 – 31Invoice exchange rate variances, 7 – 86Invoice Matching, option setup, 1 – 31Invoice matching, setup, 7 – 8Invoice Price Variance by Vendor, 9 – 43Invoice Price Variance report, 9 – 41Item Attachments, 1 – 22Item Description, update options setup, 1 – 34Item Detail Listing, 9 – 45Item Summary Listing, 9 – 47Items
last price history, 5 – 4purchase history, 5 – 4
JJournal Entry Batches in General Ledger, 7 – 95
KKanban, replenishments, 3 – 18Kanban replenishment request, receiving
purchase order for, 7 – 6
LLast Price History, definition, 5 – 4Line Type, 1 – 58
default for documents, 1 – 31Line Types, definition, 1 – 61Line Types window, Defining Line Types,
1 – 63Line Types, defining, 1 – 61Location Listing, 9 – 48Lookup Codes
1099 Supplier Exception, 1 – 54acceptance type, 1 – 55freight terms, 1 – 55minority group, 1 – 55pay group, 1 – 55PO/Requistion Reason, 1 – 55price type, 1 – 55quotation approval reason, 1 – 55reply/receive via, 1 – 55supplier type, 1 – 55
Lookup Codes window, Defining LookupCodes, 1 – 54
Lookup Codes, defining, 1 – 54Lot numbers, 7 – 68
MMaintain Shipments window, Maintaining
Shipments, 7 – 67Managing Attachments, 1 – 22Managing Requisitions, 3 – 9Mass Forwarding Documents, 2 – 35
change original approver, 2 – 36view action history, 2 – 36
MassCanceldelete MassCancel batch, 2 – 60run MassCancel, 2 – 59
MassCancel, defining, 2 – 53MassCancel, running, 2 – 58Match Unordered Receipts, Matching
Unordered Receipts, 7 – 35Matching Holds by Buyer report, 9 – 50

Index – 7
Matching Service Purchase Orders, 1 – 61Matching Unordered Receipts, 7 – 34Maximum release amount, option setup, 1 – 30Menu paths, A – 2Modify Lines window, Modifying Requisition
Lines, 6 – 21Multiple Distributions, 7 – 22Multiple Receiving Organizations, Centralized
Purchasing in, 7 – 6
NNavigator
placing purchase orders in, 4 – 10placing requisitions in, 3 – 5
Navigator paths, A – 2New Vendor Letter report, 9 – 52Notification Controls window, Entering
Purchase Order Notification Controls,4 – 77
Notifications, viewing and responding to(overview), 2 – 29
Notifications Summary window, 2 – 29
OOff–line approver, 2 – 4On–line approver, 2 – 4Open Purchase Orders By Buyer report, 9 – 54Open Purchase Orders by Organization report,
9 – 55Oracle Alert, use in Purchasing, B – 2Oracle Public Sector Purchasing, Account
Generator setup, C – 2Oracle Quality results in Receiving
Transactions window, 7 – 47Oracle Workflow, Account Generator:Purge
Runtime Data profile option, 1 – 77Order Pad Options, entering, 5 – 17Order Source default, setup for internal
requisitions, 1 – 35Order Type default, setup for internal
requisitions, 1 – 35
Outside processingapproving purchase orders, 4 – 151business examples, 4 – 125controlling your receiving routing, 4 – 145correcting errors in receiving, 4 – 155cost rollup, 4 – 143creating outside processing purchase orders,
4 – 150defining accounting information, 4 – 146defining deliver to locations, 4 – 146defining departments with delivery
locations, 4 – 141defining employees, 4 – 144defining outside processing item lead times,
4 – 145defining outside processing item list prices,
4 – 144defining outside processing items, 4 – 135defining outside processing line types,
4 – 144defining outside resources, 4 – 138defining overreceipt tolerance and control,
4 – 145defining routings, 4 – 141defining ship to locations, 4 – 146defining supplier sourcing rules, 4 – 144defining supplier supplied components,
4 – 143defining units of measure, 4 – 137defining WIP accounting classes, 4 – 148foreign currency purchases, 4 – 151generating purchase orders from
requisitions, 4 – 151inspection options, 4 – 131introduction, 4 – 122kitting options, 4 – 129managing returns and corrections, 4 – 154manually creating purchase orders and lines,
4 – 151outside processed assembly tracking options,
4 – 131outside processing item in multiple
organizations, 4 – 137planning outside resource load, 4 – 148returning assemblies to suppliers, 4 – 155setting up Oracle Bills of Material, 4 – 138setting up Oracle Inventory, 4 – 135setting up Oracle Public Sector Purchasing,
4 – 144

Index – 8
setting up other Oracle products, 4 – 147shipping options, 4 – 130understanding the physical flow of outside
processed assemblies, 4 – 128Outside processing information, entering,
4 – 75Outside processing item
defining, 4 – 135defining lead times, 4 – 145defining list prices, 4 – 144maintaining in multiple organizations,
4 – 137receiving, 4 – 152requisitioning, 4 – 148
Outside Processing Line Types, 1 – 58Outside Processing window, Entering Outside
Processing Information, 4 – 75Outside processing, overview, 4 – 120Outside resources, 4 – 138Over–Receipt Tolerance percentage, option
setup, 1 – 40Overdue Vendor Shipments report, 9 – 56Overreceipt tolerance, setup, 7 – 9Overshipments report, 9 – 58
PPeriod Status
closed, 1 – 72future, 1 – 72never opened, 1 – 72open, 1 – 72permanently closed, 1 – 72
Period–End reconciliation tasks, 7 – 87Perpetual accruals, accrual process for, 7 – 81Physical flow of outside processed assemblies,
4 – 128Placing purchase orders in the Navigator,
4 – 10Placing requisitions in the Navigator, 3 – 5Planned purchase orders, 4 – 5Planning active, 5 – 73Planning outside resource load, 4 – 148
Position Hierarchiessetting up, 2 – 6uses, 2 – 6
Price Break Type, option setup, 1 – 30Price Break window, Entering Purchase
Agreement Price Break Information, 4 – 68Price Tolerance, options setup, 1 – 33Price Type, option setup, 1 – 31Price Variances, monitoring, 7 – 88Print, purchase orders, 4 – 8Printed Change Orders (Landscape) report,
9 – 65Printed Change Orders (Portrait) report, 9 – 67Printed Purchase Order (Landscape) report,
9 – 69Printed Purchase Order (Portrait) report, 9 – 71Printed Purchase Order, overview, 4 – 96Printed Requisitions report, 9 – 77Printed RFQ (Landscape) report, 9 – 73Printed RFQ (Portrait) report, 9 – 75Printing Attachments, 1 – 25Processes
ASL Upgrade, 9 – 17change order workflow, 2 – 75Create Internal Sales Orders, 9 – 29Create Releases, 9 – 30Fill Employee Hierarchy, 9 – 35overall document creation, 4 – 163Purchasing Database Administration, 9 – 94Receipt Accruals – Period End, 7 – 91,
9 – 105Receiving Transaction Processor, 9 – 117Requisition Import, 9 – 130Reschedule Requisitions, 9 – 137Send Notifications for Purchasing
Documents, 9 – 142workflow approval for purchase orders,
2 – 67workflow approval for requisitions, 2 – 72Workflow Background, 9 – 163
Processing mode, setup, 7 – 10Profile options, 1 – 76
Account Generator:Purge Runtime Data,1 – 77

Index – 9
Project informationin purchase order Distributions window,
4 – 72in Purchase Order Preferences window,
4 – 36in quotation when copying from RFQ, 5 – 61in Quotations window, 5 – 52in release Distributions window, 4 – 90in requisition Distributions window, 3 – 59in Requisition Preferences window, 3 – 47in RFQs window, 5 – 36
Purchase Agreement Audit report, 9 – 78Purchase agreement header information,
entering, 4 – 54Purchase agreement line information, entering,
4 – 54Purchase History, definition, 5 – 4Purchase order acceptances, entering and
viewing, 4 – 79Purchase Order and Releases Detail report,
9 – 86Purchase Order Commitment report, 9 – 80Purchase Order Detail report, 9 – 82Purchase order details, entering, 4 – 58Purchase Order Distribution Detail report,
9 – 84Purchase Order Distributions results window,
Using the Purchase Order DistributionsResults Window, 4 – 30
Purchase Order Distributions results window,using, 4 – 30
Purchase order distributions, entering, 4 – 70Purchase Order Header Results window,
using, 4 – 22Purchase Order Headers window, Using the
Purchase Order Headers Results window,4 – 23
Purchase Order Headers, entering, 4 – 39Purchase order lines, using line types, 1 – 61Purchase Order Lines Results window, using,
4 – 25Purchase Order Lines window, Using the
Purchase Order Lines Results window,4 – 25
Purchase order lines, entering, 4 – 44
Purchase Order Miscellaneous Information,entering, 4 – 52
Purchase order notification controls, entering,4 – 77
Purchase order numbersentry method setup, 1 – 36entry type setup, 1 – 37
Purchase Order Preferences window, EnteringPurchase Order Preferences, 4 – 34
Purchase Order Preferences, entering, 4 – 33Purchase order price break information,
entering, 4 – 68Purchase order price reference information,
entering, 4 – 48purchase order receipt accruals, defining,
7 – 102Purchase order receipt to expense destinations,
standard costing, 7 – 84Purchase order receipt to inventory, standard
costing, 7 – 83Purchase order receipt to receiving inspection,
standard costing, 7 – 81Purchase order receiving controls, entering,
4 – 65Purchase order reference document
information, entering, 4 – 50Purchase Order Shipments results window,
using, 4 – 28Purchase Order Shipments window, Using the
Purchase Order Shipments ResultsWindow, 4 – 28
Purchase order shipments, entering, 4 – 61Purchase order terms and conditions, entering,
4 – 58Purchase Orders
control matrices, 2 – 42line types, 4 – 7
Purchase ordersacceptances, 4 – 7approval, 4 – 8AutoClose, 4 – 9blanket purchase agreements, 4 – 4cancel, 4 – 8close, 4 – 9contract purchase agreements, 4 – 4

Index – 10
defaulting rules, 4 – 11freeze, 4 – 9hold, 4 – 9multiple shipments, 4 – 7notification controls, 4 – 10overview, 4 – 3placing in the Navigator for easy access,
4 – 10planned purchase orders, 4 – 5print, 4 – 8revising and archiving, 4 – 110revision, 4 – 7standard purchase orders, 4 – 4types, 4 – 4workflow, 4 – 160
Purchase Orders windowEntering Purchase Agreement Header
Information, 4 – 54entering purchase agreement line
information, 4 – 54Entering Purchase Order Headers, 4 – 39Entering Purchase Order Lines, 4 – 44Entering Purchase Order Miscellaneous
Information, 4 – 52Entering Purchase Order Price Reference
Information, 4 – 48Entering Purchase Order Reference
Document Information, 4 – 50Purchase Orders, finding, 4 – 19Purchase Price Variance report, 9 – 87Purchase Requisition Status report, 9 – 89Purchase Summary by Category report, 9 – 91Purchasing Activity Register, 9 – 92Purchasing Database Administration, 9 – 94Purchasing documents open interface, 5 – 20Purchasing Documents Open Interface Report,
9 – 95Purchasing Interface Errors Report, 9 – 98Purchasing Options
accrual options, 1 – 29control options, 1 – 29default options, 1 – 29internal requistion options, 1 – 29numbering options, 1 – 29tax defaults options, 1 – 29
Purchasing optionsaccrual options, 1 – 32control options, 1 – 33default options, 1 – 29internal requisition options, 1 – 35numbering options, 1 – 36numbering options in a Multi–Org setup,
1 – 37tax defaults options, 1 – 38
Purchasing Options window, DefiningPurchasing Options, 1 – 29
Purchasing options, defining, 1 – 29Purchasing Periods, controlling, 1 – 71Purchasing Services, 1 – 57
QQuality Code Listing, 9 – 100Quality Inspection Codes
quality code, 1 – 56ranking number, 1 – 56
Quality Inspection Codes window, DefiningQuality Inspection Codes, 1 – 56
Quality Inspection Codes, defining, 1 – 56Quality results
entering (overview), 7 – 39entering in Receiving Transactions window,
7 – 47Quantity–Based Purchasing, 1 – 58Quotation Action Required report, 9 – 101Quotation Headers, entering, 5 – 47Quotation lines, using line types, 1 – 61Quotation Lines, entering, 5 – 50Quotation numbers
entry method setup, 1 – 36entry type setup, 1 – 37
Quotation Price Breaks window, EnteringQuotation Price Break Information, 5 – 57
Quotation Price Breaks, entering, 5 – 57Quotation Shipments window, Entering
Quotation Shipment Information, 5 – 54Quotation Shipments, approving, 5 – 64

Index – 11
Quotation Shipments, entering, 5 – 54Quotation Terms window, Entering Quotation
Terms Information, 5 – 53Quotation Terms, entering, 5 – 53Quotations
autocreating, 5 – 4copying from RFQs, 5 – 61numbering options, 5 – 3purchase orders, 5 – 5requisitions, 5 – 6warning delay default, 1 – 31
Quotations windowEntering Quotation Headers, 5 – 47Entering Quotation Lines, 5 – 51
Quotations, approving entire, 5 – 66Quotations, finding, 5 – 63Quote warning delay, option setup, 1 – 31
RReassign, through Notifications Summary
window, 2 – 29Receipt accounting, overview, 7 – 73Receipt Accruals – Period End process, 7 – 91,
9 – 105Receipt Adjustments Report, 9 – 108Receipt Close % Tolerance, setup, 7 – 8Receipt Close Point, option setup, 1 – 34Receipt close point, setup, 7 – 8Receipt Close Tolerance percentage, option
setup, 1 – 31Receipt Date Control, option setup, 1 – 40Receipt Header Details window, Using the
Receipt Header Details window, 7 – 43Receipt Header Details window, using, 7 – 42Receipt Header window, Entering Receipt
Headers, 7 – 28Receipt Headers, entering, 7 – 28Receipt Lines, entering, 7 – 30Receipt numbering
alphanumeric or numeric, 7 – 9automatic or manual, 7 – 8option setup, 1 – 42
Receipt Routing, option setup, 1 – 42Receipt routing override, setup, 7 – 10Receipt routing, default, setup, 7 – 10Receipt tolerances, 7 – 12Receipt Traveler, 9 – 110Receipt Traveler, automatic print, setup, 7 – 10Receipt Travelers, 7 – 71Receipts
cascade, 7 – 22express, 7 – 24Receipt Traveler, 7 – 71Substitute Receipts Report, 9 – 144
Receipts windowEntering Express Receipts, 7 – 25Entering Receipt Lines, 7 – 30
Receivingaccrue un–invoiced receipts, 7 – 4blind receiving, 7 – 2Cascade, 7 – 2closed for invoicing, 7 – 4closed for receiving, 7 – 4control numbers, 7 – 5entering Quality results (overview), 7 – 39entering Quality results in Receiving
Transactions window, 7 – 47Express Receipt, 7 – 2hazardous materials, 7 – 5inspection, 7 – 5invoice matching controls, 7 – 3locator, 7 – 5overview, 7 – 2predefined substitute items, 7 – 3quality and destination, 7 – 5receiving tolerances, 7 – 2returns, 7 – 5services and labor, 7 – 4supply information, 7 – 3transfers of inventory items, 7 – 3unordered items, 7 – 3
Receiving Account Distributions report, 9 – 112Receiving account, default, setup, 7 – 10Receiving Accrual Account, option setup,
1 – 43Receiving Controls window, Entering Purchase
Order Receiving Controls, 4 – 65

Index – 12
Receiving Controls, Options, and Profiles, 7 – 7Receiving corrections, 7 – 59Receiving Exceptions report, 9 – 114Receiving Headers Summary window, using,
7 – 40Receiving Inspections, 7 – 51Receiving Locations, 7 – 7Receiving Options window, Defining
Receiving Options, 1 – 40Receiving Options, defining, 1 – 40Receiving outside processing items
assembly vs resource outside processing unittype items, 4 – 153
direct vs standard, 4 – 152move transactions, 4 – 153partial vs full quantities, 4 – 152resource transactions, 4 – 153
Receiving Reports, 7 – 71Receiving Returns, 7 – 54Receiving Returns window, Entering Receiving
Returns, 7 – 57Receiving Services, 1 – 61Receiving Transaction Processor, 9 – 117Receiving Transaction Summary window,
using, 7 – 41Receiving Transactions, 7 – 37
cascade, 7 – 22express, 7 – 24
Receiving transactions (summary), finding,7 – 39
Receiving Transactions Register, 9 – 119Receiving Transactions Summary window,
Using the Receiving TransactionsSummary window, 7 – 41
Receiving Transactions windowentering Quality results, 7 – 47Entering Receiving Transactions, 7 – 47
Receiving Transactions, entering, 7 – 47Receiving transactions, finding, 7 – 46Receiving Value by Destination Account
report, 9 – 125Receiving Value report, 9 – 122Regulation Background
hazard class, 1 – 49
identification number, 1 – 49labels required, 1 – 50packaging requirements, 1 – 50shipping name, 1 – 48shipping requirements, 1 – 50
Release distributions, entering, 4 – 87Release generation, automatic, 4 – 93Release Headers, entering, 4 – 81Release shipments, entering, 4 – 83Releases
blanket, 4 – 4scheduled, 4 – 5
Releases windowEntering Release Headers, 4 – 81Entering Release Shipments, 4 – 83
ReportsAccrual Reconciliation, 9 – 5Accrual Write–Off, 9 – 13Backordered Internal Requisitions, 9 – 18Blanket and Planned PO Status, 9 – 19Buyer Listing, 9 – 21Buyer’s Requisition Action Required, 9 – 23Cancelled Purchase Order, 9 – 25Cancelled Requisition, 9 – 26Contract Status, 9 – 28Define MassCancel Listing, 2 – 56Encumbrance Detail, 9 – 31Expected Receipts Report, 9 – 33Financials/Purchasing Options Listing,
9 – 36Internal Requisition Status Report, 9 – 37Internal Requisitions/Deliveries
Discrepancy, 9 – 39Invoice Price Variance by Vendor, 9 – 43Invoice Price Variance Report, 9 – 41Item Detail Listing, 9 – 45Item Summary Listing, 9 – 47Location Listing, 9 – 48Matching Holds by Buyer, 9 – 50New Vendor Letter, 9 – 52Open Purchase Orders By Buyer, 9 – 54Open Purchase Orders by Organization,
9 – 55Overdue Vendor Shipments Report, 9 – 56Overshipments, 9 – 58Printed Change Orders (Landscape), 9 – 65Printed Change Orders (Portrait), 9 – 67
Index – 13
Printed Purchase Order (Landscape), 9 – 69Printed Purchase Order (Portrait), 9 – 71Printed Requisitions, 9 – 77Printed RFQ (Landscape), 9 – 73Printed RFQ Report (Portrait), 9 – 75Purchase Agreement Audit, 9 – 78Purchase Order and Releases Detail, 9 – 86Purchase Order Commitment, 9 – 80Purchase Order Detail, 9 – 82Purchase Order Distribution Detail, 9 – 84Purchase Price Variance Report, 9 – 87Purchase Requisition Status Report, 9 – 89Purchase Summary by Category, 9 – 91Purchasing Activity Register, 9 – 92Purchasing Documents Open Interface,
9 – 95Purchasing Interface Errors, 9 – 98Quality Code Listing, 9 – 100Quotation Action Required, 9 – 101Receipt Adjustments Report, 9 – 108Receipt Traveler, 9 – 110Receiving Account Distributions Report,
9 – 112Receiving Exceptions Report, 9 – 114Receiving Transactions Register, 9 – 119Receiving Value by Destination Account
Report, 9 – 125Receiving Value Report, 9 – 122ReqExpress Templates Listing, 9 – 127Requisition Activity Register, 9 – 128Requisition Distribution Detail, 9 – 129Requisition Import Exceptions, 9 – 134Requisitions on Cancelled Sales Orders,
9 – 136RFQ Action Required, 9 – 103Run MassCancel Listing, 2 – 60Savings Analysis (By Buyer), 9 – 138Savings Analysis (By Category), 9 – 140Standard Notes Listing, 9 – 143Substitute Receipts Report, 9 – 144Tax Code Listing, 9 – 156Uninvoiced Receipts, 9 – 157Unit of Measure Class Listing, 9 – 159Unit of Measure Listing, 9 – 160Unordered Receipts, 9 – 162Vendor Affiliated Structure Listing, 9 – 145Vendor Price Performance Analysis, 9 – 146Vendor Purchase Summary, 9 – 148
Vendor Quality Performance Analysis,9 – 150
Vendor Service Performance Analysis,9 – 152
Vendor Volume Analysis, 9 – 154Vendors on Hold, 9 – 155
Req Import group by, option setup, 1 – 30ReqExpress, definition, 3 – 5ReqExpress Templates Listing, 9 – 127ReqImport, definition, 3 – 6Requisition Activity Register, 9 – 128Requisition Distribution Detail report, 9 – 129Requisition Distributions, 3 – 58Requisition Distributions Summary window,
Using the Requisition DistributionsSummary Window, 3 – 42
Requisition Distributions Summary window,using, 3 – 41
Requisition Headersenter requisition preferences, 3 – 51open the Supplier Item Catalog, 3 – 50take approval actions, 3 – 50to check funds, 3 – 50
Requisition Headers Summary window, Usingthe Requisition Headers SummaryWindow, 3 – 37
Requisition Headers Summary window, using,3 – 37
enter a new requisition, 3 – 38enter requisition preferences, 3 – 39navigate, 3 – 37open for the current line, 3 – 38requisition control information, 3 – 39view action history, 3 – 39view distributions information, 3 – 38view purchase orders, 3 – 39view requisition line information, 3 – 38view sales orders, 3 – 39
Requisition Headers, entering, 3 – 49Requisition Import Exceptions report, 9 – 134Requisition Import process, 9 – 130Requisition Lines
enter line details, 3 – 55enter requisition distributions, 3 – 57

Index – 14
enter requisition preferences, 3 – 57line currency information, 3 – 56line source details, 3 – 55open the Supplier Item Catalog, 3 – 56outside processing information, 3 – 56to approve requisitions, 3 – 57to check funds, 3 – 57
Requisition lines, using line types, 1 – 61Requisition Lines for AutoCreate, finding,
6 – 10Requisition Lines Summary window, Using the
Requisition Lines Summary Window,3 – 40
Requisition Lines Summary window, using,3 – 39
Requisition Lines, assigning, 5 – 82Requisition lines, entering, 3 – 52Requisition Lines, finding for review or
assignment, 5 – 78Requisition lines, modifying during
AutoCreate, 6 – 21Requisition numbers
entry method setup, 1 – 36entry type setup, 1 – 37
Requisition Preferences window, EnteringRequisition Preferences, 3 – 44
Requisition preferences, entering, 3 – 44Requisition Template, copy button, 1 – 45Requisition Templates window, Defining
Requisition Express Templates, 1 – 44Requisition Templates, defining, 1 – 44Requisition templates, using, 3 – 61Requisitioning outside processing items
approving requisitions, 4 – 150creating approved requisitions, 4 – 149manually creating requisitions, 4 – 150move transactions, 4 – 148submitting requisition import, 4 – 149
Requisitionsaccounting information, 3 – 4action history, 8 – 2approval history, 3 – 3approval status, 3 – 3approvals, 3 – 5assigning to a buyer, 3 – 10
AutoApproval, 3 – 6cancelling, 3 – 11finally closing, 3 – 12foreign currency, 3 – 11imported, 3 – 8importing from another system, 3 – 6Internal, 3 – 7kanban replenishments, 3 – 18on–line entry, 3 – 3paper, 3 – 8paperless system, 3 – 3placing in the Navigator for easy access,
3 – 5printing, 3 – 5purchase, 3 – 7Purchase Requisitions Status report, 9 – 89quantity rounding, 3 – 5reserving funds for, 3 – 8resubmission, 3 – 3returning, 3 – 10templates, 3 – 8updating during approval, 3 – 13updating with Modify, 3 – 13
Requisitions cancellation, , 3 – 4, 3 – 24Requisitions on Cancelled Sales Order Report,
9 – 136Requisitions window
Entering Requisition Headers, 3 – 49Entering Requisition Lines, 3 – 52using requisition templates, 3 – 61
Requisitions, finding, 3 – 35Requisitions, overview, 3 – 2Requistion Template
copy lines, 1 – 45define, 1 – 44manually add lines, 1 – 45sourcing information, 1 – 46
Reschedule Requisitions process, 9 – 137Reserving funds
for requisitions, 3 – 8through Approve Document window, 2 – 32
Return to supplier from inventory or expensedestinations, standard costing, 7 – 87
Return to supplier from receiving, standardcosting, 7 – 87
Returns, 7 – 54

Index – 15
Returns, entering, 7 – 56Returns, finding, 7 – 55Review, requisition approvals, 8 – 2Review Buyer Workload window, Reviewing
Buyer Workload, 5 – 80Reviewing Requisitions, 3 – 9RFQ, requirement, 5 – 4RFQ Action Required report, 9 – 103RFQ Headers, entering, 5 – 32RFQ lines, using line types, 1 – 61RFQ Lines, entering, 5 – 35RFQ numbers
entry method setup, 1 – 36entry type setup, 1 – 37
RFQ Price Break Information, entering, 5 – 43RFQ Price Breaks window, Entering RFQ Price
Break Information, 5 – 43RFQ required, option setup, 1 – 31RFQ Shipment Information, entering, 5 – 40RFQ Shipments window, Entering RFQ
Shipment Information, 5 – 40RFQ Supplier Information, entering, 5 – 37RFQ Suppliers window, Entering RFQ Supplier
Information, 5 – 37RFQ Terms Information, entering, 5 – 39RFQ Terms window, Entering RFQ Terms
Information, 5 – 39RFQs
autocreating, 5 – 4numbering options, 5 – 3supplier lists, 5 – 4
RFQs windowEntering RFQ Headers, 5 – 32Entering RFQ Lines, 5 – 35
Routing ControlAllow Change to Approval Hierarchy, 2 – 14Allow Change to Forward–From, 2 – 13Allow Change to Forward–To, 2 – 13Approval Hierarchy, 2 – 14Forwarding Method, 2 – 14Owner Can Approve, 2 – 13
Run MassCancelpurchase order, 2 – 54requisition, 2 – 54
Run MassCancel Listing, 2 – 60Run MassCancel window, 2 – 54
Running MassCancel, 2 – 59
SSample alerts, for Oracle Public Sector
Purchasing, B – 3Savings Analysis (By Buyer) report, 9 – 138Savings Analysis Report (By Category), 9 – 140Scheduled releases, 4 – 5Search Supplier Item Catalog window, Finding
Supplier Items, 5 – 11Security Hierarchy, options setup, 1 – 34Send Notifications for Purchasing Documents
process, 9 – 142Serial numbers, 7 – 68Setting Up a Default Line Type, 1 – 59setup overview, 1 – 2Shipments window, Entering Purchase Order
Shipments, 4 – 61Shipments, maintaining, 7 – 66Sourcing
automatic, 5 – 69overview, 5 – 2
Sourcing rules, creating (overview), 5 – 70Sourcing rules, overview, 5 – 69Sourcing Services, 1 – 61Standard costing transactions
delivery from receiving inspection toinventory, 7 – 82
matching invoices, 7 – 85purchase order receipt to expense
destinations, 7 – 84purchase order receipt to inventory, 7 – 83purchase order receipt to receiving
inspection, 7 – 81return to supplier from inventory or expense
destinations, 7 – 87return to supplier from receiving, 7 – 87
Standard Notes Listing, 9 – 143Standard purchase orders, 4 – 4Status, defining approved supplier, 5 – 24

Index – 16
Stock locators, 7 – 69Submissiion Check Rules, 2 – 26Submission Check, 2 – 25Substitute Receipts, option setup, 1 – 41Substitute receipts, setup, 7 – 9Substitute Receipts Report, 9 – 144Supplier and Item/Commodity Combination,
defining, 5 – 26Supplier Item Catalog
Order Pad, 5 – 8order pad options, 5 – 9Order Total, 5 – 10search window, 5 – 7Select Price Only, 5 – 10sourcing regions, 5 – 7
Supplier Item Catalog Alternative Regions,using, 5 – 14
Supplier Item Catalog windowEntering Order Pad Options, 5 – 18Using the Supplier Item Catalog Alternative
Regions, 5 – 15Supplier Item Catalog, overview, 5 – 7Supplier Item Catalog, searching, 5 – 10Supplier Lists, 5 – 4
alternate fields, 5 – 4Supplier Lists window, Defining Supplier
Lists, 5 – 76Supplier Lists, defining, 5 – 76Supplier–Item Attributes window, 5 – 29Supplier/Item Attributes window, defining,
5 – 29Suppliers
defaulting, 5 – 3holding, 5 – 3
TTax, defaults options, 1 – 38Tax Code Listing, 9 – 156Tax defaults overview, 4 – 158Taxable, option setup, 1 – 30Terms and Conditions window, Entering
Purchase Order Terms and ConditionsInformation, 4 – 58
Timeout feature in approval workflow, 2 – 65Transaction status information, finding, 7 – 43Transaction Statuses, 7 – 43
UUN Numbers window, Defining UN Numbers,
1 – 52UN Numbers, defining, 1 – 52Unable to Reserve Document notification,
2 – 31Uninvoiced Receipts report, 9 – 157Unit of Measure Class Listing, 9 – 159Unit of Measure Listing, 9 – 160Unordered Receipts, 7 – 33
option setup, 1 – 41Unordered receipts, setup, 7 – 9Unordered Receipts report, 9 – 162Unordered receipts, entering, 7 – 34Unordered Receipts, matching, 7 – 34Unreserve, through Approve Document
window, 2 – 33Updating Requisitions, 3 – 12Usages, in attachments, 1 – 26Using Attachments, 1 – 21Using Internal Requisitions, 3 – 17
VVendor, Volume, 9 – 148Vendor Affiliated Structure Listing, 9 – 145Vendor Price Performance Analysis report,
9 – 146Vendor Purchase Summary report, 9 – 148Vendor Quality Performance Analysis report,
9 – 150Vendor Service Performance Analysis report,
9 – 152Vendor Volume Analysis report, 9 – 154Vendors on Hold report, 9 – 155View Approved Suppliers, 5 – 31

Index – 17
WWindows, navigator paths, A – 2Workflow
approval process for requisitions, 2 – 72approval processes for purchase orders,
2 – 67approving change orders, 2 – 73change order processes, 2 – 75customizing change orders, 2 – 74customizing purchase order creation, 4 – 162
for approvals (overview), 2 – 63for approvals, customizing, 2 – 64for approvals, initiation, 2 – 64initiating change orders, 2 – 74overall document creation process, 4 – 163purchase order and release creation, 4 – 160Send Notifications for Purchasing
Documents, 2 – 73Workflow Background process, 9 – 163Workflow setup options, 1 – 73

Index – 18

Reader’s Comment Form
Oracle � Public Sector Purchasing User’s Guide A58266–01
Oracle Corporation welcomes your comments and suggestions on the quality and usefulnessof this publication. Your input is an important part of the information we use for revision.
• Did you find any errors?
• Is the information clearly presented?
• Do you need more information? If so, where?
• Are the examples correct? Do you need more examples?
• What features did you like most about this manual? What did you like least about it?
If you find any errors or have any other suggestions for improvement, please indicate the topic, chapter,and page number below:
Please send your comments to:
Documentation ManagerWorldwide Government and Education Products DivisionOracle Corporation500 Oracle ParkwayMS 3op7Redwood Shores, CA 94065Phone: (650) 506–8968 Fax: (650) 506–7800 Email: [email protected]
If you would like a reply, please give your name, address, and telephone number below:
Thank you for helping us improve our documentation.


Oracle� Public SectorPurchasingUser’s GuideRelease 11Volume 2
March 1998
Oracle� Public Sector Purchasing User’s GuideRelease 11
The part number for this book is A58266–01.
Copyright � 1996, 1998, Oracle Corporation. All Rights Reserved.
Major Contributors: Louis Bryan, Rick Copeland, Rachel Haas, David Reitan
Contributors: Vance Checketts, George Kellner, Raghav Keshav, Kevin Miller, SusanRamage, Doug Volz
The Programs (which include both the software and documentation) contain proprietaryinformation of Oracle Corporation; they are provided under a license agreementcontaining restrictions on use and disclosure and are also protected by copyright, patentand other intellectual property law. Reverse engineering of the Programs is prohibited.
The information contained in this document is subject to change without notice. If you findany problems in the documentation, please report them to us in writing. OracleCorporation does not warrant that this document is error–free. No part of this documentmay be reproduced or transmitted in any form or by any means, electronic or mechanical,for any purpose, without the express written permission of Oracle Corporation.
Restricted Rights LegendPrograms delivered subject to the DOD FAR Supplement are ’commercial computersoftware’ and use, duplication and disclosure of the Programs shall be subject to thelicensing restrictions set forth in the applicable Oracle license agreement. Otherwise,Programs delivered subject to the Federal Acquisition Regulations are ’restricted computersoftware’ and use, duplication and disclosure of the Programs shall be subject to therestrictions in FAR 52.227–14, Rights in Data –– General, including Alternate III (June 1987).Oracle Corporation, 500 Oracle Parkway, Redwood City, CA 94065.
The Programs are not intended for use in any nuclear, aviation, mass transit, medical, orother inherently dangerous applications. It shall be licensee’s responsibility to take allappropriate fail–safe, back–up, redundancy and other measures to ensure the safe use ofsuch applications if the Programs are used for such purposes, and Oracle disclaims liabilityfor any damages caused by such use of the Programs.
Oracle is a registered trademark and Oracle8, Oracle Application Object Library, OracleAlert, Oracle Financials, Oracle Quality, Oracle Workflow, Oracle Work in Process,SQL*Forms, SQL*Plus, SQL*AMX, SQL*Report, and SQL*ReportWriter are trademarks orregistered trademarks of Oracle Corporation.
All other product or company names mentioned are used for identification purposes only,and may be trademarks of their respective owners.

iiiContents
Contents
VOLUME I
Preface xi. . . . . . . . . . . . . . . . . . . . . . . . . . . . . . . . . . . . . . . . . . . . . . . . . . . . . . . .
Chapter 1 Setting Up 1 – 1. . . . . . . . . . . . . . . . . . . . . . . . . . . . . . . . . . . . . . . . . . . . . . Setup Overview 1 – 2. . . . . . . . . . . . . . . . . . . . . . . . . . . . . . . . . . . . . . . . . Defining Buyers 1 – 13. . . . . . . . . . . . . . . . . . . . . . . . . . . . . . . . . . . . . . . . . Defining Approval Groups 1 – 15. . . . . . . . . . . . . . . . . . . . . . . . . . . . . . . . Assigning Approval Groups 1 – 18. . . . . . . . . . . . . . . . . . . . . . . . . . . . . . . Annotating Purchasing Documents 1 – 20. . . . . . . . . . . . . . . . . . . . . . . . . Defining Purchasing Options 1 – 29. . . . . . . . . . . . . . . . . . . . . . . . . . . . . . Defining Receiving Options 1 – 40. . . . . . . . . . . . . . . . . . . . . . . . . . . . . . . Defining Requisition Templates 1 – 44. . . . . . . . . . . . . . . . . . . . . . . . . . . . Purchasing Hazardous Materials 1 – 48. . . . . . . . . . . . . . . . . . . . . . . . . . . Defining Lookup Codes 1 – 54. . . . . . . . . . . . . . . . . . . . . . . . . . . . . . . . . . Purchasing Services 1 – 57. . . . . . . . . . . . . . . . . . . . . . . . . . . . . . . . . . . . . . Defining Document Types 1 – 65. . . . . . . . . . . . . . . . . . . . . . . . . . . . . . . . . Controlling Purchasing Periods 1 – 71. . . . . . . . . . . . . . . . . . . . . . . . . . . . Choosing Workflow Options 1 – 73. . . . . . . . . . . . . . . . . . . . . . . . . . . . . . Profile Options in Purchasing 1 – 76. . . . . . . . . . . . . . . . . . . . . . . . . . . . . .

iv Oracle Public Sector Purchasing User’s Guide
Chapter 2 Approval, Security, and Control 2 – 1. . . . . . . . . . . . . . . . . . . . . . . . . . . Setting Up Document Approval and Security 2 – 2. . . . . . . . . . . . . . . . Position Hierarchies 2 – 6. . . . . . . . . . . . . . . . . . . . . . . . . . . . . . . . . . . . . . Document Security and Access 2 – 8. . . . . . . . . . . . . . . . . . . . . . . . . . . . Approval Routing 2 – 13. . . . . . . . . . . . . . . . . . . . . . . . . . . . . . . . . . . . . . . . Approval Authorization Control 2 – 15. . . . . . . . . . . . . . . . . . . . . . . . . . . Assigning Employees 2 – 22. . . . . . . . . . . . . . . . . . . . . . . . . . . . . . . . . . . . . The Document Approval Process 2 – 23. . . . . . . . . . . . . . . . . . . . . . . . . . . Document Control Overview 2 – 37. . . . . . . . . . . . . . . . . . . . . . . . . . . . . . MassCancel 2 – 53. . . . . . . . . . . . . . . . . . . . . . . . . . . . . . . . . . . . . . . . . . . . . Approval Workflows 2 – 63. . . . . . . . . . . . . . . . . . . . . . . . . . . . . . . . . . . . .
Chapter 3 Requisitions 3 – 1. . . . . . . . . . . . . . . . . . . . . . . . . . . . . . . . . . . . . . . . . . . . Overview of Requisitions 3 – 2. . . . . . . . . . . . . . . . . . . . . . . . . . . . . . . . . Overview of Internal Requisitions 3 – 14. . . . . . . . . . . . . . . . . . . . . . . . . . Finding Requisitions 3 – 35. . . . . . . . . . . . . . . . . . . . . . . . . . . . . . . . . . . . . Entering Requisition Preferences 3 – 44. . . . . . . . . . . . . . . . . . . . . . . . . . . Entering Requisition Headers 3 – 49. . . . . . . . . . . . . . . . . . . . . . . . . . . . . . Entering Requisition Lines 3 – 52. . . . . . . . . . . . . . . . . . . . . . . . . . . . . . . . Entering Requisition Distributions 3 – 58. . . . . . . . . . . . . . . . . . . . . . . . . Using Requisition Templates 3 – 61. . . . . . . . . . . . . . . . . . . . . . . . . . . . . .
Chapter 4 Purchase Orders 4 – 1. . . . . . . . . . . . . . . . . . . . . . . . . . . . . . . . . . . . . . . . . Overview of Purchase Orders 4 – 3. . . . . . . . . . . . . . . . . . . . . . . . . . . . . . Purchase Order Defaulting Rules 4 – 11. . . . . . . . . . . . . . . . . . . . . . . . . . . Finding Purchase Orders 4 – 19. . . . . . . . . . . . . . . . . . . . . . . . . . . . . . . . . . Entering Purchase Order Preferences 4 – 33. . . . . . . . . . . . . . . . . . . . . . . Entering Purchase Order Headers 4 – 39. . . . . . . . . . . . . . . . . . . . . . . . . . Entering Purchase Order Lines 4 – 44. . . . . . . . . . . . . . . . . . . . . . . . . . . . Entering Purchase Order Price Reference Information 4 – 48. . . . . . . . . Entering Purchase Order Reference Document Information 4 – 50. . . . Entering Purchase Order Miscellaneous Information 4 – 52. . . . . . . . . . Entering Purchase Agreement Information 4 – 54. . . . . . . . . . . . . . . . . . Entering Currency Information 4 – 56. . . . . . . . . . . . . . . . . . . . . . . . . . . . Entering Purchase Order Details Information 4 – 58. . . . . . . . . . . . . . . . Entering Purchase Order Shipments 4 – 61. . . . . . . . . . . . . . . . . . . . . . . . Entering Purchase Order Receiving Controls 4 – 65. . . . . . . . . . . . . . . . Entering Purchase Order Price Break Information 4 – 68. . . . . . . . . . . .

vContents
Entering Purchase Order Distributions 4 – 70. . . . . . . . . . . . . . . . . . . . . . Entering Outside Processing Information 4 – 75. . . . . . . . . . . . . . . . . . . Entering Purchase Order Notification Controls 4 – 77. . . . . . . . . . . . . . . Entering and Viewing Purchase Order Acceptances 4 – 79. . . . . . . . . . Entering Releases 4 – 81. . . . . . . . . . . . . . . . . . . . . . . . . . . . . . . . . . . . . . . . Automatic Release Generation 4 – 93. . . . . . . . . . . . . . . . . . . . . . . . . . . . . Printed Purchase Order Overview 4 – 96. . . . . . . . . . . . . . . . . . . . . . . . . . Document Revision Numbering 4 – 110. . . . . . . . . . . . . . . . . . . . . . . . . . . Changing Encumbered Documents 4 – 119. . . . . . . . . . . . . . . . . . . . . . . . . Overview of Outside Processing 4 – 120. . . . . . . . . . . . . . . . . . . . . . . . . . . Drop Shipments 4 – 156. . . . . . . . . . . . . . . . . . . . . . . . . . . . . . . . . . . . . . . . . Tax Defaults in Purchasing 4 – 158. . . . . . . . . . . . . . . . . . . . . . . . . . . . . . . . Workflow for Creating Purchase Orders and Releases 4 – 160. . . . . . . . .
Chapter 5 Supply Base Management 5 – 1. . . . . . . . . . . . . . . . . . . . . . . . . . . . . . . . Overview of Sourcing 5 – 2. . . . . . . . . . . . . . . . . . . . . . . . . . . . . . . . . . . . Overview of the Supplier Item Catalog 5 – 7. . . . . . . . . . . . . . . . . . . . . Receiving Price/Sales Catalog Information Electronically 5 – 20. . . . . Approved Supplier List 5 – 22. . . . . . . . . . . . . . . . . . . . . . . . . . . . . . . . . . . Entering RFQs 5 – 32. . . . . . . . . . . . . . . . . . . . . . . . . . . . . . . . . . . . . . . . . . . Entering Quotations 5 – 47. . . . . . . . . . . . . . . . . . . . . . . . . . . . . . . . . . . . . . Copying Quotations from RFQs 5 – 61. . . . . . . . . . . . . . . . . . . . . . . . . . . . Approving Quotations 5 – 63. . . . . . . . . . . . . . . . . . . . . . . . . . . . . . . . . . . . Automatic Sourcing 5 – 69. . . . . . . . . . . . . . . . . . . . . . . . . . . . . . . . . . . . . . Defining Supplier Lists 5 – 76. . . . . . . . . . . . . . . . . . . . . . . . . . . . . . . . . . . Managing Buyer Workload 5 – 78. . . . . . . . . . . . . . . . . . . . . . . . . . . . . . . .
Index

vi Oracle Public Sector Purchasing User’s Guide
VOLUME II
Chapter 6 Documents 6 – 1. . . . . . . . . . . . . . . . . . . . . . . . . . . . . . . . . . . . . . . . . . . . . AutoCreate Documents Overview 6 – 2. . . . . . . . . . . . . . . . . . . . . . . . . .
Chapter 7 Receiving 7 – 1. . . . . . . . . . . . . . . . . . . . . . . . . . . . . . . . . . . . . . . . . . . . . . . Overview of Receiving 7 – 2. . . . . . . . . . . . . . . . . . . . . . . . . . . . . . . . . . . Advance Shipment Notices (ASNs) 7 – 14. . . . . . . . . . . . . . . . . . . . . . . . . Managing Receipts 7 – 21. . . . . . . . . . . . . . . . . . . . . . . . . . . . . . . . . . . . . . . Unordered Receipts 7 – 33. . . . . . . . . . . . . . . . . . . . . . . . . . . . . . . . . . . . . . Receiving Transactions 7 – 37. . . . . . . . . . . . . . . . . . . . . . . . . . . . . . . . . . . Inspections 7 – 51. . . . . . . . . . . . . . . . . . . . . . . . . . . . . . . . . . . . . . . . . . . . . . Returns 7 – 54. . . . . . . . . . . . . . . . . . . . . . . . . . . . . . . . . . . . . . . . . . . . . . . . . Corrections 7 – 59. . . . . . . . . . . . . . . . . . . . . . . . . . . . . . . . . . . . . . . . . . . . . Finding Intransit Shipments 7 – 65. . . . . . . . . . . . . . . . . . . . . . . . . . . . . . . Control Numbers 7 – 68. . . . . . . . . . . . . . . . . . . . . . . . . . . . . . . . . . . . . . . . Receiving Reports 7 – 71. . . . . . . . . . . . . . . . . . . . . . . . . . . . . . . . . . . . . . . . Overview of Receipt Accounting 7 – 73. . . . . . . . . . . . . . . . . . . . . . . . . . . Automatic Offsets in Oracle Public Sector Purchasing 7 – 102. . . . . . . . .
Chapter 8 Inquiries 8 – 1. . . . . . . . . . . . . . . . . . . . . . . . . . . . . . . . . . . . . . . . . . . . . . . Viewing Action History 8 – 2. . . . . . . . . . . . . . . . . . . . . . . . . . . . . . . . . . .
Chapter 9 Reports and Processes 9 – 1. . . . . . . . . . . . . . . . . . . . . . . . . . . . . . . . . . . Accrual Reconciliation Report 9 – 5. . . . . . . . . . . . . . . . . . . . . . . . . . . . . Accrual Write–Off Report 9 – 13. . . . . . . . . . . . . . . . . . . . . . . . . . . . . . . . . Advanced Shipment Notice Discrepant Receipts Report 9 – 16. . . . . . . ASL Upgrade Process 9 – 17. . . . . . . . . . . . . . . . . . . . . . . . . . . . . . . . . . . . Backordered Internal Requisitions Report 9 – 18. . . . . . . . . . . . . . . . . . . Blanket and Planned PO Status Report 9 – 19. . . . . . . . . . . . . . . . . . . . . . Buyer Listing 9 – 21. . . . . . . . . . . . . . . . . . . . . . . . . . . . . . . . . . . . . . . . . . . . Buyer’s Requisition Action Required Report 9 – 23. . . . . . . . . . . . . . . . . Cancelled Purchase Orders Report 9 – 25. . . . . . . . . . . . . . . . . . . . . . . . . Cancelled Requisitions Report 9 – 26. . . . . . . . . . . . . . . . . . . . . . . . . . . . . Contract Status Report 9 – 28. . . . . . . . . . . . . . . . . . . . . . . . . . . . . . . . . . . . Create Internal Sales Orders Process 9 – 29. . . . . . . . . . . . . . . . . . . . . . . . Create Releases Process 9 – 30. . . . . . . . . . . . . . . . . . . . . . . . . . . . . . . . . . .

viiContents
Encumbrance Detail Report 9 – 31. . . . . . . . . . . . . . . . . . . . . . . . . . . . . . . Expected Receipts Report 9 – 33. . . . . . . . . . . . . . . . . . . . . . . . . . . . . . . . . Fill Employee Hierarchy Process 9 – 35. . . . . . . . . . . . . . . . . . . . . . . . . . . Financials/Purchasing Options Listing 9 – 36. . . . . . . . . . . . . . . . . . . . . Internal Requisition Status Report 9 – 37. . . . . . . . . . . . . . . . . . . . . . . . . . Internal Requisitions/Deliveries Discrepancy Report 9 – 39. . . . . . . . . Invoice Price Variance Report 9 – 41. . . . . . . . . . . . . . . . . . . . . . . . . . . . . . Invoice Price Variance by Supplier Report 9 – 43. . . . . . . . . . . . . . . . . . . Item Detail Listing 9 – 45. . . . . . . . . . . . . . . . . . . . . . . . . . . . . . . . . . . . . . . Item Summary Listing 9 – 47. . . . . . . . . . . . . . . . . . . . . . . . . . . . . . . . . . . . Location Listing 9 – 48. . . . . . . . . . . . . . . . . . . . . . . . . . . . . . . . . . . . . . . . . Matching Holds by Buyer Report 9 – 50. . . . . . . . . . . . . . . . . . . . . . . . . . New Supplier Letter Report 9 – 52. . . . . . . . . . . . . . . . . . . . . . . . . . . . . . . Open Purchase Orders Report (by Buyer) 9 – 54. . . . . . . . . . . . . . . . . . . Open Purchase Orders Report (by Cost Center) 9 – 55. . . . . . . . . . . . . . Overdue Supplier Shipments Report 9 – 56. . . . . . . . . . . . . . . . . . . . . . . Overshipments Report 9 – 58. . . . . . . . . . . . . . . . . . . . . . . . . . . . . . . . . . . . Payment on Receipt 9 – 60. . . . . . . . . . . . . . . . . . . . . . . . . . . . . . . . . . . . . . Printed Change Orders Report (Landscape) 9 – 65. . . . . . . . . . . . . . . . . Printed Change Orders Report (Portrait) 9 – 67. . . . . . . . . . . . . . . . . . . . Printed Purchase Order Report (Landscape) 9 – 69. . . . . . . . . . . . . . . . . Printed Purchase Order Report (Portrait) 9 – 71. . . . . . . . . . . . . . . . . . . . Printed RFQ Report (Landscape) 9 – 73. . . . . . . . . . . . . . . . . . . . . . . . . . . Printed RFQ Report (Portrait) 9 – 75. . . . . . . . . . . . . . . . . . . . . . . . . . . . . Printed Requisitions Report 9 – 77. . . . . . . . . . . . . . . . . . . . . . . . . . . . . . . Purchase Agreement Audit Report 9 – 78. . . . . . . . . . . . . . . . . . . . . . . . . Purchase Order Commitment by Period Report 9 – 80. . . . . . . . . . . . . . Purchase Order Detail Report 9 – 82. . . . . . . . . . . . . . . . . . . . . . . . . . . . . . Purchase Order Distribution Detail Report 9 – 84. . . . . . . . . . . . . . . . . . Purchase Order and Releases Detail Report 9 – 86. . . . . . . . . . . . . . . . . . Purchase Price Variance Report 9 – 87. . . . . . . . . . . . . . . . . . . . . . . . . . . . Purchase Requisition Status Report 9 – 89. . . . . . . . . . . . . . . . . . . . . . . . . Purchase Summary Report by Category 9 – 91. . . . . . . . . . . . . . . . . . . . . Purchasing Activity Register 9 – 92. . . . . . . . . . . . . . . . . . . . . . . . . . . . . . Purchasing Database Administration 9 – 94. . . . . . . . . . . . . . . . . . . . . . . Purchasing Documents Open Interface 9 – 95. . . . . . . . . . . . . . . . . . . . . . Purchasing Interface Errors Report 9 – 98. . . . . . . . . . . . . . . . . . . . . . . . . Quality Code Listing 9 – 100. . . . . . . . . . . . . . . . . . . . . . . . . . . . . . . . . . . . . Quotation Action Required Report 9 – 101. . . . . . . . . . . . . . . . . . . . . . . . .

viii Oracle Public Sector Purchasing User’s Guide
RFQ Action Required Report 9 – 103. . . . . . . . . . . . . . . . . . . . . . . . . . . . . . Receipt Accruals – Period–End Process 9 – 105. . . . . . . . . . . . . . . . . . . . . Receipt Adjustments Report 9 – 108. . . . . . . . . . . . . . . . . . . . . . . . . . . . . . . Receipt Traveler 9 – 110. . . . . . . . . . . . . . . . . . . . . . . . . . . . . . . . . . . . . . . . . Receiving Account Distribution Report 9 – 112. . . . . . . . . . . . . . . . . . . . . Receiving Exceptions Report 9 – 114. . . . . . . . . . . . . . . . . . . . . . . . . . . . . . Receiving Interface Errors Report 9 – 116. . . . . . . . . . . . . . . . . . . . . . . . . . Receiving Transaction Processor 9 – 117. . . . . . . . . . . . . . . . . . . . . . . . . . . Receiving Transactions Register 9 – 119. . . . . . . . . . . . . . . . . . . . . . . . . . . . Receiving Value Report 9 – 122. . . . . . . . . . . . . . . . . . . . . . . . . . . . . . . . . . . Receiving Value Report by Destination Account 9 – 125. . . . . . . . . . . . . . ReqExpress Templates Listing 9 – 127. . . . . . . . . . . . . . . . . . . . . . . . . . . . . Requisition Activity Register 9 – 128. . . . . . . . . . . . . . . . . . . . . . . . . . . . . . Requisition Distribution Detail Report 9 – 129. . . . . . . . . . . . . . . . . . . . . . Requisition Import Process 9 – 130. . . . . . . . . . . . . . . . . . . . . . . . . . . . . . . . Requisition Import Exceptions Report 9 – 134. . . . . . . . . . . . . . . . . . . . . . Requisitions on Cancelled Sales Order Report 9 – 136. . . . . . . . . . . . . . . Reschedule Requisitions Process 9 – 137. . . . . . . . . . . . . . . . . . . . . . . . . . . Savings Analysis Report (by Buyer) 9 – 138. . . . . . . . . . . . . . . . . . . . . . . . Savings Analysis Report (by Category) 9 – 140. . . . . . . . . . . . . . . . . . . . . Send Notifications for Purchasing Documents 9 – 142. . . . . . . . . . . . . . . Standard Notes Listing 9 – 143. . . . . . . . . . . . . . . . . . . . . . . . . . . . . . . . . . . Substitute Receipts Report 9 – 144. . . . . . . . . . . . . . . . . . . . . . . . . . . . . . . . Supplier Affiliated Structure Listing 9 – 145. . . . . . . . . . . . . . . . . . . . . . . . Supplier Price Performance Analysis Report 9 – 146. . . . . . . . . . . . . . . . . Supplier Purchase Summary Report 9 – 148. . . . . . . . . . . . . . . . . . . . . . . . Supplier Quality Performance Analysis Report 9 – 150. . . . . . . . . . . . . . Supplier Service Performance Analysis Report 9 – 152. . . . . . . . . . . . . . . Supplier Volume Analysis Report 9 – 154. . . . . . . . . . . . . . . . . . . . . . . . . . Suppliers on Hold Report 9 – 155. . . . . . . . . . . . . . . . . . . . . . . . . . . . . . . . . Tax Code Listing 9 – 156. . . . . . . . . . . . . . . . . . . . . . . . . . . . . . . . . . . . . . . . . Uninvoiced Receipts Report 9 – 157. . . . . . . . . . . . . . . . . . . . . . . . . . . . . . . Unit of Measure Class Listing 9 – 159. . . . . . . . . . . . . . . . . . . . . . . . . . . . . . Unit of Measure Listing 9 – 160. . . . . . . . . . . . . . . . . . . . . . . . . . . . . . . . . . . Unordered Receipts Report 9 – 162. . . . . . . . . . . . . . . . . . . . . . . . . . . . . . . . Workflow Background Process 9 – 163. . . . . . . . . . . . . . . . . . . . . . . . . . . . .

ixContents
Appendix A Windows and Navigator Paths A – 1. . . . . . . . . . . . . . . . . . . . . . . . . . . .
Appendix B Oracle Public Sector Purchasing Alerts B – 1. . . . . . . . . . . . . . . . . . . .
Appendix C Using the Account Generator in Oracle Public Sector Purchasing C – 1. . . . . . . . . . . . . . . . . . . . . . . . . . . . . . . . . . . . . . . . . . . . .
Glossary
Index

x Oracle Public Sector Purchasing User’s Guide

C H A P T E R
6T
6 – 1Documents
Documents
his chapter tells you everything you need to know aboutAutoCreating Documents, including:
• AutoCreate Documents Overview: page 6 – 2
• Finding Requisition Lines for AutoCreate: page 6 – 10
• Selecting AutoCreate Criteria: page 6 – 13
• Entering Document Information and Completing AutoCreate:page 6 – 16
• Using the Document Builder: page 6 – 19
• Modifying Requisition Lines: page 6 – 21

6 – 2 Oracle Public Sector Purchasing User’s Guide
AutoCreate Documents Overview
Purchasing provides automatic creation capabilities for documents.Buyers can quickly create standard purchase orders, planned purchaseorders, blanket releases, and RFQs from any available purchaserequisition lines. The purchase requisition lines can be for predefineditems or one–time items as well as outside processing items. However,internally sourced requisition lines are supplied by internal salesorders, so they are not available for autocreation. AutoCreatingdocuments can be as simple as selecting requisition lines and adding asupplier—and letting Purchasing do the rest. Use the AutoCreateDocuments window to access the features of AutoCreate.
Note: For information on creating quotations directly fromRFQs, see: Copying Quotations from RFQs: page 5 – 61.
AutoCreate provides you with the features you need to satisfy yourautomatic document creation needs. You should be able to:
• Create new standard or planned purchase orders, blanketreleases, RFQs, and quotations with a minimum number ofkeystrokes. Add to existing blanket releases, planned purchaseorders, standard purchase orders, RFQs, and quotations
• Review all approved requisition lines before placing specificrequisition lines on a purchase order or RFQ
• Review RFQ headers, lines, and shipments before creating aquotation from a specific RFQ
• Collect all requisition lines that meet a certain set of criteria thatyou establish
• Split one requisition line into several requisition lines
• Consolidate multiple like requisition lines into single purchaseorder lines
• Review or change your purchase orders, quotations, or RFQsimmediately after creation
• Use document security to control whether buyers can add tocertain document types
• Specify foreign currency details during autocreation. You shouldbe able to use the requisition foreign currency or choose anothercurrency
• Review requisition lines by currency type

6 – 3Documents
Major Features
Complete Search Criteria
You have flexible criteria by which you can search for unpurchasedapproved purchase requisition lines for inclusion on purchase ordersand RFQs as well as unapproved requisition lines for inclusion onRFQs. When you are creating quotations from RFQs, you specify theRFQ number and lines from which you want to create the quotation.See: Copying Quotations from RFQs: page 5 – 61.
Fast Purchase Order and RFQ Creation
All purchase requisition lines available for autocreation go into a singlerequisition pool. Buyers can retrieve any of the requisition lines fromthe pool and use the AutoCreate Documents window to createstandard and planned purchase orders, blanket releases and RFQs.You can place a requisition line on as many RFQs as you want beforeyou place it on a purchase order, after which it is no longer available inthe requisition pool.
Fast Quotation Creation
Buyers can use the Copy Documents window to create supplierquotations for each RFQ. Buyers can choose entire RFQs or specificRFQ lines and shipments. See: Copying Quotations from RFQs: page5 – 61.
Automatic Creation Mode
Automatic Creation Mode lets you create purchase orders, blanketreleases, or RFQs with a minimum number of keystrokes. You providesearch criteria to locate the requisition lines you want to place on apurchase order or RFQ. After reviewing the requisition lines, youselect all lines that you want. Then you select the Automatic button tocreate the purchase order or RFQ. You have the option to grouprequisition lines with the same item, revision, line type, unit ofmeasure, and transaction reason into individual purchase order lines.Similarly, you can group requisition lines with the same item, revision,and line type into individual RFQ lines. Alternatively, you canautocreate documents that parallel the structure of the requisition fromwhich they were created.
Manual Creation Mode
Manual Creation Mode lets you specify which requisition lines youwant to place on a document. You decide which requisition lines you

6 – 4 Oracle Public Sector Purchasing User’s Guide
want to combine and where you want them to appear on thedocument. Then you select the Manual button to create the document.
Foreign Currency Options
When you autocreate new purchase orders, the requisition price isconverted into a purchase order price based on specified currency andrate information. You cannot specify currency information inAutoCreate if you are adding requisition lines to an existing document.Purchasing performs price tolerance verification for all currencies.
See Also
Finding Requisition Lines for AutoCreate: page 6 – 10
Selecting AutoCreate Criteria: page 6 – 13
Entering Document Information and Completing AutoCreate: page6 – 16
Using the Document Builder: page 6 – 19
Modifying Requisition Lines: page 6 – 21
Copying Quotations from RFQs: page 5 – 61
AutoCreate Document Options
The AutoCreate Documents window has features that simplifypurchase order and blanket release creation into a few steps:
• Enter selection criteria for your requisition lines in the FindRequisition Lines window. See: Finding Requisition Lines forAutoCreate: page 6 – 10.
• Choose whether to create a new document or add to an existingdocument. See: Selecting AutoCreate Criteria: page 6 – 13.
• In the AutoCreate Documents window, select the DocumentType: Standard Purchase Order, Planned Purchase Order,Blanket Release, or RFQ. See: Selecting AutoCreate Criteria:page 6 – 13.
• Choose the Grouping method: Default – requisition lines for thesame item, revision, line type, unit of measure, and transactionreason are combined into individual purchase order lines; andrequisition lines for the same item, revision, and line type arecombined into individual RFQ lines. Requisition – the

6 – 5Documents
autocreated documents parallel the structure of the requisitionfrom which they were created. See: Selecting AutoCreateCriteria: page 6 – 13.
• Choose Automatic or Manual creation mode to place therequisition lines onto a document. Based on the results of yoursearch and on how you want the autocreated document to look,you can decide whether Automatic or Manual creation mode ismore appropriate. See: Selecting AutoCreate Criteria: page6 – 13.
Selecting Requisition Lines
In the Find Requisition Lines window, enter search criteria to narrowthe selection of requisition lines. Purchasing chooses all requisitionlines from the requisition pool that meet your search criteria anddisplays them in the AutoCreate Documents window. Requisition linesfor the same item and item category are grouped together, but they arenot necessarily in order alphabetically. Within each grouping of itemand item category, requisition lines are ordered by need–by date.
Creating a Purchase Order, Release, or RFQ
In the AutoCreate Documents window, you can create a new plannedpurchase order, standard purchase order, blanket release, or RFQ.Also, depending on your security criteria, you can add lines to anexisting document. For example, if standard purchase orders have anaccess level of View Only, you cannot add lines to an existing standardpurchase order unless you are the document owner. See: DefiningDocument Types: page 1 – 65. See: Selecting AutoCreate Criteria: page6 – 13
• To create a new document, select Create New in the Action field.
• To add to an existing document, choose Add To as the and selectthe document number in the Document Number field.
Using Automatic Creation Mode
Use the Automatic creation mode when any of the following conditionsoccur:
• A majority of the requisition lines that your search criterialocated are items you want to place on the document
• You want Purchasing to determine where to place the requisitionlines on the document
• You want Purchasing to combine similar requisition linesautomatically onto a single document line

6 – 6 Oracle Public Sector Purchasing User’s Guide
• You are creating or adding to a release
• You are using Requisition grouping
Automatic Creation Mode lets you create documents with a minimumnumber of keystrokes. If you want to place on a document all therequisition lines that you selected from those which met your searchcriteria, select the Automatic button. Purchasing creates in a newdocument or adds to an existing document all the requisition lines youselected, and these lines are removed from the requisition pool if youare placing them on a purchase order. Lines that you did not select andlines placed on an RFQ remain in the requisition pool. Purchasing alsocopies the notes from the requisition lines and the correspondingrequisition headers, but not descriptive flexfields, to the document linesyou create.
When creating a purchase order, Purchasing combines the quantities ofall requisition lines that have the same item, item revision, line type,transaction reason, and unit of measure onto a single document line.For RFQs, quantities of all requisition lines that have the same item,revision, and line type are combined. The lowest unit price from thecombined requisition lines becomes the actual price of the purchaseorder line. If the items on the requisition lines you combine havedifferent prices, you may want to use Manual creation mode to ensureyou get the price you want. See the discussion of Manual creationmode below.
For purchase orders and releases, Purchasing combines shipmentinformation only if the requisition lines have the same need–by date,ship–to location, organization, Accrual type (period–end or on–line),and shipment type. Each purchase order distribution corresponds toonly one requisition distribution. Purchasing does not add to anexisting purchase order shipment if that shipment has beenencumbered. For RFQs, Purchasing combines shipment informationonly if the requisition lines have the same ship–to location, need–bydate, and unit of measure.
For new documents, Purchasing places the items on document lines inthe same order that they are displayed, and the shipments will beordered by need–by date if all requisition lines share a common unitprice. Additions to existing documents or document lines will beplaced after any existing lines or shipments.
If the items you selected are not predefined items, Purchasing does notcombine the lines. To combine lines that do not have predefined items,you must use Manual creation mode. See the discussion of Manualcreation mode below.
6 – 7Documents
If the profile option PO: Display the Autocreated Document is set toYes, Purchasing displays the Purchase Orders, Releases, or RFQwindow, as appropriate, after creating your document lines. See:Profile Options in Purchasing: page 1 – 76.
Using Manual Creation Mode
Use Manual creation mode when any of the following conditions occur:
• You want to manually choose the requisition lines to combineonto a single document line
• You want to specify the location of the items on the document(for example, specify which purchase order lines the requisitionlines will become)
• You want to ensure you get the negotiated price when combiningmultiple requisition lines with different prices
Manual creation mode lets you take control of the actual placement ofrequisition lines on purchase order lines. You move each line into theposition you want it on the document by using the Document Builder.See: Using the Document Builder: page 6 – 19.
You can combine requisition lines that have the same predefined itemand lines that have one–time items onto a single document line. If youwant to combine two requisition lines for the same item, one with anitem number and one without, use Modify on the Special menu to addthe predefined item to the requisition line for the one–time item.
Note: You cannot use Modify with outside processing items orif you are using encumbrance or budgetary control. See:Modifying Requisition Lines: page 6 – 21.
Purchasing copies only the notes from the remaining selectedrequisition lines (and their corresponding headers).
Adding Lines to Existing Documents
You can add lines to existing documents only if your security criteriaallow you to modify them. However, you can always create newreleases against blanket purchase agreements – even if your securitycriteria do not permit you to access the document elsewhere in thesystem. To add lines to an existing planned or standard purchaseorder, specify the purchase order number:
If you use Automatic creation mode, Purchasing creates new linesbeginning with the next available line number or combines yourrequisition lines with existing document lines

6 – 8 Oracle Public Sector Purchasing User’s Guide
If you use Manual creation mode, you can select any displayed line andplace it onto a line in the Document Builder region
Entering Document Information
Once you have completed specification of all criteria (and used theDocument Builder for Manual creation mode), you add documentinformation to complete the autocreate process. See: EnteringDocument Information and Completing AutoCreate: page 6 – 16.
Additional AutoCreate Features
Modifying Requisition Lines
Use the Modify feature when you want to split an existing requisitionline into multiple requisition lines that represent the same or differentitems. For example, if the requisition line quantity is so large that asingle supplier cannot fill the entire order by the need–by date, thenyou need to multisource the order (that is, fill it from more than onesupplier). On the other hand, if you have a requisition line item thatcontains parts that you want to order as unique items, you can explodethe requisition line into several lines.
Note: After you modify a requisition line, you cannot modifythe new requisition line(s) again. You cannot modifyrequisition lines for outside processing items and when you areusing encumbrance accounting or budgetary control.
• In the AutoCreate Documents window, select Modify on theSpecial menu to display the Modify Lines window with thecurrent requisition line selected. See: Modifying RequisitionLines: page 6 – 21.
• Enter as many new lines as you need to represent the originalrequisition line. Purchasing automatically creates newdistribution lines and prorates quantities for the newdistributions from the original requisition line distributions.Purchasing also backs out requisition supply for the originalrequisition line and creates new supply for the new lines.
When you return to the AutoCreate Documents window, Purchasingdisplays the new requisition lines that are now available for placementon a purchase order or RFQ. These lines do not appear, however, if thenew requisition lines do not meet your original search criteria. Theoriginal requisition line is no longer available for purchase order or

6 – 9Documents
RFQ placement, but your requestor can easily review the modificationstatus of a requisition line in the Requisitions window.
Returning a Requisition
Purchasing lets you return a requisition line to the requisition preparer.You might want to return a requisition line if you are unable to obtainthe requestor’s price and want the requestor to resubmit the requisitionfor approval at a higher price.
Select Return Requisitions on the Special menu to display the ReturnRequisitions window. Enter a reason for the return and select OK toreturn all requisition lines on the current requisition except any linesfrom the requisition already placed on a purchase order. When youreturn requisition lines, they are no longer available in the requisitionpool.
Automatic Tax Defaulting
If you’ve set up a tax defaulting hierarchy in the Tax Defaults region ofthe Purchasing Options window, the appropriate tax namesautomatically default onto the documents you autocreate. See:Defining Tax Defaults Options: page 1 – 38.

6 – 10 Oracle Public Sector Purchasing User’s Guide
Finding Requisition Lines for AutoCreate
Use the Find Requisition Lines window to specify search criteria forrequisition lines that you will use to autocreate purchase orders andRFQs.
Prerequisites
❑ Create on–line requisitions with Enter Requisitions. See: EnteringRequisition Headers: page 3 – 49. Approve the requisitions. See:The Document Approval Process: page 2 – 23.
❑ Use Requisition Import to import requisitions generated by otherproducts. See: Requisition Import Process: page 9 – 130.
� To enter search criteria:
1. Navigate to the Find Requisition Lines window by selectingAutoCreate from the menu. Then enter desired search criteria asdescribed in the following steps.
2. Select the Approved status: Yes or No. Only approved lines can beused when you autocreate purchase orders. Either status can be

6 – 11Documents
used on RFQs. If you do not make a selection, both approved andunapproved requisition lines will be included.
Yes – You can autocreate purchase orders, releases, and RFQs.
No – You can autocreate only RFQs.
3. Enter the Requisition number.
4. Enter the Requestor.
5. Select the Supplier Sourcing criterion (Sourced or Unsourced).
6. The suggested Buyer from the Enter Person window is displayedas the default. If the PO: Allow Buyer Override in AutoCreate Findprofile option is set to Yes, you can clear the default or enter adifferent buyer.
7. Enter the Supplier and Supplier Site.
8. Select the Document Type to indicate that you want to includerequisition lines sourced to a Blanket purchase agreement or to aQuotation.
9. Enter the PO Number.
10. Enter the Ship To location to include requisition lines with thisDeliver To location. The default is the Ship–To Location for thebuyer from the Enter Person window.
11. Enter the currency Rate Type.
12. Enter the Currency.
13. Use the alternative regions to further restrict the search:
• In the Item region, you can enter the following search criteria:Item number, Revision number, Category, item Description, andSupplier Item number. The default Category is the categorydefined for the buyer from the Enter Person window. If the PO:Allow Category Override in AutoCreate Find profile option isset to Yes, you can clear the default or enter a different category.
• In the Status region, you can limit the search by Late status (Yesor No), Urgent status (Yes or No), Assigned status (Yes or No),RFQ Required status (Yes or No), or the number of need by daysfrom today (For example, enter 10 if you want to locate allrequisition lines with a need–by date within the next tencalendar days.)
14. Select the Find button to initiate the search and open theAutoCreate Documents window. See: Selecting AutoCreateCriteria: page 6 – 13.

6 – 12 Oracle Public Sector Purchasing User’s Guide
� To clear existing search criteria:
� Select the Clear button to clear any existing search criteria.
� To enter requisition preferences:
� Select Requisition Preferences on the Special menu to open theRequisition Preferences window. See: Entering RequisitionPreferences: page 3 – 44.
See Also
Defining Buyers: page 1 – 13
Profile Options in Purchasing: page 1 – 76
Enter Person, Oracle Human Resource Management Systems User’s Guide

☞
6 – 13Documents
Selecting AutoCreate Criteria
The AutoCreate Documents folder window displays the requisitionlines that met the search criteria entered in the Find Requisition Lineswindow. Use this window to:
• Select whether you are creating a new document or adding to anexisting document
• Select the type of document you are creating: Standard PO,Planned PO, Blanket Release, or RFQ
• Select the grouping method: Default or Requisition
• For Automatic creation mode, select which of the displayedrequisition lines you will use on the autocreated document
• Select the creation mode: Manual or Automatic
Attention: To select a requisition line for autocreation, press<Control> and click on the line. Press <Shift> and click on a line toselect all lines between that line and the current line. Click on anyunselected line to deselect all lines. You can also use ’Select All’ or’Deselect All’.
� To select autocreation criteria:
1. Navigate to the AutoCreate Documents window by selecting theFind button in the Find Requisition Lines window. See: FindingRequisition Lines for AutoCreate: page 6 – 10.
2. In the Action field, select whether you want to Create a Newdocument or Add To an existing document.
3. Select the Document Type you want to create: Standard PO,Planned PO, Blanket Release, or RFQ. The Document Type can be

6 – 14 Oracle Public Sector Purchasing User’s Guide
only RFQ if you did not select Approved Requisitions in the FindRequisition Lines window.
4. Select the Grouping for requisition lines on the document:
Default: Combine requisition lines for the same item, revision, linetype, unit of measure, and transaction reason onto one purchaseorder line. Combine requisition lines for the same item, revision,and line type onto one RFQ line.
Requisition: Create document with one line for each requisitionline. Used only when you select lines on a single requisition.
5. For Automatic creation mode, select the requisition lines that youwant to use on the document and then select the Automatic button.
For Manual creation mode, select the Manual button. Manualcreation mode is available only when you have chosen Defaultgrouping for Standard and Planned Purchase Orders and RFQs.
For both creation modes, Purchasing displays the Add ToDocument, New Document Number, or New Document window,depending on the action you selected. See: Entering DocumentInformation for AutoCreate: page 6 – 16.
� To return requisition lines:
1. Select Return Requisitions on the Special menu to display theReturn Requisitions window.
2. Enter a Reason for the return.
3. Select OK to return to the requisition pool all unpurchased lines onthe current requisition.
� To modify requisition lines:
� Select Modify on the Special menu to open the Modify Lineswindow. See: Modifying Requisition Lines: page 6 – 21
� To view action history:
� Select View Action History on the Special menu to open the ActionHistory window and display action history for the current line.See: Viewing Action History: page 8 – 2.

6 – 15Documents
� To view blanket purchase agreements:
� Select View Blanket POs on the Special menu to open the PurchaseOrder Lines window and display all blanket purchase agreementsfor the item on the current line.
� To enter requisition preferences:
� Select Requisition Preferences on the Special menu to open theRequisition Preferences window. See: Entering RequisitionPreferences: page 3 – 44.
See Also
Customizing the Presentation of Data in a Folder, Oracle ApplicationsUser’s Guide

☞
6 – 16 Oracle Public Sector Purchasing User’s Guide
Entering Document Information and Completing AutoCreateUse the Add To Document, New Document Number, and NewDocument modal windows to enter document information fordocuments you are autocreating. Which window displays isdetermined by your Action choice in the AutoCreate Documentswindow.
Attention: If the PO: Warn RFQ Required before AutoCreateprofile option is set to Yes, and one or more of the requisition linesselected for autocreation requires an RFQ and has not been placedon an RFQ, you will be given a warning message and can cancel theautocreate. See: Profile Options in Purchasing: page 1 – 76
� To enter information in the Add To Document window:
1. The Add To Document modal window appears when you havechosen the Add To action and selected either the Manual or theAutomatic creation mode button in the AutoCreate Documentswindow.
2. Select the Document Number. For blanket releases, you must alsoenter the Release Number.
You can select Cancel to close the modal window.
3. Select OK to go to the next step.
If you are in Automatic creation mode, this completes all requiredsteps. Purchasing autocreates the document and displays thedocument entry window appropriate for the selected criteria if thePO: Display the AutoCreated Document profile option is set to Yes.See: Profile Options in Purchasing: page 1 – 76.

6 – 17Documents
If you are in Manual creation mode, you go to the DocumentBuilder. See: Using the Document Builder: page 6 – 19.
� To enter information in the New Document Number window:
1. The New Document Number window appears when you havechosen the Create New action and selected the Manual creationmode button in the AutoCreate Documents window. This shortversion of the New Document window requires only that you enterthe Document Number. Later, after you have entered informationin the Document Builder, the New Document window will appear.See: Using the Document Builder: page 6 – 19.
� To enter information in the New Document window:
1. The New Document window appears after you have selected theCreate button in the Document Builder when you are creating anew document in Manual creation mode and in all cases when youare creating a new document in Automatic creation mode.
2. Enter the Document Number. If automatic document numbering isenabled for the document type, this field is not enterable. See:Defining Numbering Options: page 1 – 36.
For RFQs, you must enter the RFQ Type, and you can enter theSupplier List Name.
For releases, you must enter the Release and the Release Date

6 – 18 Oracle Public Sector Purchasing User’s Guide
3. For standard and planned purchase orders, you can enter theSupplier and Supplier Site. This is filled in for releases.
4. Enter the Currency Source:
Default – The currency is defaulted from the supplier site (if foreigncurrency), the supplier (if foreign currency), or the functionalcurrency.
First Requisition Line – The currency from the first requisition line isused.
Specify – If you select a Requisition and Requisition Line, thecurrency from that line is autoselected; however, you can overridethis currency.
The Rate and Rate Date are enterable only when the Rate Type isUser. A rate type of EMU Fixed means that if either your basecurrency (functional currency, defined in your set of books) or yourforeign currency (transaction currency in a document entrywindow) is Euro and the other is another European currency,Purchasing automatically enters a conversion Rate Date and Ratefor you that you cannot change.
You can select Cancel to close the modal window.
5. Select Create to complete autocreation of the document. If the PO:Display the AutoCreated Document profile option is set to Yes,Purchasing displays the document entry window appropriate forthe selected criteria. See: Profile Options in Purchasing: page1 – 76.

6 – 19Documents
Using the Document Builder
Use the Document Builder region in the AutoCreate Documentswindow to build documents for autocreation in Manual creation mode.
� To build documents when creating a new document:
1. Navigate to the Document Builder by selecting the Manual buttonin the AutoCreate Documents window and entering a documentnumber in the New Document Number window. See: EnteringDocument Information and Completing AutoCreate: page 6 – 16
2. In the upper region, select one requisition line for build placement.This enables the down arrow.
3. Select the down arrow. This converts the cursor to cross hairs.
4. Position the cross hairs in the Document or Line field and click.This places the selected requisition line from the upper region intothe Document Builder, highlights the upper region, restores thecursor to its normal shape, and positions the cursor in the nextavailable Line field.
You can position the cursor anywhere in a populated line in theDocument Builder to enable the up arrow. Click on the up arrow toreturn the line to the upper region and deselect the line.

6 – 20 Oracle Public Sector Purchasing User’s Guide
5. You can select additional lines one at a time in the upper region andmove them to the Document Builder.
Click in the Line field of an existing line to attempt to add the newline to the existing line. If the proposed new line fails to pass thevalidation tests, Purchasing places it on the next available openline. Click in the Document field of an open line to add the newline to the first available existing line. You can change a linenumber to any unused line number.
6. Select Create to display the New Document window. See:Entering Document Information and Completing AutoCreate: page6 – 16
� To build documents when adding to an existing document:
If you are adding to an existing document, Purchasing displays allthe existing document lines in the Document Builder, with the linedisabled. You cannot remove any of these existing lines.
1. Follow steps 2 – 5 above.
2. Select Create to complete autocreation. If the PO: Display theAutoCreated Document profile option is set to Yes, Purchasingdisplays the document entry window appropriate for the selectedcriteria. See: Profile Options in Purchasing: page 1 – 76.
� To cancel the current placement in the Document Builder:
� When you have selected a line in the upper region and thenselected the down arrow but have not yet placed the selected lineonto the Document Builder, you can select the Cancel Placementbutton to cancel the current placement attempt without removingpreviously–placed lines from the Document Builder.
� To cancel the current session in the Document Builder:
� Select the Cancel Build button to remove any lines you have addedto the Document Builder and return them to the upper region.
See Also
Autocreate Documents Overview: page 6 – 2

6 – 21Documents
Modifying Requisition LinesUse the Modify Lines window to split an existing requisition line intomultiple requisition lines that represent the same or different items.For example, if the requisition line quantity is so large that a singlesupplier cannot fill the entire order by the need–by date, then you needto fill this order from more than one supplier. On the other hand, ifyou have a requisition line item that contains parts that you want toorder as unique items, you can explode the requisition line into severallines. After you modify a requisition line, you cannot modify the newrequisition line(s) again.
Note: You cannot modify requisition lines for outsideprocessing items and when you are using encumbranceaccounting or budgetary control.
� To modify requisition lines:
1. Navigate to the Modify Lines window by selecting Modify on theSpecial menu in the AutoCreate Documents window. Purchasingdisplays the current requisition line in the Lines alternative region.
2. Enter as many new lines as you need to represent the originalrequisition line. Purchasing automatically creates new distributionlines and prorates quantities for the new distributions from theoriginal requisition line distributions. Except that you cannotupdate destination information (destination type, organization,

6 – 22 Oracle Public Sector Purchasing User’s Guide
location, requestor, and subinventory), the entry of information inthe Lines, Source Details, Details, and Currency alternative regionsis identical to entry of this information in the Requisitions window.See: Entering Requisition Lines: page 3 – 52.
� To cancel your entries:
� Select Cancel to cancel your entries and return to the AutoCreateDocuments window.
� To save your work:
� Select OK to save your work and return to the AutoCreateDocuments window, where Purchasing displays the newrequisition lines that are now available for placement on a purchaseorder or RFQ. These lines do not appear, however, if the newrequisition lines do not meet your original search criteria. Theoriginal requisition line is no longer available for purchase order orRFQ placement, but your requestor can easily review themodification status of a requisition line in the View Requisitionswindow.

C H A P T E R
7T
7 – 1Receiving
Receiving
his chapter tells you everything you need to know aboutReceiving, including:
• Overview of Receiving: page 7 – 2
• Advanced Shipment Notices (ASNs): page 7 – 14
• Managing Receipts: page 7 – 21
• Unordered Receipts: page 7 – 33
• Receiving Transactions: page 7 – 37
• Inspections: page 7 – 51
• Returns: page 7 – 54
• Corrections: page 7 – 59
• Finding Intransit Shipments: page 7 – 65
• Control Numbers: page 7 – 68
• Receiving Reports: page 7 – 71
• Overview of Receipt Accounting: page 7 – 73
• Automatic Offsets in Oracle Public Sector Purchasing: page7 – 102
7 – 2 Oracle Public Sector Purchasing User’s Guide
Overview of Receiving
Purchasing lets you control the items you order through receiving,inspection, transfer, and internal delivery. You can use these features tocontrol the quantity, quality, and internal delivery of the items youreceive.
Purchasing provides you with the features you need to satisfy yourreceipt, inspection, transfer, and delivery needs. You should be able to:
• Use routing controls at the organization, supplier, item, or orderlevel to enforce material movement through receiving. Forexample, you can require inspection for some items anddock–to–stock receipt for others. See: Receiving Controls,Options, and Profiles: page 7 – 7.
• Define receiving tolerances at the organization, supplier, item,and order level, with the lowest level overriding previous levels.You can define tolerances for receipt quantity, on–time delivery,and receiving location. You can assign looser tolerances tolow–value items that you consume at high volumes. You can setenforcement options to ignore, warn the user, or rejecttransactions that violate the tolerances. See: Receiving Controls,Options, and Profiles: page 7 – 7.
• Use blind receiving to improve accuracy in the receiving process.With this option, the quantity due for each shipment does notshow and quantity control tolerances are ignored. Also, thequantity is not visible in view windows or in reports. However,if you choose to have visible receiving, then your receiving staffcan see the quantity due. See: Receiving Controls, Options, andProfiles: page 7 – 7.
• Use Express Receipt to receive an entire purchase order with afew keystrokes. You can exclude certain lines for expresstransactions. See: Express Receipts and Receiving Transactions:page 7 – 24
• Use Advance Shipment Notices (ASNs) to enter receipts in theEnter Receipts window, reducing data entry time. See: AdvanceShipment Notices: page 7 – 14.
• Use the Cascade function to distribute a given quantity of anitem from a single supplier across multiple shipments anddistributions. This function is enabled by a Receiving Optionscheckbox, Allow Cascade Transactions, and is available onlywhen you have specified a source and an item in the Find

7 – 3Receiving
Expected Receipts window. See: Cascading Receipts andReceiving Transactions: page 7 – 22.
• Specify invoice matching controls. You can specify two–, three–,and four–way matching on a purchase order line. Purchasinguses your receiving and inspection information to ensure thatyou only accept and pay for the items you order. Choosethree–way matching if you want to receive items before youallow payment. Choose four–way matching if you requireinspection and acceptance of receipts before authorizingpayment. See: Receiving Controls, Options, and Profiles: page7 – 7.
• Print the receiving and inspection documentation you need. Forexample, you can print Receipt Travelers. Also, you can preparefor incoming receipts by printing the Expected Receipts Reportto help you identify items and quantities you expect to receive.You can use this report to plan your work, identify receiptssatisfying an urgent demand, and control unexpected receipts.Finally, you can produce summary and detail receivingtransaction reports by item, supplier, purchase order number,and/or receiving date range. See: Receiving Reports: page7 – 71.
• Track, update, and record the receipt of intransit andinter–organization shipments.
• Enter different types of receipt transactions based on yourorganization’s needs. For example, you should be able to recordin one transaction a direct receipt of inventory items intoinventory.
• Record receipt of unordered items based on your item, supplier,or organization defaults. For example, if your organization doesnot allow receipt of unordered items, you should not be able toenter a receipt unless it is matched to an order shipment. See:Unordered Receipts: page 7 – 33.
• Record receipt of predefined substitute items if you set yourreceiving options to allow this feature. You define the acceptablesubstitutes during setup for the items you purchase. See:Receiving Controls, Options, and Profiles: page 7 – 7.
• Automatically update related supply information, inventorybalances, WIP operations, requisition details, and purchase orderdetails while entering a single receiving transaction.
• You can record transfers of inventory items from receiving andinspection to inventory or to the shop floor. You can also record

7 – 4 Oracle Public Sector Purchasing User’s Guide
transfers of items to different locations in the receiving andinspection area. For example, you might need to moverefrigerated items from the receiving dock into a cold storagearea while you are waiting to inspect them. Purchasing lets yourecord these types of transfers in the same window you use todeliver to stock or expense.
• Record receipts against services and labor. You can enter eitherthe total value of services received, or the amount of servicestied to an invoice. For example, you might receive 40 hours ofconsulting services.
• Receive services, inventory, expense, and outside processingitems using one screen. You acknowledge receipt of services byreceiving amounts of the service, generally related to receipt ofan invoice. You receive inventory items to expense or assetsubinventories, you receive expense items to the requestor, andyou receive outside processing to the shop floor (designatedoperations in your manufacturing process).
• Distinguish closed for invoicing from closed for receiving.Purchasing automatically closes your purchase order for receiptwhen it is fully received. You can manually close partiallyreceived purchase orders if you no longer expect any morereceipts against them. Close for invoicing and close for receivingare managed using tolerances. You can specify that when youhave received a certain percentage of a shipment, Purchasingwill close the receipt. This is a soft close, and you can reopen thereceipt. Purchasing rolls up closing to the line and header level,and ”Closed” information does not show in the Open PurchaseOrders Report. Also, if there is a remaining balance, closedquantities are no longer visible as supply scheduled receipts toMRP/ATP.
• Decide how you accrue un–invoiced receipts. For instance, youcan accrue receipts perpetually or at period–end for expenseitems. Purchasing uses perpetual accrual for your inventory andshop floor item receipts. Purchasing and Inventory togetherprovide you with perpetual visibility and control on youraccrued liabilities for inventory items. Inventory lets youmaintain the value of your inventories on a perpetual basis. AndPurchasing automatically records your accrued liability in yourgeneral ledger as you enter receiving transactions. Purchasingalso provides you with complete visibility and control of yourinventories values, accrued liabilities for inventory andnon–inventory items, purchase price variances, and invoice pricevariances. And Purchasing provides you with the information

7 – 5Receiving
you need to facilitate your period close and your inventory,purchasing, and payables reconciliation process. See: Overviewof Receipt Accounting: page 7 – 73.
• Identify and handle hazardous materials. You can useattachments to provide detailed handling instructions.Purchasing displays hazardous material information in thereceiving, transfer, and inspection windows as well as on theReceipt Traveler. See: Purchasing Hazardous Materials: page1 – 48.
• Track the quantity and destination of internally delivered items.You know exactly what items you receive and where to deliverthem within your organization.
• Define detailed rules for locator within subinventories for thedisposition of inventory receipts. See: Defining Stock Locators,Oracle Inventory User’s Guide..
• Track lot and serially controlled items. See: Control Numbers:page 7 – 68.
• Define which of your items require inspection. Purchasing letsyou inspect received items before you move the items into stockor deliver them to the requestor. You can accept or reject itemsand provide detailed information about your inspection results.Purchasing lets you review your inspection results on–line. Youcan review your inspection results by receipt number, purchaseorder number, supplier, item, and/or transaction date range.Purchasing also provides summary and detail reports to helpyou analyze your suppliers’ performance. You can producesupplier quality reports by buyer, supplier, and item. You canuse the receiving inspection register to review your inspectionsby receipt. See: Inspections: page 7 – 51.
• Record returns to suppliers. You can return items that aredamaged on receipt or that fail your inspection process. If youreturn items that you have already delivered to inventory,Purchasing automatically updates the inventory stock levels.See: Returns: page 7 – 54.
• Correct receiving transaction errors. Purchasing automaticallyupdates the inventory balances if you correct the quantities ofitems that have already been moved into inventory. See:Corrections: page 7 – 59.
• Use flexible search criteria to choose receipts for review.

7 – 6 Oracle Public Sector Purchasing User’s Guide
• View receipts details. You should be able to view all the detailsof your receipt, including matching purchase order andshipment information.
• Perform transactions with minimal effort. For example, you canrecord a complete receipt with only a few mouse clicks.
• Use attachments throughout the receiving process to morecompletely identify transactions and to inform users of specialrequirements. See: Attaching Notes to Purchasing Documents:page 1 – 28.
• Record drop shipments as receipts once the supplier informs youthat the drop shipment has been delivered to the customer. See:Drop Shipments: page 4 – 156.
• Receive purchase orders for kanban replenishment requests thatwere generated from Oracle Inventory. Once you recorddelivery of a kanban item through the Receipts or ReceivingTransactions windows, Inventory automatically receives a statusof Full for the order, indicating that the inventory supply hasbeen replenished. See: Kanban Replenishments: page 3 – 18.
Centralized Purchasing for Multiple Receiving Organizations
Purchasing provides complete centralized procurement support. Youcan leverage your purchasing power by consolidating the requirementsfrom different plants, warehouses, and office sites; yet retain receivingsupport. You can define separate, autonomous receiving organizationsfor each of these sites.
Use the Change Organization window (See: Changing YourOrganization, Oracle Master Scheduling/MRP and Supply Chain PlanningUser’s Guide) to choose your receiving organization. With the Receiptswindow, you can receive goods only for your current organization.The current organization code is displayed in the title bar of theReceipts window. (See: Entering Receipt Lines: page 7 – 30) Forsupplier shipments, you specify the receiving organization on thepurchase order shipment. For intransit inventory shipments, youspecify the receiving organization when you create the intransitshipment. For internal requisitions, you use the destinationorganization to specify the receiving organization.
All other receiving windows can access receiving only in your currentorganization. You also must deliver to the same organization in whichyou received the goods.
7 – 7Receiving
Use the Maintain Shipments window to update intransit information toprovide accurate expected delivery date information to better planyour production processes. See: Maintaining Shipments: page 7 – 66.
Receiving Locations
Receiving locations are designated areas in which you temporarilystore items before you deliver them to their final destinations. Yourreceiving dock and the area in which items are inspected are receivinglocations. See: Site Locations, Oracle Human Resource ManagementSystems User’s Guide.
Receiving locations are not required when the routing is Direct Receipt,when you are delivering goods to their final locations. However, whenthe routing is Standard Receipt, you initially receive the items into areceiving location, and you must specify the receiving location. If therouting is Inspection Required, you could transfer the items to aninspection location before delivering them to their destination. Ifnecessary, you can create additional receiving locations, such as a coldstorage area where items can be held pending inspection.
See Also
Entering Receipt Header Information: page 7 – 28
Receiving Transactions: page 7 – 37
Inspections: page 7 – 51
Receiving Controls, Options, and Profiles
Purchasing provides you with all the necessary functionality to set upflexible purchasing and receiving controls, control options, and profileoptions. The profile options can be set at the site, application,responsibility, or user level. The receiving controls and options can beset at one or more of the following levels: order, item, supplier,organization, and system. Controls at any level override those at ahigher level. For example, item level controls override suppliercontrols but are overridden by order controls.
Use the Profile Options window to set profile options for receiving.Use the Receiving Controls window (See: Entering Purchase OrderReceiving Controls: page 4 – 65.) and the More alternative region in the

7 – 8 Oracle Public Sector Purchasing User’s Guide
PO Shipments window (See: Entering Purchase Order Shipments: page4 – 61.) to set receiving options at the order level. Use the Item window(See: Defining Items, Oracle Inventory User’s Guide.) to set receivingoptions at the item level. Use the Supplier window (See: AboutSuppliers, Oracle Public Sector Payables User’s Guide) to set receivingoptions at the supplier level. Use the Receiving Options window (See:Defining Receiving Options: page 1 – 40.) to set receiving options at theorganization level. Use the Purchasing Options window (See: DefiningPurchasing Options: page 1 – 29.) to set receiving options at the systemlevel. You can set the following receiving options:
• Invoice matching: whether the items on a purchase order linemust be received and/or inspected before the correspondinginvoice can be paid. See: Defining Default Options: page 1 – 29.You can override this option for specific suppliers, items, andorders.
• The Invoice Close % tolerance for your shipments. Purchasingautomatically closes a shipment for invoicing if it is within theinvoicing closing tolerance at billing, when Payables matchesinvoices to purchase orders. See: Defining Default Options: page1 – 29. You can override this option for specific items andorders.
• The Receipt Close % tolerance for your shipments. Purchasingautomatically closes a shipment for receiving if it is within thereceiving closing tolerance at the receiving close point. See:Defining Default Options: page 1 – 29. Note also that in the FindExpected Receipts form you have the option to include closedpurchase orders when you are entering search criteria. You canoverride this option for specific items and orders. See: FindingExpected Receipts: page 7 – 26.
• The Receipt Close Point, when the shipment is closed forreceiving: Accepted (passed inspection), Delivered, or Received.See: Defining Control Options: page 1 – 33.
• Whether expense accrual is on receipt or at period end. See:Defining Accrual Options: page 1 – 32.
• The default expense AP accrual account. See: Defining AccrualOptions: page 1 – 32.
• Automatic or manual receipt numbering. If you chooseAutomatic, you can also set the start of the receipt numbersequence. This is used with manual receipt numbering forinter–organization direct receipts. See: Defining NumberingOptions: page 1 – 36.

7 – 9Receiving
• Alphanumeric or numeric receipt numbering. See: DefiningNumbering Options: page 1 – 36.
• Whether you can receive a defined substitute item instead of theoriginally ordered item. See: Defining Receiving Options: page1 – 40. You can override this option for specific suppliers, items,and orders.
• Whether you can receive unordered items. See: DefiningReceiving Options: page 1 – 40. You can override this option forspecific suppliers and items.
• Whether you allow express transactions. See: Defining ReceivingOptions: page 1 – 40.
Express receipt/delivery allows you to receive/deliver the entirequantity of all selected shipments (except those you specificallyomit) without entering specific quantities for each shipment anddistribution
• Whether you allow cascade transactions. See: DefiningReceiving Options: page 1 – 40.
The cascade function lets you distribute a quantity of an itemfrom a single supplier across multiple shipments anddistributions.
• Blind receipt. If you choose this option, Purchasing does notenforce quantity tolerances, nor does it display the Quantity Dueor the Quantity Ordered for shipments on line or on receivingworksheets. See: Defining Receiving Options: page 1 – 40.
• Whether goods can be received only to the receiving locationthat was defined as the ship–to location on the purchase orderand whether Purchasing prohibits the transaction, displays awarning message while permitting the transaction, or permitsthe transaction without a warning. See: Defining ReceivingOptions: page 1 – 40. You can override this option for specificsuppliers, items, and orders.
• The maximum acceptable over–receipt percentage and whetherPurchasing prohibits the transaction, displays a warningmessage while permitting the transaction, or permits thetransaction without a warning. See: Defining Receiving Options:page 1 – 40. You can override this option for specific suppliers,items, and orders.
• The number of calendar days before and after the purchase orderdelivery date that you allow receipt and whether Purchasingprohibits the transaction, displays a warning message while

7 – 10 Oracle Public Sector Purchasing User’s Guide
permitting the transaction, or permits the transaction without awarning. See: Defining Receiving Options: page 1 – 40. You canoverride this option for specific suppliers, items, and orders.
• The receiving account for your accrual entries. See: DefiningReceiving Options: page 1 – 40.
• The default receipt routing that you assign goods: DirectDelivery, Standard Receipt, or Inspection Required. See:Defining Receiving Options: page 1 – 40. You can override thisoption for specific suppliers, items, and orders.
• Whether you can override the receipt routing at receipt time.This is a profile option (RCV: Allow Routing Override) that youcan set at the application, responsibility, or user level. See:Profile Options in Purchasing: page 1 – 76.
• Whether receipt travelers are automatically printed when youperform a receipt or receiving transaction, and match anunordered receipt. This is a profile option (RCV: Print ReceiptTraveler) that you can set at the site, application, responsibility,or user level. See: Profile Options in Purchasing: page 1 – 76.
• The processing mode for receiving transactions: Batch,Immediate, or Online. (See Receiving Transaction Processor:page 9 – 117.) This is a profile option (RCV: Processing Mode)that you can set at the site, application, responsibility, or userlevel. See: Profile Options in Purchasing: page 1 – 76.
• Whether or not you receive an error message—or are preventedby Purchasing—when you attempt to receive against a purchaseorder shipment for which an Advance Shipment Notice (ASN)already exists. This is done through an option (ASN Control) inthe Receiving Options window. See: Defining ReceivingOptions: page 1 – 40. See also: Advance Shipment Notices(ASNs): page 7 – 14.
• Whether to reject an entire Advance Shipment Notice (ASN) ifany ASN line fails validation or processing, or to accept an ASNif at least one ASN line is successful. This is a profile option(RCV: Fail All ASN Lines if One Line Fails). See: Profile Optionsin Purchasing: page 1 – 76. See also: Advance Shipment Notices(ASNs): page 7 – 14.
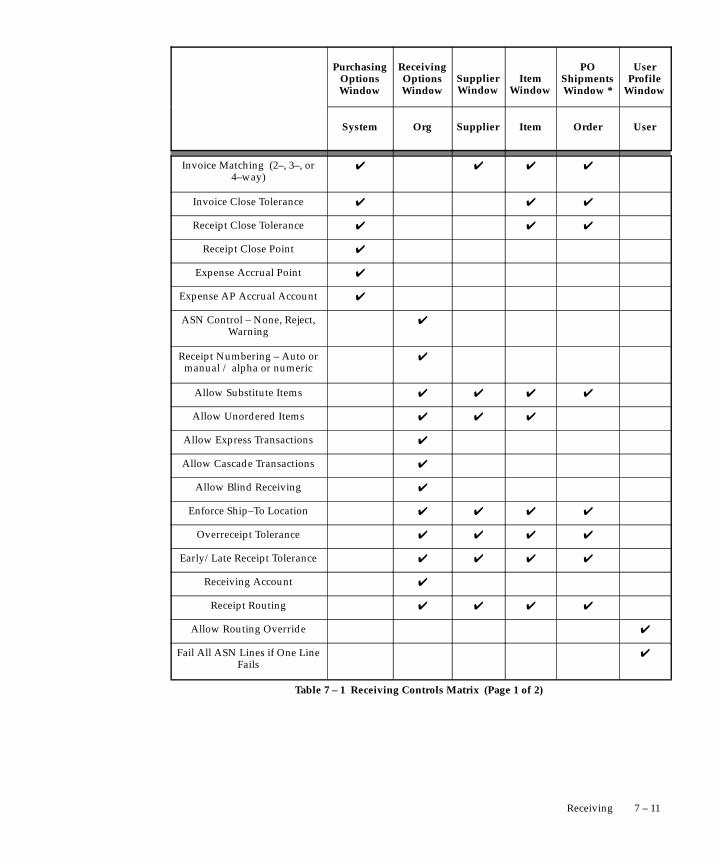
7 – 11Receiving
PurchasingOptionsWindow
ReceivingOptionsWindow
SupplierWindow
ItemWindow
POShipmentsWindow *
UserProfile
Window
System Org Supplier Item Order User
Invoice Matching (2–, 3–, or4–way)
✔ ✔ ✔ ✔
Invoice Close Tolerance ✔ ✔ ✔
Receipt Close Tolerance ✔ ✔ ✔
Receipt Close Point ✔
Expense Accrual Point ✔
Expense AP Accrual Account ✔
ASN Control – None, Reject,Warning
✔
Receipt Numbering – Auto ormanual / alpha or numeric
✔
Allow Substitute Items ✔ ✔ ✔ ✔
Allow Unordered Items ✔ ✔ ✔
Allow Express Transactions ✔
Allow Cascade Transactions ✔
Allow Blind Receiving ✔
Enforce Ship–To Location ✔ ✔ ✔ ✔
Overreceipt Tolerance ✔ ✔ ✔ ✔
Early/Late Receipt Tolerance ✔ ✔ ✔ ✔
Receiving Account ✔
Receipt Routing ✔ ✔ ✔ ✔
Allow Routing Override ✔
Fail All ASN Lines if One LineFails
✔
Table 7 – 1 Receiving Controls Matrix (Page 1 of 2)

Example
7 – 12 Oracle Public Sector Purchasing User’s Guide
UserOrderItemSupplierOrgSystem
Print Receipt Traveler ✔
Processing Mode ✔
Table 7 – 1 Receiving Controls Matrix (Page 2 of 2)
* Note: Controls are entered through the More alternative region in thePO Shipments window (See: Entering Purchase Order Shipments: page4 – 61) or through the Receiving Controls window (See: EnteringPurchase Order Receiving Controls: page 4 – 65), which is accessibleonly through the PO Shipments window.
Receipt Tolerances
You may want to allow over–receipts on items that you use frequentlywithin your organization, and you can prevent misallocation ofshipments to incorrect destinations by setting tolerance levels and thecontrol action. You can over–receive for a particular item if theover–receipt quantity is within tolerance, and you can set the controlaction to allow all over–receipts, permit over–receipts outside thetolerance but issue a warning message, or reject over–receipts outsidethe tolerance. See: Receiving Controls, Options, and Profiles: page7 – 7.
You order 100 boxes of shelf braces and indicate on the purchase orderthat this order requires a receipt. You decide to relax the restriction onthe receiving tolerance for shelves since shelves are a low cost/highturnover item. You define the receiving tolerance level for shelves to be10% but choose to allow receipts over this tolerance level afterdisplaying a warning.
At the receiving dock, the receiving agent receives 111 boxes of shelfbraces and enters a receipt for all of them. The receiving agent canaccept them all because your system setup allows receipt over tolerancefor this item.
Later, you determine that you are not using all the shelf braces you hadpredicted, and you decide to change the tolerance level to 3% and tonot allow receipts over tolerance. In the next shipment, you receiveanother 111 boxes of shelf braces. Again, the purchase order was for100 boxes. The receiving agent attempts to receive 111, but Purchasingdisplays an error message stating that the receipt quantity is over

7 – 13Receiving
tolerance and does not let the receiving agent record the over receipt.So, this time the receiving agent can receive only 103 and must rejectthe additional 8.

☞
7 – 14 Oracle Public Sector Purchasing User’s Guide
Advance Shipment Notices (ASNs)
An Advance Shipment Notice (ASN) is transmitted via Electronic DataInterchange (EDI) from a supplier to let the receiving organizationknow that a shipment is coming. The ASN contains details includingshipment date, time, and identification number; packing slip data;freight information; item detail including cumulative receivedquantities; purchase order number; and returnable containerinformation.
Once an ASN is successfully validated, you can use it in the Receiptswindow to create receipts, reducing data entry time. (A validated ASNis one that contains no errors during data validation in the ReceivingOpen Interface.)
Suppliers can also send ASNs with billing information. These containthe same information as ASNs plus invoice and tax information. Oncean ASN with billing information is validated in the receiving openinterface and imported into Purchasing, an invoice for the shipment iscreated automatically.
A supplier creates an ASN based on the demand conveyed by thepurchasing organization’s Purchase Order, Planning Schedule, orShipping Schedule. If Purchasing detects errors or discrepancies in theASN at any time, from the time the ASN is sent to the time it is enteredas received, an Application Advice, transmitted via EDI, is sentautomatically to the supplier. The supplier can then send a correctedASN.
Attention: ASNs come from external suppliers only. Theycannot be used for internal sales orders sourced from yourinventory and generated by internal requisitions.
You can view or cancel an accepted ASN as an intransit shipment in theMaintain Shipments window.
ASN Process
The ASN process, shown in the next figure, includes the following:
• A shipment authorization is made to the supplier in the form ofa Purchase Order, Planning Schedule, or Shipping Schedule.
• The supplier sends the ASN to the receiving organization at thetime of shipment.
• The ASN is verified in the Receiving Open Interface. Intransitand purchasing supplies are updated for ASN lines that aresuccessfully validated. For each accepted line on the ASN,

7 – 15Receiving
intransit supply is increased and purchasing supply is reduced.If the data isn’t accepted or if there is an error or discrepancy inthe data, an Application Advice, containing the most likely causeof the error, is sent to the supplier. The supplier can then send acorrected (Replacement) ASN.
• The goods arrive. You can use the ASN in the Receipts windowto create receipts.
• Shipment–vs.–receipt quantities are compared during thereceipt transaction process. (As an optional step, CUMquantities can be compared if Oracle Supplier Scheduling isinstalled.) If discrepancies are detected in shipment–vs.–receiptor CUM quantity comparisons, an Application Advice is sent tothe supplier.
Oracle Applications
Supplier Scheduling
Receiving
Purchasing
Supplier Planning Schedule (ANSI X12 830)
Supplier Shipping Schedule (ANSI X12 862)
Purchase Order (ANSI X12 850)
Application Advice (ANSI X12 824)
ASN with billing information (ANSI X12 857)
Supplier
Advance Shipment Notice (ASN) (ANSI X12 856)

7 – 16 Oracle Public Sector Purchasing User’s Guide
ASN Receiving Options
There are two receiving options related to ASNs:
• ASN Control option in the Receiving Options window – Withthis option, you can choose whether or not you receive an errormessage—or are prevented by Purchasing—when you attempt toreceive against a purchase order shipment for which an ASNalready exists. See: Defining Receiving Options: page 1 – 40.
• RCV: Fail All ASN Lines if One Line Fails – With this profileoption, you can choose to reject an entire ASN if any ASN linefails validation or processing, or to accept an ASN if at least oneASN line is successful. See: Profile Options in Purchasing: page1 – 76.
Application Advices
If an ASN is not accepted or is only partially accepted, errors anddiscrepancies are electronically conveyed to the supplier in anApplication Advice. The Application Advice transmits to the supplierthe status (acceptance with errors or rejection) of the ASN, and theseverity and description of the errors.
An Application Advice can be sent at several points during thereceiving process:
• When the ASN is first sent and contains header or line errors.
• When the quantity received does not match the quantity shippedindicated by the ASN.
• When the receiving organization’s newly updated cumulativereceived quantities do not match the supplier’s cumulativeshipped quantities.
Note: CUM quantity comparisons can be performed only ifOracle Supplier Scheduling is installed.
The supplier can respond to an Application Advice by sending aReplacement or Cancellation ASN. The receiving organization can alsocancel an ASN manually in the Maintain Shipments window.
The following table indicates the appropriate supplier response toparticular Application Advices.

7 – 17Receiving
Supplier Response to Application Advices
ASN Header ASN Lines Transaction Status Supplier Action
Fatal Error Not Validated Transaction Rejected Send Original ASNbefore goods arrive.
Warning or Valid All lines Warning orValid (no fatal errors)
Transaction Accepted Do not send an OriginalASN, but correctindicated problems onfuture ASNs.
Warning or Valid Some WarningSome ValidSome Fatal Error
Transaction Acceptedwith Some LinesRejected
Send Cancellation ASN,then send an Original(corrected) ASN.
Warning or Valid All lines had a FatalError
Transaction Rejected Send Original (corrected)ASN before goods arrive.
Table 7 – 2 (Page 1 of 1)
Types of ASNs
There are four types of ASNs: Original, Cancellation, Replacement,and Test.
Note: A validated ASN, as described below, is one thatcontains no errors during data validation in the receiving openinterface.
An Original ASN is the initial ASN.
A Cancellation ASN, once validated, cancels the Original ASN if theOriginal ASN has not yet had a receipt created against it. The shipmentnumber on the Cancellation ASN is matched to the shipment numberon the validated Original ASN.
A Replacement ASN, once validated, replaces all of the Original ASNif the Original ASN has not yet had a receipt created against it. Theshipment number on the Replacement ASN is matched to the shipmentnumber on the validated Original ASN.
The Replacement ASN can convey the supplier’s substitute item if oneis used. To accurately handle substitutions, the supplier must indicateboth the buyer’s original item number and the buyer’s substitute itemnumber on the ASN. With both identifiers available, substitutes can be

☞
7 – 18 Oracle Public Sector Purchasing User’s Guide
validated as allowed, and a valid substitute item is referenced againstvalid purchasing document information.
Attention: A Replacement ASN will be rejected if receipt of allthe goods has already taken place. However, a supplier canstill send a Replacement ASN for items that have not yet beenentered as received.
A Test ASN is sent by the supplier usually to make sure the ASNtransmission works between you and your supplier. A Test ASN isverified as if it were an Original ASN and generates an outboundApplication Advice if necessary. A Test ASN is not available forcreating a receipt against it and is not visible as inbound supply.
ASNs and CUM Management
You can perform CUM management under the following conditions:
– Oracle Supplier Scheduling is installed and CUMAccounting is enabled for the ship–to organization.
– The ASN item or items are defined in the ApprovedSupplier List.
– The items are sourced from the supplier using a SupplyAgreement Blanket Purchase Order.
The CUM is the total quantity received from a supplier site, for aparticular item, within a CUM period. When an ASN is used duringreceiving and Supplier Scheduling is installed, the updated CUM iscompared to the supplier’s CUM. Any discrepancy transmits anApplication Advice to the supplier and an Oracle Alert to the itemscheduler. For more information about CUM management, see: CUMManagement, Oracle Supplier Scheduling User’s Guide.
ASNs and Supply
For each accepted line on the accepted ASN, intransit supply quantityis automatically increased and purchasing supply quantity isautomatically reduced by the shipment quantity specified in the ASN.
When an accepted ASN is modified by the supplier’s sending aReplacement ASN, corresponding changes are also made to purchasingand intransit supply.
The table below shows, for each action you perform with an ASN, themovement of the quantity on the ASN between the various categoriesof supply.

7 – 19Receiving
ASNs and Supply
Accept ASN Purchasing Supply Intransit Supply Inventory
Accept the Original ASN Reduced foraccepted lines only
Increased foraccepted lines only
Accept the Cancellation ASN Increased for allaccepted lines onOriginal
Reduced for allaccepted lines onOriginal
Accept the Replacement ASN(equivalent to canceling andaccepting a new original)
Increased forOriginal,Reduced forReplacement
Reduced forOriginal,Increased forReplacement
Receive Items Purchasing Supply Intransit Supply Inventory
Receive item when the item isindicated on an ASN line
Reduced Increased
Receive item when the item isnot indicated on an ASN line
Reduced Increased
Change Receipt Quantities Purchasing Supply Intransit Supply Inventory
Increase receipt quantity beforethe ASN is closed
Reduced Increased
Increase receipt quantity afterthe ASN is closed
Reduced Increased
Decrease receipt quantitybefore the ASN is closed
Increased Reduced
Decrease receipt quantity afterthe ASN is closed
Increased Reduced
Return Items Purchasing Supply Intransit Supply Inventory
Return item(s) to the supplierbefore the ASN is closed
Increased Reduced
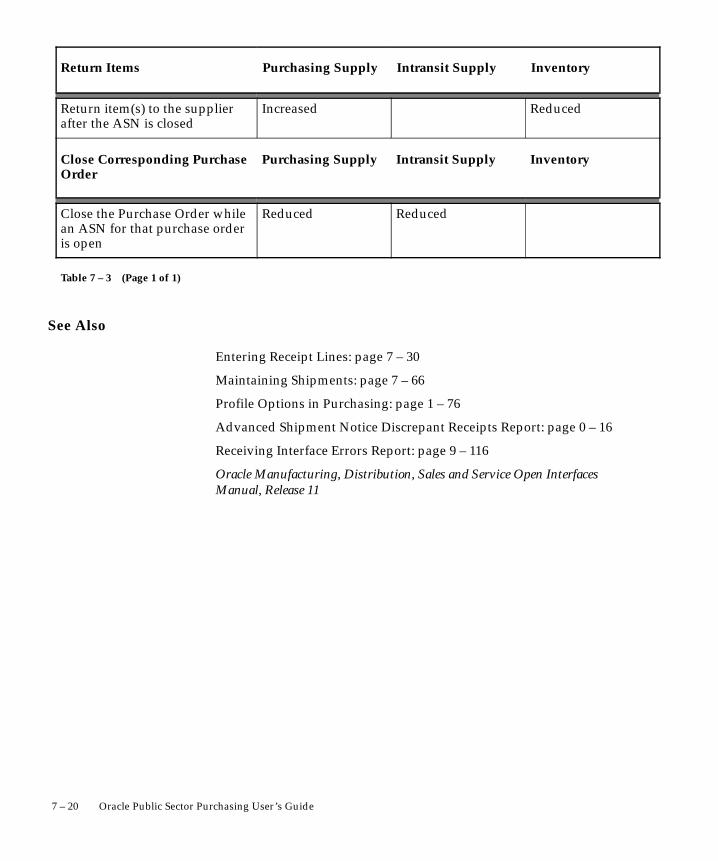
7 – 20 Oracle Public Sector Purchasing User’s Guide
Return Items InventoryIntransit SupplyPurchasing Supply
Return item(s) to the supplierafter the ASN is closed
Increased Reduced
Close Corresponding PurchaseOrder
Purchasing Supply Intransit Supply Inventory
Close the Purchase Order whilean ASN for that purchase orderis open
Reduced Reduced
Table 7 – 3 (Page 1 of 1)
See Also
Entering Receipt Lines: page 7 – 30
Maintaining Shipments: page 7 – 66
Profile Options in Purchasing: page 1 – 76
Advanced Shipment Notice Discrepant Receipts Report: page 0 – 16
Receiving Interface Errors Report: page 9 – 116
Oracle Manufacturing, Distribution, Sales and Service Open InterfacesManual, Release 11

7 – 21Receiving
Managing Receipts
Using the Find Expected Receipts Window
When you enter a receipt, you first use the Find Expected Receiptswindow to locate the source document for the receipt: a shipment froma supplier based on a purchase order, a shipment from inventorybacked by an internal sales order generated by an internal requisition,or an intransit shipment within your inventory.
Receiving Shipments
Once you have entered your search criteria, you move to the Receiptswindow, where all the supplier shipments and inter–organizationshipments corresponding to your search criteria are displayed. You canreceive goods into a receiving location or to their final destination.When you receive goods into a receiving location, you then use theReceiving Transactions window to optionally inspect and/or transferreceipts between receiving locations before you deliver the receipts totheir final destination specified on the source document. You can alsoreceive and deliver to a final destination in one transaction using theReceipts window. You can either use Express Receipt to receive allquantities as shipped, or you can enter specific receipt quantities forshipments. You can modify information, such as the receipt numberand packing slip number. When suppliers have consolidated ordersonto a single shipment, you can use the Cascade function to allocate theshipment across orders during entry of receipts.
If the RCV: Print Receipt Traveler profile option is set to Yes, receipttravelers are printed automatically when you perform receipts orreceiving transactions. See: Profile Options in Purchasing: page 1 – 76.
You can also record the receipt of substitute and unordered items.Purchasing records the shipment for the unordered items when youenter the receipt. You cannot perform receiving transactions upon thereceipt until you match it to an order. See: Matching UnorderedReceipts: page 7 – 34
See Also
Finding Expected Receipts: page 7 – 26
Express Receipts and Receiving Transactions: page 7 – 24

7 – 22 Oracle Public Sector Purchasing User’s Guide
Cascading Receipts and Receiving Transactions: page 7 – 22
Unordered Receipts: page 7 – 33
Receiving Transactions: page 7 – 37
Multiple Distributions
If you’re familiar with the previous release of Purchasing, you mayremember you had to use a separate screen when entering receipts forpurchase orders with multiple distributions. In the current release ofPurchasing, you can explode a single shipment into its componentdistributions in the Receipts window.
When you initially query up a shipment line that has multipledistributions, there will be a + icon to the right of the UOM field for alllines with a Destination Type of Multiple. Shipment lines for whichthere is only a single distribution will not have the + icon. You can clickon the + icon to expand the line into multiple lines, one for eachdistribution. The original shipment line will appear grey and will notbe updatable. The + icon on that line will change to a – icon. Click onthe – icon to end the display of the expanded lines.
You can distribute the available quantity across the expanded lines, butyou cannot distribute more than the available quantity shown in theparent shipment quantity column. Also, you can enter and maintainline information only in the expanded lines.
If the default routing is direct receipt and routing override is notenabled, you can explode the line and transact the receipt at thedistribution level, but you cannot change any of the values on that line.If the default routing is standard receipt and routing override isenabled and there are multiple destinations, Purchasing displays thedestination type Receiving and the + icon is not present. If you want tooverride the routing and send it to final, you must first change thedestination type to Multiple. Then the + icon will appear, and you canexpand to see all of the distribution lines and change any or all to havea destination type of final.
Cascading Receipts and Receiving Transactions
The Cascade function facilitates the distribution of a given quantity ofan item from a single supplier across multiple shipments and

7 – 23Receiving
distributions. This function is available in the Receipts window if youhave specified or inferred a source and an item in the Find ExpectedReceipts window. (The source and item would be inferred if youentered, for example, a purchase order number.) In the ReceivingTransactions window, the cascade function is available for deliveries ifyou have specified or inferred an item in the Find ReceivingTransactions window. Performing any manual transaction in a linedisables the Cascade button, and it is not enabled until you have againselected the Find button in the appropriate Find window.
When you select the Cascade button, Purchasing displays the CascadeDetails window in which you must enter the cascade quantity and theunit of measure. When you select the OK button, the cascade processbegins.
The process starts at the first displayed line and allocates the supplyavailable to receive/deliver to that line from the cascade quantity youentered. The process continues to the next line and again allocates thequantity available to receive/deliver, continuing until either the processreaches the last queried line or the cascade quantity is exhausted. Sincethe lines are displayed in order by promised date/need–by date, theprocess operates as a First In/First Out procedure. If you entered acascade quantity larger than the quantity available to receive/deliver,Purchasing displays a dialog window explaining that the process couldallocate only so many. If the quantity available to receive/deliver isgreater than the cascade quantity, the last receipt/delivery may bepartial. To clearly indicate that the cascade quantity has beenexhausted, Purchasing displays a transaction quantity of 0 for theremaining lines.
The cascade function does not modify any destination information; ituses the information defined by the routing and defaulted from theshipment.
If a given shipment line has multiple distributions and the defaultrouting for that line is direct receipt, the cascade process explodes theline and allocates the quantity available on the shipment line to thecomponent distributions based on the supply available for thedistribution. If you have over distributed a given line, Purchasingallocates all remaining supply for the shipment to the last distribution.If you have over delivered the transactions with prior receipts ortransactions, then the process may fill the lines with undesired values,but you can reallocate in this situation once the cascade process iscomplete.
Record validation is disabled during the cascade process to facilitatethe running of the process, but all lines are validated when you save

7 – 24 Oracle Public Sector Purchasing User’s Guide
them. Quantities are applied to lines in the expectation that you willtransact the line as the default routing intended. However, you canmanually override these values.
Express Receipts and Receiving Transactions
The express function is a quick method of entering receipts andreceiving transactions. This function is available in the Receiptswindow if you have specified or inferred a source in the Find ExpectedReceipts window. (The source would be inferred if you entered, forexample, a purchase order number.) In the Receiving Transactionswindow, the express function is available for deliveries regardless ofyour search criteria in the Find Receiving Transactions window.Performing any manual action in a line disables the Express button,and it is not enabled until you have again selected the Find button.
When you select the Express button in the Receipts window,Purchasing displays the Express Details window in which you mustenter the destination: Final Destination or Receiving location. Whenyou select the OK button, all lines are selected and the Express buttonchanges to Unexpress. When you select the Express button in theReceiving Transactions window, all lines are selected and the Expressbutton changes to Unexpress. In either case, you can select theUnexpress button to return to manual mode. Otherwise, you candeselect lines to omit them from express processing and then save yourwork to initiate express processing.
Note: You cannot perform data collection using Oracle Qualitywhen you select the Express button in the ReceivingTransactions window. See: Receiving Transactions: page 7 – 37.
The express processor performs validation and rejects lines based onthe following criteria:
• the item revision/subinventory/locator is required and notobtainable as a default from the item definition and thedestination is Final
• the early/late receipt date tolerance is exceeded and theexception control is Reject
• lot/serial information is required
• ship–to location is not available and the destination is Receiving
• location is not available for Expense destination type and thedestination is Final Destination
7 – 25Receiving
• purchase order supplier and receipt header supplier do notmatch
• other receipts are pending for the specified shipment
When validation processing is complete, Purchasing displays a dialogtelling you how many lines passed validation and how many failed andare still available to receive manually.
See Also
Entering Express Receipts: page 7 – 25
Entering Express Receipts
Use the Receipts window to enter express receipts.
� To find source documents:
1. Navigate to the Find Expected Receipts window by selectingReceipts on the menu.
2. Enter search criteria to find the source documents for which youwant to enter express receipts. You must include the supplier ororganization in the source criteria.
3. Select the Find button to display the Receipts window with line(s)available for receipt displayed in the Lines alternative region.
� To enter express receipts:
1. Select the Express button to open the Express Details window.
2. Select the Destination Type: Final Destination or Receivinglocation.
3. Select the OK button. This changes the Express button toUnexpress and selects all the lines for express receipt.
4. Optionally deselect individual lines to omit them from the expressreceipt.
5. Save your work to begin express receipt validation processing.

7 – 26 Oracle Public Sector Purchasing User’s Guide
See Also
Express Receipts and Receiving Transactions: page 7 – 24
Finding Expected Receipts: page 7 – 26
Entering Receipt Lines: page 7 – 30
Finding Expected Receipts
Use the Find Expected Receipts window to find source documents forwhich you can enter receipts.
� To find expected receipts:
1. Navigate to the Find Expected Receipts window by selectingReceipts from the menu.
2. Specify any of the following, optional search criteria:
• Select the receipt Source Type for the search:
Internal: An internal order generated from an internal requisitionand sourced from your inventory, or an intransit inventoryshipment. If you choose this option, the following fields are

7 – 27Receiving
disabled: PO Number, Release, Line, Shipment, and IncludeClosed POs.
Supplier: A purchase order sourced from a supplier. If youchoose this option, the following fields are disabled: RequisitionNumber, requisition Line number, and Shipment Number.
• Enter the PO Number. To be available, a purchase order musthave at least one approved shipment for which the ship–toorganization is the same as the current active organization. Ifyou enter a PO Number, you can also enter a Release number,Line number, and/or Shipment number for the purchase order.The Release field is applicable only when you have entered apurchase order number associated with a planned purchaseorder or a blanket purchase agreement. The list of values in theRelease field includes all releases for the specified PO that arenot final closed.
• Enter the Shipment number of the Advance Shipment Notice(ASN). See: Advanced Shipment Notices (ASNs): page 7 – 14.
• Enter the Requisition Number. If you enter a requisition number,you can also enter a Shipment Number and/or Line number.Available shipments are those with the same ship–toorganization as the current active organization.
• Select Include Closed POs to include soft closed purchase ordersin the search. By not checking Include Closed POs, you excludepurchase orders that have a status of Closed or Closed forReceiving.
• Enter the Source. For Source Type Internal, this is theOrganization. For Source Type Supplier, this is the suppliername, and you can also enter the supplier site in the Source Sitefield.
• Enter the Receiving Location.
• Use the alternative regions to further restrict the search.
– In the Item region, you can enter the following searchcriteria: Item number, Revision number, Category, itemDescription, and Supplier Item Number. Since the supplieritem number is generally the best way you can identifypurchase order lines when your supplier does not referenceyour purchase order number on its shipping documents,you should provide a supplier item number on yourpurchase order lines.
7 – 28 Oracle Public Sector Purchasing User’s Guide
– In the Date Ranges region, you can select Due Today to limitthe search to receipt lines due on the current date.Otherwise, you can enter a Due By date range.
– In the Shipment region, you can enter the Container, TruckNumber, or Bar Code Label indicated on an AdvanceShipment Notice (ASN). See: Advance Shipment Notices(ASNs): page 7 – 14.
3. Select the Find button to initiate the search and display the selectedsource documents in the Receipts window. Purchasing first opensthe Receipt Header window.
� To enter unordered receipts:
� Select the Unordered button to open the Receipt Header window toenter unordered receipts. See: Entering Unordered Receipts: page7 – 34.
� To remove existing search criteria
� Select the Clear button in any of the source document searchwindows to remove existing search criteria.
See Also
Entering Receipt Header Information: page 7 – 28
Entering Receipt Header Information
Use the Receipt Header window to enter header information for alltypes of receipts.
Note: If you are entering a receipt against an AdvanceShipment Notice (ASN), the header information may alreadybe entered for you if the supplier sending the ASN providedthat information. See: Advanced Shipment Notices (ASNs):page 7 – 14.
� To enter receipt header information:
1. Navigate to the Receipt Header window. Purchasing opens thiswindow when you select Find or Unordered in the Find Expected

7 – 29Receiving
Receipts window. You can also get to this window by selecting theHeader button in the Receipts window.
2. Enter the Receipt Number. If automatic receipt numbering isenabled, this field is not enterable when you are creating a newreceipt. Purchasing displays the receipt number if the shipment hasbeen partially received.
3. Enter the Receipt Date.
4. Enter the Shipment Number.
5. Enter the Shipped Date.
6. Enter the Packing Slip number.
7. Enter the Waybill/Airbill number.
8. Enter the Freight Carrier. See: Defining Freight Carriers, OracleInventory User’s Guide
Note: Only the active freight carriers are displayed.
9. Enter the Bill of Lading.
10. Enter the Number of Containers.
11. Enter the Received By person.
12. Enter the Source. For supplier sourced shipments, this is thesupplier. For inventory sourced shipments, this is the organization.
13. Enter Comments.
14. Navigate to the Receipts window.
� To add lines to an existing receipt:
� Select the Add To Receipt button to open a list of values showingthe receipts to which you can add lines. When you select the

7 – 30 Oracle Public Sector Purchasing User’s Guide
receipt to add to, Purchasing displays values from that receipt inthe remaining header fields. You can also change the date whenthe action is Add To Receipt.
See Also
Entering Receipt Lines: page 7 – 30
Entering Receipt Lines
Use this window to enter receipt line information.
� To enter receipt line information:
1. Purchasing opens the Receipts window and displays all shipmentsthat meet the search criteria when you choose the Find button inthe Find Expected Receipts window. See: Finding ExpectedReceipts: page 7 – 26.
In the lower part of the screen, Purchasing displays the followingdetail information for the current shipment line: Order Type,Order Number, Source, Due Date, Item Description, Hazard class,Destination, UN Number, Receiver Note, and Routing.

7 – 31Receiving
2. Select the line you want to receive.
If the line you select contains information in the ASN Type field,then an Advance Shipment Notice (ASN) exists for that shipment.(You can set an ASN Control option in the Receiving Optionswindow to prevent you from receiving against a purchase ordershipment for which an ASN exists. See: Defining ReceivingOptions: page 1 – 40.)
3. Purchasing displays the Quantity due for the shipment. If youchange the unit of measure, the receipt quantity is adjusted toreflect the new unit of measure. You can override this value if youare recording a partial receipt or an over–receipt. Depending onyour receiving options, Purchasing either ignores over–receipts,displays a warning message when you try to receive more itemsthan you ordered, or prevents you from receiving quantities overyour receipt tolerance. If you specify blind receiving at the systemoption level, Purchasing neither performs over–receipt checkingnor displays a Quantity To Receive. If you have fully received ashipment, the receipt quantity displayed is zero, but over–receiptchecking will reveal whether you have exceeded the over–receipttolerance on this shipment.
The information described above applies to an ASN line as well asa purchase order shipment line.
4. Enter the UOM of the item you are receiving.
5. Enter the Destination Type: Receiving, Expense, Inventory, or ShopFloor. This determines the final destination of the received items.
6. If the item is under revision control, you must enter a Revision.
7. Enter the receiving Location.
8. Enter the Requestor.
9. For the Inventory destination type, enter the Subinventory intowhich the goods will be delivered.
10. When the destination type is Inventory and when the item and/orthe subinventory have locator control enabled, enter the stockLocator.
11. Save your work.
� To enter receipt line detail information:
1. Navigate to the Details alternative region.
2. Enter the Packing Slip number.
7 – 32 Oracle Public Sector Purchasing User’s Guide
3. Enter the Supplier Lot number.
4. Enter the transaction Reason Code. See: Defining TransactionReasons, Oracle Inventory User’s Guide.
5. Enter comments.
6. Select Receipt Exception if you want to enter a release exception forthis receipt.
� To view order information:
� Navigate to the Order Information alternative region to view thefollowing information for the shipment: Order Type, Number,Release number, order Line number, Shipment number, Supplier,Quantity Ordered, UOM, Due Date, and Supplier Item number.
� To view outside processing information:
� Navigate to the Outside Processing alternative region to view theJob or repetitive Schedule number, the repetitive schedule Linenumber, the Operation Sequence, and the Department number.
� To enter control number information:
� For controlled items, you can select the Lot–Serial button tonavigate to the Lot Number and Serial Number windows. See: Lotand Serial Number Control, Oracle Inventory User’s Guide
� To perform an express receipt:
� Select the Express button to perform an express receipt. See:Entering Express Receipts: page 7 – 25.
See Also
Entering Receipt Header Information: page 7 – 28
Cascading Receipts and Receiving Transactions: page 7 – 22
Express Receipts and Receiving Transactions: page 7 – 24
Entering Express Receipts: page 7 – 25

7 – 33Receiving
Unordered Receipts
You can receive items from a supplier when you do not have acorresponding purchase order but want to receive the items so you cantrack them on the system while you wait for a buyer to decide whichpurchase order to use.
First receive the items as Unordered Receipts in the Receipts window.You can create a new receipt or add to an existing receipt for thesupplier who shipped the unordered items. Then perform a standardreceipt for the unordered item shipment quantity.
Use the Find Unordered Receipts window to find the receipts that areavailable for matching. Then use the Match Unordered Receiptswindow to specify the purchase order number, release, line, andshipment schedule to which you want to match the unordered receipt.Purchasing restricts the list of possible matching purchaseorders/releases as follows:
• The purchase order must have the same supplier as theunordered receipt
• The purchase order cannot be final closed or cancelled
• The purchase order must have at least one approved shipment inthe same organization where you performed the unorderedreceipt
• Except for receipts for one–time items, the item and thepurchasing category on the purchase order must be the same asthe item and purchasing category on the unordered receipt
You can match only to approved shipments. If you cannot locate avalid matching document for your unordered receipt, you can modifyand approve an existing purchase order/release or you can create andapprove a new purchase order. You can then match to this new,approved shipment
When you choose a shipment, Purchasing performs receiving controlchecks of the quantity received tolerance, due date threshold, and shipto location restriction.
If the RCV: Print Receipt Traveler profile option is set to Yes, receipttravelers are printed automatically when you match unorderedreceipts.
See Also
Entering Unordered Receipts: page 7 – 34

7 – 34 Oracle Public Sector Purchasing User’s Guide
Matching Unordered Receipts: page 7 – 34
Profile Options in Purchasing: page 1 – 76
Entering Unordered Receipts
� To enter unordered receipts:
1. Select Receipts on the menu to open the Find Expected Receiptswindow. See: Finding Expected Receipts: page 7 – 26.
2. Select the Unordered button to open the Receipt Header window.
3. Enter receipt header information. See: Entering Receipt HeaderInformation: page 7 – 28.
4. Enter receipt line information. See: Entering Receipt Lines: page7 – 30.
5. Save your work.
See Also
Unordered Receipts: page 7 – 33
Matching Unordered Receipts: page 7 – 34
Matching Unordered Receipts
Use this window to match unordered receipts to purchase ordershipments.
� To select unordered receipts for matching:
1. Navigate to the Find Unordered Receipts window by selectingMatch Unordered Receipts on the menu.
2. Enter any of the following as selection criteria for the receipts youwant to match to purchase orders: Receipt Number, SupplierName, Item, Category, Supplier Item Number, Receiver,Transaction Date, Receiving Location, Item Description.
3. Select the Find button. If your selection criteria produce anyreceipts for matching, the Item Number, Revision, Category, and

7 – 35Receiving
Supplier are displayed in the Unordered Receipts block in theMatch Unordered Receipts window. The Receipt Number,Quantity Received, Receiving UOM, Deliver To, Receiver, ItemDescription, Quantity Ordered, Order UOM, Destination, andSupplier Item Number for the current receipt are displayed in thelower part of the window.
� To match unordered receipts:
1. Navigate to the Match Unordered Receipts window by selectingthe Find button in the Find Unordered Receipts window.
2. In the Purchase Order block in the Match Unordered Receiptswindow, enter a purchase order number in the PO Number field.You can also choose List of Values from the tool bar to query thepurchase order shipments available to match the current unorderedreceipt. This displays the PO Number, Release, Line, and Shipmentfor all shipments appropriate for matching. See: UnorderedReceipts: page 7 – 33.
3. Select the Match button to match the current shipment to thecurrent unordered receipt.

7 – 36 Oracle Public Sector Purchasing User’s Guide
� To display receipt header information:
� Select the View Receipt Header on the Special menu to displayreceipt header information.
� To display receipt line information:
� Select the View Receipt Line on the Special menu to display receiptline information.
� To display purchase order information:
� Select View PO Header on the Special menu to display purchaseorder header information.
See Also
Unordered Receipts: page 7 – 33

7 – 37Receiving
Receiving Transactions
You record inspections, deliveries, and material movements withinreceiving and inspection by entering receiving transactions. Thesetransactions provide a history that allows you to track an item from itssource to its destination.
From the time of receipt, many transactions may be required to recordthe movement of an item through the receiving and inspection process.For example, after being received, an item can be transferred,inspected, and then delivered. To help you keep track of an itemwithin receiving and inspection, these transactions are linked to eachother. You can use the Receiving Transaction Summary (See: FindingReceiving Transactions (Summary): page 7 – 39) to view an item’stransaction history as if it were a family tree with parent and childtransactions. A parent transaction can have one or more childtransactions, but a child transaction has only one parent transaction. Inthe above example, the receipt transaction is the parent of the transfertransaction, while the transfer transaction is the child of the receipttransaction. Purchasing displays parent transaction information to helpyou determine the status of the item for which you are entering atransaction. For example, if you are about to transfer an item fromReceiving Dock 1 to Inspection Area A, you should verify that theparent transaction’s location is Receiving Dock 1. Purchasing alsodisplays the parent transaction’s unit of measure and availablequantity. Available quantity is significant because you cannot enter aquantity for a current transaction that is greater than the parenttransaction’s available quantity. For example, if you have received 10,you can inspect only up to a quantity of 10. Purchasing also displaysthe inspection result for a parent transaction if the given material hasbeen accepted or rejected as part of an inspection. For deliverytransactions, you must enter lot/serial/locator information forcontrolled items. See: Lot and Serial Number Control, Oracle InventoryUser’s Guide. See: Defining Stock Locators, Oracle Inventory User’sGuide.
Search Criteria
The first step in entering a new receiving transaction is to choose thereceipt involved in this transaction. In the Find Receiving Transactionswindow (See: Finding Receiving Transactions: page 7 – 46), you canenter a variety of search criteria such as receipt number, currentlocation, various item details, shipment number, purchase ordernumber, and requisition number. Once you have specified searchcriteria, Purchasing displays the receipts (and previous transactions) in

Example
7 – 38 Oracle Public Sector Purchasing User’s Guide
the Receiving Transactions window for which you can processtransactions. Information for receipts is based on information fromparent transactions that meet your search criteria.
Express and Cascade Transactions
Purchasing offers two functions to facilitate transaction entry: Expressand Cascade. In Express mode, you cannot modify default quantities,but you can record the delivery of many receipts at once. See: ExpressReceipts and Receiving Transactions: page 7 – 24. Cascade mode isapplicable only for receipts for the same item. In cascade mode,Purchasing starts with the first receipt and enters deliveries for eachsubsequent receipt for this item until the cascade quantity is met. See:Cascading Receipts and Receiving Transactions: page 7 – 22.
Receiving Transactions Window
You enter all transfer and delivery transactions in the ReceivingTransactions window. If you want to perform an inspectiontransaction, you can open the Inspections window to specify acceptedand rejected quantities. See: Inspections: page 7 – 51.
Deliveries
Purchasing ensures that you can record deliveries quickly and easily. Ifyou know the purchase order number (or shipment number for internaltransactions), you can simply record the quantity delivered for theappropriate item. If you do not know the purchase order number, youcan search using what you know, such as Receipt Number, Supplier,Packing Slip, Category, Item Number or Inspection Required.Purchasing automatically tracks the total quantity delivered to date fora particular receipt.
You can deliver only as many items as you receive. Purchasing lets youeasily correct any delivery information.
Both Jane Tims and Juliet Cunningham submit a requisition for 50chairs each. The buyer places both requisitions on one purchase orderline and indicates that the items require receipt. You receive the 100chairs and record the receipt in the Receipts window. You see that 50chairs are for Jane Tims in Building 1, and the other 50 chairs are forJuliet Cunningham in Building 2. In the Transactions window, youdeliver 50 chairs to each requestor and record the quantity delivered.
7 – 39Receiving
Oracle Quality
There are two entry points to Oracle Quality from Purchasing if OracleQuality is installed. Both entry points are in the Receiving Transactionswindow: the Enter Quality Results option in the Special menu (or theQuality button on the menu bar) and the Inspect button. The EnterQuality Results menu option and button are available only if a qualitycollection plan or plans exist for the receiving transaction. When amandatory collection plan exists for the receiving transaction, qualityresults data must be entered and saved before you can save yourreceiving transaction line information. (You optionally define acollection plan as mandatory when you create the collection plan inOracle Quality. See also: Oracle Quality User’s Guide.)
You cannot perform data collection using Oracle Quality when youselect the Express button in the Receiving Transactions window.
For more information on Oracle Quality and the Inspect button, see:Inspections: page 7 – 51.
See also: Entering Receiving Transactions: page 7 – 47.
Finding Receiving Transactions (Summary)
Use the Find Receiving Transactions (Summary) window to:
• Access the Receiving Headers Summary window.
• Access the Receiving Transaction Summary window.
• Perform purchase order inquiries at header and line levels.
� To enter search criteria:
1. Navigate to the Receiving Transactions Summary window.
2. Enter the Source Type from the Find Receiving TransactionsSummary window.
Note: For source type Supplier, enter the PO Number. If you entera purchase order number, you can also enter a Release (for blanketpurchase agreements), Line, and/or Shipment (for purchase orders)number. For source type Internal, enter the Requisition Number. Ifyou enter a requisition number, you can enter a requisition Linenumber.
3. Enter or choose a Receipt Number and Purchase Order orRequisition Number.

7 – 40 Oracle Public Sector Purchasing User’s Guide
4. Optionally enter the Source and a Source Site.
5. The alternative regions further define the search:
• Item
• Receipt Details
• Transaction Detail
6. Choose Results Headers (to go to the Receiving Headers Summarywindow) or Results Transactions (to go to the ReceivingTransaction Summary window). Choose Find.
See Also
Using the Receiving Headers Summary Window: page 7 – 40
Using the Receiving Transaction Summary Window: page 7 – 41
Using the Receiving Headers Summary Window
Use the Receiving Headers Summary folder window to:
• View receipt header information.
• Access the Receiving Transaction Summary window to displayall receiving transactions for the current header line.
� To display receiving headers information:
1. Navigate to the Receipt Header Details window.
2. Enter or choose information from one of the available fields tolocate the record from the Find Receiving Transactions window.
3. Choose Results Headers, then choose Find.

7 – 41Receiving
4. Optionally choose Transactions to view all the records pertaining tothe current search criteria.
See Also
Finding Receiving Transactions: page 7 – 46
Using the Receiving Transaction Summary Window: page 7 – 41
Customizing the Presentation of Data in a Folder, Oracle ApplicationsUser’s Guide
Using the Receiving Transaction Summary Window
Use the Receiving Transaction Summary folder window to:
• View receiving transaction information.
• View order information backing the receipt.
• Access the Receipt Header Details window to view receiptheader details.
� To display receiving transactions navigate to the ReceivingTransaction Summary window:
� In the Receiving Headers Summary window, select theTransactions button to open the Receiving Transaction Summary

7 – 42 Oracle Public Sector Purchasing User’s Guide
window and display all receiving transactions for the receipt on thecurrent line. Alternatively, in the Find Receiving Transactionswindow, you can select Lines in the Results region and then selectthe Find button to display all receiving transactions that meet thesearch criteria.
As installed, Purchasing displays the following information foreach receiving transaction: Transaction Type, transaction Quantity,UOM, Transaction Date, Item Number, item Revision, DestinationType, Location, Person, Subinventory, Locator, Receipt Number,Source Type, Order Number, Order Release, Order Line number,Order Shipment, Supplier, Supplier Site, Order Quantity, OrderUOM, Supplier Item Number, Supplier Lot Number, Packing Slip,Reason, Hazard class, UN Number, Category, Job, Line, Assembly,Operation Sequence Department, and Receipt Exception.
In the lower part of the screen, Purchasing displays the followinginformation for the purchase order or sales order (for internalrequisitions) behind the receipt: Order Type (PO or SO), Source,Item Description, Destination, Receiver Note, Order Number,Transaction Date, Hazard class, UN Number, and Routing.
� To view receipt header detail information:
� Select the Header button to open the Receipt Header Detailswindow.
See Also
Finding Receiving Transactions: page 7 – 46
Using the Receiving Headers Summary Window: page 7 – 40
Using the Receipt Header Details Window: page 7 – 42
Customizing the Presentation of Data in a Folder, Oracle ApplicationsUser’s Guide
Using the Receipt Header Details Window
Use the Receipt Header Details window to:
• View detail information for receipt headers

7 – 43Receiving
� To navigate to the Receipt Header Details window:
� In the Receiving Transaction Summary window, select the Headerbutton to open the Receipt Header Details window.
The following information is displayed: Receipt Number, ReceiptDate, Shipment Number, Shipped Date, Packing Slip,Waybill/Airbill, Freight Carrier, Bill of Lading, Number ofContainers, Received By, Supplier, and Comments.
� To return to the Receiving Transaction Summary window:
� Select the Transactions button to return to the ReceivingTransaction Summary window.
See Also
Using the Receiving Transaction Summary Window: page 7 – 41
Finding Transaction Status Information
Use the Find Transaction Status window to access the TransactionStatus window. You can use this window to review pendingtransactions before they are processed by the Receiving TransactionProcessor.
� To enter search criteria:
1. Navigate to the Transaction Statuses window. The FindTransaction Statuses window appears.

7 – 44 Oracle Public Sector Purchasing User’s Guide
2. Enter the Source Type: Internal or Supplier.
3. Enter the Receipt Number.
4. For source type Supplier, enter the PO Number. If you enter apurchase order number, you can also enter a Release (for blanketpurchase agreements), Line, and/or Shipment (for purchase orders)number for the purchase order.
5. For source type Internal, enter the Requisition Number. If youenter a requisition number, you can enter a requisition Linenumber.
6. Enter the Shipment Number.
7. Enter the Source. If you enter a source, you can also enter a sourceSite.
8. Enter the Current Location.
9. Use the alternative regions to further restrict the search:
• In the Item region, you can enter the following search criteria:Item, Rev, Category, Description, and Supplier Item.
• In the Receipt Details region, you can limit the search by PackingSlip, Receiver, Freight Carrier, and Bill of Lading number.
• In the Transaction Details region, you can limit the search byentering a range of Transaction Dates and Transaction Type.
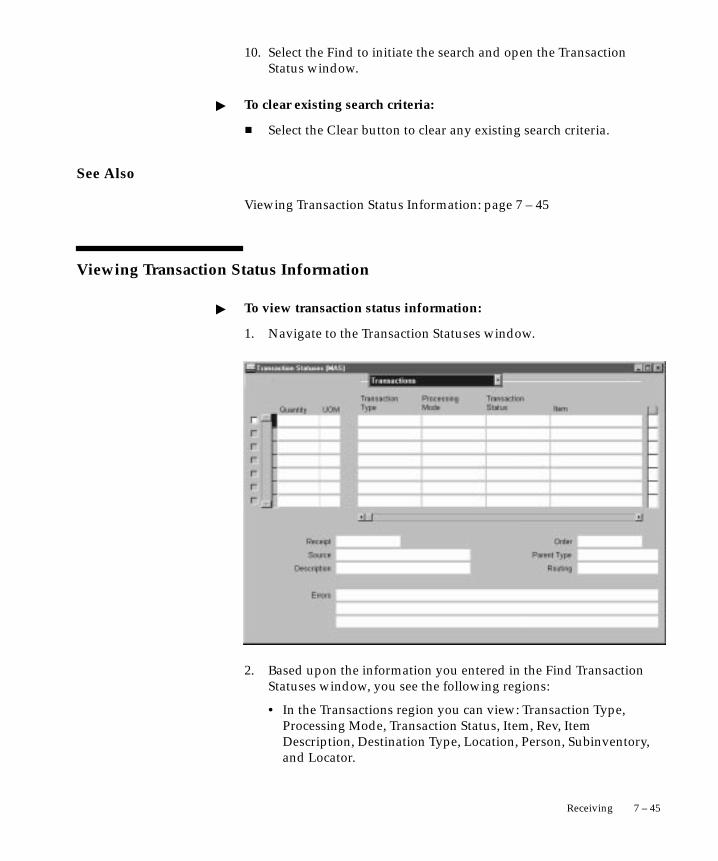
7 – 45Receiving
10. Select the Find to initiate the search and open the TransactionStatus window.
� To clear existing search criteria:
� Select the Clear button to clear any existing search criteria.
See Also
Viewing Transaction Status Information: page 7 – 45
Viewing Transaction Status Information
� To view transaction status information:
1. Navigate to the Transaction Statuses window.
2. Based upon the information you entered in the Find TransactionStatuses window, you see the following regions:
• In the Transactions region you can view: Transaction Type,Processing Mode, Transaction Status, Item, Rev, ItemDescription, Destination Type, Location, Person, Subinventory,and Locator.

7 – 46 Oracle Public Sector Purchasing User’s Guide
• In the Details region you can view: Transaction Date, Reason,Comments, Packing Slip, Supplier Lot, Hazard, and UNNumber.
• In the Order Information region you can view: Order Type,Order Num, Rel, Line, Shipment, Supplier, Qty Ordered, UOM,and Due Date.
• In the Order Processing region you can view: Job/Schedule,Line, Operation Sequence, and Department.
Finding Receiving Transactions
Use the Find Receiving Transactions window to find source documentsfor which you can enter receiving transactions.
� To enter search criteria:
1. Navigate to the Find Receiving Transactions window by selectingReceiving Transactions from the menu. Enter desired searchcriteria as described in the following steps.
2. Enter the Source Type: Internal or Supplier.
3. Enter the Receipt Number.
4. For source type Supplier, enter the PO Number. If you enter apurchase order number, you can also enter a Release (for blanketpurchase agreements), Line, and/or Shipment (for purchase orders)number for the purchase order.
5. For source type Internal, enter the Requisition Number. If youenter a requisition number, you can enter a requisition Linenumber.
6. Enter the Shipment Number.
7. Enter the Source. If you enter a source, you can also enter a sourceSite.
8. Use the alternative regions to further restrict the search:
• In the Item region, you can enter the following search criteria:Item number, Revision number, Category, item Description, andSupplier Item Number.
• In the Receipt Details region, you can limit the search by PackingSlip, Receiver, Freight Carrier, and Bill of Lading number.

☞
7 – 47Receiving
• In the Transaction Detail region, you can limit the search byentering a range of Transaction Dates.
9. Select the Find button to initiate the search and open the ReceivingTransactions window.
� To clear existing search criteria:
� Select the Clear button to clear any existing search criteria.
See Also
Receiving Transactions: page 7 – 37
Entering Receiving Transactions: page 7 – 47
Entering Receiving Transactions
Use the Receiving Transactions window to enter receiving transactions.
Attention: If Oracle Quality is installed and at least onequalified collection plan exists, both the Enter Quality Resultsoption on the Special Menu and the Quality button on thebutton bar are enabled. Only collection plans that have beenassociated with the Receiving Transaction are qualified. Pleasenote that when mandatory collection plans are used, qualityresults data must be entered and saved before you can saveyour receiving transaction line information. Data collection forInspection Transaction collection plans have no bearing onwhether the Enter Quality Results Special menu option and theQuality button are enabled. See: Using Oracle Quality withOracle Public Sector Purchasing, Oracle Quality User’s Guideand Purchasing Versus Quality Inspections, Oracle QualityUser’s Guide.
� To enter receiving transaction line information:
1. Purchasing opens the Receiving Transactions window and displaysall receipts that meet your search criteria when you select the Findbutton in the Find Receiving Transactions window. See: FindingReceiving Transactions: page 7 – 46

7 – 48 Oracle Public Sector Purchasing User’s Guide
In the lower part of the screen, Purchasing displays the followingreceipt information for the current line: Receipt Number, OrderNumber, Source, Parent Type, Description, Inspection, Destination,Current Location, Receiver Note, and Hazard Class.
2. Select the line for which you want to enter a receiving transaction.
3. Enter the transaction Quantity.
4. Enter the UOM of the transaction.
5. Enter the Destination Type: Expense, Inventory, Receiving, or ShopFloor. This determines the final destination of the received items.
6. Enter the Location for the transaction.
7. Enter the Person performing the transaction.
8. For Inventory transactions, enter the Subinventory.
9. If the item is under locator control, enter the stock Locator.
10. Save your work.
� To enter receiving transaction detail information:
1. Navigate to the Details alternative region.
2. Enter the Packing Slip number.
3. Enter the Transaction Date.

7 – 49Receiving
4. Enter the Supplier Lot number.
5. Enter the transaction Reason Code. See: Defining TransactionReasons, Oracle Inventory User’s Guide .
6. Enter the Hazard class. See: Defining Hazard Classes: page 1 – 51.
7. Enter Enter the UN Number. See: Defining UN Numbers: page1 – 52.
8. Select Receipt Exception if you want to enter a release exception forthis receipt.
9. If Oracle Quality is installed and one or more qualified collectionplans exist, you can enter quality results by choosing the Qualitybutton from the button bar or Enter Quality Results from theSpecial menu. If mandatory collection plans exist, you must enterQuality results in the Enter Quality Results window before you cansave the transaction line. See To enter quality results below. Seealso: Entering Quality Data for Receiving Transactions, OracleQuality User’s Guide.
10. Save your work.
� To enter quality results:
� Choose the Quality button from the button bar or Enter QualityResults from the Special menu.
The system selects the first—based on the alphanumeric order ofcollection plan names—of these collection plans in the EnterQuality Results window that appears.
You can only choose to enter quality results after entering allrequired receiving transaction line information. If the collectionplan you select is mandatory, you must enter quality results databefore you can save the transaction line. If the collection plan is abackground data collection plan, it is not mandatory to enter data.The plan picks up data you enter in the receiving transaction line,according to the data it is configured to pick up. (A mandatorycollection plan is optionally defined as mandatory when it wascreated in Oracle Quality. If it is mandatory and you don’t enterquality results data for it, you’ll receive a message when you savethe receiving transaction line or move to the next line, telling youwhich collection plan was mandatory and requires quality resultsdata.) See: Entering Quality Results Associated with MoveTransactions, Oracle Quality User’s Guide.

7 – 50 Oracle Public Sector Purchasing User’s Guide
� To view order information:
� Navigate to the Order Information alternative region to view thefollowing information for the shipment: Order Type, Number,Release number, order Line number, Shipment number, Supplier,Quantity Ordered, UOM, Due Date, and Supplier Item number.
� To view outside processing information:
� Navigate to the Outside Processing alternative region to view theJob or repetitive Schedule number, the repetitive schedule Linenumber, the Operation Sequence, and the Department number.
� To enter control number information:
� For controlled items, you can select the Lot–Serial button tonavigate to the Lot Number and Serial Number windows. See: Lotand Serial Number Control, Oracle Inventory User’s Guide
� To enter inspection information:
� Select the Inspect button to open the Inspection Details window.See: Inspecting Received Items: page 7 – 52.
See Also
Receiving Transactions: page 7 – 37
Cascading Receipts and Receiving Transactions: page 7 – 22
Express Receipts and Receiving Transactions: page 7 – 24

Example
Example
7 – 51Receiving
Inspections
Purchasing lets you inspect items before internal delivery.
The buyer can use the Note to Receiver field when preparing thepurchase order to indicate where items that require inspection shouldgo. The inspector or requestor can record the inspection results in theInspections window. See: Inspecting Received Items: page 7 – 52.
You can review in the Receiving Transactions window what itemsrequire inspection, and the quantity accepted after inspection. If itemsrequire inspection, but the quantity accepted for the receipt is zero,then you know the items are still in inspection. Requestors can reviewthe status of their requisitions in the Requisitions window. In thePurchase Orders window, you can view whether items requireinspection and the quantities received and accepted.
If you choose to let requestors inspect items, they can enter the resultsof their inspections and then record the quantity delivered in theReceiving Transactions window.
If Oracle Quality is installed, you can inspect items through Quality, ifthe profile option QA: PO Inspection is set to Oracle Quality. (Bydefault, it is set to Oracle Public Sector Purchasing.) See: ProfileOptions (in Oracle Quality), Oracle Quality User’s Guide.
At the receiving dock, you receive a shipment of 200 glass vials thatrequire inspection. You record receipt and send the items to inspection.As the inspector of the 200 glass vials, you accept 195 and reject 5. Yousend the 5 rejected glass vials back to the supplier and deliver the 195glass vials to the requestor.
In the Receiving Transactions window, Purchasing displays 195 in theQuantity Accepted field. This shows you how many items you candeliver to the requestors.
Returns of Rejected Goods
Purchasing lets you identify returns to a supplier. There may be manyreceipt numbers associated with a particular purchase order number.If, after inspection, you find damaged goods and reject these, you cansend the goods back to Receiving to return to the supplier. Thereceiving agent records the quantity returned to the supplier using theReceiving Returns window. See: Entering Returns: page 7 – 56.
After inspecting 15 computer boards, you reject 5 boards and want toreturn them to the supplier. You can reference the purchase order

7 – 52 Oracle Public Sector Purchasing User’s Guide
number on the receipt traveler that you attach to the board boxes. Thispurchase order number lets the receiving agent locate the receipt, andenter the quantity returned for this receipt. Purchasing keeps an audittrail of returned items, so you can track returns to suppliers andmaintain accurate receipt information.
Inspecting Received Items
Use the Inspection Details window to enter inspection information forreceived items.
Note: If Oracle Quality is installed, you can inspect itemsthrough Quality, if the profile option QA: PO Inspection is setto Oracle Quality. (By default, it is set to Oracle Public SectorPurchasing.) See: Profile Options (in Oracle Quality), OracleQuality User’s Guide.
� To enter inspection information:
1. Navigate to the Inspection Details window by selecting the Inspectbutton in the Receiving Transactions window.
Note: If you use Oracle Quality to inspect the items, when youchoose the Inspect button the system selects the first—based onthe alphanumeric order of inspection plan names—of theinspection plans to display. See: Entering Quality Results forReceiving Inspections, Oracle Quality User’s Guide.
2. Select Accept or Reject to describe the action you are taking in aline.

7 – 53Receiving
3. Enter the Quantity accepted or rejected. Purchasing displays theuninspected quantity as the default.
4. Enter the UOM for the inspected item.
5. Enter the Quality Code. See: Defining Quality Inspection Codes:page 1 – 56
6. Enter a Reason Code for the transaction. See: Defining TransactionReasons, Oracle Inventory User’s Guide.
7. Enter the Supplier Lot number.
8. Enter the inspection Date. The system date is the default.
9. Enter a Comment.
10. Save your work.
� To cancel inspection entry:
� Select the Cancel button to cancel inspection entry and return to theReceiving Transactions window.
� To save your work:
� Select OK to save your inspection entries and return to theReceiving Transactions window. You can use Inspection to returnto this line for additional inspection entries until you have savedyour work. After this time, the receipts will no longer be availablefor inspection.

7 – 54 Oracle Public Sector Purchasing User’s Guide
Returns
Use the Receiving Returns window to return delivered items toreceiving and to return received or delivered externally sourced itemsto the supplier if the purchase order has neither been cancelled norfinal closed. For controlled items, you must specify lot numbers, serialnumbers or locators, as appropriate. If the Quality module is installed,you can enter quality information.
When you are entering a return, the first step is to identify the purchaseorder number and/or item that you want to return. You can chooseamong various selection criteria when searching for items in the FindReturns window.
You can return to the supplier unordered receipts that have not beenmatched.
Note: You cannot make adjustments or corrections to receivingtransactions against internal shipments.
To return items to receiving, enter the return quantity. If you originallyperformed a direct receipt, you must specify a Return To receivinglocation. Otherwise, Purchasing routes all returned items to thereceiving location from which you delivered them. For Inventory (butnot Expense or Shop Floor) deliveries, you can update the Return Fromsubinventory. You can also optionally specify additional returninformation such as Reason Code and RMA number.
To return items to the supplier, enter the return quantity. Purchasingprovides the source supplier for the items. For Inventory (but notExpense or Shop Floor) deliveries, you can update the Return Fromsubinventory. You can also optionally specify additional returninformation such as Reason Code and RMA number. When you returnitems to the supplier, Purchasing creates both a Return To Receivingand a Return To Supplier transaction. Purchasing also reopens theassociated purchase order for the return quantity by reducing theoriginal receipt quantity.
See Also
Finding Returns: page 7 – 55
Entering Returns: page 7 – 56
7 – 55Receiving
Finding Returns
Use the Find Returns window to find source documents for which youcan enter returns.
� To find source documents for returns:
1. Navigate to the Find Returns window by selecting Returns fromthe menu. The following steps describe ways in which you canspecify search criteria to limit the search for source documents. Allof the search criteria are optional.
2. Enter the receipt Source Type for the search:
Internal: An internal order generated from an internal requisitionand sourced from your inventory, or an intransit inventoryshipment. If you choose this option, the following fields aredisabled: PO Number, Release, Line, Shipment, and IncludeClosed POs.
Supplier: A purchase order sourced from a supplier. If you choosethis option, the following fields are disabled: Requisition Number,requisition Line number, and Shipment Number.
3. Enter the Receipt Number.
4. Enter the PO Number. To be available, a purchase order must haveat least one approved shipment for which the ship–to organizationis the same as the current active organization. If you enter a PONumber, you can also enter a Release number, Line number,and/or Shipment number for the purchase order. The Release fieldis applicable only when you have entered a purchase order numberassociated with a planned purchase order or a blanket purchaseagreement. The list of values in the Release field includes allreleases for the specified PO that are not final closed.
5. Enter the Requisition Number. If you enter a requisition number,you can also enter a Shipment Number and/or Line number.Available shipments are those with the same ship–to organizationas the current active organization.
6. Enter the Source. For Source Type Internal, this is theOrganization. For Source Type Supplier, this is the supplier name,and you can also enter the supplier site in the Source Site field.
7. Enter the Current Location.
8. Use the alternative regions to further restrict the search.

7 – 56 Oracle Public Sector Purchasing User’s Guide
• In the Item region, you can enter the following search criteria:Item number, Revision number, Category, item Description, andSupplier Item Number. Since the supplier item number isgenerally the best way you can identify purchase order lineswhen your supplier does not reference your purchase ordernumber on its shipping documents, you should provide asupplier item number on your purchase order lines.
• In the Date Ranges region, you can select Due Today to limit thesearch to receipt lines due on the current date. Otherwise, youcan enter a Due By date range.
• In the Transaction Detail region, you can enter a TransactionDate range.
• In the Shipment region, you can enter the Container, TruckNumber, or Bar Code Label indicated on an Advance ShipmentNotice (ASN) or Advance Shipment and Billing Notice (ASBN).See: Advance Shipment Notices (ASNs): page 7 – 14.
9. Select the Find button to initiate the search and display the selectedsource documents in the Receiving Returns window.
� To remove existing search criteria
� Select the Clear button in any of the source document searchwindows to remove existing search criteria.
See Also
Returns: page 7 – 54
Entering Returns: page 7 – 56
Entering Returns
Use the Receiving Returns window to enter returns against receipts,deliveries, transfers, acceptances, and rejections.
� To select transactions for returns:
1. Navigate to the Find Returns window by selecting Returns on themenu. See: Finding Returns: page 7 – 55
2. Enter any of the following as selection criteria for the transactionsyou want to correct: Source Type, Receipt Number, PO Number,

7 – 57Receiving
Release, Line, Shipment, Requisition Number, requisition Linenumber, Shipment Number, Source, Source Site and CurrentLocation. In the alternative regions in the lower part of the screen,you can specify additional selection criteria for the item, dateranges, and transaction detail.
3. Select the Find button to open the Receiving Returns window. Inthe Transactions alternative region of this window, Purchasingdisplays transactions that meet your search criteria. The OrderInformation alternative region displays information about thepurchase order against which the receipt was made. The OutsideProcessing alternative region displays pertinent information foroutside processing receipts.
� To enter returns:
1. Navigate to the Receiving Returns window.
2. Enter the return Quantity. Purchasing selects the line and places acheck in the line selector checkbox.
3. Enter the Return Unit of Measure. Purchasing displays the unit ofmeasure conversion.
4. In the Transactions alternative region, you can update the RMANumber. For Inventory (but not Expense or Shop Floor) deliveries,you can update the Return From subinventory.

7 – 58 Oracle Public Sector Purchasing User’s Guide
5. In the Details alternative region, you can enter a Reason Code,update the Transaction Date, and remove the Receipt Exception.See: Defining Quality Inspection Codes: page 1 – 56
6. Save your work.
� To enter control number information:
� For controlled items, you can select the Lot & Serial button tonavigate to the Lot Number and Serial Number windows. See: Lotand Serial Number Control, Oracle Inventory User’s Guide
� To move to the Quality module:
� If the Quality module is installed and if a quality plan applies to thetransaction, you can navigate to the Quality module by selectingthe Quality button.
See Also
Returns: page 7 – 54
Corrections: page 7 – 59
Finding Returns: page 7 – 55

7 – 59Receiving
Corrections
Use the Receiving Corrections window to modify receivingtransactions to correct errors. You can correct any receiving transactionexcept another Correction transaction and a Return to Receivingtransaction. For controlled items, you must specify lot and/or serialnumbers, as appropriate.
Note: You cannot make corrections to receiving transactionsagainst internal shipments.
When you are entering a correction, the first step is using the FindCorrections window to identify the transaction that you want tocorrect. See: Finding Corrections: page 7 – 60.
You can enter positive or negative corrections to any receivingtransaction. However, there are some restrictions. Purchasing allowsyou to enter correction quantities greater than the outstandingreceiving supply quantity.
You can also make corrections to Return To Supplier transactions. Forexample, if you realize that you want to return only 9 items to thesupplier instead of 10, you can adjust the Return to Suppliertransaction by –1 to reduce the open purchase order supply by 1 andadd it to receiving supply. You can then adjust the related Return toReceiving transaction by –1 to increase your on–hand balance by 1 andremove the corresponding receiving supply. Similarly, if you want toreturn 11 instead of 10 items to the supplier, you can perform anadditional Return to Supplier transaction. However, you can alsoadjust the Return to Receiving transaction by 1 to reduce the on–handbalance and increase receiving supply, and then adjust the Return toSupplier transaction by 1 to increase your open purchase orderquantity and remove the corresponding receiving supply.
When you make corrections to a receipt created against an AdvanceShipment Notice (ASN), your purchasing, in–transit, and inventorysupplies are automatically updated. See: ASNs and Supply: page7 – 18.
See Also
Returns: page 7 – 54
Entering Returns: page 7 – 56
Finding Corrections: page 7 – 60

7 – 60 Oracle Public Sector Purchasing User’s Guide
Entering Corrections: page 7 – 61
Finding Corrections
Use the Find Corrections window to find source documents for whichyou can enter corrections.
� To find source documents for corrections:
1. Navigate to the Find Corrections window by selecting Correctionsfrom the menu. The following steps describe ways in which youcan specify search criteria to limit the search for source documents.All of the search criteria are optional.
2. Enter the receipt Source Type for the search:
Internal: An internal order generated from an internal requisitionand sourced from your inventory, or an intransit inventoryshipment. If you choose this option, the following fields aredisabled: PO Number, Release, Line, Shipment, and IncludeClosed POs.
Supplier: A purchase order sourced from a supplier. If you choosethis option, the following fields are disabled: Requisition Number,requisition Line number, and Shipment Number.
3. Enter the Receipt Number.
4. Enter the PO Number. To be available, a purchase order must haveat least one approved shipment for which the ship–to organizationis the same as the current active organization. If you enter a PONumber, you can also enter a Release number, Line number,and/or Shipment number for the purchase order. The Release fieldis applicable only when you have entered a purchase order numberassociated with a planned purchase order or a blanket purchaseagreement. The list of values in the Release field includes allreleases for the specified PO that are not final closed.
5. Enter the Requisition Number. If you enter a requisition number,you can also enter a Shipment Number and/or Line number.Available shipments are those with the same ship–to organizationas the current active organization.
6. Enter the Source. For Source Type Internal, this is theOrganization. For Source Type Supplier, this is the supplier name,and you can also enter the supplier site in the Source Site field.

7 – 61Receiving
7. Enter the Current Location.
8. Use the alternative regions to further restrict the search.
• In the Item region, you can enter the following search criteria:Item number, Revision number, Category, item Description, andSupplier Item number. Since the supplier item number isgenerally the best way you can identify purchase order lineswhen your supplier does not reference your purchase ordernumber on its shipping documents, you should provide asupplier item number on your purchase order lines.
• In the Receipt Details region, you can restrict the search byPacking Slip number, Receiver, Freight Carrier, or Bill of Lading.
• In the Transaction Detail region, you can enter a TransactionDate range.
• In the Shipment region, you can enter the Container, TruckNumber, or Bar Code Label indicated on an Advance ShipmentNotice (ASN). See: Advance Shipment Notices (ASNs): page7 – 14.
9. Select the Find button to initiate the search and display the selectedsource documents in the Receiving Corrections window.
� To remove existing search criteria
� Select the Clear button in any of the source document searchwindows to remove existing search criteria.
See Also
Corrections: page 7 – 59
Entering Corrections: page 7 – 61
Entering Corrections
Use the Receiving Corrections window to record correctiontransactions against prior receiving transactions.
Note: You cannot make corrections to receiving transactionsagainst internal shipments.

7 – 62 Oracle Public Sector Purchasing User’s Guide
Prerequisites
❑ Receiving transactions against which to make corrections. See:Receiving Transactions: page 7 – 37
� To select transactions for corrections:
1. Navigate to the Find Corrections window by selecting Correctionson the menu. See: Finding Corrections: page 7 – 60
2. Enter any of the following as selection criteria for the transactionsyou want to correct: Source Type, Receipt Number, PO Number,Release, Line, Shipment, Requisition Number, Line, ShipmentNumber, Source, and Source Site. In the alternative regions in thelower part of the screen, you can specify additional selectioncriteria for the item, receipt detail, transaction details, project, andoutside processing.
3. Select the Find button to move to the Receiving Correctionswindow.
� To enter corrections:
1. Navigate to the Receiving Corrections window. You can navigateto this window from the Find Corrections window, from the EnterReceipts gateway, and by selecting the Correct button in the ViewTransaction History window. If your selection criteria produce anytransactions, the Transaction Type (Expense, Inventory, Shop Floor,or Receiving), Quantity, Destination, Item, Revision, and ItemDescription are displayed in the Transactions alternative region.The Order Type, Order Number, Source, Due Date, ItemDescription, Hazard Class, Destination, UN Number, ReceiverNote, and Routing for the current line are displayed in the lowerpart of the window.

7 – 63Receiving
2. Use the remaining alternative regions to display additionalinformation about the transactions.
• In the Lines region, you can view the following: DestinationType, Item number, Revision number, Item Description,Location, Person, Subinventory, and stock Locator.
• In the Details region, you can view the following: Packing Slipnumber, Lot Number, Supplier Lot number, Supplier Itemnumber, Reason Code, Hazard class, and UN Number.
• In the Order Information region, you can view the following:Order Type, Order Number, Release number, Line number,Shipment number, Supplier, Quantity Ordered, UOM, and DueDate.
• In the Outside Processing region, you can view theJob/Schedule, Line, Operation Sequence, and Department.
3. Enter the positive or negative correction quantity for the currentline. Making any entry on the line automatically selects the line.You can also use the line selector to select and deselect lines.
4. Save your work.
� To display additional information:
� Select the More button to display additional information for thefollowing areas: PO Header Notes, PO Line Detail, PO Line Notes,

7 – 64 Oracle Public Sector Purchasing User’s Guide
PO Shipment Line Detail, PO Shipment Header Notes, and POShipment Line Notes.
� To enter control number information:
� For controlled items, you can select the Lot & Serial button tonavigate to the Lot Number and Serial Number windows. See: Lotand Serial Number Control, Oracle Inventory User’s Guide
� To move to the Quality module:
� If the Quality module is installed and if a quality plan applies to thetransaction, you can navigate to the Quality module by selectingthe Quality button.
See Also
Returns: page 7 – 54
Entering Returns: page 7 – 56
Corrections: page 7 – 59
Finding Corrections: page 7 – 60

7 – 65Receiving
Finding Intransit Shipments
Use the Find Intransit Shipments window to find source documents forwhich you can enter shipment information. You can also use the FindIntransit Shipments window to view validated Advance ShipmentNotices (ASNs).
� To find source documents for intransit shipments:
1. Navigate to the Find Intransit Shipments window by selectingManage Shipments in the Navigator.
2. Specify any of the following, optional search criteria:
• Enter the Requisition Number. If you enter a requisition number,you can also enter a Line number.
• Enter the Shipment Number. Available shipments are those withthe same ship–to organization as the current active organization.
• Select a Source Type of Internal or Supplier. ’Internal’ searchesfor inventory intransit shipment information. ’Supplier’ searchesfor external suppliers’ shipment information, such as ASNs.
• Enter the Receiving Location.
• Use the alternative regions to further restrict the search.
– In the Item region, you can enter the following searchcriteria: Item number, Revision number, Category, and itemDescription.
– In the Date Ranges region, you can select Due Today to limitthe search to receipt lines due on the current date.Otherwise, you can enter a Due By date range.
– In the Receipt Details region, you can restrict the search byPacking Slip number, Receiver, Freight Carrier, or Bill ofLading.
– In the Shipment region, you can enter the Container, TruckNumber, or Bar Code Label indicated on an ASN.
3. Select the Find button to initiate the search and display the selectedsource documents in the Maintain Shipments window.
� To remove existing search criteria
� Select the Clear button in any of the source document searchwindows to remove existing search criteria.

7 – 66 Oracle Public Sector Purchasing User’s Guide
See Also
Maintaining Shipments: page 7 – 66
Advanced Shipment Notices (ASNs): page 7 – 14
Maintaining Shipments
Use the Maintain Shipments window to view and update inventoryintransit shipment information. Also use the Maintain Shipmentswindow to view or cancel Advance Shipment Notices (ASNs).
You can view a wide variety of information about an inventoryintransit shipment, including internal requisition information backingthe intransit shipment. You can enter or change selected headerinformation including packing slip and bill of lading numbers, theexpected receipt date, the freight carrier, the ship–to location, and thenumber of containers. You can also enter or change some informationat the shipment line level: the packing slip number, receipt routing,and reason code.
For an ASN, you can also view a wide variety of information, includingtruck and container numbers. You can also cancel an ASN by choosingCancel from the Special menu. A supplier can correct an ASN bysending a Replacement ASN. See: Advanced Shipment Notices(ASNs): page 7 – 14.
Prerequisites
❑ Before you can use this window to view and update inventoryintransit shipment information, you must transfer material betweenorganizations that use intransit inventory. See: TransferringBetween Organizations, Oracle Inventory User’s Guide.
� To select shipments:
1. Select Manage Shipments on the menu to navigate to the FindIntransit Shipments window. See: Finding Intransit Shipments:page 7 – 65.
2. Enter any of the following as selection criteria: RequisitionNumber, requisition Line number, Shipment Number, Source,Source Site and Receiving Location. In the alternative regions inthe lower part of the screen, you can specify additional selectioncriteria for the item, and date ranges.

7 – 67Receiving
3. Select the Find button to move to the Maintain Shipments window.
� To maintain shipments:
1. Navigate to the Maintain Shipments window. In this windowPurchasing displays Shipment Header information for the firstshipment that meets the criteria. Use Next Record to displayinformation for subsequent shipments that meet your searchcriteria. Select Sync lines with header to re–query shipment lineswhen you display different shipments.
2. You can maintain data only in the following Shipment Headerfields: Expected Receipt Date, Bill of Lading, Freight Carrier,Packing Slip, Ship–to Location, Number of Containers, andComments.
3. In the Shipment Lines region, only the Item Revision, stock Locator,Packing Slip, Comments, Transaction Reason Code, and ReceiptRouting are maintainable.
4. Save your work.
� To cancel an Advanced Shipment Notice:
� Select the shipment line and choose Cancel from the Special menu.

7 – 68 Oracle Public Sector Purchasing User’s Guide
Control Numbers
Purchasing uses three types of control numbers: lot numbers, serialnumbers, and stock locators.
Purchasing provides you the ability to assign lot and serial numbers toitems as they are transacted to their destinations by direct receipt ordelivery and to track these items by lot and serial number.
You assign lot and serial numbers to items as you are enteringindividual deliveries or performing direct receipts. You can access theLot and Serial Numbers window directly from each transaction thatyou enter, and assign lot and/or serial numbers to each unit of the itemin the transaction.
Stock Locators are used for deliveries to inventory destinations.Purchasing uses the locator controls defined in Inventory.
Entering Lot Numbers
In the Lot Numbers window, there may or may not be existing lotnumber information corresponding to your transaction. If suchinformation exists, you can pick the lot number that you want to assignto your receiving transaction. If you are entering a supplier receipt,you have to enter a lot number that has not been previously assigned toan item. If you are entering any other type of receiving transaction,you have to pick a lot number from the list of lot numbers that arevalid for the given item. For example, if you enter an intransit receiptor a transfer, you cannot assign a completely new lot number, butrather you must choose the appropriate lot number that has beenpreviously assigned to the item.
Based on the lot number you enter, Purchasing automatically enters theexpiration date if you defined shelf life control for the item andspecified a number of shelf life days. If you defined the item byspecifying lot control with shelf life control that is user definable, thenyou can enter an expiration date that is the same as or later than thecurrent date. Purchasing displays the quantity of each lot number thatis available for assignment, and you cannot assign more units to a lotnumber than are available.
Entering Serial Numbers
For deliveries, you must enter serial number information if the item isunder serial number control. Purchasing displays a running total of thenumber of units that have been assigned to serial numbers.

7 – 69Receiving
There may be existing serial number information corresponding to theitem in this transaction. For example, if you were receiving an itemfrom intransit and the sending organization had assigned serialnumbers to the item at the time of shipment, these numbers would beavailable in a list of values. On the other hand, if you were entering asupplier receipt, you would have to assign new serial numbers.
You enter serial numbers by assigning a range of numbers for each itemor lot quantity. Purchasing then assigns each unit of the item or lotquantity to a serial number within your selected range. When youenter a beginning serial number, Purchasing automatically defaults theending serial number to the same value. You can override this defaultif you want to specify a range of serial numbers rather than just oneserial number.
Lot and Serial Numbers in Inter–organization Transfers
When you perform an inter–organization transfer, the source anddestination organization may have different lot/serial controls.Purchasing handles this situation as follows:
• When the source organization uses controls and the destinationorganization does not, the control numbers are recorded as beingissued from the source organization. Lot/serial transactions arerecorded for the destination organization.
• When the source organization does not use controls and thedestination organization does, the transaction is processednormally.
• When both source and destination organizations use controls, thecontrol numbers are recorded as being issued from the sourceorganization. These control numbers are tracked to insure thatthe same control numbers that were shipped are the ones that arereceived. When items are returned from inventory to receivingor to the supplier, only the control numbers originally recordedfor the delivery transaction can be used.
Entering Stock Locators
When you enter a receiving transaction that will result in a delivery toan inventory destination, and when locator control is required for theorganization/item/subinventory, Purchasing displays the StockLocator flexfield during entry of the destination information in theReceipts, Receiving Transactions, Returns, and Corrections windows.

7 – 70 Oracle Public Sector Purchasing User’s Guide
See Also
Lot and Serial Number Control, Oracle Inventory User’s Guide
Defining Stock Locators, Oracle Inventory User’s Guide

Example
Example
☞
7 – 71Receiving
Receiving Reports
Purchasing provides summary and detail reports on your receipts. Youcan produce receiving transaction reports by item, supplier, purchaseorder number, receipt number and/or receiving date range.
Purchasing also provides summary and detail reports to help youanalyze your suppliers’ performance. You can produce supplierquality reports by buyer, supplier, and item. You can use the receivinginspection register to review your inspections by receipt.
Use the Submit Requests window to run Receiving reports. See:Submitting a Request, Oracle Applications System Administrator’s Guide.
Printing an Expected Receipts Report
Purchasing helps you organize your work by generating an ExpectedReceipts Report using the setup options you specify. You can use setupoptions such as Ship–To Location, Promised Dates, Category, and ItemNumber. For example, you can review all expected computerequipment receipts, or you can review all receipts for the next twodays.
You want to print an Expected Receipts Report for the current week.You are primarily interested in the furniture receipts for the week, soyou specify a date range for the current week and the purchasingcategory Furniture in the Category field. See: Expected ReceiptsReport: page 9 – 33.
Using Receipt Travelers
Purchasing makes it easy to route goods in your organization by lettingyou print a receipt traveler that you can place on the goods. You canuse the Submit Requests window to print as many travelers as youneed. See: Submitting a Request, Oracle Applications SystemAdministrator’s Guide.
You receive 5 personal computers and you want to show the finaldestination for each. In the Submit Requests window, you can generatea Receipt Traveler for each box. See: Receipt Traveler: page 9 – 110.
Attention: If the RCV: Print Receipt Traveler profile option isset to Yes, Purchasing automatically prints the Receipt Travelerwhen you perform a standard or direct receipt and when youmatch unordered receipts.

7 – 72 Oracle Public Sector Purchasing User’s Guide
See Also
Profile Options in Purchasing: page 1 – 76
Submitting a Request, Oracle Applications System Administrator’s Guide.

☞
7 – 73Receiving
Overview of Receipt Accounting
Inventory Accruals
Inventory and Purchasing provide you with visibility and control ofyour accrued liabilities for inventory items. Purchasing automaticallyrecords the accrued liability for your inventory items at the time ofreceipt as perpetual accruals. This transaction is automaticallyrecorded in your general ledger at the time of receipt. The inventoryexpense is recorded at delivery if you use Standard Delivery and atreceipt if you use Direct Delivery. You have options to determinewhether Purchasing and Inventory reverse encumbrances. The optionused is dependent on how you compare encumbrance to budgetbalances in inventory for your organization.
Expense Period–End Accruals
Purchasing optionally accrues uninvoiced receipts of non–inventoryitems when you close a period. You can choose which uninvoicedreceipts are accrued. Purchasing automatically creates a balancedjournal entry for each receipt uninvoiced at period end which can bereversed at the beginning of the next period. Purchasing creates areversing entry for the encumbered amount corresponding to theexpense while creating an accrual entry for the receipt in the generalledger if you are using encumbrance at your site.
Attention: When using Cash Basis Accounting, you will notnormally run the Receipt Accrual – Period End process.However, you must use the Purchasing Options window andset the Accrue Expense Items flag to Period End. See: ReceiptAccruals – Period End Process: page 9 – 105.
Expense Perpetual Accruals
Purchasing optionally provides you with the ability to accruenon–inventory liabilities at the time of receipt. If you choose at time ofreceipt, Purchasing records an accrued liability and charges yourreceiving inspection account for each non–inventory receipt. Thistransaction is automatically recorded in your general ledger at the timeof receipt. Purchasing creates a reversing entry for the encumberedamount at the time you deliver the goods to the final inventory orexpense destination. Payables automatically recognizes the accrual andencumbrance reversal on receipt, not at invoice posting time.

7 – 74 Oracle Public Sector Purchasing User’s Guide
Purchase Price Variance
Purchasing and Inventory provide you with visibility and control ofyour purchase price variances. When you use standard costing,Purchasing and Inventory automatically calculate and record purchaseprice variances as you receive your inventory items into inventory. Ifdesired, Purchasing and Inventory automatically calculate and recordpurchase price variances for your outside processing receipts into workin process. You can use the Purchase Price Variance Report to reviewthe accuracy of the standard costs for your purchased items andservices. See: Purchase Price Variance Report: page 9 – 87.
Invoice Price Variance (IPV) and Exchange Rate Variance
Purchasing and Inventory provide you with visibility and control ofyour invoice price and exchange rate variances. Payables automaticallycalculates and records invoice price and exchange rate variances inyour general ledger when you have matched, approved and postedyour invoices. You can use the Invoice Price Variance Report to reviewthe accuracy of your purchase order prices. See: Invoice Price VarianceReport: page 9 – 41.
Foreign Currencies
If the purchase order uses a foreign currency, Purchasing converts thepurchase order price to the inventory functional currency. Inventoryuses this converted value for receiving accounting purposes. Payablesallows you to record exchange rate invoice variance to separateaccounts.
Accrual Reconciliation and Write–Off
Purchasing and Inventory provide you with a complete reconciliationreport of all of your accounts payable accrual transactions. You canquickly identify any mismatched items and write–off accrualtransactions from your receiving, accounts payable, inventory, andwork in process subledgers.
Expense Accrual Reporting
You can use the Uninvoiced Receipts Report to analyze youruninvoiced receipt liabilities for non–inventory purchases when youcreate accrual entries for them in your general ledger. You can controlthe amount of expenses you accrue by supplier and purchasing

7 – 75Receiving
category. You can obtain detailed information about the purchase orderreceipts you accrued during your accounting period. See: UninvoicedReceipts Report: page 9 – 157.
Period–End Accruals and Encumbrance
For period–end accruals when using encumbrances, Purchasing createsa reversing entry for the encumbered amount corresponding to anexpense while creating an accrual entry for the receipt in the generalledger. When you accrue your receipts, Purchasing ensures that you donot duplicate entries for the period. At the beginning of the followingperiod, you reverse the accrual entry for the expense and recreate theencumbrance entry you reversed in the previous period using GeneralLedger. See: Receipt Accruals – Period End Process: page 9 – 105.
Inventory and Perpetual Expense Accruals and Encumbrance
For perpetual expense and inventory accruals, Purchasing andInventory create a reversing entry for the encumbered amount at thetime you deliver the goods to the final inventory or expensedestination. Payables automatically recognizes the accrual andencumbrance reversal on receipt, not at the time of invoice posting.
See Also
Setting Up Inventory Accruals: page 7 – 75
Accrual Process for Perpetual Accruals: page 7 – 81
Monitoring Price variances: page 7 – 88
Reconciling A/P Accrual Accounts Balance: page 7 – 89
Accrual Process for Period End Accruals: page 7 – 91
Identifying Journal Entry Batches in General Ledger: page 7 – 95
Setting Up Inventory Accruals
If you use Purchasing and Inventory together, use the following stepsto implement perpetual accruals for inventory item purchases:

7 – 76 Oracle Public Sector Purchasing User’s Guide
Defining Expense Accrual Option
You need to specify whether you want to use period–end or perpetualaccruals for your expense destination receipts. Set the Accrue ExpenseItems option in the Purchasing Options window to On Receipt if youwant to accrue your expense receipts perpetually. Specify Period End ifyou want to accrue your receipts at period end. See: Defining AccrualOptions: page 1 – 32
Defining Default Accounts
You need to define the following accounts before entering transactionsin Purchasing and Inventory.
Receiving Account
Enter the general ledger account to record the current balance ofmaterial in receiving and inspection.
Use the Define Organization or Receiving Options window to set upthis account. See: Defining Receiving Options: page 1 – 40.
Inventory A/P Accrual Account
Enter a general ledger account to accumulate the inventory accountspayable accrual for this organization. This is the account used byPurchasing to accrue your payable liability when you receive youritems. This account represents your uninvoiced receipts and is usuallypart of your accounts payable liabilities in the balance sheet. Payablesrelieves this account when the invoice is matched and approved. See:Defining Other Account Parameters, Oracle Inventory User’s Guide
Expense A/P Accrual Account
Enter a general ledger account to accumulate the expense accountspayable accrual for your purchasing installation. This is the accountused by Purchasing to accrue your accounts payable liability forexpense items at time of receipt when your Expense Accrual Option isOn Receipt, or at period–end when your Expense Accrual Option isPeriod End. This account represents your uninvoiced receipts and isusually part of your accounts payable liabilities in the balance sheet.
Use the Purchasing Options window to set up this account. See:Defining Accrual Options: page 1 – 32.

7 – 77Receiving
Purchase Price Variance Account
Enter a general ledger account to accumulate purchase price variancefor this organization. The purchase price variance account is usually anexpense account. This is the variance that you record at the time youreceive an item in inventory, and is the difference between the purchaseorder cost and an item’s standard cost. Purchasing calculates purchaseprice variance as:
PPV = (PO unit price – standard unit cost) �quantity received
Purchase price variance is not used for average costing.
Use the Organization Parameters window to set this account. See:Inter–Organization Transfer Accounts, Oracle Inventory User’s Guide.
Invoice Price Variance Account
Enter a general ledger account to accumulate invoice price variance forthis organization. This is usually an expense account.
Invoice price variance is the difference between the purchase orderprice for an inventory item and the actual invoice price multiplied bythe quantity invoiced. Purchasing uses this account on the POdistribution when the requisition or purchase order is created. WhenPayables matches and approves the invoice, Payables uses the invoiceprice variance account from the purchase order to record invoice pricevariance entries. In addition, if you have exchange rate variances,Payables also records invoice price variance for exchange rate gainsand losses.
Use the Organization Parameters window to set this account. See:Inter–Organization Transfer Accounts, Oracle Inventory User’s Guide.
Exchange Rate Gain or Loss Accounts
Enter general ledger accounts to accumulate exchange rate gains orlosses for this organization. These are usually expense accounts.
Exchange rate gain or loss accounts are used to record the differencebetween the exchange rate used for the purchase order and theexchange rate used for the invoice.
Use the Accounting region of the Financials Options window to set upthese accounts. See: Defining Financials Options, Oracle Public SectorPayables User’s Guide.

7 – 78 Oracle Public Sector Purchasing User’s Guide
Using the Account Generator to build accounts
In addition to the standard default accounts listed above, you can usethe Account Generator to predefine a set of rules that allow Purchasingto build the following accounts for each purchase order distributionautomatically:
• Charge Account
• Budget Account
• Accrual Account
• Invoice Variance Account
See: Using the Account Generator in Oracle Public Sector Purchasing:page 0 – 2.
Setting Up Your Period End Date
For the accrual report to balance to the general ledger, the lasttransaction (or accounting) date of each fiscal period has to be the samein Inventory, Purchasing, and Payables.
Creating Purchase Orders for Inventory Items
Some of the purchase orders you create are for items you want to movedirectly into your inventories. Some other purchase orders are foritems you simply want to expense.
Purchasing ensures that you charge all inventory items you purchase tothe Inventory A/P accrual account for the receiving organization. Eachtime you enter an item on a purchase order, Purchasing defaults theInventory A/P accrual account corresponding to the organization youare ordering this item for on your distributions. You cannot overridethe distribution accrual account.
Purchasing also ensures that you use the correct invoice price varianceaccount for the receiving organization. Each time you enter an item ona purchase order, Purchasing defaults the invoice price varianceaccount corresponding to the organization you are ordering this itemfor on your distributions. You cannot override the distribution invoicevariance account.
Inventory Funds Checking Methods
One way in which you can budget and funds check the inventorypurchases you make for a given subinventory is by setting up an

7 – 79Receiving
encumbrance (i.e. budget) account for the subinventory, and notreversing the encumbrance on receipt/delivery. This way, theencumbrance will accumulate as an actual and can be compared withthe account budget for actual purchases to budget analysis. You cannotuse the subinventory asset account in the funds available calculation(FA = Budget – Enc – Actuals), because this account will only containthe current value of the subinventory or the net of received anddelivered items currently in the subinventory, and will not track to theaccumulated purchases for the subinventory. To use this method offunds checking, you must set the Reverse Encumbrance flag in theOrganization Parameters window to No. See: Inter–OrganizationTransfer Accounts, Oracle Inventory User’s Guide.
An alternative method of funds checking inventory purchases is bysetting up a summary account and performing a funds check againstthat summary account. To provide an accurate picture of the fundsavailable, you need to take into account:
• The outstanding commitments/obligations for inventory andexpense purchases
• The current value of inventory
• The amounts purchased for inventory, but already issued out ofthe subinventory to either expense accounts within the”department” (summary account) or to other ”departments”(other summary accounts)
Funds available = Budget
less amount on open commitments/obligations (either for inventory, orfor expense accounts within the department)
less current inventory value
less value of material ’expensed’ to accounts with the department
The following example illustrates some of the transactions and theirimpact on the funds available:

7 – 80 Oracle Public Sector Purchasing User’s Guide
Summary (Department X)
SubinventoryAssetAccount ’x1’
SubinventoryEncumbranceAccount ’x2’
BudgetAccount’xbud’
DepartmentExpense ’xA’
DepartmentExpense ’xB’
DepartmentExpense ’xC’
Summary (Department Y)
SubinventoryAssetAccount ’y1’
SubinventoryEncumbranceAccount ’y2’
BudgetAccount’ybud’
DepartmentExpense ’yA’
DepartmentExpense ’yB’
DepartmentExpense ’yC’
• Requisitions and purchase orders for expense purchases willcreate commitments/obligations against expense accounts (xA,xB, xC), decreasing the funds available for Department X
• Receipt and Delivery of expense purchase orders (or invoicingfor period end accruals) will create the actuals to the departmentexpense accounts (xA, xB, xC), and reverse the encumbrance inthose same accounts
• Requisitions and purchase orders for inventory purchases willcreate commitments/obligations against the encumbranceaccount (x2, y2). We use a different account than the assetaccount to ensure that we do not distort the value in the assetaccount (which should only contain the value of the material inthe given subinventory). The requisitions and purchase orderswill decrease funds available for the department.
• Receipt and Delivery of inventory purchase orders will reversethe encumbrance against x2/y2 and create actuals to thesubinventory asset account, having no net impact against fundsavailable
• Inventory issues from x1 to xA, xB, or xC will not be fundschecked and will have no net impact on funds available
• Inventory issues from x1 to Department Y expense accounts (yA,yB, or yC) will increase Department X’s funds available anddecrease Department Y’s funds available
• Inventory transfers from x1 to y1 will also increase DepartmentX’s funds available, and decrease Department Y’s funds available.
Note: If you want to use encumbrances and budgetary controlfor inventory transfers or issues to expense accounts, you canuse internal requisitions.
☞
7 – 81Receiving
If you are using Period End Accruals, the encumbrance reversals arecreated with the accrual entries for the month end. You should reversethese journal entries in the beginning of the next period.
If you are accruing on Receipt, the delivery transaction reverses theencumbrances (and creates the debit to the charge account and thecredit to the receiving/inspection account).
Note: A direct receipt in purchasing performs both the debitand credit transactions.
Accrual Process for Perpetual Accruals
Use perpetual accruals for expense purchases when you want to recorduninvoiced receipt liabilities immediately upon receipt of goods.Receipts for inventory purchases are always accrued upon receipt.Other key points of perpetual accruals include:
• Actual journal entries are created for the amount of the receiptliabilities, debiting the receiving inspection account and creditingthe expense accrual liability account.
• Accrual journal entries are created when you enter receivingtransactions. Purchasing creates adjusting journal entries if youcorrect your receiving transactions.
• Perpetual accrual entries do not need to be reversed at the startof a new accounting period.
• If you are using encumbrance accounting, purchase orderencumbrance is relieved when the goods are delivered to theirfinal destination, either by a delivery or a direct receipt.
Attention: If you accrue expense purchases on receipt, youmust reconcile the entries in the A/P accrual accounts. Inaddition, if you also receive inventory, you need to use theReceiving Value By Destination Account Report to break outyour receiving/inspection value by asset and expense.
Purchase Order Receipt to Receiving Inspection
When you receive material from a supplier into receiving inspection,Purchasing uses the quantity received and the purchase order price toupdate the purchase order and the receiving inspection account. Theaccounting entries for inventory receipts are:

☞
7 – 82 Oracle Public Sector Purchasing User’s Guide
Account Debit CreditReceiving Inspection account @ PO price XX
Inventory A/P Accrual account @ PO price XX
The accounting entries for expense destination receipts are:
Account Debit CreditReceiving Inspection account @ PO price XX
Expense A/P Accrual account @ PO price XX
Attention: For clarity, the accounting entries in this sectionrefer to the Inventory A/P Accrual Account and the ExpenseA/P Accrual Account. These are the accounts you typicallyuse as your purchase order distribution accrual accounts forinventory and expense destinations. You can use the AccountGenerator to define the business rules you want Purchasing touse to determine the actual purchase order distribution accrualaccount. Purchasing uses the accrual account on the purchaseorder distribution for all receipt accrual entries.
For expense destinations, the PO distribution accrual account is theExpense A/P Accrual Account set in the Purchasing Options window.For inventory destinations, the purchase order distribution accrualaccount is the Inventory A/P accrual account for the receivingorganization. The accrual accounts are the liability accounts that offsetthe material and expense charge accounts. They represent all inventoryand expense receipts not matched in Payables.
Delivery From Receiving Inspection to Inventory
With the Receiving Transactions window, you can move material fromreceiving inspection to inventory. See: Receiving Transactions: page7 – 37.
For standard costing, when you enter a delivery transaction inPurchasing and move the items to inventory, Inventory generates apurchase price variance transaction. Inventory books this transactionas a period expense for the current accounting period. If the standardcost is greater than the purchase order price, then the purchase pricevariance is favorable. Inventory records the expense as a credit(negative expense). If the standard cost is less than the purchase orderprice, then the variance is unfavorable. Inventory records the expenseas a debit (positive expense).
For average costing, when you enter a delivery transaction inPurchasing, you re–weight the average cost for the inventory

7 – 83Receiving
organization with the incoming purchase order value. You do not haveany purchase price variance for average costing.
Inventory uses the quantity and the purchase order price of thedelivered item to update the receiving inspection account and thequantity, and the standard cost of the delivered item to update thesubinventory balances. The accounting entries are:
Account Debit CreditSubinventory accounts @ standard cost XX
Receiving Inspection account @ PO price XXDebit/Credit Purchase Price Variance
Delivery From Receiving Inspection to Expense Destinations
With the Receiving Transactions window, you can also move materialfrom receiving inspection to expense destinations. See: ReceivingTransactions: page 7 – 37.
When you enter a delivery transaction in Purchasing and move theitems to an expense location, Purchasing uses the transaction quantityand the purchase order price of the delivered item to update thereceiving inspection and expense charge account. The accountingentries are:
Account Debit CreditPO distribution charge accounts @ PO price XX
Receiving Inspection account @ PO price XXEncumbrance @ PO price XX
Reserve for Encumbrance @ PO price XX
Purchase Order Receipt to Inventory
You can use the Receipts window to receive material directly from asupplier to inventory. See: Managing Receipts: page 7 – 21. Pleasenote that this section addresses inventory destinations only.
When you receive material from a supplier directly to inventory,Purchasing and Inventory perform the receipt and deliverytransactions in one step.
Purchasing uses the quantity received and the purchase order price toupdate the purchase order and the receiving inspection account. Theaccounting entries are:

7 – 84 Oracle Public Sector Purchasing User’s Guide
Account Debit CreditReceiving Inspection account @ PO price XX
Inventory A/P Accrual account @ PO price XX
Inventory uses the quantity and standard cost of the received item toupdate the receiving inspection and subinventory balances. Theaccounting entries are:
Account Debit CreditSubinventory accounts @ standard cost XX
Receiving Inspection account @ PO price XXDebit/Credit Purchase Price Variance
If you use average costing, you re–weight the average cost at receiptand do not have any purchase price variance.
The Inventory A/P Accrual account is the liability account that offsetsthe material accounts, and represents all inventory receipts notmatched in Payables.
Purchase Order Receipt to Expense Destinations
You can use the Receipts window to receive material directly from asupplier to the expense destination. See: Managing Receipts: page7 – 21. Please note this section addresses expense destinations only.
When you receive material from a supplier directly to expensedestinations, Purchasing performs the receipt and delivery transactionsin one step.
Purchasing uses the quantity received and the purchase order price toupdate the purchase order and the receiving inspection account. Theaccounting entries are:
Account Debit CreditReceiving Inspection account @ PO price XX
Expense A/P Accrual account @ PO price XX
Purchasing uses the quantity and purchase order price of the receiveditem to update the receiving inspection and expense accounts. Theaccounting entries are:
Account Debit CreditPO distribution charge accounts @ PO price XX
Receiving Inspection account @ PO price XX

7 – 85Receiving
Account CreditDebitEncumbrance @ PO price XX
Reserve for Encumbrance @ PO price XX
Match, Approve, and Post an Invoice
When you enter an invoice in Payables, you match each invoice line toa specific purchase order shipment in Purchasing. You can set upPayables to ensure that you pay only for the quantity you received. Ifyou accrue your receipts online, Payables clears the PO distributionaccrual account as part of the accounting transactions.
Inventory Receipts
Under standard costing, when you initially enter the purchase orderreceipt and delivery to inventory destinations in Purchasing, you creditthe Inventory A/P Accrual Account for the amount of the receipt, debitthe inventory at standard cost, and charge the difference to thepurchase price variance. Encumbrance is reserved for the receiptquantity @ purchase order amount. When you match the invoice to thepurchase order, Payables offsets the Inventory A/P Accrual Accountfor the quantity invoiced times the PO price, and records the supplierliability and the invoice price variance. Encumbrances are created orreversed depending on the positive (created) or negative (reversed)variances.
In general, invoice price variance is the difference between the purchaseprice and the invoice price paid for a purchase order receipt.Purchasing reports invoice variance. Upon invoice approval, Payablesautomatically records the invoice price variance to the invoice pricevariance account and, if appropriate, to the exchange rate varianceaccount.
Account Debit CreditAP accrual account @ PO price XXInvoice Price Variance account @ Invoice Quantity *(Invoice Price – PO Price)
XX
Encumbrance XXA/P Liability @ (Invoice price * InvoiceQuantity)
XX
Reserve for Encumbrance XX
If you have a foreign currency purchase order, Payables also recordsexchange rate gains and losses.

7 – 86 Oracle Public Sector Purchasing User’s Guide
Expense Destination Receipts
When you initially enter the purchase order receipt and delivery toexpense destinations in Purchasing, when your Expense AccrualOption is set to On Receipt, the net accounting entry credits theExpense A/P Accrual Account for the amount of the receipt and debitsthe PO distribution charge account at purchase order price.Encumbrance is reversed for the Receipt Quantity at the PO amount.When you match the invoice to the purchase order, Payables offsets theExpense A/P Accrual Account for the quantity invoiced times the POprice and records the supplier liability for the amount of the invoice.Encumbrances are created or reversed depending on the positive(encumbrance created) or negative (encumbrance reversed) variance.
Normally, you charge the original expense account for any invoice pricevariances. You do not record invoice price variances for expensepurchases. Purchasing uses the Account Generator to set yourpurchase order distribution variance account to be the same as yourpurchase order charge account. If you want to record your invoiceprice variances to a separate account, use the Account Generator todefine the business rules you use to determine the correct invoice pricevariance account.
Account Debit CreditExpense A/P accrual account @ PO price XXPO distribution variance account (= POdistribution Charge Account) @ Invoice Quantity *(Invoice Price – PO Price)
XX
Encumbrance XXA/P Liability @ (Invoice price * InvoiceQuantity)
XX
Reserve for Encumbrance XX
Invoice Exchange Rate Variances
Note that Purchasing uses the functional currency for your set of booksin all receiving accounting entries. Purchasing converts foreigncurrency purchase order prices to the functional currency using thecurrency conversion rate from the purchase order. Payables uses thecurrency and the conversion rate of the invoice when bookingtransactions to the general ledger. If the conversion rate differsbetween the purchase order and invoice, the conversion difference isrecorded as an Exchange Rate Variance. Separate accounts are definedfor exchange rate gains and losses.

7 – 87Receiving
Return to Supplier From Receiving
You use the Returns window to return material from receivinginspection or from inventory to a supplier. If you use receivinginspection and you have delivered the material into inventory, youmust first return the goods to receiving before you can return to yoursupplier. For a return from inspection, Purchasing decreases thereceiving inspection balance, and reverses the accounting entry createdfor the original receipt. See: Returns: page 7 – 54.
Return To Supplier From Inventory or Expense Destinations
When you do not use receiving inspection, the return to suppliertransaction updates the same accounts as the direct receipt to theinventory or expense destination, with reverse transaction amounts.
Period–End Reconciliation Tasks
When you use perpetual inventories, you should balance yourinventory accounts to your inventory value report. You should alsoreview the general ledger journal transactions for inventory PurchasePrice Variance and A/P Accrual Accounts. You should look forpotential problems or errors such as transactions charged to the wrongaccount and duplicate transactions. This process is called theInventory Reconciliation and Period Close Review. Purchasing andInventory provide you with a set of reports you can use to reconcileyour transactions with your general ledger account balances quicklyand easily.
Period–End Checklist
Before reconciling your transactions with your general ledger accountbalances, you should perform the following steps:
1. Identify the period you want to reconcile and close.
2. Enter all receiving transactions for goods and services you receivedduring the period.
3. Enter and match all invoices you received during the period foryour receipt accrual entries.
4. Perform the GL Transfer in Inventory and reconcile your InventoryPurchase Price Variance and A/P Accrual entries.
5. Identify the period–end balances of the following accounts in yourgeneral ledger:

7 – 88 Oracle Public Sector Purchasing User’s Guide
• Purchase Price Variance
• A/P Accrual Account
• Inventory Accounts
6. Reconcile the balance of the Purchase Price Variance account usingthe Purchase Price Variance Report (detailed below).
7. Identify the Invoice Price Variances amount and Accrued Receiptsamounts in the A/P Accrual Account (detailed below).
8. Manually remove the Invoice Price Variance amount from the A/PAccrual Account using your general ledger (prior release IPV only).
9. Close your accounts payable period corresponding to thepurchasing period for your receipts accrual entries. See:Controlling the Status of AP Accounting Periods, Oracle PublicSector Payables User’s Guide
10. Perform period–end accruals steps for purchasing and one–timeitems as described in the following section.
11. Close the period in Purchasing, (You do not need to reverse anyjournal entry batch in the following period). See: ControllingPurchasing Periods: page 1 – 71.
12. Close your Inventory period after review. See: MaintainingAccounting Periods, Oracle Inventory User’s Guide .
13. Close your General Ledger period after review.
Monitoring Price Variances
Purchasing provides you with reports you can use to review thepurchase and invoice price variances. You should run the PurchasePrice Variance Report weekly to review the accuracy of standard costsand purchase price variance. The Purchase Price Variance Report isalso a good indicator of buyer’s performance. However, you shouldmake sure to include in your analysis any fluctuation of market pricesbeyond buyer control or changes in standard costs. At the end of aperiod, you should run the Purchase Price Variance Report for theentire period. See: Purchase Price Variance Report: page 9 – 87.
You should run the Invoice Price Variance Report monthly to reviewthe accuracy of standard costs and purchase order prices. The InvoicePrice Variance Report is also a good indicator of buyers’ performance.However, you should make sure to include in your analysis any pricingfluctuations beyond buyer control.

7 – 89Receiving
You can sort the Invoice Price Variance Report by Category or Supplier,and you can restrict your report to invoice price variances for a specificCategory, Supplier, or Period Name.
At the end of a period, you should run the Invoice Price VarianceReport for this period. Identify the invoice price variance for allpurchase orders charged to the Inventory A/P Accrual Account andcompare it with the balance of the Invoice Price Variance account inyour general ledger. See: Invoice Price Variance Report: page 9 – 41.
Reconciling A/P Accrual Accounts Balance
At any given time, the balance of the A/P accrual accounts can accountfor the following transactions:
• Uninvoiced Receipts
• Over–invoiced Receipts
• Invoice Price Variance (for transactions created using Release 9)
• Errors (Invoices or inventory transactions charged to thisAccount by mistake)
You need to analyze the balance of the A/P accrual accounts,distinguish accrued receipts from invoice price variances, and identifyerrors.
Analyzing the A/P Accrual Account Balance
You need to monitor potential problems with purchasing and receivingactivities that can affect the accuracy of your A/P accrual accounts.You can use the Accrual Reconciliation Report to identify the followingproblems in receiving, purchasing, inventory, work in process, oraccounts payable transactions:
• Quantities differ between receipts and invoices
• Incorrect purchase order or invoice unit prices (previous releasesonly)
• Discrepancies in supplier billing
• Invoice matched to wrong purchase order or wrong purchaseorder line
• Received against the wrong purchase order or order line

7 – 90 Oracle Public Sector Purchasing User’s Guide
• Miscellaneous inventory or work in process transactions that donot belong to the accrual accounts
• Payables entries for sales tax and freight that do not belong tothe accrual accounts
Using the Accrual Reconciliation Report
Use the Accrual Reconciliation Report to analyze the balance of theAccounts Payable (A/P) accrual accounts. To submit this report, youmust have Purchasing and Payables installed. You can accrue bothexpense and inventory purchases as you receive them. When thishappens, you temporarily record an accounts payable liability to yourExpense or Inventory A/P accrual accounts. When Payables matchesand approves the invoice, Payables clears the A/P accrual accounts andrecords the liability from the supplier site. See: Accrual ReconciliationReport: page 9 – 5.
Typically, you run this report at month end. After you have enteredyour receipt transactions and matched your invoices, you can run theAccrual Reconciliation Report for any transaction date range andidentify any differences between your PO Receipts and A/P Invoices.This report also displays any miscellaneous transactions recorded inerror to your accrual accounts. These miscellaneous transactions ortransactions unrelated to purchase order receipts may be fromPayables, Inventory, or Work in Process (depending on yourinstallation). After you have researched the reported accrual balances,you can use the Accrual Write–Off form to indicate which entries youwish to remove and write off from this report. And, after you havewritten off these entries, you can use the Accrual Write–Off Report assupporting detail for your manual journal entry.
Resolving Quantity Differences
The Accrual Reconciliation Report lets you easily identify quantitydifferences (i.e., when the quantity received for a purchase ordershipment is smaller than the quantity invoiced). Such differences leaveresidual balances that never clear from the A/P accrual accounts. Youshould investigate the cause of these differences and take correctiveactions before closing your period.
Common causes of quantity differences include late inventory receipts,incorrect receipt quantities, and supplier overbilling. To correct latereceipts, ensure that receivers enter all receipts into inventory. Tocorrect receipt quantities, enter receipt corrections. To correct
7 – 91Receiving
overbilling errors, follow your standard procedure for supplier debitmemos to clear the difference.
Resolving Price Differences
The Accrual Reconciliation Report lets you determine how much youshould have paid and whether the PO or invoice is correct. Suchdifferences leave residual balances that never clear from the A/Paccrual accounts. You should investigate the cause of these differencesand take corrective actions before closing your period.
Accrual Process for Period–End Accruals
Key points for accruing expense purchases at period–end include:
• You record the total uninvoiced receipt liabilities accrued duringthe accounting period.
• Actual journal entries are created for the amount of the receiptliabilities, debiting the charge account and crediting the POdistribution accrual account (normally the Expense A/P AccrualAccount defined in the Define Purchasing Options form).
• You reverse accrual journal entries manually at the start of thenew accounting period.
• If you are using encumbrance accounting, purchase orderencumbrance is relieved when the invoice(s) matched to thepurchase order are posted to the general ledger.
Receiving Transactions
Purchasing does not record any accounting entries for expense during areceiving transaction if you use period–end accruals. You record all ofyour uninvoiced liabilities at month end using the Receipt Accruals –Period–End process. See: Receipt Accruals – Period End Process: page9 – 105
Receipts Accruals–Period End
Use the Receipt Accruals – Period End process to create period–endaccruals for your uninvoiced receipts for expense distributions.Purchasing creates an accrual journal entry in your general ledger foreach uninvoiced receipt you choose using this form. If you use

7 – 92 Oracle Public Sector Purchasing User’s Guide
encumbrance or budgetary control, Purchasing reverses yourencumbrance entry when creating the corresponding accrual entry.
Purchasing never accrues an uninvoiced receipt twice. Each time youcreate accrual entries for a specific uninvoiced receipt, Purchasingmarks this receipt as accrued and ignores it the next time you run theReceipt Accrual – Period–End process. Purchasing creates accrualentries only up to the quantity the supplier did not invoice for partiallyinvoiced receipts.
Purchasing creates the following accounting entries for eachdistribution you accrue using the Receipt Accruals – Period–Endprocess:
Account Debit CreditPO charge account @ Uninvoiced Quantity * POPrice
XX
Expense A/P accrual account @ UninvoicedQuantity * PO price
XX
As soon as you open the next period, Purchasing reverses the accrualentries using the following accounting entries:
Account Debit CreditExpense A/P accrual account @ UninvoicedQuantity * PO price
XX
PO charge account @ Uninvoiced Quantity *PO Price
XX
Match, Approve, and Post an Invoice
When you enter an invoice in Payables, you match each invoice line toa specific purchase order shipment in Purchasing. You can set upPayables to ensure that you pay only for the quantity you received. Ifyou accrue your uninvoiced receipts at period–end, Payables recordsthe expense transactions part of the accounting transactions:
Account Debit CreditPO Distribution Charge Account @ InvoiceQuantity * PO Price
XX
PO Distribution Variance Account @ InvoiceQuantity * (Invoice Price – PO Price)
XX
A/P Liability @ (Invoice price * InvoiceQuantity)
XX
☞
7 – 93Receiving
Attention: Normally, you charge the original expense accountfor any invoice price variances, so your PO distributionvariance account is the same as the PO distribution chargeaccount. You do not record invoice price variances for expensepurchases. Purchasing uses the Account Generator to set yourpurchase order distribution variance account to be the same asyour purchase order charge account. If you want to recordyour invoice price variances to a separate account, use theAccount Generator to define the business rules you use todetermine the correct invoice price variance account.
Complete Period Transactions
If you use encumbrance or budgetary control, Purchasing createsencumbrance journal entries in your general ledger each time youapprove a purchase order. Similar to accrual journal entries,encumbrance journal entries recognize a liability towards your supplierbefore any invoicing transactions occur. Unlike accrual journal entries,encumbrance journal entries are not actual transactions. GeneralLedger tracks actual and encumbrance journal entries and balancesseparately.
Period–End Checklist
Purchasing provides you with complete flexibility and control for yourperiod–end accruals. You can use the Uninvoiced Receipts Report toanalyze your uninvoiced non–inventory receipts before you accruethese receipts. You can then use the Receipt Accruals – Period–Endprocess as many times as you want to generate accrual entries for thereceipts you choose.
For your period–end reconciliation, you should perform the followingsteps:
1. Identify the purchasing period you want to reconcile and close.
2. Enter all receiving transactions for goods and services you receivedduring the period. Purchasing automatically creates receiptaccruals for all receipts you entered up to the end of this period. Toprevent any period–end disruption, Purchasing lets you provide areceipt date that is different from the date you enter the receipts.You never have to enter all the receipts for a period before the endof this period. You can enter these receipts later. You simply needto back date the receipt date.

7 – 94 Oracle Public Sector Purchasing User’s Guide
3. Enter and match all invoices you received during the period foryour receipt accrual entries. You should make sure that you solveall posting holds problems in Payables before accruing receipts.Purchasing creates accrual journal entries for all purchase ordersyou received and did not match to an invoice. If you matched apurchase order to an invoice, Purchasing does not accrue thecorresponding receipts. Purchasing does not accrue any purchaseorder that you closed on or before the end of the accrual periodyou choose. If the invoice is on posting hold, Payables has not yetaccounted for the liability corresponding to the invoice. Underthese conditions, the liability corresponding to this invoice wouldnot appear in your books for the period. Payables lets yourecognize this liability in the following period.
4. Close your accounts payable period corresponding to thepurchasing period for your receipt accrual entries.
Note: The List of Values for period end accruals does not requirethe Accounts Payable period to be closed, however it’s stronglyrecommended that closed periods are used, as the receipt accrualsprocess will not pick up invoices entered after the accruals processis run for the period.rcvaccov
5. For period–end accruals of expense purchases, run the UninvoicedReceipts Report. Use this report to analyze your uninvoicedreceipts. The Uninvoiced Receipts Report lets you use the sameselection criteria for your uninvoiced receipts as the ReceiptAccruals – Period–End process. You always know exactly whatyou accrue and for what amount.
6. For period–end accruals of expense purchases, use the ReceiptAccruals – Period–End process as many times as you need. Youcan use the search criteria to choose what you want to accrue andaccrue your receipts steps by steps. You create accruals for aspecific purchasing period. Purchasing automatically accrues alluninvoiced receipts your entered up to the end of the accrualperiod you specify. See: Receipt Accruals – Period End Process:page 9 – 105.
Each time you use the Receipt Accruals – Period–End process,Purchasing creates an unposted journal entries batch in yourgeneral ledger for your receipt accruals. If you are usingencumbrance, Purchasing creates another journal entries batch inyour general ledger corresponding to the encumbrance reversalentries for the uninvoiced receipts you accrued.
Purchasing never accrues your uninvoiced receipt twice. Each timeyou create accrual entries for a specific uninvoiced receipt,

7 – 95Receiving
Purchasing marks this receipt as accrued and ignores it the nexttime you use the Receipt Accruals – Period–End process.Purchasing creates accrual entries only up to the quantity yoursupplier did not invoice for your partially invoiced receipts.
7. Post Accrual and Encumbrance Reversal journal entry batches inyour general ledger (See the following section to identify Accrualand Encumbrance Reversal journal entry batches.)
8. Perform all the steps you need to close your accounting period andgenerate your period–end reports and financial statements in yourgeneral ledger.
9. Use your general ledger system to reverse all the receipt accrualand encumbrance reversal batches you created for your period–endaccruals.
10. Close the purchasing period for your receipt accruals. When youclose a purchasing period, Purchasing automatically un–marks allthe receipts you previously accrued to make sure you can accruethese receipts again if they are still uninvoiced in the next period.See: Uninvoiced Receipts Report: page 9 – 157.
Identifying Journal Entry Batches in General Ledger
Purchasing creates accrual journal entries in your general ledger whenyou accrue receipts. If you use encumbrance, Purchasing also createsencumbrance reversal journal entries corresponding to the receipts youaccrued. Purchasing automatically names journal entry batches,headers, and lines for you. The names Purchasing uses to createbatches are the following:
Period–End Accruals
Purchasing creates one batch each time you run the Receipt Accruals –Period–End process. Purchasing creates one header for each purchaseorder you accrue. See: Receipt Accruals – Period End Process: page9 – 105.
Journal Entry Batches
• Batch Name: PO/Accruals/[current date and time]/Batch:[JE_BATCH_ID of the Accruals Batch]
• Batch Type: Actual

7 – 96 Oracle Public Sector Purchasing User’s Guide
• Batch Status: Unposted
• Period: [Accrual Period]
• Debits: [Sum of all debits for all headers]
• Credits: [Sum of all credits for all headers]
Journal Entry Headers
• Header Name: Accrue/PO [PO Number–Release Number]
• Category: Accrual
• Source: Purchasing
• Currency: [PO Currency]
• Reverse: Yes
• Reverse to Period: [Next Period]
• Debits: [Sum of all debits for all lines]
• Credits: [Sum of all credits for all lines]
Purchasing creates two types of journal entry lines for each accruedreceipt:
• Distribution Lines (one for each distribution of an accruedpurchase order line)
• Accrued Receipt Lines (one for each accrued purchase order line)
Purchasing creates one line for each purchase order distribution youaccrued on the purchase order. Purchasing charges each line to thecharge account on the purchase order distribution. Purchasingcomputes the accrual amount by prorating the quantity accrued for thepurchase order shipment of the distribution to the quantity ordered onthe distribution.
Purchasing creates one journal entry line charged to the PO distributionaccrual account (normally the expense A/P accrual account). This linecorresponds to the amount accrued for a purchase order. The amountaccrued for a purchase order equals the sum of all uninvoiced receiptsfor this purchase order multiplied by the price for the correspondingpurchase order shipments. The accrued receipt journal entry linebalances all the distribution journal entry lines.
Distribution Journal Entry Lines
• Account: [Charge Account for PO Distribution]

7 – 97Receiving
• Amount: [Shipment Price * Quantity Received for Shipment *Quantity Ordered on Distribution/Quantity Ordered onShipment]
• Dr/Cr: Dr
• Description: Purchase Order Line Description
Accrued Receipt Journal Entry Lines
• Account: [Accrual Account for PO Distribution]
• Amount: [Sum of all amounts for Distributions Journal EntryLines for the same Header]
• Dr/Cr: Dr
• Description: Accrued Liability Account
Encumbrance Reversal
Purchasing creates one batch each time you use the Receipt Accruals –Period–End process if you use encumbrance.
Note that Encumbrance Journal Entry Batches are unbalanced inGeneral Ledger. General Ledger automatically offsets the Reserve forEncumbrance account with the balance of your encumbrance batch.You set up your Reserve for Encumbrance account when defining yourset of books. See: Defining Sets of Books, Oracle Public Sector GeneralLedger User’s Guide.
Purchasing creates one header for each purchase order you accrue.
Journal Entry Batches
• Batch Name: PO/Accruals/[current date and time]/Batch:[JE_BATCH_ID of the Encumbrance Batch]
• Batch Type: Encumbrance
• Batch Status: Unposted
• Period: [Accrual Period]
• Debits: 0.00
• Credits: [Sum of all credits for all headers]
Journal Entry Headers
• Header Name: Rev Enc/PO [PO Number–Release Number]
• Category: Purchases

7 – 98 Oracle Public Sector Purchasing User’s Guide
• Source: Purchasing
• Encumbrance Type: Obligation
• Currency: [PO Currency]
• Reverse: Yes
• Reverse to Period: [Next Period]
• Debits: 0.00
• Credits: [Sum of all credits for all lines]
Purchasing creates one line for each purchase order distribution youaccrued on the purchase order. Purchasing charges each line to theaccount on the purchase order distribution. Purchasing computes theline amount by prorating the quantity accrued for the purchase ordershipment of the distribution to the quantity ordered on the distribution.
Distribution Journal Entry Lines
• Account: [Charge Account for PO Distribution]
• Amount: [Shipment Price * Quantity Received for Shipment *Quantity Ordered on Distribution/Quantity Ordered onShipment]
• Dr/Cr: Cr
• Description: Purchase Order Line Description
Accrual Write–offs
If you choose the Perpetual Accrual Method within Purchasing,Purchasing records an accounts payable liability to an AP accrualaccount for goods received but not invoiced. When Payables matchesand approves the invoice for the received goods, Payables clears theaccounts payable accrual account and records the actual liabilityamount to the invoice accounts payable liability account.
After you have entered your receipt transactions and matched andapproved your invoices, you can run the Accrual Reconciliation Reportto identify any differences between your Purchasing receipts andPayables invoices. With this report, you can identify the followingproblems with receiving, purchasing, inventory, work in process, oraccounts payable transactions:
• Quantities differ between receipts and invoices

7 – 99Receiving
• Incorrect purchase order or invoice unit prices (previous releasesonly)
• Discrepancies in supplier billing
• Accounts Payable clerk matched an invoice to wrong purchaseorder or wrong purchase order line
• Receiving clerk received against the wrong purchase order orwrong purchase order line
• Miscellaneous inventory or work in process transactions that donot belong to the accrual accounts
• Payables entries for sales tax and freight that do not belong tothe accrual accounts
After you have researched the reported accrual balances, you can usethe Accrual Write–Offs window to indicate which entries you wish towrite off and remove from the Accrual Reconciliation Report. Submitthe Accrual Write Off Report, which lists the transactions you markedin the Accrual Write–Offs window, and use it to support a manualjournal entry to write off listed transactions.
Writing Off Accrual Transactions
Prerequisites:
❑ Payables and Purchasing are installed.
❑ Define your transactions reasons in Inventory’s TransactionReasons window. This gives you a means of classifying yourwrite–offs so you can record them in separate accounts when yourecord a manual journal entry to write off these transactions. TheAccrual Write Off Report provides a summary by transactionreason. See: Defining Transaction Reasons, Oracle Inventory User’sGuide.
❑ If you use Inventory and Work in Process, transfer to your generalledger transactions from these two sources.
❑ Transfer your Payables invoices to your general ledger. See:Payables Transfer to General Ledger Program, Oracle Public SectorPayables User’s Guide.

7 – 100 Oracle Public Sector Purchasing User’s Guide
� To write off a transaction from an accrual account:
1. Submit the Accrual Reconciliation Report. Review this report andidentify the transactions you want to write off. See: AccrualReconciliation Report: page 9 – 5.
2. Select Accrual Write–Offs from the menu. Enter search criteria inthe Write–Off Search Criteria region to find the transactions youwant to write off:
• Enter the Source:
AP. Payables.
INV. Inventory.
PO. Purchasing.
WIP. Work in Progress.
• You can optionally enter the following additional search criteria:Account number, Item number, item Description, PO Number,Document Order Line, Document Number, Document Line,Destination Type, Quantity, and a date range. You can alsorestrict the search to include written off transactions andtransactions matched to a purchase order.
3. Choose Find to initiate the search and display the results in theWrite–Off Transactions region.
4. Select the transactions that you want to write off. Enter a Write OffDate that is in the same accounting period as the journal entry youwill prepare to write off selected transactions.
5. Save your work. Transactions that you selected to write off in thiswindow will no longer appear on the Accrual ReconciliationReport. They will appear on the Accrual Write Off Report, which isused to support your manual journal entry.
6. Submit the Accrual Write Off Report. See: Accrual Write–OffReport: page 9 – 13.
7. Using the Accrual Writeoff Report as support, prepare a manualjournal entry for the transactions you wish to write off. Optionallyprepare a journal entry line for each transaction reason.
See Also
Defining Accrual Options: page 1 – 32
Setting Up Inventory Accruals: page 7 – 75

7 – 101Receiving
Defining Purchase Order Receipt Accruals: page 7 – 102
Overview of Receipt Accounting: page 7 – 73
Reconciling A/P Accrual Accounts Balance: page 7 – 89
Accrual Process for Perpetual Accruals: page 7 – 81

7 – 102 Oracle Public Sector Purchasing User’s Guide
Automatic Offsets in Oracle Public Sector Purchasing
Receipt Accruals
The default Account Generator configuration in Purchasing builds acharge, budget, accrual, and variance account for each purchase order,release, and requisition distribution based on the distribution’sExpense, or Inventory, destination type. Purchasing always buildsthese accounts using the Account Generator; you cannot disable thisfeature.
To populate the Accrual account for distributions with an Expensedestination type, the Account Generator locates the Expense APAccrual Account that you specify in Define Purchasing Options as partof your application setup and copies it into the Accrual Account inyour document. The Account Generator then overlays the balancingsegment of the AP Accrual Account with the balancing segment of thecharge account so that your transactions always balance by fund.
Defining Purchase Order Receipt Accruals
You can create balanced offsets for receipt accrual accounts inPurchasing by customizing the default configuration of the AccountGenerator to overlay the balancing segment of the AP Accrual Accountwith the balancing segment of the charge account so that yourtransactions always balance by balancing segment.
Prerequisites
❑ Establish your Chart of Accounts. See: Defining Your Chart ofAccounts, Oracle Public Sector General Ledger User’s Guide
❑ See Prerequisites to Using the Account Generator in: Decide HowTo Use the Account Generator: page 0 – 2.
� To build Purchase Order Receipt Accrual Accounts:
1. Use the same Chart of Accounts you used to build the purchaseorder charge accounts by balancing segment, substituting thereceipt accrual liability account for the expense account.
The Account Generator function is called from the Purchase Orderswindow to automatically create the receipt accrual liability

☞
7 – 103Receiving
accounts by balancing segment on each purchase orderdistribution.
Attention: Use the same balancing segment for the charge accountand the receipt accrual account so the receipt transactions willbalance by balancing segment.
2. Customize your Account Generator process. See: Customizing theAccount Generator for Oracle Public Sector Purchasing: page0 – 12.
See Also
Automatic Offsets in Oracle Public Sector Purchasing: page 7 – 102
Defining Purchase Order Receipt Accruals: page 7 – 102
Defining Transaction Reasons, Oracle Inventory User’s Guide
Accrual Reconciliation Report: page 9 – 5
Accrual Write Off Report: page 9 – 13
Overview of Receipt Accounting: page 7 – 73

7 – 104 Oracle Public Sector Purchasing User’s Guide

C H A P T E R
8T
8 – 1Inquiries
Inquiries
his chapter tells you everything you need to know about OraclePublic Sector Purchasing Inquiries, including:
• Viewing Action History: page 8 – 2

8 – 2 Oracle Public Sector Purchasing User’s Guide
Viewing Action History
Use this window to review the action history for specific purchasingdocuments or document lines.
� To view action history:
1. Navigate to the Action History window by selecting View ActionHistory from the Special menu in the following windows:
• Releases
• Purchase Order Headers
• Purchase Order Lines
• Purchase Order Shipments
• Purchase Order Distributions
• Requisition Headers
• Requisition Lines
• Requisition Distributions
• View Requisitions
Purchasing displays the document approval action Sequencenumber, the Date of the approval action, the Revision number, theAction performed (Accept, Approve, Approve and Reserve,Cancel, Forward, Import, Reject, Reserve, or Submit), the userwhom the action was Performed By, and any Notes.

8 – 3Inquiries
When the Action field is empty, the Performed By field displays thename of the employee in whose approval queue the documentcurrently resides.
2. Select the Cancel button to return to the previous window.

8 – 4 Oracle Public Sector Purchasing User’s Guide

C H A P T E R
9T
9 – 1Reports and Processes
Reports and Processes
his chapter tells you everything you need to know about thefollowing Oracle Public Sector Purchasing reports and processes:
• Accrual Reconciliation Report: page 9 – 5
• Accrual Write–Off Report: page 9 – 13
• Advanced Shipment Notice Discrepant Receipts Report: page9 – 16
• ASL Upgrade Process: page 9 – 17
• AutoSubmit Process: page 9 – 94
• Backordered Internal Requisitions Report: page 9 – 18
• Blanket and Planned PO Status Report: page 9 – 19
• Buyer Listing: page 9 – 21
• Buyer’s Requisition Action Required Report: page 9 – 23
• Cancelled Purchase Orders Report: page 9 – 25
• Cancelled Requisitions Report: page 9 – 26
• Contract Status Report: page 9 – 28
• Create Internal Sales Orders Process: page 9 – 29
• Create Releases Process: page 9 – 30
• Encumbrance Detail Report: page 9 – 31
• Expected Receipts Report: page 9 – 33

9 – 2 Oracle Public Sector Purchasing User’s Guide
• Fill Employee Hierarchy Process: page 9 – 35
• Financials/Purchasing Options Listing: page 9 – 36
• Internal Requisition Status Report: page 9 – 37
• Internal Requisitions/Deliveries Discrepancy Report: page 9 – 39
• Invoice Price Variance Report: page 9 – 41
• Invoice Price Variance by Supplier Report: page 9 – 43
• Item Detail Listing: page 9 – 45
• Item Summary Listing: page 9 – 47
• Location Listing: page 9 – 48
• Matching Holds by Buyer Report: page 9 – 50
• New Supplier Letter Report: page 9 – 52
• Open Purchase Orders Report (by Buyer): page 9 – 54
• Open Purchase Orders Report (by Cost Center): page 9 – 55
• Overdue Supplier Shipments Report: page 9 – 56
• Overshipments Report: page 9 – 58
• Payment on Receipt: page 9 – 60
• Printed Change Orders Report (Landscape): page 9 – 65
• Printed Change Orders Report (Portrait): page 9 – 67
• Printed Purchase Order Report (Landscape): page 9 – 69
• Printed Purchase Order Report (Portrait): page 9 – 71
• Printed RFQ Report (Landscape): page 9 – 73
• Printed RFQ Report (Portrait): page 9 – 75
• Printed Requisitions Report: page 9 – 77
• Purchase Agreement Audit Report: page 9 – 78
• Purchase Order Commitment by Period Report: page 9 – 80
• Purchase Order Detail Report: page 9 – 82
• Purchase Order Distribution Detail Report: page 9 – 84
• Purchase Order and Releases Detail Report: page 9 – 86
• Purchase Price Variance Report: page 9 – 87
• Purchase Requisition Status Report: page 9 – 89

9 – 3Reports and Processes
• Purchase Summary Report by Category: page 9 – 91
• Purchasing Activity Register: page 9 – 92
• Purchasing Database Administration: page 9 – 94
• Purchasing Interface Errors Report: page 9 – 98
• Quality Code Listing: page 9 – 100
• Quotation Action Required Report: page 9 – 101
• RFQ Action Required Report: page 9 – 103
• Receipt Accruals – Period–End Process: page 9 – 105
• Receipt Adjustments Report: page 9 – 108
• Receipt Traveler: page 9 – 110
• Receiving Account Distribution Report: page 9 – 112
• Receiving Exceptions Report: page 9 – 114
• Receiving Transaction Processor: page 9 – 117
• Receiving Transactions Register: page 9 – 119
• Receiving Value Report: page 9 – 122
• Receiving Value Report by Destination Account: page 9 – 125
• ReqExpress Templates Listing: page 9 – 127
• Requisition Activity Register: page 9 – 128
• Requisition Distribution Detail Report: page 9 – 129
• Requisition Import Process: page 9 – 130
• Requisition Import Exceptions Report: page 9 – 134
• Requisitions on Cancelled Sales Order Report: page 9 – 136
• Reschedule Requisitions Process: page 9 – 137
• Savings Analysis Report (by Buyer): page 9 – 138
• Savings Analysis Report (by Category): page 9 – 140
• Send Notifications for Purchasing Documents: page 9 – 142
• Standard Notes Listing: page 9 – 143
• Substitute Receipts Report: page 9 – 144
• Supplier Affiliated Structure Listing: page 9 – 145
• Supplier Price Performance Analysis Report: page 9 – 146

9 – 4 Oracle Public Sector Purchasing User’s Guide
• Supplier Purchase Summary Report: page 9 – 148
• Supplier Quality Performance Analysis Report: page 9 – 150
• Supplier Service Performance Analysis Report: page 9 – 152
• Supplier Volume Analysis Report: page 9 – 154
• Suppliers on Hold Report: page 9 – 155
• Tax Code Listing: page 9 – 156
• Uninvoiced Receipts Report: page 9 – 157
• Unit of Measure Class Listing: page 9 – 159
• Unit of Measure Listing: page 9 – 160
• Unordered Receipts Report: page 9 – 162
• Workflow Background Process: page 9 – 163

9 – 5Reports and Processes
Accrual Reconciliation Report
The Accrual Reconciliation Report can be used to analyze the balanceof the Accounts Payable (A/P) accrual accounts. You can accrue bothexpense and inventory purchases as you receive them. When thishappens, you temporarily record an accounts payable liability to yourExpense or Inventory A/P accrual accounts. When Payables matchesand approves the invoice, Payables clears the A/P accrual accounts andrecords the liability from the supplier site.
This report is available in two versions: Accrual Reconciliation Reportand Accrual Rebuild Reconciliation Report. When you specify AccrualRebuild Reconciliation Report, the report selects the accounting entriesfrom the appropriate source (subledgers). This accounting informationresides in a temporary table and remains until you rebuild thisinformation again. When you specify Accrual Reconciliation Report,the report does not reselect this information. Instead, it merely reportsusing the pre–existing information. This feature saves you time,because you do not have to recreate the accrual information every timeyou submit a report. Typically, you specify the Accrual RebuildReconciliation Report at month end and use the Accrual ReconciliationReport for interim reports. Note that the title of the report remains theAccrual Reconciliation Report even if you specify the rebuild option.
After you have entered your receipt transactions and matched yourinvoices, you can run the report for any transaction date range andidentify any differences between your PO Receipts and A/P Invoices.This report also displays any miscellaneous transactions recorded inerror to your accrual accounts. These miscellaneous transactions ortransactions unrelated to purchase order receipts may be fromPayables, Inventory, or Work in Process (depending on yourinstallation). After you have researched the reported accrual balances,you can use the Accrual Write–Offs window to indicate which entriesyou wish to remove and write off from this report. And, after you havewritten off these entries, you can use the Accrual Write–Off Report assupporting detail for your manual journal entry.
The Accrual Reconciliation Report helps you monitor potentialproblems with purchasing and receiving activities that can affect theaccuracy of your A/P accrual accounts. You can review this report toidentify the following problems in receiving, purchasing, inventory,work in process, or accounts payable transactions:
• Quantities differ between receipts and invoices
• Incorrect purchase order or invoice unit prices (previous releasesonly)

9 – 6 Oracle Public Sector Purchasing User’s Guide
• Discrepancies in supplier billing
• Accounts payable matched invoice to wrong purchase order orwrong purchase order line
• Receiving clerk received against the wrong purchase order orwrong purchase order line
• Miscellaneous inventory or work in process transactions that donot belong to the accrual accounts
• Payables entries for sales tax and freight that do not belong tothe accrual accounts. See: Overview of Receipt Accounting:page 7 – 73.
If you use Inventory, this report automatically reconciles your activityfor all inventory organizations. If you use Work in Process for outsideprocessing receipts, this report also reconciles all work in processactivity for all organizations.
In addition, the Accrual Reconciliation Report supports multiple A/Paccrual accounts. In this case, the report groups information by eachaccount. When you define your purchase order requisitions or orders,the Account Generator processes create your A/P accrual accounts.Typically, you use only one A/P accrual account for all of yourinventory organizations. However, for certain situations you may wantto use more.
If you used Inventory, Purchasing and Payables in a prior release, theAccrual Reconciliation Report displays any invoice price variance fromthese entries. In Release 10, you do not have any invoice price varianceremaining in your A/P accrual accounts, since Payables records invoiceprice variances as you match and approve the invoices. However, bydisplaying any invoice price variance from the previous release, youcan resolve any open issues using the Release 10 report. If you did notuse the previous release, the Invoice Price Variance column is usuallyzero.
The report prints the following Accrual Transaction types:
Accounts Payable Accrual Transactions
A/P invoice matching transaction for which thereis a receipt against the same purchase order andpurchase order line.
A/P invoice matching transaction for which thereis a receipt on the correct purchase order butagainst a different purchase order line.
A/P Line Match
A/P PO Match

9 – 7Reports and Processes
A/P invoice matching transaction for which thereis a receipt for the item but against a differentpurchase order and purchase order line.
A/P invoice that has no corresponding receiptmatched to it. However, this invoice is for a validpurchase order for an item you intend to receive.
A/P invoice matching transaction matched to apurchase order line with an invalid item number.The item is not in your item master but is presenton your transactions. This is usually caused byincorrect data conversion from a legacy system.The report lists the reciprocal of the transactionamount in the Invoice Price Variance column.
A/P transaction charged to the A/P accrualaccount that is not matched to any purchase order.Such a transaction should typically be charged toan expense account. The report lists the reciprocalof the transaction amount in the Invoice PriceVariance column.
A/P invoice exchange rate variance charged to theA/P accrual account in error. You can use theAccrual Write–Offs window to remove this entryfrom the report. The report lists the reciprocal ofthe transaction amount in the Invoice PriceVariance column.
A/P invoice price variance charged to the A/Paccrual account in error. You can use the AccrualWrite–Offs window to remove this entry from thereport. The report lists the reciprocal of thetransaction amount in the Invoice Price Variancecolumn.
Purchasing Accrual Transactions
Receipt transaction from a purchase order intoreceiving.
Receipt transaction from a purchase order intoreceiving, and then delivered to its destination.
Purchase order return from receiving to thesupplier.
A/P Item Match
A/P No Match
A/P No Item
A/P No PO
Exchange Rate Var
Invoice Price Var
Receive
Deliver
Return to Supplier

9 – 8 Oracle Public Sector Purchasing User’s Guide
Inventory Accrual Transactions
The Accrual Reconciliation Report lists any Inventory transaction to theA/P accrual account. Typically, these material transaction types areAccount issue, Account receipt, Account alias issue, Account aliasreceipt, Miscellaneous issue, or Miscellaneous receipt transaction.Usually, these transactions should not be charged to the A/P accrualaccount.
Work in Process Accrual Transactions
The Accrual Reconciliation Report lists any Work in Process transactionto the A/P accrual account. Typically, these are Assembly scraptransactions that are charged to the wrong account.
The report prints the unit of measure for the purchase order receipt, theinvoice, the inventory transaction, or work in process transaction.
The Transaction Quantity is the quantity received or the quantityinvoiced, depending on the type of transaction. Quantities received arenegative since purchase order receipts credit the A/P accrual account.Quantities invoiced are positive since invoices debit the A/P accrualaccount.
The Unit Price is the purchase order price of the receipt, the actualinvoice price, or the transaction unit cost. If the purchase order is in aforeign currency, the purchase order price is in the base currency ofyour set of books using the currency conversion rate from the purchaseorder at the time of receipt.
The Transaction Amount is the total amount posted by the transactionsource to the A/P accrual account. The total of this column should addup to the balance of your A/P accrual account in your general ledger,by source (subledger). Purchase order receipts are negative to indicatea credit. Payables invoices are positive to indicate a debit. Thisamount is in the base currency for your set of books.
For prior release transactions, the report prints the actual invoice pricevariance. The total of this column represents the total invoice pricevariance for the reported transactions. If you did not use the previousrelease, the Invoice Price Variance column is usually zero. You can usethe Accrual Write–Offs window to remove any invoice price variancerelated transactions from this report. This amount is in the basecurrency for your set of books.
If you used Inventory and Payables in a prior release, the Net AccrualBalance column represents the net balance of the A/P accrual accountafter you moved the IPV out of this account. If you did not use aprevious release, this column usually has the same value as the

☞
9 – 9Reports and Processes
Transaction Amount column. This amount is in the base currency foryour set of books.
Report Summary By Source and Accrual Transaction
Purchasing displays the report totals by each transaction source for alltransactions in your report. Within each transaction source, Purchasingdisplays a summary total for each accrual transaction. Analyze theaccrual transaction summary totals for purchase order receipt, invoice,and other miscellaneous transactions.
If you do not display written off transactions, a summary columndisplays the total write–offs not included in the report. If you do notdisplay zero balance purchase order line entries, a summary columndisplays the accrual transaction totals not included in the report. Usingthe total column, you can balance this report by transaction source toyour general ledger.
Prerequisites
If you install Purchasing and Oracle Public Sector Payables, you canrun this report. If you accrue expense purchases on receipt, you canreconcile your expense A/P accrual account using this report. If youaccrue expense purchases at period end and you do not performinventory receipts, no information will be available to report. If youhave installed Inventory or Work in Process, the AccrualReconciliation Report also displays any inventory or work in processtransactions for the accrual accounts.
Attention: Most commercial installations accrue expensereceipts at period end because this information is not requiredas the receipt occurs. If you accrue expense purchases onreceipt, you have more entries to reconcile in the A/P accrualaccounts. In addition, if you also receive inventory, you needto use the Receiving Value By Destination Account Report tobreak out your receiving/inspection value by asset andexpense.
In addition, for transactions to appear on this report, you shoulddownload the transactions to the General Ledger interface. ForPayables, you need to create journal entries for the invoices. ForPurchasing, all transactions are automatically transferred to the GeneralLedger interface. For Inventory and Work in Process, you must firstperform a GL transfer or period close, for transactions to appear on this

☞
9 – 10 Oracle Public Sector Purchasing User’s Guide
report. The Accrual Reconciliation Report requires the transactions tobe transferred to the General Ledger interface to ensure the reportbalances to your general ledger.
Attention: Since the Accrual Reconciliation Report is 180columns wide, you need to use a printer with this capability.
Report Submission
In the Submit Requests window, select Accrual Reconciliation Reportor Accrual Rebuild Reconciliation Report in the Name field.
Report Parameters
Title
Enter a user defined Title for the report.
Sort By
Use the Sort By feature to produce a report customized to your specificneeds. Choose one of the following options:
Sort the report by item (aging date, account, item,and purchase order line). When you sort by item,the item heading is printed.
Sort the report by supplier (aging date, account,supplier, and purchase order line). When you sortby supplier, the supplier name heading is printed.
GL Dates From/To
Enter the beginning and ending general ledger dates. These are alsoknown as the beginning and ending transaction dates.
Items From/To
Enter the beginning and ending item numbers.
Item
Supplier

9 – 11Reports and Processes
Suppliers From/To
Enter the beginning and ending supplier names.
Include All Transactions
Enter Yes or No to indicate whether you want to print zero balancepurchase order line subtotals on the report. The report adds up allreceipts and invoices by purchase order line. When you specify Yesand the net purchase order line amount is zero, the report prints allreceipt or invoice entries for that line. When you specify No, the reportconsiders the Transaction Amount Tolerance and Transaction QuantityTolerance parameters. When you choose the Accrual RebuildReconciliation Report, the default is No. When you choose the AccrualReconciliation Report, the default is Yes.
Suggestion: To minimize the size of the report, you shouldspecify No for this option. However, if you want to see allaccrual entries, you should specify Yes.
Transaction Amount Tolerance
If you selected No for Include All Transactions, specify the net amountbelow which purchase order line transactions are not included in thereport.
Transaction Quantity Tolerance
If you selected No for Include All Transactions, specify the net quantitybelow which transactions are not included. This condition is checkedonly if the transaction amount tolerance is satisfied.
Include WrittenOff Transactions
Enter Yes or No to indicate whether you want to print written offentries on the report. When you specify Yes, an asterisk appears in thefar right column to indicate a written off transaction. By selecting No,you decrease the report size. The default is No.
Aging Number of Days
Enter the number of days you would like the report to groupinformation. For example, if you enter 60, for 60 days, the report firstgroups all purchase order lines that have the earliest transaction date inthe past sixty days, and then groups the next set of lines with the

9 – 12 Oracle Public Sector Purchasing User’s Guide
earliest transaction date from 60 to 120 days, and so on. If you do notspecify a number, the report displays all receipts and invoices together.This report parameter helps you separate your older activity from yourcurrent activity. When you enter a number of days, a subheadingappears on the report to indicate the to and from range of days for eachgroup of information.
See Also
Inventory Standard Cost Transactions, Oracle Cost Management User’sGuide
Overview of Standard Costing, Oracle Cost Management User’s Guide
Overview of Average Costing, Oracle Cost Management User’s Guide
Overview of Work in Process Costing, Oracle Work in Process User’sGuide
Overview of Receipt Accounting: page 7 – 73
Accrual Write–Off Report: page 9 – 13
Using the Account Generator in Oracle Public Sector Purchasing: page0 – 2
Submitting a Request, Oracle Applications System Administrator’s Guide

9 – 13Reports and Processes
Accrual Write–Off Report
The Accrual Write–Off Report to provide supporting detail for yourwrite–off journal entries. The process is as follows. First, you analyzethe Accrual Reconciliation Report for transactions that you shouldexpense out of the accrual accounts. After you have researched thereported accrual balances, you then use the Accrual Write–Off windowto indicate which entries you wish to remove and write off from thisreport. And, after you have written off these entries, you use theAccrual Write–Off Report as supporting detail for your manual journalentry.
The Accrual Write–Off Report displays entries for all organizations.Typically, you run this report at month end, at the time you prepareyour manual general ledger journal entry. You can run this report forany write–off date range. These dates represent the journal entry datesfor your manual journal entry. Since the Accrual Write–Off windowand report do not directly create journal entries, there are no controlsover the write–off date. In addition, the report displays both write–offsand any write–off reversals. Reversals display an opposite transactionamount as the initial write–off.
For example, you may want to write off a miscellaneous inventorytransaction that debited your Inventory A/P accrual account. Afteryou write off the transaction with the Accrual Write–Off window, theAccrual Write–Off Report displays a positive amount for yourwrite–off. If you go back to the Accrual Write–Off window and reversethe write–off, the Accrual Write–Off Report displays a negative amountfor your reversal, and a positive amount for the initial write–off.
You can use this report to display written off transactions for thefollowing problems in receiving, purchasing, inventory, work inprocess, or accounts payable transactions:
• Quantities differ between receipts and invoices
• Incorrect purchase order or invoice unit prices (previous releasesonly)
• Discrepancies in supplier billing
• Accounts payable matched invoice to wrong purchase order orwrong purchase order line
• Receiving clerk received against the wrong purchase order orwrong purchase order line
• Miscellaneous inventory or work in process transactions that donot belong to the accrual accounts

9 – 14 Oracle Public Sector Purchasing User’s Guide
• Payables entries for sales tax and freight that do not belong tothe accrual accounts. See: Overview of Receipt Accounting:page 7 – 73.
In addition, the Accrual Write–Off Report supports multiple A/Paccrual accounts in Purchasing. When you define your purchase orderrequisitions or orders, the Account Generator processes create yourA/P accrual accounts. Typically, you only use one A/P accrual accountfor all of your inventory organizations. However, for certain situationsyou may want to use more.
The Document Number is the receipt number, invoice number, ortransaction number, depending on the type of transaction.
The Transaction Quantity is the quantity received or the quantityinvoiced, depending on the type of transaction. Quantities received arenegative since purchase order receipts credit the A/P accrual account.Quantities invoiced are positive since invoices debit the A/P accrualaccount.
The Unit Price is the purchase order price of the receipt, actual invoiceprice, or transaction unit cost. If the purchase order is in a foreigncurrency, the purchase order price is in the currency of your set ofbooks using the currency conversion rate from your purchase order atthe time of receipt.
For accrual write–offs, the Transaction Amount is the total amountposted by the transaction source to the A/P accrual account. If youreverse a write–off, the transaction amount is printed with an oppositesign from the original write–off. You use the subtotals for theTransaction Amount column when preparing your manual journalentry.
Prerequisites
Since this report displays transactions from purchase order receiptsand accounts payable invoices, you must install Purchasing andPayables to run this report. If you have Inventory or Work inProcess, the Accrual Write–Off Report also displays any inventory orwork in process transactions you have written off.

9 – 15Reports and Processes
Report Submission
In the Submit Requests window, select Accrual Write–Off Report in theName field.
Report Parameters
Write–Off Dates From/To
Enter the beginning and ending general ledger dates. Usually, these arethe beginning and ending dates of the accounting period.
Write–Off Reason
Enter a specific write–off reason.
Print Comments
Enter Yes or No to indicate whether you want to print comments on thereport.
See Also
Submitting a Request, Oracle Applications System Administrator’s Guide
Overview of Receipt Accounting: page 7 – 73
Using the Account Generator in Oracle Public Sector Purchasing: page0 – 2

9 – 16 Oracle Public Sector Purchasing User’s Guide
Advanced Shipment Notice Discrepant Receipts Report
For each Advance Shipment Notice (ASN) sent to you by your supplier,the Advanced Shipment Notice Discrepant Receipts report checks forovershipped or unfulfilled shipments. It looks for discrepanciesbetween what the ASN said was shipped and what you actuallyreceived. In addition, these discrepancies are sent to the EDI Gatewayprocess responsible for generating Application Advices. (For example,Application Advices are sent back to suppliers detailing errors thatoccurred when the suppliers sent ASNs.)
Note: Goods returned to a supplier are considered shipped.For example, if a supplier promised to ship 200 items and youreceived 200 items but returned 40, this is not considered adiscrepant receipt.
Report Submission
In the Submit Requests window, select Advanced Shipment NoticeDiscrepant Receipts in the Name field.
Report Parameters
Start Date / End Date
The report evaluates discrepancies for expected receipt dates that fallwithin the date range you enter. It also sends information to EDIGateway for the generation of Application Advices, if the expectedreceipt date of the shipment falls within the date range you enter.
See Also
Submitting a Request, Oracle Applications System Administrator’s Guide
Advance Shipment Notices (ASNs): page 7 – 14

9 – 17Reports and Processes
ASL Upgrade Process
The ASL Upgrade process performs the same upgrade of AutoSourcerules as AutoInstall, which was used to upgrade your Purchasingapplication or install it for the first time. AutoSource rules in previousreleases of Purchasing have been replaced by enhanced sourcing rulesand Approved Supplier List (ASL) entries in the current release. BothAutoInstall and the ASL Upgrade process are designed to upgrade oldAutoSource rules.
You run this process only if AutoInstall failed to upgrade yourAutoSource rules automatically.
Report Submission
In the Submit Requests window, select ASL Upgrade in the Name field.
Report Parameters
Supplier Status
Select a Supplier Status of New. This Supplier Status appears next to allof your suppliers in the Approved Supplier List window once the ASLUpgrade process upgrades your ASL entries. New is the only SupplierStatus supported by the ASL Upgrade process.
Upgrade Documents From
Select Current and future rules. This option upgrades source documentswith current effectivity dates as well as effectivity dates that don’tbegin until the future. Current and future rules is the only optionsupported by the ASL Upgrade process.
See Also
Submitting a Request, Oracle Applications System Administrator’s Guide
Oracle Applications Upgrade Manual

9 – 18 Oracle Public Sector Purchasing User’s Guide
Backordered Internal Requisitions Report
The Backordered Internal Requisitions Report details information onyour backordered internally–sourced requisition lines. You can run thisreport only if Order Entry is installed.
Report Submission
In the Submit Requests window, select Backordered InternalRequisitions Report in the Name field.
Report Parameters
Creation Dates From/To
Enter the beginning and ending creation dates.
Requestor
Enter a requestor name.
Subinventories From/To
Enter the beginning and ending subinventories.
Dynamic Precision Option
Enter the decimal precision for quantities on the report.
See Also
Submitting a Request, Oracle Applications System Administrator’s Guide

9 – 19Reports and Processes
Blanket and Planned PO Status Report
The Blanket and Planned PO Status report can be used to reviewpurchase order transactions for items you buy, using blanket purchaseagreements and planned purchase orders. For each blanket purchaseagreement and planned purchase order you create, Purchasingprovides you with the detail of the releases you created against theseorders. Purchasing prints the blanket agreement or planned purchaseorder header information, if no release exists.
Report Submission
In the Submit Requests window, select Blanket and Planned PO StatusReport in the Name field.
Report Parameters
PO Numbers From/To
Enter the beginning and ending purchase order numbers.
Buyer
Enter a buyer name.
Suppliers From/To
Enter the beginning and ending supplier numbers.
Categories From/To
Enter the beginning and ending categories.
Expired Date
Enter an expiration date to restrict the report to purchase orders withearlier expiration dates.

9 – 20 Oracle Public Sector Purchasing User’s Guide
Sort By
Use the Sort By feature to produce a report customized to your specificneeds. Choose one of the following options:
Sort the report by purchase order number.
Sort the report by supplier.
Dynamic Precision Option
Enter the decimal precision for quantities on the report.
See Also
Submitting a Request, Oracle Applications System Administrator’s Guide
Purchase OrderNumber
Supplier

9 – 21Reports and Processes
Buyer Listing
The Buyer Listing shows the buyer name, default purchasing category,ship–to location, and effective dates of all buyers or a selected set ofbuyers. You can also use the report to isolate buyers who are assignedto a category of procurement items. See: Defining Buyers: page 1 – 13.
Report Submission
In the Submit Requests window, select Buyer Listing in the Name field.
Report Parameters
Active/Inactive
Choose one of the following options:
List only active buyers on the report.
List both active and inactive buyers on the report.
List only inactive buyers on the report.
Categories From/To
Enter the beginning and ending category names.
Location
Enter a ship–to location.
Sort By
Use the Sort By feature to produce a report customized to your specificneeds. Choose one of the following options:
Sort the report by buyer name. This is the defaultif you do not choose a sort by option.
Sort the report by purchasing category.
Sort the report by location.
Active
Both
Inactive
Buyer Name
Category
Location

9 – 22 Oracle Public Sector Purchasing User’s Guide
See Also
Submitting a Request, Oracle Applications System Administrator’s Guide

9 – 23Reports and Processes
Buyer’s Requisition Action Required Report
The Buyer’s Requisition Action Required Report identifies all orspecific approved requisition lines that buyers have not placed onpurchase orders. Later, you can use the AutoCreate Purchase Orderswindow to modify a requisition line, return a requisition, or place arequisition line onto a purchase order.
The report includes suggested document types Blanket, Agreement,Catalog, and Quotation.
Report Submission
In the Submit Requests window, select Buyer’s Requisition ActionRequired Report in the Name field.
Report Parameters
Suggested Suppliers From/To
Enter the beginning and ending suggested supplier names.
Categories From/To
Enter the beginning and ending category from the purchasing categoryset. The report breaks and prints by categories.
Need By Dates From/To
Enter the beginning and ending need–by dates.
Location
Enter a location.
Requestor
Enter a requestor name.

9 – 24 Oracle Public Sector Purchasing User’s Guide
Requisition Numbers From/To
Enter the beginning and ending requisition numbers.
Print Price History
Enter Yes or No to indicate whether you want to print the price historyon the report. If you leave this field blank, the default is Yes.
Dynamic Precision Option
Enter the decimal precision for quantities on the report.
See Also
Submitting a Request, Oracle Applications System Administrator’s Guide

9 – 25Reports and Processes
Cancelled Purchase Orders Report
The Cancelled Purchase Orders Report can be used to reviewinformation on cancelled purchase orders.
Report Submission
In the Submit Requests window, select Cancelled Purchase OrdersReport in the Name field.
Report Parameters
Suppliers From/To
Enter the beginning and ending supplier names.
Buyer
Enter the buyer name.
Cancelled Dates From/To
Enter the beginning and ending cancelled dates.
See Also
Submitting a Request, Oracle Applications System Administrator’s Guide

9 – 26 Oracle Public Sector Purchasing User’s Guide
Cancelled Requisitions Report
Use the Cancelled Requisitions Report to review information oncancelled requisitions.
Report Submission
In the Submit Requests window, select Cancelled Requisitions Reportin the Name field.
Report Parameters
Preparers From/To
Enter the beginning and ending preparer names.
Requisition CreationDates From/To
Enter the beginning and ending creation dates to restrict the report to arange of dates.
Requestors From/To
Enter the beginning and ending requestor names to restrict the reportto a range of requestors.
Sort By
Use the Sort By feature to produce a report customized to your specificneeds. Choose one of the following options:
Sort the report by preparer. This is the default ifyou do not choose a sort by option.
Sort the report by requisition number.
Dynamic Precision Option
Enter the decimal precision for quantities on the report.
Preparer
RequisitionNumber

9 – 27Reports and Processes
See Also
Submitting a Request, Oracle Applications System Administrator’s Guide
9 – 28 Oracle Public Sector Purchasing User’s Guide
Contract Status Report
The Contract Status Report can be used to review the status of yourcontracts and list purchase order information for each contract.Purchasing prints the contract information if there are standardpurchase order lines that reference that contract.
Report Submission
In the Submit Requests window, select Contract Status Report in theName field.
Report Parameters
PO Numbers From/To
Enter the beginning and ending purchase order numbers.
Suppliers From/To
Enter the beginning and ending supplier names.
See Also
Submitting a Request, Oracle Applications System Administrator’s Guide

9 – 29Reports and Processes
Create Internal Sales Orders Process
Use the Create Internal Sales Orders process to send requisitioninformation from approved, inventory–sourced requisition lines to theOrder Entry interface tables. Then the Order Import process is runfrom within Order Entry to generate the internal sales orders. You canset the Create Internal Sales Orders and Order Import processes to runautomatically at specified intervals.
If the OE:Reservations profile option is set to Yes, the Create InternalSales Orders process requests that internal sales orders be Demandedrather than Reserved. Note that this process does not pass any revisionor lot number information
The Create Internal Sales Orders process loads the Order Entry openinterface, OrderImport, using the order type you define in thePurchasing Options window. OrderImport creates internal sales ordersfrom the records in the interface table, and determines the order cycleand defaults values based on the order type.
� To run the Create Internal Sales Orders process:
1. Navigate to the Submit Requests window.
2. Select Requests in the first field.
3. Select Create Internal Sales Orders in the Name field.
4. Save your work to begin the process.
See Also
Creation of Internal Sales Orders: page 3 – 20
Submitting a Request, Oracle Applications System Administrator’s Guide
Defining Internal Requisition Options: page 1 – 35

9 – 30 Oracle Public Sector Purchasing User’s Guide
Create Releases Process
Use the Create Releases process to create releases for requisition linesthat meet the following criteria:
• Approved (and Reserved, if requisition encumbrance is active)
• Requisition is already sourced to an existing blanket
• The Approved Supplier List entry for the item, supplier, andblanket indicate that the Release Generation method is eitherAutomatic Release or Automatic Release/Review
• The requisition line is not already on a purchase order
• The source blanket is still active and the release will not put theblanket over the amount limit.
If the release generation method is Automatic Release, the process setsthe status to Approved.
You can set the Create Releases process to run automatically atspecified intervals.
� To run the Create Releases process:
1. Navigate to the Submit Requests window.
2. Select Requests in the first field.
3. Select Create Releases in the Name field.
4. Save your work to begin the process.
See Also
Submitting a Request, Oracle Applications System Administrator’s Guide
Automatic Release Generation: page 4 – 93

9 – 31Reports and Processes
Encumbrance Detail Report
The Encumbrance Detail Report can be used to review requisition andpurchase order encumbrances for a range of accounts. If you haveenabled the encumbrance option for requisitions or purchase orders,and have entered and approved requisitions and purchases. You usethis report to review the accounts encumbered.
Purchasing prints the purchase order and release number for purchaseorder encumbrances. The heading Requisition Number orPO#–Release prints if the charge account had distributions torequisitions and to purchase orders.
Report Submission
In the Submit Requests window, select Encumbrance Detail Report inthe Name field.
Report Parameters
Accounts From/To
Enter the beginning and ending accounts.
Cost Centers From/To
Enter the beginning and ending cost centers.
Encumbrance Dates From/To
Enter the beginning and ending encumbrance dates.
Document Type
Enter a document type to restrict the report to a specific documenttype. Leave this field blank if you want the report to include bothdocument types. Otherwise, choose one of the following options.
list only requisitions.
list only purchase orders.
Requisition
Purchase order

9 – 32 Oracle Public Sector Purchasing User’s Guide
Suppliers From/To
Enter the beginning and ending supplier names.
Dynamic Precision Option
Enter the decimal precision for quantities on the report.
PO#–Release
See Also
Submitting a Request, Oracle Applications System Administrator’s Guide

9 – 33Reports and Processes
Expected Receipts Report
The Expected Receipts Report can be used to review all or specificsupplier sourced expected receipts for a particular date or a range ofdates. The report excludes purchase orders that are cancelled, closed,or closed for receiving at the header, release, line, or shipment level.You can specify the expected receipts you want to review.
For Supplier source type the Due Date is the promised date. If thepromised date is not entered, this is the need by date. For internallysourced requisition lines, the Due Date is the need by date.
The Quantity/Amount Ordered and Quantity/Amount Due are notprinted on the report if you are using blind receiving.
Use this report to improve or speed up your receiving operations. Yourreceivers may sometimes not have access to Oracle Applications whenthey need to enter receiving transactions. They can use the report ofexpected receipts to record receiving transactions and later enter them.There is space at the end of each shipment for you to record comments,the receipt date, and the quantity/amount you received.
Report Submission
In the Transaction Reports (for Inventory) or Submit Requests window,select Expected Receipts Report in the Name field.
Report Parameters
Purchase OrderNumbers From/To
Enter the beginning and ending purchase order numbers.
Requisition Numbers From/To
Enter the beginning and ending requisition numbers.
Supplier
Enter the supplier name.

9 – 34 Oracle Public Sector Purchasing User’s Guide
Items From/To
Enter the beginning and ending item numbers.
Categories From/To
Enter the beginning and ending categories.
Due Dates From/To
Enter the beginning and ending promised dates.
Ship–To Location
Enter a location to restrict the report to that location.
Organization Name
Enter an organization name to restrict the report to that organization.
Dynamic Precision Option
Enter the decimal precision for quantities on the report.
See Also
Submitting a Request, Oracle Applications System Administrator’s Guide

9 – 35Reports and Processes
Fill Employee Hierarchy Process
Use the Fill Employee Hierarchy process to create a direct mappingbetween the defined position hierarchies and the employees holdingpositions in each hierarchy. When you run this process, it checks eachposition hierarchy and updates each employee, his supervisor, the levelof supervision (a direct supervisor is level 1), the employee’s position,and the supervisor’s position.
The process creates an error log which lists all positions to which noemployee is assigned, but having such positions is a benign error thatdoes not hamper system operation.
If you do not use hierarchical security for any of your documents anddo not use position hierarchies for your approvals, you do not need torun this process. Otherwise, you must run this process before any ofthe following changes can take effect:
• add or delete an employee
• change an employee name or an employee position. See: EnterPerson, Oracle Human Resource Management Systems User’s Guide.
• add, delete, or modify a position. See: Representing Jobs andPositions, Oracle Human Resource Management Systems User’sGuide.
• add, delete, or modify a position hierarchy. See: RepresentingJobs and Positions, Oracle Human Resource Management SystemsUser’s Guide.
� To run the Fill Employee Hierarchy process:
1. Navigate to the Submit Requests window.
2. Select Requests in the first field.
3. Select Fill Employee Hierarchy in the Name field.
4. Save your work to begin the process.
See Also
Submitting a Request, Oracle Applications System Administrator’s Guide

9 – 36 Oracle Public Sector Purchasing User’s Guide
Financials/Purchasing Options Listing
The Financials/Purchasing Options Listing can be used to review theoptions set for your system in the Financials Options and PurchasingOptions windows.
Report Submission
In the Submit Requests window, select Financials/Purchasing OptionsListing in the Name field.
See Also
Submitting a Request, Oracle Applications System Administrator’s Guide

9 – 37Reports and Processes
Internal Requisition Status Report
Use the Internal Requisition Status Report to print status informationfor internal requisitions.
Report Submission
In the Submit Requests window, select Internal Requisition StatusReport in the Name field.
Report Parameters
Creation Dates From/To
Enter the beginning and ending creation dates.
Items From/To
Enter the beginning and ending item numbers.
Requestor
Enter a requestor name to restrict the report to a specific requestor.
Subinventories From/To
Enter the beginning and ending subinventories.
Status
Enter the status to restrict the report to a specific status.
Requisition Numbers From/To
Enter the beginning and ending requisition numbers.
Sort By
Use the Sort By feature to produce a report customized to your specificneeds. Choose one of the following options:

9 – 38 Oracle Public Sector Purchasing User’s Guide
Sort the report by creation date.
Sort the report by requestor.
Sort the report by source subinventory.
Dynamic Precision Option
Enter the decimal precision for quantities on the report.
See Also
Submitting a Request, Oracle Applications System Administrator’s Guide
Creation Date
Requestor
Subinventory

9 – 39Reports and Processes
Internal Requisitions/Deliveries Discrepancy Report
The Internal Requisitions/Deliveries Discrepancy Report listsrequisition documents with items whose source type is inventory.Internal requisitions are typically for transfers of material from yourinventories. Use this report to identify goods that have been shippedand have a delivery discrepancy. This report can be run only if OrderEntry is installed.
The Quantity Variance is the difference between the quantity shippedand the quantity delivered. If the quantity shipped is less than thequantity received, the result displays with a negative sign.
The Cost Variance is the variance in cost between the quantity shippedand the quantity delivered. The calculation for the cost variance is thequantity delivered times the requisition unit price, minus quantityshipped, times the sales order price.
Report Submission
In the Submit Requests window, select Internal Requisitions/DeliveriesDiscrepancy Report in the Name field.
Report Parameters
Requisition Numbers From/To
Enter the beginning and ending requisition numbers.
Requestor
Enter a requestor name to restrict the report to a specific requestor.
RequisitionCreation Dates From/To
Enter the beginning and ending creation dates.
Sort By
Choose one of the following options:

9 – 40 Oracle Public Sector Purchasing User’s Guide
Sort the report by creation date. This is the defaultif you leave this field blank.
Sort the report by requestor.
Sort the report by item source organizationsubinventory.
Dynamic Precision Option
Enter the decimal precision for quantities on the report.
See Also
Submitting a Request, Oracle Applications System Administrator’s Guide
Creation Date
Requestor
Subinventory

9 – 41Reports and Processes
Invoice Price Variance Report
The Invoice Price Variance Report shows the variance between theinvoice price and the purchase price for all inventory and work inprocess related invoice distributions. Payables records invoice pricevariances when the invoices are matched, approved, and posted.
The report includes invoice Entry Types Adjustment, Entry, and Reversal.
The invoice price variance is the quantity invoiced multiplied by thedifference between the invoice unit price and the purchase order unitprice.
Prerequisites
Payables records invoice price variance only when you have inventoryor work in process related invoices. Use this report only if you useInventory by itself or with Work in Process.
Report Submission
In the Cost and Period Close Reports (for Inventory) or SubmitRequests windows, select Invoice Price Variance Report in the Namefield.
Report Parameters
Categories From/To
Enter the beginning and ending purchasing categories.
Suppliers From/To
Enter the beginning and ending supplier numbers.
Period Name
Enter an accounting period to restrict the report to a specific period.

9 – 42 Oracle Public Sector Purchasing User’s Guide
Sort By
Choose one of the following options:
Sort the report by purchasing category.
Sort the report by supplier.
Dynamic Precision Option
Enter the decimal precision for quantities on the report.
See Also
Submitting a Request, Oracle Applications System Administrator’s Guide
Category
Supplier

9 – 43Reports and Processes
Invoice Price Variance by Supplier Report
The Invoice Price Variance Report shows the variance between theinvoice price and the purchase price for all inventory and work inprocess related invoice distributions. Payables records invoice pricevariances when the invoices are matched, approved, and posted.
The report includes invoice Entry Types Adjustment, Entry, and Reversal.
The invoice price variance is the quantity invoiced multiplied by thedifference between the invoice unit price and the purchase order unitprice.
Prerequisites
Payables records invoice price variance only when you have inventoryor work in process related invoices. Use this report only if you useInventory by itself or with Work in Process.
Report Submission
In the Cost and Period Close Reports (for Inventory) or SubmitRequests windows, select Invoice Price Variance Report in the Namefield.
Report Parameters
Categories From/To
Enter the beginning and ending purchasing categories.
Suppliers From/To
Enter the beginning and ending supplier numbers.
Period Name
Enter an accounting period to restrict the report to a specific period.

9 – 44 Oracle Public Sector Purchasing User’s Guide
Sort By
Choose one of the following options:
Sort the report by supplier.
Sort the report by purchasing category.
Sort the report by purchasing item.
Sort the report by purchasing invoice date.
Dynamic Precision Option
Enter the decimal precision for quantities on the report.
See Also
Submitting a Request, Oracle Applications System Administrator’s Guide
Supplier
Category
Item
Invoice Date

9 – 45Reports and Processes
Item Detail Listing
The Item Detail Listing shows detail information for items defined asPurchasing Items in the Item window as well as unit of measureconversion, notes, manufacturer part numbers, and dispositionsassigned to the item. Purchasing lets you isolate items by limiting theitems, categories, or buyer you want to review. For example, if yourcategories reflect purchased commodities, you can use the listing toreview what manufactured items are for a commodity.
Report Submission
In the Submit Requests window, select Item Detail Listing in the Namefield.
Report Parameters
Active/Inactive
Choose one of the following options:
List only active items on the report.
List both active and inactive items on the report.
List only inactive items on the report.
Categories From/To
Enter the beginning and ending purchasing categories.
Items From/To
Enter the beginning and ending item numbers.
Buyer
Enter the buyer name to restrict the report to a specific buyer.
Active
Both
Inactive

9 – 46 Oracle Public Sector Purchasing User’s Guide
Sort By
Use the Sort By feature to produce a report customized to your specificneeds. Choose one of the following options:
Sort the report by purchasing category.
Sort the report by item number.
Dynamic Precision Option
Enter the decimal precision for quantities on the report.
See Also
Submitting a Request, Oracle Applications System Administrator’s Guide
Defining Items, Oracle Inventory User’s Guide
Category
Item

9 – 47Reports and Processes
Item Summary Listing
The Item Summary Listing shows the inactive or active status of items.You can also use the report to review the commodities of items that areinactive. And, finally, you can use the report as a listing of all itemsdefined as Purchasing Items in the Items window.
Report Submission
In the Submit Requests window, select Item Summary Listing in theName field.
Report Parameters
Active/Inactive
Choose one of the following options:
List only active items on the report.
List both active and inactive items on the report.
List only inactive items on the report.
Sort By
Use the Sort By feature to produce a report customized to your specificneeds. Choose one of the following options:
Sort the report by purchasing category.
Sort the report by item number.
See Also
Submitting a Request, Oracle Applications System Administrator’s Guide
Defining Items, Oracle Inventory User’s Guide
Active
Both
Inactive
Category
Item

9 – 48 Oracle Public Sector Purchasing User’s Guide
Location Listing
The Location Listing shows internal organizations locations andaddresses. Purchasing lets you specify which locations you want toreview: Ship To, Bill To, Office, Internal, and Receiving. Use this reportto isolate locations which are only for a specific function, such aslocations where receiving is permitted. This document can be used as aresource when entering purchase order receiving locations.
Report Submission
In the Submit Requests window, select Location Listing in the Namefield.
Report Parameters
Site
Choose one of the following options:
List locations regardless of site criteria. This is thedefault if you do not choose a sort by option.
List only locations that are bill–to sites.
List only locations that are not internal sites.
List only locations that are office sites.
List only locations that are receiving sites.
List only locations that are ship–to sites.
Active/Inactive
Choose one of the following options:
List only active locations on the report.
List both active and inactive locations on thereport.
List only inactive locations on the report.
All
Bill–To
External
Office
Receiving
Ship–To
Active
Both
Inactive

9 – 49Reports and Processes
Sort By
Choose one of the following options:
Sort the listing by country.
Sort the listing by location. This is the default ifyou do not choose a sort by option.
Sort the listing by state.
See Also
Submitting a Request, Oracle Applications System Administrator’s Guide
Site Locations, Oracle Human Resource Management Systems User’s Guide
Country
Location
State
9 – 50 Oracle Public Sector Purchasing User’s Guide
Matching Holds by Buyer Report
The Matching Holds by Buyer Report can be used to review all orselected invoices that Purchasing or your accounts payable systemplaced on matching hold. You can review price holds, quantity orderedholds, quantity received holds, and quality holds. You can review thematching holds for one or more buyers. After printing all of aparticular buyer’s matching holds, Purchasing prints summarymatching hold information for this buyer. At the end of the report,Purchasing prints summary matching hold information for all of thebuyers that you selected. This report helps you understand why aninvoice is on hold and provides you with the information you need tosolve the problem. You can also monitor the performance for suppliersor buyers using this report.
Suggestion: Use this report carefully when monitoring theperformance of a supplier or buyer. This report summarizesthe matching holds information and provides the reason whyinvoices are on hold. The buyer may have no control oversome of the problems.
Report Submission
In the Submit Requests window, select Matching Holds by BuyerReport in the Name field.
Report Parameters
Buyer
Enter a buyer name to restrict the report to a specific buyer.
Suppliers From/To
Enter the beginning and ending supplier names.
Invoice Dates From/To
Enter the beginning and ending invoice dates.

9 – 51Reports and Processes
Categories From/To
Enter the beginning and ending purchasing categories.
Items From/To
Enter the beginning and ending item numbers.
Price Hold
Enter Yes or No to indicate whether the report includes purchaseorders on price hold. If you leave this field blank, the default is Yes.
Quantity Ordered Hold
Enter Yes or No to indicate whether the report includes purchaseorders on quantity ordered hold. If you leave this field blank, thedefault is Yes.
Quantity Received Hold
Enter Yes or No to indicate whether the report includes purchaseorders on quantity received hold. If you leave this field blank, thedefault is Yes.
Quantity Accepted Hold
Enter Yes or No to indicate whether the report includes purchaseorders on quantity accepted hold. If you leave this field blank, thedefault is Yes.
Dynamic Precision Option
Enter the decimal precision for quantities on the report.
See Also
Submitting a Request, Oracle Applications System Administrator’s Guide
9 – 52 Oracle Public Sector Purchasing User’s Guide
New Supplier Letter Report
The New Supplier Letter Report prints letters you send to yoursuppliers to ask for information about the nature of their businesses.Purchasing prints the New Supplier Letter Report together with thecorresponding supplier letters. The report gives you a listing of thesupplier names, sites, and addresses to which you can send yourletters, and prints the letters for each supplier on the listing.
Report Submission
In the Submit Requests window, select New Supplier Letter Report inthe Name field.
Report Parameters
Supplier Type
Enter the supplier type from the Enter Lookup Codes window torestrict the report to a specific supplier type.
Suppliers From/To
Enter the beginning and ending supplier names.
Supplier Site
Enter the supplier site to restrict the report to a specific supplier site.
Creation Dates From/To
Enter the beginning and ending creation dates.
Active/Inactive
Choose one of the following options:
List only active suppliers on the report.
List both active and inactive suppliers on thereport.
Active
Both

9 – 53Reports and Processes
List only inactive suppliers on the report.
Sort By
Use the Sort By feature to produce a report customized to your specificneeds. Choose one of the following options:
Sort the report by supplier name and supplier site.This is the default if you do not enter an option.
Sort the report by supplier site and supplier name.
Sort the report by postal code, supplier name, andsupplier site.
See Also
Submitting a Request, Oracle Applications System Administrator’s Guide
Inactive
Supplier
Supplier Site
ZIP Code

9 – 54 Oracle Public Sector Purchasing User’s Guide
Open Purchase Orders Report (by Buyer)
The Open Purchase Orders Report (by Buyer) lists all or specific openpurchase orders that relate to buyers. Purchasing lets you specify theopen purchase orders you want to review. An open purchase order isone that references an item that your supplier has not yet fully billed orreceived. The report excludes closed, final closed, and cancelledorders.
Report Submission
In the Submit Requests window, select Open Purchase Orders Report(by Buyer) in the Name field.
Report Parameters
Buyer
Enter a buyer name to restrict the report to a specific buyer.
Suppliers From/To
Enter the beginning and ending supplier names.
Dynamic Precision Option
Enter the decimal precision for quantities on the report.
See Also
Submitting a Request, Oracle Applications System Administrator’s Guide

9 – 55Reports and Processes
Open Purchase Orders Report (by Cost Center)
The Open Purchase Orders Report (by Cost Center) can be used toreview all or specific open purchase orders relating to one or more costcenters. An open purchase order is one that references an item thatyour supplier has not yet fully billed or received. The report excludesclosed, final closed, and cancelled orders.
Report Submission
In the Submit Requests window, select Open Purchase Orders Report(by Cost Center) in the Name field.
Report Parameters
Cost Centers From/To
Enter the beginning and ending cost centers.
Dynamic Precision Option
Enter the decimal precision for quantities on the report.
See Also
Submitting a Request, Oracle Applications System Administrator’s Guide

9 – 56 Oracle Public Sector Purchasing User’s Guide
Overdue Supplier Shipments Report
This report can be used to follow–up with suppliers. The reportincludes the supplier contact and the phone number along withpercentage delivery and the due date. The report also includespurchase orders that do not have a supplier contact assigned. Bylimiting the report to only one buyer, you can do follow–up by buyer.And, finally, by limiting the report by categories, you can dopurchasing follow–up for a range of commodities.
The Due Date is the date the supplier promised delivery for the itemsyou ordered on the shipment, or the date you indicated that youneeded the goods by.
Report Submission
In the Transaction Reports (for Inventory) or Submit Requestswindows, select Overdue Supplier Shipments Report in the Name field.
Report Parameters
Overdue as of
Enter a date to restrict the report to purchase orders not fully receivedwhere the promised date is less than or equal to this date. If you donot enter a date, the report prints all purchase orders that you have notyet fully received where the promised date is less than or equal to thecurrent date. If the promised date is not provided, the need by date isused.
Buyer
Enter a buyer to restrict the report to a specific buyer.
Suppliers From/To
Enter a beginning and ending supplier.

9 – 57Reports and Processes
Ship–to Location
Enter a ship–to location to restrict the report to overdue shipments fora specific location.
Categories From/To
Enter a beginning and an ending category from the purchasingcategory set.
Organization Name
Enter the organization name to restrict the report to a specificorganization.
Dynamic Precision Option
Enter the decimal precision for quantities on the report.
See Also
Submitting a Request, Oracle Applications System Administrator’s Guide

9 – 58 Oracle Public Sector Purchasing User’s Guide
Overshipments Report
The Overshipments Report lists purchase order receipts with a quantityreceived greater than the quantity ordered. You can also use theOvershipments Report to identify service overcharges or suppliers whodeliver more than the requested quantity.
Report Submission
In the Submit Requests window, select Overshipments Report in theName field.
Report Parameters
Receipt Location
Enter the receipt location to restrict the report to overshipments to aspecific internal location.
Receiver
Enter the name of the employee to restrict the report to overshipmentsto a specific receiver.
Receipt Date From/To
Enter the beginning and ending receipt dates to restrict the report to arange of receipt dates.
Supplier From/To
Enter the beginning and ending supplier names to restrict the report toa range of suppliers.
Supplier Site
Enter the supplier site to restrict the report to overshipments to aspecific supplier site.

9 – 59Reports and Processes
Organization Name
Enter the organization name to restrict the report to a specificorganization.
Sort By
Use the Sort By feature to produce a report customized to your specificneeds. Choose one of the following options:
Sort the report by document number. This is thedefault if you do not choose an option.
Sort the report by supplier.
Quantity Precision Option
Enter the decimal precision for quantities on the report.
See Also
Submitting a Request, Oracle Applications System Administrator’s Guide
Purchase OrderNumber
Supplier

9 – 60 Oracle Public Sector Purchasing User’s Guide
Payment on Receipt
Payment on Receipt enables the user to automatically create standard,unapproved invoices for payment of goods based on receipttransactions. Invoices are created using a combination of receipt andpurchase order information, that eliminates duplicate manual dataentry and ensures accurate and timely data processing. Payment onReceipt is also known as Evaluated Receipt Settlement (ERS) and SelfBilling.
Automatically create invoices with multiple items and distributionlines, and include sales tax.
You define which suppliers participate in Payment on Receipt andenforce matching rules to ensure the proper payments are made to thesuppliers.
The amount on the invoice is determined by multiplying the Quantityreceived by the Purchase Order Item Unit Price. The Payment Termson the invoice default from the purchase order payment terms. ThePayment Currency defaults from the supplier site. Sales Tax iscalculated based on the Tax Codes on each Purchase Order Line.
If the Alternate Pay Site is populated for the Supplier Site used on thePurchase Order, the invoice created is for the Alternate Pay Site,otherwise the Supplier Site on the Purchase Order is used. TheSupplier Site used for the invoice must be defined as a Pay Site.
Advance Shipment Notices with Billing Information
Invoices are generated automatically for Advance Shipment Notices(ASNs) that contain billing information, if they are successfullyvalidated in the receiving open interface after being sent by yoursupplier. You don’t have to receive against an ASN with billinginformation in order for Payment on Receipt to automatically generatean invoice.
Debit Memos
Return–to–supplier and receipt adjustment transactions do notautomatically generate debit memos once an invoice has beengenerated using Payment on Receipt.
Create Invoices with Multiple Items and Multiple Distribution Lines
You can create a single invoice for one or more items as long as theitems have not been previously invoiced and purchase order matched.If you are creating an invoice from the receipt transaction and purchase

9 – 61Reports and Processes
order, you are able to create an invoice for all ordered and receiveditems. In the event of a partial shipment or multiple delivery dates,you are able to create multiple invoices for a single purchase order.
In addition, if your purchase order contains multiple distribution lines,you can create an invoice in Oracle Public Sector Payables with thesame multiple distribution lines.
When creating multiple distribution lines for invoices with partialreceipt quantities, the Pay on Receipt AutoInvoice program will eitherprorate the charges across all your purchase order distribution lines(for the received item) or use the FIFO method if you utilize CascadingReceipts. After the invoice has been created, you are able to makechanges to the invoice distribution in accordance with the currentOracle Public Sector Payables system functionality.
Note: Return–to–supplier and receipt adjustment transactions do notautomatically generate debit memos once an invoice has beengenerated using Payment on Receipt.
Enforce Matching Rules to Ensure Proper Payment
Invoices created automatically are subject to the same matching rulesas standard invoices to ensure proper payment. Three and four waymatching is enforced by Oracle Public Sector Payables if you specifythree or four way matching for the Invoice Matching supplier siteoption. Three way matching is the process of verifying that thepurchase order, invoice, and receiving information matches withinaccepted tolerance levels. Three way matching is available with the’Receipt Required’ purchasing option.
Four way matching is the process of verifying that the purchase order,invoice, inspection, and receiving information matches within acceptedtolerance levels. Four way matching is available with the ’InspectionRequired’ purchasing option.
Oracle Public Sector Payables requires that you approve invoices beforeyou post or pay them. Approvals may be handled interactively or bybatch process. All discrepancies and/or adjustments must be handledmanually using the appropriate online Purchasing, Receiving, and/orPayables windows.
Create Invoices which Include Sales Tax
You can generate a purchase order matched invoice which includessales tax for those invoices you create using a receipt transactioncombined with a purchase order. If an invoice created from a receipt

9 – 62 Oracle Public Sector Purchasing User’s Guide
transaction and purchase order is to include sales tax, you must firsthave entered a Taxable status of ’Yes’ and a Tax Name in the PurchaseOrder Shipment zone. If a Tax Name is not entered, an invoice tax lineis not created. The tax amount for the tax distribution line is calculatedby multiplying the quantity received by the purchase order unit priceby the tax rate associated with the Tax Name.
In accordance with current Oracle Public Sector Purchasingfunctionality, you are not able to create multiple tax lines per individualpurchase order shipment line because each Purchase Order shipmentline can have only one Tax Name associated with it. Any additionaltaxes can be added manually in the Distributions window in Payables.
Also you can create tax distribution lines based on the tax type of eachdistribution:
If the tax type of the distribution is ’Sales’, one tax distribution line iscreated for each taxable invoice distribution. The Offset taxdistribution line is created if the following conditions are met:
Tax code specified on the Purchase Order matches the tax codespecified at the supplier pay site.
Offset tax code is specified at the supplier pay site.
If the tax type is ’Use’, no tax distribution will be created.
Create Scheduled Payments
The invoice creation program automatically creates a scheduledpayment for each invoice based on the payment of terms and yourinvoice terms date. After the invoice has been created, you can modifythe scheduled payment using the Scheduled Payments window to alterdue dates, and to change payment and discount amounts.
Define Payment on Receipt Supplier Information
You can enter supplier information in the Oracle Public Sector PayablesSuppliers and Supplier Sites windows to identify which of yoursuppliers are eligible for Payment on Receipt and can have theirinvoices automatically created using the Pay on Receipt AutoInvoiceprogram. In addition, you can specify an alternate Payment on Receiptpay site if the supplier’s pay site address is different from thepurchasing address. For invoices created based on receipt transactions,you can set up invoice consolidation levels for an individual pay site.You also define the default Payment Currency in the Suppliers andSupplier Sites windows.

9 – 63Reports and Processes
See Also
Purchasing Region of the Suppliers and Supplier Sites windows, OraclePublic Sector Payables User’s Guide
Create Invoices with Different Invoice Summary Levels Based on the Supplier Site Setup
The level of invoice consolidation determines how an invoice will becreated for each run of Pay on Receipt AutoInvoice program. Forinvoices created based on receipt transactions, you set up invoiceconsolidation levels for an individual pay site in the Supplier Siteswindow. The levels are:
’Pay Site’ –– one invoice is created per supplier pay site.
’Packing Slip’ –– one invoice is created per packing slip per supplierpay site.
’Receipt’ –– one invoice is created per receipt per supplier pay site.
Invoice numbers are created based on the summary level. The invoicenumber is of the following format:
’ERS’–< X >–< Seq# >
where:
– Seq# is a unique system generated number.
– X depends on the summary level:
– if summary level = Pay Site then X = Invoice Date
– if summary level = Packing Slip then X = Packing SlipNumber
– if summary level = Receipt then X = Receipt Number
Submit Pay on Receipt AutoInvoice Program
The Pay on Receipt AutoInvoice program automatically creates aninvoice batch depending on the AP system option. Invoice count andinvoice total are calculated automatically.
Prerequisites
� The supplier and supplier site must be set up correctly. Specifically,the supplier site must be set up as a Pay on Receipt site. See:

☞
9 – 64 Oracle Public Sector Purchasing User’s Guide
Purchasing Region of the Suppliers and Supplier Sites windows,Oracle Public Sector Payables User’s Guide
Attention: Check that the receipts that you are interested inhave been created successfully before running this program.You can do this by locating the receipt in the ReceivingTransactions Summary window.
� To run Evaluated Receipt Settlement:
1. Navigate to the Submit Requests window.
2. Choose Requests as the Type.
3. Choose Pay on Receipt AutoInvoice as the Name.
4. Choose the Transaction Source ERS.
5. Enter a Commit Interval. The Commit Interval is a numericrepresentation of the number of invoices evaluated before they arecommitted. For example, if you have a Commit Interval of 10, after10 invoices have been processed, they are committed. If you thenprocess another 5, and the process fails, only 5 will not becommitted.
6. Optionally enter a Receipt Number.
Note: If the Receipt Number is null, the program will try toprocess all the receipts that have not been invoiced successfully. Ifyou enter a Receipt Number, only that receipt will be processed.
7. Choose OK to begin the process.

9 – 65Reports and Processes
Printed Change Orders Report (Landscape)
The Printed Change Orders Report (Landscape) prints changedpurchase orders. The change purchase orders are the hard copydocument you print on a preprinted form and distribute through themail or fax to confirm changed orders you have requested or confirmedwith your suppliers. Purchasing provides a default format for thepreprinted form. Contact your Oracle Consultant for informationregarding the forms. See: Printed Purchase Order Overview: page4 – 96.
Report Submission
In the Submit Requests window, select Printed Change Orders Report(Landscape) in the Name field.
Report Parameters
Buyer
**Select a buyer name to restrict the report to a specific buyer.
Purchase OrderNumbers From/To
To restrict the report to a range of purchase orders, select the beginningand ending numbers.
Release Numbers From/To
To restrict the report to a range of releases, select the beginning andending numbers.
Release Dates From/To
To restrict the report to a release date range, enter the beginning andending dates.
9 – 66 Oracle Public Sector Purchasing User’s Guide
Print Releases Option
Enter Y or N to indicate whether you want Blanket and PlannedPurchase Order releases to be automatically printed with the Blanketand Purchase Order Agreements.
Sort By
Select one of the following options:
Sort the report by buyer name. This is the defaultif you leave the field blank.
Sort the report by purchase order number.
Dynamic Precision Option
Enter the decimal precision for quantities on the report.
See Also
Submitting a Request, Oracle Applications System Administrator’s Guide
Viewing Requests, Oracle Applications User’s Guide
Buyer Name
Purchase OrderNumber

9 – 67Reports and Processes
Printed Change Orders Report (Portrait)
The Printed Change Orders Report (Portrait) prints changed purchaseorders to send to your suppliers. The change purchase orders are thehard copy document you print on a preprinted form and distributethrough the mail or fax to confirm changed orders you have requestedor confirmed with your suppliers. Purchasing provides a defaultformat for the preprinted form. Contact your Oracle Consultant forinformation regarding the forms. See: Printed Purchase OrderOverview: page 4 – 96.
Report Submission
In the Submit Requests window, select Printed Change Orders Report(Portrait) in the Name field.
Report Parameters
Buyer
Select a buyer name to restrict the report to a specific buyer.
Purchase OrderNumbers From/To
To restrict the report to a range of purchase orders, select the beginningand ending numbers.
Release Numbers From/To
To restrict the report to a range of releases, select the beginning andending numbers.
Release Dates From/To
To restrict the report to a release date range, enter the beginning andending dates.

9 – 68 Oracle Public Sector Purchasing User’s Guide
Print Releases Option
Enter Y or N to indicate whether you want Blanket and PlannedPurchase Order releases to be automatically printed with the Blanketand Purchase Order Agreements.
Sort By
Select one of the following options:
Sort the report by buyer name. This is the defaultif you leave the field blank.
Sort the report by purchase order number.
Dynamic Precision Option
Enter the decimal precision for quantities on the report.
See Also
Submitting a Request, Oracle Applications System Administrator’s Guide
Viewing Requests, Oracle Applications User’s Guide
Buyer Name
Purchase OrderNumber

9 – 69Reports and Processes
Printed Purchase Order Report (Landscape)
The Printed Purchase Order Report (Landscape) prints your purchaseorders. Purchasing lets you specify the purchase orders you want toreview or print on your preprinted form. The printed purchase ordersare the hard copy document you print on a preprinted form anddistribute through the mail or fax to confirm orders you have requestedor confirmed with your suppliers. Purchasing provides a defaultlandscape format for the preprinted form. Contact your OracleConsultant for information regarding the forms. See: PrintedPurchase Order Overview: page 4 – 96.
Report Submission
In the Submit Requests window, select Printed Purchase Order Report(Landscape) in the Name field.
Report Parameters
Print Selection
Select one of the following options:
Print the report for all purchase orders. This is thedefault for no entry.
Print the report only for changed purchase orders.
Print the report only for new purchase orders.
Buyer
Select a buyer name to restrict the report to a specific buyer.
Purchase OrderNumbers From/To
To restrict the report to a range of purchase orders, select the beginningand ending numbers.
All
Changed
New

9 – 70 Oracle Public Sector Purchasing User’s Guide
Release Numbers From/To
To restrict the report to a range of releases, select the beginning andending numbers.
Release Dates From/To
To restrict the report to a release date range, enter the beginning andending dates.
Approved
Select Yes or No to indicate whether the report is restricted to approvedpurchase orders.
Test
Select Yes or No to indicate whether the report is a test.
Print Releases Option
Enter Y or N to indicate whether you want Blanket and PlannedPurchase Order releases to be automatically printed with the Blanketand Purchase Order Agreements.
Sort By
Select one of the following options:
Sort the report by buyer name and purchase ordernumber.
Sort the report by purchase order number.
Dynamic Precision Option
Enter the decimal precision for quantities on the report.
See Also
Submitting a Request, Oracle Applications System Administrator’s Guide
Viewing Requests, Oracle Applications User’s Guide
Buyer Name
Purchase OrderNumber

9 – 71Reports and Processes
Printed Purchase Order Report (Portrait)
The Printed Purchase Orders Report (Portrait) prints the purchaseorders you specify. The printed purchase orders are the hard copydocument you print on a preprinted form and distribute through themail or fax to confirm orders you have requested or confirmed withyour suppliers. Purchasing provides a default portrait format for thepreprinted form. Contact your Oracle Consultant for informationregarding the forms. See: Printed Purchase Order Overview: page4 – 96.
Report Submission
In the Submit Requests window, select Printed Purchase Order Report(Portrait) in the Name field.
Report Parameters
Print Selection
Select one of the following options:
Print the report for all purchase orders. This is thedefault for no entry.
Print the report only for changed purchase orders.
Print the report only for new purchase orders.
Buyer
Select a buyer name to restrict the report to a specific buyer.
Purchase OrderNumbers From/To
To restrict the report to a range of purchase orders, select the beginningand ending numbers.
All
Changed
New

9 – 72 Oracle Public Sector Purchasing User’s Guide
Release Numbers From/To
To restrict the report to a range of releases, select the beginning andending numbers.
Release Dates From/To
To restrict the report to a release date range, enter the beginning andending dates.
Approved
Select Yes or No to indicate whether the report is restricted to approvedpurchase orders.
Test
Select Yes or No to indicate whether the report is a test.
Print Releases Option
Enter Y or N to indicate whether you want Blanket and PlannedPurchase Order releases to be automatically printed with the Blanketand Purchase Order Agreements.
Sort By
Select one of the following options:
Sort the report by buyer name and purchase ordernumber.
Sort the report by purchase order number.
Dynamic Precision Option
Enter the decimal precision for quantities on the report.
See Also
Submitting a Request, Oracle Applications System Administrator’s Guide
Viewing Requests, Oracle Applications User’s Guide
Buyer Name
Purchase OrderNumber

9 – 73Reports and Processes
Printed RFQ Report (Landscape)
The Printed RFQ Report (Landscape) prints in landscape format RFQswith a Status of Active. Purchasing lets you specify the RFQs you wantto review or print. Purchasing provides a default landscape format forpreprinted landscape forms. Contact your Oracle Consultant forinformation regarding the forms.
Report Submission
In the Submit Requests window, select Printed RFQ Report(Landscape) in the Name field.
Report Parameters
Report Type
Choose one of the following options:
Print the report for all RFQs.
Print the report only for changed RFQs.
Print the report only for new RFQs.
Buyer
Enter a buyer name to restrict the report to a specific buyer.
RFQ Numbers From/To
Enter the beginning and ending RFQ numbers.
Test
Enter Yes or No to indicate whether the report is a test.
Sort By
Choose one of the following options:
Sort the report by buyer name.
All
Changed
New
Buyer Name

9 – 74 Oracle Public Sector Purchasing User’s Guide
Sort the report by RFQ number.
Dynamic Precision Option
Enter the decimal precision for quantities on the report.
See Also
Submitting a Request, Oracle Applications System Administrator’s Guide
RFQ Number

9 – 75Reports and Processes
Printed RFQ Report (Portrait)
The Printed RFQ Report (Portrait) prints in portrait format RFQs with aStatus of Active. Purchasing lets you specify the RFQs you want toreview or print. Purchasing provides a default portrait format forpreprinted portrait forms. Contact your Oracle Consultant forinformation regarding these forms.
Report Submission
In the Submit Requests window, select Printed RFQ Report (Portrait) inthe Name field.
Report Parameters
Report Type
Choose one of the following options:
Print the report for all RFQs.
Print the report only for changed RFQs.
Print the report only for new RFQs.
Buyer
Enter a buyer name to restrict the report to a specific buyer.
RFQ Numbers From/To
Enter the beginning and ending RFQ numbers.
Test
Enter Yes or No to indicate whether the report is a test.
Sort By
Choose one of the following options:
Sort the report by buyer name.
All
Changed
New
Buyer Name

9 – 76 Oracle Public Sector Purchasing User’s Guide
Sort the report by RFQ number.
Dynamic Precision Option
Enter the decimal precision for quantities on the report.
See Also
Submitting a Request, Oracle Applications System Administrator’s Guide
RFQ Number

9 – 77Reports and Processes
Printed Requisitions Report
The Printed Requisitions Report prints the requisitions which have thefollowing status: Approved, Rejected, In Process, Pre–Approved, andReturned. The report does not include requisitions with statusIncomplete or cancelled. You can circulate the printed requisitions forsignature approvals and notes.
Additional Information: In the Approver field the reportprints the name of the last person who performed an action onthe requisition. This is not necessarily the approver.
Report Submission
In the Submit Requests window, select Printed Requisitions Report inthe Name field.
Report Parameters
Requisition Numbers From/To
Enter the beginning and ending requisition numbers.
Dynamic Precision Option
Enter the decimal precision for quantities on the report.
See Also
Submitting a Request, Oracle Applications System Administrator’s Guide

9 – 78 Oracle Public Sector Purchasing User’s Guide
Purchase Agreement Audit Report
You can use this report to review purchase order transactions for itemsyou normally buy using blanket purchase agreements. Purchasing letsyou determine if you are efficiently using the blanket purchaseagreements you negotiate with your suppliers. For each item you buyusing blanket purchase agreements, Purchasing provides you with thedetail of the existing purchase orders for this item and the detail of theagreement lines— blanket or standard— you created for this item.Purchasing shows you when you purchased items using a standardpurchase order where you could have used a blanket purchaseagreement.
The Opportunity Cost is calculated as the sum of the amount of thepurchase order subtracted from the sum of the amount of the blankets.
Report Submission
In the Submit Requests window, select Purchase Agreement AuditReport in the Name field.
Report Parameters
Buyer
Enter a buyer name to restrict the report to a specific buyer.
Blanket PO Numbers From/To
Enter the beginning and ending blanket purchase agreement numbers.
Creation Dates From/To
Enter the beginning and ending creation dates.
Categories From/To
Enter the beginning and ending purchasing categories.

9 – 79Reports and Processes
Items From/To
Enter the beginning and ending item numbers.
Sort By
Use the Sort By feature to produce a report customized to your specificneeds. Choose one of the following options:
Sort the report by purchasing category.
Sort the report by item number.
Dynamic Precision Option
Enter the decimal precision for quantities on the report.
See Also
Submitting a Request, Oracle Applications System Administrator’s Guide
Category
Item

9 – 80 Oracle Public Sector Purchasing User’s Guide
Purchase Order Commitment by Period Report
The Purchase Order Commitment By Period Report shows themonetary value of your purchased commitments for a specified periodand the next five periods. You can use the report sorted by buyer tomonitor buyer performance. You can also use the report whennegotiating with a supplier by limiting the commitments to a specificsupplier.
Report Submission
In the Submit Requests window, select Purchase Order Commitment byPeriod Report in the Name field.
Report Parameters
Period
Enter the beginning period to be covered by the report. If the purchaseorder number shipment promise date falls within the period start andend date, the monetary value is included in the report. For orderswhich do not include a promise date, the need–by date is considered.
PO Numbers From/To
Enter the beginning and ending purchase order numbers.
Suppliers From/To
Enter the beginning and ending supplier names.
Buyer
Enter the buyer name to restrict the report to a specific buyer.
Categories From/To
Enter the beginning and ending purchasing categories.

9 – 81Reports and Processes
Sort By
Use the Sort By feature to produce a report customized to your specificneeds. Choose one of the following options:
Sort the report by supplier.
Sort the report by buyer.
See Also
Submitting a Request, Oracle Applications System Administrator’s Guide
Supplier
Buyer Name

9 – 82 Oracle Public Sector Purchasing User’s Guide
Purchase Order Detail Report
The Purchase Order Detail Report lists all, specific standard, orplanned purchase orders. Purchasing displays the quantity youordered and received so you can monitor the status of your purchaseorders. You can also review the open purchase orders to determinehow much you still have to receive and how much your supplier hasalready billed you.
Report Submission
In the Submit Requests window, select Purchase Order Detail Report inthe Name field.
Report Parameters
Buyer
Enter the buyer name to restrict the report to a specific buyer.
Items From/To
Enter the beginning and ending item numbers.
Categories From/To
Enter the beginning and ending purchasing categories.
Suppliers From/To
Enter the beginning and ending supplier names.
PO Numbers From/To
Enter the beginning and ending purchase order numbers.
Status
Enter the purchase order status to restrict the report to a specific status.Choose one of the following options: Approved, In Process,

9 – 83Reports and Processes
Incomplete, Pre–Approved, Rejected, Requires Reapproval, Reserved,or Returned.
Dynamic Precision Option
Enter the decimal precision for quantities on the report.
See Also
Submitting a Request, Oracle Applications System Administrator’s Guide

9 – 84 Oracle Public Sector Purchasing User’s Guide
Purchase Order Distribution Detail Report
The Purchase Order Distribution Detail Report shows accountdistributions for a range of purchase orders. If you use Purchase OrderEncumbrance Control and you set the failure funds only report optionto Yes, Purchasing prints only those accounts that fail fundsreservation.
The Quantity Ordered is the uncancelled shipment quantity. Forplanned purchase order shipments, this quantity excludes cancelledquantities and any scheduled release quantities associated with theshipment.
Report Submission
In the Submit Requests window, select Purchase Order DistributionDetail Report in the Name field.
Report Parameters
PO Numbers From/To
Enter the beginning and ending purchase order numbers.
Creation Dates From/To
Enter the beginning and ending creation dates.
Suppliers From/To
Enter the beginning and ending supplier numbers.
Buyer
Enter a buyer name to restrict the report to a specific buyer.
Failed Funds Only
Enter Yes or No to indicate whether you want to restrict the report topurchase orders that failed funds checking.

9 – 85Reports and Processes
Sort By
Use the Sort By feature to produce a report customized to your specificneeds. Choose one of the following options:
Sort the report by purchase order number.
Sort the report by supplier.
See Also
Submitting a Request, Oracle Applications System Administrator’s Guide
Purchase OrderNumber
Supplier

9 – 86 Oracle Public Sector Purchasing User’s Guide
Purchase Order and Releases Detail Report
The Purchase Order and Releases Detail Reports show detailinformation for your blanket purchase agreements and plannedpurchase orders. Purchasing displays the quantity that you ordered,received, billed, and that is due to be received so you can monitor thestatus of your purchase orders. You can review releases to determinehow much is remaining to be received and invoiced.
Report Submission
In the Submit Requests window, select Purchase Order and ReleasesDetail Report in the Name field.
Report Parameters
Buyer
Enter the buyer name to restrict the report to a specific buyer.
Categories From/To
Enter a beginning and an ending value.
Items From/To
Enter the beginning and ending item numbers.
Suppliers From/To
Enter the beginning and ending supplier names.
PO Numbers From/To
Enter the beginning and ending purchase order numbers.
See Also
Submitting a Request, Oracle Applications System Administrator’s Guide

9 – 87Reports and Processes
Purchase Price Variance Report
The Purchase Price Variance Report shows the variance between thepurchase price on the purchase order and standard cost for all itemsyou receive and deliver into inventory and work in process. Inventoryrecords purchase price variance on delivery into a subinventory. Workin Process records purchase price variance on delivery into a job orrepetitive schedule. For internal requisitions, the purchase order shipto location is associated with the organization in the Customerswindow. See: Assigning a Business Purpose to a Customer Address,Oracle Public Sector Receivables User’s Guide.
The purchase price variance is calculated as the quantity receivedmultiplied by the difference between the purchase order price and thestandard cost.
Prerequisites
Since this report displays purchase price variances for standardcosting, this report is appropriate only for organizations usingInventory and standard costing. If you use Work in Process, thisreport also displays the outside processing purchase price variance.
Report Submission
In the Cost and Period Close Reports (for Inventory) or SubmitRequests windows, select Purchase Price Variance Report in the Namefield.
Report Parameters
Categories From/To
Enter the beginning and ending purchasing categories.
Transaction Dates From/To
Enter the beginning and ending transaction dates.

9 – 88 Oracle Public Sector Purchasing User’s Guide
Suppliers From/To
Enter the beginning and ending suppliers.
Organization Name
Enter the organization name. The ship to location is associated withthe organization in the Location Association window.
Sort By
Choose one of the following options:
Sort the report by buyer name.
Sort the report by item category.
Sort the report by item number.
Sort the report by supplier.
Dynamic Precision Option
Enter the decimal precision for quantities on the report.
See Also
Submitting a Request, Oracle Applications System Administrator’s Guide
Buyer Name
Category
Item
Supplier

9 – 89Reports and Processes
Purchase Requisition Status Report
The Purchase Requisition Status Report can be used to review theapproval status of the requisitions you create. By limiting the approvalstatus, you can use the report as a tool to plan and monitor the buyerworkload. You can also use the report to monitor requisitions in theapproval process or returned and requiring further attention.
The report can include requisitions with the following statuses:
An approver with sufficient authority approvedthe requisition. A buyer can now place thecorresponding requisition lines onto purchaseorders.
A requisition preparer cancelled the requisition.
The preparer completed the requisition andsubmitted to the approval process. However, noone with sufficient authority has approved therequisition.
The requisition is incomplete and the preparer hasnot yet submitted the requisition to an approver.
At least one person with sufficient authorityapproved the requisition. The status is notApproved either because the approver forwardedthe requisition to someone else, or the approverhas not yet reserved the funds.
The approver rejected the requisition. Purchasingreturns the entire requisition to the preparer.
A buyer returned the requisition. Purchasingreturns to the preparer all requisition lines withinthe same requisition that are not on a purchaseorder.
Report Submission
In the Submit Requests window, select Purchase Requisition StatusReport in the Name field.
Approved
Cancelled
In Process
Incomplete
Pre–Approved
Rejected
Returned

9 – 90 Oracle Public Sector Purchasing User’s Guide
Report Parameters
Requisition Numbers From/To
Enter the beginning and ending requisition numbers.
Creation Dates From/To
Enter the beginning and ending creation dates.
Requestor
Enter a requestor name to restrict the report to a specific requestor.
Location
Enter a deliver to location to restrict the report to a specific location.
Dynamic Precision Option
Enter the decimal precision for quantities on the report.
See Also
Submitting a Request, Oracle Applications System Administrator’s Guide

9 – 91Reports and Processes
Purchase Summary Report by Category
The Purchase Summary Report by Category shows the amount oforders you place with suppliers for a given category of item. Use thereport to monitor the purchase documents included in a range ofcategories.
Report Submission
In the Submit Requests window, select Purchase Summary Report byCategory in the Name field.
Report Parameters
Categories From/To
Enter the beginning and ending categories assigned to the item fromthe purchasing category set.
Buyers From/To
Enter the beginning and ending buyer names.
Suppliers From/To
Enter the beginning and ending supplier names.
Creation Dates From/To
Enter the beginning and ending creation dates.
See Also
Submitting a Request, Oracle Applications System Administrator’s Guide

9 – 92 Oracle Public Sector Purchasing User’s Guide
Purchasing Activity Register
The Purchasing Activity Register shows purchase order monetaryactivity carried out for a time interval, such as a day or month. Thereport excludes all fully cancelled purchasing documents. The reportincludes blanket and contract purchase agreements and plannedpurchase orders for reference. However, since these documents do notrepresent actual purchase activity, their amounts are not shown in thePO Amount and Functional Amount columns and are not included inthe Total amount.
Report Submission
In the Submit Requests window, select Purchasing Activity Register inthe Name field.
Report Parameters
Creation Dates From/To
Enter the beginning and ending document creation dates.
PO Type
Enter the purchase order type to restrict the report to a specific type.
Supplier
Enter the supplier name to restrict the report to a specific supplier.
Buyer
Enter the buyer name to restrict the report to a specific buyer.
Sort By
Use the Sort By feature to produce a report customized to your specificneeds. Choose one of the following options:
Sort the report by creation date and purchase ordernumber.
Purchase OrderNumber

9 – 93Reports and Processes
Dynamic Precision Option
Enter the decimal precision for quantities on the report.
See Also
Submitting a Request, Oracle Applications System Administrator’s Guide

9 – 94 Oracle Public Sector Purchasing User’s Guide
Purchasing Database Administration
Use the Purchasing Database Administration process to initiateconcurrent processes that purge obsolete records in Purchasing interfacetables and other temporary tables. The purging of obsolete data helpsreduce memory load and improve system performance. You need torun this process only once because the AutoSubmit process resubmitsitself daily after you submit it the first time.
� To run the Purchasing Database Administration process:
1. Navigate to the Submit Requests window.
2. Select Requests in the first field.
3. Select Purchasing Database Administration in the Name field.
4. Save your work to begin the process.
See Also
Submitting a Request, Oracle Applications System Administrator’s Guide
Viewing and Responding to Notifications: page 2 – 29

9 – 95Reports and Processes
Purchasing Documents Open Interface
The Purchasing Documents Open Interface receives price/sales cataloginformation and responses to requests for quotation (RFQs)electronically from suppliers in the form of blanket purchase agreementlines or catalog quotations. One way to import catalog data into thePurchasing Documents Open Interface, and finally into Purchasing, isthrough Electronic Data Interchange (EDI). After the Oracle EDIGateway imports the electronic catalog information, the PurchasingDocuments Open Interface program validates the information beforeimporting it into Purchasing.
The Purchasing Documents Open Interface can be run from within EDIwhen you choose Import Programs from the EDI menu and enterparameters. Or you can run this program separately, from withinPurchasing, after you load the price/sales catalog data into theinterface.
Report Submission
In the Submit Requests window, select Purchasing Documents OpenInterface in the Name field.
Report Parameters
Default Buyer (Required)
Enter the default buyer name to be associated with the incomingdocuments.
Document Type (Required)
Valid options are Blanket and Quotation. The option of Blanket directsPurchasing to create a blanket agreement from the price/sales catalogor quotation to be imported. The option of Quotation directsPurchasing to create a catalog quotation for the information to beimported.

9 – 96 Oracle Public Sector Purchasing User’s Guide
Document Sub Type (Optional)
Used with document type of ”Quotation” to indicate a document subtype of “Catalog Quotation” for the Price/Sales Catalog or Response toRFQ to be imported. The document sub type of “Bid Quotation” isinvalid for the transaction.
Create or Update Item (Required)
Used with the Price/Sales Catalog or Response to RFQ to indicatewhether you wish to update the item master with catalog item changesor add catalog items to the item master.
Create Sourcing Rules (Required)
Indicate Yes or No on whether supplier sourcing rules should becreated automatically during the Price/Sales Catalog and Response toRFQ import process.
Approval Status (Optional)
Enter desired status of Approved or Incomplete for the BlanketAgreements and Quotations to be created.
Release Generation Method (Optional)
Used when Document Type is set to Blanket and Create Sourcing Rulesis set to Yes. Select from the following three blanket release methods:
Allows Purchasing to automatically generatereleases and forwards them for approval.
Allows you to use Autocreate to convert purchaserequisitions into blanket releases for blanketpurchase orders.
Allows Purchasing to automatically generateapproved blanket releases for items that areautosourced to a single supplier.
Commit Interval (Required)
Enter a numeric value or accept the default value of 100 representingthe number of records processed before committing the data to thedatabase.
AutomaticRelease/Review
Release usingAutocreate
Automatic Release

9 – 97Reports and Processes
Batch ID (Optional)
Enter a valid batch ID which corresponds to the RUN ID in EDIGateway.
See Also
Submitting a Request, Oracle Applications System Administrator’s Guide
Running the EDI Price/Sales Catalog Inbound Program, Oracle EDIGateway User’s Guide
Running the EDI Response to Request for Quote Inbound Program,Oracle EDI Gateway User’s Guide
Receiving Price/Sales Catalog Information Electronically: page 5 – 20

9 – 98 Oracle Public Sector Purchasing User’s Guide
Purchasing Interface Errors Report
The Purchasing Interface Errors Report shows you what errorsoccurred, if any, while running the following programs:
• Pay on Receipt – ASBN transactions
• Pay on Receipt – Receipt transactions
• Purchasing Documents Open Interface
For each row in the interface tables that fails validation, the aboveprograms create one or more rows with error information that appearsin the Purchasing Interface Errors Report.
Report Submission
In the Submit Requests window, select Purchasing Interface ErrorsReport in the Name field. A batch ID number is generated that you canrefer to when you choose View My Requests from the Help menu.
Report Parameters
Source Program
Select the program whose errors you want reported.
Shows what errors occurred when the Pay onReceipt program (also known as evaluated receiptsettlement, or ERS) tried creating an invoice froman Advance Shipment and Billing Notice (ASBN).
Shows what errors occurred when the Pay onReceipt program tried creating an invoice from areceipt.
Shows what errors occurred when the PurchasingDocuments Open Interface program ran. ThePurchasing Documents Open Interface programprocesses data (such as electronic cataloginformation) that is in the Oracle Applicationsinterface tables to ensure that it is valid beforeimporting it into Purchasing.
Pay on Receipt –ASBN transactions
Pay on Receipt –Receipt transactions
PurchasingDocuments OpenInterface

9 – 99Reports and Processes
See Also
Submitting a Request, Oracle Applications System Administrator’s Guide
Receiving Price/Sales Catalog Information Electronically: page 5 – 20
Purchasing Documents Open Interface: page 9 – 95

9 – 100 Oracle Public Sector Purchasing User’s Guide
Quality Code Listing
The Quality Code Listing shows inspection quality codes. You can usethis listing to help assign quality codes when inspections areperformed. See: Defining Quality Inspection Codes: page 1 – 56.
Report Submission
In the Submit Requests window, select Quality Code Listing in theName field.
Report Parameters
Active/Inactive
Choose one of the following options:
List only active codes on the report.
List both active and inactive codes on the report.
List only inactive codes on the report.
Sort By
Use the Sort By feature to produce a report customized to your specificneeds. Choose one of the following options:
Sort the report by quality code.
Sort the report by ranking.
See Also
Submitting a Request, Oracle Applications System Administrator’s Guide
Active
Both
Inactive
Quality Code
Ranking

9 – 101Reports and Processes
Quotation Action Required Report
The Quotation Action Required report lists quotations that requirefollow–up action. This report provides you with all of the informationyou need to take immediate action on the quotation. Purchasing lets youspecify the quotations you want to review. If you do not specify a daterange, all quotations are displayed.
This report prints quotations that are about to expire. For each of thesequotations, Purchasing prints the quotation number, the supplier name,the supplier site, the supplier quotation number, and the expirationdate. Purchasing displays the quotation line details so you can quicklyreview the purpose of the quotations. See: Entering QuotationHeaders: page 5 – 47.
Report Submission
In the Submit Requests window, select Quotation Action RequiredReport in the Name field.
Report Parameters
Suppliers From/To
Enter the beginning and ending supplier names.
Buyer
Enter a buyer name to restrict the report to a specific buyer.
Quotation ExpirationDates From/To
Enter the beginning and ending expiration dates to limit the quotationsto the ones with expiration dates during the date range. Note that ifyou enter a date range, the quotation warning delay is considered butquotations without an expiration date are excluded from the report.
Categories From/To
Enter the beginning and ending purchasing categories.

9 – 102 Oracle Public Sector Purchasing User’s Guide
Dynamic Precision Option
Enter the decimal precision for quantities on the report.
See Also
Submitting a Request, Oracle Applications System Administrator’s Guide

9 – 103Reports and Processes
RFQ Action Required Report
The RFQ Action Required report lists RFQs that require follow–upaction. This report provides you with all of the information you needto take immediate action on RFQs approaching the reply due date.Purchasing lets you specify which RFQs you want to review.
This report prints your RFQs for which you have not received completeresponses. For each RFQ, Purchasing prints the RFQ description andthe reply due date. To help you contact the supplier that requiresaction, Purchasing prints the supplier, supplier site, supplier contact,and telephone number of the contact. See: Entering RFQ Headers:page 5 – 32.
Report Submission
In the Submit Requests window, select RFQ Action Required Report inthe Name field.
Report Parameters
Buyer
Enter a buyer name to restrict the report to a specific buyer.
RFQ Reply Date From/To
Enter the beginning and ending reply dates. Purchasing breaks andprints on the reply date.
Suppliers From/To
Enter the beginning and ending supplier names.
Categories From/To
Enter the beginning and ending purchasing categories.
Sort By
Choose one of the following options:

9 – 104 Oracle Public Sector Purchasing User’s Guide
Sort the report by buyer name.
Sort the report by RFQ reply date.
See Also
Submitting a Request, Oracle Applications System Administrator’s Guide
Buyer Name
RFQ Reply Date

☞
9 – 105Reports and Processes
Receipt Accruals – Period–End Process
Use the Receipt Accruals – Period–End process to create period–endaccruals for your uninvoiced receipts for Expense distributions.Purchasing creates an accrual journal entry in your general ledger foreach uninvoiced receipt you choose using this form. If you useencumbrance or budgetary control, Purchasing reverses yourencumbrance entry when creating the corresponding accrual entry.
Attention: When using Cash Basis Accounting, you shoulduse the Purchasing Options window to set the Accrue ExpenseItems flag to Period End, but you will not normally run theReceipt Accrual – Period–End process. See: Defining AccrualOptions: page 1 – 32.
Purchasing provides you with complete flexibility and control for yourperiod–end accruals. You can use the Uninvoiced Receipts Report toanalyze your uninvoiced receipts before you accrue them. You canthen run the Receipt Accruals – Period–End process as many times asyou want to generate accruals entries for the receipts you choose.Purchasing does not accrue receipts for purchase orders on or beforethe last date of the Accrual Period.
You create accruals for a specific purchasing period. Purchasingautomatically accrues all uninvoiced receipts you entered up to the endof the accrual period you specify. Each time you run the ReceiptAccruals – Period–End process, Purchasing creates an unposted journalentries batch in your general ledger for your receipt accruals. If you areusing encumbrance or budgetary control, Purchasing creates anotherjournal entries batch in your general ledger corresponding to theencumbrance reversal entries for the uninvoiced receipts you accrued.
Each time you create accrual entries for a specific uninvoiced receipt,Purchasing marks this receipt as accrued and ignores it the next timeyou run the Receipt Accrual – Period–End process. Purchasing createsaccrual entries only up to the quantity the supplier did not invoice forpartially invoiced receipts.
Follow the steps listed below:
• Identify the purchasing period for your receipt accrual entries.Purchasing creates receipt accruals for all receipts you enteredup to the end of this period. To prevent any period–enddisruption, Purchasing lets you provide a receipt date that isdifferent from the date you enter the receipts. You never have toenter all the receipts for a period before the end of this period.You can enter these receipts later. You simply need to backdatethe receipt date. Of course, you should make sure you entered

9 – 106 Oracle Public Sector Purchasing User’s Guide
all receipts for a specific period before you create receipt accrualsfor that period.
• Enter and match all invoices you received during the period foryour receipt accrual entries.
• Close the accounts payable period corresponding to thepurchasing period for your receipts accrual entries.
• Run the Uninvoiced Receipts Report and analyze youruninvoiced receipts that are accrued at period end.
• Run the Receipt Accrual – Period–End process as many times asyou need. You can use the search criteria to choose what youwant to accrue and accrue your receipts step by step. Thisprocess creates accounting accrual entries using the journalsource ’Purchasing’ and the journal category ’Accrual’.
• Perform all the steps you need to close your accounting periodand generate period–end reports and financial statements inyour general ledger.
• Run the Accrual Reconciliation Report after period close toanalyze your receipts accrued on receipt.
• Use your general ledger system to reverse all the receipt accrualand encumbrance reversal batches for your period–end accruals.
• Close the purchasing period for your receipt accruals. When youclose a purchasing period, Purchasing automatically un–marksall the receipts you previously accrued to make sure you canaccrue these receipts again if they are still uninvoiced in the nextperiod.
• After you have opened your next period in General Ledger andhave either closed the previous general ledger period or havecompleted all previous month receipt accruals, you can reversethe previous month’s receipt accruals in the new month. Youperform this by reversing each general ledger journal batch inGeneral Ledger.
� To run the Receipt Accruals – Period End process:
1. Navigate to the Submit Requests window.
2. Select Requests in the first field.
3. Select Receipt Accruals – Period–End in the Name field.
4. Enter the Extended Value. The default is 0.

9 – 107Reports and Processes
5. Enter the Supplier to restrict period–end receipt accruals to a singlesupplier.
6. Enter the item Category to restrict period–end receipt accruals to asingle category.
7. Enter the Period for which you want to perform period–end receiptaccruals. Purchasing automatically provides you with a list ofacceptable accrual periods. This list contains periods that youclosed in your accounts payable system and either opened or didnot use in your general ledger system.
8. Save your work to begin the process.
See Also
Submitting a Request, Oracle Applications System Administrator’s Guide

9 – 108 Oracle Public Sector Purchasing User’s Guide
Receipt Adjustments Report
The Receipt Adjustments Report lists purchase order shipments orinternal requisition lines with corrections or returns to supplier.
For supplier sourcing the Source column lists the name of the supplierand supplier source for whom you make the adjustment. For inventorysourcing, the Source is the organization and subinventory.
Report Submission
In the Transaction Reports (for Inventory) or Submit Requests window,select Receipt Adjustments Report in the Name field.
Report Parameters
Receipt Location
Enter the receipt location to restrict the report to a specific location.
Receiver
Enter the receiver name to restrict the report to a specific receiver.
Receipt Date From/To
Enter the beginning and ending receipt dates.
Supplier From/To
Enter the beginning and ending supplier names.
Supplier Site
Enter the supplier site to restrict the report to a specific supplier site.
Organization Name
Enter the organization name to restrict the report to a specificorganization.

9 – 109Reports and Processes
Sort By
Use the Sort By feature to produce a report customized to your specificneeds. Choose one of the following options:
Sort the report by document number.
Sort the report by supplier name.
Dynamic Precision Option
Enter the decimal precision for quantities on the report.
See Also
Submitting a Request, Oracle Applications System Administrator’s Guide
Document Number
Supplier
9 – 110 Oracle Public Sector Purchasing User’s Guide
Receipt Traveler
The Receipt Traveler facilitates receiving inspection and delivery ofgoods you receive within your organization. After you receive thegoods, you can print receipt travelers and attach these tickets to thegoods. You can enter selection criteria to specify the receipt travelersyou want to print. One receipt traveler prints per distribution, andeach traveler has space for you to record delivery comments.
The report includes the document type. For the Supplier source type:Standard Purchase Order, Blanket Release, or Scheduled Release. For theInternal Order source type: Internal Requisition. For the Inventorysource type: Inventory.
The report also includes the source for the item you deliver. For sourcetype Supplier, this is the supplier name. For source type Inventory, thisis the Organization name. For source type Internal Order, this is thesource subinventory.
If the RCV: Print Receipt Traveler profile option is set to Yes, the receipttraveler automatically prints when you perform a receipt or a receivingtransaction, and when you match unordered receipts.
Report Submission
In the Transaction Reports (for Inventory) or Submit Requests window,select Receipt Traveler in the Name field.
Report Parameters
Delivery Location
Enter a delivery location to restrict the report to a specific deliverylocation.
Receipt Numbers From/To
Enter the beginning and ending receipt numbers.
Items From/To
Enter the beginning and ending item numbers.
9 – 111Reports and Processes
Categories From/To
Enter a beginning and an ending category.
Ship to Location
Enter a ship–to location to restrict the report to a specific location.
Organization Name
Enter the organization name for this report.
Dynamic Precision Option
Enter the decimal precision for quantities on the report.
See Also
Submitting a Request, Oracle Applications System Administrator’s Guide
Profile Options in Purchasing: page 1 – 76

9 – 112 Oracle Public Sector Purchasing User’s Guide
Receiving Account Distribution Report
The Receiving Account Distribution Report lists the accountingdistributions for your receiving transactions. This report supports thedistributions created for the following transactions:
– Purchase Order Receipts
– Purchase Order Receipt Adjustments
– Purchase Order Returns to Supplier
– Deliver to Expense Destinations
– Return to Receiving from Expense Destinations
– Match Unordered Receipts
This feature helps you reconcile your receiving accounting to yourgeneral ledger.
Note: The accounting distributions for Deliver to and Return fromboth Inventory and Shop Floor (WIP) destinations are transferredto the General Ledger Interface by Inventory. When you reconcileyour receiving inspection account, you need to include thesetransactions from the Material Account Distribution Reports aswell as the WIP Account Distribution Reports.
Report Submission
In the Transaction Reports (for Inventory) or Submit Requestswindows, select Receiving Account Distribution Report in the Namefield.
Report Parameters
Sort Option
Use the Sort By parameter to produce a report customized to yourspecific needs. Choose one of the following options:
Sort the report by account and item.
Sort the report by account and receipt number.
Account and Item
Account andReceipt

9 – 113Reports and Processes
Sort the report by account and supplier name.
Organization Name
Enter the organization name to restrict the report to a specificorganization. If you leave this field blank, the report printsdistributions for all organizations.
Date From/To
Enter the beginning and ending receipt dates.
Item From/To
Enter the beginning and ending item numbers.
Category From/To
Enter the beginning and ending categories.
Supplier From / Supplier To
Enter the beginning and ending supplier names.
Receipt Number From / Receipt Number To
Enter the beginning and ending receipt numbers.
Account From / Account To
Enter the beginning and ending accounts.
See Also
Submitting a Request, Oracle Applications System Administrator’s Guide
Account andSupplier

9 – 114 Oracle Public Sector Purchasing User’s Guide
Receiving Exceptions Report
Use the Receiving Exceptions Report to review receipts for which thereis a receipt exception. These receipts cannot be automatically closed forreceiving or invoicing. You can enter a receipt exception when youreceive the item.
Report Submission
In the Transaction Reports (for Inventory) or Submit Requests window,select Receiving Exceptions Report in the Name field.
Report Parameters
Receipt Location
Enter the receipt location to restrict the report to a specific location.
Receiver
Enter the receiver name to restrict the report to a specific receiver.
Receipt Date From/To
Enter the beginning and ending receipt dates.
Supplier From/To
Enter the beginning and ending supplier names.
Supplier Site
Enter the supplier site to restrict the report to a specific supplier site.
Organization Name
Enter the organization name to restrict the report to a specificorganization.

9 – 115Reports and Processes
Sort By
Use the Sort By feature to produce a report customized to your specificneeds. Choose one of the following options:
Sort the report by purchase order number.
Sort the report by supplier name.
Dynamic Precision Option
Enter the decimal precision for quantities on the report.
See Also
Submitting a Request, Oracle Applications System Administrator’s Guide
Purchase OrderNumber
Supplier

9 – 116 Oracle Public Sector Purchasing User’s Guide
Receiving Interface Errors Report
This report shows you what warnings or errors occurred while theReceiving Transaction Processor was processing rows in the ReceivingOpen Interface tables. Rows processed in the Receiving Open Interfaceinclude Advance Shipment Notices (ASNs), receipts, and deliveries.Any errors that occur during this process are displayed in theReceiving Interface Errors report when you run the report. At the sametime, the errors are also sent to the EDI Gateway process responsiblefor generating Application Advices. (For example, ApplicationAdvices are sent back to suppliers detailing errors that occurred whenthe suppliers sent ASNs.)
Report Submission
In the Submit Requests window, select Receiving Interface ErrorsReport in the Name field.
Report Parameters
Start Date / End Date
Enter the Start and End dates of the period in which the ReceivingOpen Interface information was processed and the errors weregenerated.
See Also
Submitting a Request, Oracle Applications System Administrator’s Guide
Advance Shipment Notices (ASNs): page 7 – 14

9 – 117Reports and Processes
Receiving Transaction Processor
Use the Receiving Transaction Processor to process your pending orunprocessed receiving transactions. How the Receiving TransactionProcessor handles these transactions depends on the processing mode,which is a profile option that you can set at the site, application,responsibility, and user levels.
In On–line processing mode, Purchasing calls the Receiving TransactionProcessor when you save your work.
In Immediate processing mode, when you save your work, thereceiving forms call the Receiving Transaction Processor for the groupof transactions you have entered since you last saved your work. Notethat this is a specific group of transactions. Transactions belonging toother groups (for example, those entered by another user in Batchprocessing mode) are not included.
In Batch processing mode, the receiving forms insert transactioninformation into the receiving interface tables. These transactionsremain in the interface table until you run the Receiving TransactionProcessor. The receiving forms take into account all pendingtransactions, but Purchasing does not update the transaction history,source documents, and supply information until the transactions areprocessed.
You can set Standard Report Submission parameters to run theReceiving Transaction Processor at specified intervals so that yourpending transactions are processed as often as required.
The Receiving Transaction Processor performs the following functions:
• validates Advance Shipment Notice (ASN) and AdvanceShipment and Billing and Notice (ASBN) information in thereceiving open interface
• derives and defaults values into the receiving interface tables(For example, if a particular value or field is not received, thereceiving open interface tries to derive the value using defaultingand derivation rules.)
• creates receipt headers for intransit shipments
• creates receipt lines for all receipts
• maintains transaction history information
• maintains lot and serial transaction history
• accrues uninvoiced receipt liabilities

9 – 118 Oracle Public Sector Purchasing User’s Guide
• maintains the following purchase order quantities: quantityreceived, quantity delivered, quantity accepted, and quantityrejected
• closes purchase orders for receiving
• maintains the following requisition quantities: quantityreceived, quantity delivered
• maintains supply information
• maintains inventory information (for Inventory destination type)
• maintains outside processing information (for Shop Floordestination type)
� To run the Receiving Transaction Processor:
1. Navigate to the Submit Requests window.
2. Select Requests in the first field.
3. Select Receiving Transaction Processor in the Name field.
4. Save your work to begin the process.
See Also
Profile Options in Purchasing: page 1 – 76
Submitting a Request, Oracle Applications System Administrator’s Guide

9 – 119Reports and Processes
Receiving Transactions Register
The Receiving Transactions Register lists detail information about yourreceiving transactions. The register is sorted by item, category, receiptnumber, document number, and transaction date. The three–partdocument number represents purchase order number, purchase orderline number, and purchase order shipment number.
Note that the register does not include information for transactions thatare awaiting processing when the receiving transaction processor is inBatch or Immediate mode.
Report Submission
In the Transaction Reports (for Inventory) or Submit Requests window,select Receiving Transactions Register in the Name field.
Report Parameters
Organization
Enter the organization name to restrict the report to a specificorganization.
Transaction Type
Enter the transaction type to restrict the report to a specific transactiontype.
Transaction Dates From/To
Enter the beginning and ending transaction dates.
Receipt Numbers From/To
Enter the beginning and ending receipt numbers.
Receiver
Enter the receiver to restrict the report to a specific receiver.

9 – 120 Oracle Public Sector Purchasing User’s Guide
Items From/To
Enter the beginning and ending items.
Categories From/To
Enter the beginning and ending purchasing categories.
Suppliers From/To
Enter the beginning and ending suppliers.
Purchase Order Numbers From/To
Enter the beginning and ending purchase order numbers.
Buyer
Enter the buyer to restrict the report to a specific buyer.
Requisition Numbers From/To
Enter the beginning and ending requisition numbers.
Shipment Numbers From/To
Enter the beginning and ending shipment numbers.
Exception
Enter Yes or No to indicate whether to print only transactions with areceiving exception or only transactions with no receiving exception.Leave this field blank to print transactions regardless of exceptionstatus.
Detail
Enter Yes or No to indicate whether to print detail.
Include Lot/Serial
Enter Yes or No to indicate whether to print lot/serial numberinformation.

9 – 121Reports and Processes
See Also
Submitting a Request, Oracle Applications System Administrator’s Guide
9 – 122 Oracle Public Sector Purchasing User’s Guide
Receiving Value Report
The Receiving Value Report shows item quantity, valuation, anddetailed receipt information for your receiving inspection location.
Note: If you choose a currency other than your functionalcurrency, all value fields are multiplied by the exchange rate.
The Average Unit Price is calculated by dividing the total receivingvalue by the total receiving quantity on hand, using the primary unit ofmeasure.
The Total Purchase Value is the quantity times the average unit price.
The Current Value is the sum of the quantity times the supplier cost forthe cost type. This is the total cost of the item less any materialoverheads for the item. If material overheads are included, then thePurchase Price Difference column would be incorrect.
The Purchase Price Difference is the difference between the TotalPurchase Value and the Current Value columns. You see this columnonly for inventory and shop floor (outside processing) destinations.This report also displays Outside Processing items with no associatedresource value. You can use this information to manually accruepotential purchase price variances, before you deliver into inventory orwork in process.
Report Submission
In the Cost and Period Close Reports (for Inventory) or SubmitRequests (for Cost Management) window, select Receiving ValueReport in the Name field.
Report Parameters
Organization Name
Enter the organization to restrict the report to a specific organization.
Cost Type
Optionally, enter a cost type to change the reported values for theCurrent Value column. If you do not enter a cost type, the report uses

9 – 123Reports and Processes
the Frozen or Average cost type, depending on your costing method. Ifyou specify a cost type, the report values the items at this cost type, forthe respective supplier cost. This is the total cost of the item less anymaterial overheads for the item. If the item is not in the specified costtype, the report values the item at the default cost type. For example, ifyou choose Quarter1 as the cost type and Quarter1 has Frozen as thedefault cost type, the report values the item at the Quarter1 cost. IfQuarter1 is not available, it values the items at the Frozen cost type.
Report Option
Choose one of the following options:
Include detail receipt information, such as receiptdate, receipt number, shipment number, currentlocation, deliver–to location, packing slip,document type, document number, and itemrevision.
Include only summary information for the item,such as item description, quantity, average unitprice, and total purchase value.
Sort
Choose one of the following options:
Sort the report by category set and category.
Sort the report by purchase order destination andthen by item.
Sort the report by destination, by categoryset/category and then by item.
Sort the report by item.
Sort the report by current receiving location andthen by item.
Sort the report by supplier and then by item.
Item From / Item To
Enter a beginning and an ending item to restrict the report to a range ofitems.
Detail
Summary
Category
Destination
Destination andCategory
Item
Location
Supplier

9 – 124 Oracle Public Sector Purchasing User’s Guide
Category Set
Enter a category set to restrict the report to that category set.
Category From / Category To
Enter a beginning and an ending category to restrict the report to arange of categories.
Currency
Enter a currency. When you enter a currency other than yourfunctional currency, item costs are converted to the selected currencyusing the End of period rate you choose in the Exchange Rate field.
Exchange Rate
Choose an exchange rate. If you choose a currency other than yourfunctional currency, the default is the most recent End of period rate.However, you can choose any prior End of period rate. See: EnteringPeriod Rates, Oracle Public Sector General Ledger User’s Guide.
Quantities by Revision
Enter Yes or No to indicate whether you want to display item quantitiesby the revision of the item on the report. You can see revisionquantities only when you choose Detail for the Report Option.
Display Zero Costs Only
Enter Yes or No to indicate whether you want to display items with zerocosts only on the report. You use this option to identify any items thathave a zero standard cost, before you deliver into inventory.
Document Type
Enter Purchase Order or Requisition to limit the reported information. Ifyou do not enter a document type, the report displays both documenttypes.
See Also
Submitting a Request, Oracle Applications System Administrator’s Guide

9 – 125Reports and Processes
Receiving Value Report by Destination Account
The Receiving Value Report by Destination Account lists received itemsby purchase order destination and distribution account. If you accrueboth inventory and expense at the time of receipt, you may have bothinventory and expense as part of your receiving valuation account. TheReceiving Value Report by Destination Account allocates yourreceiving balances by the purchase order line inventory, expenseaccounts, and quantities. You can then use this report to manuallyreclass the receiving valuation account to the appropriate expenseaccounts.
Report Submission
In the Cost and Period Close Reports (for Inventory) or SubmitRequests windows, select Receiving Value Report by DestinationAccount in the Name field.
Report Parameters
Items From / Items To
Enter the beginning and ending item numbers.
Categories From / Categories To
Enter the beginning and ending purchasing categories.
Destination Type
Enter a destination type to restrict the report to a specific destinationtype, such as Expense, Inventory, or Shop Floor.
Accounts From / Accounts To
Enter the beginning and ending accounts.
Organization Name
Enter the organization name to restrict the report to a specificorganization.
9 – 126 Oracle Public Sector Purchasing User’s Guide
Exclude One–time Items
Enter Yes or No to indicate whether you want to exclude one–timeitems from the report.
Dynamic Precision Option
Enter the decimal precision for quantities on the report.
See Also
Submitting a Request, Oracle Applications System Administrator’s Guide

9 – 127Reports and Processes
ReqExpress Templates Listing
The ReqExpress Templates Listing shows requisition template detailinformation.
The report lists sourcing information appropriate for the source type.For the Inventory source type, this is the organization andsubinventory. For the Supplier source type, this is the buyer, supplier,supplier site, contact, supplier item number, and RFQ Required flagvalue.
Report Submission
In the Submit Requests window, select ReqExpress Templates Listing inthe Name field.
Report Parameters
Express Name
Enter the template name to restrict the report to a specific template.
See Also
Submitting a Request, Oracle Applications System Administrator’s Guide

9 – 128 Oracle Public Sector Purchasing User’s Guide
Requisition Activity Register
The Requisition Activity Register shows requisition activity andmonetary values. Purchasing prints the requisitions in order of creationdate and prepared name.
Report Submission
In the Submit Requests window, select Requisition Activity Register inthe Name field.
Report Parameters
Creation Dates From/To
Enter the beginning and ending requisition creation dates.
Preparer
Enter the preparer name to restrict the report to a requisitions from aspecific preparer.
Requisition Type
Enter the requisitions document type (Purchase Requisition orInventory Requisition) to restrict the report to a specific type.
See Also
Submitting a Request, Oracle Applications System Administrator’s Guide

9 – 129Reports and Processes
Requisition Distribution Detail Report
The Requisition Distribution Detail Report lists requisitions,distributions, and charge account information. You can also use thereport to review requisitions that failed funds reservation if you haveenabled encumbrance. Totals print only if encumbrance has beenenabled.
Report Submission
In the Submit Requests window, select Requisition Distribution DetailReport in the Name field.
Report Parameters
Requisition Numbers From/To
Enter the beginning and ending requisition numbers.
Requisition CreationDates From/To
Enter the beginning and ending creation dates.
Preparer
Enter a preparer name to restrict the report to a specific preparer.
Failed Funds Only
Enter Yes or No to indicate whether you want to restrict the report topurchase orders that failed funds checking.
Dynamic Precision Option
Enter the decimal precision for quantities on the report.
See Also
Submitting a Request, Oracle Applications System Administrator’s Guide

9 – 130 Oracle Public Sector Purchasing User’s Guide
Requisition Import Process
Use the Requisition Import process to import requisitions from otherOracle or non–Oracle systems. Work in Process, MasterScheduling/MRP, Order Entry, and Inventory (as well as customsystems) can provide requisition information for the Purchasingrequisition interface table. For example, drop–ship orders from OrderEntry and Kanban orders from Inventory are sent to the requisitioninterface table and converted into requisitions. Also, project and taskinformation from Master Scheduling/MRP are imported through theRequisition Import process. Requisition Import creates a requisitionline and one or more requisition distributions for each row it finds inthe interface table. It then groups these lines on requisitions accordingto parameters you define below.
You can set the profile PO: Release During ReqImport to create releaseseach time you run the Requisition Import process. For example, whenyou implement planned orders as requisitions in the MRP PlannerWorkbench, you can automatically create the releases at the same timeyou create the requisitions. Purchasing automatically creates (andoptionally approves) the releases for all blanket–sourced, approvedrequisitions as part of the Requisition Import process, not just thosecreated by the Requisition Import run.
Each requisition you create using Requisition Import enters Purchasingwith the approval status that was specified when the row in theinterface table was created. However, if you are using requisitionencumbrance (the Use Requisition Encumbrance field in theEncumbrance Information region of the Financials Options window isset to Yes), Requisition Import changes the Approved status toPre–Approved, and you must approve the requisitions. If you’re usingencumbrance, the requisition approval process attempts to reservefunds for the document at the beginning of the process. If the approvalprocess cannot reserve funds at the beginning of the process, then thefunds are reserved when an approver with enough authority to reservethe funds approves the document.
If the requisitions you import are Pre–Approved or incomplete,Requisition Import calls the PO Requisition Approval workflow tosubmit the requisitions to the approval process. If the requisitions youimport are already approved, Requisition Import calls the PO CreateDocuments workflow in Purchasing to automatically createcorresponding purchase orders; the PO Create Documents workflowthen calls the PO Approval workflow to approve the purchase orders,if you’ve enabled automatic approval. See: Choosing DocumentCreation Options: page 1 – 73.

9 – 131Reports and Processes
You can place requisitions you imported on purchase orders just as youwould any other requisition. Purchasing automatically sources yourrequisition line to a blanket agreement or catalog quotation number ifthe supplier for the item is in the Approved Supplier List and ifsourcing rules are set up for the item.
When you submit the Requisition Import process, Purchasingautomatically prints the Requisition Import Run Report. You can viewthis report by Using the View Requests window and choosing theReport option in the View field for the Requisition Import process yousubmitted. If there were no records in the transaction interface table,the report has two lines:
• No records were processed
• Number of records in error = 0
Otherwise, the report normally has three lines:
• Number of approved requisitions created = n
• Number of unapproved requisitions created = n
• Number of records in error = n
When there are transaction records that cannot be processed, the reportincludes a fourth line:
• Number of records pending = n.
� To run the Requisition Import process:
1. Navigate to the Submit Requests window.
2. Select Requests in the Type field.
3. Select Requisition Import in the Name field.
4. Enter the Import Source. Leave this field blank for all importsources.
5. Enter the Import Batch Identification for the batch that you want toimport. Leave this field blank to import all batches.
6. Use the Group By feature to determine how requisition lines aregrouped on the requisitions you create. The default in this field isset in the Purchasing Options window. Choose one of thefollowing options:
All: Group all requisition lines on one requisition
Buyer: Group requisition lines for each buyer name on a separaterequisition

☞
9 – 132 Oracle Public Sector Purchasing User’s Guide
Category: Group requisition lines for each purchasing category on aseparate requisition
Item: Group requisition lines for each item on a separaterequisition
Location: Group requisition lines for each location on a separaterequisition
Supplier: Group requisition lines for each supplier name on aseparate requisition
7. Enter the Last Requisition Number that exists in your system.Purchasing increments this number by one to calculate the nextrequisition number. If the calculated number is already in use,Purchasing selects the next available requisition number. Leavethis field blank to automatically get the next available requisitionnumber.
8. Choose Yes or No for Multiple Distributions.
A multiple distribution allows you to charge requisition line itemsacross multiple organizations. For example, you could have arequisition line quantity for 10 items; you could charge 5 to oneorganization, 3 to another, and 2 to yet another. If in this run ofRequisition Import you have to create multiple distributions for atleast one requisition line, choose Yes. If you do not need to createmultiple distributions for a requisition line, choose No.
Attention: If the Import Source you chose was MasterScheduling/MRP, Order Entry, or Inventory (INV), choose No.If the Import Source you chose was Web Requisitions (ICX),choose Yes.
9. Save your work to begin the process.
See Also
Profile Options in Purchasing: page 1 – 76
Defining Purchasing Options: page 1 – 29
Automatic Release Generation: page 4 – 93
Submitting a Request, Oracle Applications System Administrator’s Guide
Viewing Requests, Oracle Applications User’s Guide
Automatic Sourcing: page 5 – 69

9 – 133Reports and Processes
Drop Shipments: page 4 – 156
Kanban Replenishments: page 3 – 18
Workflow for Creating Purchase Orders and Releases: page 4 – 160
Approval Workflows: page 2 – 63

9 – 134 Oracle Public Sector Purchasing User’s Guide
Requisition Import Exceptions Report
The Requisition Import Exceptions Report shows errors from theRequisition Import process. If the Requisition Import process finds anyrequisitions that it cannot create, Purchasing records the errors in thePO Interface Errors Table.
Report Submission
In the Submit Requests window, select Requisition Import ExceptionsReport in the Name field.
Report Parameters
Import Source
Enter the interface source to restrict the report to a specific importsource.
Import Batch ID
Enter the name of a Requisition Import batch to restrict the report to aspecific batch within your Import Source.
Delete Exceptions
Enter Yes or No to indicate whether you want to delete the exceptionsfrom the PO interface errors table. If you enter Yes, Purchasing printsthe report and deletes the items printed from the PO Interface ErrorsTable. If you enter No, Purchasing Prints the report and leaves theerrors in the error table. Each time Requisition Import process isgenerated, new transaction id numbers are created for errors. If theerrors are not deleted, they remain in the Errors Table and are listedalong with new error messages generated by the Requisition Importprocess for the same Import Source and Import Batch ID.

9 – 135Reports and Processes
See Also
Submitting a Request, Oracle Applications System Administrator’s Guide
Requisition Import Process: page 9 – 130

9 – 136 Oracle Public Sector Purchasing User’s Guide
Requisitions on Cancelled Sales Order Report
The Requisitions on Cancelled Sales Order Report shows informationon internally sourced requisition lines for which a sales order has beengenerated and subsequently cancelled. You can run the report only ifOrder Entry is installed.
Report Submission
In the Submit Requests window, select Requisitions on Cancelled SalesOrder Report in the Name field.
Report Parameters
Items From/To
Enter the beginning and ending item numbers.
Requestor
Enter a requestor name to restrict the report to a specific requestor.
Categories From/To
Enter the beginning and ending purchasing categories.
Dynamic Precision Option
Enter the decimal precision for quantities on the report.
See Also
Submitting a Request, Oracle Applications System Administrator’s Guide

9 – 137Reports and Processes
Reschedule Requisitions Process
Use the Reschedule Requisitions process to update requisitioninformation for the rows that Master Scheduling/MRP has insertedinto the rescheduling interface table. This information can includechanges to need–by dates recommended by MRP as well as changes torequisition quantities made by means of the Planner’s Workbench.
� To run the Requisition Import process:
1. Navigate to the Submit Requests window.
2. Select Requests in the Type field.
3. Select Reschedule Requisitions in the Name field.
4. Save your work to begin the process.
See Also
Submitting a Request, Oracle Applications System Administrator’s Guide
Planner Workbench, Oracle Master Scheduling/MRP and Supply ChainPlanning User’s Guide

9 – 138 Oracle Public Sector Purchasing User’s Guide
Savings Analysis Report (by Buyer)
The Savings Analysis Report (By Buyer) shows buyer performance bypurchase order.
The Negotiated Amount is the product of the price on the quotationand the quantity ordered. If a quote is not defined, Purchasing printsthe product of the market price of the item ordered and the quantityordered. If the market price is not defined, Purchasing uses the listprice.
The report includes a price type Legend at the bottom of each page forthe price type. If the line price type is Q, the line price was from theQuote. If the line price type is M, the line price was from Market Price,and if the line price type is L, the line price was from List Price.
The Actual Amount is the product of the actual price listed on thepurchase order line and the quantity ordered.
The Amount Saved is the negotiated amount less the actual amount,with negative figures in parentheses.
Report Submission
In the Submit Requests window, select Savings Analysis Report (ByBuyer) in the Name field.
Report Parameters
Creation Date From/To
Enter the beginning and ending creation dates.
Buyer
Enter the buyer name to restrict the report to a specific buyer.
Sort By
Use the Sort By feature to produce a report customized to your specificneeds. Choose one of the following options:
9 – 139Reports and Processes
Sort the report by buyer name and purchase ordertype.
Sort the report by buyer name and purchase ordernumber.
Dynamic Precision Option
Enter the decimal precision for quantities on the report.
See Also
Submitting a Request, Oracle Applications System Administrator’s Guide
PO Type
Purchase OrderNumber

9 – 140 Oracle Public Sector Purchasing User’s Guide
Savings Analysis Report (by Category)
The Savings Analysis Report (By Category) shows buyer performanceby category. Use the report to compare the market, quote, or list priceto the actual price.
The Negotiated Amount is the product of the price on the quotationand the quantity ordered. If a quote is not defined, Purchasing printsthe product of the market price of the item ordered and the quantityordered. If the market price is not defined, Purchasing uses the listprice.
The report includes a price type Legend at the bottom of each page forthe price type. If the line price type is Q, the line price was from theQuote. If the line price type is M, the line price was from Market Price,and if the line price type is L, the line price was from List Price.
The Actual Amount is the product of the actual price listed on thepurchase order line and the quantity ordered.
The Amount Saved is the negotiated amount less the actual amount,with negative figures in parentheses.
Report Submission
In the Submit Requests window, select Savings Analysis Report (ByCategory) in the Name field.
Report Parameters
Buyer
Enter the buyer name to restrict the report to a specific buyer.
Creation Dates From/To
Enter the beginning and ending document creation dates.
Categories From/To
Enter the beginning and ending categories from the purchasingcategory set.

9 – 141Reports and Processes
Dynamic Precision Option
Enter the decimal precision for quantities on the report.
See Also
Submitting a Request, Oracle Applications System Administrator’s Guide

9 – 142 Oracle Public Sector Purchasing User’s Guide
Send Notifications for Purchasing Documents
The workflow process, Send Notifications for Purchasing Documents,looks for documents that are incomplete, rejected, or in need ofreapproval and sends notifications to the appropriate people of thedocument’s status. You can view and respond to these notificationsthrough the Notifications Summary window. In order for thesenotifications to be sent, you need to start this concurrent programprocess, Send Notifications for Purchasing Documents, and choosehow frequently you want the process to run. (The workflow definitionitself, Send Notifications for Purchasing Documents, which is initiatedby this concurrent program process, is viewable through the OracleWorkflow Builder.)
For information on the kinds of notifications sent by the SendNotifications for Purchasing Documents process, see: Viewing andResponding to Notifications: page 2 – 29.
� To run the Send Notifications for Purchasing Documents process:
1. Navigate to the Submit Requests window and select SendNotifications for Purchasing Documents in the Request Name field.
2. Choose Schedule.
3. Choose how often you want the process to run.
For example, choose Periodically if you want the process to runperiodically. You can then choose to run the process every so manymonth(s), week(s), day(s), hour(s), or minute(s). For example,choose On Specific Days if you want the process to run on specificdays of the month or week.
4. Choose OK.
5. Choose Submit Request once you’ve selected your options and areready to run the process.
See Also
Approval Workflows: page 2 – 63
Oracle Workflow Guide
Submitting a Request, Oracle Applications System Administrator’s Guide

9 – 143Reports and Processes
Standard Notes Listing
The Standard Notes Listing shows your standard notes and their startand end dates.
The report lists standard notes alphabetically by usage and name.
Report Submission
In the Submit Requests window, select Standard Notes Listing in theName field.
Report Parameters
Usages From/To
Enter the beginning and ending usages. Standard usages are thefollowing: Approver, Buyer, Invoice Internal, Item Internal, POInternal, Payables, Quote Internal, RCV Internal, RFQ Internal,Receiver, Req Internal, and Supplier.
When you enter a note for an invoice, you can assign a use of InvoiceInternal or Supplier.
Names From/To
Enter the beginning and ending note names.
Purchasing includes notes whose names fall alphabetically, within therange you enter, including the notes with the beginning and end namesyou specify.
See Also
Submitting a Request, Oracle Applications System Administrator’s Guide

9 – 144 Oracle Public Sector Purchasing User’s Guide
Substitute Receipts Report
The Substitute Receipts Report lists all or specific substitute receipts.To prevent disruption in your receiving process, Purchasing lets youreceive items which a supplier has delivered as a substitute for theordered item. You need to predefine the items you accept as substitutefor other items. See: Defining Item Revisions, Oracle Inventory User’sGuide.
The report includes sourcing information appropriate for the sourcetype. For the Inventory source type, this is the organization andsubinventory. For the Supplier source type, this is the supplier andsupplier site.
Report Submission
In the Submit Requests window, select Substitute Receipts Report in theName field.
Report Parameters
Transaction Dates From/To
Enter the beginning and ending transaction dates.
Organization Name
Enter the organization name to restrict the report to a specificorganization.
Dynamic Precision Option
Enter the decimal precision for quantities on the report.
See Also
Submitting a Request, Oracle Applications System Administrator’s Guide

9 – 145Reports and Processes
Supplier Affiliated Structure Listing
The Supplier Affiliated Structure Listing shows information about yoursupplier’s parent–child relationships. Your list of suppliers includessuppliers who are subsidiaries of larger organizations. The SupplierAffiliated Structure Listing allows you to review the relationshipsestablished. The subsidiary organization is the child supplier to theparent supplier.
Report Submission
In the Submit Requests window, select Supplier Affiliated StructureListing in the Name field.
Report Parameters
Suppliers From/To
Enter the beginning and ending supplier names.
See Also
Submitting a Request, Oracle Applications System Administrator’s Guide
9 – 146 Oracle Public Sector Purchasing User’s Guide
Supplier Price Performance Analysis Report
Use the Supplier Price Performance Analysis Report to compare theprice of an item from different suppliers.
Report Submission
In the Submit Requests window, select Supplier Price PerformanceAnalysis Report in the Name field.
Report Parameters
Suppliers From/To
Enter the beginning and ending supplier names.
Period From/To
Enter the beginning and ending periods.
Creation Date From/To
Enter the beginning and ending purchase order creation dates.
Categories From/To
Enter the beginning and ending purchasing categories.
Items From/To
Enter the beginning and ending system item numbers.
Sort By
Choose one of the following options:
Sort the report by purchasing category. If you donot make an entry, this is the default.
Sort the report by item number.
Category
Item

9 – 147Reports and Processes
Dynamic Precision Option
Enter the decimal precision for quantities on the report.
See Also
Submitting a Request, Oracle Applications System Administrator’s Guide

9 – 148 Oracle Public Sector Purchasing User’s Guide
Supplier Purchase Summary Report
The Supplier Purchase Summary report lists the numbers and amountof orders you have placed with various suppliers during a particularperiod. You can use this information to analyze and manage yourpurchasing volume with your suppliers. You can also use the SmallBusiness Sort By option to get the statistics you need to complete theCumulative Commitments section of Form 295 as required forcompliance with the Federal Acquisition Regulation (FAR) (U.S.). Inaddition, with the New Supplier Listing you can update theinformation provided by your suppliers.
Report Submission
In the Submit Requests window, select Supplier Purchase SummaryReport in the Name field.
Report Parameters
Creation Dates From/To
Enter the beginning and ending creation dates.
Supplier Type
Enter the supplier type from the Lookup Codes window to restrict thereport to a specific supplier type. See: Defining Lookup Codes: page1 – 54.
Small Business
Enter Yes to restrict the report to small business suppliers.
Minority Owned
Enter Yes to restrict the report to minority owned suppliers.
Women Owned
Enter Yes to restrict the report to women owned suppliers.

9 – 149Reports and Processes
Sort By
Use the Sort By feature to produce a report customized to your specificneeds. Choose one of the following options:
Sort the report by supplier name, supplier site, andPO number
Sort the report by supplier type, supplier name,supplier site, and PO number
See Also
Submitting a Request, Oracle Applications System Administrator’s Guide
About Suppliers, Oracle Public Sector Payables User’s Guide
New Supplier Listing: page 9 – 52
Supplier
Supplier Type

9 – 150 Oracle Public Sector Purchasing User’s Guide
Supplier Quality Performance Analysis Report
The Supplier Quality Performance Analysis Report can be used toreview your suppliers’ quality performance. You can review supplierquality performance for percents accepted, rejected, and returned. Youcan use this report to identify suppliers with quality performanceissues.
Report Submission
In the Submit Requests window, select Supplier Quality PerformanceAnalysis Report in the Name field.
Report Parameters
Items From/To
Enter the beginning and ending item numbers.
Suppliers From/To
Enter the beginning and ending supplier names.
Categories From/To
Enter the beginning and ending purchasing categories.
Buyer
Enter a buyer name to restrict the report to a specific buyer.
Creation Dates From/To
Enter the beginning and ending creation dates.
Detail
Enter Yes or No to indicate whether you want to print detailinformation on the report.

9 – 151Reports and Processes
Dynamic Precision Option
Enter the decimal precision for quantities on the report.
See Also
Submitting a Request, Oracle Applications System Administrator’s Guide

9 – 152 Oracle Public Sector Purchasing User’s Guide
Supplier Service Performance Analysis Report
The Supplier Service Performance Analysis Report lists late shipments,early shipments, rejected shipments, and shipments to wrong locations.You can use this report to derive a supplier service penalty bymultiplying the days variance quantity by a percentage of the price.
The % Open Current is the percentage of the ordered quantity not yetreceived, but within the receipt tolerance days or not past due.
The % Open Past Due is the percentage of the ordered quantity notreceived by the promise date and beyond the receipt tolerance days.
The % Received On Time is the percentage of the ordered quantityreceived on the promise date or within the receipt tolerance days.
The % Received Late is the percentage of the ordered quantity receivedafter the promise date and outside the receipt tolerance days.
The % Received Early is the percentage of the ordered quantityreceived before the promise date and outside the receipt tolerance days.
The Days Variance is calculated as the summation of the datedifferential (transaction date subtracted from promise date) multipliedby the corrected received quantity (the received quantity plus or minuscorrections) for each shipment, all divided by the total correctedreceived quantity. The result is the quantity per day the supplier is invariance.
Report Submission
In the Submit Requests window, select Supplier Service PerformanceAnalysis Report in the Name field.
Report Parameters
Items From/To
Enter the beginning and ending item numbers.
Suppliers From/To
Enter the beginning and ending supplier names.

9 – 153Reports and Processes
Categories From/To
Enter the beginning and ending purchasing categories.
Buyer
Enter a buyer name to restrict the report to a specific buyer.
Creation Dates From/To
Enter the beginning and ending creation dates.
Detail
Enter Yes or No to indicate whether you want to print detailinformation for each purchase order on the report.
Dynamic Precision Option
Enter the decimal precision for quantities on the report.
See Also
Submitting a Request, Oracle Applications System Administrator’s Guide

9 – 154 Oracle Public Sector Purchasing User’s Guide
Supplier Volume Analysis Report
The Supplier Volume Analysis Report shows the dollar value of itemsyou purchase from a supplier. The report prints the items that areassigned sourcing rules. Use the report to compare your actualpurchase percentages with your sourcing percentage.
The Expenditure is the sum of the item line amounts for standardpurchase orders for the supplier.
The Actual Percentage is the items expenditure as a percentage of thetotal expenditure for the date range of the report.
The Intended Commitment is the total expenditure multiplied by thesplit percentage entered in the sourcing rules.
Report Submission
In the Submit Requests window, select Supplier Volume AnalysisReport in the Name field.
Report Parameters
Items From/To
Enter the beginning and ending item numbers.
Creation Dates From/To
Enter the beginning and ending purchase order creation dates.
See Also
Submitting a Request, Oracle Applications System Administrator’s Guide

9 – 155Reports and Processes
Suppliers on Hold Report
The Suppliers on Hold Report lists all suppliers placed on hold. Thisreport also prints all purchase orders you still have outstanding withthe suppliers on hold.
Report Submission
In the Submit Requests window, select Suppliers on Hold Report in theName field.
Report Parameters
Supplier Names From/To
Enter the beginning and ending supplier names.
PO Numbers From/To
Enter the beginning and ending purchase order numbers.
Sort By
Use the sort by feature to produce a report customized to your specificneeds. Choose one of the following options:
Sort the report by purchase order number
Sort the report by supplier
Dynamic Precision Option
Enter the decimal precision for quantities on the report.
See Also
Submitting a Request, Oracle Applications System Administrator’s Guide
Purchase OrderNumber
Supplier

9 – 156 Oracle Public Sector Purchasing User’s Guide
Tax Code Listing
The Tax Code Listing shows the tax authorities and rates that areavailable you use when you enter purchase orders or invoices. The taxcode is assigned to a purchase order line. When the line is received, themonetary value is applied to the account associated with the tax code.All information for the tax codes applies to the set of books of theOrganization listed in the header of the report. Use this report to verifythe validity of the tax code accounts.
Report Submission
In the Submit Requests window, select Tax Code Listing in the Namefield.
See Also
Submitting a Request, Oracle Applications System Administrator’s Guide
Defining Tax Names, Oracle Public Sector Payables User’s Guide

9 – 157Reports and Processes
Uninvoiced Receipts Report
The Uninvoiced Receipts Report should be run before the ReceiptAccrual – Period–End process. With this report, you can review all orspecific uninvoiced receipts for both period end and online accruals.Uninvoiced receipts are goods and services you have received thatyour supplier did not invoice yet. This report indicates exactly whatyou have to accrue and for what amount, and helps you analyze yourreceipt accrual entries. The accrual amount is the difference betweenthe quantity received and the quantity billed multiplied by the unitprice of the item.
Report Submission
In the Submit Requests window, select Uninvoiced Receipts Report inthe Name field.
Report Parameters
Accrued Receipts
Enter Yes to indicate that you want to include accrued receipts on thereport. Otherwise, the report includes only unaccrued receipts.
Include Online Accruals
Enter Yes to indicate that you want to include online accruals on thereport. Typically, you use the Accrual Reconciliation Report rather thanthis report to analyze your online accruals.
Categories From/To
Enter the beginning and ending purchasing categories.
Minimum Extended Value
Enter the minimum extended value for the report.
9 – 158 Oracle Public Sector Purchasing User’s Guide
Period Name
Enter a period name to restrict the report to the periods up to andincluding the specified period.
Suppliers From/To
Enter the beginning and ending supplier names.
Sort By
Choose one of the following options:
Sort the report by purchasing category.
Sort the report by supplier name.
Dynamic Precision Option
Enter the decimal precision for quantities on the report.
See Also
Submitting a Request, Oracle Applications System Administrator’s Guide
Receipt Accruals – Period End Process: page 9 – 105
Accrual Reconciliation Report: page 9 – 5
Category
Supplier

9 – 159Reports and Processes
Unit of Measure Class Listing
The Unit Of Measure Class Listing shows the classes of measurementyou have defined. A unit of measure class is a grouping of commonunits of measurement. For example, the standard measurement fordistance is inch, yard, foot, or mile. Units of distance are assigned tothe class Distance. The units assigned to a class are reviewed in theUnit Of Measure Listing.
Report Submission
In the Submit Requests window, select Unit of Measure Class Listing inthe Name field.
Report Parameters
Active/Inactive
Choose one of the following options:
List only active unit of measure classes on thereport.
List both active and inactive unit of measureclasses on the report.
List only inactive unit of measure classes on thereport.
See Also
Submitting a Request, Oracle Applications System Administrator’s Guide
Defining Unit of Measure Classes, Oracle Inventory User’s Guide
Active
Both
Inactive

9 – 160 Oracle Public Sector Purchasing User’s Guide
Unit of Measure Listing
The Unit of Measure Listing shows the unit conversions you havedefined in the Unit of Measure Conversions window. A unit ofmeasure is assigned to a class. The class is a common grouping of unitsbased on a common denominator. For example, distance is a class ofmeasurement; where inch, foot, yard and mile are units of distancemeasurement. The base unit would be foot. The unit of measure inchwould have a conversion of .08333, which is multiplied by the base unitfoot to create the conversion from inch to foot. The conversion for milewould be 5280. A unit is assigned to a class to ensure that it has acommon denominator of conversion. In other words, gallons are in adifferent class than miles. Gallons are a unit of volume, and miles are aunit of distance. You can assign items an interclass conversion.
Use this report to review the units of measure conversions when youcreate purchase orders or requisitions, or enter receiving, delivery, orinspection transactions
Report Submission
In the Submit Requests window, select Unit of Measure Listing in theName field.
Report Parameters
Active/Inactive
Choose one of the following options:
List only active units of measure on the report.
List both active and inactive units of measure onthe report.
List only inactive units of measure on the report.
Dynamic Precision Option
Enter the decimal precision for quantities on the report.
Active
Both
Inactive

9 – 161Reports and Processes
See Also
Submitting a Request, Oracle Applications System Administrator’s Guide
Defining Unit of Measure Conversions, Oracle Inventory User’s Guide

9 – 162 Oracle Public Sector Purchasing User’s Guide
Unordered Receipts Report
The Unordered Receipts Report lists all or selected unordered receipts.Unordered receipts refer to received items that receivers could notmatch to purchase orders. You can enter unordered receipttransactions only if you set up your system options accordingly.Purchasing lets you specify which unordered receipts you want toreview. See: Defining Purchasing Options: page 1 – 29.
Report Submission
In the Submit Requests window, select Unordered Receipts Report inthe Name field.
Report Parameters
Transaction Dates From/To
Enter the beginning and ending transaction dates.
Organization Name
Enter the organization to restrict the report to a specific organization.
Dynamic Precision Option
Enter the decimal precision for quantities on the report.
See Also
Submitting a Request, Oracle Applications System Administrator’s Guide

9 – 163Reports and Processes
Workflow Background Process
The Workflow Background Engine process must be running if you areusing the Timeout feature in the approval workflow processes forpurchase orders or requisitions. The Timeout feature is enabled only ifyou modify the notification(s) associated with it in the OracleWorkflow Builder. The Timeout feature sends periodic reminders toapprovers or automatically forwards a notification to the next approverin the hierarchy after no response is received over a particular period oftime. For information on how to set the Timeout feature in theWorkflow Builder, see: Approval Workflows: page 2 – 63.
Report Submission
In the Submit Requests window, select Workflow Background processin the Name field.
For more information on how to submit this process, see: To ScheduleBackground Engines, Oracle Workflow Guide.
See Also
Submitting a Request, Oracle Applications System Administrator’s Guide

9 – 164 Oracle Public Sector Purchasing User’s Guide
A P P E N D I X
AT
A – 1Windows and Navigator Paths
Windows andNavigator Paths
his appendix shows you the default menu path for each OraclePublic Sector Purchasing window. Refer to this appendix when you donot already know the menu path for a window you want to use.

A – 2 Oracle Public Sector Purchasing User’s Guide
Windows and Navigator Paths
Although your system administrator may have customized yournavigator, typical navigational paths include the following:
Note: Text in brackets ([ ]) indicates a button.
See also: Oracle Applications Character to GUI Menu Path Changes.
For windows described in other manuals:
See: page Refer to this manual for a complete window description
BOM Oracle Bills of Material User’s Guide
CST Oracle Cost Management User’s Guide
Flex Oracle Applications Flexfields Manual
GL Oracle Public Sector General Ledger User’s Guide
HR Oracle Human Resources User’s Guide
INV Oracle Inventory User’s Guide
PO Oracle Public Sector Purchasing User’s Guide
MRP Oracle Master Scheduling/MRP and Supply Chain Plan-ning User’s Guide
SYS Oracle System Administrator’s Guide
User Oracle Applications User’s Guide

A – 3Windows and Navigator Paths
Window Name Navigation Path
Acceptances: page 4 – 79 Purchase Orders > Purchase Orders > Special menu >Acceptances
Account Generator Processes: page 0 – 12 Setup > Flexfields > Key > Accounts
Accounting Calendar, (see GL) Setup > Financials > Accounting > Calendar
Accrual Options: page 1 – 32 Setup > Organizations > Purchasing Options > Accrual
Action History: page 8 – 2 From the following windows: Releases, Purchase Order Headers,Purchase Order Lines, Purchase Order Shipments, PurchaseOrder Distributions, Requisition Headers, Requisition Lines,Requisition Distributions > View Requisitions > Special menu >View Action History
Approval Assignments: page 1 – 18 Setup > Approvals > Approval Assignments
Approval Groups: page 1 – 15 Setup > Approvals > Approval Groups
Approve Entire Quotation: page 5 – 66 RFQs and Quotations > Quotations > [Approve]
RFQs and Quotations > Quotations > [Price Breaks] > [Approve]
RFQs and Quotations > Quote Analysis > [Find] > [ApproveEntire Quotation]
Approve Document: page 2 – 32 Requisitions > Requisitions > [Approve]
Purchase Orders > Purchase Orders > [Approve]
Purchase Orders > Releases > [Approve]
Approved Supplier List: page 5 – 22 Supply Base > Approved Supplier List
Approved Supplier List Statuses: page5 – 24
Supply Base > Supplier Statuses
Approved Supplier List Summary: page5 – 31
Supply Base > Summary Approved Supplier List
Assign Cross References (see INV) Items > Cross References > [Assign]
Assign Security Rules (see Flex) Setup > Flexfields > Descriptive > Security > Assign
Assign Requisition Lines: page 5 – 82 Management > Manage Buyer Workload > [Find]

A – 4 Oracle Public Sector Purchasing User’s Guide
Navigation PathWindow Name
Assign Security Rules (see Flex) Setup > Flexfields > Descriptive > Security > Assign
Setup > Flexfields > Key > Security > Assign
Setup > Flexfields > Validation > Security > Assign
AutoCreate Documents: page 6 – 13 Autocreate > [Find]
Buyers: page 1 – 13 Setup > Personnel > Buyers
Buyer Workload: page 5 – 80 Management > Manage Buyer Workload > [Find]
Categories (see INV) Setup > Items > Categories > Category Codes
Category Assignment (see INV) Items > Master Items > Special menu > Categories
Items > Organization Items > Special menu > Categories
Category Set (see INV) Setup > Items > Categories > Category Sets
Change Organization (see MRP) Change Organization
Common Lookups (see User) Setup > Items > Item Types
Concurrent Requests Summary (see User) Requests
Control Document: page 2 – 48 Requisitions > Requisition Summary > [Headers] > [Find] >Special menu > Control
Requisitions > Requisition Summary > [Lines] > [Find] > Specialmenu > Control
Purchase Orders > Purchase Order Summary > [Headers] >[Find] > Special menu > Control
Purchase Orders > Purchase Order Summary > [Lines] > [Find] >Special menu > Control
Purchase Orders > Purchase Order Summary > [Shipments] >[Find] > Special menu > Control
Control Options: page 1 – 33 Setup > Organizations > Purchasing Options > Control
Control Purchasing Periods: page 1 – 71 Setup > Financials > Accounting > Control Purchasing Periods
Corrections: page 7 – 61 Receiving > Corrections
Receiving > Corrections > [Find]
Cross Reference Types (see INV) Items > Cross References
Cross–Validation Rules (see Flex) Setup > Flexfields > Key > Cross–Validation

A – 5Windows and Navigator Paths
Navigation PathWindow Name
Currencies (see SYS) Setup > Financials > Currency > Currencies
RFQs and Quotations > RFQs > [Currency]
RFQs and Quotations > Quotations > [Currency]
Daily Rates see (GL) Setup > Financials > Currency > Currencies > Daily Rates
Daily Conversion Rate Type (see GL) Setup > Financials > Currency > Daily Conversion Rate Type
Default Category Sets (see INV) Setup > Items > Categories > Default Category Sets
Define MassCancel: page 2 – 53 Accounting > MassCancel
Define Security Rules (see Flex) Setup > Flexfields > Descriptive > Security > Define
Setup > Flexfields > Key > Security > Define
Setup > Flexfields > Validation > Security > Define
Deletion Constraint (see BOM) Setup > Items > Delete Constraints
Deletion Groups (see BOM) Items > Delete Items
Descriptive Flexfield Segments (see Flex) Setup > Flexfields > Descriptive > Segments
Distributions: page 4 – 70 Purchase Orders > Purchase Orders > [Shipments] >[Distributions]
Purchase Orders > Releases > [Distributions]
Requisitions > Requisitions > [Distributions]
Document Types: page 1 – 61 Setup > Purchasing > Document Types
Enter Person (see HR) Setup > Personnel > Employees
Express Receipts: page 7 – 25 Receiving > Receipts > [Find] > [Express]
Find Corrections: page 7 – 60 Receiving > Corrections
Find Expected Receipts: page 7 – 26 Receiving > Receipts
Find Intransit Shipments: page 7 – 65 Receiving > Manage Shipments
Find Item Information (see INV) Items > Item Information
Find Purchase Orders: page 4 – 19 Purchase Orders > Purchase Order Summary
Find Quotations: page 5 – 63 RFQs and Quotations > Quote Analysis
Find Receiving Transactions: page 7 – 46 Receiving > Receiving Transactions

A – 6 Oracle Public Sector Purchasing User’s Guide
Navigation PathWindow Name
Find Receiving Transactions (Summary):page 7 – 39
Receiving > Receiving Transactions Summary
Find Requisitions: page 3 – 35 Requisitions > Requisition Summary
Find Requisition Lines: page 6 – 10 Autocreate
Find Requisition Lines: page 5 – 78 Management > Manage Buyer Workload
Find Returns: page 7 – 55 Receiving > Returns
Find Unordered Receipts: page 7 – 34 Receiving > Match Unordered Receipts
Forward Documents: page 2 – 35 Management > Forward Documents
Freight Carriers (see INV) Setup > Purchasing > Freight Carriers
GL Accounts (see GL) Setup > Accounting > Accounts
Hazard Classes: page 1 – 51 Setup > Purchasing > Hazard Classes
Import Items (see INV) Items > Import Items
Inspect Received Items: page 7 – 52 Receiving > Receiving Transactions > [Inspect]
Item Assignment (see INV) Setup > Items > Categories > Category Sets > [Assign]
Internal Requisition Options: page 1 – 35 Setup > Organizations > Purchasing Options > InternalRequisitions
Item Attribute Controls (see (INV) Setup > Items > Attribute Controls
Item Attributes (see INV) Items > Item Information > [Attributes]
Item Catalog (see INV) Items > Master Items > Special menu > Catalog
Item Catalog Groups (see INV) Setup > Items > Catalog Groups
Setup > Items > Catalog Groups > [Details]
Item Categories (see INV) Items > Item Information > [Categories]
Item Cross Reference Assignment (seeINV)
Items > Master Items > Special menu > Cross References
Item Flexfield View (see INV) Setup > Items > Item Flexfield View
Item Relationships (see INV) Items > Item Relationships
Items > Master Items > Special menu > Item Relationships
Item Revisions (see INV) Items > Master Items > Special Menu > Revisions

A – 7Windows and Navigator Paths
Navigation PathWindow Name
Items > Organization Items > Special Menu > Revisions
Item Revisions (see INV) Items > Item Information > [Revisions]
Item Search (see INV) Items > Item Search
Item Status History (see INV) Items > Master Items > Special menu > Pending Status
Items > Organization Items > Special menu > Pending Status
Item Subinventories (see INV) Items > Master Items > Special menu > Item Subinventories
Items > Organization Items > Special menu > ItemSubinventories
Item Template (see INV) Setup > Items > Templates > [New]
Item Templates Summary (see INV) Setup > Items > Templates
Item Type QuickCodes (see INV) Setup > Items > Item Types
Key Flexfield Segments (see Flex) Setup > Flexfields > Key > Segments
Key Segment Values (see Flex) Setup > Flexfields > Key > Values
Line Types: page 1 – 61 Setup > Purchasing > Line Types
Locations (see HR) Setup > Organizations > Locations
Lookup Codes: page 1 – 54 Setup > Purchasing > Lookup Codes
Lot Entry (see INV) [Lot/Serial] various locations
Maintain Shipments: page 7 – 66 Receiving > Manage Shipments > [Find]
Manufacturer Part Numbers (see INV) Items > Manufacturers’ Part Numbers > By Items
Items > Manufacturers’ Part Numbers > By Manufacturers >[Parts]
Items > Master Items > Special Menu > Manufacturer PartNumbers
Items > Organization Items > Special menu > Manufacturer PartNumber
Manufacturers (see INV) Items > Manufacturers’ Part Numbers > By Manufacturers
Master Items (see INV) Items > Master Items > [New]
Mass Forwarding Documents: page 2 – 35 Management > Forward Documents

A – 8 Oracle Public Sector Purchasing User’s Guide
Navigation PathWindow Name
Items > Master Items > [Open]
Master Items Summary (see INV) Items > Master Items
Match Unordered Receipts: page 7 – 34 Receiving > Match Unordered Receipts > [Find]
Modify Lines: page 6 – 21 Autocreate > [Find] > Special menu > [Modify]
New Document: page 6 – 16 Autocreate > [Find] > [Automatic]
New Document Number: page 6 – 19 Autocreate > [Find] > [Manual]
Notification Controls: page 4 – 77 Purchase Orders > Purchase Orders > Special menu >Notification Control
Notifications: page 2 – 29 Notifications Summary > [Open]
Notifications Summary: page 2 – 29 Notifications Summary
Numbering Options: page 1 – 36 Setup > Organizations > Purchasing Options > Numbering
Order Pad Options: page 5 – 17 Supplier Item Catalog > [Find] > [Options]
Requisitions > Requisitions > [Catalog] > [Options]
Order Pad Options: page 5 – 17 Purchase Orders > Purchase Orders > [Catalog] > [Options]
Organization Assignment (see INV) Items > Master Items > Special menu > Organization Assignment
Organization Items (see INV) Items > Organization Items > [Open]
Organization Items Summary (see INV) Items > Organization Items
Organization (see HR) Setup > Organizations > Organizations
Outside Processing page 4 – 75 Purchase Orders > Purchase Orders > [Shipments] >[Distributions] > [Outside Processing]
Requisitions > Requisitions > [Distributions] > [OutsideProcessing]
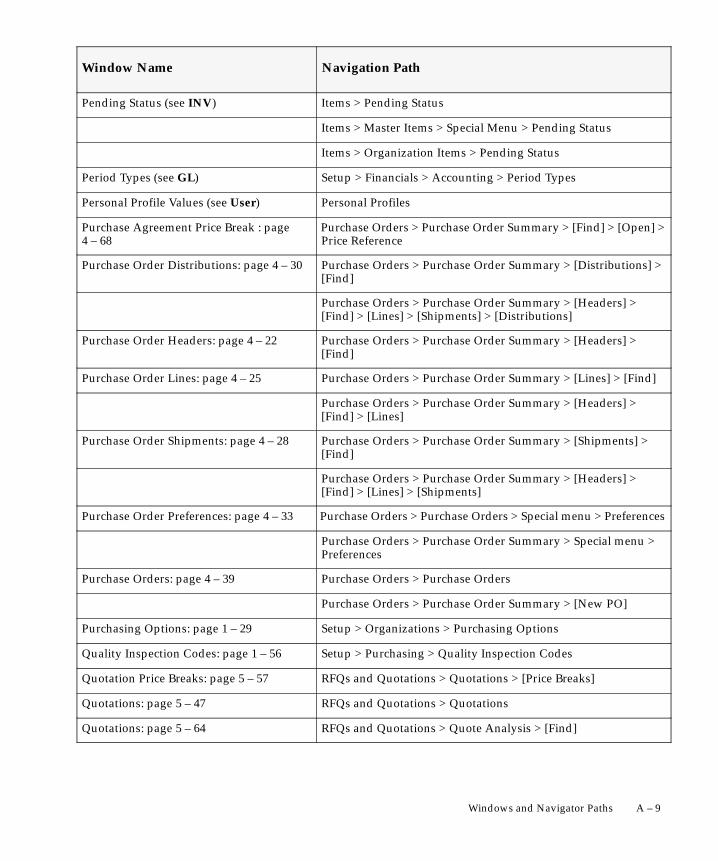
A – 9Windows and Navigator Paths
Navigation PathWindow Name
Pending Status (see INV) Items > Pending Status
Items > Master Items > Special Menu > Pending Status
Items > Organization Items > Pending Status
Period Types (see GL) Setup > Financials > Accounting > Period Types
Personal Profile Values (see User) Personal Profiles
Purchase Agreement Price Break : page4 – 68
Purchase Orders > Purchase Order Summary > [Find] > [Open] >Price Reference
Purchase Order Distributions: page 4 – 30 Purchase Orders > Purchase Order Summary > [Distributions] >[Find]
Purchase Orders > Purchase Order Summary > [Headers] >[Find] > [Lines] > [Shipments] > [Distributions]
Purchase Order Headers: page 4 – 22 Purchase Orders > Purchase Order Summary > [Headers] >[Find]
Purchase Order Lines: page 4 – 25 Purchase Orders > Purchase Order Summary > [Lines] > [Find]
Purchase Orders > Purchase Order Summary > [Headers] >[Find] > [Lines]
Purchase Order Shipments: page 4 – 28 Purchase Orders > Purchase Order Summary > [Shipments] >[Find]
Purchase Orders > Purchase Order Summary > [Headers] >[Find] > [Lines] > [Shipments]
Purchase Order Preferences: page 4 – 33 Purchase Orders > Purchase Orders > Special menu > Preferences
Purchase Orders > Purchase Order Summary > Special menu >Preferences
Purchase Orders: page 4 – 39 Purchase Orders > Purchase Orders
Purchase Orders > Purchase Order Summary > [New PO]
Purchasing Options: page 1 – 29 Setup > Organizations > Purchasing Options
Quality Inspection Codes: page 1 – 56 Setup > Purchasing > Quality Inspection Codes
Quotation Price Breaks: page 5 – 57 RFQs and Quotations > Quotations > [Price Breaks]
Quotations: page 5 – 47 RFQs and Quotations > Quotations
Quotations: page 5 – 64 RFQs and Quotations > Quote Analysis > [Find]

A – 10 Oracle Public Sector Purchasing User’s Guide
Navigation PathWindow Name
Quotation Shipments: page 5 – 54 RFQs and Quotations > Quotations > [Shipments]
Quotation Terms: page 5 – 53 RFQs and Quotations > Quotations > [Terms]
Receipts: page 7 – 30 Receiving > Receipts > [Find]
Receipt Header: page 7 – 28 Receiving > Receipts > [Find] > [Header]
Receipt Header Details: page 7 – 42 Receiving > Receiving Transactions Summary > [Find] >[Transactions] > [Header]
Receipt Lines: page 7 – 30 Receiving > Receipts
Receiving Controls: page 4 – 65 Purchase Orders > Purchase Orders > [Shipments] > [ReceivingControls]
Purchase Orders > Releases > [Receiving Controls]
Receiving > Corrections > [Find]
Receiving Headers Summary: page 7 – 40 Receiving > Receiving Transactions Summary > [Find]
Receiving Options: page 1 – 40 Setup > Organizations > Receiving Options
Receiving Returns: page 7 – 56 Receiving > Returns > [Find]
Receiving Transactions: page 7 – 47 Receiving > Receiving Transactions > [Find]
Receiving Transaction Summary: page7 – 41
Receiving > Receiving Transactions Summary > [Find] >[Transactions]
Releases: page 4 – 39 Purchase Orders > Releases
Purchase Orders > Purchase Order Summary > [NewRelease]
Requisition Headers Summary: page 3 – 37 Requisitions > Requisition Summary > [Headers] > [Find]
Requisition Lines Summary: page 3 – 39 Requisitions > Requisition Summary > [Lines] > [Find]
Requisitions > Requisition Summary > [Headers] > [Find] >[Lines]

A – 11Windows and Navigator Paths
Navigation PathWindow Name
Requisition Distributions Summary: page3 – 41
Requisitions > Requisition Summary > [Distributions] > [Find]
Requisitions > Requisition Summary > [Headers] > [Find] >[Lines] > [Distributions]
Requisition Preferences: page 3 – 44 Requisitions > Requisitions > Special menu > Preferences
Requisitions > Requisition Summary > Special menu >Preferences
Requisitions: page 3 – 49 Requisitions > Requisitions
Requisition Templates: page 1 – 44 Setup > Purchasing > Requisition Templates
Requisitions > Requisitions > Items > [Catalog] > RequisitionTemplates alternative region
Requisitions > Requisition Summary > [Headers] > [Find] >[New]
Requisitions > Requisition Summary > [Headers] > [Find] >[Open]
RFQ Lines: page 5 – 32 RFQs > Quotations > RFQs
RFQ Price Breaks: page 5 – 43 RFQs and Quotations > RFQs > [Price Breaks]
RFQs: page 5 – 32 RFQs and Quotations > RFQs
RFQ Shipments: page 5 – 37 RFQs and Quotations > RFQs > [Shipments]
RFQ Suppliers: page 5 – 37 RFQs and Quotations > RFQs > [Suppliers]
RFQ Terms: page 5 – 39 RFQs and Quotations > RFQs > [Terms]
Rollup Groups (see Flex) Setup > Flexfields > Key > Groups
Run MassCancel: page 2 – 58 Accounting > Run MassCancel
Search Supplier Item Catalog: page 5 – 10 Supplier Item Catalog
Segment Values (see Flex) Setup > Flexfields > Descriptive > Values
Setup > Flexfields > Validation > Values
Serial Numbers (see INV) [Lot/Serial] various locations
Set of Books (see GL) Setup > Organizations > Set of Books
Shipments: page 4 – 61 Purchase Orders > Purchase Orders > [Shipments]

A – 12 Oracle Public Sector Purchasing User’s Guide
Navigation PathWindow Name
Shorthand Aliases (see Flex) Setup > Flexfields > Key > Aliases
Sourcing Rule: page 5 – 71 Supply Base > Sourcing Rules
Sourcing Rule/Bill of DistributionAssignments: page 5 – 74
Supply Base > Assign Sourcing Rules
Status (see INV) Setup > Items > Status Codes
Supplier–Item Attributes: page 5 – 29 Supply Base > Approved Supplier List > [Attributes]
Supplier Item Catalog: page 5 – 14 Supplier Item Catalog > [Find]
Supplier Lists: page 5 – 76 Supply Base > Define Supplier Lists
System Profile Values (see SYS) Setup > Profiles > System
Terms and Conditions: page 4 – 58 Purchase Orders > Purchase Orders > [Terms]
Transaction Reasons (see INV) Setup > Transactions > Reasons
Unit of Measure Classes (see INV) Setup > Units of Measure > Classes
Unit of Measure Conversions (see INV) Setup > Units of Measure > Conversions
Setup > Units of Measure > Classes > [Conversions]
Setup > Units of Measure > Units of Measure > [Conversions]
Units of Measure (see INV) Setup > Units of Measure > Units of Measure
Setup > Units of Measure > Classes > [Units of Measure]
UN Numbers: page 1 – 52 Setup > Purchasing > UN Numbers
Value Sets (see Flex) Setup > Flexfields > Validation > Sets

A P P E N D I X
BT
B – 1Oracle Public Sector Purchasing Alerts
Oracle Public SectorPurchasing Alerts
his appendix describes the alerts that are provided in OraclePublic Sector Purchasing. We provide a brief description of each alert.

B – 2 Oracle Public Sector Purchasing User’s Guide
Using Oracle Alert in Oracle Public Sector Purchasing
Several Oracle Applications products, including Purchasing, includethe functionality of Oracle Alert to provide you with on–line exceptionreporting capability.
Oracle Alert is a customizable exception control application that:
• Notifies you automatically when a user performs a specific formtransaction
• Notifies you automatically when a specific database transactionoccurs
• Provides key information to you on a periodic basis
• Monitors critical activity in your Purchasing database
• Acts automatically according to your specifications
Purchasing supplies you with several pre–coded alerts that you can usewith or without customizing. These alerts help you identify forecastoverconsumption. See: Using Predefined Alerts, Oracle ApplicationsUser’s Guide.
You get the alerts described in the following pages if you have OracleAlert. You can also create your own alerts to notify you when a usertakes a specific action, or notify you about specific exceptions found inyour Purchasing database. You can also create alerts that sendmessages about key indicators, according to a delivery schedule youdefine. See: Overview of Oracle Alert, Oracle Applications User’s Guide.
Expiration and Release Control Alerts
For planned purchase orders, blanket purchase agreements, andcontracts, you can establish expiration and release control notificationconditions and specify the number of days before the condition is metthat you want to be notified. By selecting Notification Controls on theSpecial menu in the Purchase Orders window, you can specify thefollowing notification conditions:
• Amount released by date
• Amount not released by date
• Amount not released
• Amount released
• Expiration date

B – 3Oracle Public Sector Purchasing Alerts
When the notification conditions are met, Purchasing sends you one ofthe following Oracle Alerts so that you can take appropriate action:
Alerts you that the total planned amount releasedto date against a planned purchase order, blanketpurchase agreement, or contract purchaseagreement is insufficient.
Alerts you that the total amount released to dateagainst a planned purchase order, blanket purchaseagreement, or contract purchase agreement meetsor exceeds specified amounts.
Alerts you that a planned purchase order, blanketpurchase agreement, or contract purchaseagreement is about to expire.
See Also
Entering Purchase Order Notification Controls: page 4 – 77
Predefined Purchasing Alerts
Oracle Alert supplies you with the following predefined alerts forPurchasing that you can use with or without customizing. For eachpre–coded alert, we include:
• A brief explanation of what the alert does
• Information about the alert’s periodicity, inputs, and distribution
• An example of the message Oracle Alert sends when you use thealert
Amount NotReleased
Amount Released
Expiration

B – 4 Oracle Public Sector Purchasing User’s Guide
Approved Standard Purchase Orders
This alert shows the number of approved purchase orders created byeach buyer during the past N days.
Periodic
On Demand
Number of days
User defined
ÍÍÍ
To: Henry SmithFrom: Oracle AlertSubject: Approved Purchase Orders by Agent––––––––––––––––––––––––––––––––––––––––––––––––––––––––––––––The list below shows the number of approved purchase orderscreated by each agent during the last 100 days.
AGENT NAME NUMBER OF PURCHASE ORDERS––––––––––––––––––––––––––––––––––––––––––––––––––––––––––––––John Brown 431Alice Green 540Ludwig Salzwasser 876Tom White 112
Alert Type
Periodicity
Inputs
Distribution

B – 5Oracle Public Sector Purchasing Alerts
Blanket Notification Expiration
This alert shows the blanket purchase agreements that are about toexpire.
Periodic
On Demand
None
Buyer
ÍÍ
To: Henry SmithFrom: Oracle AlertSubject: Blanket Agreements About to Expire––––––––––––––––––––––––––––––––––––––––––––––––––––––––––––––Review the following blanket agreement(s) to identify thosethat are about to expire.
Blanket Purchase Order: 2388 Expiration Date: 28–Jul–94 Tickler Date: 20–Jul–94
Alert Type
Periodicity
Inputs
Distribution

B – 6 Oracle Public Sector Purchasing User’s Guide
Blanket Notification Not Released
This alert shows the blanket purchase agreements for which aninsufficient amount has been released.
Periodic
On Demand
None
Buyer
ÍÍÍ
To: Henry SmithFrom: Oracle AlertSubject: Blanket Agreements with Insufficient Releases––––––––––––––––––––––––––––––––––––––––––––––––––––––––––––––Review the following blanket agreement(s) to insure that you havereleased the desired amount.
Blanket Purchase Order: 2275 Currency: USD Tickler Date: 20–Jul–94
Agreed Amount: 150000 Desired Release Amount: 75000Desired Release Percentage (%): 50 Actual Release Amount: 0 Actual Release Percentage (%): 0
Alert Type
Periodicity
Inputs
Distribution
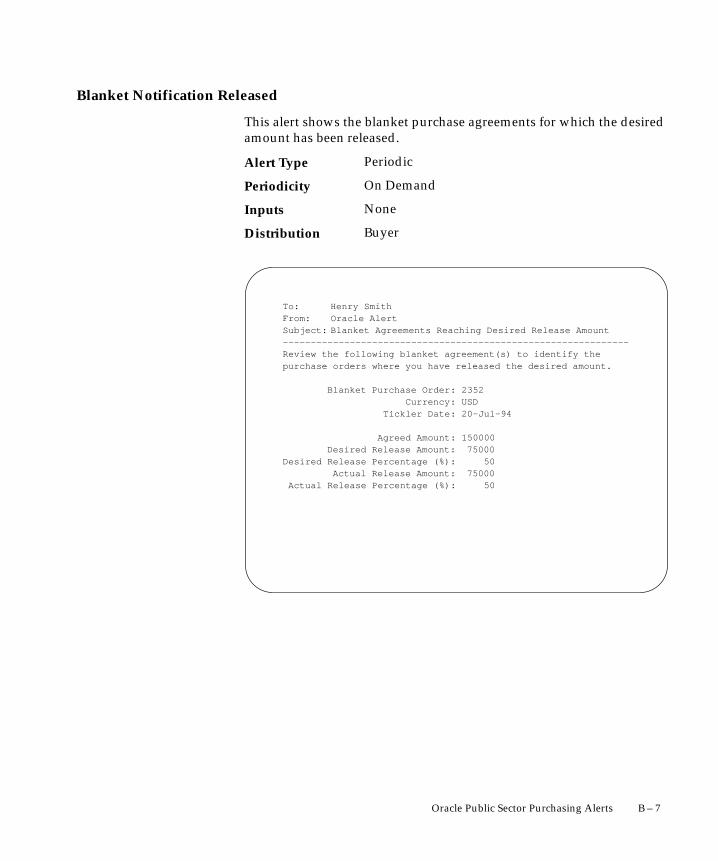
B – 7Oracle Public Sector Purchasing Alerts
Blanket Notification Released
This alert shows the blanket purchase agreements for which the desiredamount has been released.
Periodic
On Demand
None
Buyer
ÍÍ
To: Henry SmithFrom: Oracle AlertSubject: Blanket Agreements Reaching Desired Release Amount––––––––––––––––––––––––––––––––––––––––––––––––––––––––––––––Review the following blanket agreement(s) to identify thepurchase orders where you have released the desired amount.
Blanket Purchase Order: 2352 Currency: USD Tickler Date: 20–Jul–94
Agreed Amount: 150000 Desired Release Amount: 75000Desired Release Percentage (%): 50 Actual Release Amount: 75000 Actual Release Percentage (%): 50
Alert Type
Periodicity
Inputs
Distribution

B – 8 Oracle Public Sector Purchasing User’s Guide
Blanket Purchase Releases over Threshold
This alert looks for blanket purchase releases that exceed a certaindollar amount.
Periodic
On Demand
Number of days
Dollar amount
User defined
ÍÍÍ
To: Henry SmithFrom: Oracle AlertSubject: Blanket Purchase Releases Over $50,000.00––––––––––––––––––––––––––––––––––––––––––––––––––––––––––––––During the past 30 days, the following blanket releases werecreated whose total exceeded $50,000.00.
Supplier : Ace Furniture Total : $63,455,99 P.O.: 4555 Agent : Susan Smith Approved: No Approved Date: Line : 1 Description: Forklifts for Warehouse Location: HQ Requestor: Peter Dock Accounting Information: 01–200–0220
Alert Type
Periodicity
Inputs
Distribution

B – 9Oracle Public Sector Purchasing Alerts
Contract Notification Expiration
This alert shows the contract purchase agreements that are about toexpire.
Periodic
On Demand
None
Buyer
ÍÍ
To: Henry SmithFrom: Oracle AlertSubject: Contract Agreements About to Expire––––––––––––––––––––––––––––––––––––––––––––––––––––––––––––––Review the following contract agreement(s) to identify thosethat are about to expire.
Contract Purchase Order: 244 Expiration Date: 28–Jul–94 Tickler Date: 20–Jul–94
Alert Type
Periodicity
Inputs
Distribution
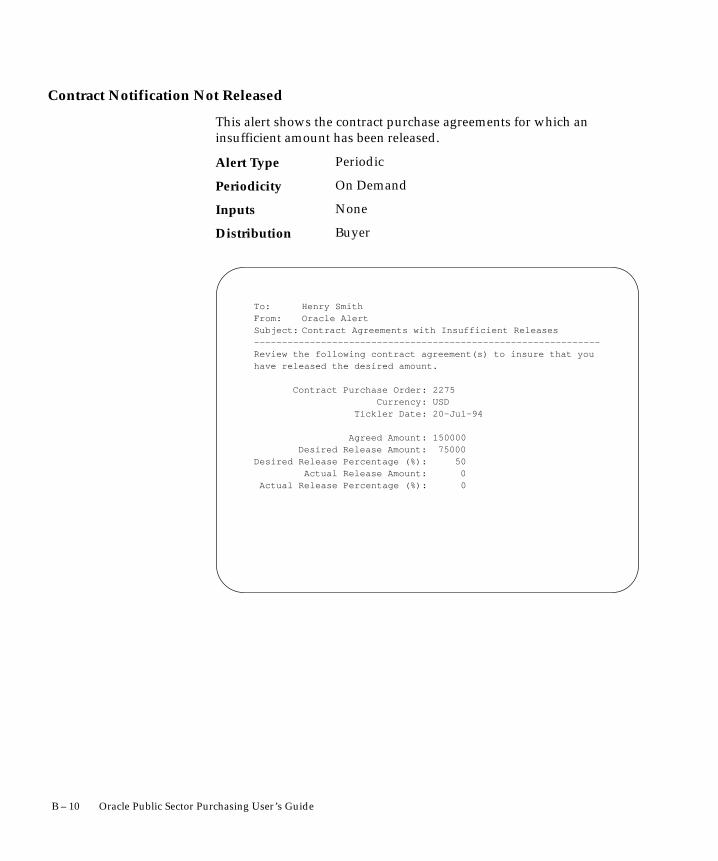
B – 10 Oracle Public Sector Purchasing User’s Guide
Contract Notification Not Released
This alert shows the contract purchase agreements for which aninsufficient amount has been released.
Periodic
On Demand
None
Buyer
ÍÍÍ
To: Henry SmithFrom: Oracle AlertSubject: Contract Agreements with Insufficient Releases––––––––––––––––––––––––––––––––––––––––––––––––––––––––––––––Review the following contract agreement(s) to insure that youhave released the desired amount.
Contract Purchase Order: 2275 Currency: USD Tickler Date: 20–Jul–94
Agreed Amount: 150000 Desired Release Amount: 75000Desired Release Percentage (%): 50 Actual Release Amount: 0 Actual Release Percentage (%): 0
Alert Type
Periodicity
Inputs
Distribution

B – 11Oracle Public Sector Purchasing Alerts
Contract Notification Released
This alert shows the contract purchase agreements for which thedesired amount has been released.
Periodic
On Demand
None
Buyer
ÍÍ
To: Henry SmithFrom: Oracle AlertSubject: Contract Agreements Reaching Desired Release Amount––––––––––––––––––––––––––––––––––––––––––––––––––––––––––––––Review the following contract agreement(s) to identify thepurchase orders where you have released the desired amount.
Contract Purchase Order: 2352 Currency: USD Tickler Date: 20–Jul–94
Agreed Amount: 150000 Desired Release Amount: 75000Desired Release Percentage (%): 50 Actual Release Amount: 75000 Actual Release Percentage (%): 50
Alert Type
Periodicity
Inputs
Distribution

B – 12 Oracle Public Sector Purchasing User’s Guide
No Receipt Required on Purchase Order Shipment
This alert looks for purchase order shipments where two–waymatching is allowed.
Periodic
On Demand
Number of days
User defined
ÍÍÍ
To: Henry SmithFrom: Oracle AlertSubject: No Receipt Required on Purchase Order Shipment––––––––––––––––––––––––––––––––––––––––––––––––––––––––––––––During the past 7 days, the following purchase order shipmentswere created without requiring receipt before payment:
Agent : Susan Smith Supplier : Comac Description: 3–Hole Punch Paper
PO/Line/Release/Shipment: 4563/1/2/1
Alert Type
Periodicity
Inputs
Distribution

B – 13Oracle Public Sector Purchasing Alerts
Planned Notification Expiration
This alert shows the planned purchase orders that are about to expire.
Periodic
On Demand
None
Buyer
ÍÍ
To: Henry SmithFrom: Oracle AlertSubject: Planned Orders About to Expire––––––––––––––––––––––––––––––––––––––––––––––––––––––––––––––Review the following planned order(s) to identify thosethat are about to expire.
Planned Purchase Order: 244 Expiration Date: 28–Jul–94 Tickler Date: 20–Jul–94
Alert Type
Periodicity
Inputs
Distribution

B – 14 Oracle Public Sector Purchasing User’s Guide
Planned Notification Not Released
This alert shows the planned purchase orders for which an insufficientamount has been released.
Periodic
On Demand
None
Buyer
ÍÍÍ
To: Henry SmithFrom: Oracle AlertSubject: Planned Orders with Insufficient Releases––––––––––––––––––––––––––––––––––––––––––––––––––––––––––––––Review the following planned order(s) to insure that you havereleased the desired amount.
Planned Purchase Order: 2275 Currency: USD Tickler Date: 20–Jul–94
Agreed Amount: 150000 Desired Release Amount: 75000Desired Release Percentage (%): 50 Actual Release Amount: 0 Actual Release Percentage (%): 0
Alert Type
Periodicity
Inputs
Distribution

B – 15Oracle Public Sector Purchasing Alerts
Planned Notification Released
This alert shows the planned purchase orders for which the desiredamount has been released.
Periodic
On Demand
None
Buyer
ÍÍ
To: Henry SmithFrom: Oracle AlertSubject: Planned Orders Reaching Desired Release Amount––––––––––––––––––––––––––––––––––––––––––––––––––––––––––––––Review the following planned purchase order(s) to identify thepurchase orders where you have released the desired amount.
Planned Purchase Order: 2352 Currency: USD Tickler Date: 20–Jul–94
Agreed Amount: 150000 Desired Release Amount: 75000Desired Release Percentage (%): 50 Actual Release Amount: 75000 Actual Release Percentage (%): 50
Alert Type
Periodicity
Inputs
Distribution

B – 16 Oracle Public Sector Purchasing User’s Guide
Small Business Suppliers
This alert shows your suppliers who are identified as small businesses.
Periodic
On Demand
None
User defined
ÍÍÍ
To: Henry SmithFrom: Oracle AlertSubject: Small Business Suppliers––––––––––––––––––––––––––––––––––––––––––––––––––––––––––––––The following is a listing of Small Business Suppliers.
Ace FurnitureCodex LithographyManor’s HardwareSalzwasser Company
Alert Type
Periodicity
Inputs
Distribution

B – 17Oracle Public Sector Purchasing Alerts
Standard Purchase Orders over Threshold
This alert looks for standard purchase orders created in the past N daysthat exceed a certain dollar amount.
Periodic
On Demand
Number of days
Dollar total
User defined
ÍÍ
To: Henry SmithFrom: Oracle AlertSubject: Standard Purchase Orders Over $50,000.00––––––––––––––––––––––––––––––––––––––––––––––––––––––––––––––During the past 30 days, the following standard purchase orderswere created whose total exceeded $50,000.00.
Supplier : Model Furniture Total : $53,495,99 P.O.: 3455 Agent : David Smith Approved: No Approved Date: Line: 1 Description: Modules Location : HQ Requestor: Peter Dock Accounting Information: 01–200–0220
Alert Type
Periodicity
Inputs
Distribution

B – 18 Oracle Public Sector Purchasing User’s Guide
Suppliers on Hold
This alert shows the suppliers that you have placed on hold.
Periodic
On Demand
None
User defined
ÍÍÍ
To: Henry SmithFrom: Oracle AlertSubject: List of Suppliers on Hold––––––––––––––––––––––––––––––––––––––––––––––––––––––––––––––The following is a listing of suppliers that have been placed onhold:
Acme HardwareDave’s LandscapingManor’s Hardware
Alert Type
Periodicity
Inputs
Distribution

A P P E N D I X
C
T
C – 1Using the Account Generator in Oracle Public Sector Purchasing
Using the AccountGenerator in OraclePublic SectorPurchasing
his appendix explains how to use the Account Generator in OraclePublic Sector Purchasing.

C – 2 Oracle Public Sector Purchasing User’s Guide
Using the Account Generator in Oracle Public Sector Purchasing
This essay describes how to use and customize the default AccountGenerator process in Oracle Public Sector Purchasing.
The Account Generator in Oracle Public Sector Purchasing utilizesOracle Workflow. You can view and customize Account Generatorprocesses through the Oracle Workflow Builder. You can also monitoraccount generation through the Oracle Workflow Monitor. See: OracleWorkflow Guide.
All purchase orders, requisitions, and releases require accountingdistributions. Oracle Public Sector Purchasing automatically builds acharge, budget (if using budgetary control), accrual, and varianceaccount for each document distribution.
Basic Public Sector Needs
Purchasing provides you with the features you need to:
• Improve accuracy and speed document generation byautomatically constructing accounting distributions.
• Relieve buyers, requestors, and document preparers from theresponsibility of specifying which accounts should be chargedfor their purchases.
• Perform fund accounting.
• Customize Account Generator account construction rules tomatch your business rules.
See Also
Overview of Account Generator (Oracle Applications Flexfields Guide)
Decide How to Use the Account Generator
In Release 10, several Oracle Applications products used FlexBuilder toderive account code combinations for certain account transactions. InRelease 11, FlexBuilder is replaced by the Account Generator to

☞
C – 3Using the Account Generator in Oracle Public Sector Purchasing
provide implementation teams with even greater flexibility and a betteruser interface with Oracle Workflow.
If you are upgrading from Release 10 and used FlexBuilder, then youshould perform the equivalent of this setup step as part of yourupgrade, see the FlexBuilder chapter of the Oracle Applications UpgradePreparation Manual.
If you are implementing Oracle Public Sector Purchasing for the firsttime, you need to review how Purchasing uses the Account Generatorto build Accounting Flexfield code combinations. Consider whetherthe default Account Generator process is appropriate for each set ofbooks that uses a unique Accounting Flexfield structure. For eachstructure and set of books, you can choose one of the following:
• Use the default Account Generator processes
– Generate Default Accrual Account
– Generate Default Budget Account
– Generate Default Charge Account
– Generate Default Variance Account
• Customize the default Account Generator process
This decision determines which setup steps your implementation teamneeds to perform.
Attention: These steps need to be performed for eachoperating unit.
Prerequisites to Using the Account Generator
Before using the Account Generator on a production database in OraclePublic Sector Purchasing to build accounts for purchase order, release,and requisition distributions, you must:
❑ Define your Accounting Flexfield structure for each set of books.
❑ Define flexfield segment values and validation rules.
❑ Set up Oracle Workflow. See: Setting Up Oracle Workflow, OracleWorkflow Guide.
❑ Choose whether you want to use the default Account Generatorprocesses, or if you need to customize them to meet youraccounting needs.
❑ Then do one of the following for each set of books:

C – 4 Oracle Public Sector Purchasing User’s Guide
• Choose to use the default Account Generator processes.
• Customize the default Account Generator processes, test yourcustomizations, and choose the processes for a flexfieldstructure, if necessary.
See Also
Customizing the Account Generator for Oracle Public SectorPurchasing: page C – 12
The Default Account Generator Processes for Oracle Public Sector Purchasing
Evaluate whether the default Account Generator process meets youraccounting requirements. No setup steps are required to use thedefault. The default process can also be updated later as your needschange. You can make minor changes to the default process withoutchanging the name.
Note: If you used FlexBuilder in Release 10 but did notcustomize the default configuration, you can use the defaultAccount Generator process in Release 11, which gives you thesame result as the default assignments in FlexBuilder.
Each Account Generator workflow is called an item type. Oracle PublicSector Purchasing comes with the following Account Generator itemtypes for purchase orders and releases:
• PO Accrual Account Generator
• PO Budget Account Generator
• PO Charge Account Generator
• PO Variance Account Generator
The following Account Generator item types exist for requisitions:
• PO Requisition Accrual Account Generator
• PO Requisition Budget Account Generator
• PO Requisition Charge Account Generator
• PO Requisition Variance Account Generator
Each Account Generator item type for purchase orders, releases, andrequisitions above contains the following top–level workflowprocesses:

C – 5Using the Account Generator in Oracle Public Sector Purchasing
• Generate Default Account
• Generate Account Using FlexBuilder Rules
Each of the item types also contains a subprocess called Build ProjectRelated Account. This process is available for you to customize anaccount–building process if Oracle Projects is installed. To use thisprocess, you provide your own rules to the process, in the form ofworkflow process definitions, to build the account. Note that you canprovide your own rules only when the destination type for thedocument is Expense.
For more information about using the Account Generator when youintegrate Oracle Public Sector Purchasing with Oracle Projects, read thefollowing essay: Using the Account Generator in Oracle Projects(Oracle Projects User’s Guide).
Generate Default Account Process
The Generate Default Account process is the default workflow inPurchasing that builds the accounts.
The following functions are used by each of the Generate DefaultAccount processes in Oracle Public Sector Purchasing:
PO Accrual Account Generator and PO Requisition Accrual Account Generator
• Accrual Account for Expense Item
• Accrual Account from Organization
• PO Project–Related? (You can customize this function if youwant to build project–related accounts using your own rules andif Oracle Projects is installed.)
• Purchase Order FlexBuilder Upgrade
• Work Item Destination Type
PO Budget Account Generator andPO Requisition Budget Account Generator
• Build Inventory Charge Account
• Get Budget Account from Item/Sub
• Get Charge Account
• Get Item Level Budget Account
• Get Org Level Budget Account

C – 6 Oracle Public Sector Purchasing User’s Guide
• Item Pre–Defined?
• PO Project–Related? (You can customize this function if youwant to build project–related accounts using your own rules andif Oracle Projects is installed.)
• Purchase Order FlexBuilder Upgrade
PO Charge Account Generator andPO Requisition Charge Account Generator
• Build Inventory Charge Account
• Expense Account
• Job WIP Account
• PO Project–Related? (You can customize this function if youwant to build project–related accounts using your own rules andif Oracle Projects is installed.)
• Purchase Order FlexBuilder Upgrade
• Schedule Account
• Type of WIP
• Work Item Destination Type
PO Variance Account Generator andPO Requisition Variance Account Generator
• Get Charge Account
• PO Project–Related? (You can customize this function if youwant to build project–related accounts using your own rules andif Oracle Projects is installed.)
• Purchase Order FlexBuilder Upgrade
• Variance Account from Organization
• Work Item Destination Type
Note: For more information about using the Account Generator whenyou integrate Oracle Public Sector Purchasing with Oracle Projects,read the following essay: Using the Account Generator in OracleProjects, Oracle Projects User’s Guide.
Each account generator contains a number of item attributes. Theseattributes correspond to all the row parameters and some derivedparameters that were used in FlexBuilder. For a particular account,such as the PO Accrual Account Generator, the item attributes, just likethe functions and processes, are identical among all of the purchase

C – 7Using the Account Generator in Oracle Public Sector Purchasing
order item types and all the requisition item types. Moreover, eachaccount ID is provided as a possible source value, in the form of anitem attribute, to the subsequent account being built.
Viewing Account Generator Processes in the Workflow Builder
The PO Charge Account Generator contains the default process,Generate Default Charge Account. This is what the Generate DefaultCharge Account process looks like in the Oracle Workflow Builder.
What the Account Generator Does in Oracle Public SectorPurchasing
The default Account Generator processes in Oracle Public SectorPurchasing build a charge, budget, accrual, and variance account foreach purchase order, release, and requisition distribution based on thedistribution’s Expense, Inventory, or Shop Floor destination type.Oracle Public Sector Purchasing always builds these accounts using theAccount Generator; you cannot disable this feature.
For Inventory charge account construction, the Account Generatorfurther distinguishes between asset and expense purchases based onthe item and subinventory that you provide for the distribution. If youselect an expense item, the Account Generator disregards thesubinventory and builds an expense charge account. If you select anasset item, the Account Generator evaluates the subinventory to decidewhether to build an expense or asset charge account.
Additional Information: You classify a subinventory asExpense or Asset by selecting the Asset Subinventory checkbox in the Oracle Inventory Subinventories window. You

C – 8 Oracle Public Sector Purchasing User’s Guide
classify an item as Expense or Asset by selecting the InventoryAsset Value check box in the Costing section of the Master Itemwindow. (This window is accessible through Inventory orPurchasing.)
When the Account Generator locates a source account based on thedistribution destination type, it copies complete code combinations(full Accounting Flexfields) from designated fields to destinationAccounting Flexfields to create the Charge, Budget, and Varianceaccounts.
To populate the Accrual account for distributions with an Expensedestination type, the Account Generator locates the Expense APAccrual Account that you specify in the Purchasing Options window aspart of your application setup, and copies it into the Accrual AccountFlexfield in your document. It then overlays the balancing segment ofthe AP Accrual Account with the balancing segment of the chargeaccount so that your transactions always balance by fund.

C – 9Using the Account Generator in Oracle Public Sector Purchasing
Enter RequisitionsRequisition Distribution
04.120.540.7520.000.0000
04.120.540.7520.000.0000
04.000.000.2220.000.0000
04.120.540.7520.000.0000
Charge
Budget
Accrual
Variance
Define Purchasing Options
Period End
On Receipt
01.000.000.2220.000.0000
Accrue Expense
Accrue Inventory
Expense APAccrual Account
Expense AP Accrual Amount
01
000
000
2220
0000
Accrual Options
Accrual
04
000
000
2220
0000
Expense Accrual Account Construction
Figure 9 – 1
The following matrix describes the source fields that the AccountGenerator references to build the charge, budget, accrual, and varianceaccount based on the distribution destination type.
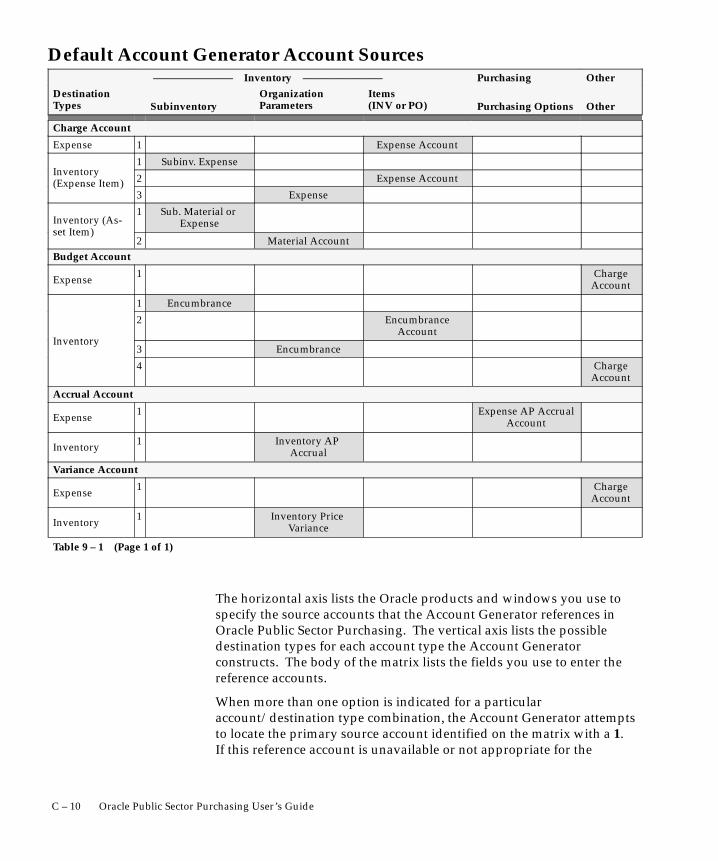
C – 10 Oracle Public Sector Purchasing User’s Guide
Default Account Generator Account Sources ––––––––––––––– Inventory ––––––––––––––– Purchasing Other
DestinationTypes Subinventory
OrganizationParameters
Items(INV or PO) Purchasing Options Other
Charge Account
Expense 1 Expense Account
n entor1 Subinv. Expense
Inventoryense te 2 Expense Account(Expense Item)
3 Expense
Inventory (As-set te
1 Sub. Material or Expense
set Item)2 Material Account
Budget Account
Expense 1 ChargeAccount
n entor
1 Encumbrance
n entor
2 EncumbranceAccount
Inventory3 Encumbrance
4 ChargeAccount
Accrual Account
Expense 1 Expense AP AccrualAccount
Inventory 1 Inventory AP Accrual
Variance Account
Expense 1 ChargeAccount
Inventory 1 Inventory Price Variance
Table 9 – 1 (Page 1 of 1)
The horizontal axis lists the Oracle products and windows you use tospecify the source accounts that the Account Generator references inOracle Public Sector Purchasing. The vertical axis lists the possibledestination types for each account type the Account Generatorconstructs. The body of the matrix lists the fields you use to enter thereference accounts.
When more than one option is indicated for a particularaccount/destination type combination, the Account Generator attemptsto locate the primary source account identified on the matrix with a 1.If this reference account is unavailable or not appropriate for the

☞
C – 11Using the Account Generator in Oracle Public Sector Purchasing
distribution information you provide, the Account Generator tries thesource indicated as 2 and so on until it either successfully locates areference account, or fails.
Suggestion: Minimize your setup by specifying sourceaccounts at the appropriate level of detail for your business.For example, you can specify the charge account source forInventory (expense) destination types at the subinventory, item,or organization level. If an organization level account issufficient for your public sector needs, it is not necessary tospecify item or subinventory accounts.
Attention: The default Oracle Public Sector PurchasingAccount Generator processes includes one rule for buildingExpense destination charge accounts. If you specify an expenseaccount for each of your predefined items, the AccountGenerator copies this code combination to the Charge Accountfield of your destination documents. If you are buyingone–time or predefined items with no associated expenseaccount, the Account Generator is unable to build a chargeaccount. In this case, you can either manually specify a chargeaccount in your document or you can design a custom AccountGenerator function to build Expense destination chargeaccounts based on field values like Requestor.
While you cannot edit the accrual, budget, or variance accounts thatthe Account Generator constructs, you can override or specify thecharge account for uncommitted Expense distributions. In this case,you can either edit the charge account that the Account Generatorconstructs for you, or you can specify a default charge account in theDefaults region of your document. When you specify a default chargeaccount, it always overrides any expense charge account that theAccount Generator tries to provide.
Account Build Timing and Logistics
For Expense and Inventory destinations in the Requisitions, PurchaseOrders, and Releases windows, the Account Generator constructs theaccount when you navigate into the distribution Charge Account field,or when an explicit or implicit commit anywhere in the windowprovides enough information for Oracle Public Sector Purchasing tocreate a distribution. For Shop Floor destinations, the code isconstructed when you enter all required data in the Outside Processingregion and either return to the document distributions region orcommit.
For all windows, the build sequence is:

C – 12 Oracle Public Sector Purchasing User’s Guide
1. Charge
2. Budget
3. Accrual
4. Variance
Each account is provided as a possible source value to the subsequentbuilds. For example, the budget rules accept the charge account as apossible value, and for Expense destination types the charge accountvalue is copied into the Budget Account field. The accrual accountrules accept both the charge and budget account values. Finally, thevariance account rules accept the charge, budget, and accrual accountvalues as possible sources.
If the Account Generator is unable to construct accrual, variance, orbudget accounts you cannot enter these fields to manually provide themissing values. You must identify and resolve the problem that iscausing the Account Generator to fail. If the Account Generator isunable to construct a charge account, you can manually specify themissing values if the destination type is Expense. Since budget andvariance account rules take the charge account value for Expensedestination types, the Account Generator tries to construct theseaccounts as soon as you manually provide a charge account if it wasunable to find one during the initial build attempt.
Generate Account Using FlexBuilder Rules Process
If you used FlexBuilder in a previous release to generate accountcombinations, you can use the Generate Account Using FlexBuilderRules process to replicate your FlexBuilder setup automatically,without changing any of your predefined FlexBuilder Rules, andwithout customizing the Account Generator. The Generate AccountUsing FlexBuilder Rules process includes a function generated duringyour upgrade from Release 10 to Release 11.
If you are upgrading from Release 10, follow the guidelines in theFlexBuilder chapter of the Oracle Applications Upgrade PreparationManual.
Customizing the Account Generator for Oracle Public Sector Purchasing
Oracle Public Sector Purchasing provides default Account Generatorprocesses for you to use. If the defaults do not satisfy your accounting

C – 13Using the Account Generator in Oracle Public Sector Purchasing
requirements, you can use the Oracle Workflow Builder to customizethe default processes or create a new one.
If you want to create a new process to meet your organization’s needs,use the Oracle Workflow Builder to create a new process, or copy theexisting default and change the name before making extensive changesto it.
For more information on the generic features and functions of theAccount Generator, see the Customizing the Account Generator sectionof the Oracle Applications Flexfields Guide.
For more information on how to use the Oracle Workflow Builder, seethe Oracle Workflow Guide.
See Also
Customizing the Account Generator (Oracle Applications Flexfields Guide)
Oracle Workflow Guide
Customization Guidelines
When you choose to customize the Account Generator in Oracle PublicSector Purchasing, consider the following:
Once the Account Generator successfully builds accounts for adocument, it does not attempt to rebuild when you update thedocument. For example, if you build a custom process to generate therequisition charge account for Expense purchases based on requestor,and change the requestor after the Account Generator constructs thecharge account, it will not attempt to rebuild.
Requisition Import does not use the Account Generator to constructcharge, budget, accrual, or variance accounts. Any custom process thatyou create cannot be used by this utility.
Both the top–level processes used by the Account Generator item typesin Purchasing can be customized. The only subprocesses that you cancustomize are the following:
• Build Expense Account
• Build Project Related Account
C – 14 Oracle Public Sector Purchasing User’s Guide
Customization Example
In the PO Charge Account Generator item type, you could modify theBuild Expense Charge Account subprocess by replacing the GetExpense Account ID function with one of your own. Your newfunction, however, should have the same result type as the Get ExpenseAccount ID function has. In this new function, you also must set theitem attribute, Temp Account ID, with the code combinationidentification number (CCID) of the account being built. This attributeis used by the function, Copy Values from Account ID, to fetch theconcatenated segments.
You must test any modified Account Generator process before using iton a production database.
Implementing a Customized Account Generator Process
If you have customized your Account Generator process for aparticular Account Generator item type and assigned a new name to it,use the Account Generator Processes window to associate the newprocess name with the appropriate Accounting Flexfield structure anditem type.
If you made customizations to the default process, but did not changethe name of it, you do not need to perform this step.
Choosing the Process for a Flexfield Structure
1. Navigate to the Account Generator Processes window.
In the System Administrator responsibility, this window is underthe navigation path Application > Flexfield > Key > Accounts. Inyour Oracle Public Sector Purchasing responsibility, it is underSetup > Flexfields > Key > Accounts.

C – 15Using the Account Generator in Oracle Public Sector Purchasing
2. Select the structure to which you want to assign a process. You canchoose the application, flexfield title, structure, and descriptionfrom the list of values.
3. Specify the Item Type containing the process, for example, POAccrual Account Generator.
4. Specify the process you want to use to generate the accounts.
The default process—for example Generate Default AccrualAccount—will default in. If you want to use a different process, enterthe name of the process you want to use.
Using the Account Generator Profile Option
The Account Generator: Purge Runtime Data profile option ensuresthat data used to build account combinations is purged after theAccount Generator has completed. For more information, see: ProfileOptions in Oracle Public Sector Purchasing: page 1 – 76.

C – 16 Oracle Public Sector Purchasing User’s Guide

1Glossary
Glossary
Account Generator A feature that uses OracleWorkflow to provide various OracleApplications with the ability to constructAccounting Flexfield combinationsautomatically using custom constructioncriteria. You define a group of steps thatdetermine how to fill in your AccountingFlexfield segments. You can defineadditional processes and/or modify thedefault process(es), depending on theapplication. See also activity, function, itemtype, lookup type, node, process, protectionlevel, result type, transition, Workflow Engine
account groups Fixed asset or long–termliabilities for which public sectororganizations usually maintain separateaccountability. Public sector organizationsusually maintain these transactions inaccount groups known as the general fixedassets account group and the generallong–term debt account group.
accounting classification code structure Thedata elements an activity uses to classifythe financial aspects of a transaction.
activity An Oracle Workflow unit of workperformed during a business process. Seealso activity attribute, function activity
activity attribute A parameter for an OracleWorkflow function activity that controlshow the function activity operates. Youdefine an activity attribute by displayingthe activity’s Attributes properties page inthe Activities window of Oracle WorkflowBuilder. You assign a value to an activityattribute by displaying the activity node’sAttribute Values properties page in theProcess window.
advance An amount of money prepaid inanticipation of receipt of goods, services,obligations or expenditures. Generally, anadvance is made by an organization to apayee to whom the organization has anobligation, and not more than theobligation. For example, an organizationmight issue a travel advance to anemployee before the beginning of a trip.
agency A representative organization of afederal government, state or localgovernment, or institution of highereducation.
agent An individual responsible for providinggoods or services or authorizing theirprovision to another entity or recipient.

2 Oracle Public Sector Purchasing User’s Guide
appropriation An authorization by alegislative body that permits a governmentto incur obligations and make payments forspecified purposes. An appropriationusually follows enactment of authorizinglegislation. Appropriations are limitationson the amounts agencies can obligateduring the time specified in theappropriation act.
attribute See activity attribute, item typeattribute
balancing segment An Accounting Flexfieldsegment that you define so that OraclePublic Sector Purchasing automaticallybalances all journal entries for each value ofthis segment. For example, if your fundsegment is a balancing segment, OraclePublic Sector General Ledger assures that,with every journal entry, the total debits toFund 01 equals the total credits to Fund 01.
budget organization An entity, such as adepartment, division, or activity,responsible for entering and maintainingbudget data.
budgetary account An account segment value(such as 6110) that is assigned one of thetwo budgetary account types. You usebudgetary accounts to record themovement of funds through the budgetprocess from appropriation to expendedappropriation.
Budgetary Account An account that containsa budgetary account.
budgetary account type Either of the twoaccount types Budgetary DR andBudgetary CR.
budgetary control An Oracle Public SectorFinancials feature you use to control actualand anticipated expenditures against abudget. When budgetary control isenabled, you can check funds online fortransactions, and you can reserve funds fortransactions by creating encumbrances.Oracle Public Sector Financialsautomatically calculates funds available(budget less encumbrances less actualexpenditures) when you attempt to reservefunds for a transaction. Oracle PublicSector Financials notifies you online iffunds available are insufficient for yourtransaction.
commitment A journal entry you make torecord an anticipated expenditure asindicated by approval of a requisition. Alsoknown as pre–commitment,pre–encumbrance or pre–lien.
folder A flexible entry and display window inwhich you can choose the fields you wantto see and where each appears in thewindow.
function A PL/SQL stored procedurereferenced by an Oracle Workflow functionactivity that can enforce business rules,perform automated tasks within anapplication, or retrieve applicationinformation. The stored procedure acceptsstandard arguments and returns acompletion result. See also function activity.
function activity An automated OracleWorkflow unit of work that is defined by aPL/SQL stored procedure. See alsofunction.

3Glossary
function security An Oracle Applicationsfeature that lets you control user access tocertain functions and windows. By default,access to functionality is not restricted; yoursystem administrator customizes eachresponsibility at your site by including orexcluding functions and menus in theResponsibilities window.
funds checking The process of certifyingfunds available. When you check funds,Oracle Public Sector Financials comparesthe amount of your transaction againstyour funds available and notifies youonline whether funds are available for yourtransaction. Oracle Public Sector Financialsdoes not reserve funds for your transactionwhen you check funds.
funds reservation The creation of requisition,purchase order, or invoice encumbrancejournal entries. reserves funds for yourinvoice when you approve the invoice.Approval creates encumbrance journalentries for an unmatched invoice or forprice and quantity variances between aninvoice and the purchase order to whichyou match the invoice. Oracle Public SectorPurchasing immediately updates yourfunds available balances and creates anencumbrance journal entry that you canpost in your general ledger.
internal requisition See internal sales order,purchase requisition.
internal sales order A request within youragency for goods or services. An internalsales order originates from an employee orfrom another process as a requisition, suchas inventory or manufacturing, andbecomes an internal sales order when theinformation is transferred from Purchasingto Order Entry. Also known as internalrequisition or purchase requisition.
inventory item Items that you stock ininventory. You control inventory forinventory items by quantity and value.Typically, the inventory item remains anasset until you consume it. You recognizethe cost of an inventory item as an expensewhen you consume it or sell it. Yougenerally value the inventory for an item bymultiplying the item standard cost by thequantity on hand. See also item.
item item type A term used by Oracle Workflow to
refer to a grouping of all items of aparticular category that share the same setof item attributes, used as a high levelgrouping for processes. For example, eachAccount Generator item type (e.g. FAAccount Generator) contains a group ofprocesses for determining how anAccounting Flexfield code combination iscreated. See also item type attribute
item type attribute A feature of a particularOracle Workflow item type, also known asan item attribute. An item type attribute isdefined as a variable whose value can belooked up and set by the application thatmaintains the item. An item type attributeand its value is available to all activities in aprocess.
key flexfield segment One of up to 30different sections of your key flexfield. Youseparate segments from each other by asymbol you choose (such as –, / or \.).Each segment can be up to 25 characterslong. Each key flexfield segment typicallycaptures one element of your business oroperations structure, such as agency,division, region, or product for theAccounting Flexfield and item, versionnumber, or color code for the ItemFlexfield.

4 Oracle Public Sector Purchasing User’s Guide
key flexfield segment value A series ofcharacters and a description that provide aunique value for this element, such as 0100,Eastern region, or V20, Version 2.0.
lookup code The internal name of a valuedefined in an Oracle Workflow lookup type.See also lookup type.
lookup type An Oracle Workflow predefinedlist of values. Each value in a lookup typehas an internal and a display name. Seealso lookup code.
node An instance of an activity in an OracleWorkflow process diagram as shown in theProcess window of Oracle WorkflowBuilder. See also process.
Pay Date Basis A feature you assign tosuppliers to determine when AutoSelectselects invoices for payment in a paymentbatch. Pay Date Basis (Due or Discount)defaults from the system level when youenter a new supplier, but you can overrideit. When Pay Date Basis is Due for asupplier site, Oracle Public SectorPurchasing selects that supplier’s sitesinvoices for payment only when the invoicedue date falls on or before thePay–Through–Date for the payment batch.If Pay Date Basis is Discount, Oracle PublicSector Purchasing selects the supplier’ssites invoices for payment if the discountdate or due date is before thepay–through–date.
pay on receipt A Financials feature thatallows you to automatically create supplierinvoices in Payables based on receipts andpurchase orders you enter in Purchasing.
planned purchase order A type of purchaseorder you issue before you order deliveryof goods and services for specific dates andlocations. You usually enter a plannedpurchase order to specify items you want toorder and when you want the itemsdelivered. You later enter a shipmentrelease against the planned purchase orderto order the items.
PO See purchase order.process A set of Oracle Workflow activities
that need to be performed to accomplish abusiness goal. See also Account Generator,process activity, process definition.
process activity An Oracle Workflow processmodelled as an activity so that it can bereferenced by other processes; also knownas a subprocess. See also process.
process definition An Oracle Workflowprocess as defined in the Oracle WorkflowBuilder. See also process.
proprietary account An account segmentvalue (such as 3500) assigned one of thefive proprietary account types. The fivetypes include Asset, Liability, Equity,Revenue, and Expense.

5Glossary
protection level In Oracle Workflow, anumeric value ranging from 0 to 1000 thatrepresents who the data is protected fromfor modification. When workflow data isdefined, it can either be set to customizable(1000), meaning anyone can modify it, or itcan be assigned a protection level that isequal to the access level of the user definingthe data. In the latter case, only usersoperating at an access level equal to orlower than the data’s protection level canmodify the data. See also Account Generator.
purchase order (PO) A document used to buyand request delivery of goods or servicesfrom a supplier.
purchase requisition An internal request forgoods or services. A requisition canoriginate from an employee or from anotherprocess, such as inventory ormanufacturing. Each requisition caninclude many lines, generally with adistinct item on each requisition line. Eachrequisition line includes at least adescription of the item, the unit of measure,the quantity needed, the price per item, andthe Accounting Flexfield you are chargingfor the item. Also known as internalrequisition. See also internal sales order.
request for quotation (RFQ) A document youuse to solicit supplier quotations for goodsor services you need. You usually send arequest for quotation to many suppliers toensure that you get the best price and termspossible. Depending on the way you dobusiness, you can use two general types ofRFQs: specific and generic.
requisition See purchase requisition.
Reserve for Encumbrance A portion of fundbalance you use to record anticipatedexpenditures. In Oracle Public SectorFinancials, you define your Reserve forEncumbrance account when you defineyour set of books. Oracle Public SectorFinancials uses your Reserve forEncumbrance account to create offsets forunbalanced encumbrance entries you createin Purchasing, Payables, and GeneralLedger.
Reserve for Encumbrance account Theaccount you use to record yourencumbrance liability. You define a Reservefor Encumbrance account when you defineyour set of books. When you createencumbrances automatically in Purchasing,General Ledger automatically creates abalancing entry to your Reserve forEncumbrance account as you post yourencumbrance journal entries. GeneralLedger overwrites the balancing segmentfor your Reserve for Encumbrance account,so you automatically create the reserve forencumbrance journal entry to the correctfund.
result code In Oracle Workflow, the internalname of a result value, as defined by theresult type. See also result type, result value.
result type In Oracle Workflow, the name ofthe lookup type that contains an activity’spossible result values. See also result code,result value.
result value In Oracle Workflow, the valuereturned by a completed activity, such asApproved. See also result code, result type.

6 Oracle Public Sector Purchasing User’s Guide
RFQ See request for quotation. RFQ Only Site A supplier site from which you
receive quotations.revision A particular version of an item, bill
of material, or routing.
sourcing The action of identifying apurchasing source or supplier for goods orservices. To identify the best sources foryour purchases, you can create RFQs thatyou send to your suppliers, enter quotationsfrom your supplier, and evaluate thesequotations for each item you purchase.
supplier A business or individual thatprovides goods or services or both in returnfor payment.
transition In Oracle Workflow, therelationship that defines the completion ofone activity and the activation of anotheractivity within a process. In a processdiagram, the arrow drawn between twoactivities represents a transition. See alsoactivity, Workflow Engine.
unit See unit of measure.unit class A group of units of measure and
their corresponding base unit of measure.The standard unit classes are: Length,Weight, Volume, Area, Time and Pack.
unit of measure vendor See supplier.Workflow Engine The Oracle Workflow
component that implements a workflowprocess definition. The Workflow Enginemanages the state of all activities,automatically executes functions, maintainsa history of completed activities, anddetects error conditions and starts errorprocesses. The Workflow Engine isimplemented in server PL/SQL andactivated when a call to an engine API ismade. See also Account Generator, activity,function, item type.

Index – 1
IndexAAcceptances, 4 – 7Acceptances window, Entering and Viewing
Purchase Order Acceptances, 4 – 79Access Level Options
full, 2 – 8modify, 2 – 8view only, 2 – 8
Account Generator, using in Oracle PublicSector Purchasing, C – 2
Account Generator:Purge Runtime Data profileoption, 1 – 77
Accrual Process, for period–end accruals,7 – 91
Accrual Reconciliation report, 9 – 5Accrual Write–Off report, 9 – 13Accrual Write–offs, 7 – 98Accrual Write–offs window, Accrual
Write–offs, 7 – 98Accrue Expense Items, option setup, 1 – 32Action History Window
Enter Releases, 8 – 2Purchase Order Distributions, 8 – 2Purchase Order Headers, 8 – 2Purchase Order Lines, 8 – 2Purchase Order Shipments, 8 – 2Requisition Distributions, 8 – 2Requisition Headers, 8 – 2Requisition Lines, 8 – 2View Requisitions, 8 – 2
Action History window, Viewing ActionHistory, 8 – 2
Action History, viewing, 8 – 2Advance Shipment Notice
and CUM management, 7 – 18and Payment on Receipt, 9 – 60application advices, 7 – 16correcting a receipt against, 7 – 59finding expected receipts, 7 – 27finding returns, 7 – 56in Find Intransit Shipments window, 7 – 65in Maintain Shipments window, 7 – 66overview, 7 – 14receiving against, 7 – 18related receiving options, 7 – 16types of, 7 – 17
Alternate Fields, 5 – 4Amount Based Purchasing, 1 – 58Annotating Purchasing Documents, 1 – 20
unlimited text, 1 – 20Approval Actions
cancel, 2 – 33change the forward from person, 2 – 33change the forward to person, 2 – 33enter notes, 2 – 34print, 2 – 34reserve, 2 – 32
Approval and Securitysetup matrix, 2 – 4setup overview, 2 – 2setup steps, 2 – 3

Index – 2
Approval authorization rules, defining, 2 – 15Approval Groups
account range, 1 – 16document total, 1 – 16item category range, 1 – 16item range, 1 – 16location, 1 – 16
Approval groupsassigning, 2 – 18defining, 2 – 15
Approval Groups window, Defining ApprovalGroups, 1 – 15
Approval groups, assigning, 1 – 18Approval groups, defining, 1 – 15Approvals
by Web or e–mail (overview), 2 – 24overview, 2 – 23taking approval actions, 2 – 32workflow initiation, 2 – 64workflow overview, 2 – 63workflow, customizing, 2 – 64
Approve Document window, Taking ApprovalActions, 2 – 32
Approve Entire Quotations window,Approving Entire Quotations, 5 – 66
Approve purchase orders, 4 – 8Approve Quotations window, Approving
Quotation Shipments, 5 – 64Approved Quotations
using on purchase orders, 5 – 64using on purchase orders and requisitions,
5 – 66using on requisitions, 5 – 64
Approved Supplier List, 5 – 22find window, 5 – 31
Approved Supplier List Statuses window,5 – 24
Approved Supplier List Summary, window,5 – 31
Approved Supplier List Summary window,5 – 31
Approved Supplier List window, 5 – 27defining the supplier and item/commodity
combination, 5 – 26ASL Upgrade process, 9 – 17
Assign Approval Groups, Assign ApprovalGroups, 1 – 18
Assign Requisition Lines window, AssigningRequisition Lines, 5 – 82
Attachments, 1 – 28icon, 1 – 28referencing on documents, 1 – 27understanding usages, 1 – 26
AutoApproval, definition, 3 – 6AutoClose, 4 – 9AutoCreate
Add to Document window, 6 – 16Autocreating quotations, 5 – 61modifying requisition lines, 6 – 21New Document Number window, 6 – 17New Document window, 6 – 17
AutoCreate Criteria, selecting, 6 – 13AutoCreate documents
Automatic mode, 6 – 3Manual mode, 6 – 3
Autocreate documents overview, 6 – 2AutoCreate Documents window
Selecting AutoCreation Criteria, 6 – 13Using the Document Builder, 6 – 19
AutoCreate, completing, 6 – 16AutoCreate, entering document information,
6 – 16AutoCreating Purchase Orders, 1 – 59Autocreating quotations, 5 – 61Automatic Release Generation, 4 – 93Automatic sourcing, 5 – 69automatic sourcing, definition, 5 – 5
BBackordered Internal Requisitions report,
9 – 18Blanket and Planned PO Status report, 9 – 19Blanket purchase agreements, 4 – 4
audit report, 9 – 78notify options setup, 1 – 34
Blanket purchase orders, status report, 9 – 19Blanket releases, 4 – 4

Index – 3
Blind receipt, setup, 7 – 9Blind Receiving, option setup, 1 – 41Brief Notes, 1 – 21Budgetary control
on–line funds availability Checking, 3 – 4on–line funds availability checking, 4 – 6
Buyer Listing, 9 – 21Buyer Workload, Reviewing, 5 – 80Buyer’s Requisition Action Required report,
9 – 23Buyers window, Defining Buyers, 1 – 13Buyers, defining, 1 – 13
CCancel, purchase orders, 4 – 8Cancel Requisitions, option setup, 1 – 34Cancelled Purchase Order report, 9 – 25Cancelled Requisition report, 9 – 26Cascade, receipts and receiving transactions,
7 – 22Cascade Transactions, option setup, 1 – 41Cascade transactions, setup, 7 – 9Catalog information, receiving electronically,
5 – 20Change orders workflow, 2 – 73Change orders workflow, customizing, 2 – 74Change orders workflow, initiating, 2 – 74Contract purchase agreements, 4 – 4Contract Status report, 9 – 28Control Documents window, Controlling
Documents, 2 – 50Control Numbers, 7 – 68Control Purchasing Periods window,
Controlling Purchasing Periods, 1 – 71Controlling Documents, 2 – 48
cancel, 2 – 48close, 2 – 49close for invoicing, 2 – 49close for receiving, 2 – 49finally close, 2 – 49freeze, 2 – 50
on hold, 2 – 50open, 2 – 50open for invoicing, 2 – 50open for receiving, 2 – 50release hold, 2 – 50unfreeze, 2 – 50
Controlling Purchasing Periods, prerequisites,1 – 71
Copy Document window, AutoCreatingQuotations, 5 – 61
Copying quotations from RFQs, 5 – 61Corrections, 7 – 59Corrections window, Entering Corrections,
7 – 62Corrections, entering, 7 – 61Corrections, finding, 7 – 60Cost rollup, outside processing, 4 – 143Costing, defining accounting information for
outside processing, 4 – 146Create Internal Sales Orders process, 9 – 29Create Releases process, 9 – 30Creating Purchase Orders for Services, 1 – 60Creating Purchasing Document Lines, 1 – 59Creating Requisitions for Services, 1 – 60Currency, rate type options setup, 1 – 30Currency information, entering, 4 – 56Currency window, Entering Currency
Information, 4 – 56
DDays Early/Late tolerance, option setup, 1 – 40Define MassCancel Listing, 2 – 56Define MassCancel window, 2 – 53
Defining MassCancel, 2 – 53Defining Line Types, 1 – 59Defining MassCancel, report submission,
2 – 58Defining Purchase Order Receipt Accruals,
7 – 102Delivery from receiving inspection to
inventory, standard costing, 7 – 82

Index – 4
Disposition messages, display option, 1 – 34Distributions window, 3 – 58
Entering Purchase Order Distributions,4 – 70
Entering Release Distributions, 4 – 88Document Approval
approval button, 2 – 23Approve button, 2 – 23
Document Approval and SecurityHuman Resources, 2 – 2Using Approval Hierarchies, 2 – 2Using Security Hierarchies, 2 – 2
Document Approval Status Rules, 2 – 25Document Builder in AutoCreate, using, 6 – 19Document Control, 2 – 37
options, 2 – 37Document control
applicability matrix, 2 – 45status check matrix, 2 – 45submission check matrix, 2 – 46
Document Control Optionscancel, 2 – 38close, close for receiving, close for invoicing,
2 – 41delete, 2 – 37final close, 2 – 39firm, 2 – 41freeze, 2 – 40hold, 2 – 41
Document Manager Failed notification, 2 – 31Document Revision Numbering, 4 – 110Document Security and Access
hierarchy, 2 – 8private, 2 – 8public, 2 – 8purchasing, 2 – 8
Document Subtypespurchase agreement, 1 – 66purchase order, 1 – 66quotation, 1 – 66release, 1 – 66request for quotation, 1 – 66requisition, 1 – 66
Document Typesassociating workflow processes with, 1 – 68prerequisites, 1 – 65
Document Types window, Defining DocumentTypes, 1 – 65
Document Types, defining, 1 – 65Documents
approval process overview, 2 – 23approval routing, 2 – 13approval status checks, 2 – 24approval submission checks, 2 – 25authorization rules, 2 – 15controlling, 2 – 37placing purchase orders in the Navigator,
4 – 10placing requisitions in the Navigator, 3 – 5security and access level matrix, 2 – 10security and access levels, 2 – 8
Drop shipments, 4 – 156
EEarly/late receipt tolerance, setup, 7 – 9Employees, assigning to jobs or positions,
2 – 22Encumbrance Detail report, 9 – 31Enforce Buyer Name, options setup, 1 – 35Enforce Ship–To Location, option setup, 1 – 42Enforce ship–to location, setup, 7 – 9Enforce Supplier Hold, options setup, 1 – 35Enhanced Document Printing, 1 – 60Enhanced Reporting, 1 – 60Enter Person, window, 2 – 22Euro
currency rate type in Currency window,4 – 56
currency Rate Type in New Documentwindow, 6 – 18
currency rate type in Requisition Preferenceswindow, 3 – 45
currency rate type in Requisitions window,3 – 56
rate type options setup, 1 – 30Expected Receipts Report, using, 7 – 71Expected Receipts report, 9 – 33Expected Receipts, finding, 7 – 26Expense Accrual, setup, 7 – 8

Index – 5
Expense AP accrual account, setup, 7 – 8Express, receipts and receiving transactions,
7 – 24Express Receipts, entering, 7 – 25Express Transactions, option setup, 1 – 41Express transactions, setup, 7 – 9External Systems, 3 – 19
FFill Employee Hierarchy process, 9 – 35Financials/Purchasing Options Listing, 9 – 36Find Corrections window, Finding Corrections,
7 – 60Find Expected Receipts window
Entering Unordered Receipts, 7 – 34Finding Expected Receipts, 7 – 26
Find In–Transit Shipments window, FindingIn–Transit Shipments, 7 – 65
Find Purchase Orders window, FindingPurchase Orders, 4 – 19
Find Quotations window, Finding quotations,5 – 63
Find Receiving Transactions window, FindingReceiving Transactions, 7 – 46
Find Requisition Lines window (forassignment), Finding Requisition Lines forReview or Assignment, 5 – 78
Find Requisitions window, FindingRequisitions, 3 – 35
Find Returns window, Finding Returns, 7 – 55Finding Requisitions
clear existing search criteria, 3 – 37enter a new requisition, 3 – 37
Flexfields, Account Generator:Purge RuntimeData profile option, 1 – 77
Forms, Enter Purchase Orders, 6 – 10Forward, in Approve Document window,
2 – 33Forward Documents window, Mass
Forwarding Documents, 2 – 35Freeze, purchase orders, 4 – 9Full lot quantities, enforcement options, 1 – 33
Function Security, 2 – 11Funds checking
purchase orders, 4 – 6requisitions, 3 – 4
HHazard Classes window, Defining Hazard
Classes, 1 – 51Hazard Classes, defining, 1 – 51Hazardous Materials
overview, 1 – 48regulation background, 1 – 48
IIn–Transit Shipments, finding, 7 – 65Include In Next RFQ Printing, 5 – 38Inspecting Received Items, 7 – 52Inspection, 7 – 51Inspection Details window, Inspecting
Received Items, 7 – 52Internal Requisition Status Report, 9 – 37Internal Requisitions
approvals and controls, 3 – 16cancellation of requisitions, 3 – 16complete item sourcing definition, 3 – 14complete requisitions status visibility, 3 – 16creating online requistions, 3 – 15creation of internal sales orders, 3 – 16exception processing, 3 – 16flexible processing, 3 – 15full unit of issue enforcement, 3 – 15inter–organization shipping network, 3 – 15inventory replenishment requisitions, 3 – 15Kanban replenishments, 3 – 18order management, 3 – 16
Internal requisitionsapproval, 3 – 19cancelling, 3 – 24demand for, 3 – 17management, 3 – 23minimum inventory setup, 3 – 31minimum purchasing setup, 3 – 29

Index – 6
online processing automation, 3 – 33overview, 3 – 14processing summary, 3 – 24setup overview, 3 – 25updating intransit information, 3 – 23viewing status of, 3 – 24
Internal Requisitions/Deliveries Discrepancyreport, 9 – 39
Internal Sales Orders, across operating units,3 – 21
Internal sales orderscreation, 3 – 20management, 3 – 21pick release, 3 – 22ship confirmation, 3 – 22
Inventory accruals, setting up, 7 – 75Inventory Replenishment Requests, 3 – 18Invoice Close % Tolerance, setup, 7 – 8Invoice Close Tolerance percentage, option
setup, 1 – 31Invoice exchange rate variances, 7 – 86Invoice Matching, option setup, 1 – 31Invoice matching, setup, 7 – 8Invoice Price Variance by Vendor, 9 – 43Invoice Price Variance report, 9 – 41Item Attachments, 1 – 22Item Description, update options setup, 1 – 34Item Detail Listing, 9 – 45Item Summary Listing, 9 – 47Items
last price history, 5 – 4purchase history, 5 – 4
JJournal Entry Batches in General Ledger, 7 – 95
KKanban, replenishments, 3 – 18Kanban replenishment request, receiving
purchase order for, 7 – 6
LLast Price History, definition, 5 – 4Line Type, 1 – 58
default for documents, 1 – 31Line Types, definition, 1 – 61Line Types window, Defining Line Types,
1 – 63Line Types, defining, 1 – 61Location Listing, 9 – 48Lookup Codes
1099 Supplier Exception, 1 – 54acceptance type, 1 – 55freight terms, 1 – 55minority group, 1 – 55pay group, 1 – 55PO/Requistion Reason, 1 – 55price type, 1 – 55quotation approval reason, 1 – 55reply/receive via, 1 – 55supplier type, 1 – 55
Lookup Codes window, Defining LookupCodes, 1 – 54
Lookup Codes, defining, 1 – 54Lot numbers, 7 – 68
MMaintain Shipments window, Maintaining
Shipments, 7 – 67Managing Attachments, 1 – 22Managing Requisitions, 3 – 9Mass Forwarding Documents, 2 – 35
change original approver, 2 – 36view action history, 2 – 36
MassCanceldelete MassCancel batch, 2 – 60run MassCancel, 2 – 59
MassCancel, defining, 2 – 53MassCancel, running, 2 – 58Match Unordered Receipts, Matching
Unordered Receipts, 7 – 35Matching Holds by Buyer report, 9 – 50

Index – 7
Matching Service Purchase Orders, 1 – 61Matching Unordered Receipts, 7 – 34Maximum release amount, option setup, 1 – 30Menu paths, A – 2Modify Lines window, Modifying Requisition
Lines, 6 – 21Multiple Distributions, 7 – 22Multiple Receiving Organizations, Centralized
Purchasing in, 7 – 6
NNavigator
placing purchase orders in, 4 – 10placing requisitions in, 3 – 5
Navigator paths, A – 2New Vendor Letter report, 9 – 52Notification Controls window, Entering
Purchase Order Notification Controls,4 – 77
Notifications, viewing and responding to(overview), 2 – 29
Notifications Summary window, 2 – 29
OOff–line approver, 2 – 4On–line approver, 2 – 4Open Purchase Orders By Buyer report, 9 – 54Open Purchase Orders by Organization report,
9 – 55Oracle Alert, use in Purchasing, B – 2Oracle Public Sector Purchasing, Account
Generator setup, C – 2Oracle Quality results in Receiving
Transactions window, 7 – 47Oracle Workflow, Account Generator:Purge
Runtime Data profile option, 1 – 77Order Pad Options, entering, 5 – 17Order Source default, setup for internal
requisitions, 1 – 35Order Type default, setup for internal
requisitions, 1 – 35
Outside processingapproving purchase orders, 4 – 151business examples, 4 – 125controlling your receiving routing, 4 – 145correcting errors in receiving, 4 – 155cost rollup, 4 – 143creating outside processing purchase orders,
4 – 150defining accounting information, 4 – 146defining deliver to locations, 4 – 146defining departments with delivery
locations, 4 – 141defining employees, 4 – 144defining outside processing item lead times,
4 – 145defining outside processing item list prices,
4 – 144defining outside processing items, 4 – 135defining outside processing line types,
4 – 144defining outside resources, 4 – 138defining overreceipt tolerance and control,
4 – 145defining routings, 4 – 141defining ship to locations, 4 – 146defining supplier sourcing rules, 4 – 144defining supplier supplied components,
4 – 143defining units of measure, 4 – 137defining WIP accounting classes, 4 – 148foreign currency purchases, 4 – 151generating purchase orders from
requisitions, 4 – 151inspection options, 4 – 131introduction, 4 – 122kitting options, 4 – 129managing returns and corrections, 4 – 154manually creating purchase orders and lines,
4 – 151outside processed assembly tracking options,
4 – 131outside processing item in multiple
organizations, 4 – 137planning outside resource load, 4 – 148returning assemblies to suppliers, 4 – 155setting up Oracle Bills of Material, 4 – 138setting up Oracle Inventory, 4 – 135setting up Oracle Public Sector Purchasing,
4 – 144

Index – 8
setting up other Oracle products, 4 – 147shipping options, 4 – 130understanding the physical flow of outside
processed assemblies, 4 – 128Outside processing information, entering,
4 – 75Outside processing item
defining, 4 – 135defining lead times, 4 – 145defining list prices, 4 – 144maintaining in multiple organizations,
4 – 137receiving, 4 – 152requisitioning, 4 – 148
Outside Processing Line Types, 1 – 58Outside Processing window, Entering Outside
Processing Information, 4 – 75Outside processing, overview, 4 – 120Outside resources, 4 – 138Over–Receipt Tolerance percentage, option
setup, 1 – 40Overdue Vendor Shipments report, 9 – 56Overreceipt tolerance, setup, 7 – 9Overshipments report, 9 – 58
PPeriod Status
closed, 1 – 72future, 1 – 72never opened, 1 – 72open, 1 – 72permanently closed, 1 – 72
Period–End reconciliation tasks, 7 – 87Perpetual accruals, accrual process for, 7 – 81Physical flow of outside processed assemblies,
4 – 128Placing purchase orders in the Navigator,
4 – 10Placing requisitions in the Navigator, 3 – 5Planned purchase orders, 4 – 5Planning active, 5 – 73Planning outside resource load, 4 – 148
Position Hierarchiessetting up, 2 – 6uses, 2 – 6
Price Break Type, option setup, 1 – 30Price Break window, Entering Purchase
Agreement Price Break Information, 4 – 68Price Tolerance, options setup, 1 – 33Price Type, option setup, 1 – 31Price Variances, monitoring, 7 – 88Print, purchase orders, 4 – 8Printed Change Orders (Landscape) report,
9 – 65Printed Change Orders (Portrait) report, 9 – 67Printed Purchase Order (Landscape) report,
9 – 69Printed Purchase Order (Portrait) report, 9 – 71Printed Purchase Order, overview, 4 – 96Printed Requisitions report, 9 – 77Printed RFQ (Landscape) report, 9 – 73Printed RFQ (Portrait) report, 9 – 75Printing Attachments, 1 – 25Processes
ASL Upgrade, 9 – 17change order workflow, 2 – 75Create Internal Sales Orders, 9 – 29Create Releases, 9 – 30Fill Employee Hierarchy, 9 – 35overall document creation, 4 – 163Purchasing Database Administration, 9 – 94Receipt Accruals – Period End, 7 – 91,
9 – 105Receiving Transaction Processor, 9 – 117Requisition Import, 9 – 130Reschedule Requisitions, 9 – 137Send Notifications for Purchasing
Documents, 9 – 142workflow approval for purchase orders,
2 – 67workflow approval for requisitions, 2 – 72Workflow Background, 9 – 163
Processing mode, setup, 7 – 10Profile options, 1 – 76
Account Generator:Purge Runtime Data,1 – 77

Index – 9
Project informationin purchase order Distributions window,
4 – 72in Purchase Order Preferences window,
4 – 36in quotation when copying from RFQ, 5 – 61in Quotations window, 5 – 52in release Distributions window, 4 – 90in requisition Distributions window, 3 – 59in Requisition Preferences window, 3 – 47in RFQs window, 5 – 36
Purchase Agreement Audit report, 9 – 78Purchase agreement header information,
entering, 4 – 54Purchase agreement line information, entering,
4 – 54Purchase History, definition, 5 – 4Purchase order acceptances, entering and
viewing, 4 – 79Purchase Order and Releases Detail report,
9 – 86Purchase Order Commitment report, 9 – 80Purchase Order Detail report, 9 – 82Purchase order details, entering, 4 – 58Purchase Order Distribution Detail report,
9 – 84Purchase Order Distributions results window,
Using the Purchase Order DistributionsResults Window, 4 – 30
Purchase Order Distributions results window,using, 4 – 30
Purchase order distributions, entering, 4 – 70Purchase Order Header Results window,
using, 4 – 22Purchase Order Headers window, Using the
Purchase Order Headers Results window,4 – 23
Purchase Order Headers, entering, 4 – 39Purchase order lines, using line types, 1 – 61Purchase Order Lines Results window, using,
4 – 25Purchase Order Lines window, Using the
Purchase Order Lines Results window,4 – 25
Purchase order lines, entering, 4 – 44
Purchase Order Miscellaneous Information,entering, 4 – 52
Purchase order notification controls, entering,4 – 77
Purchase order numbersentry method setup, 1 – 36entry type setup, 1 – 37
Purchase Order Preferences window, EnteringPurchase Order Preferences, 4 – 34
Purchase Order Preferences, entering, 4 – 33Purchase order price break information,
entering, 4 – 68Purchase order price reference information,
entering, 4 – 48purchase order receipt accruals, defining,
7 – 102Purchase order receipt to expense destinations,
standard costing, 7 – 84Purchase order receipt to inventory, standard
costing, 7 – 83Purchase order receipt to receiving inspection,
standard costing, 7 – 81Purchase order receiving controls, entering,
4 – 65Purchase order reference document
information, entering, 4 – 50Purchase Order Shipments results window,
using, 4 – 28Purchase Order Shipments window, Using the
Purchase Order Shipments ResultsWindow, 4 – 28
Purchase order shipments, entering, 4 – 61Purchase order terms and conditions, entering,
4 – 58Purchase Orders
control matrices, 2 – 42line types, 4 – 7
Purchase ordersacceptances, 4 – 7approval, 4 – 8AutoClose, 4 – 9blanket purchase agreements, 4 – 4cancel, 4 – 8close, 4 – 9contract purchase agreements, 4 – 4

Index – 10
defaulting rules, 4 – 11freeze, 4 – 9hold, 4 – 9multiple shipments, 4 – 7notification controls, 4 – 10overview, 4 – 3placing in the Navigator for easy access,
4 – 10planned purchase orders, 4 – 5print, 4 – 8revising and archiving, 4 – 110revision, 4 – 7standard purchase orders, 4 – 4types, 4 – 4workflow, 4 – 160
Purchase Orders windowEntering Purchase Agreement Header
Information, 4 – 54entering purchase agreement line
information, 4 – 54Entering Purchase Order Headers, 4 – 39Entering Purchase Order Lines, 4 – 44Entering Purchase Order Miscellaneous
Information, 4 – 52Entering Purchase Order Price Reference
Information, 4 – 48Entering Purchase Order Reference
Document Information, 4 – 50Purchase Orders, finding, 4 – 19Purchase Price Variance report, 9 – 87Purchase Requisition Status report, 9 – 89Purchase Summary by Category report, 9 – 91Purchasing Activity Register, 9 – 92Purchasing Database Administration, 9 – 94Purchasing documents open interface, 5 – 20Purchasing Documents Open Interface Report,
9 – 95Purchasing Interface Errors Report, 9 – 98Purchasing Options
accrual options, 1 – 29control options, 1 – 29default options, 1 – 29internal requistion options, 1 – 29numbering options, 1 – 29tax defaults options, 1 – 29
Purchasing optionsaccrual options, 1 – 32control options, 1 – 33default options, 1 – 29internal requisition options, 1 – 35numbering options, 1 – 36numbering options in a Multi–Org setup,
1 – 37tax defaults options, 1 – 38
Purchasing Options window, DefiningPurchasing Options, 1 – 29
Purchasing options, defining, 1 – 29Purchasing Periods, controlling, 1 – 71Purchasing Services, 1 – 57
QQuality Code Listing, 9 – 100Quality Inspection Codes
quality code, 1 – 56ranking number, 1 – 56
Quality Inspection Codes window, DefiningQuality Inspection Codes, 1 – 56
Quality Inspection Codes, defining, 1 – 56Quality results
entering (overview), 7 – 39entering in Receiving Transactions window,
7 – 47Quantity–Based Purchasing, 1 – 58Quotation Action Required report, 9 – 101Quotation Headers, entering, 5 – 47Quotation lines, using line types, 1 – 61Quotation Lines, entering, 5 – 50Quotation numbers
entry method setup, 1 – 36entry type setup, 1 – 37
Quotation Price Breaks window, EnteringQuotation Price Break Information, 5 – 57
Quotation Price Breaks, entering, 5 – 57Quotation Shipments window, Entering
Quotation Shipment Information, 5 – 54Quotation Shipments, approving, 5 – 64

Index – 11
Quotation Shipments, entering, 5 – 54Quotation Terms window, Entering Quotation
Terms Information, 5 – 53Quotation Terms, entering, 5 – 53Quotations
autocreating, 5 – 4copying from RFQs, 5 – 61numbering options, 5 – 3purchase orders, 5 – 5requisitions, 5 – 6warning delay default, 1 – 31
Quotations windowEntering Quotation Headers, 5 – 47Entering Quotation Lines, 5 – 51
Quotations, approving entire, 5 – 66Quotations, finding, 5 – 63Quote warning delay, option setup, 1 – 31
RReassign, through Notifications Summary
window, 2 – 29Receipt accounting, overview, 7 – 73Receipt Accruals – Period End process, 7 – 91,
9 – 105Receipt Adjustments Report, 9 – 108Receipt Close % Tolerance, setup, 7 – 8Receipt Close Point, option setup, 1 – 34Receipt close point, setup, 7 – 8Receipt Close Tolerance percentage, option
setup, 1 – 31Receipt Date Control, option setup, 1 – 40Receipt Header Details window, Using the
Receipt Header Details window, 7 – 43Receipt Header Details window, using, 7 – 42Receipt Header window, Entering Receipt
Headers, 7 – 28Receipt Headers, entering, 7 – 28Receipt Lines, entering, 7 – 30Receipt numbering
alphanumeric or numeric, 7 – 9automatic or manual, 7 – 8option setup, 1 – 42
Receipt Routing, option setup, 1 – 42Receipt routing override, setup, 7 – 10Receipt routing, default, setup, 7 – 10Receipt tolerances, 7 – 12Receipt Traveler, 9 – 110Receipt Traveler, automatic print, setup, 7 – 10Receipt Travelers, 7 – 71Receipts
cascade, 7 – 22express, 7 – 24Receipt Traveler, 7 – 71Substitute Receipts Report, 9 – 144
Receipts windowEntering Express Receipts, 7 – 25Entering Receipt Lines, 7 – 30
Receivingaccrue un–invoiced receipts, 7 – 4blind receiving, 7 – 2Cascade, 7 – 2closed for invoicing, 7 – 4closed for receiving, 7 – 4control numbers, 7 – 5entering Quality results (overview), 7 – 39entering Quality results in Receiving
Transactions window, 7 – 47Express Receipt, 7 – 2hazardous materials, 7 – 5inspection, 7 – 5invoice matching controls, 7 – 3locator, 7 – 5overview, 7 – 2predefined substitute items, 7 – 3quality and destination, 7 – 5receiving tolerances, 7 – 2returns, 7 – 5services and labor, 7 – 4supply information, 7 – 3transfers of inventory items, 7 – 3unordered items, 7 – 3
Receiving Account Distributions report, 9 – 112Receiving account, default, setup, 7 – 10Receiving Accrual Account, option setup,
1 – 43Receiving Controls window, Entering Purchase
Order Receiving Controls, 4 – 65

Index – 12
Receiving Controls, Options, and Profiles, 7 – 7Receiving corrections, 7 – 59Receiving Exceptions report, 9 – 114Receiving Headers Summary window, using,
7 – 40Receiving Inspections, 7 – 51Receiving Locations, 7 – 7Receiving Options window, Defining
Receiving Options, 1 – 40Receiving Options, defining, 1 – 40Receiving outside processing items
assembly vs resource outside processing unittype items, 4 – 153
direct vs standard, 4 – 152move transactions, 4 – 153partial vs full quantities, 4 – 152resource transactions, 4 – 153
Receiving Reports, 7 – 71Receiving Returns, 7 – 54Receiving Returns window, Entering Receiving
Returns, 7 – 57Receiving Services, 1 – 61Receiving Transaction Processor, 9 – 117Receiving Transaction Summary window,
using, 7 – 41Receiving Transactions, 7 – 37
cascade, 7 – 22express, 7 – 24
Receiving transactions (summary), finding,7 – 39
Receiving Transactions Register, 9 – 119Receiving Transactions Summary window,
Using the Receiving TransactionsSummary window, 7 – 41
Receiving Transactions windowentering Quality results, 7 – 47Entering Receiving Transactions, 7 – 47
Receiving Transactions, entering, 7 – 47Receiving transactions, finding, 7 – 46Receiving Value by Destination Account
report, 9 – 125Receiving Value report, 9 – 122Regulation Background
hazard class, 1 – 49
identification number, 1 – 49labels required, 1 – 50packaging requirements, 1 – 50shipping name, 1 – 48shipping requirements, 1 – 50
Release distributions, entering, 4 – 87Release generation, automatic, 4 – 93Release Headers, entering, 4 – 81Release shipments, entering, 4 – 83Releases
blanket, 4 – 4scheduled, 4 – 5
Releases windowEntering Release Headers, 4 – 81Entering Release Shipments, 4 – 83
ReportsAccrual Reconciliation, 9 – 5Accrual Write–Off, 9 – 13Backordered Internal Requisitions, 9 – 18Blanket and Planned PO Status, 9 – 19Buyer Listing, 9 – 21Buyer’s Requisition Action Required, 9 – 23Cancelled Purchase Order, 9 – 25Cancelled Requisition, 9 – 26Contract Status, 9 – 28Define MassCancel Listing, 2 – 56Encumbrance Detail, 9 – 31Expected Receipts Report, 9 – 33Financials/Purchasing Options Listing,
9 – 36Internal Requisition Status Report, 9 – 37Internal Requisitions/Deliveries
Discrepancy, 9 – 39Invoice Price Variance by Vendor, 9 – 43Invoice Price Variance Report, 9 – 41Item Detail Listing, 9 – 45Item Summary Listing, 9 – 47Location Listing, 9 – 48Matching Holds by Buyer, 9 – 50New Vendor Letter, 9 – 52Open Purchase Orders By Buyer, 9 – 54Open Purchase Orders by Organization,
9 – 55Overdue Vendor Shipments Report, 9 – 56Overshipments, 9 – 58Printed Change Orders (Landscape), 9 – 65Printed Change Orders (Portrait), 9 – 67

Index – 13
Printed Purchase Order (Landscape), 9 – 69Printed Purchase Order (Portrait), 9 – 71Printed Requisitions, 9 – 77Printed RFQ (Landscape), 9 – 73Printed RFQ Report (Portrait), 9 – 75Purchase Agreement Audit, 9 – 78Purchase Order and Releases Detail, 9 – 86Purchase Order Commitment, 9 – 80Purchase Order Detail, 9 – 82Purchase Order Distribution Detail, 9 – 84Purchase Price Variance Report, 9 – 87Purchase Requisition Status Report, 9 – 89Purchase Summary by Category, 9 – 91Purchasing Activity Register, 9 – 92Purchasing Documents Open Interface,
9 – 95Purchasing Interface Errors, 9 – 98Quality Code Listing, 9 – 100Quotation Action Required, 9 – 101Receipt Adjustments Report, 9 – 108Receipt Traveler, 9 – 110Receiving Account Distributions Report,
9 – 112Receiving Exceptions Report, 9 – 114Receiving Transactions Register, 9 – 119Receiving Value by Destination Account
Report, 9 – 125Receiving Value Report, 9 – 122ReqExpress Templates Listing, 9 – 127Requisition Activity Register, 9 – 128Requisition Distribution Detail, 9 – 129Requisition Import Exceptions, 9 – 134Requisitions on Cancelled Sales Orders,
9 – 136RFQ Action Required, 9 – 103Run MassCancel Listing, 2 – 60Savings Analysis (By Buyer), 9 – 138Savings Analysis (By Category), 9 – 140Standard Notes Listing, 9 – 143Substitute Receipts Report, 9 – 144Tax Code Listing, 9 – 156Uninvoiced Receipts, 9 – 157Unit of Measure Class Listing, 9 – 159Unit of Measure Listing, 9 – 160Unordered Receipts, 9 – 162Vendor Affiliated Structure Listing, 9 – 145Vendor Price Performance Analysis, 9 – 146Vendor Purchase Summary, 9 – 148
Vendor Quality Performance Analysis,9 – 150
Vendor Service Performance Analysis,9 – 152
Vendor Volume Analysis, 9 – 154Vendors on Hold, 9 – 155
Req Import group by, option setup, 1 – 30ReqExpress, definition, 3 – 5ReqExpress Templates Listing, 9 – 127ReqImport, definition, 3 – 6Requisition Activity Register, 9 – 128Requisition Distribution Detail report, 9 – 129Requisition Distributions, 3 – 58Requisition Distributions Summary window,
Using the Requisition DistributionsSummary Window, 3 – 42
Requisition Distributions Summary window,using, 3 – 41
Requisition Headersenter requisition preferences, 3 – 51open the Supplier Item Catalog, 3 – 50take approval actions, 3 – 50to check funds, 3 – 50
Requisition Headers Summary window, Usingthe Requisition Headers SummaryWindow, 3 – 37
Requisition Headers Summary window, using,3 – 37
enter a new requisition, 3 – 38enter requisition preferences, 3 – 39navigate, 3 – 37open for the current line, 3 – 38requisition control information, 3 – 39view action history, 3 – 39view distributions information, 3 – 38view purchase orders, 3 – 39view requisition line information, 3 – 38view sales orders, 3 – 39
Requisition Headers, entering, 3 – 49Requisition Import Exceptions report, 9 – 134Requisition Import process, 9 – 130Requisition Lines
enter line details, 3 – 55enter requisition distributions, 3 – 57

Index – 14
enter requisition preferences, 3 – 57line currency information, 3 – 56line source details, 3 – 55open the Supplier Item Catalog, 3 – 56outside processing information, 3 – 56to approve requisitions, 3 – 57to check funds, 3 – 57
Requisition lines, using line types, 1 – 61Requisition Lines for AutoCreate, finding,
6 – 10Requisition Lines Summary window, Using the
Requisition Lines Summary Window,3 – 40
Requisition Lines Summary window, using,3 – 39
Requisition Lines, assigning, 5 – 82Requisition lines, entering, 3 – 52Requisition Lines, finding for review or
assignment, 5 – 78Requisition lines, modifying during
AutoCreate, 6 – 21Requisition numbers
entry method setup, 1 – 36entry type setup, 1 – 37
Requisition Preferences window, EnteringRequisition Preferences, 3 – 44
Requisition preferences, entering, 3 – 44Requisition Template, copy button, 1 – 45Requisition Templates window, Defining
Requisition Express Templates, 1 – 44Requisition Templates, defining, 1 – 44Requisition templates, using, 3 – 61Requisitioning outside processing items
approving requisitions, 4 – 150creating approved requisitions, 4 – 149manually creating requisitions, 4 – 150move transactions, 4 – 148submitting requisition import, 4 – 149
Requisitionsaccounting information, 3 – 4action history, 8 – 2approval history, 3 – 3approval status, 3 – 3approvals, 3 – 5assigning to a buyer, 3 – 10
AutoApproval, 3 – 6cancelling, 3 – 11finally closing, 3 – 12foreign currency, 3 – 11imported, 3 – 8importing from another system, 3 – 6Internal, 3 – 7kanban replenishments, 3 – 18on–line entry, 3 – 3paper, 3 – 8paperless system, 3 – 3placing in the Navigator for easy access,
3 – 5printing, 3 – 5purchase, 3 – 7Purchase Requisitions Status report, 9 – 89quantity rounding, 3 – 5reserving funds for, 3 – 8resubmission, 3 – 3returning, 3 – 10templates, 3 – 8updating during approval, 3 – 13updating with Modify, 3 – 13
Requisitions cancellation, , 3 – 4, 3 – 24Requisitions on Cancelled Sales Order Report,
9 – 136Requisitions window
Entering Requisition Headers, 3 – 49Entering Requisition Lines, 3 – 52using requisition templates, 3 – 61
Requisitions, finding, 3 – 35Requisitions, overview, 3 – 2Requistion Template
copy lines, 1 – 45define, 1 – 44manually add lines, 1 – 45sourcing information, 1 – 46
Reschedule Requisitions process, 9 – 137Reserving funds
for requisitions, 3 – 8through Approve Document window, 2 – 32
Return to supplier from inventory or expensedestinations, standard costing, 7 – 87
Return to supplier from receiving, standardcosting, 7 – 87
Returns, 7 – 54

Index – 15
Returns, entering, 7 – 56Returns, finding, 7 – 55Review, requisition approvals, 8 – 2Review Buyer Workload window, Reviewing
Buyer Workload, 5 – 80Reviewing Requisitions, 3 – 9RFQ, requirement, 5 – 4RFQ Action Required report, 9 – 103RFQ Headers, entering, 5 – 32RFQ lines, using line types, 1 – 61RFQ Lines, entering, 5 – 35RFQ numbers
entry method setup, 1 – 36entry type setup, 1 – 37
RFQ Price Break Information, entering, 5 – 43RFQ Price Breaks window, Entering RFQ Price
Break Information, 5 – 43RFQ required, option setup, 1 – 31RFQ Shipment Information, entering, 5 – 40RFQ Shipments window, Entering RFQ
Shipment Information, 5 – 40RFQ Supplier Information, entering, 5 – 37RFQ Suppliers window, Entering RFQ Supplier
Information, 5 – 37RFQ Terms Information, entering, 5 – 39RFQ Terms window, Entering RFQ Terms
Information, 5 – 39RFQs
autocreating, 5 – 4numbering options, 5 – 3supplier lists, 5 – 4
RFQs windowEntering RFQ Headers, 5 – 32Entering RFQ Lines, 5 – 35
Routing ControlAllow Change to Approval Hierarchy, 2 – 14Allow Change to Forward–From, 2 – 13Allow Change to Forward–To, 2 – 13Approval Hierarchy, 2 – 14Forwarding Method, 2 – 14Owner Can Approve, 2 – 13
Run MassCancelpurchase order, 2 – 54requisition, 2 – 54
Run MassCancel Listing, 2 – 60Run MassCancel window, 2 – 54
Running MassCancel, 2 – 59
SSample alerts, for Oracle Public Sector
Purchasing, B – 3Savings Analysis (By Buyer) report, 9 – 138Savings Analysis Report (By Category), 9 – 140Scheduled releases, 4 – 5Search Supplier Item Catalog window, Finding
Supplier Items, 5 – 11Security Hierarchy, options setup, 1 – 34Send Notifications for Purchasing Documents
process, 9 – 142Serial numbers, 7 – 68Setting Up a Default Line Type, 1 – 59setup overview, 1 – 2Shipments window, Entering Purchase Order
Shipments, 4 – 61Shipments, maintaining, 7 – 66Sourcing
automatic, 5 – 69overview, 5 – 2
Sourcing rules, creating (overview), 5 – 70Sourcing rules, overview, 5 – 69Sourcing Services, 1 – 61Standard costing transactions
delivery from receiving inspection toinventory, 7 – 82
matching invoices, 7 – 85purchase order receipt to expense
destinations, 7 – 84purchase order receipt to inventory, 7 – 83purchase order receipt to receiving
inspection, 7 – 81return to supplier from inventory or expense
destinations, 7 – 87return to supplier from receiving, 7 – 87
Standard Notes Listing, 9 – 143Standard purchase orders, 4 – 4Status, defining approved supplier, 5 – 24

Index – 16
Stock locators, 7 – 69Submissiion Check Rules, 2 – 26Submission Check, 2 – 25Substitute Receipts, option setup, 1 – 41Substitute receipts, setup, 7 – 9Substitute Receipts Report, 9 – 144Supplier and Item/Commodity Combination,
defining, 5 – 26Supplier Item Catalog
Order Pad, 5 – 8order pad options, 5 – 9Order Total, 5 – 10search window, 5 – 7Select Price Only, 5 – 10sourcing regions, 5 – 7
Supplier Item Catalog Alternative Regions,using, 5 – 14
Supplier Item Catalog windowEntering Order Pad Options, 5 – 18Using the Supplier Item Catalog Alternative
Regions, 5 – 15Supplier Item Catalog, overview, 5 – 7Supplier Item Catalog, searching, 5 – 10Supplier Lists, 5 – 4
alternate fields, 5 – 4Supplier Lists window, Defining Supplier
Lists, 5 – 76Supplier Lists, defining, 5 – 76Supplier–Item Attributes window, 5 – 29Supplier/Item Attributes window, defining,
5 – 29Suppliers
defaulting, 5 – 3holding, 5 – 3
TTax, defaults options, 1 – 38Tax Code Listing, 9 – 156Tax defaults overview, 4 – 158Taxable, option setup, 1 – 30Terms and Conditions window, Entering
Purchase Order Terms and ConditionsInformation, 4 – 58
Timeout feature in approval workflow, 2 – 65Transaction status information, finding, 7 – 43Transaction Statuses, 7 – 43
UUN Numbers window, Defining UN Numbers,
1 – 52UN Numbers, defining, 1 – 52Unable to Reserve Document notification,
2 – 31Uninvoiced Receipts report, 9 – 157Unit of Measure Class Listing, 9 – 159Unit of Measure Listing, 9 – 160Unordered Receipts, 7 – 33
option setup, 1 – 41Unordered receipts, setup, 7 – 9Unordered Receipts report, 9 – 162Unordered receipts, entering, 7 – 34Unordered Receipts, matching, 7 – 34Unreserve, through Approve Document
window, 2 – 33Updating Requisitions, 3 – 12Usages, in attachments, 1 – 26Using Attachments, 1 – 21Using Internal Requisitions, 3 – 17
VVendor, Volume, 9 – 148Vendor Affiliated Structure Listing, 9 – 145Vendor Price Performance Analysis report,
9 – 146Vendor Purchase Summary report, 9 – 148Vendor Quality Performance Analysis report,
9 – 150Vendor Service Performance Analysis report,
9 – 152Vendor Volume Analysis report, 9 – 154Vendors on Hold report, 9 – 155View Approved Suppliers, 5 – 31

Index – 17
WWindows, navigator paths, A – 2Workflow
approval process for requisitions, 2 – 72approval processes for purchase orders,
2 – 67approving change orders, 2 – 73change order processes, 2 – 75customizing change orders, 2 – 74customizing purchase order creation, 4 – 162
for approvals (overview), 2 – 63for approvals, customizing, 2 – 64for approvals, initiation, 2 – 64initiating change orders, 2 – 74overall document creation process, 4 – 163purchase order and release creation, 4 – 160Send Notifications for Purchasing
Documents, 2 – 73Workflow Background process, 9 – 163Workflow setup options, 1 – 73

Index – 18

Reader’s Comment Form
Oracle � Public Sector Purchasing User’s Guide A58266–01
Oracle Corporation welcomes your comments and suggestions on the quality and usefulnessof this publication. Your input is an important part of the information we use for revision.
• Did you find any errors?
• Is the information clearly presented?
• Do you need more information? If so, where?
• Are the examples correct? Do you need more examples?
• What features did you like most about this manual? What did you like least about it?
If you find any errors or have any other suggestions for improvement, please indicate the topic, chapter,and page number below:
Please send your comments to:
Documentation ManagerWorldwide Government and Education Products DivisionOracle Corporation500 Oracle ParkwayMS 3op7Redwood Shores, CA 94065Phone: (650) 506–8968 Fax: (650) 506–7800 Email: [email protected]
If you would like a reply, please give your name, address, and telephone number below:
Thank you for helping us improve our documentation.