Oracle Application Express Application Builder User's Guide
866
Oracle® Application Express Application Builder User’s Guide Release 4.2 for Oracle Database 12c E17961-11 July 2014
-
Upload
khangminh22 -
Category
Documents
-
view
1 -
download
0
Transcript of Oracle Application Express Application Builder User's Guide

Oracle® Application ExpressApplication Builder User’s Guide
Release 4.2 for Oracle Database 12c
E17961-11
July 2014

Oracle Application Express Application Builder User's Guide, Release 4.2 for Oracle Database 12c
E17961-11
Copyright © 2003, 2014, Oracle and/or its affiliates. All rights reserved.
Primary Authors: Terri Jennings, Drue Swadener
Contributors: Marco Adelfio, Christina Cho, Hilary Farrell, Michael Hichwa, Christopher Jones, Joel Kallman, Sharon Kennedy, David Peake, Anthony Rayner, Marc Sewtz, Scott Spadafore, Jason Straub, Patrick Wolf
This software and related documentation are provided under a license agreement containing restrictions on use and disclosure and are protected by intellectual property laws. Except as expressly permitted in your license agreement or allowed by law, you may not use, copy, reproduce, translate, broadcast, modify, license, transmit, distribute, exhibit, perform, publish, or display any part, in any form, or by any means. Reverse engineering, disassembly, or decompilation of this software, unless required by law for interoperability, is prohibited.
The information contained herein is subject to change without notice and is not warranted to be error-free. If you find any errors, please report them to us in writing.
If this is software or related documentation that is delivered to the U.S. Government or anyone licensing it on behalf of the U.S. Government, the following notice is applicable:
U.S. GOVERNMENT END USERS: Oracle programs, including any operating system, integrated software, any programs installed on the hardware, and/or documentation, delivered to U.S. Government end users are "commercial computer software" pursuant to the applicable Federal Acquisition Regulation and agency-specific supplemental regulations. As such, use, duplication, disclosure, modification, and adaptation of the programs, including any operating system, integrated software, any programs installed on the hardware, and/or documentation, shall be subject to license terms and license restrictions applicable to the programs. No other rights are granted to the U.S. Government.
This software or hardware is developed for general use in a variety of information management applications. It is not developed or intended for use in any inherently dangerous applications, including applications that may create a risk of personal injury. If you use this software or hardware in dangerous applications, then you shall be responsible to take all appropriate fail-safe, backup, redundancy, and other measures to ensure its safe use. Oracle Corporation and its affiliates disclaim any liability for any damages caused by use of this software or hardware in dangerous applications.
Oracle and Java are registered trademarks of Oracle and/or its affiliates. Other names may be trademarks of their respective owners.
Intel and Intel Xeon are trademarks or registered trademarks of Intel Corporation. All SPARC trademarks are used under license and are trademarks or registered trademarks of SPARC International, Inc. AMD, Opteron, the AMD logo, and the AMD Opteron logo are trademarks or registered trademarks of Advanced Micro Devices. UNIX is a registered trademark of The Open Group.
This software or hardware and documentation may provide access to or information on content, products, and services from third parties. Oracle Corporation and its affiliates are not responsible for and expressly disclaim all warranties of any kind with respect to third-party content, products, and services. Oracle Corporation and its affiliates will not be responsible for any loss, costs, or damages incurred due to your access to or use of third-party content, products, or services.

iii
Contents
Preface ............................................................................................................................................................... xxi
Topic Overview ......................................................................................................................................... xxiAudience................................................................................................................................................... xxiiiDocumentation Accessibility ................................................................................................................. xxiiiRelated Documents ................................................................................................................................. xxiiiConventions ............................................................................................................................................. xxiv
Changes in This Release ..................................................................................................................... xxv
Changes in Oracle Application Express Release 4.X.......................................................................... xxv
1 Quick Start
What is Oracle Application Express? ................................................................................................... 1-1About Oracle Application Express........................................................................................................ 1-2Understanding Application Express User Roles ................................................................................ 1-2Logging In To Oracle Application Express.......................................................................................... 1-3
About Browser Requirements .......................................................................................................... 1-3Configuring Your Oracle Application Express Environment ..................................................... 1-3Logging In To Oracle Application Express as a Developer ......................................................... 1-5
About the Workspace Home Page ......................................................................................................... 1-9About the Oracle Application Express Documentation ................................................................ 1-11
Accessing the Online Documentation Library............................................................................ 1-11Downloading the Online Documentation Library..................................................................... 1-13About Field-Level Help.................................................................................................................. 1-13
2 Application Builder Concepts
What is an Oracle Application Express Application? ....................................................................... 2-1Understanding the Difference Between Database and Websheet Applications....................... 2-1About the Create Application Wizard ............................................................................................ 2-2
What Is a Page? ......................................................................................................................................... 2-3Understanding Page Processing and Page Rendering ...................................................................... 2-4
How the Application Express Engine Renders and Processes Pages......................................... 2-4Understanding Conditional Rendering and Processing .............................................................. 2-4Verifying User Identity...................................................................................................................... 2-6Controlling Access to Controls and Components ......................................................................... 2-6
Understanding Session State Management ........................................................................................ 2-6

iv
What Is a Session? .............................................................................................................................. 2-7Understanding Session IDs............................................................................................................... 2-7Viewing Session State ........................................................................................................................ 2-7
Understanding URL Syntax ................................................................................................................... 2-8Understanding the URL that Displays for a Page ......................................................................... 2-9Using f?p Syntax to Link Pages........................................................................................................ 2-9Calling a Page Using an Application and Page Alias ................................................................ 2-11Calling a Page from a Button URL ............................................................................................... 2-11Facilitating Bookmarks by Using Zero as the Session ID.......................................................... 2-11
Managing Session State Values .......................................................................................................... 2-13Referencing Session State............................................................................................................... 2-13Setting Session State........................................................................................................................ 2-14Clearing Session State..................................................................................................................... 2-14About Bind Variable Syntax .......................................................................................................... 2-16
Understanding Substitution Strings ................................................................................................. 2-17Using Substitution Strings ............................................................................................................. 2-17About Built-in Substitution Strings .............................................................................................. 2-18
3 Utilizing Packaged Applications
About Packaged Applications ............................................................................................................... 3-1Managing Packaged Applications ........................................................................................................ 3-1
Accessing the Packaged Applications Page ................................................................................... 3-2Installing a Packaged Application ................................................................................................... 3-3Running an Installed Packaged Application.................................................................................. 3-3Removing an Installed Packaged Application............................................................................... 3-4Unlocking an Installed Productivity Application ......................................................................... 3-4Exporting an Installed Packaged Application ............................................................................... 3-4Changing Authentication for an Installed Packaged Application.............................................. 3-5Updating a Packaged Application................................................................................................... 3-6
About Sample Database Application ................................................................................................... 3-6Installing and Running Sample Database Application ................................................................ 3-6Understanding Sample Database Application .............................................................................. 3-7Modifying Sample Database Application ................................................................................... 3-13
About Sample Websheet - AnyCo IT Department ......................................................................... 3-16Installing and Running AnyCo IT Department.......................................................................... 3-16About Websheet Navigation ......................................................................................................... 3-17Understanding AnyCo IT Department ........................................................................................ 3-18Common Websheet User Interface Elements.............................................................................. 3-24Modifying Websheet Content ....................................................................................................... 3-26
4 Managing the Development Process
About the Team Development Home Page ......................................................................................... 4-1Tracking Features...................................................................................................................................... 4-3
Viewing Features................................................................................................................................ 4-3Creating a Feature .............................................................................................................................. 4-4Updating a Feature ............................................................................................................................ 4-4About Attaching Files to a Feature.................................................................................................. 4-5

v
Viewing Feature Reports................................................................................................................... 4-5Tracking Milestones................................................................................................................................. 4-8
Viewing Milestones ........................................................................................................................... 4-8Creating a Milestone.......................................................................................................................... 4-9Updating a Milestone ........................................................................................................................ 4-9Viewing Milestone Reports .............................................................................................................. 4-9
Tracking To Dos ..................................................................................................................................... 4-10Viewing To Dos ............................................................................................................................... 4-11Creating a To Do ............................................................................................................................. 4-11Updating a To Do............................................................................................................................ 4-12About Attaching Files to a To Do ................................................................................................. 4-12Viewing To Do Reports .................................................................................................................. 4-13
Managing Bugs ...................................................................................................................................... 4-14Viewing Bugs................................................................................................................................... 4-14Creating a Bug ................................................................................................................................. 4-15Editing a Bug.................................................................................................................................... 4-15About Attaching Files to a Bug ..................................................................................................... 4-16Viewing Bug Reports...................................................................................................................... 4-16
Managing Feedback .............................................................................................................................. 4-17Viewing Feedback........................................................................................................................... 4-17Adding a Feedback Page to an Application................................................................................ 4-18Reviewing Feedback ....................................................................................................................... 4-19Viewing Feedback Reports ............................................................................................................ 4-19
Utilizing the Tags Summary................................................................................................................ 4-20Managing Team Actions ...................................................................................................................... 4-20
Managing Links.............................................................................................................................. 4-21Managing News Entries ................................................................................................................. 4-22Managing Team Development Settings....................................................................................... 4-24Viewing a Release Summary ......................................................................................................... 4-24About Utilities ................................................................................................................................. 4-25Editing Focus Areas ........................................................................................................................ 4-26 Viewing Files Attached to Features, To Dos and Bugs............................................................. 4-26
5 About Websheet Applications
About Using Websheet Applications ................................................................................................... 5-1Navigating Between Websheet Pages and Sections...................................................................... 5-2About Language................................................................................................................................. 5-3About the Help Link.......................................................................................................................... 5-3About Builder Link ............................................................................................................................ 5-4About Logout Link............................................................................................................................. 5-4About Websheet Search .................................................................................................................... 5-4About the Control Panel ................................................................................................................... 5-5
About Creating a Websheet Application ............................................................................................. 5-6Creating a Websheet from Application Builder ............................................................................ 5-6Creating a Websheet Application from a Running Websheet..................................................... 5-7Running a Websheet .......................................................................................................................... 5-7Adding a New Page........................................................................................................................... 5-8

vi
Copying an Existing Page ................................................................................................................. 5-9Editing Page Details........................................................................................................................... 5-9Deleting a Websheet ....................................................................................................................... 5-10
About Adding and Editing Page Sections ........................................................................................ 5-10About Section Types ....................................................................................................................... 5-10About Editing Sections................................................................................................................... 5-10Deleting Page Sections.................................................................................................................... 5-11Editing Section Titles and Display Order .................................................................................... 5-12
About Text Sections .............................................................................................................................. 5-12Adding a Text Section .................................................................................................................... 5-12Editing a Text Section ..................................................................................................................... 5-13
About Navigation Sections.................................................................................................................. 5-14Adding a Navigation Section ........................................................................................................ 5-14
About Adding Data Grids ................................................................................................................... 5-15About Data Grids ............................................................................................................................ 5-15Creating a Data Grid....................................................................................................................... 5-16Copying a Data Grid....................................................................................................................... 5-18Viewing and Editing a Data Grid ................................................................................................. 5-18Viewing the Data Grid Change History Log............................................................................... 5-24Deleting a Data Grid....................................................................................................................... 5-24
About Adding and Editing Data Content......................................................................................... 5-24Available Data Sources................................................................................................................... 5-24About Enabling Support for Creating Data Reports.................................................................. 5-24Incorporating Data into Websheet Pages .................................................................................... 5-25
About Adding Data Reports ............................................................................................................... 5-25About Data Reports ........................................................................................................................ 5-25Creating a Data Report................................................................................................................... 5-25Viewing and Modifying a Data Report........................................................................................ 5-26Deleting a Data Report ................................................................................................................... 5-27
About Data Sections ............................................................................................................................. 5-27Adding a Data Section to a Page................................................................................................... 5-27Editing a Data Section .................................................................................................................... 5-28
About Chart Sections ............................................................................................................................ 5-28Adding a Chart Section .................................................................................................................. 5-28Editing a Chart Section................................................................................................................... 5-29
About PL/SQL Sections........................................................................................................................ 5-29Adding a PL/SQL Section ............................................................................................................. 5-30Editing a PL/SQL Section.............................................................................................................. 5-30
Understanding Markup Syntax .......................................................................................................... 5-30Linking to a Page............................................................................................................................. 5-31Linking to a Section......................................................................................................................... 5-31Linking to External URLs............................................................................................................... 5-32Linking to a Data Grid.................................................................................................................... 5-32Using SQL and SQLVALUE Syntax ............................................................................................. 5-32About Advanced Data Grid Queries Rules................................................................................. 5-33
Managing Annotations......................................................................................................................... 5-34Managing Uploaded Files and Images ........................................................................................ 5-34

vii
Adding Tags..................................................................................................................................... 5-36Adding Notes................................................................................................................................... 5-37Viewing and Deleting Annotations.............................................................................................. 5-37
Managing Websheet Applications ..................................................................................................... 5-39Viewing the Websheet Dashboard ............................................................................................... 5-39Monitoring Websheet Activity...................................................................................................... 5-39Editing Websheet Properties ......................................................................................................... 5-40Controlling Websheet Access ........................................................................................................ 5-43Changing Your Websheet Password............................................................................................ 5-45Emailing a Websheet Page............................................................................................................. 5-45Printing a Websheet Page .............................................................................................................. 5-45
Viewing Websheets ............................................................................................................................... 5-46About Presentation Mode .............................................................................................................. 5-46Viewing the Page Directory........................................................................................................... 5-47Viewing Page History..................................................................................................................... 5-48Viewing an Websheet Directory ................................................................................................... 5-48
6 Using Application Builder
Accessing Application Builder .............................................................................................................. 6-1About the Application Builder Home Page ........................................................................................ 6-1About the Application Home Page ....................................................................................................... 6-3
About the Developer Action Bar...................................................................................................... 6-7Searching Page Metadata .................................................................................................................. 6-9
7 About Database Applications
About Creating a Database Application .............................................................................................. 7-1Creating Mobile Applications .......................................................................................................... 7-2Creating a Database Application Based on a Table, Query, or Drill-down Query .................. 7-4Creating an Application from a Spreadsheet................................................................................. 7-7Copying a Database Application ..................................................................................................... 7-9Creating a Database Application from a Template.................................................................... 7-10Installing Sample Applications ..................................................................................................... 7-11Deleting a Database Application .................................................................................................. 7-13About Application Models and User Interface Defaults........................................................... 7-13
About Application Attributes ............................................................................................................. 7-15Editing the Application Definition ............................................................................................... 7-15Configuring Security Attributes ................................................................................................... 7-21Configuring Globalization Attributes .......................................................................................... 7-27Managing the Application User Interface ................................................................................... 7-30
Managing Pages in a Database Application .................................................................................... 7-35About Creating Pages in a Database Application ...................................................................... 7-35Creating a Page from the Application Home Page .................................................................... 7-35Creating a Page from the Developer Toolbar ............................................................................. 7-37Copying a Database Application Page......................................................................................... 7-39Running an Application or Page................................................................................................... 7-40Grouping Pages ............................................................................................................................... 7-42

viii
Locking and Unlocking a Page...................................................................................................... 7-44Deleting a Page ................................................................................................................................ 7-47
Adding Database Application Comments ....................................................................................... 7-48Creating and Editing Database Application Comments ........................................................... 7-48
Adding Developer Comments ............................................................................................................ 7-49Adding Developer Comments to an Application or Page ........................................................ 7-49Viewing and Editing Developer Comments ............................................................................... 7-50Deleting Developer Comments..................................................................................................... 7-51About the Developer Comments Report ..................................................................................... 7-52Viewing the Developer Comments Calendar ............................................................................. 7-53
Creating Application Groups.............................................................................................................. 7-54Viewing Database Application Groups ....................................................................................... 7-54Creating a Database Application Group ..................................................................................... 7-54Assigning a Database Application to an Application Group ................................................... 7-55Removing a Database Application from an Application Group.............................................. 7-55Deleting an Database Application Group ................................................................................... 7-55
Understanding Page-Level Items ....................................................................................................... 7-56Differences Between Page Items and Application Items........................................................... 7-56Viewing Items on the Page Definition ......................................................................................... 7-56Creating Page-Level Items............................................................................................................. 7-58Editing Page-Level Items ............................................................................................................... 7-63Referencing Item Values ................................................................................................................ 7-70Displaying Conditional or Read-Only Page Items..................................................................... 7-72Working with Multiple Select List Item....................................................................................... 7-73
Understanding Application-Level Items .......................................................................................... 7-75Creating an Application-level Item .............................................................................................. 7-75Viewing Application Item Usage.................................................................................................. 7-77Editing Application-level Item Attributes................................................................................... 7-77Creating an Application-level Item that Functions as a Global Variable ............................... 7-78
Viewing Application Utilities and Reports...................................................................................... 7-78Using Application Builder Utilities .............................................................................................. 7-78About Page Specific Utilities ......................................................................................................... 7-84About Cross Page Utilities ............................................................................................................. 7-85About Cross Application Reports................................................................................................. 7-86
8 Working with Database Application Pages
About the Page Definition...................................................................................................................... 8-1Accessing the Page Definition.......................................................................................................... 8-2About Tree and Component View .................................................................................................. 8-2Editing a Page in Tree View ............................................................................................................. 8-5Editing a Page in Component View ................................................................................................ 8-8About Page Rendering ................................................................................................................... 8-12About Page Processing................................................................................................................... 8-13About Shared Components ........................................................................................................... 8-14Common Elements of the Page Definition .................................................................................. 8-16
Altering Page Attributes ...................................................................................................................... 8-20Accessing Page Attributes ............................................................................................................. 8-21

ix
About Page Attributes.................................................................................................................... 8-21Understanding Page Computations................................................................................................... 8-29
Creating a Page Computation ....................................................................................................... 8-30Understanding Computation Points and Computation Syntax............................................... 8-31Editing Page Computation Attributes ......................................................................................... 8-32
Understanding Validations ................................................................................................................. 8-32Creating Item and Page Validations............................................................................................. 8-33Determining When Validations Execute ..................................................................................... 8-40Defining How Validation Error Messages Display.................................................................... 8-40Processing Validations Conditionally.......................................................................................... 8-41What Happens When a Validation Fails?.................................................................................... 8-42
Understanding Page Processes ........................................................................................................... 8-43About Creating a Page Process ..................................................................................................... 8-43Editing Page Process Attributes.................................................................................................... 8-45Controlling When a Page Process Executes ................................................................................ 8-46Creating Page Process Success and Error Messages .................................................................. 8-47Making a Page Process Conditional ............................................................................................. 8-47
Working with Branches ........................................................................................................................ 8-48Defining a Branch Point and Action............................................................................................. 8-49Branching Conditionally ................................................................................................................ 8-49
Working with Shared Components ................................................................................................... 8-49Accessing the Shared Components Page..................................................................................... 8-50About the Shared Components Page ........................................................................................... 8-50About Exporting Shared Components......................................................................................... 8-54
Understanding Application Processes .............................................................................................. 8-55About On Demand Application Processes.................................................................................. 8-55Application Process Example........................................................................................................ 8-56Creating an Application Process................................................................................................... 8-56Editing Application Process Attributes ....................................................................................... 8-57Creating Application Process Error Messages............................................................................ 8-58Viewing the Application Processes History Report................................................................... 8-59
Understanding Application Computations...................................................................................... 8-59About Application Computations ................................................................................................ 8-59Creating an Application Computation ........................................................................................ 8-60Accessing the Application Computation History Report ......................................................... 8-61
Using the Attribute Dictionary........................................................................................................... 8-62
9 Creating Reports
Understanding the Difference Between Interactive and Classic Reports..................................... 9-1Creating a Report Using a Wizard ........................................................................................................ 9-3Customizing Interactive Reports........................................................................................................... 9-4
Using the Search Bar.......................................................................................................................... 9-5Using the Select Columns to Search Icon ....................................................................................... 9-5Using the Column Heading Menu .................................................................................................. 9-6About the Actions Menu................................................................................................................... 9-6Selecting Columns to Display .......................................................................................................... 9-8Adding a Filter.................................................................................................................................... 9-9

x
Specifying Rows Per Page.............................................................................................................. 9-11Selecting Column Sort Order ........................................................................................................ 9-11Creating a Control Break................................................................................................................ 9-12Adding Highlighting ...................................................................................................................... 9-13Computing Columns ...................................................................................................................... 9-14Aggregating a Column .................................................................................................................. 9-16Creating a Chart from the Actions Menu .................................................................................... 9-17Grouping Columns ......................................................................................................................... 9-19Executing a Flashback Query ........................................................................................................ 9-21Saving an Interactive Report ......................................................................................................... 9-21Resetting a Report ........................................................................................................................... 9-26Downloading a Report ................................................................................................................... 9-26Subscribing to Emailed Reports .................................................................................................... 9-26
Editing Interactive Reports as a Developer...................................................................................... 9-27Accessing the Interactive Report Attributes Page...................................................................... 9-28Editing Interactive Report Column Attributes ........................................................................... 9-30Creating Column Groups............................................................................................................... 9-31Controlling Interactive Report Pagination .................................................................................. 9-32Managing Interactive Report Column Sorting ........................................................................... 9-33Customizing the Interactive Report Search Bar.......................................................................... 9-33Configuring Download Options on the Actions Menu............................................................. 9-36Understanding Link Columns ...................................................................................................... 9-38Creating a Column Link in an Interactive Report ...................................................................... 9-40Displaying Interactive Reports Conditionally ............................................................................ 9-41Defining a Column as a List of Values in an Interactive Report .............................................. 9-42Formatting Columns in an Interactive Values Report............................................................... 9-43Enabling Icon View......................................................................................................................... 9-43Enabling Detail View...................................................................................................................... 9-45Configuring Advanced Attributes for Interactive Reports....................................................... 9-45Linking to Interactive Reports....................................................................................................... 9-47Linking to Shared Interactive Reports ......................................................................................... 9-48Managing Saved Reports as a Developer .................................................................................... 9-49Viewing Saved Report Activity..................................................................................................... 9-50
Editing Classic Reports ........................................................................................................................ 9-50Accessing Classic Report Attributes............................................................................................. 9-51Altering Classic Report Layout Using Column Attributes ....................................................... 9-53Controlling Classic Report Pagination......................................................................................... 9-55Enabling Column Sorting in a Classic Report............................................................................. 9-57Adding a Download Link to a Classic Report ............................................................................ 9-58Enabling the CSV Output Option in a Classic Report ............................................................... 9-58Exporting a Classic Report as an XML File or a CSV File ......................................................... 9-58Creating a Column Link in a Classic Report............................................................................... 9-59Defining an Updatable Column in a Classic Report .................................................................. 9-60Defining a Column as a List of Values in a Classic Report....................................................... 9-61Controlling When Columns Display in a Classic Report.......................................................... 9-62Controlling Column Breaks in a Classic Report ........................................................................ 9-62Synchronizing Classic Report Column Order with Region Source......................................... 9-63

xi
Printing Report Regions ...................................................................................................................... 9-63About Printing Reports to PDF..................................................................................................... 9-63About Report Printing Configuration Options........................................................................... 9-64About Classic Report Printing Methods...................................................................................... 9-64About Report Queries..................................................................................................................... 9-65About Report Layouts .................................................................................................................... 9-67Configuring Classic Report Region Print Attributes ................................................................. 9-70Configuring Interactive Report Region Print Attributes........................................................... 9-71
10 Adding Database Application Components and Controls
Creating Forms....................................................................................................................................... 10-1Creating a Form Using a Wizard .................................................................................................. 10-2Creating a Tabular Form................................................................................................................ 10-3Creating a Master Detail Form.................................................................................................... 10-10Creating a Form Manually........................................................................................................... 10-16Validating User Input in Forms .................................................................................................. 10-19
Creating Calendars.............................................................................................................................. 10-20About Creating Calendars ........................................................................................................... 10-21Viewing a Sample Calendar ........................................................................................................ 10-21Creating an Easy Calendar .......................................................................................................... 10-22Creating a SQL Calendar ............................................................................................................. 10-27Editing Calendar Attributes ........................................................................................................ 10-34Editing an Existing Calendar to Include Add and Edit Functionality .................................. 10-39Enabling the Dragging and Dropping of Data In an Existing Calendar............................... 10-40Editing a Calendar Title ............................................................................................................... 10-40Upgrading a Calendar Created in a Previous Releases........................................................... 10-41Converting an Easy Calendar to a SQL Calendar .................................................................... 10-41
Creating Maps ...................................................................................................................................... 10-41About Flash Map Support ........................................................................................................... 10-42Adding a Flash Map to an Existing Page................................................................................... 10-42Adding Flash Maps to a New Page ............................................................................................ 10-43About Creating SQL Queries for Maps...................................................................................... 10-44Editing Flash Map Attributes ...................................................................................................... 10-46Using Custom XML with Flash Maps........................................................................................ 10-46Enabling Asynchronous Updates ............................................................................................... 10-47
Creating Charts .................................................................................................................................... 10-47About Creating SQL Queries for Charts.................................................................................... 10-48About Creating a HTML5 Charts ............................................................................................... 10-49About Creating a Flash Chart...................................................................................................... 10-52About SVG Charts......................................................................................................................... 10-56About HTML Charts..................................................................................................................... 10-61Editing Chart Attributes............................................................................................................... 10-62About Saving Flash Charts .......................................................................................................... 10-63Using Custom XML with Flash and HTML5 Charts ............................................................... 10-63Enabling Asynchronous Updates ............................................................................................... 10-64
Creating Buttons .................................................................................................................................. 10-65Creating a Button Using a Wizard.............................................................................................. 10-65

xii
Creating Multiple Buttons in Component View....................................................................... 10-70Editing Buttons.............................................................................................................................. 10-70Understanding the Relationship Between Button Names and REQUEST ........................... 10-72About Branching with Buttons ................................................................................................... 10-72Displaying Buttons Conditionally .............................................................................................. 10-72
Creating Lists of Values at the Application Level......................................................................... 10-73Creating a Named LOV at the Application Level .................................................................... 10-73About Static LOVs......................................................................................................................... 10-74Editing an Existing LOV .............................................................................................................. 10-75Referencing Session State Within an LOV................................................................................. 10-75Accessing LOV Reports................................................................................................................ 10-76
Using Shortcuts.................................................................................................................................... 10-77About Shortcut Types................................................................................................................... 10-77Defining Shortcuts ........................................................................................................................ 10-77Editing Existing Shortcuts............................................................................................................ 10-78Accessing Shortcut Reports ......................................................................................................... 10-79
Creating Trees....................................................................................................................................... 10-79Creating a Tree .............................................................................................................................. 10-80Editing a Tree as a Developer...................................................................................................... 10-81About Trees Created as Shared Components ........................................................................... 10-82
Using the Find Icon............................................................................................................................. 10-84About the Find Icon ...................................................................................................................... 10-84About the Item Finder .................................................................................................................. 10-84Using the Pages Finder................................................................................................................. 10-85Using the Queries Finder ............................................................................................................. 10-86Using the Tables Finder................................................................................................................ 10-87Using the PL/SQL Finder ............................................................................................................ 10-88Using the Images Finder .............................................................................................................. 10-89
Controlling Access to Applications, Pages, and Page Components .......................................... 10-90How the Access Control List Works .......................................................................................... 10-91Creating an Access Control List.................................................................................................. 10-91Selecting an Application Mode and Adding Users.................................................................. 10-92Controlling Access for Pages and Page Components.............................................................. 10-94
Incorporating JavaScript into an Application................................................................................ 10-95Referencing Items Using JavaScript ........................................................................................... 10-95Incorporating JavaScript Utilizing the JavaScript Attribute ................................................... 10-96Calling the JavaScript File from the HTML Header Attribute ............................................... 10-96Calling the JavaScript File from the Page Template ................................................................ 10-97Calling JavaScript from a Button ................................................................................................ 10-97Calling JavaScript Using a Dynamic Action ............................................................................. 10-98
About jQuery and jQuery UI Support ............................................................................................ 10-98About Available jQuery UI Features.......................................................................................... 10-98Referencing the jQuery Library in Your JavaScript Code....................................................... 10-99
Optimizing a Page for Printing ...................................................................................................... 10-101Selecting a Printer Friendly Template for an Application .................................................... 10-102Using f?p Syntax to Toggle to Printer Friendly Mode........................................................... 10-102
Creating a Help Page ........................................................................................................................ 10-102

xiii
Creating a Help Page and Region............................................................................................. 10-103Defining Help Text...................................................................................................................... 10-103Creating a Help Navigation Bar Entry..................................................................................... 10-105
11 Adding Navigation
Creating Tabs.......................................................................................................................................... 11-1About Tabs ....................................................................................................................................... 11-2About the Tabs Page ....................................................................................................................... 11-3Creating a Tab.................................................................................................................................. 11-4Editing Tabs ..................................................................................................................................... 11-5Accessing Tab Reports.................................................................................................................... 11-6
Creating Lists ......................................................................................................................................... 11-7About List Types ............................................................................................................................. 11-8About Static Lists ............................................................................................................................ 11-8About Dynamic Lists .................................................................................................................... 11-13Copying a List................................................................................................................................ 11-16Adding a List to a Page by Creating a Region .......................................................................... 11-17Editing List Attributes .................................................................................................................. 11-18Accessing List Reports.................................................................................................................. 11-19
Creating Breadcrumbs ........................................................................................................................ 11-20About Breadcrumbs...................................................................................................................... 11-20How to Create Breadcrumbs ....................................................................................................... 11-20Editing Breadcrumbs .................................................................................................................... 11-24Reparenting Breadcrumb Entries................................................................................................ 11-25Deleting Unused Breadcrumb Entries ....................................................................................... 11-26Accessing Breadcrumb Reports .................................................................................................. 11-26
Creating a Navigation Bar Entry ...................................................................................................... 11-27About Navigation Bars................................................................................................................. 11-27How to Create a Navigation Bar Entry ...................................................................................... 11-28Editing a Navigation Bar Entry................................................................................................... 11-31Editing Multiple Navigation Bar Entries Simultaneously ...................................................... 11-31Accessing Navigation Bar Entry Reports .................................................................................. 11-32
Controlling Navigation Using Branches......................................................................................... 11-32Creating a Branch.......................................................................................................................... 11-32
12 Controlling Page Layout
Understanding Page Layout in Oracle Application Express ........................................................ 12-1Creating a Global Page to Display Components on Every Page.................................................. 12-2
Creating a Global Page ................................................................................................................... 12-2Navigating to the Global Page ...................................................................................................... 12-2
Understanding Regions ....................................................................................................................... 12-3Creating a Region............................................................................................................................ 12-3About Region Types ....................................................................................................................... 12-4Editing Regions ............................................................................................................................... 12-5Creating a Region Display Selector ............................................................................................ 12-12Copying a Region.......................................................................................................................... 12-13

xiv
Deleting Regions ........................................................................................................................... 12-14How Item Attributes Affect Page Layout ....................................................................................... 12-14Incorporating Content from Other Web Sites................................................................................ 12-16Managing Images ................................................................................................................................ 12-17
Uploading Images ......................................................................................................................... 12-17Referencing Images....................................................................................................................... 12-18Editing Image Attributes.............................................................................................................. 12-19Deleting an Image ......................................................................................................................... 12-19
Managing Static Files ......................................................................................................................... 12-20Uploading Static Files................................................................................................................... 12-20Editing an Uploaded File ............................................................................................................. 12-21Downloading an Uploaded File.................................................................................................. 12-22Deleting an Uploaded File ........................................................................................................... 12-22
Rendering HTML Using Custom PL/SQL...................................................................................... 12-23
13 Managing Themes and Templates
Managing Themes ................................................................................................................................. 13-1Accessing the Themes Page ........................................................................................................... 13-2About Using Theme 25 to Create a Responsive Design ............................................................ 13-2Editing a Theme .............................................................................................................................. 13-3Creating a Theme ............................................................................................................................ 13-4Switching an Active Theme........................................................................................................... 13-5Copying a Theme ............................................................................................................................ 13-6Deleting a Theme ............................................................................................................................ 13-7Managing Workspace Themes ...................................................................................................... 13-7About Exporting and Importing Themes .................................................................................... 13-9Changing a Theme Identification Number ................................................................................. 13-9Viewing Theme Reports................................................................................................................. 13-9
Customizing Templates...................................................................................................................... 13-12About Cascading Style Sheets ..................................................................................................... 13-12Selecting a Default Page Template ............................................................................................. 13-13Creating a New Template ............................................................................................................ 13-14Viewing Template Reports .......................................................................................................... 13-14Managing Templates .................................................................................................................... 13-15Breadcrumb Templates ................................................................................................................ 13-18Button Templates .......................................................................................................................... 13-20Calendar Templates ...................................................................................................................... 13-22Label Templates............................................................................................................................. 13-23List Templates................................................................................................................................ 13-25Page Templates.............................................................................................................................. 13-27Popup LOV Templates ................................................................................................................. 13-36Region Templates.......................................................................................................................... 13-37Report Templates .......................................................................................................................... 13-39
Using Custom Cascading Style Sheets............................................................................................ 13-47Uploading Cascading Style Sheets ............................................................................................. 13-47Referencing an Uploaded Cascading Style Sheet in the Page Template............................... 13-48

xv
14 Debugging an Application
About Tuning Performance ................................................................................................................. 14-1Running Advisor to Check Application Integrity .......................................................................... 14-1
About Oracle Application Express Advisor................................................................................ 14-2Running Advisor on an Entire Application ................................................................................ 14-2Running Advisor on a Single Page............................................................................................... 14-3
Reviewing Session State ...................................................................................................................... 14-4Accessing Debugging Mode ............................................................................................................... 14-4
Enabling and Disabling Debugging ............................................................................................. 14-5Running an Application in Debugging Mode ............................................................................ 14-5Using f?p Syntax to Access Debugging Mode ............................................................................ 14-5Viewing Debug Reports ................................................................................................................. 14-6
Enabling SQL Tracing and Using TKPROF ..................................................................................... 14-7Monitoring Application and Page Resource Use ............................................................................ 14-7Viewing Page Reports .......................................................................................................................... 14-7Debugging Problematic SQL Queries............................................................................................... 14-8Removing Controls and Components to Isolate a Problem.......................................................... 14-8
15 Managing Application Security
Understanding Administrator Security Best Practices .................................................................. 15-1Security Considerations When Using the Embedded PL/SQL Gateway............................... 15-1About Configuring Oracle HTTP Server with mod_plsql for Oracle Application Express. 15-2Utilizing Secure Sockets Layer (SSL)............................................................................................ 15-2Integrating with Oracle BI Publisher............................................................................................ 15-2About Setting Password Complexity Rules ................................................................................ 15-3Advantages of the Oracle Application Express Runtime Environment ................................. 15-4Understanding Session Timeout................................................................................................... 15-4Enabling Network Services in Oracle Database 12c................................................................... 15-5
Understanding Developer Security Best Practices ......................................................................... 15-8Understanding Items of Type Password ..................................................................................... 15-8Identifying At Risk Password Items............................................................................................. 15-9Understanding Cross-Site Scripting Protection........................................................................ 15-10About Session State and Security ............................................................................................... 15-12Understanding Session State Protection.................................................................................... 15-13
Securing File Uploads ........................................................................................................................ 15-25Establishing User Identity Through Authentication ................................................................... 15-25
Understanding How Authentication Works............................................................................. 15-26Determining Whether to Include Authentication .................................................................... 15-26Creating an Authentication Scheme........................................................................................... 15-27Creating a Preconfigured Authentication Schemes ................................................................. 15-27Managing Existing Authentication Schemes ............................................................................ 15-35Viewing the Authentication Scheme Associated with an Application ................................. 15-36Changing the Authentication Scheme Associated with an Application............................... 15-36Viewing Authentication Scheme Reports.................................................................................. 15-36
Providing Security Through Authorization................................................................................... 15-37How Authorization Schemes Work............................................................................................ 15-37

xvi
Creating an Authorization Scheme ............................................................................................ 15-37Attaching an Authorization Scheme to an Application, Page, or Components .................. 15-39Viewing Authorization Reports.................................................................................................. 15-40
16 Deploying an Application
About the Oracle Application Express Application Development Life Cycle.......................... 16-1System Development Life Cycle Methodologies to Consider .................................................. 16-2
Understanding the Packaging Process .............................................................................................. 16-2Deployment Options to Consider................................................................................................. 16-3Deciding Whether to Copy a Workspace .................................................................................... 16-3Deciding Whether to Copy a Database........................................................................................ 16-3About the Application ID .............................................................................................................. 16-4Deciding to Install a New HTTP Server ...................................................................................... 16-4
How to Move an Application to Another Instance......................................................................... 16-4About Managing Database Objects .............................................................................................. 16-4
How to Create a Custom Packaged Application ............................................................................. 16-5How Creating a Custom Packaged Application Simplifies Deployment............................... 16-5Creating a Custom Packaged Application .................................................................................. 16-6Adding Installation Scripts for an Image, Cascading Style Sheet, or Static File .................... 16-8Adding an Access Control List to a Custom Packaged Application ....................................... 16-9Installing Supporting Objects........................................................................................................ 16-9Deleting Supporting Objects Scripts, Messages, and Installation Options........................... 16-10Upgrading a Custom Packaged Application ............................................................................ 16-10Deinstalling Supporting Objects ................................................................................................. 16-11Viewing an Install Summary....................................................................................................... 16-12
Exporting an Application and Related Files .................................................................................. 16-12Where Images, CSS, and Script Files Are Stored...................................................................... 16-13Exporting an Application............................................................................................................. 16-14Exporting Application Components .......................................................................................... 16-15Exporting a Workspace ................................................................................................................ 16-17Exporting a Page in an Application............................................................................................ 16-17Exporting a Websheet................................................................................................................... 16-18Exporting Cascading Style Sheets............................................................................................... 16-18Exporting Images .......................................................................................................................... 16-19Exporting Static Files .................................................................................................................... 16-19Exporting Themes ......................................................................................................................... 16-20Exporting Plug-ins ........................................................................................................................ 16-21Exporting User Interface Defaults .............................................................................................. 16-21Exporting Feedback ...................................................................................................................... 16-23Exporting Script Files ................................................................................................................... 16-23
Importing Export Files........................................................................................................................ 16-23Importing an Application, Page or Component Export .......................................................... 16-24Importing a Websheet .................................................................................................................. 16-25Importing Plug-ins........................................................................................................................ 16-26Importing Cascading Style Sheets .............................................................................................. 16-26Importing Images.......................................................................................................................... 16-27Importing Static Files.................................................................................................................... 16-27

xvii
Importing Themes......................................................................................................................... 16-28Importing User Interface Defaults .............................................................................................. 16-28Importing Feedback...................................................................................................................... 16-29
Installing Export Files ........................................................................................................................ 16-29Accessing the Export Repository ................................................................................................ 16-30Installing an Application Export from the Export Repository ............................................... 16-30Installing Other Files from the Export Repository ................................................................... 16-31Deleting Files from the Export Repository................................................................................ 16-31Installing Export Files from SQL*Plus ....................................................................................... 16-31
About Publishing the Database Application URL ....................................................................... 16-32About Publishing the Websheet Application URL ...................................................................... 16-32Using Build Options to Control Configuration ............................................................................ 16-33
Creating Build Options ................................................................................................................ 16-33Managing Build Options.............................................................................................................. 16-34Exporting Build Options or Build Option Status ..................................................................... 16-35Viewing the Build Option Utilization Report ........................................................................... 16-36
17 Advanced Programming Techniques
About DML Locking............................................................................................................................. 17-1Accessing Data with Database Links ................................................................................................ 17-2Sending Email from an Application.................................................................................................. 17-3Using Collections .................................................................................................................................. 17-3Creating Custom Activity Reports Using APEX_ACTIVITY_LOG ............................................ 17-4Running Background PL/SQL ............................................................................................................ 17-5
About System Status Updates ....................................................................................................... 17-6Using a Process to Implement Background PL/SQL ................................................................ 17-6
Implementing Web Services ............................................................................................................... 17-7Understanding Web Service References ...................................................................................... 17-8Working with SSL Enabled Web Services ................................................................................... 17-9Creating a Web Service Reference Based on a WSDL ............................................................... 17-9Creating a Web Service Reference Manually ............................................................................ 17-11Creating a RESTful Web Service Reference............................................................................... 17-12Using the Web Service Reference Repository ........................................................................... 17-13Testing a Web Service Reference Created from a WSDL ........................................................ 17-14Testing a Web Service Reference Created Manually ............................................................... 17-14Testing a REST Web Service Reference...................................................................................... 17-14Creating an Input Form and Report on a Web Service ........................................................... 17-15Creating a Form on a Web Service ............................................................................................. 17-17Invoking a Web Service as a Process.......................................................................................... 17-19Editing a Web Service Process .................................................................................................... 17-22Viewing a Web Service Reference History ................................................................................ 17-22Exposing a Report Region as a RESTful Web Service.............................................................. 17-23
Implementing Plug-ins ...................................................................................................................... 17-25About Plug-ins............................................................................................................................... 17-26Accessing Plug-ins ........................................................................................................................ 17-26Editing a Plug-in............................................................................................................................ 17-27Creating a Plug-in ......................................................................................................................... 17-27

xviii
Adding Custom Attributes to a Plug-in .................................................................................... 17-31Uploading Files to Associate with a Plug-in ............................................................................. 17-32Adding Events to a Plug-in ......................................................................................................... 17-33Deleting a Plug-in.......................................................................................................................... 17-33Viewing the Plug-in Repository.................................................................................................. 17-34Importing a Plug-in from the Plug-in Page............................................................................... 17-34Exporting a Plug-in from the Plug-in Page ............................................................................... 17-34Resetting the Plug-in Interactive Report.................................................................................... 17-35View Plug-in Utilization .............................................................................................................. 17-35View Plug-in History.................................................................................................................... 17-35
Implementing Dynamic Actions ...................................................................................................... 17-35Understanding Dynamic Actions ............................................................................................... 17-36Creating a Dynamic Action ......................................................................................................... 17-36Editing Dynamic Actions............................................................................................................. 17-43Adding Additional True Actions................................................................................................ 17-44Defining the Frequency and Scope............................................................................................. 17-45Debugging Dynamic Actions ...................................................................................................... 17-46
About BLOB Support in Forms and Reports ................................................................................. 17-46About BLOB in Forms .................................................................................................................. 17-47About BLOB Support in Reports ................................................................................................ 17-48Working With BLOBs Procedurally ........................................................................................... 17-50
Using Screen Reader Mode in Your Database Applications ...................................................... 17-50Provisioning Screen Reader Mode.............................................................................................. 17-51Extending Screen Reader Mode .................................................................................................. 17-51
Using High Contrast Mode in Your Database Applications....................................................... 17-51Provisioning High Contrast Mode ............................................................................................. 17-52Extending High Contrast Mode.................................................................................................. 17-52
Creating Applications with Data Loading Capability ................................................................. 17-52Creating a Data Load Wizard...................................................................................................... 17-53Editing the Data Load Wizard .................................................................................................... 17-55
Managing Component Settings....................................................................................................... 17-56Editing Component Settings........................................................................................................ 17-56Viewing the Component Settings History Report.................................................................... 17-56
18 Managing Application Globalization
About Translating an Application and Globalization Support ................................................... 18-1About Language Identification ..................................................................................................... 18-2Rules for Translating Applications Built in Application Builder............................................. 18-2How Translated Applications Are Rendered ............................................................................ 18-2About Translatable Components .................................................................................................. 18-2
Specifying the Primary Language for an Application ................................................................... 18-4Using Format Masks for Items ...................................................................................................... 18-5Translating Applications for Multibyte Languages .................................................................. 18-5
Understanding the Translation Process ............................................................................................ 18-6Step 1: Map the Target Language ................................................................................................. 18-6Step 2: Seed and Download to a Translation File ....................................................................... 18-7Step 3: Translate the XLIFF File..................................................................................................... 18-8

xix
Step 4: Upload and Apply a Translated XLIFF Document ....................................................... 18-9Step 5: Publish the Application ................................................................................................... 18-11Manually Editing a Translation .................................................................................................. 18-11
Translating Messages.......................................................................................................................... 18-12Translating Messages Used in PL/SQL Procedures ................................................................ 18-12Translating Messages Used Internally by Oracle Application Express ................................ 18-14
Translating Data That Supports List of Values.............................................................................. 18-31Defining a Dynamic Translation................................................................................................. 18-31APEX_LANG.LANG API ............................................................................................................ 18-31
About Supported Globalization Codes .......................................................................................... 18-32
A About Item Types
Available Item Types .............................................................................................................................. A-1
B Oracle Application Express Limits
Development Environment Limits ...................................................................................................... B-1Component Limits................................................................................................................................... B-1
C Available Conditions
About Conditions .................................................................................................................................... C-1Conditions in Application Builder ...................................................................................................... C-1
D About Granted Privileges
About Granting Privileges to Database Users................................................................................... D-1About Privileges Granted to PUBLIC ................................................................................................. D-2
Packages ............................................................................................................................................. D-2Procedures.......................................................................................................................................... D-4Functions ............................................................................................................................................ D-4Tables .................................................................................................................................................. D-4Views................................................................................................................................................... D-5Sequences ........................................................................................................................................... D-8Types ................................................................................................................................................... D-8
E Accessibility in Oracle Application Express
About Screen Reader Mode................................................................................................................... E-1What Does Screen Reader Mode Do?............................................................................................. E-1Enabling Screen Reader Mode ........................................................................................................ E-3
About High Contrast Mode................................................................................................................... E-3What Does High Contrast Mode Do? ............................................................................................ E-4Enabling High Contrast Mode ........................................................................................................ E-4
Accessing Interactive Reports Using JAWS ....................................................................................... E-4Accessing the Actions Menu ........................................................................................................... E-4
Accessing Form Pages Using JAWS ..................................................................................................... E-6Understanding the Structure of Pages ........................................................................................... E-6Using the Tasks Links on a Page..................................................................................................... E-7

xx
Accessing Help Text ......................................................................................................................... E-8Dealing with Validation Errors ....................................................................................................... E-8
Accessing Components Using a Keyboard ...................................................................................... E-10Using New Date Pickers ................................................................................................................ E-10Accessing Interactive Report Regions.......................................................................................... E-11
Index

xxi
Preface
Oracle Application Express Application Builder User's Guide describes how to use the Oracle Application Express development environment to build and deploy database-centric web applications. Oracle Application Express turns a single Oracle database into a shared service by enabling multiple workgroups to build and access applications as if they were running in separate databases.
Topics:■ Topic Overview
■ Audience
■ Documentation Accessibility
■ Related Documents
■ Conventions
Topic OverviewThis document contains the following chapters:
Title Description
Changes in This Release Describes changes in this document for Oracle Application Express, release 4.2.
Quick Start Offers a quick introduction to using the Oracle Application Express.
Application Builder Concepts Provides basic conceptual information about Application Builder. Use Application Builder to assemble an HTML interface (or application) on top of database objects such as tables and procedures.
Utilizing Packaged Applications Describes how to install and run the sample applications provided with Oracle Application Express.
Managing the Development Process
Describes how to use Team Development, a built-in development management tool, to manage the development process by tracking new features, non-feature related tasks (or To Do tasks), bugs, and milestones.
About Websheet Applications Describes how to use Application Builder to create and add content to a Websheet application.

xxii
Using Application Builder Provides important background information about using Application Builder to build dynamically rendered applications.
Working with Database Application Pages
Provides important background information about creating and managing pages within an application.
About Database Applications Describes how to use Application Builder to build a database application and manage application components.
Working with Database Application Pages
Describes important background information about working with pages within a database application.
Creating Reports Describes how to create interactive reports and classic reports in a database application.
Adding Database Application Components and Controls
Describes how to use Application Builder to create various application components (such as forms, calendars, maps, and charts) and page controls (such as buttons, list of values, shortcuts, and trees).
Adding Navigation Describes how to implement navigation in your database application using different types of navigation controls, including navigation bar entries, tabs, breadcrumbs, and lists.
Controlling Page Layout Describes different ways you can customize your database application’s page layout by customizing regions, editing item attributes, and incorporating images.
Managing Themes and Templates Describes different ways you can alter your database application’s user interface and page layout through themes and templates.
Debugging an Application Describes approaches to debugging an application including running Oracle Application Express Advisor (Advisor), viewing Debug Mode, enabling SQL tracing, and viewing page reports.
Managing Application Security Describes how to provide security for an Application Builder application by understanding security best practices, securing file uploads, authentication, and authorization.
Deploying an Application Explains how to package an application built within Application Builder and how to export, import, and install an application and related files.
Advanced Programming Techniques
Provides information about advanced programming techniques including establishing database links, using collections, running background SQL, utilizing web services, implementing plug-ins, creating dynamic actions, using screen reader and high contrast modes, and creating applications that load data.
Managing Application Globalization
Explains how to translate an application built-in Application Builder.
Appendix A: About Item Types Describes available item types and important item attributes that control item behavior.
Appendix B: Oracle Application Express Limits
Lists limits associated with Oracle Application Express development environment and application components.
Appendix C: Available Conditions Describes many Application Builder conditions.
Appendix D: About Granted Privileges
Describes grant privilege in Oracle Application Express.
Title Description

xxiii
AudienceOracle Application Express Application Builder User's Guide is intended for application developers who are building database-centric web applications using Oracle Application Express. The guide describes how to use the Oracle Application Express development environment to build, debug, manage, and deploy applications.
To use this guide, you must have a general understanding of relational database concepts and an understanding of the operating system environment under which you run Oracle Application Express.
Documentation AccessibilityFor information about Oracle's commitment to accessibility, visit the Oracle Accessibility Program website at http://www.oracle.com/pls/topic/lookup?ctx=acc&id=docacc.
Access to Oracle SupportOracle customers have access to electronic support through My Oracle Support. For information, visit http://www.oracle.com/pls/topic/lookup?ctx=acc&id=info or visit http://www.oracle.com/pls/topic/lookup?ctx=acc&id=trs if you are hearing impaired.
Related DocumentsFor more information, see these Oracle resources:
■ Oracle Application Express Release Notes
■ Oracle Application Express Installation Guide
■ Oracle Database 2 Day + Application Express Developer's Guide
■ Oracle Application Express End User Guide
■ Oracle Application Express Administration Guide
■ Oracle Application Express SQL Workshop Guide
■ Oracle Application Express API Reference
■ Oracle Application Express Application Migration Guide
■ Oracle Database Concepts
■ Oracle Database Development Guide
■ Oracle Database Administrator's Guide
■ Oracle Database SQL Language Reference
Appendix E: Accessibility in Oracle Application Express
Provide information for users who are accessing Oracle Application Express utilizing only a keyboard or Freedom Scientific's screen reader JAWS.
See Also: Oracle Database 2 Day + Application Express Developer's Guide
Title Description

xxiv
■ SQL*Plus User's Guide and Reference
For additional documentation available on Oracle Technology Network (OTN), visit the Oracle Application Express website located at:
http://www.oracle.com/technetwork/developer-tools/apex/overview/index.html
For additional application examples, go to the Learning Library. Search for free online training content, including Oracle by Example (OBE), demos, and tutorials. To access the Oracle Learning Library, go to:
http://www.oracle.com/technetwork/tutorials/index.html
Printed documentation is available for sale in the Oracle Store at:
http://shop.oracle.com/
If you have a user name and password for OTN, then you can go directly to the documentation section of the OTN website at:
http://www.oracle.com/technetwork/indexes/documentation/index.html
ConventionsThe following text conventions are used in this document:
Convention Meaning
boldface Boldface type indicates graphical user interface elements associated with an action, or terms defined in text or the glossary.
italic Italic type indicates book titles, emphasis, or placeholder variables for which you supply particular values.
monospace Monospace type indicates commands within a paragraph, URLs, code in examples, text that appears on the screen, or text that you enter.

xxv
Changes in This Release
This preface contains:
■ Changes in Oracle Application Express Release 4.X
Changes in Oracle Application Express Release 4.XThe following are changes in Oracle Application Express Application Builder User's Guide for Oracle Application Express release 4.X.
New FeaturesThe following features are new in this release:
■ Mobile Application Building
Developers can declaratively define mobile applications and mobile application components. Applications can now have both desktop and mobile user interfaces with automatic detection. Details include:
– List View Region Type
Incorporated new List View region type which is a common presentation mode for mobile applications and is used in place of report views.
– New Common Pages for Different User Interfaces
Developers can define a separate Global Page (formerly Page 0), Login Page, and Home Page for each user interface. This facilitates different pages being shown to end users when they access the application from a mobile device as opposed to a desktop system.
See "Creating a Global Page to Display Components on Every Page" on page 12-2.
– User Interface Specific Components
Based on the user interface defined for the page, different region types and item types are available by default. For example, Interactive Reports and Tabular Forms are standard region types for desktop pages and List View is standard for mobile pages. The new Slider item type is standard for mobile pages only.
See "Managing the Application User Interface" on page 7-30.
■ Mobile Themes and Templates

xxvi
By leveraging jQuery Mobile, mobile themes function on all major mobile platforms without need for modification and include features such as page transitions and HTML5 item types. Details include:
– Support for Grid Layouts
Within page templates it is now possible to specify which Grid Layout to use for the placement of regions and page items. This is an alternative to HTML table-based layouts used by Oracle Application Express in previous releases.
See "Page Templates" on page 13-27.
– Page and Popup Transitions
For mobile page templates, page and popup transitions (for example slip, flip, and fade) can be specified to make the user experience more native for mobile devices.
– Declarative support for Cascading Style Sheets and JavaScript File Substitutions
New page and page template attributes for inline Cascading Style Sheets (CSS) and JavaScript files provide declarative support for developers to load files into their applications.
See "About Page Attributes" on page 8-21 and "Page Templates" on page 13-27.
– Content Delivery Network
A new application-level attribute, Content Delivery Network, within User Interface provides support for jQuery and jQuery Mobile files being loaded from a Content Delivery Network (for example, Google, Microsoft, or jQuery).
See "Accessing the User Interface Page" on page 7-30
■ HTML5 Charts
HTML5 charting enables charts to be rendered without Flash.
See "About Creating a HTML5 Charts" on page 10-49.
■ HTML5 Item Types
Specifying item types for number, email, telephone, and URL greatly enhances the user experience when entering data for modern mobile devices that are HTML5 aware. Details include:
– Slider Item Type
Slider renders an HTML5 range input type which is switched to a nice slider in mobile pages and can also be utilized on non-mobile pages.
– Yes/No Item Type
Yes/No renders as a flip toggle switch on mobile pages and as a radio group on non-mobile pages.
– New Display Orientation
For check box and radio group item types there is a new Display Orientation attribute which can be set to either Vertical (default) or Horizontal.
See "Understanding Page-Level Items" on page 7-56 and "About Item Types" on page A-1.
■ Packaged Applications

xxvii
A collection of productivity applications enable users to immediately start utilizing their database investment. The ability to unlock these applications also enables developers to customize and learn best practices.
See "Utilizing Packaged Applications" on page 3-1.
■ Other New Features
– Named Branches
Developers can now specify names for branches to help to identify different branches.
See "Controlling Navigation Using Branches" on page 11-32.
– Read-Only Pages and Regions
Developers can now specify read-only pages or regions enabling them to readily build view-only components.
See "About Page Attributes" on page 8-21 and "How Item Attributes Affect Page Layout" on page 12-14.
– Share Session State across Applications
Large logical applications are often separated into several physical applications that share the same session by configuring the same cookie name. Application items can now be shared between these applications by defining the item scope as Global.
See "Creating an Application-level Item that Functions as a Global Variable" on page 7-78.
Deprecated FeaturesThe following features are deprecated in this release, and may not be supported in a future release:
■ Set Memory Cache for DML Fetch process
DML Fetch processes should always use the Set Memory Cache on Fetch option to avoid confusion and issues with the setting of session state. Therefore the Set Memory Cache On Display option has been deprecated and is only be visible if the DML Fetch process is currently defined with that option.
■ Placeholders to Include Standard CSS and Standard JavaScript Files
The page-level attribute Include Standard JavaScript and CSS is deprecated and is only displayed for existing applications if the value is set to No. New applications no longer have this page-level attribute.
In page templates developers can now use the placeholders #APEX_CSS# and #APEX_JAVASCRIPT# to indicate if and where the standard Oracle Application Express CSS and JavaScript files should be loaded. If these placeholder are not included in the page template, they will not be loaded.
Other ChangesThe following are additional changes in the release:
■ Dynamic Actions
Dynamic actions provide developers with a way to define client-side behavior declaratively without the need of JavaScript. Enhancements in this release include:
– Enable jQuery Mobile

xxviii
Existing item types have been modified so that they work with jQuery Mobile when JavaScript and Dynamic Actions are used to manipulate them (for example Set Value, Enable, and Hide).
– Expose jQuery Mobile Events
The jQuery Mobile framework exposes a number of events that provide useful hooks for developers of mobile applications. The Dynamic Actions framework has been extended to incorporate these events.
– Asynchronous AJAX Calls
Change server-side actions to always fire asynchronously and provide developers the ability to define how subsequent actions are fired.
– Extend Affected Elements
Enables developers to add buttons to the components that can be specified as the affected element of a dynamic action.
See "Implementing Dynamic Actions" on page 17-35.
■ Plug-Ins
Plug-ins enable developers to enhance the existing built-in functionality by writing PL/SQL components for item types, regions, and processes. Enhancements in this release include:
– Increase Custom Attributes to 25
The number of custom attributes has been increased from 15 to 25.
– Add Fetched Rows and No Data Found Message to Region Type Settings
The attributes Number of Fetched Rows, Number of Fetched Rows (item), and No Data Found Message have been added as standard attributes which can be exposed for region type plug-ins to determine how many rows should be displayed or fetched for pagination of the region source data or displayed when nothing is found.
– Support Data Type Checking
The Region SQL Statement Column attribute has been added to support data type checking.
See "Implementing Plug-ins" on page 17-25.
■ Interactive Reports
– Immutable ID to Preserve Saved Interactive Reports
By introducing an immutable identifier for saved reports, subscriptions can be preserved when the application is upgraded by importing a new application definition (for example, importing from development into production). This identifier works even if the application being imported has a different application identifier.
– Column Formatting
HTML expressions to be used in column definitions which can be rendered in the report and included in HTML and email downloads.
– Define From Address
For subscriptions and email downloads users can now specify the "from" address.

xxix
– API for Runtime SQL Query
A new API returns an interactive report's current SQL query to help developers determine the exact query being executed. This can be very useful when the output from an interactive report is used in some other functionality where user defined conditions such as filters, sorting, and columns displayed are required for customization.
– Date Columns can use Equal (=) Operator
Enables users to filter on a specific date using the equal (=) operator.
See "Customizing Interactive Reports" on page 9-4 and "Editing Interactive Reports as a Developer" on page 9-27.
■ Websheets
Websheet applications are interactive web pages that combine text with data. Enhancements in this release include:
– Improved Create Websheet Wizard
Application developers can now specify to Allow SQL and PL/SQL when creating the application rather than having to create the Websheet and then edit the application properties.
– Toolbar Menu Enhancement
The existing toolbar menu options have been moved and new options added for Reports. These changes are designed to make it easier, more productive, and more intuitive for users to navigate with from within Websheets.
– Link Directly to Data Grids
Provide users with the ability to use a link directly to edit a data grid or data grid row (form view) which can be exposed or emailed for easier access.
See "About Websheet Applications" on page 5-1.
■ Team Development Attachments
Team Development enables developers to manage the development process by tracking new features, non-feature related tasks (or To Do tasks), bugs, and milestones. With this release, developers can now add external documents as attachments to features, bugs, and ToDos.
See "Managing the Development Process" on page 4-1.
■ All content, screen captures, and graphics have been updated to reflect Oracle Application Express release 4.2 functionality and user interface enhancements.
■ Additional administration enhancements:
– Maximum Items per Page Raised to 200
Maximum enterable items on a page has changed from 100 to 200.
– Debugging Enhancements
Developers no longer need to change the Debugging Allowed flag to Yes to view debugging information when they run a application from Application Builder. Oracle Application Express now makes better use of the different debugging levels and provides better controls to manage what level of detail is returned.
– On-Demand Improvements

xxx
Authorizations and conditions can now be utilized with on-demand processes. By default, on-demand processes are now created with an initial authorization of Must Not Be Public User to avoid execution by users in unauthenticated sessions.
– Globalization Enhancements
To improve productivity within the translation repository, developers can edit text messages using a grid.

Quick Start 1-1
1Quick Start
This section offers a quick introduction to using Oracle Application Express. It is assumed you have completed the installation process.
Topics:■ What is Oracle Application Express?
■ About Oracle Application Express
■ Understanding Application Express User Roles
■ Logging In To Oracle Application Express
■ About the Workspace Home Page
■ About the Oracle Application Express Documentation
What is Oracle Application Express?Oracle Application Express is a hosted declarative development environment for developing and deploying database-centric web applications. Thanks to built-in features such as user interface themes, navigational controls, form handlers, and flexible reports, Oracle Application Express accelerates the application development process.
The Application Express engine renders applications in real time from data stored in database tables. When you create or extend an application, Oracle Application Express creates or modifies metadata stored in database tables. When the application is run, the Application Express engine then reads the metadata and displays the application.
To provide stateful behavior within an application, Oracle Application Express transparently manages session state in the database. Application developers can get and set session state using simple substitutions and standard SQL bind variable syntax.
To learn more about Oracle Application Express, click the Learn More link on the Workspace home page. The About Oracle Application Express page appears.
See Also: Oracle Database 2 Day + Application Express Developer's Guide
See Also: "Logging In To Oracle Application Express" on page 1-3 and "About Learn More" on page 1-10

About Oracle Application Express
1-2 Oracle Application Express Application Builder User's Guide
About Oracle Application ExpressOracle Application Express installs with your Oracle database and consists of data in tables and PL/SQL code.
Whether you run the Oracle Application Express development environment or an application you built using Oracle Application Express, the process is the same. Your browser sends a URL request that is translated into the appropriate Oracle Application Express PL/SQL call. After the database processes the PL/SQL, the results are relayed back to your browser as HTML. This cycle happens each time you either request or submit a page.
The application session state is managed in the database tables within Application Express. It does not use a dedicated database connection. Instead, each request is made through a new database session, consuming minimal CPU resources.
About the Application Express EngineThe Application Express engine renders and processes pages. It also performs these tasks:
■ Session state management
■ Authentication services
■ Authorization services
■ Page flow control
■ Validation processing
Different Oracle Application Express EnvironmentsWhen you install Oracle Application Express, you can install two different environments:
■ A runtime environment is the appropriate choice for production implementations in which users can run applications that cannot be modified.
■ A full development environment provides complete access to the Application Builder environment to develop applications as described in this document.
Understanding Application Express User RolesTo access the Oracle Application Express development environment, users log in to a shared work area called a workspace. Users are divided into four primary roles:
■ Developers are users who create and edit applications
■ Workspace administrators are users who perform administrator tasks specific to a workspace such as managing user accounts, monitoring workspace activity, and viewing log files
■ End users are application users without any access to development or administrative capabilities
■ Instance administrators are superusers that manage an entire hosted instance using the Application Express Administration Services application
See Also: Oracle Application Express Installation Guide
See Also: Oracle Application Express Administration Guide

Logging In To Oracle Application Express
Quick Start 1-3
Logging In To Oracle Application ExpressWhen you log in to Oracle Application Express you log in to a workspace. A workspace is an area within the Oracle Application Express development environment where developers can create applications.
How you log in to Oracle Application Express depends upon whether you have configured your development environment:
■ If you have recently installed Oracle Application Express, you must configure your development environment. See "Configuring Your Oracle Application Express Environment" on page 1-3.
■ If you are a developer logging into a previously configured development environment, an administrator must grant you access to a workspace. See "Configuring Your Oracle Application Express Environment" on page 1-3.
Topics:■ About Browser Requirements
■ Configuring Your Oracle Application Express Environment
■ Logging In To Oracle Application Express as a Developer
About Browser Requirementso view or develop Oracle Application Express applications, web browsers must support Java Script and the HTML 4.0 and CSS 1.0 standards. The following browsers are required to develop applications in Oracle Application Express:
■ Microsoft Internet Explorer 7.0 or later version
■ Mozilla Firefox 14 or later version
■ Google Chrome 21 or later version
■ Apple Safari 5.0 or later version
Application Express applications can be developed that support earlier web browser versions, including Microsoft Internet Explorer 6.0.
Configuring Your Oracle Application Express EnvironmentHow you set up Oracle Application Express depends upon your user role. If you are a developer accessing a hosted development environment, an administrator must grant you access to a workspace. If you are an Oracle Application Express administrator, you must perform the following steps:
1. Log in to Oracle Application Express Administration Services. Oracle Application Express Administration Services is a separate application for managing an entire Oracle Application Express instance. You log in using the ADMIN account and password created or reset during the installation process.
a. In a web browser, navigate to the Oracle Application Express Administration Services application. By default, Oracle Application Express Administration Services installs to the following location:
– If your setup uses the Oracle Application Express Listener, go to:
http://hostname:port/apex/apex_admin
Where:

Logging In To Oracle Application Express
1-4 Oracle Application Express Application Builder User's Guide
hostname is the name of the system where Oracle Application Express Listener is installed.
port is the port number assigned when configuring the Oracle Applica-tion Express Listener. In a default installation, this number is 8080. To learn more, see Oracle Application Express Listener Installation and Configura-tion Guide.
apex is the service name defined when configuring the Oracle Applica-tion Express Listener.
– If your setup uses the embedded PL/SQL gateway, go to:
http://hostname:port/apex/apex_admin
Where:
hostname is the name of the system where Oracle XML DB Protocol Server is installed.
port is the port number assigned to HTTP on the Oracle XML DB Proto-col Server. In a default installation, this number is 8080. If you are using the Oracle Database 12c multitenant architecture, then each PDB will have a distinct port number. See "Verifying the Port Assigned to HTTP on the Oracle XML DB Protocol Server" on page 1-7.
apex is the database access descriptor (DAD) defined in the configuration file.
– If your setup uses Apache and mod_plsql, go to:
http://hostname:port/pls/apex/apex_admin
Where:
hostname is the name of the system where Oracle HTTP Server is installed.
port is the port number assigned to HTTP on the Oracle HTTP Server. In a default installation, this number is 7777.
pls is the indicator to use the mod_plsql cartridge.
apex is the database access descriptor (DAD) defined in the mod_plsql configuration file.
b. On the Login page:
– In Username, enter admin.
– In Password, enter the Oracle Application Express administrator account password you specified when you installed Oracle Application Express.
– Click Login.
2. Specify a provisioning mode. In Oracle Application Express Administration Services you must determine how the process of creating (or provisioning) a workspace works. See "About Workspace Provisioning" in Oracle Application Express Administration Guide.
See Also: "Logging In To Oracle Application Express Administration Services" in Oracle Application Express Administration Guide

Logging In To Oracle Application Express
Quick Start 1-5
3. Create a Workspace. A workspace is a virtual private database allowing multiple users to work within the same Oracle Application Express installation while keeping their objects, data and applications private. Each workspace has a unique ID and name. An Oracle Application Express administrator can create a workspace manually or have users submit requests. See "Creating Workspaces" and "Managing Workspace Requests" in Oracle Application Express Administration Guide.
4. Log in to a Workspace. Once you create a workspace in Oracle Application Express Administration Services, return to the Oracle Application Express Login page and log in to that workspace. See "Logging In To Oracle Application Express as a Developer" on page 1-5.
Logging In To Oracle Application Express as a DeveloperWhen you log in to Oracle Application Express, you log in to a workspace. If you are a developer, an administrator must grant you access to a workspace.
Topics:■ Requesting a Workspace
■ Logging In To a Workspace
■ Finding Your Workspace Name
■ Resetting Your Password
■ Logging Out of a Workspace
Requesting a Workspace
Before you can log in to Oracle Application Express, an administrator must grant you access to a workspace. Each workspace has a unique ID and name.
To request a workspace:
1. In a web browser, navigate to the Oracle Application Express Login page.
If you do not know the URL for logging in to Application Express, see "Logging In To a Workspace" on page 1-6.
The Login page appears.
2. Under Workspace, click Request a Workspace.
Note: Before users can request a workspace or change their passwords, an Oracle Application Express administrator must configure Oracle Application Express environment preferences.
See Also: "Managing Environment Settings" in Oracle Application Express Administration Guide
Note: This section applies only if your Oracle Application Express administrator has configured Oracle Application Express to support workspace requests.
See Also: Oracle Application Express Administration Guide

Logging In To Oracle Application Express
1-6 Oracle Application Express Application Builder User's Guide
The Request Service Wizard appears.
3. Click Get Started and follow the on-screen instructions.
Logging In To a WorkspaceAfter an Oracle Application Express administrator approves a workspace request, an e-mail arrives with your login credentials (the workspace name, user name, and password).
Note that if your administrator selected Email Verification as the automated method for handling new workspace requests, you might first receive an email containing a verification link. This step ensures that your email is a valid one before the workspace request is approved.
To log in to Oracle Application Express:
1. In a web browser, navigate to the Oracle Application Express Login page. By default, Oracle Application Express installs to the following location:
■ If your setup uses the Oracle Application Express Listener, go to:
http://hostname:port/apex
Where:
– hostname is the name of the system where Oracle Application Express Listener is installed.
– port is the port number assigned to Oracle Application Express Listener. In a default installation, this number is 8080. To learn more, see Oracle Application Express Listener Installation and Configuration Guide
– apex is the service name defined when configuring the Oracle Application Express Listener.
■ If your setup uses the embedded PL/SQL gateway, go to:
http://hostname:port/apex
Where:
– hostname is the name of the system where Oracle XML DB Protocol Server is installed.
– port is the port number assigned to HTTP on the Oracle XML DB Protocol Server. In a default installation, this number is 8080. If you are using the Oracle Database 12c multitenant architecture, then each PDB will have a distinct port number. See "Verifying the Port Assigned to HTTP on the Oracle XML DB Protocol Server" on page 1-7.
– apex is the database access descriptor (DAD) defined in the configuration file.
For users who have upgraded from earlier releases, or who have a custom configuration, this value may be htmldb or something else. Verify your DAD with your Oracle Application Express administrator.
■ If your setup uses Apache and mod_plsql, go to:
See Also: "Creating Workspaces" in Oracle Application Express Administration Guide
See Also: Oracle Application Express Administration Guide

Logging In To Oracle Application Express
Quick Start 1-7
http://hostname:port/pls/apex
Where:
– hostname is the name of the system where Oracle HTTP Server is installed.
– port is the port number assigned to Oracle HTTP Server. In a default installation, this number is 7777. You can find information about your Oracle HTTP Server installation’s port number from either of the following files:
ORACLE_BASE\ORACLE_HOME\install\portlist.iniORACLE_BASE\ORACLE_HTTPSERVER_HOME\Apache\Apache\conf\httpd.conf
Be aware that if you change a port number, it is not updated in the portlist.ini file. You can only rely on this file immediately after installation.
– pls is the indicator to use the mod_plsql cartridge.
– apex is the database access descriptor (DAD) defined in the mod_plsql configuration file.
For users who have upgraded from earlier releases, or who have a custom configuration, this value may be htmldb or something else. Verify your DAD with your Oracle Application Express administrator.
The Login page appears.
2. Under Login, enter the following:
■ In the Workspace field, enter the name of your workspace.
■ In the Username field, enter your user name.
■ In the Password field, enter your case-sensitive password.
3. Click Login.
Note that, depending on your setup, you might be required to change your password when you log in for the first time.
Verifying the Port Assigned to HTTP on the Oracle XML DB Protocol Server To verify the port number assigned to HTTP on the Oracle XML DB Protocol Server:
1. Start SQL*Plus and connect to the database where Oracle Application Express is installed as SYS specifying the SYSDBA role. For example:
■ On Windows:
SYSTEM_DRIVE:\ sqlplus /nologSQL> CONNECT SYS as SYSDBAEnter password: SYS_password
■ On UNIX and Linux:
$ sqlplus /nologSQL> CONNECT SYS as SYSDBA
See Also: "Managing Oracle Database Port Numbers" in Oracle Database Installation Guide and ORACLE_BASE\ORACLE_HTTPSERVER_HOME\Apache\modplsql\conf\dads.readme for more information on database access descriptors

Logging In To Oracle Application Express
1-8 Oracle Application Express Application Builder User's Guide
Enter password: SYS_password
2. Enter the following statement to verify the port number:
SELECT DBMS_XDB.GETHTTPPORT FROM DUAL;
If the port number returns 0, the Oracle XML DB Protocol Server is disabled.
Finding Your Workspace NameIf you cannot remember your workspace name, you can request a list of all workspace names associated with your email address.
To find your workspace name:
1. On the Login page, click Find My Workspace on the Tasks list.
2. Enter your email address and click Find Workspace.
An email with the list workspace names is sent to you.
Resetting Your PasswordYou can reset your password by clicking the Change Password link on the Workspace home page.
To reset your password from the Workspace home page:
1. Log in to Oracle Application Express. See "Logging In To Oracle Application Express" on page 1-3.
2. Click the Administration icon.
The Administration page appears.
3. From the Administration list, click Change My Password.
The Change Password page appears.
4. In Change Password, enter the following:
■ Enter Current Password - Enter your current password.
■ Enter New Password - Enter your new password.
■ Confirm New Password - Enter your new password again.
5. Click Apply Changes.
Logging Out of a WorkspaceTo log out of Oracle Application Express, click the Logout link in the upper right corner of the window.
See Also: Oracle Application Express Installation Guide to learn how to enable the Oracle XML DB Protocol Server
Tip: You can also reset your password on the Login page by clicking the Reset Password link.
See Also: "Changing an End User Password" in Oracle Application Express Administration Guide

About the Workspace Home Page
Quick Start 1-9
About the Workspace Home PageWhen you log in to Oracle Application Express, the Workspace home page appears. A workspace is a virtual private database allowing multiple users to work within the same Oracle Application Express installation while keeping their objects, data and applications private.
The following large icons display in the center of the page:
■ Application Builder. Use Application Builder to create an application, composed of a set of HTML pages, based on database objects. See "Application Builder Concepts" on page 2-1 and "Using Application Builder" on page 6-1.
■ SQL Workshop. Use the SQL Workshop to access tools for viewing and managing database objects. See Oracle Application Express SQL Workshop Guide.
■ Team Development. Use Team Development to track new features, non-feature related tasks (or To Do tasks), bugs, and milestones. Users can also provide real-time feedback which then can be categorized into features, general tasks, or bugs. See "Managing the Development Process" on page 4-1.
■ Administration links to the Workspace Administration page. See "Workspace and Application Administration" in Oracle Application Express Administration Guide.
Click the Learn more link in the About box to view an informative introduction to Oracle Application Express. Topics covered include architecture, self service, security, Websheets, application development, SQL Workshop, Team Development, administration, and managing development.
About the System Message and News Regions
The system message displays at the top of the Workspace home page. The News region displays in the center of the page. Use these regions to communicate with other users in the workspace. To learn more, see "Defining a System Message" in Oracle

About the Workspace Home Page
1-10 Oracle Application Express Application Builder User's Guide
Application Express Administration Guide and "Managing News Entries" on page 4-22.
About Top Applications and Top UsersThe Top Applications and Top Users dashboards display at the bottom of the page. These regions offer real time information about development activities in the current workspace.
About Search Workspace
The Search Workspace field displays in the upper right corner of the Workspace home page. Use this field to search for application names, application ID and page, workspace images, workspace theme names, and other workspace components. By default, this field is case sensitive and supports regular expressions.
For example, to navigate to a specific application and page use the following formats:
pageapplication_ID:pageapplication_ID-page
Where:
■ application_ID is the numeric identification number (or ID) that identifies an application.
■ page is the numeric identification number that identifies a specific page.
Consider the following examples:
10570-10570:10
About Learn More
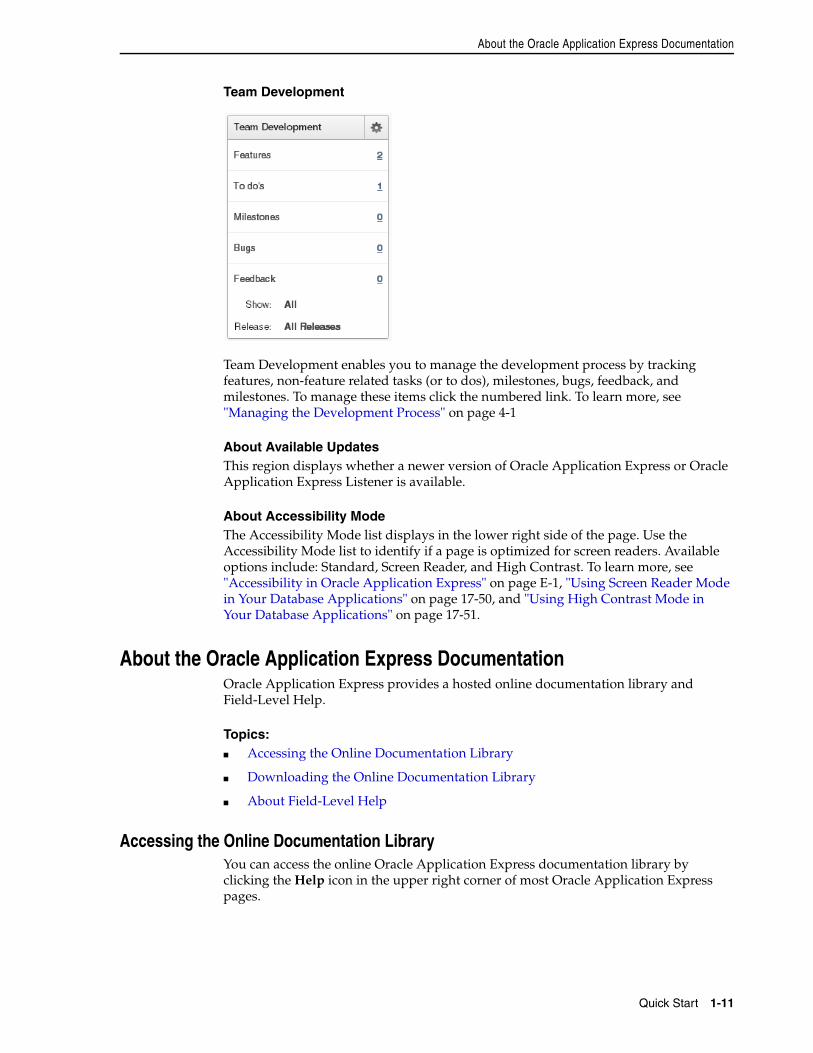
About the Oracle Application Express Documentation
Quick Start 1-11
Team Development
Team Development enables you to manage the development process by tracking features, non-feature related tasks (or to dos), milestones, bugs, feedback, and milestones. To manage these items click the numbered link. To learn more, see "Managing the Development Process" on page 4-1
About Available UpdatesThis region displays whether a newer version of Oracle Application Express or Oracle Application Express Listener is available.
About Accessibility ModeThe Accessibility Mode list displays in the lower right side of the page. Use the Accessibility Mode list to identify if a page is optimized for screen readers. Available options include: Standard, Screen Reader, and High Contrast. To learn more, see "Accessibility in Oracle Application Express" on page E-1, "Using Screen Reader Mode in Your Database Applications" on page 17-50, and "Using High Contrast Mode in Your Database Applications" on page 17-51.
About the Oracle Application Express DocumentationOracle Application Express provides a hosted online documentation library and Field-Level Help.
Topics:■ Accessing the Online Documentation Library
■ Downloading the Online Documentation Library
■ About Field-Level Help
Accessing the Online Documentation LibraryYou can access the online Oracle Application Express documentation library by clicking the Help icon in the upper right corner of most Oracle Application Express pages.

About the Oracle Application Express Documentation
1-12 Oracle Application Express Application Builder User's Guide
Clicking the Help icon displays the Documentation page. To view the entire library, click the Full Library HTML link, or click a specific HTML or PDF link.
Searching the Online Documentation LibraryTo perform a keyword search of the online documentation library:
1. Click the Help icon.
The Documentation page appears.
2. To search the entire library:
a. Click the Full Library HTML link.
The Overview page appears.
b. Enter keywords in the Search field in the upper right corner and click Search.
Search results display.
c. Select a topic to review.
3. To search a specific book:
a. Select the book HTML link.
b. Enter keywords in the Search field in the upper left corner.
c. To narrow or broaden your search, select either This Book or Entire Library.
Search results display.
d. Select a topic to review.
Using the Master Index in the Online Documentation Library To search the master index in the online documentation library:
1. Click the Help icon.
The Documentation page appears.
2. Click the Full Library HTML link.
The Overview page appears.
3. Under Index, click the Master Index HTML link.
4. Click a letter to view specific topics.
Tip: You can redirect the Help icon at the instance level in Instances Settings in Oracle Application Express Administration Services. To learn more, see "Configuring Online Help" in Oracle Application Express Administration Guide
Tip: Selecting the Hide Navigation link hides the left Navigation pane. To display the Navigation pane again, click the left edge of the browser window or retart your browser.

About the Oracle Application Express Documentation
Quick Start 1-13
Entries are organized by index term and book.
5. Click an index term.
Downloading the Online Documentation LibraryYou can download the Oracle Application Express documentation library locally from the Oracle Application Express Documentation page.
To download the online documentation library:
1. Go to the Oracle Application Express Documentation page:
http://www.oracle.com/technetwork/developer-tools/apex/application-express/apex-094287.html
2. Locate the Oracle Application Express library you want to download and click the ZIP link.
3. Download ZIP file and extract it locally.
4. Open the extracted folder and click welcome.html.
The Oracle Application Express Documentation Library welcome page appears.
Searching a Downloaded Documentation LibraryYou can use the provided Acrobat search index to fast search across PDFs in the downloaded library.
To perform a global search on the downloaded documentation:
1. Go to the location of the downloaded documentation.
2. Double click index.pdx.
3. Click Shift+Ctrl+F.
The Search window appears.
4. Enter your search criteria and click Search.
Search results appear.
About Field-Level HelpMost select lists, check boxes, items, and fields within the Oracle Application Express user interface include field-level Help. Items within the user interface that have Field-level Help have a light gray underline. If field-level Help is available, the cursor changes to an arrow and question mark when you pass your cursor over it.
Tip: You can also access the Master Index from within a specific book. Click the Master Index link under Quick Lookup.
Tip: You must have access to the Internet to be able to use the global search capability and master index as described in "Searching the Online Documentation Library" on page 1-12 and "Using the Master Index in the Online Documentation Library" on page 1-12.

About the Oracle Application Express Documentation
1-14 Oracle Application Express Application Builder User's Guide
Click the item label to display a description in a separate window.
Clicking the Help link in the upper-right corner links to the online documentation library.

Application Builder Concepts 2-1
2Application Builder Concepts
This section provides basic conceptual information about Application Builder. Use Application Builder to create an application, composed of a set of HTML pages, based on database objects. Each application is a collection of pages linked together using tabs, buttons, or hypertext links.
Topics:■ What is an Oracle Application Express Application?
■ What Is a Page?
■ Understanding Page Processing and Page Rendering
■ Understanding Session State Management
■ Understanding URL Syntax
■ Managing Session State Values
■ Understanding Substitution Strings
What is an Oracle Application Express Application?An Oracle Application Express application enables you to manage and display data from an Oracle database. You build an application using Application Builder. Using Application Builder you can create two different types of applications: database applications and Websheet applications.
Topics:■ Understanding the Difference Between Database and Websheet Applications
■ About the Create Application Wizard
Understanding the Difference Between Database and Websheet ApplicationsAn application is an HTML interface that exists on top of database objects such as tables or procedures. You create both database applications and Websheet applications using the Create Application Wizard. The main difference between these two types of applications is the intended audience. While database applications are geared toward application developers, Websheet applications are designed for end users with no development experience.
See Also: "Using Application Builder" on page 6-1
See Also: "Using Application Builder" on page 6-1

What is an Oracle Application Express Application?
2-2 Oracle Application Express Application Builder User's Guide
About Database ApplicationsA database application is a collection of pages linked together using tabs, buttons, or hypertext links. Application pages share a common session state and authentication.
To create a database application, an application developer runs wizards to declaratively assemble pages and navigation. Individual pages are organized using containers called regions. Regions can contain text, custom PL/SQL, reports, charts, maps, calendars, web service content, or forms. Forms are made up of fields (called items) which can be selected from the multitude of built-in types (such as text fields, text areas, radio groups, select lists, check boxes, date pickers, and popup list of values). Developers can also create their own custom item types using plug-ins. Session state (or application context) is transparently managed and the user interface presentation is separated from the application logic enabling developers to manage the look and feel of an application by simply selecting a different theme. See "About Database Applications" on page 7-1.
About Websheet ApplicationsBy creating Websheet applications, end users can manage structured and unstructured data without developer assistance. Page sections contain unstructured data which can be edited using a WYSIWYG editor. Data Grids enable users to manage structured data without the need for writing SQL. Using runtime dialog boxes, users can add columns, rename columns, and validations. Each page and row of data grid data can be annotated with files, tags, notes, and links. Pages can contain sections, reports, and data grids and everything can be linked together using navigation. All information is searchable and completely controlled by the end-user. See "About Websheet Applications" on page 5-1.
About the Create Application WizardYou create an Oracle Application Express application by running the Create Application Wizard. To run the Create Application Wizard, click the Create button on the Application Builder home page.
Key Decision Points in the Create Application WizardWhen you run the Create Application Wizard, the wizard prompts you to choose the type of application you want to create.
Tip: For more information on applications, click the Learn More link on the Application Express home page

What Is a Page?
Application Builder Concepts 2-3
Options include:
■ Database. Database applications enable developers to have full control over all aspects of development process and final application functionality. With database applications, developers can directly leverage their SQL and PL/SQL programming skills. Database applications use declarative control over flow control and support full user interface controls through the use of templates and themes. See "About Database Applications" on page 7-1.
■ Websheet. Websheet applications enable users to build data centric applications without any SQL programming knowledge. Websheet applications are simplified and support pages, data grids, and reports. These applications are easy to build and support community contributions. For more information on Websheet applications, click the Learn More link on the Application Express home page. See "About Websheet Applications" on page 5-1.
■ Packaged Application. Packaged applications are fully functional applications that have been designed to address a specific business need. You can install, run, and use packaged applications as is, or unlock productivity applications to customize the solution provided or analyze them to better understand how to use Application Builder to build specific types of functionality. See "About Packaged Applications" on page 3-1.
What Is a Page?A page is the basic building block of an application. When you build an application in Application Builder, you create pages that contain user interface elements, such as tabs, lists, buttons, items, and regions.
Page creation wizards automatically add controls to a Page Definition and you can add controls to a page in the Page Definition
To view the Page Definition of an existing page:
1. Navigate to the Workspace home page.
2. Click the Application Builder icon.
3. Select an application.
4. Select a page.
The Page Definition appears and is divided into three main sections:
■ Page Rendering lists user interface controls and logic that are executed when a page is rendered. Page Rendering is the process of generating a page from the database. See "Using Page Rendering Icons" on page 8-10.
■ Page Processing lists logic controls (such as computations and processes) that are evaluated and executed when the page is processed. See "Using Page Processing Icons" on page 8-10.
■ Shared Components lists common components that can be used by one or more pages within an application. See "Using Shared Components Icons" on page 8-11.
See Also: "Creating an Application from a Spreadsheet" on page 7-7, "Copying a Database Application" on page 7-9, "Creating a Database Application from a Template" on page 7-10, and "Installing a Packaged Application" on page 3-3

Understanding Page Processing and Page Rendering
2-4 Oracle Application Express Application Builder User's Guide
Understanding Page Processing and Page RenderingWhen you create an application in Application Builder, you link pages together using tabs, buttons, or hypertext links. Each page can have buttons and items and can include application logic. You can branch from one page to the next using conditional navigation, perform calculations and validations, and display reports, calendars, and charts. You can generate reports, charts, and forms using built-in wizards, static HTML, or deliver more custom rendering with PL/SQL programming.
Topics:■ How the Application Express Engine Renders and Processes Pages
■ Understanding Conditional Rendering and Processing
■ Verifying User Identity
■ Controlling Access to Controls and Components
How the Application Express Engine Renders and Processes PagesThe Application Express engine dynamically renders and processes pages based on data stored in Oracle database tables. To view a rendered version of your application, you request it from the Application Express engine. When you run an application, the Application Express engine relies on two processes:
■ Show Page is the page rendering process. It assembles all the page attributes (including regions, items, and buttons) into a viewable HTML page.
■ Accept Page performs page processing. It performs any computations, validations, processes, and branching.
When you request a page using a URL, the engine is running Show Page. When you submit a page, the Application Express engine is running Accept Page or performing page processing during which it saves the submitted values in the session cache and then performs any computations, validations, or processes.
Understanding Conditional Rendering and ProcessingA condition is a small unit of logic that helps you control the display of regions, items, buttons, charts, and tabs and the execution of processes, computations, and validations. For example, when you apply a condition to a button, the rendering engine evaluates the condition during the rendering (or Show Page) process. Whether the condition passes or fails determines if the page control (such as a button) displays.
You specify a condition by selecting a condition type. You can select a condition type when you first create the control or component, or by editing the control or component and making a selection from the Condition Type attribute. Depending upon the Condition Type you select, you enter the appropriate values in the Expressions fields. The condition evaluates to true or false based on the values you enter in the Expression fields.
See Also: "About the Page Definition" on page 8-1 and "Editing a Page in Component View" on page 8-8

Understanding Page Processing and Page Rendering
Application Builder Concepts 2-5
To view a complete list of all available conditions for a given component or control, click the arrow to the right of the Condition Type list. Shortcuts to common selections appear directly beneath the list. If your condition requires an expression, enter it in the appropriate field.
The following sections offer examples of some commonly used condition types.
Current Page in Expression 1Current page in Expression 1 evaluates to true if the current page number is contained within the comma-delimited list of pages in Expression 1. For example:
3,100,203
If the current page is 100, then this condition evaluates to true and the condition passes.
ExistsExists (SQL query returns at least one row) is expressed as a SQL query. If the query returns at least one row, then the condition evaluates as true. For example:
SELECT 1 FROM employees WHERE department_id = :P101_DEPTNO
This example references item P101_DEPTNO as a bind variable. You can use bind variables within application processes and SQL query regions to reference item session
Note: Whether you use the Expression fields depends upon the selected condition type. Some condition types do not require values in either field, others require a value only for Expression 1, and other condition types require values in both fields. Although these fields are labeled "Expression 1" and "Expression 2", the values for a given condition type do not necessarily conform to any formal definition of the term expression. They are simply text values appropriate for the selected condition type.
See Also: Appendix C, "Available Conditions" on page C-1 for a detailed listing of available condition types

Understanding Session State Management
2-6 Oracle Application Express Application Builder User's Guide
state. If one or more employees are in the department identified by the value of P101_DEPTNO, then the condition evaluates as true.
PL/SQL ExpressionUse PL/SQL Expression to specify an expression in valid PL/SQL syntax that evaluates to true or false. For example:
NVL(:MY_ITEM,'NO') = 'YES'
If the value of :MY_ITEM is Yes, as in the previous example, then the condition evaluates as true. If the value of :MY_ITEM is anything other than Yes, then the condition evaluates as false.
Verifying User IdentityAuthentication is the process of establishing users' identities before they can access an application. Authentication may require a user to enter a user name and password, or may involve the use of a digital certificate or a secure key.
Oracle Application Express supports modular authentication, making it easy to switch authentication methods when needed. You can establish a user's identity by selecting from several built-in authentication methods, or by using a wizard to create your own custom authentication approach.
Controlling Access to Controls and ComponentsWhile conditions control the rendering and processing of specific controls or components on a page, authorization schemes control user access. Authorization is a broad term for controlling access to resources based on user privileges.
Authorization schemes use the identities established by authentication to grant privileges on applications and objects within them. You can specify an authorization scheme for an entire application, a page, or a specific page control such as a region, item, or button. For example, you could use an authorization scheme to selectively determine which tabs, regions, or navigation bar entries a user sees.
Understanding Session State ManagementHTTP, the protocol over which HTML pages are most often delivered, is a stateless protocol. A web browser is only connected to the server for as long as it takes to download a complete page. In addition, each page request is treated by the server as an independent event, unrelated to any page requests that happened previously or that may occur in the future. To access form values entered on one page on a subsequent page, the values must be stored as session state. Oracle Application Express transparently maintains session state and provides developers with the ability to get and set session state values from any page in the application.
Topics:■ What Is a Session?
See Also: "About Bind Variable Syntax" on page 2-16
See Also: "Establishing User Identity Through Authentication" on page 15-25 for more information
See Also: "Providing Security Through Authorization" on page 15-37

Understanding Session State Management
Application Builder Concepts 2-7
■ Understanding Session IDs
■ Referencing Session State
What Is a Session?A session is a logical construct that establishes persistence (or stateful behavior) across page views. Each session is assigned a unique identifier. The Application Express engine uses this identifier (or session ID) to store and retrieve an application's working set of data (or session state) before and after each page view.
Because sessions are entirely independent of one another, any number of sessions can exist in the database at the same time. A user can also run multiple instances of an application simultaneously in different browsers.
Sessions are logically and physically distinct from Oracle database sessions used to service page requests. A user runs an application in a single Oracle Application Express session from log in to log out with a typical duration measured in minutes or hours. Each page requested during that session results in the Application Express engine creating or reusing an Oracle database session to access database resources. Often these database sessions last just a fraction of a second.
Understanding Session IDsThe Application Express engine establishes the identity of the user for each page request and the session ID to fetch session state from the database. The most visible location of the session ID is in the URL for a page request. The session ID displays as the third parameter in the URL, for example:
http://apex.somewhere.com/pls/apex/f?p=4350:1:220883407765693447
In this example, the session ID is 220883407765693447.
Another visible location is in the page's HTML POST data and indirectly in the contents of a session cookie. This cookie is sent by the Application Express engine during authentication and is maintained for the life of the application (or browser) session.
Oracle Application Express assigns new session IDs during authentication processing, records the authenticated user's identity with the session ID, and continually checks the session ID in each page request's URL or POST data with the session cookie and the session record in the database. These checks provide users with flexibility and security.
While the session ID is the key to session state, the session cookie and the session record safeguard the integrity of the session ID and the authentication status of the user.
Viewing Session StateThe behavior of an Oracle Application Express application is usually driven by values in session state. For example, a button may display conditionally based on the value of an item session state. You can view the session state for a page by clicking Session on the Developer toolbar.
See Also: "Viewing Active Sessions" in Oracle Application Express Administration Guide
See Also: "Understanding the URL that Displays for a Page" on page 2-9

Understanding URL Syntax
2-8 Oracle Application Express Application Builder User's Guide
About the Session State PageThe Session State page provides valuable information about the session in which the application is currently running. To locate a specific page, enter the page number in the page field and click Go. Table 2–1 describes the various types of information available on the Session State page.
Understanding URL SyntaxThe URL that displays for each page identifies the location of Oracle Application Express, the address of Oracle Application Express, the application ID, the page number, and the session ID.
The application ID is a unique number that identifies each application. Similarly, the page number uniquely identifies each page within an application. Applications and pages may also have alphanumeric aliases. Application aliases are unique within a workspace and page aliases are unique within each application. When you run an application, the Application Express engine generates a session number that serves as a key to the user's session state.
Topics:■ Understanding the URL that Displays for a Page
Table 2–1 Information Available on the Session State Page
Heading Description
Application Identifies the application name.
Session Summarizes session state for the current session.
User Identifies the current user.
Workspace Identifies the current workspace ID.
Browser Language Identifies the current browser language.
Page Items Identify attributes of the page item, including the application ID, page number, item name, how the item displays (for example, check box, date picker, display only, text field, hidden, popup, radio group, and so on), the item value in session state, and status.
The Status column indicates the status of the session state. Available values include:
■ I - Inserted
■ U - Updated
■ R - Reset
See Also: "Understanding Page-Level Items" on page 7-56
Application Items Application items are items that do not reside on a page. Application items are session state variables without the associated user interface properties.
See Also: "Understanding Application-Level Items" on page 7-75 and "Understanding Substitution Strings" on page 2-17 for information about referencing item values
See Also: "Managing Session State Values" on page 2-13

Understanding URL Syntax
Application Builder Concepts 2-9
■ Using f?p Syntax to Link Pages
■ Calling a Page Using an Application and Page Alias
■ Calling a Page from a Button URL
■ Facilitating Bookmarks by Using Zero as the Session ID
Understanding the URL that Displays for a PageThe URL that displays for each page indicates the location of Oracle Application Express and identifies the address of Oracle Application Express, the application ID, page number, and session ID. For example:
http://apex.somewhere.com/pls/apex/f?p=4350:1:220883407765693447
This example indicates:
■ apex.somewhere.com is the URL of the server
■ pls is the indicator to use the mod_plsql cartridge
■ apex is the database access descriptor (DAD) name. The DAD describes how HTTP Server connects to the database server so that it can fulfill an HTTP request. The default value is apex.
■ f?p= is a prefix used by Oracle Application Express
■ 4350 is the application being called
■ 1 is the page within the application to be displayed
■ 220883407765693447 is the session number
Using f?p Syntax to Link PagesYou can create links between pages in your application using the following syntax:
f?p=App:Page:Session:Request:Debug:ClearCache:itemNames:itemValues:PrinterFriendly
Table 2–2 describes the arguments you can pass when using f?p syntax.
See Also: "About Publishing the Database Application URL" on page 16-32
Table 2–2 f?p Syntax Arguments
Syntax Description
App Indicates an application ID or alphanumeric alias.
Page Indicates a page number or alphanumeric alias.
Session Identifies a session ID. You can reference a session ID to create hypertext links to other pages that maintain the same session state by passing the session number. You can reference the session ID using the syntax:
■ Short substitution string: &SESSION.
■ PL/SQL: V('SESSION')
■ Bind variable: :APP_SESSION
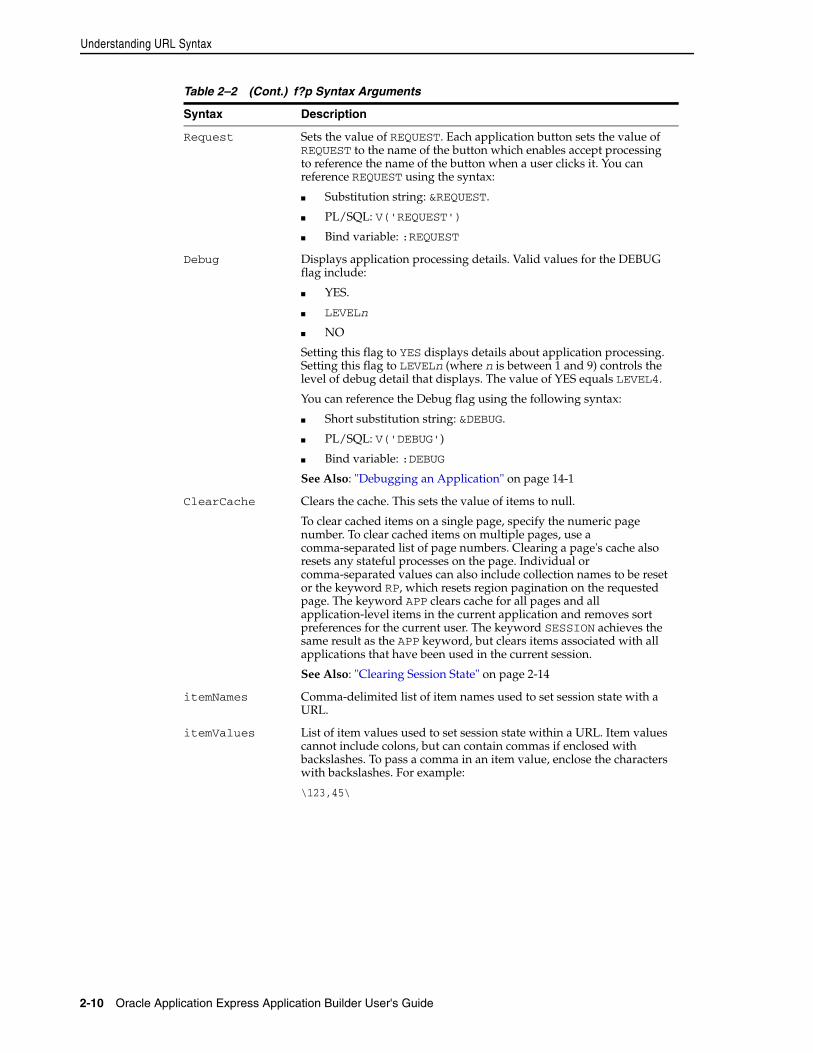
Understanding URL Syntax
2-10 Oracle Application Express Application Builder User's Guide
Request Sets the value of REQUEST. Each application button sets the value of REQUEST to the name of the button which enables accept processing to reference the name of the button when a user clicks it. You can reference REQUEST using the syntax:
■ Substitution string: &REQUEST.
■ PL/SQL: V('REQUEST')
■ Bind variable: :REQUEST
Debug Displays application processing details. Valid values for the DEBUG flag include:
■ YES.
■ LEVELn
■ NO
Setting this flag to YES displays details about application processing. Setting this flag to LEVELn (where n is between 1 and 9) controls the level of debug detail that displays. The value of YES equals LEVEL4.
You can reference the Debug flag using the following syntax:
■ Short substitution string: &DEBUG.
■ PL/SQL: V('DEBUG')
■ Bind variable: :DEBUG
See Also: "Debugging an Application" on page 14-1
ClearCache Clears the cache. This sets the value of items to null.
To clear cached items on a single page, specify the numeric page number. To clear cached items on multiple pages, use a comma-separated list of page numbers. Clearing a page's cache also resets any stateful processes on the page. Individual or comma-separated values can also include collection names to be reset or the keyword RP, which resets region pagination on the requested page. The keyword APP clears cache for all pages and all application-level items in the current application and removes sort preferences for the current user. The keyword SESSION achieves the same result as the APP keyword, but clears items associated with all applications that have been used in the current session.
See Also: "Clearing Session State" on page 2-14
itemNames Comma-delimited list of item names used to set session state with a URL.
itemValues List of item values used to set session state within a URL. Item values cannot include colons, but can contain commas if enclosed with backslashes. To pass a comma in an item value, enclose the characters with backslashes. For example:
\123,45\
Table 2–2 (Cont.) f?p Syntax Arguments
Syntax Description

Understanding URL Syntax
Application Builder Concepts 2-11
It is important to understand how f?p syntax works. Application Builder includes many wizards that automatically create these references for you. However, you may have to create the syntax yourself in some situations. The following sections describe specific instances that use f?p syntax to link pages.
Calling a Page Using an Application and Page AliasApplication and page aliases must consist of valid Oracle identifiers, cannot contain any whitespace, and are not case-sensitive. The following example calls a page using an application and a page alias from within an application. It runs the page home of the application myapp and uses the current session ID.
f?p=myapp:home:&APP_SESSION.
Application aliases must be unique within a workspace. If an application in a different workspace has the same application alias, use the &c argument to specify the workspace name. For example:
f?p=common_alias:home:&APP_SESSION.&c=WORKSPACE_A
Calling a Page from a Button URLWhen you create a button, you can specify a URL to redirect to when the user clicks the button. This example runs page 6001 of application 6000 and uses the current session ID.
f?p=6000:6001:&APP_SESSION.
Note that this is only one approach to using a button. This method bypasses page submission and acts as a hyperlink on the page. You can also have a button click submit a page. In that approach, clicking the button submits the page for processing, allowing forms to be submitted and session state to be saved.
Facilitating Bookmarks by Using Zero as the Session IDIf the pages within an application are public and do not require authentication, you help application users to bookmark pages by using zero as the session ID.
Application pages that do not require authentication can be accessed with "f?p" URLs where the session ID is zero (that is, the single digit 0). When you request a page by
PrinterFriendly Determines if the page is being rendered in printer friendly mode. If PrinterFriendly is set to Yes, then the page is rendered in printer friendly mode. The value of PrinterFriendly can be used in rendering conditions to remove elements such as regions from the page to optimize printed output. You can reference the printer friendly preference by using the following syntax:
V('PRINTER_FRIENDLY')
When referenced, the Application Express engine does not display tabs or navigation bars, and all items are displayed as text and not as form elements.
See Also: "Creating Buttons" on page 10-65 and "APP_SESSION" on page 2-23
Table 2–2 (Cont.) f?p Syntax Arguments
Syntax Description

Understanding URL Syntax
2-12 Oracle Application Express Application Builder User's Guide
either entering the URL in the browser or by clicking on a link having 0 for the session ID, the Application Express engine assigns a new session ID and sends a session cookie containing this new session ID to your browser. As you navigate through the application's public pages, you see that all generated links to public pages contain 0 for the session ID and all branches to public pages have new URLs that use 0 as the visible session ID. Behind the scenes, however, the Application Express engine uses the session ID in the cookie as the actual session ID to locate session state.
This feature is useful when you want to hide the actual session ID. By hiding the session ID, you enable users to bookmark pages without needing to include the session ID in the bookmark link. As an added benefit, using zero as the session ID also keeps the actual session ID hidden from search engines.
To use zero as the session ID in your application, must generate at least one link having a zero session ID. The use of this first link starts the zero session ID mechanism. One approach would be to provide a single static link with a zero session ID on the application home page. For example, where you might normally code the link to page 2 as f?p=&APP_ID.:2:&APP_SESSION, you would code f?p=&APP_ID.:2:0.
About APEX_UTIL.PREPARE_URLOracle provides a utility function to enable developers to use PL/SQL to generate anchors to application pages using the f?p syntax. Use APEX_UTIL.PREPARE_URL whenever PL/SQL in the application produces f?p anchors that might require a zero session ID. To learn more, see "PREPARE_URL" in Oracle Application Express API Reference.
How the Zero Session ID Feature WorksThe zero session ID feature provides support for pages having anchors in the HTML (such as in templates or HTML regions). When the Application Express engine encounters f?p anchors it recognizes them and replaces the session ID with zero, if certain criteria are met.
The Application Express engine replaces the session ID component with zero when it detects the following situations:
■ The numeric ID of the current application
■ One of the following patterns:
– the all-uppercase or all-lowercase alphanumeric alias of the current application followed by a colon followed by the numeric ID of a public page in the current application
– the all-uppercase or all-lowercase alphanumeric alias of a public page in the current application followed by a colon followed by &APP_SESSION. or &SESSION.
Examples of patterns in HTML that are candidates for zero-session ID replacement include:
■ Page 10 is a public page:
"f?p=&APP_ID.:10:&APP_SESSION.
■ Page 10 is a public page:
"f?p=100:10:&APP_SESSION.
■ home is an alias for a public page:

Managing Session State Values
Application Builder Concepts 2-13
"f?p=&APP_ID.:home:&APP_SESSION.
■ HOME is an alias for a public page:
"f?p=&APP_ID.:HOME:&APP_SESSION.
■ PEOPLE is an application alias and HOME is an alias for a public page:
"f?p=PEOPLE:HOME:&APP_SESSION
In these examples, the pattern &APP_SESSION. (or &SESSION., not shown) is replaced with zero if the application is operating in zero-session ID mode and the user is a public user. Note that the user is considered a public user if the following PL/SQL expression is true:
:app_user in ('nobody','HTMLDB_PUBLIC_USER','PUBLIC_USER','ANONYMOUS','APEX_PUBLIC_USER')"
Managing Session State ValuesWhen building interactive, data-driven web applications, the ability to access and manage session state values is critical. In Oracle Application Express, session state is automatically managed for every page and easily referenced in static HTML or logic controls such as processes or validations.
Topics:■ Referencing Session State
■ Setting Session State
■ Clearing Session State
■ About Bind Variable Syntax
Referencing Session StateYou can reference item values stored in session state in regions, computations, processes, validations, and branches. An item can be a field, a text area, a password, a select list, or a check box. Table 2–3 describes the supported syntax for referencing item values.
Tip: For links not prepared by the Application Express engine, use the built-in substitution APP_SESSION_VISIBLE which returns '0' for the session ID when a user is not authenticated to an application and they are using the zero-session ID feature of Oracle Application Express. See "APP_SESSION_VISIBLE" on page 2-23.
See Also: "Referencing Item Values" on page 7-70

Managing Session State Values
2-14 Oracle Application Express Application Builder User's Guide
Setting Session StateYou set the value of an item in your application and therefore session state using the following methods:
■ Form submission. See "Form Submission Example" on page 2-14.
■ Bind variable. See "About Bind Variable Syntax" on page 2-16.
■ Computation. See "Understanding Application Computations" on page 8-59.
■ f?p syntax. See "Using f?p Syntax to Link Pages" on page 2-9
Form Submission ExampleWhen a user submits a page, the Application Express engine automatically stores values typed into fields (items) in session state. For example, suppose you have an application containing two pages. The first page of the application contains a form in which a user can enter a phone number. You defined this form by creating an item named P2_PhoneNo. On the second page, you want to display the information the user enters in the form.
When the page is submitted, Oracle Application Express captures the value entered in the phone number field and stores the value for future use. The phone number entered by the user can then be retrieved from session state by referencing the item associated with the field on the page.
Clearing Session StateAs you develop your applications, you may find it useful to clear the cached value for specific items, all items on a page, all pages in an application, or the current user session. Clearing a cached value resets the value to null. The topics that follow offer specific examples of clearing session state.
Table 2–3 Syntax for Referencing Item Values
Type Syntax Description
SQL Standard item syntax:
:MY_ITEM
Syntax for items containing special characters:
:"MY_ITEM"
For items whose names are no longer than 30 characters, precede the item name with a colon (:). Use this syntax for references within a SQL query and within PL/SQL.
To reference page items containing special, multibyte, or unicode characters, wrap the page item name in double quotation marks.
PL/SQL V('MY_ITEM') Use PL/SQL syntax to reference an item value using the V function.
See Also: Oracle Application Express API Reference
PL/SQL NV('MY_NUMERIC_ITEM') Use standard PL/SQL syntax referencing the numeric item value using the NV function.
See Also: Oracle Application Express API Reference
Static text (exact) Standard item syntax:
&MY_ITEM.
Syntax for items containing special characters:
&"MY_ITEM".
For static text or an exact substitution, use the convention &ITEM_NAME followed by a period (.).
To reference page items containing special, multibyte, or unicode characters, wrap the page item name in double quotation marks.

Managing Session State Values
Application Builder Concepts 2-15
Topics:■ Clearing Cache by Item
■ Clearing Cache by Page
■ Clearing Cache for an Entire Application
■ Clearing Cache for the Current User Session
Clearing Cache by ItemClearing cache for a single item resets the value of the item to null. For example, you might use this approach to make sure a specific item's value is null when a page is prepared for rendering.
The following example uses standard f?p syntax to clear the cache for an item. This example calls page 5 of application 100. Placing MY_ITEM in the ClearCache position of the f?p syntax resets the value of MY_ITEM to NULL.
f?p=100:5:&APP_SESSION.::NO:MY_ITEM
The following example resets the value of the items THE_EMPNO and THE_DEPTNO.
f?p=100:5:&APP_SESSION.::NO:THE_EMPNO,THE_DEPTNO
Clearing Cache by PageCaching application items provides an effective way to maintain session state. However, there are occasions when you may want to clear the cache for all items on a page. For example, suppose you needed to clear all fields on a page when a user clicks a link that creates a new order. By clearing the cache for an entire page, you set the value of all items on the page to null.
Clearing Session Cache for Two Pages While Resetting Pagination This example clears the session cache for two pages and resets pagination.
f?p=6000:6003:&APP_SESSION.::NO:RP,6004,6014
This example:
■ Runs page 6003 of application 6000 and uses the current session ID
■ Indicates to not show debug information (NO)
■ Clears all values maintained by the current session's cache for items of pages 6004 and 6014
■ Resets region pagination (RP) on page 6003 (the requested page)
Clearing Session Cache on a Page and Passing an Item Value This example shows how to implement an update form. It clears existing information and sets the item's value (typically a primary key).
f?p=6000:6003:&APP_SESSION.::NO:6003:MY_ITEM:1234
This example:
■ Runs page 6003 of application 6000 and uses the current session ID
■ Indicates to not show debug information (NO)
■ Clears all values maintained by the current session's cache for items on page 6003
■ Sets the session state of an item called MY_ITEM to the value 1234

Managing Session State Values
2-16 Oracle Application Express Application Builder User's Guide
Clearing Session Cache on a Page and Passing Values to Multiple Items This example is similar to the previous example, except it passes values to multiple items.
f?p=6000:6004:&APP_SESSION.::NO:6003:MY_ITEM1,MY_ITEM2,MY_ITEM3:1234,,5678
This example:
■ Runs page 6004 of application 6000 and uses the current session ID
■ Clears the current session's cache for items on page 6003
■ Indicates debug information should be hidden (NO)
■ Sets the value of MY_ITEM1 to 1234, sets the value of MY_ITEM2 to null (indicated by the comma used as placeholder), and sets the value of MY_ITEM3 to 5678
Clearing Cache for an Entire ApplicationYou can clear an application’s cache by using f?p syntax and creating a Clear Cache argument using the keyword APP. For example:
f?p=App:Page:Session::NO:APP
Clearing Cache for the Current User SessionAnother approach to clearing an application’s cache is to create a Clear Cache argument using the keyword SESSION. For example:
f?p=6000:6004:12507785108488427528::NO:SESSION
About Bind Variable SyntaxYou can use bind variables syntax anywhere in Oracle Application Express where you are using SQL or PL/SQL to reference session state of a specified item. For example:
SELECT * FROM employees WHERE last_name like '%' || :SEARCH_STRING || '%'
In this example, the search string is a page item. If the region type is defined as SQL Query, you can reference the value using standard SQL bind variable syntax. Using bind variables ensures that parsed representations of SQL queries are reused by the database, optimizing memory usage by the server.
When using bind variable syntax, remember the following rules:
■ Bind variable names must correspond to an item name.
Note: Resetting the cache for an entire application does not restore the application to a completely reset state. For example, if an application includes on-new instance computations or on-new instance processes, the Application Express engine runs these computations and processes when the application session is created. Then, it processes the clear cache request and displays the requested page.
To reset an application completely without a session ID (if no cookie is used to track the session ID), you must request it using a URL without a session ID, or by calling APEX_UTIL.CLEAR_APP_CACHE from another application. If the session ID is tracked using a cookie, you must logout to reset the state.

Understanding Substitution Strings
Application Builder Concepts 2-17
■ Bind variable names are not case-sensitive.
■ Bind variable names cannot be longer than 30 characters (that is, they must be a valid Oracle identifier).
Although page item and application item names can be up to 255 characters, if you intend to use an application item within SQL using bind variable syntax, the item name must be 30 characters or less.
Using Bind Variables in Regions Based on a SQL Query or LOV If your region type is defined as a SQL Query, SQL Query (plsql function body returning SQL query), or list of values (LOV), you can reference session state using the following syntax:
:MY_ITEM
One common way to do this is to incorporate a session state variable in a WHERE clause. The following example shows how to bind the value of the item THE_DEPTNO into a region defined from a SQL Query.
SELECT last_name, job_id, salaryFROM employeesWHERE department_id = :THE_DEPTNO
Using Bind Variables in Regions Based on PL/SQLFor region types defined as PL/SQL dynamic content, regions are constructed using PL/SQL anonymous block syntax. In other words, the beginning and ending keywords are used to enclose the PL/SQL block. For example:
IF :P1_JOB IS NOT NULL THEN INSERT INTO employees (employee_id, first_name, job_id) VALUES (:P1_EMP_ID, :P1_NAME, :P1_JOB)end if;
In this example, the values of the employee_id, first_name, and job_id are populated by the values of P1_EMP_ID, P1_NAME, and P1_JOB.
Understanding Substitution StringsYou can use substitution strings within a page template or region source to replace a character string with another value. As you design your application and enable users to edit items, you use substitution strings to pass information.
Topics:■ Using Substitution Strings
■ About Built-in Substitution Strings
Using Substitution StringsYou can use substitution strings in Application Builder in the following ways:
■ Include a substitution string within a template to reference component values
■ Reference page or application items using &ITEM. syntax
See Also: "Understanding Regions" on page 12-3 for information about creating regions

Understanding Substitution Strings
2-18 Oracle Application Express Application Builder User's Guide
■ Use built-in substitution strings
Special substitution strings available within a template are denoted by the number symbol (#). For example:
#ABC#
To reference page or application items using substitution variables:
1. Reference the page or application item in all capital letters.
2. Precede the item name with an ampersand (&).
3. Append a period (.) to the item name.
For example, you would refer to an application item named F101_X in an HTML region, a region title, an item label, or in any of numerous other contexts in which static text is used, for example:
&F101_X.
Notice the required trailing period. When the page is rendered, Application Express engine replaces value the substitution string with the value of item F101_X.
Determining Substitution String Usage within a Given TemplateYou can determine what template-specific substitution strings are supported in which templates by viewing the template definition. See "Customizing Templates" on page 13-12.
About Built-in Substitution StringsApplication Builder supports several built-in substitution strings. You may must reference these values to achieve specific types of functionality.
The following sections describe these substitution strings, when to use them, and what supported syntax is currently available. Note that bind variable :USER has special meaning within the database. Also, the term Direct PL/SQL refers to PL/SQL that can be used in stored database objects such as procedures and functions.
Topics:■ APEX$ROW_NUM
■ APEX$ROW_SELECTOR
■ APEX$ROW_STATUS
■ APP_ID
■ APP_ALIAS
■ APP_DATE_TIME_FORMAT
■ APP_IMAGES
■ APP_NLS_DATE_FORMAT
■ APP_NLS_TIMESTAMP_FORMAT
■ APP_NLS_TIMESTAMP_TZ_FORMAT
■ APP_IMAGES
■ APP_PAGE_ID
■ APP_SESSION

Understanding Substitution Strings
Application Builder Concepts 2-19
■ APP_SESSION_VISIBLE
■ APP_UNIQUE_PAGE_ID
■ APP_USER
■ AUTHENTICATED_URL_PREFIX
■ BROWSER_LANGUAGE
■ CURRENT_PARENT_TAB_TEXT
■ DEBUG
■ HOME_LINK
■ IMAGE_PREFIX
■ LOGIN_URL
■ LOGOUT_URL
■ PRINTER_FRIENDLY
■ PROXY_SERVER
■ PUBLIC_URL_PREFIX
■ REQUEST
■ SCHEMA OWNER
■ SQLERRM
■ SYSDATE_YYYYMMDD
■ WORKSPACE_IMAGES
APEX$ROW_NUMAPEX$ROW_NUM refers the currently processed row number of a submitted tabular form data. You can use this placeholder in validations, processes, and conditions associated with a tabular form to refer to the row number of the currently processed tabular form row. Table 2–4 describes the supported syntax for referencing APEX$ROW_NUM.
APEX$ROW_SELECTORUse APEX$ROW_SELECTOR in validations, processes, and conditions associated with a tabular form to refer to the row selector check box in a tabular form. This placeholder returns X if the tabular form row selector check box of the currently processed tabular
See Also:
■ "Substitutions" on page 7-21 for information about defining static substitution strings as an application attribute
■ "Establishing User Identity Through Authentication" on page 15-25 for information about authentication
Table 2–4 APEX$ROW_NUM
Reference Type Syntax
Bind variable :APEX$ROW_NUM
PL/SQL V('APEX$ROW_NUM')
Substitution string &APEX$ROW_NUM.

Understanding Substitution Strings
2-20 Oracle Application Express Application Builder User's Guide
form row is checked and NULL if it unchecked. Table 2–5 describes the supported syntax for referencing APEX$ROW_SELECTOR.
APEX$ROW_STATUSUse APEX$STATUS in validations, processes, and conditions associated with a tabular form to refer to the row status in a tabular form. This placeholder returns the status of C if created, U if updated, or D if deleted for the currently processed tabular form row. Table 2–6 describes the supported syntax for referencing APEX$ROW_STATUS.
APP_IDAPP_ID identifies the application ID of the currently executing application. Table 2–7 describes the supported syntax for referencing APP_ID.
The following is an example of a substitution string reference:
f?p=&APP_ID.:40:&APP_SESSION.
APP_ALIASAPP_ALIAS is an alphanumeric name for the current application. APP_ALIAS is different from the APP_ID in that the APP_ID must be unique over all workspaces and all applications hosted in one database. In contrast, APP_ALIAS must be unique within a workspace. For example, by using the same APP_ALIAS you can create the application, ABC, in two different workspaces. You can use APP_ALIAS almost anywhere APP_ID can be used. For example, f?p syntax can use an APP_ALIAS or an application ID as demonstrated in this example:
f?p=ABC:1:&APP_SESSION.
This example runs application ABC, page 1 using the current session.
Table 2–5 APEX$ROW_SELECTOR
Reference Type Syntax
Bind variable :APEX$ROW_SELECTOR
PL/SQL V('APEX$ROW_SELECTOR')
Substitution string &APEX$ROW_SELECTOR.
Table 2–6 APEX$ROW_STATUS
Reference Type Syntax
Bind variable :APEX$ROW_STATUS
PL/SQL V('APEX$ROW_STATUS')
Substitution string &APEX$ROW_STATUS.
Table 2–7 APP_ID Syntax
Reference Type Syntax
Bind variable :APP_ID
Direct PL/SQL APEX_APPLICATION.G_FLOW_ID (A NUMBER)
PL/SQL NV('APP_ID')
Substitution string &APP_ID.
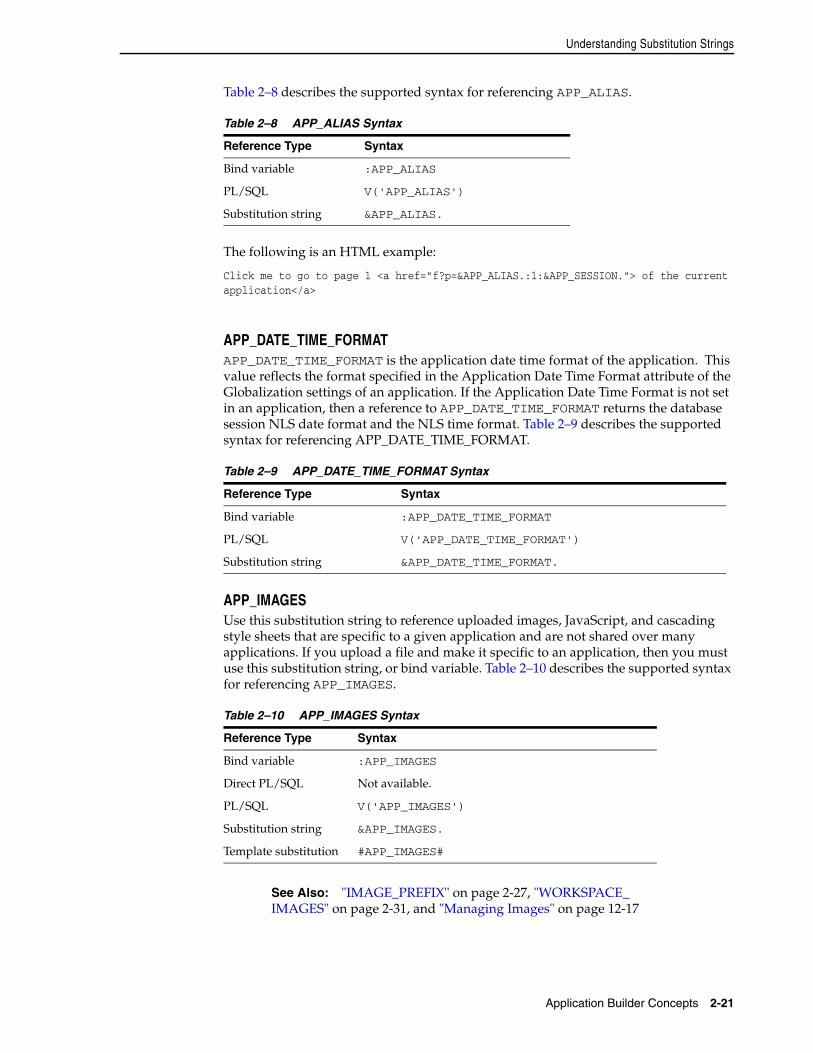
Understanding Substitution Strings
Application Builder Concepts 2-21
Table 2–8 describes the supported syntax for referencing APP_ALIAS.
The following is an HTML example:
Click me to go to page 1 <a href="f?p=&APP_ALIAS.:1:&APP_SESSION."> of the current application</a>
APP_DATE_TIME_FORMATAPP_DATE_TIME_FORMAT is the application date time format of the application. This value reflects the format specified in the Application Date Time Format attribute of the Globalization settings of an application. If the Application Date Time Format is not set in an application, then a reference to APP_DATE_TIME_FORMAT returns the database session NLS date format and the NLS time format. Table 2–9 describes the supported syntax for referencing APP_DATE_TIME_FORMAT.
APP_IMAGESUse this substitution string to reference uploaded images, JavaScript, and cascading style sheets that are specific to a given application and are not shared over many applications. If you upload a file and make it specific to an application, then you must use this substitution string, or bind variable. Table 2–10 describes the supported syntax for referencing APP_IMAGES.
Table 2–8 APP_ALIAS Syntax
Reference Type Syntax
Bind variable :APP_ALIAS
PL/SQL V('APP_ALIAS')
Substitution string &APP_ALIAS.
Table 2–9 APP_DATE_TIME_FORMAT Syntax
Reference Type Syntax
Bind variable :APP_DATE_TIME_FORMAT
PL/SQL V('APP_DATE_TIME_FORMAT')
Substitution string &APP_DATE_TIME_FORMAT.
Table 2–10 APP_IMAGES Syntax
Reference Type Syntax
Bind variable :APP_IMAGES
Direct PL/SQL Not available.
PL/SQL V('APP_IMAGES')
Substitution string &APP_IMAGES.
Template substitution #APP_IMAGES#
See Also: "IMAGE_PREFIX" on page 2-27, "WORKSPACE_IMAGES" on page 2-31, and "Managing Images" on page 12-17

Understanding Substitution Strings
2-22 Oracle Application Express Application Builder User's Guide
APP_NLS_DATE_FORMATAPP_NLS_DATE_FORMAT is the application date format of the database session. This value reflects the format specified in the Application Date Format attribute of the Globalization settings of the application. However, if the Application Date Format is not set, then APP_NLS_DATE_FORMAT returns the NLS_DATE_FORMAT value of the database session at the start of the request to the Application Express engine. Table 2–11 describes the supported syntax for referencing APP_NLS_DATE_FORMAT.
APP_NLS_TIMESTAMP_FORMATAPP_NLS_TIMESTAMP_FORMAT is the application timestamp format of the database session. This value reflects the format specified in the Application Timestamp Format attribute of the Globalization settings of the application. However, if the Application Timestamp Format is not set, then APP_NLS_TIMESTAMP_FORMAT return the NLS_TIMESTAMP_FORMAT value of the database session at the start of the request to the Application Express engine. Table 2–12 describes the supported syntax for referencing APP_NLS_TIMESTAMP_FORMAT.
APP_NLS_TIMESTAMP_TZ_FORMATAPP_NLS_TIMESTAMP_TZ_FORMAT is the application timestamp time zone format of the database session. This value reflects the format specified in the Application Timestamp Time Zone Format attribute of the Globalization settings of an application. However, if the Application Timestamp Time Zone Format is not set, then APP_NLS_TIMESTAMP_TZ_FORMAT returns the NLS_TIMESTAMP_TZ_FORMAT value of the database session at the start of the request to the Application Express engine. Table 2–13 describes the supported syntax for referencing APP_NLS_TIMESTAMP_TZ_FORMAT.
APP_PAGE_IDAPP_PAGE_ID is the current application ID. For example, if your application was on page 3, then the result would be 3. Using this syntax is useful when writing
Table 2–11 APP_NLS_DATE_FORMAT Syntax
Reference Type Syntax
Bind variable :APP_NLS_DATE_FORMAT
PL/SQL V('APP_NLS_DATE_FORMAT')
Substitution string &APP_NLS_DATE_FORMAT.
Table 2–12 APP_NLS_TIMESTAMP_FORMAT Syntax
Reference Type Syntax
Bind variable :APP_NLS_TIMESTAMP_FORMAT
PL/SQL V('APP_NLS_TIMESTAMP_FORMAT')
Substitution string &APP_NLS_TIMESTAMP_FORMAT.
Table 2–13 APP_NLS_TIMESTAMP_TZ_FORMAT Syntax
Reference Type Syntax
Bind variable :APP_NLS_TIMESTAMP_TZ_FORMAT
PL/SQL V('APP_NLS_TIMESTAMP_TZ_FORMAT')
Substitution string &APP_NLS_TIMESTAMP_TZ_FORMAT.

Understanding Substitution Strings
Application Builder Concepts 2-23
application components that must work generically in multiple applications. Table 2–14 describes the supported syntax for referencing APP_PAGE_ID.
The following is an example of a substitution string reference:
f?p=&APP_ID.:&APP_PAGE_ID.:&APP_SESSION.
APP_SESSIONAPP_SESSION is the most commonly used built-in substitution strings. You can use this substitution string to create hypertext links between application pages that maintain a session state by passing the session number. Note that you can also use the substitution string SESSION in place of APP_SESSION. Table 2–15 describes the supported syntax for referencing APP_SESSION.
Consider the following examples:
■ From within an HTML region:
<a href="f?p=100:5:&APP_SESSION.">click me</a>
■ Using PL/SQL:
htf.anchor('f?p=100:5:'||V('APP_SESSION'),'click me');
■ Using a SQL query:
SELECT htf.anchor('f?p=100:5:'||:APP_SESSION,'clickme') FROM DUAL;
APP_SESSION_VISIBLEAPP_SESSION_VISIBLE is similar to the built-in substitution APP_SESSION. Use this substitution string to create hypertext links between application pages that maintain a session state by passing the session number. APP_SESSION_VISIBLE always returns '0' when users are not authenticated to an application and they are using the Zero Session ID feature of Oracle Application Express. Table 2–16 describes the supported syntax for referencing APP_SESSION_VISIBLE.
Table 2–14 APP_PAGE_ID Syntax
Reference Type Syntax
Bind variable :APP_PAGE_ID
PL/SQL and Direct PL NV('APP_PAGE_ID')
Substitution string &APP_PAGE_ID.
Table 2–15 APP_SESSION Syntax
Reference Type Syntax
Bind variable :APP_SESSION
PL/SQL V('APP_SESSION')
Short PL/SQL V('SESSION')
Substitution string &APP_SESSION.

Understanding Substitution Strings
2-24 Oracle Application Express Application Builder User's Guide
Consider the following examples:
■ From within an HTML region:
<a href="f?p=100:5:&APP_SESSION_VISIBLE.">click me</a>
■ Using PL/SQL:
sys.htf.anchor('f?p=100:5:'||V('APP_SESSION_VISIBLE'),'click me');
■ Using a SQL query:
SELECT sys.htf.anchor('f?p=100:5:'||:APP_SESSION_VISIBLE,'clickme') FROM DUAL;
APP_UNIQUE_PAGE_IDAPP_UNIQUE_PAGE_ID is an integer generated from an Oracle sequence which is unique for each page view. This number is used by applications to prevent duplicate page submissions and can be used for other purposes. For example, to make a unique URL and avoid browser caching issues, you can embed this number in the request or debug column in calls to the f procedure. Table 2–17 describes the supported syntax for referencing APP_UNIQUE_PAGE_ID.
The following is an HTML example:
SELECT 'f?p=100:1:'||:APP_SESSION||':'||:APP_UNIQUE_PAGE_ID|| ':::P1_EMPNO:'||employee_id, first_name, job_idFROM employees
Note the use of the APP_UNIQUE_PAGE_ID in the request column. This makes this URL unique and may avoid excessive browser caching problems.
APP_USERAPP_USER is the current user running the application. Depending upon your authentication model, the value of the user is set differently. If the application is running using database authentication, then the value of the user is the same as the database pseudo column USER. If the application uses an authentication scheme that requires the user to authenticate, the value of APP_USER is set by the authentication scheme, usually to the user name used during authentication. Table 2–18 describes the
Table 2–16 APP_SESSION_VISIBLE Syntax
Reference Type Syntax
Bind variable :APP_SESSION_VISIBLE
PL/SQL V('APP_SESSION_VISIBLE')
Substitution string &APP_SESSION_VISIBLE.
Table 2–17 APP_UNIQUE_PAGE_ID Syntax
Reference Type Syntax
Bind variable :APP_UNIQUE_PAGE_ID
PL/SQL V('APP_UNIQUE_PAGE_ID')
Substitution string &APP_UNIQUE_PAGE_ID.

Understanding Substitution Strings
Application Builder Concepts 2-25
supported syntax for referencing APP_USER.
Consider the following examples:
■ From within an HTML region:
Hello you are logged in as &APP_USER.
■ Using PL/SQL:
htp.p('Hello you are logged in as'||V('APP_USER'));
■ As a bind variable:
SELECT * FROM some_table WHERE user_id = :APP_USER
AUTHENTICATED_URL_PREFIXThis application-level attribute identifies a valid authenticated prefix (that is, a logged in URL prefix). You can use a relative path or a full path beginning with http. This item is useful if your application can be run in both authenticated (logged in) and public (not logged in) modes. You can use AUTHENTICATED_URL_PREFIX to construct a link to an authenticated page. This item is most useful when using basic database authentication because changes to the URL can require authentication. Table 2–19 describes the supported syntax for referencing AUTHENTICATED_URL_PREFIX.
BROWSER_LANGUAGEBROWSER_LANGUAGE refers to the web browser's current language preference. Table 2–20 describes the supported syntax for referencing BROWSER_LANGUAGE.
Table 2–18 APP_USER Syntax
Reference Type Syntax
Bind variable :APP_USER
PL/SQL V('APP_USER')
Substitution string &APP_USER.
See Also: "Authentication" on page 7-22 for information about the Public User attribute
Table 2–19 AUTHENTICATED_URL_PREFIX Syntax
Reference Type Syntax
Bind variable :AUTHENTICATED_URL_PREFIX
PL/SQL V('AUTHENTICATED_URL_PREFIX')
Substitution string &AUTHENTICATED_URL_PREFIX.
Table 2–20 BROWSER_LANGUAGE Syntax
Reference Type Syntax
Bind variable :BROWSER_LANGUAGE
Direct PL/SQL APEX_APPLICATION.G_BROWSER_LANGUAGE
PL/SQL V('BROWSER_LANGUAGE')

Understanding Substitution Strings
2-26 Oracle Application Express Application Builder User's Guide
CURRENT_PARENT_TAB_TEXTCURRENT_PARENT_TAB_TEXT is most useful in page templates, but is only relevant for applications that use two-level tabs (that is, parent and standard tabs). Use this string to reference the parent tab label. This substitution string enables you to repeat the currently selected parent tab within the page template. Table 2–21 describes the supported syntax for referencing CURRENT_PARENT_TAB_TEXT.
DEBUGValid values for the DEBUG flag are Yes or No. Turning debug on shows details about application processing. If you write your own custom code, you may want to generate debug information only if the debug mode is set to Yes. Table 2–22 describes the supported syntax for referencing DEBUG.
The following is an example of a substitution string reference that preserves the current value of DEBUG:
f?p=100:1:&APP_SESSION.::&DEBUG
HOME_LINKHOME_LINK is the home page of an application. The Application Express engine redirects to this location if no page is given and if no alternative page is dictated by the authentication scheme's logic. You define the Home Link on the Application Attributes page.
Table 2–23 describes the supported syntax for referencing HOME_LINK.
Substitution string :BROWSER_LANGUAGE.
Substitution string &BROWSER_LANGUAGE.
Table 2–21 CURRENT_PARENT_TAB_TEXT Syntax
Reference Type Syntax
Bind variable Not Available.
Substitution string &CURRENT_PARENT_TAB_TEXT.
Table 2–22 DEBUG Syntax
Reference Type Syntax
Bind variable :DEBUG
Direct PL/SQL APEX_APPLICATION.G_DEBUG
PL/SQL V('DEBUG')
Substitution string &DEBUG.
Table 2–23 HOME_LINK Syntax
Reference Type Syntax
Direct PL/SQL APEX_APPLICATION.G_HOME_LINK
PL/SQL V('HOME_LINK')
Table 2–20 (Cont.) BROWSER_LANGUAGE Syntax
Reference Type Syntax

Understanding Substitution Strings
Application Builder Concepts 2-27
IMAGE_PREFIXThe value of IMAGE_PREFIX determines the virtual path the web server uses to point to the images directory distributed with Oracle Application Express. To reference uploaded images, use WORKSPACE_IMAGES and APP_IMAGES. Table 2–24 describes the supported syntax for referencing IMAGE_PREFIX.
LOGIN_URLUse LOGIN_URL to display a link to a login page for users that are not currently logged in. Table 2–25 describes the supported syntax for LOGIN_URL.
LOGOUT_URLLOGOUT_URL is an application-level attribute used to identify the logout URL. This is a URL that navigates the user to a logout page or optionally directly logs out a user. To create a logout navigation bar entry, add a trailing period to &LOGOUT_URL (&LOGOUT_URL.). If you are coding a page template, use #LOGOUT_URL#. Table 2–26
Template Reference #HOME_LINK#
Substitution String &HOME_LINK.
See Also: "Authentication" on page 7-22 for information about the Home Link attribute
See Also: "APP_IMAGES" on page 2-21,"WORKSPACE_IMAGES" on page 2-31, and "Editing the Application Definition" on page 7-15
Table 2–24 IMAGE_PREFIX Syntax
Reference Type Syntax
Bind variable :IMAGE_PREFIX
Direct PL/SQL APEX_APPLICATION.G_IMAGE_PREFIX
PL/SQL V('IMAGE_PREFIX')
Substitution string &IMAGE_PREFIX.
Template Substitution #IMAGE_PREFIX#
See Also: "Authentication" on page 7-22 and "About the Security Attributes Page" on page 7-22
Table 2–25 LOGIN_URL Syntax
Reference Type Syntax
Bind variable :LOGIN_URL
Direct PL/SQL APEX_APPLICATION.G_LOGIN_URL
PL/SQL V('LOGIN_URL')
Substitution string &LOGIN_URL.
Template Substitution #LOGIN_URL#
Table 2–23 (Cont.) HOME_LINK Syntax
Reference Type Syntax
Understanding Substitution Strings
2-28 Oracle Application Express Application Builder User's Guide
describes the supported syntax for referencing LOGOUT_URL.
PRINTER_FRIENDLYThe value of PRINTER_FRIENDLY determines if the Application Express engine is running in print view mode. This setting can be referenced in conditions to eliminate elements not desired in a printed document from a page. Table 2–27 describes the supported syntax for referencing PRINTER_FRIENDLY.
PROXY_SERVERPROXY_SERVER is an application attribute. The attribute may be used by regions whose source comes from a URL. The following is the correct syntax for a direct PL/SQL reference used when you are writing PL/SQL to access remote web servers from within the database (for example, when using the utl_http package shipped with the database).
APEX_APPLICATION.G_PROXY_SERVER
PUBLIC_URL_PREFIXPUBLIC_URL_PREFIX is an application-level attribute that identifies a URL to toggle out of a logged in mode to a public view. Table 2–28 describes the supported syntax for referencing PUBLIC_URL_PREFIX.
REQUEST Each application button sets the value of REQUEST to the name of the button or to the request value attribute associated with the button, enabling accept processing to
Table 2–26 LOGOUT_URL Syntax
Reference Type Syntax
Bind variable :LOGOUT_URL
PL/SQL V('LOGOUT_URL')
Substitution string &LOGOUT_URL.
Template substitution #LOGOUT_URL#
Table 2–27 PRINTER_FRIENDLY Syntax
Reference Type Syntax
Direct PL/SQL APEX_APPLICATION.G_PRINTER_FRIENDLY (VARCHAR2 DATATYPE)
PL/SQL V('PRINTER_FRIENDLY')
Substitution string &PRINTER_FRIENDLY.
Table 2–28 PUBLIC_URL_PREFIX Syntax
Reference Type Syntax
Bind variable :PUBLIC_URL_PREFIX
PL/SQL V('PUBLIC_URL_PREFIX')
Substitution string &PUBLIC_URL_PREFIX.
Template substitution #PUBLIC_URL_PREFIX#

Understanding Substitution Strings
Application Builder Concepts 2-29
reference the name of the button when a user clicks it. In the f?p syntax, REQUEST may be set using the fourth argument.
Referencing the Value of REQUEST REQUEST is typically referenced during Accept processing (that is, the processing that occurs when you post a page). Table 2–29 describes the supported syntax for referencing REQUEST.
Scope and Value of REQUEST for Posted Pages When you post a page, you initiate Accept processing. Accept processing consists of computations, validations, processes, and branches. The value of REQUEST is available during each phase of the Accept processing. Once an application branches to a different page then REQUEST is set to NULL.
The value of REQUEST is the name of the button the user clicks, or the name of the tab the user selects. For example, suppose you have a button with a name of CHANGE, and a label Apply Change. When a user clicks the button, the value of REQUEST is CHANGE.
About the When Button Pressed Attribute Validations, processes, and branches have a When Button Pressed attribute. This attribute displays as a select list and contains the names of buttons that exist on the current page. If you make a selection from When Button Pressed, you associate the button’s REQUEST value with the validation, process, or branch.
When you use a button to submit a page, the REQUEST value is passed to the page. The Accept processing logic evaluates each validation, process, and branch that uses a When Button Pressed attribute to determine whether the component should run (or fire). When one of these components runs, do not assume that a user actually clicked the associated button and caused the page to be submitted. Keep in mind, that another button using the same request value may have submitted the page. Similarly, JavaScript on the page can also submit the page and pass in a request value.
Referencing REQUEST Using Declarative Conditions It is common to reference REQUEST using conditions. For example, you may want to reset pagination when a user clicks Go on a report page. You can reset pagination by creating an on-submit page process. The page process can be made conditional using the condition Request = Expression 1.
To conditionalize an on-submit page process:
1. Under Condition, select the condition type Request = Expression 1.
2. In Expression 1, enter GO.
Using REQUEST for Show Processing You can also use REQUEST for Show processing when navigating to a page using f?p syntax. For example:
f?p=100:1:&APP_SESSION.:GO
Table 2–29 REQUEST Syntax
Reference Type Syntax
Bind variable :REQUEST
Direct PL/SQL APEX_APPLICATION.G_REQUEST
PL/SQL V('REQUEST')
Substitution string &REQUEST
&REQUEST. (exact syntax match)

Understanding Substitution Strings
2-30 Oracle Application Express Application Builder User's Guide
Remember that the fourth argument in the f?p syntax is REQUEST. This example goes to application 100, page 1 for the current session, and sets the value of REQUEST to GO. Any process or region can reference the value of REQUEST using Show processing.
The following is a similar example using PL/SQL:
IF V ('REQUEST') = 'GO' THEN htp.p('hello');END IF;
Note that htp.p('hello') is a call to a PL/SQL Web Toolkit package to print the specified text string.
SCHEMA OWNER If you are generating calls to applications from within your PL/SQL code, you may must reference the owner of the Oracle Application Express schema. The following describes the correct syntax for a direct PL/SQL reference:
APEX_APPLICATION.G_FLOW_SCHEMA_OWNER
You may also use #FLOW_OWNER# to reference this value in SQL queries and PL/SQL (for example, in a region or a process).
SQLERRMSQLERRM is a template substitution only available in the Applications Region Error Message. The following describes the correct syntax for a region template substitution reference:
#SQLERRM#
SYSDATE_YYYYMMDDSYSDATE_YYYYMMDD represents the current date on the database server, with the YYYYMMDD format mask applied. You may use this value instead of repeated calls to the SYSDATE() function. The following list describes the supported syntax for referencing SYSDATE_YYYYMMDD.
■ Bind variable
:SYSDATE_YYYYMMDD
■ PL/SQL
V('SYSDATE_YYYYMMDD')
■ Direct PL/SQL
APEX_APPLICATION.G_SYSDATE (DATE DATATYPE)
See Also:
■ Oracle Database Development Guide for information about developing web applications with PL/SQL
■ Oracle Database PL/SQL Packages and Types Reference for information about htp packages

Understanding Substitution Strings
Application Builder Concepts 2-31
WORKSPACE_IMAGESUse this substitution string to reference uploaded images, JavaScript, and cascading style sheets that are shared over many applications within a workspace. Table 2–31 describes the supported syntax for referencing WORKSPACE_IMAGES.
Table 2–30 SYSDATE_YYYYMMDD Syntax
Reference Type Syntax
Bind variable :SYSDATE_YYYYMMDD
Direct PL/SQL APEX_APPLICATION.G_SYSDATE (DATE DATATYPE)
PL/SQL V('SYSDATE_YYYYMMDD')
Table 2–31 WORKSPACE_IMAGES Syntax
Reference Type Syntax
Bind variable :WORKSPACE_IMAGES
Direct PL/SQL Not available
PL/SQL V('WORKSPACE_IMAGES')
Substitution string &WORKSPACE_IMAGES.
Template substitution #WORKSPACE_IMAGES#
See Also: "APP_IMAGES" on page 2-21 and "IMAGE_PREFIX" on page 2-27

Understanding Substitution Strings
2-32 Oracle Application Express Application Builder User's Guide
Utilizing Packaged Applications 3-1
3Utilizing Packaged Applications
This section describes how to install and run the packaged applications available with Oracle Application Express.
Topics:■ About Packaged Applications
■ Managing Packaged Applications
■ About Sample Database Application
■ About Sample Websheet - AnyCo IT Department
About Packaged ApplicationsOracle Application Express includes two types of packaged applications:
■ Sample applications
■ Productivity applications
Both sample and productivity applications are fully functional applications that have been designed to address a specific business need. You can install, run, and use packaged applications as is, or analyze them to better understand how to use Application Builder to build specific types of functionality.
The main difference between a sample and productivity application is the level of support. By default, sample applications are fully editable. In contrast, you must unlock productivity applications before you can edit them. Unlocking a productivity application makes it ineligible for future upgrades or support by Oracle Support.
Managing Packaged ApplicationsThis section describes how to view, install, run, and remove packaged applications.
Topics:■ Accessing the Packaged Applications Page
■ Installing a Packaged Application
■ Running an Installed Packaged Application
See Also: "Disabling the Creation of Sample Applications in a New Workspace" in Oracle Application Express Administration Guide and "Downloading Public Packaged Applications and Sample Code" in Oracle Database 2 Day + Application Express Developer's Guide

Managing Packaged Applications
3-2 Oracle Application Express Application Builder User's Guide
■ Removing an Installed Packaged Application
■ Unlocking an Installed Productivity Application
■ Exporting an Installed Packaged Application
■ Changing Authentication for an Installed Packaged Application
■ Updating a Packaged Application
Accessing the Packaged Applications PageTo access the Packaged Applications page:
1. Log in to Oracle Application Express.
The Workspace home page appears.
2. Click the Application Builder icon.
The Application Builder home page appears.
3. Select the Packaged Applications tab.
The Packaged Applications page appears.
Note that the application category (for example, Software Development or Sample Websheet) displays beneath the application title. You can identify installed applications by the green Installed tag that displays beneath the product category.

Managing Packaged Applications
Utilizing Packaged Applications 3-3
4. Use the following lists at the top of the page to filter the display:
■ Category - Sort by application category. Options include: Community, IT Management, Knowledge Management, Marketing, Project Management, Sample, Software Development, Team Productivity, Tracking, and so on.
■ Type - Sort by application type. Options include: All Applications, Only Installed, Not Installed, Database Applications, or Websheets
5. To view information about a packaged application, or install or remove a previously installed packaged application, click the application image.
Installing a Packaged ApplicationTo install a packaged application:
1. Go to the Packaged Applications page. See "Accessing the Packaged Applications Page" on page 3-2.
The Packaged Applications page appears.
2. Locate the application to be installed.
3. Click the application image.
A summary page appears.
4. Click Install Application.
5. Select an Authentication scheme and click Next.
6. Click Install Application again.
A success message appears.
7. To run the application, click the Run Application icon.
8. Enter the appropriate login credentials:
a. Username - Enter your workspace username.
b. Password - Enter your workspace password.
c. Click Login.
Running an Installed Packaged ApplicationTo run an installed packaged application:
1. Go to the Packaged Applications page. See "Accessing the Packaged Applications Page" on page 3-2.
The Packaged Applications page appears.
2. Locate the application.
Tip: Use the Category and Type lists to filter the display.
Tip: Use the Category and Type lists to filter the display.

Managing Packaged Applications
3-4 Oracle Application Express Application Builder User's Guide
3. Click the application image.
4. Click Run.
5. Enter the appropriate login credentials:
a. Username - Enter your workspace username.
b. Password - Enter your workspace password.
c. Click Login.
Removing an Installed Packaged ApplicationTo run an installed packaged application:
1. Go to the Packaged Applications page. See "Accessing the Packaged Applications Page" on page 3-2.
The Packaged Applications page appears.
2. Locate the application to be removed.
3. Click the application image.
4. Click Remove.
5. When prompted, click Remove Application.
Unlocking an Installed Productivity ApplicationThe main difference between a sample and productivity packaged application is the level of support. Once a productivity application is installed you must unlock it before you can edit it. By default, sample applications are fully editable.
To unlock an installed productivity packaged application:
1. Go to the Packaged Applications page. See "Accessing the Packaged Applications Page" on page 3-2.
The Packaged Applications page appears.
2. Locate the application to be unlocked.
3. Click the application image.
4. Click Manage.
5. Click Unlock Application and click Next.
6. When prompted, click Unlock Application.
Exporting an Installed Packaged ApplicationIf you wish to export a locked productivity application into a different instance then you need to generate scripts from the Packaged Applications tab. For example, in a
Tip: Use the Category and Type lists to filter the display.
Note: Unlocking a productivity application makes it ineligible for future upgrades or support by Oracle Support.
Tip: Use the Category and Type lists to filter the display.

Managing Packaged Applications
Utilizing Packaged Applications 3-5
runtime-only environment you would need to create scripts to install the productivity application.
To export an installed packaged application:
1. Go to the Packaged Applications page. See "Accessing the Packaged Applications Page" on page 3-2.
The Packaged Applications page appears.
2. Locate and select the application to be exported.
3. Click Manage.
4. Select Export Application and click Next.
5. On the Export Packaged Application page, click the download links:
■ Export Application Download
■ Export Supporting Objects Download
Each link downloads a SQL script.
6. Run the downloaded scripts to import the application and supporting objects in a new workspace.
Changing Authentication for an Installed Packaged ApplicationTo change the authentication for an installed packaged application:
1. Go to the Packaged Applications page. See "Accessing the Packaged Applications Page" on page 3-2.
The Packaged Applications page appears.
2. Locate and select the installed application.
3. Click Manage.
4. Select Change Authentication and click Next.
The Authentication Scheme page appears.
5. Under Name:
a. Name - Enter the name used to reference the authentication scheme by other application developers.
b. Scheme Type - Select a new authentication scheme.
6. Fill in the appropriate fields.
7. To learn more about a specific field, see item Help.
When help is available, the cursor changes to a question mark. See "About Field-Level Help" on page 1-13.
Tip: Use the Category and Type lists to filter the display.
Tip: You can run the downloaded scripts from SQL*Plus, SQL Developer, or using Oracle Application Express SQL Scripts. To learn more, see "Using SQL Scripts" in Oracle Application Express SQL Workshop Guide.
See Also: "Establishing User Identity Through Authentication" on page 15-25

About Sample Database Application
3-6 Oracle Application Express Application Builder User's Guide
Updating a Packaged ApplicationYou can update a packaged application if it has the message Update Available message adjacent to its name.
To update a packaged application:
1. Go to the Packaged Applications page. See "Accessing the Packaged Applications Page" on page 3-2.
The Packaged Applications page appears.
2. Locate and click the application to be updated.
3. Click Update.
The Update Application Wizard appears.
4. Click Update Application.
Once updated, the Packaged Application Updated page appears.
About Sample Database ApplicationThis section describes the sample packaged application, Sample Database Application. Like all sample packaged applications, Sample Database Application is fully editable. This packaged application features an easy-to-use interface for viewing, updating, and searching order and customer information for clothing products. Users can navigate among the pages using the Home, Customers, Products, Orders, and Reports tabs.
Topics:■ Installing and Running Sample Database Application
■ Understanding Sample Database Application
■ Modifying Sample Database Application
Installing and Running Sample Database ApplicationTo install Sample Database Application:
1. Go to the Packaged Applications page. See "Accessing the Packaged Applications Page" on page 3-2.
The Packaged Applications page appears.
2. From the Category list, select Sample.
3. From the Type list, select Not Installed.
4. Locate Sample Database Application.
5. Click the application image.
A summary page appears.
6. Click Install Application.
7. Select an Authentication scheme and click Next.
8. Click Install Application again.
See Also: "Running an Installed Packaged Application" on page 3-3
Tip: Use the Category and Type lists to filter the display.

About Sample Database Application
Utilizing Packaged Applications 3-7
A success message appears.
9. To run the application, click the Run Application icon.
10. Enter the appropriate login credentials:
a. Username - Enter your workspace username.
b. Password - Enter your workspace password.
c. Click Login.
Understanding Sample Database ApplicationSample Database Application demonstrates the following functionality:
■ Examples of ways to display summary information, including a dial chart and summary reports
■ Reports and forms for viewing, updating, and adding customers, products, and orders
■ Flash charts and maps available in Oracle Application Express
■ A Calendar report
■ Mobile pages to replicate the majority of functionality available in the desktop pages
The following sections describe specific functionality available on each page.
Topics:■ About the Home Page
■ About the Customers Page
■ About the Products Page
■ About the Orders Page
■ About the Reports Page
■ About the Administration Page
■ About the Mobile Version
See Also: "Running an Installed Packaged Application" on page 3-3
See Also: "What Is a Page?" on page 2-3
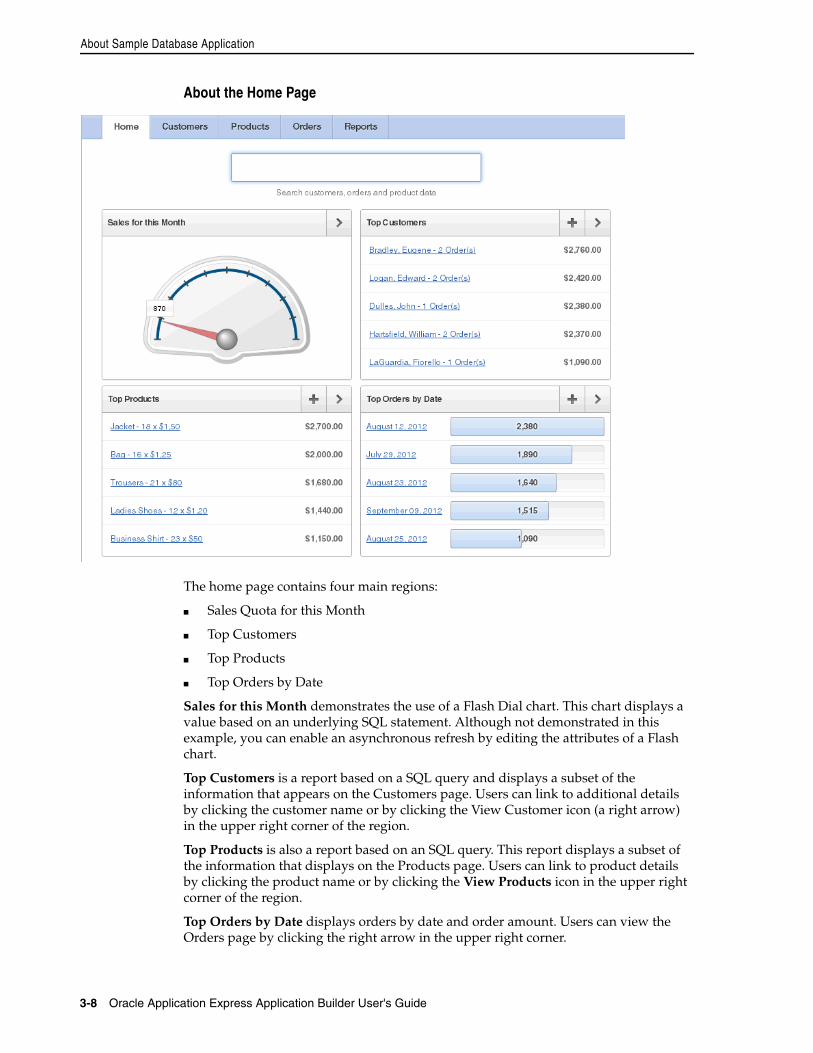
About Sample Database Application
3-8 Oracle Application Express Application Builder User's Guide
About the Home Page
The home page contains four main regions:
■ Sales Quota for this Month
■ Top Customers
■ Top Products
■ Top Orders by Date
Sales for this Month demonstrates the use of a Flash Dial chart. This chart displays a value based on an underlying SQL statement. Although not demonstrated in this example, you can enable an asynchronous refresh by editing the attributes of a Flash chart.
Top Customers is a report based on a SQL query and displays a subset of the information that appears on the Customers page. Users can link to additional details by clicking the customer name or by clicking the View Customer icon (a right arrow) in the upper right corner of the region.
Top Products is also a report based on an SQL query. This report displays a subset of the information that displays on the Products page. Users can link to product details by clicking the product name or by clicking the View Products icon in the upper right corner of the region.
Top Orders by Date displays orders by date and order amount. Users can view the Orders page by clicking the right arrow in the upper right corner.

About Sample Database Application
Utilizing Packaged Applications 3-9
About the Customers PageThe Customers page enables users to view and edit customer information.
Customers is an interactive report for tracking customer information. To search for a customer, enter a customer name in the Search field and click Go. To sort by customer name, click the column heading and then select the Up or Down arrow to sort in ascending or descending mode. See "Customizing Interactive Reports" on page 9-4.
You can change the appearance of the report using the Actions menu. See "About the Actions Menu" on page 9-6. To update existing customer information, click the Edit icon. To add a new customer, click the Create Customer button. To upload data, click the Upload Data button.
About the Products PageThe Products page enables users to view and edit product information. The Products region displays product information. This region is based on a SQL query that uses a custom function for displaying images stored in the database.
See Also: "Creating Reports" on page 9-1, "Creating Charts" on page 10-47, "Creating a Region" on page 12-3, and "Creating Lists" on page 11-7
See Also: "Customizing Interactive Reports" on page 9-4

About Sample Database Application
3-10 Oracle Application Express Application Builder User's Guide
By default, this page display in Detail view. You can change the view by clicking View Icons and View Report to the right of the Go button. In Report view, you can sort by product category by clicking the column heading and then selecting the Up or Down arrow to sort in ascending or descending mode. Users can change the appearance of the report using the Actions menu. See "About the Actions Menu" on page 9-6. To edit a product description, click the Edit icon. To add a new product, click the Create Product button at the top of the page.
About the Orders PageThe Orders page enables users to view and edit customer orders.

About Sample Database Application
Utilizing Packaged Applications 3-11
My Orders is an interactive report for tracking order information. To sort by column, click the column heading and then select the Up or Down arrow to sort in ascending or descending mode.
You can change the appearance of the report using the Actions menu. To view orders in a calendar, click Calendar. The Calendar appears. In the Order Calendar, you can link to a specific order, by clicking a calendar entry. To update existing customer information, click the Edit icon. To add a new order, click the Enter New Order button.
About the Reports Page
The Reports page enables you to view information in various formats, including bar chart, pie chart, map, tree, and tags. To view a report or chart, select it.
About the Administration PageClicking the Administration link in the upper right corner displays the Administration page. Use the Administration page to manage sample data, manage state codes and names, and enable user feedback capability. Use the reports on the right side of the page to view user activity, view pages views, and view page views in a monthly calendar.
To access the Administration page:
1. Go to the Packaged Applications page and run Sample Database Application. See "Running an Installed Packaged Application" on page 3-3.
2. On the home page, click the Administration link in the upper right corner.
The Administration page appears and contains two regions: Administration and Reports.
See Also: "Creating Reports" on page 9-1
See Also: "Creating Charts" on page 10-47, "Creating Maps" on page 10-41, and "Creating Trees" on page 10-79

About Sample Database Application
3-12 Oracle Application Express Application Builder User's Guide
The Administration region contains these sections:
■ Manage Sample Data - Remove or re-create the sample data that ships with Sample Database Application.
■ Manage States - Add, edit, or delete states.
■ Feedback - Enable, disable, and manage feedback for the application. To learn more, see "Managing Feedback" on page 4-17.
The Reports region contains these sections:
■ Top Users - Displays use activity in the application.
■ Page Views - Displays page views by user in the application.
■ Activity Calendar - Displays page views by user in a calendar format.
About the Mobile VersionClicking the Mobile link in the upper right corner of the home page displays Sample Database Application in a format compatible with a mobile device. This mobile version replicates the majority of functionality available in the desktop version.
To access the mobile version of Sample Database Application:
1. Go to the Packaged Applications page and run Sample Database Application. See "Running an Installed Packaged Application" on page 3-3.
2. Click the Mobile link in the upper right corner.
The Mobile version of Sample Database Application appears.

About Sample Database Application
Utilizing Packaged Applications 3-13
3. To view a page, select it.
4. To edit a specific customer or product, select it.
A form appears.
5. To return to the home page, click the Home icon in the upper left corner.
The home page appears.
6. On the home page:
■ Click Full Site to return to the desktop version of Sample Database Application.
■ Click Logout to return to Application Builder.
Modifying Sample Database ApplicationOnce you understand the type of functionality available in a packaged application, such as Sample Database Application, the next step is to learn more about the

About Sample Database Application
3-14 Oracle Application Express Application Builder User's Guide
construction of each page. An efficient way to speed up the learning process is to analyze and deconstruct the pages in the packaged applications. If you happen to break something, you can quickly delete the packaged application and install it again. See "Managing Packaged Applications" on page 3-1.
Topics:■ About the Developer Toolbar
■ Editing Sample Database Application
About the Developer ToolbarYou edit existing pages in an application, add pages to an application, or create entirely new applications using Application Builder.
The Developer toolbar displays at the bottom of any editable running page in a desktop application. Use the Developer toolbar to quickly edit the current application, the current running page, create a new page, control, or component, view session state, or turn edit links on or off.
The Developer toolbar consists of the following links:
■ Home links you to the Workspace home page. See "About the Workspace Home Page" on page 1-9.
■ Application ID links you to the Application home page. See "About the Application Home Page" on page 6-3.
Tip: Oracle Application Express includes two types of packaged applications: sample and productivity applications. By default, sample applications are fully editable. In contrast, you must unlock a productivity application before you can edit it. Unlocking a productivity packaged application makes it ineligible for future upgrades or support by Oracle Support.
See Also: Oracle Database 2 Day + Application Express Developer's Guide for an introduction to building database application

About Sample Database Application
Utilizing Packaged Applications 3-15
■ Edit Page accesses the Page Definition for the current running page. See "About the Page Definition" on page 8-1.
■ Create links to wizards for creating a page, region, page control (item, button, branch, computation, process, or validation), or a shared control (navigation bar icon, tab, list of values, list, or breadcrumb). See "About Database Applications" on page 7-1.
■ Session links you to session state information for the current page. See "Viewing Session State" on page 2-7.
■ Caching links to the Caching page. See "Managing Cached Regions" on page 12-10.
■ View Debug displays the Debug window. See "Accessing Debugging Mode" on page 14-4.
■ Debug toggles the page between Debug and No Debug mode. See "Accessing Debugging Mode" on page 14-4.
■ Show Edit Links toggles between Show Edit Links and Hide Edit Links. Clicking Show Edit Links displays a small orange icon next to each editable object on the page. Each icon is orange and contains a triangle with two rules beneath it. Clicking the link displays another window in which to edit the object.
■ Show Grid enables you see how regions and page items are positioned on a page if a grid layout is used.
Editing Sample Database ApplicationTo edit a running application, click the Application link on the Developer toolbar. The Application home page appears. The application ID and application name display at the top of the page.
You can run the current application, edit supporting objects, create shared components, or export and import information by clicking one of the following:
■ Run Application submits the pages in the current application to the Application Express engine to render viewable HTML. See "How the Application Express Engine Renders and Processes Pages" on page 2-4.
■ Supporting Objects links to the Supporting Objects page. See "How to Create a Custom Packaged Application" on page 16-5.
Note: The Developer toolbar does not display on locked packaged applications pages or on jQuery Mobile Smartphone pages.
See Also: "About the Developer Toolbar" on page 8-19

About Sample Websheet - AnyCo IT Department
3-16 Oracle Application Express Application Builder User's Guide
■ Shared Components links to a list of shared components and user interface controls that can display or be applied on every page within an application. See "Working with Shared Components" on page 8-49.
■ Utilities links to the Utilities page. Use this page to monitor developer activity, view dashboards, run Advisor, and view numerous other reports. See "Using Application Builder Utilities" on page 7-78.
■ Export/Import links you to the Export/Import Wizard. Use this wizard to import and export an entire application and related files such as cascading style sheets, images, static files, script files, themes, user interface defaults, and workspace users. See "Exporting an Application and Related Files" on page 16-12.
The pages that comprise the application appear on the Application home page. To access a specific page, simply click it. To search for a specific page, enter a case insensitive query for the page title or page number in the Page field and click Go.
About Sample Websheet - AnyCo IT DepartmentThis section describes the packaged application, Sample Websheet - AnyCo IT Department. Sample Websheet - AnyCo IT Department highlights the features and capabilities of Websheets.
Topics:■ Installing and Running AnyCo IT Department
■ About Websheet Navigation
■ Understanding AnyCo IT Department
■ Common Websheet User Interface Elements
■ Modifying Websheet Content
Installing and Running AnyCo IT DepartmentTo install and run Sample Websheet - AnyCo IT Department:
1. Go to the Packaged Applications page. See "Accessing the Packaged Applications Page" on page 3-2.
The Packaged Applications page appears.
2. From the Category list, select Sample.
3. From the Type list, select Websheets.
4. Locate Sample Websheet - AnyCo IT Department.
5. Click the application image.
A summary page appears.
6. Click Install Application.
7. Select an Authentication scheme and click Next.
8. Click Install Application again.
See Also: "About the Application Home Page" on page 6-1 and "About the Page Definition" on page 8-1
See Also: "About Websheet Applications" on page 5-1 to learn more about creating Websheet applications.

About Sample Websheet - AnyCo IT Department
Utilizing Packaged Applications 3-17
A success message appears.
9. To run the application, click the Run Application icon.
10. Enter the appropriate login credentials:
a. Username - Enter your workspace username.
b. Password - Enter your workspace password.
c. Click Login.
The home page appears.
About Websheet NavigationEvery Websheet contains common navigation elements that enable you to quickly move within a page or between pages. Each Websheet page is divided into sections. You can hide and unhide a page section by clicking the arrow to the left of the Section title. In the following example, Systems Overview is hidden.
Using Breadcrumbs to Navigate Between Websheet PagesA breadcrumb displays at the top of every Websheet page. Positioning the mouse over the Home breadcrumb displays a submenu of links to all the pages in the Websheet.
See Also: "Viewing the Page Directory" on page 5-47

About Sample Websheet - AnyCo IT Department
3-18 Oracle Application Express Application Builder User's Guide
Understanding AnyCo IT DepartmentSample Websheet - AnyCo IT Department demonstrates the following functionality:
■ Examples of ways to share text, data, and images using a Websheet pages
■ Hierarchical navigation between page sections and pages
■ Formatted text that includes easily formatted links
■ Display of tabular data by creating Data Grids and displaying the content as reports, interactive report, or charts.
The following sections describe specific functionality available on each page.
Topics:■ Understanding Navigation
■ About the Home Page
■ About the Project Review Page
■ About the Systems Page
■ About Planned Purchase Review
■ About Systems Budget Review
Understanding NavigationThe hierarchical tree displays at the top of the home page enables you to navigate between Websheet pages. Click the arrow to the left of the Home breadcrumb to expand or collapse the tree. To learn more about adding navigation, see "About Navigation Sections" on page 5-14.
To view subsections (or children) within a section, click the arrow to the left of a section name. Click Expand All to view all pages and page subsections and Reset to return the tree to the default display. To link to another page, select the page name.
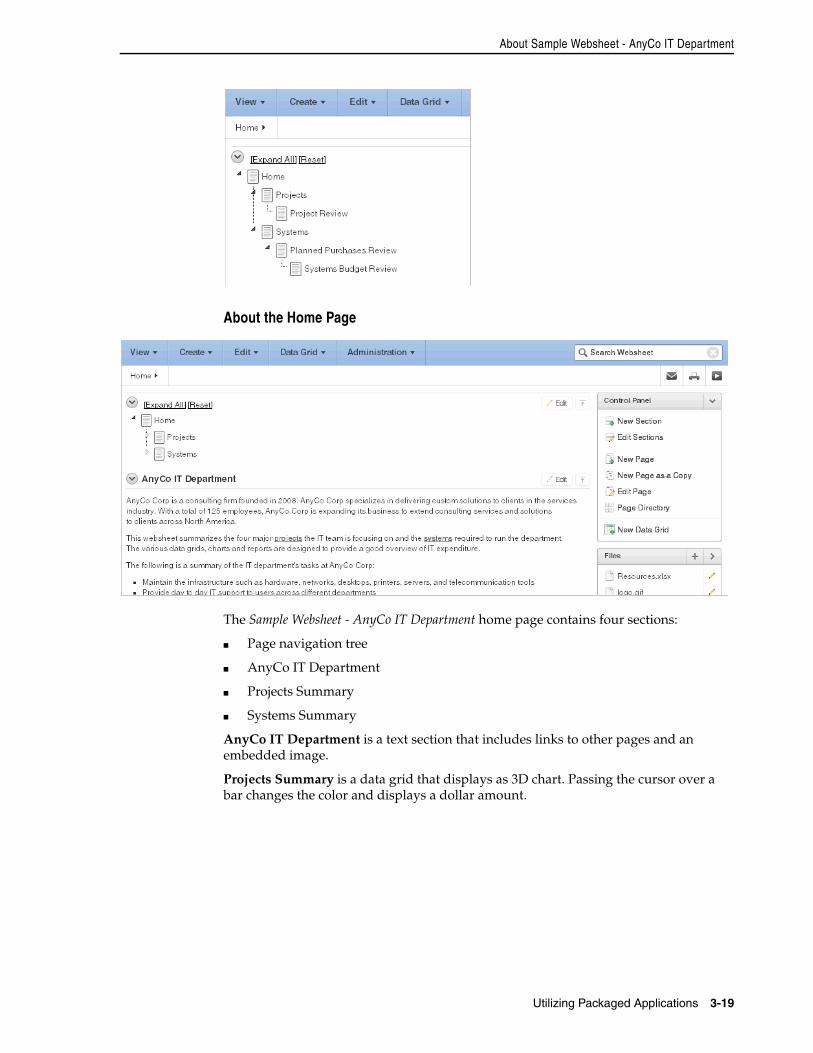
About Sample Websheet - AnyCo IT Department
Utilizing Packaged Applications 3-19
About the Home Page
The Sample Websheet - AnyCo IT Department home page contains four sections:
■ Page navigation tree
■ AnyCo IT Department
■ Projects Summary
■ Systems Summary
AnyCo IT Department is a text section that includes links to other pages and an embedded image.
Projects Summary is a data grid that displays as 3D chart. Passing the cursor over a bar changes the color and displays a dollar amount.

About Sample Websheet - AnyCo IT Department
3-20 Oracle Application Express Application Builder User's Guide
Systems Summary is a report of hardware, software, and cloud services. The bottom of the section includes links to Systems Management report and to the Systems page.
See Also: "Using SQL and SQLVALUE Syntax" on page 5-32

About Sample Websheet - AnyCo IT Department
Utilizing Packaged Applications 3-21
About the Projects Page
The Project contains one section, Projects Breakdown. The Projects Breakdown section includes a link to the Project Review page and an updatable report of major IT projects.To edit a specific project, click the Edit Row icon. To add another projects, click the Add Row icon.
About the Project Review Page
The Project Review page contains two sections, Budget Review and Task Analysis. Both sections are data grids that display as different types of 3-D charts.
See Also: "Using SQL and SQLVALUE Syntax" on page 5-32

About Sample Websheet - AnyCo IT Department
3-22 Oracle Application Express Application Builder User's Guide
About the Systems Page
The Systems page contains three sections:
■ System (navigation)
■ System Overview
■ Systems Maintenance
■ Purchasing Projections
System is a navigation section that includes links to the sections, Systems Overview, Systems Maintenance, and Purchasing Projections.
System Overview is a text section that includes an embedded image and links to other pages.
System Maintenance is a data grid that displays as a 3D horizontal chart. Passing the cursor over a bar changes the color and displays a dollar amount.
Purchasing Projections features a report of planned purchases and a link to the Planned Purchases Review page. To add entries, click Add Row.
See Also: "About Chart Sections" on page 5-28

About Sample Websheet - AnyCo IT Department
Utilizing Packaged Applications 3-23
About Planned Purchase Review
The Planned Purchase Review page contains two sections:
■ Vendor Analysis
■ Total Planned Purchases
Vendor Analysis is report of vendors.
Total Planned Purchases is a data grid that displays as 3D horizontal chart. Passing the cursor over a bar changes the color and displays a dollar amount.

About Sample Websheet - AnyCo IT Department
3-24 Oracle Application Express Application Builder User's Guide
About Systems Budget Review
The Systems Budget Review page contains two sections:
■ Annual Budget Allocation
■ Remaining Budget for the Year
Annual Budget Allocation is a report budget categories. To update report item, click the Edit Row icon.
Remaining Budget for the Year is a data grid that displays as 3D pie chart. Passing the cursor over a pie section displays the dollar amount. Selecting a section, removes it slightly from the pie.
Common Websheet User Interface ElementsThe sections that follow describe interface elements common of all Websheets.
Topics:■ About Websheet Menus
■ About Websheet Search
■ About the Control Panel

About Sample Websheet - AnyCo IT Department
Utilizing Packaged Applications 3-25
■ About the Files Region
■ About the Tags Region
■ About the Notes Region
About Websheet Menus
Five menus display at the top of each Websheet:
■ View
■ Create
■ Edit
■ Data Grid
■ Administration
Many of the create and edit options within these menus are duplicated on the Control Panel that displays on the right side of the page. To learn more, see "About Websheet Applications" on page 5-1.
About Websheet SearchThe Search Websheet field displays in the upper right of each Websheet page.
Use Search Websheet to perform case insensitive searches of application content. To learn more, see "About Websheet Search" on page 5-4.

About Sample Websheet - AnyCo IT Department
3-26 Oracle Application Express Application Builder User's Guide
About the Control PanelThe Control Panel displays on the right side of each Websheet page and includes commands available in the Create, Edit, and View menus at the top of the page. To hide or display the Control Panel, click the arrow to the right of the region title.
The Websheet Control Panel contains the following options:
■ New Sections. See "About Adding and Editing Page Sections" on page 5-10.
■ Edit Sections. See "About Adding and Editing Page Sections" on page 5-10.
■ New Page. See "Adding a New Page" on page 5-8.
■ New Page as a Copy. See "Copying an Existing Page" on page 5-9.
■ Edit Page. See "Editing Page Details" on page 5-9.
■ Page Directory. See "Viewing the Page Directory" on page 5-47.
■ New Data Grid. See "Creating a Data Grid" on page 5-16.
About the Files RegionThe Files region displays below the Control Panel. The Files region displays files currently upload to the current page. To hide or display the Control Panel, click the arrow to the right of the region title.
About the Tags RegionUse the Tags region to enter tags that identify the current page and facilitate searching. To hide or display the Tags region, click the arrow to the right of the region title.
About the Notes RegionThe Notes region displays notes associated with current page. To hide or display the Notes region, click the arrow to the right of the region title.
Modifying Websheet ContentOnce you understand the type of functionality available in AnyCo IT Department, the next step is to learn more about the construction of each page. Analyzing the deconstruction of an application is an efficient way to speed up the learning process. If you break something, you can quickly delete the demonstration application and install
See Also: "Managing Uploaded Files and Images" on page 5-34
See Also: "Adding Tags" on page 5-36
See Also: "Adding Notes" on page 5-37

About Sample Websheet - AnyCo IT Department
Utilizing Packaged Applications 3-27
it again. See "Managing Packaged Applications" on page 3-1.
The section that follows offers a high-level discussion of editing a Websheet. To learn more, see "About Websheet Applications" on page 5-1.
To update a Websheet section:
1. Run the Websheet as described in "About Packaged Applications" on page 1.
2. Click the Edit icon that displays in the upper right of the section.
The Edit Section page appears. How you edit a specific section depends upon the section type.
3. Edit the fields provided.
4. To change the formatting, click the Expand Toolbar icon in the upper right corner.
The Toolbar appears. When you pass your cursor over an icon, a descriptive tooltip displays.
Tip: Oracle Application Express includes two types of packaged applications: sample and productivity applications. By default, sample applications are fully editable. In contrast, you must unlock a productivity application before you can edit it. Unlocking a productivity packaged application makes it ineligible for future upgrades or support by Oracle Support.

About Sample Websheet - AnyCo IT Department
3-28 Oracle Application Express Application Builder User's Guide
5. To hide the toolbar, click the Collapse Toolbar icon.
6. To save your changes, click Apply Changes.
See Also: "About Adding and Editing Page Sections" on page 5-10 to learn more about editing Websheets

4
Managing the Development Process 4-1
4 Managing the Development Process
Team Development is a built-in development management tool that enables you to manage the development process by tracking new features, non-feature related tasks (or To Dos), bugs, and milestones. Users can provide real-time feedback which then can be categorized into To Dos, bugs, or features.
Topics:■ About the Team Development Home Page
■ Tracking Features
■ Tracking Milestones
■ Tracking To Dos
■ Managing Bugs
■ Managing Feedback
■ Utilizing the Tags Summary
■ Managing Team Actions
About the Team Development Home PageThe Team Development home page functions as a starting point for managing features, milestones, To Dos, bugs, and feedback.
The following large icons display in the center of the page:
■ Milestones. Track events associated with the development process. You can associate milestones with features, bugs, and To Dos. See "Tracking Milestones" on page 4-8.

About the Team Development Home Page
4-2 Oracle Application Express Application Builder User's Guide
■ Features. Track features from initial concept through implementation. You can organize features by release, assignee, tags, or associated milestones.See "Tracking Features" on page 4-3.
■ To Dos. Manage action items that can be assigned, prioritized, tagged, and tracked. To dos can also have related parent tasks. To dos may or may not be associated with a feature or milestone. See "Tracking To Dos" on page 4-10.
■ Bugs. Track software defects or bugs. Bugs can be assigned, associated with milestones, and tracked by due date, status, and other attributes. See "Managing Bugs" on page 4-14.
■ Feedback. Gathering real-time comments, enhancement requests, and bugs from your application users. See "Managing Feedback" on page 4-17.
About NewsUse the News region to communicate with other developers. You can add new or view news entries posted by other workspace users. News displays on the Application Express home page, the Team Development home page, and the News page. See "Managing News Entries" on page 4-22.
About Team ActionsThe Team Actions list displays on the right side of the page.
The Team Actions list contains the following links:
■ Manage Links. See "Managing Links" on page 4-21.
■ Manage News. See "Managing News Entries" on page 4-22.
■ Team Development Settings. See "Managing Team Development Settings" on page 4-24.
■ Release Summary. See "Viewing a Release Summary" on page 4-24.
■ Utilities. See "About Utilities" on page 4-25.
■ Manage Focus Areas. See "Editing Focus Areas" on page 4-26.
■ View Files. See "Viewing Files Attached to Features, To Dos and Bugs" on page 4-26.
Tip: The last item on the Team Actions list toggles between View Files and Enable Files depending upon whether your administrator has enabled file upload capability. If Enable Files displays, then file upload capability has not yet been enabled by your administrator.
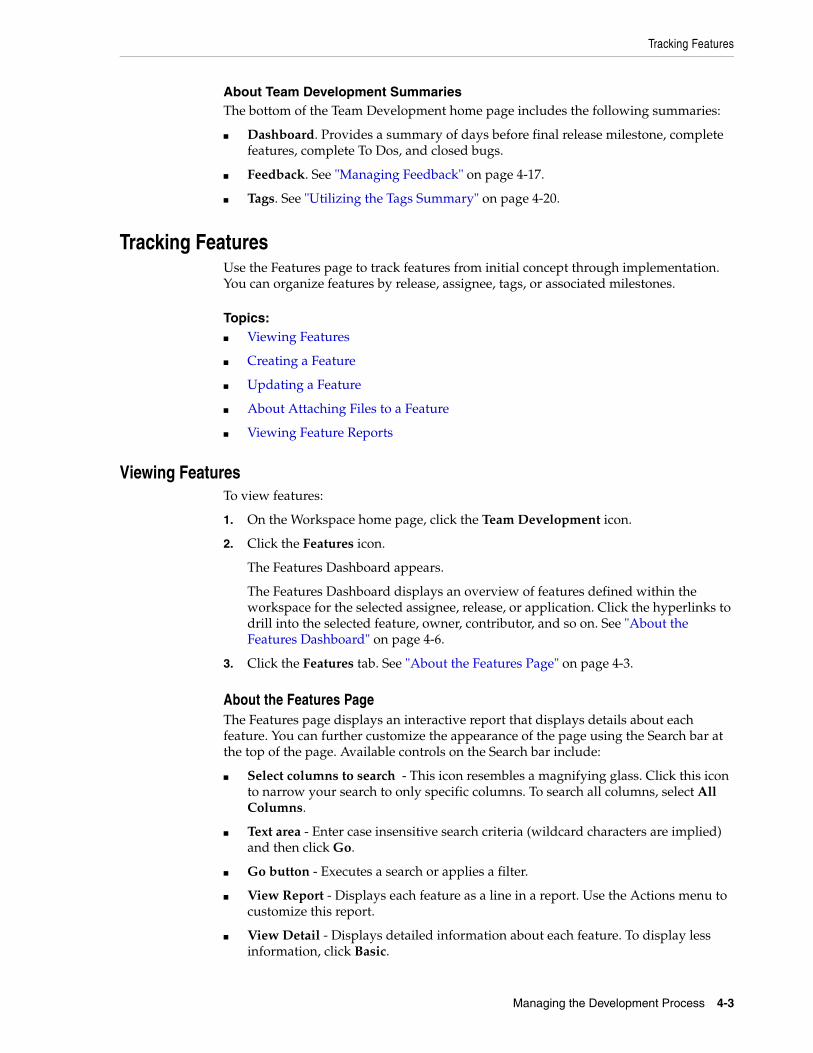
Tracking Features
Managing the Development Process 4-3
About Team Development SummariesThe bottom of the Team Development home page includes the following summaries:
■ Dashboard. Provides a summary of days before final release milestone, complete features, complete To Dos, and closed bugs.
■ Feedback. See "Managing Feedback" on page 4-17.
■ Tags. See "Utilizing the Tags Summary" on page 4-20.
Tracking FeaturesUse the Features page to track features from initial concept through implementation. You can organize features by release, assignee, tags, or associated milestones.
Topics:■ Viewing Features
■ Creating a Feature
■ Updating a Feature
■ About Attaching Files to a Feature
■ Viewing Feature Reports
Viewing FeaturesTo view features:
1. On the Workspace home page, click the Team Development icon.
2. Click the Features icon.
The Features Dashboard appears.
The Features Dashboard displays an overview of features defined within the workspace for the selected assignee, release, or application. Click the hyperlinks to drill into the selected feature, owner, contributor, and so on. See "About the Features Dashboard" on page 4-6.
3. Click the Features tab. See "About the Features Page" on page 4-3.
About the Features PageThe Features page displays an interactive report that displays details about each feature. You can further customize the appearance of the page using the Search bar at the top of the page. Available controls on the Search bar include:
■ Select columns to search - This icon resembles a magnifying glass. Click this icon to narrow your search to only specific columns. To search all columns, select All Columns.
■ Text area - Enter case insensitive search criteria (wildcard characters are implied) and then click Go.
■ Go button - Executes a search or applies a filter.
■ View Report - Displays each feature as a line in a report. Use the Actions menu to customize this report.
■ View Detail - Displays detailed information about each feature. To display less information, click Basic.

Tracking Features
4-4 Oracle Application Express Application Builder User's Guide
■ Actions menu - Use this menu to customize the report view. See "About the Actions Menu" on page 9-6.
Creating a FeatureTo create a feature:
1. On the Workspace home page, click the Team Development icon.
2. Click the Features icon.
The Features Dashboard appears.
3. Click Create Feature.
4. Fill in the appropriate fields. Mandatory fields are marked with a red asterisk (*).
5. To learn more about a specific field, see item Help. See "About Field-Level Help" on page 1-13.
6. To add new values to editable select lists, enter a value in the field with the title New. For example, to add name to the Feature Owner list, enter a value in New Feature owner.
The value you enter is added.
7. Click Create Feature.
Creating Parent FeaturesYou can group features hierarchically using the Parent Feature attribute. Selecting a Parent Feature creates a parent/child relationship. When viewing features in Tree view, features are grouped first by release and then by parent. To learn more, see "About Tree" on page 4-6.
Updating a FeatureTo update a feature:
1. On the Workspace home page, click the Team Development icon.
2. Click the Features icon.
The Features Dashboard appears.
3. Click the Features tab.
The Features page appears.
4. How you edit a feature description depends upon the View selected in the Search bar. Options include:
■ View Detail - Click the feature number.
■ View Report - Click the Edit icon.
5. Edit the appropriate fields.
6. To add new values to editable select lists, enter a value in the field with the title New (for example, New Owner).
For example, to add a name to the Feature Owner list, enter a value in New Owner.
See Also: "Editing Focus Areas" on page 4-26

Tracking Features
Managing the Development Process 4-5
The value you enter is added.
7. Click Apply Changes.
About Attaching Files to a FeatureIf enabled at the workspace-level, you can attach files to features. To learn more, see "Enabling Support for File Attachments in Team Development" in Oracle Application Express Administration Guide.
Topics:■ Attaching a File to a Feature
■ Viewing, Editing, and Removing Attached Files
Attaching a File to a FeatureTo attach a file to a feature:
1. Navigate to the Feature page. See "Updating a Feature" on page 4-4.
2. From Actions, click Add File.
3. On Add File:
a. File - Locate the file to be uploaded.
b. Description - Enter a description of the file.
c. Click Add File.
A new region, called Files, displays at the bottom of the Feature page.
Viewing, Editing, and Removing Attached FilesTo view, edit, or remove attached files:
1. Navigate to the Feature page. See "Updating a Feature" on page 4-4.
2. Scroll down to Files.
3. Click View and Manage Files.
The Files page appears.
4. To view a file, click the name.
5. To edit the file description, click the Edit icon.
6. To delete an attached file, click the Delete icon.
Viewing Feature ReportsUse feature reports to view features from different perspectives.
Topics:■ About the Features Dashboard
■ About Tree
See Also: "Editing Focus Areas" on page 4-26
See Also: "Viewing Files Attached to Features, To Dos and Bugs" on page 4-26

Tracking Features
4-6 Oracle Application Express Application Builder User's Guide
■ About Calendar
■ About History
■ About Progress Log
■ About Focus Areas
■ About Owners
■ About Utilities
About the Features DashboardThe Features Dashboard displays an overview of features defined within the workspace for the selected assignee, release, or application. Click the hyperlinks to drill into the selected feature, owner, contributor, and so on. The Dashboard page contains the following regions:
■ Percent Complete
■ Development Progress
■ Owners
■ New Features
To edit the dashboard:
1. Edit the following fields at the top of the page and click Set.
■ Assignee
■ Release
■ Application
2. To reset the dashboard to the default display, click the Reset button.
About TreeThe Tree page displays features in a hierarchical tree by release. To select a new release, make a selection from the Release list. The feature number and percent complete display to the right of the feature name. To hide or display the percent complete, select Yes or No from Include Percent Complete and click Set. To edit a feature, simply click it.
Features are grouped first by release and then by parent. To expand a grouping, click the small triangle to the left of the feature name.
See Also: "About Feature Utilities" on page 4-25

Tracking Features
Managing the Development Process 4-7
Click the Expand All and Collapse All buttons to expand or collapse all grouping. To view or edit a feature, click the feature name. The Feature page appears. To create a feature, click Create Feature and follow the online instructions.
About CalendarThe Calendar page displays features by due date or date completed in a calendar format. Click the Previous and Next buttons to view other months. To view feature milestones for the current day, click Today. To view a specific feature, click the feature name. To create a feature, click Create Feature and following the online instructions.
If a parent features have been defined, the due date or date completed displays in a calendar format. Click the Previous and Next buttons to view other months. To view feature milestones for the current day, click Today. To view a specific feature, click the feature name. To create a feature, click Create Feature and following the online instructions.
About HistoryDisplays a report of recently changed features, including the old value and new value and who made the update. To view a specific feature, click the feature name.
The Change History page displays as an interactive report. To customize the report, use the Search bar at the top of the page. To learn more, see "Customizing Interactive Reports" on page 9-4.
About Progress LogDisplays a report of progress log entries. The progress log shows all the progress entries across all features. To view log entries by release, make a selection from the Release select list and click Set. To edit the log, click the Edit icon.
The Progress Log page displays as an interactive report. To customize the report, use the Search bar at the top of the page. To learn more, see "Customizing Interactive Reports" on page 9-4.
About Focus AreasDisplays a chart of the number of features per defined focus area by release. To alter the chart, select another release or another assignee and click Set. To return to the default chart, click Reset.
Tip: When displaying features by a given release, features with parent or children features in different releases do not display.
See Also: "Creating a Feature" on page 4-4
See Also: "Creating a Feature" on page 4-4

Tracking Milestones
4-8 Oracle Application Express Application Builder User's Guide
About OwnersDisplays a chart of the number of features by owner. To alter the chart, select another release, minimum status, or maximum status and click Set. To return to the default chart, click Reset.
About UtilitiesUse the Feature Utilities page to manage milestones for multiple features. Select one of the following and follow the on-screen instructions:
■ Assign milestones to features (only those with no milestone currently assigned).
■ Set feature due date to milestone date (only affects features).
■ Change milestone for overdue features.
■ Push due date of open features.
See "About Feature Utilities" on page 4-25.
Tracking MilestonesUse the Milestones page to manage important milestones. Milestones track events. You can associate milestones with features, bugs, and To Dos
Topics:■ Viewing Milestones
■ Creating a Milestone
■ Updating a Milestone
■ Viewing Milestone Reports
Viewing MilestonesTo view milestones:
1. On the Workspace home page, click the Team Development icon.
2. Click the Milestones icon.
The Milestones Dashboard appears.
The Milestones Dashboard displays an overview of milestones within the workspace. You can filter by release or link to a specific milestone or milestones by owner. See "About the Milestones Dashboard" on page 4-10.
3. Click the Milestones tab.
The Milestones page appears. "About the Milestones Page" on page 4-8.
About the Milestones PageThe Milestones page displays as a report. You can customize the appearance of page, using the Search bar at the top of the page. Available controls on the Search bar include:
■ Search icon - Resembles a magnifying glass. Click this icon to narrow your search to only specific columns. To search all columns, select All Columns.
■ Text area - Enter case insensitive search criteria (wildcard characters are implied) and then click Go.

Tracking Milestones
Managing the Development Process 4-9
■ Go button - Executes a search or applies a filter.
■ Actions menu - Displays the Actions menu. Use this menu to customize the report. See "About the Actions Menu" on page 9-6.
Creating a MilestoneTo create a milestone:
1. On the Workspace home page, click the Team Development icon.
2. Click the Milestones icon.
The Milestones Dashboard page appears and displays the following regions:
■ Milestone calendar
■ Days to final milestone
■ Component Counts
■ Milestone Owners
3. Click Create Milestone.
4. Fill in the appropriate fields. Mandatory fields are marked with a red asterisk (*).
5. To learn more about a specific field, see item Help. See "About Field-Level Help" on page 1-13.
6. To add new values to editable select lists, enter a value in the field with the title New. For example, to add name to the Owner list, enter a value in New Owner.
The value you enter is added.
7. Click Create Milestone.
Updating a MilestoneTo update a milestone:
1. On the Workspace home page, click the Team Development icon.
2. Click the Milestones icon.
3. Click the Milestones tab.
The Milestones page appears.
4. Click the Edit icon to the left of the description.
5. Edit the appropriate fields.
6. To learn more about a specific field, click the item label. See "About Field-Level Help" on page 1-13.
7. To add new values to editable select lists, enter a value in the field with the title New. For example, to add name to the Owner list, enter a value in New Owner.
The value you enter is added.
8. Click Apply Changes.
Viewing Milestone ReportsUse milestone reports to view milestones from different perspectives.

Tracking To Dos
4-10 Oracle Application Express Application Builder User's Guide
Topics:■ About the Milestones Dashboard
■ About Calendar View
■ By Owner
■ About Features by Milestone
About the Milestones DashboardThe Milestones Dashboard displays an overview of milestones within the workspace. To filter by release, make a selection from the Release list. To view specific milestones, click the milestone hyperlinks or the milestone owner.
The Milestones Dashboard page appears and displays the following regions:
■ Milestone calendar
■ Days to final milestone
■ Component Counts
■ Milestone Owners
To edit the dashboard:
1. Edit the following Show and Release lists at the top of the page and click Set.
2. To reset the dashboard to the default display, click the Reset button.
About Calendar ViewThe Calendar page displays milestones by date in a calendar format. To filter by release, make a selection from the Release list. Click the Previous and Next buttons to view other months. To view milestones for the current day, click Today. To view a specific milestone, click the hyperlink. To create a milestone, click Create Milestone and following the online instructions.
By OwnerThe By Owner page enables you to select a milestone and view Team Development objects associated with it (for example, features by owner, feature metrics, milestone exceptions, and so on). To view milestones associated with a specific owner, click the appropriate section of the pie chart. A report appears displaying milestones by owner.
To alter the chart, select another release or milestone and click Set. To return to the default chart, click Reset.
About Features by MilestoneFeature by Milestone displays a report of features associated with each milestone. This report is useful in tracking progress. To edit the report, select another release and click Set. To return to the default report, click Reset.
Tracking To DosTo dos are action items that can be assigned, prioritized, tagged, and tracked. To dos can also have related parent tasks. To dos may or may not be associated with a feature or milestone.
See Also: "About Feature Utilities" on page 4-25

Tracking To Dos
Managing the Development Process 4-11
Topics:■ Viewing To Dos
■ About the To Dos Page
■ Creating a To Do
■ Updating a To Do
■ About Attaching Files to a To Do
■ Viewing To Do Reports
Viewing To DosTo view To Dos:
1. On the Workspace home page, click the Team Development icon.
2. Click the To Dos icon.
The To Dos Dashboard appears. The To Dos Dashboard displays an overview of To Dos within the workspace. You can filter by release, assignee, or application. See "About the To Do Dashboard" on page 4-13.
3. Click the To Dos tab.
The To Dos page appears.
About the To Dos PageThe To Dos page displays details about each task. To view your personal To Dos, click the My To Dos button at the top of the page. You can customize the appearance of page, using the Search bar at the top of the page. Available controls on the Search bar include:
■ Search - Resembles a magnifying glass. Click this icon to narrow your search to specific columns. To search all columns, select All Columns.
■ Text area - Enter case insensitive search criteria (wildcard characters are implied) and then click Go.
■ Go button - Executes a search or applies a filter.
■ View Report - Displays each item as a line in a report. Use the Actions menu to customize this report.
■ View Detail - Displays detailed information about each item. To display less information, click Basic.
■ Actions menu - Use this menu to customize the report view. See "About the Actions Menu" on page 9-6.
Creating a To DoTo create a To Do:
1. On the Workspace home page, click the Team Development icon.
2. Click the To Dos icon.
The To Dos dashboard appears.
3. Click Create To Do.
4. Fill in the appropriate fields. Mandatory fields are marked with a red asterisk (*).

Tracking To Dos
4-12 Oracle Application Express Application Builder User's Guide
5. To learn more about a specific field, see item Help. See "About Field-Level Help" on page 1-13.
6. To add new values to editable select lists, enter a value in the field with the title New. For example, to add name to the Assigned To list, enter a value in New Assignee.
The value you enter is added.
7. Click Create To Do.
Updating a To DoTo update a To Do:
1. On the Workspace home page, click the Team Development icon.
2. Click the To Dos icon.
The To Dos Dashboard appears.
3. Click the To Dos tab.
4. How you edit a To Do depends upon the View selected in the Search bar. Options include:
■ View Detail - Click the To Do number.
■ View Report - Click the To Do number or click the Edit icon.
5. Edit the appropriate fields.
6. To add new values to editable select lists, enter a value in the field with the title New. For example, to add name to the Assigned To list, enter a value in New Assignee.
The value you enter is added.
7. Click Apply Changes.
About Attaching Files to a To DoIf enabled at the workspace-level, you can attach files to a To Do. To learn more, "Enabling Support for File Attachments in Team Development" in Oracle Application Express Administration Guide.
Topics:■ Attaching a File to a To Do
■ Viewing, Editing, and Removing Attached Files
Attaching a File to a To DoTo attach a file to a To Do:
1. Navigate to the To Do page. See "Updating a To Do" on page 4-12.
2. From Actions, click Add File.
3. On Add File:
a. File - Locate the file to be uploaded.
See Also: "Viewing Files Attached to Features, To Dos and Bugs" on page 4-26

Tracking To Dos
Managing the Development Process 4-13
b. Description - Enter a description of the file.
c. Click Add File.
A new region, called Files, displays at the bottom of the page.
Viewing, Editing, and Removing Attached FilesTo manage attached files:
1. Navigate to the To Do page. See "Updating a To Do" on page 4-12.
2. Scroll down to Files.
3. Click View and Manage Files.
The Files page appears.
4. To view a file, click the name.
5. To edit the file description, click the Edit icon.
6. To delete an attached file, click the Delete icon.
Viewing To Do ReportsUse To Do reports to view To Dos from different perspectives.
Topics:■ About the To Do Dashboard
■ About Calendar View
■ About Progress Log
About the To Do DashboardThe To Dos Dashboard displays an overview of To Dos within the workspace. You can filter by release, assignee, or application. The page is divided into the following sections:
■ Developer Percent Complete
To view To Dos associated with specific owner, click the assignee name.
■ Open To do’s
To edit the dashboard:
1. Edit the following fields at the top of the page and click Set.
■ Show
■ Release
■ Assignee
■ Application
2. To reset the dashboard to the default display, click the Reset button.
About Calendar ViewThe Calendar page displays To Dos by due date or date completed in a calendar format. To filter the display by completion status or release, make a selection from the Show and Release select lists and click Set. Click the Previous and Next buttons to view other months. To view To Dos for the current day, click Today. To view a specific

Managing Bugs
4-14 Oracle Application Express Application Builder User's Guide
To Do, click the To Do name. To create a To Do, click Create To Do and following the online instructions.
About Progress LogDisplays a report of progress log entries. The progress log shows all the progress entries across all To Dos. To edit the log, click the Edit icon.
The Progress Log page displays as an interactive report. To customize the report, use the Search bar at the top of the page. To learn more, see "Customizing Interactive Reports" on page 9-4.
Managing BugsBugs track software defects. Bugs can be assigned, associated with milestones, and tracked by due date, status, and other attributes.
Topics:■ Viewing Bugs
■ About the Bugs Page
■ Creating a Bug
■ Editing a Bug
■ About Attaching Files to a Bug
■ Viewing Bug Reports
Viewing BugsTo view bugs:
1. On the Workspace home page, click the Team Development icon.
2. Click the Bugs icon.
The Bugs Dashboard appears. The Bugs Dashboard displays an overview of known software defects. See "About the Bugs Dashboard" on page 4-17.
3. Click the Bugs tab.
The Bugs page appears. See "About the Bugs Page" on page 4-14.
About the Bugs PageThe Bugs page displays details about each bug. You can further customize the appearance of the page using the Search bar at the top of the page. Available controls on the Search bar include:
■ Search icon - Resembles a magnifying glass. Click this icon to narrow your search to only specific columns. To search all columns, select All Columns.
■ Text area - Enter case insensitive search criteria (wildcard characters are implied) and then click Go.
■ Go button - Executes a search or applies a filter.
■ View Report - Displays each bug as a line in a report. Use the Actions menu to customize this report.

Managing Bugs
Managing the Development Process 4-15
■ View Detail - Displays detailed information about each bug. To display less information, click Basic.
■ Actions menu - Use this menu to customize the report view. See "About the Actions Menu" on page 9-6.
Creating a BugTo create a bug:
1. On the Workspace home page, click the Team Development icon.
2. Click the Bugs icon.
The Bugs Dashboard appears.
3. Click Create Bug.
4. Fill in the appropriate fields. Mandatory fields are marked with a red asterisk (*).
5. To learn more about a specific field, see item Help. See "About Field-Level Help" on page 1-13.
6. To add new values to editable select lists, enter a value in the field with the title New. For example, to add name to the Assigned To list, enter a value in New Assignee.
The value you enter is added.
7. Click Create.
Editing a BugTo edit a bug:
1. On the Workspace home page, click the Team Development icon.
2. Click the Bugs icon.
The Bugs Dashboard appears.
3. Click the Bugs tab.
The Bugs page appears.
4. How you edit a bug depends upon the View selected in the Search bar. Options include:
■ View Detail - Click the bug number or click the Edit icon.
■ View Report - Click the Edit icon.
5. Edit the appropriate fields.
6. To add new values to editable select lists, enter a value in the field with the title New. For example, to add name to the Assigned To list, enter a value in New Assignee.
The value you enter is added.
7. Click Apply Changes.

Managing Bugs
4-16 Oracle Application Express Application Builder User's Guide
About Attaching Files to a BugIf enabled at the workspace-level, you can attach files to a To Do. To learn more, see "Enabling Support for File Attachments in Team Development" in Oracle Application Express Administration Guide.
Topics:■ Attaching a File to a Bug
■ Viewing, Editing, and Removing Attached Files
Attaching a File to a BugTo attach a file to a bug:
1. Navigate to the To Do page. See "Editing a Bug" on page 4-15.
2. From Actions, click Add File.
3. On Add File:
a. File - Locate the file to be uploaded.
b. Description - Enter a description of the file.
c. Click Add File.
A new region, called Files, displays at the bottom of the page.
Viewing, Editing, and Removing Attached FilesTo manage attached files:
1. Navigate to the Bug page. See "Editing a Bug" on page 4-15.
2. Scroll down to Files.
3. Click View and Manage Files.
The Files page appears.
4. To view a file, click the name.
5. To edit the file description, click the Edit icon.
6. To delete an attached file, click the Delete icon.
Viewing Bug ReportsUse bug reports to view bugs from different perspectives.
Topics:■ About the Bugs Dashboard
■ About Calendar
■ About By Developer
■ About By Day
See Also: "Viewing Files Attached to Features, To Dos and Bugs" on page 4-26

Managing Feedback
Managing the Development Process 4-17
About the Bugs DashboardThe Bugs Dashboard displays an overview of known software defects. The Dashboard page contains the following regions:
■ Percent Closed
■ Assigned Developer
■ Severity
■ Status
To edit the dashboard:
1. Edit the following fields at the top of the page and click Set.
■ Show
■ Release
2. To reset the dashboard to the default display, click the Reset button.
About CalendarUse the Show list on the Calendar page to display open bugs with an estimated close date, open bugs with no estimated close date, or closed bugs. Click the Previous and Next buttons to view other months. To view a specific bug, click the bug description. To create a new bug, click Create Bug.
About By DeveloperThe By Developer page displays bugs by developer. To view bugs associated with a specific assignee, click the appropriate section of the chart. A report appears displaying bugs by developer.
To alter the chart, select another release and click Set. To return to the default chart, click Reset. To create a new bug, click Create Bug.
About By DayThe By Day page displays number of bugs opened and closed by day. To alter the chart, select another release and click Set. To return to the default bar chart, click Reset. To create a new bug, click Create Bug.
Managing FeedbackFeedback is the process of gathering real-time comments, enhancement requests, and bugs from your application users. To add a feedback page to an application, you add a Feedback page.
Topics:■ Viewing Feedback
■ Adding a Feedback Page to an Application
■ Reviewing Feedback
■ Viewing Feedback Reports
Viewing FeedbackTo view feedback:

Managing Feedback
4-18 Oracle Application Express Application Builder User's Guide
1. On the Workspace home page, click the Team Development icon.
2. Click the Feedback icon.
The Feedback Dashboard appears. See "About the Feedback Dashboard" on page 4-20.
3. Click the Feedback tab.
The Feedback page appears.
About the Feedback PageThe Feedback page displays details about feedback entries. You can further customize the appearance of the page using the Search bar at the top of the page. Available controls on the Search bar include:
■ Search icon - Resembles a magnifying glass. Click this icon to narrow your search to only specific columns. To search all columns, select All Columns.
■ Text area - Enter case insensitive search criteria (wildcard characters are implied) and then click Go.
■ Go button - Executes a search or applies a filter.
■ View Report displays each item as a line in a report. Use the Actions menu to customize this report.
■ View Detail displays detailed information about each item. To display less information, click Basic.
■ Actions menu - Use this menu to customize the report view. See "About the Actions Menu" on page 9-6.
Adding a Feedback Page to an ApplicationTo use the Feedback module in Team Development, you must add a Feedback page to the target application.
Topics:■ Creating a Feedback Page
■ Using the Feedback Page
Creating a Feedback PageTo add a feedback page to an application:
1. On the Workspace home page, click Application Builder.
2. Select the application for which you want feedback.
The Application home page appears.
3. Click the Create Page button.
4. For Page Type, select Feedback Page.
5. For Create Page, customize any settings.
6. For Navigation Bar, specify whether to create a navigation bar entry. If you select Yes, enter an entry label.
7. Click Create.

Managing Feedback
Managing the Development Process 4-19
Using the Feedback PageTo submit feedback:
1. Run the application for which you want to submit feedback.
2. Click the Feedback link.
A Feedback window appears.
3. In Feedback, enter a comment.
Note that the application and page are noted and this information is made available to the developers.
4. From Feedback Type, select General Comment, Enhancement Request, or Bug.
5. Click Submit Feedback.
Reviewing FeedbackTo review feedback:
1. On the Workspace home page, click the Team Development icon.
2. Click the Feedback icon.
The Dashboard appears.
3. Click the Feedback tab.
4. How you access a specific feedback depends upon the View:
■ View Detail - Click the feedback ID.
■ View Report - Click the Edit icon.
The feedback entry displays at the top of the page.
5. Under Disposition:
a. Status - Select a new status.
b. Tags are keywords that further describe this feedback. Separate multiple tags with commas.
c. Developer Comment - Enter additional comments.
d. Public Response - Enter a public response.
6. To create a bug, To Do, or feature, select the following buttons:
a. Log as Bug. Enter the appropriate information and click Create Bug.
b. Log as To Do. Enter the appropriate information and click Create To Do.
c. Log as Feature. Enter the appropriate information and click Log as Feature.
7. Click Apply Changes.
Viewing Feedback ReportsUse feedback reports to view feedback from different perspectives.
Topics:■ About the Feedback Dashboard
■ About Calendar

Utilizing the Tags Summary
4-20 Oracle Application Express Application Builder User's Guide
■ About By Application
■ About By Filing User
About the Feedback DashboardThe Feedback Dashboard contains the following regions:
■ Percent Closed
■ Distinct Filers
■ Feedback by Status
■ Top Feedback Filers
■ Summary
To refresh the content, click the Refresh button.
About CalendarThe Calendar page displays the number of feedback comments provided by application by day. Click the Previous and Next buttons to view other months.
About By ApplicationThe By Application page displays a chart of feedback by application. Click a section of the chart to view a more detailed report.
About By Filing UserThe By Filing User page displays a chart of open feedback by filing user. Click a section of the chart to view a more detailed report.
Utilizing the Tags SummaryThe Tags summary on the Team Development home page displays a weighted list of all the tags associated with all the Team Development components. Click the hyperlinks to link to a search page displaying all components with the selected tag. You can use the Tag Cloud summary to better manage Team Development components.
To populate this summary, edit the Tags field for each Team Development component (that is, feature, To Do task, bug, and feedback entry).
Managing Team ActionsThe Team Actions list displays on the right side of the Team Development home page.

Managing Team Actions
Managing the Development Process 4-21
Topics:■ Managing Links
■ Managing News Entries
■ Managing Team Development Settings
■ Viewing a Release Summary
■ About Utilities
■ Editing Focus Areas
■ Viewing Files Attached to Features, To Dos and Bugs
Managing LinksUse the Links page to share links within Team Development.
Topics:■ Accessing the Links Page
■ Adding a Link
■ Editing or Deleting a Link
Accessing the Links PageTo access the links page:
1. On the Workspace home page, click the Team Development icon.
2. On the Team Actions list, click Manage Links.
The Links page appears.
3. Use the Search bar to filter the display.
Available controls on the Search bar include:
■ Search icon - Resembles a magnifying glass. Click this icon to narrow your search to only specific columns. To search all columns, select All Columns.
Tip: The last item on the Team Actions list toggles between View Files and Enable Files depending upon whether your administrator has enabled file upload capability. If Enable Files displays, then file upload capability has not yet been enabled by your administrator.

Managing Team Actions
4-22 Oracle Application Express Application Builder User's Guide
■ Text area - Enter case insensitive search criteria (wildcard characters are implied) and then click Go.
■ Go button - Executes a search or applies a filter.
■ Actions menu - Displays the Actions menu. Use this menu to customize an interactive report. See "About the Actions Menu" on page 9-6.
Adding a LinkTo add a link:
1. On the Workspace home page, click the Team Development icon.
2. On the Team Actions list, click Manage Links.
The Links page appears.
3. Click Create Link.
The Links page appears.
4. Fill in the appropriate fields. Mandatory fields are marked with a red asterisk (*).
5. To learn more about a specific field, see item Help. See "About Field-Level Help" on page 1-13.
6. Click Create Link.
Editing or Deleting a LinkTo edit or delete a link:
1. On the Workspace home page, click the Team Development icon.
2. On the Team Actions list, click Manage Links.
The Links page appears.
3. To edit a link:
a. Click the Edit icon.
The Links page appears.
b. Edit the appropriate fields.
c. Click Apply Changes.
4. To delete a new link:
a. Click the Edit icon.
The Links page appears.
b. Click Delete.
Managing News Entries

Managing Team Actions
Managing the Development Process 4-23
Use the News region to communicate with other developers. You can add or view news entries posted by other workspace users. News displays on the Application Express home page, the Team Development home page, and News page.
Topics:■ Accessing the News Page
■ Adding a News Entry
■ Editing or Deleting News
Accessing the News PageTo access the News page:
1. On the Workspace home page, click the Team Development icon.
2. On the Team Actions list, click Manage News.
The News page appears.
3. Use the Search bar to filter the display. Available controls include:
■ Search icon - Resembles a magnifying glass. Click this icon to narrow your search to only specific columns. To search all columns, select All Columns.
■ Text area - Enter case insensitive search criteria (wildcard characters are implied) and then click Go.
■ Go button - Executes a search or applies a filter.
■ View Report - Displays each entry as a line in a report.
■ View Detail - Displays detailed information about each news entry.
■ Actions menu - Displays the Actions menu. Use this menu to customize an interactive report. See "About the Actions Menu" on page 9-6.
Adding a News EntryTo add a news entry:
1. On the Workspace home page, click the Team Development icon.
2. On the Team Actions list, click Manage News.
The News page appears.
3. To add news:
a. Click Add News.
The News page appears.
b. Enter text in the News Entry field.
c. Click Add News.
Editing or Deleting NewsTo edit or delete news:
1. On the Workspace home page, click the Team Development icon.
2. On the Team Actions list, click Manage News.
The News page appears.

Managing Team Actions
4-24 Oracle Application Express Application Builder User's Guide
3. To edit a news item:
a. Click the Edit icon.
b. Edit the news item.
c. Click Apply Changes.
4. To delete a news item:
a. Click the Edit icon.
b. Click Delete.
Managing Team Development SettingsTeam Development Settings enable you specify how To Dos and bugs display, default values for release, owner, and priority, and what tracking attributes are enabled for the current workspace.
To edit Team Development settings:
1. On the Workspace home page, click the Team Development icon.
2. On the Team Actions list, click Team Development Settings.
The Settings page appears.
3. Edit the appropriate attributes.
4. To learn more about a specific field, see item Help. See "About Field-Level Help" on page 1-13.
5. Click Apply Changes.
Viewing a Release SummaryThe Release Summary report enables you to organize features, To Dos, and bugs.
To access the Release Summary report:
1. On the Workspace home page, click the Team Development icon.
2. On the Team Actions list, click Release Summary.
The Release Summary page appears.
3. Use the Search bar to restrict the view. To filter the view, select a developer or release and click Set.
4. To email the report:
a. Click Email.
The Email Report page appears.
b. Fill in the appropriate fields. Mandatory fields are marked with a red asterisk (*).
c. To learn more about a specific field, see item Help. See "About Field-Level Help" on page 1-13.
5. Click Email.
Tip: Click Reset to Default to return the settings to the default values.
Tip: Click Reset to return the report to the default view.

Managing Team Actions
Managing the Development Process 4-25
About UtilitiesUse Team Development Utilities to manage team development data.
To access Team Development Utilities:
1. On the Workspace home page, click the Team Development icon.
2. On the Team Actions list, click Utilities.
3. Options include:
■ Push past due Bugs - Enables you to extend the estimated fix date of bugs that are not yet complete. You can filter and then select just the bugs you want to push and then extend for any number of days.
■ Update Assignees - Enables you to reassign selected components from one user to another user, for all releases or just a selected release. Only incomplete components are reassigned (that is, those components having a status less than 100% or milestone date in the future).
■ Purge Data - Deletes all entries for the selected components. This is useful when beginning a new development cycle or after using a workspace for testing.
■ Manage Team Development Settings - See "Managing Team Development Settings" on page 4-24.
■ Feature Utilities - See "About Feature Utilities" on page 4-25
About Feature UtilitiesUse the Feature Utilities page to manage milestones for multiple features at once. Use this feature to:
■ Assign milestones to features
■ Set the feature due date to a milestone date
■ Change milestone for overdue features
■ Push due date of open features
To access the Feature Utilities page:
1. On the Workspace home page, click the Team Development icon.
2. On the Team Actions list, click Utilities.
3. On the Utilities page, click the Feature Utilities link.
4. On the Feature Utilities page:
a. Select one of the following:
– Assign milestones to features (only those with no milestone currently assigned).
– Set feature due date to milestone date (only affects features).
– Change milestone for overdue features.
– Push due date of open features.
b. Click Next.
5. Follow the on-screen instructions.

Managing Team Actions
4-26 Oracle Application Express Application Builder User's Guide
6. To learn more about a specific field, see item Help. See "About Field-Level Help" on page 1-13.
Editing Focus AreasWhen you create or update a feature, you can assign it to a Focus Area.
To edit an existing feature Focus Area:
1. On the Workspace home page, click the Team Development icon.
2. From the Team Actions list, click Manage Focus Areas.
The Manage Focus Areas page appears.
3. Locate the Focus Area and click the Edit icon.
4. In Change To, enter your edits.
5. Click Apply Changes.
Viewing Files Attached to Features, To Dos and BugsIf enabled at the workspace-level, you can attach files to a feature, To Do, or bug. To learn more, see "Enabling Support for File Attachments in Team Development" in Oracle Application Express Administration Guide.
To view files attached to features, To Dos, and bugs:
1. On the Workspace home page, click the Team Development icon.
2. From the Team Actions list, click the View Files.
The Manage Focus Areas page appears.
3. To view a file, click the name.
Tip: If not enabled, administrators can access the Set Workspace Administration page directly from Team Development by clicking Enable Files on the Team Actions list.

5
About Websheet Applications 5-1
5About Websheet Applications
Websheet applications are interactive web pages that combine text with data. These applications are highly dynamic and defined by their users. Websheet applications include navigation controls, search capabilities, and the ability to add annotations such as files, notes, and tags. Websheet applications can be secured using access control lists and several built-in authentication models.
To learn more about viewing the sample Websheet applications that ship with Oracle Application Express, see "About Sample Websheet - AnyCo IT Department" on page 16.
Topics:■ About Using Websheet Applications
■ About Creating a Websheet Application
■ About Adding and Editing Page Sections
■ About Text Sections
■ About Navigation Sections
■ About Adding Data Grids
■ About Adding and Editing Data Content
■ About Adding Data Reports
■ About Data Sections
■ About Chart Sections
■ About PL/SQL Sections
■ Understanding Markup Syntax
■ Managing Annotations
■ Managing Websheet Applications
■ Viewing Websheets
About Using Websheet ApplicationsThis section describes interface elements common to all Websheet applications.
See Also: "Understanding the Difference Between Database and Websheet Applications" on page 2-1 and "Managing Websheet Database Objects" in Oracle Application Express Administration Guide

About Using Websheet Applications
5-2 Oracle Application Express Application Builder User's Guide
Topics:■ Navigating Between Websheet Pages and Sections
■ About Language
■ About the Help Link
■ About Builder Link
■ About Logout Link
■ About Websheet Search
■ About the Control Panel
Navigating Between Websheet Pages and SectionsA breadcrumb displays at the top of every Websheet page. Positioning the mouse over the Home breadcrumb displays a submenu of links to all Websheet pages. To view another page, click the child breadcrumb entry.
Using Navigation SectionsWebsheets can contain multiple pages. Many Websheets include dynamically generated navigation sections. Each navigation section includes a hierarchical tree that enables you to navigate between pages or page sections.
Click the arrows on the left to expand or collapse the tree. To link to a specific section or page, simply select it. Click Expand All to view all pages and page subsections and click Reset to return the tree to the default display. To learn more, see "About Navigation Sections" on page 14.
See Also: "About Websheet Navigation" on page 3-17
See Also: "Viewing the Page Directory" on page 5-47

About Using Websheet Applications
About Websheet Applications 5-3
Showing and Hiding Page SectionsYou can hide and show page sections. To expand or hide a section, click the arrow to the left of a section name.
About Language
Clicking the Language button displays the Select Language section of Websheet Properties page. Options include:
■ Language - Select the language used when running this application. Users can only select from the languages installed into Oracle Application Express. If cookies are enabled in your web browser, this language preference is written to a cookie and controls your language preference for all Websheet applications on this instance. The language list is determined by the translated versions of Oracle Application Express which are installed.
■ Territory - Select the territory preference used when running this application. This controls how dates, numbers, and calendars display by default. If cookies are enabled in your browser, this territory preference is written to a cookie and controls your territory preference for all Websheet applications on this instance.
About the Help Link
See Also: "Editing Websheet Properties" on page 5-40

About Using Websheet Applications
5-4 Oracle Application Express Application Builder User's Guide
Clicking the Help link displays a small Help system that provides an overview of Websheet functionality. Available tabs include: About, Overview, Access Control, Markup Syntax, Data Grid, Application Content and FAQ. Note the content in this online Help system is also covered within this guide.
About Builder Link
The Builder icon only displays if you run your Websheet from Application Builder. Click the Builder icon to return to the Application Builder home page.
About Logout Link
To log out of running a Websheet, click the Logout link in the upper right of the page. The Login page appears. To return to Application Builder, click Return to Development.
About Websheet SearchThe Search Websheet field displays in the upper right of each Websheet page.
Use Search Websheet to perform case insensitive searches of application content. Search results display in a report.

About Using Websheet Applications
About Websheet Applications 5-5
Once the search result displays, you can control the search by selecting or deselecting the search options in the Search region which displays on the right side of the page.
To refresh the view, click the Search button.
About the Control PanelThe Control Panel displays on the right side of most Websheet pages. This region includes commands that are also available on the Create, Edit, and View menus. To hide or display the Control Panel, click the arrow to the right of the region title.
The Websheet Control Panel contains the following options:

About Creating a Websheet Application
5-6 Oracle Application Express Application Builder User's Guide
■ New Section. See "About Adding and Editing Page Sections" on page 5-10.
■ Edit Sections. See "About Adding and Editing Page Sections" on page 5-10.
■ New Page. See "Adding a New Page" on page 5-8.
■ New Page as a Copy. See "Copying an Existing Page" on page 5-9.
■ Edit Page. See "Editing Page Details" on page 5-9.
■ Page Directory. See "Viewing the Page Directory" on page 5-47.
■ New Data Grid. See "Creating a Data Grid" on page 5-16.
About Creating a Websheet ApplicationYou create a Websheet application by running the Create Application wizard. After you create a Websheet page, you add content either as text or data.
Topics:■ Creating a Websheet from Application Builder
■ Creating a Websheet Application from a Running Websheet
■ Running a Websheet
■ Adding a New Page
■ Copying an Existing Page
■ Editing Page Details
■ Deleting a Websheet
Creating a Websheet from Application BuilderTo create a Websheet application:
1. On the Workspace home page, click the Application Builder icon.
2. Click the Create button.
3. For Method, select Websheet and click Next.
4. On Create Websheet:
a. Websheet - Identifies a unique integer value to identify the application. Application IDs between 3000 to 9000 are reserved for internal use.
b. Name - Enter a name to identify the application.
c. Allow SQL and PL/SQL - Determines whether you can define SQL tags, SQL reports, and PL/SQL sections. Select Yes or No. By default, this attribute is disabled and set to No.
d. Include Getting Started Guide - Select this option to include basic information about using Websheets in the first text section of the Websheet home page.
Once reviewed, you can edit or remove this text section. See "About Adding and Editing Page Sections" on page 5-10.
5. Confirm your selections and click Create Websheet.
A success message appears.
6. To view a rendered version of your application:

About Creating a Websheet Application
About Websheet Applications 5-7
a. Click Run Websheet.
b. On the Login page, enter your Websheet credentials:
– Username - Enter your workspace username.
– Password - Enter your workspace password.
– Click Login.
By default, your Websheet credentials are the same as you workspace login credentials.
Your Websheet application appears.
7. Add Websheet content.
Creating a Websheet Application from a Running WebsheetTo create a Websheet application from a running Websheet:
1. Run a Websheet application. See "Running a Websheet" on page 5-7.
2. From the Create menu, click New Websheet.
3. For Create Websheet:
a. Websheet - Identifies a unique integer value to identify the application. Application IDs between 3000 to 9000 are reserved for internal use.
b. Name - Enter a name to identify the application.
c. Description - Enter a description of your application.
d. Click Next.
4. Confirm your selections and click Create.
5. To view a rendered version of your application, click Run.
Your Websheet application appears.
6. Add Websheet content. See "About Adding and Editing Page Sections" on page 5-10.
Running a WebsheetTo view a rendered version of your application, you run or submit it to the Application Express engine.
Topics:■ Running a Websheet from the Application Builder Home Page
■ Running a Websheet from the Application Home Page
■ Running a Websheet from a URL
See Also: "About Adding and Editing Page Sections" on page 5-10
See Also: "Running a Websheet" on page 5-7
See Also: "Navigating Between Websheet Pages and Sections" on page 5-2

About Creating a Websheet Application
5-8 Oracle Application Express Application Builder User's Guide
Running a Websheet from the Application Builder Home PageTo run a Websheet from the Application Builder home page:
1. On the Workspace home page, click the Application Builder icon.
2. Click the Websheet Applications tab.
3. From the Search bar, click the View Report icon.
4. Locate the Websheet application in the Applications list.
5. Click the Run icon in the far right column.
6. On the Login page, enter your Websheet credentials:
– Username - Enter your workspace username.
– Password - Enter your workspace password.
– Click Login.
Your Websheet application appears.
Running a Websheet from the Application Home PageTo run an entire application from the Application home page:
1. On the Workspace home page, click the Application Builder icon.
The Application Builder home page appears.
2. Select the Websheet application.
3. Click the Run icon.
4. On the Login page, enter your Websheet credentials:
– Username - Enter your workspace username.
– Password - Enter your workspace password.
– Click Login.
Your Websheet application appears.
Running a Websheet from a URLOnce you complete your Websheet application, you can publish your production URL.
You can determine the URL to your Websheet application by selecting the Websheet application from the Application home page and positioning the mouse over the Run icon. The URL displays in the status bar at the bottom of the page.
Consider the following example:
http://apex.somewhere.com/pls/apex/ws?p=123:home
To learn more, see "About Publishing the Websheet Application URL" on page 16-32.
Adding a New PageTo add a new Websheet page:
1. Run the Websheet application. See "Running a Websheet" on page 5-7.
2. From the Create menu, select New Page.
3. On Create Page:

About Creating a Websheet Application
About Websheet Applications 5-9
a. Name - Enter a page name. The page name displays as the window title and in the breadcrumb.
b. Page Alias - Identify the page alias. This alias enables you to link to this page. See "Linking to a Page" on page 5-31.
c. Parent Page - If this page is part of a page hierarchy, select the parent page.
d. Click Create Page.
Copying an Existing PageTo copy an existing page:
1. Run the Websheet application. See "Running a Websheet" on page 5-7.
2. From the Create menu, select New Page as a Copy.
3. On New Page as a Copy, enter the name of the new page.
4. Click Copy Page.
A success message appears.
5. Select one of the following:
■ View Current Page
■ View New Page
Editing Page DetailsOn Page Details, you can change the page name, alias, parent page, or page description.
To edit page details:
1. Run the Websheet application. See "Running a Websheet" on page 5-7.
2. From the Edit menu, select Edit Page.
3. One Page Details.
■ Name - Identifies the name of the page. The page name displays in the window title and in the breadcrumb.
■ Alias - A page alias enables you to create links in page sections to other pages. A page alias must be unique within an application. See "Linking to a Page" on page 5-31.
■ Owner - Identifies the owner of the page.
■ Parent Page - Identifies the parent page. The defined parent page is used to construct breadcrumbs and navigation between pages.
■ Page Description - Descriptive text that describes the page.
4. Click Apply Changes.
A success message appears.
Tip: You can change the parent page by editing the Page Details. See "Editing Page Details" on page 5-9.
Tip: You can also edit page details by clicking Edit Page on the Control Panel.

About Adding and Editing Page Sections
5-10 Oracle Application Express Application Builder User's Guide
Deleting a WebsheetYou delete a Websheet on the Websheet Properties page.
To delete a Websheet application:
1. On the Workspace home page, click the Application Builder icon.
The Application Builder home page appears.
2. Select the Websheet application.
The Websheet Properties page appears.
3. Click Delete.
About Adding and Editing Page SectionsThis section describes how to add and edit page sections.
Topics:■ About Section Types
■ About Editing Sections
■ Deleting Page Sections
■ Editing Section Titles and Display Order
About Section TypesWebsheets are organized into pages which consist of containers called sections. To each Websheet page, you can add the following section types:
■ Text - Display entered text, inline images, and inline reports, and links to reports, data grids, other pages, files, external URLs, and so on. You can manage text sections using an intuitive WYSIWIG editor. See "About Text Sections" on page 12.
■ Navigation - Add dynamically generated navigation to subordinate pages or page sections. See "About Navigation Sections" on page 14.
■ Data - Create inline reports based upon a data grid or report. See "About Adding Data Grids" on page 15 and "About Adding Data Reports" on page 25.
■ Chart - Create inline charts based upon a data grid or report. See "About Chart Sections" on page 28.
■ PL/SQL - Select a data grid to generate SQL and SQLVALUE queries to use within your application. See "About PL/SQL Sections" on page 29.
About Editing SectionsTo edit a page section:
1. Run the Websheet as described in "Running a Websheet" on page 7.
2. Click the Edit icon that displays in the upper right of the section.
See Also: "Editing Websheet Properties" on page 5-40

About Adding and Editing Page Sections
About Websheet Applications 5-11
The Edit Section page appears.
3. Edit the section and click Apply Changes.
Deleting Page SectionsTo delete a page section:
1. Run the Websheet as described in "Running a Websheet" on page 7.
2. Click the Edit icon that displays in the upper right of the section.
The Edit Section page appears.
3. Click Delete.
Tip: The left side of the Edit Section page lists all sections on the current page. The current section is highlighted. To go to another section, simply select it.

About Text Sections
5-12 Oracle Application Express Application Builder User's Guide
Editing Section Titles and Display OrderYou can change the section title or display order on the Edit Sections page.
To edit all sections:
1. Run the Websheet application. See "Running a Websheet" on page 5-7.
2. From the Edit menu, select Edit Sections.
The Edit Sections page appears.
3. To edit the section title, enter a new title.
4. To change the section order, click the Up and Down arrows adjacent to the section title.
5. Click Apply Changes.
About Text SectionsTo add text to a Websheet page, you create a text section. You can type directly into a text section, or copy and paste content from a spreadsheet. Copying and pasting from a spreadsheet creates a new section for each spreadsheet row.
Topics:■ Adding a Text Section
■ Editing a Text Section
Adding a Text SectionTo add a text section:
1. Run the Websheet application. See "Running a Websheet" on page 5-7.
2. From the Create menu, select New Section.
3. When prompted for the section type, select Text and click Next.
4. On Create Text Section select either:
Tip: You can also edit sections by clicking Edit Sections on the Control Panel.
See Also: "Deleting Page Sections" on page 5-11 and "Understanding Markup Syntax" on page 5-30

About Text Sections
About Websheet Applications 5-13
■ Create single text section
■ Create multiple text section from Spreadsheet
5. If you select Create single text section:
a. Sequence - Enter the section display sequence.
b. Title - Enter a section title.
c. Content - Enter text. To learn more about formatting text, see "Editing a Text Section" on page 5-13.
d. Click Create Section.
6. If you select Create multiple text section from Spreadsheet:
a. First Row Contains Column Headings - Select this option if applicable.
b. Paste Spreadsheet Data - Paste a two column spreadsheet or other tab delimited data. The first column must contain the section title and the second column must contain the section content.
c. Click Create Section.
Editing a Text SectionYou can edit and format text sections using an intuitive WYSIWIG editor.
To edit a text section:
1. Run the Websheet as described in "Running a Websheet" on page 7.
2. Click the Edit icon that displays in the upper right of the section.
The Edit Section page appears.
3. Edit the text in the field provided.
4. To change the formatting, click the Expand Toolbar icon in the upper right corner.
Tip: You can also add a new section by selecting New Section on the Control Panel.
Tip: To learn more about adding or embedding links, see "Understanding Markup Syntax" on page 5-30.

About Navigation Sections
5-14 Oracle Application Express Application Builder User's Guide
The Toolbar appears. When you pass your cursor over an icon, a descriptive tooltip displays.
5. To hide the toolbar, click the Collapse Toolbar icon.
6. To save your changes, click Apply Changes.
About Navigation SectionsBy creating a Navigation section, you can add dynamically generated navigation to subordinate pages or page sections.
Adding a Navigation SectionTo add a navigation section:
1. Run the Websheet application. See "Running a Websheet" on page 5-7.
2. From the Create menu, select New Section.
3. When prompted for the section type, select Navigation and click Next.
4. For Navigation Type:
See Also: "Using Navigation Sections" on page 5-2, "Deleting Page Sections" on page 5-11, and "Editing Section Titles and Display Order" on page 5-12

About Adding Data Grids
About Websheet Applications 5-15
a. Select either:
– Page Navigation - Creates navigation of all pages in the Websheet.
– Section Navigation - Creates navigation for all sections on a page.
b. Click Next.
5. If you select Page Navigation:
a. Sequence - Enter the section display sequence.
b. Title - Enter a section title.
c. Starting Page - Select the starting page from which to display hierarchical navigation.
d. Maximum Levels - Select the maximum number of levels (or tree depth) to display.
e. Order Siblings By - Select the order of siblings by column. If not defined, the siblings are sorted by the page name.
f. Click Create Section.
6. If you select Section Navigation:
a. Sequence - Enter the section display sequence.
b. Title - Enter a section title.
c. Click Create Section.
About Adding Data GridsData grids are sets of data displayed in rows and columns. Data grids store data in a similar way to how spreadsheets store data. Once created, the structure can be modified as needed over time.
Topics:■ About Data Grids
■ Creating a Data Grid
■ Copying a Data Grid
■ Viewing and Editing a Data Grid
■ Viewing the Data Grid Change History Log
■ Deleting a Data Grid
About Data GridsYou can define the structure of a data grid using column names, data sources, and basic validations, or you can create a data grid by pasting spreadsheet data. Once created, the structure can be modified as needed.
Users can alter the layout of report data by selecting columns or by applying filters, highlighting, and sorting. Users can also define breaks, aggregations, group bys, computations, and different charts. Additionally, users can create multiple variations of a data grid and save them as named reports, for either public or private viewing.
See Also: "About Adding and Editing Data Content" on page 5-24 and "Understanding Markup Syntax" on page 5-30

About Adding Data Grids
5-16 Oracle Application Express Application Builder User's Guide
You can also use the data from a data grid and include it as a chart or report within any page.
Creating a Data GridYou can create a data grid by either defining the structure (that is, the column names, data types, and basic validations), or by pasting in spreadsheet data. In addition to the defined columns, the following standard columns are always included within each data grid: owner, created by, created on, updated by, updated on, row order, and annotation (files, notes, links, and tags).
Topics:■ Creating a Data Grid from Scratch
■ Creating a Data Grid by Copying and Pasting Spreadsheet Data
Creating a Data Grid from ScratchWhen you create a data grid from scratch you must define the column names, datatypes, and basic values. Once you have created the basic structure, you can then populate it with data.
To create a data grid from scratch:
1. Run the Websheet application. See "Running a Websheet" on page 5-7.
2. From the Data Grid menu, select New Data Grid.
3. When prompted for the section type, select From Scratch and click Next.
See Also: "About Chart Sections" on page 28
Tip: You can also select New Data Grid on the Control Panel.
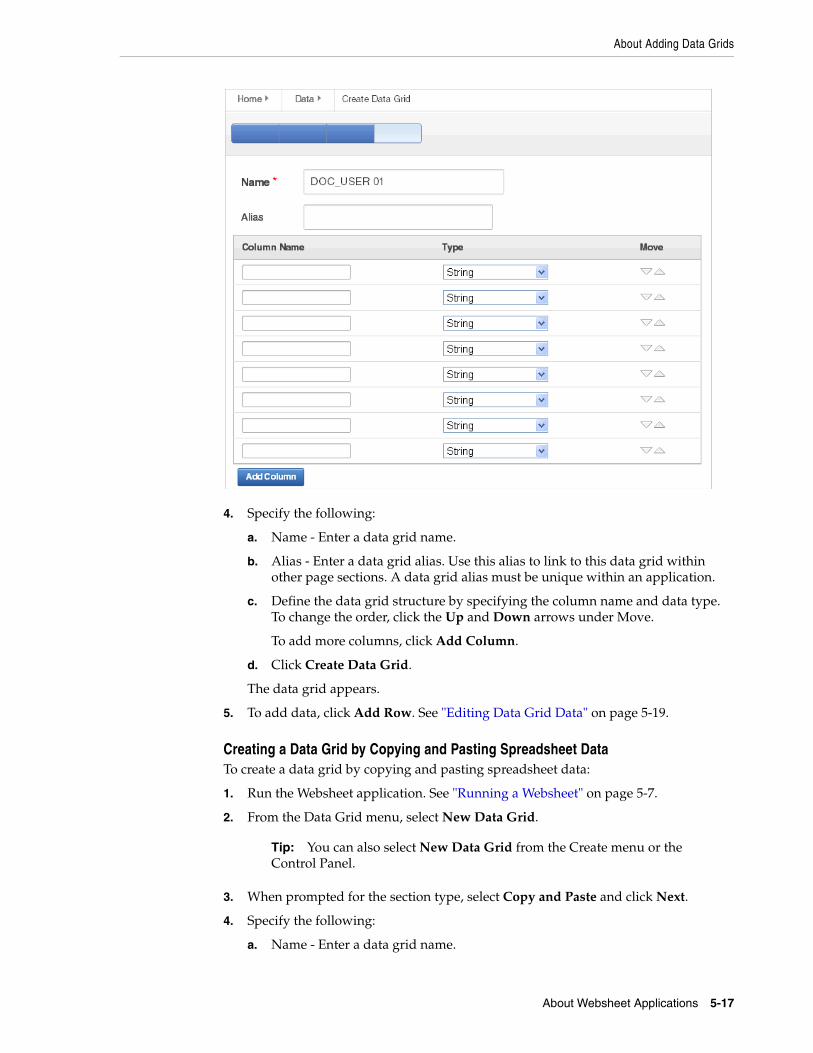
About Adding Data Grids
About Websheet Applications 5-17
4. Specify the following:
a. Name - Enter a data grid name.
b. Alias - Enter a data grid alias. Use this alias to link to this data grid within other page sections. A data grid alias must be unique within an application.
c. Define the data grid structure by specifying the column name and data type. To change the order, click the Up and Down arrows under Move.
To add more columns, click Add Column.
d. Click Create Data Grid.
The data grid appears.
5. To add data, click Add Row. See "Editing Data Grid Data" on page 5-19.
Creating a Data Grid by Copying and Pasting Spreadsheet DataTo create a data grid by copying and pasting spreadsheet data:
1. Run the Websheet application. See "Running a Websheet" on page 5-7.
2. From the Data Grid menu, select New Data Grid.
3. When prompted for the section type, select Copy and Paste and click Next.
4. Specify the following:
a. Name - Enter a data grid name.
Tip: You can also select New Data Grid from the Create menu or the Control Panel.

About Adding Data Grids
5-18 Oracle Application Express Application Builder User's Guide
b. Alias - Enter a data grid alias. You can use this alias to link to this data grid within page sections. A data grid alias must be unique within an application.
c. First Row Contains Column Headings - Select this option if applicable.
d. Paste Spreadsheet Data - Copy and paste the data you want to load from a spreadsheet program.
e. Click Upload.
A data grid appears.
Copying a Data GridTo copy a data grid:
1. Run the Websheet application. See "Running a Websheet" on page 5-7.
2. From the Data Grid menu, select an existing data grid.
The data grid appears.
3. Click Manage and select Copy.
4. Enter a new data grid name and click Copy.
Viewing and Editing a Data GridOnce you create a data grid, you can view and edit it on the Data page.
Topics:■ Accessing the Data Page
■ Editing Data Grid Data
■ Editing Data Grid Columns Manually
■ Editing Data Grid Rows Manually
■ Editing a Single Data Grid Row
■ Editing Data Grid Properties
■ Creating a Bookmark Link to a Data Grid
Accessing the Data PageTo access the Data page:
1. Run the Websheet application. See "Running a Websheet" on page 5-7.
2. From the Data Grid menu, select View All.
An interactive report appears displaying all data grids.
The Report view appears.
Tip: Data grids display as an interactive report. To learn more about interactive reports and using the Actions menu, see "Customizing Interactive Reports" on page 9-4 and "About the Actions Menu" on page 9-6.
Tip: If icons display, click the View Report icon.

About Adding Data Grids
About Websheet Applications 5-19
By default, Report view displays the data grid Name, Embed Tag, Alias, Status, Updated, and Updated By columns. The Embed Tag column displays the syntax used to include a link to the report or data grid from within a section of a page.
3. Select a data grid.
The data grid appears.
Toggling Check Boxes When viewing a data grid, you can enable and disable check boxes. From the Manage menu, select Toggle Check Boxes. Selecting this option, displays check boxes to the left of each row.
Editing Data Grid DataTo edit data grid data:
1. Run the Websheet application. See "Running a Websheet" on page 5-7.
2. From the Data Grid menu, select a data grid.

About Adding Data Grids
5-20 Oracle Application Express Application Builder User's Guide
The data grid appears.
3. To add another row:
a. Click the Add Row button.
A form appears.
b. Edit the fields provided and click either Save or Save and Add Another.
Editing Data Grid Columns ManuallyTo manually edit data grid columns:
1. Run the Websheet application. See "Running a Websheet" on page 5-7.
2. From the Data Grid menu, select a data grid.
The data grid appears.
3. From the Manage Menu, select Columns.
The following submenu displays:
■ Add - Adds a new column. Enables you to define all column properties such as the column name, type, whether a value is required, list of values, default type, and default text.
■ Column Properties - Editable properties include sequence, group, required value, label, format, heading, width and height, column type, default text, list of values, and help text.
■ List of Values - Enables you to restrict the values a user can enter. You associate a list of values with a column on Column Properties.
■ Column Groups - Create a group and add columns to the group. Add / Edit row page displays groups as a subsection under the Data region and lists columns within the group. By using groups, you can control the Add / Edit row page display.
■ Validation - Create a column validation and error message.
■ Delete Columns - Select columns to be deleted.
4. Select a submenu option and follow the on-screen instructions.

About Adding Data Grids
About Websheet Applications 5-21
Editing Data Grid Rows ManuallyYou can manually edit the rows of a data grid by selecting Rows and on the Manage menu.
To manually edit data grid rows:
1. Run the Websheet application. See "Running a Websheet" on page 5-7.
2. From the Data Grid menu, select a data grid.
The data grid appears.
3. From the Manage Menu, select Rows.
The following options display:
■ Add row - Adds a new row.
■ Set Column Values - Set a predefined value for a column.
■ Replace - Search and replace rows.
■ Fill - Fill down null column values with column value from above cell.
■ Delete Rows - Select rows to be deleted.
4. Select a submenu option and follow the on-screen instructions.
Editing a Single Data Grid RowTo manually edit a single data grid row:
1. Run the Websheet application. See "Running a Websheet" on page 5-7.
2. From the Data Grid menu, select a data grid.
The data grid appears.
3. Locate the row to be edited and click the Edit Row icon.
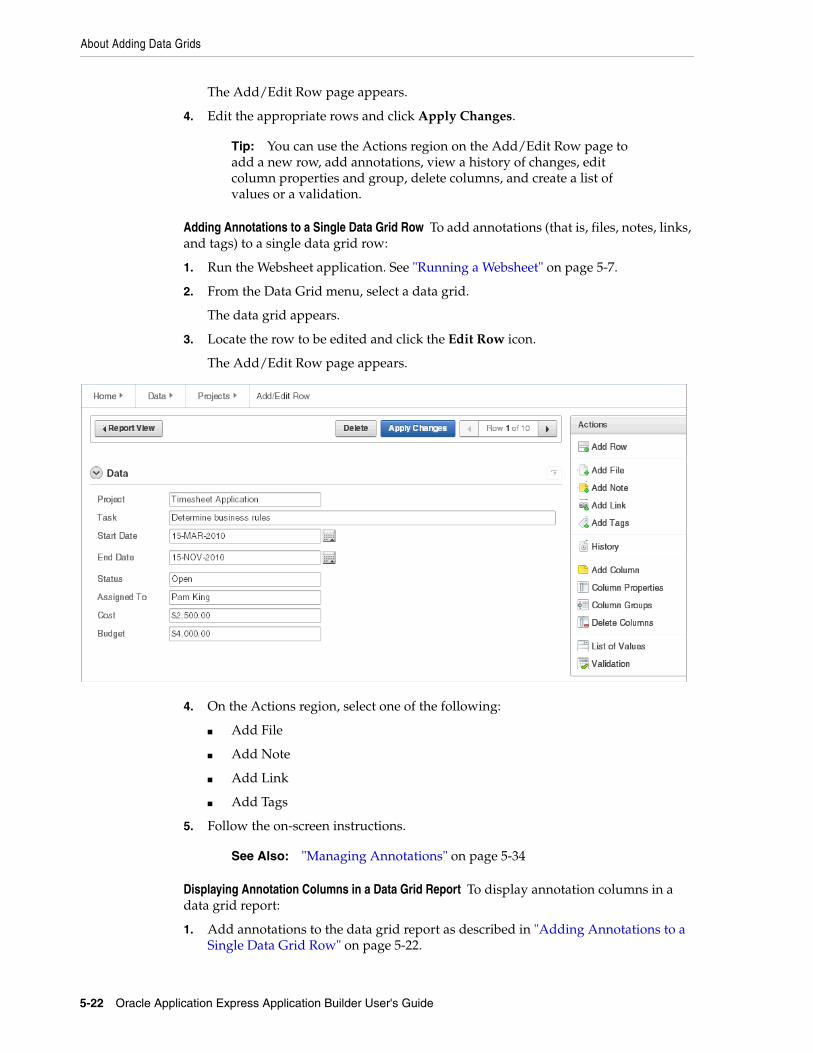
About Adding Data Grids
5-22 Oracle Application Express Application Builder User's Guide
The Add/Edit Row page appears.
4. Edit the appropriate rows and click Apply Changes.
Adding Annotations to a Single Data Grid Row To add annotations (that is, files, notes, links, and tags) to a single data grid row:
1. Run the Websheet application. See "Running a Websheet" on page 5-7.
2. From the Data Grid menu, select a data grid.
The data grid appears.
3. Locate the row to be edited and click the Edit Row icon.
The Add/Edit Row page appears.
4. On the Actions region, select one of the following:
■ Add File
■ Add Note
■ Add Link
■ Add Tags
5. Follow the on-screen instructions.
Displaying Annotation Columns in a Data Grid Report To display annotation columns in a data grid report:
1. Add annotations to the data grid report as described in "Adding Annotations to a Single Data Grid Row" on page 5-22.
Tip: You can use the Actions region on the Add/Edit Row page to add a new row, add annotations, view a history of changes, edit column properties and group, delete columns, and create a list of values or a validation.
See Also: "Managing Annotations" on page 5-34

About Adding Data Grids
About Websheet Applications 5-23
2. To include the columns in the data grid report:
a. View the data grid report.
b. Click the Actions menu and then Select Columns.
c. In the Select Columns region, move the columns (for example, Files, Notes, Links, and Tags) to Display in Report.
d. Click Apply.
3. To ensure all users can see the columns, developers can save the revised layout as the default report:
a. Click the Actions menu and select Save Report.
The Save Report Region appears.
b. In Save Report:
a. Save - Select As Default Report Settings.
b. Name - Enter a name for the report.
c. Description - Enter an optional description.
d. Click Apply.
Editing Data Grid PropertiesYou can change the name, alias, and description of a data grid on the Data Grid Properties page.
To edit a data grid:
1. Run the Websheet application. See "Running a Websheet" on page 5-7.
2. From the Data Grid menu, select a data grid.
The data grid appears.
3. From the Manage menu, click Properties.
The Data Grid Properties page appears.
4. Edit the fields provided and click Apply.
Creating a Bookmark Link to a Data GridTo bookmark directly to a data grid or a row, use the following syntax:
ws?p=100000:DG_<data grid alias> ws?p=100000:DG_<data grid alias>:<session ID>:ROW_ID:<data grid row ID>
The data grid row ID is an ID column value of the APEX$_WS_ROWS table.
To get a link to a specific data grid row:
1. Run the data grid.
2. Click the Edit Row icon.
3. Note the URL in the browser.
About Adding and Editing Data Content
5-24 Oracle Application Express Application Builder User's Guide
Viewing the Data Grid Change History LogThe View Change History log displays a report of data grid changes. This report lists the row, column name, old value, new value, user who authored the change, and how long ago the change occurred.
To view a history of data grid changes:
1. Run the Websheet application. See "Running a Websheet" on page 5-7.
2. From the Data Grid menu, select a data grid.
The data grid appears.
3. From the Manage menu, select History.
Deleting a Data GridTo copy a data grid:
1. Run the Websheet application. See "Running a Websheet" on page 5-7.
2. From the Data Grid menu, select a data grid.
The data grid appears.
3. From the Manage menu, select Delete Data Grid.
4. Confirm your selection and click Delete.
About Adding and Editing Data ContentThis section describes how to add and edit data content.
Topics:■ Available Data Sources
■ About Enabling Support for Creating Data Reports
■ Incorporating Data into Websheet Pages
Available Data SourcesWebsheets can include data sources. Once defined, you can incorporate these data sources into Websheet page sections. Websheets can include the following data sources:
■ Data Grids - Data grids are highly customizable, editable tabular reports. Data grids enable you to maintain data within the Websheet which is stored within the Oracle database. See "About Adding Data Grids" on page 5-15.
■ Reports - Reports are queries defined against tables or views that exist within your Oracle database. See "About Adding Data Reports" on page 5-25.
About Enabling Support for Creating Data ReportsTo define a data report, your Websheet developer must enable the Allow SQL and PL/SQL attribute on the Websheet Properties page. By default, this attribute is disabled.

About Adding Data Reports
About Websheet Applications 5-25
Incorporating Data into Websheet PagesData grids and data reports can be incorporated into page sections in the following ways:
■ Within a data section. See "About Adding Data Reports" on page 25.
■ Within a chart section. See "Adding a Chart Section" on page 5-28.
■ Linking to a Data Grid. See "Linking to a Data Grid" on page 5-32.
■ Include a single value or tabular results of queries See "Using SQL and SQLVALUE Syntax" on page 5-32.
About Adding Data ReportsData reports are contributor-defined queries on tables or views within the underlying Oracle database.
Topics:■ About Data Reports
■ Creating a Data Report
■ Viewing and Modifying a Data Report
■ Deleting a Data Report
About Data ReportsData reports, unlike data grids, are query-only and based on existing data from the Oracle database. You can specify the table or view name and retrieve all columns or write an SQL statement to retrieve the required data.
Users can alter the layout of report data by selecting columns or by applying filters, highlighting, and sorting. Users can also define breaks, aggregations, group by, computations, and different charts. Additionally, users can create multiple variations of a data grid and save them as named reports, for either public or private viewing. You can also use the data from a data report and include it as a chart or report within any page.
Creating a Data ReportYou can create a data report by either simply entering the table or view name, or by providing a SQL query.
Tip: Only a Websheet application developer can edit the Allow SQL and PL/SQL attribute on the Websheet Properties page. To learn more, see "Editing Websheet Properties" on page 5-40
Tip: Before you can add a data report, the Websheet application developer must enable the Allow SQL and PL/SQL attribute on the Websheet properties page. By default, this attribute is disabled. To learn more, see "Editing Websheet Properties" on page 5-40.
See Also: "About Adding and Editing Data Content" on page 5-24 and "Understanding Markup Syntax" on page 5-30
See Also: "About Data Sections" on page 5-27 and "About Chart Sections" on page 5-28

About Adding Data Reports
5-26 Oracle Application Express Application Builder User's Guide
To create a data report:
1. Run the Websheet as described in "Running a Websheet" on page 7.
2. From the Report menu, select New Report.
The Create Report page appears.
3. For Report Source, identify how to develop your source. Options include:
a. Table - Select Table and enter the following:
– Table or View Name - Select the table name the report is to be based on.
– Report Name - Enter the name of the report.
– Report Alias - Enter a report alias. A Report alias is used for linking to the Report within page sections. A Report alias must be unique within an application.
b. SQL Query - Select SQL Query and enter the following:
– Report Name - Enter the name of the report.
– Report Alias - Enter a report alias. A Report alias is used for linking to the Report within page sections. A Report alias must be unique within a Websheet.
– Query - Enter the SQL query that defines your report.
c. Click Next.
4. Confirm your selections and click Create Report.
Viewing and Modifying a Data ReportTo view or modify a data report:
1. Run the Websheet as described in "Running a Websheet" on page 7.
2. From the Report menu, select View All.
The Report page appears.
3. Select the report.
The report appears.
4. To edit report attributes:
■ From the Manage menu, click Edit Attributes.
The Report Attributes page appears.
■ Edit the attributes and click Apply Changes.
5. To edit the report query:
■ From the Manage menu, click Edit Query.
The Report Query page appears.
■ To save your changes, click Apply Changes.
Tip: You can also select New Report on the Control Panel.

About Data Sections
About Websheet Applications 5-27
Deleting a Data ReportTo delete a data report:
1. Run the Websheet as described in "Running a Websheet" on page 7.
2. From the Report menu, select the report.
The report appears.
3. From the Manage menu, click Edit Attributes.
The Report Attributes page appears.
4. Click Delete.
About Data SectionsYou can create data sections based upon a data grid or report.
Topics:■ Adding a Data Section to a Page
■ Editing a Data Section
Adding a Data Section to a PageOnce you create a data grid or report, you add it to a page by adding a data section.
To add a data section:
1. Run the Websheet application. See "Running a Websheet" on page 5-7.
2. From the Create menu, select New Section.
3. When prompted for the section type, select Data and click Next.
4. Specify the following:
a. Data Section Source - Select either Data Grid or Report.
b. Display Sequence - Enter the section display sequence.
c. Data Grid/Report - Select the data grid or report to be used to display the data section.
d. Report Settings to Use - For the selected data grid or report, select the report settings to use. This selection enables you to filter the rows and columns you want to display and set the columns to display. If you do not have a saved report with the settings you need, create it now before adding the section.
e. Title - Enter the section title.
f. Include - Select whether to add the following:
– Add Row (available if Data Section Source is Data Grid)
– Edit Row(available if Data Section Source is Data Grid)
– Search Field
See Also: "About Adding and Editing Data Content" on page 5-24
See Also: "About Adding Data Grids" on page 5-15 and "About Adding Data Reports" on page 5-25

About Chart Sections
5-28 Oracle Application Express Application Builder User's Guide
g. Style - Choose a user interface style.
h. Click Next.
5. Click Create Section.
Editing a Data SectionOnce you have added a data report to a page, you can change the section sequence, title, and user interface style.
To edit a data section:
1. Run the Websheet as described in "Running a Websheet" on page 7.
2. Click the Edit icon that displays in the upper right of the section.
The Edit Section page appears.
3. Edit the fields provided. See item Help for more details.
4. To save your changes, click Apply Changes.
About Chart SectionsYou can create inline charts based upon a data grid or report.
Topics:■ Adding a Chart Section
■ Editing a Chart Section
Adding a Chart SectionTo add a chart section:
1. Run the Websheet application. See "Running a Websheet" on page 5-7.
2. Create a data grid or report. See "About Adding Data Grids" on page 15.
3. From the Create menu, select New Section.
4. When prompted for the section type, select Chart and click Next.
5. On Select Chart Type:
a. Select one of the following:
– Column
– Horizontal Bar
– Pie
– Line
b. Click Next.
6. Specify the following:
a. Display Sequence - Enter the section display sequence.
See Also: "About Adding Data Grids" on page 5-15 and "About Adding Data Reports" on page 5-25
See Also: "About Adding and Editing Data Content" on page 5-24

About PL/SQL Sections
About Websheet Applications 5-29
b. Data Grid - Select a data grid.
c. Report Settings to Use - For the selected data grid or report, select the report settings to use. This selection enables you to filter the rows and columns you want to display.
If you do not have a saved report with the settings you need, create it now before adding the section.
d. Section Title - Enter the section title.
e. Click Next.
7. Specify the following:
a. Chart Label - Select the column to be used as the Label.
In Axis Title for Label, enter title to display on the axis associated with the column selected for Label.
b. Chart Value - Select the column to be used as the Value. If your function is a COUNT, a Value does not need to be selected.
In Axis Title for Value, enter the title to display on the axis associated with the column selected for Value.
c. Function - Select a function to be performed on the column selected for Value.
d. Sort - Select the chart sort direction.
Check Enable 3D to display the chart in 3D.
e. Click Next.
8. On the summary page, confirm your selections and click Create Section.
Editing a Chart SectionTo edit a chart section:
1. Run the Websheet application. See "Running a Websheet" on page 5-7.
2. Click the Edit icon that displays in the upper right of the section.
The Edit Section page appears.
3. Edit the fields provided. See item Help for more details.
4. Click Apply Changes.
About PL/SQL SectionsUsers with PL/SQL knowledge can use PL/SQL sections to write their own code against the associated schema.
Topics:■ Adding a PL/SQL Section
■ Editing a PL/SQL Section
Tip: PL/SQL sections are only available if the Websheet application developer has enabled the Allow SQL and PL/SQL attribute on the Websheet Properties page. To learn more, see "Editing Websheet Properties" on page 5-40

Understanding Markup Syntax
5-30 Oracle Application Express Application Builder User's Guide
Adding a PL/SQL SectionTo add a PL/SQL Section:
1. Enable SQL and PL/SQL on the Websheet Properties page. See "Editing Websheet Properties" on page 5-40.
2. Run the Websheet application. See "Running a Websheet" on page 5-7.
3. From the Create menu, select New Section.
4. When prompted for the section type, select PL/SQL and click Next.
5. Specify the following:
a. Sequence - Enter the section display sequence.
b. Title - Enter the section title.
c. Enter PL/SQL - Enter a PL/SQL anonymous block of code.
d. If applicable, select Do not validate PL/SQL code (parse PL/SQL code at run time only). Select this option to create the section even if an errors occurs. Use this option to create the section and then debug it later.
6. Click Create Section.
Editing a PL/SQL SectionTo edit a PL/SQL section:
1. Run the Websheet as described in "Running a Websheet" on page 7.
2. Click the Edit icon that displays in the upper right of the section.
The Edit Section page appears.
3. Edit the following:
a. Sequence - Enter the section display sequence.
b. Title - Enter the section title.
c. Enter PL/SQL - Enter a PL/SQL anonymous block of code.
4. To save your changes, click Apply Changes.
Understanding Markup SyntaxThis section describes syntax for adding links to Websheet pages, page sections, external URLs, data grids, or for including SQL or SQLVALUE syntax.
See Also: "Deleting Page Sections" on page 5-11
Tip: You can also select New Section on the Control Panel. See "About the Control Panel" on page 3-26.
Tip: To view an example, click PL/SQL Example.
Tip: A Help button displays in the upper right corner of each Websheet page. The Help page, Markup Syntax, lists all the different syntax options described in this section.

Understanding Markup Syntax
About Websheet Applications 5-31
Topics:■ Linking to a Page
■ Linking to a Section
■ Linking to External URLs
■ Linking to a Data Grid
■ Using SQL and SQLVALUE Syntax
■ About Advanced Data Grid Queries Rules
Linking to a PageTo include links in page sections to other pages in a Websheet, use the syntax described below. If the page exists, a link displays. If the page does not exist, a link to create the page displays. Note that the use of the page: identifier is optional.
Syntax:[[ page: <page alias> | <link name> ]][[ <page alias> | <link name> ]]
Syntax Example:[[page: home]] [[mypage | My Page]]
In Context Example:One of the most colorful fish is the [[ clownfish | Clown fish]].
Linking to a SectionTo include links to a page section, use the syntax below. If the section exists, a link displays. If the section does not exist, a link to create the section displays. Note that if the section is not prefaced by a page, it is assumed the section is on the current page.
Syntax:[[ section: <page alias> . <page section> | <link name> ]][[ section: <page section> | <link name> ]]
Syntax Example Linking Within the Current Page:[[section: clownfish | Clown Fish]]
Syntax Example Linking to a Different Page:[[section: fish.clownfish | Clown Fish]]
In Context Example:One of the most colorful fish is the [[ section: clownfish | Clown fish]].Visit or fish page to see the [[ section: fish . clownfish | Clown fish]], also known as Nemo.
See Also: "Managing Uploaded Files and Images" on page 34
Understanding Markup Syntax
5-32 Oracle Application Express Application Builder User's Guide
Linking to External URLsTo include links to external URLs in page sections, use the syntax below. Note that the use of the url: identifier is optional. To have the link open in a new browser window, use the popup prefix.
Syntax:[[ url: <url> | <link name> ]][ popupurl: <url> | <link name> ]][[ <url> | <link name> ]]
Syntax Example:[[url: http://www.company.com/store | commpanystore]][[popupurl: http://www.company.com/store | commpanystore]][[http://www.searchengine.com | searchengine]] [[http://www.searchengine.com ]]
In Context Example:You can buy Company software on the [[http://www.company.com/store | Company Store]] website.
Linking to a Data GridTo include links to data grids within page sections, use the syntax below. You can use these links to view the data grid or to create new data. Note that data grid can be one or two words.
Syntax:[[ data grid: <datagrid alias | <link name> ]][[ datagrid: <datagrid alias | <link name> ]][[ datagrid: <datagrid alias . <saved report name (may not be private)> | <link name> ]]
Syntax Example:[[ data grid: todo list | To Do List ]][[ data grid: todo list . open todo items | To Do List ]][[ datagrid: todo list | To Do List ]]
In Context Example:Please review the [[ data grid: todo list | To Do List ]] and ensure your tasks can be accomplished by Friday.
Using SQL and SQLVALUE SyntaxUsing SQL or SQLVALUE syntax, you can include single value and tabular results of queries against data grids or tables and views within sections of a page. The SQLVALUE tag displays the first column of the first row returned by the SQL query, enabling you to embed data within a sentence (for example: There are currently 5 types of cats.). For tabular results, use the SQL tag. SQL tag results display in a searchable report. By default, however, the search option can be disabled using the NOSEARCH syntax.
When working with data grids, there are a few more options (shown under Syntax) and a few more rules. Basic rules when writing a data grid query include:

Understanding Markup Syntax
About Websheet Applications 5-33
■ Enclose the data grid name or data grid alias with curly brackets. For example:
{Cat Facts}
■ Enclose the data grid column names with double quotation marks. For example:
"Type of Cat"
To learn more about advanced rules, see "About Advanced Data Grid Queries Rules" on page 33.
Syntax for Queries Against Tables and Views:[[sql: <select statement> ]][[sql: <select statement | limit="<maximum rows>" nosearch style="<style number>" ]][[sqlvalue: <select statement> ]]
Syntax for Data Grid Queries:[[sql: <select statement> ]][[sql: <select statement | limit="<maximum rows>" nosearch style="<style number>" edit_row add_row show_sql ]][[sqlvalue: <select statement> ]][[sqlvalue: <select statement> | show_sql ]]
In Context SQL Tag Syntax Examples:[[sql: select ename "Employee Name", sal "Salary" from emp order by sal desc | limit="10" style="2"]].[[sql: select "Type of Cat", "Estimated Population", "Largest Threats", "Top Speed", "Scientific Name", "IUCN Status", "Weight", "Study Date" from {Cat Facts} | add_row edit_row ]]
In Context SQLVALUE Tag Syntax Examples:We have [[sqlvalue: select count(*) from emp]] employees in our database, [[sqlvalue: select count(*) from emp where deptno=10 ]] work in department 10.We are currently tracking [[sqlvalue: select count(*) from {Cat Facts} ]] types of cats.
About Advanced Data Grid Queries RulesAdvanced data grid query rules include:
■ The query must reference the data grid only once to include an edit or add row link (that is, you cannot join the data grid to itself within the query).
■ The first column must be the primary key of the data grid to include an edit row link (that is, the column that uniquely identifies the row of data). If the "edit_row" option is included and the query has a single select statement, the primary key column is included automatically. If the query contains multiple select statements, you can use the "APXWS_DATA_GRID_PK" substitution (always enclosed with

Managing Annotations
5-34 Oracle Application Express Application Builder User's Guide
double quotation marks) as the first column in the SELECT statement to include the primary key in order to include an edit row link.
■ Report column names are the column name from the data grid, but can be modified using standard SQL column aliasing syntax. For example, the following displays the data from the Minimum Number column but the heading displays as Min:
select "Minimum Number" "Min" from ...
■ If a column name is longer than 30 characters, you only include the first 30 characters as the name. For example, use:
"% of Estimated Lions per Region"
Instead of:
"% of Estimated Lions per Region"
■ To display the query that is executed, include the "show_sql" option. By including this option, the query displays above the included report. Although this is a good approach for debugging, Oracle does not recommend using "show_sql" for a production application.
Managing AnnotationsYou can add commentary and additional details to a web page by adding annotations. Annotations can be in the form of uploaded files, notes, links, and tags. Annotations can be added to both pages and data grid records.
Topics:■ Managing Uploaded Files and Images
■ Adding Tags
■ Adding Notes
■ Viewing and Deleting Annotations
Managing Uploaded Files and ImagesYou can upload files and images to a Websheet page using the Files region. Once uploaded, you can display uploaded images within a page section or embed download links to files.
Topics:■ Uploading Files and Images
■ Including a Download Link in a Page Section
■ Displaying an Uploaded Image Inline
■ Editing or Deleting Uploaded Files
Uploading Files and ImagesTo upload files and images to a Websheet:
1. Log in to and run the Websheet. See "Running a Websheet" on page 5-7.
2. Under Files on the right side of the page, click the Add File icon.

Managing Annotations
About Websheet Applications 5-35
3. On the Add File page:
a. File - Browse to locate the file to upload. Once uploaded, the file is associated with the current page. You can reference an uploaded file in any page using the image or file syntax. See "Displaying an Uploaded Image Inline" on page 35 or online Help, Markup Syntax.
b. Alias - A file alias enables you to embed download links or image links within page sections. A file alias must be unique within an application.
c. Description - Enter descriptive text to describe the file.
4. Click Add File.
Including a Download Link in a Page SectionYou can embed a download link within a page section to uploaded files using the following syntax.
Syntax:[[ file: < file name > | < link name > ]][[ file: < file alias > | < link name > ]]
Syntax Examples:[[file: myfile ]][[file: myfile.xls ]][[file: myfile | My File ]]
File Markup Example:This [[file: parts01.xls | spreadsheet ]] documents our part numbers.
Displaying an Uploaded Image InlineAfter you upload an image, you can display it within any page section of an application by embedding a download link using the following syntax. You can reference an uploaded image using the image name or image alias.
Images defined for the current page are used before images associated with other pages. If image names are ambiguous, the most recently created image displays.
Syntax:[[ image: < file name > | < properties > ]][[ image: < file alias > | < properties > ]]
Syntax Examples:[[image: myimage ]][[image: theimagename.jpg ]][[image: myimage | width="600" alt="my image" ]]

Managing Annotations
5-36 Oracle Application Express Application Builder User's Guide
Example:This diagram [[image: diagram1]] illustrates the work flow.
Editing or Deleting Uploaded FilesTo edit details or delete uploaded files:
1. Log in to and run the Websheet. See "Running a Websheet" on page 5-7.
2. In the Files region, click the Edit File icon.
The Details page appears.
3. To edit file details:
a. Edit the fields provided. See item Help for more details.
b. To accept your changes, click Apply Changes.
4. To delete a file:
a. Click Delete.
b. To accept your changes, click OK.
Adding TagsTags facilitate keyword searching within a Websheet.
Topics:■ Adding Tags
■ Editing Existing Tags
Adding TagsTo add tags to a Websheet page:
1. Log in to and run the Websheet. See "Running a Websheet" on page 5-7.
2. Under Tags on the right side of the page, click the Add Tag icon.
3. Enter tags in the field provided. Separate multiple tags with a comma.
4. Click Apply Changes.
Editing Existing TagsTo edit existing tags:
1. Log in to and run the Websheet. See "Running a Websheet" on page 5-7.
2. In the Tags region, click the Edit Tag icon.
The Details page appears.
3. Edit the tags and click Apply Changes.

Managing Annotations
About Websheet Applications 5-37
Adding NotesUse notes to record user comments.
Topics:■ Adding Notes
■ Editing and Deleting Existing Notes
Adding NotesTo add notes to a Websheet page:
1. Log in to and run the Websheet. See "Running a Websheet" on page 5-7.
2. Under Notes on the right side of the page, click the Add Note icon.
3. Enter text in the field provided.
4. Click Add Note.
Editing and Deleting Existing NotesTo edit or delete existing notes:
1. Log in to and run the Websheet. See "Running a Websheet" on page 5-7.
2. In the Notes region, click the Edit Note icon.
3. To edit file details:
a. Edit the fields provided. See item Help for more details.
b. To accept your changes, click Apply Changes.
4. To delete a note, click Delete.
Viewing and Deleting AnnotationsYou can view and delete all Websheet annotations on the Annotations page. Annotations include uploaded files, notes, links, and tags that were either added to a Websheet page or to a specific row in a data grid.
Topics:■ Accessing the Annotations Page
■ Deleting Annotations
Accessing the Annotations PageTo access the Annotations page:
1. Log in to and run the Websheet. See "Running a Websheet" on page 5-7.
2. From the View menu, select Annotations.
The Annotations page appears.

Managing Annotations
5-38 Oracle Application Express Application Builder User's Guide
3. To view specific type of annotation, click the Files, Notes, Links, Tags, or Tag Cloud tabs.
Deleting AnnotationsTo delete uploaded files, notes, link, or tags:
1. Log in to and run the Websheet. See "Running a Websheet" on page 5-7.
2. From the View menu, select Annotations.
The Annotations page appears.
3. Select an annotation type by clicking the appropriate tab at the top of the page.
4. Click the appropriate tab: Files, Notes, Links, Tags, or Tag Cloud.
5. Select the annotations to be deleted.
6. If not selected, click the View Report icon.
7. Click Delete Checked.

Managing Websheet Applications
About Websheet Applications 5-39
Managing Websheet ApplicationsUse the options on the Administration menu to view the Websheet Dashboard, monitor Websheet activity, edit Websheet properties, and control Websheet access.
Topics:■ Viewing the Websheet Dashboard
■ Monitoring Websheet Activity
■ Editing Websheet Properties
■ Controlling Websheet Access
■ Changing Your Websheet Password
■ Emailing a Websheet Page
■ Printing a Websheet Page
Viewing the Websheet DashboardThe Websheet dashboard displays the details about the current Websheet application including recent changes, top users, and top pages.
To view the Websheet Dashboard:
1. Log in to and run the Websheet. See "Running a Websheet" on page 5-7.
2. From the Administration menu, select Dashboard.
The Dashboard appears and is divided into the following sections:
■ Application Details
■ Recent Changes
■ Top Users
■ Top Pages
3. To edit the time frame, select a new value from the TimeFrame list.
4. Click Reset to return to the default setting.
Monitoring Websheet ActivityUse the Monitor Activity page to analyze usage, performance, and popularity of pages and content.
To access the Monitor Activity page:
1. Log in to and run the Websheet. See "Running a Websheet" on page 5-7.
2. From the Administration menu, select Monitor Activity.
The Monitor Activity page appears and is divided into the following sections:
■ Activity
– Page Views
– Top Pages
– Top Data Grids
See Also: "About Publishing the Websheet Application URL" on page 16-32

Managing Websheet Applications
5-40 Oracle Application Express Application Builder User's Guide
– Top Reports
– Top Users
■ Annotations
– Top Files
– Top Notes
– Top Tags
Each report displays as an interactive report. To learn more about interactive reports and using the Actions menu, see "Customizing Interactive Reports" on page 9-4 and "About the Actions Menu" on page 9-6.
Editing Websheet PropertiesYou can access the Websheet Properties page from inside or outside a running Websheet. Use the Websheet Properties page to control general application defaults and behavior. The home page identifies the home page users land on when running the Websheet. The name of the application is displayed within the breadcrumb.
Topics:■ Accessing Websheet Properties from a Running Websheet
■ Accessing Websheet Properties from Application Builder
■ About Websheet Properties
Accessing Websheet Properties from a Running WebsheetTo access the Websheet Properties page:
1. Log in to and run the Websheet. See "Running a Websheet" on page 5-7.
2. From the Administration menu, select Websheet Properties.
The Websheet Properties appears.
3. To view a section, click the greater than sign (>) to the left of the section title.
4. To learn more about a specific attribute, see item Help and "About Websheet Properties" on page 5-40.
Accessing Websheet Properties from Application BuilderTo access the Websheet Properties page:
1. On the Workspace home page, click the Application Builder icon.
2. Click the Websheet Applications tab.
3. Click the View Icons button.
4. Locate the Websheet and click Edit.
The Websheet Properties appears. See "About Websheet Properties" on page 5-40.
5. To learn more about a specific attribute, see item Help.
About Websheet PropertiesThis section describes the attributes on the Websheet Properties page.

Managing Websheet Applications
About Websheet Applications 5-41
Application Use the Application section to control general application properties. Table 5–1 describes Application attributes.
Details Use the Details section to edit the application description and login message. Table 5–2 describes Details attributes.
Logo Use the Logo section to create a logo for this Websheet application. This logo displays at the top of the Websheet. Table 5–3 describes Logo attributes.
Table 5–1 Application Attributes
Attribute Descriptions
Name Identifies the name of the application. This name displays within the breadcrumb when the application is running.
Status Identifies the status of the application. Available options include: Available or Unavailable.
Home Page Select the home page for this Websheet. This is the first page a user sees when running the Websheet.
Application Date Format Determines the date format to be used in the application.
This date format is used to alter the NLS_DATE_FORMAT database session setting before showing or submitting any page in the application. This value can be a literal string containing a valid Oracle date format mask or an item reference using substitution syntax. If no value is specified, the default date format is derived from the database session at runtime.
Default Application Language
Identifies the default language of the application. Users are able to change their language preference from within the application. This language list is determined by the translated versions of Application Express which are installed.
Default Application Territory
Identifies the default territory of the application, which controls attributes like date language and numeric characters. Users are able to change their territory preference from within the application.
Show Reset Password Controls the display of the Reset Password link on the Login page. This link enables users to reset their passwords. This option works only if the application is using Application Express Account authentication.
Websheet Email From Address
Determines the email address to use as the from address in the Websheet. This from email address is used when sending email from a data grid or report email download in the Websheet.
Table 5–2 Details
Attribute Descriptions
Owner Identifies the user who owns the application.
Description An optional description that describes the application.
Login Message Display this message on the login page.
Table 5–3 Logo
Attribute Descriptions
Logo Type Select the type of logo being used for the application.
Logo Enter a full text string to use as application logo.

Managing Websheet Applications
5-42 Oracle Application Express Application Builder User's Guide
Style Use the Style section to override default application style and use a custom CSS.
Authentication Use the Authentication section to select an authentication scheme for this Websheet. Table 5–4 describes Authentication attributes.
Authorization Use the Authorization section to control who can log in to a Websheet application. Table 5–5 describes Application attributes.
Table 5–4 Authentication
Attribute Descriptions
Authentication Select the way users of the application are authenticated. To change the authentication scheme, click Edit Authentication. The following list displays:
■ Application Express Account - Authenticate using developer account username and password.
■ Single Sign-On - Authenticate using Oracle Application Server Single Sign-On. This must be configured for the Application Express instance.
■ LDAP - Authenticate using an LDAP directory. Specify additional parameters on this page to configure this.
■ Custom - Provide your own code for authentication and session management tasks. See "Controlling Websheet Access" on page 5-43.
Logout URL Specify a URL to become this application's Logout URL attribute. This attribute is referenced in logout links as follows:
&LOGOUT_URL.
If the application uses built-in session verification, you may use "wwv_flow_custom_auth_std.ws_logout?p_websheet_app_id=&WS_APP_ID.&p_next_url=ws?p=&WS_APP_ID.:home" to invoke a built-in logout procedure.
Cookie Name Name for the session cookie, which is required to identify an Application Express session and the session ID in the URL. If no value for the session cookie name is specified, Application Express picks a default value.
Cookie Path Path attribute for the session cookie.
Cookie Domain Domain attribute for the session cookie.
Secure Options include:
■ Yes - Allow the session management cookie to be sent from the browser only when the protocol is HTTPS.
■ No - Allow the session management cookie to be sent from the browser when the protocol is HTTP or HTTPS.
Table 5–5 Authorization
Attribute Descriptions
Access Control List Type If authentication is Application Express Account, choose whether authorization is determined by the role in the Application Express workspace, or if authorization is determined by the access control list. For all authentication types other than Application Express Account, authorization is always determined by the access control List.

Managing Websheet Applications
About Websheet Applications 5-43
Click Access Control Roles to learn more about roles and their privileges. Click Edit Access Control List to link to the Access Control List page. To learn more, see "Controlling Websheet Access" on page 43.
SQL and PL/SQL Use the SQL and PL/SQL section to determine if users can use SQL and PL/SQL in the current Websheet. By default, this capability is disabled. To change the default setting, for Allow SQL and PL/SQL, select Yes.
If enabled, users can use SQL in reports and SQL Tags and include PL/SQL in page sections. Click Add Object to link to the Suggestion Objects page. Users can write custom reports and use SQL tags on database objects within the schema associated with the current workspace. Identifying a database table or view as a Suggested Object makes it easier to write SQL by exposing the table and view columns in the help page.
Controlling Websheet AccessThis section describes how to control access to a Websheet application.
Topics:■ How Websheet Access Works
■ Specifying the Access Control List Type
■ Creating Access Control List Entries
How Websheet Access WorksAn administrator controls who can log in to a Websheet application by specifying one of the following authentication mechanisms:
■ Public access (no authentication)
■ Oracle Application Express Account
■ Single Sign-On Verification
■ LDAP Credentials Verification
■ Custom
If authentication is defined as Custom, an access control list manages the privileges of this application's users.
If authentication is Oracle Application Express Account, you must specify whether authorization is determined by the user role defined in the Application Express workspace, or if authorization is determined by the access control list. For all
Allow Public Access Options include:
■ Yes - Enable users to run the application in a read-only mode without requiring users to log in.
■ No - All users must log in to run the application.
Tip: instance administrators can control the ability to use SQL and PL/SQL for an entire instance. To learn more, see "Enabling and Disabling SQL Access in Websheets" in Oracle Application Express Administration Guide.
Table 5–5 (Cont.) Authorization
Attribute Descriptions

Managing Websheet Applications
5-44 Oracle Application Express Application Builder User's Guide
authentication types other than Oracle Application Express Accounts, authorization is always determined by the access control list.
Once a user logs in to an application, a user's assigned role determines access. User assigned roles include:
■ Reader - May view, but not edit content.
■ Contributor - May view and edit content.
■ Administrator - May view and edit content and edit Websheet Properties and manage the Access Control List.
To learn more about user roles and privileges, click Help and then select Access Control. See "About the Help Link" on page 5-3.
Specifying the Access Control List TypeTo use an access control list, you must edit the Websheet Properties and define the Access Control List Type as Custom.
To access the Websheet Properties page:
1. On the Workspace home page, click the Application Builder icon.
2. Click the Websheet Applications tab.
3. Click the View Icons button.
4. Locate the Websheet and click Edit.
The Websheet Properties appears. See "About Websheet Properties" on page 5-40.
5. Scroll down to Authorization.
6. From Access Control List Type, select Custom.
7. Click Apply Changes.
Creating Access Control List EntriesTo create access control list entries:
1. Log in to and run the Websheet. See "Running a Websheet" on page 5-7.
2. From the Administration menu, select Access Control.
3. Click Create Entry.
The Entry Details page appears.
4. On the Entry Details page:
a. Username - Enter the username of the user for whom you want to control access.
b. Privilege - Identify the user’s privileges:
– Reader - May view, but not edit content.
– Contributor - May view and edit content.
– Administrator - May view and edit content and edit Websheet Properties and manage the Access Control List.
5. Click either Create or Create and Create Another.
See Also: "Authentication" on page 5-42

Managing Websheet Applications
About Websheet Applications 5-45
Changing Your Websheet PasswordTo change your Websheet password:
1. Log in to and run the Websheet. See "Running a Websheet" on page 5-7.
2. From the Administration menu, select Change My Password.
The Change Password page appears.
3. Follow the on-screen instructions and click Change Password.
Emailing a Websheet PageTo email a Websheet page:
1. Log in to and run the Websheet. See "Running a Websheet" on page 5-7.
2. Locate the page you want to email.
3. Click the Email icon above the Control Panel.
4. On the Email Page:
a. To - Enter the target email address.
b. Subject - Enter a description of this email.
c. Body - Enter the email content you want to include along with the Websheet page link.
5. Click Send.
An email link to the currently selected page is automatically included in your email message.
Printing a Websheet PageTo print a Websheet in printer-friendly mode:
1. Log in to and run the Websheet. See "Running a Websheet" on page 5-7.
2. Click the Print icon above the Control Panel.
See Also: "Configuring Email" in Oracle Application Express Administration Guide

Viewing Websheets
5-46 Oracle Application Express Application Builder User's Guide
The page displays in printer-friendly mode.
3. Print the page.
Viewing WebsheetsUse the options on the View menu to access presentation mode, view a page directory, access a page history, and view an application directory.
Topics:■ About Presentation Mode
■ Viewing the Page Directory
■ Viewing Page History
■ Viewing an Websheet Directory
About Presentation ModePresentation mode enables a single Websheet page to be viewed as a presentation. Each page section displays one at a time as a slide. Users can navigate between sections by using the right and left arrow keys, by using the right and left arrow controls on the top right of the page, or by entering a section number to quickly jump to a specific section.
To view a Websheet in presentation mode, click the Presentation icon on the far right side of the page.
In Presentation mode, each page section displays as a separate page.
See Also: "Managing Annotations" on page 5-34 and "About Publishing the Websheet Application URL" on page 16-32

Viewing Websheets
About Websheet Applications 5-47
Use the navigation bar on the upper right of the page. To exit Presentation mode, click the Exit icon or press ESC.
Viewing the Page DirectoryUse the Page Directory to view all pages in the current Websheet. Each Websheet can contain any number of pages.
To access the Page Directory:
1. Log in to and run the Websheet. See "Running a Websheet" on page 5-7.
2. From the View menu, select Page Directory.
The Page Directory displays as an interactive report. To learn more about interactive reports and using the Actions menu, see "Customizing Interactive Reports" on page 9-4 and "About the Actions Menu" on page 9-6.
By default, the Page Directory displays in icon view.

Viewing Websheets
5-48 Oracle Application Express Application Builder User's Guide
One page in each Websheet is designated as the home page. The home page is the starting page that displays when you run the Websheet. In Icon view, the home page displays as a page with orange outline of home.
3. To view the page as a report, click the View Report icon.
By default, Report view displays the following columns: Name, Doc Type, Created, Created By, Updated On, Updated By, Parent Page, and Grand Parent Page.
4. To create a new page, click Create Page.
Viewing Page HistoryUse the Page History to view a log of all changes to the current page.
To view the Page History:
1. Log in to and run the Websheet. See "Running a Websheet" on page 5-7.
2. Select a page.
3. From the View menu, select Page History.
The Page History displays as an interactive report.
A Search bar displays at the top of the page. Available controls include:
■ Select columns to search - Resembles a magnifying glass. Click this icon to narrow your search. To search all columns, select All Columns.
■ Text area - Enter case insensitive search criteria (wildcard characters are implied) to search for a page group by name and then click Go.
■ Go button - Executes a search or applies a filter.
■ View Icons - Displays each Websheet as a large icon.
■ View Report - Displays each Websheet as a line in a report.
■ Actions menu - Use the Actions menu to customize the report view. See "About the Actions Menu" on page 9-6.
4. To view changes in a Calendar format, click Calendar.
Viewing an Websheet DirectoryUse the Websheet Directory to navigate to another Websheet application.
To access the Websheet Directory:
1. Log in to and run the Websheet. See "Running a Websheet" on page 5-7.
2. From the View menu, select Websheet Directory.
A Search bar displays at the top of the page. Available controls include:
■ Select columns to search - Resembles a magnifying glass. Click this icon to narrow your search. To search all columns, select All Columns.
Tip: You specify the Websheet home page on the Websheet Properties page. See "Editing Websheet Properties" on page 5-40.
See Also: "Editing Websheet Properties" on page 5-40

Viewing Websheets
About Websheet Applications 5-49
■ Text area - Enter case insensitive search criteria (wildcard characters are implied) to search for a page group by name and then click Go.
■ Go button - Executes a search or applies a filter.
■ View Icons - Displays each Websheet as a large icon.
■ View Report - Displays each Websheet as a line in a report.
■ Actions menu - Use the Actions menu to customize the report view. See "About the Actions Menu" on page 9-6.
3. To view an Websheet:
■ In Icon view, click the appropriate icon.
■ In Report view, click the Run icon in the Actions column.
Viewing Websheets
5-50 Oracle Application Express Application Builder User's Guide

Using Application Builder 6-1
6Using Application Builder
This section provides important background information about using Application Builder to build dynamically rendered applications.
Topics:■ Accessing Application Builder
■ About the Application Builder Home Page
■ About the Application Home Page
Accessing Application BuilderAn application is a collection of database-driven web pages linked together using tabs, buttons, or hypertext links. The pages within an application share a common session state definition and authentication method. Application Builder is the tool you use to build the pages that comprise an application.
To access Application Builder:
1. Log in to Oracle Application Express. See "Logging In To Oracle Application Express" on page 1-3.
The Workspace home page appears.
2. Click the Application Builder icon.
The Application Builder home page appears.
About the Application Builder Home PageThe Application Builder home page displays all installed applications. Applications are divided into two categories: database applications and Websheet applications. To learn more, see "Understanding the Difference Between Database and Websheet Applications" on page 2-1.
Tabs at the top of the Application Builder home page enable you to choose the type of applications to view. Available tabs include: All Applications, Database Applications, Websheet Applications, and Packaged Application. To learn more about packaged
See Also: "Quick Start" on page 1-1, "Application Builder Concepts" on page 2-1, "About Database Applications" on page 7-1, "Controlling Page Layout" on page 12-1, and "Adding Navigation" on page 11-1
See Also: "About the Application Home Page" on page 6-3

About the Application Builder Home Page
6-2 Oracle Application Express Application Builder User's Guide
applications, see "Utilizing Packaged Applications" on page 3-1.
You can customize the appearance of the Application Builder home page using the Search bar at the top of the page. Available controls include:
■ Search icon - Resembles a magnifying glass. Click this icon to narrow your search to only specific columns. To search all columns, select All Columns.
■ Text area - Enter case insensitive search criteria (wildcard characters are implied) and then click Go.
■ Go button - Executes a search or applies a filter.
■ View Icons (default) - Displays each application as a large icon identified by the application name.
■ View Report - Displays each application as a line in a report. Each line includes the application ID, the application name, when the application was last updated, the page count, and who last updated the application.
■ View Detail - Displays detailed information about each application.
■ Actions menu - Displays the Actions menu. Use this menu to customize the report view. See "About the Actions Menu" on page 9-6.
The following buttons appear to the right of the navigation bar:
■ Reset. Click Reset to return the page to the default display.
■ Import. Click Import to import an exported application file. See "Importing Export Files" on page 16-23.
■ Create. Click Create to create an application or install a demonstration application. See "About the Create Application Wizard" on page 2-2.
About the Tasks ListA Tasks list displays on the right side of the Application Builder home page.

About the Application Home Page
Using Application Builder 6-3
The Tasks list contains the following links:
■ Application Builder Defaults. See "Leveraging Application Builder Defaults" in Oracle Application Express Administration Guide.
■ Application Groups. See "Creating Application Groups" on page 7-54.
■ Workspace Themes. See "Managing Workspace Themes" on page 13-7
■ Cross Application Reports. See "Viewing Application Utilities and Reports" on page 7-78.
■ Application Express Views. See "About Application Express Views" on page 7-83.
■ Export. See "Exporting an Application and Related Files" on page 16-12.
About RecentThe Recent list contains links to recently viewed applications.
About MigrationsLinks to Oracle Application Express Application Migration Workshop. Use this tool to migrate a Microsoft Access application or convert an Oracle Forms application to an Oracle Application Express application. See Oracle Application Express Application Migration Guide.
About the Application Home PageTo view a specific application, select the application on the Application Builder home page. The Application home page appears. The application ID and the application name display at the top of the page. To link to the application definition, click the Edit Application Properties button.
See Also: "Editing the Application Definition" on page 7-15

About the Application Home Page
6-4 Oracle Application Express Application Builder User's Guide
The following large icons appear next:
■ Run Application submits the home page in the current application to the Application Express engine to render viewable HTML. See "How the Application Express Engine Renders and Processes Pages" on page 2-4.
■ Supporting Objects links to the Supporting Objects page. See "How to Create a Custom Packaged Application" on page 16-5.
■ Shared Components links to a list of shared components and user interface controls that can display or be applied on every page within an application. See "Working with Shared Components" on page 8-49.
■ Utilities links to the Utilities page. Use this page to monitor developer activity, view dashboards, run Advisor, and view numerous other reports. See "Using Application Builder Utilities" on page 7-78.
■ Export/Import links you to the Export/Import Wizard. Use this wizard to import and export an entire application and related files such as cascading style sheets, images, static files, script files, themes, user interface defaults, and workspace users. See "Exporting an Application and Related Files" on page 16-12.
About the Edit Application Properties ButtonThe Edit Application Properties button displays to the right of the application ID and name. Click Edit Application Properties to edit the application definition. See "Editing the Application Definition" on page 7-15.
About the Create Page ButtonClick Create Page to launch a wizard that walks you creating a page in an application. See "Creating a Page from the Application Home Page" on page 7-35.
About the Navigation BarA navigation bar displays in the center of the Application home page. You can use these controls to search for pages or customize the page view.

About the Application Home Page
Using Application Builder 6-5
The Application home page navigation bar contains the following controls:
■ Search icon - Resembles a magnifying glass. Click this icon to narrow your search to only specific columns. To search all columns, select All Columns.
■ Text area - Enter case insensitive search criteria (wildcard characters are implied) and then click Go.
■ Go button - Executes a search or applies a filter.
■ View icons. Use these icons to toggle between three views:
– View Icons (default) displays each page as a large icon identified by the page name.
– View Report displays each page as a line in a report. Each line includes the page ID, the page name, when the page was last updated, who updated it, the page type, user interface classification, and group.
– View Detail displays detailed information about each page.
■ Actions menu - Displays the Actions menu. Use this menu to customize the report view. See "About the Actions Menu" on page 9-6.
About the Tasks ListA Tasks list displays on the right side of the Application home page.
The Tasks list contains the following links:
See Also: "Understanding Page Display Alternatives" on page 6-6

About the Application Home Page
6-6 Oracle Application Express Application Builder User's Guide
■ Delete this Application deletes the current application. See "Deleting a Database Application" on page 7-13.
■ Copy this Application creates a copy of the current application. See "Copying a Database Application" on page 7-9.
■ Hide Icons hides the icons that display at the top of the Application home page. See "About the Application Home Page" on page 6-3. This link toggles between Hide Icons and Show Icons depending upon whether the icons currently display.
Understanding Page Display AlternativesYou can control how the Application home page appears by selecting the following icons: View Icons, View Report, or View Detail.
View Icons (the default) display each page as an icon.
Report mode displays each page as a line in a report. Each line includes the page number, the page name, when the page was last updated and by whom, the page type, any associated group, and lock status. To view a page, click the page ID. Click the Lock icon to prevent conflicts during application development. Click the Run icon to run the associated page and render viewable HTML.
View Detail displays detailed information about each page in a separate region. Click the Run icon to run the associated page and render viewable HTML. Click the Edit icon to view the Page Definition. Click the Lock icon to prevent conflicts during application development.
See Also: "Locking and Unlocking a Page" on page 7-44 and "Running an Application or Page" on page 7-40

About the Application Home Page
Using Application Builder 6-7
About Recently Edited PagesThe Recent list contains links to recently edited pages within the current application. To link to specific page, click the page ID and name.
About the Developer Action BarThe Developer Action bar displays in the upper right corner below the Search Application field on most pages in Application Builder.
The Developer Action bar contains several icons. The icons that display depend upon the page you are in Application Builder. Note that the Run Page icon, Edit Page icon, Developer Comment icon, and Find icon display on numerous pages in Application Builder, including pages for creating and managing shared components. See "Working with Shared Components" on page 8-49.
Run Page Icon
The Run Page icon resembles a forward arrow. Click this icon to render viewable HTML of the current page. If no page is selected, clicking this icon runs the first page in the application. When you run a page, the Application Express engine dynamically renders the page based on data stored in the database. See "Running an Application or Page" on page 7-40.

About the Application Home Page
6-8 Oracle Application Express Application Builder User's Guide
Edit Page Icon
The Edit Page icon resembles a small piece of paper and pencil. Click this icon to access the Page Definition of the current page. If no page is selected, clicking this icon displays the Page Definition of the first page in the application. See "About the Page Definition" on page 8-1.
Shared Components Icon
The Shared Components icon resembles a small mechanical gear. Click this icon to view a list of shared components and user interface controls that can display or be applied on every page within an application. See "Working with Shared Components" on page 8-49.
Application Utilities Icon
The Application Utilities icon resembles four small boxes. Click this icon to link to the Utilities page. The Utilities page summarizes information across the application and provides access to useful tools. See "Using Application Builder Utilities" on page 7-78.
Developer Comment, Bug, or To Do icon
The Developer Comment, Bug, or To Do icon resembles a balloon with a plus sign. Click this icon to link to create a developer comment, a bug, or a To Do entry. See "Adding Developer Comments" on page 7-49, "Managing Bugs" on page 4-14, and "Tracking To Dos" on page 4-10.
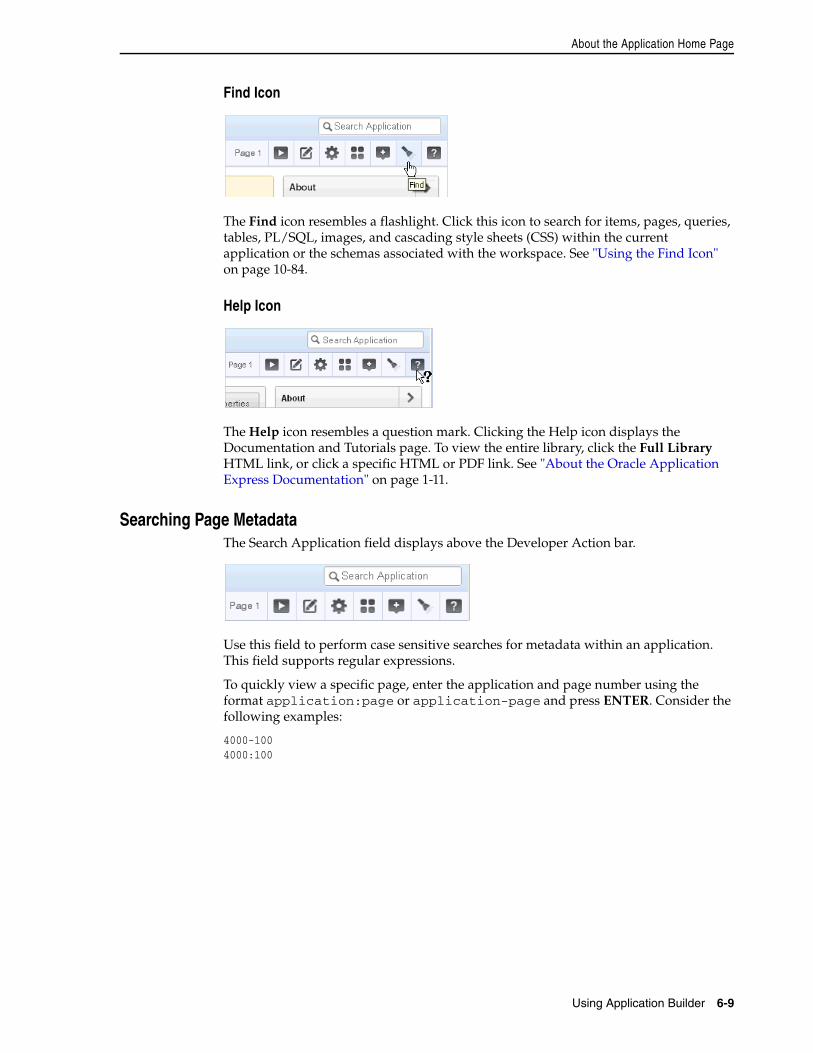
About the Application Home Page
Using Application Builder 6-9
Find Icon
The Find icon resembles a flashlight. Click this icon to search for items, pages, queries, tables, PL/SQL, images, and cascading style sheets (CSS) within the current application or the schemas associated with the workspace. See "Using the Find Icon" on page 10-84.
Help Icon
The Help icon resembles a question mark. Clicking the Help icon displays the Documentation and Tutorials page. To view the entire library, click the Full Library HTML link, or click a specific HTML or PDF link. See "About the Oracle Application Express Documentation" on page 1-11.
Searching Page MetadataThe Search Application field displays above the Developer Action bar.
Use this field to perform case sensitive searches for metadata within an application. This field supports regular expressions.
To quickly view a specific page, enter the application and page number using the format application:page or application-page and press ENTER. Consider the following examples:
4000-1004000:100

About the Application Home Page
6-10 Oracle Application Express Application Builder User's Guide
About Database Applications 7-1
7About Database Applications
This section describes how to use Application Builder to build database applications and application components. It includes instructions for creating an application and adding pages and adding components (reports, charts, or forms), page controls (buttons, items, list of values), and shared components (breadcrumbs, lists, or tabs). For instructions on viewing the packaged and sample applications that ship with Oracle Application Express, see "Utilizing Packaged Applications" on page 1.
Topics:■ About Creating a Database Application
■ About Application Attributes
■ Managing Pages in a Database Application
■ Adding Database Application Comments
■ Adding Developer Comments
■ Creating Application Groups
■ Understanding Page-Level Items
■ Understanding Application-Level Items
■ Viewing Application Utilities and Reports
About Creating a Database ApplicationBy using the Create Application Wizard, you can create a complete application containing multiple pages including reports, interactive reports, forms, tabular forms, and master detail forms. The Create Application Wizard is designed to easily and quickly create basic Oracle Application Express applications. After you create an application using this wizard, you can modify pages and add additional pages using the Create Page Wizard. See "About Creating Pages in a Database Application" on page 7-35.
You can use the Create Application Wizard to create blank pages, or pages based on SQL queries or existing database tables. Applications based on tables can consist of a simple report, a form and report, or a tabular form. To learn more, see and "Creating Forms" on page 10-1. You can create SQL queries by manually typing SQL, or by using the graphical user interface of Query Builder.
See Also: "Understanding the Difference Between Database and Websheet Applications" on page 2-1, "Using Application Builder" on page 6-1, "Creating Reports" on page 9-1, "Controlling Page Layout" on page 12-1, and "Adding Navigation" on page 11-1
About Creating a Database Application
7-2 Oracle Application Express Application Builder User's Guide
At the workspace level, you have the option of setting defaults that are used for applications built in that workspace. Setting these defaults enables you to exit the wizard without paging through each step. When you exit the wizard, the application you create uses the values you specified as defaults.
Topics:■ Creating Mobile Applications
■ Creating a Database Application Based on a Table, Query, or Drill-down Query
■ Creating an Application from a Spreadsheet
■ Copying a Database Application
■ Creating a Database Application from a Template
■ Installing Sample Applications
■ Deleting a Database Application
■ About Application Models and User Interface Defaults
Creating Mobile ApplicationsBecause mobile applications are designed to run specifically on smartphone devices, they should be built with minimal, semantic HTML that is optimized for mobile connections. This section describes how to create mobile applications in Oracle Application Express.
Topics:■ What Is the Difference Between a Mobile Design and Responsive Design?
■ About jQuery Mobile Support
■ About Creating Mobile Applications
■ About Selecting the jQuery Mobile Smartphone User Interface
What Is the Difference Between a Mobile Design and Responsive Design?Oracle Application Express includes two approaches to developing applications for mobile devices:
■ Option 1: Create jQuery Mobile-based web pages.
■ Option 2: Use Theme 25 to create a responsive design in which the page layout fits the space regardless of the target device (for example, a desktop computer, laptop computer, tablet, or smartphone).
The main difference between these two approaches is that responsive design enables a single web page to display on any device. In contrast, developers building mobile applications with jQuery Mobile must create two sets of pages: one for desktop display and another for mobile devices. On the surface, creating a responsive design and having only a single page to maintain sounds more appealing than maintaining two separate pages. In practice, however, the up front cost of designing a truly
See Also: "Building Queries with Query Builder" in Oracle Application Express SQL Workshop Guide and "Leveraging Application Builder Defaults" in Oracle Application Express Administration Guide
See Also: "About Using Theme 25 to Create a Responsive Design" on page 13-2

About Creating a Database Application
About Database Applications 7-3
responsive page are much higher and requires a much higher level of understanding of grid layout, HTML and CSS.
You should base your decision on whether to build separate mobile pages or create a responsive design based on the type of site or application you are developing. For example, applications that will be accessed by the general public, such as marketing sites, are well suited for responsive design. Productivity applications, such as customer tracker applications, are good candidates for building mobile pages where the native functionality of the smartphone can be utilized.
About jQuery Mobile SupportTo support mobile application development, Oracle Application Express incorporates jQuery Mobile. jQuery Mobile-based web pages use a lightweight framework that enables you to create compact and minimalistic web sites that include only a few images and CSS files. jQuery Mobile supports mobile device-specific events, such as orientation change and touch events. You easily change the look and feel of jQuery Mobile-based applications by modifying the CSS using tools such as ThemeRoller. See http://jqueryui.com/themeroller/.
About Creating Mobile ApplicationsOracle Application Express mobile applications run inside the browser on a mobile device. These mobile applications must have a connection in order to communicate with the Oracle database and cannot operate in a disconnected environment. Using jQuery Mobile, these applications can run on the following mobile operating systems: iOS, Android, Blackberry, and Windows Mobile.
Mobile devices that support HTML5 capabilities can utilize all built-in capabilities including HTML5 date-pickers, sub-types that display different keypads based on field definition, and so on. Older devices can still render the application but with less advanced features. The major advantage of developing browser-based applications is that you only need to develop them once for the majority of mobile devices. However, one major limitation is accessing on-device features such as contact lists. You can alleviate this limitation by integrating solutions such as PhoneGap. PhoneGap supports the creation of hybrid solutions which use a native application wrapper to display the web application.
About Selecting the jQuery Mobile Smartphone User InterfaceWhen you create a database application using a wizard, you select a User Interface (for example, Desktop or jQuery Mobile Smartphone). The User Interface you select determines what options display later in the wizard. You can view or alter the User Interface on the Application Attributes page. Note that jQuery Mobile Smartphone does not supports all page types. Supported page types are described in detail later in this document.
See Also: "About Using Theme 25 to Create a Responsive Design" on page 13-2
See Also: http://jquerymobile.com/
See Also: http://phonegap.com/
See Also: "Managing the Application User Interface" on page 7-30

About Creating a Database Application
7-4 Oracle Application Express Application Builder User's Guide
Creating a Database Application Based on a Table, Query, or Drill-down QueryYou can create a database application based on a table, query, or drill-down query by selecting Database in the Create Application Wizard. A key decision point when running the Create Application Wizard is choosing a target user interface. Based on the user interface you select, the wizard is optimized to display the appropriate page types, attributes, and themes.
To create a database application based on a table, query, or drill-down query:
1. On the Workspace home page, click the Application Builder icon.
2. Click the Create button.
3. For Method, select Database and click Next.
4. For Name:
a. Application - Enter a unique integer value to identify the application. Note that Application IDs between 3000 to 9000 are reserved for internal use by Oracle Application Express.
b. Name - Enter a name to identify the application.
c. Schema - Each application obtains its privileges by parsing all SQL as a specific database schema. Identify the database schema owner.
d. Create Options:
– Start from scratch - Enables you to manually add all pages.
– Include Home page - Includes a blank page, which automatically acts as the parent of any new pages added. A list region is also created on the home page, providing navigation to the additional pages.
– Use previously created application model - Reuses an existing application definition. Using an existing application definition enables you to run this wizard without reentering application property values.
Note that you still have to define all other application attributes, or you can choose to copy some attributes by choosing to copy shared compo-nents from another application (See "About Application Models and User Interface Defaults" on page 7-13).
e. User Interface - Select a user interface for the application. For application primarily designed for desktop use, select Desktop.
f. Click Next.
Next, add pages to your application.
5. For Pages, select the type of page you want to add.
a. Select the type of page you want to add.
Table 7–1 lists available page types by target user interface (that is, Desktop and jQuery Mobile Smartphone).
See Also: "Managing Pages in a Database Application" on page 7-35
Tip: To create an instant application consisting of just a login page and blank page, click Create Application.
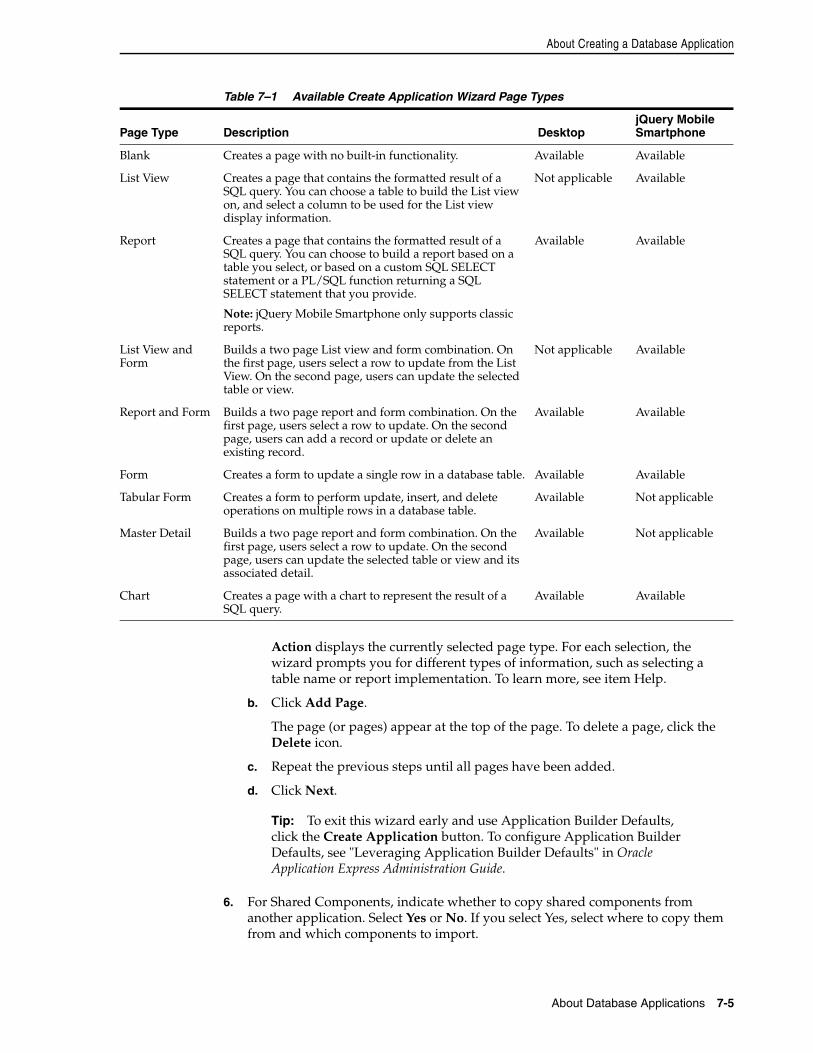
About Creating a Database Application
About Database Applications 7-5
Action displays the currently selected page type. For each selection, the wizard prompts you for different types of information, such as selecting a table name or report implementation. To learn more, see item Help.
b. Click Add Page.
The page (or pages) appear at the top of the page. To delete a page, click the Delete icon.
c. Repeat the previous steps until all pages have been added.
d. Click Next.
6. For Shared Components, indicate whether to copy shared components from another application. Select Yes or No. If you select Yes, select where to copy them from and which components to import.
Table 7–1 Available Create Application Wizard Page Types
Page Type Description DesktopjQuery Mobile Smartphone
Blank Creates a page with no built-in functionality. Available Available
List View Creates a page that contains the formatted result of a SQL query. You can choose a table to build the List view on, and select a column to be used for the List view display information.
Not applicable Available
Report Creates a page that contains the formatted result of a SQL query. You can choose to build a report based on a table you select, or based on a custom SQL SELECT statement or a PL/SQL function returning a SQL SELECT statement that you provide.
Note: jQuery Mobile Smartphone only supports classic reports.
Available Available
List View and Form
Builds a two page List view and form combination. On the first page, users select a row to update from the List View. On the second page, users can update the selected table or view.
Not applicable Available
Report and Form Builds a two page report and form combination. On the first page, users select a row to update. On the second page, users can add a record or update or delete an existing record.
Available Available
Form Creates a form to update a single row in a database table. Available Available
Tabular Form Creates a form to perform update, insert, and delete operations on multiple rows in a database table.
Available Not applicable
Master Detail Builds a two page report and form combination. On the first page, users select a row to update. On the second page, users can update the selected table or view and its associated detail.
Available Not applicable
Chart Creates a page with a chart to represent the result of a SQL query.
Available Available
Tip: To exit this wizard early and use Application Builder Defaults, click the Create Application button. To configure Application Builder Defaults, see "Leveraging Application Builder Defaults" in Oracle Application Express Administration Guide.

About Creating a Database Application
7-6 Oracle Application Express Application Builder User's Guide
Shared components are common application elements that can be displayed or applied across multiple pages in an application. To save time or maintain consistency between applications, copy the shared components from an existing application. The types of shared components you can copy include: user interface themes, lists of values, navigation bar entries, authorization schemes and authentication schemes.
7. For Attributes:
a. Authentication Scheme - Determine how establish user identity before accessing an application. Options include:
– Application Express - Uses the user account credentials created and maintained with the Application Express Service Administration application. These are the accounts you use to log in to the Application Express development environment. You can also create accounts in this user account repository for end users of your applications.
– Database Account - Requires users logging into your application to enter a database schema name (or user name) and a password in order to authenticate. This account information is managed entirely within the Oracle database.
– No Authentication - Also known as Database Account Credentials. This option enables users to access your application using the account credentials stored in the mod_plsql DAD definition. In most cases this results in users not having to login when accessing your application. This is the quickest way to create a “public” application.
To learn more, see "Establishing User Identity Through Authentication" on page 15-25
b. Tabs - Select whether to include tabs in your application. You can create one level tabs, two level tabs, or no tabs at all. To learn more, see "Creating Tabs" on page 11-1
This attribute identifies the language in which an application is developed. This language is the base language from which all translations are made.
c. Language - Select the primary language for this application.
This attribute identifies the language in which an application is developed. This language is the base language from which all translations are made.
d. User Language Preference Derived From - Specifies how the engine determines the application language. The application primary language can be static (that is, derived from the web browser language) or determined from a user preference or item. The database language setting determines date display and sorting characteristics. To learn more, see item Help.
You can alter the Language and User Language Preference Derived From attributes later on the Edit Globalization attributes page. See "Configuring Globalization Attributes" on page 7-27.
e. Date Format - Specifies the date format to be used in the application.
Use this date format to alter the NLS_DATE_FORMAT database session setting before showing or submitting any page within the application. This value can be a literal string containing a valid Oracle date format mask or an item reference through substitution syntax. If no value is specified, the default date format is derived from the database session at runtime. If supplied, this is also used as the date format for any items resulting from columns of type DATE.

About Creating a Database Application
About Database Applications 7-7
f. Date Time Format - Specifies the date time format to be used in the application.
This date time format can be referenced in an application using the substitution reference &APP_DATE_TIME_FORMAT., or in PL/SQL using the function v('APP_DATE_TIME_FORMAT'). This attribute does not alter any NLS settings. This value can be a literal string containing a valid Oracle date format mask or an item reference using substitution syntax. If this attribute value is not specified, then a reference to APP_DATE_TIME_FORMAT returns the NLS database session date format and the NLS time format.
g. Timestamp Format - Specifies the timestamp format to be used in your application.
Use this timestamp format to alter the NLS_TIMESTAMP_FORMAT database session setting before showing or submitting any page within the application. This value can be a literal string containing a valid Oracle timestamp format mask or an item reference through substitution syntax. If no value is specified, the default timestamp format is derived from the database session at runtime.
h. Timestamp Time Zone Format - Specifies the timestamp with time zone format to be used in your application.
Use this timestamp with time zone format to alter the NLS_TIMESTAMP_TZ_FORMAT database session setting before showing or submitting any page within the application. This value can be a literal string containing a valid Oracle timestamp with time zone format mask or an item reference through substitution syntax. If no value is specified, the default timestamp with time zone format is derived from the database session at runtime.
i. Click Next.
8. For User Interface Theme, select a theme and click Next.
Themes are collections of templates used to define the layout and style of an entire application. See "Managing Themes" on page 13-1.
9. Confirm your selections and click Create Application.
Creating an Application from a SpreadsheetYou can create an application based on spreadsheet data by selecting From Spreadsheet in the Create Application Wizard.
To create an application from spreadsheet data:
1. On the Workspace home page, click the Application Builder icon.
2. Click the Create button.
3. For Method, select From Spreadsheet.

About Creating a Database Application
7-8 Oracle Application Express Application Builder User's Guide
4. For Load Method, specify how spreadsheet data is imported. Select one of the following and click Next:
a. Upload file, comma separated (*.csv) or tab delimited. Specify the following and click Next:
– Text File - Click Choose File to locate the file to be uploaded.
– Separator - Specify the column separator character. Use \t for tab separators.
– Optionally Enclosed By - Enter a delimiter character. You can use this character to deliminate the starting and ending boundary of a data value. If you specify a delimiter character, the wizard ignores white space occurring before the starting and ending boundary of a data value. You can also use this option to enclose a data value with the specified delimiter character. If applicable, select First row contains column names.
– File Character Set - Choose the character set in which the text file is encoded.
b. Copy and paste. Copy and paste the tab delimited data you want to import.
5. For Table Properties:
a. Schema - Identify the database schema owner.
b. Table - Enter a name for the table being created.
c. Set Table Properties - Review the table properties. Modify the data types or enter format masks.Specify whether to include a column by selecting Yes or No from the Upload list.
d. Click Next.
6. For User Interface Defaults:
a. Review the displayed Singular Name and Plural Name.
b. (Optional) Under Column User Interface Defaults, review the displayed column labels.
c. Click Next.
7. For Application Options, specify the following:
a. Application Name - Enter an alphanumeric name for this application.

About Creating a Database Application
About Database Applications 7-9
b. Create Mode - Options include:
– Read Only does not include insert and update pages.
– Read and Write includes insert and update pages.
c. Report Implementation:
– Classic creates a SQL report.
– Interactive creates an interactive report.
d. Click Next.
8. For User Interface Theme, select a theme and click Next.
Themes are collections of templates used to define the layout and style of an entire application. See "Managing Themes" on page 13-1.
9. Confirm your selections and click Create Application.
Copying a Database ApplicationYou can create a copy of an existing application by running the Create Application Wizard or by selecting the application and then Copy this Application on the Application home page.
Topics:■ Copying a Database Application Using the Create Application Wizard
■ Copying an Application from the Application Home Page
Copying a Database Application Using the Create Application WizardTo copy application by running the Create Application Wizard:
1. On the Workspace home page, click the Application Builder icon.
2. Click the Create button.
3. Select Copy of an existing Application.
4. For Method, click the As a copy of an existing application link.
5. For Identify Copy Target:
a. Copy From - Select the name of the application to copy.

About Creating a Database Application
7-10 Oracle Application Express Application Builder User's Guide
b. Copy To - Enter a short descriptive name for the application to distinguish the new application in select lists and reports.
c. New Application ID - Enter a unique integer value to identify the application. Note that Application IDs between 3000 to 9000 are reserved for internal use.
d. Copy Supporting Object Definitions - Specify whether to include supporting object definitions. Options include:
– Yes - Include database object definitions, image definitions, and seed data SQL statements encapsulated in a single file.
– No - Do not include supporting object definitions.
e. Click Next.
6. Click Create Application.
Copying an Application from the Application Home PageTo copy a database application from the Application home page:
1. On the Workspace home page, click the Application Builder icon.
2. Select an application.
The Application home page appears.
3. From the Tasks list, click Copy this Application.
4. For Identify Copy Target:
a. New Application ID - Enter a unique integer value to identify the application. Note that Application IDs between 3000 to 9000 are reserved for internal use.
b. New Application Name - Enter a short descriptive name for the application to distinguish the new application in select lists and reports.
c. Copy Supporting Object Definitions - Specify whether to include supporting object definitions. Options include:
– Yes - Include database object definitions, image definitions, and seed data SQL statements encapsulated in a single file.
– No - Do not include supporting object definitions.
d. Click Next.
5. Click Copy Application.
Creating a Database Application from a TemplateInstance administrators manage the template application repository for an entire Oracle Application Express instance. Developers can create robust applications based on template applications stored in the template application repository.
Only an instance administrator can add or remove an application template from the repository. To create a template application, an instance administrator must first export the application and then add it to the template application repository.
To create an application based on a template application:
1. On the Workspace home page, click the Application Builder icon.
See Also: "Managing Template Applications" in Oracle Application Express Administration Guide

About Creating a Database Application
About Database Applications 7-11
2. Click the Create button.
3. For Method, select From Application Template.
4. For Select Application:
a. Application Type - Select the type of template application on which to base your new application. Select either Database or Websheet.
b. Template Application - Select the name of the template application on which to base your new application.
c. Name - Enter a short descriptive name for the application, helping to distinguish the new application in select lists and reports.
d. Application - Specify an integer value that identifies the application. The application ID must be unique within your Application Express instance.
Application IDs in the range of 3000 to 9000 are reserved for internal use by Application Express.
e. Schema - Your application obtains its privileges by parsing all SQL as a specific database schema. Identify the database schema owner. This option only displays if you select Database for Application Type.
f. Click Next.
5. Confirm your selections and click Create Application.
Installing Sample ApplicationsOracle Application Express includes many sample applications. You can install, run, and use sample applications as is, or analyze them to better understand how to use Application Builder to build specific types of functionality.
To install sample applications:
1. On the Workspace home page, click the Application Builder icon.
2. Click the Create button.
3. For Method, select Install Sample applications.
See Also: "Utilizing Packaged Applications" on page 3-1

About Creating a Database Application
7-12 Oracle Application Express Application Builder User's Guide
The Packaged Applications page appears.
Note that the application category (for example, Sample Application) displays beneath the application title. You can identify installed applications by the green Installed tag that displays beneath the product category.
4. Locate the application to be installed.
5. Click the application image.
A summary page appears.
6. Click Install Application.
7. Select an Authentication scheme and click Next.
8. Click Install Application again.
A success message appears.
9. To run the application, click the Run Application icon.

About Creating a Database Application
About Database Applications 7-13
10. Enter the appropriate login credentials:
a. Username - Enter your workspace username.
b. Password - Enter your workspace password.
c. Click Login.
Deleting a Database ApplicationYou can delete an application from within Application Builder, or while editing application attributes. If you delete an application you also delete all defined components (reports, charts, or forms), page controls (buttons, items, list of values), and shared components (breadcrumbs, lists, and tabs, but not user interface defaults).
Topics:■ Deleting an Application from the Application Builder Home Page
■ Deleting an Application from the Edit Application Definition Page
Deleting an Application from the Application Builder Home PageTo delete an application from Application Builder:
1. On the Workspace home page, click the Application Builder icon.
2. Select an application.
3. When Application Builder appears, verify the application ID and name at the top of the page.
4. On the Tasks list, click Delete this Application.
5. When prompted, click Permanently Delete Now.
Deleting an Application from the Edit Application Definition PageTo delete an application from the Edit Application Definition page:
1. On the Workspace home page, click the Application Builder icon.
2. Select an application.
3. Click the Edit Application Properties button to the right of the application name.
The Edit Application Definition page appears.
4. Verify the application ID and name.
5. Click Delete at the top of the page.
6. When prompted, click Permanently Delete Now.
About Application Models and User Interface DefaultsThe Create Application Wizard is designed with the assumption that the developer may run it multiple times. To facilitate this iterative approach to application development, every time you run the wizard it saves the page definitions to an application model.
See Also: "Deinstalling Supporting Objects" on page 16-11
See Also: "Deinstalling Supporting Objects" on page 16-11
See Also: "Editing the Application Definition" on page 7-15

About Creating a Database Application
7-14 Oracle Application Express Application Builder User's Guide
Consider the following example. You create an application by running the Create Application Wizard. After viewing the application, you realize it is not quite what you wanted. Instead of altering it, you can run the wizard again and select an application model. By selecting an existing application model when you rerun the wizard, you can quickly improve your application with minimal time and effort.
Another way to increase your productivity when creating an application is to specify user interface defaults. User interface defaults are metadata that enable you to assign default user interface properties to a table, column, or view within a specified schema.
Leveraging Application Models and User Interface DefaultsYou can increase your productivity when creating applications by leveraging application models and user interface defaults. Consider the following scenario:
1. Create an application based on tables or views by running the Create Application Wizard.
2. Run the generated application. Note any functional deficiencies.
3. Evaluate whether to create or edit user interface defaults.
For example, you can use user interface defaults to control how form field or report labels display. You can also use user interface defaults to display specific columns or have columns display in an alternate order.
4. Navigate to the Application Builder home page and create an application by clicking Create.
5. For Method, select Database.
6. For Name:
a. Application - Enter a unique integer value to identify the application. Note that Application IDs between 3000 to 9000 are reserved for internal use by Oracle Application Express.
b. Name - Enter a name to identify the application.
c. Schema - Each application obtains its privileges by parsing all SQL as a specific database schema. Identify the database schema owner.
d. For Create Options - Select Use previously created application model. This option reuses an existing application definition. Using an existing application definition enables you to run the wizard without reentering application property values.
Note that you still have to define all other application attributes, or you can choose to copy some attributes by choosing to copy shared components from another application (See "About Application Models and User Interface Defaults" on page 7-13).
e. User Interface - Select user interface for the application.
f. Click Next.
7. Select a design model and developer.
See Also: "Managing Application Models" in Oracle Application Express Administration Guide
See Also: "Managing User Interface Defaults" in Oracle Application Express SQL Workshop Guide

About Application Attributes
About Database Applications 7-15
Note the pages you previously created already appear.
8. Add pages, edit pages, or remove pages.
9. Complete the wizard.
10. Repeat steps 2 through 9 until the application meets your functional requirements.
About Application AttributesApplication attributes apply to an entire application. Once you create an application, the next logical step is to review and possibly update application attributes.
Topics:■ Editing the Application Definition
■ Configuring Security Attributes
■ Configuring Globalization Attributes
■ Managing the Application User Interface
Editing the Application DefinitionYou use the attributes on the Edit Application Definition page to edit the application name and availability and to define static substitution strings.
Topics:■ Accessing the Edit Definition Page
■ About the Edit Application Definition Page
Accessing the Edit Definition PageTo edit the application definition:
1. On the Workspace home page, click the Application Builder icon.
2. Select an application.
3. Click the Edit Application Properties button to the right of the application name.
The Edit Application Definition page appears.
See Also: "How to Create a Custom Packaged Application" on page 16-5 for information on using the Supporting Objects utility to create a packaged application

About Application Attributes
7-16 Oracle Application Express Application Builder User's Guide
About Navigation Alternatives The Edit Application Definition page is divided into the following sections: Name, Properties, Availability, Error Handling, Global Notification, Substitutions, Logo, and Build Options. You can access these sections by scrolling down the page, or by clicking a navigation button at the top of the page.
When you select a button at the top of the page, the selected section appears and all other sections are temporarily hidden. To view all sections of the page, click Show All.
About the Edit Application Definition PageThe following sections describe the attributes available on the Edit Application Definition page. Note that required values are marked with a red asterisk (*).
Topics:■ Name
■ Properties
■ Availability
■ Error Handling
■ Global Notification
■ Substitutions
■ Build Options
Name Use Name to define basic characteristics of your application, including the application name, an optional alphanumeric alias, and a version number. Table 7–2 describes all Name attributes.
Table 7–2 Application Definition, Name
Attribute Description
Name Provides a short descriptive name for the application to distinguish it from other applications in your development environment.
Application Alias Assigns an alternate alphanumeric application identifier. You can use this identifier for the application ID.
For example, suppose you create an alias of myapp for application 105. Using f?p syntax, you could call application 105 as either:
■ f?p=105:1
■ f?p=myapp:1
See Also: "Using f?p Syntax to Link Pages" on page 2-9

About Application Attributes
About Database Applications 7-17
Properties Use Properties to enable the following attributes: logging, debugging, exact substitutions, application group, feedback, and default error display location. Table 7–3 describes all Name attributes.
Version Includes the application's version number on a page. You can also automatically tie the version to the date of last modification using the following format masks:
■ YYYY.MM.DD
■ MM.DD.YYYY
■ DD.MM.YYYY
If your application version uses YYYY.MM.DD, then Application Builder replaces this format mask with the date of last modification of any application attribute.
Application Group Displays the application group currently associated with this application. To select another application group, make a selection from the list. To remove an application from an existing group, select Unassigned.
See Also: "Creating Application Groups" on page 7-54
Table 7–3 Application Definition, Properties
Attribute Description
Logging Determines whether user activity is recorded in the Oracle Application Express activity log. When set to Yes, every page view is logged, enabling an administrator to monitor user activity for each application.
Disabling logging may be advisable for high volume applications.
This attribute can only be modified if the Application Activity Logging attribute in Oracle Application Express Administration Services is set to Use Application Setting.
See Also: "Enabling Application Activity" in Logging in Oracle Application Express Administration Guide.
Debugging Controls debug mode for the current application. Available options include:
■ Yes - Enables the application to run in a debug mode.
■ No - Prevents end users from running an application in debug mode.
Running an application in debug mode is useful when an application is under development. However, for a production application, it is a good idea to disable debugging and thus prevent users from viewing application logic.
Allow Feedback Enables support for end user feedback for this application. Select Yes or No.
If enable this option, you must create a feedback page and navigation bar icon to call that page. If you later disable feedback, the navigation bar icon is hidden.
See Also: "Managing Feedback" on page 4-17
Table 7–2 (Cont.) Application Definition, Name
Attribute Description

About Application Attributes
7-18 Oracle Application Express Application Builder User's Guide
Availability Use Availability to manage your application by defining an application status and build status. For example, if you select the status Restricted Access, you can specify which users have access and can run the application. To learn more, see Table 7–4.
Compatibility Mode This attribute controls the compatibility mode of the Application Express engine. Certain runtime behaviors are changed from release to release. Use this attribute to obtain specific application behavior. To realize new behavior in an application, set the compatibility mode of the application to 4.2.
To learn more, see Field-level Help.
Application Email from Address
Determines the email address to use as the from address in the application.
Enter a valid email address to use as the from address when sending email from an email download or subscription. The value can be a literal string containing a valid email or a static substitution reference defined in the application using substitution syntax APP_EMAIL. Examples:
[email protected]&MY_APP_EMAIL_FROM.
Oracle does not recommend using an item substitution at the application or page-level since it only works in email download, but not for subscriptions.
You can also specify the from address on the Interactive Report Attributes page. See "Accessing Classic Report Attributes" on page 9-51.
Proxy Server Use this field to specify a proxy server.
For example, you may require a proxy server when using a region source type of URL. The URL region source embeds the results of the URL (that is, the page returned by navigating to the URL) as the region source. If you use a firewall and the target of a URL is outside the firewall relative to Application Builder, you may need to specify a proxy server.
You can reference values entered into this field from PL/SQL using the PL/SQL package variable APEX_APPLICATION.G_PROXY_SERVER.
Table 7–3 (Cont.) Application Definition, Properties
Attribute Description

About Application Attributes
About Database Applications 7-19
Error Handling Use the attributes described in Table 7–5 to control or modify how an application logs errors. Error handling functions specified here are overridden by similar page-level attributes. See "About Page Attributes" on page 8-21.
Table 7–4 Application Definition, Availability
Attribute Description
Status Specifies whether the application is available or unavailable for use. Options include:
■ Available - Application is available with no restrictions.
■ Available with Edit Links - Application is available for use. For developers, the Developer toolbar displays at the bottom of each page. Requires the developer to be logged in to the Application Builder in the same browser session.
■ Available to Developers Only - Application is available to users having developer privileges.
■ Restricted Access - Application is available to developers named in the Restrict to comma separated user list.
■ Unavailable - Application cannot be run or edited. The message in Message for unavailable application displays when users attempt to access the application.
■ Unavailable (Status Shown with PL/SQL) - Application cannot be run or edited.
■ Unavailable (Redirect to URL) - Application cannot be run. The user is linked to the URL entered in Message for unavailable application.
See Also: "Changing Build Status for Multiple Applications" in Oracle Application Express Administration Guide, "Changing Application Build Status Set During Deployment" in Oracle Application Express Administration Guide, and "Controlling Access to Applications, Pages, and Page Components" on page 10-90,
Build Status Identifies the build status of the current application. Options include:
■ Run and Build Application - Developers and users can both run and develop the application.
■ Run Application Only - Users can only run the application. This option is intended for applications in a production instance.
See Also: "Changing Application Build Status Set During Deployment" in Oracle Application Express Administration Guide
Message for unavailable application
Use this attribute with Status. If you set Status to Unavailable, Unavailable (Status Shown with PL/SQL), or Unavailable (Redirect to URL), the text you enter in this attribute displays. If you set Status to Available, the text you enter in this attribute does not display.
Restrict to comma separated user list (status must equal Restricted Access)
Use this attribute with the Status Restricted Access. If you set Status to Restricted Access, only the users listed in this attribute can run the application. To use this attribute:
1. From the Status list, select Restricted Access.
2. Enter a comma-delimited list of users who can run the application in the field provided.

About Application Attributes
7-20 Oracle Application Express Application Builder User's Guide
Global Notification You can use the Global Notification attribute to communicate system status to application users. For example, you can use this attribute to notify users of scheduled downtime, or communicate other messages regarding application availability. If the page templates used in your application contain the #GLOBAL_NOTIFICATION# substitution string, the text entered here displays in that string's place.
To create a global notification:
1. Include the #GLOBAL_NOTIFICATION# substitution string in your page template.
2. Navigate to the Edit Application Definition page and enter a message in the Global Notification attribute.
3. Click Apply Changes.
Table 7–5 Application Definition, Error Handling
Attribute Description
Default Error Display Location
Identifies where the validation error messages display for basic validations performed by Application Express or by plug-ins. Validation error messages can display in a notification area (defined as part of the page template), or within the field label. Options include:
■ Inline with Field and in Notification - Error messages display in a notification area defined as part of the page template.
■ Inline with Field - Error messages display within the field label.
■ Inline in Notification - Enter the error text displays in the #NOTIFICATION_MESSAGE# template substitution string when an error occurs on the page.
Error Handling Function Enter the name of a PL/SQL error function to be called to modify the existing error message and display a more user-friendly message or log the error if one occurs. This function can reference a package function or standalone function in the database. For example:
log_apex_error
When referencing a database PL/SQL package or standalone function, use the #OWNER# substitution string to reference the parsing schema of the current application. For example:
#OWNER#.log_apex_error
You must implement error handling functions using the syntax described in the apex_error package.
function <name of function> ( p_error in apex_error.t_error ) return apex_error.t_error_result
See Also: apex_error in Oracle Application Express API Reference
Note: Error handling specified at the page-level overwrites any error handling function specified here. See "About Page Attributes" on page 8-21.

About Application Attributes
About Database Applications 7-21
Substitutions Use these fields to define static substitution strings for your application. You can use static substitution string for phrases or labels that occur in many places within an application. To create a substitution string, enter the string name in the Substitution String column and the string value in the Substitution Value column.
Defining static substitution strings centrally enables you to change text strings in multiple places in your application by making a single change to the Substitution Value defined on this page.
Build Options Displays existing build options. Most applications have a build option attribute. Build Options have two possible values: INCLUDE and EXCLUDE. If you specify an attribute to be included, then the Application Express engine considers it at runtime. However, if you specify an attribute to be excluded, then the Application Express engine treats it as if it did not exist.
Do not specify a build option unless you plan to exclude that object from specific installations.
Configuring Security AttributesYou can provide security for your application by configuring attributes on the Edit Security Attributes page. The Security Attributes you choose apply to all pages within an application.
Topics:■ Accessing the Edit Security Attributes Page
■ About the Security Attributes Page
Accessing the Edit Security Attributes PageTo access the Edit Security Attributes page:
1. On the Workspace home page, click the Application Builder icon.
2. Select an application.
3. Click Shared Components.
The Shared Components page appears.
4. Under Security, click Security Attributes.
The Edit Security Attributes page appears.
See Also: "Understanding Substitution Strings" on page 2-17 and "Page Templates" on page 13-27
See Also: "Understanding Substitution Strings" on page 2-17
See Also: "Using Build Options to Control Configuration" on page 16-33
See Also: "Managing Application Security" on page 15-1
Tip: you can also access to the Edit Security Attributes by navigating to the Edit Application Definition and then clicking the Security tab. See "Accessing the Edit Definition Page" on page 7-15.
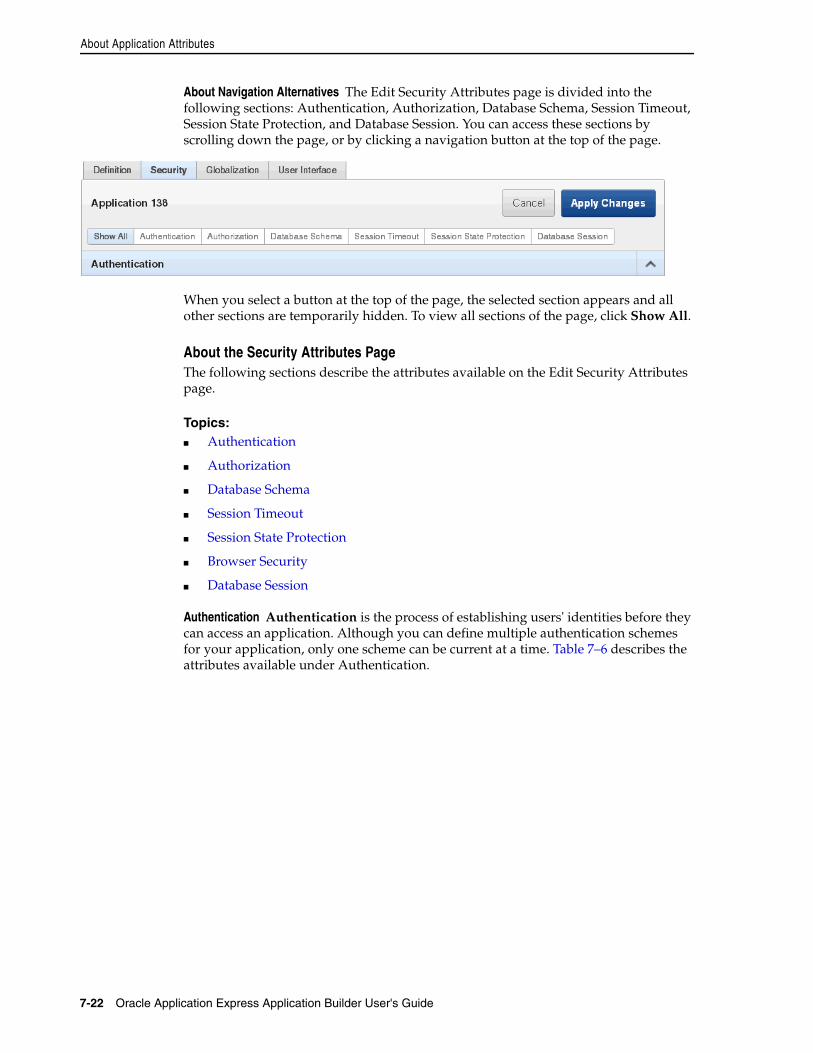
About Application Attributes
7-22 Oracle Application Express Application Builder User's Guide
About Navigation Alternatives The Edit Security Attributes page is divided into the following sections: Authentication, Authorization, Database Schema, Session Timeout, Session State Protection, and Database Session. You can access these sections by scrolling down the page, or by clicking a navigation button at the top of the page.
When you select a button at the top of the page, the selected section appears and all other sections are temporarily hidden. To view all sections of the page, click Show All.
About the Security Attributes PageThe following sections describe the attributes available on the Edit Security Attributes page.
Topics:■ Authentication
■ Authorization
■ Database Schema
■ Session Timeout
■ Session State Protection
■ Browser Security
■ Database Session
Authentication Authentication is the process of establishing users' identities before they can access an application. Although you can define multiple authentication schemes for your application, only one scheme can be current at a time. Table 7–6 describes the attributes available under Authentication.

About Application Attributes
About Database Applications 7-23
Authorization Authorization controls user access to specific controls or components based on user privileges. You can specify an authorization scheme for your application, by making a selection from the Authorization Scheme list. For example, if
Table 7–6 Authentication Attributes
Attribute Descriptions
Public User Identifies the Oracle schema used to connect to the database through the database access descriptor (DAD). The default value is ANONYMOUS in environments where the database server version is Oracle Database Express Edition and it is APEX_PUBLIC_USER for all other versions of the database server.
Once a user has been identified, the Application Express engine keeps track of each user by setting the value of the built-in substitution string APP_USER.
Note: Previous versions of Oracle Application Express used the built-in substitution string HTMLDB_PUBLIC_USER.
When APP_USER equals this value, the Application Express engine considers the current session to be a public user session. The Application Express engine supports the following built-in display conditions:
■ USER_IS_PUBLIC_USER
■ USER_IS_NOT_PUBLIC_USER
If the current application user (APP_USER) equals the value of this attribute, then the user is logged on as a public user. Some applications have public (not logged in) and private (logged in) modes. By determining if the user is the public user, you can conditionally display or hide information.
For example, you can show a login button if the user is the public user and a logout link if the user is not a public user. Reference this value using APEX_APPLICATION.G_PUBLIC_USER. The Application Express engine also has built in condition types USER_IS_PUBLIC_USER and USER_IS_NOT_PUBLIC.
See Also: "HOME_LINK" on page 2-26 and "Understanding Conditional Rendering and Processing" on page 2-4
Authentication Scheme Select from the authentication schemes defined for the application. To create an authentication scheme, click Define Authentication Schemes.
See Also: "Understanding How Authentication Works" on page 15-26 and "Creating an Authentication Scheme" on page 15-27
Deep Linking Use this attribute to enable or prevent deep linking to an application. Options include:
■ Enabled - The URL to a specific page ultimately redirects there, possibly after the user has logged in.
■ Disabled - If the URL does not contain a valid session ID, Application Express starts a new session and redirects to the application’s home page.
For example, browsers often save the URLs of opened tabs and try to restore the sessions after a restart, causing a deep link. This behavior may be undesirable (for example if a URL points to a page in the middle of a multi-step wizard). By selecting Disable, Application Express starts a new session and redirects to the application’s home page.
See Also: "Security" on page 8-26 to learn more about overriding this behavior at the page-level.

About Application Attributes
7-24 Oracle Application Express Application Builder User's Guide
you only want company employees to be able to log in to an application you could define an authorization scheme that is true if the users email address ends in '@somecompany.com' and then select that authorization scheme for this option.You can assign only one authorization scheme to an entire application. However, you can assign an authorization scheme to individual pages, page controls (such as a region, a button, or an item), or a shared component (such as a menu, a list, or a tab).
To create an authorization scheme, click Define Authorization Schemes.
Use Run on Public Pages to control whether the application-level authorization scheme is checked on public pages (that is, pages that do not require authorization). Options include:
■ Yes - If you select Yes and the page is public, the application authorization is checked.
■ No - If you select No and the page is public, the application authorization is ignored.
Application-level authorization is never evaluated on the login page (independent of Run on Public Pages), because authorizations typically are dependent on the username.
Database Schema Use Parsing Schema to specify the database scheme for the current application. Once defined, all SQL and PL/SQL commands issued by the application are performed with the rights and privileges of the defined database schema.
Session Timeout Use the following attributes to reduce exposure to abandoned computers with an open web browser by application:
■ Maximum Session Length in Seconds - Enter a positive integer to control how many seconds a session exists and should be used by this application. Leave the value null to revert the value to the instance level setting. Enter 0 to have the session exist indefinitely. The session duration may be superseded by the operation of the job that runs every eight hours which deletes sessions older than 12 hours.
■ On session timeout direct to this URL - Enter an optional URL to redirect to when the maximum session lifetime has been exceeded. The target page in this URL, if implemented in Application Express, should be a public page. A common use for this page would be to inform the user of the session expiration and to present a login link or other options. If no URL is supplied, the user is redirected to the application home page.
Only three substitution items are supported in this URL:
– &APP_SESSION.
– &SESSION.
– &APP_ID.
Because of the particular purpose of this URL. it is not necessary to include either &APP_SESSION. or &SESSION. in the link.
■ Maximum Session Idle Time in Seconds - Enter a positive integer to control the seconds of inactivity or idle time for sessions used by this application. The idle time is the time between one page request and the next one. Leave the value null
See Also: "Attaching an Authorization Scheme to an Application" on page 15-39

About Application Attributes
About Database Applications 7-25
to revert the value to the instance level setting. Set to 0 to prevent session idle time checks from being performed.
■ On session idle time timeout direct to this URL - Enter an optional URL to be redirected to when the maximum session idle time has been exceeded. The target page in this URL, if implemented in Application Express, should be a public page. A common use for this page would be to inform the user of the session timeout and to present a login link or other options. If no URL is supplied, the user is redirected to the application home page.
Only three substitution items are supported in this URL:
– &APP_SESSION.
– &SESSION.
– &APP_ID.
Because of the particular purpose of this URL. it is not necessary to include either &APP_SESSION. or &SESSION. in the link.
Session State Protection Enabling Session State Protection can prevent hackers from tampering with URLs within your application. URL tampering can adversely affect program logic, session state contents, and information privacy.
To enable or disable Session State Protection for your application, make a selection from the Session State Protection list. Setting Session State Protection to Enabled turns on session state protection controls defined at the page and item level.
Allows URLS Created After lists the date and time after which bookmarked links are usable to access pages in this application if the bookmarked link contains a checksum and Session State Protection is enabled for the application.
Bookmarks created before this date and time are not usable to access this application if the bookmarked link contains a checksum and Session State Protection is enabled for the application. Bookmarks that do not contain checksums or bookmarks that contain checksums that are unnecessary are not affected by this attribute. Their usability is determined using other criteria. A hidden application attribute (a checksum salt) is used during the computation and later verification of checksums included in f?p= URLs generated during page rendering. Checksums are included when Session State Protection is enabled for the application. You can reset this checksum salt attribute at any time by clicking the Expire Bookmarks button. Clicking this button causes any bookmarked URLs that contain previously generated checksums to fail when they are subsequently used to access the application.
To configure Session State Protection, click Manage Session State Protection.
Browser Security Use Cache to enable or disable browser caching of application page contents. If enabled, the browser saves the contents of pages for this application in its cache, both in memory and on disk. Typically when caching is enabled and the browser back button is clicked, the page is loaded from the cache instead of from the server. If disabled, the browser is instructed not to save application page contents and requests the latest page content from the server whenever the URL changes.
See Also: "Understanding Session Timeout" on page 15-4 and "Configuring Session Timeout" in Oracle Application Express Administration Guide
See Also: "Understanding Session State Protection" on page 15-13

About Application Attributes
7-26 Oracle Application Express Application Builder User's Guide
To avoid the possibility of saving sensitive data, Oracle recommends that this attribute be disabled. Otherwise, it is possible to go back in the browser history after a logout and see cached content from a previous session. Disabling the browser cache also prevents issues with pages that use partial page refreshes, such as is the case with interactive reports.
If this attribute is set to Disabled, Application Express sends the HTTP header cache-control: no-store which instructs the browser to not cache the page contents on disk or in memory. Note that this feature requires modern browsers that support the HTTP header response variable cache-control.
Use Embed in Frames to control if a browser may display your application's pages within a frame. Available options include:
■ Deny - The page cannot be displayed in a frame, regardless of the site attempting to do so.
■ Allow from same origin - The page can only be displayed in a frame on the same origin as the page itself.
■ Allow - The page can be displayed in any frame.
Displaying pages within frames can be misused with "clickjacking" attacks. In a clickjacking attack the attacker uses multiple layers to trick a user into clicking a button or link on another page when they were intending to click the top level page. Thus, the attacker is hijacking clicks (or keystrokes) meant for their page and routing them to another page.
Use HTML Escaping Mode to define how Oracle Application Express escapes special characters. Options include:
■ Basic: Escape &, ", < and >
■ Extended: Escape &, ", <, >, ', / and non-ASCII characters if the database character set is not AL32UTF8
Database Session Attributes available under Database Session include:
■ Initialization PL/SQL Code
Use this attribute to enter a PL/SQL block that sets a context for the database session associated with the current "show page" or "accept page" request. The block you enter here is executed at a very early point during the page request, immediately after the APP_USER value is established. The value of APP_USER (using :APP_USER or v('APP_USER')) may be used within the block. Values of other items in session state may be referenced as well, but any such items must have been established in session state before the initiation of the current page request. Consider the following example:
dbms_session.set_context('CTX_USER_QRY','USERPRIV',my_package.my_function(:APP_USER));
This example sets the value of USERPRIV in the context named CTX_USER_QRY to the value returned by the function my_function in package my_package. The function is passed the current value of APP_USER as an input argument. Presumably, the named context would be used in a VPD policy (created within the application's parsing schema) to effect the generation of predicates appropriate to the authenticated user.
Tip: Both of these features require modern browsers that support the HTTP header response variable X-Frame-Options.

About Application Attributes
About Database Applications 7-27
Virtual Private Database, also known as Fine-Grained Access Control or FGAC, is an Oracle database feature that provides an application programming interface (API) that enables developers to assign security policies to database tables and views. Using PL/SQL, developers can create security policies with stored procedures and bind the procedures to a table or view by a call to an RDBMS package. Such policies are based on the content of application data stored within the database, or based on context variables provided by Oracle database. In this way, VPD permits access security mechanisms to be removed from applications, and to be situated closer to particular schemas.
The code entered in this section need not pertain to VPD/FGAC and may not be related to security at all. Any code that must be executed at the earliest point in a page request can be placed here. For example, to set the database session time zone for every page request:
BEGIN EXECUTE IMMEDIATE 'alter session set time_zone = ''Australia/Sydney'' ';END;
■ Cleanup PL/SQL Code
Use this attribute to enter a PL/SQL block that runs at the end of page processing. For example, you can use this attribute to free or clean up resources such as VPD contexts or database links.
Example 1:
dbms_session.clear_context('CTX_USER_QRY');
This call resets the application context named CTX_USER_QRY before the database session is given back to the session pool, to ensure that no information is leaked when it gets reused.
Example 2:
dbms_session.close_database_link('SALES');
This call closes the database link SALES, which may have been opened in the Initialization PL/SQL Code or implicitly, just by querying data through the link. This frees resources and prevents resource leakage when the database session is reused.
Configuring Globalization AttributesIn Application Builder you can develop applications that can run concurrently in different languages. A single application can be translated to support different languages. Use the attributes on the Edit Globalization Attributes page to specify globalization options such as the primary application language.
Topics:■ Accessing the Globalization Attributes Page
■ About the Edit Globalization Attributes Page
See Also: "Providing Security Through Authorization" on page 15-37 and Oracle Label Security Administrator's Guide
See Also: "Managing Application Globalization" on page 18-1

About Application Attributes
7-28 Oracle Application Express Application Builder User's Guide
Accessing the Globalization Attributes PageTo access the Edit Globalization Attributes page:
1. On the Workspace home page, click the Application Builder icon.
2. Select an application.
The Application home page appears.
3. Click Shared Components.
The Shared Components page appears.
4. Under Globalization, click Globalization Attributes.
The Edit Globalization Attributes page appears.
About the Edit Globalization Attributes PageThe following sections describe the attributes available on the Edit Globalization Attributes page.
Application Primary Language Identifies the language in which an application is developed. This language is the base language from which all translations are made. For example, suppose application 100 was authored in English, translated into French, and published as application 101. English would be the Application Primary Language.
All modifications to the application should be made to the primary language specified here.
Application Language Derived From Determines how Application Builder determines or derives the application language.
The application primary language can be static, derived from the web browser language, or determined from a user preference or item. The database language setting also determines how the date is displayed and how certain information is sorted.
This option enables you to disable browser derived language support. You also have the option of having the application language derived from an application preference. To learn more, see Field-level Help.
Application Date Format Determines the date format to be used in the application.
Use this date format to alter the NLS_DATE_FORMAT database session setting before showing or submitting any page in the application. This value can be a literal string containing a valid Oracle date format mask or an item reference using substitution syntax. If no value is specified, the default date format is derived from the database session at runtime. Consider the following examples:
Month DD, YYYY&MY_DATE_FORMAT.
Tip: you can also access to the Edit Globalization Attributes page by navigating to the Edit Application Definition and then clicking the Globalization tab. See "Accessing the Edit Definition Page" on page 7-15.
See Also: "Specifying the Primary Language for an Application" on page 18-4
About Application Attributes
About Database Applications 7-29
Application Date Time Format Specify the date time format to be used in the application.
This date time format can be referenced in an application using the substitution reference &APP_DATE_TIME_FORMAT., or in PL/SQL using the function v('APP_DATE_TIME_FORMAT'). This attribute does not alter any NLS settings. This value can be a literal string containing a valid Oracle date format mask or an item reference using substitution syntax. If this attribute value is not specified, then a reference to APP_DATE_TIME_FORMAT returns the NLS database session date format and the NLS time format. Consider the following examples:
Month DD, RRRR HH24:MI&MY_DATE_TIME_FORMAT.
Application Timestamp Format Determines the timestamp format to be used in the application. Select a timestamp format from the list of values.
Use this timestamp format to alter the NLS_TIMESTAMP_FORMAT database session setting before showing or submitting any page in the application. This value can be a literal string containing a valid Oracle timestamp format mask or an item reference using substitution syntax. If no value is specified, the default timestamp format is derived from the database session at runtime. Consider the following examples:
DD-MON-RR HH.MI.SSXFF AM&MY_TIMESTAMP_FORMAT.
Application Timestamp Time Zone Format Determines the timestamp with time zone format to be used in the application.
Use this date format to alter the NLS_TIMESTAMP_TZ_FORMAT database session setting before showing or submitting any page in the application. This value can be a literal string containing a valid Oracle timestamp with time zone format mask or an item reference using substitution syntax. If no value is specified, the default timestamp with time zone format is derived from the database session at runtime. Consider the following examples:
DD-MON-RR HH.MI.SSXFF AM TZR&MY_TIMESTAMP_TZ_FORMAT.
Character Value Comparison Determines the collating sequence for character value comparison in various SQL operations and clauses, for example, ORDER BY, LIKE, MIN/MAX.
Use this value to alter NLS_SORT database session parameter for the execution of SQL queries in classic report and interactive report regions. If no value is specified, the default value is derived from the database session at runtime. Consider the following examples:
BINARYGERMANCANADIAN_M
Character Value Comparison Behavior Determines the collation behavior of SQL operations, for example, LIKE, MIN/MAX.
Use this value to alter the NLS_COMP database session parameter for the execution of SQL queries in classic report and interactive report regions. Options include:

About Application Attributes
7-30 Oracle Application Express Application Builder User's Guide
■ Database session NLS setting (default) - The NLS_COMP value is derived from the database session at runtime.
■ Binary - Comparisons in WHERE clauses and other SQL operations are binary.
■ Linguistic - Comparisons in WHERE clauses and other SQL operations use the linguistic sort specified in the Character Value Comparison attribute (NLS_SORT).
Automatic Time Zone Controls the setting of the database session time zone. When set to Yes, the client time zone is derived from the client's web browser and set for the duration of the Application Express session.
Subsequent page views have the database session time zone set properly per page view. Once set, this setting can be overridden using APEX_UTIL.SET_SESSION_TIME_ZONE, or reset using APEX_UTIL.RESET_SESSION_TIME_ZONE.
Automatic CSV Encoding Automatic CSV Encoding controls the encoding of all comma-delimited (CSV) report output in an application. The default value for Automatic CSV Encoding is No. If Automatic CSV Encoding is set to Yes, CSV report output is converted to a character set compatible with localized desktop applications. The character set for the CSV encoding is determined by the Application Language Derived From setting.
The encoding of pages in Application Builder is determined by the character set of the database access descriptor (DAD) used to access Oracle Application Express. For example, if the character set of the database access descriptor is AL32UTF8, all pages in all applications in the Oracle Application Express user interface are encoded in UTF-8.
By default, the CSV output from report regions is encoded in the same character set as the database access descriptor. However, some desktop spreadsheet applications require that the data is encoded in the client desktop operating system character set. In the case of multibyte data, the CSV output from report regions often appears corrupted when opened by a desktop spreadsheet application. This is because the CSV output from report regions is encoded differently than what is required by the desktop application. Enabling Automatic CSV Encoding resolves this issue.
For example, if the user’s language preference for an application is de, the CSV data is encoded in Western European Windows 1252, regardless of the Database Access Descriptor character set setting. If the user's language preference is zh-cn, the CSV data is encoded in Chinese GBK.
Managing the Application User InterfaceUse the attributes on the User Interface page to specify user interface options for an application.
Topics:■ Accessing the User Interface Page
■ About the User Interface Page
■ Creating a New User Interface
Accessing the User Interface PageTo access the User Interface page:
See Also: Oracle Application Express API Reference

About Application Attributes
About Database Applications 7-31
1. On the Workspace home page, click the Application Builder icon.
2. Select an application.
The Application home page appears.
3. Click Shared Components.
The Shared Components page appears.
4. Under User Interface, click User Interface Attributes.
The User Interface page appears.
About the User Interface PageThe following sections describe the attributes available on the User Interface page.
Topics:■ General Properties
■ Logo
■ JavaScript
■ User Interface Detection
■ User Interfaces
General Properties Use General Properties to define basic characteristics of the application user interface. Table 7–7 describes all General Properties attributes.
Tip: you can also access to the User Interface page by navigating to the Edit Application Definition and then clicking the User Interface tab. See "Accessing the Edit Definition Page" on page 7-15.
Table 7–7 User Interface, General Properties
Attribute Description
Image Prefix Determines the virtual path the web server uses to point to the images directory distributed with Application Builder. During installation, the virtual path is configured as /i/.
When embedding an image in static text (for example, in page or region headers or footers), you can reference an image using the substitution string #IMAGE_PREFIX#. For example, to reference the image go.gif, you would use the following syntax:
<img src="#IMAGE_PREFIX#go.gif">
See Also: "IMAGE_PREFIX" on page 2-27, "Managing Images" on page 12-17, and "Referencing Images" on page 12-18
Content Delivery Network Specify the Content Delivery Network used to load the 3rd party libraries jQuery and jQuery Mobile.
Using a Content Delivery Network can reduce the loading time of your application if the user has visited other websites which also use the same content delivery network to load the jQuery files. It is very likely that those file calls are still in the browser cache and do not have to be downloaded again. Especially on mobile devices with limited browser caches, this can improve performance because it is not so likely that the files are purged from the cache.

About Application Attributes
7-32 Oracle Application Express Application Builder User's Guide
Logo Use Logo attributes to define an application logo. An application logo can be text-based or image-based. To use this feature, your page template must include the #LOGO# substitution string.
To define an application logo:
1. For Logo Type, select one of the following:
■ Select Image to use an image for the application logo.
■ Select Text to use text for the application logo.
2. In Logo, enter the following:
■ For an image, enter the complete image name, including the file name extension. For example:
/i/oracle.gif
■ For text, enter the full text string. For example:
Sample Application
3. In Logo Attributes, enter the appropriate attributes for the logo or make a selection from the list.
Image example:
width="100" height="20" alt="Company Logo"
Text example:
style="font-family:Arial; color:#000000; font-size:18; white-space:nowrap; font-weight:bold;"
JavaScript Use the attributes described in Table 7–8 to control or modify how an application handles JavaScript.
Media Type Enter the Internet Media Type. An Internet Media Type is two-part identifier for file formats on the Internet. A Media Type is composed of at least two parts: a type, a subtype, and one or more optional parameters. This Media Type is used in the Content-Type HTTP header when rendering the page.
The page-level Media Type overrides the application-level Media Type. The default value for this attribute is NULL. If both the page-level and application-level values for Media Type are NULL, the Media Type text/html is used.
See Also: "Managing Images" on page 12-17, "Verifying the Prefix for the Virtual Image Directory" on page 12-18, "Customizing Templates" on page 13-12, and "Page Templates" on page 13-27
Table 7–7 (Cont.) User Interface, General Properties
Attribute Description

About Application Attributes
About Database Applications 7-33
User Interface Detection Enter Cascading Style Sheet ( CSS) file URLs for stylesheets that should load when Oracle Application Express displays the available user interfaces, when automatic detection fails. Each URL has to be written on a new line. If you provide a minified version of your file you can use the substitution string #MIN# to include .min in your file URL for a regular page view and an empty string if the page is viewed in debug mode. You also have access to the substitution string #APP_VERSION# to include the application's version in the file URL. If you do not enter any URLs, Oracle Application Express uses a default stylesheet.
Examples:
■ Standard file reference:
/mycss/main.css
■ Standard file reference which loads the minified file main.min.css for regular page views and main.css in debug mode:
/mycss/main#MIN#.css
■ Conditional media query:
[media="only screen and (max-device-width: 480px)"]/mycss/smartphone.css
■ Conditional file for Internet Explorer:
[if IE]/mycss/ie.css
Table 7–8 User Interface, JavaScript
Attribute Description
File URLs Enter JavaScript file URLs for code to be loaded on every page. Each URL has to be written into a new line. If you provide a minified version of your file, you can use the substitution string #MIN# to include .min in your file URL for a regular page view and an empty string if the page is viewed in debug mode.
JavaScript file URLs you enter here replaces the #APPLICATION_JAVASCRIPT# substitution string in the page template.
Note: You do not need to include opening or closing script tags. Just write the URL.
Examples:
■ Standard file reference:
/myjs/main.js
■ Standard file reference which loads the minified file main.min.js for regular page views and main.js in Debug mode:
/myjs/main#MIN#.js
■ Conditional file for Internet Explorer
[if IE]/myjs/ie.js
Include Legacy JavaScript Specifies if the legacy JavaScript functions are included on every page in the application. If you are confident your application does not contain any references to the legacy functions, set this to No to reduce the overall size of the JavaScript files loaded.

About Application Attributes
7-34 Oracle Application Express Application Builder User's Guide
■ File reference using a query string in the URL referencing the application version, such that when the application is upgraded (and the version is incremented), the browser loads the new file and ignores any previously cached files:
/mycss/main.css?version=#APP_VERSION#
You do not need to include opening or closing script tags. Just write the URL.
User Interfaces Displays user interfaces defined for the current application. To edit an existing user interface, click the user interface name. To add a new user interface, click Add New User Interface.
Creating a New User InterfaceTo add a new user interface:
1. Navigate to the User Interface page. See Accessing the User Interface Page.
2. Scroll down to User Interfaces and click Add New User Interface.
3. For User Interface:
a. User Interface - Displays the current user interface.
b. Type - Select a user interface type. You can only select interfaces not currently associated with the application.
c. Display Name - Specify a display name for the user interface.
d. Sequence - Specify the user interface sequence.
e. Auto Detect - Select whether the user interface should be automatically detected.
f. Home URL - Specifies a URL or procedure that should be run when you run the application.
For example, Home Link could contain the relative URL used to locate the application home page. For example, f?p=6000:600 would specify application 6000 with a home page number of 600. In this example, the value you enter in Home Link replaces the #HOME_LINK# substitution string in application templates. See "HOME_LINK" on page 2-26.
You can also use this attribute to name a procedure. For example, you could create a procedure such as personal_calendar which renders an HTML page to serve as the application home.
g. Login URL - Specify the URL for the page that is to be used as the login page for the current user interface. This replaces the substitution strings &LOGIN_URL. in HTML or #LOGIN_URL# in templates. See "LOGIN_URL" on page 2-27 and "Creating an Authentication Scheme" on page 15-27.
h. Click Next.
4. For Identify Theme:
See Also: "Managing Themes" on page 13-1
Note: Do not use the Home Link attribute to determine the page that displays after authentication. The page that displays after authentication is determined by other components within the application's authentication scheme.

Managing Pages in a Database Application
About Database Applications 7-35
a. Theme Type - Select a theme type. Standard themes are supplied with Application Express. Custom themes are those created for the workspace or Oracle Application Express instance. Legacy themes are older themes supplied with Application Express.
b. Theme - Select a theme. A theme identifies a collection of templates which define the look and feel of the application.
c. Click Next.
5. Confirm your selections and click Create.
Managing Pages in a Database ApplicationA page is the basic building block of an application. When you build an application in Application Builder, you create pages that contain user interface elements, such as tabs, lists, buttons, items, and regions.
Topics:■ About Creating Pages in a Database Application
■ Creating a Page from the Application Home Page
■ Creating a Page from the Developer Toolbar
■ Copying a Database Application Page
■ Running an Application or Page
■ Grouping Pages
■ Locking and Unlocking a Page
■ Deleting a Page
About Creating Pages in a Database ApplicationYou add a page or add a component to an existing page by running the Create Page Wizard. You can access this wizard by:
■ Clicking Create Page on the Application home page. See "Creating a Page from the Application Home Page" on page 7-35.
■ Click the Create link on the Developer toolbar and then select New Page. "Creating a Page from the Developer Toolbar" on page 7-37.
■ Click the Create button on the Page Definition and select New page. See "About the Page Definition" on page 8-1.
Creating a Page from the Application Home PageTo create a page from the Application home page:
1. On the Workspace home page, click Application Builder.
See Also: "Viewing Application Utilities and Reports" on page 7-78 and "Working with Database Application Pages" on page 8-1
Note: You can also use the Create Page Wizard to add a component (that is, a report, chart, form, wizard, a calendar, or tree) to an existing page. When prompted, specify an existing page number.

Managing Pages in a Database Application
7-36 Oracle Application Express Application Builder User's Guide
2. Select an application.
The Application home page appears.
3. Click the Create Page button.
4. Select the type of page you want to create as described in Table 7–9, " Available Create Page Wizard Page Types".
Table 7–9 Available Create Page Wizard Page Types
Page Type Description DesktopjQuery Mobile Smartphone
Blank Page Creates a page with no built-in functionality. Available Available
Multiple Blank Pages Creates multiple blank pages. Available Available
Report Formatted result of a SQL query. Available options:
■ Classic Report - Creates a report based on a custom SQL SELECT statement or a PL/SQL function returning a SQL SELECT statement that you provide.
■ List View - Creates a page that contains the formatted result of a SQL query. You can choose a table to build the List view on, and select a column to be used for the List view display information.
Note: Desktop applications do not support list view.
■ Interactive Report - Creates an interactive report based on a custom SQL SELECT statement you provide. Users can alter the layout of report data by selecting specific columns, applying filters, highlighting, and sorting. They can also define breaks, aggregations, different charts, and their own computations.
Note: jQuery Mobile Smartphone does not support interactive reports.
■ Report on Web Service Result - Creates a report on a Web Service result.
See Also: "Implementing Web Services" on page 17-7
■ Wizard Report - Creates a report without requiring any SQL knowledge. Select the appropriate schema, table, columns, and result set display.
Available Available
Form Creates a form interface with which users can update a single row or multiple rows within a table.
See Also: "Creating Forms" on page 10-1
Available Available
Plug-ins Creates a new page based on a region type plug-in. Plug-ins enable developers to declaratively extend, share, and reuse the built-in types available with Oracle Application Express.
See Also: "Importing a Plug-in from the Plug-in Page" on page 17-34
Available Available
Chart Enables you to create HTML5 and Flash graphical charts.
See Also: "Creating Charts" on page 10-47
Available No applicable.

Managing Pages in a Database Application
About Database Applications 7-37
5. Follow the on-screen instructions.
Creating a Page from the Developer ToolbarTo view a rendered version of your application, you run or submit it to the Application Express engine by clicking the Run or Run Application icon.
When you run a desktop application, the Developer toolbar appears at the bottom of the page. The Developer toolbar offers a quick way to edit the current page, create a new page, region, or page control, view session state, or turn edit links on and off. You can control whether the Developer toolbar displays by changing the Status attribute on the Edit Application Definition page. To learn more about changing the Status attribute, see "Editing the Application Definition" on page 7-15.
Map Creates a Flash map based on the AnyChart AnyMap Interactive Maps Component.
See Also: "Creating Maps" on page 10-41
Available Not applicable.
Tree Creates a tree to graphically communicate hierarchical or multiple level data.
See Also: "Creating Trees" on page 10-79
Available Not applicable.
Calendar Generates a calendar with monthly, weekly, and daily views.
See Also: "Creating Calendars" on page 10-20
Available Available
Wizard Create a wizard. Available Available
Data Loading Creates a new data loading wizard allowing the end user to manage the loading of data into a table to all schemas for which the user has privileges
See Also: "Creating Applications with Data Loading Capability" on page 17-52
Available Not available.
Feedback Page Adds a feedback page. Feedback is the process of gathering real-time comments, enhancement requests, and bugs from your application users.
See Also: "Managing Feedback" on page 4-17
Available Available
Login Page Creates a login page.
See Also: "About Building a Login Page" on page 15-30
Available Available
Access Control Creates a page containing an access control list, enabling developers to control access to an application, individual pages, or page components.
See Also: "Controlling Access to Applications, Pages, and Page Components" on page 10-90
Available Available
See Also: "Creating a Page from the Developer Toolbar" on page 7-37 and "Running an Application or Page" on page 7-40
See Also: "Running an Application or Page" on page 7-40
See Also: "Running an Application or Page" on page 7-40 and "About the Developer Toolbar" on page 19
Table 7–9 (Cont.) Available Create Page Wizard Page Types
Page Type Description DesktopjQuery Mobile Smartphone

Managing Pages in a Database Application
7-38 Oracle Application Express Application Builder User's Guide
To create a page from the Developer toolbar:
1. Run the application. See "Running an Application or Page" on page 7-40.
2. On the Developer toolbar, click Create.
The New Component Wizard appears.
3. Select the type of component you want to create and click Next. Available options include:
■ New Page. See "About Supported Options When Running the New Component Wizard" on page 7-38.
■ Region on this page
■ Page control on this page
■ Shared control
4. Follow the on-screen instructions.
About Supported Options When Running the New Component WizardWhen you run the New Component Wizard from the Developer Toolbar, you select a component type. Table 7–10 describes available options based on component you select.
See Also: "Creating a Page from the Application Home Page" on page 7-35, "Running an Application or Page" on page 7-40, and "About the Developer Toolbar" on page 8-19
Table 7–10 Component Options
Component Options Available Desktop Selections
New Page Available page types:
■ Blank page
■ Multiple blank pages
■ Report. See "Creating Reports" on page 9-1.
■ Form. See "Creating Forms" on page 10-1.
■ Plug-in. See "Implementing Plug-ins" on page 17-25.
■ Chart. See "Creating Charts" on page 10-47.
■ Map. See "Creating Maps" on page 10-41.
■ Tree. See "Creating Trees" on page 10-79.
■ Calendar. See "Creating Calendars" on page 10-20.
■ Wizard
■ Data Loading. See "Creating Applications with Data Loading Capability" on page 17-52.
■ Feedback Page. See "Managing Feedback" on page 4-17.
■ Login Page. See "About Building a Login Page" on page 15-30.
■ Access Control. See "Controlling Access to Applications, Pages, and Page Components" on page 10-90.

Managing Pages in a Database Application
About Database Applications 7-39
Copying a Database Application PageYou can copy a page from the current application or from another application. During the copy process, you can also copy shared components or change mappings to shared components in the target application.
To copy a page:
Region on this page Regions function as containers for content. Available region types:
■ HTML
■ Multiple HTML
■ Report
■ Form
■ Plug-ins (displays if region type plug-in exists)
■ Chart
■ Map
■ Tree
■ Calendar
■ List
■ Breadcrumb
■ PL/SQL Dynamic Content
■ URL
■ Region Display Selector
■ Help Text
See Also: "Understanding Regions" on page 12-3 and "About Region Types" on page 12-4
Page control on this page Page controls:
■ Item. See "Understanding Page-Level Items" on page 7-56
■ Button. See "Creating Buttons" on page 10-65.
■ Branch. See "Controlling Navigation Using Branches" on page 11-32
■ Computation. See "Understanding Page Computations" on page 8-29.
■ Process. See "Understanding Page Processes" on page 8-43.
■ Validation. See "Understanding Validations" on page 8-32.
Shared control Shared component options:
■ Navigation Bar icon. See "Creating a Navigation Bar Entry" on page 11-27.
■ Parent tab. See "Creating Tabs" on page 11-1.
■ Standard tab. See "Creating Tabs" on page 11-1.
■ List of values. See "Creating Lists of Values at the Application Level" on page 10-73.
■ List. See "Creating Lists" on page 11-7.
■ Breadcrumb. See "Creating Breadcrumbs" on page 11-20.
Table 7–10 (Cont.) Component Options
Component Options Available Desktop Selections

Managing Pages in a Database Application
7-40 Oracle Application Express Application Builder User's Guide
1. Navigate to the application you want to copy to:
a. Navigate to the Workspace home page.
b. Click the Application Builder icon.
c. Select an application.
d. Select a page.
The Page Definition appears.
2. In Tree view:
a. Under Page Rendering, select the page name.
b. Right-click and select copy.
3. In Component view:
a. Under Page, click the Copy icon.
b. For Copy Page Option, select one of the following:
– Page in this application
– Page in another application
4. Follow the on-screen instructions.
Desktop Pages That Cannot Be Copied to a Mobile User InterfaceThe Copy Page Wizard enables you to copy a page to a different user interface. During the copying process, the user can select the user interface for the new page. If the application contains a Desktop and a Mobile theme, both user interface options display. However, the following Desktop pages cannot be copied to a Mobile user interface:
■ Interactive report
■ Flash map
■ Flash chart
■ jsTree region.
Attempting to copy these Desktop pages to a Mobile page results in an error.
Running an Application or PageThe Application Express engine dynamically renders and processes pages based on data stored in database tables. To view a rendered version of your application, you run or submit it to the Application Express engine. As you create new pages, you can run them individually, or run an entire application. You can run an application by clicking the Run Application icon.
Topics:■ About the Run Application and Run Page Icons
■ Running an Application from the Application Builder Home Page
■ Running an Application from the Application Home Page
■ Running a Page on the Application Home Page
■ Running a Page from the Page Definition

Managing Pages in a Database Application
About Database Applications 7-41
About the Run Application and Run Page IconsThe Run Application icon displays on the Application home page and resembles of an application window with a run (or play) button. Clicking the Run Application icon runs an entire application.
The Run Page icon resembles a small, gray play button and displays in the upper right corner of many pages within Application Builder. Clicking the Run Page icon runs the current page.
Running an Application from the Application Builder Home PageTo run an entire application from the Application Builder home page:
1. On the Workspace home page, click the Application Builder icon.
2. Click the View Report icon.
3. Locate the application in the Applications list.
4. Click the Run icon in the far right column.
Running an Application from the Application Home PageTo run an entire application from the Application home page:
1. On the Workspace home page, click the Application Builder icon.
The Application Builder home page appears.
2. Select on application.
3. Click the Run Application icon at the top of the page.
Running a Page on the Application Home PageYou can control how the Application home page displays by selecting the View icons on the navigation bar at the top of the page. Selecting View Report displays each page as a line in a report. Each line includes the page number, the page name, when the page was last updated, who last updated the page, the page type, the selected user interface, a lock icon, and a Run icon.
Tip: When running mobile applications and locked packaged applications, the Developer toolbar does not display. As a best practice, right-click on the icon and select Open Link in New Tab so that you can easily access the Application Builder.

Managing Pages in a Database Application
7-42 Oracle Application Express Application Builder User's Guide
To run a page from the Pages list:
1. On the Workspace home page, click the Application Builder icon.
2. Select an application.
3. Click the View Report icon.
4. Locate the page you want to run and click the Run icon in the far right column.
Running a Page from the Page DefinitionTo run a specific page from the Page Definition:
1. On the Workspace home page, click the Application Builder icon.
2. Select an application.
3. Select a page.
The Page Definition appears.
4. Click the Run button at the top of the page.
Grouping PagesYou can make the pages within your application easier to access by organizing them into page groups. To use page groups, you create a group and then assign pages to the group.
Page groups do not have any function other than to aid developers in organizing their application pages.
Topics:■ Viewing Page Groups
■ Creating a Page Group
■ Editing a Page Group Definition
■ Assigning a Page to a Page Group
■ Viewing Pages by Page Group
■ Deleting a Page Group
Viewing Page GroupsThe section describes different ways to view page groups.
To access the Page Groups page:
1. On the Workspace home page, click the Application Builder icon.
2. Select the application.
3. Click the Utilities icon.
4. From Page Specific Utilities, click Cross Page Utilities.
5. Click Page Groups.
The Page Groups page appears.
A Search bar displays at the top of the page. Available controls include:
See Also: "Locking and Unlocking a Page" on page 7-44

Managing Pages in a Database Application
About Database Applications 7-43
■ Select columns to search - Resembles a magnifying glass. Click this icon to narrow your search. To search all columns, select All Columns.
■ Text area - Enter case insensitive search criteria (wildcard characters are implied) to search for a page group by name and then click Go.
■ Go button - Executes a search or applies a filter.
■ View Icons - Displays each group as a large icon. To edit a group, click the appropriate icon.
■ View Report - Displays each group as a line in a report. To edit a group, click the name.
■ Actions menu - Use the Actions menu to customize the report view. See "About the Actions Menu" on page 9-6.
6. To view the pages associated with a group, click Pages by Page Group.
Creating a Page GroupTo create a page group:
1. On the Workspace home page, click the Application Builder icon.
2. Select the application.
3. Click the Utilities icon.
4. From Page Specific Utilities, click Cross Page Utilities.
5. Click Page Groups.
6. On the Page Groups page, click Create.
7. Enter a name, a description (optional), and click Create.
Editing a Page Group DefinitionWhen you create page group you specify a name and description.
To edit the Page Group definition:
1. On the Workspace home page, click the Application Builder icon.
2. Select the application.
3. Click the Utilities icon.
4. From Page Specific Utilities, click Cross Page Utilities.
5. Click Page Groups.
6. Select a page group.
7. On the Page Group page, edit the name or description and click Apply Changes.
8. To move to the next Page Group definition, click the Previous (<) and Next (>) buttons and repeat the previous step.
Assigning a Page to a Page GroupTo assign pages to a group:
1. On the Workspace home page, click the Application Builder icon.
2. Select the application.
3. Click the Utilities icon.

Managing Pages in a Database Application
7-44 Oracle Application Express Application Builder User's Guide
4. From Page Specific Utilities, click Cross Page Utilities.
5. Click Page Groups.
6. Click the Page Assignments tab.
The Page Assignments page appears.
7. Click the page number.
The Page Attributes page appears.
8. Locate the Name region and select a group from the Group list.
9. Click Apply Changes.
Viewing Pages by Page GroupTo view pages by page group:
1. On the Workspace home page, click the Application Builder icon.
2. Select the application.
3. Click the Utilities icon.
4. From Page Specific Utilities, click Cross Page Utilities.
5. Click Page Groups.
6. Click the Pages by Page Group tab.
The Pages by Page Group page appears. Clicking a page number takes you to the Page Attributes page. Clicking the page Name links to the Page Definition.
7. To create a new group, click Create and follow the on-screen instructions.
Deleting a Page GroupTo remove a page group:
1. Remove all pages from the group to be deleted. See "Viewing Pages by Page Group" on page 7-44.
2. Access the Page Group page:
a. On the Workspace home page, click the Application Builder icon.
b. Select the application.
c. Click the Utilities icon.
d. From Page Specific Utilities, click Cross Page Utilities.
e. Click Page Groups.
f. Select a page group.
3. Click Delete.
A confirmation page appears.
4. Confirm your request.
Locking and Unlocking a PageYou can prevent conflicts during application development by locking pages in your application. By locking a page, you prevent other developers from editing it.

Managing Pages in a Database Application
About Database Applications 7-45
Topics:■ Determining If a Page Is Locked
■ Locking a Page
■ Unlocking Pages
Determining If a Page Is LockedA lock icon indicates whether a page is currently locked. If a page is unlocked, the icon appears as an open padlock. If the page is locked, the icon appears as a locked padlock. A lock icon appears on the Application home page and on the Page Definition.
To view the lock icon on the Application home page, click the View Report icon. A report appears. The lock icon appears on the right side of the page.
The lock icon also appears on the Developer Action Bar on the Page Definition. See "About the Developer Action Bar" on page 6-7.
Locking a PageYou can lock pages from Application home page (click View Report or View Detail), from the Page Locks page, the Pages list, and from the Page Definition.
Locking a Page from the Page Locks Page To lock a page from the Page Locks Page:
1. On the Workspace home page, click the Application Builder icon.
2. Select an application.
3. Click the Utilities icon.
4. On the Page Specific Utilities list, click Cross Page Utilities.
5. Click Page Locks.
6. Select the appropriate pages and click Lock Checked.
7. Enter a comment in the Comment field.
8. Click Lock Page(s).
Locking a Page from the Application Home Page To lock a page from the Application Home Page:
1. On the Workspace home page, click the Application Builder icon.
2. Select an application.
3. On the search bar, click the View Report or View Detail icon.
4. Click the Lock icon.
5. Enter a comment in the Comment field.

Managing Pages in a Database Application
7-46 Oracle Application Express Application Builder User's Guide
6. Click Lock Page(s).
Locking a Page from the Page Definition To lock a page from the Page Definition:
1. Navigate to the appropriate Page Definition. See "Accessing the Page Definition" on page 8-2.
2. Click the Lock icon in the Developer Action bar. See "About the Developer Action Bar" on page 6-7.
3. Select the page to lock and click Lock Checked.
4. Enter a comment in the Comment field.
5. Click Lock Page(s).
Unlocking PagesOnly the developer who locked a page can unlock it. However, a developer with administrative privileges can unlock pages locked by other developers.
Unlocking Pages from the Page Locks Page To unlock a page from the Page Locks page:
1. On the Workspace home page, click the Application Builder icon.
2. Select an application.
3. Click the Utilities icon.
4. On the Page Specific Utilities list, click Cross Page Utilities.
5. Click Page Locks.
6. Select the appropriate pages.
7. Click Unlock Checked.
Unlocking Pages from the Application Home Page To unlock a page from the Application Home Page:
1. On the Workspace home page, click the Application Builder icon.
2. Select an application.
3. On the search bar, click the View Report or View Detail icon.
4. Click the Lock icon.
The Edit Lock Comment page appears.
5. Click Unlock.
Unlocking Pages from the Page Definition To unlock pages from the Page Definition:
1. Navigate to the appropriate Page Definition. See "Accessing the Page Definition" on page 8-2.
2. Click the Lock icon in the Developer Action bar. See "About the Developer Action Bar" on page 6-7.
3. Select the page you want to unlock and click Unlock Checked.
Tip: You can also lock a page on the Page Definition, by clicking the Utilities button and then Lock.

Managing Pages in a Database Application
About Database Applications 7-47
Unlocking Pages As a Workspace Administrator To unlock pages as a Workspace Administrator:
1. On the Workspace home page, click the Application Builder icon.
2. Select an application.
3. Click the Utilities icon.
4. On the Page Specific Utilities list, click Cross Page Utilities.
5. Click Page Locks.
6. Click Lock Administration.
7. Select the appropriate pages.
8. Click Unlock Page(s).
Deleting a PageDeleting a page deletes the corresponding tabs, breadcrumbs, and list entries. You can only delete pages that are locked or unlocked by you. See "Locking and Unlocking a Page" on page 7-44.
Topics:■ Deleting a Page from the Page Definition
■ Deleting a Page While Editing Page Attributes
■ Deleting Multiple Pages
■ Deleting a Range of Pages
Deleting a Page from the Page DefinitionTo delete a page from the Page Definition:
1. Navigate to the appropriate Page Definition. See "Accessing the Page Definition" on page 8-2.
2. Verify the page number.
3. Click the Utilities button and then click Delete.
4. Click Permanently Delete Page.
Deleting a Page While Editing Page AttributesTo delete a page while editing page attributes:
1. Navigate to the Page Definition. See "Accessing the Page Definition" on page 8-2.
2. To access the Edit Page:
■ Tree view - Under Page Rendering, double-click the page title at the top of the tree.
■ Component view - Under Page, click the Edit All icon.
Tip: You can also unlock a page on the Page Definition, by clicking the Utilities button and then Unlock.
See Also: "Editing a Page in Component View" on page 8-8 for information about editing page attributes
Adding Database Application Comments
7-48 Oracle Application Express Application Builder User's Guide
The Page Attributes page appears. Required values are marked with a red asterisk (*).
3. Verify the page number and page name.
4. Click Delete.
5. Follow the on-screen instructions.
Deleting Multiple PagesTo delete multiple pages:
1. On the Workspace home page, click the Application Builder icon.
2. Select an application.
3. Click Utilities.
4. From Page Specific Utilities, click Cross Page Utilities.
5. Click Delete Multiple Pages.
6. Select the pages to be deleted and click Delete Pages.
Deleting a Range of PagesTo delete a range of pages:
1. On the Workspace home page, click the Application Builder icon.
2. Select an application.
3. Click Utilities.
4. From Page Specific Utilities, click Cross Page Utilities.
5. Click Delete Multiple Pages.
6. Click the Delete Pages by Range tab.
7. Enter the pages to be deleted and click Delete Pages.
Adding Database Application CommentsYou can add comments concerning an entire database application on the Application Comments page. You could add a description of the application or track the developers involved in working on the application.
Topics:■ Creating and Editing Database Application Comments
Creating and Editing Database Application CommentsTo create an application comment:
1. Navigate to the Workspace home page.
2. Click the Application Builder icon.
3. Select an application.
4. On the Application home page, click Shared Components.
See Also: "Adding Developer Comments" on page 7-49

Adding Developer Comments
About Database Applications 7-49
The Shared Components page appears.
5. Under Application, click Edit Comments.
The Application Comments page appears.
6. Enter comments in the Comments field and click Apply Changes.
Adding Developer CommentsYou can add developer comments to an application, a page, or a group of pages using the Developer Comment, Bug, or To Do icon. This icon resembles a small balloon with a plus symbol and displays on the Developer Action bar. The Developer Comment, Bug, or To Do icon displays on any page in Application Builder that is related to a specific application or application page.
You can use developer comments to communicate application changes, report issues, or record developer suggestions.
Topics:■ Adding Developer Comments to an Application or Page
■ Viewing and Editing Developer Comments
■ Deleting Developer Comments
■ About the Developer Comments Report
■ Viewing the Developer Comments Calendar
Adding Developer Comments to an Application or PageThe Developer Comment icon displays on any page in Application Builder that is related to a specific application or application page. You can add developer comments to an application, a page, or a group of pages.
To add a developer comment:
1. On the Workspace home page, click the Application Builder icon.
2. Select an application.
3. Click the Developer Comment, Bug, or To Do icon.
4. Click the Comment icon.
The Create Comment page displays in a separate window.
5. In Relevant Page(s), specify the pages to which the comment applies. To enter a comment that:
■ Applies to a specific page, enter the page number.
■ Applies to multiple pages, enter a comma-delimited list of pages. For example:
See Also: "Adding Database Application Comments" on page 7-48

Adding Developer Comments
7-50 Oracle Application Express Application Builder User's Guide
1, 2, 3
■ Does not apply to a page or group of pages, leave this field blank.
6. In Comment, enter up to 4000 characters of text.
7. Click Create or Create and Create Another.
Viewing and Editing Developer CommentsTo edit a developer comment:
1. On the Workspace home page, click the Application Builder icon.
2. Select an application.
3. Click the Developer Comment, Bug, or To Do icon.
4. Click the Comment icon.
The Create Comment page displays in a separate window.
5. Click View Comments.
The View Comments page appears. See "About the Navigation Bar on the View Comments Page" on page 7-50.
6. To edit a comment, click the Edit icon.
The Edit Comment page appears.
a. In Relevant Page(s), specify the pages to which the comment applies. To enter a comment that:
– Applies to a specific page, enter the page number.
– Applies to multiple pages, enter a comma-delimited list of pages. For example:
1, 2, 3
– Does not apply to a page or group of pages, leave this field blank.
b. In Comment, enter up to 4000 characters of text.
7. Click Apply Changes.
About the Navigation Bar on the View Comments PageA navigation bar appears at the top of the View Comments page and contains the following controls:
■ Select Columns to Search. Select a column and click Go. To search all, leave the search field blank and click Go.
■ Select Report. Enter case insensitive query and click Go. To view all pages, leave the field blank and click Go.
■ Actions - Use the Actions menu to customize the report view. See "About the Actions Menu" on page 9-6.
Tip: You can also view and edit Developer comments on the Shared Components page. Navigate to the Shared Components page and click Developer Comments on the Tasks list. See "Accessing the Shared Components Page" on page 8-50.

Adding Developer Comments
About Database Applications 7-51
■ Display. Determines how comments display. To increase or decrease the number of comments that appear, make a selection from the Display list and click Go.
Deleting Developer CommentsYou can delete developer comments on the Edit Comment page or on the Manage Comments page.
Topics:■ Deleting a Specific Developer Comment
■ Deleting Multiple Developer Comments
Deleting a Specific Developer CommentTo delete a developer comment:
1. On the Workspace home page, click the Application Builder icon.
2. Select an application.
3. Click the Developer Comment, Bug, or To Do icon.
4. Click the Comment icon.
The Create Comment page displays in a separate window.
5. Click View Comments.
6. Locate the comment to be deleted. See "About the Navigation Bar on the View Comments Page" on page 7-50.
7. Click the Edit icon.
The Edit Comment page appears.
8. Click Delete.
Deleting Multiple Developer CommentsTo delete multiple developer comments:
1. On the Workspace home page, click the Application Builder icon.
2. Select an application.
3. Click the Developer Comment, Bug, or To Do icon.
4. Click the Comment icon.
The Create Comment page displays in a separate window.
5. Click Manage Comments.
6. Select one of the following actions:
■ Delete all comments
■ Delete comments created by a developer
■ Delete comments by date
7. Follow the on-screen instructions.

Adding Developer Comments
7-52 Oracle Application Express Application Builder User's Guide
About the Developer Comments ReportYou can also view, edit, and manage developer comments from the Developer Comments report.
Topics:■ Accessing the Developer Comments Report
■ Editing or Deleting Comments from the Developer Comments Report
■ Deleting a Comment from the Developer Comments Report
■ Deleting Multiple Comments from the Developer Comments Report
Accessing the Developer Comments ReportTo access the Developer Comments report:
1. On the Workspace home page, click the Application Builder icon.
2. Select an application.
3. Click Shared Components
4. Under Tasks, click Developer Comments.
The Developer Comments report appears.
A navigation bar appears at the top of the page and contains the following controls:
■ Select columns to search - Resembles a magnifying glass. Click this icon to narrow your search to only specific columns. To search all columns, select All Columns.
■ Text area - Enter case insensitive search criteria (wildcard characters are implied) and then click Go.
■ Go button - Executes a search.
■ Actions menu - Use the Actions menu to customize the report view. See "About the Actions Menu" on page 9-6.
Editing or Deleting Comments from the Developer Comments ReportTo edit a comment from the Developer Comments report:
1. Navigate to the Developer Comments report. See "Accessing the Developer Comments Report" on page 7-52.
The Developer Comments report appears.
2. Locate the comment to be edited.
3. Click the Edit icon.
The Edit Comments page displays in a separate window.
a. In Relevant Page(s), specify the pages to which the comment applies. To enter a comment that:
– Applies to a specific page, enter the page number.
– Applies to multiple pages, enter a comma-delimited list of pages, for example:
1, 2, 3
– Does not apply to a page or group of pages, leave this field blank.

Adding Developer Comments
About Database Applications 7-53
b. In Comment, enter up to 4000 characters of text.
4. Click Apply Changes.
Deleting a Comment from the Developer Comments ReportTo delete a comment from the Developer Comments report:
1. Navigate to the Developer Comments report. See "Accessing the Developer Comments Report" on page 7-52.
The Developer Comments report appears.
2. Locate the comment to be deleted.
3. Click the Edit icon.
The Edit Comment page displays in a separate window.
4. Click Delete.
Deleting Multiple Comments from the Developer Comments ReportTo delete multiple comments from the Developer Comments report:
1. Navigate to the Developer Comments report. See "Deleting Multiple Developer Comments" on page 7-51.
The Developer Comments report appears.
2. Locate the comment to be deleted.
3. Click the Edit icon.
The Edit Comment page displays in a separate window.
4. Click Manage Comments.
5. Select one of the following actions:
■ Delete all comments
■ Delete comments created by a developer
■ Delete comments by date
6. Follow the on-screen instructions.
Viewing the Developer Comments CalendarTo access the Developer Comments Calendar:
1. On the Workspace home page, click the Application Builder icon.
2. Select an application.
3. Click Shared Components
4. Under Tasks, click Developer Comments Calendar.
The Developer Comments Calendar page appears.
5. Use the Previous, Today and Next buttons to navigate.
Creating Application Groups
7-54 Oracle Application Express Application Builder User's Guide
Creating Application GroupsYou can organize your applications by assigning them to application groups. To use application groups, create a group by clicking the Create button and then assign applications to it.
Topics:■ Viewing Database Application Groups
■ Creating a Database Application Group
■ Assigning a Database Application to an Application Group
■ Removing a Database Application from an Application Group
■ Deleting an Database Application Group
Viewing Database Application GroupsThe section describes different ways to view database application groups.
Accessing the Application Group PageTo access the Application Group page:
1. On the Workspace home page, click the Application Builder icon.
2. On the Tasks List on the right side of the page, click Application Groups.
The Application Group page appears.
A Search bar displays at the top of the page. Available controls include:
■ Select columns to search - Resembles a magnifying glass. Click this icon to narrow your search. To search all columns, select All Columns.
■ Text area - Enter case insensitive search criteria (wildcard characters are implied) to search for a group by name and then click Go.
■ Go button - Executes a search or applies a filter.
■ View Icons (the default) displays each group as a large icon. To edit a group, click the appropriate icon.
■ View Report displays each group as a line in a report. To edit a group, click the name.
3. To view the applications associated with a group, you click the group name.
Creating a Database Application GroupTo create a database application group:
1. On the Workspace home page, click the Application Builder icon
2. On the Tasks List on the right side of the page, click Application Groups.
3. On the Application Group page, click Create.
4. Enter a name, a description (optional), and click Create.
See Also: "About Cross Page Utilities" on page 7-85
Note: The Tasks list only appears if groups currently exist.

Creating Application Groups
About Database Applications 7-55
Editing a Database Application Group DefinitionWhen you create page group you specify a name and description.
To edit an application group definition:
1. On the Workspace home page, click the Application Builder icon
2. On the Tasks List on the right side of the page, click Application Groups.
Application Group page appears.
3. Select an application group.
4. On the Application Group page, edit the name or description and click Apply Changes.
Assigning a Database Application to an Application GroupTo assign applications to a group:
1. On the Workspace home page, click the Application Builder icon.
2. On the Tasks List on the right side of the page, click Application Groups.
3. On the Tasks list, click Manage Unassigned.
The Manage Application Group Assignments page appears.
4. From the New Group list, select a group.
5. Select the applications to be assigned and click Assigned Checked.
Removing a Database Application from an Application GroupTo remove an application from an application group:
1. On the Workspace home page, click the Application Builder icon.
2. On the Tasks List on the right side of the page, click Application Groups.
3. On the Tasks list, click Manage Unassigned.
The Manage Application Group Assignments page appears.
4. From the New Group list, select Unassign.
5. Select the pages to be unassigned and click Assigned Checked.
Deleting an Database Application GroupTo delete an application group:
1. On the Workspace home page, click the Application Builder icon.
2. On the Tasks List on the right side of the page, click Application Groups.
Tip: You can also assign an application to an application group by editing the application definition. Select the group from the Application Group list. See "Editing the Application Definition" on page 7-15.
Tip: You can also remove an application from an application group by editing the application definition. Select Unassigned from the Application Group list. See "Editing the Application Definition" on page 7-15.

Understanding Page-Level Items
7-56 Oracle Application Express Application Builder User's Guide
3. Assign all applications in the group to Unassign. See "Removing a Database Application from an Application Group" on page 55.
4. Return to the Application Groups page.
5. Select the application group to be deleted.
6. On the Application Group page, click Delete.
A confirmation page appears.
7. Confirm your request.
Understanding Page-Level ItemsAn item is part of an HTML form. An item can be a text field, text area, password, select list, check box, and so on. Item attributes affect the display of items on a page. For example, these attributes can impact where a label displays, how large an item is, and if the item displays next to or below the previous item.
Topics:■ Differences Between Page Items and Application Items
■ Viewing Items on the Page Definition
■ Creating Page-Level Items
■ Editing Page-Level Items
■ Referencing Item Values
■ Displaying Conditional or Read-Only Page Items
■ Working with Multiple Select List Item
Differences Between Page Items and Application ItemsThere are two types of items: page items and application items. Page items are placed on a page and have associated user interface properties, such as Display Only, Label and Label Template. Examples of page-level items include a check box, date picker, display as text, file browse field, popup list of values, select list, or a text area. Application items are not associated with a page and therefore have no user interface properties. You can use an application item as a global variable.
Viewing Items on the Page DefinitionYou create and edit page-level items on the Page Definition. In both Component and Tree view, items display in the Page Rendering section. See "Switching Between Tree and Component View" on page 8-3.
Topics:■ Viewing Items in Tree View
■ Viewing Items in Component View
See Also: "Understanding Application-Level Items" on page 7-75, "How Item Attributes Affect Page Layout" on page 12-14, "About the Item Finder" on page 10-84, and "About Page Specific Utilities" on page 7-84
See Also: "Understanding Application-Level Items" on page 7-75

Understanding Page-Level Items
About Database Applications 7-57
Viewing Items in Tree ViewIn Tree view, items display within a tree under the region which contains them.
To edit or add an item, right-click to display a context menu. Then, make a selection from the context menu.
Tip: You can also edit an item by double-clicking the item name or selecting the name and pressing ENTER. See "Editing a Page in Tree View" on page 8-5.

Understanding Page-Level Items
7-58 Oracle Application Express Application Builder User's Guide
To edit multiple items at once, right-click Items and select Edit All. The Items page appears. See "Editing Multiple Items Simultaneously" on page 7-67.
Viewing Items in Component View
In Component view, items display under the Items. You can temporarily hide all other subsections by clicking the Items icon. To restore the view, click Show All. The Show All icon resembles an inverted triangle.
The following icons display next to the section title:
■ Edit All. The Edit All icon resembles a small grid with a pencil on top of it. Use this icon to edit all items at once. See "Editing Multiple Items Simultaneously" on page 7-67.
■ Copy. The Copy icon resembles two small overlapping pages. Use this icon to make a copy of an existing item.
■ Create. The Create icon resembles a plus (+) sign overlapping a small page. Click this icon to create an item.
Items are organized by region. To edit an item, click the item name.
Creating Page-Level ItemsYou can create page-level items by running the Create Item Wizard.
Topics:■ About Item Naming Conventions
■ Creating a Page-Level Item on the Page Definition
■ Creating a Static List of Values
■ Creating a Cascading List of Values
■ Creating Multiple Items Using a Tabular Form
See Also: "Editing Page Item Attributes" on page 7-63

Understanding Page-Level Items
About Database Applications 7-59
About Item Naming ConventionsWhen specifying an item name, remember the following rules. Item names must:
■ Be unique within an application.
■ Not include quotation marks.
■ Begin with a letter or a number, and subsequent characters can be letters, numbers, or underscore characters.
■ Be case-insensitive.
■ Should not exceed 30 characters. Items longer than 30 characters cannot be referenced using bind variable syntax. See "About Bind Variable Syntax" on page 2-16.
■ Cannot contain letters outside the base ASCII character set
As a best practice Oracle recommends including the page number when naming items. By default, wizards prefix page item names with P<page no>_<item name> (for example, P1_NAME).
Creating a Page-Level Item on the Page DefinitionYou create a page-level item by running the Create Item Wizard from the Page Definition.
To create a page-level item:
1. Navigate to the appropriate Page Definition. See "Accessing the Page Definition" on page 8-2.
2. If necessary, create an HTML region. See "Understanding Regions" on page 12-3.
3. To access the Create Item Wizard:
■ Tree view - Under Page Rending, right-click the region to contain the item and select Create Page Item.
■ Component view - Under Items, click the Create icon.
The Create Item Wizard appears.
4. Select an item type. See "About Item Types" on page A-1.
When creating a Popup LOV, Color Picker, or Text Field with Calculator Popup, select Popup LOV and then the specific popup list of values type.
5. For Display Position and Name:
a. Item Name - Enter a name used to retrieve the value of the item. See "About Item Naming Conventions" on page 7-59.
b. Sequence - Specify the sequence for this component. The sequence determines the order of evaluation.
c. Region - Select a region to contain this item.
d. Click Next.
6. Follow the on-screen instructions.
7. To learn more about a specific field, click the field label.
See Also: "Differences Between Page Items and Application Items" on page 7-56 and "About Item Types" on page A-1

Understanding Page-Level Items
7-60 Oracle Application Express Application Builder User's Guide
When help is available, the cursor changes to an arrow and question mark when you pass the cursor over an item. See "About Field-Level Help" on page 1-13.
Creating a Static List of ValuesOne way to create a static list of values is to edit an item's List of Values definition. Note that this type of list of values is not reusable. As a best practice, create a list of values as a shared component whenever possible.
To create a static list of values:
1. Navigate to the appropriate Page Definition. See "Accessing the Page Definition" on page 8-2.
2. Access the attributes page for the item:
■ Tree view - Right-click the item and select Edit.
■ Component view -Under Items, select the item name.
The Edit Page Item page appears.
3. Under Name, specify how the item is rendered. From Display As, select Select List.
4. Scroll down to List of Values.
5. Under List of Values, create a static list of values:
a. From Named LOV, select Select Named LOV.
b. In List of values definition, enter a definition using the following syntax:
STATIC[2]:Display Value[;Return Value],Display Value[;Return Value]
Where:
– The first keyword may be STATIC or STATIC2.
STATIC results in the values being sorted alphabetically by display value. STATIC2 results in the values being displayed in the order they are entered in the list.
– A semicolon separates the display value from the return value in each entry.
– Return Value is optional. If a Return Value is not included, the return value equals the display value.
6. To view help for a specific item on a page, click the item label. See "About Field-Level Help" on page 1-13.
7. Click Apply Changes.
The examples that follow demonstrate syntax for three different static LOVs.
Example 1: Four Values Displayed in Alphabetical Order In this example, the list of values has four values (Cow, Dog, Cat, and Lion) that display in alphabetical order. The return value of each entry equals the display value.
STATIC:Cow,Dog,Cat,Lion
See Also: "Creating Lists of Values at the Application Level" on page 10-73

Understanding Page-Level Items
About Database Applications 7-61
Example 2: Ten Values Displayed in the Order Listed In this example, the list of values has ten values that display in the order listed in the definition. The return value of each entry equals the display value.
STATIC2:10,15,20,25,50,100,200,500,1000,10000
Example 3: A List of Values with Having Both a Return and Display Value In this example, the list of values has two values: Yes and No (the display value Yes and its return value Y, and the display value No and its return value N).
STATIC:Yes;Y,No;N
Creating a Cascading List of ValuesBy creating a cascading list of values (LOV), one item on a page determines the list of values for another item. Application Builder includes cascading LOV support for the following item types: Select List, Shuttle, Checkbox, Radio Group, Popup LOV, and List Manager. To learn more about item types, see Appendix A, "About Item Types" on page A-1.
You create a cascading LOV by creating two items. To populate the second item, you specify a Cascading LOV Parent Item when running the Create Item Wizard or by editing the item’s attributes.
The following example demonstrates how to create two related select lists where the value of the first list populates the second.
To create a cascading list of values:
1. Create the first item and name it P1_DEPTNO:
a. Create a select list item. See "Creating a Page-Level Item on the Page Definition" on page 7-59.
b. For Item Type, select Select List.
c. For Display Position and Name:
– Item Name - Enter:
P1_DEPTNO
– Accept the remaining defaults and click Next.
d. For Item Attributes:
– Label - Enter Department
– Accept the remaining defaults and click Next.
e. For Settings, accept the defaults and click Next.
f. For List of Values:
– Display Null Value - Accept the default, Yes.
– Null Display Value - Enter - Select Department -
- Select Department -
– In List of values definition, enter:
SELECT dname as d, deptno as r FROM dept
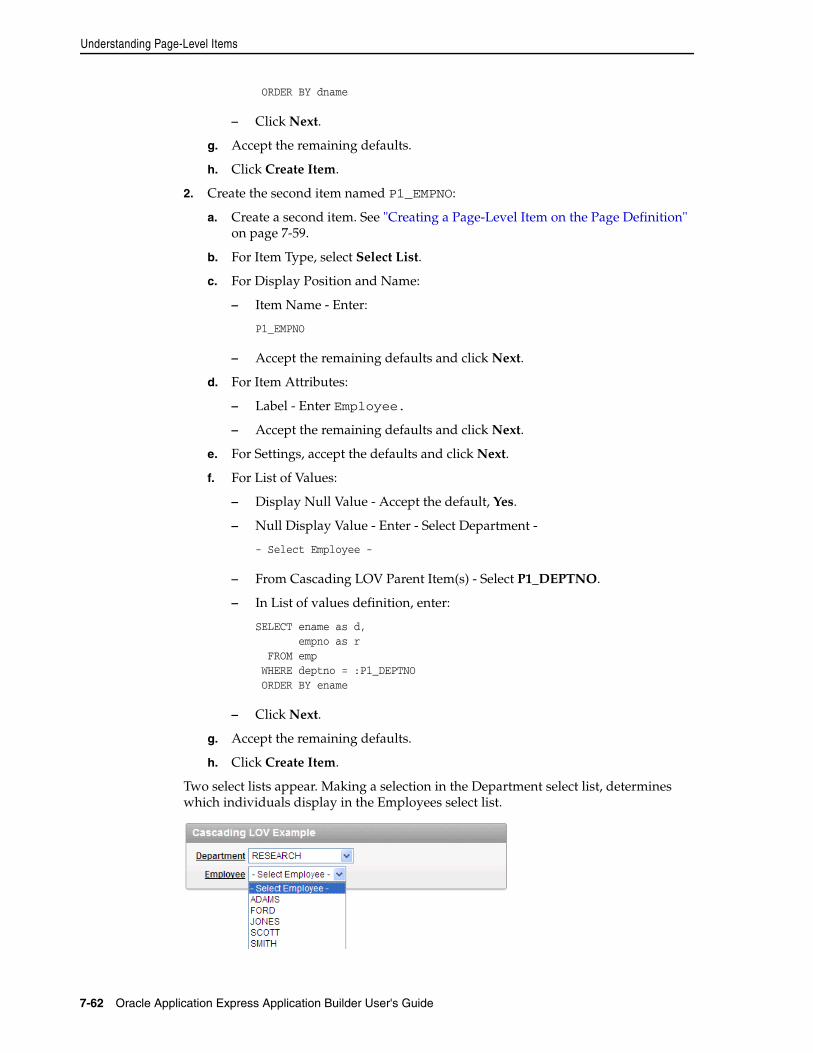
Understanding Page-Level Items
7-62 Oracle Application Express Application Builder User's Guide
ORDER BY dname
– Click Next.
g. Accept the remaining defaults.
h. Click Create Item.
2. Create the second item named P1_EMPNO:
a. Create a second item. See "Creating a Page-Level Item on the Page Definition" on page 7-59.
b. For Item Type, select Select List.
c. For Display Position and Name:
– Item Name - Enter:
P1_EMPNO
– Accept the remaining defaults and click Next.
d. For Item Attributes:
– Label - Enter Employee.
– Accept the remaining defaults and click Next.
e. For Settings, accept the defaults and click Next.
f. For List of Values:
– Display Null Value - Accept the default, Yes.
– Null Display Value - Enter - Select Department -
- Select Employee -
– From Cascading LOV Parent Item(s) - Select P1_DEPTNO.
– In List of values definition, enter:
SELECT ename as d, empno as r FROM emp WHERE deptno = :P1_DEPTNO ORDER BY ename
– Click Next.
g. Accept the remaining defaults.
h. Click Create Item.
Two select lists appear. Making a selection in the Department select list, determines which individuals display in the Employees select list.

Understanding Page-Level Items
About Database Applications 7-63
Creating Multiple Items Using a Tabular FormTo create multiple items simultaneously:
1. Navigate to the appropriate Page Definition. See "Accessing the Page Definition" on page 8-2.
2. If necessary, create an HTML region. See "Understanding Regions" on page 12-3.
3. To access the Create Item Wizard:
■ Tree view - Under Page Rending, right-click the region to contain the item and select Create Page Item.
■ Component view - Under Items, click the Create icon.
The Create Item Wizard appears.
4. Click the Create multiple items using tabular form link at the bottom of the page.
5. On the Create Multiple Items page, specify the following:
a. Create Item(s) in Region - Select the region to contain the items.
b. Item Template - Select an item template.
c. For each item, enter the Sequence, Name, Label, Type and specify whether the item should be cached.
6. Click Create Multiple Items.
Editing Page-Level ItemsYou can edit page-level items by editing page item attributes or using the Edit All or Reorder Items icons.
Topics:■ Editing Page Item Attributes
■ Defining Default Values
■ Configuring Page Item Security
■ Creating a Quick Pick Selection
■ Editing Multiple Items Simultaneously
Editing Page Item AttributesOnce you create a page item, you can edit it on the Edit Page Item page.
To edit page item attributes:
1. Navigate to the appropriate Page Definition. See "Accessing the Page Definition" on page 8-2.
2. Access the attributes page for the item:
■ Tree view - Right-click the item and select Edit.
■ Component view -Under Items, select the item name.
See Also: "Editing Page-Level Items" on page 7-63
See Also: "Displaying Conditional or Read-Only Page Items" on page 7-72 and "Available Item Types" on page A-1

Understanding Page-Level Items
7-64 Oracle Application Express Application Builder User's Guide
The Edit Page Item page appears.
3. To learn more about a specific attribute on a page, click the attribute label. See "About Field-Level Help" on page 1-13.
4. Click Apply Changes.
About Navigation Alternatives The Edit Page Item page is divided into sections. The sections that display depend upon the Display As attribute.
You can access these sections by scrolling down the page, or by clicking a navigation button at the top of the page. When you select a button at the top of the page, the selected section appears and all other sections are temporarily hidden. To view all sections of the page, click Show All.
Defining Default ValuesYou define default values for an item using the attributes under Default on the Edit Page Item page. The default value is used when the item's value is not derived from session state and when the source value is NULL.
To define a default value for an item:
1. Create the item. See "Creating Page-Level Items" on page 7-58.
2. Navigate to the appropriate Page Definition. See "Accessing the Page Definition" on page 8-2.
3. Access the attributes page for the item:
■ Tree view - Right-click the item and select Edit.
■ Component view -Under Items, select the item name.
The Edit Page Item page appears.
4. Scroll down to Default.
5. In Default Value, enter a value.
6. From Default Value Type, select one of the following:
■ Static Text with Session State Substitutions
■ PL/SQL Function Body
■ PL/SQL Expression
7. Click Apply Changes.
Configuring Page Item SecurityYou can configure security for an item in Security region on the Edit Page Item page.
To configure page item security:
1. Navigate to the appropriate Page Definition. See "Accessing the Page Definition" on page 8-2.
Tip: You can also edit an item by double-clicking the item name or selecting the name and pressing ENTER. See "Editing a Page in Tree View" on page 8-5.
See Also: "How Item Attributes Affect Page Layout" on page 12-14 and "Understanding Cross-Site Scripting Protection" on page 15-10

Understanding Page-Level Items
About Database Applications 7-65
2. Access the attributes page for the item:
■ Tree view - Right-click the item and select Edit.
■ Component view -Under Items, select the item name.
The Edit Page Item page appears.
3. Scroll down to Security.
4. Configure the attributes described in Table 7–11.
Table 7–11 Edit Page Item, Security
Attribute Description
Authorization Scheme Select an authorization scheme which must evaluate to TRUE in order for this component to be rendered or otherwise processed.
See Also: "Providing Security Through Authorization" on page 15-37
Session State Protection Select a Session State Protection level. Options include:
■ Unrestricted - The item may be set by passing the item in a URL or in a form. No checksum is required in the URL.
■ Restricted: May not be set from browser - The item may not be altered using the URL or POSTDATA. Select this option to restrict the way that the item value can be set to internal processes, computations, and so on. This attribute only applies to items that cannot be used as data entry items and is always observed, even if Session State Protection is disabled.
Use this attribute for application items or for page items having the following Display As types: Display Only (Save State=No), Text Field (Disabled, does not save state), and Stop and Start Grid Layout (Displays label only).
If Session State Protection is enabled, these additional attributes may be applied to items:
■ Checksum Required: Application Level - The item may be set by passing the item in a URL if a checksum is also provided that is specific to the workspace and application.
■ Checksum Required: User Level - The item may be set by passing the item in a URL if a checksum is also provided that is specific to the workspace, application, and user.
■ Checksum Required: Session Level - The item may be set by passing the item in a URL if a checksum is also provided that is specific to the current session.
See Also: "Understanding Session State Protection" on page 15-13
Store value encrypted in session state
Session state that is sensitive can be encrypted when stored in Application Express session state management tables. To maintain session state encrypted for this item, set the value to Yes.
Values up to 4000 bytes in length can be encrypted. Attempts to encrypt values longer than 4000 bytes produce an error message.

Understanding Page-Level Items
7-66 Oracle Application Express Application Builder User's Guide
Creating a Quick Pick SelectionIf the item type supports quick pick selection, use the Quick Picks attributes to define up to ten selections that display under a give item. Clicking on a quick pick sets the value of item. The following example shows quick picks for 5%, 10%, 15%, and 20%.
To create a quick pick:
1. Create the item. See "Creating Page-Level Items" on page 7-58.
2. Navigate to the appropriate Page Definition. See "Accessing the Page Definition" on page 8-2.
Escape Special Characters This attribute only displays with some item types. Select Yes to prevent Cross-Site Scripting (XSS) attacks. Select No if you want that HTML tags which are stored in the page item or in the entries of a list of value are actually rendered.
See Also: "Understanding Cross-Site Scripting Protection" on page 15-10
Restricted Characters Use this attribute to restrict the characters that can be saved in session state. Oracle Application Express displays an error message if a user tries to save data which does not conform to the selected character restriction. Available options include:
■ All Characters Allowed
No restriction applies.
■ Whitelist for a-Z, 0-9 and space
Only allow characters a-z, A-Z, 0-9, and space.
■ Blacklist HTML command characters (<>").
Do not allow reserved HTML characters
■ Blacklist &<>"/;,*|=% and --:
Do not allow &, <, >, ", /, ;, ",", *, |, =, % and "--" (PL/SQL comment).
■ Blacklist &<>"/;,*|=% or -- and new line
Do not allow &, <, >, ", /, ;, ",", *, |, =, %, "--", and new line characters
See Also: "Understanding Cross-Site Scripting Protection" on page 15-10
Table 7–11 (Cont.) Edit Page Item, Security
Attribute Description

Understanding Page-Level Items
About Database Applications 7-67
3. Access the attributes page for the item:
■ Tree view - Right-click the item and select Edit.
■ Component view -Under Items, select the item name.
The Edit Page Item page appears.
4. Scroll down to Quick Picks.
5. From Show Quick Picks, select Yes.
6. Define the Label and Value for each quick pick:
a. Under Label, enter the label to display for each selection.
b. Under Value, enter the corresponding value.
7. In Link Attributes, enter additional attributes for the quick picks.
8. Click Apply Changes.
Editing Multiple Items SimultaneouslyItem attributes control how items display on a page. You can use the Page Items page to edit the sequence, field label, template, region, and overall position for all items on a page. The sections that follow describe how to edit items using these pages.
Topics:■ Items
■ Reassign Region Items
■ Delete Multiple Items
■ Viewing Item Utilities
■ History
Items To edit multiple items simultaneously:
1. Navigate to the appropriate Page Definition. See "Accessing the Page Definition" on page 8-2.
2. Access the Page Items page:
■ Tree view - Right-click Items and select Edit All.
■ Component view - Under Items, click the Edit All icon. The Edit All icon resembles a small page with a pencil on top of it.
See Also: "How Item Attributes Affect Page Layout" on page 12-14
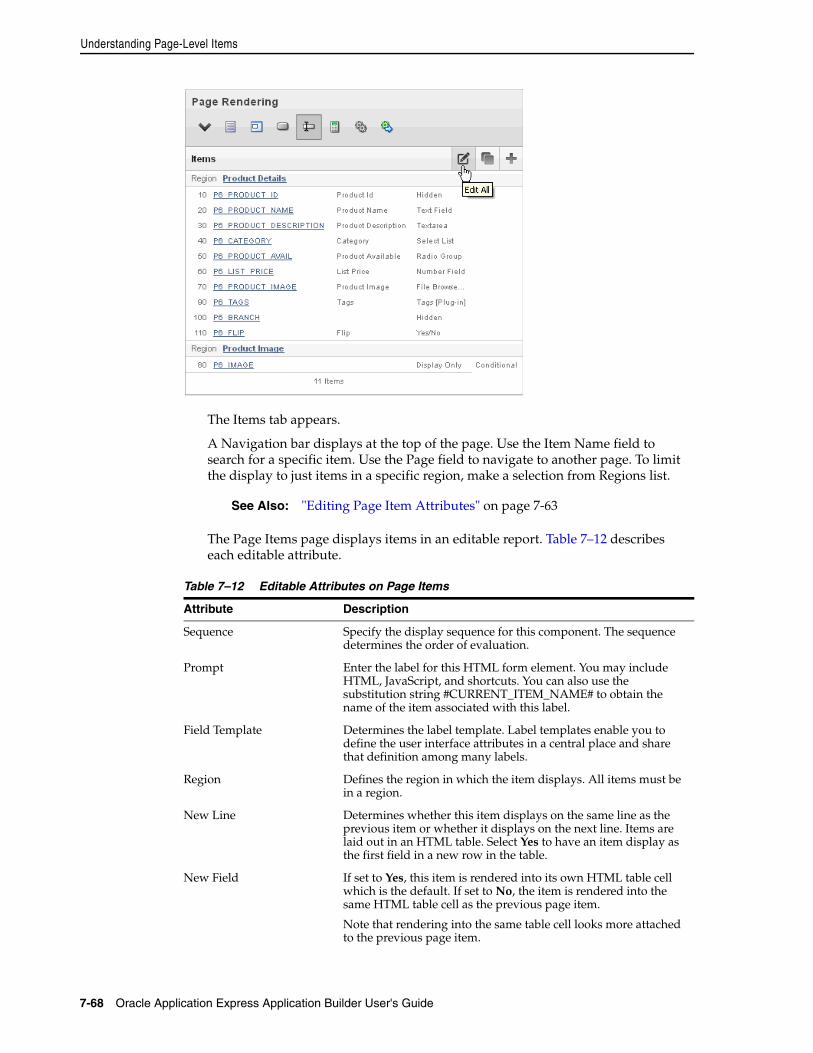
Understanding Page-Level Items
7-68 Oracle Application Express Application Builder User's Guide
The Items tab appears.
A Navigation bar displays at the top of the page. Use the Item Name field to search for a specific item. Use the Page field to navigate to another page. To limit the display to just items in a specific region, make a selection from Regions list.
The Page Items page displays items in an editable report. Table 7–12 describes each editable attribute.
See Also: "Editing Page Item Attributes" on page 7-63
Table 7–12 Editable Attributes on Page Items
Attribute Description
Sequence Specify the display sequence for this component. The sequence determines the order of evaluation.
Prompt Enter the label for this HTML form element. You may include HTML, JavaScript, and shortcuts. You can also use the substitution string #CURRENT_ITEM_NAME# to obtain the name of the item associated with this label.
Field Template Determines the label template. Label templates enable you to define the user interface attributes in a central place and share that definition among many labels.
Region Defines the region in which the item displays. All items must be in a region.
New Line Determines whether this item displays on the same line as the previous item or whether it displays on the next line. Items are laid out in an HTML table. Select Yes to have an item display as the first field in a new row in the table.
New Field If set to Yes, this item is rendered into its own HTML table cell which is the default. If set to No, the item is rendered into the same HTML table cell as the previous page item.
Note that rendering into the same table cell looks more attached to the previous page item.

Understanding Page-Level Items
About Database Applications 7-69
Reassign Region Items Use the Reassign Region Items page to assign items to a new region.
To assign items to a new region on the Reassign Region Items page:
1. Navigate to the appropriate Page Definition. See "Accessing the Page Definition" on page 8-2.
2. Access the Page Item page:
■ Tree view - Right-click Items and select Edit All.
■ Component view - Under Items, click the Edit All icon. The Edit All icon resembles a small grid with a pencil on top of it.
The Page Item page appears.
3. Click Reassign Region Items.
The Reassign Region Items page appears.
Use the Navigation bar at the top of the page to narrow or broaden the display. Available options include:
■ Page - Select or enter a new number and click Go.
■ Show Region(s) - Select a region to display and click Go.
4. To reassign an item to another region:
a. Select the items to reassign.
b. From Assign to Region, select a new region.
c. Click Reassign.
Delete Multiple Items Use the Delete Multiple Items page to simultaneously delete multiple items.
To delete multiple items:
1. Navigate to the appropriate Page Definition. See "Accessing the Page Definition" on page 8-2.
2. Access the Page Item page:
■ Tree view - Right-click Items and select Edit All.
■ Component view - Under Items, click the Edit All icon. The Edit All icon resembles a small grid with a pencil on top of it.
Width Specifies the length (in characters) of the form element that displays for this item.
Height Specifies the height (in lines) for text areas and multi select lists.
Column Span Items are laid out in HTML tables. This property defines the value to be used for the COLSPAN attribute in the table cell.
Row Span Items are laid out in HTML tables. The attribute determines the value to be used for the ROWSPAN attribute in the table cell that the item displays in.
Post Element Text or HTML code is rendered immediately after the page item element.
Table 7–12 (Cont.) Editable Attributes on Page Items
Attribute Description
Understanding Page-Level Items
7-70 Oracle Application Express Application Builder User's Guide
The Page Item page appears.
3. Click Delete Multiple Items.
The Delete Multiple Items page appears.
Use the Navigation bar at the top of the page to narrow or broaden the display. Use the Page field to navigate to a new page. Select or enter a new number and click Go.
4. To delete items:
a. Select the items.
b. Click Remove Items.
Viewing Item Utilities The Utilities page includes Grid Edit pages and reports that enable you to edit items on multiple pages within a selected application.
To access the Utilities page:
1. Navigate to the appropriate Page Definition. See "Accessing the Page Definition" on page 8-2.
2. Access the Page Item page:
■ Tree view - Right-click Items and select Edit All.
■ Component view - Under Items, click the Edit All icon. The Edit All icon resembles a small grid with a pencil on top of it.
The Page Item page appears.
3. Select one of the following reports:
■ Grid Edit of all Item Labels
■ Grid Edit of all Item Help Text
■ Item Help Subscriptions
■ All Page Items
■ Conditional Items
History Use the History page to view a summary of recent edits to page-level items.
Referencing Item ValuesYou can reference item values stored in session state in regions, computations, processes, validation, and branches. Table 7–13 describes the supported syntax for referencing item values.
See Also: "Managing Session State Values" on page 2-13

Understanding Page-Level Items
About Database Applications 7-71
You can set the value of an item in your application using any of the following methods:
■ For page-level items, use the Source Attribute to set the item value.
From the Page Definition, select the item name to view the Edit Page Item page. Scroll down to Source and edit the appropriate fields.
You can also set the value of an item in any region based on PL/SQL or a process using the following syntax:
BEGIN :MY_ITEM := 'new value';END;
■ Pass the value on a URL reference using f?p syntax. For example:
f?p=100:101:10636547268728380919::NO::MY_ITEM:ABC
■ Set the value using a computation. Computations are designed to set item values. For example:
TO_CHAR(SYSDATE,'Day DD Month, YYYY');
■ Use the PL/SQL API to set an item value within a PL/SQL context. For example:
APEX_UTIL.SET_SESSION_STATE('MY_ITEM',SYSDATE);
Table 7–13 Syntax for Referencing Item Values
Type Syntax Description
SQL :MY_ITEM Standard bind variable syntax for items whose names are no longer than 30 bytes. Use this syntax for references within a SQL query and within PL/SQL code.
PL/SQL V('MY_ITEM') PL/SQL syntax referencing the item value using the V function. Use this syntax in PL/SQL code of packages or stored procedures and functions.
Avoid this syntax in SQL statements. It may result in performance problems.
See Also: Oracle Application Express API Reference
PL/SQL NV('MY_NUMERIC_ITEM') Standard PL/SQL syntax referencing the numeric item value using the NV function. Use this syntax in PL/SQL code of packages or stored procedures and functions.
Avoid this syntax in SQL statements. It may result in performance problems.
See Also: Oracle Application Express API Reference
Static Text (exact) &MY_ITEM. Static text. Exact Substitution.
Note: Exact substitution syntax should be avoided in SQL or PL/SQL code because it can result in SQL Injection vulnerabilities.
See Also: "Clearing Session State" on page 2-14, Oracle Application Express API Reference, and "Understanding Cross-Site Scripting Protection" on page 15-10

Understanding Page-Level Items
7-72 Oracle Application Express Application Builder User's Guide
Displaying Conditional or Read-Only Page ItemsYou can choose to have an item display conditionally or as read-only by editing attributes on the Edit Pages Item page.
Topics:■ Displaying Conditional Page Items
■ Displaying Read Only Page Items
Displaying Conditional Page ItemsTo display a conditional item:
1. Create the item. See "Creating Page-Level Items" on page 7-58.
2. Navigate to the appropriate Page Definition. See "Accessing the Page Definition" on page 8-2.
3. Access the attributes page for the item:
■ Tree view - Right-click the item and select Edit.
■ Component view -Under Items, select the item name.
The Edit Page Item page appears.
4. Scroll down to Conditions.
5. Make a selection from the Condition Type list.
6. Enter an expression in the fields provided.
7. Click Apply Changes.
Displaying Read Only Page ItemsTo display a read-only item:
1. Create the item. See "Creating Page-Level Items" on page 7-58.
2. Navigate to the appropriate Page Definition. See "Accessing the Page Definition" on page 8-2.
3. Access the attributes page for the item:
■ Tree view - Right-click the item and select Edit.
■ Component view -Under Items, select the item name.
The Edit Page Item page appears.
4. Scroll down to Read Only. Under Read Only:
a. Make a selection from Read Only Condition Type.
Depending on the item type, a read-only item may be rendered as plain text or as nonenterable field. Not selecting a condition causes the item to render normally.
b. Enter an expression in the fields provided.
Tip: Setting Condition Type to Never always renders the item as an enterable field. This setting overwrites any read-only condition setting defined at the region or page-level.

Understanding Page-Level Items
About Database Applications 7-73
c. In Read Only Element Table Cell(s) Attributes, enter attributes to be included in the HTML table cell tag, <td>, that contains the item when displayed in read only mode. For example:
bgcolor="#FF0000"
5. Click Apply Changes.
Working with Multiple Select List ItemA multiple select item renders as a multiple select list form element which can be either a Multiselect List or Shuttle item type. When submitted, selected values are returned in a single colon-delimited string. You can handle values in this format in three ways:
■ Using the INSTR function
■ Using the APEX_UTIL.STRING_TO_TABLE function
■ Creating a shuttle
Topics:■ Using APEX_UTIL.STRING_TO_TABLE to Convert Selected Values
■ Creating a Shuttle Item Type
Using APEX_UTIL.STRING_TO_TABLE to Convert Selected ValuesSuppose you had a report on the EMP and DEPT tables that is limited by the departments selected from a Department multiple select list. First, you create the multiple select item, P1_DEPTNO, using the following query:
SELECT dname, deptnoFROM dept
Second, you return only those employees within the selected departments as follows:
SELECT ename, job, sal, comm, dnameFROM emp e, dept dWHERE d.deptno = e.deptnoAND instr(':'||:P1_DEPTNO||':',':'||e.deptno||':') > 0
Next, assume you want to programmatically step through the values selected in the multiple select item, P1_DEPTNO. To accomplish this task, convert the colon-delimited string into a PL/SQL array using the APEX_UTIL.STRING_TO_TABLE function. The following example demonstrates how to insert the selected departments into an audit table containing the date of the query.
DECLARE l_selected APEX_APPLICATION_GLOBAL.VC_ARR2;BEGIN -- -- Convert the colon separated string of values into -- a PL/SQL array
l_selected := APEX_UTIL.STRING_TO_TABLE(:P1_DEPTNO);
Tip: Read Only Element Table Cell(s) Attributes only be displays if the application uses HTML tables to layout regions and page items.

Understanding Page-Level Items
7-74 Oracle Application Express Application Builder User's Guide
-- -- Loop over array to insert department numbers and sysdate --
FOR i IN 1..l_selected.count LOOP INSERT INTO report_audit_table (report_date, selected_department) VALUES (sysdate, l_selected(i)); END LOOP;END;
Creating a Shuttle Item TypeSuppose you have a form on the DEPT table that shows which employees are assigned to a given department. To make assigning employees to a department easier, you can create a shuttle item that lists employees alphabetically.
To create a shuttle item:
1. Create a new Form page on DEPT using Form on a Table with Report:
a. On the Workspace home page, click the Application Builder icon.
b. Select an application.
c. Click Create Page.
d. For Page Type, select Form.
e. Under Forms, select Form on a Table with Report.
f. For Report Page, accept the defaults and click Next.
g. For Table/View Name, select DEPT.
h. Accept the remaining defaults and follow the on-screen instructions. To learn more about a specific field, click the item label.
2. Create a shuttle named P2_EMP_LIST and the form page.
a. Go the Page Definition for the form page.
b. Right-click the region containing the form and select Create Page Item.
c. For Item Type, select Shuttle.
d. For Item Name, enter P2_EMP_LIST and click Next.
e. For Item Attributes, accept the defaults and click Next.
f. For Setting, accept the defaults and click Next.
g. For List of Values:
– List of Values Query - Enter:
SELECT ename, empno FROM emp ORDER BY 1
– Click Next.
See Also: "STRING_TO_TABLE Function" in Oracle Application Express API Reference
Tip: In this example, "P2" in the item name P2_EMP_LIST indicates the item resides on page 2.

Understanding Application-Level Items
About Database Applications 7-75
h. For Source:
– Source Type - Select SQL Query (return color separated value)
– Item Source Value - Enter:
SELECT empno FROM emp WHERE deptno = :P2_DEPTNO ORDER BY ename
– Click Create Item.
i. Run the page by clicking the Run Page icon.
Understanding Application-Level ItemsApplication-level items do not display, but are used as global variables to the application. You can use an application item as a global variable.
Topics:■ Creating an Application-level Item
■ Viewing Application Item Usage
■ Editing Application-level Item Attributes
■ Creating an Application-level Item that Functions as a Global Variable
Creating an Application-level ItemTo create an application-level item:
1. Navigate to the Workspace home page.
2. Click the Application Builder icon.
3. Select an application.
4. When Application home page appears, click Shared Components.
5. Under Logic, select Application Items.
The Application Items page appears.
6. To create an application item, click Create.
The Create/Edit page appears.
7. For Name:
See Also: "Differences Between Page Items and Application Items" on page 7-56 and "Referencing Item Values" on page 7-70

Understanding Application-Level Items
7-76 Oracle Application Express Application Builder User's Guide
a. Name - Enter a name for the application-level item.
b. Scope - Options include:
– Global - Select this option if the application shares session state with other applications in the same workspace. To learn more, see "Creating an Application-level Item that Functions as a Global Variable" on page 7-78.
– Application - Select this option if the application does share session state with another application.
8. For Security, Session State Protection:
■ Unrestricted - The item's session state may be set by passing the item name/value in a URL or in a form. No checksum is required in the URL.
Note: If you must set this item's value in session state using Ajax, then an Unrestricted protection level must be used for the item (for example in Dynamic Actions, Set Value, Page Items to Submit or Cascading LOVs, Page Items to Submit).
■ Restricted - May not be set from browser - The item may not be altered using the URL or POSTDATA. Use this option when you want to restrict the way that the item value can be set to internal processes, computations, and so on. This attribute is only applicable only to items that cannot be used as data entry items and is always observed even if Session State Protection is disabled. This attribute may be used for application items or for page items with any of these Display As types:
– Display Only (Save State=No)
– Display Only (Save State=No)
– Stop and Start Grid Layout (Displays label only)
■ Checksum Required: Application Level - The item's session state may be set by passing the item name/value in a URL if a checksum specific to the schema is provided. A user-level checksum or a session-level checksum will also suffice (see next bullets). Use this option when you want to allow the item to be set only by URLs having checksums that were generated by any user running the same application in the current workspace but in a different session.
■ Checksum Required: User Level - The item's session state may be set by passing the item name/value in a URL if a checksum specific to the workspace, application, and user is provided. A session-level checksum will also suffice (see next bullet). Use this option when you want to allow the item to be set only by URLs having checksums that were generated by the same named user, running the same application in the current workspace but in a different session.
■ Checksum Required: Session Level - The item's session state may be set by passing the item name/value in a URL if a checksum specific to the current session is provided. Use this option when you want to allow this item to be set only by URLs having checksums that were generated in the current session.
9. For Build Option, Select a build option for this component. Build options are predefined settings that determine whether components within an application are enabled.
10. In Comments, enter any notes regarding this item.
11. Click Create Application Item.
Understanding Application-Level Items
About Database Applications 7-77
About the Application Items PageOnce you create an application item, it appears on the Application Items page. You can customize the appearance of page using the Search bar at the top of the page. Available controls include:
■ Select columns to search - Resembles a magnifying glass. Click this icon to narrow your search. To search all columns, select All Columns.
■ Text area - Enter case insensitive search criteria (wildcard characters are implied) to search for items by name and then click Go.
■ Go button - Executes a search or applies a filter.
■ View Icons - Displays each item as a large icon. To edit an item, click the appropriate icon.
■ View Report - Displays each item as a line in a report. To edit an item, click the name.
■ Actions menu - Use the Actions menu to customize the report view. See "About the Actions Menu" on page 9-6.
Viewing Application Item UsageYou can view a list of where application items are used by clicking the Utilization tab at the top of the Application Items page.
Editing Application-level Item AttributesOnce you create an application-level item, you can edit it on the Create/Edit Application Item page.
To edit application-level item attributes:
1. Navigate to the Workspace home page.
2. Click the Application Builder icon.
3. Select an application.
4. When Application home page appears, click Shared Components.
5. Under Logic, select Application Items.
The Application Items page appears. See "About the Application Items Page" on page 77
6. Select an application item.
The Create/Edit page appears.
7. To learn more about a specific item on a page, click the item label.
When help is available, the cursor changes to an arrow and question mark when you pass the cursor over an item. See "About Field-Level Help" on page 1-13.
8. Click Apply Changes.
About Navigation AlternativesThe Create/Edit Application Item page is divided into the following sections: Name, Security, Configuration, and Comments.
See Also: "Understanding Cross-Site Scripting Protection" on page 15-10

Viewing Application Utilities and Reports
7-78 Oracle Application Express Application Builder User's Guide
You can access these sections by scrolling down the page, or by clicking a navigation button at the top of the page. When you select a button at the top of the page, the selected section appears and all other sections are temporarily hidden. To view all sections of the page, click Show All.
Creating an Application-level Item that Functions as a Global VariableLarge applications are often separated into several physical applications that reside in the same workspace. These applications often share session state by configuring the same cookie name in each application.
Another requirement of this type of architecture is the need to share a few global variables. While the number global variables should be kept small, global variables function as an effective means to facilitate communicate between the applications. For example:
■ Properties of the current user (such as email address, employee number, and so on)
■ Current company in a multi-tenant application
You can create a global variable by creating an application-level item with the same name across all applications and setting the scope to Global.
To create an application-level item that functions as a global variable:
1. Create an application-level item with the same name in each application to share session state.
2. For Scope, select Global.
3. For Security, Session State Protection, select Restricted.
To learn more, see "Creating an Application-level Item" on page 7-75.
Viewing Application Utilities and ReportsOracle Application Express includes a comprehensive number of reports that enable you to view of your application from various perspectives. You can use these reports to view statistics and access reports of page and application components, templates, plug-ins, and conditions. For example, you can view details about buttons used on all pages within your application. Additionally, many reports are updatable so you can standardize components, such as item and region labels, without navigating to a specific page.
Topics:■ Using Application Builder Utilities
■ About Page Specific Utilities
■ About Cross Page Utilities
■ About Cross Application Reports
Using Application Builder UtilitiesThe Application Builder Utilities page includes tools and reports that summarize information across an application.
See Also: "Creating Custom Activity Reports Using APEX_ACTIVITY_LOG" on page 17-4

Viewing Application Utilities and Reports
About Database Applications 7-79
Topics:■ About the Application Builder Utilities Page
■ Viewing the Application Dashboard
■ Viewing the Change History Report
■ Viewing the Recently Updated Pages Report
■ Upgrading an Existing Application
■ Using the Database Object Dependencies Report
■ About Application Express Views
About the Application Builder Utilities PageTo access Application Builder Utilities page:
1. On the Workspace home page, click the Application Builder icon.
2. Select the application.
3. Click the Utilities icon.
The Application Builder Utilities page appears.
The Application Builder Utilities page features icons that link to the following tools and reports:
■ Application Dashboard. See "Viewing the Application Dashboard" on page 7-80.
■ Change History. See "Viewing the Change History Report" on page 7-81.
■ Recently Updated Pages. See "Viewing the Recently Updated Pages Report" on page 7-81.
■ Export Repository. See "Accessing the Export Repository" on page 16-30.
■ Debug Messages. See "Debugging an Application" on page 14-1.
■ Advisor. See "Running Advisor to Check Application Integrity" on page 14-1.
■ Upgrade Application. See "Upgrading an Existing Application" on page 7-82

Viewing Application Utilities and Reports
7-80 Oracle Application Express Application Builder User's Guide
■ Database Object Dependencies. See "Using the Database Object Dependencies Report" on page 7-82.
■ Manage Attribute Dictionary - See "Using the Attribute Dictionary" on page 8-62.
■ Application Express Views - See "About Application Express Views" on page 7-83.
Page Specific Utilities
The Page Specific Utilities display on the right side of the Utilities page. Use these utilities to view component reports across pages in an application and by component type (for example, region, button, item, validation, process, dynamic action, or branch). To learn more, see "About Page Specific Utilities" on page 7-84 and "About Cross Page Utilities" on page 7-85.
Viewing the Application DashboardThe Application Dashboard details application components and attributes.
To view the Application Dashboard:
1. Navigate to the Workspace home page.
2. Click the Application Builder icon.
3. Select an application.
The Application home page appears.
4. Click Utilities.
5. Click Application Dashboard.
The Application Dashboard appears and contains the following sections:
■ Application Overview lists detailed information and statistics about the current application, including the ID, name, alias, parsing schema, associated group, number of pages, and associated theme.
■ Security lists the current authentication scheme, number of public and non public pages, and the number of authorization schemes used within the current application.

Viewing Application Utilities and Reports
About Database Applications 7-81
■ Templates contains links to reports of templates used within the current application.
■ Pages by Type lists counts of components, including types of reports and forms and dynamic HTML.
■ Application Components contains links to reports of application-level controls and logic, including lists, shortcuts, lists of value, tabs, application computations, application items, plug-ins, and application processes.
■ Page Components contains links to reports of page-level controls and logic, including regions, items, branches, computations, validations, dynamic actions, classic report columns, interactive report columns, and button.
6. To view a specific report, click the number to the right of the component type or template.
Viewing the Change History ReportThe Change History report displays a summary report of edits to the current applications by developer, component type, and page number.
To view the Change History report:
1. Navigate to the Workspace home page.
2. Click the Application Builder icon.
3. Select an application.
The Application home page appears.
4. Click Utilities.
5. Click the Change History.
A Search bar displays at the top of the page. See "Using the Search Bar" on page 9-5.
Viewing the Recently Updated Pages ReportThe Recently Updated Pages report displays a report of pages recently updated by the current user.
To view the Recently Updated Pages report:
1. Navigate to the Workspace home page.
2. Click the Application Builder icon.
3. Select an application.
The Application home page appears.
4. Click Utilities.
5. Click Recently Updated Pages.
A Search bar displays at the top of the page. See "Using the Search Bar" on page 9-5.
See Also: "Identifying At Risk Password Items" on page 15-9

Viewing Application Utilities and Reports
7-82 Oracle Application Express Application Builder User's Guide
Upgrading an Existing ApplicationUse the Upgrade Application icon on the Utilities page to upgrade an existing application to include new components available in the current release. This feature upgrades the following components:
■ Update Text Field items to Number Field items when there is an IS NUMERIC validation.
■ Update the Value Required item attribute to Yes when there is a NOT NULL validation.
■ Upgrade Date Picker (Classic) to the new Date Picker.
■ Remove %null% in LOV Null Return Value of page items.
■ Upgrade FCKeditor 2 to CKEditor 3.
■ Upgrade SVG Charts to HTML5 Charts.
■ Upgrade Flash Charts to Flash 6 Charts.
■ Upgrade Flash Charts to HTML5 Charts.
■ For interactive reports:
– Enable Group By for interactive reports.
– Enable Save Public Report for interactive reports.
– Enable Subscription for interactive reports.
– Enable Rows Per Page Selector for interactive reports.
■ Numeric, Required, and Date Picker Item updates based upon conditional validations.
A wizard displays all relevant validations per page and enables you to select the ones you want to replace with item settings. Then, select buttons that should not execute validations (such as Cancel). Lastly, you can select any validations that should always execute (for example, checking privileges before deletion).
To upgrade an existing application:
1. Navigate to the Workspace home page.
2. Click the Application Builder icon.
3. Select an application.
The Application home page appears.
4. Click Utilities.
5. Click Upgrade Application.
6. Follow the on-screen instructions.
Using the Database Object Dependencies ReportThe Database Object Dependencies report identifies database objects referenced by the current application. Review this report to determine what objects to move when deploying an application.
To view the Database Object Dependencies report:
1. Navigate to the Workspace home page.
2. Click the Application Builder icon.

Viewing Application Utilities and Reports
About Database Applications 7-83
3. Select an application.
The Application home page appears.
4. Click Utilities.
5. Click Database Object Dependencies.
The Database Object Dependencies page appears.
6. Click Compute Dependencies.
The Database Object Dependencies report appears.
About Application Express ViewsApplication Express Views are data dictionary views that expose the metadata for applications. In Application Express Views, you cannot only see the view, but you can also see the data they contain.
To access the Application Express Views page:
1. Navigate to the Workspace home page.
2. Click the Application Builder icon.
3. Select an application.
The Application home page appears.
4. Click Utilities.
5. Click Application Express Views.
The Application Express Views page appears.
A Search bar displays at the top of the page. Available controls include:
■ Select columns to search - Resembles a magnifying glass. Click this icon to narrow your search. To search all columns, select All Columns.
■ Text area - Enter case insensitive search criteria (wildcard characters are implied) to search for a view by name and then click Go.
■ Go button - Executes a search or applies a filter.
■ View Icons - Displays each view as a large icon. To access a view, click the appropriate icon.
■ View Report - Displays each view as a line in a report. To access a view, click the name.
■ Actions menu - Use the Actions menu to customize the report view. See "About the Actions Menu" on page 9-6.
6. Select a view
To view the data within a view, select columns from the Select Column tab and click the Results button.
On the Results tab, expand the Query region to view the query that was executed. You can copy this query for reuse with SQL Commands or SQL Developer.
Tip: Display of the report may take a moment depending on the size and complexity of your application.

Viewing Application Utilities and Reports
7-84 Oracle Application Express Application Builder User's Guide
About Page Specific UtilitiesThe Page Specific Utilities display on the right side of the Utilities page. Use these utilities to view component reports across pages in an application and by component type (for example, region, button, item, computation, validation, process, dynamic action, or branch).
To access Page Specific Utilities page:
1. Log in to Oracle Application Express.
The Workspace home page appears.

Viewing Application Utilities and Reports
About Database Applications 7-85
2. Click the Application Builder icon.
The Application Builder home page appears.
3. Select an application.
The Application home page appears.
4. Click Utilities.
5. Under Page Specific Utilities, select one of the following:
■ Cross Page Utilities. See "About Cross Page Utilities" on page 7-85.
■ Region Utilities
■ Button Utilities
■ Item Utilities
■ Computations Utilities
■ Process Utilities
■ Dynamic Action Utilities
■ Branch Utilities
About Cross Page UtilitiesThe Cross Page Utilities page provides access to the following tools and reports:
■ Recently Updated Pages. Displays a report of recently updated pages in the current application. See "About Recently Updated Pages" on page 7-85.
■ Grid Edit of all Pages. Edit multiple page attributes across multiple pages in a grid format. See "About Grid Edit of all Pages" on page 7-86.
■ Delete Multiple Pages. See "About Delete Multiple Pages" on page 7-86.
■ Page Attributes. Displays a report of attributes, components, controls, and application logic by page. See "About the Page Attributes" on page 7-86.
■ Page Groups. See "About Page Groups" on page 7-86
■ Page Locks. See "About Page Locks" on page 7-86.
Accessing Cross Page UtilitiesTo access the Cross Page Utilities page:
1. On the Workspace home page, click the Application Builder icon.
2. Select an application.
3. Click Utilities.
4. From Page Specific Utilities, click Cross Page Utilities.
About Recently Updated PagesThe Recent Pages report displays a report of recently accessed pages within the current application. To link to a page, click the page number. To customize the report, use the search bar at the top of the page. See "Using the Search Bar" on page 9-5.
See Also: "Viewing Application Utilities and Reports" on page 7-78

Viewing Application Utilities and Reports
7-86 Oracle Application Express Application Builder User's Guide
About Grid Edit of all PagesUse the Grid Edit of all Pages report to edit the page name, alias, title, page template, and security options. To link to a specific page, click the Edit icon adjacent to the page number. To save your changes, click Apply Changes.
About Delete Multiple PagesUse Delete Multiple Pages to delete multiple pages at once. See "Deleting Multiple Pages" on page 7-48.
About the Page AttributesThe Page Attributes report details attributes, components, controls, and application logic for each page in the current application. To customize the report, use the search bar at the top of the page. See "Using the Search Bar" on page 9-5.
To link to a specific page, click the page number.
About Page GroupsUse Page Groups to better organize the pages within an application. See "Grouping Pages" on page 7-42.
About Page LocksUse Page Locks to prevent conflicts during application development. By locking a page, you prevent other developers from editing it. See "Locking and Unlocking a Page" on page 7-44.
About Cross Application ReportsUse the links on the Cross Application Reports page to view and edit information across multiple applications in the current workspace. You access cross application reports from Application Builder home page.
To access cross application reports:
1. Log in to Oracle Application Express.
The Workspace home page appears.
2. Click the Application Builder icon.
The Application Builder home page appears.
3. From Tasks, click Cross Application Reports.
The Cross Application Reports page is divided into the following sections:
■ Application Attributes
■ Application Comparison Reports
■ Security
■ User Interface
4. Select a report to review.

8
Working with Database Application Pages 8-1
8Working with Database Application Pages
This section provides important information about working with pages within a database application.
Topics:■ About the Page Definition
■ Altering Page Attributes
■ Understanding Page Computations
■ Understanding Validations
■ Understanding Page Processes
■ Working with Branches
■ Working with Shared Components
■ Understanding Application Processes
■ Understanding Application Computations
■ Using the Attribute Dictionary
About the Page DefinitionA Page Definition is the basic building block of a page. You use the Page Definition to view, create, and edit the controls and application logic that define a page. Each page can have buttons and fields (called items), which are grouped into containers called regions. Pages can also have application logic (or processes). You can branch from one page to the next using conditional navigation; perform calculations (called computations); perform validations (such as edit checks); and display reports, calendars, and charts. You view, create, and edit the controls that define a page by accessing the Page Definition.
Topics:■ Accessing the Page Definition
■ About Tree and Component View
■ Editing a Page in Tree View
See Also: "Quick Start" on page 1-1, "Application Builder Concepts" on page 2-1, "About Database Applications" on page 7-1, "Controlling Page Layout" on page 12-1, and "Adding Navigation" on page 11-1

About the Page Definition
8-2 Oracle Application Express Application Builder User's Guide
■ Editing a Page in Component View
■ About Page Rendering
■ About Page Processing
■ About Shared Components
■ Common Elements of the Page Definition
Accessing the Page DefinitionYou can view, create, and edit the controls that define a page through the Page Definition.
To access the Page Definition for an existing page:
1. On the Workspace home page, click the Application Builder icon.
The Application Builder home page appears.
2. Select an application.
The Application home page appears.
3. Select a page.
The Page Definition appears and is divided into the following sections:
■ Page Rendering. Page rendering is the process of generating a page from the database. Use the Page Rendering section to modify controls that impact the rendering of a page, including page attributes, regions, buttons, items, page rendering computations, and page processes. See "About Page Rendering" on page 8-12.
■ Page Processing. Page processing is the process of submitting a page. A page is typically submitted when a user clicks a button. Use the Page Processing section of the Page Definition to specify application logic such as computations, validations, processes, and branches. In general, the Application Express engine runs this logic in the order it appears on the Page Definition. See "About Page Processing" on page 8-13.
■ Shared Components. The Shared Components section lists common components that can be used by one or more pages within an application. See "About Shared Components" on page 8-14.
About Tree and Component ViewA page is the basic building block of an application. Each page has a page number, a name, and typically some text attributes such as a header, title, and footer. You add content to your page by creating page controls (regions, items, and buttons). Page templates and page region templates control the exact look and feel of each page. There are two ways to view a page: Tree view and Component view.
Topics:■ Switching Between Tree and Component View
■ About Tree View
■ About Component View

About the Page Definition
Working with Database Application Pages 8-3
Switching Between Tree and Component ViewTo switch between Tree view and Component view:
1. Navigate to the Page Definition. See "Accessing the Page Definition" on page 8-2.
The Page Definition appears. By default, each page displays components as nodes in a tree.
2. To switch to Component view, click the Switch to Component View icon to the right of the navigation bar.
3. To switch back to Tree view, click the Switch to Tree View icon.
About Tree ViewTree view displays regions, page items, and application logic as nodes in a tree. Each tree groups components based on event sequence or how Oracle Application Express processes them when rendering or processing a page. This organization enables you to better understand when a component is processed.

About the Page Definition
8-4 Oracle Application Express Application Builder User's Guide
Key features of this view include:
■ Context menus. Each tree node features a custom context menu. To access a context menu, right-click.
■ Quick access to attributes pages. To edit attributes, double-click or press ENTER. If available, an attribute page appears.
■ Easy reorder of components. Reorder page items, report columns, processes, validations, branches, or computations by dragging and dropping to another display, processing point, or region.
■ Tooltips. Each tree node features a tooltip which displays basic information about the component, including item type, condition, authorization, and so on.
■ View component names or labels. Choose to view the components on a page using the component name or the label that displays when you run the page. (for example, an item named P7_CUST_FIRST_NAME, but with the label First Name). See "Switching Between Names or Labels" on page 8-8
■ Identification of conditions, authorizations, and build options. If a component has a condition, authorization, or build option, then the tree node label displays in italic.
■ Direct access to default wizards. Each context menu includes actions that link to default wizards. For example, selecting Create Validation for an item displays the Create Validation Wizard.
To learn more, see, "Editing a Page in Tree View" on page 8-5 and "Switching Between Tree and Component View" on page 8-3.
About Component ViewComponent view groups user interface elements and application logic by component type.

About the Page Definition
Working with Database Application Pages 8-5
To edit a component, drill down on the component name or click the icons. To learn more, see "Editing a Page in Component View" on page 8-8 and "Switching Between Tree and Component View" on page 8-3.
Editing a Page in Tree ViewIn Tree view displays regions, page items, and application logic as nodes in a tree. Each tree groups components based on event sequence or how Oracle Application Express processes them when rendering a page. This organization enables you to better understand when a component is processed.
Topics:■ About Tree View
■ Accessing Context Menus
■ Creating New Components
■ Reordering Page Components
■ Switching Between Names or Labels
About Tree ViewIn Tree view, the Page Definition displays each page component as a node in a tree.
See Also: "Switching Between Tree and Component View" on page 8-3 and "Common Elements of the Page Definition" on page 8-16

About the Page Definition
8-6 Oracle Application Express Application Builder User's Guide
Each tree groups components based on event sequence, or how Application Builder processes them when rendering or processing the page.
Moving your cursor over a component displays a tooltip. Tooltips display basic information about the component, including item type, condition, authorization, and so on.
Accessing Context MenusTo edit or add a component, right-click to display a context menu. The context menu changes, based on the component type. The following example includes the options Edit, Expand All, and Collapse All. However other options may also display depending upon the component type (for example, Copy, Edit All, and Delete).

About the Page Definition
Working with Database Application Pages 8-7
Accessing Attribute Pages
To edit a node, you can:
■ Right-click the node and select Edit All or Edit.
■ Double-click the node.
■ Select the node and press ENTER.
Creating New ComponentsYou can create controls or components by right-clicking and selecting Create.
A wizard appears. Follow the online instructions

About the Page Definition
8-8 Oracle Application Express Application Builder User's Guide
Reordering Page ComponentsYou can quickly change the order in which page items, regions, report columns, computations, processes, validations, branches, and dynamic actions display by dragging and dropping to another display, processing point, or region.
Switching Between Names or LabelsYou choose to view the components on a page using the component name or the label that displays when you run the page. (for example, an item named P7_CUST_FIRST_NAME, but with the label First Name).
To change the view:
1. Click the Utilities button.
2. Select Switch To and then one of the following:
■ Show Names
■ Show Labels
To learn more about the Utilities button, see "Common Elements of the Page Definition" on page 8-16
Editing a Page in Component ViewA page is the basic building block of an application. Each page has a page number, a name, and typically some text attributes such as a header, title, and footer. You add content to your page by creating page controls (regions, items, and buttons). Page templates and page region templates control the exact look and feel of each page.
Topics:■ About Component View
■ Using Page Rendering Icons
■ Using Page Processing Icons
■ Using Shared Components Icons
About Component ViewEach Page Definition is divided into three sections: Page Rendering, Page Processing, and Shared Components. Each of these sections is broken into subsections with headings that identify the type of control, component, or application logic.
See Also: "Switching Between Tree and Component View" on page 8-3

About the Page Definition
Working with Database Application Pages 8-9
To edit a component, drill down on the component name or click the icon described in the following sections.
Topics:■ About the Edit All Icon
■ About the Copy or Create Icons
About the Edit All Icon
You can edit the controls, components, or logic within a given subsection by clicking the Edit icon that displays to the right of the subsection title. The Edit All icon resembles a piece of paper with a pencil on top of it.
Clicking the Edit All icon enables you to edit or delete multiple controls, components, or application logic simultaneously or view a history of recent changes.
For example, selecting the Edit All icon under Regions displays a summary report of all currently defined regions on the current page. You can use this summary view to:
■ Edit the multiple attributes at once by making selections from the available fields and select lists.
■ Link to a definition page by clicking the Edit icon.
You can access similar summary views on other pages by selecting a different page from the Page pop up list. To save your edits to any summary view, click Apply Changes.
You can also view the attributes of a specific control or component by selecting its name on the Page Definition. For example, suppose your Page Definition contains a region named Customers. Clicking the region name Customers would display a region definition page for that region.

About the Page Definition
8-10 Oracle Application Express Application Builder User's Guide
About the Copy or Create Icons You can copy or create controls or components by clicking the Copy and Create icons. The Copy icon resembles two small overlapping pages. Click the Copy icon to make a copy of an existing control or component.
The Create icon resembles a plus (+) sign. Click the Create icon to create a control or component.
Using Page Rendering IconsPage rendering is the process of generating a page from the database. See "About Page Rendering" on page 8-12.
In Component view, you can navigate to a specific subsection by clicking the icons beneath the heading. When you select one of these icons, the subsection appears and all other subsections are temporarily hidden. To restore the view, click Show All.
Using Page Processing IconsPage processing is the process of submitting a page. A page is typically submitted when a user clicks a button. Use the Page Processing section of the Page Definition to specify application logic such as computations, validations, processes, and branches. In general, the Application Express engine runs this logic in the order it appears on the Page Definition.
See Also: "About the Edit All Icon" on page 8-9

About the Page Definition
Working with Database Application Pages 8-11
You can quickly navigate to a specific subsection by clicking the icons beneath the heading. When you select one of these icons, the subsection appears and all other subsections are temporarily hidden. To restore the view, click Show All.
Using Shared Components IconsThe Shared Components section of the Page Definition contains common elements that can display or be applied on any page within an application.
You can quickly navigate to a specific subsection by clicking the icons beneath the heading. When you select one of these icons, the subsection appears and all other subsections are temporarily hidden. To restore the view, click Show All.

About the Page Definition
8-12 Oracle Application Express Application Builder User's Guide
About Page RenderingPage rendering is the process of generating a page from the database. Use the Page Rendering section to modify controls that impact the rendering of a page, including page attributes, regions, buttons, items, and page processes.
The sections that follow describe each subsection under Page Rendering.
Topics:■ Page
■ Regions
■ Buttons
■ Items
■ Processes
■ Dynamic Actions
PagePage attributes control specific characteristics of a page such as the page name, display attributes such as the page title and the associated page template, header text, and the selected authorization scheme to name just a few. You access page attributes from the Page Definition.
RegionsA region is an area on a page that serves as a container for content. Each page can have any number of regions. The content of a region is determined by the region source. For example, a region may contain a report based on a SQL query you define, or it may contain static HTML.
You control the appearance of a region through a specific region template. You can use regions to group page controls (such as items or buttons). You can also create simple regions that do not generate additional HTML, or create elaborate regions that frame content within HTML tables or images.
ButtonsAs you design your application, you can use buttons to direct users to a specific page or URL, or to enable users to submit a page. When you submit a page, the Application Express engine posts or processes information. A button can be implemented as an HTML button, an image, or by using a template. Buttons can be placed in predefined region template positions or among items in a form.
See Also: "Working with Shared Components" on page 8-49
See Also: "Altering Page Attributes" on page 8-20
See Also:
■ "Understanding Regions" on page 12-3 for information about creating and editing regions
■ Oracle Database Development Guide for information about developing web applications with PL/SQL
■ Oracle Database PL/SQL Packages and Types Reference for information about htp packages

About the Page Definition
Working with Database Application Pages 8-13
ItemsItems are HTML form elements such as text fields, select lists, and check boxes with an associated session state. Item attributes affect the display and behavior of items on a page. For example, these attributes can impact where a label displays, how large an item is, and whether the item displays next to or below the previous item.
There are two categories of items: page items and application items. Page-level items are placed on a page and have associated user interface properties, such as Display As, Label, and Label Template. Application-level items are not associated with a page and therefore have no user interface properties. An application item can be used as a global variable.
ProcessesProcesses are logic controls used to execute data manipulation language (DML) or PL/SQL. For example, you can use a process to populate session state at the time a page is rendered, to execute some type of logic (for example, using PL/SQL), or to make a call to the rendering engine. Typically a process performs an action. A process may be hand coded PL/SQL, or the invocation of a predefined process.
Dynamic ActionsDynamic actions provide a way to define complex client-side behavior declaratively without the need for JavaScript. You can specify an action that is performed based on a defined set of conditions. You can also specify which elements are affected by the action and when and how they are affected.
About Page ProcessingPage processing is the process of submitting a page. A page is typically submitted when a user clicks a button. Use the Page Processing section of the Page Definition to specify application logic such as computations, validations, processes, and branches. In general, when viewing the Page Definition in Tree View, the Application Express engine runs this logic in the order it appears.
The sections that follow describe each subsection under Page Processing.
Topics:■ Computations
■ Validations
■ Processes
■ Branches
See Also: "Creating Buttons" on page 10-65
See Also: "Understanding Page-Level Items" on page 7-56 and "Understanding Application-Level Items" on page 7-75
See Also: "Understanding Page Processes" on page 8-43 and "Understanding Application Processes" on page 8-55
See Also: "Implementing Dynamic Actions" on page 17-35

About the Page Definition
8-14 Oracle Application Express Application Builder User's Guide
ComputationsComputations are units of logic used to assign session state to items and are executed at the time the page is processed.
ValidationsValidations enable you to create logic controls to verify whether user input is valid. For example, a validation can check whether a date entered into a target completion date field is in the future.
ProcessesProcesses are logic controls used to execute data manipulation language (DML) or PL/SQL. Processes are executed after the page is submitted.
BranchesBranches enable you to create logic controls that determine how the user navigates through the application.
About Shared ComponentsThe Shared Components section of the Page Definition contains common elements that can display or be applied on any page within an application. Note Shared Components only display on the Page Definition after you add them.
The sections that follow describe subsections that may display under Shared Components on the Page Definition.
Topics:■ Tabs
■ Lists of Values
■ Breadcrumbs
■ Lists
■ Theme
■ Templates
■ Security
■ Navigation Bar
See Also: "Understanding Page Computations" on page 8-29
See Also: "Understanding Validations" on page 8-32 and "About the When Button Pressed Attribute" on page 2-29
See Also: "Understanding Page Processes" on page 8-43
See Also: "Working with Branches" on page 8-48 and "About the When Button Pressed Attribute" on page 2-29
See Also: "Working with Shared Components" on page 8-49
See Also: "About the Page Definition" on page 8-1

About the Page Definition
Working with Database Application Pages 8-15
TabsTabs are an effective way to navigate between pages of an application. Application Builder includes two types of tabs: standard tabs and parent tabs.
An application having only one level of tabs uses a standard tab set. A standard tab set is associated with a specific page. You can use standard tabs to link users to other pages within your application. A parent tab set functions as a container to hold a group of standard tabs. Parent tabs give users another level of navigation and context (or sense of place) within the application.
Lists of ValuesA list of values (LOV) is a static or dynamic definition used to display a specific type of page item, such as a radio group, check box, popup list, or select list. LOVs can be static (that is, based on a set of predefined display and return values) or dynamic (based on SQL queries that select values from tables). Once created, an LOV can then be referenced by one or more page items.
You define LOVs at the application level by running the LOV Wizard and adding them to the List of Values repository.
BreadcrumbsA breadcrumb is a hierarchical list of links that is rendered using a template. For example, you can display breadcrumbs as a list of links or as a breadcrumb path.
ListsA list is a collection of links that is rendered using a template. For each list entry, you specify display text, a target URL, and other attributes that control when and how the list entry displays. You control the display of the list and the appearance of all list entries by linking the list to a template.
ThemeA theme is a named collection of templates that defines the application user interface. Each theme contains templates for every type of application component and page control, including individual pages, regions, reports, lists, labels, menus, buttons, and list of values.
TemplatesTemplates control the look and feel of the pages in your application. As you create your application, you specify templates for pages, regions, reports, lists, labels, menus, buttons, and popup lists of values. Groups of templates are organized into named collections called themes.
See Also: "Creating Tabs" on page 11-1
See Also: "Creating Lists of Values at the Application Level" on page 10-73
See Also: "Creating Breadcrumbs" on page 11-20
See Also: "Creating Lists" on page 7
See Also: "Managing Themes" on page 13-1
See Also: "Customizing Templates" on page 13-12

About the Page Definition
8-16 Oracle Application Express Application Builder User's Guide
SecurityYou can provide security for your application by specifying an authorization scheme. Authorization is a broad term for controlling access to resources based on user privileges.
Navigation BarUse a navigation bar to link users to various pages within an application. You can use a navigation bar to enable users to log in, log out, or link to Help text. The location of a navigation bar depends upon the associated page template. A navigation bar icon enables you to display a link from an image or text. When you create a navigation bar icon you can specify an image name, text, display sequence, and target location (a URL or page).
Common Elements of the Page DefinitionA Page Definition is the basic building block of a page. You use the Page Definition to view, create, and edit the controls and application logic that define a page. The sections that follow describe common UI elements of the Page Definition.
Topics:■ About the Developer Action Bar
■ Searching for Page Metadata
■ About the Navigation Bar
■ About the Developer Toolbar
About the Developer Action BarThe Developer Action bar displays in the upper right corner, beneath the Search Application field.
The Developer Action bar contains the following icons: Run Page, Shared Components, Application Utilities, Developer Comment, Bug, or To Do, Page Unlocked/Locked, Export Page, Find icon and Help.
Run Page Icon The Run Page icon resembles a small, gray play button. Click this icon to render viewable HTML of the current page. If no page is selected, clicking this icon runs the first page in the application. When you run a page, the Application Express engine dynamically renders the page based on data stored in the database. See "Running an Application or Page" on page 7-40.
Shared Components Icon The Shared Components icon resembles a small mechanical gear. Click this icon to view a list of shared components and user interface controls
See Also: "Providing Security Through Authorization" on page 15-37
See Also: "Creating a Navigation Bar Entry" on page 11-27
See Also: "Accessing the Page Definition" on page 8-2 and "Editing a Page in Component View" on page 8-8

About the Page Definition
Working with Database Application Pages 8-17
that can display or be applied on every page within an application. See "Working with Shared Components" on page 8-49.
Application Utilities The Application Utilities icon resembles a circle and four small boxes. Click this icon to link to the Utilities page. See "Using Application Builder Utilities" on page 7-78.
Developer Comment, Bug, or To Do icon The Developer Comment, Bug, or To Do icon is the shape of a gray balloon. Click this icon to create a developer comment, bug, or To Do about an application, a specific page, or a group of pages. See "Adding Developer Comments" on page 7-49, "Managing Bugs" on page 4-14, and "Tracking To Dos" on page 4-10.
Page Unlocked/Page Locked Icon The Page Unlocked and Page Locked icon indicates whether a page is available for editing. If a page is unlocked, the icon appears as an open padlock. If the page is locked, the icon appears as a locked padlock. To change the lock status of a page, click this icon. See "Locking and Unlocking a Page" on page 7-44.
Export Page Icon The Export Page icon resembles a downward arrow. Click this icon to export the current page. See "Exporting a Page in an Application" on page 16-17.
Find Icon The Find icon resembles a flashlight. Click this icon to search for items, pages, queries, tables, PL/SQL, images, and cascading style sheets (CSS) within the current application or the schemas associated with the workspace. See "Using the Find Icon" on page 10-84.
Help Click the Help link to view online help for this page. See "About the Oracle Application Express Documentation" on page 1-11.
Searching for Page MetadataThe Search Application field displays above the Developer Action bar.
Use this field to search for metadata within an application. By default, this field is case insensitive and supports regular expression syntax. For a regular search, enter P1_NAME to search for all occurrences of P1_NAME in the application
The following is an advanced regular expression search and finds all occurrence of P1_NAME or P2_NAME:
regexp:(P1_NAME)|(P2_NAME)
The Search Application field also supports a shortcut to quickly view a specific page. Simply enter the application and page number using the format page, application:page or application-page and press ENTER. Consider the following examples:
10570-10570:10

About the Page Definition
8-18 Oracle Application Express Application Builder User's Guide
About the Navigation BarA navigation bar displays at the top of the page beneath the breadcrumb menu. Use this bar to navigate between pages within an application.
Use the Page field to navigate between pages. Enter a page number in the Page field and click Go.
The following buttons display on the right side: Run, Utilities, Create.
About the Run ButtonClick Run to dynamically render the page based on data stored in the database. "Running an Application or Page" on page 7-40.
About the Utilities Button
Click the Utilities button to view the following menu:
■ Check. Links to Advisor. Use this tool to verify the integrity and quality of your Oracle Application Express application. See "Running Advisor to Check Application Integrity" on page 14-1
■ Clean up. Click this link to change the sequence page components.
■ Lock. Locks the current page. See "Locking and Unlocking a Page" on page 7-44.
■ Delete. Deletes the current page. See "Deleting a Page" on page 7-47.
■ History. Displays a report of changes to the current page.
■ Export. Links to Export page. See "Exporting an Application" on page 16-14.
Tip: Some Utilities menu options only display in Tree view.

About the Page Definition
Working with Database Application Pages 8-19
■ Caching. Displays the caching page. See "Managing Cached Regions" on page 12-10.
■ Attribute Dictionary. Links to Manage Attribute Dictionary page. See "Using the Attribute Dictionary" on page 8-62.
■ Cross Page contains links to:
– Recently Updated. Displays a report of recently updated pages in the current application.
– Grid Edit. Displays a report for editing multiple page attributes across multiple pages in a grid format.
– Delete Multiple Pages. See "Deleting Multiple Pages" on page 7-48.
– Page Attributes. Displays a report of attributes, components, controls, and application logic by page.
– Page Groups. See "Grouping Pages" on page 7-42
– Page Locks. See "Locking and Unlocking a Page" on page 7-44.
■ Page Events. Details all currently defined page controls and processes in the order in which the Application Express engine renders the page, invokes logic, and runs processes.
■ Referenced Database Objects. Identifies database objects referenced by the current application. See "Using the Database Object Dependencies Report" on page 7-82.
■ Switch to (Tree view only). Choose whether to view the components on a page using the component name or the label that displays when you run the page. (for example, an item named P7_CUST_FIRST_NAME but with the label First Name). Select either Show Names or Show Labels.
■ Using the Tree View. Displays an explanation about using Tree view. See "About Tree and Component View" on page 8-2 and "Editing a Page in Tree View" on page 8-5.
About the Create ButtonClick Create to add new page or component to the existing page. Available options include:
■ New page. See "About Creating Pages in a Database Application" on page 7-35.
■ Region in this page. See "Understanding Regions" on page 12-3
■ Shared Component. See "Working with Shared Components" on page 8-49.
■ New page as a copy. "Copying a Database Application Page" on page 7-39.
■ Bug. See "Managing Bugs" on page 4-14.
■ To Do. "Tracking To Dos" on page 4-10.
■ Comment. see "Adding Developer Comments" on page 7-49.
About the Developer ToolbarThe Application Express engine dynamically renders and processes pages based on data stored in database tables. To view a rendered version of your application, you run or submit it to the Application Express engine by clicking the Run icon.
See Also: "Running an Application or Page" on page 7-40

Altering Page Attributes
8-20 Oracle Application Express Application Builder User's Guide
When you run a desktop application from within the development environment, the Developer toolbar appears at the bottom of the page. The Developer toolbar offers a quick way to edit the current page, create a page, region, or page control, view session state, or toggle in and out of Debugging mode. You can control whether the Developer toolbar displays by changing the Status attribute on the Edit Definition page.
The Developer toolbar consists of the following links:
■ Home links you to the Workspace home page. See "About the Workspace Home Page" on page 1-9.
■ Application links you to the Application home page. See "About the Application Home Page" on page 6-3.
■ Edit Page accesses the Page Definition for the current running page. See "About the Page Definition" on page 8-1.
■ Create links to a wizard for creating a page, region, page control (item, button, branch, computation, process, or validation), or a shared control (navigation bar icon, tab, list of values, list, or breadcrumb). See "About Database Applications" on page 7-1.
■ Session links you to session state information for the current page. See "Viewing Session State" on page 2-7.
■ Caching links to the Caching page. See "Managing Cached Regions" on page 12-10.
■ View Debug displays the Debug window. See "Accessing Debugging Mode" on page 14-4.
■ Debug toggles the page between Debug and No Debug mode. See "Accessing Debugging Mode" on page 14-4.
■ Show Edit Links toggles between Show Edit Links and Hide Edit Links. Clicking Show Edit Links displays a small orange icon next to each editable object on the page. Each icon is orange and contains a triangle with two rules beneath it. Clicking the link displays another window in which to edit the object.
■ Show Grid displays how regions and page items are positioned on a page if a grid layout is used.
Altering Page AttributesPage attributes control specific characteristics of a page such as the page name, display attributes such as the page title and the associated page template, header text, and the selected authorization scheme. You access page attributes from the Page Definition.
Topics:■ Accessing Page Attributes
■ About Page Attributes
Note: The Developer toolbar does not display on locked packaged applications pages or on jQuery Mobile Smartphone pages.
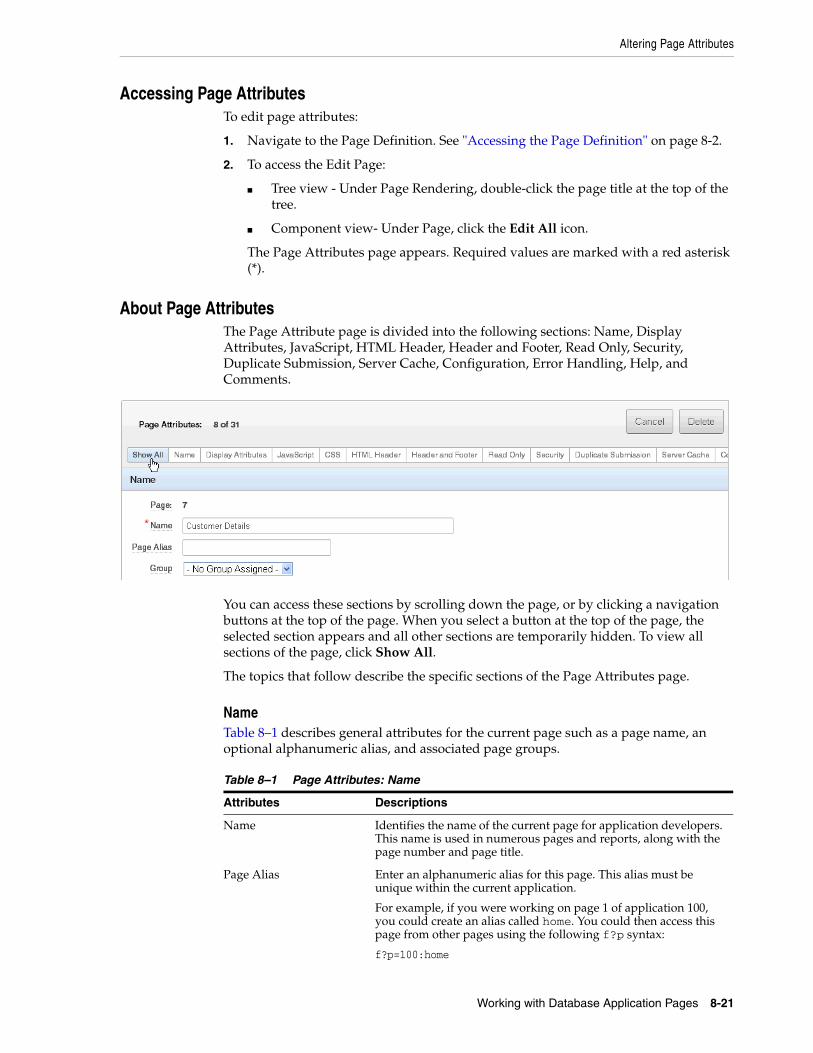
Altering Page Attributes
Working with Database Application Pages 8-21
Accessing Page AttributesTo edit page attributes:
1. Navigate to the Page Definition. See "Accessing the Page Definition" on page 8-2.
2. To access the Edit Page:
■ Tree view - Under Page Rendering, double-click the page title at the top of the tree.
■ Component view- Under Page, click the Edit All icon.
The Page Attributes page appears. Required values are marked with a red asterisk (*).
About Page AttributesThe Page Attribute page is divided into the following sections: Name, Display Attributes, JavaScript, HTML Header, Header and Footer, Read Only, Security, Duplicate Submission, Server Cache, Configuration, Error Handling, Help, and Comments.
You can access these sections by scrolling down the page, or by clicking a navigation buttons at the top of the page. When you select a button at the top of the page, the selected section appears and all other sections are temporarily hidden. To view all sections of the page, click Show All.
The topics that follow describe the specific sections of the Page Attributes page.
NameTable 8–1 describes general attributes for the current page such as a page name, an optional alphanumeric alias, and associated page groups.
Table 8–1 Page Attributes: Name
Attributes Descriptions
Name Identifies the name of the current page for application developers. This name is used in numerous pages and reports, along with the page number and page title.
Page Alias Enter an alphanumeric alias for this page. This alias must be unique within the current application.
For example, if you were working on page 1 of application 100, you could create an alias called home. You could then access this page from other pages using the following f?p syntax:
f?p=100:home

Altering Page Attributes
8-22 Oracle Application Express Application Builder User's Guide
Display AttributesTable 8–2 describes general display attributes for the current page such as the selected page template, standard tab set, title, and cursor focus.
JavaScriptTable 8–3 describes attributes that enable you to include JavaScript on the current page.
Group Identify the page group you would like to associate with this page. Page groups do not affect functionality, but help developers manage the pages within an application.
To remove a page from a group, select No Group Assigned and click Apply Changes.
See Also: "Grouping Pages" on page 7-42
Table 8–2 Page Attributes: Display Attributes
Attributes Descriptions
Page Template Select a page template to control the appearance of this page. Making a selection here overrides the default page template defined within the current theme.
See Also: "Editing a Theme" on page 13-3
Standard Tab Set Select a standard tab set to be used for this page. A standard tab set is associated with a specific page and page number. You can use standard tabs to link users to a specific page.
See Also: "Creating Tabs" on page 11-1
Title Enter a title to display in the title bar of the browser window. The Application Express engine uses the title you specify here in place of the #TITLE# substitution string used in the page template. This title is inserted between the HTML tag <TITLE></TITLE>.
Cursor Focus Specify the cursor focus. Available options include:
■ Select First item on page to have the cursor focus placed in the first field on the page.
■ Select Do not focus cursor if you do not want to include JavaScript. Select this option to prevent conflicts between generated JavaScript and custom JavaScript.
Media Type Enter the Internet Media Type. An Internet Media Type is two-part identifier for file formats on the Internet. A Media Type is composed of at least two parts: a type, a subtype, and one or more optional parameters. This Media Type is used in the Content-Type HTTP header when rendering the page.
The page-level Media type overrides the application-level media type. The default value for this attribute is NULL If both the page-level and application-level values for Media Type are NULL, the Media Type text/html is used.
Table 8–1 (Cont.) Page Attributes: Name
Attributes Descriptions

Altering Page Attributes
Working with Database Application Pages 8-23
Table 8–3 JavaScript Attributes
Attribute Description
File URLs Enter JavaScript file URLs for code to be loaded on this page. Each URL has to be written into a new line. If you provide a minified version of your file you can use the substitution string #MIN# to include .min in your file URL for a regular page view and an empty string if the page is viewed in debug mode. You also have access to the substitution string #APP_VERSION# to include the application's version in the file URL.
JavaScript file URLs you enter here replaces the #PAGE_JAVASCRIPT# substitution string in the page template.
Note: Do not include opening or closing script tags. Just write the URL.
Examples:
■ Standard file reference:
/myjs/main.js
■ Standard file reference which loads the minified file main.min.js for regular page views and main.js in Debug mode:
/myjs/main#MIN#.js
■ Conditional file for Internet Explorer
[if IE]/myjs/ie.js
■ File reference using a query string in the URL referencing the application version, such that when the application is upgraded (and the version is incremented), the browser is instructed to always load the new file and ignore any previously cached files.
/myjs/main.js?version=#APP_VERSION#
Function and Global Variable Declaration
Enter JavaScript code (for example, functions or global variable declarations) for code to be used on this page. If the code is used on multiple pages, consider putting it into an external JavaScript file to avoid duplication.
Code you enter here replaces the #PAGE_JAVASCRIPT# substitution string in the page template.
Note: Do not to include opening or closing script tags. Just include the JavaScript code.
To reference a shortcut, use:
"SHORTCUTNAME"
Execute when Page Loads Enter JavaScript code to execute when the page loads. The code is executed after the JavaScript code generated by Oracle Application Express.
Code you enter here replaces the #GENERATED_JAVASCRIPT# substitution string in the page template.
Note: Do not to add any opening or closing script tags, just the JavaScript code.

Altering Page Attributes
8-24 Oracle Application Express Application Builder User's Guide
CSSTable 8–4 describes attributes that enable you to include Cascading Style Sheet (CSS) files on the current page.
Table 8–4 CSS Attributes
Attribute Description
File URLs Enter Cascading Style Sheet file URLs to be loaded on this page. Each URL has to be written into a new line. If you provide a minified version of your file you can use the substitution string #MIN# to include .min in your file URL for a regular page view and an empty string if the page is viewed in debug mode. You can also use the substitution string #APP_VERSION# to include the application's version in the file URL.
File URLs you enter here replace the #PAGE_CSS# substitution string in the page template.
Note: Do not include opening or closing link tags. Just include the file URL.
Examples:
■ Standard file reference:
/myjs/main.js
■ Standard file reference which loads the minified file main.min.css for regular page views and main.css in debug mode:
/mycss/main#MIN#.css
■ Conditional media query:
[media="only screen and (max-device-width: 480px)"]/mycss/smartphone.css
■ Conditional file for Internet Explorer:
[if IE]/myjs/ie.js
■ File reference using a query string in the URL referencing the application version, such that when the application is upgraded (and the version is incremented), the browser loads the new file and ignores any previously cached files:
/mycss/main.css?version=#APP_VERSION#
Note: Do not include opening or closing script tags. Just write the URL. To learn more, see item Help.

Altering Page Attributes
Working with Database Application Pages 8-25
HTML HeaderTable 8–5 describes attributes for defining the page header and page HTML body text.
Header and FooterTable 8–6 describes attributes for defining the header and footer text.
Read OnlyFor Read Only Condition Type, select a condition type from the list that must be met in order for this page to render page items as a read-only. Depending on the item type, a read-only item is rendered as plain text or as a not enterable field. Not selecting a condition will cause the item to render normally.
A Read Only condition defined at the page-level is evaluated after the processes with a processing point of On Load - After Header have executed. This evaluation order enables a developer to reference a page item set by the Fetch process (or by any other
Inline Enter Cascading Style Sheet code to be used on this page. If the code is used on multiple pages, consider putting it into an external file to avoid duplication and to leverage browser caching of static files.
Code you enter here replaces the #PAGE_CSS# substitution string in the page template.
Note: Do not include opening or closing style tags. Just include the cascading style sheet code.
For example to set the CSS class display_only to bold:
.display_only { font-weight:bold;}
Table 8–5 HTML Header Attributes
Attribute Description
HTML Header Enter text to replace the #HEAD# substitution string in the page template header. The values entered here are inserted after the HTML <HEAD> tag. Use this page attribute to:
■ Code page specific inline cascading style sheet classes
■ Add additional style sheets for a specific page
■ Code page specific meta tags
Page HTML Body Attribute
Enter text to be substituted in for your page template's #ONLOAD# substitution string. To use this feature, your page template must include the #ONLOAD# substitution string.
Table 8–6 Header Text and Footer Text
Attribute Description
Header Text Enter any text or HTML to appear immediately following the page header and before the body content.
Footer Text Enter text or HTML to appear before the page template footer.
Table 8–4 (Cont.) CSS Attributes
Attribute Description
Altering Page Attributes
8-26 Oracle Application Express Application Builder User's Guide
process) and use that in the read only condition to make the page read only based on the data displayed.
SecurityTable 8–7 describes attributes for defining authorization scheme and authentication requirements for the current page.
Tip: If you want some page items (for example a search field) or all page items of a specific region to always render as enterable page items independent of how this condition evaluates, then set the Read Only condition of those regions or page items to Never.
Table 8–7 Page Attributes: Security
Attribute Description
Authorization Scheme Select an authorization scheme to be applied to the page. Authorization schemes are defined at the application-level and can be applied to many elements within the application.
An authorization scheme is evaluated either once for each application session (at session creation), or once for each page view. If the selected authorization scheme evaluates to true, then the page displays and is subject to other defined conditions. If it evaluates to false, then the page does display and an error message displays.
See Also: "Providing Security Through Authorization" on page 15-37
Authentication Specifies whether this page has been defined as public or requires authentication. If a page is identified as public, the page can be viewed before authentication. This attribute only applies to applications requiring authentication. The application's page sentry function can access this page attribute to identify pages that do not require prior authentication to view. The implementation of the authentication scheme's page sentry function determines if this attribute has any effect.
See Also: "Establishing User Identity Through Authentication" on page 15-25
Deep Linking Use this attribute to enable or prevent deep linking to an application page. Options include:
■ Enabled - The URL to a specific page ultimately redirects there, possibly after the user has logged in.
■ Disabled - If the URL does not contain a valid session ID, Application Express starts a new session and redirects to the application’s home page.
■ Application Default - The application-level setting is used.
See Also: "Authentication" on page 7-22

Altering Page Attributes
Working with Database Application Pages 8-27
Duplicate SubmissionUse the Allow duplicate page submissions list to specify whether users may process a page multiple times in a row. Set this attribute to No to prevent duplicate page submissions from being processed multiple times.
Examples of duplicate page submissions include:
■ A user clicks the Submit button multiple times.
Page Access Protection Note: This attribute only displays if Session State Protection has been enabled for the application. See "Understanding Session State Protection" on page 15-13.
Select a Page Access Protection level for the current page:
■ Unrestricted - The page may be requested using an URL with or without session state arguments (Request, Clear Cache, Name/Values).
■ Arguments Must Have Checksum - If Request, Clear Cache, or Name/Value arguments appear in the URL, a checksum must also be provided. The checksum type must be compatible with the most stringent Session State Protection attribute of all the items passed as arguments.
■ No Arguments Allowed - A URL may be used to request the page but no Request, Clear Cache, or Name/Value arguments are allowed.
■ No URL Access - The page may not be accessed using a URL, however the page may be the target of a Branch to Page branch type, which does not do a URL redirect.
Form Auto Complete Setting this attribute to On has no effect on the page. Setting this value to Off generates the following HTML in the FORM tag:
autocomplete="off"
Browser Cache Note: This feature requires a modern browser that support the HTTP header response variable cache-control.
Options include:
■ Application Default - The value at runtime is taken from the application's Browser Cache attribute.
■ Enabled - The browser saves the content of application's pages in its cache, both in memory and on disk. If a user presses the browser’s back button, the page typically loads from the cache, not from the server.
■ Disabled - The browser does not save page content and requests content from the server. Oracle Application Express sends the HTTP header cache-control: no-store which instructs the browser to not cache the page content in memory and on disk. Disabling Browser Cache also prevents subtle back button issues with pages that use partial page refreshes (for example, pages with interactive reports).
From a security perspective and as a best practice, Oracle recommends the browser cache should be disabled. This prevents the browser from storing sensitive data and ensures the browser always request pages if the URL changes. Otherwise, it may even be possible to go back in the browser history after a logout and see cached content of the former session.
Table 8–7 (Cont.) Page Attributes: Security
Attribute Description

Altering Page Attributes
8-28 Oracle Application Express Application Builder User's Guide
■ You create a branch of type Branch to Page, and the user clicks the browser reload button.
In On duplicate page submissions go to this URL, enter a URL. Use this field if you set Allow duplicate page submissions to No. If you select No and a user attempts to submit the same page twice, Oracle Application Express displays an error message and a link to the URL you specify.]
Server CacheTable 8–8 describes attributes to enable caching for the current page.
ConfigurationSelect a build option for this page. You can use build options to enable or disable functionality. Most application attributes have a build option attribute. Do not specify a build option for the current page unless you plan to exclude the page in certain configurations.
Build options have two possible values: INCLUDE and EXCLUDE. If you specify an attribute as being included, then the Application Express engine considers it part of the application definition at runtime. Conversely, if you specify an attribute as being excluded, then the Application Express engine treats it as if it did not exist.
Error HandlingTable 8–9 describes attributes used to control or modify how an application logs errors.
Table 8–8 Cache Attributes
Attribute Description
Cache Page Specify whether to enable page caching by selecting Yes or No. Page caching can improve performance because the page displays from the cache instead of displaying dynamically.
Cache Timeout Specify the amount of time for which a cached page remains valid.
Cache by User Specify if the page should be cached by user. If Yes, the page is cached specifically for each user. If No, the same cached page is used for all users.
Cache Page Condition Specify a condition. If the condition returns false, the page is rendered dynamically and is not to be cached. If the condition returns true, the page is displayed from the cache.
Expression 1 Displays conditionally based on the selected Cache Page Condition.
Enter values in this attribute based on the specific condition type selected.
Expression 2 Displays conditionally based on the selected Cache Page Condition.
Enter values in this attribute based on the specific condition type selected.
See Also: "Managing Cached Regions and Pages" in Oracle Application Express Administration Guide and "Utilizing Region Caching" on page 12-9
See Also: "Using Build Options to Control Configuration" on page 16-33

Understanding Page Computations
Working with Database Application Pages 8-29
In-line Error Notification Text, enter the error text that displays in the #NOTIFICATION_MESSAGE# template substitution string in the event an error occurs on the page.
HelpUse this attribute to enter Help text for the current page. Help text is displayed using a help system that you must develop.
CommentsUse this attribute to record comments about the current page. These comments never display when the application is running.
Understanding Page ComputationsUse page computations to assign a value to an identified item when a page is submitted or displayed. You can also use application-level computations to assign values to items. Most page-level computations populate page items. In contrast, most application-level computations populate application items.
Table 8–9 Page Attributes, Error Handling
Attribute Description
In-line Error Notification Text
Enter the error text that displays in the #NOTIFICATION_MESSAGE# template substitution string in the event an error occurs on the page.
Error Handling Function Enter the name of a PL/SQL error function to modify the existing error message and display location or log the error if one occurs. This function can reference a package function or standalone function in the database. For example:
log_apex_error
When referencing a database PL/SQL package or standalone function, use the #OWNER# substitution string to reference the parsing schema of the current application. For example:
#OWNER#.log_apex_error
You must implement error handling functions using the syntax described in the apex_error package.
function <name of function> ( p_error in apex_error.t_error ) return apex_error.t_error_result
See Also: apex_error in Oracle Application Express API Reference
Note: Error handling specified at the page-level overwrites any error handling function specified at the application-level. See "Editing the Application Definition" on page 7-15.
See Also: "Page Templates" on page 13-27
See Also: "Creating a Help Page" on page 10-102 and "Using Shortcuts" on page 10-77

Understanding Page Computations
8-30 Oracle Application Express Application Builder User's Guide
Topics:■ Creating a Page Computation
■ Understanding Computation Points and Computation Syntax
■ Editing Page Computation Attributes
Creating a Page ComputationA page computation assigns a value to an identified item when a page is displayed or submitted (rendered and processed).You create a page computation by running the Create Page Computation Wizard. For each computation, specify the item for which you are creating the computation and a computation type.
To create a page computation:
1. Navigate to the appropriate Page Definition. See "Accessing the Page Definition" on page 8-2.
2. Access the Create Computation Wizard:
■ Tree view - Under the appropriate page rendering event (such as Before Header, After Header and so on), locate Computations. Right-click and select Create.
■ Component view - Under Computations, click the Create icon.
3. For Item Type, select where the computation executes and click Next. Location options include:
■ Item on This Page
■ Item on Another Page
■ Application Level Item
4. For Item, select the item and computation point:
a. Compute Item - Select the item the computation updates.
b. Sequence - Select the order of evaluation.
c. Computation Point - Select the point at which the computation executes. The computation point On New Instance executes the computation when a new session (or instance) is generated.
d. Computation Type - Select the method of computation you want to create.
e. Click Next.
5. In Computation, enter a computation that corresponds to the selected computation type and click Next.
6. On Condition, you can choose to make the computation conditional. To make a computation conditional, make a selection from the Condition Type list and enter text in the expression fields.
7. Click Create Computation.
Tip: To learn more about execution behavior in the case of a validation error, see "What Happens When a Validation Fails?" on page 8-42
See Also: "Understanding Application Computations" on page 8-59 and "About Cross Page Utilities" on page 7-85

Understanding Page Computations
Working with Database Application Pages 8-31
Understanding Computation Points and Computation SyntaxA good example of using computations can be illustrated by a page containing form fields for entering phone numbers. In this example, the phone number is stored in one database column; however, the data entry form breaks the phone number into three components: area code, prefix, and line number. In this example, the page items are called P10_AREA_CODE, P10_PREFIX, and P10_LINE_NUMBER.
Next, suppose you need to combine the values stored in these items into a single string. You could accomplish this by using an After Submit computation and store the combined values in an item called P10_PHONE_NUMBER.
To create a computation to store the combined values of P10_AREA_CODE, P10_PREFIX, and P10_LINE_NUMBER in new items:
1. Navigate to the appropriate Page Definition. See "Accessing the Page Definition" on page 8-2.
2. Create an item named P10_PHONE_NUMBER to store the combined values of P10_AREA_CODE, P10_PREFIX, and P10_LINE_NUMBER. See "Differences Between Page Items and Application Items" on page 7-56.
3. Access the Create Computation Wizard:
■ Tree view - Under the appropriate event, locate Computations. Right-click and select Create.
■ Component view - Under Computations, click the Create icon.
4. For Item Location, select Item on this Page and click Next.
5. For Computation, select P10_PHONE_NUMBER.
6. For Sequence, select the order of evaluation.
7. For Computation, you can create the following computation types:
a. Static Assignment:
– For Computation Type, select Static Assignment and click Next.
– Enter the following computation:
(&P10_AREA_CODE.) &P10_PREFIX.-&P10_LINE_NUMBER.
– Click Next.
b. PL/SQL Function Body:
– For Computation Type, select PL/SQL Function Body and click Next.
– Enter the following computation:
DECLAREl_return_value VARCHAR2(300) DEFAULT NULL;BEGIN l_return_value :='('||:P10_AREA_CODE||')'||:P10_PREFIX||'-'||:P10_LINE_NUMBER;RETURN l_return_value;END;
– Click Next.
c. SQL Query (return colon separated value):
– For Computation Type, select SQL Query (return colon separated value) and click Next.

Understanding Validations
8-32 Oracle Application Express Application Builder User's Guide
– Enter the following computation:
SELECT '('||:P10_AREA_CODE||')'||:P10_PREFIX||'-'||:P10_LINE_NUMBER FROM DUAL
– Click Next.
d. PLSQL Expression:
– For Computation Type, select PLSQL Expression and click Next.
– Enter the following computation:
'('||:P10_AREA_CODE||')'||:P10_PREFIX||'-'||:P10_LINE_NUMBER
– Click Next.
8. Click Create.
Editing Page Computation AttributesOnce you create a computation, you can edit it on the Edit Page Computation page.
To edit a page computation:
1. Navigate to the appropriate Page Definition. See "Accessing the Page Definition" on page 8-2.
2. Access the Edit Page Computation page:
■ Tree view - Under the appropriate event, locate Computations. Right-click the computation name and select Edit.
■ Component view - Under Computations, select the computation name.
The Edit Page Computation page appears.
3. Edit the appropriate attributes.
4. Click Apply Changes.
Editing the Computation Point and SourceYou control when a computation executes under the Computation Point attributes by specifying a sequence and a computation point. The computation point On New Instance executes the computation when a new session (or instance) is generated.
Under Source, enter an expression or query to compute an item's value. In the event a computation fails, you can optionally define an error message in the Computation Error Message field.
Creating Conditional ComputationsYou can make a computation conditional by making a selection from the Condition Type list and entering text in the expression fields.
Understanding ValidationsA validation is an edit check. Validations specific to a single item are page item validations. Validations that apply to an entire page are page validations. Validations for tabular forms specific to a single column are column level validations. Validations for tabular forms that do not apply to a single column are tabular form row validations.

Understanding Validations
Working with Database Application Pages 8-33
You can define a validation declaratively by selecting a validation method. You enter the actual validation edit check in the Validation Messages field. Be aware that if a validation fails, subsequent page processes or computations do not occur. Also remember that the validation you enter must be consistent with the validation type you selected.
Topics:■ Creating Item and Page Validations
■ Determining When Validations Execute
■ Defining How Validation Error Messages Display
■ Processing Validations Conditionally
■ What Happens When a Validation Fails?
Creating Item and Page ValidationsYou create a validation by running the Create Validation Wizard. This wizard changes slightly depending upon what you are validating. Validations are either specific to a given field (either a single page item or tabular form column validation) or, they are not field specific (either a page or tabular form row validation).
Topics:■ Creating a Validation for a Page Item
■ Creating a Validation for an Entire Page
■ Creating a Validation for a Tabular Form Column
■ Creating a Validation for a Tabular Form Row
Creating a Validation for a Page ItemTo create a validation for a page item:
1. Navigate to the appropriate Page Definition. See "Accessing the Page Definition" on page 8-2.
2. Access the Create Validation Wizard:
■ Tree view - Under Page Processing, right-click Validating and select Create Validation.
■ Component view - Under Page Processing, locate Validations. Click the Create icon.
The Create Validation Wizard appears.
3. For Validation Level, select Page Item and click Next.
4. For Item/Column, select the item to be validated and click Next.
See Also: "About the When Button Pressed Attribute" on page 2-29
See Also: "Validating User Input in Forms" on page 10-19, "About Execute Validations" on page 10-71, and "About Item Types" on page A-1
Note: Text entered for validations may not exceed 3,950 characters.

Understanding Validations
8-34 Oracle Application Express Application Builder User's Guide
5. For Sequence and Name:
a. Sequence - Enter the sequence number for this item.
b. Validation Name - Enter a name for the validation.
c. Error Display Location - Select the display location of the validation error message. Validation error messages can display on an error page or inline with the submitted page. Inline validations can display in the notification area (defined as part of the page template) or within the field label.
d. Click Next.
6. For Validation Type, select a method as described in Table 8–10 and click Next.
Table 8–10 Page Item Validation Methods
Validation Method Descriptions
Not Null Checks if an item's value in session state is null.
For example, you could validate that the user enters a value in a field by creating an item validation and then selecting the validation method Item Not Null.
String Comparison Compares the value of an item to a specific string. When prompted select a validation type.
There are several string comparison validations that compare the value of an item to a literal string. For example, you select the validation type Item in Expression 1 is contained in Expression 2 to validate a user entry in a field against a list of values you provide.
In Expression 1, enter the name of the item you want to validate without a colon. For example:
P1_VALUE
In Expression 2, enter a string of values you want to validate against. For example:
ABC/DEF/GHI
Regular Expression Regular expressions provide a method to describe text patterns. Use a Regular Expression validation to perform data validation. When prompted, enter a regular expression.
For example, you could use the following regular expression validation to verify that a string of entered data always consists of groups of six numbers separated by commas and followed by a comma:
^([[:digit:]]{6},)+$
This regular expression would find the following entries valid:
123456,654321,
123456,
123456,123456,654321,
However, the following would not be valid:
123456,12345
12345

Understanding Validations
Working with Database Application Pages 8-35
7. For Validation:
a. Error Message - Depending upon the validation method, enter the validation or message text that displays if the validation fails.
You can use #LABEL# as placeholder for the label of the associated page item.
b. Always Execute - Determines if validations execute when a page is submitted. Use this attribute with the Execute Validations attribute for buttons or certain page items that submit a page. Option include:
– Yes - The validation always executes independent of validation settings for buttons or items on a page. Note that defined conditions still apply.
– No - The validation only executes if the button or item used to submit the page has the Execute Validations attributes set to Yes.
To learn more, see "Determining When Validations Execute" on page 8-40.
c. Click Next.
SQL Compares to values in the database. Select a validation type:
■ Exists
■ NOT Exists
■ SQL Expression
For example, you can use a SQL validation to verify whether a last name typed into a field exists in the database. In the following Exists SQL validation, the field is named P1_LAST_NAME and the table is named customers.
SELECT 1 FROM customers WHERE last_name = :P1_LAST_NAME
To learn more, see the syntax examples at the bottom of the page.
PL/SQL Useful if you need complex logic. Select a validation type:
■ PL/SQL Expression
■ PL/SQL Error
■ Function Returning Boolean
■ Function Returning Error Text
For example, suppose you need to create a validation for an address form that requires the user to enter a province if the address is not in the United States. You could create the validation as a Function Returning Boolean, using the following PL/SQL:
BEGIN IF :P1_COUNTRY = 'US' AND :P1_PROVINCE IS NULL THEN RETURN FALSE; ELSE RETURN TRUE; END IF;END;
You could also create the same validation implemented as a PL/SQL Expression as follows:
NOT (:P1_COUNTRY='US' AND :P1_PROVINCE IS NULL);
To learn more, see the syntax examples at the bottom of the page.
Table 8–10 (Cont.) Page Item Validation Methods
Validation Method Descriptions

Understanding Validations
8-36 Oracle Application Express Application Builder User's Guide
8. Define conditions that apply to this validation and click Create.
Creating a Validation for an Entire PageTo create a validation for an entire page:
1. Navigate to the appropriate Page Definition. See "Accessing the Page Definition" on page 8-2.
2. To access the Create Validation Wizard:
■ Tree view - Under Page Processing, right-click Validating and select Create Validation.
■ Component view - Under Page Processing, locate Validations. Click the Create icon.
The Create Validation Wizard appears.
3. For Validation Level, select Page and click Next:
4. For Sequence and Name:
a. Sequence - Enter the sequence number for this item.
b. Validation Name - Enter a name for the validation.
c. Error Display Location - Select the display location of the validation error message. Validation error messages can display on an error page or inline with the submitted page. Inline validations can display in the notification area (defined as part of the page template) or within the field label.
d. Click Next.
5. For Validation Type, select a method as described in Table 8–11 and click Next.
6. For Validation:
a. Validation Code - Enter the code corresponding to the validation type selected.
Note: Text entered for validations may not exceed 3,950 characters.
Table 8–11 Page Validation Methods
Validation Method Descriptions
SQL Compares to values in the database. Select a validation type:
■ Exists
■ NOT Exists
■ SQL Expression
To learn more, see the syntax examples at the bottom of the page.
PL/SQL Useful if you need complex logic. Select a validation type:
■ PL/SQL Expression
■ PL/SQL Error
■ Function Returning Boolean
■ Function Returning Error Text
To learn more, see the syntax examples at the bottom of the page.

Understanding Validations
Working with Database Application Pages 8-37
b. Error Message - Depending upon the validation method, enter the validation or message text that displays if the validation fails.
You can use #LABEL# as placeholder for the label of the associated page item.
c. Always Execute - Determines if validations execute when a page is submitted. Use this attribute with the Execute Validations attribute for buttons or certain page items that submit a page. Option include:
– Yes - The validation always executes independent of validation settings for buttons or items on a page. Note that defined conditions still apply.
– No - The validation only executes if the button or item used to submit the page has the Execute Validations attributes set to Yes.
To learn more, see "Determining When Validations Execute" on page 8-40.
d. Click Next.
7. Define conditions that apply to this validation and click Create.
Creating a Validation for a Tabular Form ColumnTo create a validation for a tabular form column:
1. Navigate to the appropriate Page Definition. See "Accessing the Page Definition" on page 8-2.
2. To access the Create Validation Wizard:
■ Tree view - Under Page Processing, right-click Validating and select Create Validation.
■ Component view - Under Page Processing, locate Validations. Click the Create icon.
The Create Validation Wizard appears.
3. For Validation Level:
a. Tabular Form - Select the associated tabular form region for this validation.
b. Identify the validation level - Select Column.
c. Select the column to be validated.
4. For Item/Column:
a. Select the column to be validated.
b. Click Next.
5. For Sequence and Name:
a. Sequence - Enter the sequence number for this item.
b. Validation Name - Enter a name for the validation.
c. Error Display Location - Select the display location of the validation error message. Validation error messages can display on an error page or inline with the submitted page. Inline validations can display in the notification area (defined as part of the page template) or within the field label.
d. Click Next.
Note: Text entered for validations may not exceed 3,950 characters.

Understanding Validations
8-38 Oracle Application Express Application Builder User's Guide
6. For Validation Type, select a method as described in Table 8–12. Follow the on-screen instructions and click Next.
7. For Validation:
a. Error Message - Depending upon the validation method, enter the validation or message text that displays if the validation fails.
You can use #COLUMN_HEADER# as placeholder for the column header of the associated tabular form column.
b. Always Execute - Determines if validations execute when a page is submitted. Use this attribute with the Execute Validations attribute for buttons or certain page items that submit a page. Option include:
– Yes - The validation always executes independent of validation settings for buttons or items on a page. Note that defined conditions still apply.
– No - The validation only executes if the button or item used to submit the page has the Execute Validations attributes set to Yes.
To learn more, see "Determining When Validations Execute" on page 8-40.
c. Click Next.
8. Define conditions that apply to this validation and click Create.
Creating a Validation for a Tabular Form RowTo create a validation for a tabular form row:
Table 8–12 Validation Methods for Tabular Form Column
Validation Method Descriptions
Not Null Checks if the item's value in session state is null.
String Comparison Compares the value of an item to a specific string. When prompted select a validation type.
Regular Expression Regular expressions provide a method to describe text patterns. Use a Regular Expression validation to perform data validation. When prompted, enter a regular expression.
SQL Compares to values in the database. Select a validation type:
■ Exists
■ NOT Exists
■ SQL Expression
To learn more, see the syntax examples at the bottom of the page.
PL/SQL Useful if you need complex logic. Select a validation type:
■ PL/SQL Expression
■ PL/SQL Error
■ Function Returning Boolean
■ Function Returning Error Text
To learn more, see the syntax examples at the bottom of the page.
Note: Text entered for validations may not exceed 3,950 characters.

Understanding Validations
Working with Database Application Pages 8-39
1. Navigate to the appropriate Page Definition. See "Accessing the Page Definition" on page 8-2.
2. Access the Create Validation Wizard:
■ Tree view - Under Page Processing, right-click Validating and select Create Validation.
■ Component view - Under Page Processing, locate Validations. Click the Create icon.
The Create Validation Wizard appears.
3. For Validation Level:
a. Tabular Form - Select the associated tabular form region for this Validation.
b. Identify the validation level - Select Tabular Form Row.
c. Click Next.
4. For Sequence and Name specify the following and click Next.
■ Sequence - Enter the sequence number for this item.
■ Validation Name - Enter a name for the validation.
■ Error Display Location - Select the display location of the validation error message. Validation error messages can display on an error page or inline with the submitted page. Inline validations can display in the notification area (defined as part of the page template) or within the field label.
5. For Validation Type, select a method as described in Table 8–13.
6. For Validation:
a. Validation Code - Enter the code corresponding to the validation type selected.
b. Error Message - Depending upon the validation method, enter the validation or message text that displays if the validation fails.
You can use #COLUMN_HEADER# as placeholder for the column header of the associated tabular form column.
Table 8–13 Validation Methods for Tabular Form Row
Validation Method Descriptions
SQL Compares to values in the database. Select a validation type:
■ Exists
■ NOT Exists
■ SQL Expression
To learn more, see the syntax examples at the bottom of the page.
PL/SQL Useful if you need complex logic. Select a validation type:
■ PL/SQL Expression
■ PL/SQL Error
■ Function Returning Boolean
■ Function Returning Error Text
To learn more, see the syntax examples at the bottom of the page.

Understanding Validations
8-40 Oracle Application Express Application Builder User's Guide
c. Always Execute - Determines if validations execute when a page is submitted. Use this attribute with the Execute Validations attribute for buttons or certain page items that submit a page. Option include:
– Yes - The validation always executes independent of validation settings for buttons or items on a page. Note that defined conditions still apply.
– No - The validation only executes if the button or item used to submit the page has the Execute Validations attributes set to Yes.
To learn more, see "Determining When Validations Execute" on page 8-40.
d. Click Next.
7. Define conditions that apply to this validation and click Create.
Determining When Validations ExecuteWhen creating a validation, the Always Execute attribute determines if validations execute when a page is submitted. Use this attribute with the Execute Validations attribute for buttons or certain page items that submit a page. This attribute has two options:
■ Yes - The validation always executes independent of validation settings for buttons or items on a page.
For example, select Yes if your validation is a security check which determines if the current user is allowed to modify or delete the current record. This ensures the validation executes for any operation and prevents unprivileged users from modifying data.
■ No - The validation only executes if the button or item used to submit the page has the Execute Validations attributes set to Yes.
For example, it is not useful to verify that an item be numeric and display an error message if the user is simply deleting a record. In that example, the validations should only execute when the user clicks the Create or Apply Changes buttons.
To accomplish this behavior:
– For the validation, set Always Execute to No
– For the Create and Apply Changes buttons, set Execute Validations to Yes.
– For the Delete button, set Execute Validations to No to avoid unnecessary validations
Defining How Validation Error Messages DisplayYou can choose to have validation error messages display inline (that is, on the page where the validation is performed) or on a separate error page.
To define how a validation error message displays:
1. Navigate to the appropriate Page Definition. See "Accessing the Page Definition" on page 8-2.
2. Go to the Edit Validations page:
■ Tree view - Under Page Processing, locate Validating and expand the Validations branch. Right-click the validation name and select Edit.
■ Component view - Under Validations, select the appropriate validation.
3. Scroll down to Error Message.

Understanding Validations
Working with Database Application Pages 8-41
4. In Error Message, enter the error message text. See item Help, for more details.
Validation error messages can display on an error page or inline within the existing page.
5. From Error message display, select one of the following:
– Inline with Field and in Notification - Error displays inline within the field label and within a notification area (defined as part of the page template).
– Inline with Field - Error displays inline within the field label.
– Inline in Notification - Error displays inline within a notification area (defined as part of the page template).
– On Error Page - Displays the error on a separate error page. To create a hard error that stops all processing (including validations), you must display the error on an error page.
If you select Inline with Field or Inline with Field and in Notification, you must associate an item with the error message. From the Associated Item list, select an item.
6. Click Apply Changes.
About the Go to Error LinkIf you define an associated item, Oracle Application Express renders a Go to Error link in the Notification display location next to the corresponding error message. When clicked, the user's focus is set to the associated item.
You can alter the Go to Error text to change the default text or to translate it into a language that is not translated by default with Oracle Application Express. In either case, define a text message called APEX.GO_TO_ERROR with the text and language of your choice. Additionally, you can disable this functionality and remove the Go to Error link by setting the text of the APEX.GO_TO_ERROR text message to just a single space. To learn more, see "Translating Messages Used Internally by Oracle Application Express" on page 18-14.
Processing Validations ConditionallyYou can control when and if a validation is performed under Conditions.
To create a condition for an existing validation:
1. Navigate to the appropriate Page Definition. See "Accessing the Page Definition" on page 8-2.
2. Go the Edit Validations page:
■ Tree view - Under Page Processing, locate Validating and expand the Validations branch. Right-click the validation name and select Edit.
■ Component view - Under Validations, select the appropriate validation.
3. Scroll down to Conditions.
Tip: If you select Inline with Field or Inline with Field and in Notification, be aware that the Application Express engine does not execute computations or processes during the re-rendering of the page when the validation error messages appear.
See Also: "Page Templates" on page 13-27

Understanding Validations
8-42 Oracle Application Express Application Builder User's Guide
4. Under Condition, specify the following:
a. When Button Pressed - Select a page button. If a user clicks the button you select, the validation is performed (that is, depending upon to other defined conditions). This validation is performed if the page is submitted by a means other than the clicking the specified button.
If no button is pressed, other conditions are evaluated before performing the validation.
b. Execution Scope - Applicable only to tabular forms. Specify the execution scope:
– For Created and Modified Rows - The validation executes only for created and modified rows in your tabular form.
– All Submitted Rows - The validation executes for every submitted row.
c. Condition Type - Select a condition type.
– Expression Attributes - Depending upon the selected Condition Type, enter values in the Expression attributes.
– Execute Condition - Applicable only to tabular forms. Select either:
For Each Row - Select this option if you refer to tabular form columns in your condition. This option causes the condition to evaluate each row of the tabular form.
Once - Select this option if you do not refer to tabular form specific values.
The validation is rendered or processed if the specified condition is met.
5. Click Apply Changes.
What Happens When a Validation Fails?If a page is submitted and some of the validations fail, Oracle Application Express redisplays the existing page with all inline validation errors. While displaying inline errors, Oracle Application Express does not execute computations, application processes, or page processes (for example, Automated Row Fetch) which are defined to execute during Page Rendering (in other words, all "On Load %" display points). The one exception is if the computations and processes use the condition type Inline Validation Errors Displayed.
The reason for skipping these computations and processes is that any of they could potentially alter the data entered by the user. For example, an Automated Row Fetch process would fetch and overwrite the modified data with the values from the database when the user actually wants to get the entered data in order to fix the validation error.
If a computation is skipped, the following displays in the debug output:
Do not perform computation because inline validation errors found.
If an application or page process is skipped, the following displays in the debug output:
Skip because inline validation errors found.

Understanding Page Processes
Working with Database Application Pages 8-43
Understanding Page ProcessesA page process performs an action at a specified point during the rendering or submission of the page. For example, you can create a page process to execute logic or to make a call to the Application Express engine. A page process is a unit of logic that runs when a specific event occurs, such as loading or submitting a page.
From a functional perspective, there is no difference between page-level and application-level processes. The difference between these two process types is where the process is defined, that is at the page-level or at the application level.
Topics:■ About Creating a Page Process
■ Editing Page Process Attributes
■ Controlling When a Page Process Executes
■ Creating Page Process Success and Error Messages
■ Making a Page Process Conditional
About Creating a Page ProcessYou create a process by running the Create Process Wizard. During the wizard, you define a process name, specify a sequence and the point at which the process executes, and select a process category. You can change nearly all of these attributes on the Edit Page Process page.
Topics:■ Creating a Page Process
■ Creating a Tabular Form Page Process
Creating a Page ProcessTo create a page process:
1. Navigate to the appropriate Page Definition. See "Accessing the Page Definition" on page 8-2.
2. Access the Create Page Process Wizard:
■ Tree view - Under the appropriate page rendering event (such as Before Header, After Header and so on), locate Processes. Right-click and select Create.
■ Component view - Under Processes, click the Create icon.
3. For Process Type, select the category of the process you want to create as described in Table 8–14.
Tip: To learn more about execution behavior in the case of a validation error, see "What Happens When a Validation Fails?" on page 8-42
See Also: "Understanding Application Processes" on page 8-55 and "About Cross Page Utilities" on page 7-85

Understanding Page Processes
8-44 Oracle Application Express Application Builder User's Guide
4. Follow the on-screen instructions.
Table 8–14 Page Process Categories
Process Category Description
PL/SQL Runs the PL/SQL you provide. Use this process type to execute a block of PL/SQL entered directly into the process or to simply call an existing API.
Reset Pagination In Report regions, resets pagination back to the first result set. The Application Express engine keeps track of where the user is within a given result set. This process category returns the user to the beginning result set. In other words, this category resets the counters associated with the report region to return the first part of the result set the next time the result set displays.
Plug-ins Plug-ins allow developers to declaratively extend the built-in types available with Application Express. This option is only available when a plug-in type process exists in this application.
See Also: "Implementing Plug-ins" on page 17-25
Session State Sets the values of existing session state items to null. Select this process type to clear the cache for applications, sessions, or items and to clear existing user preferences.
See Also: "Managing Session State Values" on page 2-13 and "Managing User Preferences" in Oracle Application Express Administration Guide
Data Manipulation Data Manipulation process types are frequently used by wizards to support data manipulation language (DML) actions. Application Builder supports the following declarative data manipulation processes:
■ Select Automatic Row Fetch and Automatic Row Processing (DML) to create an automatic data manipulation language (DML) process.
■ Use Multi Row Update and Multi Row Delete with tabular forms.
■ Use Add Rows to Tabular Form with a tabular form.
Web Services Implements a Web Service as a process on a page. Running the process submits a request to the service provider.
See Also: "Invoking a Web Service as a Process" on page 17-19
Form Pagination Implements pagination through the detail records associated with a master detail form. Most often used in master detail forms (such as in the Master Detail Wizard), this process checks the master table to determine which set of detail records you are in and determines what the next detail record should be.
See Also: "Creating a Master Detail Form" on page 10-10
Send E-Mail Provides a declarative interface for the APEX_MAIL.SEND_MAIL package. The process type support attachments.
Close popup window Applies to processes running within a popup window. Upon execution, this process type closes the current popup window.
Run On Demand Process Creates an application-level process that can only be executed when called from a specific page. When you create this process type at the page-level, you are creating reference to an existing application-level process.
See Also: "About On Demand Application Processes" on page 8-55

Understanding Page Processes
Working with Database Application Pages 8-45
Creating a Tabular Form Page ProcessTo create a tabular form page process:
1. Navigate to the appropriate Page Definition. See "Accessing the Page Definition" on page 8-2.
2. Access the Create Page Process Wizard:
■ Tree view - Under the appropriate page rendering event (such as Before Header, After Header and so on), locate Processes. Right-click and select Create.
■ Component view - Under Processes, click the Create icon.
3. For Process Type:
– Tabular Form - Select the associated tabular form region.
– Select the category of the process you want to create as described in Table 8–15:
4. Follow the on-screen instructions.
Editing Page Process AttributesOnce you create a process, you can control when the process executes and what the process does by editing attributes on the Edit Page Process page.
To edit an existing page process:
1. Navigate to the appropriate Page Definition. See "Accessing the Page Definition" on page 8-2.
Table 8–15 Tabular Form Process Categories
Process Category Description
PL/SQL Runs the PL/SQL you provide. Use this process type to execute a block of PL/SQL entered directly into the process or to simply call an existing API.
Plug-ins Plug-ins allow developers to declaratively extend the built-in types available with Application Express. This option is only available when a plug-in type process exists in this application.
See Also: "Implementing Plug-ins" on page 17-25
Data Manipulation Data Manipulation process types are frequently used by wizards to support data manipulation language (DML) actions. Application Builder supports the following declarative data manipulation processes:
■ Select Automatic Row Fetch and Automatic Row Processing (DML) to create an automatic data manipulation language (DML) process.
■ Use Multi Row Update and Multi Row Delete with tabular forms.
■ Use Add Rows to Tabular Form with a tabular form.
Web Services Implements a Web service as a process on a page. Running the process submits a request to the service provider.
See Also: "Invoking a Web Service as a Process" on page 17-19
Send E-Mail Provides a declarative interface for the APEX_MAIL.SEND_MAIL package. The process type support attachments.

Understanding Page Processes
8-46 Oracle Application Express Application Builder User's Guide
2. Access the Edit Page Process page:
■ Tree view - Under the appropriate page rendering event (such as Before Header, After Header and so on), locate the Processes section. Right-click and select Edit.
■ Component view - Under Processes, click the process name.
The Edit Page Process page appears.
3. Edit the appropriate attributes. For more information, see item Help and the sections that follow.
4. Click Apply Changes.
Controlling When a Page Process ExecutesYou control when a process executes by specifying a sequence number and a process point under Process Point. You can prevent a process from running during subsequent visits to a page by selecting the options under Run Process.
To change the processing point or source:
1. Navigate to the appropriate Page Definition. See "Accessing the Page Definition" on page 8-2.
2. Access the Edit Page Process page:
■ Tree view - Under the appropriate page rendering event (such as Before Header, After Header and so on), locate the Processes section. Right-click and select Edit.
■ Component view - Under Processes, click the process name.
The Edit Page Process page appears.
You control when a process executes by specifying a sequence number and a process point under Process Point.
3. Locate the section, Process Point.
4. In Sequence, enter a number. The sequence determines the order of evaluation.
5. From Process Point, select the point at which the process executes.
6. You can prevent a process from running during subsequent visits to a page by selecting the following options under Run Process:
– Once for each page visit
– Once for each session or when reset
7. Enter the appropriate code for PL/SQL process types.
For PL/SQL anonymous block processes, enter the appropriate code under Process.
For Clear Cache processes, enter the appropriate code under Source.
8. Optionally define an error message. See "Creating Page Process Success and Error Messages" on page 8-47.
9. Click Apply Changes.

Understanding Page Processes
Working with Database Application Pages 8-47
Creating Page Process Success and Error MessagesYou can define both success and error messages that display when a process runs. How an error message displays depends upon the processing point. For processes with a processing point of On Submit - Before Computation and Validations or On Submit - After Computations and Validations, you can specify whether the error message displays inline on the current page (the default) or on a separate page. For all other page processes, error messages display on a separate error page.
To create a page process error or success message:
1. Navigate to the appropriate Page Definition. See "Accessing the Page Definition" on page 8-2.
2. Access the Edit Page Process page:
■ Tree view - Under the appropriate page rendering event (such as Before Header, After Header and so on), locate the Processes section. Right-click and select Edit.
■ Component view - Under Processes, click the process name.
The Edit Page Process page appears.
3. Scroll down to Messages.
4. In Process Success Message, enter a message that displays when the process runs successfully.
5. In Process Error Message, enter the message that displays when an unhandled exception is raised. See item Help for more details of supported substitution strings for both success and error messages.
6. For processes with a processing point of On Submit - Before Computation and Validations or On Submit - After Computations and Validations, you can specify where the error message displays.
From Error message display location, select one of the following:
– Inline in Notification - Error displays inline with the existing page in the "notification" area (defined as part of the page template). This is the default setting for new processes.
– On Error Page - Error displays on a separate error page.
If the page contains a manually created tabular form (using APEX_ITEM calls in the SQL statement), select On Error Page. Otherwise, changes made by the user are discarded when the page is re-rendered. When errors are displayed on a separate error page, the user can use the browser’s Back button to preserve the entered values.
7. Click Apply Changes.
Making a Page Process ConditionalTo create a conditional page process:
1. Navigate to the appropriate Page Definition. See "Accessing the Page Definition" on page 8-2.
2. Access the Edit Page Process page:
See Also: "Page Templates" on page 13-27

Working with Branches
8-48 Oracle Application Express Application Builder User's Guide
■ Tree view - Under the appropriate page rendering event (such as Before Header, After Header and so on), locate the Processes section. Right-click and select Edit.
■ Component view - Under Processes, click the process name.
The Edit Page Process page appears.
3. Scroll down to Conditions.
4. Under Condition, specify the following:
a. When Button Pressed - Select a page button. If a user clicks the button you select, the validation is performed (that is, depending upon to other defined conditions). This validation is performed if the page is submitted by a means other than the clicking the specified button.
If no button is pressed, other conditions are evaluated before performing the validation.
b. Execution Scope - Applicable only to tabular forms. Specify the execution scope:
– For Created and Modified Rows - The validation executes only for created and modified rows in your tabular form.
– All Submitted Rows - The validation executes for every submitted row.
c. Condition Type - Select a condition type.
– Expression Attributes - Depending upon the selected Condition Type, enter values in the Expression attributes.
– Execute Condition - Applicable only to tabular forms. Select either:
For Each Row - Select this option if you refer to tabular form columns in your condition. This option causes the condition to evaluate each row of the tabular form.
Once - Select this option if you do not refer to tabular form specific values.
The validation is rendered or processed if the specified condition is met.
5. Click Apply Changes.
Working with BranchesA branch is an instruction to go to a specific page, procedure, or URL. For example, you can branch from page 1 to page 2 after page 1 is submitted.
You create a branch by running the Create Page Branch Wizard and specifying Branch Point and Branch Type. The Branch Type defines the type of branch you are creating. For more information about Branch Types, see online Help.
Topics:■ Defining a Branch Point and Action
■ Branching Conditionally
See Also: "About the When Button Pressed Attribute" on page 2-29

Working with Shared Components
Working with Database Application Pages 8-49
Defining a Branch Point and ActionWhen you click a standard tab in an application, the Application Express engine sets session state, executes computations, and then links you to the target page. It does not run any processes or explicitly defined branches. In cases where the page is submitted without clicking a tab, the Application Express engine explicitly defines branches to direct users to a subsequent page.
You can control when a branch executes by making a selection from the Branch Point list. Available options include:
■ On Submit: Before Computation - Branching occurs before computations, validations, or processing. Use this option for buttons that should not invoke processing (for example, a Cancel button).
■ On Submit: Before Validation - Branching occurs after computations, but before validations or processing. If a validation fails, page processing stops, a rollback is issued, and the page displays the error. Because of this default behavior, you do not need to create branches to accommodate validations. However, you may want to branch based on the result of a computation (for example, to a previous branch point).
■ On Submit: Before Processing - Branching occurs after computations and validations, but before processing. Use this option to branch based on a validated session state, but before performing any page processing.
■ On Submit: After Processing - Branching occurs after computations, validations, and processing. This option branches to a URL or page after performing computations, validations, and processing. When using this option, remember to sequence your branches if you have multiple branches for a given branch point.
■ On Load: Before Header - Branching occurs before a page is rendered. This option displays another page instead of the current page or redirects the user to another URL or procedure.
Depending upon the Branch Type you select, you can specify the following additional information in the Action attributes:
■ The page number of the page to which you want to branch
■ PL/SQL procedure which ultimately renders a branch target page
■ A URL address
Branching ConditionallyLike other controls, branches can be made conditional. To create a conditional branch, make a selection from the Condition Type list, and enter text in the expression fields to implement the condition type you choose.
Working with Shared ComponentsShared components are common elements that can display or be applied on any page within an application. You can use the tools and wizards on the Shared Components page either at the application-level or on specific pages.
Topics:■ Accessing the Shared Components Page
See Also: "Controlling Navigation Using Branches" on page 11-32

Working with Shared Components
8-50 Oracle Application Express Application Builder User's Guide
■ About the Shared Components Page
■ About Exporting Shared Components
Accessing the Shared Components PageTo access the Shared Components page:
1. Navigate to the Workspace home page.
2. Click the Application Builder icon.
3. Select an application.
4. On the Application home page, click Shared Components.
The Shared Components page appears.
5. To create a shared component, select the appropriate link.
Using the Shared Components IconYou can also access the Shared Components page by clicking the Shared Components icon on the Developer Action bar. The Shared Components icon resembles a small mechanical gear and displays beneath the Search Application field on most pages in Application Builder.
About the Shared Components PageThe following sections describe each link on the Shared Components page.
LogicThe following sections describe the links under Logic.
Application Items Application-level items do not display, but are used as global variables to the application. Commonly, you set the value of a page-level item using an application or page computations. See "Understanding Application-Level Items" on page 7-75.
Application Processes Use application processes to run PL/SQL logic:
■ At specific points for each page in an application
■ As defined by the conditions under which the process is set to execute
■ Upon the creation of a new session
Note that On Demand processes execute only when called from a page-level On Demand process or when called using AJAX from the browser. See "Understanding Application Processes" on page 8-55.
See Also: "About the Developer Action Bar" on page 8-16
See Also: "About the Developer Action Bar" on page 8-16

Working with Shared Components
Working with Database Application Pages 8-51
Application Computations Use application-level computations to assign values to application and page-level items for each page displayed or upon the creation of a new application session. You can also create an application-level computation and execute it conditionally on multiple pages. See "Understanding Application Computations" on page 8-59.
Web Service References Web service references in Application Builder are typically based on the Simple Object Access Protocol (SOAP) or Representational State Transfer (REST) architectures. You can create a reference to a Web service and then incorporate it into an application to process data submitted by a form, or to render output in the form or report. See "Implementing Web Services" on page 17-7.
Build Options Use build options to conditionally display or process specific functionality within an application. You can use build options to control which features of an application are turned on for each application deployment. See "Using Build Options to Control Configuration" on page 16-33.
Data Loading Use Data Load Tables to define tables for use in the Data Loading create page wizard. A Data Load Table is an existing table in your schema that has been selected for use in the data loading process to upload data. See "Importing a Plug-in from the Plug-in Page" on page 17-34.
NavigationThe following sections describe the links under Navigation.
Tabs Tabs are an effective way to navigate users between pages in an application. You can create two types of tabs: standard tabs or parent tabs. A standard tab set is associated with a specific page and page number. A parent tab set functions as a container to hold a group of standard tabs. See "Creating Tabs" on page 11-1.
Lists A list is a shared collection of links. You control the appearance of a list through list templates. Each list element has a display condition that enables you to control when it displays. See "Creating Lists" on page 11-7.
Breadcrumbs Breadcrumbs provide users with hierarchical navigation. A breadcrumb is a hierarchical list of links that display using templates. You can display a breadcrumb as a list of links or as a breadcrumb path. See "Creating Breadcrumbs" on page 11-20.
Navigation Bar Entries Navigation bar entries offer users a simple navigation path for moving between pages in an application. The location of a navigation bar depends upon the associated page template. Navigation bar entries can display as a link from an image or text. A navigation bar entry can be an image, an image with text beneath it, or text. See "Creating a Navigation Bar Entry" on page 11-27.
SecurityThe following sections describe the links under Security.
Authentication Schemes Authentication is the process of establishing each user's identity before they can access your application. Authentication may require a user to enter a user name and password or may involve verification of a user’s identity or use of a secure key. See "Establishing User Identity Through Authentication" on page 15-25.

Working with Shared Components
8-52 Oracle Application Express Application Builder User's Guide
Authorization Schemes Authorization restricts user access to specific controls or components based on predefined user privileges. See "Providing Security Through Authorization" on page 15-37.
Session State Protection Session State Protection is a built-in functionality that prevents hackers from tampering with the URLs within your application. URL tampering can adversely affect program logic, session state contents, and information privacy. See "Understanding Session State Protection" on page 15-13.
Security Attributes Use the Edit Security Attributes page to configure general security attributes for all pages within an application. See "Configuring Security Attributes" on page 7-21.
User InterfaceThe following sections describe the links under User Interface.
User Interface Attributes Use User Interface page to specify user interface options for an application. See "Managing the Application User Interface" on page 7-30.
Themes A theme is a named collection of templates that defines the application user interface. See "Managing Themes" on page 13-1.
Templates Templates control the look and feel of specific constructs within your application, such as pages, regions, items, and menus. See "Customizing Templates" on page 13-12.
Lists of Values A list of values (LOV) is a static or dynamic set of values used to display a popup list of values, select list, check box, or radio group. See "Creating Lists of Values at the Application Level" on page 10-73.
Shortcuts Use shortcuts to avoid repetitive coding of HTML or PL/SQL functions. You can create a shortcut to define a page control such as a button, HTML text, a PL/SQL procedure, or HTML. Once you define a shortcut, it is stored in a central repository so you can reference it from various locations within your application. See "Using Shortcuts" on page 10-77.
Plug-ins Application Builder includes built-in item types, region types, dynamic actions, and processes. Use plug-ins to add new declarative types in to your application. See "Implementing Plug-ins" on page 17-25.
Component Settings Use Component Settings to set application-level values for built-in Oracle Application Express components and installed plug-ins. See "Managing Component Settings" on page 17-56.
User Interface Attributes Use User Interface Attributes to edit the user interface definition associated with an application. See "Managing the Application User Interface" on page 7-30
FilesThe following sections describe the links under Files.
Cascading Style Sheets Application Builder includes themes that contain templates that reference their own cascading style sheets (CSS). Use the Cascading Style Sheets link to upload cascading style sheets to your workspace. See "Using Custom Cascading Style

Working with Shared Components
Working with Database Application Pages 8-53
Sheets" on page 13-47.
Images Use the Images link to upload images to your workspace. See "Managing Images" on page 12-17.
Static Files Use the Static Files link to upload static files to your workspace. See "Managing Static Files" on page 12-20.
GlobalizationThe following sections describe the links under Globalization.
Translate Application You can develop applications in Oracle Application Express that can run concurrently in different languages. A single Oracle database and Oracle Application Express instance can support an application in multiple languages. Translating an application involves multiple steps. See "About Translating an Application and Globalization Support" on page 18-1 and "Understanding the Translation Process" on page 18-6.
Text Messages Text messages are named text strings that can be called from the PL/SQL code you write. This PL/SQL can be anonymous blocks within page processes and page regions, or in packages and procedures. See "Translating Messages" on page 18-12.
Globalization Attributes You can develop applications that can run concurrently in different languages. Click this link to specify globalization options such as the Application Primary Language and Application Language Derived From attributes. See "Configuring Globalization Attributes" on page 7-27 and "About Translating an Application and Globalization Support" on page 18-1.
ReportsThe following sections describe the links under Reports.
Report Queries Use the Report Queries link to view a report of stored queries within the current application. See "About Report Queries" on page 9-65.
Report Layouts Use Report Layouts with a report or shared query to render data in a printer-friendly format, such as Adobe Portable Document Format (PDF), Microsoft Word Rich Text Format (RTF), or Microsoft Excel (XLS) format. See "About Report Layouts" on page 9-67.
About the Application ListThe following sections describe the links under the Application region on the right side of the page.
Edit Definition Links to the Edit Application Definition page. Use this page to edit attributes that determine the application name, application availability, and static substitution strings. You can also use this page to define other attributes such as build options or an application logo and view associated templates and component defaults. See "Editing the Application Definition" on page 7-15.
Edit Comments Use Edit Comments to enter comments specific to the currently selected application. See "Adding Database Application Comments" on page 48.

Working with Shared Components
8-54 Oracle Application Express Application Builder User's Guide
About the Tasks ListThe following describes the links under the Tasks list:
■ Export Application Components link to the Component Export page appears. Use this page to identify the components of an application to be exported either for backup purposes or to load the components on another instance. See "Exporting Application Components" on page 15.
■ Manage Supporting Objects links to the Supporting Objects page. Use this page to create a packaged application. See "How to Create a Custom Packaged Application" on page 5.
■ Developer Comments links to Developer Comments page. See "Adding Developer Comments" on page 7-49.
■ Developer Comments Calendar links to Developer Comments Calendar page. See "Viewing the Developer Comments Calendar" on page 7-53.
About Exporting Shared ComponentsYou can export shared components and page components on the Component Export page. You can also use this wizard to back up a component before editing it or to create an export that functions as a patch to another Oracle Application Express instance.
Topics:■ Exporting Shared Components from the Export Page
■ Exporting Shared Components from the Shared Components Page
Exporting Shared Components from the Export PageTo export shared components from the Export page:
1. Navigate to the Export page:
a. On the Workspace home page, click the Application Builder icon.
b. Select an application.
c. On the Application home page, click Export/Import.
d. On the Export/Import page, click Export and click Next.
2. On the Tasks list, click Component Export.
The Component Export page appears. See "Exporting Application Components" on page 15.
Exporting Shared Components from the Shared Components PageTo export shared components from the Shared Components page:
1. Navigate to the Workspace home page.
2. Click the Application Builder icon.
3. Select an application.
4. On the Application home page, click Shared Components.
The Shared Components page appears.
5. On the Tasks list, click Export Application Components.

Understanding Application Processes
Working with Database Application Pages 8-55
The Component Export page appears. See "Exporting Application Components" on page 15.
Understanding Application ProcessesApplication processes are blocks of PL/SQL logic that are set to run at specific points using processes from multiple pages of an application. By default, application processes execute at the same point for every page in the application. However, you can apply conditions for specific pages to control when the process executes.
Topics:■ About On Demand Application Processes
■ Application Process Example
■ Creating an Application Process
■ Editing Application Process Attributes
■ Creating Application Process Error Messages
■ Viewing the Application Processes History Report
About On Demand Application ProcessesAn On Demand process is special type of application process which has a Process Point of On Demand and executes when called from a page-level On Demand process or from an AJAX call from the browser. On Demand processes are useful when you have PL/SQL logic that you would like to run from different execution points across multiple pages.
On Demand processes should typically be created on a page and not at the application-level. On Demand processes created at the application-level are created with an initial authorization scheme of Must Not Be Public User. This prohibits the processes being invoked from users in authenticated sessions.
Running an On Demand Process from a Page RequestYou can have a page request run an On Demand process by using the following syntax:
f?p=application_id:page_id:session:APPLICATION_PROCESS=process_id
Where:
■ application_id is the application ID or alphanumeric alias
■ page_id is the page number or alphanumeric alias
■ session is the session ID
Tip: To learn more about execution behavior in the case of a validation error, see "What Happens When a Validation Fails?" on page 8-42
See Also: "Understanding Page Processes" on page 8-43
See Also: "About Creating a Page Process" on page 8-43

Understanding Application Processes
8-56 Oracle Application Express Application Builder User's Guide
■ APPLICATION_PROCESS=process_id is the keyword APPLICATION_PROCESS= followed by either the process ID or an alphanumeric name of an application-level process having a Process Point of On Demand
When you use this syntax, the Application Express engine recognizes the request and processes it using the following rules:
■ The page number in the URL can be the current page number or alias. A page number or alias is required in the request only as a syntactic placeholder because no specific page is accessed for this type of request.
■ The process authorization scheme, the application’s authorization scheme, and the process conditions are supported.
■ Session state (that is, item names and values) may be set in the URL, but clear cache options are ignored.
■ Any failures of authentication, authorization, or process conditions do not result in visible error messages or other indicators of such failures and most often result in a blank page being displayed. Note that if you are logged in to Application Builder as a developer, an error messages displays.
■ Specifying the process by name locates the first process with the specified (case-preserved) name.
Application Process ExampleA shopping cart application is a good example of when you might use an application process. For example, to display the contents of a user’s shopping cart with each page view, you create a region on page zero of your application that displays the values of the application-level items TOTAL_CART_ITEMS and TOTAL_PURCHASE_PRICE.
Instead of writing a process for each page to set the values of TOTAL_CART_ITEMS and TOTAL_PURCHASE_PRICE, you could write an application process of type On Load: Before Header to compute these values. Then, the Application Express engine would execute the process on each page as it renders the application. As a result, each page, would display the most current values for TOTAL_CART_ITEMS and TOTAL_PURCHASE_PRICE.
Creating an Application ProcessTo create an application process:
1. Navigate to the Shared Components page:
a. On the Workspace home page, click Application Builder.
b. Select an application.
c. On the Application home page, click Shared Components.
The Shared Components page appears.
2. Under Logic, select Application Processes.
The Application Processes page appears.
3. Click Create.
See Also: "Clearing Session State" on page 2-14
See Also: "Creating a Global Page to Display Components on Every Page" on page 12-2

Understanding Application Processes
Working with Database Application Pages 8-57
4. For Identification:
a. Name - Enter a name for the application process.
b. Sequence - Specify the sequence number for this process. The sequence number determines the order in which the process is evaluated relative to other processes that execute at the same point.
c. Point - Identify the point during the processing of each page in the application that this process would run. Note the option, On Demand, only runs when requested by a page process.
d. Click Next.
5. For Source:
a. Process Text - Enter the text that is to be the source of your process. Processor of type PL/SQL is wrapped with a Begin and End;.
b. Error Message - Enter the error message that displays if the process raises an error. See "Creating Application Process Error Messages" on page 8-58.
c. Click Next.
6. For Conditionality:
a. Condition Type - Select a condition type that must be met in order for this process to execute.
b. Expression 1 and Expression 2 - Use these attributes to conditionally control whether the process executes. Enter values in this attribute based on the specific condition type you select. The process executes if the specified condition is met.
c. Click Create Process.
About the Application Process PageOnce you create an application process, it appears on the Application Processes page. A Search bar displays at the top of the page. Available controls include:
■ Select columns to search - Resembles a magnifying glass. Click this icon to narrow your search. To search all columns, select All Columns.
■ Text area - Enter case insensitive search criteria (wildcard characters are implied) to search for a process by name and then click Go.
■ Go button - Executes a search or applies a filter.
■ View Icons - Displays each process as a large icon. To edit a process, click the appropriate icon.
■ View Report - Displays each process as a line in a report. To edit a process, click the name.
■ Actions menu - Use the Actions menu to customize the report view. See "About the Actions Menu" on page 9-6.
Editing Application Process AttributesTo edit an existing page process:
1. Navigate to the Shared Components page:
a. On the Workspace home page, click Application Builder.

Understanding Application Processes
8-58 Oracle Application Express Application Builder User's Guide
b. Select an application.
c. On the Application home page, click Shared Components.
The Shared Components page appears.
2. Under Logic, select Application Processes.
The Application Processes page appears.
3. Click the process name.
4. Edit the appropriate attributes. For more information, see item Help
5. Click Apply Changes.
Creating Application Process Error MessagesIf a process raises an error, you can define an error messages that displays to the user. How the error message displays depends upon the processing point. For processes with a processing point of On Submit - Before Computation and Validations or On Submit - After Computations and Validations, you can specify whether the error message displays inline on the current page (the default) or on a separate page. For all other application processes, error messages display on a separate error page.
To create an application process error message:
1. Navigate to the Shared Components page:
a. On the Workspace home page, click Application Builder.
b. Select an application.
c. On the Application home page, click Shared Components.
The Shared Components page appears.
2. Under Logic, select Application Processes.
The Application Processes page appears.
3. Click the process name.
4. Scroll down to Source.
5. In Process Error Message, enter the message that displays when an unhandled exception is raised. See item Help for more details and supported substitution strings for both success and error messages.
6. For processes with a processing point of On Submit - Before Computation and Validations or On Submit - After Computations and Validations, you can specify where the error message displays.
From Error message display location, select one of the following:
– Inline in Notification - Error displays inline on the page in the "notification" area (defined as part of the page template). This is the default setting for new processes.
– On Error Page - Error displays on a separate error page.
If the application contains a manually created tabular form (using APEX_ITEM calls in the SQL statement), select On Error Page. Otherwise, changes made by the user are discarded when the page is re-rendered. When errors are displayed on a separate error page, the user can use the browser’s Back button to preserve the entered values.

Understanding Application Computations
Working with Database Application Pages 8-59
7. Click Apply Changes.
Viewing the Application Processes History ReportAfter you create an application process, you can access the Application Processes History reports. This report displays a history of recently changed application processes by date.
To access application processes reports:
1. Navigate to the Workspace home page.
2. Click Application Builder.
3. Select an application.
4. On the Application home page, click Shared Components.
5. Under Logic, select Application Processes.
6. Select the History tab at the top of the page.
7. You can customize the appearance the page using the Search bar at the top of the page. Available controls include:
■ Select columns to search - Resembles a magnifying glass. Click this icon to narrow your search. To search all columns, select All Columns.
■ Text area - Enter case insensitive search criteria (wildcard characters are implied) to search for a process by name and then click Go.
■ Go button - Executes a search or applies a filter.
■ Actions menu - Use the Actions menu to customize the report view. See "About the Actions Menu" on page 9-6.
Understanding Application ComputationsApplication Computations are units of logic that set the value of a single page or application-level item and are run at the same point across multiple pages in an application. Like page-level computation, application computations can be based on static values, item values, PL/SQL, or SQL.
Topics:■ About Application Computations
■ Creating an Application Computation
■ Accessing the Application Computation History Report
About Application ComputationsA common use of an application item is to store the value of the last page viewed in the application. By storing the value in an item, you can add a back button and then redirect the user to the page number captured by the computation. This type of computation works well, for example, when you need to enable users to back out of an error page.
Tip: To learn more about execution behavior in the case of a validation error, see "What Happens When a Validation Fails?" on page 8-42

Understanding Application Computations
8-60 Oracle Application Express Application Builder User's Guide
The following is an example of a computation that stores the last page visited. In this example, the computation:
■ Stores the last application page visited to an item named LAST_PAGE
■ Checks that the value of a CURRENT_PAGE_ITEM is of type PL/SQL Function Body with a Computation body of:
BEGIN :LAST_PAGE := nvl(:CURRENT_PAGE,:APP_PAGE_ID); :CURRENT_PAGE := :APP_PAGE_ID; RETURN :LAST_PAGE;END;
About Application Computations that Execute On New InstanceTypically an application computation runs at the same point across multiple pages in an application. The exception is computations having a Computation Point of On New Instance. This type of computation only runs when a user first accesses your application. This type of computation is useful when you need to only retrieve information once within a user's session (for example, to retrieve a user’s job title).
Creating an Application ComputationTo create an application computation:
1. Navigate to the Shared Components page:
a. On the Workspace home page, click Application Builder.
b. Select an application.
c. On the Application home page, click Shared Components.
The Shared Components page appears.
2. Under Logic, select Application Computations.
3. Click Create.
4. Under Item:
a. Sequence - Specify the sequence for this component. The sequence determines the order of evaluation.
b. Computation Item - Select the item this computation affects.
5. For Computation Point, select a process point at which this computation should be performed. Selecting After Submit causes the computation to be performed only after the page is displayed and then submitted.
6. Under Computation:
a. Computation Type - Select the manner in which this computation is performed.
b. Computation - Enter the computation logic that corresponds to the computation type.
c. Computation Error Message - Enter the error message that displays if the computation fails.
7. For Authorization Scheme (optional), select an authorization scheme which must evaluate to True in order for this computation to execute.

Understanding Application Computations
Working with Database Application Pages 8-61
8. Under Conditions (optional):
a. Condition Type - Select a condition type that must be met in order for this computation to execute.
b. Expression 1 and Expression 2 - Use these attributes to conditionally control whether the computation executes. Enter values in this attribute based on the specific condition type you select. The computation executes if the specified condition is met.
9. For Build Option (optional), select a build option for this component. See "Using Build Options to Control Configuration" on page 16-33.
10. Click Create Computation.
About the Application Computations PageOnce you create an application computation, it appears on the Application Computations page. You control how the page displays by making a selection from the View list. Available options include:
■ Icons (the default) displays each computation as a large icon. To edit a computation, click the appropriate icon.
■ Details displays each application process as a line in a report. To edit a computation process, click the name.
Accessing the Application Computation History ReportOnce you create an application computation, you can view the Application Computation History report.
To access the Application Computation History report:
1. Navigate to the Workspace home page.
2. Click the Application Builder icon.
3. Select an application.
4. When Application Builder appears, click Shared Components.
5. Under Logic, select Application Computations.
6. Select the History tab at the top of the page.
This Application Computation History report displays a history of recently changed application computations by date.
7. You can customize the appearance the page using the Search bar at the top of the page. Available controls include:
■ Select columns to search - Resembles a magnifying glass. Click this icon to narrow your search. To search all columns, select All Columns.
■ Text area - Enter case insensitive search criteria (wildcard characters are implied) and then Go.
■ Go button - Executes a search or applies a filter.
■ View Icons - Displays each computation as a large icon. To edit a computation, click the appropriate icon.
■ View Report - Displays each computation as a line in a report. To edit a computation, click the name.

Using the Attribute Dictionary
8-62 Oracle Application Express Application Builder User's Guide
■ Actions menu - Use the Actions menu to customize the report view. See "About the Actions Menu" on page 9-6.
Using the Attribute DictionaryThe Attribute Dictionary contains a set of attributes about a column that are used in creating forms and reports. The definitions are matched by column name and a particular definition can be shared among several columns by using synonyms.
You can use the Manage Attribute Dictionary page to update values on the current page with those in the Attribute Dictionary or to update the Attribute Dictionary with the values on the current page.
To access the Manage Attribute Dictionary page:
1. On the Workspace home page, click the Application Builder icon.
The Application Builder home page appears.
2. Select an application.
3. Select a page.
The Page Definition appears.
4. Click the Utilities button and then click Attribute Dictionary.
The page is divided into two sections: Page Items and Report Columns.
Use Page Item and Report Column definitions to update the Attribute Dictionary. You can also use the Attribute Dictionary to update Page Items and Report Columns.
Hidden objects (that is, those in hidden regions and button items) are not counted in the number of candidate Items and Report Columns as these are not used in the updates.
5. To update the current page or update the Attribute dictionary, select the appropriate page link.
The Attribute Dictionary appears.
Only Items and Report Columns that have different values for at least one attribute are shown. You choose which objects to insert or update and which attributes to include. The number of Items and Report Columns that can be used might be less than the total because hidden objects, objects in hidden regions, and button items are not included.
Tip: To go to the Attribute Dictionary in SQL Workshop, click Access Attribute Dictionary on the Tasks list. To learn more, see "Managing User Interface Defaults" in Oracle Application Express SQL Workshop Guide.

9
Creating Reports 9-1
9Creating Reports
In Oracle Application Express, a report is the formatted result of a SQL query. You can generate reports in a database application by selecting and running a built-in query, or by defining a report region based on a SQL query.
Topics:■ Understanding the Difference Between Interactive and Classic Reports
■ Creating a Report Using a Wizard
■ Customizing Interactive Reports
■ Editing Interactive Reports as a Developer
■ Editing Classic Reports
■ Printing Report Regions
Understanding the Difference Between Interactive and Classic ReportsWhen creating a database application, you can include two types of reports: an interactive report or a classic report. The main difference between these two report types is that interactive reports enable the user to customize the appearance of the data through searching, filtering, sorting, column selection, highlighting, and other data manipulations.
About Interactive ReportsThe following is an example of an interactive report.
See Also: "Creating Forms" on page 10-1 and "Adding Database Application Components and Controls" on page 1

Understanding the Difference Between Interactive and Classic Reports
9-2 Oracle Application Express Application Builder User's Guide
Interactive reports enable end users to create highly customized reports. Users can alter the report layout by hiding or exposing specific columns and applying filters, highlighting, and sorting. They can also define breaks, aggregations, charts, group bys, and add their own computations. Once customized, the report can be saved as either a private or public report. Each interactive report includes a search bar, Actions menu, Column Heading menu, and Edit icons in the first column of each row. For a complete description of these components, see "Customizing Interactive Reports" on page 9-4.
When using an interactive report you can:
■ Include one interactive report per page
■ Display 100 columns using report columns. You can edit additional columns using Tree view or paginating through Report Column Attributes.
■ 1,000,000 rows per column heading filter (if no custom LOV is specified in the column attributes)
■ Include 999 rows per column heading filter (if no custom LOV is specified in the column attributes)
About Classic ReportsIn contrast, a classic report does not support the ability to create a highly customized report. The following is an example of a classic report built on top of the same data.

Creating a Report Using a Wizard
Creating Reports 9-3
Classic reports support general keyword search capability, the ability to specify the number of rows that display, and basic column sorting.
When using a classic report, you can view 100 columns using report columns. You can edit additional columns using Tree view or paginating through Report Column attributes.
Creating a Report Using a Wizard Application Builder includes many built-in wizards for generating reports.
To create a report using a wizard:
1. On the Workspace home page, click the Application Builder icon.
2. Select the application.
3. Click Create Page and click Next.
4. Select Report and click Next.
5. Select a report type and click Next. Options include:
■ Interactive Report - Creates an interactive report based on a custom SQL SELECT statement you provide. For assistance in writing the SQL query, click the Query Builder button. Interactive Reports are only supported on Desktop pages and you may only define one interactive report per page. End users can customize the report layout and data displayed by selecting options on the Actions menu. See "Customizing Interactive Reports" on page 9-4 and "Editing Interactive Reports as a Developer" on page 9-27.
■ Classic Report - Creates a report based on a custom SQL SELECT statement or a PL/SQL function returning a SQL SELECT statement that you provide. For assistance in writing the SQL query, click the Query Builder button. See "Editing Classic Reports" on page 9-50.
See Also: "Editing Classic Reports" on page 9-50

Customizing Interactive Reports
9-4 Oracle Application Express Application Builder User's Guide
■ Report on Web Service Result - Creates a report based on a Web service result. See "Implementing Web Services" on page 17-7.
■ Wizard Report - Creates a classic report without requiring any SQL knowledge. Select the appropriate schema, table, columns, and result set display.
6. Follow the on-screen instructions. To learn more about a specific field, click the item label.
When Help is available, the cursor changes to an arrow and question mark. See "About Field-Level Help" on page 1-13.
Customizing Interactive ReportsInteractive reports enable end users to customize reports. Users can alter the layout of report data by choosing the columns they are interested in, applying filters, highlighting, and sorting. They can also define breaks, aggregations, charts, group bys, and add their own computations.
Users can also set up a subscription so that an HTML version of the report is emailed to them a designated interval. Users can create multiple variations of a report and save them as named reports, for either public or private viewing.
An interactive report can be customized in three ways: the Search bar, Actions menu and Column Heading menu.
Topics:■ Using the Search Bar
■ Using the Select Columns to Search Icon
■ Using the Column Heading Menu
■ About the Actions Menu
■ Selecting Columns to Display
■ Adding a Filter
■ Specifying Rows Per Page
■ Selecting Column Sort Order
■ Creating a Control Break
■ Adding Highlighting
■ Computing Columns
■ Aggregating a Column
■ Creating a Chart from the Actions Menu
■ Grouping Columns
■ Executing a Flashback Query
■ Saving an Interactive Report
■ Resetting a Report
Tip: To learn more about controlling what options display in an interactive report, see "Editing Interactive Reports as a Developer" on page 9-27

Customizing Interactive Reports
Creating Reports 9-5
■ Downloading a Report
■ Subscribing to Emailed Reports
Using the Search Bar
A search bar displays at the top of every interactive report and may include the following features:
■ Select columns to Search icon - Resembles a magnifying glass. Click this icon to narrow your search to specific columns. To search all columns, select All Columns. See "Using the Select Columns to Search Icon" on page 9-5.
■ Text area - Enter case insensitive search criteria (wildcard characters are implied) and then click Go.
■ Go button - Executes a search.
■ Reports - Displays alternate default and saved private, or public reports. See "Saving an Interactive Report" on page 9-21.
■ View icons - Switches between an icon, report and detail view of the default report (if enabled). May also include Chart and Group By View (if defined).
■ Actions menu - Use the Actions menu to customize an interactive report. See "About the Actions Menu" on page 9-6.
Using the Select Columns to Search IconThe Select columns to search icon displays to the left of the search bar. Clicking this icon displays a listing of all columns in the current report.
To search specific columns:
1. Click the Select columns to search icon and select a column.
See Also: "Customizing the Interactive Report Search Bar" on page 9-33

Customizing Interactive Reports
9-6 Oracle Application Express Application Builder User's Guide
2. Enter keywords in the text area and click Go.
3. To disable the filter, select the Enable/Disable check box.
4. To delete the filter, click the Remove Filter icon.
Using the Column Heading MenuClicking a column heading in an interactive report exposes the Column Heading menu. Positioning the cursor over each icon displays a tooltip that describes its function.
Column Heading menu options include:
■ Sort Ascending icon - Sorts the report by the column in ascending order.
■ Sort Descending icon - Sorts the report by the column in descending order.
■ Hide Column - Hides the column. Not all columns can be hidden. If a column cannot be hidden, no Hide Column icon displays.
■ Control Break - Creates a break group on the column. This pulls the column out of the report as a master record. See "Creating a Control Break" on page 9-12.
■ Column Information - Displays help text about the column, if available.
■ Text Area - Used to enter a case insensitive search criteria. Entering a value reduces the list of values at the bottom of the menu. You can then select a value from the bottom. The selected value is created as a filter using either the equal sign (=) or contains depending on the List of Values Column Filter Type.
■ List of Unique Values - Contains the first 500 unique values that meet your filter criteria. If the column is a date, a list of date ranges is displayed instead.
About the Actions MenuYou can customize an interactive report by selecting options on the Actions menu.
See Also: "Selecting Columns to Display" on page 9-8

Customizing Interactive Reports
Creating Reports 9-7
The Actions menu appears to the right of the Go button on the Search bar. Use this menu to customize an interactive report.
The Actions menu contains the following options:
■ Select Columns specifies which columns to display and in what order. See "Selecting Columns to Display" on page 9-8.
■ Filter focuses the report by adding or modifying the WHERE clause on the query. See "Adding a Filter" on page 9-9.
■ Rows Per Page determines how many rows display in the current report. See "Specifying Rows Per Page" on page 9-11.
■ Format contains the following submenu:
– Sort - Changes the columns to sort on and determines whether to sort in ascending or descending order. See "Selecting Column Sort Order" on page 9-11.
– Control Break - Creates a break group on one or several columns. This pulls the columns out of the interactive report and displays them as a master record. See "Creating a Control Break" on page 9-12.
– Highlight - Defines a filter that highlights the rows that meet the filter criteria. See "Adding Highlighting" on page 9-13.
– Compute - Enables users to add computed columns to a report. See "Computing Columns" on page 9-14.
– Aggregate - Enables users to perform mathematical computations against a column. See "Aggregating a Column" on page 9-16.
– Chart - Displays the report data as a chart. See "Creating a Chart from the Actions Menu" on page 9-17.
– Group By - Enables users to group the result set by one or more columns and perform mathematical computations against columns. See "Grouping
Tip: Not all options described in this section are available on every Actions menu. Developers can customize what options appear. To learn more, see "Customizing the Interactive Report Search Bar" on page 9-33.

Customizing Interactive Reports
9-8 Oracle Application Express Application Builder User's Guide
Columns" on page 9-19.
■ Flashback - Enables you to view the data as it existed at a previous point in time. See "Executing a Flashback Query" on page 9-21.
■ Save Report - Saves the interactive report. Depending upon their user credentials, users can save different types of reports. See "Saving an Interactive Report" on page 9-21.
■ Reset - Resets the report back to the default report settings. See "Resetting a Report" on page 26.
■ Help - Provides descriptions of how to customize interactive reports.
■ Download - Enables users to download a report. Available download formats depend upon your installation and report definition. See "Downloading a Report" on page 9-26.
■ Subscription - Enables users to send themselves an interactive report by email. See "Subscribing to Emailed Reports" on page 9-26
Selecting Columns to DisplayTo customize a report to include specific columns, select Select Columns on the Actions menu.
To use the Select Columns option:
1. Click the Actions menu and select Select Columns.
The Select Columns region appears.
2. Select the columns you want to move. Click the center arrows to move a column from the Display in Report box to the Do Not Display box. To select multiple columns at once, press and hold the CTRL key.
3. To change the order of the columns, click the Top, Up, Down, and Bottom arrows on the right.
4. Click Apply.
A revised report appears.
See Also: "Customizing the Interactive Report Search Bar" on page 9-33
See Also: "Resetting a Report" on page 9-26

Customizing Interactive Reports
Creating Reports 9-9
Adding a FilterYou can create a filter on an interactive report by adding or modifying the WHERE clause on the query. You can create two types of filters:
■ Column - Creates a custom column filter. Select a column, select a standard Oracle operator (=, !=, not in, between), and enter an expression to compare against. Expressions are case sensitive. Use the percent sign (%) as a wildcard. Note that the selected column does not need to be one that currently displays. For example:
STATE_NAME like A%
■ Row - Creates a custom row filter. This filter creates a complex WHERE clauses using column aliases and any Oracle functions or operators. For example:
G = 'VA' or G = 'CT'
Where G is the alias for CUSTOMER_STATE.
Adding a Column FilterTo add a column filter:
1. Click the Actions menu and select Filter.
The Filter region appears.
2. For Filter Type, select Column.
3. In the Filter region, specify a column, an operator, and an expression.
This example narrows the display to Discussion Forum projects.
4. Click Apply.
Notice the filter Project = 'Discussion Forum' has been added to the Report Settings area above the report.

Customizing Interactive Reports
9-10 Oracle Application Express Application Builder User's Guide
5. To revise the filter:
a. Click the filter name (in this example, Project = 'Discussion Forum').
b. Edit your selections and click Apply.
6. To disable the filter, select the Enable/Disable Filter check box.
7. To delete the filter, click Remove Filter.
Adding a Row FilterTo add a row filter:
1. Click the Actions menu and select Filter.
The Filter region appears.
2. For Filter Type, select Row.
3. In the Filter region:
a. Name - Enter a name that describes this filter.
b. Filter Expression - Enter an expression. Select a column and function or operator at the bottom of the region.
4. Click Apply.
The Row Filter narrows the display to projects with a cost of $5000 or more.

Customizing Interactive Reports
Creating Reports 9-11
5. To revise the filter:
a. Click the Row Filter, Cost over $1000.
b. Edit your selections and click Apply.
6. To disable the filter, select the Enable/Disable Filter check box.
7. To delete the filter, click Remove Filter.
Specifying Rows Per PageYou can specify the number of rows that display on a page by selecting Rows Per Page on the Actions menu.
To specify the number of rows that display:
1. Click the Actions menu and select Rows Per Page.
2. From the submenu, select a number.
Selecting Column Sort OrderYou can specify which column sort order (ascending or descending) by selecting Sort on the Format submenu. You can also specify how to handle NULL values. Using the default setting always displays NULL values last or always displays them first.
To sort by column:
1. Click the Actions menu and select Format and then Sort.
The Sort region appears.
2. Select a column, the sort direction (Ascending or Descending), and Null Sorting behavior (Default, Nulls Always Last, or Nulls Always First).

Customizing Interactive Reports
9-12 Oracle Application Express Application Builder User's Guide
3. Click Apply.
Creating a Control BreakYou can create a break group of one or several columns by selecting Control Break from the Actions, Format submenu. Creating a break group pulls the columns out of the interactive report and displays them as a master record.
To create a break group:
1. Click the Actions menu and select Format and then Control Break.
The Control Break region appears.
2. Select a column and then a status (Enable or Disable)
3. Click Apply.
A revised report displays.

Customizing Interactive Reports
Creating Reports 9-13
Note the defined break group, Project, displays in the Report Settings area above the report.
4. To disable the Control Break filter, deselect the Enable/Disable Filter check box. To enable the filer, select the Enable/Disable Filter check box again.
5. To delete the filter, click Remove Breaks.
Adding HighlightingYou can customize the display to highlight specific rows in a report by selecting Highlight on the Actions, Format submenu.
To add highlighting:
1. Click the Actions menu and select Format and then Highlight.
The Highlight region appears.
2. Edit the following information:
a. Name - Enter a name that describes this filter.
b. Sequence - Enter a numeric value to identify the sequence in which highlighting rules are evaluated.
c. Enabled - Select Yes.

Customizing Interactive Reports
9-14 Oracle Application Express Application Builder User's Guide
d. Highlight Type - Select Cell or Row.
e. Background Color - Select a new color for the background of the highlighted area.
f. Text Color - Select a new color for the text in the highlighted area.
g. Highlight Condition - Select a column, an operator, and expression.
3. Click Apply.
Note the highlight On-Hold Projects appears in the Report Settings area above the report.
4. To revise the highlight, click the highlight name and make the following edits:
a. Background Color - Select yellow.
b. Text Color - Select green.
c. Click Apply.
5. To disable the highlight, select the Enable/Disable check box.
6. To delete the highlight, click Remove Highlight.
Computing ColumnsYou can add computations to columns by selecting Compute from the Actions, Format submenu. These computations can be mathematical computations (for example, NBR_HOURS/24) or standard Oracle functions applied to existing columns.
To create a computation:

Customizing Interactive Reports
Creating Reports 9-15
1. Click the Actions menu and select Format and then Compute.
The Compute region appears.
2. In the Compute region:
a. Computation - Select New Computation.
b. Column Heading - Enter the name of the new column to be created.
c. Format Mask - Select an Oracle format mask to be applied to the new column. (for example, $5,234.10).
Next, create the computation.
d. Create the computation:
– Columns - Select a column or alias.
– Keypad - Select a shortcut for commonly used keys.
– Functions - Select the appropriate function.
In the following example, a new column compares the actual cost to the budgeted amount, using the formula H - I, where H is the cost and I is the budgeted amount.
3. Click Apply.
The revised report appears.

Customizing Interactive Reports
9-16 Oracle Application Express Application Builder User's Guide
Deleting a ComputationTo delete a computation:
1. Click the Actions menu and select Format and then Compute.
The Compute region appears.
2. From Computation, select computation name.
3. Click Delete.
Aggregating a Column You can define an aggregation against a column by selecting Aggregate from the Actions, Format menu. Aggregates are displayed after each control break and at the end of the report within the column for which they are defined.
To aggregate columns:
1. Click the Actions menu and select Format and then Aggregate.
The Aggregate region appears.
2. In the Aggregate region:
a. Aggregation - Select New Aggregation.
b. Function - Select one of the following: Sum; Average, Count, Count Distinct, Minimum, Maximum, or Median.
c. Column - Select a column.
This example creates a sum of the Cost column.
3. Click Apply.
The computation appears at the bottom of the report.

Customizing Interactive Reports
Creating Reports 9-17
In this example, the aggregate shows the sum of all amounts in the Cost column.
Removing an AggregateTo remove aggregate columns:
1. Click the Actions menu and select Format and then Aggregate.
The Aggregate region appears.
2. From Aggregation, select a previously defined aggregation.
3. Click Delete.
Creating a Chart from the Actions MenuTo create a chart, select Chart on the Actions, Format menu. You can create one chart for each interactive report. Once defined, you can switch between the chart and report views using links on the Search bar.
To create a chart:
1. Click the Actions menu and select Format and then Chart.
The Chart region appears.
2. In the Chart region, specify the appropriate options.
The following attributes are for bar charts:
a. Chart Type - Select the type of chart you want to create (horizontal bar, vertical bar, pie, or line.).
b. Label - Select the column to be used as the label.
c. Axis for Title for Label - Enter the title to display on the axis associated with the column selected for Label (not available for pie chart).

Customizing Interactive Reports
9-18 Oracle Application Express Application Builder User's Guide
d. Value - Select the column to be used as the Value. If your function is a COUNT, a Value does not need to be selected.
e. Axis Title for Value - Enter the title to display on the axis associated with the column selected for Value (not available for pie chart).
f. Function - (Optional) Select a function to be performed on the column selected for Value.
g. Sort - Select a sorting method.
3. Click Apply.
The chart appears.
Note the Search bar now contains two icons: View Report and View Chart.
4. Click these icons to toggle between chart and report views.
Editing a ChartTo edit a chart:
1. While viewing a report:
a. Click the Actions menu and select Format and then Chart.
The Chart region appears.
b. Edit your selections and click Apply.
2. While viewing the chart:
a. Click Edit Chart.
b. Edit your selections and click Apply.
Deleting a ChartTo delete a chart:
1. While viewing a report:

Customizing Interactive Reports
Creating Reports 9-19
a. Click the Actions menu and select Format and then Chart.
The Chart region appears.
b. Edit your selections and click Apply.
2. While view the chart:
a. Click Edit Chart.
b. Edit your selections and click Apply.
Grouping ColumnsGroup By enables users to group the result set by one or more columns and perform mathematical computations against the columns. Once users define the group by, they can switch between the group by and report views using the View Icon on the Search bar.
Topics:■ Creating a Group By
■ Editing a Group By
■ Deleting a Group By
■ Selecting a Group By Sort Order
Creating a Group ByTo create a Group By:
1. Click the Actions menu and select Format and then Group By.
The Group By region appears.
2. From Group by Column, select up to three columns to display.
3. To include a computation, select the function, column, label, and format mask.
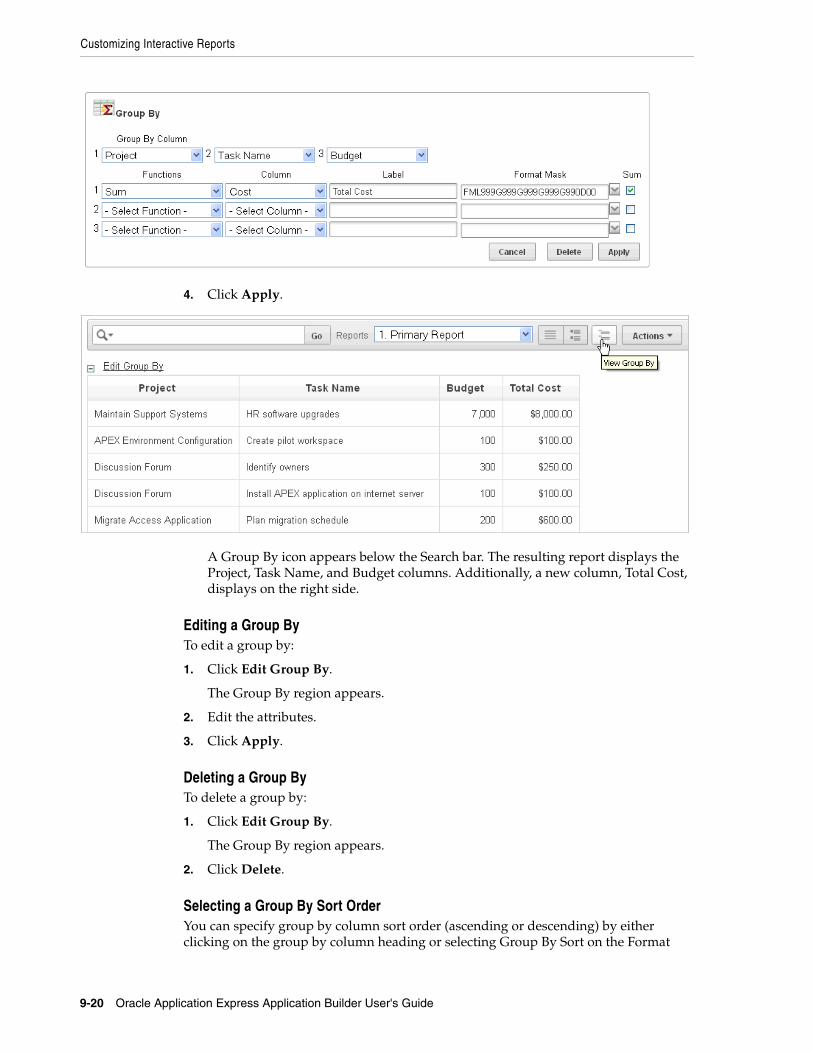
Customizing Interactive Reports
9-20 Oracle Application Express Application Builder User's Guide
4. Click Apply.
A Group By icon appears below the Search bar. The resulting report displays the Project, Task Name, and Budget columns. Additionally, a new column, Total Cost, displays on the right side.
Editing a Group ByTo edit a group by:
1. Click Edit Group By.
The Group By region appears.
2. Edit the attributes.
3. Click Apply.
Deleting a Group ByTo delete a group by:
1. Click Edit Group By.
The Group By region appears.
2. Click Delete.
Selecting a Group By Sort OrderYou can specify group by column sort order (ascending or descending) by either clicking on the group by column heading or selecting Group By Sort on the Format

Customizing Interactive Reports
Creating Reports 9-21
submenu. You can also specify how to handle NULL values. Using the default setting always displays NULL values last or always displays them first.
To sort a group by column:
1. Access a Group By view. See "Creating a Group By" on page 9-19.
2. Click the Actions menu and select Format and then Group By Sort.
The Group By Sort region appears.
3. Select a column, the sort direction (Ascending or Descending), and Null Sorting behavior (Default, Nulls Always Last, or Nulls Always First).
4. Click Apply.
Executing a Flashback QueryYou can execute a flashback query by selecting Flashback from the Actions menu. A flashback query enables you to view the data as it existed at a previous point in time. The default amount of time that you can flashback is 3 hours (or 180 minutes) but the actual amount differs for each database.
To execute a flashback query:
1. Click the Actions menu and select Flashback.
2. In the Flashback region, enter the number of minutes.
3. Click Apply.
Saving an Interactive ReportAll users can save a private or public interactive report. However, only the user who creates a private report can view, save, rename, or delete it. Developers have additional save capabilities in that they can save the report that initially displays, called the Primary Default, or create an Alternative Default report.
Topics:■ Save Options by User Type
■ Configuration Dependencies
■ Saving a Public or Private Interactive Report
■ Saving a Default Interactive Report
Tip: The Group By Sort menu is only visible when you are viewing Group By view.

Customizing Interactive Reports
9-22 Oracle Application Express Application Builder User's Guide
■ Renaming a Public or Private Interactive Report
■ Deleting a Public or Private Interactive Report
Save Options by User TypeAn end user can save an interactive report in two ways:
■ Public Report (End user and developer). This report is viewable by all users. However, only the user who creates a public report can save, rename, or delete it. Although all users can view a public report, they can only save it under a new report name.
■ Private Report (End user and developer). Only the user who creates the private report can view, save, rename, or delete it.
A developer can additionally save an interactive report in the following ways:
■ Primary Default (Developer only). The Primary Default is the report that initially displays. Primary Default reports cannot be renamed or deleted.
■ Alternative Report (Developer only). Enables developers to create multiple report layouts. Only developers can save, rename, or delete an Alternative Report.
The following shows the Reports list on the Search bar of an interactive report.
This example shows two reports:
■ Default - Primary Report. This is the initial report created by the application developer. Default, Primary reports cannot be renamed or deleted.
■ Private - 1. Control. This is a Private report. Only the user who creates a private report can view, save, rename, or delete it.
Configuration DependenciesThe Save Report option on the Actions only displays if the application developer:
■ Defines an authentication scheme for the current application. See "Establishing User Identity Through Authentication" on page 15-25.
■ Selects Save Report or Save Public Report under Search Bar on the Report. See "Customizing the Interactive Report Search Bar" on page 9-33.
See Also: "Managing Saved Reports as a Developer" on page 9-49
See Also: "Managing Saved Reports as a Developer" on page 9-49

Customizing Interactive Reports
Creating Reports 9-23
Also note that the Reports select list on the Search Bar only displays if the application developer selects Reports Select List under Search Bar on the Report Attributes page. See "Customizing the Interactive Report Search Bar" on page 9-33.
Note that many of these options are selected by default.
Saving a Public or Private Interactive ReportEnd users can save an interactive report and classify it as being either public or private. Public reports can be viewed by all users. Private reports can only be viewed by the user who saves the report.
To save a public or private interactive report:
1. Go to the page containing the interactive report you want to save.
2. Customize the report (for example, hide columns, add filters, and so on). See "About the Actions Menu" on page 9-6.
3. Click the Actions menu and select Save Report.
The Save Report region appears.
4. For end users, the following Save Report Region appears.
In Save Report:
a. Name - Enter a name for the report.
b. Public- Select this check box to make the report viewable to all users. Deselect this check box to make the report private.
c. Description - Enter an optional description.
d. Click Apply.
5. For developers, the following Save Report Region appears.
Tip: To save a public report, the developer must select Save Public Report must be selected under Include in Actions Menu on the Report Attributes page. Developers can also apply authorization scheme to enable or disable Save Public Report. See "Customizing the Interactive Report Search Bar" on page 9-33.

Customizing Interactive Reports
9-24 Oracle Application Express Application Builder User's Guide
In Save Report:
a. Save - Select As Named Report.
b. Name - Enter a name for the report.
c. Public- Select this check box to make the report viewable to all users. Deselect this check box to make the report private.
d. Description - Enter an optional description.
e. Click Apply.
Saving a Default Interactive Report Developers can save two types of default interactive report: primary and alternative. Both reports display on the Report list on the search bar. However, primary default reports cannot be renamed or deleted.
To save a default interactive report:
1. Run the report as a developer.
2. Customize the report (for example, hide columns, add filters, and so on). See "About the Actions Menu" on page 9-6.
3. Click the Actions menu and select Save Report.
The Save Report region appears.
4. For Save, select As Default Report Settings.
Another region appears.

Customizing Interactive Reports
Creating Reports 9-25
5. For Default Report Type, select either:
■ Primary - This report displays as the primary report when the page runs.
■ Alternative - This report displays as an alternative option on the Reports list on the Search bar. If you select Alternative, enter a name.
6. Click Apply.
Renaming a Public or Private Interactive ReportTo rename a public or private interactive report:
1. Run the report as a developer.
2. Select public or private interactive report to rename.
3. Click the Rename Report link.
4. Edit the attributes (for example, enter a new name).
5. Click Apply.
Deleting a Public or Private Interactive ReportTo delete a public or private interactive report:
1. Run the report as a developer.
2. Click the Delete Report icon next to the report name link.
3. Click Apply.
About Exporting Interactive ReportsWhen you export an application, the Primary Default, Alternative Default, public reports are included by default. You can also choose to include personal reports during the export process by selecting Yes for Private Interactive Reports. See "Exporting an Application" on page 16-14.

Customizing Interactive Reports
9-26 Oracle Application Express Application Builder User's Guide
Resetting a ReportYou can reset a report back to the default settings by selecting Reset from the Actions menu. Resetting a report removes any customizations you have made.
To reset a report:
1. Click the Actions menu and select Reset.
2. Click Apply.
Downloading a ReportYou can download an interactive report by selecting Download from the Actions menu. Available download formats depend upon your installation and report definition. Supported formats include comma-delimited file (CSV) format, HTML, Email, Microsoft Excel (XLS) format, Adobe Portable Document Format (PDF), and Microsoft Word Rich Text Format (RTF).
To download a report:
1. Click the Actions menu and select Download.
2. Select a report download format and follow the provided instructions.
Subscribing to Emailed ReportsEnd users can receive updated versions of a report by subscribing to it. To subscribe to a report, click Subscription on the Actions menu. Emails sent from an interactive report contain a system generated email signature that cannot be overwritten that identifies who originated the email.
To utilize a subscription:
■ An Oracle Application Express administrator must configure email at the Instance level. See "Configuring Mail" in Oracle Application Express Administration Guide.
■ The application developer must enable the Subscription check box on the Interactive Report Attributes page. See "Customizing the Interactive Report Search Bar" on page 9-33
To receive updated report results by email:
1. Click the Actions menu and select Subscription.
The Add Subscription region appears.
2. Under Add Subscription:
a. Email Address - Enter the email addresses to receive the report. To include multiple email addresses, separate each email address with a comma.
b. Subject - Enter text to display in the email subject line.
c. Frequency - Select the interval at which the report is sent.
d. Starting From - Select a start date and time.
e. Ending - Select an end date and time. Select a day, week, month, or year.
Tip: The ability to download an interactive report is configurable by your application developer. To learn more about configuring download options, see "Configuring Download Options on the Actions Menu" on page 9-36.

Editing Interactive Reports as a Developer
Creating Reports 9-27
f. Click Apply.
Editing Interactive Reports as a DeveloperBy default, an interactive report includes a Search Bar which contains a search icon, text area, Go button, and Actions menu. As described in "Customizing Interactive Reports" on page 9-4, users can use these controls to alter the layout of report data by selecting columns, applying filters, highlighting, and sorting. This section describes how developers can customize an interactive report by editing report attributes.
Topics:■ Accessing the Interactive Report Attributes Page
■ Editing Interactive Report Column Attributes
■ Creating Column Groups
■ Controlling Interactive Report Pagination
■ Managing Interactive Report Column Sorting
■ Customizing the Interactive Report Search Bar
■ Configuring Download Options on the Actions Menu
■ Understanding Link Columns
■ Creating a Column Link in an Interactive Report
■ Displaying Interactive Reports Conditionally
■ Defining a Column as a List of Values in an Interactive Report
■ Formatting Columns in an Interactive Values Report
■ Enabling Icon View
■ Enabling Detail View
■ Configuring Advanced Attributes for Interactive Reports
■ Linking to Interactive Reports
■ Linking to Shared Interactive Reports
■ Managing Saved Reports as a Developer
■ Viewing Saved Report Activity
Note: Emails sent from a subscription include a system generated email signature indicating who created the subscription. This signature cannot be removed.
Tip: "Managing Interactive Report Subscriptions" in Oracle Application Express Administration Guide
Tip: To learn more about using interactive reports as a user, see "Customizing Interactive Reports" on page 9-4
See Also: "APEX_IR" in Oracle Application Express API Reference

Editing Interactive Reports as a Developer
9-28 Oracle Application Express Application Builder User's Guide
Accessing the Interactive Report Attributes PageYou customize an interactive report by editing attributes on the Interactive Report Attributes page.
To access the Report Attributes page:
1. On the Workspace home page, click the Application Builder icon.
2. Select the application.
3. Select the page containing the interactive report you want to edit.
The Page Definition appears.
4. To access the Interactive Report Attributes page:
■ Tree view - Right-click the Region name and select Edit Report Attributes.
■ Component view - Under Regions, click the Interactive Report link next to the name of the report region you want to edit.
5. The Report Attributes page appears and is divided into the following sections:
See Also: "Switching Between Tree and Component View" on page 8-3

Editing Interactive Reports as a Developer
Creating Reports 9-29
■ Column Attributes control the report layout. See "Editing Interactive Report Column Attributes" on page 9-30.
■ Column Groups attributes enable you to group columns on the single row view. See "Creating Column Groups" on page 9-31.
■ Pagination attributes control report pagination. See "Controlling Interactive Report Pagination" on page 9-32.
■ Sorting attributes enable you to define images and image attributes for images that display in report headings to sort values. See "Managing Interactive Report Column Sorting" on page 9-33.
■ Search Bar contain attributes that enable you to define the search bar within an interactive report. See "Customizing the Interactive Report Search Bar" on page 9-33.
■ Download enables you to add a download option to the Actions menu and export the report as CSV, HTML, Email, XLS, PDF, or RTF file. See "Configuring Download Options on the Actions Menu" on page 9-36.
■ Link Column attributes enable you to add a link to a column. See "Understanding Link Columns" on page 9-38 and "Creating a Column Link in an Interactive Report" on page 9-40.
■ Advanced Attributes enable you to define the Interactive Report region alias, specify an item whose value stores the saved report id, and define items to set into session state. See "Configuring Advanced Attributes for Interactive Reports" on page 9-45.
■ Icon View attributes enable you to add a View Icons icon to the Search bar. See "Enabling Icon View" on page 9-43.
■ Detail View attributes enable you to add a View Details icon to the Search bar. See "Enabling Detail View" on page 9-45.
■ Description lists a textual description of the current report.
6. To learn more about a specific attribute, click the item label.
When help is available, the cursor changes to an arrow and question mark when you pass the cursor over an item. See "About Field-Level Help" on page 1-13.
About Navigation AlternativesThe Report Attribute page is divided into these sections: Column Attributes, Groups, Pagination, Sorting, Search Bar, Download, Link Column, Icon View, Detail View, Advanced, and Description.
You can access these sections by scrolling down the page, or by clicking a navigation button at the top of the page.
See Also: "Creating a Column Link in a Classic Report" on page 9-59 and "Defining an Updatable Column in a Classic Report" on page 9-60, and "Defining a Column as a List of Values in a Classic Report" on page 9-61, and "Controlling When Columns Display in a Classic Report" on page 9-62

Editing Interactive Reports as a Developer
9-30 Oracle Application Express Application Builder User's Guide
When you select a button at the top of the page, the selected section appears and all other sections are temporarily hidden. To view all sections of the page, click Show All.
Editing Interactive Report Column AttributesYou can use the Column Attributes section of the Report Attributes page to precisely control the report layout. For example, you can use these attributes to alter column heading text, change column positioning, or hide a column.
To access Column Attributes:
1. Access the Interactive Report Attributes page. See "Accessing the Interactive Report Attributes Page" on page 9-28.
The Interactive Report Attributes page appears with the Column Attributes section at the top of the page.
Use the Column Attributes section to control report column appearance and functionality.
Heading displays the heading text to be included in the report. Type indicates the type of query column. The Link column indicates if a link column is currently defined.
Table 9–1 describes common report column edits.

Editing Interactive Reports as a Developer
Creating Reports 9-31
You can further refine the attributes of a specific column on the Column Attributes page.
2. To access the Column Attributes page, click the Edit icon next to the appropriate column Alias.
The Column Definition appears.
Use the check boxes under Allow Users To to control how users manipulate the report. Options include: Hide, Sort, Filter, Highlight, Control Break, Aggregate, Compute, Chart, and Group By.
3. Under Column Definition, Allow Users To, select the appropriate check boxes.
To learn more about a specific attribute, click the item label.
Creating Column GroupsUse column groups to group columns on a single row view.
To create a column group:
1. Access the Interactive Report Attributes page. See "Accessing the Interactive Report Attributes Page" on page 9-28.
Table 9–1 Common Report Column Edits for Interactive Reports
Description Developer Action
Alter column display sequence. Click the up and down arrows to change the column display sequence.
This display sequence is only used in the Single Row View if enabled. It does not affect report column display. The report column display can be changed when you run the report and save.
Change column group assignment. If Column Groups are defined, individual columns can be assigned under Column Group.
Change column heading text. Under Heading, enter different heading text.
Change how columns display. Select an option from Display Text As.

Editing Interactive Reports as a Developer
9-32 Oracle Application Express Application Builder User's Guide
The Interactive Report Attributes page appears.
2. Scroll down to Column Groups.
3. Click Add Group.
4. Under Column Group:
a. Sequence - Enter the display sequence for this column group. This attribute determines the order in which the column groups display in the detail view.
b. Group Name - Enter a column group name. This name displays in the region header in detailed view.
c. Description - Enter an optional description for the column group. This description never displays to the end user.
5. Click Create.
Controlling Interactive Report PaginationYou control how pagination displays by making selections from Pagination attributes on the Interactive Report Attributes page.
To access the Pagination section of the Report Attributes page:
1. Access the Interactive Report Attributes page. See "Accessing the Interactive Report Attributes Page" on page 9-28.
The Interactive Report Attributes page appears.
2. Scroll down to Pagination.
You use the Pagination attributes to select a pagination style, determine where pagination occurs, specify the maximum number of rows to query, and messages to display when more than the maximum number of rows are returned or if no rows are returned.
Table 9–2 describes the available Pagination attributes.
Table 9–2 Pagination Attributes
Attribute Description
Pagination Type Select a pagination type. Pagination provides the user with information about the number of rows and the current position within the result set. You can display pagination above or below the report (or both) and position it on the left or right. Available pagination options include:
■ Row Ranges X to Y
■ Row Ranges X to Y of Z
Pagination Display Position Defines where pagination occurs. Pagination can be display on the left side, right side, at the bottom, or above the report.
Show Null Values as Enter the text you want to display for null columns. The default value is (null).

Editing Interactive Reports as a Developer
Creating Reports 9-33
Managing Interactive Report Column SortingYou manage column sorting on the Interactive Report Attributes page.
To manage column sorting:
1. Access the Interactive Report Attributes page. See "Accessing the Interactive Report Attributes Page" on page 9-28.
The Interactive Report Attributes page appears.
2. Under Column Attributes, click the Edit icon for the column for which you want to enable sorting.
3. Under Column Definition, select Sort and click Apply Changes.
The Interactive Report Attributes page appears.
4. Scroll down to Sorting.
5. Specify ascending and descending image attributes and click Apply Changes.
Customizing the Interactive Report Search BarA search bar displays at the top of every interactive report and includes a Select columns to search icon, Text area, Go button, and Actions menu.
You can remove or customize the search bar by selecting and deselecting options in the Search Bar section of the Interactive Reports Attributes page.
Topics:■ Customizing the Search Bar
■ Removing the Search Bar
Customizing the Search BarTo customize the search bar:
Maximum Row Count Defines the maximum number of rows to query, for example, rows 1 - 10 or 456.
If you set this attribute to 200, the result would appear as follows:
rows 1 - 10 of more than 200 rows
This attribute impacts performance. Counting fewer rows can improve performance and counting thousands of rows can degrade performance.
When more than maximum row data found message
Defines the text message that displays when more than the maximum row count is returned.
When No Data Found Message
Defines the text message that displays when the query does not return any rows.
See Also: "Enabling Icon View" on page 9-43 and "Enabling Detail View" on page 9-45
Table 9–2 (Cont.) Pagination Attributes
Attribute Description

Editing Interactive Reports as a Developer
9-34 Oracle Application Express Application Builder User's Guide
1. Access the Interactive Report Attributes page. See "Accessing the Interactive Report Attributes Page" on page 9-28.
The Interactive Report Attributes page appears.
2. Scroll down to Search Bar.
Use these attributes to customize how the search bar displays. Table 9–3 describes Search bar attributes:
Table 9–3 Search Bar Attributes
Attribute Description
Include Search Bar Select Yes or No. Selecting No removes the following default components:
■ Search Field - Displays a text field in the search bar in which to enter search criteria.
■ Finder Drop Down - Enables users to search on a selected column or against all columns.
■ Reports Select List - Displays report select list if the report has alternative default, shared report or personal report. See "Saving an Interactive Report" on page 9-21.
■ Rows Per Page Selector - Displays a select list to enable users to select the number of rows to display per page.
■ Actions Menu - Enables the user to customize the report based on selected Actions.

Editing Interactive Reports as a Developer
Creating Reports 9-35
Include in Actions Menu Select and deselect functions to be included in the Actions menu. Available options include:
■ Select Columns - Used to hide, unhide, and order the report columns.
■ Filter - Used to add filters to the report (for example, STATE = VA).
■ Rows Per Page - Used to display rows per page menu.
■ Sort - Used to sort columns.
■ Control Break - Used to build control breaks on report columns.
■ Highlight - Used to define conditions that highlights certain rows.
■ Compute - Used to add computed columns.
■ Aggregate - Used to include aggregate calculations on report columns.
■ Chart - Used to create a Flash chart based off the data in the report.
■ Group By - Used to create a Group By view based off the data in the report.
■ Flashback - Used to flashback the report data to some time in the past.
■ Save Report - Used to save the report settings for future use. Only available for authenticated pages.
■ Save Public Report * - Used to save a public report for all users to view. You must select Save Report to enable this option. Only available for unauthenticated pages.
■ Reset - Used to reset the report to the default settings.
■ Help - Used to display instructions for using the Interactive report.
■ Download - Used to download the report in different formats.
Note: Disabling the Download functionality only prevents the Download menu from displaying on the Actions menu. To fully prevent users from downloading data, deselect all check boxes in the Download Formats section.
■ Subscription * - Used to schedule a subscription to send the report in email. Only available for unauthenticated pages.
See Also: "About the Actions Menu" on page 9-6.
Save Report Public Authorization
Users can save reports and classify them as being either public or private. Public reports can be viewed by all users. Private reports can only be viewed by the user who saved the report.
In addition to enabling Save Public Report on the Actions Menu, you can add additional security by defining an Authorization Scheme to determine who has rights to enable Save Public Report.
To enable support for public reports, select an authentication method from this list.
Button Template Select a template for buttons that display in the search region and in the dialogs.
Table 9–3 (Cont.) Search Bar Attributes
Attribute Description

Editing Interactive Reports as a Developer
9-36 Oracle Application Express Application Builder User's Guide
3. Click Apply Changes.
Removing the Search BarTo remove the search bar:
1. Access the Interactive Report Attributes page. See "Accessing the Interactive Report Attributes Page" on page 9-28.
The Interactive Report Attributes page appears.
2. Scroll down to Search Bar.
3. From Include Search Bar, select No.
4. Click Apply Changes.
Configuring Download Options on the Actions MenuYou can add a Download option to the Actions menu to enable users to download an interactive report as a comma-delimited file (CSV) format, HTML, Microsoft Excel (XLS) format, Adobe Portable Document Format (PDF), Microsoft Word Rich Text Format (RTF), or as HTML attached to an email.
Enabling Download FormatsTo configure download formats:
Finder Image Specify an image. If no image is defined, the following is used:
/i/htmldb/builder/finder_w_dropdown.gif
Actions Menu Image Specify an image. If no image is defined, the default button is used.
Search Button Label Specify the text to use as search button label.
Maximum Rows Per Page Enter the maximum number to display in the Rows Per Page Selector.
Table 9–3 (Cont.) Search Bar Attributes
Attribute Description

Editing Interactive Reports as a Developer
Creating Reports 9-37
1. Access the Interactive Report Attributes page. See "Accessing the Interactive Report Attributes Page" on page 9-28.
The Interactive Report Attributes page appears.
2. Scroll down to Search Bar.
a. For Include Search Bar, select Yes and then select Actions Menu.
b. Under Include in Actions menu, select Download.
3. Scroll down to Download.
4. Select download formats. Options include:
■ CSV. See "Enabling CSV Download" on page 9-37.
■ HTML.
■ Email. See "Enabling Email Download" on page 9-38.
■ XLS.
■ PDF. See "About Printing Reports to PDF" on page 9-63.
■ RTF.
5. Click Apply Changes.
Enabling CSV DownloadTo enable the Enable CSV download:
1. Enable the CSV output option on the Edit Globalization Attributes page. See "Accessing the Globalization Attributes Page" on page 7-28 and "Automatic CSV Encoding" on page 7-30.
2. Access the Interactive Report Attributes page. See "Accessing the Interactive Report Attributes Page" on page 9-28.
The Interactive Report Attributes page appears.
3. Scroll down to Search Bar.
a. For Include Search Bar, select Yes and then select Actions Menu.
b. Under Include in Actions menu, select Download.
4. Scroll down to Download.
5. From Download Formats, select CSV.
Tip: Disabling the Download functionality only prevents the Download menu from displaying on the Actions menu. To fully prevent users from downloading data, deselect all check boxes in the Download Formats section.
Tip: The Download option only appears on the Actions menu if a file format is selected. If a report server has not been defined within Instance Administration then certain options do not display. To learn more, see "Configuring Report Printing" Oracle Application Express Administration Guide.
Tip: The Download option only appears on the Actions menu if a file format is selected.

Editing Interactive Reports as a Developer
9-38 Oracle Application Express Application Builder User's Guide
6. In the CSV Separator, define the column separator. If no value is entered, a comma or semicolon is used depending on your current NLS settings.
7. In the CSV Enclosed By, enter a delimiter character. This character delineates the starting and ending boundary of a data value. Default delimiter is double quotation marks (" ").
8. In Filename, enter a name for the downloaded document. Do not specify a file extension, the extension is added automatically. If you leave this blank, the region name is used as the file name.
9. Click Apply Changes.
Enabling Email DownloadYou can configure the Download option to send static HTML report to specific email addresses.
To enable email download:
1. An Oracle Application Express administrator must configure email at the Instance level. See "Configuring Mail" in Oracle Application Express Administration Guide
2. Access the Interactive Report Attributes page. See "Accessing the Interactive Report Attributes Page" on page 9-28.
The Interactive Report Attributes page appears.
3. Scroll down to Search Bar.
a. For Include Search Bar, select Yes and then select Actions Menu.
b. Under Include in Actions menu, select Download.
4. Scroll down to Download.
5. From Download Formats, select Email.
6. Click Apply Changes.
Understanding Link ColumnsA Link Column displays on the left side of an interactive report. It can link to a single row view, a custom target, or be excluded from the report. Note that a Link Column cannot be sorted, hidden, or moved by an end user and does not interact with the standard column link defined on the Column Attributes page.
Tip: Email download is only supported on authenticated pages. If you enable Email download on a public page, the Email download option does not display in Download dialog.
Tip: The Download option only appears on the Actions menu if a file format is selected.
Note: Email sent from an Email Download contains a system generated email signature identifying who sent the email. This signature cannot be removed.
See Also: "About Emailing from an Interactive Report" on page 9-46

Editing Interactive Reports as a Developer
Creating Reports 9-39
Linking to a Single Row ViewTo link to a single row view:
1. Access the Interactive Report Attributes page. See "Accessing the Interactive Report Attributes Page" on page 9-28.
The Interactive Report Attributes page appears.
2. Scroll down to Link Column.
3. For Link Column, select Link to Single Row View.
4. From Single Row View, select the appropriate options:
■ Allow Exclude Null Values - Excludes columns with null values.
■ Allow Displayed Columns - Displays only the columns shown in the report.
5. For Uniquely Identify Rows by, select ROWID or Unique Column.
If you select, Unique Column, specify the column in the Unique Column field.
6. For Link Icon, select an icon.
7. For Link Attributes (Optional), specify additional column link attributes to be included in the <a href= > tag (for example, a link target, classes, or styles).
8. Click Apply Changes.
Linking to a Specific PageTo link to a specific page:
1. Access the Interactive Report Attributes page. See "Accessing the Interactive Report Attributes Page" on page 9-28.
The Interactive Report Attributes page appears.
2. Scroll down to Link Column.
3. For Link Column, select Link to Custom Target.
4. For Link Icon, select an icon.
5. For Link Attributes (Optional), specify additional column link attributes to be included in the <a href= > tag (for example, a link target, classes, or styles).
6. For Target, select Page in this Application.
7. For Page, select the target page number. To reset the pagination for this page, select Reset Pagination.
8. For Request, specify the request to be used.
9. For Clear Cache, specify the pages (that is, the page numbers) on which to clear cache. You can specify multiple pages by listing the page numbers in a comma-delimited list. See "Linking to Interactive Reports" on page 9-47.
10. For Name and Value, specify session state for a specific item.
11. Click Apply Changes.
Tip: If an interactive report links to single row view and the link icon is missing ALT text or has empty ALT text, the alt="Single Row View" gets included automatically to make the report accessible. To override this behavior, include meaningful ALT text.

Editing Interactive Reports as a Developer
9-40 Oracle Application Express Application Builder User's Guide
Linking to a URLTo link to a URL:
1. Access the Interactive Report Attributes page. See "Accessing the Interactive Report Attributes Page" on page 9-28.
The Interactive Report Attributes page appears.
2. Scroll down to Link Column.
3. For Link Column, select Link to Custom Target.
4. For Link Icon, select an icon.
5. For Link Attributes (Optional), specify additional column link attributes that to be included in the <a href= > tag (for example, a link target, classes, or styles).
6. From Target, select URL.
7. In URL, enter the appropriate address.
8. For Checksum - Select one of the following:
– Use default
– Application Level - Link reusable by any user
– User Level - Link reusable by current user
To learn more about each option, see item Help.
9. Click Apply Changes.
Excluding a Link ColumnTo exclude a column link:
1. Access the Interactive Report Attributes page. See "Accessing the Interactive Report Attributes Page" on page 9-28.
The Interactive Report Attributes page appears.
2. Scroll down to Link Column.
3. For Link Column, select Exclude Link Column.
4. Click Apply Changes.
Creating a Column Link in an Interactive ReportUse Column Attributes to create a link from a report to another page in your application or to a URL.
To create a column link to another page:
1. Access the Interactive Report Attributes page. See "Accessing the Interactive Report Attributes Page" on page 9-28.
The Interactive Report Attributes page appears.
2. Under Column Attributes, locate the column to contain the link.
3. Click the Edit icon next to the column name.
The Column Attributes page appears.
4. Scroll down to Column Link.
5. To create a column link to another page:

Editing Interactive Reports as a Developer
Creating Reports 9-41
a. From Target, select Page in this Application.
b. (Optional) In Link Attributes, specify additional column link attributes to be included in the <a href= > tag (for example, a link target, classes, or styles).
c. In Link Text, enter the text to be displayed as a link, specify an image tag, or pick from the list of default images.
d. In Page, specify the target page number. To reset the pagination for this page, select Reset Pagination.
e. In Request, specify the request to be used.
f. In Clear Cache, specify the pages (that is, the page numbers) on which to clear cache. You can specify multiple pages by listing the page numbers in a comma-delimited list.
g. Use the Name and Value fields to specify session state for a specific item.
h. For Checksum - Select one of the following:
– Use default
– Application Level - Link reusable by any user
– User Level - Link reusable by current user
To learn more about each option, see item Help.
6. Click Apply Changes.
To create a column link to a URL:
1. Access the Interactive Report Attributes page. See "Accessing the Interactive Report Attributes Page" on page 9-28.
The Interactive Report Attributes page appears.
2. Access the Column Attributes page by clicking the Edit icon next to the appropriate column.
The Column Attributes page appears.
3. Scroll down to Column Link.
4. Under Column Link, specify the following:
a. From Target, select URL.
b. In Link Text, enter the text to be displayed as a link and select a substitution string.
c. (Optional) In Link Attributes, specify additional column link attributes to be included in the <a href= > tag (for example, a link target, classes, or styles).
d. In URL, enter the appropriate address.
5. Click Apply Changes.
Displaying Interactive Reports ConditionallyYou can choose to have interactive reports display conditionally by editing region attributes on the Edit Region page.
To display an interactive report conditionally:
1. Navigate to the appropriate Page Definition. See "Accessing the Page Definition" on page 8-2.

Editing Interactive Reports as a Developer
9-42 Oracle Application Express Application Builder User's Guide
2. Access the Edit Region page:
■ Component view - Under Regions, select the region name.
■ Tree view - Right-click the region name and select Edit.
The Edit Region page appears.
3. Scroll down to Conditions.
4. From the Condition Type list, make a selection.
5. Enter an expression in the fields provided.
6. Click Apply Changes.
Defining a Column as a List of Values in an Interactive ReportIn interactive reports you can use a list of values to improve the speed of built-in filter tools.
To define a report column as a list of values:
1. Access the Interactive Report Attributes page. See "Accessing the Interactive Report Attributes Page" on page 9-28.
The Interactive Report Attributes page appears.
2. Access the Column Attributes page by clicking the Edit icon next to the appropriate column.
The Column Attributes page appears.
3. Scroll down to List of Values.
4. From Column Filter List of Values, specify how to create a list of values as a filter on the report column list. Available options include:
■ None - Disable filter on list of values.
■ Default Based on Column Type - STRING and NUMBER columns derive the list of values from distinct column values. DATE columns derive the list of values from predefined date ranges.
■ Use Defined List of Values to Filter Word Contains - Derive the list of values from a defined list of values SQL query to create a contains filter.
■ Use Named List of Values to Filter Exact Match - Derive the list of values from the named list of values to create an equal filter.
■ Use Named List of Values to Filter Word Contains - Derive the list of values from the named list of values to create a contains filter.
5. Click Apply Changes.
Tip: Asynchronous JavaScript and XML (AJAX) is used throughout interactive reports. Because AJAX is asynchronous, the value evaluated for conditional display must be in the session. To display an interactive report conditionally based on specified value, use a page item instead of using a :REQUEST value. Using :REQUEST in a conditional display causes in the interactive report function incorrectly.

Editing Interactive Reports as a Developer
Creating Reports 9-43
Formatting Columns in an Interactive Values ReportYou can use HTML expressions in interactive reports to further the customize column display.
To define column formatting:
1. Access the Interactive Report Attributes page. See "Accessing the Interactive Report Attributes Page" on page 9-28.
The Interactive Report Attributes page appears.
2. Access the Column Attributes page by clicking the Edit icon next to the appropriate column.
3. Scroll down to Column Formatting.
4. Specify HTML expressions to be shown for the column. Use substitution strings for column names to show column values in HTML. Consider the following examples:
Example 1:
<span style="background-color: yellow; color: red;">#EMPLOYEE_STATUS</span>
Example 2:
<span class="#COLUMN_CLASS#">#EMPLOYEE_STATUS#
In the previous example, the #COLUMN_CLASS# and #EMPLOYEE_STATUS# substitutions in this example are columns selected in the report SQL query.
Example 3:
<img src="#IMAGE_NAME#" title="#EMPLOYEE_NAME#">
5. Click Apply Changes.
Enabling Icon ViewBe default, most interactive reports display as a report. You can optionally display columns as icons. When configured, a View Icons icon displays on the Search bar.
To use Icon view, you must identify the columns used to identify the icon, the label, and the target (that is, the link). As a best practice, set these columns to display as hidden since they are typically not useful for end users.
Topics:■ Adding Icon View to an Interactive Report
■ Adding a Custom Icon View Link
Adding Icon View to an Interactive ReportTo add Icon view to an interactive report:
1. Access the Interactive Report Attributes page. See "Accessing the Interactive Report Attributes Page" on page 9-28.

Editing Interactive Reports as a Developer
9-44 Oracle Application Express Application Builder User's Guide
The Interactive Report Attributes page appears.
2. Scroll down to Icon View.
3. For Icon View Enabled, select Yes.
4. Specify the following mandatory attributes:
■ Link Column - Select the column that returns the link target of the icon. See item Help for an example.
■ Image Source Column - Identify the column that returns the image source. See item Help for an example.
■ Label Column - Select the column that returns the image label. See item Help for an example.
5. For Columns Per Row, identify the number of icons to be displayed per row. A value of 5 would display 5 icons per row.
6. Click Apply Changes.
Adding a Custom Icon View LinkTo add a custom Icon View link:
1. Access the Interactive Report Attributes page. See "Accessing the Interactive Report Attributes Page" on page 9-28.
The Interactive Report Attributes page appears.
2. Scroll down to Icon View.
3. For Use Custom Icon Link, select Yes.
4. For Columns Per Row, identify the number of icons to be displayed per row.
A value of 5 would display 5 icons per row.

Editing Interactive Reports as a Developer
Creating Reports 9-45
5. In Custom Link, enter the column link for the Icon view. Use substitution strings for column names, for example:
<a href="#ICON_LINK#"><img src="#DETAIL_IMG_NO_STYLE#" title="" alt="" width="75" height="75"><br />#PRODUCT_NAME#</a>
6. Click Apply Changes.
Enabling Detail ViewBe default, most interactive reports display as a report. You can optionally display details about each column. When configured, a View Details icon displays on the Search bar.
To add Details view to an interactive report:
1. Access the Interactive Report Attributes page. See "Accessing the Interactive Report Attributes Page" on page 9-28.
The Interactive Report Attributes page appears.
2. Scroll down to Detail View.
3. For Detail View Enabled, select Yes.
4. Specify the following attributes:
■ Before Rows - Enter the HTML to be displayed before report rows. For example:
<TABLE>
■ For Each Row (Use #COLUMN_ALIAS# substitutions) - Use substitution strings for column names and column labels. For example:
<tr><td align="right">#ENAME_LABEL#:</td><td>#ENAME#</td></tr><tr><td align="right">#JOB_LABEL#:</td><td>#JOB#</td></tr>
■ After Rows - Enter the HTML to be displayed after report rows. For example:
</TABLE>
5. Click Apply Changes.
Configuring Advanced Attributes for Interactive ReportsUse the Advanced Attributes section to define the Interactive Report region alias, specify an item whose value stores the saved report id, and define a from address in an interactive report subscription or email download.
To configure Advanced Attributes:
1. Access the Interactive Report Attributes page. See "Accessing the Interactive Report Attributes Page" on page 9-28.
The Interactive Report Attributes page appears.
2. Scroll down to Advanced Attributes.

Editing Interactive Reports as a Developer
9-46 Oracle Application Express Application Builder User's Guide
Table 9–4 describes the available Advanced Attributes.
3. Click Apply Changes.
About Emailing from an Interactive ReportYou can define the from address for emails sent from an interactive report in two ways:
■ At the application-level on the Edit Application Definition page in the Application Email from Address attribute. See "About the Edit Application Definition Page" on page 7-16.
■ At the interactive report-level on the Interactive Report Attributes page in the Email from Address attribute. See "Configuring Advanced Attributes for Interactive Reports" on page 9-45
Table 9–4 Advanced Attributes
Attribute Description
Region Alias Enter an alphanumeric alias for this interactive report region. The alias must be unique within the application.
You can use an alias to reference an interactive report in an API call. For example, you can write a function to return INTERACTIVE_REPORT_ID by querying ALIAS column in the APEX_APPLICATION_PAGE_IR view). The alias must be unique within the application. Since the INTERACTIVE_REPORT_ID value can change when you export or import to different instance, referencing an interactive report region using an alias can be useful.
Report ID Item Enables you to send a user to a saved view of a report rather than the default, or working view. You specify an item whose value stores the report id of the saved view. Report ID’s can be retrieved from the APEX_APPLICATION_PAGE_IR_RPT view.
Email From Address Enter a valid email address to use as the from address when sending email from an email download or a subscription. The value can be a literal string containing a valid email or an application substitution defined at the application-level using substitution syntax or the &APP_EMAIL. substitution which returns the Application Email From Address defined at the application-level. Examples:
[email protected]&MY_APP_EMAIL_FROM.&APP_EMAIL.
Oracle does not recommend using an item substitution at the application or page-level since it only works in an email download, but not for subscriptions.
Tip: The email from address comes from the following in the order of precedence:
Email From Address at report level > Application Email From Address at application level > Default Email From Address at instance level.
If all of them are null, the email from address is the same as email to address.
See Also: "About the Edit Application Definition Page" on page 7-16.

Editing Interactive Reports as a Developer
Creating Reports 9-47
In either case, the value can be a literal string containing a valid email or an application substitution defined at the application-level using substitution syntax or &APP_EMAIL. substitution which returns the Application Email From Address defined at the application-level. Examples:
[email protected]&MY_APP_EMAIL_FROM.&APP_EMAIL.
Oracle does not recommend using an item substitution at the application or page-level since it only works in email download, but not for subscriptions.
Linking to Interactive ReportsUnlike classic reports which typically use page items as report parameters, the data in an interactive report is driven by declarative filters. However, the developer may want to set these report parameters by modifying interactive report settings for an end user. These settings only affect the end user's working report and do not affect any saved report settings.
To reset an interactive report in a link, use the string "RIR" in the Clear-Cache section of a URL. This is equivalent to the end user choosing the Reset option from the interactive report actions menu on the target page. The report is returned to the default report settings specified by the developer or saved by the user.
To create a Row text contains filter on an interactive report, use the string IR_ROWFILTER in the Item Names section of the URL. Adding this string passes the filter value in the corresponding location in the Item Values section of the URL.
To create a filter on an interactive report in a link, use the string IR<operator>_<target column alias> in the Item Names section of the URL, and pass the filter value in the corresponding location in the Item Values section of the URL.
Valid operators include:
■ C = Contains
■ EQ = Equals (this is the default)
■ GTE = Greater than or equal to
■ GT = Greater Than
■ LIKE = SQL Like operator
■ LT = Less than
■ LTE = Less than or equal to
■ N = Null
■ NC = Not Contains
■ NEQ = Not Equals
■ NLIKE = Not Like
■ NN = Not Null
■ NIN = Not In (escape the comma separated values with backslash, \)
■ IN = In (escape the comma separated values with backslash, \)
See Also: "Enabling Email Download" on page 9-38 and Understanding Substitution Strings

Editing Interactive Reports as a Developer
9-48 Oracle Application Express Application Builder User's Guide
■ ROWFILTER = Row Text Contains (this searches all columns displayed in the report with type STRING or NUMBER)
Consider the following example:
f?p=...:IR_ENAME:KING
The previous example is equivalent to the end user creating a filter on the target page: ENAME = KING. When an operator is not provided, EQ is used because it is the default.
f?p=...:IRGT_SAL:3000
The previous example is equivalent to the end user creating a filter on the target page: SAL > 3000.
Linking to Shared Interactive ReportsYou can link to saved primary default, alternative default and public reports using IR_REPORT_[report_alias] in the request value of the URL.
Link Examples to a Primary ReportThe following examples demonstrate how to link to a primary report (report_alias=12345):
This example links to a primary report:
f?p=100:1:&APP_SESSION.:IR_REPORT_12345
This example links, resets, and clears primary report settings:
f?p=100:1:&APP_SESSION.:IR_REPORT_12345::RIR,CIR:
This example links, resets, and clears primary report settings. It additionally creates a ENAME = 'KING' filter on the primary report:
f?p=100:1:&APP_SESSION.:IR_REPORT_12345::RIR,CIR:IR_ENAME:KING
Link Examples to Saved ReportsThe following examples demonstrate how to link to a saved report (report_alias=12345):
This example links to a saved report:
f?p=100:1:&SESSION.:IR_REPORT_1234
This example links, resets, and clears settings for saved report 12345:
f?p=100:1:&SESSION.:IR_REPORT_12345::RIR,CIR:
This example links, resets, and clears saved report 12345 settings. It additionally creates a ENAME = 'KING' filter on saved report 12345.
f?p=100:1:&SESSION.:IR_REPORT_12345::RIR,CIR::RIR,CIR:IR_ENAME:KING
If you reset, clear, or create filter using URL without the IR_REPORT_[report_alias] request value, it resets, clears, and creates filter on the primary report. For example, this link goes to the primary report:
f?p=100:1:&SESSION.:::RIR,CIR:IR_ENAME:KING
Editing Interactive Reports as a Developer
Creating Reports 9-49
Editing the Saved Report AliasDevelopers can edit the report alias or view link examples by going to Saved Reports page.
To access the Saved Reports page.
1. On the Workspace home page, click the Application Builder icon.
2. Select the application.
3. Go to the Page Definition containing the saved interactive report.
The Page Definition appears.
4. To access the Saved Reports page:
■ Tree view - Right-click the Region name and select Edit Saved Reports.
■ Component view - Under Regions, click the Saved Report link.
The Saved Reports page appears.
5. In Report Alias, you can either:
■ Enter a new alias for the saved report
■ Copy and paste the link example to link to a specific saved report
6. Click Apply Changes.
Managing Saved Reports as a DeveloperEach interactive report can have multiple default reports. A report categorized as Primary Default displays initially and cannot be renamed nor deleted. A report saved as Alternative Default can be selected from Reports list on the Search bar.
End users can also save reports and classify them as being either public or private. Public reports can be viewed by all users. Private reports can only be viewed by the user who saved the report.
Topics:■ Editing or Renaming an Alternative Default Interactive Report
■ Viewing or Deleting Saved Reports
Editing or Renaming an Alternative Default Interactive ReportTo rename an alternative default interactive report:
1. Run the report as a developer.
2. Select the report to be edited.
3. Click the Saved Report link.
A new region appears.
4. Edit the attributes (for example, enter a new name or change the default report type).
5. Click Apply.
See Also: "Saving an Interactive Report" on page 9-21
See Also: "Saving a Default Interactive Report" on page 9-24

Editing Classic Reports
9-50 Oracle Application Express Application Builder User's Guide
Viewing or Deleting Saved ReportsTo view a listing of Saved Reports:
1. Access the Interactive Report Attributes page. See "Accessing the Interactive Report Attributes Page" on page 9-28.
The Interactive Report Attributes page appears.
2. Click the Saved Reports tab.
A report displays all saved reports by report type, report name, owner, and report alias.
3. To delete a report, select it and click Delete Checked.
Viewing Saved Report ActivityDevelopers can view saved report activity by clicking the View Saved Report Activity link under Tasks on the Edit Report Attributes page. This link only displays if saved reports other than the primary default report exist. You can use this page to determine which reports are being used and which ones are not.
To view saved report activity:
1. Access the Interactive Report Attributes page. See "Accessing the Interactive Report Attributes Page" on page 9-28.
The Interactive Report Attributes page appears.
2. On the Tasks list, click View Saved Report Activity.
Editing Classic ReportsDevelopers can control report layout, pagination, column sorting, error messages, export links, and column break of Classic reports using the Report Attributes page.
Tip: You can also view saved report activity from the Workspace Administration page. On the Workspace home page, click Administration and then Monitory Activity. Under Page Views, click by Interactive Report.

Editing Classic Reports
Creating Reports 9-51
Topics:■ Accessing Classic Report Attributes
■ Altering Classic Report Layout Using Column Attributes
■ Controlling Classic Report Pagination
■ Enabling Column Sorting in a Classic Report
■ Adding a Download Link to a Classic Report
■ Enabling the CSV Output Option in a Classic Report
■ Exporting a Classic Report as an XML File or a CSV File
■ Creating a Column Link in a Classic Report
■ Defining an Updatable Column in a Classic Report
■ Defining a Column as a List of Values in a Classic Report
■ Controlling When Columns Display in a Classic Report
■ Controlling Column Breaks in a Classic Report
■ Synchronizing Classic Report Column Order with Region Source
Accessing Classic Report AttributesTo access the Report Attributes page:
1. On the Workspace home page, click the Application Builder icon.
2. Select the application.
3. Select a page.
The Page Definition appears.
4. To access the Report Attributes page:
■ Tree view - Right-click the region name and select Edit Report Attributes.
Tip: With the addition of interactive reports in Oracle Application Express release 3.1, all previous report types are referred to as classic reports. See "Editing Interactive Reports as a Developer" on page 9-27.

Editing Classic Reports
9-52 Oracle Application Express Application Builder User's Guide
■ Component view - Click the Report link next to the report region you want to edit.
The Report Attributes page appears and is divided into the following sections:
■ Column Attributes control the report layout. See "Altering Classic Report Layout Using Column Attributes" on page 9-53.
■ Layout and Pagination attributes control report pagination. See "Controlling Classic Report Pagination" on page 9-55.
■ Sorting attributes enable you to define images and image attributes for images that display in report headings to sort values. See "Enabling Column Sorting in a Classic Report" on page 9-57.
■ Messages contain attributes that enable you to define messages that display if no data is found or more data is found than can be displayed.
■ Report Export attributes enable you to add download link to a report or export a report as either an XML file or CSV file. See "Adding a Download Link to a Classic Report" on page 9-58 and "Exporting a Classic Report as an XML File or a CSV File" on page 9-58.
■ Break Formatting attributes enable you to control if a specific column repeats and how column breaks appear when printed. See "Controlling Column

Editing Classic Reports
Creating Reports 9-53
Breaks in a Classic Report" on page 9-62.
■ External Processing attributes enable you to specify a URL for post processing and a link label.
5. To learn more about a specific attribute, click the item label.
When help is available, the cursor changes to an arrow and question mark when you pass the cursor over an item. See "About Field-Level Help" on page 1-13.
6. To save your changes, click Apply Changes.
About Navigation AlternativesThe Report Attribute page is divided into these sections: Column Attributes, Layout and Pagination, Sorting, Messages, Report Export, Break Formatting, and External Processing.
You can access these sections by scrolling down the page, or by clicking a navigation button at the top of the page.
When you select a button at the top of the page, the selected section appears and all other sections are temporarily hidden. To view all sections of the page, click Show All.
Altering Classic Report Layout Using Column AttributesYou can use the Column Attributes section of the Report Attributes page to precisely control the report layout. For example, you can use these attributes to alter column heading text, change column positioning, hide a column, create a sum of a column, or select a sort sequence.
To access the Column Attributes:
1. On the Workspace home page, click the Application Builder icon.
2. Select the application.
3. Select a page.
The Page Definition appears.
4. Access the Classic Report Attributes page. See "Accessing Classic Report Attributes" on page 9-51.
The Report Attributes page appears with the Column Attributes section at the top of the page.
See Also: "Creating a Column Link in a Classic Report" on page 9-59 and "Defining an Updatable Column in a Classic Report" on page 9-60, and "Defining a Column as a List of Values in a Classic Report" on page 9-61, and "Controlling When Columns Display in a Classic Report" on page 9-62

Editing Classic Reports
9-54 Oracle Application Express Application Builder User's Guide
Use the Column Attributes section to control report column appearance and functionality.
Heading Type identifies how the heading is generated for the report. The Link column indicates if a column link is currently defined. The Edit column indicates whether a column is currently updatable.
Table 9–5 describes common report column edits.
You can further refine the attributes of a specific column on the Column Attributes page.
5. To access the Column Attributes page, click the Edit icon next to the appropriate column Alias.
To learn more about a specific attribute, click the item label.
When help is available, the cursor changes to an arrow and question mark when you pass the cursor over an item. See "About Field-Level Help" on page 1-13.
Table 9–5 Common Report Column Edits for Classic Reports
Description Developer Action
Alter column display sequence. Click the up and down arrows to change the column display sequence.
Alter heading alignment. Under Column Alignment, select a column alignment.
Change column heading text. Under Heading, enter different heading text.
Control which columns display. Click Show to indicate a column should display.
Enable a unique sort sequence. Click Sort and select a sequence number from Sort Sequence.
Any number of columns can be sort enabled. However, at least one column must have a Sort Sequence defined.
Enable the sum of a column. Click Sum to enable the sum of a column.
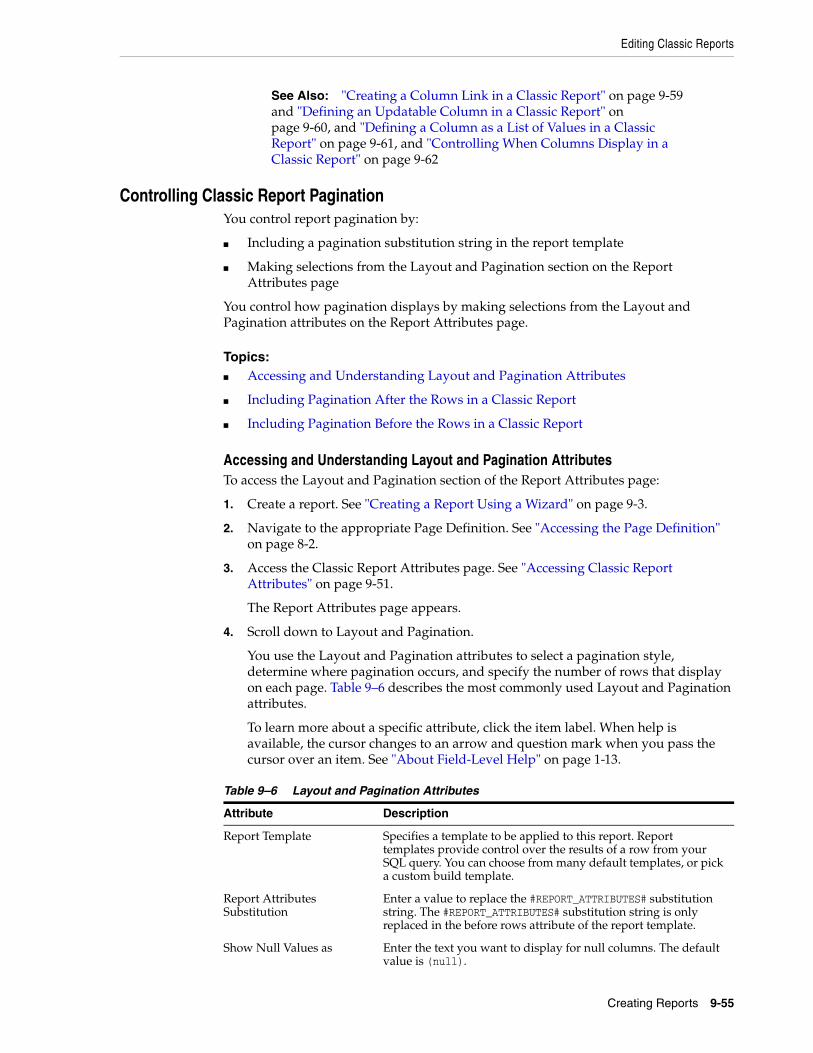
Editing Classic Reports
Creating Reports 9-55
Controlling Classic Report PaginationYou control report pagination by:
■ Including a pagination substitution string in the report template
■ Making selections from the Layout and Pagination section on the Report Attributes page
You control how pagination displays by making selections from the Layout and Pagination attributes on the Report Attributes page.
Topics:■ Accessing and Understanding Layout and Pagination Attributes
■ Including Pagination After the Rows in a Classic Report
■ Including Pagination Before the Rows in a Classic Report
Accessing and Understanding Layout and Pagination Attributes To access the Layout and Pagination section of the Report Attributes page:
1. Create a report. See "Creating a Report Using a Wizard" on page 9-3.
2. Navigate to the appropriate Page Definition. See "Accessing the Page Definition" on page 8-2.
3. Access the Classic Report Attributes page. See "Accessing Classic Report Attributes" on page 9-51.
The Report Attributes page appears.
4. Scroll down to Layout and Pagination.
You use the Layout and Pagination attributes to select a pagination style, determine where pagination occurs, and specify the number of rows that display on each page. Table 9–6 describes the most commonly used Layout and Pagination attributes.
To learn more about a specific attribute, click the item label. When help is available, the cursor changes to an arrow and question mark when you pass the cursor over an item. See "About Field-Level Help" on page 1-13.
See Also: "Creating a Column Link in a Classic Report" on page 9-59 and "Defining an Updatable Column in a Classic Report" on page 9-60, and "Defining a Column as a List of Values in a Classic Report" on page 9-61, and "Controlling When Columns Display in a Classic Report" on page 9-62
Table 9–6 Layout and Pagination Attributes
Attribute Description
Report Template Specifies a template to be applied to this report. Report templates provide control over the results of a row from your SQL query. You can choose from many default templates, or pick a custom build template.
Report Attributes Substitution
Enter a value to replace the #REPORT_ATTRIBUTES# substitution string. The #REPORT_ATTRIBUTES# substitution string is only replaced in the before rows attribute of the report template.
Show Null Values as Enter the text you want to display for null columns. The default value is (null).

Editing Classic Reports
9-56 Oracle Application Express Application Builder User's Guide
Including Pagination After the Rows in a Classic ReportTo include pagination after the rows in a report:
1. Create a report. See "Creating a Report Using a Wizard" on page 9-3.
Next, select the appropriate Layout and Pagination attributes.
2. Access the Classic Report Attributes page. See "Accessing Classic Report Attributes" on page 9-51.
The Report Attributes page appears.
3. Under Layout and Pagination, select the following:
a. Report Template - Select a report template (optional).
Pagination Scheme Specifies a pagination scheme for this report.
Pagination provides the user with information about the number of rows and the current position within the result set. Pagination also defines the style of links or buttons used to navigate to the next or previous page.
For more information, see the Help information for this attribute.
Enable Partial Page Refresh If enabled, this attribute refreshed the report region when paginating forward and backward in your result set.
Display Position Defines where pagination occurs.
If you choose to display pagination above a report, the selected report template must support that type of display.
Number of Rows Defines the maximum number of rows to display on each page.
Number of Rows (Item) Defines the number of rows displayed by default per page for SQL queries (obtained dynamically from an item). Identify the item in this attribute.
Maximum Row Count Defines the maximum number of rows to query, for example, rows 1 - 10 of 456.
If you set this attribute to 200, the result would appear as follows:
rows 1 - 10 of more than 200 rows
This attribute impacts performance. Counting fewer rows can improve performance and counting thousands of rows can degrade performance.
Strip HTML Specify whether to remove HTML tags from the original column values for HTML expressions, column links and report data exported as CSV files.
If you select values from the database that contain HTML tags, then those tags can cause conflicts with the HTML generated for your columns links or HTML expressions. When this option is enabled, only the actual data portion of your column value is used.
Sort Nulls For reports with column heading sorting, specify if you want null valued columns to sort first or last.
See Also: "Enabling Column Sorting in a Classic Report" on page 9-57
Table 9–6 (Cont.) Layout and Pagination Attributes
Attribute Description

Editing Classic Reports
Creating Reports 9-57
b. Pagination Scheme - Select a pagination scheme.
c. Display Position - Select a display position.
d. Number of Rows - Specify how many rows display on each page.
e. Click Apply Changes.
4. Edit the report template:
a. Navigate to the Page Definition. See "Accessing the Page Definition" on page 8-2.
b. Under Templates, select the report template name.
c. Include the #PAGINATION# substitution string in the After Rows attribute.
d. Click Apply Changes.
5. Run the page.
Including Pagination Before the Rows in a Classic ReportTo include pagination before the rows in a report:
1. Create a report. See "Creating a Report Using a Wizard" on page 9-3.
Next, select the appropriate Layout and Pagination attributes.
2. Access the Classic Report Attributes page. See "Accessing Classic Report Attributes" on page 9-51.
The Report Attributes page appears.
3. Under Layout and Pagination:
a. Report Template - Select a report template (optional).
b. Pagination Scheme - Select a pagination scheme.
c. Display Position - Select a position that contains the word top.
d. Number of Rows - Specify how many rows display on each page.
e. Click Apply Changes.
4. Edit the report template.
a. Navigate to the Page Definition. See "Accessing the Page Definition" on page 8-2.
b. Under Templates, select the report template name.
c. Include the #TOP_PAGINATION# substitution string in the Before Rows attribute.
d. Click Apply Changes.
5. Run the page.
Enabling Column Sorting in a Classic ReportYou enable column sorting on the Report Attributes page.
To enable column sorting:
1. Access the Classic Report Attributes page. See "Accessing Classic Report Attributes" on page 9-51.
The Report Attributes page appears.

Editing Classic Reports
9-58 Oracle Application Express Application Builder User's Guide
2. Under Column Attributes, select the Sort check box next to the columns to be sorted.
3. From Sort Sequence, select a sequence number.
Sort Sequence is optional. However, if there are one or more sort enabled columns, then at least one column needs a defined Sort Sequence.
4. Scroll down to Sorting.
5. Specify ascending and descending image attributes or click set defaults.
6. Click Apply Changes.
Adding a Download Link to a Classic ReportYou can create a link within a report that enables users to export the report as a comma-delimited file (.csv) file. To add a CSV link to a report you must enable the CSV output option. When using the CSV output option, the report template is not important. You can include a CSV link with any report template that has the CSV export substitution string defined.
Enabling the CSV Output Option in a Classic ReportTo use the enable the CSV output option:
1. Access the Classic Report Attributes page. See "Accessing Classic Report Attributes" on page 9-51.
The Report Attributes page appears.
2. Scroll down to Report Export.
3. From Enable CSV output, select Yes.
4. (Optional) In the Separator and Enclosed By fields, define the separator and delimiter.
The default Enclosed By by characters are a double quotation marks (" "). The default delimiter is either a comma or a semicolon depending upon your current NLS settings.
5. In Link Label, enter link text. This text displays in your report and enables users to invoke a download.
6. (Optional) To specify a default export file name, enter a name in the Filename field.
By default, the Application Express engine creates an export file name by taking the region name and adding the appropriate file name extension (.csv or .xml).
7. Click Apply Changes.
Exporting a Classic Report as an XML File or a CSV FileYou can export a report as an XML file by selecting a report template.
Tip: Column sorting must be enabled if you want columns with null values to display at the top or end of the report. To learn more about the Sort Nulls attribute, see "Accessing and Understanding Layout and Pagination Attributes" on page 9-55.
See Also: "Automatic CSV Encoding" on page 7-30

Editing Classic Reports
Creating Reports 9-59
To export a report as a file:
1. Access the Classic Report Attributes page. See "Accessing Classic Report Attributes" on page 9-51.
The Report Attributes page appears.
2. Scroll down to Layout and Pagination.
3. From the Report Template list, select export: XML or export: CSV.
Selecting export: XML prevents the Application Express engine from rendering the page and dumps the content to an XML file.
4. Click Apply Changes.
Creating a Column Link in a Classic ReportUse the Column Link attributes to create a link from a report to another page in your application or to a URL.
To create a column link to another page:
1. Access the Classic Report Attributes page. See "Accessing Classic Report Attributes" on page 9-51.
The Report Attributes page appears.
2. Under Column Attributes, locate the column to contain the link.
3. Click the Edit icon next to the column name.
The Column Attributes page appears.
4. Scroll down to Column Link.
5. To create a column link to another page:
a. From Target, select Page in this Application.
b. (Optional) In Link Attributes, specify additional column link attributes to be included in the <a href= > tag (for example, a link target, classes, or styles).
c. In Link Text, enter the text to be displayed as a link, specify an image tag, or pick from the list of default images.
d. In Page, specify the target page number. To reset the pagination for this page, select Reset Pagination.
e. In Request, specify the request to be used.
f. In Clear Cache, specify the pages (that is, the page numbers) on which to clear cache. You can specify multiple pages by listing the page numbers in a comma-delimited list. See "Linking to Interactive Reports" on page 9-47.
g. Use the Name and Value fields to specify session state for a specific item.
6. Click Apply Changes.
To create a column link to a URL:
1. Access the Classic Report Attributes page. See "Accessing Classic Report Attributes" on page 9-51.
The Report Attributes page appears.
2. Access the Column Attributes page by clicking the Edit icon next to the appropriate column.

Editing Classic Reports
9-60 Oracle Application Express Application Builder User's Guide
The Column Attributes page appears.
3. Scroll down to Column Link.
4. Under Column Link, specify the following:
a. From Target, select URL.
b. In Link Text, enter the text to be displayed as a link and select a substitution string.
c. (Optional) In Link Attributes, specify additional column link attributes to be included in the <a href= > tag (for example, a link target, classes, or styles).
d. In URL, enter the appropriate address.
5. Click Apply Changes.
Defining an Updatable Column in a Classic ReportYou can make a column updatable by editing Tabular Form Element attributes on the Column Attributes page. Note that the Application Express engine can only perform updates if:
■ A multirow update is defined
■ A PL/SQL process is implemented to process updated data
■ When using the built-in tabular form elements and display types, then the report has to be defined using the type SQL Query (updatable report)
To define updatable column attributes:
1. Access the Classic Report Attributes page. See "Accessing Classic Report Attributes" on page 9-51.
The Report Attributes page appears.
2. Access the Column Attributes page by clicking the Edit icon next to the appropriate column.
The Column Attributes page appears.
3. Under Column Attributes, specify the following:
a. Display As - Select a type of updatable column.
Use this option to make a column updatable. Updates can only be performed if a multirow update is defined, or a PL/SQL process is implemented to process updated data.
b. Number/Date Format - Make a selection if you selected the Display As type of Date Picker.
c. Element Width - Specify the width of the form item.
d. Number of Rows - Specify the height of a form item (applicable to text areas).
e. Element Attributes - Define a style or standard form element attribute.
f. Element Option Attributes - Specify form element attributes for items in a radio group or check box.
4. Tabular Form Attributes, specify the following:
a. Default Type - Identify the default type.
b. Default - Identify the default source.

Editing Classic Reports
Creating Reports 9-61
c. Reference Table Owner - Identify the owner of the referenced table. This attribute compares references to columns across applications against User Interface Defaults. This reference is manually maintained after being initialized by a wizard, whenever possible.
d. Reference Table Name - Specify the table or view that this column references. This attribute compares references to columns across applications against User Interface Defaults. This reference is manually maintained after being initialized by a wizard, whenever possible.
e. Reference Column Name - Specify the column name that this report column references. This attribute compares references to columns across applications against User Interface Defaults. This reference is manually maintained after being initialized by a wizard, whenever possible.
5. Click Apply Changes.
Defining a Column as a List of Values in a Classic ReportA column can be rendered as Radio Group or a static, named, or query-based LOV. For example, a column can be rendered using a select list or a popup list of values. Or, a column can be rendered as read-only text based on a list of values.
This last approach is an effective strategy when creating display lookup values and is particularly useful in regular, nonupdatable reports. This approach enables you to display the value of a column without having to write a SQL JOIN statement.
To render a report column as a list of values:
1. Access the Classic Report Attributes page. See "Accessing Classic Report Attributes" on page 9-51.
The Report Attributes page appears.
2. Access the Column Attributes page by clicking the Edit icon next to the appropriate column.
The Column Attributes page appears. Next, specify how the column is rendered (radio group, LOV, select list, and so on).
3. Under Column Attributes, make a selection from the Display As list.
4. Scroll down to List of Values.
5. From Named LOV, make a selection from the List of Values repository.
6. To include a null value in a list of values:
a. In Display Null - Select Yes.
b. Null display value - Enter the display value for the NULL option here.
c. Null return value - Enter the NULL value to be used for this item's list of values. If you do not specify a value, the default is %null%.
A column can also have a value that does not display in its list of values.
7. To define a value that does not display in the list of values:
a. From Display Extra Value, select Yes.
The extra value is used if the actual column value is not part of the LOV. In that situation, the actual value is shown. If you do not display extra values, you may end up with the wrong value and unintentionally update your data incorrectly.

Editing Classic Reports
9-62 Oracle Application Express Application Builder User's Guide
b. In Null Value, specify the value that displays.
c. If you have not selected a Named LOV, enter the query used to display a select list in the LOV Query field.
8. If you have not selected a Named LOV, enter the query used to display a select list in List of values definition.
9. Click Apply Changes.
Controlling When Columns Display in a Classic ReportYou can use the Authorization and Condition attributes to control when a column displays.
Authorization enables you to control access to resources (such as a report column) based on predefined user privileges. For example, you could create an authorization scheme in which only managers can view a specific report column. Before you can select an authorization scheme, you must first create it.
A condition is a small unit of logic that enables you to control the display of a column based on a predefined condition type. The condition evaluates to true or false based on the values you enter in the Expressions fields.
To specify Authorization and Condition attributes:
1. Access the Classic Report Attributes page. See "Accessing Classic Report Attributes" on page 9-51.
The Report Attributes page appears.
2. Access the Column Attributes page by clicking the Edit icon next to the appropriate column.
The Column Attributes page appears.
3. Under Authorization, make a selection from the Authorization Scheme list.
4. Under Conditions, make a selection from the Condition Type list, and depending upon your selection, enter an expression or value in the appropriate Expression fields.
If the authorization is successful and the condition type display evaluates to true, the column displays.
Controlling Column Breaks in a Classic Report You can control if a specific column repeats and how column breaks appear when printed using Break Formatting attributes. For example, suppose your report displays employee information by department number. If multiple employees are members of the same department, you can increase the readability by specifying the department number only appears once.
To create this type of column break:
1. Access the Classic Report Attributes page. See "Accessing Classic Report Attributes" on page 9-51.
The Report Attributes page appears.
See Also: "Providing Security Through Authorization" on page 15-37, "Understanding Conditional Rendering and Processing" on page 2-4, and Appendix C, "Available Conditions" on page C-1

Printing Report Regions
Creating Reports 9-63
2. Scroll down to Break Formatting.
3. Make a selection from the Breaks list.
Synchronizing Classic Report Column Order with Region SourceTo synchronize a classic report's column order with the column order defined in the region source query:
1. Access the Classic Report Attributes page. See "Accessing Classic Report Attributes" on page 9-51.
The Report Attributes page appears.
2. From Tasks, select Synchronize Column Order with Region Source.
3. Click Synchronize.
Printing Report RegionsYou can configure a report region to print by exporting it to several different formats. Oracle BI Publisher supports Adobe Portable Document Format (PDF), Microsoft Word Rich Text Format (RTF), or Microsoft Excel format (XLS), or Extensible Markup Language (XML). The supplied OC4J with Apache FOP alternative only supports PDF and XML. If you choose to use other third-party rendering engines, other output formats can also be configured.
By taking advantage of report region printing, your application users can view and print reports that have a predefined orientation, page size, column headings, and page header and footer. Interactive reports also have the ability to export to PDF, RTF, Microsoft Excel and Comma Separated Values (CSV). Note that for interactive reports, it is not possible to define a custom report layout.
Topics:■ About Printing Reports to PDF
■ About Report Printing Configuration Options
■ About Classic Report Printing Methods
■ About Report Queries
■ About Report Layouts
■ Configuring Classic Report Region Print Attributes
■ Configuring Interactive Report Region Print Attributes
About Printing Reports to PDFTo print a report to PDF, the data must be transformed using a report server defined at the instance-level. From an end user’s perspective, they simply click a print link. However, from developer’s perspective, you must then declaratively create regions to support PDF printing.
Tip: If you run Oracle Application Express with Oracle Database 11g Release 1 (11.1) or higher, you must enable network services to use report printing. See "Enabling Network Services in Oracle Database 12c" on page 15-5

Printing Report Regions
9-64 Oracle Application Express Application Builder User's Guide
About Report Printing Configuration OptionsOracle Application Express provides three report printing configuration options:
■ Oracle Application Express Listener - Select this option if you are using the Oracle Application Express Listener 2.0 or higher. This option enables you to use the basic printing functionality, which includes creating report queries and printing report regions using the default templates provided in Application Express and using your own customized XSL-FO templates.
■ External (Apache FOP) - Select this option if you are using Apache FOP on an external J2EE server. This option enables you to use the basic printing functionality, which includes creating report queries and printing report regions using the default templates provided in Application Express and using your own customized XSL-FO templates.
■ Oracle BI Publisher - This option requires a valid license of Oracle BI Publisher (also known as Oracle XML Publisher). This option enables you to take report query results and convert them from XML to RTF format using Oracle BI Publisher. Select this option to upload your own customized RTF or XSL-FO templates for printing reports within Application Express.
To use the full functionality of report printing, your Oracle Application Express service administrator must enable it for your instance. To learn more, see "Configuring Report Printing" in Oracle Application Express Administration Guide.
About Classic Report Printing MethodsThere are two ways to print classic report regions:
■ Configure Printing Attributes for a Report Region. You can print a report region by configuring the Printing Attributes for the region. See "Configuring Classic Report Region Print Attributes" on page 9-70.
■ Create a Report Query. You can print a report by defining a report query as a Shared Component. See "About Report Queries" on page 9-65.
Both report regions and report queries can be downloaded in the following formats:
■ PDF - Adobe Portable Document Format.
■ RTF - Microsoft Word Rich Text Format.
■ XLS - Microsoft Excel format. Note that this is not a true .xls file because the content is HTML-based.
■ HTML
Note: The Oracle Application Express Listener option does not require an external print server, instead the report data and stylesheet are downloaded to the listener, rendered into PDF format by the listener and then sent to the client. The PDF documents in this setup are not returned back into the database, thus the print APIs are not supported when using the Oracle Application Express Listener-based configuration.
See Also: PDF Printing in Application Express to learn more about installing and configuring Oracle BI Publisher. Go to:
http://www.oracle.com/technetwork/developer-tools/apex/application-express/configure-printing-093060.html

Printing Report Regions
Creating Reports 9-65
■ XML - Extensible Markup Language.
To format either a report region or report query, you associate it with a report layout. To learn more, see "About Report Layouts" on page 9-67.
About Report QueriesYou can print a report region by defining a report query as a Shared Component. A report query identifies the data to be extracted. Unlike SQL statements contained in regions, report queries contain SQL statements that are validated when you save the query. Note that report queries must be SQL statements, not functions returning SQL statements.
You can associate a report query with a report layout and download it as a formatted document. If no report layout is selected, a generic layout is used. The generic layout is intended to be used to test and verify a report query. When using the generic layout option and multiple source queries are defined, only the first result set is included in the print document. The reports can include session state of the current application.
To make these reports available to end users, you then integrate them with an application. For example, you can associate a report query with a button, list item, branch, or other navigational component that enables you to use URLs as targets. Selecting that item then initiates the printing process.
Topics:■ Creating a Report Query
■ Editing a Report Query
■ Copying a Report Query
Creating a Report QueryNote that the availability of the report query options depends on how your service administrator configures report printing for your instance. All options described in these steps may not be available to you.
To create a report query:
1. Navigate to the Shared Components page. See "Accessing the Shared Components Page" on page 8-50.
2. Under Reports, click Report Queries.
3. Click Create.
4. For Query, specify the following information:
a. Report Query Name - Enter a name to identify the report query. When referencing a report query as a link target, the report query name is part of the request string.
Tip: You can also have the output format specified by an item that determines the output format at runtime. Select the item that holds the format value. Valid values are PDF, RTF (to open the document in Microsoft Word), XLS (to open the document in Microsoft Excel) and HTM (to download the document as an HTML file).
See Also: "About Report Printing Configuration Options" on page 9-64

Printing Report Regions
9-66 Oracle Application Express Application Builder User's Guide
b. Output Format - Select the report output format. Valid options include:
– PDF - Adobe Portable Document Format.
– Word - Microsoft Word Rich Text Format.
– Excel - Microsoft Excel format. Note that this is not a true .xls file because the content is HTML-based.
– HTML
– XML - Extensible Markup Language.
c. Item - Select the item to hold the format value. You can use this item to determine the output format at runtime.
d. View File As - Select how the web browser opens the report query document. Options include:
– Attachment - Displays a File Open/Save dialog box when the user clicks the report query download button.
– Inline - Displays the report query document inside the Browser window.
e. Session State - Select this check box to reference session state values, such as the values of page items in the XML structure of your report.
f. Click Next.
5. For SQL Query, enter a SQL statement directly or click Query Builder to build a SQL statement by clicking and pointing.
To reference applications and page items in the SQL statement, reference them as bind variables. Click Set Bind Variables to be able to enter in values for each bind variable and test the query to ensure the expected output is returned.
6. For Download Definition, specify the following:
a. Data Source for Report Layout - Use this option to download a report definition export file. Select XML Data or XML Schema and then click Download.
XML Schema creates XSD file (that is, a XML schema definition of your XML structure.)
b. Add Query - Click this button to add another query to the report query. Adding another query enables the production of complex reports with more than one output component (for example, a chart and a report based on two different queries).
c. Create Report Query - Click this button to exit the wizard early. The Report Layout Source defaults to use the generic report layout.
d. Click Next.
7. For Upload Report Layout, specify the following:
a. Report Layout Source - Specify how the report layout is derived. If you choose the report based file layout then the layout name and report layout file must be provided.
b. Layout Name - Enter a layout name (optional). The default is the report query name.
c. Report Layout File - Click Browse and select a Rich Text Format (RTF).
d. Click Next.

Printing Report Regions
Creating Reports 9-67
8. For Confirm:
a. Query Name - Identifies the query.
b. Report Layout - Identifies the report layout you selected.
c. Output Format - Identifies the format for this report query.
d. Derive from Item - Identifies the item to hold the format information.
e. URL - To integrate this report with your application, use the displayed URL as the target for a button, list item, link, or other navigational component. End users can click a button, for example, to start the printing process.
f. Test Report - Click this to preview your report. If you have chosen to use a generic report layout then the Test Report does not produce an output.
g. Click Finish.
The Report Query is created and saved to Shared Components.
Editing a Report QueryTo edit a report query:
1. Navigate to the Shared Components page. See "Accessing the Shared Components Page" on page 8-50.
2. Under Reports, click Report Queries.
3. On the Report Queries page, you can use the Navigation bar at the top of the page to search for a query by name or change the page display. For example, you can change the default display by making a selection from View list. Available options include:
■ Icons (the default) displays each query as a large icon. To edit a query, click the appropriate icon.
■ Details displays each query as a line in a report. To edit a query, click the name.
4. Select the appropriate report query. On the Edit Report Query page, edit the information.
5. Click Apply Changes.
Copying a Report QueryTo copy a report query:
1. Navigate to the Shared Components page. See "Accessing the Shared Components Page" on page 8-50.
2. Under Reports, click Report Queries.
3. On the Report Queries page, click Copy.
4. On the Copy Report Query, select the query you want to copy, enter a name for the report query, and click Copy.
The copy appears in the query list.
About Report LayoutsTo format either a classic report region or report query, you associate it with a report layout. Using report layouts renders the data in a printer-friendly format. If you do not

Printing Report Regions
9-68 Oracle Application Express Application Builder User's Guide
select a report layout, a default XSL-FO layout is used. The default XSL-FO layout is always used for rendering Interactive Report regions.
When creating and using report layouts, you can:
■ Take advantage of the default layouts for report regions and generic layouts for report queries provided with Oracle Application Express.
■ Utilize the built-in XSL-FO-based layouts for report regions by copying and customizing the code. You can edit several attributes for report regions that control page size, fonts, colors, and so on.
■ Create RTF or XSL-FO report layouts to customize the report look and feel. To use RTF report layouts, your Oracle Application Express service administrator must select the Advanced setting for your site. See "Configuring Report Printing" in Oracle Application Express Administration Guide.
Topics:■ About Report Layout Options
■ Creating a Report Layout
■ Editing Report Layouts
■ Copying Report Layouts
About Report Layout OptionsYou can create a report layout based on one of these options:
■ Generic Columns - A generic report layout works with most query result sets. With this layout, the number of columns is automatically adjusted when generating the printable document.
Many report layout attributes can be defined declaratively for report regions using the built-in XSL-FO default layout. This step allows for creating customizable copies of the built-in default XSL-FO layout, if additional control over the report layout is needed.
■ Named Columns - A named column report layout is a query-specific report layout designed to work with a defined list of columns in the query result set. This type of layout is used for custom-designed layouts when precise control of the positioning of page items and query columns is required.
Note that the availability of the Report Layout options depends on how your site administrator configured the report printing settings at your site. All options described in these steps may not be available to you.
Creating a Report LayoutTo create a report layout:
1. Navigate to the Shared Components page. See "Accessing the Shared Components Page" on page 8-50.
2. Under Reports, click Report Layouts.
3. Click Create.
The Create Report Layout wizard appears.
See Also: "Configuring Report Printing" in Oracle Application Express Administration Guide.

Printing Report Regions
Creating Reports 9-69
4. For Report Layout Type, select an option and click Next:
■ Generic Columns (XSL-FO) - This layout is pre-populated with a default template, which you can edit to fit your needs.
■ Named Columns (RTF) - This layout is uploaded as an RTF file.
■ Named Columns (XSL-FO) - This layout is uploaded as an XSL-FO file.
5. For Layout Source, review and edit the appropriate information. The options that appear on this page depend on the layout type you select:
■ If you selected Generic Columns:
a. Report Layout Name - Enter a name to identify the report layout when associating it with a report query or report region.
b. Report Layout - The report layout is the XSL-FO based definition of the page formatting. All attributes defining page size, orientation, fonts, styles, and so on, are defined in this section.
To see a list of valid substitution strings and other information, click the item label, Report Layout. This opens a separate Help window.
c. Report Column Heading - Defines the look of each cell in the report heading row.
d. Report Column - Defines the look of each cell for all report rows.
e. Report Column Width - This width is computed at runtime or can be derived from the report column definition of a report region.
■ If you selected Named Columns:
a. Layout Name - Enter a name to identify the report layout when associating it with a report query or report region.
b. 8.b)Report Layout File - Upload the file containing the report layout.
Editing Report LayoutsYou can edit a generic column report layout directly in Application Express. However, to edit a named column report layout, you must download the current file, edit it, and then upload it again.
To edit a report layout:
1. Navigate to the Shared Components page. See "Accessing the Shared Components Page" on page 8-50.
2. Under Reports, click Report Layouts.
3. On the Report Layouts page, select the layout you want to edit.
4. For generic column layouts, edit the layout directly on the Edit Report Layout page and then click Apply Changes.
5. For named column layouts, click Download and save the file to your computer.
Edit the file and then upload the updated version as a new report layout.
Copying Report LayoutsYou can copy a report layout to edit and save.
To copy a report layout:

Printing Report Regions
9-70 Oracle Application Express Application Builder User's Guide
1. Navigate to the Shared Components page. See "Accessing the Shared Components Page" on page 8-50.
2. Under Reports, click Report Layouts.
3. On the Report Layouts page, click Copy.
4. On the Copy Report Layout page, select the layout you want to copy, enter a name for the copy, and click Copy.
The copy appears in the layout list.
Configuring Classic Report Region Print AttributesOne approach to printing a report region is to configure Print Attributes. Once configured, these attributes only apply only to current region and cannot be used outside the context of the region.
If the printing feature is set up for your instance, you can configure a report region to print in various formats.
To configure a classic report region for printing:
1. In your application, select the page containing the classic report region you want to print.
The Page Definition appears.
2. Access the Report Attributes page. See "Accessing Classic Report Attributes" on page 9-51.
3. Click the Print Attributes tab.
4. Under Printing, specify the appropriate information:
a. Enable Report Printing - Select Yes.
b. Link Label - Enter the text for the link that starts the printing process.
c. Response Header - Specify whether the response header generated by Oracle Application Express is based on your Report Settings or the Print Server. The response header is the information the server sends back to the web browser in response to receiving an HTTP request. It contains the date, size and type of file that the server is sending back to the client and also data about the server itself. To specify content disposition (using the attribute View File As) and file name, the response header must be based on Report Settings.
d. View File As - Select how the web browser opens the report query document. Options include:
– Attachment - Displays a File Open/Save dialog box when the user clicks the report query download button.
– Inline - Displays the report query document inside the Browser window.
e. (Optional) File Name - Enter a name for the downloaded file. If you leave this blank, the region name is used as the file name.
f. Output Format - Select an output option.
See Also: "About Classic Report Printing Methods" on page 9-64 and "Configuring Report Printing" in Oracle Application Express Administration Guide

Printing Report Regions
Creating Reports 9-71
g. Item - Only enabled, if you select the Output Format Derived from Item. If enabled, select the application or page item that holds format value.
h. Report Layout - Select Default Report Layout to use the built-in generic report layout, or an available report layout you or your administrator created. See item Help for a listing of the supported substitution strings available when building custom XSL-FO report layouts.
i. Print Server Overwrite - Specify an alternate print server. A print server is typically configured centrally for all workspaces in Oracle Application Express Administration Services. See "Configuring Report Printing" in Oracle Application Express Administration Guide.
Configuring an alternative print server at the report level makes debugging and diagnosis of potential printing problems easier and supports the use of specific custom built end points to perform custom XSLT transformations.
j. Print URL - Report regions can be printed using the standard print link or using a page button. To use a button, remove the Link Label, create a button on your page, and use the URL shown in this attribute as the button target.
5. In the remaining sections, define page size, paper orientation, page headers and footers, fonts, text color, and background color.
6. Under Report Columns, specify the width for each column.
The default is to make each column the same width. The Total Width is a display only field that shows the sum of all column width values. When changing the width for an individual column the Total Width is automatically recalculated. If Column Width Units is set to Percentage, rather than Points, then the total column width must be less than or equal to 100.
Use the Reset Column Width button to reset the Column Width Units to Percentage and change all column widths back to their default value. The Recalculate button maintains the current ratios between column widths but reduce all column widths such that the Total Width is less than or equal to 100%.
7. Click Apply Changes.
Configuring Interactive Report Region Print AttributesUnlike classic reports, the Interactive Report Print Attributes can only use the default XSL-FO layout and is initiated from the Report Attributes, Download section rather than directly from this screen. Once configured, these attributes only apply only to the current region and cannot be used outside the context of the region.
If the printing feature is set up for your instance, you can configure a report region to print in various formats
To configure a interactive report region for printing:
1. In your application, select the page containing the interactive report region you want to print.
The Page Definition appears.
2. Under Regions, click Interactive Report next to the region you want to print.
3. Click the Print Attributes tab.
4. Under Printing, specify the appropriate information:
a. Response Header - Specify whether the response header generated by Oracle Application Express is based on your Report Settings or the Print Server. The

Printing Report Regions
9-72 Oracle Application Express Application Builder User's Guide
response header is the information the server sends back to the web browser in response to receiving an HTTP request. It contains the date, size and type of file that the server is sending back to the client and also data about the server itself. To specify content disposition (using the attribute View File As) and file name, the response header must be based on Report Settings.
b. View File As - Select how the web browser opens the report query document. Options include:
– Attachment - Displays a File Open/Save dialog box when the user clicks the report query download button.
– Inline - Displays the report query document inside the Browser window.
c. Print Server Overwrite - Specify an alternate print server. A print server is typically configured centrally for all workspaces in Oracle Application Express Administration Services. See "Configuring Report Printing" in Oracle Application Express Administration Guide.
Configuring an alternative print server at the report level allows for easier debugging and diagnosis of potential printing problems and supports the use of specific custom built end points to perform custom XSLT transformations.
5. In the remaining sections, define page size, paper orientation, page headers and footers, fonts, text color, and background color.
6. Click Apply Changes.

Adding Database Application Components and Controls 10-1
10Adding Database Application Components
and Controls
This section describes how to use Application Builder to create database application components (such as forms, calendars, maps, and charts) and page controls (such as buttons, list of values, shortcuts, and trees). To learn more about creating interactive and classic reports, see "Creating Reports" on page 9-1.
Topics:■ Creating Forms
■ Creating Calendars
■ Creating Maps
■ Creating Charts
■ Creating Buttons
■ Creating Lists of Values at the Application Level
■ Using Shortcuts
■ Creating Trees
■ Using the Find Icon
■ Controlling Access to Applications, Pages, and Page Components
■ Incorporating JavaScript into an Application
■ About jQuery and jQuery UI Support
■ Optimizing a Page for Printing
■ Creating a Help Page
Creating FormsYou can include a variety of different types of forms in your applications. You can include forms that enable users to update just a single row in a table or multiple rows at once. Application Builder includes several wizards you can use to create forms automatically, or you can create forms manually.
Topics:■ Creating a Form Using a Wizard
See Also: "Controlling Page Layout" on page 12-1 and "Adding Navigation" on page 11-1

Creating Forms
10-2 Oracle Application Express Application Builder User's Guide
■ Creating a Tabular Form
■ Creating a Master Detail Form
■ Creating a Form Manually
■ Validating User Input in Forms
Creating a Form Using a WizardThe easiest way to create a form is to use a wizard. For example, the Form on Table or View Wizard creates one item for each column in a table. It also includes the necessary buttons and processes required to insert, update, and delete rows from the table using a primary key. Each region has a defined name and display position; all other attributes are items, buttons, processes, and branches.
To create a form using a wizard:
1. On the Workspace home page, click the Application Builder icon.
2. Select an application.
3. Click Create Page.
4. Select Form and click Next.
5. Under Forms, select a type of form page as described in Table 10–1.
See Also: "Creating Reports" on page 9-1
Table 10–1 Form Page Types
Form Page Type Description
Form on a Procedure Builds a form based on stored procedure arguments. Use this approach when you have implemented logic or data manipulation language (DML) in a stored procedure or package.
Form on a Table or View Creates a form that enables users to update a single row in a database table.
Form on a Table with Report
Creates two pages. One page displays a report. Each row provides a link to the second page to enable users to update each record.
Note: This wizard does not support tables having more than 127 columns. Selecting more than 127 columns generates an error.
Master Detail Form Creates a form that displays a master row and multiple detail rows within a single HTML form. With this form, users can query, insert, update, and delete values from two tables or views.
See Also: "Creating a Master Detail Form" on page 10-10
Tabular Form Creates a form in which users can update multiple rows in a database.
See Also: "Creating a Tabular Form" on page 10-3
Form on a SQL Query Creates a form based on the columns returned by a SQL query such as an EQUIJOIN.
Summary Page Creates a read-only version of a form. Typically used to provide a confirmation page at the end of a wizard.

Creating Forms
Adding Database Application Components and Controls 10-3
6. Follow the on-screen instructions. To learn more about a specific field, click the item label.
When help is available, the cursor changes to an arrow and question mark when you pass the cursor over an item. See "About Field-Level Help" on page 1-13.
Creating a Tabular FormA tabular form enables users to update multiple rows in a table at once from a single page. If created using a wizard, a tabular forms enables you to perform update, insert, and delete operations on multiple rows in a database table. This form includes a built-in multiple row update process that performs optimistic locking behind the scenes to maintain the data integrity.
Topics:■ About Tabular Forms
■ How Tabular Forms Work
■ Creating a Tabular Form Using the Create Application Wizard
■ Creating a Tabular Form Using the Create Page Wizard
■ Synchronizing Tabular Form Column Order with Region Source
About Tabular FormsThere are two primary methods for creating tabular forms:
■ Create Application Wizard
■ Create Page Wizard
Tabular forms created using these wizards include automatic DML processes. These wizards create a form that performs update, insert, and delete operations on multiple rows in a database table. Alternatively, you can build a tabular form manually either by creating a updatable report region or standard report region with updatable columns with custom PL/SQL page processes to process the tabular form data.
Form on Web Service Creates a page with items based on a Web service definition. This wizard creates a user input form, a process to call the Web service, and a submit button.
See Also: "Creating a Form on a Web Service" on page 17-17
Form and Report on Web Service
Creates a page with items based on a Web service definition. This wizard creates a user input form, a process to call the Web service, a submit button, and displays the results returned in a report.
See Also: "Creating an Input Form and Report on a Web Service" on page 17-15
Note: Oracle does not recommend modifications of the select list of a SQL statement of a tabular form after it has been generated using a wizard. If you do modify the query, make sure the values of the updatable columns are not altered after being queried from the database by the Application Express engine.
Table 10–1 (Cont.) Form Page Types
Form Page Type Description
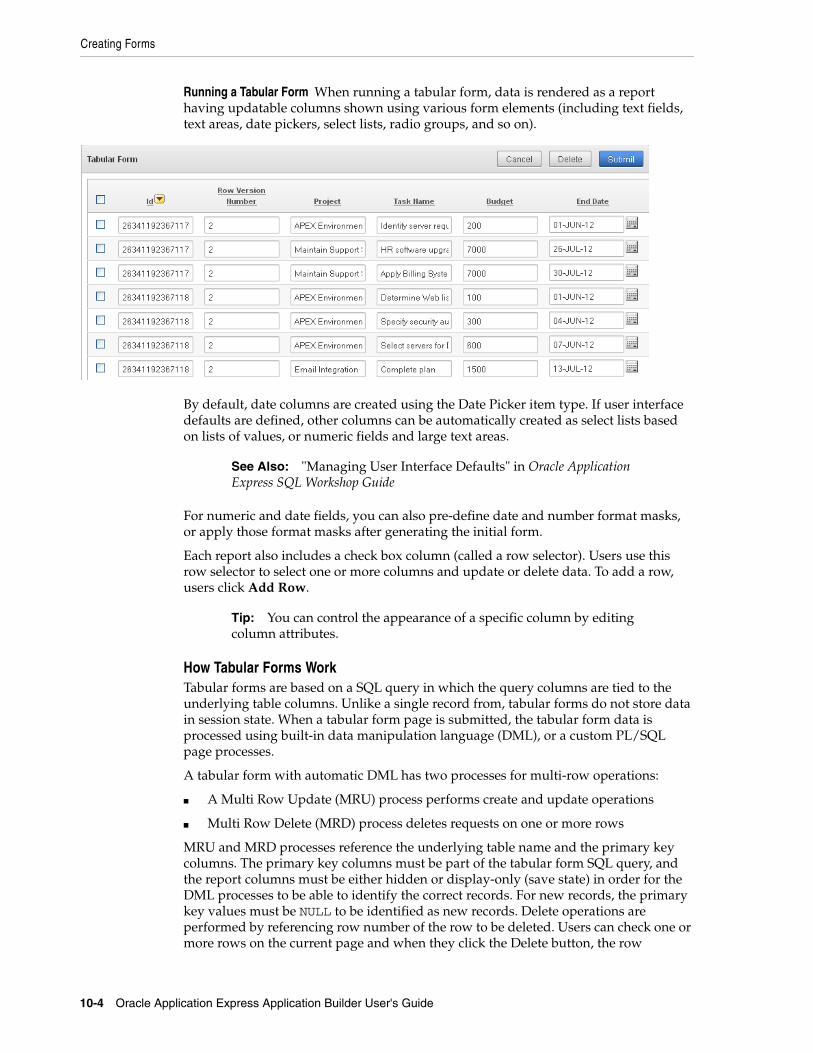
Creating Forms
10-4 Oracle Application Express Application Builder User's Guide
Running a Tabular Form When running a tabular form, data is rendered as a report having updatable columns shown using various form elements (including text fields, text areas, date pickers, select lists, radio groups, and so on).
By default, date columns are created using the Date Picker item type. If user interface defaults are defined, other columns can be automatically created as select lists based on lists of values, or numeric fields and large text areas.
For numeric and date fields, you can also pre-define date and number format masks, or apply those format masks after generating the initial form.
Each report also includes a check box column (called a row selector). Users use this row selector to select one or more columns and update or delete data. To add a row, users click Add Row.
How Tabular Forms WorkTabular forms are based on a SQL query in which the query columns are tied to the underlying table columns. Unlike a single record from, tabular forms do not store data in session state. When a tabular form page is submitted, the tabular form data is processed using built-in data manipulation language (DML), or a custom PL/SQL page processes.
A tabular form with automatic DML has two processes for multi-row operations:
■ A Multi Row Update (MRU) process performs create and update operations
■ Multi Row Delete (MRD) process deletes requests on one or more rows
MRU and MRD processes reference the underlying table name and the primary key columns. The primary key columns must be part of the tabular form SQL query, and the report columns must be either hidden or display-only (save state) in order for the DML processes to be able to identify the correct records. For new records, the primary key values must be NULL to be identified as new records. Delete operations are performed by referencing row number of the row to be deleted. Users can check one or more rows on the current page and when they click the Delete button, the row
See Also: "Managing User Interface Defaults" in Oracle Application Express SQL Workshop Guide
Tip: You can control the appearance of a specific column by editing column attributes.

Creating Forms
Adding Database Application Components and Controls 10-5
numbers identify the corresponding primary key value(s) and the matching rows are deleted.
Wizard generated tabular forms built-in DML, include a checksum column to prevent lost updates. Using a method called optimistic locking, a checksum is computed for each row when rendering a tabular form. This checksum is stored in an extra hidden tabular form column. Upon submission of the form for update, an additional set of checksums is computed on the then current data stored in the database. The new checksums are compared to those built when the tabular form was first rendered, and if there are any mismatches, the update is rejected, because the data in the database was either modified by another user or anther process in the time between the tabular form was rendered and the time the data was submitted.
Wizard generated tabular forms also automatically create validations for some columns. Validations are created for columns that are set to NOT NULL in the underlying table and columns of type NUMBER, DATE or TIMESTAMP. Note that validations are not created for columns if the column is set to read-only, either based on the user's selection, or defined user interface defaults.
Creating a Tabular Form Using the Create Application WizardThe Create Application Wizard is designed to quickly create a basic Oracle Application Express application consisting of multiple pages and components. For that reason, this wizard uses general best practices to generate the application and does not include several advanced options included in the Create Page Wizard.
To create a tabular form using the Create Application Wizard:
1. On the Workspace home page, click the Application Builder icon.
2. Click the Create button.
3. For Method, select Database and click Next.
4. For Name:
a. Application - Enter a unique integer value to identify the application. Application IDs between 3000 to 9000 are reserved for internal use by Oracle Application Express.
b. Name - Enter a name to identify the application.
c. Schema - Each application obtains its privileges by parsing all SQL as a specific database schema. Identify the database schema owner.
d. Create Options:
– Start from scratch - Enables you to manually add all pages.
– Include Home page - Includes a blank page, which automatically acts as the parent of any new pages added. A list region is also created on the home page, providing navigation to the additional pages.
– Use previously created application model - Reuses an existing application definition. Using an existing application definition enables you to run this wizard without reentering application property values.
Tip: When creating a tabular form, Oracle recommends using a generic column template and avoiding column report templates. See "Report Templates" on page 13-39.

Creating Forms
10-6 Oracle Application Express Application Builder User's Guide
Note that you still have to define all other application attributes, or you can choose to copy some attributes by choosing to copy shared compo-nents from another application.
e. User Interface - Select a user interface for the application. For application primarily designed for desktop use, select Desktop.
f. Click Next.
5. Under Add Page:
a. Select Page Type - Select Tabular Form.
b. Subordinate to Page - If applicable, select a subordinate page. To learn more, see item Help.
c. Table Name - Select a table.
d. Click Add Page.
The new page appears at the top of the page.
e. Click Next.
6. For Shared Components, indicate whether to copy shared components from another application. Select Yes or No. If you select Yes, select where to copy them from and which components to import.
Shared components are common application elements that can be displayed or applied across multiple pages in an application. To save time or maintain consistency between applications, copy the shared components from an existing application. The types of shared components you can copy include: user interface themes, lists of values, navigation bar entries, authorization schemes and authentication schemes.
7. For Attributes:
a. Authentication Scheme - Determines how to establish user identity before accessing an application. Options include:
– Application Express - Uses the user account credentials created and maintained with the Application Express Service Administration application. These are the accounts you use to log in to the Application Express development environment. You can also create accounts in this user account repository for end users of your applications.
– Database Account - Requires users logging into your application to enter a database schema name (or user name) and a password in order to authenticate. This account information is managed entirely within the Oracle database.
– No Authentication - Also known as Database Account Credentials. This option enables users to access your application using the account credentials stored in the mod_plsql DAD definition. In most cases this results in users not having to login when accessing your application. This is the quickest way to create a “public” application.
To learn more, see "Establishing User Identity Through Authentication" on page 15-25
b. Tabs - Select whether to include tabs in your application. You can create one level tabs, two level tabs, or no tabs at all. To learn more, see "Creating Tabs" on page 11-1

Creating Forms
Adding Database Application Components and Controls 10-7
This attribute identifies the language in which an application is developed. This language is the base language from which all translations are made.
c. Language - Select the primary language for this application.
This attribute identifies the language in which an application is developed. This language is the base language from which all translations are made.
d. User Language Preference Derived From - Specifies how the engine determines the application language. The application primary language can be static (that is, derived from the web browser language) or determined from a user preference or item. The database language setting determines date display and sorting characteristics. To learn more, see item Help.
You can alter the Language and User Language Preference Derived From attributes later on the Edit Globalization attributes page. See "Configuring Globalization Attributes" on page 7-27.
e. Date Format - Specifies the date format to be used in the application.
This date format is used to alter the NLS_DATE_FORMAT database session setting before showing or submitting any page within the application. This value can be a literal string containing a valid Oracle date format mask or an item reference through substitution syntax. If no value is specified, the default date format is derived from the database session at runtime. If supplied, this is also used as the date format for any items resulting from columns of type DATE.
f. Date Time Format - Specifies the date time format to be used in the application.
This date time format can be referenced in an application using the substitution reference &APP_DATE_TIME_FORMAT., or in PL/SQL using the function v('APP_DATE_TIME_FORMAT'). This attribute does not alter any NLS settings. This value can be a literal string containing a valid Oracle date format mask or an item reference using substitution syntax. If this attribute value is not specified, then a reference to APP_DATE_TIME_FORMAT returns the NLS database session date format and the NLS time format.
g. Timestamp Format - Specifies the timestamp format to be used in your application.
This timestamp format is used to alter the NLS_TIMESTAMP_FORMAT database session setting before showing or submitting any page within the application. This value can be a literal string containing a valid Oracle timestamp format mask or an item reference through substitution syntax. If no value is specified, the default timestamp format is derived from the database session at runtime.
h. Timestamp Time Zone Format - Specifies the timestamp with time zone format to be used in your application.
This timestamp with time zone format is used to alter the NLS_TIMESTAMP_TZ_FORMAT database session setting before showing or submitting any page within the application. This value can be a literal string containing a valid Oracle timestamp with time zone format mask or an item reference through substitution syntax. If no value is specified, the default timestamp with time zone format is derived from the database session at runtime.
i. Click Next.
8. For User Interface Theme, select a theme and click Next.

Creating Forms
10-8 Oracle Application Express Application Builder User's Guide
Themes are collections of templates that you can use to define the layout and style of an entire application. See "Managing Themes" on page 13-1.
9. Confirm your selections and click Create.
Creating a Tabular Form Using the Create Page WizardUse the Create Page Wizard to add a tabular form to an existing application. Once you provide a table name on which to build the tabular form, the wizard reads the table columns from the database data dictionary.
Tabular forms perform insert, update and delete operations on table rows. Unlike with the Create Application Wizard, when you create a tabular form using the Create page Wizard you determine how rows are identified. You can either specify a primary key defined on the table, or a ROWID pseudo column, which uniquely identifies a row in a table. If you choose to select a primary key, you can choose between three different primary key source types: trigger, PL/SQL function, and sequence.
To create a tabular form using the Create Page Wizard:
1. On the Workspace home page, click the Application Builder icon.
2. Select an application.
3. Click Create Page.
4. Select Form and click Next.
5. Select Tabular Form and click Next.
The Create Tabular Form Wizard appears.
6. For Table and Columns, specify the following:
a. Table/View Owner - Select the table or view owner on which to base the tabular form.
b. Table/View Name - Select the table or view which contains the columns to be included in the tabular form region.
c. Select Columns - Select one or more columns to be included in the tabular form. In the pages that follow you define which columns should be updatable.
d. Allowed Operations - Select the operations to be performed on the table (for example, Update, Insert and Delete).
e. User Interface Defaults - Select whether to use user interface defaults. See item Help for more information and "Managing User Interface Defaults" in Oracle Application Express SQL Workshop Guide.
f. Click Next.
Next, define a primary key. Tabular forms perform insert, update and delete operations on table rows in the database. You identify the rows by using either a primary key defined on the table, or the ROWID pseudo column, which uniquely identifies a row in a table.
See Also: "Managing User Interface Defaults" in Oracle Application Express SQL Workshop Guide
Tip: When creating a tabular form, Oracle recommends using a generic column template and avoiding column report templates. See "Report Templates" on page 13-39.

Creating Forms
Adding Database Application Components and Controls 10-9
7. For Primary Key, select one of the following:
■ Managed by Database (ROWID) - The tabular form uses the ROWID pseudo column to identify rows to update and delete.
■ Select Primary Key Column(s) - The tabular form uses the source table's primary key column(s).
8. If you select Managed by Database (ROWID), click Next to continue.
9. If you select Select Primary Key Column(s):
a. Primary Key Column 1 - Select the first column of the primary key.
b. Primary Key Column 2 - If you have a compound primary key, specify the second primary key column in this attribute. This attribute is optional.
c. Click Next.
d. For Source Type, select the method by which the primary key is populated:
– Existing trigger - Select this option if a before-insert trigger populates the primary key. You can also select this option if you plan on specifying the primary key column source later after completing the form.
– Custom PL/SQL function - Select this option to provide a PL/SQL function to generate returning key value.
– Existing sequence - Select this option to pick the sequence from a list of sequences available in the selected schema.
e. Click Next.
10. For Updatable Columns:
a. Updatable Columns - Select the updatable columns to include in the form.
You can modify the column order or your SQL query after you create the page.
b. Click Next.
11. For Page and Region Attributes:
a. Page - Select a page to contain the new updatable report, or enter a new page number.
b. Page Name - If you are creating a new page, enter a name.
c. Region Title - Enter a name for the region in which the updatable report appears.
d. Region Template - Select a region template for the updatable report region.
e. Report Template - Select a report template.
f. Breadcrumb - Select whether you want to use a breadcrumb navigation control on your page, and which breadcrumb navigation control you want to use.
g. Click Next.
12. For Tab Options, select an option that describes how tabs display on the page and click Next.
13. For Buttons and Branching:
a. Cancel Button Label - Enter text to display on the Cancel button.
b. Branch to Page - Specify the page number to branch to when the user clicks Cancel.

Creating Forms
10-10 Oracle Application Express Application Builder User's Guide
c. Submit Button Label - Enter text to display on the Submit button.
d. Branch to Page - Specify the page number to branch to when the user clicks Submit.
e. Delete Button Label - Enter text to display on the Delete button.
f. Add Row Button Label - Enter text to display on the Add Row button label.
g. Click Next.
14. Click Create.
A success message appears.
Synchronizing Tabular Form Column Order with Region SourceTo synchronize a classic report's column order with the column order defined in the region source query:
1. On the Workspace home page, click the Application Builder icon.
2. Select the application.
3. Select a page containing the tabular form.
The Page Definition appears.
4. To access the Report Attributes page:
■ Tree view - Right-click Tabular Form region and select Edit Report Attributes.
■ Component view - Click the Report link next to the Tabular Form region.
5. From Tasks, select Synchronize Column Order with Region Source.
6. Click Synchronize.
Creating a Master Detail FormA master detail form reflects a one-to-many relationship between two tables in a database. Typically, a master detail form displays a master row and multiple detail rows within a single HTML form. With this form, users can insert, update, and delete values from two tables or views.
Topics:■ About Master Detail Forms
■ Creating a Master Detail Form Using the Create Application Wizard
■ Create a Master Detail Form Using the Create Page Wizard
About Master Detail FormsWhen running a master detail form, data is rendered as a report using various form elements (including text fields, text areas, date pickers, select lists, radio groups, and so on). By default, date columns are created using the Date Picker item type. If user interface defaults are defined, other columns can be automatically created as select lists based on lists of values, or numeric fields and large text areas.

Creating Forms
Adding Database Application Components and Controls 10-11
On the Master Detail, the master record displays as a standard form and the detail records display in a tabular form at the bottom of the page. Click Add Item to Order to add a new row.
For numeric and date fields, you can also pre-define date and number format masks, or apply those format masks after generating the initial form. Wizard generated master detail forms also automatically create validations for some columns. Validations are created for columns that are set to NOT NULL in the underlying table and columns of type NUMBER, DATE or TIMESTAMP. Note that validations are not created for columns if the column is set to read-only, either based on the user's selection, or defined user interface defaults.
Creating a Master Detail Form Using the Create Application WizardThe Create Application Wizard is designed to quickly create a basic Oracle Application Express application consisting of multiple pages and components. This wizard uses general best practices to generate the application and does not include several advanced options included in the Create Page Wizard.
To create a master detail form using the Create Application Wizard:
1. On the Workspace home page, click the Application Builder icon.
2. Click the Create button.
See Also: "Managing User Interface Defaults" in Oracle Application Express SQL Workshop Guide
Tip: You can control the appearance of a specific column by editing column attributes.

Creating Forms
10-12 Oracle Application Express Application Builder User's Guide
3. For Method, select Database and click Next.
4. For Name:
a. Application - Enter a unique integer value to identify the application. Application IDs between 3000 to 9000 are reserved for internal use by Oracle Application Express.
b. Name - Enter a name to identify the application.
c. Schema - Each application obtains its privileges by parsing all SQL as a specific database schema. Identify the database schema owner.
d. Create Options:
– Start from scratch - Enables you to manually add all pages.
– Include Home page - Includes a blank page, which automatically acts as the parent of any new pages added. A list region is also created on the home page, providing navigation to the additional pages.
– Use previously created application model - Reuses an existing application definition. Using an existing application definition enables you to run this wizard without reentering application property values.
Note that you still have to define all other application attributes, or you can choose to copy some attributes by choosing to copy shared compo-nents from another application.
e. User Interface - Select a user interface for the application. For application primarily designed for desktop use, select Desktop.
f. Click Next.
Next, add pages to your application.
5. For Pages:
a. Select Page Type - Select Master Detail.
b. Subordinate to Page - If applicable, select a subordinate page. To learn more, see item Help.
c. Master Table Name - Select the table or view to be used as your master table. This table is used to create a report page and a master form on the master detail page.
d. Detail Table Name - Select the table or view to be used as your detail table.
Only tables and views that are associated to your selected Master Table using a foreign key are displayed.
e. Click Add Page.
The new pages appear at the top of the page.
f. Click Next.
6. For Shared Components, indicate whether to copy shared components from another application. Select Yes or No. If you select Yes, select where to copy them from and which components to import.
Tip: To create an instant application consisting of just a login page and blank page, click the Create Application button.

Creating Forms
Adding Database Application Components and Controls 10-13
Shared components are common application elements that can be displayed or applied across multiple pages in an application. To save time or maintain consistency between applications, copy the shared components from an existing application. The types of shared components you can copy include: user interface themes, lists of values, navigation bar entries, authorization schemes and authentication schemes.
7. For Attributes:
a. Authentication Scheme - Determine how establish user identity before accessing an application. Options include:
– Application Express - Uses the user account credentials created and maintained with the Oracle Application Express Service Administration application. These are the accounts you use to log in to the Application Express development environment. You can also create accounts in this user account repository for end users of your applications.
– Database Account - Requires users logging into your application to enter a database schema name (or user name) and a password in order to authenticate. This account information is managed entirely within the Oracle database.
– No Authentication - Also known as Database Account Credentials. This option enables users to access your application using the account credentials stored in the mod_plsql DAD definition. In most cases this results in users not having to login when accessing your application. This is the quickest way to create a “public” application.
To learn more, see "Establishing User Identity Through Authentication" on page 15-25
b. Tabs - Select whether to include tabs in your application. You can create one level tabs, two level tabs, or no tabs at all. To learn more, see "Creating Tabs" on page 11-1
This attribute identifies the language in which an application is developed. This language is the base language from which all translations are made.
c. Language - Select the primary language for this application.
This attribute identifies the language in which an application is developed. This language is the base language from which all translations are made.
d. User Language Preference Derived From - Specifies how the engine determines the application language. The application primary language can be static (that is, derived from the web browser language) or determined from a user preference or item. The database language setting determines date display and sorting characteristics. To learn more, see item Help.
You can alter the Language and User Language Preference Derived From attributes later on the Edit Globalization attributes page. See "Configuring Globalization Attributes" on page 7-27.
e. Date Format - Specifies the date format to be used in the application.
This date format is used to alter the NLS_DATE_FORMAT database session setting before showing or submitting any page within the application. This value can be a literal string containing a valid Oracle date format mask or an item reference through substitution syntax. If no value is specified, the default date format is derived from the database session at runtime. If supplied, this is

Creating Forms
10-14 Oracle Application Express Application Builder User's Guide
also used as the date format for any items resulting from columns of type DATE.
f. Date Time Format - Specifies the date time format to be used in the application.
This date time format can be referenced in an application using the substitution reference &APP_DATE_TIME_FORMAT., or in PL/SQL using the function v('APP_DATE_TIME_FORMAT'). This attribute does not alter any NLS settings. This value can be a literal string containing a valid Oracle date format mask or an item reference using substitution syntax. If this attribute value is not specified, then a reference to APP_DATE_TIME_FORMAT returns the NLS database session date format and the NLS time format.
g. Timestamp Format - Specifies the timestamp format to be used in your application.
This timestamp format is used to alter the NLS_TIMESTAMP_FORMAT database session setting before showing or submitting any page within the application. This value can be a literal string containing a valid Oracle timestamp format mask or an item reference through substitution syntax. If no value is specified, the default timestamp format is derived from the database session at runtime.
h. Timestamp Time Zone Format - Specifies the timestamp with time zone format to be used in your application.
This timestamp with time zone format is used to alter the NLS_TIMESTAMP_TZ_FORMAT database session setting before showing or submitting any page within the application. This value can be a literal string containing a valid Oracle timestamp with time zone format mask or an item reference through substitution syntax. If no value is specified, the default timestamp with time zone format is derived from the database session at runtime.
i. Click Next.
8. For User Interface Theme, select a theme and click Next.
Themes are collections of templates that you can use to define the layout and style of an entire application. See "Managing Themes" on page 13-1.
9. Confirm your selections and click Create Application.
Create a Master Detail Form Using the Create Page WizardThe Create Page Wizard provides support for creating a master detail from two tables that do not have foreign key relationship defined in the database. Although Oracle recommends the use of foreign keys and properly defined relationships in the underlying database, developers do not always have the ability to modify their database model.
When created using a wizard, the master form on a master detail form page includes buttons that enable the user to move forward and backward within the master result set. While running the wizard, you choose which columns determine the navigation order. You also have the option to choose whether to create a two-page or three-page master detail form, with the detail records shown in a report with single-record editing on a separate page.
To create a master detail form using the Create Page Wizard:
1. On the Workspace home page, click the Application Builder icon.
2. Select an application.

Creating Forms
Adding Database Application Components and Controls 10-15
3. Click Create Page.
4. Select Form and click Next.
5. Select Master Detail Form and click Next.
The Master Detail Wizard appears.
6. On Define Master Table:
a. Table/View Owner - Select the schema that owns the master table.
b. Table/View Name - Select the table or view which contains the columns to be included in the master page.
The columns in that object display.
c. Click Next.
7. On Define Detail Table:
a. Show Only Related Tables - Specify whether to restrict the list of detail tables to only those tables related to the master table. Select Yes or No.
b. Table/View Owner - Select the table or view owner. The default selected owner for the table or view is the same owner as for your application. If the owner of your application has select privileges on tables or views in other schemas, you may select another schema.
c. Table/View Name - Select the table or view which contains the columns to be included in the detail page.
The columns in that object appear.
d. Select columns for detail page - Select the columns to display in your detail page. You may add columns later.
e. Click Next.
Next, define a primary key. Forms perform insert, update and delete operations on table rows in the database. You identify the rows by using either a primary key defined on the table, or the ROWID pseudo column, which uniquely identifies a row in a table.
8. For Define Primary Key, select one for each table:
■ Managed by Database (ROWID) - Use the ROWID pseudo column to identify rows to update and delete.
■ Select Primary Key Column(s) - Use the source table's primary key column(s).
9. If you select Managed by Database (ROWID):
a. Click Next.
b. For Master Options, define the relationship between the Master and Detail tables. You may type in the column names (fully qualified with table names), or choose them from the list. Click Next.
c. Click Next.
10. If you select Select Primary Key Column(s):
a. On Define Primary Key, select the following for each table:
– Primary Key Column 1 - Select the first column of the primary key.
– Primary Key Column 2 - If you have a compound primary key, specify the second primary key column in this attribute. This attribute is optional

Creating Forms
10-16 Oracle Application Express Application Builder User's Guide
– Click Next.
b. For Primary Key Source, select the method by which the primary key is populated and click Next.
– Existing trigger - Select this option if a before-insert trigger populates the primary key. You can also select this option if you plan on specifying the primary key column source later after completing the form.
– Custom PL/SQL function - Select this option to provide a PL/SQL function to generate returning key value.
– Existing sequence - Select this option to pick the sequence from a list of sequences available in the selected schema.
c. For Master Options, specify whether to include master row navigation and click Next.
If you include master row navigation, define navigation order columns. If a navigation order column is not defined, the master update form navigates by the primary key column.
d. Click Next.
11. On Layout, specify how to build the master detail and click Next. Options include:
■ Edit detail as tabular form on same page creates a two page master detail. Edit detail on separate page creates a three page master detail.
■ Edit detail on separate page creates a three page master detail.
12. On Page Attributes:
a. Page Attributes - Review and edit the master page and detail page information.
b. Breadcrumb - Specify whether to create a breadcrumb. To create breadcrumbs entries:
– Entry Name (Master Report) - Specify the name of the breadcrumb entry for the master report page.
– Entry Name (Master Detail Page) - Specify the name of the breadcrumb entry for the master detail page.
– Select Parent Entry - Select a parent entry for this breadcrumb entry.
– Parent Entry - This item displays if you have chosen a parent entry.
c. Click Next.
13. On Tab Options, specify whether to include a tab set and click Next.
14. Click Create.
Creating a Form ManuallyYou can also create a form manually by performing the following steps:
■ Step 1 - Create an HTML region (to serve as a container for your page items).
■ Step 2 - Create items to display in the region.
■ Step 3 - Create processes and branches.
To create a form manually by creating an HTML region:

Creating Forms
Adding Database Application Components and Controls 10-17
1. Navigate to the appropriate Page Definition. See "Accessing the Page Definition" on page 8-2.
2. Create an HTML region. See "Creating a Region" on page 12-3.
3. Start adding items to the page. "Creating Page-Level Items" on page 7-58.
Processing a FormOnce you create a form, the next step is to process the data a user types by inserting into or updating the underlying database tables or views. There are three ways to process a form:
■ Creating an Automatic Row (DML) Processing Process
■ Creating a Process that Contains One or More Insert Statements
■ Using a PL/SQL API to Process Form Values
Creating an Automatic Row (DML) Processing Process One common way to implement a form is to manually create an Automatic Row Processing (DML) process. This approach offers three advantages. First, you are not required to provide any SQL coding. Second, Oracle Application Express performs DML processing for you. Third, this process automatically performs lost update detection. Lost update detection ensures data integrity in applications where data can be accessed concurrently.
To implement this approach you must:
■ Add items, define the Item Source Type as Database Column, and specify a case-sensitive column name.
■ Select the option Always overrides the cache value.
To create an Automatic Row Processing (DML) process:
1. Navigate to the appropriate Page Definition. See "Accessing the Page Definition" on page 8-2
2. Access the Create Page Process Wizard:
■ Tree view - Under the appropriate location, right-click and click Create Process.
■ Component view - Under Processes, click the Create icon.
3. Under Processes, click the Create icon.
4. Select the process Data Manipulation.
5. Select the process category Automatic Row Processing (DML).
6. Specify the following process attributes:
a. In the Name field, enter a name to identify the process.
b. In the Sequence field, specify a sequence number.
c. From the Point list, select the appropriate processing point. In most instances, select Onload - After Header.
d. From the Type list, select Automated Row Processing (DML).
7. Follow the on-screen instructions.
Creating a Process that Contains One or More Insert Statements In this approach to form handling, you create one or more processes to handle insert, update, and delete

Creating Forms
10-18 Oracle Application Express Application Builder User's Guide
actions. Instead of having the Application Express engine handling everything transparently, you are in complete control.
For example, suppose you have a form with three items:
■ P1_ID - A hidden item to store the primary key of the currently displayed row in a table.
■ P1_FIRST_NAME - A text field for user input.
■ P1_LAST_NAME - A text field for user input.
Assume also there are three buttons labeled Insert, Update, and Delete. Also assume you have a table T that contains the columns id, first_name, and last_name. The table has a trigger that automatically populates the ID column when there is no value supplied.
To process the insertion of a new row, you create a conditional process of type PL/SQL that executes when the user clicks the Insert button. For example:
BEGIN INSERT INTO T ( first_name, last_name ) VALUES (:P1_FIRST_NAME, :P1_LAST_NAME);END;
To process the updating of a row, you create another conditional process of type PL/SQL. For example:
BEGIN UPDATE T SET first_name = :P1_FIRST_NAME, last_name = :P1_LAST_NAME WHERE ID = :P1_ID;END;
To process the deletion of a row, you create a conditional process that executes when the user clicks the Delete button. For example:
BEGIN DELETE FROM T WHERE ID = :P1_ID;END;
Using a PL/SQL API to Process Form Values For certain types of applications, it is appropriate to centralize all access to tables in a single or a few PL/SQL packages. If you created a package to handle DML operations, you can call procedures and functions within this package from an After Submit PL/SQL process to process insert, updates, and delete requests.
Populating FormsOracle Application Express populates a form either on load or when the Application Express engine renders the page. You can populate a form in the following ways:
■ Create a process and define the type as Automated Row Fetch.
■ Populate the form manually by referencing a hidden session state item.
To create an Automated Row Fetch process:
1. Navigate to the appropriate Page Definition. See "Accessing the Page Definition" on page 8-2.

Creating Forms
Adding Database Application Components and Controls 10-19
2. Access the Create Page Process Wizard:
■ Tree view - Under the appropriate location, right-click and click Create Process.
■ Component view - Under Processes, click the Create icon.
3. Select the process type Data Manipulation.
4. Select the process category Automatic Row Fetch.
5. Specify the following process attributes:
a. In the Name field, enter a name to identify the process.
b. In the Sequence field, specify a sequence number.
c. From the Point list, select the appropriate processing point.
d. From the Type list, select Automated Row Fetch.
6. Follow the on-screen instructions.
You can also populate a form manually by referencing a hidden session state item. For example, the following code in an Oracle Application Express process of type PL/SQL would set the values of ename and sal. The example also demonstrates how to manually populate a form by referencing a hidden session state item named P2_ID.
FOR C1 in (SELECT ename, salFROM emp WHERE ID=:P2_ID)LOOP :P2_ENAME := C1.ename; :P2_SAL := C1.sal;END LOOP;
In this example:
■ C1 is an implicit cursor.
■ The value of P2_ID has been set.
■ The process point for this process would be set to execute (or fire) on or before Onload - Before Regions.
Validating User Input in FormsYou can use validations to check data a user enters before processing. Once you create a validation and the associated error message, you can associate it with a specific item. You can choose to have validation error messages display inline (that is, on the page where the validation is performed) or on a separate error page.
Creating an inline error message involves these steps:
■ Create a validation and specify error message text. To learn more, see "Creating Item and Page Validations" on page 8-33.
■ Associate the validation with a specific item.
Topics:■ Associating a Validation with a Specific Item
■ About Error Message

Creating Calendars
10-20 Oracle Application Express Application Builder User's Guide
Associating a Validation with a Specific ItemTo associate an item with a validation and specify error message text:
1. Navigate to the appropriate Page Definition. See "Accessing the Page Definition" on page 8-2.
2. Navigate to the Edit Page Validations page:
■ Tree view - Right-click the validation name and click Edit.
■ Component view - Under Validations, select the validation item you want to associate.
The attributes page for the validation appears.
3. Scroll down to Error Message:
■ Error message display location - Verify the display location.
■ Associated Item - Select the item you want to associate with this validation.
4. Click Apply Changes.
About Error MessageError message display location identifies where a validation error message displays. Validation error messages can display on an error page or inline within the existing page. Inline error messages can display in a notification area (defined as part of the page template) or within the field label.
To create a hard error that stops processes, including any remaining validations, you must display the error on an error page.
Creating CalendarsApplication Builder includes a built-in wizard for generating a calendar with monthly, weekly, daily, and list views. Once you specify the table on which the calendar is based, you can create drill-down links to information stored in specific columns and enable drag and drop capability.
Topics:■ About Creating Calendars
■ Viewing a Sample Calendar
■ Creating an Easy Calendar
■ Creating a SQL Calendar
■ Editing Calendar Attributes
■ Editing an Existing Calendar to Include Add and Edit Functionality
■ Enabling the Dragging and Dropping of Data In an Existing Calendar
■ Editing a Calendar Title
■ Upgrading a Calendar Created in a Previous Releases
■ Converting an Easy Calendar to a SQL Calendar
Note: Oracle Application Express supports the creation of only one calendar per page.

Creating Calendars
Adding Database Application Components and Controls 10-21
About Creating CalendarsApplication Builder supports two calendar types:
■ Easy Calendar creates a calendar based on the schema, table, and columns you specify. The wizard prompts you to select a date column and display column. See "Creating an Easy Calendar" on page 10-22.
■ SQL Calendar creates a calendar based on a SQL query you provide. This SQL SELECT statement must include at least two columns: a date column and display column. See "Creating a SQL Calendar" on page 10-27.
How you create a calendar depends on if you are adding a calendar to an existing page or adding a calendar on a new page. When creating calendars, remember:
■ You can only create one calendar for each page. The calendar may include daily, weekly, and monthly views.
■ The date column determines the days on the calendar which contains entries.
■ The display column defines a specific row which displays the calendar.
About Adding Drag and Drop CapabilityIf you choose to enable drag and drop capability in an Easy Calendar, the calendar generation process automatically creates a On Demand process to implement this functionality for you. However, when you create a SQL Calendar on a new page, the Enable Drag and Drop option does not appear. To enable this functionality, create a SQL Calendar page and then edit the page to enable drag and drop. To learn more, see "Enabling the Dragging and Dropping of Data In an Existing Calendar" on page 10-40.
Supported Calendar Substitution StringsApplication Builder supports many date format substitution strings. You can view a complete list of supported substitution strings on the Calendar Templates page.
To view a list of supported substitution strings for calendars:
1. Navigate to the appropriate calendar template.
2. View the Substitution Stings list on the right side of the page.
Viewing a Sample CalendarThe following is a sample calendar of IT projects.
See Also: "Calendar Display" on page 10-35
See Also: "Managing Themes and Templates" on page 13-1

Creating Calendars
10-22 Oracle Application Express Application Builder User's Guide
This calendar includes the following buttons:
■ Monthly - Displays a monthly view of all projects.
■ Weekly - Displays projects by week.
■ Daily - Displays projects by day.
■ List - Displays a list of all projects.
■ Previous - Navigates to the previous view.
■ Today - Displays the current day.
■ Next - Navigates to the next view.
In the previous example, you can move a calendar entry to another date by dragging and dropping it.
Creating an Easy CalendarAn Easy Calendar creates a calendar based on schema, table, and columns you specify. The wizard prompts you to select a date column and display column.
Topics:■ Adding an Easy Calendar to an Existing Page
■ Adding an Easy Calendar to a New Page
Adding an Easy Calendar to an Existing PageTo add an Easy Calendar to an existing page:
1. Create a Calendar region:
a. Navigate to the Page Definition. See "Accessing the Page Definition" on page 8-2.
b. On the Page Definition, create a new Calendar region:
– Tree view- Under Page Rendering, right-click Regions and select Create.

Creating Calendars
Adding Database Application Components and Controls 10-23
– Component view - Under Region, click the Create icon.
The Create Region Wizard appears.
c. Select Calendar and click Next.
2. For Implementation, select Easy Calendar and click Next.
3. For Region Attributes:
a. Title - Enter a title for the region. This title displays if the region template you select displays the region title.
b. Region Template - Choose a template to control the appearance of the region.
c. Parent Region - Defines the parent region to which the new region belongs.
d. Display Point - Identify a display point for this region. Two types of display points exist: page template positions and page body positions. To learn more, see online Help.
e. Sequence - Specify the sequence for this component. The sequence determines the order of evaluation.
f. Click Next.
4. For Source:
a. Owner - Select the database schema that owns the table from which you are creating a calendar.
b. Table/View Name - Specify the table to be used in the calendar.
c. Click Next.
5. For Calendar Attributes:
a. Date Column - Specify the column used as the date to place an entry on the calendar.
b. Display Column - Specify the column to be displayed on the calendar.
c. Date Format - Specify how you want to represent dates on your calendar. Options include:
– Date Only - Results display in a monthly and list calendar.
– Date and Time - Results display in a monthly, weekly, daily, and list calendar.
d. Primary Key Column - Select the name of the first column that uniquely identifies a row in the table, or select ROWID. ROWID is a built in globally unique identifier for the row. For example:
EMPNO
e. Enable Drag and Drop - Identify whether to enable the drag and drop of calendar data to other dates and times on the calendar.
f. Click Next.
Next, define Link Details for calendar entries. The Link Target determines where users are redirected to if they select a calendar entry. The selected Link Target determines what attributes display.
6. For Link Details:

Creating Calendars
10-24 Oracle Application Express Application Builder User's Guide
a. Link Target - Identify whether a calendar entry should have a link target. When a calendar entry is selected, the user is redirected to the link target. Options include:
– Create a new edit page
– Page in this application
– URL
– Exclude Link Target
b. Allowed Operations - Determines which data manipulation language (DML) operations are allowed. To enable drag and drop on the calendar data, you must select Update. Options include:
– Insert
– Update
– Delete
c. Page Number - Enter a unique page number for the page being created.
d. Page Name - Enter a title for the page being created.
e. Region Template - Select a region template for the new calendar region.
f. Region Name - Enter a name for the region to contain the calendar.
g. Select Columns(s) - Select the columns to be included in the form. To ensure expected behavior, include the Date and Primary Key columns to the form.
h. Open Link In - Specify the location where the URL or page should open.
i. Click Next.
7. For Process Options:
a. Cancel Button Label - Enter the label for the Cancel button.
b. Show Create Button - Indicate whether users should have insert capability using the form.
c. Create Button Label - Enter the label for the Create button.
d. Show Save Button - Indicate whether users should have update capability using the form.
e. Save Button Label - Enter the label for the Save button.
f. Show Delete Button - Indicate whether users should have delete capability using the form.
g. Delete Button Label - Enter the label for the Delete button.
h. Select Next.
8. Confirm your selections and click Create.
Adding an Easy Calendar to a New PageTo create an Easy Calendar on a new page:
1. Create a Calendar page:
a. Navigate to the Workspace home page.
b. Click the Application Builder icon.

Creating Calendars
Adding Database Application Components and Controls 10-25
c. Select an application.
d. Click Create Page.
The Create Page Wizard appears.
2. Select Calendar and click Next.
3. Select Easy Calendar and click Next.
4. For Page Attributes:
a. Page Number -If you identify a new page number, the wizard creates a new page. If you identify an existing page number, the wizard adds the component to that page.
b. Page Name - Enter a title for the page to be created.
c. Region Template - Select a region template for the new calendar region. The template controls the appearance of the region.
d. Region Name - Enter a name for the region to contain the calendar.
e. Display Type - Determines the behavior of the calendar. Options include:
– Standard - Submits the page along with the associated request.
– Partial Page Refresh - Only refreshes the Calendar region
f. Breadcrumb - Select whether to use a breadcrumb navigation control on your page, and which breadcrumb navigation control you want to use.
g. Click Next.
5. On Tab Options, specify a tab implementation and click Next.
6. For Source:
a. Owner - Select the database schema that owns the table from which you are creating a calendar.
b. Table/View Name - Specify the table to be used in the calendar.
c. Click Next.
7. For Calendar Attributes:
a. Date Column - Specify which column is used as the date to place an entry on the calendar.
b. Display Column - Specify the column to be displayed on the calendar.
c. Date Format - Specify how you want to represent dates on your calendar. Options include:
– Date Only - Results display in a monthly and list calendar.
– Date and Time - Results display in a monthly, weekly, daily, and list calendar.
d. Primary Key Column - Select the name of the first column that uniquely identifies a row in the table, or select ROWID.
Tip: Once the calendar is created, the display type cannot be changed. To change the display type, you must delete the calendar and then re-create it.
Creating Calendars
10-26 Oracle Application Express Application Builder User's Guide
ROWID is a built in globally unique identifier for the row. This column is used for adding or editing and for drag and drop through the calendar. For example:
EMPNO
e. Custom Date Range - Identify whether to include custom start and end dates. Use this option to enable more than one month to be represented on a monthly calendar.
f. Enable Drag and Drop - Select Yes or No. Enables drag and drop of calendar data to other dates and times on the calendar.
g. Click Next.
Next, define Link Details for calendar entries. The Link Target determines where users are redirected to if they select a calendar entry. The selected Link Target determines what attributes display.
8. For Link Details:
a. Link Target - Identify whether a calendar entry should have a link target. When a calendar entry is selected, the user is redirected to the link target. Options include:
– Create a new edit page
– Page in this application
– URL
– Exclude Link Target
b. Allowed Operations - Determines which data manipulation language (DML) operations are allowed. To enable drag and drop on the calendar data, you must select Update. Options include:
– Insert
– Update
– Delete
c. Page Number - Enter a unique page number for the page being created.
d. Page Name - Enter a title for the page being created.
e. Region Name - Enter a name for the region to contain the calendar.
f. Region Template - Select a region template for the new calendar region.
g. Region Name - Enter a name for the region to contain the calendar.
h. Select Columns(s) - Select the columns to be included in the form. To ensure expected behavior, include the Date and Primary Key columns to the form
i. Click Next.
9. For Process Options:
a. Cancel Button Label - Enter the label for the Cancel button.
b. Show Create Button - Indicate whether users should have insert capability using the form.
Tip: If you select Yes for Enable Drag and Drop, the wizard automatically creates an On Demand process.

Creating Calendars
Adding Database Application Components and Controls 10-27
c. Create Button Label - Enter the label for the Create button.
d. Show Save Button - Indicate whether users should have update capability using the form.
e. Save Button Label - Enter the label for the Save button.
f. Show Delete Button - Indicate whether users should have delete capability using the form.
g. Delete Button Label - Enter the label for the Delete button.
h. Select Next.
10. Confirm your selections and click Create.
Creating a SQL CalendarA SQL Calendar creates a calendar based on a SQL query you provide. When creating a SQL Calendar, you must select the date and display columns. Also since you are using a SQL source, you must explicitly specify the primary key.
Topics:■ Adding a SQL Calendar to an Existing Page
■ Adding a SQL Calendar to a New Page
Adding a SQL Calendar to an Existing PageTo add a SQL Calendar to an existing page:
1. Create a Calendar region:
a. Navigate to the Page Definition. See "Accessing the Page Definition" on page 8-2.
b. On the Page Definition, create a new Calendar region:
– Tree view- Under Page Rendering, right-click Regions and select Create.
– Component view - Under Region, click the Create icon.
The Create Region Wizard appears.
c. Select Calendar and click Next.
2. For Implementation, select SQL Calendar and click Next.
3. For Region Attributes:
a. Title - Enter a title for the region. This title displays if the region template you select displays the region title.
b. Region Template - Choose a template to control the appearance of the region.
c. Parent Region - Defines the parent region to which the new region belongs.
See Also: "Editing Calendar Attributes" on page 10-34
Tip: When creating a SQL Calendar, you must manually create an On Demand page process to enable drag and drop functionality. See "Enabling the Dragging and Dropping of Data In an Existing Calendar" on page 10-40.

Creating Calendars
10-28 Oracle Application Express Application Builder User's Guide
d. Display Point - Identify a display point for this region. Two types of display points exist: page template positions and page body positions. To learn more, see item Help.
e. Sequence - Specify the sequence for this component. The sequence determines the order of evaluation.
f. Click Next.
4. For Source:
a. Enter SQL Query - Enter the select statement to be used by the calendar.
Use the syntax:
SELECT id, name, date FROM ...
Remember the following:
– You include at least two columns, one of which must be a DATE column.
– The first column should identify the primary key column to be used for managing data manipulation language (DML) operation.
– Review the examples at the bottom of the page.
b. Click Next.
5. For Calendar Attributes:
a. Date Column - Specify the column used as the date to place an entry on the calendar.
b. Display Column - Specify the column to be displayed on the calendar.
c. Date Format - Specify how you want to represent dates on your calendar. Options include:
– Date Only - Results display in a monthly and list calendar.
– Date and Time - Results display in a monthly, weekly, daily, and list calendar.
d. Custom Date Range - Identify whether to include custom start and end dates. Use this option to enable more than one month to be represented on a monthly calendar.
e. Enable Drag and Drop - Select Yes or No. Enables drag and drop of calendar data to other dates and times on the calendar.
f. Click Next.
Next, define Link Details for calendar entries. The Link Target determines where users are redirected to if they select a calendar entry. The selected Link Target determines what attributes display.
6. For Link Details, Link Target - Identify whether a calendar entry should have a link target. When a calendar entry is selected, the user is redirected to the link target. Options include:
Tip: When creating a SQL Calendar, you must manually create an On Demand page process to enable drag and drop functionality. See "Enabling the Dragging and Dropping of Data In an Existing Calendar" on page 10-40

Creating Calendars
Adding Database Application Components and Controls 10-29
– Create a new edit page
– Page in this application
– URL
– Exclude Link Target
The options that display depend upon the type of link target you select. To learn more about a specific item on a page, click the item label.
7. If for Link Target , you select Create a new edit page:
a. Link Target - Select Create a new edit page.
b. Source Table Primary Key Column - Select the name of the first column that uniquely identifies a row in the table, or select ROWID. ROWID is a built in globally unique identifier for the row. This column is used for adding or editing as well as for drag and drop through the calendar.
c. Allowed Operations - Determines which data manipulation language (DML) operations are allowed.
– Insert
– Update
– Delete
To enable drag and drop on the calendar data, you must select Update.
d. Page Number - Enter a unique page number for the page being created.
e. Page Name - Enter a title for the page being created.
f. Region Template - Select a region template for the new calendar region.
g. Region Name - Enter a name for the region to contain the calendar.
h. Owner - Identifies the schema that owns the table.
i. Table/View Name - Select the database object (table or view) on which this calendar is based.
j. Date Column - Specify which column is used as the date to place an entry on the calendar.
k. Primary Key Type - Options include:
– Managed by Database (ROWID) - The form uses the ROWID pseudo column to identify rows to update and delete.
– Select Primary Key Column(s) - Uses the source table's primary key column(s).
l. Select Columns - Select the column(s) to be included in the form. You must include date and primary key columns to the form for expected functionality.
m. Open Link in - Select the location where the URL or page should open. Options include:
– Same Window
– Popup Window
n. Click Next.
8. If for Link Target, you select Page in this application:
a. Link Target - Select Page in this application.

Creating Calendars
10-30 Oracle Application Express Application Builder User's Guide
b. Source Table Primary Key Column - Select the name of the first column that uniquely identifies a row in the table, or select ROWID. ROWID is a built in globally unique identifier for the row. This column is used for adding or editing as well as for drag and drop through the calendar.
c. Page - Identify the target page number for the calendar entry link.
d. Date Item on Target Page - Identify the page item on the Target page to be used to pass the Date value when adding data..
e. Region Template - Select a region template for the new calendar region.
f. Primary Key Item on Target Page - Identify the page item on the Target page to be used to pass the Date value when adding data.
g. Open Link in - Select the location where the URL or page should open. Options include:
– Same Window
– Popup Window
h. Click Next.
9. If for Link Target , you select URL:
a. Link Target - Select URL.
b. URL Target - Identify a URL to serve as a destination for the calendar link.
c. Open Link in - Select the location where the URL or page should open. Options include:
– Same Window
– Popup Window
d. Click Next.
10. If for Link Target , you select Exclude Target Link:
a. Link Target - Select Exclude Target Link.
b. Click Next.
11. If you selected Process Options:
a. Cancel Button Label - Enter the label for the Cancel button.
b. Show Create Button - Indicate whether users should have insert capability using the form.
c. Create Button Label - Enter the label for the Create button.
d. Show Save Button - Indicate whether users should have update capability using the form.
e. Save Button Label - Enter the label for the Save button.
f. Show Delete Button - Indicate whether users should have delete capability using the form.
g. Delete Button Label - Enter the label for the Delete button.
h. Select Next.
12. Confirm your selections and click Create.

Creating Calendars
Adding Database Application Components and Controls 10-31
Adding a SQL Calendar to a New PageTo create an Easy Calendar on a new page:
1. Create a Calendar page:
a. Navigate to the Workspace home page.
b. Click the Application Builder icon.
c. Select an application.
d. Click Create Page.
e. Select Calendar and click Next.
2. For Page, select SQL Calendar and click Next.
3. For Page Attributes:
a. Page Number - If you identify a new page number, the wizard creates a new page. If you identify an existing page number, the wizard adds the component to that page.
b. Page Name - Enter a title for the page being created.
c. Region Template - Select a region template for the new calendar region.
d. Region Name - Enter a name for the region to contain the calendar.
e. Display Type - Determines the behavior of the calendar. Options include
– Standard - Submits the page along with the associated request.
– Partial Page Refresh - Only refreshes the Calendar region
f. Breadcrumb - Select whether you want to use a breadcrumb navigation control on your page and which breadcrumb navigation control you want to use.
g. Click Next.
4. On Tab Options, specify a tab implementation and click Next.
5. For Source:
a. Enter SQL Query - Enter the select statement to be used by the calendar.
Use the syntax:
SELECT id, name, date FROM ...
Remember the following:
– You include at least two columns, one of which must be a DATE column.
– The first column should identify the primary key column to be used for managing data manipulation language (DML) operation.
– Review the examples at the bottom of the page.
b. Click Next.
6. For Calendar Attributes:
Tip: Once the calendar is created, the display type cannot be changed. To change the display type, you must delete the calendar and then re-create it.

Creating Calendars
10-32 Oracle Application Express Application Builder User's Guide
a. Date Column - Specify which column is used as the date to place an entry on to the calendar.
b. Display Column - Specify the column to be displayed on the calendar.
c. Date Format - Specify how you want to represent dates on your calendar. Options include:
– Date Only - Results display in a monthly and list calendar.
– Date and Time - Results display in a monthly, weekly, daily, and list calendar.
d. Primary Key Column - Select the name of the first column that uniquely identifies a row in the table, or select ROWID. ROWID is a built in globally unique identifier for the row.
e. Custom Date Range - Identify whether to include custom start and end dates. Use this option to enable more than one month to be represented on a monthly calendar.
f. Enable Drag and Drop - Identify whether to enable the drag and drop of calendar data to other dates and times on the calendar.
g. Click Next.
Next, define Link Details for calendar entries. The Link Target determines where users are redirected to if they select a calendar entry. The selected Link Target determines what attributes display.
7. For Link Details, Link Target - Identify whether a calendar entry should have a link target. When a calendar entry is selected, the user is redirected to the link target. Options include:
– Create new edit page
– Page in this application
– URL
– Exclude Link Target
The options that display depend upon the type of link target you select. To learn more about a specific item on a page, click the item label.
8. If for Link Target, you select Create new edit page:
a. Link Target - Select Create a new edit page.
b. Allowed Operations - Determines which data manipulation language (DML) operations are allowed.
– Insert
– Update
– Delete
To enable drag and drop on the calendar data, you must select Update.
c. Page Number - Enter a unique page number for the page being created.
Tip: When creating a SQL Calendar, you must manually create an On Demand page process to enable drag and drop functionality. See "Enabling the Dragging and Dropping of Data In an Existing Calendar" on page 10-40

Creating Calendars
Adding Database Application Components and Controls 10-33
d. Page Name - Enter a title for the page being created.
e. Region Template - Select a region template for the new calendar region.
f. Region Name - Enter a name for the region to contain the calendar.
g. Owner - Identifies the schema that owns the table.
h. Table/View Name - Select the database object (table or view) on which this calendar is based.
i. Date Column - Specify which column is used as the date to place an entry on the calendar.
j. Primary Key Type - Options include:
– Managed by Database (ROWID) - The form uses the ROWID pseudo column to identify rows to update and delete.
– Select Primary Key Column(s) - Uses the source table's primary key column(s).
k. Select Columns - Select the column(s) to be included in the form. You must include date and primary key columns to the form for expected functionality.
l. Open Link in - Select the location where the URL or page should open. Options include:
– Same Window
– Popup Window
m. Click Next.
9. If for Link Target , you select Page in this application:
a. Link Target - Select Page in this application.
b. Page - Identify the target page number for the calendar entry link..
c. Date Item on Target Page - Identify the page item on the Target page to be used to pass the Date value when adding data..
d. Region Template - Select a region template for the new calendar region.
e. Primary Key Item on Target Page - Identify the page item on the Target page to be used to pass the Date value when adding data.
f. Open Link in - Select the location where the URL or page should open. Options include:
– Same Window
– Popup Window
g. Click Next.
10. If for Link Target , you select URL:
a. Link Target - Select URL.
b. URL Target - Identify a URL to serve as a destination for the calendar link.
c. Open Link in - Select the location where the URL or page should open. Options include:
– Same Window
– Popup Window

Creating Calendars
10-34 Oracle Application Express Application Builder User's Guide
d. Click Next.
11. If for Link Target , you select Exclude Target Link:
a. Link Target - Select Exclude Target Link.
b. Click Next.
12. If you selected Process Options:
a. Cancel Button Label - Enter the label for the Cancel button.
b. Show Create Button - Indicate whether users should have insert capability using the form.
c. Create Button Label - Enter the label for the Create button.
d. Show Save Button - Indicate whether users should have update capability using the form.
e. Save Button Label - Enter the label for the Save button.
f. Show Delete Button - Indicate whether users should have delete capability using the form.
g. Delete Button Label - Enter the label for the Delete button.
h. Select Next.
13. Confirm your selections and click Create.
Editing Calendar AttributesOnce you create a calendar, you can alter the display by editing attributes on the Calendar Attributes page.
To disable a view of a calendar, you must delete the Monthly, Weekly, or Daily buttons on the calendar page.
Topics:■ Accessing the Calendar Attributes Page
■ About the Calendar Attributes Page
Accessing the Calendar Attributes PageTo access the Calendar Attributes page:
1. Navigate to the appropriate Page Definition. See "Accessing the Page Definition" on page 8-2.
2. Access the Calendar Attributes page:
■ Tree view- Under Page Rendering, double-click the region name.
■ Component view - Under Region, select the region name.
The Region Definition appears.
3. Click Calendar Attributes.
4. Edit the appropriate attributes. To learn more about a specific item on a page, click the item label.
See Also: "Editing Calendar Attributes" on page 10-34

Creating Calendars
Adding Database Application Components and Controls 10-35
When help is available, the cursor changes to an arrow and question mark when you pass the cursor over an item.
5. Click Apply Changes.
About Navigation Alternatives The Calendar Attribute page is divided into sections.
You can access these sections by scrolling down the page, or by clicking a navigation button at the top of the page. When you select a button at the top of the page, the selected section appears and all other sections are temporarily hidden. To view all sections of the page, click Show All.
About the Calendar Attributes PageThe topics that follow describe specific sections of the Calendar Attributes page. You can use these attribute to specify general calendar formatting, define the dates included in the calendar, or create a link on the column or a day in the calendar.
Calendar Display Use Calendar Display to specify a calendar template, date columns, and general calendar formatting. Table 10–2 describes Calendar Display attributes.
See Also: "About the Calendar Attributes Page" on page 10-35 and "About Field-Level Help" on page 1-13
Table 10–2 Calendar Display Attributes
Attribute Description
Calendar Template Determines what template is used when the Application Express engine renders a calendar.
Easy SQL Table Owner Indicates the database owner of the table on which the calendar is based.
Easy SQL Table Indicates the database table on which the calendar is based.
Date Column Defines the column from the table or query containing the dates to be placed on the calendar.
Date Format Specifies how you want to represent dates on your calendar. Options include:
■ Date Only
■ Date and Time
Date Item Defines the item which holds the date on which the calendar is based
End Date Item Specifies the item which holds the end date on which the calendar of type Custom is based.
Calendar Type Column Specifies the item which holds the calendar type.
Display Type Defines the display type. Options include:
■ Column
■ Custom
■ No Display Value
If the Display Type is Column, use the Display Column attribute to select the column to display in the day cell of the monthly calendar.
If the Display Type is Custom, in Column Format enter a custom column format using HTML expressions and supported substitution strings.

Creating Calendars
10-36 Oracle Application Express Application Builder User's Guide
Display Attributes Use Display Attributes to define the dates that are included in the calendar. Table 10–3 describes Display attributes.
Display Column When the Display Type is set to Column, select the column to display in the day cell of the monthly calendar. To display more than one column, change the display type.
Primary Key Column The primary key column value which is passed when editing data through Calendar. This value is passed to the target page only if the Column link item value has #PRIMARY_KEY_VALUE#.
Column Format Enter HTML expressions to be shown in this column. Use #COLUMN# syntax to show column values in HTML. For example:
#EMPLOYEE_NAME#
This following example demonstrates how to display images in a column.
<img src="#IMAGE_NAME#">
See Also: "Supported Calendar Substitution Strings" on page 10-21
Table 10–3 Display Attributes
Attribute Description
Begin at Start of Interval Determines when the calendar should start. Selecting this option creates a calendar that spans an entire interval (such as a month). For example:
■ If you select Begin at Start of Interval, the date is June 15th, and the display is monthly, the resulting calendar spans from June 1st to June 30th.
■ If you do not select Begin at Start of Interval, the date is June 15th, and the display is monthly, the resulting calendar spans from June 15th to June 30th.
Start of Week for Monthly Calendar
Determines the day of the week on which the calendar starts for the monthly view.
Start Day for Weekly Calendar
Select the start day for a weekly calendar.
End Day for Weekly Calendar
Select the end day for a weekly calendar.
Time Format Select the time format. Determines if the time displays in a 12 hour or 24 hour format.
Start Time Enter the start time from which the weekly and daily Calendar should display.
End Time Enter the end time until which the weekly and daily Calendar should display.
Data Background Color Specify a background color for this data displayed in the calendar.
Data Text Color Specify a text color for data displayed on the calendar.
Table 10–2 (Cont.) Calendar Display Attributes
Attribute Description

Creating Calendars
Adding Database Application Components and Controls 10-37
Column Link Use Column link to create a link on the entries displayed on the calendar.
To set session state with these values:
1. Navigate to the appropriate Calendar Attributes page. See "Accessing the Calendar Attributes Page" on page 10-34.
2. Scroll down to Column Link.
3. From Target is a, select Page in this Application.
4. From Open Link in, select the location where the URL or page should open. Options include:
■ Same Window
■ Popup Window
5. In Page, specify the target page number. To reset the pagination for this page, select reset pagination for this page.
6. In Request, enter text for the built-in application item called REQUEST. This is also the item that is set with the name of a button that was clicked.
7. In Clear Cache, specify the pages (that is, the page numbers) on which to clear cache. Specify multiple pages by listing the page numbers in a comma-delimited list.
You can set session state (that is, give a listed item a value) using the next two attributes: the Set these items attribute and the With these values attribute.
8. To set session state with these values:
a. Set these items - Enter a comma-delimited list of item names for which you would like to set session state.
b. With these values - Enter a comma-delimited list of values for the items specified in the previous step.
You can specify static values or substitution syntax (for example, &APP_ITEM_NAME.). Note that item values passed to f?p= in the URL cannot contain a colon (:). Additionally, item values cannot contain commas unless you enclose the entire value in backslashes (for example, \1234,56\).
9. Click Apply Changes.
To create a column link to a URL:
1. Navigate to the appropriate Calendar Attributes page.
2. Scroll down to Column Link.
3. From Target is a, select URL.
4. In URL Target, enter the appropriate address.
You can use a column link to a URL to:
Custom View Days Enter total number of days to be displayed in the custom calendar.
See Also: "Supported Calendar Substitution Strings" on page 10-21
Table 10–3 (Cont.) Display Attributes
Attribute Description

Creating Calendars
10-38 Oracle Application Express Application Builder User's Guide
■ Link to a URL defined by your query, for example:
#URL#
Where URL is a column alias from your query that defines the proper URL.
■ Pass values from your query to the page you want to call, for example:
f?p=&FLOW_ID.:3:&SESSION.::&DEBUG.:3:P3_EVENT_ID,P3_PREV_PAGE:#EVENT_ID#,1
Where EVENT_ID is the alias of a column from your query.
5. Click Apply Changes.
Day Link Use Day link to create a link on a day in the calendar. This attribute creates a link on an actual number (or day) on the calendar.
To create a day link to another page:
1. Navigate to the appropriate Calendar Attributes page. See "Accessing the Calendar Attributes Page" on page 10-34.
2. Scroll down to Day Link.
3. From Target is a, select Page in this Application.
4. In Page, specify the target page number.
To reset the pagination for this page, select reset pagination for this page.
5. In Request, enter text for the built-in application item called REQUEST. This is also the item that is set with the name of a button that was clicked.
6. In Clear Cache, specify the pages (that is, the page numbers) on which to clear cache. Specify multiple pages by listing the page numbers in a comma-delimited list.
You can set session state (that is, give a listed item a value) using the next two attributes: Set these items and With these values.
7. To set session state:
a. Set these items - Enter a comma-delimited list of item names for which you would like to set session state.
b. With these values - Enter a comma-delimited list of values for the items specified in the previous step.
You can specify static values or substitution syntax (for example, &APP_ITEM_NAME.). Note that item values passed to f?p= in the URL cannot contain a colon (:). Additionally, item values cannot contain commas unless you enclose the entire value in backslashes (for example, \1234,56\).
8. Click Apply Changes.
To create a day link to a URL:
1. Navigate to the appropriate Calendar Attributes page.
2. Scroll down to Day Link.
3. From Target is a, select URL.
4. In URL Target, enter the appropriate address.
See Also: "Editing an Existing Calendar to Include Add and Edit Functionality" on page 10-39

Creating Calendars
Adding Database Application Components and Controls 10-39
5. Click Apply Changes.
Editing an Existing Calendar to Include Add and Edit FunctionalityTo edit an existing calendar to include add and edit functionality:
1. Navigate to the appropriate Calendar Attributes page. See "Accessing the Calendar Attributes Page" on page 10-34.
2. Scroll down to Column Link. Under Column Link:
a. Target is a - Select Page in this Application.
b. Open Link in - Select the location where the URL or page should open. Options include:
– Same Window
– Popup Window
c. Page - Specify the form page number.
d. Set these items - Select the primary key and date column from the target form page.
e. With these values - Enter the substitution strings #PRIMARY_KEY_VALUE# for primary key value and #DATE_VALUE#, for example:
#PRIMARY_KEY_VALUE#,#DATE_VALUE#
3. Scroll up to Calendar Display.
From Primary Key Column, select the value to be passed when editing calendar data. This value is substituted for the #PRIMARY_KEY_VALUE# specified in the previous step.
4. Click Apply Changes.
About the Date Column Format MaskBecause the calendar passes the date in specific format, the selected date column must have a format mask of RRRRMMDDHH24MISS. If you do not want to change the format mask of date item, you must create a hidden item (this hidden item should be selected as Date Item which accepts the date value) in the form page with the above format mask. The default value of the date column should be changed to:
return to_char(to_date(<hidden item created>,'RRRRMMDDHH24MISS'),<Date item format mask>);
Consider the following example:
return to_char(to_date(:P130_HIREDATE_TMP,'RRRRMMDDHH24MISS'),:APP_DATE_TIME_FORMAT);
Tip: The selected date column must have a format mask of RRRRMMDDHH24MISS since the calendar passes the date in the that format.
If you do not want to change the format mask of date item, you must create a hidden item (this hidden item should be selected as Date Item which accepts the date value) in the form page with the above format mask.
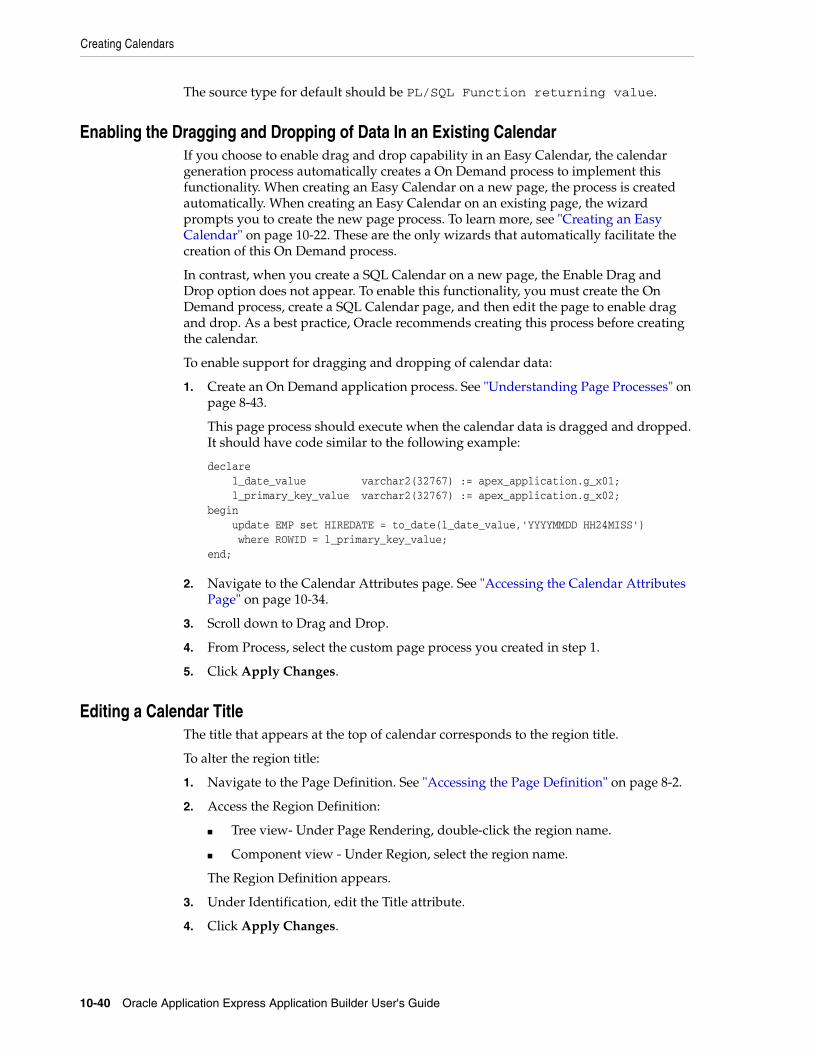
Creating Calendars
10-40 Oracle Application Express Application Builder User's Guide
The source type for default should be PL/SQL Function returning value.
Enabling the Dragging and Dropping of Data In an Existing CalendarIf you choose to enable drag and drop capability in an Easy Calendar, the calendar generation process automatically creates a On Demand process to implement this functionality. When creating an Easy Calendar on a new page, the process is created automatically. When creating an Easy Calendar on an existing page, the wizard prompts you to create the new page process. To learn more, see "Creating an Easy Calendar" on page 10-22. These are the only wizards that automatically facilitate the creation of this On Demand process.
In contrast, when you create a SQL Calendar on a new page, the Enable Drag and Drop option does not appear. To enable this functionality, you must create the On Demand process, create a SQL Calendar page, and then edit the page to enable drag and drop. As a best practice, Oracle recommends creating this process before creating the calendar.
To enable support for dragging and dropping of calendar data:
1. Create an On Demand application process. See "Understanding Page Processes" on page 8-43.
This page process should execute when the calendar data is dragged and dropped. It should have code similar to the following example:
declare l_date_value varchar2(32767) := apex_application.g_x01; l_primary_key_value varchar2(32767) := apex_application.g_x02;begin update EMP set HIREDATE = to_date(l_date_value,'YYYYMMDD HH24MISS') where ROWID = l_primary_key_value;end;
2. Navigate to the Calendar Attributes page. See "Accessing the Calendar Attributes Page" on page 10-34.
3. Scroll down to Drag and Drop.
4. From Process, select the custom page process you created in step 1.
5. Click Apply Changes.
Editing a Calendar TitleThe title that appears at the top of calendar corresponds to the region title.
To alter the region title:
1. Navigate to the Page Definition. See "Accessing the Page Definition" on page 8-2.
2. Access the Region Definition:
■ Tree view- Under Page Rendering, double-click the region name.
■ Component view - Under Region, select the region name.
The Region Definition appears.
3. Under Identification, edit the Title attribute.
4. Click Apply Changes.

Creating Maps
Adding Database Application Components and Controls 10-41
Upgrading a Calendar Created in a Previous ReleasesBy default, calendars you create in Oracle Application Express 3.0 include daily, weekly, and monthly views. To update calendars created in a previous release to include these views, you can either:
■ Create a calendar:
a. Create a calendar page and integrate the SQL query from your previous calendar.
b. Replace the previous calendar page with the new one in your application.
■ Upgrade the theme:
a. Change the identification number of the existing theme. See "Changing a Theme Identification Number" on page 13-9.
b. Re-create the theme. See "Creating a Theme" on page 13-4.
c. Apply the new theme to your application. See "Switching an Active Theme" on page 5.
Converting an Easy Calendar to a SQL CalendarCreating an Easy Calendar is the simplest way to create a calendar. However, if you find the resulting calendar does not meet your needs, you can quickly convert it to a SQL Calendar.
To convert an Easy Calendar to a SQL Calendar:
1. Navigate to the appropriate Calendar Attributes page. See "Accessing the Calendar Attributes Page" on page 10-34.
2. On the Tasks list, click Convert to SQL Based calendar.
Converting an Easy Calendar to a SQL Calendar adds a Region Source section to the Region Definition. The Region Source contains the original SQL query that creates the calendar. By accessing the Region Source, you can edit the query to meet your needs.
Creating MapsApplication Builder includes built-in wizards for generating Flash maps on pages with a Desktop user interface. How you create a flash map depends upon whether you are adding the map to an existing page, or adding a map on a new page.
Topics:■ About Flash Map Support
■ Adding a Flash Map to an Existing Page
■ Adding Flash Maps to a New Page
■ About Creating SQL Queries for Maps
■ Editing Flash Map Attributes
■ Using Custom XML with Flash Maps
■ Enabling Asynchronous Updates

Creating Maps
10-42 Oracle Application Express Application Builder User's Guide
About Flash Map SupportFlash map support in Oracle Application Express is based on the AnyChart AnyMap Interactive Maps Component. AnyMap is a flexible Macromedia Flash-based solution that enables developers to visualize geographical related data. Flash maps are rendered by a browser and require Flash Player 9 or later. For more information about AnyChart, go to
http://www.anychart.com
AnyChart stores map data in files with a *.amap extension, and supports 300 map files for the United States of America, Europe, Asia, Europe, Africa, Oceania, North America, and South America. To render a desired map, you select the map source in the wizard (for example, Germany) and the map XML automatically references the desired map source .amap file, germany.amap. To browse through the available maps, see "Map Reference" in AnyChart User's Guide:
http://anychart.com/products/anychart/docs/
Adding a Flash Map to an Existing PageTo add a flash map to an existing page.
1. Navigate to the Page Definition. See "Accessing the Page Definition" on page 8-2.
2. On the Page Definition, create a new region:
■ Tree view- Under Page Rendering, right-click Regions and select Create.
■ Component view - Under Region, click the Create icon.
The Create Region Wizard appears.
3. Select Map and click Next.
4. For Map Type, select a map type (for example, Europe), and click Next.
5. For Map Source, a Tree lists the map source files for the selected Map Type. Click the Map Source you want to use (for example, Denmark).
6. For Display Attributes, specify the following:
a. Title
b. Region Template
c. Parent Region
d. Display Point
e. Sequence
To learn more, click the item label. When help is available, the cursor changes to an arrow and question mark when you pass the cursor over an item. See "About Field-Level Help" on page 1-13.
f. Click Next.
7. For Display Attributes, select the appropriate map attributes and click Next.
To learn more about a specific attribute, click the item label. See "About Field-Level Help" on page 1-13.
8. For Source:
a. Specify a query by either:

Creating Maps
Adding Database Application Components and Controls 10-43
– Entering a SQL query in the field provided. See "About Creating SQL Queries for Maps" on page 10-44.
– Clicking the Build Query button. When the Build Chart Query Wizard appears, follow the on-screen instructions.
b. Specify relevant attributes. To view map reference information associated with your selected Map Source, expand the Map Region Information region at the bottom of the page.
To associate data with geographical locations, you must incorporate information from the Region Name or Region ID columns into the Map query. See "About Creating SQL Queries for Maps" on page 10-44.
9. For Conditional Display:
a. Condition Type - Select a condition type from the list that must be met in order for this component to be rendered processed. See "Understanding Conditional Rendering and Processing" on page 2-4
b. Authorization Scheme - Optionally select an authorization scheme which must evaluate to TRUE in order for this component to be rendered or otherwise processed. See "Providing Security Through Authorization" on page 15-37.
c. Click Create Region.
Adding Flash Maps to a New PageTo create a flash map chart on a new page:
1. On the Workspace home page, click the Application Builder icon.
2. Select an application.
3. Click Create Page.
4. Select Map and click Next.
5. For Map Type, select a map type (for example, Europe), and click Next.
6. For Map Source, a Tree lists the map source files for the selected Map Type. Click the Map Source you want to use (for example, Denmark).
7. For Page Attributes:
a. Specify the following:
– Page Number
– Page Name
– Region Template
– Region Name
– Breadcrumb
To learn more, click the item label. When help is available, the cursor changes to an arrow and question mark when you pass the cursor over an item. See "About Field-Level Help" on page 1-13.
b. Click Next.
8. Specify whether to include tabs and click Next.
9. For Map Attributes, select the appropriate attributes and click Next.

Creating Maps
10-44 Oracle Application Express Application Builder User's Guide
To learn more about a specific attribute, click the item label. See "About Field-Level Help" on page 1-13.
10. For Query:
a. Specify a query by either:
– Entering a SQL query in the field provided. See "About Creating SQL Queries for Maps" on page 10-44.
– Clicking the Build Query button. When the Build Chart Query Wizard appears, follow the on-screen instructions.
b. Specify relevant attributes. To view map reference information associated with your selected Map Source, expand the Map Reference Information region at the bottom of the page.
To associate data with geographical locations, you must incorporate information from the Region Name or Region ID columns into the Map query. See "About Creating SQL Queries for Maps" on page 10-44.
c. Click Next.
11. Click Create.
About Creating SQL Queries for MapsYou define a map in Application Builder using a wizard. For most chart wizards, you select a map type, map source, and provide a SQL query using the following syntax:
SELECT link, label, valueFROM ...
Where:
■ link is a URL.
■ label is the text that identifies the point on the map with which you want to associate data. The Region ID or Region Name of the map will be used as the label.
■ value is the numeric column that defines the data to be associated with a point on the map.
Consider the following example when creating a new page:
1. On the Workspace home page, click the Application Builder icon.
2. Select an application.
3. Click Create Page.
4. Select Map and click Next.
5. For Map Type, select United States of America and click Next.
6. For Map Source, expand Country Maps and select States.

Creating Maps
Adding Database Application Components and Controls 10-45
7. For Page Attributes specify the appropriate attributes and click Next.
8. Specify whether to include tabs and click Next.
9. For Map Attributes, select the appropriate attributes and click Next.
The Query page appears.
10. Expand and review the Map Reference Information region at the bottom of the page.
11. For Query,
a. Specify a query by either:
– Entering a SQL query in the field provided. See "About Creating SQL Queries for Maps" on page 10-44.
– Clicking the Build Query button. When the Build Chart Query Wizard appears, follow the on-screen instructions.
b. When you create your query, you must incorporate the region name information. The following example includes information for Florida and Alaska:
SELECT null link, region label, value PopulationsFROM (SELECT 'Florida' region, 18328340 value FROM dualUNION ALLSELECT 'Alaska' region, 686293 value FROM dual)

Creating Maps
10-46 Oracle Application Express Application Builder User's Guide
c. Click Next.
12. Click Finish.
Editing Flash Map AttributesOnce you create a map, you can alter its display by editing map attributes on the Map Attributes page.
To access the Map Attributes page:
1. Navigate to the Page Definition. See "Accessing the Page Definition" on page 8-2.
2. Access the Chart Attributes page:
■ Tree view- Under Page Rendering, double-click the region name.
■ Component view - Under Region, select the region name.
The Region Definition appears.
3. Click Map Attributes.
4. Edit the appropriate attributes.
To learn more about a specific item on a page, click the item label.
When help is available, the cursor changes to an arrow and question mark when you pass the cursor over an item. See "About Field-Level Help" on page 1-13.
5. Click Apply Changes.
About Navigation AlternativesThe Map Attributes page is divided into sections. You can access these sections by scrolling down the page, or by clicking a navigation button at the top of the page. When you select a button at the top of the page, the selected section appears and all other sections are temporarily hidden. To view all sections of the page, click Show All.
Using Custom XML with Flash MapsThere are additional map settings that cannot be controlled using the standard attributes on the Map Attributes page. To further control the look and feel of a chart, you can use custom XML.
To use custom XML:
1. Create a Flash map.
2. Navigate to the Page Definition. See "Accessing the Page Definition" on page 8-2.
3. Access the Map Attributes page:
■ Tree view- Under Page Rendering, double-click the region name.
■ Component view - Under Region, select the region name.
Note: If you are referencing geographical information stored in a database table, the information must correspond with the Region information associated with the map source. For more information, see AnyChart User's Guide:
http://anychart.com/products/anychart/docs/

Creating Charts
Adding Database Application Components and Controls 10-47
The Region Definition appears.
4. Click Map Attributes.
5. Scroll down to Map XML.
6. From Use Custom XML, select Yes.
If you select to use custom XML, regions with attributes that no longer appear are hidden. To display these regions again, select No for Use Custom XML.
7. Edit the XML.
8. Click Apply Changes.
Enabling Asynchronous UpdatesYou can create Flash maps that monitor information by enabling the Asynchronous Update attribute on the Map Attributes page. Enabling this attribute updates the map to reflect changes in the underlying data within a specified time interval.
To enable asynchronous updates:
1. Create a Flash map.
2. Navigate to the Page Definition. See "Accessing the Page Definition" on page 8-2.
3. Access the Map Attributes page:
■ Tree view- Under Page Rendering, double-click the region name.
■ Component view - Under Region, select the region name.
The Region Definition appears.
4. Click Map Attributes.
5. Scroll down to Refresh.
6. From Asynchronous Update, select Yes.
7. In Update Interval (Seconds), enter the interval in seconds between map updates. For optimal performance, select an interval that is greater than 2 seconds.
8. Click Apply Changes.
Creating ChartsApplication Builder includes built-in wizards for generating Flash and HTML5 charts, and supports the editing of SVG and HTML charts. Oracle Application Express supports only these four types of graphical charts.
Topics:■ About Creating SQL Queries for Charts
■ About Creating a HTML5 Charts
■ About Creating a Flash Chart
■ About SVG Charts
Tip: For more information on supported XML format for maps, see the Online Map XML Reference at:
http://www.anychart.com/

Creating Charts
10-48 Oracle Application Express Application Builder User's Guide
■ About HTML Charts
■ Editing Chart Attributes
■ About Saving Flash Charts
■ Enabling Asynchronous Updates
About Creating SQL Queries for ChartsYou define a chart in Application Builder using a wizard. For most chart wizards, you select a chart type and provide a SQL query using the following syntax:
SELECT link, label, valueFROM ...
Where:
■ link is a URL.
■ label is the text that displays in the bar.
■ value is the numeric column that defines the bar size.
For example:
SELECT null, last_name, salaryFROM employeesWHERE DEPARTMENT_ID = :P101_DEPARTMENT_ID
Dial Chart Syntax (Flash and HTML5)To create a dial chart, select a dial chart type and provide a SQL query using the following syntax:
SELECT value , maximum_value [ ,low_value [ ,high_value] ]FROM ...
Where:
■ value is the starting point on the dial.
■ maximum_value is the possible highest point on the dial.
■ low_value and high_value are the historical low and high values.
For example:
SELECT dbms_random.value(500, 1200), 1300, dbms_random.value(100, 200)FROM DUAL
Multiple Series Syntax (Flash and HTML5)For column charts and line charts, you can define multiple series in one SQL query. The series names for these chart types are derived from the corresponding column aliases in the query. To define a multiple series chart, use the following syntax:
SELECT link, label, series_1_value [, series_2_value [, ...]]FROM ...
Range Chart Syntax (Flash and HTML5)Range charts require two values for each bar. To create a range chart, create a chart and provide a SQL query using the following syntax:

Creating Charts
Adding Database Application Components and Controls 10-49
SELECT link, label, low_value, high_value FROM ...
Scatter Chart Syntax (Flash and HTML5)Scatter charts require an x value and y value for each point. To create a range chart, create a chart and provide a SQL query using the following syntax:
SELECT link, label, x_value, y_value FROM ...
Candlestick Chart Syntax (Flash and HTML5)Candlestick charts require open, low, high, and close values for each candlestick. To create a candlestick chart, create a chart and provide a SQL query using the following syntax:
SELECT link, label, open, low, high, closeFROM ...
Gantt Chart Syntax (Flash Only)Project Gantt charts require a task name, task id, parent task id, actual start date, actual_end_date, and progress value for each task. Two optional values for planned start date and planned end date can also be used. To create a Project Gantt chart, create a Flash chart and provide a SQL query using the following syntax:
SELECT link, task_name, task_id, parent_task_id, actual_start_date, actual_end_date, progressFROM ...
Resource Gantt charts require a resource id, resource name, parent resource id, actual start date, and actual end date value for each task. To create a Resource Gantt chart, create a Flash chart and provide a SQL query using the following syntax:
SELECT link, resource_id, resource_name, resource_parent_id, actual_start_date, actual_end_dateFROM ...
About Creating a HTML5 ChartsHTML5 chart support in Oracle Application Express is based on the AnyChart HTML5 Chart Component.
Topics:■ About HTML5 Charts
■ Adding an HTML5 Chart to an Existing Page
■ Adding an HTML5 Chart to a New Page
■ Switching an HTML5 Chart to a Flash Chart
About HTML5 ChartsHTML5 chart support in Oracle Application Express is based on the AnyChart HTML5 Chart Component. AnyChart is a flexible Flash and JavaScript (HTML5) based solution that enables developers to create animated and compact interactive charts.

Creating Charts
10-50 Oracle Application Express Application Builder User's Guide
HTML5 charts use a JavaScript chart engine, rendering the chart in SVG format. Flash cannot be rendered on most of the modern mobile devices, however you can now take advantage of our new HTML5 charting solution to incorporate charts in your mobile applications. HTML5 charts are compatible with popular browsers for the following mobile platforms:
■ Android: Versions 3.1, 3.2, 4.0, 4.0.3, and 4.1
■ iOs (iPhone, iPad, iPod Touch): Safari 3.2 and higher is required
To learn more see:
http://www.anychart.com/
Adding an HTML5 Chart to an Existing PageTo add an HTML chart to an existing page:
1. Navigate to the Page Definition. See "Accessing the Page Definition" on page 8-2.
2. On the Page Definition, create a new region:
■ Tree view- Under Page Rendering, right-click Regions and select Create.
■ Component view - Under Region, click the Create icon.
The Create Region Wizard appears.
3. Select Chart and click Next.
4. For Chart Type:
a. Chart Rendering - Select HTML5 Chart.
b. Chart Type - Specify a chart type. Depending upon the chart type, you may be prompted to make one or two selections.
c. Click Next.
5. For Display Attributes:
a. Specify the following:
– Title
– Region Template
– Parent Region
– Display Point
– Sequence
To learn more, click the item label. When help is available, the cursor changes to an arrow and question mark when you pass the cursor over an item. See "About Field-Level Help" on page 1-13.
b. Click Next.
6. For Chart Attributes, specify the appropriate attributes and click Next.
To learn more about a specific attribute, click the item label.
7. For Source:
a. Specify a query by either:
– Entering a SQL query in the field provided. See "About Creating SQL Queries for Charts" on page 10-48.

Creating Charts
Adding Database Application Components and Controls 10-51
– Clicking the Build Query button. When the Build Chart Query Wizard appears, follow the on-screen instructions.
b. Specify relevant chart attributes. To learn more, click the item label.
8. For Conditional Display:
a. Condition Type - Select a condition type from the list that must be met in order for this component to be rendered processed. See "Understanding Conditional Rendering and Processing" on page 2-4
b. Authorization Scheme - Optionally select an authorization scheme which must evaluate to TRUE in order for this component to be rendered or otherwise processed. See "Providing Security Through Authorization" on page 15-37.
c. Click Create Region.
Adding an HTML5 Chart to a New PageTo create an HTML5 chart on a new page:
1. On the Workspace home page, click the Application Builder icon.
2. Select an application.
3. Click Create Page.
4. Select Chart and click Next.
5. For Chart Type:
a. Chart Rendering - Select HTML5 Chart.
b. Chart Type - Specify a chart type. Depending upon the chart type, you may be prompted to make one or two selections.
c. Click Next.
6. For Page and Region Attributes:
a. Specify the following:
– Page Number
– Page Name
– Region Template
– Region Name
– Breadcrumb
To learn more, click the item label. When help is available, the cursor changes to an arrow and question mark when you pass the cursor over an item. See "About Field-Level Help" on page 1-13.
b. Click Next.
7. For Tab Options, specify whether to include tabs and click Next.
8. For Chart Attributes, specify the appropriate attributes and click Next.
To learn more about an attribute, click the item label. When help is available, the cursor changes to an arrow and question mark when you pass the cursor over an item. See "About Field-Level Help" on page 1-13.
9. For Query:
a. Specify a query by either:

Creating Charts
10-52 Oracle Application Express Application Builder User's Guide
– Entering a SQL query in the field provided. See "About Creating SQL Queries for Charts" on page 10-48.
– Clicking the Build Query button. When the Build Chart Query Wizard appears, follow the on-screen instructions.
b. Specify relevant chart attributes. To learn more, click the item label.
c. Click Next.
10. Click Create.
Switching an HTML5 Chart to a Flash ChartOnce you create an HTML5 chart, you can switch its rendering to Flash by editing chart attributes on the Chart Attributes page.
To switch an HTML5 chart to a Flash Chart:
1. Navigate to the Page Definition. See "Accessing the Page Definition" on page 8-2.
2. Access the Chart Attributes page:
■ Tree view- Under Page Rendering, double-click the region name.
■ Component view - Under Region, select the region name.
The Region Definition appears.
■ Click Chart Attributes
3. For Chart Type:
a. Chart Rendering - Select Flash Chart.
b. Chart Type - Specify a chart type. Note that 3D chart types are only supported for Flash charts, so you may want to change the chart type to use one of the 3D options.
To learn more about an attribute, click the item label. When help is available, the cursor changes to an arrow and question mark when you pass the cursor over an item. See "About Field-Level Help" on page 1-13.
4. Click Apply Changes.
About Creating a Flash ChartFlash chart support in Oracle Application Express is based on the AnyChart Flash Chart Component.
Topics:■ About Flash Charts
■ Adding a Flash Chart to an Existing Page
■ Adding a Flash Chart to a New Page
■ Upgrading All Flash Charts to Flash 6
■ Upgrading All Flash Charts to HTML5
■ Upgrading a Flash 3 Chart to Flash 6
■ Upgrading a Flash 3 Chart to HTML5
■ Switching a Flash Chart to an HTML5 Chart

Creating Charts
Adding Database Application Components and Controls 10-53
About Flash ChartsFlash chart support in Oracle Application Express is based on the AnyChart Flash Chart Component. AnyChart is a flexible Flash and JavaScript-based solution that enables developers to create animated, compact, interactive charts. Flash charts are rendered by a browser and require Flash player 9 or later. With AnyChart 6.0, Flash charts are rendered using the FLASH_PREFERRED rendering type. If Flash Player is not available on the device displaying the chart (for example, pages displayed on an iPhone), AnyChart automatically switches to the HTML5 chart engine and displays an SVG-based chart.
Adding a Flash Chart to an Existing PageTo add a flash chart to an existing page:
1. Navigate to the Page Definition. See "Accessing the Page Definition" on page 8-2.
2. On the Page Definition, create a new region:
■ Tree view- Under Page Rendering, right-click Regions and select Create.
■ Component view - Under Region, click the Create icon.
The Create Region Wizard appears.
3. Select Chart and click Next.
4. For Chart Type:
a. Chart Rendering - Select Flash Chart.
b. Chart Type - Specify a chart type. Depending upon the chart type, you may be prompted to make one or two selections.
c. Click Next.
5. For Display Attributes
a. Specify the following:
– Title
– Region Template
– Parent Region
– Display Point
– Sequence
To learn more, click the item label. When help is available, the cursor changes to an arrow and question mark when you pass the cursor over an item. See "About Field-Level Help" on page 1-13.
b. Click Next.
6. For Chart Attributes, select the appropriate attributes and click Next.
To learn more about a specific attribute, click the item label.
7. For Source:
a. Specify a query by either:
– Entering a SQL query in the field provided. See "About Creating SQL Queries for Charts" on page 10-48.
– Clicking the Build Query button. When the Build Chart Query Wizard appears, follow the on-screen instructions.

Creating Charts
10-54 Oracle Application Express Application Builder User's Guide
b. Specify relevant chart attributes. To learn more, click the item label.
c. Click Next.
8. For Conditional Display:
a. Condition Type - Select a condition type from the list that must be met in order for this component to be rendered processed. See "Understanding Conditional Rendering and Processing" on page 2-4
b. Authorization Scheme - Optionally select an authorization scheme which must evaluate to TRUE in order for this component to be rendered or otherwise processed. See "Providing Security Through Authorization" on page 15-37.
c. Click Create Region.
Adding a Flash Chart to a New PageTo create a flash chart on a new page:
1. On the Workspace home page, click the Application Builder icon.
2. Select an application.
3. Click Create Page.
4. Select Chart and click Next.
5. For Chart Type:
a. Chart Rendering - Select Flash Chart.
b. Chart Type - Specify a chart type. Depending upon the chart type, you may be prompted to make one or two selections.
c. Click Next.
6. For Page and Region Attributes:
a. Specify the following:
– Page Number
– Page Name
– Region Template
– Region Name
– Breadcrumb
To learn more, click the item label. When help is available, the cursor changes to an arrow and question mark when you pass the cursor over an item. See "About Field-Level Help" on page 1-13.
b. Click Next.
7. Specify whether to include tabs and click Next.
8. For Chart Attributes, select the appropriate attributes and click Next.
To learn more, click the item label. When help is available, the cursor changes to an arrow and question mark when you pass the cursor over an item. See "About Field-Level Help" on page 1-13.
9. For Query:
a. Specify a query by either:
Creating Charts
Adding Database Application Components and Controls 10-55
– Entering a SQL query in the field provided. See "About Creating SQL Queries for Charts" on page 10-48.
– Clicking the Build Query button. When the Build Chart Query Wizard appears, follow the on-screen instructions.
b. Specify the remaining attributes. To learn more, click the item label.
c. Click Next.
10. Click Create.
Upgrading All Flash Charts to Flash 6To upgrade all Flash charts in an application to Flash 6:
1. On the Workspace home page, click the Application Builder icon.
The Application Builder home page appears.
2. Select an application.
The Application home page appears.
3. Click Utilities and then click Upgrade Application.
The Upgrade Application Summary report appears.
4. For Upgrade Flash Charts to Flash Chart 5, click the number of candidate objects.
5. Select the objects to upgrade and click Upgrade.
Upgrading All Flash Charts to HTML5To upgrade all Flash charts in an application to HTML5 charts:
1. On the Workspace home page, click the Application Builder icon.
The Application Builder home page appears.
2. Select an application.
The Application home page appears.
3. Click Utilities and then click Upgrade Application.
The Upgrade Application Summary report appears.
4. For Upgrade Flash Charts to Flash Chart 5, click the number of candidate objects.
5. Select the objects to upgrade and click Upgrade.
Upgrading a Flash 3 Chart to Flash 6To upgrade a Flash 3 charts Flash 6:
1. Navigate to the Page Definition. See "Accessing the Page Definition" on page 8-2.
2. Access the Chart Attributes page:
■ Tree view- Under Page Rendering, double-click the region name.
■ Component view - Under Region, select the region name.
The Region Definition appears.
3. From the Tasks list, click Upgrade to Flash 6 Chart.
4. Click Upgrade.

Creating Charts
10-56 Oracle Application Express Application Builder User's Guide
Upgrading a Flash 3 Chart to HTML5To upgrade a Flash 3 charts HTML5:
1. Navigate to the Page Definition. See "Accessing the Page Definition" on page 8-2.
2. Access the Chart Attributes page:
■ Tree view- Under Page Rendering, double-click the region name.
■ Component view - Under Region, select the region name.
The Region Definition appears.
3. From the Tasks list, click Upgrade to HTML5 Chart.
4. Click Upgrade.
Switching a Flash Chart to an HTML5 ChartOnce you create a Flash chart, you can switch its rendering to HTML5 by editing chart attributes on the Chart Attributes page.
To switch an Flash chart to an HTML5 Chart:
1. Navigate to the Page Definition. See "Accessing the Page Definition" on page 8-2.
2. Access the Chart Attributes page:
■ Tree view- Under Page Rendering, double-click the region name.
■ Component view - Under Region, select the region name.
The Region Definition appears.
■ Click Chart Attributes
3. For Chart Type:
a. Chart Rendering - Select HTML5 Chart.
b. Chart Type - Specify a chart type. Note that 3D chart types are only supported for Flash charts, so you may want to change the chart type to use one of the 2D options.
To learn more about an attribute, click the item label. When help is available, the cursor changes to an arrow and question mark when you pass the cursor over an item. See "About Field-Level Help" on page 1-13.
4. Click Apply Changes.
About SVG ChartsPrevious releases of Oracle Application Express supported the creation of SVG charts. Although existing SVG charts are still supported, Oracle Application Express no longer supports the creation of new SVG charts.
Topics:■ About Upgrading SVG Charts to HTML5
■ Understanding SVG Chart Cascading Style Sheet Classes
■ Referencing a Custom SVG Chart Cascading Style Sheet
■ Specifying Custom CSS Styles Inline for SVG Charts
■ Displaying SVG Charts in Other Languages
Creating Charts
Adding Database Application Components and Controls 10-57
About Upgrading SVG Charts to HTML5This section describes restrictions that apply when upgrading SVG charts to HTML5 and also describes the instructions for upgrading.
Topics:■ About SVG Chart Upgrade Restrictions
■ Upgrading an SVG Chart to HTML5
■ Upgrading all SVG Charts in an Application to HTML5
You can automatically upgrade single or multiple SVG charts to HTML5.
About SVG Chart Upgrade Restrictions SVG charts can be upgraded with the following restrictions:
■ Only number formats defined in axis format strings are migrated. Date and time formats are ignored.
■ Number format elements containing the following are migrated:
0,9,D,G,, (comma),. (period),$,C,L,FM
■ The label for each series in the HTML5 chart is derived from each series' column alias. This differs from SVG charts, where the label for each series is derived from the Series Name attribute.
■ In SVG charts, only the labels for the first series are used for the x-axis. In HTML5 charts, this has been enhanced so that all data appears, even if the data's label does not occur in the first series.
Upgrading an SVG Chart to HTML5 To upgrade an SVG chart to HTML5:
1. Navigate to the Page Definition. See "Accessing the Page Definition" on page 8-2.
2. Access the Chart Attributes page:
■ Tree view- Under Page Rendering, double-click the region name.
■ Component view - Under Region, select the region name.
The Region Definition appears.
3. From the Tasks list, click Upgrade to New HTML5 Chart.
4. Click Upgrade.
Upgrading all SVG Charts in an Application to HTML5 To upgrade all SVG Charts to HTML5 charts:
1. On the Workspace home page, click the Application Builder icon.
The Application Builder home page appears.
2. Select an application.
The Application home page appears.
3. Click Utilities and then click Upgrade Application.
The Upgrade Application Summary report appears.
4. For Upgrade SVG Charts to HTML5 Charts, click the number of candidate objects.
5. Select the objects to upgrade and click Upgrade.

Creating Charts
10-58 Oracle Application Express Application Builder User's Guide
Understanding SVG Chart Cascading Style Sheet ClassesWhen you create a SVG chart, Oracle Application Express renders it based on cascading style sheet (CSS) classes associated with the current theme. You can change the appearance of a chart by referencing another CSS or by overriding individual classes in the CSS section of the Edit Attributes page
The following sample contains the CSS classes for the dial chart in Sample Application. This example contains all the available CSS classes. Class names appear in boldface.
text{font-family:Verdana, Geneva, Arial, Helvetica, sans-serif;fill:#000000;}tspan{font-family:Verdana, Geneva, Arial, Helvetica, sans-serif;fill:#000000;}text.title{font-weight:bold;font-size:14;fill:#000000;}text.moredatafound{font-size:12;}rect.legend{fill:#EEEEEE;stroke:#000000;stroke-width:1;}text.legend{font-size:10;}#background{fill:#FFFFFF;stroke:none;}rect.chartholderbackground{fill:#ffffff;stroke:#000000;stroke-width:1;}#timestamp{text-anchor:start;font-size:9;}text.tic{stroke:none;fill:#000000;font-size:12}line.tic{stroke:#000000;stroke-width:1px;fill:none;}#dial{stroke:#336699;stroke-width:2px;fill:#336699;fill-opacity:.5;}#dial.alert{fill:#FF0000;fill-opacity:.5;}#dialbackground{stroke:#000000;stroke-width:none;fill:none;filter:url(#MyFilter);}#dialcenter{stroke:none;fill:#111111;filter:url(#MyFilter);}#dialbackground-border{stroke:#DDDDDD;stroke-width:2px;fill:none;filter:url(#MyFilter);}#low{stroke-width:3;stroke:#336699;}#high{stroke-width:3;stroke:#FF0000;}#XAxisTitle{letter-spacing:2;kerning:auto;font-size:14;fill:#000000;text-anchor:middle;}#YAxisTitle{letter-spacing:2;kerning:auto;font-size:14;fill:#000000;text-anchor:middle;writing-mode:tb;}.XAxisValue{font-size:8;fill:#000000;}.YAxisValue{font-size:8;fill:#000000;text-anchor:end;}.nodatafound{stroke:#000000;stroke-width:1;font-size:12;}.AxisLine{stroke:#000000;stroke-width:2;fill:#FFFFFF;}.GridLine{stroke:#000000;stroke-width:0.3;stroke-dasharray:2,4;fill:none;}g.dataholder rect{stroke:#000000;stroke-width:0.5;}.legenditem rect{stroke:#000000;stroke-width:0.5;}
Table 10–4 describes all supported CSS classes. Note that certain classes only apply to specific chart types.
Table 10–4 Available SVG Chart CSS Classes
Class Description
text Defines the appearance of text that displays in a chart.
tspan Defines the appearance of text that displays in a chart. tspan should match the definition of text.
text.title Overrides the default chart text. Use this class for title text.
text.moredatafound Defines the appearance of more datafound text.
rect.legend Creates the rectangular box that holds the chart legend.
To remove the legend border, change rect.legend to the following:
rect.legend{fill:#CCCC99;stroke:none;}

Creating Charts
Adding Database Application Components and Controls 10-59
text.legend Defines the text that appears in the chart legend.
#background Creates the entire background for the SVG plug-in.
For a solid white background with no border, change #background to the following:
#background{fill:#FFFFFF;stroke:#FFFFFF;stroke-width:2;}
rect.chartholderbackground Not applicable to pie and dial charts. Creates the background of the rectangle that holds the chart data.
For a clear background, change rect.chartholderbackground to the following:
rect.chartholderbackground(display:none;)
#timestamp Only applicable if the Asynchronous Update chart attribute is set to Yes. Controls the appearance of the update timestamp test.
To disable the display of the timestamp, use defines #timestamp as follows in the Custom CSS, Inline attribute.
"#timestamp{display:none;}"
See Also: "Enabling Asynchronous Updates" on page 10-64
text.tic Dial charts only. Defines the numbers on a dial chart.
line.tic Dial charts only. Defines the graduation mark that displays directly beneath the number on a dial chart.
#dial Dial charts only. Defines the value that displays on the dial chart.
#dial.alert Dial charts only. Defines a value (called an alert value) that renders in a dial chart using a different display.
#dialbackground Dial charts only. Creates the background of a dial chart.
#dialcenter Dial charts only. Creates the center of the dial on a dial chart.
#dialbackground-border Dial charts only. Works with #dialbackground to create specific graphic effect.
#low Dial charts only. Defines the historical low watermark of the data being displayed on a chart.
#high Dial charts only. Defines the historical high watermark of the data being displayed on a chart.
#XAxisTitle Defines the title that appears on the x-axis
#YAxisTitle Defines the title that appears on the y-axis.
.XAxisValue Defines the value that appears on the x-axis.
.YAxisValue Defines the value that appears on the y-axis.
.AxisLabel Similar to the axis value.
.nodatafound Defines the text element that displays if no information is available.
.AxisLine Indicates zero on charts that have negative values.
Table 10–4 (Cont.) Available SVG Chart CSS Classes
Class Description

Creating Charts
10-60 Oracle Application Express Application Builder User's Guide
Referencing a Custom SVG Chart Cascading Style SheetYou can reference a custom cascading style sheet for a chart using the CSS section of the Chart Attributes page. When you reference an external CSS, you can reference it entirely or simply override specific styles.
To reference a custom chart CSS:
1. Upload the CSS to Application Builder. See "Uploading Cascading Style Sheets" on page 13-47.
2. Navigate to the Page Definition containing the chart. See "Accessing the Page Definition" on page 2.
3. Access the Chart Attributes page:
■ Tree view- Under Page Rendering, double-click the region name.
■ Component view - Under Region, select the region name.
The Region Definition appears.
4. Click the Chart Attributes tab.
5. On the Chart Attributes page, scroll down to the CSS section.
6. From Use Custom CSS, select Yes.
7. To reference an external CSS exclusively:
a. In Custom CSS, Link, enter a link to a custom CSS. For example:
#IMAGE_PREFIX#themes/theme_4/svg.css
b. Specify that the CSS should be used exclusively. In Custom CSS, Inline enter the following:
/**/
8. To reference a custom CSS and override specific styles:
a. In Custom CSS, Link, enter a link to a custom style sheet. For example:
#IMAGE_PREFIX#themes/theme_4/svg.css
b. In Custom CSS, Inline, enter the custom CSS styles you want to override.
Specifying Custom CSS Styles Inline for SVG ChartsYou can override specific styles within the default CSS, using the Custom CSS, Inline attribute on the Chart Attributes page.
To override specific styles within the default CSS:
1. Create a chart. See "About SVG Charts" on page 10-56.
2. Navigate to the Page Definition. See "Accessing the Page Definition" on page 8-2.
.GridLine Creates the horizontal and vertical lines on the chart.
g.dataholder rect Applies a blanket style to all data that displays in the chart.
.legenditem rect Applies a blanket style to all rectangular items in the legend.
Table 10–4 (Cont.) Available SVG Chart CSS Classes
Class Description

Creating Charts
Adding Database Application Components and Controls 10-61
3. Access the Chart Attributes page:
■ Tree view- Under Page Rendering, double-click the region name.
■ Component view - Under Region, select the region name.
The Region Definition appears.
4. Click the Chart Attributes tab.
5. Scroll down to CSS.
6. From Use Custom CSS, select Yes.
7. In Custom CSS, Inline, enter the custom CSS styles you want to override.
Displaying SVG Charts in Other LanguagesTo display an SVG chart in another language, you edit the text and tspan classes to reflect the correct language.
To display an SVG chart in another language:
1. Navigate to the Page Definition. See "Accessing the Page Definition" on page 8-2.
2. Access the Chart Attributes page:
■ Tree view- Under Page Rendering, double-click the region name.
■ Component view - Under Region, select the region name.
The Region Definition appears.
3. Click the Chart Attributes tab.
4. Scroll down to CSS.
5. From Use Custom CSS, select Yes.
6. In Custom CSS, Inline, edit the text and tspan classes to reflect the correct language. The following example demonstrates how to change a chart to Korean:
text{font-family:Batang;fill:#000000;}tspan{font-family:Batang;fill:#000000;}
About HTML ChartsPrevious releases of Oracle Application Express supported the creation of HTML charts. Although existing HTML charts are still supported, Oracle Application Express no longer supports the creation of new HTML charts with the Create wizards. A new HTML chart region type plug-in is available for download from OTN. This plug-in enables users to create HTML chart regions in their applications
To learn more, see:
http://www.oracle.com/technetwork/developer-tools/apex/application-express/apex-plug-ins-182042.html#region
Topics:■ Upgrading an HTML Chart to HTML5
■ Upgrading All HTML Charts to HTML5
Upgrading an HTML Chart to HTML5To upgrade an HTML chart to HTML5:

Creating Charts
10-62 Oracle Application Express Application Builder User's Guide
1. On the Workspace home page, click the Application Builder icon.
The Application Builder home page appears.
2. Select an application.
The Application home page appears.
3. Navigate to the Page Definition. See "Accessing the Page Definition" on page 8-2.
4. Access the Chart Attributes page:
■ Tree view- Under Page Rendering, double-click the region name.
■ Component view - Under Region, select the region name.
The Region Definition appears.
■ Click Chart Attributes
5. From the Tasks list, click Upgrade to HTML5 Chart.
6. Click Upgrade.
Upgrading All HTML Charts to HTML5To upgrade all HTML charts to HTML5:
1. On the Workspace home page, click the Application Builder icon.
The Application Builder home page appears.
2. Select an application.
The Application home page appears.
3. Click Utilities and then click Upgrade Application.
The Upgrade Application Summary report appears.
4. For Upgrade HTML Charts to HTML5 Charts, click the number of candidate objects.
5. Select the objects to upgrade and click Upgrade.
Editing Chart AttributesOnce you have created a chart, you can alter its display by editing chart attributes on the Chart Attributes page.
To access the Chart Attributes page:
1. Navigate to the Page Definition. See "Accessing the Page Definition" on page 8-2.
2. Access the Chart Attributes page:
■ Tree view- Under Page Rendering, double-click the region name.
■ Component view - Under Region, select the region name.
The Region Definition appears.
■ Click Chart Attributes
3. Edit the appropriate attributes.
4. To learn more about a specific item on a page, click the item label.
See Also: "About Saving Flash Charts" on page 10-63

Creating Charts
Adding Database Application Components and Controls 10-63
When help is available, the cursor changes to an arrow and question mark when you pass the cursor over an item. See "About Field-Level Help" on page 1-13.
5. Click Apply Changes.
About Navigation AlternativesThe Chart Attributes page is divided into sections. You can access these sections by scrolling down the page, or by clicking a navigation button at the top of the page. When you select a button at the top of the page, the selected section appears and all other sections are temporarily hidden. To view all sections of the page, click Show All.
About Saving Flash ChartsTo support the saving of an image, AnyChart requires the use of a server-side script that resides on http://www.anychart.com. When you attempt to save an image, the data is sent to the server in Base64 encoding. It is then decoded on the server and the decoded response is returned.
If you want to support the saving of charts locally, you must host the decoding script on your local server. The Flash chart would also require you use of the AnyChart JavaScript function getPNG. By default, the chart region uses embedded HTML tags and does not use any AnyChart JavaScript calls. To make use of the AnyChart JavaScript call, you must modify the region source of your Flash charts.
Using Custom XML with Flash and HTML5 ChartsThere are additional chart settings that cannot be controlled using the standard attributes on the Chart attributes page. To further control the look and feel of a chart, you can use custom XML.
To use custom XML:
1. Navigate to the Chart Attributes page. See "Editing Chart Attributes" on page 10-62.
2. Scroll down to Chart XML.
3. From Use Custom XML, select Yes.
If you select to use custom XML, regions with attributes that no longer apply are hidden. To display these regions again, select No for Use Custom XML.
4. Edit the XML.
5. Click Apply Changes.
Tip: Removing the chart title of an SVG chart (that is, the Chart Title attribute) may negatively impact the location and display of the chart legend.
See Also: "Saving chart as image or vector file" in AnyChart User's Guide for more information on adding support to save Flash charts locally.
Tip: For more information on supported XML format for charts, see the Online XML Reference at:
http://www.anychart.com

Creating Charts
10-64 Oracle Application Express Application Builder User's Guide
Enabling Asynchronous UpdatesSVG, Flash, and HTML5 charts can monitor information by enabling the Asynchronous Update attribute on the Chart attributes page or using a dynamic action with the Refresh action.
Topics:■ Editing the Asynchronous Update Attribute
■ Creating a Refresh Dynamic Action
Editing the Asynchronous Update AttributeEnabling the Asynchronous Update attribute updates the chart to reflect changes in the underlying data within a specified time interval.
To enable asynchronous updates:
1. Navigate to the Chart Attributes page. See "Editing Chart Attributes" on page 10-62.
The Chart Attributes page appears.
2. Scroll down to Refresh.
3. From Asynchronous Update, select Yes.
4. In Update Interval (Seconds), enter the interval in seconds between chart updates. For optimal performance, select an interval that is greater than 2 seconds.
When Asynchronous Update is enabled for an SVG chart, a timestamp displays on the chart indicating the last update.
To disable the Asynchronous Update timestamp:
1. Navigate to the Chart Attributes page.
2. Locate the CSS section.
3. From Use Custom CSS, select Yes.
4. In Custom CSS, Inline edit #timestamp as follows:
#timestamp{display:none;}
Creating a Refresh Dynamic ActionTo create a Refresh dynamic action:
1. Navigate to the Page Definition containing the chart. See "Accessing the Page Definition" on page 8-2.
2. Locate the Dynamic Action section and click Create.
3. For Identification:
a. Name - Enter a name of the dynamic action.
b. Sequence - Specify the sequence for this component. The sequence determines the order of evaluation.
c. Click Next.
4. For When:
a. Event - Specify the event to trigger the firing of the dynamic action.
b. Click Next.

Creating Buttons
Adding Database Application Components and Controls 10-65
5. For True Action:
a. Action - Select Refresh.
b. Click Next.
6. For Affected Elements:
a. Selection Type - Select Region.
b. Region - Select the region containing the chart.
c. Click Next.
7. Click Create Dynamic Action.
Creating ButtonsAs you design your application, you can use buttons to direct users to a specific page or URL, or to post or process information (for example, by creating Create, Cancel, Next, Previous, or Delete buttons).
Buttons can perform four different types of actions. A button can submit a page (for example to save changes to a form page), redirect to either a different page or a custom URL, or do nothing (for example if the button's behavior is defined in a Dynamic Action).
Topics:■ Creating a Button Using a Wizard
■ Creating Multiple Buttons in Component View
■ Editing Buttons
■ Understanding the Relationship Between Button Names and REQUEST
■ About Branching with Buttons
■ Displaying Buttons Conditionally
Creating a Button Using a WizardYou create a button by running the Create Button Wizard from the Page Definition. How you create a button depends upon whether you are viewing the Page Definition in tree or component view. To learn more, see "About Tree and Component View" on page 8-2.
Topics:■ Creating a Button in Component View
■ Creating a Button in Tree View
Creating a Button in Component ViewComponent view groups user interface elements and application logic by component type. To create a button in Component view, under buttons and click the Create icon.
To create a region button in Component view:
See Also: "Calling a Page from a Button URL" on page 2-11 and "About Page Specific Utilities" on page 7-84

Creating Buttons
10-66 Oracle Application Express Application Builder User's Guide
1. Navigate to the appropriate Page Definition. See "Accessing the Page Definition" on page 8-2.
2. If necessary, create a region. See "Understanding Regions" on page 12-3.
3. Under Buttons, click the Create icon.
4. Select a region for the button and click Next.
5. Select a position for the button and click Next:
■ Create a button in a region position - Select this option to place the button in a region position. A region position is a position defined by a region template.
■ Create a button displayed among this region's items - Select this option to display the button within or between page items (for example, to add a button directly to the right of a form field).
6. For Button Attributes:
a. Button Name - Enter a name for this button. For buttons with an action of Submit Page, the button name becomes the page request value. For example, if you name the button FLOW_RESET_BUTTON, then the button has purpose of resetting the current page without doing a submit).
b. Label - Enter a label to be displayed for the button.
c. Button Style - Available options:
– HTML Button
– Template Based Button
– Image
If the button is an image, you must supply an image name. If the button is template controlled, you must select a template name.
d. Button Template - Define which template controls the display of the button. Button templates are defined on the templates page. You must have at least one button template defined to use button templates.
e. Button Type - Use this attribute to select either the Normal or Hot template of the button template.
If you select Hot, the button is rendered using the template stored in the Hot Template attribute of a button template. If no value is defined, the regular button template is used.
f. Button Attributes - Text entered is added to the HTML element definition. The following example sets the class of a text button:
class="myclass"
For buttons based on templates, your template must include the #BUTTON_ATTRIBUTES# substitution string. You can use this to control tab stops. For example:
tabindex="3"
g. Click Next.
The options that display for Display Properties depend upon the selected region position.
7. For Display Properties:
Creating Buttons
Adding Database Application Components and Controls 10-67
■ If the button position is Create a button in a region position:
– Sequence - Enter the sequence for this component. The sequence determines the order of evaluation.
– Position - Select a position for this button.
– Alignment - Select Right or Left.
– Click Next.
■ If the button position is Create a button displayed among this region's items:
– Sequence - Enter the sequence for this component. The sequence determines the order of evaluation.
– Click Next.
8. For Action When Clicked:
a. Action - Select a behavior when the button is clicked:
– Submit Page - Submits the current page with a REQUEST value equal to the Button Name.
– Redirect to Page in this Application - Redirect to a page in the current application, with optional additional properties for resetting pagination, setting the request value, clearing cache, and setting item values, on the target page.
– Redirect to URL - Redirect to a target URL.
– Defined by Dynamic Action - Does nothing. The button's behavior is defined by a Dynamic Action.
– Download Printable Report Query - This creates a Submit Page button and also a corresponding branch. When the button is clicked, the output is downloaded from the Report Query.
Note that this action is only available if you have a report query defined in your application's Shared Components.
b. Execute Validations - Execute Validations controls the execution of validations when a page is submitted. For example, this is useful for a Delete button where you do not want to annoy the user with irrelevant validation error messages when they are deleting a record.
Options include:
– Yes - If the page is submitted and this attribute is set to Yes, all validations defined for the page and all built-in validations execute (for example to check for a required value or to determine if the value is a valid number or date).
– No - If set to No, none of the defined validations or the built-in validations execute.
To have a specific validation always execute independent of this setting, set the validation attribute, Always Execute, to Yes. To learn more, see "Determining When Validations Execute" on page 8-40.
c. Click Next.
9. For Conditional Display, select a condition type from the list that must be met in order for this component to be rendered.
10. Click Create Button.

Creating Buttons
10-68 Oracle Application Express Application Builder User's Guide
Creating a Button in Tree ViewTree view displays regions, page items, and application logic as nodes in a tree. To create a button in Tree view, you select a region and then one of two options:
■ Create Region Button displays a button in a region position. For example, to add a button in a region position, as defined by the region template.
■ Create Page Item Button displays a button within or between button items. for example, use this option to place a button after a page item.
To create a region button in Tree view:
1. Navigate to the appropriate Page Definition. See "Accessing the Page Definition" on page 8-2.
2. If necessary, create region. See "Understanding Regions" on page 12-3.
3. Right-click the region to contain the button and select one of the following:
■ Create Region Button - Displays a button in a region position. For example, to add a button in a region position, as defined by the region template.
■ Create Page Item Button - Displays a button within or between button items (for example, to place a button after a page item).
4. For Button Attributes:
a. Button Name - Enter a name for this button. For buttons with an action of Submit Page, the button name becomes the page request value. For example, if you name the button FLOW_RESET_BUTTON, then the button has the purpose of resetting the current page without doing a submit.
b. Label - Enter a label to be displayed for the button.
c. Button Style - Available options:
– HTML Button
– Template Based Button
– Image
If the button is an image, you must supply an image name. If the button is template controlled, you must select a template name.
d. Button Template - Define which template controls the display of the button. Button templates are defined on the templates page. You must have at least one button template defined to use button templates.
e. Button Type - Use this attribute to select either the Normal or Hot template of the button template.
If you select Hot, the button is rendered using the template stored in the Hot Template attribute of a button template. If no value is defined, the regular button template is used.
f. Button Attributes - Text entered is added to the HTML element definition. The following example sets the class of a text button:
See Also: "Understanding the Relationship Between Button Names and REQUEST" on page 10-72
See Also: "Understanding the Relationship Between Button Names and REQUEST" on page 10-72

Creating Buttons
Adding Database Application Components and Controls 10-69
class="myclass"
For buttons based on templates, your template must include the #BUTTON_ATTRIBUTES# substitution string. You can use this to control tab stops. For example:
tabindex="3"
g. Click Next.
The options that display for Display Properties depend upon the selected region position.
5. For Display Properties:
■ For Create Region Button:
– Sequence - Enter the sequence for this component. The sequence determines the order of evaluation.
– Position - Select a position for this button.
– Alignment - Select Right or Left.
– Click Next.
■ For Create Page Item Button:
– Sequence - Enter the sequence for this component. The sequence determines the order of evaluation.
– Click Next.
6. For Action When Clicked:
a. Action - Select a behavior when the button is clicked:
– Submit Page - Submits the current page with a REQUEST value equal to the Button Name.
– Redirect to Page in this Application - Redirect to a page in the current application, with optional additional properties for resetting pagination, setting the request value, clearing cache, and setting item values, on the target page.
– Redirect to URL - Redirect to a target URL.
– Defined by Dynamic Action - Does nothing. The button's behavior is defined by a Dynamic Action.
– Download Printable Report Query - This creates a Submit Page button and also a corresponding branch. When the button is clicked, the output is downloaded from the Report Query.
Note that this action is only available if you have a report query defined in your application's Shared Components.
b. Execute Validations - Execute Validations controls the execution of validations when a page is submitted. For example, this is useful for a Delete button where you do not want to annoy the user with irrelevant validation error messages when they are deleting a record.
Options include:
– Yes - If the page is submitted and this attribute is set to Yes, all validations defined for the page and all built-in validations execute (for example to

Creating Buttons
10-70 Oracle Application Express Application Builder User's Guide
check for a required value or to determine if the value is a valid number or date).
– No - If set to No, none of the defined validations or the built-in validations execute.
To have a specific validation always execute independent of this setting, set the validation attribute, Always Execute, to Yes. To learn more, see "Determining When Validations Execute" on page 8-40.
c. Click Next.
7. For Conditional Display, select a condition type from the list that must be met in order for this component to be rendered.
8. Click Create Button.
Creating Multiple Buttons in Component ViewIn Component view, you can create multiple Submit Page buttons within the same region at once using the Create Multiple Buttons Wizard.
To create multiple buttons at once:
1. Navigate to the appropriate Page Definition in Component view. See "Switching Between Tree and Component View" on page 8-3.
2. If necessary, create an HTML region. See "Understanding Regions" on page 12-3.
3. In Component view, locate the Buttons section and click the Create icon.
The Create Button wizard appears.
4. Click the Create Multiple Buttons link.
The Create Multiple Button Wizard appears.
5. From Region, select the region to contain the buttons.
6. From Template, select a template. If no template is selected, buttons of style HTML are created.
7. In HTML Attributes, specify HTML attributes for these buttons. This text is added to the HTML element definition. For example, you could set the class of a text button as follows:
class="myclass"
8. To quickly populate the remaining fields, make a selection from the Quick Button list on the right side of the page.
9. Click Create Buttons.
Editing ButtonsWhen you want to edit a button, you start from the Buttons section on the Page Definition. You can edit the attributes of a button, edit multiple buttons at once, or change a button position within a region.
Topics:■ Editing Button Attributes
■ Editing Multiple Buttons at Once

Creating Buttons
Adding Database Application Components and Controls 10-71
Editing Button AttributesYou can edit button attributes on the Edit Pages Buttons page.
To edit attributes for an existing button:
1. Navigate to the appropriate Page Definition. See "Accessing the Page Definition" on page 8-2.
2. Access the Edit Page Buttons page:
■ Tree view- Under Page Rendering, double-click the button name.
■ Component view - Under Button, select the button name.
The Edit Page Buttons page appears.
3. Edit the button attributes.
To learn more about a specific item on a page, click the item label. When help is available, the cursor changes to an arrow and question mark when you pass the cursor over an item. See "About Field-Level Help" on page 1-13.
4. Click Apply Changes.
About Execute Validations Execute Validations controls the execution of validations when a page is submitted. For example, this is useful for a Delete button where you do not want to annoy the user with irrelevant validation error messages when they are deleting a record.
Options include:
■ Yes - If the page is submitted and this attribute is set to Yes, all validations defined for the page and all built-in validations execute (for example to check for a required value or to determine if the value is a valid number or date).
■ No - If set to No, none of the defined validations or the built-in validations execute.
To have a specific validation always execute independent of this setting, set the validation attribute, Always Execute, to Yes. To learn more, see "Determining When Validations Execute" on page 8-40.
Editing Multiple Buttons at OnceUse the Buttons page to delete multiple buttons or view a history of recent changes.
To edit multiple buttons at once:
1. Navigate to the appropriate Page Definition. See "Accessing the Page Definition" on page 8-2.
2. Access the Edit Page Buttons page:
■ Tree view- Under Page Rendering, right-click the button name and select Edit All.
■ Component view - Click the Edit All icon. The Edit All icon resembles a small grid with a pencil on top of it.
The Buttons page appears. The Buttons page contains a table listing the buttons in the region.
3. Edit the attributes and click Apply Changes.
Deleting Multiple Buttons To delete multiple buttons at once:
Creating Buttons
10-72 Oracle Application Express Application Builder User's Guide
1. Navigate to the appropriate Page Definition. See "Accessing the Page Definition" on page 8-2.
2. Access the Edit Page Buttons page:
■ Tree view- Under Page Rendering, right-click the button name and select Edit All.
■ Component view - Click the Edit All icon. The Edit All icon resembles a small grid with a pencil on top of it.
The Buttons page appears.
3. Click Delete Multiple Buttons.
The Delete Multiple Buttons page appears.
4. Select the buttons to delete and click Remove Buttons.
History Use the History page to view a summary of recent edits to buttons.
Understanding the Relationship Between Button Names and REQUESTThe name you give a Submit button (that is, a button with an Action of Submit Page) determines the value of the built-in attribute REQUEST when the page submits. You can reference the value of REQUEST from within PL/SQL using the bind variable :REQUEST. By using this bind variable, you can conditionally process, validate, or branch based on which button the user clicks. You can also create processes that execute when the user clicks a button. And you can use a more complex condition as demonstrated in the following examples:
If :REQUEST in ('EDIT','DELETE') then ...If :REQUEST != 'DELETE' then ...
These examples assume the existence of buttons named EDIT and DELETE. You can also use this syntax in PL/SQL Expression conditions. Be aware, however, that the button name capitalization (case) is preserved. In other words, if you name a button LOGIN, then a request looking for the name Login fails. For example:
<input type="BUTTON" value="Finish" onclick="apex.submit('Finish');">
In this example Finish is the name of the REQUEST and this example is case-sensitive.
About Branching with ButtonsEach page can include any number of branches. A branch links to another page in your application or to a URL. The Application Express engine considers branching at different times during page processing. You can choose to branch before processing, before computation, before validation, and after processing. Like any other control in Application Builder, branching can be conditional. For example, you can branch when a user clicks a button. When you create a branch, you associate it with a specific button. The branch is only be considered if a user clicks the button.
Displaying Buttons ConditionallyYou can choose to have a button display conditionally by editing attributes on the Edit Pages Button page.
See Also: "Controlling Navigation Using Branches" on page 11-32

Creating Lists of Values at the Application Level
Adding Database Application Components and Controls 10-73
To have a button display conditionally:
1. Create the button. See "Creating a Button Using a Wizard" on page 10-65.
2. Navigate to the appropriate Page Definition. See "Accessing the Page Definition" on page 8-2.
3. Access the Edit Page Buttons page:
■ Tree view- Under Page Rendering, locate the button and double-click the button name.
■ Component view - Under Buttons, click the button name.
4. Scroll down to Conditions.
5. Make a selection from the Condition Type list.
6. Enter an expression in the fields provided.
7. Click Apply Changes.
Creating Lists of Values at the Application LevelA list of values (LOV) is a static or dynamic set of values used to display a specific type of page item, such as popup lists of values, a select list, a check box, a radio group, or multiple select lists.
Creating a LOV as a shared component has several advantages:
■ It can be added to any page within an application.
■ All LOV definitions are stored in one location, making them easy to locate and update.
Topics:■ Creating a Named LOV at the Application Level
■ About Static LOVs
■ Editing an Existing LOV
■ Referencing Session State Within an LOV
■ Accessing LOV Reports
Creating a Named LOV at the Application LevelYou define named (or shared) LOVs at the application level by running the Create LOV Wizard and adding them to the List of Values repository. All LOVs can be defined as static or dynamic. Static lists are based on predefined pairs of display values and return values. Dynamic lists are based on a SQL query you write that selects values from a table.
To create a named LOV:
1. On the Workspace home page, click the Application Builder icon.
2. Select an application.
See Also: "About Bind Variable Syntax" on page 2-16
See Also: "Creating a Static List of Values" on page 7-60, "Creating a Cascading List of Values" on page 7-61, and "Working with Shared Components" on page 8-49

Creating Lists of Values at the Application Level
10-74 Oracle Application Express Application Builder User's Guide
The Application home page appears.
3. Click the Shared Components icon.
4. Under User Interface, select Lists of Values.
The Lists of Values page appears.
5. To create a LOV, click Create.
6. Follow the on-screen instructions.
New named LOVs are added to the List of Values repository. Note to add the LOV to a page you must edit the appropriate item or column and select the named LOV.
About the List of Values PageOnce you create an LOV, it appears on the List of Values page.
A navigation bar appears at the top of the page and contains the following controls:
■ Select columns to search icon - Resembles a magnifying glass. Click this icon to narrow your search to only specific columns. To search all columns, select All Columns.
■ Text area - Enter case insensitive search criteria (wildcard characters are implied) and then click Go.
■ Go button - Executes a search or applies a filter.
■ View Icons - Displays each LOV as a large icon. To edit a group, click the appropriate icon.
■ View Report - Displays each LOV as a line in a report. To edit a group, click the name.
■ Actions menu - Displays the Actions menu. Use this menu to customize an interactive report. See "About the Actions Menu" on page 9-6.
About Static LOVsStatic LOVs are based on a static list of display values and return values you specify when you run the Create LOV Wizard. To create a static LOV, run the Create LOV Wizard and select the LOV type Static. Oracle Application Express stores the display values, return values, and sort sequence you specify in the List of Values repository. Once you add a static LOV to the repository, you can create an item and display it as a check box, radio group, select list, or popup list based on this definition.

Creating Lists of Values at the Application Level
Adding Database Application Components and Controls 10-75
Editing an Existing LOVTo edit an existing LOV, select the LOV on the Lists of Values page.
To edit an LOV:
1. On the Workspace home page, click the Application Builder icon.
2. Select an application.
3. Click Shared Components.
4. Under User Interface, select Lists of Values.
5. Select an LOV.
The Edit page appears.
6. To learn more about a specific item on a page, click the item label.
When help is available, the cursor changes to an arrow and question mark when you pass the cursor over an item. See "About Field-Level Help" on page 1-13.
7. Click Apply Changes.
About Navigation AlternativesThe Edit List of Values page is divided into the following sections: Name, Subscription, and Source.
You can access these sections by scrolling down the page, or by clicking a navigation button at the top of the page. When you select a button at the top of the page, the selected section appears and all other sections are temporarily hidden. To view all sections of the page, click Show All.
Bulk Edit of Static LOVsYou can edit the display values of all static LOVs by clicking the Grid Edit button on the Edit List of Values page.
To perform a bulk edit of static LOVs:
1. On the Workspace home page, click the Application Builder icon.
2. Select an application.
3. Click Shared Components.
4. Under User Interface, select Lists of Values.
By default, LOVs display as icons.
5. Click the Grid Edit tab.
6. Edit the display text and click Apply Changes.
Referencing Session State Within an LOVYou can reference session state by using bind variables. Keep in mind that referencing session state makes an LOV a bit less reusable, but is still a recommended development practice. In the following example, this LOV only works if the item called my_deptno contains a valid department number.
SELECT ename, empno FROM emp WHERE deptno = :P1_DEPTNO

Creating Lists of Values at the Application Level
10-76 Oracle Application Express Application Builder User's Guide
Accessing LOV ReportsApplication Builder includes many reports designed to help you better manage LOVs.
To access LOV reports:
1. On the Workspace home page, click the Application Builder icon.
2. Select an application.
3. When Application Builder appears, click Shared Components.
4. Under User Interface, select Lists of Values.
5. Select one of the following tabs at the top of the page:
■ Edit Null Text
■ Locally Defined
■ Grid Edit
■ Conditional Entries
■ Subscription
■ Utilization
■ History
6. Follow the on-screen instructions.
Edit Null TextClick Edit Null Text to edit null text for all LOVs in your application.
Locally DefinedClick Locally Defined to view all LOVs that are defined locally with the definition of an item. LOVs that are usable by multiple pages can be converted into shared lists of values. Converting locally defined lists of values into a shared list of values promotes reuse.
Grid EditClick Grid Edit to edit the display values of all static LOVs.
Conditional EntriesClick Conditional Entries to view LOVs that display conditionally.
SubscriptionClick Subscription to display the List of Values Subscription page. This page displays all subscribed LOVs in your application.
UtilizationClick Utilization to view a report of where LOVs are used in your application.
HistoryClick History to display the List of Values History page. This page displays a history of recently changed LOVs by date.

Using Shortcuts
Adding Database Application Components and Controls 10-77
Using ShortcutsBy using shortcuts you can avoid repetitive coding of HTML or PL/SQL functions. You can use a shortcut to define a page control such as a button, HTML text, a PL/SQL procedure, or HTML. Once defined, you can invoke a shortcut using specific syntax unique to the location in which the shortcut is used. Shortcuts can be referenced many times, thus reducing code redundancy.
Topics:■ About Shortcut Types
■ Defining Shortcuts
■ Editing Existing Shortcuts
■ Accessing Shortcut Reports
About Shortcut TypesWhen you create a shortcut, you must specify the type of shortcut you want to create. Oracle Application Express supports the following shortcut types:
■ PL/SQL Function Body
■ HTML Text
■ HTML Text with Escaped Special Characters
■ Image
■ Text with JavaScript Escaped Single Quotes
■ Message
■ Message with JavaScript Escaped Special Quotes
Text with JavaScript Escaped Single QuotesUse this type of shortcut to reference a shortcut inside of a JavaScript literal string. This shortcut defines a text string. When the shortcut is referenced, it escapes the single quotation marks required for JavaScript.
MessageUse this type of shortcut to reference a translatable message at runtime. Since this shortcut does not have a shortcut body, the name of the shortcut must match the corresponding message name. At runtime, the name of the shortcut expands to the text of the translatable message for the current language.
Message with JavaScript Escaped Single QuotesUse this type of shortcut to reference a shortcut inside of JavaScript literal string and reference a translatable message at runtime.
Defining ShortcutsBefore you can incorporate a shortcut in your application, you must define it and add it to the Shortcuts repository. You reference shortcuts using the following syntax:
See Also: "About Translating an Application and Globalization Support" on page 18-1

Using Shortcuts
10-78 Oracle Application Express Application Builder User's Guide
"MY_SHORTCUT"
The shortcut name must be capitalized and enclosed in quotation marks.
To define a shortcut:
1. On the Workspace home page, click the Application Builder icon.
2. Select an application.
3. When Application Builder appears, click Shared Components.
4. Under User Interface, select Shortcuts.
5. Click Create.
6. Select one of the following creation methods:
■ From Scratch
■ As a Copy of an Existing Shortcut
7. Follow the on-screen instructions.
New shortcuts are added to the Shortcut repository and are available for use within the following locations:
■ The Region Source attribute of regions defined as HTML Text (with shortcuts). See "Understanding Regions" on page 12-3.
■ Region Header and Footer Text attribute. See "Specifying a Region Header and Footer" on page 12-8.
■ Item Label attributes and Default Value attribute.
■ Region Templates attributes. See "Customizing Templates" on page 13-12.
About the Shortcuts PageOnce you create a shortcut, it appears on the Shortcuts page. You control how the page displays by making a selection from the View list. Available options include:
■ Icons (the default) displays each shortcut as a large icon. To edit a shortcut, click the appropriate icon.
■ Details displays each shortcut as a line in a report. To edit a shortcut, click the name.
Editing Existing ShortcutsOnce you create a shortcut, you can alter it by editing attributes on the Edit Shortcut page.
To edit an existing shortcut:
1. On the Workspace home page, click the Application Builder icon.
2. Select an application.
3. Click Shared Components.
4. Under User Interface, select Shortcuts.
5. Select a shortcut.
The Edit Shortcut page appears.
6. To learn more about a specific item on a page, click the item label.

Creating Trees
Adding Database Application Components and Controls 10-79
When help is available, the cursor changes to an arrow and question mark when you pass the cursor over an item. See "About Field-Level Help" on page 1-13.
7. Click Apply Changes.
About Navigation AlternativesThe Edit Shortcut page is divided into the following sections: Name, Subscription, Source, Configuration, and Comments.
You can access these sections by scrolling down the page, or by clicking a navigation button at the top of the page. When you select a button at the top of the page, the selected section appears and all other sections are temporarily hidden. To view all sections of the page, click Show All.
Accessing Shortcut ReportsApplication Builder includes several reports designed to help you better manage shortcuts.
To access shortcut reports:
1. On the Workspace home page, click the Application Builder icon.
2. Select an application.
3. When Application Builder appears, click Shared Components.
4. Under User Interface, select Shortcuts.
5. Click one of the following tabs:
■ Subscription
■ History
Subscribed ShortcutsClick Subscription to display the Subscribed Shortcuts page. This page displays all subscribed shortcuts in your application.
Shortcut HistoryClick History to display the Shortcut History page. This page displays a history of recently changed shortcuts by date.
Creating TreesApplication Builder includes a built-in wizard for generating a tree. Trees use jsTree, a JavaScript-based, cross browser tree component that features theme support, optional keyboard navigation, and optional state saving. You can create a Tree from a query that specifies a hierarchical relationship by identifying an ID and parent ID column in a table or view. The tree query utilizes a START WITH .. CONNECT BY clause to generate the hierarchical query.
Topics:■ Creating a Tree
Note: The Subscription and History tabs only appear after you create a shortcut.
Creating Trees
10-80 Oracle Application Express Application Builder User's Guide
■ Editing a Tree as a Developer
■ About Trees Created as Shared Components
Creating a TreeTo create a tree using a wizard:
1. On the Workspace home page, click the Application Builder icon.
2. Select an application.
3. Click Create Page and click Next.
4. For Page Type, select Tree.
5. For Page Attributes, specify the following:
a. Page Number - Specify the page on which the tree should be created.
b. Page Name - If the tree will be created on a new page, enter the page name.
c. Region Template - Select a region template for the tree region.
d. Region Name - Enter a name for the region to contain the tree.
e. Breadcrumb - Select whether you want to use a breadcrumb navigation control on your page, and which breadcrumb navigation control you want to use. If you select Breadcrumb, enter the following:
– Entry Name - Enter a name for the breadcrumb entry.
– Select Parent Entry - Select a parent entry.
f. Click Next.
6. For Tab, specify whether the page should have tabs and click Next.
7. For Tree Templates, select a tree template and click Next.
8. For Table/View Owner and Name, select the table or view owner and name on which to base the tree and click Next.
9. For Query, select the columns to include in the tree:
a. ID - Select the column to use as the ID.
b. Parent ID - Select the column to use as the parent ID.
c. Node Text - Select the text to appear on the tree nodes.
d. Start With - Select the column to be used to specify the root of the hierarchical tree query.
e. Start Tree - Choose how to start your query. Options include:
– Based on Existing Item - Select an existing application or page item.
– Based on a SQL Query - Enter a SQL query that returns a single row or single column.
– Based on a Static Value - Enter a static value.
– Value is NULL.
f. Click Next.
Tip: The creation of jsTree regions is only possible on pages using a Desktop user interface.

Creating Trees
Adding Database Application Components and Controls 10-81
10. For Where and Order by, specify the following:
a. Where Clause - Enter an optional WHERE clause.
b. Order Siblings By - Select the columns by which siblings are ordered.
c. Click Next.
11. For Tree Attributes, specify the following:
a. Include Buttons - Select the buttons to include.
b. Selected Node Page Item - Can be used to hold the selected node value. If you select an application item, you can use this item to save the tree state, by holding the last selected node of the tree.
c. Tooltip - Displays a tooltip when the mouse hovers over a leaf node. Options include:
– Static Assignment - Specifies a static value to be used as the tooltip text. Substitution strings can be used in the static text, to incorporate information from the SQL query in the tooltip text. The following substitution strings can be used:
#VALUE# - refers to the value of ID column.
#TITLE# - refers to the value of Node Text column
#LINK# - refers to the value of Link option
– Database Column - Select the column to use as the tooltip text.
d. Link Option:
– Existing Application Item - Makes the leaf node text a link. If you select this option, you must specify a page to link to and an existing application item to link leaf node text.
This option only appears if you select the Existing Application Item link option.
– Nothing
e. Click Next.
12. Confirm your selections and click Finish.
Editing a Tree as a DeveloperBy default, a tree does not have focus and node links are activated with a single click action. This section describes how developers can customize a tree by editing tree attributes.
Accessing the Tree Attributes PageDevelopers can customize a tree by editing attributes on the Tree Attributes page.
To access the Tree Attributes page:
1. Navigate to the appropriate Page Definition. See "Accessing the Page Definition" on page 8-2.
2. Access the Tree Attributes page:
■ Tree view - Right-click the Region name and select Edit Tree.

Creating Trees
10-82 Oracle Application Express Application Builder User's Guide
■ Component View - Under Regions, click the Tree link next to the name of the tree region you want to edit.
The Tree Attributes page appears and is divided into the following sections:
■ Display Settings enable you control a tree’s appearance and functionality. Use these settings to define a tree template, tooltip, a page item to hold the last selected node value for saving tree state, determine whether the tree has focus on page load, and what action activates node links on a tree.
■ Query enables you to edit the SQL query underlying the tree. The query must be in the following format:
SELECT status, level, name, icon, id, tooltip, link FROM ... WHERE ... START WITH... CONNECT BY PRIOR id = pid
ORDER SIBLINGS BY ...
3. To learn more about a specific attribute, click the item label.
When help is available, the cursor changes to an arrow and question mark when you pass the cursor over an item. See "About Field-Level Help" on page 1-13.
4. Click Apply Changes.
About Trees Created as Shared ComponentsPrevious releases of Oracle Application Express supported the creation of trees as Shared Components. Although existing trees are still supported, Oracle Application Express no longer supports the creation of trees as Shared Components.
Oracle Application Express now supports the generation of a jsTree tree region. jsTree is a JavaScript based, cross browser tree component. It is packaged as a jQuery plug-in. To learn more, see "Creating Trees" on page 10-79.
Topics:■ Editing an Existing Tree
■ Accessing Existing Tree Reports
Editing an Existing TreeOnce you create a tree as a Shared Component, you can edit it on the Trees page.
To edit a tree created as a Shared Component:
1. Navigate to the Trees page:
a. Navigate to the Workspace home page.
b. Click the Application Builder icon.
c. Select an application.
d. On the Application home page, click Shared Components.
e. Under Navigation, click Trees.
The Trees page appears.
You can change the appearance of the page by using the Search bar at the top of the page. See "Customizing Interactive Reports" on page 9-4.

Creating Trees
Adding Database Application Components and Controls 10-83
2. Select a tree.
The Edit Tree page appears.
3. Edit the appropriate attributes.
4. To learn more about a specific item on a page, click the item label. See "About Field-Level Help" on page 1-13.
5. Click Apply Changes.
About Navigation Alternatives The Edit Tree page is divided into the following sections: Name, Query, Before and After, Static Node Templates, Dynamic Templates, Node Text Templates, and Link Templates.
You can access these sections by scrolling down the page, or by clicking a navigation button at the top of the page. When you select a button at the top of the page, the selected section appears and all other sections are temporarily hidden. To view all sections of the page, click Show All.
Accessing Existing Tree ReportsYou can view the Trees Utilization and Tree History reports by clicking the appropriate tab at the top of the Trees page.
To view tree reports:
1. Navigate to the Trees page:
a. Navigate to the Workspace home page.
b. Click the Application Builder icon.
c. Select an application.
d. On the Application home page, click Shared Components.
e. Under Navigation, click Trees.
2. Click the appropriate tab:
■ Utilization
■ History
You can change the appearance of the page by using the Search bar at the top of the page. See "Customizing Interactive Reports" on page 9-4.
To learn more, see the sections that follow.
Tree Utilization Click Utilization on the Trees page to access the Tree Utilization report. This report displays all trees included in the current application. To edit a tree, select the tree name.
Tree History Click History on the Trees page to view changes to trees by developer and date.
Note: The Utilization and History buttons only appear after you have created a tree.

Using the Find Icon
10-84 Oracle Application Express Application Builder User's Guide
Using the Find IconYou can search for items, pages, queries, tables, PL/SQL code, or images by clicking the Find icon on numerous pages within Application Builder.
Topics:■ About the Find Icon
■ About the Item Finder
■ Using the Pages Finder
■ Using the Queries Finder
■ Using the Tables Finder
■ Using the PL/SQL Finder
■ Using the Images Finder
About the Find IconThe Find icon resembles a flashlight and often displays to the right of the Run Page and Edit Page icons as shown in the following illustration. The Find icon displays on many pages in Application Builder, including the Application home page, the Page Definition, application attribute pages, and numerous pages for creating and managing shared components.
About the Item FinderIn Application Builder, an item can be a text field, text area, password, select list, check box, and so on. You can use the Item Finder to search for items within the current application or within the schema associated with the workspace.
To search for an item using the Item Finder:
1. Click the Find icon.
The Items Finder appears. A search bar displays at the top of the page and contains the following controls:
■ Select Columns icon - Resembles a magnifying glass. Click this icon to narrow your search to specific columns. To search all columns, select All Columns.
■ Text area - Enter case insensitive search criteria (wildcard characters are implied) and then click Go.
■ Go button - Executes a search.
See Also: "Debugging an Application" on page 14-1
See Also: "About the Application Home Page" on page 6-3
See Also: "Understanding Page-Level Items" on page 7-56

Using the Find Icon
Adding Database Application Components and Controls 10-85
■ Actions menu - Clicking the icon displays the Actions menu. Use this menu to customize an interactive report. See "About the Actions Menu" on page 9-6.
2. To restrict the report to display just items on a specific page, click the appropriate page number in the far right column.
Note the page number you select appears in the Page field at the top of the page. To expand the view to all pages, delete the page number in the Page field and click Go.
3. To edit a specific item, navigate to the appropriate item. See "Understanding Page-Level Items" on page 7-56 and "Editing Multiple Items Simultaneously" on page 7-67.
Using the Pages FinderA page (or Page Definition) is the basic building block of an application. You can use the Pages Finder to search for pages within the current application or within the schema associated with the workspace.
To search for a page:
1. Click the Find icon.
2. Click the Pages tab.
The Pages Finder report appears, displaying the page number, page name, page alias, title, tab set, and counts of the number of items and regions on the page.
A search bar displays at the top of the page and contains the following controls:
■ Select columns to search icon - Resembles a magnifying glass. Click this icon to narrow your search to specific columns. To search all columns, select All Columns.
■ Text area - Enter case insensitive search criteria (wildcard characters are implied) and then click Go.
■ Go button - Executes a search.
■ Actions menu - Clicking the icon displays the Actions menu. Use this menu to customize an interactive report. See "About the Actions Menu" on page 9-6.

Using the Find Icon
10-86 Oracle Application Express Application Builder User's Guide
3. To link to the Items page, click the page number.
Using the Queries FinderYou can use the Queries Finder to locate a query within your application or within the schema associated with the workspace.
To search for a query using the Queries Finder:
1. Click the Find icon.
2. Click the Queries tab.
The Query Finder report appears, displaying the page number, page name, the region containing the query, and the query source.
A search bar displays at the top of the page and contains the following controls:
■ Select columns to search icon - Resembles a magnifying glass. Click this icon to narrow your search to specific columns. To search all columns, select All Columns.
■ Text area - Enter case insensitive search criteria (wildcard characters are implied) and then click Go.
■ Go button - Executes a search.
■ Actions menu - Clicking the icon displays the Actions menu. Use this menu to customize an interactive report. See "About the Actions Menu" on page 9-6.
See Also: "About the Page Definition" on page 8-1 and "Editing a Page in Component View" on page 8-8

Using the Find Icon
Adding Database Application Components and Controls 10-87
3. To link to the Items page, click the page number.
Using the Tables FinderYou can use the Tables Finder to view tables within the schema associated with the workspace.
To view tables associated within the current schema:
1. Click the Find icon.
2. Click the Tables tab.
The Tables Finder appears.
See Also: "About the Page Definition" on page 8-1 and "Editing a Page in Component View" on page 8-8

Using the Find Icon
10-88 Oracle Application Express Application Builder User's Guide
A search bar displaying the selected tab appears at the top of the page and contains the following controls:
■ Select columns to search icon - Resembles a magnifying glass. Click this icon to narrow your search to specific columns. To search all columns, select All Columns.
■ Text area - Enter case insensitive search criteria (wildcard characters are implied) and then click Go.
■ Go button - Executes a search.
■ Actions menu - Clicking the icon displays the Actions menu. Use this menu to customize an interactive report. See "About the Actions Menu" on page 9-6.
3. Select a table name.
A table definition appears.
This report displays the column names, data type, length, precision, and scale and the SQL necessary to re-create the table appears at the bottom of the page.
Using the PL/SQL FinderYou can use the PL/SQL Finder to locate and view details about stored procedures, functions, and packages associated with each object within the schema associated with the workspace.
To search for PL/SQL code in the current schema:
1. Click the Find icon.
2. Click the PL/SQL tab.
The PL/SQL Finder appears.
A search bar displays at the top of the page and contains the following controls:
See Also: "Managing Tables" in Oracle Application Express SQL Workshop Guide

Using the Find Icon
Adding Database Application Components and Controls 10-89
■ Select columns to search icon - Resembles a magnifying glass. Click this icon to narrow your search to specific columns. To search all columns, select All Columns.
■ Text area - Enter case insensitive search criteria (wildcard characters are implied) and then click Go.
■ Go button - Executes a search.
■ Actions menu - Clicking the icon displays the Actions menu. Use this menu to customize an interactive report. See "About the Actions Menu" on page 9-6.
3. To view additional details, select the procedure, function, or package name.
The procedure, package, or function name appears and additional information including the owner, source name, source type, return type, argument names, data types, and IN/OUT parameters.
Using the Images FinderYou can use the Images Finder to identify images available to the current application.
To view available images:
1. Click the Find icon.
2. Click the Images tab.
The Images Finder appears.
See Also: "Managing Database Objects with Object Browser" in Oracle Application Express SQL Workshop Guide

Controlling Access to Applications, Pages, and Page Components
10-90 Oracle Application Express Application Builder User's Guide
A search bar displays at the top of the page and contains the following controls:
■ Select columns to search icon - Resembles a magnifying glass. Click this icon to narrow your search to specific columns. To search all columns, select All Columns.
■ Text area - Enter case insensitive search criteria (wildcard characters are implied) and then click Go.
■ Go button - Executes a search.
■ Actions menu - Clicking the icon displays the Actions menu. Use this menu to customize an interactive report. See "About the Actions Menu" on page 9-6.
3. From Show, select the type of images to view. Options include:
■ Standard Images
■ Workspace Images
■ Application Images
Controlling Access to Applications, Pages, and Page ComponentsYou can control access to an application, individual pages, or page components by creating an access control list. To create an access control page, the application schema must have CREATE TABLE, CREATE TRIGGER, CREATE SEQUENCE privileges.
Topics:■ How the Access Control List Works
■ Creating an Access Control List
■ Selecting an Application Mode and Adding Users
■ Controlling Access for Pages and Page Components
See Also: "Managing Database Objects with Object Browser" in Oracle Application Express SQL Workshop Guide

Controlling Access to Applications, Pages, and Page Components
Adding Database Application Components and Controls 10-91
How the Access Control List WorksYou create an access control list by running the Access Control Wizard. The Access Control Wizard creates a page named Access Control Administration. This page contains a list of application modes and an Access Control List. Once you create the Access Control Administration page, you:
1. Run the Access Control Administration page.
2. Select one of the following application modes:
– Full access to all, access control list not used.
– Restricted access. Only users defined in the access control list are allowed.
– Public read only. Edit and administrative privileges controlled by access control list.
– Administrative access only.
3. Add users to the Access Control List.
In addition to creating the Access Control Administration page, the Access Control Wizard also creates:
■ two tables within the application’s default schema to manage the access control
■ the authorization schemes that correspond to the application mode list options
■ the privileges available in the Access Control List
You can control access to a specific page or page component by selecting one of these authorization schemes on the page or component attributes pages. Once you create an Access Control, you can customize the page, tables and values to suit the specific needs of your application.
Creating an Access Control ListYou create an access control list by creating a page. You can create a page on the Application home page, while viewing a Page Definition, or by clicking Create on the Developer toolbar.
Topics:■ Creating an Access Control from the Application Home Page
■ Creating an Access Control from the Page Definition
■ Creating an Access Control List from the Developer Toolbar
Creating an Access Control from the Application Home PageTo create an access control list from the Application home page:
1. On the Workspace home page, click the Application Builder icon.
2. Select an application.
The Application home page appears.
See Also: "Building Queries with Query Builder" in Oracle Application Express SQL Workshop Guide
See Also: "Attaching an Authorization Scheme to an Application" on page 15-39

Controlling Access to Applications, Pages, and Page Components
10-92 Oracle Application Express Application Builder User's Guide
3. Click Create Page.
4. For page type, select Access Control and click Next.
The Access Control Wizard appears.
5. Specify a page number and click Next.
6. Select a tab option and click Next.
7. Review the confirmation page and click Create.
Creating an Access Control from the Page Definition To create an access control list from the Page Definition:
1. Navigate to the appropriate Page Definition. See "Accessing the Page Definition" on page 8-2.
2. Click the Create button at the top of the page.
3. Click New page and select New Page.
4. For page type, select Access Control and click Next.
The Access Control Wizard appears.
5. Specify a page number and click Next.
6. Select a tab option and click Next.
7. Review the confirmation page and click Finish.
Creating an Access Control List from the Developer ToolbarTo create an access control list from the Developer toolbar:
1. Run the application. See "Running an Application or Page" on page 7-40.
2. On the Developer toolbar, click Create.
The New Component Wizard appears.
3. Select New page and click Next.
4. For page type, select Access Control and click Next.
The Access Control Wizard appears.
5. Specify a page number and click Next.
6. Select a tab option and click Next.
7. Review the confirmation page and click Finish.
Selecting an Application Mode and Adding UsersYou can control access to an application by running the Access Control Administration page, selecting an application mode, and then adding users to the Access Control list.
Topics:■ Selecting an Application Mode
■ Adding Users to the Access Control List and Selecting Privileges
■ Removing Users from the Access Control List

Controlling Access to Applications, Pages, and Page Components
Adding Database Application Components and Controls 10-93
Selecting an Application ModeTo select an application mode:
1. Create an access control list. See "Creating an Access Control List" on page 10-91.
The wizard creates a page named Access Control Administration.
2. Run the Access Control Administration page. See "Running an Application or Page" on page 7-40.
3. Select an Application Mode. Options include:
■ Full access to all, access control list not used.
Select this option to enable all users access to an application.
■ Restricted access. Only users defined in the access control list are allowed.
Select this option to restrict access to users on the Access Control List. Only users on the Access Control List can view pages and components associated with an authorization scheme.
■ Public read only. Edit and administrative privileges controlled by access control list.
Provides public access to pages and components associated with the access control - view authorization scheme.
■ Administrative access only.
Only users with Administrator privileges can access pages or components associated with an authorization scheme.
4. Click Set Application Mode.
The user interface of your page depends on the theme you selected for your application. See "Managing Themes" on page 13-1.
Next, add users to the Access Control List.

Controlling Access to Applications, Pages, and Page Components
10-94 Oracle Application Express Application Builder User's Guide
Adding Users to the Access Control List and Selecting PrivilegesTo add users to the Access Control List:
1. Under Access Control List, click Add User.
A new row appears.
2. Enter a user in the Username field.
3. Associate a privilege with the user. Available options include:
■ Administrator
■ Edit
■ View
4. Click Apply Changes.
5. Repeat steps 1 to 5 for all users.
Removing Users from the Access Control ListTo remove users from the Access Control List:
1. Select the user to be removed by selecting the check box to the left of the user name.
2. Click Delete.
Controlling Access for Pages and Page ComponentsThe Access Control Wizard creates authorization schemes that correspond to the application mode list options and the privileges available in the Access Control List.
You can control access to a specific page or page component by selecting one of the following authorization schemes on the page or component attributes pages:
■ access control administrator. Only users with Administrator privileges can view the page or component.
■ access control - edit. Users with both Edit and Administrator privileges can view the page or component. Users with View privileges cannot view the page or component.
■ access control - view. Users with Administrator, Edit, or View privileges can view the page or component.
■ Not access control administrator. Users with Administrator privileges cannot view the page or component.

Incorporating JavaScript into an Application
Adding Database Application Components and Controls 10-95
■ Not access control - edit. Users with both Edit and Administrator privileges cannot view the page or component. Users with View privileges can view the page or component.
■ Not access control - view. Users with Administrator, Edit, or View privileges cannot view the page or component.
Incorporating JavaScript into an ApplicationAdding JavaScript to a web application is a great way to add features that mimic those found in client/server applications without sacrificing all the benefits of web deployment. Oracle Application Express includes multiple built-in interfaces especially designed for adding JavaScript.
Remember that JavaScript is not appropriate for data intensive validations. For example, to verify that a name is contained within a large database table, you must pull down every record to the client, creating a huge HTML document. In general, complex operations are much better suited for server-side Application Express validations instead of JavaScript.
Topics:■ Referencing Items Using JavaScript
■ Incorporating JavaScript Utilizing the JavaScript Attribute
■ Calling the JavaScript File from the HTML Header Attribute
■ Calling the JavaScript File from the Page Template
■ Calling JavaScript from a Button
■ Calling JavaScript Using a Dynamic Action
Referencing Items Using JavaScriptWhen you reference an item, the best approach is to reference by ID. If you view the HTML source of an Oracle Application Express page in a web browser, you would notice that all items have an id attribute. This id corresponds to the name of the item, not the item label. For example, if you create an item with the name P1_FIRST_NAME and a label of First Name, the ID is P1_FIRST_NAME.
You can get and set item attributes and values using the JavaScript functions $v('P1_FIRST_NAME') and $s('P1_FIRST_NAME', 'Joe');. Consider the following example:
function showFirstName(){ alert('First Name is ' +$v('P1_FIRST_NAME'))};function setFirstName(pFirstName){ $s('P1_FIRST_NAME', pFirstName);};
See Also: "Attaching an Authorization Scheme to an Application, Page, or Components" on page 15-39
See Also: "Text with JavaScript Escaped Single Quotes" on page 10-77 for information about referencing a shortcut inside of a JavaScript literal string, "Understanding Validations" on page 8-32, and "Using JavaScript Code in a Plug-In" on page 10-101

Incorporating JavaScript into an Application
10-96 Oracle Application Express Application Builder User's Guide
These functions can be called by other JavaScript functions or with the Execute JavaScript code dynamic action.
Incorporating JavaScript Utilizing the JavaScript AttributeYou can include JavaScript into your application by adding it to the JavaScript attribute of the page. This is a good approach for functions that are very specific to a page and a convenient way to test a function before you include it in the .js file.
In the following example, adding the code would make the test function accessible from anywhere on the current page.
To add JavaScript code to the JavaScript attribute:
1. Navigate to the Page Definition. See "Accessing the Page Definition" on page 8-2.
2. To access the Edit Page:
■ Tree view - Under Page Rendering, double-click the page title at the top of the tree.
■ Component view- Under Page, click the Edit icon.
3. Scroll down to JavaScript.
4. Enter code into the following:
■ Function and Global Variable Declaration - Enter JavaScript code (for example, functions or global variable declarations) for code to be used on this page. If the code is used on multiple pages, consider putting it into an external JavaScript file to avoid duplication.
Code you enter here replaces the #JAVASCRIPT_CODE# substitution string in the page template.
■ Execute When Page Loads - Enter JavaScript code to execute when the page loads. The code is executed after the JavaScript code generated by Oracle Application Express.
For example, adding the following would test a function accessible from anywhere on the current page.
function test(){ alert('This is a test.'); }
5. Apply Changes.
Calling the JavaScript File from the HTML Header AttributeTo call a .js file from the HTML Header attribute:
1. Navigate to the Page Definition. See "Accessing the Page Definition" on page 8-2.
2. To access the Edit Page:
■ Tree view - Under Page Rendering, double-click the page title at the top of the tree.
■ Component view- Under Page, click the Edit icon.
3. Scroll down to HTML Header and Body Attribute.
See Also: "APEX_JAVASCRIPT" in Oracle Application Express API Reference

Incorporating JavaScript into an Application
Adding Database Application Components and Controls 10-97
4. In HTML Header, call the JavaScript file using the following syntax:
<script src="/my_images/custom.js" type="text/javascript"></script>
5. Apply Changes.
Calling the JavaScript File from the Page TemplateIn Oracle Application Express, you can reference a .js file in the page template. This approach makes all the JavaScript in that file accessible to the application. This is the most efficient approach since a .js file loads on the first page view of your application and is then cached by the browser.
The following demonstrates how to include a .js file in the header section of a page template. Note the line script src= that appears in bold.
<!DOCTYPE html PUBLIC "-//W3C//DTD HTML 4.01 Transitional//EN"><html><head> <title>#TITLE#</title> #HEAD# <script src="/my_images/custom.js" type="text/javascript"></script></head><body #ONLOAD#>#FORM_OPEN#
Calling JavaScript from a ButtonCalling JavaScript from a button is a great way to confirm a request. Oracle Application Express uses this technique for the delete operation of most objects. For example, when you delete a button, a JavaScript message appears asking you to confirm your request. Consider the following example:
function deleteConfirm(msg) {var confDel = msg;if(confDel ==null) confDel= confirm("Would you like to perform this delete action?");else confDel= confirm(msg); if (confDel== true) doSubmit('Delete'); }
This example creates a function to confirm a delete action and then calls that function from a button. Note that the function optionally submits the page and sets the value of the internal variable :REQUEST to Delete, thus performing the deletion using a process that conditionally executes based on the value of the request.
When you create the button, you must select Redirect to URL. Then, you would specify a URL target such as the following:
javascript:confirmDelete('Would you like to perform this delete action?');
See Also: "Page Templates" on page 13-27
See Also: "Creating a Button Using a Wizard" on page 10-65

About jQuery and jQuery UI Support
10-98 Oracle Application Express Application Builder User's Guide
Oracle recommends using dynamic actions as the preferred way of executing JavaScript code. Consider the following example:
1. Create a button with action of Defined by Dynamic Action. See "Creating a Button Using a Wizard" on page 10-65.
2. Create a dynamic action and using the action type Execute JavaScript Code to execute the previous code, for example:
if (confirm("Would you like to perform this delete action?")) { apex.submit('Delete');}
This example uses JavaScript, but you could also easily implement this example without having to use JavaScript. Instead, you can use the declarative actions Confirm and Submit Page which are also translatable. To learn more, see "Implementing Dynamic Actions" on page 17-35.
Calling JavaScript Using a Dynamic ActionYou can also execute JavaScript code by creating a dynamic action. JavaScript code can be executed with the types Execute JavaScript and Set Value. You can also use JavaScript code for the condition of a dynamic action by setting the condition type to JavaScript Expression. To learn more, see "Implementing Dynamic Actions" on page 17-35.
About jQuery and jQuery UI SupportIn Oracle Application Express includes the jQuery 1.7.1, jQuery UI 1.8.22, and jQuery Mobile - 1.1.1 RC1 JavaScript libraries. This section discusses the features available in jQuery UI and best practices when referencing jQuery libraries in your JavaScript code.
Topics:■ About Available jQuery UI Features
■ Referencing the jQuery Library in Your JavaScript Code
About Available jQuery UI FeaturesOracle Application Express only loads the components of jQuery UI that are required for base Oracle Application Express functionality. Oracle Application Express does not include the entire jQuery UI library since doing so would significantly add to download and processing time for each page load. Oracle Application Express includes these components by default:
■ jQuery UI Core - Required for all interactions and widgets.
■ Query UI Widget - The widget factory that is the base for all widgets.
■ jQuery UI Mouse - The mouse widget is a base class for all interactions and widgets with heavy mouse interaction.
■ jQuery UI Position - A utility plug-in for positioning elements relative to other elements.
■ jQuery UI Draggable - Makes any element on the page draggable.
■ jQuery UI Resizable - Makes any element on the page resizable.
■ jQuery UI Dialog - Opens existing mark up in a draggable and resizable dialog.
About jQuery and jQuery UI Support
Adding Database Application Components and Controls 10-99
■ jQuery UI Datepicker - A datepicker than can be toggled from a input or displayed inline.
■ jQuery UI Effects - Extends the internal jQuery effects, includes morphing, easing, and is required by all other effects.
■ jQuery UI Effects Drop - A drop out effect by moving the element in one direction and hiding it at the same time.
For more information about jQuery UI and these specific components, see the jQuery UI site:
http://jqueryui.com/
Accessing Other jQuery UI ComponentsOracle Application Express does not include the entire jQuery UI library. You can easily activate other components of jQuery UI by just including the relevant files. For example, to include the Tabs jQuery UI Widget in your application, you would include the following in your Page Template, Header within the <head>...</head> tags as shown in the following example:
<link href="#IMAGE_PREFIX#libraries/jquery-ui/1.8.22/themes/base/minified/jquery.ui.tabs.min.css" rel="stylesheet" type="text/css" /><script src="#IMAGE_PREFIX#libraries/jquery-ui/1.8.22/ui/minified/jquery.ui.tabs.min.js" type="text/javascript"></script>
Referencing the jQuery Library in Your JavaScript CodeDetermining when to use the $, jQuery, and apex.jQuery references to the jQuery library in your own JavaScript code depends on where you use it.
Newer versions of Oracle Application Express may include updated versions of the jQuery libraries. When new versions of jQuery are released, they sometimes introduce changes that could break existing functionality. These issues are documented in the Change Log for a particular version's Release Notes. To minimize your risk when upgrading to a newer version of Oracle Application Express, Oracle recommends the best practices described in the sections that follow.
Topics:■ Managing JavaScript Code in Your Application
■ Using JavaScript Code in a Plug-In
Managing JavaScript Code in Your ApplicationIf you want to use jQuery in your own JavaScript code in an application, Oracle recommends you use jQuery or the shortcut $ for the following reasons:
1. If you upgrade Oracle Application Express, there is the potential that the newer jQuery version may break your existing code.
Tip: You do not need to include the Dependencies for Tabs of UI Core and UI Widget since these are included by default with Oracle Application Express, as shown in the previous list of default components.

About jQuery and jQuery UI Support
10-100 Oracle Application Express Application Builder User's Guide
To avoid intensive testing and rewriting of your application to the new jQuery version, you can include the old jQuery version that was shipped with Oracle Application Express release 4.1 in your Page Template, Header within the <head>…</head> tags after the #HEAD# substitution string. Consider the following example:
...#HEAD#...<script src="#IMAGE_PREFIX#libraries/jquery/1.6.2/jquery-1.6.2.min.js" type="text/javascript"></script>...
In this example, the references to the jQuery library '$' and 'jQuery' point to jQuery version 1.6.2 (the version included in Oracle Application Express release 4.1) and not the newer version 1.7.1 included with Oracle Application Express release 4.2
Note that no additional code changes necessary. This approach minimizes the risk of breaking custom jQuery code when upgrading to a newer version of Application Express.
2. If jQuery plug-in you use requires a different version of jQuery and you want to use that version in other code in your application.
In this case, you can include version of jQuery library (the newer or older) into your page template as described in the previous step (that is, after the #HEAD# substitution string). The variables $ and jQuery point to the appropriate jQuery version.
3. If a jQuery plug-in you use requires a different version of jQuery and you do not want to use that version in other code in an application.
For example, suppose a jQuery plug-in requires jQuery 1.6.2, but you want to use jQuery 1.7.1 which included with Oracle Application Express. Include jQuery version 1.6.2 into your Page Template, Header, within the <head>…</head> tags, before the #HEAD# substitution string.
In this case, you also need a JavaScript snippet to define a new variable to store the plug-in specific jQuery version (for example, jQuery_1_6_2) and then assign it. Consider the following example:
...<script src="#IMAGE_PREFIX#libraries/jquery/1.6.2/jquery-1.6.2.min.js" type="text/javascript"></script><script type="text/javascript"> var jQuery_1_6_2 = jQuery;</script>...#HEAD#...
You must also modify the initialization code of the jQuery plug-in to use the jQuery_1_6_2 variable, for example:
(function($) { ... plugin code ...})(jQuery_1_6_2);
Tip: Oracle Application Express release 4.2 includes jQuery version 1.6.2 so you do not need to add this to your web server.

Optimizing a Page for Printing
Adding Database Application Components and Controls 10-101
For more information about jQuery plug-in initialization, see "Using JavaScript Code in a Plug-In" on page 10-101.
Using JavaScript Code in a Plug-InIf you want to use jQuery in an Oracle Application Express plug-in, Oracle recommends using the apex.jQuery reference to the jQuery library. This reference should even include a modification of the initialization code of the included jQuery plug-in to use the apex.jQuery reference.
If you look at the JavaScript code of a jQuery plug-in, notice that most have the following code structure:
(function($) { ... plugin code ... })(jQuery);
This structure declares an anonymous JavaScript function with a parameter $, which is immediately called and passed the parameter value of the current jQuery variable. The use of $ as the jQuery shortcut is implemented in a safe manner without having to rely on the fact that $ is still used to reference the main jQuery library.
Oracle recommends copying the jQuery plug-in file and prefixing it with apex (for example, apex.jquery.maskedinput-1.2.2.js). This makes it obvious to Oracle Application Express that the file has been modified. Then, change the reference from jQuery to apex.jQuery in the initialization code as shown in the following example.
(function($) { ... plugin code ...})(apex.jQuery);
Other Reasons to Use this Approach As a plug-in developer, you want to minimize your testing effort and create an environment where you have full control. Assume you are not following the recommendations described in the previous section. What happens if your plug-in is using a different version of jQuery?
This may result in strange plug-in behavior. Furthermore, it may be difficult to reproduce that behavior because you will not know if your plug-in is actually referencing a different version of jQuery. Using the apex.jQuery namespace reduces your risk and also the risk to your users. This approach enables you to test your plug-ins with the Oracle Application Express versions you want to support.
Optimizing a Page for PrintingYou can optimize a page for printing by creating a specific Printer Friendly template and selecting that template on the Create/Edit Theme page. See "Editing a Theme" on page 13-3.
Generally, a Printer Friendly template optimizes a page for printing. For example, a Printer Friendly template might:
■ Not display tabs or navigation bars
Tip: In all of these scenarios, use the variables $ and jQuery in your application to specify the version you require. Note that the variable apex.jQuery still points to the version that ships with Oracle Application Express to support built-in functionality, which depends on that jQuery version.

Creating a Help Page
10-102 Oracle Application Express Application Builder User's Guide
■ Display items as text instead of as form elements
If the theme you select does not include a printer friendly template, you can create a Printer Friendly template by creating a new page template.
Topics:■ Selecting a Printer Friendly Template for an Application
■ Using f?p Syntax to Toggle to Printer Friendly Mode
Selecting a Printer Friendly Template for an ApplicationTo select a Printer Friendly template:
1. Navigate to the Themes page:
a. On the Workspace home page, click Application Builder.
b. Select an application.
c. Click Shared Components.
d. Under User Interface, select Themes.
The Themes page appears.
2. Change to a report view by clicking the View Report icon.
3. In the Themes list, click the theme name.
The Create/Edit Theme page appears.
4. Scroll down to Component Defaults and locate the Printer Friendly Page list.
5. Make a selection from the Printer Friendly Page list.
6. Click Apply Changes.
Using f?p Syntax to Toggle to Printer Friendly ModeOnce you create a Printer Friendly template and select it, you can use f?p syntax to toggle to Printer Friendly mode. Including the ninth f?p syntax argument (PrinterFriendly) renders the page in printer friendly mode (optimizing printed output). For example, you could include this argument when coding a link or creating a navigation bar icon.
Creating a Help PageApplication Builder includes built-in attributes to create Help for your application. Creating Help for your application involves the following steps:
1. Create a dedicated Help page and Help region.
2. Define page Help text.
3. Define item Help text.
See Also: "Editing a Theme" on page 13-3 and "Creating a Theme" on page 13-4
See Also: "Editing a Theme" on page 13-3
See Also: "Using f?p Syntax to Link Pages" on page 2-9

Creating a Help Page
Adding Database Application Components and Controls 10-103
4. Create a navigation bar icon to link to your Help page.
Help created in Application Builder displays on a dedicated Help page. To access Help, users click a link that takes them to a dedicated Help page. This Help page displays page and item Help topics specific to the page they are viewing.
Topics:■ Creating a Help Page and Region
■ Defining Help Text
■ Creating a Help Navigation Bar Entry
Creating a Help Page and RegionThe first step in creating Help for your application is to create a dedicated page and Help Text region.
To create a Help Text region:
1. Create a page for your Help. See "Managing Pages in a Database Application" on page 7-35.
2. Navigate to the Page Definition of your Help page. See "Accessing the Page Definition" on page 8-2.
3. Under Regions, the Create icon.
4. When prompted to select a region type, select Help Text.
5. Follow the on-screen instructions.
Defining Help TextYou define Help text for a page or single item by editing attributes. Ideally, you would define these attributes as you create your application. For simplicity, however, the following procedures describe how to define this text after the fact.
Topics:■ Defining Help for a Page
■ Defining Help Text for an Item
■ Editing Multiple Item Help Topics Simultaneously
Defining Help for a PageTo define page Help text:
1. Navigate to the Page Definition for the page for which you want to add page Help. See "Accessing the Page Definition" on page 8-2.
2. Under Page, click the Edit page attributes icon to view the existing page attributes.
3. Scroll down to Help.
4. Enter your Help text in the field provided.
5. Click Apply Changes.
Repeat the previous procedure for each page requiring page Help text.

Creating a Help Page
10-104 Oracle Application Express Application Builder User's Guide
Defining Help Text for an ItemTo define item Help text for an item:
1. Navigate to the Page Definition for the page for which you want to add item Help. See "Accessing the Page Definition" on page 8-2.
2. Under Items, click the name of the item you want to edit.
3. Scroll down to Help Text.
4. Enter your Help text in the field provided.
5. Click Apply Change.
Repeat the previous procedure for each item requiring Help text.
Editing Multiple Item Help Topics SimultaneouslyIf you are including item Help in your application, you can edit multiple item Help topics at once using the Bulk Edit Item Help report.
Accessing the Bulk Edit Item Help Report To view the Bulk Edit Item Help report:
1. On the Workspace home page, click the Application Builder icon.
2. Select an application.
3. On the Tasks list, click Application Reports.
4. Click the Utilities icon.
5. From Page Specific Utilities, select Item Utilities.
6. Click Grid Edit of All Item Help Text.
7. In Bulk Item Help Report, you can:
■ Update existing Help topics. Edit the Help text that appears and click Apply Changes.
■ Link to the Page Definition containing the item by clicking the page number.
■ Link to the Page Item by clicking the item name.
Seeding Item Help Topics If your application does not yet contain item Help, you can perform a mass update of default Help text.
To seed item Help topics:
1. Access the Bulk Edit Item Help report as described in "Accessing the Bulk Edit Item Help Report" on page 10-104.
2. Click Seed Item Help Text.
3. In Default Help Text, enter the default text to appear in all Help topics.
4. Click Apply Changes.
Searching for Existing Item Help Topics You can search for existing Help text, or for an item label.
To search for existing item Help topic:
1. Access the Bulk Edit Item Help report as described in "Accessing the Bulk Edit Item Help Report" on page 10-104.
2. In Help Contains, enter keywords.

Creating a Help Page
Adding Database Application Components and Controls 10-105
3. Click Go.
Searching for an Item Label To search for an item label:
1. Access the Bulk Edit Item Help report as described in "Accessing the Bulk Edit Item Help Report" on page 10-104.
2. In Help Contains, enter keywords.
3. Click Go.
Creating a Help Navigation Bar EntryOnce you have created your Help, the next step is to create a navigation bar entry so users can link to it.
To create a navigation bar entry:
1. Navigate to the Page Definition. See "Accessing the Page Definition" on page 8-2.
2. Under Navigation Bar, click the Create icon.
3. For Attributes:
a. Sequence - Specify the sequence for this component. The sequence determines the order of evaluation.
b. Alt Tag Text - Enter ALT text for navigation icons that are images. If you do not specify an image name, then this text displays.
c. Icon Image Name - Enter the name of the image that displays.
d. Image Height - Enter the height of the image.
e. Image Width - Enter the width of the image.
f. Text - Enter additional text to display with the image. You can include text or use icons with no text. This attribute is optional and can be translated.
g. Click Next.
Next, specify the target location.
4. For Target:
a. Target is a - Select Page in this application.
b. Page - Specify the page number of the help page you created in "Creating a Help Page and Region" on page 10-103.
c. Request - Enter the following:
&APP_PAGE_ID.
By specifying substitution string &APP_PAGE_ID as the Request, you are instructing the Application Express engine to display Help text for the current page when the user clicks this icon.
d. Click Next.
5. Click Create.
See Also: "Viewing Application Utilities and Reports" on page 7-78

Creating a Help Page
10-106 Oracle Application Express Application Builder User's Guide

Adding Navigation 11-1
11Adding Navigation
When you build a database application, you can include different types of navigation controls, such as tabs, lists, breadcrumbs, navigation bar entries, and branches. This section describes how to implement navigation in your application.
Navigation controls such as navigation bar entries, tabs, breadcrumbs, and lists are shared components. Shared components enable you to create a specific type of navigation control at the application level on the Shared Components page. Once created, you can add them to any page within your database application.
Topics:■ Creating Tabs
■ Creating Lists
■ Creating Breadcrumbs
■ Creating a Navigation Bar Entry
■ Controlling Navigation Using Branches
Creating TabsTabs are an effective way to navigate users between pages of an application. You can create a tabbed application look by using parent tabs, standard tabs, and lists.
An application can have pages with no tabs, one level of tabs, and two levels of tabs. Standard tabs enable you to display only one level of tabs. To display two levels of tabs define both Parent tabs and Standard tabs.
Topics:■ About Tabs
■ About the Tabs Page
■ Creating a Tab
■ Editing Tabs
■ Accessing Tab Reports
See Also: "Working with Shared Components" on page 8-49
Tip: As an alternative to tabs, you can use lists to display tab controls. List templates provide greater control over HTML generation. See "Creating Lists" on page 11-7.

Creating Tabs
11-2 Oracle Application Express Application Builder User's Guide
About TabsA standard tab can have a one-to-one relationship with a page, or a standard tab can be the current tab for many pages. Application Builder includes two different types of tabs:
■ Standard tabs
An application having only one level of tabs uses a standard tab set. A standard tab set is associated with a specific page and page number. You can use standard tabs to link users to a specific page.
■ Parent tabs
Parent tabs can control the display of standard tab sets. Clicking a parent tab displays the corresponding standard tab, with the default page as the current page. Parent tabs give users another level of navigation and a context (or sense of place) within the application. You can use parent tabs to link users to a specific URL associated with a specific page.
You can group tabs into collections called a tab set. Each tab must be part of a tab set.
About Template SupportBefore you can create parent and standard tabs, you must check that your default template has positions defined for both standard and parent tabs using the appropriate substitution strings. You also must make sure you do not override this template at the page-level.
To view page templates:
1. On the Workspace home page, click the Application Builder icon.
2. Select an application.
3. On the Application home page, click Shared Components.
4. Under Navigation, click Tabs.
The Tabs page appears.
5. Locate Page Templates at the bottom of the page. If needed, expand the Page Templates region.
Note: When running the Create Application Wizard, you have the option of creating an application with tabs. The following procedures assume you have created an application that does not have any tabs.
See Also: "About Creating a Database Application" on page 7-1

Creating Tabs
Adding Navigation 11-3
About the Tabs PageThe Tabs page describes the tabs defined in your application.
To access the Tabs page:
1. On the Workspace home page, click the Application Builder icon.
2. Select an application.
3. On the Application home page, click Shared Components.
4. Under Navigation, click Tabs.
The Tabs page appears.
See Also:
■ "Managing Themes" on page 13-1 for information about setting a default page template at the application level
■ "Page Templates" on page 13-27

Creating Tabs
11-4 Oracle Application Express Application Builder User's Guide
The sections that follow describe the Tab Display and Page Templates section of the Tabs page.
Tab DisplayTab Display provides additional information about how the current tabs or tab set are configured to display.
Page TemplatesPage Templates displays a report of page templates associated with the current application. See "About Template Support" on page 11-2.
Creating a TabAn application can have pages with no tabs, one level of tabs, and two levels of tabs. Standard tabs enable you to display only one level of tabs. To display two levels of tabs define both Parent tabs and Standard tabs. See "About Tabs" on page 11-2.
To create a tab:
1. Access the Tabs page:
a. On the Workspace home page, click the Application Builder icon.
b. Select an application.
c. On the Application home page, click Shared Components.
d. Under Navigation, click Tabs.
2. Click Manage Tabs.
3. To add a Parent tab, click the Add button in the upper row.
Tip: You can also access the Tabs page under Shared Components on the Page Definition. See "Accessing the Page Definition" on page 8-2.

Creating Tabs
Adding Navigation 11-5
Parent tabs can control the display of standard tab sets. Clicking a parent tab displays the corresponding standard tab, with the default page as the current page.
4. To create a Standard tab, click the Add button in the lower row.
The Create Parent Tab or Create Standard Tab Wizard appears.
5. Follow the on-screen instructions.
Editing TabsYou can edit multiple tabs simultaneously. Also, for standard tabs, you can update tab properties, such as their labels and order sequence, by using the Standard Tab Tasks list.
Editing Multiple Tabs SimultaneouslyYou can edit multiple tabs simultaneously.
To edit multiple tabs simultaneously:
1. Navigate to the Tabs page:
a. On the Workspace home page, click the Application Builder icon.

Creating Tabs
11-6 Oracle Application Express Application Builder User's Guide
b. Select an application.
c. Click Shared Components.
d. Under Navigation, click Tabs.
2. Click one of the following tabs at the top of the page:
■ Edit Standard Tabs
■ Edit Parent Tabs
A report appears.
3. To edit a specific tab, click the Edit icon.
4. Edit the appropriate attributes and click Apply Changes.
Using the Standard Tab Task ListThe Standard Tab Task list displays on the right side of the Tabs page. You can access the links on this list to rename a standard tab set, resequence the display order, associate pages with a tab set, create a new standard tab, or create a new standard tab set.
To access the Standard Tab Task list:
1. Navigate to the Tabs page:
a. On the Workspace home page, click the Application Builder icon.
b. Select an application.
c. Click Shared Components.
d. Under Navigation, click Tabs.
2. Click Manage Tabs.
3. Make a selection from the Standard Tab Task list:
■ Rename Standard Tab Set
■ Resequence Display Order
■ Associate Page(s) with Selected Standard Tab
■ Create New Standard Tab
■ Create New Standard Tab Set
Accessing Tab ReportsThis section describes the Conditional Display, Utilization, and History reports.
To view the Conditional Display report:
1. Navigate to the Tabs page:
a. Navigate to the Workspace home page.
b. Click the Application Builder icon.
c. Select an application.
d. On the Application home page, click Shared Components.
e. Under Navigation, click Tabs.
The Tabs page appears.

Creating Lists
Adding Navigation 11-7
2. Click the appropriate tab:
■ Conditional Display
■ Utilization
■ History
To learn more, see the sections that follow.
Conditional DisplayThe Conditional Display report displays Standard Tabs and Parent tabs that are configured to display conditionally. To filter the display, select tab type and click Go.
Utilization The Utilization report lists the standard tabs used in the current application.
Standard and Parent Tab HistoryHistory report displays a history of changes to tab attributes for the current application.
Creating ListsA list is a shared collection of links. You add a list to a page by creating a region and specifying the region type as List. You control the appearance of a list through list templates.
You can define a list by creating static or dynamic definition. The definition displays a specific type of page item, such as progress bars, sidebar, or a bullet navigation list. The following illustration is an example of a static list using the template Vertical Unordered List with Bullets.
You can further control how a list displays using template attributes. For information about altering a list display, see "Creating a New Template" on page 13-14 and "List Templates" on page 13-25.
Topics:■ About List Types
■ About Static Lists
■ About Dynamic Lists
■ Copying a List
■ Adding a List to a Page by Creating a Region
■ Editing List Attributes
■ Accessing List Reports

Creating Lists
11-8 Oracle Application Express Application Builder User's Guide
About List TypesOracle Application Express supports two types of lists: static and dynamic.
Static ListsWhen you create a static list you define a list entry label and a target (either a page or URL). You can add list entries when you create the list (creating from scratch), by copying existing entries, or by adding the list entries. You can control when list entries display by defining display conditions. See "About Static Lists" on page 11-8.
Dynamic ListsDynamic lists are based on a SQL query or a PL/SQL function executed at runtime. A dynamic list enables you to dynamically create styled list items that support mobile frameworks such as jQuery Mobile. See "About Dynamic Lists" on page 11-13 and "Understanding Dynamic List Syntax" on page 11-14.
About Static ListsTo create a static list:
1. Create the list by running the Create List Wizard.
2. Specify whether to create the list from scratch or by copying an existing list.
You can add list entries by either creating them from scratch or by coping entries from an existing list. If you copy an entire list, you also copy all of its list entries.
3. If creating a list from scratch, you are prompted to select a list type. Select Static.
Each list element has a display condition, which enables you to control when it displays. You can define a list element to be either current or non-current for a specific page. See "Editing List Attributes" on page 11-18 and "Conditional Entries" on page 11-19.
4. Add the list to a page by creating a List region.
How you perform these steps is a personal preference. You can perform all three when you run the Create List Wizard. Alternatively, you can perform these steps one at a time.
Topics:■ Creating a Static List from Scratch
■ Adding Entries and Sublists to a Static List
■ Copying Static List Entries Between Lists
■ Reparenting Static List Entries
■ Managing Orphaned Static List Entries
■ Resequencing Static List Entries
Creating a Static List from ScratchTo create a list:
1. Access the Create/Edit Lists Wizard:
a. On the Workspace home page, click the Application Builder icon.
b. Select an application.

Creating Lists
Adding Navigation 11-9
c. On the Application home page, click Shared Components.
d. Under Navigation, click Lists.
e. Click Create.
2. For Source, select From Scratch and click Next.
3. For Name and Type:
a. Name - Enter a numeric or alphanumeric name for the list.
b. Type - Select Static.
c. Build Option - If applicable, select a build option for this component. Build options are predefined settings that determine whether components within an application are enabled.
d. Click Next.
4. For Define List Entries, specify the following:
a. List Entry Label - Enter a numeric or alphanumeric name for the list.
b. Target Page ID or custom URL - Select a target page or enter a custom URL.
c. Click Next.
5. For Confirm, specify the following:
a. Create List Regions - Select whether to create a list region. Options include:
– Do not create list region(s)
– Create list region on current page
– Create list region for each target page
b. Region Position - If creating a new region, select the region position.
c. Region Template - If creating a new region, select a region template.
d. List Template - Select the list template to use to control the appearance of your list.
e. Click Create List.
Adding Entries and Sublists to a Static List Once you create a list, you must add entries to it. You can add list entries when creating a list from scratch, copying a list entry from within a list, or copying existing entries from one list to another.
You can also create hierarchical lists that contain sublists. To create a hierarchical list, you must:
■ Select a list template that supports hierarchical lists. To determine which list templates support hierarchical lists, look for templates having the naming convention "with Sublist."
■ Select a Parent List Item when you create each list entry.
Tip: You can also create a list under Shared Components on the Page Definition. To learn more, see "Accessing the Page Definition" on page 8-2, "Editing a Page in Tree View" on page 8-5, and "Editing a Page in Component View" on page 8-8

Creating Lists
11-10 Oracle Application Express Application Builder User's Guide
Adding Entries or Sublists from Scratch To add an entry or sublist from scratch:
1. Navigate to the Lists page:
a. On the Workspace home page, click the Application Builder icon.
b. Select an application.
c. On the Application home page, click Shared Components.
d. Under Navigation, select Lists.
The Lists page appears.
2. Select a list.
The List Details page appears.
3. Click Create List Entry.
4. Under Entry:
a. Parent List Entry - If applicable, select the parent for this list entry. Use this attribute if you are creating a hierarchical list that contains a sublist.
Note this attribute does not appear if you are creating the parent list entry.
b. Sequence - Indicate the order in which list the list entry appears. The sequence determines the order of evaluation.
c. Image - Identify the file name for the image used to display this list entry. List templates control this attribute.
d. Attributes - Identify the image attributes (such as width="12" height="12") for the list element image.
Use the #LIST_LABEL# substitution string to reference the list label text. This substitution string enables the title image attribute to be automatically set based on the value of the list label text. For example:
title="#LIST_LABEL#"
e. Alt Attribute - Identify the image alt attribute for the list element image.
Use the #LIST_LABEL# substitution string to reference the list label text. This substitution string enables the Alt attribute to be automatically set based on the value of the list label text. For example:
...alt="#LIST_LABEL#"...
f. List Entry Label - Enter the label text for this link.
5. Specify a target type. Options include: URL or Page in this Application.
If the target location is a URL, specify the following:
a. Target Type - Select URL.
b. URL Target - Enter a URL. For example:
http://www.yahoo.com
If the target location is a page:
a. Target Type - Select Page in this Application.
See Also: "Customizing Templates" on page 13-12 and "List Templates" on page 13-25

Creating Lists
Adding Navigation 11-11
b. Page - Specify the target page number.
Other options include:
– reset pagination for this page - Select this option to have the page to return to the first set of data meeting a user’s new query.
– Printer Friendly - This option displays the target page using the application's Printer Friendly template. Printer friendly templates optimize a page for printing. "Editing a Theme" on page 13-3 and "Optimizing a Page for Printing" on page 10-101.
c. Request - Enter text to set the built-in application item REQUEST. This is also the item that is set with the name of a button that was clicked.
d. Clear Cache - Specify the page numbers on which to clear cache. To learn more, see item Help. See "About Field-Level Help" on page 1-13.
e. To set session state (that is, give a listed item a value):
– Set these items - Enter a comma-delimited list of item names for which you would like to set session state.
– With these values - Enter a comma-delimited list of values for the items specified in the previous step.
You can specify static values or substitution syntax (for example, &APP_ITEM_NAME.). Note that item values passed to f?p= in the URL cannot contain a colon. Additionally, item values cannot contain commas unless you enclose the entire value in backslashes (for example, \1234,56\).
6. Under Current List Entry:
a. List Entry Current for Pages Type - Specify when this list entry should be current based on the page type.
List items can be current or non-current. Current list items use the current template; non-current list items use the non-current list item template. The actual condition and templates are defined in subsequent attributes.
b. List Entry Current for Condition - Displays conditionally. Based on the selection above, define a condition to evaluate. When this condition is true, then the list item becomes current. To learn more, see item Help. See "About Field-Level Help" on page 1-13.
7. Under Conditions, specify the appropriate information to make the list entry conditional.
8. Under Authorization, you can specify an authorization scheme.
This authorization scheme must evaluate to TRUE in order for this component to be rendered or otherwise processed.
9. Under Configuration, select a build option for this component.
Build options are predefined settings that determine whether components within an application are enabled.
10. Under Click Counting, specify if you want the list entries to be included in the click count.
If this is a link to an external page, such as www.google.com, you can count clicks. For more information, see "COUNT_CLICK Procedure" in Oracle Application Express API Reference.

Creating Lists
11-12 Oracle Application Express Application Builder User's Guide
11. To specify additional attributes, use the User Defined Attributes section. For example, the following adds a tabindex and accesskey.
tabindex="15" accesskey="D"
12. When you are finished defining list attributes, click Create or Create and Create Another.
Copying Static List Entries Between ListsYou can copy static list entries from one list to another.
To copy list entries between lists:
1. Navigate to the Lists page.
a. Navigate to the Workspace home page.
b. Click the Application Builder icon.
c. Select an application.
d. On the Application home page, click Shared Components.
e. Under Navigation, click Lists.
The Lists page appears.
2. Select the list to copy.
3. On the Tasks list, click Copy List Entries from one List to Another.
4. From Copy List Entries, select the list to copy to and click Next.
5. Click Copy List Entries.
Reparenting Static List EntriesUse the Reparent List Entries page to manage list entry hierarchy.
To reparent list entries:
1. Navigate to the Lists page.
a. Navigate to the Workspace home page.
b. Click the Application Builder icon.
c. Select an application.
d. On the Application home page, click Shared Components.
e. Under Navigation, click Lists.
The Lists page appears.
2. Select the list.
3. From the Tasks list, click Reparent List Entries within this List.
4. Use Start With to restrict your view to a subset of hierarchy. Make a selection and click Go.
5. From Reparent To, select a new parent.
6. Select the entries to move.
7. Click Reparent Checked Entries.

Creating Lists
Adding Navigation 11-13
Managing Orphaned Static List EntriesAn orphaned list entry is a list entry which has a parent, but the parent is no longer a member of the current list. When a list entry becomes orphaned, remove the parent entry.
To manage orphaned list entries:
1. Navigate to the Lists page.
a. Navigate to the Workspace home page.
b. Click the Application Builder icon.
c. Select an application.
d. On the Application home page, click Shared Components.
e. Under Navigation, click Lists.
The Lists page appears.
2. Select the list.
3. From the Tasks list, click Manage Orphaned List Entries.
4. Select the entries to remove.
5. Click Clear Parent Entries.
Resequencing Static List EntriesYou can resequence list entries in increments of 10 on the Clean Up page.
To clean up list entries:
1. Navigate to the Lists page.
a. Navigate to the Workspace home page.
b. Click the Application Builder icon.
c. Select an application.
d. On the Application home page, click Shared Components.
e. Under Navigation, click Lists.
The Lists page appears.
2. Select the list.
3. From the Tasks list, click Clean Up List Entries.
4. Click Clean Up.
About Dynamic ListsA dynamic list enables you to dynamically create styled list items that support mobile frameworks such as jQuery Mobile. Dynamic lists are based on a SQL query or a PL/SQL function returning a SQL query.
To create a dynamic static list:
1. Create the list by running the Create List Wizard.
2. Specify whether to create the list from scratch or by copying an existing list.
3. If creating a list from scratch, you are prompted to select a list type. Select Dynamic.

Creating Lists
11-14 Oracle Application Express Application Builder User's Guide
4. Enter a SQL query or a PL/SQL function returning a SQL query.
5. Add the list to a page by creating a List region. See "Adding a List to a Page by Creating a Region" on page 11-17.
Topics:■ Understanding Dynamic List Syntax
■ Creating a Dynamic List from Scratch
Understanding Dynamic List SyntaxYou create a dynamic list using a SQL query or a function returning a SQL Query.
Syntax for a SQL query:
SELECT level, labelValue label, [targetValue] target, [is_current] is_current_list_entry, [imageValue] image, [imageAttributeValue] image_attribute, [imageAltValue] image_alt_attribute, [attribute1] attribute1, [attribute2] attribute2, [attribute3] attribute3, [attribute4] attribute4, [attribute5] attribute5, [attribute6] attribute6, [attribute7] attribute7, [attribute8] attribute8, [attribute9] attribute9, [attribute10] attribute10FROM ...WHERE ...ORDER BY ...
Syntax for a function returning a SQL query:
RETURN'SELECT level, labelValue label,'||' [targetValue] target,'|| ' [is_current] is_current_list_entry,'||' [imageValue] image,'||' [imageAttributeValue] image_attribute, '||' [imageAltValue] image_alt_attribute,'||' [attribute1] attribute1,'||' [attribute2] attribute2,'||' [attribute3] attribute3,'||' [attribute4] attribute4,'||' [attribute5] attribute5,'||' [attribute6] attribute6,'||' [attribute7] attribute7,'||' [attribute8] attribute8,'||' [attribute9] attribute9,'||' [attribute10] attribute10'||'FROM ...'||'WHERE ...'||'ORDER BY ...';
Where:
■ level and labelvalue are required.

Creating Lists
Adding Navigation 11-15
■ level - For hierarchical lists, the level parameter should be supplied. For non-hierarchical lists, this parameter can be set to NULL.
■ labelvalue - Text to appear as list entry.
■ targetvalue - Target URL to branch to when list entry is selected.
■ is_current - Controls the behavior of the list entry. Values include:
– NULL - Currency of target is based upon Target URL.
– 'YES' - List entry is always current.
– 'NO' - List entry is not current.
■ imagevalue - The name of image to be display on the list entry
■ imageattributevalue - Attributes of the image, such as the width or height
■ imagealtvalue - Value for Image ALT tag, required for accessibility purposes in templates where the user must click the image.
■ attribute1 to 10: These attributes tie in with the existing ten User Attributes exposed on the Static List Entry page.
Creating a Dynamic List from ScratchTo create a dynamic list:
1. Access the Create/Edit Lists Wizard:
a. On the Workspace home page, click the Application Builder icon.
b. Select an application.
c. On the Application home page, click Shared Components.
d. Under Navigation, click Lists.
e. Click Create.
2. Click From Scratch and click Next.
3. For Name and Type:
a. Name - Enter a numeric or alphanumeric name for the list.
b. Type - Select Dynamic.
c. Build Option - If applicable, select a build option for this component. Build options are predefined settings that determine whether components within an application are enabled.
d. Click Next.
4. For Query or Static Values:
a. Query Source Type - Select SQL Query or Function Returning SQL Query.
b. Query - Enter a SQL query or function returning a SQL query. See "Understanding Dynamic List Syntax" on page 11-14.
c. Click Next.
5. For Confirm, specify the following:
a. Create List Regions - Select whether to create a list region. Options include:
– Do not create list region(s)
– Create list region on current page
Creating Lists
11-16 Oracle Application Express Application Builder User's Guide
b. Region Position - If creating a new region, select the region position.
c. Region Template - If creating a new region, select a region template.
d. List Template - If creating a new region, select a list template.
e. Click Create.
Copying a ListYou can copy a list from another application or from a list in the existing application.
Topics:■ Copying a List from the Current Application
■ Copying a List Between Applications
Copying a List from the Current ApplicationYou can copy list entries from one list to another.
To copy list entries between lists:
1. Navigate to the Lists page.
a. Navigate to the Workspace home page.
b. Click the Application Builder icon.
c. Select an application.
d. On the Application home page, click Shared Components.
e. Under Navigation, click Lists.
The Lists page appears.
2. Select the list to copy.
3. On the Tasks list, click Copy List.
4. On Copy List, select List in this application and click Next.
5. For Identify List:
a. Copy List - Select the list to be copied.
b. New List Name - Enter a new name for the copied list.
c. Click Copy.
Copying a List Between ApplicationsYou can copy a list from the current application or from another application.
To copy a list:
1. Navigate to the Lists page.
a. Navigate to the Workspace home page.
b. Click the Application Builder icon.
Tip: You can also create a list under Shared Components on the Page Definition. To learn more, see "Accessing the Page Definition" on page 8-2, "Editing a Page in Tree View" on page 8-5, and "Editing a Page in Component View" on page 8-8

Creating Lists
Adding Navigation 11-17
c. Select an application.
d. On the Application home page, click Shared Components.
e. Under Navigation, click Lists.
The Lists page appears.
2. Select the list to copy.
3. On the Tasks list, click Copy List.
4. On Copy List, select List in another application and click Next.
5. For Identify List:
a. Copy From Application - Select the application from which you want to copy a list.
b. Copy List - Select the list you are copying.
c. New List Name - Enter a name for the new list.
d. Click Copy.
Adding a List to a Page by Creating a RegionOnce you create a list and list entries, the next step is to add it to a page by creating a region and specifying the region type as List.
To add a list to a page:
1. Navigate to the appropriate Page Definition. See "Accessing the Page Definition" on page 8-2.
2. On the Page Definition, add a list region:
■ Tree view - Under Page Rendering, right-click Regions and select Create.
■ Component view - Under Region, click the Create icon.
The Create Region Wizard appears.
3. For Region, select List as the region type and click Next.
4. For Display Attributes:
a. Title - Enter a title for the region. This title displays if the region template you choose displays the region title.
b. Region Template - Choose a template to control the look of the region.
c. Parent Region - Defines the parent region to which the new region belongs.
d. Display Point - Identify a display point for this region.
e. Sequence - Specify the sequence for this component. The sequence determines the order of evaluation.
f. Click Next.
5. For Source:
a. List - Select the list you want to add.
b. List Template - Choose a template to control the look of the list.
See Also: "Creating a New Template" on page 13-14 and "List Templates" on page 13-25 for information about altering list display

Creating Lists
11-18 Oracle Application Express Application Builder User's Guide
c. Click Next.
6. For Conditional Display:
a. Condition Type - Select a condition type from the list that must be met in order for this component to be rendered processed. See "Understanding Conditional Rendering and Processing" on page 2-4
b. Authorization Scheme - Optionally select an authorization scheme which must evaluate to TRUE in order for this component to be rendered or otherwise processed. See "Providing Security Through Authorization" on page 15-37.
c. Click Create Region.
Repeat these procedures for each page where you would like to add a list.
Editing List AttributesOnce you create a list, you can edit it on the Lists page.
To edit a list:
1. Navigate to the Lists page.
a. Navigate to the Workspace home page.
b. Click the Application Builder icon.
c. Select an application.
d. On the Application home page, click Shared Components.
e. Under Navigation, click Lists.
The Lists page appears.
You can change the appearance of the page by using the Search bar at the top of the page. See "Customizing Interactive Reports" on page 9-4.
2. Select a list.
The List Details page appears.
3. To change the list name, template, or build options, click the Edit List button.
4. For a dynamic list:
a. Edit the appropriate attributes. To learn more about an attribute, click the item label. See "About Field-Level Help" on page 1-13.
b. Click Apply Changes.
5. For a static list:
a. To edit the list sequence, link text, target, or current status for all list entries, click Grid Edit.
b. Click the Edit icon adjacent to the appropriate list entry.
The Create/Edit page that appears is divided into sections. You can access these sections by scrolling down the page, or by clicking a navigation button at the top of the page. When you select a button at the top of the page, the selected section appears and all other sections are temporarily hidden. To view all sections of the page, click Show All.
c. Edit the appropriate attributes. To learn more about an attribute, click the item label. See "About Field-Level Help" on page 1-13.

Creating Lists
Adding Navigation 11-19
d. Click Apply Changes.
Accessing List ReportsYou can view the Unused, Conditional Entries, Utilization, and History reports by clicking the appropriate tab at the top of the Lists page. Note that these reports only display after you create a list.
To view list reports:
1. Navigate to the Lists page.
a. Navigate to the Workspace home page.
b. Click the Application Builder icon.
c. Select an application.
d. On the Application home page, click Shared Components.
e. Under Navigation, click Lists.
The Lists page appears.
2. Click the appropriate tab:
■ Unused
■ Conditional Entries
■ Utilization
■ History
You can change the appearance of the page by using the Search bar at the top of the page. See "Customizing Interactive Reports" on page 9-4.
To learn more, see the sections that follow.
UnusedClick the Unused tab to identify lists that are not used in the current application.
Conditional EntriesClick the Conditional Entries tab to view conditional lists.
UtilizationClick the List Utilization tab to access the Utilization report. This report displays all lists included in the current application. From the report:
■ To edit list entries, select the list name.
■ To view the pages on which the list appears, click the number in the Pages column.
■ To view the template used with the list, expand List Template Utilization. Then click the name to view or edit the list template.
HistoryClick the History tab to view changes to list definitions and list entries by developer and date.

Creating Breadcrumbs
11-20 Oracle Application Express Application Builder User's Guide
Creating BreadcrumbsBreadcrumbs provide users with hierarchical navigation. A breadcrumb is a hierarchical list of links that display using templates. You can display a breadcrumb as a list of links or as a breadcrumb path.
Topics:■ About Breadcrumbs
■ How to Create Breadcrumbs
■ Editing Breadcrumbs
■ Reparenting Breadcrumb Entries
■ Deleting Unused Breadcrumb Entries
■ Accessing Breadcrumb Reports
About BreadcrumbsA breadcrumb trail indicates where the user is within the application from a hierarchical perspective. In addition, users can click a specific breadcrumb link to instantly view the page. You use breadcrumbs as a second level of navigation at the top of each page, complementing other user interface elements such as tabs and lists.
How to Create BreadcrumbsYou can create breadcrumbs while creating a page, or manually by running the Create Breadcrumb Wizard.
Topics:■ Creating a Breadcrumb While Creating a Page
■ Creating a Breadcrumb Manually
Creating a Breadcrumb While Creating a PageTo create a breadcrumb while creating a page:
1. Run the Create Page Wizard to add a new page. See "Managing Pages in a Database Application" on page 7-35.
See Also: "Creating a Theme" on page 13-4 and "Breadcrumb Templates" on page 13-18

Creating Breadcrumbs
Adding Navigation 11-21
During the wizard, a Breadcrumb option appears. The actual page on which this list displays depends upon the type of page you are creating.
2. From the Breadcrumb list, select a breadcrumb or select -do not add breadcrumb region to page -.
If you select a breadcrumb, the Create Breadcrumb Entry form appears.
3. In Entry Name, enter a name for the breadcrumb.
4. For Parent Entry:
■ To specify a parent, select a parent page from the Select Parent Entry list.
■ If this breadcrumb does not have a parent, select No parent breadcrumb entry.
5. Follow the on-screen instructions.
Creating a Breadcrumb ManuallyTo create breadcrumbs manually, you must add a breadcrumb to each page in your application as follows:
1. Create the breadcrumb by running the Create/Edit Breadcrumb Wizard from either the Shared Components page or the Page Definition. See "Creating Breadcrumbs from the Shared Components Page" on page 11-21 and "Creating Breadcrumbs from a Page Definition" on page 11-22.
2. Add entries to the breadcrumb. See "Adding Breadcrumb Entries" on page 11-22.
3. Add the breadcrumb to a page by creating a region. See "Adding a Breadcrumb Region" on page 11-23.
Creating Breadcrumbs from the Shared Components Page To create breadcrumbs from the Shared Components page:
1. On the Workspace home page, click the Application Builder icon.
2. Select an application.
3. On the Application home page, click Shared Components.
4. Under Navigation, click Breadcrumbs.
The Breadcrumbs page appears.
5. Click Create Breadcrumb.

Creating Breadcrumbs
11-22 Oracle Application Express Application Builder User's Guide
6. Enter a name and click Create.
7. Add breadcrumb entries. See "Adding Breadcrumb Entries" on page 11-22.
Creating Breadcrumbs from a Page Definition To create breadcrumbs from a Page Definition:
1. Navigate to the appropriate Page Definition. See "Accessing the Page Definition" on page 8-2.
2. Access the Create Breadcrumb Wizard:
■ Tree view - Under Shared Components, right-click Breadcrumbs and click Create.
■ Component view - Under Shared Components, click the Create icon.
The Breadcrumb page appears.
3. Under Shared Components, scroll down to Breadcrumbs and click the Create icon.
4. For Create, select Breadcrumb and click Next.
5. Enter a name and click Create.
6. Add breadcrumb entries. See "Adding Breadcrumb Entries" on page 11-22.
Adding Breadcrumb Entries To add a breadcrumb entry:
1. Navigate to the Breadcrumbs page:
a. Navigate to the Workspace home page.
b. Click the Application Builder icon.
c. Select an application.
d. On the Application home page, click Shared Components.
e. Under Navigation, click Breadcrumbs.
The Breadcrumbs page appears.
2. Select a breadcrumb to add entries to.
3. Click Create Breadcrumb Entry.
4. Under Breadcrumb, specify the page where this breadcrumb entry displays.
5. Under Entry:
a. Sequence - Indicate the order in which breadcrumb entries appear. The sequence determines the order of evaluation.
b. Parent Entry - Identify the parent of this entry. Any given breadcrumb should have only one root node, identified as an item with no parent ID.
c. Short Name - Specify the short name of this entry (referenced in the breadcrumb template).
d. Long Name - Specify the long name of this entry (referenced in the breadcrumb template).
6. Under Target, specify the target location:
a. Target is a - Select Page in this Application.
b. Page - Specify the target page number.

Creating Breadcrumbs
Adding Navigation 11-23
You can also select reset pagination for this page. Selecting this option causes the page to return to the first set of data meeting a user’s new query.
c. Request - Specify the request to be used.
d. Clear Cache - Specify the page numbers on which to clear cache.
e. To set session state (that is, give a listed item a value):
– Set these items - Enter a comma-delimited list of item names for which you would like to set session state.
– With these values - Enter a comma-delimited list of values for the items your specified.
You can specify static values or substitution syntax (for example, &APP_ITEM_NAME.). Note that item values passed to f?p= in the URL cannot contain a colon. Additionally, item values cannot contain commas unless you enclose the entire value in backslashes (for example, \1234,56\).
7. To make the breadcrumb conditional:
a. Make a selection from the Condition Type list.
b. Enter an expression in the fields provided.
8. Under Authorization, you can specify an authorization scheme.
This authorization scheme must evaluate to TRUE in order for this component to be rendered or otherwise processed.
9. Under Configuration, you can select a build option for this component.
Build options are predefined settings that determine whether components within an application are enabled.
10. Click Create Breadcrumb Entry.
Repeat these procedures for each breadcrumb entry you create.
Adding a Breadcrumb Region A region is an area on a page that serves as a container for content. Once you create a breadcrumb and a breadcrumb template, the next step is to create a region. Once you create a breadcrumb region, you can add a breadcrumb to a page.
To create a breadcrumb region:
1. Navigate to the appropriate Page Definition. See "Accessing the Page Definition" on page 8-2.
■ Tree view - Under Page Rendering, right-click Regions and click Create.
■ Component view - Under Page Rendering, click the Create icon.
The Create Region Wizard appears.
2. For the region type, select Breadcrumb and click Next.
3. For Breadcrumb Container Region:
a. Region Title - Enter a title for this region.
b. Region Template - Select a region template.
See Also: "Creating a New Template" on page 13-14 and "Breadcrumb Templates" on page 13-18 for information about changing menu display

Creating Breadcrumbs
11-24 Oracle Application Express Application Builder User's Guide
c. Display Point - Select a Display Point.
Regions are organized by position (or Display Point). To determine the appropriate region position, click the flashlight icon. A graphical representation appears.
d. Sequence - Enter a number for the sequence. The sequence determines the order of evaluation.
e. Click Next.
4. For Breadcrumb:
a. Breadcrumb - Select the breadcrumb to be associated with this region.
b. Breadcrumb Template - Select a template.
c. Click Next.
5. Review the breadcrumb region information and click Next.
6. Click Finish.
Repeat these procedures for each page where you would like to add breadcrumb navigation.
About Creating Dynamic Breadcrumbs To give users more exact context, you can include session state in breadcrumbs, making your breadcrumbs dynamic. For example, suppose a page in your application displays a list of orders for a particular company and you want to include the following breadcrumb:
Home > Orders > Orders for ACME Inc
In this example, ACME Inc not only indicates the page a user is on but also the navigation path. The Application Express engine stores the value of ACME Inc. in session state.
To create this type of dynamic menu, you must include a reference to a session state item in the breadcrumb's short name or long name. For example:
&COMPANY_NAME.
Editing BreadcrumbsOnce you create a breadcrumb, you can edit it on the Breadcrumbs page.
To edit a breadcrumb:
1. Navigate to the Breadcrumbs page:
a. Navigate to the Workspace home page.
b. Click the Application Builder icon.
c. Select an application.
d. On the Application home page, click Shared Components.
e. Under Navigation, select Breadcrumbs.
The Breadcrumbs page appears.
2. Select a breadcrumb.
3. Select a breadcrumb entry.
The Create/Edit page appears.
Creating Breadcrumbs
Adding Navigation 11-25
4. Edit the appropriate attributes.
To learn more about a specific item, see item Help. See "About Field-Level Help" on page 1-13.
5. (Optional) In the Breadcrumb Entry list on the right side of the page, you can select the Synchronize Breadcrumb With Page Name and Title option.
Selecting this option makes changing the name of a page and breadcrumb a one-step process. The information you provide for breadcrumb names is used to update the referenced page name and title.
6. Click Apply Changes.
About Navigation AlternativesThe Create/Edit page is divided into the following sections: Breadcrumb, Entry, Target, Conditions, Authorization and Configuration.
You can access these sections by scrolling down the page, or by clicking a navigation button at the top of the page. When you select a button at the top of the page, the selected section appears and all other sections are temporarily hidden. To view all sections of the page, click Show All.
Reparenting Breadcrumb EntriesYou can select a new parent for selected breadcrumb entries on the Reparent Entries page.
To reparent breadcrumb entries:
1. Navigate to the Breadcrumbs page:
a. Navigate to the Workspace home page.
b. Click the Application Builder icon.
c. Select an application.
d. On the Application home page, click Shared Components.
e. Under Navigation, select Breadcrumbs.
The Breadcrumbs page appears.
2. Select a breadcrumb.
The Entries page appears.
3. From the Tasks list, click Reparent Entries within this Breadcrumb.
The Reparent Entries page appears.
4. Use the navigation bar to edit or filter the view:
■ Breadcrumb - Identify the breadcrumb you want to edit and click Go.
■ Start With - Make a selection to restrict your view to a subset of the breadcrumb hierarchy and click Go.
Tip: By default, the Breadcrumb Entries page displays in a hierarchical list. You can toggle between a hierarchical view or a tabular view by selecting either Tabular View or Hierarchical View on the Tasks list.
See Also: "Grid Edit" on page 11-27

Creating Breadcrumbs
11-26 Oracle Application Express Application Builder User's Guide
5. From Reparent to, select the new parent.
6. Select the breadcrumbs entries you want to move and click Reparent Checked Entries.
Deleting Unused Breadcrumb EntriesTo delete unused breadcrumb entries:
1. Navigate to the Breadcrumbs page:
a. Navigate to the Workspace home page.
b. Click the Application Builder icon.
c. Select an application.
d. On the Application home page, click Shared Components.
e. Under Navigation, select Breadcrumbs.
The Breadcrumbs page appears.
2. Select a breadcrumb.
The Breadcrumb Entries page appears.
3. From the Tasks list, click Delete Unused Breadcrumb Entries.
The Delete page appears.
4. Select the entries to remove and click Delete Checked.
Accessing Breadcrumb ReportsYou can view the Breadcrumb Hierarchy, Grid Edit Breadcrumb, Breadcrumb Exceptions, Breadcrumb Utilization and Breadcrumb History reports by clicking the appropriate tab at the top of the Breadcrumbs page.
To view Breadcrumb reports:
1. Navigate to the Breadcrumbs page:
a. Navigate to the Workspace home page.
b. Click the Application Builder icon.
c. Select an application.
d. On the Application home page, click Shared Components.
e. Under Navigation, select Breadcrumbs.
The Breadcrumbs page appears.
2. Click the appropriate tab:
■ Hierarchy
■ Grid Edit
■ Exceptions
■ Utilization
Note: These reports only appear after you create a breadcrumb.
Creating a Navigation Bar Entry
Adding Navigation 11-27
■ History
You can change the appearance of the page by using the Search bar at the top of the page. See "Customizing Interactive Reports" on page 9-4.
To learn more, see the sections that follow.
HierarchyClick Hierarchy to view breadcrumbs by page and hierarchy. Click the page number to link to a page.
Grid EditClick Grid Edit to edit all breadcrumb names at once. Click the page number to link to a page.
ExceptionsClick Exceptions to view the Exceptions page.
Utilization ReportClick Utilization to access the Breadcrumb Utilization report. This report lists breadcrumbs by page. Click the page number to go to a specific page.
History ReportClick History to view the Breadcrumb History report. This report lists recent changes to breadcrumbs.
Creating a Navigation Bar EntryNavigation bar entries offer an easy way to move users between pages in an application. For example, a navigation entry enables you to display a link from an image or text. The associated page template determines the location of a navigation bar.
Topics:■ About Navigation Bars
■ How to Create a Navigation Bar Entry
■ Editing a Navigation Bar Entry
■ Editing Multiple Navigation Bar Entries Simultaneously
■ Accessing Navigation Bar Entry Reports
About Navigation BarsA navigation bar entry can be an image, text, or an image with text beneath it. You must supply the images and text to use in the navigation bar entries.
See Also: "Customizing Templates" on page 13-12

Creating a Navigation Bar Entry
11-28 Oracle Application Express Application Builder User's Guide
Navigation bars are different from other shared components in that you do not need to reference them on a page-by-page basis. If your page template includes the #NAVIGATION_BAR# substitution string, the Application Express engine automatically includes any defined navigation bars when it renders the page.
How to Create a Navigation Bar EntryBefore adding a navigation bar, you must create entries for the navigation bar. You can create a navigation bar entry from scratch or by copying an existing entry.
Topics:■ Creating a Navigation Bar Entry from Scratch
■ Creating a Navigation Bar Entry for Feedback
■ Copying a Navigation Bar Entry
Creating a Navigation Bar Entry from ScratchTo create a navigation bar entry from scratch:
1. Navigate to the Navigation Bar Entries page:
a. Navigate to the Workspace home page.
b. Click the Application Builder icon.
c. Select an application.
d. On the Application home page, click Shared Components.
e. Under Navigation, click Navigation Bar Entries.
2. Click Create.
The Create Navigation Bar Entry Wizard appears.
3. For Method, select From Scratch.
4. For Type, select Navigation to URL. To learn more about Feedback, see "Creating a Navigation Bar Entry for Feedback" on page 11-30.
5. For Attributes, specify the following:
a. Sequence - Specify the order of evaluation for this component.
See Also: "About Supported Page Template Substitution Strings" on page 13-28
See Also: "Understanding Application Computations" on page 8-59
Tip: To review the existing entries, click the Existing Navigation Bar Entries link at the bottom of the page.

Creating a Navigation Bar Entry
Adding Navigation 11-29
b. Entry Label - Enter display text for this navigation bar entry.
c. Icon Image Name - Enter an image name. For naming conventions, see item Help. See "About Field-Level Help" on page 1-13.
d. Image ALT - Enter ALT text for navigation icons that are images. If you do not specify an image name, then this text displays.
e. Image Height - Define the height of the image in pixels.
f. Click Next.
6. For Target, specify the following
a. If the target location is a URL, specify:
– Target is a - Select URL.
– URL Target - Enter a URL. For example:
http://www.yahoo.com
b. If the target location is a page, specify:
– Target is a - Select Page in this Application.
– Page - Specify the target page number.
Select reset pagination for this page to make the page return to the first set of data meeting a user’s new query.
Select Printer Friendly to display the target page using the application's Printer Friendly template. Printer friendly templates optimize a page for printing. "Editing a Theme" on page 13-3 and "Optimizing a Page for Printing" on page 10-101.
– Request - Specify the request to be used.
– Clear Cache - Specify the page numbers on which to clear cache.
c. To set session state (that is, give a listed item a value):
– Set these items - Enter a comma-delimited list of item names for which you would like to set session state.
– With these values - Enter a comma-delimited list of values for the items your specified.
You can specify static values or substitution syntax (for example, &APP_ITEM_NAME.). Note that item values passed to f?p= in the URL cannot contain a colon. Additionally, item values cannot contain commas unless you enclose the entire value in backslashes (for example, \1234,56\).
d. Click Next.
7. To set a condition for displaying the navigation bar entry, select a condition type.
8. Click Create.
Tip: In order for a navigation bar to appear, your page template must include the #NAVIGATION_BAR# substitution string. To learn more, see "About Supported Page Template Substitution Strings" on page 13-28.

Creating a Navigation Bar Entry
11-30 Oracle Application Express Application Builder User's Guide
Creating a Navigation Bar Entry for FeedbackFeedback is the process of gathering real-time comments, enhancement requests, and bugs from your application users. To add a feedback page to an application, you add a Feedback page. See "Managing Feedback" on page 4-17.
To create a navigation bar entry for feedback:
1. Navigate to the Navigation Bar Entries page:
a. Navigate to the Workspace home page.
b. Click the Application Builder icon.
c. Select an application.
d. On the Application home page, click Shared Components.
e. Under Navigation, click Navigation Bar Entries.
2. Click Create.
The Create Navigation Bar Entry Wizard appears. Each wizard page displays a series of blocks on the left, representing the sequence of steps. The highlighted block indicates the step you are performing.
3. For Method, select From Scratch.
4. For Type, select Feedback.
5. For Feedback, specify the following:
a. Feedback Page - Select your feedback page.
b. Entry Label - Enter the label of the new navigation bar entry.
c. Sequence - The sequence for the new navigation bar entry. The sequence determines the order of evaluation.
6. Click Create.
Copying a Navigation Bar EntryTo copy a navigation bar entry:
1. Navigate to the Navigation Bar Entries page:
a. Navigate to the Workspace home page.
b. Click the Application Builder icon.
c. Select an application.
d. On the Application home page, click Shared Components.
e. Under Navigation, click Navigation Bar Entries.
2. Click Create.
The Create Navigation Bar Entry Wizard appears.
3. For Method, select As a Copy of an Existing Navigation Bar and click Next.
4. For Copy From Application, select an application and click Next.
Tip: In order for a navigation bar to appear, your page template must include the #NAVIGATION_BAR# substitution string. See"About Supported Page Template Substitution Strings" on page 13-28.

Creating a Navigation Bar Entry
Adding Navigation 11-31
5. For New Names, enter the name on the new entry, and select whether to copy and subscribe.
6. Click Copy Navigation Bar Entries.
Editing a Navigation Bar EntryOnce you create a navigation bar entry, you can edit it on the Navigation Bar Entries page.
To edit a navigation bar entry:
1. Navigate to the Navigation Bar Entries page:
a. Navigate to the Workspace home page.
b. Click the Application Builder icon.
c. Select an application.
d. On the Application home page, click Shared Components.
e. Under Navigation, click Navigation Bar Entries.
The Navigation Bar Entries page appears.
You can change the appearance of the page by using the Search bar at the top of the page. See "Customizing Interactive Reports" on page 9-4.
2. Select a navigation bar entry.
The Edit page appears.
The Edit page is divided into the following sections: Entry Display, Entry Image, Feedback Entry, Target, Conditions, Authorization, Configuration, Subscription, and Comments.
You can access these sections by scrolling down the page, or by clicking a navigation button at the top of the page. When you select a button at the top of the page, the selected section appears and all other sections are temporarily hidden. To view all sections of the page, click Show All.
3. Edit the appropriate attributes.
4. To learn more about a specific item on a page, see item Help. See "About Field-Level Help" on page 1-13.
5. Click Apply Changes.
Editing Multiple Navigation Bar Entries SimultaneouslyTo edit multiple navigation bar entries simultaneously:
1. Navigate to the Navigation Bar Entries page:
a. Navigate to the Workspace home page.
b. Click the Application Builder icon.
c. Select an application.
d. On the Application home page, click Shared Components.
e. Under Navigation, click Navigation Bar Entries.
2. Click Grid Edit at the top of the page.
3. Edit the appropriate attributes and click Apply Changes.

Controlling Navigation Using Branches
11-32 Oracle Application Express Application Builder User's Guide
Accessing Navigation Bar Entry ReportsYou can view the Navigation Bar Entry Subscription and Navigation Bar Entry History reports by clicking the appropriate tab at the top of the Navigation Bar Entries page.
1. Navigate to the Navigation Bar Entries page:
a. Navigate to the Workspace home page.
b. Click the Application Builder icon.
c. Select an application.
d. On the Application home page, click Shared Components.
e. Under Navigation, click Navigation Bar Entries.
2. Click the appropriate tab:
■ Subscription
■ History
Navigation Bar Entry Subscription ReportClick Subscription to access the Subscribed NavBars report. This report displays subscribed navigation bar entries in your application.
Navigation Bar Entry HistoryClick History to view the Navigation Bar History report. This report lists recent changes to navigation bars.
Controlling Navigation Using BranchesA branch is an instruction to link to a specific page, procedure, or URL after a given page is submitted. For example, you can branch from page 1 to page 2 after page 1 is submitted.
Topics:■ Creating a Branch
Creating a BranchYou create a branch by running the Create Branch Wizard and specifying the branch point and branch type.
To create a branch:
1. Navigate to the appropriate Page Definition. See "Accessing the Page Definition" on page 8-2.
2. Under Branches access the Create Branch Wizard:
■ Tree view - Under Page Processing, right-click and select Create Branch.
■ Component view - Under Branches, click the Create icon.
Note: The Subscription and History buttons only appear after you create a navigation bar.
See Also: "About Cross Page Utilities" on page 7-85

Controlling Navigation Using Branches
Adding Navigation 11-33
The Create Branch Wizard appears.
3. For Branch Attributes:
a. Name - Specify the name of the branch for easy identification by developers.
b. Sequence - Specify the sequence for this component. The sequence determines the order of evaluation.
c. Branch Point options:
– On Submit: Before Computation - Occurs before computations, validations, or processing. Use this option for a Cancel button.
– On Submit: Before Validation - Occurs after computations, but before validations or processing. Typically not used. If a validation fails, page processing stops, a rollback is issued, and the page displays the error. Because of this default behavior, you do not need to create branches to accommodate validations. However, you might want to branch based on the result of a computation (for example, to the previous branch point).
– On Submit: Before Processing - Occurs after computations and validations, but before processing. Use this option to branch based on a validated session state, but before performing any page processing.
– On Submit: After Processing - Occurs after computations, validations, and processing. This option branches to a URL or page after performing computations, validations, and processing. When using this option, remember to sequence your branches if you have multiple branches for a given branch point.
– On Load: Before Header - Occurs before a page is rendered. This option displays another page, instead of the current page, or redirects the user to another URL or procedure.
d. Select a branch type.
e. Click Next.
4. For Target, specify the target location. The information that appears on the page depends on the branch type you selected:
a. If the target location is a URL:
– Branch Target - Select URL.
– URL Target - Enter a URL. For example:
http://www.yahoo.com
b. If the target location is a page:
– Branch Target - Select Page in this Application.
– Page - Specify the target page number.
Select reset pagination for this page to have the page return to the first set of data meeting a user’s query.
Select include process success message to display a message when a user submits a page and a branch is taken to another page. If you do not select this option, the message does not display because it is part of submitting the page, not displaying the next one.

Controlling Navigation Using Branches
11-34 Oracle Application Express Application Builder User's Guide
– Request - Enter text to assign to the built-in application item called REQUEST. To learn more, see item Help. See "About Field-Level Help" on page 1-13.
– Clear Cache - Specify the page numbers on which to clear cache. Separate multiple entries with a comma.
c. To set session state (that is, give a listed item a value):
– Set these items - Enter a comma-delimited list of item names for which you would like to set session state.
– With these values - Enter a comma-delimited list of values for the items specified in Set these items.
You can specify static values or substitution syntax (for example, &APP_ITEM_NAME.). Note that item values passed to f?p= in the URL cannot contain a colon. Additionally, item values cannot contain commas unless you enclose the entire value in backslashes (for example, \1234,56\).
d. Click Next.
5. Follow the on-screen instructions.
See Also: "About the When Button Pressed Attribute" on page 2-29

Controlling Page Layout 12-1
12Controlling Page Layout
This section describes different ways you can customize your database application’s page layout by customizing regions, editing item attributes, and incorporating images.
Topics:■ Understanding Page Layout in Oracle Application Express
■ Creating a Global Page to Display Components on Every Page
■ Understanding Regions
■ How Item Attributes Affect Page Layout
■ Incorporating Content from Other Web Sites
■ Managing Images
■ Managing Static Files
■ Rendering HTML Using Custom PL/SQL
Understanding Page Layout in Oracle Application ExpressThe Application Express engine renders pages by combining templates with application components defined by the developer and data in the database.
The overall framework (or structure of a page) is determined by the page template. For example, the page template controls if a page uses tabs and a navigation bar. It can also define if a page includes a bar on the left side that serves as a placeholder for navigation or secondary content. Finally, a page template can include definitions of region positions, which enable precise control over placement of regions using HTML tables or style sheet definitions. The page template itself is composed of HTML combined with substitution strings, which are substituted with the appropriate components at runtime.
As a developer, you add content to a page by creating a region. A region is an area of a page that serves as a container for content. Each region contains a different type of content such as HTML, a report, a form, a chart, a list, a breadcrumb, PL/SQL, a tree, a URL, or a calendar. You position a region either relative to other regions (that is, based on its sequence number and column), or by using a region position defined in the page template. The style of the region is also controlled by the region template. Like the page template, the region template defines the structure of the area that the region takes up on a page. It defines if the region title is displayed and where it is displayed
See Also: "Adding Navigation" on page 11-1 and "Managing the Application User Interface" on page 7-30

Creating a Global Page to Display Components on Every Page
12-2 Oracle Application Express Application Builder User's Guide
relative to the main content or the body. A region can also define absolute positions for buttons.
Creating a Global Page to Display Components on Every PageThe Global page of your application functions as a master page. You can add a separate Global page for each user interface. The Application Express engine renders all components you add to a Global page on every page within your application. You can further control whether the Application Express engine renders a component or runs a computation, validation, or process by defining conditions.
Topics:■ Creating a Global Page
■ Navigating to the Global Page
Creating a Global PageTo create a Global page:
1. On the Workspace home page, click Application Builder.
2. Select an application.
The Application home page appears.
3. Click the Create Page button.
4. On Create Page:
a. User Interface - Select a user interface for the page.
b. For Select a page type, select Global Page.
Note that the Global Page option only appears if the application does not have a Global page for the specified user interface.
5. For Page Number, enter an integer value that identifies a page within the application.
6. Click Finish.
Navigating to the Global PageTo navigate to the Global page:
1. On the Workspace home page, click the Application Builder icon.
The Application Builder home page appears.
2. Select an application.
The Application home page appears.
3. Select Global Page.
See Also: "Creating a Region" on page 12-3
See Also: "Managing Pages in a Database Application" on page 7-35, "Understanding Conditional Rendering and Processing" on page 2-4 and "Available Conditions" on page C-1
See Also: "Managing the Application User Interface" on page 7-30

Understanding Regions
Controlling Page Layout 12-3
Understanding RegionsA region is a area on a page that serves as a container for content. Each page can have any number of regions. You control the appearance of a region through a specific region template. The region template controls the look of the region, the size, determines whether there is a border or a background color, and what type of fonts display. A region template also determines the standard placement for any buttons placed in region positions.
You can use regions to group page controls (such as items or buttons). You can create simple regions that do not generate additional HTML, or create elaborate regions that frame content within HTML tables or images.
Regions display in sequence in the page template body or can be placed explicitly into region positions. The page structure can be defined using HTML tables or more commonly today using DIV tags.
Topics:■ Creating a Region
■ About Region Types
■ Editing Regions
■ Creating a Region Display Selector
■ Copying a Region
■ Deleting Regions
Creating a RegionYou create regions by running the Create Region Wizard.
To create a region:
1. Navigate to the appropriate Page Definition. See "Accessing the Page Definition" on page 8-2.
2. Access the Create Region Wizard:
■ Component view - Under Regions, click the Create icon.
■ Tree view - Right-click the Regions and select Create.
The Create Region Wizard appears.
3. Select a region type. See "About Region Types" on page 12-4.
4. Follow the on-screen instructions.
About Creating SubregionsSubregions enable you to create a parent/child relationship between two regions. A subregion displays inside of a parent region. You can specify a Parent Region when you initially create the region, or when editing region attributes. See "Creating a Region" on page 12-3 and "Editing Regions" on page 12-5.
You can use this feature in a variety of ways. One use case would be to use subregions to group information. For example, suppose you have a region with a border. You can
See Also: "About Page Specific Utilities" on page 7-84
See Also: "Creating a Region Display Selector" on page 12-12

Understanding Regions
12-4 Oracle Application Express Application Builder User's Guide
use this feature to display two classic reports (or subregions) within it. You can also use subregions to display regions as tabs or as an accordion. You control how parent and subregions display by editing the Sub Region attributes of the region template. To learn more, see "Region Templates" on page 13-37.
About Region TypesWhen you create a region, you select a region type. The Application Express engine interprets a region differently based on the type you select. Table 12–1 describes the available region types.
Table 12–1 Region Types
Region Type Description
HTML When you select HTML, the wizard prompts you to select one of the following:
■ HTML - Functions as containers for items and contains the HTML you provide. Any HTML you type may contain substitution strings.
■ HTML Text (escape special characters) - Same as HTML region, but the Application Express engine escapes special characters before they are rendered.
■ HTML Text (with shortcuts) - Same as HTML region, but with support for shortcuts.
See Also: "Using Shortcuts" on page 10-77
Multiple HTML Use this option to create multiple HTML regions at once. In the fields provided, specify the Sequence, Title, Display Point, Report Template, and Column for each region.
Report Report regions can be defined by a SQL query you write, or by using a wizard to guide you through the steps needed to write a query.
When you select Report, the wizard prompts you to select one of the following:
■ Classic Report - Creates a report based on a custom SQL SELECT statement or a PL/SQL function returning a SQL SELECT statement that you provide.
■ List View - Creates a report optimized to display data and provide easy navigation on Smartphones.
■ Web Service Result - Creates a report based on a Web service result
■ Wizard Report - Creates a classic report without requiring any SQL knowledge.
See Also: "Creating Reports" on page 9-1
Form Form regions contain a form.
See Also: "Creating Forms" on page 10-1
Plug-ins Plug-ins allow developers to declaratively extend the built-in types available with Application Express.
See Also: "Implementing Plug-ins" on page 17-25
Chart Chart regions contain line, bar, or pie charts based on SQL queries.
See Also: "Creating Charts" on page 10-47

Understanding Regions
Controlling Page Layout 12-5
Editing RegionsA region is an area of a page that serves as a container for content. You can alter the appearance of a page by editing region attributes.
Map Map regions contain declaratively defined Flash maps.
See Also: "Creating Maps" on page 10-41
Tree Trees are a hierarchical navigational control based on a SQL query executed at runtime.
See Also: "Creating Trees" on page 10-79
Calendar Calendar regions contain a calendar.
See Also: "Creating Calendars" on page 10-20
List List regions contain a shared collection of links called list.
See Also: "Creating Lists" on page 11-7
Breadcrumb Breadcrumb regions contain a hierarchical list of links called a breadcrumb.
See Also: "Creating Breadcrumbs" on page 11-20
PL/SQL Dynamic Content Regions based on PL/SQL enable you to render any HTML or text using the PL/SQL Web Toolkit.
URL URL based regions obtain their content by calling a web server using a predefined URL.
See Also: "Incorporating Content from Other Web Sites" on page 12-16
Region Display Selector Region Display Selector region enables the display of show hide controls for each region on a page for which region display selection has been enabled.
See Also: "Creating a Region Display Selector" on page 12-12
Help Text Help Text regions enable you to provide page-level help.
See Also: "Creating a Help Page" on page 10-102
See Also:
■ Oracle Database Development Guide for information about developing Web applications with PL/SQL
■ Oracle Database PL/SQL Packages and Types Reference for information about htp packages
■ "Editing Regions" on page 12-5
See Also:
■ Oracle Database Development Guide for information about developing web applications with PL/SQL
■ Oracle Database PL/SQL Packages and Types Reference for information about htp packages
Table 12–1 (Cont.) Region Types
Region Type Description

Understanding Regions
12-6 Oracle Application Express Application Builder User's Guide
Topics:■ Editing Region Attributes
■ How Region Attributes Affect Page Layout
■ Specifying a Region Header and Footer
■ Enabling Users to Customize a Page
■ Utilizing Region Caching
■ Specifying a Static Region ID
■ Adding a Region Image
■ Editing Multiple Regions at Once
Editing Region AttributesTo edit region attributes:
1. Navigate to the appropriate Page Definition. See "Accessing the Page Definition" on page 8-2.
2. Access the Edit Region page:
■ Component view - Under Regions, select the region name.
■ Tree view - Right-click the region name and select Edit.
The Edit Region page appears.
3. Edit the appropriate attributes.
4. To learn more about a specific item on a page, click the item label.
When help is available, the cursor changes to an arrow and question mark when you pass the cursor over an item. See "About Field-Level Help" on page 1-13.
5. Click Apply Changes.
About Navigation Alternatives The Region Definition page is divided into sections. You can access these sections by scrolling down the page, or by clicking a navigation button at the top of the page. When you select a button at the top of the page, the selected section appears and all other sections are temporarily hidden. To view all sections of the page, click Show All.
How Region Attributes Affect Page LayoutRegion attributes control the appearance of a page. Table 12–2, " Region Attributes Affecting Page Layout" describes region attributes that affect the layout of a page.
Note: For further information regarding regions that are plug-in type regions, see "Importing a Plug-in from the Plug-in Page" on page 17-34.
See Also: "How Region Attributes Affect Page Layout" on page 12-6, "Controlling Region Positioning" on page 12-8, and "Specifying a Region Header and Footer" on page 12-8

Understanding Regions
Controlling Page Layout 12-7
Table 12–2 Region Attributes Affecting Page Layout
Attribute Description
User Interface, Sequence Specifies the display order of the regions within the page.
User Interface, Parent Regions Defines the parent region to which the current region belongs.
User Interface, Display Point Identifies where the region displays within the page. Regions are rendered in order of sequence number within a Display Point. Click the View icon to see the page layout and select a position.
The possible display points for a region are determined by the page-level template (which is a page attribute). If no page-level template is selected, the default page-level template, defined in the Application Definition, is used.
User Interface, Template Determines the look of the region. To view template attributes, click the template name on the Page Definition.
See Also: "Customizing Templates" on page 13-12 and "Region Templates" on page 13-37
User Interface, Item Display Position Determines if page items are displayed above or below the main region content.
Grid Layout, Start New Grid Determines whether this region displays in a new grid or in the same grid as the previous region.
Grid Layout, Start New Row Determines whether this region displays on the same row as the previous region or whether it displays on the next row.
Grid Layout, Column Determines if the region displays in a specific grid column. Select Automatic to automatically determine the next available grid column where the region gets displayed.
Grid Layout, Column Span Determines how many grid columns should be occupied by the region. Select Automatic to balance the available grid columns within all regions in the same grid row.
Grid Layout, Column Attributes Enter additional attributes which are set for the grid column. This value replaces the #ATTRIBUTES# substitution placeholder in the grid layout column template.
Attributes, Region CSS Classes Enter additional CSS classes as space delimited list which are substituted if the region template contains the substitution string #REGION_CSS_CLASSES#.
Attributes, Region Region templates that contain the substitution string #REGION_ATTRIBUTES# are substituted with this value.
Attributes, Region Display Selector Use the region display selector to identify the region to display in a region display selector region type. Region display selectors enable you to hide other regions on the page and just show a specific region. Region display selectors only display regions that have been identified using this attribute.
Attributes, Region Image If populated, the identified image displays in the upper left of the region. There is no control over the table tag used to display this image.
See Also: "Adding a Region Image" on page 12-11
Attributes, Image Tag Attributes Used with the Region Image attributes. Enter attributes to be included in the image html. For example, use this attribute for height and width.
Note: If no ALT is defined in the image tag attributes, Oracle Application Express defaults to rendering the image as a decorative image (for example with an empty ALT tag).
See Also: "Adding a Region Image" on page 12-11
Header and Footer Specifies HTML text to be displayed at the top of the region (just before the #BODY# content).

Understanding Regions
12-8 Oracle Application Express Application Builder User's Guide
Controlling Region Positioning When you create a region, you must specify its position (or Display Point) on the page. You can choose either a default position (such as Page Template Body) or a user-defined position in the template (such as Page Template Region Position 1.)
In addition to Display Point, you can specify the column in which the region is placed. When you place regions in multiple columns, Oracle Application Express automatically renders the necessary HTML to produce a multiple column layout.
Specifying a Region Header and FooterIn addition to the body content of a region (which can be a report, a chart, or HTML with form elements), you can specify additional HTML to be placed above and below a region or in its header and footer.
For all report regions, the substitution string #TIMING# shows the elapsed time in seconds used when rendering a region. You can use this substitution string for debugging purposes.
For classic report regions, the region footer supports the following substitution strings:
■ #ROWS_FETCHED# shows the number of rows fetched by the Oracle Application Express reporting engine (the page size). You can use these substitution strings to display customized messages to the user. For example:
Fetched #ROWS_FETCHED# rows in #TIMING# seconds.
■ #TOTAL_ROWS# displays the total number of rows that satisfy a SQL query used for a report.
■ #FIRST_ROW_FETCHED# and #LAST_ROW_FETCHED# display the range of rows displayed. For example:
Row(s) #FIRST_ROW_FETCHED# through #LAST_ROW_FETCHED# of #ROWS_FETCHED# displayed
Conditions Defines conditions and appropriate expressions that determine if the region displays. Conditions can reference session state, the currently logged in user, or environment preferences (such as whether a page is in Print View mode).
See Also: "Understanding Conditional Rendering and Processing" on page 2-4 and "Optimizing a Page for Printing" on page 10-101
Read Only, Read Only Condition Type Select a condition type from the list that must be met in order for this region to render page items as a read-only. Not selecting a condition causes the page items to render normally.
Note: Set the condition type to Never to always render the items of this region as enterable fields. This overwrites any read-only condition defined at the page-level.
Customization Enables end-user customization. To use this feature, you must include the #CUSTOMIZE# substitution string in the Header, Body, or Footer section of the page template.
See Also: "Enabling Users to Customize a Page" on page 12-9
See Also: "About Region Types" on page 12-4
Table 12–2 (Cont.) Region Attributes Affecting Page Layout
Attribute Description

Understanding Regions
Controlling Page Layout 12-9
Enabling Users to Customize a PageYou can use the Customization attribute to control whether display attributes in a region can be customized by users.
To enable end-user customization:
1. Navigate to the appropriate Page Definition. See "Accessing the Page Definition" on page 8-2.
2. Access the Edit Region page:
■ Component view - Under Regions, select the region name.
■ Tree view - Right-click the region name and select Edit.
The Edit Region page appears.
3. Scroll down to Customization and select one of the following:
■ Customizable and Not Shown By Default
■ Customizable and Shown By Default
■ Not Customizable By End Users
4. In Customized Option Name, enter the label that represents this region on the page to the user.
5. Include the #CUSTOMIZE# substitution string in the Header, Body, or Footer section of the page template.
To use this feature, you must include the #CUSTOMIZE# substitution string in the Header, Body, or Footer section of the page template.
If at least one region supports end-user customization, a link called Customize appears wherever you include the #CUSTOMIZE# substitution string in the page template. When users click this link, a window appears, enabling them to turn on and off regions on the page.
Utilizing Region CachingEnabling region caching is an effective way improve the performance of static regions such as regions containing lists that do not use conditions or regions containing static HTML.
When you enable region caching, the Application Express engine renders a region from a cached (or stored) repository instead of rendering it dynamically. Keep in mind that the actual session identifiers are not cached. Instead, the Application Express engine caches a &SESSION. substitution string and the current session rendering the cached region is substituted on display. For example, if a region contains a link and the link includes a session, the exact session is not cached to ensure that the links works for all sessions.
The Application Express engine only renders a region from cache if it meets the defined condition. Additionally, regions can be cached specific to a user or cached independent of a user.
See Also: "Customizing Templates" on page 13-12
Tip: Region caching is not available for interactive report regions.
See Also: "Server Cache" on page 8-28 and "Managing Cached Regions" on page 12-10

Understanding Regions
12-10 Oracle Application Express Application Builder User's Guide
Enabling Region Caching To enable region caching:
1. Navigate to the appropriate Page Definition. See "Accessing the Page Definition" on page 8-2.
2. Access the Edit Region page:
■ Component view - Under Regions, select the region name.
■ Tree view - Right-click the region name and select Edit.
The Edit Region page appears.
3. Scroll down to Caching.
4. For Caching, select one of the following:
■ Cached - Caches the region independent of the user.
■ Cached by User - Caches the region specific to a given user.
■ Not Cached - Disables this feature.
5. If you select Cached or Cached by User, specify the following:
a. Timeout Cache After - Identify how long the cached region remains valid.
b. Cache Condition Type - Select a condition type from the list. If the condition returns false, the region is rendered dynamically and is not cached. If the condition returns true, the region is cached.
c. Expression 1 and Expression 2 - Enter values based on the specific condition type selected.
6. Click Apply Changes.
Managing Cached Regions One way to improve an application’s performance is to take advantage region caching. Developers can configure region caching by setting the Cache attribute on the Edit Region pages. See "Utilizing Region Caching" on page 12-9.
You can manage cached regions on the Cached Regions page.
To access the Cached Regions page:
1. Navigate to the appropriate Page Definition. See "Accessing the Page Definition" on page 8-2.
2. Select an application.
3. Select a page.
4. Click the Utilities button and select Caching.
5. Under Cached Regions, click Manage.
The Cached Regions page appears.
6. You can customize the appearance the page using the Search bar at the top of the page. See 4.
7. Select the regions you want to purge and click one of the following:
■ Purge Expired
■ Purge Checked
8. To purge all cached regions, click Purge All.

Understanding Regions
Controlling Page Layout 12-11
Specifying a Static Region IDSpecifying a static region ID is useful when creating custom JavaScript or cascading stylesheets. You can use the Static ID attribute on the Edit Region page to uniquely identify a region. You can then reference the region using the #REGION_STATIC_ID# substitution string in a region templates, the header, the footer, or the body.
A static region ID is included by assigning it as an HTML element ID to the region container object (that is, the table or DIV). The ID of an HTML element must be unique for the entire page. For example, to keep the page HTML valid you cannot have a button and region with the same ID.
To specify a static region ID:
1. Navigate to the appropriate Page Definition. See "Accessing the Page Definition" on page 8-2.
2. Access the Edit Region page:
■ Component view - Under Regions, select the region name.
■ Tree view - Right-click the region name and select Edit.
The Edit Region page appears.
3. Scroll down to Attributes.
4. For Static ID, enter value to identify this region. You can reference this value using the substitution string #REGION_STATIC_ID#.
5. Click Apply Changes.
Adding a Region ImageUse the Region Image and Image tag attributes to add an image to the upper left side of a region.
To add a region image:
1. Navigate to the appropriate Page Definition. See "Accessing the Page Definition" on page 8-2.
2. Access the Edit Region page:
■ Component view - Under Regions, select the region name.
■ Tree view - Right-click the region name and select Edit.
The Edit Region page appears.
3. Scroll down to Attributes.
4. Under Attributes, specify the following:
■ Region Image - Specify an image to display in the upper left of the region.
■ Image Tag Attributes - Enter attributes to be included in the image html. Use these attributes to specify height and width.
5. Click Apply Changes.
Editing Multiple Regions at OnceApplication Builder includes several ways to edit multiple regions at once.
See Also: "Managing Cached Regions" in Oracle Application Express Administration Guide

Understanding Regions
12-12 Oracle Application Express Application Builder User's Guide
Topics:■ Editing Multiple Attributes Across All Regions
■ Accessing Region Utilities
Editing Multiple Attributes Across All Regions Using the Regions page you can update multiple region attributes across all regions on a page, including sequence (the order), column, region name, and display point.
To edit multiple attributes across all regions:
1. Navigate to the appropriate Page Definition. See "Accessing the Page Definition" on page 8-2.
2. Access the Edit Regions page:
■ Component view - Click the Edit All icon. The Edit All icon resembles a small grid with a pencil on top of it.
■ Tree view - Right-click Regions and select Edit All.
Regions page appears.
3. Update the appropriate attributes.
4. Click Apply Changes.
Accessing Region Utilities Use the Utilities page to access Grid Edit pages and reports across all pages within a selected application.
To access the Region Utilities page:
1. Navigate to the appropriate Page Definition. See "Accessing the Page Definition" on page 8-2.
2. Access the Regions page:
■ Component view - Click the Edit All icon. The Edit All icon resembles a small grid with a pencil on top of it.
■ Tree view - Right-click Regions and select Edit All.
Regions page appears.
3. Click Utilities.
4. Select a utility and follow the on-screen instructions.
Creating a Region Display SelectorRegion Display Selector region enables you to include show and hide controls for each region on a page.
To create a Region Display Selector:
1. Create the page and regions to be included in the Region Page Selector.
2. For each region to be included in the selector, edit Region Display Selector attribute:
See Also: To learn more about region attributes, go to the Edit Region page. See "Editing Regions" on page 12-5.
See Also: "Editing Regions" on page 12-5

Understanding Regions
Controlling Page Layout 12-13
a. Navigate to the appropriate Page Definition. See "Accessing the Page Definition" on page 8-2.
b. Access the Edit Region page:
– Component view - Under Regions, select the region name.
– Tree view - Right-click the region name and select Edit.
The Edit Region page appears.
c. Under Attributes, change Region Display Selector to Yes.
d. Click Apply Changes.
3. Create a region of type Region Display Selector:
1. Navigate to the Page Definition. See "Accessing the Page Definition" on page 8-2.
2. Access the Create Region Wizard:
– Component view - Under Regions, click the Create icon.
– Tree view - Right-click the Regions and select Create.
The Create Region Wizard appears.
3. Select a region type Region Display Selector.
4. Click Create.
Copying a Region
To copy a region:
1. Navigate to the Page Definition. See "Accessing the Page Definition" on page 8-2.
2. Access the Edit Region page:
■ Component view - Under Regions, click the Copy icon. The Copy icon resembles two small overlapping pages.
■ Tree view - Right-click the region and click the Copy icon.
The Copy Region Wizard appears.
3. If you are using Component view, select the region you want to copy. Otherwise, proceed to the next step.
4. For To Page:
a. To Page - Select the page to which you want to copy the region.
b. Copy Region Items - Select Yes or No to determine whether to copy items within this region. Depending upon the region, this option may not appear.
c. Copy Buttons - Select Yes or No to determine whether to copy buttons within this region. Depending upon the region, this option may not appear.
d. Click Next.
5. Click Copy Region.
Note: You cannot copy a Tree region since this type of region encompasses more than one region.

How Item Attributes Affect Page Layout
12-14 Oracle Application Express Application Builder User's Guide
Deleting RegionsTo delete a region:
1. Navigate to the appropriate Page Definition. See "Accessing the Page Definition" on page 8-2.
2. Access the Edit Region page:
■ Component view - Under Regions, select the region name.
■ Tree view - Right-click the region name and select Edit.
The Edit Region page appears.
3. Click Delete.
Deleting Multiple Regions at OnceTo delete multiple regions at once:
1. Navigate to the appropriate Page Definition. See "Accessing the Page Definition" on page 8-2.
2. Access the Edit Regions page:
■ Component view - Click the Edit All icon. The Edit All icon resembles a small grid with a pencil on top of it.
■ Tree view - Right-click Regions and select Edit All.
Regions page appears.
3. Click the Delete Multiple Regions tab.
4. Specify the following:
a. Cascade to Delete Button - Select Yes to delete corresponding region buttons.
b. Cascade to Delete Items - Select Yes to delete corresponding region items.
c. Delete associated list and list Entries - Select Yes to delete corresponding lists. This option only displays when the region to be deleted is the only region which references the list.
d. Cascade to Delete Dynamic Actions - Select Yes to delete corresponding region items.
5. Select the lists to be deleted.
6. Click Apply Changes.
How Item Attributes Affect Page LayoutAn item is part of an HTML form and can be a text field, text area, password, select list, check box, and so on. You can alter the appearance of a page by changing the item attributes. For example, these attributes can effect where a label displays, how large an item is, and if the item displays next to or below the previous item.
To edit item attributes:
1. Navigate to the Page Definition. See "Accessing the Page Definition" on page 8-2.
2. Access the attributes page for the item:
See Also: "Understanding Page-Level Items" on page 7-56

How Item Attributes Affect Page Layout
Controlling Page Layout 12-15
■ Tree view - Right-click the item and select Edit.
■ Component view -Under Items, select the item name.
The Edit Page Item page appears.
3. Under Items, click the item name.
The Edit Page Item page appears.
Table 12–3 describes how item attributes affect the layout of a page.
Tip: You can also edit an item by double-clicking the item name or selecting the name and pressing ENTER. See "Editing a Page in Tree View" on page 8-5.
Table 12–3 Item Attributes Effecting Page Layout
Heading Attribute Description
User Interface Sequence Specifies the display sequence for this component. The sequence determines the order of evaluation.
User Interface Region Defines the region where the item displays. All items must be in a region.
User Interface Template Indicates the item template. Item templates enable you to define the user interface attributes in a central place and share that definition among many page items.
Grid Layout Start New Grid Determines whether this page item displays in a new grid or in the same grid as the previous page item.
Grid Layout Start New Row Determines whether this page item displays on the same row as the previous page item or button, or whether it displays on the next row.
Grid Layout Column Determines if the page item should be displayed in a specific grid column. Use Automatic to automatically determine the next available grid column where the page item gets displayed.
Grid Layout ColSpan Determines how many grid columns should be occupied by the page item. Use Automatic to balance the available grid columns within all page items and buttons in the same grid row.
Grid Layout RowSpan If items are laid out in HTML tables, this attribute determines the value used for the ROWSPAN attribute in the table cell in which the page item displays.
Grid Layout Column Attributes Enter additional attributes which are set for the grid column. This value replaces the #ATTRIBUTES# substitution placeholder in the grid layout column template.
Label Label Identifies the field label for the page item. The label displays on the page only if the item displays. Depending on the label alignment, the label displays in its own HTML table cell for some displays or in the same cell for others. Item labels can include shortcuts using "SHORTCUT_NAME" syntax.
Label Horizontal/Vertical Alignment
Controls the placement and the horizontal and vertical alignment of the label. Labels can be displayed above, below, or to the left of the item. When the label is displayed next to a form element, it occupies its own HTML table cell. By changing the alignment here, you control the label's position within that table cell.
Label HTML Table Cell Attributes
Enter any additional attributes to be used in the HTML table cell that contains this label.

Incorporating Content from Other Web Sites
12-16 Oracle Application Express Application Builder User's Guide
Incorporating Content from Other Web SitesTypically, pages in an application are based on data stored in an Oracle database. To incorporate content from other servers, you can create a region based on a URL to display content. For example, suppose you wanted to reference the current Oracle stock price. You could create a region of type URL based on a URL such as the following:
http://quote.yahoo.com/q?d=b&s=ORCL
You could then create an item called STOCK_SYMBOL and base your region on a stock price entered by the user. For example:
http://quote.yahoo.com/q?d=b&s=&STOCK_SYMBOL.
Sometimes (as is the case with the previous example) the HTML returned to the region is more than is needed. To restrict the HTML displayed, you can use the following region attributes:
■ URL (discard until but not including this text)
■ URL (discard after and including this text)
Element Pre Element Texts Specifies additional attributes for the HTML table cell used to display each individual option in a radio group or set of check boxes. Can include HTML, JavaScript, and shortcuts. You can reference the following substitution strings:
■ #CURRENT_FORM_ELEMENT# obtains the name of the HTML form element with which this post element text is associated.
■ #CURRENT_ITEM_NAME# obtains the name of the item with which this post element text is associated.
Element Post Element Texts Specifies additional attributes for the HTML table cell used to display each individual option in a radio group or set of check boxes. Can include HTML, JavaScript, and shortcuts. You can reference the following substitution strings:
■ #CURRENT_FORM_ELEMENT# obtains the name of the HTML form element with which this post element text is associated.
■ #CURRENT_ITEM_NAME# obtains the name of the item with which this post element text is associated.
Conditions Condition Type and Expressions
Defines conditions and appropriate expressions that determine if an item displays.
See Also: "Understanding Conditional Rendering and Processing" on page 2-4
Read Only Display Settings
Read Only Condition Type
Defines conditions and expressions that determine if the item displays as read-only. Use this attribute to display certain items to a set of users as updatable, while displaying that same set of items to others users as nonupdatable. Using this attribute reduces the need to code duplicate interfaces for different users.
Depending on the item type, a read-only item renders as plain text or as not enterable field. Not selecting a condition causes the item to render normally.
Note: Set the condition type to Never to always render the item as enterable field. This overwrites any read-only condition defined at the region or page-level
Table 12–3 (Cont.) Item Attributes Effecting Page Layout
Heading Attribute Description

Managing Images
Controlling Page Layout 12-17
Note that the previous example may require that you set the Proxy Server application attribute. If you do not set the Proxy Server application attribute, you get an error message. Oracle Application Express uses the Oracle utl_http.request_pieces function to obtain the HTML generated from the given URL. See "Editing the Application Definition" on page 7-15.
Working with SSL-Enabled URLsIf you call a SSL-enabled URL (for example, by invoking a Web service), or create a region of type URL that is SSL-enabled, you must create a wallet. A wallet is a password-protected container that stores authentication and signing credentials (including private keys, certificates, and trusted certificates) needed by SSL.
Managing ImagesYou can reference images within your application by uploading them to the Images Repository. When you upload an image, you can specify whether it is available to all applications or a specific application.
Topics:■ Uploading Images
■ Referencing Images
■ Editing Image Attributes
■ Deleting an Image
Uploading ImagesYou upload images to your workspace using the Image Repository.
To upload images to your workspace:
1. On the Workspace home page, click the Application Builder icon.
2. Select an application.
3. Click Shared Components.
The Shared Components page appears.
4. Under Files, select Images.
The Images page appears.
5. To upload an image, click Create.
6. On the Create Image page, specify the following:
a. Application - Select No Application Associated to make the image available to all applications within the workspace, or select a specific application ID.
b. Upload New Image - Click Browse to identify a file to upload.
c. Note - Enter details that describe the image.
7. Click Upload.
Tip: See "Configuring Wallet Information" in Oracle Application Express Administration Guide
Tip: You can use the Images Finder to identify images available to the current application. See "Using the Images Finder" on page 10-89.

Managing Images
12-18 Oracle Application Express Application Builder User's Guide
Referencing ImagesYou can reference images in your application by referencing the substitution string #IMAGE_PREFIX# or including a fully qualified URL to the image.
Topics:■ Verifying the Prefix for the Virtual Image Directory
■ Referencing an Image Using #IMAGE_PREFIX#
■ Referencing Images Using a Fully Qualified URL
Verifying the Prefix for the Virtual Image DirectoryWhen you install Application Builder, the installer creates a virtual directory for images. This virtual directory points to the actual path on the file system that contains uploaded images. By default, you reference this virtual directory using the prefix:
/i/
When you first create an application, you must verify this prefix on the Edit Definition page.
To verify the Image Prefix for an application:
1. On the Workspace home page, click the Application Builder icon.
2. Select an application.
3. On the Application home page, click Shared Components.
4. Under User Interface, select User Interface Attributes.
5. Locate the Image Prefix field.
By default, this attribute is defined as /i/. Contact your administrator for information about the name of this virtual directory for your installation.
Referencing an Image Using #IMAGE_PREFIX#When you embed an image in static text (for example, in page headers, region headers, or footers), you can reference the image using the substitution string #IMAGE_PREFIX#. For example, to reference the image go.gif, you would use the following syntax:
<img src="#IMAGE_PREFIX#go.gif">
Referencing Images Using a Fully Qualified URLAlternatively, you can also reference an image using a fully qualified URL. For example:
<img
See Also: "Referencing Images" on page 12-18 and "Deleting an Image" on page 12-19
See Also: "Uploading Images" on page 12-17
See Also: "About Built-in Substitution Strings" on page 2-18, "IMAGE_PREFIX" on page 2-27, "APP_IMAGES" on page 2-21, and "WORKSPACE_IMAGES" on page 2-31

Managing Images
Controlling Page Layout 12-19
src="http://g-images.amazon.com/images/G/01/associates/navbar2000/logo-no-border(1).gif">
Editing Image AttributesWhen you edit image attributes, you can add notes that describe an image or change the associated application. However, you cannot change the actual image. To change an image, delete it and then upload it again.
To edit images attributes:
1. On the Workspace home page, click the Application Builder icon.
2. Select an application.
3. Click Shared Components.
The Shared Components page appears.
4. Under Files, select Images.
The Images page appears.
5. A Search bar displays at the top of the page. Available controls include:
■ Select columns to search - Resembles a magnifying glass. Click this icon to narrow your search. To search all columns, select All Columns.
■ Text area - Enter case insensitive search criteria (wildcard characters are implied) to search for a name and then click Go.
■ Go button - Executes a search or applies a filter.
■ View Icons - Displays each image as a large icon. To edit an image, click the appropriate icon.
■ View Report - Displays each image as a line in a report. To edit a image, click the name.
■ Actions menu - Use the Actions menu to customize the report view. See "About the Actions Menu" on page 9-6.
6. Select an image.
The Edit Image Attributes page appears.
7. From Application, specify the image availability.
Select No Application Associated to make the image available to all applications within the workspace, or select a specific application ID.
8. In Notes, enter details that describe the image.
9. Click Apply Changes.
Deleting an ImageTo delete an image:
1. On the Workspace home page, click the Application Builder icon.
2. Select an application.
See Also: "Deleting an Image" on page 12-19 and "Uploading Images" on page 12-17

Managing Static Files
12-20 Oracle Application Express Application Builder User's Guide
3. Click Shared Components.
The Shared Components page appears.
4. Under Files, select Images.
The Images page appears.
5. A Search bar displays at the top of the page. Available controls include:
■ Select columns to search - Resembles a magnifying glass. Click this icon to narrow your search. To search all columns, select All Columns.
■ Text area - Enter case insensitive search criteria (wildcard characters are implied) to search for a name and then click Go.
■ Go button - Executes a search or applies a filter.
■ View Icons - Displays each image as a large icon. To edit an image, click the appropriate icon.
■ View Report - Displays each image as a line in a report. To edit a image, click the name.
■ Actions menu - Use the Actions menu to customize the report view. See "About the Actions Menu" on page 9-6.
6. Select an image.
7. Click Delete.
Managing Static FilesYou can upload static files to your workspace using the Static File Repository.
Topics:■ Uploading Static Files
■ Editing an Uploaded File
■ Downloading an Uploaded File
■ Deleting an Uploaded File
Uploading Static FilesTo upload static files:
1. On the Workspace home page, click the Application Builder icon.
2. Select an application.
3. Click Shared Components.
The Shared Components page appears.
4. Under Files, select Static Files.
The Static Files page appears.
5. A Search bar displays at the top of the page. Available controls include:
■ Select columns to search - Resembles a magnifying glass. Click this icon to narrow your search. To search all columns, select All Columns.
■ Text area - Enter case insensitive search criteria (wildcard characters are implied) to search for a name and then click Go.

Managing Static Files
Controlling Page Layout 12-21
■ Go button - Executes a search or applies a filter.
■ View Icons - Displays each file as a large icon. To edit a file, click the appropriate icon.
■ View Report - Displays each file as a line in a report. To edit a file, click the name.
■ Actions menu - Use the Actions menu to customize the report view. See "About the Actions Menu" on page 9-6.
6. To upload a file, click Create.
7. Follow the on-screen instructions.
Editing an Uploaded FileYou can edit static files smaller than 30,000 bytes by selecting the file name. Otherwise, you must edit the file offline and upload it again.
To edit a static file smaller than 30,000 bytes:
1. On the Workspace home page, click the Application Builder icon.
2. Select an application.
3. Click Shared Components.
The Shared Components page appears.
4. Under Files, select Static Files.
The Static Files page appears.
5. A Search bar displays at the top of the page. Available controls include:
■ Select columns to search - Resembles a magnifying glass. Click this icon to narrow your search. To search all columns, select All Columns.
■ Text area - Enter case insensitive search criteria (wildcard characters are implied) to search for a name and then click Go.
■ Go button - Executes a search or applies a filter.
■ View Icons - Displays each file as a large icon. To edit a file, click the appropriate icon.
■ View Report - Displays each file as a line in a report. To edit a file, click the name.
■ Actions menu - Use the Actions menu to customize the report view. See "About the Actions Menu" on page 9-6.
6. Select a file.
7. If the file is smaller than 30,000 bytes, edit the file.
8. In Notes, edit or enter notes describing the file.
9. Click Apply Changes.
See Also: "Editing an Uploaded File" on page 12-21, "Downloading an Uploaded File" on page 12-22, and "Deleting an Uploaded File" on page 12-22

Managing Static Files
12-22 Oracle Application Express Application Builder User's Guide
Downloading an Uploaded FileTo download an uploaded file:
1. On the Workspace home page, click the Application Builder icon.
2. Select an application.
3. Click Shared Components.
The Shared Components page appears.
4. Under Files, select Static Files.
The Static Files Repository appears.
5. Click View Report.
A report appears.
6. Select the Download icon next to the appropriate file.
Deleting an Uploaded FileTo delete an uploaded static file:
1. On the Workspace home page, click the Application Builder icon.
2. Select an application.
3. Click Shared Components.
The Shared Components page appears.
4. Under Files, select Static Files.
The Static Files Repository appears.
5. A Search bar displays at the top of the page. Available controls include:
■ Select columns to search - Resembles a magnifying glass. Click this icon to narrow your search. To search all columns, select All Columns.
■ Text area - Enter case insensitive search criteria (wildcard characters are implied) to search for a name and then click Go.
■ Go button - Executes a search or applies a filter.
■ View Icons - Displays each file as a large icon. To edit a file, click the appropriate icon.
■ View Report - Displays each file as a line in a report. To edit a file, click the name.
■ Actions menu - Use the Actions menu to customize the report view. See "About the Actions Menu" on page 9-6.
6. Select a file.
7. Click Delete.
See Also: "Uploading Static Files" on page 12-20, "Downloading an Uploaded File" on page 12-22, and "Deleting an Uploaded File" on page 12-22
See Also: "Uploading Static Files" on page 12-20, "Editing an Uploaded File" on page 12-21, and "Deleting an Uploaded File" on page 12-22

Rendering HTML Using Custom PL/SQL
Controlling Page Layout 12-23
Rendering HTML Using Custom PL/SQLIf you must generate specific HTML content not handled by Oracle Application Express forms, reports, and charts, you can use the PL/SQL region type. To generate HTML in this type of region, you need to use the PL/SQL Web Toolkit. You can reference session state using bind variable syntax. Keep in mind that when you generate HTML in this way, you do not get the same consistency and control provided with templates.
To give you more control over HTML dynamically generated within a region, you can use PL/SQL. For example, to print the current date, you could create a region with the following source:
htp.p(TO_CHAR(SYSDATE,'Day Month DD, YYYY'));
This next example accesses tables:
DECLARE l_max_sal NUMBER;BEGIN SELECT max(sal) INTO l_max_sal FROM emp; htp.p('The maximum salary is: '||TO_CHAR(l_max_sal,'999,999.00'));END;
See Also: "Uploading Static Files" on page 12-20, "Editing an Uploaded File" on page 12-21, and "Downloading an Uploaded File" on page 12-22
See Also:
■ Oracle Database Development Guide for information about developing web applications with PL/SQL
■ Oracle Database PL/SQL Packages and Types Reference for information about htp packages

Rendering HTML Using Custom PL/SQL
12-24 Oracle Application Express Application Builder User's Guide

Managing Themes and Templates 13-1
13Managing Themes and Templates
This section describes different ways you can alter your database application’s user interface and page layout through themes and templates.
Topics:■ Managing Themes
■ Customizing Templates
■ Using Custom Cascading Style Sheets
Managing ThemesThemes are collections of templates that you can use to define the layout and style of an entire application. The idea behind a theme is to provide a complete set of templates that accommodate every UI pattern that may be needed in an application. Templates are organized first by type and then by template class. Template types include breadcrumb, button, calendar, label, list, page, popup list of values, region, and report. The template class identifies the purpose of the each template within a given type. Each template type provides a group of standard classes and eight custom classes. These classifications enable Oracle Application Express to map templates among themes, making it easy to quickly change the entire look and feel of an application.
Oracle Application Express ships with an extensive theme repository. You can add themes to the theme repository as follows:
■ Workspace administrators can create Workspace themes. Workspace themes are available to all developers within the workspace. See "Managing Workspace Themes" on page 13-7.
■ Instance administrators can create public themes. Public themes are added using Application Express Administration Services. Once added, these themes are available to all workspaces and developers. See "Managing Public Themes" in Oracle Application Express Administration Guide.
Topics:■ Accessing the Themes Page
■ Accessing the Themes Page
■ Editing a Theme
■ Creating a Theme
See Also: "Adding Navigation"
Managing Themes
13-2 Oracle Application Express Application Builder User's Guide
■ Switching an Active Theme
■ Copying a Theme
■ Deleting a Theme
■ Managing Workspace Themes
■ About Exporting and Importing Themes
■ Changing a Theme Identification Number
■ Viewing Theme Reports
Accessing the Themes PageYou manage themes on the Themes page. You can access the Themes page from the Shared Components page or from the Page Definition.
To access the Themes page:
1. On the Workspace home page, click the Application Builder icon.
2. Select an application.
3. Click Shared Components.
4. Under User Interface, select Themes.
The Themes page appears. A check mark in the Is Current column indicates which theme is selected.
5. Click the theme name.
The Create/Edit Theme page appears.
About Using Theme 25 to Create a Responsive DesignResponsive design enables you to design web pages so that the layout fits the available space regardless of the device on which page displays (for example, a desktop computer, laptop computer, tablet, or smartphone). By implementing a responsive design, on larger screens the user gets the full experience, but on smartphones and tablets, the layout adjusts to the size of the specific device. During this resizing process, elements shift position, re-size, or become hidden. The objective of responsive design is to make all essential content available on any device, but to display it in a user-friendly format.
In Oracle Application Express, Theme 25 is responsive user interface theme. This theme provides the building blocks and templates to support a responsive layout. Keep in mind, that responsive design is not just a matter of picking one set of templates. As the application developer, you are responsible for using the templates in Theme 25 and design a page to facilitate a truly responsive design. Converting an existing application to Theme 25 requires you review all the application pages to ensure you have defined the appropriate template and layout.
See Also: "Customizing Templates" on page 13-12
Tip: You can change the selected default templates for a theme on the Create/Edit Theme page. See "Editing a Theme" on page 13-3.
See Also: "About the Themes Page" on page 13-5

Managing Themes
Managing Themes and Templates 13-3
On the surface, creating a responsive design and having only a single page to maintain sounds more appealing than maintaining two separate pages. In practice, however, the up front cost of designing a truly responsive page are much higher and requires a much higher level of understanding of grid layout, HTML and CSS.
Editing a ThemeA standard theme contains templates for every type of application component and region type. When you edit a theme you can change the theme name, edit the default templates for components and regions, alter the page transition, change the icon that displays for Date Picker items, and specify if custom images are supported. The sections that follow describe each section Theme Create/Edit page.
To review or edit a theme:
1. Navigate to the Themes page. See "Accessing the Themes Page" on page 13-2.
2. Click the theme name.
The Create/Edit Theme page appears
The Create/Edit Theme page is divided into sections. You can access these sections by scrolling down the page, or by clicking a navigation button at the top of the page. When you select a button at the top of the page, the selected section appears and all other sections are temporarily hidden. To view all sections of the page, click Show All.
Note the application ID and the Theme Identification Number display at the top of the page.
3. To change the theme name, enter a name in the Name field.
4. To change a default template for a component, scroll down to Component Defaults. Make a selection from the appropriate list.
Table 13–1 describes the default templates available under Component Defaults.
See Also: "Creating Mobile Applications" on page 7-2 and "What Is the Difference Between a Mobile Design and Responsive Design?" on page 7-2
Table 13–1 Component Default Templates
Attribute Description
Page Identifies the default template for displaying pages. If a developer does not explicitly choose a template, then the Application Express engine uses the template specified here.
See Also: "Display Attributes" on page 8-22 for information about overriding the page template on the Page Attributes page
Error Page Specifies a page template to use for errors that display on a separate page as opposed to those that display inline. Leave this attribute blank if you do not want to use a template designed to display errors.
Printer Friendly Page Identifies the template to be used when the Application Express engine is in printer friendly mode.
See Also: "Optimizing a Page for Printing" on page 10-101
Breadcrumb Identifies the default breadcrumb template used when you create a breadcrumb.
Button Identifies the default button template used when you create a button.

Managing Themes
13-4 Oracle Application Express Application Builder User's Guide
5. To change a default template for a region, scroll down to Region Defaults. Make a selection from the appropriate list.
Table 13–2 describes the default templates available under the Regions Defaults.
6. For Calendar Icon Details:
a. Icon Name - Specify the name and location of image to be used when items of type Date Picker are displayed, for example:
/i/new_cal.bmp
b. Icon Name - Identify the image attributes for the Calendar Icon, for example:
width="16" height="16" alt="Display Calendar"
7. For Custom Image, specify whether to use the default theme image or enable support for a custom theme image. Select Yes or No.
8. Click Apply Changes.
Creating a ThemeOnce you create a theme, it displays on the Themes page. You can create a theme from scratch or select an existing theme from the repository.
To create a theme:
Calendar Specifies the default calendar template used when you create a calendar.
Label Identifies the default label template used when you create a label.
List Specifies the default list template used when you create a list.
Region Specifies the default region template used when you create a region.
Report Identifies the default region template used when you create a report.
Header Toolbar Identifies the default template used for the header toolbar.
Footer Toolbar Identifies the default template used for the footer toolbar.
Table 13–2 Region Defaults
Attribute Description
Breadcrumbs Default region template used when you create a breadcrumb.
Charts Default chart template used when you create a chart.
Forms Default form template used when you create a form.
Lists Default region template used when you create a list.
Interactive Reports Default region template used when you create an interactive report.
Reports Default region template used when you create a report.
Tabular Forms Default region template used when you create a tabular form.
Wizards Default region template used when you create a new wizard component.
Table 13–1 (Cont.) Component Default Templates
Attribute Description

Managing Themes
Managing Themes and Templates 13-5
1. Navigate to the Themes page. See "Accessing the Themes Page" on page 13-2.
2. Click Create.
3. Select a creation method:
■ From the Repository - View and select a theme from the repository.
■ From Scratch - Create a theme from scratch.
■ From Export - Create a theme to import from the export repository.
4. Follow the on-screen instructions.
5. To learn more about a specific field, click the field label.
When help is available, the cursor changes to an arrow and question mark when you pass the cursor over an item. See "About Field-Level Help" on page 1-13.
About the Themes PageOnce you create a theme, it appears on the Themes page. You can change the appearance of the page by using the Search bar at the top of the page. Available controls include:
■ Select columns to search - Resembles a magnifying glass. Click this icon to narrow your search. To search all columns, select All Columns.
■ Text area - Enter case insensitive search criteria (wildcard characters are implied) to search by name and then click Go.
■ Go button - Executes a search or applies a filter.
■ View Icons - Displays each theme as a large icon. To edit a theme, click the icon.
■ View Report - Displays each theme as a line in a report. To edit a theme, click the name.
■ Actions menu - Use the Actions menu to customize the report view. See "About the Actions Menu" on page 9-6.
Switching an Active ThemeWhen you switch to a theme, all components with assigned templates are assigned to a corresponding template in the theme. Application Builder accomplishes template mapping through the assignment of template class identifiers.
When switching an active theme, remember:
■ You can only switch to a theme if the theme exists. For example, before you can switch to a theme available in the repository, you must first create it. See "Creating a Theme" on page 13-4.
■ If the wizard locates multiple matches (that is, when several templates share the same template type and templates class), the wizard defaults to a template matching type, class, and name. If no match is found, you must select another template with the same type and class.
■ If no matching template is found (that is, no template with the same type and class exists) then you are prompted to select a template with the same type but with a different class. Then, a warning displays explaining this issue might lead to problems with page functionality, or issues with the page display.
See Also: "Editing a Theme" on page 13-3

Managing Themes
13-6 Oracle Application Express Application Builder User's Guide
■ When no template of the same template type exists, then the theme cannot be switched. You are blocked from switching themes.
To switch an active theme:
1. Navigate to the Themes page. See "Accessing the Themes Page" on page 13-2.
2. Click Switch Theme.
The Switch Theme page appears.
3. For Identify Theme:
a. Currently Active Theme - Select the current theme for the application.
b. Switch to Theme - Select the new theme for the application.
c. Click Next.
4. Review the Status column to identify problematic mappings:
■ Check indicates the mapping was successful.
■ Warning indicates there are more than one template in the theme you are switching to with the identified class. The warning provides a select list from which to choose the appropriate template.
■ Error indicates that Application Builder was unable to map the class among the themes. Ensure that a class is identified for the templates in both themes.
5. Click Next to continue.
6. Click Switch Theme.
Updating an Older Application with a New ThemeOracle Application Express ships with a variety of themes. Many of these themes have been updated and include a new more modern style.
If you import or upgrade and application from a previous Oracle Application Express release, the appearance of the application does not change. To obtain the newer theme, you must:
1. Switch to another theme. See "Switching an Active Theme" on page 13-5.
2. Re-create the theme you want to use from the repository. "Creating a Theme" on page 13-4.
3. Switch to that new theme. "Switching an Active Theme" on page 13-5
Copying a ThemeEach theme is identified by a numeric identification number (ID). When you copy a theme, you specify a theme ID. Copying a theme is useful when experimenting with editing a theme or to export a theme with a different ID.
Tip: If you do not have at least two themes installed, click Create Theme. You can create a theme from scratch or simply select an existing theme from the repository. See "Creating a Theme" on page 13-4.
Note: Failure to resolve warnings may result in a loss of functionality and applications that do not display well.

Managing Themes
Managing Themes and Templates 13-7
To copy a theme:
1. Navigate to the Themes page. See "Accessing the Themes Page" on page 13-2.
2. On the Tasks list, click Copy Theme.
3. On Copy Theme:
a. Copy From Theme - Select the theme you want to copy.
b. Copy to this Theme Identification Number - Enter a new ID for the theme.
c. Click Next.
4. Click Copy Theme.
Deleting a ThemeYou can only delete inactive themes. When you delete a theme, Application Builder only removes inactive templates.
To delete a theme:
1. Navigate to the Themes page. See "Accessing the Themes Page" on page 13-2.
2. On the Tasks list, click Delete Theme.
3. From Remove Theme, select the theme you want to delete and click Next.
4. Click Delete Theme.
Managing Workspace ThemesWorkspace administrators manage the theme repository for a workspace. Workspace administrators can add a theme to the repository, making it available to all developers within a workspace, or delete it.
Topics:■ Adding a Theme to the Theme Repository
■ Modifying a Workspace Theme
■ Deleting a Workspace Theme
■ Modifying a Workspace Theme
■ About Exporting a Workspace Theme
Adding a Theme to the Theme RepositoryTo add a theme to the Theme repository:
1. Navigate to the Themes page. See "Accessing the Themes Page" on page 13-2.
2. From the Tasks List, click Manage Workspace Themes.
Tip: Themes are tied to an application. If you modify a theme, those changes only apply to the application being edited. If you delete a theme, any template modifications are lost. To keep template modifications, you must export the theme. See "Exporting Themes" on page 16-20.
See Also: "Managing Public Themes" in Oracle Application Express Administration Guide

Managing Themes
13-8 Oracle Application Express Application Builder User's Guide
3. Select Create and click Next.
4. For Application Theme to Copy, select the desired theme and click Next.
5. For Identify Name, enter a theme number, name, and optional description and then click Next.
6. Click Create Workspace Theme.
Viewing an Existing Workspace ThemeTo view an existing workspace theme:
1. Navigate to the Themes page. See "Accessing the Themes Page" on page 13-2.
2. From the Tasks List, click Manage Workspace Themes.
3. Click View Existing and click Next.
The Workspace Themes page appears.
Deleting a Workspace ThemeTo delete a workspace theme:
1. Navigate to the Themes page. See "Accessing the Themes Page" on page 13-2.
2. From the Tasks List, click Manage Workspace Themes.
3. Click Delete and click Next.
4. Select the workspace theme to be deleted and click Delete Theme.
Modifying a Workspace ThemeYou cannot edit a workspace theme directly. To modify a workspace theme, you must create an application using the theme, modify it, and then manually add it to the workspace theme repository.
To modify a workspace theme:
1. Create an application using the theme you want to modify. "About Creating a Database Application" on page 7-1.
2. Modify the theme. See "Editing a Theme" on page 13-3.
3. Delete the existing workspace theme. See "Deleting a Workspace Theme" on page 13-8.
4. Add the modified theme to the workspace theme repository. See "Adding a Theme to the Theme Repository" on page 13-7.
About Exporting a Workspace ThemeYou export a theme in the same way you export any related application files. Exporting a workspace theme involves the following steps:
1. Create an application using the theme. "About Creating a Database Application" on page 7-1.
2. Export the application. See "Exporting an Application" on page 16-14.
Tip: You cannot edit a workspace theme directly. To modify a workspace theme, you must create an application using the theme, modify it, and then manually add it to the workspace theme repository. See "Modifying a Workspace Theme" on page 13-8.

Managing Themes
Managing Themes and Templates 13-9
3. Import the exported file into the target Oracle Application Express instance. See "Importing an Application, Page or Component Export" on page 16-24.
4. Install the exported file from the Export Repository. See "Installing Export Files" on page 16-29.
About Exporting and Importing ThemesYou export a theme in the same way you export any related application files. Exporting a theme from one development instance to another involves the following steps:
1. Create an application using the theme. "About Creating a Database Application" on page 7-1.
2. Export the theme using the Export Theme utility. See "Exporting Themes" on page 16-20.
3. Import the exported file into the target Oracle Application Express instance. See "Importing Export Files" on page 16-23.
4. Install the exported file from the Export Repository. See "Installing Export Files" on page 16-29.
Changing a Theme Identification NumberEach theme has an identification number (ID). You can use the Change Theme ID utility to change a theme ID to another identification number. Changing a theme ID is useful when you want to export a theme with a different number and then import it into another application.
To change a theme identification number:
1. Navigate to the Themes page. See "Accessing the Themes Page" on page 13-2.
2. On the Tasks list, click Change Identification Number.
3. For Theme Number:
a. Identify Theme - Select a theme.
b. Change to this Theme Identification Number - Specify an identification number.
c. Click Next.
4. Confirm your changes and click Change Theme ID.
Viewing Theme ReportsApplication Builder includes several reports designed to help you manage themes and templates.
Topics:■ Viewing All Templates in a Theme
■ Viewing Theme Template Counts
■ Viewing File References
■ Viewing Class References
■ Viewing Template Substitution Strings

Managing Themes
13-10 Oracle Application Express Application Builder User's Guide
Viewing All Templates in a ThemeTo view all templates that comprise a theme:
1. Navigate to the Themes page. See "Accessing the Themes Page" on page 13-2.
2. Click Reports.
3. On the Theme Reports page:
a. From Report, select Application Templates.
b. From Theme, select a theme.
c. Click Go.
A list of templates appears with the template type, template name, the associated theme, and template class.
4. To edit a template, select the template name.
Viewing Theme Template CountsThe Theme Template Count report lists which template classes currently have templates created for them.
To view the Theme Template Count report:
1. Navigate to the Themes page. See "Accessing the Themes Page" on page 13-2.
2. Click Reports.
3. On the Theme Reports page:
a. From Report, select Theme Template Counts.
b. From Theme, select a theme.
c. Click Go.
4. If you are using custom classifications, select Show Custom and click Go.
Viewing File ReferencesThe File References report displays a list of all files associated with templates, shared components, or page components in the current application.
To view the File References report:
1. Navigate to the Themes page. See "Accessing the Themes Page" on page 13-2.
2. On the Themes page, click Reports.
3. On the Theme Reports page:
a. From Report, select File References.
b. From Theme, select a theme.
c. Click Go.
4. On the File References page:
a. From Show, select the type of component to include in the report. If you do not make a selection, no results are returned.
b. From Show Files, select one of the following:

Managing Themes
Managing Themes and Templates 13-11
– With context displays the component, the theme identification number, the component name, the image (if applicable), and the page number. Select the page number to link to a Page Definition.
– Without context displays only the file name and the image (if applicable).
c. From File Extensions, select the type of extensions for which to search.
d. Click Go.
5. To download a comma-delimited file (.csv) version of this report, click Download at the bottom of the page.
Viewing Class ReferencesAccessing the Class References report displays a list of classes associated with templates, shared components, or page components in the current application.
To view the Class References report:
1. Navigate to the Themes page. See "Accessing the Themes Page" on page 13-2.
2. Click Reports.
3. On the Theme Reports page:
a. From Report, select Class References.
b. From Theme, select a theme.
c. Click Go.
4. On the Class References page:
a. From Show, select the components to check for a class reference. If you do not make a selection, no results are returned.
b. From Show Class Names, select one of the following:
– With context displays the component, the theme identification number, the component name, the image (if applicable), and the page number.
– Without context displays only the referenced class.
c. Click Go.
5. To download a comma-delimited file (.csv) version of this report, click Download at the bottom of the page.
Viewing Template Substitution StringsUse the Template Substitution Strings report to view all supported substitution strings by component.
To view the Substitution String report:
1. Navigate to the Themes page. See "Accessing the Themes Page" on page 13-2.
2. Click Reports.
3. On the Theme Reports page:
a. From the Report list, select Template Substitution Strings.
b. From the Theme list, select which themes to include in the report.
c. Click Go.
4. To link to a template definition, select the component name.

Customizing Templates
13-12 Oracle Application Express Application Builder User's Guide
Customizing TemplatesThe Application Express engine creates the user interface of an application based on a named collection of templates called a theme. Templates control the look and feel of the components in your application. If you must create a custom template, it is generally easier to start with an existing template and then modify it. Once you have created one or more default templates, you can modify those templates to fit your specific needs.
Topics:■ About Cascading Style Sheets
■ Selecting a Default Page Template
■ Creating a New Template
■ Viewing Template Reports
■ Managing Templates
■ Breadcrumb Templates
■ Button Templates
■ Calendar Templates
■ Label Templates
■ List Templates
■ Page Templates
■ Popup LOV Templates
■ Region Templates
■ Report Templates
About Cascading Style SheetsA cascading style sheet (CSS) provides a way to control the style of a web page without changing its structure. When used properly, a CSS separates visual attributes such as color, margins, and fonts from the structure of the HTML document. Oracle Application Express includes themes that contain templates that reference their own CSS. The style rules defined in each CSS for a particular theme also determine the way reports and regions display.
When using built-in themes, you can find the theme specific CSS files in the following locations:
/i/themes/theme_xx /i/themes/theme_xx/css
Theme specific image can be found in the following locations:
/i/themes/theme_xx /i/themes/theme_xx/images
See Also: "Understanding Substitution Strings" on page 2-17
See Also: "Managing Themes" on page 13-1

Customizing Templates
Managing Themes and Templates 13-13
Where xx is the Oracle Application Express version number. Theme specific CSS files include the Oracle Application Express version number to preserve backward compatibility for imported applications using older versions of a theme.
Selecting a Default Page TemplateYou can specify a default page template in two ways:
■ Select a default page template within a specific theme.
■ Select a specific page template on a page-by-page basis.
By default, the Application Express engine uses the Page template specified on the Themes page.
Topics:■ Selecting a Page-level Template Within a Theme
■ Selecting a Page-level Template for a Specific Page
Selecting a Page-level Template Within a ThemeTo specify a default page template within a theme:
1. Navigate to the Themes page. See "Accessing the Themes Page" on page 13-2.
2. Select a theme name.
The Create/Edit Theme page appears.
3. Scroll down to Component Defaults. Make a selection from the Page list.
4. Click Apply Changes at the top of the page.
Selecting a Page-level Template for a Specific PageTo specify a page-level template for a specific page:
1. On the Workspace home page, click the Application Builder icon.
2. Select an application.
3. Select a page.
The Page Definition appears.
4. To access the Page Definition Edit Page:
■ Tree view - Under Page Rendering, double-click the page title at the top of the tree.
■ Component view- Under Page, click the Edit icon.
The Page Attributes page appears.
5. Locate the section Display Attributes.
6. Make a selection from the Page Template list.
7. Click Apply Changes.
See Also: "Using Custom Cascading Style Sheets" on page 13-47
See Also: "Editing a Theme" on page 13-3

Customizing Templates
13-14 Oracle Application Express Application Builder User's Guide
Creating a New TemplateIf you must create a custom template, it is generally easier to start with an existing template and then modify it. Once you have created one or more default templates, you can modify those templates to fit your specific needs.
To create a custom template:
1. Navigate to the Templates page.
a. On the Workspace home page, click the Application Builder icon.
b. Select an application.
c. Click Shared Components.
d. Under User Interface, select Templates.
2. Click Create.
3. Select the type of template you want to create and click Next.
4. Select a creation method:
■ From Scratch
■ As a Copy of an Existing Template
5. Follow the on-screen instructions.
Viewing Template ReportsApplication Builder includes reports describing template utilization, subscription, published templates and edit history.
To view template reports for the current application:
1. Navigate to the Templates page.
a. On the Workspace home page, click the Application Builder icon.
b. Select an application.
c. Click Shared Components.
d. Under User Interface, select Templates.
2. You can narrow the display by making a selection from the following lists and clicking Go.
■ Template Name - Enter a case insensitive query.
■ Theme - View only templates in a specific theme.
■ Referenced - Select a type of template to display. Options include:
– All Templates
– Templates Referenced
– Templates Not Referenced
■ Type - Select a template type.
■ Since - Restrict the report to a specific time frame. Select the amount of time to include in your report.
Tip: Make sure you associate your template with the correct theme.

Customizing Templates
Managing Themes and Templates 13-15
■ Subscribed - Specify whether to view All Templates, Subscribed Templates, or Not Subscribed Templates.
3. To view template reports, click the following tabs:
■ Subscription displays subscribed templates in your application.
■ Utilization displays template utilization in the current application for all template types (page, report, region, label and list).
■ History details recent changes to templates by developers and the last update date.
Managing TemplatesYou can view all available templates on the Templates page. Alternatively, you can access a template associated with a specific page on the Page Definition.
Topics:■ Viewing Templates on the Templates Page
■ Viewing Templates Associated with a Specific Page
■ Replacing Templates
■ Replacing All Templates within an Application
■ Viewing Region Position Utilization by Page Template
■ Unsubscribing to Templates
■ Publishing Templates
Viewing Templates on the Templates PageTo view existing templates:
1. Navigate to the Templates page.
a. On the Workspace home page, click the Application Builder icon.
b. Select an application.
c. Click Shared Components.
d. Under User Interface, select Templates.
The Templates page appears.
2. You can narrow the display by making a selections from the following lists and clicking Go.
■ Template Name - Enter a case insensitive query.
■ Theme - View only templates in a specific theme.
■ Referenced - Select a type of template to display.
■ Type - Select a template type.
■ Since - Restrict the report to a specific time frame. Select the amount of time to include in your report.
■ Subscribed - Specify whether to view All Templates, Subscribed Templates, or Not Subscribed Templates.
See Also: "Viewing All Templates in a Theme" on page 13-10

Customizing Templates
13-16 Oracle Application Express Application Builder User's Guide
3. To see a preview of a template, click the Run icon in the Preview column.
Note that not all template types have the preview capability.
4. To view or edit a template definition, click the template name.
The template definition appears.
Each template definition is divided into sections. You can access these sections by manually scrolling, or by clicking a navigation button at the top of the page. When you select a button at the top of the page, the selected section appears and all other sections are temporarily hidden. To view all sections of the page, click Show All.
5. Edit the appropriate attributes.
If you edit a template, you can make changes in one window and run your application in another by selecting the Return to Page check box on the right side of the template definition page. Selecting this check box keeps the page you are editing current after you click Apply Changes.
6. Click Apply Changes.
Viewing Templates Associated with a Specific PageTo view templates associated with a specific page:
1. On the Workspace home page, click the Application Builder icon.
2. Select an application.
3. Select a page.
The Page Definition appears. Templates associated with the current page display under the Templates heading in the far right column.
4. To view or edit a template definition, click the template name.
The Template Definition appears.
Each template definition is divided into sections. You can access these sections by manually scrolling, or by clicking a navigation button at the top of the page. When you select a button at the top of the page, the selected section appears and all other sections are temporarily hidden. To view all sections of the page, click Show All.
5. Edit the appropriate attributes.
If you edit a template, you can make changes in one window and run your application in another by selecting the Return to Page check box on the right side of the template definition page. Selecting this check box keeps the page you are editing current after you click Apply Changes.
6. Click Apply Changes.
Replacing TemplatesYou can update the template associated with a component using the Replace Templates Wizard.
To replace the template associated with a component:
1. Navigate to the Templates page.
a. On the Workspace home page, click the Application Builder icon.
b. Select an application.
c. Click Shared Components.

Customizing Templates
Managing Themes and Templates 13-17
d. Under User Interface, select Templates.
The Templates page appears.
2. From the Task list, select Replace Templates.
3. From Template Type, select a template and click Next.
4. For Replace Templates, select the following:
a. Change From - Select the template you want to change.
b. Change To - Select the template you want to change to.
c. Click Next.
5. Click Finish.
Replacing All Templates within an ApplicationTo replace all templates within an application with templates from another application:
1. Navigate to the Templates page.
a. On the Workspace home page, click the Application Builder icon.
b. Select an application.
c. Click Shared Components.
d. Under User Interface, select Templates.
The Templates page appears.
2. From the Task list, select Replace templates in this application with templates from another application.
3. For Replace Templates:
a. Replace from Application - Select an application.
b. User Interface - Select the type of user interface for which this application has been developed.
c. Click Next.
4. On Replace Templates, select a new template for each component and then select an Action:
■ Replace copies the template definition
■ Replace/Subscribe copies the templates and adds a subscription.
5. Click Replace Templates.
Viewing Region Position Utilization by Page TemplateRegions are organized on a page by position (or Display Point). The possible display points for a region are determined by the page-level template.
To view region position utilization by page template:
1. Navigate to the Templates page.
a. On the Workspace home page, click the Application Builder icon.
b. Select an application.
c. Click Shared Components.

Customizing Templates
13-18 Oracle Application Express Application Builder User's Guide
d. Under User Interface, select Templates.
The Templates page appears.
2. From the Task list, select View page template region position utilization.
The Region Display Point Utilization report appears.
Unsubscribing to TemplatesA subscribed template is a template that has its definition maintained in another template, the referenced template. If your application uses subscribed templates, you can unsubscribe to templates on the Unsubscribe Templates page.
To unsubscribe to templates:
1. Navigate to the Templates page.
a. On the Workspace home page, click the Application Builder icon.
b. Select an application.
c. Click Shared Components.
d. Under User Interface, select Templates.
The Templates page appears.
2. From the Task list, select Unsubscribe Templates.
The Unsubscribe Templates page appears.
3. To unsubscribe to a specific template type within the current theme, select the template type and click Unsubscribe.
Publishing TemplatesUse the Publish Templates page to view templates that are subscribed to by other templates in your workspace.
To publish master template content to subscribing templates:
1. Navigate to the Templates page.
a. On the Workspace home page, click the Application Builder icon.
b. Select an application.
c. Click Shared Components.
d. Under User Interface, select Templates.
The Templates page appears.
2. Click the Publish tab.
The Published Templates page appears.
3. Select those you want to publish and click Publish Checked.
Breadcrumb TemplatesA breadcrumb template controls the display of breadcrumb entries. You select a breadcrumb template when you create a region.
See also: "Customizing Templates" on page 13-12 and "Managing Themes" on page 13-1

Customizing Templates
Managing Themes and Templates 13-19
About Breadcrumb Style NavigationBreadcrumbs usually indicate where the current page is relative to other pages in the application. In addition, users can click a specific page to instantly view it. For example, the Oracle Application Express Sample Database Application includes breadcrumb paths at the top of each page.
Breadcrumb Template AttributesThis section describes specific sections of the Edit Breadcrumb Template page. You can access the sections of the page by either scrolling down the page, or by clicking a navigation button at the top of the page. When you select a button at the top of the page, the selected section appears and all other sections are temporarily hidden. To view all sections of the page, click Show All.
Name Name identifies the name of the template. Use the Translatable check box to indicate that the template contains text strings that require translation. Theme indicates the theme to which the template is a member.
Template Class identifies a specific use for the template. When you switch to a theme, all templates in one theme are mapped to corresponding templates in another theme. Application Builder accomplishes this template mapping through the assignment of a template class.
Subscription Use Subscription to apply an existing template to the current application.
Use Reference Master Breadcrumb Template From to select an existing template in this application or another template in your workspace's schema. By selecting an existing template, you become a subscriber to that template.
To load a copy of a master template, click Refresh.
Template Type Select one of the following template styles:
■ Child Breadcrumb Entries displays all breadcrumb entries that are children of the current page parent breadcrumb (that is, peers of the current breadcrumb).
■ Current Breadcrumb displays all breadcrumb entries in sequence with a common parent.
■ Parent Breadcrumb Entries displays all breadcrumb entries for the current pages parent breadcrumb (that is, one level up from the current breadcrumb entry).
■ Parent to Leaf (breadcrumb style) displays the current page breadcrumb entry, its parent to the left, and so on, until the root node is reached.
Definition Table 13–3 describes available breadcrumb Entry attributes.
See Also:
■ Online help for information about using specific sections of the Edit Breadcrumb Template page
■ "Creating Breadcrumbs" on page 11-20

Customizing Templates
13-20 Oracle Application Express Application Builder User's Guide
Link Attributes Use Breadcrumb Link Attributes to specify hypertext link attributes for a breadcrumb entry. For example, to display the hypertext link for the breadcrumb entry, add the following text to the HTML anchor tag in the position of the X:
<A HREF="..." X>
Comments Use this attribute to record comments about this component.
Substitution Strings Lists substitution string used in the current template. Substitution strings are used within subtemplates to reference component values.
Button TemplatesButton templates enable developers to customize the look and feel of a button. To build a button, you can use multiple images or HTML tags. Using button templates is optional.
Table 13–3 Breadcrumb Entry Control attributes
Attribute Description
Before First Defines text that displays before the first breadcrumb entry.
Current Page Breadcrumb Entry
Defines the look of a breadcrumb entry that corresponds to the current page. This attribute supports the following substitution strings:
■ #NAME# specifies the short name of the breadcrumb entry.
■ #LINK# specifies the anchor target of the breadcrumb entry.
■ #LONG_NAME# specifies the long name of the breadcrumb entry.
For example:
<li><a href="#LINK#">#NAME#</a>
Non Current Page Breadcrumb Entry
Defines the look of a breadcrumb entry that does not correspond to the current page. This attribute supports the following substitution strings:
■ #NAME# specifies the short name of the breadcrumb entry
■ #LINK# specifies the anchor target of the breadcrumb entry
■ #LONG_NAME# specifies the long name of the breadcrumb entry
For example:
<li><a href="#LINK#">#NAME#</a>
After Last Defines text that displays after the last breadcrumb entry.
Between Level Defines text that displays between levels of breadcrumb entries. For example, if a breadcrumb has three levels this text would display at the "X" in the example that follows:
main X cars X porsche X 911
Maximum Levels Specifies the number of levels that appear when displaying breadcrumbs in a breadcrumb style.

Customizing Templates
Managing Themes and Templates 13-21
Button Template AttributesThis section describes specific sections of the Edit Button Template page. You can access the sections of the page by either scrolling down the page, or by clicking a navigation button at the top of the page. When you select a button at the top of the page, the selected section appears and all other sections are temporarily hidden. To view all sections of the page, click Show All.
Name Template Name identifies the name of the template. Use the Translatable check box to indicate if the template contains text strings that require translation. Theme indicates the theme to which the template is a member.
Template Class identifies a specific use for the template. When you switch to a theme, all templates in one theme are mapped to corresponding templates in another theme. Application Builder accomplishes this template mapping through the assignment of a template class.
Subscription Use Subscription to apply an existing template to the current application.
Use Reference Master Template From to select an existing template in this workspace or another template in your workspace's schema. By selecting an existing template, you become a subscriber to that template.
To load a copy of a master template, click Refresh.
Definition Normal Template defines the button template that displays if the button type is Normal. You can include standard application substitutions. For example, &ITEM_NAME. values can be substituted at rendering time.
Hot Template defines the button template that displays if the button type is Hot. You have the option of including standard application substitutions. For example, &ITEM_NAME. values can be substituted at rendering time.
Button templates support the following substitution strings:
■ The #LABEL# substitution string is replaced with a button label.
■ The #LINK# substitution string is replaced with generated JavaScript code to control the button's behavior. Depending on the button's action, this code could either a call to apex.submit to submit the page, a redirect to a page, a redirect to some other URL supplied, execution of some custom JavaScript, or void(0) to do nothing (when the behavior is be defined separately with Dynamic Actions). Since the #LINK# prefixes the generated JavaScript code with 'javascript:', use it in an HREF attribute.
■ The #JAVASCRIPT# substitution string is replaced with generated JavaScript code to control the button's behavior. Depending on a button's action, this code could be either a call to apex.submit to submit the page, a redirect to a page, a redirect to some other URL supplied, execution of some custom JavaScript or void(0) to do nothing (when the behavior may be defined separately with Dynamic Actions).
■ The #BUTTON_ID# substitution string is replaced with the ID for the button. This is either the button's Static ID, if defined, or an internally generated ID in the format. For example:
See also: "Customizing Templates" on page 13-12 and "Managing Themes" on page 13-1
Tip: Since #JAVASCRIPT# does not prefix the generated JavaScript code with 'javascript:', use it in an onclick attribute.

Customizing Templates
13-22 Oracle Application Express Application Builder User's Guide
'B' || [Internal Button ID]
■ The #BUTTON_CSS_CLASSES# substitution string is replaced with the button CSS classes property from the button definition.
■ The #BUTTON_ATTRIBUTES# substitution string is replaced with the button attributes property from the button definition.
Comments Use this attribute to record comments about this component.
Substitution Strings Lists substitution string used in this template. Substitution strings are used within subtemplates to reference component values.
Calendar TemplatesCalendar templates control the appearance and placement of a calendar. Calendar templates frequently use HTML tables to arrange dates. You place calendar attributes using substitution strings such as #DD# and #MONTH#.
About Supported Calendar Template Substitution StringsA list of supported substitution strings appears on the right side of the Edit Calendar Template page. Note that template substitution strings must be in uppercase letters and begin and end with a number sign (#).
Calendar Template AttributesThis section describes specific sections of the Edit Calendar Template page. You can access the sections of the page by either scrolling down the page, or by clicking a navigation button at the top of the page. When you select a button at the top of the page, the selected section appears and all other sections are temporarily hidden. To view all sections of the page, click Show All.
Calendar Definition
Name Name identifies the name of the template. Use the Translatable check box to indicate if the template contains text strings that require translation.Theme indicates the theme to which the template is a member.
Template Class identifies a specific use for the template. When you switch to a theme, all templates in one theme are mapped to corresponding templates in another theme. Application Builder accomplishes this template mapping through the assignment of a template class.
Subscription Use Subscription to apply an existing template to the current application.
Use Reference Master Label Template From to select an existing template in this workspace or another template in your workspace's schema. By selecting an existing template, you become a subscriber to that template.
To load a copy of a master template, click Refresh.
Comments Use this attribute to record comments about this component.
Tip: All substitution string must be in uppercase.
See Also: "Creating Calendars" on page 10-20, "Customizing Templates" on page 13-12, and "Managing Themes" on page 13-1

Customizing Templates
Managing Themes and Templates 13-23
Monthly Calendar, Weekly Calendar, Daily Calendar, and List CalendarUse the Monthly Calendar, Weekly Calendar, Daily Calendar, and List Calendar attributes to control the appearance and placement of specific calendars.
To learn more about a specific attribute, click the attribute label. When help is available, the cursor changes to an arrow and question mark when you pass the cursor over an item. See "About Field-Level Help" on page 1-13.
Label TemplatesLabel templates are designed to centrally manage HTML markup of page item labels. Each item can have an optional label. You can control how these labels display using label templates. For example, you could create a label template called Required Field that references an image (such as an asterisk) to indicate to the user that the field is required.
Label templates enable you to define a before-and-after text string that gets prepended and appended to the item.
Label Template AttributesThis section describes specific sections of the Edit Label Template page. You can access the sections of the page by either scrolling down the page, or by clicking a navigation button at the top of the page. When you select a button at the top of the page, the selected section appears and all other sections are temporarily hidden. To view all sections of the page, click Show All.
Name Template Name identifies the name of the template. Use the Translatable check box to indicate that the template contains text strings that require translation. Theme indicates the theme to which the template is a member.
Template Class identifies a specific use for the template. When you switch to a theme, all templates in one theme are mapped to corresponding templates in another theme. Application Builder accomplishes this template mapping through the assignment of a template class.
Subscription Use Template Subscription to apply an existing template to the current application.
Use Reference Master Label Template From to select an existing template in this workspace or another template in your workspace's schema. When you select an existing template, you become a subscriber to that template.
To load a copy of a master template, click Refresh.
Definition In Before Label, enter HTML to display before the item label. Before Label supports the following substitution strings:
■ #CURRENT_FORM_ELEMENT#
■ #CURRENT_ITEM_ID#
■ #CURRENT_ITEM_NAME#
■ #CURRENT_ITEM_HELP_TEXT#
For example:
See Also: "Customizing Templates" on page 13-12 and "Managing Themes" on page 13-1

Customizing Templates
13-24 Oracle Application Express Application Builder User's Guide
<label for="#CURRENT_ITEM_NAME#"><a href="javascript:popupFieldHelp('#CURRENT_ITEM_ID#', '&APP_SESSION.','&CLOSE.')" >
In this example the label automatically displays after the HTML in this region. Therefore, if you open an <a> tag, you should close it in the After Label region.
In After Label, enter HTML to display after the item label. Since the label automatically displays before the HTML in this region, any open HTML tags in the Before Label region should be closed. For example:
</a></label>
In Before Label, enter HTML to display before the item label. This attribute supports the following substitution strings:
■ #CURRENT_FORM_ELEMENT#
■ #CURRENT_ITEM_ID#
■ #CURRENT_ITEM_NAME#
■ #CURRENT_ITEM_HELP_TEXT#
Error Display In On Error Before Label, enter HTML to precede the item label when an application displays an inline validation error message for the item. For example:
<font class="fieldtitleleft">#ERROR_MESSAGE#
This attribute supports the following substitution strings:
■ #CURRENT_FORM_ELEMENT#
■ #CURRENT_ITEM_ID#
■ #CURRENT_ITEM_NAME#
■ #CURRENT_ITEM_HELP_TEXT#
In On Error After Label, enter HTML to be appended to the item label when an application displays an inline validation error message for the item. For example:
]</font>
This attribute supports the following substitution strings:
■ #CURRENT_FORM_ELEMENT#
■ #CURRENT_ITEM_ID#
■ #CURRENT_ITEM_NAME#
■ #CURRENT_ITEM_HELP_TEXT#
Field Container In Before Label and Item enter HTML to be displayed before the label and item. This is typically used to wrap an item into a DIV container or field set. The Before Label and Item attribute is only rendered for pages that do not use a table grid to display form items. This includes any page using a mobile page template.
This attribute supports the following substitution strings:
■ #CURRENT_FORM_ELEMENT#
■ #CURRENT_ITEM_ID#
■ #CURRENT_ITEM_NAME#

Customizing Templates
Managing Themes and Templates 13-25
■ #CURRENT_ITEM_HELP_TEXT#
■ #CURRENT_ITEM_CONTAINER_ID#
In order for page items rendered on pages that do not use a table grid to be reliably hidden and shown with the Oracle Application Express JavaScript APIs, you should ensure the HTML container element defined in this attribute also has an id="#CURRENT_ITEM_CONTAINER_ID#" defined. If this is not done, you may find some elements of the item are not successfully hidden and shown.
Substitution Strings Lists substitution string usage for this template. Substitution strings are used within subtemplates to reference component values.
Comments Use this attribute to record comments about this object.
Using #CURRENT_ITEM_HELP_TEXT# to Create Item HelpYou can use the #CURRENT_ITEM_HELP_TEXT# substitution string to create inline page item Help text when a page is rendered. For example, you can use this substitution string to create page item Help text which displays as a tooltip when the mouse hovers over the page item label. This placeholder enables you to include help text on the page when it's rendered without having to perform an expensive AJAX call.
Example Label TemplateBefore Label:
<label for="#CURRENT_ITEM_NAME#" class="optional"><span>class="helpText">#CURRENT_ITEM_HELP_TEXT#</span>
After Label:
</label>
List TemplatesA list is a shared collection of links. You control the appearance of a list through list templates. Using template attributes, you can also define a list element to be either current or non current for a specific page.
About Hierarchical ListsOracle Application Express supports hierarchical lists. To create a hierarchical list, you must:
■ Select a list template that supports hierarchical lists. To determine which list templates support hierarchical lists, look for templates having the naming convention "with Sublist."
■ Select a Parent List Entry when you create each list entry.
Tip: Only use this placeholder if the Help text is short. The generated page always includes the help text of all page items independent if the user actually hovers over the label of a page item to display the help text.
See Also: "Creating Lists" on page 11-7, "Customizing Templates" on page 13-12, and "Managing Themes" on page 13-1

Customizing Templates
13-26 Oracle Application Express Application Builder User's Guide
List Template AttributesThis section describes specific sections of the Edit List Template page. You can access the sections of the page by either scrolling down the page, or by clicking a navigation button at the top of the page. When you select a button at the top of the page, the selected section appears and all other sections are temporarily hidden. To view all sections of the page, click Show All.
Name Name identifies the name of the template. Use the Translatable check box to indicate that the template contains text strings that require translation. Theme indicates the theme to which the template is a member.
Template Class identifies a specific use for the template. When you switch to a new theme, all templates in one theme are mapped to corresponding templates in another theme. Application Builder accomplishes this template mapping through the assignment of a template class.
Subscription Use Subscription to apply an existing template to the current application.
Use Reference Master List Template From to select an existing template in this workspace or another template in your workspace's schema. By selecting an existing template, you become a subscriber to that template.
To load a copy of a master template, click Refresh.
Before List Entry Enter HTML that displays before any list elements. You can use this attribute to open an HTML table or HTML table row.
Template Definition Defines current and noncurrent list templates. Supported substitution strings include #LINK#, #TEXT#, #TEXT_ESC_SC#, #IMAGE_PREFIX#, #IMAGE#, #IMAGE_ATTR#, and #A01#...#A10#.
Template Definition attributes include:
■ List Template Current. Enter HTML or text to be substituted for the selected (or current) list template.
■ List Template Current with Sub List Items. Enter HTML or text to be substituted for the selected (or current) list template when an item has sublist items. If not specified, the current list item template is used.
■ List Template Noncurrent. Enter HTML or text to be substituted for the unselected (or noncurrent) list template.
■ List Template Noncurrent with Sub List Items. Enter HTML or text to be substituted for the unselected (or noncurrent) list template used when an item has sublist items. If not specified, the current list item template is used.
■ Between List Elements. Enter HTML that displays between list elements. This attribute is ignored if no HTML is specified.
Template Definitions for First Entry Available attributes include:
■ List Template Current (First). If defined, this is used for the first list item. Enter HTML or text to be substituted for the selected (or current) list template.
See Also:
■ Online Help for information about using specific sections of the Edit List Template page
■ "Creating Lists" on page 11-7

Customizing Templates
Managing Themes and Templates 13-27
■ List Template Current with Sub List Items (First). If defined, this is used for the first list item. HTML or text to be substituted for the selected (or current) list template used when item has sub list items.
■ List Template Noncurrent (First). If defined, this is used for the first list item. Enter HTML or text to be substituted for the unselected (or noncurrent) list template.
■ List Template Noncurrent with Sub List Items (First). If defined, this is used for the first list item. HTML or text to be substituted for the unselected (or noncurrent) list template used when item has sub list items.
Before Sublist Entry Enter HTML that displays before any sublist elements.
Sublist Entry Defines current and noncurrent list templates. Supported substitution strings include #LINK#, #TEXT#, #IMAGE_PREFIX#, #IMAGE#, #IMAGE_ATTR#, #A01#...#A10#, #LIST_ITEM_ID#, and #PARENT_LIST_ITEM_ID#.
Sub List Entry attributes include:
■ Sub List Template Current. Enter HTML or text to be substituted for the selected (or current) list template.
■ Sub List Template Current with Sub List Items. Enter HTML or text to be substituted for the selected (or current) list template when an item has sublist items. If not specified, the current list item template is used.
■ Sub List Template Noncurrent. Enter HTML or text to be substituted for the unselected (or noncurrent) list template.
■ Sub List Template Noncurrent with Sub List Items. Enter HTML or text to be substituted for the unselected (or noncurrent) list template used when an item has sublist items. If not specified, the current list item template is used.
■ Between Sub List Items. Enter HTML that displays between list elements. This attribute is ignored if no HTML is specified.
After Sub List Entry Enter HTML that displays after displaying sublist elements.
After List Entry Enter HTML that displays after displaying all list elements. You can use this attribute to close an HTML table opened in the Before List Elements attribute.
Substitution Strings Lists substitution string usage for this template. Substitution strings are used within subtemplates to reference component values.
Comments Use this attribute to record comments about this object.
Page TemplatesPage templates define the appearance of a page. Each template consists of a header template, a body template, a footer template, and several subtemplates. If you do not specify a page template as a page-level attribute, then the Application Express engine uses the default page template defined on the Create/Edit Theme page.
Page templates combine static HTML with substitution strings that are replaced at runtime. You use substitution strings to indicate the existence and placement of a component within a page template. You can further specify how a component should display using subtemplates.

Customizing Templates
13-28 Oracle Application Express Application Builder User's Guide
Topics:■ About Supported Page Template Substitution Strings
■ Page Template Attributes
About Supported Page Template Substitution StringsTable 13–4 describes the available page template substitution strings. Note that all template substitution strings must be in uppercase letters and begin and end with a number sign (#).
To view a report of substitution strings supported by a given template, look at the Substitution Stings section of the Edit Page Template page. See "Page Template Attributes" on page 13-30.
See Also: "Customizing Templates" on page 13-12 and "Managing Themes" on page 13-1
Table 13–4 Page Template Substitution Strings
Substitution String From Description
#APEX_JAVASCRIPT# Header Template
JavaScript files and code used by Oracle Application Express.
#APP_CSS# Header Template
CSS files used by Oracle Application Express.
#BOX_BODY# Body Where the Body displays. If the Body is null, then #BOX_BODY# is used instead.
#CUSTOMIZE# Footer Template
Customize link.
#FORM_CLOSE# Footer template
Where the HTML close form tag <form> is placed.
#FORM_OPEN# Header Template
Where the HTML open form tag <form> is placed. You must include this substitution string to submit a form.
#GENERATED_CSS# Header Template
Cascading style sheet files created by components.
#GENERATED_JAVASCRIPT# Header Template
JavaScript code created by components as needed.
#GLOBAL_NOTIFICATION# Body Displays the Global Notification attribute. Global notifications are intended to communicate system status, such as pending system downtime. You can also use APEX_APPLICATION.G_GLOBAL_NOTIFICATION to set this value programmatically.
See Also: "Global Notification" on page 7-20
#HEAD# Header Template
Used after the <head> open tag but before the </head> close tag. You can optionally define the contents of #HEAD# for each page (for example, to reference additional style sheets or JavaScript libraries).
#HIGH_CONTRAST_TOGGLE# All High Contrast toggle.
#LOGO# Body Application image or log.
In the Logo section of the Edit Application Definition page, you can identify an image and image attributes for an application logo. To use this feature, you must also include the #LOGO# substitution string in the Header or Body page template.
See Also: "Logo" on page 7-32

Customizing Templates
Managing Themes and Templates 13-29
#NAVIGATION_BAR# Body Navigation bar.
See Also: "Subtemplate" on page 13-33 for information about the Navigation Bar subtemplate
#NOTIFICATION_MESSAGE# Body Defines where a summary of inline error messages displays. Inline error messages can display next to a field, inline in the notification area, or both.
#ONLOAD# Header Template
Page onload.
Use this string as a substitute in a JavaScript call to be executed when a page is loaded by the web browser. The JavaScript to be called can vary for each page.
#PAGE_CSS# Header Template
Cascading style sheet files and inline style defined on the page-level.
#PAGE_JAVASCRIPT# Header Template
JavaScript files and code defined on the page-level.
#PAGE_STATIC_ID# All Page Static ID (for example 'P100')
#PAGE_TRANSITION# Page Default page transition used to navigate to other pages in a jQuery Mobile application. You must use this new placeholders in a DIV of type role="page". For example:
<div id="#PAGE_STATIC_ID#" data-role="page" data-apex-page-transition="#PAGE_TRANSITION#" data-apex-popup-transition="#POPUP_TRANSITION#" data-url="#REQUESTED_URL#">
#PARENT_TAB_CELLS# All Display of parent tabs.
See Also: "Parent Tab Attributes" on page 13-34
#POPUP_TRANSITION# Page Default page transition used to open a dialog in a jQuery Mobile application. You must use this new placeholders in a DIV of type role="page". For example:
<div id="#PAGE_STATIC_ID#" data-role="page" data-apex-page-transition="#PAGE_TRANSITION#" data-apex-popup-transition="#POPUP_TRANSITION#" data-url="#REQUESTED_URL#">
#REGION_POSITION_01# Body Region Position 1.
#REGION_POSITION_02# Body Region Position 2.
#REGION_POSITION_03# Body Region Position 3.
#REGION_POSITION_04# Body Region Position 4.
#REGION_POSITION_05# Footer Template
Region Position 5.
#REGION_POSITION_06# All Region Position 6.
#REGION_POSITION_07# Body Region Position 7.
#REGION_POSITION_08# Body Region Position 8.
#REQUESTED_URL# All
Page URL which was requested by the browser
#SCREEN_READER_TOGGLE#
All
Screen Reader toggle.
Table 13–4 (Cont.) Page Template Substitution Strings
Substitution String From Description

Customizing Templates
13-30 Oracle Application Express Application Builder User's Guide
Page Template AttributesThis section describes specific sections of the Edit Page Template page. You can access the sections of the page by either scrolling down the page, or by clicking a navigation button at the top of the page. When you select a button at the top of the page, the selected section appears and all other sections are temporarily hidden. To view all sections of the page, click Show All.
Name Name identifies the name of the template. Theme indicates the theme to which the template is a member.
Template Class identifies a specific use for the template. When you switch to a new theme, all templates in one theme are mapped to corresponding templates in another theme. Application Builder accomplishes this template mapping through the assignment of a template class.
Use the Translatable check box to indicate if this template contains text strings that require translation.
Subscription Use Subscription to apply an existing template to the current application.
Use Reference Master Page Template From to select an existing template in this workspace or another template in your workspace's schema. By selecting an existing template, you become a subscriber to that template.
To load a new copy of a master template, select Refresh.
Definition Each template consists of a header, a body, a footer, and subtemplates. Use substitution strings to include dynamic content. All template substitution strings must be in uppercase letters and begin and end with a number sign (#). See item Help for information about supported substitution strings.
#SUCCESS_MESSAGE# Body Success message. Defines where page success and error messages appear. If the page process runs without raising errors, then this text displays.
You can customize the display of the success message for each template by adding HTML to be displayed before and after the success message.
#SWITCH_UI_TO_DESKTOP# All Hyperlink for home page of desktop user interface.
#SWITCH_UI_TO_JQM_SMARTPHONE#
All Hyperlink for home page of smart phone user interface.
#TAB_CELLS# Body Display of standard tabs.
See Also: "Standard Tab Attributes" on page 13-34
#TEMPLATE_CSS# Header Template
Cascading style sheet files and inline style defined on page template-level.
#THEME_CSS# Header Template
Cascading style sheet files selected for the theme.
#TITLE# Header Template
Defines the page title. Typically included within HTML title tags.
See Also: "Understanding Substitution Strings" on page 2-17and "Managing Pages in a Database Application" on page 7-35
Table 13–4 (Cont.) Page Template Substitution Strings
Substitution String From Description

Customizing Templates
Managing Themes and Templates 13-31
Header is the first section of the page template. Enter HTML that defines the <Head> section of the HTML document. Regions that display or processes and computations that execute AFTER HEADER display or execute immediately after this section in the template that is rendered. For example:
<html> <head> <title>#TITLE#</title> #APEX_CSS# #TEMPLATE_CSS# #THEME_CSS# #PAGE_CSS# #HEAD# </head>
Oracle recommends you include at least #TITLE# and #HEAD# in this template section. See item Help for a specific list of supported substitution strings.
Body is the second section in the page template and is rendered after the header section but before the footer section. Enter HTML that defines the <Body> section of the HTML document. At a minimum, you must include the #BOX_BODY#, #FORM_OPEN# and #FORM_CLOSE# substitution strings in this section of the template. For example:
<body #ONLOAD#> #FORM_OPEN# #BOX_BODY# #FORM_CLOSE# #GENERATED_CSS# #APEX_JAVASCRIPT# #TEMPLATE_JAVASCRIPT# #APPLICATION_JAVASCRIPT# #PAGE_JAVASCRIPT# #GENERATED_JAVASCRIPT# </body>
See item Help for information about supported substitution strings.
Footer is the third section in the page template that displays after the Body. See item Help for information about supported substitution strings
JavaScript Available attributes include:
■ File URLs. Enter JavaScript file URLs for code to be loaded on this page. Each URL must be written into a new line. If you provide a minified version of your file you can use the substitution string #MIN# to include .min in your file URL for a regular page view and an empty string if the page is viewed in debug mode. You can also use the substitution string #APP_VERSION# to include the application's version in the file URL. JavaScript file URLs you enter here replaces the #TEMPLATE_JAVASCRIPT# substitution string in the page template.
Do not include opening or closing script tags, just write the URL.
Examples:
■ Standard file reference:
/myjs/main.js
■ Standard file reference which loads the minified file main.min.js for regular page views and main.js in Debug mode:

Customizing Templates
13-32 Oracle Application Express Application Builder User's Guide
/myjs/main#MIN#.js
■ Conditional file for Internet Explorer
[if IE]/myjs/ie.js
■ File reference using a query string in the URL referencing the application version, such that when the application is upgraded (and the version is incremented), the browser is instructed to always load the new file and ignore any previously cached files.
/myjs/main.js?version=#APP_VERSION#
■ Function and Global Variable Declaration. Enter JavaScript code (for example, functions or global variable declarations) for code to be used in this page template. Consider putting it into an external file to avoid duplication and to leverage browser caching of static files. Code you enter here replaces the #TEMPLATE_JAVASCRIPT# substitution string in the page template.
Do not include opening or closing script tags, just include the JavaScript code.
To reference a shortcut, use "SHORTCUTNAME".
■ Execute when Page Loads. Enter JavaScript code to execute when the page loads. The code is executed after the JavaScript code generated by Oracle Application Express. Code you enter here replaces the #GENERATED_JAVASCRIPT# substitution string in the page template.
Do not include opening or closing script tags, just include the JavaScript code.
Cascading Style Sheet Available attributes include:
■ File URLs. Enter Cascading Style Sheet file URLs to be loaded for this page template. Each URL has to be written into a new line. If you provide a minified version of your file you can use the substitution string #MIN# to include .min in your file URL for a regular page view and an empty string if the page is viewed in debug mode. You can also use the substitution string #APP_VERSION# to include the application's version in the file URL. File URLs you enter here replace the #TEMPLATE_CSS# substitution string in the template.
Do not include opening or closing script tags, just include the file URL.
Examples:
■ Standard file reference:
/mycss/main.css
■ Standard file reference which loads the minified file main.min.css for regular page views and main.css in debug mode.
/mycss/main#MIN#.css
■ Conditional media query
[media="only screen and (max-device-width: 480px)"]/mycss/smartphone.css
■ Conditional file for Internet Explorer
[if IE]/mycss/ie.css
■ File reference using a query string in the URL referencing the application version, such that when the application is upgraded (and the version is

Customizing Templates
Managing Themes and Templates 13-33
incremented), the browser is instructed to always load the new file and ignore any previously cached files.
/mycss/main.css?version=#APP_VERSION#
■ Inline. Enter Cascading Style Sheet code to be used for this page template. Consider putting it into an external file to avoid duplication and to leverage browser caching of static files. Code you enter here replaces the #TEMPLATE_CSS# substitution string in the template to avoid duplication and to leverage browser caching of static files.
Do not include opening or closing style tags, just include the cascading style sheet code. This example sets the CSS class display_only to bold:
.display_only { font-weight:bold;}
Subtemplate Enter the HTML for subtemplates below. Subtemplates are placed inside the body of the page template using substitution strings. Available subtemplates include:
■ Success Message. Enter HTML to replace the string #SUCCESS_MESSAGE# in the template body, header, or footer. For example:
<b>#SUCCESS_MESSAGE#</b>
■ Navigation Bar. Enter HTML or text to replace the string #NAVIGATION_BAR# in the template header, body, or footer. Use the substitution string #BAR_BODY# to indicate where in the Navigation Bar the entries should appear. For example:
<table class="navBar"><tr>#BAR_BODY#</tr></table>
The #BAR_BODY# substitution string generates the appropriate HTML table cells.
■ Navigation Bar Entry. Enter HTML or text to be substituted into the navigation bar #BAR_BODY# substitution string for each navigation bar entry. Use the these substitution strings to create the navigation bar entry subtemplate.
– #LINK# - entry link
– #TEXT# - entry sub text
– #IMAGE# - entry image
Note that the HTML image ALT, HEIGHT, and WIDTH arguments are included with the HTML IMG tag when supplied with the navigation bar entry.
– #EDIT# - Inline edit link editing capability
– #WIDTH# - Image width
– #HEIGHT# - Image height
– #COLSPAN# - HTML COLSPAN value
– #ALT# - Image alternative text
■ Notification. Enter HTML or text to be substituted when the #NOTIFICATION_MESSAGE# substitution string is referenced in the template header, body, or footer. The Notification subtemplate supports these substitution strings:
– #MESSAGE#

Customizing Templates
13-34 Oracle Application Express Application Builder User's Guide
– #NOTIFICATION_MESSAGE_HEADER#
Use the substitution string #MESSAGE# to indicate where the body of the message should appear in the Notification Message. For example:
<table><tr><td>#MESSAGE#</td></tr></table>
Standard Tab Attributes You must populate this attribute if your application includes standard tabs. Standard tabs can be placed in the header, body, or footer sections of the page template using the #TAB_CELLS# substitution string. The page template Header/Body/Footer defines the HTML table and rows. This subtemplate defines how these tabs display by defining the specific cell. See item Help for information about supported substitution strings.
Available attributes include:
■ Current Tab. Enter HTML or text to be substituted for the currently selected standard tab. Whether a tab is current is determined by standard tab attributes. Include the #TAB_TEXT# substitution string to show the displayed name of the tab. For example:
<td>#TAB_LABEL#</td>
See item Help for information about supported substitution strings.
■ Non Current Standard Tab. Enter HTML or text to be substituted for the unselected standard tabs. Include the #TAB_TEXT# substitution string to show the displayed name of the tab. For example:
<td><a href="#TAB_LINK#">#TAB_LABEL#</a></td>
See item Help for information about supported substitution strings.
Parent Tab Attributes You must populate this attribute if your application includes two levels of tabs. Enter HTML or text that to be substituted for the selected parent tabs. Parent tabs can be placed in the header, body, or footer section of the page template using the #PARENT_TAB_CELLS# substitution string. Parent tabs only display with standard tabs.
Available attributes include:
■ Current Parent Tab. Enter HTML or text to be substituted for the selected parent tabs. Whether a tab is current is determined by the page that displays and the standard tab set that the page uses. Include the #TAB_TEXT# substitution string to show the displayed name of the tab. For example:
<td><a href="#TAB_LINK#">#TAB_LABEL#</a></td>
See item Help for information about supported substitution strings.
This attribute is part of the Parent Tab subtemplate and expands the #PARENT_TAB_CELLS# substitution string.
■ Non Current Parent Tab. Enter HTML or text to be substituted for the unselected parent tabs. Include the #TAB_TEXT# substitution string to show the displayed name of the tab. For example:
<td><a href="#TAB_LINK#">#TAB_LABEL#</a></td>
See item Help for information about supported substitution strings.
See Also: "Creating Tabs" on page 11-1

Customizing Templates
Managing Themes and Templates 13-35
This attribute is part of the Parent Tab subtemplate and expands the #PARENT_TAB_CELLS# substitution string.
Image Based Tab Attributes Use this subtemplate for tabs that are entirely based on images. Available attributes include:
■ Current Image Tab. Enter HTML to be used to indicate that an image-based tab is currently selected. Include the #TAB_TEXT# substitution string to show the displayed name of the tab. For example:
<td>#TAB_TEXT#</td>
■ Non Current Image Tab. Enter the HTML to be used to indicate that an image tab is not currently selected. Include the #TAB_TEXT# substitution string to show the displayed name of the tab.
Grid Layout Available attributes include:
■ Type. Select a grid layout:
– HTML Table - Uses HTML Tables to position regions, page items, and buttons.
– Fixed Number of Columns - Used for grids which divide the screen into a fixed number of grid columns.
– Variable Number of Columns - Used for grids which can display up to "n" number of grid columns depending on how the regions, page items and buttons are positioned.
■ Region Table Attributes. This attribute enables you to control the attributes of the <table> tag. If the Application Express engine displays regions in multiple columns in the same region position, then Oracle Application Express renders an HTML table.
Display Points Breadcrumb Display Point applies to generated components that use breadcrumbs. It defines where the breadcrumbs are placed on the page. Sidebar Display Point applies to generated components that use Sidebars. It defines where sidebars are placed on the page.
Error Page Template Control Use this attribute when a page template is designated as an error template. Supported substitution strings include:
■ #MESSAGE# and #ADDITIONAL_INFO# - Places the error message.
■ #TECHNICAL_INFO# - Displays detailed internal error information which is visible to developers.
■ #BACK_LINK# - Displays a link back to the previous page.
■ #OK# and #RETURN_TO_APPLICATION# - Returns to translated text strings.
Substitution Strings Lists substitution string usage for this template. Substitution strings are used within subtemplates to reference component values. See "About Supported Page Template Substitution Strings" on page 13-28
Comments Use this attribute to record comments about this component.
See Also: "Creating Tabs" on page 11-1

Customizing Templates
13-36 Oracle Application Express Application Builder User's Guide
Popup LOV TemplatesPopup LOV templates control how popup lists display for all items defined as POPUP. You can only specify one popup LOV template for each theme.
Popup List of Values Template AttributesThis section describes specific sections of the Edit Popup List of Values Template page. You can access the sections of the page either by scrolling down the page or by clicking a navigation button at the top of the page. When you select a button at the top of the page, the selected section appears and all other sections are temporarily hidden. To view all sections of the page, click Show All.
Application Theme indicates the theme to which the template is a member. Template Class identifies a specific use for the template. When you switch to a new theme, all templates in one theme are mapped to corresponding templates in another theme. Application Builder accomplishes this template mapping through the assignment of a template class. Use the Translatable check box to indicate if this template contains text strings that require translation.
Subscription Use Subscription to apply an existing template to the current application. Reference Master Popup List of Values Template From to select an existing template in this workspace or another template in your workspace's schema. By selecting an existing template, you become a subscriber to that template.
To load a new copy of a master template, click Refresh.
Icon Available attributes include:
■ Popup Icon. Specifies an icon to display to the right of a form field for items of type POPUP. By default, the Application Express engine uses a list.gif image.
■ Popup Icon Attr. Defines image attributes, such as height and width, for the Popup Icon.
■ Popup Color Picker Icon. Defines an icon to display to the right of a form field for items of type Popup Color Picker. By default, the Application Express engine uses /i/htmldb/icons/palette.gif image.
■ Popup Color Picker Icon Attr. Defines image attributes, such as height and width, used to display the Popup Color Picker Icon.
Search Field Use these attributes to specify how a Search field displays. Table 13–5 describes available Search Field attributes.
See Also: "Creating Lists of Values at the Application Level" on page 10-73, "Customizing Templates" on page 13-12, and "Managing Themes" on page 13-1
Table 13–5 Search Field Attributes
Attribute Description
Before Field Text Defines text to display before the popup list of values search field displays.
Filter Width Displays the HTML INPUT TYPE = TEXT widget using this width.
Filter Max Width Displays the HTML INPUT TYPE = TEXT widget using this maximum width.

Customizing Templates
Managing Themes and Templates 13-37
Buttons Use these attributes to define the button name and attributes for the Find, Close, Next, and Previous buttons. For more information, see item Help.
Window Popup lists of values are executed using JavaScript. Use these attribute to control the values of scrollbars=, resizable=, width=, and height=. For information about default values, see item Help. For more information, see item Help.
Pagination Defines how row count results display. For more information, see item Help.
Result Set Use these attributes to define text or HTML to display before and after a result set. For more information, see item Help.
Page Attributes Use these attributes to define popup pages. For more information, see item Help.
Region TemplatesRegion templates control the appearance and placement of region attributes. You place region attributes using substitution strings such as #BODY# and #EDIT#. Template substitution strings must be in upper case and begin and end with a pound sign (#).
Region Template AttributesThis section describes specific sections of the Edit Region Template page. You can access the sections of the page either by scrolling down the page or by clicking a navigation button at the top of the page. When you select a button at the top of the page, the selected section appears and all other sections are temporarily hidden. To view all sections of the page, click Show All.
Name Name identifies the name of the template. Theme indicates the theme to which the template is a member.
Template Class identifies a specific use for the template. When you switch to a new theme, all templates in one theme are mapped to corresponding templates in another theme. Application Builder accomplishes this template mapping through the assignment of a template class. Use the Translatable check box to indicate that the template contains text strings that require translation.
Subscription Use Reference Master Region Template From to select an existing template in this application or another template in your workspace schema. By selecting an existing template, you become a subscriber to that template.
To load a new copy of a master template, click Refresh Template.
Definition Region templates provide the appearance for a portion of a page called a region. Use substitution strings to indicate the existence and placement of a
Filter Text Attribute Displays the HTML INPUT TYPE = TEXT widget using these attributes. This is included within the HTML input tag.
After Field Text Displays this text after displaying the search field, the search button, and the close button.
See Also: "Understanding Regions" on page 12-3, "Customizing Templates" on page 13-12, and "Managing Themes" on page 13-1
Table 13–5 (Cont.) Search Field Attributes
Attribute Description

Customizing Templates
13-38 Oracle Application Express Application Builder User's Guide
component within the region. #BODY# is the only required substitution string. It identifies where the source of the region should be placed. All other substitution strings are optional. The following are valid substitution strings:
■ #TITLE#
■ #PAGE_TITLE#
■ #EXPAND#
■ #CHANGE#
■ #BODY#
■ #SUB_REGION_HEADERS#
■ #SUB_REGIONS#
■ #FORM_OPEN#
■ #FORM_CLOSE#
■ #REGION_ID#
■ #REGION_STATIC_ID#
■ #REGION_ATTRIBUTES#
When you create a button in a region position, the positions you define appear in a select list. Use the following substitution strings to define positions for the placement of buttons in a region:
■ #EDIT#
■ #CLOSE#
■ #CREATE#
■ #CREATE2#
■ #EXPAND#
■ #HELP#
■ #DELETE#
■ #COPY#
■ #NEXT#
■ #PREVIOUS#
Grid Layout Page items display within regions. Each item is part of an HTML table if the grid type in the page template is set to Table. You can set the attributes of this table using this attribute. For example:
class="instructiontext"
Sub Regions Use Header Templates and Header Entry Templates to generate a list of region titles of all the subregions of the current region. For either template, #ENTRIES# is the only required substitution string.
Other valid substitution strings include:
■ #ENTRIES#
See Also: "Understanding Substitution Strings" on page 2-17

Customizing Templates
Managing Themes and Templates 13-39
■ #REGION_ID#
■ #REGION_STATIC_ID#
Use #SUB_REGION_HEADERS# in the region template to place the output of this template.
Use Template to wrap a subregion with additional HTML code. #SUB_REGION# is the only required substitution string. It identifies where the source of the subregion should be placed. All other substitution strings are optional.
See item Help for more information and a list of supported substitution strings.
Comments Use this attribute to record comments about this component.
Substitution Strings Lists substitution string usage for this template. Substitution strings are used within subtemplates to reference component values.
Report TemplatesReport column templates provide you with control over the results of a row from a SQL query. This type of template defines a cell, not an entire row.
Each report template identifies column names using the syntax #1#, #2#, #3#, and so on. You can also name columns using column name substitution syntax such as #ENAME# or #EMPNO#. You can reference any item from your application within your template. For example, to reference an item called ABC. in your template, you could include the exact substitution string &ABC.. The actual value of ABC. would be provided by an end user editing an item in your application named ABC.
Topics:■ About Generic Column Templates and Named Column Templates
■ Report Column Template Attributes for Generic Column Templates
■ Report Column Template Attributes for Named Column Templates
■ About Using JavaScript in Column Templates
About Generic Column Templates and Named Column TemplatesOracle Application Express includes two types of report templates:
■ Generic column templates
■ Named column templates
Generic Column Templates A generic column template determines the appearance of a report by defining the look of the column once. This look is then repeated as many times as is necessary, based on the number of columns specified in the report's definition. This type of template is limited to reports that have a standard row and column structure. Additional style can be applied to a report using this type of template through the use of conditions.
The following example demonstrates how to have each column use a specific style:
<td class="tabledata" align="#ALIGN#">#COLUMN_VALUE#</td>
See Also: , "Customizing Templates" on page 13-12, and "Managing Themes" on page 13-1

Customizing Templates
13-40 Oracle Application Express Application Builder User's Guide
This example assumes your page template includes a CSS containing the class tabledata. This example also demonstrates the use the substitution strings #ALIGN# and #COLUMN_VALUE#. If you actually ran this report, these substitution strings would be replaced with values generated by the results of a SQL query.
If your query uses an expression in the select list, it is a good idea to create an alias for the columns to avoid runtime errors. For example, suppose your query was as follows:
SELECT ename, (sal + comm) * 12 FROM emp
You could rewrite the query to alias the columns as follows:
SELECT ename, (sal + comm) * 12 yearly_comp FROM emp
Named Column Templates Named column templates allow for more flexibility in report design. However, because they reference columns by name, they can only be used by reports that are based on those columns. For example:
<tr><td>#ENAME#</td><td>#SAL#</td></tr>
Although named column templates offer flexibility, you may need to create a new template for each query. You can also include a position notation. The following example demonstrates how to use following HTML and substitution strings:
<tr><td>#ENAME#</td><td>#SAL#</td></tr>
<tr><td>#1#</td><td>#2#</td></tr>
Report Column Template Attributes for Generic Column TemplatesThis section describes specific sections of the Edit Report Template page for Generic Column Templates. You can access the sections of the page by either scrolling down the page, or by clicking a navigation button at the top of the page. When you select a button at the top of the page, the selected section appears and all other sections are temporarily hidden. To view all sections of the page, click Show All.
Report Template Template Name identifies the name of the template. Template Type indicates the type of template. Named Column templates reference column names in the template. Generic Column Templates reference the #COLUMN_VALUE# substitution string in the template.
Theme indicates the theme to which the template is a member. Template Class identifies a specific use for the template. When you switch to a new theme, all templates in one theme are mapped to corresponding templates in another theme. Application Builder accomplishes this template mapping through the assignment of a template class. Use the Translatable check box to indicate the template contains text strings that require translation.
Template Subscription Use Reference Master Report Template From to select an existing template in this workspace or another template in your workspace's schema. By selecting an existing template, you become a subscriber to that template.
To load a new copy of a master template, click Refresh.
Before Rows In Before Rows, enter HTML that displays once at the beginning of a report template. Opening an HTML table is a common use of this attribute as shown in the following example:
<table>

Customizing Templates
Managing Themes and Templates 13-41
You can identify column headers using the syntax #1#, #2#, #3#. For example:
<th>#1#</th><th>#2#</th><th>#3#</th>
You can include pagination above a report by including the substitution string #TOP_PAGINATION#. This substitution string generates HTML that starts with an opening <tr> tag and ends with a closing </tr> tag. For example, to include an open table tag and the #TOP_PAGINATION# substitution string, you would enter the following:
<table>#TOP_PAGINATION#
You can also include the substitution string #CSV_LINK# to include support for exporting your report to comma-separated value (CSV) format, a format compatible with most spreadsheet programs.
You can also use the substitution string #REPORT_ATTRIBUTES#. This substitution string is set per report region on the report attributes page.
Column Headings Use Before Column Heading to display text before report heading.
Use Column Heading Template to colorize each column header cell. The text of this attribute must include Help to indicate where the cell heading text should be colorized. For example:
<th >Item Help Text</th>
If you do not want any column headings, enter the following:
OMIT
If you do use this attribute, Application Express engine applies the default column heading template.
Use After Column Heading to display text after report headings.
Before Each Row In Before Each Row, enter text to display before all columns in the report. Use this attribute to open a new HTML row. Before Each Row supports the following substitution strings:
■ #ROWNUM#
Use this substitution string to specify the current row.
■ #COLCOUNT#
Use this substitution string to specify the number of columns.
■ #HIGHLIGHT_ROW#
Use this substitution string to specify the number of highlighted rows.
Column Templates Column templates define the look of each column. You can define up to four column templates; each can be conditional. For example, you can have different background colors for even and odd rows, or highlight rows that meet a PL/SQL defined condition.
In each Column Template, you define the look of each column. Column Templates support the substitution strings described in Table 13–6.

Customizing Templates
13-42 Oracle Application Express Application Builder User's Guide
Consider the following example:
<td> #ALIGNMENT#>#COLUMN_VALUE#</td>
If you actually ran this report, these substitution strings would be replaced with values generated by the results of a SQL query.
By creating conditions, you can create a report that displays columns differently depending on whether the specified condition is met. To specify a column template be used conditionally, select a condition type from the Column Template Condition list. Valid values include:
■ Use Based on PL/SQL Expression. Conditionally formats columns based on data in that row.
■ Use for Even Numbered Rows. Conditionally formats even numbered rows.
■ Use for Odd Numbered Rows. Conditionally formats odd numbered rows.
If you select Use Based on PL/SQL Expression, the next step is to enter a PL/SQL expression in the Column Template Expression field. For example, the following expression displays a value in bold if the value is greater than 2000:
#SAL# > 2000
You could also use the substitution string #ROWNUM#. For example:
#ROWNUM# > 2000
After Each Row In After Each Row, enter HTML that displays after all columns in the report display. This attribute is often used to close an HTML table row. For example:
</tr>
After Rows Use After Rows to specify text that should display after the last row. A common use of this attribute is to close the HTML table tag. For example:
</table>
The After Rows attribute supports the following substitution strings:
■ #PAGINATION#
Replaced with a pagination attribute.
■ #COLCOUNT#
Substituted at runtime with the number of columns defined in the report.
Table 13–6 Column Template Substitution Strings
Substitution String Description
#ALIGNMENT# Determines the column alignment. Specified by the user.
#COLCOUNT# Defines the count of the number of columns.
#COLNUM# Defines the current column number.
#COLUMN_HEADER# Defines the column header.
#COLUMN_VALUE# Replaced with the value of the column.
#ROWNUM# Specifies the current row number.

Customizing Templates
Managing Themes and Templates 13-43
■ #CSV_LINK#
Substituted at runtime with CSV download link if CSV export is enabled. Otherwise the string is not shown.
■ #EXTERNAL_LINK#
Substituted at runtime with the download link for exports using external processing engine for (for example, PDF export). If this feature is not enabled, the string is not shown.
Row Highlighting Background color for checked row controls the background color of a report row when the row selector is checked. Background color for current row controls the background color of a report row when the user moves the mouse over the row.
Pagination Subtemplate The Pagination Subtemplate section contains attributes for editing the Pagination Template, Next Page Template, Previous Page Template, Next Set Template, and Previous Template. Pagination Subtemplates support the substitution strings #PAGINATION_NEXT#, #PAGINATION_NEXT_SET#, #PAGINATION_PREVIOUS# and #PAGINATION_PREVIOUS_SET#. Table 13–9 describes these templates.
Comments Use this attribute to record comments about this component.
Table 13–7 Pagination Subtemplate Attributes
Pagination Subtemplate Attribute Description
Pagination Template Applies to the entire pagination subtemplate. For example:
<span class="instructiontext">#TEXT#</span>
Use the substitution string #TEXT# to specify where you want the pagination subtemplate to display.
Use the other Pagination Subtemplate attributes to modify individual items.
Next Page Template Enter HTML to modify how the Next Page portion of the pagination subtemplate appears. For example:
<a href="#LINK#">next</a>
Previous Page Template Enter HTML to modify how the Previous Page portion of the pagination subtemplate appears. For example:
<a href="#LINK#">previous</a>
Next Set Template Enter HTML to modify how the Next Set portion of the pagination subtemplate appears. For example:
<a href="#LINK#">next set</a>
Previous Set Template Enter HTML to modify how the Previous Set portion of the pagination subtemplate appears. For example:
<a href="#LINK#">previous set</a>

Customizing Templates
13-44 Oracle Application Express Application Builder User's Guide
Report Column Template Attributes for Named Column TemplatesThis section describes specific sections of the Edit Report Template page for Named Column Templates. You can access the sections of the page by either scrolling down the page, or by clicking a navigation button at the top of the page. When you select a button at the top of the page, the selected section appears and all other sections are temporarily hidden. To view all sections of the page, click Show All.
Name Template Name identifies the name of the template. Template Type indicates the type of template. Named Column templates reference column names in the template. Generic Column Templates reference the #COLUMN_VALUE# substitution string in the template.
Theme indicates the theme to which the template is a member. Use the Translatable check box to indicate the template contains text strings that require translation. Template Class identifies a specific use for the template. When you switch to a new theme, all templates in one theme are mapped to corresponding templates in another theme. Application Builder accomplishes this template mapping through the assignment of a template class.
Subscription Use Subscription to apply an existing template to the current application. When you select an existing template, you become a subscriber to that template.
To load a new copy of a master template, click Refresh.
Row Templates Row templates define the look of each column. You can define up to four row templates, each of which can be conditional.
In each Row Template, you define the look of each row. Row Templates support the substitution strings described in Table 13–8.
By creating conditions, you can create a report that displays rows differently depending on whether the specified condition is met. To specify a row template be used conditionally, select a condition type from the Column Template Condition list. Valid values include:
■ Use Based on PL/SQL Expression. Conditionally formats columns based on data in that row.
■ Use for Even Numbered Rows. Conditionally formats even numbered rows.
■ Use for Odd Numbered Rows. Conditionally formats odd numbered rows.
If you select Use Based on PL/SQL Expression, the next step is to enter a PL/SQL expression in the Column Template Expression field. For example, the following expression displays a value in bold if the value is greater than 2000:
#SAL# > 2000
Table 13–8 Row Template Substitution Strings
Substitution String Description
#ALIGNMENT# Determines the row alignment. Specified by the user.
#COLCOUNT# Defines the count of the number of columns.
#COLNUM# Defines the current column number.
#COLUMN_HEADER# Defines the column header.
#COLUMN_VALUE# Replaced with the value of the column.
#ROWNUM# Specifies the current row number.

Customizing Templates
Managing Themes and Templates 13-45
You could also use the substitution string #ROWNUM#. For example:
#ROWNUM# > 2000
Column Headings Use this template to add color to each column header cell. The text of this attribute must include help to indicate where the cell heading text should be colorized. If you do not enter a Column Heading Template, then a default column header template is applied. If you do not want any column headings, then enter OMIT.
For example:
<th #ALIGNMENT#>#COLUMN_HEADER#</th>
Before first and after last row text In Before Rows, enter HTML that displays once at the beginning of a report template. Opening an HTML table is a common use of this attribute, as shown in the following example:
<table>
You can identify column headers using the syntax #1#, #2#, #3#. For example:
<th>#1#</th><th>#2#</th><th>#3#</th>
You can include pagination above a report by including the substitution string #TOP_PAGINATION#. This substitution string generates HTML that starts with an opening <tr> tag and ends with a closing </tr> tag. For example, to include an open table tag and #TOP_PAGINATION# substitution string, you would enter the following:
<table>#TOP_PAGINATION#
You can also include the substitution string #CSV_LINK# to include support for exporting your report to CSV format, a format compatible with most spreadsheet programs.
Use After Rows to specify text that should display after the last row. A common use of this attribute is to close the HTML table tag. For example:
</table>
The After Rows attribute supports the following substitution strings:
■ #PAGINATION#
Replaced with a pagination attribute.
■ #COLCOUNT#
Substituted at runtime with the number of columns defined in the report.
Pagination The Pagination section contains attributes for editing the Pagination Template, Next Page Template, Previous Page Template, Next Set Template, and Previous Template. Pagination Subtemplates support the substitution strings #PAGINATION_NEXT#, #PAGINATION_NEXT_SET#, #PAGINATION_PREVIOUS# and #PAGINATION_PREVIOUS_SET#. Table 13–9 describes these templates.

Customizing Templates
13-46 Oracle Application Express Application Builder User's Guide
Comments Use this attribute to record comments about this component.
About Using JavaScript in Column TemplatesYou can conditionally display HTML depending upon values in the database using JavaScript. The following example displays an HTML row only if the GROUP_DESC query column is not null:
<script language="javascript">IF ( "#GROUP_DESC#" != "" )document.writeln( "<TR>;<TD BGCOLOR=#336699>;</TD></TR></TR><TD>#GROUP_DESC#</TD> </TR>" );</TR>" );
Table 13–9 Pagination Subtemplate Attributes
Pagination Subtemplate Attribute Description
Pagination Template Applies to the entire pagination subtemplate. For example:
<span class="instructiontext">#TEXT#</span>
Use the substitution string #TEXT# to specify where you want the pagination subtemplate to display.
Use the other Pagination Subtemplate attributes to modify individual items.
Next Page Template Enter HTML to modify how the Next Page portion of the pagination subtemplate appears. For example:
<a href="#LINK#">next</a>
Previous Page Template Enter HTML to modify how the Previous Page portion of the pagination subtemplate appears. For example:
<a href="#LINK#">previous</a>
Next Set Template Enter HTML to modify how the Next Set portion of the pagination subtemplate appears. For example:
<a href="#LINK#">next set</a>
Previous Set Template Enter HTML to modify how the Previous Set portion of the pagination subtemplate appears. For example:
<a href="#LINK#">previous set</a>
See Also:
■ Online Help for information about using specific sections of the Edit Report Template page
■ "Understanding Regions" on page 12-3

Using Custom Cascading Style Sheets
Managing Themes and Templates 13-47
Using Custom Cascading Style SheetsA cascading style sheet (CSS) provides a way to control the style of a web page without changing its structure. When used properly, a CSS separates visual attributes such as color, margins, and fonts from the structure of the HTML document. Oracle Application Express includes themes that contain templates that reference their own CSS. The style rules defined in each CSS for a particular theme also determine the way reports and regions display.
Topics:■ Uploading Cascading Style Sheets
■ Referencing an Uploaded Cascading Style Sheet in the Page Template
Uploading Cascading Style SheetsYou upload cascading style sheets to your workspace using the Cascading Style Sheet Repository. Uploaded cascading style sheets (CSS) are available to any application created in your workspace. The cascading style sheets are written to the file system, so you can reference them in your HTML source code.
To upload cascading style sheets:
1. On the Workspace home page, click the Application Builder icon.
2. Select an application.
3. Click Shared Components.
The Shared Components page appears.
4. Under Files, select Cascading Style Sheets.
The Cascading Style Sheet page appears.
5. Click the View Report icon. See "About the Cascading Style Sheets Page" on page 13-47.
A report appears.
6. To upload a CSS, click Create and follow the on-screen instructions.
7. To edit an existing CSS, select the CSS name.
8. To download an existing CSS, click the Download icon.
About the Cascading Style Sheets PageOnce you upload a CSS to the CSS Repository, you control how the page displays by making a selections from the search bar. Available controls include:
■ Search icon - Resembles a magnifying glass. Click this icon to narrow your search to only specific columns. To search all columns, select All Columns.
■ Text area - Enter case insensitive search criteria (wildcard characters are implied) and then click Go.
■ Go button - Executes a search or applies a filter.
■ View Icons - Displays each cascading style sheet as a large icon.
■ View Report - Displays each cascading style sheet as a line in a report.
See Also: "Referencing an Uploaded Cascading Style Sheet in the Page Template" on page 13-48

Using Custom Cascading Style Sheets
13-48 Oracle Application Express Application Builder User's Guide
■ Actions menu - Displays the Actions menu. Use this menu to customize report view. See "About the Actions Menu" on page 9-6.
Referencing an Uploaded Cascading Style Sheet in the Page TemplateYou can reference an uploaded cascading style sheet within the Header section of the page template. You use the Header section to enter the HTML that makes up the <HEAD> section of the HTML document.
To reference an uploaded cascading style sheet:
1. On the Workspace home page, click the Application Builder icon.
2. Select an application.
3. Click Shared Components.
4. Under User Interface, select Themes.
The Themes page appears.
5. On the Tasks list, click View Templates.
6. Select the name of the page template you want to edit.
7. Use a <link> tag within the Header section to reference the appropriate style sheet.
To reference an uploaded file that is associated with a specific application, you would use the substitution string #APP_IMAGES#. For example:
<html><head> <title>#TITLE#</title> #HEAD# <link rel="stylesheet" href="#APP_IMAGES#sample2.css" type="text/css"></head>...
To reference an uploaded file that is associated with a specific workspace, you would use the substitution string #WORKSPACE_IMAGES#. For example:
<html><head> <title>#TITLE#</title> #HEAD# <link rel="stylesheet" href="#WORKSPACE_IMAGES#sample3.css" type="text/css"></head>...
See Also: "Uploading Cascading Style Sheets" on page 13-47, "Creating a New Template" on page 13-14, "Managing Templates" on page 13-15, "Page Templates" on page 13-27, "APP_IMAGES" on page 2-21, and "WORKSPACE_IMAGES" on page 2-31

Debugging an Application 14-1
14Debugging an Application
This section describes approaches to debugging an application including running Oracle Application Express Advisor (Advisor), viewing Debug Mode, enabling SQL tracing, and viewing page reports. It also describes how to manually remove a control or a component to isolate a problem.
Topics:■ About Tuning Performance
■ Running Advisor to Check Application Integrity
■ Reviewing Session State
■ Accessing Debugging Mode
■ Enabling SQL Tracing and Using TKPROF
■ Monitoring Application and Page Resource Use
■ Viewing Page Reports
■ Debugging Problematic SQL Queries
■ Removing Controls and Components to Isolate a Problem
About Tuning PerformanceFor applications having a large number of concurrent users, maintaining optimal performance is critical. To optimize your application's performance, remember to use the following features:
■ Use bind variables within your application whenever possible. You can reference session state values using bind variable syntax in SQL queries and application logic such as PL/SQL executed from processes and validations. Accessing session state using bind variables is the most efficient way to reference session state. See "About Bind Variable Syntax" on page 2-16.
■ Include a #TIMING# substitution string in the region footer so that you can view the timing of each region. See "Understanding Substitution Strings" on page 2-17.
Running Advisor to Check Application IntegrityThe Oracle Application Express Advisor (Advisor) enables you to check the integrity and quality of your Oracle Application Express application. Advisor functions like a
See Also: "APEX_DEBUG" in Oracle Application Express API Reference

Running Advisor to Check Application Integrity
14-2 Oracle Application Express Application Builder User's Guide
compiler or LINT and flags suspicious behavior or errors. Running Advisor checks the integrity of your application based on the underlying metadata.
Topics:■ About Oracle Application Express Advisor
■ Running Advisor on an Entire Application
■ Running Advisor on a Single Page
About Oracle Application Express AdvisorBefore deploying your application, you can use the Oracle Application Express Advisor to perform various sanity checks on your application. The Advisor checks for errors, security issues, performance bottlenecks, usability and quality assurance.
Running Advisor on an Entire ApplicationTo run Advisor on an entire application:
1. Navigate to the appropriate application:
a. On the Workspace home page, click the Application Builder icon.
The Application Builder home page appears.
b. Select the application.
The Application home page appears.
2. Click Utilities.
3. Click Advisor.
The Advisor page appears.

Running Advisor to Check Application Integrity
Debugging an Application 14-3
4. Under Checks to Perform, review the selected checks. Enable and disable check boxes as appropriate.
5. Click Perform Check at the top of the page.
A Results page appears. Current Advisor settings are used next time the check is performed.
6. To remove any Advisor changes you have made, under Tasks select Remove My Preferences.
7. To run Advisor again, click Perform Check.
Running Advisor on a Single PageTo run Advisor on a single page:
1. Navigate to the appropriate application:
a. On the Workspace home page, click the Application Builder icon.
The Application Builder home page appears.
b. Select the application.
The Application home page appears.
c. Select the page.
The Page Definition page appears.

Reviewing Session State
14-4 Oracle Application Express Application Builder User's Guide
2. Click Utilities.
The list of utility options displays.
3. Click Check.
The Results page appears. Result reports are generated using the last Advisor settings.
4. To change settings, click Change Settings.
The Advisor page appears.
5. Under Checks to Perform, review the selected checks. Enable and disable check boxes as appropriate.
6. To run the check again, click Perform Check at the top of the page.
A Results page appears. Current Advisor settings are used next time the check is performed.
7. To filter results, enable and disable check boxes under Filter Results and click Apply Filter.
8. To re-run the Advisor and see if reported problems are fixed, click Check Again.
Reviewing Session StateMany applications are based on data contained within application controls. For example, buttons can display conditionally based on a value stored in session state. You can view current session state for your application by clicking the Session link on the Developer Toolbar.
Accessing Debugging ModeThe Debug mode is a built in mechanism used to track down unexpected application behavior. You enable and disable debug mode for the current page and session by clicking the Debug and No Debug links in the Developer Toolbar. To view Debug reports, click the View Debug link in the Developer Toolbar.
If an application runs in debug mode, Oracle Application Express writes information about how it processes each page request to a log table. You can control the logging level of detail, add debug calls in your own code, and analyze the written log information.
When debug is enabled, Oracle Application Express also uses its non-minified JavaScript files to better isolate where possible issues may be coming from with client-side-code.
See Also: "About the Developer Toolbar" on page 8-19, "Viewing Session State" on page 2-7, "Managing Session State Values" on page 2-13, and "Managing Session State and User Preferences" in Oracle Application Express Administration Guide
See Also: "About the Developer Toolbar" on page 8-19 and "APEX_DEBUG" in Oracle Application Express API Reference

Accessing Debugging Mode
Debugging an Application 14-5
Topics:■ Enabling and Disabling Debugging
■ Running an Application in Debugging Mode
■ Using f?p Syntax to Access Debugging Mode
■ Viewing Debug Reports
Enabling and Disabling DebuggingYou can configure whether end users can run the application in debug mode by using the Debugging attribute on the Edit Application Definition page. A developer who is logged into the application's workspace can always run the application in debug mode.
To enable or disable debugging:
1. On the Workspace home page, click the Application Builder icon.
2. Select an application.
3. Click the Edit Application Properties button to the right of the application name.
The Edit Application page appears.
4. Scroll down to Properties.
5. For Debugging:
■ Yes. Enables the application debug mode using the browser at runtime.
■ No. Disables the application debug mode using the browser at runtime.
Running an Application in Debugging ModeYou run and disable debug mode at runtime by clicking Debug and No Debug on the Developer Toolbar. By default, Debugging mode is disabled, unless you are logged into the application's workspace as a developer. See "Enabling and Disabling Debugging" on page 14-5.
To enable or disable Debug mode:
1. On the Workspace home page, click the Application Builder icon.
2. Run the application.
3. On the Developer Toolbar, click Debug.
The debugging mode is enabled. Debug data is captured in the background.
4. To disable debug mode, on the Developer Toolbar, click No Debug.
Using f?p Syntax to Access Debugging ModeYou can also use f?p syntax to run an application in Debugging mode. Simply call the page and set the Debug argument to YES or LEVELn, where n is between 1 (least detailed) and 9 (most detailed). For example:
f?p=100:1:&APP_SESSION.::YES
See Also: "About Application Attributes" on page 7-15
See Also: "Using f?p Syntax to Link Pages" on page 2-9
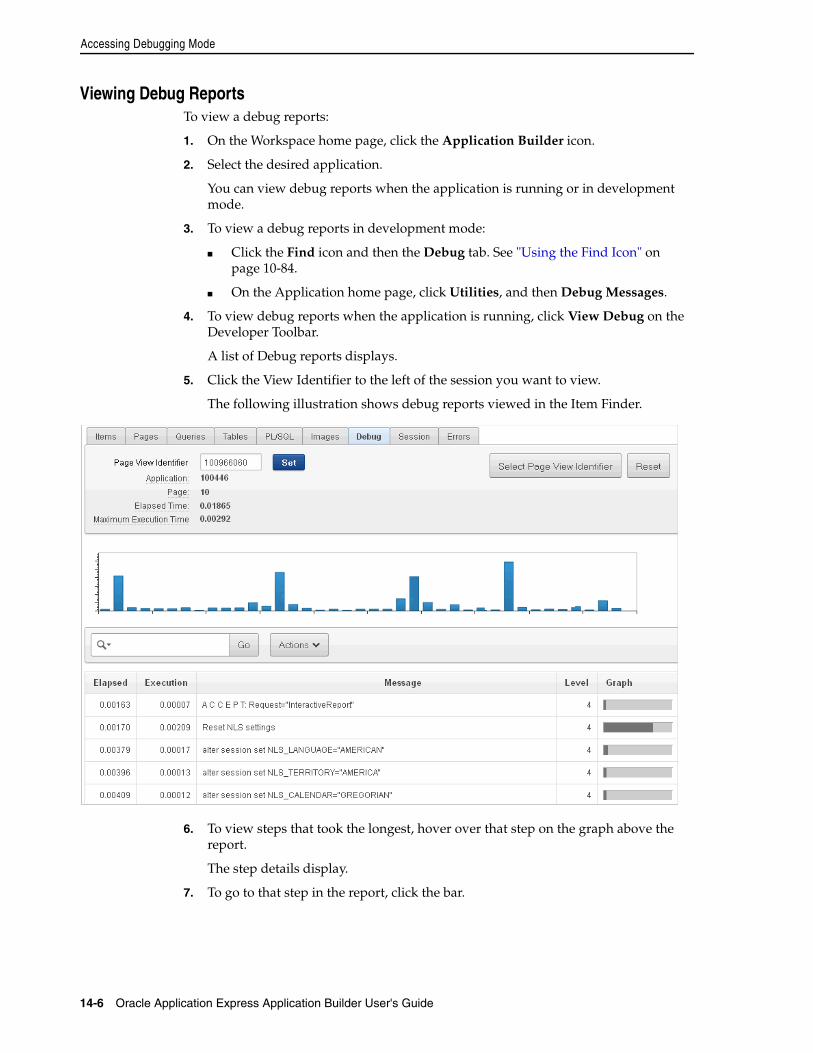
Accessing Debugging Mode
14-6 Oracle Application Express Application Builder User's Guide
Viewing Debug ReportsTo view a debug reports:
1. On the Workspace home page, click the Application Builder icon.
2. Select the desired application.
You can view debug reports when the application is running or in development mode.
3. To view a debug reports in development mode:
■ Click the Find icon and then the Debug tab. See "Using the Find Icon" on page 10-84.
■ On the Application home page, click Utilities, and then Debug Messages.
4. To view debug reports when the application is running, click View Debug on the Developer Toolbar.
A list of Debug reports displays.
5. Click the View Identifier to the left of the session you want to view.
The following illustration shows debug reports viewed in the Item Finder.
6. To view steps that took the longest, hover over that step on the graph above the report.
The step details display.
7. To go to that step in the report, click the bar.

Viewing Page Reports
Debugging an Application 14-7
Enabling SQL Tracing and Using TKPROFTracing your session can be a very effective way to debug an application. From a database perspective, each page request is a single database session. If you enable SQL tracing, then Oracle Application Express creates a temporary file you can then analyze using the TKPROF utility.
You enable SQL tracing in Oracle Application Express by using f?p syntax to set the argument p_trace=YES. For example, to trace the display of page 1 in application 100, you would use the syntax:
http:/.../f?p=100:1&p_trace=YES
To use the TKPROF utility:
1. Log in to SQL*Plus as a privileged user.
2. Execute the following statement:
show parameter USER_DUMP_DEST
3. Navigate to the directory in which the trace file is created.
4. Run the TKPROF utility from the operating system prompt using the following syntax:
tkprof filename1 filename2 [waits=yes|no] [sort=option] [print=n] [aggregate=yes|no] [insert=filename3] [sys=yes|no] [table=schema.table] [explain=user/password] [record=filename4] [width=n]
The input and output files are the only required arguments.
5. To view online Help, invoke TKPROF without arguments.
Monitoring Application and Page Resource UseOracle Application Express facilitates the monitoring of resources used by applications and pages by calling the package DBMS_APPLICATION_INFO. Whenever the Application Express engine renders or processes a page, the module is set to APEX and includes the application ID and page number. Once set, you can query the V$SESSION and V$SQLAREA views to monitor transactions.
Viewing Page ReportsWhen isolating an issue within a page, it is important to clearly understand the functions it is performing. To accomplish this goal, Application Builder includes several page and application reports.
Note: Debug sessions listed in the report live for at least 2 weeks and age out along with the activity log. This is usually more than adequate for debugging purposes.
See Also: "Understanding SQL Trace and TKPROF" in Oracle Database SQL Tuning Guide for information about using the TKPROF program
See Also: "APEX_DEBUG" in Oracle Application Express API Reference

Debugging Problematic SQL Queries
14-8 Oracle Application Express Application Builder User's Guide
Viewing the Application Dashboard ReportThe Application Dashboard provides a comprehensive view of your application from various perspectives. You can use this dashboard to view statistics and access reports of security settings, page and application components and templates.
To view the Application Dashboard:
1. Navigate to the Workspace home page.
2. Click the Application Builder icon.
3. Select an application.
The Application home page appears.
4. Click Utilities.
5. Click Application Dashboard.
The Application Dashboard appears. The first two regions on the left, Application Overview, and Pages by Types, list detailed information and statistics about the current application. The remaining regions are divided into the following sections:
■ Security lists the current authentication scheme, number of public and non public pages, and the number of authorization schemes used within the current application.
■ Templates contains links to reports of templates used within the current application.
■ Pages by Type lists pages by type.
■ Application Components contains links to reports of application-level controls and logic, including lists of values, tabs, lists, application items, application processes, and application computations.
■ Page Components contains links to reports of page-level controls and logic, including items, buttons, processes, regions, branches, validations, and dynamic actions.
6. To view a specific report, click the number to the right of the component type or template.
Debugging Problematic SQL QueriesIf your query does not seem to be running correctly, try running it in SQL*Plus, SQL Developer, or in SQL Commands. Any of these approaches will test your query outside the context of your application, making it easier to determine what the problem is.
Removing Controls and Components to Isolate a ProblemIf you have problems running a page, try removing controls and components one at a time. Using this approach, you can quickly determine which control or component may be the source of your problem. You can disable a control or component by selecting the Condition attribute Never.
To remove a control or component using conditional attributes:
1. Navigate to the appropriate Page Definition. See "Accessing the Page Definition" on page 8-2.
2. Select the name of the control or component you want to disable.

Removing Controls and Components to Isolate a Problem
Debugging an Application 14-9
The appropriate attributes page appears.
3. Scroll down to Condition Type and select Never from the Condition Type list.
4. Click Apply Changes and return to the Page Definition.
5. Try running the page again.
6. Continue to remove controls or components until the page runs correctly.
See Also: "Accessing the Page Definition" on page 8-2, "Editing a Page in Component View" on page 8-8, "Understanding Conditional Rendering and Processing" on page 2-4, and "Running an Application or Page" on page 7-40

Removing Controls and Components to Isolate a Problem
14-10 Oracle Application Express Application Builder User's Guide

Managing Application Security 15-1
15Managing Application Security
This section describes how to implement security best practices for Oracle Application Express. Administrators are primarily responsible for ensuring the security of the Oracle Application Express installation, while developers are responsible for building secure applications.
Topics:■ Understanding Administrator Security Best Practices
■ Understanding Developer Security Best Practices
■ Securing File Uploads
■ Establishing User Identity Through Authentication
■ Providing Security Through Authorization
Understanding Administrator Security Best PracticesThis section describes security best practices for Oracle Application Express administrators.
Topics:■ Security Considerations When Using the Embedded PL/SQL Gateway
■ About Configuring Oracle HTTP Server with mod_plsql for Oracle Application Express
■ Utilizing Secure Sockets Layer (SSL)
■ Integrating with Oracle BI Publisher
■ About Setting Password Complexity Rules
■ Advantages of the Oracle Application Express Runtime Environment
■ Understanding Session Timeout
■ Enabling Network Services in Oracle Database 12c
Security Considerations When Using the Embedded PL/SQL GatewayThe embedded PL/SQL gateway runs in the database as part of the Oracle XML DB HTTP listener. The Oracle XML DB HTTP listener and embedded PL/SQL gateway
See Also: "Application Builder Concepts" on page 2-1 and "Using Application Builder" on page 6-1

Understanding Administrator Security Best Practices
15-2 Oracle Application Express Application Builder User's Guide
provides the equivalent core features of Oracle HTTP Server and mod_plsql. Because the HTTP Listener runs in the same database where Oracle Application Express is installed, it is not possible to separate the HTTP listener from the database. For this reason, Oracle does not recommend the embedded PL/SQL gateway for applications that run on the Internet. Additionally, the embedded PL/SQL gateway does not provide the same flexibility of configuration and detailed logging as Oracle HTTP Server with mod_plsql.
About Configuring Oracle HTTP Server with mod_plsql for Oracle Application ExpressOracle HTTP Server uses the mod_plsql plug-in to communicate with the Oracle Application Express engine within the Oracle database. mod_plsql functions act as a communication broker between the web server and the Oracle Application Express engine in the Oracle database.
Each mod_plsql request is associated with a set of configuration values used to access the database called a Database Access Descriptor (DAD). mod_plsql provides a DAD parameter called PlsqlRequestValidationFunction which enables you to allow or disallow further processing of a requested procedure. You can utilize this parameter to implement tighter security for your PL/SQL application by blocking package and procedure calls which should not be allowed to run from the DAD. Oracle recommends a DAD configuration for Oracle Application Express which utilizes the PlsqlRequestValidationFunction directive with a value of wwv_flow_epg_include_modules.authorize.
The purpose of the PlsqlRequestValidationFunction parameter is to control which procedures can be invoked through mod_plsql. By default, the only procedures permitted are the public entry points of Oracle Application Express. This can be extended using the validation functions shipped with Oracle Application Express. To learn more, see "Restricting Access to Oracle Application Express by Database Access Descriptor (DAD)" in Oracle Application Express Administration Guide.
Utilizing Secure Sockets Layer (SSL)Secure Sockets Layer (SSL) is a protocol for managing the security of data transmitted on the Internet. For web applications, SSL is implemented by using the HTTPS protocol. Oracle recommends that you run Oracle Application Express applications using SSL (HTTPS protocol) to prevent any sensitive data from being sent over an unencrypted (cleartext) communication channel.
You can configure both your Oracle Application Express instance and all related applications to require HTTPS by setting the Require HTTPS attribute to Yes on the Security Settings page in Oracle Application Express Administration Services.
Setting the Require HTTPS attribute to Yes and logging out prevents anyone from logging in to Oracle Application Express Administration Services and from logging into an Oracle Application Express workspace as a developer or administrator unless the protocol in use is HTTPS.
Integrating with Oracle BI PublisherOracle recommends that you employ Secure Sockets Layer (SSL) when integrating Oracle Application Express with Oracle BI Publisher. Once SSL (HTTPS protocol) is configured for your Oracle BI Publisher server, you must create a wallet and specify
See Also: "Requiring HTTPS" in Oracle Application Express Administration Guide

Understanding Administrator Security Best Practices
Managing Application Security 15-3
the HTTPS protocol for the Report Server in the internal administration Environment Settings.
About Setting Password Complexity RulesWorkspace administrators and developers can create user accounts for the purpose of logging in to the Oracle Application Express development environment and for end-user authentication to applications developed within their workspaces. The Oracle Application Express administrator can create password complexity rules, or a policy, for the passwords of these accounts. These rules apply to all accounts in the installation, across all workspaces.
The following are example password complexity policies:
All passwords must:
■ Contain at least one upper-case character
■ Contain at least one numeric digit
■ Must be at least six characters long
Note that many other variations are possible. Oracle recommends administrators establish a password complexity policy for each Oracle Application Express instance. To learn more, see "Enabling Login Controls for All Workspaces," "About Strong Password Policies," and "Enabling Account Login Controls for a Workspace" in Oracle Application Express Administration Guide.
Restricting Password ReuseSite administrators can restrict password reuse for all administrator, developer, and end-user accounts based on a history of passwords previously used for the accounts.
To restrict password reuse:
1. Start SQL*Plus and connect to the database where Oracle Application Express is installed having the apex_administrator_role role or as SYS specifying the SYSDBA role. For example:
■ On Windows:
SYSTEM_DRIVE:\ sqlplus /nologSQL> CONNECT SYS as SYSDBAEnter password: SYS_password
■ On UNIX and Linux:
$ sqlplus /nologSQL> CONNECT SYS as SYSDBAEnter password: SYS_password
2. Execute the following statement:
ALTER SESSION SET CURRENT_SCHEMA = APEX_040200;
See Also: "Configuring Wallet Information" and "Configuring Report Printing" in Oracle Application Express Administration Guide
Tip: The APEX_ADMINISTRATOR_ROLE must be granted directly to a user and not through another database role.

Understanding Administrator Security Best Practices
15-4 Oracle Application Express Application Builder User's Guide
3. Execute the following statement:
BEGINAPEX_INSTANCE_ADMIN.SET_PARAMETER('PASSWORD_HISTORY_DAYS',365);COMMIT;END;/This restricts new or updated passwords to those that have not been used for the account for the previous 365 days. Recording of previously used passwords (actually, hashed representations of passwords) begins upon installation of Oracle Application Express.
4. To disable this feature, run the block above, providing 0 for the parameter value. For example:
BEGINAPEX_INSTANCE_ADMIN.SET_PARAMETER('PASSWORD_HISTORY_DAYS',0);COMMIT;END;/
Advantages of the Oracle Application Express Runtime EnvironmentAn Oracle Application Express runtime environment enables you to run production applications, but it does not provide a web interface for administration or direct development of these applications
Oracle recommends that you run any sensitive production Oracle Application Express applications with a runtime installation of Oracle Application Express. A runtime installation does not expose the web-based application development environment, thus preventing the use of Application Builder, SQL Workshop, and related utilities on a production installation. Additionally, a runtime environment only includes the Oracle Application Express database objects and privileges necessary to run applications, making it a more hardened environment.
Understanding Session TimeoutBy configuring Session Timeout attributes, you can reduce your application's exposure. Users often leave their computers unattended for extended periods and do not close applications before departing. Therefore, an unauthorized person can easily assume the user’s identity within the application. By setting the session and idle timeout, users are automatically logged out of their application after the specified timeout.
Session Timeout attributes include:
■ Maximum Session Length in Seconds
■ Session Timeout URL
■ Maximum Session Idle Time in Seconds
Tip: Developers can also use the APEX_UTIL.STRONG_PASSWORD_CHECK procedure and the APEX_UTIL.STRONG_PASSWORD_VALIDATION function described in Oracle Application Express API Reference.
See Also: "Managing a Runtime Environment" in Oracle Application Express Administration Guide

Understanding Administrator Security Best Practices
Managing Application Security 15-5
■ Idle Timeout URL
To learn more about configuring these attributes at an application-level, see "Session Timeout" on page 7-24. To learn more about configuring these attributes for an entire Oracle Application Express instance, see "Configuring Session Timeout" in Oracle Application Express Administration Guide.
Enabling Network Services in Oracle Database 12cBy default, the ability to interact with network services is disabled in Oracle Database 12c. Therefore, if you are running Oracle Application Express with Oracle Database 12c, you must use the new DBMS_NETWORK_ACL_ADMIN package to grant connect privileges to any host for the APEX_040200 database user. Failing to grant these privileges results in issues with:
■ Sending outbound mail in Oracle Application Express.
Users can call methods from the APEX_MAIL package, but issues arise when sending outbound email.
■ Using Web services in Oracle Application Express.
■ PDF/report printing.
Topics:■ Granting Connect Privileges
■ Troubleshooting an Invalid ACL Error
Granting Connect PrivilegesThe following example demonstrates how to grant connect privileges to any host for the APEX_040200 database user. This example assumes you connected to the database where Oracle Application Express is installed as SYS specifying the SYSDBA role.
DECLARE ACL_PATH VARCHAR2(4000); ACL_ID RAW(16);BEGIN -- Look for the ACL currently assigned to '*' and give APEX_040200 -- the "connect" privilege if APEX_040200 does not have the privilege yet. SELECT ACL INTO ACL_PATH FROM DBA_NETWORK_ACLS WHERE HOST = '*' AND LOWER_PORT IS NULL AND UPPER_PORT IS NULL; -- Before checking the privilege, ensure that the ACL is valid -- (for example, does not contain stale references to dropped users). -- If it does, the following exception will be raised: -- -- ORA-44416: Invalid ACL: Unresolved principal 'APEX_040200' -- ORA-06512: at "XDB.DBMS_XDBZ", line ... --
Tip: To run the examples described in this section, the compatible initialization parameter of the database must be set to at least 11.1.0.0.0. By default Oracle Database 12c will already has the parameter set properly, but a database upgraded to Oracle Database 12c from a prior version may not. See "Creating and Configuring an Oracle Database" in Oracle Database Administrator's Guide for information about changing database initialization parameters.

Understanding Administrator Security Best Practices
15-6 Oracle Application Express Application Builder User's Guide
SELECT SYS_OP_R2O(extractValue(P.RES, '/Resource/XMLRef')) INTO ACL_ID FROM XDB.XDB$ACL A, PATH_VIEW P WHERE extractValue(P.RES, '/Resource/XMLRef') = REF(A) AND EQUALS_PATH(P.RES, ACL_PATH) = 1; DBMS_XDBZ.ValidateACL(ACL_ID); IF DBMS_NETWORK_ACL_ADMIN.CHECK_PRIVILEGE(ACL_PATH, 'APEX_040200', 'connect') IS NULL THEN DBMS_NETWORK_ACL_ADMIN.ADD_PRIVILEGE(ACL_PATH, 'APEX_040200', TRUE, 'connect'); END IF; EXCEPTION -- When no ACL has been assigned to '*'. WHEN NO_DATA_FOUND THEN DBMS_NETWORK_ACL_ADMIN.CREATE_ACL('power_users.xml', 'ACL that lets power users to connect to everywhere', 'APEX_040200', TRUE, 'connect'); DBMS_NETWORK_ACL_ADMIN.ASSIGN_ACL('power_users.xml','*');END;/COMMIT;
The following example demonstrates how to provide less privileged access to local network resources. This example would enable indexing the Oracle Application Express Online Help and could possibly enable email and PDF printing if those servers were also on the local host.
DECLARE ACL_PATH VARCHAR2(4000); ACL_ID RAW(16);BEGIN -- Look for the ACL currently assigned to 'localhost' and give APEX_040200 -- the "connect" privilege if APEX_040200 does not have the privilege yet. SELECT ACL INTO ACL_PATH FROM DBA_NETWORK_ACLS WHERE HOST = 'localhost' AND LOWER_PORT IS NULL AND UPPER_PORT IS NULL; -- Before checking the privilege, ensure that the ACL is valid -- (for example, does not contain stale references to dropped users). -- If it does, the following exception will be raised: -- -- ORA-44416: Invalid ACL: Unresolved principal 'APEX_040200' -- ORA-06512: at "XDB.DBMS_XDBZ", line ... -- SELECT SYS_OP_R2O(extractValue(P.RES, '/Resource/XMLRef')) INTO ACL_ID FROM XDB.XDB$ACL A, PATH_VIEW P WHERE extractValue(P.RES, '/Resource/XMLRef') = REF(A) AND EQUALS_PATH(P.RES, ACL_PATH) = 1; DBMS_XDBZ.ValidateACL(ACL_ID); IF DBMS_NETWORK_ACL_ADMIN.CHECK_PRIVILEGE(ACL_PATH, 'APEX_040200', 'connect') IS NULL THEN DBMS_NETWORK_ACL_ADMIN.ADD_PRIVILEGE(ACL_PATH, 'APEX_040200', TRUE, 'connect'); END IF; EXCEPTION -- When no ACL has been assigned to 'localhost'. WHEN NO_DATA_FOUND THEN

Understanding Administrator Security Best Practices
Managing Application Security 15-7
DBMS_NETWORK_ACL_ADMIN.CREATE_ACL('local-access-users.xml', 'ACL that lets power users to connect to everywhere', 'APEX_040200', TRUE, 'connect'); DBMS_NETWORK_ACL_ADMIN.ASSIGN_ACL('local-access-users.xml','localhost');END;/COMMIT;
Troubleshooting an Invalid ACL ErrorIf you receive an ORA-44416: Invalid ACL error after running the previous script, use the following query to identify the invalid ACL:
REM Show the dangling references to dropped users in the ACL that is assignedREM to '*'.
SELECT ACL, PRINCIPAL FROM DBA_NETWORK_ACLS NACL, XDS_ACE ACE WHERE HOST = '*' AND LOWER_PORT IS NULL AND UPPER_PORT IS NULL AND NACL.ACLID = ACE.ACLID AND NOT EXISTS (SELECT NULL FROM ALL_USERS WHERE USERNAME = PRINCIPAL);
Next, run the following code to fix the ACL:
DECLARE ACL_ID RAW(16); CNT NUMBER;BEGIN -- Look for the object ID of the ACL currently assigned to '*' SELECT ACLID INTO ACL_ID FROM DBA_NETWORK_ACLS WHERE HOST = '*' AND LOWER_PORT IS NULL AND UPPER_PORT IS NULL;
-- If just some users referenced in the ACL are invalid, remove just those -- users in the ACL. Otherwise, drop the ACL completely. SELECT COUNT(PRINCIPAL) INTO CNT FROM XDS_ACE WHERE ACLID = ACL_ID AND EXISTS (SELECT NULL FROM ALL_USERS WHERE USERNAME = PRINCIPAL);
IF (CNT > 0) THEN
FOR R IN (SELECT PRINCIPAL FROM XDS_ACE WHERE ACLID = ACL_ID AND NOT EXISTS (SELECT NULL FROM ALL_USERS WHERE USERNAME = PRINCIPAL)) LOOP UPDATE XDB.XDB$ACL SET OBJECT_VALUE = DELETEXML(OBJECT_VALUE, '/ACL/ACE[PRINCIPAL="'||R.PRINCIPAL||'"]') WHERE OBJECT_ID = ACL_ID; END LOOP;
ELSE DELETE FROM XDB.XDB$ACL WHERE OBJECT_ID = ACL_ID; END IF;
END;/
REM commit the changes.

Understanding Developer Security Best Practices
15-8 Oracle Application Express Application Builder User's Guide
COMMIT;
Once the ACL has been fixed, you must run the first script in this section to apply the ACL to the APEX_040200 user. See "Granting Connect Privileges" on page 15-5.
Understanding Developer Security Best PracticesThis section describes security best practices for Oracle Application Express developers.
Topics:■ Understanding Items of Type Password
■ Identifying At Risk Password Items
■ Understanding Cross-Site Scripting Protection
■ About Session State and Security
■ Understanding Session State Protection
Understanding Items of Type PasswordPassword items do not emit the text entered to the web browser screen. When creating password items, Oracle recommends using password attributes that do not save session state. This prevents the password from being saved in the database in the session state tables.
Configurable password item type attributes include:
■ Value Required - If set to Yes and the page item is visible, Oracle Application Express automatically performs a NOT NULL validation when the page is submitted. If set to No, no validation a NULL value is accepted.
■ Submit when Enter pressed - If set to Yes, when the user presses the ENTER key in the field the page is submitted.
■ Does not save state - If set to Yes, the password is not saved into session state. For security reasons you should always set this attribute to Yes. If you set it to No, consider to set the attribute Store value encrypted in session state to Yes.
■ Authorization Scheme - Optionally select an authorization scheme which must evaluate to TRUE in order for this component to be rendered or otherwise processed.
■ Session State Protection - You can select the level of session state protection by setting this attribute to Unrestricted or Restricted.
– Unrestricted means the item may be set by passing the item in a URL or in a form. No checksum is required in the URL.
– Restricted means the item may not be set from a browser. Use this when you want to restrict the way that the item value can be set to internal processes, computations, and so on. This attribute is applicable only to items that cannot be used as data entry items and is always observed, even if Session State Protection is disabled.
■ Store value encrypted in session state - Session state that is sensitive can be encrypted when stored in Application Express session state management tables. To maintain session state encrypted for this item set the value to Yes. To learn more, see "About Session State and Security" on page 15-12.

Understanding Developer Security Best Practices
Managing Application Security 15-9
Identifying At Risk Password ItemsAt risk password items are those that either:
■ Do not use a password item type that does not save session state
■ Store the value in session state un-encrypted
Use the Security Profiles and Password Items reports to help identify at risk password items.
Topics:■ Viewing the Security Profiles Report
■ Viewing the Password Items Report
Viewing the Security Profiles ReportTo view the Security Profiles Report:
1. Navigate to the Workspace home page.
2. Click the Application Builder icon.
The Application Builder home page appears.
3. On the Tasks list, click Cross Application Reports.
4. Under Security, click Security Profiles report.
This report list the following information about all applications in the current workspace:
■ Application
■ Name
■ Parsing Schema
■ Application Level Authorization Scheme
■ Authentication
■ Authorization Schemes
■ Authorization Schemes
■ Pages
■ Encrypted Items
■ At Risk Password Items
Viewing the Password Items ReportTo identify at risk password items:
1. Navigate to the Workspace home page.
2. Click the Application Builder icon.
The Application Builder home page appears.
3. On the Tasks list, click Cross Application Reports.
See Also: "About Item Types" on page A-1 and "Editing Page-Level Items" on page 7-63

Understanding Developer Security Best Practices
15-10 Oracle Application Express Application Builder User's Guide
4. Under Security, click Password Items.
The Password Items report shows all of the password items within the application and indicates if they use encryption and whether they save state. Password items that do neither are highlighted as At Risk.
Understanding Cross-Site Scripting ProtectionCross site-scripting (also referred to as XSS) is a security breach that takes advantage of dynamically generated web pages. In a XSS attack, a web application is sent a script that activates when it is read by a user's browser. Once activated, these scripts can steal data, even session credentials, and return the information to the attacker.
If malicious code were introduced into an Oracle Application Express application, it could be rendered into HTML regions and other places within the application during normal page rendering. To prevent the introduction of malicious code into session state, the Application Express engine escapes characters in certain cases.
Topics:■ Protecting HTML Regions and Other Static Areas
■ Protecting Dynamic Output
■ Protecting Report Regions
■ Protecting Form Items
■ Restricting Characters Entered on an Item
Protecting HTML Regions and Other Static AreasIn HTML regions and other static display areas, you can reference session state using the &ITEM. notation. Examples of static display areas include HTML regions, page headers and footers, region headers and footers, region titles, button labels, help text, form item labels and post-element text, templates, radiogroup (before and after field text), event success messages, event error messages, navigation bar attributes, application static substitution string values, chart labels and legends, breadcrumbs and list framing text, and calendar text, labels, or legends.
About Safe Item Display Types When session state is referenced in this way, the value emitted to the page will not have special characters (<, >, &, ") escaped if the referenced item is Display Only with the attribute Save Session State set to No.
If the referenced item has a display type other than Display Only with the attribute Save Session State set to No, the value emitted to the page will have special characters escaped. Although application-level items are also considered to have a safe display type, they do not actually have display properties like form items do.
About the Rules Used to Determine Whether to Escape Values The Application Express engine uses predefined smart escaping rules to determine if and when to escape values fetched from session state.
The reason for these rules is that items that use the display types listed previously are often for text containing HTML that is intended to be emitted to the browser without
Tip: For pages that contain password items, set the page attribute Form Auto Complete to Off. Setting that attribute to Off prevents the web browser from attempting to auto complete items on the page.
See Also: "Understanding Page-Level Items" on page 7-56

Understanding Developer Security Best Practices
Managing Application Security 15-11
being filtered (that is, escaped). The only way this can be made safe is by the enforcement of the rule that these types of items are always escaped on input to the application. For example, if a user passes some text into a safe item using an Oracle Application Express f?p URL syntax, the Application Express engine escapes special characters when saving the value into session state. This has two intended results:
1. If the value contained no special characters, the value passed in is saved into session state exactly as it was provided.
2. If the value contained special characters, those characters are escaped when the value is saved into session state.
In either situation, the item can now safely be referenced using an &ITEM. notation in any HTML region or other static area mentioned previously.
Using Safe Item Types to Hold and Emit HTML Markup You can use the safe item types listed previously to hold and emit HTML markup to the browser. For example, suppose you have a requirement to render some text in bold face by referencing a safe page item named P1_XXX (using &P1_XXX.) The item P1_XXX is presumed to contain the following HTML:
<b>ABABABAB</b>
You can achieve this by using application controls (computations, processes, item source expressions, item default values, and so on) to store values into these safe items. When values are introduced in this way, you ensure the safety of the content. When you use these methods, the Application Express engine does not escape any special characters when saving the values into session state.
Finally, the safety of safe items is ensured by a rule that prevents those items from being posted on a page and submitted to the Application Express engine as part of a page submission.
Protecting Dynamic OutputItems fetched from session state and rendered using htp.p or other methods should be explicitly escaped by the code where it is appropriate to do so. For example, suppose a PL/SQL dynamic content region on a page uses the following:
htp.p(v(‘SOME_ITEM’));
If the value of the item fetched from session state could contain unintended tags or scripts, you might want to use the following in the region:
htp.p(apex_escape.html(:SOME_ITEM));
However, if you are confident that the fetched value is safe for rendering, you do not need to escape the value. As a developer, you must determine when it is appropriate to not escape output.
As a best practice, follow this rule:
■ Never emit an item fetched from session state without escaping it unless the item is a safe type described in "About Safe Item Display Types" on page 15-10.
The reason for this is that as a developer, there is no way you can prevent a hacker from posting a malicious value into a non-safe item. Even if your application does not present these items visibly to ordinary users, be aware that a hacker can mount a XSS attack using your application if you do not follow this rule.

Understanding Developer Security Best Practices
15-12 Oracle Application Express Application Builder User's Guide
Protecting Report RegionsThe Application Express engine escapes data rendered in the body of a report. References to session state in report headings and messages are fetched from session state using the smart escaping rules so that the values of safe item types are not escaped and the values of other item types are escaped.
Protecting Form ItemsWhen form items, including hidden items, obtain their values during the generation of the form page to be sent to the browser, the resulting text is escaped before rendering. Some of the safe item types are exceptions to this rule to support the intended behavior of each display type.
Some item types have the attribute Escape special characters in the Security region. Use this attribute to specify if the value should be escaped or not. The default is set to Yes. To display HTML code, set this attribute to No.
Restricting Characters Entered on an ItemYou can limit cross site-scripting and other injection attacks by restricting the characters users can enter on an item. To accomplish this, use the Restricted Characters attribute in the Security region of the Edit Page Item page.
Use the Restricted Characters to restrict the characters that can be saved in session state. Available options include:
■ All Characters Allowed
No restriction applies.
■ Whitelist for a-Z, 0-9 and space
Only allow characters a-z, A-Z, 0-9, and space.
■ Blacklist HTML command characters (<>").
Do not allow reserved HTML characters
■ Blacklist &<>"/;,*|=% and --:
Do not allow &, <, >, ", /, ;, ",", *, |, =, % and "--" (PL/SQL comment).
■ Blacklist &<>"/;,*|=% or -- and new line
Do not allow &, <, >, ", /, ;, ",", *, |, =, %, "--", and new line characters
If you select a restriction, Oracle Application Express displays an error message if a user tries to save data which does not conform to the selected character restriction.
About Session State and SecurityOracle Application Express persists session state in database tables. Session state is preserved in database tables because it is more secure to store the session state on the server side than on the client. Because Oracle Application Express applications use the stateless HTTP protocol, an application's session state across multiple page views is preserved in database tables. Not maintaining a synchronous database connection for each Oracle Application Express application user significantly lessens memory and database resource requirements.
Developers can query the session state stored by Oracle Application Express applications using the Application Builder and built-in monitoring pages. Developers
See Also: "Configuring Page Item Security" on page 7-64

Understanding Developer Security Best Practices
Managing Application Security 15-13
and administrators can access session state for any application in the workspace to which they are authenticated.
A few best practices for developers include:
■ As a standard part of implementing program control flow, clear the session state of unneeded values using clear-cache page processes or clear-cache directives in URLs used to navigate to pages.
■ Use password page item types that do not save state. This prevents the entered passwords from being saved in session state tables in the database.
■ When sensitive data must persist in a session, it should be saved in Oracle Application Express session state tables in encrypted form. To use this feature, set the page item’s Store value encrypted in session state attribute to Yes. Encrypted stored values are automatically decrypted when read.
Understanding Session State ProtectionSession State Protection is a built-in functionality that prevents hackers from tampering with the URLs within your application. URL tampering can adversely affect program logic, session state contents, and information privacy.
Enabling Session State Protection is a two-step process. First, you enable the feature. Second, you set page and item security attributes.
Topics:■ How Session State Protection Works
■ Enabling Session State Protection
■ Configuring Session State Protection
How Session State Protection WorksWhen enabled, Session State Protection uses the Page Access Protection attributes and the Session State Protection item attributes with checksums positioned in f?p= URLs to prevent URL tampering and unauthorized access to and alteration of session state. When Session State Protection is disabled, the page and item attributes related to session state protection are ignored and checksums are not included checksums in generated f?p= URLs.
Enabling Session State ProtectionYou can enable session state protection from either the Edit Security Attributes page or the Session State Protection page.
Note: The objective of encrypted session state is to persist session state such that the unencrypted values cannot be read by other Oracle Application Express developers or database administrators who might have access to the Oracle Application Express session state tables, debug output, or database data files. Oracle recommends that database backups be performed using facilities that encrypt data in the backup files.
Tip: You can encrypt item values up to 4000 bytes in length. Attempts to encrypt values longer than 4000 bytes produces an error message.

Understanding Developer Security Best Practices
15-14 Oracle Application Express Application Builder User's Guide
Enabling Session State Protection is a two-step process. First, you enable the feature. Second, you set page and item security attributes. You can perform these steps using a wizard, or you can set security attributes for pages and items manually on the Session State Protection page.
Topics:■ Enabling Session State Protection from Edit Security Attributes
■ About the Expire Bookmarks Button
■ Enabling Session State Protection from Session State Protection
Enabling Session State Protection from Edit Security Attributes To enable Session State Protection from the Edit Security Attributes page:
1. On the Workspace home page, click the Application Builder icon.
2. Select an application.
3. Click the Shared Components icon.
4. Under Security, click Security Attributes.
5. Scroll down to Session State Protection and select Enabled from the Session State Protection list.
6. To configure session Session State Protection, click Manage Session State Protection.
The Session State Projection page appears.
7. To enable, disable, or configure Session State Protection using a wizard, click Set Protection.
8. Otherwise, navigate to the appropriate page or item attributes page and configure the Security attributes.
About the Expire Bookmarks Button Enabling Session State Protection affects whether bookmarked links to the current application work. Consider the following rules:
1. Bookmarked links created after Session State Protection is enabled work if the bookmarked link contains a checksum.
2. Bookmarked links created before Session State Protection is enabled do not work if the bookmarked link contains a checksum.
3. Bookmarks that do not contain checksums or contain unnecessary checksums are not affected by Session State Protection.
During page rendering, the Application Express engine uses a hidden application attribute (a checksum salt) during computation and to verify checksums included in f?p URLs. When you enable Session State Protection, the Application Express engine includes checksums. You can reset the checksum salt attribute by clicking Expire Bookmarks on the Edit Security Attributes page. Note that if you click Expire Bookmarks, bookmarked URLs used to access your application that contain previously generated checksums will fail.
Tip: To disable Session State Protection, perform the same steps again, but select Disabled instead of Enabled. Disabling Session State Protection does not change existing security attribute settings, but those attributes are ignored at runtime.

Understanding Developer Security Best Practices
Managing Application Security 15-15
Enabling Session State Protection from Session State Protection To enable Session State Protection:
1. Navigate to the Shared Components page:
a. On the Workspace home page, click the Application Builder icon.
b. Select an application.
c. Click Shared Components.
d. Under Security, select Session State Protection.
The Session State Protection page appears. Note the current Session State Protection status (Enabled or Disabled) displays at the top of the page.
2. Click the Set Protection button.
The Session State Protection wizard appears.
3. Under Select Action, select Enable and click Next.
Next, determine whether to set security attributes for pages and items.
4. Select Enable and click Next.
5. Click Enable Session State Protection.
Configuring Session State ProtectionOnce you have enabled Session State Protection, the next step is to configure security attributes. You can configure security attributes in two ways:
■ Use a wizard and select a value for specific attribute categories. Those selections are then applied to all pages and items within the application.
■ Configure values for individual pages, items, or application items.
Topics:■ Reviewing Existing Session State Protection Settings
■ Configuring Session State Protection Using a Wizard
■ Configuring Session State Protection for Pages
■ Configuring Session State Protection for Page Items
■ Configuring Session State Protection for Application Items
Reviewing Existing Session State Protection Settings You can review a summary of Session State Protection settings for pages, items, and application items on the first page of the Session State Protection wizard.
To view summaries of existing Session State Protection settings:
1. Navigate to the Session State Protection page:
Tip: To disable Session State Protection, perform the same steps, but select Disable instead of Enable. Disabling Session State Protection does not change existing security attribute settings, but those attributes are ignored at runtime.
Tip: Before you can configure security attributes, you must first enable Session State Protection. See "Enabling Session State Protection" on page 15-13.

Understanding Developer Security Best Practices
15-16 Oracle Application Express Application Builder User's Guide
a. On the Workspace home page, click the Application Builder icon.
b. Select an application.
c. Click Shared Components.
d. Under Security, select Session State Protection.
The Session State Protection page appears.
2. Click Set Protection.
3. Expand the following reports at the bottom of the page:
■ Page Level Session State Protection Summary
■ Page Item Session State Protection Summary
■ Application Item Session State Protection
Configuring Session State Protection Using a Wizard When you configure Session State Protection using a wizard, you set a value for specific attribute categories. Those selections are then applied to all pages and items within the application.
To configure Session State Protection using a wizard:
1. Navigate to the Session State Protection page:
a. On the Workspace home page, click the Application Builder icon.
b. Select an application.
c. Click Shared Components.
d. Under Security, select Session State Protection.
The Session State Protection page appears.
2. Click Set Protection.
The Session State Protection wizard appears.
3. Under Select Action, select Configure and click Next.
4. For Page Access Protection, select one of the following:

Understanding Developer Security Best Practices
Managing Application Security 15-17
■ Unrestricted - The page may be requested using a URL with or without session state arguments (Request, Clear Cache, Name/Values).
■ Arguments Must Have Checksum - If Request, Clear Cache, or Name/Value arguments appear in the URL, a checksum must also be provided. The checksum type must be compatible with the most stringent Session State Protection attribute of all the items passed as arguments.
■ No Arguments Allowed - A URL may be used to request the page but no Request, Clear Cache, or Name/Value arguments are allowed.
■ No URL Access - The page may not be accessed using a URL; however, the page may be the target of a Branch to Page branch type, which does not do a URL redirect.
5. For Application Item Protection, select one of the following:
■ Unrestricted - The item's session state may be set by passing the item name/value in a URL or in a form. No checksum is required in the URL.
Note: If you must set this item's value in session state using Ajax, then an Unrestricted protection level must be used for the item (for example in Dynamic Actions, Set Value, Page Items to Submit or Cascading LOVs, Page Items to Submit).
■ Checksum Required: Application Level - The item's session state may be set by passing the item name/value in a URL if a checksum specific to the schema is provided. You can also use a user-level checksum or a session-level checksum (see next bullets). Use this option when you want to allow the item to be set only by URLs having checksums that were generated by any user running the same application in the current workspace but in a different session.
■ Checksum Required: User Level - The item's session state may be set by passing the item name/value in a URL if a checksum specific to the workspace, application, and user is provided. You can also use a session-level checksum (see next bullet). Use this option when you want to allow the item to be set only by URLs having checksums that were generated by the same named user, running the same application in the current workspace but in a different session.
■ Checksum Required: Session Level - The item's session state may be set by passing the item name/value in a URL if a checksum specific to the current session is also provided. Use this option when you want to allow this item to be set only by URLs having checksums that were generated in the current session.
■ Restricted - May not be set from browser - The item may not be altered using the URL or POSTDATA. Use this option when you want to restrict the way that the item value can be set to internal processes, computations, and so on. This attribute is applicable only to items that cannot be used as data entry items and is always observed even if Session State Protection is disabled.
Use this attribute for application items or for page items with any of these Display As types:
– Display as Text (escape special characters, does not save state)
– Display as Text (does not save state)
– Display as Text (based on LOV, does not save state)
– Display as Text (based on PLSQL, does not save state)

Understanding Developer Security Best Practices
15-18 Oracle Application Express Application Builder User's Guide
– Text Field (Disabled, does not save state)
– Stop and Start HTML Table (Displays label only)
6. For Page Data Entry Item Protection, select one of the following:
■ Unrestricted - The item's session state may be set by passing the item name/value in a URL or in a form. No checksum is required in the URL.
Note: If you must set this item's value in session state using Ajax, then an Unrestricted protection level must be used for the item (for example in Dynamic Actions, Set Value, Page Items to Submit or Cascading LOVs, Page Items to Submit).
■ Checksum Required: Application Level - The item's session state may be set by passing the item name/value in a URL if a checksum specific to the schema is provided. You can also use a user-level checksum or a session-level checksum (see next bullets). Use this option when you want to allow the item to be set only by URLs having checksums that were generated by any user running the same application in the current workspace but in a different session.
■ Checksum Required: User Level - The item's session state may be set by passing the item name/value in a URL if a checksum specific to the workspace, application, and user is provided. You can also use a session-level checksum (see next bullet). Use this option when you want to allow the item to be set only by URLs having checksums that were generated by the same named user, running the same application in the current workspace but in a different session.
■ Checksum Required: Session Level - The item's session state may be set by passing the item name/value in a URL if a checksum specific to the current session is provided. Use this option when you want to allow this item to be set only by URLs having checksums that were generated in the current session.
7. For Page Display-Only Item Protection, select one of the following:
■ Unrestricted - The item may be set by passing the item name/value in a URL or in a form. No checksum is required in the URL.
Note: If you must set this item's value in session state using Ajax, then an Unrestricted protection level must be used for the item (for example in Dynamic Actions, Set Value, Page Items to Submit or Cascading LOVs, Page Items to Submit).
■ Checksum Required: Application Level - The item's session state may be set by passing the item name/value in a URL if a checksum specific to the schema is provided. You can also use a user-level checksum or a session-level checksum (see next bullets). Use this option when you want to allow the item to be set only by URLs having checksums that were generated by any user running the same application in the current workspace but in a different session.
■ Checksum Required: Session Level - The item's session state may be set by passing the item name/value in a URL if a checksum specific to the current session is provided. Use this option when you want to allow this item to be set only by URLs having checksums that were generated in the current session.
■ Checksum Required: User Level - The item's session state may be set by passing the item name/value in a URL if a checksum specific to the workspace, application, and user is provided. You can also use a session-level checksum. Use this option when you want to allow the item to be set only by

Understanding Developer Security Best Practices
Managing Application Security 15-19
URLs having checksums that were generated by the same named user, running the same application in the current workspace but in a different session.
■ Restricted: May not be set from browser - The item may not be altered using the URL or POSTDATA. Use this when you want to restrict the way that the item value can be set to internal processes, computations, and so on. This attribute is always observed, even if Session State Protection is disabled.
This attribute may be used with any of these Display As types:
– Display as Text (escape special characters, does not save state)
– Display as Text (does not save state)
– Display as Text (based on LOV, does not save state)
– Display as Text (based on PLSQL, does not save state)
– Text Field (Disabled, does not save state)
– Stop and Start HTML Table (Displays label only)
8. Click Next.
9. Click Finish.
Configuring Session State Protection for Pages To configure Session State Protection for Pages:
1. Navigate to the Session State Protection page:
a. On the Workspace home page, click the Application Builder icon.
b. Select an application.
c. Click Shared Components.
d. Under Security, select Session State Protection.
The Session State Protection page appears.
2. Click the Page icon.
3. You can customize the appearance the page using the Search bar at the top of the page. Available controls include:
■ Search icon - Resembles a magnifying glass. Click this icon to narrow your search to only specific columns. To search all columns, select All Columns.
■ Text area - Enter case insensitive search criteria (wildcard characters are implied) and then click Go.
■ Go button - Executes a search or applies a filter.
■ View Chart. Use this control to view information as a chart.
■ Actions menu - Displays the Actions menu. Use this menu to customize this interactive report. See "About the Actions Menu" on page 9-6.
4. Select a page number.
The Set Page and Item Protection page appears. The following information displays at the top of the page:
■ Application ID and name
■ Session State Protection status (Enabled or Disabled)

Understanding Developer Security Best Practices
15-20 Oracle Application Express Application Builder User's Guide
■ Page Number
■ Page name
5. For Page Access Protection, select one of the following:
■ Unrestricted - The page may be requested using a URL with or without session state arguments (Request, Clear Cache, Name/Values).
■ Arguments Must Have Checksum - If Request, Clear Cache, or Name/Value arguments appear in the URL, a checksum must also be provided. The checksum type must be compatible with the most stringent Session State Protection attribute of all the items passed as arguments.
■ No Arguments Allowed - A URL may be used to request the page but no Request, Clear Cache, or Name/Value arguments are allowed.
■ No URL Access - The page may not be accessed using a URL; however, the page may be the target of a Branch to Page branch type, which does not do a URL redirect.
6. For Item Types, select Data Entry Items or Display-only Items.
Data Entry items are items that can be altered using forms and include hidden items. Display-Only items are rendered only and are not submitted with the form.
7. If you select Data Entry Items, select a session state protection level for each item:
■ Unrestricted - The item's session state may be set by passing the item name/value in a URL or in a form. No checksum is required in the URL.
Note: If you must set this item's value in session state using Ajax, then an Unrestricted protection level must be used for the item (for example in Dynamic Actions, Set Value, Page Items to Submit or Cascading LOVs, Page Items to Submit).
■ Checksum Required: Application Level - The item's session state may be set by passing the item name/value in a URL if a checksum specific to the schema is provided. You can also use a user-level checksum or a session-level checksum (see next bullets). Use this option when you want to allow the item to be set only by URLs having checksums that were generated by any user running the same application in the current workspace but in a different session.
■ Checksum Required: User Level - The item's session state may be set by passing the item name/value in a URL if a checksum specific to the workspace, application, and user is provided. You can also use a session-level checksum (see next bullet). Use this option when you want to allow the item to be set only by URLs having checksums that were generated by the same named user, running the same application in the current workspace but in a different session.
■ Checksum Required: Session Level - The item's session state may be set by passing the item name/value in a URL if a checksum specific to the current session is provided. Use this option when you want to allow this item to be set only by URLs having checksums that were generated in the current session.
8. If you select Display-only Item, select a session state protection level for each item:
■ Unrestricted - The item may be set by passing the item name/value in a URL or in a form. No checksum is required in the URL.

Understanding Developer Security Best Practices
Managing Application Security 15-21
Note: If you must set this item's value in session state using Ajax, then an Unrestricted protection level must be used for the item (for example in Dynamic Actions, Set Value, Page Items to Submit or Cascading LOVs, Page Items to Submit).
■ Restricted: May not be set from browser - The item may not be altered using the URL or POSTDATA. Use this when you want to restrict the way that the item value can be set to internal processes, computations, and so on. This attribute is always observed, even if Session State Protection is disabled. This attribute may be used with any of these Display As types:
– Display as Text (escape special characters, does not save state)
– Display as Text (does not save state)
– Display as Text (based on LOV, does not save state)
– Display as Text (based on PLSQL, does not save state)
– Text Field (Disabled, does not save state)
– Stop and Start HTML Table (Displays label only)
■ Checksum Required: Application Level - The item's session state may be set by passing the item name/value in a URL if a checksum specific to the schema is provided. You can also use a user-level checksum or a session-level checksum (see next bullets). Use this option when you want to allow the item to be set only by URLs having checksums that were generated by any user running the same application in the current workspace but in a different session.
■ Checksum Required: User Level - The item's session state may be set by passing the item name/value in a URL if a checksum specific to the workspace, application, and user is provided. You can also use a session-level checksum (see next bullet). Use this option when you want to allow the item to be set only by URLs having checksums that were generated by the same named user, running the same application in the current workspace but in a different session.
■ Checksum Required: Session Level - The item's session state may be set by passing the item name/value in a URL if a checksum specific to the current session is provided. Use this option when you want to allow this item to be set only by URLs having checksums that were generated in the current session.
9. Click Apply Changes.
Configuring Session State Protection for Page Items To configure Session State Protection for items:
1. Navigate to the Session State Protection page:
a. On the Workspace home page, click the Application Builder icon.
b. Select an application.
c. Click Shared Components.
d. Under Security, select Session State Protection.
The Session State Protection page appears.
2. Click the Page Item icon.
3. You can customize the appearance the page using the Search bar at the top of the page. Available controls include:

Understanding Developer Security Best Practices
15-22 Oracle Application Express Application Builder User's Guide
■ Search icon - Resembles a magnifying glass. Click this icon to narrow your search to only specific columns. To search all columns, select All Columns.
■ Text area - Enter case insensitive search criteria (wildcard characters are implied) and then click Go.
■ Go button - Executes a search or applies a filter.
■ Actions menu - Displays the Actions menu. Use this menu to customize the report view. See "About the Actions Menu" on page 9-6.
4. Select a page number.
The Edit Session State Protection for Page and Items page appears. The following information displays at the top of the page:
■ Application ID and name
■ Session State Protection status (Enabled or Disabled)
■ page Number
■ Page name
5. For Page Access Protection, select a session state protection level for each item:
■ Unrestricted - The page may be requested using a URL with or without session state arguments (Request, Clear Cache, Name/Values).
■ Arguments Must Have Checksum - If Request, Clear Cache, or Name/Value arguments appear in the URL, a checksum must also be provided. The checksum type must be compatible with the most stringent Session State Protection attribute of all the items passed as arguments.
■ No Arguments Allowed - A URL may be used to request the page but no Request, Clear Cache, or Name/Value arguments are allowed.
■ No URL Access - The page may not be accessed using a URL, however the page may be the target of a Branch to Page branch type, which does not do a URL redirect.
6. For Item Types, select Data Entry Items or Display-only Items.
Data Entry items are items that can be altered using forms and include hidden items. Display-Only items are rendered only and are not submitted with the form.
7. If you select Data Entry Items, select a session state protection level for each item:
■ Unrestricted - The item's session state may be set by passing the item name/value in a URL or in a form. No checksum is required in the URL.
Note: If you must set this item's value in session state using Ajax, then an Unrestricted protection level must be used for the item (for example in Dynamic Actions, Set Value, Page Items to Submit or Cascading LOVs, Page Items to Submit).
■ Checksum Required: Application Level - The item's session state may be set by passing the item name/value in a URL if a checksum specific to the schema is provided. You can also use a user-level checksum or a session-level checksum (see next bullets). Use this option when you want to allow the item to be set only by URLs having checksums that were generated by any user running the same application in the current workspace but in a different session.
■ Checksum Required: User Level - The item's session state may be set by passing the item name/value in a URL if a checksum specific to the

Understanding Developer Security Best Practices
Managing Application Security 15-23
workspace, application, and user is provided. You can also use a session-level checksum (see next bullet). Use this option when you want to allow the item to be set only by URLs having checksums that were generated by the same named user, running the same application in the current workspace but in a different session.
■ Checksum Required: Session Level - The item's session state may be set by passing the item name/value in a URL if a checksum specific to the current session is provided. Use this option when you want to allow this item to be set only by URLs having checksums that were generated in the current session.
8. If you select Display-only Item, select a session state protection level for each item:
■ Unrestricted - The item may be set by passing the item name/value in a URL or in a form. No checksum is required in the URL.
Note: If you must set this item's value in session state using Ajax, then an Unrestricted protection level must be used for the item (for example in Dynamic Actions, Set Value, Page Items to Submit or Cascading LOVs, Page Items to Submit).
■ Restricted: May not be set from browser - The item may not be altered using the URL or POSTDATA. Use this when you want to restrict the way that the item value can be set to internal processes, computations, and so on. This attribute is always observed, even if Session State Protection is disabled. This attribute may be used with any of these Display As types:
– Display as Text (escape special characters, does not save state)
– Display as Text (does not save state)
– Display as Text (based on LOV, does not save state)
– Display as Text (based on PLSQL, does not save state)
– Text Field (Disabled, does not save state)
– Stop and Start HTML Table (Displays label only)
■ Checksum Required: Application Level - The item's session state may be set by passing the item name/value in a URL if a checksum specific to the schema is provided. You can also use a user-level checksum or a session-level checksum (see next bullets). Use this option when you want to allow the item to be set only by URLs having checksums that were generated by any user running the same application in the current workspace but in a different session.
■ Checksum Required: User Level - The item's session state may be set by passing the item name/value in a URL if a checksum specific to the workspace, application, and user is provided. You can also use a session-level checksum (see next bullet). Use this option when you want to allow the item to be set only by URLs having checksums that were generated by the same named user, running the same application in the current workspace but in a different session.
■ Checksum Required: Session Level - The item's session state may be set by passing the item name/value in a URL if a checksum specific to the current session is provided. Use this option when you want to allow this item to be set only by URLs having checksums that were generated in the current session.
9. Click Apply Changes.

Understanding Developer Security Best Practices
15-24 Oracle Application Express Application Builder User's Guide
Configuring Session State Protection for Application Items To configure Session State Protection for application items:
1. Navigate to the Session State Protection page:
a. On the Workspace home page, click the Application Builder icon.
b. Select an application.
c. Click Shared Components.
d. Under Security, select Session State Protection.
The Session State Protection page appears.
2. Click the Application Item icon.
3. You can customize the appearance the page using the Search bar at the top of the page. Available controls include:
■ Search icon - Resembles a magnifying glass. Click this icon to narrow your search to only specific columns. To search all columns, select All Columns.
■ Text area - Enter case insensitive search criteria (wildcard characters are implied) and then click Go.
■ Go button - Executes a search or applies a filter.
■ Actions menu - Displays the Actions menu. Use this menu to customize the report view. See "About the Actions Menu" on page 9-6.
4. Select an application item.
5. Under Security, select one of the following from the Session State Protection list:
■ Unrestricted - The item's session state may be set by passing the item name/value in a URL or in a form. No checksum is required in the URL.
Note: If you must set this item's value in session state using Ajax, then an Unrestricted protection level must be used for the item (for example in Dynamic Actions, Set Value, Page Items to Submit or Cascading LOVs, Page Items to Submit).
■ Restricted - May not be set from browser - The item may not be altered using the URL or POSTDATA. Use this option when you want to restrict the way that the item value can be set to internal processes, computations, and so on. This attribute is only applicable only to items that cannot be used as data entry items and is always observed even if Session State Protection is disabled. This attribute may be used for application items or for page items with any of these Display As types:
– Display as Text (escape special characters, does not save state)
– Display as Text (does not save state)
– Display as Text (based on LOV, does not save state)
– Display as Text (based on PLSQL, does not save state)
– Text Field (Disabled, does not save state)
– Stop and Start HTML Table (Displays label only)
■ Checksum Required: Application Level - The item's session state may be set by passing the item name/value in a URL if a checksum specific to the schema is provided. You can also use a user-level checksum or a session-level checksum (see next bullets). Use this option when you want to allow the item

Establishing User Identity Through Authentication
Managing Application Security 15-25
to be set only by URLs having checksums that were generated by any user running the same application in the current workspace but in a different session.
■ Checksum Required: User Level - The item's session state may be set by passing the item name/value in a URL if a checksum specific to the workspace, application, and user is provided. You can also use a session-level checksum (see next bullet). Use this option when you want to allow the item to be set only by URLs having checksums that were generated by the same named user, running the same application in the current workspace but in a different session.
■ Checksum Required: Session Level - The item's session state may be set by passing the item name/value in a URL if a checksum specific to the current session is provided. Use this option when you want to allow this item to be set only by URLs having checksums that were generated in the current session.
6. Click Apply Changes.
Securing File UploadsOracle Application Express enables you to easily build an application that can be used to upload files and to access uploaded files. These files are uploaded into a common file storage table. Although the database view APEX_APPLICATION_FILES shows those files associated with your database account (or workspace), programmatic access to the common file storage table does not always require authentication, enabling other users to see your uploaded files. For this reason, Oracle recommends that developers either use the methods described in "About BLOB Support in Forms and Reports" on page 17-46 or use the methods described in Oracle Application Express How To Documents for file upload on OTN at:
http://www.oracle.com/technetwork/developer-tools/apex/overview/index.html
Either of these methods results in the uploaded files being stored in schema tables and not the public table.
Establishing User Identity Through AuthenticationAuthentication is the process of establishing each user's identify before they can access your application. Authentication may require a user identify a user name and password or could involve the use of digital certificates or a secure key.
When you create an authentication scheme, you have the option of choosing from several preconfigured authentication schemes, copying an authentication scheme from an existing application, or creating your own custom authentication scheme.
Topics:■ Understanding How Authentication Works
■ Determining Whether to Include Authentication
■ Creating an Authentication Scheme
■ Creating a Preconfigured Authentication Schemes
See Also: "Differences Between Page Items and Application Items" on page 7-56 and "About Item Types" on page A-1 to learn more about creating a File Browse page-level item

Establishing User Identity Through Authentication
15-26 Oracle Application Express Application Builder User's Guide
■ Managing Existing Authentication Schemes
■ Viewing the Authentication Scheme Associated with an Application
■ Changing the Authentication Scheme Associated with an Application
■ Viewing Authentication Scheme Reports
Understanding How Authentication WorksYou determine how your application interacts with users. If all users have the same rights and privileges, they are referred to as public users. However, if your application must track each user individually, you must specify an authentication method.
Authentication establishes the identity of each user who accesses your application. Many authentication processes require that a user provide some type of credentials such as a user name and password. These credentials are then evaluated and they either pass or fail. If the credentials pass, the user has access to the application. Otherwise, access is denied.
Once a user has been identified, the Application Express engine keeps track of each user by setting the value of the built-in substitution string APP_USER. As a user navigates from page to page, the Application Express engine sets the value of APP_USER to identify the user. The Application Express engine uses APP_USER as one component of a key for tracking each user's session state.
From a programming perspective, you can access APP_USER using the following syntax:
■ As a bind variable from either PL/SQL or SQL:
:APP_USER
■ From PL/SQL packages and triggers:
V('APP_USER')
You can use APP_USER to perform your own security checks and conditional processing. For example, suppose you created the following table:
CREATE TABLE my_security_table ( user_id VARCHAR2(30), privilege VARCHAR2(30));
Once created, you could populate this table with user privilege information and then use it to control the display of pages, tabs, navigation bars, buttons, regions, or any other control or component.
Determining Whether to Include AuthenticationAs you create your application, you must determine whether to include authentication. You can:
■ Choose to not require authentication. Oracle Application Express does not check any user credentials. All pages of your application are accessible to all users.
■ Select a built-in authentication scheme. Create an authentication method based on available preconfigured authentication schemes. Depending on which scheme you choose, you may also have to configure the corresponding components of
See Also: "APP_USER" on page 2-24 and "Configuring Security Attributes" on page 7-21

Establishing User Identity Through Authentication
Managing Application Security 15-27
Oracle 10giAS, Oracle Internet Directory, or other external services. See "Creating a Preconfigured Authentication Schemes" on page 15-27 and "Changing the Authentication Scheme Associated with an Application" on page 15-36.
■ Create custom authentication scheme. Create a custom authentication method to have complete control over the authentication interface. To implement this approach, you must provide a PL/SQL function the Application Express engine executes before processing each page request. This function's Boolean return value determines whether the Application Express engine processes the page normally or displays a failure page. See "Creating an Authorization Scheme" on page 15-37.
Creating an Authentication SchemeTo create an authentication scheme:
1. On the Workspace home page, click the Application Builder icon.
2. Select an application.
3. On the Application home page, click Shared Components.
The Shared Components page appears.
4. Under Security, select Authentication Schemes.
The Authentication Schemes page appears.
5. You can customize the appearance the page using the Search bar at the top of the page. Available controls include:
■ Select columns to search - Resembles a magnifying glass. Click this icon to narrow your search. To search all columns, select All Columns.
■ Text area - Enter case insensitive search criteria (wildcard characters are implied) to search for items by name and then click Go.
■ Go button - Executes a search or applies a filter.
■ View Icons - Displays each scheme as a large icon. To edit a scheme, click the appropriate icon.
■ View Report - Displays each scheme as a line in a report. To edit a scheme, click the Edit icon.
■ Actions menu - Use the Actions menu to customize the report view. See "About the Actions Menu" on page 9-6.
6. To create a new authentication scheme, click Create.
7. Specify how the scheme should be created by selecting one of the following:
■ Based on a pre-configured scheme from the gallery. See "Creating a Preconfigured Authentication Schemes" on page 15-27 and "Custom Authentication" on page 15-29.
■ As a copy of an existing authentication scheme.
8. Follow the on-screen instructions.
Creating a Preconfigured Authentication SchemesWhen you create an authentication scheme from the gallery you can select a preconfigured authentication scheme which follows a standard behavior for authentication and session management. Note that if you create a new authentication scheme, it automatically becomes the current authentication scheme for the selected

Establishing User Identity Through Authentication
15-28 Oracle Application Express Application Builder User's Guide
application. This section describes all preconfigured authentication schemes that ship with Oracle Application Express.
Topics:■ Application Express Accounts
■ Custom Authentication
■ Database Accounts
■ HTTP Header Variable
■ LDAP Directory Verification
■ No Authentication (using DAD)
■ Open Door Credentials
■ Oracle Application Server Single Sign-On Server
Application Express AccountsApplication Express Accounts are user accounts that are created within and managed in the Oracle Application Express user repository. When you use this method, your application is authenticated against these accounts.
Application Express Accounts is a good solution when:
■ You want control of the user account repository
■ User name and password-based approach to security is sufficient
■ You do not need to integrate into a single sign-on framework
This is an especially good approach when you must get a group of users up and running on a new application quickly.
Setting Up Application Express Accounts To set up Application Express Accounts:
1. On the Workspace home page, click the Application Builder icon.
2. Select an application.
3. On the Application home page, click Shared Components.
The Shared Components page appears.
4. Under Security, select Authentication Schemes.
5. On the Authentication Schemes page, click Create.
6. Select Based on a pre-configured scheme from the gallery and click Next.
7. Under Name:
a. Name - Enter the name used to reference the authentication scheme by other application developers.
b. Scheme Type - Select Application Express Accounts.
c. Click Create.
Tip: Authentication schemes support plug-ins. To learn more, see "Implementing Plug-ins" on page 17-25.
See Also: "Managing Application Express Users" in Oracle Application Express Administration Guide

Establishing User Identity Through Authentication
Managing Application Security 15-29
Custom AuthenticationCreating an authentication scheme from scratch gives you complete control over your authentication interface. This is the best approach for applications when any of the following is true:
■ Database authentication or other methods are not adequate.
■ You want to develop your own login form and associated methods.
■ You want to control security aspects of session management.
■ You want to record or audit activity at the user or session level.
■ You want to enforce session activity or expiry limits.
■ You want to program conditional one-way redirection logic before Oracle Application Express page processing.
■ You want to integrate your application with non-Oracle Application Express applications using a common session management framework.
■ Your application consists of multiple applications that operate seamlessly (for example, more than one application ID).
Topics:■ Creating a Custom Authentication Scheme
■ About Session Management Security
■ About Building a Login Page
Creating a Custom Authentication Scheme To create a custom authentication scheme:
1. On the Workspace home page, click the Application Builder icon.
2. Select an application.
3. On the Application home page, click Shared Components.
The Shared Components page appears.
4. Under Security, select Authentication Schemes.
5. On the Authentication Schemes page, click Create.
6. Select Based on a pre-configured scheme from the gallery and click Next.
7. Under Name:
a. Name - Enter the name used to reference the authentication scheme by other application developers.
b. Scheme Type - Select Custom.
8. Fill in the appropriate fields.
9. To learn more about a specific field, see item Help.
When help is available, the cursor changes to an arrow and question mark when you pass the cursor over an item. See "About Field-Level Help" on page 1-13.
10. Click Create.
Tip: If you are planning on using the same authentication scheme for multiple applications, consider writing a custom authentication plug-in. To learn more, see "Implementing Plug-ins" on page 17-25.

Establishing User Identity Through Authentication
15-30 Oracle Application Express Application Builder User's Guide
About Session Management Security When running custom authentication, Oracle Application Express attempts to prevent two improper situations:
■ Intentional attempts by a user to access session state belonging to someone else. However, users can still type in an arbitrary application session ID into the URL.
■ Inadvertent access to a stale session state (probably belonging to the same user from an earlier time). This would commonly result from using bookmarks to application pages.
Oracle Application Express checks that the user identity token set by the custom authentication function matches the user identity recorded when the application session was first created. If the user has not yet been authenticated and the user identity is not yet known, the session state being accessed does not belong to someone else. These checks determine whether the session ID in the request can be used. If not, the Application Express engine redirects back the same page using an appropriate session ID.
About Building a Login Page When you create an application in Oracle Application Express, a login page is created. The alias for the page is 'LOGIN'. You can use this page as the "invalid session page" in an authentication scheme. The page is constructed with processes that call the Oracle Application Express login API to perform credentials verification and session registration.
You can also build your own login pages using the pre-built pages as models and tailoring all of the user interface and processing logic to your requirements.
To create a login page for your application:
1. On the Workspace home page, click the Application Builder icon.
2. Select an application.
3. Click Create Page.
4. Select Login Page.
5. Specify Login page attributes and click Create.
About Deep Linking Deep linking refers to the ability to link to an Oracle Application Express page out of context (for example, from a hyperlink in an email or workflow notification). When you link to a page out of context and the application requires the user be authenticated, the user is taken to the login page. After credentials verification, the Application Express engine automatically displays the page that was referenced in the original link. Deep linking is supported for applications that use authentication schemes.
Database Accounts Database Account Credentials utilizes database schema accounts. This authentication scheme requires that a database user (schema) exist in the local database. When using this method, the user name and password of the database account is used to authenticate the user.
Database Account Credentials is a good choice if having one database account for each named user of your application is feasible and account maintenance using database tools meets your needs
Setting Up Database Account Credentials To set up Database Account Credentials:
1. On the Workspace home page, click the Application Builder icon.

Establishing User Identity Through Authentication
Managing Application Security 15-31
2. Select an application.
3. On the Application home page, click Shared Components.
The Shared Components page appears.
4. Under Security, select Authentication Schemes.
5. On the Authentication Schemes page, click Create.
6. Select Based on a pre-configured scheme from the gallery and click Next.
7. Under Name:
a. Name - Enter the name used to reference the authentication scheme by other application developers.
b. Scheme Type - Select Database Accounts.
c. Click Create.
HTTP Header VariableHTTP Header Variable supports the use of header variables to identify a user and to create an Application Express user session. Use this authentication scheme if your company employs a centralized web authentication solution like Oracle Access Manager which provides single sign-on across applications and technologies. User credential verification is performed by these systems and they pass the user's name to Oracle Application Express using a HTTP header variable such as "REMOTE_USER" (which is the default).
Setting Up HTTP Header Variable To set up HTTP Header Variable:
1. On the Workspace home page, click the Application Builder icon.
2. Select an application.
3. On the Application home page, click Shared Components.
The Shared Components page appears.
4. Under Security, select Authentication Schemes.
5. On the Authentication Schemes page, click Create.
6. Select Based on a pre-configured scheme from the gallery and click Next.
7. Under Name:
a. Name - Enter the name used to reference the authentication scheme by other application developers.
b. Scheme Type - Select HTTP Header Variable.
8. Fill in the appropriate fields.
9. To learn more about a specific field, see item Help.
When help is available, the cursor changes to an arrow and question mark when you pass the cursor over an item. See "About Field-Level Help" on page 1-13.
10. Click Create.
LDAP Directory VerificationYou can configure any authentication scheme that uses a login page to use Lightweight Directory Access Protocol (LDAP) to verify the user name and password submitted on the login page.
Establishing User Identity Through Authentication
15-32 Oracle Application Express Application Builder User's Guide
Application Builder includes wizards and edit pages that explain how to configure this option. These wizards assume that an LDAP directory accessible to your application for this purpose already exists and that it can respond to a SIMPLE_BIND_S call for credentials verification. When you create an LDAP Credentials authentication scheme, the wizard requests and saves the LDAP host name, LDAP port, DN string, and determines whether to use SSL, exact DN, and optionally a search filter if not using exact DN. An optional preprocessing function can be specified to adjust formatting of the user name passed to the API.
Setting Up LDAP Directory Verification To set up LDAP Directory:
1. On the Workspace home page, click the Application Builder icon.
2. Select an application.
3. On the Application home page, click Shared Components.
The Shared Components page appears.
4. Under Security, select Authentication Schemes.
5. On the Authentication Schemes page, click Create.
6. Select Based on a pre-configured scheme from the gallery and click Next.
7. Under Name:
a. Name - Enter the name used to reference the authentication scheme by other application developers.
b. Scheme Type - Select LDAP Directory.
8. Under Settings:
a. Host - Enter the hostname of your LDAP directory server.
b. Port - Enter the port number of your LDAP directory host. The default is 389.
c. Use SSL - Choose whether to use SSL to bind to the LDAP directory. If SSL with Authentication is chosen, a wallet must be configured for the Application Express instance.
d. Distinguished Name (DN) String - Enter the pattern used to construct the fully qualified distinguished name (DN) string to DBMS_LDAP.SIMPLE_BIND_S if using exact DN or the search base if using non-exact DN. Use %LDAP_USER% as a placeholder for the username. For example:
Exact DN:
cn=%LDAP_USER%,l=amer,dc=yourdomain,dc=com
Non-Exact DN (Search Base):
Non-Exact DN (Search Base)
e. Use Distinguished Name (DN) - Choose whether the LDAP Distinguished Name (DN) String is exact or non-exact. If non-exact, LDAP Distinguished Name (DN) is the search base and you must supply a Search Filter.
f. LDAP Username Edit Function - You may provide additional code to be executed to transform the username into a format perfectly suited to the LDAP directory entry or LDAP username. The bind variable :USERNAME contains the name the end user specified. For example, the following code calls a function which replaces all periods (.) with underscores (_) in the DN string:
return apex_custom_auth.ldap_dnprep(p_username => :USERNAME);

Establishing User Identity Through Authentication
Managing Application Security 15-33
g. Username Escaping - Choose how Oracle Application Express escapes special characters in %LDAP_USER%. The correct value for this attribute depends on the used LDAP server and whether a LDAP Username Edit Function already escapes special characters.
9. To learn more about a specific field, see item Help.
When help is available, the cursor changes to an arrow and question mark when you pass the cursor over an item. See "About Field-Level Help" on page 1-13.
10. Click Create.
No Authentication (using DAD)Database Access Descriptor (DAD) database authentication uses the Oracle database native authentication and user mechanisms to authenticate users using a basic authentication scheme. This authentication scheme gets the user name from the DAD either as the value stored in the DAD configuration or, if the account information is not stored in the DAD configuration, as the user name captured using the basic authentication challenge.
To use DAD credentials verification:
■ Each application user must have a user account in the Oracle database.
■ You must configure a PL/SQL DAD for basic authentication (without account information).
This results in one user name/password challenge for browser session for your application users. The user identity token is then made available in the APP_USER item.
DAD database authentication is useful when you must implement an authentication method that requires minimal setup for a manageable number of users. Ideally these users would have self-managed accounts in the database and your use of this authentication method would be short lived (for example, during the demonstration or prototyping stages of development).
The main drawback of this approach is burdensome account maintenance, especially if users do not administer their own passwords, or if their database accounts exist only to facilitate authentication to your application.
Setting Up DAD Credentials Verification To set up DAD Credentials Verification:
1. On the Workspace home page, click the Application Builder icon.
2. Select an application.
3. On the Application home page, click Shared Components.
The Shared Components page appears.
4. Under Security, select Authentication Schemes.
Note: If you choose SSL with Authentication as the SSL mode, a wallet must be set up using the Oracle Application Express instance settings. Additionally, the root certification from the LDAP server must be imported into that wallet as a trusted certificate. See "Configuring Wallet Information" in Oracle Application Express Administration Guide and "Using Oracle Wallet Manager" in Oracle Database Advanced Security Guide.

Establishing User Identity Through Authentication
15-34 Oracle Application Express Application Builder User's Guide
5. On the Authentication Schemes page, click Create.
6. Select Based on a pre-configured scheme from the gallery and click Next.
7. Under Name:
a. Name - Enter the name used to reference the authentication scheme by other application developers.
b. Scheme Type - Select No Authentication (using DAD).
8. Click Create.
Open Door CredentialsOpen Door Credentials enables anyone to access your application using a built-in login page that captures a user name. This authentication method is useful during application development.
Setting Up Open Door Credentials To set up Open Door Credentials:
1. On the Workspace home page, click the Application Builder icon.
2. Select an application.
3. On the Application home page, click Shared Components.
The Shared Components page appears.
4. Under Security, select Authentication Schemes.
5. On the Authentication Schemes page, click Create.
6. Select Based on a pre-configured scheme from the gallery and click Next.
7. Under Name:
a. Name - Enter the name used to reference the authentication scheme by other application developers.
b. Scheme Type - Select Open Door Credentials.
8. Click Create.
Oracle Application Server Single Sign-On ServerOracle Application Server Single Sign-On verification delegates authentication to the Oracle AS Single Sign-On (SSO) Server. To use this authentication scheme, your site must have been registered as a partner application with the SSO server.
Oracle Application Express applications can operate as partner applications with Oracle Application Server's Single Sign-On (SSO) infrastructure. You must register your application (or register the Application Express engine) as the partner application by following the Oracle Application Server instructions for registering partner applications and install the Oracle 9iAS SSO Software Developer Kit (SDK).
If you choose this approach, your application will not use an integrated login page. Instead, when a user accesses your application in a new browser session, the Application Express engine redirects to the Single Sign-On login page. After the user is authentication by SSO, the SSO components redirect back to your application, passing the user identity and other information to the Application Express engine. The user can then continue to use the application until they log off, terminate their browser session, or until some other session-terminating event occurs.

Establishing User Identity Through Authentication
Managing Application Security 15-35
Setting Up Oracle Application Server Single Sign-On To set up Oracle Application Server Single Sign-On:
1. On the Workspace home page, click the Application Builder icon.
2. Select an application.
3. On the Application home page, click Shared Components.
The Shared Components page appears.
4. Under Security, select Authentication Schemes.
5. On the Authentication Schemes page, click Create.
6. Select Based on a pre-configured scheme from the gallery and click Next.
7. Under Name:
a. Name - Enter the name used to reference the authentication scheme by other application developers.
b. Scheme Type - Select Oracle Application Server Single Sign-On.
8. Fill in the appropriate fields.
9. To learn more about a specific field, see item Help.
When help is available, the cursor changes to an arrow and question mark when you pass the cursor over an item. See "About Field-Level Help" on page 1-13.
10. Click Create.
Managing Existing Authentication SchemesOnce created, available authentication schemes display in the Authentication Schemes Repository.
To navigate to the Authentication Schemes Repository:
1. On the Workspace home page, click the Application Builder icon.
2. Select an application.
3. On the Application home page, click Shared Components.
The Shared Components page appears.
4. Under Security, select Authentication Schemes.
5. You can customize the appearance the page using the Search bar at the top of the page. Available controls include:
■ Select columns to search - Resembles a magnifying glass. Click this icon to narrow your search. To search all columns, select All Columns.
■ Text area - Enter case insensitive search criteria (wildcard characters are implied) to search for items by name and then click Go.
■ Go button - Executes a search or applies a filter.
■ View Icons - Displays each scheme as a large icon. To edit a scheme, click the appropriate icon.
■ View Report - Displays each scheme as a line in a report. To edit a scheme, click the Edit icon.
■ Actions menu - Use the Actions menu to customize the report view. See "About the Actions Menu" on page 9-6.

Establishing User Identity Through Authentication
15-36 Oracle Application Express Application Builder User's Guide
6. To edit a specific authentication scheme as a report, click the Edit icon the to the left of the authentication scheme name.
The Authentication Scheme page appears.
7. To learn more about a specific field, see item Help.
When help is available, the cursor changes to an arrow and question mark when you pass the cursor over an item. See "About Field-Level Help" on page 1-13.
8. Edit the appropriate attributes and click Apply Changes.
Viewing the Authentication Scheme Associated with an ApplicationTo view the current authentication scheme for an application:
1. On the Workspace home page, click the Application Builder icon.
2. Select an application.
3. Click Shared Components.
4. Under Security, click Security Attributes.
5. Locate the Authentication section. The current authentication scheme displays next to Authentication Scheme.
6. To edit the Authentication Scheme, Define Authentication Schemes.
Changing the Authentication Scheme Associated with an ApplicationTo change the authentication scheme for an application:
1. Navigate to the Authentication Schemes:
a. On the Workspace home page, click the Application Builder icon.
b. Select an application.
c. On the Application home page, click Shared Components.
The Shared Components page appears.
d. Under Security, select Authentication Schemes.
2. Click the Edit icon adjacent to the authentication scheme you want to activate.
The Create/Edit page appears.
3. Click Make Current Scheme.
Viewing Authentication Scheme ReportsTo view authentication scheme reports:
1. On the Workspace home page, click the Application Builder icon.
2. Select an application.
3. On the Application home page, click Shared Components.
The Shared Components page appears.
4. Under Security, select Authorization Schemes.
See Also: "Creating a Preconfigured Authentication Schemes" on page 15-27

Providing Security Through Authorization
Managing Application Security 15-37
5. Click the appropriate tab at the top of the page:
■ Subscription
■ History
SubscriptionUse the Authentication Scheme Subscription report to view subscribed authentication schemes in your application.
HistoryUse the Authentication Scheme History report to view recent modifications made to items in this application.
Providing Security Through AuthorizationAuthorization is a broad term for controlling access to resources based on user privileges. While conditions control the rendering and processing of specific page controls or components, authorization schemes control user access to specific controls or components.
Topics:■ How Authorization Schemes Work
■ Creating an Authorization Scheme
■ Attaching an Authorization Scheme to an Application, Page, or Components
■ Viewing Authorization Reports
How Authorization Schemes WorkAn authorization scheme extends the security of your application's authentication scheme. You can specify an authorization scheme for an entire application, page, or specific control such as a region, item, or button. For example, you could use an authorization scheme to selectively determine which tabs, regions, or navigation bars a user sees.
An authorization scheme either succeeds or fails. If a component or control level authorization scheme succeeds, the user can view the component or control. If it fails, the user cannot view the component or control. If an application or page-level authorization scheme fails, then Oracle Application Express displays a previously defined message.
When you define an authorization scheme, you give it a unique name. Once defined, you can attach it to any component or control in your application. To attach an authorization scheme to a component or control in your application, simply navigate to the appropriate attributes page and select an authorization scheme from the Authorization Scheme list.
Creating an Authorization SchemeBefore you can attach an authorization scheme to an application or an application component or control, you must first create it.
To create an authorization scheme:
1. On the Workspace home page, click the Application Builder icon.

Providing Security Through Authorization
15-38 Oracle Application Express Application Builder User's Guide
2. Select an application.
3. On the Application home page, click Shared Components.
The Shared Components page appears.
4. Under Security, select Authorization Schemes.
5. Click Create.
6. Specify how to create an authorization scheme by selecting one of the following:
■ From Scratch
■ As a Copy of an Existing Authorization Scheme
7. Follow the on-screen instructions.
Editing Attributes of an Existing Authorization SchemeTo edit attributes of an existing authorization scheme:
1. On the Workspace home page, click the Application Builder icon.
2. Select an application.
3. On the Application home page, click Shared Components.
The Shared Components page appears.
4. Under Security, select Authorization Schemes.
The Authorization Schemes page appears. By default, each scheme displays as an icon.
5. You can customize the appearance the page using the Search bar at the top of the page. Available controls include:
■ Select columns to search - Resembles a magnifying glass. Click this icon to narrow your search. To search all columns, select All Columns.
■ Text area - Enter case insensitive search criteria (wildcard characters are implied) to search for items by name and then click Go.
■ Go button - Executes a search or applies a filter.
■ View Icons - Displays each scheme as a large icon. To edit a scheme, click the appropriate icon.
■ View Report - Displays each scheme as a line in a report. To edit a scheme, click the Edit icon.
■ Actions menu - Use the Actions menu to customize the report view. See "About the Actions Menu" on page 9-6.
About the Evaluation Point AttributeYou can specify when your authorization scheme is validated in the Evaluation Point attribute. You can choose to have your authorization scheme validated once for each session or once for each page view.
Keep in mind, if you specify that an authorization scheme should be evaluated once for each session and the authorization scheme passes, then the underlying code, test, or query will not be executed again for the duration of the application session. If your
See Also: "Attaching an Authorization Scheme to an Application, Page, or Components" on page 15-39

Providing Security Through Authorization
Managing Application Security 15-39
authorization scheme consists of a test whose results might change if evaluated at different times during the session, then you should specify that the evaluation point be once for each page view.
About Resetting Authorization Scheme StateIf an authorization scheme is validated once for each session, Oracle Application Express caches the validation results in each user's session cache. You can reset a session's authorization scheme state by calling the APEX_UTIL.RESET_AUTHORIZATIONS API.
Calling this procedure nulls out any previously cached authorization scheme results for the current session. Be aware that this procedure takes no arguments and is part of the publicly executable APEX_UTIL package.
Attaching an Authorization Scheme to an Application, Page, or ComponentsOnce you have created an authorization scheme you can attach it to an entire application, page, control, or component.
Topics:■ Attaching an Authorization Scheme to an Application
■ Attaching an Authorization Scheme to a Page
■ Attaching an Authorization Scheme to a Control or Component
Attaching an Authorization Scheme to an ApplicationTo attach an authorization scheme to an application:
1. On the Workspace home page, click the Application Builder icon.
2. Select an application.
3. Click the Shared Components icon.
The Shared Components page appears.
4. Under Security, click Security Attributes.
5. Scroll down to Authorization and make a selection from the Authorization Scheme list.
6. For Run on Public Pages, select Yes or No to specify whether the application-level authorization scheme is checked on public pages (that is, pages that do not require authorization). To learn more, see "Authorization" on page 7-23.
7. To define a new authorization scheme, click Define Authorization Schemes.
Attaching an Authorization Scheme to a PageTo attach an authorization scheme to a page:
1. On the Workspace home page, click the Application Builder icon.
2. Select an application.
3. Select a page.
4. To access the Edit Page:
See Also: "RESET_AUTHORIZATIONS Procedure" in Oracle Application Express API Reference

Providing Security Through Authorization
15-40 Oracle Application Express Application Builder User's Guide
■ Tree view - Under Page Rendering, double-click the page title at the top of the tree.
■ Component view- Under Page, click the page name.
5. Scroll down to Security and make a selection from the Authorization Scheme list.
Attaching an Authorization Scheme to a Control or ComponentTo attach an authorization scheme to a page component or control:
1. On the Workspace home page, click the Application Builder icon.
2. Select an application.
3. Select a page.
4. Click the name of the component or control to which you want to apply the authorization scheme.
5. Scroll down to Security and make a selection from the Authorization Scheme list.
Viewing Authorization ReportsYou can use the Authorization Scheme Subscription and Authorization Scheme Utilization reports to better manage authorization schemes within your application.
To view authorization scheme reports:
1. On the Workspace home page, click the Application Builder icon.
2. Select an application.
3. On the Application home page, click Shared Components.
The Shared Components page appears.
4. Under Security, select Authorization Schemes.
5. Click the appropriate tab at the top of the page:
■ Subscription
■ by Component
■ Utilization
■ History
SubscriptionUse the Authorization Scheme Subscription report to view details about authorization schemes subscription.
By ComponentUse the By Component report to view all components within this application which have an associated authorization scheme. For a component to be rendered it must pass authorization schemes placed on the component level, the page level, and at the application level.
UtilizationUse the Authorization Scheme Utilization report to view details about authorization schemes utilization.
Providing Security Through Authorization
Managing Application Security 15-41
To view additional reports indicating which pages having authorization schemes and which do not, select one of the following from the Tasks list:
■ Report Pages With Authorization Schemes
■ Report Pages Without Authorization Schemes
HistoryUse the History report to view recent modifications made to Authorization Schemes in this application.

Providing Security Through Authorization
15-42 Oracle Application Express Application Builder User's Guide

Deploying an Application 16-1
16Deploying an Application
This section describes how to deploy and package a database application built within Application Builder.
Topics:■ About the Oracle Application Express Application Development Life Cycle
■ Understanding the Packaging Process
■ How to Move an Application to Another Instance
■ How to Create a Custom Packaged Application
■ Exporting an Application and Related Files
■ Importing Export Files
■ Installing Export Files
■ About Publishing the Database Application URL
■ About Publishing the Websheet Application URL
■ Using Build Options to Control Configuration
About the Oracle Application Express Application Development Life CycleWhen developing applications using Application Builder, you must find a balance between two dramatically different development methodologies:
■ Iterative, rapid application development
■ Planned, linear style development
The first approach offers so much flexibility that you run the risk of never completing your project. In contrast, the second approach can yield applications that do not meet the needs of end users even if they meet the stated requirements on paper.
See Also: "Advanced Programming Techniques" on page 17-1 and "Managing Application Express Users" in Oracle Application Express Administration Guide
Tip: To review a tutorial that demonstrates deployment options, go to the Oracle Online Learning Library at http://apex.oracle.com/pls/apex/f?p=44785:1 and search for "Advanced Deployment of Your Application: Part 3".

Understanding the Packaging Process
16-2 Oracle Application Express Application Builder User's Guide
System Development Life Cycle Methodologies to ConsiderThe system development life cycle (SDLC) is the overall process of developing software using a series of defined steps. There are several SDLC models that work well for developing applications in Oracle Application Express.
The SDLC waterfall is probably the best known model. In this methodology, the development process is broken down into the following stages:
1. Project Planning
2. Requirements Definition
3. Design
4. Development
5. Integration and Testing
6. Installation and Acceptance
7. Maintenance
This methodology is referred to as a waterfall because the output from one stage is the input for the next stage. A primary problem with this approach is that it is assumed that all requirements can be established in advance. Unfortunately, requirements often change and evolve during the development process.
The Oracle Application Express development environment enables developers to take a more iterative approach to development. Unlike many other development environments, creating prototypes is easy. With Oracle Application Express, developers can:
■ Use built-in wizards to quickly design an application user interface
■ Make prototypes available to users and gather feedback
■ Implement changes in real time, creating new prototypes instantly
Other methodologies that work well with Oracle Application Express include:
■ Spiral - This approach is actually a series of short waterfall cycles. Each waterfall cycle yields new requirements and enables the development team to create a robust series of prototypes.
■ Rapid application development (RAD) life cycle - This approach has a heavy emphasis on creating a prototype that closely resembles the final product. The prototype is an essential part of the requirements phase. One disadvantage of this model is that the emphasis on creating the prototype can cause scope creep; developers can lose sight of their initial goals in the attempt to create the perfect application.
Understanding the Packaging ProcessTo move an application from one Oracle Application Express instance to another, you must move both the metadata and supporting objects used by the application as follows:
1. Move the application definition and all associated files. See "How to Move an Application to Another Instance" on page 4.
2. Move the supporting objects. Review the Database Object Dependencies report to determine what objects to move. See "Using the Database Object Dependencies Report" on page 7-82 and "How to Create a Custom Packaged Application" on

Understanding the Packaging Process
Deploying an Application 16-3
page 16-5.
Topics:■ Deployment Options to Consider
■ Deciding Whether to Copy a Workspace
■ Deciding Whether to Copy a Database
■ About the Application ID
■ Deciding to Install a New HTTP Server
Deployment Options to ConsiderWhen you develop an application in Application Builder, you create the application within a specific workspace. Each workspace has a unique ID and name. A common scenario is to create the application in a development instance and then deploy it to a production instance.
Deployment options to consider include:
1. Use the same workspace and same schema. Export and then import the application and install it using a different application ID. This approach works well when there are few changes to the underlying objects, but frequent changes to the application functionality.
2. Use a different workspace and same schema. Export and then import the application into a different workspace. This is an effective way to prevent a production application from being modified by developers.
3. Use a different workspace and different schema. Export and then import the application into a different workspace and install it so that it uses a different schema. This new schema needs to have the database objects required by your application. See "Using the Database Object Dependencies Report" on page 7-82.
4. Use a different database with all its variations. Export and then import the application into a different Oracle Application Express instance and install it using a different workspace, schema, and database.
Deciding Whether to Copy a WorkspaceDeciding whether to copy an existing workspace is a matter of preference. Keep in mind that the production version must have access to all the appropriate objects. For example, you might want to copy a workspace in the following situations:
■ When you want to keep the same application identifiers between development and other environments.
■ When the application relies on Oracle Application Express authentication. Copying the workspace automatically migrates all the required user data.
Deciding Whether to Copy a DatabaseWhen deciding whether to copy the database, remember that the schema against which the application runs must have access to the same objects as the development instance. The actual name of the schema is unimportant. You can change it during the import process.

How to Move an Application to Another Instance
16-4 Oracle Application Express Application Builder User's Guide
About the Application IDIt is not necessary to have matching application IDs for a development version and production version of an application. In fact, as a best practice never hard code the application ID into your application. Instead, use the application alias (defined on the Edit Application page), or use a built-in substitution string (such as APP_ID and APP_ALIAS). Using a substitution string is the better approach because it enables you to change the application ID without affecting any application functionality.
Deciding to Install a New HTTP ServerIn order to run, Oracle Application Express must have access to either the embedded PL/SQL gateway, Oracle HTTP Server and mod_plsql, or Oracle Application Express Listener. Installing a new HTTP server is another way to separate a development version and production version of an application. To learn more about HTTP server configuration options, see "About Choosing a HTTP Server" in Oracle Application Express Installation Guide.
How to Move an Application to Another InstanceWhether you want to move an application to another workspace or just make a copy of it, deploying involves the following steps:
1. Move the supporting database objects (if appropriate). Review the Database Object Dependencies report to determine what objects to move. See "Using the Database Object Dependencies Report" on page 7-82.
2. Package the application definition with its supporting objects to create a custom packaged application. See "How to Create a Custom Packaged Application" on page 16-5.
3. Export the custom packaged application. See "Exporting an Application and Related Files" on page 16-12.
4. Import the exported files into the target Oracle Application Express instance. See "Importing Export Files" on page 16-23.
You can import an application into your workspace regardless of the workspace in which it was developed. See "Deployment Options to Consider" on page 16-3.
About Managing Database ObjectsBefore you export an application and the appropriate related files, you must determine if you also need to migrate the database objects referenced by the application. If you are unsure of which database objects to move, review the Database Object Dependencies report.
See Also: "Name" on page 7-16 for information about defining an application alias and "About Built-in Substitution Strings" on page 2-18 for information about using APP_ID and APP_ALIAS
Tip: You can also move the application definition and all supporting objects manually. See "Exporting an Application and Related Files" on page 16-12.
See Also: "Using the Database Object Dependencies Report" on page 7-82 and "How to Create a Custom Packaged Application" on page 16-5

How to Create a Custom Packaged Application
Deploying an Application 16-5
If the target schema is different from the schema used in the development environment, you must migrate the database objects referenced by the application. In many cases, this process can be as simple as using Oracle database export and import utilities to copy the application schema from the development environment to target instance. The following are two common scenarios where this approach does not work:
■ When the object development schema refers to tablespaces to which the target instance schema does not have access
■ When the development instance schema has sample data that you do not want to migrate to the target instance schema
If a database administrator or an Oracle Application Express administrator is the person responsible for exporting Oracle Application Express applications, be sure to clearly communicate if he or she:
■ Should include all data when exporting your application
■ Should not include data from specific tables you identify
How to Create a Custom Packaged ApplicationYou can greatly simplify the steps needed to deploy an application by creating a custom packaged application on the Supporting Objects page.
Topics:■ How Creating a Custom Packaged Application Simplifies Deployment
■ Creating a Custom Packaged Application
■ Adding Installation Scripts for an Image, Cascading Style Sheet, or Static File
■ Adding an Access Control List to a Custom Packaged Application
■ Installing Supporting Objects
■ Deleting Supporting Objects Scripts, Messages, and Installation Options
■ Upgrading a Custom Packaged Application
■ Deinstalling Supporting Objects
■ Viewing an Install Summary
How Creating a Custom Packaged Application Simplifies DeploymentFrom a developer’s perspective, importing and installing an application is a complicated process. First, you create the target database objects and seed data. Second, you import and install the application definition and all related files, including images, themes, and any other required static files.
Creating a custom packaged application using the Supporting Objects utility greatly simplifies this process. Instead of performing numerous steps to create the database objects and then import and install the application and all supporting files, you can
Tip: "Using the Data Workshop to Manage Data" in Oracle Application Express SQL Workshop Guide
See Also: "How to Move an Application to Another Instance" on page 16-4 and "Exporting an Application and Related Files" on page 16-12

How to Create a Custom Packaged Application
16-6 Oracle Application Express Application Builder User's Guide
define the supporting objects so that the application and supporting files can be migrated in a few easy steps.
After users import and install the application definition, a wizard guides them through a few simple configuration steps. Then, the wizard asks whether to install the supporting application objects. Users have the option of installing the supporting application objects then or doing it later.
From a developer’s perspective, this feature has many advantages:
■ Ensures that the supporting objects are created in the correct order.
■ Provides an automated process for deploying an application quickly using very few steps.
■ Gives users the option to install supporting application objects when they import and install the application definition or at a later time. See "Installing Supporting Objects" on page 16-9.
■ Enables users and developers with a convenient method for removing the application definition, supporting files, and all database objects. See "Deinstalling Supporting Objects" on page 16-11.
■ Provides users and developers with an easy way to upgrade a previously released custom packaged application. See "Upgrading a Custom Packaged Application" on page 16-10.
Plus, you can also take advantage of the Deinstall and Install features to quickly edit the underlying database objects that support an application. For example, you can deinstall and remove all database objects, edit the underlying database object creation scripts, and reinstall to create the redefined application objects.
Creating a Custom Packaged ApplicationTo create a custom packaged application, you must create installation scripts that define your application's supporting objects (including database objects, images, and seed data) and any preinstallation validations. You define these objects and the installation and deinstallation scripts and the messages that display when the user installs or deinstalls on the Supporting Objects page.
Topics:■ Accessing the Supporting Objects Page
■ About the Supporting Objects Page
Accessing the Supporting Objects PageYou create a custom packaged application on the Supporting Objects page.
To access the Supporting Objects Page application:
1. On the Workspace home page, click the Application Builder icon.
2. Select the application.
The Application home page appears.
3. Click the Supporting Objects icon.
The Supporting Objects page appears.

How to Create a Custom Packaged Application
Deploying an Application 16-7
About the Supporting Objects PageThe top of the Supporting Objects page displays the application name and indicates current selections for the following: Check for Objects, Verify System Privileges, Required Free KB, Prompt for License, Substitutions, Build Options, Validations, Installation Scripts, Upgrade Scripts, Deinstallation Script, and Include in Export.
To specify whether to include supporting objects with an application export, select Yes or No from the Include in Export list and click Apply.
The rest of the page is divided into three categories.
Installation Use the links under Installation to define the following types of information:
■ Prerequisites. Defines built-in checks required before installing the application, including required free disk space, required system privileges, and schema object restrictions.
■ Application Substitution strings. Lists static substitution strings defined for the application. You can define static substitution strings for phrases or labels that occur in many places within an application. See "Substitutions" on page 7-21.
When packaging an application, you can include prompts for substitution strings which users can specify when they install the custom packaged application.
■ Build Options. Lists build options defined for this application. You can use build options to conditionally display specific functionality within an application. See "Using Build Options to Control Configuration" on page 16-33 and "Exporting Build Options or Build Option Status" on page 16-35.
When packaging an application, you can include prompts for specific build options which display when the application is installed.
■ Pre-installation Validations. Lists validations defined for the custom packaged application. Similar to normal page validations, these validations prevent a user from installing database objects if the user-defined conditions are not satisfied. To create a new validation, click Create and follow the on-screen instructions.
■ Installation Scripts. Enables a you to define multiple installation scripts that install supporting objects for the application. To create a new script, click Create and follow the on-screen instructions. To edit an existing script, click the Edit icon.
■ Messages. Enables you to define messages that display when the user installs or deinstalls the application. Supported HTML tags include <b>, <i>, <u>, <p>, <br>, <hr>, <ul>, <ol>, <li>, and <pre>.
When these messages display, only a limited set of HTML tags are recognized to prevent a cross site-scripting (XSS) attack. See "Understanding Cross-Site Scripting

How to Create a Custom Packaged Application
16-8 Oracle Application Express Application Builder User's Guide
Protection" on page 15-10.
Upgrade Use the links under Upgrade to define the following types of information:
■ Upgrade Scripts. Click Upgrade scripts to define scripts to upgrade database objects, images, and seed data when upgrading an existing application. See "Upgrading a Custom Packaged Application" on page 16-10.
■ Upgrade Message. Enables you to define messages that display when the user upgrades the application. Supported HTML tags include <b>, <i>, <u>, <p>, <br>, <hr>, <ul>, <ol>, <li>, and <pre>.
When these messages display, only a limited set of HTML tags are recognized to prevent a cross site-scripting (XSS) attack. See "Understanding Cross-Site Scripting Protection" on page 15-10.
Deinstallation Use the links under Deinstallation to define the following types of information:
■ Deinstallation Script. Click Deinstallation Script to define a script to drop database objects and static files created by the installation scripts. To edit an existing script, click the Edit icon.
■ Deinstallation Message. Allows you to define messages that display when the user deinstalls the application. Supported HTML tags include <b>, <i>, <u>, <p>, <br>, <hr>, <ul>, <ol>, <li>, and <pre>.
When these messages display, only a limited set of HTML tags are recognized to prevent a cross site-scripting (XSS) attack. See "Understanding Cross-Site Scripting Protection" on page 15-10.
Adding Installation Scripts for an Image, Cascading Style Sheet, or Static FileYou can create installation scripts for images, cascading style sheets, and static files you have previously uploaded for your application or workspace on the Installation Scripts page. Oracle Application Express uses the name of the file you select as the name for each new script. It also adds corresponding API calls to the end of the deinstallation script (or creates one if one does not exist), which removes the selected files when the application’s supporting objects are deinstalled.
To create installation scripts for an image, cascading style sheet, or static file:
1. Navigate to the Supporting Objects page:
a. On the Workspace home page, click the Application Builder icon.
b. Select the application.
The Application home page appears.
c. Click Supporting Objects.
The Supporting Objects page appears.
2. Under Installation, click Installation Scripts.
The Installation Scripts page appears.
3. Click Create.
See Also: "Using Custom Cascading Style Sheets" on page 13-47, "Managing Images" on page 12-17, and "Managing Static Files" on page 12-20

How to Create a Custom Packaged Application
Deploying an Application 16-9
4. Follow the on-screen instructions.
5. At the bottom of the page, click Create Script to Install Files.
A list of available cascading style sheets, images, and static files appears.
6. Select the files to include with your custom packaged application and click Create Script.
Adding an Access Control List to a Custom Packaged ApplicationYou can control access to an application, individual pages, or page components by creating an access control list.
To add an access control list of a custom packaged application:
1. Create an access control list. See "Controlling Access to Applications, Pages, and Page Components" on page 10-90.
2. Navigate to the Supporting Objects page:
a. On the Workspace home page, click the Application Builder icon.
b. Select the application.
The Application home page appears.
c. Click Supporting Objects.
The Supporting Objects page appears.
3. Under Installation, click Installation Scripts.
The Installation Scripts page appears.
4. Click Create.
5. At the bottom of the page, click Create Scripts for Access Control Tables.
If Access Control tables are defined, the Create Script page displays the tables to be included.
6. Click Create Script.
Installing Supporting ObjectsAfter you edit your supporting objects and create the appropriate scripts, you can run your installation scripts by clicking Install Supporting Objects on the Tasks list.
End users can also use this feature if they elect to not install the custom packaged application (or supporting objects) after they import and install the application definition.
To install supporting objects:
1. On the Workspace home page, click the Application Builder icon.
2. Select the application.
3. Click Supporting Objects.
The Supporting Objects page appears.
4. Click the Install Supporting Objects on the Tasks list.
5. To view details about the installation script before running it, click Preview Installation Script.

How to Create a Custom Packaged Application
16-10 Oracle Application Express Application Builder User's Guide
The Preview Scripts page appears listing summary information, prerequisites, and the actual scripts to be run.
6. To exit the Preview Scripts page and continue, click Close.
7. From Install Supporting Objects, click Yes and click Next.
8. Follow the on-screen instructions.
Deleting Supporting Objects Scripts, Messages, and Installation OptionsYou can delete the metadata that defines supporting object scripts, messages, and installation options associated with a custom packaged application by clicking Remove Supporting Object Installation on the Tasks list on the Supporting Objects page.
To delete the metadata that defines supporting object scripts, messages, and installation options:
1. On the Workspace home page, click the Application Builder icon.
2. Select an application.
3. Click Supporting Objects.
The Supporting Objects page appears.
4. On the Tasks list on the right side of the page, click Remove Supporting Object Installation.
5. Follow the on-screen instructions.
Upgrading a Custom Packaged ApplicationYou can define scripts to upgrade a previously published application on the Upgrade page.
Topics:■ Defining an Upgrade Script
■ Upgrading a Custom Packaged Application
Defining an Upgrade ScriptYou can use the Upgrade page to define scripts to upgrade database objects, images, and seed data when upgrading an existing application.
To create an upgrade script:
1. On the Workspace home page, click the Application Builder icon.
2. Select an application.
3. Click Supporting Objects.
The Supporting Objects page appears.
4. Under Upgrade, click Upgrade Scripts.
Use the Detect Existing Supporting Objects section to determine if the appropriate objects are installed or must be upgraded.
5. In Query to Detect Existing Supporting Objects, enter a query in the field that returns at least one row if the supporting objects exist.

How to Create a Custom Packaged Application
Deploying an Application 16-11
This query determines whether the user who installs the custom packaged application is prompted to run the installation scripts or the upgrade scripts.
6. To create a script, click Create.
7. Follow the on-screen instructions.
Upgrading a Custom Packaged ApplicationAfter you create your upgrade script, you can test it by clicking Upgrade Supporting Objects on Tasks list on the Supporting Object page.
End users can also use this feature to upgrade an existing custom packaged application.
To upgrade a custom packaged application:
1. Import a new version of application to be upgraded (if applicable). See "Importing an Application, Page or Component Export" on page 16-24.
2. On the Workspace home page, click the Application Builder icon.
3. Select the application.
4. Click Supporting Objects.
The Supporting Objects page appears.
5. From the Tasks list, click Upgrade Supporting Objects.
6. Follow the on-screen instructions.
Deinstalling Supporting ObjectsOnce you create or install a custom packaged application, you can deinstall it by either:
■ Clicking the Deinstall Supporting Objects on the Supporting Objects page
■ Clicking Delete this Application on the Application home page
When you deinstall an application, you have the option of removing the current application definition and running the deinstallation script defined in the Supporting Objects.
To deinstall a custom packaged application:
1. On the Workspace home page, click the Application Builder icon.
2. Select the application.
3. Click Supporting Objects.
The Supporting Objects page appears.
4. From the Tasks list, click Deinstall Supporting Objects.
5. Select a deinstallation option:
■ Remove Application Definition removes the current application definition.
Tip: To enable users to upgrade from various earlier versions of this application, you can add conditions to the upgrade scripts by going to the Script Properties page.
See Also: "Creating a Custom Packaged Application" on page 16-6.
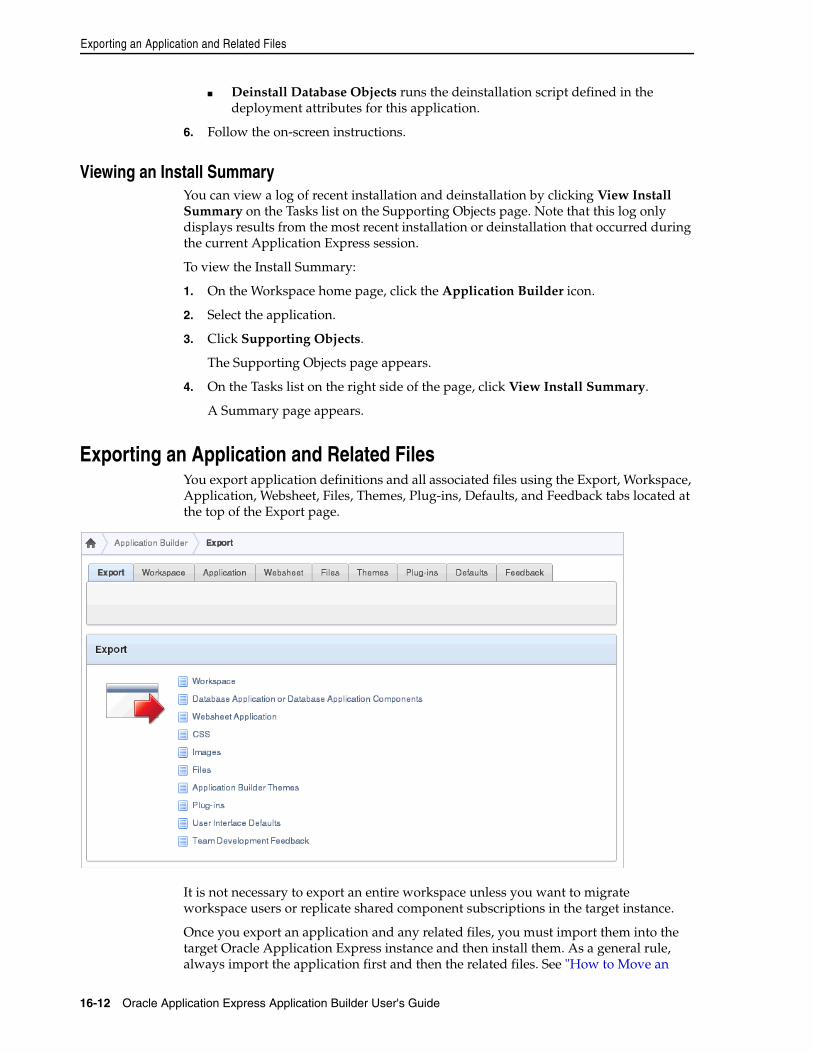
Exporting an Application and Related Files
16-12 Oracle Application Express Application Builder User's Guide
■ Deinstall Database Objects runs the deinstallation script defined in the deployment attributes for this application.
6. Follow the on-screen instructions.
Viewing an Install SummaryYou can view a log of recent installation and deinstallation by clicking View Install Summary on the Tasks list on the Supporting Objects page. Note that this log only displays results from the most recent installation or deinstallation that occurred during the current Application Express session.
To view the Install Summary:
1. On the Workspace home page, click the Application Builder icon.
2. Select the application.
3. Click Supporting Objects.
The Supporting Objects page appears.
4. On the Tasks list on the right side of the page, click View Install Summary.
A Summary page appears.
Exporting an Application and Related FilesYou export application definitions and all associated files using the Export, Workspace, Application, Websheet, Files, Themes, Plug-ins, Defaults, and Feedback tabs located at the top of the Export page.
It is not necessary to export an entire workspace unless you want to migrate workspace users or replicate shared component subscriptions in the target instance.
Once you export an application and any related files, you must import them into the target Oracle Application Express instance and then install them. As a general rule, always import the application first and then the related files. See "How to Move an

Exporting an Application and Related Files
Deploying an Application 16-13
Application to Another Instance" on page 16-4.
Topics:■ Where Images, CSS, and Script Files Are Stored
■ Exporting an Application
■ Exporting Application Components
■ Exporting a Workspace
■ Exporting a Page in an Application
■ Exporting a Websheet
■ Exporting Cascading Style Sheets
■ Exporting Images
■ Exporting Static Files
■ Exporting Themes
■ Exporting Plug-ins
■ Exporting Script Files
■ Exporting User Interface Defaults
■ Exporting Feedback
■ Exporting Script Files
Where Images, CSS, and Script Files Are StoredIn order to run, Oracle Application Express must have access to either Oracle HTTP Server and mod_plsql or the embedded PL/SQL gateway. Where images, CSS, and script files are stored depends upon the HTTP server you choose.
Topics:■ Finding Images, CSS, and Script Files When Using Oracle HTTP Server or Oracle
Application Express Listener
■ Finding Images, CSS, and Script Files When Using the Embedded PL/SQL Gateway
Finding Images, CSS, and Script Files When Using Oracle HTTP Server or Oracle Application Express Listener In an Oracle HTTP Server, Oracle Application Server, or Oracle Application Express Listener configuration, images are stored on the file system in the location referenced by the alias /i/. To locate the images directory on the file system, review the following files and search for the text alias /i/:
■ Oracle HTTP Server distributed with Oracle Database 11g—see the dads.conf file.
■ Oracle Application Server 10g—see the marvel.conf file.
Tip: You can simplify the steps needed to deploy an application by creating a custom packaged application. See "How to Create a Custom Packaged Application" on page 16-5.

Exporting an Application and Related Files
16-14 Oracle Application Express Application Builder User's Guide
Specific examples for locating the text alias /i/ can be found in Oracle Application Express Installation Guide
Finding Images, CSS, and Script Files When Using the Embedded PL/SQL GatewayWhen running Oracle Application Express with the embedded PL/SQL gateway, images are stored directly in the database within the Oracle XML DB repository. You can access images by using the WebDAV feature of Oracle XML DB or by using FTP. To learn more, see "Using Protocols to Access the Repository" in Oracle XML DB Developer's Guide.
Exporting an ApplicationWhen you export an application, Oracle Application Express generates a text file containing PL/SQL API calls.
To export an application:
1. Navigate to the Export page:
a. On the Workspace home page, click the Application Builder icon.
b. On the Application Builder home page, click Export on the Tasks list.
2. On the Export page, click the Application tab.
3. Under Choose Application, select the application to export.
4. Under Export Application, specify the following:
a. File Format - Select how rows in the export file are formatted:
– Choose UNIX to have the resulting file contain rows delimited by line feeds.
– Choose DOS to have the resulting file contain rows delimited by carriage returns and line feeds.
b. Owner Override - Optionally select another owner. By default, the application is owned by the owner identified in the application attribute owner.
c. Build Status Override - Select one of the following:
– Run Application Only - Developers can only run an application
– Run and Build Application - Developers can both run and edit an application
Selecting Run Application Only is an effective way to protect an application from modifications from other developers.
d. Debugging - Select one of the following:
See Also: "Exporting Application Components" on page 16-15
Tip: If you select Run Application Only, you cannot set the argument p_trace to Yes. See "Using Build Options to Control Configuration" on page 16-33. Also, the only way to change this setting after you import the application, is to log in to Oracle Application Express Administration Services. See "Changing Application Build Status Set During Deployment" in Oracle Application Express Administration Guide.

Exporting an Application and Related Files
Deploying an Application 16-15
– Yes exports the application with debugging enabled.
– No exports the application with debugging disabled.
e. As of - Enables you to go back in time and export a previous version of your application. For example, you can use this option to export a version of your application that contain an object that is currently deleted. Specify the number of minutes in the field provided.
This utility uses the DBMS_FLASHBACK package. Because the timestamp to System Change Number (SCN) mapping is refreshed approximately every five minutes, you may have to wait that amount of time to locate the version for which you are looking. The time undo information is retained and influenced by the startup parameter UNDO_RETENTION (the default is three hours). However, this only influences the size of the undo tablespace. While two databases can have the same UNDO_RETENTION parameter, you are able to go back further in time on a database with fewer transactions because it is not filling the undo tablespace, forcing older data to be archived.
5. Under Export Preferences, select Yes or No to include or exclude the following:
■ Export Supporting Object Definitions. See "How to Create a Custom Packaged Application" on page 16-5.
■ Export Public Interactive Reports. See "Saving an Interactive Report" on page 9-21.
■ Export Private Interactive Reports. See "Saving an Interactive Report" on page 9-21.
■ Export Interactive Report Subscriptions. See "Saving an Interactive Report" on page 9-21.
■ Export Developer Comments. See "Adding Developer Comments" on page 7-49.
■ Export Translations
To learn more about a specific attribute, click the item label. When help is available, the cursor changes to an arrow and question mark when you pass the cursor over an item. See "About Field-Level Help" on page 1-13.
6. Click Export Application.
In addition to exporting the actual application file, you may also need to export other related files such as cascading style sheets, images, and script files.
Exporting Application ComponentsYou can export shared components or components of a page on the Component Export page. You can use this wizard to:
■ Export shared components or page components to another application or workspace
■ Back up a component before editing it
■ Create an export to function as a patch to another Oracle Application Express instance
See Also: "Enabling SQL Tracing and Using TKPROF" on page 14-7

Exporting an Application and Related Files
16-16 Oracle Application Express Application Builder User's Guide
To export shared components or page components:
1. Navigate to the Component Export page:
a. On the Workspace home page, click the Application Builder icon.
b. Select an application.
c. Click Shared Components.
d. From the Tasks list, click Export Application Components.
The Component Export page appears.
2. Click the following tabs and select the components to export:
■ Components displays shared application components and entire pages. Use the navigation bar at the top of the page to search for components. See "Working with Shared Components" on page 8-49 and "Exporting Build Options or Build Option Status" on page 16-35.
■ Components by Page lists components of the selected page. Navigate to a specific page by making a selection from the Page. Click Check All to select all components.
■ Build Option Status displays available build options. Use this page to turn build options on and off. See "Exporting Build Options or Build Option Status" on page 16-35.
3. Click Add to Export.
4. Click Next.
5. On Components to Export:
a. From File Format, select how rows in the export file are formatted:
– Choose UNIX to have the resulting file contain rows delimited by line feeds.
– Choose DOS to have the resulting file contain rows delimited by carriage returns and line feeds.
b. Use the As of field to export a page as it was previously defined. Specify the number of minutes in the field provided.
This utility uses the DBMS_FLASHBACK package. Because the timestamp to System Change Number (SCN) mapping is refreshed approximately every five minutes, you may have to wait that amount of time to locate the version for which you are looking. The time undo information is retained and influenced by the startup parameter UNDO_RETENTION (the default is three hours). However, this only influences the size of the undo tablespace. While two databases may have the same UNDO_RETENTION parameter, you are able to go back further in time on a database with fewer transactions because it is not filling the undo tablespace, forcing older data to be archived.
c. Click Export Components.
See Also: "Exporting an Application" on page 16-14, "Exporting a Page in an Application" on page 16-17, "Importing an Application, Page or Component Export" on page 16-24, and "Exporting Build Options or Build Option Status" on page 16-35

Exporting an Application and Related Files
Deploying an Application 16-17
Exporting a WorkspaceYou can make an application available to other users by exporting a workspace. When you export a workspace, Oracle Application Express creates an ASCII text SQL script of users, any defined user groups and Team Development data.
To export a workspace:
1. Navigate to the Export page:
a. On the Workspace home page, click the Application Builder icon.
b. On the Application Builder home page, click Export on the Tasks list.
2. On the Export page, click the Workspace tab.
3. Under Export Workspace:
■ Include Team Development - Select Yes to include Team Development data such as Features, Milestones, To Do, Bugs, Feedback, Links and News. Otherwise, select No.
■ File Format - Select how rows in the export file are formatted:
– Choose UNIX to have the resulting file contain rows delimited by line feeds.
– Choose DOS to have the resulting file contain rows delimited by carriage returns and line feeds.
4. Click Export Workspace.
Exporting a Page in an ApplicationYou can also export a specific page within an application by clicking the Export page icon on the Page Definition. When exporting a page, remember that exported pages can only be imported successfully if they have the same application ID and workspace ID.
To export a page in an application:
1. Navigate to the appropriate Page Definition. See "Accessing the Page Definition" on page 8-2.
2. On the Page Definition, click the Export Page icon in the upper right corner.
The Export Page Wizard appears.
3. From Page, select the page to export.
See Also: "Managing Application Express Users" in Oracle Application Express Administration Guide
See Also: "Exporting Application Components" on page 16-15, "Exporting an Application" on page 16-14, and "Importing an Application, Page or Component Export" on page 16-24

Exporting an Application and Related Files
16-18 Oracle Application Express Application Builder User's Guide
4. From File Format, select how rows in the export file are formatted:
■ Choose UNIX to have the resulting file contain rows delimited by line feeds.
■ Choose DOS to have the resulting file contain rows delimited by carriage returns and line feeds.
5. Use the As of field to export a page as it was previously defined. Specify the number of minutes in the field provided.
This utility uses the DBMS_FLASHBACK package. Because the timestamp to System Change Number (SCN) mapping is refreshed approximately every five minutes, you may have to wait that amount of time to locate the version for which you are looking. The time undo information is retained and influenced by the startup parameter UNDO_RETENTION (the default is three hours). However, this only influences the size of the undo tablespace. While two databases may have the same UNDO_RETENTION parameter, you are able to go back further in time on a database with fewer transactions because it is not filling the undo tablespace, forcing older data to be archived.
6. Click Export Page.
Exporting a WebsheetUse the Export Websheet utility to make a Websheet application available to other users.
To export a Websheet application:
1. Navigate to the Export page:
a. On the Workspace home page, click the Application Builder icon.
b. On the Application Builder home page, click Export.
2. On the Export page, click the Websheet tab.
3. For Websheet Application, select the Websheet to export and click Set Application.
4. Follow on screen instructions.
Exporting Cascading Style SheetsUse the Export Cascading Style Sheets utility to export uploaded cascading style sheets. Note that you can use this utility to export only uploaded cascading style sheets.
To export related cascading style sheets:
1. Navigate to the Export page:
a. On the Workspace home page, click the Application Builder icon.
b. On the Application Builder home page, click Export on the Tasks list.
2. On the Export page, click CSS.
3. On the Export Cascading Style Sheets page:
a. Stylesheets - Select the cascading style sheets to export.
b. File Format - Select how rows in the export file are formatted:
See Also: "About Websheet Applications" on page 5-1
Exporting an Application and Related Files
Deploying an Application 16-19
– Choose UNIX to have the resulting file contain rows delimited by line feeds.
– Choose DOS to have the resulting file contain rows delimited by carriage returns and line feeds.
c. Click Export Style Sheets.
Exporting ImagesUse the Export Images utility to export uploaded images. When you export images using this utility, the images are converted to a text document. Note that you can use this utility to export only uploaded images.
To export upload images:
1. Navigate to the Export page:
a. On the Workspace home page, click the Application Builder icon.
b. On the Application Builder home page, click Export on the Tasks list.
2. On the Export page, click Images.
3. On the Export Images page:
a. Export Images in Application - Select an application from which to export images.
Be aware that selecting Workspace Images only exports those images in your repository that are not associated with a specific application. If all of your images are associated with specific applications, then the workspace image export file will be empty.
b. File Format - Select how rows in the export file are formatted:
– Choose UNIX to have the resulting file contain rows delimited by line feeds.
– Choose DOS to have the resulting file contain rows delimited by carriage returns and line feeds.
4. Click Export Images.
Exporting Static FilesUse the Export Static Files utility to export static files you have imported. Note that you can use this utility to export only uploaded static files.
To export related static files:
1. Navigate to the Export page:
a. On the Workspace home page, click the Application Builder icon.
b. On the Application Builder home page, click Export from the Tasks list.
2. On the Export page, click Files.
3. On Export Static Files page:
See Also: "Importing Cascading Style Sheets" on page 16-26 and "Using Custom Cascading Style Sheets" on page 13-47
See Also: "Importing Images" on page 16-27, "Managing Images" on page 12-17, and "Using the Images Finder" on page 10-89

Exporting an Application and Related Files
16-20 Oracle Application Express Application Builder User's Guide
a. Static Files - Select the files to export.
b. File Format - Select how rows in the export file are formatted:
– Choose UNIX to have the resulting file contain rows delimited by line feeds.
– Choose DOS to have the resulting file contain rows delimited by carriage returns and line feeds.
c. Click Export File(s).
About Importing into Another Oracle Application Express InstanceYou cannot use the web interface described in this section to import exported static files into another Oracle Application Express instance. To import exported static files into another Oracle Application Express instance, use SQL*Plus while connected to the database. Note that you must export from and to a workspace having the same name and workspace ID.
Exporting ThemesUse the Export Theme utility to export themes from one Oracle Application Express development instance to a file.
Exporting a Theme from the Export PageTo export an application theme from the Export page:
1. Navigate to the Export page:
a. On the Workspace home page, click the Application Builder icon.
b. On the Application Builder home page, click Export on the Tasks list.
2. Click the Themes tab at the top of the page.
3. On the Themes page:
a. Application - Select an application.
b. Export Theme - Select the theme to export.
c. File Format - Select how rows in the export file are formatted:
– Choose UNIX to have the resulting file contain rows delimited by line feeds.
– Choose DOS to have the resulting file contain rows delimited by carriage returns and line feeds.
d. Click Export Theme.
Exporting a Theme from the Themes PageTo export an application theme from the Themes page:
1. On the Workspace home page, click the Application Builder icon.
2. Select an application.
3. On the Application home page, click Shared Components.
See Also: "Importing Themes" on page 16-28 and "Managing Themes" on page 13-1

Exporting an Application and Related Files
Deploying an Application 16-21
4. Under User Interface, select Themes.
The Themes page appears.
5. On the Tasks list, click Export Theme.
6. On the Themes page:
a. Application - Select an application.
b. Export Theme - Select the theme to export.
c. File Format - Select how rows in the export file are formatted:
– Choose UNIX to have the resulting file contain rows delimited by line feeds.
– Choose DOS to have the resulting file contain rows delimited by carriage returns and line feeds.
d. Click Export Theme.
Exporting Plug-insUse the Export Plug-in utility to export plug-ins from one Oracle Application Express development instance to a file.
To export a Plug-in from the Export page:
1. Navigate to the Export page:
a. On the Workspace home page, click the Application Builder icon.
b. On the Application Builder home page, click Export on the Tasks list.
2. Click Plug-ins.
3. On the Plug-ins page:
a. Application - Select an application
b. Plug-in - Select the plug-in to export.
c. File Format - Select how rows in the export file are formatted:
– Choose UNIX to have the resulting file contain rows delimited by line feeds.
– Choose DOS to have the resulting file contain rows delimited by carriage returns and line feeds.
d. Click Export Plug-in.
Exporting User Interface DefaultsExporting User Interface Defaults is useful when you plan to develop on a target system. User Interface Defaults are divided into two categories, the Table Dictionary, and the Attribute Dictionary.
■ The Table Dictionary consists is specific to tables and columns within a selected schema. These defaults are used over those defined in the Attribute Dictionary.
■ The Attribute Dictionary contains a set of attributes about a column that is used in creating forms and reports. The definitions are matched by column name and a particular definition can be shared among several columns by using synonyms.

Exporting an Application and Related Files
16-22 Oracle Application Express Application Builder User's Guide
When you export User Interface Defaults, all User Interface Defaults for the selected dictionary and schema are exported to a single SQL Command script. When prompted, save this file to your hard drive. The file contains an API call to create table hints by making calls to the application PL/SQL API. You can use this file to import User Interface Defaults to another database and Oracle Application Express instance.
Exporting User Interface Defaults from the Export PageTo export User Interface Defaults from the Export page:
1. Navigate to the Export page:
a. On the Workspace home page, click the Application Builder icon.
b. On the Application Builder home page, click Export on the Tasks list.
2. On the Export page, click User Interface Defaults.
3. On the Export User Interface Defaults - Table Dictionary page:
a. Schema - Select the schema that owns the table associated with the User Interface Defaults.
b. File Format - Select how rows in the export file are formatted:
– Choose UNIX to have the resulting file contain rows delimited by line feeds.
– Choose DOS to have the resulting file contain rows delimited by carriage returns and line feeds.
c. Click Export.
4. To export Attribute Dictionary, click Attribute Dictionary tab.
5. Click Export.
Exporting User Interface Defaults from the User Interface Defaults PageTo export User Interface Defaults from the User Interface Defaults page:
1. On the Workspace home page, click the SQL Workshop icon.
2. Click Utilities.
3. Click User Interface Defaults.
The User Interface Defaults page appears.
4. Select the dictionary you want to export:
■ Manage Table Dictionary - Select this button to export specific tables and columns within a selected schema.
■ Manage Attribute Dictionary - Select this button to export a set of column attributes used to create forms and reports.
5. Under Tasks, click Export.
6. On the Table Dictionary page, select the file format:
■ Choose UNIX to have the resulting file contain rows delimited by line feeds.
See Also: "Importing User Interface Defaults" on page 16-28 and "Managing User Interface Defaults" in Oracle Application Express SQL Workshop Guide.

Importing Export Files
Deploying an Application 16-23
■ Choose DOS to have the resulting file contain rows delimited by carriage returns and line feeds.
7. Click Export.
Exporting FeedbackUse the Export Feedback utility to synchronize feedback from a production or test system to the development system. The development system is identified by using the workspace setting Feedback Synchronization Source Identifier which is set on the Edit Workspace Information page. If exporting from a development system, the export process has an additional attribute called Deployment System where you specify to which deployment system, production or test, you want to synchronize the updated feedback to.
To export Feedback:
1. Navigate to the Export page:
a. On the Workspace home page, click the Application Builder icon.
b. On the Application Builder home page, click Export on the Tasks list.
2. On the Export page, click the Feedback tab.
3. For Export Feedback:
■ Deployment System - Select the name of the deployment systems for which you want to export the feedback entries.
■ Changes Since - select the date of the oldest feedback to export. All feedback from this selected date until the current date is exported.
■ File Format - select the format of the export file.
4. Click Export.
5. Follow on screen instructions.
Exporting Script FilesYou can transfer selected scripts from your current Script Repository to a Script Repository in a different Workspace by using the Export and Import tasks.
To export script files:
1. On the Workspace home page, click the SQL Workshop icon.
2. Click SQL Scripts.
3. On the Tasks list, click Export.
4. Select the appropriate script files and click Add to Export.
5. Review the file name and click Export All.
Select the Remove check box to remove the script.
Importing Export FilesOnce you export an application and any related files, you must import them into the target Oracle Application Express instance before you can install them. Note that you
See Also: "Using SQL Scripts" in Oracle Application Express SQL Workshop Guide

Importing Export Files
16-24 Oracle Application Express Application Builder User's Guide
cannot import an application created in a specific release into an earlier version. As a general rule, always import the application first and then the related files. See "How to Move an Application to Another Instance" on page 16-4.
Topics:■ Importing an Application, Page or Component Export
■ Importing a Websheet
■ Importing Plug-ins
■ Importing Cascading Style Sheets
■ Importing Images
■ Importing Static Files
■ Importing Themes
■ Importing User Interface Defaults
■ Importing Feedback
Importing an Application, Page or Component ExportTo import an Application, Page or Component Export into a target Oracle Application Express instance:
1. Navigate to the Import page:
a. On the Workspace home page, click the Application Builder icon.
b. On the Application Builder home page, click Import.
2. For Specify File:
a. Import file - Navigate to the file.
b. File Type - Select Application, Page, or Component Export.
c. Verify that File Character Set is correct.
d. Click Next.
Once you import a file, you have the option to install it.
3. To install the file, click Next.
The Install Application wizard appears.
4. For the Install wizard:
a. Parsing Schema - Select a schema.
This is the schema against which all of the application's SQL and PL/SQL are parsed.
b. Build Status - Select one of the following:
– Run Application Only - Users can only run an application.
– Run and Build Application - Users can run an application and developers can both run and edit an application.
Tip: You can simplify the steps needed to deploy an application by creating a custom packaged application. See "How to Create a Custom Packaged Application" on page 16-5.

Importing Export Files
Deploying an Application 16-25
Selecting Run Application Only is an effective way to protect an application from modifications from other developers.
c. Install As Application - Select one of the following:
– Auto Assign New Application ID
– Reuse Application ID From Export File
– Change Application ID
Use these options to avoid application ID conflicts. These options come in handy when you have two versions of the same application in the same instance. For example, you might be migrating an application to a production instance and still need to maintain the development version.
d. Click Install.
If you are installing a custom packaged application (that is, one for which you have defined Supporting Objects), the installer prompts you to install the custom packaged installation scripts. Follow the on-screen instructions.
About Importing Application GroupsApplication groups are exported with an application, application exports include an group ID, name, and comments. When importing an application, the application import follows these rules:
■ On import, an application uses an existing group if the ID matches.
■ If no application group exists with the same ID on the target system, then application import looks for another group ID with the same name. If a name match is found, the application is imported with the ID corresponding to this application group name.
■ If no ID or name matches existing application groups on the target system then a new application group is created. The new application group uses the application group ID if that ID is not used in that Oracle Application Express instance. If the group ID is being used, then a new ID is generated.
Importing a Websheet
To import a Websheet into a target Oracle Application Express instance:
1. Navigate to the Import page:
a. On the Workspace home page, click the Application Builder icon.
b. On the Application Builder home page, click Import.
2. For Specify File:
Tip: If you select Run Application Only, the only way to change this setting after you import the application is to log in to Oracle Application Express Administration Services. See "Changing Application Build Status Set During Deployment" in Oracle Application Express Administration Guide.
See Also: "How to Create a Custom Packaged Application" on page 16-5
See Also: "About Websheet Applications" on page 5-1

Importing Export Files
16-26 Oracle Application Express Application Builder User's Guide
a. Import file - Navigate to the file.
b. File Type - Select Websheet Application Export.
c. Click Next.
Once you import a file, you have the option to install it.
3. To install an imported file, click Next.
The Install Application wizard appears.
4. For the Install Application wizard:
a. Install As Application - Select one of the following:
– Auto Assign New Application ID
– Reuse Application ID From Export File
– Change Application ID
Use these options to avoid application ID conflicts. These options come in handy when you have two versions of the same application in the same instance. For example, you might be migrating an application to a production instance and still need to maintain the development version.
b. Click Install.
Importing Plug-insTo import an exported plug-in file:
1. Navigate to the Import page:
a. On the Workspace home page, click the Application Builder icon.
b. On the Application Builder home page, click Import.
2. For Specify File:
a. Import file - Navigate to the file.
b. File Type - Select Plug-in.
c. Verify that File Character Set is correct.
d. Click Next.
Once you import a file, you have the option to install it.
3. To install an imported file, click Next.
4. Click Install Plug-in.
Importing Cascading Style SheetsAfter you import an application into the target Oracle Application Express instance, you must import all related files.
To import a CSS Export file:
1. Navigate to the Import page:
Note: If the plug-in with the same name exists, a dialog displays requesting permission to write over the existing plug-in.

Importing Export Files
Deploying an Application 16-27
a. On the Workspace home page, click the Application Builder icon.
b. On the Application Builder home page, click Import.
2. For Specify File:
a. Import file - Navigate to the file.
b. File Type - Select CSS Export.
c. File Character Set - Verify that File Character Set is correct.
d. Click Next.
Once you import a file, you have the option to install it.
3. To install an imported file, click Next.
4. Click Install CSS.
Importing ImagesAfter you import an application into the target Oracle Application Express instance, you must import all related files.
To import an Image Export file:
1. Navigate to the Import page:
a. On the Workspace home page, click the Application Builder icon.
b. On the Application Builder home page, click Import.
2. On Import Definition:
a. Import file - Navigate to the file.
b. File Type - Select Image Export.
c. File Character Set - Verify that File Character Set is correct.
d. Click Next.
Once you import a file, you have the option to install it.
3. To install an imported file, click Next.
4. Click Install Image.
Importing Static FilesAfter you import an application into the target Oracle Application Express instance, you must import all related files.
To import a static file:
1. Navigate to the Import page:
a. On the Workspace home page, click the Application Builder icon.
b. On the Application Builder home page, click Import.
2. For Specify File:
See Also: "Using Custom Cascading Style Sheets" on page 13-47 and "Exporting Cascading Style Sheets" on page 16-18
See Also: "Managing Images" on page 12-17, "Using the Images Finder" on page 10-89, and "Exporting Images" on page 16-19

Importing Export Files
16-28 Oracle Application Express Application Builder User's Guide
a. Import file - Navigate to the file.
b. File Type - Select File Export.
c. File Character Set - Verify that File Character Set is correct.
d. Click Next.
Once you import a file, you have the option to install it.
3. To install an imported file, click Next.
4. Click Install Static Files.
Importing ThemesAfter you import an application into the target Oracle Application Express instance, you must import all related files.
To import a Theme Export file:
1. Navigate to the Import page:
a. On the Workspace home page, click the Application Builder icon.
b. On the Application Builder home page, click Import.
2. On Import Definition, select the following:
a. Import file - Navigate to the file.
b. File Type - Select Theme Export.
c. File Character Set - Verify that File Character Set is correct.
d. Click Next.
Once you import a file, you have the option to install it.
3. To install an imported file, click Next.
4. Click Install Theme.
Importing User Interface DefaultsUser Interface Defaults enables you to assign default user interface properties to a table, column, or view within a specified schema.
After you import an application into the target Oracle Application Express instance, you must import all related files.
To import User Interface Defaults:
1. Navigate to the Import page:
a. On the Workspace home page, click the Application Builder icon.
b. On the Application Builder home page, click Import.
2. Select an application.
3. On Import Definition:
a. Import file - Navigate to the file.
See Also: "Exporting Static Files" on page 16-19
See Also: "Managing Themes" on page 13-1 and "Exporting Themes" on page 16-19

Installing Export Files
Deploying an Application 16-29
b. File Type - Select User Interface Defaults.
c. File Character Set - Verify that File Character Set is correct.
d. Click Next.
Once you import a file, you have the option to install it.
4. To install an imported file, click Next.
5. Click Install User Interface Defaults.
Importing FeedbackTo import Feedback:
1. Navigate to the Import page:
a. On the Workspace home page, click the Application Builder icon.
b. On the Application Builder home page, click Import.
2. Select Feedback.
3. For File Character Set, verify that File Character Set is correct and click Next.
Once you import a file, you have the option to install it.
4. To install an imported file, click Next.
5. Click Install Feedback.
Installing Export FilesAfter you import an application and any related files into the target Oracle Application Express instance, the files are stored in the Export Repository. Next, you must install them.
You can install export files in the following ways:
■ After you import the export file, click the Install button and follow the on-screen instructions.
■ Import the export files into Application Builder and then install the files from the Export Repository.
■ Install the export files from SQL*Plus.
Topics:■ Accessing the Export Repository
■ Installing an Application Export from the Export Repository
■ Installing Other Files from the Export Repository
■ Deleting Files from the Export Repository
■ Installing Export Files from SQL*Plus
See Also: "Managing User Interface Defaults" in Oracle Application Express SQL Workshop Guide and "Exporting User Interface Defaults" on page 16-21
Tip: You can simplify the steps needed to deploy an application by creating a custom packaged application. See "How to Create a Custom Packaged Application" on page 16-5.

Installing Export Files
16-30 Oracle Application Express Application Builder User's Guide
Accessing the Export RepositoryWhen you import an application and any related files into a target Oracle Application Express instance, the files are stored in the Export Repository. You can use the Export Repository to manage archived application exports, imports, and other files.
To access the Export Repository:
1. On the Workspace home page, click the Application Builder icon.
2. Select an application.
3. On the Application home page, click Utilities.
4. Click Export Repository.
The Export Repository appears.
Installing an Application Export from the Export RepositoryAfter you import an application export into an Oracle Application Express instance, you must install it before it can become active or available in Application Builder.
To install an application export from the Export Repository:
1. Navigate to the Export Repository. See "Accessing the Export Repository" on page 16-30.
2. Select an application export and click Install in the Action column.
3. Specify the following:
a. Parsing Schema - Select a schema.
This is the schema against which all of the application's SQL and PL/SQL are parsed.
b. Build Status - Select one of the following:
– Run Application Only
– Run and Build Application
Select Run Application Only to run the application in the target instance and make it inaccessible to developers.
c. Install As Application - Select one of the following:
– Auto Assign New Application ID
– Reuse Application ID from Export File
– Change Application ID
Use these options to avoid application ID conflicts. Use these options when you must have two versions of the same application in the same instance. For example, you might be migrating an application to a production instance and still need to maintain the development version.
d. Click Install.
Tip: If you select Run Application Only, the only way to change this setting after you import the application is to log in to Oracle Application Express Administration Services. See "Changing Application Build Status Set During Deployment" in Oracle Application Express Administration Guide.

Installing Export Files
Deploying an Application 16-31
About Installing a Custom Packaged ApplicationIf you are installing a custom packaged application, the installer prompts you to install the custom packaged installation scripts. Follow the on-screen instructions.
Installing Other Files from the Export RepositoryAfter you import files into an Oracle Application Express instance, you must install them before they can become active or available in Application Builder.
To install files stored in the Export Repository:
1. Navigate to the Export Repository. See "Accessing the Export Repository" on page 16-30.
2. Select the file to be installed and click Install in the Action column.
3. Follow the on-screen instructions.
Deleting Files from the Export RepositoryYou can delete a file from the Export Repository.
To delete a file from the Export Repository:
1. Navigate to the Export Repository. See "Accessing the Export Repository" on page 16-30.
2. Select the file to be deleted and click Delete Checked.
Installing Export Files from SQL*PlusYou can also install export files from SQL*Plus.
The following restrictions apply for export files:
■ The export file must originate from the same user database account as the one into which you are installing.
■ If the export file is a database application, the application ID is overwritten. Therefore, the target workspace must own the ID of the application being installed.
■ If the export file contains Supporting Object scripts, the scripts are not run when the application is installed. You can either log in to the Application Builder to install Supporting Objects, or copy the installation scripts to a standalone SQL*Plus script and run them from there.
■ If the export file is a Websheet application, the target workspace must have Websheet Database objects set-up.
■ If the export file is a Websheet application, the export file must be installed using the Websheet schema in the target workspace.
■ If the export file is a Websheet application, the application ID is overwritten.
Topics:■ Using SQL*Plus to Install Export Files
See Also: "How to Create a Custom Packaged Application" on page 16-5
About Publishing the Database Application URL
16-32 Oracle Application Express Application Builder User's Guide
Using SQL*Plus to Install Export FilesTo install Oracle Application Express export files from SQL*Plus:
1. Log in to SQL*Plus.
2. Run the export file.
For example, if your export file is names f144.sql by default, you would type @f144 at the command prompt.
About Publishing the Database Application URLOnce you have deployed your application, loaded data, and created users, you can publish your production URL. You can determine the URL to your application by either:
■ Selecting the application on the Application home page and right-clicking the Run button. Then, select Copy link address or Copy link location depending on your browser.
■ Running the application and then copying the URL.
The Run icon gets its value from the Home link attribute on the Edit Security Attributes page. This link is only referenced by this icon and by applications that do not use the Oracle Application Express Login API. Consider the following example:
http://apex.somewhere.com/pls/apex/f?p=11563:1:3397731373043366363
Where:
■ apex.somewhere.com is the URL of the server.
■ pls is the indicator to use the mod_plsql cartridge.
■ apex is the database access descriptor (DAD) name. The DAD describes how Oracle HTTP Server connects to the database server so that it can fulfill an HTTP request. The default value is apex.
■ f?p= is a prefix used by Oracle Application Express.
■ 11563 is the application being called.
■ 1 is the page within the application to be displayed.
■ 3397731373043366363 is the session number.
To run this example application, you would use the URL:
http://apex.somewhere.com/pls/apex/f?p=11563:1
When users log in, they receive unique session numbers. Do not include the session number as part of the URL.
About Publishing the Websheet Application URLOnce you complete your Websheet application, you can publish your production URL. You can determine the URL to your Websheet application by either:
■ Selecting the Websheet application on the Application home page and right-clicking the Run button. Then, select Copy link address or Copy link location depending on your browser.
See Also: "Accessing the Edit Definition Page" on page 7-15

Using Build Options to Control Configuration
Deploying an Application 16-33
■ Running the application and then copying the URL.
Consider the following example:
http://apex.somewhere.com/pls/apex/ws?p=123:home
Where:
■ apex.somewhere.com is the URL of the server.
■ pls is the indicator to use the mod_plsql cartridge.
■ apex is the database access descriptor (DAD) name. The DAD describes how Oracle HTTP Server connects to the database server so that it can fulfill an HTTP request. The default value is apex.
■ ws?p= is a prefix used by Oracle Application Express to link to a Websheet application.
■ 123 is the Websheet application being called.
■ home is the home page alias defined as Home Page on the Application Properties page.
To run this example application, you would use the URL:
http://apex.somewhere.com/pls/apex/ws?p=123:home
When users log in, they receive unique session numbers. Do not include the session number as part of the URL.
Using Build Options to Control ConfigurationBuild options enable you to conditionally display specific functionality within an application.
Build options have two possible values: INCLUDE and EXCLUDE. If you specify an attribute as being included, then the Application Express engine considers it part of the application definition at runtime. Conversely, if you specify an attribute as being excluded, then the Application Express engine treats it as if it did not exist.
Topics:■ Creating Build Options
■ Managing Build Options
■ Exporting Build Options or Build Option Status
■ Viewing the Build Option Utilization Report
Creating Build OptionsYou create a build option for an application on the Build Options page.
To create a build option:
1. On the Workspace home page, click the Application Builder icon.
2. Select an application.
See Also: "Changing Build Status for Multiple Applications" in Oracle Application Express Administration Guide and discussions of the GET_BUILD_OPTION_STATUS and SET_BUILD_OPTION_STATUS procedures in "APEX_UTIL" in Oracle Application Express API Reference

Using Build Options to Control Configuration
16-34 Oracle Application Express Application Builder User's Guide
3. On the Application home page, click Shared Components.
4. Under Logic, click Build Options.
5. To create a new build option, click Create.
6. Follow the on-screen instructions.
Managing Build OptionsBuild options have two possible values: INCLUDE and EXCLUDE. If you specify an attribute as being included, then the Application Express engine considers it part of the application definition at runtime. Conversely, if you specify an attribute as being excluded, then the Application Express engine treats it as if it did not exist.
To include or exclude a build option:
1. On the Workspace home page, click the Application Builder icon.
2. Select an application.
3. On the Application home page, click Shared Components.
4. Under Logic, click Build Options.
The Build Options page appears.
5. You can change the appearance of the page by using the Search bar at the top of the page. Available controls include:
■ Select columns to search - Resembles a magnifying glass. Click this icon to narrow your search. To search all columns, select All Columns.
■ Text area - Enter case insensitive search criteria (wildcard characters are implied) to search for build options by name and then click Go.
■ Go button - Executes a search or applies a filter.
■ View Icons - Displays each build option as a large icon. To edit a build option, click the appropriate icon.
■ View Report - Displays each build option as a line in a report. To edit a build option, click Name.
■ Actions menu - Use the Actions menu to customize the report view. See "About the Actions Menu" on page 9-6.
6. Select a build option name.
The Create/Edit Build Option page appears.
7. For Status, select either INCLUDE or EXCLUDE.
Selecting a Build OptionOnce you create a build option, you can select it for a page, a component (report, chart, or form), a specific page control (button, item, list of value), and another shared component (breadcrumb, list, or tab). You apply build options to a page, component, page control, or shared component by navigating to the appropriate attributes page. Most attributes pages contain a Configuration section where you can select defined build options.
See Also: "Altering Page Attributes" on page 8-20

Using Build Options to Control Configuration
Deploying an Application 16-35
Exporting Build Options or Build Option StatusYou can export build options or build option status on the Component Export page. Exporting build option status is an effective way to toggle build options on or off within another environment. For example, you can use this feature to deploy a production application with a hidden feature by associating the components of the hidden feature with a build option having the status of EXCLUDE. After deployment, you can enable the hidden feature by changing the status of the build option to INCLUDE and then exporting the Build Option Status.
Once you apply the Build Options Status to the production instance, the new feature appears.
To export build options or build option status:
1. Navigate to the Component Export page:
a. On the Workspace home page, click the Application Builder icon.
b. Select an application.
c. Click Shared Components.
d. From the Tasks list, click Export Application Components.
The Component Export page appears.
2. Select the build options to export:
a. Click the Components tab and select the build options to export.
b. Click Add to Export.
3. Select Build Option Status to be exported:
a. Click the Build Options Status tab and select the build options to export.
b. Click Add to Export.
4. Click Next.
5. On Components to Export:
a. From File Format, select how rows in the export file are formatted:
– Choose UNIX to have the resulting file contain rows delimited by line feeds.
– Choose DOS to have the resulting file contain rows delimited by carriage returns and line feeds.
b. Use the As of field to export a page as it was previously defined. Specify the number of minutes in the field provided.
This utility uses the DBMS_FLASHBACK package. Because the timestamp to System Change Number (SCN) mapping is refreshed approximately every five minutes, you may have to wait that amount of time to locate the version for which you are looking. The time undo information is retained and influenced by the startup parameter UNDO_RETENTION (the default is three hours). However, this only influences the size of the undo tablespace. While two databases may have the same UNDO_RETENTION parameter, you are able to go back further in time on a database with fewer transactions because it is not filling the undo tablespace, forcing older data to be archived.
See Also: "How to Create a Custom Packaged Application" on page 16-5 and "Exporting Application Components" on page 16-15

Using Build Options to Control Configuration
16-36 Oracle Application Express Application Builder User's Guide
c. Click Export Components.
Viewing the Build Option Utilization ReportOnce you create a build option, a Utilization tab appears on the Build Options page. This report details build option utilization in the current application.
To view the Build Option Utilization report:
1. Navigate to the Build Options page:
a. Navigate to the Workspace home page.
b. Click the Application Builder icon.
c. On the Application home page, click Shared Components.
d. Under Application, click Build Options.
The Build Options page appears.
2. On the Build Options page, click Utilization.
The Build Option Utilization report appears.
3. Select a build option and click Go.
Note: The Utilization tab only appears on the Build Options page after you create a build option.

Advanced Programming Techniques 17-1
17Advanced Programming Techniques
This section provides information about advanced programming techniques including working with automatic data manipulation language, establishing database links, using collections, running background SQL, utilizing Web services, and managing user preferences.
Topics:■ About DML Locking
■ Accessing Data with Database Links
■ Sending Email from an Application
■ Using Collections
■ Creating Custom Activity Reports Using APEX_ACTIVITY_LOG
■ Running Background PL/SQL
■ Implementing Web Services
■ Implementing Plug-ins
■ Implementing Dynamic Actions
■ About BLOB Support in Forms and Reports
■ Using Screen Reader Mode in Your Database Applications
■ Using High Contrast Mode in Your Database Applications
■ Creating Applications with Data Loading Capability
■ Managing Component Settings
About DML LockingWhen automatic data manipulation language (DML) is used in Oracle Application Express to update or delete rows of a table, a transaction is initiated to first lock the row, verify if it has changed since it was displayed on the page, and then finally issue the actual UPDATE or DELETE statement for the row.
In some environments where locking of rows is prevalent, you may want to control the DML operation and determine if the DML operation:
■ waits indefinitely
See Also: Oracle Application Express API Reference and "Deploying an Application" on page 16-1

Accessing Data with Database Links
17-2 Oracle Application Express Application Builder User's Guide
■ fails immediately
■ waits for a specified period of time
About APEX_DML_LOCK_WAIT_TIMEYou can set the value of an application substitution string, an application item, or a page item to APEX_DML_LOCK_WAIT_TIME to control the DML operation. The following values are supported:
■ If null (the default), results in the same behavior as previous versions of Oracle Application Express, that is, wait indefinitely.
■ If 0, fail immediately if the row is locked by another database session.
■ If > 0 and the row is locked, wait for the specified number of seconds.
When set in an application, the value for APEX_DML_LOCK_WAIT_TIME applies to all UPDATE and DELETE DML operations using Automatic DML in the entire application. To control a specific Automatic DML process, update the value of APEX_DML_LOCK_WAIT_TIME before the Automatic DML process and reset it after the Automatic DML process. Note that this does not affect updates and deletes using tabular forms.
About FSP_DML_LOCK_ROWYou can also set the value of an application substitution string, an application item, or a page item to FSP_DML_LOCK_ROW to control the DML operation. The following values are supported:
■ If the value is set to FALSE, then no SELECT FOR UPDATE is issued.
■ If the value is anything other than FALSE, the default behavior of SELECT FOR UPDATE is performed when issuing an UPDATE or DELETE DML operation using Automatic DML.
Accessing Data with Database LinksBecause the Workspace home page runs in an Oracle database, you have access to all distributed Oracle database capabilities. Typically, you perform distributed database operations using database links.
A database link is a schema object in one database that enables you to access objects on another database. Once you have created the database link you can access the remote objects by appending @dblink to the table or view name where dblink is the Database Link Name you specify in the Create Database Object Wizard.
To create a database link:
1. On the Workspace home page, click SQL Workshop and then Object Browser.
Object Browser home page appears.
2. Click Create.
3. Select Database Link and click Next.
Note: By default, the CREATE DATABASE LINK system privilege is not granted to a provisioned workspace or database user. To use this feature, a DBA or administrator must grant this specific privilege to the database user in the user's workspace. See "Creating Database Links" in Oracle Database Administrator's Guide.

Using Collections
Advanced Programming Techniques 17-3
4. Follow the on-screen instructions.
Note that Database Link names must conform to Oracle naming conventions and cannot contain spaces, or start with a number or underscore.
To view an existing a database link:
1. On the Workspace home page, click SQL Workshop and then Object Browser.
Object Browser appears.
2. Select the object type Database Links at the top of the page.
Sending Email from an ApplicationYou can use the APEX_MAIL package to send an email from an Oracle Application Express application. This package is built on top of the Oracle supplied UTL_SMTP package. Because of this dependence, the UTL_SMTP package must be installed and functioning to use APEX_MAIL.
APEX_MAIL contains three procedures. Use APEX_MAIL.SEND to send an outbound email message from your application. Use APEX_MAIL.PUSH_QUEUE to deliver mail messages stored in APEX_MAIL_QUEUE. Use APEX_MAIL.ADD_ATTACHMENT to send an outbound email message from your application as an attachment. For complete descriptions of all Application Programming Interface packages for Oracle Application Express, see Oracle Application Express API Reference.
Using CollectionsCollections enable you to temporarily capture one or more nonscalar values. You can use collections to store rows and columns currently in session state so they can be accessed, manipulated, or processed during a user's specific session. You can think of a collection as a bucket in which you temporarily store and name rows of information.
The following are examples of when you might use collections:
■ When you are creating a data-entry wizard in which multiple rows of information first need to be collected within a logical transaction. You can use collections to temporarily store the contents of the multiple rows of information, before performing the final step in the wizard when both the physical and logical transactions are completed.
■ When your application includes an update page on which a user updates multiple detail rows on one page. The user can make many updates, apply these updates to a collection and then call a final process to apply the changes to the database.
■ When you are building a wizard where you are collecting an arbitrary number of attributes. At the end of the wizard, the user then performs a task that takes the information temporarily stored in the collection and applies it to the database.
See Also: "Managing Database Objects with Object Browser" in Oracle Application Express SQL Workshop Guide and "Database Links" in Oracle Database Administrator's Guide
See Also: Oracle Database PL/SQL Packages and Types Reference for more information about the UTL_SMTP package
See Also: "APEX_MAIL" in Oracle Application Express API Reference and "Configuring Email" in Oracle Application Express Administration Guide

Creating Custom Activity Reports Using APEX_ACTIVITY_LOG
17-4 Oracle Application Express Application Builder User's Guide
You insert, update, and delete collection information using the PL/SQL API APEX_COLLECTION. For complete descriptions of all Application Programming Interface packages for Oracle Application Express, see Oracle Application Express API Reference.
Creating Custom Activity Reports Using APEX_ACTIVITY_LOGThe APEX_ACTIVITY_LOG view records all activity in a workspace, including developer activity and application runtime activity. You can use APEX_ACTIVITY_LOG to view to query all activity for the current workspace. For example, you can use this view to develop monitoring reports within a specific application to provide real-time performance statistics.
Table 17–1 describes the columns in the APEX_ACTIVITY_LOG view.
To conserve space in the activity log, only the first log entry of each unique session contains the IP address and web browser user agent.
The following example demonstrates how to create a report that displays the total number of page views and the average page view time in the past 24 hours for application 9529, and grouped by userid:
SELECT COUNT(*), AVG(elap), userid
See Also: "APEX_COLLECTION" in Oracle Application Express API Reference
Table 17–1 Columns in APEX_ACTIVITY_LOG
Column Type Description
time_stamp DATE Date and time that activity was logged at the end of the page view.
component_type VARCHAR2(255) Reserved for future use.
component_name VARCHAR2(255) Reserved for future use.
component_attribute VARCHAR2(4000) Title of page.
information VARCHAR2(4000) Reserved for future use.
elap NUMBER Elapsed time of page view in seconds.
num_rows NUMBER Number of rows processed on page.
userid VARCHAR2(255) User ID performing page view.
ip_address VARCHAR2(4000) IP address of client.
ir_report_id NUMBER Interactive report ID
ir_search VARCHAR2 Interactive report search criteria entered by users.
user_agent VARCHAR2(4000) web browser user agent of client.
flow_id NUMBER Application ID.
step_id NUMBER Page number.
session_id NUMBER Oracle Application Express session identifier.
sqlerrm VARCHAR2(4000) SQL Error message.
sqlerrm_component_type VARCHAR2(255) Reserved for future use.
sqlerrm_component_name VARCHAR2(255) Reserved for future use.

Running Background PL/SQL
Advanced Programming Techniques 17-5
FROM APEX_ACTIVITY_LOG WHERE time_stamp > (SYSDATE-1) AND flow_id = 9529GROUP BY userid
Keep in mind that logging of activity in an Oracle Application Express instance is rotated between two different log tables. Because there are two log tables, logging information is only as current as the oldest available entry in the logs. To persist your application specific log information for all time, you must either copy the log information into your own application table or implement logging directly in your application.
Running Background PL/SQLYou can use the APEX_PLSQL_JOB package to run PL/SQL code in the background of your application. This is an effective approach for managing long running operations that do not need to complete for a user to continue working with your application.
APEX_PLSQL_JOB is a wrapper package around DBMS_JOB functionality offered in the Oracle database. Note that the APEX_PLSQL_JOB package only exposes that functionality which is necessary to run PL/SQL in the background.
Table 17–2 describes the functions available in the APEX_PLSQL_JOB package.
You can view all jobs submitted to the APEX_PLSQL_JOB package using the APEX_PLSQL_JOB view.
For complete descriptions of all Application Programming Interface packages for Oracle Application Express, see Oracle Application Express API Reference.
See Also: "Name" on page 7-16 for information on enabling logging on the Edit Definition page
Table 17–2 APEX_PLSQL_JOB Package: Available Functions
Function or Procedure Description
SUBMIT_PROCESS Use this procedure to submit background PL/SQL. This procedure returns a unique job number. Because you can use this job number as a reference point for other procedures and functions in this package, it may be useful to store it in your own schema.
UPDATE_JOB_STATUS Call this procedure to update the status of the currently running job. This procedure is most effective when called from the submitted PL/SQL.
TIME_ELAPSED Use this function to determine how much time has elapsed since the job was submitted.
JOBS_ARE_ENABLED Call this function to determine whether the database is currently in a mode that supports submitting jobs to the APEX_PLSQL_JOB package.
PURGE_PROCESS Call this procedure to clean up submitted jobs. Submitted jobs stay in the APEX_PLSQL_JOBS view until either Oracle Application Express cleans out those records, or you call PURGE_PROCESS to manually remove them.
See Also: "APEX_PLSQL_JOB" in Oracle Application Express API Reference
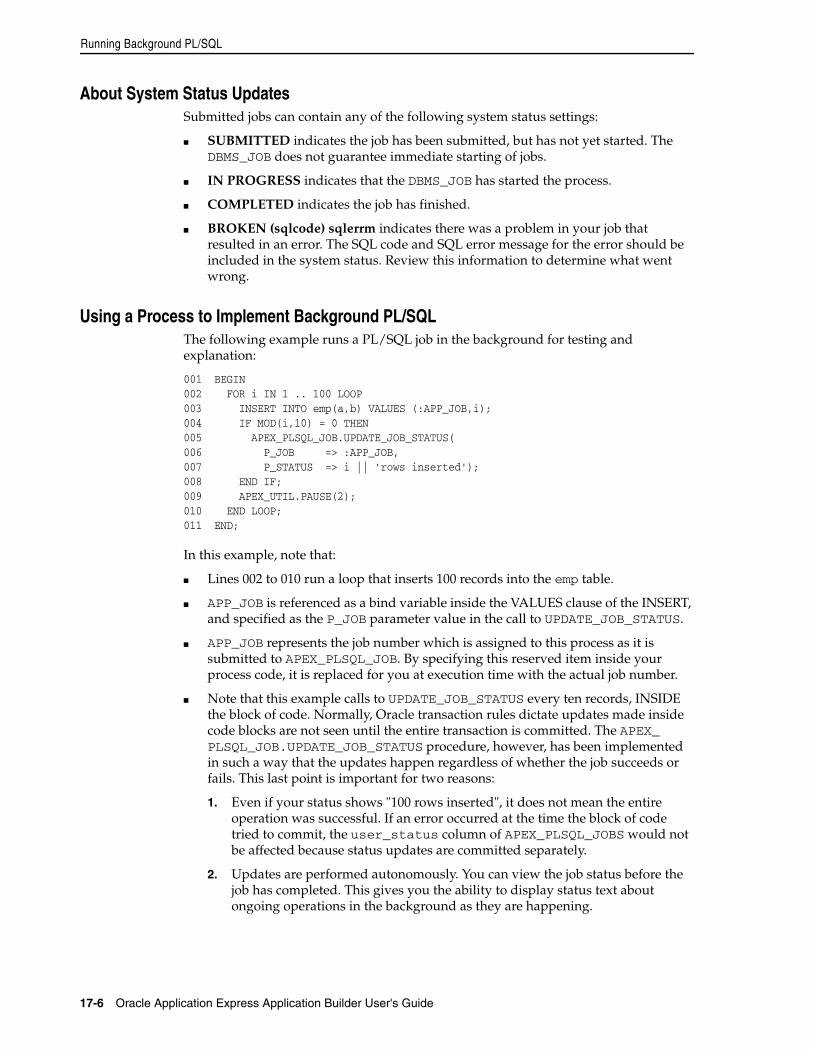
Running Background PL/SQL
17-6 Oracle Application Express Application Builder User's Guide
About System Status UpdatesSubmitted jobs can contain any of the following system status settings:
■ SUBMITTED indicates the job has been submitted, but has not yet started. The DBMS_JOB does not guarantee immediate starting of jobs.
■ IN PROGRESS indicates that the DBMS_JOB has started the process.
■ COMPLETED indicates the job has finished.
■ BROKEN (sqlcode) sqlerrm indicates there was a problem in your job that resulted in an error. The SQL code and SQL error message for the error should be included in the system status. Review this information to determine what went wrong.
Using a Process to Implement Background PL/SQLThe following example runs a PL/SQL job in the background for testing and explanation:
001 BEGIN002 FOR i IN 1 .. 100 LOOP003 INSERT INTO emp(a,b) VALUES (:APP_JOB,i);004 IF MOD(i,10) = 0 THEN005 APEX_PLSQL_JOB.UPDATE_JOB_STATUS(006 P_JOB => :APP_JOB,007 P_STATUS => i || 'rows inserted');008 END IF;009 APEX_UTIL.PAUSE(2);010 END LOOP;011 END;
In this example, note that:
■ Lines 002 to 010 run a loop that inserts 100 records into the emp table.
■ APP_JOB is referenced as a bind variable inside the VALUES clause of the INSERT, and specified as the P_JOB parameter value in the call to UPDATE_JOB_STATUS.
■ APP_JOB represents the job number which is assigned to this process as it is submitted to APEX_PLSQL_JOB. By specifying this reserved item inside your process code, it is replaced for you at execution time with the actual job number.
■ Note that this example calls to UPDATE_JOB_STATUS every ten records, INSIDE the block of code. Normally, Oracle transaction rules dictate updates made inside code blocks are not seen until the entire transaction is committed. The APEX_PLSQL_JOB.UPDATE_JOB_STATUS procedure, however, has been implemented in such a way that the updates happen regardless of whether the job succeeds or fails. This last point is important for two reasons:
1. Even if your status shows "100 rows inserted", it does not mean the entire operation was successful. If an error occurred at the time the block of code tried to commit, the user_status column of APEX_PLSQL_JOBS would not be affected because status updates are committed separately.
2. Updates are performed autonomously. You can view the job status before the job has completed. This gives you the ability to display status text about ongoing operations in the background as they are happening.

Implementing Web Services
Advanced Programming Techniques 17-7
Implementing Web ServicesWeb services enable applications to interact with one another over the web in a platform-neutral, language independent environment. In a typical Web services scenario, a business application sends a request to a service at a given URL by using the protocol over HTTP. The service receives the request, processes it, and returns a response. You can incorporate calls with external Web services in applications developed in Application Builder.
Web services are typically based on Simple Object Access Protocol (SOAP) or Representational State Transfer (REST) architectures. SOAP is a World Wide Web Consortium (W3C) standard protocol for sending and receiving requests and responses across the Internet. SOAP messages can be sent back and forth between a service provider and a service user in SOAP envelopes. RESTful Web services are resource oriented. The scope of the Web service is found in the URI and the method of the service is described by the HTTP method that is used such as GET, POST, PUT, HEAD, and DELETE.
SOAP offers two primary advantages:
■ SOAP is based on XML, and therefore easy to use.
■ SOAP messages are not blocked by firewalls because this protocol uses simple transport protocols, such as HTTP.
REST offers similar advantages:
■ REST messages are also not blocked by firewalls because this protocol uses the HTTP protocol.
■ REST requests do not require the overhead of XML and SOAP envelopes and inputs are typically provided in the URI.
Topics:■ Understanding Web Service References
■ Working with SSL Enabled Web Services
■ Creating a Web Service Reference Based on a WSDL
■ Creating a Web Service Reference Manually
■ Creating a RESTful Web Service Reference
■ Using the Web Service Reference Repository
■ Testing a Web Service Reference Created from a WSDL
■ Testing a Web Service Reference Created Manually
■ Testing a REST Web Service Reference
■ Creating an Input Form and Report on a Web Service
■ Creating a Form on a Web Service
■ Invoking a Web Service as a Process
■ Editing a Web Service Process
Tip: If you run Oracle Application Express with Oracle Database 11g Release 1 (11.1), you must enable network services to use Web services. See "Enabling Network Services in Oracle Database 12c" on page 15-5

Implementing Web Services
17-8 Oracle Application Express Application Builder User's Guide
■ Viewing a Web Service Reference History
■ Exposing a Report Region as a RESTful Web Service
Understanding Web Service ReferencesTo use Web services in Oracle Application Express, you create a Web service reference using a wizard. Web service references can be based on a Web Services Description Language (WSDL) document, RESTful style, or created manually by supplying information about the service.
When you create a Web service reference based on a WSDL, the wizard analyzes the WSDL and collects all the necessary information to create a valid SOAP message, including:
■ The URL used to post the SOAP request over HTTP(S)
■ A Universal Resource Identifier (URI) identifying the SOAP HTTP request
■ Operations of the Web Service
■ Input parameters for each operation
■ Output parameters for each operation
When you create a Web service reference manually, you supply the necessary information to create a valid SOAP request, including:
■ The URL used to post the SOAP request over HTTP(S)
■ A Universal Resource Identifier (URI) identifying the SOAP HTTP request
■ The SOAP envelope for the request, including any item substitutions
■ Optionally the name of a collection to store the response from the Web service
When you create a RESTful Web service reference, you supply the necessary information about the structure of the request and response including:
■ A Universal Resource Identifier (URI) identifying the RESTful request
■ The HTTP method identifying the method of the Web service
■ HTTP Headers, if required, that are part of the request
■ The type of input expected by the Web service
■ The format of the response and how to identify the response parameters
Accessing the Web Service References PageYou manage Web service references on the Web Service References page.
To access the Web Service References page:
1. On the Workspace home page, click the Application Builder icon.
The Application Builder home page appears.
2. Select an application.
Note: The SOAP 1.1 specification is a W3C note. SOAP Version 1.2 specification is a W3C recommendation.
For information about Simple Object Access Protocol (SOAP) see:
http://www.w3.org/TR/SOAP/

Implementing Web Services
Advanced Programming Techniques 17-9
The Application home page appears.
3. Click Shared Components.
The Shared Components page appears.
4. Under Logic, click Web Service References.
The Web Service References page appears.
Specifying an Application Proxy Server AddressIf your environment requires a proxy server to access the Internet, you must specify a proxy server address on the Application Attributes page before you can create a Web service reference.
To specify a proxy address for an application:
1. On the Workspace home page, click the Application Builder icon.
The Application Builder home page appears.
2. Select an application.
Application home page appears.
3. Click Edit Application Properties.
4. Under Properties, enter the proxy server in the Proxy Server field.
5. Click Apply Changes.
Working with SSL Enabled Web ServicesSecure Sockets Layer (SSL) is an industry standard protocol that uses RSA public key cryptography with symmetric key cryptography to provide authentication, encryption, and data integrity.
If the Web service that you need to interact with is SSL-enabled (that is, https displays in the URL to the Web service), you must create a wallet and configure Oracle Application Express to use the wallet. A wallet is a password-protected container that stores authentication and signing credentials (including private keys, certificates, and trusted certificates) needed by SSL.
Creating a Web Service Reference Based on a WSDLWhen you create a Web service reference based on a WSDL, you must decide how to locate the WSDL. You can locate a WSDL in two ways:
■ By searching a Universal Description, Discovery and Integration (UDDI) registry
■ By entering the URL to the WSDL document
A UDDI registry is a directory where businesses register their Web services.
Topics:■ Creating a Web Service Reference by Searching a UDDI Registry
■ Creating a Web Service Reference by Specifying a WSDL Document
See Also: "Configuring Wallet Information" in Oracle Application Express Administration Guide

Implementing Web Services
17-10 Oracle Application Express Application Builder User's Guide
Creating a Web Service Reference by Searching a UDDI RegistryTo create a Web service by searching a UDDI registry:
1. Navigate to the Web Service References page. See "Accessing the Web Service References Page" on page 17-8.
2. Click Create.
3. Select Based on WSDL and click Next.
4. When prompted to search a UDDI registry to find a WSDL, click Yes then Next.
5. For UDDI Location, enter a URL endpoint to a UDDI registry and click Next.
6. For Search, specify the following:
a. Search Type - Specify whether to search for a business name or a service name. You cannot search for both.
b. Name - Enter the business name or service name to search for. Use the percent (%) symbol as a wildcard character.
c. Optionally indicate if the search should be case-sensitive or an exact match.
d. Click Search.
e. When the search results appear, make a selection and click Next.
A summary page appears describing the selected Web service.
7. Review your selection and click Next to continue.
The URL to the WSDL document displays in the WSDL Location field.
8. Click Finish.
The Web service reference is added to the Web Service References Repository.
Creating a Web Service Reference by Specifying a WSDL DocumentTo create a Web service by specifying a URL to a specific WSDL document:
1. Navigate to the Web Service References page. See "Accessing the Web Service References Page" on page 17-8.
2. Click Create.
3. Select Based on WSDL and click Next.
4. When prompted to search a UDDI registry to find a WSDL, click No then Next.
5. In WSDL Location, enter the URL to the WSDL document.
6. For Username, enter the username required to access the WSDL.
7. For Password, enter the password required to access the WSDL.
8. Click Next.
The Web Service Details page appears.
9. For Basic Authentication, select:
■ No - Select this option if authentication credentials are not sent as part of the HTTP request.
■ Yes - Select this option if authentication credentials are sent as part of the HTTP request. Web services that employ basic authentication usually also use
Implementing Web Services
Advanced Programming Techniques 17-11
the HTTPS (SSL) protocol since the username and password are sent in clear text.
10. Click Create Reference.
The Web service reference is added to the Web Service References Repository.
11. On the Create page, the following selections are available:
■ View Web Service References - Select to go to the Web Service Reference page.
■ Create Form on Web Service - Select to create a Form for this Web Service Reference. See "Creating a Form After Creating a Reference" on page 17-17.
■ Create Form & Report on Web Service - Select to create a Form and Report for this Web Service Reference. See "Creating a Form and Report After Creating a Reference" on page 17-15.
Creating a Web Service Reference ManuallyTo create a Web service reference manually:
1. Navigate to the Web Service References page. See "Accessing the Web Service References Page" on page 17-8.
2. Click Create.
3. Select Manual and click Next.
The Create/Edit Web Service page appears.
4. Under Web Service, for Name, enter a name to identify the reference.
5. Under Service Description. make these changes:
a. URL - Enter the URL used to post the SOAP request over HTTP. This corresponds to the soap:address location of a service port in the WSDL.
b. Action - Enter the intent of the SOAP HTTP request (optional). The value is a URI identifying the intent. SOAP places no restrictions on the format or specificity of the URI or requires that it is resolvable.
c. Proxy - Enter a proxy to override the application proxy for this service.
d. SOAP Version - Select 1.1 or 1.2.
e. Basic Authentication - Choose whether the Web service requires authentication. Select Yes or No.
6. Under SOAP Envelope, for SOAP Envelope, enter the SOAP envelope to be used for the SOAP request to the Web service.
7. Under SOAP Response, for Store Response in Collection, enter the name of a collection to store the response (optional). The response is stored in the CLOB001 column.
8. Click Create.
The Web service reference is added to the Web Service References Repository.
Note: You can reference items from session state in the SOAP envelope by using #ITEM_NAME# syntax.

Implementing Web Services
17-12 Oracle Application Express Application Builder User's Guide
Creating a RESTful Web Service ReferenceTo use a RESTful Web service from your application, you must create a RESTful Web service reference.
To create a RESTful Web service reference:
1. Navigate to the Web Service References page. See "Accessing the Web Service References Page" on page 17-8.
2. Click Create.
3. Select REST and click Next.
4. For REST Details, specify the following:
a. Name - Enter a name to identify the reference.
b. URL - Enter the URL endpoint of the Web service.
c. Proxy - Enter a proxy to override the application proxy for this service (optional). This setting is overridden by the proxy setting for this instance. See "Creating a Proxy Server for an Instance" in Oracle Application Express Administration Guide.
d. HTTP Method - Choose the http method used for the request to the Web service. Select GET, HEAD, POST, PUT or DELETE.
e. Basic Authentication - Select Yes to require HTTP Basic Authentication. Otherwise, select No.
f. REST HTTP Headers - Enter the names of the HTTP headers to send with the request.
g. Click Next.
5. For REST Input parameters, specify the following:
a. Name - Enter the name of the input parameter expected by the method.
b. Type - Select the input type.
c. Click Add Parameter.
d. Repeat steps a though c for each expected input.
e. Click Next.
6. For REST Output parameters, specify the following:
a. Output Format - Select XML, Text or JSON for the response format expected from the Web service.
b. XPath to Output Parameters (XML only) - Enter an XPath expression to the relevant part of the response.
For example:
/ListBucketResult/Contentsc. Response Namespace (XML only) - Enter the namespace corresponding to the
Response XPath.
For example:
http://s3.amazonaws.com/doc/2006-03-01/

Implementing Web Services
Advanced Programming Techniques 17-13
d. Parameter Delimiter (Text only)- Enter the character or sequence that separates parameters returned from the Web service. Use \n to indicate a new line and \t to indicate a tab character.
e. New Record Delimiter (Text only) - Enter the character or sequence that determines a new record in a text response from the Web service. Use \n to indicate a new line and \t to indicate a tab character.
f. Name - Enter the name of the output parameter returned by the method.
g. Path - Enter the path. If the response is XML, the path is an XPath expression to the node. If the response is Text, the path is a number. If the response is JSON, the entire response is stored in the CLOB001 column of a collection you specify.
h. Type - Select the output type.
i. Click Add Parameter.
j. Repeat steps f though h for each returned output parameter.
7. Click Create.
The Create Web Service Reference Success page appears. The Web service reference is added to the Web Service References Repository.
Using the Web Service Reference RepositoryWeb service references are stored in the Web Service Reference Repository.
To access the Web Service References Repository:
1. Navigate to the Web Service References page. See "Accessing the Web Service References Page" on page 17-8.
The Web Service Reference page appears.
A Search bar displays at the top of the page. Available controls include:
■ Search columns icon - Resembles a magnifying glass. Click this icon to narrow your search. To search all columns, select All Columns.
■ Text area - Enter case insensitive search criteria (wildcard characters are implied) and then click Go.
■ Go button - Executes a search or applies a filter.
■ View Icons - Displays each Web service reference as a large icon. To edit a Web service reference, click the appropriate icon.
■ View Report - Displays each Web service reference as a line in a report.
■ Actions menu - Displays the Actions menu. Use this menu to customize the report view. See "About the Actions Menu" on page 9-6.
2. Click the View Report icon.
3. In report view you can:
■ Edit a reference by clicking the reference name.
Note: Click Test to send a request to a RESTful Web service and see the response. This test process helps you specify the appropriate Output parameters.

Implementing Web Services
17-14 Oracle Application Express Application Builder User's Guide
■ Test a reference by clicking the Test icon.
■ View details about a reference by clicking the View icon. Note that this option is not available for manually created or REST Web service references.
Testing a Web Service Reference Created from a WSDLAfter you have created a Web service reference, you can test it on the Test Web Service Reference page.
To test a Web service reference:
1. Navigate to the Web Service References page. See "Accessing the Web Service References Page" on page 17-8.
2. Select the View Report icon.
3. Click the Test icon for the Web Service reference you want to test.
The Test Web Service Reference page appears. The Web service name and URL endpoint display at the top of the page.
4. From Operation, select an operation (that is, the method to be executed).
5. Under Input Parameters, enter the appropriate values.
6. Click Test.
The message request and response appear at the bottom of the page under Messages.
Testing a Web Service Reference Created ManuallyAfter you have created a Web service reference, you can test it on the Test Web Service Reference page.
To test a Web service reference:
1. Navigate to the Web Service References page. See "Accessing the Web Service References Page" on page 17-8.
2. Select the View Report icon.
3. Click the Test icon for the Web Service reference you want to test.
The Test Web Service Reference page appears. The Web service name and URL endpoint display at the top of the page.
4. If required, enter the username and password under Basic Authentication.
5. In SOAP Envelope text area, optionally edit the SOAP request envelope.
6. Click Test.
The message request and response appear at the bottom of the page under Messages.
Testing a REST Web Service ReferenceAfter you have created a Web service reference, you can test it on the Test Web Service Reference page.
To test a Web service reference:
1. Navigate to the Web Service References page. See "Accessing the Web Service References Page" on page 17-8.

Implementing Web Services
Advanced Programming Techniques 17-15
2. Select the View Report icon.
3. Click the Test icon for the Web Service reference you want to test.
The Test Web Service Reference page appears. The Web service name and URL endpoint display at the top of the page.
4. In the URL and Proxy Override fields, optionally edit the values for the test.
5. If required, enter the username and password under Basic Authentication.
6. Under HTTP Headers, enter appropriate values.
7. Under Input Parameters, enter appropriate values.
8. Click Test.
The message response appears at the bottom of the page under Messages.
Creating an Input Form and Report on a Web ServiceThe Create Form and Report on Web Service Wizard creates an input form, a submit button, and a report for displaying results. You can execute this wizard directly after creating the Web service reference from a WSDL or a RESTful style Web service, or by adding a page.
Use this wizard when you expect a nonscalar result from the Web service. The Amazon Product API Web service is a good example. This Web service returns many results based on the search criteria entered in an input form.
Creating a Form and Report After Creating a ReferenceTo create a form and report after creating a Web service reference:
1. Create the Web service reference. See "Creating a Web Service Reference Based on a WSDL" on page 17-9 and Creating a RESTful Web Service Reference on page 17-12.
2. After the Web service reference has been added, select Create Form & Report on Web Service.
3. For Choose Service and Operation, make these selections and click Next:
a. Web Service Reference - Select the Web service reference.
b. Operation - Select the method to be executed. For REST style Web references, select doREST.
c. User Interface - Select Desktop to create a form and report for a desktop. Select jQuery Mobile Smartphone to create a form and report for a mobile phone. The jQuery Mobile Smartphone option is only available if the user interface options for the application properties have jQuery Mobile Smartphone selected. See "Managing the Application User Interface" on page 7-30.
4. For Page and Region Attributes, review the displayed attributes and click Next.
5. For Input Items, make these selections and click Next:
a. Identify which items to add to the form. To include an item, select Yes in the Create column. Otherwise, select No.
Note: If the page you specify does not exist, the wizard creates the page for you.

Implementing Web Services
17-16 Oracle Application Express Application Builder User's Guide
b. If necessary, edit the Item Name.
c. If necessary, edit the Item Label.
6. If applicable, specify the Item Names and Item Labels for basic authentication and click Next.
7. For Window Service Results, make these selections and click Next:
a. Temporary Result Set Name - Enter a name for the collection that stores the Web service result.
b. Result Tree to Report On (Not displayed for REST style Web service references) - Select the portion of the resulting XML document that contains the information you want to include in the report.
8. For Report Parameters, select the parameters to be included in the report and click Next.
9. For Tab Options, select whether the page should have tabs and how they should be created, then click Next.
10. Review confirmation page and click Create.
Creating a Form and Report by Adding a New PageIf you have an existing Web service reference, you can create an input form and report by adding a new page.
To create a form and report by adding a new page:
1. Create the Web service reference. See "Creating a Web Service Reference Based on a WSDL" on page 17-9, "Creating a Web Service Reference Manually" on page 17-11, and "Creating a RESTful Web Service Reference" on page 17-12.
2. Create a new page. See "Managing Pages in a Database Application" on page 7-35.
In the Create Page Wizard:
a. For User Interface, select Desktop to create a form and report for a desktop. Select jQuery Mobile Smartphone to create a form and report for a mobile phone. The jQuery Mobile Smartphone option is only available if the user interface options for the application properties have jQuery Mobile Smartphone selected. See "Managing the Application User Interface" on page 7-30.
b. Select Form and click Next.
c. Select Form and Report on Web Service and click Next.
3. For Choose Service and Operation, make the following selections and click Next:
a. Web Service Reference - Select the Web service reference.
b. Operation - Select the method to be executed. For RESTful style Web references, doREST is selected automatically. The Operation option does not appear for Manual style Web references.
4. For Page and Region Attributes, review the page and region attributes and click Next.
Note: This step only appears if basic authentication was specified for this Web service reference when it was created.

Implementing Web Services
Advanced Programming Techniques 17-17
5. For Input Items, make the following selections and click Next:
a. Identify which items to add to the form. To include an item, select Yes in the Create column. Otherwise, select No.
b. If necessary, edit the Item Name.
c. If necessary, edit the Item Label.
6. If applicable, specify the Item Names and Item Labels for basic authentication, then click Next.
7. Follow the on-screen instructions.
8. Click Finish.
Creating a Form on a Web ServiceThe Create Form on Web Service Wizard creates a form and a submit button. You can execute this wizard after creating the Web service reference from a WSDL or on a RESTful style Web service, or from the Page Definition.
Use this wizard when you expect a scalar result from the Web service. A Web service that looks up a stock price is a good example because the input is a stock symbol and the output is the scalar value price.
Creating a Form After Creating a ReferenceTo create a form after creating a Web service reference:
1. Create the Web service reference. See "Creating a Web Service Reference Based on a WSDL" on page 17-9, Creating a RESTful Web Service Reference on page 17-12, and Creating a Web Service Reference Manually on page 17-11.
2. After the Web service reference has been added, select Create Form on Web Service.
3. For Choose Service and Operation, Make the following selections then click Next:
a. Web Service Reference - Select the Web service reference.
b. Operation - Select the method to be executed. For RESTful style Web references, doREST is selected automatically. The Operation option does not appear for Manual style Web references.
c. User Interface - Select Desktop to create a form and report for a desktop. Select jQuery Mobile Smartphone to create a form and report for a mobile phone. The jQuery Mobile Smartphone option is only available if the user interface options for the application properties have jQuery Mobile Smartphone selected. See "Managing the Application User Interface" on page 7-30.
4. For Page and Region Attributes, review the page and region attributes and click Next.
Note: If the page you specify does not exist, the wizard creates the page for you.
Note: This step only appears if basic authentication was specified for this Web service reference when it was created.

Implementing Web Services
17-18 Oracle Application Express Application Builder User's Guide
5. For Input Items, make these selections and click Next:
a. Identify which items to add to the form. To include an item, select Yes in the Create column. Otherwise, select No.
b. If necessary, edit the Item Name.
c. If necessary, edit the Item Label.
6. If applicable, specify the Item Names and Item Labels for basic authentication and click Next.
7. If applicable, specify the Item Names and Item Labels for basic authentication.
Note that this step only appears if basic authentication was specified for this Web service reference when it was created.
8. For Output Items, make these selections and click Next:
a. Identify which items to add to the form. To include an item, select Yes in the Create column. Otherwise, select No.
b. If necessary, edit the Item Name.
c. If necessary, edit the Item Label.
9. For Tab Options, select whether the page should have tabs and how they should be created, then click Next.
10. Review confirmation page and click Create.
Creating a Form by Adding a New PageIf you have an existing Web service reference, you can create a form based on a Web service reference by adding a new page.
To create a form by adding a new page:
1. Create the Web service reference. See "Creating a Web Service Reference Based on a WSDL" on page 17-9, Creating a RESTful Web Service Reference on page 17-12, and Creating a Web Service Reference Manually on page 17-11.
2. Create a new page. See "Managing Pages in a Database Application" on page 7-35.
In the Create Page Wizard:
a. For User Interface, select Desktop to create a form and report for a desktop. Select jQuery Mobile Smartphone to create a form and report for a mobile phone. The jQuery Mobile Smartphone option is only available if the user interface options for the application properties have jQuery Mobile Smartphone selected. See "Managing the Application User Interface" on page 7-30
b. Select Form and click Next.
c. Select Form on Web Service and click Next.
Note: If the page you specify does not exist, the wizard creates the page for you.
Note: This step only appears if basic authentication was specified for this Web service reference when it was created.

Implementing Web Services
Advanced Programming Techniques 17-19
3. For Choose Service and Operation, Make the following selections then click Next:
a. Web Service Reference - Select the Web service reference.
b. Operation - Select the method to be executed. For RESTful style Web references, doREST is selected automatically. The Operation option does not appear for Manual style Web references.
4. For Page and Region Attributes, review the page and region attributes and click Next.
5. For Input Items, make these selections and click Next:
a. Identify which items to add to the form. To include an item, select Yes in the Create column. Otherwise, select No.
b. If necessary, edit the Item Name.
c. If necessary, edit the Item Label.
6. If applicable, specify the Item Names and Item Labels for basic authentication and click Next.
7. If applicable, specify the Item Names and Item Labels for basic authentication.
Note that this step only appears if basic authentication was specified for this Web service reference when it was created.
8. For Output Items, make these selections and click Next:
a. Identify which items to add to the form. To include an item, select Yes in the Create column. Otherwise, select No.
b. If necessary, edit the Item Name.
c. If necessary, edit the Item Label.
9. For Tab Options, select whether the page should have tabs and how they should be created, then click Next.
10. Review confirmation page and click Create.
Invoking a Web Service as a ProcessYou can invoke a Web service as a process on the page. The process is created for you if you run one of the Create Form wizards for Web services. Running the process submits the request to the service provider. You can then display the request results in the report.
To invoke a Web service as a process:
1. Create a Web Service Reference. See "Creating a Web Service Reference Based on a WSDL" on page 17-9, "Creating a Web Service Reference Manually" on page 17-11, or "Creating a RESTful Web Service Reference" on page 17-12.
Note: If the page you specify does not exist, the wizard creates the page for you.
Note: This step only appears if basic authentication was specified for this Web service reference when it was created.

Implementing Web Services
17-20 Oracle Application Express Application Builder User's Guide
2. Create a page. See "Managing Pages in a Database Application" on page 7-35.
In the Create Page Wizard:
a. Select Blank Page.
b. When prompted to use tabs, select No.
3. Click Edit Page. See "Altering Page Attributes" on page 8-20.
4. Under Page Rendering or Page Processing, locate the Processes section, right click and select Create Process.
The Create Page Process wizard appears.
5. For Process Type, select Web Services and click Next.
6. For Process Attributes, specify the following and click Next:
a. Name - Enter the process name.
b. Sequence - Enter the sequence for this component. This specifies the order of evaluation.
c. Point - Select the processing point.
7. For Process, specify the following:
a. Web Service Reference - Select the Web service reference for this process.
If the Web reference was created from a WSDL or is RESTful style, the Operation selection appears.
b. Operation (WSDL or RESTful style Web service references only) - Select the Web service operation this process executes.
The Web Service Input Parameters and Web Service Output Parameters appear.
c. Under Web Service Input Parameters, specify inputs to the Web service process:
– Source - Select the source type.
– Value - Select the source value.
d. Under Web Service Output Parameters, specify where the results are stored:
To store the results in a collection:
– Store Result in - Select Collection.
– Value - Enter a name for the collection.
To store the results in items on the page:
– Store Result in - Select Items.
– Value - Enter the appropriate item value.
e. Click Next.
8. For Messages, make the following entries and click Next:
a. Success Message - Enter the message that displays on the next page when the process runs successfully.
b. Failure Message - Enter the message that displays when an unhandled exception is raised. After any error processing stops, a rollback is issued and an error message displays.

Implementing Web Services
Advanced Programming Techniques 17-21
9. For Process Conditions, make the following selections and click Next:
a. When Button Pressed - Select that button that causes the process to run.
b. Condition Type - Select a condition type that must be met in order for this component to be processed. If the condition type requires expressions for comparison, the Expression 1 and possibly Expression 2 fields display. Enter expressions into these fields as required.
10. Click Create Process.
Displaying Web Service Results in a ReportTo create a report in which to display Web Service request results:
1. Navigate to the Page Definition. See "Editing a Page in Component View" on page 8-8.
2. In component view, for Regions, click the Create icon.
The Create Region Wizard appears.
3. For the region type, select Report and click Next.
4. For Region, select Web Service Result and click Next.
5. For Display Attributes, enter a region title and optionally edit the region attributes and click Next.
6. Choose whether the Web reference was created manually, from a WSDL, or is RESTful style and click Next.
7. If the Web service reference was created from a WSDL:
a. For Web Service Reference, select the Web service reference to execute.
b. For Operation, select the method to be executed.
c. For Result Tree to Report On, select the portion of the resulting XML document that contains the information you want to include in the report.
d. For Report Parameters and Options:
– In Temporary Result Set Name, enter a name for the collection that stores the Web service result.
– Select and deselect the appropriate parameters.
8. If the Web service reference was created manually:
a. Select the Web service reference.
b. Choose the SOAP style.
c. Choose the message format.
d. Enter the XPath expression to the node to report on.
e. Enter the namespace for the SOAP response envelope and click Next.
f. Enter the name of the collection where the response message is stored.
g. Enter the names of the parameters that you want to be included in the report.
9. If the Web service reference is REST style:
a. Select the Web service reference.
b. Enter the name of the collection where the response message is stored.

Implementing Web Services
17-22 Oracle Application Express Application Builder User's Guide
c. Choose the report template and the number of rows to display per page.
d. Select the parameters to be included in the report.
10. Click Create SQL Report.
Editing a Web Service ProcessAfter you create a process of type Web service on a Web service reference created from a WSDL or a RESTful style Web reference, you can change the attributes of the input and output parameters to the service.
To edit a Web service process:
1. Create a Web service process. See "Invoking a Web Service as a Process" on page 17-19.
2. Navigate to the Page Definition containing the Web service process.
3. Select the process name.
The Edit Page Process page appears.
4. To map an input parameter to a static value:
a. Scroll down to Web Service Input Parameters.
b. Enter a value in the Value field, adjacent to the appropriate parameter name.
5. To map an output parameter to a collection:
a. Scroll down to Web Service Output Parameters.
b. For Store Response In, select Collection.
c. For Value, enter the name of a collection to store the response. The response is stored in the CLOB001 or XMLTYPE001 based on the expected response.
6. To map an output parameter to an item:
a. Scroll down to Web Service Output Parameters.
b. For Store Response In, select Items.
c. Enter an item name in the Value field, adjacent to the appropriate parameter name.
7. Click Apply Changes.
Viewing a Web Service Reference HistoryThe Web Services History displays changes to Web service references for the current application by application ID, Web service references name, developer, and date.
To view a history of Web service reference changes:
1. On the Workspace home page, click the Application Builder icon.
2. Select an application.
3. Click Shared Components.
The Shared Components page appears.
4. Under Logic, click Web Service References.
5. Click History.

Implementing Web Services
Advanced Programming Techniques 17-23
Exposing a Report Region as a RESTful Web ServiceTo expose a report region as a RESTful Web service, perform the following steps:
1. The instance administrator must enable the REST provider feature in instance settings. To enable RESTful access to an Oracle Application Express instance, see "Enabling RESTful Access" in the Oracle Application Express Administration Guide.
2. A developer must enable RESTful access to a report region. See "Enabling RESTful Access to a Report Region" on page 17-23.
3. The page that contains the report must not require authentication.
Topics:■ Enabling RESTful Access to a Report Region
■ Accessing a RESTful Enabled Report Region from a Web Service Client
Enabling RESTful Access to a Report RegionTo enable RESTful access to a report region, you must make the page public so no authentication is required and enable the report for RESTful access. To enable RESTful access to an Oracle Application Express instance, see "Enabling RESTful Access" in the Oracle Application Express Administration Guide.
To make a page public:
1. On the Workspace home page, click Application Builder.
The Application Builder home page appears.
2. Select an application.
3. Select the page that contains the report you want to enable.
The Page Definition appears.
4. Under Page, click the edit icon.
5. Under Security, select Page is Public from the Authentication list.
6. Click Apply Changes.
To enable a report region for RESTful access:
1. On the Workspace home page, click Application Builder.
2. Select an application.
The Application Builder home page appears.
3. Select the page that contains the report you want to enable.
The Page Definition appears.
4. Under Regions, click the name of the region that contains the report you want to enable.
Note: The History button only appears on the Web Service Reference page if at least one reference exists.
See Also: "Using RESTful Services" in Oracle Application Express SQL Workshop Guide

Implementing Web Services
17-24 Oracle Application Express Application Builder User's Guide
5. Under Attributes, enter a value for Static ID field. This value is used to access the report RESTfully.
6. From the Enable RESTful Access List, select Yes.
7. Click Apply Changes.
Accessing a RESTful Enabled Report Region from a Web Service ClientOnce you enable a report for RESTful access, you need to know the endpoint URL and parameters to pass to the RESTful Web service. The endpoint URL is similar to the URL used to access this instance of Oracle Application Express followed by the resource apex_rest.getReport. For example:
http://apex.oracle.com/apex/apex_rest.getReport
The apex_rest service also has an operation to allow discoverability of RESTful enabled reports, given an application ID or alias. The response is an XML document with a description of all reports that can be accessed by RESTful Web services. This service is invoked with a URL similar to the following:
http://apex.oracle.com/apex/apex_rest.getServiceDescription?app=691
Note: The Enable RESTful Access List option only displays if RESTful access to this Oracle Application Express instance has been enabled, see "Enabling RESTful Access" in the Oracle Application Express Administration Guide.
Tip: If your client uses the POST method, you must also set the HTTP Header, Content-Type, to the value application/x-www-form-urlencoded.
Name Default Required Description
app N/A Yes The numeric ID or alias of the application that contains the RESTful enabled report.
page N/A Yes The numeric ID or alias of the page that contains the RESTful enabled report.
reportid N/A Yes The Static ID attribute of the RESTful enabled report.
parmvalues null No Values for the report parameters can be sent in a comma separated list. For example: CLERK,10
lang en No Sets the NLS environment variables before running the report based on the language passed in. For example: de
output xml Yes This determines whether XML or JSON are returned to the client. Domain of possible values are: xml, json

Implementing Plug-ins
Advanced Programming Techniques 17-25
In the URL above, 691 is the numeric ID of an application. The document returned is similar to the following:
<?xml version="1.0"?><urn:getServiceDescriptionResponse xmlns:urn="urn:oasis:names:tc:wsrp:v1:types"> <urn:requiresRegistration>false</urn:requiresRegistration> <urn:offeredPortlets> <urn:PortletDescription> <urn:portletHandle>employees</urn:portletHandle> <urn:markupTypes> <urn:mimeType>application/xml</urn:mimeType> <urn:mimeType>application/json</urn:mimeType> </urn:markupTypes> <urn:groupID>1</urn:groupID> <urn:description/> <urn:title>EMP</urn:title> <urn:keywords> <urn:value>P1_JOB</urn:value> <urn:value>P1_DEPTNO</urn:value> </urn:keywords> </urn:PortletDescription> </urn:offeredPortlets></urn:getServiceDescriptionResponse
The portletHandle maps to the Static ID of the report region or the reportid parameter in the REST request. The groupID maps to the page id or the page parameter in the REST request. Finally, any parameters used by the SQL report are listed as children of the keywords node.
Implementing Plug-insThis section describes how to add plug-ins to your application, and how to manage reuse and sharing. Plug-in examples are available on the Oracle Application Express Plug-in Repository on the Oracle Technology Network, and are included in the Sample Database Application.
Topics:■ About Plug-ins
■ Accessing Plug-ins
■ Editing a Plug-in
■ Creating a Plug-in
■ Adding Custom Attributes to a Plug-in
■ Uploading Files to Associate with a Plug-in
■ Adding Events to a Plug-in
■ Deleting a Plug-in
■ Viewing the Plug-in Repository
■ Importing a Plug-in from the Plug-in Page
■ Exporting a Plug-in from the Plug-in Page
See Also: "Viewing the Plug-in Repository" on page 17-34 and "About Sample Database Application" on page 3-6

Implementing Plug-ins
17-26 Oracle Application Express Application Builder User's Guide
■ Resetting the Plug-in Interactive Report
■ View Plug-in Utilization
■ View Plug-in History
About Plug-insPlug-ins enable developers to declaratively extend, share, and reuse the built-in types available with Oracle Application Express.
Oracle Application Express supports a set group of authentication scheme, authorization scheme, item, region, dynamic action, and process types. Plug-ins offer a means of augmenting these built-in types by declaratively creating and using new types in your application. Because plug-ins are designed for reuse, developers can export and import them to other workspaces and also share them with the Oracle Application Express Plug-in community by using the Plug-in Repository.
The process of implementing a plug-in involves the following steps:
1. Create a plug-in or import a plug-in in to your application workspace.
2. Edit or create an authorization scheme, item, region, process, or dynamic action type to use the plug-in.
3. Run your application to test the plug-in.
For Plug-in implementation examples, go to the Oracle Plug-in Repository at:
http://apex.oracle.com/plugins
For additional Plug-in implementation examples, go to the Oracle Learning Library at the following location, click the link at the bottom of the page to access the library, then enter search criteria for Oracle Application Express (APEX) Product OBEs:
http://www.oracle.com/technetwork/tutorials/index.html
Accessing Plug-insTo access the plug-ins:
1. Navigate to the Plug-ins page.
a. Navigate to the Workspace home page.
b. Click the Application Builder.
c. Select an application.
d. Click Shared Components.
e. Under User Interface, select Plug-ins.
The Plug-ins page displays with the Plug-ins tab selected by default. All available plug-ins appear.
2. You can customize the appearance of the page using the Search bar at the top of the page. Available controls include:
■ Search icon - Resembles a magnifying glass. Click this icon to narrow your search to only specific columns. To search all columns, select All Columns.
■ Text field - Enter case insensitive search criteria (wildcard characters are implied) and then click Go.
■ Go button - Executes a search or applies a filter.

Implementing Plug-ins
Advanced Programming Techniques 17-27
■ View Icons - (the default) Displays each plug-in as a large icon. To edit a plug-in, click the appropriate icon.
■ View Report - Displays each plug-in as a line in a report.
■ Actions menu - Displays the Actions menu. Use this menu to customize the report view. See "About the Actions Menu" on page 9-6.
Editing a Plug-inTo edit a plug-in:
1. Navigate to the Plug-ins page. See "Accessing Plug-ins" on page 26.
2. Click the plug-in you want to edit or view.
The Plug-in Create/Edit page appears.
3. Make modifications.
To learn more about each option, see item Help, "Creating a Plug-in" on page 17-27, "Adding Custom Attributes to a Plug-in" on page 17-31, "Uploading Files to Associate with a Plug-in" on page 17-32 and "Adding Events to a Plug-in" on page 17-33
4. Click Apply Changes.
Creating a Plug-in
To create a plug-in:
1. Navigate to the Plug-ins page. See "Accessing Plug-ins" on page 26.
2. Click Create.
The Plug-in Create/Edit page appears.
3. Under Name:
a. Name (Required) - Enter name of the plug-in.
b. Internal Name (Required) - Enter the internal name of the plug-in. This name must be unique within the current application.
c. Type (Required) - Select the type of component that can use this plug-in. Settings under Callbacks and Standard Attributes differ depending on the plug-in type selected. Refer to the following sections for details.
d. Category (Required when Type is Dynamic Action) - Select the category the plug-in is displayed under on the UI.
4. Under Subscription:
Tip: During the following steps, see item help to learn more about a specific field.
Tip: To insure the internal name is a globally unique name worldwide, it is recommended that your organization domain name be used as a prefix to internal plug-in names. For example, a domain name of mycompany.com prefixed to a plug-in named Slider, would result in an internal name of COM.MYCOMPANY.SLIDER.

Implementing Plug-ins
17-28 Oracle Application Express Application Builder User's Guide
■ Reference Master Plug-in From - To base this plug-in on another plug-in in this workspace, select the plug-in from the pop up list. Otherwise, leave the field blank to make this the master copy of this plug-in.
5. Under Source:
a. PL/SQL Code - Enter a PL/SQL anonymous block of code that contains the procedures for rendering, validating, executing, and performing AJAX callbacks for this plug-in.
b. Do not validate PL/SQL code (parse PL/SQL code at runtime only) - Check this option to parse the PL/SQL code at runtime only. Otherwise, the code is parsed when the plug-in is created.
6. Under Callbacks:
a. Render Function Name (only available for Region, Item, and Dynamic Action type plug-ins) - Enter the name of the PL/SQL function called to render the plug-in.
b. AJAX Function Name (only available for Authentication, Region, Item and Dynamic Action type plug-ins) - Enter the name of the PL/SQL function used by the plug-in to load additional data with an AJAX call.
c. Validation Function Name (only available for Item type plug-ins) - Enter the name of the PL/SQL function the plug-in can use to perform basic validations on the submitted data.
d. Execution Function Name (only available for Authorization and Process type plug-ins) - Enter the name of the PL/SQL function called to execute the plug-in.
e. Session Sentry Function Name (only available for Authentication type plug-ins) - Enter the name of the PL/SQL function the plug-in uses to perform the session sentry verification.
f. Invalid Session Function Name (only available for Authentication type plug-ins) - Enter the name of the PL/SQL function the plug-in calls if an invalid session is detected. For example, use this function to call a Single Sign-On sever.
g. Authentication Function Name (only available for Authentication type plug-ins) - Enter the name of the PL/SQL function the plug-in uses to perform the verification of the entered user credentials.
h. Post Logout Function Name (only available for Authentication type plug-ins) - Enter the name of the PL/SQL function the plug-in calls after Application Express has terminated the current session. Use this function to logout from other systems like a Single Sign-On sever.
7. Under User Interfaces, select the display devices the Application Builder must support for this plug-in:
■ Supported for:
– Desktop - Select this option if the plug-in is displayed on a Desktop.
Note: All Callback function names can reference a function of the anonymous PL/SQL code block, a function within a package or a standalone function in the database. See item help for further details and examples.

Implementing Plug-ins
Advanced Programming Techniques 17-29
– jQuery Mobile Smartphone - Select this option if the plug-in is displayed on a mobile smartphone.
8. Under Standard Attributes (not available for Authorization Scheme and Process type plug-ins):
For Authentication Scheme type plug-ins, specify the following attribute:
■ Has Session not valid Attribute - If selected, the Stop Execution on Error field is available for the action.
For Dynamic Action type plug-ins, identify the attributes that apply to this plug-in:
a. For Item(s) - The dynamic action supports selection of items as the affected elements.
b. For Button - The dynamic action supports selection of buttons as the affected elements.
c. For Region - The dynamic action supports selection of a region as the affected elements.
d. For DOM Object - The dynamic action supports selection of DOM Objects as the affected elements.
e. For jQuery Selector - The dynamic action supports specifying a jQuery selector as the affected elements.
f. For Triggering Element - The dynamic action supports selection of the triggering element as the affected elements.
g. For Event Source - The dynamic action supports selection of your event source as the affected elements.
h. Affected Element Required - The dynamic action requires an affected element to be specified.
i. Check "Fire on page load" - Defines the default value for the action’s Fire on Page Load field.
j. Has Stop Execution on Error Attribute - The Stop Execution on Error field is available for the action.
k. Has Wait For Result Attribute - The Wait For Result field is available for the action.
For Item type plug-ins, identify the attributes that apply to this plug-in:
a. Is Visible Widget - The widget is visible.
b. Session State Changeable - The value for an item can be changed in session state. The Is Visible Widget attribute must be checked.
c. Has Read Only Attribute - The user can specify a Read Only condition for the item. The Is Visible Widget attribute must be checked for this attribute to be enabled.
d. Has Escape Special Characters Attribute - The item has the Escape special characters field in the Security section when the item is edited. The Is Visible Widget attribute must be checked.
e. Has Quick Pick Attributes - The item has quick pick attributes. The Is Visible Widget attribute must be checked.

Implementing Plug-ins
17-30 Oracle Application Express Application Builder User's Guide
f. Has Source Attributes - The item has source related attributes such as Source Used, Source Type and Format Mask.
g. Format Mask Date Only - For items that handle date information, the Format Mask field popup restricts the date selections by displaying date values to select from. The Has Source Attributes must be checked.
h. Format Mask Number Only - For items that handle numeric information, the Format Mask field popup restricts the numeric selections by displaying numeric values to select from.
i. Has Element Attributes - The item has element attributes such as Horizontal/Vertical Alignment, HTML Form Element Attributes, and Pre/Post Element Text.
j. Has Width Attributes - The item width can be controlled.
k. Has Height Attribute - The item height can be controlled.
l. Has Element Option Attribute - The item allows specification of additional option attributes when rendering multi-selection elements such as radio groups of check boxes.
m. Has Placeholder Attribute - The item supports the specification of placeholder text, which gets displayed in the element.
n. Has Encrypt Session State Attribute - When editing the item, the Store value encrypted in session state displays under the Security region.
o. Has List of Values - The item has an associated list of values. The Is Visible Widget attribute must be checked.
p. List of Values Required - For items that handle lists of values, a list of values must be defined. The Has List of Values attribute must be checked.
q. Has LOV Display Null Attributes - The item is associated with a list of values that is allowed to include null values. The Has List of Values attribute must be checked.
r. Has Cascading LOV Attributes - The item has cascading LOV related attributes. The Has List of Values attribute must be checked.
For Region type plug-ins, check the following to enable options as described here:
a. Region Source is SQL Statement - The region source is a SQL Statement. When checked, a minimum and a maximum number of columns the query can return can be specified and SQL Examples display to help the user.
b. Region Source is Plain Text - The region source is plain text.
c. Region Source Required - If region source is a SQL Statement, this attribute makes this a required value.
d. Has 'Page Items to Submit' Attribute - If region source is a SQL Statement, this attribute enables you to specify those page items which should be set in session state when executing an AJAX call for that region.
e. Has 'Number of Fetched Rows' Attribute - The region has the Number of Fetched Rows fields in the Advanced section when the region is edited.
f. Has 'No Data Found Message' Attribute - The region has the No Data Found Message field in the Advanced section when the region is edited.
g. Has "Escape Special Characters" Attribute - The region has the Escape special characters field in the Security section when the region is edited.

Implementing Plug-ins
Advanced Programming Techniques 17-31
9. For Information:
a. Version - Enter a string to identify the plug-in version.
b. About URL - Enter a URL to the plug-in authors home page or to additional information about the plug-in.
10. For Help Text, enter help text used by the user to understand how the plug-in works.
11. For Comments, enter comments and notes that never display when the application is running.
To learn more about each option, see item Help.
12. Click Create.
Now that the plug-in is created, you can specify additional custom attributes, upload files such as image, CSS and JavaScript files to associate with your plug-in and add events. See "Adding Custom Attributes to a Plug-in" on page 17-31, "Uploading Files to Associate with a Plug-in" on page 17-32, and "Adding Events to a Plug-in" on page 17-33.
Adding Custom Attributes to a Plug-inA plug-in attribute is used to prompt the developer for additional data in the Application Builder when the plug-in is used.
To add custom attributes to the plug-in:
1. Navigate to the Plug-ins page. See Accessing Plug-ins on page 17-26.
2. Click the plug-in you want to modify.
The Plug-in Create/Edit page appears.
3. Under Custom Attributes, enable or disable substitution of attribute values.
■ Substitute Attribute Values - Custom attribute values specified by the developer might contain items referenced with substitution syntax, for example &P1_DNAME.
If set to Yes, Application Express automatically replaces substitution syntax with their actual values.
If set to No, substitution syntax is written unchanged into the attribute_01 through attribute_15 record type attributes of p_plugin, p_item, p_region, and so on. The plug-in developer is responsible for replacing those substitution syntax references with a call to apex_plugin_util.replace_substitutions or perform similar replacements. See item help for further details.
4. Under Custom Attributes click Add Attribute.
The Edit Attribute page appears.
5. Under name:
a. Scope - Select Application if the attribute is only defined once for the application. Select Component if the attribute is defined each time the plug-in is referenced in a component.
Tip: During the following steps, see item help to learn more about a specific field.
Implementing Plug-ins
17-32 Oracle Application Express Application Builder User's Guide
b. Attribute - Enter the sequence that correlates with the ATTRBUTE_XX columns and to the PL/SQL types defined in the APEX_PLUGIN package.
c. Display Sequence - Enter the display sequence for this plug-in attribute in the Application Builder.
d. Label - Enter the label that displays for this attribute in the Application Builder.
6. For Settings:
a. Type - Select the attribute type.
b. Required - Select Yes if this attribute must be specified. Otherwise, select No.
c. Translatable - Select Yes if this attribute is included in the translation file, otherwise, select No.
d. Display Width - Enter the length in characters displayed for this attribute in the Application Builder.
e. Maximum Width - Enter the maximum number of characters users are allowed to enter for this attribute in the Application Builder.
7. Under Default Value, specify a value to be used for this plug-in attribute when a new component is created that uses this plug-in. Use Y and N for attributes of type Yes/No.
8. Under Condition:
a. Depending on - Select the attribute on which the current attribute depends.
b. Condition Type (only displays if dependent attribute) - Select the type of condition that must be met in order for this attribute to render.
c. Expression (only displays if needed for condition type)- Enter expression that must meet the selected condition type. See item help for details.
9. For Help Text, specify the help text that is displayed as context sensitive help for the attribute in the Application Builder.
10. Under Comments, enter comments or notes that are never displayed when the application is running.
11. Click Create to create the attribute and go back to the Edit page, or click Create and Create Another to create the attribute and continue to create another attribute.
Uploading Files to Associate with a Plug-inUpload image, CSS, and JavaScript files you want to associate with your plug-in. Use #PLUGIN_PREFIX# in uploaded CSS and JavaScript files to reference another uploaded file. See the Plug-in Files region on the right of the Upload New File page for more details.
For example, in a CSS file the reference might be:
.sidebar{background-image:url(#PLUGIN_PREFIX#flowers.png);}
Note: If you click Create or Create and Create Another and the Return To Page check box on the right panel under Plug-ins is checked, this same Edit Attribute page displays.

Implementing Plug-ins
Advanced Programming Techniques 17-33
To upload a file:
1. Navigate to the Plug-ins page. See "Accessing Plug-ins" on page 17-26.
2. Click the plug-in you want to upload to.
The Plug-in Create/Edit page appears.
3. Click Files.
The Files options display.
4. For File Prefix - Use the default, #PLUGIN_PREFIX#, to reference files that are stored with your plug-in definition in the database. This prefix determines the virtual path the Web server uses to point to the files of the plug-in. For improved performance, you can also store your plug-in files on your Web server and use #IMAGE_PREFIX# or any valid URL to reference them.
5. Click Upload New File.
The Upload New File page appears.
6. For File, browse to and select the file you want to upload.
7. Click Upload.
The Create/Edit page appears. The name of the uploaded file appears under Files.
8. Click Apply Changes.
Adding Events to a Plug-inAdding events to an item, region, or dynamic action type plug-in, enables them to be exposed to dynamic actions. For example, a Slider plug-in that exposes events such as Start Slide, Sliding, and Stop Slide, allows the creation of dynamic actions that can react when these events occur.
To add events to a plug-in:
1. Navigate to the Plug-ins page. See "Accessing Plug-ins" on page 17-26.
2. Click the plug-in you want to edit.
The Plug-in Create/Edit page appears.
3. Scroll down to Events and click Add Event.
A new row displays under Events.
4. Under Events, specify the following:
a. Name - The display name under which the plug-in event appears in the dynamic action, for example: Start Slide.
b. Internal Name - The name of the assigned JavaScript event that triggers the dynamic action, for example: slidestart.
5. Click Add Event.
6. Repeat steps 3 through 4 to add another event.
7. Click Apply Changes.
Deleting a Plug-inYou can delete a plug-in if it is not in use. If it is in use, the Delete button does not display.

Implementing Plug-ins
17-34 Oracle Application Express Application Builder User's Guide
To delete a plug-in:
1. Navigate to the Plug-ins page. See "Accessing Plug-ins" on page 17-26.
2. Click the plug-in you want to delete.
The Plug-in Create/Edit page appears.
3. Click Delete.
4. To confirm, click OK.
Viewing the Plug-in RepositoryThe purpose of the Plug-in Repository is to provide a central location where developers can share and download plug-ins. The repository is located on the Oracle Technology Network.
To view the Plug-in repository:
1. Navigate to the Plug-ins page. See "Accessing Plug-ins" on page 17-26.
2. Click View Plug-in Repository.
The Oracle Application Express Plug-in Repository displays.
Importing a Plug-in from the Plug-in PageUse this option to import an exported plug-in to your application. Importing a plug-in can be done from the Plug-ins page under Shared Components, as described here, or from the Application Builder home page. See "Importing Plug-ins" on page 16-26.
To import a plug-in:
1. Navigate to the Plug-ins page. See "Accessing Plug-ins" on page 17-26.
2. Click Import.
The import Plug-in page appears.
3. For Specify File, make the following selections and click Next:
■ Import file - Enter or browse to the name of the import file.
■ File Type - Select Plug-in.
■ File Character Set - Select the import file character set encoding.
4. For File Import Confirmation, click Next.
5. For Install, click Install Plug-in.
Exporting a Plug-in from the Plug-in PageUse this option to export a plug-in definition to a file. This file can be imported into any APEX application. Exporting a plug-in can be done from the Plug-ins page under Shared Components, as described here, or from the workspace home page. See "Exporting Plug-ins" on page 16-21.
1. Navigate to the Plug-ins page. See "Accessing Plug-ins" on page 17-26.
2. Under Tasks, click Export Plug-in.
The Export Plug-in page appears.
3. For Application, select the application to export the plug-in from.

Implementing Dynamic Actions
Advanced Programming Techniques 17-35
4. Click Set Application.
5. For Export Plug-in:
■ Plug-in - Select plug-in.
■ File Format - Select file format of the plug-in export.
6. Click Export Plug-in.
7. Select Save File, and click OK.
Downloads complete message appears.
Resetting the Plug-in Interactive ReportYou can reset the plug-in interactive report to clear all current filters applied to the report.
To reset the interactive report:
1. Navigate to the Plug-ins page. See "Accessing Plug-ins" on page 17-26.
2. Click Reset.
View Plug-in UtilizationThe Plug-in Utilization page displays which pages, components, and regions use each plug-in.
To view plug-in utilization:
1. Navigate to the Plug-ins page. See "Accessing Plug-ins" on page 17-26.
2. Click Utilization.
The Utilization page appears.
View Plug-in HistoryThe Plug-in History page shows the actions taken on each plug-in, the developer that performed the action and the date of each action.
To view plug-in history:
1. Navigate to the Plug-ins page. See "Accessing Plug-ins" on page 17-26.
2. Click History.
The History page appears.
Implementing Dynamic ActionsThis section provides an overview of dynamic actions and explains how to create and modify them.
Topics:■ Understanding Dynamic Actions
■ Creating a Dynamic Action
■ Editing Dynamic Actions
See Also:

Implementing Dynamic Actions
17-36 Oracle Application Express Application Builder User's Guide
■ Adding Additional True Actions
■ Defining the Frequency and Scope
■ Debugging Dynamic Actions
Understanding Dynamic ActionsDynamic actions provide a way to define complex client-side behavior declaratively without the need for JavaScript. Using the Dynamic Action Create wizard, you specify an action that is performed when a defined set of conditions occur. You can also specify which elements are affected by the action, and when and how they are affected.
When working with dynamic actions, you should be mindful of the fact that the more dynamic actions you add to a page, the greater your overall page size. This is because the dynamic action framework emits additional code to the client for each dynamic action defined, which then also must be downloaded and executed by the framework in the client. See "Debugging Dynamic Actions" on page 17-46 for information on how to debug problems.
The process of implementing a dynamic action involves the following:
1. Edit or create an item, button, region, DOM object, or jQuery selector on a page. This component is referenced within the dynamic action in defining when it fires.
2. Create a dynamic action from the application page that invokes the action.
3. Run your application to test the dynamic action.
For Dynamic Action implementation examples, go to the Learning Library at the following location, click the All Content tab and enter search criteria for Application Express (APEX) Product OBEs:
http://www.oracle.com/technetwork/tutorials/index.html
Creating a Dynamic ActionCreating a Dynamic Action involves specifying when the action happens (with optional conditions), what action or actions are performed, and what elements are affected by the action.
1. Navigate to the appropriate Page Definition. See "Accessing the Page Definition" on page 8-2.
2. Under Page Rendering, scroll down to Dynamic Actions and click the Create icon.
The Dynamic Action wizard appears.
3. For Identification, enter the following and click Next.
■ Name - Enter the name of the dynamic action.
■ Sequence - Enter the sequence of this component. The sequence determines the order of execution.
4. For When, specify when the action is performed and click Next. Available options include:
a. Event - Dynamic actions can be defined to fire based on events that happen on the page. There are four different categories of events that can be utilized, Browser events, Framework events, Component events and Custom events.
See Also: "About Page Specific Utilities" on page 7-84

Implementing Dynamic Actions
Advanced Programming Techniques 17-37
Here are the details of all the supported events, including the internal JavaScript event name in brackets.
Browser Events
– Change (change) - Fires when a control loses the input focus and its value has been modified since gaining focus. Supported User Interface Types: Desktop and jQuery Mobile Smartphone.
– Click (click) - Fires when the pointing device button is clicked over the triggering element. Supported User Interface Types: Desktop and jQuery Mobile Smartphone.
– Double Click (dblclick) - Fires when the pointing device button is double clicked over the triggering element. Supported User Interface Types: Desktop.
– Get Focus (focusing) - Fires when the triggering element receives focus by either a pointing device or by tabbing into the element. Supported User Interface Types: Desktop and jQuery Mobile Smartphone.
– Key Down (keydown) - Fires when a key on the keyboard is pressed. Use this event when you want to capture special keystrokes such as arrow keys, after a key has been pressed. Supported User Interface Types: Desktop and jQuery Mobile Smartphone.
– Key Press (keypress) - Fires when a key on the keyboard is pressed resulting in text being entered. Use this event when you want to capture actual text entry. Supported User Interface Types: Desktop and jQuery Mobile Smartphone.
– Key Release (keyup) - Fires when a key on the keyboard is released. Use this event when you want to capture special keystrokes such as arrow keys, after a key has been released. Supported User Interface Types: Desktop and jQuery Mobile Smartphone.
– Lose Focus (focusout) - Fires when the triggering element loses focus either by the pointing device or by tabbing out of the element. Supported User Interface Types: Desktop and jQuery Mobile Smartphone.
– Mouse Button Press (mousedown) - Fires when the pointing device button is pressed over the triggering element. Supported User Interface Types: Desktop.
– Mouse Button Release (mouseup) - Fires when the pointing device button is released over the triggering element. Supported User Interface Types: Desktop.
– Mouse Enter (mouseenter) - Fires once when the pointing device is moved into the triggering element. Supported User Interface Types: Desktop.
Note: The events displayed differ according to the page's current User Interface type. If you want to select an event that corresponds to a different type, then you have the option of selecting Show unsupported, which displays all events including those that do not correspond to the current type.

Implementing Dynamic Actions
17-38 Oracle Application Express Application Builder User's Guide
– Mouse Leave (mouseleave) - Fires once when the pointing device is moved away from the triggering element. Supported User Interface Types: Desktop.
– Mouse Move (mousemove) - Fires when the pointing device is moved while it is over the triggering element. Supported User Interface Types: Desktop.
– Orientation Change (orientationchange) - Fires when a device's orientation changes (by turning it horizontally or vertically). The 'this.browserEvent' JavaScript object contains an 'orientation' property that will equal either 'portrait' or 'landscape'. Supported User Interface Type: 'jQuery Mobile Smartphone'.
– Page Load (Desktop User Interface uses ready, jQuery Mobile Smartphone User Interface uses pageint) – Fires when the page loads. Supported User Interface Types: Desktop and jQuery Mobile Smartphone.
– Page Unload (unload) - Fires when a page is unloaded. Supported User Interface Types: Desktop and jQuery Mobile Smartphone.
– Resize (resize) - Fires when the browser window is resized. Supported User Interface Types: Desktop.
– Resource Load (load) - When the triggering element is the window element (using a DOM Object value of window in the When attributes), the event fires when the browser finishes loading all content within a document, including window, frames, objects and images. For other elements, it fires when the target element and all of its content has finished loading. Supported User Interface Types: Desktop and jQuery Mobile Smartphone.
– Scroll (scroll) - Fires when a scrollable triggering element is scrolled. This could be the browser window (using a DOM Object value of window in the When attributes), scrollable frames or elements with the overflow CSS property set to scroll (or auto when the element’s explicit height is less than the height of its contents). Supported User Interface Types: Desktop and jQuery Mobile Smartphone.
– Scroll Start (scrollstart) - Fires when a scroll begins. Supported User Interface Type: jQuery Mobile Smartphone.
– Scroll Stop (scrollstop) - Fires when a scroll ends. Supported User Interface Type: jQuery Mobile Smartphone.
– Select (select) - Fires when a user selects some text in a text field. Supported User Interface Types: Desktop and jQuery Mobile Smartphone.
– Swipe (swipe) - Fires when a horizontal drag of 30px or more (and less than 75px vertically) occurs, within a 1 second duration. Supported User Interface Type: jQuery Mobile Smartphone.
– Swipe Left (swipeleft) - Fires when a swipe event occurs moving in the left direction. Supported User. Interface Type: jQuery Mobile Smartphone.
– Swipe Right (swiperight) - Fires when a swipe event occurs moving in the right direction. Supported User Interface Type: jQuery Mobile Smartphone.
– Tap (tap) - Fires after a quick touch event. Supported User Interface Type: jQuery Mobile Smartphone.

Implementing Dynamic Actions
Advanced Programming Techniques 17-39
– Tap and Hold (taphold) - Fires after a held touch event (held for close to 1 second). Supported User Interface Type: jQuery Mobile Smartphone.
– Touch Cancel (vmousecancel) - Normalized event for handling touch or mousecancel events. Supported User Interface Type: jQuery Mobile Smartphone.
– Touch End (vmouseup) - Normalized event for handling touchend or mouseup events. Supported User Interface Type: jQuery Mobile Smartphone.
– Touch Move (vmousemove) - Normalized event for handling touchmove or mousemove events. Supported User Interface Type: jQuery Mobile Smartphone.
– Touch Start (vmousedown) - Normalized event for handling touchstart or mousedown events. Supported User Interface Type: jQuery Mobile Smartphone.
– Virtual Click (vclick) - Normalized event for handling touchend or mouse click events. On touch devices, this event is dispatched after Touch End. Supported User Interface Type: jQuery Mobile Smartphone.
Framework Events
– After Refresh (apexafterrefresh) - Fires after the triggering element has been refreshed. The event is only valid for triggering elements that perform Partial Page Refresh and fire this event. The native components that support this are Interactive Reports, Classic Reports, Charts, List View and all item types with cascading LOV support. Plug-ins might support this event as well. Supported User Interface Types: Desktop and jQuery Mobile Smartphone.
– Before Page Submit (apexbeforepagesubmit) - Fires before a page being submitted. Supported User Interface Types: Desktop and jQuery Mobile Smartphone.
– Before Refresh (apexbeforerefresh) - Fires before the triggering element has been refreshed. The event is only valid for triggering elements that perform Partial Page Refresh and fire this event. The native components that support this are Interactive Reports, Classic Reports, Charts, List View and all item types with cascading LOV support. Plug-ins might support this event as well. Supported User Interface Types: Desktop and jQuery Mobile Smartphone.
Component Events
These events are available when there is a component (either an item, region, or dynamic action) available to your application that triggers a custom event. These events appear in the following format Event name [Component Name], for example the Change Order event triggered by the Shuttle native item type appears as Change Order [Shuttle]. Component events are either triggered from native components shipped with Oracle Application Express, or from plug-in components you have installed into your application.
– Events triggered by native components:
Change Order [Shuttle] (shuttlechangeorder) – Fires when the order of a value in the right hand select list is changed (either using Move Top, Move Up, Move Down, or Move Bottom). There are currently no other events triggered by native components in Oracle Application Express. Supported User Interface Types: Desktop and jQuery Mobile Smartphone.

Implementing Dynamic Actions
17-40 Oracle Application Express Application Builder User's Guide
– Events triggered by plug-in components:
These will be available when added to your current application and will be in the format Event name [Component Name]. For help related to events raised by plug-ins, refer to Help text on the plug-in configuration page, by navigating to Shared Components, Plug-ins, plug-in name, Help Text, where the plug-in author may have included documentation. Sup-ported User Interface Types: Determined by the plug-in's User Interfaces > Supported for settings.
– Custom Event:
By selecting Custom an additional field displays enabling you to define of a custom event. This is useful when the native or plug-in provided events are insufficient.
b. Selection Type - Select the type of page element that triggers the dynamic action. A corresponding name field displays to specify the name of the page element.
c. Item(s), Button, Region, DOM Object, or jQuery Selector - Specify the name of the page element as follows:
– Item(s) - Enter or select one or more page item names that trigger the dynamic action. For multiple items, separate page items with a comma.
– Button - Select the button that triggers the dynamic action. If the button is a Template button, the button selected must use a button template that includes an ID attribute set to #BUTTON_ID#. The dynamic action framework relies on this ID value to reference the button.
– Region - Select the region name that triggers the dynamic action. The region selected must use a region template that includes a container element with an ID attribute set to #REGION_STATIC_ID#. The dynamic action framework relies on this ID value to reference the region.
The region can fire the event itself, for example, Before Refresh or After Refresh events, or can be a container to catch events that fire on items or other elements in the region. Only the following subset of events support this: Change (change), Click (click), Double Click (dblclick), Get Focus (focus), Key Down (keydown), Key Press, Key Release (keyup), Lose Focus (blur), Mouse Button Press (mousedown), Mouse Button Release (mouseup), Mouse Move (mousemove).
– DOM Object - Enter either a Document Object Model (DOM) object constant (for example, document or window), or the ID of a DOM object that triggers the dynamic action.
– jQuery Selector - Enter the jQuery selector syntax to return one or more page elements that trigger the dynamic action.
d. Condition - To provide a condition, make a selection from the Condition list. Depending on the condition type, you may be required to enter a Value to test the condition against. If no condition is specified, only True Actions fire. If a
Note: Only available if the event selected supports definition of a page element. Selecting any of the following events hides this field: Page Load, Page Unload, Resize, Before Page Submit, Orientation Change. All other event types show this field.
Implementing Dynamic Actions
Advanced Programming Techniques 17-41
condition is specified, the True Action fires when the condition is met, the False Action fires when it is not.
5. Specify the action that is performed when the previously specified event occurs and conditions are satisfied and then click Next.
■ For True Actions - Depending on the selected action, additional options display. Use these options to specify additional settings and values required to perform the action.
Component
– Clear - Clears the affected elements.
– Disable - Disables the affected elements. By disabling the affected elements, the page item will be non-editable and will not retain the item’s value when the page is submitted.
– Enable - Enables the affected elements.
– Hide - Hides the affected elements. Also has the option to Hide all page items on the same line.
– Refresh - Triggers a refresh of the affected elements. Note that not all elements support a refresh, you can use it for interactive reports, classic reports, charts, list view and all item types with cascading LOV support. Plug-ins might support this action as well.
– Set Focus - Sets the focus to the affected elements. This defaults to the first of the affected elements if there are multiple. This can be especially useful when used with the Show and Enable actions to take the user straight to the appropriate item.
– Set Value - Sets the value of the affected elements. This supports the following Set Types: Static Assignment, JavaScript Expression, SQL Statement, PL/SQL Expression, PL/SQL Function Body. SQL Statement Set Type supports setting between 1 and 100 page item values, by selecting between 1 and 100 columns in the query. All other Set Types only support setting 1 page item. See the Execute PL/SQL Code action for an alternative way to set multiple values on the page.
– Show - Shows the affected elements. Also has the option to Show all the page items on the same line.
Execute
– Execute JavaScript Code - Enables you to define or call custom, page specific JavaScript code to use within the dynamic action framework. If you are defining JavaScript code that is specific to just one page, you can also make use of the new page level attribute Function and Global Variable Declaration to define this. Functions and variables defined here can subsequently be referenced from this action.
– Execute PL/SQL Code - Executes some PL/SQL code on the server. If an error occurs during execution, the user is alerted. To specify page items that are set on the page when the call to the server returns, based on their values in session state, define Page Items to Return. When the Page Items to Return option is used, and you want to prevent subsequent Change based dynamic actions from firing for the Page Items to Return, set Suppress Change Event to Yes.
Notification

Implementing Dynamic Actions
17-42 Oracle Application Express Application Builder User's Guide
– Alert - Displays an Alert.
– Confirm - Displays a confirmation dialog. If the user chooses Cancel then the proceeding actions are not executed and the current event is canceled.
Style
– Add Class - Adds 1 or more CSS classes to the affected elements.
– Remove Class - Removes one, more or all classes from the affected elements.
– Set Style - Sets any style, CSS, property to the affected elements.
Miscellaneous
– Cancel Event - Cancels subsequent dynamic actions or events from firing, based on certain conditions. This could be useful in the following situations:
If you have multiple dynamic actions on a page that are based on the same event (such as Click) and they refer to the same element on the page, you can use the Cancel Event action to prevent subsequent dynamic actions from firing, conditionally based on its When Condition.
If a dynamic action has many true actions, you can use Cancel Event to halt subsequent actions from being processed. Currently this has limited value as it is not possible to define a dynamic action's actions to fire condi-tionally, so this would just always prevent subsequent actions being pro-cessed, which could be useful in debugging.
Used to cancel page submission, when used with the Before Page Submit event of dynamic actions. For example, suppose you define a dynamic action that fires on the Before Page Submit even. For the Condition, you define JavaScript Expression and in the Value enter an expression such as $v('P2_ENAME') == 'DO NOT SUBMIT'. Then, if you define a True Action that uses the Cancel Event action, the page is not submitted when the ENAME field is equal to DO NOT SUBMIT.
– Submit Page - Submits the page. Also, has the option to disable the current page during page submission and display a processing style GIF.
Plug-ins
– my_plugin_action[Plug-in] - Depending on your application configuration, you may also have additional plug-in dynamic actions available here. These are displayed as my_plugin_action [Plug-in]. Plug-in dynamic actions are installed within the application's shared components. The plug-in developer must assign an appropriate category for the action (Component, Execute and so forth).
■ Fire On Page Load - Select this option to also trigger this action when the page loads. This may or may not be checked by default, depending on the type of Action selected.
■ Generate Opposite False Action - Select this option to also generate the opposite false action. Actions treated as opposite are Show / Hide, Enable / Disable and Add Class / Remove Class. This option only displays if one of the above actions are selected, and a When Condition has been specified.
6. For Affected Elements (available only for actions that support affected elements), specify the elements affected by this dynamic action and how they are affected then click Next.

Implementing Dynamic Actions
Advanced Programming Techniques 17-43
The final step in creating the dynamic action is different depending on whether the action you have selected supports selection of affected elements. Some actions, such as Submit Page, do not require affected elements to be selected. Other actions, such as Show, do. If the action selected does not support the selection of affected elements, the last page will be a Confirm page where you can review details of the dynamic action. If the action selected does support selection of affected elements, options on this page include:
■ Selection Type - Select the type of page element that is affected by the dynamic action. Depending on the selected type, additional options display. Use these options to specify additional settings and values required to specify how the element is affected.
■ Item(s), Button, Region, DOM Object, or jQuery Selector - Specify the name of the page element as follows:
– Item(s) - Select the item name that is affected by the dynamic action.
– Button - Select the button that is affected by the dynamic action. If the button is a Template button, the button selected must use a button template that includes an ID attribute set to #BUTTON_ID#. The dynamic action framework relies on this ID value to reference the button.
– Region - Enter or select the region name that is affected by the dynamic action. The region selected must use a region template that includes a container element with an ID attribute set to #REGION_STATIC_ID#. The dynamic action framework relies on this ID value to reference the region.
– DOM Object - Enter either a Document Object Model (DOM) object constant (for example, document or window), or the ID of a DOM object that is affected by the dynamic action.
– jQuery Selector - Enter the jQuery selector syntax to return one or more page elements that is affected by the dynamic action.
– Triggering Element - Provides access to the page element defined in the 'When' of the dynamic action.
– Event Source - Provides access to the page element where the event originated, which could be different from the Triggering Element in some cases. For example, if the When element is some container element (such as a region) that has been defined to handle events raised by its sub-elements (such as page items in that region), you can use the Event Source to easily act upon the sub-element that triggered the event.
7. Click Create Dynamic Action.
Editing Dynamic ActionsOnce you create a dynamic action, you can modify attributes defined during the creation process, specify attributes not available during the process (such as specifying an Authorization Scheme) and add additional true actions.
To edit a dynamic action:
1. Navigate to the appropriate Page Definition. See "Accessing the Page Definition" on page 8-2.
See Also: "Creating a Dynamic Action" on page 17-36, "Adding Additional True Actions" on page 17-44, "Defining the Frequency and Scope" on page 17-45

Implementing Dynamic Actions
17-44 Oracle Application Express Application Builder User's Guide
2. Under Page Rendering, scroll down to Dynamic Actions and click the dynamic action you want to modify.
The Edit Dynamic Action page appears.
3. Make changes and click Apply.
Adding Additional True ActionsDynamic actions contain a condition that can be specified to control when True actions fire. For example, consider an application that displays employee information to managers. If the employee is exempt, their salary displays, otherwise their hourly wage displays.
The Dynamic Action creation wizard allows only one true action to be specified. To add more than one action you must use the create wizard to create the dynamic action and then edit the action to add additional true actions.
To add an action:
1. Navigate to the appropriate Page Definition. See "Accessing the Page Definition" on page 8-2.
2. Under Page Rendering, scroll down to Dynamic Actions and click the dynamic action you want to modify.
The Edit Dynamic Action page appears.
3. To add an action that executes when the conditions are met or when no condition is specified, scroll down to True Actions and click Add True Action.
The Create/Edit Action page appears.
4. Under Identification:
a. Sequence - Enter the sequence for this component. This indicates the execution order.
b. Action - Select the action that triggers when the condition is true.
5. Under Execution Options:
a. Fire on Page Load - Select if you want the action to also trigger when the page loads.
b. Stop Execution on Error - Specify whether any proceeding actions should be executed, if an error occurs while executing the current action. Only available when the selected Action has been defined to expose this attribute, for example Execute PL/SQL Code.
c. Wait for Result - Specify whether any proceeding actions should wait for the result of the current action (if they are dependent on the result), or whether they can just execute without waiting. Only available when the selected Action has been defined to expose this attribute, for example Execute PL/SQL Code.
6. For Affected Elements (only available if the selected action supports definition of affected elements):
Note: Some or all of these fields may not be available to select, depending on the type of action selected. For example the Disable action does not support selecting a Region as the affected element.

Implementing Dynamic Actions
Advanced Programming Techniques 17-45
a. Selection Type - Select the type of page element that is affected by the dynamic action. A corresponding name field displays to specify the name of the page element.
b. Item(s), Button, Region, DOM Object, or jQuery Selector - Specify the name of the page element as follows:
– Item(s) - Enter or select the item name that is affected by the dynamic action.
– Button - Select the button that is affected by the dynamic action. If the button is a Template button, the button selected must use a button template that includes an ID attribute set to #BUTTON_ID#. The dynamic action framework relies on this ID value to reference the button
– Region - Enter or select the region name that is affected by the dynamic action. The region selected must use a region template that includes a container element with an ID attribute set to #REGION_STATIC_ID#. The dynamic action framework relies on this ID value to reference the region.
– DOM Object - Enter either the Document Object Model (DOM) object or the ID of a DOM object that is affected by the dynamic action.
– jQuery Selector - Enter the jQuery selector syntax to return one or more page elements that is affected by the dynamic action.
7. For Comments, enter developer comments or notes. These comments never display when the application is running.
8. Click Create.
The Edit Dynamic Action page displays with the added action listed under True Actions.
Defining the Frequency and ScopeAfter creating the dynamic action, the scope of the action can be modified to trigger only once, for the lifetime of the current page, or until triggering elements are updated by a Partial Page Refresh (PPR).
To specify scope:
1. Navigate to the appropriate Page Definition. See "Accessing the Page Definition" on page 8-2.
2. Under Page Rendering, scroll down to Dynamic Actions and click the dynamic action you want to modify.
The Edit Dynamic Action page appears.
3. Scroll down to Advanced and for Event Scope make one of the following selections:
a. Static (default) - Binds the event handler to the triggering elements for the lifetime of the current page, but will no longer be bound if the triggering elements are updated by Partial Page Refresh (PPR).
b. Dynamic - Binds the event handler to the triggering elements for the lifetime of the current page, including any elements that are updated by Partial Page Refresh (PPR). Specifying Dynamic causes an additional field Static Container (jQuery Selector) to be displayed. Specifying a Static Container can help improve the performance of the way events are handled with a Dynamic Event Scope. This should be an element on the page that itself does not get

About BLOB Support in Forms and Reports
17-46 Oracle Application Express Application Builder User's Guide
re-created, but contains the triggering elements that are re-created using Partial Page Refresh (PPR). This element reference must be defined as a jQuery selector.For example if you have a dynamic action that does something to the rows of an interactive report region (which is re-created by PPR), this would need an Event Scope of Dynamic, in order for the dynamic action to still work after the report has been refreshed. And here, the Static Container value could be set to a jQuery selector selecting the region's Static ID value, for example: '#my_region'.
c. Once - Binds the event handler to the triggering elements for a once only event.
4. Click Apply Changes.
Debugging Dynamic ActionsDebugging dynamic actions in Oracle Application Express is slightly different than other debugging, because much of the processing done with the dynamic action framework is done on the client, not on the server. To debug dynamic actions, Oracle Application Express outputs debug information to the browser's JavaScript console if your browser supports it (for example Firefox with Firebug installed shows the debug information in its Console pane). The debug information tells you when a dynamic action fires, the name of the dynamic action and also the Action JavaScript Object, which contains all the information needed by the client to execute the action (for example, event name, when details, action, affected elements and so on).
To debug a dynamic action:
1. Ensure the application containing the dynamic action has Debugging enabled. See "Accessing Debugging Mode" on page 14-4.
2. Run the page containing the dynamic action.
3. Open the browser's JavaScript console.
4. From the Developer toolbar, click Debug.
The page refreshes. If you have any dynamic actions that are set to fire on page load, you see the following text output to the console:
Dynamic Action Fired: [Dynamic action name] ({JavaScript Object containing all Dynamic Action information})
Since debug information is only output when running in Debug mode, leaving Debug mode switched on enables you to further test if dynamic actions are firing when you expect them to. For example if you have defined a dynamic action that fires when a certain item's value changes, change that item's value and the console shows the debug output if the dynamic action fires.
About BLOB Support in Forms and ReportsOracle Application Express includes declarative BLOB support to enable developers to declaratively upload files in forms, and download or display files in reports. BLOB display and download can also be authored procedurally using PL/SQL. This section describes how to upload, download and display files, and how to manage additional file attributes such as MIME type and file name that are important for proper management of files stored in BLOB columns. Using this functionality you can easily extend your Oracle Application Express applications to manage files including images, documents, videos, and so on.

About BLOB Support in Forms and Reports
Advanced Programming Techniques 17-47
Topics:■ About BLOB in Forms
■ About BLOB Support in Reports
■ Working With BLOBs Procedurally
About BLOB in FormsIf you create a Form (either using the Create Application Wizard, create page of type Form - or Report and Form, or create region of type Form) or add an item to an existing form, any item whose source is a database column of type BLOB results in an item of type File Browse. When the form is called for INSERT, the file selected by the user is loaded into the BLOB column. When the form is called for update, a download link is displayed to the right of the Browse button. Users can use this link to download the file.
Uploading and Downloading Files into a BLOBThe defaulted BLOB support does not give you all the information a typical application needs to effectively manage a BLOB. In addition to knowing that the column is a BLOB, more information about the file provides a better experience for the end-user. The File Browse page item has additional settings to facilitate managing this additional information completely declaratively.
There are two different types of storage types available within the File Browse item type:
■ BLOB column specific in Item Source Attribute - Completely declarative approach that supports configuration of the additional settings discussed here. This references a BLOB in your own database table.
■ Table WWV_FLOW_FILES - Available for backwards compatibility. Do not use it in new applications.
To provide this additional information, it is recommended that you add additional columns to your base table to store and track the MIME type, file name, last updated date and character set settings. You can accomplish this by extending your table. For example:
ALTER TABLE emp ADD (ATTACH_MIMETYPE VARCHAR2(255), ATTACH_FILENAME VARCHAR2(255), ATTACH_LAST_UPDATE DATE, ATTACH_CHARSET VARCHAR2(128));
If you manually create a form on a custom table, you can still take advantage of this feature. To do so, use the File Browse item type with a Storage Type setting of BLOB
See Also: File Browse in Appendix A, "About Item Types", item level help for the File Browse settings
Note: The character set of the BLOB is not automatically set on upload. To store the character set value for your BLOB, you must provide an additional page item on your page which is bound to the column you use to store the character set, and where the user will be able to specify the character set for the document they are uploading.

About BLOB Support in Forms and Reports
17-48 Oracle Application Express Application Builder User's Guide
column specified in Item Source Attribute, on a page with a DML Process type of DML_PROCESS_ROW. This process determines the table name and primary key columns.
Displaying the BLOBIf the BLOB you are working with is an image, you can display it in the form as well. You can use the Display Image item type to handle this declaratively, see Appendix A, "About Item Types" for details. See "Working With BLOBs Procedurally" on page 17-50 to handle procedurally.
Removing the Image ReferenceBecause there is no set to NULL when using File Browse, if you need to provide a mechanism to remove an image reference, you must include a special Remove Image button to nullify the necessary columns. Consider the following example:
UPDATE demo_product_info SET product_image = NULL, MIMETYPE = NULL, FILENAME = NULL, IMAGE_LAST_UPDATE = NULL, CHARSET = NULL WHERE product_id = :P6_PRODUCT_ID;
About BLOB Support in ReportsOracle Application Express includes BLOB support for both classic and interactive reports. If you use a wizard to create a report and include a column of type BLOB, basic support is included. Additional information should be added after generation to make the download capability more user friendly.
Providing a Download LinkTo facilitate the inclusion of a download link in a report, the report includes the selection of the length of the BLOB (for example, dbms_lob.getlength(RESUME)). If the length is 0, the BLOB is NULL and no download link is displayed. In the same way you specify a format mask for a date or number you can format a download link. The DOWNLOAD format is more complex however then other format masks in that you are required to specify at least three parameters, for example:
DOWNLOAD:EMP:RESUME:EMPNO
The following table describes the parameters of the DOWNLOAD format:
Position Attribute Required Description
1 DOWNLOAD Yes Identifies the DOWNLOAD report format mask.
2 Table Name Yes Case sensitive name of table containing target column of type BLOB.
3 Column containing BLOB
Yes Case sensitive name of column of type BLOB.
4 Primary Key Column 1 Yes Case sensitive name of primary key column 1.
5 Primary Key Column 2 No Case sensitive name of primary key column 2.
6 MIME type Column No Case sensitive column name used to store the MIME type.

About BLOB Support in Forms and Reports
Advanced Programming Techniques 17-49
Consider the following example:
DOWNLOAD:EMP:RESUME:EMPNO::RESUME_MIMETYPE:RESUME_FILENAME:RESUME_LAST_UPDATE::attachment:Resume
To be able to enter these parameters and create the format as described above. You have to select Blob Format for Number/Date format item. Once selected, the Blob Column attributes region displays and you can fill in all parameters as described above.
Displaying the BLOBIf the BLOB you are working with is an image, you can display it in the report using the new report format mask of 'IMAGE'. Regardless of the MIME type, the report always attempts to display the BLOB. If the BLOB cannot be rendered, a broken image is displayed.
The following table describes the parameters of the IMAGE format mask:
7 Filename Column No Case sensitive column name used to store the filename of the BLOB. If NULL, the column name is used as the default when a user downloads the file.
8 Last Update Column No Case sensitive column name used to store the last update date of the BLOB. If used, the HTTP header of the file download indicates the date of last modification and web browsers will be able to cache the BLOB. If not specified, the browser may not be able to cache files.
9 Character Set Column No Case sensitive column name used to store the character set of the BLOB. Most relevant for Asian languages which may need to maintain the character set encoding.
10 Content Disposition No Specify inline or attachment. All other values are ignored. If a MIME type is provided and the file is a type that can be displayed, the file is displayed. If MIME type is not provided, or the file cannot be displayed inline, the user is prompted to download.
11 Download Text No String used for the download link. If nothing is provided, Download is used. Note that this supports substitutions (useful for translated applications).
Position Attribute Required Description
1 IMAGE Yes Identifies the IMAGE report format mask.
2 Table Name Yes Case sensitive name of table containing target column of type BLOB.
3 Column containing BLOB
Yes Case sensitive name of column of type BLOB.
4 Primary Key Column 1
Yes Case sensitive name of primary key column 1.
5 Primary Key Column 2
No Case sensitive name of primary key column 2.
6 MIME type Column
No Case sensitive column name used to store the MIME type.
Position Attribute Required Description

Using Screen Reader Mode in Your Database Applications
17-50 Oracle Application Express Application Builder User's Guide
Consider the following example:
IMAGE:EMP:RESUME:EMPNO::RESUME_MIMETYPE:RESUME_FILENAME:RESUME_LAST_UPDATE::attachment:Resume
To be able to enter these parameters and create the format as described above. You have to select Blob Format for Number/Date format item. Once selected, a new region, Blob Column attributes, displays and you can fill in all parameters as described above.
Working With BLOBs ProcedurallyAs an alternative to using the built-in methods of providing a download link, you can use the APEX_UTIL.GET_BLOB_FILE_SRC function. One advantage of this approach, is the ability to more specifically format the display of the image (with height and width tags). Note that this approach is only valid if called from a valid Oracle Application Express session. Also, this method requires that the parameters that describe the BLOB to be listed as the format of a valid item within the application. That item is then referenced by the function.
Using Screen Reader Mode in Your Database ApplicationsSessions in Oracle Application Express can now be identified as optimized for screen readers, in the Oracle Application Express development environment, Websheet runtime, and also within your own database applications. By default sessions are not flagged as running in screen reader mode. This section describes how you can provide users of your own database applications access to this mode and also how you can extend it.
Although this mode improves usability of Oracle Application Express with a screen reader, there may still be some areas where outstanding issues remain. For a full list of outstanding issues with workarounds where possible, refer to "Accessibility in Oracle Application Express" on page E-1 and Oracle Application Express Release Notes.
Topics:■ Provisioning Screen Reader Mode
■ Extending Screen Reader Mode
7 Filename Column
No Not used for IMAGE format but left in so that the format can easily be changed between IMAGE and DOWNLOAD.
8 Last Update Column
No Case sensitive column name used to store the last update date of the BLOB. If used, the HTTP header of the file download indicates the date of last modification and web browsers will be able to cache the BLOB. If not specified, the browser may not be able to cache files.
9 Character Set Column
No Not used for IMAGE format but left in so that the format can easily be changed between IMAGE and DOWNLOAD.
10 Content Disposition
No Not used for IMAGE format but left in so that the format can easily be changed between IMAGE and DOWNLOAD.
11 Alt Text No String used for the alt tag associated with the image.
See Also: "GET_BLOB_FILE_SRC Function" in the Oracle Application Express API Reference
Position Attribute Required Description

Using High Contrast Mode in Your Database Applications
Advanced Programming Techniques 17-51
Provisioning Screen Reader ModeYou can provision screen reader mode for use with your own database application in three ways:
1. Use the page template #SCREEN_READER_TOGGLE# substitution string.
Add the #SCREEN_READER_TOGGLE# substitution string to your page template and Oracle Application Express displays a link to the current page to turn on or off (toggle) the mode. So if you are in standard mode, this procedure generates a link to turn it on.
2. Use APIs to control screen reader mode.
You may want to use the APIs if you only want to render the toggle in one place and not at the page template level, or if you want more control over the actual displayed link text. To learn more, see "APEX_UTIL" in Oracle Application Express API Reference.
3. Use the f?p syntax REQUEST attribute to enable and disable screen reader mode.
The general syntax for f?p is:
f?p=application:page:session:request:...
If the request is exactly SET_SESSION_SCREEN_READER_ON or SET_SESSION_SCREEN_READER_OFF then the session is put into or out of Screen Reader mode. For example:
<a href="f?p=100:1:&SESSION.:SET_SESSION_SCREEN_READER_ON">Set Screen Reader On</a>
Extending Screen Reader ModeIn addition to what this mode does by default as detailed in "What Does Screen Reader Mode Do?" on page E-1, you can control your own page components. For example, you can conditionally display region when running in Screen Reader mode. See "APEX_UTIL" in Oracle Application Express API Reference for details of the relevant database functions, APEX_UTIL.IS_SCREEN_READER_SESSION and APEX_UTIL.IS_SCREEN_READER_SESSION_YN.
Using High Contrast Mode in Your Database ApplicationsYou can identify sessions as optimized for high contrast in the Oracle Application Express development environment, Websheet runtime, and also within your own database applications. This section describes how you can provide users of your own database applications access to this mode and also how you can extend it.
Topics:■ Provisioning High Contrast Mode
■ Extending High Contrast Mode
See Also: "About Screen Reader Mode" on page E-1
See Also: "About High Contrast Mode" on page E-3

Creating Applications with Data Loading Capability
17-52 Oracle Application Express Application Builder User's Guide
Provisioning High Contrast ModeYou can provision high contrast mode for user's of your own database applications in three ways:
■ Use the page template #HIGH_CONTRAST_TOGGLE# substitution string.
Add the #HIGH_CONTRAST_TOGGLE# substitution string to your page template and Oracle Application Express displays a link to the current page to turn on or off (or toggle) the mode. In other words, if you are in standard mode, this procedure generates a link to turn it on.
■ Use APIs to control high contrast mode.
Use the APEX_UTIL APIs to control this mode. You may want to use the APIs if you only want to render the toggle in one place and not at the page template level, or if you want more control over the actual displayed link text. To learn more, see "APEX_UTIL" in Oracle Application Express API Reference.
■ Use the f?p syntax REQUEST attribute to enable and disable high contrast mode.
The general syntax for the f?p syntax REQUEST attribute is:
f?p=application:page:session:request:...
If the request is exactly SET_SESSION_HIGH_CONTRAST_ON or SET_SESSION_HIGH_CONTRAST_OFF then the session is put into or out of high contrast mode. For example:
<a href="f?p=100:1:&SESSION.:SET_SESSION_HIGH_CONTRAST_ON">Set High Contrast On</a>
Extending High Contrast ModeIn addition to what this mode does by default as described in "What Does High Contrast Mode Do?" on page E-4, you can also control your own components. For example, you could conditionally include a high contrast specific CSS file, when running in high contrast mode.
To learn more, see "APEX_UTIL" in Oracle Application Express API Reference details of the following functions: APEX_UTIL.IS_HIGH_CONTRAST_SESSION and APEX_UTIL.IS_HIGH_CONTRAST_SESSION_YN.
Creating Applications with Data Loading CapabilityApplications with data loading capability enable end users to dynamically import data into a table within any schema to which the user has access. To import data, end users run a Data Load Wizard that uploads data from a file or copies and pastes data entered by the end user directly into the wizard.
The application developer creates the Data Load Wizard by creating a Data Load type page with the Create Page Wizard. The creation process allows developers to specify the upload table and its unique columns, table lookups and data transformation rules. See "Creating a Data Load Wizard" on page 17-53
The Create Page Wizard creates a Data Load Table that defines the Data Load Wizard. The developer edits the Data Load Wizard’s definitions, such as table lookups and data transformation rules, by finding and clicking on the corresponding Data Load Table under the application’s Shared Components. See "Editing the Data Load Wizard" on page 17-55.
Creating Applications with Data Loading Capability
Advanced Programming Techniques 17-53
To learn about using the Data Load wizard, see "About Uploading Data" in Oracle Application Express End User Guide.
Topics:■ Creating a Data Load Wizard
■ Editing the Data Load Wizard
Creating a Data Load WizardThe Create Page Wizard is used by the developer to create a Data Load Wizard that is several pages. The Data Load Wizard can be defined to include:
■ Table Definitions - This definition specifies the data upload table name with its unique key columns.
■ Data transformation rules - For formatting transformations such as changing import data to uppercase, lowercase, and so on, define data transformation rules. If the import file includes column data with both upper and lowercase and the upload table requires all uppercase, define a data transformation rule to insert only uppercase into that column during data upload.
■ Table lookups - If data exists in the import file that must be mapped to data that can be found in another table, specify a table lookup to perform the mapping. For example, if the import file contains a department name for the DEPTNO column but the upload table requires a number for that column, use a table lookup rule to find the corresponding department number for that department name in another table.
■ Column Name Aliases - End users may have issues with correctly identifying the columns to upload based on the table's column names. Therefore, you can define aliases for each column. These are displayed to the end user while uploading the spreadsheet data. If a list of values is created, the aliases is automatically picked up by the application during data column mapping. Otherwise, the application uses the table column names. Once created, the list of values can also be edited and a column can be removed from the list.
■ Manage Concurrency - By default the last user to submit data, updates the record. This option gives the developer the ability to choose a column to track the record versions. This is particularly important when dealing with a table that is regularly updated by different users. Every time the user tries to upload data, the data loading feature uses this column to track the version of the record. If while uploading the value of this column is found o have changed, the record is flagged and not directly updated, instead letting the end user know before he or she makes any further action.
To create a Data Load Wizard:
1. On the Workspace home page, click the Application Builder icon.
The Application Builder home page appears.
2. Select an application.
The Application home page appears.
3. Click Create Page.
4. Select Data Loading and click Next.
5. For Data Load Table, specify the following then click Next:

Creating Applications with Data Loading Capability
17-54 Oracle Application Express Application Builder User's Guide
■ Data Load Definition Name - Enter the name of this data load definition.
■ Owner - Select the owner of the data loading table.
■ Table Name - Select the table to use for data loading, also referred to as the upload table.
■ Unique Column 1 - Select the column name to use as the primary unique key column during the data load process. At least one unique key column is required.
■ Case Sensitive - If the selected column for Unique Column 1 is case sensitive, select Yes. Otherwise, select No.
■ Unique Column 2 - If the unique key definition of the data load table is a compound key consisting of 2 or more columns, select the column name to use as the second unique key column during the data load process.
■ Case Sensitive - If the selected column for Unique Column 2 is case sensitive, select Yes. Otherwise, select No.
■ Unique Column 3 - If the unique key definition of the data load table is a compound key consisting of 3 or more columns, select the column name to use as the third unique key column during the data load process.
■ Case Sensitive - If the selected column for Unique Column 3 is case sensitive, select Yes. Otherwise, select No.
6. For Transformation Rules (optional), specify the following then click Add.
■ Sequence - Specify the sequence for the transformation rule. The sequence determines the order of execution.
■ Rule Name - Enter a name for this transformation rule.
■ Select Columns - Select the name of the column that requires transformation and move to the right.
■ Type - Select the type of transformation rule you want to perform.
7. Repeat the previous step for each transformation rule you want to add, then click Next.
8. For Table Lookups (optional), specify the following then click Add.
■ Column Name - Select the column in the import file you want to replace with the associated value.
■ Owner - Select the owner of the lookup table.
■ Table Name - Select the name of the lookup table. This is the table containing the associated value to be used in place of the value from the import file.
■ Return Column - Select the name of the column returned by the table lookup. This value is inserted into the load column specified, and is generally the key value of the parent in a foreign key relationship. For example: DEPTNO.
■ Upload Column - Select the name of the column end users upload instead of the return column. This is the column that contains the display value from the lookup table. For example: DNAME.
■ Upload Column 2 - Select the name of the second column to be uploaded to uniquely identify the return column if necessary. It may be possible that Department IDs are different from SALES departments in NEW YORK and SAN FRANCISCO. To retrieve the value, you would need to pass second column which is LOCATION in this case.

Creating Applications with Data Loading Capability
Advanced Programming Techniques 17-55
■ Upload Column 3 - Select the name of the third column to be uploaded to uniquely identify the return column if necessary.
9. Repeat the previous step for each Table Lookup you want to add, then click Next.
The Page Attributes page appears providing a short description of each page of the Data Load Wizard being created.
10. For Pages Attributes, you can optionally change the default page names, page numbers and region names for each page of the data load wizard that is being created, then click Next.
11. For Tab Options, select the tab type for the wizard pages, and click Next.
12. For Breadcrumb, select the type of breadcrumb to be used by the data load wizard pages and click Next.
13. For Buttons and Branching, specify the branching for the buttons on the data load wizard pages and click Next.
14. Review the Confirm page and click Create.
15. Click Edit Page to modify the Data Load Wizard definitions, otherwise click Run Page, to test the Data Load Wizard.
Editing the Data Load WizardThe Add/Edit Data Load Table page enables you to modify the upload table column and unique key definitions, the Table Lookups and Transformation Rules. Table Lookups and Transformation Rules can be modified, added and removed.
To edit a Data Load Wizard:
1. On the Workspace home page, click the Application Builder icon.
The Application Builder home page appears.
2. Select an application.
The Application home page appears.
3. Click Shared Components.
4. Under Logic, click Data Loading.
5. Click the Data Load Definition you want to edit.
The Data Load Table Details page appears.
6. Make changes to the following data load table details:
■ Data Load Table - Edit the data load table name and add, remove or edit unique columns.
■ Transformation Rules - Add, remove or edit transformation rules.
■ Table Lookups - Add, remove or edit table lookups.
■ Column Name Aliases - Edit the List of Values for Data Loading column aliases.
■ Manage Concurrency - Edit the column which is used as the concurrency management column by the data loading feature.
■ Comments - Edit comments for this data load table.
7. Click Apply Changes.

Managing Component Settings
17-56 Oracle Application Express Application Builder User's Guide
Managing Component SettingsUse the Component Settings page to set application-level values for built-in Oracle Application Express components and installed plug-ins.
Topics:■ Editing Component Settings
■ Viewing the Component Settings History Report
Editing Component SettingsTo edit component settings:
1. On the Workspace home page, click the Application Builder icon.
2. Select an application.
The Application home page appears.
3. Click Shared Components.
The Shared Components page appears.
4. Under User Interface, click Component Settings.
The Component Settings page displays as an interactive report. To customize the report, use the Search bar at the top of the page. To learn more, see "Customizing Interactive Reports" on page 9-4.
5. Edit the settings and click Apply Changes.
Viewing the Component Settings History ReportYou can view a report of modifications made to Oracle Application Express components and installed plug-ins on the Component Settings History page.
To view the Component Settings History report:
1. On the Workspace home page, click the Application Builder icon.
2. Select an application.
The Application home page appears.
3. Click Shared Components.
The Shared Components page appears.
4. Under User Interface, click Component Settings.
5. Click the History tab.
The History page displays as an interactive report. To customize the report, use the Search bar at the top of the page. To learn more, see "Customizing Interactive Reports" on page 9-4.

Managing Application Globalization 18-1
18Managing Application Globalization
This section describes how to translate an application built in Application Builder.
Topics:■ About Translating an Application and Globalization Support
■ Specifying the Primary Language for an Application
■ Understanding the Translation Process
■ Translating Messages
■ Translating Data That Supports List of Values
■ About Supported Globalization Codes
About Translating an Application and Globalization SupportYou can develop applications in Application Builder that can run concurrently in different languages. A single Oracle database instance and Oracle Application Express can support multiple database sessions customized to support different languages.
In general, translating an application built in Application Builder involves the following steps:
■ Map the primary and target application IDs
■ Seed and export the text to a file for translation
■ Translate the text in the file
■ Apply the translated file
■ Publish the translated file
Topics:■ About Language Identification
■ Rules for Translating Applications Built in Application Builder
■ How Translated Applications Are Rendered
■ About Translatable Components
See Also: "Viewing Installed Translations" in Oracle Application Express Administration Guide
See Also: "Understanding the Translation Process" on page 18-6

About Translating an Application and Globalization Support
18-2 Oracle Application Express Application Builder User's Guide
About Language IdentificationAfter you create an application, you specify a language preference on the Edit Globalization Attributes page. Then you select a primary application language and determine how the Application Express engine determines the application language. You can specify to have the application language based on the user's browser language preference, an application preference, or an item preference.
Rules for Translating Applications Built in Application BuilderUse the following rules to determine which translated version to use:
■ Look for an exact match between the user language preference and the language code of the translated application.
■ Look for a truncated match. That is, see if the language and locale exist. For example, if the user language preference is en-us and the translated version of en-us does not exist, look for a translated application that has the language code en.
■ Use the primary application language.
For example, suppose you create an application with the primary language of German, de, and you create a translated version of the application with a language code of en-us. Users accessing this application with a browser language of en-us execute the English en-us version of the application. Users accessing the application with a browser language of en-gb view the application in the application’s primary language, that is, in German. For this example, you should create the translated English version using language code en to encompass all variations of en.
How Translated Applications Are Rendered After Oracle Application Express determines the language for an application, the Application Express engine alters the database language for a specific page request. It then looks for a translated application in the appropriate language. If the Application Express engine finds that language, it renders the application using that definition. Otherwise, it renders the application in the base (or primary) application language.
Note that the text that displays within an application is not translated on the fly. Oracle Application Express dynamically collects page attributes from either a base language application definition or an alternative application definition.
About Translatable ComponentsWhen you build an application in Application Builder, you define a large number of declarative attributes such as field labels, region headings, page header text, and so on. Using the steps described in this section, you can make all the application definition attributes within your application translatable.
About Shortcuts that Support Translatable MessagesApplication Builder includes two shortcut types that enable you to reference translatable messages:
See Also: "Specifying the Primary Language for an Application" on page 18-4
See Also: "About Dynamic Translation Text Strings" on page 18-3 and "Translating Data That Supports List of Values" on page 18-31

About Translating an Application and Globalization Support
Managing Application Globalization 18-3
■ Message. Use this shortcut to reference a translatable message at runtime. Note that the name of the shortcut must match the corresponding message name. At runtime, the name of the shortcut expands to the text of the translatable message for the current language.
■ Message with JavaScript Escaped Single Quotes. Use this shortcut to reference a shortcut inside of a JavaScript literal string and reference a translatable message at runtime. This shortcut defines a text string. When the shortcut is referenced, it escapes the single quotation marks required for JavaScript.
About MessagesIf your application includes PL/SQL regions or PL/SQL processes, you must translate any generated HTML or text. You may also need to translate messages used in reports if your application uses a language that is not one of the ten languages into which Oracle Application Express is translated.
About Dynamic Translation Text StringsDynamic translations are used for database data that must be translated at runtime. For example, you might use a dynamic translation to translate a list of values based on a database query. A dynamic translation consists of a translate-from language string, a language code, and a translate-to string. You can also use the APEX_LANG.LANG API to retrieve dynamic translations programmatically.
About Translating Region TitlesBy default, page region titles are included in the generated translation file. However, you can mark a region title as not translatable.
To mark a region title as not translatable:
1. Navigate to the Page Definition. See "About the Page Definition" on page 8-1.
2. On the Page Definition, select the region title.
The Edit Region page appears.
3. Select the exclude title from translation check box.
About Translating TemplatesBy default, templates are not translatable, and therefore are not included in the generated translation file. Generally, templates do not and should not contain translatable text. However, if you must mark a template as translatable, select the Translatable check box on the Edit Page Template page.
To identify a template as translatable:
1. On the Workspace home page, click the Application Builder icon.
2. Select an application.
3. On the Application home page, click Shared Components.
4. Under User Interface, select Templates.
See Also: "Using Shortcuts" on page 10-77
See Also: "Translating Messages" on page 18-12
See Also: "Translating Data That Supports List of Values" on page 18-31

Specifying the Primary Language for an Application
18-4 Oracle Application Express Application Builder User's Guide
The Templates page appears.
5. Locate the template you want to edit and select the template name.
6. Under Name, select Translatable.
You can include translatable text at the application-level by defining the translatable text using static substitution strings. Because application-level attributes are translated, any text defined as a static substitution string is included in the generated translation file.
Specifying the Primary Language for an ApplicationGlobalization attributes specify how the Application Express engine determines the primary language of an application.
To edit globalization attributes:
1. On the Workspace home page, click the Application Builder icon.
2. Select an application.
3. Click Shared Components.
4. Under Globalization, select Globalization Attributes.
5. From Application Primary Language, select the language in which the application is being developed.
6. From Application Language Derived From, specify how the Application Express engine determines (or derives) the application language. Table 18–1 describes available options:
See Also: "Customizing Templates" on page 13-12 and "Substitutions" on page 7-21
Table 18–1 Application Language Derived From Options
Option Description
No NLS (Application not translated)
Select this option if the application will not be translated.
Application Primary Language Determines the application’s primary language based on the Application Primary Language attribute. (See step 5.)
Browser (use browser language preference)
Determines the application’s primary language based on the user's browser language preference.
Application Preference (use FSP_LANGUAGE_PREFERENCE)
Determines the application’s primary language based on a value defined using the APEX_UTIL.SET_PREFERENCE API. Select this option to maintain the selected language preference across multiple logins.
See Also: "SET_PREFERENCE Procedure" in Oracle Application Express API Reference
Item Preference (use item containing preference)
Determines the application’s primary language based on an application-level item called FSP_LANGUAGE_PREFERENCE. Using this option requires Oracle Application Express to determine the appropriate language preference every time the user logs in.

Specifying the Primary Language for an Application
Managing Application Globalization 18-5
7. Configure other options as appropriate. To learn more about an attribute, click the item label.
8. Click Apply Changes.
Using Format Masks for ItemsThe Application Express engine applies globalization settings for each rendered page. This default behavior can impact the display of certain items such as numbers and dates.
For example, suppose your application determines the application language based on the user's browser language preference. If the Application Express engine determines the users's browser language preference is French, it displays dates and numbers in a format that conforms to French standards. You can override this default behavior and explicitly control how items display by applying a format mask. You apply a format mask by making a selection from the Display As list:
■ When you create the item
■ After you create the item by editing the item attributes
The following procedure describes how to edit item attributes for items having the source type of Database Column.
To edit item attributes:
1. On the Workspace home page, click the Application Builder icon.
2. Select an application.
3. Select a page.
The Page Definition appears.
4. Select an item.
The Edit Page Item page appears.
5. Under Name, make a selection from the Display As list.
6. Under source, select or enter a format mask.
Translating Applications for Multibyte Languages If your application must run in several languages simultaneously (such as Chinese and Japanese), consider configuring your database with a character set to support all of the languages. The same character set has to be configured in the corresponding database access descriptor (DAD) in mod_plsql. UTF8 and AL32UTF8 are the character sets you can use to support almost all languages around the world.
Session Determines the translated application language from the session setting. The Application Express session language can be set through either the APEX_UTIL.SET_SESSION_LANG procedure or by using the p_lang parameter of the "f" procedure in the URL
See Also: "Editing the Application Definition" on page 7-15, "Configuring Security Attributes" on page 7-21, and "About Supported Globalization Codes" on page 18-32
Table 18–1 (Cont.) Application Language Derived From Options
Option Description

Understanding the Translation Process
18-6 Oracle Application Express Application Builder User's Guide
Understanding the Translation ProcessTo translate an application developed in Application Builder, you must map the primary and target language, seed and export text to a translation file, translate the text, apply the translation file, and publish the translated application.
Topics:■ Step 1: Map the Target Language
■ Step 2: Seed and Download to a Translation File
■ Step 3: Translate the XLIFF File
■ Step 4: Upload and Apply a Translated XLIFF Document
■ Step 5: Publish the Application
■ Manually Editing a Translation
Step 1: Map the Target LanguageThe first step in translating an application is to map the primary and target application language. The primary application is the application to be translated. The target application is the resulting translated application.
To map the primary and target application language:
1. Navigate to the Translate Application page:
a. On the Workspace home page, click the Application Builder icon.
b. Select an application.
c. Click Shared Components.
d. Under Globalization, click Translate Application.
The Translate page appears.
2. Click Map your primary language application to a translated application.
The Mappings page appears.
3. Click Create.
4. On the Translation Application Mapping page:
■ Translation Application - Enter a unique integer value that identifies an application. The application ID must be unique on your instance of Oracle Application Express.
■ Language - Select the language to be translated.
■ Image Directory - Enter the directory where images are obtained. Unless you are using static files from the images directory which are translated, leave this field blank. This is the default and most common option.
This attribute determines the virtual path for translated images. For example, if your primary language application had an image prefix of /i/, you could define additional virtual directories for other languages, such as /i/de/ for German or /i/es/ for Spanish.
5. Click Create.
See Also: "Translating Messages" on page 18-12 and "Translating Data That Supports List of Values" on page 18-31

Understanding the Translation Process
Managing Application Globalization 18-7
Step 2: Seed and Download to a Translation FileThe second step is to seed the translation table and then export the translation text to a translation file.
Topics:■ Seeding Translatable Text
■ Downloading an XLIFF File
Seeding Translatable TextSeeding the translation copies all translatable text into the Translation Text repository. After you specify the language and seed the Translation Text, you can then generate and export an XLIFF file for translation.
The seeding process keeps your primary language application synchronized with the Translation Text repository. You should run the seed process any time your primary language application changes.
To seed translatable text:
1. Navigate to the Translate Application page:
a. On the Workspace home page, click the Application Builder icon.
b. Select an application.
c. Click Shared Components.
d. Under Globalization, click Translate Application.
The Translate page appears.
2. Select Seed translatable text to translation repository.
3. Select the appropriate target application.
4. Click Seed.
When completed, the following message displays:
Successfully seeded translatable text.
Downloading an XLIFF FileOnce the translation mappings are established the translatable text within the application is seeded into a translation repository. This repository can then be exported to an XML Localization Interchange File Format (XLIFF) file for translation.
The XLIFF Export page is divided into two sections. Use the upper section to export translatable text for an entire application (that is, all pages, lists of values, messages, and so on). Use the lower section to export translatable text for a specific page.
See Also: "Step 2: Seed and Download to a Translation File" on page 18-7
Note: XML Localization Interchange File Format (XLIFF) is an XML-based format for exchanging localization data. For information about the XLIFF or to view the XLIFF specification, see:
http://www.xliff.org

Understanding the Translation Process
18-8 Oracle Application Express Application Builder User's Guide
Downloading a XLIFF file for an Application To download an XLIFF file for an complete application:
1. Seed the translatable text. See "Seeding Translatable Text" on page 18-7.
2. On the Translate page, click Download XLIFF translation files from translation repository.
3. Under Download XLIFF file for complete Application:
a. Language - Choose the language to be downloaded in the XLIFF file.
b. Include XLIFF Target Elements - Specify whether to include XLIFF target elements. To include then, select Include XLIFF Target Elements.
c. Export - Choose to export all translatable elements of the application or only those elements which are new or have been updated.
d. Click Export XLIFF.
4. Follow the on-screen instructions.
Downloading an XLIFF File for an Application Page To download an XLIFF file for a specific page:
1. Seed the translatable text as described in "Seeding Translatable Text" on page 18-7.
2. On the Translate page, click Download XLIFF translation files from translation repository.
3. Under Download XLIFF file for Application Page:
a. Language - Choose the language to be downloaded in the XLIFF file.
b. Page - Select a page.
c. Include XLIFF Target Elements - Specify whether to include XLIFF target elements. To include then, select Include XLIFF Target Elements.
d. Export - Choose to export all translatable elements of the page or only those elements which are new or have been updated.
e. Click Export XLIFF.
4. Follow the on-screen instructions.
About Including XLIFF Target Elements When Oracle Application Express generates an XLIFF document, each document contains multiple translation units. Each translation unit consists of a source element and a target element. The XLIFF document can be generated with both the source and target elements for each translation unit. You have the option of generating a file containing only source elements. The updated translations will be applied from the target elements of the translation units.
Step 3: Translate the XLIFF FileAfter you export a translatable file to XLIFF format, you can translate it into the appropriate languages. Because XLIFF is an open standard XML file for exchanging translations, most translation vendors should support it. Oracle Application Express only supports XLIFF files encoded in UTF-8 character sets. In other words, it exports XLIFF files for translation in UTF-8 and assumes that the translated XLIFF files are in the same character set.
Translation is a time-consuming task. Oracle Application Express supports incremental translation so that application development can be done in parallel with

Understanding the Translation Process
Managing Application Globalization 18-9
the translation. An XLIFF file can be translated and uploaded to Oracle Application Express even when only part of the XLIFF file is translated. For strings that have no translation in the corresponding translated application, Oracle Application Express uses the corresponding ones in the primary language.
Step 4: Upload and Apply a Translated XLIFF DocumentAfter your XLIFF document has been translated, the next step is to upload and then apply it.
Topics:■ Uploading a Translated XLIFF Document
■ Applying an Uploaded XLIFF Document
■ Deleting an Uploaded XLIFF Document
Uploading a Translated XLIFF DocumentTo upload a translated XLIFF document:
1. Navigate to the Translate Application page:
a. On the Workspace home page, click the Application Builder icon.
b. Select an application.
c. Click Shared Components.
d. Under Globalization, click Translate Application.
The Translate page appears.
2. Click Upload and apply XLIFF translation file to translation repository.
The XLIFF Translation Files page appears.
3. Click Upload Files.
4. On the XLIFF Upload page:
a. Enter a description.
b. Locate the file to be uploaded.
c. Click Upload.
The uploaded document appears on the XLIFF Translation Files page.
Applying an Uploaded XLIFF DocumentAfter you upload an XLIFF document, the next step is to apply the XLIFF document and then publish the translated application. When you apply an XLIFF document, the Application Express engine parses the file and then updates the translation tables with the new translatable text.
Publishing your application creates a copy of the base language application, substituting the translated text strings from your translations table. This published application can then be used to render your application in alternate languages.
See Also: For more information about the XLIFF, or to view the XLIFF specification, see:
http://www.xliff.org

Understanding the Translation Process
18-10 Oracle Application Express Application Builder User's Guide
Remember that to run an application in an alternative language, you must run it with globalization settings that cause an alternative language version to display. For example, if the language is derived from the browser language, you must set the browser language to the same language as the translated application.
To apply a translated XLIFF document:
1. Navigate to the Translate Application page:
a. On the Workspace home page, click the Application Builder icon.
b. Select an application.
c. Click Shared Components.
d. Under Globalization, click Translate Application.
The Translate Application page appears.
2. Click Upload and apply XLIFF translation file to translation repository.
The XLIFF Translation Files page appears.
3. To apply the XLIFF files:
a. Select the XLIFF files you want to apply.
b. From Apply to Translation, choose a translation mapping.
c. Click Apply Checked.
The XLIFF file is parsed and the contents is applied to the translation repository. Once this process is complete, you must publish the application for each translation. See "Step 5: Publish the Application" on page 18-11.
Deleting an Uploaded XLIFF DocumentTo delete an uploaded XLIFF document:
1. Navigate to the Translate Application page:
a. On the Workspace home page, click the Application Builder icon.
b. Select an application.
c. Click Shared Components.
d. Under Globalization, click Translate Application.
The Translate page appears.
2. Click Upload and apply XLIFF translation file to translation repository.
The XLIFF Translation Files page appears.
3. In the XLIFF Files repository, select the check box to the left of the Filename column.
4. Click Delete Checked.
See Also: "Specifying the Primary Language for an Application" on page 18-4
See Also: "Specifying the Primary Language for an Application" on page 18-4

Understanding the Translation Process
Managing Application Globalization 18-11
Step 5: Publish the ApplicationPublishing your application creates a copy of the base language application, substituting the translated text strings from your translations table. This published application can then be used to render your application in alternate languages.
Remember that to run an application in an alternative language, you must run it with globalization settings that cause an alternative language version to display. For example, if the language is derived from the browser language, you must set the browser language to the same language as the translated application.
To publish an application:
1. Navigate to the Translate Application page:
a. On the Workspace home page, click the Application Builder icon.
b. Select an application.
c. Click Shared Components.
d. Under Globalization, click Translate Application.
The Translate Application page appears.
2. Click Publish translated applications.
The XLIFF Translation Files page appears.
3. Select the items you want to publish and click Publish.
You should verify the existence of the translated application after it is published. Translated applications do not display in the Available Applications list on the Application Builder home page. Instead, use the Application Navigate list on the left side of the page.
Note that in order for a translated application to appear in Application Builder, you must ensure that you have correctly configured the application Globalization attributes.
Manually Editing a TranslationOnce you have mapped the target language and seeded the translatable text, you manually edit a translation.
To manually edit a translation:
1. Map the target language. See "Step 1: Map the Target Language" on page 18-6.
2. Seed the translatable text. See "Seeding Translatable Text" on page 18-7.
3. Navigate to the Translatable Text:
a. On the Workspace home page, click the Application Builder icon.
b. Select an application.
c. Click Shared Components.
d. Under Globalization, click Translate Application.
4. Under Translation Utilities, click Manually Edit Translation Repository.
The Translatable Text page appears.
See Also: "Specifying the Primary Language for an Application" on page 18-4

Translating Messages
18-12 Oracle Application Express Application Builder User's Guide
5. Select a Language Mapping or page and click Set.
6. To further customize the report, use the Search bar at the top of the page. To learn more, see "Customizing Interactive Reports" on page 9-4.
7. To edit translatable text:
a. Click the Edit icon.
The Translatable Text page appears.
b. In Translate to Text, enter the appropriate text.
c. Click Apply Changes
8. To access a Grid Edit page:
a. Click Grid Edit.
The Translatable Text - Grid Edit page appears.
b. In Translate To, enter the appropriate text.
c. Click Apply Changes
Translating MessagesYou may need to translate messages if your application:
■ Includes PL/SQL regions or PL/SQL processes, or calls PL/SQL packages, procedures, or functions. If it does, you may need to translate the generated HTML.
■ Uses a language that is not one of the ten languages into which Oracle Application Express is translated. If it does, you may need to translate messages used in reports.
Topics:■ Translating Messages Used in PL/SQL Procedures
■ Translating Messages Used Internally by Oracle Application Express
Translating Messages Used in PL/SQL ProceduresIf your application includes PL/SQL regions or PL/SQL processes or calls PL/SQL package, procedures, or functions, you may need to translate generated HTML. First, you define each message on the Translatable Messages page. Second, you use the APEX_LANG.MESSAGE API to translate the messages from PL/SQL stored procedures, functions, triggers, or packaged procedures and functions.
You create translatable messages on the Translate Messages page.
To define a new translation message:
1. Navigate to the Translate Application page:
a. On the Workspace home page, click the Application Builder icon.
b. Select an application.
c. Click Shared Components.
d. Under Globalization, click Text Messages.
2. On the Translate Messages page, click Create Text Message.

Translating Messages
Managing Application Globalization 18-13
3. On Identify Text Message:
a. Name - Enter a name to identify the message.
b. Language - Select the language for which the message would be used.
c. Text - Enter the text to be returned when the text message is called.
For example, you could define the message GREETING_MSG in English as:
Good morning %0
Or, you could define the message GREETING_MSG in German as:
Guten Tag %0
4. Click Create Text Message.
About the APEX_LANG.MESSAGE APIUse the APEX_LANG.MESSAGE API to translate text strings (or messages) generated from PL/SQL stored procedures, functions, triggers, packaged procedures, and functions.
SyntaxAPEX_LANG.MESSAGE ( p_name IN VARCHAR2 DEFAULT NULL, p0 IN VARCHAR2 DEFAULT NULL, p1 IN VARCHAR2 DEFAULT NULL, p2 IN VARCHAR2 DEFAULT NULL, ... p9 IN VARCHAR2 DEFAULT NULL, p_lang IN VARCHAR2 DEFAULT NULL) RETURN VARCHAR2;
ParametersTable 18–2 describes the parameters available in the APEX_LANG.MESSAGE API.
ExampleThe following example assumes you have defined a message called GREETING_MSG in your application in English as Good morning%0 and in German as Guten Tag%1. The following example demonstrates how you could invoke this message from PL/SQL:
Table 18–2 APEX_LANG.MESSAGE Parameters
Parameter Description
p_name Name of the message as defined in Oracle Application Express.
p0
...
p9
Dynamic substitution value: p0 corresponds to 0% in the message; p1 corresponds to 1% in the message; p2 corresponds to 2% in the message, and so on.
p_lang Language code for the message to be retrieved. If not specified, Oracle Application Express uses the current language for the user as defined in the Application Language Derived From attribute.
See Also: "Specifying the Primary Language for an Application" on page 18-4

Translating Messages
18-14 Oracle Application Express Application Builder User's Guide
BEGIN -- -- Print the greeting -- APEX_LANG.MESSAGE('GREETING_MSG', V('APP_USER'));END;
How the p_lang attribute is defined depends on how the Application Express engine derives the Application Primary Language. For example, if you run the application in German and the previous call is made to the APEX_LANG.MESSAGE API, the Application Express engine first looks for a message called GREETING_MSG with a LANG_CODE of de. If it does not find anything, then it reverts to the Application Primary Language attribute. If it still does not find anything, the Application Express engine looks for a message by this name with a language code of en-us.
Translating Messages Used Internally by Oracle Application ExpressOracle Application Express is translated into German, Spanish, French, Italian, Japanese, Korean, Brazilian Portuguese, Simplified Chinese, and Traditional Chinese. If your application uses a language that is not among the ten languages into which Oracle Application Express is translated, you must translate messages displayed by the Application Express reporting engine.
For example, if you develop a Russian application and want to include report messages, such as pagination, in Russian, you must translate the strings used in messages displayed in reports.
Topics:■ Creating Text Messages
■ Editing Text Messages
■ About Internal Messages Requiring Translation
■ About Interactive Report Messages Requiring Translation
Creating Text MessagesTo create a translation message:
1. Navigate to the Translate Application page:
a. On the Workspace home page, click the Application Builder icon.
b. Select an application.
c. Click Shared Components.
d. Under Globalization, click Text Messages.
2. On the Translate Messages page, click Create Text Message.
3. On Identify Text Message, specify the following:
a. Name - Enter the name of each message that must be translated. See "About Internal Messages Requiring Translation" on page 18-15 and "About Interactive Report Messages Requiring Translation" on page 18-17.
See Also: "Specifying the Primary Language for an Application" on page 18-4 for information about the Application Primary Language attribute and APEX_LANG in the Oracle Application Express API Reference

Translating Messages
Managing Application Globalization 18-15
b. Language - Select the language for which the message will be used.
c. Text - Enter the text to be returned when the text message is called. If the English text message contains positional substitution values (for example, %0, %1), ensure that your defined message also contains the same named and number of positional substitution values.
4. Click Create Text Message.
Editing Text MessagesTo edit text messages:
1. Navigate to the Translate Application page:
a. On the Workspace home page, click the Application Builder icon.
b. Select an application.
c. Click Shared Components.
d. Under Globalization, click Text Messages.
2. On edit a text message:
a. Click the message name.
b. Make the appropriate edits.
If the English text message contains positional substitution values (for example, %0, %1), ensure that your defined message also contains the same named and number of positional substitution values.
c. Click Apply Changes.
3. To access a Grid Edit page:
a. Click Grid Edit.
The Grid Edit page appears.
b. Make the appropriate edits.
If the English text message contains positional substitution values (for example, %0, %1), ensure that your defined message also contains the same named and number of positional substitution values.
c. Click Apply Changes
About Internal Messages Requiring TranslationTable 18–3 lists the internal messages that require translation.
Tip: To add a new message from the Grid Edit page, click Add Text Message at the bottom of the page.
Table 18–3 Internal Messages Requiring Translation
Message Name English Text
APEX.AUTHENTICATION.LOGIN_THROTTLE.COUNTER Please wait <span id="apex_login_throttle_sec">%0</span> seconds to login again.
APEX.AUTHENTICATION.LOGIN_THROTTLE.ERROR The login attempt has been blocked.
APEX.DATA_HAS_CHANGED Current version of data in database has changed since user initiated update process. current checksum = "%0" application checksum = "%1".

Translating Messages
18-16 Oracle Application Express Application Builder User's Guide
APEX.DATEPICKER.ICON_TEXT Popup Calendar: %0
APEX.DATEPICKER_VALUE_GREATER_MAX_DATE #LABEL# is greater than specified maximum date %0.
APEX.DATEPICKER_VALUE_INVALID #LABEL# does not match format %0.
APEX.DATEPICKER_VALUE_LESS_MIN_DATE #LABEL# is less than specified minimum date %0.
APEX.DATEPICKER_VALUE_NOT_BETWEEN_MIN_MAX #LABEL# is not between the valid range of %0 and %1.
APEX.DATEPICKER_VALUE_NOT_IN_YEAR_RANGE #LABEL# is not within valid year range of %0 and %1.
APEX.FILE_BROWSE.DOWNLOAD_LINK_TEXT Download
APEX.GO_TO_ERROR Go to error
APEX.ITEM_TYPE.SLIDER.VALUE_NOT_BETWEEN_MIN_MAX
#LABEL# is not between the valid range of %0 and %1.
APEX.ITEM_TYPE.SLIDER.VALUE_NOT_MULTIPLE_OF_STEP
#LABEL# is not a multiple of %0.
APEX.ITEM_TYPE.YES_NO.INVALID_VALUE #LABEL# must match to the values %0 and %1.
APEX.ITEM_TYPE.YES_NO.NO_LABEL No
APEX.ITEM_TYPE.YES_NO.YES_LABEL Yes
APEX.NUMBER_FIELD.VALUE_GREATER_MAX_VALUE #LABEL# is greater than specified maximum %0.
APEX.NUMBER_FIELD.VALUE_INVALID #LABEL# must be Numeric.
APEX.NUMBER_FIELD.VALUE_INVALID2 #LABEL# does not match number format %0 (For example, %1).
APEX.NUMBER_FIELD.VALUE_LESS_MIN_VALUE #LABEL# is less than specified minimum %0.
APEX.NUMBER_FIELD.VALUE_NOT_BETWEEN_MIN_MAX #LABEL# is not between the valid range of %0 and %1.
APEX.PAGE_ITEM_IS_REQUIRED #LABEL# must have some value.
APEX.POPUP_LOV.ICON_TEXT Popup List of Values: %0.
APEX.REGION.JQM_LIST_VIEW.SEARCH Search
APEX.REGION.JQM_LIST_VIEW.LOAD_MORE Load more
FLOW.SINGLE_VALIDATION_ERROR 1 error has occurred.
FLOW.VALIDATION_ERROR %0 errors have occurred.
INVALID_CREDENTIALS Invalid Login Credentials .
OUT_OF_RANGE Invalid set of rows requested, the source data of the report has been modified.
PAGINATION.NEXT Next
PAGINATION.NEXT_SET Next Set
PAGINATION.PREVIOUS Previous
PAGINATION.PREVIOUS_SET Previous Set
REPORT_TOTAL report total
RESET reset pagination
SINCE_DAYS_AGO %0 days ago
Table 18–3 (Cont.) Internal Messages Requiring Translation
Message Name English Text
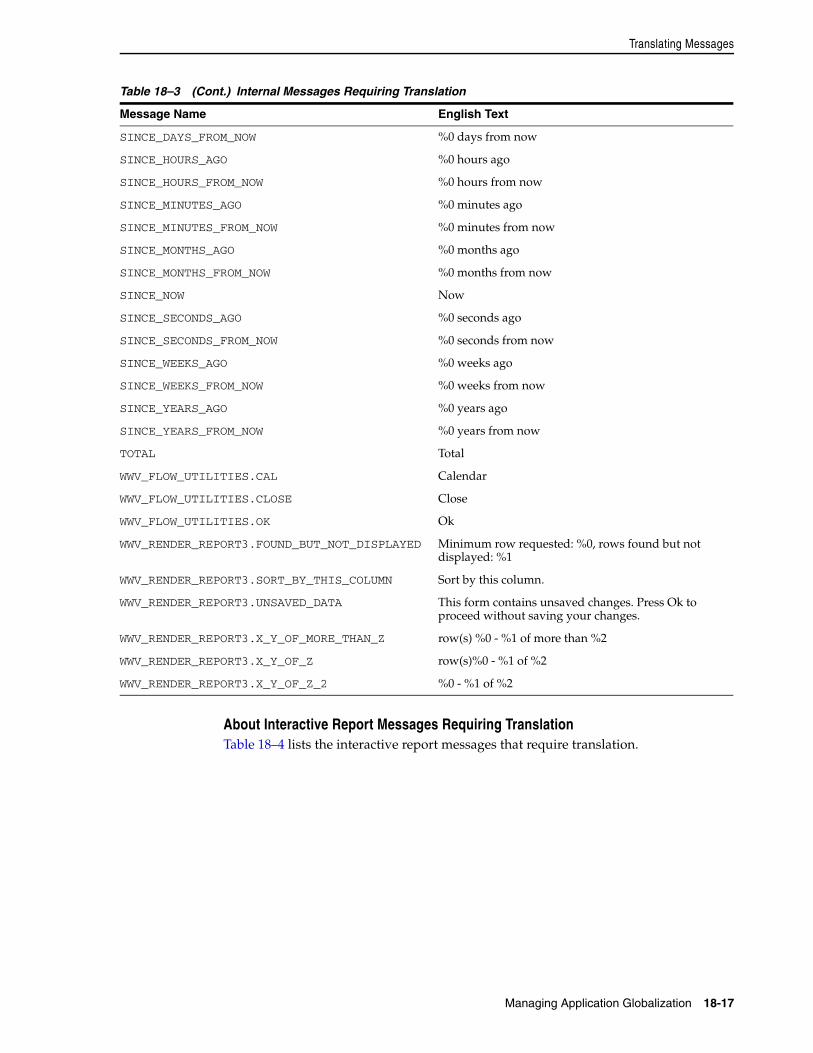
Translating Messages
Managing Application Globalization 18-17
About Interactive Report Messages Requiring TranslationTable 18–4 lists the interactive report messages that require translation.
SINCE_DAYS_FROM_NOW %0 days from now
SINCE_HOURS_AGO %0 hours ago
SINCE_HOURS_FROM_NOW %0 hours from now
SINCE_MINUTES_AGO %0 minutes ago
SINCE_MINUTES_FROM_NOW %0 minutes from now
SINCE_MONTHS_AGO %0 months ago
SINCE_MONTHS_FROM_NOW %0 months from now
SINCE_NOW Now
SINCE_SECONDS_AGO %0 seconds ago
SINCE_SECONDS_FROM_NOW %0 seconds from now
SINCE_WEEKS_AGO %0 weeks ago
SINCE_WEEKS_FROM_NOW %0 weeks from now
SINCE_YEARS_AGO %0 years ago
SINCE_YEARS_FROM_NOW %0 years from now
TOTAL Total
WWV_FLOW_UTILITIES.CAL Calendar
WWV_FLOW_UTILITIES.CLOSE Close
WWV_FLOW_UTILITIES.OK Ok
WWV_RENDER_REPORT3.FOUND_BUT_NOT_DISPLAYED Minimum row requested: %0, rows found but not displayed: %1
WWV_RENDER_REPORT3.SORT_BY_THIS_COLUMN Sort by this column.
WWV_RENDER_REPORT3.UNSAVED_DATA This form contains unsaved changes. Press Ok to proceed without saving your changes.
WWV_RENDER_REPORT3.X_Y_OF_MORE_THAN_Z row(s) %0 - %1 of more than %2
WWV_RENDER_REPORT3.X_Y_OF_Z row(s)%0 - %1 of %2
WWV_RENDER_REPORT3.X_Y_OF_Z_2 %0 - %1 of %2
Table 18–3 (Cont.) Internal Messages Requiring Translation
Message Name English Text

Translating Messages
18-18 Oracle Application Express Application Builder User's Guide
Table 18–4 Interactive Report Messages Requiring Translation
Message Name English Text
APEXIR_CHART_MAX_ROW_CNT The maximum row count for a chart query limits the number of rows in the base query, not the number of rows displayed. Your base query exceeds the maximum row count of %0. Please apply a filter to reduce the number of records in your base query.
APEXIR_GROUP_BY_MAX_ROW_CNT The maximum row count for a Group By query limits the number of rows in the base query, not the number of rows displayed. Your base query exceeds the maximum row count of %0. Please apply a filter to reduce the number of records in your base query.
APEXIR_GROUP_BY_SORT Group By Sort
APEXIR_SUBSCRIPTION Subscription
4150_COLUMN_NUMBER Column %0
APEXIR_3D 3D
APEXIR_ACTIONS Actions
APEXIR_ACTIONS_MENU Actions Menu
APEXIR_ADD Add
APEXIR_ADD_SUBSCRIPTION Add Subscription
APEXIR_AGGREGATE Aggregate
APEXIR_AGGREGATE_DESCRIPTION Aggregates are displayed after each control break and at the end of the report.
APEXIR_AGGREGATION Aggregation
APEXIR_AGG_AVG Average
APEXIR_AGG_COUNT Count
APEXIR_AGG_MAX Maximum
APEXIR_AGG_MEDIAN Median
APEXIR_AGG_MIN Minimum
APEXIR_AGG_MODE Mode
APEXIR_AGG_SUM Sum
APEXIR_ALL All
APEXIR_ALL_COLUMNS All Columns
APEXIR_ALTERNATIVE Alternative
APEXIR_ALTERNATIVE_DEFAULT_NAME Alternative Default: %0
APEXIR_AND and
APEXIR_APPLY Apply
APEXIR_ASCENDING Ascending
APEXIR_AS_OF As of %0
APEXIR_AVERAGE_X Average %0
APEXIR_BETWEEN between
APEXIR_BGCOLOR Background Color

Translating Messages
Managing Application Globalization 18-19
APEXIR_BLUE blue
APEXIR_BOTTOM Bottom
APEXIR_CALENDAR Calendar
APEXIR_CANCEL Cancel
APEXIR_CATEGORY Category
APEXIR_CELL Cell
APEXIR_CHART Chart
APEXIR_CHART_INITIALIZING Initializing...
APEXIR_CHART_TYPE Chart Type
APEXIR_CHOOSE_DOWNLOAD_FORMAT Choose report download format
APEXIR_CLEAR clear
APEXIR_COLUMN Column
APEXIR_COLUMNS Columns
APEXIR_COLUMN_HEADING Column Heading
APEXIR_COLUMN_HEADING_MENU Column Heading Menu
APEXIR_COLUMN_INFO Column Information
APEXIR_COMPARISON_CONTAINS contains
APEXIR_COMPARISON_DOESNOT_CONTAIN does not contain
APEXIR_COMPARISON_IN in
APEXIR_COMPARISON_ISNOT_IN_LAST is not in the last
APEXIR_COMPARISON_ISNOT_IN_NEXT is not in the next
APEXIR_COMPARISON_IS_IN_LAST is in the last
APEXIR_COMPARISON_IS_IN_NEXT is in the next
APEXIR_COMPARISON_IS_NOT_NULL is not null
APEXIR_COMPARISON_IS_NULL is null
APEXIR_COMPARISON_LIKE like
APEXIR_COMPARISON_NOT_IN not in
APEXIR_COMPARISON_NOT_LIKE not like
APEXIR_COMPARISON_REGEXP_LIKE matches regular expression
APEXIR_COMPUTATION Computation
APEXIR_COMPUTATION_FOOTER Create a computation using column aliases.
APEXIR_COMPUTATION_FOOTER_E1 (B+C)*100
APEXIR_COMPUTATION_FOOTER_E2 INITCAP(B)||', '||INITCAP(C)
APEXIR_COMPUTATION_FOOTER_E3 CASE WHEN A = 10 THEN B + C ELSE B END
APEXIR_COMPUTE Compute
APEXIR_CONTROL_BREAK Control Break
APEXIR_CONTROL_BREAKS Control Breaks
Table 18–4 (Cont.) Interactive Report Messages Requiring Translation
Message Name English Text

Translating Messages
18-20 Oracle Application Express Application Builder User's Guide
APEXIR_COUNT_DISTINCT Count Distinct
APEXIR_COUNT_DISTINCT_X Count Distinct
APEXIR_COUNT_X Count %0
APEXIR_DAILY Daily
APEXIR_DATA_AS_OF Report data as of %0 minutes ago.
APEXIR_DATE Date
APEXIR_DAY Day
APEXIR_DEFAULT Default
APEXIR_DEFAULT_REPORT_TYPE Default Report Type
APEXIR_DELETE Delete
APEXIR_DELETE_CHECKED Delete Checked
APEXIR_DELETE_CONFIRM Would you like to delete these report settings?
APEXIR_DELETE_CONFIRM_JS_DIALOG Would you like to perform this delete action?
APEXIR_DELETE_REPORT Delete Report
APEXIR_DESCENDING Descending
APEXIR_DESCRIPTION Description
APEXIR_DETAIL_VIEW Single Row View
APEXIR_DIRECTION Direction
APEXIR_DISABLE Disable
APEXIR_DISABLED Disabled
APEXIR_DISPLAY Display
APEXIR_DISPLAYED Displayed
APEXIR_DISPLAYED_COLUMNS Displayed Columns
APEXIR_DISPLAY_IN_REPORT Display in Report
APEXIR_DOWN Down
APEXIR_DOWNLOAD Download
APEXIR_DO_NOT_AGGREGATE - Do not aggregate -
APEXIR_DO_NOT_DISPLAY Do Not Display
APEXIR_EDIT_ALTERNATIVE_DEFAULT Edit Alternative Default
APEXIR_EDIT_CHART Edit Chart Settings
APEXIR_EDIT_CHART2 Edit Chart
APEXIR_EDIT_FILTER Edit Filter
APEXIR_EDIT_GROUP_BY Edit Group By
APEXIR_EDIT_HIGHLIGHT Edit Highlight
APEXIR_EMAIL Email
APEXIR_EMAIL_ADDRESS Email Address
APEXIR_EMAIL_BCC Bcc
Table 18–4 (Cont.) Interactive Report Messages Requiring Translation
Message Name English Text

Translating Messages
Managing Application Globalization 18-21
APEXIR_EMAIL_BODY Body
APEXIR_EMAIL_CC Cc
APEXIR_EMAIL_FREQUENCY Frequency
APEXIR_EMAIL_NOT_CONFIGURED Email has not been configured for this application. Please contact your administrator.
APEXIR_EMAIL_SEE_ATTACHED See attached.
APEXIR_EMAIL_SUBJECT Subject
APEXIR_EMAIL_TO To
APEXIR_ENABLE Enable
APEXIR_ENABLED Enabled
APEXIR_ENABLE_DISABLE_ALT Enable/Disable
APEXIR_ERROR Error
APEXIR_EXAMPLES Examples
APEXIR_EXAMPLES_WITH_COLON Examples:
APEXIR_EXCLUDE_NULL Exclude Null Values
APEXIR_EXPAND_COLLAPSE_ALT Expand/Collapse
APEXIR_EXPRESSION Expression
APEXIR_FILTER Filter
APEXIR_FILTER_EXPRESSION Filter Expression
APEXIR_FILTERS Filters
APEXIR_FILTER_TYPE Filter Type
APEXIR_FINDER_ALT Select columns to search.
APEXIR_FLASHBACK Flashback
APEXIR_FLASHBACK_DESCRIPTION A flashback query enables you to view the data as it existed at a previous point in time.
APEXIR_FLASHBACK_ERROR_MSG Unable to perform flashback request.
APEXIR_FORMAT Format
APEXIR_FORMAT_MASK Format Mask
APEXIR_FUNCTION Function
APEXIR_FUNCTIONS_OPERATORS Functions / Operators
APEXIR_FUNCTIONS Functions
APEXIR_GO Go
APEXIR_GROUP_BY Group By
APEXIR_GROUP_BY_COLUMN Group By Column
APEXIR_GREEN green
APEXIR_HCOLUMN Horizontal Column
APEXIR_HELP Help
Table 18–4 (Cont.) Interactive Report Messages Requiring Translation
Message Name English Text

Translating Messages
18-22 Oracle Application Express Application Builder User's Guide
APEXIR_HELP_01 An Interactive Report displays a predetermined set of columns. The report may be further customized with an initial filter clause, a default sort order, control breaks, highlighting, computations, aggregates and a chart. Each Interactive Report can then be further customized and the results can be viewed, or downloaded, and the report definition can be stored for later use.
<p/>
An Interactive Report can be customized in three ways: the search bar, actions menu and column heading menu.
APEXIR_HELP_ACTIONS_MENU The actions menu is used to customize the display of your Interactive Report.
APEXIR_HELP_AGGREGATE Aggregates are mathematical computations performed against a column. Aggregates are displayed after each control break and at the end of the report within the column they are defined.
<p/>
<ul><li><b>Aggregation</b> allows you to select a previously defined aggregation to edit.</li>
<li><b>Function</b> is the function to be performed (e.g. SUM, MIN).</li>
<li><b>Column</b> is used to select the column to apply the mathematical function to. Only numeric columns will be displayed.</li></ul>
APEXIR_HELP_CHART You can include one chart per Interactive Report. Once defined, you can switch between the chart and report views using links below the search bar.
<p/>
<ul><li><b>Chart Type</b> identifies the chart type to include. Select from horizontal bar, vertical bar, pie or line.</li>
<li><b>Label</b> allows you to select the column to be used as the label.</li>
<li><b>Axis Title for Label</b> is the title that will display on the axis associated with the column selected for Label. This is not available for pie chart.</li>
<li><b>Value</b> allows you to select the column to be used as the value. If your function is a COUNT, a Value does not need to be selected.</li>
<li><b>Axis Title for Value</b> is the title that will display on the axis associated with the column selected for Value. This is not available for pie chart.</li>
<li><b>Function</b> is an optional function to be performed on the column selected for Value.</li></ul>
Table 18–4 (Cont.) Interactive Report Messages Requiring Translation
Message Name English Text

Translating Messages
Managing Application Globalization 18-23
APEXIR_HELP_COLUMN_HEADING_MENU Clicking on any column heading exposes a column heading menu.
<p/>
<ul><li><b>Sort Ascending icon</b> sorts the report by the column in ascending order.</li>
<li><b>Sort Descending icon</b> sorts the report by the column in descending order.</li>
<li><b>Hide Column</b> hides the column.</li>
<li><b>Break Column</b> creates a break group on the column. This pulls the column out of the report as a master record.</li>
<li><b>Column Information</b> displays help text about the column, if available.</li>
<li><b>Text Area</b> is used to enter case insensitive search criteria (no need for wild cards). Entering a value will reduce the list of values at the bottom of the menu. You can then select a value from the bottom and the selected value will be created as a filter using '=' (e.g. column = 'ABC'). Alternatively, you can click the flashlight icon and the entered value will be created as a filter with the 'LIKE' modifier (e.g. column LIKE '%ABC%').
<li><b>List of Unique Values</b> contains the first 500 unique values that meet your filters. If the column is a date, a list of date ranges is displayed instead. If you select a value, a filter will be created using '=' (e.g. column = 'ABC').</li></ul>
Table 18–4 (Cont.) Interactive Report Messages Requiring Translation
Message Name English Text

Translating Messages
18-24 Oracle Application Express Application Builder User's Guide
APEXIR_HELP_COMPUTE Computations allow you to add computed columns to your report. These can be mathematical computations (e.g. NBR_HOURS/24) or standard Oracle functions applied to existing columns (some have been displayed for example, others, like TO_DATE, can also be used).
<p/>
<ul><li><b>Computation</b> allows you to select a previously defined computation to edit.</li>
<li><b>Column Heading</b> is the column heading for the new column.</li>
<li><b>Format Mask</b> is an Oracle format mask to be applied against the column (e.g. S9999).</li>
<li><b>Format Mask</b> is an Oracle format mask to be applied against the column (e.g. S9999).</li>
<li><b>Computation</b> is the computation to be performed. Within the computation, columns are referenced using the aliases displayed.</li>
</ul>
<p/>
Below computation, the columns in your query are displayed with their associated alias. Clicking on the column name or alias will write them into the Computation. Next to Columns is a Keypad. These are simply shortcuts of commonly used keys. On the far right are Functions.
<p/>
An example computation to display Total Compensation is:
<p/>
<pre>CASE WHEN A = 'SALES' THEN B + C ELSE B END</pre>
(where A is ORGANIZATION, B is SALARY and C is COMMISSION)
APEXIR_HELP_CONTROL_BREAK Used to create a break group on one or several columns. This pulls the columns out of the Interactive Report and displays them as a master record.
APEXIR_HELP_DETAIL_VIEW To view the details of a single row at a time, click the single row view icon on the row you want to view. If available, the single row view will always be the first column. Depending on the customization of the Interactive Report, the single row view may be the standard view or a custom page that may allow update.
APEXIR_HELP_DOWNLOAD Allows the current result set to be downloaded. The download formats will differ depending upon your installation and report definition but may include CSV, XLS, PDF, or RTF.
Table 18–4 (Cont.) Interactive Report Messages Requiring Translation
Message Name English Text

Translating Messages
Managing Application Globalization 18-25
APEXIR_HELP_FILTER Used to add or modify the where clause on the query. You first select a column (it does not need to be one that is displayed), select from a list of standard Oracle operators (=, !=, not in, between), and enter an expression to compare against. The expression is case sensitive and you can use % as a wildcard (for example, STATE_NAME like A%).
APEXIR_HELP_FLASHBACK Performs a flashback query to allow you to view the data as it existed at a previous point in time. The default amount of time that you can flashback is 3 hours (or 180 minutes) but the actual amount will differ per database.
APEXIR_HELP_HIGHLIGHT Highlighting allows you to define a filter. The rows that meet the filter are highlighted using the characteristics associated with the filter.
<p/>
<ul><li><b>Name</b> is used only for display.</li>
<li><b>Sequence</b> identifies the sequence in which the rules will be evaluated.</li>
<li><b>Enabled</b> identifies if the rule is enabled or disabled.</li>
<li><b>Highlight Type</b> identifies whether the Row or Cell should be highlighted. If Cell is selected, the column referenced in the Highlight Condition is highlighted.</li>
<li><b>Background Color</b> is the new color for the background of the highlighted area.</li>
<li><b>Text Color</b> is the new color for the text in the highlighted area.</li>
<li><b>Highlight Condition</b> defines your filter condition.</li></ul>
APEXIR_HELP_REPORT_SETTINGS If you have customized your Interactive Report, the report settings will be displayed below the Search Bar and above the report. If you have saved customized reports, they will be shown as tabs. You can access your alternate views by clicking the tabs. Below the tabs are the report settings for the current report. This area can be collapsed and expanded using the icon on the left.
<p/>
For each report setting, you can:
<ul><li><b>Edit</b> by clicking the name.</li>
<li><b>Disable/Enable</b> by unchecking or checking the Enable/Disable check box. This is used to temporarily turn off and on the setting.</li>
<li><b>Remove</b> by click the Remove icon. This permanently removes the setting.</li></ul>
<p/>
If you have created a chart, you can toggle between the report and chart using the Report View and Chart View links shown on the right. If you are viewing the chart, you can also use the Edit Chart link to edit the chart settings.
Table 18–4 (Cont.) Interactive Report Messages Requiring Translation
Message Name English Text

Translating Messages
18-26 Oracle Application Express Application Builder User's Guide
APEXIR_HELP_RESET Resets the report back to the default settings, removing any customizations that you have made.
APEXIR_HELP_SAVE_REPORT Saves the customized report for future use. You provide a name and an optional description.
APEXIR_HELP_SEARCH_BAR At the top of each report page is a search region. The region provides the following features:
<p/>
<ul><li><b>Select columns icon</b> allows you to identify which column to search (or all).</li>
<li><b>Text area</b> allows for case insensitive search criteria (no need for wild cards).</li>
<li><b>Rows</b> selects the number of records to display per page.</li>
<li><b>[Go] button</b> executes the search.</li>
<li><b>Actions Menu icon</b> displays the actions menu (discussed next).</li></ul>
<p/>
Please note that all features may not be available for each report.
APEXIR_HELP_SELECT_COLUMNS Used to modify the columns displayed. The columns on the right are displayed. The columns on the left are hidden. You can reorder the displayed columns using the arrows on the far right. Computed columns are prefixed with <b>**</b>.
APEXIR_HELP_SORT Used to change the column(s) to sort on and whether to sort ascending or descending. You can also specify how to handle nulls (use the default setting, always display them last or always display them first). The resulting sorting is displayed to the right of column headings in the report.
APEXIR_HIDE_COLUMN Hide Column
APEXIR_HIGHLIGHT Highlight
APEXIR_HIGHLIGHTS Highlights
APEXIR_HIGHLIGHT_CONDITION Highlight Condition
APEXIR_HIGHLIGHT_TYPE Highlight Type
APEXIR_HIGHLIGHT_WHEN Highlight When
APEXIR_INTERACTIVE_REPORT_HELP Interactive Report Help
APEXIR_INVALID Invalid
APEXIR_INVALID_COMPUTATION Invalid computation expression. %0
APEXIR_IS_IN_THE_LAST %0 is in the last %1
APEXIR_IS_IN_THE_NEXT %0 is in the next %1
APEXIR_IS_NOT_IN_THE_LAST %0 is not in the last %1
APEXIR_IS_NOT_IN_THE_NEXT %0 is not in the next %1
APEXIR_KEYPAD Keypad
APEXIR_LABEL Label
Table 18–4 (Cont.) Interactive Report Messages Requiring Translation
Message Name English Text

Translating Messages
Managing Application Globalization 18-27
APEXIR_LABEL_AXIS_TITLE Axis Title for Label
APEXIR_LAST_DAY Last Day
APEXIR_LAST_HOUR Last Hour
APEXIR_LAST_MONTH Last Month
APEXIR_LAST_WEEK Last Week
APEXIR_LAST_X_DAYS Last %0 Days
APEXIR_LAST_X_HOURS Last %0 Hours
APEXIR_LAST_X_YEARS Last %0 Years
APEXIR_LAST_YEAR Last Year
APEXIR_LINE Line
APEXIR_MAX_QUERY_COST The query is estimated to exceed the maximum allowed resources. Please modify your report settings and try again.
APEXIR_MAX_X Maximum %0
APEXIR_MAX_ROW_CNT This query returns more then %0 rows, please filter your data to ensure complete results.
APEXIR_MEDIAN_X Median %0
APEXIR_MIN_AGO %0 minutes ago
APEXIR_MIN_X Minimum %0
APEXIR_MONTH Month
APEXIR_MONTHLY Monthly
APEXIR_MORE_DATA More Data
APEXIR_MOVE Move
APEXIR_MOVE_ALL Move All
APEXIR_NAME Name
APEXIR_NEW_AGGREGATION New Aggregation
APEXIR_NEW_CATEGORY - New Category -
APEXIR_NEW_COMPUTATION New Computation
APEXIR_NEXT >
APEXIR_NEXT_DAY Next Day
APEXIR_NEXT_HOUR Next Hour
APEXIR_NEXT_MONTH Next Month
APEXIR_NEXT_WEEK Next Week
APEXIR_NEXT_X_DAYS Next %0 Days
APEXIR_NEXT_X_HOURS Next %0 Hours
APEXIR_NEXT_X_YEARS Next %0 Years
APEXIR_NEXT_YEAR Next Year
APEXIR_NO No
Table 18–4 (Cont.) Interactive Report Messages Requiring Translation
Message Name English Text
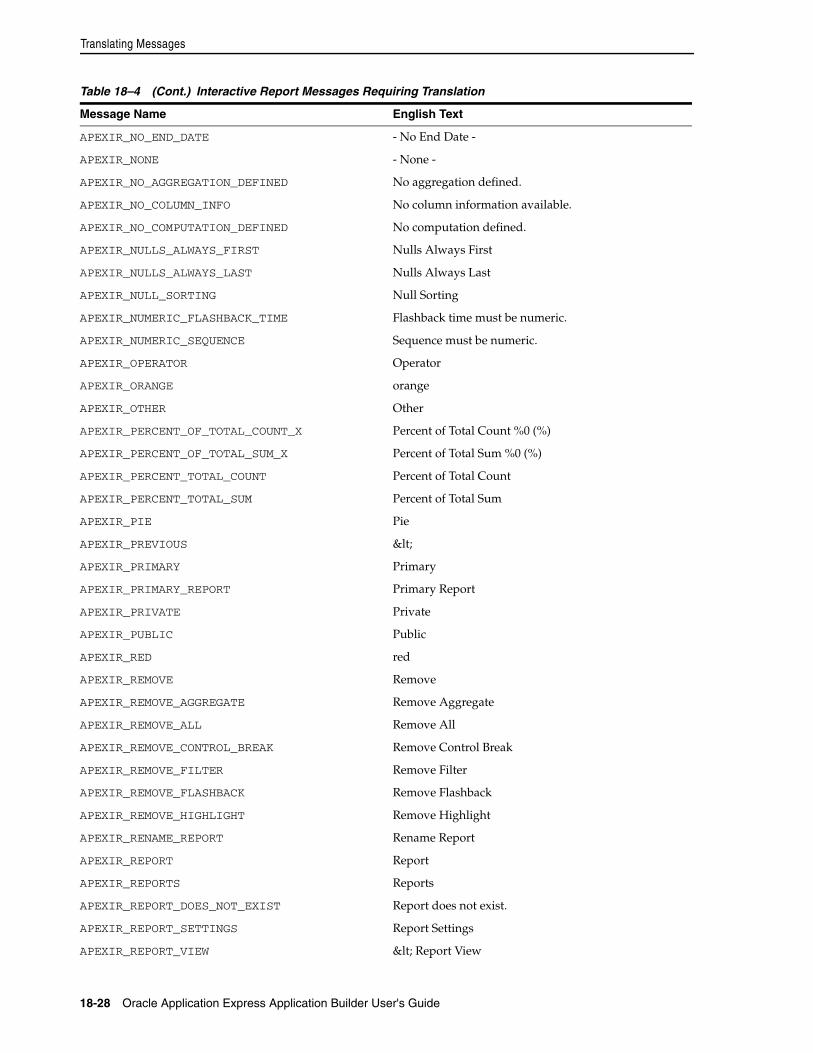
Translating Messages
18-28 Oracle Application Express Application Builder User's Guide
APEXIR_NO_END_DATE - No End Date -
APEXIR_NONE - None -
APEXIR_NO_AGGREGATION_DEFINED No aggregation defined.
APEXIR_NO_COLUMN_INFO No column information available.
APEXIR_NO_COMPUTATION_DEFINED No computation defined.
APEXIR_NULLS_ALWAYS_FIRST Nulls Always First
APEXIR_NULLS_ALWAYS_LAST Nulls Always Last
APEXIR_NULL_SORTING Null Sorting
APEXIR_NUMERIC_FLASHBACK_TIME Flashback time must be numeric.
APEXIR_NUMERIC_SEQUENCE Sequence must be numeric.
APEXIR_OPERATOR Operator
APEXIR_ORANGE orange
APEXIR_OTHER Other
APEXIR_PERCENT_OF_TOTAL_COUNT_X Percent of Total Count %0 (%)
APEXIR_PERCENT_OF_TOTAL_SUM_X Percent of Total Sum %0 (%)
APEXIR_PERCENT_TOTAL_COUNT Percent of Total Count
APEXIR_PERCENT_TOTAL_SUM Percent of Total Sum
APEXIR_PIE Pie
APEXIR_PREVIOUS <
APEXIR_PRIMARY Primary
APEXIR_PRIMARY_REPORT Primary Report
APEXIR_PRIVATE Private
APEXIR_PUBLIC Public
APEXIR_RED red
APEXIR_REMOVE Remove
APEXIR_REMOVE_AGGREGATE Remove Aggregate
APEXIR_REMOVE_ALL Remove All
APEXIR_REMOVE_CONTROL_BREAK Remove Control Break
APEXIR_REMOVE_FILTER Remove Filter
APEXIR_REMOVE_FLASHBACK Remove Flashback
APEXIR_REMOVE_HIGHLIGHT Remove Highlight
APEXIR_RENAME_REPORT Rename Report
APEXIR_REPORT Report
APEXIR_REPORTS Reports
APEXIR_REPORT_DOES_NOT_EXIST Report does not exist.
APEXIR_REPORT_SETTINGS Report Settings
APEXIR_REPORT_VIEW < Report View
Table 18–4 (Cont.) Interactive Report Messages Requiring Translation
Message Name English Text

Translating Messages
Managing Application Globalization 18-29
APEXIR_RESET Reset
APEXIR_RESET_CONFIRM Restore report to the default settings.
APEXIR_ROW Row
APEXIR_ROWS Rows
APEXIR_ROW_OF Row %0 of %1
APEXIR_ROW_ORDER Row Order
APEXIR_ROWS_PER_PAGE Rows Per Page
APEXIR_ROW_TEXT_CONTAINS Row text contains
APEXIR_SAVE Save
APEXIR_SAVED_REPORT Saved Report
APEXIR_SAVED_REPORT_MSG Saved Report = "%0"
APEXIR_SAVE_AS_DEFAULT Save as Default
APEXIR_SAVE_DEFAULT_CONFIRM The current report settings are used as the default for all users.
APEXIR_SAVE_REPORT Save Report
APEXIR_SEARCH Search
APEXIR_SEARCH_BAR Search Bar
APEXIR_SEARCH_REPORT Search Report
APEXIR_SELECT_CATEGORY - Select Category -
APEXIR_SELECT_COLUMN - Select Column -
APEXIR_SELECT_COLUMNS Select Columns
APEXIR_SELECT_COLUMNS_FOOTER Computed columns are prefixed with **.
APEXIR_SELECT_FUNCTION - Select Function -
APEXIR_SELECT_SORT_COLUMN - Select Sort Column -
APEXIR_SELECT_VALUE Select Value
APEXIR_SEQUENCE Sequence
APEXIR_SORT Sort
APEXIR_SORT_ASCENDING Sort Ascending
APEXIR_SORT_COLUMN Sort Column
APEXIR_SORT_DESCENDING Sort Descending
APEXIR_SPACE_AS_IN_ONE_EMPTY_STRING space
APEXIR_STATUS Status
APEXIR_SUBSCRIPTION_ENDING Ending
APEXIR_SUBSCRIPTION_STARTING_FROM Starting From
APEXIR_SUM_X Sum %0
APEXIR_TEXT_COLOR Text Color
APEXIR_TIME_DAYS days
Table 18–4 (Cont.) Interactive Report Messages Requiring Translation
Message Name English Text

Translating Messages
18-30 Oracle Application Express Application Builder User's Guide
APEXIR_TIME_HOURS hours
APEXIR_TIME_MINS minutes
APEXIR_TIME_MONTHS months
APEXIR_TIME_WEEKS weeks
APEXIR_TIME_YEARS years
APEXIR_TOP Top
APEXIR_UNAUTHORIZED Unauthorized
APEXIR_UNIQUE_COLUMN_HEADING Column Heading must be unique.
APEXIR_UNIQUE_HIGHLIGHT_NAME Highlight Name must be unique.
APEXIR_UNSUPPORTED_DATA_TYPE unsupported data type
APEXIR_UP Up
APEXIR_VALID_COLOR Please enter a valid color.
APEXIR_VALID_FORMAT_MASK Please enter a valid format mask.
APEXIR_VALUE Value
APEXIR_VALUE_AXIS_TITLE Axis Title for Value
APEXIR_VALUE_REQUIRED Value Required
APEXIR_VCOLUMN Vertical Column
APEXIR_VIEW_CHART View Chart
APEXIR_VIEW_DETAIL View Detail
APEXIR_VIEW_GROUP_BY View Group By
APEXIR_VIEW_ICONS View Icons
APEXIR_VIEW_REPORT View Report
APEXIR_WEEK Week
APEXIR_WEEKLY Weekly
APEXIR_WORKING_REPORT Working Report
APEXIR_X_DAYS %0 days
APEXIR_X_HOURS %0 hours
APEXIR_X_MINS %0 minutes
APEXIR_X_MONTHS %0 months
APEXIR_X_WEEKS %0 weeks
APEXIR_X_YEARS %0 years
APEXIR_YEAR Year
APEXIR_YELLOW yellow
APEXIR_YES Yes
IR_AS_DEFAULT_REPORT_SETTING As Default Report Settings
IR_AS_NAMED_REPORT As Named Report
IR_STAR Only displayed for developers
Table 18–4 (Cont.) Interactive Report Messages Requiring Translation
Message Name English Text

Translating Data That Supports List of Values
Managing Application Globalization 18-31
Translating Data That Supports List of ValuesYou create a dynamic translation to translate dynamic pieces of data. For example, you might use a dynamic translation on a list of values based on a database query.
Dynamic translations differ from messages in that you query a specific string rather than a message name. You define dynamic translations on the Dynamic Translations page. You then use the APEX_LANG.LANG API to return the dynamic translation string identified by the p_primary_text_string parameter.
Defining a Dynamic TranslationYou define dynamic translations on the Dynamic Translations page. A dynamic translation consists of a translate-from language string, a language code, and a translate-to string.
To define a dynamic translation:
1. Navigate to the Translate Application page:
a. On the Workspace home page, click the Application Builder icon.
b. Select an application.
c. Click Shared Components.
d. Under Globalization, click Translate Application.
2. On the Translate Application page, select Optionally identify any data that needs to be dynamically translated to support SQL based lists of values.
3. On the Dynamic Translations page, click Create and specify the following:
a. Language - Select a target language.
b. Translate From Text - Enter the source text to be translated.
c. Translate To - Enter the translated text.
4. Click Create.
APEX_LANG.LANG API
SyntaxAPEX_LANG.LANG ( p_primary_text_string IN VARCHAR2 DEFAULT NULL,
LAYOUT.T_CONDITION_EXPR2 Expression 2
OUT_OF_RANGE Invalid set of rows requested, the source data of the report has been modified.
REPORT Report
REPORTING_PERIOD Reporting Period
RESET Reset Pagination
SAVED_REPORTS.PRIMARY.DEFAULT Primary Default
WWV_RENDER_REPORT3.X_Y_OF_Z_2 %0 - %1 of %2
Table 18–4 (Cont.) Interactive Report Messages Requiring Translation
Message Name English Text

About Supported Globalization Codes
18-32 Oracle Application Express Application Builder User's Guide
p0 IN VARCHAR2 DEFAULT NULL, p1 IN VARCHAR2 DEFAULT NULL, p2 IN VARCHAR2 DEFAULT NULL, ... p9 IN VARCHAR2 DEFAULT NULL, p_primary_language IN VARCHAR2 DEFAULT NULL) RETURN VARCHAR2;
ParametersTable 18–5 describes the parameters available in the APEX_LANG.LANG API.
ExampleSuppose you have a table that defines all primary colors. You could define a dynamic message for each color and then apply the LANG function to the defined values in a query. For example:
SELECT APEX_LANG.LANG(color) FROM my_colors
If you were running the application in German, RED was a value for the color column in the my_colors table, and you defined the German word for red, the previous example would return ROT.
About Supported Globalization CodesIf you are building a multilingual application, it is important to understand how globalization codes affect the way in which your application runs. These codes are set automatically based on the application-level Globalization attributes you select.
NLS_LANGUAGE and NLS_TERRITORY determine the default presentation of numbers, dates, and currencies.
Table 18–6 describes the globalization codes in Oracle Application Express.
Table 18–5 APEX_LANG.LANG Parameters
Parameter Description
p_primary_string Text string of the primary language. This is the value of the Translate From Text in the dynamic translation.
p0
...
p9
Dynamic substitution value: p0 corresponds to 0% in the translation string; p1 corresponds to 1% in the translation string; p2 corresponds to 2% in the translation string, and so on.
p_primary_language Language code for the message to be retrieved. If not specified, Oracle Application Express uses the current language for the user as defined in the Application Language Derived From attribute.
See Also: "Specifying the Primary Language for an Application" on page 18-4
See Also: APEX_LANG in the Oracle Application Express API Reference
See Also: "Specifying the Primary Language for an Application" on page 18-4

About Supported Globalization Codes
Managing Application Globalization 18-33
Table 18–6 Oracle Application Express Globalization Codes
Language NameLanguage Code NLS_LANGUAGE NLS_TERRITORY
Afrikaans af ENGLISH SOUTH AFRICA
Arabic ar ARABIC UNITED ARAB EMIRATES
Arabic (Algeria) ar-dz ARABIC ALGERIA
Arabic (Bahrain) ar-bh ARABIC BAHRAIN
Arabic (Egypt) ar-eg EGYPTIAN EGYPT
Arabic (Iraq) ar-iq ARABIC IRAQ
Arabic (Jordan) ar-jo ARABIC JORDAN
Arabic (Kuwait) ar-kw ARABIC KUWAIT
Arabic (Lebanon ar-lb ARABIC LEBANNON
Arabic (Libya) ar-ly ARABIC LIBYA
Arabic (Morocco) ar-ma ARABIC MOROCCO
Arabic (Oman) ar-om ARABIC OMAN
Arabic (Qatar) ar-qa ARABIC QATAR
Arabic (Saudi Arabia) ar-sa ARABIC SAUDI ARABIA
Arabic (Syria) ar-sy ARABIC SYRIA
Arabic (Tunisia) ar-tn ARABIC TUNISIA
Arabic (U.A.E.) ar-ae ARABIC UNITED ARAB EMIRATES
Arabic (YEMEN) ar-ye ARABIC YEMEN
Assamese as ASSAMESE INDIA
Basque eu FRENCH FRANCE
Belarusian be RUSSIAN RUSSIA
Bengali bn BANGLA BANGLADESH
Bulgarian bg BULGARIAN BULGARIA
Catalan ca CATALAN CATALONIA
Chinese zh SIMPLIFIED CHINESE CHINA
Chinese (China) zh-cn SIMPLIFIED CHINESE CHINA
Chinese (Hong Kong SAR) zh-hk TRADITIONAL CHINESE HONG KONG
Chinese (Macau SAR) zh-mo TRADITIONAL CHINESE HONG KONG
Chinese (Singapore) zh-sg SIMPLIFIED CHINESE SINGAPORE
Chinese (Taiwan) zh-tw TRADITIONAL CHINESE TAIWAN
Croatian hr CROATIAN CROATIA
Czech cs CZECH CZECH REPUBLIC
Danish da DANISH DENMARK
Dutch (Belgium) nl-be DUTCH BELGIUM
Dutch (Netherlands) nl DUTCH THE NETHERLANDS
English en AMERICAN AMERICA

About Supported Globalization Codes
18-34 Oracle Application Express Application Builder User's Guide
English (Australia) en-au ENGLISH AUSTRALIA
English (Belize) en-bz ENGLISH UNITED KINGDOM
English (Canada) en-ca ENGLISH CANADA
English (Ireland) en-ie ENGLISH IRELAND
English (Jamaica) en-jm ENGLISH UNITED KINGDOM
English (New Zealand) en-nz ENGLISH NEW ZEALAND
English (Philippines) en-ph ENGLISH PHILIPPINES
English (South Africa) en-za ENGLISH SOUTH AFRICA
English (Trinidad) en-tt ENGLISH UNITED KINGDOM
English (United Kingdom) en-gb ENGLISH UNITED KINGDOM
English (United States) en-us AMERICAN AMERICA
English (Zimbabwe) en-zw ENGLISH UNITED KINGDOM
Estonian et ESTONIAN ESTONIA
Faeroese fo ENGLISH UNITED KINGDOM
Farsi fa ENGLISH UNITED KINGDOM
Finnish fi FINNISH FINLAND
French (Belgium) fr-be FRENCH BELGIUM
French (Canada) fr-ca CANADIAN FRENCH CANADA
French (France) fr FRENCH FRANCE
French (Luxembourg) fr-lu FRENCH LUXEMBOURG
French (Monaco) fr-mc FRENCH FRANCE
French (Switzerland) fr-ch FRANCH SWITZERLAND
FYRO Macedonian mk MACEDONIAN FYR MACEDONIA
Gaelic gd ENGLISH UNITED KINGDOM
Galician gl SPANISH SPAIN
German (Austria) de-at GERMAN AUSTRIA
German (Germany) de GERMAN GERMANY
German (Liechtenstein) de-li GERMAN GERMANY
German (Luxembourg) de-lu GERMAN LUXEMBOURG
German (Switzerland) de-ch GERMAN SWITZERLAND
Greek el GREEK GREECE
Gujarati gu GUJARATI INDIA
Hebrew he HEBREW ISRAEL
Hindi hi HINDI INDIA
Hungarian hu HUNGARIAN HUNGARY
Icelandic is ICELANDIC ICELAND
Table 18–6 (Cont.) Oracle Application Express Globalization Codes
Language NameLanguage Code NLS_LANGUAGE NLS_TERRITORY

About Supported Globalization Codes
Managing Application Globalization 18-35
Indonesian id INDONESIAN INDONESIA
Italian (Italy) it ITALIAN ITALY
Italian (Switzerland) it-ch ITALIAN SWITZERLAND
Japanese ja JAPANESE JAPAN
Kannada kn KANNADA INDIA
Kazakh kk CYRILLIC KAZAKH KAZAKHSTAN
Konkani kok KOREAN KOREA
Korean ko KOREAN KOREA
Kyrgyz kz RUSSIAN RUSSIA
Latvian lv LATVIAN LATVIA
Lithuanian lt LITHUANIAN LITHUANIANA
Malay (Malaysia) ms MALAY MALAYSIA
Malayalam ml MALAYALAM INDIA
Maltese mt ENGLISH UNITED KINGDOM
Marathi mr ENGLISH INDIA
Nepali (India) ne ENGLISH UNITED KINGDOM
Norwegian (Bokmal) nb-no NORWEGIAN NORWAY
Norwegian (Bokmal) no NORWEGIAN NORWAY
Norwegian (Nynorsk) nn-no NORWEGIAN NORWAY
Oriya or ORIYA INDIA
Polish pl POLISH POLAND
Portuguese (Brazil) pt-br BRAZILIAN PORTUGUESE BRAZIL
Portuguese (Portugal) pt PORTUGUESE PORTUGAL
Punjabi pa PUNJABI INDIA
Romanian ro ROMANIAN ROMANIA
Russian ru RUSSIAN RUSSIA
Russian (Moldova) ru-md RUSSIAN RUSSIA
Serbia sr CYRILLIC SERBIAN SERBIA AND MONTENEGRO
Slovak sk SLOVAK SLOVAKIA
Slovenian sl SLOVENIAN SLOVENIA
Spanish (Argentina) es-ar LATIN AMERICAN SPANISH ARGENTINA
Spanish (Bolivia) es-bo LATIN AMERICAN SPANISH ARGENTINA
Spanish (Chile) es-cl LATIN AMERICAN SPANISH CHILE
Spanish (Columbia) ec-co LATIN AMERICAN SPANISH COLUMBIA
Spanish (Costa Rica) es-cr LATIN AMERICAN SPANISH COSTA RICA
Spanish (Dominican Republic)
es-do LATIN AMERICAN SPANISH PUERTO RICO
Table 18–6 (Cont.) Oracle Application Express Globalization Codes
Language NameLanguage Code NLS_LANGUAGE NLS_TERRITORY

About Supported Globalization Codes
18-36 Oracle Application Express Application Builder User's Guide
Spanish (Ecuador) es-ec LATIN AMERICAN SPANISH ECUDOR
Spanish (El Salvador) es-sv LATIN AMERICAN SPANISH EL SALVADOR
Spanish (Guatemala) es-gt LATIN AMERICAN SPANISH GUATEMALA
Spanish (Honduras) es-hn LATIN AMERICAN SPANISH GUATEMALA
Spanish (Mexico) es-mx MEXICAN SPANISH MEXICO
Spanish (Nicaragua) es-ni LATIN AMERICAN SPANISH Nicaragua
Spanish (Panama) es-pa LATIN AMERICAN SPANISH Panama
Spanish (Paraguay) es-py LATIN AMERICAN SPANISH ARGENTINA
Spanish (Peru) es-pe LATIN AMERICAN SPANISH PERU
Spanish (Puerto Rico) es-pr LATIN AMERICAN SPANISH PUERTO RICO
Spanish (Traditional Sort) es LATIN AMERICAN SPANISH SPAIN
Spanish (United States) es-us LATIN AMERICAN SPANISH AMERICAN
Spanish (Uruguay) es-uy LATIN AMERICAN SPANISH ARGENTINA
Spanish (Venezuela) es-ve LATIN AMERICAN SPANISH VENEZUELA
Swedish sv SWEDISH SWEDEN
Swedish sv-fi SWEDISH FINLAND
Tamil ta TAMIL INDIA
Telugu te TELUGU INDIA
Thai th THAI THAILAND
Turkish tr TURKISH TURKEY
Ukrainian uk UKRAINIAN UKRAINE
Urdu ur ENGLISH UNITED KINGDOM
Uzbek uz LATIN UZBEK UZBEKISTAN
Vietnamese vi VIETNAMESE VIETNAM
Table 18–6 (Cont.) Oracle Application Express Globalization Codes
Language NameLanguage Code NLS_LANGUAGE NLS_TERRITORY

A
About Item Types A-1
AAbout Item Types
When you create an item, you specify an item type. Once you create an item, these types appear on the Display As list on the Edit Page Item page. Table A–1, " Available Item Types" on page A-2 describes available item types.
Controlling Item Functionality by Editing Item AttributesYou can control how a page item works by editing the page item’s attributes. Each item type in Table A–1, " Available Item Types" lists important attributes that control item functionality. To learn more about editing attributes, see "Editing Page-Level Items" on page 7-63
Available Item TypesWhen you create an item, you specify an item type. Once you create an item, these types appear on the Display As list on the Edit Page Item page. This section describes available item types and important item attributes that control item behavior.
See Also: "Understanding Page-Level Items" on page 7-56

Available Item Types
A-2 Oracle Application Express Application Builder User's Guide
Table A–1 Available Item Types
Item Type Description
Check Box Displayed using a list of values. A list of values is required for items displayed as check boxes. The value corresponding to a checked box is returned in a single colon-delimited string.
The following example demonstrates how to create a single check box that returns YES. This example would display both a check box and a field label.
SELECT NULL display_text, 'YES' return_value FROM DUAL;
This example includes the additional text Click to select.
SELECT 'Click to select' display_text, 'YES' return_value FROM DUAL;
See Also: "APEX_UTIL" in Oracle Application Express API Reference for information about breaking up returned values
Settings attributes:
■ Value Required - If select Yes and the page item is visible, Oracle Application Express automatically performs a NOT NULL validation when the page is submitted. See item Help for more details.
■ Number of Checkbox Columns - Defines the number of layout columns to use to display the values defined in the List of Values.
See Also: "Creating a Cascading List of Values" on page 7-61
Color Picker Renders as a text field with an icon. When the user clicks the icon, a popup window appears. When the user makes a selection from the palette, the HTML value for the color selected (for example, #000000 for black) is returned.
Note: When creating a new item of this type, first select Popup List of Values and then Color Picker.
Settings attributes:
■ Value Required - If select Yes and the page item is visible, Oracle Application Express automatically performs a NOT NULL validation when the page is submitted. See item Help for more details.
Date Picker Displays a text field with a Calendar icon next to it. When clicked, this icon displays a small calendar where the user can select a date and a time (optional).
Settings attributes:
■ Value Required- If select Yes and the page item is visible, Oracle Application Express automatically performs a NOT NULL validation when the page is submitted.
■ Format Mask - Identify the date format mask used by the item type. You can use substitution syntax to reference a dynamic format mask from an application or page item.
■ Highlighted Date - Enter a date, which should be highlighted in the Date picker. See item Help for more details.
■ Minimum Date - Enter a minimum selectable date.
■ Maximum Date - Enter the maximum selectable date.
■ Show - Determines when the date picker displays.
■ Show other Months - Display dates in other months (non-selectable) at the start or end of the current month.
■ Navigation List - Change the month, year or both using a select list.

Available Item Types
About Item Types A-3
Date Picker (Classic) Displays a text field with a Calendar icon next to it. When clicked, this icon displays a small calendar where the user can select a date and a time (optional).
If the format you need is not included in the Display As list, select Date Picker (use application format mask) or Date Picker (use item format mask). The latter uses the value from the Format Mask field in the Source section of the Edit Page Item page.
Display Image Enables the display of images stored in an image URL stored in another page item or in a BLOB column. To alter where the image is stored, edit the item and configure the Based on attribute. Options include:
Settings attributes:
■ Based On - Determines where the item is retrieved from. To learn more, see item Help.
■ Alternative Text Column - If specified, the returned text is used as an alternative text for the image.
■ Filename Column - If specified, the returned file name is used by the browser in the Save As dialog when the user tries to saves the image.
■ BLOB Last Updated Column - If specified, the column is used for browser caching. It identifies if the image changed since the last browser request. If not entered, no caching is done. Note: This attribute is case sensitive and the column must be of type DATE.
Display Only Displays the item as display only text.
Settings attributes:
■ Save Session State - Stores the current value in session state when the page gets submitted.
■ Based On - Specifies what gets displayed in the field. Options include:
Page Item Value - The current value of the page item displays.
Display Value of List of Values - The current value of the page item maps to a different display value using a list of values.
Output of PL/SQL Code - The specified PL/SQL code takes care of emitting the necessary output for the page item.
■ Show Line Breaks - Select Yes to convert line breaks in the display value to an HTML line break and display them in HTML output.
Table A–1 (Cont.) Available Item Types
Item Type Description

Available Item Types
A-4 Oracle Application Express Application Builder User's Guide
File Browse Displays a text field with a Browse... button. The Browse button enables the user to locate and upload a file from a local file system.
See Also: "Securing File Uploads" on page 15-25
Settings attributes:
■ Value Required- If select Yes and the page item is visible, Oracle Application Express automatically performs a NOT NULL validation when the page is submitted.
■ Storage Type - Identify where the uploaded file is stored.
■ MIME Type Column - Specify the name of the column where the MIME type of the uploaded file should be stored.
■ Filename Column - Specify the name of the column where the file name of the uploaded file should be stored.
■ Character Set Column - Specify the name of the column where the character set of the uploaded file should be stored.
■ BLOB Last Updated Column - Specify the name of the column to update with the current time stamp when a file is uploaded.
■ Display Download Link - Select Yes to display the download link next to the Browse button.
■ Download Link Text - Text used for the download link.
■ Content Disposition - Determines if the downloaded content is displayed inline within the Browser window or if a Open dialog displays.
Hidden Creates a hidden page item.
Settings attributes:
■ Value is Protected - Select Yes to prevent hidden values from being manipulated when a page is posted.
List Manager Based on a list of values. This item enables you to manage a list of items by selecting and adding to a list. The list of values display as a popup.
Settings attributes:
■ Value Required- If select Yes and the page item is visible, Oracle Application Express automatically performs a NOT NULL validation when the page is submitted.
■ Fetch - Specifies if data is displayed when the Popup LOV is opened by a user.
See Also: "Creating a Cascading List of Values" on page 7-61
Number Field Displays a number field. You can configure number range checks for values entered by configuring the Minimum Value and Maximum Value attributes. This item type automatically checks if the entered value is a number. No extra validations are required.
Settings attributes:
■ Value Required- If select Yes and the page item is visible, Oracle Application Express automatically performs a NOT NULL validation when the page is submitted.
■ Format Mask - Identify the number format mask used by the item type. You can use substitution syntax to reference a dynamic format mask from an application or page item.
■ Minimum Value - Enter a minimum enterable value.
■ Maximum Value - Enter the maximum enterable value.
■ Number Alignment - Select the value alignment within the field.
Table A–1 (Cont.) Available Item Types
Item Type Description

Available Item Types
About Item Types A-5
Password Renders as an HTML password form element.
Settings attributes:
■ Value Required - If select Yes and the page item is visible, Oracle Application Express automatically performs a NOT NULL validation when the page is submitted. See item Help for more details.
■ Submit when Enter Pressed - Select Yes to submit the page when ENTER is pressed. This saves the password in a database table when the page is submitted. Select No to not save the password in a database table.
Only select Yes when the password is needed in session state for use by other pages during the session.
■ Does not save state - Select Yes to suppress text entered into the field and not save the value in session state.
For security reasons you should always set this attribute to Yes.
If you must reference and retrieve the value of a password in your application then you set the Store value encrypted in session state attribute to Yes. To learn more, see "About Session State and Security" on page 15-12.
Popup List of Values (LOV) Renders as a text field with an icon. When the user clicks the icon, a popup window appears with a list of values represented as a series of links. When the user makes a selection from the list, the selected value is placed in the text field.
You control popup lists of values through templates. You can only specify one popup list of values (LOV) template for each application. A popup LOV is a good choice for lists of values that are too large to return on a single page.
Popup LOVs must be based on a query that selects two columns with different column aliases. For example:
SELECT ename name, empno id FROM emp
If one of the columns is an expression, remember to use an alias. For example:
SELECT ename||' '||job display_value, empno FROM emp
Note: When creating a new item of this type, first select Popup List of Values and then Text Field with Calculator Popup.
Settings attributes:
■ Value Required- If select Yes and the page item is visible, Oracle Application Express automatically performs a NOT NULL validation when the page is submitted. See item Help for more details.
■ Input Field - Specifies what the input field of the Popup LOV shows and how it behaves.
■ Fetch - Specifies if data is displayed when the Popup LOV is opened by an user.
Note: Input Field and Fetch are not available for Text Field with Calculator Popup.
■ Allow Multi Selection - Allows for multiple, comma separated values to be selected.
See Also: "Creating a Cascading List of Values" on page 7-61
Table A–1 (Cont.) Available Item Types
Item Type Description

Available Item Types
A-6 Oracle Application Express Application Builder User's Guide
Radio Group Renders as an HTML radio group form element, based on a list of values.
The following example displays employee names (ename), but returns employee numbers (empno):
SELECT ename, empno FROM emp
Settings and other attributes:
■ Value Required- If select Yes and the page item is visible, Oracle Application Express automatically performs a NOT NULL validation when the page is submitted. See item Help for more details.
■ Number of Radio Columns - Defines the number of columns to use to display the values defined in the List of Values.
■ Page Action when Value Changed - Option includes: None (Default); Submit Page; or Redirect and Set Value.
Choose Submit Page to have the page submitted when the radio button is selected.
■ Execute Validations - Displays if Page Action when Value Changed is set to Submit Page. Controls the execution of validations when a page is submitted. Set this attribute to No to prevent the execution of validations and associated error messages. Set this attribute to Yes to execute all page and built-in validations and associated error messages when the page is submitted. Use this attribute in conjunction with the validation attribute, Always Execute. To learn more, see "Creating Item and Page Validations" on page 8-33.
See Also: "Creating a Cascading List of Values" on page 7-61
Rich Text Editor Renders as an HTML text area. There is no maximum length for an item displayed as a text area. You control the height and width by editing the Height and Width item attribute.
Settings attributes:
■ Value Required- If select Yes and the page item is visible, Oracle Application Express automatically performs a NOT NULL validation when the page is submitted. See item Help for more details.
■ Editor - Select an editor.
■ Toolbar - Select a toolbar style.
■ Toolbar Expanded - Determines if the toolbar must start expanded when the Rich Text Editor is loaded.
■ Skin - Skin used for the appearance of the Rich Text Editor.
Table A–1 (Cont.) Available Item Types
Item Type Description

Available Item Types
About Item Types A-7
Select List Displays using a list of values. A list of values is required for items displayed as a select list. Select lists are rendered using the HTML form element <select>. The values in a select list are determined using a named list of values or a list of values defined at the item level. You can specify the NULL display value and NULL return value.
The following example would return employee names (ename) and employee numbers (empno) from the emp table. Note that column aliases are not required and are included in this example for clarity.
SELECT ename display_text, empno return_value FROM emp
Settings and other attributes:
■ Value Required- If select Yes and the page item is visible, Oracle Application Express automatically performs a NOT NULL validation when the page is submitted. See item Help for more details.
■ Page Action when Value Changed - Options include: None, Submit Page, Redirect and Set Value, Redirect to Page (based on selected value), or Redirect to URL (based on selected value).
■ Allow Multi Selection - Enables to select multiple values in the Select List. Use the Height attribute to define how many entries of the Select List should be visible at once.
■ Execute Validations - Displays if Page Action when Value Changed is set to Submit Page. Controls the execution of validations when a page is submitted. Set this attribute to No to prevent the execution of validations and associated error messages. Set this attribute to Yes to execute all page and built-in validations and associated error messages when the page is submitted. Use this attribute in conjunction with the validation attribute, Always Execute. To learn more, see "Creating Item and Page Validations" on page 8-33.
See Also: "Creating a Cascading List of Values" on page 7-61
Shuttle Renders as a multiple select list that includes two boxes containing lists. The left list displays a source list of values. Users use the shuttle control icons and buttons to select list items and move them from the left (source) list to the right (destination) list. Each shuttle has five controls:
■ Move all - Moves all items in the source list to the destination list.
■ Move selected - Moves only selected items (Ctrl + Shift items) to destination list.
■ Remove selected - Moves only selected items (Ctrl + Shift items) to the source list.
■ Remove all - Moves all items on destination list back to the source list.
■ Refresh - Resets the source and destination lists.
The right destination list includes the sort controls Move to top, Move up, Move down, and Move to bottom.
Settings attributes:
■ Value Required- If select Yes and the page item is visible, Oracle Application Express automatically performs a NOT NULL validation when the page is submitted. See item Help for more details.
■ Show Controls - Specifies which controls are visible for the Shuttle. Options include: None, Moving Only, Ordering Only, or All.
Note: To create this item type, you must define a list of values. See "Creating Lists of Values at the Application Level" on page 10-73, "Working with Multiple Select List Item" on page 7-73, and "Creating a Cascading List of Values" on page 7-61
Table A–1 (Cont.) Available Item Types
Item Type Description

Available Item Types
A-8 Oracle Application Express Application Builder User's Guide
Slider Renders slider item type for jQuery Mobile applications. This item type enables users to use slide handler to set a value.
Settings attributes:
■ Value Required - If select Yes and the page item is visible, Oracle Application Express automatically performs a NOT NULL validation when the page is submitted. See item Help for more details.
■ Minimum Value - Enter the minimum enterable value. The value can be a static value or the name of the page item which holds the value (for example, &ITEM_NAME.).
■ Maximum Value - Enter the maximum enterable value. The value can be a static value or the name of the page item which holds the value (for example, &ITEM_NAME.).
■ Step Increment - Enter a value to force the slider to snap to a specific increment. By default, the step is 1. The value can be a static value or the name of the page item (for example, &ITEM_NAME.).
■ Highlight Selected - If set to Yes, the slider highlights the track up to the current slider handle position.
Text Field with Calculator Popup
Renders as a text field with an icon. When clicked, the icon displays a small window containing a calculator. Calculations are placed back in the text field.
Note: When creating a new item of this type, first select Popup List of Values and then Text Field with Calculator Popup.
Settings attributes:
■ Value Required - If select Yes and the page item is visible, Oracle Application Express automatically performs a NOT NULL validation when the page is submitted. See item Help for more details.
■ Allow Multi Selection - Allows for multiple, comma separated values to be selected.
Table A–1 (Cont.) Available Item Types
Item Type Description

Available Item Types
About Item Types A-9
Text Field with autocomplete Displays a list of possible values when the user starts typing in the field. The values are based on the defined LOV SQL statement. The following example displays employee names (ename) and stores them in the field:
SELECT ename FROM empORDER BY 1
Settings attributes:
■ Value Required - If select Yes and the page item is visible, Oracle Application Express automatically performs a NOT NULL validation when the page is submitted. See item Help for more details.
■ Search - Defines how the search with the entered value should be performed. Contains & Ignore Case prevents the use of an existing index on the column if Lazy Loading is set to Yes.
■ Lazy Loading - If select Yes, the matching values are read from the database each time the user types a character. Select Yes if the LOV SQL statement returns many records. Otherwise all values are included if the page is rendered, independent of whether or not the autocomplete is used. If select No, all values are read only once when the page is rendered.
■ Maximum Values in List - Specify the number of items in the select box to avoid performance problems by returning to many rows.
■ Automatic Fill - Select Yes to fill the text field while still selecting a value, replacing the value if something is typed, or something else is selected.
■ Select First - Select Yes and the first autocomplete value is automatically selected when the user presses TAB or RETURN.
■ Highlight Search - Select Yes and the entered value is highlighted in the select box of matching entries.
Text Area Renders as an HTML text area. There is no maximum length for an item displayed as a text area. You control the height and width by editing the Height, Width, and Maximum Width attributes.
Settings attributes:
■ Value Required- If select Yes and the page item is visible, Oracle Application Express automatically performs a NOT NULL validation when the page is submitted.
By defining a message called APEX.PAGE_ITEM_IS_REQUIRED in Shared Components, Text Messages, the predefined error text can be replaced by an application specific error text. The display location of the message is defined by the application level setting Default error display location.
■ Resizable - Select Yes to enable the user resize the Text Area with a mouse.
■ Auto-Height - Select Yes to scale the text area to the amount of data. This option varies the height based on the amount of text.
■ Character Counter - Select Yes to include a counter that displays the number of characters entered in the field.
Table A–1 (Cont.) Available Item Types
Item Type Description

Available Item Types
A-10 Oracle Application Express Application Builder User's Guide
Yes/No Displays Flip Toggle Switch in jQuery Mobile user interfaces and as a select list in non-mobile environments.
Settings attributes:
■ Value Required - If select Yes and the page item is visible, Oracle Application Express automatically performs a NOT NULL validation when the page is submitted. See item Help for more details.
■ Settings - Options include: Use Component Settings or Custom.
If Settings is set to Custom, the following attributes display:
■ Yes Value - Specifies the value stored in the page item if the user picks the Yes option.
■ Yes Label - Specifies the text displayed as the Yes option.
■ No Value - Specifies the value stored in the page item if the user picks the No option. This attribute can also be left blank if you want to store NULL when the No value is selected.
■ No Label - Specifies the text displayed as the No option.
Table A–1 (Cont.) Available Item Types
Item Type Description

B
Oracle Application Express Limits B-1
BOracle Application Express Limits
This appendix list limits associated with Oracle Application Express development environment and application components.
Topics:■ Development Environment Limits
■ Component Limits
Development Environment LimitsThe Oracle Application Express development environment has no limits as to the number of workspaces or number of users that can exist in a given workspace.
Component LimitsTable B–1, " Component Limits" describes limits associated with Oracle Application Express components, such as interactive reports, classic reports, forms, and tabular forms.
Table B–1 Component Limits
Component Limits
Interactive reports One interactive report per page.
100 columns can be seen using report columns. You can edit additional columns using Tree view or paginating through Report Column Attributes.
999 rows per column heading filter (if no custom LOV is specified in the column attributes).
You can edit additional columns using Tree view or paginating through Report Column Attributes.
See Also: "Creating Reports" on page 9-1
Classic reports 100 columns can be seen using report columns. You can edit additional columns using Tree view or paginating through Report Column Attributes.
See Also: "Creating Reports" on page 9-1
Forms 200 enterable items per page.
32767 bytes for a text area or rich text editor item.
Two columns for primary key (when using built in DML processes). For users with more than two primary key columns defined, you can also specify a ROWID.
See Also: "Creating Forms" on page 10-1
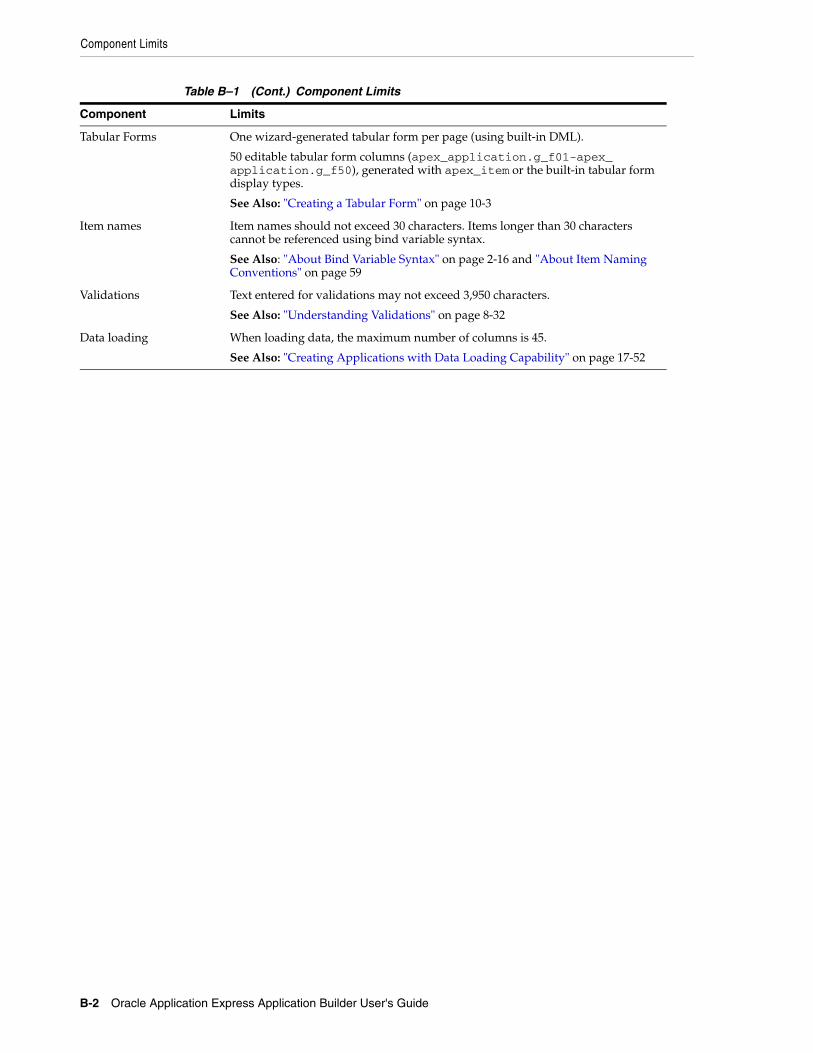
Component Limits
B-2 Oracle Application Express Application Builder User's Guide
Tabular Forms One wizard-generated tabular form per page (using built-in DML).
50 editable tabular form columns (apex_application.g_f01-apex_application.g_f50), generated with apex_item or the built-in tabular form display types.
See Also: "Creating a Tabular Form" on page 10-3
Item names Item names should not exceed 30 characters. Items longer than 30 characters cannot be referenced using bind variable syntax.
See Also: "About Bind Variable Syntax" on page 2-16 and "About Item Naming Conventions" on page 59
Validations Text entered for validations may not exceed 3,950 characters.
See Also: "Understanding Validations" on page 8-32
Data loading When loading data, the maximum number of columns is 45.
See Also: "Creating Applications with Data Loading Capability" on page 17-52
Table B–1 (Cont.) Component Limits
Component Limits

Available Conditions C-1
CAvailable Conditions
This section describes conditions available in Application Builder.
■ About Conditions
■ Conditions in Application Builder
About ConditionsA condition is a small unit of logic that helps you control the display of regions, items, buttons, and tabs as well execute processes, computations and validations. When you apply a condition to a control or component, the condition is evaluated. Whether a condition passes or fails determines whether a control or component displays, or page processing executes.
You can specify conditions by selecting a condition type when you create the control (region, button, or item) or component (tab, list, or navigation bar), or by making a selection under the Condition attribute.
Conditions in Application BuilderTable C–1, " Available Conditions" describes many Application Builder conditions. To view a complete listing of all available conditions for a given control or component, click the View icon to the right of the Condition Type list. Shortcuts to common selections appear directly beneath the Type list. If your condition requires an expression, type it in the appropriate field.
See Also: "Understanding Conditional Rendering and Processing" on page 2-4 and "Conditions in Application Builder" on page C-1
Table C–1 Available Conditions
Condition Description
Always Always returns true. Used primarily for the read-only conditions of a page item.
Client Browser: Microsoft Internet Explorer 5.5, 6.0 or higher
Evaluates to true when the client browser is one of the following: Microsoft Internet Explorer 5.5, 6.0, or higher.
Setting this condition on an item hides the item for all for client browsers other than Microsoft Internet Explorer 5.5, 6.0, or higher.
Client Browser: Mozilla, Netscape 6.x/7x or higher
Evaluates to true when the client browser is one of the following: Mozilla, Netscape 6.x, 7x, or higher.
Setting this condition on a component hides it for all client browsers other than Mozilla, Netscape 6.x, 7x, or higher.

Conditions in Application Builder
C-2 Oracle Application Express Application Builder User's Guide
Client Browser: Other browsers (or older version)
Evaluates to true when the client browser is one of the following: Other browsers (or older versions).
Client Browser: XHTML / CSS capable browser (NS 6.x,7x, Mozilla, IE 5.5, 6.0 or higher)
Evaluates to true when the client browser is one of the following: Netscape 6.x, 7x, Mozilla, or Microsoft Internet Explorer 5.5, 6.0, or higher).
Setting this condition on an item hides the item for all for client browsers other than Netscape 6.x, 7x, Mozilla, or Microsoft Internet Explorer 5.5, 6.0 or higher).
Current Language != Expression 1 Verifies the language setting in which the client browser is not currently running. Checks that the current language is not the one entered in Expression 1
Current Language = Expression Verifies the language setting in which the client browser is currently running. Checks that the current language is not the one entered in Expression 1.
Current Language is contained within Expression 1
Determines whether the browser current language is contained within a string. Evaluates to true if the current language matches the string entered in Expression 1.
For example, to check if the current language is either en-US or en-GB, choose this condition and enter the following string in Expression 1:
en-us,en-gb
Current Language is not contained within Expression 1
Verifies the application's current language is not contained within a specified string. Evaluates to true if the current language is not contained within the string entered in Expression 1.
Current page != Expression 1 Evaluates to true if the current page does not equal the page you specify in Expression 1.
Current Page != Page Submitted (this page was not the page posted)
Determines if the specified page was not posted. Evaluates to true if the current page does not match the value entered in Expression 1.
Current page = Expression 1 Evaluates to true if the current page equals the page you specify in Expression 1.
Current Page = Page Submitted (this page was posted)
Verifies whether the specified page was posted. Evaluates to true if the current page matches the value entered in Expression 1.
Current Page is contained within Expression 1 (comma-delimited list of pages)
Verifies if the current page is part of the list of pages you specify in Expression 1. To check if the current page is in either page 1, 2, 3 or 4, select this condition type and enter the following string in Expression 1:
1,2,3,4
Current page is in Printer Friendly mode Only displays certain page control or components when the user has selected printer friendly mode. If the current page is in printer friendly mode, then the condition evaluates to true. Use f?p syntax to specify printer friendly mode.
Current page is not in Printer Friendly mode
Hides page controls or components when printer friendly mode is selected. Use f?p syntax to specify printer friendly mode.
See Also: "Using f?p Syntax to Link Pages" on page 2-9 for information about f?p syntax
Current Page not in Expression 1 (comma-delimited list of pages)
Verifies if the current page is not part of the comma-separated list of pages specified in Expression 1.
Exists (SQL query returns at least one row)
This condition is expressed as a SQL query. If the query returns at least one row then the condition evaluates as true. For example:
select 1 from emp where deptno = :P101_DEPTNO
This example references item P101_DEPTNO as a bind variable. You can use bind variables a within an application processes and SQL query regions to reference item session state. If one or more employees are in the department identified by the value of P101_DEPTNO then the condition evaluates as true.
See Also: "About Bind Variable Syntax" on page 2-16 for information about bind variables
Inline Validation Errors Displayed This condition type hides page controls or components when inline validation errors are displayed on the page.
Never This condition type is hard wired to always fail. It is useful in temporarily preventing controls or components (such as regions, buttons, or items) from being rendered on a page, or to prevent processes, computations and validations from running.
Table C–1 (Cont.) Available Conditions
Condition Description

Conditions in Application Builder
Available Conditions C-3
No Inline Validation Errors Displayed This condition type hides page controls or components when no inline validation errors are displayed on the page.
NOT Exists (SQL query returns no rows) This condition is expressed as a SQL query. If the query does not return any rows, it evaluates as true.
PLSQL Expression A PL/SQL expression is any expression in valid PL/SQL syntax that evaluates to true or false. For example:
nvl(:MY_FLOW_ITEM,'NO') = 'YES'
If the value of MY_FLOW_ITEM is YES then the condition evaluates as true. Otherwise it evaluates as false.
PLSQL Function Body returning a Boolean
The body of a PL/SQL function that returns true or false. For example:
BEGINIF :P1_DAY = 'MONDAY' THEN RETURN TRUE;ELSE RETURN FALSE;END IF;END;
Request != Expression 1 REQUEST is an internal attribute that tracks how a page is submitted. By default, when a page is submitted, the value of the application attribute REQUEST is set according the name of the object that caused the page to be submitted. For a regular button, REQUEST is set as the name of the button (such as CANCEL or SAVE) not the label of the button. You can also set request using f?p syntax.
For example, the event could be when a user clicks a button or selects a tab menu. Depending upon the event, you can perform different operations by referencing the value of the REQUEST application attribute.
This condition evaluates as true if REQUEST does not equal the value entered in Expression 1.
See Also: "Understanding URL Syntax" on page 2-8, "REQUEST" on page 2-28, and "Understanding the Relationship Between Button Names and REQUEST" on page 10-72
Request = Expression 1 This condition is the opposite of Request != Expression 1.
This condition evaluates as true if REQUEST equals the value entered in Expression 1. From PL/SQL you can also reference the application attribute using the following syntax:
V('REQUEST')
See Also: "Understanding URL Syntax" on page 2-8, "REQUEST" on page 2-28, and "Understanding the Relationship Between Button Names and REQUEST" on page 10-72
Request is contained within Expression 1 REQUEST is an internal application attribute that tracks of how a page is submitted. By default, when a page is submitted, the value of REQUEST is set according to the event that caused the page to be submitted. For example, the event could be when a user clicks a button or selects a tab. Depending upon the event, you can perform different operations by referencing the value of the REQUEST application attribute.
Use this condition to specify a comma delimited list of allowed requests (such as SAVE or UPDATE) in Expression 1. The condition evaluates to true if the value of REQUEST is contained in the list.
See Also: "REQUEST" on page 2-28, and "Understanding the Relationship Between Button Names and REQUEST" on page 10-72
Request is not contained within Expression 1
This condition is the opposite of Request is contained within Expression 1. Evaluates to true if the value of the REQUEST is not contained within Expression 1.
See Also: "REQUEST" on page 2-28, and "Understanding the Relationship Between Button Names and REQUEST" on page 10-72
Table C–1 (Cont.) Available Conditions
Condition Description

Conditions in Application Builder
C-4 Oracle Application Express Application Builder User's Guide
SQL Expression SQL Expressions are evaluated as a WHERE clause in a SQL statement. For example suppose your expression is :MY_ITEM = 'ABC'.
The Application Express engine processes the following:
select 1 from dual where :MY_ITEM = 'ABC'
This condition evaluates to true if a row is returned.
SQL Reports (OK to show the back button)
Use this condition for reports having pagination. It automatically determines when it is appropriate to include a button that pages back in the result set.
SQL Reports (OK to show the forward button)
Use this condition for reports having pagination. It automatically determines when it is appropriate to include a button that pages forward in the result set.
Text in Expression 1 != Expression 2 (includes &ITEM. substitutions)
Use this expression to compare two expressions containing strings. Either expression may contain references to session state using &MY_ITEM. syntax.
See Also: "Understanding Substitution Strings" on page 2-17 for information about &MY_ITEM. syntax
Text in Expression 1 = Expression 2 (includes &ITEM. substitutions)
This condition is the opposite of Text in Expression 1 != Expression 2 (includes &ITEM. substitutions). Compares two expressions containing strings. Either expression may contain references to session state using the &ITEM. syntax.
To check if the item F100_P2_DAY_DATE equals "Wednesday", select this condition enter the following in Expression 1 and Expression 2:
■ Expression 1: F100_P2_DAY_DATE
■ Expression 2: Wednesday
See Also: "Understanding Substitution Strings" on page 2-17 for information about &MY_ITEM. syntax
Text in Expression 1 Is Contained in Value of Item in Expression 2
This condition compares the string contained in Expression 1 with the value of an item referenced in Expression 2. Expression 1 may contain references to session state using the &ITEM. syntax.
To check if the item F100_P2_DAY_DATE contains the text Wed, select this condition and enter the following in Expression 1 and Expression :
■ Expression 1: Wed
■ Expression 2: F100_P2_DAY_DATE
See Also: "Understanding Substitution Strings" on page 2-17 for information about &MY_ITEM. syntax
Text in Expression 1 Is Contained within the Text in Expression 2
This condition compares two expressions containing strings. Either expression may contain references to session state using the &ITEM. syntax.
See Also: "Understanding Substitution Strings" on page 2-17 for information about &MY_ITEM. syntax
Text in Expression 1 Is NOT Contained within the Text in Expression 2
This condition is the opposite of Text in Expression 1 Is Contained within the Text in Expression 2. Either expression may contain references to session state using the &ITEM. syntax.
See Also: "Understanding Substitution Strings" on page 2-17 for information about &MY_ITEM. syntax
User is authenticated (not public) Verifies whether the current user was authenticated using one of the built-in authentication schemes or a custom authentication scheme.
See Also: "Establishing User Identity Through Authentication" on page 15-25 for information about authentication
User is the public user (user has not authenticated)
The public user is defined as an application attribute. To set the public user for a specific application, navigate to the Application Builder home page and click the edit link corresponding to your application.
A public user is a user used for multiple users. Sometimes applications have pages that are public and thus require authentication and log in. This condition returns true if the user is the public user (that is, the user is authenticated as themselves or some other user not equal to the public user identified in the application attribute Public User.
See Also: "Authentication" on page 7-22 for information about Public User
Table C–1 (Cont.) Available Conditions
Condition Description

Conditions in Application Builder
Available Conditions C-5
Value of Item in Expression 1 != Expression 2
This condition is the opposite of Value of item in Expression 1 = Expression 2. It compares the value of an item with a specific string. Comparisons using this condition are case-sensitive.
For example, to verify whether the value of an item F100_ID is not equal to the value 10, enter the following in the Expression 1 and Expression 2 fields:
■ Expression 1: F100_ID
■ Expression 2: 10
Value of item in Expression 1 = Expression 2
Compares the value of an item with a specific string. Comparisons using this condition are case-sensitive.
For example, to verify whether the value of an item F100_P2_WORD is contained within the string "the quick brown fox", enter the following in the Expression 1 and Expression 2 fields:
■ Expression 1: F100_P2_WORD
■ Expression 2: the quick brown fox
Value of Item in Expression 1 = zero Verifies if the value of the item in Expression 1 does equal zero.
Value of item in Expression 1 contains no spaces
Evaluate to true if the value of the item specified in Expression 1 contains no spaces.
Value of Item in Expression 1 is alphanumeric
Evaluates to true when the string in Expression 1 contains only alphanumeric characters.
Value of Item in Expression 1 is contained within colon-delimited list in Expression 2
Use this condition type to check whether a certain string is contained within the value of a session state item. Verifies whether the string specified in Expression 1 is contained in the value of the item specified in Expression 2.
Value of Item in Expression 1 is NOT contained within colon-delimited list in Expression 2
Evaluates to true when the value specified in Expression 1 contains a string that lists elements delimited by colons.
To check if the item P1_TODAY is either "Monday", "Tuesday", or "Wednesday", select this condition and enter the following in Expression 1 and Expression 2:
■ Expression 1: P1_TODAY
■ Expression 2: Monday: Tuesday:Wednesday
Value of Item in Expression 1 is NOT NULL
In Expression 1, enter the name (uppercase) of the application or page item. Evaluates as true, if the current cache value of the item is not null and has a value. If not, the condition evaluates as false.
Value of Item in Expression 1 Is NOT null and the Item Is NOT Zero
Use this condition to check whether the value in Expression 1 is not NULL and does not equal zero.
For example, to verify whether the value of an item F100_ID is not null and is not equal to zero, enter the following in the Expression 1:
■ Expression 1: F100_ID
Value of Item in Expression 1 Is Not Numeric
Use this condition to verify that the value in Expression 1 is not numeric.
For example, to verify whether the value of an item F100_USER_NAME is not numeric, enter the following in the Expression 1:
■ Expression 1: F100_USER_NAME
Value of Item in Expression 1 is NULL Evaluates as true if the item in Expression 1 has no value.
Value of Item in Expression 1 is NULL or zero
Evaluates as true if the item in Expression is either NULL or zero.
Value of item in Expression 1 is numeric Evaluates to true if the value of the Item in Expression 1 is numeric.
Value of user preference in Expression 1 != Expression 2
This condition is the opposite of Value of user preference in Expression 1 = Expression 2. Evaluates to true if the name of the user preference specified in Expression 1 is not equal to the string in Expression 2.
Value of user preference in Expression 1 = Expression 2
Verifies the value of a user preferences. Evaluates to true if the name of the user preference specified in Expression 1 is equal to the string in Expression 2.
When any item in comma-delimited list of items has changed
Evaluates to true when the value of any nonnull session state item in the list of items specified in Expression 1 has changed.
When any item in comma-delimited list of pages has changed
Evaluates to true when the value of any nonnull session state item in the list of pages specified in Expression 1 has changed.
Table C–1 (Cont.) Available Conditions
Condition Description

Conditions in Application Builder
C-6 Oracle Application Express Application Builder User's Guide
When any item in current application has changed
This condition passes when the value of any nonnull session state item in the current application has changed.
When any item in current page has changed
Evaluate to true when the value of any nonnull session state item in the current page has changed.
When any item in current session has changed
Evaluates to true when the value of any nonnull session state item in the current session has changed.
When cgi_env DAD_NAME != Expression 1
This condition is the opposite of When cgi_env DAD_NAME = Expression 1.
Checks for the data access descriptor (DAD) that is being used in the URL to call the current page in the application and compares it to Expression 1. Evaluate to true, when the DAD is not the same as Expression 1.
When cgi_env DAD_NAME = Expression 1
Checks for the data access descriptor (DAD) that is being used in the URL to call the current page in the application and compares it to Expression 1. Evaluate to true, when the DAD is the same as Expression 1.
When cgi_env HTTP_HOST != Expression 1
This condition is the opposite of When cgi_env HTTP_HOST = Expression 1.
Checks for the value of the common gateway interface (CGI) environment variable HTTP_HOST that is the value returned by owa_util.get_cgi_env ('HTTP_HOST'). Evaluate to true, when this value is not equal to the string in Expression 1.
When cgi_env HTTP_HOST = Expression 1
Checks for the value of the common gateway interface (CGI) environment variable HTTP_HOST that is the value returned by owa_util.get_cgi_env ('HTTP_HOST'). Evaluate to true, when this value is equal to the string in Expression 1.
When cgi_env SERVER_NAME != Expression 1
This condition is the opposite of When cgi_env SERVER_NAME = Expression 1.
This condition checks for the value of the common gateway interface (CGI) environment variable SERVER_NAME, that is the value returned by owa_util.get_cgi_env ('SERVER_NAME'). Evaluate to true, when this value is not equal to the string in Expression 1.
When cgi_env SERVER_NAME = Expression 1
This condition checks for the value of the common gateway interface (CGI) environment variable SERVER_NAME, that is the value returned by owa_util.get_cgi_env ('SERVER_NAME'). Evaluate to true, when this value is equal to the string in Expression 1.
Table C–1 (Cont.) Available Conditions
Condition Description

About Granted Privileges D-1
DAbout Granted Privileges
This section describes grant privileges.
Topics:■ About Granting Privileges to Database Users
■ About Privileges Granted to PUBLIC
About Granting Privileges to Database UsersIn Oracle Application Express release 4.2, no privileges are granted to database users when creating a workspace on an existing schema. Unless direct grants exist, database users in Oracle Application Express will not be able to create tables or other database objects. To allow the creation of typical database objects, Oracle recommends the following list of directly granted privileges:
grant CREATE SESSION to [database username]
grant CREATE CLUSTER to [database username]
grant CREATE DIMENSION to [database username]
grant CREATE INDEXTYPE to [database username]
grant CREATE JOB to [database username]
grant CREATE MATERIALIZED VIEW to [database username]
grant CREATE OPERATOR to [database username]
grant CREATE PROCEDURE to [database username]
grant CREATE SEQUENCE to [database username]
grant CREATE SNAPSHOT to [database username]
grant CREATE SYNONYM to [database username]
grant CREATE TABLE to [database username]
grant CREATE TRIGGER to [database username]
grant CREATE TYPE to [database username]
grant CREATE VIEW to [database username]

About Privileges Granted to PUBLIC
D-2 Oracle Application Express Application Builder User's Guide
About Privileges Granted to PUBLICThis section describes public synonyms that exist and for which the execute privilege is granted to PUBLIC for the packages, procedures, functions, tables, and views owned by the Oracle Application Express product schema, (for example, APEX_040200).
Topics:■ Packages
■ Procedures
■ Functions
■ Tables
■ Views
■ Sequences
■ Types
PackagesPublic synonyms exist and execute privilege is granted to PUBLIC for the following packages owned by the Oracle Application Express product schema, (for example, APEX_040200):
APEXWS
APEX_MIG_PROJECTS_UPDATE
APEX_UI_DEFAULT_UPDATE
HTMLDB_CUSTOM_AUTH
HTMLDB_ITEM
HTMLDB_LANG
HTMLDB_SITE_ADMIN_PRIVS
WWV_FLOW_APPLICATION_INSTALL
HTMLDB_UTIL
WWV_FLOW
WWV_FLOW_API
WWV_FLOW_AUDIT
WWV_FLOW_CSS_API
WWV_FLOW_APPLICATION_INSTALL
WWV_FLOW_AUDIT
WWV_FLOW_COLLECTION
WWV_FLOW_CSS
WWV_FLOW_CSS_API
WWV_FLOW_CUSTOMIZE
WWV_FLOW_CUSTOM_AUTH
WWV_FLOW_CUSTOM_AUTH_LDAP

About Privileges Granted to PUBLIC
About Granted Privileges D-3
WWV_FLOW_CUSTOM_AUTH_STD
WWV_FLOW_DEBUG_MESSAGE
WWV_FLOW_EPG_INCLUDE_MODULES
WWV_FLOW_FILE_MGR
WWV_FLOW_FND_USER_API
WWV_FLOW_GLOBAL
WWV_FLOW_HINT
WWV_FLOW_HTML_API
WWV_FLOW_ID
WWV_FLOW_IMAGE_API
WWV_FLOW_ITEM
WWV_FLOW_ITEM_HELP
WWV_FLOW_JAVASCRIPT
WWV_FLOW_LANG
WWV_FLOW_LDAP
WWV_FLOW_LOOKUP_TABLES
WWV_FLOW_MAIL
WWV_FLOW_PLSQL_JOB
WWV_FLOW_PLUGIN
WWV_FLOW_PLUGIN_UTIL
WWV_FLOW_PREFERENCES
WWV_FLOW_RANDOM
WWV_FLOW_RENDER_SHORTCUT
WWV_FLOW_REST
WWV_FLOW_SVG
WWV_FLOW_USER_API
WWV_FLOW_UTILITIES
WWV_FLOW_WEBSERVICES_API
WWV_FLOW_WS_IMPORT_API
WWV_MIG_ACC_LOAD
WWV_RENDER_CALENDAR2
WWV_RENDER_CHART2
Execute privilege is granted to PUBLIC for the following packages owned by the Oracle Application Express product schema, (for example, APEX_040200):
WWV_CALCULATOR
WWV_FLOW_FLASH_CHART
WWV_FLOW_GENERATE_DDL

About Privileges Granted to PUBLIC
D-4 Oracle Application Express Application Builder User's Guide
WWV_FLOW_IMAGE_GENERATOR
WWV_FLOW_TREE_GLOBAL_VARS
ProceduresPublic synonyms exist and execute privilege is granted to PUBLIC for the following procedures owned by the Oracle Application Express product schema, (for example, APEX_040200):
APEX
APEX_ADMIN
DEVELOPMENT_SERVICE_HOME
DEVELOPMENT_SERVICE_HOME_LOGIN
DEVELOPMENT_SERVICE_SIGNUP
F
HTMLDB
HTMLDB_ADMIN
HTMLDB_LOGIN
P
WS
WWV_FLOW_INIT_HTP_BUFFER
Z
FunctionsPublic synonyms exist and execute privilege is granted to PUBLIC for the following functions owned by the Oracle Application Express product schema, (for example, APEX_040200):
NV
V
WWV_FLOW_HOT_HTTP_LINKS
Execute privilege is granted to PUBLIC for the following function owned by the Oracle Application Express product schema, (for example, APEX_040200):
WWV_POPUP_FILTER
TablesPublic synonyms exist and select privilege is granted to PUBLIC for the following tables owned by the Oracle Application Express product schema, (for example, APEX_040200):
WWV_FLOW_DUAL100
WWV_FLOW_TEMP_TABLE
WWV_FLOW_LOV_TEMP

About Privileges Granted to PUBLIC
About Granted Privileges D-5
ViewsPublic synonyms exist and select privilege is granted to PUBLIC for the following views owned by the Oracle Application Express product schema, (for example, APEX_040200):
APEX_APPLICATIONS
APEX_APPLICATION_ALL_AUTH
APEX_APPLICATION_AUTH
APEX_APPLICATION_AUTHORIZATION
APEX_APPLICATION_BC_ENTRIES
APEX_APPLICATION_BREADCRUMBS
APEX_APPLICATION_BUILD_OPTIONS
APEX_APPLICATION_CACHING
APEX_APPLICATION_COMPUTATIONS
APEX_APPLICATION_GROUPS
APEX_APPLICATION_ITEMS
APEX_APPLICATION_LISTS
APEX_APPLICATION_LIST_ENTRIES
APEX_APPLICATION_LOVS
APEX_APPLICATION_LOV_ENTRIES
APEX_APPLICATION_NAV_BAR
APEX_APPLICATION_PAGES
APEX_APPLICATION_PAGE_BRANCHES
APEX_APPLICATION_PAGE_BUTTONS
APEX_APPLICATION_PAGE_COMP
APEX_APPLICATION_PAGE_DA
APEX_APPLICATION_PAGE_DA_ACTS
APEX_APPLICATION_PAGE_DB_ITEMS
APEX_APPLICATION_PAGE_FLASH5
APEX_APPLICATION_PAGE_FLASH5_S
APEX_APPLICATION_PAGE_FLASH_CH
APEX_APPLICATION_PAGE_GROUPS
APEX_APPLICATION_PAGE_IR
APEX_APPLICATION_PAGE_IR_CAT
APEX_APPLICATION_PAGE_IR_CGRPS
APEX_APPLICATION_PAGE_IR_COL
APEX_APPLICATION_PAGE_IR_COMP
APEX_APPLICATION_PAGE_IR_COND
APEX_APPLICATION_PAGE_IR_GRPBY

About Privileges Granted to PUBLIC
D-6 Oracle Application Express Application Builder User's Guide
APEX_APPLICATION_PAGE_IR_RPT
APEX_APPLICATION_PAGE_IR_SUB
APEX_APPLICATION_PAGE_ITEMS
APEX_APPLICATION_PAGE_MAP
APEX_APPLICATION_PAGE_PROC
APEX_APPLICATION_PAGE_REGIONS
APEX_APPLICATION_PAGE_RPT
APEX_APPLICATION_PAGE_RPT_COLS
APEX_APPLICATION_PAGE_TREES
APEX_APPLICATION_PAGE_VAL
APEX_APPLICATION_PARENT_TABS
APEX_APPLICATION_PROCESSES
APEX_APPLICATION_SHORTCUTS
APEX_APPLICATION_SUBSTITUTIONS
APEX_APPLICATION_SUPP_OBJECTS
APEX_APPLICATION_SUPP_OBJ_BOPT
APEX_APPLICATION_SUPP_OBJ_CHCK
APEX_APPLICATION_SUPP_OBJ_SCR
APEX_APPLICATION_TABS
APEX_APPLICATION_TEMPLATES
APEX_APPLICATION_TEMP_BC
APEX_APPLICATION_TEMP_BUTTON
APEX_APPLICATION_TEMP_CALENDAR
APEX_APPLICATION_TEMP_LABEL
APEX_APPLICATION_TEMP_LIST
APEX_APPLICATION_TEMP_PAGE
APEX_APPLICATION_TEMP_POPUPLOV
APEX_APPLICATION_TEMP_REGION
APEX_APPLICATION_TEMP_REPORT
APEX_APPLICATION_THEMES
APEX_APPLICATION_TRANSLATIONS
APEX_APPLICATION_TRANS_MAP
APEX_APPLICATION_TREES
APEX_APPLICATION_WEB_SERVICES
APEX_APPL_PLUGINS
APEX_APPL_PLUGIN_ATTRIBUTES
APEX_APPL_PLUGIN_ATTR_VALUES

About Privileges Granted to PUBLIC
About Granted Privileges D-7
APEX_APPL_PLUGIN_EVENTS
APEX_APPL_PLUGIN_FILES
APEX_DEBUG_MESSAGES
APEX_DEVELOPER_ACTIVITY_LOG
APEX_DICTIONARY
APEX_MIGRATION_ACC_FORMS
APEX_MIGRATION_ACC_PROJECTS
APEX_MIGRATION_ACC_QUERIES
APEX_MIGRATION_ACC_RPTS
APEX_MIGRATION_ACC_TABLES
APEX_MIGRATION_PROJECTS
APEX_MIGRATION_REV_FORMS
APEX_MIGRATION_REV_QUERIES
APEX_MIGRATION_REV_RPTS
APEX_MIGRATION_REV_TABLES
APEX_RELEASE
APEX_STANDARD_CONDITIONS
APEX_TEAM_BUGS
APEX_TEAM_FEEDBACK
APEX_TEAM_MILESTONES
APEX_TEAM_TODOS
APEX_THEMES
APEX_UI_DEFAULTS_ATTR_DICT
APEX_UI_DEFAULTS_COLUMNS
APEX_UI_DEFAULTS_GROUPS
APEX_UI_DEFAULTS_LOV_DATA
APEX_UI_DEFAULTS_TABLES
APEX_WORKSPACES
APEX_WORKSPACE_ACCESS_LOG
APEX_WORKSPACE_ACTIVITY_LOG
APEX_WORKSPACE_APEX_USERS
APEX_WORKSPACE_CLICKS
APEX_WORKSPACE_DEVELOPERS
APEX_WORKSPACE_FILES
APEX_WORKSPACE_LOG_SUMMARY
APEX_WORKSPACE_LOG_SUMMARY_USR
APEX_WORKSPACE_SCHEMAS

About Privileges Granted to PUBLIC
D-8 Oracle Application Express Application Builder User's Guide
APEX_WORKSPACE_SESSIONS
APEX_WORKSPACE_SQL_SCRIPTS
APEX_WS_APPLICATIONS
APEX_WS_APP_PAGES
APEX_WS_DATA_GRID
APEX_WS_DATA_GRID_COL
WWV_FLOW_CLICKTHRU_LOG
WWV_FLOW_COLLECTIONS
WWV_FLOW_FEEDBACK_TYPES
WWV_FLOW_GROUP_USERS
WWV_FLOW_LISTS_OF_VALUES$_V
WWV_FLOW_LIST_OF_VALUES_DATA_V
WWV_FLOW_MONTHS_MON
WWV_FLOW_MONTHS_MONTH
WWV_FLOW_PLSQL_JOBS
WWV_FLOW_USERS
WWV_FLOW_USER_ACCESS_LOG
WWV_FLOW_USER_ACTIVITY_LOG
WWV_FLOW_USER_MAIL_LOG
WWV_FLOW_YEARS
Additionally, insert is granted on the following:
WWV_FLOW_FILES
Additionally, the following views have select privilege granted to PUBLIC, but no synonym:
WWV_FLOW_HOURS_12
WWV_FLOW_HOURS_24
WWV_FLOW_MINUTES
WWV_FLOW_MINUTES_5
SequencesThe following sequences have public synonyms and select privilege granted to public:
WWV_FLOW_SESSION_SEQ
WWV_SEQ
TypesThe following types have execute granted to public but no synonyms:

About Privileges Granted to PUBLIC
About Granted Privileges D-9
WWV_FLOW_TREE_ENTRY
WWV_FLOW_TREE_SUBS

About Privileges Granted to PUBLIC
D-10 Oracle Application Express Application Builder User's Guide

Accessibility in Oracle Application Express E-1
EAccessibility in Oracle Application Express
This section attempts to provide information for users who are accessing Oracle Application Express utilizing only a keyboard or Freedom Scientific's screen reader JAWS.
Topics:■ About Screen Reader Mode
■ About High Contrast Mode
■ Accessing Interactive Reports Using JAWS
■ Accessing Form Pages Using JAWS
■ Accessing Components Using a Keyboard
For additional information about the accessibility of Oracle products, see:
http://www.oracle.com/accessibility
About Screen Reader ModeSessions can be defined as optimized for use with screen readers. This includes both when using the Application Express development environment and also for use in your own applications.
Topics:■ What Does Screen Reader Mode Do?
■ Enabling Screen Reader Mode
What Does Screen Reader Mode Do?Enabling Screen Reader mode currently does the following, by default:
■ Oracle Application Express Flash charts are not currently accessible to screen readers, therefore when running in screen reader mode the user gets a report representation of the information conveyed in the chart. A separate report is
Note: JAWS release 13.0 with all default settings was used in writing this section. All instructions in this section are based on using a full size keyboard. Note that instructions may vary if using a laptop keyboard.
See Also: "Using Screen Reader Mode in Your Database Applications" on page 17-50

About Screen Reader Mode
E-2 Oracle Application Express Application Builder User's Guide
generated for each series of a multiple-series chart. When running in screen reader mode, these data tables contain descriptive text, in the following format:
– Database Applications:
* Summary Text - A combination of the chart title and chart series title are used.
* Column Headers - The column name/alias in the chart series query identifies the columns in the report.
– Websheet Applications:
* Summary Text - The section title is used as the summary text.
* Column Headers - The Data Grid report labels identify the columns in the report.
■ You must be using both a screen reader and browser that supports WAI-ARIA Live Regions. Oracle Application Express is only tested with the most recent JAWS screen reader (13.0), which supports Live Regions. The current list of browsers that support this include:
– Mozilla Firefox 3.0 and later
– Microsoft Internet Explorer version 8
■ Interactive report regions in Report View or Group By View use data tables to convey information. Data tables require a text description that describes what information the table contains to a screen reader user. When running in screen reader mode, these data tables now contain detailed summary text, in the following format:
– Region - The name of the region defined by the developer.
– Report - The name of the current Saved Report within the Interactive Report. Default to Primary Default if no saved report is defined.
– View - The current view of the report (Either Report or Group By).
– Displayed Rows Start - The starting row of the currently displayed set of rows.
– Displayed Rows End - The ending row of the currently displayed set of rows.
– Total Rows - The total number of rows returned by the report.
■ Interactive report regions provide the ability to add Aggregates to your report data. One of the available aggregates is to Sum a column's values. When running in screen reader mode, the text Sum: is displayed as a prefix to the summed value. In standard mode only the summed value is displayed. All other aggregates display an aggregate type prefix by default, regardless of mode.
■ Item level Help text is provided differently in screen reader mode. In standard mode, a dialog is displayed on your page displaying the Help text for a specific item. Since these dialogs have many problems when used with screen readers, a the classic popup page displays item help text when running in screen reader mode.
■ In Application Builder the Page Definition page used to manage page information contains 2 different views, Component View and Tree View. The tree used in Tree View is not accessible using a screen reader and therefore, when running this page in screen reader mode the default is Component View.
■ The Tree region component in Application Express, available for database applications is not accessible with a screen reader. For this reason, when running

About High Contrast Mode
Accessibility in Oracle Application Express E-3
in screen reader mode, the user gets an unordered hierarchical list, as a representation of the information conveyed in the tree.
■ Screen reader mode has greatly improved the process for the user of dealing with raised validation errors. Consider the following example. A form page is submitted and a validation has failed resulting in displayed errors. If the page item has an associated error, then additional markup is added to that page item so that the screen reader informs the user that the item contains an invalid entry, when moving through the form fields. Additionally, the user is informed of the corresponding error message, when moving through the form fields.
■ The home page of a Websheet application displays breadcrumbs that indicate the current page, parent pages, and the home page. On parent page breadcrumb entries, if the user hovers over the entry, a tooltip displays that shows all the sibling pages for that page. In Screen Reader mode, this information is displays as a hierarchical page list instead. This can easily be identified by screen reader users as it is directly under the <h2> level heading, Hierarchical Page List with Child Pages.
Enabling Screen Reader ModeYou can enable screen reader mode in the Oracle Application Express development environment by selecting Screen Reader from Accessibility Mode list on the Workspace home page and on the Oracle Application Express Administration Services page.
You can enable screen reader mode in the Websheet application by clicking the Screen Reader link located in the lower right side of the Websheet home page.
If you intend on using the Oracle Application Express development environment with a screen reader, ensure that you have this option enabled.
About High Contrast ModeYou can identify sessions as optimized for high contrast in the Oracle Application Express development environment, Websheet runtime, and also within your own database applications. By default, sessions are not flagged as running in high contrast mode.
Topics:■ What Does High Contrast Mode Do?
■ Enabling High Contrast Mode
Tip: You must be using both a screen reader and browser that supports WAI-ARIA, to benefit from these improvements.
See Also: "Using High Contrast Mode in Your Database Applications" on page 17-51

Accessing Interactive Reports Using JAWS
E-4 Oracle Application Express Application Builder User's Guide
What Does High Contrast Mode Do?Enabling high contrast mode results in the following behavior:
■ Oracle Application Express Development environment.
The controls in interactive report region's search bar display without icons, and all controls, including the icons are shown as clear text using a button-like look. There are also numerous reports throughout Application Express that share the same report template, which have contrast issues in the column headers. If high contrast mode is enabled, for those reports, the gradient background is removed and a darker, solid-color background displays instead.
■ Application Express Websheet runtime.
Websheet application replace CSS-based image links with text links. These text links are only created for images where the source image is transparent and the CSS background property is used in its place.
■ Custom Database Applications.
Nothing is done natively from the framework. It is up to each developer to provision the mode and make changes where required.
Enabling High Contrast ModeYou enable high contrast mode in the Oracle Application Express development environment by selecting High Contrast from Accessibility Mode list on the Workspace home page and on the Oracle Application Express Administration Services page.
You can enable high contrast mode in a running Websheet application by clicking the High Contrast link located in the lower right side of the Websheet home page.
If you intend on using the Oracle Application Express development environment in Windows High Contrast mode, ensure that you have this option enabled.
Accessing Interactive Reports Using JAWSThis section describes how to access interactive reports using JAWS.
Topics:■ Accessing the Actions Menu
Accessing the Actions MenuInteractive report regions contain an Actions menu which is the main entry point to much of the functionality offered by these regions.
To access the Actions menu with JAWS:
1. Press INSERT + F5 to load the Select a Form Field dialog box.
See Also: "Accessing Interactive Report Regions" on page E-11

Accessing Interactive Reports Using JAWS
Accessibility in Oracle Application Express E-5
2. Press A repeatedly to reach the Actions Button field.
3. Press ENTER to navigate to the Actions button.
4. Press ENTER to open the Actions menu.
You must now switch off the JAWS virtual PC cursor. The Actions menu is fully keyboard accessible.
5. Press INSERT + Z to switch off the JAWS virtual PC cursor.
JAWS announces, "Use Virtual PC Cursor Off."
6. Press UP and DOWN to move up and down the current level of menu and LEFT and RIGHT to navigate in and out of sub-menus. The menu consists of:
■ Select Columns
■ Filter
■ Rows Per Page (Contains a submenu to select the number of rows the report displays)
■ Format (Contains a submenu to specify Sort, Control Break, Highlight, Compute, Aggregate, Chart, Group By).
■ Save Report
■ Reset
■ Help
■ Download
■ Subscription
7. Once you have chosen the specific action you want to perform, press ENTER to load the relevant dialog.
For example, assume you select Filter. The Filter dialog loads. When it is updated, JAWS announces the name of the current page followed by the first form field in the dialog which has focus.
8. Refresh the virtual cursor now, by pressing INSERT + ESC.
JAWS announces, "Screen Updated."
9. To switch the JAWS virtual PC cursor back on, press INSERT + Z.
JAWS announces, "Use Virtual PC Cursor On."
Next, define your filter attributes. This dialog contains slightly different form fields depending on your filter type and subsequent selections. The default fields for defining a Column filter are a Column select list, Operator select list, and Expression input.
10. To hear these fields, just press the JAWS shortcut key F and SHIFT + F a few times to move around these field items. Then, select or enter your filter details into the form fields.
Next, apply the filter. The dialog ends with a Cancel and Apply button, which can be navigated to using the JAWS shortcut key B.
11. Press B until you hear, "Apply" and then press ENTER.
The page refreshes and JAWS announces when the content has refreshed by starting to read the current report settings.
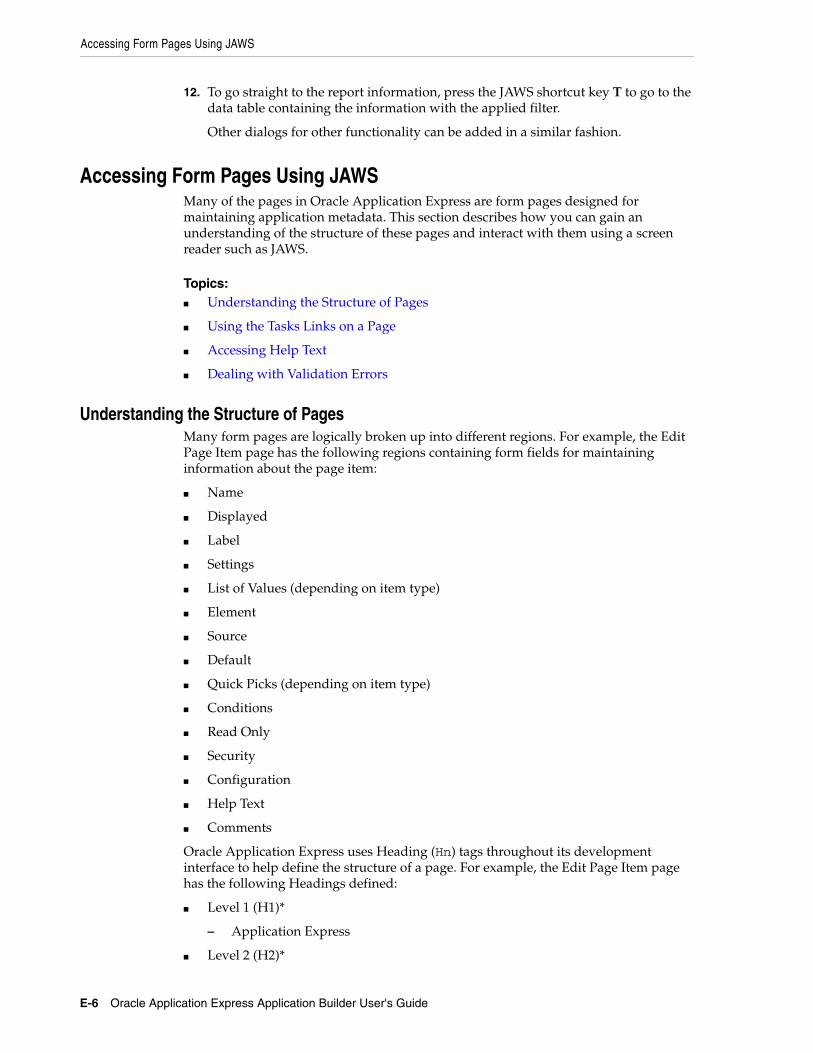
Accessing Form Pages Using JAWS
E-6 Oracle Application Express Application Builder User's Guide
12. To go straight to the report information, press the JAWS shortcut key T to go to the data table containing the information with the applied filter.
Other dialogs for other functionality can be added in a similar fashion.
Accessing Form Pages Using JAWSMany of the pages in Oracle Application Express are form pages designed for maintaining application metadata. This section describes how you can gain an understanding of the structure of these pages and interact with them using a screen reader such as JAWS.
Topics:■ Understanding the Structure of Pages
■ Using the Tasks Links on a Page
■ Accessing Help Text
■ Dealing with Validation Errors
Understanding the Structure of PagesMany form pages are logically broken up into different regions. For example, the Edit Page Item page has the following regions containing form fields for maintaining information about the page item:
■ Name
■ Displayed
■ Label
■ Settings
■ List of Values (depending on item type)
■ Element
■ Source
■ Default
■ Quick Picks (depending on item type)
■ Conditions
■ Read Only
■ Security
■ Configuration
■ Help Text
■ Comments
Oracle Application Express uses Heading (Hn) tags throughout its development interface to help define the structure of a page. For example, the Edit Page Item page has the following Headings defined:
■ Level 1 (H1)*
– Application Express
■ Level 2 (H2)*

Accessing Form Pages Using JAWS
Accessibility in Oracle Application Express E-7
– Name
– Displayed
– Label
– Settings
– Element
– Source
– Default
– Conditions
– Read Only
– Security
– Configuration
– Help Text
– Comments
■ Level 3 (H3)*
– Page Items
– Tasks
The previous list represents of how headings are used in the Oracle Application Express development environment. Note the following:
■ Level 1 headings (H1) provides a link to the relevant root page depending on the context of where you are in the development environment (for example when editing an application this takes you to the home page for the application in the Application Builder).
■ Level 2 headings (H2) contain sections integral to the primary function of the current page.
■ Level 3 headings (H3) that contain sections that are related to the function of the current page.
To gain an overview of all the headings on the current page, press INSERT+F6 to list the current page's headings.
You can also use other JAWS keystrokes to navigate through the page headings. For example, to navigate around level 2 headings:
1. Press INSERT+ALT+CTRL+2 to go to the first heading on the page at level 2.
On the Edit Page Item page, JAWS announces, "Name heading level 2."
2. Press 2 to go to the next heading at level 2.
On the Edit Page Item page, JAWS announces, "Displayed heading level 2."
3. Press SHIFT+2 to go to the previous heading at level 2.
On the Edit Page Item page, JAWS announces, "Name heading level 2."
Using the Tasks Links on a PageMany pages in Oracle Application Express contain a Tasks region on the right-hand side of the page. For example, the Edit Page Item page has a Tasks region on the right side containing a list of links relevant to the current item type. This region has a level 3

Accessing Form Pages Using JAWS
E-8 Oracle Application Express Application Builder User's Guide
Heading (H3) defined on the section title Tasks (as this is a section that is related to the primary function of the current page).
To navigate to the Tasks region using JAWS:
1. Press INSERT+ALT+CTRL+3 to go to the first heading on the page at level 3.
JAWS announces, "Page Items heading level 3" on the Edit Page Item page. This contains general help information about page items.
2. Press 3 to go to the next heading at level 3.
On the Edit Page Item page, JAWS announces, "Tasks heading level 3." This contains a list of links to related tasks.
3. Press L once to navigate to the list.
JAWS announces, "List of x items" (where x depends on the type of page item currently being edited).
4. Press I to navigate through the list items and press ENTER to activate a link.
Accessing Help TextThis section describes how to use JAWS to access Item-level help in Oracle Application Express.
Topics:■ Accessing Item Help
Accessing Item HelpMost items within the user interface have field-level Help available by activating or clicking on the field label. If Help text is available, the adjacent label is implemented as a link, the link text matches the current form item's label text. Activating this link loads a separate window containing the help text.
To access this field-level Help for an item using JAWS:
1. Press CTRL+HOME to go to the top of the page.
JAWS announces the page name.
2. Press INSERT+F7 load the Links List dialog box.
3. Press the first letter of the link text you want to locate, repeatedly.
If there is no link text matching the label of the form item you want to get help for, then there is no help available for that item
4. If the appropriate link is found, press ENTER to activate the link.
A separate window containing the Help text appears
5. Press the JAWS navigation quick key N to go to the help text.
6. Once you are finished reading the help text, press ALT+F4 to close the Help window and return to page.
Dealing with Validation ErrorsOracle Application Express provides many in-built features that help a JAWS user deal validation errors on form pages.

Accessing Form Pages Using JAWS
Accessibility in Oracle Application Express E-9
Topics:■ Understanding the an Error Has Occurred
■ Reviewing the Error
■ Navigating to the Relevant Fields to Fix the Errors
■ About WAI-ARIA Support
Understanding the an Error Has OccurredIf a validation has failed on a form page when using Screen Reader mode, the page title is prefixed with the following:
x errors have occurred - [page title]
When a page loads, JAWS announces the page title. This means a JAWS user immediately knows a validation has failed.
Reviewing the ErrorTo navigate to the section of the page where the error messages display, locate the H2 (Heading Level 2) tag with the text Notification Message included at the top of this section. This heading is hidden visually, but is available to screen reader users.
Adding a Validation Notification to Your Database Applications You can easily add this functionality to your own database applications. To accomplish this, add the substitution string #NOTIFICATION_MESSAGE_HEADING# in the Page Template, Subtemplate, Notification section of a page template. This placeholder substitutes the contents of the built-in system message APEX.NOTIFICATION_MESSAGE_HEADING to the text Notification Message.
To customize this displayed text, define a text message with that name APEX.NOTIFICATION_MESSAGE_HEADING in your own application, along with the text you want to use.
For example, you could add the following to the Notification section of your page template:
<h2 class="hideMeButHearMe">#NOTIFICATION_MESSAGE_HEADING#</h2>
In this example, the use of the hideMeButHearMe CSS class hides content visually, but is available to screen reader users.
Navigating to the Relevant Fields to Fix the ErrorsFor validations that are associated with a particular page item, Oracle Application Express renders a Go to error link in the Notification section next to the corresponding error message. When a user clicks (or activates) the Go to error link, the focus shifts to the associated item. This enables all users (not just screen reader users) to go straight to the page item related to the error.
You can alter the Go to Error text to change the default text or to translate it into a language that is not translated by default with Oracle Application Express. In either case, define a text message called APEX.GO_TO_ERROR with the text and language of your choice. Additionally, you can disable this functionality and remove the Go to
Tip: This behavior is also available by default for custom database applications that provision Screen Reader mode. See "About Screen Reader Mode" on page E-1.

Accessing Components Using a Keyboard
E-10 Oracle Application Express Application Builder User's Guide
Error link by setting the text of the APEX.GO_TO_ERROR text message to just a single space. To learn more, see "Translating Messages Used Internally by Oracle Application Express" on page 18-14.
About WAI-ARIA SupportWhen running in Screen Reader mode, Oracle Application Express includes some Web Accessibility Initiative - Accessible Rich Internet Applications (WAI-ARIA) markup to invalid page items. This enhancement improves the screen reader user experience for screen reader and browser combinations that support WAI-ARIA.
When an error occurs relating to a specific page item, that page item is given the following additional attributes:
■ aria-invalid="true"
This means a screen reader announces "Invalid Entry"when the screen reader user is focused on the page item.
■ aria-describedby="[page_item_name]_error"
This attribute value matches up with the item's associated error messages so when the screen reader user focuses on the page item, the screen reader announces the actual error.
Before this enhancement, if a screen reader user navigated to a page item that had an error, the screen reader might announce, "Job, Edit, Type of Text." Now the screen reader would announce, "Job Edit, Invalid Entry, Job must have some value, Type of Text."
Accessing Components Using a KeyboardThis section describes how to access components in Oracle Application Express using a keyboard.
Topics:■ Using New Date Pickers
■ Accessing Interactive Report Regions
Using New Date PickersThere are many keyboard shortcuts for the Date Picker.
To open a Date Picker:
1. Tab to the relevant input field.
Tip: If you are a plug-in item developer and want to provide the same WAI-ARIA support in your own plug-in, please see the APEX_ERROR.GET_ARIA_ERROR_ATTRIBUTES function in Oracle Application Express API Reference.
Tip: If using Oracle Application Express using only a keyboard, you should enable Screen Reader Mode since tree regions are not keyboard accessible. When running in screen reader mode, a hierarchical unordered list displays instead and can be easily navigated with keyboard-only using TAB, SHIFT + TAB and ENTER keys to activate a specific list item. To learn more, see "About Screen Reader Mode" on page E-1.

Accessing Components Using a Keyboard
Accessibility in Oracle Application Express E-11
2. Press CTRL+HOME to open the Date Picker.
3. Once the Date Picker is open, you have the following navigation options:
■ By month:
– Press PAGE UP to go to the previous month.
– Press PAGE DOWN to go to the next month.
– Press CTRL +HOME to go to the current month.
■ By week:
– Press CTRL+UP to go to the previous week.
– Press CTRL+DOWN to go to the next week.
■ By day:
– Press CTRL+LEFT to go to the previous day.
– Press CTRL+RIGHT to go to the next day.
Once you are finished with the Date Picker:
1. Press ENTER to accept the selected date.
2. Press ESCAPE to close the date picker without selection.
3. Press CTRL+END to close the date picker and erase the date.
Accessing Interactive Report RegionsThis section describes how to access common features within Interactive Report regions.
Topics:■ Searching Data in an Interactive Report
■ Using the Actions Menu
■ Managing Bulk Updates
■ Utilizing Drill Down Links
■ Editing Existing Filters
■ Loading Saved Reports
Searching Data in an Interactive ReportIf a search bar displays above an interactive report then the Include Search Bar attribute has been enabled in Report Attributes. This attribute is enabled by default when a new interactive report is created.
To execute a search:
1. Press TAB until the search field has focus.
2. Type your search keywords into the search field.
3. Press ENTER to invoke the search.
4. To refine your search to a specific column:
See Also:

Accessing Components Using a Keyboard
E-12 Oracle Application Express Application Builder User's Guide
a. Press TAB to access the magnifying glass icon to the left of the search field.
b. Press ENTER to activate the pull down menu and display a list of all available columns to search.
c. Press the DOWN or UP arrow keys on your keyboard to navigate through the list of columns.
d. Press ENTER to select the column you want to search on. This sets the context of the subsequent search as specific to the column selected.
5. Repeat steps 1 and 2 to execute your column specific search.
Using the Actions MenuBy default, new interactive reports include both a search bar and Actions menu. Both of these features are controlled by the developer by enabling the Include Search Bar and Actions menu attributes on the Report Attributes page. Depending upon how the developer creates the report, the Action menu can contain different options.
To learn more, see "About the Actions Menu" on page 9-6.
To access the Actions menu using a keyboard:
1. Press TAB until the Actions menu has focus.
2. Press ENTER to open the menu.
3. Once the menu is open, you have the following navigation options:
■ Press the DOWN arrow key to go down the menu.
■ Press the UP arrow key to go up the menu.
■ Press the RIGHT arrow key to open a submenu (indicated by a right arrow) and move focus to the first item in the submenu.
■ Press the LEFT arrow key to close a submenu and move focus back to the appropriate item in the parent menu.
4. To exit the Action menu:
■ Press ENTER to load the action specific dialog. Focus is set to the first focusable element within the dialog box.
■ Press ESC to close the menu without selection.
Managing Bulk UpdatesSome interactive reports in Oracle Application Express contain form items for applying bulk updates to components. All form items within the report and buttons to apply the changes are keyboard accessible. Also some pages feature a check box in the first row to perform bulk processing and corresponding Select All and Deselect All links below the report. All of these items are keyboard accessible.
Utilizing Drill Down LinksSome interactive reports in Oracle Application Express contain at least one link to edit or view a specific sub-components. These are all standard links and are therefore keyboard accessible.
Editing Existing FiltersWhen an existing search filter is applied to an interactive report, a search filter displays below the Search bar.

Accessing Components Using a Keyboard
Accessibility in Oracle Application Express E-13
You can access the search filter using the keyboard to:
■ Edit the search filter.
Press TAB to navigate to the search filter and then press ENTER to open the Filter dialog box. Focus is automatically set to first focusable element in the dialog box.
■ Disable or enable the search filter.
Press TAB to navigate to the check box to the right of the filter and SPACEBAR to disable or enable the filter.
■ Delete the search filter.
Press TAB to navigate to the search filter and then ENTER to open the Filter dialog box. Press TAB or SHIFT+TAB to navigate to the Delete button and then press ENTER.
Loading Saved ReportsIf an Interactive Report includes a Search bar, Actions menu, and support for saved reports, then these options have been enabled by the developer on the Report Attributes page. To learn more, see "Editing Interactive Reports as a Developer" on page 9-27.
To load a saved report:
1. Press TAB until the Reports select list has focus. Note that the Reports select list only displays if there are saved reports.
2. Press the UP and DOWN keys to select the specific saved report you want to view.
3. Press ENTER to view the saved report.

Accessing Components Using a Keyboard
E-14 Oracle Application Express Application Builder User's Guide

Index-1
Index
AAccept Page, 2-4access control list
about, 10-90adding users, 10-94creating, 10-91removing users, 10-94selecting an application mode, 10-92selecting user privileges, 10-94
access controll, authorization schemes, 10-94accessibility
about, E-1about high contrast mode, E-3Accessibility Mode list, E-3accessing components with keyboard, E-10high contrast mode, E-4screen reader mode, E-1WAI-ARIA support, E-10
Accessibility Mode list, 1-11High Contrast, E-4Screen Reader, E-3
Action Barabout, 8-16Comment icon, 8-16Export Page icon, 8-16Find icon, 8-16Lock icon, 8-16Run Page icon, 8-16Shared Components icon, 8-16
Actions menu, 9-6accessing with JAWS, E-4Aggregate, 9-7Chart, 9-7Compute, 9-7Control Break, 9-7Download, 9-8Filter, 9-7Flashback, 9-8Format, 9-7Group By, 9-8Help, 9-8Highlight, 9-7Reset, 9-8Rows Per Page, 9-7Save Report, 9-8
Select Columns, 9-7Sort, 9-7Subscription, 9-8
activity log, 17-4activity reports, creating custom, 17-4Administration
Dashboards, 1-9Manage Users and Groups, 1-9Monitor Activity, 1-9
Administration icon, 1-9Allow Feedback attribute, 7-17Allow SQL and PL/SQL, enabling, 5-24alternative default interactive report
editing, 9-49renaming, 9-49
annotationsaccessing Annotations page, 5-37adding to Websheet, 5-37deleting, 5-38
AnyCo IT Departmentabout, 3-16installing, 3-16navigating, 3-17running, 3-16
APEX_ACTIVITY_LOG view, 17-4APEX_LANG
LANG, 18-31MESSAGE API, 18-13
APEX_MAIL, 17-3APEX_UTIL.STRING_TO_TABLE, 7-73application
adding content from Web sites, 12-16attaching an authorization scheme, 15-39changing authentication scheme, 15-36controlling navigation using branches, 11-32copying, 6-6creating, 2-1debugging, 14-1defining primary language, 18-4deleting, 6-6deploying, 16-2, 16-4, 16-14exporting, 16-4, 16-14grouping, 7-54hiding features, 16-35importing export file, 16-23importing from SQL*Plus, 16-31
Index-2
language preference, 18-2performance tuning, 14-1resource use, 14-7switching active theme, 13-5translatable components, 18-2translating, 18-1translating components, 18-2translating multibye languages, 18-5translation rendering, 18-2upgrading, 7-82
Application Alias attribute, 7-16application attributes
Availability, 7-34Build Options, 7-21Database Session, 7-26editing, 7-15Error Handling, 7-19exporting, 16-15JavaScript, 7-32Logo, 7-32Substitutions, 7-21
Application Builderaccessing, 6-1home page, 6-1Page Definition, 2-3utilities, 7-78
Application Builder home page, 6-1Application Builder utilities
Advisor, 7-79Application Dashboard, 7-79Application Express Views, 7-80Change History, 7-79Database Object Dependencies, 7-80Debug Messages, 7-79Export Repository, 7-79Manage Attribute Dictionary, 7-80Recently Updated Pages, 7-79Upgrade Application, 7-79
application computationsabout, 8-59Application Computations page, 8-61creating, 8-60executing On New Instance, 8-60history report, 8-61
Application Dashboard, 7-80viewing, 7-78
Application Date Format attribute, 7-28Application Date Time Format attribute, 7-29application definition, editing, 7-15Application Express Administration Services, 1-3Application Express Views, 7-83application groups, 7-54Application Groups attribute, 7-17Application home page, 6-3
adding database application page, 7-35copying database application page, 7-39Export/Install icon, 3-16, 6-4Run Application icon, 3-15, 6-4Shared Components icon, 3-16, 6-4
Application home Task list
Copy this Application, 6-6Delete this Application, 6-6
application itemabout, 7-56, 7-75creating, 7-75creating a global variable, 7-78editing attributes, 7-77history, 7-77
Application Items page, 7-77application language, 7-27Application Language Derived From attribute, 7-28,
18-4application layout
print preview mode, 10-101shortcuts, 10-77
application models, 7-13leveraging, 7-14
Application Primary Language attribute, 7-28, 18-4application processes
Application Process page, 8-57creating, 8-56creating error message, 8-58editing attributes, 8-57example, 8-56On Demand, 8-55reports, 8-59understanding, 8-55
Application Timestamp Format, 7-29Application Timestamp Time Zone Format, 7-29Application Utilities icon, 6-8, 8-17architecture, 1-2asynchronous updates
charts, 10-64maps, 10-47
Attribute Dictionary, 8-62authentication, 2-6, 15-25
Authentication Scheme History report, 15-37Authentication Scheme Subscription
report, 15-37Authentication Schemes Repository, 15-35changing, 15-36creating an authentication scheme, 15-27managing existing schemes, 15-35preconfigured authentication schemes, 15-27reports, 15-36security attributes, 7-22viewing current scheme, 15-36
Authentication Scheme attribute, 7-23authentication schemes
Application Express Accounts, 15-28cookie user accounts, 15-28Custom authentication, 15-29DAD Credentials, 15-33Database Accounts, 15-30HTTP Header Variable, 15-31LDAP Credentials, 15-31Open Door Credentials, 15-34Single Sign-on, 15-34
authorization, 2-6Authorization attributes, 7-23

Index-3
authorization schemeattaching to application, 15-39attaching to component, 15-40attaching to control, 15-40attaching to page, 15-39By Component report, 15-40History report, 15-41of an application, 7-23reports, 15-40specifying, 7-23Subscription report, 15-40Utilization report, 15-40
authorization schemes, 15-37attaching to application, 15-39attaching to component, 15-40attaching to control, 15-40attaching to page, 15-39creating, 15-37for controlling access, 10-94
Automatic CSV Encoding attribute, 7-30Automatic Time Zone, 7-30
Bbackground PL/SQL, 17-5
using a process, 17-6bind variables
syntax, 2-16using in regions, 2-17using in regions based on PL/SQL, 2-17
BLOBabout, 17-47displaying, 17-48uploading and downloading files into, 17-47
BLOBsAPEX_UTIL.GET_BLOB_FILE_SRC, 17-50displaying, 17-49download support, 17-47populating, 17-47removing the image reference, 17-48support in forms, 17-46support in Reports, 17-48
branchabout, 8-48creating, 11-32When Button Pressed attribute, 2-29
branchingaction, 8-49branch point, 8-49Branch Point list, 8-49making conditional, 8-49on load, before header, 8-49on submit, after processing, 8-49on submit, before computation, 8-49on submit, before processing, 8-49on submit, before validation, 8-49using buttons, 10-72
breadcrumb reports, 11-26Breadcrumb Exceptions, 11-26Breadcrumb Hierarchy, 11-26
Breadcrumb History, 11-26Breadcrumb Utilization, 11-26Grid Edit Breadcrumb, 11-26
breadcrumb template, 13-18Comments, 13-20Definition, 13-19Name, 13-19Subscription, 13-19Substitution Strings, 13-20Template Attributes, 13-20Template Type, 13-19
breadcrumbs, 8-15about, 11-20adding a breadcrumb region, 11-23adding entries, 11-22adding to a page, 11-23creating, 11-20creating dynamic, 11-24deleting unused, 11-26editing, 11-24navigations, 13-19reparenting entries, 11-25shared components, 8-15
Browse button, A-4bugs
attaching files, 4-16Bugs Dashboard, 4-17Bugs page, 4-14By Day page, 4-17By Developer page, 4-17Calendar page, 4-17creating, 4-15editing, 4-15managing, 4-14reports, 4-16viewing, 4-14
build options, 16-33changing status, 16-34creating, 16-33excluding, 16-34exporting, 16-35exporting status, 16-35including, 16-34reports, 16-36
Build Options attribute, 7-21Build Status attribute, 7-19built-in substitution strings, 2-18Bulk Edit Item Help report, 10-104button
about, 8-12branching, 10-72creating, 10-65creating in Component view, 10-65creating in Tree view, 10-68creating multiple at once, 10-70delete multiple, 10-71displaying conditionally, 10-72editing, 10-70editing attributes, 10-71editing multiple, 10-71

Index-4
names, 10-72template, 13-20
button templateComments, 13-22Definition, 13-21Name, 13-21Subscription, 13-21Substitution Strings, 13-22
Ccaching regions, 12-9calendar
about Easy Calendar, 10-21about SQL Calendar, 10-21accessing attributes, 10-34adding Easy Calendar to a page, 10-22adding Easy Calendar to new page, 10-24adding SQL Calendar to a page, 10-27adding SQL Calendar to new page, 10-31converting Easy to SQL, 10-41creating, 10-20creating a column link, 10-37creating a day link, 10-38creating Easy Calendar, 10-22creating SQL Calendar, 10-27defining calendar interval, 10-36defining display attributes, 10-36editing attributes, 10-34editing title, 10-40Enable Drag and Drop, 10-26, 10-28enabling drag and drop, 10-40formatting, 10-35including add and edit functions, 10-39supported substitution strings, 10-21types, 10-21upgrading, 10-41viewing sample, 10-21
calendar attributesaccessing, 10-34Calendar Display, 10-35Column Link, 10-37Day Link, 10-38Display Attributes, 10-36
calendar template, 13-22Comments, 13-22Daily Calendar, 13-23Monthly Calendar, 13-23Name, 13-22Template Subscription, 13-22Weekly Calendar, 13-23
cascading style sheetsabout, 13-12exporting, 16-18importing, 16-26referencing for SVG charts, 10-60referencing in page template, 13-48referencing inline (SVG charts), 10-60uploading, 13-47using custom, 13-47
Change History report, 7-81Character Value Comparison, 7-29Character Value Comparison Behavior, 7-29chart synchronous update
creating refresh dynamic action, 10-64editing chart attributes, 10-64
chartsabout Flash, 10-53about wizards, 10-44, 10-48altering display, 10-62asynchronous updates, 10-64candlestick syntax, 10-49creating, 10-47dial chart syntax, 10-48displaying in other languages, 10-61editing attributes, 10-62Flash, 10-52Gantt syntax, 10-49HTML chart, 10-61HTML5 chart, 10-49HTML5 chart about, 10-49migrating SVG to Flash, 10-57monitoring information, 10-64multiple series syntax, 10-48providing a SQL query, 10-44, 10-48range syntax, 10-48scatter syntax, 10-49SQL query syntax, 10-48SVG chart, 10-56types, 10-44, 10-48upgrading a SVG chart to HTML5, 10-57upgrading all SVG charts to HTML5, 10-57
check box, A-2creating dependent LOV, 7-61
classic reportadding download link, 9-58controlling column breaks, 9-62controlling column display, 9-62creating updatable columns, 9-60defining a column as a list of values, 9-61exporting, 9-58synchronizing column order with region
source, 9-63, 10-10classic report regions
configuring print attributes, 9-70printing methods, 9-64
classic reportschanging, 9-50changing alignment, 9-50changing column attributes, 9-50changing column text, 9-50changing pagination, 9-55creating a sum, 9-50hiding columns, 9-50sorting columns, 9-50
collections, 17-3color picker, A-2columns templates, using JavaScript, 13-46Comments attribute, 8-29Compatibility Mode attribute, 7-18
Index-5
componentattaching an authorization scheme, 15-40
Component Settingsediting, 17-56managing, 17-56viewing History report, 17-56
Component view, 8-8Edit All Icon, 8-9Page Processing icons, 8-10Page Rendering Icons, 8-10Shared Components icons, 8-11
componentsabout translating, 18-2accessing with keyboard, E-10controlling access to, 2-6displaying on all pages, 12-2displaying on every page, 12-1translating messages, 18-12, 18-14
condition types, 2-5conditional
processing, 2-4rendering, 2-4
conditionsdisplaying regions, 12-8list of, C-1using, 2-4using with buttons, 10-72
configuration, controlling, 16-33Content Delivery Network attribute, 7-31controls, controlling access to, 2-6Create Application Wizard, 2-1Create Branch Wizard, 11-32Create Breadcrumb Wizard, 11-21Create Button Wizard, 10-65Create Navigation Bar Entry Wizard, 11-28, 11-30Create Page Computation Wizard, 8-30, 17-20Create Page Process Wizard, 8-43Create Page Wizard, 7-35Create Region Wizard, 10-23, 10-27, 10-42, 10-50,
10-53, 11-17, 11-23, 12-3, 12-13HTML options, 12-4report options, 12-4
Create Validations Wizard, 8-33, 8-36, 8-37, 8-39Cross Page utilities, 7-85cross page utilities
accessing, 7-85Grid Edit of all Pages, 7-86Page Attributes, 7-86Recently Updated Pages, 7-85
cross site-scriptingabout, 15-10dynamic output, 15-11form items, 15-12HTML region, 15-10report regions, 15-12restricting characters on items, 15-12static display areas, 15-10
CSS, 13-47CSS classes, SVG charts, 10-58CSS file URLs attribute, 7-33
CSS Finder, 10-84CSS Repository, 13-47custom packaged application
about, 16-5about Supporting Objects page, 16-7adding access control list, 16-9adding CSS installation script, 16-8adding image installation script, 16-8adding static file installation script, 16-8build options, 16-7creating supporting objects, 16-6defining an upgrade script, 16-10deinstallation scripts, 16-8deinstalling, 16-11deleting installation options, 16-10deleting messages, 16-10deleting supporting object scripts, 16-10how to create, 16-5installation scripts, 16-7installing supporting objects, 16-9messages, 16-7, 16-8prerequisites, 16-7substitutions strings, 16-7testing installation scripts, 16-9upgrade messages, 16-8upgrade scripts, 16-8upgrading, 16-11validations, 16-7viewing an install summary, 16-12
Ddata
about adding, 5-24about data grids, 5-24about editing, 5-24about reports, 5-24incorporating into Websheet pages, 5-25
data gridaccessing Data page, 5-18adding annotation to single data row, 5-22adding new column, 5-20adding rows, 5-21copying, 5-18creating, 5-16creating a bookmark link, 5-23creating a list of values, 5-20creating a validation, 5-20creating column groups, 5-20deleting, 5-24deleting columns, 5-20deleting rows, 5-21editing, 5-19editing column properties, 5-20editing columns manually, 5-20editing properties, 5-23editing rows manually, 5-21editing single row, 5-21filling down, 5-21searching and replacing rows, 5-21
Index-6
setting column values, 5-21viewing and editing, 5-18viewing history, 5-24
data reportsabout, 5-25creating, 5-25deleting, 5-27editing, 5-26, 5-28viewing, 5-26
data section, adding to Websheet, 5-27database application
about, 2-2adding a page, 7-35application models, 7-13assigning to groups, 7-55based on queries, 7-4based spreadsheet, 7-7copying, 7-9copying from Application home page, 7-10copying with Create Application Wizard, 7-9creating from template application, 7-10creating groups, 7-54creating on tables, 7-4deleting, 7-13groups, 7-54removing from groups, 7-55running, 7-40
database application groupsassigning pages, 7-55creating, 7-54editing group definition, 7-55removing, 7-55removing pages, 7-55
database application pageadding, 7-35assigning to groups, 7-43copying, 7-39creating, 7-35creating from Application home, 7-35creating from Developer toolbar, 7-37deleting, 7-47deleting a range of, 7-48deleting from Page Definition, 7-47deleting multiple, 7-48deleting while editing page attributes, 7-47determining lock status, 7-45grouping, 7-42locking, 7-44, 7-45managing, 7-35preventing conflicts, 7-44removing from groups, 7-44running, 7-40unlocking, 7-44, 7-46
database application page groups, 7-43assigning pages, 7-43creating, 7-43editing group definition, 7-43removing, 7-44removing pages, 7-44viewing, 7-42
database link, 17-2Database Object Dependencies report, 7-82database schema
of an application, 7-24specifying, 7-24
Database Schema attributes, 7-24Database Session attribute, 7-26database users
granted privileges, D-1granting privileges, D-1
date picker, A-2date picker (classic), A-3DBMS_APPLICATION_INFO, 14-7debugging, 14-1
checking for errors, 14-1debug mode, 14-4enabling and disabling, 14-5isolating a problem, 14-8running on an application, 14-5SQL queries, 14-8SQL tracing, 14-7using f?p to access, 14-5viewing reports, 14-6
Debugging attribute, 7-17deep linking, 15-30Deep Linking attribute, 7-23defining, 17-9deleting export files, 16-31demonstration application
about Sample Database Application, 3-6dependent list of values, 7-61deployment, 16-4
creating supporting objects, 16-6exporting a page, 16-17exporting a Websheet, 16-18exporting application definition, 16-14exporting cascading style sheets, 16-18exporting feedback, 16-23exporting images, 16-19exporting script files, 16-23exporting static files, 16-19exporting themes, 16-20, 16-21exporting User Interface Defaults, 16-21exporting workspaces, 16-17importing application from SQL*Plus, 16-31importing export files, 16-23importing files, 16-23installing application export, 16-30installing files, 16-31managing database objects, 16-4of an application, 16-2options, 16-3packaging an application, 16-2publishing the URL, 16-32publishing the Websheet application URL, 16-32
Developer Action Bar, 6-7Developer Comment, Bug, or To Do icon, 6-8, 8-17developer comments
about, 7-49adding to a page, 7-49

Index-7
adding to database application, 7-49deleting, 7-51editing, 7-50viewing, 7-50viewing reports, 7-52
Developer Comments calendar, 7-53Developer Comments report
accessing, 7-52deleting a comments, 7-53deleting multiple comments, 7-53editing comments, 7-52
Developer toolbarabout, 3-14creating database application page, 7-37Session, 2-7using, 8-19
development life cycle, 16-1development process
managing, 4-1development process, managing, 1-11, 4-1dial chart syntax, 10-48DML
about locking, 17-1APEX_DML_LOCK_WAIT_TIME, 17-2controlling DML operation, 17-2FSP_DML_LOCK_ROW, 17-2
documentation libraryabout, 1-11accessing, 1-11downloading, 1-13searching, 1-12using master index, 1-12
Downloading, 17-47Dynamic Actions
adding True or False Actions, 17-44creating, 8-13, 17-36debugging, 17-46editing, 17-43frequency and scope, 17-45implementing, 17-35understanding, 17-36
dynamic listabout, 11-13creating from scratch, 11-15syntax, 11-14
dynamic translation, 18-31
EEdit Application Definition
Allow Feedback, 7-17Application Alias, 7-16Application Groups, 7-17Build Status, 7-19Compatibility Mode, 7-18Debugging, 7-17Email from Address, 7-18Error Handling, Default Error Display
Location, 7-20Error Handling, Error Handling Function, 7-20
Global Notifications, 7-20Logging, 7-17Message for unavailable application, 7-19Name attribute, 7-16Proxy Server, 7-18restrict access, 7-19Status, 7-19Version, 7-17
Edit Application pageDatabase Session, 7-26
Edit Globalization AttributesApplication Date Format, 7-28Application Date Time Format, 7-29Application Language Derived From, 7-28Application Primary Language, 7-28Application Timestamp Format, 7-29Application Timestamp Time Zone Format, 7-29Automatic CSV Encoding, 7-30Automatic Time Zone, 7-30Character Value Comparison, 7-29Character Value Comparison Behavior, 7-29
Edit Globalization Attributes page, 7-27Edit Page icon, 6-8Edit Page Item
Authorization Scheme, 7-65Escape Special Characters, 7-66Restricted Characters, 7-66Session State Protection, 7-65Version, 7-65
Edit Security Attributes, 7-21Authentication, 7-22Authorization, 7-23Database Schema, 7-24Session State Protection, 7-25
emailemail log, 17-3email queue, 17-3managing, 17-3problems sending, 15-5
Email from Address attribute, 7-18embedded PL/SQL gateway
location of images, CSS, and script files, 16-14security practices, 15-1
engine, 1-2environment, configuring, 1-3error message
creating for a page process, 8-47creating for application processes, 8-58
errors, handling, 7-19, 8-28export
application, 16-12, 16-14application attributes, 16-15build option status, 16-15CSS, 16-18defaults, 16-12feedback, 16-12, 16-23files, 16-12images, 16-19managing database objects, 16-4page, 16-17

Index-8
page components, 16-15plug-in, 16-21plug-ins, 16-12related files, 16-12script file, 16-23shared components, 16-15static files, 16-19text for translations, 18-7themes, 16-12, 16-20, 16-21User Interface Defaults, 16-21Websheet, 16-12, 16-18workspace, 16-12workspaces, 16-17
Export icon, 8-17Export Repository, 16-30, 16-31
accessing, 16-30exported application, importing, 16-23Export/Install icon, 3-16, 6-4
Ff?p syntax, 2-9
facilitating bookmarking, 2-11features
attaching files, 4-5Calendar page, 4-7Change History page, 4-7creating, 4-4Features by Owner page, 4-8Focus Areas page, 4-7Progress Log page, 4-7tracking, 4-3Tree page, 4-6updating, 4-4Utilities page, 4-8viewing, 4-3viewing reports, 4-5
feedbackadding a page, 4-18By Application page, 4-20By Filing User page, 4-20Calendar page, 4-20Feedback Dashboard, 4-20Feedback page, 4-18reports, 4-19reviewing comments, 4-19using, 4-19viewing, 4-17
file upload tablesecurity risks, 15-25
File URLs attribute, 7-33files
deleting uploaded files, 12-22downloading uploaded files, 12-22editing uploaded files, 12-21managing, 12-20uploading, 12-20
Find icon, 6-9, 8-17, 10-84Flash chart
adding to existing page, 10-53
adding to new page, 10-54candlestick syntax, 10-49Gantt syntax, 10-49multiple series syntax, 10-48range syntax, 10-48saving locally, 10-63scatter syntax, 10-49switching to HTML5, 10-56upgrading all Flash charts to Flash 6, 10-55upgrading Flash 3 to Flash 6, 10-55upgrading Flash 3 to HTML5, 10-56upgrading Flash charts to HTML5, 10-55using custom XML, 10-63
footer, substitution strings, 12-8Form Auto Complete, 8-27form wizard
Form and Report on Web Service, 10-3Form on a Procedure, 10-2Form on a SQL Query, 10-2Form on a Table with Report, 10-2Form on Table or View, 10-2Form on Web Service, 10-3Master Detail Form, 10-2Summary Page, 10-2Tabular Form, 10-2
formsaccessing using JAWS, E-6Automatic Row Processing (DML) process, 10-17creating, 10-1creating a master detail, 10-10creating a tabular form, 10-3creating manually, 10-16creating using a wizard, 10-2page types, 10-2populating, 10-18types, 10-2understanding processing, 10-17validating input, 10-19
full development environment, 1-2functions, searching for, 10-88
GGlobal Notifications attribute, 7-20Global page, 12-2
creating, 12-2navigating to, 12-2
global variable, creating, 7-78globalization
attributes, 18-4determining application language, 7-27format masks, 18-5understanding, 18-1
graphicsmanaging, 12-17referencing, 12-18uploading, 12-17
group by, editing, 9-20groups
of applications, 7-54

Index-9
of database application pages, 7-42
HHelp
accessing, 1-11creating, 10-102creating navigation bar entry, 10-105editing, 10-104searching, 1-11using, 1-11
Help icon, 6-9Help text
accessing with JAWS, E-8defining for item, 10-104defining for page, 10-103editing in bulk, 10-104editing items, 10-104searching for item labels, 10-105searching for topics, 10-104seeding, 10-104
hidden item, A-4high contrast mode, E-3
about, 17-51, E-4controlling with APIs, 17-52controlling with f?p syntax, 17-52controlling with substitution string, 17-52enabling, E-4extending, 17-52provisioning, 17-52
HTMLgenerated using custom PL/SQL, 12-23not handled by Application Express, 12-23
HTML chartupgrading all charts to HTML5, 10-62upgrading to HTML5, 10-61
HTML password form element, A-5HTML text area, A-6HTML5 chart
about, 10-49adding to a new page, 10-51adding to an existing page, 10-50multiple series syntax, 10-48switching to Flash chart, 10-52using custom XML, 10-63
IImage Finder, 10-84Image Prefix, 12-18Image Prefix attribute, 7-31Image Repository, 12-17image, displaying from URL, A-3images
exporting, 16-19importing, 16-27managing, 12-17referencing, 12-18searching for, 10-89uploading, 12-17
viewing available, 10-89Images Finder, 10-89implementing
Plug-ins, 17-25import
feedback, 16-29Websheet, 16-25
importingapplication, 16-24application using SQL*Plus, 16-31cascading style sheets, 16-26export files, 16-23images, 16-27page, 16-24plug-in, 16-26static files, 16-27themes, 16-28User Interface Defaults, 16-28
Include Legacy JavaScript attribute, 7-33injection attacks, restricting characters on
items, 15-12installing
application files, 16-30export files, 16-31
installing application export, 16-30installing export files, 16-31interactive report messages, translating, 18-17interactive report regions
configuring print attributes, 9-71interactive reports
about, 9-1about Column Heading menu, 9-6about link columns, 9-38about Search bar, 9-5Actions menu, 9-6adding computations, 9-14adding download option, 9-36adding filters, 9-9adding highlighting, 9-13advanced attributes, 9-45aggregating a column, 9-16Attributes page, 9-28changing pagination, 9-32column attributes, 9-30creating a chart, 9-17creating a column link, 9-40creating a control break, 9-12creating groups, 9-31defining a column as a list of values, 9-42deleting as a developer, 9-50deleting private report, 9-25deleting public report, 9-25displaying conditionally, 9-41downloading, 9-26editing alternative default reports, 9-49editing as a developer, 9-27Email From Address, 9-46enabling Icon view, 9-43executing a Flashback query, 9-21exporting, 9-36

Index-10
formatting columns, 9-43grouping columns, 9-19linking to, 9-47managing as a developer, 9-49managing column sorting, 9-33message requiring translation, 18-17Region Alias, 9-46renaming alternative default reports, 9-49renaming private report, 9-25, 9-49renaming public report, 9-25, 9-49Report ID Item, 9-46resetting, 9-26saving, 9-21saving alternative, 9-24saving as private, 9-23saving as public, 9-23saving primary default, 9-24Select columns to search icon, 9-5selecting column sort order, 9-11selecting columns to display, 9-8selecting sort order, 9-11specifying rows per page, 9-11subscribing to, 9-26user save options, 9-22using, 9-4using JAWS, E-4viewing as a developer, 9-50viewing saved report activity, 9-50
internal messages, requiring translation, 18-15item
about, 8-13about Application Items page, 7-77conditional, 7-72multiple select list item, 7-73naming conventions, 7-59read-only, 7-72referencing using JavaScript, 10-95referencing values, 7-70searching for, 10-84using format masks when translating, 18-5
item attributesaffecting layout, 12-14ColSpan, 12-15Column, 12-15Column Attributes, 12-15Condition Type and Expressions, 12-16Horizontal/Vertical Alignment, 12-15HTML Table Cell Attributes, 12-15Label, 12-15Post Element Texts, 12-16Pre Element Texts, 12-16Read Only Condition Type, 12-16Region, 12-15RowSpan, 12-15Sequence, 12-15Start New Grid, 12-15Start New Row, 12-15
Item Finder, 10-84item Help, 7-18
editing, 10-104
item typeCheck box, A-2Color Picker, A-2Date Picker, A-2Date Picker (classic), A-3Display Image, A-3Display Only, A-3File Browse, A-4Hidden, A-4List Manager, A-4Number Field, A-4Password, A-5Popup List of Values, A-5Radio, A-6Rich Text Editor, A-6Select list, A-7Shuttle, A-7slider, A-8Text Area, A-9
JJavaScript, 13-29
application attributes, 7-32calling from button, 10-97in row templates, 13-46including in HTML Header attribute, 10-96including in .js file, 10-97including in page template, 10-97incorporating, 10-95libraries, 13-28referencing items, 10-95referencing jQuery library, 10-99setting focus on item, 8-22using in a plug-in, 10-101using jQuery, 10-99
JavaScript Finder, 10-84JAWS, E-1
about validation errors, E-8accessing forms, E-6accessing Help text, E-8accessing interactive reports, E-4accessing Tasks links, E-7
jQuerysupport, 10-98using in JavaScript, 10-99
jQuery Mobile, 7-3jQuery UI
accessing other jQuery UI components, 10-99available features, 10-98support, 10-98
Llabel template
#CURRENT_ITEM_HELP_TEXT#, 13-25Comments, 13-25creating page item Help, 13-25Definition, 13-23editing, 13-23

Index-11
Error Display, 13-24Field Container, 13-24Name, 13-23Subscription, 13-23Substitution Strings, 13-25
languagedefining for application, 18-4multibyte, 18-5preference, 18-2
layoutabout region attributes, 12-6altering using item attributes, 12-14controlling, 13-1
Learn More link, 1-10limits
classic reports, B-1environment, B-1forms, B-1interactive reports, B-1item names, B-2tabular forms, B-2validations, B-2
Link Columnabout, 9-38excluding, 9-40linking a single row view, 9-39linking to a page, 9-39linking to URL, 9-40
linkingdeep, about, 15-30
listabout dynamic, 11-13about list types, 11-8about static, 11-8adding to a page, 11-17copying, 11-16copying between applications, 11-16copying from current application, 11-16creating, 11-7creating hierarchical, 13-25editing, 11-18editing attributes, 11-18Lists page, 11-18reports, 11-19
list manager, creating dependent LOV, 7-61list of values, 8-15
bulk edit of static LOVs, 10-75creating, 10-73creating at application-level, 10-73editing, 10-75List of Values History report, 10-76List of Values page, 10-74List of Values Subscription report, 10-76named, 10-73referencing session state, 10-75reports, 10-76Search Dynamic Lists of Values report, 10-76shared, 10-73static, 10-74translating, 18-31
List of Values page, 10-74list reports
Conditional Entries, 11-19History, 11-19Unused, 11-19Utilization, 11-19
list templateAfter List Entry, 13-27After Sub List Entry, 13-27Before List Entry, 13-26Before Sub List Entry, 13-27Comments, 13-27editing, 13-25Name, 13-26Sub List Entry, 13-27Subscription, 13-26Substitution Strings, 13-27, 13-35Template Definition, 13-26Template Definitions for First Entry, 13-26
lists, 8-15lists of terms, A-4Lists page, 11-18Lists Wizard, 11-8, 11-13Lock icon, 8-17locks
determining lock status, 7-45for database application page, 7-44
Logging attribute, 7-17logging in to, Oracle Application Express, 1-5logging out, 1-8login credentials, 1-6login page, 1-3
building, 15-30understanding login credentials, 1-6
Logo attribute, 7-32
Mmaps
about Flash map support, 10-42adding to a a page, 10-42adding to new page, 10-43creating, 10-41creating SQL queries, 10-44editing map attributes, 10-46enabling asynchronous updates, 10-47using custom XML, 10-46
master detail form, creating, 10-10Media Type attribute, 7-32Message for unavailable application, 7-19messages
creating for translation, 18-14editing text messages, 18-15translating, 18-12translating internal, 18-14
messages in PL/SQL procedures, 18-12translating, 18-12
messages in reports, 18-14translating, 18-14
messages requiring translation

Index-12
interactive reports, 18-17internal, 18-15
milestonesBy Owner page, 4-10Calendar page, 4-10creating, 4-9Feature by Milestone page, 4-10Milestones Dashboard, 4-10reports, 4-9tracking, 4-8updating, 4-9viewing, 4-8
mobile applications, 7-2about creating, 7-3about responsive design, 13-2creating with jQuery Mobile Smartphone, 7-3jQuery Mobile, 7-3
support, 7-3mobile design, 7-2responsive design, 7-2
Nnavigation
branch, 11-32breadcrumb, 11-20list, 11-7parent tabs, 11-1standard tabs, 11-1tab, 11-1trees, 10-82
navigation bar, 11-27navigation bar entry, 11-27
about, 11-27copying, 11-30creating, 11-28creating for feedback, 11-30creating from scratch, 11-28editing, 11-31editing multiple, 11-31history, 11-32reports, 11-32
navigation bar entry reportshistory, 11-32subscription, 11-32
New Component Wizard, 7-38, 10-92notes
adding to Websheets, 5-37deleting from Websheets, 5-37editing, 5-37
number field, A-4
Oonline Help, 1-11
problems, 15-5searching, 1-11
Oracle Application Expressabout, 1-1architecture, 1-2
browser requirements, 1-3component limits, B-1configuring your environment, 1-3environment limits, B-1logging in, 1-3logging in to as a developer, 1-5user roles, 1-2
Oracle Application Express administrator, 1-2Oracle Application Express Advisor
about, 14-2checking application integrity, 14-1running on application, 14-2running on single page, 14-3
Oracle Application Express Engine, 1-2Oracle Application Express Listener
finding CSS files, 16-13finding images, 16-13finding script files, 16-13
Oracle BI Publisher, integrating with, 15-2Oracle HTTP Server
about security, 15-2finding images, CSS, and script files, 16-13
Oracle XML DB Protocol Server, verifying HTTP server port, 1-7
Ppackaged application
changing authentication, 3-5exporting, 3-4installing, 3-3managing, 3-1productivity application, 3-1removing, 3-4running, 3-3sample application, 3-1updating, 3-6
Packaged Applications page, 3-2about, 3-2accessing, 3-2
packages, searching for, 10-88page attributes, 8-12
about, 8-20accessing, 8-21Authentication, 8-26, 8-27Authorization Scheme, 8-26Browser Cache, 8-27Cache by User, 8-28Cache Page, 8-28Cache Page Condition, 8-28Cache Timeout, 8-28Comments, 8-29Configuration, 8-28CSS, Inline, 8-25Cursor Focus, 8-22Deep Linking, 8-26display attributes, 8-22Duplicate Submission, 8-27Error Handling, 8-28Error Handling Function, 8-29

Index-13
Expression 1, 8-28File URLs, 8-24Footer, 8-25Groups, 8-22Header and Footer, 8-25Header Text, 8-25Help, 8-29In-line Error Notification Text, 8-29JavaScript, Execute when Page Loads, 8-23JavaScript, File URLs, 8-23JavaScript, Function and Global Variable
Declaration, 8-23Name, 8-21Page Alias, 8-21Page Template, 8-22Read Only, 8-25security, 8-26Server Cache, 8-28Standard Tab Set, 8-22Title, 8-22
page components, controlling access, 10-94page computation
computation point, 8-31creating, 8-30defining computation point, 8-32defining computation source, 8-32editing attributes, 8-32making a computation conditional, 8-32syntax, 8-31
Page Definitionabout, 2-3about Component view, 8-2about Tree view, 8-2Action Bar, 8-16editing in Component view, 8-8editing in Tree view, 8-5Page Processing, 8-13Page Rendering, 8-12reordering components, 8-8searching for page metadata, 6-9, 8-17switching between names and labels, 8-8switching views, 8-3viewing, 8-1
Page Finder, 10-84page help, creating, 10-102page item
about, 7-56configuring security, 7-64converting selected values, 7-73creating, 7-56, 7-58creating a shuttle item, 7-74creating from Page Definition, 7-59creating multiple using tabular form, 7-63defining default values, 7-64defining quick picks, 7-66deleting multiple, 7-69displaying as conditional, 7-72displaying as read only, 7-72editing attributes, 7-63editing display on a page, 7-67
editing multiple, 7-67multiple select list item, 7-73naming conventions, 7-59reassigning to a region, 7-69referencing values, 7-70static list of values, 7-60types, A-1
page items, viewing, 7-56page layout, about, 12-1page number, 8-8page processes
changing processing points, 8-46changing source, 8-46creating, 8-13, 8-43creating error message, 8-47creating success message, 8-47editing attributes, 8-45making conditional, 8-47When Button Pressed attribute, 2-29
Page Processingabout, 8-13Branches, 8-14Computations, 8-14Processes, 8-14Validations, 8-14
page processing, 2-4understanding, 2-4
Page Renderingabout, 8-12Buttons, 8-12Dynamic Actions
about, 8-13Items, 7-56, 8-13Page, 8-12Processes, 8-13Regions, 8-12
page rendering, 2-4understanding, 2-4
Page specific utilities, 7-84page specific utilities
Branch Utilities, 7-85Button Utilities, 7-85Computations Utilities, 7-85Cross Page Utilities, 7-85Dynamic Action Utilities, 7-85Item Utilities, 7-85Process Utilities, 7-85Region Utilities, 7-85
page templateBody, 13-31Cascading Style Sheet, 13-32Definition, 13-30Display Points, 13-35editing, 13-27Error Page Template Control, 13-35Footer, 13-31Grid Layout, 13-35Header, 13-31Image Based Tab Attributes, 13-35JavaScript, 13-31

Index-14
Name, 13-30Parent Tab Attributes, 13-34selecting, 13-13specifying defaults, 13-13Standard Tab Attributes, 13-34Subscription, 13-30substitution strings, 13-27Subtemplate, 13-33
page template substitution strings, 13-27#APP_VERSION#, 13-28, 13-29, 13-30#BOX_BODY#, 13-28#FORM_CLOSE#, 13-28#FORM_OPEN#, 13-28#GLOBAL_NOTIFICATION#, 13-28#HEAD#, 13-28#LOGO#, 13-28#NAVIGATION_BAR#, 13-29#NOTIFICATION_MESSAGE#, 13-28, 13-29#ONLOAD#, 13-29#REGION_POSITION_NN#, 13-29#SUCCESS_MESSAGE#, 13-30#TAB_CELLS#, 13-29, 13-30#TITLE#, 13-30
page zero, 12-1page, attaching uthorization scheme, 15-39page-level item
All Page Items, 7-70Conditional Items, 7-70Grid Edit of all Item Help Text, 7-70Grid Edit of all Item Labels, 7-70History, 7-70Item Help Subscriptions, 7-70utilities, 7-70
page-level template, 13-13pages
about, 2-3about Global page, 12-2calling from a button, 2-11calling with an alias, 2-11controlling access to, 10-94duplicate submission, 8-27enabling user customization, 12-9exporting, 16-17linking with f?p syntax, 2-9optimizing for printing, 10-101resource use, 14-7searching for, 10-85server cache, 8-28specifying page template, 13-13
Pages Finder, 10-85pagination
classic reports, 9-55interactive reports, 9-32reports, 13-40, 13-45
Pagination SubtemplateNext Page Template, 13-46Next Set Template, 13-46Pagination Template, 13-46Previous Page Template, 13-46Previous Set Template, 13-46
parent tabs, creating, 11-1password
changing, 1-8resetting, 1-8
password complexity, 15-3Password Items Report, 15-9passwords
best practices, 15-8identifying risks, 15-9
patch, creating, 16-15PDF printing, problems, 15-5performance tuning, 14-1PL/SQL code, searching for, 10-88PL/SQL Finder, 10-84PL/SQL, running in background, 17-5Plug-ins
about Plug-ins, 17-26accessing Plug-ins, 17-26adding events, 17-33creating Plug-ins, 17-27custom attributes, 17-31deleting a Plug-in, 17-33editing Plug-ins, 17-27exporting Plug-ins, 17-34implementing, 17-25importing, 16-26importing Plug-ins, 17-34resetting Plug-ins, 17-35uploading associated files, 17-32using JavaScript code, 10-101utilization, 17-35viewing history, 17-35viewing Plug-in Repository, 17-34
popup list of values, A-5Popup LOV template
Application, 13-36Buttons, 13-37editing, 13-36Icon, 13-36Page Attributes, 13-37Pagination, 13-37Result Set, 13-37Search Field, 13-36Subscription, 13-36Window, 13-37
popup LOV, creating dependent LOV, 7-61preconfigured authentication schemes, 15-27Printer Friendly template, 10-101printing reports, 9-63privileges
about granting to database users, D-1granted to database users, D-1granted to PUBLIC, D-2
Procedure Finder, 10-88procedures, searching for, 10-88process
Cache Management, 8-43, 8-45Data Manipulation, 8-43, 8-45Form Pagination, 8-43, 8-45implementing background PL/SQL, 17-6

Index-15
On Demand, 8-43, 8-45PL/SQL, 8-43, 8-45Report Pagination, 8-43, 8-45Web Services, 8-43, 8-45
productivity application, unlocking, 3-4programming techniques
collections, 17-3database links, 17-2implementing Web services, 17-7running background PL/SQL, 17-5
proxy server, 17-9Proxy Server attribute, 7-18PUBLIC
privileges granted to, D-2public synonyms, D-2Public User attribute, 7-23
QQuery Finder, 10-84, 10-86query, searching for, 10-86
Rradio group, A-6
LOV, 7-61Recently Updated Pages report, 7-81region
about, 8-12about types, 12-4accessing utilities and reports, 12-12adding an image, 12-11based on a URL, 12-16controlling positioning, 12-8copying, 12-13creating, 12-3creating for a list, 11-17creating region display selector, 12-12creating subregion, 12-3deleting, 12-14deleting multiple regions at once, 12-14displaying conditionally, 12-8editing attributes, 12-6editing attributes for multiple regions, 12-12editing region attributes, 12-6enabling customization, 12-9enabling users to customize a page, 12-9how attributes affect layout, 12-6specifying a static region ID, 12-11specifying header and footer, 12-8understanding, 12-3
region attributesCache, 12-9Column, 12-7Column Attributes, 12-7Column Span, 12-7Condition Type, 12-8Customization, 12-8Display Point, 12-7Expression, 12-8
Image Tag Attributes, 12-7Item Display Position, 12-7Read Only Condition Type, 12-8Region CSS Classes, 12-7Region Display Selector, 12-7Region Footer, 12-7Region Header, 12-7Region Image, 12-7Sequence, 12-7Start New Grid, 12-7Static ID, 12-11Template, 12-7
region display selector, creating, 12-12region template
Comments, 13-39Definition, 13-37editing, 13-37Form Table Attributes, 13-38Name, 13-37Sub Regions Attributes, 13-38Subscription, 13-37Substitution Strings, 13-39
region typeCalendar, 12-5Chart, 12-4form, 12-4Help Text, 12-5HTML, 12-4List, 12-4, 12-5PL/SQL Dynamic Content, 12-5Plug-ins, 12-4Report, 12-4Tree, 12-5URL, 12-5
report column templatescolorizing cell headings, 13-41omitting headings, 13-41
report column templates (generic)After Rows, 13-42Before Each Row, 13-41, 13-42Before Rows, 13-40Column Headings, 13-41Column Templates, 13-41displaying HTML after all columns, 13-42displaying HTML after last row, 13-42Next Page Template, 13-43Next Set Template, 13-43Pagination Subtemplate, 13-43Previous Page Template, 13-43Previous Set Template, 13-43Report Template, 13-40Row Highlighting, 13-43Template Subscription, 13-40
report column templates (named)Before Rows attribute, 13-45colorizing column header cell, 13-45Column Headings, 13-45Pagination Subtemplate, 13-45Report Template Identification, 13-44Row Templates, 13-44

Index-16
Subscription, 13-44report layouts
about, 9-67copying, 9-69creating, 9-68editing, 9-69options, 9-68
report printing, problems, 15-5report queries
about, 9-65copying, 9-67creating, 9-65editing, 9-67
report regionsabout configuration options, 9-64printing, 9-63printing to PDF, 9-63
report templates, 13-39editing, 13-39generic column templates, 13-39named column templates, 13-40using JavaScript, 13-46
reports, 13-14about, 9-1about database application, 7-78Application Dashboard, 7-80Bulk Edit Item Help, 10-104Change History, 7-81class references, 13-11creating a column link, 9-59creating with a wizard, 9-3CSV export, 13-41database applications, 7-78exporting to CSV format, 13-40, 13-45including pagination above, 13-40, 13-45printing, 9-63Recently Updated Pages, 7-81sorting columns, 9-57SQL, 9-3supported substitution strings, 13-11template subscription, 13-14template utilization, 13-14templates in a theme, 13-10theme file references, 13-10theme template counts, 13-10themes, 13-9understanding differences, 9-1Wizard Report, 9-3
REQUESTbutton names, 10-72referencing value of, 2-28substitution string, 2-28
resource use, monitoring, 14-7responsive design, Theme 25, 13-2restrict access, to application, 7-19Run Application icon, 3-15, 6-4Run Page icon, 6-7, 8-16runtime environment, 1-2
advantages, 15-4
Ssample applications, installing, 7-11Sample Database Application
about, 3-6Administration page, 3-11Customers page, 3-9editing, 3-13, 3-15editing an application, 3-15Home page, 3-8installing, 3-6Mobile page, 3-12modifying, 3-13, 3-15Orders page, 3-10Products page, 3-9Reports page, 3-11running, 3-6understanding, 3-6, 3-7
screen reader mode, E-1about, 17-50, E-1controlling with APIs, 17-51controlling with f?p syntax, 17-51controlling with substitution string, 17-51enabling, E-3extending, 17-51provisioning, 17-51
SDLC, 16-1rapid application development, 16-2Spiral, 16-2waterfall, 16-1
Search Application, 6-9, 8-17Search Workspace, 1-10secure sockets layer, best practices, 15-2security
attributes, 7-21for pages, 8-26
security attributesauthentication, 7-22Authentication Scheme, 7-23Authorization Scheme, 7-23Database Schema, 7-24Deep Linking, 7-23Public User, 7-23Session State Protection, 7-25
security best practicesadministrator tasks, 15-1at risk passwords, 15-9cross site-scripting protection, 15-10embedded PL/SQL gateway, 15-1enabling network services, 15-5items of type password, 15-8Oracle BI Publisher, 15-2Oracle HTTP Server, 15-2password complexity, 15-3runtime environment, 15-4secure sockets layer, 15-2session state, 15-12session timeout, 15-4
Security Profiles Report, 15-9security risks, file upload table, 15-25seeding, 18-7

Index-17
select list, A-7select lists, creating dependent LOV, 7-61session ID, 2-7
facilitating bookmarking, 2-11session state
clearing, 2-14clearing application cache, 2-16clearing cache by item, 2-15clearing cache by page, 2-15clearing cache for current user session, 2-16clearing cache for two pages, 2-15enabling projection, 7-25management, 2-6passing item value, 2-15protection, 15-13referencing, 2-13security best practices, 15-12setting, 2-14sharing across applications, 7-78viewing, 2-7
session state protectionconfiguring all attributes, 15-16configuring security attributes, 15-15disabling, 15-13enabling, 15-13enabling from Edit Security Attributes, 15-14enabling from Session State Protection, 15-15enabling using a wizard, 15-15reports, 15-15understanding, 15-13viewing existing settings, 15-15viewing summaries, 15-15
Session State Protection attribute, 7-25session state values, managing, 2-13session timeout, 15-4shared components
about, 8-14, 8-50accessing, 8-50backing up, 16-15Breadcrumbs, 8-15creating, 8-50exporting, 8-54, 16-15icon, 3-16, 6-4list of values, 8-15Lists, 8-15Lists of Values, 8-15Navigation Bar, 8-16Security, 8-16Shared Components page, 8-49Tabs, 8-15Templates, 8-15Theme, 8-15
Shared Components icon, 6-8, 8-16Shared Components page
Application Computations, 8-51Application Items, 8-50Application Processes, 8-50, 8-55Authentication Schemes, 8-51Authorization Schemes, 8-52Breadcrumbs, 8-51
Build Options, 8-51Cascading Style Sheets, 8-52Comments, 8-53Component Settings, 8-52Definition, 8-53Globalization Attributes, 8-53Images, 8-53Lists, 8-51Lists of Values, 8-52Navigation Bar Entries, 8-51Plug-ins, 8-52Report Layouts, 8-53Report Queries, 8-53Security Attributes, 8-52Session State Protection, 8-52Shortcuts, 8-52Static Files, 8-53Tabs, 8-51Templates, 8-52Test Messages, 8-53Themes, 8-52Translate Application, 8-53User Interface Attributes, 8-52Web Service References, 8-51
shared interactive reports, linking to, 9-48Shortcut page, 10-78shortcuts, 10-77
defining, 10-77editing attributes, 10-78HTML Text, 10-77HTML Text with Escaped Special
Characters, 10-77Image, 10-77Message, 10-77Message with JavaScript Escaped Special
Quotes, 10-77PL/SQL Function Body, 10-77reports, 10-79Shortcut History, 10-79Shortcut page, 10-78Subscribed Shortcuts, 10-79supporting translatable messages, 18-2Text with JavaScript Escaped Single
Quotes, 10-77types, 10-77
Show Page, 2-4shuttle multiple select list, A-7shuttle, creating dependent LOV, 7-61single data grid row, editing, 5-21single data row, adding annotation, 5-22slider item type, A-8SOAP, 17-7SQL, 5-43SQL report, 9-3SQL tracing, enabling, 14-7standard tabs, creating, 11-1Static File Repository, 12-20static files
deleting, 12-22downloading, 12-22

Index-18
editing, 12-21exporting, 16-19importing, 16-27importing into another instance, 16-19managing, 12-20uploading, 12-20
static listabout, 11-8adding list entries, 11-9adding sublists, 11-9copying entries, 11-12creating from scratch, 11-8managing orphaned list entries, 11-13reparenting entries, 11-12resequencing entries, 11-13
static substitution string, 7-21Status attribute, 7-19Store value encrypted in session state, 7-65style sheet, 13-12substitution strings
#COLCOUNT#, 13-41#CSV_LINK#, 13-41, 13-45#GLOBAL_NOTIFICATION#, 7-20#HIGHLIGHT_ROW#, 13-41#IMAGE_PREFIX#, 12-18#ROWNUM#, 13-41about built-in, 2-18APEX$ROW_NUM, 2-19APEX$ROW_SELECTOR, 2-19APEX$ROW_STATUS, 2-20APP_ALIAS, 2-20APP_DATE_TIME_FORMAT, 2-21APP_ID, 2-20APP_IMAGES, 2-21APP_NLS_DATE_FORMAT, 2-22APP_NLS_TIMESTAMP_FORMAT, 2-22APP_NLS_TIMESTAMP_TZ_FORMAT, 2-22APP_PAGE_ID, 2-22APP_SESSION, 2-23APP_SESSION_VISIBLE, 2-23APP_UNIQUE_PAGE_ID, 2-24APP_USER, 2-24Application Express SCHEMA OWNER, 2-30AUTHENTICATED_URL_PREFIX, 2-25BROWSER_LANGUAGE, 2-25calendar, 10-21CURRENT_PARENT_TAB_TEXT, 2-26DEBUG, 2-26IMAGE_PREFIX, 2-27in page templates, 13-27LOGOUT_URL, 2-27PRINTER_FRIENDLY, 2-28PROXY SERVER, 2-28PUBLIC_URL_PREFIX, 2-28report of supported, 13-11REQUEST, 2-28SQLERRM, 2-30static, 7-21supported in region footer, 12-8SYSDATE_YYYYMMDD, 2-30
understanding, 2-17usage within templates, 2-18using, 2-17WORKSPACE_IMAGES, 2-31
success message, creating for a page process, 8-47supporting objects
creating, 16-6deinstalling, 16-11
SVG chartmigrating to Flash, 10-57migration restrictions, 10-57referencing CSS styles inline, 10-60referencing custom CSS, 10-60upgrading all to HTML5, 10-57upgrading to HTML5, 10-57
SVG chart, about CSS classes, 10-58syntax, for dynamic list, 11-14
Ttab
about Tabs page, 11-3adding, 11-1creating, 11-3, 11-4editing, 11-5editing multiple, 11-5managing, 11-3reports, 11-6template support, 11-2
tab reportsConditional Display, 11-7History, 11-7
Table Finder, 10-84Tables Finder, 10-87tables, searching for, 10-87Tabs page, 11-3tabular form
creating, 10-3Tag Cloud, 4-20Team Development
about utilities, 4-25Feature Utilities, 4-25Features dashboard, 4-3home page, 4-1Manage Team Development Settings, 4-25managing bugs, 4-14managing feedback, 4-17managing links, 4-21managing news entries, 4-22managing settings, 4-24managing team actions, 4-20managing To Dos, 4-10Purge Data, 4-25Push past due Bugs, 4-25release summary, 4-24sharing links, 4-19Tag Cloud, 4-20tracking features, 4-3tracking milestones, 4-8Update Assignee, 4-25

Index-19
template application, 7-10template edit history, 13-14templates
breadcrumbs, 13-18button, 13-20calendar, 13-22changing defaults, 13-3columns, 13-41, 13-46creating, 13-14customizing, 13-12labels, 13-23lists, 13-25managing, 13-15page, 13-27popup LOV, 13-36publishing, 13-18regions, 13-37replacing, 13-16replacing all, 13-17reports, 13-39selecting for a page, 13-13selecting theme default, 13-13supported substitution strings, 13-11unsubscribing to, 13-18viewing for specific page, 13-16viewing on Templates page, 13-15viewing region position utilization, 13-17viewing reports, 13-14
text area, A-9text strings, 18-14
translating, 18-12text strings, translating, 18-12Theme 25, responsive design, 13-2theme reports
Application Templates, 13-10Class References, 13-11class references, 13-11File References, 13-10files references, 13-10supported substitution strings, 13-11template counts, 13-10Template Substitution Strings, 13-11templates in a theme, 13-10Theme Template Counts, 13-10
themesaccessing, 13-2changing default template for components, 13-3changing ID, 13-9changing identification number (ID), 13-9changing name, 13-3copying, 13-6creating, 13-4default templates, 13-3deleting, 13-7editing, 13-3exporting, 13-9, 16-20, 16-21exporting and importing, 13-9exporting with different ID, 13-9importing, 13-9, 16-28managing, 13-1
reports, 13-9selecting page-level template, 13-13switching, 13-5switching active theme, 13-5Themes page, 13-2
Themes page, 13-5accessing from Page Definition, 13-2accessing from Shared Components, 13-2
tion, 10-1To Dos
attaching files, 4-12Calendar page, 4-13creating, 4-11managing, 4-10Progress Log page, 4-14reports, 4-13To Dos page, 4-11updating a task, 4-12viewing, 4-11
toolbar, 8-19translatable messages, defining, 18-12translating, 18-14translation, 18-1
applications, 18-1dynamic, 18-31dynamic text strings, 18-2dynamic translations, 18-3editing manually, 18-11exporting text, 18-7globalization support, 18-1language identification, 18-2mapping primary application ID, 18-6mapping target application ID, 18-6messages, 18-2, 18-3region titles, 18-3rules, 18-2seeding, 18-7shortcuts, 18-2steps, 18-6templates, 18-3translatable components, 18-2translation file, 18-7understanding, 18-6understanding application rendering, 18-2XLIFF, 18-7XLIFF Target Elements, 18-8
translation file, 18-7publishing, 18-9uploading, 18-9
treecreating as a shared component, 10-82editing, 10-82reports, 10-83Trees page, 10-82
tree reportsHistory, 10-83Utilization, 10-83
Trees page, 10-82
Index-20
UUDDI registry, 17-9unlocking, productivity application, 3-4Upgrade Application icon, 7-82URL
publishing, 16-32SSL-enabled, 12-17syntax, 2-8
url, zero as session ID, 2-11user identity
establishing, 15-25verifying, 2-6
user interfaceabout, 1-1controlling, 13-1
User Interface attributesconfiguring, 7-30General Properties, Content Delivery
Network, 7-31Image Prefix, 7-31JavaScript, CSS file URLs, 7-33JavaScript, File URLs attributes, 7-33JavaScript, Include Legacy JavaScript, 7-33Media Type, 7-32
User Interface Defaults, 7-13exporting, 16-21importing, 16-28leveraging, 7-14
user rolesdeveloper, 1-2Oracle Application Express administrator, 1-2Workspace administrator, 1-2
utilities, 7-78
Vvalidation errors, running JAWS, E-8validations
about, 8-32about Go to error link, E-9defining error messages, 8-40Go to Error link, 8-41making conditional, 8-41When Button Pressed attribute, 2-29
Version attribute, 7-17view, viewing data within, 7-83
WWAI-ARIA support, E-10Web service process
editing a process, 17-22mapping input parameters to static values, 17-22
Web service reference, 17-8creating, 17-9creating forms, 17-17creating forms and reports, 17-15creating manually, 17-11, 17-14searching UDDI registry, 17-10specifying WSDL, 17-10
viewing a history, 17-22Web Service Reference Page, 17-8Web services, 17-7
creating a reference from a WSDL, 17-14creating RESTful Web services, 17-12displaying Web service results in a report, 17-21editing a Web service process, 17-22invoking as a process, 17-19problems, 15-5RESTful Web service
exposing a report region, 17-23specifying proxy server address, 17-9SSL enabled, 17-9testing a RESTful Web service reference, 17-14testing Web service reference manually, 17-14using, 17-8viewing Web service reference history, 17-22Web service reference repository, 17-13Web Services References page, 17-8
Websheet applicationsabout, 2-2, 5-1about annotations, 5-34about data grids, 5-15about data sections, 5-27about PL/SQL sections, 5-29about sections, 5-10about text sections, 5-12access control list, 5-43accessing Presentation Mode, 5-46adding chart sections, 5-28adding charts, 5-28adding data, 5-15adding data sections, 5-15, 5-27adding navigation, 5-14adding new pages, 5-8adding notes, 5-37adding PL/SQL sections, 5-30adding tags, 5-36adding text sections, 5-12changing your password, 5-45Control Panel, 5-5controlling access, 5-43copying a page, 5-9creating, 5-1creating access control list entries, 5-44creating from Application Builder, 5-6creating from running Websheet, 5-7deleting, 5-10deleting sections, 5-11displaying tabular data, 5-16displaying uploaded images inline, 5-35editing charts, 5-29editing page details, 5-9editing PL/SQL sections, 5-30editing properties, 5-40editing section order, 5-12editing section titles, 5-12editing sections, 5-10editing text sections, 5-13emailing, 5-45

Index-21
including links to uploaded files, 5-35Language link, 5-3linking to a page, 5-31linking to data grid, 5-32linking to sections, 5-31linking to URLs, 5-32logging out, 5-4markup syntax, 5-30monitoring activity, 5-39navigating between pages, 5-2online Help, 5-3printing, 5-45returning to Application Builder, 5-4running, 5-7specifying access control list, 5-44uploading files and images, 5-34using breadcrumbs, 5-2using SQL and SQLVALUE syntax, 5-32viewing Page Directory, 5-47viewing Page History, 5-48viewing Websheet dashboard, 5-39viewing Websheet Directory, 5-48
Websheet authenticationApplication Express Account, 5-42Custom, 5-42LDAP, 5-42Single Sign-On, 5-42
Websheet dashboard, viewing, 5-39Websheet properties
about, 5-40Access Control List Type, 5-42accessing, 5-40Allow Public Access, 5-43Application Date Format, 5-41Authentication, 5-42Cookie Domain, 5-42Cookie Name, 5-42Cookie Path, 5-42Default Application Language, 5-41Default Application Territory, 5-41Description, 5-41editing SQL and PL/SQL access, 5-43Home Page, 5-41Login Message, 5-41Logo, 5-41Logo Type, 5-41Logout URL, 5-42Name, 5-41Owner, 5-41Secure, 5-42Show Reset Password, 5-41Status, 5-41Style, 5-42Websheet Email From Address, 5-41
Websheetsabout navigation, 3-18breadcrumb, 5-2common UI elements, 5-1Control Panel, 3-26editing, 3-26
Files region, 3-26menus, 3-25modifying, 3-26navigating, 3-17Notes region, 3-26Tags regions, 3-26understanding navigation, 3-18using breadcrumbs, 3-17Websheet Search, 3-25, 5-4
Wizard Report, 9-3wizards
Create Page, 7-35creating a branch, 11-32creating a breadcrumb, 11-21creating a button, 10-65creating a calendar, 10-20creating a chart, 10-47creating a list, 11-8, 11-13creating a LOV, 10-73creating a new component, 7-38, 10-92creating a page computation, 8-30, 17-20creating a page process, 8-43creating a region, 12-3creating an application, 2-2creating applications, 2-1creating navigation bar entry, 11-28, 11-30creating reports, 9-3creating validations, 8-33, 8-36, 8-37, 8-39
workspacelogging in, 1-6logging out, 1-8requesting, 1-5searching, 1-10
Workspace administrator, 1-2Workspace home page
about, 1-9Accessibility Mode list, 1-11Available Updates region, 1-11Learn More link, 1-10News region, 1-9system message, 1-9Top Applications region, 1-10Top Users region, 1-10
workspace themesadding, 13-7deleting, 13-8exporting, 13-8managing, 13-7modifying, 13-8viewing existing, 13-8
WSDL document, 17-8
XXLIFF, 18-7
applying, 18-9deleting an uploaded document, 18-10Target Elements, 18-8uploading, 18-9uploading and publishing, 18-9

Index-22