Operating Instructions - Geizhals Static Content
516
User's Guide For safe and correct use, be sure to read Safety Information separately provided before using the machine.
-
Upload
khangminh22 -
Category
Documents
-
view
0 -
download
0
Transcript of Operating Instructions - Geizhals Static Content

User's Guide
For safe and correct use, be sure to read Safety Information separatelyprovided before using the machine.


TABLE OF CONTENTSHow to Find Information about Operations and Troubleshooting...............................................................12
Operating Manual (Printed)....................................................................................................................... 12
Operating Manual (Digital Format)........................................................................................................... 12
How to Read This Manual...............................................................................................................................13
Introduction...................................................................................................................................................13
Symbols Used in This Manual.....................................................................................................................13
Model-Specific Information........................................................................................................................ 13
Disclaimer..................................................................................................................................................... 14
Notes............................................................................................................................................................ 14
Note to Administrator.................................................................................................................................. 15
List of Option................................................................................................................................................ 16
About IP Address......................................................................................................................................... 16
Supplied Items.................................................................................................................................................. 17
1. Guide to the Machine
Guide to Components......................................................................................................................................19
Exterior..........................................................................................................................................................19
Interior...........................................................................................................................................................21
Control Panel (When Using the Touch Panel Model)...............................................................................22
Control Panel (When Using the Four-line LCD Panel Model)..................................................................24
Installing Option...............................................................................................................................................27
Attaching Paper Feed Unit.......................................................................................................................... 27
Installing the Wireless LAN option............................................................................................................. 28
How to Use the [Home] Screen (When Using the Touch Panel Model)..................................................... 31
Displaying the [Home] Screen (When Using the Touch Panel Model)...................................................31
How to Use the [Home] Screen (When Using the Touch Panel Model)................................................. 31
Customizing the [Home] Screen (When Using the Touch Panel Model).................................................... 34
How to Customize the [Home] Screen (When Using the Touch Panel Model)......................................34
Adding to the [Home] Screen Shortcuts to Favorite Items (When Using the Touch Panel Model)....... 34
Changing the Order of Icons on the [Home] Screen (When Using the Touch Panel Model)...............35
Deleting an Icon on the [Home] Screen (When Using the Touch Panel Model)....................................35
Registering Frequently Used Functions (When Using the Touch Panel Model).......................................... 36
Registering Functions in a Favorite Item (When Using the Touch Panel Model).................................... 36
Recalling a Favorite Item (When Using the Touch Panel Model)............................................................ 37
1

Deleting a Favorite Item (When Using the Touch Panel Model)..............................................................38
Displaying Frequently Used Modes Preferentially (When Using the Touch Panel Model)....................... 39
Changing Operation Modes (When Using the Four-line LCD Panel Model).............................................40
Multi-access......................................................................................................................................................41
About Operation Tools.................................................................................................................................... 45
Assigning a Setting to the Shortcut Key (When Using the Four-line LCD Panel Model)............................ 47
Assigning a Setting Using the Control Panel (When Using the Four-line LCD Panel Model)................47
Assigning a Setting Using Web Image Monitor (When Using the Four-line LCD Panel Model)..........47
Accessing the Function Assigned to the Shortcut Key (When Using the Four-line LCD Panel Model).............................................................................................................................................................................48
Entering Characters (When Using the Touch Panel Model).........................................................................49
Character Entry Display.............................................................................................................................. 49
Available Characters...................................................................................................................................50
Entering Text.................................................................................................................................................50
Entering Characters (When Using the Four-line LCD Panel Model)............................................................52
Using Application for Smart Devices.............................................................................................................. 53
Connecting a Smart Device to the Machine Using NFC.............................................................................. 55
Writing the Machine's Information to NFC with a Smart Device.............................................................55
Using the Application on a Smart Device by Using NFC.........................................................................56
2. Paper Specifications and Adding Paper
Workflow for Loading Paper and Configuring Paper Sizes and Types...................................................... 57
Loading Paper.................................................................................................................................................. 58
Loading Paper into Tray1 and 2................................................................................................................ 58
Loading Paper into Bypass Tray................................................................................................................. 62
Loading Envelopes.......................................................................................................................................63
Specifying Paper Type and Paper Size Using the Control Panel.................................................................66
Specifying the Paper Type.......................................................................................................................... 66
Specifying the Standard Paper Size...........................................................................................................68
Specifying a Custom Paper Size................................................................................................................ 69
Specifying Paper Type and Paper Size Using Smart Organizing Monitor.................................................71
Specifying a Custom Paper Size................................................................................................................ 72
Specifying Paper Type and Paper Size Using Web Image Monitor...........................................................73
Specifying a Custom Paper Size................................................................................................................ 73
2

Specifying Paper Type and Paper Size Using the Printer Driver.................................................................. 74
When Using Windows................................................................................................................................ 74
When Using macOS....................................................................................................................................75
Supported Paper.............................................................................................................................................. 77
Specifications of Paper Types.....................................................................................................................80
Non-Recommended Paper Types.............................................................................................................. 87
Paper Storage.............................................................................................................................................. 88
Print Area...................................................................................................................................................... 88
Placing Originals..............................................................................................................................................92
Placing Originals on the Exposure Glass...................................................................................................92
Placing Originals in the Auto Document Feeder....................................................................................... 92
About Originals............................................................................................................................................93
3. Printing Documents
What You Can Do with the Printer Function...................................................................................................97
Configuring Option Settings for the Printer.................................................................................................... 98
Conditions for Bidirectional Communication............................................................................................. 98
If Bidirectional Communication is Disabled............................................................................................... 98
Displaying the Printing Preferences Dialog Box.......................................................................................... 100
Displaying the Printing Preferences Dialog Box from the [Start] Menu.................................................100
Displaying the Printing Preferences Dialog Box in an Application........................................................100
Basic Operation of Printing...........................................................................................................................102
When Using Windows..............................................................................................................................102
When Using macOS................................................................................................................................. 103
If a Paper Mismatch Occurs.....................................................................................................................104
Canceling a Print Job................................................................................................................................ 105
Printing Confidential Documents...................................................................................................................107
Storing a Locked Print file......................................................................................................................... 107
Printing a Locked Print file......................................................................................................................... 108
Deleting a Locked Print file....................................................................................................................... 109
Using Various Print Functions........................................................................................................................ 112
Print Quality Functions...............................................................................................................................112
Print Output Functions................................................................................................................................113
3

4. Copying Originals
What You Can Do with the Copier Function............................................................................................... 115
Copier Mode Screen.................................................................................................................................... 116
Basic Operation of Copying.........................................................................................................................118
Canceling a Copy.....................................................................................................................................120
Making Enlarged or Reduced Copies......................................................................................................... 122
Specifying Reduce/Enlarge.....................................................................................................................123
Copying Single-Sided Originals with 2-Sided and Combined Printing....................................................125
Specifying Combined and 2-sided Copies.............................................................................................128
Copying 2-Sided Originals with 2-Sided and Combined Printing............................................................130
Duplex Copying Using the ADF............................................................................................................... 131
Duplex Copying Manually Using the Exposure Glass...........................................................................133
Copying an ID Card......................................................................................................................................135
Specifying Scan Settings for Copying..........................................................................................................139
Adjusting Image Density........................................................................................................................... 139
Selecting the Document Type According to Original.............................................................................140
5. Scanning Originals
What You Can Do with the Scanner Function.............................................................................................143
Scanner Mode Screen.................................................................................................................................. 145
Preparation for Registering Scan Destinations (Scan to Folder)................................................................ 147
Printing the Check Sheet.......................................................................................................................147
Checking the User Name and Computer Name................................................................................148
Creating a Shared Folder on a Computer..........................................................................................150
Specifying Access Privileges for the Created Shared Folder............................................................ 152
Preparation for Registering Scan Destinations (Scan to E-mail)................................................................ 153
Configuring SMTP and DNS Settings..................................................................................................153
Preparation for Registering Scan Destinations (Scan to FTP)..................................................................... 155
Checking the FTP Server Address........................................................................................................ 155
Registering Scan Destinations.......................................................................................................................156
Modifying Scan Destinations....................................................................................................................162
Deleting Scan Destinations....................................................................................................................... 162
Basic Procedures for Sending Scan Files.....................................................................................................164
Specifying the Scan Destination Using [Resend] (When Using the Touch Panel Model)........................168
4

Basic Procedures for Saving Scan Files on a USB Flash Memory Device................................................ 169
Scanning from Smart Organizing Monitor..................................................................................................174
Scanner Settings You Can Configure for Smart Organizing Monitor.................................................. 175
Basic Operation for TWAIN Scanning........................................................................................................178
Using TWAIN scanner..............................................................................................................................178
TWAIN scanning.......................................................................................................................................178
Settings you can configure in the TWAIN dialog box........................................................................... 179
Basic Operation for WIA Scanning............................................................................................................. 181
Basic Operation for ICA Scanning...............................................................................................................182
Installing the ICA Driver............................................................................................................................ 182
Using ICA Scanner....................................................................................................................................182
ICA Scanning.............................................................................................................................................182
Settings you can configure in the ICA dialog box..................................................................................183
About SANE Scanning..................................................................................................................................185
Specifying Scan Settings for Scanning........................................................................................................ 186
Specifying the Scanning Size According to the Size of the Original....................................................186
Adjusting Image Density........................................................................................................................... 188
Specifying Resolution................................................................................................................................189
6. Sending and Receiving a Fax
What You Can Do with the Fax Function.....................................................................................................191
Fax Setting Workflows.................................................................................................................................. 192
Fax Mode Screen.......................................................................................................................................... 193
Registering Fax Destinations......................................................................................................................... 195
Registering Fax Destinations Using the Control Panel............................................................................195
Registering Fax Destinations Using Web Image Monitor...................................................................... 197
Preventing Transmission to the Wrong Destination.................................................................................199
Sending a Fax................................................................................................................................................201
Selecting Transmission Mode...................................................................................................................201
Internet Fax Transmission.......................................................................................................................... 202
Basic Operation for Sending a Fax......................................................................................................... 203
Canceling a Transmission......................................................................................................................... 205
Specifying the Fax Destination................................................................................................................. 208
Useful Sending Functions..........................................................................................................................211
5

Specifying Scan Settings for Faxing........................................................................................................ 214
Using the Fax Function from a Computer (LAN-Fax)..................................................................................216
Basic Operation for Sending Faxes from a Computer........................................................................... 216
Configuring Transmission Settings............................................................................................................218
Configuring the LAN-Fax Address Book................................................................................................. 218
Editing a Fax Cover Sheet........................................................................................................................ 221
Receiving a Fax..............................................................................................................................................222
Selecting Reception Mode....................................................................................................................... 222
Receiving an Internet Fax..........................................................................................................................226
Forwarding or Storing Faxes in Memory................................................................................................ 228
Receiving or Rejecting Faxes from Special Senders...............................................................................232
Lists/Reports Related to Fax......................................................................................................................... 235
7. Configuring the Machine Using the Control Panel
Basic Operation.............................................................................................................................................237
Menu Chart.................................................................................................................................................... 239
Copier Features Settings (When Using the Touch Panel Model)...............................................................241
Scanner Features Settings (When Using the Touch Panel Model)............................................................ 246
Fax Features Settings (When Using the Touch Panel Model).................................................................... 249
Address Book Settings (When Using the Touch Panel Model)..................................................................258
System Settings (When Using the Touch Panel Model)..............................................................................259
Printer Features Settings (When Using the Touch Panel Model)................................................................265
Paper Settings (When Using the Touch Panel Model)................................................................................269
Administrator Tools Settings (When Using the Touch Panel Model)......................................................... 274
Printing Lists/Reports (When Using the Touch Panel Model).................................................................... 283
Printing the Configuration Page (When Using the Touch Panel Model)...............................................283
Configuration Page................................................................................................................................... 283
Types of Lists/Reports (When Using the Touch Panel Model).............................................................. 284
Network Settings (When Using the Touch Panel Model)...........................................................................286
@Remote (When Using the Touch Panel Model)........................................................................................292
Copier Features Settings (When Using the Four-line LCD Panel Model)..................................................293
Scan Settings (When Using the Four-line LCD Panel Model).................................................................... 298
System Settings (When Using the Four-line LCD Panel Model).................................................................300
Printer Features Settings (When Using the Four-line LCD Panel Model)...................................................305
6

Tray Paper Settings (When Using the Four-line LCD Panel Model).......................................................... 310
Administrator Tools Settings (When Using the Four-line LCD Panel Model)............................................ 316
Printing Lists/Reports (When Using the Four-line LCD Panel Model)........................................................322
Printing the Configuration Page (When Using the Four-line LCD Panel Model)..................................322
Configuration Page................................................................................................................................... 322
Types of Lists/Reports (When Using the Four-line LCD Panel Model)................................................. 323
Network Settings (When Using the Four-line LCD Panel Model)..............................................................325
Network Wizard (When Using the Four-line LCD Panel Model)..............................................................330
@Remote (When Using the Four-line LCD Panel Model)...........................................................................331
8. Configuring the Machine Using Utilities
Available Setting Functions Using Web Image Monitor and Smart Organizing Monitor...................... 333
Using Web Image Monitor...........................................................................................................................335
Displaying Top Page..................................................................................................................................... 336
Changing the Interface Language........................................................................................................... 337
Checking the System Information................................................................................................................. 338
Status Tab...................................................................................................................................................338
Counter Tab............................................................................................................................................... 339
Machine Information Tab......................................................................................................................... 340
Configuring the System Settings................................................................................................................... 341
Sound Volume Adjustment Tab................................................................................................................ 341
Tray Paper Settings Tab............................................................................................................................ 341
Copier Tab.................................................................................................................................................344
Fax Tab (Only When Using the Touch Panel Model)............................................................................ 344
Priority Tray Tab.........................................................................................................................................347
Toner Management Tab........................................................................................................................... 348
Interface Tab..............................................................................................................................................348
Shortcut to Function Tab (Only When Using the Four-line LCD Panel Model).................................... 349
Registering Destinations................................................................................................................................ 350
Registering Fax Special Senders (Only When Using the Touch Panel Model)........................................351
Restricting Machine Functions According to User.......................................................................................352
Enabling the User Restriction Settings...................................................................................................... 352
When Machine Functions are Restricted..................................................................................................... 356
Configuring the Network Settings................................................................................................................ 358
7

Network Status Tab...................................................................................................................................358
IPv6 Configuration Tab.............................................................................................................................359
Network Application Tab......................................................................................................................... 360
TLS Security Tab........................................................................................................................................ 361
DNS Tab.................................................................................................................................................... 362
Auto E-mail Notification Tab.................................................................................................................... 363
SNMPv1/v2 Tab...................................................................................................................................... 363
SNMPv3 Tab.............................................................................................................................................365
SMTP Tab...................................................................................................................................................367
POP3 Tab...................................................................................................................................................368
Internet Fax Tab.........................................................................................................................................369
Wireless Tab.............................................................................................................................................. 370
Certificate Tab........................................................................................................................................... 371
Configuring the IPsec Settings.......................................................................................................................375
IPsec Global Settings Tab.........................................................................................................................375
IPsec Policy List Tab...................................................................................................................................375
Printing Lists/Reports..................................................................................................................................... 379
Configuring the Administrator Settings.........................................................................................................380
Administrator Tab...................................................................................................................................... 380
Reset Settings Tab......................................................................................................................................381
Backup Setting Tab................................................................................................................................... 381
Restore Setting Tab....................................................................................................................................382
Set Date/Time Tab....................................................................................................................................383
Energy Saver Mode Tab.......................................................................................................................... 384
PCL6 Mode................................................................................................................................................384
Using Smart Organizing Monitor.................................................................................................................385
Displaying the Smart Organizing Monitor Dialog................................................................................. 385
Checking the Status Information...............................................................................................................385
Configuring the Machine Settings............................................................................................................386
Printing the Configuration Page................................................................................................................388
Configuration Page................................................................................................................................... 388
Types of Lists/Reports............................................................................................................................... 389
8

9. Maintaining the Machine
Replacing the Print Cartridge........................................................................................................................391
Cautions When Cleaning..............................................................................................................................395
Cleaning the Friction Pad and Paper Feed Roller....................................................................................... 396
Cleaning the Exposure Glass........................................................................................................................398
Cleaning the Auto Document Feeder...........................................................................................................399
Moving and Transporting the Machine....................................................................................................... 400
Disposal......................................................................................................................................................401
Where to Inquire....................................................................................................................................... 401
10. Troubleshooting
Error and Status Messages on the Screen...................................................................................................403
Panel Indicator............................................................................................................................................... 419
Error and Status Messages Appear on Smart Organizing Monitor..........................................................420
Removing Paper Jams....................................................................................................................................422
Removing Printing Jams.............................................................................................................................423
Removing Scanning Jams......................................................................................................................... 432
When You Cannot Print Test Page............................................................................................................... 434
Paper Feed Problems.....................................................................................................................................435
Print Quality Problems................................................................................................................................... 438
Checking the Condition of the Machine..................................................................................................438
Checking the Printer Driver Settings......................................................................................................... 439
Printer Problems............................................................................................................................................. 441
When You Cannot Print Properly............................................................................................................. 441
When You Cannot Print Clearly...............................................................................................................444
When Paper Is Not Fed or Ejected Properly...........................................................................................446
Other Printing Problems............................................................................................................................ 446
Copier Problems............................................................................................................................................ 447
When You Cannot Make Clear Copies..................................................................................................447
When You Cannot Make Copies as Wanted.........................................................................................448
Scanner Problems.......................................................................................................................................... 449
When You Cannot Browse the Network to Send a Scan File............................................................... 449
When Scanning Is Not Done As Expected............................................................................................. 449
Fax Problems (When Using the Touch Panel Model).................................................................................450
9

When You Cannot Send or Receive Fax Messages As Wanted (When Using the Touch Panel Model)..................................................................................................................................................................... 450
When an Error Is Notified via a Report or E-mail (When Using the Touch Panel Model)..................453
Error Code (When Using the Touch Panel Model)................................................................................ 455
Common Problems.........................................................................................................................................461
11. Configuring Network Settings
Installing Smart Organizing Monitor When Using macOS....................................................................... 465
Connecting the Machine to a Wired Network........................................................................................... 466
Configuring the IPv4 Setting.....................................................................................................................466
Configuring the IPv6 setting......................................................................................................................467
Connecting the Machine to a Wireless Network........................................................................................469
Using the Wi-Fi Setup Wizard................................................................................................................. 469
Using the WPS Button............................................................................................................................... 471
Using a PIN Code..................................................................................................................................... 473
12. Appendix
Transmission Using IPsec...............................................................................................................................477
Encryption and Authentication by IPsec.................................................................................................. 477
Security Association.................................................................................................................................. 478
Encryption Key Exchange Settings Configuration Flow......................................................................... 479
Specifying Encryption Key Exchange Settings........................................................................................480
Specifying IPsec Settings on the Computer............................................................................................. 480
Enabling and Disabling IPsec Using the Control Panel..........................................................................482
Notes about the Toner...................................................................................................................................484
Specifications of the Machine...................................................................................................................... 485
General Function Specifications.............................................................................................................. 485
Printer Function Specifications..................................................................................................................487
Copier Function Specifications.................................................................................................................488
Scanner Function Specifications...............................................................................................................488
Fax Function Specifications (When Using the Touch Panel Model)..................................................... 490
Paper Feed Unit PB1130..........................................................................................................................492
Consumables..................................................................................................................................................494
Print Cartridge............................................................................................................................................494
Information for This Machine........................................................................................................................495
10

User Information on Electrical & Electronic Equipment (mainly Europe and Asia)..........495
Note for the Battery and/or Accumulator Symbol (For EU countries only)......................................... 496
Environmental Advice for Users (mainly Europe)............................................................... 496
Notice to NFC Users (mainly Europe).................................................................................497
NOTES TO USERS REGARDING FACSIMILE UNIT (NEW ZEALAND)............................................. 498
Notes to Users in the State of California (Notes to Users in USA)........................................................ 498
Notes to Users in the United States of America...................................................................................... 499
Notes to Canadian Users regarding Facsimile Unit...............................................................................501
Remarques à l'attention des utilisateurs canadiens.................................................................................501
ENERGY STAR Program ....................................................................................................... 502
Saving Energy............................................................................................................................................502
Trademarks.....................................................................................................................................................505
INDEX...........................................................................................................................................................507
11

How to Find Information about Operationsand TroubleshootingYou can find support information about operating the machine and troubleshooting in the OperatingManual (printed), Operating Manual (digital format), and Help (online).
Operating Manual (Printed)
The following manuals are provided with this machine.
Safety Information
This manual explains the safety precautions that should be followed when using the machine. Besure to read this manual before using the machine.
Setup Guide
This manual explains how to set up the machine. It also explains how to remove the machine fromthe packaging and how to connect it to a computer.
Operating Manual (Digital Format)
Operating manuals can be viewed from Ricoh's website.
Viewing from a web browser
Access the Internet from a web browser.
Confirm that the computer or the machine is connected to the network.
Download the operating manuals from https://www.ricoh.com/.
12

How to Read This Manual
Introduction
This manual contains detailed instructions and notes on the operation and use of this machine. For yoursafety and benefit, read this manual carefully before using the machine. Keep this manual in a handyplace for quick reference.
Symbols Used in This Manual
This manual uses the following symbols:
Indicates points to pay attention to when using functions. This symbol indicates points that may result inthe product or service becoming unusable or result in the loss of data if the instructions are not obeyed.Be sure to read these explanations.
Indicates supplementary explanations of the product's functions and instructions on resolving user errors.
[ ]
Indicates the names of keys on the machine's display or control panels.
Model-Specific Information
This section explains how you can identify the region your machine belongs to.
There is a label on the rear of the machine, located in the position shown below. The label containsdetails that identify the region your machine belongs to. Read the label.
DYG231
13

The following information is region-specific. Read the information under the symbol that corresponds tothe region of your machine.
(mainly Europe and Asia)
If the label contains the following, your machine is a region A model:
• CODE XXXX -25, -27
• 220–240 V
(mainly North America)
If the label contains the following, your machine is a region B model:
• CODE XXXX -17
• 120–127 V
• Dimensions in this manual are given in two units of measure: metric and inch. If your machine is aRegion A model, refer to the metric units. If your machine is a Region B model, refer to the inchunits.
Disclaimer
To the maximum extent permitted by applicable laws, in no event will the manufacturer be liable for anydamages whatsoever arising out of failures of this machine, losses of the registered data, or the use ornon-use of this product and operation manuals provided with it.
Make sure that you always copy or have backups of the data registered in this machine. Documents ordata might be erased due to your operational errors or malfunctions of the machine.
In no event will the manufacturer be responsible for any documents created by you using this machine orany results from the data executed by you.
For good output quality, the manufacturer recommends that you use genuine toner from themanufacturer.
Notes
Contents of this manual are subject to change without prior notice.
The manufacturer shall not be responsible for any damage or expense that might result from the use ofparts other than genuine parts from the manufacturer with your office products.
Two kinds of size notation are employed in this manual.
Some illustrations in this manual might be slightly different from the machine.
The illustrations of the control panel and the machine in this manual are for the touch panel model.
14

Note to Administrator
Password
Certain configurations of this machine can be password-protected to prevent unauthorized modificationsby others.
The following are the passwords that must be specified by the administrator during the Initial Setup,which are required after turning on the machine for the first time. For details, see Setup Guide.
When Using the Touch Panel Model
• Panel Admin. Tools Lock
This is the password for access to [Address Book], [Network Settings], and [AdministratorTools] on the control panel menu.
This can be changed in [Admin. Tools Lock], located in [Administrator Tools]. See page 274"Administrator Tools Settings (When Using the Touch Panel Model)".
• Panel RX File Password Setting
This is the password for access to [Rx File] on the fax mode screen.
This can be changed in [RX File Password Setting], located in [Administrator Tools]. Seepage 274 "Administrator Tools Settings (When Using the Touch Panel Model)".
• Webpage Administrator Password
This is the password to configure [System Settings], [Quick Dial Destination], [ScanDestination], [Fax Speed Dial Destination], [Special Sender], [Restrict Available Functions],[Network Settings], [IPsec Settings], and [Administrator Tools] on the Web Image Monitor.
This can be changed in [Administrator Settings] on the Web Image Monitor. See page 380"Configuring the Administrator Settings".
• FTP Password
This is the password for access to the FTP server for operations such as printing via FTP andfirmware updates.
This can be changed in [Network Print Setting] on the Web Image Monitor. See page 358"Configuring the Network Settings".
When Using the Four-line LCD Panel Model
• Admin. Tools Lock.
This is the password for access to [Network Settings], [Network Wizard], and [Admin. Tools]on the control panel menu.
This can be changed in [Admin. Tools Lock], located in [Admin. Tools]. See page 316"Administrator Tools Settings (When Using the Four-line LCD Panel Model)".
• Administrator Password
15

This is the password for configure to [System Settings], [Scan Destination], [Restrict AvailableFunctions], [Network Settings], [IPsec Settings], and [Administrator Tools] on the Web ImageMonitor.
This can be changed in [Administrator Settings] on the Web Image Monitor. See page 380"Configuring the Administrator Settings".
• FTP Password
This is the password for access to the FTP server for operations such as printing via FTP andfirmware updates.
This can be changed in [Network Print Setting] on the Web Image Monitor. See page 358"Configuring the Network Settings".
Note that these passwords will be cleared if the settings are reset. For the default password, see theapplicable settings.
User restriction
You can restrict the use of certain functions of this machine to users with proper authentication.
Using Web Image Monitor, you can select the functions you want to restrict, and register the users whocan use that function upon authentication.
• For details about creating passwords and configuring the user restriction settings, see page 352"Restricting Machine Functions According to User".
List of Option
Option List Referred to as
Paper Feed Unit PB1130 Paper feed unit
IEEE 802.11 Interface Unit Type P16 Wireless LAN option
• If Paper feed unit is attached, "Tray 2" appears on the machine's control panel.
About IP Address
In this manual, "IP address" covers both IPv4 and IPv6 environments. Read the instructions that arerelevant to the environment you are using.
16

Supplied ItemsOpen the box and take out all supplied items. Check that all the following items are present:
• Power cord
• Modular cable (M 320FB/320F only)
• Starter cartridge
• Safety Information
• Setup Guide
• About Open Source Software License
• Warranty (except for India)
• Sheet - EULA (End User License Agreement)
• Decal - FAQ
• Customer registration form (mainly North America)
17

18

1. Guide to the MachineThis chapter describes preparations for using the machine and its operating instructions.
Guide to ComponentsThis section introduces the names of the various parts on the front and rear side of the machine andoutlines their functions.
Exterior
DYG226
161215
12
171819
20
21 3 4
8
7
56
9
1314 1112 10
No. Name Description
1 Control Panel Contains a screen and keys for machine control.
2 ADF Cover Open this cover to remove originals jammed in the ADF.
19

No. Name Description
3 Input Tray for the ADF Place stacks of originals here. They will feed inautomatically. This tray can hold up to 35 sheets ofplain paper.
4 Auto Document Feeder(Exposure Glass Cover)
The ADF is integrated with the exposure glass cover.Open this cover to place originals on the exposureglass.
5 External Telephone Connector(only the Touch Panel Model)
For connecting an external telephone.
6 G3 (analog) Line InterfaceConnector (only the Touch PanelModel)
For connecting a telephone line.
7 USB Port for wireless LAN option Insert the wireless LAN option to connect with a wirelessLAN when the machine's power is turned off.
8 USB Port For connecting the machine to a computer using a USBcable.
9 Ethernet Port For connecting the machine to the network using anetwork interface cable.
10 Tray 1 Rear Cover This cover opens when you load paper longer than A4in Tray 1.
11 Rear Cover Open this cover to remove jammed paper or to lowerthe levers inside before printing on envelopes.
12 Side Fence Adjust this fence to the paper size.
13 Bypass Tray This tray can hold up to 50 sheets of plain paper.
14 Tray 1 This tray can hold up to 250 sheets of plain paper.
15 End Fence Adjust this fence to the paper size.
16 Front Cover Open this cover to replace the print cartridge or removejammed paper.
17 USB Flash Disk Port Insert a USB flash memory device to store scanned filesusing the Scan to USB function.
18 Standard Tray Printed paper is output here. Up to 50 sheets of plainpaper can be stacked here.
1. Guide to the Machine
20

No. Name Description
19 Stop Fence Raise this fence to prevent paper from falling off.
20 Exposure Glass Place originals here sheet by sheet.
• If it is difficult to take printed paper out of the output tray, you can lift the control panel and make iteasier to take the printed paper out.
DYG227
Interior
1
DYG229
2 2
No. Name Description
1 Print Cartridge A replacement consumable that is required to make prints onpaper. It needs to be replaced when the alert indicator flashes. Fordetails about replacing the cartridge, see page 391 "Replacingthe Print Cartridge".
Guide to Components
21

No. Name Description
2 Envelope Levers Lower these levers when copying or printing on envelopes. Pull upthese levers back when copying or printing on paper other thanenvelopes.
Control Panel (When Using the Touch Panel Model)
This description is for M 320FB/320F only.
• When you push the [Power] key, wait at least a second after the indicator has lit up or gone out.
DYG317
1 2 3 4 5 6
9 107 8
No. Name Description
1 NFC Allows you to connect a smart device to the machine when youtouch NFC on a smart device using the application correspondingto the machine.
For details, see page 53 "Using Application for Smart Devices".
2 [Home] key Press to display the [Home] screen. For details, see page 31"How to Use the [Home] Screen (When Using the Touch PanelModel)".
3 Display panel This is a touch panel display that features icons, keys, andshortcuts that allow you to navigate the screens of the variousfunctions and provide you with information about operation statusand other messages.
1. Guide to the Machine
22

No. Name Description
4 Number keys Use to enter the numbers for copies, fax numbers and data for theselected function.
5 [Clear/Stop] key • While the machine is processing a job: press to cancel thecurrent job.
• While configuring the machine settings: press to cancel thecurrent setting and return to standby mode.
• While in standby mode: press to cancel temporary settingssuch as image density or resolution.
6 [Power] key Press to turn the main power on or off.
This indicator lights up when the machine is turned on.
To turn off the machine, press and hold down this key for at leastthree seconds.
If you press this key for less than 3 seconds, the machine switchesto Energy Saver mode. To recover Energy Saver mode, press thiskey again for less than 3 seconds.
7 Fax indicator Indicates the status of the fax functions. Lights up when receivedfaxes that have not been printed out exist in the machine'smemory.
8 Data In indicator This indicator flashes when the machine receives print data from ahost device.
This indicator lights up when there is a Locked Print file stored inthe machine.
9 Alert indicator Flashes when the toner is nearly empty, or lights up when themachine runs out of toner or a machine error occurs.
When an alert is issued, check the messages on the screen. Fordetails about the messages that appear on the screen, seepage 403 "Error and Status Messages on the Screen".
10 [Start] key Press to scan or copy or start sending a fax.
• The backlight of the screen is turned off when the machine is in Energy Saver mode. Furthermore,after the specified lapse of time for Energy Saver Mode 2, all LEDs except for the power indicatorwill go out.
Guide to Components
23

• When the machine is processing a job, you cannot display the settings menu for configuring themachine. You can confirm the machine's status by checking messages on the screen. If you seemessages such as "Printing...", "Copying...", or "Processing..." wait until the current job is finished.
Control Panel (When Using the Four-line LCD Panel Model)
This description is for M 320 only.
• When you push the [Power] key, wait at least a second after the indicator has lit up or gone out.
1 2 3 4 5 6 7 8 9 10 11
12 13 181614 1715 19 20 DYG318
No. Name Description
1 [Image Quality] key Press to select the scan quality for the current job.
2 [Shortcut to Func.] key Press to use the function pre-assigned to this key.
3 [Density] key Press to adjust the image density for the current job.
4 [Copy] key Press to switch the machine to copier mode.
5 [Scanner] key Press to switch the machine to scanner mode.
6 Screen Displays the current status and messages.
7 Scroll Keys Press to move the cursor in the direction indicated by the key.
8 Number Keys Press to enter numerical values when specifying settings such ascopy quantities or to enter letters when specifying names.
9 [Clear/Stop] key Press to cancel or stop print jobs, document copying, scanning,and other actions in progress.
10 [User Tools] key Press to display the menu for configuring the machine's systemsettings.
1. Guide to the Machine
24

No. Name Description
11 [Power] key Press to turn the main power on or off.
This indicator lights up when the machine is turned on.
To turn off the machine, press and hold down this key for at leastthree seconds.
If you press this key for less than 3 seconds, the machine switchesto Energy Saver mode. To recover Energy Saver mode, press thiskey again for less than 3 seconds.
12 [Duplex] key Press to print on both sides of paper.
13 [Wi-Fi Direct] key Pressing this key enables Wi-Fi while Wi-Fi is disabled and thewireless LAN option is installed to the USB port on the back of themachine. Press this key while Wi-Fi is enabled to activate ordeactivate the Wi-Fi Direct function.
This indicator lights up when the Wi-Fi Direct function is active.
To use this key, the wireless LAN option needs to be installed tothe machine when the machine's power is turned off.
14 Data In Indicator This indicator flashes when the machine receives print data from ahost device.
This indicator lights up when there is a Locked Print file stored inthe machine.
15 Alert Indicator Flashes when the toner is nearly empty, or lights up when themachine runs out of toner or a machine error occurs.
16 Selection keys Press the key underneath an item shown on the bottom line of thescreen to select it.
17 [Back] key Press to cancel the last operation or to return to the previous levelof the menu tree.
18 [OK] Key Press to confirm settings and specified values, or to move to thenext menu level.
19 [Start] key Press to start scanning or copying.
20 NFC Allows you to connect a smart device to the machine when youtouch NFC on a smart device using the application correspondingto the machine.
For details, see page 53 "Using Application for Smart Devices".
Guide to Components
25

• The backlight of the screen is turned off when the machine is in Energy Saver mode. Furthermore,after the specified lapse of time for Energy Saver Mode 2, all LEDs except for the power indicatorwill go out.
• When the machine is processing a job, you cannot display the menu for configuring the machine.You can confirm the machine's status by checking messages on the screen. If you see messagessuch as "Printing...", "Copying...", or "Processing..." wait until the current job is finished.
1. Guide to the Machine
26

Installing OptionThis section explains how to install options.
Attaching Paper Feed Unit
• Touching the prongs of the power cable's plug with anything metallic constitutes a fire andelectric shock hazard.
• Do not handle the power cord plug with wet hands. Doing so can result in electric shock.
• Before installing or removing options, always disconnect the power cord plugs from the walloutlet and allow time for the main unit to fully cool. Failing to take these precautions could resultin burns.
• The machine weighs approximately 18 kg (40 lb.). Lift the machine using the inset grips on bothsides of the machine, and then move it horizontally to the place where you want to use it.
• Lifting the paper feed unit carelessly or dropping may cause injury.
• Before moving the machine, unplug the power cord from the wall outlet. If the cord isunplugged abruptly, it could become damaged. Damaged plugs or cords can cause anelectrical or fire hazard.
• Tray 1 is required to print using the optional paper feed unit. Without Tray 1, paper jams will occur.
• Do not hold the tray to lift the machine.
1. Turn off the machine's power, and then pull the power plug out of the wall outlet.
2. Remove the adhesive tape and the cushioning material from the optional paper feed unit.
DYG315
Installing Option
27

3. Lift the machine using the inset grips on both sides of the machine.
DYH051
4. There are three upright pins on the optional paper feed unit. Align the holes of themachine with the pins, and then lower the machine slowly.
DYG316
5. Insert the power plug into the wall outlet, and then turn on the power.
• After installing the optional paper feed unit, select Tray 2 in the printer driver. For details, see theprinter driver Help.
• If the new device is listed in the column of configuration options, it has been properly installed.
• If the optional paper feed unit is not installed properly, try to install it again by repeating theprocedure. If the problem persists, contact your sales or service representative.
• For details about printing the configuration page, see page 283 "Printing Lists/Reports (WhenUsing the Touch Panel Model)" or page 322 "Printing Lists/Reports (When Using the Four-lineLCD Panel Model)".
Installing the Wireless LAN option
• Before using the option, you must configure settings from the control panel. For details, see SetupGuide.
1. Guide to the Machine
28

• Before beginning work, ground yourself by touching something metal to discharge any staticelectricity. Static electricity can damage the interface units.
• Do not subject the interface units to physical shocks.
• Be sure to turn off the machine before installing the wireless LAN option.
• Insert the wireless LAN option into the USB port on the back of the machine. Do not insert it into theUSB flash disk port of the front of the machine.
• We recommend installing the printer driver on your computer after completing the configuration forthe wireless LAN option.
1. Check the contents of the package.
2. Turn the machine off and unplug the power cord.
3. Fully insert the option.
DYG339
Check that the option is firmly connected to the USB port.
4. Plug in the power cord, and then turn on the machine.
5. Configure settings from the control panel.
For details, see Setup Guide.
• When using the touch panel modelCheck that the wireless LAN option was correctly installed by printing the configuration page. If it iscorrectly installed, "Wireless (Wi-Fi) Status" will appear for "Network Settings" on the configurationpage. For details about printing the configuration page, see page 283 "Printing Lists/Reports(When Using the Touch Panel Model)".
• When using the four-line LCD panel modelCheck that the wireless LAN option was correctly installed by printing the configuration page. If it iscorrectly installed, "Wireless (Wi-Fi) Status" will appear for "Network Settings" on the configurationpage. For details about printing the configuration page, see page 322 "Printing Lists/Reports(When Using the Four-line LCD Panel Model)".
Installing Option
29

• If the option was not installed properly, repeat the procedure from the beginning. If it cannot beinstalled correctly even after trying the installation a second time, contact your sales or servicerepresentative.
1. Guide to the Machine
30

How to Use the [Home] Screen (When Usingthe Touch Panel Model)This description is for M 320FB/320F only.
• The [Home] screen is set as the default screen when the machine is turned on. You can change thisdefault setting under Function Priority. See page 274 "Administrator Tools Settings (When Usingthe Touch Panel Model)".
Displaying the [Home] Screen (When Using the Touch Panel Model)
1. Press the [Home] key.
DYG322
• Function or shortcut icons will be displayed on the [Home] screen. For details, see page 31 "Howto Use the [Home] Screen (When Using the Touch Panel Model)".
• To use a different function, press the icon of the function you want to use.
How to Use the [Home] Screen (When Using the Touch Panel Model)
The icons of each function are displayed on the [Home] screen.
You can add shortcuts to favorite items to [Home] screens 2 and 3. The icons of added shortcuts appearon the [Home] screen. You can recall favorite items by pressing the shortcut icons.
To display the [Home] screen, press the [Home] key.
How to Use the [Home] Screen (When Using the Touch Panel Model)
31

[Home] screen 1
M0ESPC5107
21 3
5
67
4
8
9
[Home] screen 2
M0ESPC5108
10
1. Supply Information icon
Displays the remaining amount of toner.
2. [Scanner]
Press to scan originals and save images as files.
For details about how to use the scanner function, see page 143 "Scanning Originals".
3. [Fax]
Press to send or receive faxes.
For details about how to use the fax function, see page 191 "Sending and Receiving a Fax".
1. Guide to the Machine
32

4. Wireless LAN icon
Press to display the [Network Settings] screen.
This icon appears when the wireless LAN option is inserted into the USB port on the back of the machine and[Wrless (Wi-Fi) Enable] is set to [Enable].
When wireless LAN connection is enabled, the icon appears.
When Wi-Fi Direct connection is enabled, the icon appears.
5. /
Press to switch pages when the icons are not displayed on 1 page.
6. [Setting]
Press to customize the default settings of the machine to meet your requirements.
7. [Status]
Press to check the machine's system status, operational status of each function, and Locked Print jobs. You canalso display the machine's maintenance information.
8. [Card]
Press to make ID card copies.
9. [Copier]
Press to make copies.
For details about how to use the copy function, see page 241 "Copier Features Settings (When Using theTouch Panel Model)".
10. Shortcut icon
You can add shortcuts to favorite items to the [Home] screen. For details about how to register shortcuts, seepage 34 "Adding to the [Home] Screen Shortcuts to Favorite Items (When Using the Touch Panel Model)".
For details about examples of shortcuts that you can register, see page 37 "Example of favorite items (whenusing the touch panel model)".
• You can change the order of favorite item icons. For details, see page 35 "Changing the Orderof Icons on the [Home] Screen (When Using the Touch Panel Model)".
How to Use the [Home] Screen (When Using the Touch Panel Model)
33

Customizing the [Home] Screen (When Usingthe Touch Panel Model)This description is for M 320FB/320F only.
You can add shortcuts to favorite items in the [Home] screen. You can recall favorite items by pressingthe shortcut icons. You can rearrange the order of the function and shortcut icons.
How to Customize the [Home] Screen (When Using the Touch Panel Model)
You can customize the [Home] screen to make it more accessible.
The icons of each application are displayed on the [Home] screen. You can also add shortcuts tofavorite items registered in some applications.
For details about the items on the [Home] screen, see page 31 "How to Use the [Home] Screen (WhenUsing the Touch Panel Model)".
• When you register a favorite item, the shortcut to the favorite item appears on [Home] screens 2 or3. If [Home] screens 2 and 3 do not have enough space for more icons, registering any morefavorite items becomes impossible.
• You can register a total of 12 icons for shortcuts to favorite items, 6 icons on each of the 2 pages.
Adding to the [Home] Screen Shortcuts to Favorite Items (When Using theTouch Panel Model)
When you register frequently used settings for functions such as copier and fax functions as favoriteitems, the shortcuts to them appear on [Home] screens 2 or 3. For details about how to register afavorite item, see page 36 "Registering Functions in a Favorite Item (When Using the Touch PanelModel)".
1. Guide to the Machine
34

Changing the Order of Icons on the [Home] Screen (When Using the TouchPanel Model)
You can change the order of the favorite item icons on [Home] screen 2 and 3 to make them moreaccessible.
1. Press and hold an icon that you want to move for more than 2 seconds and release it.
2. Select [Move Up] or [Move Down].
The position of an icon switches from that of another icon located ahead or behind.
• You cannot change the order of the icons on the [Home] screen 1.
Deleting an Icon on the [Home] Screen (When Using the Touch Panel Model)
Delete unused favorite item icons. You can only display icons and shortcuts that you use.
When a shortcut to a favorite item on the [Home] screen is deleted, the registered favorite item is alsodeleted. For details about how to delete a favorite item, see page 38 "Deleting a Favorite Item (WhenUsing the Touch Panel Model)".
• You cannot delete icons on the [Home] screen 1.
Customizing the [Home] Screen (When Using the Touch Panel Model)
35

Registering Frequently Used Functions (WhenUsing the Touch Panel Model)This description is for M 320FB/320F only.
You can store frequently used job settings in the machine memory and recall them easily.
Registering Functions in a Favorite Item (When Using the Touch Panel Model)
You can register up to 12 favorite items for each function.
The following settings can be registered to favorite items:
• Copier:
Sim to Dup, Dup to Dup, Paper Tray, Reduce/Enlarge, Quantity, Original Settings, Original Type,Other Settings, Sort
• Fax:
Fax/Internet Fax, Immed. TX, TX Settings, Address
• Scanner:
Original Settings, Scan Setting
• ID card copy:
Paper Tray, Quantity, Card Size, Original Settings, Original Type
This section explains how to register functions to a favorite item by using each application.
1. Edit the settings so all functions you want to register to a favorite item are selected on the[Copier], [Fax], [Scanner], or [ID Card Copy Mode] screen.
2. Press the favorite item icon ( ) in the upper right of the screen.
3. Press the [Input favorite item name:] box.
4. Enter the favorite item name, and then press [OK].
5. Press the [Home] key.
The favorite item is registered to the [Home] screen.
• You can enter up to 8 characters for a favorite item name.
• Favorite items are not deleted by turning the power off or by pressing the [Clear/Stop] key unlessthe favorite item is deleted or overwritten.
• Favorite items can be registered to the [Home] screen, and can be recalled easily. For details, seepage 34 "Adding to the [Home] Screen Shortcuts to Favorite Items (When Using the Touch PanelModel)".
1. Guide to the Machine
36

Example of favorite items (when using the touch panel model)
Copier
Favorite item name Favorite item description Effect
Eco copy Specify [Sim to Dup]. You can save paper andtoner.
Thumbnail copy Specify settings to combineand print a multiple pages onone side or both sides ofpaper in [Other Settings].
You can copy up to fourpages onto one side of asheet, so that you can savepaper.
Fax
Favorite item name Favorite item description Effect
Duplex fax transmission In [TX Settings], specify[Duplex] for [OriginalSettings].
After scanning the originalsprinted on both sides of thepaper, you can send faxes.
• The names of favorite items given above are just examples. You can assign any name to a favoriteitem according to your objectives.
• Depending on your business details or the type of documents to be scanned, registering a favoriteitem cannot be recommended.
Recalling a Favorite Item (When Using the Touch Panel Model)
You can recall the favorite item and operate the machine using the stored settings.
Registering Frequently Used Functions (When Using the Touch Panel Model)
37

1. Press the [Home] key.
DYG322
2. Press [ ] until the favorite item icon you want appears.
3. Press the favorite item icon.
• Using the favorite item causes the previous settings to be cleared.
Deleting a Favorite Item (When Using the Touch Panel Model)
1. Press the [Home] key.
DYG322
2. Press [ ] until the favorite item icon you want appears.
3. Press and hold down the favorite item icon for more than 3 seconds and release it.
4. Press [Delete].
1. Guide to the Machine
38

Displaying Frequently Used ModesPreferentially (When Using the Touch PanelModel)This description is for M 320FB/320F only.
Specify the mode to be displayed immediately after the operation switch is turned on, or when SystemReset mode is turned on.
1. Press the [Home] key.
DYG322
2. Press the [Setting] icon.
3. Press [Administrator Tools].
4. Enter the password using the number keys, and then press [OK].
5. Press [ ].
6. Press [Function Priority].
7. Specify the mode to be displayed preferentially.
8. Press the [Home] key.
• For details about which modes you can specify, see page 274 "Administrator Tools Settings(When Using the Touch Panel Model)".
Displaying Frequently Used Modes Preferentially (When Using the Touch Panel Model)
39

Changing Operation Modes (When Using theFour-line LCD Panel Model)This description is for M 320 only.
You can switch between copier and scanner modes by pressing the corresponding keys.
Press the [Copy] or [Scanner] key to activate each mode. While in each mode, the corresponding keylights up.
DYG338
Function Priority
By default, copy mode is selected when the machine is turned on, or if the preset [System AutoReset Timer] time passes with no operation while the initial screen of the current mode is displayed.You can change the selected mode using [Function Priority] under [Admin. Tools].
For details about [System Auto Reset Timer] or [Function Priority], see page 316 "AdministratorTools Settings (When Using the Four-line LCD Panel Model)".
1. Guide to the Machine
40

Multi-accessThis machine can perform multiple jobs using different functions, such as copying and faxing, at thesame time. Performing multiple functions simultaneously is called “Multi-access”.
The following table shows the functions that can be performed simultaneously.
When Using the Touch Panel Model
Current job Types of jobs that can be executed simultaneously
Copying• Fax memory reception (no printing)
• Internet Fax reception (no printing)
Scanning (Pull-type)
• Fax receiving and printing
• Fax memory reception (no printing)
• Internet Fax receiving and printing
• Internet Fax reception (no printing)
• Printing a Fax job in the machine's memory
• LAN-Fax transmission (except when TWAIN scanning)
• Receiving a Lan-Fax job from a computer (except whenTWAIN scanning)
• Printing
• Mobile printing (from a device)
Scanning (Push-type)
• Fax receiving and printing
• Fax memory reception (no printing)
• Internet Fax receiving and printing
• Internet Fax reception (no printing)
• LAN-Fax transmission (except when TWAIN scanning)
• Receiving a Lan-Fax job from a computer (except whenTWAIN scanning)
• Printing
• Mobile printing (from a device)
Multi-access
41

Current job Types of jobs that can be executed simultaneously
Scan to USB
• Fax receiving and printing
• Fax memory reception (no printing)
• Internet Fax receiving and printing
• Internet Fax reception (no printing)
• LAN-Fax transmission (except when TWAIN scanning)
• Receiving a Lan-Fax job from a computer (except whenTWAIN scanning)
• Printing
• Mobile printing (from a device)
Fax transmission
• Internet Fax receiving and printing
• Internet Fax reception (no printing)
• Printing
• Mobile printing (from a device)
Fax receiving and printing
• Scanning (Pull-type)
• Scanning (Push-type)*1
• Scan to USB
• Internet Fax transmission
• Internet Fax reception (no printing)
Fax memory reception (storinga received fax into themachine's memory)
• Copying
• Scanning (Pull-type)
• Scanning (Push-type)*1
• Scan to USB
• Internet Fax transmission
• Internet Fax receiving and printing
• Internet Fax reception (no printing)
• Printing a Fax job in the machine's memory
• Printing
• Mobile printing (from a device)
Printing a Fax job in themachine's memory
• Scanning (Pull-type)
• Fax memory reception (no printing)
• Internet Fax reception (no printing)
1. Guide to the Machine
42

Current job Types of jobs that can be executed simultaneously
• LAN-Fax transmission
• Receiving a Lan-Fax jobfrom a computer
• Scanning (Pull-type)
• Scanning (Push-type)*1
• Scan to USB
• Internet Fax reception (no printing)
Internet Fax transmission
• Fax receiving and printing
• Fax memory reception (no printing)
• Printing
• Mobile printing (from a device)
Internet Fax reception
• Scanning (Pull-type)
• Scanning (Push-type)*1
• Scan to USB
• Fax transmission
• Fax memory reception (no printing)
Printing
• Scanning (Pull-type)
• Scanning (Push-type)*1
• Scan to USB
• Fax transmission
• Fax memory reception (no printing)
• Internet Fax transmission
• Internet Fax reception (no printing)
Mobile printing (from adevice)
• Scanning (Pull-type)
• Scanning (Push-type)*1
• Scan to USB
• Fax transmission
• Fax memory reception (no printing)
• Internet Fax transmission
• Internet Fax reception (no printing)
*1 Fax printing may take longer than normal if you scan using the control panel at the same time, especiallywhen scanning multiple pages using the exposure glass.
When Using the Four-line LCD Panel Model
Multi-access
43

Current job Types of jobs that can be executed simultaneously
Scanning (Pull-type)• Printing
• Mobile printing (from a device)
Scanning (Push-type)• Printing
• Mobile printing (from a device)
Scan to USB• Printing
• Mobile printing (from a device)
Printing
• Scanning (Pull-type)
• Scanning (Push-type)
• Scan to USB
Mobile printing (from adevice)
• Scanning (Pull-type)
• Scanning (Push-type)
• Scan to USB
• If you try to use a function that cannot be performed simultaneously, you will hear a beep soundfrom the machine or see a failure message pop up on your computer screen. In this case, try againafter the current job is finished.
1. Guide to the Machine
44

About Operation ToolsThis section explains the operation tools of this machine.
Control Panel
The control panel contains a screen and keys for controlling the machine. They allow you toconfigure the machine's various settings.
For details about how to use the control panel, see page 237 "Configuring the Machine Using theControl Panel".
Web Image Monitor
M0ESAC8110
You can check the machine's status and configure its settings by accessing the machine directlyusing Web Image Monitor.
For details about how to use Web Image Monitor, see page 333 "Configuring the Machine UsingUtilities".
Smart Organizing Monitor
M0ESOC8112
About Operation Tools
45

Download the latest version of this utility from the manufacturer's website and install it on yourcomputer before using it.
Using Smart Organizing Monitor, you can check the machine's status, configure its settings, anduse other functions.
For details about how to use Smart Organizing Monitor, see page 385 "Using Smart OrganizingMonitor".
1. Guide to the Machine
46

Assigning a Setting to the Shortcut Key (WhenUsing the Four-line LCD Panel Model)This description is for M 320 only.
You can access a frequently-used setting with a single keystroke by assigning the setting to the [Shortcutto Func.] key.
You can configure settings for the following 2 functions:
• ID Card Copy Mode
• Select Scanner Address
Assigning a Setting Using the Control Panel (When Using the Four-line LCDPanel Model)
1. Press the [User Tools] key.
2. Press the [ ] or [ ] key to select [Admin. Tools], and then press the [OK] key.
3. Enter the password using the number keys, and then press the [OK] key.
4. Press the [ ] or [ ] key to select [Shortcut to Function], and then press the [OK] key.
5. Press the [ ] or [ ] key to select the setting you want to configure, and then press the[OK] key.
6. Press the [User Tools] key to return to the initial screen.
• A password for accessing the [Admin. Tools] menu can be specified in [Admin. Tools Lock].
Assigning a Setting Using Web Image Monitor (When Using the Four-line LCDPanel Model)
1. Start the web browser and enter "https://(the machine's IP address)/" in the address bar.
The top page of Web Image Monitor appears.
2. Click [System Settings].
3. Click the [Shortcut to Function] tab.
4. Specify the setting you want to configure from [Shortcut to Function Settings].
5. Enter the administrator password.
6. Click [OK].
7. Close the web browser.
Assigning a Setting to the Shortcut Key (When Using the Four-line LCD Panel Model)
47

• For details about passwords, see page 380 "Configuring the Administrator Settings".
Accessing the Function Assigned to the Shortcut Key (When Using the Four-lineLCD Panel Model)
1. Press the [Shortcut to Func.] key.
DYG403
The function assigned to the [Shortcut to Func.] key is displayed.
1. Guide to the Machine
48

Entering Characters (When Using the TouchPanel Model)This description is for M 320FB/320F only.
This section describes how to enter text on the screens of the functions such as copier or fax or on theSetting screen.
To open the keyboard, press the input box twice.
Character Entry Display
This section explains the entry screen and the keys displayed on it.
ECC206
9 10 9 8 7
6
5
4321
1. Characters you enter are displayed on the text field.
2. Cancels the entered text and closes the character entry display.
3. Deletes the character to the left of the cursor.
4. Confirms text and closes the character entry display.
5. Deletes all characters that have been input.
6. Enters characters.
7. Switches between uppercase and lowercase.
8. Enters a space.
9. You can switch the input method from the menu displayed pressing this key. Press to enter numbers,symbols, and some special characters.
10. Displays the current input method.
Entering Characters (When Using the Touch Panel Model)
49

Available Characters
You can enter the following characters:
• Alphabetic characters
• Symbols
• Numerals
0123456789
Entering Text
When you enter a character, it appears at the position of the cursor.
Entering letters
1. Press the letters you want to enter.
Entering alphanumeric characters and symbols
1. Press [ ] or [ ] to select [123], [,.-&@%], or [Latin].
D0D8PC5052
2. Press the numbers or symbols you want to enter.
1. Guide to the Machine
50

Deleting characters
1. Press [ ] to delete characters.
Entering Characters (When Using the Touch Panel Model)
51

Entering Characters (When Using the Four-lineLCD Panel Model)This description is for M 320 only.
To enter characters, use keys as follows:
To enter a digit
Press a number key.
To delete a character
Press the [ ] key.
To enter a name
Letters, numbers, and symbols can be entered using the number keys.
To enter two characters consecutively that use the same number key, press the [ ] key to move thecursor before entering the second character.
DSG155
• Characters you can enter depend on the setting you are configuring.
• If the number you entered is too large or too small for the setting, it will not be accepted. If youpress the [OK] key, the machine will increase or decrease the number to the minimum or maximumvalue for the setting.
1. Guide to the Machine
52

Using Application for Smart DevicesYou can use the machine to print photographs and documents that are stored in your smart device.
Access the App Store or Google Play with your smart device, search for and download the applicationcorresponding to the machine from the site.
When Using the Touch Panel Model
1. Press the [Home] key.
DYG322
2. Press the [Status] icon on the [Home] screen.
3. Press the [Machine info] tab.
The QR code is displayed on the screen.
4. Start the application on the smart device, and then read the QR code.
Follow the instructions displayed on the application.
For details about how to connect a smart device to the machine using Near-fieldcommunication (NFC), see page 55 "Connecting a Smart Device to the Machine UsingNFC".
When Using the Four-line LCD Panel Model
1. Press the [User Tools] key.
DYG327
Using Application for Smart Devices
53

2. Press the [ ] or [ ] key to select [Print List/Report], and then press the [OK] key.
3. Press the [ ] or [ ] key to select [Maintenance Page], and then press the [OK] key.
4. When a message appears, press the [OK] key.
The Maintenance page including the QR code is printed.
5. Start the application on the smart device, and then read the QR code.
Follow the instructions displayed on the application.
For details about how to connect a smart device to the machine using Near-fieldcommunication (NFC), see page 55 "Connecting a Smart Device to the Machine UsingNFC".
1. Guide to the Machine
54

Connecting a Smart Device to the MachineUsing NFCThis section describes how to connect your smart device to the machine using NFC.
Writing the Machine's Information to NFC with a Smart Device
When Using the Touch Panel Model
1. Configure the network connection of the machine.
2. Access the App Store or Google Play from your smart device, search for anddownload the application corresponding to the machine from the site.
3. Press the [Home] key.
DYG322
4. Press the [Status] icon on the [Home] screen.
5. Press the [Machine info] tab.
The QR code is displayed on the screen.
6. Start the application on the smart device, and then read the QR code.
7. Write the machine's network information to NFC using the application, and thentouch NFC with the smart device.
When Using Four-line LCD Panel Model
1. Configure the network connection of the machine.
2. Access the App Store or Google Play from your smart device, search for anddownload the application corresponding to the machine from the site.
Connecting a Smart Device to the Machine Using NFC
55

3. Press the [User Tools] key.
DYG327
4. Press the [ ] or [ ] key to select [Print List/Report], and then press the [OK] key.
5. Press the [ ] or [ ] key to select [Maintenance Page], and then press the [OK] key.
6. When a message appears, press the [OK] key.
The Maintenance page including the QR code is printed.
7. Start the application on the smart device, and then read the QR code.
8. Write the machine's network information to NFC using the application, and thentouch NFC with the smart device.
Using the Application on a Smart Device by Using NFC
1. Start the application on the smart device, and then touch NFC with the smart device.
2. Print using application corresponding to the machine by touching NFC or execute a scanusing the application.
1. Guide to the Machine
56

2. Paper Specifications and AddingPaperThis chapter describes how to load paper and originals and about their specifications.
Workflow for Loading Paper and ConfiguringPaper Sizes and TypesThis section explains how to load paper and operations required after paper is loaded.
After following the procedures below, you can copy or print on the paper that is loaded in the machine.
Load paper into the paper tray.
Specify the paper type and size.
Specify the paper type and size on the printer driver.
Procedure Reference
See page 58 "Loading Paper".
• When using the control panel
See page 66 "Specifying Paper Type and Paper Size Using theControl Panel".
• When using Web Image Monitor
See page 73 "Specifying Paper Type and Paper Size Using WebImage Monitor".
• When using Smart Organizing Monitor
See page 71 "Specifying Paper Type and Paper Size Using SmartOrganizing Monitor".
See page 74 "Specifying Paper Type and Paper Size Using the PrinterDriver".
For details about supported paper, see page 77 "Supported Paper".
57

Loading PaperThis section explains how to load paper into the paper tray and the bypass tray.
• When loading paper, take care not to trap or injure your fingers.
For information about supported paper, precautions for storing paper and print areas, see page 77"Supported Paper".
Loading Paper into Tray1 and 2
The following example explains the loading procedure for the standard paper tray (Tray 1).
The same procedure applies to loading paper in Tray 2.
• Before printing on paper other than envelopes, make sure to pull up the levers on the machine rear,inside the rear cover. Leaving the levers lowered can cause print quality problems when printing onpaper other than envelopes.
• Curled paper may jam. Straighten curled paper before loading.
• After loading paper in the tray, specify the paper type and size using the control panel to avoidprinting problems. This machine does not detect the paper size automatically.
• Make sure the paper stack does not exceed the upper limit mark inside the paper tray. Excessivestacking can cause paper jams.
• If paper jams occur frequently, flip the paper stack in the tray.
• Do not mix different types of paper in the same paper tray.
• After loading paper, specify the paper size using the control panel and paper type using thecontrol panel. When printing a document, specify the same paper size and type in the printerdriver as specified on the printer.
• Do not move the side fences and end fence forcefully. Doing so may damage the tray.
• Do not slide the paper tray in forcefully when inserting the loaded tray into the printer. Otherwise,the side and end fences of the bypass tray might move.
2. Paper Specifications and Adding Paper
58

1. Pull out the paper tray carefully with both hands.
DYH068
Place the tray on a flat surface.
2. Pinch the clip on the side fence and the end fence, and slide them to the maximum extent.
DYH070
3. Fan the paper before loading it.
DAC344
4. Load the paper in the tray with the print side faced down.
Make sure the paper is not stacked higher than the upper limit marked inside the tray.
Loading Paper
59

DYH071
5. Slide the fences inward until they are flush against the sides of the paper.
DYH072
Check there are no gaps between the paper and the fences; both side and end fences.
DYG349
6. Carefully push the paper tray straight into the machine.
To avoid paper jams, make sure the tray is securely inserted.
2. Paper Specifications and Adding Paper
60

DYH073
• The remaining paper indicator on the left front side of the paper tray shows approximately howmuch paper is remaining.
Extending Tray 1 to load paper
This section explains how to load paper longer than A4 (297 mm) into the machine.
1. Pull out tray 1 carefully with both hands.
Place the tray on a flat surface.
2. Pinch the lever in the rear of the tray, and then pull out the extender until it clicks.
DYG241
Loading Paper
61

3. After extension, check that the arrows on the extender and tray are aligned.
DYG242
4. Follow Steps 2 to 6 in page 58 "Loading Paper into Tray1 and 2".
• To reinsert the extender, you might have to push it with moderate force.
Loading Paper into Bypass Tray
• Before printing on paper other than envelopes, make sure to pull up the levers on the machine rear,inside the rear cover. Leaving the levers lowered can cause print quality problems when printing onpaper other than envelopes.
• Do not load paper while the machine is printing.
• Load paper with the print side up and in the short-edge feed direction.
• Curled paper may jam. Straighten curled paper before loading.
1. Open the bypass tray.
If you load A4 (297 mm) or larger size paper, pull out the bypass tray extension.
DYG245
2. Paper Specifications and Adding Paper
62

2. Slide the side fences outward, then load paper with the print side up, and push in until itstops against the machine.
DYG247
3. Adjust the paper fences to the paper size.
DYG249
Loading Envelopes
• Before printing on envelopes, make sure to lower the levers on the machine rear, inside the rearcover, to avoid envelopes coming out creased. Also, pull up the levers back to their originalpositions after printing. Leaving the levers lowered can cause print quality problems when printingon paper other than envelopes.
• Avoid using self-adhesive envelopes. They may cause machine malfunctions.
• Check there is no air in the envelopes before loading.
• Load only one size and type of envelope at a time.
• Before loading envelopes, flatten their leading edges (the edge going into the machine) by runninga pencil or ruler across them.
• Some kinds of envelope might cause misfeeds, wrinkles or print poorly.
• Print quality on envelopes may be uneven if parts of an envelope have different thicknesses. Printone or two envelopes to check print quality.
Loading Paper
63

• In a hot and humid environment, the envelope might be output creased or improper printingquality.
1. Open the bypass tray.
DYG243
2. Slide the side fences outward, then load envelopes with the print side up, and push inuntil it stops against the machine.
Envelopes whose flaps are open must be printed with the flaps open, and envelopes whose flapsare closed must be printed with the flaps closed. Before loading envelopes, make sure they are asflat as possible.
3. Adjust the side fences to the envelope width.
DYG257
4. Open the rear cover.
DYG251
2. Paper Specifications and Adding Paper
64

5. Lower the levers for printing envelopes on both sides to the position indicated with anenvelope mark.
DYG253
Make sure to pull up the levers back to their original positions after printing.
6. Close the rear cover.
• Be sure to load envelopes so that their flaps are on the left. If you do not, the envelopes willbecome creased.
• If printed envelopes come out badly creased, load the envelopes in the opposite direction, andthen rotate the print object by 180 degrees using the printer driver before printing. For details, seethe printer driver Help.
Loading Paper
65

Specifying Paper Type and Paper Size Usingthe Control PanelThis section describes how to specify the paper size and paper type using the control panel.
• Paper type and size can also be specified using the printer driver. For details, see the printer driverHelp.
• When using the touch panel modelFor prints from the bypass tray or Tray 1, you can select to print according to either the printerdriver settings or the control panel settings with [Bypass Tray Priority] under [Paper Settings]. Fordetails about [Bypass Tray Priority], see page 269 "Paper Settings (When Using the Touch PanelModel)".
• When using the four-line LCD panel modelFor prints from the bypass tray or Tray 1, you can select to print according to either the printerdriver settings or the control panel settings with [Bypass Tray Priority] or [Paper Tray Priority] under[Tray Paper Settings]. For details about [Bypass Tray Priority] or [Paper Tray Priority], seepage 310 "Tray Paper Settings (When Using the Four-line LCD Panel Model)".
• When using the touch panel modelIf [Auto Continue] under [System Settings] is enabled, printing stops temporarily if a paper type/size error is detected. The printing restarts automatically with the settings made with the controlpanel after about ten seconds. For details about [Auto Continue], see page 259 "System Settings(When Using the Touch Panel Model)".
• When using the four-line LCD panel modelIf [Auto Continue] under [System Settings] is enabled, printing stops temporarily if a paper type/size error is detected. The printing restarts automatically with the settings made with the controlpanel after about ten seconds. For details about [Auto Continue], see page 300 "System Settings(When Using the Four-line LCD Panel Model)".
Specifying the Paper Type
This section describes how to specify the paper type.
2. Paper Specifications and Adding Paper
66

When Using the Touch Panel Model
1. Press the [Home] key.
DYG322
2. Press the [Setting] icon on the [Home] screen.
3. Press [Paper Settings].
4. Select the tray for which you want to specify the paper type.
5. Select the desired paper type.
6. Press the [Home] key.
When Using the Four-line LCD Panel Model
1. Press the [User Tools] key.
DYG327
2. Press the [ ] or [ ] key to select [Tray Paper Settings], and then press the [OK] key.
3. Press the [ ] or [ ] key to select the paper type setting for the desired tray, and thenpress the [OK] key.
4. Press the [ ] or [ ] key to select the desired paper type, and then press the [OK] key.
5. Press the [User Tools] key to return to the initial screen.
• You can press the [Back] key to exit to the previous level of the menu tree.
Specifying Paper Type and Paper Size Using the Control Panel
67

Specifying the Standard Paper Size
This section describes how to specify the standard paper size.
When Using the Touch Panel Model
1. Press the [Home] key.
DYG322
2. Press the [Setting] icon on the [Home] screen.
3. Press [Paper Settings].
4. Select the tray for which you want to specify the paper size.
5. Select the desired paper size.
6. Press the [Home] key.
When Using the Four-line LCD Panel Model
1. Press the [User Tools] key.
DYG327
2. Press the [ ] or [ ] key to select [Tray Paper Settings], and then press the [OK] key.
3. Press the [ ] or [ ] key to select the paper size setting for the desired tray, and thenpress the [OK] key.
4. Press the [ ], [ ], [ ], or [ ] key to select the desired paper size, and then press the[OK] key.
2. Paper Specifications and Adding Paper
68

5. Press the [User Tools] key to return to the initial screen.
• You can press the [Back] key to exit to the previous level of the menu tree.
Specifying a Custom Paper Size
This section describes how to specify a custom paper size.
• Custom size paper cannot be loaded in tray 2.
• When you perform printing, make sure that the paper size specified with the printer driver matchesthe paper size specified with the control panel. If a paper size mismatch occurs, a messageappears on the display. To ignore the error and print using mismatched paper, see page 104 "If aPaper Mismatch Occurs".
When Using the Touch Panel Model
1. Press the [Home] key.
DYG322
2. Press the [Setting] icon on the [Home] screen.
3. Press [Paper Settings].
4. Select the tray for which you want to specify the paper size.
5. Press [ ].
6. Press [Custom Size].
7. Select [mm] or [inch].
8. Press [Horiz:].
9. Enter the horizontal size, and then press [OK].
10. Press [Vert:].
11. Enter the vertical size, and then press [OK].
Specifying Paper Type and Paper Size Using the Control Panel
69

12. Confirm the size you entered is displayed, and then press [OK].
13. Press the [Home] key.
When Using the Four-line LCD Panel Model
1. Press the [User Tools] key.
DYG327
2. Press the [ ] or [ ] key to select [Tray Paper Settings], and then press the [OK] key.
3. Press the [ ] or [ ] key to select the paper size setting for the desired tray, and thenpress the [OK] key.
4. Press the [ ], [ ], [ ], or [ ] key to select [Custom Size], and then press the [OK]key.
5. Press the [ ] or [ ] key to select [mm] or [inch], and then press the [OK] key.
6. Enter the width using number keys, and then press the [OK] key.
To enter a decimal point, press [ ].
7. Enter the length using number keys, and then press the [OK] key.
To enter a decimal point, press [ ].
8. Press the [User Tools] key to return to the initial screen.
• When using the touch panel model, you can also enter a size by using the number keys. To enter asize by using the number keys, press the box in Steps 8 and 10 only once.
• When using the four-line LCD panel model, you can press the [Back] key to exit to the previouslevel of the menu tree.
2. Paper Specifications and Adding Paper
70

Specifying Paper Type and Paper Size UsingSmart Organizing Monitor
• For details about acquiring Smart Organizing Monitor, see Setup Guide.
The procedure in this section is an example based on Windows 10. The actual procedure may varydepending on the operating system you are using.
1. On the [Start] menu, open the pull-down list next to [P 310_M 320_Series SoftwareUtilities].
2. Click [Smart Organizing Monitor for P 310_M 320_Series].
Smart Organizing Monitor starts.
M0ESOC8112
3. If the machine you are using is not selected, click [Connect Printer], and then do one of thefollowing:
• Select the machine's model.
• Enter the IP address of the machine manually.
• Click [Search Network Printer] to search the machine via the network.
4. Click [OK].
5. On the [User Tools] tab, click [Printer Configuration].
If you are requested to enter an access code, enter the access code and then click [OK].
The default access code is "Admin".
6. On the [Paper Input] tab, select the paper type and paper size, and then click [OK].
7. Click [Close].
Specifying Paper Type and Paper Size Using Smart Organizing Monitor
71

Specifying a Custom Paper Size
1. On the [Start] menu, open the pull-down list next to [P 310_M 320_Series SoftwareUtilities].
2. Click [Smart Organizing Monitor for P 310_M 320_Series].
3. If the machine you are using is not selected, click [Connect Printer], and then do one of thefollowing:
• Select the machine's model.
• Enter the IP address of the machine manually.
• Click [Search Network Printer] to search the machine via the network.
4. Click [OK].
5. On the [User Tools] tab, click [Printer Configuration].
If you are requested to enter an access code, enter the access code and then click [OK].
The default access code is "Admin".
6. On the [Paper Input] tab, select [Custom Paper Size] in the [Paper Size] list.
7. In the [Unit:] list, select [mm] or [inch].
8. In the [Horizontal] box and [Vertical] box, specify the width and length.
9. Click [OK].
10. Click [Close].
2. Paper Specifications and Adding Paper
72

Specifying Paper Type and Paper Size UsingWeb Image MonitorThis section describes how to specify paper sizes and types using Web Image Monitor.
1. Start the web browser and access the machine by entering its IP address.
The top page of Web Image Monitor appears.
M0ESAC8110
2. Click [System Settings].
3. Click [Tray Paper Settings] tab.
4. Select the paper type and paper size for the tray you want to use.
5. Enter the administrator password.
6. Click [OK].
7. Close the web browser.
Specifying a Custom Paper Size
1. Start the web browser and access the machine by entering the IP address.
The top page of Web Image Monitor appears.
2. Click [System Settings].
3. Click [Tray Paper Settings] tab.
4. Select [Custom Size] in the [Paper Size] list.
5. Select [mm] or [Inch] and specify the width and length.
6. Enter the administrator password.
7. Click [OK].
8. Close the web browser.
Specifying Paper Type and Paper Size Using Web Image Monitor
73

Specifying Paper Type and Paper Size Usingthe Printer Driver
• Make sure that the paper type and size specified with the printer driver matches the type and sizeof the paper loaded in the tray. Since this machine does not detect paper sizes automatically, thetype or size of the paper may be mismatched and the print job may not print correctly.
When Using Windows
The procedure in this section is an example based on Windows 10. The actual procedure may varydepending on the operating system you are using.
PCL printer driver
1. Open the [Printing preferences] dialog box from the printer driver.
For information of how to open the printer driver properties from [Devices and Printers], seepage 100 "Displaying the Printing Preferences Dialog Box".
The [Printing Preferences] dialog box appears.
M0ESDC8105
2. Click the [Paper] tab.
3. In the [Input Tray:] list, select the paper tray you want to use for printing.
4. In the [Paper Type:] list, select the type of paper that is loaded in the paper tray.
2. Paper Specifications and Adding Paper
74

5. Select the [Print On] check box and select the size of the paper that is loaded in thepaper tray.
Clear the [Fit to Print Size] check box as necessary.
6. Click [OK].
PostScript printer driver
1. Open the [Printing preferences] dialog box from the printer driver.
M0ESDC8106
2. Click the [Paper/Quality] tab.
3. In the [Paper Source:] list, select the paper tray you want to use for printing.
4. In the [Media:] list, select the type of paper that is loaded in the paper tray.
5. Click [OK].
When Using macOS
The procedure in this section is an example based on macOS 11.2.3. The actual procedure may varydepending on the operating system you are using.
1. Start System Preferences.
2. Click [Printers & Scanners].
3. Select the printer you are using.
4. In the [Default paper Size:] list, select the size of the document to be printed.
Specifying Paper Type and Paper Size Using the Printer Driver
75

• The paper sizes that can be selected on the macOS printer driver are: A4/Letter/A5/Legal (andCom10/Monarch/DL Env/C5 Env from [Bypass Tray])
2. Paper Specifications and Adding Paper
76

Supported Paper
• After loading paper in the tray, specify the paper type and size using the control panel or usingSmart Organizing Monitor and the printer driver. This machine does not detect the paper sizeautomatically.
• When loading custom size paper into Tray 1 or the bypass tray, specify the width and length usingthe control panel or using Smart Organizing Monitor and the printer driver.
• When printing on custom size paper from the bypass tray, you can print without specifying thepaper type or paper size from the control panel depending on the settings for [Bypass TrayPriority].
Tray 1
Type Size Weight Capacity
Plain Paper
Recycled Paper
Thick Paper 1
Thick Paper 2
Thin Paper
Letterhead
Preprinted Paper
Label Paper
Prepunched Paper
Bond Paper
Cardstock
Color Paper
A4
B5 JIS
A5 LEF (210 × 148 mm)
A5 SEF
B6 JIS
A6
81/2 × 14
81/2 × 11
51/2 × 81/2
81/2 × 14
81/2 × 13
16K
81/2 × 132/5
81/2 × 133/5
8.11 × 13.3
52 to 162 g/m2
(14 to 43 lb.)
250
(80 g/m2, 20 lb.)
Supported Paper
77

Type Size Weight Capacity
Plain Paper
Recycled Paper
Thick Paper 1
Thick Paper 2
Thin Paper
Letterhead
Preprinted Paper
Label Paper
Prepunched Paper
Bond Paper
Cardstock
Color Paper
Custom size:
100 to 216 mm in width,
148 to 356 mm in length
(3.94 to 8.50 inches in width,
5.83 to 14.02 inches in length)
52 to 162 g/m2
(14 to 43 lb.)
250
(80 g/m2, 20 lb.)
Tray 2 (option)
Type Size Weight Capacity
Thin Paper
Plain Paper
Thick Paper 1
Recycled Paper
Color Paper
Preprinted Paper
Prepunched Paper
Letterhead
A4
B5 JIS
A5 SEF
81/2 × 14
81/2 × 132/5
81/2 × 11
51/2 × 81/2
60 to 105 g/m2
(16 to 28 lb.)
250
(80 g/m2, 20 lb.)
2. Paper Specifications and Adding Paper
78

Bypass tray
Type Size Weight Capacity*1
Plain Paper
Recycled Paper
Thick Paper 1
Thick Paper 2
Thin Paper
Letterhead
Envelope
Label Paper
Preprinted Paper
Prepunched Paper
Bond Paper
Cardstock
Color Paper
A4
B5 JIS
A5 LEF (210 × 148 mm)
A5 SEF
B6 JIS
A6
81/2 × 14
81/2 × 11
51/2 × 81/2
81/2 × 13
16K
41/8 × 91/2
37/8 × 71/2
C5 Env
C6 Env
DL Env
81/2 × 132/5
81/2 × 133/5
8.11 × 13.3
52 to 162 g/m2
(14 to 43 lb.)
50
(80 g/m2, 20 lb.)
Supported Paper
79

Type Size Weight Capacity*1
Plain Paper
Recycled Paper
Thick Paper 1
Thick Paper 2
Thin Paper
Letterhead
Envelope
Label Paper
Preprinted Paper
Prepunched Paper
Bond Paper
Cardstock
Color Paper
Custom size:
90 to 216 mm in width,
140 to 356 mm in length
(3.54 to 8.50 inches in width,
5.51 to 14.02 inches in length)
52 to 162 g/m2
(14 to 43 lb.)
50
(80 g/m2, 20 lb.)
*1 The number of envelopes that can be loaded is up to 8.
Specifications of Paper Types
The following tables describe the types of paper that can be used with this machine.
• Depending on the paper type, the toner may take a while to dry. Before handling printed sheets,make sure that they have fully dried. Otherwise, the toner may smudge.
• Print quality can be guaranteed only if recommended paper is used. For more information aboutthe recommended paper, contact your sales or service representative.
Plain Paper
Item Description
Paper thickness 65 to 99 g/m2 (17 to 27 lb.)
Supported paper tray Can be used with any of the paper trays.
2. Paper Specifications and Adding Paper
80

Item Description
Duplex supported size A4
81/2 × 14
81/2 × 11
81/2 × 13
81/2 × 132/5
81/2 × 133/5
8.11 × 13.3
Thick Paper 1
Item Description
Paper thickness 100 to 130 g/m2 (27 to 35 lb.)
Supported paper tray Can be used with any of the paper trays.*1
Duplex supported size A4
81/2 × 11
81/2 × 14
81/2 × 13
81/2 × 132/5
81/2 × 133/5
8.11 × 13.3
*1 You can use thick paper that is 105 g/m2 or less when using Tray 2 or the duplex function.
Thick Paper 2
Item Description
Paper thickness 131 to 162 g/m2 (35 to 43 lb.)
Supported paper tray Tray 1 and bypass tray
Duplex supported size None
Supported Paper
81

Thin Paper
Item Description
Paper thickness 52 to 64 g/m2 (14 to 16 lb.)
Supported paper tray Can be used with any of the paper trays.*1
Duplex supported size A4
81/2 × 14
81/2 × 11
81/2 × 13
81/2 × 132/5
81/2 × 133/5
8.11 × 13.3
*1 You can use thin paper that is 60 g/m2 or more when using Tray 2 or the duplex function.
Recycled Paper
Item Description
Paper thickness 75 to 90 g/m2 (20 to 24 lb.)
Supported paper tray Can be used with any of the paper trays.
Duplex supported size A4
81/2 × 14
81/2 × 11
81/2 × 13
81/2 × 132/5
81/2 × 133/5
8.11 × 13.3
Notes If the paper thickness is outside the specified range, select [Thin Paper],[Plain Paper], [Thick Paper 1], or [Thick Paper 2].
2. Paper Specifications and Adding Paper
82

Color Paper
Item Description
Paper thickness 75 to 90 g/m2 (20 to 24 lb.)
Supported paper tray Can be used with any of the paper trays.
Duplex supported size A4
81/2 × 14
81/2 × 11
81/2 × 13
81/2 × 132/5
81/2 × 133/5
8.11 × 13.3
Notes If the paper thickness is outside the specified range, select [Thin Paper],[Plain Paper], [Thick Paper 1], or [Thick Paper 2].
Preprinted Paper
Item Description
Paper thickness 75 to 90 g/m2 (20 to 24 lb.)
Supported paper tray Can be used with any of the paper trays.
Duplex supported size A4
81/2 × 14
81/2 × 11
81/2 × 13
81/2 × 132/5
81/2 × 133/5
8.11 × 13.3
Notes If the paper thickness is outside the specified range, select [Thin Paper],[Plain Paper], [Thick Paper 1], or [Thick Paper 2].
Supported Paper
83

Prepunched Paper
Item Description
Paper thickness 75 to 90 g/m2 (20 to 24 lb.)
Supported paper tray Can be used with any of the paper trays.
Duplex supported size A4
81/2 × 14
81/2 × 11
81/2 × 13
81/2 × 132/5
81/2 × 133/5
8.11 × 13.3
Notes If the paper thickness is outside the specified range, select [Thin Paper],[Plain Paper], [Thick Paper 1], or [Thick Paper 2].
Letterhead
Item Description
Paper thickness 100 to 130 g/m2 (27 to 35 lb.)
Supported paper tray Can be used with any of the paper trays.*1
Duplex supported size A4
81/2 × 14
81/2 × 11
81/2 × 13
16K
81/2 × 132/5
81/2 × 133/5
8.11 × 13.3
Notes Paper that has a thickness outside the specified range cannot be printedonto.
*1 You can use Letterhead that is 105 g/m2 or less when using Tray 2 or the duplex function.
2. Paper Specifications and Adding Paper
84

Bond Paper
Item Description
Paper thickness 100 to 160 g/m2 (27 to 43 lb.)
Supported paper tray Tray 1 and bypass tray
Duplex supported size None
Notes If the paper thickness is outside the specified range, select [Thin Paper],[Plain Paper], [Thick Paper 1], or [Thick Paper 2].
Cardstock
Item Description
Paper thickness 100 to 160 g/m2 (27 to 43 lb.)
Supported paper tray Tray 1 and bypass tray
Duplex supported size None
Notes If the paper thickness is outside the specified range, select [Thin Paper],[Plain Paper], [Thick Paper 1], or [Thick Paper 2].
Label Paper
Item Description
Paper thickness 100 to 160 g/m2 (27 to 43 lb.)
Supported paper tray Tray 1 and bypass tray
Duplex supported size None
Notes Avoid using adhesive label paper on which glue is exposed. Glue may stickto the inner parts of the machine, which can cause paper feed problems,deterioration in print quality, or premature wear of the print cartridge'sphoto conductor unit.
Supported Paper
85

Envelope
Item Description
Supported paper tray Bypass tray
Duplex supported size None
Notes
• Avoid using self-adhesive envelopes. They may cause machine malfunctions.
• Paper can be loaded only up to the lower of the two paper limit marks of the tray.
• If printed envelopes come out badly creased, load the envelopes in the opposite direction. Also,configure the printer driver to rotate the print object 180 degrees. For details about changing theorientation see the printer driver Help.
• Environmental factors can degrade the print quality on both recommended and non-recommendedenvelopes.
• If envelopes are severely curled after printing, flatten them by bending them back against the curl.
• After printing, envelopes sometimes have creases along their long edges and toner smear on theirunprinted sides. Print images might also be blurred. When printing large, black-solid areas, stripingcan occur as a result of the envelopes overlapping.
• To correctly specify the length of an envelope whose flap opens along its short edge, be sure toinclude the open flap when measuring.
CER112
• Fan envelopes, and then align their edges before loading.
DAC573
2. Paper Specifications and Adding Paper
86

• When fanning envelopes, make sure they are not stuck together. If they are stuck together,separate them.
• When fanning envelopes, make sure the envelope flaps are not stuck. If they are stuck, separatethem.
• Before loading envelopes, flatten them out so that their curl does not exceed that shown as shownbelow.
DAC574
• If the curl is severe, flatten out the envelopes using your fingers, as shown below.
DAC575
Non-Recommended Paper Types
Do not use the following types of paper:
• Ink-jet printer paper
• Bent, folded, or creased paper
• Curled or twisted paper
• Torn paper
• Wrinkled paper
• Damp paper
• Dirty or damaged paper
Supported Paper
87

• Paper that is dry enough to emit static electricity
• Paper that has already been printed onto, except a preprinted letterhead paper.
Malfunctions are especially likely when using paper printed on by other than a laser printer(e.g.monochrome and color copiers, ink-jet printers, etc.)
• Thermal paper and carbon paper
• Paper weighing heavier or lighter than the limit
• Paper with windows, holes, perforations, cutouts, or embossing
• Adhesive label paper on which glue or base paper is exposed
• Paper with clips or staples
• Paper with glue on it
• When loading paper, take care not to touch the surface of the paper.
• Even if paper is adequate for the machine, poorly stored paper can cause paper misfeeds, printquality degradation, or malfunctions.
Paper Storage
• Store paper appropriately. If the paper is stored incorrectly, misfeeds, lower printing quality, ormalfunctions may result.
When storing paper:
• Do not store paper in a humid place.
• Do not store paper in direct sunlight.
• Do not stand paper on its edge.
• Store any leftover paper in a wrapping or box supplied with the paper.
Print Area
The diagram below shows the area of the paper that the machine can print on.
2. Paper Specifications and Adding Paper
88

From the printer driver
CHZ904
2
3
3
1
4 4
1. Print area
2. Feed direction
3. Approx. 4.2 mm (0.2 inches)
4. Approx. 4.2 mm (0.2 inches)
Envelope
CMC044
44
3
3
2 1
1. Print area
2. Feed direction
3. Approximately 4.2 mm (0.2 inches)
4. Approximately 4.2 mm (0.2 inches)
Supported Paper
89

Copier function
CHZ904
2
3
3
1
4 4
1. Print area
2. Feed direction
3. Leading edge: Approx. 4 mm (0.2 inches), Trailing edge: Approx. 3 mm (0.2 inches)
4. Approx. 2.8 mm (0.1 inches)
Fax function
CHZ904
2
3
3
1
4 4
1. Print area
2. Feed direction
3. Approx. 4.2 mm (0.2 inches)
4. Approx. 2 mm (0.08 inches)
2. Paper Specifications and Adding Paper
90

• Borderless printing is not supported.
• The print area may vary depending on the paper size, printer language and printer driver settings.
• For better envelope printing, we recommend you set the right, left, top, and bottom print margins toat least 15 mm (0.6 inches) each.
Supported Paper
91

Placing OriginalsThis section describes the types of originals you can set and how to place them.
Placing Originals on the Exposure Glass
This section describes the procedure for placing originals on the exposure glass.
• Do not place originals before any correction fluid and toner has completely dried. Doing so maymake marks on the exposure glass that will appear on copies.
• The original in the ADF takes precedence over the original on the exposure glass if you placeoriginals both in the ADF and on the exposure glass.
• Be careful not to hold the input tray when lifting the ADF, for the tray might be damaged.
1. Lift the ADF.
2. Place the original face down on the exposure glass. The original should be aligned to therear left corner.
DYG262
3. Lower the ADF.
Hold down the ADF with your hands when using thick, folded, or bound originals and when theADF cannot be lowered completely.
Placing Originals in the Auto Document Feeder
By using the ADF, you can scan multiple pages at once.
• Do not place different size originals in the ADF at once.
• Straighten curls in the originals before placing them in the ADF.
2. Paper Specifications and Adding Paper
92

• To prevent multiple sheets from being fed at once, fan the pages of your original before placingthem in the ADF.
• Place the original squarely.
1. Open the cover of the input tray for the ADF and adjust the guides according to the size ofthe original.
DYG263
2. Place the aligned originals face up in the ADF. The last page should be on the bottom.
DYG264
• When placing originals longer than A4 or 81/2 × 11, pull out the ADF tray's extenders.
About Originals
This section describes the types of originals that can be placed and the parts of the original that areunscannable.
Recommended size of originals
This section describes the recommended size of the original.
Exposure glass
Up to 216 mm (8.5 inches) in width, up to 297 mm (11.7 inches) in length
Placing Originals
93

ADF
• Paper size: 140 to 216 mm (51/2 to 81/2 inches) in width, 140 to 356 mm (51/2 to 14inches) in length
• Paper weight: 52 to 105 g/m2 (13.8 to 28.0 lb.)
• Only 1 sheet of an original can be placed on the exposure glass at a time.
• In the ADF, up to 35 sheets of originals can be placed at once (when using paper weighing 80g/m2, 20 lb.).
Types of originals not supported by the Auto Document Feeder
If placed in the ADF, the following types of original might be damaged or become jammed, or result ingray or black lines appearing on prints:
• Originals larger or heavier than recommended
• Stapled or clipped originals
• Perforated or torn originals
• Curled, folded, or creased originals
• Pasted originals
• Originals with any kind of coating, such as thermal fax paper, art paper, aluminum foil, carbonpaper, or conductive paper
• Originals with perforated lines
• Originals with indexes, tags, or other projecting parts
• Sticky originals such as translucent paper
• Thin, highly flexible originals
• Thick originals such as postcards
• Bound originals such as books
• Transparent originals such as OHP transparencies or translucent paper
• Originals that are wet with toner or white out
Unscannable image area
Even if you correctly place originals in the ADF or on the exposure glass, margins of a few millimeters onall four sides of the original might not be scanned.
2. Paper Specifications and Adding Paper
94

CES107
Margins when using exposure glass
In copier mode In scanner mode In fax mode
Top 4 mm (0.2 inches) 0 mm (0 inches) 0 mm (0 inches)
Right 3 mm (0.1 inches) 0 mm (0 inches) 0 mm (0 inches)
Left 3 mm (0.1 inches) 0 mm (0 inches) 0 mm (0 inches)
Bottom 3.3 mm (0.1 inches) 0 mm (0 inches) 0 mm (0 inches)
Margins when using ADF
In copier mode In scanner mode In fax mode
Top 4 mm (0.2 inches) 0 mm (0 inches) 0 mm (0 inches)
Right 3 mm (0.1 inches) 0 mm (0 inches) 0 mm (0 inches)
Left 3 mm (0.1 inches) 0 mm (0 inches) 0 mm (0 inches)
Bottom 3.3 mm (0.1 inches) 2 mm (0.08 inches) 0 mm (0 inches)
Placing Originals
95

2. Paper Specifications and Adding Paper
96

3. Printing DocumentsThis chapter describes how to configure settings on the printer driver and print documents.
What You Can Do with the Printer FunctionDuplex printing
You can print on both sides of a sheet of paper. For details, see the printer driver Help.
DSG261
Combined printing
You can combine multiple pages and print them on a single sheet of paper. For details, see theprinter driver Help.
1
2 3
DSG262
97

Configuring Option Settings for the PrinterWhen bidirectional communication works correctly, your computer obtains information about option,paper size and paper feed direction settings from the machine automatically. Bidirectionalcommunication also allows you to monitor machine status.
Conditions for Bidirectional Communication
To support bidirectional communication, the following conditions must be met:
When connected with the network
• The Standard TCP/IP port must be used.
• In addition to the above, one of the following conditions must also be met:
• The TCP/IP protocol or the IPP protocol is used. (When using the IPP protocol, the IPPport name must include the IP address.)
When connected with USB
• The machine must be connected to the computer's USB port using the USB interface cable.
• The computer must support bidirectional communication.
• [Enable bidirectional support] must be selected, and [Enable printer pooling] must not beselected on the [Ports] tab with the printer driver.
If Bidirectional Communication is Disabled
This section describes how to set up option and setting of paper size for each tray on your computermanually.
• Manage Printers permission is required to change the printer properties. Log on as anAdministrators group member.
When using Windows
The procedure in this section is an example based on Windows 10.
1. On the [Start] menu, select [Control Panel] under [Windows System].
2. Click [View devices and printers].
3. Right-click the machine's icon, and then click [Printer properties].
4. Click the [Accessories] tab.
5. Select options installed from the [Options] area, and then make the necessary settings.
3. Printing Documents
98

6. Click [Paper Size Settings] tab.
7. In [Input Tray:] select which trays to use, and then, in [Paper Size:] select the size of thepaper that you want to load in each tray.
Click [Update] to apply the setting for each tray.
8. Click [Apply].
9. Click [OK] to close the printer properties window.
When using macOS
The following procedure is explained using macOS 11.2.3 as an example.
1. Start System Preferences.
2. Click [Printers & Scanners].
3. Select the printer you are using, and then click [Options & Supplies...].
4. Click [Options], and then configure settings as needed.
5. Click [OK].
6. Quit System Preferences.
Configuring Option Settings for the Printer
99

Displaying the Printing Preferences Dialog BoxTo change the default settings of the printer driver, configure settings in the [Printing preferences] dialogbox.
To change the default settings of all applications, open the [Printing preferences] dialog box from theOS. For details, see page 100 "Displaying the Printing Preferences Dialog Box from the [Start] Menu".To change the default settings of a specific application, open the [Printing preferences] dialog box fromthat application. For details, see page 100 "Displaying the Printing Preferences Dialog Box in anApplication".
Displaying the Printing Preferences Dialog Box from the [Start] Menu
This section explains how to open the [Printing preferences] dialog box from [Devices and Printers].
• When the printer driver is distributed from the print server, the setting values specified by the serverare displayed as the default for [Printing Defaults...].
• You cannot configure different print settings for each user. The settings configured in this dialog boxare used as the default.
1. On the [Start] menu, select [Control Panel] under [Windows System].
2. Click [View devices and printers].
3. Right-click the icon of the printer you want to use.
4. Click [Printing preferences].
Displaying the Printing Preferences Dialog Box in an Application
You can make printer settings for a specific application. To make printer settings for a specificapplication, open the [Printing preferences] dialog box from that application.
The settings displayed in the [Printing preferences] dialog box opened from the [Devices and Printers]window are applied as the default in the [Printing preferences] dialog box opened in an application.When printing from an application, modify the settings as required.
Displaying the printing preferences dialog box in an application when usingWindows
The screens displayed may differ depending on the application. The following procedure explains howto print documents from an application using WordPad in Windows 10 as an example.
1. Click [File] in the upper left corner of the window, and then click [Print].
3. Printing Documents
100

2. In the [Select Printer] list, select the printer you want to use.
3. Click [Preferences].
• Procedures for opening the [Printing preferences] dialog box vary depending on the application.For details, see the printer driver Help or the manuals provided with the application.
Displaying the printing preferences dialog box in an application when using macOS
The following procedure is explained using macOS 11.2.3 as an example.
1. Open the document to print.
2. Select [Print...] on the [File] menu.
3. Check that the machine name or IP address you are using is selected in the [Printer:]popup menu.
If the machine name or IP address you are using is not selected in the [Printer:] list, click the list, andthen select the machine.
Displaying the Printing Preferences Dialog Box
101

Basic Operation of PrintingThe following procedure explains how to perform basic printing.
• Duplex printing is selected as the default setting.
When Using Windows
The procedure in this section is an example based on Windows 10 and PCL6 driver. The actualprocedure may vary depending on the operating system you are using.
For details of printing options, see the printer driver Help.
1. Open the printer properties dialog box in your document's application.
For details about how to open the printer properties dialog box, see page 100 "Displaying thePrinting Preferences Dialog Box in an Application".
For details about each setting, click [Help]. You can also click the information icons to showconfiguration information.
2. Set printing options as necessary, and then click [OK].
The printer properties dialog box closes.
3. Click [Print].
• When printing a job is restricted, specify the user code in the printer properties of the printer driverbefore printing. For details about user code, see page 352 "Restricting Machine FunctionsAccording to User".
3. Printing Documents
102

• In the following setting menu, you can specify which paper tray is selected first when the trays areautomatically selected while you are printing. For details about [Paper Tray Priority], seepage 269 "Paper Settings (When Using the Touch Panel Model)" or page 310 "Tray PaperSettings (When Using the Four-line LCD Panel Model)".
• When using the touch panel model: [Paper Tray Priority] under [Paper Settings]
• When using the four-line LCD panel model: [Paper Tray Priority] under [Tray Paper Settings]
• If a paper jam occurs, printing stops after the current page has been printed out. After the jammedpaper is removed, printing restarts from the jammed page automatically. For details about how toremove the jammed paper, see page 422 "Removing Paper Jams".
• After printing on envelopes, make sure to pull up the levers for printing on envelopes back to theiroriginal positions. Leaving the levers lowered can cause print quality problems when printing onpaper other than envelopes. For details about the levers for printing on envelopes, see page 58"Loading Paper".
When Using macOS
The procedure in this section is an example based on macOS 11.2.3. The actual procedure may varydepending on the operating system you are using.
1. Open the printer properties dialog box in your document's application.
For details, see page 101 "Displaying the printing preferences dialog box in an application whenusing macOS".
2. Set printing options as necessary, and then click [OK].
The printer properties dialog box closes.
3. Click [Print].
• In the following setting menu, you can specify which paper tray is selected first when the trays areautomatically selected while you are printing. For details about [Paper Tray Priority], seepage 269 "Paper Settings (When Using the Touch Panel Model)" or page 310 "Tray PaperSettings (When Using the Four-line LCD Panel Model)".
• When using the touch panel model: [Paper Tray Priority] under [Paper Settings]
• When using the four-line LCD panel model: [Paper Tray Priority] under [Tray Paper Settings]
• If a paper jam occurs, printing stops after the current page has been printed out. After the jammedpaper is removed, printing restarts from the jammed page automatically. For details about how toremove the jammed paper, see page 422 "Removing Paper Jams".
• After printing on envelopes, make sure to pull up the levers for printing on envelopes back to theiroriginal positions. Leaving the levers lowered can cause print quality problems when printing on
Basic Operation of Printing
103

paper other than envelopes. For details about the levers for printing on envelopes, see page 58"Loading Paper".
If a Paper Mismatch Occurs
The machine reports an error if:
• The paper size does not match the print job's machine settings when the following machine's settingitem is enabled.
• When using the touch panel model: [Size Mismatch Detctn] under [Paper Settings]
• When using the four-line LCD panel model: [Size Mismatch Detection] under [Tray PaperSettings]
• The paper type does not match the print job's settings when [Input Tray:] is set to [Auto Tray Select]on the printer driver.
There are two ways to resolve these errors:
Continue printing using mismatched paper
Ignore the error and print using mismatched paper.
Cancel the print job
Cancel printing.
• For details about "size mismatch detection", see page 269 "Paper Settings (When Using the TouchPanel Model)" or page 310 "Tray Paper Settings (When Using the Four-line LCD Panel Model)".
• If [Auto Continue] under [System Settings] is enabled, the machine ignores the paper type and sizesettings and prints on whatever paper is loaded. Printing stops temporarily when the error isdetected, and restarts automatically after about ten seconds using the settings made on the controlpanel. For details about [Auto Continue], see page 259 "System Settings (When Using the TouchPanel Model)" or page 300 "System Settings (When Using the Four-line LCD Panel Model)".
Continuing printing using mismatched paper
If the paper is too small for the print job, the printed image will be cropped.
When using the touch panel model
1. While the error message is displayed, press [Form Feed].
3. Printing Documents
104

When using the four-line LCD panel model
1. While the error message is displayed, press the [OK] key.
DYG400
Canceling a Print Job
You can cancel print jobs using either the machine's control panel or your computer, depending on thestatus of the job.
Canceling a print job before printing has started
Windows
1. Double-click the printer icon on the task tray of your computer.
2. Select the print job you want to cancel, click the [Document] menu, and then click[Cancel].
3. Click [Yes].
macOS
1. Start System Preferences.
2. Click [Printers & Scanners].
3. Select the printer you are using, and then click [Open Print Queue...].
4. Select the queue you want to delete.
5. Click [×].
• If you cancel a print job that has already been processed, printing may continue for a few pagesbefore being canceled.
• It may take a while to cancel a large print job.
Basic Operation of Printing
105

Canceling a print job while printing
When using the touch panel model
1. Press the [Clear/Stop] key.
DYG330
2. Press [Print Jobs] on the [Cancel Jobs] screen.
When using the four-line LCD panel model
1. Press the [Clear/Stop] key.
DYG328
3. Printing Documents
106
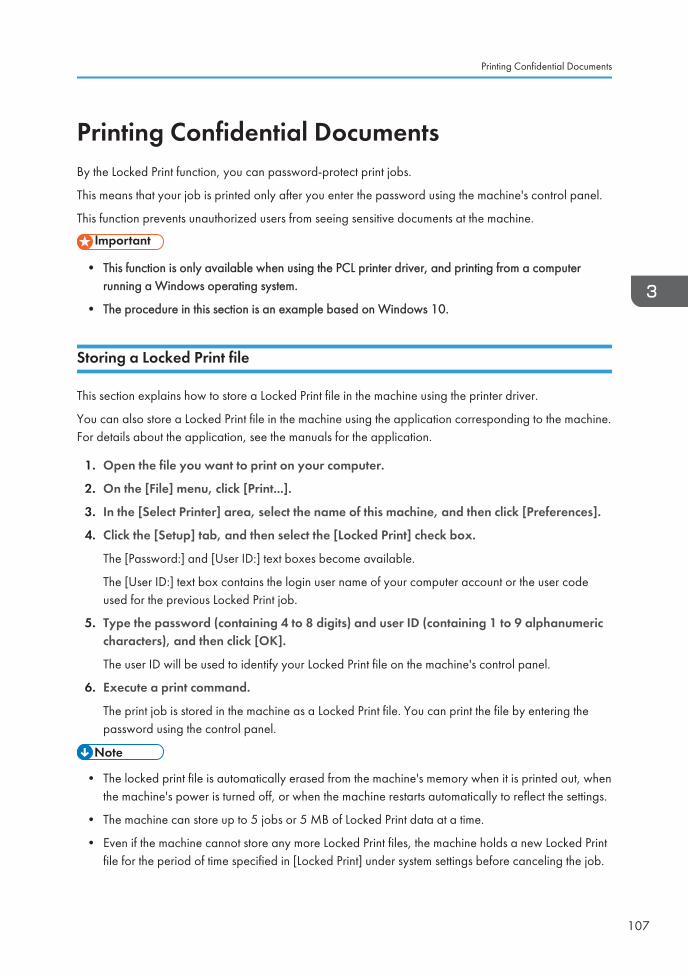
Printing Confidential DocumentsBy the Locked Print function, you can password-protect print jobs.
This means that your job is printed only after you enter the password using the machine's control panel.
This function prevents unauthorized users from seeing sensitive documents at the machine.
• This function is only available when using the PCL printer driver, and printing from a computerrunning a Windows operating system.
• The procedure in this section is an example based on Windows 10.
Storing a Locked Print file
This section explains how to store a Locked Print file in the machine using the printer driver.
You can also store a Locked Print file in the machine using the application corresponding to the machine.For details about the application, see the manuals for the application.
1. Open the file you want to print on your computer.
2. On the [File] menu, click [Print...].
3. In the [Select Printer] area, select the name of this machine, and then click [Preferences].
4. Click the [Setup] tab, and then select the [Locked Print] check box.
The [Password:] and [User ID:] text boxes become available.
The [User ID:] text box contains the login user name of your computer account or the user codeused for the previous Locked Print job.
5. Type the password (containing 4 to 8 digits) and user ID (containing 1 to 9 alphanumericcharacters), and then click [OK].
The user ID will be used to identify your Locked Print file on the machine's control panel.
6. Execute a print command.
The print job is stored in the machine as a Locked Print file. You can print the file by entering thepassword using the control panel.
• The locked print file is automatically erased from the machine's memory when it is printed out, whenthe machine's power is turned off, or when the machine restarts automatically to reflect the settings.
• The machine can store up to 5 jobs or 5 MB of Locked Print data at a time.
• Even if the machine cannot store any more Locked Print files, the machine holds a new Locked Printfile for the period of time specified in [Locked Print] under system settings before canceling the job.
Printing Confidential Documents
107

Within this time, you can print or delete the new Locked Print file. You can also print or delete anexisting Locked Print file so that the new Locked Print file can be stored in the machine.
Printing a Locked Print file
When using the touch panel model
When there is a Locked Print file stored in the machine, "Locked Print Job" appears on themachine's control panel display when the machine is in the copier, fax, scanner, or ID card copymode.
Also, "Locked Print Job" appears on the [Status] screen.
Use the following procedure to unlock and print the Locked Print file.
1. Press the [Home] key.
DYG322
2. Press the [Status] icon on the [Home] screen.
3. Printing Documents
108

3. Press the [Locked Print] tab.
You can also display the Locked Print file list by pressing [Check] on the [Status] tab.
4. Select the file you want to print.
Identify the Locked Print file by checking its time stamp and user ID.
5. Press [Print Jobs].
6. Press the [Locked Print Password:] box.
To use the application to start printing a locked print file, hold a smart device on which theapplication corresponding to the machine is running.
7. Enter the password, and then press [OK].
8. Press [OK].
When using the four-line LCD panel model
When there is a Locked Print file stored in the machine, "Locked Print Job" and "Press User Toolskey." appears on the machine's control panel display.
Use the following procedure to unlock and print the Locked Print file.
1. Press the [User Tools] key.
2. Press the [ ] or [ ] key to select the file you want to print, and then press the [OK]key.
Identify the Locked Print file by checking its time stamp and user ID.
3. Select [Print].
4. Enter the password using the number keys.
Press the [Back] key to discard the current digits and exit to the previous level of the menu tree.
To use the application to start printing a locked print file, hold a smart device on which theapplication corresponding to the machine is running.
5. Press the [OK] key.
The Locked Print file is printed.
• While entering a password using the control panel, the machine cannot process other print jobs.
Deleting a Locked Print file
When using the touch panel model
When there is a Locked Print file stored in the machine, "Locked Print Job" appears on themachine's control panel display when the machine is in the copier, fax, scanner, or ID card copymode.
Printing Confidential Documents
109

Also, "Locked Print Job" appears on the [Status] screen.
Use the following procedure to delete a Locked Print file. You do not need to enter a password todelete a Locked Print file.
1. Press the [Home] key.
DYG322
2. Press the [Status] icon on the [Home] screen.
3. Press the [Locked Print] tab.
You can also display the Locked Print file list by pressing [Check] on the [Status] tab.
4. Select the file you want to delete.
Identify the Locked Print file by checking its time stamp and user ID.
5. Press [Delete Jobs].
The Locked Print file is deleted.
3. Printing Documents
110

When using the four-line LCD panel model
When there is a Locked Print file stored in the machine, "Locked Print Job" and "Press User Toolskey." appears on the machine's control panel display.
Use the following procedure to unlock and print the Locked Print file. You do not need to enter apassword to delete a Locked Print file.
1. Press the [User Tools] key.
2. Press the [ ] or [ ] key to select the file you want to delete, and then press the [OK]key.
Identify the Locked Print file by checking its time stamp and user ID.
3. Select [Delete].
The Locked Print file is deleted.
If there are Locked Print files/logs remaining in the machine, the display returns to the list ofLocked Print files/logs. If there are none remaining, the display returns to the initial screen.
Printing Confidential Documents
111

Using Various Print FunctionsThis section briefly describes various print functions that you can configure with the printer driver to makeprintouts appropriate for your purposes.
Print Quality Functions
Print quality and color tone can be adjusted to suit the print data. Some of the print quality settings youcan configure are described below.
Changing the image printing method
You can select to print with priority on print quality or print speed. When printing images, the higherthe resolution of images, the longer the time required for printing.
Changing the graphics mode
You can send graphic information to the machine as either raster or vector images. Most geometricshapes or patterns print faster as vector images than as raster images. However, if certain graphicsdo not print as they appear on the screen, try to print them as raster images.
Saving toner when printing
You can save toner by printing with lower toner consumption. While this increases the life of theprint cartridge, the output appears slightly lighter.
Changing the printable area
You can change the printable area when printing a document printed on a single page with onemachine is printed on two separate pages with another machine, or vice-versa.
Changing the method of downloading TrueType fonts to the machine
When you print documents that contain characters in TrueType fonts, garbled or distortedcharacters may be printed. Changing the method of downloading TrueType fonts may help to solvethe problem.
Changing the dither pattern
A dither pattern is a pattern of dots used to simulate a color or shade of an image. If the pattern ischanged, the characteristics of the image will also change. You can select a pattern suitable for theimage to be printed.
• Some of the functions described above might not be available depending on the printer driver oroperating system. For details, see the printer driver Help.
3. Printing Documents
112

Print Output Functions
You can specify the form of print outputs according to your purposes. This section briefly describes someof the settings that you can specify.
Printing multiple sets of a document
You can print multiple sets of the same document.
Collating the output in document batches
You can print complete sets of a multiple-page document one set at a time (P1, P2, P1, P2 ...). If thisfunction is not used when printing multiple sets, prints will be output in page batches (P1, P1, P2,P2 ...). This function is useful when, for example, making presentation materials.
Changing orientation or rotating the image
You can change the orientation of an image to portrait or landscape. You can also rotate theimage by 180 degrees. Use rotation to prevent an image from being printed upside down whenusing paper with a predefined top and bottom (such as letterhead paper).
Printing multiple pages per sheet
You can print multiple pages onto one sheet of paper.
When using this function, a suitable reduction ratio is selected automatically based on the papersize and the number of pages you want to fit on each sheet.
Printing on both sides of paper (duplex printing)
You can print on both sides of paper.
Reducing or enlarging the document
You can reduce or enlarge documents by a specific ratio, from 25% to 400% in 1% increments.
You can also reduce or enlarge documents automatically to fit a specific paper size. This function isuseful, for example, when printing Web pages.
If the [Enable Large Papers] option is selected, A3/11 × 17/B4/8K documents can be scaled toa size that the machine supports, so that it can then be printed out.
Not printing of blank pages
If a print job contains blank pages, they can be prevented from being printed.
Note that this setting has higher priority than [Blank Page Print] under printer feature settings of thecontrol panel.
Printing with a cover page
You can add a cover page to the print job.
You can select to leave the cover page blank, or print the first page of the document on the coverpage. If a cover page is inserted into a duplex job, you can print on its back side also.
Paper for the cover page can either be the same as or different from the remaining pages.
Using Various Print Functions
113

Printing on custom size paper
You can print using non-standard size paper by specifying the size of the paper as custom size.
To specify the custom paper size, select [Custom Paper Size] from the [Document Size:] list, andthen click the [Custom Paper Size...] button in the lower part of the dialog box to configure thepaper size.
Superimposing text on prints (watermark)
You can superimpose watermark text on prints. Various predefined watermarks are provided. Youcan also create your own watermarks.
• Some of the functions described above might not be available depending on the printer driver oroperating system. For details, see the printer driver Help.
3. Printing Documents
114

4. Copying OriginalsThis chapter describes the basic and advanced procedures for making copies and how to specifysettings.
What You Can Do with the Copier FunctionDuplex copying
You can copy two pages onto both sides of a single sheet of paper. For details about the settings,see page 125 "Copying Single-Sided Originals with 2-Sided and Combined Printing" andpage 130 "Copying 2-Sided Originals with 2-Sided and Combined Printing".
DYG379
Combined copying
You can copy multiple pages onto a single sheet of paper. For details about the settings, seepage 125 "Copying Single-Sided Originals with 2-Sided and Combined Printing" and page 130"Copying 2-Sided Originals with 2-Sided and Combined Printing".
1
2 3
DYG380
ID card copying
ID card copying allows you to copy the front and back sides of an ID card or passport onto oneside of a sheet of paper. For details, see page 135 "Copying an ID Card".
DYG381
1
2
115

Copier Mode ScreenThis section provides information about the screen when the machine is in copier mode.
When using the touch panel model
M0ESPC5133
1 3 4
5
2
6
9
78
1. Current status or messages
Displays the current status or messages.
2. Paper tray status indicators
Displays paper tray settings.
3. Favorite item icon
Press to register current settings to a favorite item.
4. Copy quantity
Displays the numbers of copies set and copies made. You can change the copy quantity using thenumber keys.
5. Reduce/Enlarge ratio
You can specify the enlargement and reduction ratios if [Reduce/Enlarge] is pressed.
6. [Other Settings]
Press to display the functions you can use.
7. [Sort]
Configures the machine to sort the output pages into sets when making multiple copies of a multipagedocument.
8. Original and scanning settings
Press to specify the original type and image density level.
4. Copying Originals
116

9. [Sim to Dup], [Dup to Dup]
Press to set the duplex function.
When using the four-line LCD panel model
M0ESIC0114
1. Current status or messages
Displays the current status or messages.
2. Current settings
Displays the current tray, reproduction ratio, and scan settings.
3. Selection key items
Displays the functions you can use by pressing the corresponding selection keys.
4. Copy quantity
Displays the current copy quantity. You can change the copy quantity using the number keys.
• The start-up mode can be specified in the [Function Priority] setting under the administrator settings.For details, see page 274 "Administrator Tools Settings (When Using the Touch Panel Model)" orpage 316 "Administrator Tools Settings (When Using the Four-line LCD Panel Model)".
Copier Mode Screen
117

Basic Operation of Copying
• The original in the ADF takes precedence over the original on the exposure glass if you placeoriginals both in the ADF and on the exposure glass.
• Duplex copying is selected as the default setting.
When using the touch panel model
1. Press the [Home] key.
DYG322
2. Press the [Copier] icon on the [Home] screen.
3. Place the original on the exposure glass or in the ADF.
To place the original, see page 92 "Placing Originals". If necessary, configure advancedphotocopy settings.
4. To make multiple copies, enter the number of copies using the number keys.
5. Press the [Start] key.
DYG336
4. Copying Originals
118

When using the four-line LCD panel model
1. Press the [Copy] key.
DYG331
2. Place the original on the exposure glass or in the ADF.
To place the original, see page 92 "Placing Originals". If necessary, configure advancedphotocopy settings.
3. To make multiple copies, enter the number of copies using the number keys.
4. Press the [Start] key.
DYG334
• The maximum number of copies is 99.
• You can change the paper tray temporarily for printing out copies. To change the setting, press theicon indicating the tray if you are using the touch panel model, or press the [ ] or [ ] key if you areusing the four-line LCD panel model. Also, you can select to change the paper tray automaticallyaccording to the paper size (A4 or Letter).
• You can select the paper tray for printing out copies in [Select Paper] under copy settings. If you setthe machine to switch between Tray 1 and other trays automatically depending on the paper sizein this setting, you can also specify the tray the machine uses first in [Paper Tray Priority] under thepaper settings. For [Select Paper], see page 241 "Copier Features Settings (When Using theTouch Panel Model)" or page 293 "Copier Features Settings (When Using the Four-line LCD Panel
Basic Operation of Copying
119

Model)". For [Paper Tray Priority], see page 269 "Paper Settings (When Using the Touch PanelModel)" or page 310 "Tray Paper Settings (When Using the Four-line LCD Panel Model)".
• When making multiple copies of a multi-page document, you can select whether copies are outputin collated sets, or in page batches in the [Sort] setting under copy settings. For [Sort], seepage 241 "Copier Features Settings (When Using the Touch Panel Model)" or page 293 "CopierFeatures Settings (When Using the Four-line LCD Panel Model)".
• When making multiple copies of a multi-page document, you can select whether copies are outputin collated sets, or in page batches in the [Sort] setting under copy settings. For [Sort], seepage 241 "Copier Features Settings (When Using the Touch Panel Model)".
• If a paper jam occurs, printing stops after the current page has been printed out. After the jammedpaper is removed, printing restarts from the jammed page automatically.
• If a scanning jam occurs in the ADF, copying is canceled immediately. In this case, copy theoriginals again starting from the jammed page. For the direction to remove the jammed paper, seepage 422 "Removing Paper Jams".
Canceling a Copy
While scanning the original
If copying is canceled while the machine is scanning the original, copying is cancelled immediatelyand there is no printout.
When the original is set in the ADF, scanning stops immediately and all the originals are ejected.
While printing (when using the touch panel model)
If copying is canceled during printing, the photocopy process is canceled after the current pagehas been printed out.
Follow the procedure below to cancel copying.
1. Press the [Home] key.
DYG322
2. Press the [Copier] icon on the [Home] screen.
4. Copying Originals
120

3. Press the [Clear/Stop] key.
DYG330
When the [Cancel Jobs] screen appears, proceed to Step 4.
4. Press [Copy Jobs].
While printing (when using the four-line LCD panel model)
If copying is canceled during printing, the photocopy process is canceled after the current pagehas been printed out.
Follow the procedure below to cancel copying.
1. Press the [Copy] key.
DYG331
2. Press the [Clear/Stop] key.
DYG328
Basic Operation of Copying
121

Making Enlarged or Reduced CopiesThere are two ways to set the scaling ratio: using a preset ratio or manually specifying a customizedratio.
Preset ratio
CES103
• (mainly Europe and Asia)
50%, 71%, 82%, 93%, 122%, 141%, 200%, 400%
• (mainly North America)
50%, 65%, 78%, 93%, 129%, 155%, 200%, 400%
Custom ratio
CES106
25% to 400% in 1% increments.
4. Copying Originals
122

Specifying Reduce/Enlarge
When using the touch panel model
1. Press the [Home] key.
DYG322
2. Press the [Copier] icon on the [Home] screen.
3. Press [Reduce/Enlarge].
4. Select a ratio from the list or enter the ratio you require. Also, you can specify theratio by pressing [+] or [-] in increments of 1%.
5. Press [OK].
When using the four-line LCD panel model
1. Press the [Copy] key.
DYG331
2. Press [Scale].
Making Enlarged or Reduced Copies
123

3. Press [Reduce], [Enlarge], or [Zoom].
For [Reduce] or [Enlarge], press the [ ], [ ], [ ], or [ ] key to select the desired ratio. For[Zoom], specify the desired ratio using the number keys.
4. Press the [OK] key.
• You can change the machine's default [Reduce/Enlarge] setting to always make photocopies inthe specified ratio. For details, see page 241 "Copier Features Settings (When Using the TouchPanel Model)" or page 293 "Copier Features Settings (When Using the Four-line LCD PanelModel)".
• Temporary job settings are cleared in the following cases:
• When no input is received for the period of time specified in [System Reset Timer] or [SystemAuto Reset Timer] while the initial screen is displayed. For details, see page 274"Administrator Tools Settings (When Using the Touch Panel Model)" or page 316"Administrator Tools Settings (When Using the Four-line LCD Panel Model)".
• When the [Clear/Stop] key is pressed while the initial screen is displayed.
• When the machine's mode is changed.
• When the power is turned off.
• When the machine's default for the same setting is changed.
4. Copying Originals
124

Copying Single-Sided Originals with 2-Sidedand Combined PrintingThis section explains how to combine and print a multiple pages (two or four pages) on one side or bothsides of paper.
• This function is only available when the original is set in the ADF, not when it is set on the exposureglass.
• To use this function, the paper size used for printing copies must be set to A4, Letter or Legal.
• The types of paper that can be used for 2-sided copy are plain, thin, thick paper 1, recycled,color, preprinted, prepunched, and letterhead.
There are following copy modes. Select a copy mode according to your original and how you want thecopy outputs to appear.
Combined copy on one side
In this mode, a two or four-page original is combined and printed on one side of paper.
2 on 1
Por
trait
Land
scap
e
Original Copy
CMF250
Copying Single-Sided Originals with 2-Sided and Combined Printing
125

4 on 1P
ortra
itLa
ndsc
ape
Original Copy
Left to Right Top to Bottom
Left to Right Top to Bottom
CMF251
Combined copy on both sides
In this mode, a multiple-page original is combined and printed on both sides of paper.
2 on 1
Por
trait
Land
scap
e
Original Copy
Top to Top Top to Bottom
Top to Top Top to Bottom
DUE331
4. Copying Originals
126

4 on 1
8 7
6 5
8 6
7 5
65
87
75
86Por
trait
Original Copy
Left to Right, Top to Top Left to Right, Top to Bottom
Top to Bottom, Top to Top Top to Bottom, Top to Bottom
CMF255
8 7
6 5
8 6
7 5
65
87
75
86
Land
scap
e
Original Copy
Left to Right, Top to Top Left to Right, Top to Bottom
Top to Bottom, Top to Top Top to Bottom, Top to Bottom
DCT004
1 on 1
In this mode, one-sided pages are printed on the front and back sides of paper without beingcombined.
Copying Single-Sided Originals with 2-Sided and Combined Printing
127

Por
trait
Land
scap
eOriginal Copy
DYG420
Top to Top Top to Bottom
Top to Top Top to Bottom
Specifying Combined and 2-sided Copies
When using the touch panel model
1. Press the [Home] key.
DYG322
2. Press the [Copier] icon on the [Home] screen.
3. Press [Other Settings].
4. Press [Simplex to Duplex].
5. Select the desired copy mode, and then press [OK].
6. Press [OK].
4. Copying Originals
128

When using the four-line LCD panel model
1. Press the [Duplex] key.
DYG321
2. Press the [ ] or [ ] key to select the desired copy mode, and then press the [OK]key.
3. Press the [ ] or [ ] key to select paper orientation and page order, and then pressthe [OK] key.
• Setting combined and 2-sided copying automatically disables the ID card copy setting.
• You can change the machine's default [Duplex/Combine] setting to always make photocopies inthe specified ratio. For details, see page 241 "Copier Features Settings (When Using the TouchPanel Model)" or page 293 "Copier Features Settings (When Using the Four-line LCD PanelModel)".
• Temporary job settings are cleared in the following cases:
• When no input is received for the period of time specified in [System Reset Timer] or [SystemAuto Reset Timer] while the initial screen is displayed. For details, see page 274"Administrator Tools Settings (When Using the Touch Panel Model)" or page 316"Administrator Tools Settings (When Using the Four-line LCD Panel Model)".
• When the [Clear/Stop] key is pressed while the initial screen is displayed.
• When the machine's mode is changed.
• When the power is turned off.
• When the machine's default for the same setting is changed.
Copying Single-Sided Originals with 2-Sided and Combined Printing
129

Copying 2-Sided Originals with 2-Sided andCombined PrintingThis section explains how to make 2-sided copies of 2-sided originals, or copy two original pages toone sheet, or copy four original pages to one sheet with two pages per side.
DAC602
DAC603
DAC603
• You can use the exposure glass for manual duplex scanning. Other settings require the ADF.
There are following copy modes:
Combined copy on one side
• 2 on 1
Copies one 2-sided original to one side of a sheet.
• 4 on 1
Copies two 2-sided originals to one side of a sheet.
1 on 1
Makes 2-sided copies of 2-sided originals.
Combined copy on both side
• 2 on 1
4. Copying Originals
130

Copies both sides of one 2-sided original to one side of a sheet, and both sides of another 2-sided original to the other side of the sheet.
• 4 on 1
Copies four 2-sided originals to one sheet with four pages per side.
Manual duplex scan
Select this mode to make 2-sided copies using the exposure glass.
Duplex Copying Using the ADF
This function is available for the touch panel model only.
1. Press the [Home] key.
DYG322
2. Press the [Copier] icon on the [Home] screen.
3. Press [Other Settings].
4. Press [Duplex to Duplex].
5. Select the desired copy mode, and then press [OK].
6. Press [OK].
7. Place all 2-sided originals into the ADF with their fronts facing up.
DYG264
Copying 2-Sided Originals with 2-Sided and Combined Printing
131

DYH224
8. Press the [Start] key.
DYG336
• After you place the originals, press the [Start] key within the time specified in [System Reset Timer].Otherwise, the job is canceled. For details, see page 274 "Administrator Tools Settings (WhenUsing the Touch Panel Model)".
• If the memory becomes full while originals are being scanned, the job is canceled.
4. Copying Originals
132

Duplex Copying Manually Using the Exposure Glass
When using the touch panel model
1. Press the [Home] key.
DYG322
2. Press the [Copier] icon on the [Home] screen.
3. Press [Other Settings].
4. Press [Manual Duplex Scan].
5. Press [OK].
6. Place the original on the exposure glass front side down and with the top to the rearof the machine.
Place the originals one by one.
7. Press the [Start] key.
A message prompting you to place the original back side down on the exposure glassappears on the display.
8. Place the original on the exposure glass with the back side faced down and with thetop to the rear of the machine.
9. Press [Start].
When all originals have been scanned, press [Job Finished].
Copying 2-Sided Originals with 2-Sided and Combined Printing
133

When using the four-line LCD panel model
1. Press the [Duplex] key.
DYG321
2. Press the [ ] key or [ ] key to select [Manual 2 Sided Scan Mode], and then pressthe [OK] key.
3. Place the original on the exposure glass front side down and with the top to the rearof the machine.
Place the originals one by one.
4. Press the [Start] key.
A message prompting you to place the original back side down on the exposure glassappears on the display.
5. Place the original on the exposure glass with the back side faced down and with thetop to the rear of the machine.
6. Press the [Start] key again.
When all originals have been scanned, press the [ ] key.
• After you load the original, press the [Start] key within the time specified in [System Reset Timer] or[System Auto Reset Timer]. Otherwise, the job is canceled. For details, see page 274"Administrator Tools Settings (When Using the Touch Panel Model)" or page 316 "AdministratorTools Settings (When Using the Four-line LCD Panel Model)".
• Sort is not available.
4. Copying Originals
134

Copying an ID CardThis section describes how to copy the front and back sides of an ID card or other small documents ontoone side of a sheet of paper.
• You cannot use the duplex function with the ID card copy function.
• This function is available only when the original is set on the exposure glass, not when it is set in theADF.
• To use this function, the paper size used for printing copies must be set to A6, A5, A4, Half Letter,or Letter.
Printed paper size Scanned paper size
A4 A5 (148 × 210 mm)
Letter Half Letter (140 × 216 mm)
A5 A6 (105 × 148 mm)
A6 A7 (74 × 105 mm)
Half Letter Quarter of Letter size paper (70 × 108 mm)
DUE332
Copying an ID Card
135

When using the touch panel model
1. Press the [Home] key.
DYG322
2. Press the [Card] icon on the [Home] screen.
3. To make multiple copies, enter the number of copies using the number keys.
4. Place the original with the front side faced down in the upper-left corner of theexposure glass.
DYH228
5. Press the [Start] key.
DYG336
A message prompting you to place the original back side down on the exposure glassappears on the display.
4. Copying Originals
136

6. Place the original on the exposure glass with the back side faced down and with thetop to the rear of the machine, and then press [Start].
When using the four-line LCD panel model
1. Press the [Shortcut to Func.] key.
DYG403
To make the [Shortcut to Func.] key enable ID card copy mode for the current job, [Shortcut toFunction] under [Admin. Tools] must be set to [ID Card Copy Mode]. You can also assign thesetting using Web Image Monitor.
For [Shortcut to Function], see page 316 "Administrator Tools Settings (When Using the Four-line LCD Panel Model)".
2. To make multiple copies, enter the number of copies using the number keys.
3. Place the original with the front side faced down in the upper-left corner of theexposure glass.
DYH502
4. Press the [Start] key.
A message prompting you to place the original back side down on the exposure glassappears on the display.
5. Place the original on the exposure glass with the back side faced down and with thetop to the rear of the machine, and then press the [Start] key again.
Copying an ID Card
137

• Depending on the thickness of the card, shadows may appear around the edges of the copy of thecard.
• For the ID card copy function, you can set the machine to print a line in the middle of the printedpaper. Specify [Center Line] in [ID Card Setting] under [Copier Features] if you are using the touchpanel model, or specify [ID Card Center Line] in [ID Card Settings] under [Copier Features] if youare using the four-line LCD panel model.
• You can change the scanning size for the ID card function. Specify [Card Size] in [ID Card Setting]under [Copier Features] if you are using the touch panel model, or specify [ID Card Size] in [IDCard Settings] under [Copier Features] if you are using the four-line LCD panel model.
• After you load the originals, press the [Start] key within the time specified in [System Reset Timer] or[System Auto Reset Timer]. Otherwise, the job is canceled. For details, see page 274"Administrator Tools Settings (When Using the Touch Panel Model)" or page 316 "AdministratorTools Settings (When Using the Four-line LCD Panel Model)".
• Regardless of the machine's reduction or enlargement ratio setting, an ID card copy will always bemade at 100%.
• Temporary job settings are cleared in the following cases:
• When no input is received for the period of time specified in [System Reset Timer] or [SystemAuto Reset Timer] while the initial screen is displayed. For details, see page 274"Administrator Tools Settings (When Using the Touch Panel Model)" or page 316"Administrator Tools Settings (When Using the Four-line LCD Panel Model)".
• When the [Clear/Stop] key is pressed while the initial screen is displayed.
• When the machine's mode is changed.
• When the power is turned off.
• When the machine's default for the same setting is changed.
4. Copying Originals
138

Specifying Scan Settings for CopyingThis section describes how to specify image density and scan quality for the current job.
Adjusting Image Density
There are five image density levels. The higher the density level, the darker the printout.
When using the touch panel model
1. Press the [Home] key.
DYG322
2. Press the [Copier] icon on the [Home] screen.
3. Press [Text/Photo].
4. Press [ ] or [ ] to select the desired density level, and then press [OK].
When using the four-line LCD panel model
1. Press the [Density] key.
DYG320
2. Press the [ ] or [ ] key to select the desired density level, and then press the [OK]key.
Specifying Scan Settings for Copying
139

• You can change the machine's default [Density] setting to always make copies with a specificdensity level. For details, see page 241 "Copier Features Settings (When Using the Touch PanelModel)" or page 293 "Copier Features Settings (When Using the Four-line LCD Panel Model)".
• Temporary job settings are cleared in the following cases:
• When no input is received for the period of time specified in [System Reset Timer] or [SystemAuto Reset Timer] while the initial screen is displayed. For details, see page 274"Administrator Tools Settings (When Using the Touch Panel Model)" or page 316"Administrator Tools Settings (When Using the Four-line LCD Panel Model)".
• When the [Clear/Stop] key is pressed while the initial screen is displayed.
• When the machine's mode is changed.
• When the power is turned off.
• When the machine's default for the same setting is changed.
Selecting the Document Type According to Original
There are three document types:
Text/Photo
Select this when the original contains both text and photographs or pictures.
Text
Select this when the original contains only text and no photographs or pictures.
Photo
Select this when the original contains only photographs or pictures. Use this mode for the followingtypes of original:
• Photographs
• Pages that are entirely or mainly photographs or pictures, such as magazine pages.
4. Copying Originals
140

When using the touch panel model
1. Press the [Home] key.
DYG322
2. Press the [Copier] icon on the [Home] screen.
3. Press [Text/Photo].
4. Select the desired document type, and then press [OK].
When using the four-line LCD panel model
1. Press the [Image Quality] key.
DYG323
2. Press the [ ] or [ ] key to select the desired document type, and then press the [OK]key.
• You can change the machine's default [Original Type] setting to always make copies with aspecific document type. For details, see page 241 "Copier Features Settings (When Using theTouch Panel Model)" or page 293 "Copier Features Settings (When Using the Four-line LCD PanelModel)".
• Temporary job settings are cleared in the following cases:
• When no input is received for the period of time specified in [System Reset Timer] or [SystemAuto Reset Timer] while the initial screen is displayed. For details, see page 274
Specifying Scan Settings for Copying
141

"Administrator Tools Settings (When Using the Touch Panel Model)" or page 316"Administrator Tools Settings (When Using the Four-line LCD Panel Model)".
• When the [Clear/Stop] key is pressed while the initial screen is displayed.
• When the machine's mode is changed.
• When the power is turned off.
• When the machine's default for the same setting is changed.
4. Copying Originals
142

5. Scanning OriginalsThis chapter describes how to specify settings and use the scanner function.
What You Can Do with the Scanner FunctionSend Scanned Documents to a Folder on a Computer
M0ESIC0100
You can send scanned documents to a folder on a client computer. For details, see page 147"Preparation for Registering Scan Destinations (Scan to Folder)".
The scanned documents can be also saved to an FTP server. For details, see page 155"Preparation for Registering Scan Destinations (Scan to FTP)".
Send Scanned Documents by E-mail
M0ESIC0101
You can send scanned documents as a file attached to an e-mail. For details, see page 153"Preparation for Registering Scan Destinations (Scan to E-mail)".
Saving Scan Files on a USB Flash Memory Device
M0ESIC0102
You can save scanned files to the USB flash memory device inserted into the machine. For details,see page 169 "Basic Procedures for Saving Scan Files on a USB Flash Memory Device".
Scanning Documents from Smart Organizing Monitor or a Client Computer
M0ESIC0103
You can use the Smart Organizing Monitor, TWAIN, WIA, ICA or SANE scanner.
For details, see page 174 "Scanning from Smart Organizing Monitor".
143

For details, see page 178 "Basic Operation for TWAIN Scanning".
For details, see page 181 "Basic Operation for WIA Scanning".
For details, see page 182 "Basic Operation for ICA Scanning".
For details, see page 185 "About SANE Scanning".
5. Scanning Originals
144

Scanner Mode ScreenThis section provides information about the screen in scanner mode.
When using the touch panel model
DUE313
1 32
7
8
5
4
6
1. Current status or messages
Displays the current status or messages.
2. Email / Folder / FTP / USB
Press these tabs to switch between the [Email] screen, [Scan to Folder] screen, [Scan to FTP] screen, and[Scan to USB] screen.
• When [Email] is selected, you can specify e-mail destinations.
• When [Folder] is selected, you can specify folder destinations.
• When [FTP] is selected, you can send scanned documents to an FTP server.
• When [USB] is selected, you can save scanned files to the USB flash memory device inserted intothe machine.
3. Favorite item icon
Press to register current settings to a favorite item.
4. Original Settings
Allows you to specify original settings.
5. Scan Setting
Allows you to specify scan settings.
6. Resend
Press this to specify the last used destination as the destination for the current job.
7. Address Book
Allows you to recall destinations registered in the machine.
Scanner Mode Screen
145

8. E-mail icon
Indicates that the [Email] screen is displayed.
When using the four-line LCD panel model
DYG396
ReadySpecify Address
A4Scn S ize Dest .
300 x 300dp i
1
3
2
1. Current status or messages
Displays the current status or messages.
2. Current settings
Displays the current scanning mode and scan settings.
• When "Specify Address" is displayed:
Scan to E-mail, Scan to FTP, or Scan to Folder functions can be used.
3. Selection key items
Displays the functions you can use by pressing the corresponding selection keys.
• The machine's default mode at power on can be specified in the [Function Priority] setting under theadministrator settings. For [Function Priority], see page 274 "Administrator Tools Settings (WhenUsing the Touch Panel Model)" or page 316 "Administrator Tools Settings (When Using the Four-line LCD Panel Model)".
5. Scanning Originals
146

Preparation for Registering Scan Destinations(Scan to Folder)This section explains the preparations and procedures to send scanned documents to a folder on a clientcomputer.
After following the procedures below, you can send scanned documents from the machine to a sharedfolder on a client computer.
Register the shared folder to the machine's Address Book.
Send a file to the shared folder.
Print the check sheet.
Check the user name and computer name.
Create a shared folder on a computer.
Specify access privileges for the created shared folder. *1
*1 only Windows
• You can create the shared folder under Windows 8.1 or later, Windows Server 2012 or later, andmacOS 10.13 or later.
• Files can be sent via SMB using the SMB (139/TCP, 137/UDP) or CIFS (445/TCP) protocol.
• Files can be sent via SMB (139/TCP, 137/UDP) in a NetBIOS over TCP/IP environment only.
• Files cannot be sent via SMB in a NetBEUI environment.
Printing the Check Sheet
Print out the following check sheet. Write on the check sheet the settings for the computer to which youwill send documents.
For details about how to use the check sheet to make a list of the setting values, see page 148 "Checking the User Name and Computer Name" and page 150 " Creating a Shared Folder on aComputer".
Preparation for Registering Scan Destinations (Scan to Folder)
147

• After registering scan destinations to the Address Book, discard the completed check sheet toprevent leakage of personal information.
Check Sheet
No. Check Item (Entry Example) Entry Column
[1]
Computer name
(ex. YamadaPC)
Active settings of DHCP server
([Yes] or [No])
Computer's IP address
(ex. 192.168.0.152)
[2] Domain Name/WorkingGroup Name
(ex. ABCD-NET)
USERDNSDOMAIN
USERDOMAIN
Computer's user name
(ex. TYamada)
[3] Computer's login password
(ex. Administrator)
[4] Computer's shared folder name
(ex. scan)
• Depending on the network environment, USERDNSDOMAIN or USERDOMAIN may not bedisplayed. Write the domain name or working group name in the check sheet.
Checking the User Name and Computer Name
Checking the user name and computer name when running Microsoft Windows
Confirm the user name and the name of the computer you will send scanned documents to.
1. On the [Start] menu, click [Windows System], and then click [Command Prompt].
5. Scanning Originals
148

2. Enter the command "ipconfig /all", and then press the [Enter] key.
3. Confirm the name of the computer, the active settings of the DHCP server, and the IPv4address, and then write them in [1] on the check sheet.
The computer's name is displayed under [Host Name].
The address displayed under [IPv4 Address] is the IPv4 address of the computer.
Active settings of DHCP server are displayed under [DHCP Enabled].
4. Next, enter the command "set user", and then press the [Enter] key.
Be sure to put a space between "set" and "user".
5. Confirm the domain name/working group name and the user name, and then write themin [2] on the check sheet.
The user name is displayed under [USERNAME].
Confirm the computer's login password and write it in [3] on the check sheet.
Next, create a shared folder on a computer. For details about creating a shared folder, see page 150" Creating a Shared Folder on a Computer".
• Depending on the operating system or security settings, it might be possible to specify a user namethat does not have a password assigned. However, we recommend that for greater security youselect a user name that has a password.
Checking the user name and computer name when running macOS
Confirm the user name and the name of the computer you will send scanned documents to. Confirm thevalues, and then write them on the check sheet.
1. On the Apple menu, click [About This Mac].
The computer's information screen appears.
2. Click [System Report...].
3. In the left pane, click [Software], and then confirm the computer name and user nameunder "System Software Overview:".
The computer name is displayed next to [Computer Name].
The user name is displayed next to [User Name].
On the check sheet, write the computer name in [1] and the user name in [2].
Next, create a shared folder on a computer. For details about creating a shared folder, see page 150" Creating a Shared Folder on a Computer".
Preparation for Registering Scan Destinations (Scan to Folder)
149

• Depending on the operating system or security settings, you might be able to specify a user namethat does not have a password assigned. However, we recommend that you select a user namethat has a password.
• To confirm the IP address on the Apple menu, click [System Preferences...], and then click[Network] on the System Preferences window. Then click [Ethernet]. The address displayed in the IPaddress field is the IP address of the computer.
Creating a Shared Folder on a Computer
Creating a shared folder on a computer running Microsoft Windows
Create a shared destination folder in Windows and enable sharing. In the following procedure, acomputer which is running under Windows 10 and participating in a domain is used as an example.
• You must log in as an Administrators group member to create a shared folder.
• If "Everyone" is left selected in Step 6, the created shared folder will be accessible by all users. Thisis a security risk, so we recommend that you give access rights only to specific users. Use thefollowing procedure to remove "Everyone" and specify user access rights.
1. Create a folder, just as you would create a normal folder, in a location of your choice onthe computer. Write the folder name in [4] on the check sheet.
2. Right-click the folder, and then click [Properties].
3. On the [Sharing] tab, select [Advanced Sharing...].
4. Select the [Share this folder] check box.
5. Click [Permissions].
6. In the [Group or user names:] list, select "Everyone", and then click [Remove].
7. Click [Add...].
If the [Enter network credentials] screen appears, enter the user name and password.
In the [Select Users or Groups] window, add groups or users to whom you want to grant access. Inthe following procedure, the procedure to give access privileges to users that you wrote on thecheck sheet is used as an example.
8. In the [Select Users, Computers, Service Accounts, or Groups] window, click[Advanced...].
9. Specify one or more object types, select a location, and then click [Find Now].
10. From the list of results, select the groups and users you want to grant access to (the nameyou wrote in [2] on the check sheet), and then click [OK].
5. Scanning Originals
150

11. In the [Select Users, Computers, Service Accounts, or Groups] window, click [OK].
12. In the [Group or user names:] list, select a group or user (the name you wrote in [2] onthe check sheet), and then, in the [Allow] column of the permissions list, select either the[Full Control] or [Change] check box.
Configure the access permissions for each group and user.
13. Click [OK].
14. Click [Close].
If you want to specify access privileges for the created folder to allow other users or groups to access it,proceed to page 152 " Specifying Access Privileges for the Created Shared Folder".
If not, proceed to page 156 "Registering Scan Destinations".
Creating a shared folder on a computer running macOS
The following procedures explain how to create a shared folder on a computer running macOS, andhow to confirm the computer's information. macOS 11.2.3 is used in these examples.
• You must log in as an administrator to create a shared folder.
1. Create the folder that you want to send scan files to.
Write the folder name into [4] in the check sheet.
2. On the Apple menu, click [System Preferences...].
3. Click [Sharing].
4. Select the [File Sharing] check box.
5. Click [Options...].
6. Select the [Share files and folders using SMB] check box.
7. Select the account that will be used to access the shared folder.
8. If the [Authenticate] screen appears, enter the password for the account, click [OK], andthen click [Done].
9. Under the [Shared Folders:] list, click [ ].
10. Select the folder you have created, and then click [Add].
11. Make sure that the permissions for the user who will access this folder are set to [Read&Write].
Next, register scan destinations . For details about registering scan destinations, see page 156"Registering Scan Destinations".
Preparation for Registering Scan Destinations (Scan to Folder)
151

Specifying Access Privileges for the Created Shared Folder
If you want to specify access privileges for the created folder to allow other users or groups to accessthe folder, configure the folder as follows:
1. Right-click the folder created in Step 3, and then click [Properties].
2. On the [Security] tab, click [Edit...].
3. Click [Add...].
If the [Enter network credentials] screen appears, enter the user name and password.
4. In the [Select Users or Groups] window, click [Advanced...].
5. Specify one or more object types, select a location, and then click [Find Now].
6. From the list of results, select the groups and users you want to grant access to, and thenclick [OK].
7. In the [Select Users or Groups] window, click [OK].
8. In the [Groups or user names:] list, select a group or user, and then, in the [Allow] columnof the permissions list, select either the [Full control] or [Modify] check box.
9. Click [OK].
10. Click [Close].
Next, register scan destinations . For details about registering scan destinations, see page 156"Registering Scan Destinations".
Send files to the registered destinations ( ). For details about sending scanned files to the destinationyou registered to the Address Book, see page 164 "Basic Procedures for Sending Scan Files".
• If you are creating a shared folder for the first time on this computer, you must enable the filesharing function. For details, see Windows Help.
5. Scanning Originals
152

Preparation for Registering Scan Destinations(Scan to E-mail)This section explains the preparations and procedures to send scanned documents as a file attached toan e-mail.
After following the procedures below, you can send scanned documents to the specified e-mail address.
Configure SMTP server and DNS settings.
Register the destination e-mail address in the Address Book.
Send scanned files by e-mail.
Configuring SMTP and DNS Settings
To send files via e-mail, SMTP and DNS settings must be configured properly.
For details about SMTP server information, contact the network administrator of your Internet serviceprovider.
Configure SMTP and DNS information using Web Image Monitor.
1. Start the web browser and access the machine by entering its IP address.
The top page of Web Image Monitor appears.
2. Click [Network Settings].
3. Click the [DNS] tab.
4. Register information as necessary.
For details, see page 358 "Configuring the Network Settings".
5. Enter the administrator password.
6. Click [OK].
7. Click the [SMTP] tab.
8. Register information as necessary.
For details, see page 358 "Configuring the Network Settings".
9. Enter the administrator password.
10. Click [OK].
11. Close the web browser.
Preparation for Registering Scan Destinations (Scan to E-mail)
153

Next, register the destination e-mail address to the Address Book ( ). For details, see page 156"Registering Scan Destinations".
Send files to the registered destinations ( ). For details about sending scanned files to the destinationyou registered to the Address Book, see page 164 "Basic Procedures for Sending Scan Files".
5. Scanning Originals
154

Preparation for Registering Scan Destinations(Scan to FTP)This section explains the preparations and instructions to send scanned documents to an FTP server.
After following the procedures below, you can send scanned documents to an FTP server.
Check the FTP Server Address.
Send scanned files to the FTP server.
Checking the FTP Server Address
To send files to an FTP server, configure FTP server settings properly. For details about FTP servers,contact your network administrator ( ).
Register scan destinations. For details about registering scan destinations, see page 156 "RegisteringScan Destinations".
Send files to the registered destinations ( ). For details about sending scanned files to the destinationyou registered to the Address Book, see page 164 "Basic Procedures for Sending Scan Files".
Preparation for Registering Scan Destinations (Scan to FTP)
155

Registering Scan DestinationsThis section describes how to register scan destinations in the Address Book. To send scanned files to ane-mail address (Scan to E-mail), FTP server (Scan to FTP), or a shared folder on a network computer(Scan to Folder), you must first register the destination in the Address Book using Web Image Monitor.
• The Address Book data could be damaged or lost unexpectedly. The manufacturer shall not beresponsible for any damages resulting from such data loss. Be sure to create backup files of theAddress Book data periodically.
• Depending on your network environment, the Scan to FTP and Scan to Folder functions mayrequire a user name and password to be correctly entered in the destination information. In suchcases, after registering destinations, check that the user name and password are correctly enteredby sending test documents to those destinations.
The Address Book can contain up to 100 entries, including 8 Quick Dial entries.
Destinations registered as Quick Dial entries can be selected by pressing the corresponding button in theAddress Book.
However, Quick Dial is available for the touch panel model only.
1. Start the web browser and access the machine by entering its IP address.
The top page of Web Image Monitor appears.
2. Click [Quick Dial Destination] or [Scan Destination].
3. From the [Destination Type] list, select [E-mail Address], [FTP], or [Folder].
4. Register information as necessary.
The information you must register varies depending on the destination type. For details, see thetables below.
5. Enter the administrator password.
6. Click [Apply].
7. Close the web browser.
5. Scanning Originals
156

Scan to E-mail Settings
Item Setting Description
Quick Dial Number Optional
Select when setting the destination as a Quick Dialentry.
This item is available for the touch panel model only.
Name RequiredName of the destination. The name specified here willbe shown on the screen when selecting a scandestination. Can contain up to 16 characters.
Destination E-mail Address RequiredE-mail address of the destination. Can contain up to64 characters.
Notification E-mail Address Optional
If you enter an e-mail address in [Notification E-mailAddress], that address is used as the sender's e-mailaddress. If you leave [Notification E-mail Address]blank, the e-mail address specified in [Device E-mailAddress] on the [SMTP] tab is used as the sender's e-mail address. Can contain up to 64 characters.
Subject Required Subject of the e-mail. Can contain up to 64 characters.
Sender's Name Optional
Name of e-mail sender. The name specified here willbe shown under "From" or a similar field of therecipient's email application. Can contain up to 32characters.
Registering Scan Destinations
157

Item Setting Description
File Format (Color/GrayScale)
OptionalFile format of the scanned file when scanning in color.PDF or JPEG can be selected. PDF supports multiplepages in a document, but JPEG does not.
File Format (Black & White) OptionalFile format of the scanned file when scanning in blackand white. PDF or TIFF can be selected. Both formatssupport multiple pages in a document.
Original Optional
Select the sides of the original (1 side or 2-sides) toscan according to the page and binding orientation.
This item is available for the touch panel model only.
Scan Size Optional
Select the scanning size for the original from A5, B5,A4, 71/4 × 101/2, 81/2 × 51/2, 81/2 × 11, 81/2 ×14, 16K, or custom size.
If you select custom size, select [mm] or [Inch], andthen specify the width and length.
Resolution OptionalSelect the scan resolution from 100×100, 150×150,200×200, 300×300, 400×400, or 600×600 dpi.
Density OptionalSpecify the image density by clicking the right or leftbutton. is the lightest, and isthe darkest.
Scan to FTP Settings
5. Scanning Originals
158

Item Setting Description
Quick Dial Number Optional
Select when setting the destination as a Quick Dialentry.
This item is available for the touch panel model only.
Name RequiredName of the destination. The name specified here willbe shown on the screen when selecting a scandestination. Can contain up to 16 characters.
Hostname or IP Address RequiredName or IP address of the FTP server. Can contain upto 64 characters.
File Format (Color/GrayScale)
OptionalFile format of the scanned file when scanning in color.PDF or JPEG can be selected. PDF supports multiplepages in a document, but JPEG does not.
File Format (Black & White) OptionalFile format of the scanned file when scanning in blackand white. PDF or TIFF can be selected. Both formatssupport multiple pages in a document.
FTP User Name OptionalUser name for logging in to the FTP server. Cancontain up to 32 characters.
FTP Password OptionalPassword for logging in to the FTP server. Can containup to 32 characters.
Directory OptionalName of the FTP server directory where scanned filesare stored. Can contain up to 64 characters.
Notification E-mail Address OptionalE-mail address to which a notification is sent aftertransmission. Can contain up to 64 characters.
Original Optional
Select the sides of the original (1 side or 2-sides) toscan according to the page and binding orientation.
This item is available for the touch panel model only.
Scan Size Optional
Select the scanning size for the original from A5, B5,A4, 71/4 × 101/2, 81/2 × 51/2, 81/2 × 11, 81/2 ×14, 16K, or custom size.
If you select custom size, select [mm] or [Inch], andthen specify the width and length.
Resolution OptionalSelect the scan resolution from 100×100, 150×150,200×200, 300×300, 400×400, or 600×600 dpi.
Registering Scan Destinations
159

Item Setting Description
Density OptionalSpecify the image density by clicking the right or leftbutton. is the lightest, and isthe darkest.
Connection Test- A connection test is performed to check whether the
specified FTP server exists.
Scan to Folder Settings
Item Setting Description
Quick Dial Number Optional
Select when setting the destination as a Quick Dialentry.
This item is available for the touch panel model only.
Name RequiredName of the destination. The name specified here willbe shown on the screen when selecting a scandestination. Can contain up to 16 characters.
Service Name Required
Path to the directory where scanned files will be stored.Consists of the IP address or name of the destinationcomputer (can contain up to 64 characters), and nameof the shared folder (can contain up to 32 characters).
Domain OptionalSpecify the name of the domain to which the computerbelongs. Can contain up to 15 characters.
5. Scanning Originals
160

Item Setting Description
Login User Name OptionalUser name for logging in to the destination computer.Can contain up to 32 characters.
Login Password OptionalPassword for logging in to the destination computer.Can contain up to 32 characters.
Directory OptionalDirectory within the shared folder for storing scannedfiles. Can contain up to 64 characters.
Notification E-mail Address OptionalE-mail address to which a notification is sent aftertransmission. Can contain up to 64 characters.
Connection Test- A connection test is performed to check whether the
specified FTP server exists.
File Format (Color/GrayScale)
OptionalFile format of the scanned file when scanning in color.PDF or JPEG can be selected. PDF supports multiplepages in a document, but JPEG does not.
File Format (Black & White) OptionalFile format of the scanned file when scanning in blackand white. PDF or TIFF can be selected. Both formatssupport multiple pages in a document.
Original Optional
Select the sides of the original (1 side or 2-sides) toscan according to the page and binding orientation.
This item is available for the touch panel model only.
Scan Size Optional
Select the scanning size for the original from A5, B5,A4, 71/4 × 101/2, 81/2 × 51/2, 81/2 × 11, 81/2 ×14, 16K, or custom size.
If you select custom size, select [mm] or [Inch], andthen specify the width and length.
Resolution OptionalSelect the scan resolution from 100×100, 150×150,200×200, 300×300, 400×400, or 600×600 dpi.
Density OptionalSpecify the image density by clicking the right or leftbutton. is the lightest, and isthe darkest.
• To send files via e-mail, SMTP and DNS settings must be configured properly.
Registering Scan Destinations
161

• If you are using the Scan to E-mail function, select a time zone according to your geographiclocation to send email with correct transmission date and time.
• To send files to an FTP server or computer, the user name, password, and directory must beconfigured properly.
• On a network that uses a DNS server, specify a computer name in [Service Name] and the nameof the domain to which the computer belongs in [Domain]. In this case, also configure the DNSrelated settings using Web Image Monitor.
• The Scan to Folder destination must operate on one of the following operating systems: Windows8.1 or later, Windows Server 2012 or later, and macOS 10.13 or later.
• Scan destinations cannot be registered using the control panel.
Modifying Scan Destinations
This section describes how to modify the information of registered destinations.
1. Start the web browser and access the machine by entering its IP address.
The top page of Web Image Monitor appears.
2. Click [Scan Destination].
3. Click the [E-mail Address], [FTP], or [Folder] tab.
4. Select the entry to modify, and then click [Change].
5. Modify settings as necessary.
6. Enter the administrator password.
7. Click [Apply].
8. Close the web browser.
• If you are using the touch panel model, you can unassign a Quick Dial entry from the [Quick DialDestination] page. To do this, select the desired entry, click [Delete], and then click [Apply] againon a confirmation page.
• If you are using the touch panel model, the machine will notify you if the destination you want tomodify is set as a forwarding destination of received faxes. For details about fax forwardingsettings, see page 344 "Fax Tab (Only When Using the Touch Panel Model)".
Deleting Scan Destinations
This section describes how to delete registered destinations.
5. Scanning Originals
162

1. Start the web browser and access the machine by entering its IP address.
The top page of Web Image Monitor appears.
2. Click [Scan Destination].
3. Click the [E-mail Address], [FTP], or [Folder] tab.
4. Select the entry to delete, and then click [Delete].
5. Confirm that the entry you have selected is the entry that you want to delete.
6. Enter the administrator password.
7. Click [Apply].
8. Close the web browser.
• If you are using the touch panel model, the machine will notify you if the destination you want todelete is set as a forwarding destination of received faxes. If you delete the destination anyway,reconfigure the fax forwarding setting. For details about fax forwarding settings, see page 344"Fax Tab (Only When Using the Touch Panel Model)".
Registering Scan Destinations
163

Basic Procedures for Sending Scan FilesThis section explains the procedures to send scanned documents.
• The original in the ADF takes precedence over the original on the exposure glass if you placeoriginals both in the ADF and on the exposure glass.
• You can switch between scanning in black-and-white or in full color in [Scanning Mode] under thescan settings. When scanning in black-and-white, you can also specify to scan in either halftone orgrayscale. For details about [Scanning Mode], see page 246 "Scanner Features Settings (WhenUsing the Touch Panel Model)" or page 298 "Scan Settings (When Using the Four-line LCD PanelModel)". When scanning using the Smart Organizing Monitor, TWAIN scanner or ICA scanner,you can specify whether to scan in black and white or in full color on the application's menu.
• Register the scan destination in the Address Book using Web Image Monitor. For details, seepage 156 "Registering Scan Destinations".
• With the four-line LCD panel model, when a USB flash memory device is inserted into the machine,scanned documents will be stored in the USB flash memory device. Confirm that there are no USBflash memory devices inserted into the machine.
When using the touch panel model
1. Place the original on the exposure glass or in the ADF.
To place the original, see page 92 "Placing Originals".
2. Press the [Home] key.
DYG322
3. Press the [Scanner] icon on the [Home] screen.
4. Press the [Email], [Folder], [FTP] tab.
If the message with the tip for specifying the Scan to Folder setting appears after pressing the[Folder] tab, press [OK].
You can specify whether or not to display the hint message in [Folder Hint] in [ScannerFeatures]. For details about [Folder Hint], see page 246 "Scanner Features Settings (WhenUsing the Touch Panel Model)".
5. Scanning Originals
164

5. Press [Address Book].
6. Select the desired destination by pressing the small square.
A check mark appears in the small square. Press the small square again to cancel theselection.
7. Press [OK].
8. Press the [Start] key.
DYG336
Depending on the machine's settings, you may see the following screen on the display whenscanning from the exposure glass.
If you see this screen, proceed to the next step.
9. If you have more originals to scan, place the next original on the exposure glass,and then press [Yes]. Repeat this step until all originals are scanned.
10. When all originals have been scanned, press [No] to start sending the scanned file.
When using the four-line LCD panel model
1. Place the original on the exposure glass or in the ADF.
To place the original, see page 92 "Placing Originals".
Basic Procedures for Sending Scan Files
165

2. Press the [Scanner] key, and then select [Dest.].
DYG326
Alternatively, you can press the [Shortcut to Func.] key if [Shortcut to Function] under [Admin.Tools] is set to [Select Scanner Address]. For [Shortcut to Function], see page 316"Administrator Tools Settings (When Using the Four-line LCD Panel Model)".
3. Make sure [Search Address Book] is selected, and then press the [OK] key.
4. If you want to search for a specific entry by its name, enter the first letters of thename using the number keys, and then press the [OK] key. Each time you enter acharacter, the display changes to show the matching name.
5. Search for the desired destination by pressing the [ ] or [ ] key to scroll the AddressBook, and then press the [OK] key.
When you specify a scan destination, the machine's scan settings change automaticallyaccording to the information registered for that destination in the Address Book. If necessary,you can change the scan settings using the control panel. For scan settings, see page 298"Scan Settings (When Using the Four-line LCD Panel Model)".
6. Press the [Start] key.
DYG334
Depending on the machine's settings, you may see the following screen on the display whenscanning from the exposure glass.
5. Scanning Originals
166

If you see this screen, proceed to the next step.
7. If you have more originals to scan, place the next original on the exposure glass,and then press [Yes]. Repeat this step until all originals are scanned.
8. When all originals have been scanned, press [No] to start sending the scanned file.
• To cancel scanning, press the [Clear/Stop] key. The scan files are discarded.
• With the four-line LCD panel model, you can also specify a destination using [Resend]. For details,see page 168 "Specifying the Scan Destination Using [Resend] (When Using the Touch PanelModel)".
Basic Procedures for Sending Scan Files
167

Specifying the Scan Destination Using [Resend](When Using the Touch Panel Model)This section describes how to specify a destination using [Resend].
This function is available for M 320FB/320F only.
Using [Resend]
Press [Resend] to select the last used destination.
• When you specify a scan destination, the machine's scan settings change automatically accordingto the information registered for that destination in the Address Book. If necessary, you can changethe scan settings using the control panel. For details, see page 186 "Specifying Scan Settings forScanning".
• [Resend] is not effective for the first scan job after the machine is turned on.
• You can press the [Clear/Stop] key to clear the destination.
5. Scanning Originals
168

Basic Procedures for Saving Scan Files on aUSB Flash Memory DeviceThis section explains basic operations of Scan to USB. Files are saved to the USB flash memory deviceinserted into the machine.
• The original in the ADF takes precedence over the original on the exposure glass if you placeoriginals both in the ADF and on the exposure glass.
• This machine does not support the use of external USB hubs.
• Not all types of USB flash memory devices are supported.
• When using Scan to USB, set [Save Scn Data to USB] to [Active]. For details, see page 274"Administrator Tools Settings (When Using the Touch Panel Model)" or page 316 "AdministratorTools Settings (When Using the Four-line LCD Panel Model)".
When using the touch panel model
1. Insert the USB flash memory device into the USB port.
DYH234
2. Press the [Home] key.
DYG322
3. Press the [Scanner] icon on the [Home] screen.
Basic Procedures for Saving Scan Files on a USB Flash Memory Device
169

4. Press the [USB] tab.
5. Place the original on the exposure glass or in the ADF.
To place the original, see page 92 "Placing Originals".
Specify the scanning settings as necessary. For details of specifying the scanning settings, seepage 186 "Specifying Scan Settings for Scanning".
6. Press the [Start] key.
DYG336
Depending on the machine's setting, you will see the following screen on the display.
• When in halftone black-and-white scanning mode:
• When in color or gray scale black-and-white scanning mode:
7. Press the appropriate selection key according to the desired file format, and thenpress [OK].
Depending on the machine's settings, you may see the following screen on the display whenscanning from the exposure glass.
5. Scanning Originals
170

If you see this screen, proceed to the next step.
8. If you have more originals to scan, place the next original on the exposure glass,and then press [Yes]. Repeat this step until all originals are scanned.
9. When all originals have been scanned, press [No] to start sending the scanned file.
10. Wait until "Completed the Process" is displayed on the screen.
Scanned files are saved in the root directory of the USB flash memory device.
11. Remove the USB flash memory device from the machine.
When using the four-line LCD panel model
1. Insert the USB flash memory device into the USB port.
DYH503
The scanner screen appears on the display.
Wait until [Save Scn Data to USB] appears on the display. The time before the messageappears differs depending on the type of USB flash memory device.
2. Place the original on the exposure glass or in the ADF.
To place the original, see page 92 "Placing Originals".
Specify the scanning settings as necessary. For details of specifying the scanning settings, seepage 186 "Specifying Scan Settings for Scanning".
Basic Procedures for Saving Scan Files on a USB Flash Memory Device
171

3. Press the [Start] key.
DYG334
4. Select the file format by pressing the corresponding selection key.
If the [Limitless Scan] setting under [Scan Settings] is enabled, you may see the followingscreen on the display when scanning from the exposure glass.
If you see this screen, proceed to the next step.
5. If you have more originals to scan, place the next original on the exposure glass,and then press [Yes]. Repeat this step until all originals are scanned.
6. When all originals have been scanned, press [No] to start sending the scanned file.
7. Wait until "Completed the Process" is displayed on the screen.
Scanned files are saved in the root directory of the USB flash memory device.
8. Remove the USB flash memory device from the machine.
• To cancel scanning, press the [Clear/Stop] key. The scan files are discarded.
• You can configure the machine to perform black-and-white scanning in halftone or grayscale bychanging [Scanning Mode] setting under the scan settings. For details about [Scanning Mode], seepage 246 "Scanner Features Settings (When Using the Touch Panel Model)" or page 298 "ScanSettings (When Using the Four-line LCD Panel Model)".
• If the [Limitless Scan] setting under the scan settings is enabled, you can place originals on theexposure glass repeatedly in a single scan procedure. For details about [Limitless Scan], seepage 246 "Scanner Features Settings (When Using the Touch Panel Model)" or page 298 "ScanSettings (When Using the Four-line LCD Panel Model)".
5. Scanning Originals
172

• If the [Single/ Multi Page] or [File Type] setting under scanner settings is set to [Multi-page], youcan scan multiple pages to create a single PDF or TIFF file containing all pages. However, if the fileformat is JPEG, a single-page file will be created for every page scanned. For details about[Single/ Multi Page], see page 246 "Scanner Features Settings (When Using the Touch PanelModel)" or page 298 "Scan Settings (When Using the Four-line LCD Panel Model)".
• If paper is jammed in the ADF, the scan job will be put on hold. To resume the current job, removethe jammed paper and scan the originals again starting from the jammed page. For details abouthow to remove the paper jammed in the ADF, see page 432 "Removing Scanning Jams".
Basic Procedures for Saving Scan Files on a USB Flash Memory Device
173

Scanning from Smart Organizing MonitorThe procedure in this section is an example based on Windows 10. The actual procedure may varydepending on the operating system you are using.
1. Place originals.
2. On the [Start] menu, click [P 310_M 320_Series Software Utilities].
3. Click [Smart Organizing Monitor for P 310_M 320_Series].
Smart Organizing Monitor starts.
4. Click the [User Tools] tab.
5. Click [Scan].
M0ESOC8119
The dialog box appears.
6. On the [General] tab, specify settings according to the types of originals and scanning,and the orientation of the original.
5. Scanning Originals
174

7. On the [Options] tab, specify the file format and the directory to save the file.
8. Click [Scan].
9. After all originals are scanned, click [Exit].
Scanner Settings You Can Configure for Smart Organizing Monitor
The following explains the setting options you can configure when Smart Organizing Monitor is used forscanning.
[General] tab
DYG388
1
2
345
6
1. Original:
Select [Exposure Glass] to scan from the exposure glass or [Automatic Document Feeder] to scan fromthe ADF.
2. Original type
According to your original, select a setting from the list of options detailed below, or select [Custom...] toconfigure your own scan settings. [Scn. Mode], [Resolution], and [Size] under [Scan Configuration] willchange according to the original type setting you selected here.
• When using the exposure glass:
[Editing Text (OCR)]
[Faxing, Filing, or Copying]
[Black and White Photo]
[Color Document-Faster]
Scanning from Smart Organizing Monitor
175

[Color Document-Better Quality]
[Custom...]
• When using the ADF:
[ADF-Faster]
[ADF-Better]
[ADF-Gray]
[Custom...]
3. Scn. Mode:
Select from full color, grayscale, or black-and-white.
4. Resolution:
Select a resolution from the list. Note that increasing the resolution also increases the file size andscanning time.
Select from 100, 200, 300, or 600 dpi.
5. Size:
Select the scanning size.
When [Exposure Glass] is selected in [Original:], you can change the scanning size with your mouse inthe preview area. Also, after selecting [User defined], you can select the unit of measure from [cm],[inches], or [pixels].
6. Duplex (only when using the touch panel model)
Appears only when [Automatic Document Feeder] is selected in [Original:]. Select the check box whenscanning both sides of the original, and then specify the orientation.
[Options] tab
DYG389
1
2
3
5. Scanning Originals
176

1. Scan To:
Specify the directory to save the file.
2. File Name Prefix:
Specify the file name prefix. Year, month, date, and time are consecutively shown after the prefix.
For example, if [File Name Prefix] is "Scan" and the original is scanned at 10 o'clock on January 1,2018, the file name will be "Scan_20180101_100000". If you leave [File Name Prefix] blank, the filename will be "20180101_1000000". If a file with the same name already exists, a branch number isattached to the end of the file name, and the file name will be "Scan_20180101_100000_01".
3. Format:
Select the file format of the scanned document from JPEG, TIFF, or PDF.
Scanning from Smart Organizing Monitor
177

Basic Operation for TWAIN ScanningThis section describes the basic TWAIN scanning operation.
TWAIN scanning is possible if a TWAIN-compatible application is running on your computer.
DYG390
1. Your Computer (TWAIN driver already installed)
Instruct the machine to start scanning the original that is set on the machine.
2. This Machine
The original that is set on the machine is scanned, and its data is sent to a client computer.
Using TWAIN scanner
This section describes the preparations for using the TWAIN scanner.
• You can use TWAIN scanning on a Windows operating system.
• To use the TWAIN scanner, you must download the latest driver from the manufacturer's websiteand install it on your computer.
• To use the TWAIN scanner, a TWAIN-compliant application must be installed.
To use the machine as a TWAIN scanner, first do the following:
• Install the TWAIN driver.
• Install a TWAIN-compliant application.
TWAIN scanning
TWAIN scanning is possible if your computer is running a TWAIN-compatible application.
The following is a general scan procedure with the TWAIN driver, so the actual operation may differdepending on the applications you use. For details, see the application's Help.
1. Start a TWAIN-compliant application.
5. Scanning Originals
178

2. Place originals.
3. Open the Scanner Control dialog box.
The Scanner Control dialog box is used to control the scanner using the TWAIN driver. To open theScanner Control dialog box, select the correct TWAIN scanner using the TWAIN-compliantapplication. For details, see the application's Help.
4. Make settings according to such factors as the type of original, type of scanning, andorientation of the original.
For details, see the TWAIN driver Help.
5. In the Scanner Control dialog box, click [Scan].
Depending on the security setting, if you press [Scan], a dialog box for entering the user name andpassword may appear.
If there are more originals to be scanned, place the next original, and then click [Continue].
If there are no more originals to be scanned, click [Complete].
Settings you can configure in the TWAIN dialog box
DYG391
12
3
456
7
1. Scanner:
Select the scanner you want to use. The scanner you select becomes the default scanner. Click [Refresh] todiscover all available scanners connected via USB or the network.
2. Original:
Select [Reflective] to scan from the exposure glass, or [Automatic Document Feeder] to scan from the ADF.
Basic Operation for TWAIN Scanning
179

3. Original type
According to your original, select a setting from the list of options detailed below, or select [Custom...] toconfigure your own scan settings. [Mode], [Resolution], and [Size] under [Scan Configuration] will changeaccording to the original type setting you selected here.
• When using the exposure glass:
[Editing Text(OCR)]
[Fax, Filing or Copy]
[Black and White Photo]
[Color Document-Fast]
[Color Document-Better Quality]
[Custom...]
• When using the ADF:
[ADF-Faster]
[ADF-Better]
[ADF-Gray]
[Custom...]
4. Mode:
Select from full color, grayscale, or black-and-white.
5. Resolution:
Select a resolution from the list. If you select [User defined], enter a resolution value directly in the edit box.Note that increasing the resolution also increases the file size and scanning time.
Selectable resolutions vary depending on where the original is set.
• When using the exposure glass:
75, 100, 150, 200, 300, 400, 500, 600, 1200, 2400, 4800, 9600, 19200 dpi, User defined
• When using the ADF:
75, 100, 150, 200, 300, 400, 500, 600 dpi, User defined
6. Size:
Select the scanning size from the list. If you select [Reflective] in [Original:] and select [User defined] in [Size:],enter the scanning size directly in the edit box. Also, you can change the scanning size with your mouse in thepreview area. You can select the unit of measure from [cm], [inches], or [pixels]. Selectable resolutions varydepending on where the original is set. For details, see the TWAIN Help.
7. Scan task: (when using the exposure glass)
Displays up to 10 previously used scan areas. To remove a scan task, select the number of the task, and thenclick [Remove]. You can select [AutoCrop] to let the scanner automatically detect the size of your original.
When you use the touch panel model and select [Automatic Document Feeder] for [Original:], [Duplex]appears instead of [Scan task:]. Select this check box when you placing two-sided originals in the ADF.
• If the scan data is larger than the memory capacity, an error message appears and scanning iscanceled. If this happens, specify a lower resolution and scan the original again.
5. Scanning Originals
180

Basic Operation for WIA ScanningWIA allows computers running Windows 8.1 or later versions of Windows operating systems andWindows Server 2012 or later to perform scanning via USB connection.
The procedure in this section is an example based on Windows 10.
1. Place the original on the exposure glass or in the ADF.
2. On the [Start] menu, select [Control Panel] under [Windows System].
3. Click [View devices and printers].
4. Right-click the icon of the printer model you want to use, and then click [Start scan] toopen the dialog box for the scan settings.
5. In the dialog box, configure the scan settings as required, and then click [Scan].
6. Click [Import].
Basic Operation for WIA Scanning
181

Basic Operation for ICA ScanningThis section describes the basic ICA scanning operation.
You can use the ICA scanner over both USB and network connections.
Installing the ICA Driver
1. Download the driver from the web site.
2. Open the package file.
3. Follow the instructions on the screen.
Using ICA Scanner
This section describes the preparations and procedure for using the ICA scanner.
To use the network connection, configure the network setting.
Install an ICA-compliant application.
ICA Scanning
Setting procedures using macOS 11.2.3 are shown as an example. The actual procedure may differdepending on the macOS version you are using.
1. Place the original on the exposure glass or in the ADF.
2. Start System Preferences.
3. Click [Printers & Scanners].
4. Select the scanner you want to use from the list.
5. Select [Open Scanner...] in the [Scan] button.
5. Scanning Originals
182

Settings you can configure in the ICA dialog box
1 2
34
78
9
65
10 11 12DYG392
1. Scan Mode:
Select where the original is placed.
• Flatbed
If the original is placed on the exposure glass, select [Flatbed].
• Document Feeder
If the original is placed in the ADF, select [Document Feeder].
2. Kind:
Set the type of original to [Text], [Black & White], or [Color].
[Text] is suitable for scanning originals containing mainly text.
3. Resolution:
Select a resolution from the list.
Note that increasing the resolution also increases the file size and scanning time.
Selectable resolutions vary depending on where the original is set.
• When using the exposure glass:
75, 100, 150, 200, 300, 400, 500, 600, 1200, 2400, 4800 dpi
• When using the ADF:
75, 100, 150, 200, 300, 400, 500, 600 dpi
4. Size:
Specify the original paper size.
The [Use Custom Size] check box appears when [Flatbed] is selected in [Scan Mode:]. If you select this checkbox, specify the following items also:
• Rotation Angle:
You can specify how many degrees to rotate the scan image clockwise.
• Auto Selection:
• Detect Separate Items
Basic Operation for ICA Scanning
183

You can scan multiple originals together and store each scan image as a separate file.
• Detect Enclosing Box
You can scan multiple originals placed on the exposure glass and store their scan images as asingle file.
5. Orientation
Select the orientation for originals placed in the ADF or on the exposure glass.
This item does not appear when the [Use Custom Size] check box is selected.
When you use the touch panel model and select [Document Feeder] for [Scan Mode:], [Duplex] appearsunder [Orientation:]. Select this check box when you placing two-sided originals in the ADF.
6. Scan To:
Select where to store the scan data.
7. Name:
Name the scan data.
8. Format:
Select the format of the scan data.
• HEIC
• TIFF
• PNG
• GIF
• JPEG
• JPEG 2000
• BMP
9. Image Correction:
By selecting [Manual], you can adjust settings such as brightness and contrast.
10. Hide Details
Click to hide the settings.
11. Overview
Click to preview the scan image.
12. Scan
Click to start scanning.
• If the scan data is larger than the memory capacity, an error message appears and scanning iscanceled. If this happens, specify a lower resolution and scan the original again.
5. Scanning Originals
184

About SANE ScanningThis machine can be used as a SANE scanner.
Supported Linux distributions are as follows:
• openSUSE Leap 42.3
• Ubuntu 16.04LTS/18.04LTS/18.10
• Red Hat Enterprise Linux 6/7
• BOSS 6.0
About SANE Scanning
185

Specifying Scan Settings for ScanningWhen you specify a scan destination, the machine's scan settings change automatically according to theinformation registered for that destination in the Address Book. If necessary, you can change the scansettings for the current job using the control panel.
• The machine maintains the preset scan settings for the current destination until the machine returnsto standby mode.
• Changing the preset scan settings for the current destination does not change the informationregistered in the Address Book.
• If you specify the last used destination, the preset scan settings become effective again, even if youhave changed the settings for the previous job.
Specifying the Scanning Size According to the Size of the Original
This section describes how to specify the scanning size according to the size of the current original.
When using the touch panel model
1. Press the [Home] key.
DYG322
2. Press the [Scanner] icon on the [Home] screen.
3. Press the [USB] tab.
4. Press [Scan Setting].
You can press [Scan Setting] only when you have selected the [USB] tab.
5. Press [Scan Size...].
6. Select the size of the original, and then press [OK].
If you selected anything other than [Custom Size], you do not need to perform the remainingsteps of the procedure.
7. Select [mm] or [inch].
5. Scanning Originals
186

8. Press [Set Width...].
9. Enter the width, and then press [OK].
10. Press [Set Length...].
11. Enter the length, and then press [OK].
12. Confirm the scan size you entered is displayed, and then press [OK].
When using the four-line LCD panel model
1. Press [Scn Size].
ReadySpecify Address
A4Scn S ize Dest .
300 x 300dp i
2. Press the [ ] or [ ] key to select the size of the original, and then press the [OK] key.
If you selected anything other than [Custom Size], you do not need to perform the remainingsteps of the procedure.
3. Press the [ ] or [ ] key to select [mm] or [inch], and then press the [OK] key.
4. Enter the width using the number keys, and then press the [OK] key.
To enter a decimal point, press [ ].
5. Enter the length using the number keys, and then press the [OK] key.
To enter a decimal point, press [ ].
• You can change the machine's default [Scan Size] setting to always scan originals with a specificscanning size. For details, see page 246 "Scanner Features Settings (When Using the Touch PanelModel)" or page 298 "Scan Settings (When Using the Four-line LCD Panel Model)".
• Temporary job settings are cleared in the following cases:
• When no input is received for the period of time specified in [System Reset Timer] or [SystemAuto Reset Timer] while the initial screen is displayed. For details, see page 274"Administrator Tools Settings (When Using the Touch Panel Model)" or page 316"Administrator Tools Settings (When Using the Four-line LCD Panel Model)".
• When the [Clear/Stop] key is pressed while the initial screen is displayed.
• When the machine's mode is changed.
• When the power is turned off.
• When the machine's default for the same setting is changed.
Specifying Scan Settings for Scanning
187
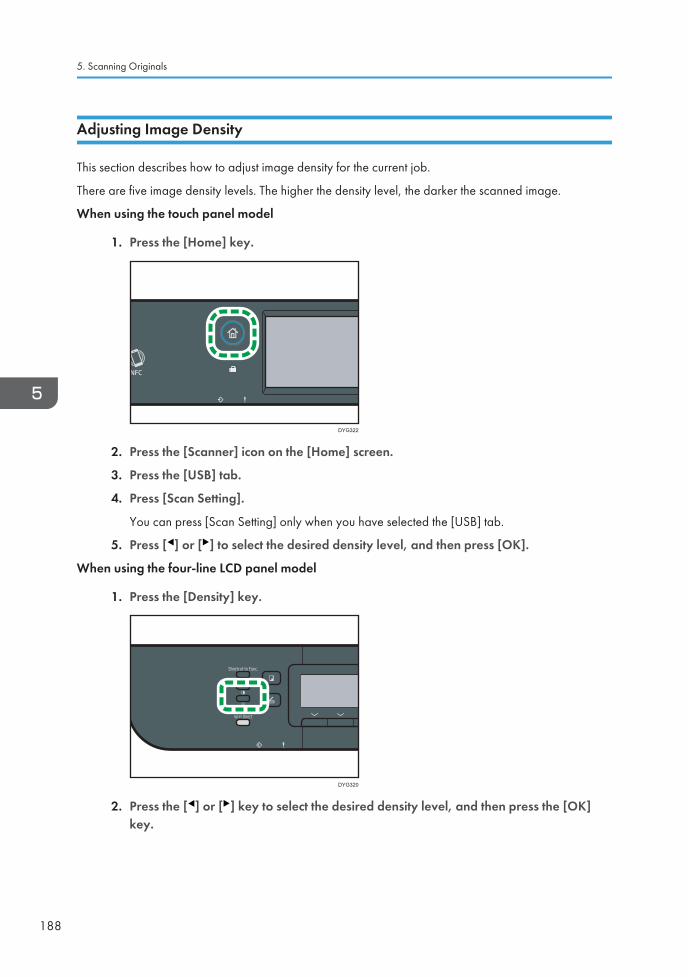
Adjusting Image Density
This section describes how to adjust image density for the current job.
There are five image density levels. The higher the density level, the darker the scanned image.
When using the touch panel model
1. Press the [Home] key.
DYG322
2. Press the [Scanner] icon on the [Home] screen.
3. Press the [USB] tab.
4. Press [Scan Setting].
You can press [Scan Setting] only when you have selected the [USB] tab.
5. Press [ ] or [ ] to select the desired density level, and then press [OK].
When using the four-line LCD panel model
1. Press the [Density] key.
DYG320
2. Press the [ ] or [ ] key to select the desired density level, and then press the [OK]key.
5. Scanning Originals
188

• You can change the machine's default [Density] setting to always scan with a specific density level.For details, see page 246 "Scanner Features Settings (When Using the Touch Panel Model)" orpage 298 "Scan Settings (When Using the Four-line LCD Panel Model)".
• Temporary job settings are cleared in the following cases:
• When no input is received for the period of time specified in [System Reset Timer] or [SystemAuto Reset Timer] while the initial screen is displayed. For details, see page 274"Administrator Tools Settings (When Using the Touch Panel Model)" or page 316"Administrator Tools Settings (When Using the Four-line LCD Panel Model)".
• When the [Clear/Stop] key is pressed while the initial screen is displayed.
• When the machine's mode is changed.
• When the power is turned off.
• When the machine's default for the same setting is changed.
Specifying Resolution
This section describes how to specify the scan resolution for the current job.
There are six resolution settings. The higher the resolution, the higher the quality but greater the file size.
When using the touch panel model
1. Press the [Home] key.
DYG322
2. Press the [Scanner] icon on the [Home] screen.
3. Press the [USB] tab.
4. Press [Scan Setting].
You can press [Scan Setting] only when you have selected the [USB] tab.
5. Press [Resolution...].
6. Select the desired resolution, and then press [OK].
Specifying Scan Settings for Scanning
189

7. Confirm the resolution you selected is displayed, and then press [OK].
When using the four-line LCD panel model
1. Press the [Image Quality] key.
DYG323
2. Press the [ ], [ ], [ ], or [ ] key to select the desired resolution, and then press the[OK] key.
• You can change the machine's default [Resolution] setting to always scan with a specific resolutionlevel. For details, see page 246 "Scanner Features Settings (When Using the Touch Panel Model)"or page 298 "Scan Settings (When Using the Four-line LCD Panel Model)".
• Temporary job settings are cleared in the following cases:
• When no input is received for the period of time specified in [System Reset Timer] or [SystemAuto Reset Timer] while the initial screen is displayed. For details, see page 274"Administrator Tools Settings (When Using the Touch Panel Model)" or page 316"Administrator Tools Settings (When Using the Four-line LCD Panel Model)".
• When the [Clear/Stop] key is pressed while the initial screen is displayed.
• When the machine's mode is changed.
• When the power is turned off.
• When the machine's default for the same setting is changed.
5. Scanning Originals
190

6. Sending and Receiving a FaxThis chapter describes how to use the fax function and specify the settings.
This function is available for M 320FB/320F.
What You Can Do with the Fax FunctionForward received faxes to receive them wherever you are
By forwarding received faxes to an e-mail address or a folder, you can receive them anytime,anywhere you are.
For details, see page 228 "Forwarding or Storing Faxes in Memory".
DYG526
Send faxes by data to save paper
By using a LAN-Fax Driver, you can send documents from your computer without printing them.
For details, see page 216 "Using the Fax Function from a Computer (LAN-Fax)".
DYG527
Send faxes via the Internet
The machine converts scanned documents to TIFF files and sends them as e-mail attachments toemail addresses.
For details, see page 202 "Internet Fax Transmission".
191

Fax Setting WorkflowsThis section explains the preparations and procedures to send fax documents to a folder on a clientcomputer.
After following the procedures below, you can send fax documents from the machine to a shared folderon a client computer.
Set the date and time.
Register the fax number and fax name of the machine.
Connect the machine to a telephone line.
Select the telephone line type and telephone network connection type.
Set the outside line access number. *1
Specify the reception mode.
*1 Specify when using an extension line or a PBX.
Procedure Reference
See Setup Guide.
For details about selecting reception modes, see page 222 "SelectingReception Mode".
• After the initial setup, you can change settings in the [Administrator Tools] menu. For details aboutchanging settings, see page 274 "Administrator Tools Settings (When Using the Touch PanelModel)".
6. Sending and Receiving a Fax
192

Fax Mode ScreenThis section provides information about the screen in fax mode.
Screen in standby mode
M0ESPC5120
13
12 11 10
9
8
7
6
54321
1. Current status or messages
Displays the current status or messages.
2. Fax and Internet Fax
Press a tab to switch the transmission type between the [Fax] ( ) screen and [Internet Fax] ( ) screen.
When the [Fax] ( ) tab is selected, you can specify fax destinations.
When the [Internet Fax] ( ) tab is selected, you can specify Internet Fax destinations.
3. [On Hook]
Allows you to dial while listening to the tone from the internal speaker. You can send a fax checking theconnection.
4. [Immed. TX]
Press to select Immediate Transmission mode. For details, see page 201 "Selecting Transmission Mode".
5. Favorite item icon
Press to register current settings to a favorite item.
6. [Tx File]
Press to display the list of transmission files in memory.
7. [Rx File]
Press to display the list of received files in memory.
You will also be prompted to enter the password when you press this. A password for accessing [RX File]can be specified in [RX File Password Setting] under the [Administrator Tools] menu.
Fax Mode Screen
193

8. Current TX settings
Displays the current density, original, and resolution settings.
9. [TX Settings]
Press to specify scan settings.
10. [Redial]
Press to select the last used destination.
While entering a destination, press this key to insert a pause.
11. [Manual Entry]
Press to specify destinations manually.
12. [Address Book]
Press to select destinations registered in the machine.
13. Entered number
Displays the entered number of a destination.
• The machine's default mode at power on can be specified in the [Function Priority] setting under[Administrator Tools]. For [Function Priority], see page 274 "Administrator Tools Settings (WhenUsing the Touch Panel Model)".
• The display format for time and date can be specified in [Set Date/Time] under [AdministratorTools]. For [Set Date/Time], see page 274 "Administrator Tools Settings (When Using the TouchPanel Model)".
• If the Alert indicator flashes on the initial fax display, press the [Home] key, press the [Status] icon,and check the displayed message.
6. Sending and Receiving a Fax
194

Registering Fax DestinationsThis section describes how to register fax destinations in the Address Book using the control panel. Forentering characters, see page 49 "Entering Characters (When Using the Touch Panel Model)".
The Address Book can also be edited using Web Image Monitor.
• The Address Book data could be damaged or lost unexpectedly. The manufacturer shall not beresponsible for any damages resulting from such data loss. Be sure to create backup files of theAddress Book data periodically. For details about creating backup files, see page 380"Configuring the Administrator Settings".
The Address Book can contain up to 108 entries (8 Quick Dial entries and 100 Speed Dial entries).
Registering Fax Destinations Using the Control Panel
1. Press the [Home] key.
DYG322
2. Press the [Setting] icon on the [Home] screen.
3. Press [Address Book].
4. Enter the password using the number keys, and then press [OK].
5. Select [Quick Dial List] or [Speed Dial List].
6. Select the number of Quick Dial List or Speed Dial List you want to register.
7. Press [Name:].
8. Enter the fax name, and then press [OK].
9. Press [Number:].
10. Enter the fax number, and then press [OK].
11. Confirm the setting, and then press [OK].
12. Press the [Home] key.
Registering Fax Destinations
195

• A fax number can contain 0 to 9, "P" (pause), " ", " ", and space.
• If necessary, insert a pause in the fax number. The machine pauses briefly before it dials the digitsfollowing the pause. You can specify the length of the pause time in the [Pause Time] setting under[Transmission Setting]. For [Pause Time], see page 249 "Fax Features Settings (When Using theTouch Panel Model)".
• To use tone services on a pulse-dialing line, insert " " in the fax number. " " switches the dialingmode from pulse to tone temporarily.
• If the machine is connected to the telephone network through a PBX, make sure to enter the outsideline access number specified in [PBX Access Number] before the fax number. For [PBX AccessNumber], see page 274 "Administrator Tools Settings (When Using the Touch Panel Model)".
• Use Web Image Monitor to register an Internet Fax destination (an e-mail address). For detailsabout registering an Internet Fax destination, page 197 "Registering Fax Destinations Using WebImage Monitor".
• A password for accessing the [Address Book] menu can be specified in [Admin. Tools Lock]. For[Admin. Tools Lock], see page 274 "Administrator Tools Settings (When Using the Touch PanelModel)".
Modifying or deleting fax destinations
1. Press the [Home] key.
DYG322
2. Press the [Setting] icon on the [Home] screen.
3. Press [Address Book].
4. Enter the password using the number keys, and then press [OK].
5. Select [Quick Dial List] or [Speed Dial List].
6. Select the number of Quick Dial List or Speed Dial List you want to modify or delete.
7. Press the box next to [Name:].
6. Sending and Receiving a Fax
196

8. Enter the fax name, and then press [OK].
If you want to delete the fax name, press [ ] or [C] until the current name is deleted.
9. Press the box next to [Number:].
10. Enter the fax number, and then press [OK].
If you want to delete the fax number, press [ ] or [C] until the current number is deleted.
11. Confirm the setting, and then press [OK].
12. Press the [Home] key.
Registering Fax Destinations Using Web Image Monitor
1. Start the web browser and access the machine by entering its IP address.
The top page of Web Image Monitor appears.
2. Click [Quick Dial Destination] or [Fax Speed Dial Destination].
3. From the [Destination Type] list, select [Fax].
4. Select [Quick Dial Number] or [Speed Dial Number], and then select the registrationnumber from the list.
5. Register information as necessary.
6. Enter the administrator password.
7. Click [Apply].
8. Close the web browser.
Fax destination settings
Item Setting Description
Quick Dial Number /Speed Dial Number
RequiredSelect the number to which you want to register QuickDial or Speed Dial destination.
Name OptionalName of the destination. The name specified here willbe shown on the screen when selecting a faxdestination. Can contain up to 20 characters.
Registering Fax Destinations
197

Item Setting Description
Fax Number Required
Fax number of the destination. Can contain up to 40characters.
If the machine is connected to the telephone networkthrough a PBX, make sure to enter the outside lineaccess number specified in [PBX Access Number]before the fax number. For [PBX Access Number], seepage 274 "Administrator Tools Settings (When Usingthe Touch Panel Model)".
E-mail Address OptionalE-mail address of the destination of the Internet Fax.
Can contain up to 64 characters.
• A fax number can contain 0 to 9, "P" (pause), " ", " ", "-", and space.
• If necessary, insert a pause in the fax number. The machine pauses briefly before it dials the digitsfollowing the pause. You can specify the length of the pause time in the [Pause Time] setting under[Transmission Setting]. For [Pause Time], see page 249 "Fax Features Settings (When Using theTouch Panel Model)".
• For details about using Web Image Monitor, see page 333 "Configuring the Machine UsingUtilities".
• To use tone services on a pulse-dialing line, insert " " in the fax number. " " switches the dialingmode from pulse to tone temporarily.
• If the machine is connected to the telephone network through a PBX, make sure to enter the outsideline access number specified in [PBX Access Number] before the fax number. For [PBX AccessNumber], see page 274 "Administrator Tools Settings (When Using the Touch Panel Model)".
Modifying fax destinations
1. Start the web browser and access the machine by entering its IP address.
The top page of Web Image Monitor appears.
2. Click [Quick Dial Destination] or [Fax Speed Dial Destination].
If you modify the Speed Dial entry, proceed to Step 4.
3. Click [Fax Quick Dial Destination].
4. Select the entry to modify, and then click [Change].
If you want to delete the entry, click [Delete].
6. Sending and Receiving a Fax
198

5. Modify settings as necessary.
To delete the entry, confirm the entry you have selected.
6. Enter the administrator password.
7. Click [Apply].
8. Close the web browser.
Preventing Transmission to the Wrong Destination
If you want to prevent documents being sent to the wrong destination, you can configure the machine toprompt users twice for the destination, or to display the entered destination prior to transmission.
Re-entering a fax number to confirm destination
Enter the fax number again to confirm the destination is correct.
Transmission is disabled if the confirmation fax number does not match the first fax number. This functionhelps prevent users accidentally sending faxes to the wrong destination.
• This function is available only when an administrator password is specified.
1. Press the [Home] key.
DYG322
2. Press the [Setting] icon on the [Home] screen.
3. Press [Administrator Tools].
4. Enter the password using the number keys, and then press [OK].
5. Press [ ] twice.
6. Press [Fax No. Confirmation].
7. Select [On].
8. Press the [Home] key.
Registering Fax Destinations
199

• A password for accessing the [Administrator Tools] menu can be specified in [Admin. Tools Lock].For [Admin. Tools Lock], see page 274 "Administrator Tools Settings (When Using the Touch PanelModel)".
6. Sending and Receiving a Fax
200

Sending a Fax
• It is recommended that you call the receiver and confirm with them when sending importantdocuments.
Selecting Transmission Mode
The following explains the transmission modes of the fax function and how to select them.
Types of transmission modes
There are two types of transmission:
• Memory transmission
• Immediate transmission
Selecting the transmission mode
Remove the original quickly from the machine.
Send documents immediately.
How many fax numbers does the destination have?
Which mode has priority?
Multiple
Single
Memory Transmission
Immediate Transmission
Immediate Transmission
Memory Transmission
Description of transmission modes
• Memory transmission
In this mode, the machine scans several originals into memory and sends them all at once. Thisis convenient when you are in a hurry and want to remove the document from the machine. Inthis mode, you can send a fax to multiple destinations. If the [Auto Redial] under [TransmissionSetting] is enabled, the machine redials the fax destination automatically when the line is busyor a transmission error occurs. The number of redial attempts is set to two or three in five-minute intervals, depending on the [Country/Region] setting under [Administrator Tools]. Youcan disable [Auto Redial] under [Fax Features]. For details, see page 249 "Fax FeaturesSettings (When Using the Touch Panel Model)".
• Immediate transmission
In this mode, the machine scans the original and faxes it simultaneously. This is convenientwhen you want to send an original quickly or when you want to check the destination you are
Sending a Fax
201

sending to. The original is not stored in memory. You can only specify one destination. If fax isnot received normally, an error message appears on the control panel.
Configuring the transmission mode
1. Press the [Home] key.
DYG322
2. Press the [Setting] icon on the [Home] screen.
3. Press [Fax Features].
4. Press [ ].
5. Select [Transmission Setting].
6. Press [Immediate TX].
7. Select [Off], [On], or [Next Fax Only].
For Memory Transmission, select [Off].
For Immediate Transmission, select [On] or [Next Fax Only].
8. Press the [Home] key.
Internet Fax Transmission
You can send faxes over the Internet. When you send faxes to Internet Fax destinations, the machineconverts scanned images to TIFF-S format files and send them as attachments to e-mail.
• The level of security for Internet communications is low. It is recommended that you use thetelephone network for confidential communications.
• Internet Fax delivery might be delayed due to network congestion. Use a telephone line if the faxneeds to be delivered in a timely manner.
• The Internet Fax function supported by this machine is compliant with ITU-T Recommendation T.37(Simple Mode).
6. Sending and Receiving a Fax
202

• To use the Internet Fax function, network settings must be configured properly. For details aboutnetwork settings, see page 358 "Configuring the Network Settings".
• Internet Fax transmission may take some time before it starts. The machine needs a certain amountof time to convert data in memory prior to transmission.
• Depending on e-mail environment conditions, you may not be able to fax large images.
• The "Photo" resolution is not available for Internet Faxes. Faxes will be sent using "Detail" resolutionif "Photo" resolution has been specified.
• If the faxes are received on a computer, a viewer application needs to be installed in order to viewthe documents.
Basic Operation for Sending a Fax
• The original in the ADF takes precedence over the original on the exposure glass if you placeoriginals both in the ADF and on the exposure glass.
• If you specify fax original settings for a 2-sided original, place it in the ADF. You cannot send faxeswhen placing the original on the exposure glass. You can specify fax original settings in two ways:[Original Settings] under [TX Settings] on the [Fax] screen or [Fax Original] under [TransmissionSetting] in the [Fax Features] menu. For details about fax original settings, see page 249 "FaxFeatures Settings (When Using the Touch Panel Model)".
1. Press the [Home] key.
DYG322
2. Press the [Fax] icon on the [Home] screen.
3. Place the original on the exposure glass or in the ADF.
To place the originals, see page 92 "Placing Originals".
4. Select the [Fax] ( ) tab or [Internet Fax] ( ) tab.
5. Select [Address Book], [Manual Entry], or [Redial].
If you select [Redial], confirm the destination, and then proceed to Step 7.
Sending a Fax
203

6. Enter the fax number (up to 40 characters), or specify a destination.
• For details about entering characters, see page 49 "Entering Characters (When Using theTouch Panel Model)".
• For details about specifying destinations, see page 208 "Specifying the Fax Destination".
• If the machine is connected to the telephone network through a PBX, make sure to enter theoutside line access number specified in [PBX Access Number] before the fax number. For [PBXAccess Number], see page 274 "Administrator Tools Settings (When Using the Touch PanelModel)".
7. Press [OK].
8. Press the [Start] key.
DYG336
• Depending on the machine's settings, you may be prompted to enter the fax number again ifyou manually entered the destination fax number. In this case, re-enter the number within 60seconds, and then press the [Start] key. If the fax numbers do not match, go back to Step 5.For [Fax No. Confirmation], see page 274 "Administrator Tools Settings (When Using theTouch Panel Model)".
• When using the exposure glass in Memory Transmission mode, you will be prompted to placeanother original. In this case, proceed to the next step.
9. If you have more originals to scan, press [Yes] within 60 seconds, place the next originalon the exposure glass, and then press [OK]. Repeat this step until all originals arescanned.
If you do not press [Yes] within 60 seconds, the machine will start to dial the destination.
10. When all originals have been scanned, press [No] or the [Start] key to start sending thefax.
• A fax number can contain 0 to 9, "P" (pause), " ", " ", and space.
• If necessary, insert a pause in a fax number. The machine pauses briefly before it dials the digitsfollowing the pause. You can specify the length of the pause time in the [Pause Time] setting under
6. Sending and Receiving a Fax
204

[Transmission Setting]. For [Pause Time], see page 249 "Fax Features Settings (When Using theTouch Panel Model)".
• To use tone services on a pulse-dialing line, insert " " in a fax number. " " switches the dialingmode from pulse to tone temporarily.
• You can specify multiple destinations and broadcast the fax you are sending. For sending a faxusing the broadcast function, see page 208 "Specifying the Fax Destination".
• When [Fax No. Confirmation] is set to [On], the machine prompts you to enter the fax numbertwice only when you dial the destination manually. Destinations specified using the Speed Dialfunction or [Redial] need not be confirmed. For details about [Fax No. Confirmation], seepage 199 "Preventing Transmission to the Wrong Destination".
• When in Memory Transmission mode, you can enable the [Auto Redial] setting under [TransmissionSetting] to set the machine to automatically redial the destination if the line is busy or an erroroccurs during transmission. For [Auto Redial], see page 249 "Fax Features Settings (When Usingthe Touch Panel Model)".
• When in Memory Transmission mode, the machine's memory may become full while scanning theoriginals. In this case, the screen prompts you to cancel the transmission or to send only the pagesthat have been scanned successfully.
• You can scan 2-sided originals from the ADF in Memory Transmission mode. Specify how to scan2-sided originals in the [Fax Original] setting under [Transmission Setting]. For [Fax Original], seepage 249 "Fax Features Settings (When Using the Touch Panel Model)".
• If paper is jammed in the ADF, the jammed page has not been scanned properly. When themachine is in Immediate Transmission mode, resend the fax starting from the jammed page. Whenin Memory Transmission mode, scan the entire originals again. For details about removing paperjammed in the ADF, see page 422 "Removing Paper Jams".
• The machine can store up to 5 unsent fax jobs.
Canceling a Transmission
This section explains how to cancel a fax transmission.
Canceling a transmission before the original is scanned
Use this procedure to cancel a transmission before pressing the [Start] key.
Sending a Fax
205

1. Press the [Clear/Stop] key.
DYG330
Canceling a transmission while the original is being scanned
Use this procedure to cancel scanning or transmitting of the original while it is being scanned.
1. Press the [Clear/Stop] key.
DYG330
2. Press [Fax Jobs] on the [Cancel Jobs] screen.
Canceling a transmission after the original is scanned (while a transmission is inprogress)
Use this procedure to delete a file that is being sent after the original is scanned.
6. Sending and Receiving a Fax
206

1. Press the [Clear/Stop] key while "Transmitting..." is displayed on the display.
DYG330
2. Press [Fax Jobs] on the [Cancel Jobs] screen.
• If you cancel a document while it is being sent, the transmission is halted as soon as you finish thecancellation procedure. However, some pages of the document may already have been sent andreceived at the other end.
• If the transmission finishes while this procedure is being processed, the transmission is not canceled.Note that the transmission duration is short if an Internet Fax is being executed.
• If you cancel sending a fax while broadcasting, only the fax to the current destination is canceled.The fax will be sent to the subsequent destinations as normal. For details about sending a fax usingthe broadcast function, see page 208 "Specifying the Fax Destination".
Canceling a transmission after the original is scanned (before a transmission starts)
Use this procedure to delete a file stored in memory before its transmission starts.
Use the following procedure to delete a file stored in memory (such as automatic redial) before itstransmission starts.
1. Confirm that the initial screen for Fax mode is shown on the display.
For details about the initial screen, see page 193 "Fax Mode Screen".
2. Press [Tx File].
3. Select the file you want to delete.
• To delete a file
Select the file you want to delete, and then press [Delete]. Press [Yes] when the messageappears.
• To delete all files
Press [Delete All]. Press [Yes] when the message appears.
Sending a Fax
207

• You cannot view files that are in the process of being sent.
• If you specify a broadcast task, all the unsent destinations are canceled.
Specifying the Fax Destination
Other than entering the destination fax number using the number keys, you can specify destinationsusing the following functions:
• Quick Dial
• Speed Dial
• Broadcast function
• Redial function
Specifying the destination using Quick Dial
1. Press the [Home] key.
DYG322
2. Press the [Fax] icon on the [Home] screen.
3. Press [Address Book].
4. Press the [Quick Dial] tab.
5. Select the Quick Dial entry you want by pressing the small square.
A check mark appears in the small square. Press the small square again to cancel the selection.
6. Press [OK].
• You can check the registered names and fax numbers by printing a report. For printing the QuickDial list, see page 283 "Printing Lists/Reports (When Using the Touch Panel Model)".
• For registering the Quick Dial entries, see page 195 "Registering Fax Destinations".
6. Sending and Receiving a Fax
208

Specifying the destination using Speed Dial
1. Press the [Home] key.
DYG322
2. Press the [Fax] icon on the [Home] screen.
3. Press [Address Book].
4. Press the [Speed Dial] tab.
5. Select the Speed Dial entry you want by pressing the small square.
A check mark appears in the small square. Press the small square again to cancel the selection.
6. Press [OK].
• You can check the registered names and fax numbers by printing a report. For printing the SpeedDial list, see page 283 "Printing Lists/Reports (When Using the Touch Panel Model)".
• For registering the Speed Dial entries, see page 195 "Registering Fax Destinations".
Specifying the destination using the broadcast function
You can send a fax to multiple destinations (up to 100 destinations) simultaneously.
Faxes are sent to destinations in the order they were specified.
Sending a Fax
209

1. Press the [Home] key.
DYG322
2. Press the [Fax] icon on the [Home] screen.
3. Add a destination by using one of the following methods:
• To add a Quick Dial destination: press [Address Book], press the [Quick Dial] tab, select adestination, and then press [OK].
• To add a Speed Dial destination: press [Address Book], press the [Speed Dial] tab, select adestination, and then press [OK].
• To add a manually-specified destination: press [Manual Entry], press the box, enter thedestination fax number, and then press [OK] twice.
• While specifying multiple destinations, you can press the [Clear/Stop] key to clear all destinations.
• If you specify multiple destinations in Immediate Transmission mode, the mode switches to MemoryTransmission mode temporarily.
• While broadcasting, pressing [Clear] cancels the fax to the current destination only.
• If the destinations contain both normal fax destinations and Internet Fax destinations, the fax will besent to the Internet Fax destinations first.
Specifying the destination using the redial function
You can specify the last used destination as the destination for the current job.
This function saves time when you are sending to the same destination repeatedly, as you do not have toenter the destination each time.
6. Sending and Receiving a Fax
210

1. Press the [Home] key.
DYG322
2. Press the [Fax] icon on the [Home] screen.
3. Press [Redial].
4. Confirm the destination, and then press the [Start] key.
Useful Sending Functions
You can check the status of the other party's machine easily before sending a fax by using the On HookDial function.
Using an external telephone, you can talk and send a fax in one call.
The procedure differs depending on whether [TX/RX Switch Setting] is set to [TX/RX Auto Setting] or[TX/RX Manual Setting] in [Fax Features].
• This function is available in Immediate Transmission mode only.
• For details about [TX/RX Switch Setting], see page 249 "Fax Features Settings (When Using theTouch Panel Model)".
Sending a fax using On Hook Dial
The On Hook Dial function allows you to check the destination's status while listening to the tone from theinternal speaker. This function is useful when you want to ensure that the fax will be received.
• The On Hook Dial function cannot be used when [Fax No. Confirmation] under [AdministratorTools] is enabled.
Sending a Fax
211

1. Place the original.
If [TX/RX Switch Setting] is set to [TX/RX Auto Setting], you cannot send faxes using the exposureglass.
2. Press the [Home] key.
DYG322
3. Press the [Fax] icon on the [Home] screen.
4. Press [On Hook].
[On Hook] appears on the screen.
5. Specify the destination using the number keys.
6. If you hear a high pitched tone, press the [Start] key.
DYG336
If [TX/RX Switch Setting] is set to [TX/RX Auto Setting], Step 7 does not apply.
7. If the original is placed on the exposure glass, press [TX], and then press the [Start] key.
• If the handset of external telephone is on-hook, it is possible to use the address book and numerickeys on the operation panel.
• For details about selecting the transmission mode, see page 201 "Selecting Transmission Mode".
• For details about [Fax No. Confirmation], see page 274 "Administrator Tools Settings (WhenUsing the Touch Panel Model)".
6. Sending and Receiving a Fax
212

Sending a fax after a conversation
An external telephone allows you to send a fax after finishing your conversation without having todisconnect and redial. This function is useful when you want to ensure that the fax has been received.
1. Place the original.
If [TX/RX Switch Setting] is set to [TX/RX Auto Setting], you cannot send faxes using the exposureglass.
2. Press the [Home] key.
DYG322
3. Press the [Fax] icon on the [Home] screen.
4. Pick up the handset of the external telephone.
5. Specify the destination using the external telephone.
6. When the other party answers, tell the receiver that you want to send them a faxdocument (ask them to switch to facsimile mode).
7. If you hear a high pitched tone, press the [Start] key.
DYG336
If [TX/RX Switch Setting] is set to [TX/RX Auto Setting], Step 8 does not apply.
8. If the original is placed on the exposure glass, press [TX], and then press the [Start] key.
9. Replace the handset.
Sending a Fax
213

Specifying Scan Settings for Faxing
Adjusting image density
This section describes how to adjust image density for the current job.
There are three image density levels. The darker the density level, the darker the printout.
1. Press the [Home] key.
DYG322
2. Press the [Fax] icon on the [Home] screen.
3. Press [TX Settings].
4. Press [ ] or [ ] to select the desired density level, and then press [OK].
• You can change the machine's default [Density] setting to always scan with a specific density level.For [Density], see page 249 "Fax Features Settings (When Using the Touch Panel Model)".
Specifying the resolution
This section describes how to specify the scan resolution for the current job.
There are three resolution settings:
Standard
Select this when the original is a printed or typewritten document with normal-sized characters.
Detail
Select this when the original is a document with small print.
Photo
Select this when the original contains images such as photographs or shaded drawings.
6. Sending and Receiving a Fax
214

1. Press the [Home] key.
DYG322
2. Press the [Fax] icon on the [Home] screen.
3. Press [TX Settings].
4. Press [Resolution].
5. Select the desired resolution, and then press [OK].
6. Confirm the resolution you selected is displayed, and then press [OK].
• You can change the machine's default [Resolution] setting to always scan with a specific resolutionlevel. For [Resolution], see page 249 "Fax Features Settings (When Using the Touch PanelModel)".
Sending a Fax
215

Using the Fax Function from a Computer (LAN-Fax)This section describes how to use the fax function of the machine from a computer.
You can send a document directly from a computer through this machine to another fax machine,without printing the document.
Basic Operation for Sending Faxes from a Computer
This section describes the basic operation for sending faxes from a computer.
You can select a destination from the LAN-Fax address book or enter a fax number manually. You cansend faxes to up to 100 destinations at one time.
The procedure in this section is an example based on Windows 10.
• Before sending a fax, the machine stores all the fax data in memory. If the machine's memorybecomes full while storing this data, the fax transmission will be canceled. If this happens, lower theresolution or reduce the number of pages and try again.
1. Open the file you want to send.
2. On the [File] menu, click [Print].
3. Select the LAN-Fax driver as the printer, and then click [Print].
4. Specify a destination.
• To specify a destination from the LAN-Fax address book:
Select a destination from [User List:], and then click [Add to List].
Repeat this step to add more destinations.
• To enter a fax number directly:
Click the [Specify Destination] tab, and enter a fax number (up to 40 digits) in [Fax Number:],and then click [Add to List].
Repeat this step to add more destinations.
5. To attach a cover sheet, click [Edit Cover Sheet] on the [Specify Destination] tab, and thenselect the [Attach a Cover Sheet] check box.
Edit the cover sheet as necessary, and then click [OK].
For details about the settings, see the LAN-Fax driver help.
6. Click [Send].
6. Sending and Receiving a Fax
216

• For details, see the LAN-Fax driver help.
• A fax number can contain 0 to 9, "P" (pause), " ", " ", "-", and space.
• If necessary, insert a pause in a fax number. The machine pauses briefly before it dials the digitsfollowing the pause. You can specify the length of the pause time in the [Pause Time] setting under[Transmission Setting]. For [Pause Time], see page 249 "Fax Features Settings (When Using theTouch Panel Model)".
• To use tone services on a pulse-dialing line, insert " " in a fax number. " " switches the dialingmode from pulse to tone temporarily.
• To delete an entered destination, select the destination in the [Destination List:], and then click[Delete from List].
• You can register the fax number you entered in the [Specify Destination] tab in the LAN-FaxAddress Book. Click [Save to Address Book] to open the dialog box for registering a destination.
• From the [View:] list in the [Address Book] tab, you can select the types of destinations to display.
• [All]: Displays all destinations.
• [Group]: Displays groups only.
• [User]: Displays individual destinations only.
• If sending faxes via LAN-Fax is restricted, you must enter a user code in the LAN-Fax driver'sproperty before sending a fax. For details about entering a user code, see page 352 "RestrictingMachine Functions According to User".
Canceling a fax
You can cancel sending a fax using either the machine's control panel or your computer, depending onthe status of the job.
Canceling while the machine is receiving a fax from the computer
If the machine is shared by multiple computers, be careful not to cancel the fax of another user.
1. Double-click the printer icon on the task bar of your computer.
2. Select the print job you want to cancel, click the [Document] menu, and then click[Cancel].
3. Click [Yes].
Canceling while sending a fax
Cancel the fax using the control panel.
Using the Fax Function from a Computer (LAN-Fax)
217

1. Press the [Home] key.
DYG322
2. Press the [Fax] icon on the [Home] screen.
3. Press the [Clear/Stop] key.
4. Press [Fax Jobs] on the [Cancel Jobs] screen.
Configuring Transmission Settings
This section describes how to configure transmission settings in the LAN-Fax driver's properties.
Properties are set separately for each application.
1. On the [File] menu, click [Print].
2. Select the LAN-Fax driver as the printer, and then click a button such as [Preferences].
LAN-Fax driver properties dialog box appears.
3. Click the [Setup] tab.
4. Configure settings as necessary, and then click [OK].
For details about the settings, see the LAN-Fax driver help.
Configuring the LAN-Fax Address Book
This section describes the LAN-Fax address book. Configure the LAN-Fax address book on thecomputer. The LAN-Fax address book allows you to specify LAN-Fax destinations quickly and easily.
The LAN-Fax address book can contain up to 1000 entries, including individual destinations andgroups of destinations.
Opening the LAN-Fax address book
1. On the [Start] menu, select [Control Panel] under [Windows System].
6. Sending and Receiving a Fax
218

2. Click [View devices and printers].
3. Right-click the LAN-Fax driver icon, and then click [Printing preferences].
4. Click the [Address Book] tab.
Registering destinations
1. Open the LAN-Fax address book, and then click [Add User].
2. Enter the destination information, and then click [OK].
You must enter a contact name and fax number.
3. Confirm the setting, and then click [OK].
Modifying destinations
1. Open the LAN-Fax address Book, select the destination you want to modify from the[User List:], and then click [Edit].
2. Modify information as necessary, and then click [OK].
Click [Save as new User] if you want to register a new destination with similar information. This isuseful when you want to register a series of destinations that contain similar information. To closethe dialog box without modifying the original destination, click [Cancel].
3. Confirm the setting, and then click [OK].
Registering groups
1. Open the LAN-Fax address Book, and then click [Add Group].
2. Enter the group name in [Group Name].
3. Select the destination you want to include in the group from [User List:], and then click[Add].
To delete a destination from a group, select the destination you want to delete from [List of GroupMembers:], and then click [Delete from List].
4. Click [OK].
5. Confirm the setting, and then click [OK].
• A group must contain at least one destination.
• A group name must be specified for a group. No two groups can have the same group name.
• A single destination can be included in more than one group.
Using the Fax Function from a Computer (LAN-Fax)
219

Modifying groups
1. Open the LAN-Fax address Book, select the group you want to modify from the [UserList:], and then click [Edit].
2. To add a destination to the group, select the destination you want to add from [User List:]and click [Add].
3. To delete a destination from the group, select the destination you want to delete from [Listof Group Members:], and then click [Delete from List].
4. To change the group name, enter the new name in [Group Name].
A message appears if the name you specified already exists in the LAN-Fax Address Book. Click[OK] and register it under a different name.
5. Click [OK].
6. Confirm the setting, and then click [OK].
Deleting individual destinations or groups
1. Open the LAN-Fax Address Book, select the destination you want to delete from [UserList:], and then click [Delete].
A confirmation message appears.
2. Click [Yes].
3. Confirm the setting, and then click [OK].
• A destination is automatically deleted from a group if that destination is deleted from the LAN-FaxAddress Book. If you are deleting the last destination from a group, a message asking you toconfirm the deletion appears. Click [OK] if you want to delete the group.
• Deleting a group does not delete the destinations it contains from the LAN-Fax Address Book.
Exporting/Importing LAN-Fax Address Book data
• The following procedure is based on Windows 10 as an example. If you are using anotheroperating system, the procedure might vary slightly.
Exporting LAN-Fax Address Book data
LAN-Fax Address Book data can be exported to a file in CSV (Comma Separated Values) format.
Follow this procedure to export LAN-Fax Address Book data.
1. Open the LAN-Fax Address Book, and then click [Export].
6. Sending and Receiving a Fax
220

2. Navigate to the location to save the LAN-Fax Address Book data, specify a name forthe file, and then click [Save].
Importing LAN-Fax Address Book data
LAN-Fax Address Book data can be imported from files in CSV format. You can import addressbook data from other applications if the data is saved as a CSV file.
1. Open the LAN-Fax Address Book, and then click [Import].
2. Select the file containing the address book data, and then click [Open].
A dialog box for selecting the items to import appears.
3. For each field, select an appropriate item from the list.
Select [*empty*] for fields for which there is no data to import. Note that [*empty*] cannotbe selected for [Name:] and [Fax:].
4. Click [OK].
For details about the settings, see the LAN-Fax driver help.
• CSV files are exported using Unicode encoding.
• LAN-Fax Address Book data can be imported from CSV files whose character encoding is Unicodeor ASCII.
• Group data cannot be exported or imported.
• Up to 1000 destinations can be registered in the LAN-Fax Address Book. If this limit is exceededduring importing, the remaining destinations will not be imported.
Editing a Fax Cover Sheet
1. On the [File] menu, click [Print].
2. Select the LAN-Fax driver as the printer, and then click [Print].
3. Click the [Specify Destination] tab, and then click [Edit Cover Sheet].
4. Click [Attach a Cover Sheet].
5. Configure settings as necessary, and then click [OK].
For details about the settings, see the LAN-Fax driver help.
Using the Fax Function from a Computer (LAN-Fax)
221

Receiving a Fax
• When receiving an important fax, we recommend you confirm the contents of the received fax withthe sender.
• The machine may not be able to receive faxes when the amount of free memory space is low.
• You can use an external telephone to use this machine as a telephone.
• Only A4, Letter, or Legal size paper can be used for printing faxes.
Selecting Reception Mode
The following explains the reception modes of the fax function and how to select them.
• In FAX/TAD mode, the machine receives the fax automatically after the external telephoneanswering device rings the number of times specified in [No. of Rings (TAD)]. Set the externaltelephone answering device to ring before receiving a fax. For details about [No. of Rings (TAD)],see page 249 "Fax Features Settings (When Using the Touch Panel Model)".
Types of reception mode
There are four types of reception:
• Fax Only mode
• FAX/TEL Manual mode
• FAX/TEL Auto mode
• FAX/TAD mode
6. Sending and Receiving a Fax
222

Selecting the reception modes
Is an external telephone connected to the machine?
Fax Only mode
FAX/TAD mode
FAX/TEL Auto mode
FAX/TEL Manual mode
Do you want to use an external answering device?
Do you want to receive faxes automatically?
Yes
Yes
Yes
No
No
No
Description of reception modes
• Fax Only mode (auto reception)
• When an external telephone is not connected
The machine automatically answers all incoming calls in fax reception mode.
• When an external telephone is connected
The machine automatically answers all incoming calls in fax reception mode after theexternal telephone rings the number of times specified. It is convenient for people thatuse telephones for outgoing calls only.
• FAX/TAD mode (auto reception)
In this mode, the external telephone answering device answers and records messages whenthe machine receives telephone calls. If the incoming call is a fax call, the machine receivesthe fax automatically. For details, see page 226 "Receiving a fax in FAX/TAD mode".
• FAX/TEL Auto mode (auto reception)
In this mode, the machine receives faxes automatically if a fax calling tone is detected from anincoming call. For details, see page 225 "Receiving a fax in FAX/TEL Auto mode".
• FAX/TEL Manual mode (manual reception)
Receiving a Fax
223

In this mode, you must answer calls with an external telephone. If a call is a fax call, you muststart the fax reception manually. For details, see page 224 "Receiving a fax in FAX/TELManual mode".
Configuring the reception mode
1. Press the [Home] key.
DYG322
2. Press the [Setting] icon on the [Home] screen.
3. Press [Fax Features].
4. Press [Reception Settings].
5. Press [Switch Recep. Mode].
6. Select the desired reception mode.
7. Press the [Home] key.
• In FAX/TAD mode, the machine automatically starts to receive faxes after the externaltelephone answering device rings the number of times specified in [No. of Rings (TAD)] under[Fax Features]. Make sure to set the external telephone answering device to answer callsbefore the machine starts to receive faxes. For [No. of Rings (TAD)], see page 249 "FaxFeatures Settings (When Using the Touch Panel Model)".
• An external telephone is required to use this machine as a telephone. For details aboutconnecting an external telephone to the machine, see Setup Guide.
Receiving a fax in FAX/TEL Manual mode
• To receive faxes, be sure to first remove any originals loaded in the ADF.
The procedure differs depending on whether [TX/RX Switch Setting] is set to [TX/RX Auto Setting] or[TX/RX Manual Setting] in [Fax Features].
6. Sending and Receiving a Fax
224

1. Pick up the handset of the external telephone to answer the call.
A normal telephone call starts.
2. When you hear a fax calling tone or no sound, press the [Home] key, press the [Fax]icon, and then press the [Start] key.
If [TX/RX Switch Setting] is set to [TX/RX Auto Setting], proceed to Step 5.
3. Press [RX].
4. Press the [Start] key.
5. Replace the handset.
• For details about [TX/RX Switch Setting], see page 249 "Fax Features Settings (When Using theTouch Panel Model)".
Receiving a fax in Fax Only mode
When the reception mode is set to Fax Only mode, the machine automatically answers all incomingcalls in fax reception mode.
• You can specify the number of times the machine rings before answering a call in the [Number ofRings] setting under [Fax Features]. For [Number of Rings], see page 249 "Fax Features Settings(When Using the Touch Panel Model)".
• If you answer a call with the external telephone while the machine is ringing, a normal telephonecall starts. If you hear a fax calling tone or no sound, receive the fax manually. To receive the faxmanually, see page 224 "Receiving a fax in FAX/TEL Manual mode".
Receiving a fax in FAX/TEL Auto mode
When the reception mode is set to FAX/TEL Auto mode, the machine receives faxes automatically if afax calling tone is detected from an incoming call.
• You can specify how long the machine rings before it receives faxes in the [RX Mode Switch Time]setting under [Fax Features]. For [RX Mode Switch Time], see page 249 "Fax Features Settings(When Using the Touch Panel Model)".
• If you answer a call with the external telephone while the machine is ringing, a normal telephonecall starts. If you hear a fax calling tone, receive the fax manually. To receive the fax manually, seepage 224 "Receiving a fax in FAX/TEL Manual mode".
Receiving a Fax
225

Receiving a fax in FAX/TAD mode
When the reception mode is set to FAX/TAD mode, the external telephone answering device answersand records messages when the machine receives telephone calls. If the incoming call is a fax call, themachine receives the fax automatically.
1. When there is an incoming call, the external telephone answering device rings thenumber of times specified in [No. of Rings (TAD)] under [Fax Features].
For [No. of Rings (TAD)], see page 249 "Fax Features Settings (When Using the Touch PanelModel)".
If the external telephone answering device does not answer, the machine starts to receive the faxautomatically.
2. If the external telephone answering device answers, the machine monitors silence on theline for 30 seconds (silence detection).
• If a fax calling tone or no sound is detected, the machine starts to receive the faxautomatically.
• If a voice is detected, a normal telephone call starts. The external telephone answering devicerecords messages.
• You can manually receive a fax during silence detection. To receive the fax manually, seepage 224 "Receiving a fax in FAX/TEL Manual mode".
• Silence detection does not terminate for 30 seconds even if the external telephone answeringdevice goes on-hook, unless you press the [Clear/Stop] key and disconnect the call.
Receiving an Internet Fax
You can set the machine to periodically check for e-mails (Internet Faxes) and receive themautomatically, or you can manually check and receive them.
• Specify the e-mail address of this machine for receiving Internet Faxes in User Account under POP3settings of Web Image Monitor.
• This machine may not be able to receive e-mails in HTML format.
Automatic reception
When [Automatic POP] under Internet Fax settings of Web Image Monitor is enabled, the machineperiodically connects to the POP3 server, as specified in [POP Interval (minutes)], to check for newe-mails. The machine will download them if there are any.
6. Sending and Receiving a Fax
226

Manual reception
When [Automatic POP] is disabled, use the control panel to manually connect to the POP3 serverand check for new e-mails.
Receiving a fax using the control panel
1. Press the [Home] key.
DYG322
2. Press the [Setting] icon on the [Home] screen.
3. Press [Fax Features].
4. Press [Reception Settings].
5. Press [ ] twice.
6. Press [Manual POP].
7. In the confirmation screen, press [Yes].
The machine checks for new e-mails and downloads them if there is any.
Receiving a fax using Web Image Monitor
1. Start the Web browser, and access the machine by entering its IP address.
The top page of Web Image Monitor appears.
2. Click [Network Settings].
3. Click the [Internet Fax] tab.
4. Select "Automatic POP" to [Active] or [Inactive].
[Active]: Automatic reception
[Inactive]: Manual reception
5. Enter the administrator password.
6. Click [OK].
Receiving a Fax
227

7. Close the Web browser.
For details about using Web Image Monitor, see page 335 "Using Web Image Monitor".
• If the e-mail reception fails and [Error Notification E-mail] under Internet Fax settings of Web ImageMonitor is enabled, an error notification e-mail will be sent to the original sender. For details aboutsettings of Web Image Monitor, see page 369 "Internet Fax Tab".
• If [Error Notification E-mail] is disabled or the error notification e-mail failed, the machine will printout an error report.
Forwarding or Storing Faxes in Memory
To prevent unauthorized users from seeing sensitive faxes, you can set the machine to forward receivedfaxes to a preset destination, or store them in memory without printing them out.
• The table below shows what happens after forwarding succeeds or fails depending on themachine’s configuration.
Forwarding [PrintForwarded File]
[Print ReceivedFile]
Results
Success Off Not applicable The machine deletes the fax frommemory.
Success On On The machine prints out the fax anddeletes it from memory.
Success On Off The machine stores the fax inmemory for later manual printing.
Failure Off Not applicable The machine prints out a forwardingfailure report, prints out the fax, andthen deletes it from memory.
Failure On On The machine prints out a forwardingfailure report, prints out the fax, andthen deletes it from memory.
Failure On Off The machine prints out a forwardingfailure report, prints out the fax, andthen deletes it from memory.
6. Sending and Receiving a Fax
228

• If the machine is unable to print out a fax due to machine errors such as an empty paper tray or apaper jam, the fax will remain in memory and the Fax Received indicator will flash. The remainingpages will start printing as soon as the problem is resolved.
• The number of forwarding attempts and the attempt interval time can be specified using WebImage Monitor. For details about the forwarding destination, forwarding trials and interval settings,see page 341 "Configuring the System Settings".
• The faxes can be forwarded or stored in memory as TIFF or PDF files. The image file format can bespecified in [Forwarded File Format] on the [Fax] tab. For details, see page 344 "Fax Tab (OnlyWhen Using the Touch Panel Model)".
Forwarding settings
To specify the forwarding conditions for received faxes, configure the machine as follows:
1. Press the [Home] key.
DYG322
2. Press the [Setting] icon on the [Home] screen.
3. Press [Fax Features].
4. Press [Reception Settings].
5. Press [ ].
6. Press [Reception File Sett.].
7. Select [Forward].
To send e-mail notifications after faxes are forwarded, proceed to Step 8.
8. Press [Notify Forwarding].
9. Press [Active].
• [Active]: Send an e-mail notification after forwarding. E-mail notification destination dependson how the forwarding destination is configured.
• [Inactive]: An e-mail notification is not sent.
10. Press the [Home] key.
Receiving a Fax
229

Specifying the forwarding destination using Web Image Monitor
1. Start the web browser and access the machine by entering its IP address.
The top page of Web Image Monitor appears.
2. Click [System Settings].
3. Click the [Fax] tab.
4. Specify the forwarding destination in [Forwarding Destination].
• [E-mail Address]: Enter a destination e-mail address.
• [Scan Destination]: Select a scan destination as a forwarding destination.
5. Enter the administrator password.
6. Click [OK].
7. Close the web browser.
For details about using Web Image Monitor, see page 341 "Configuring the System Settings".
Configuring the storing conditions
To specify the storing conditions for received faxes, configure the machine as follows:
1. Press the [Home] key.
DYG322
2. Press the [Setting] icon on the [Home] screen.
3. Press [Fax Features].
4. Press [Reception Settings].
5. Press [ ].
6. Press [Reception File Sett.].
7. Select [Print] or [Forward].
8. Press [Print Received File].
6. Sending and Receiving a Fax
230

9. Select [On] or [Off].
• [On]: Automatically print out the received faxes and delete from memory.
• [Off]: Store the received faxes in memory for later manual printing.
10. Press the [Home] key.
• When the fax is successfully printed out, it will be deleted from memory.
• If the machine is unable to print out a fax due to machine errors such as an empty paper tray or apaper jam, the fax will remain in memory. The remaining pages will start printing as soon as theproblem is resolved.
Printing out faxes stored in memory
This section explains how to print out received faxes stored in the machine's memory.
If the Data-In indicator is lit, there is a fax in machine's memory. Follow the procedure below to print thefax.
1. Press the [Home] key.
DYG322
2. Press the [Fax] icon on the [Home] screen.
3. Press [Rx File].
4. Enter the password using the number keys, and then press [OK].
A password for accessing [Rx File] can be specified in [RX File Password Setting] under[Administrator Tools] menu.
5. Select the file, and then press [Print].
6. Press [Yes].
The machine prints out the stored fax and deletes it from memory.
7. Press the [Home] key.
Receiving a Fax
231

• If tray 2 is installed, you can select which tray to feed paper from in [Select Paper Tray] under faxfeature settings. If you set the machine to switch between Tray 1 and 2 automatically in this setting,you can also specify the tray the machine uses first in [Paper Tray Priority] under [Paper Settings].For details about [Select Paper Tray], see page 249 "Fax Features Settings (When Using theTouch Panel Model)" and [Paper Tray Priority], see page 269 "Paper Settings (When Using theTouch Panel Model)".
• If the Fax Received indicator is lit, there is a received fax in the machine's memory that could not beprinted out due to machine errors such as an empty paper tray or a paper jam. The printing willstart as soon as the problem is resolved.
Receiving or Rejecting Faxes from Special Senders
You can set the machine to receive (or reject) faxes only from the registered Special Senders. This helpsyou screen out unwanted documents, such as junk faxes, and prevents the wasting of fax paper.
To use this function, you must first register Special Senders using Web Image Monitor, and then selectwhether to accept or reject faxes from them.
• This function is not available with Internet Fax.
Registering the special senders
This section explains how to register special senders.
Up to 30 special senders can be registered.
1. Start the web browser, and access the machine by entering its IP address.
The top page of Web Image Monitor appears.
2. Click [Special Sender].
3. From the [Destination Type] list, select [Special Sender].
6. Sending and Receiving a Fax
232

4. Select a number for [Special Sender No.] from the list (1 to 30).
5. Enter the special sender's fax number (up to 20 characters) in [Special Sender Number].
6. Enter the administrator password.
7. Click Apply.
8. Close the web browser.
• You can use the numbers 0 to 9, spaces, alphanumeric characters, and symbols.
Limiting the incoming faxes
This section explains how to set the machine to receive (or reject) faxes only from the programmedspecial senders.
1. Start the web browser, and access the machine by entering its IP address.
The top page of Web Image Monitor appears.
2. Press [Special Sender].
3. Select senders from whom to receive faxes in [Reception Conditions].
• [All Senders]
Select this to receive faxes from all senders.
• [Not Special Sender]
Receiving a Fax
233

Select this to reject faxes from the special senders and receive faxes from all other senders.
• [Special Sender Only]
Select this to receive faxes from the special senders and reject faxes from all other senders.
4. Enter the administrator password.
5. Click [Apply].
6. Close the web browser.
6. Sending and Receiving a Fax
234

Lists/Reports Related to FaxThe lists and reports related to the fax function are as follow:
• Configuration Page
Prints general information and the current configurations of the machine.
• Fax Journal
Prints a fax transmission and reception journal for the last 50 jobs.
• TX/RX Standby Files
Prints a list of fax jobs remaining in the machine's memory to be printed, sent, or forwarded.
• Quick Dial Dest.
Prints a list of scan and fax Quick Dial entries.
• Fax Speed Dial Dest.
Prints a list of Speed Dial entries.
• By Speed Dial No.
Prints the list with the entries sorted by Speed Dial registration number.
• By Name
Prints the list with the entries sorted by name.
• Special Sender List
Prints a list of fax Special Senders.
• Power Failure Report
Prints a report when the machine's power has been interrupted while sending or receiving a fax, orimages stored in the machine's memory have been lost due to the machine being turned off for aprolonged period of time.
• For more information on Fax Journal and Print TX Status, see page 249 "Fax Features Settings(When Using the Touch Panel Model)".
• Repots will be printed on A4 or Letter size paper. Load one of these sizes of paper into the traybefore printing reports. For details about loading paper, see page 58 "Loading Paper".
Lists/Reports Related to Fax
235

6. Sending and Receiving a Fax
236

7. Configuring the Machine Using theControl PanelThis chapter describes how to configure the machine using the control panel.
Basic OperationUse the following procedure to access the machine settings.
To check which category the function you want to configure belongs to, see page 239 "Menu Chart".
When Using the Touch Panel Model
1. Press the [Home] key.
DYG322
2. Press the [Setting] icon on the [Home] screen.
3. Select the settings you want to use.
For a list of available items, see page 239 "Menu Chart".
If you select [Address Book], [Network Settings], or [Administrator Tools] menu, you might berequested to enter a password. Enter the eight-digit password, and then press [OK]. Fordetails about the password, see [Admin. Tools Lock] on page 274 "Administrator ToolsSettings (When Using the Touch Panel Model)".
4. To confirm setting items and values displayed, press [OK].
5. To go back to the previous item, press [Exit].
When Using the Four-line LCD Panel Model
There are two main ways to access the machine settings:
• Press the [User Tools] key to access the system or network settings.
• Press the [ ] or [ ] key while in standby mode of each function to access the Copy or Scansettings.
To check which category the function you want to configure belongs to, see page 239 "MenuChart".
237

1. If you want to configure the machine's system settings, press the [User Tools] key.
DYG327
Otherwise, press the [ ] or [ ] key while "Ready" is displayed on the initial screen of the Copyand Scan settings.
DYG333
2. Press the [ ] or [ ] key to select the settings you want to use.
For a list of available items, see page 239 "Menu Chart".
If you select [Network Settings], [Network Wizard], or [Admin. Tools] menu, you might berequested to enter a password. Enter the eight-digit password, and then press the [OK] key.For details about the password, see [Admin. Tools Lock] on page 316 "Administrator ToolsSettings (When Using the Four-line LCD Panel Model)".
3. To confirm setting items and values displayed, press the [OK] key.
4. To go back to the previous item, press the [Back] key.
• To return to the initial screen, press the [Back] key the same amount of times as the number ofselected items, or press the [User Tools] key once.
• Some setting items will be reflected after the machine restarts.
7. Configuring the Machine Using the Control Panel
238

Menu ChartThis section lists the parameters included in each menu.
For details about configuring the machine using Web Image Monitor, see page 333 "Configuring theMachine Using Utilities".
• Some items can also be configured using Web Image Monitor.
When Using the Touch Panel Model
• Copier Features
For details, see page 241 "Copier Features Settings (When Using the Touch Panel Model)".
• Scanner Features
For details, see page 246 "Scanner Features Settings (When Using the Touch Panel Model)".
• Fax Features
For details, see page 249 "Fax Features Settings (When Using the Touch Panel Model)".
• Address Book
For details, see page 258 "Address Book Settings (When Using the Touch Panel Model)".
• System Settings
For details, see page 259 "System Settings (When Using the Touch Panel Model)".
• Paper Settings
For details, see page 269 "Paper Settings (When Using the Touch Panel Model)".
• Network Settings
For details, see page 286 "Network Settings (When Using the Touch Panel Model)".
• Print List/Report
For details, see page 283 "Printing Lists/Reports (When Using the Touch Panel Model)".
• Administrator Tools
For details, see page 274 "Administrator Tools Settings (When Using the Touch PanelModel)".
• Printer Features
For details, see page 265 "Printer Features Settings (When Using the Touch Panel Model)".
• @Remote
For details, see page 292 "@Remote (When Using the Touch Panel Model)".
When Using the Four-line LCD Panel Model
• Copier Features ([ ] [ ] key setting)
Menu Chart
239

For details, see page 293 "Copier Features Settings (When Using the Four-line LCD PanelModel)".
• Scan Settings ([ ] [ ] key setting)
For details, see page 298 "Scan Settings (When Using the Four-line LCD Panel Model)".
• System Settings ([User Tools] key setting)
For details, see page 300 "System Settings (When Using the Four-line LCD Panel Model)".
• Tray Paper Settings ([User Tools] key setting)
For details, see page 310 "Tray Paper Settings (When Using the Four-line LCD PanelModel)".
• Network Wizard ([User Tools] key setting)
For details, see Setup Guide.
• Network Settings ([User Tools] key setting)
For details, see page 325 "Network Settings (When Using the Four-line LCD Panel Model)".
• Print List/Report ([User Tools] key setting)
For details, see page 322 "Printing Lists/Reports (When Using the Four-line LCD PanelModel)".
• Admin. Tools ([User Tools] key setting)
For details, see page 316 "Administrator Tools Settings (When Using the Four-line LCD PanelModel)".
• Printer Features ([User Tools] key setting)
For details, see page 305 "Printer Features Settings (When Using the Four-line LCD PanelModel)".
• @Remote ([User Tools] key setting)
For details, see page 331 "@Remote (When Using the Four-line LCD Panel Model)".
7. Configuring the Machine Using the Control Panel
240

Copier Features Settings (When Using theTouch Panel Model)This function is available for M 320FB/320F only.
Item Description Value
Select Paper Specifies the paper size used for printing copies.
When a tray is selected, the machine prints fromthat tray only.
When a paper size is selected, the machineprints from the trays that contain the paper of thespecified size, except the bypass tray. If Tray 1and tray 2 both contain the paper of thespecified size, the machine starts to print from thetray specified as the priority tray in [Paper TrayPriority] under [Paper Settings]. If that tray runsout of paper, the machine automatically switchesto the other tray to continue printing.
If Tray 2 is not installed, only [Tray 1] and[Bypass Tray] appear.
• Tray 1
• Tray 2
• Bypass Tray
• A4
• 8 1/2 × 11
• 16K
Default: [Tray 1]
Sort Configures the machine to sort the output pagesinto sets when making multiple copies of a multi-page document (P1, P2, P1, P2...).
• Off
• On
Default: [Off]
Copier Features Settings (When Using the Touch Panel Model)
241

Item Description Value
Original Type Specifies the content of originals, to optimizecopy quality.
• Text/Photo
Select this when theoriginal contains bothtext and photographsor pictures.
• Text
Select this when theoriginal contains onlytext and nophotographs orpictures.
• Photo
Select this when theoriginal containsphotographs orpictures. Use this modefor the following typesof original:
• Photographs
• Pages that areentirely or mainlyphotographs orpictures, such asmagazine pages.
Default: [Text/Photo]
Density Specifies the image density for photocopying. Increase the level (blacksquares) to increase thedensity.
Default: The default settingis the middle of 5adjustment levels.
7. Configuring the Machine Using the Control Panel
242

Item Description Value
Reduce/Enlarge Specifies the percentage by which copies areenlarged or reduced. • 50% (A4->A6)
• 71% (A4->A5 B5->B6)
• 82% (8 × 13->A4)
• 93%
• 100%
• 122% (A5->B5J)
• 141% (A5->A4 B6->B5)
• 200% (A6->A4)
• 400%
• Manual Entry
• 50% (A4->A6)
• 65% (LT->HLT)
• 78% (LG->LT)
• 93%
• 100%
• 129% (HLT->LT)
• 155% (HLT->LG)
• 200% (A6->A4)
• 400%
• Manual Entry
Default: [100%]
Copier Features Settings (When Using the Touch Panel Model)
243

Item Description Value
Duplex/Combine Specifies combined copying. Select a copymode according to your original and how youwant the copy outputs to appear. For moredetails, see page 125 "Copying Single-SidedOriginals with 2-Sided and Combined Printing"and page 130 "Copying 2-Sided Originals with2-Sided and Combined Printing".
Note that enabling combined copyingautomatically disables ID card copying.
• Off
• 1S 2Org->Cmb 2on11S
• 1S 4Org->Cmb 4on11S
• 1S Orig->2S Copy
• 1S 4Org->Cmb 2on12S
• 1S 8Org->Cmb 4on12S
• 2S 1Org->Cmb 2on11S
• 2S 2Org->Cmb 4on11S
• 2S Orig->2S Copy
• 2S 2Org->Cmb 2on12S
• 2S 4Org->Cmb 4on12S
• Manual 2Sd ScanMode
Default: [1S Orig->2SCopy]
7. Configuring the Machine Using the Control Panel
244

Item Description Value
ID Card Setting Specifies the ID Card Copy setting. • Card Size
You can change the IDcard copy scanningsize.
• Horizontal: 50 to148mm (1.90 to5.83 inches)
• Vertical: 50 to216mm (1.90 to8.50 inches)
Default(horizontal ×vertical): 57×88mm(2.24×3.46inches)
• Center Line
Specify whether todraw a center linewhen making ID cardcopy.
• Do not Print
Default: [Do not Print]
Copier Features Settings (When Using the Touch Panel Model)
245

Scanner Features Settings (When Using theTouch Panel Model)This function is available for M 320FB/320F only.
Item Description Value
Scan Size Specifies the scanning size according tothe size of the original.
8 1/2 × 14, 8 1/2 × 11, 5 1/2 × 81/2, 7 1/4 × 10 1/2, A4, B5 JIS, A5SEF, 16K, Custom Size
Default: [A4]
Default: [8 1/2 × 11]
ScanningMode
Specifies the scanning mode for black-and-white scanning using the controlpanel.
• Halftone
The machine creates 1-bit black-and-white images. Images containonly black and white colors.
• Color
The machine creates 8-bit colorimages. Images are full color.
• Gray Scale
The machine creates 8-bit black-and-white images. Images containblack and white, and intermediategray colors.
Default: [Halftone]
Maximum EmailSize
Specifies the maximum size of a file thatcan be sent by e-mail.
• 1 MB
• 2 MB
• 3 MB
• 4 MB
• 5 MB
• No Limit
Default: [1 MB]
7. Configuring the Machine Using the Control Panel
246

Item Description Value
Density Specifies the image density for scanningoriginals.
Increase the level (black squares) toincrease the density.
Default: The default setting is the middleof 5 adjustment levels.
Resolution Specifies the resolution for scanning theoriginal.
• 100 × 100dpi
• 150 × 150dpi
• 200 × 200dpi
• 300 × 300dpi
• 400 × 400dpi
• 600 × 600dpi
Default: [300 × 300dpi]
Compression(Color)
Specifies the color compression ratio forJPEG files. The lower the compressionratio, the higher the quality but greaterthe file size.
• Low
• Medium
• High
Default: [Medium]
Limitless Scan Sets the machine to request next originalswhen scanning with the exposure glass.
• Off
• On
Default: [Off]
Single/ MultiPage
Specifies whether to create a multi-pagefile containing all pages or separatesingle-page files when scanning multiplepages.
Note that a scanned file can containmultiple pages only when the file formatis PDF or TIFF. If the file format is JPEG, asingle-page file is created for eachscanned page.
• Multi-page
• Single Page
Default: [Multi-page]
Scanner Features Settings (When Using the Touch Panel Model)
247

Item Description Value
Scan Original Specifies the orientation to scan andwhether to have scanned in double side.
• Simplex Portrait
• Dup.Portrait:T to T
• Dup.Portrait:T to B
• Dup.Landscape:T to T
• Dup.Landscape:T To B
Default: [Simplex Portrait]
Folder Hint Specify whether or not to display themessage with the tip for specifying theScan to Folder setting.
The message appears when selecting the[Folder] tab in the scanner mode screen.
• Off
• On
Default: [On]
7. Configuring the Machine Using the Control Panel
248

Fax Features Settings (When Using the TouchPanel Model)This function is available for M 320FB/320F only.
Reception Settings
Specifies the settings for receiving a fax.
Item Description Value
Switch Recep.Mode
Specifies the reception mode. • Fax Only
The machine automatically answersall incoming calls in fax receptionmode.
• FAX/TEL(Manually)
The machine rings when it receivesincoming calls. The machine receivesfaxes only when you manuallyreceive faxes.
• FAX/TAD
The machine receives faxesautomatically when a fax call isreceived. Otherwise, the connectedtelephone answering device answersthe call.
• FAX/TEL(Auto)
The machine receives faxesautomatically if a fax calling tone isdetected from an incoming call.
If you answer the call with theexternal telephone while the machineis ringing, a normal telephone callstarts. If you hear a fax calling tone,receive the fax manually.
Default: [Fax Only]
Fax Features Settings (When Using the Touch Panel Model)
249

Item Description Value
Auto Reduction Sets the machine to reduce the size ofa received fax if it is too large to printon a single sheet of paper.
Note that the machine only reducesthe size down to 74%. If furtherreduction is required to fit the fax on asingle sheet, it will be printed onseparate sheets without beingreduced.
• Off
• On
Default: [On]
Default may be [Off] depending onthe [Country/Region] setting under[Administrator Tools].
No. of Rings(TAD)
Specifies the number of times theexternal telephone answering devicerings before the machine starts toreceive faxes in FAX/TAD mode.
1 to 20 times, in increments of 1 time
Default: 5 times
Number ofRings
Specifies the number of times themachine rings before it starts to receivefaxes in Fax Only mode.
3 to 5 times, in increments of 1 time
Default: 3 times
RX ModeSwitch Time
Specifies how long the machine ringsbefore it starts to receive faxes in FAX/TEL(Auto) mode.
5 to 99 seconds, in increments of 1second
Default: 15 seconds
ReceiveConditions
Specifies whether to receive or rejectfaxes from the programmed SpecialSenders.
• All Senders
Receive faxes from all senders.
• Not Special Sender
Reject faxes from the SpecialSenders and receive faxes fromall other senders.
• Special Sender
Receive faxes from the SpecialSenders and reject faxes fromall other senders.
Default: [All Senders]
7. Configuring the Machine Using the Control Panel
250

Item Description Value
Reception FileSett.
Sets the machine to store receivedfaxes in memory to print them orforward them to a preset destination.
Use Web Image Monitor to specify theforwarding destination (for details, seepage 341 "Configuring the SystemSettings").
• Forward
Default: [Print]
Print ReceivedFile
Sets the machine to automatically printthe faxes received into memory orstore them for later manual printing.
• On
Automatically print out thereceived faxes and delete frommemory.
• Off
Store the received faxes inmemory for manual printing.
Default: [On]
PrintForwarded File
Sets the machine to store the faxes inmemory for printing or delete themafter forwarding.
• Off
Delete the faxes from memoryafter forwarding.
• On
Store the faxes in memory forprinting after forwarding.
Default: [Off]
NotifyForwarding
Sets the machine to send e-mailnotifications after faxes are forwarded.The e-mail notification destinationdepends on how the forwardingdestination is configured using WebImage Monitor (for details, seepage 341 "Configuring the SystemSettings").
• Inactive
• Active
Default: [Inactive]
Fax Features Settings (When Using the Touch Panel Model)
251

Item Description Value
Manual POP Connects to the POP3 server to receivee-mail messages manually.
Press [Yes] to connect to the POP3server and receive e-mail messages.Press [No] to exit to the previous levelof the menu tree without connecting tothe POP3 server.
-
RX Image AutoReduction
Reduces the main scan line to fit to theprintable area, and then prints theimage in it after reducing the size ofthe image.
Select [On] to enable this function.Select [Off] to disable this function.
• Off
• On
Default: [Off]
Duplex Print Specify whether or not received faxdocuments are to be printed on bothsides of the paper.
• Off
• Duplex Portrait: T to T
• Duplex Portrait: T to B
Default: [Off]
Select Paper Tray
Item Description Value
Select PaperTray
Specifies the tray for printing receivedfaxes.
Note that only A4, Letter, or Legal sizepaper can be used for printing faxes.
Make sure to select a tray that containspaper of the valid size.
If Tray 2 is not installed, only [Tray 1]appears.
• Auto
The machine uses Tray 1 andTray 2 if they contain paper ofthe same size. In this case, themachine starts to print from thetray specified as the prioritytray in [Paper Tray Priority]under [Paper Settings]. If thattray runs out of paper, themachine automaticallyswitches to the other tray tocontinue printing.
• Tray 1
• Tray 2
Default: [Auto]
7. Configuring the Machine Using the Control Panel
252

Delete TX Stand.File
Deletes unsent fax jobs remaining in the machine's memory. The machine can store up to 5 unsentfax jobs. This function is only performed when selected.
Item Description Value
DeleteSelected File
To delete a fax job, select the desiredjob, press [Delete], and then press[Yes]. Pressing [Exit] without pressing[Delete] exits to the previous level ofthe menu tree without deleting the faxjob.
Delete All Files To delete the fax jobs, press [DeleteAll], and then press [Yes]. Pressing[Exit] without pressing [Delete All] exitsto the previous level of the menu treewithout deleting the fax jobs.
Communication Sett.
Item Description Value
ECMTransmission
Sets the machine to automaticallyresend parts of the data that are lostduring transmission.
• Off
• On
Default: [On]
ECMReception
Sets the machine to automaticallyreceive parts of the data that are lostduring reception.
• Off
• On
Default: [On]
Dial ToneDetect
Sets the machine to detect a dial tonebefore the machine begins to dial thedestination automatically.
(Default may be [Not Detect]depending on the [Country/Region]setting under [Administrator Tools].)
• Detect
• Not Detect
Default: [Detect]
Fax Features Settings (When Using the Touch Panel Model)
253

Item Description Value
TransmissionSpeed
Specifies the transmission speed for thefax modem.
• 33.6 Kbps
• 14.4 Kbps
• 9.6 Kbps
• 7.2 Kbps
• 4.8 Kbps
• 2.4 Kbps
Default: [33.6 Kbps]
ReceptionSpeed
Specifies the reception speed for thefax modem.
• 33.6 Kbps
• 14.4 Kbps
• 9.6 Kbps
• 7.2 Kbps
• 4.8 Kbps
• 2.4 Kbps
Default: [33.6 Kbps]
7. Configuring the Machine Using the Control Panel
254

Report Print Setting
Item Description Value
Print TX Status Sets the machine to print a transmissionreport automatically after a faxtransmission.
When the machine is in ImmediateTransmission mode, the image of theoriginal will not be reproduced on thereport, even if [Error Only(Image)] or[Every TX (Image)] is selected.
Note that if a memory error occurs forLAN-Fax transmission, a transmissionreport will always be printedregardless of this setting.
The transmission report will be printedon A4 or Letter size paper.
• Error Only
Prints a report when atransmission error occurs.
• Error Only(Image)
Prints a report with an image ofthe original when transmissionerror occurs.
• Every TX
Prints a report for every faxtransmission.
• Every TX (Image)
Prints a report with an image ofthe original for every faxtransmission.
• Do not Print
Default: [Every TX (Image)]
Print FaxJournal
Sets the machine to print a fax journalautomatically for every 50 fax jobs(both sent and received).
The fax journal will be printed usingthe tray set for [Facsimile] under[Paper Tray Priority] in [PaperSettings], on A4 or Letter size paper.
• Auto Print
• Do not Auto Print
Default: [Auto Print]
Fax Features Settings (When Using the Touch Panel Model)
255

Transmission Setting
Item Description Value
Immediate TX Sets the machine to send a faximmediately when the original isscanned.
• Off
Select this when using MemoryTransmission.
• On
Select this when usingImmediate Transmission.
• Next Fax Only
Select this when usingImmediate Transmission for thenext transmission only.
Default: [Off]
Resolution Specifies the resolution to use forscanning originals.
"Photo" resolution is not available forInternet Faxes. Faxes will be sent using"Detail" resolution if "Photo" resolutionhas been specified.
• Standard
Select this when the original is aprinted or typewritten documentwith normal-sized characters.
• Detail
Select this when the original is adocument with small print.
• Photo
Select this when the originalcontains images such asphotographs or shadeddrawings.
Default: [Standard]
Density Specifies the image density to use forscanning originals.
Press [ ] to increase the density.
Default: The default setting is themiddle of 3 adjustment levels.
Pause Time Specifies the length of pause timewhen a pause is inserted between thedigits of a fax number.
1 to 15 seconds
Default: 3 seconds
7. Configuring the Machine Using the Control Panel
256

Item Description Value
Auto Redial Sets the machine to redial the faxdestination automatically when the lineis busy or a transmission error occurs, ifthe machine is in Memory Transmissionmode. The number of redial attempts ispreset to two or three times, dependingon the [Country/Region] setting under[Administrator Tools], in five-minuteintervals.
• Off
• On
Default: [On]
Print FaxHeader
Sets the machine to add a header toevery fax you send. The headerincludes the current date and time, userfax name and fax number of themachine, job ID, and pageinformation.
• Off
• On
Default: [On]
Fax Original Specifies the orientation to fax andwhether to have faxes printed in bothsides.
• Simplex Portrait
• Dup.Portrait:T to T
• Dup.Portrait:T to B
• Dup.Landscape:T to T
• Dup.Landscape:T To B
Default: [Simplex Portrait]
TX/RX Switch Setting
Item Description Value
TX/RX SwitchSetting
Specifies whether to switch thetransmission and reception modes ofthe machine automatically ormanually.
• TX/RX Auto Setting
• TX/RX Manual Setting
Default: [TX/RX Manual Setting]
Fax Features Settings (When Using the Touch Panel Model)
257

Address Book Settings (When Using the TouchPanel Model)This function is available for M 320FB/320F only.
Item Description Value
Quick Dial List Specifies the fax number and name forQuick Dial entries. You can register up to8 Quick Dial entries.
• No.
Specifies the Quick Dial number.
• Name:
Specifies the name for Quick Dialentries. The name can contain upto 20 characters.
• Number:
Specifies the fax number for QuickDial entries. The fax number cancontain up to 40 characters,including 0 to 9, pause, " "," ", and space.
Speed Dial List Specifies the fax number and name forSpeed Dial entries. You can register upto 100 Speed Dial entries.
• No.
Specifies the Speed Dial number.
• Name:
Specifies the name for Speed Dialentries. The name can contain upto 20 characters.
• Number:
Specifies the fax number forSpeed Dial entries. The faxnumber can contain up to 40characters, including 0 to 9,pause, " ", " ", and space.
7. Configuring the Machine Using the Control Panel
258

System Settings (When Using the Touch PanelModel)This function is available for M 320FB/320F only.
Adjust Sound Volume
Specifies the volume of the sounds produced by the machine.
Item Description Value
Panel KeySound
Specifies the volume of the beep thatsounds when a key is pressed.
• Off
• Low
• Middle
• High
Default: [Low]
Ring Volume Specifies the volume of the ringingtone.
• Off
• Low
• Middle
• High
Default: [Middle]
On HookMode
Specifies the volume of the sound fromthe speaker during on hook mode.
• Off
• Low
• Middle
• High
Default: [Middle]
Job End Tone Specifies the volume of the beep thatsounds when a job is complete.
• Off
• Low
• Middle
• High
Default: [Middle]
System Settings (When Using the Touch Panel Model)
259

Item Description Value
Job Error Tone Specifies the volume of the beep thatsounds when a fax transmission erroroccurs.
• Off
• Low
• Middle
• High
Default: [Middle]
Alarm Volume Specifies the volume of the alarm thatsounds when an operation erroroccurs.
• Off
• Low
• Middle
• High
Default: [Middle]
I/O Timeout
Item Description Value
USB Specifies how many seconds themachine waits for print data, if thedata is interrupted while it is being sentfrom the computer via USB. If themachine does not receive any moredata within the time specified here, themachine only prints the data it hasreceived. If printing is frequentlyinterrupted by data from other ports,increase the timeout period.
• 15 sec.
• 60 sec.
• 300 sec.
Default: [60 sec.]
Network Specifies how many seconds themachine waits for print data, if thedata is interrupted while it is being sentfrom the computer via network. If themachine does not receive any moredata within the time specified here, themachine only prints the data it hasreceived. If printing is frequentlyinterrupted by data from other ports,increase the timeout period.
• 15 sec.
• 60 sec.
• 300 sec.
Default: [15 sec.]
7. Configuring the Machine Using the Control Panel
260

Item Description Value
Locked Print Specifies how many seconds themachine holds a new Locked Print file,when the machine cannot store anymore Locked Print files. Within thistime, you can print or delete the newLocked Print file. You can also print ordelete an existing Locked Print file sothat the new Locked Print file can bestored in the machine.
• 0 to 300 seconds, in incrementsof 1 second
Default: [60 seconds]
User Auth.(Copy)
Specifies how many seconds a userstays authenticated after paper isoutput when copying with theexposure glass. Note thatauthentication for other functions willexpire immediately after using thatfunction.
This setting appears only when the userrestriction function is enabled via WebImage Monitor.
• 5 to 60 seconds, in incrementsof 1 second
Default: [30 seconds]
Fixed USB Port Specifies whether the same printer/LAN-Fax driver can be used formultiple machines or not under USBconnection.
• Off
You must install the printer/LAN-Fax driver separately forindividual machines, becausethe machine other than theoriginal will be recognized as anew device upon USBconnection.
• On
The same printer/LAN-Faxdriver you have installed in yourcomputer can be used with anymachine other than the oneoriginally used for installation, ifthe machine is of the samemodel.
Default: [Off]
System Settings (When Using the Touch Panel Model)
261

Item Description Value
Export to NFC Specifies whether or not tosynchronize the data you haveconfigured using the control panel andWeb Image Monitor with the datastored in NFC.
You can read and write the data inNFC by using the applicationcorresponding to the machine.
• Off
Does not synchronize the datayou have configured using thecontrol panel and Web ImageMonitor with the data stored inNFC.
• On
Synchronizes the data you haveconfigured using the controlpanel and Web Image Monitorwith the data stored in NFC.
Default: [On]
Auto Continue
Item Description Value
Auto Continue Sets the machine to ignore an errorwith paper size or type and continueprinting. The printing stops temporarilywhen an error is detected, and restartsautomatically after about ten secondsusing the settings made on the controlpanel.
However, if the size of paper specifiedon the control panel and that of thepaper loaded in the paper tray or thepaper size specified for the print jobdo not match when printing restarts, itmay cause a paper jam.
• Off
• On
Default: [Off]
Toner Saving
Item Description Value
Toner Saving Sets the machine to print using areduced amount of toner (for printsmade by the copier function only).
• Off
• On
Default: [Off]
7. Configuring the Machine Using the Control Panel
262

Low Humidity Mode
Item Description Value
Low HumidityMode
If the machine is used in a room wherehumidity level is low, black lines of afew millimeters thick may appear onprintouts with 75-millimeter spaces inbetween. Selecting [On] for this settingmay prevent these lines fromappearing (wait for about one dayuntil this setting becomes effective).
Note that when this setting is enabled,the machine automatically performsself-maintenance in every 10 minutes.
• Off
• On
Default: [Off]
Printer Registration
Adjust the registration of each tray if necessary. You can adjust the registration value between -15and +15 (that is, -1.5 and +1.5 mm, in 0.1 mm increments).
Default: 0 for all parameters
Item Description
Horiz.: Tray 1 Select this to adjust the tray 1 registration horizontally.
Horiz.: Tray 2 Select this to adjust the tray 2 registration horizontally.
Vert.: Tray 1 Select this to adjust the tray 1 registration vertically.
Vert.: Tray 2 Select this to adjust the tray 2 registration vertically.
Horiz.: BypassTray
Select this to adjust the bypass tray registration horizontally.
Vert.: BypassTray
Select this to adjust the bypass tray registration vertically.
Horiz.: DuplexUnit
Select this to adjust the registration of the back of duplex printing horizontally.
Vert.: DuplexUnit
Select this to adjust the registration of the back of duplex printing vertically.
System Settings (When Using the Touch Panel Model)
263

Image Density
Item Description Value
Image Density Adjusts the density of images on prints. -3 to +3
Default: 0
7. Configuring the Machine Using the Control Panel
264

Printer Features Settings (When Using theTouch Panel Model)This function is available for M 320FB/320F only.
List/Test Print
Prints lists showing configurations on the machine.
The lists will be printed using the tray set for [Printer] under [Paper Tray Priority] in [Paper Settings]on A4 or Letter size paper.
Item Description
Test Page Prints a test page for checking the single-sided printing condition. The test pagecontains network settings.
PCL Font List Prints installed PCL font list.
PS Font List Prints installed PostScript font list.
Duplex TestPage
Prints a test page for checking the duplex printing condition.
System
Item Description Value
Copies Sets the machine to print the specifiednumber of sets.
This setting is disabled if the number ofpages to print is specified by theprinter driver.
1 to 999
Default: 1
Sub PaperSize
Sets the machine to print onto paper ofanother size if the specified paper isnot loaded in any tray. Alternativesizes are preset to A4 and Letter.
• Off
• Auto
Default: [Auto]
Printer Features Settings (When Using the Touch Panel Model)
265

Item Description Value
Default PageSize
Specifies the paper size to be usedwhen the paper size is not specified inthe print job.
A4, A5 LEF, A5 SEF, A6, 8 1/2 ×11,
8 1/2 × 13, 16K, 3 7/8 × 7 1/2,C6 Env, B5 JIS, B6 JIS, 8 1/2 × 14,5 1/2 × 8 1/2, 4 1/8 × 9 1/2, C5Env, DL Env, 8 1/2 × 13 2/5, 81/2 × 13 3/5, 8.11 × 13.3
Default: [A4]
Default: [8 1/2 × 11]
Duplex Sets the machine to print on both sidesof paper according to the specifiedbinding method.
• None
• Long Edge Bind
• Short Edge Bind
Default: [None]
Blank PagePrint
Sets the machine to print blank pages.
When cover sheet printing is enabledfrom the printer driver, cover sheetsare inserted even if you select [Off].
Note that this setting has lower prioritythan the printer driver's blank pagesetting.
• Off
• On
Default: [On]
Print ErrorReport
Sets the machine to print an error pagewhen the machine detects a printer ormemory error.
• Off
• On
Default: [Off]
PCL Menu
Specifies conditions when using PCL for printing.
Item Description Value
Orientation Specifies the page orientation. • Portrait
• Landscape
Default: [Portrait]
7. Configuring the Machine Using the Control Panel
266

Item Description Value
Form Lines Specifies the number of lines per page. 5 to 128
Default: 64
Default: 60
Font Number Specifies the ID of the default font youwant to use.
0 to 89
Default: 0
Point Size Specifies the point size for the defaultfont.
This setting is effective only for avariable-space font.
4.00 to 999.75
Default: 12.00 points
Font Pitch Specifies the number of characters perinch for the default font.
This setting is effective only for fixed-space fonts.
0.44 to 99.99
Default: 10.00 pitch
Symbol Set Specifies the character set for thedefault font. The following sets areavailable:
Roman-8, Roman-9, ISO L1, ISO L2,ISO L5, PC-8, PC-8 D/N, PC-850,PC-852, PC-858, PC8-TK, Win L1,Win L2, Win L5, Desktop, PS Text,VN Intl, VN US, MS Publ, Math-8,PS Math, VN Math, Pifont, Legal,ISO 4, ISO 6, ISO 11, ISO 15, ISO17, ISO 21, ISO 60, ISO 69, Win3.0, MC Text, ISO L6, ISO L9,PC-775, PC-1004, Win Baltic
Default: [PC-8]
Courier Font Specifies a courier-type font. • Regular
• Dark
Default: [Regular]
Printer Features Settings (When Using the Touch Panel Model)
267

Item Description Value
Extend A4Width
Sets the machine to extend the width ofthe printable area of A4 size paper,reducing side margin width.
Normally, you can print up to 78characters of Courier 10 Pitch Font perline on A4 paper in portraitorientation. If you set this to On, youcan print up to 80 characters under thesame conditions.
• Off
• On
Default: [Off]
Append CR toLF
Sets the machine to append a CR codeto each LF code to print text dataclearly.
• On
• Off
Default: [Off]
PCL Resolution Specifies the print resolution in dots perinch.
• 600 × 600 dpi
Default: [600 × 600 dpi]
PS Menu
Specifies conditions when using PostScript for printing.
Item Description Value
PS Resolution Specifies the print resolution in dotsper inch.
• 600 × 600 dpi
• 1200 × 1200 dpi
Default: [600 × 600 dpi]
7. Configuring the Machine Using the Control Panel
268

Paper Settings (When Using the Touch PanelModel)This function is available for M 320FB/320F only.
Item Description Value
PaperSize: Tray1
A4, B5 JIS, A5 SEF, B6 JIS, A6, 8 1/2 × 14, 8 1/2× 11, 5 1/2 × 8 1/2,
8 1/2 × 13, 16K, A5 LEF, 8 1/2 × 13 2/5,
8 1/2 × 13 3/5, 8.11 × 13.3, Custom Size
Default: [A4]
Default: [8 1/2 × 11]
PaperSize: Tray2
Specifies the paper size forTray 2.
This setting appears only whenthe optional paper feed unit isinstalled.
• A4
• 8 1/2 × 11
• B5 JIS
• A5 SEF
• 8 1/2 × 14
• 8 1/2 × 13 2/5
• 5 1/2 × 8 1/2
Default: [A4]
Default: [8 1/2 × 11]
Paper Settings (When Using the Touch Panel Model)
269

Item Description Value
PaperSize:Bypass
A4, B5 JIS, A5 SEF, B6 JIS, A6, 8 1/2 × 14, 8 1/2× 11, 5 1/2 × 8 1/2,
8 1/2 × 13, 16K, 4 1/8 × 9 1/2, 3 7/8 × 7 1/2,C5 Env, C6 Env, DL Env,
A5 LEF, 8 1/2 × 13 2/5, 8 1/2 × 13 3/5, 8.11 ×13.3, Custom Size
Default: [A4]
Default: [8 1/2 × 11]
PaperType: Tray1
Specifies the paper type fortray 1.
• Thin Paper
• Plain Paper
• Thick Paper 1
• Recycled Paper
• Color Paper
• Letterhead
• Preprinted Paper
• Prepunched Paper
• Label Paper
• Bond Paper
• Cardstock
• Thick Paper 2
Default: [Plain Paper]
7. Configuring the Machine Using the Control Panel
270

Item Description Value
PaperType: Tray2
Specifies the paper type forTray 2.
This setting appears only whenthe optional paper feed unit isinstalled.
• Thin Paper
• Plain Paper
• Thick Paper 1
• Recycled Paper
• Color Paper
• Letterhead
• Preprinted Paper
• Prepunched Paper
Default: [Plain Paper]
PaperType:Bypass
Specifies the paper type forbypass tray.
• Thin Paper
• Plain Paper
• Thick Paper 1
• Recycled Paper
• Color Paper
• Letterhead
• Preprinted Paper
• Prepunched Paper
• Label Paper
• Bond Paper
• Cardstock
• Envelope
• Thick Paper 2
Default: [Plain Paper]
Paper Settings (When Using the Touch Panel Model)
271

Item Description Value
BypassTrayPriority
Specifies how print jobs usingthe bypass tray are handled.
• Machine Setting(s)
The machine prints all print jobs according to themachine’s settings.
An error will occur if the paper size/typesettings of the machine and printer driver do notmatch.
• Any Size/Type
The machine prints all print jobs according to theprinter driver’s settings.
Printing proceeds even if the paper size/typesettings of the machine and printer driver do notmatch. However, if the paper is too small for theprint job, the printed image will be cropped.
• Any Custom Size/Type
The machine prints custom size print jobsaccording to the printer driver’s settings andprints standard size print jobs according to themachine’s settings.
For custom size print jobs, printing proceedseven if the paper size/type settings of themachine and printer driver do not match.However, if the paper is too small for the printjob, the printed image will be cropped.
For standard size print jobs, an error will occur ifthe paper size/type settings of the machine andprinter driver do not match.
Default: [Machine Setting(s)]
7. Configuring the Machine Using the Control Panel
272

Item Description Value
Paper TrayPriority
Specifies the tray that themachine checks first for paperthat can be used for the jobwhen a tray is set to be selectedautomatically.
If multiple trays contain validpaper, the first tray the machinefinds will be used for printing;when that tray runs out ofpaper, the machineautomatically switches to thenext tray to continue printing.
If Tray 2 is not installed, [Tray2] does not appear.
• Printer
Select a tray to check first when automatic trayselection is specified for the print job.
• Tray 1
• Tray 2
• Bypass Tray
Default: [Tray 1]
• Copier
Selects a tray to check first when [A4], or [81/2 × 11] is selected for [Select Paper] undercopy settings and both tray 1 and tray 2 containpaper of that size, the machine starts to printfrom the specified tray.
Select a tray to check first when [A4], [8 1/2 ×11], or [16K] is selected for [Select Paper]under [Copier Features].
• Tray 1
• Tray 2
• Bypass Tray
Default: [Tray 1]
• Facsimile
[Auto] is selected for [Select Paper Tray] underfax feature settings, and both Tray 1 and Tray 2contain paper of the same size, the machinestarts to print from the specified tray.
• Tray 1
• Tray 2
Default: [Tray 1]
SizeMismatchDetctn
Sets the machine to report anerror if the paper size does notmatch the print job's settings.
• On
• Off
Default: [Off]
Paper Settings (When Using the Touch Panel Model)
273

Administrator Tools Settings (When Using theTouch Panel Model)This function is available for M 320FB/320F only.
Item Description Value
Set Date/Time Sets the date and time of themachine’s internal clock.(Default differs depending onthe [Country/Region] settingunder [Administrator Tools].)
• Set Date
Specifies the date of the machine’s internalclock.
Only dates that correspond with the year andmonth can be set. Incompatible dates will berefused.
• Date format: Year/Month/Day,Month/Day/Year, or Day/Month/Year
Year: 2000 to 2099
Month: 1 to 12
Day: 1 to 31
• Set Time
Sets the time of the machine’s internal clock.
• Time format: 12-hour Format, 24-hourFormat
AM/PM stamp: AM, PM (for 12-hourFormat)
Hour: 0 to 23 (for 24-hour Format), or 1to 12 (for 12-hour Format)
Minute: 0 to 59
Program FaxInfo.
Specifies the fax name andfax number of the machine.
• Number:
Specifies the fax number of the machine usingup to 20 characters, including 0 to 9, space,and "+".
• Name:
Specifies the fax name of the machine usingup to 20 alphanumeric characters andsymbols.
7. Configuring the Machine Using the Control Panel
274

Item Description Value
Dial/PushPhone
Specifies the line type of thetelephone line.
To configure this setting,contact your telephonecompany and select thesetting based on yourtelephone line. Selecting awrong setting may causefailures in fax transmissions.
[Dial Phone (20PPS)] maynot appear depending onthe country/region setting ofthe machine.
• Push Phone
• Dial Phone (10PPS)
• Dial Phone (20PPS)
Default: [Push Phone]
PSTN / PBX Sets the machine to connectto the public switchedtelephone network (PSTN) ora private branch exchange(PBX).
• PSTN
• PBX
Default: [PSTN]
PBX AccessNumber
Specifies the dial number toaccess the outside line whenthe machine is connected toa PBX.
Make sure that this settingmatches the setting of yourPBX. Otherwise, you may notbe able to send faxes tooutside destinations.
0 to 999
Default: 9
Function Priority Specifies the mode that isactivated when the power isturned on, or if the timespecified for [System ResetTimer] elapses withoutactivity while the initialscreen of the current mode isdisplayed.
• Home
• Copier
• Facsimile
• Scanner
Default: [Home]
Administrator Tools Settings (When Using the Touch Panel Model)
275

Item Description Value
System ResetTimer
Sets the machine to return tothe mode specified in[Function Priority].
This setting is also applied tothe timeout for copying thenext document while ID cardcopy and manual 2-sidedcopy is performed.
• Off
• 30 sec.
• 1 min.
• 2 min.
• 3 min.
• 5 min.
• 10 min.
Default: [1 min.]
Energy SaverMode
Sets the machine to enterEnergy Saver mode, EnergySaver mode 1 or EnergySaver mode 2, to reducepower consumption. Themachine recovers fromEnergy Saver mode when itreceives a print job, prints areceived fax, or one of thekeys on the control panel ispressed.
• Energy Saver Mode 1
The machine enters Energy Saver mode 1 ifthe machine has been idle for about 30seconds. It takes less time to recover fromEnergy Saver mode 1 than from power-offstate or Energy Saver mode 2, but powerconsumption is higher in Energy Saver mode 1than in Energy Saver mode 2.
• Off
• On
Default: [Off]
7. Configuring the Machine Using the Control Panel
276

Item Description Value
Energy SaverMode
Sets the machine to enterEnergy Saver mode, EnergySaver mode 1 or EnergySaver mode 2, to reducepower consumption. Themachine recovers fromEnergy Saver mode when itreceives a print job, prints areceived fax, or one of thekeys on the control panel ispressed.
• Energy Saver Mode 2
The machine enters Energy Saver mode 2after the period of time specified for this settingis passed. The machine consumes less powerin Energy Saver mode 2 than in Energy Savermode 1, but it takes longer to recover fromEnergy Saver mode 2 than from Energy Savermode 1.
This setting cannot be disabled.
• On (1 to 20 minutes)
• 30 sec.
• On (1 to 60 minutes)
• 30 sec.
Default: [30 sec.]
Administrator Tools Settings (When Using the Touch Panel Model)
277

Item Description Value
Language Specifies the language usedon the screen and in reports.
The default value for thissetting is the language youhave specified during theInitial Setup, which isrequired after turning on themachine for the first time.
• English
• German
• French
• Italian
• Spanish
• Dutch
• Swedish
• Norwegian
• Danish
• Finnish
• Portuguese
• Czech
• Hungarian
• Polish
• Simplified Chinese
• Russian
• Brazilian Portuguese
• Turkish
• Traditional Chinese
• Arabic
7. Configuring the Machine Using the Control Panel
278

Item Description Value
Country/Region
Selects the country/region inwhich the machine is used.The country/region youspecify determines the timeand date display format andthe default values of the faxtransmission-related settings.
Make sure to select thecountry/region correctly.Selecting a wrong country/region may cause failures infax transmissions.
The default value for thissetting is the country/regionyou have specified duringthe Initial Setup, which isrequired after turning on themachine for the first time.
Algeria, Argentina, Australia, Austria,
Belgium, Bolivia, Brazil, Bulgaria,
Canada, Chile, China, Colombia, Costa Rica,Croatia, Cyprus, Czech Republic,
Denmark, Dominican Republic, Ecuador, Egypt, ElSalvador, Estonia,
Finland, France, Germany, Greece, Guam,Guatemala,
Honduras, Hong Kong, Hungary, Iceland, India,Ireland, Israel, Italy,
Japan, Jordan, Kazakhstan, Kuwait,
Latvia, Lebanon, Liechtenstein, Lithuania,Luxembourg,
Malaysia, Malta, Mexico, Montenegro, Morocco,
Netherlands, New Zealand, Nicaragua, Nigeria,Norway,
Country/Region
Selects the country/region inwhich the machine is used.The country/region youspecify determines the timeand date display format andthe default values of the faxtransmission-related settings.
Make sure to select thecountry/region correctly.Selecting a wrong country/region may cause failures infax transmissions.
The default value for thissetting is the country/regionyou have specified duringthe Initial Setup, which isrequired after turning on themachine for the first time.
Oman, Panama, Paraguay, Peru, Philippines,Poland, Portugal, Puerto Rico,
Romania, Russia, Saudi Arabia, Senegal, Serbia,Singapore, Slovakia, Slovenia, South Africa,Spain, Sri Lanka, Sweden, Switzerland,
Taiwan, Thailand, Trinidad and Tobago, Tunisia,Turkey,
UAE, UK, Uruguay, USA, Venezuela, Vietnam,Virgin Islands, Yemen
Administrator Tools Settings (When Using the Touch Panel Model)
279

Item Description Value
Reset Settings Be sure not to clear thesettings by mistake.
• Reset All Settings
Resets the machine's settings to their defaultsexcept the following:
• Language settings
• Country/Region settings
• Network settings
• Fax destinations
Press [Yes] to execute. Press [No] to exit to theprevious level of the menu tree withoutclearing the settings.
• Reset Network Sett.
Resets the network settings to their defaults.
Press [Yes] to execute. Press [No] to exit to theprevious level of the menu tree withoutclearing the settings.
• Clear Address Book
Clears the fax Quick Dial/Speed Dialdestinations.
Press [Yes] to execute. Press [No] to exit to theprevious level of the menu tree withoutclearing the destinations.
PCL6 Mode Set this to [Universal] whenusing the Universal Driverand to [P 310/M 320]when using the normaldriver.
• P 310/M 320
• Universal
Default: [P 310/M 320]
7. Configuring the Machine Using the Control Panel
280

Item Description Value
Admin. ToolsLock
Specifies an eight-digitpassword for accessing the[Address Book], [NetworkSettings], and [AdministratorTools] menus.
The password must bespecified during the InitialSetup, which is required afterturning on the machine forthe first time. For details, seeSetup Guide.
Do not forget this password.
The default password is"00000000".
• On (00000000 to 99999999)
• Off
Default: [On]
IPSec Selects whether to enable ordisable IPsec.
This function appears onlywhen a password isspecified under [Admin.Tools Lock].
• Inactive
• Active
Default: [Inactive]
Fax No.Confirmation
Sets the machine to require afax number to be enteredtwice when specifying adestination manually.
When this function isenabled, you cannot use theOn Hook Dial function.
This function appears onlywhen a password isspecified under [Admin.Tools Lock].
• On
• Off
Default: [Off]
Save Scn Datato USB
Specify whether to enable ordisable Scan to USB.
This function appears onlywhen a password isspecified under [Admin.Tools Lock].
• Inactive
• Active
Default: [Active]
Administrator Tools Settings (When Using the Touch Panel Model)
281

Item Description Value
RX FilePasswordSetting
Specify an eight-digitpassword for accessing filesof received faxes in thememory.
You will also be prompted toenter the password whenyou select this setting.
The password must bespecified during the InitialSetup, which is required afterturning on the machine forthe first time. For details, seeSetup Guide.
Do not forget this password.
The default password is"00000000".
• On (00000000 to 99999999)
• Off
Default: [On]
7. Configuring the Machine Using the Control Panel
282

Printing Lists/Reports (When Using the TouchPanel Model)
Printing the Configuration Page (When Using the Touch Panel Model)
This function is available for M 320FB/320F only.
1. Press the [Home] key.
DYG322
2. Press the [Setting] icon on the [Home] screen.
3. Press [Print List/Report].
4. Press [Configuration Page].
5. Press [Yes].
Configuration Page
The following illustration is a sample of a configuration page.
Printing Lists/Reports (When Using the Touch Panel Model)
283

M0ESOC8129
3
21
1. System Reference
Displays the model name, machine ID, and firmware version.
2. Note
The message "* denotes a non-default setting" is displayed in English despite the country/region setting.When a value is changed from the default setting, an asterisk * appears next to the new value.
3. Setting Menu and Current Value
Displays the setting items and current values.
Types of Lists/Reports (When Using the Touch Panel Model)
• Reports will be printed on A4 or Letter size paper. Load one of these sizes of paper into the traybefore printing reports.
Configuration Page
Prints general information and the current configurations of the machine.
7. Configuring the Machine Using the Control Panel
284

Fax Journal
Prints a fax transmission and reception journal for the last 50 jobs.
TX/RX Standby Files
Prints a list of fax jobs remaining in the machine's memory to be printed, sent, or forwarded.
Quick Dial Dest.
Prints a list of scan and fax Quick Dial entries.
Fax Speed Dial Dest.
Prints a list of Speed Dial entries.
• By Speed Dial No.
Prints the list with the entries sorted by Speed Dial registration number.
• By Name
Prints the list with the entries sorted by name.
Scanner Dest. List
Prints a list of scan destinations.
Scanner Journal
Prints a scanner journal for the last 100 Scan to E-mail, Scan to FTP, and Scan to Foldertransmissions.
Maintenance Page
Prints the maintenance page.
Special Sender List
Prints a list of fax Special Senders.
• The average printing pages per job is shown in [P/J Information (AVE)] under [Total Counter] onthe maintenance page. A job means printing of a document from the start to the end. For example,however, if another job is consecutively added while the current document is being printed, not 2but 1 is the number of the current job.
Printing Lists/Reports (When Using the Touch Panel Model)
285

Network Settings (When Using the Touch PanelModel)This function is available for M 320FB/320F only.
• Depending on the settings you change, the machine might need to be restarted.
• Depending on the model you are using, some items might not appear.
Wrless (Wi-Fi) Enable
Item Description Value
Wrless (Wi-Fi)Enable
Select whether to enable or disableWireless LAN.
If [Disable] is set, [Wireless (Wi-Fi)Sett.] is not displayed.
• Disable
• Enable
Default: [Disable]
Connection Mode
Item Description Value
ConnectionMode
Select the network connection mode. • Wired (Ethernet)
• Wireless (Wi-Fi)
Default: [Wired (Ethernet)]
7. Configuring the Machine Using the Control Panel
286

Network Wizard
Item Description Value
Wired(Ethernet)
• Connection Method
Select the network connectionmode.
• IPV4 Configuration
Set the IPv4 configuration. Transitto the IPV4 Configurationsettings.
• IPV6 Configuration
Set the IPv6 configuration. Transitto the IPV6 Configurationsettings.
–
Wireless (Wi-Fi)
Displays the procedure for manuallyconnecting to a wireless LAN. It leadsyou step-by-step through configuringthe settings for connecting with awireless LAN.
–
Wired (Ethernet)
Item Description Value
MAC Address Displays the machine's MAC address. –
Ethernet Speed Displays the current Ethernet speedsetting.
• 100Mbps Full Duplex
• 100Mbps Half Duplex
• 10Mbps Full Duplex
• 10Mbps Half Duplex
• No Ethernet Connection
Appears when a network cableis not connected.
Network Settings (When Using the Touch Panel Model)
287

Item Description Value
Set EthernetSpeed
Specifies the speed for Ethernetcommunication. Select a speed thatmatches your network environment.
For most networks, the default setting isthe optimum setting.
• Auto Select
• 100Mbps Full Duplex
• 100Mbps Half Duplex
• 10Mbps Full Duplex
• 10Mbps Half Duplex
Default: [Auto Select]
IPV4 Configuration
Item Description Value
IPV4 DHCP Sets the machine to receive its IPv4address, subnet mask, and defaultgateway address automatically from aDHCP server.
• Active
• Inactive
Default: [Active]
IP Address Specifies the machine's IPv4 addresswhen DHCP is not used.
Use this menu to check the current IPaddress when DHCP is used.
Default: XXX.XXX.XXX.XXX
The numbers represented by "X" varyaccording to your networkenvironment.
Subnet Mask Specifies the machine's subnet maskwhen DHCP is not used.
Use this menu to check the currentsubnet mask when DHCP is used.
Default: 255.255.255.0
It is not possible to enter 0.0.0.0 or255.255.255.255.
GatewayAddress
Specifies the machine's defaultgateway address when DHCP is notused.
Use this menu to check the currentdefault gateway address when DHCPis used.
Default: 192.0.0.192
IP AddressMethod
Displays the IP address acquisitionmethod.
• DHCP
• Auto IP
• Manual Configuration
• Default IP
Default: [DHCP]
7. Configuring the Machine Using the Control Panel
288

Item Description Value
Wi-Fi Direct IPAddr
Displays the IP address of Wi-Fi Direct. –
IPV6 Configuration
Item Description Value
IPV6 Select whether to enable or disableIPv6.
• Inactive
• Active
Default: [Active]
IPV6 DHCP Sets the machine to receive its IPv6address from a DHCP server.
• Active
• Inactive
Default: [Inactive]
• Manually Set Address
Specifies the machine's IPv6address when DHCP is not used.Can contain up to 39characters.
For details about enteringcharacters, see page 49"Entering Characters (WhenUsing the Touch Panel Model)".
• Prefix Length
Specifies the prefix length, usinga value between 0 and 128.
• Gateway Address
Specifies the IPv6 address of thedefault gateway. Can containup to 39 characters.
For details about enteringcharacters, see page 49"Entering Characters (WhenUsing the Touch Panel Model)".
IP Address(DHCP)
Displays the IPv6 address obtainedfrom a DHCP server.
–
Network Settings (When Using the Touch Panel Model)
289

Item Description Value
StatelessAddress
Displays the IPv6 stateless addressesobtained from a Router Advertisement.
• 1:
• 2:
• 3:
• 4:
Link-localAddress
Displays the IPv6 link local address. –
Wireless (Wi-Fi) Sett.
Item Description Value
Wi-Fi Direct Enables devices to communicatedirectly with each other without using acentral access point.
-
Wireless (Wi-Fi) Status
• Status
Displays the current connectionstatus.
• Mac Address
Displays the machine's MACaddress.
• SSID
Displays detailed informationabout the SSID.
-
Setup Wizard Displays the procedure for manuallyconnecting to a wireless LAN. It leadsyou step-by-step through configuringthe settings for connecting with awireless LAN.
-
WPS Connects with one touch using WPS(Wi-Fi Protected Setup). For details,see Setup Guide.
• PBC
• PIN
7. Configuring the Machine Using the Control Panel
290

Item Description Value
Wi-Fi DirectSSID
• Name
Displays the current SSID of themachine.
• Password
Specify the password for Wi-FiDirect connection.
-
Wi-Fi DirectType
Select 2.4 GHz or 5 GHz as thewireless LAN frequency.
• 2.4 GHz
• 5 GHz
Default: [2.4 GHz]
• Contact your network administrator for information about the network configuration.
Network Settings (When Using the Touch Panel Model)
291

@Remote (When Using the Touch Panel Model)This function is available for M 320FB/320F only.
RC Gate Proxy Server
Item Description Value
RC Gate ProxyServer
Specify whether to use a proxy server. • Off
• On
Default: [Off]
Proxy Address Specify the proxy server address. -
Port Number Enter the port number for the proxyserver.
(1 to 65535)
Default: [8080]
User Name Enter the user name for logging in tothe proxy server.
-
Password Enter the password for logging in tothe proxy server.
-
RC Gate Setup
Item Description Value
Request No. Displays the request number issued by@Remote.
-
Reference Refers to the machine's registrationinformation.
-
RC GateLocation
Displays the location of the machine asa result of the reference function.Confirm the information and proceedwith the registration.
-
Registration Registers the machine to @Remote. -
• @Remote (At Remote) is an Internet-based support for remote management of digital multi-purposedevices and laser printers. For more information about the settings, contact your sales or servicerepresentative.
7. Configuring the Machine Using the Control Panel
292

Copier Features Settings (When Using theFour-line LCD Panel Model)This function is available for M 320 only.
Item Description Value
Select Paper Specifies the paper size used for printing copies.
When a tray is selected, the machine prints fromthat tray only.
When a paper size is selected, the machineprints from the trays that contain the paper of thespecified size, except the bypass tray. If Tray 1and tray 2 both contain the paper of thespecified size, the machine starts to print from thetray specified as the priority tray in [Paper TrayPriority] under [Tray Paper Settings]. If that trayruns out of paper, the machine automaticallyswitches to the other tray to continue printing.
If Tray 2 is not installed, only [Tray 1] and[Bypass Tray] appear.
• Tray 1
• Tray 2
• Bypass Tray
• A4
• 8 1/2 × 11
• 16K
Default: [Tray 1]
Sort Configures the machine to sort the output pagesinto sets when making multiple copies of a multi-page document (P1, P2, P1, P2...).
• Off
• On
Default: [Off]
Copier Features Settings (When Using the Four-line LCD Panel Model)
293

Item Description Value
Original Type Specifies the content of originals, to optimizecopy quality.
• Mixed
Select this when theoriginal contains bothtext and photographsor pictures.
• Text
Select this when theoriginal contains onlytext and nophotographs orpictures.
• Photo
Select this when theoriginal containsphotographs orpictures. Use this modefor the following typesof original:
• Photographs
• Pages that areentirely or mainlyphotographs orpictures, such asmagazine pages.
Default: [Mixed]
Density Specifies the image density for photocopying. Increase the level (blacksquares) to increase thedensity.
Default: The default settingis the middle of 5adjustment levels.
7. Configuring the Machine Using the Control Panel
294

Item Description Value
Reduce/Enlarge Specifies the percentage by which copies areenlarged or reduced. • 50%
• 71%(A4->A5)
• 82%(B5J->A5)
• 93%
• 100%
• 122%(A5->B5J)
• 141%(A5->A4)
• 200%
• 400%
• Zoom 25-400%
• 50% (A4->A6)
• 65% (LT->HLT)
• 78% (LG->LT)
• 93%
• 100%
• 129% (HLT->LT)
• 155% (HLT->LG)
• 200% (A6->A4)
• 400%
• Zoom 25-400%
Default: [100%]
Copier Features Settings (When Using the Four-line LCD Panel Model)
295

Item Description Value
Duplex/Combine Specifies combined copying. Select a copymode according to your original and how youwant the copy outputs to appear. For moredetails, see page 125 "Copying Single-SidedOriginals with 2-Sided and Combined Printing"and page 130 "Copying 2-Sided Originals with2-Sided and Combined Printing".
Note that enabling combined copyingautomatically disables ID card copying.
• Off
• 1Sd 2Orig->Comb2on1 1Sd
• 1Sd 4Orig->Comb4on1 1Sd
• 1 Sided Orig->2Sided Copy
• 1Sd 4Orig->Comb2on1 2Sd
• 1Sd 8Orig->Comb4on1 2Sd
• Manual 2 Sided ScanMode
Default: [1 Sided Orig->2Sided Copy]
7. Configuring the Machine Using the Control Panel
296

Item Description Value
ID Card Settings Specifies the ID Card Copy setting. • ID Card Copy
• Off
• On
Default: [Off]
• ID Card Center Line
Specify whether todraw a center linewhen making ID cardcopy.
• Do not Print
Default: [Do not Print]
• ID Card Size
You can change the IDcard copy scanningsize.
• Horizontal: 50 to148mm (1.90 to5.83 inches)
• Vertical: 50 to216mm (1.90 to8.50 inches)
Default(horizontal ×vertical): 57×88mm(2.24×3.46 inches)
Copier Features Settings (When Using the Four-line LCD Panel Model)
297

Scan Settings (When Using the Four-line LCDPanel Model)This function is available for M 320 only.
Item Description Value
Scan Size Specifies the scanning size according tothe size of the original.
8 1/2 × 14, 8 1/2 × 11, 8 1/2 ×51/2, 7 1/4 × 10 1/2, A4, B5, A5,16K, Custom Size
Default: [A4]
Default: [8 1/2 × 11]
ScanningMode
Specifies the scanning mode for black-and-white scanning using the controlpanel.
• B&W
The machine creates 1-bit black-and-white images. Images containonly black and white colors.
• Color
The machine creates 8-bit colorimages. Images are full color.
• Gray Scale
The machine creates 8-bit black-and-white images. Images containblack and white, and intermediategray colors.
Default: [B&W]
Max. E-mailSize
Specifies the maximum size of a file thatcan be sent by e-mail.
• 1 MB
• 2 MB
• 3 MB
• 4 MB
• 5 MB
• No Limit
Default: [1 MB]
7. Configuring the Machine Using the Control Panel
298

Item Description Value
Density Specifies the image density for scanningoriginals.
Increase the level (black squares) toincrease the density.
Default: The default setting is the middleof 5 adjustment levels.
Resolution Specifies the resolution for scanning theoriginal.
• 100 × 100dpi
• 150 × 150dpi
• 200 × 200dpi
• 300 × 300dpi
• 400 × 400dpi
• 600 × 600dpi
Default: [300 × 300dpi]
Compression(Color)
Specifies the color compression ratio forJPEG files. The lower the compressionratio, the higher the quality but greaterthe file size.
• Low
• Medium
• High
Default: [Medium]
Limitless Scan Sets the machine to request next originalswhen scanning with the exposure glass.
• Off
• On
Default: [Off]
File Type Specifies whether to create a multi-pagefile containing all pages or separatesingle-page files when scanning multiplepages.
Note that a scanned file can containmultiple pages only when the file formatis PDF or TIFF. If the file format is JPEG, asingle-page file is created for eachscanned page.
• Multi-page
• Single Page
Default: [Multi-page]
Scan Settings (When Using the Four-line LCD Panel Model)
299

System Settings (When Using the Four-line LCDPanel Model)This function is available for M 320 only.
I/O Timeout
Item Description Value
USB Specifies how many seconds themachine waits for print data, if thedata is interrupted while it is being sentfrom the computer via USB. If themachine does not receive any moredata within the time specified here, themachine only prints the data it hasreceived. If printing is frequentlyinterrupted by data from other ports,increase the timeout period.
• 15 sec.
• 60 sec.
• 300 sec.
Default: [60 sec.]
Network Specifies how many seconds themachine waits for print data, if thedata is interrupted while it is being sentfrom the computer via network. If themachine does not receive any moredata within the time specified here, themachine only prints the data it hasreceived. If printing is frequentlyinterrupted by data from other ports,increase the timeout period.
• 15 sec.
• 60 sec.
• 300 sec.
Default: [15 sec.]
Locked Print Specifies how many seconds themachine holds a new Locked Print file,when the machine cannot store anymore Locked Print files. Within thistime, you can print or delete the newLocked Print file. You can also print ordelete an existing Locked Print file sothat the new Locked Print file can bestored in the machine.
• 0 to 300 seconds, in incrementsof 1 second
Default: [60 seconds]
7. Configuring the Machine Using the Control Panel
300

Item Description Value
User Auth.(Copy)
Specifies how many seconds a userstays authenticated after paper isoutput when copying with theexposure glass. Note thatauthentication for other functions willexpire immediately after using thatfunction.
This setting appears only when the userrestriction function is enabled via WebImage Monitor.
• 5 to 60 seconds, in incrementsof 1 second
Default: [30 seconds]
Fixed USB Port Specifies whether the same printerdriver can be used for multiplemachines or not under USBconnection.
• Off
You must install the printer driverseparately for individualmachines, because the machineother than the original will berecognized as a new deviceupon USB connection.
• On
The same printer/LAN-Faxdriver you have installed in yourcomputer can be used with anymachine other than the oneoriginally used for installation, ifthe machine is of the samemodel.
Default: [Off]
System Settings (When Using the Four-line LCD Panel Model)
301

Item Description Value
Export to NFC Specifies whether or not tosynchronize the data you haveconfigured using the control panel andWeb Image Monitor with the datastored in NFC.
You can read and write the data inNFC by using the applicationcorresponding to the machine.
• Off
Does not synchronize the datayou have configured using thecontrol panel and Web ImageMonitor with the data stored inNFC.
• On
Synchronizes the data you haveconfigured using the controlpanel and Web Image Monitorwith the data stored in NFC.
Default: [On]
Auto Continue
Item Description Value
Auto Continue Sets the machine to ignore an errorwith paper size or type and continueprinting. The printing stops temporarilywhen an error is detected, and restartsautomatically after about ten secondsusing the settings made on the controlpanel.
However, if the size of paper specifiedon the control panel and that of thepaper loaded in the paper tray or thepaper size specified for the print jobdo not match when printing restarts, itmay cause a paper jam.
• Off
• On
Default: [Off]
Toner Saving
Item Description Value
Toner Saving Sets the machine to print using areduced amount of toner (for printsmade by the copier function only).
• Off
• On
Default: [Off]
7. Configuring the Machine Using the Control Panel
302

Supplies Status
Displays information about consumables.
Item Description Value
Print Cart. Displays the remaining amount ofsupplies.
• (New)
•
•
•
•
• (Needs replacing)
Printer Registration
Adjust the registration of each tray if necessary. You can adjust the registration value between -15and +15 (that is, -1.5 and +1.5 mm, in 0.1 mm increments).
Default: 0 for all parameters
Item Description
Horiz.: Tray 1 Select this to adjust the tray 1 registration horizontally.
Horiz.: Tray 2 Select this to adjust the tray 2 registration horizontally.
Vert.: Tray 1 Select this to adjust the tray 1 registration vertically.
Vert.: Tray 2 Select this to adjust the tray 2 registration vertically.
Horiz.: BypassTray
Select this to adjust the bypass tray registration horizontally.
Vert.: BypassTray
Select this to adjust the bypass tray registration vertically.
Horiz.: Duplex:Back
Select this to adjust the registration of the back of duplex printing horizontally.
Vert.: Duplex:Back
Select this to adjust the registration of the back of duplex printing vertically.
System Settings (When Using the Four-line LCD Panel Model)
303

Low Humidity Mode
Item Description Value
Low HumidityMode
If the machine is used in a room wherehumidity level is low, black lines of afew millimeters thick may appear onprintouts with 75-millimeter spaces inbetween. Selecting [On] for this settingmay prevent these lines fromappearing (wait for about one dayuntil this setting becomes effective).
Note that when this setting is enabled,the machine automatically performsself-maintenance in every 10 minutes.
• Off
• On
Default: [Off]
Image Density
Item Description Value
Image Density Adjusts the density of images on prints. -3 to +3
Default: 0
7. Configuring the Machine Using the Control Panel
304

Printer Features Settings (When Using the Four-line LCD Panel Model)This function is available for M 320 only.
List/Test Print
Prints lists showing configurations on the machine.
The lists will be printed using the tray set for [Printer] under [Paper Tray Priority] in [Tray PaperSettings] on A4 or Letter size paper.
Item Description
Test Page Prints a test page for checking the single-sided printing condition. The test pagecontains network settings.
PCL Font List Prints installed PCL font list.
PS Font List Prints installed PostScript font list.
Duplex TestPage
Prints a test page for checking the duplex printing condition.
System
Item Description Value
Copies Sets the machine to print the specifiednumber of sets.
This setting is disabled if the number ofpages to print is specified by theprinter driver.
1 to 999
Default: 1
Sub PaperSize
Sets the machine to print onto paper ofanother size if the specified paper isnot loaded in any tray. Alternativesizes are preset to A4 and Letter.
• Auto
• Off
Default: [Auto]
Printer Features Settings (When Using the Four-line LCD Panel Model)
305

Item Description Value
Default PageSize
Specifies the paper size to be usedwhen the paper size is not specified inthe print job.
• A4
• A5 LEF
• A5 SEF
• A6
• B5 JIS
• B6 JIS
• 3 7/8 × 7 1/2
• 4 1/8 × 9 1/2
• 5 1/2 × 8 1/2
• 8 1/2 × 11
• 8 1/2 × 13
• 8 1/2 × 14
• 8.5 × 13.4
• 8.5 × 13.6
• 8.11 × 13.3
• 16K
• C5 Env
• C6 Env
• DL Env
Default: [A4]
Default: [8 1/2 × 11]
Duplex Sets the machine to print on both sidesof paper according to the specifiedbinding method.
• None
• Long Edge Bind
• Short Edge Bind
Default: [None]
7. Configuring the Machine Using the Control Panel
306

Item Description Value
Blank PagePrint
Sets the machine to print blank pages.
When cover sheet printing is enabledfrom the printer driver, cover sheetsare inserted even if you select [Off].
Note that this setting has lower prioritythan the printer driver's blank pagesetting.
• On
• Off
Default: [On]
Print ErrorReport
Sets the machine to print an error pagewhen the machine detects a printer ormemory error.
• On
• Off
Default: [Off]
PCL Menu
Specifies conditions when using PCL for printing.
Item Description Value
Orientation Specifies the page orientation. • Portrait
• Landscape
Default: [Portrait]
Form Lines Specifies the number of lines per page. 5 to 128
Default: 64
Default: 60
Font Number Specifies the ID of the default font youwant to use.
0 to 89
Default: 0
Point Size Specifies the point size for the defaultfont.
This setting is effective only for avariable-space font.
4.00 to 999.75
Default: 12.00 points
Printer Features Settings (When Using the Four-line LCD Panel Model)
307

Item Description Value
Font Pitch Specifies the number of characters perinch for the default font.
This setting is effective only for fixed-space fonts.
0.44 to 99.99
Default: 10.00 pitch
Symbol Set Specifies the character set for thedefault font. The following sets areavailable:
Roman-8, Roman-9, ISO L1, ISO L2,ISO L5, PC-8, PC-8 D/N, PC-850,PC-852, PC-858, PC8-TK, Win L1,Win L2, Win L5, Desktop, PS Text,VN Intl, VN US, MS Publ, Math-8,PS Math, VN Math, Pifont, Legal,ISO 4, ISO 6, ISO 11, ISO 15, ISO17, ISO 21, ISO 60, ISO 69, Win3.0, MC Text, ISO L6, ISO L9,PC-775, PC-1004, Win Baltic
Default: [PC-8]
Courier Font Specifies a courier-type font. • Regular
• Dark
Default: [Regular]
Ext. A4 Width Sets the machine to extend the width ofthe printable area of A4 size paper,reducing side margin width.
Normally, you can print up to 78characters of Courier 10 Pitch Font perline on A4 paper in portraitorientation. If you set this to On, youcan print up to 80 characters under thesame conditions.
• On
• Off
Default: [Off]
Append CR toLF
Sets the machine to append a CR codeto each LF code to print text dataclearly.
• On
• Off
Default: [Off]
Resolution Specifies the print resolution in dots perinch.
• 600 × 600 dpi
Default: [600 × 600 dpi]
PS Menu
Specifies conditions when using PostScript for printing.
7. Configuring the Machine Using the Control Panel
308

Item Description Value
PS Resolution Specifies the print resolution in dotsper inch.
• 600 × 600 dpi
• 1200 × 1200 dpi
Default: [600 × 600 dpi]
Printer Features Settings (When Using the Four-line LCD Panel Model)
309

Tray Paper Settings (When Using the Four-lineLCD Panel Model)This function is available for M 320 only.
Item Description Value
PaperType: Tray1
Specifies the paper type fortray 1.
• Thin Paper
• Plain Paper
• Thick Paper 1
• Recycled Paper
• Color Paper
• Letterhead
• Preprinted Paper
• Prepunched Paper
• Label Paper
• Bond Paper
• Cardstock
• Thick Paper 2
Default: [Plain Paper]
PaperType: Tray2
Specifies the paper type forTray 2.
This setting appears only whenthe optional paper feed unit isinstalled.
• Thin Paper
• Plain Paper
• Thick Paper 1
• Recycled Paper
• Color Paper
• Letterhead
• Preprinted Paper
• Prepunched Paper
Default: [Plain Paper]
7. Configuring the Machine Using the Control Panel
310

Item Description Value
PaperType:BypassTray
Specifies the paper type forbypass tray.
• Thin Paper
• Plain Paper
• Thick Paper 1
• Recycled Paper
• Color Paper
• Letterhead
• Preprinted Paper
• Prepunched Paper
• Label Paper
• Bond Paper
• Cardstock
• Envelope
• Thick Paper 2
Default: [Plain Paper]
Tray Paper Settings (When Using the Four-line LCD Panel Model)
311

Item Description Value
PaperSize: Tray1
Specifies the paper size for tray1.
• A4
• A5 LEF
• A5 SEF
• A6
• B5 JIS
• B6 JIS
• 5 1/2 × 8 1/2
• 8 1/2 × 11
• 8 1/2 × 13
• 8 1/2 × 14
• 8.5 × 13.4
• 8.5 × 13.6
• 8.11 × 13.3
• 16K
• Custom Size
Default: [A4]
Default: [8 1/2 × 11]
PaperSize: Tray2
Specifies the paper size forTray 2.
This setting appears only whenthe optional paper feed unit isinstalled.
• A4
• A5 SEF
• B5 JIS
• 5 1/2 × 8 1/2
• 8 1/2 × 11
• 8 1/2 × 14
• 8.5 × 13.4
Default: [A4]
Default: [8 1/2 × 11]
7. Configuring the Machine Using the Control Panel
312

Item Description Value
PaperSize:BypassTray
Specifies the paper size forbypass tray.
• A4
• A5 LEF
• A5 SEF
• A6
• B5 JIS
• B6 JIS
• 3 7/8 × 7 1/2
• 4 1/8 × 9 1/2
• 5 1/2 × 8 1/2
• 8 1/2 × 11
• 8 1/2 × 13
• 8 1/2 × 14
• 8.5 × 13.4
• 8.5 × 13.6
• 8.11 × 13.3
• 16K
• C5 Env
• C6 Env
• DL Env
• Custom Size
Default: [A4]
Default: [8 1/2 × 11]
Tray Paper Settings (When Using the Four-line LCD Panel Model)
313

Item Description Value
BypassTrayPriority
Specifies how print jobs usingthe bypass tray are handled.
• Machine Setting(s)
The machine prints all print jobs according to themachine’s settings.
An error will occur if the paper size/typesettings of the machine and printer driver do notmatch.
• Any Size/Type
The machine prints all print jobs according to theprinter driver’s settings.
Printing proceeds even if the paper size/typesettings of the machine and printer driver do notmatch. However, if the paper is too small for theprint job, the printed image will be cropped.
• Any Custom Size/Type
The machine prints custom size print jobsaccording to the printer driver’s settings andprints standard size print jobs according to themachine’s settings.
For custom size print jobs, printing proceedseven if the paper size/type settings of themachine and printer driver do not match.However, if the paper is too small for the printjob, the printed image will be cropped.
For standard size print jobs, an error will occur ifthe paper size/type settings of the machine andprinter driver do not match.
Default: [Machine Setting(s)]
7. Configuring the Machine Using the Control Panel
314

Item Description Value
Paper TrayPriority
Specifies the tray that themachine checks first for paperthat can be used for the jobwhen a tray is set to be selectedautomatically.
If multiple trays contain validpaper, the first tray the machinefinds will be used for printing;when that tray runs out ofpaper, the machineautomatically switches to thenext tray to continue printing.
If Tray 2 is not installed, [Tray2] does not appear.
• Printer
Select a tray to check first when automatic trayselection is specified for the print job.
• Tray 1
• Tray 2
• Bypass Tray
Default: [Tray 1]
• Copier
Select a tray to check first when [A4], [8 1/2 ×11], or [16K] is selected for [Select Paper]under [Copier Features].
• Tray 1
• Tray 2
• Bypass Tray
Default: [Tray 1]
SizeMismatchDetection
Sets the machine to report anerror if the paper size does notmatch the print job's settings.
• On
• Off
Default: [Off]
Tray Paper Settings (When Using the Four-line LCD Panel Model)
315

Administrator Tools Settings (When Using theFour-line LCD Panel Model)This function is available for M 320 only.
Item Description Value
Set Date/Time Sets the date and time of themachine’s internal clock.(Default differs depending onthe [Country/Region]setting.)
• Set Date
Specifies the date of the machine’s internalclock.
Only dates that correspond with the year andmonth can be set. Incompatible dates will berefused.
• Date format: Month/Day/Year, Day/Month/Year, or Year/Month/Day
Year: 2000 to 2099
Month: 1 to 12
Day: 1 to 31
• Set Time
Sets the time of the machine’s internal clock.
• Time format: 12-hour Format, 24-hourFormat
AM/PM stamp: AM, PM (for 12-hourFormat)
Hour: 0 to 23 (for 24-hour Format), or 1to 12 (for 12-hour Format)
Minute: 0 to 59
Function Priority Specifies the mode that isactivated when the power isturned on, or if the timespecified for [System AutoReset Timer] elapses withoutactivity while the initialscreen of the current mode isdisplayed.
• Copier
• Scanner
Default: [Copier]
7. Configuring the Machine Using the Control Panel
316

Item Description Value
System AutoReset Timer
Sets the machine to return tothe mode specified in[Function Priority].
• Off
• 30 sec.
• 1 min.
• 2 min.
• 3 min.
• 5 min.
• 10 min.
Default: [1 min.]
Energy SaverMode
Sets the machine to enterEnergy Saver mode, EnergySaver mode 1 or EnergySaver mode 2, to reducepower consumption. Themachine recovers fromEnergy Saver mode when itreceives a print job or one ofthe keys on the control panelis pressed.
• Energy Saver Mode 1
The machine enters Energy Saver mode 1 ifthe machine has been idle for about 30seconds. It takes less time to recover fromEnergy Saver mode 1 than from power-offstate or Energy Saver mode 2, but powerconsumption is higher in Energy Saver mode 1than in Energy Saver mode 2.
• Off
• On
Default: [Off]
Administrator Tools Settings (When Using the Four-line LCD Panel Model)
317

Item Description Value
Energy SaverMode
Sets the machine to enterEnergy Saver mode, EnergySaver mode 1 or EnergySaver mode 2, to reducepower consumption. Themachine recovers fromEnergy Saver mode when itreceives a print job or one ofthe keys on the control panelis pressed.
• Energy Saver Mode 2
The machine enters Energy Saver mode 2after the period of time specified for this settingis passed. The machine consumes less powerin Energy Saver mode 2 than in Energy Savermode 1, but it takes longer to recover fromEnergy Saver mode 2 than from Energy Savermode 1.
This setting cannot be disabled.
• 30sec
• 1 - 20
• 30sec
• 1 - 60
Default: [30sec]
7. Configuring the Machine Using the Control Panel
318

Item Description Value
Language Specifies the language usedon the screen and in reports.
The default value for thissetting is the language youhave specified during theInitial Setup, which isrequired after turning on themachine for the first time.
• English
• German
• French
• Italian
• Spanish
• Dutch
• Swedish
• Norwegian
• Danish
• Finnish
• Portuguese
• Czech
• Hungarian
• Polish
• Simplified Chinese
• Russian
• Brazilian Portuguese
• Turkish
• Traditional Chinese
• Arabic
• Kazakh
Administrator Tools Settings (When Using the Four-line LCD Panel Model)
319

Item Description Value
Reset Settings Be sure not to clear thesettings by mistake.
• Reset All Settings
Resets the machine's settings to their defaultsexcept the following:
• Language settings
• Network settings
Press the [OK] key to execute. Press the [Back]key to exit to the previous level of the menutree without clearing the settings.
• Reset Network Settings
Resets the network settings to their defaults.
Press the [OK] key to execute. Press the [Back]key to exit to the previous level of the menutree without clearing the settings.
Shortcut toFunction
Assigns one of the followingfunctions to the [Shortcut toFunc.] key on the controlpanel.
• ID Card Copy Mode
• Select Scanner Address
Default: [ID Card Copy Mode]
PCL6 Set this to [Universal] whenusing the Universal Driverand to [P 310/M 320]when using the normaldriver.
• P 310/M 320
• Universal
Default: [P 310/M 320]
Admin. ToolsLock
Specifies an eight-digitpassword for accessing the[Network Settings],[Network Wizard], and[Admin. Tools] menus.
The password must bespecified during the InitialSetup, which is required afterturning on the machine forthe first time. For details, seeSetup Guide.
Do not forget this password.
The default password is"00000000".
• On (00000000 to 99999999)
• Off
Default: [On]
7. Configuring the Machine Using the Control Panel
320

Item Description Value
IPsec Selects whether to enable ordisable IPsec.
This function appears onlywhen a password isspecified under [Admin.Tools Lock].
• Inactive
• Active
Default: [Inactive]
Save Scn Datato USB
Specify whether to enable ordisable Scan to USB.
This function appears onlywhen a password isspecified under [Admin.Tools Lock].
• Inactive
• Active
Default: [Active]
Administrator Tools Settings (When Using the Four-line LCD Panel Model)
321

Printing Lists/Reports (When Using the Four-line LCD Panel Model)This function is available for M 320 only.
Printing the Configuration Page (When Using the Four-line LCD Panel Model)
1. Press the [User Tools] key.
DYG327
2. Press the [ ] or [ ] key to select [Print List/Report], and then press the [OK] key.
3. Press the [ ] or [ ] key to select [Configuration Page], and then press the [OK] key.
4. Press [OK] in the confirmation screen.
Configuration Page
The following illustration is a sample of a configuration page.
7. Configuring the Machine Using the Control Panel
322

M0ESOC8130
3
21
1. System Reference
Displays the model name, machine ID, and firmware version.
2. Note
The message "* denotes a non-default setting" is displayed in English despite the country/region setting.When a value is changed from the default setting, an asterisk * appears next to the new value.
3. Setting Menu and Current Value
Displays the setting items and current values.
Types of Lists/Reports (When Using the Four-line LCD Panel Model)
Configuration Page
Prints general information and the current configurations of the machine.
Scanner Address List
Prints a list of scan destinations.
Printing Lists/Reports (When Using the Four-line LCD Panel Model)
323

Scanner Journal
Prints a scanner journal for the last 100 Scan to E-mail, Scan to FTP, and Scan to Foldertransmissions.
Maintenance Page
Prints the maintenance page.
• Reports will be printed on A4 or Letter size paper. Load one of these sizes of paper into the traybefore printing reports.
• The average printing pages per job is shown in [P/J Information (AVE)] under [Total Counter] onthe maintenance page. A job means printing of a document from the start to the end. For example,however, if another job is consecutively added while the current document is being printed, not 2but 1 is the number of the current job.
7. Configuring the Machine Using the Control Panel
324

Network Settings (When Using the Four-lineLCD Panel Model)This function is available for M 320 only.
• Depending on the settings you change, the machine might need to be restarted.
• Depending on the model you are using, some items might not appear.
Wired (Ethernet)
Item Description Value
MAC Address Displays the machine's MAC address. –
Ethernet Speed Displays the current Ethernet speedsetting.
• 100Mbps Full Duplex
• 100Mbps Half Duplex
• 10Mbps Full Duplex
• 10Mbps Half Duplex
• Ethernet Unavailable
Appears when a network cableis not connected.
Set EthernetSpeed
Specifies the speed for Ethernetcommunication. Select a speed thatmatches your network environment.
For most networks, the default setting isthe optimum setting.
• Auto Select
• 100Mbps Full Duplex
• 100Mbps Half Duplex
• 10Mbps Full Duplex
• 10Mbps Half Duplex
Default: [Auto Select]
Network Settings (When Using the Four-line LCD Panel Model)
325

Wireless (Wi-Fi)
Item Description Value
EnableWireless (Wi-Fi)
Select whether to enable or disableWireless LAN.
If [Disable] is set, [Wireless (Wi-Fi)Status], [MAC Address], [CurrentConnection], [Input SSID], [WPS],[Wi-Fi Direct], [Wi-Fi Direct PWD],and [Wi-Fi Direct Type] are notdisplayed.
• Disable
• Enable
Default: [Disable]
Wireless (Wi-Fi) Status
Displays the current connection status. -
MAC Address Displays the machine's MAC address. -
CurrentConnection
Displays detailed information aboutthe connection, such as the SSID andthe wireless signal strength.
-
Input SSID Input the SSID of the machine. -
WPS Connects with one touch using WPS(Wi-Fi Protected Setup). For details,see Setup Guide.
• PBC
• PIN
Wi-Fi Direct Input the SSID of the machine toconfigure Wi-Fi Direct.
-
Wi-Fi DirectPWD
Input SSID to set a password for Wi-FiDirect.
-
Wi-Fi DirectType
Select 2.4 GHz or 5 GHz as thewireless LAN frequency.
• 2.4 GHz
• 5 GHz
Default: [2.4 GHz]
7. Configuring the Machine Using the Control Panel
326

IPv4 Configuration
Item Description Value
DHCP Sets the machine to receive its IPv4address, subnet mask, and defaultgateway address automatically from aDHCP server.
• Inactive
• Active
Default: [Active]
IP Address Specifies the machine's IPv4 addresswhen DHCP is not used.
Use this menu to check the current IPaddress when DHCP is used.
Default: XXX.XXX.XXX.XXX
The numbers represented by "X" varyaccording to your networkenvironment.
Subnet Mask Specifies the machine's subnet maskwhen DHCP is not used.
Use this menu to check the currentsubnet mask when DHCP is used.
Default: 255.255.255.0
It is not possible to enter 0.0.0.0 or
255.255.255.255.
GatewayAddress
Specifies the machine's defaultgateway address when DHCP is notused.
Use this menu to check the currentdefault gateway address when DHCPis used.
Default: 192.0.0.192
IP AddressMethod
Displays the IP address acquisitionmethod.
• DHCP
• Auto IP
• Manual Config.
• Default IP
Default: [DHCP]
Wi-Fi Direct IPAddress
Displays the IP address of Wi-Fi Direct. –
IPv6 Configuration
Item Description Value
IPv6 Select whether to enable or disableIPv6.
• Inactive
• Active
Default: [Active]
Network Settings (When Using the Four-line LCD Panel Model)
327

Item Description Value
DHCP Sets the machine to receive its IPv6address from a DHCP server.
• Inactive
• Active
Default: [Inactive]
IP Address(DHCP)
Displays the IPv6 address obtainedfrom a DHCP server.
–
ManualConfig.Address
Specifies the machine's IPv6 settings. • Manual Config. Address
Specifies the machine's IPv6address when DHCP is not used.Can contain up to 39characters.
For details about enteringcharacters, see page 52"Entering Characters (WhenUsing the Four-line LCD PanelModel)".
• Prefix Length
Specifies the prefix length, usinga value between 0 and 128.
• Gateway Address
Specifies the IPv6 address of thedefault gateway. Can containup to 39 characters.
For details about enteringcharacters, see page 52"Entering Characters (WhenUsing the Four-line LCD PanelModel)".
StatelessAddress
Displays the IPv6 stateless addressesobtained from a Router Advertisement.
• Stateless Address 1
• Stateless Address 2
• Stateless Address 3
• Stateless Address 4
Link-localAddress
Displays the IPv6 link local address. –
7. Configuring the Machine Using the Control Panel
328

Connect Method
Item Description Value
- Select the network connection mode. • Ethernet
• Wi-Fi
Default: [Ethernet]
• Contact your network administrator for information about the network configuration.
Network Settings (When Using the Four-line LCD Panel Model)
329

Network Wizard (When Using the Four-lineLCD Panel Model)This function is available for M 320 only.
You can enable network connections by following the wizard's instructions. For details, see Setup Guide.
7. Configuring the Machine Using the Control Panel
330

@Remote (When Using the Four-line LCD PanelModel)This function is available for M 320 only.
RC Gate ProxySvr.
Item Description Value
RC GateProxySvr.
Specify whether to use a proxy server. • Off
• On
Default: [Off]
Proxy Address Specify the proxy server address. -
Port Number Enter the port number for the proxyserver.
(1 to 65535)
Default: [8080]
User Name Enter the user name for logging in tothe proxy server.
-
Password Enter the password for logging in tothe proxy server.
-
RC Gate Setup
Item Description Value
Request No. Displays the request number issued by@Remote.
-
Reference Refers to the machine's registrationinformation.
-
RC GateLocation
Displays the location of the machine asa result of the reference function.Confirm the information and proceedwith the registration.
-
Registration Registers the machine to @Remote. -
@Remote (When Using the Four-line LCD Panel Model)
331

• @Remote (At Remote) is an Internet-based support for remote management of digital multi-purposedevices and laser printers. For more information about the settings, contact your sales or servicerepresentative.
7. Configuring the Machine Using the Control Panel
332

8. Configuring the Machine UsingUtilitiesThis chapter describes how to configure the machine using utilities.
Available Setting Functions Using Web ImageMonitor and Smart Organizing MonitorUse Web Image Monitor or Smart Organizing Monitor to change the configuration of the machine froma computer.
Available operations for Web Image Monitor and Smart Organizing Monitor are as follows:
Available operations Web Image MonitorSmart Organizing
Monitor
Checking the system settings Available Available
Configuring paper settings Available Available
Adjusting the sound volume*1 Available Unavailable
Configuring paper settings for copying Available Unavailable
Configuring fax settings*1 Available Unavailable
Configuring the user restriction settings Available Unavailable
Configuring the priority tray Available Available
Configuring toner saving Available Unavailable
Configuring interface settings Available Available
Configuring the shortcut to functionsettings*2
Available Unavailable
Registering destinations Available Unavailable
Checking the network settings Available Available
Configuring IPsec settings Available Available
Configuring Energy Saver Mode Available Available
Configuring administrator settings Available Unavailable
333

Available operations Web Image MonitorSmart Organizing
Monitor
Printing lists/reports Available Available
*1 This function is available when using the touch panel model.
*2 This function is available when using the four-line LCD panel model.
8. Configuring the Machine Using Utilities
334

Using Web Image Monitor
• Some items might not appear, depending on the model type you are using.
• Some items can also be configured using the control panel.
Recommended web browsers
• Internet Explorer 10 or later
• Microsoft Edge
• Google Chrome
• Firefox 3.0 or later
• Safari 11.0 or later
• When Using the Touch Panel ModelTo operate the machine via Web Image Monitor, you must first configure the machine's TCP/IP orwireless LAN settings. For details, see page 286 "Network Settings (When Using the Touch PanelModel)" or see page 358 "Configuring the Network Settings".
• When Using the Four-line LCD Panel ModelTo operate the machine via Web Image Monitor, you must first configure the machine's TCP/IP orwireless LAN settings. For details, see page 325 "Network Settings (When Using the Four-line LCDPanel Model)" or see page 358 "Configuring the Network Settings".
Using Web Image Monitor
335

Displaying Top PageWhen you access the machine using Web Image Monitor, the top page appears in your browser'swindow.
1. Launch the Web browser.
2. In the Web browser's address bar, enter "https://(machine’s IP address)/" to access themachine.
If a DNS server is used and the machine’s host name has been specified, you can enter the hostname instead of the IP address.
The top page of Web Image Monitor appears.
Top page
Every Web Image Monitor page is divided into the following areas:
M0ESAC8121
1
2 3
4
1. Menu area
Clicking a menu shows its contents in the main area.
2. Tab area
Contains tabs for switching between information and settings you want to see or configure.
3. FAQs/Knowledge Base
Provides answers to frequently asked questions and other useful information about using thismachine.
An internet connection is required to view this information.
4. Main area
Displays the contents of the item selected in the menu area.
8. Configuring the Machine Using Utilities
336

Information in the main area is not automatically updated. Click [Refresh] at the upper-right inthe main area to update the information. Click the Web browser's [Refresh] button to refreshthe entire browser screen.
• If you use an older version of a supported Web browser or the Web browser has JavaScript andcookies disabled, display and operation problems may occur.
• If you are using a proxy server, configure the Web browser settings as necessary. For details aboutthe settings, contact your network administrator.
• The previous page may not appear even if the back button of the Web browser is clicked. If thishappens, click the refresh button of the Web browser.
• The FAQs (Frequently Asked Questions)/Knowledge Base are not available in certain languages.
Changing the Interface Language
Select the desired interface language from the [Language] list.
Displaying Top Page
337

Checking the System InformationClick [Home] to display the main page of Web Image Monitor. You can check the current systeminformation on this page.
This page contains three tabs: [Status], [Counter], and [Machine Information].
Status Tab
Item Description
Model Name Shows the name of the machine.
Location Shows the location of the machine as registered on the [SNMPv1/v2]page.
Contact Shows the contact information of the machine as registered on the[SNMPv1/v2] page.
Host Name Shows the host name specified in [Host Name] on the [DNS] page.
Device Status Shows the current messages on the machine's display.
Status
Item Description
Print Cartridge Shows the amount of toner remaining.
Paper Tray
Item Description
Tray 1 Shows the current state and paper size/type setting of Tray 1.
Tray 2 Shows the current state and paper size/type setting of Tray 2.
Bypass Tray Shows the current state and paper size/type setting of the bypass tray.
• If a non-genuine print cartridge is installed, toner life cannot be reliably indicated.
• The information about Tray 2 appears only when it is installed.
8. Configuring the Machine Using Utilities
338

Counter Tab
Page Counter
Item Description
Printer Shows the following for pages printed using the printer function:
Total number of pages printed using the printer function, and lists/reportsprinted from the List/Test Print menu under Printer Features
Number of color pages
Number of black-and-white pages printed using the printer function
Scanner Shows the following for pages scanned using the scanner function:
Total number of pages
Number of color pages
Number of black-and-white pages
Copier Shows the following for pages printed using the copier function:
Total number of pages
Number of color pages
Number of black-and-white pages
Fax
(only when using thetouch panel model)
Shows the following for telephone line faxes:
Total number of pages sent and received
Number of pages sent
Number of pages received
Print Counter
Item Description
Page Total Shows the total number of all prints from the machine:
Pages printed using the printer, copy, and fax functions (when using thetouch panel model)
Pages printed using the printer and copy functions (when using four-lineLCD panel model)
Lists/Reports printed from the Print List/Report menu
Lists/Reports printed from the List/Test Print menu under Printer Features
Checking the System Information
339

Duplex
Item Description
Duplex Total Page Shows the total number of sheets printed on both sides.
• A sheet printed on both sides counts as two printed pages.
Machine Information Tab
Machine Information
Item Description
Firmware Version Shows the version of firmware installed on the machine.
Engine FW Version Shows the version of firmware for the machine engine.
Machine ID Shows the identification number of the machine.
Fax Card (only whenusing the touch panelmodel)
Shows that a fax card is installed.
Total Memory Shows the total memory installed on the machine.
8. Configuring the Machine Using Utilities
340

Configuring the System SettingsClick [System Settings] to display the page for configuring the system settings.
When Using the Touch Panel Model This page contains the following tabs: [Sound Volume Adjustment], [Tray Paper Settings], [Copier],[Fax], [Priority Tray], [Toner Management], and [Interface].
When Using the Four-line LCD Panel ModelThis page contains the following tabs: [Tray Paper Settings], [Copier], [Priority Tray], [TonerManagement], [Interface], and [Shortcut to Function].
Sound Volume Adjustment Tab
Sound Volume Adjustment
Item Description
Panel Key Sound Select the volume of the beep that sounds when a key is pressed from [Off],[Low], [Middle], or [High].
Ring Volume Select the volume of the ring when a call is received from [Off], [Low],[Middle], or [High].
On Hook Mode Select the volume of the sound from the speaker during on hook mode from[Off], [Low], [Middle], or [High].
Job End Tone Select the volume of the beep that sounds when a job is complete from[Off], [Low], [Middle], or [High].
Job Error Tone Select the volume of the beep that sounds when a fax transmission erroroccurs from [Off], [Low], [Middle], or [High].
Alarm Volume Select the volume of the alarm that sounds when an operation error occursfrom [Off], [Low], [Middle], or [High].
• This tab appears only when using the touch panel model.
Tray Paper Settings Tab
Tray 1
Configuring the System Settings
341

Item Description
Paper Size Select the paper size for Tray 1 from the following:
A4, B5 JIS, A5 (148 × 210 mm), A5 (210 × 148 mm), B6 JIS, A6, 8 1/2× 14, 8 1/2 × 11, 8 1/2 × 5 1/2, 8.5 × 13, 16K (195 × 267 mm), 8.5 ×13.4, 8.5 × 13.6, 8.11 × 13.3, Custom Size
Paper Type Select the paper type for Tray 1 from the following:
Thin Paper (52 to 64g/m2), Plain Paper, Thick Paper 1 (100 to 130g/m2), Recycled Paper, Color Paper, Letterhead, Preprinted Paper,Prepunched Paper, Label Paper, Bond Paper, Cardstock, Thick Paper 2(131 to 162g/m2)
Tray 2
Item Description
Paper Size Select the paper size for Tray 2 from the following:
A4, 8 1/2 × 11, B5 JIS, A5 (148 × 210 mm), 8 1/2 × 14, 8.5 × 13.4, 81/2 × 5 1/2
Paper Type Select the paper type for Tray 2 from the following:
Thin Paper (52 to 64g/m2), Plain Paper, Thick Paper 1 (100 to 130g/m2), Recycled Paper, Color Paper, Letterhead, Preprinted Paper,Prepunched Paper
Bypass Tray
Item Description
Paper Size Select the paper size for the bypass tray from the following:
A4, B5 JIS, A5 (148 × 210 mm), A5 (210 × 148 mm), B6 JIS, A6, 8 1/2× 14, 8 1/2 × 11, 5 1/2 × 8 1/2, 8.5 × 13, 16K (195 × 267 mm),Com10 (104.8 × 241.3 mm), Monarch (98.4 × 190.5 mm), C5 Env (162× 229 mm), C6 Env (114 × 162 mm), DL Env (110 × 220 mm), 8.5 ×13.4, 8.5 × 13.6, 8.11 × 13.3, Custom Size
Paper Type Select the paper type for the bypass tray from the following:
Thin Paper (52 to 64g/m2), Plain Paper, Thick Paper 1 (100 to 130g/m2), Recycled Paper, Color Paper, Letterhead, Preprinted Paper,Prepunched Paper, Label Paper, Bond Paper, Cardstock, Envelope, ThickPaper 2 (131 to 162g/m2)
8. Configuring the Machine Using Utilities
342

Bypass Tray Setting Priority
Item Description
Bypass Tray SettingPriority
Select how print jobs using the bypass tray are handled.
• System Settings
The paper settings configured on the machine's control panel areapplied to all print jobs. An error occurs when the paper settingsspecified by the printer driver or the print command do not match themachine's settings.
• Any Size/Type
Printing proceeds even if the paper size/type settings of the machineand printer driver do not match, but if the paper is too small for theprint job, the printed image will be cropped.
• Any Custom Size/Type
The machine prints custom size print jobs according to the printerdriver’s settings and prints standard size print jobs according to themachine’s settings.
For custom size print jobs, printing proceeds even if the paper size/type settings of the machine and printer driver do not match, but if thepaper is too small for the print job, the printed image will be cropped.
For standard size print jobs, an error will occur if the paper size/typesettings of the machine and printer driver do not match.
Size mismatch detection
Item Description
Size mismatchdetection
Select whether to set the machine to report an error if the paper size doesnot match the print job's settings.
• The information about Tray 2 appears only when it is installed.
Configuring the System Settings
343

Copier Tab
Select Paper
Item Description
Select Paper Select the paper size used for printing copies from the following: [Tray 1],[Tray 2], [Bypass Tray], [A4 (210 × 297 mm)], [Letter (8.5 × 11)], or [16K(195 × 267 mm)].
When a tray is selected, the machine prints from that tray only. When apaper size is selected, the machine checks the trays for the paper of thespecified size in the order of priority as set in [Copier] in the [Priority Tray]page.
If multiple trays contain valid paper, the first tray the machine finds will beused for printing; when that tray runs out of paper, the machineautomatically switches to the next tray to continue printing.
Separation Line
Item Description
Separation Line Specify whether to print a line in the middle of the printed paper whenmaking ID card copy or combined copy.
• The information about Tray 2 appears only when it is installed.
Fax Tab (Only When Using the Touch Panel Model)
Select Paper Tray
8. Configuring the Machine Using Utilities
344

Item Description
Select Paper Tray Select the tray for printing faxes from the following: [Auto], [Tray 1], or[Tray 2].
If [Auto] is selected, the machine uses Tray 1 and Tray 2 if they containpaper of the same size. In this case, the machine starts to print from the trayspecified as the priority tray for [Fax] in the [Priority Tray] page. If that trayruns out of paper, the machine automatically switches to the other tray tocontinue printing.
Only A4, Letter, or Legal size paper can be used for printing faxes. Makesure to select a tray that contains paper of the valid size.
If Tray 2 is not installed, only [Tray 1] appears.
Fax Number Confirmation
Item Description
Fax NumberConfirmation
Enable this setting to configure the machine to require a fax number to beentered twice when specifying a destination manually.
This setting appears only when the administrator password is set in the[Administrator] page.
Fax Received File Processing
Item Description
Received FileProcessing
Select whether to print received faxes that are stored in the machine'smemory or to forward them to a destination specified in [ForwardingDestination].
To forward received faxes without printing them, set [Print Received File] to[Off] in [Reception Settings] under [Fax Features].
Auto Reduce RX Image Enable this setting to reduce the main scan line to fit to the printable area,and then print the image in it after reducing the size of the image.
Configuring the System Settings
345

Item Description
Print Automatically Select whether to automatically print received faxes and delete them or tokeep them stored in the machine's memory without printing themautomatically. If you select not to print them automatically, received faxesare stored in the machine's memory until you change the settings for printingor print and delete the received faxes by using the control panel or WebImage Monitor.
For details about handling received faxes, see page 228 "Forwarding orStoring Faxes in Memory".
Print Forwarded File Sets the machine to automatically print the faxes received into memory orstore them for later manual printing.
• [Active]: Store the faxes in memory for printing after forwarding.
• [Inactive]: Delete the faxes from memory after forwarding.
Notify Forward Status Select whether e-mail notifications are sent after forwarding faxes or not.Email notification destination depends on how [Forwarding Destination] isspecified:
• If specified with [E-mail Address]: the notification will be sent to theadministrator e-mail address specified in [Administrator E-mailAddress] in the [Administrator] page.
• If specified with [Scan Destination]: the notification will be sent to thenotification destination specified for the selected scan destination.
Note that if a destination e-mail address is not specified, no notification willbe sent even if this setting is enabled.
Forwarded File Format Select either TIFF or PDF as the format of the forwarded file.
Forwarding Destination Specifies the forwarding destination.
• [E-mail Address]: Enter a destination e-mail address. Can contain upto 64 characters.
• [Scan Destination]: Select a scan destination as a forwardingdestination.
Number of Trials ofForwarding (time)
Specifies how many times the machine attempts to forward a fax (1 to 255times).
Interval of ForwardingTrial (min.)
Specifies how many minutes the machine waits between forwardingattempts (1 to 255 minutes).
8. Configuring the Machine Using Utilities
346

2 Sided Print
Item Description
2 Sided Print Specify whether to print received faxes on both sides of paper.
• The information about Tray 2 appears only when it is installed.
Priority Tray Tab
Priority Tray
Item Description
Printer Select the tray that the machine checks first for paper that can be used forthe job from [Tray 1], [Tray 2], or [Bypass Tray].
If automatic tray selection is specified for the print job and multiple trayscontain valid paper, the first tray the machine finds will be used for printing;when that tray runs out of paper, the machine automatically switches to thenext tray to continue printing.
Copier Select the tray that the machine checks first for paper that can be used forthe job from [Tray 1], [Tray 2], or [Bypass Tray].
If [A4 (210 × 297 mm)] or [Letter (8.5 × 11)] is selected for [Select Paper]in the [Copier] page and multiple trays contain valid paper, the first tray themachine finds will be used for printing; when that tray runs out of paper, themachine automatically switches to the next tray to continue printing.
Fax (only when usingthe touch panel model)
Select the tray that the machine uses first for printing out faxes from [Tray 1]or [Tray 2].
If [Auto] is selected for [Select Paper Tray] in the [Fax] page and both Tray1 and Tray 2 contain paper of the same size, the machine starts to printfrom the specified tray. If that tray runs out of paper, the machineautomatically switches to the other tray to continue printing.
• The information about Tray 2 appears only when it is installed.
Configuring the System Settings
347

Toner Management Tab
Toner Saving
Item Description
Toner Saving Enable this setting to print using a reduced amount of toner when printingout copies.
Interface Tab
Interface
Item Description
Fixed USB Port • When Using the Touch Panel Model
Specifies whether the same printer/LAN-Fax driver can be used formultiple machines or not under USB connection.
If this setting is enabled, the same printer/LAN-Fax driver you haveinstalled in your computer can be used with any machine other thanthe one originally used for installation, if the machine is of the samemodel.
If disabled, you must install the printer/LAN-Fax driver separately forindividual machines, because the machine other than the original willbe recognized as a new device upon USB connection.
• When Using the Four-line LCD Panel Model
Specifies whether the same printer driver can be used for multiplemachines or not under USB connection.
If this setting is enabled, the same printer driver you have installed inyour computer can be used with any machine other than the oneoriginally used for installation, if the machine is of the same model.
If disabled, you must install the printer driver separately for individualmachines, because the machine other than the original will berecognized as a new device upon USB connection.
NFC Specifies whether or not to synchronize the data you have configured usingthe control panel and Web Image Monitor with the data stored in NFC.
You can read and write the data in NFC by using the applicationcorresponding to the machine.
8. Configuring the Machine Using Utilities
348

Item Description
Locked Print Timeout(seconds)
Specifies how many seconds the machine holds a new Locked Print file,when the machine cannot store any more Locked Print files (0 to 300seconds). Within this time, you can print or delete the new Locked Print file.
You can also print or delete an existing Locked Print file so that the newLocked Print file can be stored in the machine.
Shortcut to Function Tab (Only When Using the Four-line LCD Panel Model)
Shortcut to Function
Item Description
Shortcut to FunctionSettings
Assigns one of the following functions to the [Shortcut to Func.] key on thecontrol panel.
• [ID Card Copy Mode]
• [Select Scanner Destination]
Configuring the System Settings
349

Registering DestinationsScan and fax destinations can be registered using Web Image Monitor.
When Using the Touch Panel Model
Up to 100 scan destinations and 108 fax destinations (8 Quick Dial and 100 Speed Dialdestinations) can be registered. See the scan and fax sections for more information on registeringdestinations.
When Using the Four-line LCD Panel Model
Scan destinations can be registered using Web Image Monitor.
A maximum of 100 scan destinations can be registered. See the scan sections for more informationon registering destinations.
• For details about registering scan destinations, see page 156 "Registering Scan Destinations".
• For details about registering fax destinations using Web Image Monitor, see page 195"Registering Fax Destinations".
8. Configuring the Machine Using Utilities
350

Registering Fax Special Senders (Only WhenUsing the Touch Panel Model)This function is available for M 320FB/320F only.
Fax Special Senders can be registered using Web Image Monitor.
Up to 30 Special Senders be registered. For details about registering Special Senders, see page 222"Receiving a Fax".
Registering Fax Special Senders (Only When Using the Touch Panel Model)
351

Restricting Machine Functions According toUserYou can configure settings to require a user code when someone tries to use certain machine functions.
To enable this setting, you must first configure the machine settings via Web Image Monitor.
• To print jobs that require authentication you can use only the Windows PCL6 printer driver. Printingsuch jobs from the PostScript 3 printer driver is not possible.
• For details about using Web Image Monitor, see page 335 "Using Web Image Monitor".
Enabling the User Restriction Settings
This section explains how to configure settings to permit only authorized users to use certain machinefunctions.
Using Web Image Monitor, enable user restriction for all or some of the functions listed below, and thenregister users who can use those functions.
• Copying
• Sending faxes
• Scan to E-mail/FTP/Folder
• Scan to USB
• Printing
• Sending faxes via LAN-Fax
You can specify functions available to each user upon authentication. Up to 30 users can be registered.
1. Start the Web browser, and access the machine by entering its IP address.
The top page of Web Image Monitor appears.
2. Click [Restrict Available Functions].
3. Enter the administrator password.
4. Click [Apply].
8. Configuring the Machine Using Utilities
352

5. Under "Available Functions", select [Restrict] for the functions you want to restrict.
Select [Do not Restrict] for the functions you do not want to restrict.
The user restriction setting is enabled for the selected function.
6. Enter the administrator password.
7. Click [Apply].
Proceed to the following steps to register users.
8. Click the [Available Functions per User] tab.
A list of currently registered user entries appears.
9. Select a user entry, and then click [Change].
The following window appears.
10. Enter the user name in [User Name] using up to 16 alphanumeric characters.
11. Enter the user code in [User Code] using up to 8 digits.
The user code will be used to authenticate users when they try to use a restricted function.
12. Select the functions you want to make available to the user upon authentication.
Unselected functions will be unavailable to users authenticated under this user code.
13. Enter the administrator password.
Restricting Machine Functions According to User
353

14. Click [Apply].
15. Close the Web browser.
• You must enter both the user name and user code to register a user entry.
• Make sure that different user entries do not share the same user name or user code.
Modifying user entries
This section explains how to modify user entries.
1. Start the Web browser, and access the machine by entering its IP address.
The top page of Web Image Monitor appears.
2. Click [Restrict Available Functions].
3. Enter the administrator password.
4. Click [Apply].
5. Click the [Available Functions per User] tab.
A list of currently registered user entries appears.
6. Select the entry to modify, and then click [Change].
7. Modify settings as necessary.
8. Enter the administrator password.
9. Click [Apply].
10. Close the Web browser.
Deleting user entries
This section explains how to delete user entries.
1. Start the Web browser, and access the machine by entering its IP address.
The top page of Web Image Monitor appears.
2. Click [Restrict Available Functions].
3. Enter the administrator password.
4. Click [Apply].
5. Click the [Available Functions per User] tab.
A list of currently registered user entries appears.
6. Select the entry to delete, and then click [Delete].
7. Confirm that the entry you have selected is the entry that you want to delete.
8. Configuring the Machine Using Utilities
354

8. Enter the administrator password.
9. Click [Apply].
10. Close the Web browser.
Restricting Machine Functions According to User
355

When Machine Functions are RestrictedRestricted functions can be used only by authorized users.
Depending on the restricted function, users will be authenticated from the machine's control panel or inthe printer/LAN-Fax driver.
• To print jobs that require authentication you can use only the Windows PCL6 printer driver. Printingsuch jobs from the PostScript 3 printer driver is not possible.
• The procedure in this section is an example based on Windows 10.
The table below shows the functions that can be restricted, and how users can be authenticated to usethem.
Restricted Function Authentication method
• Copying
• Sending faxes
• Scan to E-mail/FTP/Folder
• Scan to USB
The machine requests for a user code when a user presses the[Start] key.
The user must enter a valid user code from the control panel.
• Printing
• Sending faxes via LAN-Fax
The user must enter a valid user code in the printer or LAN-Faxdriver before executing a print command.
Authentication using the control panel
1. If the machine requests for the user code, press the box, enter a user code, and then press[OK].
If you enter a wrong user code 3 times, the machine beeps and denies further attempts ofauthentication.
2. If the printer requests for a user code, enter a user code.
If you enter a wrong user code, the printer denies further attempts of authentication.
3. Press [OK].
Authentication using the printer or LAN-Fax driver
1. Open the file you want to print on your computer.
2. On the [File] menu, click [Print...].
3. In the [Select Printer] area, select the name of this machine, and then click [Preferences].
4. Click the [Valid Access] tab or the [Setup] tab.
5. Enter the user code using 1 to 8 digits, and then click [OK].
8. Configuring the Machine Using Utilities
356

6. Execute a print command.
If an incorrect user code is entered, the job will be canceled automatically (without any errormessage).
When Machine Functions are Restricted
357

Configuring the Network SettingsClick [Network Settings] to display the page for configuring the network settings.
This page contains the following tabs: [Network Status], [IPv6 Configuration], [Network Application],[TLS Security], [DNS], [Auto E-mail Notification], [SNMPv1/v2], [SNMPv3], [SMTP], [POP3], [InternetFax], and [Wireless].
• Depending on the settings you change, the machine might need to be restarted.
• Depending on the model you are using, some items might not appear.
Network Status Tab
General Status
Item Description
Ethernet Speed Shows the type and speed of the network connection.
IPP Printer Name Shows the name used to identify the machine on the network.
Network Version Shows the version of the machine's network module (a part of the machinefirmware).
Ethernet MAC Address Shows the Ethernet MAC address of the machine.
Active Interface Shows the active communication method.
Wi-Fi Direct IP Address Shows the IP address of Wi-Fi Direct.
TCP/IP Status
Item Description
DHCP Select whether the machine should receive a dynamic IPv4 addressautomatically using DHCP. To use DHCP, select [Active]. When enabled,the items below cannot be configured.
IP Address Enter the IPv4 address for the machine.
It is not possible to enter 0.0.0.0 or 255.255.255.255.
Subnet Mask Enter the subnet mask of the network.
It is not possible to enter 0.0.0.0 or 255.255.255.255.
8. Configuring the Machine Using Utilities
358

Item Description
Gateway Enter the IPv4 address of the network gateway.
It is not possible to enter 0.0.0.0 or 255.255.255.255.
IPv6 Configuration Tab
IPv6
Item Description
IPv6 Select whether to enable or disable IPv6. You cannot disable IPv6 usingWeb Image Monitor if the machine is currently in use in an IPv6environment. In this case, use the control panel to disable [IPv6] undernetwork settings.
When disabled, [DHCP], [Manual Configuration Address], [Prefix Length],and [Gateway Address] below cannot be configured.
IPv6 Address
Item Description
DHCP Select whether or not the machine obtains its IPv6 address from a DHCPserver.
IP Address (DHCP) Displays the IPv6 address obtained from the DHCP server when [DHCP] isset to [Active].
Stateless Address Displays up to four stateless auto addresses.
Gateway Address Displays the machine's default gateway address.
Link-local Address Displays the link local address of the machine. The link local address is anaddress that is valid only inside the local network (local segment).
Manual ConfigurationAddress
Enter the machine's IPv6 address. Can contain up to 39 characters.
Prefix Length Enter the prefix length, using a value between 0 and 128.
Gateway Address Enter the default gateway's IPv6 address. Can contain up to 39 characters.
Configuring the Network Settings
359

Network Application Tab
Scanner Send Setting
Item Description
E-mail Select to enable the Scan to E-mail feature.
Max. E-mail Size Select the maximum size of scan files that can be attached to an e-mailmessage (1 to 5 MB, or no limit).
FTP Select to enable the Scan to FTP feature.
Folder Select to enable the Scan to Folder feature.
Network Print Setting
Item Description
IPP Select to enable network printing using Internet Print Protocol (via TCP port631/80).
FTP Select to enable network printing using an embedded FTP server in themachine (via TCP port 20/21).
• User Name
User name for logging in to the FTP server. Can contain up to 32characters.
The default name is "sysadm".
• Password
Password for logging in to the FTP server. Can contain up to 32characters.
The password must be specified during the Initial Setup, which isrequired after turning on the machine for the first time. For details, seeSetup Guide.
The default password is "sysadm".
RAW Select to enable network raw printing.
Port No. Enter the TCP port number to use for raw printing. The valid range is 1024to 65535, except 5222, 5353, 6006, 28900, 29102, 49999, and53550 (default is 9100).
LPR Select to enable network printing using LPR/LPD (via TCP port 515).
8. Configuring the Machine Using Utilities
360

HTTPS/HTTP
Item Description
Force To Use HTTPS Specify whether or not to make the use of HTTPS mandatory.
If this is enabled, the connection to HTTP Port 80 is automatically redirectedto Port 443. Furthermore, if the user accesses the web page by entering theURL "http://...", the access is redirected to "https://...".
Note that Port 80 cannot be used for IPP printing.
mDNS Setting
Item Description
mDNS Select to enable Multicast DNS (via UDP port 5353). If disabled, the itembelow cannot be configured.
Printer Name Enter the name of the machine. Can contain up to 32 characters.
TLS Security Tab
TLS Security Level Settings
Item Description
TLS Level Select the TLS security level from [High], [Medium] or [Low].
TLS1.3 Specify whether or not to enable TLS 1.3.
If [TLS Level] is set to [High], this setting is automatically enabled andcannot be disabled.
If [TLS Level] is set to [Medium] or [Low], this setting can be enabled/disabled manually.
TLS1.2 Specify whether or not to enable TLS 1.2.
If [TLS Level] is set to [High], this setting is automatically disabled andcannot be enabled.
If [TLS Level] is set to [Medium] or [Low], this setting can be enabled/disabled manually.
TLS1.1 Specify whether or not to enable TLS 1.1.
If [TLS Level] is set to [High] or [Medium], this setting is automaticallydisabled and cannot be enabled.
If [TLS Level] is set to [Low], this setting can be enabled/disabled manually.
Configuring the Network Settings
361

• At least one of TLS 1.3, TLS 1.2, and TLS 1.1 must be enabled.
DNS Tab
DNS
Item Description
DNS Method Select whether to specify domain name servers manually or receive DNSinformation from the network automatically. When set to [Auto-Obtain(DHCP)], [Primary DNS Server], [Secondary DNS Server], and [DomainName] below become unavailable.
Primary DNS Server Enter the IPv4 address of the primary DNS.
Secondary DNS Server Enter the IPv4 address of the secondary DNS.
Domain Name Enter the IPv4 domain name for the machine. Can contain up to 32characters.
IPv6 DNS Method Select whether to specify the domain server manually or have the machineobtain its DNS information automatically.
When set to [Auto-Obtain (DHCP)], [Primary IPv6 DNS Server],[Secondary IPv6 DNS Server], and [IPv6 Domain Name] below becomeunavailable.
Primary IPv6 DNSServer
Enter the IPv6 address of the primary IPv6 DNS server. Can contain up to39 characters.
Secondary IPv6 DNSServer
Enter the IPv6 address of the secondary IPv6 DNS server. Can contain upto 39 characters.
IPv6 Domain Name Enter the IPv6 domain name of the machine. Can contain up to 32characters.
DNS Resolve Priority Select whether to give priority to IPv4 or IPv6 for DNS name resolution.
DNS Timeout (seconds) Enter the number of seconds the machine waits before considering a DNSrequest to have timed out (1 to 999 seconds).
Host Name Enter a host name for the machine. Can contain up to 15 characters.
8. Configuring the Machine Using Utilities
362

Auto E-mail Notification Tab
E-mail Notification 1/E-mail Notification 2
Item Description
Display Name Enter a sender name for notification e-mail. Can contain up to 32characters.
E-mail Address Enter the address of the recipient of the alert email. Can contain up to 64characters.
Paper Misfeed Select to send an alert e-mail to the specified address if a paper jam occurs.
Out of Paper Select to send an alert e-mail to the specified address if paper runs out.
Replace Print CartridgeSoon
Select to send an alert e-mail to the specified address if toner becomes low.
Call Service Select to send an alert e-mail to the specified address if the machinerequires servicing.
Replace Print Cartridge Select to send an alert e-mail to the specified address if toner runs out.
Cover Open Select to send an alert e-mail to the specified address if a cover is open.
SNMPv1/v2 Tab
SNMPv1/v2
Item Description
SNMPv1/v2 Select whether to enable the machine to use SNMPv1/v2 services.
Trap (SNMPv1)
Item Description
SNMPv1 Trap Select whether to enable the machine to send SNMPv1 traps to themanagement host (NMS).
When disabled, [SNMP Management Host 1] and [SNMP ManagementHost 2] below become unavailable.
SNMP ManagementHost 1
Enter the IP address or host name of a management host. Can contain up to64 characters.
Configuring the Network Settings
363

Item Description
SNMP ManagementHost 2
Enter the IP address or host name of a management host. Can contain up to64 characters.
Trap (SNMPv2)
Item Description
SNMPv2 Trap Select whether to enable the machine to send SNMPv2 traps to themanagement host (NMS).
When disabled, [SNMP Management Host 1] and [SNMP ManagementHost 2] below become unavailable.
SNMP ManagementHost 1
Enter the IP address or host name of a management host. Can contain up to64 characters.
SNMP ManagementHost 2
Enter the IP address or host name of a management host. Can contain up to64 characters.
Community
Item Description
Get Community Enter the community name to use for authentication of Get requests. Cancontain up to 32 characters.
Set Community Enter the community name to use for authentication of Set requests. Cancontain up to 32 characters.
Trap Community Enter the community name to use for authentication of Trap requests. Cancontain up to 32 characters.
System
Item Description
Location Enter the location of the machine. The location entered here is displayed onthe main page. Can contain up to 64 characters.
Contact Enter the contact information of the machine. The contact informationentered here is displayed on the main page. Can contain up to 64characters.
8. Configuring the Machine Using Utilities
364

SNMPv3 Tab
SNMPv3
Item Description
SNMPv3 Select whether to enable the machine to use SNMPv3 services.
Context Name Displays the context name of the device. The context name is fixed to"GWNCS".
User Account
Item Description
User Name
(Required)
Enter a user name for the user account. Can contain up to 32 characters.
Security Settings Specify the user account security setting by selecting one of the following:
[Authentication Encryption]: [Authentication Algorithm] and [EncryptionAlgorithm] can be specified. It is necessary to specify [AuthenticationPassword] and [Encryption Password].
[Authentication Non-Encryption]: [Authentication Algorithm] can bespecified. It is necessary to specify [Authentication Password]. [EncryptionAlgorithm] and [Encryption Password] cannot be specified.
[Non-Authentication Non-Encryption]: [Authentication Algorithm],[Authentication Password], [Encryption Algorithm], and [EncryptionPassword] cannot be specified.
AuthenticationAlgorithm
Select an authentication algorithm from the following:
[MD5], [SHA1], [SHA224], [SHA256], [SHA384], [SHA512]
AuthenticationPassword
(Required)
Enter a password for the user account. Can contain up to 32 characters.
Encryption Algorithm Select an encryption algorithm from the following:
[AES128], [DES]
Encryption Password
(Required)
Enter a password for encrypting the user account password. Can containup to 32 characters.
MIB Access Type Select an access type for the user account to access MIB from the following:
[read-only], [Not-Accessible]
Configuring the Network Settings
365

Admin Account
Item Description
User Name
(Required)
Enter a user name for the administrator account. Can contain up to 32characters.
Security Settings Specify the administrator account security setting by selecting one of thefollowing:
[Authentication Encryption]: [Authentication Algorithm] and [EncryptionAlgorithm] can be specified. It is necessary to specify [AuthenticationPassword] and [Encryption Password].
[Authentication Non-Encryption]: [Authentication Algorithm] can bespecified. It is necessary to specify [Authentication Password]. [EncryptionAlgorithm] and [Encryption Password] cannot be specified.
[Non-Authentication Non-Encryption]: [Authentication Algorithm],[Authentication Password], [Encryption Algorithm], and [EncryptionPassword] cannot be specified.
AuthenticationAlgorithm
Select an authentication algorithm from the following:
[MD5], [SHA1], [SHA224], [SHA256], [SHA384], [SHA512]
AuthenticationPassword
(Required)
Enter a password for the administrator account. Can contain up to 32characters.
Encryption Algorithm Select an encryption algorithm from the following:
[AE128], [DES]
Encryption Password
(Required)
Enter a password for encrypting the administrator account password. Cancontain up to 32 characters.
MIB Access Type Select an access type for the administrator account to access MIB from thefollowing:
[read-only], [write-only], [read-write], [Not-Accessible]
8. Configuring the Machine Using Utilities
366

SNMPv3 Trap
Item Description
SNMPv3 Trap Select whether to enable the machine to send SNMPv3 traps to themanagement host (NMS).
When disabled, [SNMPv3 Management Host 1] and [SNMPv3Management Host 2] below become unavailable.
SNMPv3 Account 1 Select either [User Account] or [Admin Account].
SNMPv3 ManagementHost 1
Enter the IP address or host name of a management host. Can contain up to64 characters.
SNMPv3 Account 2 Select either [User Account] or [Admin Account].
SNMPv3 ManagementHost 2
Enter the IP address or host name of a management host. Can contain up to64 characters.
SMTP Tab
SMTP
Item Description
Primary SMTP Server Enter the IP address or host name of the SMTP/POP3 server. Can containup to 64 characters.
SSL/TLS Select whether or not to apply SSL/TLS encryption when sending emails tothe SMTP server. Check the box to enable SSL/TLS.
Port No. Enter the port number for SMTP (1 to 65535).
If [SSL/TLS] is checked, Port 465 is automatically selected. (Otherwise, Port25 is selected by default.)
Authentication Method Select an authentication method from the following:
[Anonymous]: The user name and password are not necessary.
[SMTP]: The machine supports NTLM and LOGIN authentication.
[POP before SMTP]: The POP3 server is used for authentication. Whensending e-mails to an SMTP server, you can enhance the SMTP serversecurity level by connecting to the POP server for authentication.
User Name Enter the user name for logging in to the SMTP server. Can contain up to 32characters.
Configuring the Network Settings
367

Item Description
Password Enter the password for logging in to the SMTP server. Can contain up to 32characters.
Device E-mail Address Enter the machine’s e-mail address.
This address is used as the sender's address of e-mail messages sent fromthis machine, such as notification e-mails. Can contain up to 64 characters.
Server Timeout(seconds)
Enter the number of seconds the machine waits before considering anSMTP operation to have timed out (1 to 999).
Time Zone Select a time zone according to your geographic location. Selecting adifferent time zone may cause transmission date and time to be incorrect foremail sent by the Scan to E-mail function, even when the machine's clock isset correctly.
POP3 Tab
POP3 Settings
Item Description
POP3 Server Enter the IP address or host name of the POP3 server for e-mail reception.The POP3 server specified here will be used for [POP before SMTP]. Cancontain up to 64 characters.
SSL/TLS Select whether or not to apply SSL/TLS encryption when receiving e-mailsfrom the POP3 server. Check the box to enable SSL/TLS.
Port No. Enter the port number for POP3 (1 to 65535).
If [SSL/TLS] is checked, Port 995 is automatically selected. (Otherwise, Port110 is selected by default.)
User Account Enter the user name for logging in to the POP3 server. Can contain up to 32characters.
User Password Enter the password for logging in to the POP3 server. Can contain up to 32characters.
8. Configuring the Machine Using Utilities
368

Item Description
Authentication Select an authentication method from the following:
[None]: Password will not be encrypted.
[APOP Authentication]: Password will be encrypted.
[Auto]: Password will be encrypted or not encrypted according to the POP3server’s settings.
Internet Fax Tab
Item Description
Internet FaxTransmission
Select whether to enable or disable the Internet Fax function.
Error Notification E-mail
Select whether to send a notification e-mail to the sender of the Internet Faxor not when e-mail reception fails.
The text will include the machine's host name (as set in the DNS settingspage), model name, and contact e-mail address (as set in the administratorsettings page).
Insert System-fixed Text Select whether to include system-fixed text in the body of the e-mail or notwhen sending Internet Faxes.
The text will include the machine's host name (as set in the DNS settingspage), model name, and contact e-mail address (as set in the administratorsettings page).
Automatic POP Select whether to automatically connect to the POP3 server to check fornew e-mails or not. If this setting is enabled, the connection will be made atan interval specified in [POP Interval (minutes)].
POP Server: E-mailReception Setting
Select whether to leave or delete e-mails in the POP3 server after receivingthem.
[No]: Delete e-mails from the server after receiving them.
[Save E-mail]: Leave e-mails on the server after receiving them.
[Save Only Error Info]: Delete e-mails that are successfully received fromthe server only.
POP Interval (minutes) Specifies how many minutes the machine waits between automaticconnections to the POP3 server to acquire new e-mails (2 to 1440minutes).
Configuring the Network Settings
369

Wireless Tab
Wireless LAN Status
Item Description
Wireless LAN Status Displays the status of the connection to the wireless LAN.
MAC Address Displays the MAC address.
Communication Mode Displays the communication mode that the machine is connecting in.
SSID Displays the SSID of the access point that the machine is connected to.
Wireless Signal Status Displays the strength of the wireless signal that is being received.
Wireless Specifies whether or not to use the wireless LAN. This item appears whenthe wireless LAN option is installed on the machine.
Wireless LAN Settings
Item Description
SSID Enter the SSID of the access point.
The SSID can contain up to 32 characters.
When you click [Scan List], a list of available access points is displayed.You can select the SSID from the list.
Communication Mode [Infrastructure] is selected by default. Therefore, connect the machine to awireless router or access point.
Authentication Select an authentication method.
Encryption Select an encryption method.
WPA Passphrase If [WPA2-PSK] or [Mixed Mode WPA/WPA2] is selected for[Authentication], enter the WPA encryption key.
WEP Key Length If [WEP] is selected for [Encryption], select 64 bits or 128 bits for the lengthof the encryption key.
WEP Transmit Key ID Select an ID number to identify each WEP key in case multiple WEPconnections are configured.
WEP Key Format Select a format for entering the WEP key.
8. Configuring the Machine Using Utilities
370

Item Description
WEP Key Enter the WEP key. The number and type of characters you can enter varydepending on the length and format selected for the key. See the following:
• WEP key length: [64bit], Format: [Hexadecimal]
WEP key max length: 10 characters (0-9, A-F, a-f)
• WEP key length: [64bit], Format: [ASCII]
WEP key max length: 5 characters (0x20-0x7e)
• WEP key length: [128bit], Format: [Hexadecimal]
WEP key max length: 26 characters (0-9, A-F, a-f)
• WEP key length: [128bit], Format: [ASCII]
WEP key max length: 13 characters (0x20-0x7e)
• When [Wireless] is set to [Active], [Wireless LAN Settings] appears and you can change thesettings there.
• If you are configuring the connection settings manually, check the SSID, authentication method, orencryption key of the access point or wireless router in advance.
Wi-Fi Direct Settings
Item Description
Wi-Fi Direct Type Select 2.4 GHz or 5 GHz as the wireless LAN frequency.
SSID Enter the SSID name.
The SSID can contain up to 32 characters.
WPA Passphrase Enter the passphrase for Wi-Fi Direct connection. You can enter 8 to 32characters for a passphrase.
• When [Wireless] is set to [Active], [Wi-Fi Direct Settings] appears and you can change the settingsthere.
Certificate Tab
You can use the following two types of certificates on this machine:
• Certificates created by the machine.
Configuring the Network Settings
371

• Certificates issued by certification authorities.
You can install only one certificate on the machine.
If you execute [Create New Self-Signed Certificate], [Create Certificate Request], [Install Certificate], or[Import Certificate and Private Key], the existing certificate on the machine is deleted.
Follow the procedure below to set items:
1. Check the item you want to set.
2. Enter the password.
3. Click [Next].
Certificate
Item Description
Create New Self-Signed Certificate
Select this item to create a new self-signed certificate.
Create CertificateRequest
Select this item to request the certification authority to issue a newcertificate. You can submit a certificate created using this setting to thecertificate authority. Note that you cannot submit a certificate to thecertification authority directly via Web Image Monitor.
Install Certificate Select this item to install the certificate issued by the certification authority.
Import Certificate andPrivate Key
Select this item to install the certificate created by the machine.
You can use certificates that are in the following formats:
• PEM
• PKCS12
Export Certificate Select this item to back-up the certificate installed on the machine. Thecertificate is exported in PKCS12 format.
View Certificate Select this item to check details about the certificate that is installed on themachine.
Create New Self-Signed Certificate
Item Description
Common Name(Required)
Enter the common name of the certificate. The name can have up to 32characters.
Organization(Optional)
Enter the name of the organization requesting the certificate (company orgroup name). The name can have up to 32 characters.
8. Configuring the Machine Using Utilities
372

Item Description
Organizational Unit(Optional)
Enter the name of the department requesting the certificate (company orgroup name). The name can have up to 32 characters.
City/Locality(Optional)
Enter the name of the city or town where the machine is located. The namecan have up to 32 characters.
State/Province(Optional)
Enter the name of the state or province where the machine is located. Thename can have up to 32 characters.
Country/Region(Optional)
Enter the two-character country/region for where the machine is located.
Validity Period (days)(Required)
Enter the four-digit validity period. For example, if the validity period is ayear, enter "0365".
Signature Algorithm Select the signature algorithm from the following:
[RSA (1024bit)], [RSA (2048bit)], [ECDSA]
Create Certificate Request
Item Description
Common Name(Required)
Enter the common name of the certificate. The name can have up to 32characters.
Organization(Optional)
Enter the name of the organization requesting the certificate (company orgroup name). The name can have up to 32 characters.
Organizational Unit(Optional)
Enter the name of the department requesting the certificate (company orgroup name). The name can have up to 32 characters.
City/Locality(Optional)
Enter the name of the city or town where the machine is located. The namecan have up to 32 characters.
State/Province(Optional)
Enter the name of the state or province where the machine is located. Thename can have up to 32 characters.
Country/Region(Optional)
Enter the two-character country/region for where the machine is located.
Signature Algorithm Select the signature algorithm from the following:
[RSA (1024bit)], [RSA (2048bit)], [ECDSA]
Configuring the Network Settings
373

Install Certificate
Item Description
File Name Click [Browse...], and then select the certificate to install.
Import Certificate and Private Key
Item Description
File Name Click [Browse...], and then select the certificate to install.
Password Enter the password of the private key.
Export Certificate
Item Description
Password Enter the password of the private key. The password has 4 to 32characters.
Confirm Password Enter the same password as for [Password].
View Certificate
Show the installed certificates.
8. Configuring the Machine Using Utilities
374

Configuring the IPsec SettingsClick [IPsec Settings] to display the page for configuring the IPsec settings.
This page contains the following tabs: [IPsec Global Settings] and [IPsec Policy List].
• This function is available only when an administrator password is specified.
IPsec Global Settings Tab
Item Description
IPsec Function Select whether to enable or disable IPsec.
Default Policy Select whether to allow for the default IPsec policy.
Broadcast andMulticast Bypass
Select the services that you do not want to apply IPsec from the following:
[DHCPv4], [DHCPv6], [SNMP], [mDNS], [NetBIOS], [UDP Port 53550]
All ICMP Bypass Select whether to apply IPsec to ICMP packets (IPv4 and IPv6) from thefollowing:
[Active]: All ICMP packets will be bypassed without IPsec protection.
"ping" command (echo request and echo reply) is not encapsulated byIPsec.
[Inactive]: Some ICMP message types will be bypassed without IPsecprotection.
IPsec Policy List Tab
Item Description
No. IPsec policy number.
Name Displays the name of the IPsec policy.
Address Settings Displays the IP address filter of the IPsec policy as below:
Remote address/Prefix length
Action Displays the action of the IPsec policy as "Allow", "Drop", or "RequireSecurity".
Configuring the IPsec Settings
375

Item Description
Status Displays the status of the IPsec policy as "Active" or "Inactive".
To configure IPsec policies, select the desired IPsec policy, and then click [Change] to open the "IPsecPolicy Settings" page. The following settings can be made on the "IPsec Policy Settings" page.
IP Policy Settings
Item Description
No. Specify a number between 1 and 10 for the IPsec policy. The number youspecify will determine the position of the policy in the IPsec Policy List. Policysearching is performed according to the order of the list. If the number youspecify is already assigned to another policy, the policy you areconfiguring will take the number of the earlier policy, and the earlier policyand any subsequent policies will be renumbered accordingly.
Activity Select whether to enable or disable the policy.
Name Enter the name of the policy. Can contain up to 16 characters.
Address Type Select IPv4 or IPv6 as the type of IP address to be used in IPseccommunication.
Local Address Displays the IP address of this printer.
Remote Address Enter the IPv4 or IPv6 address of the device with which to communicate.Can contain up to 39 characters.
Prefix Length Enter the prefix length of the Remote Address, using a value between 1 and128. If this setting is left blank, "32" (IPv4) or "128" (IPv6) will beautomatically selected.
Action Specify how the IP packets are processed from the following:
• [Allow]: IP packets are both sent and received without IPsec applied tothem.
• [Drop]: IP packets are discarded.
• [Require Security]: IPsec is applied to IP packets that are both sent andreceived.
If you have selected [Require Security], you must configure [IPsec Settings]and [IKE Settings].
8. Configuring the Machine Using Utilities
376

IPsec Settings
Item Description
Encapsulation Type Specify the encapsulation type from the following:
• [Transport]: Select this mode to secure only the payload section ofeach IP packet when communicating with IPsec compliant devices.
• [Tunnel]: Select this mode to secure every section of each IP packet.We recommend this type for communication between securitygateways (such as VPN devices).
Security Protocol Select the security protocol from the following:
• [AH]: Establishes secure communication that supports authenticationonly.
• [ESP]: Establishes secure communication that supports bothauthentication and data encryption.
• [ESP&AH]: Establishes secure communication that supports both dataencryption and authentication of packets, including packet headers.Note that you cannot specify this protocol when [Tunnel] is selectedfor [Encapsulation Type].
AuthenticationAlgorithm for AH
Specify the authentication algorithm to be applied when [AH] or [ESP&AH]is selected for [Security Protocol] from the following:
[MD5], [SHA1]
Encryption Algorithmfor ESP
Specify the encryption algorithm to be applied when [ESP] or [ESP&AH] isselected for [Security Protocol] from the following:
[None], [DES], [3DES], [AES-128], [AES-192], [AES-256]
AuthenticationAlgorithm for ESP
Specify the authentication algorithm to be applied when [ESP] is selectedfor [Security Protocol] from the following:
[MD5], [SHA1]
Life Time Specify the life time of the IPsec SA (Security Association) as a time periodor data volume. The SA will expire when the time period you specifyelapses or the volume of data you specify reaches the volume carried.
If you specify both a time period and a data volume, the SA will expire assoon as either is reached, and a new SA will then be obtained bynegotiation.
To specify the life time of the SA as a time period, enter a number ofseconds.
To specify the life time of the SA as a data volume, enter a number of KBs.
Configuring the IPsec Settings
377

Item Description
Key Perfect ForwardSecrecy
Select whether to enable or disable PFS (Perfect Forward Secrecy).
IKE Settings
Item Description
IKE Version Displays the IKE version.
Encryption Algorithm Specify the encryption algorithm from the following:
[DES], [3DES], [AES-128], [AES-192], [AES-256]
AuthenticationAlgorithm
Specify the authentication algorithm from the following:
[MD5], [SHA1]
IKE Life Time Specify the life time of the ISAKMP SA as a time period. Enter a number ofseconds.
IKE Diffie-HellmanGroup
Select the IKE Diffie-Hellman Group to be used in the generation of the IKEencryption key from the following:
[DH1], [DH2]
Pre-Shared Key Specify the PSK (Pre-Shared Key) to be used for authentication of acommunicating device. Can contain up to 32 characters.
Key Perfect ForwardSecrecy
Select whether to enable or disable PFS (Perfect Forward Secrecy).
8. Configuring the Machine Using Utilities
378

Printing Lists/ReportsClick [Print List/Report] to display the page for printing reports. Then, select an item and click [Print] toprint out information for that item.
Print List/Report
Item Description
Configuration Page Prints general information about the machine and its current configuration.
Fax Journal*1 Prints a fax transmission and reception journal for the last 50 jobs. Fordetails about automatic fax journal printing, see page 249 "Fax FeaturesSettings (When Using the Touch Panel Model)".
By clicking [View] on the right of the item, you can view the fax journal onWeb Image Monitor.
Fax TX/RX Standby FileList*1
Prints a list of fax jobs remaining in the machine's memory to be printed,sent, or forwarded.
Quick Dial DestinationList*1
Prints a list of Quick Dial entries.
Fax Speed DialDestination List*1
Prints a list of Speed Dial entries.
Scanner Destination List Prints a list of scan destinations.
Scanner Journal Prints a scanner journal for the last 100 Scan to E-mail, Scan to FTP, andScan to Folder transmissions.
Maintenance Page Prints the maintenance page.
*1 This function is available when using the touch panel model.
• Reports cannot be printed via Web Image Monitor if other jobs are printing. Before printingreports, confirm that machine is not printing.
• Reports will be printed on A4 or Letter size paper. Load one of these sizes of paper into the traybefore printing reports.
Printing Lists/Reports
379

Configuring the Administrator SettingsClick [Administrator Tools] to display the page for configuring the administrator settings.
This page contains the following tabs: [Administrator], [Reset Settings], [Backup Setting], [RestoreSetting], [Set Date/Time], [Energy Saver Mode], and [PCL6 Mode].
Administrator Tab
Administrator Settings
Item Description
Change Password(only when using thetouch panel model)
Check this to configure the administrator password.
New Password Enter the new administrator password. Can contain up to 16 characters.
Confirm New Password Enter the same password again, to confirm.
Change E-mail Address(only when using thetouch panel model)
Check this to configure the administrator e-mail address.
Administrator E-mailAddress (only whenusing the touch panelmodel)
Enter the administrator e-mail address.
If the machine's e-mail address is not configured in the [SMTP] page, thisaddress will be used as the sender's address of e-mails sent from thismachine, such as notification e-mails and Internet Faxes. Can contain up to64 characters.
• To change the password, it is necessary to enter the current password.
• The password must be specified during the Initial Setup, which is required after turning on themachine for the first time. For details, see Setup Guide. Note that the password is cleared when thesettings are reset.
8. Configuring the Machine Using Utilities
380

Reset Settings Tab
Reset Settings
Item Description
Reset Network Settings Select to clear the settings configured under the [Network Settings].
Reset Menu Settings Select to clear the settings that are not related to the network to theirdefaults.
Clear Scan Destination Select to clear the scan destinations.
Reset Settings ofAvailable Functions
Select to clear the user restriction settings.
Clear Address Book(only when using thetouch panel model)
Select to clear the fax destinations.
Reset IPsec Settings Select to clear the IPsec settings.
• [Reset IPsec Settings] appears only when the administrator password is specified.
Backup Setting Tab
• When sending the machine for repair, it is important that you create backup files in advance. Themachine's settings are returned to the default after repair.
• To back up or restore the machine settings and address book via USB connection, use theBackupRestoreTool. For information on how to acquire the tool, see the supplied FAQ.
Backup Setting
Item Description
Back up NetworkSettings
Backs up settings configured under the [Network Settings] and[Administrator Tools].
Note that, however, [Max. E-mail Size] setting under [NetworkApplication] will not be backed up here; it will be backed up by [Back upMenu Settings] instead.
Back up Menu Settings Backs up settings that are not related to the network.
Configuring the Administrator Settings
381

Item Description
Back up ScanDestination
Backs up scan destinations to a file.
Back up Settings ofAvailable Functions
Backs up user restriction settings to a file.
Back up Address Book(only when using thetouch panel model)
Backs up fax destinations to a file.
Back up IPsec Settings Backs up the IPsec settings to a file.
Follow the procedure below to create configuration backup files.
1. Select the radio button for the type of data you wish to back up.
2. Enter the administrator password.
3. Click [OK].
• [Back up IPsec Settings] appears only when the administrator password is specified.
Restore Setting Tab
• When the machine is returned from repair, it is important that you restore the machine's settingsfrom the backup files. The machine's settings are returned to the default after repair.
• To back up or restore the machine settings and address book via USB connection, use theBackupRestoreTool. For information on how to acquire the tool, see the supplied FAQ.
Restore Setting
Item Description
File to Restore Enter the path and name of the file to restore, or click [Browse...] to selectthe file.
Follow the procedure below to restore configuration backup files.
1. Click [Browse...].
2. Navigate to the directory containing the backup file to restore.
3. Select the backup file, and click [Open].
8. Configuring the Machine Using Utilities
382

4. Enter the administrator password.
5. Click [OK].
• If the settings are not restored successfully, an error message appears. Try again to restore the filecompletely.
Set Date/Time Tab
Set Date
Item Description
Year Enter the current year (2000 to 2099).
Month Enter the current month (1 to 12).
Day Enter the current day (1 to 31).
Date Format Select the date format from [MM/DD/YYYY], [DD/MM/YYYY], or[YYYY/MM/DD].
Set Time
Item Description
Time Format Select 24- or 12-hour time format.
Time (AM/PM) Select [AM] or [PM] if 12-hour time format is selected.
hour (0-23) Enter the current hour if 24-hour time format is selected (0-23).
hour (1-12) Enter the current hour if 12-hour time format is selected (1-12).
min. (0-59) Enter the current minute (0-59).
Configuring the Administrator Settings
383

Energy Saver Mode Tab
Energy Saver Mode
Item Description
Energy Saver Mode 1 Select [Active] to set the machine to enter Energy Saver mode 1 if themachine has been idle for about 30 seconds.
It takes less time to recover from Energy Saver mode 1 than from power-offstate or Energy Saver mode 2, but power consumption is higher in EnergySaver mode 1 than in Energy Saver mode 2.
Energy Saver Mode 2
Select [30sec] or specify the period of time (1-20min) for the machine toenter Energy Saver mode 2.
Select [30sec] or specify the period of time (1-60min) for the machine toenter Energy Saver mode 2.
The machine consumes less power in Energy Saver mode 2 than in EnergySaver mode 1, but it takes longer to recover from Energy Saver mode 2than from Energy Saver mode 1.
• When Using the Touch Panel ModelThe machine recovers from Energy Saver mode when it receives a print job, prints a received fax,or when the [Power] key is pressed for less than 3 seconds.
• When Using the Four-line LCD ModelThe machine recovers from Energy Saver mode when it receives a print job or when the [Power]key is pressed for less than 3 seconds.
PCL6 Mode
PCL6 Mode
Item Description
PCL6 Mode Set this to [Universal] when using the Universal Driver and to [P310/M320] when using the normal driver.
8. Configuring the Machine Using Utilities
384

Using Smart Organizing MonitorThe state and status information of the machine can be checked using Smart Organizing Monitor.
Displaying the Smart Organizing Monitor Dialog
1. On the [Start] menu, click [P 310_M 320_Series Software Utilities].
2. Click [Smart Organizing Monitor for P 310_M 320 Series].
3. If the machine you are using is not selected, click [Connect Printer], and then do one of thefollowing:
• Select the machine's model.
• Enter the IP address of the machine manually.
• Click [Search Network Printer] to search the machine via the network.
4. Click [OK].
Checking the Status Information
1
2
3
4
5
M0ESOC8127
1. Image area
Displays the status of this machine with an icon.
Using Smart Organizing Monitor
385

2. Tab area
• Status tab
• Printer Name
• Print Cartridge
Displays the following messages to indicate remaining toner levels: Remaining Level 2 to 5,"Almost Empty" and "Empty".
• Input Tray
You can check the following information about the input trays.
[Input Tray], [Status], [Paper Size], [Paper Type]
Displays the type of the paper loaded into each input tray.
• Maintenance
Displays the consumables statuses.
• System
Displays the system information about the printer, such as the model name, system version, andmemory size.
• Counter
Displays information about the counters.
• Network
Displays network details such as the printer's IP address and network-related information.
• Job Log tab
Displays the job log information.
• User Tools tab
Click to print lists or configuration pages, or to configure settings of the machine.
3. Message area
Displays the status of this machine with a message.
For details about error messages, see page 420 "Error and Status Messages Appear on Smart OrganizingMonitor".
4. [Connect Printer] button
Click to select a printer driver.
5. [Refresh:]
Specify the automatic update of the display.
Configuring the Machine Settings
Smart Organizing Monitor is used to modify the machine's settings.
1. On the [Start] menu, click [P 310_M 320_Series Software Utilities].
2. Click [Smart Organizing Monitor for P 310_M 320 Series].
8. Configuring the Machine Using Utilities
386

3. If the machine you are using is not selected, click [Connect Printer], and then do one of thefollowing:
• Select the machine's model.
• Enter the IP address of the machine manually.
• Click [Search Network Printer] to search the machine via the network.
4. Click [OK].
5. On the [User Tools] tab, click [Printer Configuration].
6. Enter the access code, and then click [OK].
The default access code is "Admin".
7. Change the settings if necessary.
8. Click [OK].
9. Click [Close].
Access Code
The configurable functions depend on the authority of the access code you enter.
• Administrator
All tabs in the [Printer Configuration] dialog box are available.
• General users
Only the [Paper Input] tab is available.
Tab settings
This section provides a tab-by-tab overview of the machine settings that can be modified using SmartOrganizing Monitor. For more information on each setting item, see the Smart Organizing MonitorHelp.
Paper Input tab
• You can change paper size and other paper settings.
Maintenance tab
• You can adjust print starting positions.
System tab
• You can set basic functions required to use the printer. The printer can be used on factory-setdefaults, but the configuration can be changed depending on the condition of the user.
• The changed condition holds even if the printer is turned off.
• The access code can be changed on this tab.
IPv6, Network 1, Network 2 and Network 3 tabs
• You can set configurations about network connection and communication.
Using Smart Organizing Monitor
387

• The following operations are possible on these tabs:
• Checking the printer name, active protocol, and other printer information
• Making interface settings, including the timeout setting and protocol settings
• Checking or making TCP/IP settings
• Checking or making SMTP, SNMP and IPsec settings
• Checking or making Alert settings
Wireless tab
• You can set configurations about wireless LAN network connection and communication.
• The following operations are possible on the tab:
• Checking the wireless LAN status
• Connecting wireless LAN manually
Printer tab
• You can set configurations about the printer.
@Remote tab
• You can configure the proxy server settings for using the @Remote service, and then registerthe machine to the service.
Printing the Configuration Page
1. On the [Start] menu, click [P 310_M 320_Series Software Utilities].
2. Click [Smart Organizing Monitor for P 310_M 320 Series].
3. If the machine you are using is not selected, click [Connect Printer], and then do one of thefollowing:
• Select the machine's model.
• Enter the IP address of the machine manually.
• Click [Search Network Printer] to search the machine via the network.
4. Click [OK].
5. On the [User Tools] tab, select [Configuration Page] in the [List/Test Print] list.
6. Click [Print].
Configuration Page
For the configuration page, see page 283 "Configuration Page" or page 322 "Configuration Page".
8. Configuring the Machine Using Utilities
388

Types of Lists/Reports
Configuration Page
Prints general information and the current configurations of the machine.
Test Page
Prints a test page for checking the printing condition.
PCL Config./Font Page
Prints the current configuration and installed PCL font list.
PS Config./Font Page
Prints the current configuration and installed PostScript font list.
• Reports will be printed on A4 or Letter size paper. Load one of these sizes of paper into the traybefore printing reports.
• The average printing pages per job is shown in [P/J Information (AVE)] under [Total Counter] onthe maintenance page. A job means printing of a document from the start to the end. For example,however, if another job is consecutively added while the current document is being printed, not 2but 1 is the number of the current job.
Using Smart Organizing Monitor
389

8. Configuring the Machine Using Utilities
390

9. Maintaining the MachineThis chapter describes how to replace supplies and how to clean the machine.
Replacing the Print Cartridge
• Store print cartridge in a cool dark place.
• Actual printable numbers vary depending on image volume and density, number of pages printedat a time, paper type and size, and environmental conditions such as temperature and humidity.Toner quality degrades over time. Early replacement of the print cartridge might be necessary.Therefore, we recommend you always keep a new print cartridge ready.
• For good print quality, the manufacturer recommends that you use genuine toner from themanufacturer.
• The manufacturer shall not be responsible for any damage or expense that might result from the useof parts other than genuine parts from the manufacturer with your office products.
• Do not allow paper clips, staples, or other small objects to fall inside the machine.
• Do not expose the print cartridge without its cover to direct sunlight for a long time.
• Do not touch the print cartridge's photo conductor unit.
DYG265
• Do not touch the ID chip on the top of the print cartridge as indicated in the illustration below.
391

DYG266
Messages on the screen
• When using the touch panel model
• Replace the print cartridge when "Replacement Required: Print Cartr." appears on thescreen.
• Prepare a new print cartridge when "Replace Required Soon:Print Cartr." appears on thescreen.
• When using the four-line LCD panel model
• Replace the print cartridge when "Replacement Required: Print Cartridge" appears onthe screen.
• Prepare a new print cartridge when "Replace Required Soon: Print Cartridge" appearson the screen.
1. If paper is loaded in the bypass tray, remove the paper and close the bypass tray.
2. Push the side button to open the front cover, and then slowly lower it.
DYH062
9. Maintaining the Machine
392

3. Hold the center of the print cartridge and carefully raise it slightly and then pull it outhorizontally.
DYH063
• Do not shake the removed print cartridge. Doing so can cause remaining toner to leak.
• Place the old print cartridge on paper or similar material to avoid dirtying your workspace.
4. Take the new print cartridge out of the box.
DYG271
5. Take the print cartridge out of the plastic bag.
DYG272
Replacing the Print Cartridge
393

6. Hold the print cartridge and shake it from side to side five or six times.
DYG273
Even distribution of toner within the bottle improves print quality.
7. Slide the print cartridge in horizontally. When the cartridge can go no further, raise itslightly and push it fully in. Then push down on the cartridge until it clicks into place.
DYH065
8. Carefully push up the front cover until it closes. Be careful not to trap your fingers.
After closing the front cover, wait until the initial screen is displayed.
9. Put the old print cartridge into the bag, and then put it into the box.
• (mainly Europe and Asia)If you want to discard your used toner container, please contact your local sales office. If youdiscard it by yourself, treat it as general plastic waste material.
• (mainly North America)Please see our local company website for information on the recycling of supply products, or youcan recycle items according to the requirements of your local municipalities or private recyclers.
9. Maintaining the Machine
394

Cautions When CleaningClean the machine periodically to maintain high print quality.
Dry wipe the exterior with a soft cloth. If dry wiping is not sufficient, wipe with a soft, damp cloth that hasbeen wrung out thoroughly. If you still cannot remove the stain or grime, use a neutral detergent, wipeover the area with a thoroughly-wrung damp cloth, and then dry wipe the area and allow it to dry.
• To avoid deformation, discoloration, or cracking, do not use volatile chemicals, such as benzineand thinner, or spray insecticide on the machine.
• If there is dust or grime inside the machine, wipe with a clean, dry cloth.
• You must disconnect the plug from the wall outlet at least once a year. Clean away any dust andgrime from the plug and outlet before reconnecting. Accumulated dust and grime pose a firehazard.
• Do not allow paper clips, staples, or other small objects to fall inside the machine.
Cautions When Cleaning
395

Cleaning the Friction Pad and Paper FeedRollerIf the friction pad or paper feed roller is dirty, a multi-feed or misfeed might occur. In this case, clean thefriction pad and paper feed roller as follows:
• Do not use chemical cleaning fluids or organic solvents such as thinner or benzine.
1. Turn off the power.
2. Unplug the power cord from the wall outlet. Remove all the cables from the machine.
3. Pull out Tray 1 carefully with both hands.
DYH068
Place the tray on a flat surface. If there is paper in the tray, remove it.
4. Wipe the friction pads with a damp cloth.
DYG277
9. Maintaining the Machine
396

5. Wipe the rubber part of the roller with a soft damp cloth. After that, wipe it with a drycloth to remove the moisture.
DYG278
6. Reload the removed paper into the tray, and then push the tray carefully into the machineuntil it clicks into place.
DYH073
7. Insert the plug of the power cord into the wall socket securely. Connect all the interfacecables that were removed.
8. Turn on the power.
• If jams or multi-sheet feeds occur after cleaning the friction pad, contact your sales or servicerepresentative.
• If Tray 2 is installed, clean its friction pad and paper feed roller in the same way as you did forTray 1.
Cleaning the Friction Pad and Paper Feed Roller
397

Cleaning the Exposure Glass1. Lift the ADF.
Be careful not to hold the input tray when lifting the ADF, for the tray might be damaged.
2. Clean the parts indicated with arrows with a soft damp cloth and then wipe the sameparts with a dry cloth to remove any remaining moisture.
DYG282
9. Maintaining the Machine
398

Cleaning the Auto Document Feeder1. Lift the ADF.
Be careful not to hold the input tray when lifting the ADF, for the tray might be damaged.
2. Clean the parts indicated with arrows with a soft damp cloth and then wipe the sameparts with a dry cloth to remove any remaining moisture.
DYG283
Cleaning the Auto Document Feeder
399

Moving and Transporting the MachineThis section provides cautions that you must follow when moving the machine both short and longdistances.
Repack the machine in its original packing materials when moving it over a long distance.
• Be sure to disconnect all cables from the machine before transporting it.
• The machine is a precision piece of machinery. Be sure to handle it carefully when moving it.
• Make sure to move the machine horizontally. Take extra caution when carrying the machine up ordown stairs.
• If Tray 2 is installed, remove it from the machine, and move them separately.
• Do not remove the print cartridge when moving the machine.
• Be sure to hold the machine level while carrying it. To prevent toner from spilling, move themachine carefully.
• Keep the machine away from salt-bearing air and corrosive gases. Also, do not install the machinein places where chemical reactions are likely (laboratories, etc.), as doing so will cause themachine to malfunction.
Ventilation
When you use this machine in a confined space without good ventilation for a long time or printlarge quantities, you might detect an odd smell.
This might cause the output paper to also have an odd smell.
When you detect an odd smell, regularly ventilate in order to keep the workplace comfortable.
• Set up the machine so that it does not directly ventilate towards people.
• Ventilation should be more than 30 m3/hr/person.
New machine smell
When a machine is new, it might have a unique smell. This smell will subside in about one week.
When you detect an odd smell, sufficiently ventilate and circulate the air in the room.
1. Be sure to check the following points:
• The power switch is turned off.
• The power cord is unplugged from the wall outlet.
• All other cables are unplugged from the machine.
2. If Tray 2 is installed, remove it.
9. Maintaining the Machine
400

3. Lift the machine using the inset grips on both sides of the machine, and then move ithorizontally to the place where you want to use it.
DYH051
4. If you have removed Tray 2, reinstall it.
• To move the machine over a long distance, pack it well and empty all the paper trays. Take carenot to tip or tilt the machine during transit.
• Toner might spill inside the machine if the machine is not kept level during transit.
• For more information about moving the machine, contact your sales or service representative.
Disposal
Ask your sales or service representative for information about correct disposal of this machine.
Where to Inquire
Contact your sales or service representative for further information about the topics included in thismanual or to inquire about other topics not included in this manual.
Moving and Transporting the Machine
401

9. Maintaining the Machine
402

10. TroubleshootingThis chapter provides solutions for error messages and other problems.
Error and Status Messages on the ScreenMessages are listed in alphabetical order in the table below.
"X" indicates a number in an error code that appear differently depending on a specific situation.
• When Using the Touch Panel Model If the alert indicator lights up continuously or flashes, press the [Status] icon on the [Home] screenand check the displayed message.
• When Using the Four-line LCD Model If the alert indicator lights up continuously or flashes, switch to copier mode and check thedisplayed message.
403

Message Causes Solutions
2XXX14 The machine was not able toprint the received fax, or themachine's memory reachedcapacity while receiving a faxbecause the document was toolarge.
• The paper tray was empty. Loadpaper in the paper tray. See page 58"Loading Paper".
• The paper tray did not contain A4,Letter, or Legal size paper. Load validsize paper in the tray, and configurethe paper size settings under [PaperSettings] accordingly.
• A cover or tray was open. Close thecover or tray.
• There was a paper jam. Remove thejammed paper. See page 422"Removing Paper Jams".
• A print cartridge was empty. Replacethe print cartridge. See page 391"Replacing the Print Cartridge".
• The received fax was too large. Askthe sender to resend the document inparts as several smaller individualfaxes, or to send at a lowerresolution.
ADF OriginalMisfeed
Open ADF Cover
and remove paper.
An original has been jammedinside the ADF.
• Remove jammed originals, and thenplace them again. See page 422"Removing Paper Jams" andpage 435 "Paper Feed Problems".
• Check the originals are suitable forscanning. See page 92 "PlacingOriginals".
ADF Orig. Misfeed
Open ADF Cover
and remove paper.
10. Troubleshooting
404

Message Causes Solutions
Available: IDCardCopy
A4/A5 SEF/A6/8.5×11/5.5×8.5
ID card copy could not beperformed because the traydoes not contain the valid sizepaper, which are A4, Letter,A5, 5.5×8.5 inches, or A6 size.
• When Using the Touch Panel Model
Set the machine to print copies usingthe A4 or Letter size paper in the[Select Paper] setting. See page 241"Copier Features Settings (WhenUsing the Touch Panel Model)".
• When Using the Four-line LCD PanelModel
Set the machine to print copies usingthe A4 or Letter size paper in the[Select Paper] setting. See page 293"Copier Features Settings (WhenUsing the Four-line LCD PanelModel)".
• When Using the Touch Panel Model
Specify the A4, Letter, A5, 5.5×8.5,or A6 size paper for the tray selectedfor printing copies. See page 269"Paper Settings (When Using theTouch Panel Model)".
• When Using the Four-line LCD PanelModel
Specify the A4, Letter, A5, 5.5×8.5,or A6 size paper for the tray selectedfor printing copies. See page 310"Tray Paper Settings (When Using theFour-line LCD Panel Model)".
Available: 2 SidedCopy
A4, LG, LT
8×13, 8 1/4×13, 81/2×13, 16K
This message appears onlywhen using the touch panelmodel.
2-sided copy could not beperformed because the traydoes not contain the valid sizepaper, which are A4, Letter,Legal, 8 × 13 inches, 81/2 ×13 inches, Folio, or 16K.
• Select the tray containing the A4, B5,Letter, or Legal size paper in the[Select Paper] setting. See page 241"Copier Features Settings (WhenUsing the Touch Panel Model)".
• Specify the A4, Letter, Legal, 8 × 13inches, 81/2 × 13 inches, Folio, or16K size for the tray selected forprinting copies. See page 269"Paper Settings (When Using theTouch Panel Model)".
Error and Status Messages on the Screen
405

Message Causes Solutions
Available: 2 SidedCopy
A4/LG/LT
This message appears onlywhen using the four-line LCDpanel model.
2-sided copy could not beperformed because the traydoes not contain the valid sizepaper, which are A4, Legal, orLetter.
• Select the tray containing the A4,Letter, or Legal size paper in the[Select Paper] setting. See page 293"Copier Features Settings (WhenUsing the Four-line LCD PanelModel)".
• Specify the A4, Letter, or Legal sizefor the tray selected for printingcopies. See page 310 "Tray PaperSettings (When Using the Four-lineLCD Panel Model)".
Busy Fax transmission could not becompleted because thedestination's line was busy.
Wait for a while and send the fax again.
10. Troubleshooting
406

Message Causes Solutions
Cannot Copy ThisSetting
Comb.: 2 on 1 / 4on 1
Combined copying could not beperformed because the traydoes not contain the valid sizepaper, which are A4, Letter, orLegal size.
• When Using the Touch Panel Model
Set the machine to print copies usingthe A4, Letter, or Legal size paper inthe [Select Paper] setting. Seepage 241 "Copier Features Settings(When Using the Touch PanelModel)".
• When Using the Four-line LCD PanelModel
Set the machine to print copies usingthe A4, Letter, or Legal size paper inthe [Select Paper] setting. Seepage 293 "Copier Features Settings(When Using the Four-line LCD PanelModel)".
• When Using the Touch Panel Model
Specify the A4, Letter, or Legal sizepaper for the tray selected for printingcopies. See page 269 "PaperSettings (When Using the TouchPanel Model)".
• When Using the Four-line LCD PanelModel
Specify the A4, Letter, or Legal sizepaper for the tray selected for printingcopies. See page 310 "Tray PaperSettings (When Using the Four-lineLCD Panel Model)".
Error and Status Messages on the Screen
407

Message Causes Solutions
Cannot copy.
Set original to ADF.
Combined copying could not beperformed because the originalswere not placed in the ADF.
• Use the ADF, even when copying asingle sheet.
• When Using the Touch Panel Model
If you need to use the exposure glass,select [Off] or [Manual 2Sd ScanMode] in [Duplex/Combine] under[Copier Features], and then try again.See page 241 "Copier FeaturesSettings (When Using the TouchPanel Model)".
• When Using the Four-line LCD PanelModel
If you need to use the exposure glass,select [Off] or [Manual 2Sdd ScanMode] in [Duplex/Combine] under[Copier Features], and then try again.See page 293 "Copier FeaturesSettings (When Using the Four-lineLCD Panel Model)".
Check Paper Size The paper size set for thedocument differs from the size ofthe paper in the indicated tray.
• When Using the Touch Panel Model
Press [Form Feed] to begin printing,or press [Job Reset] to cancel the job.
• When Using the Four-line LCD PanelModel
Press the [OK] key to begin printing,or press the [Back] key to cancel thejob.
Check Paper Type The paper type set for thedocument differs from the typeof the paper in the indicatedtray.
• When Using the Touch Panel Model
Press [Form Feed] to begin printing,or press [Job Reset] to cancel the job.
• When Using the Four-line LCD PanelModel
Press the [OK] key to begin printing,or press the [Back] key to cancel thejob.
10. Troubleshooting
408

Message Causes Solutions
Connection Failed The line could not be connectedcorrectly.
• Confirm that the telephone line isproperly connected to the machine.
• Disconnect the telephone line fromthe machine, and connect a standardtelephone in its place. Confirm thatyou can make calls using thetelephone. If you cannot make callsthis way, contact your telephonecompany.
Cooling down... If the internal parts of themachine get hot while doingcontinuous printing, a messageappears and printing stops.
Wait until the machine cools down andresumes printing.
Cover open A cover is open. Close the cover completely.
Error and Status Messages on the Screen
409

Message Causes Solutions
Dial Failed The fax could not be sent. • Confirm that the fax number youdialed is correct.
• Confirm that the destination is a faxmachine.
• Confirm that the line is not busy.
• You may need to insert a pausebetween dial digits. Press [Redial]after, for example, the area code.
• When Using the Touch Panel Model
Check that [PSTN / PBX] in[Administrator Tools] has beenspecified in accordance with thetelephone line in use. See page 274"Administrator Tools Settings (WhenUsing the Touch Panel Model)".
• When Using the Four-line LCD PanelModel
Check that [PSTN / PBX] in [Admin.Tools] has been specified inaccordance with the telephone line inuse. See page 316 "AdministratorTools Settings (When Using the Four-line LCD Panel Model)".
10. Troubleshooting
410

Message Causes Solutions
Exceeded MaxE-mailSize
The scan file exceeds the sizelimit for files that can be sentthrough e-mail.
• When Using the Touch Panel Model
Configure [Resolution] under[Scanner Features] to reduce thescanning resolution. See page 246"Scanner Features Settings (WhenUsing the Touch Panel Model)".
• When Using the Four-line LCD PanelModel
Configure [Resolution] under [ScanSettings] to reduce the scanningresolution. See page 298 "ScanSettings (When Using the Four-lineLCD Panel Model)".
• When Using the Touch Panel Model
Configure [Maximum Email Size]under [Scanner Features] to increasethe allowed size. See page 246"Scanner Features Settings (WhenUsing the Touch Panel Model)".
• When Using the Four-line LCD PanelModel
Configure [Max. E-mail Size] under[Scan Settings] to increase theallowed size. See page 298 "ScanSettings (When Using the Four-lineLCD Panel Model)".
I-Fax POP3 Failed Connection to the POP3 serverfailed.
• Confirm that the network cable isproperly connected to the machine.
• Confirm that the network settings suchas IP address, DNS, and POP3settings have been configuredproperly (make sure that nodoublebyte character is used). Seepage 358 "Configuring the NetworkSettings".
Error and Status Messages on the Screen
411

Message Causes Solutions
Indep.Sply.Prt.Cart. A non-supported print cartridgeis installed.
Remove and replace it with a printcartridge specified by an authorizeddealer.
Internal Misfeed Paper has been jammed in themachine.
Remove the jammed paper. Seepage 422 "Removing Paper Jams".
Low voltg stoppedprint
The supplied voltage is too lowto run the machine's functions.
Check the power source. If devices thatconsume much electricity, such as halogenheaters or electric heaters, are connectedto the same outlet as the machine, plugthem into separate outlets.
Memory Overflow The number of fax jobs inmemory (unsent or unprintedfaxes) has reached maximum,so new jobs cannot be stored.
Wait until pending jobs have beentransmitted or printed.
Memory Overflow The data is too large orcomplex to print.
• When Using the Touch Panel Model
Select [600 × 600 dpi] in[Resolution] under [Printer Features]to reduce the size of data. Seepage 265 "Printer Features Settings(When Using the Touch PanelModel)".
• When Using the Four-line LCD PanelModel
Select [600 × 600 dpi] in[Resolution] under [Printer Features]to reduce the size of data. Seepage 305 "Printer Features Settings(When Using the Four-line LCD PanelModel)".
• If using the PCL6 printer driver, set[Resolution] in the [Print Quality] tabto [600 × 600 dpi].
10. Troubleshooting
412

Message Causes Solutions
Memory Overflow • The machine's memoryreached capacity whilescanning the first page ofthe original to store a faxjob in memory beforetransmission.
• The machine's memoryreached capacity whilestoring a fax in memory inMemory Transmissionmode.
Resend the fax in parts as several smallerindividual faxes, or send at a lowerresolution.
Misfeed: Duplex Unit
Remove Paper
This message appears onlywhen using the touch panelmodel.
Paper has been jammed in theduplex unit.
Remove the jammed paper. Seepage 422 "Removing Paper Jams".
Misfeed: Dup. Unit This message appears onlywhen using the four-line LCDpanel model.
Paper has been jammed in theduplex unit.
Remove the jammed paper. Seepage 422 "Removing Paper Jams".
Misfeed: BypassTray Paper has been jammed in thebypass tray.
Remove the jammed paper. Seepage 422 "Removing Paper Jams".
Misfeed: StandardTray
This message appears onlywhen using the touch panelmodel.
Paper has been jammed in thepaper exit area.
Remove the jammed paper. Seepage 422 "Removing Paper Jams".
Misfeed: Main Tray This message appears onlywhen using the four-line LCDpanel model.
Paper has been jammed in thepaper exit area.
Remove the jammed paper. Seepage 422 "Removing Paper Jams".
Misfeed: Tray 1 Paper has been jammed in thetray 1 paper input area.
Remove the jammed paper. Seepage 422 "Removing Paper Jams".
Error and Status Messages on the Screen
413

Message Causes Solutions
Misfeed: Tray 2 Paper has been jammed in thepaper tray.
Remove the jammed paper. Seepage 422 "Removing Paper Jams".
Net CommunicationError
Connection with the server waslost while sending or receivingdata.
Contact the network administrator.
Network is not Ready A scanned file could not be sentbecause the machine has notreceived IP address informationfrom the DHCP servercompletely.
Wait until the machine receives the IPaddress information completely, and thentry the operation again.
On Hook or Stop key The machine has been off-hookfor an extended period of time.
Put down the handset phone or press the[Clear/Stop] key.
Out of Paper: X The indicated tray has run out ofpaper.
Load paper to the indicated tray. Seepage 58 "Loading Paper".
Please Restart theMachine
The machine needs to berestarted.
Turn off the power, and then turn it backon.
Printing stopped dueto low voltage.
The supplied voltage is too lowto run the machine's functions.
Check the power source. If devices thatconsume much electricity, such as halogenheaters or electric heaters, are connectedto the same outlet as the machine, plugthem into separate outlets.
Replace RequiredSoon:Print Cartr.
This message appears onlywhen using the touch panelmodel.
The print cartridge is almostempty.
Prepare a new print cartridge.
Replace RequiredSoon:
Print Cartridge
This message appears onlywhen using the four-line LCDpanel model.
The print cartridge is almostempty.
Prepare a new print cartridge.
10. Troubleshooting
414

Message Causes Solutions
ReplacementRequired: Print Cartr.
This message appears onlywhen using the touch panelmodel.
The print cartridge is almostempty.
The machine has run out oftoner.
Replace the print cartridge. See page 391"Replacing the Print Cartridge".
ReplacementRequired:
Print Cartridge
This message appears onlywhen using the four-line LCDpanel model.
The machine has run out oftoner.
Replace the print cartridge. See page 391"Replacing the Print Cartridge".
RX CommunicationError
A reception error occurred, andthe fax could not be receivedcorrectly.
If possible, contact the sender of the faxand ask them to resend it.
Scan (NW)Disconnected
A scanned file could not be sentbecause the Ethernet cable wasnot connected properly.
Reconnect the Ethernet cable properly,and then try the operation again.
Scan (USB)Disconnected
The USB cable wasdisconnected while scanningfrom a computer.
Reconnect the USB cable properly, andthen try the operation again.
Server ConnectionFailed
A scanned file could not be sentbecause the destination couldnot be reached.
Confirm that the destination is registeredcorrectly, and then try the operation again.
Server ResponseError
An error occurred incommunication with the serverbefore beginning transmission.
Confirm that the destination is registeredcorrectly, and then try the operation again.
If the problem could not be solved, contactthe network administrator.
SCXXX A fatal hardware error hasoccurred, and the machinecannot function.
Contact your sales or servicerepresentative.
Service call - X A fatal hardware error hasoccurred, and the machinecannot function.
Contact your sales or servicerepresentative.
Error and Status Messages on the Screen
415

Message Causes Solutions
Set Correct Paper The tray selected in [SelectPaper Tray] under [FaxFeatures] does not contain A4,Letter, or Legal size paper.
While the message is displayed, press [SetSize]. A menu for changing the paper sizeof the current tray appears.
Load A4/Letter/ Legal size paper in thetray, and then select the correspondingpaper size.
Note that the paper size setting for the trayunder [Paper Settings] will be changed.See page 269 "Paper Settings (WhenUsing the Touch Panel Model)".
Set Original to ADF
Cannot use exposureglass
with set. in [ScanSize].
Scanning could not beperformed because the originalswere not placed in the ADF,even though the machine is setto scan originals larger thanA4/Letter size.
• Use the ADF, even when scanningA4/Letter or smaller size originals.
• If you need to use the exposure glass,set A4/Letter or smaller size in [ScanSize] under the scan settings, andthen try again. See page 186"Specifying Scan Settings forScanning".
Sort Copy wasCancelled
The machine's memory reachedcapacity while originals werebeing scanned from the ADF toperform sort copying.
Press [Exit] to print the originals that weresuccessfully scanned into memory. Then,copy again the originals left in the ADF.
TX CommunicationError
A transmission error occurred,and the fax could not betransmitted correctly.
If the [Auto Redial] setting is enabled, themachine will redial the number and tryagain. If all attempts fail, or if the machineis in Immediate Transmission mode, the faxwill not be transmitted. Try the operationagain.
10. Troubleshooting
416
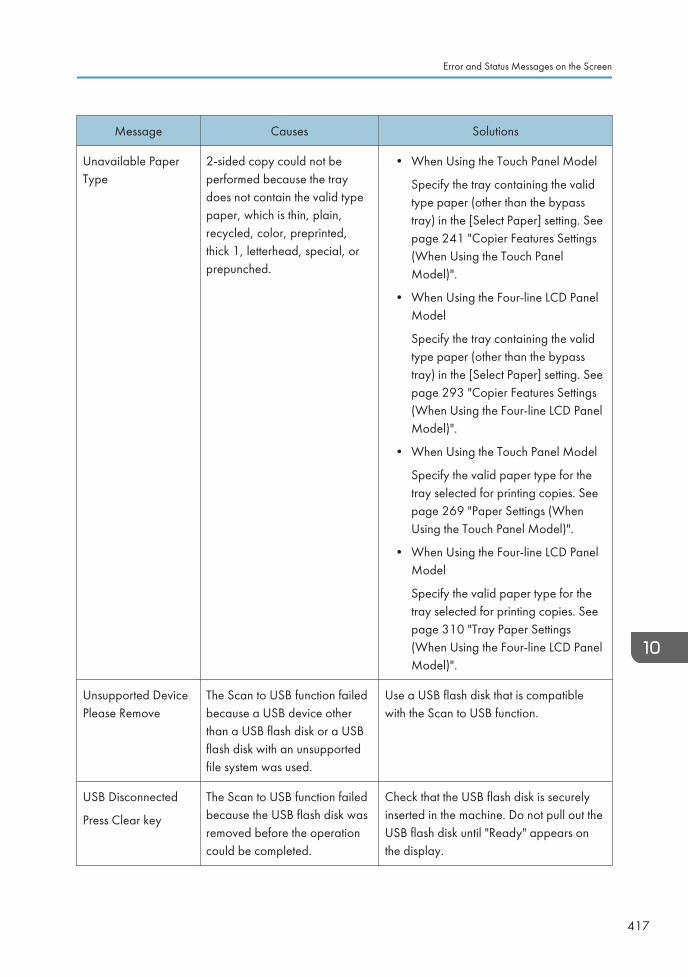
Message Causes Solutions
Unavailable PaperType
2-sided copy could not beperformed because the traydoes not contain the valid typepaper, which is thin, plain,recycled, color, preprinted,thick 1, letterhead, special, orprepunched.
• When Using the Touch Panel Model
Specify the tray containing the validtype paper (other than the bypasstray) in the [Select Paper] setting. Seepage 241 "Copier Features Settings(When Using the Touch PanelModel)".
• When Using the Four-line LCD PanelModel
Specify the tray containing the validtype paper (other than the bypasstray) in the [Select Paper] setting. Seepage 293 "Copier Features Settings(When Using the Four-line LCD PanelModel)".
• When Using the Touch Panel Model
Specify the valid paper type for thetray selected for printing copies. Seepage 269 "Paper Settings (WhenUsing the Touch Panel Model)".
• When Using the Four-line LCD PanelModel
Specify the valid paper type for thetray selected for printing copies. Seepage 310 "Tray Paper Settings(When Using the Four-line LCD PanelModel)".
Unsupported DevicePlease Remove
The Scan to USB function failedbecause a USB device otherthan a USB flash disk or a USBflash disk with an unsupportedfile system was used.
Use a USB flash disk that is compatiblewith the Scan to USB function.
USB Disconnected
Press Clear key
The Scan to USB function failedbecause the USB flash disk wasremoved before the operationcould be completed.
Check that the USB flash disk is securelyinserted in the machine. Do not pull out theUSB flash disk until "Ready" appears onthe display.
Error and Status Messages on the Screen
417

• The message about fax function appears only when using the touch panel model.
10. Troubleshooting
418

Panel IndicatorThe following table explains the meaning of the various indicator patterns that the printer alerts to usersabout its conditions.
Indicator patterns Cause
The Alert indicator is lit. The printer cannot be used normally. Check theerror on the control panel.
The Alert indicator is flashing. Toner has nearly run out.
The Data In indicator is flashing. The printer is receiving print data from acomputer.
The Data In indicator is lit. There is data to be printed.
The Power indicator is lit. The power is on.
Panel Indicator
419

Error and Status Messages Appear on SmartOrganizing Monitor
Message Causes Solutions
No Response fromI/O Device
Check the cable,power cord, andmain switch.
• The power cable of themachine is not plugged in.
• The power of the machineis not turned ON.
• The USB cable is notconnected.
• Check the printer power cord.
• Check the printer power switch is on.
• Check the USB cable is properlyconnected.
Tray Not Detected orNo Paper
The indicated papersource tray is not setproperly, or nopaper loaded.
Check the indicatedtray.
• Tray 1 has run out ofpaper.
• The bypass tray has run outof paper.
• Load paper into Tray 1. See page 58"Loading Paper".
• Load paper into the bypass tray. Seepage 58 "Loading Paper".
Tray 1 Jam
Bypass Tray Jam
Duplex Jam
Inner Jam
Outer Jam
Total Jam
A paper jam has occurred in themachine.
Remove the jammed paper. Seepage 422 "Removing Paper Jams" andpage 435 "Paper Feed Problems".
Paper Size Mismatch
Paper of the selectedpaper size is notloaded in theindicated papersource tray.
Check the indicatedtray.
The paper size specified on themachine and the size specifiedin the printer driver do notmatch.
For details about specifying the paper sizesetting on the machine, see page 57"Paper Specifications and Adding Paper".For details about changing the paper sizesetting in the printer driver, see the printerdriver Help.
10. Troubleshooting
420

Message Causes Solutions
Paper TypeMismatch
Paper of the selectedpaper type is notloaded in theindicated papersource tray.
Check the indicatedtray.
The paper type specified on themachine and the type specifiedin the printer driver do notmatch.
For details about changing the paper typesetting of the machine, see page 57"Paper Specifications and Adding Paper".For details about changing the paper typesetting in the printer driver, see the printerdriver Help.
Print Cartridge isnear empty.
The print cartridge is almostempty.
Prepare a new print cartridge.
Shortly printingbecomes notavailable. Pleasekeep Print Cartridgehandy.
The machine has run out of thetoner.
Replace the print cartridge. See page 391"Replacing the Print Cartridge".
Printing has beeninterrupted becauseof the memoryoverflow.
The data is too large orcomplex to print.
Select [600 x 600 dpi] in [Resolution] toreduce the size of data. For details, see theprinter driver Help.
No Toner or WasteToner full
No printing isavailable.
Open the indicatedcover, and thenreplace PrintCartridge.
The print cartridge has not beeninstalled.
Replace the print cartridge. See page 391"Replacing the Print Cartridge".
Error and Status Messages Appear on Smart Organizing Monitor
421

Removing Paper JamsIf a paper jam occurs, one of the following messages appears on the control panel:
• When Using the Touch Panel ModelIf the alert indicator lights up continuously or flashes, press the [Status] icon on the [Home] screenand check the displayed message.
• When Using the Four-line LCD Panel ModelIf the alert indicator lights up continuously or flashes, switch to copier mode and check thedisplayed message.
Message Reference title
Internal Misfeed See page 423 "Removing jammed paper fromTray 1".
Misfeed: Tray 1
Misfeed: Tray 2
• When Using the Touch Panel Model
Misfeed: BypassTray
• When Using the Four-line LCD Panel Model
Misfeed: BypassTray
See page 425 "Removing jammed paper fromthe bypass tray".
• When Using the Touch Panel Model
Misfeed: Duplex Unit
Remove Paper
• When Using the Four-line LCD Panel Model
Misfeed: Dup. Unit
Remove Paper
See page 427 "Removing jammed paper fromthe standard tray or duplex unit"".
• When Using the Touch Panel Model
Misfeed: Standard Tray
• When Using the Four-line LCD Panel Model
Misfeed: Main Tray
ADF Original Misfeed
Open ADF Cover
and Remove paper
See page 432 "Removing Scanning Jams"
10. Troubleshooting
422

See the section identified by the message and remove the jammed paper accordingly.
Removing Printing Jams
• The inside of this machine becomes very hot. Do not touch the parts labeled " " (indicating ahot surface).
• Some of this machine's internal components get very hot. For this reason, take care whenremoving misfed paper. Not doing so could result in burns.
• Jammed paper may be covered in toner. Be careful not to get toner on your hands or clothes.
• Toner on prints made immediately after clearing a paper jam may be insufficiently fused and maysmudge. Make test prints until smudges no longer appear.
• Do not forcefully remove jammed paper, as it may tear. Torn pieces remaining inside the machinewill cause further jams and possibly damage the machine.
• Paper jam can cause pages to be lost. Check your print job for missing pages and reprint anypages that did not print out.
Removing jammed paper from Tray 1
If "Internal Misfeed", "Misfeed: Tray 1", or "Misfeed: Tray 2" appears on the display, follow theprocedure below to remove it.
The following example explains the removing procedure for the standard paper tray (Tray 1).
The same procedure applies to remove jammed paper from Tray 2.
1. Pull tray 1 halfway out, and check for jammed paper. If there is jammed paper, remove itcarefully.
DYG288
Removing Paper Jams
423

2. Carefully slide tray 1 back in until it stops.
3. If paper is loaded in the bypass tray, remove the paper.
4. Close the bypass tray.
5. Push the side button to open the front cover, and then carefully lower it.
DYH062
6. Hold the center of the print cartridge and carefully raise it slightly and then pull it outhorizontally.
DYH063
• Do not shake the removed print cartridge. Doing so can cause remaining toner to leak.
• Place the print cartridge on paper or similar material to avoid dirtying your workspace.
7. Lifting the guide plate, remove the jammed paper carefully.
DYG290
10. Troubleshooting
424

8. Slide the print cartridge in horizontally. When the cartridge can go no further, raise itslightly and push it fully in. Then push down on the cartridge until it clicks into place.
DYH065
9. Using both hands, carefully push up the front cover until it closes.
• When closing the front cover, push the upper area of the cover firmly. After closing the cover,check that the error is cleared.
Removing jammed paper from the bypass tray
• When Using the Touch Panel Model
If "Misfeed: BypassTray" appears on the display, follow the procedure below to remove it.
• When Using the Four-line LCD Panel Model
If "Misfeed: BypassTray" appears on the display, follow the procedure below to remove it.
1. If paper is jammed in the bypass tray input area, remove the jammed paper carefully.
DYG292
2. Close the bypass tray.
Removing Paper Jams
425

3. Push the side button to open the front cover, and then carefully lower it.
DYH062
4. Hold the center of the print cartridge and carefully raise it slightly and then pull it outhorizontally.
DYH063
• Do not shake the removed print cartridge. Doing so can cause remaining toner to leak.
• Place the print cartridge on paper or similar material to avoid dirtying your workspace.
5. Lift the A lever, and then remove the jammed paper carefully.
DYG290
10. Troubleshooting
426

6. Slide the print cartridge in horizontally. When the cartridge can go no further, raise itslightly and push it fully in. Then push down on the cartridge until it clicks into place.
DYH065
7. Using both hands, carefully push up the front cover until it closes.
• When closing the front cover, push the upper area of the cover firmly. After closing the cover,check that the error is cleared.
Removing jammed paper from the standard tray or duplex unit
• When Using the Touch Panel Model
If "Misfeed: Standard Tray" or "Misfeed: Duplex Unit" appears on the display, follow theprocedure below to remove it.
• When Using the Four-line LCD Panel Model
If "Misfeed: Main Tray" or "Misfeed: Dup. Unit" appears on the display, follow the procedurebelow to remove it.
1. Open the rear cover.
DYG296
Removing Paper Jams
427

2. Hold down the B lever.
DYG298
3. Remove the jammed paper carefully.
DYG300
4. Lift the Z lever.
DYG530
10. Troubleshooting
428

5. Remove the jammed paper carefully.
DYG531
6. Close the rear cover.
DYH061
7. Pull tray 1 halfway out, and check for jammed paper. If there is jammed paper, remove itcarefully.
DYG288
Removing Paper Jams
429

8. Pull tray 1 out completely with both hands.
DYG304
Place the tray on a flat surface.
9. Push the lever.
Pushing the lever lowers the duplex transport unit.
DYG306
10. If there is jammed paper, carefully remove it.
DYG308
10. Troubleshooting
430

11. With the duplex transport unit still lowered, carefully slide tray 1 back in until it stops.
DYG310
12. If paper is loaded in the bypass tray, remove the paper and close the bypass tray.
13. Push the side button to open the front cover, and then carefully lower it.
DYH062
14. Hold the center of the print cartridge and carefully raise it slightly and then pull it outhorizontally.
DYH063
• Do not shake the removed print cartridge. Doing so can cause remaining toner to leak.
• Place the print cartridge on paper or similar material to avoid dirtying your workspace.
Removing Paper Jams
431

15. Lift the A lever, and then remove the jammed paper carefully.
DYG290
16. Slide the print cartridge in horizontally. When the cartridge can go no further, raise itslightly and push it fully in. Then push down on the cartridge until it clicks into place.
DYH065
17. Using both hands, carefully push up the front cover until it closes.
• When closing the covers, push the covers firmly. After closing the covers, check that the error iscleared.
Removing Scanning Jams
• Be careful not to hold the input tray when lifting the ADF, for the tray might be damaged.
If a paper jam occurs in the ADF, follow the procedure below to remove the jammed paper.
10. Troubleshooting
432

1. Open the ADF cover.
DYG312
2. Gently pull the jammed paper to remove it.
Be careful not to pull the original too hard, as it may rip.
DYG313
3. Close the ADF cover and the cover of the input tray for ADF.
4. Lift the ADF, and if there is any original remaining in the ADF, gently pull the jammedpaper to remove it.
Be careful not to hold the input tray when lifting the ADF. Doing so may damage the tray.
DYG314
5. Lower the ADF.
Removing Paper Jams
433

When You Cannot Print Test PagePossible cause Solution
The power cord, a USB cable, or anetwork cable is not connectedcorrectly.
Make sure that the power cord, USB cable, and networkcable are connected correctly. Also confirm that they are notdamaged.
The port connection is notestablished correctly.
1. In the Windows Start menu, click [Windows System], andthen [Control Panel].
2. In the "Hardware and Sound" category, click [Viewdevices and printers].
3. Right-click the icon of the machine, and then click [Printerproperties].
4. Click the [Ports] tab, and then make sure that the port isset as a USB or network printer.
10. Troubleshooting
434

Paper Feed ProblemsIf the machine is operating but paper will not feed or paper jams occur frequently, check the condition ofthe machine and paper.
Problem Solution
Paper does not feed smoothly. • Use supported types of paper. See page 77 "SupportedPaper".
• Load paper correctly, making sure that the side or endfences of the paper tray, or the paper guides of thebypass tray are properly adjusted. See page 58"Loading Paper".
• If the paper is curled, straighten the paper.
• Take out the paper from tray and fan it well. Then,reverse the top and bottom of the paper, and put it backin the tray.
Paper jams occur frequently. • If there are gaps between the paper and the side or endfences of the paper tray, or the paper guides of thebypass tray, adjust the side or end fences of the papertray, or the paper guides of the bypass tray to remove thegaps.
• Avoid printing on both sides of paper when printingimages that contain large solid areas, which consume alot of toner.
• Use supported types of paper. See page 77 "SupportedPaper".
• Load paper only as high as the upper limit markings onthe side fence.
• Make sure that the friction pads and paper feed rollersare clean. See page 396 "Cleaning the Friction Pad andPaper Feed Roller".
Paper Feed Problems
435

Problem Solution
Multiple sheets of paper are fed atone time.
• Fan the paper well before loading. Also make sure thatthe edges are even by tapping the stack on a flat surfacesuch as a desk.
• Make sure that the side or end fences are in the rightposition.
• Use supported types of paper. See page 77 "SupportedPaper".
• Load paper only as high as the upper limit markings onthe side fence.
• Make sure that the friction pads and paper feed rollersare clean.
• Check that paper was not added while there was stillsome left in the tray. Only add paper when there is noneleft in the tray.
Paper gets wrinkles. • Paper is damp. Use paper that has been stored properly.See page 77 "Supported Paper".
• Paper is too thin. See page 77 "Supported Paper".
• If there are gaps between the paper and the side or endfences of the paper tray, or the paper guides of thebypass tray, adjust the side or end fences of the papertray, or the paper guides of the bypass tray to remove thegaps.
The printed paper is curled. • Load the paper upside down in the paper tray.
• If the paper curl is severe, take prints from the output traymore frequently.
• Paper is damp. Use paper that has been stored properly.See page 77 "Supported Paper".
10. Troubleshooting
436

Problem Solution
The printed paper does not stackneatly.
• The machine cannot detect the paper that is on the outputtray, so make sure that the stack of paper that is outputdoes not exceed the capacity of the output tray.
• Are you printing on different sizes or types of paper? Ifyou are printing on different sizes or types of paper,remove the printed pages from the output tray as they areoutput.
• If you are printing a combination of both single-sidedand two-sided documents, remove the printed pagesfrom the output tray more frequently.
Images are not printed in the rightposition
DAC606
Adjust the front end fence and both side fences to match thepaper size.
See page 58 "Loading Paper".
Images are printed diagonally to thepages.
DAC572
If there are gaps between the paper and the side or endfences of the paper tray, or the paper guides of the bypasstray, adjust the side or end fences of the paper tray, or thepaper guides of the bypass tray to remove the gaps.
Paper Feed Problems
437

Print Quality Problems
Checking the Condition of the Machine
If there is a problem with the quality of printing, first check the condition of the machine.
Possible Cause Solution
There is a problem with themachine's location.
Make sure that the machine is on a level surface. Place themachine where it will not be subject to vibration or shock.
Unsupported types of paper is used. Make sure that the paper being used is supported by themachine. See page 77 "Supported Paper".
The paper type setting is incorrect. Make sure that the paper type setting of the printer drivermatches the type of paper loaded. See page 74 "SpecifyingPaper Type and Paper Size Using the Printer Driver".
A non-genuine print cartridge isbeing used.
Refilled or non-genuine print cartridge reduces print qualityand can cause malfunctions. Use genuine print cartridge only.
An old print cartridge is being used. Print cartridge should be opened before their expiration dateand used within six months of being opened.
The machine is dirty. See page 391 "Maintaining the Machine", and clean themachine as required.
Humidity level surrounding themachine may be too low.
Using the machine in a room where humidity level is too lowmay cause black lines of a few millimeters thick to appear onprintouts with 75-millimeter spaces in between. In this case, set[Low Humidity Mode] to [On].
• When Using the Touch Panel Model
For details about how to configure the settings, seepage 259 "System Settings (When Using the Touch PanelModel)".
• When Using the Four-line LCD Panel Model
For details about how to configure the settings, seepage 300 "System Settings (When Using the Four-lineLCD Panel Model)".
10. Troubleshooting
438

Checking the Printer Driver Settings
Problem Solution
The printed image is smudged. PCL 5e/6
On the printer driver's [Paper] tab, select [Bypass Tray] inthe "Input Tray:" list. In the "Paper Type:" list, select aproper paper type.
PostScript 3
On the printer driver's [Paper/Quality] tab, select[Bypass Tray] in the "Paper Source" list. In the "Media"list, select a proper paper type.
Images smudge when rubbed.(Toner is not fixed.)
PCL 5e/6
On the printer driver's [Paper] tab, select a proper papertype in the "Paper Type:" list.
PostScript 3
On the printer driver's [Paper/Quality] tab, select aproper paper type in the "Media" list.
If the envelope levers are lowered, pull them up.
The printed image is different fromthe image on the computer's display.
Only when using PCL 5e/6
On the printer driver's [Print Quality] tab, select [Raster]in the "Graphics Mode" list.
When printing graphics, the outputand the screen are different.
To print accurately, specify the printer driver setting to printwithout using the graphics command. For details aboutspecifying the printer driver setting, see the printer driver Help.
Images are cut off, or excess isprinted.
Use the same size paper selected in the application. If youcannot load paper of the correct size, use the reductionfunction to reduce the image, and then print. For details aboutthe reduction function, see the printer driver Help.
Photo images are coarse. Use the application's or printer driver's settings to specify ahigher resolution.
For details about the printer driver's settings, see the printerdriver Help.
A solid line is printed as a dashedline or appears blurred.
Change the dithering settings on the printer driver. For detailsabout the dithering settings, see the printer driver Help.
Print Quality Problems
439

Problem Solution
Fine lines are fuzzy, of inconsistentthickness, or do not appear.
Change the dithering settings on the printer driver. For detailsabout the dithering settings, see the printer driver Help.
If the problem persists, specify the settings of the application inwhich the image was created to change the thickness of thelines.
10. Troubleshooting
440

Printer ProblemsThis section describes printing problems and possible solutions.
When You Cannot Print Properly
Problem Solution
An error occurs. If an error occurs when printing, change the computer orprinter driver settings.
• Check the printer icon name does not exceed 32alphanumeric characters. If it does, shorten it.
• Check whether other applications are operating.
Close any other applications, as they may be interferingwith printing. If the problem is not resolved, closeunneeded processes too.
• Check that the latest printer driver is being used.
A print job is canceled. • When Using the Touch Panel Model
If [I/O Timeout] under [System Settings] is set to 15seconds, increase the time period. A print job may becanceled if printing is frequently interrupted by data fromother ports, or if printing data is large and takes time forprocessing. For details, see page 259 "System Settings(When Using the Touch Panel Model)".
• When Using the Four-line LCD Panel Model
If [I/O Timeout] under [System Settings] is set to 15seconds, increase the time period. A print job may becanceled if printing is frequently interrupted by data fromother ports, or if printing data is large and takes time forprocessing. For details, see page 300 "System Settings(When Using the Four-line LCD Panel Model)".
Printer Problems
441

Problem Solution
A Locked Print file is canceled. • The machine already has 5 jobs or 5 MB of Locked Printdata. Print or delete an existing Locked Print file. Fordetails, see page 107 "Printing Confidential Documents".
• Even if the machine cannot store any more Locked Printfiles, the machine holds the new Locked Print file for theperiod of time specified in [Locked Print] under [SystemSettings] before canceling that file. Within this time, youcan print or delete the new Locked Print file. You can alsoprint or delete an existing Locked Print file so that the newLocked Print file can be stored in the machine.
• When Using the Touch Panel Model
For details about [Locked Print], see page 259 "SystemSettings (When Using the Touch Panel Model)".
• When Using the Four-line LCD Panel Model
For details about [Locked Print], see page 300 "SystemSettings (When Using the Four-line LCD Panel Model)".
There is a considerable delaybetween the print start commandand actual printing.
• Processing time depends on data volume. High volumedata, such as graphics-heavy documents, take longer tobe processed.
• To speed up printing, reduce the printing resolution usingthe printer driver. For details, see the printer driver Help.
• The machine is calibrating color. Wait for a while.
Documents are not printed properlywhen using a certain application, orimage data is not printed properly.
Some characters are printed faintlyor not printed.
Change the print quality settings.
10. Troubleshooting
442

Problem Solution
It takes too long to complete the printjob.
• Photographs and other data intensive pages take a longtime to be processed so simply wait when printing suchdata.
• Changing the settings with printer driver may help tospeed up printing.
See the printer driver Help.
• The data is so large or complex that it takes a long timeto be processed.
• If "Processing..." is displayed on the screen, the machineis receiving data. Wait for a while.
• The printer is adjusting the color registration. Wait for awhile.
A printed image is different from theimage on the computer's display.
• When you use some functions, such as enlargement andreduction, the layout of the image might be different fromthat displayed in the computer display.
• Check that the page layout settings are properlyconfigured in the application.
• Make sure the paper size selected in the printerproperties dialog box matches the size of the paperloaded. For details, see the printer driver Help.
Images are cut off, or excess pagesare printed.
If you are using paper whose size is smaller than the papersize selected in the application, use the same size paperselected in the application. If you cannot load paper of thecorrect size, use the reduction function to reduce the image,and then print.
See the printer driver Help.
Printer Problems
443

When You Cannot Print Clearly
Problem Solution
The whole printout is blurred. • The paper being used may be damp. Use paper that hasbeen stored properly. See page 77 "Supported Paper".
• If you enable [Toner Saving] under [System Settings],printing is generally less dense.
• The print cartridge is almost empty. If "ReplacementRequired: Print Cartridge" appears on the screen, replacethe indicated print cartridge.
• Condensation may have occurred. If rapid change intemperature or humidity occurs, use this machine onlyafter it has acclimatized.
Toner smears appear on the printside of the page.
• The paper setting may not be correct. For example,although you are using thick paper, the setting for thickpaper may not be specified.
Check the printer driver's paper settings.
See the printer driver Help.
• Check that the paper is not curled or bent. Envelopes canbe curled easily. Flatten out the paper before loading it.
See page 58 "Loading Paper".
Horizontal lines appear on theprinted paper.
• Impact can cause lines to appear on printed paper andother malfunctions.
Protect the printer from impact at all times, especiallywhile it is printing.
• If lines appear on prints, turn the printer off, wait a fewmoments, and then turn it back on again. Then, performthe print job again.
Photo images are coarse. Some applications lower the resolution for making prints.
White spots appear. The surrounding registration roller or paper tray can becomedirty with paper dust if you use paper other than standardpaper.
Wipe any paper dust off both the paper tray and registrationroller.
10. Troubleshooting
444

Problem Solution
The backs of printed sheets areblemished.
• When removing a jammed sheet, the inside of the printermay have become dirty. Print several sheets until theycome out clean.
• If document size is larger than paper size, e.g. A4document on B5 paper, the back of the next printed sheetmay become dirty.
The Data In indicator is not flashingor lit.
If the Data In indicator is not flashing or lit, the data is notbeing sent to the printer.
If the printer is connected to the computer using the interfacecable.
Check the port connection setting is correct.
Network Connection
Contact your network administrator.
Solid lines are printed as brokenlines.
Only when using PostScript 3
Change the [Dithering] setting in the printer driver'sdialog box.
See the printer driver Help.
Fine dot patterns do not print. Only when using PostScript 3
Change the [Dithering] setting in the printer driver'sdialog box.
See the printer driver Help.
If rubbed with your finger, the printsmears.
The setting of the paper may not be correct. For example,although thick paper is used, the setting for thick paper maynot be specified.
• Check the paper settings of this printer.
See page 58 "Loading Paper".
• Check the paper settings of the printer driver.
See the printer driver Help.
Printer Problems
445

When Paper Is Not Fed or Ejected Properly
Problem Solution
Prints fall in front of the machinewhen they are output.
Raise the stop fence. For the position of the stop fence, seepage 19 "Guide to Components".
Prints do not stack properly. The paper being used may be damp. Use paper that has beenstored properly. See page 77 "Supported Paper".
The printed paper is curled. • Load the paper upside down in the paper tray.
• If the paper curl is severe, retrieve prints from the outputtray more frequently.
• The paper being used may be damp. Use paper that hasbeen stored properly.
• If you enable [Toner Saving] under [System Settings],printing is generally less dense.
Printed envelopes come out creased. Check if the fusing unit levers are properly set. Lower the fusingunit levers.
Other Printing Problems
Problem Solution
The toner has run out and printinghas stopped.
• When Using the Touch Panel Model
When the "Continue printing?" message appears on thecontrol panel, pressing [Yes] allows you to print a fewmore pages, but the print quality of those pages may belower.
• When Using the Four-line LCD Panel Model
When the "Continue printing?" message appears on thecontrol panel, pressing the [OK] key allows you to print afew more pages, but the print quality of those pages maybe lower.
10. Troubleshooting
446

Copier Problems
When You Cannot Make Clear Copies
Problem Solution
The printed copy is blank. The original is not placed correctly.
When using the exposure glass, place originals copy sidedown. When using the ADF, place them copy side up. Seepage 92 "Placing Originals".
The wrong original was copied. If copying from the exposure glass, make sure that there areno originals in the ADF.
Copied pages do not look the sameas the originals.
Select the correct scan mode according to the type of original.See page 139 "Specifying Scan Settings for Copying"
Black spots appear whenphotocopying a photographic print.
The original may have stuck to the exposure glass due to highhumidity.
Place the original on the exposure glass, and then place twoor three sheets of white paper on top of it. Leave the ADF openwhen copying.
A moire pattern is produced. The original probably has heavily lined or dotted areas.
Switching the setting for image quality between [Photo] and[Text/Photo] may eliminate the moire pattern.
See page 140 "Selecting the Document Type According toOriginal".
The printed copy is dirty. • Image density is too high.
Adjust the image density. See page 139 "AdjustingImage Density".
• Toner on the printed surface is not dry.
Do not touch printed surfaces immediately after copying.Remove freshly printed sheets one by one, taking carenot to touch printed areas.
• The exposure glass or ADF is dirty. See page 391"Maintaining the Machine".
• Before placing originals on the exposure glass, makesure that toner or correction fluid is dry.
Copier Problems
447

Problem Solution
When copying from the exposureglass, the print area of the copy isout of alignment with the original.
Place the original copy side down, making sure that it isaligned to the rear left corner and pressed flat against theexposure glass.
When You Cannot Make Copies as Wanted
Problem Solution
Photocopied pages are not incorrect order.
When Using the Touch Panel Model
On the control panel, change the [Sort] setting under copysettings to collate pages as you require. For details about[Sort], see page 241 "Copier Features Settings (When Usingthe Touch Panel Model)".
When Using the Four-line LCD Panel Model
On the control panel, change the [Sort] setting under copysettings to collate pages as you require. For details about[Sort], see page 293 "Copier Features Settings (When Usingthe Four-line LCD Panel Model)".
Copied pages are too dark or toolight.
Adjust the image density. See page 139 "Adjusting ImageDensity".
10. Troubleshooting
448

Scanner Problems
When You Cannot Browse the Network to Send a Scan File
Problem Solution
The following machine settings maynot be correct:
• IP address
• Subnet Mask
Check the settings. See page 358 "Configuring the NetworkSettings".
When Scanning Is Not Done As Expected
Problem Solution
The machine does not start scanning. The ADF or its cover is open. Close the ADF or its cover.
The scanned image is dirty. • The exposure glass or ADF is dirty. See page 391"Maintaining the Machine".
• Before placing originals on the exposure glass, makesure that toner or correction fluid is dry.
The scanned image is distorted orout of position.
The original was moved during scanning. Do not move theoriginal during scanning.
The scanned image is upside down. The original was placed upside down. Place the original in thecorrect orientation. See page 92 "Placing Originals".
The scanned image is blank. The original was placed with the front and back reversed.When using the exposure glass, place originals copy sidedown. When using the ADF, place originals copy side up. Seepage 92 "Placing Originals".
The scanned image is too dark ortoo light.
Adjust the image density. See page 186 "Specifying ScanSettings for Scanning".
The Scan to E-mail, Scan to FTP, orScan to Folder function does notwork.
Check if a USB flash disk is inserted into the machine. If a USBflash disk is inserted, scanning functions other than Scan toUSB are not available from the control panel.
Scanner Problems
449

Fax Problems (When Using the Touch PanelModel)This function is available for M 320FB/320F only.
When You Cannot Send or Receive Fax Messages As Wanted (When Usingthe Touch Panel Model)
Transmission (when using the touch panel model)
Problem Causes Solutions
Cannot send files. The telephone line may bedisconnected.
Check if the telephone line is properlyconnected to the machine. For details,see Setup Guide.
The machine cannot accepta new fax job because thereare 5 unsent faxes inmemory already.
Wait until any of these faxes istransmitted completely, or use the[Delete TX Stand.File] function to deleteunnecessary faxes. For details, seepage 249 "Fax Features Settings(When Using the Touch Panel Model)".
Document appears blank atthe other end.
The original was placedupside down.
The original was placed upside down.Place the original in the correctorientation. See page 92 "PlacingOriginals".
Printed or sent images arespotty.
The exposure glass,exposure glass cover, orguide plate of the ADF isdirty.
Clean them. For details about how toclean the machine, see page 398"Cleaning the Exposure Glass". Makesure ink or correction fluid is dry beforeplacing originals.
Reception is possible, buttransmission is not.
There are regions andtelephone exchanges wherea dial tone cannot bedetected.
Contact your sales or servicerepresentative.
10. Troubleshooting
450

Problem Causes Solutions
Transmission failed due to"maximum e-mail size"error.
If the e-mail size specifiedon the machine is too large,the Internet Fax documentcannot be sent.
Change the setting for [Maximum EmailSize] in [Scanner Features]. For detailsabout the maximum e-mail size, seepage 246 "Scanner Features Settings(When Using the Touch Panel Model)".
When using On Hook Dial,"Receiving..." appears andtransmission is not allowed.
If the machine fails to detectthe size of the original whenthe [Start] key is pressed, itperforms a receivingoperation.
Press [Scan Size] in [Scanner Features],select the scan size, and then resend thedocument.
LAN-Fax Driver does notwork.
The entered login username, login password, ordriver encryption key isincorrect.
Check your login user name, loginpassword, or driver encryption key,and then enter them correctly. Fordetails, contact your administrator.
Reception (when using the touch panel model)
Problem Causes Solutions
Cannot receive files. The telephone line may bedisconnected.
Check if the telephone line is properlyconnected to the machine. For details,see Setup Guide.
The Receiving File indicatorlights up and the receiveddocument is not printed.
The machine cannot printbecause it is out of paper ortoner.
• Load paper into the tray.
• Add toner.
• The paper tray does not containpaper of the right size. Load paperof the right size in the paper tray.
The machine does not printreceived fax documents.
[Fax Features] is configuredto store receiveddocuments.
Print the fax documents using Webbrowser or the Print Stored RX Filefunction. For details about printingreceived faxes stored in memory,page 231 "Printing out faxes stored inmemory" and page 344 "Fax Tab(Only When Using the Touch PanelModel)".
Fax Problems (When Using the Touch Panel Model)
451

Problem Causes Solutions
The machine failed to printreceived fax documents.
The paper has run out. Load paper into the tray.
Printing (when using the touch panel model)
Problem Causes Solutions
Print is slanted. The paper is fed at a slant. Load the paper correctly. For detailsabout loading paper, see page 58"Loading Paper".
Misfeeds occur frequently. The number sheets loadedin the paper tray exceedsthe capacity of the machine.
Load paper only as high as the upperlimit markings inside the paper tray.
The paper tray's side fenceis set too tightly.
Pinch the fence lightly, and then adjustits position.
The paper is too thick or toothin.
Use the recommended paper. Fordetails about the recommended paper,see page 77 "Supported Paper".
Printed paper is being used. Do not load sheets that have alreadybeen copied or printed.
Sheets are sticking together. Fan the sheets thoroughly beforeloading them. Alternatively, feed thesheets into the machine one at a time.
Printed copies are together,resulting in jams.
Sheets are sticking together. Fan the sheets thoroughly beforeloading them. Alternatively, feed thesheets into the machine one at a time.
Copy paper becomescreased.
Printed paper is being used. Do not load sheets that have alreadybeen copied or printed.
The paper is too thin. Use the recommended paper. Fordetails about the recommended paper,see page 77 "Supported Paper".
Edges of sheets arecreased.
You are using a non-recommended paper.
Use the recommended paper. Fordetails about the recommended paper,see page 77 "Supported Paper".
10. Troubleshooting
452

Problem Causes Solutions
Black lines appear on thefile printed at thedestination.
The exposure glass,exposure glass cover, orguide plate of the ADF isdirty.
Clean the components. For detailsabout how to clean the machine, seepage 398 "Cleaning the ExposureGlass".
The background of receivedimages appears dirty.
Images from the back of thepage appear.
Image density is too high. Adjust the image density. Seepage 186 "Specifying Scan Settings forScanning".
Received image is too light. When using moist, rough, orprocessed paper, areas ofprint may not be fullyreproduced.
Use the recommended paper. Fordetails about the recommended paper,see page 77 "Supported Paper".
The image density has beenspecified too low.
Increase the image density. For detailsabout how to change the density, seepage 188 "Adjusting Image Density".
The original of thetransmitted fax was printedon paper that is too thin.
Ask the sender to reprint the original onthicker paper, and then fax it again.
When an Error Is Notified via a Report or E-mail (When Using the Touch PanelModel)
When a report is printed from the machine (when using the touch panel model)
Error Report
An Error Report is printed if a document cannot be successfully sent or received.
Possible causes include a problem with the machine or noise on the telephone line. If an erroroccurs during transmission, resend the original. If an error occurs during reception, ask the senderto resend the document.
• If an error happens frequently, contact your service representative.
• The "Page" column gives the total number of pages.
Fax Problems (When Using the Touch Panel Model)
453

Power Failure Report
• Right after recovery from power failure, the internal battery needs to be sufficiently rechargedto guard against future data loss. Keep the machine plugged in and the power on for about24 hours after the power loss.
Even if the power is turned off, the contents of the machine memory (for example, programmednumbers) will not be lost. Lost items will include any fax documents stored in memory using MemoryTransmission or Reception.
If a file deleted from memory, Power Failure Report is automatically printed as soon as the power isrestored.
This report can be used to identify lost files. If a document stored for Memory Transmission was lost,resend it. If a document received by Memory Reception was lost, ask the sender to resend it.
Error Report (E-mail)
The Error Report (E-mail) is printed by the machine when it is unable to send an Error notificationEmail.
For details about the Error notification Email, see page 454 "When an error notification E-mail isreceived (when using the touch panel model)".
Transmission Error Report
The Transmission Error Report is printed by the machine when it is unable to send a TransmissionError Mail Notification. For details about the Transmission Error Mail Notification, see page 454"When an error notification E-mail is received (when using the touch panel model)".
When an error notification E-mail is received (when using the touch panel model)
Error notification e-mail
The machine sends the Error Notification Email to the sender when it is unable to successfullyreceive a particular e-mail message by Internet Fax Function. A "cc" of this notification is also sentto the administrator's e-mail address if the address has been specified.
• If an incoming Internet Fax from another party bypasses the SMTP server, even if reception isnot successful, an Error Mail Notification is not sent to the sender.
• You can select to send Error Notification Email using Web Image Monitor. For details, seepage 369 "Internet Fax Tab".
• If Error Notification Email cannot be sent, the Error Report (E-mail) is printed by the machine.
• If an error occurs when an e-mail is received via SMTP, the SMTP server sends an errornotification e-mail to the originator of the document.
Server-generated error e-mail
The transmitting server sends this error e-mail to the originator of an e-mail that has failed to betransmitted successfully (due to reasons such as specifying an incorrect e-mail address).
10. Troubleshooting
454

• If an Internet Fax transmission bypasses the SMTP server, even if transmission is not successful,an error e-mail is not sent from the server.
• After a server-generated error e-mail is printed, the first page of the sent document is printed.
Transmission Error Mail Notification
If an e-mail fails to be sent due to a transmission error, the machine sends the Transmission ErrorMail Notification to the sender. If an e-mail could not be sent using the forward function, theTransmission Error Mail Notification will be sent to the destination e-mail address for forwarding.
If there is an additional user-registered e-mail address or administrator e-mail address, theTransmission Error Mail Notification will be sent to that address.
• If Transmission Error Mail Notification cannot be sent, Transmission Error Report is printed bythe machine.
Error Code (When Using the Touch Panel Model)
The table below describes the meaning of error codes that appear under "Results" on Fax Journal ortransmission status report, and what to do when a particular error code appears.
"X" indicates a number in an error code that appear differently depending on the situation.
Error Code Solution
1XXX11 An original has been jammed inside the ADF while sending afax in Immediate Transmission mode.
• Remove jammed originals, and then place them again.See page 435 "Paper Feed Problems".
• Check the originals are suitable for scanning. Seepage 92 "Placing Originals".
1XXX21 The line could not be connected correctly.
• Check if the telephone line is properly connected to themachine.
• Disconnect the telephone line cord from the machine,and connect the cord to a telephone. Check if you canmake calls using the telephone. If you cannot make callsthis way, contact your telephone company.
• If the problem persists, contact your sales or servicerepresentative.
Fax Problems (When Using the Touch Panel Model)
455

Error Code Solution
1XXX22 to 1XXX23 Dial fails when trying to send faxes.
• Check if that the fax number you dialed is correct.
• Check if that the destination is a fax machine.
• Check if that the line is not busy.
• You may need to insert a pause between dial digits. Press[Redial] after, for example, the area code.
• Check if [PSTN / PBX] under [Administrator Tools] hasbeen specified properly for your connection method tothe telephone network. See page 274 "AdministratorTools Settings (When Using the Touch Panel Model)".
1XXX32 to 1XXX84 An error occurred while sending a fax.
• Check if the telephone line is properly connected to themachine.
• Disconnect the telephone line cord from the machine,and connect the cord to a telephone. Check if you canmake calls using the telephone. If you cannot make callsthis way, contact your telephone company.
• If the problem persists, contact your sales or servicerepresentative.
10. Troubleshooting
456

Error Code Solution
2XXX14 The machine was not able to print the received fax, or themachine's memory reached its capacity while receiving a faxbecause the document was too large.
• The paper tray was empty. Load paper in the paper tray.See page 58 "Loading Paper".
• The tray selected in [Select Paper Tray] under [FaxFeatures] did not contain A4, Letter, or Legal size paper.Load valid size paper in the tray, and configure thepaper size settings under [Paper Settings] accordingly.
• A cover or tray was open. Close the cover or tray.
• There was a paper jam. Remove the jammed paper. Seepage 422 "Removing Paper Jams".
• A print cartridge was empty. Replace the print cartridge.See page 391 "Replacing the Print Cartridge".
• The received fax was too large. Ask the sender to re-sendthe document in parts as several smaller faxes, or to sendthe fax at a lower resolution.
2XXX32 to 2XXX84 An error occurred while receiving a fax.
• Check if the telephone line is properly connected to themachine.
• Disconnect the telephone line cord from the machine,and connect the cord to a telephone. Check if you canmake calls using the telephone. If you cannot make callsthis way, contact your telephone company.
• If the problem persists, contact your sales or servicerepresentative.
3XXX11 Connection to the server failed while sending an Internet Fax.
• Check if the network cable is properly connected to themachine.
• Check if the network settings such as the IP address,DNS, and SMTP settings have been configured properly(make sure that no double-byte character is used). Seepage 358 "Configuring the Network Settings".
Fax Problems (When Using the Touch Panel Model)
457

Error Code Solution
3XXX12 E-mail transmission failed while sending an Internet Fax.
• There was an error in the header of the e-mail. Check ifthe network settings such as the IP address, DNS, andSMTP settings have been configured properly (make surethat no double-byte character is used). See page 358"Configuring the Network Settings".
3XXX13 E-mail transmission failed while sending an Internet Fax.
• There was an error in the part header of the e-mail.Check if the network settings such as the IP address,DNS, and SMTP settings have been configured properly(make sure that no double-byte character is used). Seepage 358 "Configuring the Network Settings".
3XXX14 E-mail transmission failed while sending an Internet Fax.
• There was an error in the converted TIFF file. Check if thenetwork settings such as the IP address, DNS, and SMTPsettings have been configured properly (make sure thatno double-byte character is used). See page 358"Configuring the Network Settings".
3XXX33 The machine memory reached capacity while sending anInternet Fax.
• The fax was too large. Resend the document in parts asseveral smaller faxes, or send the fax at a lowerresolution.
4XXX21 Connection to the server failed while receiving an Internet Fax.
• Check if the network cable is properly connected to themachine.
• Check if the network settings such as the IP address,DNS, and POP3 settings have been configured properly(make sure that no double-byte character is used). Seepage 358 "Configuring the Network Settings".
4XXX22 E-mail reception failed while receiving an Internet Fax.
• LIST command to the POP3 server failed. Ask the senderto check the e-mail settings.
10. Troubleshooting
458

Error Code Solution
4XXX23 E-mail reception failed while receiving an Internet Fax.
• There was an error in the header of the e-mail. Ask thesender to check the e-mail settings.
4XXX24 E-mail reception failed while receiving an Internet Fax.
• There was an error in the part header of the e-mail. Askthe sender to check the e-mail settings.
• The e-mail had an invalid Content-Type, or anunsupported type of file (such as PDF or JPEG) wasreceived. Ask the sender to check the file type.
4XXX25 E-mail reception failed while receiving an Internet Fax.
• There was an error in the text part of the part body of thee-mail. Ask the sender to check the e-mail settings.
4XXX26 E-mail reception failed while receiving an Internet Fax.
• There was an error in the received TIFF file (whichresulted from a condition not indicated by the error codes4XXX43 to 4XXX45). Ask the sender to check the TIFFfile.
4XXX42 E-mail reception failed while receiving an Internet Fax.
• There was an error in the part header of the e-mail. Askthe sender to check the e-mail settings.
4XXX43 A TIFF file could not be received via Internet Fax properly.
• The compression method of the received TIFF file wasother than MH/MR/MMR. Ask the sender to check theTIFF file.
4XXX44 A TIFF file could not be received via Internet Fax properly.
• The resolution of the TIFF file was not supported, or thewidth of the TIFF file was that of A3 or B4 paper. Ask thesender to check the TIFF file.
4XXX45 A TIFF file could not be received via Internet Fax properly.
• The format of the TIFF file was other than TIFF-S/F. Askthe sender to check the TIFF file.
Fax Problems (When Using the Touch Panel Model)
459

Error Code Solution
4XXX46 The machine memory reached its capacity while receiving anInternet Fax.
• The fax was too large. Ask the sender to resend thedocument in parts as several smaller faxes, or send at alower resolution.
10. Troubleshooting
460

Common ProblemsThis section describes how to troubleshoot common problems that may occur while operating themachine.
Problem Possible cause Solution
The machine does not turn on. The power cord is notconnected properly.
• Make sure that the powerplug is firmly inserted intothe wall outlet.
• Make sure that the walloutlet is not defective byconnecting anotherworking device.
An error message is shown onthe machine's screen.
An error has occurred. See page 403 "Error and StatusMessages on the Screen".
The Alert indicator is lit orflashing.
An error has occurred. See page 419 "PanelIndicator".
Pages do not print. The machine is warming up orreceiving data.
Wait until "Printing..." appearson the screen. If "Processing..."is displayed on the screen, themachine is receiving data.
Pages are not printed. The interface cable is notconnected correctly.
• Reconnect the cable.
• Check that the interfacecable is the correct type.
Strange noise is heard. The supplies are not properlyinstalled.
Confirm that the supplies areproperly installed.
Common Problems
461

Problem Possible cause Solution
The volume of the soundsproduced by the machine is tooloud.
The volume is set to the highlevel.
• When Using the TouchPanel Model
Adjust the volume of thebeep, ring, speaker, andalarm sounds. For details,see page 259 "SystemSettings (When Using theTouch Panel Model)".
• When Using the Four-lineLCD Panel Model
Adjust the volume of thebeep, ring, speaker, andalarm sounds. For details,see page 300 "SystemSettings (When Using theFour-line LCD PanelModel)".
The volume of the soundsproduced by the machine is tooquiet.
The volume is muted or set to thelow level.
• When Using the TouchPanel Model
Adjust the volume of thebeep, ring, speaker, andalarm sounds. For details,see page 259 "SystemSettings (When Using theTouch Panel Model)".
• When Using the Four-lineLCD Panel Model
Adjust the volume of thebeep, ring, speaker, andalarm sounds. For details,see page 300 "SystemSettings (When Using theFour-line LCD PanelModel)".
The network setting may nothave been configured properly.
Using Web Image Monitor,check the setting and checkwhether printing can beperformed.
If the problem persists, contactyour service representative.
10. Troubleshooting
462

Problem Possible cause Solution
Cannot connect to wirelessLAN.
A wireless LAN option is notinstalled on the machine.
Wi-Fi Direct connection andwireless LAN connection areenabled if a wireless LANoption is installed on themachine.
Turn off the machine, and inserta wireless LAN option into theUSB port for the wireless LANoption.
For the name of the optionalequipment, see page 13 "Howto Read This Manual". For theposition of the USB port, seepage 19 "Guide toComponents".
• If any of these problems persist, turn off the power, pull out the power cord, and contact your salesor service representative.
Common Problems
463

10. Troubleshooting
464

11. Configuring Network SettingsThis chapter describes how to connect the machine to the network and specify the network settings.
Configurations differ according to the communication environment of your system.
Installing Smart Organizing Monitor WhenUsing macOSThe following procedure is explained using macOS 11.2.3 as an example.
1. Download the latest driver from the manufacturer's website.
2. Double-click the package file.
3. Follow the instructions in the setup wizard.
4. If the [Printer Driver Selection] dialog box appears, do one of the following:
• Select the machine's model.
• Enter the IP address of the machine manually.
• Click [Search Network Printer] to search the machine via the network.
5. Click [OK].
6. Click [Close] in the [Summary] dialog box.
465

Connecting the Machine to a Wired Network
Configuring the IPv4 Setting
When using the touch panel model
1. Press the [Setting] icon on the [Home] screen.
2. Press [Network Settings].
3. Enter the administrator password.
4. Press [IPV4 Configuration].
5. Press [IPV4 DHCP].
6. Select [Active] to automatically obtain the IP address or [Inactive] to specify the IPaddress manually.
If you have selected [Active], proceed to Step 10.
7. Enter the machine's IPv4 address in [IP Address].
8. Enter the subnet mask in [Subnet Mask].
9. Enter the gateway address in [Gateway Address].
10. Press [OK].
11. Turn off the machine, and then turn it back on.
Setup is completed.
When using the four-line LCD panel model
1. Press the [User Tools] key.
2. Press the [ ] or [ ] key to select [Network Settings], and then press the [OK] key.
3. Enter the administrator password.
4. Press the [ ] or [ ] key to select [IPv4 Configuration], and then press the [OK] key.
5. Press the [ ] or [ ] key to select [DHCP], and then press the [OK] key.
6. Press the [ ] or [ ] key to select [Active] to automatically obtain the IP address or[Inactive] to specify the IP address manually.
If you have selected [Active], proceed to Step 13.
7. Press the [ ] or [ ] key to select [IP Address], and then press the [OK] key.
8. Enter the machine's IPv4 address, and then press the [OK] key.
9. Press the [ ] or [ ] key to select [Subnet Mask], and then press the [OK] key.
11. Configuring Network Settings
466

10. Enter the subnet mask, and then press the [OK] key.
11. Press the [ ] or [ ] key to select [Gateway Address], and then press the [OK] key.
12. Enter the gateway address, and then press the [OK] key.
13. Turn off the machine, and then turn it back on.
Setup is completed.
Configuring the IPv6 setting
When using the touch panel model
1. Press the [Setting] icon on the [Home] screen.
2. Press [Network Settings].
3. Enter the administrator password.
4. Press [IPV6 Configuration].
5. Press [IPV6 DHCP].
6. Select [Active] to automatically obtain the IP address or [Inactive] to specify the IPaddress manually.
If you have selected [Active], proceed to Step 11.
7. Press [Manually Set Address].
8. Enter the machine's IPv6 address in [Manually Set Address].
9. Enter the prefix length in [Prefix Length].
10. Enter the gateway address in [Gateway Address].
11. Press [OK].
12. Turn off the machine, and then turn it back on.
Setup is completed.
When using the four-line LCD panel model
1. Press the [User Tools] key.
2. Press the [ ] or [ ] key to select [Network Settings], and then press the [OK] key.
3. Enter the administrator password.
4. Press the [ ] or [ ] key to select [IPv6 Configuration], and then press the [OK] key.
5. Press the [ ] or [ ] key to select [DHCP], and then press the [OK] key.
Connecting the Machine to a Wired Network
467

6. Press the [ ] or [ ] key to select [Active] to automatically obtain the IP address or[Inactive] to specify the IP address manually.
If you have selected [Active], proceed to Step 14.
7. Press the [ ] or [ ] key to select [Manual Config. Address], and then press the [OK] key.
8. Press the [ ] or [ ] key to select [Manual Config. Address], and then press the [OK] key.
9. Enter the machine's IPv6 address, and then press the [OK] key.
10. Press the [ ] or [ ] key to select [Prefix Length], and then press the [OK] key.
11. Enter the prefix length, and then press the [OK] key.
12. Press the [ ] or [ ] key to select [Gateway Address], and then press the [OK] key.
13. Enter the gateway address, and then press the [OK] key.
14. Turn off the machine, and then turn it back on.
Setup is completed.
11. Configuring Network Settings
468

Connecting the Machine to a Wireless Network
• To use wireless network, the wireless LAN option needs to be installed to the machine.
There are four methods for connecting the machine to a wireless network:
• Using the Wi-Fi Setup Wizard
See page 469 "Using the Wi-Fi Setup Wizard".
• Using the WPS button
See page 471 "Using the WPS Button".
• Using a PIN code
See page 473 "Using a PIN Code".
Using the Wi-Fi Setup Wizard
A router (access point) is needed to set up a connection.
Checking the SSID and encryption key
The SSID and Encryption key for the router (access point) may be printed on a label affixed to therouter (access point). For details about the SSID and Encryption key, refer to the router (accesspoint) manual.
Configuring settings using the control panel
Make sure the Ethernet cable is not connected to the machine.
When using the touch panel model
1. Check that the router (access point) is working correctly.
2. Make sure the wireless LAN option is attached to the machine and the wireless (Wi-Fi) connection is enabled.
3. Press the [Home] key.
DYG322
Connecting the Machine to a Wireless Network
469

4. Press the Wireless (Wi-Fi) icon on the [Home] screen.
5. Enter the password using the number keys, and then press [OK].
A password for accessing the [Network Settings] menu can be specified in [Admin. ToolsLock] under [Administrator Tools] menu.
6. Press [Network Wizard].
7. Press [Wireless (Wi-Fi)].
8. Press the SSID of the router (access point) from the searched SSID list.
9. Enter the encryption key using the number keys, and then press [Connect].
As the passphrase, you can enter either 8 to 63 ASCII characters (0x20-0x7e) or 64hexadecimal digits (0-9, A-F, a-f).
10. Check the result.
• Connection has succeeded:
"Connected to access point." is displayed.
• Connection has failed:
"Failed to connect to access point." is displayed.
Check the configuration for the router (access point), and then try the connection again.
11. Press [OK].
12. Press [Exit].
13. Select to display [Network Wizard] menu or not when you turn on the machine
14. Configuring the Wireless (Wi-Fi) settings is complete.
When using the four-line LCD panel model
1. Check that the router (access point) is working correctly.
2. Make sure the wireless LAN option is attached to the machine and the wireless (Wi-Fi) connection is enabled.
3. Press the [User Tools] key.
4. Press the [ ] or [ ] key to select [Network Wizard], and then press the [OK] key.
5. Enter the administrator password.
6. Press the [ ] or [ ] key to select [Wireless (Wi-Fi)], and then press the [OK] key.
7. Press the [ ] or [ ] key to select SSID of the router (access point) from the searchedSSID list, and then press the [OK] key.
8. Enter the encryption key using the number keys, and then press the [OK] key.
As the passphrase, you can enter either 8 to 63 ASCII characters (0x20-0x7e) or 64hexadecimal digits (0-9, A-F, a-f).
11. Configuring Network Settings
470

9. Press the [OK] key.
After connecting to the network, the menu screen is displayed.
10. Check the result.
• Connection has succeeded:
"Connect succeed!" is displayed.
• Connection has failed:
"Connect failed!" is displayed.
Check the configuration for the router (access point), and then try the connection again.
11. Press the [ ] or [ ] key to select [Quit Setup], and then press the [OK] key.
12. Press the [ ] or [ ] key to select to display [Network Wizard] menu or not when youturn on the machine, then press the [OK] key.
13. Configuring the Wireless (Wi-Fi) settings is complete.
Using the WPS Button
A router (access point) is needed to set up a connection.
Make sure the Ethernet cable is not connected to the machine.
When using the touch panel model
1. Check that the router (access point) is working correctly.
2. Make sure the wireless LAN option is attached to the machine and the wireless (Wi-Fi) connection is enabled.
3. Press the [Home] key.
DYG322
4. Press the Wireless (Wi-Fi) icon on the [Home] screen.
5. Enter the password using the number keys, and then press [OK].
A password for accessing the [Network Settings] menu can be specified in [Admin. ToolsLock] under [Administrator Tools] menu.
Connecting the Machine to a Wireless Network
471

6. Press [Wireless (Wi-Fi) Sett.].
7. Press [WPS].
8. Press [PBC].
9. Press [Connect].
"Please wait for 2 minutes" appears, and the machine starts to connect in PBC method.
10. Press the WPS button on the router (access point) within two minutes.
For details about how to use the WPS button, refer to the manuals for the router (access point).
11. Check the result.
• Connection has succeeded:
"Connected to access point." is displayed.
Press [OK] to return to the screen displayed in Step 8, and then press the [Home] key toreturn to the initial screen.
Configuring the Wi-Fi settings is complete.
• Connection has failed:
"Failed to connect to access point." is displayed.
Press [OK] to return to the screen displayed in Step 8. Check the configuration for therouter (access point), then try the connection again.
12. Configuring the Wireless (Wi-Fi) settings is complete.
When using the four-line LCD panel model
1. Check that the router (access point) is working correctly.
2. Make sure the wireless LAN option is attached to the machine and the wireless (Wi-Fi) connection is enabled.
3. Press the [User Tools] key.
4. Press the [ ] or [ ] key to select [Network Settings], and then press the [OK] key.
5. Enter the password using the number keys, and then press the [OK] key.
A password for accessing the [Network Settings] menu can be specified in [Admin. ToolsLock] under [Admin. Tools] menu.
6. Press the [ ] or [ ] key to select [Wireless (Wi-Fi)], and then press the [OK] key.
7. Press the [ ] or [ ] key to select [WPS], and then press the [OK] key.
8. Press the [ ] or [ ] key to select [PBC], and then press the [OK] key.
9. Press [Yes].
10. Press the WPS button on the router (access point) within two minutes.
For details about how to use the WPS button, refer to the manuals for the router (access point).
11. Configuring Network Settings
472

11. Check the result.
• Connection has succeeded:
"Connection to AP has Succeeded" is displayed.
Press [EXIT] to return to the screen displayed in Step 8, and then press the [User Tools]key to return to the initial screen.
• Connection has failed:
"Connection to AP has Failed" is displayed.
Press [EXIT] to return to the screen displayed in Step 8.
Check the configuration for the router (access point), then try the connection again.
12. Configuring the Wireless (Wi-Fi) settings is complete.
Using a PIN Code
A router (access point) is needed to set up a connection. To establish a connection using the PIN code,use a computer that is connected to the router (access point).
Make sure the Ethernet cable is not connected to the machine.
When using the touch panel model
1. Check that the router (access point) is working correctly.
2. Open the PIN code configuration window (web page) for the router (access point) onyour computer.
3. Make sure the wireless LAN option is attached to the machine and the wireless (Wi-Fi) connection is enabled.
4. Press the [Home] key.
DYG322
5. Press the Wireless (Wi-Fi) icon on the [Home] screen.
Connecting the Machine to a Wireless Network
473

6. Enter the password using the number keys, and then press [OK].
A password for accessing the [Network Settings] menu can be specified in [Admin. ToolsLock] under [Administrator Tools] menu.
7. Press [Wireless (Wi-Fi) Sett.].
8. Press [WPS].
9. Press [PIN].
10. Check the PIN code.
Write down the PIN code in case you might forget it.
11. Enter the machine’s PIN code (8 digits) on the router (access point)’s web page. (Theweb page accessed in Step 2)
12. Execute WPS (PIN system) from the router (access point)’s web page.
13. Press [Connect] on the control panel.
"Please wait for 2 minutes" and connecting with PIN method starts.
14. Check the result.
• Connection has succeeded:
"Connected to access point." is displayed.
Press [OK] to return to the screen displayed in Step 9, and then press the [Home] key toreturn to the initial screen.
• Connection has failed:
"Failed to connect to access point." is displayed.
Press [OK] to return to the screen displayed in Step 9. Check the configuration for therouter (access point), then try the connection again.
15. Configuring the Wi-Fi settings is complete.
When using the four-line LCD panel model
1. Check that the router (access point) is working correctly.
2. Open the PIN code configuration window (web page) for the router (access point) onyour computer.
3. Make sure the wireless LAN option is attached to the machine and the wireless (Wi-Fi) connection is enabled.
4. Press the [User Tools] key.
5. Press the [ ] or [ ] key to select [Network Settings], and then press the [OK] key.
6. Enter the password using the number keys, and then press the [OK] key.
A password for accessing the [Network Settings] menu can be specified in [Admin. ToolsLock] under [Admin. Tools] menu.
11. Configuring Network Settings
474

7. Press the [ ] or [ ] key to select [Wireless (Wi-Fi)], and then press the [OK] key.
8. Press the [ ] or [ ] key to select [WPS], and then press the [OK] key.
9. Press the [ ] or [ ] key to select [PIN], and then press the [OK] key.
10. Check the PIN code.
Write down the PIN code in case you might forget it.
11. Enter the machine’s PIN code (8 digits) on the router (access point)’s web page (Theweb page accessed in Step 2).
12. Execute WPS (PIN system) from the router (access point)’s web page.
13. Press [Connect].
14. Check the result.
• Connection has succeeded:
"Connection to AP has Succeeded" is displayed.
Press [EXIT] to return to the screen displayed in Step 9, and then press the [User Tools]key to return to the initial screen.
• Connection has failed:
"Connection to AP has Failed" is displayed.
Press [EXIT] to return to the screen displayed in Step 9. Check the configuration for therouter (access point), then try the connection again.
15. Configuring the Wireless (Wi-Fi) settings is complete.
Connecting the Machine to a Wireless Network
475

11. Configuring Network Settings
476

12. AppendixThis chapter describes the machine specifications and consumables.
Transmission Using IPsecFor securer communications, this machine supports the IPsec protocol. When applied, IPsec encryptsdata packets at the network layer using shared key encryption. The machine uses encryption keyexchange to create a shared key for both sender and receiver. To achieve even higher security, you canalso renew the shared key on a validity period basis.
• IPsec is not applied to data obtained through DHCP or DNS.
• IPsec compatible operating systems are Windows 8.1 or later, Windows Server 2012 or later,and macOS 10.13 or later, Red Hat Enterprise Linux 6 or later. However, some setting items arenot supported depending on the operating system. Make sure the IPsec settings you specify areconsistent with the operating system's IPsec settings.
• When using the touch panel model
• If you cannot access Web Image Monitor due to IPsec configuration problems, disable IPsecunder [Administrator Tools] on the control panel, and then access Web Image Monitor.
• When using the four-line LCD panel model
• If you cannot access Web Image Monitor due to IPsec configuration problems, disable IPsecunder [Admin. Tools] on the control panel, and then access Web Image Monitor.
• For details about specifying the IPsec settings using Web Image Monitor, see page 375"Configuring the IPsec Settings".
• When using the touch panel model
• For details about enabling and disabling IPsec using the control panel, see page 274"Administrator Tools Settings (When Using the Touch Panel Model)".
• When using the four-line LCD panel model
• For details about enabling and disabling IPsec using the control panel, see page 316"Administrator Tools Settings (When Using the Four-line LCD Panel Model)".
Encryption and Authentication by IPsec
IPsec consists of two main functions: the encryption function, which ensures the confidentiality of data,and the authentication function, which verifies the sender of the data and the data's integrity. Thismachine's IPsec function supports two security protocols: the ESP protocol, which enables both of theIPsec functions at the same time, and the AH protocol, which enables only the authentication function.
477

ESP Protocol
The ESP protocol provides secure transmission through both encryption and authentication. Thisprotocol does not provide header authentication.
• For successful encryption, both the sender and receiver must specify the same encryptionalgorithm and encryption key. The encryption algorithm and encryption key are specifiedautomatically.
• For successful authentication, the sender and receiver must specify the same authenticationalgorithm and authentication key. The authentication algorithm and authentication key arespecified automatically.
AH Protocol
The AH protocol provides secure transmission through authentication of packets only, includingheaders.
• For successful authentication, the sender and receiver must specify the same authenticationalgorithm and authentication key. The authentication algorithm and authentication key arespecified automatically.
AH Protocol + ESP Protocol
When combined, the ESP and AH protocols provide secure transmission through both encryptionand authentication. These protocols provide header authentication.
• For successful encryption, both the sender and receiver must specify the same encryptionalgorithm and encryption key. The encryption algorithm and encryption key are specifiedautomatically.
• For successful authentication, the sender and receiver must specify the same authenticationalgorithm and authentication key. The authentication algorithm and authentication key arespecified automatically.
• Some operating systems use the term "Compliance" in place of "Authentication".
Security Association
This machine uses encryption key exchange as the key setting method. With this method, agreementssuch as the IPsec algorithm and key must be specified for both sender and receiver. Such agreementsform what is known as an SA (Security Association). IPsec communication is possible only if thereceiver's and sender's SA settings are identical.
The SA settings are auto configured on both parties' machines. However, before the IPsec SA can beestablished, the ISAKMP SA (Phase 1) settings must be auto configured. When this is done, the IPsec SA(Phase 2) settings, which allow actual IPsec transmission, will be auto configured.
Also, for further security, the SA can be periodically auto updated by applying a validity period (timelimit) for its settings. This machine only supports IKEv1 for encryption key exchange.
12. Appendix
478

Multiple settings can be configured in the SA.
Settings 1-10
You can configure ten separate sets of SA details (such as different shared keys and IPsecalgorithms).
IPsec policies are searched through one by one, starting at [No.1].
Encryption Key Exchange Settings Configuration Flow
This section explains the procedure for specifying encryption key exchange settings.
Machine PC
1. Set the IPsec settings on Web Image Monitor.1. Set the same IPsec settings as the machine onPC.
2. Enable IPsec settings. 2. Enable IPsec settings.
3. Confirm IPsec transmission.
• After configuring IPsec, you can use "ping" command to check if the connection is establishedcorrectly. Because the response is slow during initial key exchange, it may take some time toconfirm that transmission has been established.
• When using the touch panel model
• If you cannot access Web Image Monitor due to IPsec configuration problems, disable IPsecunder [Administrator Tools] on the control panel, and then access Web Image Monitor.
• When using the four-line LCD panel model
• If you cannot access Web Image Monitor due to IPsec configuration problems, disable IPsecunder [Admin. Tools] on the control panel, and then access Web Image Monitor.
• When using the touch panel model
• For details about disabling IPsec using the control panel, see page 274 "Administrator ToolsSettings (When Using the Touch Panel Model)".
• When using the four-line LCD panel model
• For details about disabling IPsec using the control panel, seepage 316 "Administrator ToolsSettings (When Using the Four-line LCD Panel Model)".
Transmission Using IPsec
479

Specifying Encryption Key Exchange Settings
• This function is available only when an administrator password is specified.
1. Start the web browser and access the machine by entering its IP address.
The top page of Web Image Monitor appears.
2. Click [IPsec Settings].
3. Click the [IPsec Policy List] tab.
4. Select the number of the setting you want to modify in the list.
5. Enter the administrator password, and then click [Change].
6. Modify the IPsec related settings as necessary.
7. Enter the administrator password, and then click [Apply].
8. Click the [IPsec Global Settings] tab, and then select [Active] in [IPsec Function].
9. If necessary, specify [Default Policy], [Broadcast and Multicast Bypass], and [All ICMPBypass] also.
10. Enter the administrator password, and then click [Apply].
• An administrator password can be specified in the [Administrator] tab.
Specifying IPsec Settings on the Computer
Specify exactly the same settings for IPsec SA settings on your computer as are specified for the IPsecSettings on the machine. Setting methods differ according to the computer's operating system. Thefollowing procedure is based on Windows 10 in an IPv4 environment as an example.
1. On the [Start] menu, click [Control Panel], [System and Security], and then click[Administrative Tools].
2. Double-click [Local Security Policy], and then click [IP Security Policies on LocalComputer].
3. In the "Action" menu, click [Create IP Security Policy...].
The IP Security Policy Wizard appears.
4. Click [Next].
5. Enter a security policy name in "Name", and then click [Next].
6. Clear the "Activate the default response rule" check box, and then click [Next].
7. Select "Edit properties", and then click [Finish].
12. Appendix
480

8. In the "General" tab, click [Settings...].
9. In "Authenticate and generate a new key after every", enter the same validity period (inminutes) that is specified on the machine in [IKE Life Time], and then click [Methods...].
10. Confirm that the Encryption Algorithm ("Encryption"), Hash Algorithm ("Integrity"), andIKE Diffie-Hellman Group ("Diffie-Hellman Group") settings in "Security methodpreference order" all match those specified on the machine in [IKE Settings].
If the settings are not displayed, click [Add...].
11. Click [OK] twice.
12. Click [Add...] in the "Rules" tab.
The Security Rule Wizard appears.
13. Click [Next].
14. Select "This rule does not specify a tunnel", and then click [Next].
15. Select the type of network for IPsec, and then click [Next].
16. Click [Add...] in the IP Filter List.
17. In [Name], enter an IP Filter name, and then click [Add...].
The IP Filter Wizard appears.
18. Click [Next].
19. In [Description:], enter a name or a detailed explanation of the IP filter, and then click[Next].
You may click [Next] and proceed to the next step without entering any information in this field.
20. Select "My IP Address" in "Source address", and then click [Next].
21. Select "A specific IP Address or Subnet" in "Destination address", enter the machine's IPaddress, and then click [Next].
22. For the IPsec protocol type, select "Any", and then click [Next].
23. Click [Finish], and then click [OK].
24. Select the IP filter that you have just created, and then click [Next].
25. Click [Add...] in the Filter Action.
The Filter Action Wizard appears.
26. Click [Next].
27. In [Name], enter a Filter Action name, and then click [Next].
28. Select "Negotiate security", and then click [Next].
29. Select "Allow unsecured communication if a secure connection cannot be established.",and then click [Next].
30. Select "Custom" and click [Settings].
Transmission Using IPsec
481

31. In "Integrity algorithm", select the authentication algorithm that was specified on themachine.
32. In "Encryption algorithm", select the encryption algorithm that specified on the machine.
33. In "Session key settings", select "Generate a new key every", and enter the validityperiod (in seconds) that was specified on the machine.
34. Click [OK].
35. Click [Next].
36. Click [Finish].
37. Select the filter action that you have just created, and then click [Next].
38. Select one of options for an authentication method, and then click [Next].
39. Click [Finish], and then click [OK].
The new IP security policy (IPsec settings) is specified.
40. Click [IP Security Policies on Local Computer].
41. Select the security policy that you have just created, right click on it, and then click[Assign].
IPsec settings on the computer are enabled.
• To disable the computer's IPsec settings, select the security policy, right click, and then click [Un-assign].
Enabling and Disabling IPsec Using the Control Panel
• [IPsec] is displayed when a password is set in [Admin. Tools Lock].
• When using the touch panel model
• For details about [Admin. Tools Lock], see page 274 "Administrator Tools Settings (WhenUsing the Touch Panel Model)".
• When using the four-line LCD panel model
• For details about [Admin. Tools Lock], see page 316 "Administrator Tools Settings (WhenUsing the Four-line LCD Panel Model)".
When using the touch panel model
1. Press the [Setting] icon on the [Home] screen.
2. Press [Administrator Tools].
3. Enter the password using the number keys, and then press [OK].
12. Appendix
482

4. Press [ ] twice.
5. Press [IPsec].
6. Press [Active] or [Inactive].
When using the four-line LCD panel model
1. Press the [User Tools] key.
2. Press the [ ] or [ ] key to select [Admin. Tools], and then press the [OK] key.
3. Enter the password using the number keys, and then press [OK] key.
4. Press the [ ] or [ ] key to select [IPsec], and then press the [OK] key.
5. Press the [ ] or [ ] key to select [Active] or [Inactive] and then press the [OK] key.
6. Press the [User Tools] key to return to the initial screen.
• A password for accessing the [Administrator Tools] menu can be specified in [Admin. Tools Lock].
• When using the touch panel model
• For details about [Admin. Tools Lock], see page 274 "Administrator Tools Settings (WhenUsing the Touch Panel Model)".
• You can press [Exit] to exit to the previous level of the menu tree.
• When using the four-line LCD panel model
• For details about [Admin. Tools Lock], see page 316 "Administrator Tools Settings (WhenUsing the Four-line LCD Panel Model)".
Transmission Using IPsec
483

Notes about the Toner• Proper operation cannot be guaranteed if any third-party toner is used.
• Depending on printing conditions, there are cases where the printer cannot print the number ofsheets indicated in the specifications.
• Replace the print cartridge if the printed image suddenly becomes pale or blurred.
• When operating the machine for the first time, use the print cartridge supplied with this machine. Ifthis cartridge is not initially used, the following problems may occur:
• When using the touch panel model
• "Replace Required Soon:Print Cartr." will be displayed before the toner runs out.
• "Replacement Required: Print Cartr." will be displayed when the toner runs out, butinstead the printed image suddenly becomes pale or blurred.
• When using the four-line LCD panel model
• "Replace Required Soon:" will be displayed before the toner runs out.
• "Replacement Required:" will be displayed when the toner runs out, but instead theprinted image suddenly becomes pale or blurred.
• When using the touch panel model
• The lifetime of the photo conductor, which is built into the print cartridge, is taken into accountin displaying "Replace Required Soon:Print Cartr.". If the photo conductor stops workingbefore the toner runs out, "Replace Required Soon:Print Cartr." may be displayed.
• When using the four-line LCD panel model
• The lifetime of the photo conductor, which is built into the print cartridge, is taken into accountin displaying "Replace Required Soon:". If the photo conductor stops working before the tonerruns out, "Replace Required Soon:" may be displayed.
12. Appendix
484

Specifications of the MachineThis section lists the machine's specifications.
• We have obtained each author's permission for the use of applications including open-sourcesoftware applications. For details about the copyright information for these software applications,see About Open Source Software License.
General Function Specifications
Item Description
Configuration Desktop
Print process Laser electrostatic transfer
Maximum paper size for scanningusing the exposure glass
A4, Letter (81/2 × 11 inches)
Maximum paper size for scanningusing the ADF
Legal (81/2 × 14 inches)
Maximum paper size for printing Legal (81/2 × 14 inches)
Warm-up time (23 °C, 71.6 °F) 30 seconds or less
Paper sizes For details, see page 77 "Supported Paper".
Paper type For details, see page 77 "Supported Paper".
Paper output capacity (80 g/m2, 20lb)
50 sheets
Paper input capacity (80 g/m2, 20lb)
• Tray 1
250 sheets
• Bypass tray
50 sheets
ADF capacity (80 g/m2, 20 lb) 35 sheets
Memory 256 MB
Specifications of the Machine
485

Item Description
Power requirements
220-240 V, 4 A, 50/60 Hz
120-127 V, 7.7 A, 60Hz
Power consumption
The power level when the main switchis turned off and the power cord isplugged into an outlet: 1 W or less
• M 320FB/320F
• Maximum
960 W
• Ready
69.4 W
• During printing
520 W
• M 320
• Maximum
960 W
• Ready
68.6 W
• During printing
514 W
Power consumption
The power level when the main switchis turned off and the power cord isplugged into an outlet: 1 W or less
• Maximum
960 W
• Ready
65.7 W
• During printing
527 W
Noise emission • Sound power level
Stand-by: 30.0 dB (A)
During printing: 67.0 dB (A)
• Sound pressure level
Stand-by: 21.5 dB (A)
During printing: 57.0 dB (A)
12. Appendix
486

Item Description
Machine dimensions (Width × Depth ×Height)
• M 320
405 × 392 × 407 mm (15.9 ×15.4 × 16.0 inches)
• M 320FB/320F
405 × 392 × 420 mm (15.9 ×15.4 × 16.5 inches)
Weight (machine body withconsumables)
18 kg (40 lb.) or less
• Sound power level and sound pressure level are actual values measured in accordance with ISO7779.
• Sound pressure level is measured from the position of the bystander.
Printer Function Specifications
Item Description
Printing speed 32 pages per minute (A4), 34 pages per minute (Letter)
Resolution 600 × 600 dpi (maximum: 1200 × 1200 dpi)
First print speed 7.5 seconds or less
Interface • Ethernet (10BASE-T, 100BASE-TX)
• USB 2.0
Printer language PCL6, PCL5e, PostScript3
Fonts (PCL6, PCL5e, PostScript3) 80 fonts
Specifications of the Machine
487

Copier Function Specifications
Item Description
Maximum resolution (scanning and printing) • Exposure glass
Scanning: 600 × 600 dpi
Printing: 600 × 600 dpi
• ADF
Scanning: 300 × 600 dpi
Printing: 600 × 600 dpi
First copy speed (A4, at 23 °C, 71.6 °F) 13 seconds
Multiple copy speed 32 pages per minute
Reproduction ratio • Fixed ratio
50%, 71%, 82%, 93%, 100%, 122%,141%, 200% ,400%
50%, 65%, 78%, 93%, 100%, 129%,155%, 200%, 400%
• Zoom ratio
25% to 400%
Copy quantity 99
Scanner Function Specifications
Item Description
Maximum scanning area (horizontal × vertical) • Exposure glass
216 × 297 mm (8.5 × 11.7 inches)
• ADF
216 × 356 mm (8.5 × 14 inches)
12. Appendix
488

Item Description
Maximum resolution when scanning from thecontrol panel (Scan to E-mail, Scan to FTP, Scanto Folder, Scan to USB)
• Exposure glass
600 × 600 dpi
• ADF
300 × 300 dpi
Maximum resolution when scanning from acomputer (TWAIN)
• Exposure glass
19200 × 19200 dpi
• ADF
600 × 600 dpi
Maximum resolution when scanning from acomputer (WIA)
600 × 600 dpi
Gradation • Input: 16 bit color processing
• Output: 8 bit color processing
Scanning time • Black and white: 10 seconds or less
• Color: 20 seconds or less (A4/600 dpi/Compressed)
Not including transfer time.
ADF throughput • Black and white: 13 image per minute
• Full Color: 4 image per minute
Interface Ethernet (10BASE-T, 100BASE-TX), USB 2.0,USB 2.0 Host
Sendable file formats TIFF, JPEG, PDF
Address book Maximum 100 items
Number of redials: 1
Specifications of the Machine
489

Item Description
Protocol • Network
TCP/IP
• E-mail transmission
SMTP, POP
• Scan to Folder
SMB, FTP
• You can use SMB protocol (139/TCP,137/UDP) or CIFS protocol (445/TCP) for sending folders with SMB.
• The Scan to Folder function with SMBprotocol (139/TCP, 137/UDP) isenabled under NetBIOS over TCP/IPenvironment only.
• You cannot use the Scan to Folderfunction with SMB under NetBEUI.
Fax Function Specifications (When Using the Touch Panel Model)
Fax transmission and reception
Item Description
Access line • Public switched telephone networks (PSTN)
• Private branch exchange (PBX)
Transmission mode ITU-T Group 3 (G3)
Scan line density • 8 dots per mm × 3.85 line per mm (200 ×100 dpi)
• 8 dots per mm × 7.7 line per mm (200 ×200 dpi)
Transmission time 3 seconds (8 dots per mm × 3.85 line per mm,33.6 kbps, MMR, ITU-T # 1 chart)
Transfer rate 33.6 kbps to 2400 bps (auto shift down system)
12. Appendix
490

Item Description
Data compression methods MH, MR, MMR
Memory capacity • Transmission
100 sheets
• Reception
95 sheets
(8 dots per mm × 3.85 line per mm, MMR, ITU-T# 1 chart)
Address book • Speed dial
100 items
• Quick dial
8 items
• Number of redials for Fax
1
Internet Fax transmission and reception
Item Description
Interface Ethernet (10BASE-T, 100BASE-TX), Wi-Fi
Communication protocols • Transmission
SMTP, TCP/IP
• Reception
POP3, TCP/IP
Transmission function E-mail
E-mail format Single/Multi-part, MIME Conversion
Attached file forms (transmission): TIFF-S (MHencoding)
Attached file forms (reception): TIFF-S/TIFF-F(MH/MR/MMR encoding)
Authentication method SMTP-AUTH, POP before SMTP, A-POP
Original size A4 (Length is up to 356 mm)
Specifications of the Machine
491

Item Description
Scan line density 8 dots per mm × 3.85 line per mm (200 × 100dpi)
8 dots per mm × 7.7 line per mm (200 × 200dpi)
Destination machine specifications • Communication protocols
• Transmission
SMTP, TCP/IP
• Reception
POP3, TCP/IP
• E-mail format
• Format
MIME, Base64
• Content-Type
Image/tiff
Multipart/mixed (text/plain, Image/tiff (attached file forms))
• Data format
• Profile
TIFF-S
• Encoding
MH
• Original size
A4
• Resolution (dpi)
200 × 100, 200 × 200
Paper Feed Unit PB1130
Paper capacity
250 sheets
Paper size
For details, see page 77 "Supported Paper".
12. Appendix
492

Dimensions (Width × Depth × Height)
370 × 392 × 89 mm (14.6 × 15.4 × 3.5 inches)
Paper weight
For details, see page 77 "Supported Paper".
Weight
Less than 3 kg (6.6 lb.)
Specifications of the Machine
493

Consumables
• Our products are engineered to meet high standards of quality and functionality, and werecommend that you use only the expendable supplies available at an authorized dealer.
Print Cartridge
Print cartridge Average printable number of pages per cartridge *1
Black 3,500 or 7,000 pages
*1 The printable number of pages is based on pages that are compliant with ISO/IEC 19798 and the imagedensity set as the factory default. ISO/IEC 19798 is an international standard on measurement of printablepages, set by the International Organization for Standardization.
• For information about consumables, see our website.
• If print cartridges are not changed when necessary, printing will become impossible. For easyreplacement, we recommend you purchase and store extra print cartridges.
• The actual number of printable pages varies depending on the image volume and density, numberof pages printed at a time, paper type and paper size used, and environmental conditions such astemperature and humidity.
• Print cartridges may need to be changed sooner than indicated above due to deterioration overthe period of use.
• Print cartridges (consumables) are not covered by warranty. However, if there is a problem,contact the store where they were purchased.
• When you first use this machine, use the print cartridges packaged with the machine.
• The supplied print cartridges are good for approximately 1,000 pages (M 320/M 320FB), or7,000 pages (M 320F).
• This machine routinely performs cleaning and uses toner during this operation to maintain quality.
• To prevent a cleaning malfunction, you may need to replace a print cartridge even if it is not empty.
12. Appendix
494

Information for This Machine
User Information on Electrical & Electronic Equipment (mainlyEurope and Asia)
Users in the countries where this symbol shown in this section has been specified innational law on collection and treatment of E-waste
Our Products contain high quality components and are designed to facilitate recycling.
Our products or product packaging are marked with the symbol below.
The symbol indicates that the product must not be treated as municipal waste. It must be disposed ofseparately via the appropriate return and collection systems available. By following these instructionsyou ensure that this product is treated correctly and help to reduce potential impacts on the environmentand human health, which could otherwise result from inappropriate handling. Recycling of productshelps to conserve natural resources and protect the environment.
For more detailed information on collection and recycling systems for this product, please contact theshop where you purchased it, your local dealer or sales/service representatives.
All Other Users
If you wish to discard this product, please contact your local authorities, the shop where you bought thisproduct, your local dealer or sales/service representatives.
For Users in India
This product including components, consumables, parts and spares complies with the "India E-wasteRule" and prohibits use of lead, mercury, hexavalent chromium, polybrominated biphenyls orpolybrominated diphenyl ethers in concentrations exceeding 0.1 weight % and 0.01 weight % forcadmium, except for the exemptions set in the Rule.
Information for This Machine
495

For Turkey only
Note for the Battery and/or Accumulator Symbol (For EU countries only)
In accordance with the Battery Directive 2006/66/EC Article 20 Information for end-users Annex II,the above symbol is printed on batteries and accumulators.
This symbol means that in the European Union, used batteries and accumulators should be disposed ofseparately from your household waste.
In the EU, there are separate collection systems for not only used electrical and electronic products butalso batteries and accumulators.
Please dispose of them correctly at your local community waste collection/recycling centre.
Environmental Advice for Users (mainly Europe)
Users in the EU, Switzerland and Norway
Consumables yield
Please refer to either the User's Manual for this information or the packaging of the consumable.
Recycled paper
The machine can use recycled paper which is produced in accordance with European standardEN 12281:2002 or DIN 19309. For products using EP printing technology, the machine can printon 64 g/m2 paper, which contains less raw materials and represents a significant resourcereduction.
12. Appendix
496

Duplex printing (if applicable)
Duplex printing enables both sides of a sheet of paper to be used. This saves paper and reducesthe size of printed documents so that fewer sheets are used. We recommend that this feature isenabled whenever you print.
Toner and ink cartridge return program
Toner and ink cartridge for recycling will be accepted free of charge from users in accordance withlocal regulations.
For details about the return program, please refer to the Web page below or consult your serviceperson.
https://www.ricoh-return.com/
Energy efficiency
The amount of electricity a machine consumes depends as much on its specifications as it does onthe way you use it. The machine is designed to allow you to reduce electricity costs by switching toReady mode after it prints the last page. If required, it can immediately print again from this mode.If no additional prints are required and a specified period of time passes, the device switches to anenergy saving mode.
In these modes, the machine consumes less power (watts). If the machine is to print again, it needsa little longer to return from an energy saving mode than from Ready mode.
For maximum energy savings, we recommend that the default setting for power management isused.
Notice to NFC Users (mainly Europe)
Model Name: M 320, M 320FB, M 320F
Manufacturer:
Ricoh Co., Ltd.
3-6 Nakamagome 1-chome, Ohta-ku, Tokyo. 143-8555, Japan
Importer (CE marking, ProdSG):
Ricoh Europe SCM B.V.
Blankenweg 24, 4612 RC Bergen op Zoom, The Netherlands
Importer (UKCA marking):
Ricoh UK Limited
800 Pavilion Drive, Ricoh House, Northampton, NN4 7YL
Declaration of Conformity
Notice to Users in EEA Countries
Information for This Machine
497

This product complies with the essential requirements and provisions of Directive 2014/53/EU.
The CE Declaration of Conformity is available by accessing the URL: https://www.ricoh.com/products/ce_doc2/
and selecting the product applicable.
NFC
Operating frequency: 13.56 MHz
Maximum radio-frequency power: less than 42 dBµA/m (at 10m)
* Maximum radio-frequency power is depended on power value of reader/writer device
NOTES TO USERS REGARDING FACSIMILE UNIT (NEW ZEALAND)
NOTICE TO USERS (NEW ZEALAND)
• The grant of a Telepermit for any item of terminal equipment indicates only that Telecom hasaccepted that the item complies with minimum conditions for connection to its network. It indicatesno endorsement of the product by Telecom, nor does it provide any sort of warranty. Above all, itprovides no assurance that any item will work correctly in all respects with another item ofTelepermitted equipment of a different make or model, nor does it imply that any product iscompatible with all of Telecom's network services.
• This equipment is not capable, under all operating conditions, of correct operation at the higherspeeds for which it is designed. Telecom will accept no responsibility should difficulties arise in suchcircumstances.
• Devices connected to the telephone port may lose their memory if this fax machine is on line forextended periods. To prevent this, such devices should have the facility for battery or similarbackup of memory.
• This device may be subject to ringing or bell tinkle when certain other devices are connected to thesame line. If this occurs, the problem should not be referred to the Telecom Faults Service.
• This equipment should not be used under any circumstances that may constitute a nuisance to otherTelecom customers.
• Telepermitted equipment only may be connected to the auxiliary telephone port. The auxiliarytelephone port is not specifically designed for 3-wire connected equipment that may not respond toincoming ringing when attached to this port.
Notes to Users in the State of California (Notes to Users in USA)
Perchlorate Material - special handling may apply. See: www.dtsc.ca.gov/hazardouswaste/perchlorate
12. Appendix
498

Notes to Users in the United States of America
Part 15 of the FCC Rules
Note:
This equipment has been tested and found to comply with the limits for a Class B digital device,pursuant to Part 15 of the FCC Rules. These limits are designed to provide reasonable protectionagainst harmful interference in a residential installation. This equipment generates, uses and canradiate radio frequency energy and, if not installed and used in accordance with the instructions,may cause harmful interference to radio communications. However, there is no guarantee thatinterference will not occur in a particular installation. If this equipment does cause harmfulinterference to radio or television reception, which can be determined by turning the equipment offand on, the user is encouraged to try to correct the interference by one or more of the followingmeasures:
• Reorient or relocate the receiving antenna.
• Increase the separation between the equipment and receiver.
• Connect the equipment into an outlet on a circuit different from that to which the receiver isconnected.
• Consult the dealer or an experienced radio /TV technician for help.
Caution:
Changes or modifications not expressly approved by the party responsible for compliance couldvoid the user's authority to operate the equipment.
Certification
This device complies with Part 15 of the FCC Rules.
Operation is subject to the following two conditions:
(1) This device may not cause harmful interference, and
(2) this device must accept any interference received, including interference that may causeundesired operation.
Responsible party: Ricoh USA, Inc.
Address: 300 Eagleview Boulevard, Suite 200 Exton, PA 19341, U.S.A.
Telephone number: 610-296-8000
Product Name: Multifunction Digital Product(Copier/Printer/Scanner)
Model Number: M 320, M 320FB, M 320F
Information for This Machine
499

Part 68 of the FCC Rules regarding Facsimile Unit
1. This equipment complies with Part 68 of the FCC rules and requirements adopted by the ACTA. Onthe cover of this equipment is a label that contains, among other information, a product identifier inthe format US:AAAEQ##TXXXXX. If requested, this number must be provided to the telephonecompany.
2. This equipment uses the RJ11C USOC jack.
3. A plug and jack used to connect this equipment to the premises wiring and telephone network mustcomply with the applicable FCC Part 68 rules and requirements adopted by the ACTA. Acompliant telephone cord and modular plug is provided with this product. It is designed to beconnected to a compatible modular jack that is also compliant. See installation instructions fordetail.
4. The REN is used to determine the number of devices that may be connected to a telephone line.Excessive RENs on a telephone line may result in the devices not ringing in response to an incomingcall. In most but not all areas, the sum of RENs should not exceed five (5.0). To be certain of thenumber of devices that may be connected to a line, as determined by the total RENs, contact thelocal telephone company. The REN for this product is part of the product identifier that has theformat US:AAAEQ##TXXXXX. The digits represented by ## are the REN without a decimal point(e.g., 03 is a REN of 0.3).
5. If this equipment causes harm to the telephone network, the telephone company will notify you inadvance that temporary discontinuance of service may be required. But if advance notice is notpractical, the telephone company will notify the customer as soon as possible. Also, you will beadvised of your right to file a complaint with the FCC if you believe it is necessary.
6. The telephone company may make changes in its facilities, equipment, operations or proceduresthat could affect the operation of the equipment. If this happens the telephone company willprovide advance notice in order for you to make necessary modifications to maintain uninterruptedservice.
7. If trouble is experienced with this equipment, for repair or warranty information, please contactRicoh USA, Inc. Customer Support Department at 1-888-456-6457. If this device is causingproblems with your telephone network, the telephone company may request that you disconnectthe equipment until the problem is resolved.
8. In the event of operation problems (document jam, copy jam, communication error indication), seethe manual provided with this machine for instruction on resolving the problem.
9. Connection to party line service is subject to state tariffs. Contact the state public utility commission,public service commission or corporation commission for information.
10. If your home has specially wired alarm equipment connected to the telephone line, ensure theinstallation of this equipment does not disable your alarm equipment. If you have questions aboutwhat will disable alarm equipment, consult your telephone company or a qualified installer.
12. Appendix
500

WHEN PROGRAMMING EMERGENCY NUMBERS AND/OR MAKING TEST CALLS TOEMERGENCY NUMBERS:
1. Remain on the line and briefly explain to the dispatcher the reason for the call before hangingup.
2. Perform such activities in the off-peak hours, such as early morning hours or late evenings.
The Telephone Consumer Protection Act of 1991 makes it unlawful for any person to use a computer orother electronic device, including FAX machines, to send any message unless such message clearlycontains in a margin at the top or bottom of each transmitted page or on the first page of thetransmission, the date and time it is sent and an identification of the business or other entity, or otherindividual sending the message and the telephone number of the sending machine or such business,other entity, or individual. (The telephone number provided may not be a 900 number or any othernumber for which charges exceed local or long-distance transmission charges.)
In order to program this information into your FAX machine, you should complete the following steps:Follow the FAX HEADER programming procedure in the Programming chapter of the operatinginstructions to enter the business identification and telephone number of the terminal or business. Thisinformation is transmitted with your document by the FAX HEADER feature. In addition to the information,be sure to program the date and time into your machine.
Notes to Canadian Users regarding Facsimile Unit
This product meets the applicable Innovation, Science and Economic Development Canada technicalspecifications.
The Ringer Equivalence Number (REN) indicates the maximum number of devices allowed to beconnected to a telephone interface. The termination of an interface may consist of any combination ofdevices subject only to the requirement that the sum of the RENs of all the devices not exceed five.
Remarques à l'attention des utilisateurs canadiens
Le présent produit est conforme aux spécifications techniques applicables d'Innovation, Sciences etDéveloppement économique Canada
L'indice d'équivalence de la sonnerie (IES) sert à indiquer le nombre maximal de dispositifs qui peuventêtre raccordés à une interface téléphonique. La terminaison d'une interface peut consister en unecombinaison quelconque de dispositifs, à la seule condition que la somme des IES de tous les dispositifsn'excède pas cinq.
Information for This Machine
501

ENERGY STAR Program
ENERGY STAR® Program Requirements for Imaging Equipment
The ENERGY STAR® Program Requirements for Imaging Equipment encourage energy conservationby promoting energy efficient computers and other office equipment.
The program backs the development and dissemination of products that feature energy savingfunctions.
It is an open program in which manufacturers participate voluntarily.
Energy Star standards and logos are internationally uniform.
Saving Energy
This machine is equipped with the following Energy Saver modes: Energy Saver mode 1 and EnergySaver mode 2. If the machine has been idle for a certain period of time, the machine automaticallyenters Energy Saver mode.
The machine recovers from Energy Saver mode when it receives a print job, prints a received fax, orwhen any key is pressed.
Energy Saver mode 1
The machine enters Energy Saver mode 1 if the machine has been idle for about 30 seconds. Ittakes less time to recover from Energy Saver mode 1 than from power-off state or Energy Savermode 2, but power consumption is higher in Energy Saver mode 1 than in Energy Saver mode 2.
Energy Saver mode 2
The machine enters Energy Saver mode 2 after the period of time specified for this setting ispassed. Power consumption is lower in Energy Saver mode 2 than in Energy Saver mode 1, but ittakes longer to recover from Energy Saver mode 2 than from Energy Saver mode 1.
12. Appendix
502

Specifications
Energy Saver mode 1 Power Consumption*1
• M 320FB/320F
47.6 W
• M 320
46.9 W
44.4 W
Default Time 30 seconds
Recovery Time*1
• M 320FB/320F
7.97 seconds
• M 320
7.83 seconds
7.93 seconds
Information for This Machine
503

Energy Saver mode 2 Power Consumption*1
• M 320FB/320F
0.928 W
• M 320
0.715 W
0.871 W
Default Time 30 seconds
Recovery Time*1
• M 320FB/320F
10.71 seconds
• M 320
10.11 seconds
10.41 seconds
Duplex Function*2 Standard
*1 Recovery time and power consumption may differ depending on the conditions and environment of themachine.
*2 Achieves ENERGY STAR energy savings; product fully qualifies when packaged with (or used with) aduplex tray and the duplex function is enabled as an option.
For details about Energy Saver modes, see page 274 "Administrator Tools Settings (When Using theTouch Panel Model)" or page 316 "Administrator Tools Settings (When Using the Four-line LCD PanelModel)".
• You cannot use NFC or the USB port in Energy Saver mode. Push any key to recover from EnergySaver mode.
12. Appendix
504

TrademarksGoogle Chrome, and Google Play are trademarks or registered trademarks of Google LLC.
macOS, TrueType, App Store, and Safari are trademarks of Apple Inc., registered in the U.S. and othercountries.
Firefox® is a registered trademark of the Mozilla Foundation.
LINUX® is the registered trademark of Linus Torvalds in the U.S. and other countries.
BOSS LinuxTM is registered trademark of CDAC.
Microsoft®, Windows®, Windows Server®, and Internet Explorer® are either registered trademarks ortrademarks of Microsoft Corporation in the United States and/or other countries.
PCL® is a registered trademark of Hewlett-Packard Company.
QR Code is a registered trademark of DENSO WAVE INCORPORATED in Japan and in other countries.
Red Hat is a registered trademark of Red Hat, Inc.
Wi-Fi® and Wi-Fi Direct® are registered trademarks of Wi-Fi Alliance.
The proper names of Internet Explorer 10 and 11 are as follows:
• Internet Explorer® 10
• Internet Explorer® 11
The proper name of Edge is Microsoft® EdgeTM.
The proper names of the Windows operating systems are as follows:
• The product names of Windows 8.1 are as follows:
Microsoft® Windows® 8.1
Microsoft® Windows® 8.1 Pro
Microsoft® Windows® 8.1 Enterprise
• The product names of Windows 10 are as follows:
Microsoft® Windows® 10 Home Premium
Microsoft® Windows® 10 Pro
Microsoft® Windows® 10 Enterprise
Microsoft® Windows® 10 Education
• The product names of Windows Server 2012 are as follows:
Microsoft® Windows Server® 2012 Foundation
Microsoft® Windows Server® 2012 Essentials
Microsoft® Windows Server® 2012 Standard
• The product names of Windows Server 2012 R2 are as follows:
Microsoft® Windows Server® 2012 R2 Foundation
Trademarks
505

Microsoft® Windows Server® 2012 R2 Essentials
Microsoft® Windows Server® 2012 R2 Standard
• The product names of Windows Server 2016 are as follows:
Microsoft® Windows Server® 2016 Standard
Microsoft® Windows Server® 2016 Essentials
Microsoft® Windows Server® 2016 MultiPoint® Premium Server
• The product names of Windows Server 2019 are as follows:
Microsoft® Windows Server® 2019 Standard
Microsoft® Windows Server® 2019 Essentials
Other product names used herein are for identification purposes only and might be trademarks of theirrespective companies. We disclaim any and all rights to those marks.
Microsoft product screen shots reprinted with permission from Microsoft Corporation.
12. Appendix
506

INDEX
@Remote..................................................... 292, 331
A
Address book..............................................156, 258
address book (LAN-Fax)........................... 218, 221
ADF.......................................................................399
ADF (Auto Document Feeder)..................... 94, 399
Administrator password..............15, 274, 316, 380
Administrator settings.......................................... 380
Administrator Tools settings....................... 274, 316
Attaching Paper Feed Unit TK1220.................... 27
Authentication......................................................477
Authorized reception.......................................... 233
Auto e-mail notification settings......................... 363
B
Backup settings....................................................381
Basic operation..................................147, 164, 237
Broadcast function.............................................. 209
Bypass tray.............................................................62
Bypass Tray......................................................... 342
Bypass tray setting priority................................. 341
C
Canceling a copy................................................120
Canceling a fax...................................................217
Canceling a Transmission...................................205
Cleaning.............................................395, 396, 398
Community.................................................. 363, 365
Confidential document........................................107
Configuration page.283, 284, 322, 323, 379, 388
Configuring Network SettingsEthernet............................................................................ 466Wireless LAN.................................................................. 469
Configuring the machinePrinting the configuration page................283, 322, 388Using Smart Organizing Monitor..................................385Using the control panel...................................................237
Confirming informationPrinter driver settings.......................................................100Status information............................................................385
Consumables.......................................................494
Control panel.........................................................22
Control Panel......................................................... 24
Copier features........................................... 241, 293
Copier mode screen........................................... 116
Copy2-sided copy........................................................ 125, 130Basic operation............................................................... 118Combine............................................................... 125, 130Copying onto envelopes...................................................63Enlarge.............................................................................122ID Card copy...................................................................135Reduce............................................................................. 122Scan settings....................................................................139Specifications.................................................................. 488
Copy key................................................................40
Counter information............................................ 339
Cover sheet..........................................................221
D
Date and time settings.........................................383
Date setting..........................................................383
Default settings.................................................... 381
Density..................................................................188
Disclaimer.............................................................. 14
DNS setting..........................................................362
Duplex..................................................................340
E
E-mail notification 1............................................ 363
E-mail notification 2............................................ 363
Encryption............................................................ 477
Encryption key exchange.......................... 479, 480
Energy saver mode.................................... 384, 502
Entering characters......................................... 49, 52
Error messages.................................................... 403
Exposure glass.....................................................398
Extending tray 1.................................................... 61
Exterior................................................................... 19
F
FaxFax setting workflows..................................................... 192LAN-Fax...........................................................................216Lists/Reports....................................................................235Receiving a fax................................................................222Registering destinations.................................................. 195Sending a fax..................................................................201
507

Specifications.................................................................. 490
Fax destinations.........................195, 197, 198, 350
Fax features......................................................... 249
Fax journal.................................................. 284, 323
Fax mode screen.................................................193
Fax Number Confirmation..................................345
Fax only mode.....................................................225
Fax printing..........................................................231
Fax Received File Processing............................. 345
Fax Speed Dial destination list.................. 284, 323
Fax TX/RX standby file list..................................379
FAX/TAD mode.................................................. 226
FAX/TEL Auto mode........................................... 225
FAX/TEL manual mode.......................................224
Forwarding..................................................228, 229
Function priority..................................................... 40
G
General status..................................................... 358
I
I/O timeout..........................................................348
IKE settings...........................................................375
Image density............................................. 139, 214
Immediate transmission.......................................201
Installing Smart Organizing MonitorInstalling Smart Organizing Monitor.............................465
Interior.................................................................... 21
Internet fax.................................................. 226, 369
Internet fax transmission and reception.............491
Introduction............................................................ 13
IPsec global settings............................................375
IPsec policy settings.............................................375
IPsec settings........................................................375
IPsec transmission................................................477
IPv6 configuration............................................... 359
IPv6 environment.................................................359
J
Job cancel............................................................105
L
LAN-Fax...............................................................216
Language.............................................................337
Lists............................235, 283, 284, 322, 323, 379
Loading paper....................................................... 58
Locked Print..........................................................108
M
Machine information...........................................340
Machine settings................................................. 386
Maintaining the machineCleaning the machine....................395, 396, 398, 399Replacing the print cartridge..........................................391
Maintenance page............................284, 323, 379
mDNS setting.......................................................360
Memory transmission..........................................201
Menu chart.......................................................... 239
Model-specific information...................................13
Moving.................................................................400
Multi-access...........................................................41
N
Network application...........................................360
Network print setting...........................................360
Network settings................................ 286, 325, 358
Network status.....................................................358
Network Wizard (When Using the Four-line LCDPanel Model).......................................................330
Network Wizard (When Using the Touch PanelModel)................................................................. 287
Non-recommended paper................................... 87
Notes....................................................................484
O
On hook dial....................................................... 211
Operation modes.................................................. 40
Operation Tools.....................................................45
Option settings.......................................................98
Original.................................................................. 93
Original type....................................................... 140
P
Page counter........................................................339
Paper Feed Unit TK1220.............................27, 492
Paper jam.................................. 423, 425, 427, 432
Paper mismatch................................................... 104
Paper recommendations.......................................93
Paper size...............................................................66
Paper Storage........................................................88
508

Paper tray............................................................ 338
Paper types............................................................ 80Bond Paper.........................................................................80Cardstock........................................................................... 80Color Paper........................................................................80Envelope.............................................................................80Label Paper........................................................................ 80Letterhead...........................................................................80Plain Paper......................................................................... 80Preprinted Paper................................................................ 80Prepunched Paper............................................................. 80Recycled Paper..................................................................80Thick Paper 1..................................................................... 80Thick Paper 2..................................................................... 80Thin Paper...........................................................................80
PCL6..................................................................... 384
Placing originals.................................................... 92
POP3 settings.......................................................368
PrintBasic operation............................................................... 102Combine............................................................................. 97Duplex................................................................................ 97Printing on envelopes........................................................ 63Specifications.................................................................. 487
Print area................................................................88
Print cartridge..............................................391, 494
Print counter......................................................... 339
Print functions.......................................................112
Print output functions........................................... 113
Print quality functions.......................................... 112
Printer features............................................ 265, 305
Priority tray...........................................................347
Q
Quick Dial destination list.......................... 284, 323
R
Reception mode.................................................. 222
Redial function.....................................................210
Registering information....................................... 316Destinations.......................................................... 156, 195E-mail address.................................................................153Fax number......................................................................274Folder....................................................................147, 164FTP server.........................................................................155
Reports................................................283, 322, 379
Resend key...........................................................168
Reset settings........................................................381
Resolution....................................................189, 214
Restore settings.................................................... 382
Restrict user function................................... 352, 356
S
SA (Security Association)................................... 478
ScanRegistering destinations.................................................. 156SANE............................................................................... 185Scan settings....................................................................186Scan to E-mail................................................................. 153Scan to Folder...................................................... 147, 164Scan to FTP...................................................................... 155Scan to USB.....................................................................169Scanning from Smart Organizing Monitor................... 174TWAIN.............................................................................178WIA..................................................................................181
Scan destinations...................... 156, 162, 168, 350
Scan size..............................................................186
Scan to E-mail.............................................153, 156
Scan to Folder..................................................... 156
Scan to FTP..................................................155, 156
Scanner destination list......................284, 323, 379
Scanner feature.......................................... 246, 298
Scanner function..................................................488
Scanner journal.......................................... 284, 323
Scanner mode screen......................................... 145
Scanner Send Setting..........................................360
Select paper........................................................ 344
Select Paper Tray................................................ 344
Sending a fax...................................................... 203
Set date................................................................383
Set time.................................................................383
Shortcut to function................................................47
Smart Organizing Monitor.................................385
SMTP settings.......................................................367
SNMPv1/v2 settings..........................................363
SNMPv1/v2 trap............................................... 363
SNMPv3 settings.................................................365
SNMPv3 trap...................................................... 365
Sound volume adjustment...................................341
Special senders................................................... 232
Specifications............................ 485, 487, 488, 490
509

Specifying a custom paper size........................... 72
Specifying the paper type and paper size.. 71, 73,74
Speed Dial......................................... 197, 198, 209
Standby file list............................................284, 323
Status information................................................338
Status messages..........................................403, 420
Supported paper...................................................77
System......................................................... 363, 365
System information..................................... 338, 385
System settings................................... 259, 300, 341
T
TCP/IP status....................................................... 358
Time setting.......................................................... 383
TLS security setting...............................................361
Toner.................................................................... 338
Toner saving........................................................ 348
Top page............................................................. 336
Trademarks.......................................................... 505
Transmission mode..............................................201
Tray 1..................................................................... 58
Tray 2...................................................................342
Tray paper settings............................ 269, 310, 341
Troubleshooting................................. 447, 449, 450Error and status messages appear on Smart OrganizingMonitor............................................................................ 420Error and status messages on the screen...................... 403Other problems................... 434, 435, 438, 441, 461
TWAIN scanning.................................................178
U
User code............................................................ 356
W
Web Image Monitor...........................................335
What you can do with this machineCopier function................................................................115Fax function..................................................................... 191Printer function....................................................................97Scanner function............................................................. 143
Wireless LAN settings.................................370, 387
Wireless settings..................................................370
510

MEMO
511

MEMO
512 EN GB EN US EN AU M0ER-8504A


EN GB EN US EN AU M0ER-8504A © 2021, 2022 Ricoh Co., Ltd.