OKLAHOMA STATE DEPARTMENT OF HEALTH
62
OKLAHOMA STATE DEPARTMENT OF HEALTH SKILLS AND PROCEDURES PERFORMANCE RECORD NURSE AIDE TRAINING PROGRAM STUDENT INFORMATION STUDENT'S NAME:________________________________________SSN#:__________________ ADDRESS:_______________________________________________________________________ CITY:___________________________________________STATE:_________ZIP+4:___________ DATE OF BIRTH:_________DATE OF HIRE:_________TRAINING START DATE:__________ TELEPHONE NUMBER:________________________________ COURSE INFORMATION NAME OF TRAINING PROGRAM:__________________________________________________ ADDDRESS:_____________________________________________________________________ CITY:________________________________________STATE:________ZIP+4:_______________ RN SUPERVISOR:_________________________________DATE COMPLETED:_____________ TELEPHONE NUMBER:________________________________ CLINICAL SITE(S) NAME OF FACILITY:_____________________________________________________________ ADDRESS:_______________________________________________________________________ CITY:___________________________________________STATE:________ZIP+4:____________ INSTRUCTOR FOR CLINICAL SUPERVISION:________________________________________ CLINICAL COMPLETION DATE:___________________________________________________ NAME OF FACILITY:_____________________________________________________________ ADDRESS:_______________________________________________________________________ CITY:___________________________________________STATE:________ZIP+4:____________ INSTRUCTOR FOR CLINICAL SUPERVISION:________________________________________ CLINICAL COMPLETION DATE:___________________________________________________
-
Upload
khangminh22 -
Category
Documents
-
view
0 -
download
0
Transcript of OKLAHOMA STATE DEPARTMENT OF HEALTH

OKLAHOMA STATE DEPARTMENT OF HEALTH
SKILLS AND PROCEDURES PERFORMANCE RECORD
NURSE AIDE TRAINING PROGRAM
STUDENT INFORMATION
STUDENT'S NAME:________________________________________SSN#:__________________
ADDRESS:_______________________________________________________________________
CITY:___________________________________________STATE:_________ZIP+4:___________
DATE OF BIRTH:_________DATE OF HIRE:_________TRAINING START DATE:__________
TELEPHONE NUMBER:________________________________
COURSE INFORMATION
NAME OF TRAINING PROGRAM:__________________________________________________
ADDDRESS:_____________________________________________________________________
CITY:________________________________________STATE:________ZIP+4:_______________
RN SUPERVISOR:_________________________________DATE COMPLETED:_____________
TELEPHONE NUMBER:________________________________
CLINICAL SITE(S)
NAME OF FACILITY:_____________________________________________________________
ADDRESS:_______________________________________________________________________
CITY:___________________________________________STATE:________ZIP+4:____________
INSTRUCTOR FOR CLINICAL SUPERVISION:________________________________________
CLINICAL COMPLETION DATE:___________________________________________________

Page 1 of 62
CORE SKILLS AND PROCEDURES
1. Handwashing *
25. Electric Razor
2. Gloves *
26. Denture Care
3. Supine Position
27. Oral Care
4. Lateral Position
28. Oral care for Unconscious
5. Fowler's Position
29. Comb Hair
6. Semi-Fowler's Position
30. Assist to Eat
7. Sit On Edge of Bed
31. Feeding
8. Assist Resident to Move to Head of Bed
32. Shower
9. Protective Devices
33. Bed Bath
10. Walking
34. Perineal Care
11. Assist with Walker
35. Assist to Bathroom
12. Assist to Chair
36. Bedside Commode
13. Transfer to Wheelchair and Transport
37. Bedpan/Fracture Pan
14. Drape and Undrape
38. Urinal
15. Rub Back
39. Empty Urinary Drainage Bag *
16. Heel or Elbow Protectors
40. Weight
17. Check Skin
41. Pulse and Respiration
18. Range of Motion
42. Oral Temperature
19. Change Gown
43. Axillary Temperature
20. Dressing a Dependent Resident
44. Blood Pressure
21. Unoccupied Bed *
45. Choking *
22. Occupied Bed
46. Fire *
23. Fingernail Care
47. Seizures *
24. Safety Razor
48. Falling or Fainting *
* Can be simulated in laboratory if clinical experience is not available.

Page 2 of 62
When beginning and ending a procedure, the learner must perform specific steps to ensure
residents' rights and provide for COMMUNICATION, privacy, safety, infection control and
Comfort. The learner is expected to perform all steps appropriate for the individual resident.
INITIAL STEPS STEP RATIONALE
1. ASK NURSE ABOUT RESIDENT'S
NEEDS, ABILITIES AND LIMITATIONS,
IF NECESSARY
1. Prepares you to provide best possible care to
resident
2. KNOCK BEFORE ENTERING ROOM 2. Maintains resident's right to privacy
3. GREET RESIDENT BY NAME AND
CHECK IDENTIFICATION
3. Shows respect for resident
4. IDENTIFY YOURSELF BY NAME AND
TITLE
4. Resident has right to know identity and
qualifications of their care giver
5. EXPLAIN WHAT YOU WILL BE
DOING. ENCOURAGE RESIDENT TO
HELP AS ABLE
5. Promotes understanding and independence
6. GATHER SUPPLIES AND CHECK
EQUIPMENT
6. Organizes work and provides for safety
7. WASH YOUR HANDS 7. Provides for Infection Control
8. CLOSE CURTAINS, DRAPES AND
DOORS. KEEP RESIDENT COVERED.
EXPOSE ONLY AREA OF RESIDENT'S
BODY NECESSARY TO DO PROCEDURE
8. Maintains resident's right to privacy and
dignity
9. RAISE SIDE RAILS BEFORE RAISING
BED TO COMFORTABLE WORKING
HEIGHT, USUALLY WAIST HIGH.
LOWER SIDE RAIL ON SIDE CARE IS
BEING GIVEN
9. Prevents injury to you and to resident
10. WEAR GLOVES AS INDICATED BY
STANDARD PRECAUTIONS
10. Protects you from contamination by bodily
fluids
11. USE GOOD BODY MECHANICS 11. Prevents you from injuring yourself
I verify that this procedure was taught and successfully demonstrated according to OSDH Standards:
Student's Signature:__________________________________________________ Date:_____________
Instructor's Signature:_________________________________________________Date:_____________
Name/Location of Lab:_________________________________________________________________
OR
Name/Location of Clinical Site:__________________________________________________________
UPON COMPLETION OF EACH PROCEDURE, PROVIDE A COPY TO THE NURSE AIDE TRAINEE

Page 3 of 62
FINAL STEPS STEP RATIONALE
1. USE GOOD BODY MECHANICS 1. Prevents you from injuring yourself
2. BE CERTAIN RESIDENT IS
COMFORTABLE AND IN GOOD
ALIGNMENT
2. Reduces stress and improves resident's
sense of well being
3. LOWER BED HEIGHT AND POSITION
SIDE RAILS AS APPROPRIATE
3. Provides for safety. Bed rails are considered
a restraint and can only be used with a
Doctor's order
4. PLACE CALL LIGHT AND WATER
WITHIN RESIDENT'S REACH
4. Allows resident to communicate with staff
as necessary
5. ASK RESIDENT IF ANY THING ELSE
IS NEEDED
5. Encourages resident to express needs
6. THANK RESIDENT 6. Shows your respect toward resident
7. REMOVE SUPPLIES AND CLEAN
EQUIPMENT ACCORDING TO
CURRENT NURSING PRACTICES
7. Facilities have different methods of disposal
and sanitation. You need to carry out the
policies of your facility
8. REMOVE GLOVES IF APPLICABLE
AND WASH YOUR HANDS
8. Provides for Infection Control
9. OPEN CURTAINS, DRAPES AND
DOOR ACCORDING TO RESIDENT'S
WISHES
9. Provides resident with right to choose
10. PERFORM A SAFETY CHECK OF
RESIDENT AND ENVIRONMENT
10. Prevents injury to you and resident
11. REPORT UNEXPECTED FINDINGS
TO NURSE
11. Provides nurse with necessary information
to properly assess resident's condition and
needs
12. DOCUMENT PROCEDURES
ACCORDING TO CURRENT NURSING
PRACTICES
12. What you write is a legal record of what
you did. If you don't document it, legally it
didn't happen
I verify that this procedure was taught and successfully demonstrated according to OSDH Standards:
Student's Signature:__________________________________________________ Date:_____________
Instructor's Signature:_________________________________________________Date:_____________
Name/Location of Lab:_________________________________________________________________
OR
Name/Location of Clinical Site:__________________________________________________________
UPON COMPLETION OF EACH PROCEDURE, PROVIDE A COPY TO THE NURSE AIDE TRAINEE

Page 4 of 62
PROCEDURE 1: HANDWASHING STEP RATIONALE
1. Turn on faucet with a clean paper towel 1. Faucet may be used by residents/visitors
and should be kept as clean as possible
2. ADJUST WATER TO ACCEPTABLE
TEMPERATURE
2. Hot water opens pores which may cause
irritation
3. Angle arms down holding hands lower than
elbows. Wet hands and wrists
3. The hands are most contaminated. Water
should run from cleanest to
dirtiest
4. Put soap in hands
5. LATHER ALL AREAS OF HANDS AND
WRISTS, RUBBING VIGOROUSLY FOR
AT LEAST 10 SECONDS
5. Lather and friction loosen skin oils and
allow pathogens to be rinsed away
6. CLEAN NAILS BY RUBBING THEM IN
PALM OF OTHER HAND
6. Most pathogens on hands come from
beneath the nails (McGinley et al, 1988)
7. RINSE THOROUGHLY, RUNNING
WATER DOWN FROM WRISTS TO
FINGERTIPS
7. Wrists are cleanest, fingertips dirtiest. Soap
left on skin may cause irritation and rashes
8. Pat dry with paper towel 8. Skin may chap if left damp
9. TURN OFF FAUCET WITH PAPER
TOWEL AND DISCARD TOWEL
IMMEDIATELY
9. Hands will be recontaminated if you touch
the dirty faucet with clean hands or if the
towel is used after turning off the faucet
I verify that this procedure was taught and successfully demonstrated according to OSDH Standards:
Student's Signature:__________________________________________________ Date:_____________
Instructor's Signature:_________________________________________________Date:_____________
Name/Location of Lab:_________________________________________________________________
OR
Name/Location of Clinical Site:__________________________________________________________
UPON COMPLETION OF EACH PROCEDURE, PROVIDE A COPY TO THE NURSE AIDE TRAINEE

Page 5 of 62
PROCEDURE 2: GLOVES STEP RATIONALE
1. Wash hands (according to procedure 1)
2. Put on gloves
3. Check for tears 3. Damaged gloves do not protect you or the
resident
4. Perform procedure
5. REMOVE ONE GLOVE BY GRASPING
OUTER SURFACE JUST
BELOW CUFF
5. Both gloves are contaminated and should
not touch unprotected skin
6. PULL GLOVE OFF SO THAT IT IS
INSIDE OUT
6. The dirtiest part of glove is concealed
7. HOLD THE REMOVED GLOVE IN
YOUR GLOVED HAND
8. PLACE TWO FINGERS OF
UNGLOVED HAND UNDER CUFF OF
OTHER GLOVE AND PULL DOWN SO
FIRST GLOVE IS INSIDE
SECOND GLOVE
8. Touching the outside of the glove with an
ungloved hand causes contamination
9. DISPOSE OF GLOVES WITHOUT
CONTAMINATING HANDS
9. Hands may be contaminated if gloves are
rolled or moved from hand to hand
10. Wash hands (according to procedure 1)
I verify that this procedure was taught and successfully demonstrated according to OSDH Standards:
Student's Signature:__________________________________________________ Date:_____________
Instructor's Signature:_________________________________________________Date:_____________
Name/Location of Lab:_________________________________________________________________
OR
Name/Location of Clinical Site:__________________________________________________________
UPON COMPLETION OF EACH PROCEDURE, PROVIDE A COPY TO THE NURSE AIDE TRAINEE
Page 6 of 62
PROCEDURE 3: SUPINE POSITION STEP RATIONALE
1. DO INITIAL STEPS
2. Lower head of bed 2. When bed is flat, resident can be moved
without working against gravity
3. Move resident to head of bed if necessary
(according to procedure 4)
3. Places resident in proper position in bed
4. POSITION RESIDENT FLAT ON BACK
WITH LEGS SLIGHTLY APART
4. Prevents friction in thigh area
5. Align resident's shoulders and hips 5. Reduces stress to spine
6. Use supportive padding if necessary 6. Maintains position, prevents friction and
reduces pressure on bony prominences.
Padding may be used under neck, shoulders,
arms, hands, ankles, lower back. Never use
padding under knees unless directed by nurse
as it may restrict blood flow to lower legs
7. DO FINAL STEPS
I verify that this procedure was taught and successfully demonstrated according to OSDH Standards:
Student's Signature:__________________________________________________ Date:_____________
Instructor's Signature:_________________________________________________Date:_____________
Name/Location of Lab:_________________________________________________________________
OR
Name/Location of Clinical Site:__________________________________________________________
UPON COMPLETION OF EACH PROCEDURE, PROVIDE A COPY TO THE NURSE AIDE TRAINEE

Page 7 of 62
PROCEDURE 4: LATERAL POSITION STEP RATIONALE
1. DO INITIAL STEPS
2. Place resident in supine position (according
to procedure 3)
2. Places resident in proper position and
alignment
3. Move resident to side of bed closest to you 3. Allows resident to be positioned in center of
bed when turned
4. Cross resident's arms over chest 4. Reduces stress on shoulders during move
5. Slightly bend knee of nearest leg to you or
cross nearest leg over farthest leg at ankle
5. Reduces stress on hip joint during turn
6. PLACE YOUR HANDS UNDER
RESIDENT'S SHOULDER BLADE AND
BUTTOCK. TURN RESIDENT AWAY
FROM YOU ONTO SIDE
6. Prevents stress on shoulder and hip joints
7. PLACE SUPPORTIVE PADDING
BEHIND BACK, BETWEEN KNEES AND
ANKLES, AND UNDER TOP ARM
7. Maintains position, prevents friction and
reduces pressure on bony prominences
8. DO FINAL STEPS
I verify that this procedure was taught and successfully demonstrated according to OSDH Standards:
Student's Signature:__________________________________________________ Date:_____________
Instructor's Signature:_________________________________________________Date:_____________
Name/Location of Lab:_________________________________________________________________
OR
Name/Location of Clinical Site:__________________________________________________________
UPON COMPLETION OF EACH PROCEDURE, PROVIDE A COPY TO THE NURSE AIDE TRAINEE

Page 8 of 62
PROCEDURE 5: FOWLER'S POSITION STEP RATIONALE
1. DO INITIAL STEPS
2. Move resident to supine position (according
to procedure 3)
2. Places resident in proper position and
alignment
3. ELEVATE BED 45 to 60 DEGREES 3. Improves breathing, allows resident to see
room and visitors
4. Use supportive padding if necessary 4. Maintains position, prevents friction and
reduces pressure on bony prominences.
Padding may be used under neck, shoulders,
arms, hands, ankles, lower back. Never use
padding under knees unless directed by nurse
as it may restrict blood flow to lower legs
5. DO FINAL STEPS
I verify that this procedure was taught and successfully demonstrated according to OSDH Standards:
Student's Signature:__________________________________________________ Date:_____________
Instructor's Signature:_________________________________________________Date:_____________
Name/Location of Lab:_________________________________________________________________
OR
Name/Location of Clinical Site:__________________________________________________________
UPON COMPLETION OF EACH PROCEDURE, PROVIDE A COPY TO THE NURSE AIDE TRAINEE

Page 9 of 62
PROCEDURE 6: SEMI-FOWLER'S POSITION STEP RATIONALE
1. DO INITIAL STEPS
2. Move resident to supine position (according
to procedure 3)
2. Places resident in proper position and
alignment
3. ELEVATE HEAD OF BED 30 TO 45
DEGREES
3. Improves breathing, allows resident to see
room and visitors
4. Use supportive padding if necessary 4. Maintains position, prevents friction and
reduces pressure on bony prominences.
Padding may be used under neck, shoulders,
arms, hands, ankles, lower back. Never use
padding under knees unless directed by nurse
as it may restrict blood flow to lower legs
5. DO FINAL STEPS
I verify that this procedure was taught and successfully demonstrated according to OSDH Standards:
Student's Signature:__________________________________________________ Date:_____________
Instructor's Signature:_________________________________________________Date:_____________
Name/Location of Lab:_________________________________________________________________
OR
Name/Location of Clinical Site:__________________________________________________________
UPON COMPLETION OF EACH PROCEDURE, PROVIDE A COPY TO THE NURSE AIDE TRAINEE

Page 10 of 62
PROCEDURE 7: SIT ON EDGE OF BED STEP RATIONALE
1. DO INITIAL STEPS
2. ADJUST BED HEIGHT TO LOWEST
POSITION
2. Allows resident's feet to touch floor when
sitting. Reduces chance of injury if resident
falls
3. Move resident to side of bed closest to you 3. Resident will be close to edge of bed when
sitting up
4. Raise head of bed to sitting position, if
necessary
4. Resident can move without working against
gravity
5. PLACE ONE ARM UNDER
RESIDENT'S SHOULDER BLADES AND
THE OTHER ARM UNDER RESIDENT'S
THIGHS
5. Placing your arm under the resident's neck
may cause injury
6. ON COUNT OF THREE, SLOWLY
TURN RESIDENT INTO SITTING
POSITION WITH LEGS DANGLING
OVER SIDE OF BED
7. SUPPORT FOR 10 TO 15 SECONDS,
CHECK FOR DIZZINESS
7. Change of position may cause dizziness due
to a drop in blood pressure
8. ASSIST RESIDENT TO PUT ON SHOES
OR SLIPPERS
8. Prevents sliding on floor and protects
resident's feet from contamination
9. MOVE RESIDENT TO EDGE OF BED
SO FEET ARE FLAT ON FLOOR
9. Allows resident to be in stable position
10. DO FINAL STEPS
I verify that this procedure was taught and successfully demonstrated according to OSDH Standards:
Student's Signature:__________________________________________________ Date:_____________
Instructor's Signature:_________________________________________________Date:_____________
Name/Location of Lab:_________________________________________________________________
OR
Name/Location of Clinical Site:__________________________________________________________
UPON COMPLETION OF EACH PROCEDURE, PROVIDE A COPY TO THE NURSE AIDE TRAINEE

Page 11 of 62
PROCEDURE 8: ASSIST RESIDENT TO MOVE TO HEAD OF
BED STEP RATIONALE
1. DO INITIAL STEPS
2. LOWER HEAD OF BED AND LEAN
PILLOW AGAINST HEAD BOARD
2. When bed is flat, resident can be moved
without working against gravity. Pillow
prevents injury should resident hit the head of
bed
3. Ask resident to bend knees, put feet flat on
mattress
3. Gives resident leverage to help with move
4. PLACE ONE ARM UNDER
RESIDENT'S SHOULDER BLADES AND
THE OTHER ARM UNDER RESIDENT'S
THIGHS
4. Putting your arm under resident's neck
could cause injury
5. ASK RESIDENT TO PUSH WITH FEET
ON COUNT OF THREE
5. Enables resident to help as much as possible
and reduces strain on you
6. Place pillow under resident's head 6. Provides for resident's comfort
7. DO FINAL STEPS
I verify that this procedure was taught and successfully demonstrated according to OSDH Standards:
Student's Signature:__________________________________________________ Date:_____________
Instructor's Signature:_________________________________________________Date:_____________
Name/Location of Lab:_________________________________________________________________
OR
Name/Location of Clinical Site:__________________________________________________________
UPON COMPLETION OF EACH PROCEDURE, PROVIDE A COPY TO THE NURSE AIDE TRAINEE

Page 12 of 62
PROCEDURE 9: PROTECTIVE DEVICES STEP RATIONALE
1. DO INITIAL STEPS
2. APPLY VEST ACCORDING TO
MANUFACTURER'S DIRECTIONS
2. If device is not applied according to
manufacturer's directions, legally you are
responsible for injuries
3. APPLY SOFT BELT ACCORDING TO
MANUFACTURER'S DIRECTIONS
3. If device is not applied according to
manufacturer's directions, legally you are
responsible for injuries
4. FASTEN WITH QUICK RELEASE TIE
TO MOVEABLE PART OF BED FRAME
OR KICK SPURS OF WHEELCHAIR
4. In an emergency, tie must release quickly.
Device must move with resident if head of bed
is elevated. When fastened to kick spurs, belt
is at 45o angle, reducing pressure on the
diaphragm
5. PLACE OPEN HAND FLAT BETWEEN
RESIDENT AND PROTECTIVE DEVICE
5. Ensures that device fits properly and is
comfortable for the resident
6. DO FINAL STEPS
7. VISIT RESIDENT AT LEAST EVERY
HOUR AND RELEASE PROTECTIVE
DEVICE AT LEAST EVERY TWO HOURS
7. Meets regulations. Visiting includes
observing resident for safety and comfort and
spending time communicating with resident.
Releasing includes removing device, assisting
with Activities of Daily Living and
repositioning
I verify that this procedure was taught and successfully demonstrated according to OSDH Standards:
Student's Signature:__________________________________________________ Date:_____________
Instructor's Signature:_________________________________________________Date:_____________
Name/Location of Lab:_________________________________________________________________
OR
Name/Location of Clinical Site:__________________________________________________________
UPON COMPLETION OF EACH PROCEDURE, PROVIDE A COPY TO THE NURSE AIDE TRAINEE

Page 13 of 62
PROCEDURE 10: WALKING STEP RATIONALE
1. DO INITIAL STEPS
2. ASSIST RESIDENT TO SIT ON EDGE
OF BED (according to procedure 7)
2. Allows resident to adjust to position change
3. ASSIST resident to stand on count of three 3. Allows you and resident to work together
4. allow resident to gain balance 4. Change in position may cause dizziness due
to a drop in blood pressure
5. STAND TO SIDE AND SLIGHTLY
BEHIND RESIDENT
5. Allows clear path for the resident and puts
you in a position to assist resident if needed
6. Walk at resident's pace 6. Reduces risk of resident falling
7. DO FINAL STEPS
I verify that this procedure was taught and successfully demonstrated according to OSDH Standards:
Student's Signature:__________________________________________________ Date:_____________
Instructor's Signature:_________________________________________________Date:_____________
Name/Location of Lab:_________________________________________________________________
OR
Name/Location of Clinical Site:__________________________________________________________
UPON COMPLETION OF EACH PROCEDURE, PROVIDE A COPY TO THE NURSE AIDE TRAINEE

Page 14 of 62
PROCEDURE 11: ASSIST WITH WALKER STEP RATIONALE
1. DO INITIAL STEPS
2. ASSIST RESIDENT TO SIT ON EDGE
OF BED (according to procedure 7)
2. Allows resident to adjust to position change
3. PLACE WALKER IN FRONT OF
RESIDENT
4. Have resident grasp both arms of walker 4. Helps steady resident
5. Brace leg of walker with your foot and
place your hand on top of walker
5. Prevents walker from moving
6. ASSIST RESIDENT TO STAND ON
COUNT OF THREE
6. Allows you and resident to work together
7. STAND TO SIDE AND SLIGHTLY
BEHIND RESIDENT
7. Puts you in a position to assist resident if
needed
8. Have resident move walker ahead 6 to 10
inches then step up to walker
8. Resident may fall forward if he steps too far
into walker
9. DO FINAL STEPS
I verify that this procedure was taught and successfully demonstrated according to OSDH Standards:
Student's Signature:__________________________________________________ Date:_____________
Instructor's Signature:_________________________________________________Date:_____________
Name/Location of Lab:_________________________________________________________________
OR
Name/Location of Clinical Site:__________________________________________________________
UPON COMPLETION OF EACH PROCEDURE, PROVIDE A COPY TO THE NURSE AIDE TRAINEE

Page 15 of 62
PROCEDURE 12: ASSIST TO CHAIR STEP RATIONALE
1. DO INITIAL STEPS
2. PLACE CHAIR ON RESIDENT'S
UNAFFECTED SIDE. BRACE FIRMLY
AGAINST SIDE OF BED
2. Unaffected side supports weight. Helps
stabilize chair and is shortest distance for
resident to turn
3. ASSIST RESIDENT TO SIT ON EDGE
OF BED (according to procedure 7)
3. Allows resident to adjust to position change
4. Stand at resident's side 4. Puts you in position to help resident if
needed
5. HAVE RESIDENT GRASP FARTHEST
ARM OF CHAIR
5. Maintains stability during move
6. TELL RESIDENT TO STAND ON
COUNT OF THREE
6. Allows you and resident to work together
7. Help resident slowly turn and sit
8. Check body alignment 8. Shoulders and hips should be in straight line
to reduce stress to spine and joints
9. DO FINAL STEPS
I verify that this procedure was taught and successfully demonstrated according to OSDH Standards:
Student's Signature:__________________________________________________ Date:_____________
Instructor's Signature:_________________________________________________Date:_____________
Name/Location of Lab:_________________________________________________________________
OR
Name/Location of Clinical Site:__________________________________________________________
UPON COMPLETION OF EACH PROCEDURE, PROVIDE A COPY TO THE NURSE AIDE TRAINEE

Page 16 of 62
PROCEDURE 13: TRANSFER TO WHEELCHAIR AND
TRANSPORT STEP RATIONALE
1. DO INITIAL STEPS
2. PLACE WHEELCHAIR ON
RESIDENT'S UNAFFECTED SIDE.
BRACE FIRMLY AGAINST SIDE OF BED
WITH WHEELS LOCKED AND FOOT
RESTS OUT OF WAY
2. Unaffected side supports weight. Helps
stabilize chair and is the shortest distance for
the resident to turn. Wheel locks prevent chair
from moving
3. ASSIST RESIDENT TO SIT ON EDGE
OF BED (according to procedure 7)
3. Allows resident to adjust to position change
4. STAND IN FRONT OF RESIDENT AND
BLOCK RESIDENT'S FEET WITH YOUR
FEET
4. Allows you to stabilize resident and prevent
slipping
5. PLACE YOUR HANDS UNDER
RESIDENT'S ARMS AND AROUND
RESIDENT'S SHOULDER BLADES
5. Reduces pressure on armpits and shoulders
6. ASK RESIDENT TO PLACE HIS
HANDS ON YOUR UPPER ARMS
6. You may be injured if resident grabs around
your neck
7. ON THE COUNT OF THREE, HELP
RESIDENT INTO STANDING POSITION
BY STRAIGHTENING YOUR KNEES
7. Allows you and resident to work together.
Minimizes strain on your back
8. ALLOW RESIDENT TO GAIN
BALANCE, CHECK FOR DIZZINESS
8. Change of position may cause dizziness due
to drop in blood pressure
9. MOVE YOUR FEET 18 INCHES APART
AND SLOWLY TURN RESIDENT
9. Improves your base of support and allows
space for resident to turn
10. LOWER RESIDENT INTO
WHEELCHAIR BY BENDING YOUR
KNEES AND LEANING FORWARD
10. Minimizes strain on your back
11. Align resident's body and position foot rests 11. Shoulders and hips should be in straight line
to reduce stress on spine and joints
12. TRANSPORT RESIDENT FORWARD
THROUGH OPEN DOORWAY AFTER
CHECKING FOR TRAFFIC
12. Provides for safety
13. TRANSPORT RESIDENT UP TO
CLOSED DOOR, OPEN DOOR AND
BACK WHEELCHAIR THROUGH
DOORWAY
13. Prevents door from closing on resident
14. TAKE RESIDENT TO DESTINATION
AND LOCK WHEELCHAIR
14. Prevents wheelchair from rolling if resident
attempts to get up
15. DO FINAL STEPS

Page 17 of 62
PROCEDURE 13: TRANSFER TO WHEELCHAIR AND TRANSPORT (Continued)
I verify that this procedure was taught and successfully demonstrated according to OSDH Standards:
Student's Signature:__________________________________________________ Date:_____________
Instructor's Signature:_________________________________________________Date:_____________
Name/Location of Lab:_________________________________________________________________
OR
Name/Location of Clinical Site:__________________________________________________________
UPON COMPLETION OF EACH PROCEDURE, PROVIDE A COPY TO THE NURSE AIDE TRAINEE

Page 18 of 62
PROCEDURE 14: DRAPE AND UNDRAPE STEP RATIONALE
1. DO INITIAL STEPS
2. TO DRAPE, UNFOLD DRAPE OVER
TOP LINEN
2. Maintains resident's dignity and right to
privacy by not exposing body. Keeps resident
warm
3. Ask resident to hold drape or tuck drape
under resident's shoulders
3. Keeps drape in place while linen is being
removed
4. ROLL TOP LINEN FROM BENEATH
DRAPE TO FOOT OF BED
4. Reduces spread of infection and makes it
easier to re-cover resident
5. Perform procedure
6. TO UNDRAPE, COVER RESIDENT
WITH TOP LINEN
6. Maintains resident's dignity and right to
privacy by not exposing body. Keeps resident
warm
7. Ask resident to hold top of linen or tuck
under resident's shoulders
8. ROLL DRAPE FROM UNDER TOP
LINEN TO FOOT OF BED AND REMOVE
8. Reduces spread of infection
9. DO FINAL STEPS
I verify that this procedure was taught and successfully demonstrated according to OSDH Standards:
Student's Signature:__________________________________________________ Date:_____________
Instructor's Signature:_________________________________________________Date:_____________
Name/Location of Lab:_________________________________________________________________
OR
Name/Location of Clinical Site:__________________________________________________________
UPON COMPLETION OF EACH PROCEDURE, PROVIDE A COPY TO THE NURSE AIDE TRAINEE

Page 19 of 62
PROCEDURE 15: RUB BACK STEP RATIONALE
1. DO INITIAL STEPS
2. PLACE RESIDENT ONTO SIDE WITH
BACK TOWARD YOU
3. Expose back and shoulders
4. RUB LOTION BETWEEN YOUR HANDS 4. Warms lotion and increases resident's
comfort
5. MAKE LONG, FIRM STROKES ALONG
SPINE FROM BUTTOCKS TO
SHOULDERS. MAKE CIRCULAR
STROKES DOWN ON SHOULDERS,
UPPER ARMS AND BACK TO BUTTOCKS
5. Long upward strokes release muscle
tension. Circular strokes increase circulation
in muscle areas
6. Repeat for at least 3-5 minutes 6. Ensures minimum benefit from procedure
7. Gently pat off excess lotion with towel. Cover
and position resident as requests
7. Provides for resident's comfort
8. DO FINAL STEPS
I verify that this procedure was taught and successfully demonstrated according to OSDH Standards:
Student's Signature:__________________________________________________ Date:_____________
Instructor's Signature:_________________________________________________Date:_____________
Name/Location of Lab:_________________________________________________________________
OR
Name/Location of Clinical Site:__________________________________________________________
UPON COMPLETION OF EACH PROCEDURE, PROVIDE A COPY TO THE NURSE AIDE TRAINEE

Page 20 of 62
PROCEDURE 16: HEEL OR ELBOW PROTECTORS STEP RATIONALE
1. DO INITIAL STEPS
2. Check skin on resident's heels or elbows 2. Allows you to identify early signs of skin
breakdown
3. Report any unexpected findings to nurse
immediately
3. Provides nurse with necessary information to
properly assess resident's condition and needs
4. APPLY HEEL OR ELBOW
PROTECTORS ACCORDING TO
MANUFACTURER'S DIRECTIONS
4. Equipment used incorrectly may cause
discomfort and injury to resident
5. PLACE WIDTH OF TWO FINGERS
BETWEEN RESIDENT AND
PROTECTOR
5. Ensures that device fits properly and is
comfortable for the resident
6. DO FINAL STEPS
I verify that this procedure was taught and successfully demonstrated according to OSDH Standards:
Student's Signature:__________________________________________________ Date:_____________
Instructor's Signature:_________________________________________________Date:_____________
Name/Location of Lab:_________________________________________________________________
OR
Name/Location of Clinical Site:__________________________________________________________
UPON COMPLETION OF EACH PROCEDURE, PROVIDE A COPY TO THE NURSE AIDE TRAINEE

Page 21 of 62
PROCEDURE 17: CHECK SKIN STEP RATIONALE
1. DO INITIAL STEPS
2. Drape resident (according to procedure 14) 2. Maintains resident's dignity and right to
privacy by not exposing body. Keeps resident
warm
3. CHECK BONY AREAS INCLUDING
EARS, SHOULDER BLADES, ELBOWS,
COCCYX, HIPS, KNEES, ANKLES AND
HEELS FOR REDNESS AND WARMTH
3. Redness and warmth indicates that the skin is
under pressure and position should be changed
more frequently
4. CHECK FRICTION AREAS
INCLUDING UNDER BREASTS AND
ARMS, BETWEEN BUTTOCKS, GROIN,
THIGHS, SKIN FOLDS, CONTRACTED
AREAS, AND AROUND ANY TUBING
FOR REDNESS, IRRITATION,
MOISTURE AND ODOR
4. Pressure, rubbing and perspiration will cause
skin to break down
5. Undrape resident (according to procedure 14)
6. REPORT ANY UNUSUAL FINDINGS
TO THE NURSE IMMEDIATELY
6. Provides nurse with necessary information to
properly assess resident's condition and needs
7. DO FINAL STEPS
I verify that this procedure was taught and successfully demonstrated according to OSDH Standards:
Student's Signature:__________________________________________________ Date:_____________
Instructor's Signature:_________________________________________________Date:_____________
Name/Location of Lab:_________________________________________________________________
OR
Name/Location of Clinical Site:__________________________________________________________
UPON COMPLETION OF EACH PROCEDURE, PROVIDE A COPY TO THE NURSE AIDE TRAINEE

Page 22 of 62
PROCEDURE 18: RANGE OF MOTION STEP RATIONALE
1. DO INITIAL STEPS
2. Position resident in good body alignment 2. Reduces stress to joints
3. CHECK JOINTS. IF SWELLING,
REDNESS OR WARMTH ISPRESENT, OR
IF RESIDENT COMPLAINS OF PAIN,
NOTIFY NURSE. CONTINUE
PROCEDURE ONLY IF INSTRUCTED
3. Indicates inflammation in joint which can
be worsened if procedure is continued
4. SUPPORT LIMB ABOVE AND BELOW
JOINT
4. Allows you to control joint movement and
minimize resident's discomfort
5. Begin range of motion at shoulders and
include the shoulders, elbows, wrists, thumbs,
fingers, hips, knees, ankles, and toes
6. SLOWLY MOVE JOINT IN ALL
DIRECTIONS IT NORMALLY MOVES
6. Rapid movement may cause injury
7. REPEAT MOVEMENT AT LEAST FIVE
TIMES
7. Ensures benefit from procedure
8. Encourage resident to participate as much as
possible
8. Promotes resident's independence and self-
esteem
9. STOP PROCEDURE AT ANY SIGN OF
PAIN AND REPORT TO NURSE
IMMEDIATELY
9. Pain is a warning sign for injury
10. DO FINAL STEPS
I verify that this procedure was taught and successfully demonstrated according to OSDH Standards:
Student's Signature:__________________________________________________ Date:_____________
Instructor's Signature:_________________________________________________Date:_____________
Name/Location of Lab:_________________________________________________________________
OR
Name/Location of Clinical Site:__________________________________________________________
UPON COMPLETION OF EACH PROCEDURE, PROVIDE A COPY TO THE NURSE AIDE TRAINEE
Page 23 of 62
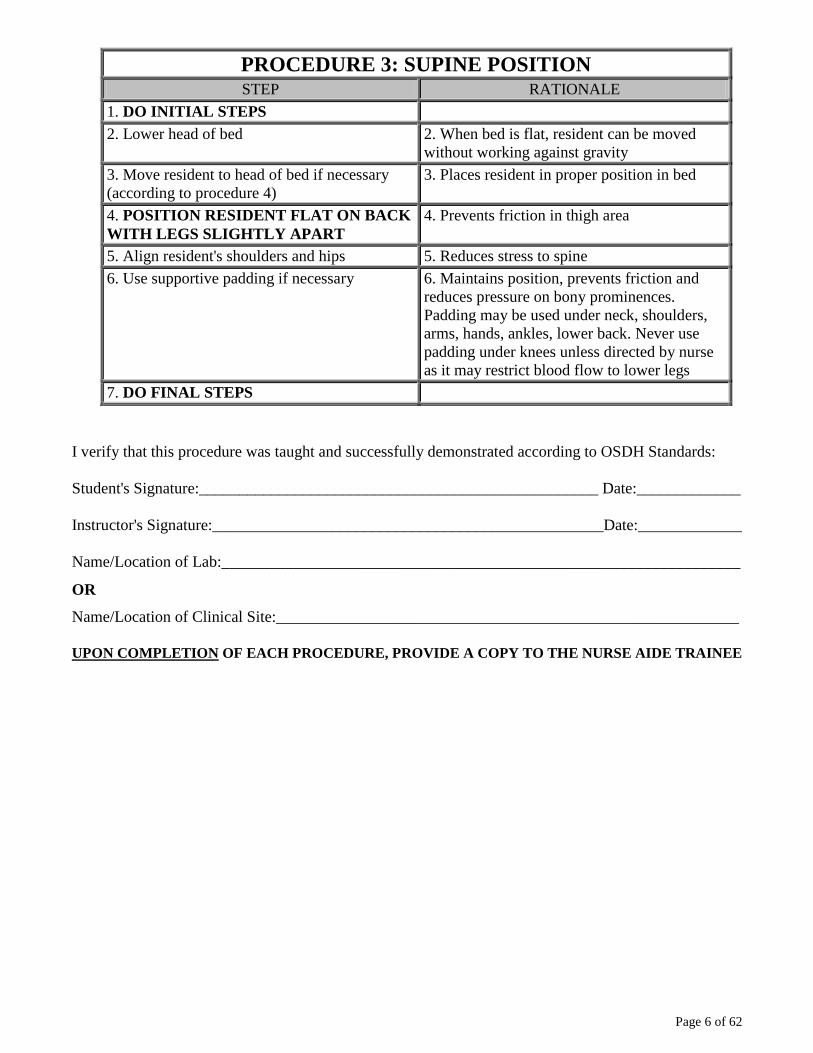
PROCEDURE 19: CHANGE GOWN STEP RATIONALE
1. DO INITIAL STEPS
2. Untie soiled gown
3. DRAW TOP SHEET OVER RESIDENT'S
CHEST
3. Maintains resident's dignity and right to
privacy by not exposing body. Keeps resident
warm
4. REMOVE RESIDENT'S ARMS FROM
GOWN, UNAFFECTED ARM FIRST
4. Undressing unaffected arm first requires
less movement
5. ROLL SOILED GOWN FROM NECK
DOWN AND REMOVE FROM BENEATH
SHEET
5. Rolling reduces spread of infection
6. SLIDE RESIDENT'S ARMS INTO
CLEAN GOWN, AFFECTED
ARM FIRST
6. Dressing affected side first requires less
movement and reduces stress to joints
7. Tie gown
8. REMOVE TOP SHEET FROM
BENEATH CLEAN GOWN AND COVER
RESIDENT
8. Maintains resident's dignity and right to
privacy
9. DO FINAL STEPS
I verify that this procedure was taught and successfully demonstrated according to OSDH Standards:
Student's Signature:__________________________________________________ Date:_____________
Instructor's Signature:_________________________________________________Date:_____________
Name/Location of Lab:_________________________________________________________________
OR
Name/Location of Clinical Site:__________________________________________________________
UPON COMPLETION OF EACH PROCEDURE, PROVIDE A COPY TO THE NURSE AIDE TRAINEE

Page 24 of 62
PROCEDURE 20: DRESSING A DEPENDENT RESIDENT STEP RATIONALE
1. DO INITIAL STEPS
2. Assist resident to choose clothing 2. Allows resident as much choice as possible
to improve self-esteem
3. Move resident onto back
4. DRAPE RESIDENT (according to
procedure 14)
4. Maintains resident's dignity and right to
privacy by not exposing body. Keeps resident
warm
5. GUIDE FEET THROUGH LEG
OPENINGS OF UNDERWEAR AND
PANTS, AFFECTED LEG FIRST. PULL
GARMENTS UP LEGS TO BUTTOCKS
5. Dressing affected side first requires less
movement and reduces stress to joints
6. SLIDE ARM INTO SHIRT SLEEVE,
AFFECTED SIDE FIRST
6. Dressing lower and upper body together
reduces number of times resident needs to be
turned
7. TURN RESIDENT ONTO
UNAFFECTED SIDE. PULL LOWER
GARMENTS OVER BUTTOCKS AND
HIP. TUCK SHIRT UNDER RESIDENT
8. TURN RESIDENT ONTO AFFECTED
SIDE. PULL LOWER GARMENTS OVER
BUTTOCKS AND HIP AND
STRAIGHTEN SHIRT
9. TURN RESIDENT ONTO BACK AND
SLIDE ARM INTO SHIRT SLEEVE.
ALIGN AND FASTEN GARMENTS
10. DO FINAL STEPS
I verify that this procedure was taught and successfully demonstrated according to OSDH Standards:
Student's Signature:__________________________________________________ Date:_____________
Instructor's Signature:_________________________________________________Date:_____________
Name/Location of Lab:_________________________________________________________________
OR
Name/Location of Clinical Site:__________________________________________________________
UPON COMPLETION OF EACH PROCEDURE, PROVIDE A COPY TO THE NURSE AIDE TRAINEE

Page 25 of 62
PROCEDURE 21: UNOCCUPIED BED STEP RATIONALE
1. Collect clean linen in order of use 1. Organizing linen allows procedure to be
completed faster
2. CARRY LINEN AWAY FROM YOUR
UNIFORM
2. If linen touches your uniform, it becomes
contaminated
3. DO INITIAL STEPS
4. PLACE LINEN ON CLEAN SURFACE
(bedside stand, overbed table or
back of chair)
4. Prevents contamination of linen
5. Put bed in flattest position 5. Allows you to make a neat, wrinkle-free bed
6. REMOVE PILLOWCASE
7. LOOSEN SOILED LINEN. ROLL
LINEN FROM HEAD TO FOOT OF BED
AND PLACE IN HAMPER/BAG, AT
FOOT OF BED OR IN CHAIR
7. Always work from cleanest (head of bed) to
dirtiest (foot of bed) to prevent spread of
infection. Rolling puts dirtiest surface of linen
inward, lessening contamination
8. FANFOLD BOTTOM SHEET TO
CENTER OF BED AND FIT CORNERS
8. Shaking linen spreads infection
9. FANFOLD TOP SHEET TO CENTER
OF BED
10. Fanfold blanket over top sheet
11. TUCK TOP LINEN UNDER FOOT OF
MATTRESS AND MITER CORNER
11. Mitering prevents resident's feet from being
restricted by or tangled in linen when getting in
or out of bed
12. MOVE TO OTHER SIDE OF BED 12. Completing one side of bed at a time allows
procedure to be completed faster and reduces
strain on you
13. FIT CORNERS OF BOTTOM SHEET,
UNFOLD TOP LINEN, TUCK IT UNDER
FOOT OF MATTRESS, AND MITER
CORNER
14. Fold top of sheet over blanket to make cuff
15. PUT ON PILLOWCASE AND PLACE
AT HEAD OF BED WITH OPEN END
AWAY FROM DOOR
16. FOR OPEN BED: MAKE TOEPLEAT
AND FANFOLD TOP LINEN TO FOOT
OF BED WITH TOP EDGE CLOSEST TO
CENTER OF BED
16. Top edge of top linen must be closest to
head of bed so resident can easily reach covers
17. FOR CLOSED BED: PULL
BEDSPREAD OVER PILLOW AND TUCK
BEDSPREAD UNDER LOWER EDGE OF
PILLOW. MAKE TOEPLEAT
17. Toepleat automatically reduces pressure of
top linen on feet when resident returns to bed
18. DO FINAL STEPS

Page 26 of 62
PROCEDURE 21: UNOCCUPIED BED (Continued)
I verify that this procedure was taught and successfully demonstrated according to OSDH Standards:
Student's Signature:__________________________________________________ Date:_____________
Instructor's Signature:_________________________________________________Date:_____________
Name/Location of Lab:_________________________________________________________________
OR
Name/Location of Clinical Site:__________________________________________________________
UPON COMPLETION OF EACH PROCEDURE, PROVIDE A COPY TO THE NURSE AIDE TRAINEE

Page 27 of 62
PROCEDURE 22: OCCUPIED BED STEP RATIONALE
1. Collect clean linen in order of use 1. Organizing linen allows procedure to be
completed faster
2. CARRY LINEN AWAY FROM YOUR
UNIFORM
2. If linen touches your uniform, it becomes
contaminated
3. DO INITIAL STEPS
4. PLACE LINEN ON CLEAN SURFACE
(bedside stand, overbed table or back of chair)
4. Prevents contamination of linen
5. Lower head of bed 5. When bed is flat, resident can be moved
without working against gravity
6. DRAPE RESIDENT (according to
procedure 14)
6. Maintains resident's dignity and right to
privacy by not exposing body. Keeps resident
warm
7. Turn resident away from you toward side rail
8. LOOSEN BOTTOM LINENS AND
ROLL LINEN TOWARD RESIDENT
TUCKING IT SNUGLY AGAINST
RESIDENT'S BACK
8. Rolling puts dirtiest surface of linen inward,
lessening contamination. The closer the linen is
rolled to resident, the easier it is to remove
from the other side
9. FANFOLD BOTTOM SHEET TO
CENTER OF BED AND FIT CORNERS
OVER MATTRESS
9. Shaking linen spreads infection
10. TURN RESIDENT ONTO BACK,
RAISE SIDE RAIL, MOVE TO OTHER
SIDE OF BED AND LOWER SIDE RAIL
11. Turn resident away from you toward side
rail
12. LOOSEN SOILED LINEN, ROLL
LINEN FROM HEAD TO FOOT OF
BED AND PLACE IN HAMPER/BAG, AT
FOOT OF BED OR IN CHAIR
12. Always work from cleanest (head of bed) to
dirtiest (foot of bed) to prevent spread of
infection. Rolling puts dirtiest surface of linen
inward, lessening contamination
13. UNFOLD BOTTOM SHEET AND FIT
CORNERS OVER MATTRESS
14. Place resident in supine position and raise
side rail
15. REMOVE PILLOW, CHANGE
PILLOWCASE AND PLACE PILLOW
UNDER RESIDENT'S HEAD WITH OPEN
END AWAY FROM DOOR
16. PLACE CLEAN TOP SHEET OVER
RESIDENT AND REMOVE DRAPE (according to procedure 14)
16. Maintains resident's dignity and right to
privacy by not exposing body
17. Unfold blanket over top sheet and make
cuff
18. TUCK TOP LINENS UNDER FOOT OF
MATTRESS AND MITER CORNERS
18. Mitering prevents resident's feet from being
restricted by or tangled in linen when getting in
and out of bed

Page 28 of 62
PROCEDURE 22: OCCUPIED BED STEP RATIONALE
19. LOOSEN TOP LINENS OVER
RESIDENT'S FEET
19. Prevents pressure on feet which can cause
pressure sores
20. DO FINAL STEPS
I verify that this procedure was taught and successfully demonstrated according to OSDH Standards:
Student's Signature:__________________________________________________ Date:_____________
Instructor's Signature:_________________________________________________Date:_____________
Name/Location of Lab:_________________________________________________________________
OR
Name/Location of Clinical Site:__________________________________________________________
UPON COMPLETION OF EACH PROCEDURE, PROVIDE A COPY TO THE NURSE AIDE TRAINEE

Page 29 of 62
PROCEDURE 23: FINGERNAIL CARE STEP RATIONALE
1. DO INITIAL STEPS
2. CHECK FINGERS AND NAILS FOR
COLOR, SWELLING, CUTS OR SPLITS.
CHECK HANDS FOR EXTREME HEAT
OR COLD. REPORT ANY UNUSUAL
FINDINGS TO NURSE BEFORE
CONTINUING PROCEDURE
2. Provides nurse with necessary information to
properly assess resident's conditions and needs
3. Raise head of bed so resident is sitting up 3. Puts resident in more natural position
4. FILL BATH BASIN HALFWAY WITH
WARM WATER AND HAVE RESIDENT
CHECK WATER TEMPERATURE
4. Resident's sense of touch may be different
than yours, therefore, resident is best able to
identify a comfortable water temperature
5. SOAK RESIDENT'S HANDS AND PAT
DRY
5. Nail care is easier if nails are first softened
6. PUT ON GLOVES (according to procedure
2)
6. Nail care may cause bleeding
7. CLEAN UNDER NAILS WITH
ORANGE STICK
7. Most pathogens on hands come from beneath
the nails
8. CLIP FINGERNAILS STRAIGHT
ACROSS, THEN FILE IN A CURVE
8. Clipping nails straight across prevents
damage to skin. Filing in a curve smoothes
nails and eliminates edge which may catch
clothes or tear skin
9. REMOVE GLOVES (according to
procedure 2)
10. DO FINAL STEPS
I verify that this procedure was taught and successfully demonstrated according to OSDH Standards:
Student's Signature:__________________________________________________ Date:_____________
Instructor's Signature:_________________________________________________Date:_____________
Name/Location of Lab:_________________________________________________________________
OR
Name/Location of Clinical Site:__________________________________________________________
UPON COMPLETION OF EACH PROCEDURE, PROVIDE A COPY TO THE NURSE AIDE TRAINEE

Page 30 of 62
PROCEDURE 24: SAFETY RAZOR STEP RATIONALE
1. DO INITIAL STEPS
2. Raise head of bed so resident is sitting up 2. Puts resident in more natural position
3. FILL BATH BASIN HALFWAY WITH
WARM WATER
3. Hot water opens pores and causes irritation
4. Drape towel under resident's chin 4. Protects resident's clothing and bed linen
5. PUT ON GLOVES (according to procedure
2)
5. Shaving may cause bleeding
6. MOISTEN BEARD WITH
WASHCLOTH AND PUT SHAVING
CREAM OVER AREA
6. Softens skin and hair
7. HOLD SKIN TAUT AND SHAVE
BEARD IN DOWNWARD STROKES ON
FACE AND UPWARD STROKES ON
NECK
7. Maximizes hair removal by shaving in the
direction of hair growth
8. RINSE RESIDENT'S FACE AND NECK 8. Removes soap which may cause irritation
9. Apply after-shave lotion as requested 9. Improves resident's self-esteem
10. Remove towel
11. REMOVE GLOVES (according to
procedure 2)
12. DO FINAL STEPS
I verify that this procedure was taught and successfully demonstrated according to OSDH Standards:
Student's Signature:__________________________________________________ Date:_____________
Instructor's Signature:_________________________________________________Date:_____________
Name/Location of Lab:_________________________________________________________________
OR
Name/Location of Clinical Site:__________________________________________________________
UPON COMPLETION OF EACH PROCEDURE, PROVIDE A COPY TO THE NURSE AIDE TRAINEE

Page 31 of 62
PROCEDURE 25: ELECTRIC RAZOR STEP RATIONALE
1. DO INITIAL STEPS
2. Raise head of bed so resident is sitting up 2. Puts resident in more natural position
3. DO NOT USE ELECTRIC RAZOR
NEAR ANY WATER SOURCE, WHEN
OXYGEN IS IN USE OR IF RESIDENT
HAS PACEMAKER
3. Electricity near water may cause
electrocution. Electricity near oxygen may
cause explosion. Electricity near some
pacemakers may cause an irregular heartbeat
4. Drape towel under resident's chin 4. Protects resident's clothing and bed linen
5. PUT ON GLOVES (according to procedure
2)
5. Shaving may cause bleeding
6. Apply pre-shave lotion as resident wishes
7. HOLD SKIN TAUT AND SHAVE
RESIDENT'S FACE AND NECK
ACCORDING TO MANUFACTURER'S
GUIDELINES
7. Smoothes out skin. Shave beard with back
and forth motion in direction of beard growth
with foil shaver. Shave beard in circular motion
with three head shaver
8. Apply after-shave lotion as requested 8. Improves resident's self-esteem
9. Remove towel from resident 9. Restores resident's dignity
10. REMOVE GLOVES (according to
procedure 2)
11. DO FINAL STEPS
I verify that this procedure was taught and successfully demonstrated according to OSDH Standards:
Student's Signature:__________________________________________________ Date:_____________
Instructor's Signature:_________________________________________________Date:_____________
Name/Location of Lab:_________________________________________________________________
OR
Name/Location of Clinical Site:__________________________________________________________
UPON COMPLETION OF EACH PROCEDURE, PROVIDE A COPY TO THE NURSE AIDE TRAINEE

Page 32 of 62
PROCEDURE 26: DENTURE CARE STEP RATIONALE
1. DO INITIAL STEPS
2. Raise head of bed so resident is sitting up 2. Prevents fluids from running down
resident's throat, causing choking
3. PUT ON GLOVES (according to procedure
2)
3. Prevents you from contamination by bodily
fluids
4. Drape towel under resident's chin 4. Protect resident's clothing and bed linen
5. REMOVE UPPER DENTURES BY
GENTLY MOVING THEM UP AND DOWN
TO RELEASE SUCTION. TURN LOWER
DENTURES SLIGHTLY TO LIFT OUT OF
MOUTH
5. Prevent injury or discomfort to resident
6. Put dentures in denture cup marked with
resident's name and take to sink
7. LINE SINK WITH TOWEL AND FILL
HALFWAY WITH WATER
7. Prevents dentures from breaking if dropped
8. Apply denture cleaner to toothbrush
9. HOLD DENTURES OVER SINK AND
BRUSH ALL SURFACES
10. Rinse dentures under warm water, place in
cup and fill with cool water
10. Hot water may damage dentures
11. Clean resident's mouth with swab if
necessary. Help resident rinse mouth with water
or mouthwash diluted with half water if
requested
11. Removes food particles. Full strength
mouthwash may irritate resident's mouth
12. CHECK TEETH, MOUTH, TONGUE,
AND LIPS FOR ODOR, CRACKING,
SORES, BLEEDING AND
DISCOLORATION. CHECK FOR LOOSE
TEETH. REPORT UNUSUAL FINDINGS
TO NURSE
12. Provides nurse with necessary information
to properly assess resident's condition and
needs
13. Help resident place dentures in mouth if
requested
13. Restores resident's dignity
14. REMOVE GLOVES (according to
procedure 2)
15. DO FINAL STEPS

Page 33 of 62
PROCEDURE 26: DENTURE CARE (Continued)
I verify that this procedure was taught and successfully demonstrated according to OSDH Standards:
Student's Signature:__________________________________________________ Date:_____________
Instructor's Signature:_________________________________________________Date:_____________
Name/Location of Lab:_________________________________________________________________
OR
Name/Location of Clinical Site:__________________________________________________________
UPON COMPLETION OF EACH PROCEDURE, PROVIDE A COPY TO THE NURSE AIDE TRAINEE

Page 34 of 62
PROCEDURE 27: ORAL CARE STEP RATIONALE
1. DO INITIAL STEPS
2. RAISE HEAD OF BED SO RESIDENT
IS SITTING UP
2. Prevents fluids from running down resident's
throat, causing choking
3. PUT ON GLOVES (according to procedure
2)
3. Brushing may cause gums to bleed
4. Drape towel under resident's chin 4. Protect resident's clothing and bed linen
5. Wet brush and put on small amount of
toothpaste
5. Water helps distribute toothpaste
6. FIRST BRUSH UPPER TEETH AND
THEN LOWER TEETH
6. Brushing upper teeth first minimizes
production of saliva in lower part of mouth
7. Hold emesis basin under resident's chin
8. HAVE RESIDENT RINSE MOUTH
WITH WATER AND SPIT INTO
REMESIS BASIN
8. Removes food particles and toothpaste
9. If requested, give resident mouthwash
diluted with half water
9. Full strength mouthwash may irritate
resident's mouth
10. CHECK TEETH, MOUTH, TONGUE,
AND LIPS FOR ODOR, CRACKING,
SORES, BLEEDING AND
DISCOLORATION. CHECK FOR LOOSE
TEETH. REPORT UNUSUAL FINDINGS
TO NURSE
10. Provides nurse with necessary information
to properly assess resident's condition and
needs
11. Remove towel and wipe resident's mouth
12. REMOVE GLOVES (according to
procedure 2)
13. DO FINAL STEPS
I verify that this procedure was taught and successfully demonstrated according to OSDH Standards:
Student's Signature:__________________________________________________ Date:_____________
Instructor's Signature:_________________________________________________Date:_____________
Name/Location of Lab:_________________________________________________________________
OR
Name/Location of Clinical Site:__________________________________________________________
UPON COMPLETION OF EACH PROCEDURE, PROVIDE A COPY TO THE NURSE AIDE TRAINEE

Page 35 of 62
PROCEDURE 28: ORAL CARE FOR UNCONSCIOUS STEP RATIONALE
1. DO INITIAL STEPS
2. Drape towel over pillow 2. Protects linen
3. TURN RESIDENT ONTO
UNAFFECTED SIDE
3. Prevents fluids from running down resident's
throat, causing choking
4. PUT ON GLOVES (according to procedure
2)
4. Protects you from contamination by bodily
fluids
5. Place an emesis basin under resident's chin 5. Protect resident's clothing and bed linen
6. Hold mouth open with padded tongue blade 6. Enables you to safely clean mouth
7. DIP SWAB IN CLEANING SOLUTION
AND WIPE TEETH, GUMS, TONGUE,
AND INSIDE SURFACES OF MOUTH,
CHANGING SWAB FREQUENTLY
7. Stimulates gums and removes mucous
8. RINSE WITH CLEAN SWAB DIPPED
IN WATER
8. Removes solution from mouth
9. CHECK TEETH, MOUTH, TONGUE,
AND LIPS FOR ODOR, CRACKING,
SORES, BLEEDING AND
DISCOLORATION. CHECK FOR LOOSE
TEETH. REPORT UNUSUAL FINDINGS
TO NURSE
9. Provides nurse with necessary information to
properly assess resident's condition and needs
10. Cover lips with thin layer of petroleum jelly 10. Prevents lips from drying and cracking.
Improves resident's comfort
11. REMOVE GLOVES (according to
procedure 2)
12. DO FINAL STEPS
I verify that this procedure was taught and successfully demonstrated according to OSDH Standards:
Student's Signature:__________________________________________________ Date:_____________
Instructor's Signature:_________________________________________________Date:_____________
Name/Location of Lab:_________________________________________________________________
OR
Name/Location of Clinical Site:__________________________________________________________
UPON COMPLETION OF EACH PROCEDURE, PROVIDE A COPY TO THE NURSE AIDE TRAINEE

Page 36 of 62
PROCEDURE 29: COMB HAIR STEP RATIONALE
1. DO INITIAL STEPS
2. Raise head of bed so resident is sitting up 2. Puts resident in more natural position
3. Drape towel over pillow 3. Protects linen
4. Remove resident's glasses and any hairpins
or clips
4. Prevents injury or discomfort
5. REMOVE TANGLES BY DIVIDING
HAIR INTO SMALL SECTIONS AND
GENTLY COMBING OUT FROM ENDS
OF HAIR TO SCALP
5. Reduces hair breakage, scalp pain and
irritation
6. Use hair preparations as resident wishes 6. Each resident may prefer different products
7. STYLE HAIR AS RESIDENT WISHES 7. Each resident has right to choose
8. Offer mirror 8. Improves self-esteem
9. DO FINAL STEPS
I verify that this procedure was taught and successfully demonstrated according to OSDH Standards:
Student's Signature:__________________________________________________ Date:_____________
Instructor's Signature:_________________________________________________Date:_____________
Name/Location of Lab:_________________________________________________________________
OR
Name/Location of Clinical Site:__________________________________________________________
UPON COMPLETION OF EACH PROCEDURE, PROVIDE A COPY TO THE NURSE AIDE TRAINEE

Page 37 of 62
PROCEDURE 30: ASSIST TO EAT STEP RATIONALE
1. DO INITIAL STEPS
2. Assist resident with elimination if necessary 2. Resident will be more comfortable when
eating
3. ASSIST RESIDENT TO WASH HANDS 3. Promotes good hygiene and prevents spread
of infection
4. Help resident into comfortable sitting
position
4. Puts resident in more natural position
5. CHECK MEAL CARD FOR NAME AND
DIET. CHECK TRAY
FOR CORRECT FOOD, CONDIMENTS
AND UTENSILS
5. Since resident's diet is ordered by the doctor,
tray should contain foods permitted by the diet
6. Serve tray with main course closest to
resident
7. Offer resident napkin 7. Protects resident's clothing
8. CUT AND SEASON FOOD, BUTTER
BREAD, AND OPEN CARTONS AS
REQUESTED
8. Resident should do as much as possible to
improve independence and self-esteem
9. Check resident every 10-15 minutes 9. Allows you to assist resident if needed and
provides for resident's safety
10. Remove napkin and tray
11. Assist resident to wash hands and face 11. Promotes self-esteem and prevents spread
of infection
12. Measure and record intake if required 12. Provides nurse with necessary information
to properly assess resident's condition and
needs
13. DO FINAL STEPS
I verify that this procedure was taught and successfully demonstrated according to OSDH Standards:
Student's Signature:__________________________________________________ Date:_____________
Instructor's Signature:_________________________________________________Date:_____________
Name/Location of Lab:_________________________________________________________________
OR
Name/Location of Clinical Site:__________________________________________________________
UPON COMPLETION OF EACH PROCEDURE, PROVIDE A COPY TO THE NURSE AIDE TRAINEE

Page 38 of 62
PROCEDURE 31: FEEDING STEP RATIONALE
1. DO INITIAL STEPS
2. Assist resident with elimination if necessary 2. Resident will be more comfortable when
eating
3. Assist resident to wash hands 3. Promotes good hygiene and prevents spread
of infection
4. PLACE RESIDENT IN
COMFORTABLE SITTING POSITION
4. Puts resident in more natural position
5. CHECK MEAL CARD FOR NAME AND
DIET. CHECK TRAY FOR CORRECT
FOOD, CONDIMENTS AND UTENSILS
5. Since diet is ordered by the doctor, tray
should contain foods permitted by the diet
6. SET TRAY ON OVERBED TABLE AND
DESCRIBE FOOD
7. Place napkin or clothing protector under
resident's chin and across chest
7. Protects resident's clothing
8. ASK RESIDENT WHAT FOOD IS
PREFERRED
8. Resident has right to choose
9. FILL SPOON HALF FULL WITH
FOOD. DIRECT FOOD TO UNAFFECTED
SIDE OF MOUTH
9. Resident will be able to chew and swallow
smaller amounts offered on the strong side
10. Allow resident time to chew and swallow.
Offer fluids as resident wishes
10. Minimizes choking
11. Wipe resident's mouth as needed 11. Maintains resident's dignity
12. Remove napkin or clothing protector and
tray
13. Wash resident's face and hands 13. Promotes self-esteem and prevents spread
of infection
14. Measure and record intake if required 14. Provides nurse with necessary information
to properly assess resident's condition and
needs
15. DO FINAL STEPS
I verify that this procedure was taught and successfully demonstrated according to OSDH Standards:
Student's Signature:__________________________________________________ Date:_____________
Instructor's Signature:_________________________________________________Date:_____________
Name/Location of Lab:_________________________________________________________________
OR
Name/Location of Clinical Site:__________________________________________________________
UPON COMPLETION OF EACH PROCEDURE, PROVIDE A COPY TO THE NURSE AIDE TRAINEE

Page 39 of 62
PROCEDURE 32: SHOWER STEP RATIONALE
1. DO INITIAL STEPS
2. Clean shower area and shower chair 2. Reduces pathogens and prevents spread of
infection
3. Help resident remove clothing. Drape
resident with bath blanket
3. Maintains resident's dignity and right to
privacy by not exposing body. Keeps resident
warm
4. Turn on water AND HAVE RESIDENT
CHECK WATER TEMPERATURE
4. Resident's sense of touch may be different
than yours, therefore, resident is best able to
identify a comfortable water temperature
5. ASSIST RESIDENT INTO SHOWER
AND LOCK WHEELS OF SHOWER
CHAIR
5. Chair may slide if resident attempts to get
up
6. LET RESIDENT WASH AS MUCH AS
POSSIBLE, STARTING WITH FACE
6. Encourages resident to be independent
7. Help resident shampoo and rinse hair
8. STAY WITH RESIDENT DURING
PROCEDURE
8. Provides for resident's safety
9. GIVE RESIDENT TOWEL AND ASSIST
TO PAT DRY
9. Patting dry prevents skin tears and reduces
chaffing
10. Assist resident out of shower
11. Help resident dress, comb hair and return to
room
11. Combing hair in shower room allows
resident to maintain dignity when returning to
room
12. DO FINAL STEPS
I verify that this procedure was taught and successfully demonstrated according to OSDH Standards:
Student's Signature:__________________________________________________ Date:_____________
Instructor's Signature:_________________________________________________Date:_____________
Name/Location of Lab:_________________________________________________________________
OR
Name/Location of Clinical Site:__________________________________________________________
UPON COMPLETION OF EACH PROCEDURE, PROVIDE A COPY TO THE NURSE AIDE TRAINEE

Page 40 of 62
PROCEDURE 33: BED BATH STEP RATIONALE
1. DO INITIAL STEPS
2. Offer resident urinal or bedpan 2. Reduces chance of urination during
procedure which may cause discomfort and
embarrassment
3. DRAPE RESIDENT (according to
procedure 14 )
3. Maintains resident's dignity and right to
privacy by not exposing body. Keeps resident
warm
4. FILL BATH BASIN WITH WARM
WATER AND HAVE RESIDENT CHECK
WATER TEMPERATURE
4. Resident's sense of touch may be different
than yours, therefore, resident is best able to
identify a comfortable water temperature
5. If resident has open lesions or wounds, put
on gloves (according to procedure 2)
5. Protects you from contamination by bodily
fluids
6. Fold washcloth and wet
7. GENTLY WASH EYE FROM INNER
CORNER OUT. USING A DIFFERENT
PART OF CLOTH WASH OTHER EYE
7. Helps prevent eye infections. Always wash
from cleanest to dirtiest. Using separate area of
cloth reduces contamination
8. WET WASHCLOTH AND APPLY
SOAP, IF REQUESTED. WASH, RINSE
AND PAT DRY FACE, NECK, EARS AND
BEHIND EARS
8. Patting dry prevents skin tears and reduces
chaffing
9. Remove resident's gown
10. Place towel under far arm 10. Prevents linen from getting wet
11. WASH, RINSE AND PAT DRY HAND,
ARM, SHOULDER AND UNDERARM
11. Soap left on the skin may cause itching and
irritation
12. REPEAT STEPS 10 AND 11 WITH
OTHER ARM
13. PLACE TOWEL OVER CHEST AND
ABDOMEN. LOWER BATH BLANKET
TO WAIST
13. Maintains resident's right to privacy
14. LIFT TOWEL AND WASH, RINSE
AND PAT DRY CHEST AND ABDOMEN
14. Exposing only the area of the body
necessary to do the procedure maintains
resident's dignity and right to privacy
15. Pull up bath blanket and remove towel
16. PLACE TOWEL UNDER FAR LEG 16. Prevents linen from getting wet
17. WASH, RINSE AND PAT DRY LEG
AND FOOT
17. Soap left on the skin may cause itching and
irritation
18. REPEAT STEPS 16 AND 17 WITH
OTHER LEG AND FOOT
19. CHANGE BATH WATER 19. Water is contaminated after washing feet.
Clean water should be used for neck and back
20. Turn resident
21. WASH, RINSE AND PAT DRY FROM
NECK TO BUTTOCKS INCLUDING
ANAL AREA
21. Always wash from cleanest to dirtiest

Page 41 of 62
PROCEDURE 33: BED BATH STEP RATIONALE
22. CHANGE BATH WATER AND
GLOVES. USE CLEAN WASHCLOTH
AND TOWEL
22. Water and linen are contaminated after
washing anal area
23. PROVIDE PERINEAL CARE (according
to procedure 34, steps 8 through 13)
24. Help resident put on clean gown
25. DO FINAL STEPS
I verify that this procedure was taught and successfully demonstrated according to OSDH Standards:
Student's Signature:__________________________________________________ Date:_____________
Instructor's Signature:_________________________________________________Date:_____________
Name/Location of Lab:_________________________________________________________________
OR
Name/Location of Clinical Site:__________________________________________________________
UPON COMPLETION OF EACH PROCEDURE, PROVIDE A COPY TO THE NURSE AIDE TRAINEE

Page 42 of 62
PROCEDURE 34: PERINEAL CARE STEP RATIONALE
1. DO INITIAL STEPS
2. Offer resident urinal or bedpan 2. Reduces chance of urination during
procedure which may cause discomfort and
embarrassment
3. ASSIST RESIDENT TO SUPINE
POSITION (according to procedure 3)
3. Prepares resident for procedure
4. Place waterproof pad under resident's hips 4. Prevents linen from getting wet
5. DRAPE RESIDENT (according to
procedure 14)
5. Maintains resident's right to privacy by not
exposing body. Keeps resident warm
6. FILL WASH BASIN WITH WARM
WATER AND HAVE RESIDENT CHECK
WATER TEMPERATURE
6. Resident's sense of touch may be different
than yours, therefore, resident is best able to
identify a comfortable water temperature
7. PUT ON GLOVES (according to procedure
2)
7. Protects you from contamination by bodily
fluids
8. ASSIST RESIDENT SPREAD LEGS
AND LIFT KNEES IF POSSIBLE
8. Exposes perineal area
9. WET AND SOAP FOLDED
WASHCLOTH
9. Folding creates separate areas on cloth to
reduce contamination
10. IF RESIDENT HAS CATHETER,
CHECK FOR LEAKAGE, SECRETIONS
OR IRRITATIONS. GENTLY WIPE FOUR
INCHES OF CATHETER FROM MEATUS
OUT
10. Washes pathogens away from the meatus
11. WIPE FROM FRONT TO BACK AND
FROM CENTER OF PERINEUM TO
THIGHS. CHANGE WASHCLOTH AS
NECESSARY
FOR FEMALES:
A. SEPARATE LABIA. WASH
URETHRAL AREA FIRST
B. WASH BETWEEN AND OUTSIDE
LABIA IN DOWNWARD
STROKES, ALTERNATING FROM
SIDE TO SIDE AND MOVING
OUTWARD TO THIGHS. USE
DIFFERENT PART OF
WASHCLOTH FOR EACH
STROKE
11. Prevents spread of infection
Females: Removes secretions in skin folds
which may cause infection and odor
Males: Removes secretions from beneath
foreskin which may cause infection and odor

Page 43 of 62
PROCEDURE 34: PERINEAL CARE STEP RATIONALE
FOR MALES:
A. PULL BACK FORESKIN IF MALE
IS UNCIRCUMCISED. WASH AND
RINSE THE TIP OF PENIS USING
CIRCULAR MOTION BEGINNING
AT URETHRA
B. CONTINUE WASHING DOWN
THE PENIS TO THE SCROTUM
AND INNER THIGHS
12. CHANGE WATER IN BASIN. WITH A
CLEAN WASHCLOTH, RINSE AREA
THOROUGHLY IN THE SAME
DIRECTION AS WHEN WASHING
12. Water used during washing contains soap
and pathogens. Soap left on the body can cause
irritation and discomfort
13. GENTLY PAT AREA DRY IN SAME
DIRECTION AS WHEN WASHING
13. If area is left wet, pathogens can grow more
quickly. Patting dry prevents skin tears and
reduces chaffing
14. Assist resident to turn onto side away from
you
15. WET AND SOAP WASHCLOTH
16. CLEAN ANAL AREA FROM FRONT
TO BACK. RINSE AND PAT DRY
THOROUGHLY
16. Prevents spread of infection
17. REMOVE PAD, Assist resident to turn
onto back AND UNDRAPE RESIDENT (according to procedure 14)
18. REMOVE GLOVES (according to
procedure 2)
19. DO FINAL STEPS
I verify that this procedure was taught and successfully demonstrated according to OSDH Standards:
Student's Signature:__________________________________________________ Date:_____________
Instructor's Signature:_________________________________________________Date:_____________
Name/Location of Lab:_________________________________________________________________
OR
Name/Location of Clinical Site:__________________________________________________________
UPON COMPLETION OF EACH PROCEDURE, PROVIDE A COPY TO THE NURSE AIDE TRAINEE

Page 44 of 62
PROCEDURE 35: ASSIST TO BATHROOM STEP RATIONALE
1. DO INITIAL STEPS
2. Walk with resident into bathroom
3. Assist resident lower garments and sit 3. Allows resident to do as much as possible to
help promote independence
4. GIVE RESIDENT CALL LIGHT AND
TOILET PAPER
4. Ensures ability to communicate need for
assistance
5. If resident is able to be left alone, step out of
bathroom and return when called
5. Provides for resident's right to privacy
6. PUT ON GLOVES (according to procedure
2)
6. Protects you from contamination by bodily
fluids
7. ASSIST RESIDENT TO WIPE AREA
FROM FRONT TO BACK
7. Prevents spread of pathogens toward meatus
which may cause urinary
tract infection
8. REMOVE GLOVES (according to
procedure 2)
9. Assist resident to raise garments
10. ASSIST RESIDENT TO WASH HANDS 10. Hand washing is the best way to prevent the
spread of infection
11. Walk with resident back to bed or chair
12. DO FINAL STEPS
I verify that this procedure was taught and successfully demonstrated according to OSDH Standards:
Student's Signature:__________________________________________________ Date:_____________
Instructor's Signature:_________________________________________________Date:_____________
Name/Location of Lab:_________________________________________________________________
OR
Name/Location of Clinical Site:__________________________________________________________
UPON COMPLETION OF EACH PROCEDURE, PROVIDE A COPY TO THE NURSE AIDE TRAINEE

Page 45 of 62
PROCEDURE 36: BEDSIDE COMMODE STEP RATIONALE
1. DO INITIAL STEPS
2. PLACE COMMODE NEXT TO BED ON
RESIDENT'S UNAFFECTED SIDE
2. Helps stabilize commode and is the shortest
distance for resident to turn
3. ASSIST RESIDENT TO COMMODE
4. GIVE RESIDENT CALL LIGHT AND
TOILET PAPER
4. Ensures ability to communicate need for
assistance
5. If resident is able to be left alone, step out of
bathroom and return when called
5. Provides resident's right to privacy
6. PUT ON GLOVES (according to procedure
2)
6. Protects you from contamination by bodily
fluids
7. ASSIST RESIDENT WIPE AREA FROM
FRONT TO BACK
7. Prevents spread of pathogens toward meatus
which may cause urinary tract infection
8. Help resident into bed
9. Remove and cover pan and take to bathroom 9. Pan should be covered to prevent the spread
of infection
10. CHECK URINE AND/OR FECES FOR
COLOR, ODOR, AMOUNT &
CHARACTER AND REPORT UNUSUAL
FINDINGS TO NURSE
10. Changes may be first sign of medical
problem. By alerting the nurse you ensure that
the resident receives attention quickly
11. Dispose of urine and/or feces, sanitize pan
and return pan according to current nursing
practices
11. Facilities have different methods of disposal
and sanitation. You need to carry out the
policies of your facility
12. REMOVE GLOVES (according to
procedure 2)
13. ASSIST RESIDENT TO WASH HANDS 13. Hand washing is the best way to prevent the
spread of infection
14. DO FINAL STEPS
I verify that this procedure was taught and successfully demonstrated according to OSDH Standards:
Student's Signature:__________________________________________________ Date:_____________
Instructor's Signature:_________________________________________________Date:_____________
Name/Location of Lab:_________________________________________________________________
OR
Name/Location of Clinical Site:__________________________________________________________
UPON COMPLETION OF EACH PROCEDURE, PROVIDE A COPY TO THE NURSE AIDE TRAINEE

Page 46 of 62
PROCEDURE 37: BEDPAN/FRACTURE PAN STEP RATIONALE
1. DO INITIAL STEPS
2. Lower head of bed 2. When bed is flat, resident can be moved
without working against gravity
3. PUT ON GLOVES (according to procedure
2)
3. Protects you from contamination by bodily
fluids
4. Turn resident away from you
5. PLACE BEDPAN OR FRACTURE PAN
ACCORDING TO MANUFACTURER'S
DIRECTIONS
5. Equipment used incorrectly may cause
discomfort and injury to resident
6. GENTLY ROLL RESIDENT BACK
ONTO PAN AND CHECK FOR CORRECT
PLACEMENT
6. Prevents linen from being soiled
7. COVER RESIDENT 7. Provides for resident's privacy
8. Raise head of bed to sitting position 8. Increases pressure on bladder to help with
elimination
9. GIVE RESIDENT CALL LIGHT AND
TOILET PAPER
9. Ensures ability to communicate need for
assistance
10. Leave resident and return when called 10. Provides for resident's privacy
11. Lower head of bed 11. Places resident in proper position to remove
pan
12. PRESS BEDPAN FLAT ON BED AND
TURN RESIDENT
12. Prevents bedpan from spilling
13. WIPE RESIDENT FROM FRONT TO
BACK
13. Prevents spread of pathogens toward
meatus which may cause urinary tract infection
14. Provide perineal care if necessary
(according to procedure 34)
15. CHECK URINE AND/OR FECES FOR
COLOR, ODOR, AMOUNT &
CHARACTER AND REPORT UNUSUAL
FINDINGS TO NURSE
15. Changes may be first sign of medical
problem. By alerting the nurse you ensure that
the resident receives attention quickly
16. Cover bedpan 16. Pan should be covered to prevent the spread
of infection
17. Dispose of urine and/or feces, sanitize pan
and return pan according to current nursing
practices
17. Facilities have different methods of disposal
and sanitation. You need to carry out the
policies of your facility
18. REMOVE GLOVES (according to
procedure 2)
19. ASSIST RESIDENT TO WASH HANDS 19. Hand washing is the best way to prevent the
spread of infection
20. DO FINAL STEPS

Page 47 of 62
PROCEDURE 37: BEDPAN/FRACTURE PAN (Continued)
I verify that this procedure was taught and successfully demonstrated according to OSDH Standards:
Student's Signature:__________________________________________________ Date:_____________
Instructor's Signature:_________________________________________________Date:_____________
Name/Location of Lab:_________________________________________________________________
OR
Name/Location of Clinical Site:__________________________________________________________
UPON COMPLETION OF EACH PROCEDURE, PROVIDE A COPY TO THE NURSE AIDE TRAINEE

Page 48 of 62
PROCEDURE 38: URINAL STEP RATIONALE
1. DO INITIAL STEPS
2. Raise head of bed to sitting position 2. Increases gravity on top of bladder to help
urination
3. PUT ON GLOVES (according to procedure
2)
3. Protects you from contamination by bodily
fluids
4. OFFER URINAL TO RESIDENT OR
PLACE URINAL BETWEEN HIS LEGS
AND INSERT PENIS INTO OPENING
4. Allows resident to do as much as possible to
help promote independence
5. COVER RESIDENT 5. Maintains resident's right to privacy
6. GIVE RESIDENT CALL LIGHT AND
TOILET PAPER
6. Ensures the ability to communicate need for
assistance
7. LEAVE RESIDENT AND RETURN
WHEN CALLED
7. Provides for resident's privacy
8. Remove and cover urinal 8. Urinal should be covered to prevent the
spread of infection
9. TAKE URINAL TO BATHROOM,
CHECK URINE FOR COLOR, ODOR,
AMOUNT & CHARACTER AND REPORT
UNUSUAL FINDINGS TO NURSE
9. Changes may be first sign of medical
problem. By alerting the nurse you ensure that
the resident receives attention quickly
10. Dispose of urine, sanitize and return urinal
according to current nursing practices
10. Facilities have different methods of disposal
and sanitation. You need to carry out the
policies of your facility
11. REMOVE GLOVES (according to
procedure 2)
12. ASSIST RESIDENT TO WASH HANDS 12. Hand washing is the best way to prevent the
spread of infection
13. DO FINAL STEPS
I verify that this procedure was taught and successfully demonstrated according to OSDH Standards:
Student's Signature:__________________________________________________ Date:_____________
Instructor's Signature:_________________________________________________Date:_____________
Name/Location of Lab:_________________________________________________________________
OR
Name/Location of Clinical Site:__________________________________________________________
UPON COMPLETION OF EACH PROCEDURE, PROVIDE A COPY TO THE NURSE AIDE TRAINEE

Page 49 of 62
PROCEDURE 39: URINAL STEP RATIONALE
1. DO INITIAL STEPS
2. PUT ON GLOVES (according to procedure
2)
2. Protects you from contamination by bodily
fluids
3. Place paper towel on floor below bag and
place graduate on paper towel
3. Reduces contamination of graduate and
protects floor from drips
4. DETACH SPOUT AND POINT IT INTO
CENTER OF GRADUATE WITHOUT
LETTING TUBE TOUCH SIDES
4. Prevents contamination of tubing
5. UNCLAMP SPOUT AND DRAIN URINE
6. CLAMP SPOUT
7. REPLACE SPOUT IN HOLDER
8. CHECK URINE FOR COLOR, ODOR,
AMOUNT & CHARACTER AND REPORT
UNUSUAL FINDINGS TO NURSE
8. Changes may be first sign of medical
problem. By alerting the nurse you ensure that
the resident receives attention quickly
9. MEASURE AND ACCURATELY
RECORD AMOUNT OF URINE
9. Accuracy is necessary because decisions
regarding resident's care may be based on your
report. What you write is a legal record of what
you did. If you don't document it, legally it
didn't happen.
10. Dispose of urine, sanitize and return
graduate according to current nursing
practices
10. Facilities have different methods of disposal
and sanitation. You need to carry out the
policies of your facility
11. REMOVE GLOVES (according to
procedure 2)
12. DO FINAL STEPS
I verify that this procedure was taught and successfully demonstrated according to OSDH Standards:
Student's Signature:__________________________________________________ Date:_____________
Instructor's Signature:_________________________________________________Date:_____________
Name/Location of Lab:_________________________________________________________________
OR
Name/Location of Clinical Site:__________________________________________________________
UPON COMPLETION OF EACH PROCEDURE, PROVIDE A COPY TO THE NURSE AIDE TRAINEE

Page 50 of 62
PROCEDURE 40: WEIGHT STEP RATIONALE
1. DO INITIAL STEPS
2. BALANCE SCALE 2. Scale must be balanced on zero for weight to
be accurate
3. DEPENDING ON SCALE USED, ASSIST
RESIDENT TO STAND ON PLATFORM
OR SIT IN CHAIR WITH FEET ON
FOOTREST OR TRANSPORT
WHEELCHAIR ONTO SCALE AND
LOCK BRAKES
3. When using chair scale, if resident has feet
on floor, weight will not be accurate. Wheel
locks prevent chair from moving when using a
wheelchair scale
4. WHEN USING A STANDARD SCALE -
MOVE LOWER WEIGHT TO FIFTY
POUND MARK THAT CAUSES ARM TO
DROP. MOVE IT BACK TO PREVIOUS
MARK. MOVE UPPER WEIGHT TO
POUND MARK THAT BALANCES
POINTER IN MIDDLE OF SQUARE. ADD
LOWER AND UPPER MARKS WHEN
USING A DIGITAL SCALE - PRESS
WEIGH BUTTON. WAIT UNTIL
NUMBERS REMAIN CONSTANT
4. When arm drops, weight is too high. When
pointer is suspended, weight is accurate Total
gives accurate weight
5. SUBTRACT WEIGHT OF
WHEELCHAIR FROM TOTAL WEIGHT,
IF APPLICABLE
6. ACCURATELY RECORD RESIDENT'S
WEIGHT ACCORDING TO CURRENT
NURSING PRACTICES
6. Record weight immediately so you won't
forget. Weight changes are an indicator of
resident condition. Accuracy is necessary
because decisions regarding resident's care may
be based on your report. What you write is a
legal record of what you did. If you don't
document it, legally it didn't happen
7. DO FINAL STEPS
8. REPORT UNUSUAL READING TO
NURSE
I verify that this procedure was taught and successfully demonstrated according to OSDH Standards:
Student's Signature:__________________________________________________ Date:_____________
Instructor's Signature:_________________________________________________Date:_____________
Name/Location of Lab:_________________________________________________________________
OR
Name/Location of Clinical Site:__________________________________________________________
UPON COMPLETION OF EACH PROCEDURE, PROVIDE A COPY TO THE NURSE AIDE TRAINEE

Page 51 of 62
PROCEDURE 41: PULSE AND RESPIRATION STEP RATIONALE
1. DO INITIAL STEPS
2. Place resident's hand on comfortable surface
3. FEEL FOR PULSE ABOVE WRIST ON
THUMB SIDE WITH TIPS OF FIRST
THREE FINGERS
3. Because of artery in your thumb, pulse
would not be accurate if you use your thumb
4. COUNT BEATS FOR 60 SECONDS,
NOTING RATE, RHYTHM AND FORCE
4. Ensures accurate count. Rate is number of
beats. Rhythm is regularity of beats. Force is
strength of beats
5. CONTINUE POSITION AS IF FEELING
FOR PULSE
5. Resident could alter breathing pattern if
aware that respirations are being taken
6. COUNT EACH RISE AND FALL OF
CHEST AS ONE RESPIRATION
7. COUNT RESPIRATION FOR 60
SECONDS NOTING RATE,
REGULARITY AND SOUND
7. Ensures accurate count. Rate is number of
breaths. Regularity is pattern of breathing.
Sound is shallowness or depth of breathing
8. RECORD PULSE AND RESPIRATION
RATES ACCORDING TO CURRENT
NURSING PRACTICES
8. Record pulse and respirations immediately so
you won't forget. Accuracy is necessary
because decisions regarding resident's care may
be based on your report. What you write is a
legal record of what you did. If you don't
document it, legally it didn't happen
9. DO FINAL STEPS
10. REPORT UNUSUAL FINDINGS TO
NURSE
10. Provides nurse with information to assess
resident's condition and needs
I verify that this procedure was taught and successfully demonstrated according to OSDH Standards:
Student's Signature:__________________________________________________ Date:_____________
Instructor's Signature:_________________________________________________Date:_____________
Name/Location of Lab:_________________________________________________________________
OR
Name/Location of Clinical Site:__________________________________________________________
UPON COMPLETION OF EACH PROCEDURE, PROVIDE A COPY TO THE NURSE AIDE TRAINEE

Page 52 of 62
PROCEDURE 42: ORAL TEMPERATURE STEP RATIONALE
1. DO INITIAL STEPS
2. Position resident comfortably in bed or chair
3. Rinse thermometer in cool water and dry
with clean tissue, if necessary
4. HOLD THERMOMETER AT STEM
END AND SHAKE DOWN TO BELOW
THE LOWEST NUMBER
4. Holding the stem end prevents contamination
of the bulb end. The thermometer reading must
be below the resident's actual temperature
5. Put on disposable sheath, if applicable 5. Equipment used incorrectly may cause
discomfort and injury to resident
6. PLACE BULB END OF
THERMOMETER UNDER RESIDENT'S
TONGUE
6. The thermometer measures heat from blood
vessels under the tongue
7. Ask resident to close lips 7. The lips hold the thermometer in position. If
broken, injury to the mouth and mercury
poisoning may occur
8. LEAVE IN PLACE FOR AT LEAST 3
MINUTES OR LONGER BASED ON THE
NEEDS OF THE INDIVIDUAL RESIDENT
8. More time may be required if resident opens
mouth to breathe or talk
9. REMOVE THERMOMETER, WIPE
WITH TISSUE FROM STEM TO BULB
OR REMOVE SHEATH. DISPOSE OF
TISSUE OR SHEATH OF TISSUE OR
SHEATH
9. Reduces contamination
10. HOLD THERMOMETER AT EYE
LEVEL. ROTATE UNTIL LINE
APPEARS. ACCURATELY READ &
RECORD TEMPERATURE ACCORDING
TO CURRENT NURSING PRACTICES
10. Record temperature immediately so you
won't forget. Accuracy is necessary because
decisions regarding resident's care may be
based on your report. What you write is a legal
record of what you did. If you don't document
it, legally it didn't happen
11. Shake down thermometer, clean and store
thermometer according to current nursing
practices
12. DO FINAL STEPS
13. REPORT UNUSUAL READING TO
NURSE
13. Provides nurse with necessary information
to properly assess resident's condition and
needs

Page 53 of 62
PROCEDURE 42: ORAL TEMPERATURE (Continued)
I verify that this procedure was taught and successfully demonstrated according to OSDH Standards:
Student's Signature:__________________________________________________ Date:_____________
Instructor's Signature:_________________________________________________Date:_____________
Name/Location of Lab:_________________________________________________________________
OR
Name/Location of Clinical Site:__________________________________________________________
UPON COMPLETION OF EACH PROCEDURE, PROVIDE A COPY TO THE NURSE AIDE TRAINEE

Page 54 of 62
PROCEDURE 43: AXILLARY TEMPERATURE STEP RATIONALE
1. DO INITIAL STEPS
2. Position resident comfortably in bed or chair
3. Rinse thermometer in cool water and dry
with clean tissue
4. REMOVE RESIDENT'S ARM FROM
SLEEVE OF GOWN AND WIPE
AXILLARY AREA WITH TOWEL
4. To remove moisture from axillary area
5. HOLD THERMOMETER AT STEM
END AND SHAKE DOWN TO BELOW
THE LOWEST NUMBER
5. The mercury must be below resident's actual
temperature
6. Put on disposable sheath, if applicable 6. Equipment used incorrectly may cause
discomfort and injury to resident
7. PLACE BULB END OF
THERMOMETER IN CENTER OF
ARMPIT AND FOLD RESIDENT'S ARM
OVER CHEST
7. Puts thermometer against blood vessels to
get reading
8. HOLD IN PLACE FOR 10 MINUTES
9. GENTLY REMOVE THERMOMETER,
WIPE WITH TISSUE FROM STEM TO
BULB OR REMOVE SHEATH AND
DISPOSE OF TISSUE OR SHEATH
9. Reduces pathogens and removes residue so
thermometer can be read accurately
10. HOLD THERMOMETER AT EYE
LEVEL. ROTATE UNTIL LINE
APPEARS. ACCURATELY READ &
RECORD TEMPERATURE ACCORDING
TO CURRENT NURSING PRACTICES
10. Record temperature immediately so you
won't forget. Accuracy is necessary because
decisions regarding resident's care may be
based on your report. What you write is a legal
record of what you did. If you don't document
it, legally it didn't happen
11. Shake down, clean and store thermometer
according to current nursing practice
12. Put resident's arm back into sleeve of gown 12. Restores resident privacy
13. DO FINAL STEPS
14. REPORT UNUSUAL READING TO
NURSE
14. Provides nurse with necessary information
to properly assess resident's condition and
needs

Page 55 of 62
PROCEDURE 43: AXILLARY TEMPERATURE (Continued)
I verify that this procedure was taught and successfully demonstrated according to OSDH Standards:
Student's Signature:__________________________________________________ Date:_____________
Instructor's Signature:_________________________________________________Date:_____________
Name/Location of Lab:_________________________________________________________________
OR
Name/Location of Clinical Site:__________________________________________________________
UPON COMPLETION OF EACH PROCEDURE, PROVIDE A COPY TO THE NURSE AIDE TRAINEE

Page 56 of 62
PROCEDURE 44: BLOOD PRESSURE STEP RATIONALE
1. DO INITIAL STEPS
2. CLEAN EARPIECES AND
DIAPHRAGM OF STETHOSCOPE WITH
ANTISEPTIC WIPE
2. Reduces pathogens, prevents ear infections
and prevents spread of infection
3. Uncover resident's arm to shoulder
4. REST RESIDENT'S ARM, LEVEL
WITH HEART, PALM UPWARD ON
COMFORTABLE SURFACE
4. A false low reading is possible if arm is
above heart level
5. WRAP SPHYGMOMANOMETER CUFF
AROUND UPPER UNAFFECTED ARM
APPROXIMATELY 1-2 INCHES ABOVE
ELBOW
5. Cuff must be proper size and put on arm
correctly so amount of pressure on artery is
correct. If not, reading will be falsely high or
low
6. PUT EARPIECES OF STETHOSCOPE
IN EARS
6. Earpieces should fit into ears snugly to make
hearing easier
7. PLACE DIAPHRAGM OF
STETHOSCOPE OVER BRACHIAL
ARTERY AT ELBOW
8. CLOSE VALVE ON BULB. IF BLOOD
PRESSURE IS KNOWN, INFLATE CUFF
TO 20 mm/hg ABOVE THE USUAL
READING. IF BLOOD PRESSURE IS
UNKNOWN, INFLATE CUFF TO 160
mm/hg
8. Inflating cuff too high is painful and may
damage small blood vessels
9. Slowly open valve on bulb 9. Releasing valve slowly allows you to hear
beats accurately
10. Watch gauge and listen for sound of pulse
11. NOTE GAUGE READING AT FIRST
PULSE SOUND
11. First sound is systolic pressure
12. NOTE GAUGE READING WHEN
PULSE SOUND DISAPPEARS
12. Last sound is diastolic pressure
13. Completely deflate and remove cuff 13. An inflated cuff left on resident's arm can
cause numbness and tingling. If you must take
blood pressure again, completely deflate cuff
and wait 30 seconds. Never partially deflate a
cuff and then pump it up again. Blood vessels
will be damaged and reading will be falsely
high or low
14. ACCURATELY RECORD SYSTOLIC
AND DIASTOLIC READINGS
ACCORDING TO CURRENT NURSING
PRACTICE
14. Record readings immediately so you won't
forget. Accuracy is necessary because decisions
regarding resident's care may be based on your
report. What you write is a legal record of what
you did. If you don't document it, legally it
didn't happen
15. DO FINAL STEPS

Page 57 of 62
PROCEDURE 44: BLOOD PRESSURE STEP RATIONALE
16. REPORT UNUSUAL READINGS TO
NURSE
I verify that this procedure was taught and successfully demonstrated according to OSDH Standards:
Student's Signature:__________________________________________________ Date:_____________
Instructor's Signature:_________________________________________________Date:_____________
Name/Location of Lab:_________________________________________________________________
OR
Name/Location of Clinical Site:__________________________________________________________
UPON COMPLETION OF EACH PROCEDURE, PROVIDE A COPY TO THE NURSE AIDE TRAINEE

Page 58 of 62
PROCEDURE 45: CHOKING STEP RATIONALE
1. CALL FOR NURSE AND STAY WITH
RESIDENT
1. Allows you to get help yet continuously
provide for resident's safety and comfort
2. ASK IF RESIDENT CAN SPEAK OR
COUGH
2. Identifies sign of a blocked airway (not being
able to speak or cough)
3. IF NOT, MOVE BEHIND RESIDENT
AND SLIDE ARMS UNDER RESIDENT'S
ARMPITS
3. Puts you in correct position to perform
procedure
4. PLACE YOUR FIST WITH
THUMBSIDE AGAINST ABDOMEN
MIDWAY BETWEEN WAIST AND
RIBCAGE
4. Positions fist for maximum pressure with
least chance of injury to resident
5. GRASP YOUR FIST WITH YOUR
OTHER HAND
5. Allows you to stabilize resident and apply
balanced pressure
6. PRESS YOUR FIST INTO ABDOMEN
WITH QUICK INWARD
AND UPWARD THRUSTS
6. Forces air from lungs to dislodge object
7. REPEAT UNTIL OBJECT IS
EXPELLED
8. DO FINAL STEPS
9. ASSIST WITH DOCUMENTATION
ACCORDING TO CURRENT NURSING
PRACTICES
9. Accuracy is necessary because decisions
regarding resident's care may be based on your
report. What you write is a legal record of what
you did. If you don't document it, legally it
didn't happen
I verify that this procedure was taught and successfully demonstrated according to OSDH Standards:
Student's Signature:__________________________________________________ Date:_____________
Instructor's Signature:_________________________________________________Date:_____________
Name/Location of Lab:_________________________________________________________________
OR
Name/Location of Clinical Site:__________________________________________________________
UPON COMPLETION OF EACH PROCEDURE, PROVIDE A COPY TO THE NURSE AIDE TRAINEE

Page 59 of 62
PROCEDURE 46: FIRE STEP RATIONALE
1. REMOVE RESIDENTS FROM AREA
OF IMMEDIATE DANGER
1. Residents may be confused, frightened or
unable to help themselves
2. ACTIVATE FIRE ALARM 2. Alerts entire facility of danger
3. CLOSE DOORS AND WINDOWS TO
CONTAIN FIRE
3. Prevents drafts that could spread fire
4. EXTINGUISH SMALL FIRE WITH
FIRE EXTINGUISHER IF POSSIBLE
4. Prevents fire from spreading
5. FOLLOW ALL FACILITY POLICIES 5. Facilities have different methods of dealing
with emergencies. You need to follow the
procedures for your facility
I verify that this procedure was taught and successfully demonstrated according to OSDH Standards:
Student's Signature:__________________________________________________ Date:_____________
Instructor's Signature:_________________________________________________Date:_____________
Name/Location of Lab:_________________________________________________________________
OR
Name/Location of Clinical Site:__________________________________________________________
UPON COMPLETION OF EACH PROCEDURE, PROVIDE A COPY TO THE NURSE AIDE TRAINEE

Page 60 of 62
PROCEDURE 47: SEIZURES STEP RATIONALE
1. CALL FOR NURSE AND STAY WITH
RESIDENT
1. Allows you to get help yet continuously
provide for resident's safety and comfort
2. PLACE PADDING UNDER HEAD AND
MOVE FURNITURE AWAY FROM
RESIDENT
2. Protects resident from injury
3. DO NOT RESTRAIN RESIDENT OR
PLACE ANYTHING IN MOUTH
3. Any restriction may injure resident during
seizure
4. LOOSEN RESIDENT'S CLOTHING
ESPECIALLY AROUND NECK
4. Prevents injury or choking
5. AFTER SEIZURE STOPS, POSITION
RESIDENT ONTO SIDE
5. Allows saliva to drain from mouth so
resident doesn't choke
6. NOTE DURATION OF SEIZURE AND
AREAS INVOLVED
6. Provides nurse with necessary information to
properly assess resident's condition and needs
7. DO FINAL STEPS
8. ASSIST WITH DOCUMENTATION
ACCORDING TO CURRENT NURSING
PRACTICES
8. Accuracy is necessary because decisions
regarding resident's care may be based on your
report. What you write is a legal record of what
you did. If you don't document it, legally it
didn't happen
I verify that this procedure was taught and successfully demonstrated according to OSDH Standards:
Student's Signature:__________________________________________________ Date:_____________
Instructor's Signature:_________________________________________________Date:_____________
Name/Location of Lab:_________________________________________________________________
OR
Name/Location of Clinical Site:__________________________________________________________
UPON COMPLETION OF EACH PROCEDURE, PROVIDE A COPY TO THE NURSE AIDE TRAINEE

Page 61 of 62
PROCEDURE 48: FALLING OR FAINTING STEP RATIONALE
1. CALL FOR NURSE AND STAY WITH
RESIDENT
1. Allows you to get help yet continuously
provide for resident's safety and comfort
2. CHECK IF RESIDENT IS BREATHING 2. Provides you with information necessary to
proceed with procedure
3. DO NOT MOVE RESIDENT 3. Prevents further damage if resident is injured
4. Talk to resident in calm and supportive
manner
4. Reassures resident
5. Apply direct pressure to any bleeding area 5. Slows or stops bleeding
6. Take pulse and respiration 6. Provides nurse with necessary information to
properly assess resident's condition and needs
7. Assist nurse as directed
8. DO FINAL STEPS
9. ASSIST WITH DOCUMENTATION
ACCORDING TO CURRENT NURSING
PRACTICES
9. Accuracy is necessary because decisions
regarding resident's care may be based on your
report. What you write is a legal record of what
you did. If you don't document it, legally it
didn't happen
10. CHECK RESIDENT FREQUENTLY
ACCORDING TO CURRENT NURSING
PRACTICES
10. Assures resident comfort and allows you to
quickly report any change in resident condition
I verify that this procedure was taught and successfully demonstrated according to OSDH Standards:
Student's Signature:__________________________________________________ Date:_____________
Instructor's Signature:_________________________________________________Date:_____________
Name/Location of Lab:_________________________________________________________________
OR
Name/Location of Clinical Site:__________________________________________________________
UPON COMPLETION OF EACH PROCEDURE, PROVIDE A COPY TO THE NURSE AIDE TRAINEE