NJROTC Junior Position Air Rifle Handbook NAVEDTRA 37117
80
-
Upload
khangminh22 -
Category
Documents
-
view
0 -
download
0
Transcript of NJROTC Junior Position Air Rifle Handbook NAVEDTRA 37117

IVJROTC Marksm&nship Pro gram
Table of Contents
Title1
2
Lesson
4
5
67
8
9
10
Appendix A
Appendix B
History of MarksmanshipFirearm safety and safe rangeoperationTarget Shooting Equipment andits OperationAiming Basics and the FirstTarget Position - StandingAiming and FiringSight Adjustment and ScoringThe Prone PositionThe Kneeling PositionPractice and Skill DevelopmentCompetition OpportunitiesCivilian Marksmanship ProgramJunior Shooter SafetyExaminationSafety Pledge
Page1
7
15
23
3l3745535969
Acknowledgements
Mr. Gary AndersonDirector, Civilian Marksmanship Program
Commander John W. Roberts, USN RetiredNJROTC Senior Naval Science Instructor
Lieutenant Colonel Peter G. Peters, USMC RetiredNJROTC Senior Naval Science Instructor
" Lieutenant Ronald J. Maul, USN RetiredNJROTC Senior Naval Science Instructor
The Navy Junior Reserve Officers Training Corpsextends special thanks to these individuals for theirefforts in development and editing of this publicationand their dedication to marksmanship youth sports.

Cadet Salety and Civilian Marksmanship Program
LESSON 1: THE HISTORY OFMARKSMANSHIP
PURPOSE
This lesson introduces you to the
historic applications of marksmanshipand its current application as a sport. Italso identifies the qualities that makeparticipants in the sport of air rifletarget shooting safe and successful.
accuracyconcentrationcontroldetemdnationpracticeskill
INTRODUCTION
From the time of the early settlershunting to survive, to the citizen-soldier whofirst fought for our independence, to themodern military marksman who protects ourfreedoms, marksmanship has played a rich partof our country's history. Some would say thatits only importance in this era is in militaryapplications. What is overlooked is
marksmanship as a sport and the tremendouspersonal benefits that can be achieved whentraining for and participating in competitivemarksmanship matches.
Why participate in marksmanshipcompetitions? Putting projectiles on target issomething we all seem to enjoy from the
moment we enter elementary school. Howmany of us shoot trash into the trashcan fromacross the room, or at least try to? All of ourmajor sports have an aspect of marksmanship.
Cadet Saiety and Civilian Marksmanship Program
Lesson 1: History of Marksmanship
From the time humans started throwing stones theyhave practiced their skills at using projectiles to hittqrgets. This sculpture of a pimitive man throwing astone is part of a statue on the Enriqae BorbonnetGomez shooting range near Havana" Caba.
Basketball, baseball and even football haveskills of trying to put a projectile on target. Itsfun! There is something satisfying when yousink the three-pointer, put that fastball justwhere the hitter can't hit,it or put a round in the
center of the ten-ring. We know from ourexperiences in competitions that none of these
things are as easy as they sound andconsistently putting a round in the ten-ring is
very challenging.
In other spofts your physicalcharacteristics, i.e. height, weight and
coordination, will go a long way in determiningyour maximum level of accomplishment. Thisis not the case in shooting competitions. Theonly limit to how good you can be is how hardyou want to work. The great thing is all thebenefits of other sports can be found in
Marksmanship Sports..in the Olyirpiis
o tslATHLON, cross-country skiing and rifleshooting
','-'- swimming, running, and air pistol shootingo': ABCHERY, with bows and affowso ,, SHOOTING, 17 6:rBnts for rifles pislol and
shotguns
Cadet Salety and Civilian Marksmanship Program
marksmanship. Shooting requires self-discipline, self-control and above alldedication. And while you might think thatstamina is not important to shooting, wait untilyour first couple practices and competitions.Those that can hold the rifle steady afterseveral rounds of competition are going to bethe winners.
The translation of marksmanship skillsto your schoolwork and lifework is obvious.Not only will you develop self-discipline andconfidence, but also when you shoot you willleave all your thoughts about school and day-to-day responsibilities behind. Yourconcentration will have to be complete. Canyou do that now? Just imagine if you could sitdown to take a test or do homework andcompletely concentrate on the subject matter!Learning marksmanship skills can help you dothat.
When you participate in marksmanshipyou are not only learning a skill that helpedfound our great nation, but you are alsoparticipating in a highly competitive sport thatwill help you develop important life skills. Goout and have fun, enjoy the sport, understandand appreciate what it meant to the history ofour country. Use the skills you learn and be apart of our future.
A HISTORIC OVERVIEW
The evolution of target sports led to thedevelopment of four different sports that noware Olympic sports. The winter sport ofbiathlon combines cross-country skiing andrifle shooting. Modern pentathlon, archery, andshooting all are summer Olympic sports.Archery involves shooting with bows andarrows. Pentathlon combines air pistolshooting with horse riding, fencing, swimming,and running. The sport of shooting is one ofthe largest and most popular of all Olympic
Lesson 1: History of Marksmanship
sports with 17 different men's and women'sevents for rifles, pistols, and shotguns.
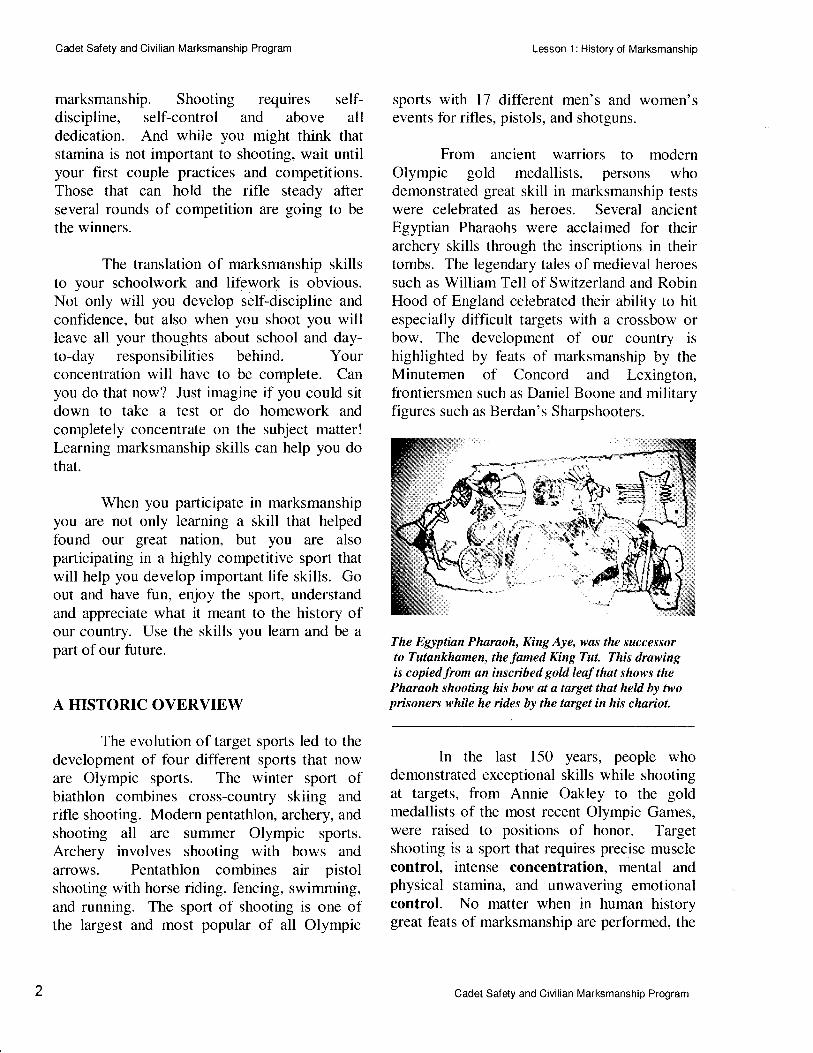
From ancient warriors to modernOlympic gold medallists, persons whodemonstrated great skill in marksmanship testswere celebrated as heroes. Several ancientEgyptian Pharaohs were acclaimed for theirarchery skills through the inscriptions in theirtombs. The legendary tales of medieval heroessuch as William Tell of Switzerland and RobinHood of England celebrated their ability to hitespecially difficult targets with a crossbow orbow. The development of our country ishighlighted by feats of marksmanship by theMinutemen of Concord and Lexington,frontiersmen such as Daniel Boone and militaryfigures such as Berdan's Sharpshooters.
The Egyptian Pharaoh, King Aye, was the successorto Tutankhamen, the famed King Tut. This drawingis copied from an inscibed gold leaf that shows thePharaoh shooting his bow at a target that held by twoprisoners while he rides by the target in his chariot.
In the last 150 years, people whodemonstrated exceptional skills while shootingat targets, from Annie Oakley to the goldmedallists of the most recent Olympic Games,were raised to positions of honor. Targetshooting is a sport that requires precise musclecontrol, intense concentration, mental andphysical stamina, and unwavering emotionalcontrol. No matter when in human historygreat feats of marksmanship are performed, the
Cadet Safety and Civilian Marksmanship Program
Cadet Saiety and Civilian Marksmanship Program
skilled marksman is respected, honoredcelebrated.
An advertising poster for Buffalo Bill Cody'sWild West Show of the lale 1800s promotes themarksmanship skills of one of America's firstgreat target shooters, Annie Oakley.
OLYMPIC COMPETITORS
Some of the greatest Olympiccompetitors are rifle shooters from the UnitedStates. Two of those shooters, Gary Anderson(1964, 1968) and Lones Wigger (1964, 1972)are among an elite group of Olympic medallistswho have won two individual Olympic goldmedals. Only one shooter in the history of the
Olympic Games has won more than twoindividual gold medals (Ralf Schumann, apistol shooter from Germany, won his thirdgold medal in 2004). One other U. S. rifleshooter, Morris Fisher (1920,1924), who was amember of the Marine Corps, also won twoindividual Olympic gold medals.
Since 1948, six other U.S. rifle shootershave won Olympic gold medals. They are
Arthur Cook (1948), John Writer (1972),
Lanny Bassham (1976), Edward Etzel (1984),
Pat Spurgin (1984), Launi Melli (1992), NancyNapolski-Johnson (2000) and Matt Emmons(2004). Another important milestone in the
Cadet Saiety and Civilian Marksmanship Program
Lesson 1: History ol Marksmanship
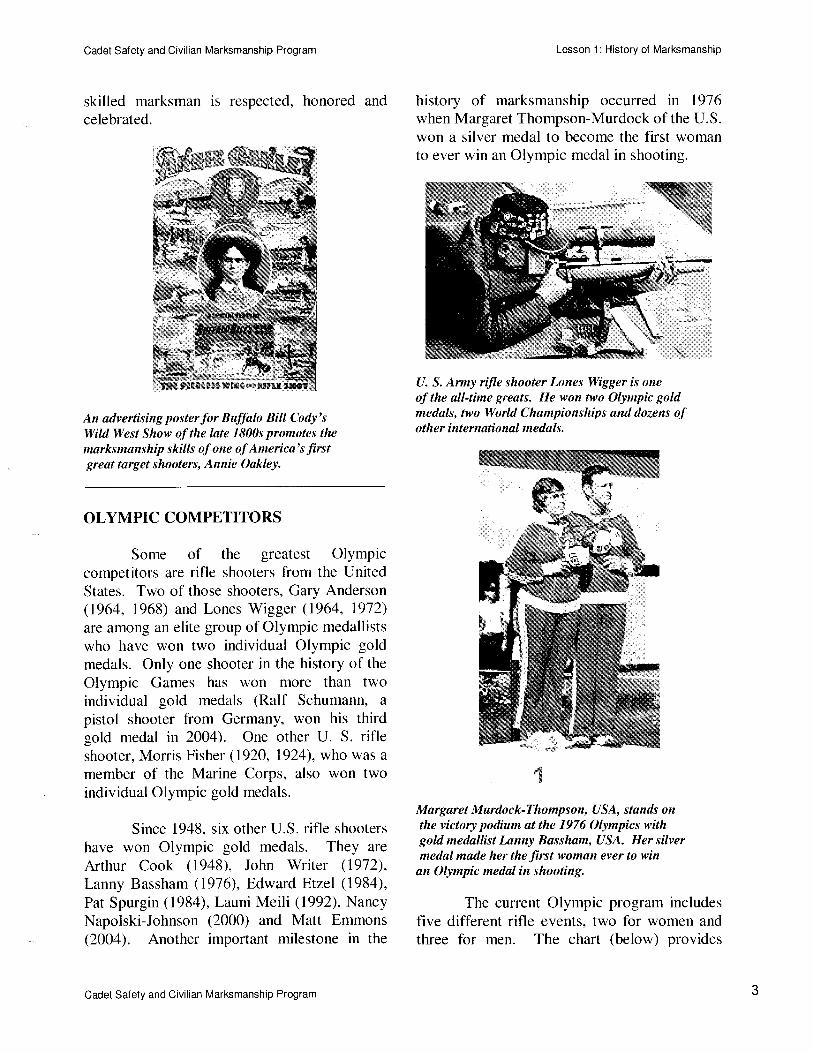
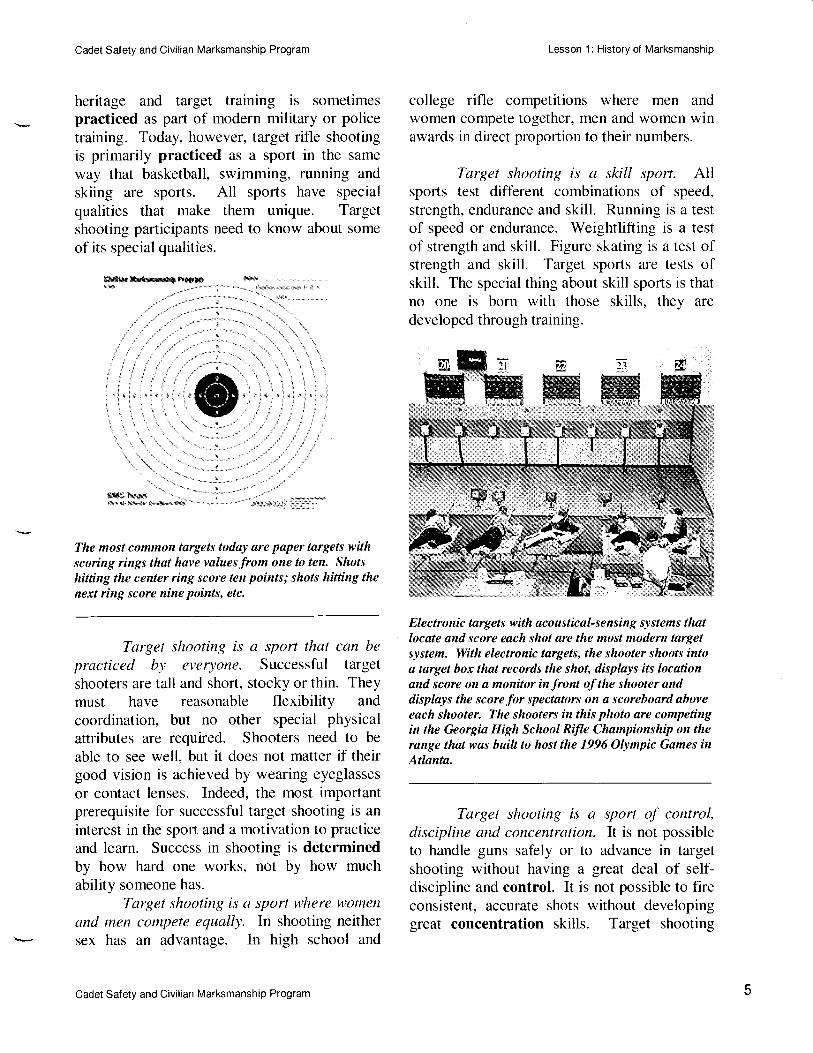
history of marksmanship occurred in 1976when Margaret Thompson-Murdock of the U.S.won a silver medal to become the first womanto ever win an Olympic medal in shooting.
U. S. Anny ifle shooter Innes Wigger is oneof the all-time greats. He won two Olympic goldmedals, two World Championships and dozens ofother international medals.
$
Margaret Murdock-Thompson, USA, stands onthe victory podium at the 1976 Olympics withgold medallist l-anny Bassham, USA. Her silvermedal made her the first woman ever to win
an Olympic medal in shooting.
The current Olympic program includesfive different rifle events, two for women andthree for men. The chart (below) provides
and

Event Type ofGun
Distance ShootingPosition
No. ol Shots
Air Rifle
WomenAir rifle 10
metersStanding 40 shots, plus
10 shots in
final
Air Rifle
Men
Air rifle 10
metersStanding 60 shots, plus
10 shots in
final
ThreePositionRifleWomen
.22
caliberrim fire
50meters
Prone,
standingand
kneeling
60 shots (20 in
each position)plus 10 shotsin final
ThreePosition
Rifle Men
.22
caliberrim fire
50meters
Prone,
standingand
kneeling
120 shots (40
in eachposition) plus'10 shots in
final
ProneRifle Men
.22
caliberrim {ire
50meters
Prone 60 shots, plus
10 shots in
f inal
Cadet Sarety and Civilian Marksmanship Program
additional information about these Olympictarget-shooting events.
TARGET SHOOTING
The targets used throughout the historyof marksmanship are graphic evidence of howthe sport of target shooting developed. Theearliest targets were cylinders or boxes withcentral marks that were used by archers. Live,and later artificial, pigeons were once placed ontop of poles and used as targets. The earliestrifle targets were large wooden disks. Largesteel plates were used for early rifle targets and
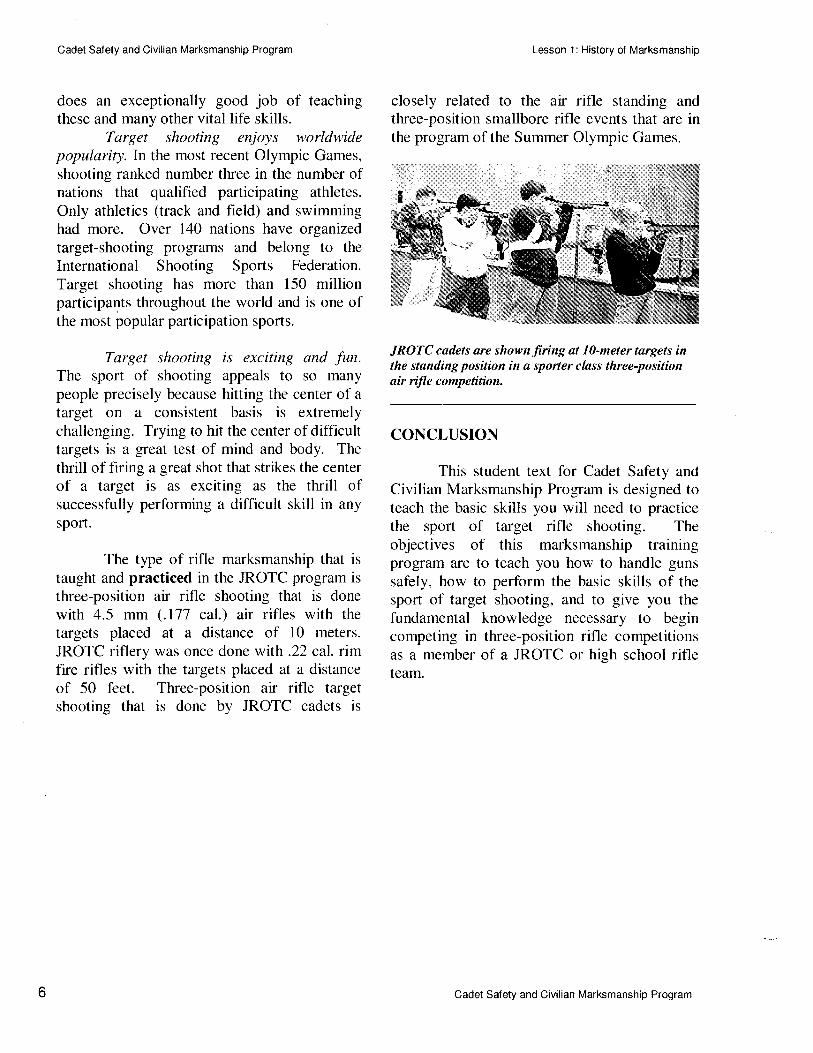
gave audible signals when hit. Paper targetscame into use in the late nineteenth century andcontinue to be used in most ranges today. Themost modern targets are electronic targets suchas those used in the Olympic Games.Electronic targets have acoustical sensingsystems that pinpoint and score the exactlocation of each shot and computer systems tocalculate the scores and display instant resultson electronic scoreboards.
The targets used today have concentricscoring rings. Shots that touch the central or
Lesson 1: History of Marksmanship
inner ring score ten points. Shots that hit thenext ring score nine points. Successivelypoorer shots score values down to one or evenzero.
Targets used in Ancient Egypt 4,000 years agowere simple boxes or cylinders.
Rifle targets in seventeenth and eighteenth centuryEurope were large wooden disks that were fired atfromdistances of as much as 400 meters. The young boywas called a "Scheibentoni" or target marker.
Al1 target shooting events trace theirorigins to survival or martial skills thatoriginally were intended to prepare men forbattle. Target sports have a strong military
Cadet Safety and Civilian Marksmanship Program
Cadet Safety and Civilian Marksmanship Program
heritage and target training is sometimespracticed as part of modern military or policetraining. Today, however, target rifle shootingis primarily practiced as a sport in the same
way that basketball, swimming, running andskiing are sports. All sports have specialqualities that make them unique. Targetshooting participants need to know about some
of its special qualities.
$*Xe*; &il**rrrg$ ftrylR
S$n'$ }s*NNN.NSs*S.iNN\
The most common targets today are paper targets withscoring rings that have values from one to ten. Shotshitting the center ring score ten points; shots hitting thenext ring score nine points, etc.
Target shooting is a sport that can be
practiced by everyone. Successful targetshooters are tall and short, stocky or thin. Theymust have reasonable flexibility and
coordination, but no other special physicalattributes are required. Shooters need to be
able to see well, but it does not matter if theirgood vision is achieved by wearing eyeglasses
or contact lenses. Indeed, the most importantprerequisite for successful target shooting is an
interest in the sport and a motivation to practiceand learn. Success in shooting is determinedby how hard one works, not by how much
ability someone has.
Target shooting is a sport where wotnen
and men compete equally. In shooting neithersex has an advantage. In high school and
Cadet Safety and Civilian Marksmanship Program
Lesson 1: History of Marksmanship
college rifle competitions where men andwomen compete together, men and women winawards in direct proportion to their numbers.
Target shooting is a skill sport. A1lsports test different combinations of speed,
strength, endurance and skill. Running is a testof speed or endurance. Weightlifting is a testof strength and skill. Figure skating is a test ofstrength and skill. Target sports are tests ofskill. The special thing about skill sports is thatno one is born with those skills, they are
developed through training.
Electronic targets with acoustical-sensing systems thatlocqte and score each shot are the most modern targetsystem. With electronic targets, the shooter shoots intoa target box thal records the shot, displays its locationand score on a monitor in front of the shooter anddisplays the score for spectators on a scoreboard aboveeach shooter. The shooters in this photo are competingin the Georgia High School Rifle Championship on therange thal was built to host the 1996 Olympic Gqmes inAtlanta.
Target shooting is a sport of control,discipline and concentration. It is not possibleto handle guns safely or to advance in targetshooting without having a great deal of self-discipline and control. It is not possible to fireconsistent, accurate shots without developinggreat concentration skills. Target shooting
Cadet Satety and Civilian Marksmanship Program
does an exceptionally good job of teachingthese and many other vital life skills.
Target shooting enjoys worldwidepopularily*. In the most recent Olympic Games,shooting ranked number three in the number ofnations that qualified participating athletes.Only athletics (track and field) and swimminghad more. Over 140 nations have organizedtarget-shooting programs and belong to theInternational Shooting Sports Federation.Target shooting has more than 150 millionparticipants throughout the world and is one ofthe most popular participation sports.
Target shooting is exciting and fun.The sport of shooting appeals to so manypeople precisely because hitting the center of atarget on a consistent basis is extremelychallenging. Trying to hit the center of difficulttargets is a great test of mind and body. Thethrill of firing a great shot that strikes the centerof a target is as exciting as the thrill ofsuccessfully performing a difficult skill in anysport.
The type of rifle marksmanship that istaught and practiced in the JROTC program is
three-position air rifle shooting that is donewith 4.5 mm (.177 cal.) air rifles wilh thetargets placed at a distance of 10 meters.JROTC riflery was once done with .22 cal. rimfire rifles with the targets placed at a distanceof 50 feet. Three-position air rifle targetshooting that is done by JROTC cadets is
Lesson 1: History of Marksmanship
closely related to the air rifle standing andthree-position smallbore rifle events that are inthe program of the Summer Olympic Games.
JROTC cadets are shown firing at l0-meter targets inthe standing position in a spofier class three-positionair rifle competition.
CONCLUSION
This student text for Cadet Safety andCivilian Marksmanship Program is designed toteach the basic skills you will need to practicethe spoft of target rifle shooting. Theobjectives of this marksmanship trainingprogram are to teach you how to handle gunssafely, how to perform the basic skills of thesport of target shooting, and to give you thefundamental knowledge necessary to begincompeting in three-position rifle competitionsas a member of a JROTC or high school rifleteam.
Cadet Safety and Civilian Marksmanship Program
Cadet Saf ety and Civilian Marksmanship Program
LESSON 2: FIREARM SAFETYAND SAFE RANGE OPERATION
PURPOSE
This lesson introduces you to therules for safe air rifle handling and therange procedures that you must followin air rifle firing activities.
INTRODUCTION
The sporl of target rifle shooting is oneofthe safest ofall youth sports. In 104 years ofOlympic shooting, there has never been an
accidental injury involving a firearm. Thereare several thousand JROTC teams and juniorrifle clubs that practice and compete in positionair rifle shooting, with more than 100,000participants in the USA. These youthmarksmanship activities have established oneof the lowest accident rates of any youth sport.
Target shooting established its record as
one of the safest of all spol'ts because it is asport where the safety of its participants can be
assured when everyone follows basic safetyrules. Target shooting is, in fact, a spoft ofcontrol and discipline where everyoneinvolved, including participants, instructors,coaches, and range officers, are expected toknow and apply the sport's safety rules at alltimes.
Lesson 2: Firearm Safety and Safe Range Operation
RULES FOR SAFE GUN HANDLING
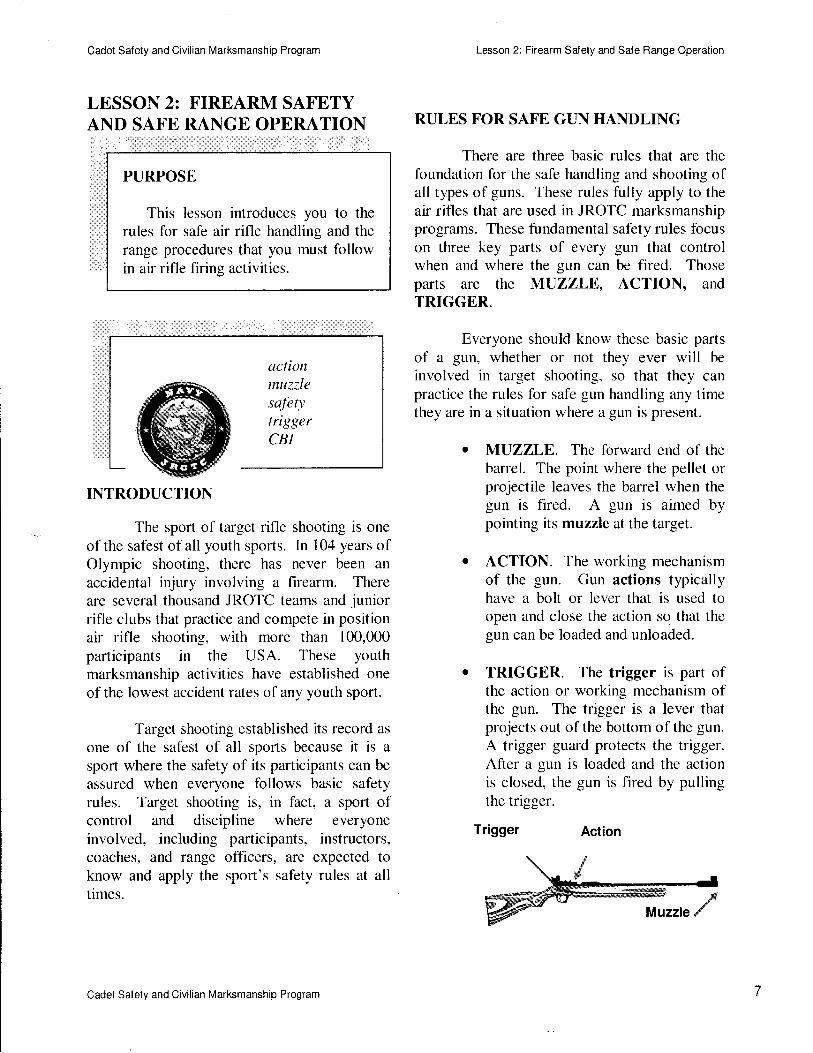
There are three basic rules that are thefoundation for the safe handling and shooting ofall types of guns. These rules fully apply to theair rifles that are used in JROTC marksmanshipprograms. These fundamental safety rules focuson three key parts of every gun that controlwhen and where the gun can be fired. Thoseparts are the MUZZLE, ACTION, andTRIGGER.
Everyone should know these basic partsof a gun, whether or not they ever will be
involved in target shooting, so that they canpractice the rules for safe gun handling any timethey are in a situation where a gun is present.
o MUZZLE. The forward end of thebarrel. The point where the pellet orprojectile leaves the barrel when thegun is fired. A gun is aimed bypointing its muzzle at the target.
. ACTION. The working mechanismof the gun. Gun actions typicallyhave a bolt or lever that is used toopen and close the action so that thegun.u, be loaded and unloaded.
o TRIGGER. The trigger is part ofthe action or working mechanism ofthe gun. The trigger is a lever thatprojects out of the bottom of the gun.A trigger guard protects the trigger.After a gun is loaded and the actionis closed, the gun is fired by pullingthe trigger.
Trigger Action
actiortmuzzle
saJbry
triggerCBI
Cadet Salety and Civilian Marksmanship Program

Cadet Salety and Civilian Marksmanship Program
Bolt: Opensby pullingto rear
Trigger Guard
THREE SAFETY STEPS
The application of the rules for safe gunhandling follow a step-by-step sequence that isdesigned to assure that even if a gun were to beunintentionally fired, it would notcause personal injury or serious damage. Besure to follow these steps:
o Whenever anyone picks up a gun ofany kind, the first thing that mustbe done is to control the directionthe mazzle points. Immediatelypoint the gun in a safe directionwhere it is not directed at anotherperson and would do no seriousdamage even if the gun were to beunintentionally fired. The first thingto do when picking up a gun ortaking a gun from someone else is topoint it away from other people inthe area. The safest direction topoint a gun is usually up. If a gun ison a range, the safest direction is topoint it downrange toward thetargets.
o As soon as the gun muzzle ispointing in a safe direction, thesecond step is to check the actionof the gun and to open it if it is not
Lesson 2: Firearm Safety and Safe Range Operation
Loading portand breechend of barrel
already open. Since the gun'saction contains its firing mechanism,it cannot be fired unintentionally oraccidentally if the action is open. Allguns, excepr muzzle loading guns,have a bolt or lever on the action thatis used to open the action. Be sure tolearn where the bolt or cocking leveris on any gun you handle. With theaction open, it is possible to visuallycheck most guns to see whether thegun is loaded and has a cartridge orpellet in the breech end (rear end) ofthe barrel. If the gun is loaded and itis possible to remove the cartridge,that must be done.
o With the mazzle pointing in a safedirection and the action open so thatthe gun cannot be fired, the thirdsafety precaution is to hold orcarry the rifle so that all fingersare held outside of the triggerguard and not on the trigger itself.The trigger guard is a protective looparound the trigger. Its purpose is toprotect the trigger from being pulledunintentionally. By keeping fingersoutside of the trigger guard, it isimpossible to accidentally pull the
\\,
I Muzzle I
t
\
N
Cadet Safety and Civilian Marksmanshlp Program

Cadet Safety and Civilian Marksmanship Program
trigger should the action somehowbecome closed.
CLEAR BARREL INDICATORS (CBIS)
Clear Barrel Indicators or CBIs are used
to demonstrate that air rifles are not loadedwith a pellet and that their actions are open.
CBIs are made from bright-coloredmonofilament line. CBIs are inserted in airrifle barrels from the breech (action) end of thebarrel and extend out both ends ofthe barrel.
Lesson 2: Firearm Safety and Sale Range Operation
SHOOTING RANGES
Everyone who comes in contact with a
gun needs to know the three basic rules for safegun handling. Individuals who will use rifles inJROTC marksmanship or other target shootingactivities also need to know and practice severaladditional rules regarding the safe operation oftarget shooting ranges.
To understand these safety rules it is firstnecessary to know something about how targetranges are designed. Study the diagram of therange (next page) so that you understand howthe firing points and targets are positioned on atypical range. This diagram is for a six-pointrange, but target ranges can have as few as fourand as many as 100 or more firing points.
L0-meter air riJle range target holders with targetsplaced at the proper hcights for firing from the prone,kneeling, and standing positions.
A range officer or instructor is in charge offiring on every range.
,l .
2.
RUI-ES FOR SAFE GUN.HANDLING
MUZZLE. Always keep gun muzzles pointedin a safe direction. Gun,muzzles should neverbe pointed, at other pcrsons, under anycircumstances- On a rnngo; :'the safestdirections tCI, point a gun muzzle are usuallyupward or downrange toward the target. :
RIFLE ACTION. When handling any rifle orfirearm, the action should 'be open. Gunactions rnust remain open except when the gunis on the firing tine and,fie cornmand to LOADhas been given. When shooting is finished or,the rifle is placed d6wn to'take a break, theaction must be open and unloaded, even whenthe gun is,on the firing line. The gun actionmay be cJosed and the CBI nroved rwardwhen it is placed in a gun case or storeroom,but must be opened and the CBI insdrted assoon a$ it is picked.up again. I -, .''
TRIGGER, ,Xeep your finger off lhe triggeruntil after placing the' gun in lhe shootingposition and preparing to fire a shot. lt isespecially imporlant to keep the finger outsideof the trigger guard when loading the gun and
-placing'it in lhe shooting posilion,
_).
Cadet Salety and Civilian Marksmanship Program

Cadet Safety and Civilian Marksmanship Program
Range officerstand or table
Lesson 2: Firearm Salety and Safe Range Operation
TargetHolders:One foreachf iringpointReady Area:
For shooterswaiting to shoot
next, or lor spectators
10
Each range has these primary features:
o Safety Barrier. Ranges normallyhave an outside wall or some means
of preventing unauthorized personsfrom entering the range area whilefiring takes place.
o Target Holders. At one end of therange there are a series of targetholders. The target holdersnormally have a metal sheet behindthe targets that serves as a backstopto stop and collect all of the pelletsthat are fired at the targets. Thetarget holders are designed so thattargets can be hung on them atheights appropriate for the threeshooting positions. Prone targetsare hung low, standing targets areplaced chest high, and kneelingtargets are between the two.
o Firing Line. At a distance ofexactly l0 meters from the targets, a
firing line is marked on the floor ofthe range. The firing line isnormally a red or black paintedstripe or line of tape that is two orthree inches wide. Al1 shootersmust position themselves on theirfiring points so that no part of theirfeet or body touches the firing line.
o Firing Points. The firing line isbroken into divisions called firingpoints. Firing points are rectangularspaces behind the firing line. Firingpoints are approximately I meter x 2meters in size. The width of eachfiring point corresponds to thedistance between the targets. Onlyone shooter may occupy one firing atone time.
Range Officer. Immediately behindthe line of firing points, a table orstand for the range officer is located.The range officer is in charge offiring on the range and givesinstructions to control shooting.Range officers use a standard seriesof range commands that control theconduct of any shooting activity.
Ready Area. Most ranges also havean area behind the firing line that isdesignated as a preparation or readyarea. If there are spectators, this isthe area where they should stand orsit. If there are other shooters whoare waiting their turn to flre, this isthe area where they should remain.
Exterior wall orsafety barrier
Distance: 10 meters
Firing Line
Firing Points: Onefor each shooter
Cadet Safety and Civilian Marksmanship Program

Cadet Safety and Civilian Marksmanship Program
FIRING PROCEDURES ANDCOMMANDS
The range officer or instructor conductsthe firing activity on the range. To begin a
range activity, the range officer designates theshooters who will use the firing points andinstructs them to move their equipment to thefiring line. When air rifles are brought to therange, their muzzles must be pointed upward ordownrange, their actions must be open andthey must have CBIs inserted in the barrels.After bringing air rifles to the firing line, theymust be "grounded." This means to place themon the floor, shooting mat or bench with themuzzle lying ahead of the firing line. Therange officer will then give instructions toprepare for firing. After the shooters are inshooting positions ready to fire, the rangeofficer gives a series of commands to start andstop firing.
LOAD. No one may load any rifleuntil the range officer gives thecommand LOAD. Then shootersmay charge their rifles with air andinsert a pellet. It is a serious offenseto load a rifle on a range before thecommand LOAD is given.
START. The next command tellsshooters they can begin to aim andfire at their targets. No one may firea shot until this command is given,even if the command LOAD has
been given. After the commandSTART is given, shooters maycontinue to charge and load theirrifles to fire all of the shots in a
firing exercise.
STOP. When shooting is finished,the range officer commands STOP.If the command STOP is givenduring firing, every shooter mustimmediately stop firing, open the
Lesson 2: Firearm Safety and Safe Range Operation
actions on their rifles and wait forfurther instructions. No one isauthorized to fire a shot after thecommand STOP is given. The rangeofficer or any other person on therange can command STOP if theybecome aware of a dangerous orunsafe condition.
UNLOAD. If anyone on a range has
a loaded air rifle after the commandSTOP is given, they must notify therange officer by raising their hand orcalling out "Loaded rifle." Theinstructor will then give directionsfor unloading any loaded rifles.Loaded air rifles are normallyunloaded by firing the rifle into anPellet Discharge Container (PDC).
A Pellet Discharge Container (PDC) is filled with paperor other muteiql. When an air iJle remains loadedafter the command STOP is given, the range officer willinstruct thqt the ifle be unloaded by firing it into thePDC.
As soon as you complete a firingexercise, you must 1) immediately open your airrifle action, 2) ground your rifle and 3) insert aCBI in the barrel.
After all firing is completed the rangeofficer will check each rifle to be sure they areunloaded with CBIs inserted. When that check
Cadet Salety and Civilian Marksmanship Program 11
Cadet Salety and Civilian Marksmanship Program
is completed, the range officer will instruct theshooters on the firing line to retrieve or changetheir targets or to leave the firing line so thenext group of shooters can move up to thefiring line.
There are a few other rules that are usedon shooting ranges to assure safety and theorderly conduct of shooting activities. Everyshooter must be familiar with these rules andany special rules that apply to the range you are
using.
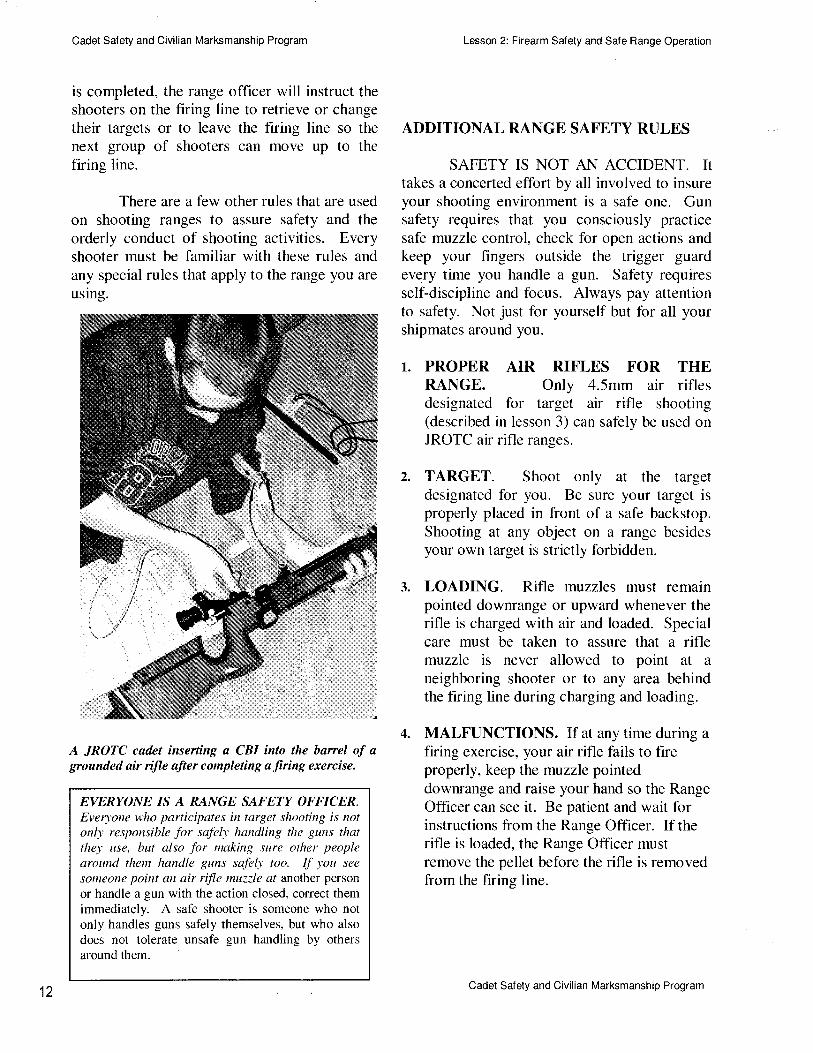
A JROTC cudet inserting a CBI into the banel of agrounded air rifle after completing a firing exercise,
EVERYONE IS A RANGE SAFETY OFFICER,Everyone who paticipates in target shooting is notonl1, responsible for safeb handling the gtms thatthey use, btfi also for nrnking sure other peoplearowtd tlrcm handle gwts safely too. If .vou see
someone poitt an air rifle muz;le at another person
or handle a gun with the action closed, correct themiurmediately. A safe shooter is someone who notonly handles guns safely themselves, but who alsodoes not tolerate unsafe gun handling by othersaround them.
Lesson 2: Firearm Safety and Sale Range Operation
ADDITIONAL RANGE SAFETY RULES
SAFETY IS NOT AN ACCIDENT. Ittakes a concerted effort by all involved to insureyour shooting environment is a safe one. Gunsafety requires that you consciously practicesafe muzzle control, check for open actions andkeep your fingers outside the trigger guardevery time you handle a gun. Safety requiresself-discipline and focus. Always pay attentionto safety. Not just for yourself but for all yourshipmates around you.
1. PROPER AIR RIFLES FOR THERANGE. Only 4.5mm air riflesdesignated for target air rifle shooting(described in lesson 3) can safely be used onJROTC air rifle ranges.
TARGET. Shoot only at the targetdesignated for you. Be sure your target isproperly placed in front of a safe backstop.Shooting at any object on a range besidesyour own target is strictly forbidden.
LOADING. Rifle muzzles must remainpointed downrange or upward whenever therifle is charged with air and loaded. Specialcare must be taken to assure that a riflemtzzle is never allowed to point at a
neighboring shooter or to any area behindthe firing line during charging and loading.
MALFUNCTIONS. If at any time during a
firing exercise, your air rifle fails to fireproperly, keep the muzzle pointeddownrange and raise your hand so the RangeOfficer can see it. Be patient and wait forinstructions from the Range Officer. If therifle is loaded, the Range Officer mustremove the pellet before the rifle is removedfrom the firing line.
12Cadet Safety and Civilian Marksmanship Program
Cadet Safety and Civilian Marksmanship Program
FIRING COMPLETED. Immediatelyafter you fire your last shot in a firingexercise or when the command STOP isgiven, you must open the action on your airrifle, place the rifle on the ground or benchand insert a CBI. The Range Officer willthen inspect the firing line to insure safety.
LOADED RIFLE. A loaded air rifle is an
air rifle that has a pellet in the barrel. Anypellet that is in the barrel must be removedbefore the air rifle may be grounded orremoved from the range. If you still have aloaded air rifle after the command STOP isgiven, keep the muzzle pointed downrange,raise your hand and announce, "Loadedrifle." The Range Officer will give youinstructions for discharging your air rifle tounload it. This may be done by instructingyou to fire into an open target backstop orto fire into a pellet discharge container.
GROUNDED RIFLE. When you bringyour rifle to the firing line, you will be
instructed to "ground" it. You must also
ground your rifle after you finish firing toinsert a CBI so it can be checked by theRange Officer. To ground a rifle, open theaction, place it on the ground or bench withthe muzzle ahead of the firing line and
insert a CBI.
LINE IS HOT/LINE IS CLEAR. Whenconducting firing, the Range Officer willalternately describe the flring line as being"hot" or "clear." A firing line is hot when
all persons on the range are in properlocations behind the firing line and the lineis prepared for live firing. Furtherinstructions or command will then be givento actually begin preparation and firing. Afiring line is clear when all firing is
completed and all rifles are grounded withCBI's inserted. No one can move forwardof the firing line until it is declared clear bythe Range Officer.
Lesson 2: Firearm Safety and Safe Range Operation
GOING DOWNRANGE. Whenever it rs
necessary for someone to go forward of thefiring line to place or retrieve a target or forany other purpose, all air rifles must begrounded with CBIs inserted. No one maygo forward of the flring line until authorizedto do so by the range officer and no one mayhandle rifles while anyone is in front of thefiring line.
PERSONAL HYGIENE. Lead is a toxicsubstance that must not be ingested.Medical research conducted at the U.S.Olympic Training Center confirms thatsimple hygiene precautions effectivelyprevent individuals who shoot air rifles fromingesting any lead. The rules are simple: I )Do not bring any food into tlte range orconsume any food otx the range; 2) Do notbring any drinks into the range unless theyare bottled and can be closed; 3) Wash yourhands in cold woter aJter handling air riflepellets. Tlrc instrtrctor or another adrilt ntustclean the target backstops of spent leadpellets.
EYE AND HEARING PROTECTION.Wearing eye protection is recommended forair rifle shooting because of the remotepossibility that a piece of a lead pellet couldbounce back off of the backstop. Someshooters also wear hearing protection (earplugs) while shooting air rifles even thoughnoise levels are at or above harmful levels.They do this mostly when they wish toreduce noise and improve their ability toconcentrate
GUN CASES. Air rifles are often broughtto the ranges in gun cases that can be lockedfor security and are used to transport therifles. When and air rifle is taken from itscase, the first thing that must be done whenthe case is opened is to open the bolt of therifle and insert a CBI. When the Range
9.
10.
7.
11.
12.
Cadet Safety and Civilian Marksmanship Program 13

Cadet Safety and Civilian Marksmanship Program
Officer gives instruction to take the airrifles and equipment to the flring line, takeyour gun case with the rifle in it to thefiring point with the case oriented so themuzzle points downrange. As soon as youopen the case, you must open the action andinsert a CBI in the rifle. You can then takethe rifle from the case to ground it on yourfiring point and remove the gun case fromthe firing line. When firing is completedthe Range Officer will give instructions toreplace it in the case. After the gun is in thecase you can close the action, remove theCBI, release the trigger and close the case.
13. AIR RIFLE STORAGE. After a shootingsession is completed the air rifles must be
stored in secure, locked storage. Whenfiring is completed, you may be instructedto bring the rifles to a storage area whereyour instructor will be in charge ofaccounting for and locking up the rifle.Whenever you carry your rifle from therange to the storage area, be sure to keepthe muzzle pointed upward and in a safe
direction.
14. AIR OR CO2 CYLINDERS. Some airrifles used in JROTC marksmanshipactivities utilize air or CO2 cylinders as ameans of propulsion. These cylinders are
safe if handled properly but proper safetyprecautions must be taken. When screwingfilled cylinders into air rifles, do not over-tighten the cylinders. When fillingcylinders from a master tank, always standto the side of the cylinder; do not allow itsend or base to point at you or anotherperson. Tighten the cylinder only enoughto prevent gas leakage; never over-tightenit. High-pressure air or gas cylinders comewith factory recommendations for periodicinspections; these must be followed.
Lesson 2: Firearm Salety and Safe Range Operation
BECOMING MARKSMANSHIPQUALIFIED
There are three steps for a cadet tobecome marksmanship qualified:
1. Safety training class. A cadet mustcomplete the safety training class from theirinstructor. Instructors giving the safety classmust be a graduate of the JROTCMarksmanship Instructor Training Course(JMrC).
2. Safety examination. Cadets mustcomplete the Civilian MarksmanshipProgram Junior Shooter Safety Examinationwith a score of 1007o. A copy of this examcan be found in Appendix A of this manual.
3. Shooter pledge. Cadets must read and signa copy or the Cadets Safety Pledge a copy orwhich can be found in Appendix B of thismanual.
CONCLUSION
The most important lesson that cadetswho participate in marksmanship learn is how tobe safe while handling any type of air rifle orfirearm. By learning and following the rules ofsafe gun handling and the range safety rules foryour range and by practicing those rules duringtarget rifle practice, anyone who participates inmarksmanship will acquire the knowledge andskills to handle all guns safely. This knowledgewill not only assure safety during JROTCmarksmanship activities, but it will insure thatan), encounter a person has with a firearm is a
safe encounter.
14 Cadet Safety and Civilian Marksmanship Program
Cadet Safety and Civilian Marksmanship Program
LESSON 3: TARGET SHOOTINGEQUIPMENT AND ITSOPERATION
PURPOSE
This lesson introduces you to theparts and components of the air rifle,how it functions and how to load and
fire it. It also gives you details aboutthe proper clothing and equipmentneeded for air rifle target shooting.
Lesson 3: Target Shooting Equipment and lts Operation
INTRODUCTION
Before you can target shoot on a range,you must know how to handle guns safely. It isalso important to know about the purpose andfunctioning of the air rifles and equipment thatyou will use. This chapter introduces you tothe air rifles and equipment used in JROTCmarksmanship training and the basic principlesof their operation.
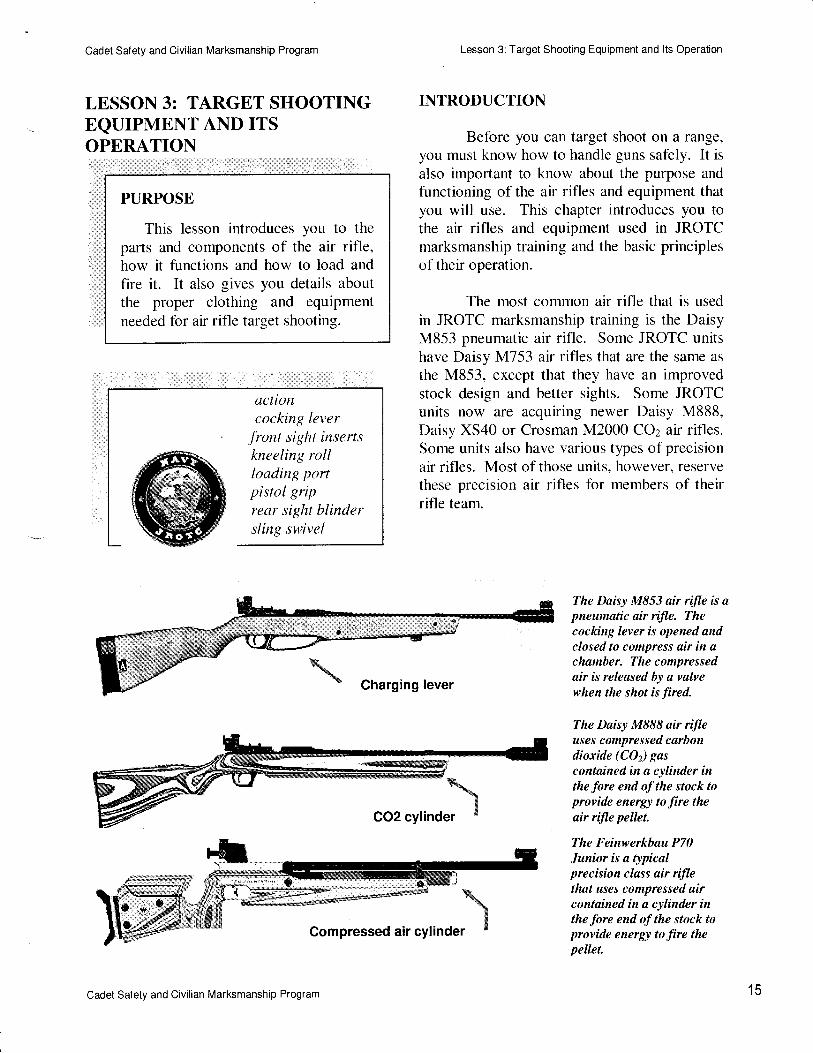
The most common air rifle that is used
in JROTC marksmanship training is the DaisyM853 pneumatic air rifle. Some JROTC unitshave Daisy M753 air rifles that are the same as
the M853, except that they have an improvedstock design and better sights. Some JROTCunits now are acquiring newer Daisy M888,Daisy XS40 or Crosman M2000 COz air rifles.Some units also have various types of precisionair rifles. Most of those units, however, reservethese precision air rifles for members of theirrifle team.
The Daisy M853 air rifle is apneumatic air riJle. Thecocking lever is opened andclosed to compress air in achamber. The compressedqir is released by a valvewhen the shot is fired.
The Daisy M888 air rifleases compressed carbondioxide (CO) Sascontained in a cylinder inthe fore end of the stock toprovide energt to ftre theair rifle pellet.
The Feinwerkbuu P70Junior is a typicalprecision class air iflethat uses compressed aircontuined in a cylinder inthe fore end ofthe stock toprovide energy to fire thepellet.
'il%***s** \Compressed air cylinder $
action
cocking lever
front sigltt insertskneeling rollloading portpistol griprear sigltt blindersling swivel
Cadet Salety and Civilian Marksmanship Program 15
Cadet Safety and Civilian Marksmanship Program
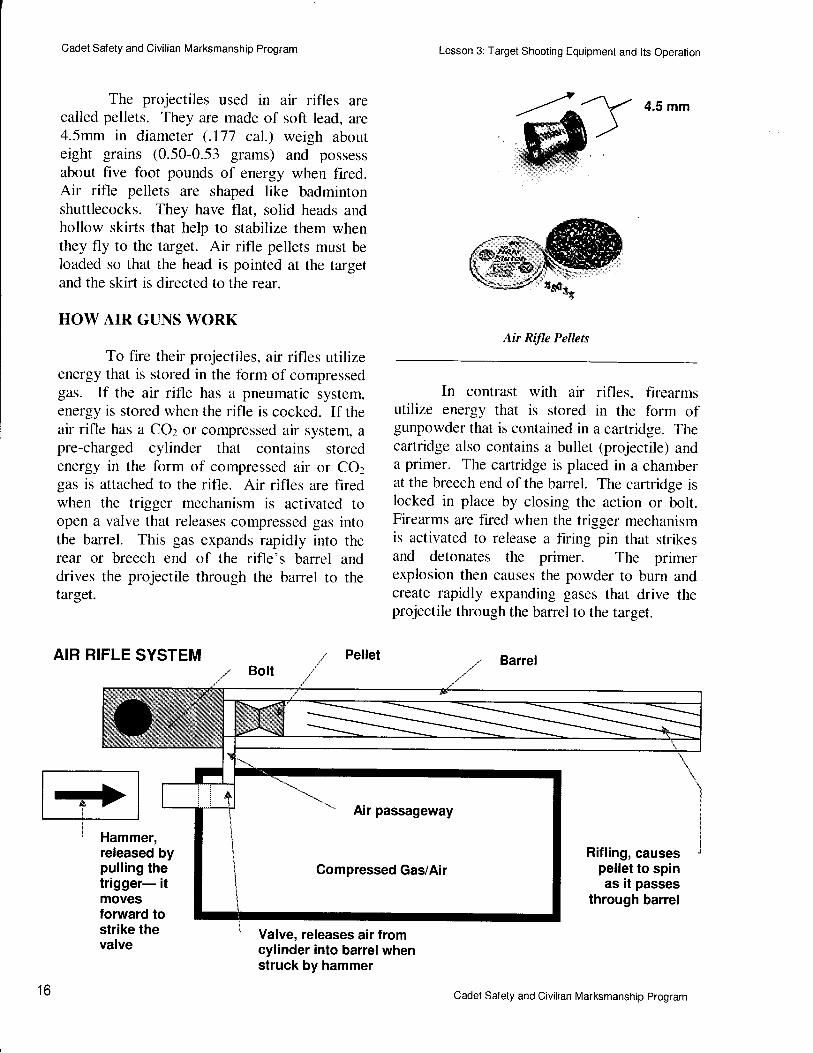
The projectiles used in air rifles arecalled pellets. They are made of soft lead, are4.5mm in diameter (.177 cal.) weigh abouteight grains (0.50-0.53 grams) and possessabout five foot pounds of energy when fired.Air rifle pellets are shaped like badmintonshuttlecocks. They have flat, solid heads andhollow skirts that help to stabilize them whenthey fly to the target. Air rifle pellets must beloaded so that the head is pointed at the targetand the skirt is directed to the rear.
HOW AIR GUNS WORK
To fire their projectiles, air rifles utilizeenergy that is stored in the form of compressedgas. If the air rifle has a pneumatic system,energy is stored when the rifle is cocked. If theair rifle has a COz or compressed air system, apre-charged cylinder that contains storedenergy in the form of compressed air or CO2gas is attached to the rifle. Air rifles are firedwhen the trigger mechanism is activated toopen a valve that releases compressed gas intothe barrel. This gas expands rapidly into therear or breech end of the rifle's barrel anddrives the projectile through the barrel to thetarget.
AIR RIFLE SYSTEM r Pellet
Hammer,released bypulling thetrigger- itmovesforward tostrike thevalve
Lesson 3: Target Shooting Equipment and lts Operation
4.5 mm
Air Rifle Pellets
In contrast with air rifles, firearmsutilize energy that is stored in the form ofgunpowder that is contained in a cartridge. Thecartridge also contains a bullet (projectile) anda primer. The cartridge is placed in a chamberat the breech end of the barrel. The cartridge islocked in place by closing the action or bolt.Firearms are fired when the trigger mechanismis activated to release a firing pin that strikesand detonates the primer. The primerexplosion then causes the powder to burn andcreate rapidly expanding gases that drive theprojectile through the barrel to the target.
Rifling, causespellet to spinas it passes
through barrel
Valve, releases air fromcylinder into barrel whenstruck by hammer
16 Cadet Safety and Civilian Marksmanship Program
Cadet Sa{ety and Civilian Marksmanship Program
WHAT MAKES RIFLES ACCURATE
When a rifle is fired at a targel twospecial features that are characteristic of riflesmake it possible for the person who fires therifle to direct the projectile at a precise point onthe target. Those features are sights and rifling.
l. Sights. All rifles have sights.Target rifles have very precise,adjustable sights. Sights serve as aguidance system for the rifle that iscontrolled by the person who firesthe rifle. The person who holds and
fires the rifle looks through the rearand front sights to aim the rifle at
the target. To hit the center of thetarget, the sights must be adjusted so
that they point at exactly the samelocation on the target as the barrelpoints.
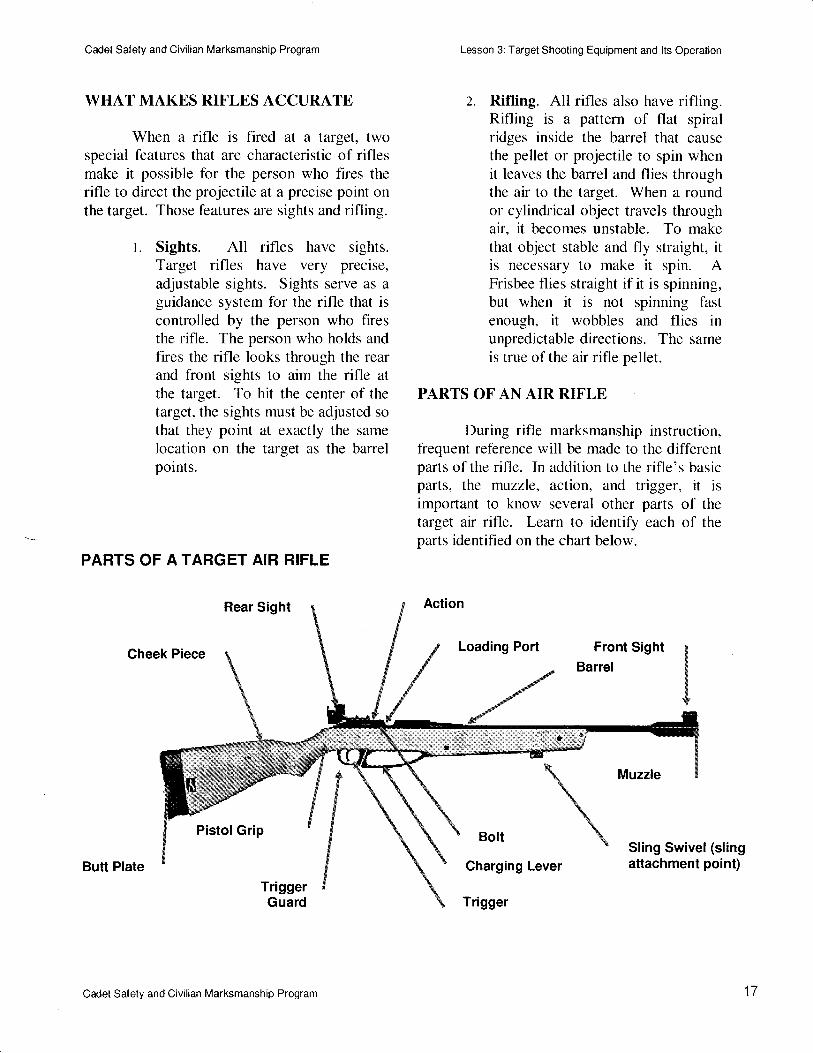
PARTS OF A TARGET AIR RIFLE
Rear Sight
Cheek Piece
PistolGrip
Butt Plate
TriggerGuard
Lesson 3:Target Shooting Equipment and lts Operation
2. Rifling. All rifles also have rifling.Rifling is a pattern of flat spiralridges inside the barrel that causethe pellet or projectile to spin whenit leaves the barrel and flies throughthe air to the target. When a roundor cylindrical object travels throughair, it becomes unstable. To makethat object stable and fly straight, itis necessary to make it spin. AFrisbee flies straight if it is spinning,but when it is not spinning fastenough, it wobbles and flies inunpredictable directions. The sameis true of the air rifle pellet.
PARTS OF AN AIR RIFLE
During rifle marksmanship instruction,frequent reference will be made to the differentparts of the rifle. In addition to the rifle's basicparts, the muzzle, action, and trigger, it isimporlant to know several other parts of thetarget air rifle. Learn to identify each of theparts identified on the chart below.
Loading Port Front SightBarrel
\ Muzzte $
\\ Sling Swivet(sling
Bolt
Charging Lever
Trigger
Cadet Safety and Civilian Marksmanship Program
attachment point)
17
Cadet Safety and Civilian Marksmanship Program
Bolt. A handle or lever that is used toopen and close the action of the rifle.
Loading Port. The location where thepellet is loaded into the barrel. Whenthe action is opened, the loading port isopen so that a pellet may be placed inthe breech end of the barrel.
Barrel. A rifled tube that controls anddirects the projectile when it is fired.
Cheek Piece. The top part of the buttstock on which the shooter rests his/hercheek while looking through the sightsto aim.
Charging Lever. On the Daisy M853,the cocking lever is opened and thenclosed so that a piston can compress airinto the air cylirider. Compressed air orCOz air rifles do not have cockinglevers.
Trigger Guard. The trigger guardprotects the trigger from catching onclothing or another object. This helpsto prevent the trigger from beingaccidentally pulled.
Pistol Grip. The curved portion of thestock behind the action and trigger.The trigger hand grasps the pistol gripand the index finger of that hand is thenextended so that it can pull the triggerto fire the rifle.
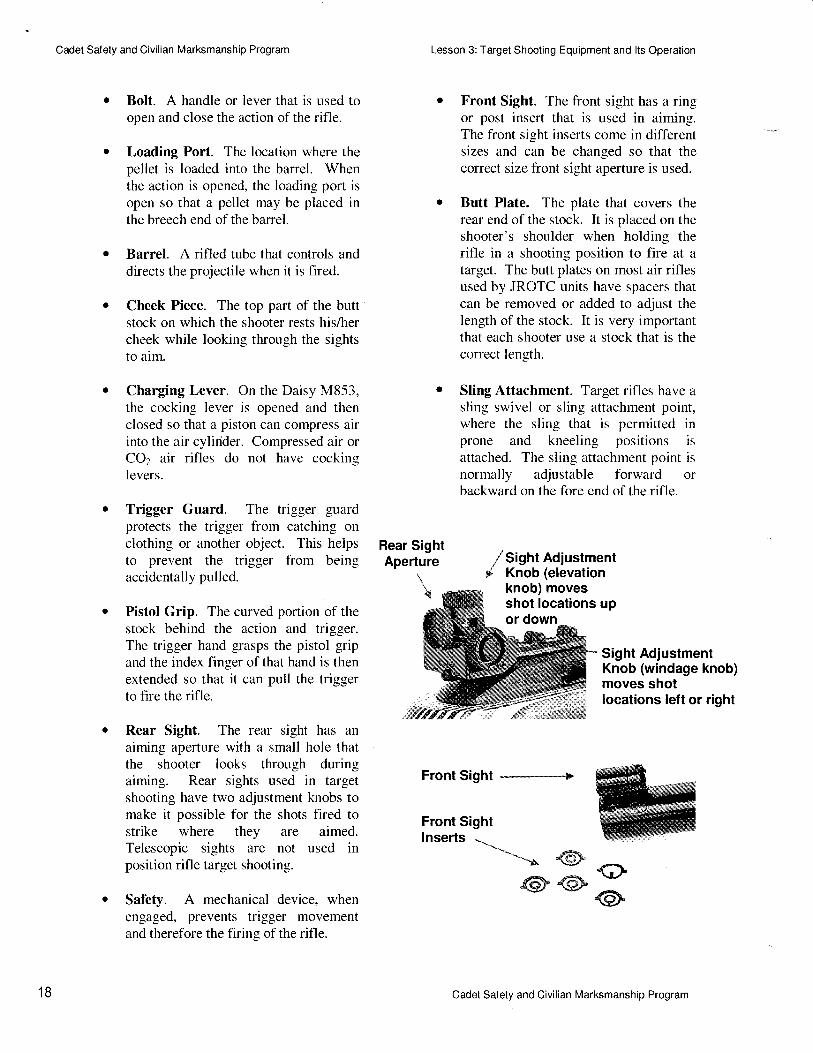
Rear Sight. The rear sight has an
aiming apertlrre with a small hole thatthe shooter looks through duringaiming. Rear sights used in targetshooting have two adjustment knobs tomake it possible for the shots fired tostrike where they are aimed.Telescopic sights are not used inposition rifle target shooting.
Safety. A mechanical device, whenengaged. prevents trigger movementand therefore the firing of the rifle.
Lesson 3: Target Shooting Equipment and lts Operation
Front Sight. The front sight has a ringor post insert that is used in aiming.The front sight inserts come in differentsizes and can be changed so that thecorrect size front sight aperture is used.
Butt Plate. The plate that covers therear end of the stock. It is placed on theshooter's shoulder when holding therifle in a shooting position to fire at atarget. The butt plates on most air riflesused by JROTC units have spacers thatcan be removed or added to adiust thelength of the stock. It is very importantthat each shooter use a stock that is thecorrect length.
Sling Attachment. Target rifles have asling swivel or sling attachment point,where the sling that is permitted inprone and kneeling positions isattached. The sling attachment point is
normally adjustable forward orbackward on the fore end of the rifle.
/Signt AdjustmentS Knob (elevation
knob) movesshot locations upor down
Rear SightAperture
\
Front Sight
Sight AdjustmentKnob (windage knob)moves shotlocations left or right
Front SightlnSeftS _____*
@"ffiX0{{}N s
18 Cadet Sa{ety and Civilian Marksmanship Program

Cadet Safety and Civilian Marksmanship Program
TARGET SHOOTING EQUIPMENT ANDCLOTHING
Only a few items of special targetshooting equipment are needed for basicmarksmanship training and the first levels ofcompetition. The equipment that is used
protects the shooter, assists in holding the riflesteadier, or makes shooting more comfortable.
o Sling. A web (or leather) strap thatattaches to the fore end of the rifleand has a loop that fits around theupper arm. The sling must be used
in the prone and kneeling positions,but cannot be used in the standingposition. When properly adjustedso that it is tight, the sling helps tohold the rifle steady.
Sling r
Glove. Target shooters wear a gloveon the hand that supports or holdsthe rifle. The glove protects the
hand from the pressure of the slingwhen firing in prone and kneelingpositions and allows the rifle to restmore comfortably on the hand whileholding the rifle in standingposition.
,\ ** Glove
Lesson 3: Target Shooting Equipment and lts Operation
Kneeling Roll. A cylindricalcushion that target shooting rulesallow to be placed under the anklewhen firing in the kneeling position.The kneeling roll provides stabilityand comfort to the body in thatposition. The roll may not exceed10 inches in length andT .2 inches indiameter
Kneeling Roll
o Shooting Mat. A mat that targetshooting rules allow shooters to lieon when firing from the prone orkneeling position.
' "'q* NwY
Rear Sight Blinder. An attachmentthat is often used on the rear sight toblock the view of the non-aimingeye. Blinders are usuallvhomemade from cardboard or a stripof plastic cut from a milk carton.They can be no more than 30mmhigh and l00mm wide.
Cadet Safety and Civilian Marksmanship Program 19
Cadet Safety and Civilian Marksmanship Program
Rear SightBlinder /
PELLET HANDLING, PERSONALCLOTHING, AND EQUIPMENT
Pellets are made of lead, which is a
toxic substance that must be handled with care.However, medical tests have shown that that airrifle shooters, when they take reasonableprecautions do not face any health risks. Theseprecautions are:
o No food on the rangeo No open beverage containerso Wash hands in cold water after
handling pellets
Advanced competition shooters wearvery specialized clothing such as shootingjackets, shooting pants and shooting boots.This special clothing is not necessary topractice the basic skills of target shooting. Infact, in sporter class air rifle competitions inwhich many JROTC rifle teams participate, thisspecialized equipment is not permitted. Thefollowing items of personal clothing andequipment are the minimum required for a safe,comfortable target shooting experience.
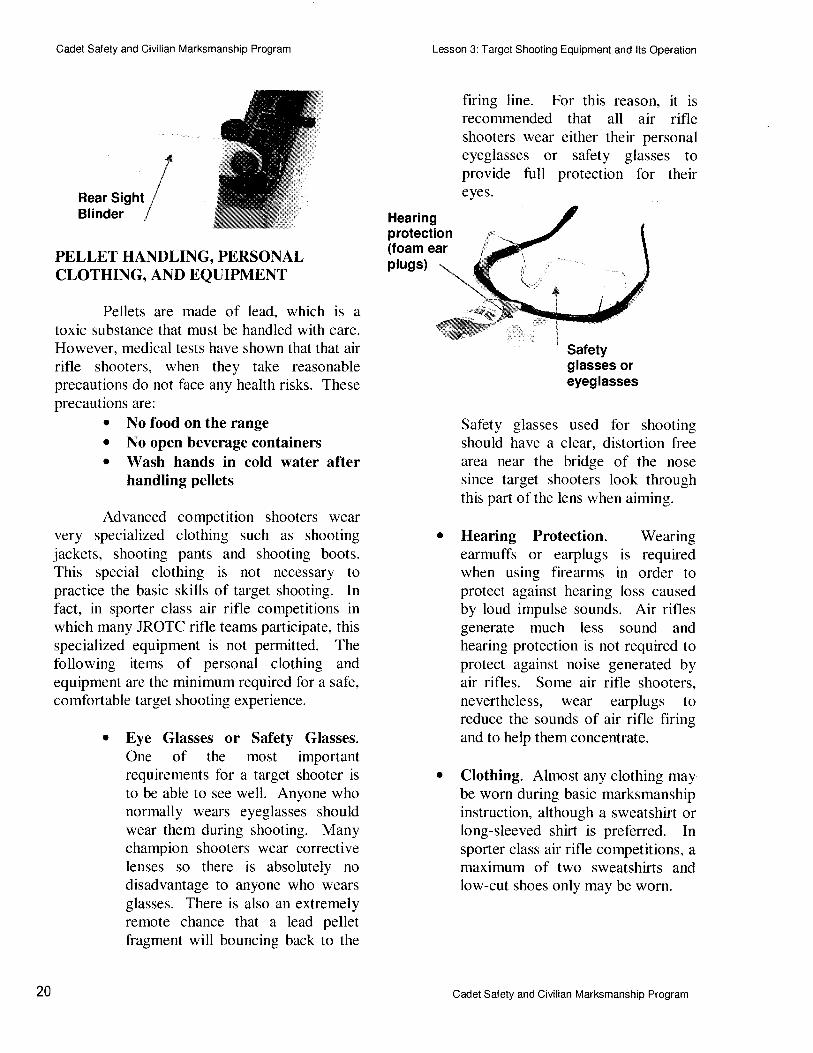
o Eye Glasses or Safety Glasses.One of the most importantrequirements for a target shooter is
to be able to see well. Anyone whonormally wears eyeglasses shouldwear them during shooting. Manychampion shooters wear correctivelenses so there is absolutely nodisadvantage to anyone who wearsglasses. There is also an extremelyremote chance that a lead pelletfragment will bouncing back to the
Lesson 3: Target Shooting Equipment and lts Operation
firing line. For this reason, it isrecommended that all air rifleshooters wear either their personaleyeglasses or safety glasses toprovide full protection for theireyes.
Hearingprotection(foam earplugs)
Safetyglasses oreyeglasses
Safety glasses used for shootingshould have a clear, distortion freearea near the bridge of the nosesince target shooters look throughthis part of the lens when aiming.
o Hearing Protection. Wearingearmuffs or earplugs is requiredwhen using firearms in order toprotect against hearing loss causedby loud impulse sounds. Air riflesgenerate much less sound andhearing protection is not required toprotect against noise generated byair rifles. Some ,air rifle shooters,nevertheless, wear earplugs toreduce the sounds of air rifle firingand to help them concentrate.
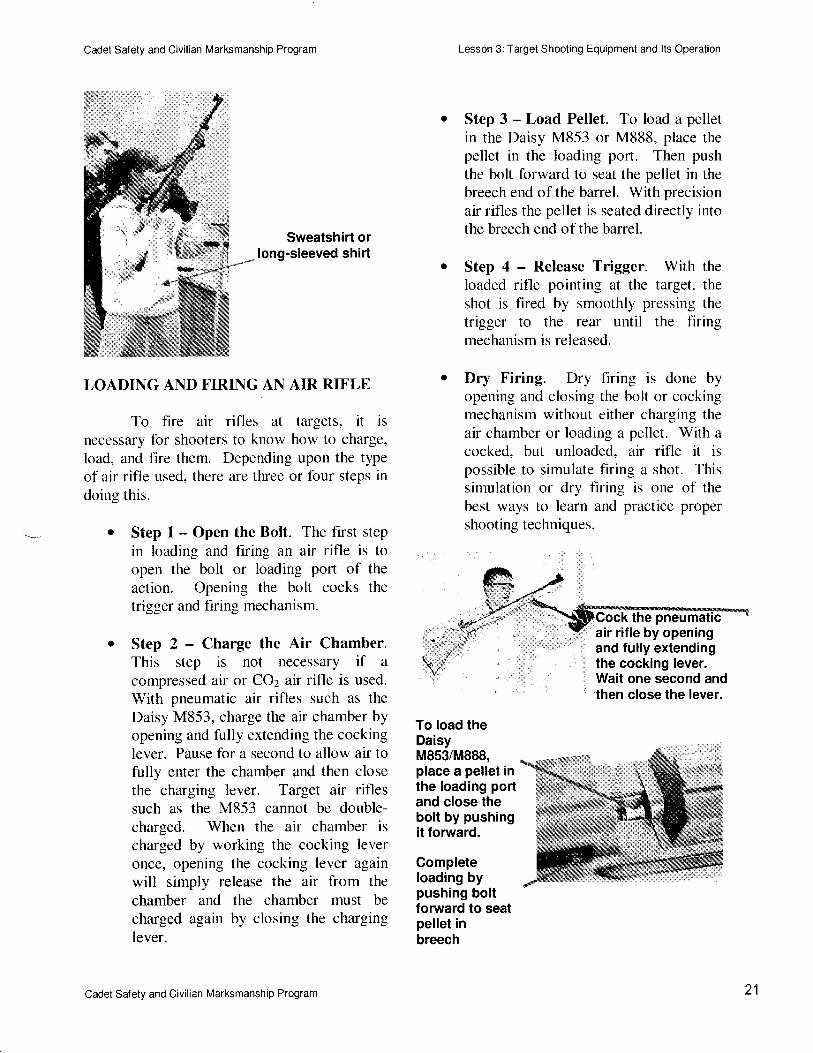
o Clothing. Almost any clothing maybe worn during basic marksmanshipinstruction, although a sweatshirt orlong-sleeved shirt is preferred. Insporter class air rifle competitions, amaximum of two sweatshirts andlow-cut shoes only may be worn.
20 Cadet Sa{ety and Civilian Marksmanship Program
Cadet Safety and Civilian Marksmanship Program
Sweatshirt orlong-sleeved shirt
LOADING AND FIRING AN AIR RIFLE
To fire air rifles at targets, it is
necessary for shooters to know how to charge,
load, and fire them. Depending upon the typeof air rifle used, there are three or four steps indoing this.
. Step L - Open the Bolt. The first step
in loading and firing an air rifle is toopen the bolt or loading port of the
action. Opening the bolt cocks thetrigger and firing mechanism.
. Step 2 - Charge the Air Chamber.This step is not necessary if a
compressed air or COz air rifle is used.
With pneumatic air rifles such as the
Daisy M853, charge the air chamber byopening and fully extending the cockinglever. Pause for a second to allow air tofully enter the chamber and then close
the charging lever. Target air riflessuch as the M853 cannot be double-charged. When the air chamber is
charged by working the cocking leveronce, opening the cocking lever againwill simply release the air from the
chamber and the chamber must be
charged again by closing the charginglever.
Lesson 3: Target Shooting Equipment and lts Operation
Step 3 - Load Pellet. To load a pelletin the Daisy M853 or M888, place thepellet in the loading port. Then pushthe bolt forward to seat the pellet in thebreech end of the barrel. With precisionair rifles the pellet is seated directly intothe breech end of the barrel.
Step 4 - Release Trigger. With theloaded rifle pointing at the target, theshot is fired by smoothly pressing thetrigger to the rear until the firingmechanism is released.
Dry Firing. Dry firing is done byopening and closing the bolt or cockingmechanism without either charging theair chamber or loading a pellet. With a
cocked, but unloaded, air rifle it is
possible to simulate firing a shot. Thissimulation or dry firing is one of thebest ways to learn and practice propershooting techniques.
theair rifle by openingand fully extendingthe cocking lever.Wait one second andthen close the Iever.
To load theDaisyM853/M888,place a pellet inthe Ioading portand close thebolt by pushingit forward.
Completeloading bypushing boltforward to seatpellet inbreech
Cadet Safety and Civilian Marksmanship Program 21
Cadet Salety and Civilian Marksmanship Program
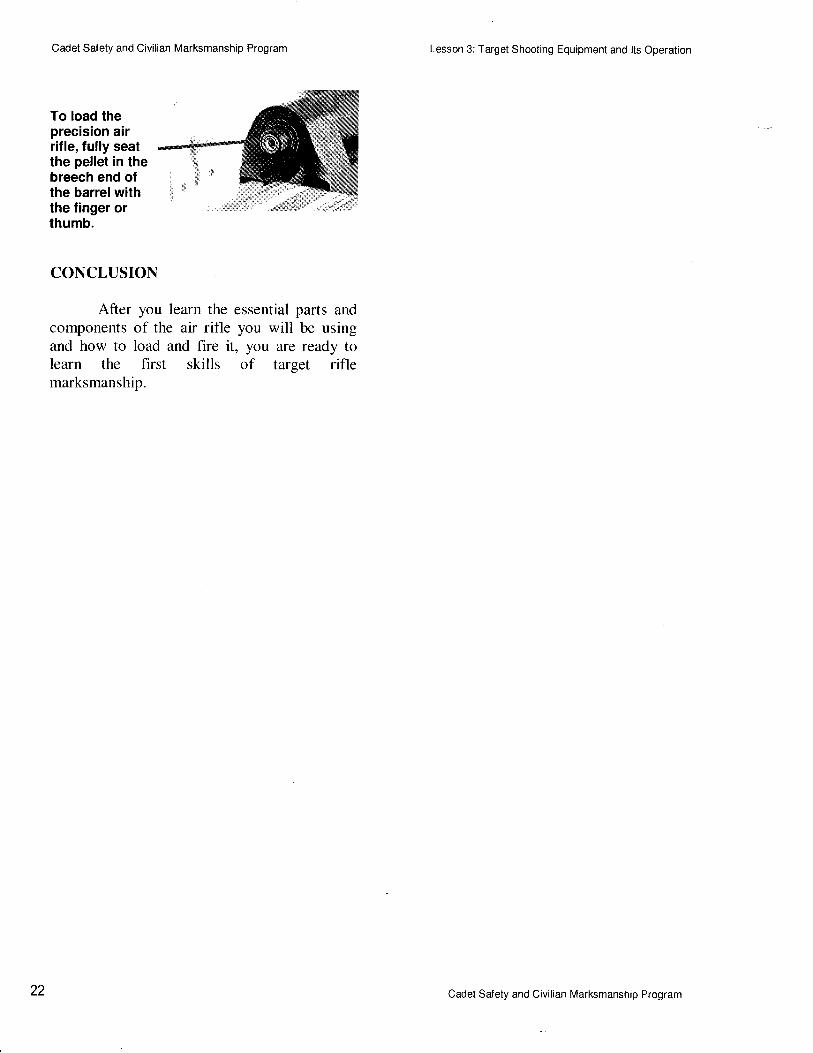
To load theprecision airrifle, fully seatthe pellet in thebreech end ofthe barrelwiththe finger orthumb.
CONCLUSION
After you learn the essential parts andcomponents of the air rifle you will be usingand how to load and fire it, you are ready tolearn the first skills of target riflemarksmanship.
Lesson 3: Target Shooting Equipment and lts Operation
22 Cadet Safety and Civilian Marksmanship Program

Cadet Saf ety and Civilian Marksmanship Program
LESSON 4: AIMING BASICS ANDTHE FIRST TARGET POSITION .
STANDING
PURPOSE
This lesson introduces you to thefirst target
.position, which is the
standing position.
Lesson 4: The First Target Position - Standing
A simple dominant eye test should be
performed to determine which eye is dominant.Cut a one-half inch hole in a 3"x5" card. Holdthe card at arm's length. With both eyes open,look through the hole at a distinct object. Thenbring the card back to your eyes whilecontinuing to look at the object. If youcontinue to look at the object with both eyesopen, the hole in the card will end up in front ofyour dominant eye.
NODUCTION
o- !.t$\
,t.\
. \N .ii
\. t-'
INTR
Target rifle shooting involves firing inthree different shooting positions, standing,kneeling and prone. These shooting positionsoriginated with firing positions that once weretaught to soldiers and hunters. Today, these
traditional firing positions have evolved intospecific shooting positions that are part oftarget shooting and are defined by competitionrules recognized throughout the world.
SHOULD I SHOOT RIGHT. OR LEFT.HANDED?
Before you begin to shoot in anyshooting position, you must decide whether youwill shoot from your right or left shoulder andaim with your right or left eye. The best way todetermine whether to shoot right-handed orleft-handed is to determine which eye is yourdominant or master eye. Someone whose righteye is dominant should shoot from the rightshoulder. Someone whose left eye is dominantshould shoot from the left shoulder.
Dominant eye test*Step 1
Dominant eye test--Step 2
There are also many people who arecross dominant. That is, they are right-handedand left-eye dominant or vice versa. There issome research that indicates cross dominantindividuals may advance further in targetshooting if they shoot from the same shoulderas their dominant eye, but the research is notconclusive.
dry- firesigltt alignmentstanding positiontargettrigger release
Cadet Salety and Civilian Marksmanship Program 23
Cadet Safety and Civilian Marksmanship Program
For cross dominant persons who simplyare not comfortable shooting from the same
shoulder as their dominant eye, shooting fromthe other shoulder is acceptable. However, ifthis is done, it is very important to place a
blinder on the rear sight to block the view ofthe dominant eye so that the eye that is used foraiming can concentrate on the rifle sights.
AIMING. SIGHT ALIGNMENT
The first practice exercises you will doinvolve aiming, holding and dry firing at blanktargets. To do that, you need to know how toalign the sights and smoothly press the trigger.
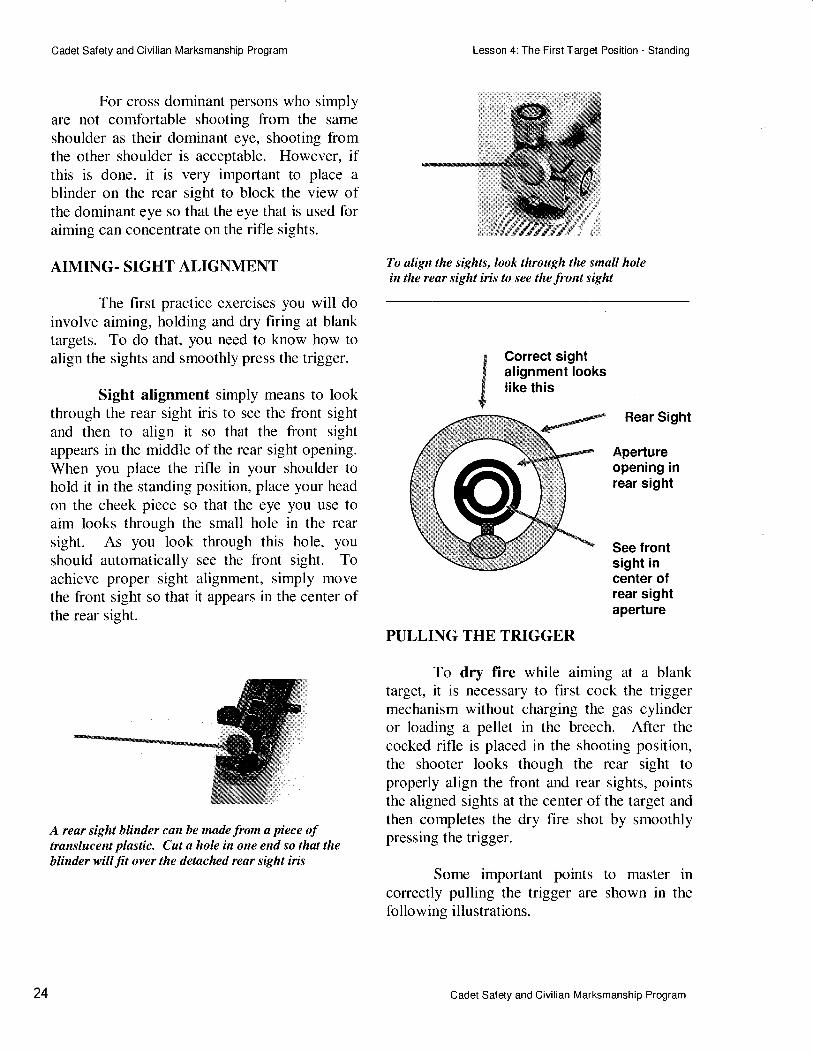
Sight alignment simply means to lookthrough the rear sight iris to see the front sightand then to align it so that the front sightappears in the middle of the rear sight opening.When you place the rifle in your shoulder tohold it in the standing position, place your head
on the cheek piece so that the eye you use toaim looks through the small hole in the rearsight. As you look through this hole, youshould automatically see the front sight. Toachieve proper sight alignment, simply movethe front sight so that it appears in the center ofthe rear sight.
A rear sight blinder can be made from a piece oftranslucent plastic. Cut a hole in one end so that theblinder willfit over the detached rear sight iris
Lesson 4: The First Target Position - Standing
To align the sights, look through the small holein the rear sight iris to see the front sight
Correct sightalignment Iookslike this
$s
$
**--.',d Rear Sight
Apertureopening inrear sight
See frontsight incenter ofrear sightaperture
PULLING THE TRIGGER
To dry fire while aiming at a blanktarget, it is necessary to first cock the triggermechanism without charging the gas cylinderor loading a pellet in the breech. After thecocked rifle is placed in the shooting position,the shooter looks though the rear sight toproperly align the front and rear sights, pointsthe aligned sights at the center ofthe target and
then completes the dry fire shot by smoothlypressing the trigger.
Some important points to master incorrectly pulling the trigger are shown in thefollowing illustrations.
24 Cadet Salety and Civilian Marksmanship Program
Cadet Safety and Civilian Marksmanship Program Lesson 4: The First Target Position - Standing
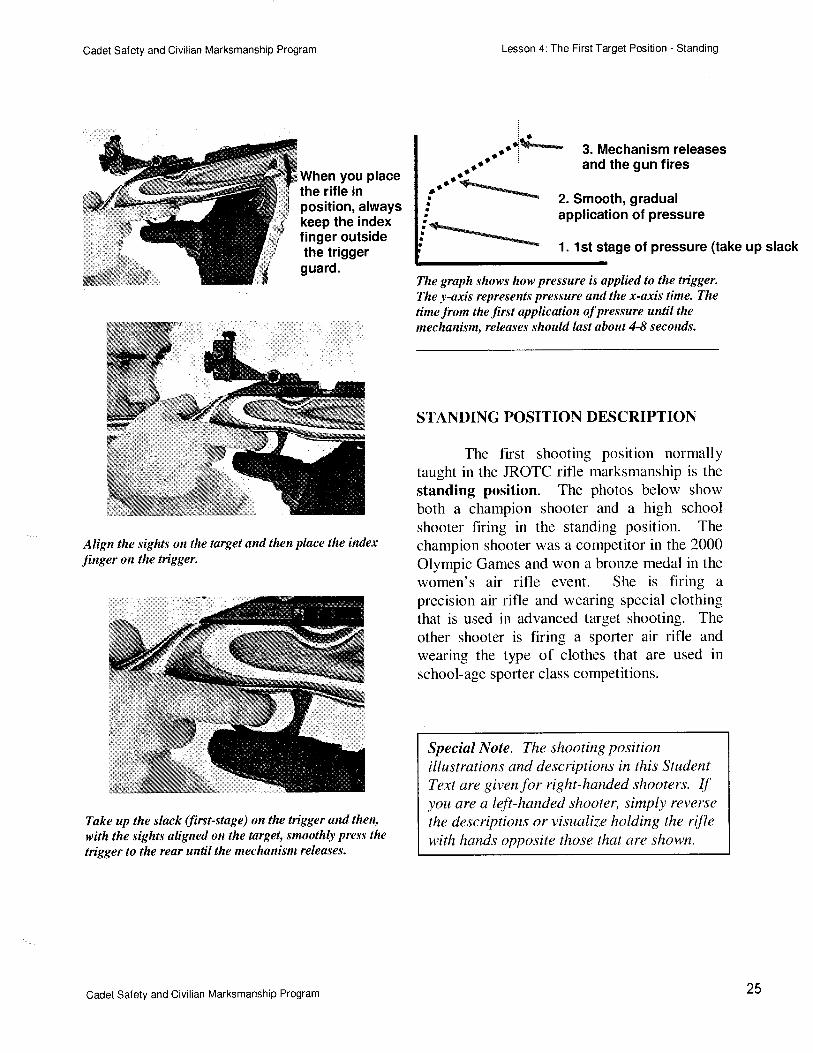
3. Mechanism releasesand the gun fires
2. Smooth, gradualapplication of pressure
1. 1st stage of pressure (take up slack
When you placethe rifle inposition, alwayskeep the indexfinger outsidethe triggerguard.
Align the sights on the target and then plnce the indexjinger on the trigger.
Take up the slack (jirst+tage) on the trigger and then,
with the sights aligned on the target, smoothly press the
trigger to the rear until the mechanism releases.
The graph shows how pressure is applied to the tigger.The y-axis represents pressure and the x-axis time. Thetime from the first application of pressure until themechanism, releases should last about 4-8 seconds.
STANDING POSITION DESCRIPTION
The first shooting position normallytaught in the JROTC rifle marksmanship is the
standing position. The photos below showboth a champion shooter and a high schoolshooter firing in the standing position. Thechampion shooter was a competitor in the 2000Olympic Games and won a bronze medal in thewomen's air rifle event. She is firing a
precision air rifle and wearing special clothingthat is used in advanced target shooting. Theother shooter is firing a sporter air rifle andwearing the type of clothes that are used inschool-age sporter class competitions.
Speci.al Note. The shooting positionillustrations and descriptions in this StudentText are givenfor right-handed shooters. Ifyou are a left-handed shooter, simply reversethe descriptions or visttalize holding the riflewith hands opposite those that are shown.
Cadet Salety and Civilian Marksmanship Program 25
Cadet Safety and Civilian Marksmanship Program Lesson 4: The First Target Position - Standing
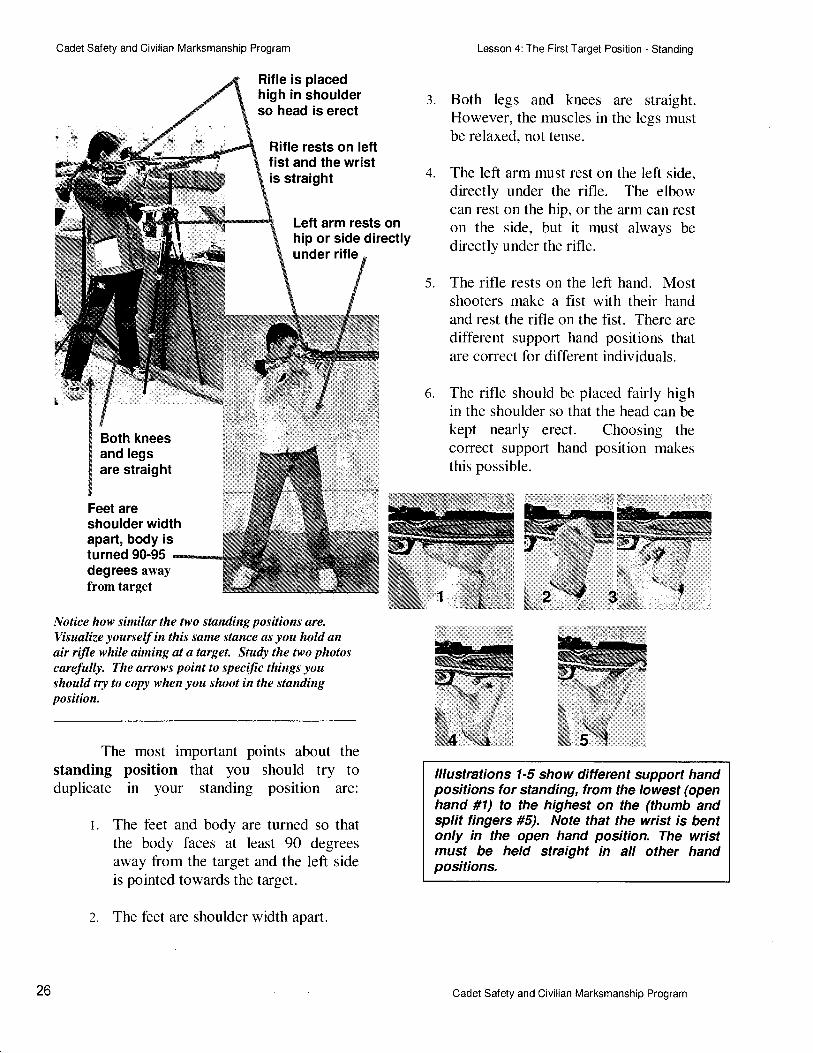
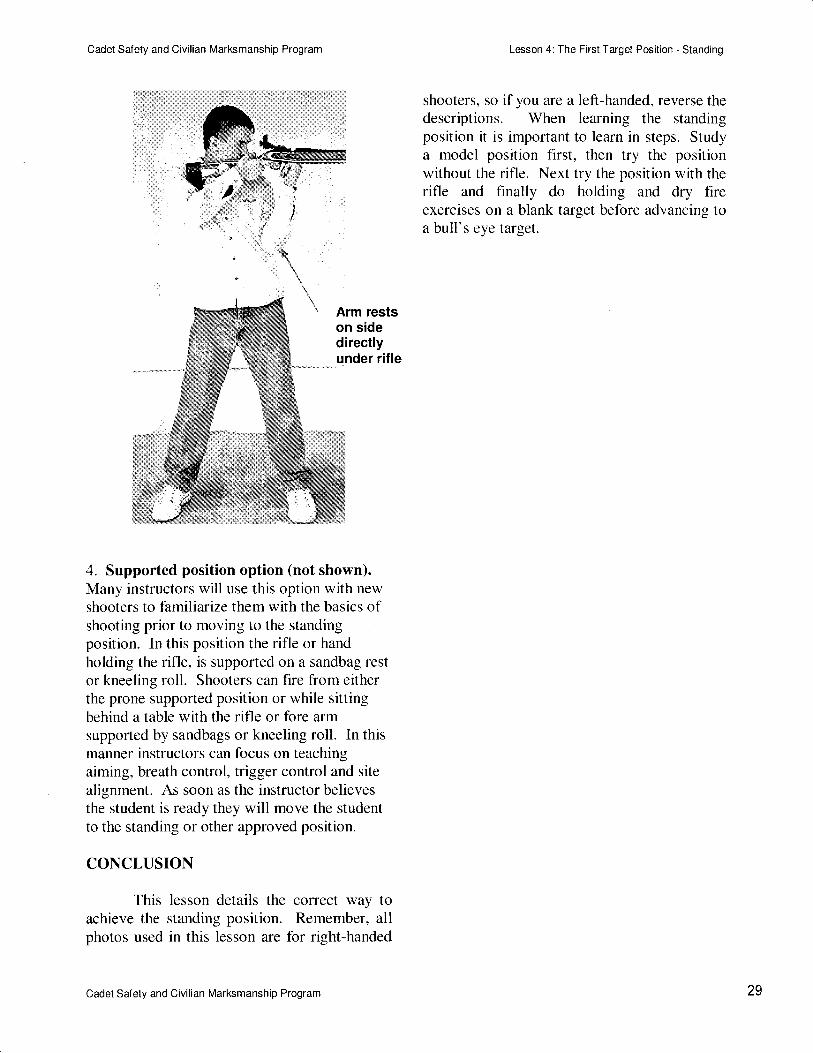
Both legs and knees are straight.However, the muscles in the legs mustbe relaxed, not tense.
The left arm must rest on the left side,directly under the rifle. The elbowcan rest on the hip, or the arm can reston the side, but it must always bedirectly under the rifle.
The rifle rests on the left hand. Mostshooters make a fist with their handand rest the rifle on the fist. There aredifferent support hand positions thatare correct for different individuals.
6. The rifle should be placed fairly highin the shoulder so that the head can bekept nearly erect. Choosing thecorrect supporl hand position makesthis possible.
lllustrations 1-5 show ditlerent support handpositions for standing, trom the lowest (openhand #1) to the highest on the (thumb andsplit fingers #5). Note that the wrist is bentonly in the open hand position. The wristmust be held straight in all other handpositions.
Rifle is placedhigh in shoulderso head is erect
Rifle rests on Ieftfist and the wristis straight
J.
4.
5.
Left arm rests onhip or side directlyunder rifle
Both kneesand legsare straight
shoulder widthapart, body isturned 90-95degrees awayfrom target
Notice how similsr the two standing positions are.Visualize yourself in this sqme stance &s you hold anair rifle while ailning at a target. Study the two photoscarefully, The arrows point to specific things youshould try to copy when you shoot in the standingposition.
The most important points about thestanding position that you should try toduplicate in your standing position are:
1. The feet and body are turned so thatthe body faces at least 90 degreesaway from the target and the left sideis pointed towards the target.
The feet are shoulder width apart.2.
Feet are
26 Cadet Safety and Civilian Marksmanship Program
Cadet Safety and Civilian Marksmanship Program
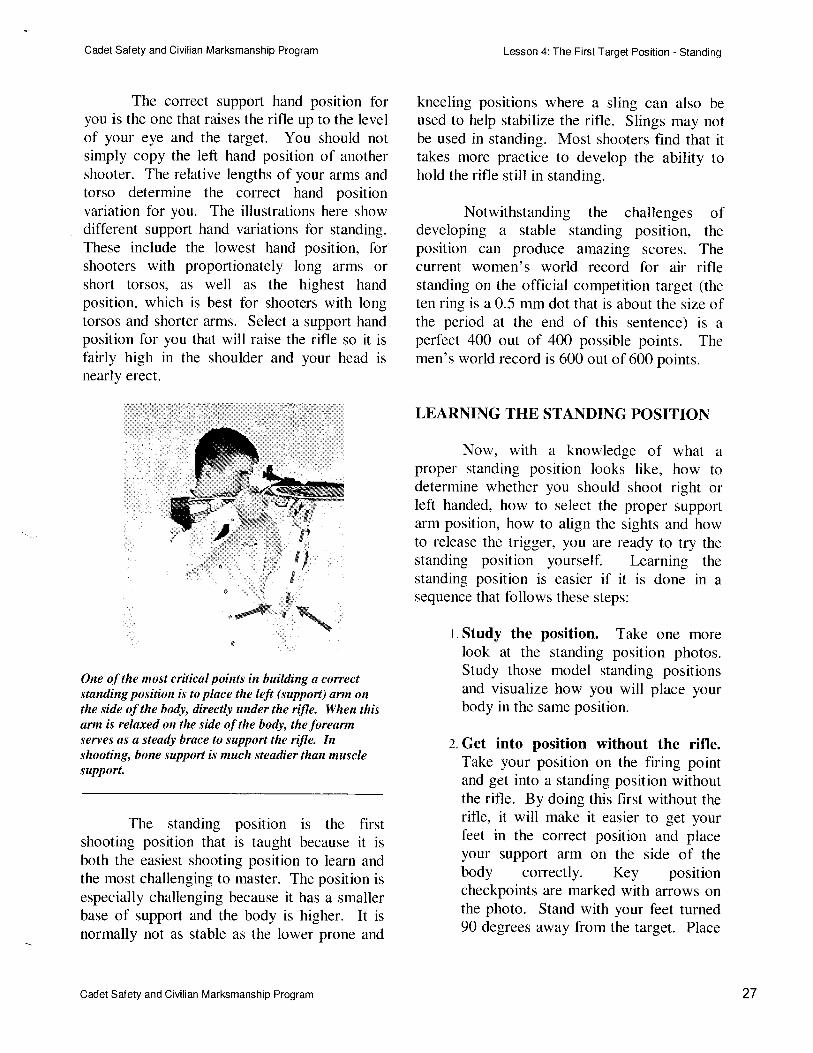
The correct support hand position foryou is the one that raises the rifle up to the levelof your eye and the target. You should notsimply copy the left hand position of anothershooter. The relative lengths of your arms andtorso determine the correct hand positionvariation for you. The illustrations here showdifferent support hand variations for standing.These include the lowest hand position, forshooters with proportionately long arms orshort torsos, as well as the highest handposition, which is best for shooters with longtorsos and shorter arms. Select a support handposition for you that will raise the rifle so it isfairly high in the shoulder and your head isnearly erect.
*NS
One of the most critical poittts in building q correctstanding position is to place the left (support) ann onthe side of the body, directly under the ifle. When thisarm is relaxed on the side of the body, the foreannserves as a steady brace to support the riJle. Inshooting, bone support is much steadier than musclesupport.
The standing position is the firstshooting position that is taught because it isboth the easiest shooting position to learn andthe most challenging to master. The position isespecially challenging because it has a smallerbase of suppofi and the body is higher. It isnormally not as stable as the lower prone and
Lesson 4: The First Target Position - Standing
kneeling positions where a sling can also beused to help stabilize the rifle. Slings may notbe used in standing. Most shooters find that ittakes more practice to develop the ability tohold the rifle still in standing.
Notwithstanding the challenges ofdeveloping a stable standing position, theposition can produce amazing scores. Thecurrent women's world record for air riflestanding on the official competition target (theten ring is a 0.5 mm dot that is about the size ofthe period at the end of this sentence) is aperfecf 400 out of 400 possible points. Themen's world record is 600 out of 600 points.
LEARNING THE STANDING POSITION
Now, with a knowledge of what aproper standing position looks like, how todetermine whether you should shoot right orleft handed, how to select the proper supportarm position, how to align the sights and howto release the trigger, you are ready to try thestanding position yourself. Learning thestanding position is easier if it is done in asequence that follows these steps:
l. Study the position. Take one morelook at the standing position photos.Study those model standing positionsand visualize how you will place yourbody in the same position.
2. Get into position without the rifle.Take your position on the firing pointand get into a standing position withoutthe rifle. By doing this first without therifle, it will make it easier to get yourfeet in the correct position and placeyour support arm on the side of thebody correctly. Key positioncheckpoints are marked with arrows onthe photo. Stand with your feet turned90 degrees away from the target. Place
-'irt$i
s!s.I
$J
$
$,.'
s=N
Cadet Safety and Civilian Marksmanship Program 27
Cadet Safety and Civilian Marksmanship Program
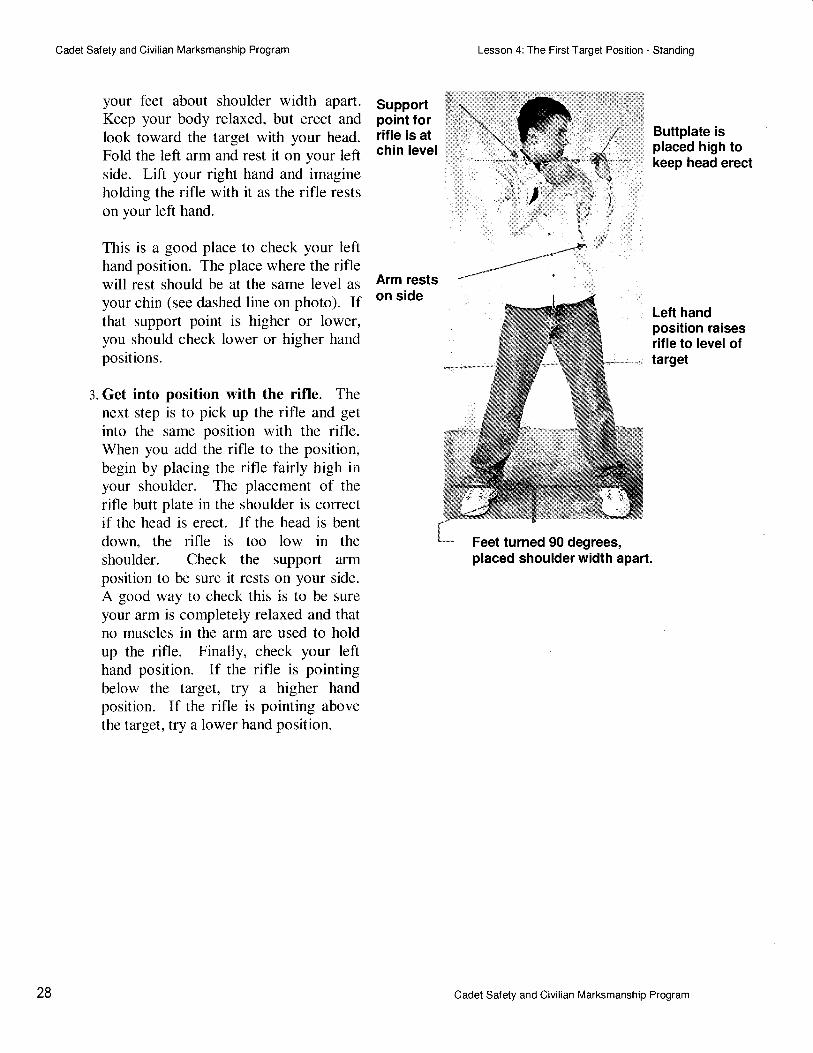
your feet about shoulder width apart.Keep your body relaxed, but erect andlook toward the target with your head.Fold the left arm and rest it on your leftside. Lift your right hand and imagineholding the rifle with it as the rifle restson your left hand.
This is a good place to check your lefthand position. The place where the riflewill rest should be at the same level as
your chin (see dashed line on photo). Ifthat support point is higher or lower,you should check lower or higher handpositions.
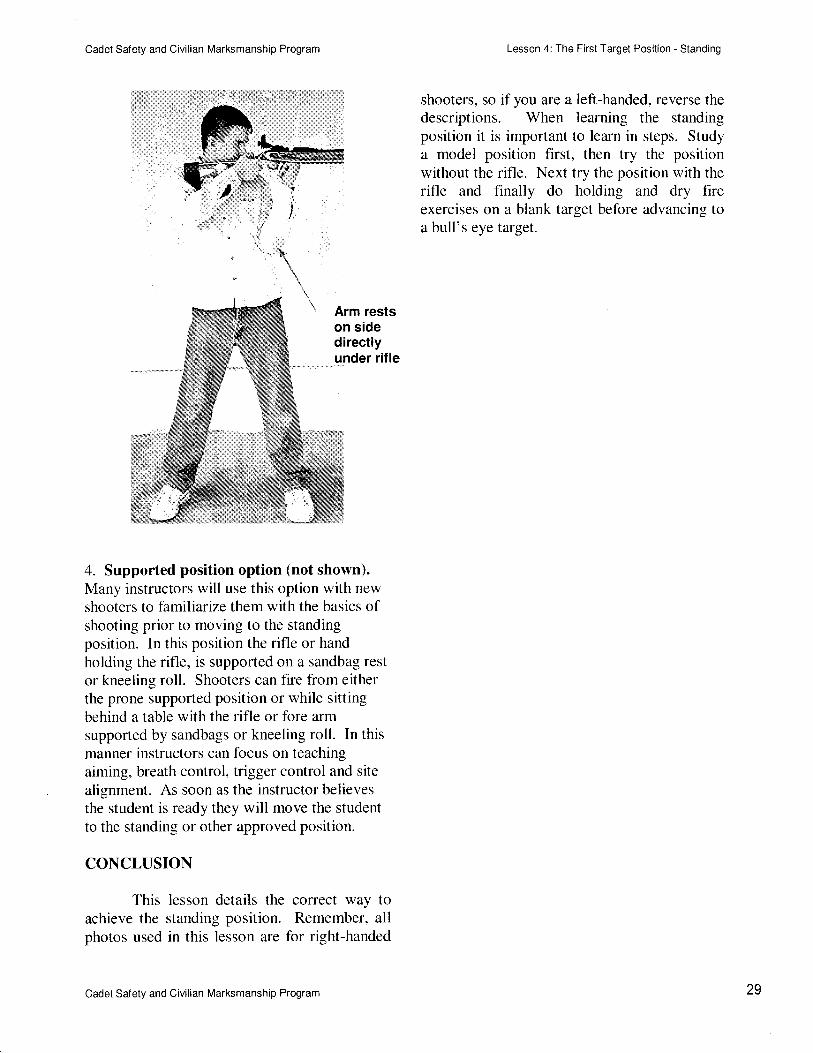
3. Get into position with the rifle. Thenext step is to pick up the rifle and getinto the same position with the rifle.When you add the rifle to the position,begin by placing the rifle fairly high iityour shoulder. The placement of therifle butt plate in the shoulder is correctif the head is erect. If the head is bentdown, the rifle is too low in theshoulder. Check the support armposition to be sure it rests on your side.
A good way to check this is to be sure
your arm is completely relaxed and thatno muscles in the arm are used to holdup the rifle. Finally, check your lefthand position. If the rifle is pointingbelow the target, try a higher handposition. If the rifle is pointing abovethe target, try a lower hand position.
Lesson 4: The First Target Position - Standing
Supportpoint forrifle is atchin level
Arm restson side
iN.,:.ir'l\
,'i-\l:
\'
Buttplate isplaced high tokeep head erect
Left handposition raisesrifle to level oftarget
Feet turned 90 degrees,placed shoulder width apart.
28 Cadet Safety and Civilian Marksmanship Program
Cadet Safety and Civilian Marksmanship Program
1| :,
Lesson 4: The First Target Position - Standing
shooters, so if you are a left-handed, reverse thedescriptions. When learning the standingposition it is important to learn in steps. Studya model position first, then try the positionwithout the rifle. Next try the position with therifle and finally do holding and dry fireexercises on a blank target before advancing toa bull's eye target.
Arm restson sidedirectlyunder rifle
4. Supported position option (not shown).Many instructors will use this option with newshooters to familiarize them with the basics ofshooting prior to moving to the standingposition. In this position the rifle or hand
holding the rifle, is supported on a sandbag rest
or kneeling roll. Shooters can fire from eitherthe prone supported position or while sittingbehind a table with the rifle or fore armsupported by sandbags or kneeling roll. In thismanner instructors can focus on teachingaiming, breath control, trigger control and site
alignment. As soon as the instructor believesthe student is ready they will move the studentto the standing or other approved position.
CONCLUSION
This lesson details the correct way toachieve the standing position. Remember, allphotos used in this lesson are for right-handed
Cadet Safety and Civilian Marksmanship Program 29
Cadet Safety and Civilian Marksmanship Program Lesson 4: The First Target Position - Standing
shooters, so ifyou are a left-handed, reverse thedescriptions. When learning the standingposition it is important to learn in steps. Studya model position first, then try the positionwithout the rifle. Next try the position with therifle and finally do holding and dry fireexercises on a blank target before advancing toa bull's eye target.
Arm restson sidedirectlyunder rifle
4. Supported position option (not shown).Many instructors will use this option with newshooters to familiarize them with the basics ofshooting prior to moving to the standingposition. In this position the rifle or handholding the rifle, is supported on a sandbag restor kneeling roll. Shooters can fire from eitherthe prone supported position or while sittingbehind a table with the rifle or fore armsupported by sandbags or kneeling roll. In thismanner instructors can focus on teachingaiming, breath control, trigger control and sitealignment. As soon as the instructor believesthe student is ready they will move the studentto the standing or other approved position.
CONCLUSION
This lesson details the correct way toachieve the standing position. Remember, allphotos used in this lesson are for right-handed
Cadet Saf ety and Civilian Marksmanship Program 29
Cadet Salety and Civilian Marksmanship Program
LBSSON 5: AIMING AND FIRING
PURPOSE
This lesson introduces you tothe basic techniques for firing an aimedshot, at a target.
sight picturebreath controlloadshootunload
INTRODUCTION
After you have learned how to assume
the standing position and have dry fired severaltimes at a blank target you are ready to prepare
for live firing at actual targets. Aiming andfiring actual shots at a target involves learningabout some additional elements of targetshooting that are covered in this chapter.These include targets, aiming and sight picture,proper breathing and the coordinated techniqueof firing the shot. Developing a good shottechnique is a critical factor for target shootersbecause it involves combining and coordinatingthe complex and simultaneous actions ofaiming, breathing, holding and trigger control.
TARGETS FOR AIR RIFLE SHOOTING
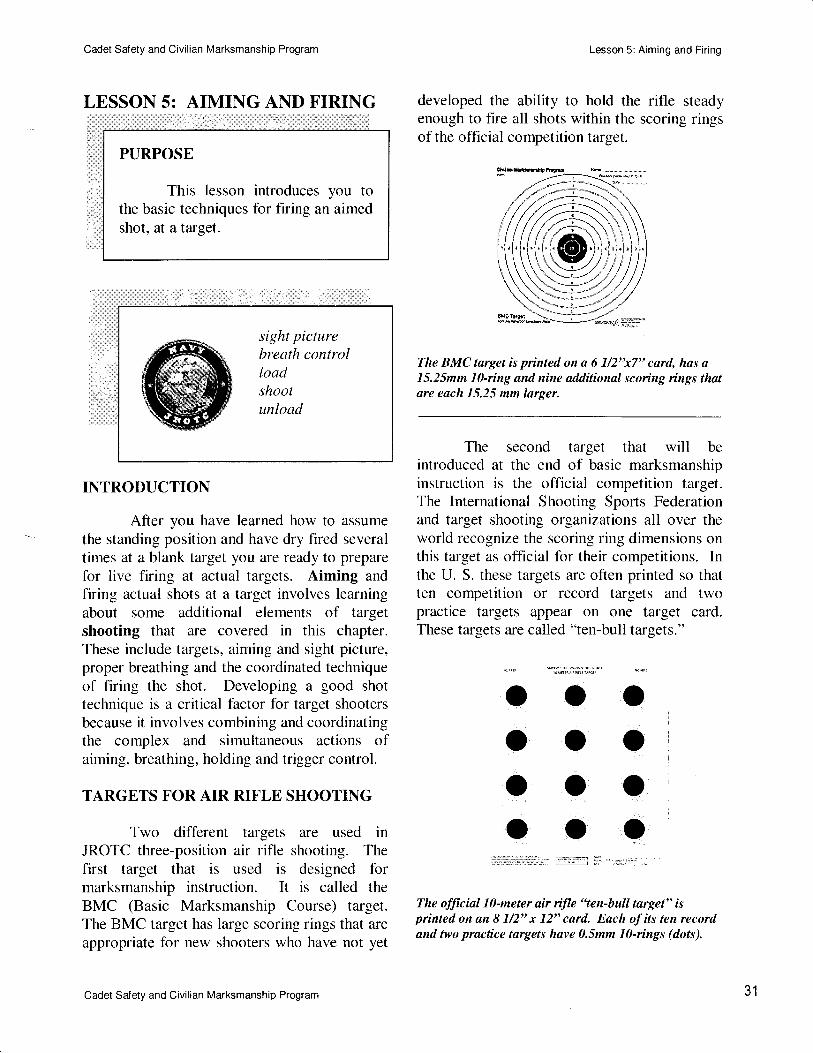
Two different targets are used inJROTC three-position air rifle shooting. Thefirst target that is used is designed formarksmanship instruction. It is called theBMC (Basic Marksmanship Course) target.The BMC target has large scoring rings that are
appropriate for new shooters who have not yet
Cadet Salety and Civilian Marksmanship Program
Lesson 5: Aiming and Firing
developed the ability to hold the rifle steadyenough to fire all shots within the scoring ringsof the official competition target.
The BMC target is pinted on a 6 7/2"x7" card, has a15.25mm l0-ring and nine qdditional scoring ings thatare each 15.25 mm larger.
The second target that will be
introduced at the end of basic marksmanshipinstruction is the official competition target.The International Shooting Sporls Federationand target shooting organizations all over theworld recognize the scoring ring dimensions onthis target as official for their competitions. Inthe U. S. these targets are often printed so thatten competition or record targets and twopractice targets appear on one target card.These targets are called "ten-bull targets."
The official l0-meter qir ifle "ten-bull target" isprinted on an 8 l/2" x 72" card. Each ofits ten recordand two practice targets have 0.5mm l0-rings (dots).
oooa
oooo
oooo
31
Cadet Safety and Civilian Marksmanship program
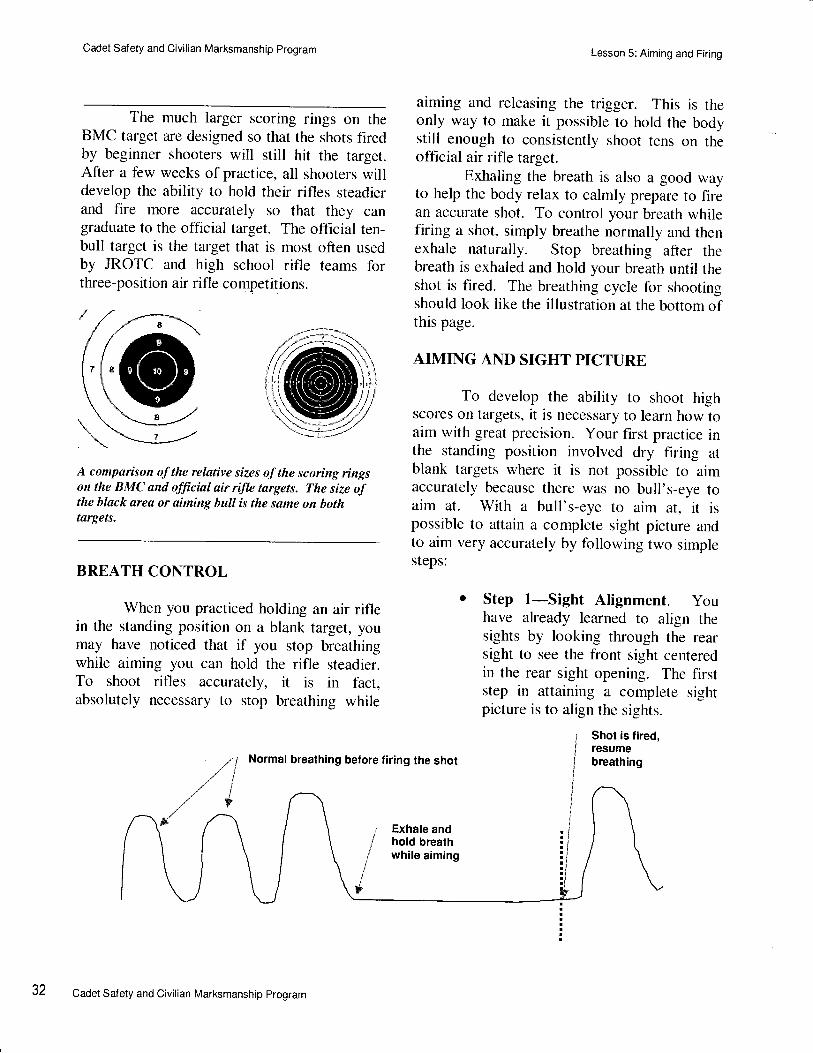
The much larger scoring rings on theBMC target are designed so that the shots firedby beginner shooters will still hit the target.After a few weeks of practice, all shooters willdevelop the ability to hold their rifles steadierand fire more accurately so that they cangraduate to the official target. The official ten-bull target is the target that is most often usedby JROTC and high school rifle teams forthree-position air rifl e competitions.
A compaison of the relative sizes of the scoring ringson the BMC and official air rifle targets. The size ofthe black area or aiming ball is the sqme on bothtargets.
BREATH CONTROL
When you practiced holding an air riflein the standing position on a blank target, youmay have noticed that if you stop breathingwhile aiming you can hold the rifle steadier.To shoot rifles accurately, it is in fact,absolutely necessary to stop breathing while
Normal breathing before firing the shot
Exhale andhold breathwhile aiming
Lesson 5: Aiming and Firing
aiming and releasing the trigger. This is theonly way to make it possible to hold the bodystill enough to consistently shoot tens on theofficial air rifle target.
Exhaling the breath is also a good wayto help the body relax to calmly prepare to firean accurate shot. To control your breath whilefiring a shot, simply breathe normally and thenexhale naturally. Stop breathing after thebreath is exhaled and hold your breath until theshot is fired. The breathing cycle for shootingshould look like the illustration at the bottom ofthis page.
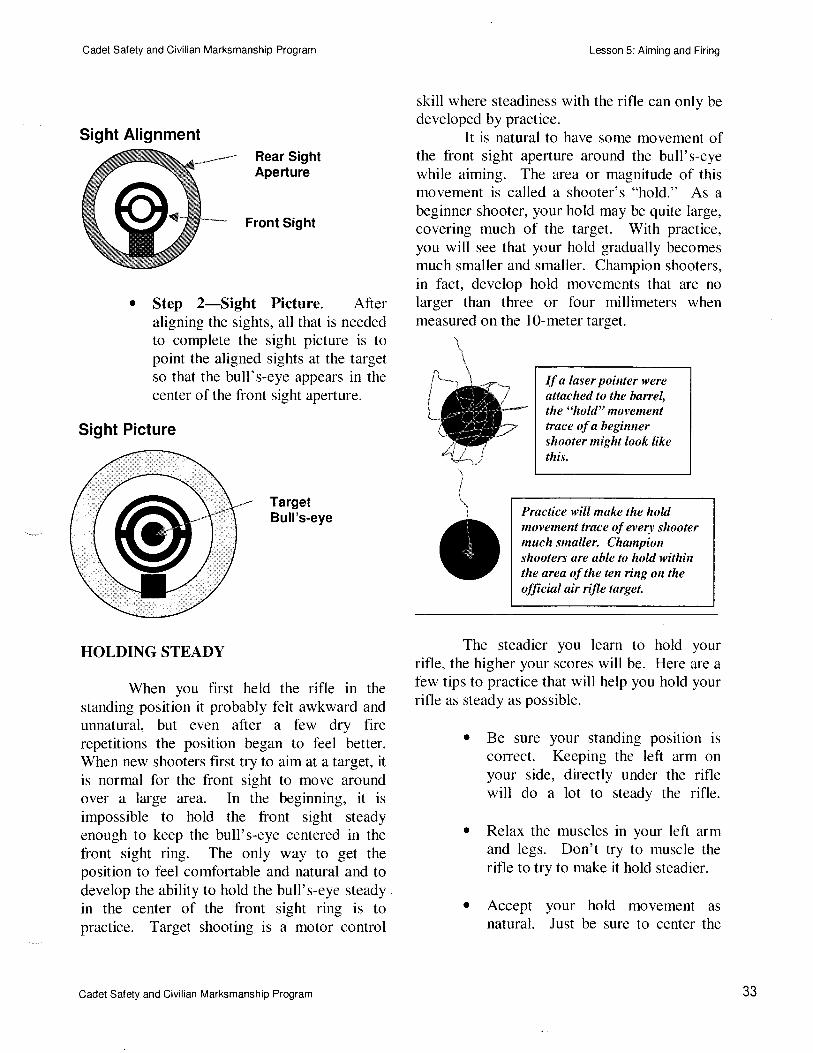
AIMING AND SIGHT PICTURE
To develop the ability to shoor highscores on targets, it is necessary to learn how toaim with great precision. Your first practice inthe standing position involved dry firing atblank targets where it is not possible to aimaccurately because there was no bull's-eye toaim at. With a bull's-eye to aim at, it ispossible to attain a complete sight picture andto aim very accurately by following two simplesteps:
o Step l-Sight Alignment. youhave already learned to align thesights by looking through the rearsight to see the front sight centeredin the rear sight opening. The firststep in attaining a complete sightpicture is to align the sights.
r Shot is fired,i resumej breathinO,nJ
,/i,/l,lt
$'
*
Cadet Saf ety and Civilian Marksmanship Program
Cadet Safety and Civilian Marksmanship Program
Rear SightAperture
Front Sight
o Step 2-Sight Picture. Afteraligning the sights, all that is neededto complete the sight picture is topoint the aligned sights at the targetso that the bull's-eye appears in thecenter ofthe front sight aperture.
Sight Alignment
Sight Picture
TargetBull's-eye
HOLDING STEADY
When you first held the rifle in thestanding position it probably felt awkward andunnatural, but even after a few dry firerepetitions the position began to feel better.When new shooters first try to aim at a target, itis normal for the front sight to move aroundover a large area. In the beginning, it is
impossible to hold the front sight steadyenough to keep the bull's-eye centered in thefront sight ring. The only way to get theposition to feel comfortable and natural and todevelop the ability to hold the bull's-eye steadyin the center of the front sight ring is topractice. Target shooting is a motor control
Lesson 5: Aiming and Firing
skill where steadiness with the rifle can only be
developed by practice.It is natural to have some movement of
the front sight aperture around the bull's-eyewhile aiming. The area or magnitude of thismovement is called a shooter's 'ohold." As a
beginner shooter, your hold may be quite large,covering much of the target. With practice,you will see that your hold gradually becomesmuch smaller and smaller. Champion shooters,in fact, develop hold movements that are nolarger than three or four millimeters whenmeasured on the lO-meter target.
If a laser pointer wereattsched to the barrel,the "hold" movementtrace of a beginnershooter might look likethis.
Practice will make the holdmovement trace of every shootermuch smaller. Champiottshooters are able to hold withinthe area of the ten ring on theofficial air iJle target.
The steadier you learn to hold yourrifle, the higher your scores will be. Here are afew tips to practice that will help you hold yourrifle as steady as possible.
o Be sure your standing position iscorrect. Keeping the left arm onyour side, directly under the riflewill do a lot to steady the rifle.
o Relax the muscles in your left armand legs. Don't try to muscle therifle to try to make it hold steadier.
o Accept your hold movement as
natural. Just be sure to center the
\
Cadet Safety and Civilian Marksmanship Program 33
Cadet Safety and Civilian Marksmanship Program
entire hold movement over thebull's-eye.
o Concentrate on your sight picture.Think about letting the holdmovements become smaller andkeeping the bull's-eye movementsinside the front sight ring.
FIRING THE SHOT
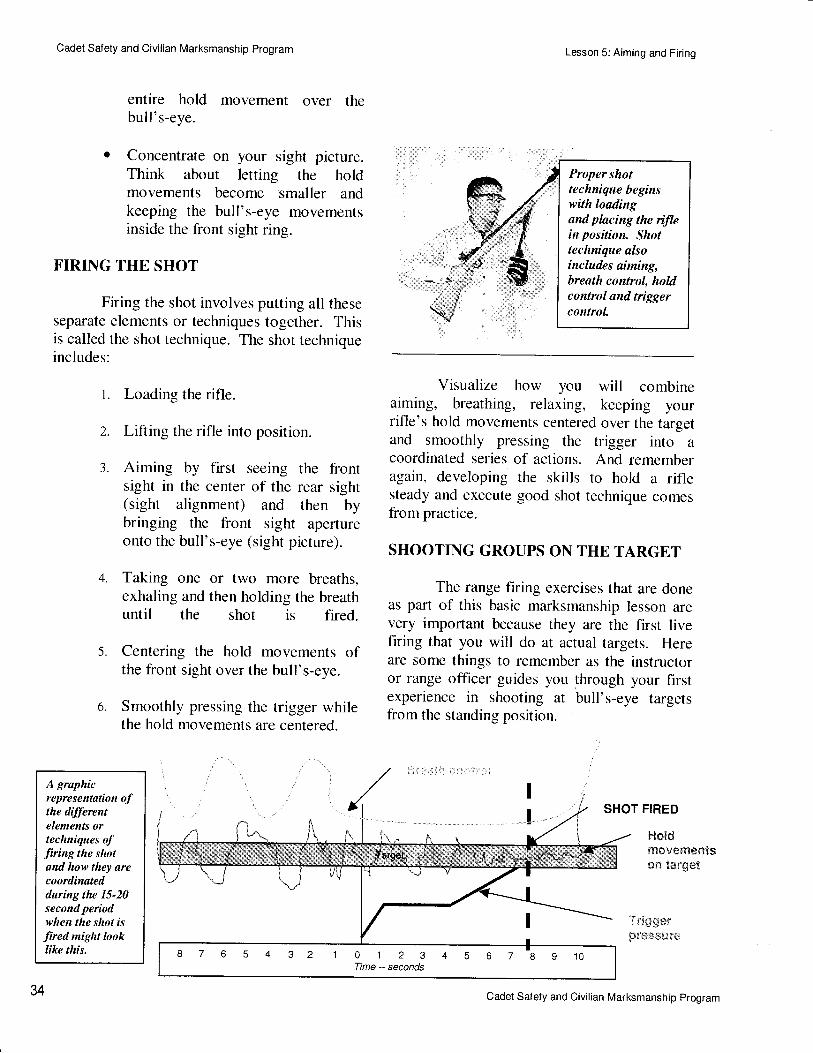
Firing the shot involves putting all theseseparate elements or techniques together. Thisis called the shot technique. The shot techniqueincludes:
l. Loading the rifle.
2. Lifting the rifle into position.
3. Aiming by first seeing the frontsight in the center of the rear sight(sight alignment) and then bybringing the front sight apertureonto the bull's-eye (sight picture).
4. Taking one or two more breaths,exhaling and then holding the breathuntil the shot is fired.
5. Centering the hold movements ofthe front sight over the bull's-eye.
6. Smoothly pressing the trigger whilethe hold movements are centered.
Lesson 5: Aiming and Firing
Visualize how you will combineaiming, breathing, relaxing, keeping yourrifle's hold movements centered over the targetand smoothly pressing the trigger into acoordinated series of actions. And rememberagain, developing the skills to hold a riflesteady and execute good shot technique comesfrom practice.
SHOOTING GROUPS ON THE TARGET
The range firing exercises that are doneas part of this basic marksmanship lesson arevery important because they are the first livefiring that you will do at actual targets. Hereare some things to remember as the instructoror range officer guides you through your firstexperience in shooting at bull's-eye targetsfrom the standing position.
A graphicrepresentation o;fthe di.ffurentelements ortechniques offiring the slntand how they arecoordinatedduring the 15-20second periodwhen the shot isfired might looklike this.
SHOT FIRED
l-lcld$n$v*r$entssn t*s$st
\sigger$sss${.rN'\\
Proper shottechnique beginswith loadingand placing the iflein position. Shottechnique alsoincludes aiming,breath control, hoWcontrol and triggercontrol.
34 Cadet Safety and Civilian Marksmanship Program
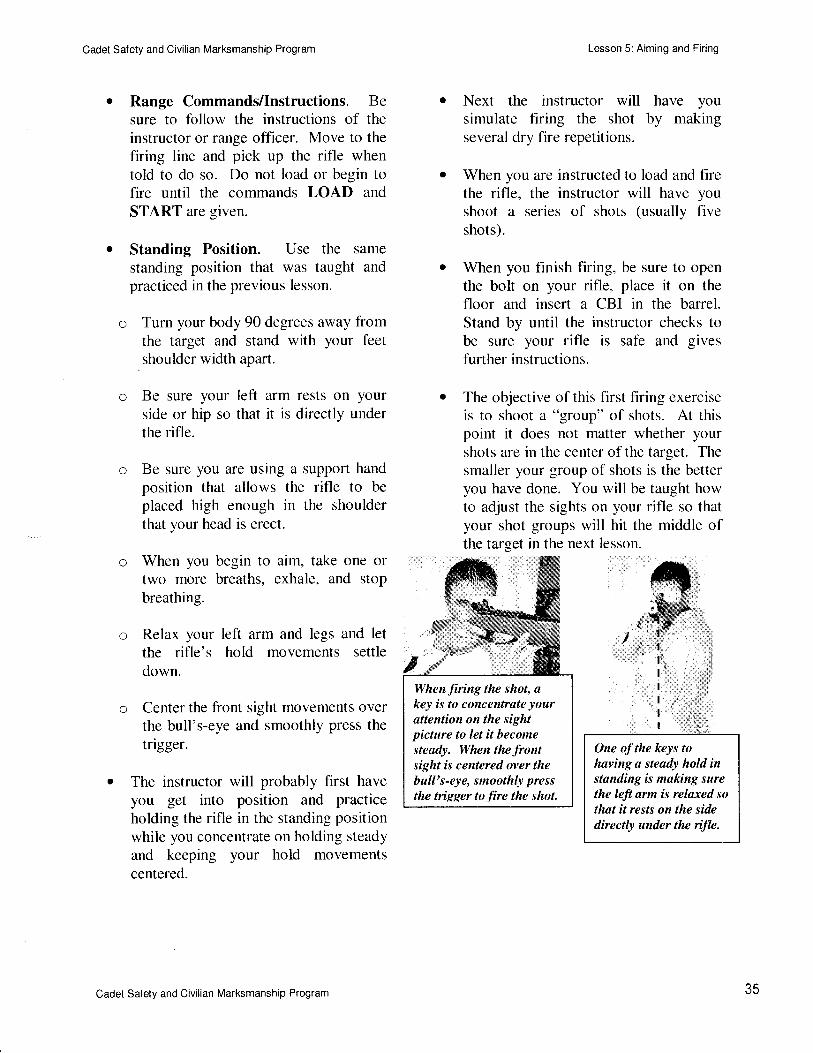
Cadet Safety and Civilian Marksmanship Program
Range Commands/Instructions. Besure to follow the instructions of theinstructor or range officer. Move to thefiring line and pick up the rifle whentold to do so. Do not load or begin tofire until the commands LOAD and
START are given.
Standing Position. Use the same
standing position that was taught andpracticed in the previous lesson.
o Turn your body 90 degrees away fromthe target and stand with your feet
. shoulder width apart.
o Be sure your left arm rests on yourside or hip so that it is directly underthe rifle.
Be sure you are using a suppoft handposition that allows the rifle to be
placed high enough in the shoulderthat your head is erect.
When you begin to aim, take one ortwo more breaths, exhale, and stop
breathing.
Relax your left arm and legs and letthe rifle's hold movements settle
down.
o Center the front sight movements overthe bull's-eye and smoothly press the
trigger.
o The instructor will probably first haveyou get into position and practiceholding the rifle in the standing positionwhile you concentrate on holding steadyand keeping your hold movementscentered.
Lesson 5: Aiming and Firing
Next the instructor will have yousimulate firing the shot by makingseveral dry fire repetitions.
When you are instructed to load and firethe rifle, the instructor will have youshoot a series of shots (usually fiveshots).
When you finish firing, be sure to openthe bolt on your rifle, place it on thefloor and insert a CBI in the barrel.Stand by until the instructor checks tobe sure your rifle is safe and givesfurther instructions.
o The objective of this first firing exercrseis to shoot a 'ogroup" of shots. At thispoint it does not matter whether yourshots are in the center ofthe target. Thesmaller your group of shots is the betteryou have done. You will be taught howto adjust the sights on your rifle so thatyour shot groups will hit the middle ofthe target in the next lesson.
One of the keys tohaving a steady hold instanding is making surethe left arm is relaxed sothat it rests on the sidedirectly under the ifle.
When.firing the shot, akey is to concentrate yourattention on the sightpicture to let it becomesteady. \l'hen the frontsight is centered over thebull's-eye, smoothly pressthe trigger to fire the shot.
Cadet Safety and Civilian Marksmanship Program 35
Cadet Salety and Civilian Marksmanship Program
INTERUPTING THE FIRING SEQUENCE
There are situations when a shootershould interrupt the firing sequence; they are:
o Running out of breatho Mental distractiono Deterioration of hold
If you decide to stop firing sequence,relax and start over; this also is part of triggercontrol. Stopping the firing sequence,
however, can be costly where pressure on thetrigger must be released first, then you relaxyour hold. Should you ignore this sequenceand relax your hold just as the rifle fires, youare likely to have a bad shot.
CONCLUSION
This lesson taught you the basics offiring a shot, including sight picture, breathcontrol and trigger control, that you mustmaster to fire accurate shots at targets.
Lesson 5: Aiming and Firing
36 Cadet Salety and Civilian Marksmanship Program
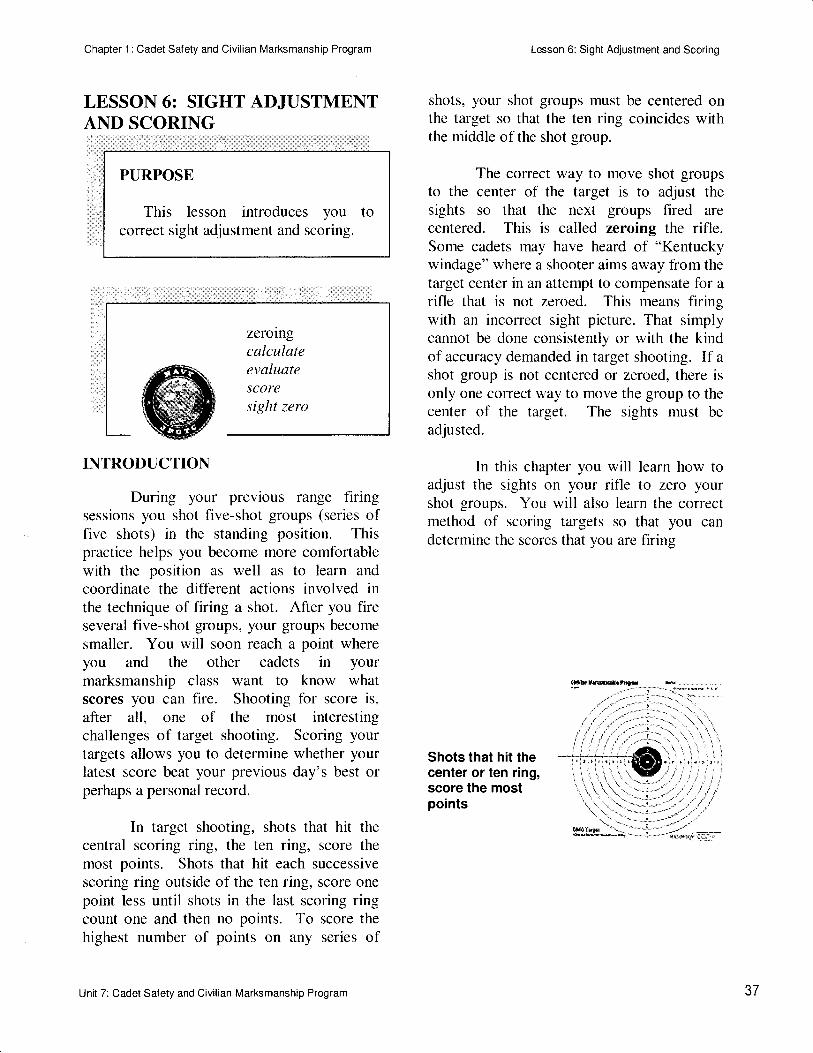
Chapter 1: Cadet Saf ety and Civilian Marksmanship Program
LESSON 6: SIGHT ADJUSTMENTAND SCORING
PURPOSE
This lesson introduces you tocorrect sight adjustment and scoring.
INTRODUCTION
During your previous range firingsessions you shot five-shot groups (series offive shots) in the standing position. Thispractice helps you become more comfortablewith the position as well as to learn andcoordinate the different actions involved inthe technique of firing a shot. After you fireseveral five-shot groups, your groups becomesmaller. You will soon reach a point whereyou and the other cadets in yourmarksmanship class want to know whatscores you can fire. Shooting for score is,
after all, one of the most interestingchallenges of target shooting. Scoring yourtargets allows you to determine whether yourlatest score beat your previous day's best orperhaps a personal record.
In target shooting, shots that hit thecentral scoring ring, the ten ring, score themost points. Shots that hit each successivescoring ring outside of the ten ring, score onepoint less until shots in the last scoring ringcount one and then no points. To score thehighest number of points on any series of
Unit 7: Cadet Safety and Civilian Marksmanship Program
Lesson 6: Sight Adjustment and Scoring
shots, your shot groups must be centered onthe target so that the ten ring coincides withthe middle of the shot group.
The correct way to move shot groupsto the center of the target is to adjust thesights so that the next groups fired arecentered. This is called zeroing the rifle.Some cadets may have heard of "Kentuckywindage" where a shooter aims away from thetarget center in an attempt to compensate for a
rifle that is not zeroed. This means flringwith an incorrect sight picture. That simplycannot be done consistently or with the kindof accuracy demanded in target shooting. If a
shot group is not centered or zeroed, there isonly one correct way to move the group to thecenter of the target. The sights must be
adjusted.
In this chapter you will learn how toadjust the sights on your rifle to zero yourshot groups. You will also learn the correctmethod of scoring targets so that you candetermine the scores that you are firing
Shots that hit thecenter or ten ring,score the mostpoints
zerolngcalculateevaluateSCOTE
sight zero
5t

Chapter 1: Cadet Salety and Civilian Marksmanship Program
Elevation
When the shot groups
fired with a ifle areoff-center, the onlycorrect way to movethem to the center ofthe target is to adjustthe rear sight by usingthe elevation andwindase adiustments
Windage
HOW TO EVALUATE SHOT GROUPS
In your first live firing in the standingposition, it is not important that your 5-shotgroups be in the center of the target.However, no matter where they are located onthe target, it is important to evaluate yourshot groups to know how you are progressing.Here are some things to look for in evaluatingyour shot groups.
o Overall size of the group - thesmaller your shot groups are, thebetter you are doing.
o Shot group location - if your shotgroups are always in the same
location on the target, thatindicates your position and shottechnique are consistent.
. Wild shots - if your shot groupshave wild shots or "fliers" that areaway from the main group, thoseshots indicate a mistake in shottechnique was made on that shot.
Excellent shotgroup, indicates
good shootingperlormance
OOoo
O
Lesson 6: Sight Adlustment and Scoring
"Flier" away frommain shot group
indicates a mistakein shot technique
Large shotgroup indicates
need forimprovement
your sights is to locate the center of your mostrecent shot group. Keep these points in mindas you determine shot group centers.
o Draw real or imaginary verticaland horizontal lines through themidpoints of the group.
. On shot groups with fliers,disregard any wild shots whendetermining the center of thegroup.
o Use the crossing point to mark thecenter point of the shot group.
Draw verticalandhorizontal lines
through center ofgroup
Disregard flierswhen determining
center ol group
;$op* * r Rdr $u x *
o:ro
Draw linesthrough centerof main part of
group
o
.".R...o I'
38 Unit 7: Cadet Safety and Civilian Marksmanship Program
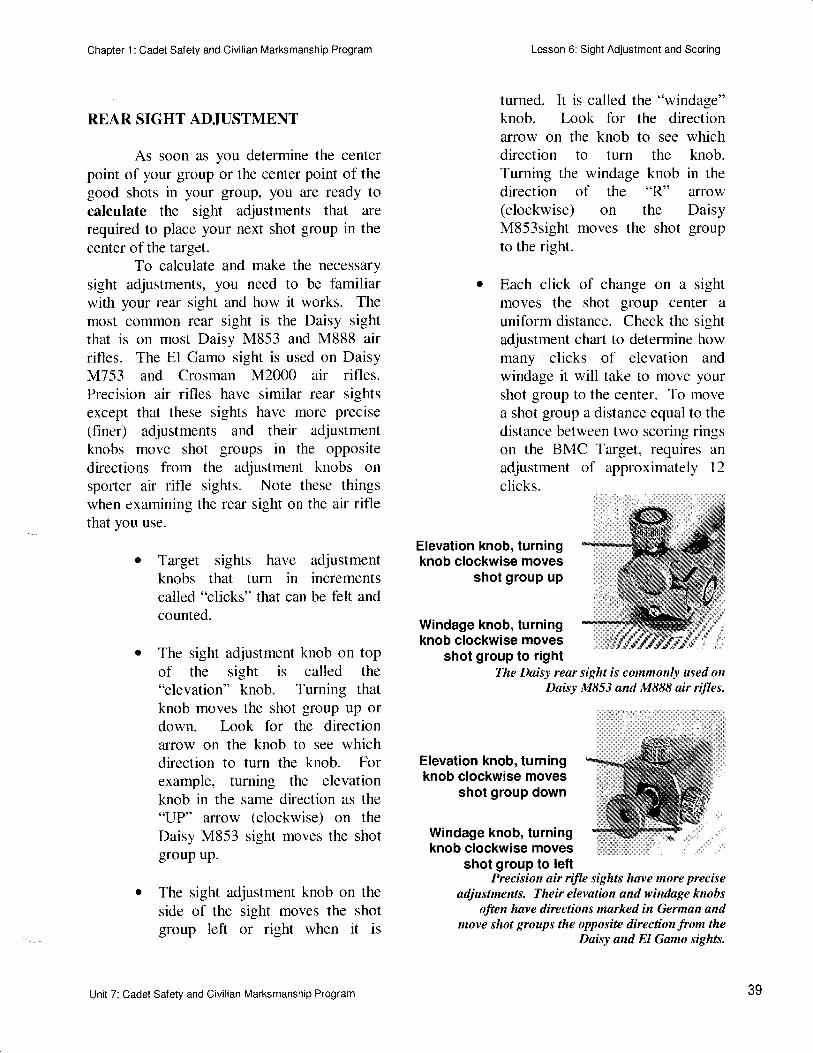
Chapter 1: Cadet Safety and Civilian Marksmanship Program
REAR SIGHT ADJUSTMENT
As soon as you determine the centerpoint of your group or the center point of thegood shots in your group, you are ready tocalculate the sight adjustments that are
required to place your next shot group in the
center ofthe target.To calculate and make the necessary
sight adjustments, you need to be familiarwith your rear sight and how it works. Themost common rear sight is the Daisy sightthat is on most Daisy M853 and M888 airrifles. The El Gamo sight is used on DaisyM753 and Crosman M2000 air rifles.Precision air rifles have similar rear sightsexcept that these sights have more precise(finer) adiustments and their adjustmentknobs move shot groups in the oppositedirections from the adjustment knobs onspofter air rifle sights. Note these thingswhen examining the rear sight on the air riflethat you use.
o Target sights have adjustmentknobs that turn in incrementscalled "clicks" that can be felt andcounted.
The sight adjustment knob on topof the sight is called the"elevation" knob. Turning thatknob moves the shot group up ordown. Look for the directionarrow on the knob to see whichdirection to turn the knob. Forexample, turning the elevationknob in the same direction as the.'IJP" arrow (clockwise) on theDaisy M853 sight moves the shotgroup up.
The sight adjustment knob on the
side of the sight moves the shotgroup left or right when it is
Lesson 6: Sight Adjustment and Scoring
turned. It is called the "windage"knob. Look for the directionarrow on the knob to see whichdirection to turn the knob.Turning the windage knob in thedirection of the "R" arrow(clockwise) on the DaisyM853sight moves the shot groupto the right.
o Each click of change on a sightmoves the shot group center a
uniform distance. Check the sightadjustment chart to determine howmany clicks of elevation andwindage it will take to move yourshot group to the center. To movea shot group a distance equal to thedistance between two scoring ringson the BMC Target, requires an
adjustment of approximately 12
clicks.
Elevation knob, turningknob clockwise moves
shot group up
Windage knob, turningknob clockwise moves
shot group to right
Elevation knob, turningknob clockwise moves
shot group down
Windage knob, turningknob clockwise moves
The Daisy rear sight is commonly used onDaisy M853 and M888 air rifles.
shot group to leftPrecision air rifle sights have more precise
adjustments. Their elevation and windage knobsoften have directions marked in Gennan and
move shot groups the opposite direction from theDaisy and El Gamo sights.
Unit 7: Cadet Safety and Civilian Marksmanship Program 39
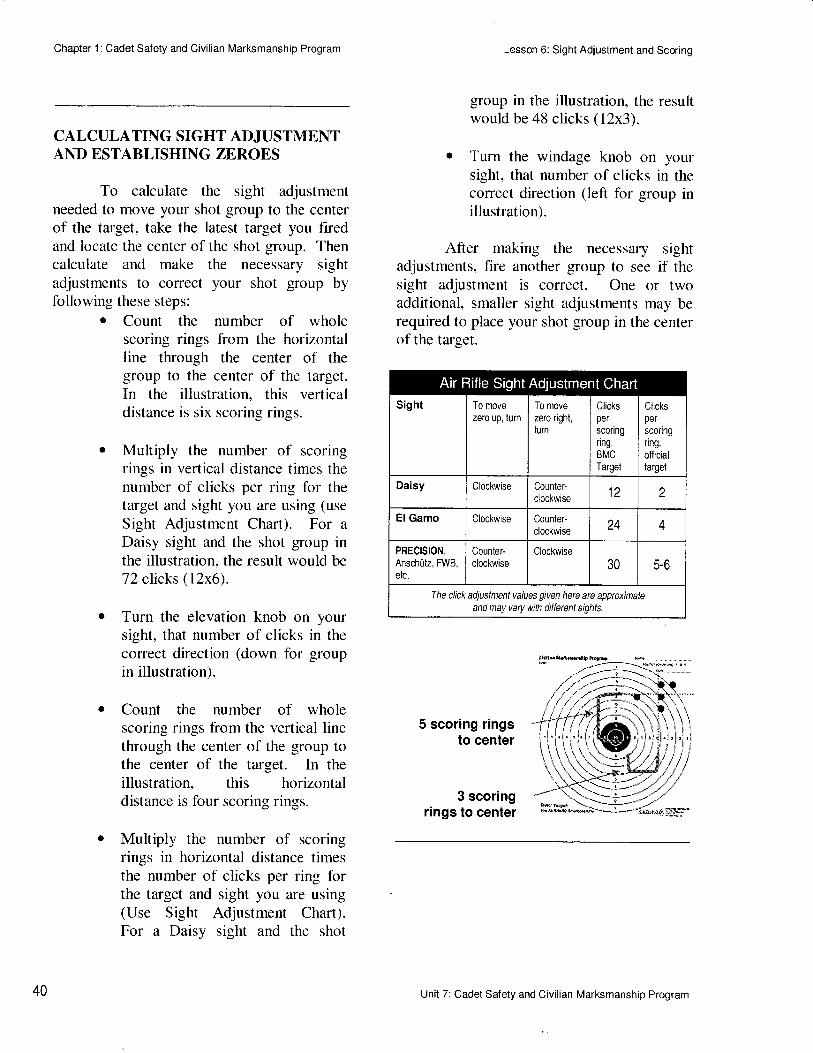
Chapter 1: Cadet Safety and Civilian Marksmanship Program
CALCULATING SIGHT ADJUSTMENTAND ESTABLISHING ZEROES
To calculate the sight adjustmentneeded to move your shot group to the centerof the target, take the latest target you firedand locate the center of the shot group. Thencalculate and make the necessary sightadjustments to correct your shot group byfollowing these stepsl
o Count the number of wholescoring rings from the horizontalline through the center of thegroup to the center of the target.In the illustration, this verticaldistance is six scoring rings.
o Multiply the number of scoringrings in vertical distance times thenumber of clicks per ring for thetarget and sight you are using (use
Sight Adjustment Chart). For aDaisy sight and the shot group inthe illustration, the result would be72 clicks (12x6).
Turn the elevation knob on yoursight, that number of clicks in thecorrect direction (down for groupin illustration).
Count the number of wholescoring rings from the vertical linethrough the center of the group tothe center of the target. In theillustration, this horizontaldistance is four scoring rings.
Multiply the number of scoringrings in horizontal distance timesthe number of clicks per ring forthe target and sight you are using(Use Sight Adjustment Chart).For a Daisy sight and the shot
Lesson 6: Sight Adiustment and Scoring
group in the illustration, the resultwould be 48 clicks (12x3).
o Turn the windage knob on yoursight, that number of clicks in thecorrect direction (left for group inillustration).
After making the necessary sightadjustments, fire another group to see if thesight adjustment is correct. One or twoadditional, smaller sight adjustments may berequired to place your shot group in the centerofthe target.
5 scoring ringsto center
3 scoringrings to center
The click adjustment values given here arc approximate
and may vary with dtflerent sights.
40 Unit 7: Cadet Safety and Civilian Marksmanship Program
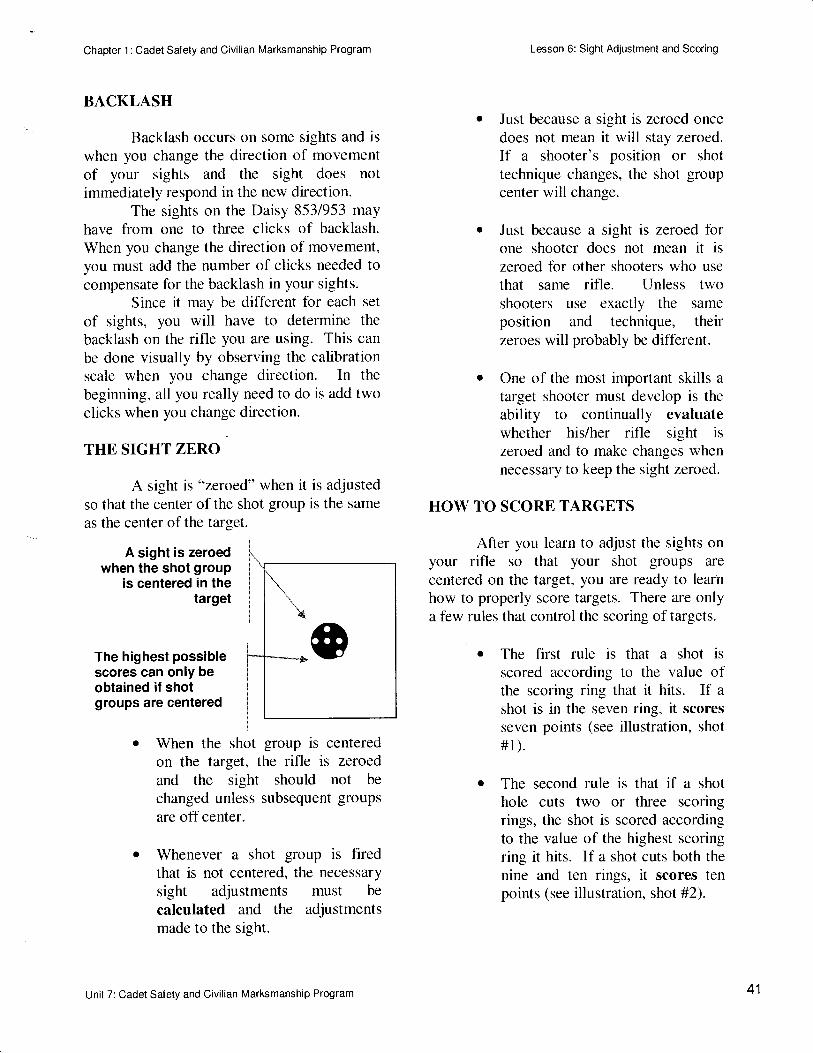
Chapter 1: Cadet Safety and Civilian Marksmanship Program
BACKLASH
Backlash occurs on some sights and iswhen you change the direction of movementof your sights and the sight does notimmediately respond in the new direction.
The sights on the Daisy 853/953 mayhave from one to three clicks of backlash.When you change the direction of movement,you must add the number of clicks needed tocompensate for the backlash in your sights.
Since it may be different for each set
of sights, you will have to determine the
backlash on the rifle you are using. This can
be done visually by observing the calibrationscale when you change direction. In the
beginning, all you really need to do is add twoclicks when you change direction.
THE SIGHT ZERO
A sight is "zeroed" when it is adjustedso that the center of the shot group is the same
as the center ofthe target.
A sight is zeroedwhen the shot group
is centered in thetarget
The highest possiblescores can only beobtained if shotgroups are centered
o When the shot group is centeredon the target, the rifle is zeroedand the sight should not be
changed unless subsequent groupsare off center.
o Whenever a shot group is firedthat is not centered, the necessary
sight adjustments must be
calculated and the adjustmentsmade to the sight.
Lesson 6: Sight Adjustment and Scoring
o Just because a sight is zeroed oncedoes not mean it will stay zeroed.If a shooter's position or shottechnique changes, the shot groupcenter will change.
o Just because a sight is zeroed forone shooter does not mean it is
zeroed for other shooters who use
that same rifle. Unless twoshooters use exactly the same
position and technique, theirzeroes will probably be different.
o One of the most important skills atarget shooter must develop is theability to continually evaluatewhether his/her rifle sight is
zeroed and to make changes whennecessary to keep the sight zeroed.
HOW TO SCORE TARGETS
After you learn to adjust the sights onyour rifle so that your shot groups are
centered on the target, you are ready to learnhow to properly score targets. There are onlya few rules that control the scoring of targets.
o The first rule is that a shot isscored according to the value ofthe scoring ring that it hits. If a
shot is in the seven ring, it scoresseven points (see illustration, shot#1).
o The second rule is that if a shothole cuts two or three scoringrings, the shot is scored accordingto the value of the highest scoringring it hits. If a shot cuts both thenine and ten rings, it scores tenpoints (see illustration, shot #2).
:
L
0
Unit 7: Cadet Safety and Civilian Marksmanship Program 41
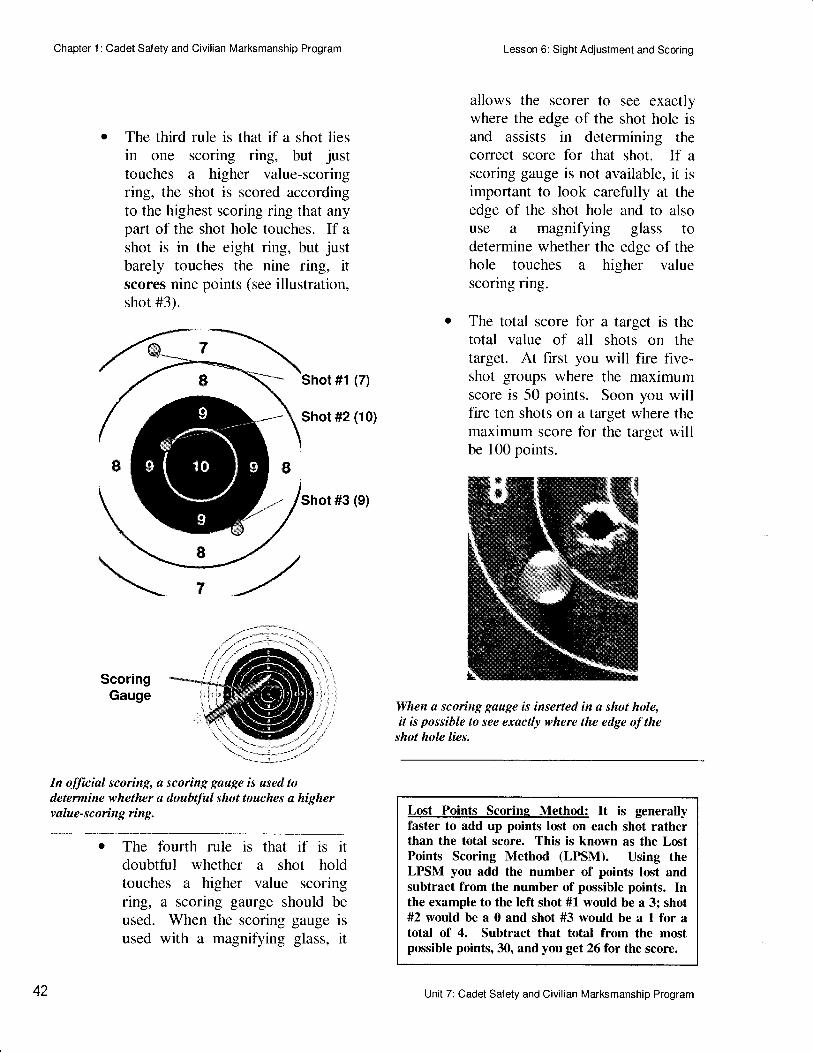
Chapter 1: Cadet Salety and Civilian Marksmanship Program
o The third rule is that if a shot liesin one scoring ring, but justtouches a higher value-scoringring, the shot is scored accordingto the highest scoring ring that anypart of the shot hole touches. If a
shot is in the eight ring, but justbarely touches the nine ring, itscores nine points (see illustration,shot #3).
Lesson 6: Sight Adjustment and Scoring
allows the scorer to see exactlywhere the edge of the shot hole isand assists in determining thecorrect score for that shot. If a
scoring gauge is not available, it isimportant to look carefully at theedge of the shot hole and to alsouse a magnifying glass todetermine whether the edge of thehole touches a higher valuescoring ring.
The total score for a target is thetotal value of all shots on thetarget. At first you will fire flve-shot groups where the maximumscore is 50 points. Soon you willfire ten shots on a target where themaximum score for the target willbe 100 points.
When a scoring gauge is inserted in a shot hole,it is possible to see exactly where the edge oJ'the
shot hole lies.
Lost Points Scorine Method: It is generallyfaster to add up points lost on each shot ratherthan the total score. This is known as the LostPoints Scoring Method (LPSM). Using theLPSM you add the number of points lost andsubtract from the number of possible points. Inthe example to the left shot #1 would be a 3; shot#2 would be a 0 and shot #3 would be a 1 for atotal of 4. Subtract that total from the mostpossible points, 30, and you get 26 for the score.
Shot #1 (7)
Shot #2 (10)
Shot #3 (9)
ScoringGauge
In offrcial scoring, a scoring gauge is used todetermine whether a doubtful shot touches a highervalue-scoring ring.
o The fourth rule is that if is itdoubtful whether a shot holdtouches a higher value scoringring, a scoring gaurge should beused. When the scoring gauge isused with a magnifying glass, it
42 Unit 7: Cadet Safety and Civilian Marksmanship Program
Chapter 1: Cadet Saf ety and Civilian Marksmanship Program
CONCLUSION
In your next range firing exercises,you will have an opportunity to adjust yoursights so that your shot groups hit the centerof the target. With your shot groups centered,it is then possible to score your targets so thatyou can begin to make records of yourprogress as a shooter.
Lesson 6: Sight Adjustment and Scoring
Unit 7: Cadet Safety and Civilian Marksmanship Program 43
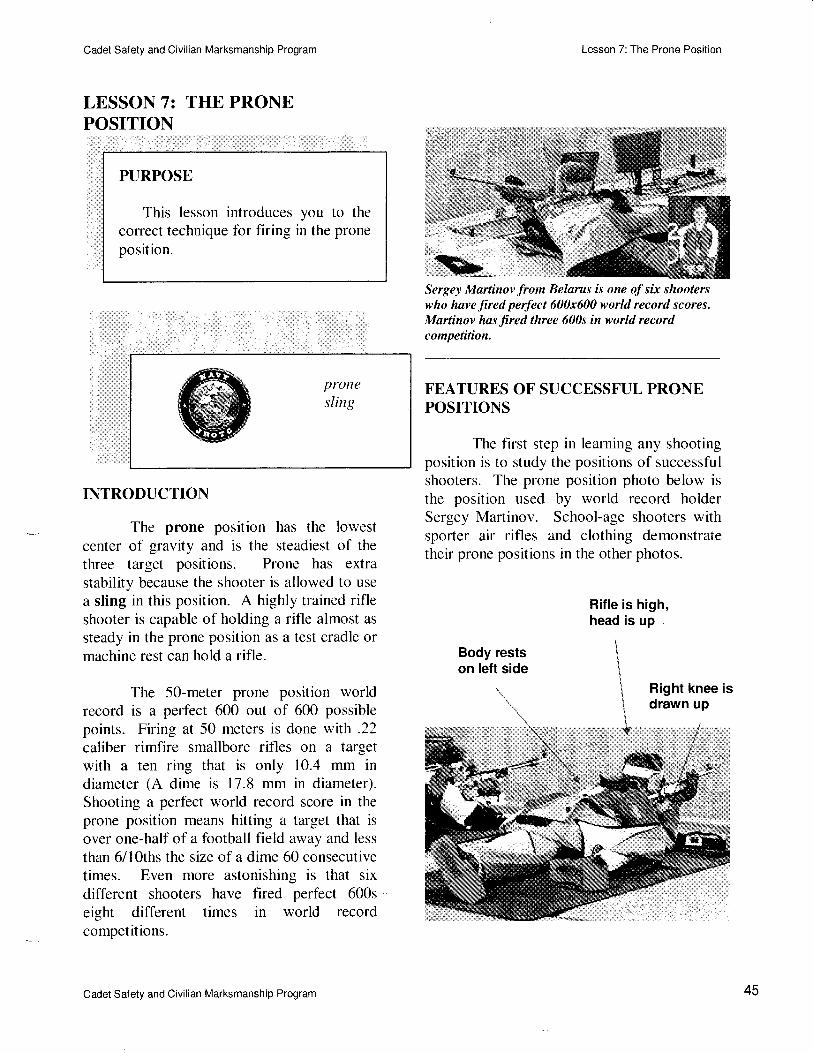
Cadet Safety and Civilian Marksmanship Program
LESSON 7: THE PRONEPOSITION
PURPOSE
This lesson introduces you to the
correct technique for firing in the prone
position.
pronesling
Lesson 7: The Prone Position
Sergey Martinov from Belarus is one of six shooterswho have fired perfect 600x600 world record scores.
Martinov has fired three 600s in world recordcompetition.
FEATURES OF SUCCESSFUL PRONEPOSITIONS
The first step in learning any shootingposition is to study the positions of successfulshooters. The prone position photo below isthe position used by world record holderSergey Martinov. School-age shooters withsporter air rifles and clothing demonstratetheir prone positions in the other photos.
Hifle is high,head is up
Body restson left side
INTRODUCTION
The prone position has the lowestcenter of gravity and is the steadiest of thethree target positions. Prone has extrastability because the shooter is allowed to use
a sling in this position. A highly trained rifleshooter is capable of holding a rifle almost as
steady in the prone position as a test cradle ormachine rest can hold a rifle.
The 50-meter prone position worldrecord is a perfect 600 out of 600 possible
points. Firing at 50 meters is done with .22caliber rimfire smallbore rifles on a targetwith a ten ring that is only 10.4 mm indiameter (A dime is 17.8 mm in diameter).Shooting a perfect world record score in theprone position means hitting a target that is
over one-half of a football field away and less
than 6/l0ths the size of a dime 60 consecutivetimes. Even more astonishing is that six
different shooters have fired perfect 600s
eight different times in world recordcompetitions.
Cadet Safety and Civilian Marksmanship Program 45

Rifle is high,head is up
Rifle butt is highin shoulder
Cadet Safety and Civilian Marksmanship Program
Body lies atan angle ot10-15degrees toline of fire
Lesson 7: The Prone Position
without a sling is a mistake. To learn thecorrect position and get the highest possiblescores, a sling must be used in the proneposition.
To take full advantage of the supportthat the sling provides, you need tounderstand how the sling is designed andused. The illustrations here show you how toplace the sling on your arm so you will be
ready to use it when you get into the proneposition.
*.ffinis=.*:s
All target shooting slings have similar features. Theyinclude 1) an arm loop with a rneans of tightening theloop around the arm, 2) s buckle or other means ofadjusting the sling length and 3) a sling attachmentpoint that can be adjustedforward and backward.
Step 1.Detach thesling from
the rifle,form a loopfor the arm
Slingsupportsweight ofrifle; leftelbowsupportsmost of rifleand upperbody weight
\-\i
Again, check the similarities betweenthe world record holder's position and thepositions of the two school-age shooters.Carefully study the position features pointedout by the arrows and captions. Visualizehow you will develop a prone position that is
like these three excellent positions.
PROPER USE OF THE SLING
Competition rules allow the use of a
sling in prone and kneeling. Scores that can
be fired with the sling are so much higher andmore consistent than scores fired without a
sling that all successful shooters use slings inthose two positions (the use of a sling is notpermitted in standing). It may be tempting tothink that shooting in the prone position is
easier without a sling, but trying to shoot
46 Cadet Safety and Civilian Marksmanship Program

Cadet Salety and Civillan Marksmanship Program
Step 2. Placesling loop highon arm, tighten
sling looparound arm
Slingsupports100% of rifleweight
The remainirry steps to attach and adjust the sling aredescribed in the prone posiliott instructions thatfollow. With a properly adjusted sling, the muscles ofthe ann can be completely relaxed,
A large safety pin or otherfastener maybe used to keep the sling from slippingdown on the qnn.
Lesson 7: The Prone Position
LEARNING THE PRONE POSITION
A step-by-step process should alwaysbe used when learning a new shootingposition. After studying the position andbecoming aware of the importance of usingthe sling, it is time to move to the firing lineand begin to develop your own proneposition. Here are the steps to follow:
1. Study the Position. Take anotherlook at ideal prone position photos.Imagine placing your arms, bodyand legs in a similar position. Putthe sling on your suppoft (left) armso that it will be ready when the timecomes to attach it.
.\ rs
\ -\rri.s: .r-.\.$$'
1"....*, .,...,.s*-','
Wearing a glove on thesupport hand makesusing the sling morecomfortable. If ashooting glove is notavailable, s normalleather work glove maybe worn.
Major Mike Anti, U. S.
Army MarksmanshipUnit, is shown firing inthe prone position duringthe 2000 Olympic Games.The photo on the leftshows how the anns andsling suppott the riflewhile keeping the butthigh in the shoulder undthe head up. The photoubove demonstrates theangle that the body shouldlie in relation to the rifle.His right knee is drawn upto roll the body onto theleft side. Note how erecthis head is in bothposition views.
Cadet Safety and Civilian Marksmanship Program 47
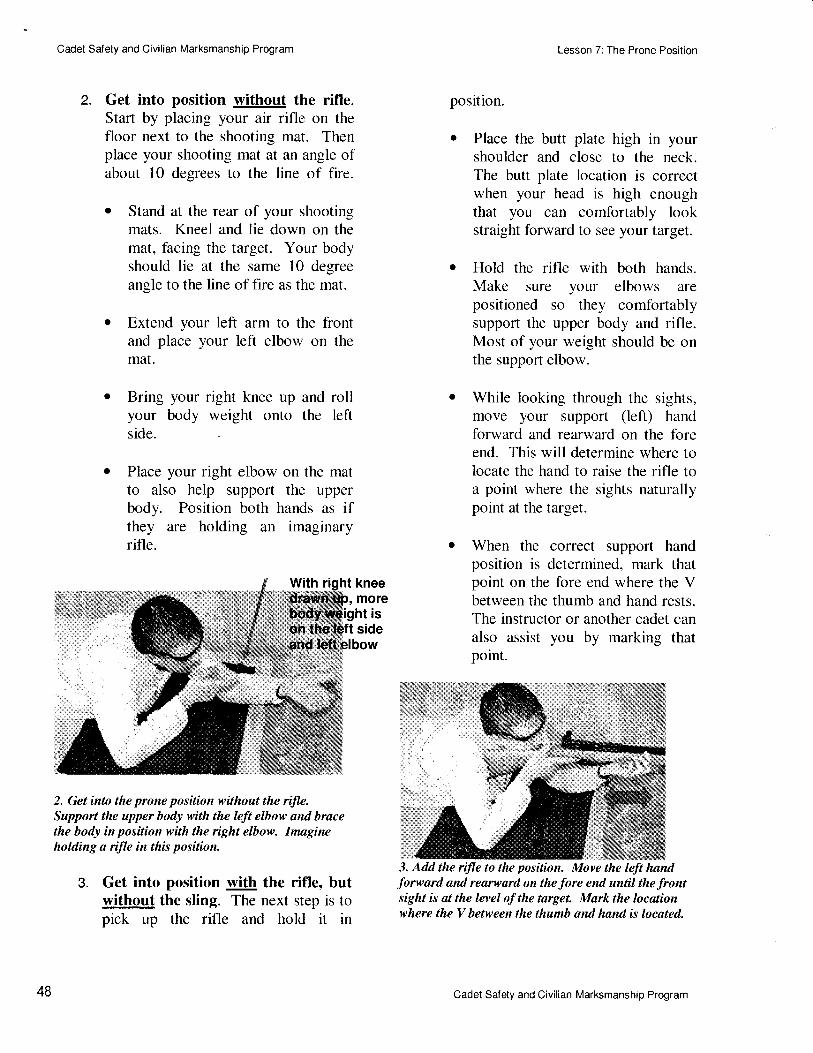
Cadet Safety and Civilian Marksmanship Program
2. Get into position without the rifle.Start by placing your air rifle on thefloor next to the shooting mat. Thenplace your shooting mat at an angle ofabout 10 degrees to the line of fire.
o Stand at the rear of your shootingmats. Kneel and lie down on themat, facing the target. Your bodyshould lie at the same 10 degreeangle to the line of fire as the mat.
o Extend your left arm to the frontand place your left elbow on themat.
Bring your right knee up and rollyour body weight onto the leftside.
Place your right elbow on the matto also help support the upperbody. Position both hands as ifthey are holding an imaginaryrifle.
with
2. Get into the prone position without the rifle.Support the upper body with the left elbow and bracethe body in position with the right elbow. Imagineholding a rifle in this position.
3. Get into position with the rifle, butwithout the sling. The next step is topick up the rifle and hold it in
Lesson 7: The Prone Position
position.
o Place the butt plate high in yourshoulder and close to the neck.The butt plate location is correctwhen your head is high enoughthat you can comfortably lookstraight forward to see your target.
o Hold the rifle with both hands.Make sure your elbows arepositioned so they comfortablysupport the upper body and rifle.Most of your weight should be onthe support elbow.
While looking through the sights,move your suppofi (left) handforward and rearward on the foreend. This will determine where tolocate the hand to raise the rifle toa point where the sights naturallypoint at the target.
o When the correct support handposition is determined, mark thatpoint on the fore end where the Vbetween the thumb and hand rests.The instructor or another cadet canalso assist you by marking thatpoint.
3. Add the riJle to the position. Move the left handforward and rearward on the fore end until the frontsight is at the level of the target. Mqrk the locationwhere the V between the thumb and hand is located.
kneemore
tsside
48 Cadet Safety and Civilian Marksmanship Program
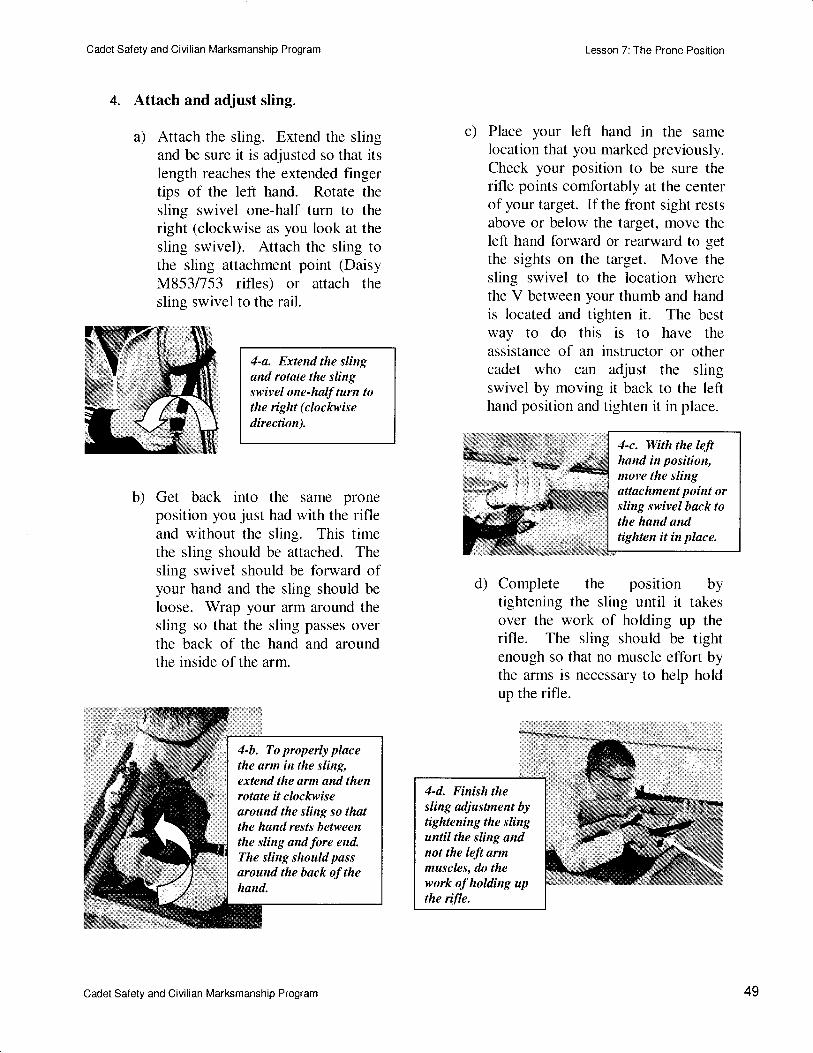
Cadet Safety and Civilian Marksmanship Program
4. Attach and adjust sling.
a) Attach the sling. Extend the slingand be sure it is adjusted so that itslength reaches the extended fingertips of the left hand. Rotate thesling swivel one-half turn to theright (clockwise as you look at thesling swivel). Attach the sling tothe sling attachment point (DaisyM853/753 rifles) or attach thesling swivel to the rail.
4-a. Extend the slingand rotate the slingswivel one-half turn tothe ight (clockwisedirection).
b) Get back into the same proneposition you just had with the rifleand without the sling. This timethe sling should be attached. Thesling swivel should be forward ofyour hand and the sling should be
loose. Wrap your arm around thesling so that the sling passes overthe back of the hand and aroundthe inside of the arm.
Lesson 7: The Prone Position
c) Place your left hand in the samelocation that you marked previously.Check your position to be sure therifle points comfortably at the centerofyour target. Ifthe front sight restsabove or below the target, move theleft hand forward or rearward to getthe sights on the target. Move thesling swivel to the location wherethe V between your thumb and handis located and tighten it. The bestway to do this is to have theassistance of an instructor or othercadet who can adjust the slingswivel by moving it back to the lefthand position and tighten it in place.
d) Complete the position bytightening the sling until it takesover the work of holding up therifle. The sling should be tightenough so that no muscle effort bythe arms is necessary to help holdup the rifle.
4-c. With the lefthand in position,move the slingattachment point orsling swivel back tothe hand andtighten it in place.
4-b. To properly placethe ann in the sling,extend the arm and thenrotute it clockwisearound the sling so thqtthe hqnd rests betweenthe sling and fore end.The sling should passaround the back of thehand.
4-d. Finish thesling adjushnent bytightening the slinguntil the sling andnot the left armmuscles, do thework of holding upthe 4fle.
Cadet Safety and Civilian Marksmanship Program 49
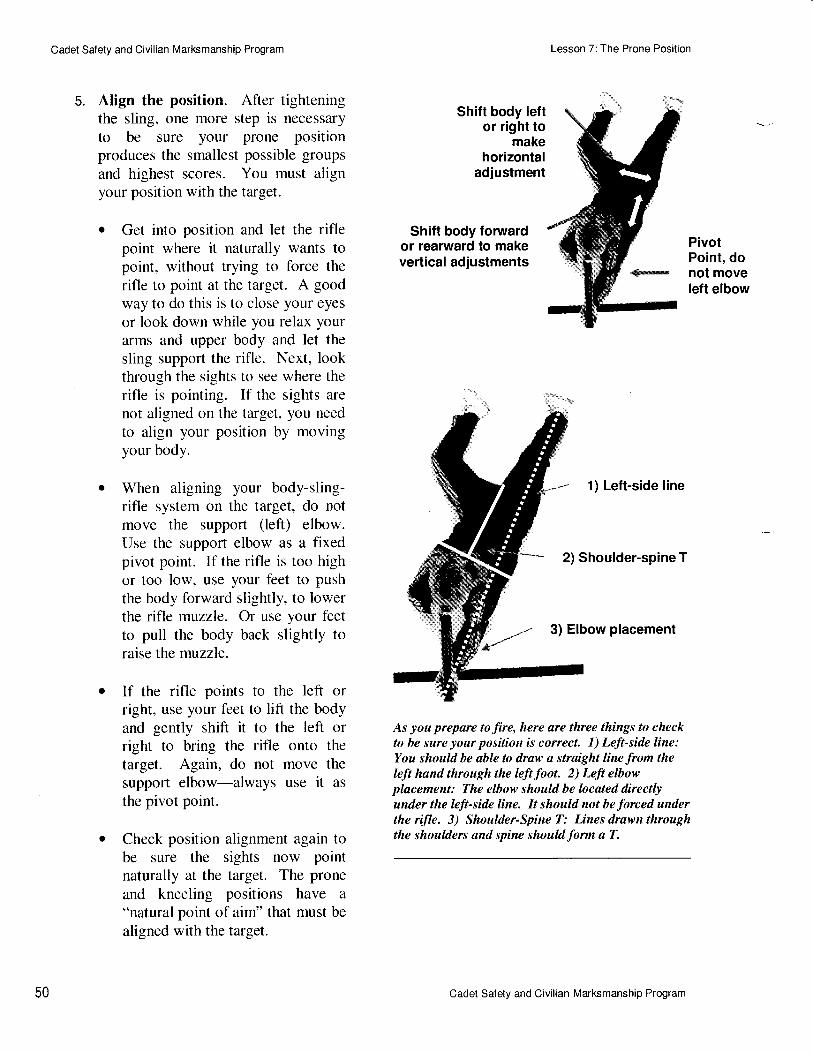
Cadet Safety and Civilian Marksmanship Program
5. Align the position. After tighteningthe sling, one more step is necessaryto be sure your prone positionproduces the smallest possible groupsand highest scores. You must alignyour position with the target.
Get into position and let the riflepoint where it naturally wants topoint, without trying to force the
rifle to point at the target. A goodway to do this is to close your eyes
or look down while you relax yourarms and upper body and let thesling support the rifle. Next, lookthrough the sights to see where therifle is pointing. If the sights are
not aligned on the target, you need
to align your position by movingyour body.
When aligning your body-sling-rifle system on the target, do notmove the support (left) elbow.Use the support elbow as a fixedpivot point. If the rifle is too highor too low, use your feet to push
the body forward slightly, to lowerthe rifle muzzle. Or use your feet
to pull the body back slightly toraise the mtzzle.
If the rifle points to the left orright, use your feet to lift the bodyand gently shift it to the left orright to bring the rifle onto thetarget. Again, do not move thesupport elbow-always use it as
the pivot point.
Check position alignment again tobe sure the sights now pointnaturally at the target. The proneand kneeling positions have a
"natural point of aim" that must be
aligned with the target.
Lesson 7: The Prone Position
Shift body leftor right to
makehorizontal
adiustment
Shift body forwardor rearward to makevertical adjustments
1) Left-side line
2) Shoulder-spine T
3) Elbow placement
As you prepare to fire, here are three things to checkto be sure your position is correct. l) Left-side line:You should be able to draw a straight line from theleft hand through the Wfoot. 2) Left elbowplacement: The elbow shoul.d be localed directlyunder the lefi-si.de line. It should not be forced underthe rifle. 3) Shoulder-Spine T: Lines drawn throughthe shoulders and spine should form a T.
PivotPoint, donot moveleft elbow
50 Cadet Safety and Civilian Marksmanship Program

Cadet Safety and Civilian Marksmanship Program
PRONE POSITION FIRING
You should now be ready for dry andlive firing in your new prone position. Yourinstructor will likely begin by doing severaldry firing repetitions to practice aiming,breathing, centering your sight picture and
smoothly pressing the trigger to release the
shot without disturbing your aim.
To fire a series of shots in the proneposition, it is also necessary to develop a
successful technique for loading the air riflein the prone position. Loading the air rifle inprone is more difficult than in standing. Themethod of loading that is used in the proneposition depends on the type of air rifle that isused.
. Spofter air rifle, Daisy M853/753. Withthe pneumatic air rifle, it is necessary totake the rifle off the shoulder and then totake the hand out of the sling so thatboth hands are available to cock therifle. The illustrations show twomethods of cocking the pneumatic airrifle in the prone position
o Compressed air and COz rifles.Loading these rifles is simply a matterof dropping the rifle from the shoulder,opening the bolt, loading and pellet,closing the pellet and placing the rifleback in the shoulder for the next shot.
After your instructor gives thecommand START to begin firing in the proneposition, think about relaxing your arms so
that the sling does the work of holding therifle. Center the bull's-eye in your front sightring as perfectly as you can. You will stillhave some hold movement, so be sure to relaxand center the movement within the frontsight ring. When you have a good sightpicture, smoothly squeeze the trigger untileach shot fires. When you finish firing, be
sure to open the bolt onthe instructor to inspect
Lesson 7: The Prone Position
rifle and wait for
Method I: Left elbow remains in place. I*ft handcomes out of sling and grasps cocking lever. Righthand pulls iJle to rear and then pushes it bqck
forward to cock the rifle. The left hand is thenrepositioned in the sling and loading is completed bythe right hand.
Method 2: Rifu is turned over and left hand holdsrifle while right hand operates the cocking lever. Theleft hand is then repositioned in the sling and loadingis completed by the ight hand.
CONCLUSION
This lesson gives step-by-stepdirections for achieving the correct proneposition. It also tells you how to use a sling.Firing accuracy in the prone and kneelingpositions is greatly increased by using a sling.
ss=S:::i..s
Cadet Safety and Civilian Marksmanship Program 51

Cadet Salety and Civilian Marksmanship Program
LESSON 8: THE KNEELINGPOSITION
PURPOSE
This lesson introduces you tocorrect technique for firing from thekneeling position
INTRODUCTION
In the kneeling position, the shooterkneels to sit on the right foot that is supportedby a kneeling roll. The rifle is supported bythe sling and left arm that rests on the left leg.The kneeling position is similar to prone inthat the sling is also used in this position. It issimilar to standing because the body's centerof gravity is higher and precise balance is
essential to achieving a stable kneelingposition.
In the kneeling position, oneadditional item of equipment is used, akneeling roll. It is possible to shoot kneelingby sitting on the side of the right foot, butonly a few shooters have ever been able to use
that position successfully. All of the topkneeling shooters in the world today use akneeling roll. Its use is highly recommended.
Lesson B: The Kneeling Position
If your unit does not have kneelingrolls available, it is easy to make suitablekneeling rolls. Pieces of heavy fabric can besewn to form a cylinder that is eight incheslong and six inches in diameter. Fill thecylinder about 807o full with birdseed, woodchips or other similar material. A kneelingroll can also be made by cutting a eight inchwide strip of carpet and rolling it into a
kneeling roll, that is about four or five inchesin diameter. Kneeling rolls cannot be morethan l0 inches long or 7.2 inches in diameter.
Sling
Kneelingroll
A competitor in the 2000 Olympic Games
firing in the kneeling positiott.
A suitable kneeling roll may be made by rolling astrip of carpet to fonn a roll. Tape the roll to keep itrolled tightly.
kneelingkneeling roll
Cadet Salety and Civilian Marksmanship Program 53

Cadet Safety and Civilian Marksmanship program
FEATURES OF SUCCESSFULKNEELING POSITIONS
Like the standing and prone positions,mastering the kneeling position also mustbegin by studying the positions ofexperienced, successfi.rl shooters. The firstkneeling position photo below, shows TatianaGoldobina of Russia firing during the 2000Olympic Games. She won a silver medal inthe women's 5O-meter three-position rifleevent. The second photo below, shows aschool-age shooter with a sporter air rifle.The arrows on both photos point out the keyfeatures to study and copy when you begin toshoot in the kneeling position.
3 *".$
Lesson 8: The Kneeling Position
Kneeling position features that are markedwith arrows are:
1. Foot is placed on a kneeling roll. Thekneeling roll allows the shooter tocomfortably sit on the foot for longperiods.
2. Almost all of the weight of rheshooter's body rests on the heel.
3. The torso is fairly erect, but theshoulders are rolled forward. Theshoulders are not erect, but instead arerolled forward or slumped down.
4. The head is fairly erect. It is tippedtoward the target, but not to the right.
5. The support hand (left hand) locationis far enough back on the fore end toplace the rifle fairly high in theshoulder and keep the head erect. Thesling supports the weight of the rifle.
6. The body is turned 30-45 degreesaway from the target.
7. The elbow of the support (left) arm isIocated on top of the knee. Othersuccessful shooters place the leftelbow just behind the knee. Theelbow must not be more than 6 inchesbehind the point of the knee or 4inches in front of the point of the knee.
B. The left lower leg that supports therifle (left leg) is vertical. Someshooters move the left foot fartherforward so that the foot is slightly infront of a point directly below theknee. The foot is never pulled back sothat it is behind this poinr.
2
54 Cadet Safety and Civilian Marksmanship program

Cadet Sa{ety and Civilian Marksmanship Program
LEARNING THE KNEELING POSITION
The steP-bY-steP Process fordeveloping a kneeling position is almost
identical with the steps that are followed inlearning the prone position. Working out aposition first without the rifle and then withthe rifle, but without the sling, are especially
important in kneeling. These steps help you
establish the correct relationships between the
different parts of your body. Do not skip
these steps.
1. Study the position. Take the time to go
though each of the eight points identifiedin the position illustrations. Visualizehow you will place your body in a similarposition.
2. Kneeling position without rifle. Beginby placing your kneeling roll on your
firing point. Turn it so that it points
between 30 and 45 degrees away from the
target. After you practice the kneelingposition for several days, you can adjust
this angle so that it is most comfortablefor you.
Next, kneel down and Place the
front part of your ankle over the
kneeling roll. Then sit on Yourright heel.
Sit back on your heel so that as
much of your body weight as
possible rests on the heel.
Do not be discouraged if it is
uncomfortable at first to sit on akneeling roll with all of Your bodY
weight resting on your heel. Ifyou have problems with this, trYimprovising a kneeling roll at
home so you can practice sitting inthis position for periods of ten to
Lesson 8: The Kneeling Position
15 minutes while you study orwatch TV.
i=
$iiiil
Keep the footvertical and sit withyour weight on theheel
N,= ,N\..::::; L
Place yourleft elbow onthe knee orjust behindthe knee
Keep thefweight
back onthe heel,
but roll theshoulders
forward
Keep theleft lower
legvertical
or angledslightlyforward
....'.' .\ \.i:.:.. 't l.l
f s-.'-''
o Next, position the support leg (leftleg for right-handed shooter) so
that the lower part of the leg isvertical or slightly forward of a
point directly below the knee. Donot pull the foot back behind the
knee.
To start buil"ding thekne eling p o sition, plac e
the kneeling roll on the
floor and turn it 30-45"
from the target, Placeyour ankle on top ofthekneeling roll and sit onyour heel.
Cadet Safety and Civilian Marksmanship Program55
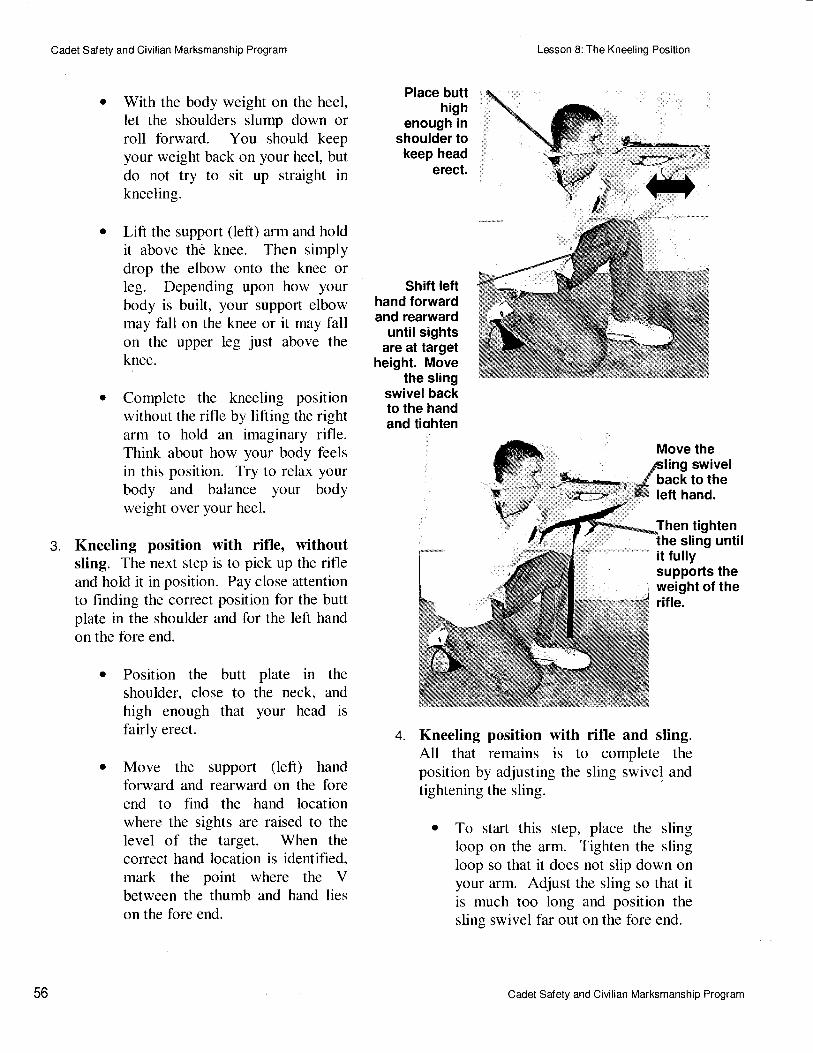
Cadet Safety and Civilian Marksmanship Program
With the body weight on the heel,let the shoulders slump down orroll forward. You should keepyour weight back on your heel, butdo not try to sit up straight inkneeling.
Lift the support (left) arm and holdit above the knee. Then simplydrop the elbow onto the knee orleg. Depending upon how yourbody is built, your support elbowmay fall on the knee or it may fallon the upper leg just above theknee.
o Complete the kneeling positionwithout the rifle by lifting the rightarm to hold an imaginary rifle.Think about how your body feelsin this position. Try to relax yourbody and balance your bodyweight over your heel.
Kneeling position with rifle, withoutsling. The next step is to pick up the rifleand hold it in position. Pay close attentionto finding the correct position for the buttplate in the shoulder and for the left handon the fore end.
Lesson B: The Kneeling Position
PIace butthigh
enough inshoulder tokeep head
erect.
Shift lefthand forwardand rearward
unti! sightsare at target
height. Movethe sling
swivelbackto the handand tiohten
Move thessling swivel
-6f back to theK left hand.
3.
Then tightensling until
it fullysupports theweight of therifle.
Position the butt plate in theshoulder, close to the neck, and
high enough that your head is
fairly erect. 4.
Move the support (left) handforward and rearward on the foreend to find the hand locationwhere the sights are raised to thelevel of the target. When thecorrect hand location is identified,mark the point where the Vbetween the thumb and hand lieson the fore end.
Kneeling position with rifle and sling.All that remains is to complete theposition by adjusting the sling swivel andtightening the sling.
o To start this step, place the slingloop on the arm. Tighten the slingloop so that it does not slip down onyour arm. Adjust the sling so that itis much too long and position thesling swivel far out on the fore end.
M-,**--..,\*r-p
56 Cadet Safety and Civilian Marksmanship Program
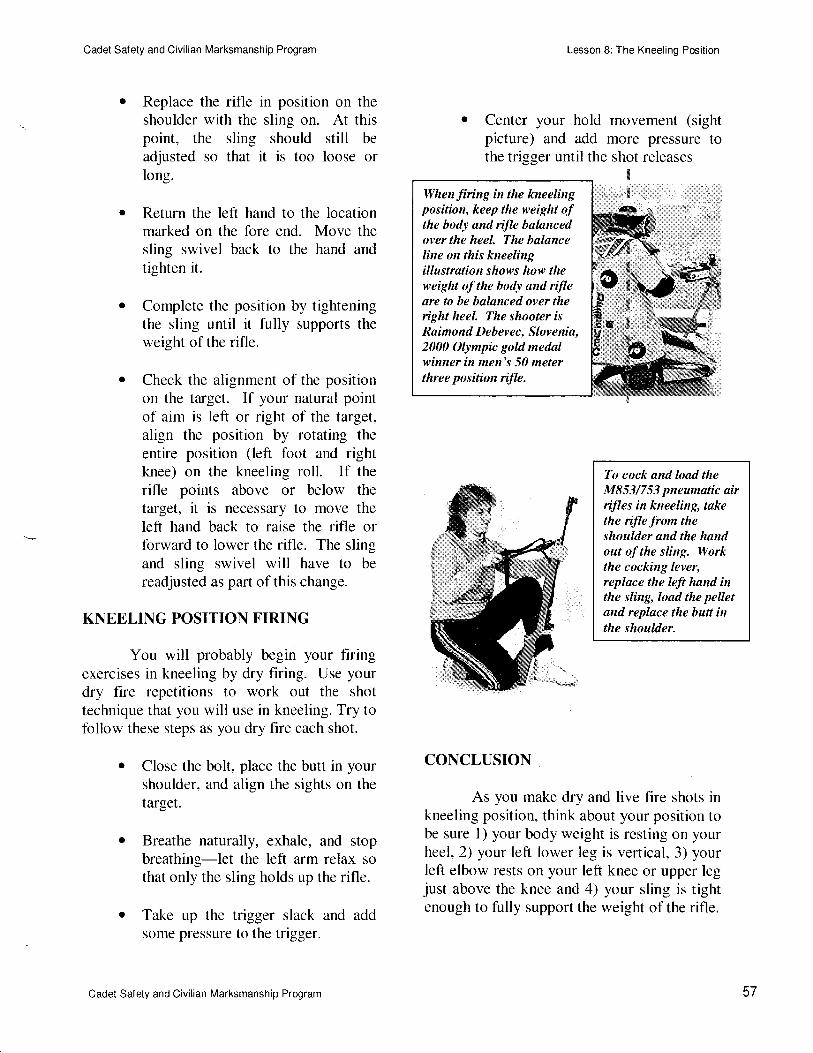
Cadet Safety and Civilian Marksmanship Program
. Replace the rifle in position on theshoulder with the sling on. At thispoint, the sling should still beadjusted so that it is too loose orlong.
o Return the left hand to the locationmarked on the fore end. Move thesling swivel back to the hand andtighten it.
o Complete the position by tighteningthe sling until it fully supports theweight of the rifle.
o Check the alignment of the positionon the target. If your natural pointof aim is left or right of the target,align the position by rotating theentire position (left foot and rightknee) on the kneeling roll. If therifle points above or below thetarget, it is necessary to move theleft hand back to raise the rifle orforward to lower the rifle. The slingand sling swivel will have to bereadjusted as part ofthis change.
KNEELING POSITION FIRING
You will probably begin your firingexercises in kneeling by dry firing. Use yourdry fire repetitions to work out the shottechnique that you will use in kneeling. Try tofollow these steps as you dry fire each shot.
o Close the bolt, place the butt in yourshoulder, and align the sights on thetarget.
o Breathe naturally, exhale, and stopbreathing-let the left arm relax so
that only the sling holds up the rifle.
o Take up the trigger slack and addsome pressure to the trigger.
Lesson 8: The Kneeling Position
o Center your hold movement (sightpicture) and add more pressure tothe trigger until the shot releases
To cock and load theM853/753 pneumalic airifles in kneeling, takethe ifle from theshoulder and the hsndout of the sling. Workthe cocking lever,replace the left hand inthe sling, load the pelletand replace the butt inthe shoulder.
CONCLUSION
As you make dry and live fire shots inkneeling position, think about your position tobe sure 1) your body weight is resting on yourheel, 2) your left lower leg is vertical, 3) yourleft elbow rests on your left knee or upper legjust above the knee and 4) your sling is tightenough to fully support the weight of the rifle.
When jiring in the kneelingposition, keep the weight ofthe body and rifle balancedoverthe heel. The balanceline on this kneelingillustralion shows how theweight of the body and riJleare to be balanced over theright heel The shooterisRaimond Deb ev ec, Slovenia,2000 Olympic gold medalwinner in rnen's 50 meterthree position ifle.
Cadet Safety and Civilian Marksmanship Program 57
Cadet Safety and Civilian Marksmanship Program
above the knee and 4) your sling is tightenough to support the weight of the rifle.
If you do a good job of relaxing and balancingyour body above the right heel, your kneelingposition should produce scores that are almostas good your prone scores.
Lesson 8: The Kneeling Position
58 Cadet Sa{ety and Civilian Marksmanship Program

Cadet Safety and Civilian Marksmanship Program
LESSON 9: PRACTICE ANDSKILL DEVBLOPMENT
PURPOSE
This lesson will help youunderstand how marksmanship skill isdeveloped through study, analysis, andpractice.
INTRODUCTION
In previous lessons you learned the
basic elements of target rifle shooting. Thesebasics included safety, equipment; the standing,prone, and kneeling positions; the technique offiring shots; sight adjustment; and scoring.This lesson shows you how to put all thosebasics together so that your can play a completegame or, as it is called in shooting, flre a
complete course of fire.
This lesson also begins to teach yousome important ways to become a bettershooter. When you reach the point where youcan fire a complete course of fire, you are alsoready to learn how to improve your shooting.The most effective ways to improve target riflescores that will be covered in this chapter are
practice, keeping a shooting diary, using a shotplan, and learning to relax and balance yourposition before each shot.
Lesson 9: Practice and Skill Development
TARGET RIFLE RULES
The most common three-position airrifle competition event for JROTC and highschool rifle teams is the 3xl0 event. 3x10means firing ten record shots in each of thethree positions, prone, standing and kneeling.JROTC rifle team members also sometimes fire3x20 events (20 shots in each position) inmajor competitions. The 3xl0 and 3x20 eventsare sometimes also called courses of fire.
The standard instructional technique forteaching every complex sporl is to break thegame down into different individual skills andthen to teach those separate skills one at a time.A golfer learns stance, grip and various stages
of the swing before putting it all together. Thesame approach is used in shooting. Completinga 3xl0 shooting event means puttingeverything you have learned so far together, toplay a complete game of target rifle shooting.
When you are ready to play a completegame in any sport, there are special rules forthat sport. Sport rules provide order and
consistency for competitions and ensure fairplay among all participants. The rules thatgovern three-position air rifle shooting are
called the National Standard Three-PositionAir Rifle Rules. A National Three-Position AirRifle Council establishes these rules. TheCouncil includes representatives of almost allmajor shooting sports organizations and themilitary cadet commands (Army, Navy andMarine Corps JROTC).
This rulebook is often called the "BlueBook." A copy of the National Standard Rulesshould be available at your JROTC unit. If a
copy is not available there or if you want toprint out a copy of your own, check theCivilian Marksmanship Program Web site at
http ://www.odcmp.com/3 P/Rules.pdf.
developntentpracticeshot planskills
Cadet Safety and Civilian Marksmanship Program 59

Cadet Safety and Civilian Marksmanship Program
A complete copy of the National StandardRules is posted at that Web site.
In competitions, the 3x10 event has aspecific order for the positions to be fired as
well as time limits for preparation before theevent, for each of the positions, and forchanging from one position to the next. Thechart shows how this event is conducted.
When you fire a shooting eventaccording to competition rules, there are somerules you will especially need to know.
o Time Limits. In competitions,there are time limits for eachposition. In the 3xl0 event,competitors have 20 minutes to firel0 shots prone, 20 minutes for 10
shots standing, and 15 minutes forl0 shots kneeling. The time limitincludes the time for practice orsighting shots that must be firedbefore the 10 record shots for eachposition. No shots may be firedafter a time limit expires.
. Preparation Period. Shooters mustbe given ten minutes before the startof the first position, prone, to set uptheir equipment, and prepare to fire.Shooters should get into positionduring this period and dry fire toprepare for shooting. Dry firing ispermitted during preparationperiods. However, it is not permittedto charge air rifles with gas,
discharge gas or load and fire a shotduring preparation periods.
Lesson 9: Practice and Skill Development
Changeover Periods. Shooters aregiven five minutes betweenpositions to change their equipmentand prepare for the next position.Shooters may get into the nextposition and dry fire during thechangeover period.
Team Events. Teams normallyconsist of four shooters. Teammembers must be named before thecompetition starts. Team scores are
calculated by adding the individualscores of the four team members.
Sighters and Record Shots. Thetargets that each shooter fires at are
designated as either sighter orrecord targets. Shots fired onsighter targets are for practice.Most shooters fire several sightingshots before they start for record, todetermine whether sight adjustmentsare necessary. Sighting shots also
serve as warm-up shots. Every shotfired on a record target counts in theshooter's score. Once a shooterbegins to fire record shots it is notpermitted to return to the sighter orpractice target.
Recordtargets
Sightertargets
A target stand withBMC targets in place
for a 3x10 event. Thelowest targets are forprone, the middle targets
for kneeling and thehighest targets.forstanding. One target foreach position isdesignated as a sightertarget (marked with un"5") and two aredesignated as recordtergets. On the BMCtarget, shooters shouldfire ftve shots at eachrecord target.
lndividual 3x10 Event Time LimitPreparation period 10 minutes
1 0 shots prone 20 minutes
Change-over period 5 minutes
10 shots standing 20 minutes
Change-over period 5 minutes
10 shots kneeling 15 minutes
60 Cadet Safety and Civilian Marksmanship Program
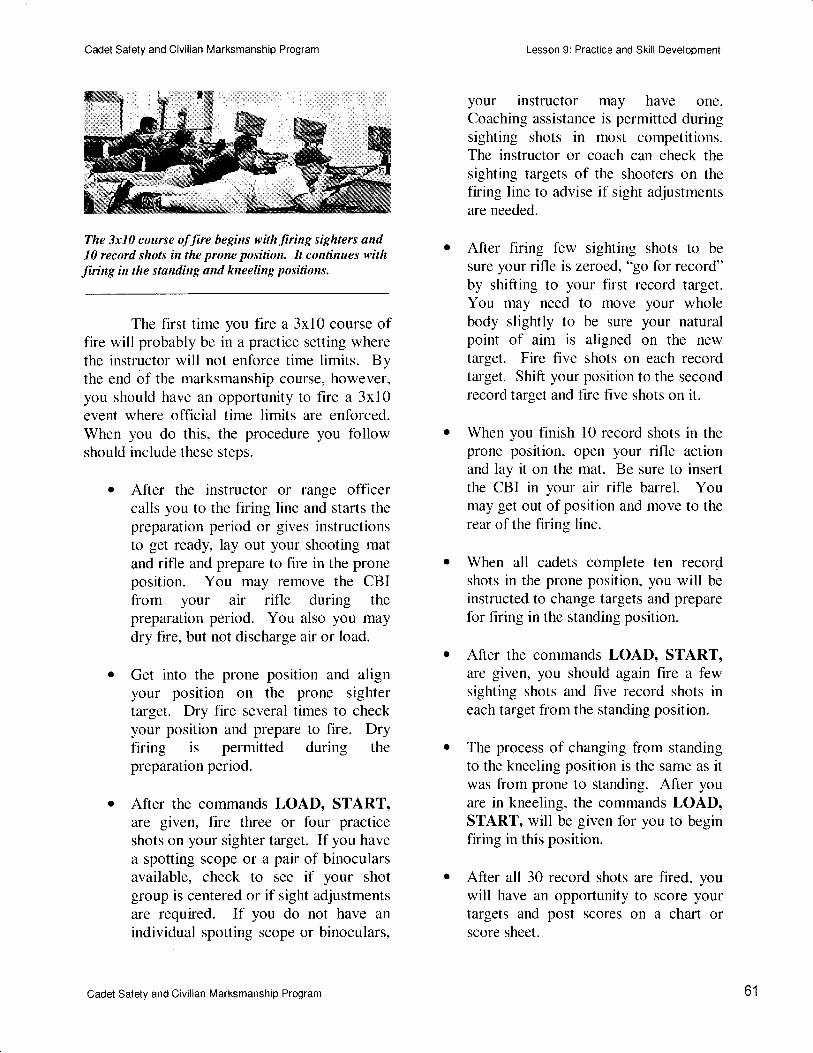
Cadet Safety and Civilian Marksmanship Program
The 3x10 course of fire begins with firing sighters and10 record shots in the prone position. It continues withjiring in the standing and kneeling positions.
The first time you fire a 3xl0 course offire will probably be in a practice setting wherethe instructor will not enforce time limits. Bythe end of the marksmanship course, however,you should have an opportunity to fire a 3xl0event where official time limits are enforced.When you do this, the procedure you followshould include these steps.
o After the instructor or range officercalls you to the firing line and starts thepreparation period or gives instructionsto get ready, lay out your shooting matand rifle and prepare to fire in the proneposition. You may remove the CBIfrom your air rifle during thepreparation period. You also you maydry fire, but not discharge air or load.
o Get into the prone position and alignyour position on the prone sightertarget. Dry fire several times to checkyour position and prepare to fire. Dryfiring is permitted during thepreparation period.
o After the commands LOAD, START,are given, fire three or four practiceshots on your sighter target. Ifyou havea spotting scope or a pair of binocularsavailable, check to see if your shotgroup is centered or if sight adjustmentsare required. If you do not have an
individual spotting scope or binoculars,
Lesson 9: Practice and Skill Development
your instructor may have one.Coaching assistance is permitted duringsighting shots in most competitions.The instructor or coach can check thesighting targets of the shooters on thefiring line to advise if sight adjustmentsare needed.
After firing few sighting shots to be
sure your rifle is zeroed, "go for record"by shifting to your first record target.You may need to move your wholebody slightly to be sure your naturalpoint of aim is aligned on the newtarget. Fire five shots on each recordtarget. Shift your position to the secondrecord target and fire five shots on it.
When you finish l0 record shots in theprone position, open your rifle actionand lay it on the mat. Be sure to insertthe CBI in your air rifle barrel. Youmay get out of position and move to therear of the firing line.
When all cadets complete ten recordshots in the prone position, you will beinstructed to change targets and preparefor firing in the standing position.
After the commands LOAD, START,are given, you should again fire a fewsighting shots and five record shots ineach target from the standing position.
The process of changing from standingto the kneeling position is the same as itwas from prone to standing. After youare in kneeling, the commands LOAD,START, will be given for you to beginfiring in this position.
After all 30 record shots are fired, youwill have an oppoftunity to score yourtargets and post scores on a chart orscore sheet.
Cadet Salety and Civilian Marksmanship Program 61
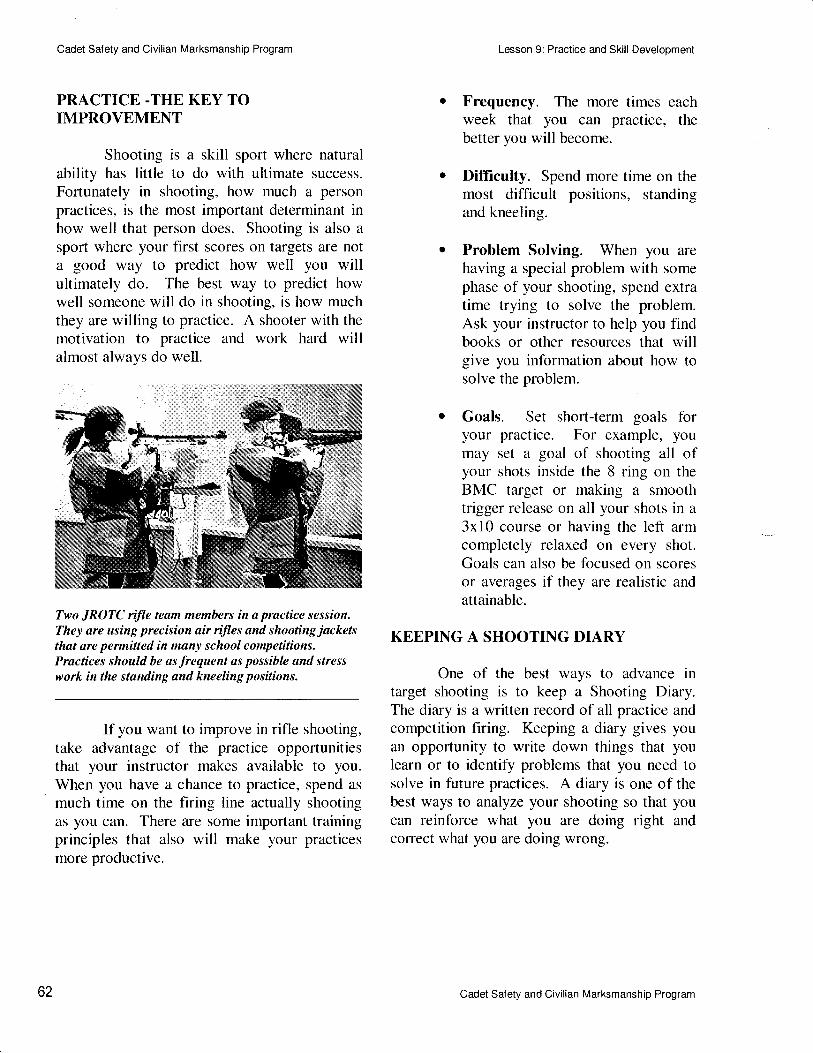
Cadet Safety and Civilian Marksmanship Program
PRACTICE.THE KEY TOIMPROVEMENT
Shooting is a skill sport where naturalability has little to do with ultimate success.Forlunately in shooting, how much a personpractices, is the most important determinant inhow well that person does. Shooting is also a
sport where your first scores on targets are nota good way to predict how well you willultimately do. The best way to predict howwell someone will do in shooting, is how muchthey are willing to practice. A shooter with themotivation to practice and work hard willalmost always do well.
Two JROTC rifle team members in a practice session.They are using precision air rtfles and shooting jacketsthat are permitted in many school competitions.Practices should be as frequent as possible and stress
work in the standing and kneeling positions.
If you want to improve in rifle shooting,take advantage of the practice opportunitiesthat your instructor makes available to you.When you have a chance to practice, spend as
much time on the firing line actually shootingas you can. There are some important trainingprinciples that also will make your practicesmore productive.
Lesson 9: Practice and Skill Development
Frequency. The more times eachweek that you can practice, thebetter you will become.
Difliculty. Spend more time on themost difficult positions, standingand kneeling.
Problem Solving. When you arehaving a special problem with somephase of your shooting, spend extratime trying to solve the problem.Ask your instructor to help you findbooks or other resources that willgive you information about how tosolve the problem.
o Goals. Set short-term goals foryour practice. For example, youmay set a goal of shooting all ofyour shots inside the 8 ring on theBMC target or making a smoothtrigger release on all your shots in a3xl0 course or having the left armcompletely relaxed on every shot.Goals can also be focused on scoresor averages if they are realistic andattainable.
KEEPING A SHOOTING DIARY
One of the best ways to advance intarget shooting is to keep a Shooting Diary.The diary is a written record of all practice andcompetition firing. Keeping a diary gives youan opportunity to write down things that youlearn or to identify problems that you need tosolve in future practices. A diary is one of thebest ways to analyze your shooting so that youcan reinforce what you are doing right andcorrect what you are doing wrong.
62 Cadet Salety and Civilian Marksmanship Program

Problems to
fn prone, when I get back into position after loading I am not getting my leftarm relaxed-f have to learn to do that,
fn kneeling, I do much bettu when I really concentrate on my sight picture-Ifiast do that on every kneeling shot.f still have quite a bit of body movenent in standing*I think I can stop someof that by checking my balance before everJl shot.
Training/Competition
Scores-KneelingScores-Standing
KN to PR +/- _ UR
PR to ST +/- _ UR
ST to KN +l UR
Scores-Prone
Trainingi Competition
PracticeLocation
School Range
Sight Changes
KN ro pR +t- _*4 UA
L2
PR to ST +t- -2 laR3
ST to KN +t- -2 laL1
otals
Practice
Scores-Prone
92 78, 86 83
My standing scotes got a lot better after my frrst ten shots when f startedchecking my balance before each shot.
My first kneeling was vet)'/ good for me-f concentrated on keeping the bullinside the front ring*I stopped payng attention to that on rny second 10 andmy scote went down.
Cadet Safety and Civilian Marksmanship Program Lesson 9: Practice and Skill Development
This is a Shooting Diary page with one part left blank and one part filled out, to show how information is keptin a ShootinC Diary.
Cadet Salety and Civilian Marksmanship Program 63
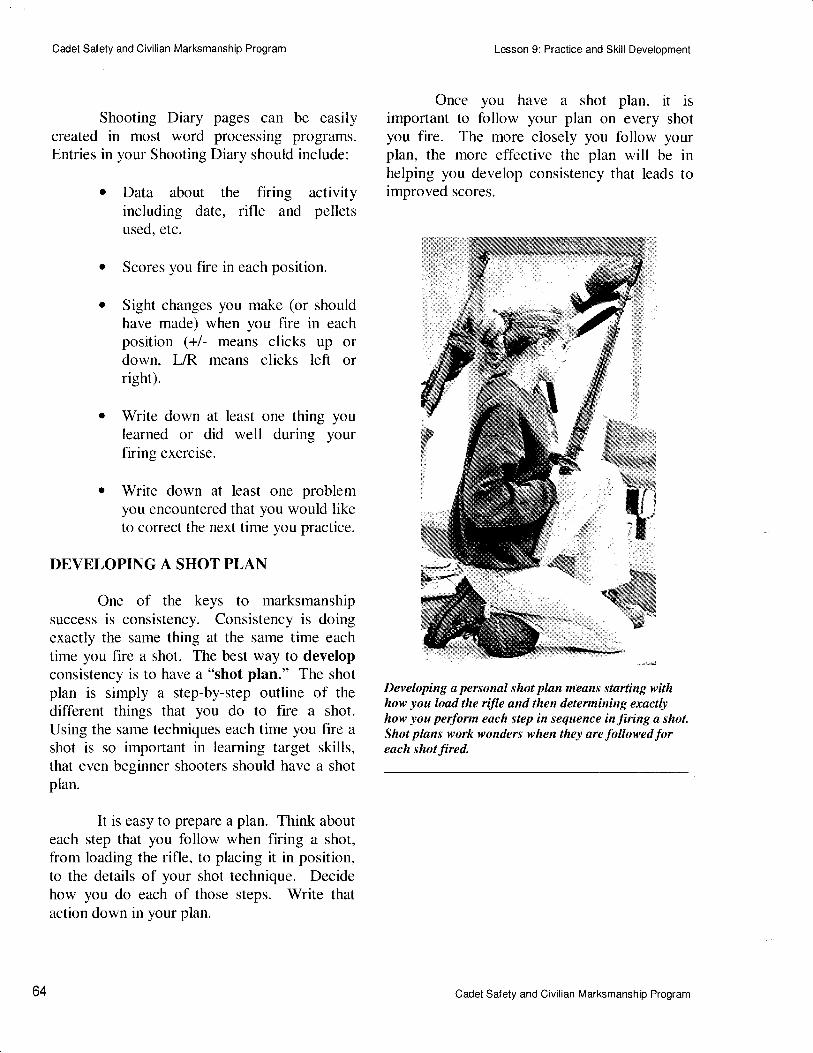
Cadet Salety and Civilian Marksmanship Program
Shooting Diary pages can be easilycreated in most word processing programs.Entries in your Shooting Diary should include:
o Data about the flring activityincluding date, rifle and pelletsused, etc.
o Scores you fire in each position.
Sight changes you make (or shouldhave made) when you fire in eachposition (+l- means clicks up ordown, L/R means clicks left orright).
Write down at least one thing youlearned or did well during yourfiring exercise.
Write down at least one problemyou encountered that you would liketo correct the next time you practice.
DEVELOPING A SHOT PLAN
One of the keys to marksmanshipsuccess is consistency. Consistency is doingexactly the same thing at the same time eachtime you fire a shot. The best way to developconsistency is to have a "shot plan." The shotplan is simply a step-by-step outline of thedifferent things that you do to fire a shot.Using the same techniques each time you fire a
shot is so important in learning target skills,that even beginner shooters should have a shotplan.
It is easy to prepare a plan. Think abouteach step that you follow when firing a shot,from loading the rifle, to placing it in position,to the details of your shot technique. Decidehow you do each of those steps. Write thataction down in your plan.
Lesson 9: Practice and Skill Development
Once you have a shot plan, it isimportant to follow your plan on every shotyou fire. The more closely you follow yourplan, the more effective the plan will be inhelping you develop consistency that leads toimproved scores.
Developing a personal shot plan m'eans starting withhow you loqd the rifie and then detennining exactlyhow you perform each step in seqaence infiring a shot.Shot plans work wonders when they are followedforeach shot fired.
64 Cadet Safety and Civilian Marksmanship Program
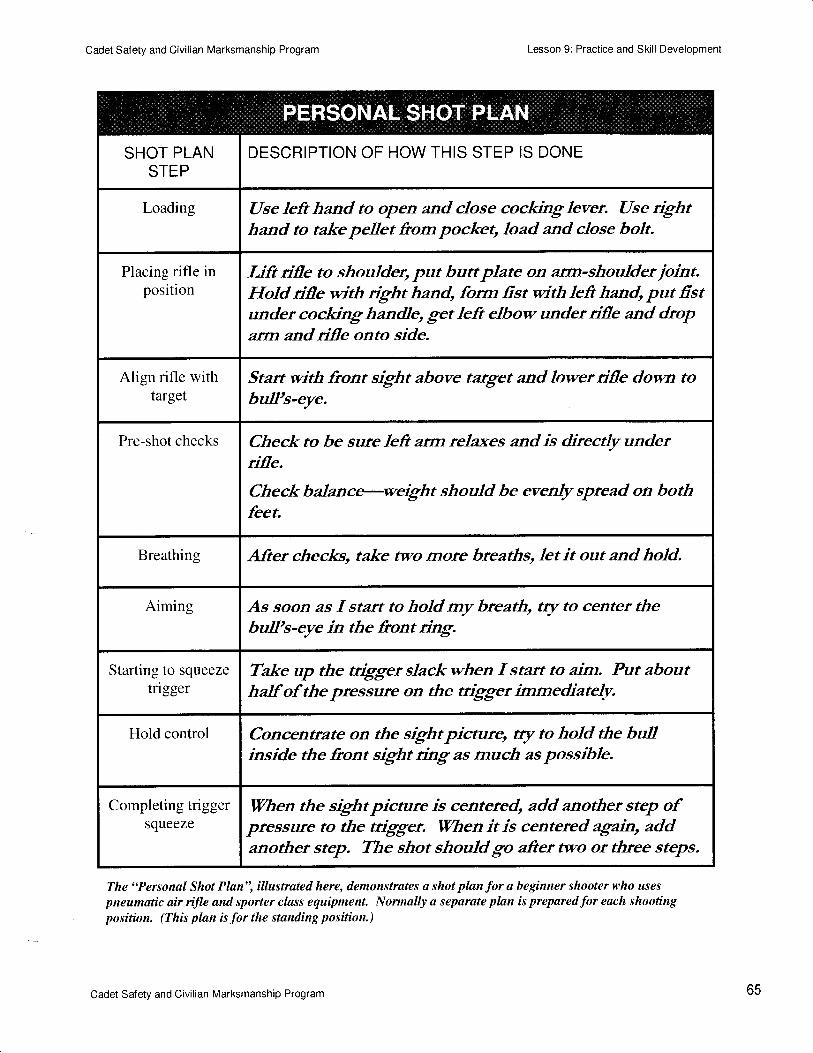
DESCRIPTION OF HOW THIS STEP IS DONE
Use left hand to open and close cockinglever. Use righthand to take pellet from pocket, load and close bolt.
Lift rifle to shoulder, put buttplate on arm-shoulder ioint.I{old dfle with right hand, form frst with left hand, put frstunder cocking handle, get left elbow under rifle and drcpann and dfle onto side.
Placing rifle inposition
Start with front sight above tatget and lower rifle down tobull's-eye.
Check to be sure left arm relaxes and is directly underrifle.
Check balanc*weight should be evenly sprcad on bothfeet.
Pre-shot checks
After checks, take two mote breathsr let it out and hald.Breathing
As soon as f start to hold my breath, tty to centet thebull's-eye in the front dng.
Aiming
Take up the trigger slack when f start to aim. Put abouthalf of the ptessute ofl the trigger immediately.
Concentate ofl the sightpicrure, try to hold the bullinside the front sight ring as much as possible.
Hold control
When the sightpicrure is centered, add anothu step ofpressure to the triggen When it is centercd again, addanother step. The shot should go after two or three steps.
Completing triggersqueeze
Cadet Salety and Civilian Marksmanship Program Lesson 9: Practice and Skill Development
The "Personal Shot Plan", illustrated here, demonstrates a shot plan for a beginner shooter who uses
pneumatic air rifle and sporter class equipment. Nonnally a separate plan is prepared for each shootingposition. (This plan is for the standing position.)
Cadet Salety and Civilian Marksmanship Program 65
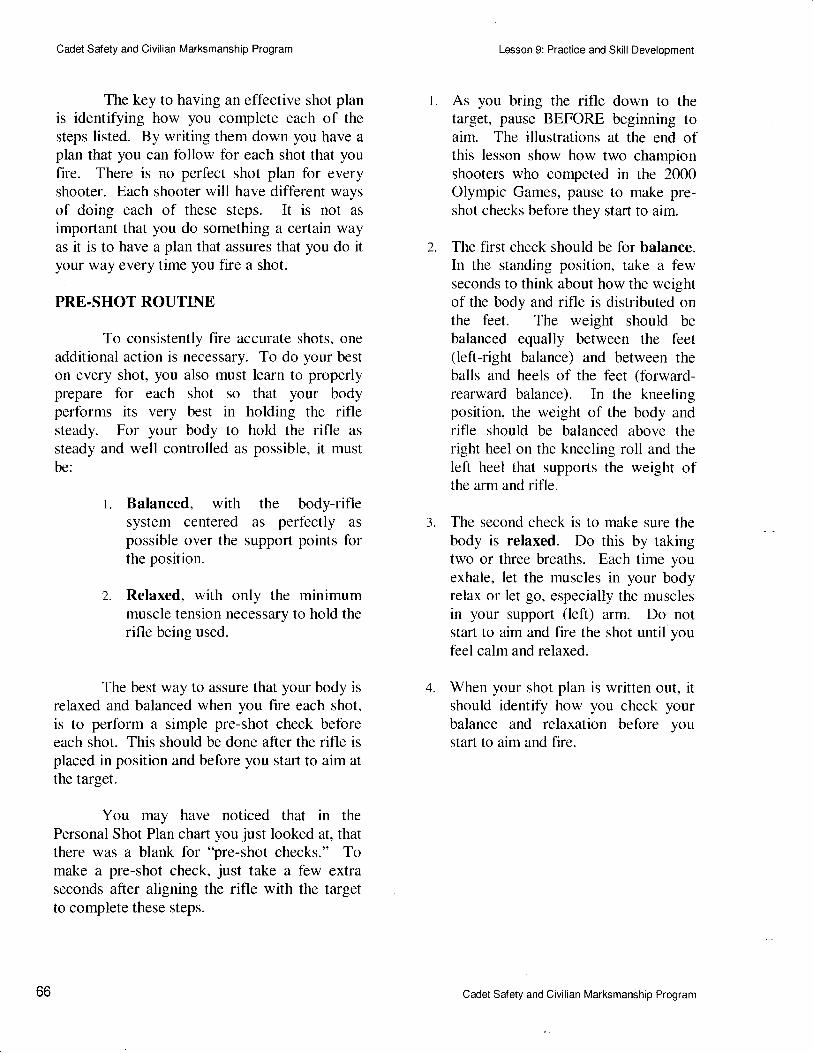
Cadet Salety and Civilian Marksmanship Program
The key to having an effective shot planis identifying how you complete each of thesteps listed. By writing them down you have aplan that you can follow for each shot that youfire. There is no perfect shot plan for everyshooter. Each shooter will have different waysof doing each of these steps. It is not as
important that you do something a certain wayas it is to have a plan that assures that you do ityour way every time you fire a shot.
PRE.SHOT ROUTINE
To consistently fire accurate shots, oneadditional action is necessary. To do your best
on every shot, you also must learn to properlyprepare for each shot so that your bodyperforms its very best in holding the riflesteady. For your body to hold the rifle as
steady and well controlled as possible, it mustbe:
l. Balanced, with the body-riflesystem centered as perfectly as
possible over the support points forthe position.
2. Relaxed, with only the minimummuscle tension necessary to hold therifle being used.
The best way to assure that your body isrelaxed and balanced when you fre each shot,is to perform a simple pre-shot check beforeeach shot. This should be done after the rifle isplaced in position and before you start to aim at
the target.
You may have noticed that in thePersonal Shot Plan chart you just looked at, thatthere was a blank for "pre-shot checks." Tomake a pre-shot check, just take a few extraseconds after aligning the rifle with the targetto complete these steps.
Lesson 9: Practice and Skill Development
As you bring the rifle down to thetarget, pause BEFORE beginning toaim. The illustrations at the end ofthis lesson show how two championshooters who competed in the 2000Olympic Games, pause to make pre-shot checks before they start to aim.
The first check should be for balance.In the standing position, take a fewseconds to think about how the weightof the body and rifle is distributed onthe feet. The weight should bebalanced equally between the feet(left-right balance) and between theballs and heels of the feet (forward-rearward balance). In the kneelingposition, the weight of the body andrifle should be balanced above theright heel on the kneeling ro11 and theleft heel that supports the weight ofthe arm and rifle.
The second check is to make sure thebody is relaxed. Do this by takingtwo or three breaths. Each time youexhale, let the muscles in your bodyrelax or let go, especially the musclesin your support (left) arm. Do notstafi to aim and fire the shot until youfeel calm and relaxed.
When your shot plan is written out, itshould identify how you check yourbalance and relaxation before youstart to aim and fire.
l.
3.
4.
66 Cadet Safety and Civilian Marksmanship Program

Cadet Salety and Civilian Marksmanship Program
CONCLUSION
This lesson has prepared you to fire a
3x10 event. Now you know how to play a
complete game of three-position air rifle targetshooting. This lesson also provided your firstinsights into how to improve your skills andscores as a target shooter. If you remain activein target shooting, you will discover that thechallenge of becoming a better target shooter isa quest that takes many years of training, whereyou continually discover new ways to improve.Attaining excellence in all sports requires thatkind of effort, but it is especially important inshooting.
Lesson 9: Practice and Skill Development
\.
,i
\\\isNrRp**
"."Q$\*rS- fi{
fnffi'*"k{
Cadet Safety and Civilian Marksmanship Program 67

1WINTRODUCTION
Cadet Safety and Civilian Marksmanship Program
LESSON 10: COMPETITIONOPPORTUNITIBS
PURPOSE
This lesson teaches how tocomplete a competition course of fireand introduces cadets to the excitementand challenge of competition shooting.
Many cadets take rifle marksmanshipinstruction to learn about another sport and howto practice it. Many others take riflemarksmanship because they are interested incompetition target shooting. Trying to becomea member of the school rifle team is
challenging and exciting to many cadets. Thisfinal lesson in the JROTC Rifle MarksmanshipStudent Text is for those who want to "go forit" and try competition shooting. It informsyou about opportunities that are available toyou in the sport of target rifle shooting.
This chapter first introduces the officialcompetition target that is used in JROTC,school and other three-position air riflecompetitions, as well as in all major air riflecompetitions around the world. You will learnabout finals that now conclude most majortarget competitions, from impoftant juniorcompetitions to the Olympic Games. Thelesson ends with a review of the different
Lesson 1 0: Competition Opportunities
competition activities that you can participatein, as a member of a JROTC rifle team.
THE COMPETITION EVENT
One big change between the 3x10practice events that you have fired on the BMCtarget and regular 3x10 competition events, isthe target. The official competition target has atiny dot for a ten ring and all of its scoring ringsfrom the l-ring to the 10-ring are slightlysmaller than the eight ring on the BMC target.
If you learned and practiced the basicsof rifle marksmanship taught in the JROTCrifle marksmanship course, you are probablyready, or with a little more practice soon willbe ready, to graduate from the BMC target tothe official competition target. If you are ableto keep your shots inside the 8-ring on theBMC target, you will now be able to keep yourshots inside the scoring rings on the moredifficult official target.
When firing a 3x10 or 3x20 competitionevent on the new target, there also is a
difference in how the targets are configured.The competition targets are printed so that thereare two sighting targets and ten record targetson one target card. Even after a few months ofpractice, shooters' skills become good enoughthat when five shots are flred on one target, theshots often are so close together, it is notpossible to score them accurately. For thisreason, competition shooters fire only onerecord shot on each competition target.
Many basic marksmanship courses endwith everyone shooting a 3x10 course of fire onthese competition targets. Cadets who join therifle team will do all of their practice andcompetition on this target.
contpetition
finalself control
Cadet Safety and Civilian Marksmanship Program 69
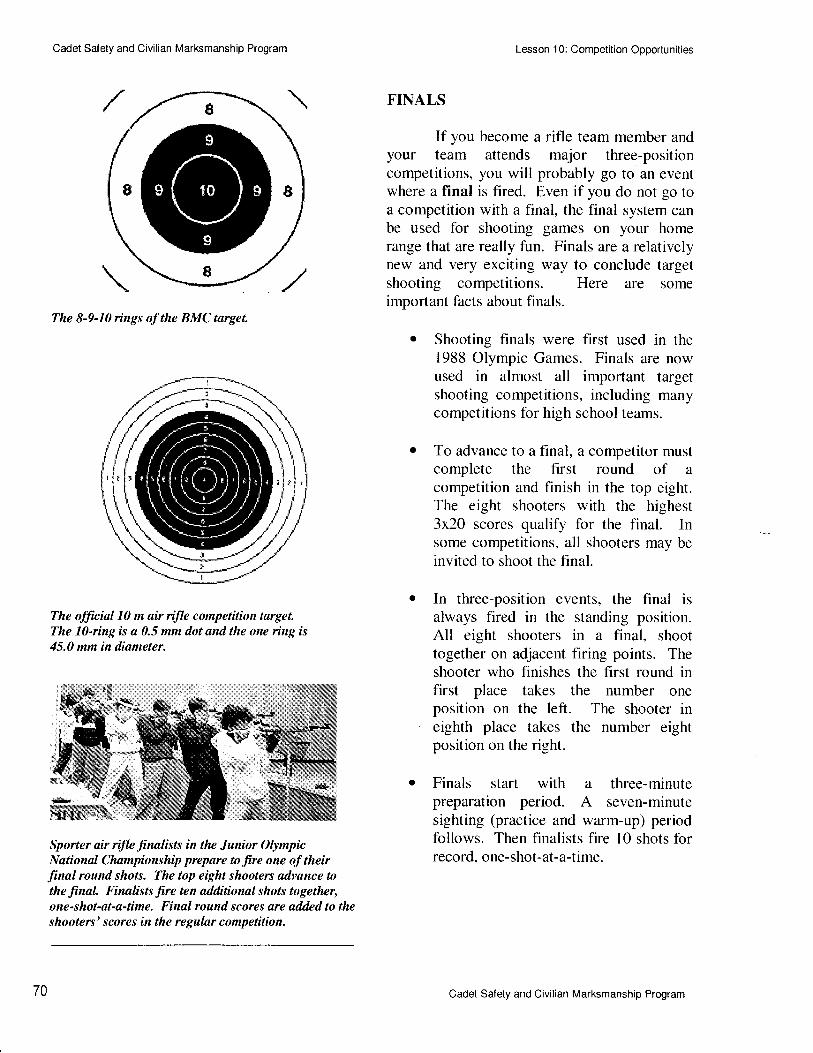
Cadet Salety and Civilian Marksmanship Program
The 8-9-10 rings of the BMC target.
The olfrcial 10 m air rifle competition target.The 10-ing is a 0.5 mm dot and the one ring is45.0 mm in diameter.
Lesson 1 0: Competition Opportunities
FINALS
If you become a rifle team member andyour team attends major three-positioncompetitions, you will probably go to an eventwhere a final is fired. Even if you do not go toa competition with a final, the final system canbe used for shooting games on your homerange that are really fun. Finals are a relativelynew and very exciting way to conclude targetshooting competitions. Here are someimportant facts about finals.
o Shooting finals were flrst used in the1988 Olympic Games. Finals are nowused in almost all important targetshooting competitions, including manycompetitions for high school teams.
o To advance to a final, a competitor mustcomplete the first round of a
competition and finish in the top eight.The eight shooters with the highest3x20 scores qualify for the final. Insome competitions, all shooters may beinvited to shoot the final.
In three-position events, the final isalways fired in the standing position.All eight shooters in a final, shoottogether on adjacent firing points. Theshooter who finishes the first round infirst place takes the number oneposition on the left. The shooter ineighth place takes the number eightposition on the right.
Finals start with a three-minutepreparation period. A seven-minutesighting (practice and warm-up) periodfollows. Then finalists fire l0 shots forrecord, one-shot-at-a-t ime.
srIi:'rB"-
{...'s'$*\
Sporter air riJle finalists in the Junior OlympicNational Championship prepare to fire one of theirfinalround shots. The top eight shooters advance tothe finaL Finalists fire ten additional shots together,one-shot-al-a-time. Firual round scores are added to theshooters' scores in the regular competition.
70 Cadet Salety and Civilian Marksmanship Program

Cadet Salety and Civilian Marksmanship Program
To staft each final round shot, the rangeofficer uses the commands: FORYOUR NEXT SHOT, LOAD, (pause),ATTENTION-3-2- I -START.Finalists have 75 seconds to flre oneshot.
After all eight finalists fire one shot,scores for that shot are announced.When electronic targets or specialscoring equipment are available, finalround shots are scored in tenth-ringvalues. A perfect center ten counts 10.9
points, while a ten that just touches thel0 dot scores 10.0 points. The rangeofficer announces the eight shooters'scores after each shot ("Shooter one,10.2; Shooter two, 8.7; Shooter three,9.9; etc.").
In many smaller competitions wherespecial scoring equipment is notavailable, finals are still held, butscoring is done in whole numbers.When paper targets are used, the rangeofficer can use a telescope to estimateand announce the shot values ("Shooterone, 9; Shooter two, 7, Shooter three,10, etc."). The targets can then be"officially" scored immediately afterthe ten shots are completed so that finalresults can be announced.
Spectators are encouraged to watchfinals. Cheering before and after eachshot is common and encouraged. At the2000 Olympic Games in Sydney, therewere 2,500 spectators in a grandstandbehind the finalists. In addition, a livetelevision signal of the shooting finalswas broadcast to as many as two billionpeople around the world.
Lesson 1 0: Competition Opportunities
o Each finalist's final score is the total ofthe first round (3x10 or 3x20 shots) plusthe final round score.
o Final scores are counted in individualrankings. Final scores are not countedin team scores or rankings.
Men's air riJle finalists at a 2000 Pre-Olympic testcompetition in Sydney. The targets on this range qre
electronic. Note the scoreboards and monitors aboveeach shooter and the electronic scoreboard on the left.
COMPETITION OPPORTUNITIES FORJROTC RIFLE TEAMS
Cadets who are interested in target rifleshooting as a sport and who become membersof their JROTC or school rifle team have manyspecial competition opportunities.Competitions are a great way to measure yourskills and progress as a shooter. They are
always exciting, challenging experiences whereyou learn to control yourself and do your verybest under pressure. They also offeropportunities to travel and meet new friends.Competition opportunities available to youinclude:
. JROTC or School Rifle Team. If yourschool has a JROTC rifle team or theschool rifle team, your instructor willprovide information about that program.Team members have a chance topractice regularly during the rifle seasonand to participate in competitionsscheduled for the team.
Cadet Salety and Civilian Marksmanship Program 71

The instructor(front center) andmembers of a highschool JROTC rifleteam pose with alrophy they won ina major high schoolair rifle invitationalcompetition.
Cadet Safety and Civilian Marksmanship Program
o Postal Competitions. In postalcompetitions, participating teamsschedule matches where each team firestheir score at their home range.Competing teams exchange scores byemail, fax or phone to determine whowon. The Army, Navy and MarineCorps JROTC programs all havenational postal competitions that allJROTC units are encouraged to fire.The National Guard Bureau andAmerican Legion sponsor sponsor twoof the most popular national postals. Tolearn more about national postalcompetitions available to JROTC rifleteams, check the CMP web site athttp :/ivrww. odcm p. co m /.
. League Competition. In many areas ofthe country, school or JROTC teamsorganize leagues where they competeagainst each other in shoulder-to-shoulder competitions. Won-lostrecords usually determine leaguestandings. There are many JROTC orhigh school leagues in the UnitedStates. The largest and most active highschool league is in Georgia where theGeorgia High School Associationrecognizes rifle as a varsity sport. Tolearn more about this rifle programwhere participating schools compete in
Lesson 1 0: Competition Opportunities
regional leagues, check this Web site:http ://www. o hsa. net/rif I ery-assn. htm
Major School Age Competitions.There are a growing number of majorcompetitions for school and JROTCrifle teams. A program goal of manyJROTC or school teams is to do well inone or of these major tournaments.They include:
State high school championships.In addition to the Georgia program,there are now several other statesthat have state high school orJROTC rifle championships.
o State Junior 0lympicchampionships. Almost every statenow has a state qualifyingcompetition for the National JuniorOlympic Championship in thewinter or early spring. Many statesorganize their qualifiers in three orfour different sections so that traveldistances are not great and as manyteams as possible can participate.Check the USA Shooting Web sitefor a listing of state qualifyingcompetitions:www. usashooti nq.com/Youthithreeoair.cf m
" CMP Cup Matches. These areIarge regional high schoolcompetitions where participantscome from several states. CMP CupMatches have sporter and precisionclass individual and team events andoffer an opportunity to earn creditpoints for Junior DistinguishedBadge awards. For a list of thesematches, check the CMP Web site:www. odemp.comlServices/Prooramsl3P. htm
72 Cadet Safety and Civilian Marksmanship Program
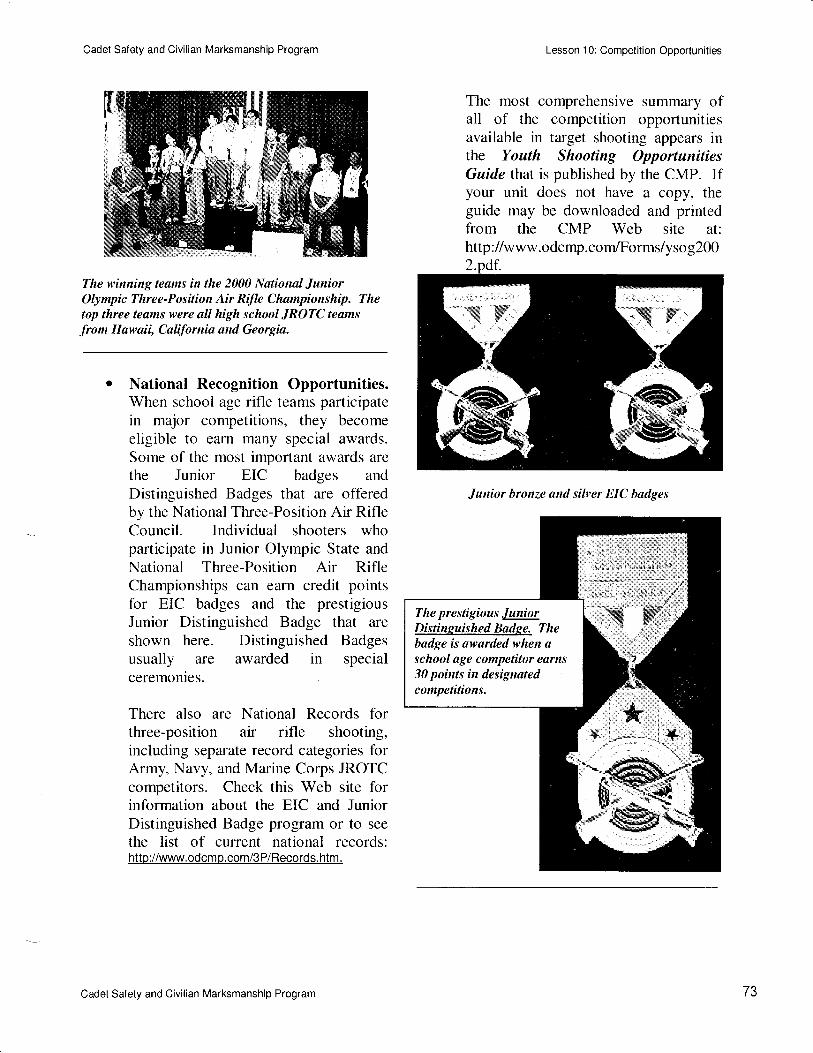
Cadet Safety and Civilian Marksmanship Program
The winning teams in the 2000 ltlational JuniorOlympic Three-Position Air Rifle Championship. Thetop three teams were all high school JROTC teams
from Hawaii, Caffirnia and Georgia.
o National Recognition Opportunities.When school age rifle teams participatein major competitions, they becomeeligible to earn many special awards.Some of the most important awards arethe Junior EIC badges andDistinguished Badges that are offeredby the National Three-Position Air RifleCouncil. Individual shooters whoparticipate in Junior Olympic State and
National Three-Position Air RifleChampionships can earn credit pointsfor EIC badges and the prestigiousJunior Distinguished Badge that are
shown here. Distinguished Badgesusually are awarded in specialceremonies.
There also are National Records forthree-position atr rifle shooting,including separate record categories forArmy, Navy, and Marine Corps JROTCcompetitors. Check this Web site forinformation about the EIC and JuniorDistinguished Badge program or to see
the list of current national records:htto ://www. odcmo. com/3 P/Records. htm.
Lesson 1 0: Competition Opportunities
The most comprehensive summary ofall of the competition opporlunitiesavailable in target shooting appears inthe Youth Shooting OpportunitiesGuide that is published by the CMP. Ifyour unit does not have a copy, theguide may be downloaded and printedfrom the CMP Web site at:http ://www.odcmp. co m/Forms/ysog200
Junior bronze and silver EIC badges
Cadet Safety and Civilian Marksmanship Program 73
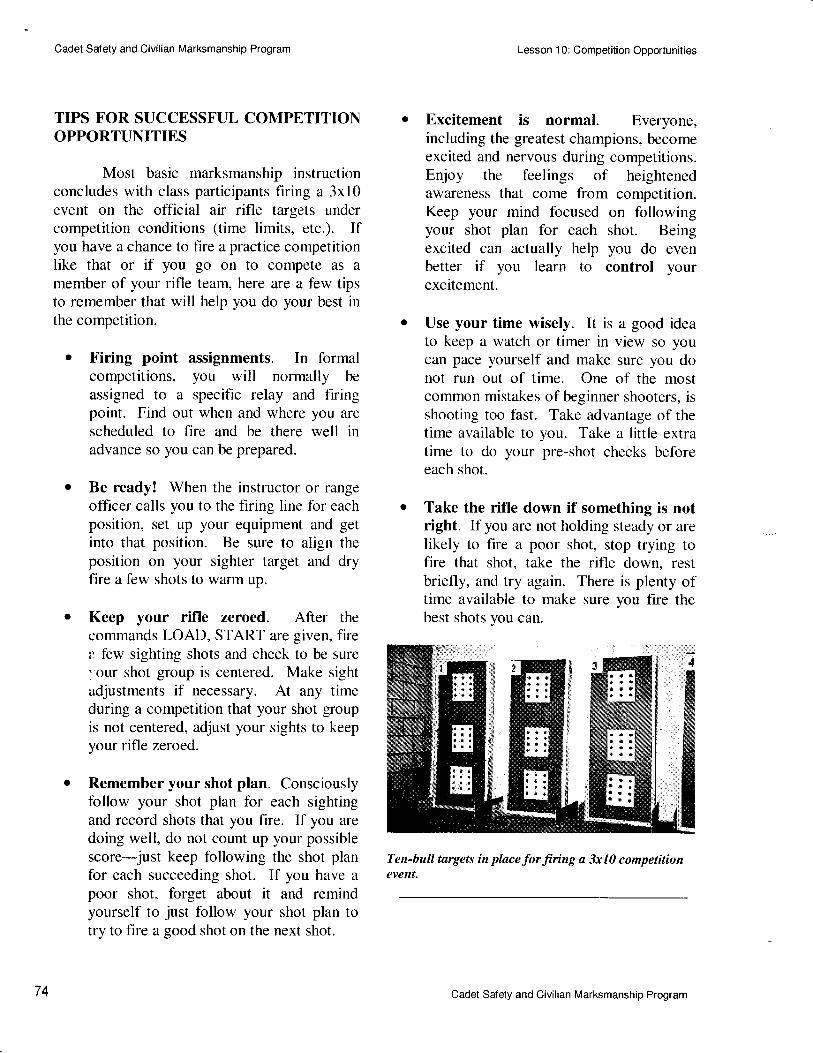
Cadet Safety and Civilian Marksmanship Program
TIPS FOR SUCCESSFUL COMPETITIONOPPORTUNITIES
Most basic marksmanship instructionconcludes with class pafticipants firing a 3xl0event on the official air rifle targets undercompetition conditions (time limits, etc.). Ifyou have a chance to fire a practice competitionlike that or if you go on to compete as amember of your rifle team, here are a few tipsto remember that will help you do your best inthe competition.
o Firing point assignments. In formalcompetitions, you will normally beassigned to a specific relay and firingpoint. Find out when and where you arescheduled to fire and be there well inadvance so you can be prepared.
o Be ready! When the instructor or rangeofficer calls you to the firing line for eachposition, set up your equipment and getinto that position. Be sure to align theposition on your sighter target and dryfire a few shots to warm up.
o Keep your rifle zeroed. After thecommands LOAD, START are given, firel few sighting shots and check to be surer our shot group is centered. Make sightadjustments if necessary. At any timeduring a competition that your shot groupis not centered, adjust your sights to keepyour rifle zeroed.
o Remember your shot plan. Consciouslyfollow your shot plan for each sightingand record shots that you fire. If you aredoing well, do not count up your possiblescore-just keep following the shot planfor each succeeding shot. If you have apoor shot, forget about it and remindyourself to just follow your shot plan totry to fire a good shot on the next shot.
Lesson 1 0: Competition Opportunities
Excitement is normal. Everyone,including the greatest champions, becomeexcited and nervous during competitions.Enjoy the feelings of heightenedawareness that come from competition.Keep your mind focused on followingyour shot plan for each shot. Beingexcited can actually help you do evenbetter if you learn to control yourexcitement.
Use your time wisely. It is a good ideato keep a watch or timer in view so youcan pace yourself and make sure you donot run out of time. One of the mostcommon mistakes of beginner shooters, isshooting too fast. Take advantage of thetime available to you. Take a little extratime to do your pre-shot checks beforeeach shot.
o Take the rifle down if something is notright. If you are not holding steady or areIikely to fire a poor shot, stop trying tofire that shot, take the rifle down, restbriefly, and try again. There is plenty oftime available to make sure you fire thebest shots you can.
Ten-bull targets in place for firing a jx10 competitionevent.
74 Cadet Safety and Civilian Marksmanship Program
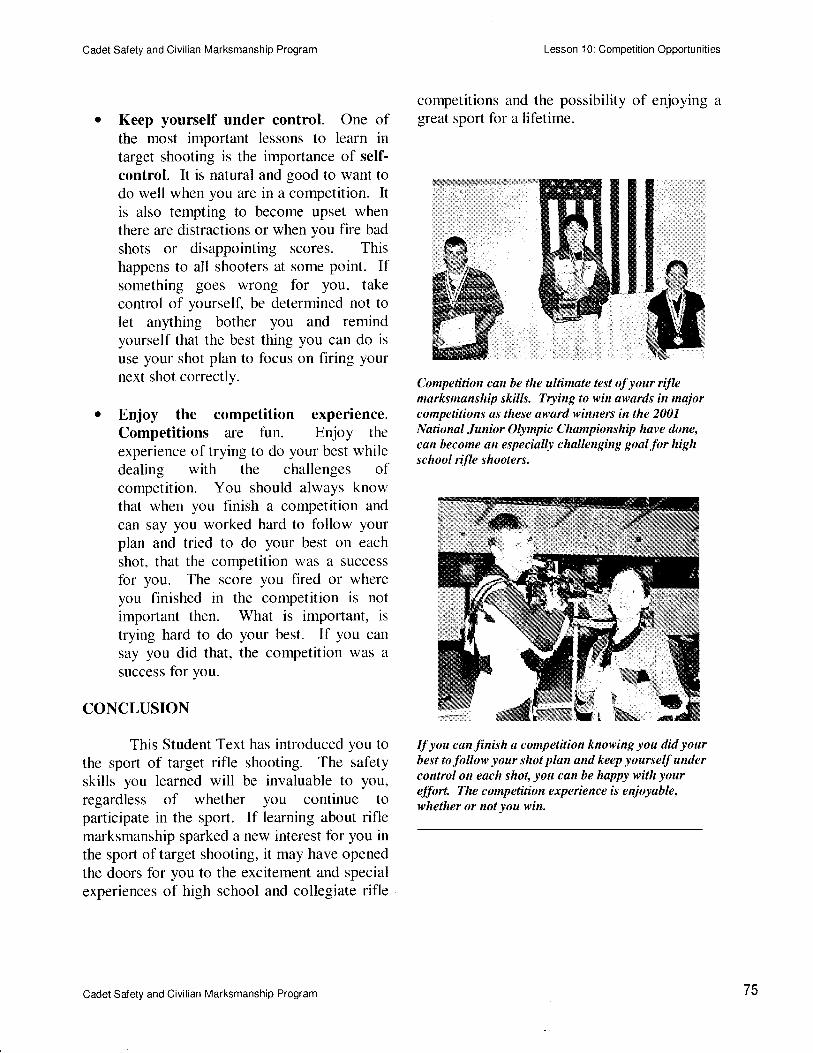
Cadet Safety and Civilian Marksmanship Program
Keep yourself under control. One ofthe most important lessons to learn intarget shooting is the importance of self-control. It is natural and good to want todo well when you are in a competition. Itis also tempting to become upset whenthere are distractions or when you fire badshots or disappointing scores. Thishappens to all shooters at some point. Ifsomething goes wrong for you, takecontrol of yourself, be determined not tolet anl,thing bother you and remindyourself that the best thing you can do is
use your shot plan to focus on firing yournext shot correctly.
. Enjoy the competition experience.Competitions are fun. Enjoy theexperience of trying to do your best whiledealing with the challenges ofcompetition. You should always knowthat when you finish a competition and
can say you worked hard to follow yourplan and tried to do your best on each
shot, that the competition was a success
for you. The score you fired or whereyou finished in the competition is notimportant then. What is important, is
trying hard to do your best. If you can
say you did that, the competition was asuccess for you.
CONCLUSION
This Student Text has introduced you tothe sport of target rifle shooting. The safetyskills you learned will be invaluable to you,regardless of whether you continue toparticipate in the sport. If learning about riflemarksmanship sparked a new interest for you inthe sport of target shooting, it may have openedthe doors for you to the excitement and specialexperiences of high school and collegiate rifle
Lesson 1 0: Competition Opportunities
competitions and the possibility of enjoying agreat sport for a lifetime.
Competition can be the ultimate test of your riflemarksmanship skills. Trying to win awards in majorcompetitions us these qward winners in the 2001National Junior Olympic Championship have done,can become an especially challenging goal for highschool ifle shooters.
If you can ftnish a competition knowing you did yourbest to follow your shot plan and keep yourself undercontrol on each shot, yott can be happy with youreffort. The competition expeience is enjoyable,whether or not you win.
If\
$
Cadet Salety and Civilian Marksmanship Program 75
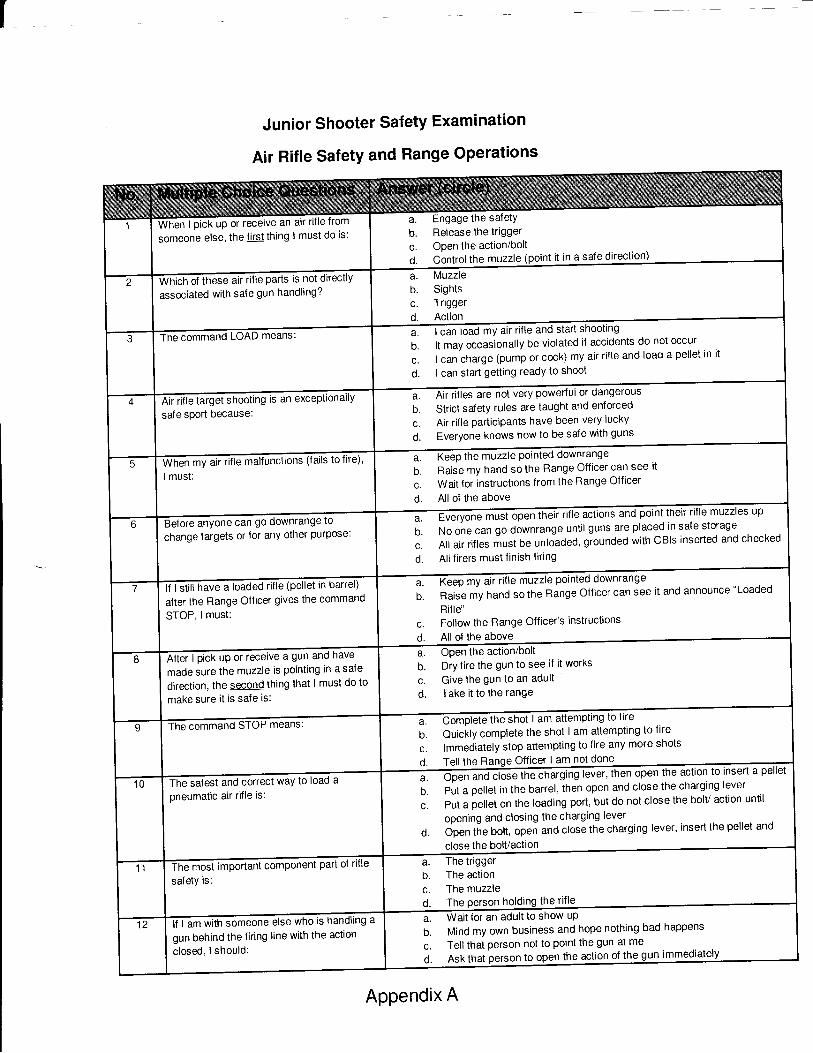
t
Junior Shooter Safety Examination
Air Rifle Safety and Range Operations
a. Engage the sa{ety
b. Release the trigger
c. OPen the action/bolt
d. Control the muzzle (point it in a saf e direction)
Wnen t prcx up or receive an air rille |rom
someone else, the lirst thing I must do is:
a. Muzzle
b. Sightsc. Trigger
d. Action
ilih6h'ot these arr rifle parts is not directly
associated with saie gun handling?
IFantpao my air rifle and start shooting
b. lt may occasionally be violated il accidents do not occur
c. I can charge (pump or cock) my air rifle and load a pellet in it
d. I can start getting ready to shoot
The command LOAD means:
a. Aruittes are not very powerful or dangerous
b. Strict satety rules are taught and enlorced
c. Air rifle participants have been very lucky
d. Everyone knows how to be sale with guns
ffitte tarSet shooting is an exceptionally
sale sport because:
a Keep the muzzle pointed downrange
b. Raise my hand so the Range Oliicer can see it
c. Wait for instructions lrom the Range Olficer
d. All of the above
whe-r rille malfunctions (lails to f ire)'
and Point their rille muzzles uP
b. No one can go downrange until guns are placed in safe storage
c. All air rilles must be untoaded, grounded with CBls inserted and checked
d. All {irers must linish firing
ore anyone can go downrange to
change targets or for any other purpose:
;'la#fiFr ritle mLtzzle pointed downrange
b. Raise my hand so the Range Olficer can see it and announce "Loaded
Rille"
c. Follow the Range Ollicels instructions
d. All of the above
lJTiill hiTe a loaded rifle (pellet in barrel)
after the Range Ollicer gives the command
STOP, lmust:
b. Dry tire the gun to see if it works
c. Give the gun to an adult
d. Take it to the range
After I ptcX up or receive a gun and have
made sure the muzzle is pointing in a sale
direction, the second thing that I must do to
make sure it is safe is:
;. Complete the shot I am attempting to fire
b. Quicfly complete the shot I am attempting to Iire
c. lmmediately stop attempting to lire any more shots
d. Tell the Range Olficer I am not done
The command STOP means:
close the bolt/action
Pen the action to insert a Pellet
Put a pellet in the barrel, then open and close the charging lever
Put a pellet on the loading port, but do not close the bolV action until
opening and closing the charging lever
Cjp"n ti" bolt, open and close the charging lever' insert the pellet and
T6Esatest and correct way to load a
a. The triggerb. The action
c. The muzzle
d. The Person holding the rille
The mosi rmpttant component part ol ritle
a. Wait for an adult to show uP
b. Mind my own business and hope nothing bad happens
c. Tell that person not to point the gun at me
d. Ask that person to open the action of the gun
gun behind the firing line with the action
closed, I should:
ll'Em with someone else who is handling a
Appendix A

When a rifle is grounded, it must: a. Be firedb. Be lying on the floor or mat with its action open and a CBI insertedc" Be lying on the {loor or shooting matd. Be prepared for use in the next position
When a liring line is "clear," firers may: a.
b.
c.
d.
down range il instructed to do so by the Range OfficerHandle their rifles as long as the muzzles are pointed in a sa{e directionPick up their riflesEat lunch
The proper time to place the index fingeron the trigger is:
a. After starting to aim at the target.b. Alter loading the rillec. When the rifle is in position on the shoulderd. When it is time to pull the
An air rille is considered "unloaded" il: a. lts action is openb. The firer is done shootingc. The action is open, there is no pellet in the barrel and a CBI is insertedd. The muzzle is pointed in a saf e direction
The ultimate goal or objective of gun saletytraining is:
a. To reduce the number of gun-related accidentsb. To make sure junior shooters have a good experience on the rangec. To make target shooting free of all gun related accidentsd. To prepare iunior shooters for marksmanship
To ensure safety, I must consciously checkthe key parts of the guns I handle in thisorder:
a. Action, Muzzle, Trigger (AMT)b. Barrel, Bullet, Butt plate (BBB)c. Muzzle, Action Trigger (MAT)d. Trigger, Action, Bolt (TAB)
When I am handling a rifle, the third thing I
must do alter I have made sure the muzzleis pointing in a sale direction and the actionis open is:
Handle the rifle with my fingers outside of the trigger guard.Go ahead and place my index linger on the trigger because the action is
openDry fire the rifle to make sure it is not loadedShow the gun to mv friends
The only place I can close the bolUaction ofmy rifle to dry f ire it or to load and fire it is:
a. lt's OK to dry fire anywhere the gun is pointing in a sale directionb. Any time I am forward of the Ready Linec. On a saf e firing ranged. On my designated liring point after the Range Olficer gives instructors to
do so
The "Rules for Safe Gun Handling" apply only to air ri{le shooting and not to other types of guns
When a gun's saf ety is engaged, it is not necessary to open the bolVaction when carrying the rirle on arange.
On target ranges, the saJest direction to point a gun muzzle is downrange or up towards the ceiling.
When I take my gun out of the gun case, it does not matter which dlrection I point the muzzle
After the Range Officer gives the command to LOAD and START, it is OK to place my index linger inside
Even iI one sale gun handling rule will make me safe, I must still follow all three gun handling rules.
{ired if the bolVaction remains open.
ll I still have a pellet in the barrel of my air rifle when I finish liring, I don't need to say anything to the RangeOfficer, because the action on my rifle is open so the rille cannot be accidentally lired.
Appendix A

o No one is authorized to rire a shot until the command START is given, even il the command LOAD hasalready been given.
TorF
10 It's OK to shoot at my neighbois target il I have f inished f iring on my target. orF
1r When a lirer completes a iiring exercise, that person is responsible for opening the rille's action andinserting a CBl.
TorF
12 I must not bring lood onto the range even ii it is consumed behind the liring line. IorF
13 All parts of my shooting position and rille, including the muzzle ol the rifle, must be behind the firing lineduring liring.
TorF
14 It is OK lor me to go downrange to change targets i1 all rifles are grounded, with CBls inserted, andchecked, and the Range Officer gives instructions to go downrange.
TorF
tc I may shoot into a pellet discharge container (PDC) after the command STOP is given, if the Range Ollicerinstructs me to do so.
TorF
16 People in the Ready Area (behind the Ready Line) may move up to the liring line during liring as long asthey do not disturb the shooters.
TorF
17 Air or COz cylinders on air rifles (COz or compressed air) should be tightened as tightly as possible with awrench to prevent gas leakage.
TorF
1B All personnel who handle air rifle pellets should wash their hands immediately alter they leave the range. TorF
19 Salety rules are not as important in being sale with air guns because air rilles are not very powerlul. TorF
20 A iiring line is considered "Hot" when the temperature is above 20' C. TorF
21 A firing line is considered "Cleai'when all rifles are grounded, with CBls inserted, and a Range O{{icer haschecked the line.
lorF
22 A1ter I finish liring, I may put my riile down without opening the action lirst because it has just been fired. TorF
23 When I open a gun case, the first thing I must do is open the gun action/bolt and insert a CBl. orF
24 Once an air rifle is unloaded and checked by a Range Oliicer, it is OK to point it in any direction. TorF
25 may act as an "Emergency Salety Offacef if I see someone handling an air rifle in an unsa{e manner. TorF
Appendix A
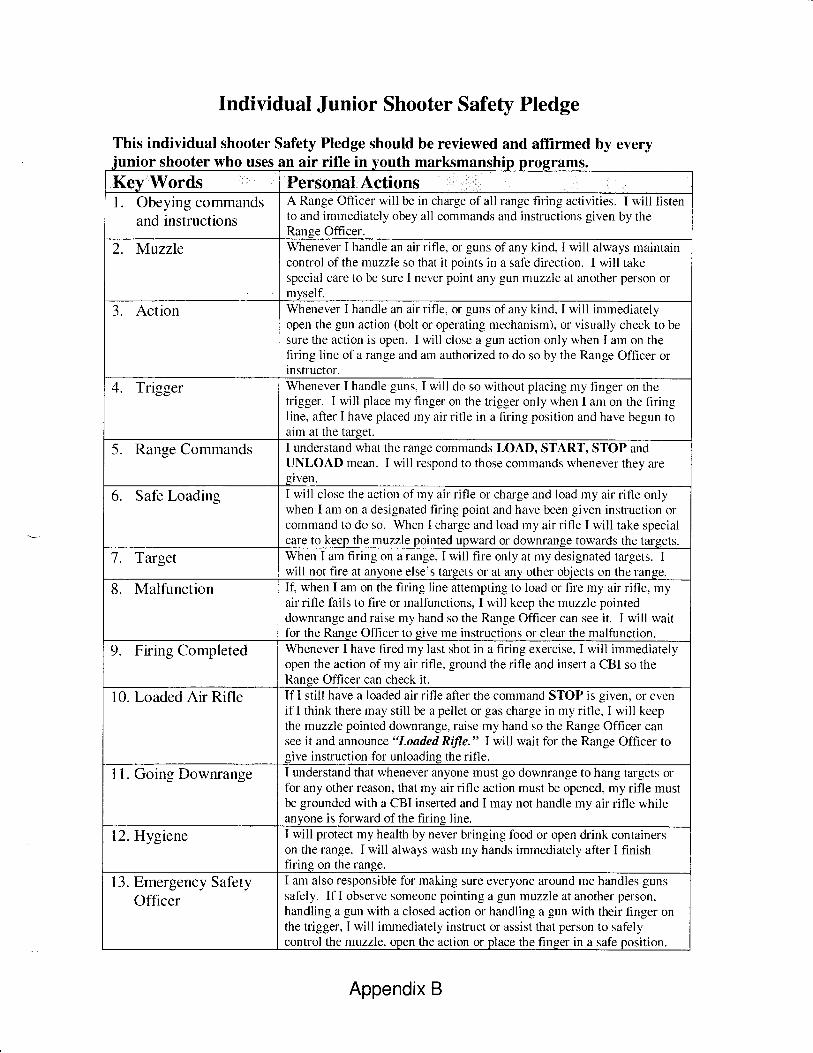
This individual shooter Safety Pledge should be reviewed and affirmed try everyunior shooter who uses an air rifle in vouth marksmanshin nrosrams.
Key Words Personal Actionsl. Obeying commands
and instructions
A Range Officer will be in charge of all range firing activities. I will listento and immediately obey all commands and instructions given by theRange Officer.
2. Muzzle Whenever I handle an air rifle, or guns of any kind, I will always rnaintaincontrol of the muzzle so that it points in a safe direction. I will takespecial care to be sure I never point any gun muzzle at another person ormvself.
3. Action Whenever I handle an air rifle, or guns of any kind, I will irnmediatelyopen the gun action (bolt or operating mechanism), or visually check to besure the action is open. I will close a gun action only when I am on thefiring line of a range and am authorized to do so by the Range Officer orinstructor.
4. Trigger Whenever I handle guns, I will do so without placing lny finger on thetrigger. I will place my finger on the trigger only when I am on the firingline, after I have placed my air rifle in a firing position and have begun toaim at the target.
5. Range Commands I understand what the range commands LOAD, START, STOP andUNLOAD mean. I will respond to those commands whenever they aregiven.
6. Safe Loading I will close the action of my air rifle or charge and load my air rifle onlywhen I am on a designated firing point and have been given instruction orcommand to do so. When I charge and load rny air rifle I will take specialcare to keep the muzzle pointed upward or downrange towards the tarsets.
1. Target When I arn firing on a range, I will fire only at my designated targets. Iwill not fire at anvone else's tarsets or at anv other obiects on the ranse-
8. Malfunction If, when I am on the firing line attempting to load or fire my air rifle, myair rifle fails to fire or malfunctions, I will keep the muzzle pointeddownrange and raise my hand so the Range Officer can see it. I will waitfor the Range Officer to give me instructions or clear the malfunction.
9. Firing Completed Whenever I have fired my last shot in a firing exercise, I will immediatelyopen the action of my air rifle, ground the rifle and insert a CBI so theRange Officer can check it.
10. Loaded Air Rifle If I still have a loaded air rifle after the command STOP is given, or evenif I think there may still be a pellet or gas charge in my rifle, I will keepthe muzzle pointed downrange, raise my hand so the Range Officer cansee it and announce "Loaded RiJle," I will wait for the Range Officer tosive instruction for unloadine the rifle.
1 l. Going Downrange I understand that whenever anyone must go downrange to hang targets orfor any other reason, that rny air rifle action urust be opened, my rifle mustbe grounded with a CBI inserted and I may not handle my air rifle whileanyone is forward of the firing line.
12. Hygiene I will protect my health by never bringing food or open drink containerson the range. I will always wash my hands immediately after I finishfiring on the range.
13. Emergency SafetyOfficer
I am also responsible for making sure everyone around me handles gunssafely. If I observe someone pointing a gun muzzle at another person,handling a gun with a closed action or handling a gun with their finger onthe trigger, I will immediately instruct or assist that person to safelycontrol the muzzle, open the action or place the frnger in a safe position.
Individual Junior Shooter Safety Pledge
Appendix B
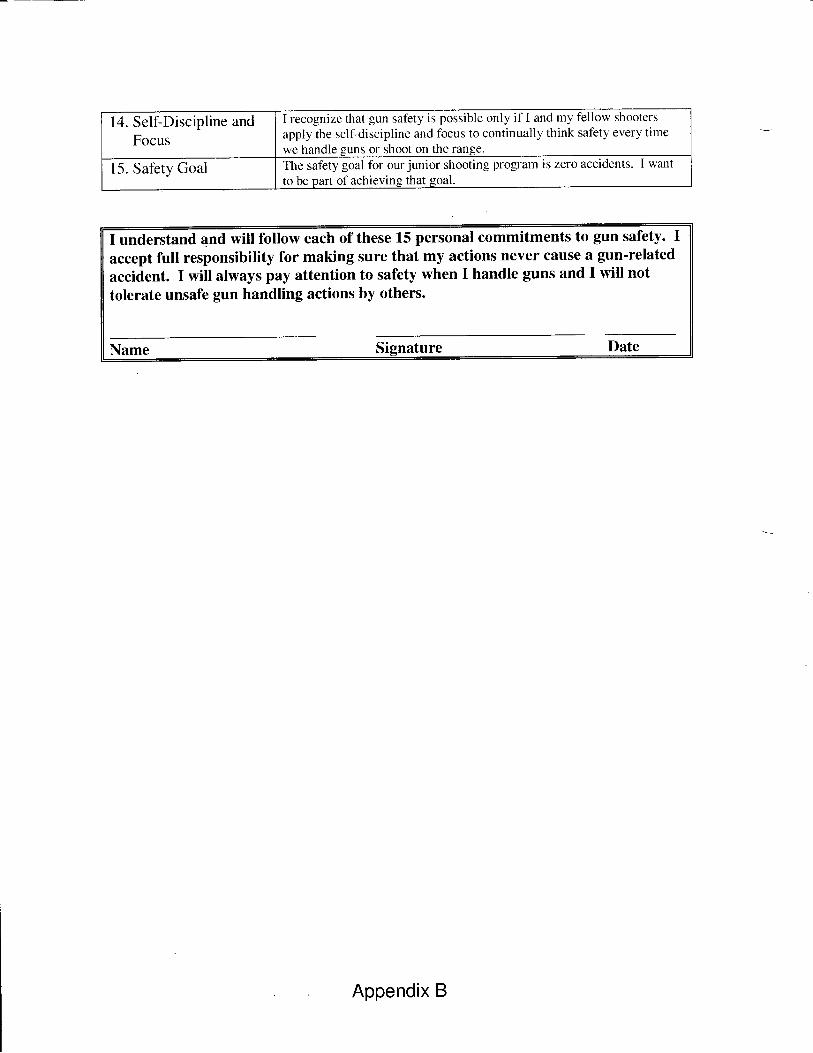
1 4. Self-Discipline and
Focus
I recognize that gun safety is possible only ifI and my fellow shooters
apply the self-discipline and focus to continually think safety every timewe handle guns or shoot on the range.
15. Safety Goal The safety goal for ourjunior shooting program is zero accidents. I want
to be oart ofachieving that soal.
I understand and will follow each of these 15 personal commitments to gun safety. Iaccept full responsibility for making sure that my actions never cause a gun-related
accident. I will always pay attention to safety when I handle guns and I will not
tolerate unsafe gun handling actions by others.
Name Sienature Date
Appendix B