Bolt Action Rifle MANUAL
20
American Rifle Company Bolt Action Rifle MANUAL MADE IN THE USA (Trigger made in Canada) American Rifle Company’s mission is equipping you with a means for securing your right to life, liberty, and the pursuit of happiness.
-
Upload
khangminh22 -
Category
Documents
-
view
7 -
download
0
Transcript of Bolt Action Rifle MANUAL
American Rifle Company
Bolt Action Rifle MANUAL
MADE IN THE USA
(Trigger made in Canada)
American Rifle Company’s mission is equipping you with a means for
securing your right to life, liberty, and the pursuit of happiness.

2
American Rifle Company, other manufacturers, distributors, and
resellers assume no liability for loss of life, personal injury, and/or
property damage related to the use, misuse, modification, or
malfunction of this product.
It is your responsibility to abide by local, state, and federal laws
governing firearm use, transportation, and sale in your area.
If you gift, sell, or transfer this firearm please be sure this manual goes
with it.
Some states require this statement:
WARNING: You may face criminal prosecution if you store or leave an
unsecured firearm where a person who is prohibited from possessing
firearms can and does obtain possession.

3
Table of Contents 1 Introduction & Nomenclature .......................................................... 4
2 Safety ................................................................................................ 6
2.1 Basic firearm safety rules .......................................................... 6
2.2 Additional safety ....................................................................... 6
3 Function ............................................................................................ 7
3.1 Firearm Check ........................................................................... 7
3.2 Ammunition .............................................................................. 7
3.3 Unloading .................................................................................. 7
3.4 Mechanical Safety ..................................................................... 8
3.5 Bolt Action ................................................................................. 9
3.6 Magazine ................................................................................. 10
3.7 Chassis/Stock Use and Adjustment ......................................... 11
3.8 Mounting a Rifle Scope ........................................................... 15
4 Maintenance ................................................................................... 16
4.1 Lubrication .............................................................................. 16
4.2 Striker Assembly Removal (Bolt Head Removal) .................... 17
5 Warranty ......................................................................................... 18
6 Purchase Record ............................................................................. 18
7 Notes ............................................................................................... 19

4
1 Introduction & Nomenclature Thank you for purchasing a rifle made in the USA by American Rifle
Company. We design and manufacture rifles to have a long and reliable
service life and hope it exceeds your expectations. Please read this
manual and familiarize yourself with the function of the rifle before
using it.
This manual applies to several American Rifle Company bolt action rifles
and may include explanations of optional equipment. Please reference
material that is relevant to your rifle.
The information in this manual is current at the time of publication. We
strive to continuously improve our products so there may be differences
between your rifle and this manual.

5
Muzzle Brake (optional)
Barrel
Bolt Action
(Receiver and Bolt)
Trigger
Chassis
Magazine
(optional)
6
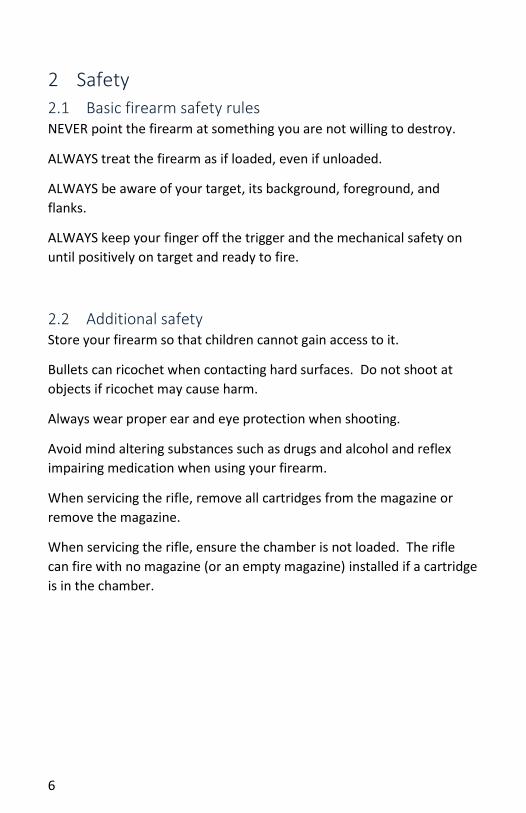
2 Safety
2.1 Basic firearm safety rules NEVER point the firearm at something you are not willing to destroy.
ALWAYS treat the firearm as if loaded, even if unloaded.
ALWAYS be aware of your target, its background, foreground, and
flanks.
ALWAYS keep your finger off the trigger and the mechanical safety on
until positively on target and ready to fire.
2.2 Additional safety Store your firearm so that children cannot gain access to it.
Bullets can ricochet when contacting hard surfaces. Do not shoot at
objects if ricochet may cause harm.
Always wear proper ear and eye protection when shooting.
Avoid mind altering substances such as drugs and alcohol and reflex
impairing medication when using your firearm.
When servicing the rifle, remove all cartridges from the magazine or
remove the magazine.
When servicing the rifle, ensure the chamber is not loaded. The rifle
can fire with no magazine (or an empty magazine) installed if a cartridge
is in the chamber.

7
3 Function
3.1 Firearm Check Before using your rifle for the first time and each time it is used check
for obstructions in the barrel by removing the bolt and looking through
the barrel from the aft end. Additionally, make sure the thread
protector or muzzle brake is tight and all other components are tight
and in good working order.
Clean the barrel before the first use to remove any debris from packing
materials. Put a loose, lightly oiled patch through the bore from breech
to muzzle twice. Use a fresh patch each time.
3.2 Ammunition American Rifle Company recommends that you only use high quality
commercially manufactured ammunition made to SAAMI (Sporting
Arms and Ammunition Manufacturers’ Institute) or CIP (Commission
International Permanente) specifications. Be sure the ammunition is
the appropriate cartridge and caliber for your rifle. Additionally, ensure
the ammunition is clean and dry.
The use of remanufactured or hand loaded ammunition is not
recommended.
A variety of types and brands of ammunition are available. It is
important to choose ammunition that is appropriate for the application.
Refer to the ammunition manufacturer’s documentation to select good
options for the application and test the ammunition at a rifle range.
3.3 Unloading When unloading, remove the magazine, remove all cartridges from the
magazine and open the bolt to empty the chamber. With the bolt open,
visually confirm there is not a cartridge in the chamber.

8
3.4 Mechanical Safety The rife is equipped with a two-position trigger safety. Keep the safety
in safe position until ready to fire. The safety is a mechanical device
which prevents the trigger from being pulled. Mechanical devices can
fail, do not assume that the rifle cannot fire when the safety is in the on
position – always follow firearm safety rules.
Note, the safety can only be engaged when the rifle is cocked. The rifle
is cocked by opening and closing the bolt. The rifle will remain cocked
when the bolt is closed until the trigger is pulled. When the rifle is fired
and another cartridge is to be chambered, open the bolt, move the
safety to the safe position, and then close the bolt.
Aft = Safe (on)
Forward = Fire (off)
Safety

9
3.5 Bolt Action
3.5.1 Bolt Installation and Removal The bolt can be installed/removed by opening the bolt stop and sliding
the bolt into or out of the receiver. Some bolt stops may latch in the
open position. If it latches open, push closed after inserting the bolt
back into the rifle.
Depending on the model, the bolt stop may be on the opposite side of
that depicted below or may be a knob style bolt stop that rotates. The
knob style can only be rotated to lock/unlock when the bolt is open and
in the aft position.
Bolt Stop Bolt Knob

10
3.6 Magazine Push forward on the bottom of the magazine latch to release the
magazine and remove the magazine from the rifle (magazine not
shown).
Insert magazine by sliding it into the magazine well with the forward-
end slightly higher than the aft-end. When the forward-end is seated
the aft-end will pivot into place and engage the magazine latch.
The aft magazine support is designed to prevent the magazine from
over insertion. If the magazine is not latched when the magazine
contacts the support, the top of the latch (or the magazine tab) may
need to be trimmed so that the magazine is fully latched.
Magazine
latch
This bump is the
aft magazine
support

11
3.7 Chassis/Stock Use and Adjustment
3.7.1 Level The level has three detent positions. In the center position it is stowed,
out of the way and cannot be referenced. Push the end of the level
tube left or right to deploy until the deployed detent engages. Try both
sides, right-handed shooters may prefer the level deployed on the right
or left side.
Level
12
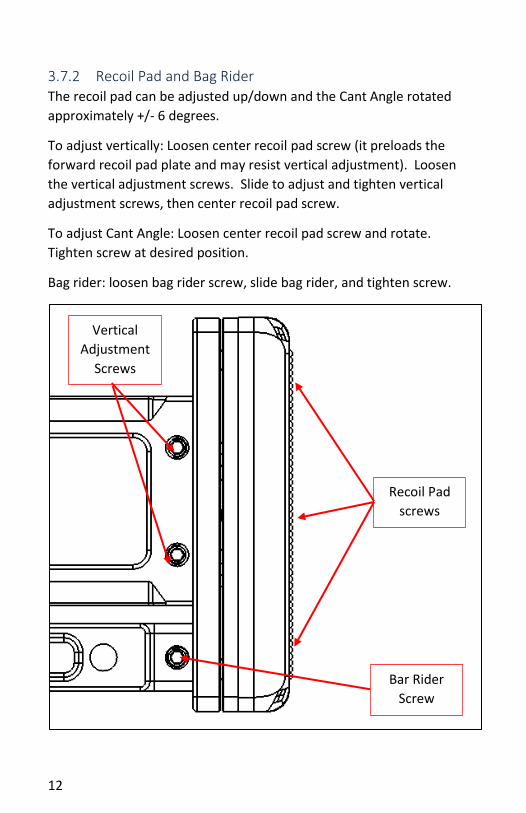
3.7.2 Recoil Pad and Bag Rider The recoil pad can be adjusted up/down and the Cant Angle rotated
approximately +/- 6 degrees.
To adjust vertically: Loosen center recoil pad screw (it preloads the
forward recoil pad plate and may resist vertical adjustment). Loosen
the vertical adjustment screws. Slide to adjust and tighten vertical
adjustment screws, then center recoil pad screw.
To adjust Cant Angle: Loosen center recoil pad screw and rotate.
Tighten screw at desired position.
Bag rider: loosen bag rider screw, slide bag rider, and tighten screw.
Vertical
Adjustment
Screws
Recoil Pad
screws
Bar Rider
Screw

13
3.7.3 Length of Pull (LOP) There are two adjustments for LOP and one removable part if you really
need to further reduce LOP:
1) Tool-less quick adjust: Adjust by depressing the LOP Yoke and
sliding the recoil pad assembly. Release the LOP Yoke and slide
until a notch is engaged. 2 inches of adjustment.
2) Set and forget adjustment: loosen the LOP screw and slide the
rods in or out to desired location and tighten screw. Make sure
when tightening the screw that notches are engaged in the
rods. 1 inch of adjustment. If desired, rods can be set with
differing amount of extension to reduce the length of quick-
adjust LOP below 2 inches.
3) Remove the aft butt plate to reduce LOP by an additional 1/4
inch. Use provided extra screw in center hole. Apply a small
amount of grease under screw head to slide in.
LOP Yoke
LOP Screw
Aft Butt plate
14
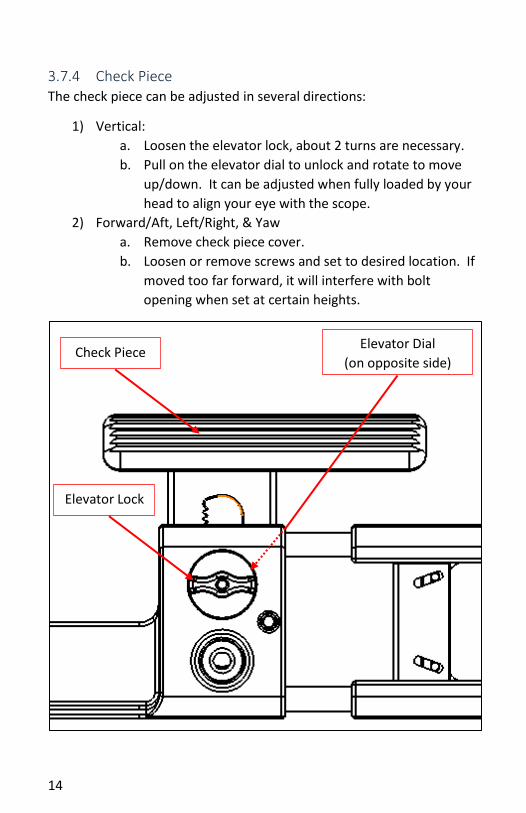
3.7.4 Check Piece The check piece can be adjusted in several directions:
1) Vertical:
a. Loosen the elevator lock, about 2 turns are necessary.
b. Pull on the elevator dial to unlock and rotate to move
up/down. It can be adjusted when fully loaded by your
head to align your eye with the scope.
2) Forward/Aft, Left/Right, & Yaw
a. Remove check piece cover.
b. Loosen or remove screws and set to desired location. If
moved too far forward, it will interfere with bolt
opening when set at certain heights.
Elevator Lock
Check Piece Elevator Dial
(on opposite side)

15
3.8 Mounting a Rifle Scope American Rifle Company rifles come standard with a MIL-STD-1913
Picatinny rail. Use scope rings or mounts designed for mounting on
Picatinny rails. Follow ring/mount manufacturers and scope
manufacturers recommendation for mounting.

16
4 Maintenance Before any maintenance, unload the rifle as described previously and
ensure there is not a cartridge in the chamber. Videos may be available
at the American Rifle Company website with more thorough
explanations for maintenance.
4.1 Lubrication Periodically clean and lubricate the following locations with gun oil or
grease. Only a small amount of lubrication is needed.
1) Aft side of bolt head lugs (2 or 3 surfaces)
2) Cocking Piece cams (top and bottom cam)
Do no lubricate the cocking piece where it contacts the trigger or the
trigger.
Do not lubricate the inside of the bolt or the striker assembly. The
lubricant may impede the striker and cause light primer strikes.
Aft bolt head
surface
(2 or 3 lugs)
Cocking Piece
sliding surface
(2 locations)

17
4.2 Striker Assembly Removal (Bolt Head Removal) This section does not apply to the Archimedes Bolt Action. Please visit
the American Rifle Company website for Archimedes bolt disassembly.
1) Remove the bolt from the receiver
2) Press the bolt shroud pin into the bolt shroud.
3) While holding the pin in, rotate the bolt shroud in the direction
shown for a right hand action until the striker springs out. The
bolt head pin, bolt head, and extractor may fall off when the
striker assembly is removed. Note: if the cocking piece drops
into the cocking cams on the rear of the bolt, it will be difficult
to rotate back. A T25 torx driver can be used for this (turn
gently on a left hand action as the screw may loosen).
Rotate Bolt
Shroud
Bolt Shroud Pin

18
5 Warranty American Rifle Company warrants to you, the original purchaser of a
new rifle, that it is free from defects in material and workmanship.
Should your rifle need repair, return it to American Rifle Company and
we will, at our discretion, repair or replace it free of charge.
American Rifle Company will not cover damage to your rifle caused by:
• Accidents, abuse, or misuse
• Barrel obstruction
• Hand loaded, reloaded or improper ammunition
• Unauthorized adjustments, repairs, or modifications
• Normal wear and tear (barrels wear out and group size increases)
• Exposure to temperatures above 400°F (204° C)
• Removal of surface finish for any reason.
6 Purchase Record Product:
Firearm Serial Number:
Cartridge:
Date Pruchased:
Purchased From:

19
7 Notes


![Panaeolus cinctulus [Bolt.] Saccardo et Panaeolus ... - DUMAS](https://static.fdokumen.com/doc/165x107/631dbceb3969c5af13078f6d/panaeolus-cinctulus-bolt-saccardo-et-panaeolus-dumas.jpg)