ORAL FEEDBACK IN FACE-TO-FACE CONFERENCING ON EFL POSTGRADUATE STUDENTS' THESIS DRAFTS
Upload
khangminh22Category
view
2download
0
NAVAL
POSTGRADUATE SCHOOL
MONTEREY, CALIFORNIA
THESIS THE DISTANCE TRAINING SYSTEM (DTS)
APPLICATION USING DREAMWEAVER MX2004 AND JSP APPLICATION SERVER TECHNOLOGY
by
Nikolaos Pogkas
September 2004
Thesis Advisor: Thomas Otani Thesis Co-Advisor: Arijit Das
Approved for public release; distribution is unlimited

THIS PAGE INTENTIONALLY LEFT BLANK

REPORT DOCUMENTATION PAGE Form Approved OMB No. 0704-0188 Public reporting burden for this collection of information is estimated to average 1 hour per response, including the time for reviewing instruction, searching existing data sources, gathering and maintaining the data needed, and completing and reviewing the collection of information. Send comments regarding this burden estimate or any other aspect of this collection of information, including suggestions for reducing this burden, to Washington headquarters Services, Directorate for Information Operations and Reports, 1215 Jefferson Davis Highway, Suite 1204, Arlington, VA 22202-4302, and to the Office of Management and Budget, Paperwork Reduction Project (0704-0188) Washington DC 20503. 1. AGENCY USE ONLY (Leave blank)
2. REPORT DATE September 2004
3. REPORT TYPE AND DATES COVERED Master’s Thesis
4. TITLE AND SUBTITLE: The Distance Training System (DTS) Application Using Dreamweaver MX2004 and JSP Application Server Technology 6. AUTHOR(S) Nikolaos Pogkas
5. FUNDING NUMBERS
7. PERFORMING ORGANIZATION NAME(S) AND ADDRESS(ES) Naval Postgraduate School Monterey, CA 93943-5000
8. PERFORMING ORGANIZATION REPORT NUMBER
9. SPONSORING /MONITORING AGENCY NAME(S) AND ADDRESS(ES) N/A
10. SPONSORING/MONITORING AGENCY REPORT NUMBER
11. SUPPLEMENTARY NOTES The views expressed in this thesis are those of the author and do not reflect the official policy or position of the Department of Defense or the U.S. Government. 12a. DISTRIBUTION / AVAILABILITY STATEMENT Approved for public release; distribution is unlimited
12b. DISTRIBUTION CODE
13. ABSTRACT (maximum 200 words)
In recent years, declining budgets, limitations on military personnel and decreases in training areas have reduced the opportunity to conduct live military training. For these reasons, Distance Learning Systems are available for providing an almost realistic training platform for enlisted staff and officers.
This thesis has two main objectives: The first is the development of a data model that can be used as a central information repository for an unlimited number of authenticated users. The Distance Training System (DTS) application was developed using a hierarchical approach. The DTS is a Content Management System (CMS) appropriate for users desiring the benefit of accessing the contents of a database. The other objective is the exploration of the interaction between application server technologies such as the JSP with a Web development tool such as Dreamweaver MX2004. This work focuses on the convenience of developing a fast and accurate web application product using HTML as long as it results in a correct and clean data model. Other server technologies are also used as references, such as Active Server Page (ASP), Coldfusion and PHP, which along with Java Servlet Pages (JSP), are the leading technologies in web database development for processing user events.
15. NUMBER OF PAGES
117
14. SUBJECT TERMS Distance Training System, DTS, Dreamweaver MX2004, JSP, Tomcat, MySQL, XML, CMS
16. PRICE CODE
17. SECURITY CLASSIFICATION OF REPORT
Unclassified
18. SECURITY CLASSIFICATION OF THIS PAGE
Unclassified
19. SECURITY CLASSIFICATION OF ABSTRACT
Unclassified
20. LIMITATION OF ABSTRACT
UL
NSN 7540-01-280-5500 Standard Form 298 (Rev. 2-89) Prescribed by ANSI Std. 239-18
i

THIS PAGE INTENTIONALLY LEFT BLANK
ii

Approved for public release: distribution is unlimited
THE DISTANCE TRAINING SYSTEM (DTS) APPLICATION USING DREAMWEAVER MX2004 AND JSP APPLICATION SERVER TECHNOLOGY
Nikolaos Pogkas
Major, Hellenic Army B.S., Hellenic Military Academy, 1990
Submitted in partial fulfillment of the requirements for the degree of
MASTER OF SCIENCE IN COMPUTER SCIENCE
from the
NAVAL POSTGRADUATE SCHOOL September 2004
Author: Nikolaos Pogkas
Approved by: Thomas Otani
Thesis Advisor
Arijit Das Co-Advisor
Peter J. Denning Chairman, Department of Computer Science
iii

THIS PAGE INTENTIONALLY LEFT BLANK
iv

ABSTRACT In recent years, declining budgets, limitations on military personnel and decreases
in training areas have reduced the opportunity to conduct live military training. For these
reasons, Distance Learning Systems are available for providing an almost realistic
training platform for enlisted staff and officers.
This thesis has two main objectives: The first is the development of a data model
that can be used as a central information repository for an unlimited number of
authenticated users. The Distance Training System (DTS) application was developed
using a hierarchical approach. The DTS is a Content Management System (CMS)
appropriate for users desiring the benefit of accessing the contents of a database. The
other objective is the exploration of the interaction between application server
technologies such as the JSP with a Web development tool such as Dreamweaver
MX2004. This work focuses on the convenience of developing a fast and accurate web
application product using HTML as long as it results in a correct and clean data model.
Other server technologies are also used as references, such as Active Server Page (ASP),
Coldfusion and PHP, which along with Java Servlet Pages (JSP), are the leading
technologies in web database development for processing user events.
v

THIS PAGE INTENTIONALLY LEFT BLANK
vi

TABLE OF CONTENTS
I. INTRODUCTION........................................................................................................1
II. WEB APPLICATION ARCHITECTURE................................................................3 A. APPLICATION SERVERS ............................................................................4
1. ASP and .NET ......................................................................................6 2. PHP........................................................................................................7 3. Pure Servlets.........................................................................................8
B. THE JSP SELECTION .................................................................................13
III. JSP SYNTAX BASICS..............................................................................................17 A. JAVA CODE ..................................................................................................17
1. Expressions .........................................................................................17 2. Scriptlets .............................................................................................18 3. Declarations ........................................................................................19 4. Java Beans ..........................................................................................20
B. JSP DIRECTIVES.........................................................................................21
IV. DEFINING THE PROJECT ....................................................................................23 A. SUPPORTING TECHNOLOGY .................................................................23
1. MySQL................................................................................................23 2. Web Server- Tomcat..........................................................................25 3. Dreamweaver MX..............................................................................28 4. JDBC Connector ................................................................................31
B. PROJECT DESCRIPTION ..........................................................................34 1. The Distance-Training Application..................................................34 2. UML Diagram ....................................................................................35 3. Relationships and Relation Schema .................................................36
C. XML USAGE .................................................................................................37
V. APPLICATION FILE ANALYSIS..........................................................................41 A. USER AUTHENTICATION INTERFACE................................................41
1. Home_Page.jsp ...................................................................................41 2. Registration.jsp ..................................................................................42
B. SEARCH INTERFACE ................................................................................46 1. Search.jsp............................................................................................46 2. Course_Request.jsp ...........................................................................47 3. Topic_Request.jsp..............................................................................51 4. Subsection_Request.jsp .....................................................................52 5. Subsection_Results.jsp.......................................................................54 6. Image_Result_All.jsp.........................................................................57 7. Keyword_Result.jsp...........................................................................59
C. ALTER DATABASE INTERFACE ............................................................61 1. Course_Master_Form.jsp .................................................................62 2. Add_New_Course_Form.jsp.............................................................63
vii
3. Update_Course.jsp.............................................................................65 4. Delete_Course_Form.jsp ...................................................................67 5. Subject_Master_Form.jsp.................................................................68 6. Topic_Master_Form.jsp....................................................................72 7. Subsection_Master_Form.jsp ...........................................................72 8. Add_New_Paragraph.jsp ..................................................................75 9. Confirmation.jsp ................................................................................77 10. Update_Paragraph.jsp.......................................................................79 11. Image_Master_Form.jsp ...................................................................82 12. Confirm_Image.jsp ............................................................................84
VI. DISTANCE TRAINING SYSTEM DATA FLOW DIAGRAM ...........................87
VII. CONCLUSIONS .......................................................................................................91 A. DTS APPLICATION.....................................................................................91
1. Advantages..........................................................................................91 2. Future Research.................................................................................93
B. DREAMWEAVER MX2004.........................................................................94 1. Advantages..........................................................................................94 2. Disadvantages.....................................................................................95
APPENDIX A. DISTANCE TRAINING SYSTEM (DTS) SCHEMA ............................97
APPENDIX B. DISTANCE TRAINING SYSTEM (DTS) CODE...................................99
LIST OF REFERENCES....................................................................................................101
INITIAL DISTRIBUTION LIST .......................................................................................103
viii

LIST OF FIGURES
Figure 1. The Web Application Architecture (From Ref. 1).............................................4 Figure 2. Application Server Architecture (From Ref. 2) .................................................5 Figure 3. JSP Compilation Process (From Ref. 3) ..........................................................15 Figure 4. Java Bean Interface ..........................................................................................20 Figure 5. Java Bean Collection........................................................................................20 Figure 6. MySQL Source Command...............................................................................24 Figure 7. Success Messages ............................................................................................25 Figure 8. Variable............................................................................................................25 Figure 9. Setting the Class Path.......................................................................................27 Figure 10. Including the Current Directory in the Classpath ............................................28 Figure 11. Site Definition-Local Info................................................................................29 Figure 12. Site Definition-Setting the Testing Sever ........................................................30 Figure 13. JDBC Architecture (From Ref. 1)....................................................................32 Figure 14. Connecting Our Web Pages to the Database Server........................................33 Figure 15. Setting Up the MySQL Driver.........................................................................33 Figure 16. UML for the DTS Application.........................................................................36 Figure 17. Home (Default) Page .......................................................................................42 Figure 18. Registration Page .............................................................................................43 Figure 19. The “Insert Record” Dialog Window ..............................................................44 Figure 20. Determines the Uniqueness of the Entered Username.....................................44 Figure 21. Search Page......................................................................................................47 Figure 22. Course Request ................................................................................................48 Figure 23. The “rs_course” Recordset ..............................................................................48 Figure 24. Testing the Query.............................................................................................49 Figure 25. The “Dynamic/List” Dialog Window ..............................................................50 Figure 26. The “rs_topic” Recordset.................................................................................51 Figure 27. Collecting the Topic Names.............................................................................52 Figure 28. The “rs_subsection” recordset .........................................................................53 Figure 29. The “subsection results” Page..........................................................................55 Figure 30. The “rs_subsection” Recordset ........................................................................55 Figure 31. Retrieving Text Using the “Dynamic Text” Dialog Window..........................56 Figure 32. The “rs_image” Recordset ...............................................................................57 Figure 33. The “rs_allimages” Recordset..........................................................................58 Figure 34. Inserting Images Using the “Select Image Source” Dialog Window ..............58 Figure 35. Determining the Number of Images Per Page .................................................59 Figure 36. The Keyword Results Page (Design View) .....................................................60 Figure 37. Retrieving a Paragraph Specified by the Passed Keyword..............................61 Figure 38. Course Master Page .........................................................................................62 Figure 39. Restricting the Access to the Specified User Groups ......................................63 Figure 40. Insert a New Course Name ..............................................................................64 Figure 41. “Insert Record” Behavior.................................................................................64 Figure 42. The “rs_course” Recordset ..............................................................................65
ix

Figure 43. Passing Test Value for the Query ....................................................................66 Figure 44. The “Update Record” Window........................................................................66 Figure 45. The “Delete Course” Page ...............................................................................67 Figure 46. The “Delete Record” Behavior ........................................................................68 Figure 47. The Subject Master Page (Design View).........................................................69 Figure 48. The “rs_course” Recordset ..............................................................................70 Figure 49. The “rs_subject” Recordset..............................................................................70 Figure 50. Keeping Track of the “course_id” Using the “Dynamic Data” Window ........71 Figure 51. The Topic Master Page ....................................................................................72 Figure 52. The “rs_topic” Recordset.................................................................................73 Figure 53. The “rs_topicsection” Recordset......................................................................74 Figure 54. The “Add New Paragraph” Page .....................................................................75 Figure 55. The “rs_topic” Recordset.................................................................................76 Figure 56. The “Insert Record” Behavior .........................................................................76 Figure 57. The Confirmation Page When We Insert A Record ........................................77 Figure 58. Inserting a Record ............................................................................................78 Figure 59. The “rs_confirm” Recordset ............................................................................78 Figure 60. The “Update Paragraph” Page .........................................................................80 Figure 61. The “rs_subsection” Recordset ........................................................................81 Figure 62. The “Update record” Server Behavior .............................................................81 Figure 63. The Image Master Page ...................................................................................82 Figure 64. The “rs_paragraph” Recordset.........................................................................83 Figure 65. The “rs_sectionimage” Recordset....................................................................84 Figure 66. The “rs_confirm” Recordset ............................................................................85 Figure 67. Inserting an Image Record ...............................................................................85 Figure 68. Securing the Database Server (After Ref. 4) ...................................................93
x

ACKNOWLEDGMENTS I would like to thank my advisors, Thomas Otani and Arijit Das, for their
supervision and support.
Also, I would like to thank my wife Orsia, for her endless encouragement and
patience.
xi

THIS PAGE INTENTIONALLY LEFT BLANK
xii

I. INTRODUCTION
For reasons of cost and accessibility, the Hellenic Army has a growing need for
training to be delivered on an “anywhere at anytime” basis through distributed training
technologies. Those technologies can be developed by using tools, which are based on
the Internet and called E-learning tools. E-learning tools refer to Internet-based programs
designed for instructional purposes, such as interactive multimedia displays or threaded
electronic messaging.
This thesis will develop a distance training product prototype using MySQL as the
DBMS, Apache Tomcat as the web server and Macromedia’s Dreamweaver JSP as the
controller. This model can be applied to short or long-term military schools used by the
Hellenic Army or it can be used by educational institutions for information repository
which others can use. Specifically, it would be possible for military officers or enlisted
personnel to attend military schools or become evaluated without taking leave and being
absent from their units for a long period of time. Students enrolled in Distance Learning
(DL) courses remain assigned to their units while in training. Their status is the same as if
they were attending a proponent school.
The proliferation of computer networks, including the Internet and corporate
‘intranets’, has enabled users to access a large number of data sources, such as data stored
in databases. As a consequence, web designers and developers today increasingly face a
different set of problems than they did a few years ago. Firstly, rather than creating
brand-new sites, today’s designers and developers need to maintain existing sites in the
face of changing standards, new technologies and evolving content. Secondly, the
variations among different browsers have become so pronounced that it is no longer
acceptable only to check the page in both Netscape and Internet Explorer. Lastly, today’s
designers and developers need to build management systems, which facilitate the
movement of site content maintenance from IT departments to non-technical users by
creating forms that post content.
1
This type of application could be classified as a Learning Management System
(LMS). It is a software package used to administer one or more courses to one or more
learners. The reusability, durability, accessibility and interoperability is examined in
order to standardize and modernize the manner in which military training and education
are delivered through the maximization of technology-based learning to generate
substantial costs savings.
Chapter II presents the most known server models and the advantages of JSP over
the other competitive server models. However, web developers seldom decide based on
rational criteria, such as which model fits their needs better than another. In reality, the
choice is usually driven by the available technology, the budget, the technology used in
an existing site and the skills and experience of the available human resources.
Chapter III analyzes JSP’s implicit objects. Dreamweaver MX is not simply a
layout tool. It is web development software, which makes it possible to work directly
with the code view, add, remove or modify code and see the results using the design
view.
Chapter IV presents how to insert java code in the form of scripting elements or
java beans in a file, which is developed using Dreamweaver. In fact, this code is inserted
into the servlet generated by the JSP page.
Chapter V discusses the main components of the Dreamweaver environment
because the majority of the web designers and developers use other server technologies,
and as a result, adequate resources are not available. Although JSP is the fastest among
the others and the most powerful solution even over .NET, its code is daunting for those
new to dynamic website development.
Chapter VI analyzes the application idea and components, the data model, the
flow navigation and presents Dreamweaver’s performance, reliability, and stability
during the development of this product.
Finally, Chapter VII presents the overall conclusions, capabilities, and limitations
from the analysis and the development of this application.
2

II. WEB APPLICATION ARCHITECTURE
The term architecture describes how the different components of a complex
application relate to one another, and it is the starting point for the design of any
application. There are numerous architectures used in database applications. The most
common are client/server, distributed and web architectures. The focus of this thesis will
be the web architecture since it is the most common flexible architecture currently used in
the Internet environment.
The simplest form of web architecture consists of three tiers. The first is the
presentation tier, which provides users with a natural interface and uses HTML (or
XHTML) as its basic language. The middle tier executes the application logic and
consists of technologies such as PHP, ASP, JSP and others able to handle several
programming tasks like doing math or interacting with data sources including text files,
databases and XML documents, which compose the data management tier. This
architecture is commonly called the three-tier architecture. They can also handle tasks
that pertain only to the web such as collect data sent by the user, do the necessary
evaluation and computation based on those data, and return the result to the user.
Although the three-tier architecture has numerous advantages, it is not without
limitations. Browsers can manipulate only HTML, CSS and client-side scripts. They
cannot understand the server code “as-is”, and as a result, whatever the server sends to
the browser must be in standard HTML. As shown in Figure 1, the computer holding the
HTML files and where the control logic occurs is properly called a Web server (Apache,
IIS, etc.). The controller plays the role of the application server and comes in many
different forms, depending on the technologies used (JSP, PHP, etc.). The controller is
responsible for processing user events. Some of these technologies, such as the JSP,
generate programs that run on the web or application server (servlets) and act as a middle
layer between a request coming from the client and the database server storing the
information. This transformation has many advantages, which this chapter explains.
3

Browser(Netscape, IE)
Web Server(Apache, IIS, JRUN)
Controller(JSP,ASP,PHP)
Model(Servlet, EJB)
Database(MySQL,Oracle)
Figure 1. The Web Application Architecture (From Ref. 1)
This model has the advantage of creating an “ultra-thin” client (web form)
because it is responsible only for the display logic. Controller logic resides in the
application server, which implements technologies illustrated in Figure 1.
A. APPLICATION SERVERS
The utilization of application server technologies arose from the need to improve
the performance of an application. A new process is generated when the user requests a
web page. This procedure does not work correctly with a large number of simultaneous
requests because the startup cost of creating a new process for each request reduces the
performance of the entire application. The solution is for the application server to
maintain a pool of processes or threads in the form of servlets programs and use these to
execute requests as illustrated in Figure 2.
4

Web Browser Web Server
Application Server
HTTP
Pool of Servlets
DBMS2
DBMS1
Java application
C++ application
JDBC
JDBC/ODBC...
Figure 2. Application Server Architecture (From Ref. 2)
Before describing the application server technologies, it would be beneficial to
refer to a possible architecture for a website with an application server as the one shown
in Figure 2:
• The client (Web browser) interacts with the web server through the HTTP protocol requesting a dynamic page.
• The web server finds the page and passes it to the application server (request).The application server, using servlet programs, reads the code on the page, processes the page according to the instructions in the code, and replaces the code from the page with the results of processing the instructions. The code instructions may require the application server to extract data from a data source or update requests to the data sources and insert it into the webpage.
• The data source (RDBMS) returns the results (recordset) to the application server.
• The application server inserts data into the webpage and then passes the page to the requesting browser through the web server.
• The browser creates the webpage.
The next sections briefly describe the leading application server technologies and
the reasons for developing the application using the JSP model.
5

1. ASP and .NET
Active Server Page (ASP) is the scripting language for the middle tier for use in
creating and running dynamic and interactive web server applications. An Active Server
Page (ASP) itself is a text file with the extension .asp containing HTML and a client- and
server-side script.
For illustration purposes, consider the following simple code snippet that outputs
a value that the user entered in a form field called “firstName”:
<p>Thank you, <% Response.Write(Request.Form(“firstName”)) %>, for your
submission.</p>
This snippet declares the following points:
• The code for the ASP is contained in a special set of tags (<% and %>). In other words, those tags indicate server markup.
• ASP uses the Write method from the Response object for outputting data.
• There is explicit reference to the variable name (Dim firstName).
• The above variable is a form variable because of the expression Request.Form(“firstName”).
The disadvantages of this technology are its restrictions in using scripting
languages such as VBScript or Jscript and its dependence on a Windows-based platform.
Thus, ASP must rely on Active X, COM or other Microsoft technologies to enhance the
code’s functionality. In addition, ASP is interpreted, which means the code must be read
each time a webpage is called.
ASP.net (with the extension .aspx) is not just an improvement of ASP. ASP.net is
much better than its predecessor because it is possible to use a full featured programming
language such as C# or VB.net to build elegant web applications. The advantage of
ASP.net is that OOP is now available to Internet programming just as is JSP. OOP makes
it possible to build large applications, while still keeping the code clean and structured.
The development of an application using ASP forces the writing of spaghetti code
because VBScript is a scripting language, and as a result, the code is messy when
building large applications. ASP.net separates code from display and it is even possible to
have pages containing no ASP.net code at all.
6

For example, consider the following code snippets written in C#. void Page_Load(Object S, EventArgs E) { myLabel.Text = “Hello!!”;
</script>
A simple ASP.net webpage is possible when embedding the above snippet into
the following HTML code: <head> <title>“Hello World” example!</title> </head> <body> <asp:Label id=“myLabel” runat=“server” /> </body> </html>
Web services are another advantage of ASP.net. Web services allow several
pieces of the application to run on different servers worldwide, and the entire application
will work almost perfectly and seamlessly.
Nevertheless, this new technology presents several but significant disadvantages.
Although the core of .NET works fine on a few non-Windows platforms, do not expect to
deploy serious ASP.net applications on multiple servers and operating systems. Second,
ASP.net is limited to C# and VB.net languages. Although C# presents significant
similarities to Java, few developers exist who are familiar with the C# syntax and its
auxiliary libraries.
2. PHP
PHP (a recursive acronym for “PHP: Hypertext Preprocessor”) is a fast-growing
open-source server, cross-platform model which integrates with other open-source
products, including an Apache Web server and MySQL DBMS. Speed is one of PHP’s
advantages. ASP is built on a COM-based architecture. A COM object is run when an
ASP programmer uses VBScript. As seen previously, writing to the client calls the
Response COM object’s Write method. Likewise, accessing a database uses another
COM object to do so. This COM overhead is cumulative and slows down the computer
programming.
In PHP modules, everything runs in PHP’s memory space. In other words, PHP
code will run faster because there is no overhead for communicating with different COM
objects in different processes.
7

The previous introductory example for the ASP server model could be applied in
this model to demonstrate the differences between the two technologies:
<p> Thank you, <?php echo $_POST[‘firstName’]; ?>, for your
submission.</p>
The above code snippet declares the following points:
• The code for the PHP is contained in a special set of tags (<?php and ?>). In other words, those tags indicate server markup.
• PHP uses the echo for outputting data.
• There is explicit reference to the variable name (firstName).
• The above variable is a form/POST variable because of the expression $_POST[‘firstName’].
Despite the above advantages, one disadvantage of PHP is having to learn a
completely new and less widely known API when compared with JSP.
3. Pure Servlets
Java servlets are java code that run either on webservers or application servers,
acting as a middle layer between requests coming from Web browsers or other HTTP
clients and databases or applications on the HTTP server, as seen in Figure 2. Their job is
to perform the following tasks:
• Read the explicit data sent by the client.
• Read the implicit HTTP request data sent by the browser.
• Generate the results
• Send the explicit (e.g., the query results) along with the implicit HTTP response data to the client.
Since servlets are java programs and follow a standard API, they can do a variety
of tasks such as building a webpage, access databases and maintain information from
request to request simplifying techniques such as session tracking and caching of
previous computations. Therefore, a servlet is java code with HTML embedded inside of
it. For example, consider the following servlet file, which is generated by the
Home_Page.jsp from the application:
8

package org.apache.jsp; import javax.servlet.*; import javax.servlet.http.*; import javax.servlet.jsp.*; import org.apache.jasper.runtime.*; import java.sql.*; public class Home_Page_jsp extends HttpJspBase { private int accesscount=0; private static java.util.Vector _jspx_includes; public java.util.List getIncludes() { return _jspx_includes; } public void _jspService(HttpServletRequest request, HttpServletResponse response) throws java.io.IOException, ServletException { JspFactory _jspxFactory = null; javax.servlet.jsp.PageContext pageContext = null; HttpSession session = null; ServletContext application = null; ServletConfig config = null; JspWriter out = null; Object page = this; JspWriter _jspx_out = null; try { _jspxFactory = JspFactory.getDefaultFactory(); response.setContentType(“text/html; charset=iso-8859-1”); pageContext = _jspxFactory.getPageContext(this, request, response, ““, true, 8192, true); application = pageContext.getServletContext(); config = pageContext.getServletConfig(); session = pageContext.getSession(); out = pageContext.getOut(); _jspx_out = out; out.write(“\r\n”); out.write(“<!DOCTYPE html PUBLIC \”-//W3C//DTD XHTML 1.0 Transitional//EN\”\”http://www.w3.org/TR/xhtml1/DTD/xhtml1-transitional.dtd\”>\r\n”); out.write(“<html xmlns=\”http://www.w3.org/1999/xhtml\”>\r\n”); out.write(“<head>\r\n”); out.write(“<title>Home Page”); out.write(“</title>\r\n”); out.write(“<meta http-equiv=\”Content-Type\” content=\”text/html; charset=iso-8859-1\” />\r\n”); out.write(“<link href=\”DTStylesheet.css\” rel=\”stylesheet\” type=\”text/css\” />\r\n”); out.write(“<style type=\”text/css\”>\r\n”); out.write(“<!--\r\n.style1 {\r\n\tfont-size: 24pt;\r\n\tcolor: #FF0000;\r\n}\r\nbody {\r\n\tbackground-color: #CCFFCC;\r\n}\r\n.style2 {color: #FF0000}\r\n.style4 {font-size: 14}\r\n-->\r\n”); out.write(“</style>\r\n”); out.write(“</head>\r\n\r\n”); out.write(“<body>\r\n\r\n”);
9

out.write(“<table width=\”95%\” height=\”264\” border=\”o\” cellpadding=\”3\” cellspacing=\”0\”>\r\n “); out.write(“<tr>\r\n “); out.write(“<td>“); out.write(“<div align=\”center\” class=\”style1\”>Distance Training System “); out.write(“</div>“); out.write(“</td>\r\n “); out.write(“</tr>\r\n “); out.write(“<tr>\r\n “);
The above code demonstrates that if it is necessary to general HTML, it must be
written to the out object.
On the other hand, JSP interchanges the roles of output and application logic.
JavaServer pages are written in HTML with java code embedded in special HTML tags.
For example, consider the JavaServer page (Home_Page.jsp) that corresponds to the
above servlet written in Dreamweaver’s IDE:
import=“java.sql.*” errorPage=““ %> <!DOCTYPE html PUBLIC “-//W3C//DTD XHTML 1.0 Transitional//EN” “http://www.w3.org/TR/xhtml1/DTD/xhtml1-transitional.dtd”> <html xmlns=“http://www.w3.org/1999/xhtml”> <head> <title>Home Page</title> <meta http-equiv=“Content-Type” content=“text/html; charset=iso-8859-1” /> <link href=“DTStylesheet.css” rel=“stylesheet” type=“text/css” /> <style type=“text/css”> <!-- .style1 { font-size: 24pt; color: #FF0000; } body { background-color: #CCFFCC; } .style2 {color: #FF0000} .style4 {font-size: 14} --> </style> </head> <body> <table width=“95%” height=“264” border=“o” cellpadding=“3” cellspacing=“0”> <tr> <td><div align=“center” class=“style1”>Distance Training System </div></td> </tr> <tr>
10
<td><hr /> <h3 align=“center”> DTS Home Page </h3> <hr /> <p align=“left”><span class=“style2”> <span class=“style4”> ***Welcome to the DTS. Select an Operation from the List below and continue***</span></span></p></td> </tr> <tr> <td><table width=“70%” border=“o” align=“center” cellpadding=“3” cellspacing=“0”> <tr> <td width=“76%”>Search(<strong>Anyone</strong>)</td> <td width=“24%”><object classid=“clsid:D27CDB6E-AE6D-11cf-96B8-444553540000” codebase=“http://download.macromedia.com/pub/shockwave/cabs/flash/swflash.cab#version=5,0,0,0” name=“Search” width=“100” height=“23” id=“Search”> <param name=“movie” value=“button1.swf” /> <param name=“quality” value=“high” /> <param name=“bgcolor” value=“#9CFF9C” /> <embed src=“button1.swf” width=“100” height=“23” quality=“high” pluginspage=“http://www.macromedia.com/shockwave/download/index.cgi?P1_Prod_Version=ShockwaveFlash” type=“application/x-shockwave-flash” bgcolor=“#9CFF9C” name=“Search”></embed> </object></td> </tr> <tr> <td>Log In </td> <td><object classid=“clsid:D27CDB6E-AE6D-11cf-96B8-444553540000” codebase=“http://download.macromedia.com/pub/shockwave/cabs/flash/swflash.cab#version=5,0,0,0” width=“103” height=“24”> <param name=“movie” value=“button5.swf” /> <param name=“quality” value=“high” /> <param name=“bgcolor” value=“#9CFF9C” /> <embed src=“button5.swf” quality=“high” pluginspage=“http://www.macromedia.com/shockwave/download/index.cgi?P1_Prod_Version=ShockwaveFlash” type=“application/x-shockwave-flash” width=“103” height=“24” bgcolor=“#9CFF9C”></embed> </object></td> </tr> <tr> <td>Alter the Database (only <strong>Professors</strong> and other legitimate users) </td> <td><object classid=“clsid:D27CDB6E-AE6D-11cf-96B8-444553540000” codebase=“http://download.macromedia.com/pub/shockwave/cabs/flash/swflash.cab#version=5,0,0,0” width=“103” height=“24”> <param name=“BGCOLOR” value=“#9CFF9C” /> <param name=“movie” value=“button6.swf” /> <param name=“quality” value=“high” /> <embed src=“button6.swf” width=“103” height=“24” quality=“high” pluginspage=“http://www.macromedia.com/shockwave/download/index.cgi?P1_
11

Prod_Version=ShockwaveFlash” type=“application/x-shockwave-flash” bgcolor=“#9CFF9C” ></embed> </object></td> </tr> <tr> <td>Register (only <strong>Admin</strong> and other legitimate users) </td> <td><object classid=“clsid:D27CDB6E-AE6D-11cf-96B8-444553540000” codebase=“http://download.macromedia.com/pub/shockwave/cabs/flash/swflash.cab#version=5,0,0,0” width=“103” height=“24”> <param name=“BGCOLOR” value=“#9CFF9C” /> <param name=“movie” value=“button7.swf” /> <param name=“quality” value=“high” /> <embed src=“button7.swf” width=“103” height=“24” quality=“high” pluginspage=“http://www.macromedia.com/shockwave/download/index.cgi?P1_Prod_Version=ShockwaveFlash” type=“application/x-shockwave-flash” bgcolor=“#9CFF9C” ></embed> </object></td> </tr> </table></td> </tr> </table> <p> </p> <p>Current time: <%=new java.util.Date() %></p> <p>Server: <%=application.getServerInfo() %></p> <p><%! private int accesscount=0;%> Accesses to site since server reboot: <%=++accesscount%></p> </body>
</html>
A comparison of these two files demonstrates how different they are from each
other. However, they are identical behind the scenes. JSP is another way of writing
servlets. JSP was used to build the application, but the JSP webpages written were
translated into servlets, which were compiled and it is the servlets that run at each
request. Why not use servlets instead of JSP? Servlets are better suited for performing
complex application logic, whereas this product is focuses on presentation with some
logic inside, not to mention that using Dreamweaver simplified the creation and
reusability of the XHTML.
XHTML is the current standard for HTML which brings HTML in line with
XML. Thus, the relationship between the two is historical: XHTML replaces HTML. The
use of the XHTML makes it possible to describe the structure of the webpage using
headings (<h1>, <h2> etc), lists (<ol>, <ul>, <li>), body text (<p>) and so forth, but
12

presentation tags are no longer allowed. CSS and XSLT handle these tasks. The
advantage of XHTML is its backward-compatibility. Browsers created before XHTML
specification can still display XHTML almost perfectly.
B. THE JSP SELECTION
JSP was chosen over ASP for the following reasons:
• Open Approach.
JSP technology is designed to be both platform and server independent, created
with input from a broader community of tool, server, and database vendors. Instead of
being tied to a single platform or vendor, JSP technology can run on any web server and
is supported by a wide variety of tools from multiple vendors. Specifically, for the used
web server, ASP works only with Microsoft’s IIS, whereas JSP works with any web
server, including Apache, Netscape, and IIS.
• From the developer’s perspective.
• Extensible JSP tags: While both ASP and JSP use a combination of tags and scripting to create dynamic web pages, JSP technology enables developers to extend the JSP tags available. Thus, the JSP specification prescribes a core set of tags, but it is possible to create new ones through custom tag libraries.
• Reusability across platforms: JSP technology emphases components (JavaBeans, Enterprise JavaBeans, custom JSP tags) over scripting. These components are reusable across platforms. On the other hand, ASP does not support any cross-platform component.
• Java utilization: The use of the Java programming language in the JSP technology makes the developer’s work easier because it provides superior performance, power and scalability over the other scripting interpreted languages (VBScript or javascript).
JSP was selected over Microsoft’s new technology .NET because a lack of
familiarity with .NET’s C# language, and secondly, it was possible that the final product
would not work on multiple servers and operating systems.The same reasons led to the
deployment of JSP over PHP. PHP requires learning an entirely new, less widely used
language, not to mention that JSP is much more supported by a wide range of tool
vendors than is PHP.
13

Finally, JSP was chosen over servlets because this application is more concerned
about the presentation rather than performing complicated logic computations. Although
JSP provides exactly the same capabilities as the servlets,JSP was selected for the
following reasons:
• Dreamweaver usage: Macromedia’s Dreamweaver was used for the JSP pages. It was not possible to take advantage of the facilities that a web-site development tool provides by writing servlets. For instance, be cognizant of the JSP tags library when developing an application writing only Java code.
• Presentation issues: It was easier to write, reuse and maintain the XHTML using JSP because it avoided the inconvenient print statements to generate XHTML along with the error-prone and time-consuming characters (semicolons, backslashes etc.) necessary to produce XHTML output using servlets.
• Distinguishing application parts: After creating the main page template and forms layout, the presentation layer is no longer worrisome and the focus is then on the project logic (database accessibility, queries and so forth).
The aforementioned reasons led to the choice of the JSP server model to develop
the application instead of the other competing technologies. As a result, the JSP
compilation process is now presented.
Figure 3 shows the process by which JSP pages are compiled. When a request for
a JSP page is received, the web server, (Tomcat in this case, finds the compiled version
of the page and checks to determine whether it is current. This is done by looking for an
uncompiled version of the page with a creation date and time later that the compiled
page’s creation date and time. If the page is not current, the new page is parsed and
transformed into a java source file and that source file is then compiled. Note that this
compile happens only once as long as the server it still running and the java source is not
changed. However, the server will recompile the JSP source the next time the page is
requested if a change is made to it. The servlet is then loaded and executed. If the
compiled JSP page is current, then it is loaded into memory and executed. If it is already
in memory, then it is simply executed.
14

JSPServlet
Current?
JSP Page Request
Parse JSP and Create Java Source File
No
JSPServlet inMemory?
Yes
Compile Java Source File
Load the JSP servlet
No
Execute the JSP servlet
JSP Page Response
Figure 3. JSP Compilation Process (From Ref. 3)
15

THIS PAGE INTENTIONALLY LEFT BLANK
16

III. JSP SYNTAX BASICS
The basics of the JSP structure are presented before describing the application in
order to provide the necessary understanding of the position of the scripting elements
along with the code structure and style of a JSP webpage. Generally, a JSP page consists
of static content, JSP directives, Java code and JSP tags. Static content is the XHTML
into which the JSP code is embedded. Consequently, the other basic syntax elements
using examples from the application are then offered.
A. JAVA CODE
JSP is used over servlets because of the desire to build user interfaces with some
logic for the application. Although putting a small amount of code in the web pages
works fine, using large pieces of java code makes the code view difficult to read and hard
to reuse. In other words, the fewer lines of java code in the JSP page the better.
Otherwise, this would defeat the purpose of using JSPs over the java Servlet API. As
stated earlier, the code written in the webpage is inserted into the servlet, which is
generated from the webpage and stored in a different directory on the Web server. It is
possible to insert Java code using JSP scripting elements in the form of expressions,
scriptlets and declarations.
1. Expressions
Java code between <%= and %> without semicolons is called a JSP Expression.
The results of evaluating a expression performed at runtime when the page is requested
are converted to a string and directly included within the output page. Typically,
expressions are used to display simple values of variables or return values by invoking a
bean's getter methods discussed later in this chapter. For example, consider the following
JSP Expression from the Home_Page.jsp:
<p>Current time: <%=new java.util.Date() %></p>
<p>Server: <%=application.getServerInfo() %></p>
17

The first line outputs the current date and time whereas the second line outputs
information about the Web server. Expressions have access to predefined variables such
as request, response, session and so forth. Specifically, the “application” implicit object is
used to extract web server information, which is a predefined variable representing the
ServletContext obtained from the servlet configuration object.
2. Scriptlets
JSP code fragments or scriptlets are embedded within <% ... %> tags. This Java
code is run when the request is serviced by the JSP page, and it is possible to have almost
any valid Java code within a scriptlet, and it is not limited to one line of source code.
Scriptlets have access to the same predefined variables as JSP expressions. For instance,
the following code fragment entered in the Course_Request.jsp file of the application to
handle the radio button responses of the Search.jsp page is a scriptlet example:
<%
int searchMethodInt=1;
String searchMethodStr=request.getQueryString( );
if((searchMethodStr.equals(“radiobutton=1&Submit=Submit”))){
response.sendRedirect(“Keyword_Request.jsp”);
}
}
%>
In this particular case, the getQueryString( ) returns the form data. Thus, if
“radiobutton=0&Submit=Submit”, then the redirect is to Course_Request.jsp. Otherwise,
if “radiobutton=1&Submit=Submit”, the redirect is to Keyword_Request.jsp and it is
possible to search for information using a specific word or phrase. The
sendRedirect(Sting url) method generates a 302 response code along with a Location
header giving the URL of the new document. Either an absolute or a relative URL is
permitted. The 302 response code is one of the HTTP’s status codes, which allows the
browser to connect to a new location.
18

3. Declarations
The JSP declarations make it possible to define page-level variables to save
information or define supporting methods that the rest of a JSP page may need. A
declaration has the following form:
<%! Field or Method Definition %>
They are inserted into the main body of the servlet but out of the _jspService
method and they must not override the standard servlet life-cycle methods such as
service, doGet, init and so on. JSP declarations do not produce any output but are used in
conjunction with JSP expressions or scriptlets. In a JSP declaration, it is possible to write
instance variables, method definitions or anything that to be put in an existing method.
However, if there are a large number of method definitions put in the JSP code, it would
be easier and more convenient to use separate Java classes (utility classes) and not use
JSP declarations. Thus, the reusability of the classes are improved and the testing of the
webpage easier because of clean and readable code.
Consider the following JSP declaration from the Home_Page.jsp of the
application:
<p><%! private int accesscount=0;%>
Accesses to site since server reboot:
<%=++accesscount%></p>
First of all, from the above example, notice that since declarations do not generate
any output, the JSP declaration is used in conjunction with a JSP expression (third line) in
order to obtain the result of this code snippet. The second observation is a counter was
created which counts the number of times that the website is accessed in just two lines of
code. When multiple users request access to a webpage, only one instance of the servlet
that corresponds to that specific webpage is created, and each user “gets” one thread
using the service method of that servlet instance.
19

4. Java Beans
Beans are Java classes that are written in order to overcome the disadvantages of
scriptlets and JSP expressions for large applications. They are written in standard format,
that is, a bean class must have an explicitly default constructor, no instance variables and
accessors along with mutators for accessing the values of the class. Although Java Beans
were not used in this project, Dreamweaver provides the possibility for inserting a Java
Bean in a webpage using the following interface or a collection of beans as shown below:
Figure 4. Java Bean Interface
Figure 5. Java Bean Collection
20

B. JSP DIRECTIVES
JSP directives appear between <%@ and %> markers. They indicate directives to
the server prior to compiling the JSP page and affect the overall structure of the servlet
that results from the JSP page. In JSP, there are three main types of directives: page,
include and taglib. The “page” directive defines the language used in the webpage, the
content type of the document, import statements and the error page attribute, which
specifies a JSP page that should process any exceptions thrown but not caught in the
current page. They are usually placed at the beginning of the code and they remain the
same for all the web pages of the application. The following page JSP directive is
provided by the Dreamweaver IDE when creating a new webpage:
<%@ page contentType=“text/html; charset=iso-8859-1” language=“java”
import=“java.sql.*” errorPage=““ %>
The above directive is not unchangeable. If the desire is to import some helper
classes to the document, it is possible to organize them into packages and then import
these packages to the document. For instance, importing a helper package to the above
page directive would be written as follows:
<%@ page contentType=“text/html; charset=iso-8859-1” language=“java”
import=“java.sql.*, helperPackage.*” errorPage=““ %>
It is worth mentioning that the import attribute is the only page attribute allowed
to appear multiple times within the same document.
The second JSP directive, “include”, makes it possible to insert a file into the JSP
page at the time the JSP file is translated into the servlet. This directive’s main advantage
is that the attributes and characteristics inserted from the code of the secondary page
completely affects the requested (main) page. The disadvantage it is necessary to update
the main page whenever any changes are made to the included file. However,
Dreamweaver makes the necessary corrections automatically. In this project, the directive
used is as follows:
<%@ include file=“Connections/conne.jsp” %>
21

In this particular case, after establishing the connection to the database and saving
it as conne.jsp, to be discussed later in more detail, Dreamweaver automatically creates a
directory for this connection. As a result, in order to have access to the database records,
the MySQL driver code is included to every webpage that must have access to the
DBMS.
The third JSP directive, taglib, defines custom markup tags. Specifically, this
directive tells the server where to find definitions for the custom tags in use in a specific
page. This type of directive was not used in this application.
Finally, the JSP tag is the last element of a JSP page structure A JSP tag is an
XML-like interface in a library of Java code. The JSP specification prescribes a set of
tags, but it is possible to create the tags through custom tag libraries. When desiring to
add the tag in a file, the class that implements a specific API is written and then that class
is mapped to a tag name via an XML descriptor file. The concept of the JSP tag was not
expounded upon in this thesis since self-defined tags were not used except for those that
Dreamweaver provided automatically.
22

IV. DEFINING THE PROJECT
A. SUPPORTING TECHNOLOGY
Generally, before starting to develop any web based application, it is appropriate
to make some architectural decisions. First, it is necessary to decide which architecture to
use, for example client/server, three-tier, or peer-to-peer. For this application, the simple
website architecture (three-tier) is selected, which is perhaps the simplest and most
familiar to Internet developers. This first step is important because it is resulted after
understanding the requirements and the basic enterprise platform for the organization.
The next step is to determinate the tools and the components that constitute this project.
For the completion of this project, Dreamweaver MX2004 was used as the web
development tool. Except for the page layout facilities provided to the developer by using
this tool, it is possible to take advantage of one of its application server components,
which is (JSP for this project. The other components participating in this application are
the web server, which is Tomcat for this project, and the database server (MySQL)
described in the following sections.
1. MySQL
MySQL is a multithreading relational database management system. Its main
advantage over the other commercial database systems is that it is free and fast. Although
the commercial database engines such as Oracle 9i, Microsoft SQL Server or Sybase
support every feature imaginable, there is a performance cost to pay for these features.
None of these database engines can compete with MySQL for read-heavy database
applications basically due to MySQL’s limited transaction management and logging
capabilities. However, due to the above limitations, MySQL is very fast for pure query
applications. Therefore, there are web-oriented data publishing companies that maintain
their databases using Oracle, but download them to MySQL for query publishing on their
web servers.
The binary distribution of MySQL 4.0 for Windows was downloaded from
MySQL’s downloads page: http://www.mysql.com/downloads. The default directory
C:\mysql was used to install the database software. It could be installed in a different
23

directory, but in this case, it would have been necessary to create a configuration file
pointing to the directory chosen. These queries are run using the command line, which
appears if the mysql.exe is run in the C:\mysql\bin. In order to keep track of the relational
schema and the data entered in the relations, a text editor (distance_training.sql) was
created, which was kept in the C:\mysql directory. Consequently, in order to generate the
distance_training database in the copy of MySQL, the following source command as
shown in the screenshot was run:
Figure 6. MySQL Source Command
The source command is used to run SQL commands stored in an external
document. All the necessary code of the database is stored in the text file
distance_training.sql and using the source command tells MySQL to generate relations
and populate these relations according to the information specified in the text file. When
running the source command, a number of success messages are obtained that indicate
that the distance_training database is properly installed and running in MySQL:
24

Figure 7. Success Messages
2. Web Server- Tomcat
After the database server, the Tomcat zip file was downloaded as the web server
from http://jakarta.apache.org/tomcat/. Tomcat was configured as a standalone server for
servlet and JSP development following the steps shown below:
• Setting the JAVA_HOME Variable
The most critical Tomcat setting is the JAVA_HOME Variable because improper
setting of this variable stops Tomcat from finding the classes used by javac, and
therefore, prevents Tomcat from handling JSP pages. On this platform (Windows XP
Pro), this variable is set as follows:
Figure 8. Variable
25

• Specifying the server port.
Tomcat uses port 8080 by default in order to avoid conflicts with other servers
running on the system, such as IIS, which is registered on port 80. In order to ensure that
the Web server’s port is set to 8080 or if it is necessary to modify the port number, the
Connector element in the install_dir/conf/server.xml verifies this. In the web server, the
following applied:
<Connector className=“org.apache.coyote.tomcat4.CoyoteConnector”
port=“8080” minProcessors=“5” maxProcessors=“75”
enableLookups=“true” redirectPort=“8443”
acceptCount=“100” debug=“0” connectionTimeout=“20000”
useURIValidationHack=“false” disableUploadTimeout=“true” />
• Enabling Servlet Reloading
As stated in Chapter II (The JSP Selection) which describes the JSP compilation
process, when a request for a JSP page is received, the web server (Tomcat) finds the
compiled version of the page and checks to determine whether it is current by looking for
an uncompiled version of the page having a creation date and time later that the compiled
page’s creation date and time. Although this feature may slightly degrade performance, it
is very useful from the programmer’s point of view because there is no need to restart the
server every time a servlet is compiled. By looking at the install_dir/conf/server.xml
directory, note that the reloadable attribute is set to true. Check the alignment throughout.
<DefaultContext reloadable=“true”/>
• Enabling the ROOT Context
The ROOT Context is the default web application in Tomcat, which is already
enabled in Tomcat 4.0 and some versions of Tomcat 4.1. If, however, it is not enabled in
this server, it is possible to uncomment the following line in the
install_dir/conf/server.xml directory:
26

<Context path=““ docBase=“ROOT”
debug=“0”/>
• Turning on the Invoker Servlet
The invoker servlet makes it possible to run servlets without making any change
to the WEB-INF/web.xml file in the Web application. In this project, the
/servlet/*servlet-mapping element is uncommented in install_dir/conf/web.xml.
The local deployment environment is now finished. It is next necessary to create
the personal development environment as well, in order to be able to compile the servlets
generated from the JSP pages. Configuring the development environment involves the
following steps:
• Creating a Development Directory
In the C:\TOMCAT\webapps\ROOT directory, a new location is created called
website. In this directory, all the JSP documents, flash objects, images, Cascading Style
Sheet documents and database are stored. Every file participating in the project is stored
in this directory.
• Setting Our Classpath
This variable is set in order to tell the Java compiler (javac) where to find the
servlet classes. Before setting this variable, only the web server knows about the servlet
classes. Thus, if the classpath is not set in the system, an attempt is made to compile
servlets, tag libraries or other classes using the servlet API. In this server, the JAR files
containing the servlet API are located in C:\TOMCAT\server\lib.
Figure 9. Setting the Class Path
27

In addition to the servlet JAR file, it is also necessary to include both the
development and the current directory “.” in the classpath, as shown below.
Figure 10. Including the Current Directory in the Classpath
• Making shortcuts to start and stop the server
It was determined that it is more convenient to place shortcuts to the server startup
and shutdown icons on the desktop in order to avoid going to the C:\TOMCAT\bin
frequently to start and stop the server.
• Testing the Setup
Finally, before starting with Dreamweaver, the configuration was tested by
verifying the SDK installation, checking the basic server configuration (access to
Tomcat’s home page), and deploying some simple servlets and JSP Pages.
Lastly, the servlet source and their classes generated from the JSP Pages are
stored in the C:\TOMCAT\work\Standalone\localhost\_\website directory.
During the development of this project, it was necessary to refer to these files frequently
in order to understand what is going on behind the scenes and for troubleshooting
problems on the webpages.
3. Dreamweaver MX
Macromedia Dreamweaver MX is a complete web application development tool
that combines many critical web authoring tools such as databases, SQL, Java, XML,
XSLT and so forth with application server technologies such as JSP, ASP.NET, PHP and
others. Dreamweaver’s main interface components will be referred to during the
development of this application. After configuring the database server and setting up the
28

JSP engine, the first step is to set Dreamweaver to work with dynamic webpages. A
location in the ROOT directory of the web server (website) was created and the
application was named DistanceTraining, as shown below:
Figure 11. Site Definition-Local Info
This thesis will not describe Dreamweaver’s user interface. Many books are
available that can assist in learning Dreamweaver’s components and features. Only its
main components and tools that helped to build a data-driven web application are
described. Besides, Dreamweaver was chosen in order to demonstrate the possibility of
developing a Web product prototype quickly and correctly as long as a reliable and clean
database model is built. Additionally, developing a static website, which is an application
not interacting with any data source, is possible by using some other lightweight HTML
text editors such as FrontPage, BBEdit or HomeSite.
29

The selection of the Testing Server from the Category list provides the next user
interface:
Figure 12. Site Definition-Setting the Testing Sever
The Testing Server enables Dreamweaver to test files after they have been
processed on the server and thus verify that they actually work. From the first drop-down
menu, the server model that will be used is selected , which is JSP for this project. In the
Access drop-down menu, Local/Network is chosen because the application was
developed on a computer with a local version of a standalone Tomcat installed. In the
testing server folder textfield, the location of the server is indicated where the files are
stored. When navigating the application, the web pages from this directory will be those
served. The website’s URL is entered in the URL prefix. The expression
30

“localhost:8080” is a shortcut that activates Tomcat on the machine on the specified port,
and tells it to look in its root directory, which is ROOT for this project. Finally, before
connecting to the database, it is necessary to handle the formatting of the web pages. This
can be done using Cascading Style Sheets (CSS), which makes it possible to maintain the
same appearance throughout the website without making formatting adjustments for
every webpage in the website. An external style sheet was used, which is stored outside
the web pages and is attached to every webpage in order to maintain the same formatting
style on the web pages. In this project, this external style sheet file is named
DTStylesheet.css.
4. JDBC Connector
JDBC, as with all Java APIs, is a set of classes and interfaces that work together
to support a specific set of functionality, which in the case of JDBC, is database access.
By using the JDBC API, it is possible to access a variety of SQL databases with the same
Java syntax. Java combines the classes that form the JDBC API in the java.sql package,
which is imported automatically in Dreamweaver as long as a connection is defined to the
database. It is important to note that JDBC standardizes the approach for connecting to a
RDBMS and does not attempt to impose a specific SQL syntax. Most of the classes in the
java.sql package are interfaces. In other words, they do not provide implementation
details. Individual database vendors provide the implementations of these interfaces in
the form of a JDBC driver. The JDBC API makes it possible to do three things:
• Establish a connection with a database or access any tabular data source
• Send SQL statements
• Process the results
Figure 13 shows the JDBC architecture.
31

Application
Data source
JDBC API JDBC APIJDBC API
MySQL JDBC driver
Oracle JDBC driver
MS SQL JDBC driver
Figure 13. JDBC Architecture (From Ref. 1)
Figure 13 illustrates the general JDBC architecture from the application’s
perspective. From the application, methods of the JDBC API are called. The
implementation written in those methods actually performs the database calls.
In order to connect the web pages with the MySQL database using
Dreamweaver’s interface, the Databases panel is used in the Application panel group to
the right of the IDE, and the Connection (+) button is selected. Next, it is necessary to
choose one connection type from among the other options.
32

Figure 14. Connecting Our Web Pages to the Database Server
“MySQL Driver (MySQL)” is selected and the textfields of the window filled that
return the necessary information, as shown below:
Figure 15. Setting Up the MySQL Driver
33

As seen, the connection name in the first textfield (conne) is passed. The GNU
driver is selected with the implementation specified in the second textfield (Driver) from
the DriverManager class of the java.sql package. MySQL also contains the Caucho and
the twz driver types. This Driver provides the connection to the database based on the
URL passed on the third textfield (URL). A JDBC URL appears in the form of
jdbc:protocol:subprotocol. The protocol of the GNU Driver is mysql, whereas the
subprotocol provides the implementation-specific connection data. Thus, the hostname
(localhost) and the database name (distance_training) is passed. The port is also required,
but in this case, the database engine is running on the default port (8080).
It is worth mentioning that it does not matter which page of the website is open
when initially creating the connection. Dreamweaver sets the connection for the whole
website creating a new folder in the website, called Connections, with a new file inside
called conne.jsp. This file holds the information previously passed in the database
window: <% // FileName=“mysql_jdbc_conn.htm” // Type=“JDBC” ““ // DesigntimeType=“JDBC” // HTTP=“true” // Catalog=““ // Schema=““ String MM_conne_DRIVER = “org.gjt.mm.mysql.Driver”; String MM_conne_USERNAME = ““; String MM_conne_PASSWORD = ““; String MM_conne_STRING = “jdbc:mysql://localhost/distance_training”; %>
B. PROJECT DESCRIPTION
1. The Distance-Training Application
In recent years, the field of educational technology has witnessed the emergence
of many e-learning tools (tools for instruction that use the Internet) as well as many
collaborative learning environments for online instruction. Basically, for economical and
flexibility reasons, the Distance Learning model should be applied to each country’s
Armed Forces without discarding the traditional learning method. This achievement will
make it possible to have a greater effectiveness and more learner-centric training.
Although the data model is created to work as a distance learning application, it can also
34

be transformed to deliver standardized individual, self-development, and small group
training to soldiers through the application of networked communication systems. This
can be accomplished by following a different hierarchy, for instance, a battalion-
company-platoon-troop-soldier. This adaptability is significant because never assume that
what works well in education will also necessarily work well in training.
The conceptual schema works fine for short-term military schools for both
officers and noncommissioned officers. Every Army branch supervision (e.g., signal
corps) has the possibility to train its personnel while they remain assigned to their units.
For familiarity reasons, the model was adapted to a university educational environment.
There are two paths to capture the information stored in the “section” and
“image” entity classes. The first path is through users→ course→subject→
topic→section→image. This path can be used by professors responsible for the course or
by students who have enrolled to attend one or more classes and they are familiar with
the official education management system of the university. The second path,
category→section→image, can be used by users not familiar with the navigation flow of
the first path. External users are able to use key words to capture the desired information.
Both types of users can use either path but only the users who belong to the professors’
user-group have permissions to insert, update, or delete information through forms.
A Learning Management System, such as NPS’s Blackboard, is appropriate for
those student/users enrolled to attend specific classes. Users in the DTS do not need to
take advantage of the full spectrum that a LMS such as Blackboard provides (grade
reports, participation records, etc.). They simply want to retrieve their desired
information by accessing the content without being necessarily part of the organization
that uses the DTS.
2. UML Diagram
There are many ways to represent the conceptual schema. The fundamental way is
the Entity- Relationship (E-R) model with the IDEF1X national standard and the UML as
its variants. UML was selected because it is the basis of the object-oriented design.
35

users
user_id (PK)user_fnameuser_lnameuser_phoneuser_addressuser_emailuser_usernameuser_pwduser_group
course
course_id (PK)course_namecourse_code
profcourses
teachid (PK)prof_num (FK)course_num (FK)room
subjectsubject_id (PK)subject_namecourse_num (FK)
topictopic_id (PK)topic_nametopic_descrsubject_num (FK)
topicsectionts_id (PK)topic_num (FK)section_num (FK)
section
section_id (PK)section_namesection_contentsection_Keywordsection_authorcategory_num (FK)
sectionimagesec_image_id (PK)section_num (FK)image_num (FK)
imageimage_id (PK)image_nameimage_desimage_authorimage_src
category
category_id (PK)category_name
Figure 16. UML for the DTS Application
3. Relationships and Relation Schema
Many-to-Many.
• A user who belongs to the professor’s user group can teach many courses and one course can be taught by many professors. The join table profcourses was used to model this many-to-many relationship.
• A topic may include many sections and one section may be included in many topics. In other words, the same section can be used by different topics, and as a result, by different courses. Thus, different professors can
36

use the same section in their course. For instance, a professor that teaches databases in the IS department can use sections (paragraphs) from a database course taught in the CS department. The join table topicsection was used to model this many-to-many relationship.
• A section may have many images and an image can be included in many sections. The join table sectionimage was used to model this many-to-many relationship and transform it to a one-to-many.
One-to-Many
• A course contains many subjects but one subject is part of one course.
• A subject contains many topics but one topic is part of one subject.
• A category contains many sections but one section is part of one category.
Successively, the relation schema is described:
• users (user_id: INT, user_fname: VARCHAR(30), user_lname: VARCHAR(30), user_phone: CHAR(20), user_address: VARCHAR(30), user_username: CHAR(8), user_pwd: CHAR(10), user_group: CHAR(10)).
• course (course_id: INT, course_name: TEXT, course_code: TEXT).
• profcourses (teachid: INT, prof_num: INT (FK), course_num: INT (FK), room: CHAR(20)).
• subject (subject_id: INT, subject_name: CHAR(30), subject_descr: VARCHAR(50), course_num: INT (FK)).
• topic (topic_id: INT, topic_name: VARCHAR(30), topic_desc: VARCHAR(60), subject_num: INT (FK)).
• section (section_id: INT, section_name: CHAR(50), section_content: MEDIUMTEXT, section_keyword: CHAR(100), section_author: MEDIUMTEXT, category_num: INT (FK)).
• topicsection (ts_id: INT, topic_num: INT (FK), section_num: INT (FK)).
• category (category_id: INT, category_name: VARCHAR(30)).
• image (image_id: INT, image_name: CHAR(30), image_des: CHAR(30), image_author: MEDIUMTEXT, image_src: VARCHAR(100)).
• sectionimage (sec_image_id: INT, section_num: INT (FK), image_num: INT (FK)).
C. XML USAGE
A dilemma was faced in the beginning of this application.Is it better to store
information in XML documents or use the relational model? Furthermore, since it was
37

necessary to have a database to store the data, could XML be used as the database? The
answer to the last question is: “Sort of”. On the plus side, XML provides many of the
things found in databases: storage (XML documents), schemas (DTDs, XML Schemas,
and so forth), query languages (XQuery, XPath, XQL, etc.), and programming interfaces
(SAX, DOM, JDOM). Conversely, it lacks many of the features found in real databases:
efficient storage, indexes, security, transactions and data integrity, multi-user access,
triggers, and queries across multiple documents. Thus, the first general reason leading to
the adoption of the relational model is that while it may be possible to use an XML
document or documents as a database in environments with small amounts of data, few
users, and modest performance requirements, this will fail in most production
environments with many users, strict data integrity requirements, and the need for good
performance.
Another issue taken into consideration before starting was the type of data to
handle: data-centric or document-centric data. Data-centric is the kind of data
characterized by a fairly regular structure, fine-grained data and little or no mixed
content. Examples of data-centric documents are sales orders, flight schedules, scientific
data, and stock quotes. On the other hand, document-centric is the kind of data
characterized by less regular or irregular structure, larger grained data and a large amount
of mixed content. Examples are books, email, advertisements, and almost any hand-
written XHTML document.
38
The above distinction is important because if the data is data-centric, a good
solution is to store the data in a relational database with XML capabilities such as SQL-
Server and Oracle, or in a relational database and use software to transfer the data
between XML documents and the database. On the other hand, if the data is document-
centric, a good solution is to store the data in a native XML Database. The data in this
project is more document-centric than data-centric. A relational database with XML
capabilities was not utilized because these products are not free and when they are
upgraded (for instance, Oracle 8i to Oracle 9i), it is difficult and sometimes painful to
transfer the information from one DBMS to the other. Additionally, a Native XML
database was not used because of the lack of familiarity with the necessary software AG
(Tamino), which allows someone to access and manipulate data in a XML database.

Nevertheless, depicting the application using XML can be provided in the
following document edited with XMLSpy:
<?xml version=“1.0” encoding=“UTF-8” ?> - <!-- MAJOR Nick Pogkas Description: This is an XML document that corresponds to one section of the DTS application
--> - <Course courseCode=“cs2900” courseName=“Introduction to Java” instructor=“Otani, Thomas”> - <Contents> - <Subject subjectName=“Chapter 1: Introduction to Object-Oriented Programming and Software Development”> - <Topic topicName=“Classes and Objects”> - <Section sectionName=“Object-Oriented Programming Basics”> 
class. Once the class is defined, we can create as many objects of the class as a program requires.</p> </BODY> </HTML> ]] </Section> </Topic> <Topic topicName=“Messages and Methods” /> <Topic topicName=“Class and Instance Data Values” /> <Topic topicName=“Inheritance” /> <Topic topicName=“Software Engineering and Software Life Cycle” /> </Subject> <Subject subjectName=“Chapter 2: Getting Started with Java” /> <Subject subjectName=“Chapter 3: Numerical Data” /> <Subject subjectName=“Chapter 4: Defining Your Own Classes” /> <Subject subjectName=“Chapter 5: Selection Statements” /> <Subject subjectName=“Chapter 6: Repetition Statements” /> <Subject subjectName=“Chapter 7: Event-Driven Programming and Basic GUI Objects” /> <Subject subjectName=“Chapter 8: Exceptions and Assertions” /> <Subject subjectName=“Chapter 9: Characters and Strings” /> <Subject subjectName=“Chapter 10: Arrays” /> <Subject subjectName=“Chapter 11:Sorting and Searching” /> <Subject subjectName=“Chapter 12: File Input and Output” /> <Subject subjectName=“Chapter 13: Inheritance and Polymorphism” /> <Subject subjectName=“Chapter 14: Advanced GUI” /> <Subject subjectName=“Chapter 15: Recursive Algorithms” /> </Contents> </Course>
In conclusion, although native XML databases offer the advantage of speed over
traditional databases, it is too new to be of practical use at this stage. XML is not just an
extension of HTML. The complexities of this emerging technology require extensive
training. A year’s worth of additional courses in XML or XML-oriented topics would be
helpful and necessary to employ the rich potential of XML. It is beyond the focus of this
thesis to expound further upon the strengths and weaknesses of employing purely XML
databases.
40

V. APPLICATION FILE ANALYSIS
This section describes the main files constituting the application and examines
some of the most important Dreamweaver features that facilitated the work on this
project.
A. USER AUTHENTICATION INTERFACE
One of the most common tasks for web developers is the implementation of a
framework that allows users to register/log into a web site. Pages in a website are divided
into those that are publicly accessible and those that require log-in by users to.
When a user wants to access the website, the default page appears, which is the
“Home_Page.jsp”. From this point, in order to proceed, it is necessary to log-in or
register if this is the first log-in in order to access the site’s information.
1. Home_Page.jsp
The default page of this application is the Home_Page.jsp. It is mainly a static
page that consists of four buttons (flash objects). An event (a new page) is generated
upon pressing any of these buttons. Each button is registered to a specific page which
opens a path to a unique operation (search, log in, alter and registration). The other
features illustrated in this page (current time, type of server and counter) are JSP
Expression, scriptlet and Declaration JSP elements, respectively that are described
previously in Chapter III, JSP SYNTAX BASICS.
41

Figure 17. Home (Default) Page
It is obvious that the capabilities of the default page can be extended by adding
more buttons and dynamic content but these operations are basic and the most usual in
every content management website.
2. Registration.jsp
If a user has not visited the site previously, it is necessary register. The
Registration.jsp and Login.jsp pages are the main pages that constitute the user
authentication part of the application. User authentication is required in order to access
any part of the website because four groups of users are distinguished:
• The administrator authorized to maintain the normal operation of the site, register new users and so forth.
• The professors responsible for the site content (insert, update or delete course material).
• The students registered to attend a class and use the site’s content to learn specific information about a subject of this course or learning material included in other courses.
42

• Other legitimate users interested in learning information about a specific topic.
This is not completely correct because unregistered users cannot determine in
advance if they are interested in the information provided by the DTS. However,
registration is free, and DTS only uses the information for marketing and promotional
reasons to learn more about the users.
Since the website consists entirely of restricted pages, the users can access them
as long as they have successfully logged in. The log-in process presupposes the
registration process. The registration process in this application is accomplished by
creating a registration form where the user can insert information to the database as
shown below.
Figure 18. Registration Page
The data passed in the text fields of the registration form update the “users”
relation of the database by adding a record to it. This is a matching activity. One item of
data from a form is matched to one field in the destination table, which is accomplished
by applying a Server behavior to the registration form by using the “Insert Record” of
Dreamweaver’s Server Behaviors panel.
43

Figure 19. The “Insert Record” Dialog Window
The second step is to ensure that the entered username is unique by using the
“Check New Username” server behavior as shown below.
Figure 20. Determines the Uniqueness of the Entered Username
If the registration fails, the redirect is to the Registration_Failed.jsp page, which
prompts the user to use a different username.
After creating a functioning registration page, the next step is to build the log-in
page. The role of the log-in page is to obtain the entered username and password. Then it
compares these values with the user_username and user_pwd with the “users” table. If
there is a match, a log-in script sets a session variable indicating that the user is logged in.
If there is no match, the user is redirected again to the Login.jsp page.
44

String MM_valUsername=request.getParameter(“username”); if (MM_valUsername != null) { String MM_fldUserAuthorization=“user_group”; String MM_redirectLoginSuccess=“Home_Page.jsp”; String MM_redirectLoginFailed=“Login_Failed.jsp”; String MM_redirectLogin=MM_redirectLoginFailed; Driver MM_driverUser =
(Driver)Class.forName(MM_conne_DRIVER).newInstance(); Connection MM_connUser =
DriverManager.getConnection(MM_conne_STRING,MM_conne_USERNAME,MM_conne_PASSWORD);
String MM_pSQL = “SELECT user_username, user_pwd”; if (!MM_fldUserAuthorization.equals(““)) MM_pSQL += “,” +
MM_fldUserAuthorization; MM_pSQL += “ FROM distance_training.users WHERE
user_username=\'“ + MM_valUsername.replace('\'', ' ') + “\' AND user_pwd=\'“ + request.getParameter(“password”).toString().replace('\'', ' ') + “\'“;
PreparedStatement MM_statementUser = MM_connUser.prepareStatement(MM_pSQL);
ResultSet MM_rsUser = MM_statementUser.executeQuery(); boolean MM_rsUser_isNotEmpty = MM_rsUser.next(); if (MM_rsUser_isNotEmpty) { // username and password match - this is a valid user session.putValue(“MM_Username”, MM_valUsername); if (!MM_fldUserAuthorization.equals(““)) { session.putValue(“MM_UserAuthorization”,
MM_rsUser.getString(MM_fldUserAuthorization).trim()); } else { session.putValue(“MM_UserAuthorization”, ““); } if ((request.getParameter(“accessdenied”) != null) && true)
{ MM_redirectLoginSuccess =
request.getParameter(“accessdenied”); } MM_redirectLogin=MM_redirectLoginSuccess; } MM_rsUser.close(); MM_connUser.close();
Response.sendRedirect(response.encodeRedirectURL(MM_redirectLogin)); return; }
Each page that restricts access needs to check for the presence of this session
variable in order to determine whether to grant access to the page or redirect the user to a
different page. For example, consider the following code listing from the Search.jsp and
Course_Master_Form.jsp pages appearing at the beginning of each page.
45

<% // *** Restrict Access To Page: Grant or deny access to this
page String MM_authorizedUsers=“professor,admin”; String MM_authFailedURL=“Login.jsp”; boolean MM_grantAccess=false; if (session.getValue(“MM_Username”) != null &&
!session.getValue(“MM_Username”).equals(““)) { if (false || (session.getValue(“MM_UserAuthorization”)==““) ||
(MM_authorizedUsers.indexOf((String)session.getValue(“MM_UserAuthorization”)) >=0)) {
MM_grantAccess = true; } } if (!MM_grantAccess) { String MM_qsChar = “?”; if (MM_authFailedURL.indexOf(“?”) >= 0) MM_qsChar = “&”; String MM_referrer = request.getRequestURI(); if (request.getQueryString() != null) MM_referrer =
MM_referrer + “?” + request.getQueryString(); MM_authFailedURL = MM_authFailedURL + MM_qsChar +
“accessdenied=“ + java.net.URLEncoder.encode(MM_referrer);
response.sendRedirect(response.encodeRedirectURL(MM_authFailedURL)); return; } %>
B. SEARCH INTERFACE
This database features two paths by which to capture the information that resides
in the subsections. The first path is through course → subject → topic → subsection and
the other is by using keywords. Either of them can be used by any user group.
1. Search.jsp
This page can be used by any legitimate user granted access to the website. The
page layout is shown below.
46

Figure 21. Search Page
Two radio buttons were used to implement the “Search” operation, giving the first
one (By Course) the value 0 and the other one the value 1. If the user chooses to proceed
searching by course, Course_Request.jsp appears.
2. Course_Request.jsp
The Course_Request.jsp page has the following layout.
47

Figure 22. Course Request
A drop-down menu was used because the users are able to select from a finite
number of options for courses that the developer specifies. The following options result
from querying the database.
48 Figure 23. The “rs_course” Recordset

Dreamweaver also provides the option to verify the results of the query by
clicking the Test button.
Figure 24. Testing the Query
Each entry in a form menu has two attributes that need to be set: the label (the
part users read, or the course_code in this case not submitted with the form) and the data
(course_id here) submitted with the other form elements. The course_id is needed
because this value is used as a foreign key in the subject relation and it specifies the
subjects associated with this passed course_id.
Dreamweaver automatically binds the data to the menu using the following
Dynamic List/Menu dialog.
49

Figure 25. The “Dynamic/List” Dialog Window
This feature is very useful because, if for any reason a change the database is
required, the menu field is automatically and instantly updated. In general terms, as long
as the database is maintained, web maintenance will happen automatically.
Another characteristic of this page not visible in the page layout is the
implementation of the Search’s page radio buttons: <% int searchMethodInt=1; String searchMethodStr=request.getQueryString(); if((searchMethodStr.equals(“radiobutton=1&Submit=Submit”))){ response.sendRedirect(“Keyword_Request.jsp”); } %>
The flow navigation methodology developed from the Course_Request.jsp page
to the Subject_Request.jsp is exactly the same as that applied from Subject_Request.jsp
to the Topic_Request.jsp.
50

3. Topic_Request.jsp
The Topic_Request.jsp is a simple web page that includes one drop-down menu
with all the topics associated with the passed subject_id. The topics appeared by
executing the following query.
Figure 26. The “rs_topic” Recordset
In this case, the simple recordset dialog was used as in the previous paragraph
because the results were obtained from only one table. The next step is to bind the
recordset results to the menu.
51

Figure 27. Collecting the Topic Names
4. Subsection_Request.jsp
As mentioned previously in this chapter, one topic may include many subsections
and one subsection may be included in many topics. This is a Many-to-Many
relationship. In the database design, this situation was handled by creating the join table
“topicsection”. In order to obtain the subsections associated with a specific topic, the
following query was executed.
52

Figure 28. The “rs_subsection” recordset
In this case, the advanced recordset dialog was used because information came
from three tables. Dreamweaver generates the code fragment shown below when
successfully running the query. <% Driver Driverrs_subsection =
(Driver)Class.forName(MM_conne_DRIVER).newInstance(); Connection Connrs_subsection =
DriverManager.getConnection(MM_conne_STRING,MM_conne_USERNAME,MM_conne_PASSWORD);
PreparedStatement Statementrs_subsection = Connrs_subsection.prepareStatement(“SELECT topicsection.section_num,topicsection.topic_num,section. section_name,section.section_id FROM distance_training.section,distance_training.topicsection, distance_training.topic WHERE section.section_id=topicsection.section_num AND topic.topic_id=topicsection.topic_num “);
ResultSet rs_subsection = Statementrs_subsection.executeQuery(); boolean rs_subsection_isEmpty = !rs_subsection.next(); boolean rs_subsection_hasData = !rs_subsection_isEmpty; Object rs_subsection_data; int rs_subsection_numRows = 0; %>
53

Dreamweaver produces the following code fragment upon binding the query
results to the menu. while (rs_subsection_hasData) { %> <option
value=“<%=((rs_subsection.getObject(“section_id”)!=null)? rs_subsection.getObject(“section_id”):”“)%>“> <%=((rs_subsection.getObject(“section_name”)!=null)? rs_subsection.getObject(“section_name”):”“)%></option> <% rs_subsection_hasData = rs_subsection.next(); }
In this case, instead of illustrating the “Dynamic List/Menu” dialog window to
bind the SQL results to the menu as done previously, this dialog window demonstrates
what goes on behind the scenes. The JSP engine goes through each
section_id/section_name pairing in the recordset and adds it to the menu item.
The form data of this page will be processed by the Subsection_Results.jsp (as the
“Action” attribute specifies) and they will be transmitted to the Server using the GET
method (as the “Method” attribute specifies).
5. Subsection_Results.jsp
Both Subsection_Results.jsp and Image_Result_All.jsp constitute the last level of
the Content Management System hierarchy. The Subsection_Results.jsp reveals the
content requested from the Subsection_Request.jsp. The page layout is shown below.
54

Figure 29. The “subsection results” Page
The necessary information for the subsection name and content was pulsed using
the SQL shown below.
Figure 30. The “rs_subsection” Recordset
55

By sending section_id from the subsection request (the previous page), it is
possible to retrieve the subsection name and content associated with that specific
section_id using the “Dynamic Text Field” of the Dreamweaver’s Server Behaviors
shown below.
Figure 31. Retrieving Text Using the “Dynamic Text” Dialog Window
For instance, the code that Dreamweaver generates for the section_content
binding is: <%=(((rs_subsection_data =
rs_subsection.getObject(“section_content”))==null || rs_subsection.wasNull())?”“:rs_subsection_data)%>
Every subsection includes zero, one or more images. In order to associate each
subsection with an image the following SQL was performed.
56

Figure 32. The “rs_image” Recordset
In succession, a drop-down menu was created and by using the “Dynamic
List/Menu” dialog window, each image was bound to the menu. This page was linked to
the Image_Result_All.jsp page so that is was possible to see all the images associated
with a specific subsection.
6. Image_Result_All.jsp
As mentioned previously (Database design), a subsection may include one or
more images and each image belongs to one or many subsections. This is a Many-to-
Many relationship, which was handled by creating the “sectionimage” join table. The
following query retrieved the images appearing in a subsection.
57

Figure 33. The “rs_allimages” Recordset
The images in this page were inserted using the “Select Image Source” dialog
window that makes it possible to use the string of the “image_src” field.
Figure 34. Inserting Images Using the “Select Image Source” Dialog Window
58

When inserting a dynamic image, what is really inserted is a dynamic string,
which consists of a URL path pointing to an image inside of an <img> element. <p><img src=“<%=(((rs_allImages_data =
rs_allImages.getObject(“image_src”))==null || rs_allImages.wasNull())?”“:rs_allImages_data)%>“ /></p>
The last characteristic of this page is the “Repeat Region” behavior, which
ensures that all the specified records, rather than just the first one, will be displayed.
Figure 35. Determining the Number of Images Per Page
7. Keyword_Result.jsp
The other “Search” option available to a user is to search the site using keywords.
The Keyword_Result.jsp page was created to process the data of the
Keyword_Request.jsp and generate the result as shown.
59

Figure 36. The Keyword Results Page (Design View)
The following query was executed to retrieve the data required for this page:
60

Figure 37. Retrieving a Paragraph Specified by the Passed Keyword
The above SQL statement indicates that all the fields from the section table are
desired where the column value (section_Keyword) matches any arbitrary number of
characters passed from the previous page using the “MMColParam” variable.
It is possible to generate the content and the images for this subsection using the
“Dynamic Text” behavior with this desired recordset.
The curly braces are Macromedia’s specific pseudocode expressions that indicate
the presence of dynamic content.
C. ALTER DATABASE INTERFACE
The “AlterDB” operation is slightly more complex than the previous two
operations of “User Authentication” and “Search”. It can be used only by the professors
and the Administrator of the site. This navigation flow is a combination of the “master”
and “detail” pages. In general terms, the master-page lists many records in a summary
61

format whereas the detail-page contains detailed information about a specific record that
has been selected by the user from the master-page. The files that constitute the
“AlterDB” operation are described successively.
1. Course_Master_Form.jsp
The top level of the content management system hierarchy is “course”. After a
professor logs-in, the Course_Master_Form.jsp page appears, which provides the actions
illustrated in the page:
Figure 38. Course Master Page
From this point on, the professor can select to continue to the other master page
(Subject_Master_Form.jsp) using the “Continue” button or perform modifications to this
page by inserting, updating or deleting a course. In order to insert data, the table is
identified and which data to write to which fields in that table specified. In order to
update a specific record, the same procedure is applied to a particular, existing record
Information is not appended to the end of the relation. The “UPDATE” SQL command
assists in the accomplishment of this task. Besides, Dreamweaver has the “Update
Record” behavior that makes it even easier. As far as the “Delete” action is concerned, it 62
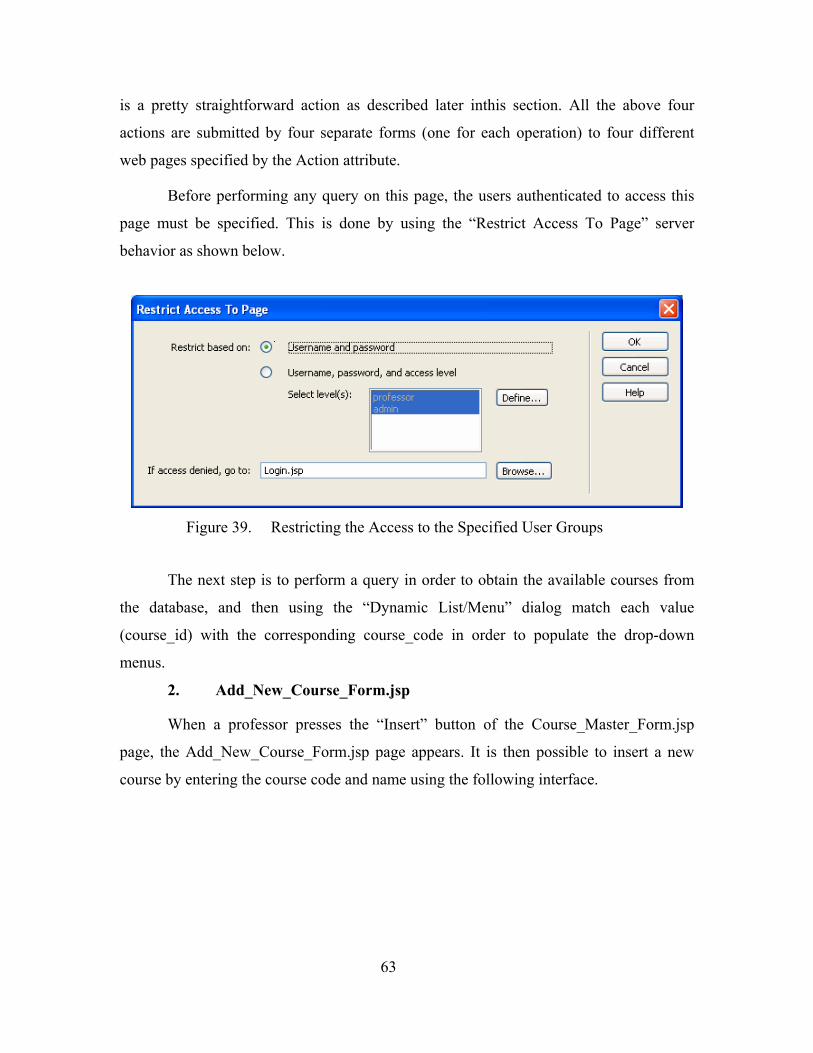
is a pretty straightforward action as described later inthis section. All the above four
actions are submitted by four separate forms (one for each operation) to four different
web pages specified by the Action attribute.
Before performing any query on this page, the users authenticated to access this
page must be specified. This is done by using the “Restrict Access To Page” server
behavior as shown below.
Figure 39. Restricting the Access to the Specified User Groups
The next step is to perform a query in order to obtain the available courses from
the database, and then using the “Dynamic List/Menu” dialog match each value
(course_id) with the corresponding course_code in order to populate the drop-down
menus.
2. Add_New_Course_Form.jsp
When a professor presses the “Insert” button of the Course_Master_Form.jsp
page, the Add_New_Course_Form.jsp page appears. It is then possible to insert a new
course by entering the course code and name using the following interface.
63

Figure 40. Insert a New Course Name
The “Insert Record” behavior was used to insert data into the database.
Figure 41. “Insert Record” Behavior
64

The Insert Record behavior matches data entered in the form to fields in the
database, creating a new record in the database and populating it with the user-entered
data. The “course_code” and “course_name” to the left of the “Form Elements”
subwindow in the above dialog are the names given to the corresponding textfields of the
web page whereas the “course_code” and “course_name” to the right indicate fields of
the “course” relation. The other attributes of the above dialog are self-explanatory.
3. Update_Course.jsp
When the “Update” button is pressed, the instructor has the capability to modify
or correct the course code or class name using an interface identical to that presented in
the Add_New_Course_Form.jsp page.
The first step is to perform a simple SQL query in order to obtain the course name
and code specified by the course_id passed from the Add_New_Course_Form.jsp page.
Figure 42. The “rs_course” Recordset
It is worth mentioning that when testing this query, a test value is specified
because the query needs a value to be sent from the form.
65

Figure 43. Passing Test Value for the Query
At the next step, for each textfield (course code and course name), the
corresponding values obtained from the recordset using the “Dynamic Text Field”
behavior are set.
After finishing the textfield bindings with the results of the query, the “Update
Record” server behavior was applied as shown below.
Figure 44. The “Update Record” Window
66

The last observation is that Dreamweaver generated two hidden fields when
applying the update behavior. <input type=“hidden” name=“MM_update” value=“frmCourse”> <input type=“hidden” name=“MM_recordId”
value=“<%=(((rs_course_data = rs_course.getObject(“course_id”))==null || rs_course.wasNull())?”“:rs_course_data)%>“>
Hidden fields are used in forms to pass predetermined data when the form is
submitted. In this case, Dreamweaver automatically passed the form name (frmCourse)
along with the “course_id”. As shown later in this chapter, it is necessary to create
specific hidden fields, especially when Many-to-Many relationships must be
manipulated.
4. Delete_Course_Form.jsp
The last option of the Course_Master_Form.jsp page is the deletion of an existing
course. When an instructor presses the Delete button, the Delete_Course_Form.jsp page
appears as shown below.
Figure 45. The “Delete Course” Page
67

The only difference from the previous page (Update_Course.jsp) methodology is
the implementation of the “Delete Record” server behavior.
Figure 46. The “Delete Record” Behavior
Two hidden fields are generated as in the “Update Record” behavior when
applying the “Delete Record” behavior. <input type=“hidden” name=“MM_delete” value=“form1”> <input type=“hidden” name=“MM_recordId”
value=“<%=(((rs_course_data = rs_course.getObject(“course_id”))==null || rs_course.wasNull())?”“:rs_course_data)%>“>
5. Subject_Master_Form.jsp
If the user choses to continue from the course master page by selecting a specific
course from the first drop-down menu, the Subject_Master_Form.jsp page appears with
the option to select one among many other subjects included in that course. The design
view appears below.
68

Figure 47. The Subject Master Page (Design View)
The structure of this page was begun by restricting its access to legitimate users
(professors and admin) as with the course master page using the “Restrict Access To
Page” server behavior.
Two queries were performed in succession. One query is needed to retrieve the
course code (rs_course).
69

Figure 48. The “rs_course” Recordset
The other query (rs_subject) is used to retrieve the subject names for the drop-
down menus.
Figure 49. The “rs_subject” Recordset
Three hidden fields were used to request the course_id for the insert, update and
delete operations, as shown in the design view of this page at the beginning of this
section, using the following dialog window.
70

Figure 50. Keeping Track of the “course_id” Using the “Dynamic Data” Window
This is necessary because of the desire to keep track of the subjects specified by
the passed course_id. For the same reason, when building the detail pages (insert, update
and delete), the course_id is passed as a hidden field for each of those pages.
71

6. Topic_Master_Form.jsp
The topic master page has the following layout.
Figure 51. The Topic Master Page
In order to build this master page and its corresponding detail pages, the same
methodology as that of the subject master page was applied. The only difference is that
the subject_id was passed as a hidden field in the insert, update and delete forms of the
master page.
7. Subsection_Master_Form.jsp
Before continuing with the description of the subsection master page and in order
to avoid terminology confusion, note that the terms “subsection” and “paragraph” are
used interchangeably throughout this thesis because they refer to the same meaning.
The layout of this page does not differ from the other master pages layout. Thus,
it includes four forms; one to continue and display the subsection’s content, and the other
three for insertion, update and deletion.
72

After restricting access to this page only to legitimate users, as done with the
other master pages, a query was performed (obtaining the recordset rs_course) in order to
select the topic (illustrated at the beginning of the page) specified by the topic_id passed
to the current page from the topic master page.
Figure 52. The “rs_topic” Recordset
The next step was to ascertain a way to populate the drop-down form menus with
the data of the subsection table specified by the passed topic_id. As indicated in the
database design section, a topic may include many subsections and one subsection may
be included in many topics (M:N relationship). This was achieved by performing the
following SQL, where topicsection is the join table between the “topic” and “section”
tables.
73

Figure 53. The “rs_topicsection” Recordset
Finally, in order to keep track of the topic where it is desired to insert a new
paragraph, modify or delete an existing paragraph, the topic_id was passed as the hidden
field to each of those forms.
74

8. Add_New_Paragraph.jsp
If an instructor wants to insert a new subsection in a specific topic, it is possible to
use the following web page.
Figure 54. The “Add New Paragraph” Page
The “Category” drop-down menu determines the area of interest to which the
inserted paragraph belongs. The “Category” entity was used for grouping courses that
pertain to one broadband subject. For example, “Ethernet”, “LAN topologies” and
“WAN” may be included in the “Networks” Category.
The other three important attributes used by the professor for adding a new
subsection are the paragraph header (textfield) and the paragraph content - keywords
(textareas).
In order to select the topic to which the inserted paragraph belongs, the following
recordset was created:
75

Figure 55. The “rs_topic” Recordset
The “Insert Record” behavior was used successively.
Figure 56. The “Insert Record” Behavior
76

The last step is to create two hidden fields: one for the “topic_id” and one for the
“author”. Both hidden fields are very important to the correctness of the application. The
topic_id is necessary in order to keep track of the topic in the join table “topicsection”.
The next section explains the usage of the “author” as a hidden field.
9. Confirmation.jsp
After an instructor presses the “Submit” button in the Add_New_Paragraph.jsp
page, the Confirmation.jsp appears.
Figure 57. The Confirmation Page When We Insert A Record
This page consists of only one form and three hidden fields. The hidden field
from the table is generated by applying the “Insert Record” behavior. The other two are
the “topic_id” from the previous page and the “section_id”. They are created in order to
update the join table “topicsection” as seen below in the “Insert Record” behavior of this
page.
77

Figure 58. Inserting a Record
Tthe “topic_id” from the Add_New_Paragraph.jsp page is passed as hidden. The
next task now is to obtain the “section_id”. The following query is performed to achieve
this.
Figure 59. The “rs_confirm” Recordset
78

As seen from the above query, the maximum “section_id” is actually obtained
that identifies the most current inserted paragraph.
The other hidden field passed from the previous page is “author”. Actually, it is
not possible to use it but what would happen if, at the same time, another professor was
inserting another subsection? The section_id that is written by the database is not known
in advance. Thus, by using the passed “section_author” in this query, firstly it is possible
to identify the paragraph’s author, and secondly, the maximum section_id for this specific
author is obtained.
In conclusion, using the section_author as the hidden field in the
“Confirmation.jsp” page takes advantage of all the attributes included in the subsection
relation, and as a result, increases the robustness of this application.
10. Update_Paragraph.jsp
The “update” and “delete” constitute the last two detail pages of the subsection
master page. This section describes the Update_Paragraph.jsp. Exactly the same
methodology is applied to the delete detail page as well. The page layout is similar to the
Add_New_Paragraph.jsp (design view)
79

Figure 60. The “Update Paragraph” Page
At the beginning, two hidden fields were created. One was for the author and the
other for the topic for identification reasons. The exact same procedure was done for the
delete detail page.
The results of the following query were used successively.
80
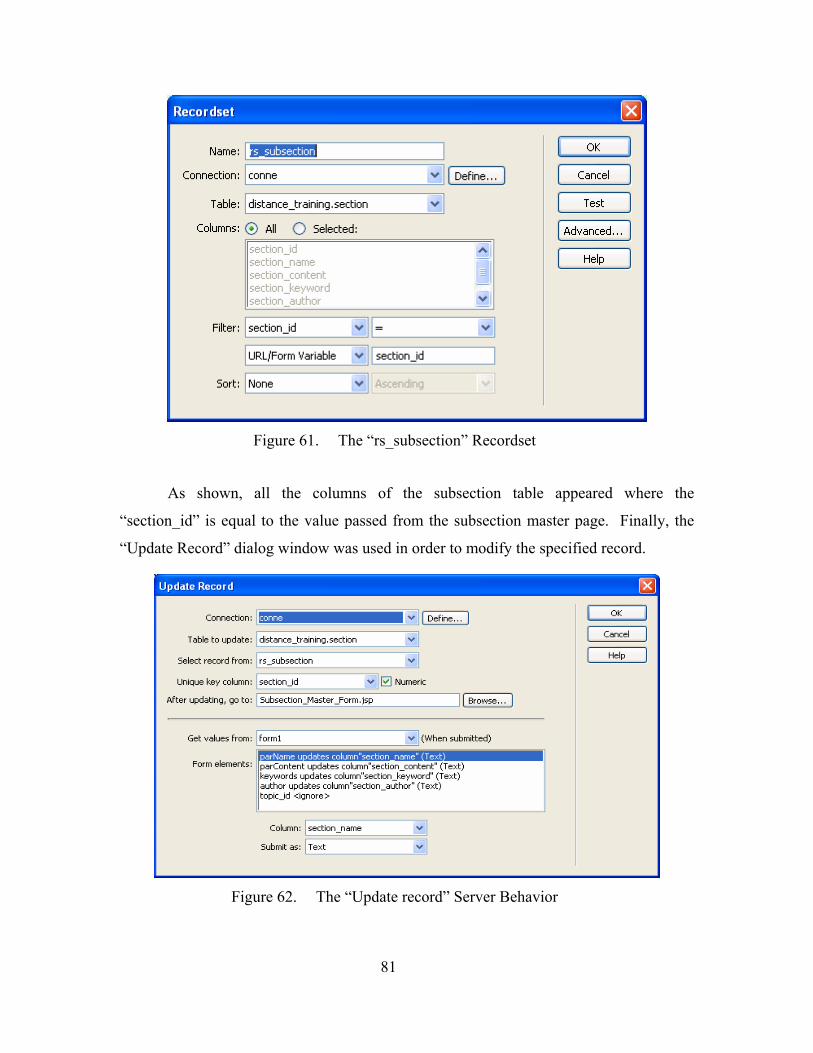
Figure 61. The “rs_subsection” Recordset
As shown, all the columns of the subsection table appeared where the
“section_id” is equal to the value passed from the subsection master page. Finally, the
“Update Record” dialog window was used in order to modify the specified record.
Figure 62. The “Update record” Server Behavior
81

11. Image_Master_Form.jsp
An instructor can select to see an image related to the current subsection by
pressing the “Continue” button of the subsection master page. In the same form, a drop-
down menu is included called “subsectionid”. Proceeding in this manner causes the
image master page to appear.
Figure 63. The Image Master Page
Two forms were added to this page. One is for inserting and one for deleting an
image. The following query is performed to specify the paragraph name to which the
inserted or deleted image is related:
82

Figure 64. The “rs_paragraph” Recordset
The “subsectionid” filter used in the above query is the value passed from the
drop-down menu of the subsection master page. In addition, in order to keep track of this
value, two hidden fields were created in the image master page as shown in the first
screenshot of this section. The label “subsectionid” was also applied because it is the
value expected from the previous page. <%= ((request.getParameter(“subsectionid”)!=null)?
request.getParameter(“subsectionid”):”“) %>
A second SQL call is also needed in order to obtain the image name to be deleted.
As indicated earlier, a subsection may include many images and one image may be
included in many subsections. This task is accomplished by performing the following
SQL, where “sectionimage” is the join table between the “image” and “subsection”
tables.
83

Figure 65. The “rs_sectionimage” Recordset
12. Confirm_Image.jsp
In the subsection master form, when inserting a new paragraph, the
“Confirmation” page appears. The role of this page is to update the join table
“topicsection” returning the maximum “section_id” for a specific professor at the time of
insertion. The same reasons led to the implementation of that idea for the image insertion.
At the “Confirmation.jsp” page, two hidden fields were created. One was for the topic
(topic_id) and the other for the subsection (section_id). Likewise, in the current page, two
hidden fields were also created. One was for the subsection (section_id) and the other for
the image (image_id).
The query performed in order to obtain the maximum “image_id” appears below:
84

Figure 66. The “rs_confirm” Recordset
Using the “Insert Record” behavior, the data entered in the form were matched
(the hidden fields “section_id” and “section_id”) to fields in the database, which created a
new record in the “image” table.
Figure 67. Inserting an Image Record
85

THIS PAGE INTENTIONALLY LEFT BLANK
86

VI. DISTANCE TRAINING SYSTEM DATA FLOW DIAGRAM
87
Logi
n/Ho
me_
page
Logi
n
Logi
n_Fa
iled
Hom
e_Pa
ge
Sea
rch
Logi
nA
lter
Reg
iste
r
To “S
earc
h” P
age
To “C
ours
e_M
aste
r_Fo
rm” P
age
To “R
egis
tratio
n” P
age

Imag
e_R
esul
t
Key
wor
d_R
eque
st
Sear
ch
Cou
rse_
Req
uest
Sea
rch
By
Cou
rse
By K
eyw
ords
From
“Hom
e_P
age S
ubje
ct_R
eque
st
Topi
c_R
eque
st
Sec
tion_
Req
uest
Sect
ion_
Res
ults
Dis
play
Imag
eD
ispl
ay a
ll Im
ages
Imag
e_R
esul
t_A
ll
88

89

THIS PAGE INTENTIONALLY LEFT BLANK
90

VII. CONCLUSIONS
The purpose of this thesis had two main objectives. The first objective was the
demonstration of the DTS application as a Content Management System. The second was
the elaboration of Dreamweaver MX2004 as a web development tool.
A. DTS APPLICATION
1. Advantages
The DTS application was developed with the notion of the Content Management
System (CMS) in mind and not the development of a Learning Management System
(LMS). An LMS is appropriate for those students/users/visitors
enrolled/registered/invited in the class. However, technical personnel of a military unit
who must fix a piece of critical equipment before their campaign or individuals interested
in accessing the information but are not registered, cannot have easy access to it, not to
mention that they may not be aware of its existence. These military personnel or
individuals are not interested in the services that an LMS provides such as grades or
participation records. They simply want to access the information of interest in order to
solve specific problems. This speculation in the military environment was the main
reason leading to the development of the DTS application.
The expert headquarters personnel, for example the signal corps experts on digital
communications, are not content designers. They merely want to provide the signal corps
units with all the necessary technical instructions about a specific system. Using the DTS
application makes their job easier because they can manage their content through simple
forms. Furthermore, the military personnel who request the information have the
possibility to extract the material fast and correctly without the transformations from one
form to another, to XML and so forth. The same idea applies to professors as well; they
want to teach. They are educators, not instructional designers.
Another feature of the DTS application is its hierarchical structure. Whenever a
hierarchical structure is used in a database design, a “clean”, reliable and robust data
model results. This is very important because the DTS or any other application that
manages content must be as “clean” as possible. Furthermore, the usage of a web
91
development tool, such as Dreamweaver, presupposes a reliable data model without
design deficiencies and errors. In other words, Dreamweaver cannot mask database flaws.
Therefore, it is imperative to be certain of the reliability of the data model design by
checking the correctness and querying the database before beginning with the
presentation part of a project. It is extremely difficult and time-consuming to go back and
try to troubleshoot the database while in the phase of deciding and designing the
functionality of the website’s menu and the connection of the several screens.
As far as the organizational structure is concerned, the ideas are rather
straightforward. First it must be emphasized that the database engine (MySQL) does not
support roles, but that is necessary to create roles. Using Dreamweaver’s behaviors
provided users single user IDs and assigned those user IDs the permissions associated
with all of their roles. In other words, when a person connects to the database, a single
user ID and password is used, and additionally, a role is specified. As long as that user is
connected under the specified role, it is possible to act on only the permissions assigned
to that role. For instance, take the Administrator, who is authorized to add or remove
professors/authors. He is also authorized for addition, update or deletion of user records,
course categories and professors. As long as the professor is logged in as the user, one
role is assigned, for example, the instructor’s role and then is classified as professor. The
Administrator can also associate current professors to courses to authorize modification
of course content.
The “Search” operation is featured from manual and keyword lookup. As
indicated earlier, this database is not as restrictive as a LMS such as Blackboard, that
limits access to specific parties and content. It is an open information repository available
to anyone with access to the Internet. The usage of the “Category” entity, which is used
to group similar courses in categories for easier identification purposes, facilitates even
more the access of an external user. Another advantage of the “Category” approach that
makes the application more flexible is that it is specified by the professor because the
latter is the only person responsible for the subsection content.
This project was developed as a standalone application. It is obvious that, if the
DTS was a part of a publicly accessibly Network, many security issues would be
92
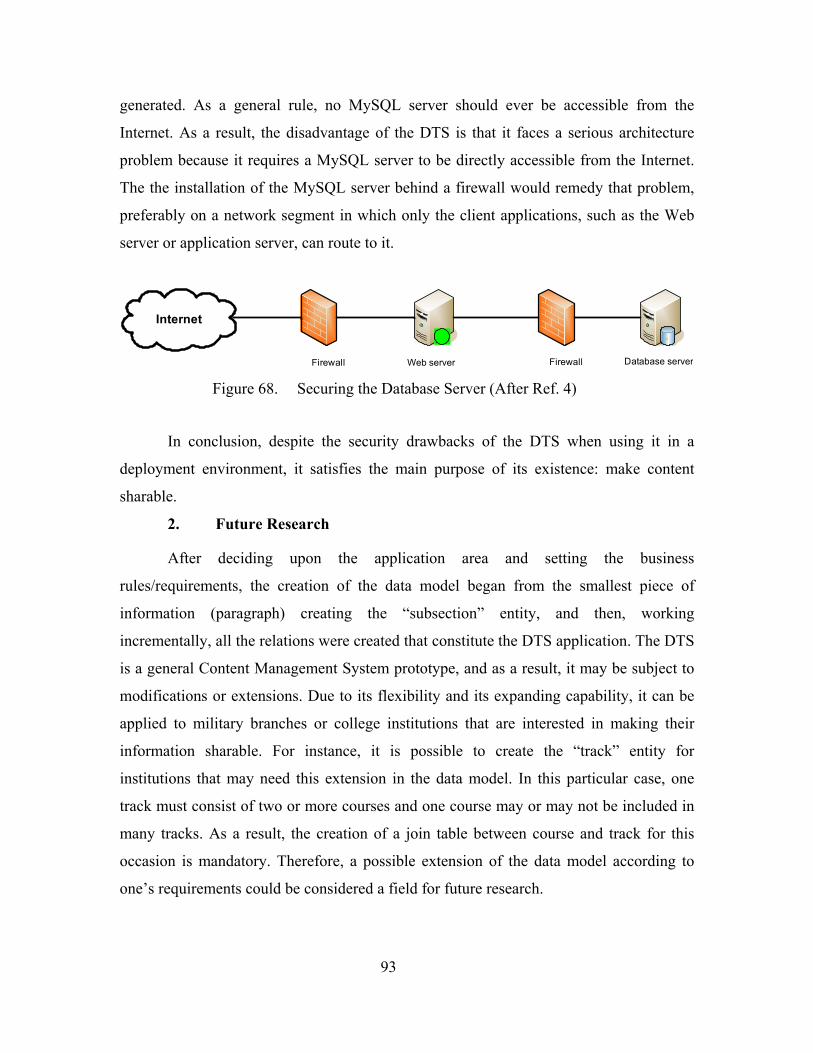
generated. As a general rule, no MySQL server should ever be accessible from the
Internet. As a result, the disadvantage of the DTS is that it faces a serious architecture
problem because it requires a MySQL server to be directly accessible from the Internet.
The the installation of the MySQL server behind a firewall would remedy that problem,
preferably on a network segment in which only the client applications, such as the Web
server or application server, can route to it.
Internet
Firewall Web server Firewall Database server Figure 68. Securing the Database Server (After Ref. 4)
In conclusion, despite the security drawbacks of the DTS when using it in a
deployment environment, it satisfies the main purpose of its existence: make content
sharable.
2. Future Research
After deciding upon the application area and setting the business
rules/requirements, the creation of the data model began from the smallest piece of
information (paragraph) creating the “subsection” entity, and then, working
incrementally, all the relations were created that constitute the DTS application. The DTS
is a general Content Management System prototype, and as a result, it may be subject to
modifications or extensions. Due to its flexibility and its expanding capability, it can be
applied to military branches or college institutions that are interested in making their
information sharable. For instance, it is possible to create the “track” entity for
institutions that may need this extension in the data model. In this particular case, one
track must consist of two or more courses and one course may or may not be included in
many tracks. As a result, the creation of a join table between course and track for this
occasion is mandatory. Therefore, a possible extension of the data model according to
one’s requirements could be considered a field for future research.
93

The database product (MySQL) used for this application is an open source
RDBMS with many other advantages as demonstrated previously. However, for the time
being, it lacks a GUI, does not support views, cascading deletions, stored procedures nor
triggers. Therefore, another field for future research would be the DTS testing using a
larger and more complicated database product with XML capabilities such as Oracle or a
SQL Server.
Finally, the keyword search function needs improvement. Instead of forcing the
professor/author to specify keywords for a particular paragraph manually in a specific
field of the “subsection” relation, a mechanism may be discovered that can generate
keywords dynamically performing a kind of algorithm on the paragraph’s content. This
algorithm may automatically capture title words, subsection headers and words in the
first sentence of the paragraph.
Additionally, the manner in which images are inserted into the DTS is a bit
cumbersome. First, the image is placed into the “images” directory of the application, and
second, the path to the image is created in the source code of the file related to the image.
Simple typographical errors may prevent the display of the imported image.
B. DREAMWEAVER MX2004
1. Advantages
There are many advantages to using Dreamweaver for designing and maintaining
websites. First of all, building and editing websites is fast. A user may start with one of
many basic templates and quickly modify it for specific purposes. The GUI interface
allows simultaneous designing and coding. The user can see how html will appear
immediately after writing the code. The split view interface allows the user to quickly
build a page in the design view and then refine the html in the coding view. Also, code
that needs modification may be located quickly by selecting the corresponding element in
the design pane. The code pane automatically scrolls to the html for the selected element
and highlights the code. The ability to work form one interface also accelerates web
development. Dynamic features may be added to a site through the use of page behaviors,
Dreamweaver's JavaScript interface, and server behaviors, and Dreamweaver's database
connection interface. Also, basic image optimization may be accomplished within
94

Dreamweaver and more advanced image processing may be accomplished through close
integration between Dreamweaver and Fireworks. Finally, Flash buttons and other basic
Flash elements may be added within the Dreamweaver interface.
Another advantage to using Dreamweaver is that the program is extensible.
Hundreds of third party extensions that add functionality may be downloaded for free or
purchased. Extensions are usually written in html, JavaScript, or C. Most extensions do
one or more of the following: automate changes to a document, interact with
Dreamweaver to open or close windows or documents, connect to a data source, insert or
manage a block of server code. Dreamweaver offers both a JavaScript API and an Utility
API.
Finally, Dreamweaver is customizable. The user may set preferences controlling
how and to what extent accessibility is coded. The user may adjust code coloring, what
fonts are used for coding, and how code is highlighted. The user may also set which
browsers to use for previewing a page. Besides setting preferences, the user may also
directly edit the configuration files. In this way, menus may be rearranged to suite
individual tastes. Tabs may be added or removed. The names of commands may be
changed, added, or removed. Anything about the look and feel of Dreamweaver may be
customized within the configuration files.
2. Disadvantages
Although Dreamweaver may be the best software of its type, it possesses several
disadvantages. Dreamweaver’s main disadvantage is that after creating an interacting
web page, it is not possible to delete a functionality part of this specific page because the
corresponding code(a part of it) sometimes remains hooked into the page, and in the
worst case, it is scattered throughout the page. This drawback caused numerous problems
during the DTS development. For instance, on many occasions, it was necessary to delete
the page completely and rebuild it from scratch when an error occurred instead of fixing
this particular error on the existing page.
The visual interface for building tables does not always work. The user must
switch between code views and various design views in order to optimize table
construction.
95

Although far from perfect, Dreamweaver MX 2004 is the best tool of its type and
improves a bit with each release. Dreamweaver's flexibility facilitates its use by all
members of a multidisciplinary web design team. Dreamweaver is arguably the best stand
alone tool to use for developing today's complex websites that incorporate multiple server
technologies (JSP, .NET, PHP etc.), integration with databases and content management
systems. However, it is not possible to create a serious application relying exclusively on
Dreamweaver or any other Web development tool. With the currently available
development tools, hand coding is still required when developing serious Web
applications.
96

APPENDIX A. DISTANCE TRAINING SYSTEM (DTS) SCHEMA
Please click on the following link to view Appendices A and B.
http://library.nps.navy.mil/uhtbin/hyperion/04Sep_Pogkas_Appendices.doc (Appendix)
97

THIS PAGE INTENTIONALLY LEFT BLANK
98

APPENDIX B. DISTANCE TRAINING SYSTEM (DTS) CODE
Please click on the following link to view Appendices A and B.
http://library.nps.navy.mil/uhtbin/hyperion/04Sep_Pogkas_Appendices.doc (Appendix)
99

THIS PAGE INTENTIONALLY LEFT BLANK
100

LIST OF REFERENCES
1. Reese, G., Yanger, R. and King, T. Managing and Using MySQL. O’Reilly, 2002.
2. Ramakrishnan, R. and Gehrke, J. Database Management Systems. McGraw Hill; 2003.
3. Kroenke, D. M., Database Processing: Fundamentals, Design, and Implementation. New Jersey: Prentice Hall, 2003.
4. Reese, G., Java Database Best Practices. O’Reilly, 2003. 5. Bardzell, J., Dreamweaver MX2004 with asp, Coldfusion and PHP. Macromedia,
2004. 6. Schach, S., Introduction to Object-Oriented Analysis and Design with UML and
the Unified Process. McGraw Hill; 2004. 7. Hunter, D. and Cagle, K., Beginning XML. Wiley Publishing; 2003. 8. Hall, M. and Brown, L., Core Servlets and JavaServer Pages. Prentice Hall, 2004. 9. Bonk, C. and Wisher, R., Applying Collaborative and E-Learning Tools to
Military Distance Learning: A Research Framework. http://www.publicationshare.com/docs/Dist.Learn(Wisher).pdf (September 2004).
10. The Army Distributed Learning System, Fort Huachuca. http://huachuca-
www.army.mil/USAG/Distance (June 2004). 11. jGuru, JavaServer Pages Fundamentals, Short Course Contents.
http://java.sun.com/developer/onlineTraining/JSPIntro/contents.html (June 2004). 12. Bourret, R., XML and Databases.
http://www.rpbourret.com/xml/XMLAndDatabases.htm (March 2004).
101
THIS PAGE INTENTIONALLY LEFT BLANK
102

103
INITIAL DISTRIBUTION LIST
1. Defense Technical Information Center Ft. Belvoir, Virginia
2. Dudley Knox Library Naval Postgraduate School Monterey, California
3. Professor Thomas Otani Naval Postgraduate School Monterey, California
4. Instructor Arijit Das Monterey Institute of International Studies Monterey, California
5. DI.K.A.T.S.A. Inter-University Center for the Recognition of Foreign Academic Titles Athens, Greece
6. Embassy of Greece, Defense and Military Attaché Office Washington, DC
7. Nikolaos Pogkas Mandra Attikis, Greece
Copyright © 2022 FDOKUMEN