Natural Shades - Blinds.com
180
Natural Shades Persianas natural INSTALLATION • OPERATION • CARE INSTALACIÓN • MANEJO • CUIDADO Corded Lift Control Control de elevación con cuerda
-
Upload
khangminh22 -
Category
Documents
-
view
0 -
download
0
Transcript of Natural Shades - Blinds.com

Natural ShadesPersianas natural
INSTALLATION • OPERATION • CAREINSTALACIÓN • MANEJO • CUIDADO
Corded Lift ControlControl de elevación con cuerda
CHILD SAFETY
2 © 2020 LEVOLOR®, Inc.Corded Lift Control
Young children can STRANGLE in cords. They can also wrap cords around their necks and STRANGLE.
• Always keep cords out of the reach of children.
• Move cribs, playpens and other furniture away from cords. Children can climb furniture to get to cords.
• Always wrap the cords around the cleats in a figure eight, up high, out of reach of children.
• See additional child and cord safety messaging on page 15
WARNING: Keep all small parts, components and packaging away from children as they pose a potential choking hazard which may result in serious injury or death. Please reference all warning tags and labels in the instructions and on the shade.
!
WARNING
CONTENTS
3Corded Lift Control
Window and Shade Terminology Mounting Types and Window Terminology ............................................ 4
Lift Styles ..................................................................................................5
Getting Started Installation Overview ............................................................................... 6
Components Included .............................................................................7
Tools and Fasteners You May Need ........................................................ 8
Installation Inside Mount ........................................................................................ 9-11
Outside Mount ................................................................................... 12-14
Installing Additional ComponentsInstalling Cord Cleat ...............................................................................15
Valance Returns......................................................................................16
Hold-Down Brackets .............................................................................. 17
Extension Brackets ................................................................................18
Spacer Blocks .........................................................................................18
OperationOperating the Shade ..............................................................................19
Cleaning and CareCleaning Procedures ............................................................................. 20
Additional Information and SupportWarranty .................................................................................................21
Customer Service Support ....................................................................21
WINDOW AND SHADE TERMINOLOGY
4
Thank you for purchasing LEVOLOR® Natural Shades. With proper installation, operation,
and care, your new natural shade will provide years of beauty and performance. Please
thoroughly review this instruction booklet before beginning installation.
MOUNTING TYPES AND WINDOW TERMINOLOGY
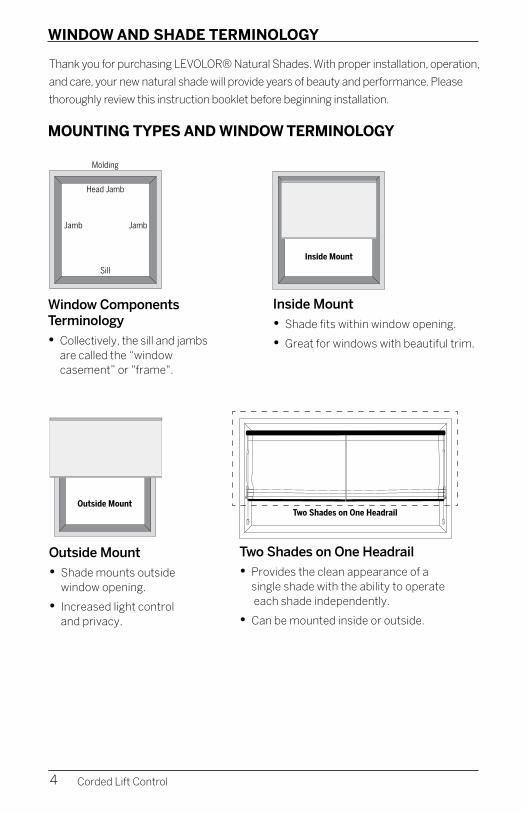
Inside Mount
• Shade fits within window opening.
• Great for windows with beautiful trim.
Window Components Terminology
• Collectively, the sill and jambs are called the “window casement” or "frame".
Two Shades on One Headrail
• Provides the clean appearance of a single shade with the ability to operate each shade independently.
• Can be mounted inside or outside.
Outside Mount
• Shade mounts outside window opening.
• Increased light control and privacy.
Corded Lift Control
Outside MountInside Mount
Molding
Head Jamb
Sill
Jamb Jamb
Outside MountInside Mount
Molding
Head Jamb
Sill
Jamb Jamb
Two Shades on One Headrail
Molding
Head Jamb
Sill
Jamb Jamb
WINDOW AND SHADE TERMINOLOGY
5
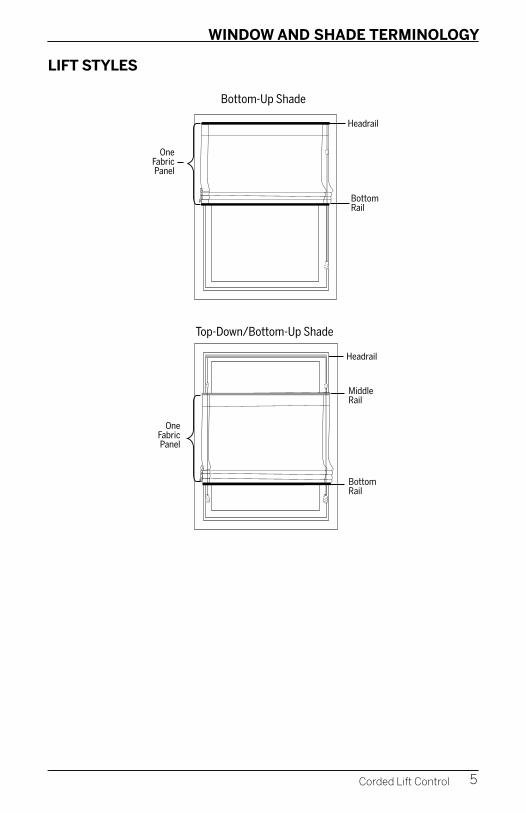
Bottom-Up Shade
Bottom Rail
Headrail
One Fabric Panel
Headrail
Top-Down/Bottom-Up Shade
Middle Rail
Bottom Rail
One Fabric Panel
LIFT STYLES
Corded Lift Control
6
GETTING STARTED
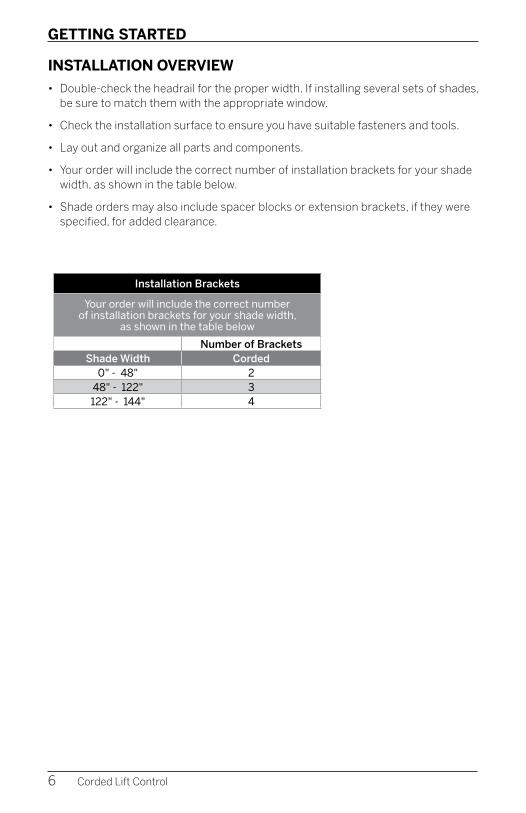
• Double-check the headrail for the proper width. If installing several sets of shades, be sure to match them with the appropriate window.
• Check the installation surface to ensure you have suitable fasteners and tools.
• Lay out and organize all parts and components.
• Your order will include the correct number of installation brackets for your shade width, as shown in the table below.
• Shade orders may also include spacer blocks or extension brackets, if they were specified, for added clearance.
INSTALLATION OVERVIEW
Installation Brackets
Your order will include the correct number of installation brackets for your shade width,
as shown in the table below
Number of BracketsShade Width Corded
0" - 48" 248" - 122" 3122" - 144" 4
Corded Lift Control
GETTING STARTED
7
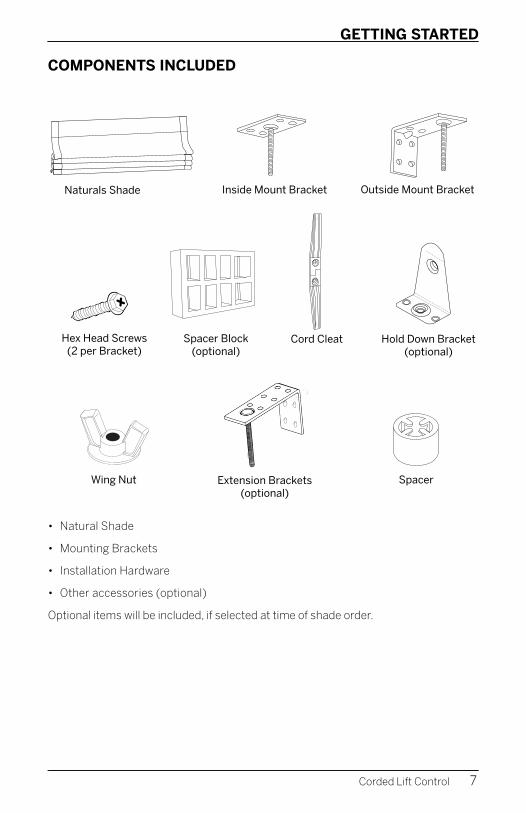
COMPONENTS INCLUDED
Outside Mount BracketInside Mount Bracket
• Natural Shade
• Mounting Brackets
• Installation Hardware
• Other accessories (optional)
Optional items will be included, if selected at time of shade order.
Cord Cleat
Naturals Shade
Hex Head Screws (2 per Bracket)
Extension Brackets(optional)
Corded Lift Control
Wing Nut Spacer
Hold Down Bracket(optional)
....................................................
Spacer Block(optional)
8
GETTING STARTED
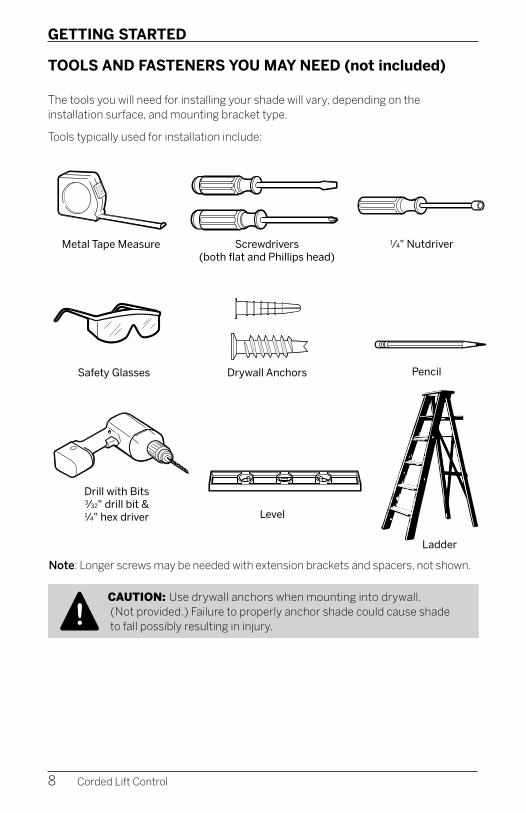
TOOLS AND FASTENERS YOU MAY NEED (not included)
The tools you will need for installing your shade will vary, depending on the installation surface, and mounting bracket type.
Tools typically used for installation include:
CAUTION: Use drywall anchors when mounting into drywall. (Not provided.) Failure to properly anchor shade could cause shade to fall possibly resulting in injury. !
Note: Longer screws may be needed with extension brackets and spacers, not shown.
Corded Lift Control
Metal Tape Measure
Safety Glasses
Drill with Bits3⁄32" drill bit &1⁄4" hex driver
Ladder
Screwdrivers (both flat and Phillips head)
Drywall Anchors
Level
1⁄4" Nutdriver
Pencil
INSTALLATION
9
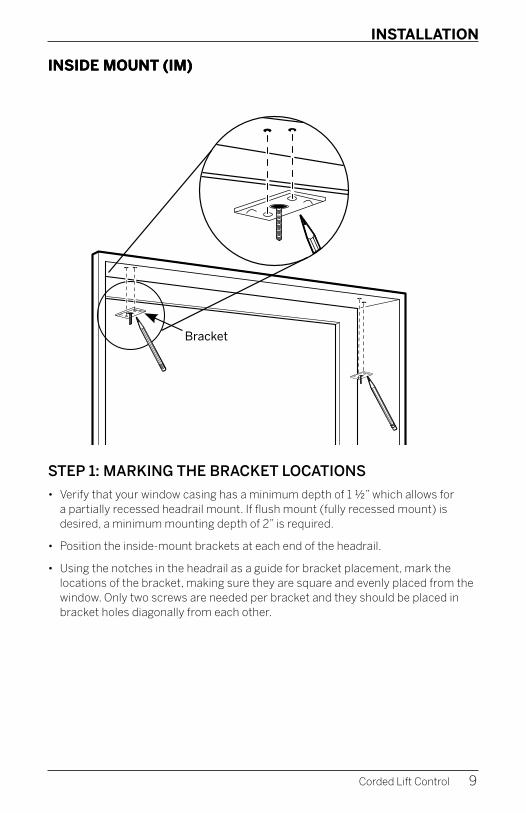
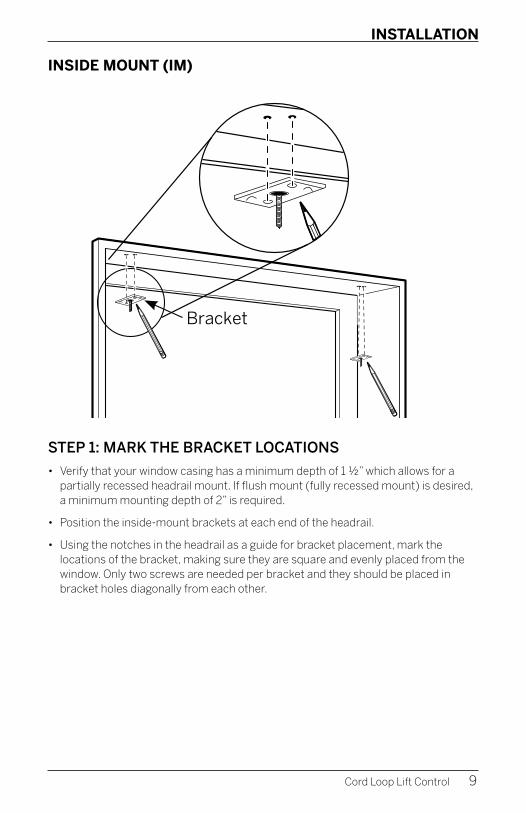
INSIDE MOUNT (IM)
STEP 1: MARKING THE BRACKET LOCATIONS
• Verify that your window casing has a minimum depth of 1 ½” which allows for a partially recessed headrail mount. If flush mount (fully recessed mount) is desired, a minimum mounting depth of 2” is required.
• Position the inside-mount brackets at each end of the headrail.
• Using the notches in the headrail as a guide for bracket placement, mark the locations of the bracket, making sure they are square and evenly placed from the window. Only two screws are needed per bracket and they should be placed in bracket holes diagonally from each other.
Corded Lift Control
INSIDE MOUNT (IM)
BracketBracket
INSTALLATION
10
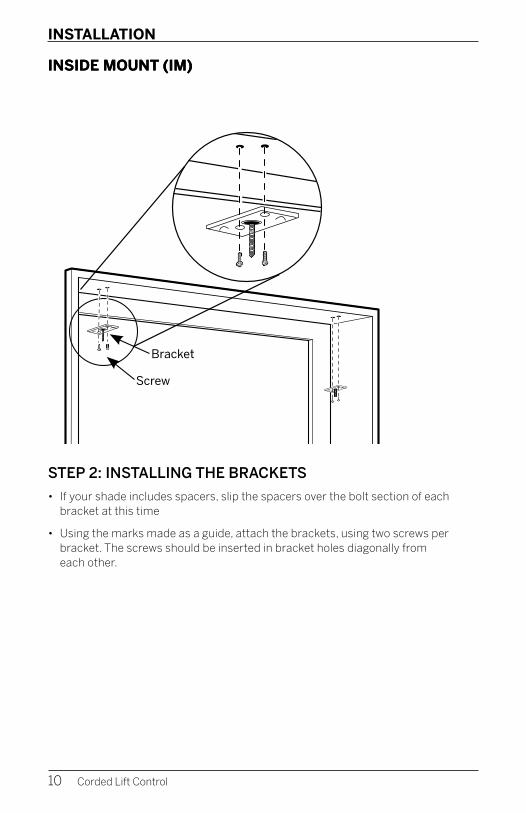
INSIDE MOUNT (IM)INSIDE MOUNT (IM)
STEP 2: INSTALLING THE BRACKETS
• If your shade includes spacers, slip the spacers over the bolt section of each bracket at this time
• Using the marks made as a guide, attach the brackets, using two screws per bracket. The screws should be inserted in bracket holes diagonally from each other.
Corded Lift Control
Bracket
Screw
Bracket
Screw
INSTALLATION
11
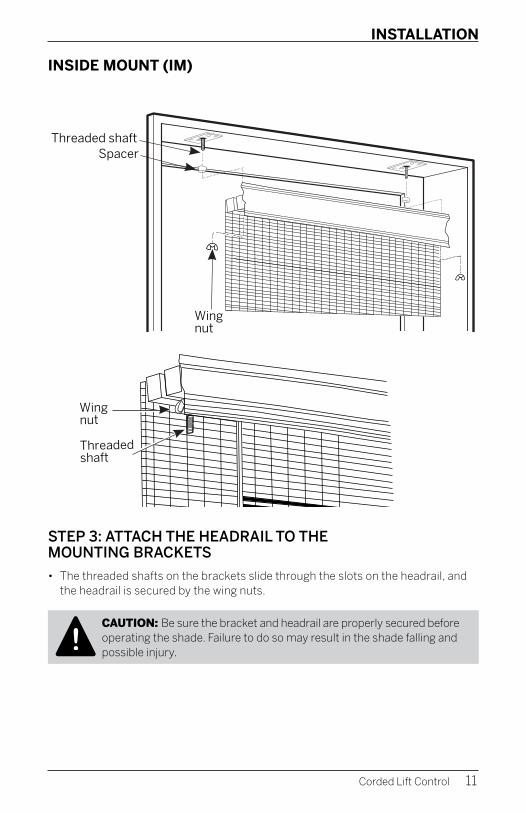
INSIDE MOUNT (IM)
STEP 3: ATTACH THE HEADRAIL TO THE MOUNTING BRACKETS
• The threaded shafts on the brackets slide through the slots on the headrail, and the headrail is secured by the wing nuts.
CAUTION: Be sure the bracket and headrail are properly secured before operating the shade. Failure to do so may result in the shade falling and possible injury.!
Corded Lift Control
Wing nut
Threaded shaft
Wing nut
Threaded shaft Spacer
Wing nut
Threaded shaft
Wing nut
Threaded shaft Spacer
INSTALLATION
12
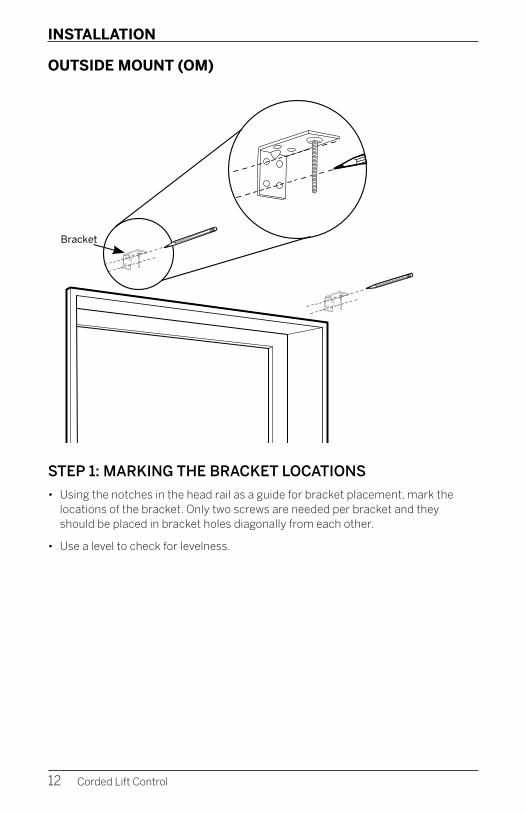
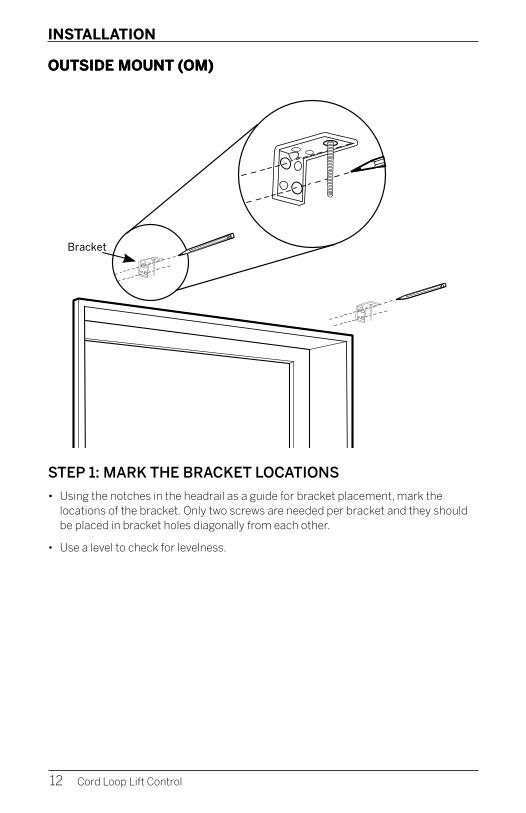
OUTSIDE MOUNT (OM)
STEP 1: MARKING THE BRACKET LOCATIONS
• Using the notches in the head rail as a guide for bracket placement, mark the locations of the bracket. Only two screws are needed per bracket and they should be placed in bracket holes diagonally from each other.
• Use a level to check for levelness.
Corded Lift Control
Bracket

INSTALLATION
13
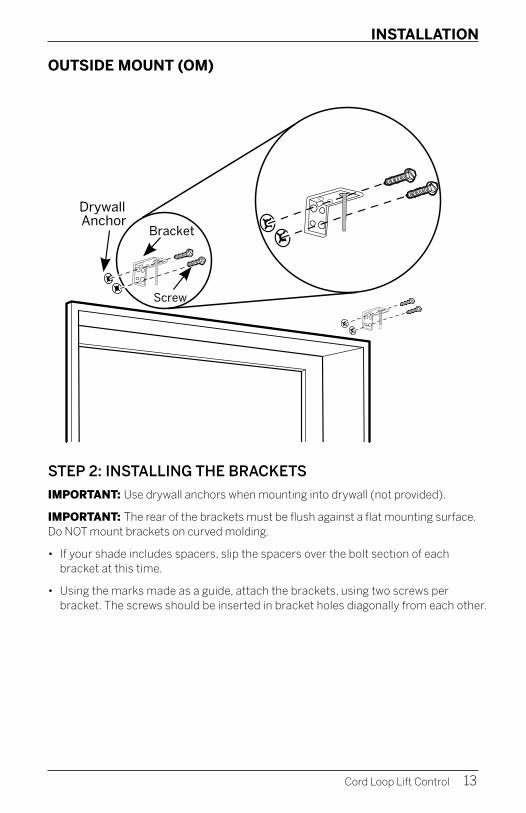
OUTSIDE MOUNT (OM)
STEP 2: INSTALLING THE BRACKETS
IMPORTANT: Use drywall anchors when mounting into drywall (not provided).
IMPORTANT: The rear of the brackets must be flush against a flat mounting surface. Do NOT mount brackets on curved molding.
• If your shade includes spacers, slip the spacers over the bolt section of each bracket at this time.
• Using the marks made as a guide, attach the brackets, using two screws per bracket. The screws should be inserted in bracket holes diagonally from each other.
Corded Lift Control
Drywall Anchor
Screw
Bracket
INSTALLATION
14
OUTSIDE MOUNT (OM)
Corded Lift Control
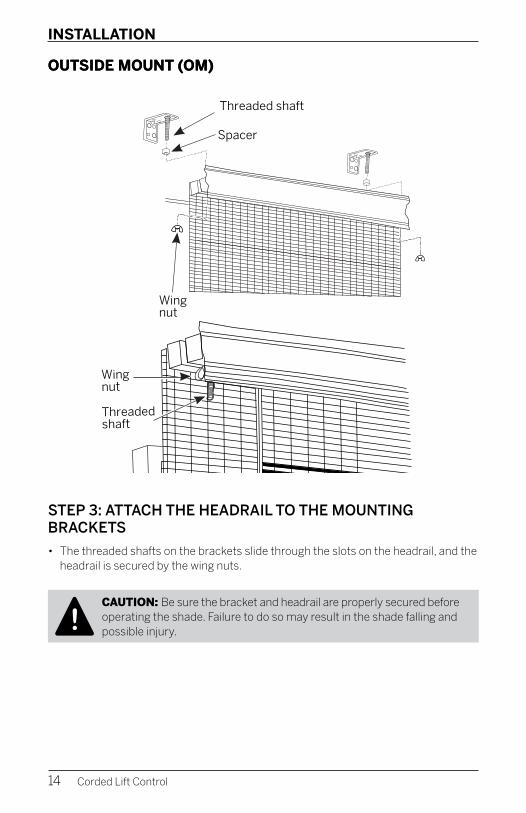
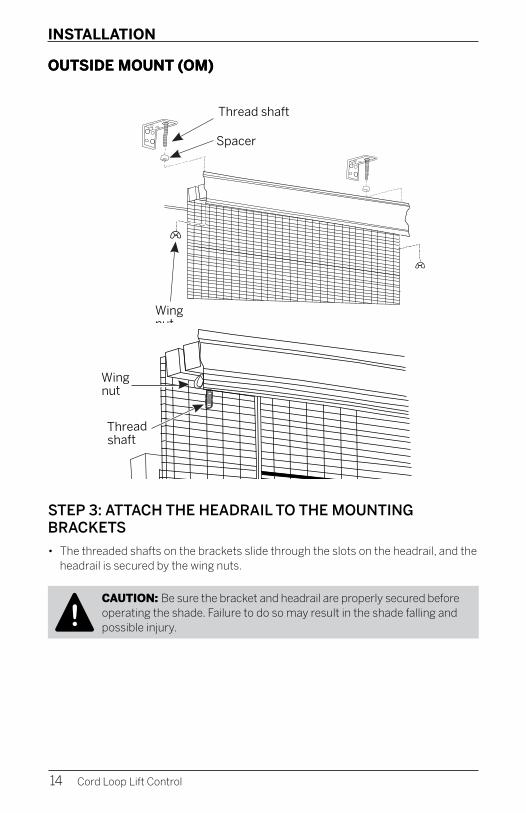
OUTSIDE MOUNT (OM)
STEP 3: ATTACH THE HEADRAIL TO THE MOUNTING BRACKETS
• The threaded shafts on the brackets slide through the slots on the headrail, and the headrail is secured by the wing nuts.
CAUTION: Be sure the bracket and headrail are properly secured before operating the shade. Failure to do so may result in the shade falling and possible injury.!
Threaded shaft
Spacer
Wing nut
Wing nut
Threaded shaft
Threaded shaft
Spacer
Wing nut
Wing nut
Threaded shaft
INSTALLATION - ADDITIONAL COMPONENTS
15Corded Lift Control
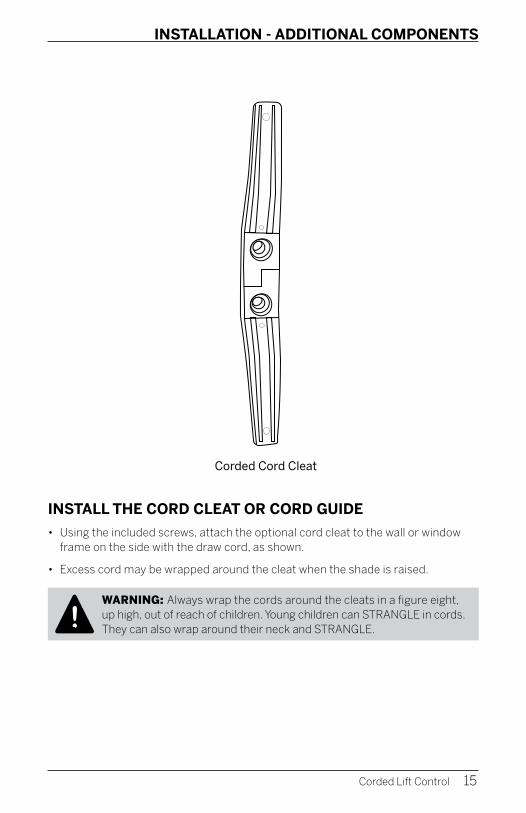
Corded Cord Cleat
WARNING: Always wrap the cords around the cleats in a figure eight, up high, out of reach of children. Young children can STRANGLE in cords. They can also wrap around their neck and STRANGLE.!
INSTALL THE CORD CLEAT OR CORD GUIDE
• Using the included screws, attach the optional cord cleat to the wall or window frame on the side with the draw cord, as shown.
• Excess cord may be wrapped around the cleat when the shade is raised.
INSTALLATION - ADDITIONAL COMPONENTS
16 Corded Lift Control
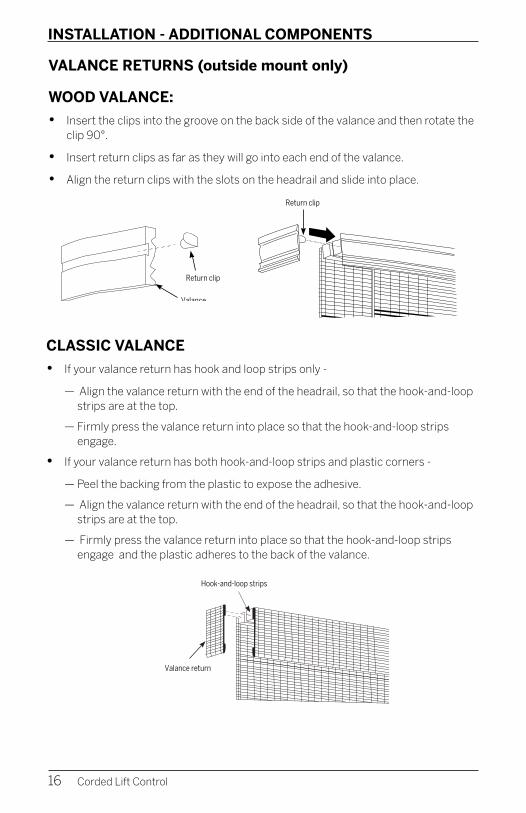
CLASSIC VALANCE
• If your valance return has hook and loop strips only -
— Align the valance return with the end of the headrail, so that the hook-and-loop strips are at the top.
— Firmly press the valance return into place so that the hook-and-loop strips engage.
• If your valance return has both hook-and-loop strips and plastic corners -
— Peel the backing from the plastic to expose the adhesive.
— Align the valance return with the end of the headrail, so that the hook-and-loop strips are at the top.
— Firmly press the valance return into place so that the hook-and-loop strips engage and the plastic adheres to the back of the valance.
Return clip
Valance
Return clip
Hook-and-loop strips
Valance return
Return clip
Valance
Return clip
Hook-and-loop strips
Valance return
VALANCE RETURNS (outside mount only)
WOOD VALANCE:
• Insert the clips into the groove on the back side of the valance and then rotate the clip 90°.
• Insert return clips as far as they will go into each end of the valance.
• Align the return clips with the slots on the headrail and slide into place.
Return clip
Valance
Return clip
Hook-and-loop strips
Valance return

INSTALLATION - ADDITIONAL COMPONENTS
17Corded Lift Control
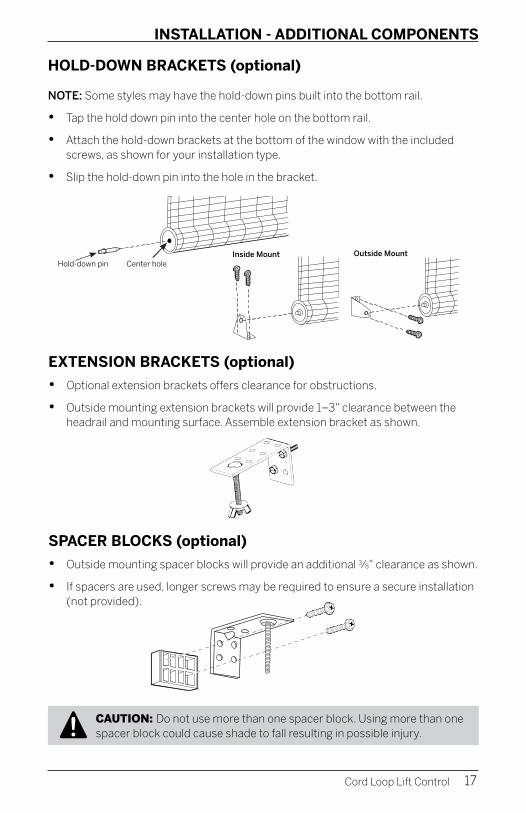
HOLD-DOWN BRACKETS (optional)
NOTE: Some styles may have the hold-down pins built into the bottom rail.
• Tap the hold down pin into the center hole on the bottom rail.
• Attach the hold-down brackets at the bottom of the window with the included screws, as shown for your installation type.
• Slip the hold-down pin into the hole in the bracket.
Center holeHold-down pin
Inside Mount Outside Mount
INSTALLATION-ADDITIONAL COMPONENTS
18 Corded Lift Control
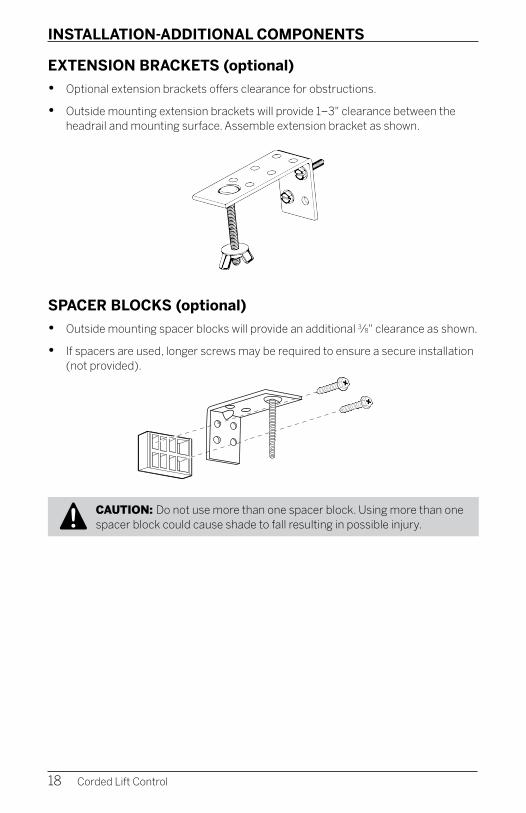
EXTENSION BRACKETS (optional)
• Optional extension brackets offers clearance for obstructions.
• Outside mounting extension brackets will provide 1–3" clearance between the headrail and mounting surface. Assemble extension bracket as shown.
CAUTION: Do not use more than one spacer block. Using more than one spacer block could cause shade to fall resulting in possible injury.!
SPACER BLOCKS (optional)
• Outside mounting spacer blocks will provide an additional 3⁄8" clearance as shown.
• If spacers are used, longer screws may be required to ensure a secure installation (not provided).

OPERATION
CORDED
• Cords, whether installed on the left or right side, have the same locking mechanism. To raise the shade, pull the cord and release it when the shade reaches the desired height. To lower the shade, gently pull the cords toward the center of the window,and then release to lower the shade while maintaining constant tension on the cords.
NOTE: If your shades have hold-down brackets, unhook the bottom rail before raising.
Do not force the cord; if the shade does not raise or lower, check for objects preventing proper operation.
TOP-DOWN BOTTOM-UP
• To lower your shade from the top, use the left-hand cords. Pull the cords gently toward the center of the window, and then release to lower the shade. Gently pull the cords to the left to lock the shade in place.
• To raise your shade back to the top, gently pull the left-hand cords toward the center of the window to unlock it, and then pull the cords to raise the shade.
• To raise or lower the bottom of your shade, follow the same process as above, using the right-hand cords.
Bottom-Up Shade
19Corded Lift Control
Top-Down/Bottom-Up Shade
CLEANING AND CARE
20 Corded Lift Control
Additional Notes
Shade Adjustment and Alignment Your shade has been carefully inspected and adjusted by the factory, but minor adjustments may be necessary once it has been installed. The yarns in your shade are flexible enough to permit minor adjustment horizontally and vertically for proper alignment on your window. If the bottom of your shade becomes uneven, pull either side to stretch the yarn and align the shade.
If your shade doesn’t lie flat against the wall or window, roll the shade tightly from the bottom and twist roll clockwise on one side and counterclockwise on the other. This will align the yarns and slats.
Should a strand of yarn slip off the edge of the shade, remove the strand from top to bottom; doing so will in no way affect the strength of the shade.
Color Variation Levolor Natural Shades are created using natural products. By nature, no two strands of grass, bamboo or reeds are exactly the same, making every shade truly unique. Slight color, grain and texture variations should be expected and cherished for their unique beauty. Although we maintain strict standards to control these variations, we cannot guarantee exact color match from dye lot to dye lot. The side of the natural shade that faces outdoors will change color in relation to the amount of sun exposure.
Stretching and Shrinking Natural shades will be affected by temperature and humidity. Shipping and handling may cause a slight change in shade lengths.
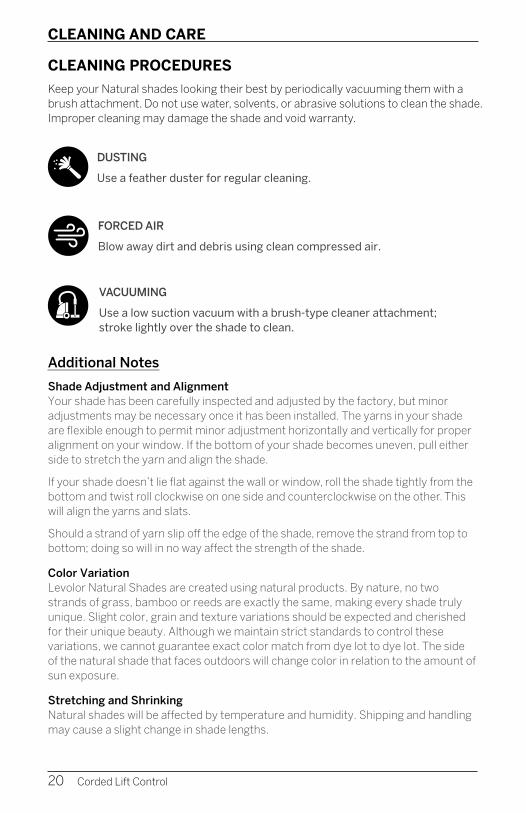
CLEANING PROCEDURES
Keep your Natural shades looking their best by periodically vacuuming them with a brush attachment. Do not use water, solvents, or abrasive solutions to clean the shade. Improper cleaning may damage the shade and void warranty.
DUSTING
Use a feather duster for regular cleaning.
FORCED AIR
Blow away dirt and debris using clean compressed air.
VACUUMING
Use a low suction vacuum with a brush-type cleaner attachment; stroke lightly over the shade to clean.

ADDITIONAL INFORMATION
WARRANTYFor complete warranty information visit LEVOLOR.com or call Customer Service at 1-800-LEVOLOR or 1-800-538-6567.
CONTACTING US
To contact LEVOLOR Customer Service regarding any questions or concerns you may have about your new shades, you may reach us at 1-800-LEVOLOR (8:30 am – 6:30 pm EST)
www.LEVOLOR.com
ADDITIONAL PARTS AND SERVICES
Additional or replacement parts can be ordered, or shades can be repaired or restrung through our repair center. Please contact LEVOLOR customer service through www.LEVOLOR.com for a return authorization number.
21Corded Lift Control

Persianas naturalINSTALACIÓN • MANEJO • CUIDADO
Control de elevación con cuerda

SEGURIDAD INFANTIL
Los niños pequeños se pueden ESTRANGULAR con las cuerdas. También podrían enrollarse las cuerdas alrededor del cuello y ESTRANGULARSE.
• Mantenga siempre las cuerdas fuera del alcance de los niños.
• Aleje las cunas, corralitos y otros muebles de las cuerdas. Los niños pueden subir por los muebles y alcanzar las cuerdas.
• Ate siempre las cuerdas alrededor de las abrazaderas en forma de ocho, en alto, fuera del alcance de los niños.
• Consulte los mensajes de seguridad adicionales para niños y cuerdas en la página 37
ADVERTENCIA: Mantenga todas las piezas pequeñas, los componentes y el embalaje lejos de los niños, ya que pueden tragarlos, lo cual puede ocasionarles lesiones graves o la muerte. Consulte todas las indicaciones y etiquetas de advertencia en las instrucciones y en la persiana misma.
!
© 2020 LEVOLOR®, Inc.24 Control de elevación con cuerda
ADVERTENCIA
CONTENIDOS
Terminología de ventanas y persianas Tipos de montaje y terminología de ventanas .................................... 26
Estilos de elevación ............................................................................... 27
Introducción Descripción general de la colocación ................................................... 28
Componentes incluidos ........................................................................ 29
Herramientas y elementos de fijación que puede necesitar .............. 30
Colocación Montaje interior ................................................................................ 31-33
Montaje exterior .............................................................................. 34-36
Cómo colocar componentes adicionalesCómo colocar la abrazadera de la cuerda ............................................37
Recodos de cenefa ................................................................................ 38
Soportes de sujeción ............................................................................ 39
Soportes de extensión .......................................................................... 40
Bloques espaciadores ........................................................................... 40
ManejoCómo manejar la persiana .....................................................................41
Limpieza y cuidadoProcedimientos de limpieza ................................................................. 42
Información adicional y asistenciaGarantía ................................................................................................. 43
Servicio de Atención al Cliente ............................................................. 43
25 Control de elevación con cuerda

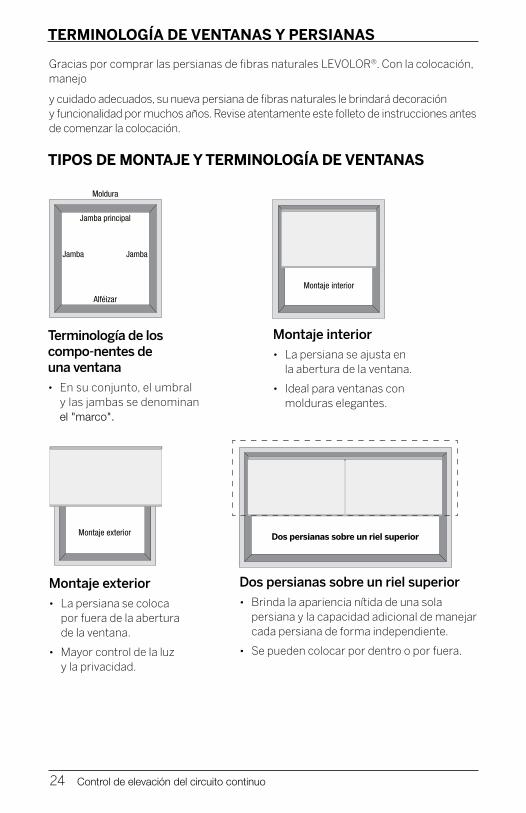
TERMINOLOGÍA DE VENTANAS Y PERSIANAS
Gracias por comprar las persianas de fibras naturales LEVOLOR®. Con la colocación, manejo y cuidado adecuados, su nueva persiana de fibras naturales le brindará decoración y funcionalidad por muchos años. Revise atentamente este folleto de instrucciones antes de comenzar la colocación.
TIPOS DE MONTAJE Y TERMINOLOGÍA DE VENTANAS
Montaje interior
• La persiana se ajusta en la abertura de la ventana.
• Ideal para ventanas con molduras elegantes.
Terminología de los componentes de una ventana
• En su conjunto, el umbral y las jambas se denominan el "marco".
Dos persianas sobre un riel superior
• Brinda la apariencia nítida de una sola persiana y la capacidad adicional de manejar cada persiana de forma independiente.
• Se pueden colocar por dentro o por fuera.
Montaje exterior
• La persiana se coloca por fuera de la abertura de la ventana.
• Mayor control de la luz y la privacidad.
26 Control de elevación con cuerda
Does persianas sobre un riel superior
JambaJamba
Alféizar
Jamba principal
Moldura
Montaje interior Montaje exterior
JambaJamba
Alféizar
Jamba principal
Moldura
Montaje interior Montaje exterior
JambaJamba
Alféizar
Jamba principal
Moldura
TERMINOLOGÍA DE VENTANAS Y PERSIANAS
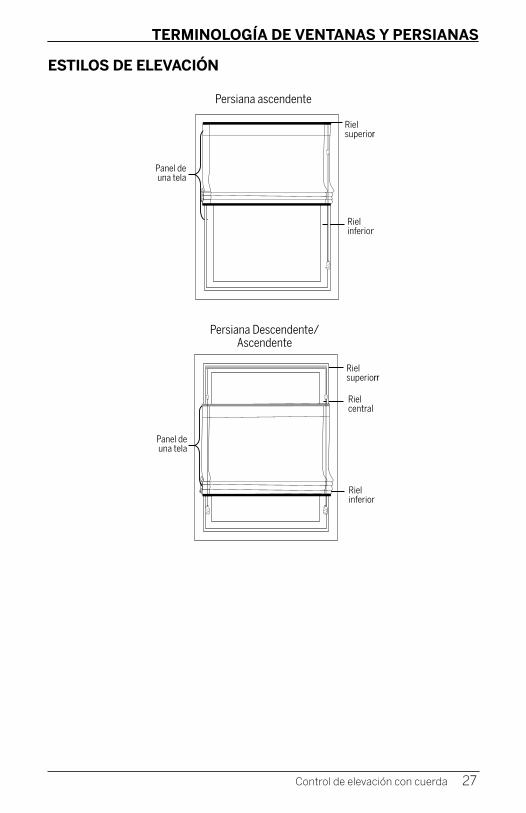
Persiana ascendente
Riel superior
Riel inferior
Riel inferior
Panel de una tela
Riel superiorr
Riel central
Panel de una tela
Persiana Descendente/Ascendente
ESTILOS DE ELEVACIÓN
27 Control de elevación con cuerda
INTRODUCCIÓN
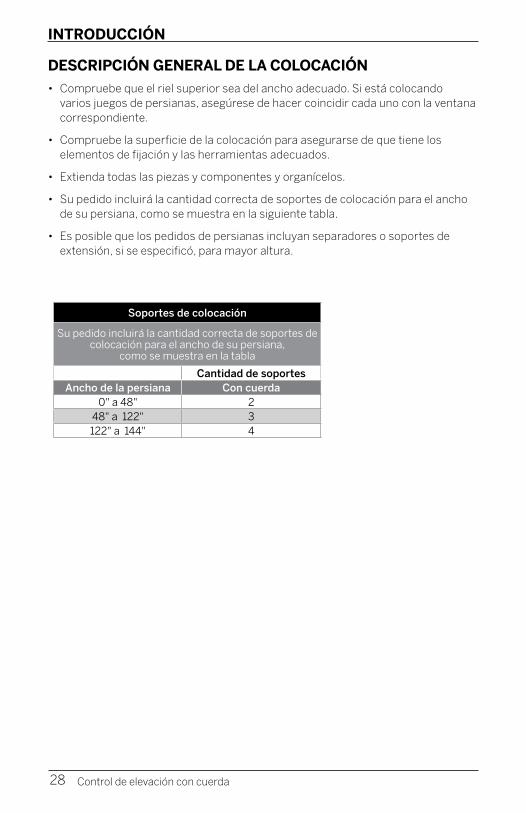
• Compruebe que el riel superior sea del ancho adecuado. Si está colocando varios juegos de persianas, asegúrese de hacer coincidir cada uno con la ventana correspondiente.
• Compruebe la superficie de la colocación para asegurarse de que tiene los elementos de fijación y las herramientas adecuados.
• Extienda todas las piezas y componentes y organícelos.
• Su pedido incluirá la cantidad correcta de soportes de colocación para el ancho de su persiana, como se muestra en la siguiente tabla.
• Es posible que los pedidos de persianas incluyan separadores o soportes de extensión, si se especificó, para mayor altura.
Soportes de colocación
Su pedido incluirá la cantidad correcta de soportes de colocación para el ancho de su persiana,
como se muestra en la tabla
Cantidad de soportesAncho de la persiana Con cuerda
0" a 48" 248" a 122" 3122" a 144" 4
DESCRIPCIÓN GENERAL DE LA COLOCACIÓN
28 Control de elevación con cuerda

INTRODUCCIÓN
COMPONENTES INCLUIDOS
• Persiana de fibras naturales
• Soportes de montaje
• Materiales de colocación
• Otros accesorios (opcional)
Se incluirán los elementos opcionales si se seleccionaron en el momento de realizar la compra de la persiana.
Abrazadera de la cuerda
Tornillos de cabeza hexagonal
(2 por soporte)
29 Control de elevación con cuerda
Soporte de montaje interior
Soporte de montaje exterior
Persiana de fibras naturales
Soportes de extensión(opcional)
Tuerca mariposa
Soporte de sujeción(opcional)
Bloque espaciador(opcional)
Espaciador
....................................................
INTRODUCCIÓN
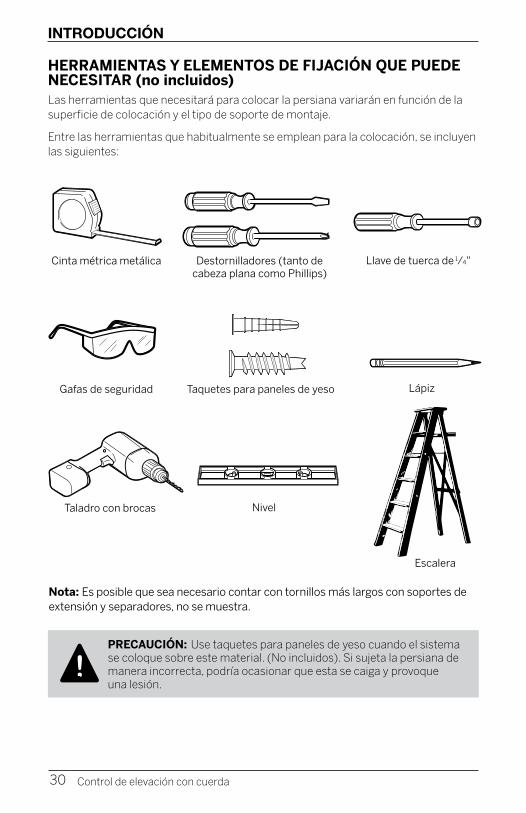
HERRAMIENTAS Y ELEMENTOS DE FIJACIÓN QUE PUEDE NECESITAR (no incluidos)Las herramientas que necesitará para colocar la persiana variarán en función de la superficie de colocación y el tipo de soporte de montaje.
Entre las herramientas que habitualmente se emplean para la colocación, se incluyen las siguientes:
Nota: Es posible que sea necesario contar con tornillos más largos con soportes de extensión y separadores, no se muestra.
Cinta métrica metálica
Gafas de seguridad
Taladro con brocas
Destornilladores (tanto de cabeza plana como Phillips)
Taquetes para paneles de yeso
Nivel
Llave de tuerca de 1⁄4"
Lápiz
Escalera
30 Control de elevación con cuerda
PRECAUCIÓN: Use taquetes para paneles de yeso cuando el sistema se coloque sobre este material. (No incluidos). Si sujeta la persiana de manera incorrecta, podría ocasionar que esta se caiga y provoque una lesión.
!
COLOCACIÓN
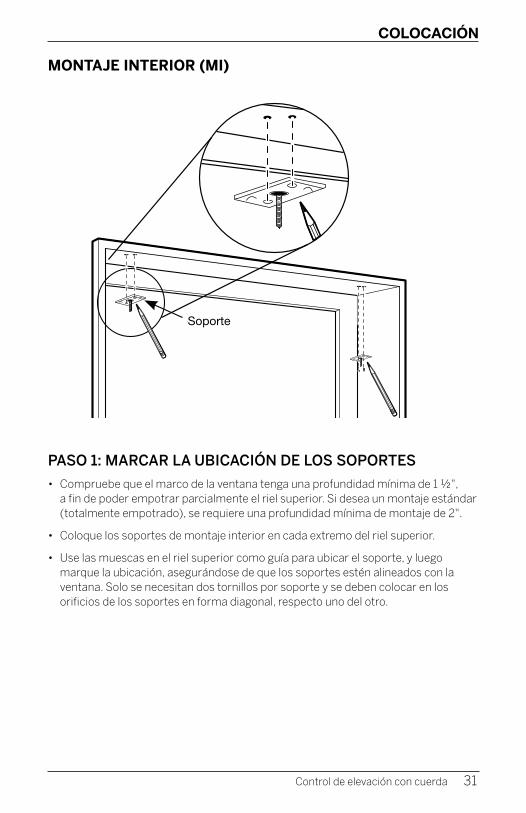
MONTAJE INTERIOR (MI)
PASO 1: MARCAR LA UBICACIÓN DE LOS SOPORTES
• Compruebe que el marco de la ventana tenga una profundidad mínima de 1 ½", a fin de poder empotrar parcialmente el riel superior. Si desea un montaje estándar (totalmente empotrado), se requiere una profundidad mínima de montaje de 2".
• Coloque los soportes de montaje interior en cada extremo del riel superior.
• Use las muescas en el riel superior como guía para ubicar el soporte, y luego marque la ubicación, asegurándose de que los soportes estén alineados con la ventana. Solo se necesitan dos tornillos por soporte y se deben colocar en los orificios de los soportes en forma diagonal, respecto uno del otro.
31 Control de elevación con cuerda
SoporteSoporte
COLOCACIÓN
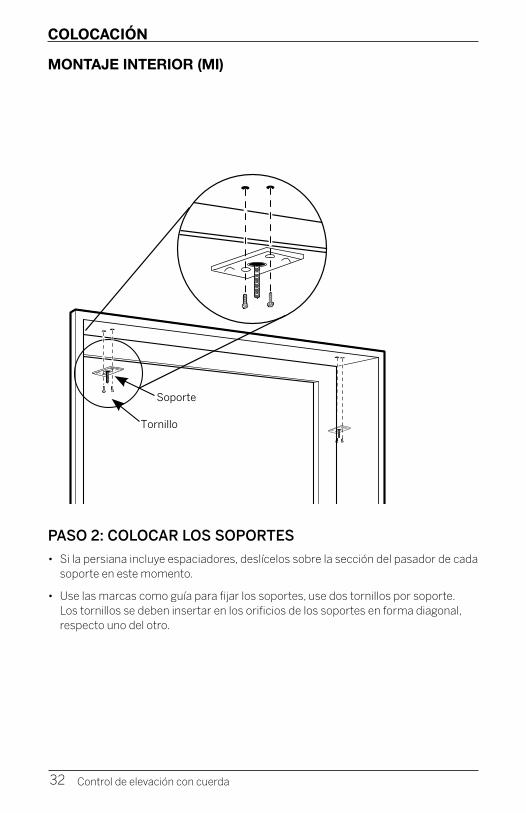
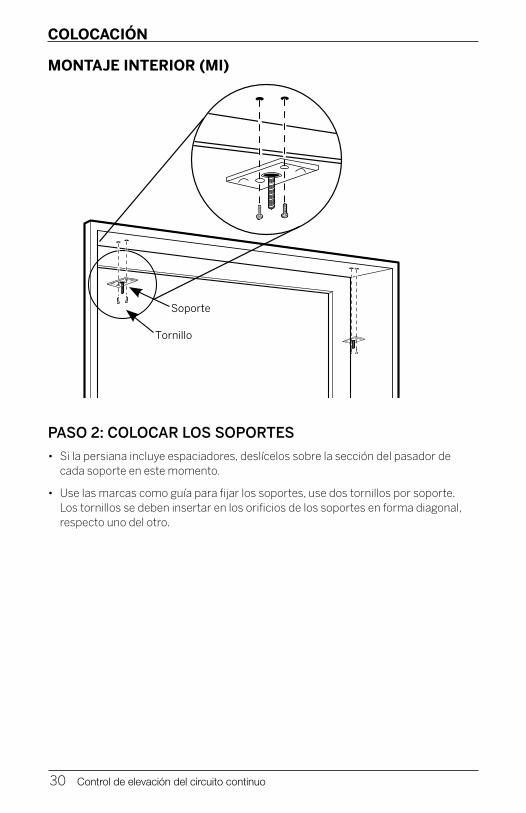
MONTAJE INTERIOR (MI)
PASO 2: COLOCAR LOS SOPORTES
• Si la persiana incluye espaciadores, deslícelos sobre la sección del pasador de cada soporte en este momento.
• Use las marcas como guía para fijar los soportes, use dos tornillos por soporte. Los tornillos se deben insertar en los orificios de los soportes en forma diagonal, respecto uno del otro.
32 Control de elevación con cuerda
Soporte
Tornillo

COLOCACIÓN
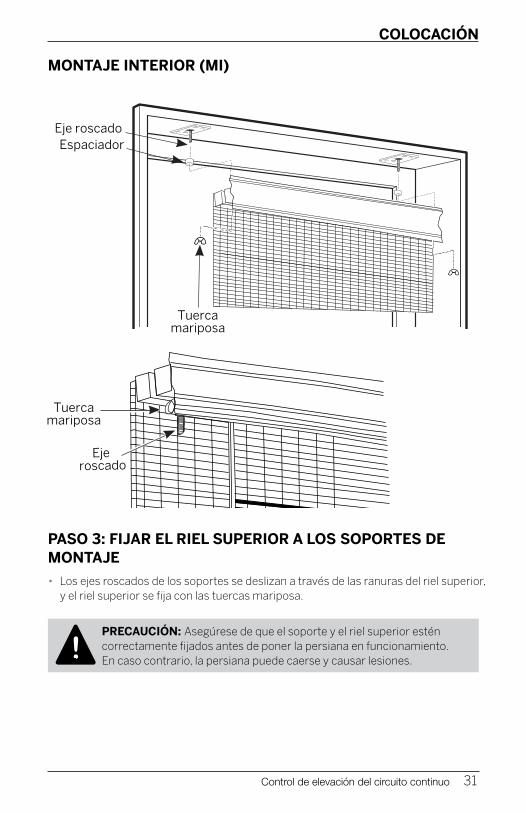
MONTAJE INTERIOR (MI)
PASO 3: FIJAR EL RIEL SUPERIOR A LOS SOPORTES DE MONTAJE
• Los ejes roscados de los soportes se deslizan a través de las ranuras del riel superior, y el riel superior se fija con las tuercas mariposa.
PRECAUCIÓN: Asegúrese de que el soporte y el riel superior estén correctamente fijados antes de poner la persiana en funcionamiento. En caso contrario, la persiana puede caerse y causar lesiones.!
33 Control de elevación con cuerda
Eje roscado
Tuercamariposa
Eje roscado Espaciador
TuercamariposaEje
roscado
Tuercamariposa
Eje roscado Espaciador
Tuercamariposa
COLOCACIÓN
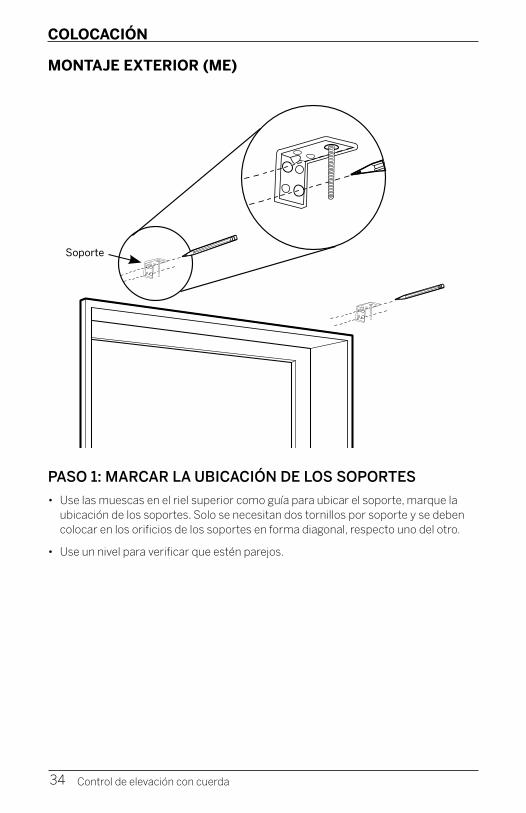
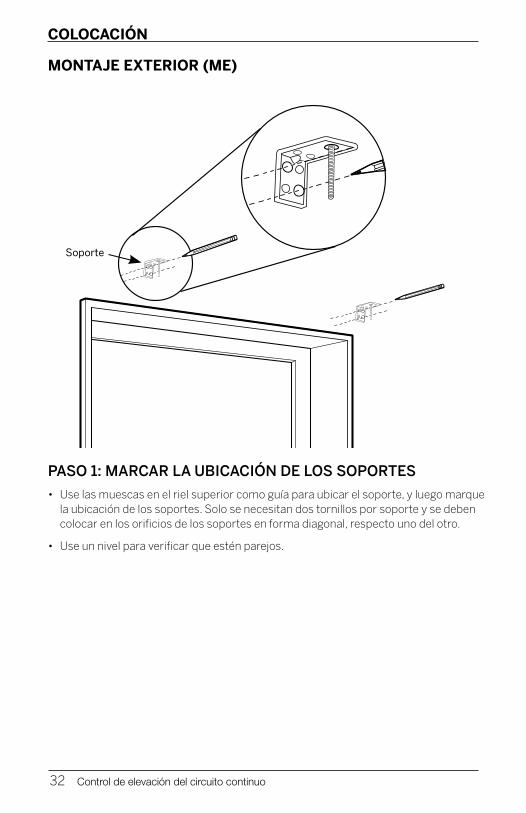
MONTAJE EXTERIOR (ME)
PASO 1: MARCAR LA UBICACIÓN DE LOS SOPORTES
• Use las muescas en el riel superior como guía para ubicar el soporte, marque la ubicación de los soportes. Solo se necesitan dos tornillos por soporte y se deben colocar en los orificios de los soportes en forma diagonal, respecto uno del otro.
• Use un nivel para verificar que estén parejos.
34 Control de elevación con cuerda
Soporte
COLOCACIÓN
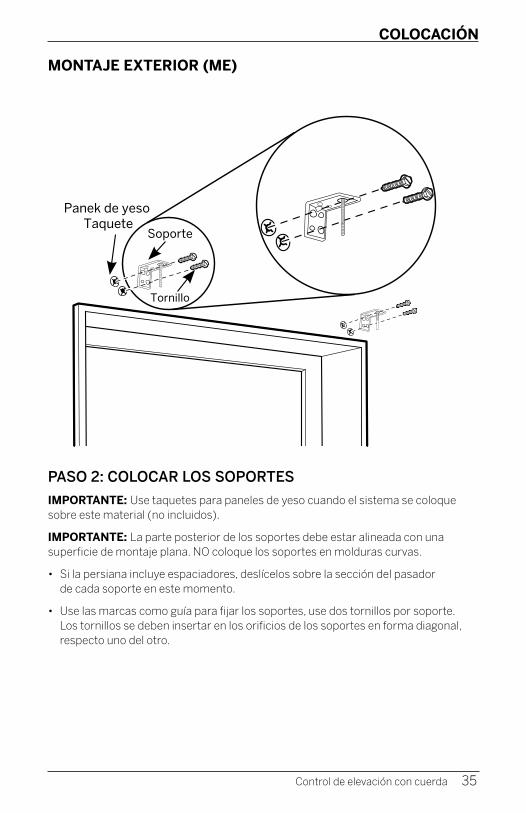
MONTAJE EXTERIOR (ME)
PASO 2: COLOCAR LOS SOPORTES
IMPORTANTE: Use taquetes para paneles de yeso cuando el sistema se coloque sobre este material (no incluidos).
IMPORTANTE: La parte posterior de los soportes debe estar alineada con una superficie de montaje plana. NO coloque los soportes en molduras curvas.
• Si la persiana incluye espaciadores, deslícelos sobre la sección del pasador de cada soporte en este momento.
• Use las marcas como guía para fijar los soportes, use dos tornillos por soporte. Los tornillos se deben insertar en los orificios de los soportes en forma diagonal, respecto uno del otro.
35 Control de elevación con cuerda
Panek de yeso Taquete
Tornillo
Soporte
COLOCACIÓN
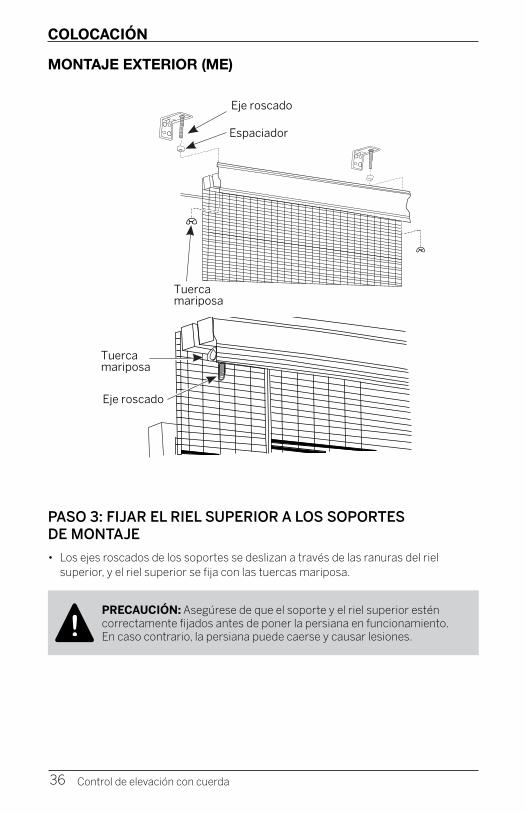
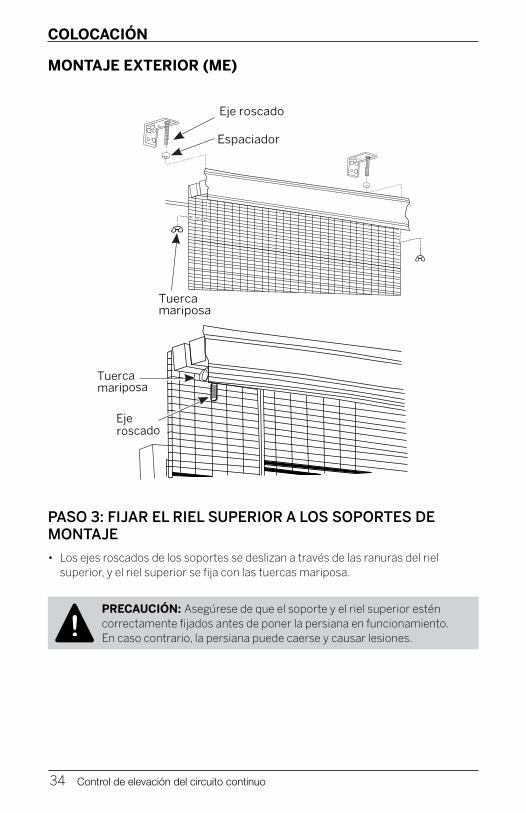
MONTAJE EXTERIOR (ME)
36 Control de elevación con cuerda
PASO 3: FIJAR EL RIEL SUPERIOR A LOS SOPORTES DE MONTAJE
• Los ejes roscados de los soportes se deslizan a través de las ranuras del riel superior, y el riel superior se fija con las tuercas mariposa.
PRECAUCIÓN: Asegúrese de que el soporte y el riel superior estén correctamente fijados antes de poner la persiana en funcionamiento. En caso contrario, la persiana puede caerse y causar lesiones.!
Eje roscado
Tuerca mariposa
Tuerca mariposa
Espaciador
Eje roscado
Eje roscado
Tuerca mariposa
Tuerca mariposa
Espaciador
Eje roscado
COLOCACIÓN: COMPONENTES ADICIONALES
37 Control de elevación con cuerda
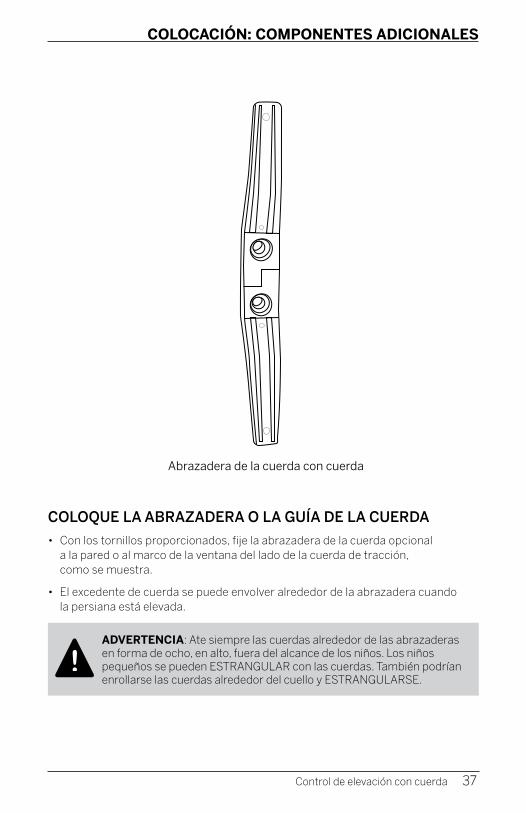
COLOQUE LA ABRAZADERA O LA GUÍA DE LA CUERDA
• Con los tornillos proporcionados, fije la abrazadera de la cuerda opcional a la pared o al marco de la ventana del lado de la cuerda de tracción, como se muestra.
• El excedente de cuerda se puede envolver alrededor de la abrazadera cuando la persiana está elevada.
ADVERTENCIA: Ate siempre las cuerdas alrededor de las abrazaderas en forma de ocho, en alto, fuera del alcance de los niños. Los niños pequeños se pueden ESTRANGULAR con las cuerdas. También podrían enrollarse las cuerdas alrededor del cuello y ESTRANGULARSE.
!
Abrazadera de la cuerda con cuerda
COLOCACIÓN: COMPONENTES ADICIONALES
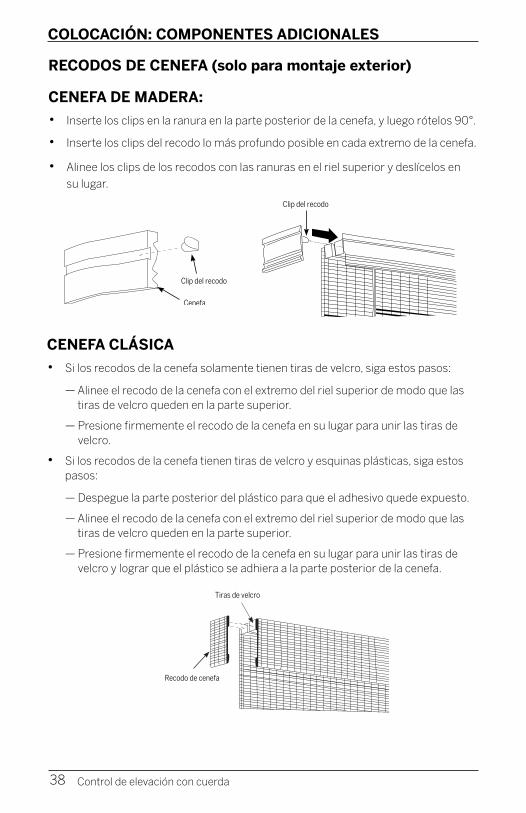
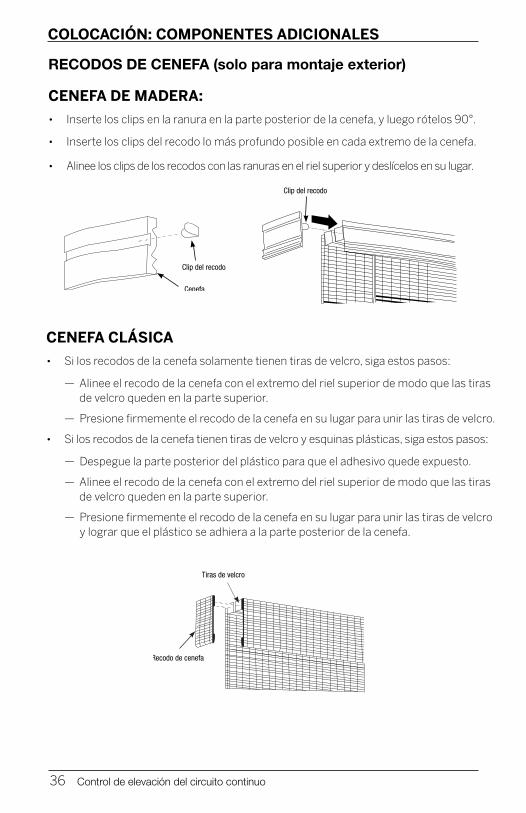
CENEFA CLÁSICA
• Si los recodos de la cenefa solamente tienen tiras de velcro, siga estos pasos:
— Alinee el recodo de la cenefa con el extremo del riel superior de modo que las tiras de velcro queden en la parte superior.
— Presione firmemente el recodo de la cenefa en su lugar para unir las tiras de velcro.
• Si los recodos de la cenefa tienen tiras de velcro y esquinas plásticas, siga estos pasos:
— Despegue la parte posterior del plástico para que el adhesivo quede expuesto.
— Alinee el recodo de la cenefa con el extremo del riel superior de modo que las tiras de velcro queden en la parte superior.
— Presione firmemente el recodo de la cenefa en su lugar para unir las tiras de velcro y lograr que el plástico se adhiera a la parte posterior de la cenefa.
RECODOS DE CENEFA (solo para montaje exterior)
CENEFA DE MADERA:
• Inserte los clips en la ranura en la parte posterior de la cenefa, y luego rótelos 90°.
• Inserte los clips del recodo lo más profundo posible en cada extremo de la cenefa.
• Alinee los clips de los recodos con las ranuras en el riel superior y deslícelos en
su lugar.
38 Control de elevación con cuerda
Clip del recodo
Cenefa
Clip del recodo
Tiras de velcro
Recodo de cenefa
Clip del recodo
Cenefa
Clip del recodo
Tiras de velcro
Recodo de cenefa
Clip del recodo
Cenefa
Clip del recodo
Tiras de velcro
Recodo de cenefa

COLOCACIÓN: COMPONENTES ADICIONALES
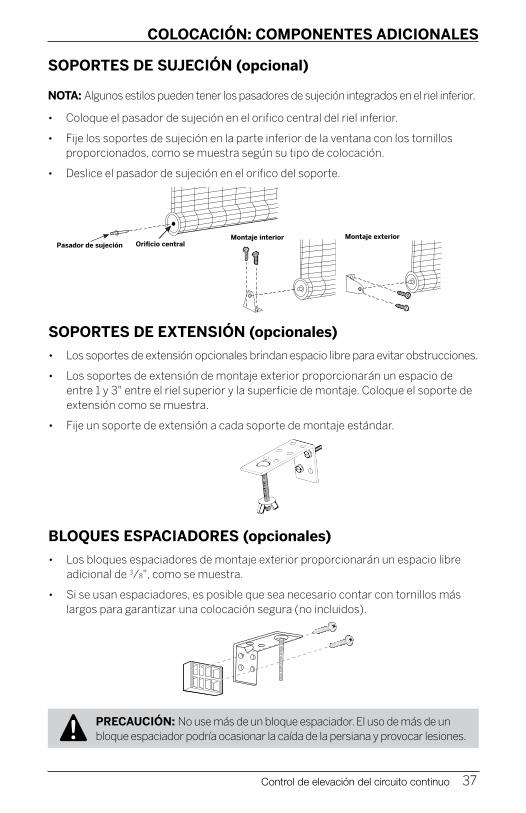
SOPORTES DE SUJECIÓN (opcional)
NOTA: Algunos estilos pueden tener los pasadores de sujeción integrados en el riel inferior.
• Coloque el pasador de sujeción en el orifico central del riel inferior.
• Fije los soportes de sujeción en la parte inferior de la ventana con los tornillos proporcionados, como se muestra según su tipo de colocación.
• Deslice el pasador de sujeción en el orifico del soporte.
39 Control de elevación con cuerda
Ori�cio centralPasador de sujeción
Montaje interior Montaje exterior

COLOCACIÓN: COMPONENTES ADICIONALES
SOPORTES DE EXTENSIÓN (opcionales)
• Los soportes de extensión opcionales brindan espacio libre para evitar obstrucciones.
• Los soportes de extensión de montaje exterior proporcionarán un espacio de entre 1 y 3" entre el riel superior y la superficie de montaje. Coloque el soporte de extensión como se muestra.
• Fije un soporte de extensión a cada soporte de montaje estándar.
BLOQUES ESPACIADORES (opcionales)
• Los bloques espaciadores de montaje exterior proporcionarán un espacio libre adicional de 3/8", como se muestra.
• Si se usan espaciadores, pueden ser necesarios tornillos más largos para
garantizar una colocación segura (no incluidos).
PRECAUCIÓN: No use más de un bloque espaciador. El uso de más de un bloque espaciador podría ocasionar la caída de la persiana y provocar lesiones.!
40 Control de elevación con cuerda
MANEJO
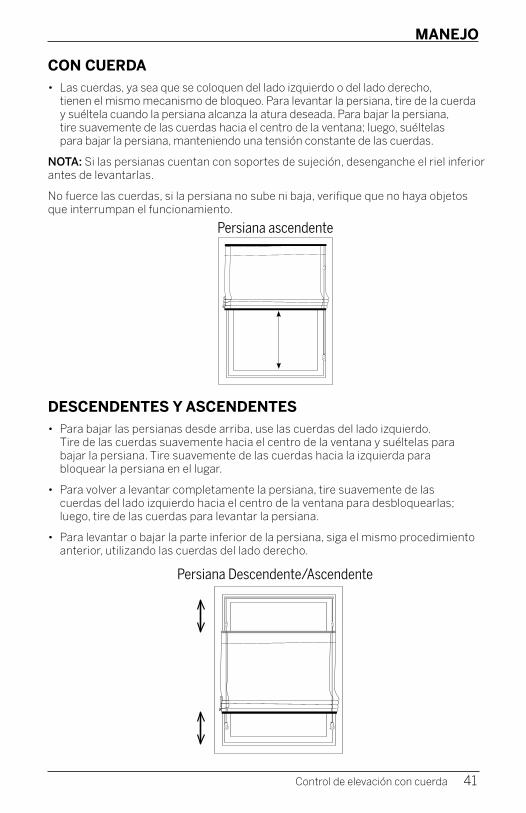
CON CUERDA• Las cuerdas, ya sea que se coloquen del lado izquierdo o del lado derecho,
tienen el mismo mecanismo de bloqueo. Para levantar la persiana, tire de la cuerda y suéltela cuando la persiana alcanza la atura deseada. Para bajar la persiana, tire suavemente de las cuerdas hacia el centro de la ventana; luego, suéltelas para bajar la persiana, manteniendo una tensión constante de las cuerdas.
NOTA: Si las persianas cuentan con soportes de sujeción, desenganche el riel inferior antes de levantarlas.
No fuerce las cuerdas, si la persiana no sube ni baja, verifique que no haya objetos que interrumpan el funcionamiento.
DESCENDENTES Y ASCENDENTES• Para bajar las persianas desde arriba, use las cuerdas del lado izquierdo.
Tire de las cuerdas suavemente hacia el centro de la ventana y suéltelas para bajar la persiana. Tire suavemente de las cuerdas hacia la izquierda para bloquear la persiana en el lugar.
• Para volver a levantar completamente la persiana, tire suavemente de las cuerdas del lado izquierdo hacia el centro de la ventana para desbloquearlas; luego, tire de las cuerdas para levantar la persiana.
• Para levantar o bajar la parte inferior de la persiana, siga el mismo procedimiento anterior, utilizando las cuerdas del lado derecho.
41 Control de elevación con cuerda
Persiana ascendente
Persiana Descendente/Ascendente
LIMPIEZA Y CUIDADO
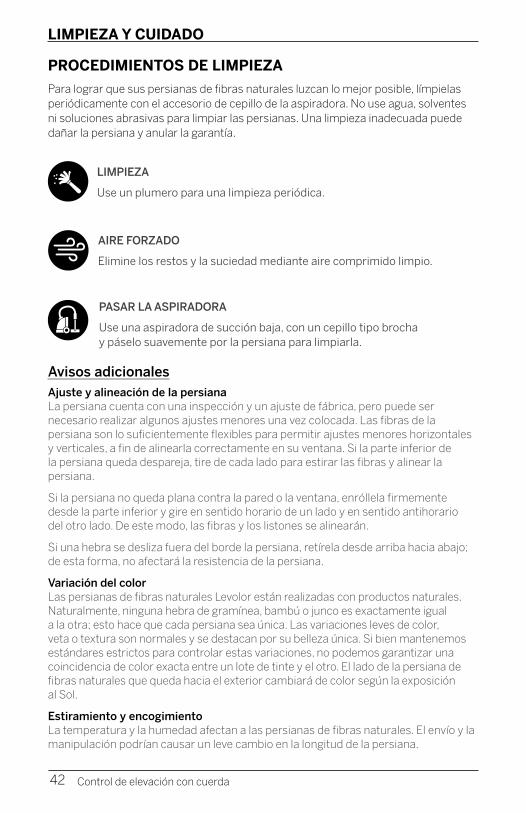
PROCEDIMIENTOS DE LIMPIEZA
Para lograr que sus persianas de fibras naturales luzcan lo mejor posible, límpielas periódicamente con el accesorio de cepillo de la aspiradora. No use agua, solventes ni soluciones abrasivas para limpiar las persianas. Una limpieza inadecuada puede dañar la persiana y anular la garantía.
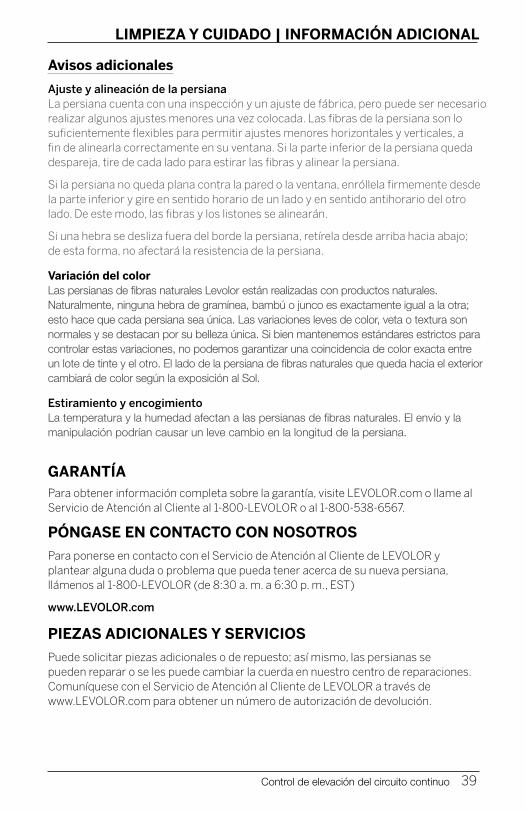
Avisos adicionalesAjuste y alineación de la persiana La persiana cuenta con una inspección y un ajuste de fábrica, pero puede ser necesario realizar algunos ajustes menores una vez colocada. Las fibras de la persiana son lo suficientemente flexibles para permitir ajustes menores horizontales y verticales, a fin de alinearla correctamente en su ventana. Si la parte inferior de la persiana queda despareja, tire de cada lado para estirar las fibras y alinear la persiana.
Si la persiana no queda plana contra la pared o la ventana, enróllela firmemente desde la parte inferior y gire en sentido horario de un lado y en sentido antihorario del otro lado. De este modo, las fibras y los listones se alinearán.
Si una hebra se desliza fuera del borde la persiana, retírela desde arriba hacia abajo; de esta forma, no afectará la resistencia de la persiana.
Variación del color Las persianas de fibras naturales Levolor están realizadas con productos naturales. Naturalmente, ninguna hebra de gramínea, bambú o junco es exactamente igual a la otra; esto hace que cada persiana sea única. Las variaciones leves de color, veta o textura son normales y se destacan por su belleza única. Si bien mantenemos estándares estrictos para controlar estas variaciones, no podemos garantizar una coincidencia de color exacta entre un lote de tinte y el otro. El lado de la persiana de fibras naturales que queda hacia el exterior cambiará de color según la exposición al Sol.
Estiramiento y encogimiento La temperatura y la humedad afectan a las persianas de fibras naturales. El envío y la manipulación podrían causar un leve cambio en la longitud de la persiana.
42 Control de elevación con cuerda
LIMPIEZA
Use un plumero para una limpieza periódica.
AIRE FORZADO
Elimine los restos y la suciedad mediante aire comprimido limpio.
PASAR LA ASPIRADORA
Use una aspiradora de succión baja, con un cepillo tipo brocha y páselo suavemente por la persiana para limpiarla.
INFORMACIÓN ADICIONAL
GARANTÍAPara obtener información completa sobre la garantía, visite LEVOLOR.com o llame al Servicio de Atención al Cliente al 1-800-LEVOLOR o al 1-800-538-6567.
PÓNGASE EN CONTACTO CON NOSOTROS
Para ponerse en contacto con el Servicio de Atención al Cliente de LEVOLOR y plantear alguna duda o problema que pueda tener acerca de su nueva persiana, llámenos al 1-800-LEVOLOR (de 8:30 a. m. a 6:30 p. m., EST)
www.LEVOLOR.com
PIEZAS ADICIONALES Y SERVICIOS
Puede solicitar piezas adicionales o de repuesto; así mismo, las persianas se pueden reparar o se les puede cambiar la cuerda en nuestro centro de reparaciones. Comuníquese con el Servicio de Atención al Cliente de LEVOLOR a través de www.LEVOLOR.com para obtener un número de autorización de devolución.
43 Control de elevación con cuerda

©2020 LEVOLOR®, Inc. 5775 Glenridge Drive Building A Atlanta, GA 30328 101180119-0050-032

Natural ShadesPersianas natural
INSTALLATION • OPERATION • CAREINSTALACIÓN • MANEJO • CUIDADO
Continuous Cord Loop Lift ControlControl de elevación de circuito de cuerdas continuo
CHILD SAFETY
© 2020 LEVOLOR®, Inc.2 Cord Loop Lift Control
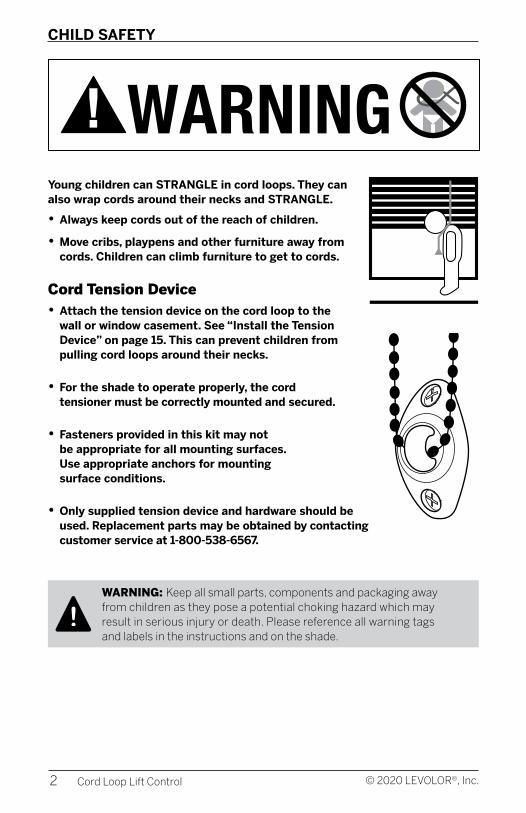
Young children can STRANGLE in cord loops. They can also wrap cords around their necks and STRANGLE.
• Always keep cords out of the reach of children.
• Move cribs, playpens and other furniture away from cords. Children can climb furniture to get to cords.
Cord Tension Device• Attach the tension device on the cord loop to the
wall or window casement. See “Install the Tension Device” on page 15. This can prevent children from pulling cord loops around their necks.
• For the shade to operate properly, the cord tensioner must be correctly mounted and secured.
• Fasteners provided in this kit may not be appropriate for all mounting surfaces. Use appropriate anchors for mounting surface conditions.
• Only supplied tension device and hardware should be used. Replacement parts may be obtained by contacting customer service at 1-800-538-6567.
WARNING: Keep all small parts, components and packaging away from children as they pose a potential choking hazard which may result in serious injury or death. Please reference all warning tags and labels in the instructions and on the shade.
!
WARNING

CONTENTS
3Cord Loop Lift Control
CONTENTS
Window and Shade Terminology Mounting Types and Window Terminology ............................................ 4
Lift Styles ..................................................................................................5
Getting Started Installation Overview ............................................................................... 6
Components Included .............................................................................7
Tools and Fasteners You May Need ........................................................ 8
Installation Inside Mount ........................................................................................ 9-11
Outside Mount ................................................................................... 12-14
Installing Additional ComponentsContinuous Cord Loop Tension Device .................................................15
Valance Returns......................................................................................16
Hold-Down Brackets .............................................................................. 17
Extension Brackets ................................................................................ 17
Spacer Blocks ......................................................................................... 17
OperationOperating the Shade ..............................................................................18
Cleaning and CareCleaning Procedures ..............................................................................18
Additional Information and SupportWarranty .................................................................................................19
Customer Service Support ....................................................................19

WINDOW AND SHADE TERMINOLOGY
Thank you for purchasing LEVOLOR® Natural Shades. With proper installation, operation,
and care, your new natural shade will provide years of beauty and performance. Please
thoroughly review this instruction booklet before beginning installation.
MOUNTING TYPES AND WINDOW TERMINOLOGY
Inside Mount
• Shade fits within window opening.
• Great for windows with beautiful trim.
Window Components Terminology
• Collectively, the sill and jambs are called the “window casement” or "frame".
Two Shades on One Headrail
• Provides the clean appearance of a single shade with the ability to operate each shade independently.
• Can be mounted inside or outside.
Outside Mount
• Shade mounts outside window opening.
• Increased light control and privacy.
4 Cord Loop Lift Control
Outside MountInside Mount
Molding
Head Jamb
Sill
Jamb Jamb
Outside MountInside Mount
Molding
Head Jamb
Sill
Jamb Jamb
Two Shades on One Headrail
Molding
Head Jamb
Sill
Jamb Jamb
WINDOW AND SHADE TERMINOLOGY
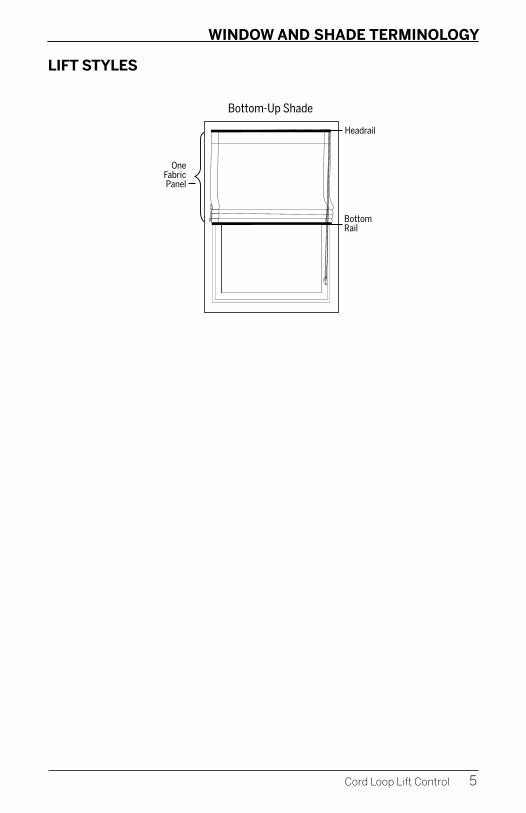
Bottom-Up Shade
One Fabric Panel
5Cord Loop Lift Control
LIFT STYLES
Headrail
Bottom Rail
GETTING STARTED
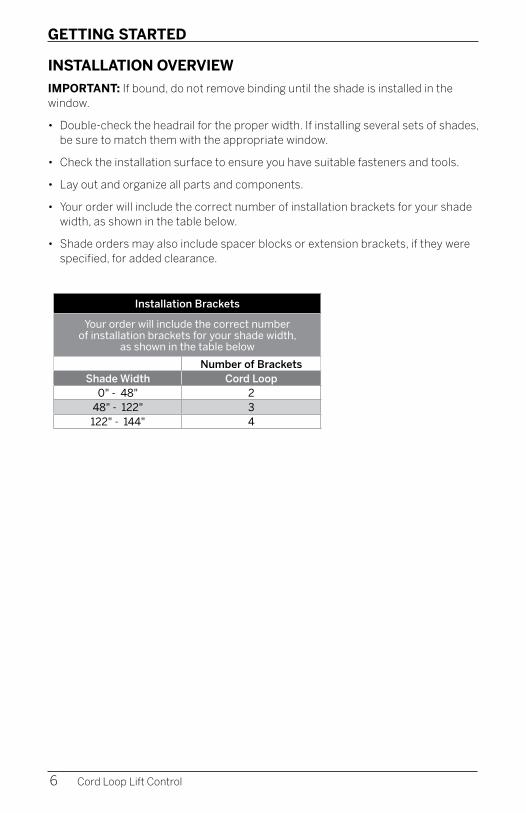
INSTALLATION OVERVIEW
IMPORTANT: If bound, do not remove binding until the shade is installed in the window.
• Double-check the headrail for the proper width. If installing several sets of shades, be sure to match them with the appropriate window.
• Check the installation surface to ensure you have suitable fasteners and tools.
• Lay out and organize all parts and components.
• Your order will include the correct number of installation brackets for your shade width, as shown in the table below.
• Shade orders may also include spacer blocks or extension brackets, if they were specified, for added clearance.
Installation Brackets
Your order will include the correct number of installation brackets for your shade width,
as shown in the table below
Number of BracketsShade Width Cord Loop
0" - 48" 248" - 122" 3122" - 144" 4
6 Cord Loop Lift Control

GETTING STARTED
COMPONENTS INCLUDED
Outside Mount BracketInside Mount Bracket
Spacer Block(optional)
• Natural Shade
• Mounting Brackets
• Installation Hardware
• Other accessories (optional)
Optional items will be included, if selected at time of shade order.
Cord Loop Tension Device
Naturals Shade
Hex Head Screws (2 per Bracket)
Wing Nut Extension Brackets(optional)
Hold Down Bracket(optional)
7Cord Loop Lift Control
Spacer
....................................................
GETTING STARTED
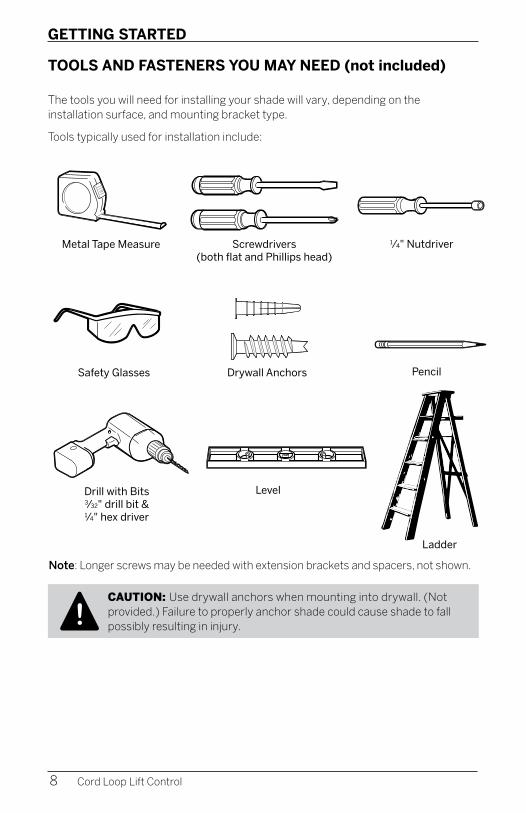
TOOLS AND FASTENERS YOU MAY NEED (not included)
The tools you will need for installing your shade will vary, depending on the installation surface, and mounting bracket type.
Tools typically used for installation include:
8 Cord Loop Lift Control
CAUTION: Use drywall anchors when mounting into drywall. (Not provided.) Failure to properly anchor shade could cause shade to fall possibly resulting in injury. !
Note: Longer screws may be needed with extension brackets and spacers, not shown.
Metal Tape Measure
Safety Glasses
Drill with Bits3⁄32" drill bit &1⁄4" hex driver
Ladder
Screwdrivers (both flat and Phillips head)
Drywall Anchors
Level
1⁄4" Nutdriver
Pencil
INSTALLATION
INSIDE MOUNT (IM)
STEP 1: MARK THE BRACKET LOCATIONS
• Verify that your window casing has a minimum depth of 1 ½” which allows for a partially recessed headrail mount. If flush mount (fully recessed mount) is desired, a minimum mounting depth of 2” is required.
• Position the inside-mount brackets at each end of the headrail.
• Using the notches in the headrail as a guide for bracket placement, mark the locations of the bracket, making sure they are square and evenly placed from the window. Only two screws are needed per bracket and they should be placed in bracket holes diagonally from each other.
9Cord Loop Lift Control
Bracket

INSTALLATION
INSIDE MOUNT (IM)INSIDE MOUNT (IM)
STEP 2: INSTALL THE BRACKETS
• If your shade includes spacers, slip the spacers over the bolt section of each bracket at this time.
• Using the marks made as a guide, attach the brackets, using two screws per bracket. The screws should be inserted in bracket holes diagonally from each other.
10 Cord Loop Lift Control
Bracket
Screw

INSTALLATION
INSIDE MOUNT (IM)
STEP 3: ATTACH THE HEADRAIL TO THE MOUNTING BRACKETS
• The threaded shafts on the brackets slide through the slots on the headrail, and the headrail is secured by the wing nuts.
CAUTION: Be sure the bracket and headrail are properly secured before operating the shade. Failure to do so may result in the shade falling and possible injury.!
11Cord Loop Lift Control
Wing nut
Threaded shaft
Wing nut
Threaded shaft Spacer
Wing nut
Threaded shaft
Wing nut
Threaded shaft Spacer
INSTALLATION
OUTSIDE MOUNT (OM)
STEP 1: MARK THE BRACKET LOCATIONS
• Using the notches in the headrail as a guide for bracket placement, mark the locations of the bracket. Only two screws are needed per bracket and they should be placed in bracket holes diagonally from each other.
• Use a level to check for levelness.
12 Cord Loop Lift Control
OUTSIDE MOUNT (OM)
Bracket
INSTALLATION
OUTSIDE MOUNT (OM)
13Cord Loop Lift Control
STEP 2: INSTALLING THE BRACKETS
IMPORTANT: Use drywall anchors when mounting into drywall (not provided).
IMPORTANT: The rear of the brackets must be flush against a flat mounting surface. Do NOT mount brackets on curved molding.
• If your shade includes spacers, slip the spacers over the bolt section of each bracket at this time.
• Using the marks made as a guide, attach the brackets, using two screws per bracket. The screws should be inserted in bracket holes diagonally from each other.
Drywall Anchor
Screw
Bracket
INSTALLATION
OUTSIDE MOUNT (OM)
14 Cord Loop Lift Control
STEP 3: ATTACH THE HEADRAIL TO THE MOUNTING BRACKETS
• The threaded shafts on the brackets slide through the slots on the headrail, and the headrail is secured by the wing nuts.
CAUTION: Be sure the bracket and headrail are properly secured before operating the shade. Failure to do so may result in the shade falling and possible injury.!
OUTSIDE MOUNT (OM)
Thread shaft
Spacer
Wing nut
Wing nut
Thread shaft
Thread shaft
Spacer
Wing nut
Wing nut
Thread shaft
INSTALLATION - ADDITIONAL COMPONENTS
15Cord Loop Lift Control
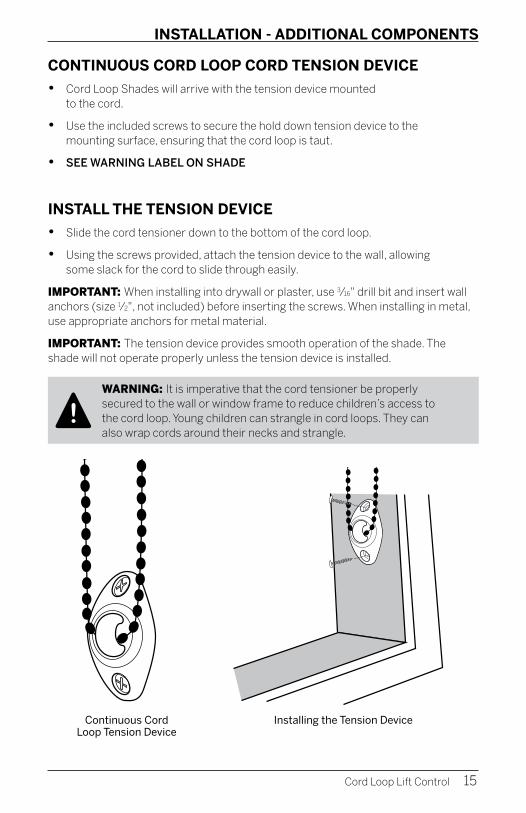
CONTINUOUS CORD LOOP CORD TENSION DEVICE
• Cord Loop Shades will arrive with the tension device mounted to the cord.
• Use the included screws to secure the hold down tension device to the mounting surface, ensuring that the cord loop is taut.
• SEE WARNING LABEL ON SHADE
INSTALL THE TENSION DEVICE
• Slide the cord tensioner down to the bottom of the cord loop.
• Using the screws provided, attach the tension device to the wall, allowing some slack for the cord to slide through easily.
IMPORTANT: When installing into drywall or plaster, use 3⁄16" drill bit and insert wall anchors (size 1⁄2", not included) before inserting the screws. When installing in metal, use appropriate anchors for metal material.
IMPORTANT: The tension device provides smooth operation of the shade. The shade will not operate properly unless the tension device is installed.
WARNING: It is imperative that the cord tensioner be properly secured to the wall or window frame to reduce children’s access to the cord loop. Young children can strangle in cord loops. They can also wrap cords around their necks and strangle.
!
Installing the Tension DeviceContinuous Cord Loop Tension Device

INSTALLATION - ADDITIONAL COMPONENTS
CLASSIC VALANCE
• If your valance return has hook and loop strips only -
— Align the valance return with the end of the headrail, so that the hook-and-loop strips are at the top.
— Firmly press the valance return into place so that the hook-and-loop strips engage.
• If your valance return has both hook-and-loop strips and plastic corners -
— Peel the backing from the plastic to expose the adhesive.
— Align the valance return with the end of the headrail, so that the hook-and-loop strips are at the top.
— Firmly press the valance return into place so that the hook-and-loop strips engage and the plastic adheres to the back of the valance.
Return clip
Valance
Return clip
Hook-and-loop strips
Valance return
VALANCE RETURNS (outside mount only)
WOOD VALANCE:
• Insert the clips into the groove on the back side of the valance and then rotate the clip 90°.
• Insert return clips as far as they will go into each end of the valance.
• Align the return clips with the slots on the headrail and slide into place.
Return clip
Valance
Return clip
Hook-and-loop strips
Valance return
16 Cord Loop Lift Control
Return clip
Valance
Return clip
Hook-and-loop strips
Valance return
HOLD-DOWN BRACKETS (optional)
NOTE: Some styles may have the hold-down pins built into the bottom rail.
• Tap the hold down pin into the center hole on the bottom rail.
• Attach the hold-down brackets at the bottom of the window with the included screws, as shown for your installation type.
• Slip the hold-down pin into the hole in the bracket.
INSTALLATION - ADDITIONAL COMPONENTS
17Cord Loop Lift Control
CAUTION: Do not use more than one spacer block. Using more than one spacer block could cause shade to fall resulting in possible injury.!
EXTENSION BRACKETS (optional)
• Optional extension brackets offers clearance for obstructions.
• Outside mounting extension brackets will provide 1–3" clearance between the headrail and mounting surface. Assemble extension bracket as shown.
SPACER BLOCKS (optional)
• Outside mounting spacer blocks will provide an additional 3⁄8" clearance as shown.
• If spacers are used, longer screws may be required to ensure a secure installation (not provided).
Center holeHold-down pin
Inside Mount Outside Mount
Center holeHold-down pin
Inside Mount Outside Mount
OPERATION | CLEANING AND CARE
18 Cord Loop Lift Control
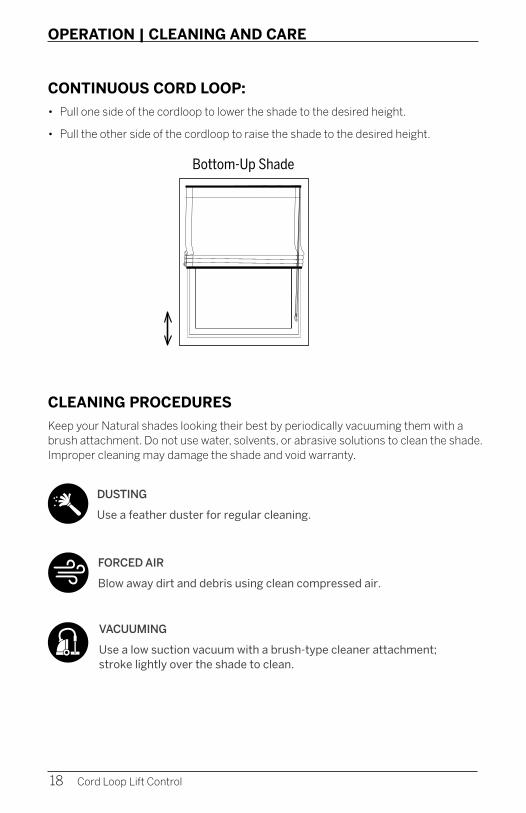
CONTINUOUS CORD LOOP:
• Pull one side of the cordloop to lower the shade to the desired height.
• Pull the other side of the cordloop to raise the shade to the desired height.
Bottom-Up Shade
CLEANING PROCEDURES
Keep your Natural shades looking their best by periodically vacuuming them with a brush attachment. Do not use water, solvents, or abrasive solutions to clean the shade. Improper cleaning may damage the shade and void warranty.
DUSTING
Use a feather duster for regular cleaning.
FORCED AIR
Blow away dirt and debris using clean compressed air.
VACUUMING
Use a low suction vacuum with a brush-type cleaner attachment; stroke lightly over the shade to clean.

CLEANING AND CARE | ADDITIONAL INFORMATION
Additional Notes
Shade Adjustment and Alignment Your shade has been carefully inspected and adjusted by the factory, but minor adjustments may be necessary once it has been installed. The yarns in your shade are flexible enough to permit minor adjustment horizontally and vertically for proper alignment on your window. If the bottom of your shade becomes uneven, pull either side to stretch the yarn and align the shade.
If your shade doesn’t lie flat against the wall or window, roll the shade tightly from the bottom and twist roll clockwise on one side and counterclockwise on the other. This will align the yarns and slats.
Should a strand of yarn slip off the edge of the shade, remove the strand from top to bottom; doing so will in no way affect the strength of the shade.
Color Variation Levolor Natural Shades are created using natural products. By nature, no two strands of grass, bamboo or reeds are exactly the same, making every shade truly unique. Slight color, grain and texture variations should be expected and cherished for their unique beauty. Although we maintain strict standards to control these variations, we cannot guarantee exact color match from dye lot to dye lot. The side of the natural shade that faces outdoors will change color in relation to the amount of sun exposure.
Stretching and Shrinking Natural shades will be affected by temperature and humidity. Shipping and handling may cause a slight change in shade lengths.
WARRANTYFor complete warranty information visit LEVOLOR.com or call Customer Service at 1-800-LEVOLOR or 1-800-538-6567.
CONTACTING US
To contact LEVOLOR Customer Service regarding any questions or concerns you may have about your new shades, you may reach us at 1-800-LEVOLOR (8:30 am – 6:30 pm EST)
www.LEVOLOR.com
ADDITIONAL PARTS AND SERVICES
Additional or replacement parts can be ordered, or shades can be repaired or restrung through our repair center. Please contact LEVOLOR customer service through www.LEVOLOR.com for a return authorization number.
19Cord Loop Lift Control


Persianas naturalINSTALACIÓN • MANEJO • CUIDADO
Control de elevación de circuito de cuerdas continuo

SEGURIDAD INFANTIL
Los niños pequeños se pueden ESTRANGULAR con los circuitos de cuerdas. También podrían enrollarse las cuerdas alrededor del cuello y ESTRANGULARSE.
• Mantenga siempre las cuerdas fuera del alcance de los niños.
• Aleje las cunas, corralitos y otros muebles de las cuerdas. Los niños pueden subir por los muebles y alcanzar las cuerdas.
Dispositivo de tensión de cuerda• Fije el dispositivo tensor del circuito de cuerdas
a la pared o al marco de la ventana. Consulte 35. Esto puede evitar que los niños se enrollen el circuito de cuerdas alrededor del cuello.
• Para que la persiana funcione correctamente, el tensor de la cuerda debe estar correctamente colocado y fijado.
• Los elementos de fijación suministrados con este equipo podrían no ser apropiados para todas las superficies de colocación. Use los taquetes apropiados, de acuerdo con los tipos de superficie de colocación.
• Solo se debe emplear el dispositivo tensor y los materiales suministrados. Para obtener las piezas de repuesto, comuníquese con el Servicio de Atención al Cliente llamando al 1-800-538-6567.
ADVERTENCIA: Mantenga todas las piezas pequeñas, los componentes y el embalaje lejos de los niños, ya que pueden tragarlos, lo cual puede ocasionarles lesiones graves o la muerte. Consulte todas las indicaciones y etiquetas de advertencia en las instrucciones y en la persiana misma.
!
22 Control de elevación del circuito continuo © 2020 LEVOLOR®, Inc.
ADVERTENCIA
CONTENIDOS
TERMINOLOGÍA DE VENTANAS Y PERSIANAS Tipos de montaje y terminología de ventanas .................................... 24
Estilos de elevación ............................................................................... 25
Introducción Descripción general de la colocación ................................................... 26
Componentes incluidos ........................................................................ 27
Herramientas y elementos de fijación que puede necesitar .............. 28
Colocación Montaje interior ................................................................................ 29-31
Montaje exterior ...............................................................................32-34
Cómo colocar componentes adicionalesDispositivo de tensión de circuito de cuerdas continuo ..................... 35
Recodos de cenefa ................................................................................ 36
Soportes de sujeción .............................................................................37
Soportes de extensión ...........................................................................37
Bloques espaciadores ............................................................................37
ManejoCómo manejar la persiana .................................................................... 38
Limpieza y cuidadoProcedimientos de limpieza ................................................................. 38
Información adicional y asistenciaGarantía ................................................................................................. 39
Servicio de Atención al Cliente ............................................................. 39
Control de elevación del circuito continuo 23
TERMINOLOGÍA DE VENTANAS Y PERSIANAS
Gracias por comprar las persianas de fibras naturales LEVOLOR®. Con la colocación, manejo
y cuidado adecuados, su nueva persiana de fibras naturales le brindará decoración y funcionalidad por muchos años. Revise atentamente este folleto de instrucciones antes de comenzar la colocación.
TIPOS DE MONTAJE Y TERMINOLOGÍA DE VENTANAS
24 Control de elevación del circuito continuo
Montaje interior
• La persiana se ajusta en la abertura de la ventana.
• Ideal para ventanas con molduras elegantes.
Terminología de los compo-nentes de una ventana
• En su conjunto, el umbral y las jambas se denominan el "marco".
Dos persianas sobre un riel superior
• Brinda la apariencia nítida de una sola persiana y la capacidad adicional de manejar cada persiana de forma independiente.
• Se pueden colocar por dentro o por fuera.
Montaje exterior
• La persiana se coloca por fuera de la abertura de la ventana.
• Mayor control de la luz y la privacidad.
Montaje exteriorMontaje interior
Moldura
Jamba principal
Alféizar
Jamba Jamba
Montaje exteriorMontaje interior
Moldura
Jamba principal
Alféizar
Jamba Jamba
Dos persianas sobre un riel superior
Moldura
Jamba principal
Alféizar
Jamba Jamba

TERMINOLOGÍA DE VENTANAS Y PERSIANAS
Persiana ascendente
Riel superior
Riel inferior
Panel de una
tela
ESTILOS DE ELEVACIÓN
Control de elevación del circuito continuo 25
INTRODUCCIÓN
DESCRIPCIÓN GENERAL DE LA COLOCACIÓN
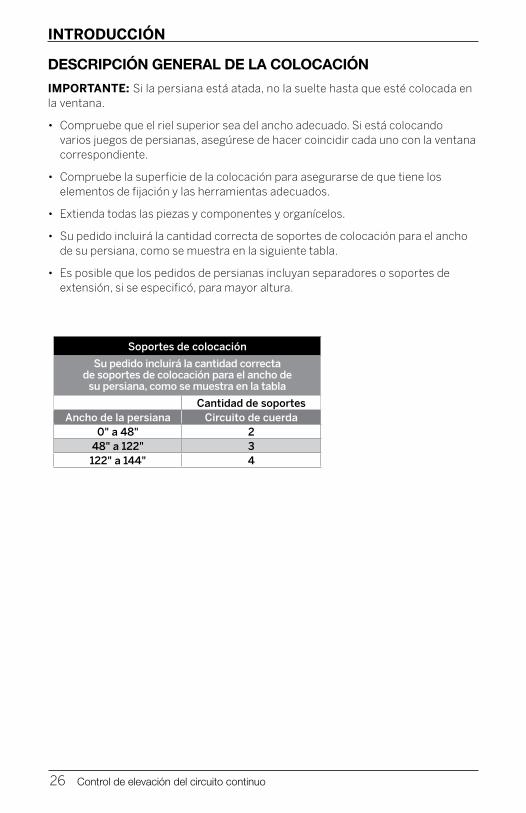
IMPORTANTE: Si la persiana está atada, no la suelte hasta que esté colocada en la ventana.
• Compruebe que el riel superior sea del ancho adecuado. Si está colocando varios juegos de persianas, asegúrese de hacer coincidir cada uno con la ventana correspondiente.
• Compruebe la superficie de la colocación para asegurarse de que tiene los elementos de fijación y las herramientas adecuados.
• Extienda todas las piezas y componentes y organícelos.
• Su pedido incluirá la cantidad correcta de soportes de colocación para el ancho de su persiana, como se muestra en la siguiente tabla.
• Es posible que los pedidos de persianas incluyan separadores o soportes de extensión, si se especificó, para mayor altura.
Soportes de colocación
Su pedido incluirá la cantidad correcta de soportes de colocación para el ancho de
su persiana, como se muestra en la tabla
Cantidad de soportesAncho de la persiana Circuito de cuerda
0" a 48" 248" a 122" 3122" a 144" 4
26 Control de elevación del circuito continuo

INTRODUCCIÓN
COMPONENTES INCLUIDOS
Soporte de montaje interior
• Persiana de fibras naturales
• Soportes de montaje
• Materiales de colocación
• Otros accesorios (opcional)
Se incluirán los elementos opcionales si se seleccionaron en el momento de realizar la compra de la persiana.
Dispositivo tensor del circuito de
cuerda
Persiana de fibras naturales
Tornillos de cabeza hexagonal
(2 por soporte)
Soporte de sujeción(opcional)
Control de elevación del circuito continuo 27
Soportes de extensión(opcional)
Tuerca mariposa Espaciador
Soporte de montaje exterior
Bloque espaciador(opcional)
....................................................
INTRODUCCIÓN
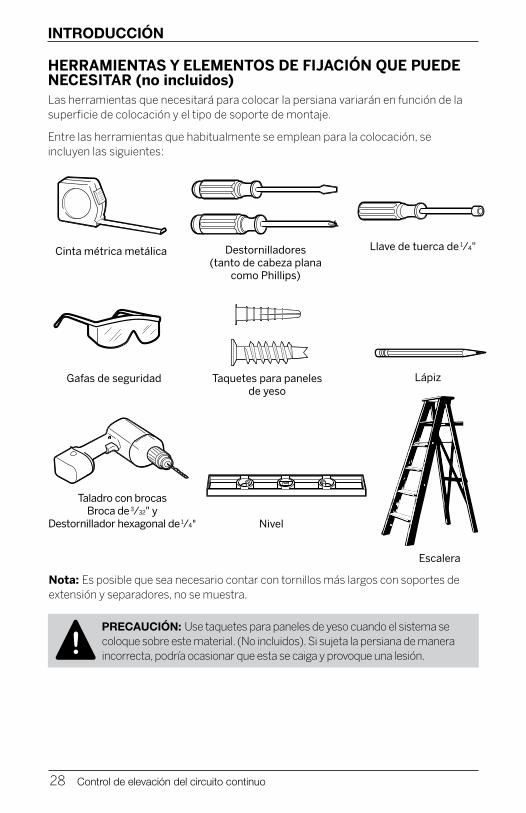
HERRAMIENTAS Y ELEMENTOS DE FIJACIÓN QUE PUEDE NECESITAR (no incluidos)Las herramientas que necesitará para colocar la persiana variarán en función de la superficie de colocación y el tipo de soporte de montaje.
Entre las herramientas que habitualmente se emplean para la colocación, se incluyen las siguientes:
Nota: Es posible que sea necesario contar con tornillos más largos con soportes de extensión y separadores, no se muestra.
Llave de tuerca de 1⁄4"
Taladro con brocasBroca de 3⁄32" y
Destornillador hexagonal de 1⁄4"
Cinta métrica metálica
Gafas de seguridad
Escalera
Destornilladores (tanto de cabeza plana
como Phillips)
Nivel
Lápiz
PRECAUCIÓN: Use taquetes para paneles de yeso cuando el sistema se coloque sobre este material. (No incluidos). Si sujeta la persiana de manera incorrecta, podría ocasionar que esta se caiga y provoque una lesión. !
28 Control de elevación del circuito continuo
Taquetes para paneles de yeso
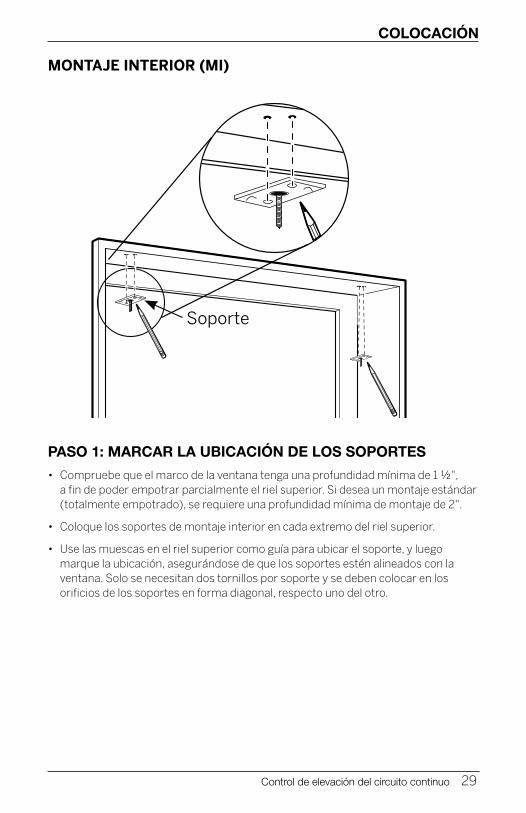
COLOCACIÓN
MONTAJE INTERIOR (MI)
PASO 1: MARCAR LA UBICACIÓN DE LOS SOPORTES
• Compruebe que el marco de la ventana tenga una profundidad mínima de 1 ½", a fin de poder empotrar parcialmente el riel superior. Si desea un montaje estándar (totalmente empotrado), se requiere una profundidad mínima de montaje de 2".
• Coloque los soportes de montaje interior en cada extremo del riel superior.
• Use las muescas en el riel superior como guía para ubicar el soporte, y luego marque la ubicación, asegurándose de que los soportes estén alineados con la ventana. Solo se necesitan dos tornillos por soporte y se deben colocar en los orificios de los soportes en forma diagonal, respecto uno del otro.
Control de elevación del circuito continuo 29
Soporte
COLOCACIÓN
MONTAJE INTERIOR (MI)
PASO 2: COLOCAR LOS SOPORTES
• Si la persiana incluye espaciadores, deslícelos sobre la sección del pasador de cada soporte en este momento.
• Use las marcas como guía para fijar los soportes, use dos tornillos por soporte. Los tornillos se deben insertar en los orificios de los soportes en forma diagonal, respecto uno del otro.
30 Control de elevación del circuito continuo
Soporte
Tornillo
COLOCACIÓN
MONTAJE INTERIOR (MI)
PASO 3: FIJAR EL RIEL SUPERIOR A LOS SOPORTES DE MONTAJE
• Los ejes roscados de los soportes se deslizan a través de las ranuras del riel superior, y el riel superior se fija con las tuercas mariposa.
PRECAUCIÓN: Asegúrese de que el soporte y el riel superior estén correctamente fijados antes de poner la persiana en funcionamiento. En caso contrario, la persiana puede caerse y causar lesiones.!
Control de elevación del circuito continuo 31
Eje roscado
Tuercamariposa
Eje roscado Espaciador
TuercamariposaEje
roscado
Tuercamariposa
Eje roscado Espaciador
Tuercamariposa
COLOCACIÓN
MONTAJE EXTERIOR (ME)
PASO 1: MARCAR LA UBICACIÓN DE LOS SOPORTES
• Use las muescas en el riel superior como guía para ubicar el soporte, y luego marque la ubicación de los soportes. Solo se necesitan dos tornillos por soporte y se deben colocar en los orificios de los soportes en forma diagonal, respecto uno del otro.
• Use un nivel para verificar que estén parejos.
32 Control de elevación del circuito continuo
Soporte

COLOCACIÓN
MONTAJE EXTERIOR (ME)
PASO 2: COLOCAR LOS SOPORTES
IMPORTANTE: Use taquetes para paneles de yeso cuando el sistema se coloque sobre este material (no incluidos).
IMPORTANTE: La parte posterior de los soportes debe estar alineada con una superficie de montaje plana. NO coloque los soportes en molduras curvas.
• Si la persiana incluye espaciadores, deslícelos sobre la sección del pasador de cada soporte en este momento.
• Use las marcas como guía para fijar los soportes, use dos tornillos por soporte. Los tornillos se deben insertar en los orificios de los soportes en forma diagonal, respecto uno del otro.
Control de elevación del circuito continuo 33
Panek de yeso Taquete
Tornillo
Soporte
COLOCACIÓN
MONTAJE EXTERIOR (ME)
34 Control de elevación del circuito continuo
PASO 3: FIJAR EL RIEL SUPERIOR A LOS SOPORTES DE MONTAJE
• Los ejes roscados de los soportes se deslizan a través de las ranuras del riel superior, y el riel superior se fija con las tuercas mariposa.
PRECAUCIÓN: Asegúrese de que el soporte y el riel superior estén correctamente fijados antes de poner la persiana en funcionamiento. En caso contrario, la persiana puede caerse y causar lesiones.!
Eje roscado
Espaciador
Tuerca mariposa
Tuercamariposa
Ejeroscado
Eje roscado
Espaciador
Tuerca mariposa
Tuercamariposa
Ejeroscado
COLOCACIÓN: COMPONENTES ADICIONALES
Cómo colocar el dispositivo de tensión
Dispositivo de tensión de circuito de cuerdas continuo
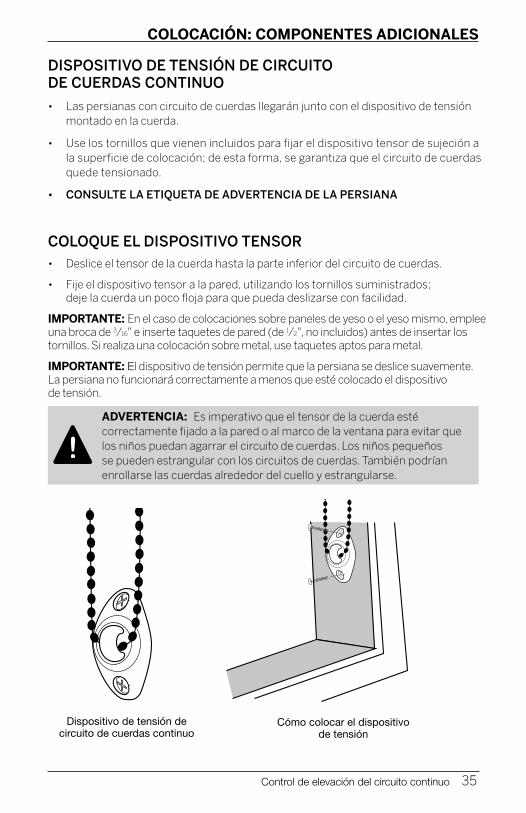
DISPOSITIVO DE TENSIÓN DE CIRCUITO DE CUERDAS CONTINUO
• Las persianas con circuito de cuerdas llegarán junto con el dispositivo de tensión montado en la cuerda.
• Use los tornillos que vienen incluidos para fijar el dispositivo tensor de sujeción a la superficie de colocación; de esta forma, se garantiza que el circuito de cuerdas quede tensionado.
• CONSULTE LA ETIQUETA DE ADVERTENCIA DE LA PERSIANA
COLOQUE EL DISPOSITIVO TENSOR• Deslice el tensor de la cuerda hasta la parte inferior del circuito de cuerdas.
• Fije el dispositivo tensor a la pared, utilizando los tornillos suministrados; deje la cuerda un poco floja para que pueda deslizarse con facilidad.
IMPORTANTE: En el caso de colocaciones sobre paneles de yeso o el yeso mismo, emplee una broca de 3⁄16" e inserte taquetes de pared (de 1⁄2", no incluidos) antes de insertar los tornillos. Si realiza una colocación sobre metal, use taquetes aptos para metal.
IMPORTANTE: El dispositivo de tensión permite que la persiana se deslice suavemente. La persiana no funcionará correctamente a menos que esté colocado el dispositivo de tensión.
ADVERTENCIA: Es imperativo que el tensor de la cuerda esté correctamente fijado a la pared o al marco de la ventana para evitar que los niños puedan agarrar el circuito de cuerdas. Los niños pequeños se pueden estrangular con los circuitos de cuerdas. También podrían enrollarse las cuerdas alrededor del cuello y estrangularse.
!
Control de elevación del circuito continuo 35
COLOCACIÓN: COMPONENTES ADICIONALES
RECODOS DE CENEFA (solo para montaje exterior)
CENEFA DE MADERA:
• Inserte los clips en la ranura en la parte posterior de la cenefa, y luego rótelos 90°.
• Inserte los clips del recodo lo más profundo posible en cada extremo de la cenefa.
• Alinee los clips de los recodos con las ranuras en el riel superior y deslícelos en su lugar.
CENEFA CLÁSICA
• Si los recodos de la cenefa solamente tienen tiras de velcro, siga estos pasos:
— Alinee el recodo de la cenefa con el extremo del riel superior de modo que las tiras de velcro queden en la parte superior.
— Presione firmemente el recodo de la cenefa en su lugar para unir las tiras de velcro.
• Si los recodos de la cenefa tienen tiras de velcro y esquinas plásticas, siga estos pasos:
— Despegue la parte posterior del plástico para que el adhesivo quede expuesto.
— Alinee el recodo de la cenefa con el extremo del riel superior de modo que las tiras de velcro queden en la parte superior.
— Presione firmemente el recodo de la cenefa en su lugar para unir las tiras de velcro y lograr que el plástico se adhiera a la parte posterior de la cenefa.
36 Control de elevación del circuito continuo
Clip del recodo
Cenefa
Clip del recodo
Tiras de velcro
Recodo de cenefa
Clip del recodo
Cenefa
Clip del recodo
Tiras de velcro
Recodo de cenefa
Clip del recodo
Cenefa
Clip del recodo
Tiras de velcro
Recodo de cenefa
SOPORTES DE SUJECIÓN (opcional)
NOTA: Algunos estilos pueden tener los pasadores de sujeción integrados en el riel inferior.
• Coloque el pasador de sujeción en el orifico central del riel inferior.
• Fije los soportes de sujeción en la parte inferior de la ventana con los tornillos proporcionados, como se muestra según su tipo de colocación.
• Deslice el pasador de sujeción en el orifico del soporte.
SOPORTES DE EXTENSIÓN (opcionales)
• Los soportes de extensión opcionales brindan espacio libre para evitar obstrucciones.
• Los soportes de extensión de montaje exterior proporcionarán un espacio de entre 1 y 3" entre el riel superior y la superficie de montaje. Coloque el soporte de extensión como se muestra.
• Fije un soporte de extensión a cada soporte de montaje estándar.
COLOCACIÓN: COMPONENTES ADICIONALES
BLOQUES ESPACIADORES (opcionales)
• Los bloques espaciadores de montaje exterior proporcionarán un espacio libre adicional de 3/8", como se muestra.
• Si se usan espaciadores, es posible que sea necesario contar con tornillos más largos para garantizar una colocación segura (no incluidos).
Control de elevación del circuito continuo 37
PRECAUCIÓN: No use más de un bloque espaciador. El uso de más de un bloque espaciador podría ocasionar la caída de la persiana y provocar lesiones.!
Ori�cio centralPasador de sujeción
Montaje interior Montaje exterior
Ori�cio centralPasador de sujeción
Montaje interior Montaje exterior
MANEJO | LIMPIEZA Y CUIDADO
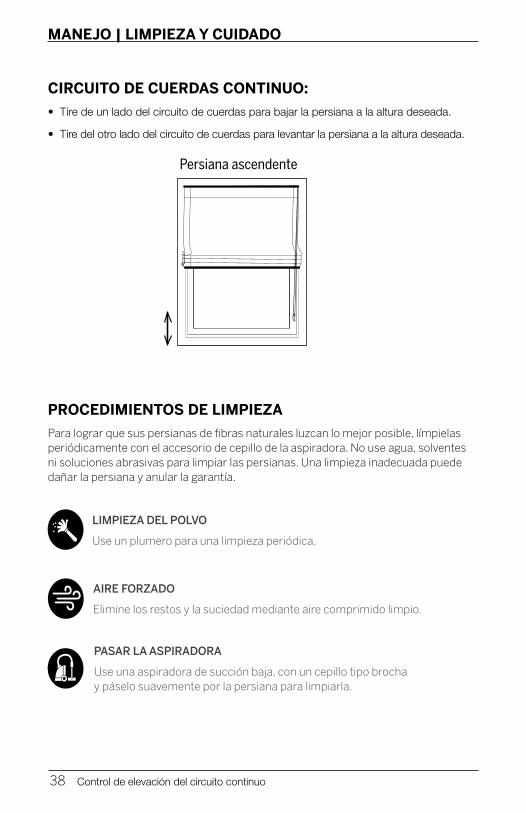
CIRCUITO DE CUERDAS CONTINUO:
• Tire de un lado del circuito de cuerdas para bajar la persiana a la altura deseada.
• Tire del otro lado del circuito de cuerdas para levantar la persiana a la altura deseada.
PROCEDIMIENTOS DE LIMPIEZA
Para lograr que sus persianas de fibras naturales luzcan lo mejor posible, límpielas periódicamente con el accesorio de cepillo de la aspiradora. No use agua, solventes ni soluciones abrasivas para limpiar las persianas. Una limpieza inadecuada puede dañar la persiana y anular la garantía.
38 Control de elevación del circuito continuo
LIMPIEZA DEL POLVO
Use un plumero para una limpieza periódica.
AIRE FORZADO
Elimine los restos y la suciedad mediante aire comprimido limpio.
PASAR LA ASPIRADORA
Use una aspiradora de succión baja, con un cepillo tipo brocha y páselo suavemente por la persiana para limpiarla.
Persiana ascendente
LIMPIEZA Y CUIDADO | INFORMACIÓN ADICIONAL
Avisos adicionales
Ajuste y alineación de la persiana La persiana cuenta con una inspección y un ajuste de fábrica, pero puede ser necesario realizar algunos ajustes menores una vez colocada. Las fibras de la persiana son lo suficientemente flexibles para permitir ajustes menores horizontales y verticales, a fin de alinearla correctamente en su ventana. Si la parte inferior de la persiana queda despareja, tire de cada lado para estirar las fibras y alinear la persiana.
Si la persiana no queda plana contra la pared o la ventana, enróllela firmemente desde la parte inferior y gire en sentido horario de un lado y en sentido antihorario del otro lado. De este modo, las fibras y los listones se alinearán.
Si una hebra se desliza fuera del borde la persiana, retírela desde arriba hacia abajo; de esta forma, no afectará la resistencia de la persiana.
Variación del color Las persianas de fibras naturales Levolor están realizadas con productos naturales. Naturalmente, ninguna hebra de gramínea, bambú o junco es exactamente igual a la otra; esto hace que cada persiana sea única. Las variaciones leves de color, veta o textura son normales y se destacan por su belleza única. Si bien mantenemos estándares estrictos para controlar estas variaciones, no podemos garantizar una coincidencia de color exacta entre un lote de tinte y el otro. El lado de la persiana de fibras naturales que queda hacia el exterior cambiará de color según la exposición al Sol.
Estiramiento y encogimiento La temperatura y la humedad afectan a las persianas de fibras naturales. El envío y la manipulación podrían causar un leve cambio en la longitud de la persiana.
GARANTÍAPara obtener información completa sobre la garantía, visite LEVOLOR.com o llame al Servicio de Atención al Cliente al 1-800-LEVOLOR o al 1-800-538-6567.
PÓNGASE EN CONTACTO CON NOSOTROS
Para ponerse en contacto con el Servicio de Atención al Cliente de LEVOLOR y plantear alguna duda o problema que pueda tener acerca de su nueva persiana, llámenos al 1-800-LEVOLOR (de 8:30 a. m. a 6:30 p. m., EST)
www.LEVOLOR.com
PIEZAS ADICIONALES Y SERVICIOS
Puede solicitar piezas adicionales o de repuesto; así mismo, las persianas se pueden reparar o se les puede cambiar la cuerda en nuestro centro de reparaciones. Comuníquese con el Servicio de Atención al Cliente de LEVOLOR a través de www.LEVOLOR.com para obtener un número de autorización de devolución.
Control de elevación del circuito continuo 39

©2020 LEVOLOR®, Inc. 5775 Glenridge Drive Building A Atlanta, GA 30328 101180219-0050-033
Cordless Lift ControlControl de elevación sin cuerda
Natural ShadesPersianas natural
INSTALLATION • OPERATION • CAREINSTALACIÓN • MANEJO • CUIDADO
CONTENTS
© 2020 LEVOLOR®, Inc.
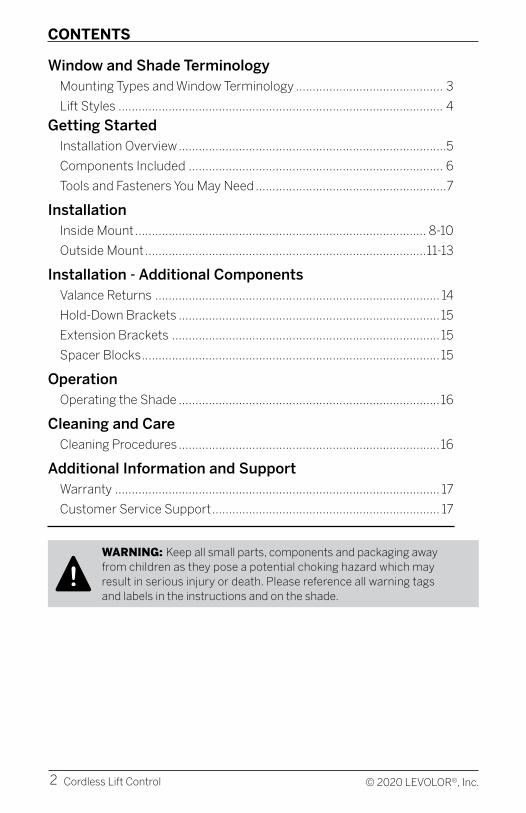
Window and Shade Terminology Mounting Types and Window Terminology ............................................ 3
Lift Styles ................................................................................................. 4
Getting Started Installation Overview ................................................................................5
Components Included ............................................................................ 6
Tools and Fasteners You May Need .........................................................7
Installation Inside Mount ....................................................................................... 8-10
Outside Mount ....................................................................................11-13
Installation - Additional ComponentsValance Returns ..................................................................................... 14
Hold-Down Brackets ..............................................................................15
Extension Brackets ................................................................................15
Spacer Blocks .........................................................................................15
OperationOperating the Shade ..............................................................................16
Cleaning and CareCleaning Procedures ..............................................................................16
Additional Information and SupportWarranty ................................................................................................. 17
Customer Service Support .................................................................... 17
2 Cordless Lift Control
WARNING: Keep all small parts, components and packaging away from children as they pose a potential choking hazard which may result in serious injury or death. Please reference all warning tags and labels in the instructions and on the shade.
!
WINDOW AND SHADE TERMINOLOGY
3Cordless Lift Control
Thank you for purchasing LEVOLOR® Natural Shades. With proper installation, operation, and care, your new natural shade will provide years of beauty and performance. Please thoroughly review this instruction booklet before beginning installation.
MOUNTING TYPES AND WINDOW TERMINOLOGY
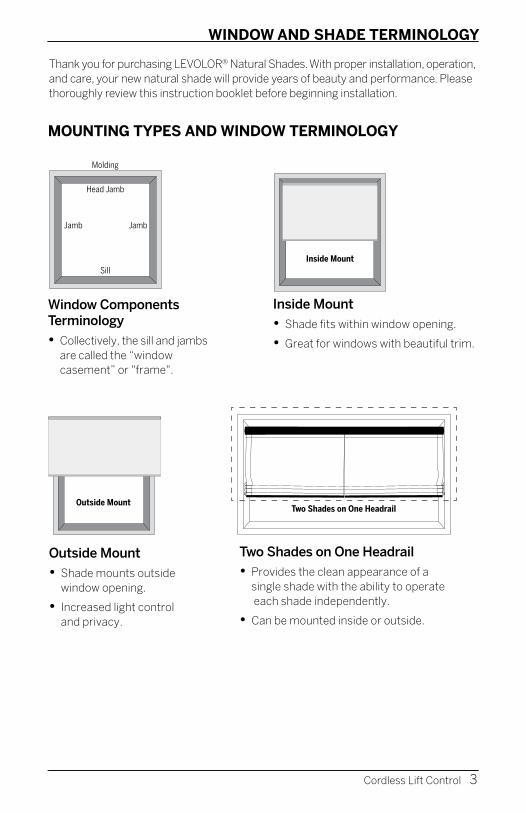
Inside Mount
• Shade fits within window opening.
• Great for windows with beautiful trim.
Window Components Terminology
• Collectively, the sill and jambs are called the “window casement” or "frame".
Two Shades on One Headrail
• Provides the clean appearance of a single shade with the ability to operate each shade independently.
• Can be mounted inside or outside.
Outside Mount
• Shade mounts outside window opening.
• Increased light control and privacy.
Molding
Head Jamb
Sill
Jamb Jamb
Outside MountInside Mount
Molding
Head Jamb
Sill
Jamb Jamb
Outside MountInside Mount
Molding
Head Jamb
Sill
Jamb Jamb
Two Shades on One Headrail

WINDOW AND SHADE TERMINOLOGY
4 Cordless Lift Control
Bottom-Up Shade
LIFT STYLES
Bottom Rail
Headrail
One Fabric Panel
GETTING STARTED
5Cordless Lift Control
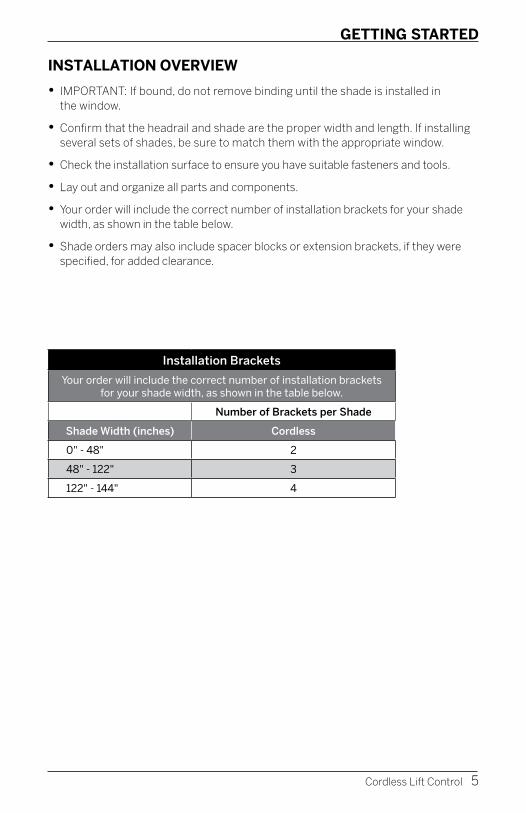
• IMPORTANT: If bound, do not remove binding until the shade is installed in the window.
• Confirm that the headrail and shade are the proper width and length. If installing several sets of shades, be sure to match them with the appropriate window.
• Check the installation surface to ensure you have suitable fasteners and tools.
• Lay out and organize all parts and components.
• Your order will include the correct number of installation brackets for your shade width, as shown in the table below.
• Shade orders may also include spacer blocks or extension brackets, if they were specified, for added clearance.
Installation Brackets
Your order will include the correct number of installation brackets for your shade width, as shown in the table below.
Number of Brackets per Shade
Shade Width (inches) Cordless
0" - 48" 2
48" - 122" 3
122" - 144" 4
INSTALLATION OVERVIEW
6 Cordless Lift Control
GETTING STARTED
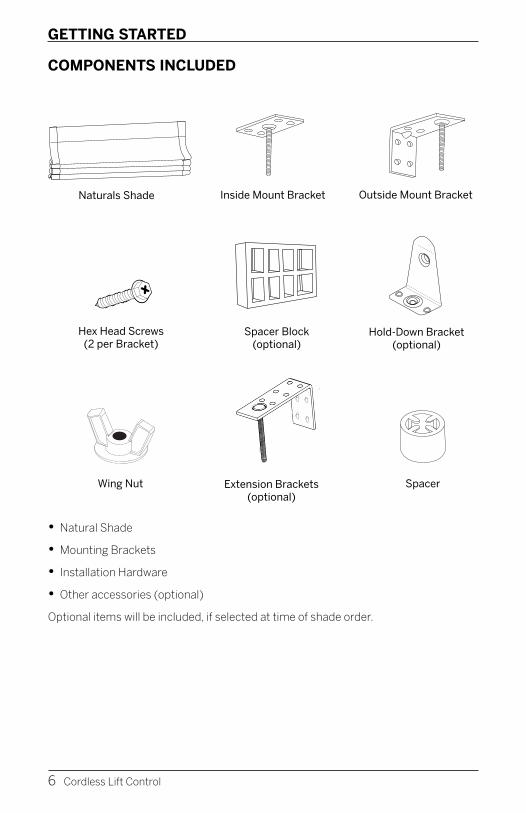
COMPONENTS INCLUDED
• Natural Shade
• Mounting Brackets
• Installation Hardware
• Other accessories (optional)
Optional items will be included, if selected at time of shade order.
Hex Head Screws (2 per Bracket)
Spacer Block(optional)
Outside Mount Bracket
Extension Brackets(optional)
Wing Nut Spacer
Hold-Down Bracket(optional)
Inside Mount BracketNaturals Shade
....................................................
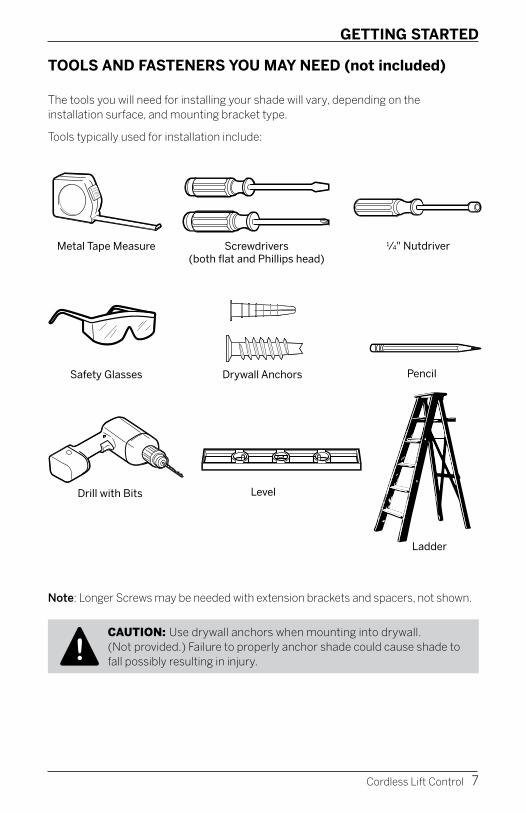
GETTING STARTED
7Cordless Lift Control
TOOLS AND FASTENERS YOU MAY NEED (not included)
The tools you will need for installing your shade will vary, depending on the installation surface, and mounting bracket type.
Tools typically used for installation include:
Metal Tape Measure
Safety Glasses
Drill with Bits
Ladder
Screwdrivers (both flat and Phillips head)
Drywall Anchors
Level
1⁄4" Nutdriver
Pencil
Note: Longer Screws may be needed with extension brackets and spacers, not shown.
CAUTION: Use drywall anchors when mounting into drywall. (Not provided.) Failure to properly anchor shade could cause shade to fall possibly resulting in injury. !

INSTALLATION
8 Cordless Lift Control
INSIDE MOUNT (IM)
STEP 1: MARK THE BRACKET LOCATIONS
• Verify that your window casing has a minimum depth of 1 ½" which allows for a partially recessed headrail mount. If flush mount (fully recessed mount) is desired, a minimum mounting depth of 2" is required.
• Position the inside-mount brackets at each end of the headrail.
• Using the notches in the headrail as a guide for bracket placement, mark the locations of the bracket, making sure they are square and evenly placed from the window. Only two screws are needed per bracket and they should be placed in bracket holes diagonally from each other.
Bracket
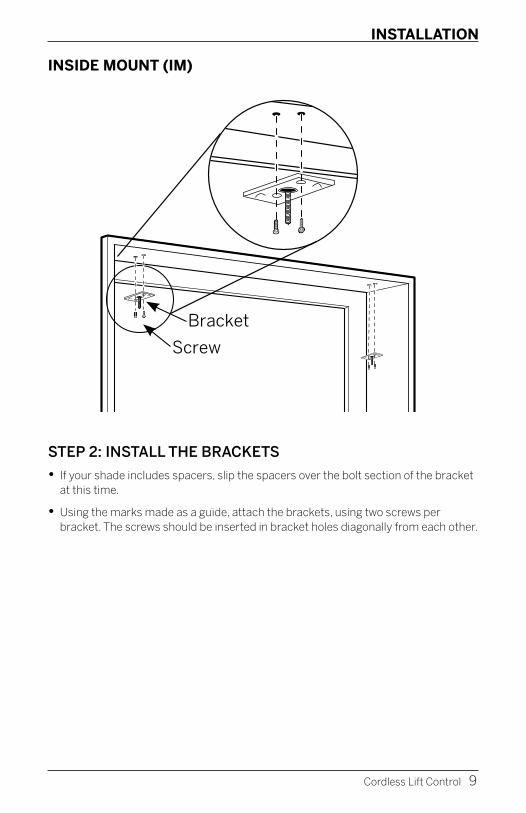
INSTALLATION
9Cordless Lift Control
INSIDE MOUNT (IM)
STEP 2: INSTALL THE BRACKETS
• If your shade includes spacers, slip the spacers over the bolt section of the bracket at this time.
• Using the marks made as a guide, attach the brackets, using two screws per bracket. The screws should be inserted in bracket holes diagonally from each other.
Bracket
Screw

INSTALLATION
10 Cordless Lift Control
INSIDE MOUNT (IM)
STEP 3: ATTACH THE HEADRAIL TO THE MOUNTING BRACKETS
• The threaded shafts on the brackets slide through the slots on the headrail, and the headrail is secured by the wing nuts.
CAUTION: Be sure the bracket and headrail are properly secured before operating the shade. Failure to do so may result in the shade falling and possible injury.!
Wing nut
Threaded shaft
Wing nut
Threaded shaft Spacer
Wing nut
Threaded shaft
Wing nut
Threaded shaft Spacer
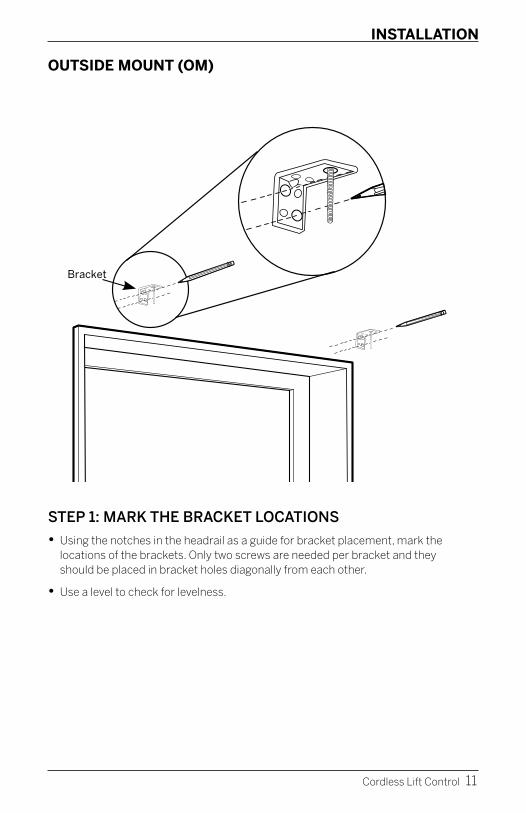
INSTALLATION
11Cordless Lift Control
OUTSIDE MOUNT (OM)
STEP 1: MARK THE BRACKET LOCATIONS
• Using the notches in the headrail as a guide for bracket placement, mark the locations of the brackets. Only two screws are needed per bracket and they should be placed in bracket holes diagonally from each other.
• Use a level to check for levelness.
Bracket
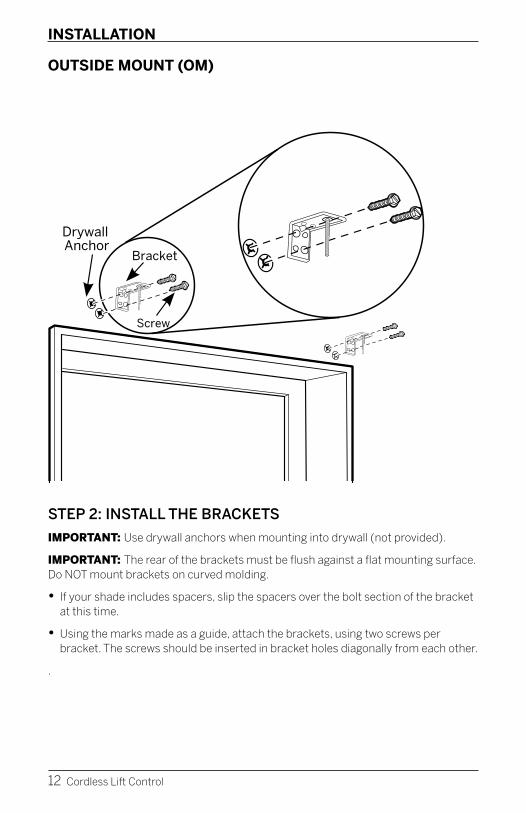
INSTALLATION
12 Cordless Lift Control
OUTSIDE MOUNT (OM)
STEP 2: INSTALL THE BRACKETS
IMPORTANT: Use drywall anchors when mounting into drywall (not provided).
IMPORTANT: The rear of the brackets must be flush against a flat mounting surface. Do NOT mount brackets on curved molding.
• If your shade includes spacers, slip the spacers over the bolt section of the bracket at this time.
• Using the marks made as a guide, attach the brackets, using two screws per bracket. The screws should be inserted in bracket holes diagonally from each other.
.
Drywall Anchor
Screw
Bracket
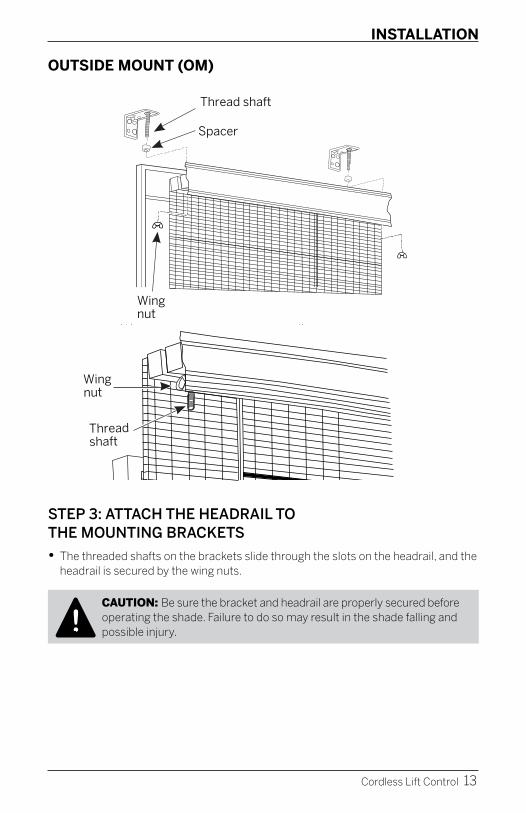
INSTALLATION
13Cordless Lift Control
OUTSIDE MOUNT (OM)
STEP 3: ATTACH THE HEADRAIL TO THE MOUNTING BRACKETS
• The threaded shafts on the brackets slide through the slots on the headrail, and the headrail is secured by the wing nuts.
CAUTION: Be sure the bracket and headrail are properly secured before operating the shade. Failure to do so may result in the shade falling and possible injury.!
Thread shaft
Spacer
Wing nut
Wing nut
Thread shaft
Thread shaft
Spacer
Wing nut
Wing nut
Thread shaft
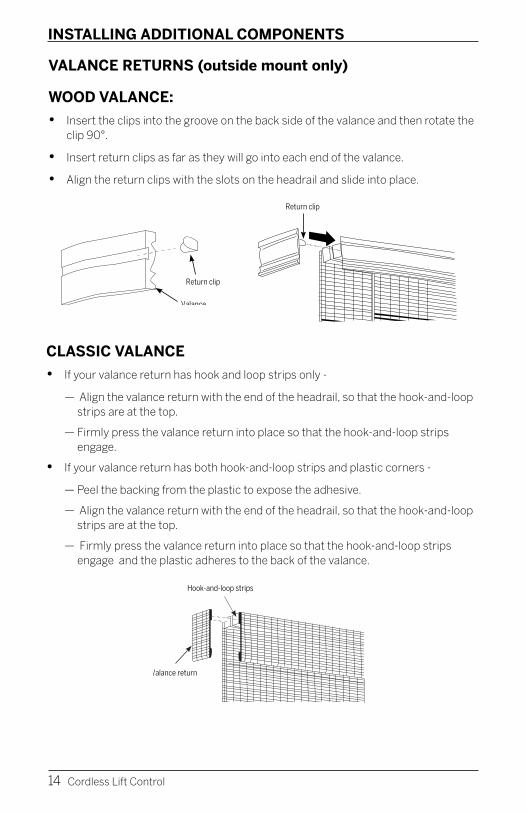
INSTALLING ADDITIONAL COMPONENTS
14 Cordless Lift Control
CLASSIC VALANCE
• If your valance return has hook and loop strips only -
— Align the valance return with the end of the headrail, so that the hook-and-loop strips are at the top.
— Firmly press the valance return into place so that the hook-and-loop strips engage.
• If your valance return has both hook-and-loop strips and plastic corners -
— Peel the backing from the plastic to expose the adhesive.
— Align the valance return with the end of the headrail, so that the hook-and-loop strips are at the top.
— Firmly press the valance return into place so that the hook-and-loop strips engage and the plastic adheres to the back of the valance.
VALANCE RETURNS (outside mount only)
WOOD VALANCE:
• Insert the clips into the groove on the back side of the valance and then rotate the clip 90°.
• Insert return clips as far as they will go into each end of the valance.
• Align the return clips with the slots on the headrail and slide into place.
Return clip
Valance
Return clip
Hook-and-loop strips
Valance return
Return clip
Valance
Return clip
Hook-and-loop strips
Valance return
Return clip
Valance
Return clip
Hook-and-loop strips
Valance return
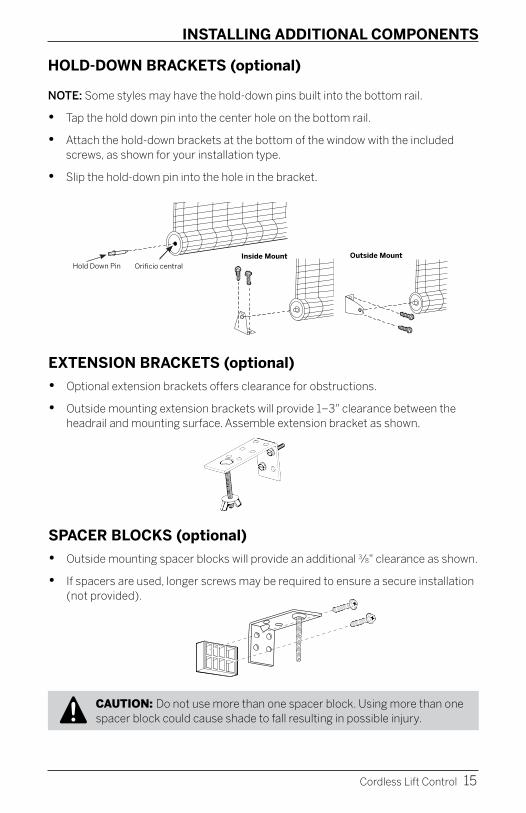
INSTALLING ADDITIONAL COMPONENTS
15Cordless Lift Control
HOLD-DOWN BRACKETS (optional)
NOTE: Some styles may have the hold-down pins built into the bottom rail.
• Tap the hold down pin into the center hole on the bottom rail.
• Attach the hold-down brackets at the bottom of the window with the included screws, as shown for your installation type.
• Slip the hold-down pin into the hole in the bracket.
CAUTION: Do not use more than one spacer block. Using more than one spacer block could cause shade to fall resulting in possible injury.!
EXTENSION BRACKETS (optional)
• Optional extension brackets offers clearance for obstructions.
• Outside mounting extension brackets will provide 1–3" clearance between the headrail and mounting surface. Assemble extension bracket as shown.
SPACER BLOCKS (optional)
• Outside mounting spacer blocks will provide an additional 3⁄8" clearance as shown.
• If spacers are used, longer screws may be required to ensure a secure installation (not provided).
Orificio centralHold Down Pin
Inside Mount Outside Mount
Orificio centralHold Down Pin
Inside Mount Outside Mount
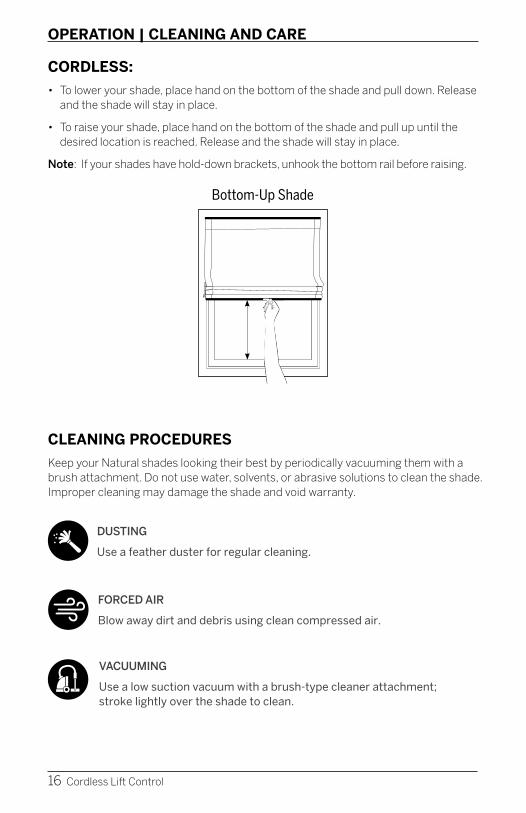
OPERATION | CLEANING AND CARE
16 Cordless Lift Control
CORDLESS:
• To lower your shade, place hand on the bottom of the shade and pull down. Release and the shade will stay in place.
• To raise your shade, place hand on the bottom of the shade and pull up until the desired location is reached. Release and the shade will stay in place.
Note: If your shades have hold-down brackets, unhook the bottom rail before raising.
CLEANING PROCEDURES
Keep your Natural shades looking their best by periodically vacuuming them with a brush attachment. Do not use water, solvents, or abrasive solutions to clean the shade. Improper cleaning may damage the shade and void warranty.
DUSTING
Use a feather duster for regular cleaning.
FORCED AIR
Blow away dirt and debris using clean compressed air.
VACUUMING
Use a low suction vacuum with a brush-type cleaner attachment; stroke lightly over the shade to clean.
Bottom-Up Shade

CLEANING AND CARE | ADDITIONAL INFORMATION
17Cordless Lift Control
Additional Notes
Shade Adjustment and Alignment Your shade has been carefully inspected and adjusted by the factory, but minor adjustments may be necessary once it has been installed. The yarns in your shade are flexible enough to permit minor adjustment horizontally and vertically for proper alignment on your window. If the bottom of your shade becomes uneven, pull either side to stretch the yarn and align the shade.
If your shade doesn’t lie flat against the wall or window, roll the shade tightly from the bottom and twist roll clockwise on one side and counterclockwise on the other. This will align the yarns and slats.
Should a strand of yarn slip off the edge of the shade, remove the strand from top to bottom; doing so will in no way affect the strength of the shade.
Color Variation Levolor Natural Shades are created using natural products. By nature, no two strands of grass, bamboo or reeds are exactly the same, making every shade truly unique. Slight color, grain and texture variations should be expected and cherished for their unique beauty. Although we maintain strict standards to control these variations, we cannot guarantee exact color match from dye lot to dye lot. The side of the natural shade that faces outdoors will change color in relation to the amount of sun exposure.
Stretching and Shrinking Natural shades will be affected by temperature and humidity. Shipping and handling may cause a slight change in shade lengths.
WARRANTYFor complete warranty information visit LEVOLOR.com or call Customer Service at 1-800-LEVOLOR or 1-800-538-6567.
CONTACTING US
To contact LEVOLOR Customer Service regarding any questions or concerns you may have about your new shades, you may reach us at 1-800-LEVOLOR (8:30 am – 6:30 pm EST)
www.LEVOLOR.com
ADDITIONAL PARTS AND SERVICES
Additional or replacement parts can be ordered, or shades can be repaired or restrung through our repair center. Please contact LEVOLOR customer service through www.LEVOLOR.com for a return authorization number.


Control de elevación sin cuerda
Persianas naturalINSTALACIÓN • MANEJO • CUIDADO
CONTENIDO
Terminología de Ventanas y Persianas Tipos de Montaje y Terminología de Ventanas .....................................21
Estilos de Elevación ............................................................................... 22
Introducción Descripción General de La Colocación ................................................ 23
Componentes Incluidos ........................................................................ 24
Herramientas y Elementos de Fijación Que Puede Necesitar ............ 25
Colocación Montaje Interior ................................................................................26-28
Montaje Exterior .............................................................................29-31
Cómo Colocar Componentes AdicionalesRecodos de Cenefa ............................................................................... 32
Soportes de Sujeción ............................................................................ 33
Soportes de Extensión .......................................................................... 33
Bloques Espaciadores ........................................................................... 33
ManejoCómo manejar la persiana .................................................................... 34
Limpieza y CuidadoProcedimientos de Limpieza ................................................................ 34
Información adicional y asistenciaGarantía ................................................................................................. 35
Servicio de Atención al Cliente ............................................................. 35
© 2020 LEVOLOR®, Inc.20 Control de elevación sin cuerdas
ADVERTENCIA: Mantenga todas las piezas pequeñas, los componentes y el embalaje lejos de los niños, ya que pueden tragarlos, lo cual puede ocasionarles lesiones graves o la muerte. Consulte todas las indicaciones y etiquetas de advertencia en las instrucciones y en la persiana misma.
!
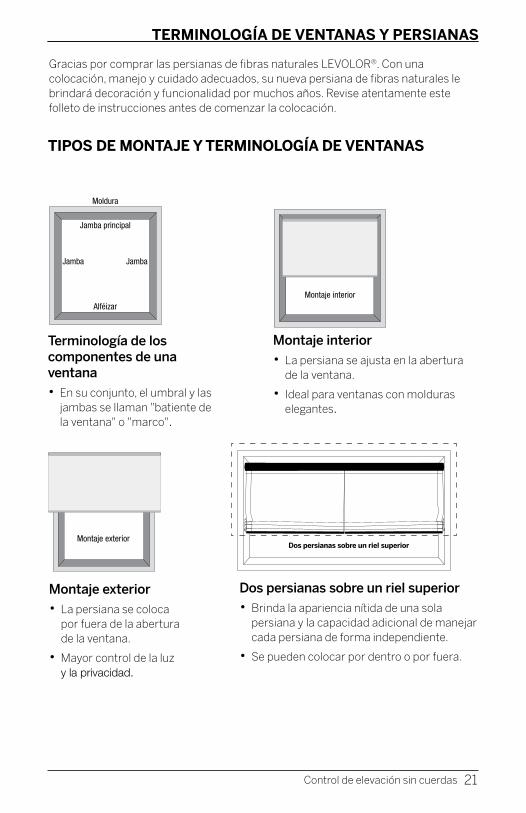
TERMINOLOGÍA DE VENTANAS Y PERSIANAS
Gracias por comprar las persianas de fibras naturales LEVOLOR®. Con una colocación, manejo y cuidado adecuados, su nueva persiana de fibras naturales le brindará decoración y funcionalidad por muchos años. Revise atentamente este folleto de instrucciones antes de comenzar la colocación.
TIPOS DE MONTAJE Y TERMINOLOGÍA DE VENTANAS
Montaje interior
• La persiana se ajusta en la abertura de la ventana.
• Ideal para ventanas con molduras elegantes.
Terminología de los componentes de una ventana
• En su conjunto, el umbral y las jambas se llaman "batiente de la ventana" o "marco".
Dos persianas sobre un riel superior
• Brinda la apariencia nítida de una sola persiana y la capacidad adicional de manejar cada persiana de forma independiente.
• Se pueden colocar por dentro o por fuera.
Montaje exterior
• La persiana se coloca por fuera de la abertura de la ventana.
• Mayor control de la luz y la privacidad.
21Control de elevación sin cuerdas
Moldura
Jamba principal
Alféizar
Jamba Jamba
Montaje exteriorMontaje interior
Moldura
Jamba principal
Alféizar
Jamba Jamba
Montaje exteriorMontaje interior
Moldura
Jamba principal
Alféizar
Jamba Jamba
Dos persianas sobre un riel superior
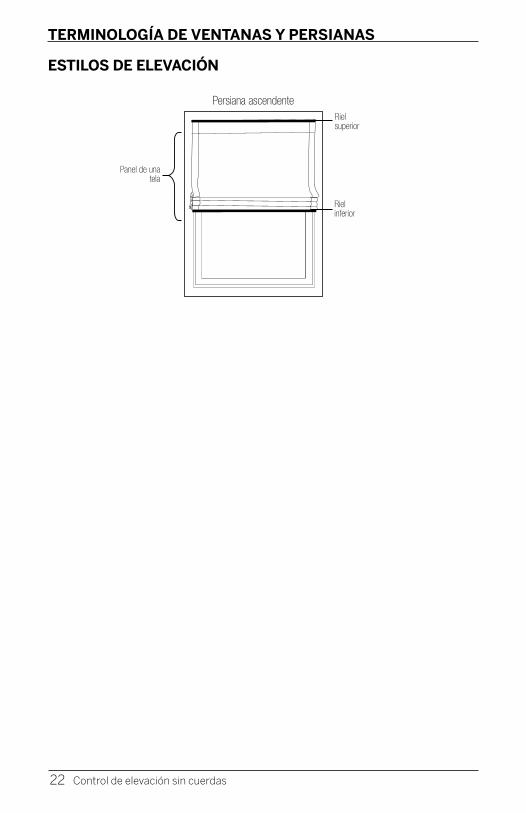
TERMINOLOGÍA DE VENTANAS Y PERSIANAS
Persiana ascendente
Panel de una tela
ESTILOS DE ELEVACIÓN
22 Control de elevación sin cuerdas
Riel superior
Riel inferior
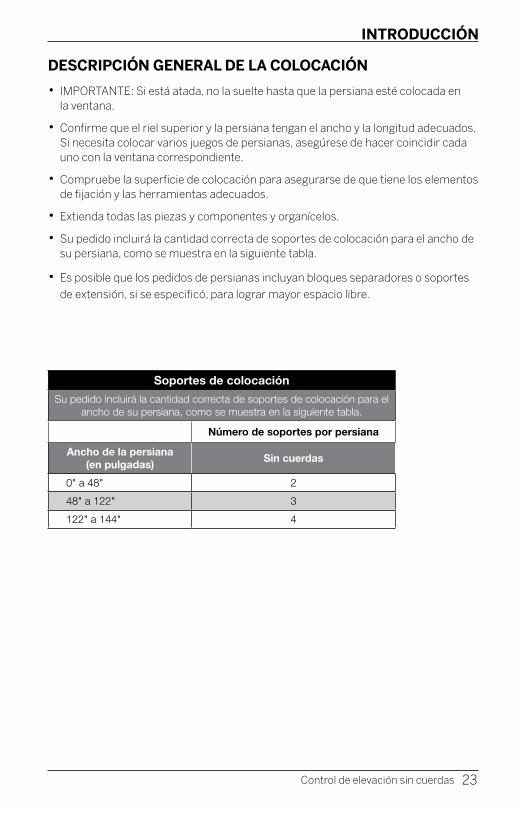
INTRODUCCIÓN
• IMPORTANTE: Si está atada, no la suelte hasta que la persiana esté colocada en la ventana.
• Confirme que el riel superior y la persiana tengan el ancho y la longitud adecuados. Si necesita colocar varios juegos de persianas, asegúrese de hacer coincidir cada uno con la ventana correspondiente.
• Compruebe la superficie de colocación para asegurarse de que tiene los elementos de fijación y las herramientas adecuados.
• Extienda todas las piezas y componentes y organícelos.
• Su pedido incluirá la cantidad correcta de soportes de colocación para el ancho de su persiana, como se muestra en la siguiente tabla.
• Es posible que los pedidos de persianas incluyan bloques separadores o soportes
de extensión, si se especificó, para lograr mayor espacio libre.
Soportes de colocación
Su pedido incluirá la cantidad correcta de soportes de colocación para el ancho de su persiana, como se muestra en la siguiente tabla.
Número de soportes por persiana
Ancho de la persiana (en pulgadas)
Sin cuerdas
0" a 48" 2
48" a 122" 3
122" a 144" 4
DESCRIPCIÓN GENERAL DE LA COLOCACIÓN
23Control de elevación sin cuerdas
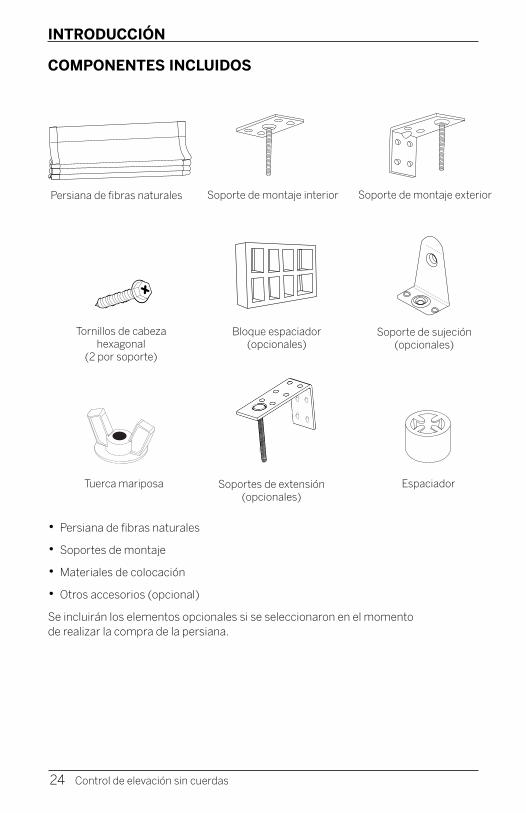
INTRODUCCIÓN
COMPONENTES INCLUIDOS
• Persiana de fibras naturales
• Soportes de montaje
• Materiales de colocación
• Otros accesorios (opcional)
Se incluirán los elementos opcionales si se seleccionaron en el momento de realizar la compra de la persiana.
Tornillos de cabeza hexagonal
(2 por soporte)
Bloque espaciador(opcionales)
Soporte de montaje exterior
Soportes de extensión(opcionales)
Tuerca mariposa Espaciador
Soporte de sujeción(opcionales)
Soporte de montaje interiorPersiana de fibras naturales
24 Control de elevación sin cuerdas
....................................................
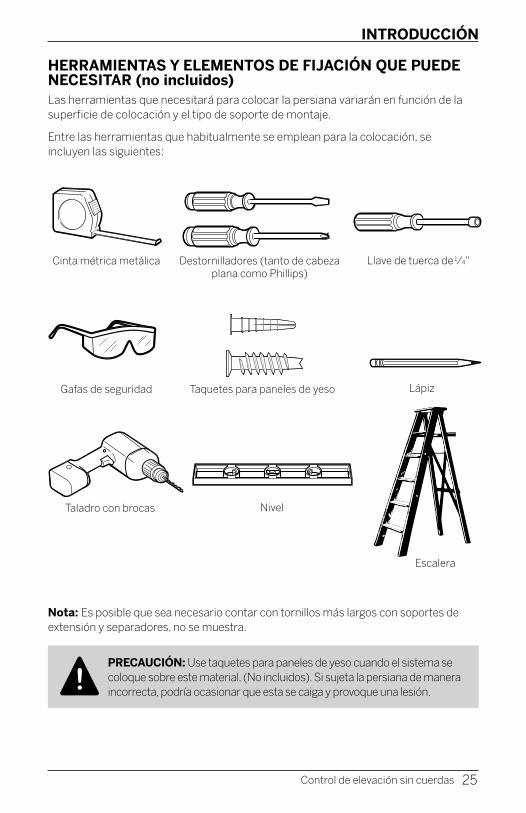
INTRODUCCIÓN
HERRAMIENTAS Y ELEMENTOS DE FIJACIÓN QUE PUEDE NECESITAR (no incluidos)Las herramientas que necesitará para colocar la persiana variarán en función de la superficie de colocación y el tipo de soporte de montaje.
Entre las herramientas que habitualmente se emplean para la colocación, se incluyen las siguientes:
Nota: Es posible que sea necesario contar con tornillos más largos con soportes de extensión y separadores, no se muestra.
PRECAUCIÓN: Use taquetes para paneles de yeso cuando el sistema se coloque sobre este material. (No incluidos). Si sujeta la persiana de manera incorrecta, podría ocasionar que esta se caiga y provoque una lesión. !
Cinta métrica metálica
Gafas de seguridad
Taladro con brocas
Destornilladores (tanto de cabeza plana como Phillips)
Taquetes para paneles de yeso
Nivel
Llave de tuerca de 1⁄4"
Lápiz
Escalera
25Control de elevación sin cuerdas
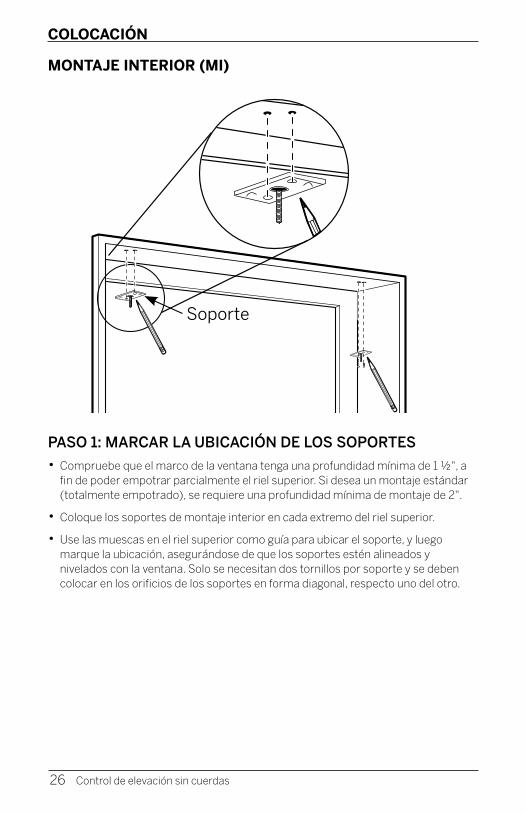
COLOCACIÓN
MONTAJE INTERIOR (MI)
PASO 1: MARCAR LA UBICACIÓN DE LOS SOPORTES
• Compruebe que el marco de la ventana tenga una profundidad mínima de 1 ½", a fin de poder empotrar parcialmente el riel superior. Si desea un montaje estándar (totalmente empotrado), se requiere una profundidad mínima de montaje de 2".
• Coloque los soportes de montaje interior en cada extremo del riel superior.
• Use las muescas en el riel superior como guía para ubicar el soporte, y luego marque la ubicación, asegurándose de que los soportes estén alineados y nivelados con la ventana. Solo se necesitan dos tornillos por soporte y se deben colocar en los orificios de los soportes en forma diagonal, respecto uno del otro.
26 Control de elevación sin cuerdas
Soporte
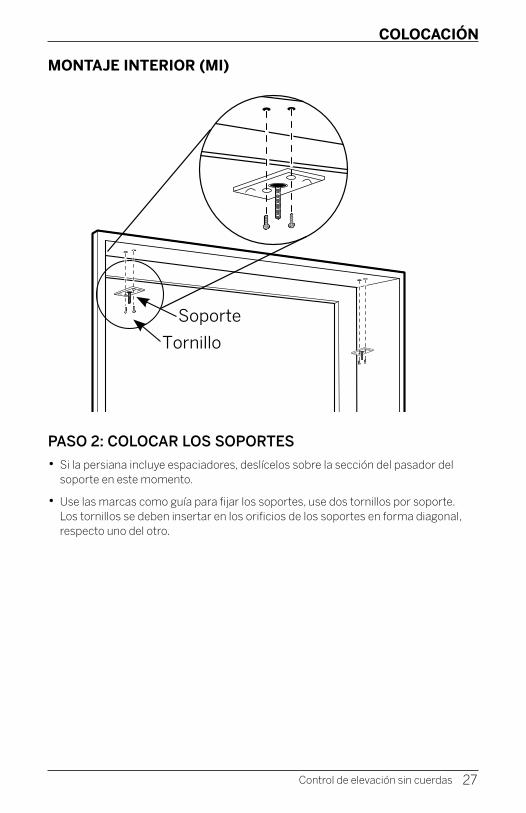
COLOCACIÓN
MONTAJE INTERIOR (MI)
PASO 2: COLOCAR LOS SOPORTES
• Si la persiana incluye espaciadores, deslícelos sobre la sección del pasador del soporte en este momento.
• Use las marcas como guía para fijar los soportes, use dos tornillos por soporte. Los tornillos se deben insertar en los orificios de los soportes en forma diagonal, respecto uno del otro.
27Control de elevación sin cuerdas
Soporte
Tornillo
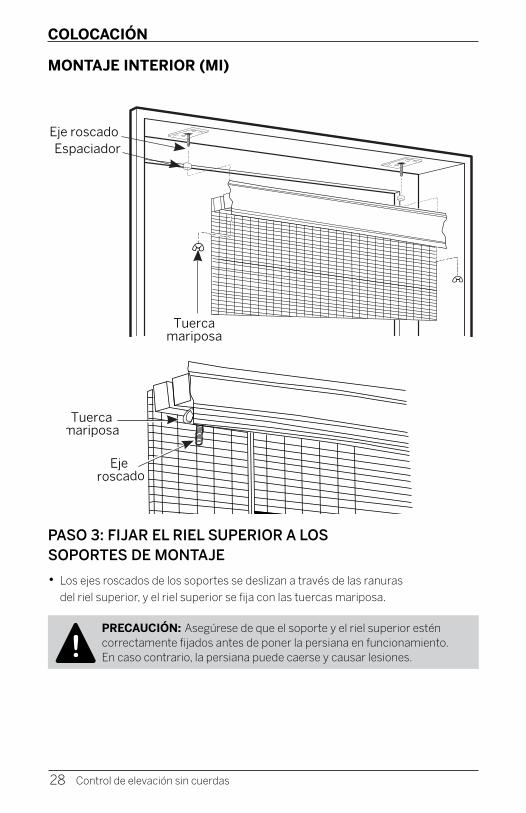
COLOCACIÓN
MONTAJE INTERIOR (MI)
PASO 3: FIJAR EL RIEL SUPERIOR A LOS SOPORTES DE MONTAJE
• Los ejes roscados de los soportes se deslizan a través de las ranuras
del riel superior, y el riel superior se fija con las tuercas mariposa.
PRECAUCIÓN: Asegúrese de que el soporte y el riel superior estén correctamente fijados antes de poner la persiana en funcionamiento. En caso contrario, la persiana puede caerse y causar lesiones.!
28 Control de elevación sin cuerdas
Eje roscado
Tuercamariposa
Eje roscado Espaciador
TuercamariposaEje roscado
Tuercamariposa
Eje roscado Espaciador
Tuercamariposa

COLOCACIÓN
MONTAJE EXTERIOR (ME)
PASO 1: MARCAR LA UBICACIÓN DE LOS SOPORTES
• Use las muescas en el riel superior como guía para ubicar el soporte, y luego marque la ubicación de los soportes. Solo se necesitan dos tornillos por soporte y se deben colocar en los orificios de los soportes en forma diagonal, respecto uno del otro.
• Use un nivel para verificar que estén parejos.
29Control de elevación sin cuerdas
Soporte
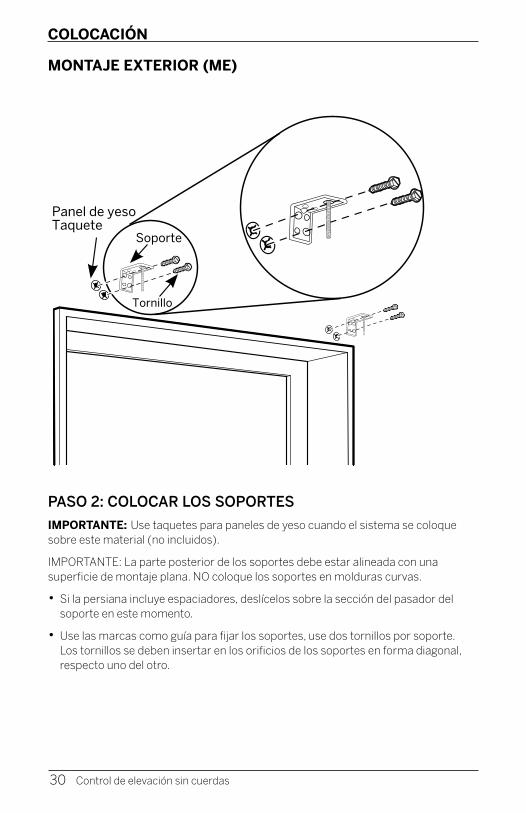
COLOCACIÓN
MONTAJE EXTERIOR (ME)
PASO 2: COLOCAR LOS SOPORTES
IMPORTANTE: Use taquetes para paneles de yeso cuando el sistema se coloque sobre este material (no incluidos).
IMPORTANTE: La parte posterior de los soportes debe estar alineada con una superficie de montaje plana. NO coloque los soportes en molduras curvas.
• Si la persiana incluye espaciadores, deslícelos sobre la sección del pasador del soporte en este momento.
• Use las marcas como guía para fijar los soportes, use dos tornillos por soporte. Los tornillos se deben insertar en los orificios de los soportes en forma diagonal, respecto uno del otro.
30 Control de elevación sin cuerdas
Panel de yeso Taquete
Tornillo
Soporte

COLOCACIÓN
MONTAJE EXTERIOR (ME)
PASO 3: FIJAR EL RIEL SUPERIOR A LOS SOPORTES DE MONTAJE
• Los ejes roscados de los soportes se deslizan a través de las ranuras del riel
superior, y el riel superior se fija con las tuercas mariposa.
PRECAUCIÓN: Asegúrese de que el soporte y el riel superior estén correctamente fijados antes de poner la persiana en funcionamiento. En caso contrario, la persiana puede caerse y causar lesiones.!
31Control de elevación sin cuerdas
Eje roscado
Espaciador
Tuercamariposa
Tuercamariposa
Eje roscado
Eje roscado
Espaciador
Tuercamariposa
Tuercamariposa
Eje roscado
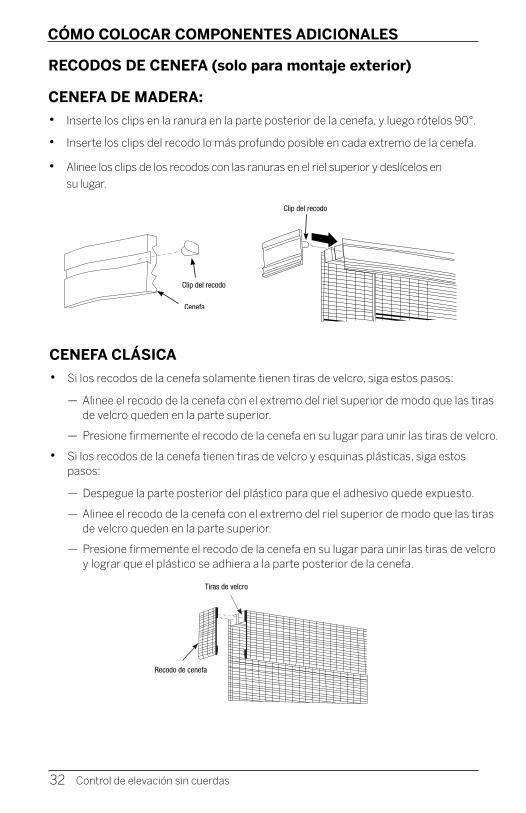
CÓMO COLOCAR COMPONENTES ADICIONALES
RECODOS DE CENEFA (solo para montaje exterior)
CENEFA DE MADERA:
• Inserte los clips en la ranura en la parte posterior de la cenefa, y luego rótelos 90°.
• Inserte los clips del recodo lo más profundo posible en cada extremo de la cenefa.
• Alinee los clips de los recodos con las ranuras en el riel superior y deslícelos en
su lugar.
CENEFA CLÁSICA
• Si los recodos de la cenefa solamente tienen tiras de velcro, siga estos pasos:
— Alinee el recodo de la cenefa con el extremo del riel superior de modo que las tiras de velcro queden en la parte superior.
— Presione firmemente el recodo de la cenefa en su lugar para unir las tiras de velcro.
• Si los recodos de la cenefa tienen tiras de velcro y esquinas plásticas, siga estos pasos:
— Despegue la parte posterior del plástico para que el adhesivo quede expuesto.
— Alinee el recodo de la cenefa con el extremo del riel superior de modo que las tiras de velcro queden en la parte superior.
— Presione firmemente el recodo de la cenefa en su lugar para unir las tiras de velcro y lograr que el plástico se adhiera a la parte posterior de la cenefa.
32 Control de elevación sin cuerdas
Clip del recodo
Cenefa
Clip del recodo
Tiras de velcro
Recodo de cenefa
Clip del recodo
Cenefa
Clip del recodo
Tiras de velcro
Recodo de cenefa
Clip del recodo
Cenefa
Clip del recodo
Tiras de velcro
Recodo de cenefa
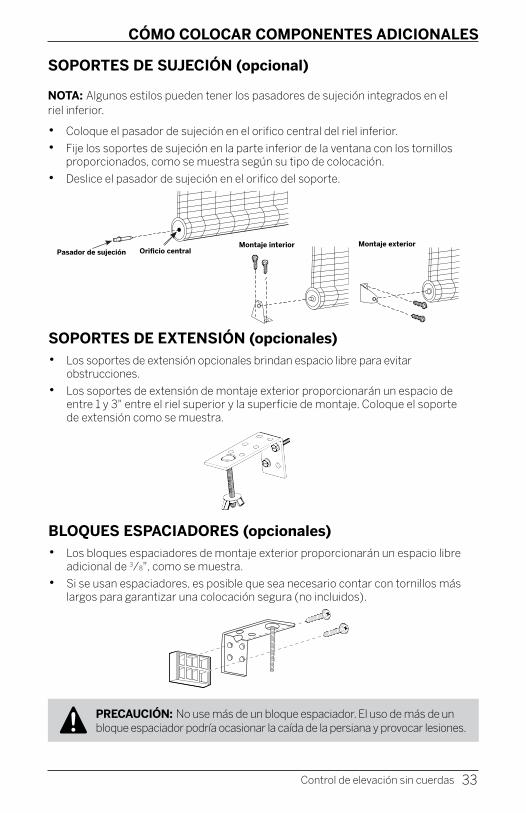
CÓMO COLOCAR COMPONENTES ADICIONALES
SOPORTES DE SUJECIÓN (opcional)
NOTA: Algunos estilos pueden tener los pasadores de sujeción integrados en el riel inferior.
• Coloque el pasador de sujeción en el orifico central del riel inferior.
• Fije los soportes de sujeción en la parte inferior de la ventana con los tornillos proporcionados, como se muestra según su tipo de colocación.
• Deslice el pasador de sujeción en el orifico del soporte.
SOPORTES DE EXTENSIÓN (opcionales) • Los soportes de extensión opcionales brindan espacio libre para evitar
obstrucciones.
• Los soportes de extensión de montaje exterior proporcionarán un espacio de entre 1 y 3" entre el riel superior y la superficie de montaje. Coloque el soporte de extensión como se muestra.
BLOQUES ESPACIADORES (opcionales)• Los bloques espaciadores de montaje exterior proporcionarán un espacio libre
adicional de 3/8", como se muestra.
• Si se usan espaciadores, es posible que sea necesario contar con tornillos más largos para garantizar una colocación segura (no incluidos).
PRECAUCIÓN: No use más de un bloque espaciador. El uso de más de un bloque espaciador podría ocasionar la caída de la persiana y provocar lesiones.!
33Control de elevación sin cuerdas
Ori�cio centralPasador de sujeción
Montaje interior Montaje exterior
Ori�cio centralPasador de sujeción
Montaje interior Montaje exterior
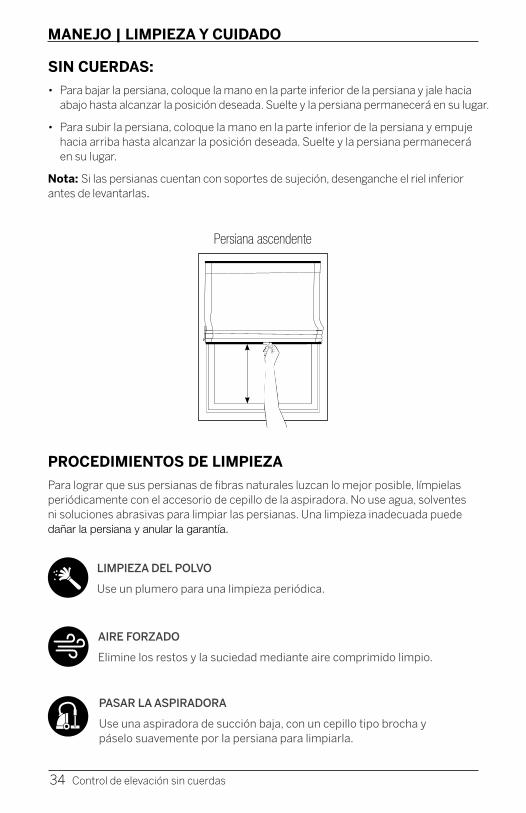
MANEJO | LIMPIEZA Y CUIDADO
SIN CUERDAS:
• Para bajar la persiana, coloque la mano en la parte inferior de la persiana y jale hacia abajo hasta alcanzar la posición deseada. Suelte y la persiana permanecerá en su lugar.
• Para subir la persiana, coloque la mano en la parte inferior de la persiana y empuje hacia arriba hasta alcanzar la posición deseada. Suelte y la persiana permanecerá en su lugar.
Nota: Si las persianas cuentan con soportes de sujeción, desenganche el riel inferior antes de levantarlas.
PROCEDIMIENTOS DE LIMPIEZA
Para lograr que sus persianas de fibras naturales luzcan lo mejor posible, límpielas periódicamente con el accesorio de cepillo de la aspiradora. No use agua, solventes ni soluciones abrasivas para limpiar las persianas. Una limpieza inadecuada puede dañar la persiana y anular la garantía.
LIMPIEZA DEL POLVO
Use un plumero para una limpieza periódica.
AIRE FORZADO
Elimine los restos y la suciedad mediante aire comprimido limpio.
PASAR LA ASPIRADORA
Use una aspiradora de succión baja, con un cepillo tipo brocha y páselo suavemente por la persiana para limpiarla.
34 Control de elevación sin cuerdas
Persiana ascendente

LIMPIEZA Y CUIDADO | INFORMACIÓN ADICIONAL
Avisos adicionales
Ajuste y alineación de la persiana La persiana cuenta con una inspección y un ajuste de fábrica, pero puede ser necesario realizar algunos ajustes menores una vez colocada. Las fibras de la persiana son lo suficientemente flexibles para permitir ajustes menores horizontales y verticales, a fin de alinearla correctamente en su ventana. Si la parte inferior de la persiana queda despareja, tire de cada lado para estirar las fibras y alinear la persiana.
Si la persiana no queda plana contra la pared o la ventana, enróllela firmemente desde la parte inferior y gire en sentido horario de un lado y en sentido antihorario del otro lado. De este modo, las fibras y los listones se alinearán.
Si una hebra se desliza fuera del borde la persiana, retírela desde arriba hacia abajo; de esta forma, no afectará la resistencia de la persiana.
Variación del color Las persianas de fibras naturales Levolor están realizadas con productos naturales. Naturalmente, ninguna hebra de gramínea, bambú o junco es exactamente igual a la otra; esto hace que cada persiana sea única. Las variaciones leves de color, veta o textura son normales y se destacan por su belleza única. Si bien mantenemos estándares estrictos para controlar estas variaciones, no podemos garantizar una coincidencia de color exacta entre un lote de tinte y el otro. El lado de la persiana de fibras naturales que queda hacia el exterior cambiará de color según la exposición al Sol.
Estiramiento y encogimiento La temperatura y la humedad afectan a las persianas de fibras naturales. El envío y la manipulación podrían causar un leve cambio en la longitud de la persiana.
GARANTÍAPara obtener información completa sobre la garantía, visite LEVOLOR.com o llame al Servicio de Atención al Cliente al 1-800-LEVOLOR o al 1-800-538-6567.
PÓNGASE EN CONTACTO CON NOSOTROS
Para ponerse en contacto con el Servicio de Atención al Cliente de LEVOLOR y plantear alguna duda o problema que pueda tener acerca de su nueva persiana, llámenos al 1-800-LEVOLOR (de 8:30 a. m. a 6:30 p. m., EST)
www.LEVOLOR.com
PIEZAS ADICIONALES Y SERVICIOS
Puede solicitar piezas adicionales o de repuesto; así mismo, las persianas se pueden reparar o se les puede cambiar la cuerda en nuestro centro de reparaciones. Comuníquese con el Servicio de Atención al Cliente de LEVOLOR a través de www.LEVOLOR.com para obtener un número de autorización de devolución.
35Control de elevación sin cuerdas

©2020 LEVOLOR®, Inc. 5775 Glenridge Drive Building A Atlanta, GA 30328 101180019-0050-034
Battery Powered Motorized Operating System
Sistema de funcionamiento motorizado con batería
Natural ShadesPersianas natural
INSTALLATION • OPERATION • CAREINSTALACIÓN • MANEJO • CUIDADO
CONTENTS
Window and Shade Terminology
Mounting Types & Window Terminology ................................................ 3Lift Styles ................................................................................................. 4
Getting Started Product View .............................................................................................5Components Included ............................................................................ 6Tools and Fasteners You May Need .........................................................7
InstallationInstallation Overview ............................................................................... 8Inside Mount ....................................................................................... 9-13Outside Mount ...................................................................................14-21Valance Installation ..........................................................................22-23
OperationTesting the Shade .................................................................................. 24Resetting the Shade .............................................................................. 25
UninstallingRemoving the Shade ............................................................................. 25
Additional Information and SupportTroubleshooting ................................................................................26-27Cleaning Procedures ............................................................................. 28Warranty ................................................................................................ 29Customer Service Support ................................................................... 29
2 © 2020 LEVOLOR®, Inc.
Radio Frequency FCC ComplianceThis device complies with Part 15 of the FCC Rules. Operation is subject to the following two conditions: (1) This device may not cause harmful interference, and (2) This device must accept any interference received, including interference that may cause undesired operation.
This equipment has been tested and found to comply with the limits for a Class B digital device, pursuant to Part 15 of the FCC Rules. These limits are designed to provide reasonable protection against harmful interference in a residential installation. This equipment generates, uses and can radiate radio frequency energy and, if not installed and used in accordance with the instructions, may cause harmful interference to radio communications. However, there is no guarantee that interference will not occur in a particular installation. If this equipment does cause harmful interference to radio or television reception, which can be determined by turning the equipment off and on, the user is encouraged to try to correct the interference by one or more of the following measures:
• Reorient or relocate the receiving antenna.• Increase the separation between the equipment and receiver.• Connect the equipment into an outlet on a circuit different from that to which the receiver is connected.• Consult the dealer or an experienced radio/TV technician for help.
Any changes or modifications not expressly approved by the party responsible for compliance could void the user’s authority to operate the equipment.
Battery-Powered Motorized Operating System
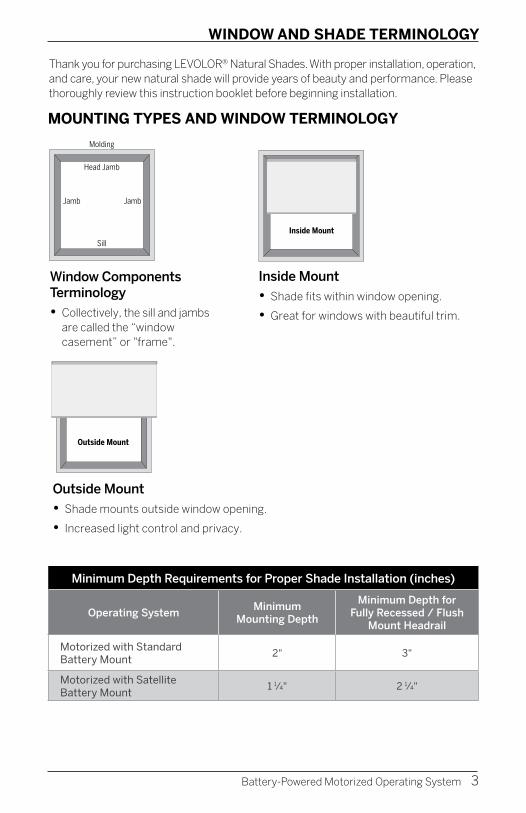
Molding
Head Jamb
Sill
Jamb Jamb
Outside MountInside Mount
Molding
Head Jamb
Sill
Jamb Jamb
Outside MountInside Mount
Molding
Head Jamb
Sill
Jamb Jamb
Thank you for purchasing LEVOLOR® Natural Shades. With proper installation, operation, and care, your new natural shade will provide years of beauty and performance. Please thoroughly review this instruction booklet before beginning installation.
MOUNTING TYPES AND WINDOW TERMINOLOGY
Inside Mount
• Shade fits within window opening.
• Great for windows with beautiful trim.
Window Components Terminology
• Collectively, the sill and jambs are called the “window casement” or "frame".
Outside Mount
• Shade mounts outside window opening.
• Increased light control and privacy.
Minimum Depth Requirements for Proper Shade Installation (inches)
Operating SystemMinimum
Mounting Depth
Minimum Depth for Fully Recessed / Flush
Mount Headrail
Motorized with Standard Battery Mount
2" 3"
Motorized with Satellite Battery Mount
1 1⁄4" 2 1⁄4"
Battery-Powered Motorized Operating System
WINDOW AND SHADE TERMINOLOGY
3

WINDOW AND SHADE TERMINOLOGY
LIFT STYLES
Battery-Powered Motorized Operating System4
Bottom-Up Shade
Headrail
Bottom Rail
One Fabric Panel
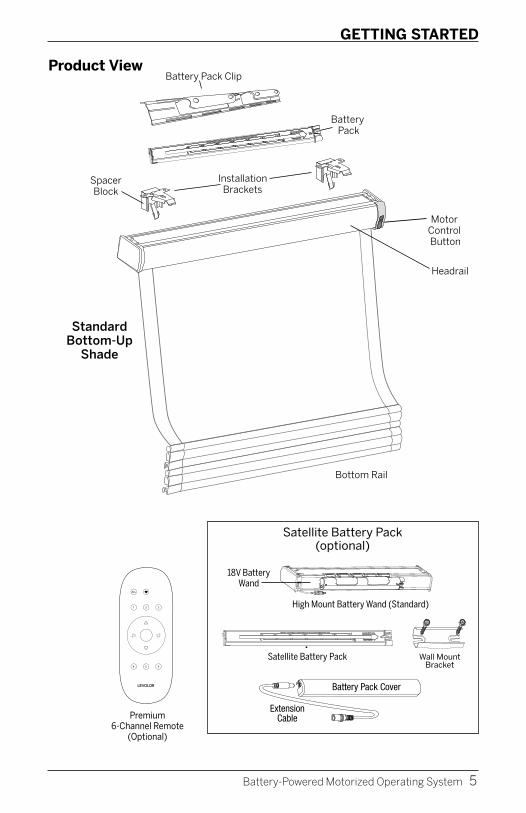
GETTING STARTED
Product View
InstallationBrackets
SpacerBlock
Not Shown: Top-Down and Top-Down/Bottom-Up Shades
Battery Pack
Bottom Rail
StandardBottom-Up
Shade
Motor Control Button
Headrail
Battery Pack Clip
5Battery-Powered Motorized Operating System
ALL
1 2 3
4 5 6
Socket
Battery Pack Cover
ExtensionCable
Wall Mount Bracket
Premium 6-Channel Remote
(Optional)
Satellite Battery Pack (optional)
18V Battery Wand
Wall Mount Bracket
Satellite Battery Pack
High Mount Battery Wand (Standard)
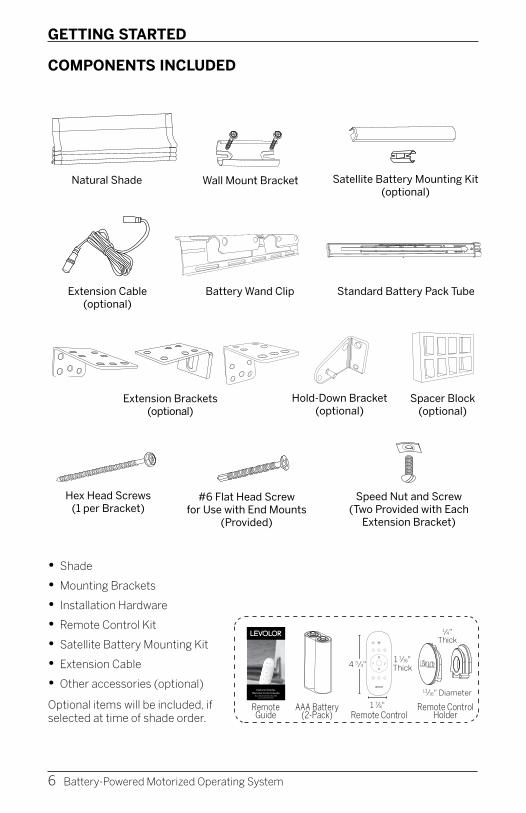
#6 x 11⁄2"Hex Head Screw
(Provided)
Longer #6 Hex Head Screwfor Use with Spacer Blocks
(Not Provided)
#6 Flat Head Screwfor Use with End Mounts
(Provided)
Speed Nutand Screw
(Two Provided withEach Extension Bracket)
ALL
1 2 3
4 5 6
Battery-Powered Motorized Operating System
GETTING STARTED
6
• Shade
• Mounting Brackets
• Installation Hardware
• Remote Control Kit
• Satellite Battery Mounting Kit
• Extension Cable
• Other accessories (optional)
Optional items will be included, if selected at time of shade order.
1 7⁄8"
1 1⁄16"Thick4 3⁄4"
AAA Battery (2-Pack) Remote Control
Remote Control Holder
Remote Guide
13⁄16" Diameter
1⁄4" Thick
COMPONENTS INCLUDED
#6 x 11⁄2"Hex Head Screw
(Provided)
Longer #6 Hex Head Screwfor Use with Spacer Blocks
(Not Provided)
#6 Flat Head Screwfor Use with End Mounts
(Provided)
Speed Nutand Screw
(Two Provided withEach Extension Bracket)
Hex Head Screws (1 per Bracket)
Socket
Battery Wand ClipExtension Cable(optional)
Standard Battery Pack Tube
Extension Brackets(optional)
Spacer Block(optional)
Hold-Down Bracket(optional)
Satellite Battery Mounting Kit(optional)
Wall Mount Bracket
Wall Mount BracketNatural Shade
#6 Flat Head Screw for Use with End Mounts
(Provided)
#6 x 11⁄2"Hex Head Screw
(Provided)
Longer #6 Hex Head Screwfor Use with Spacer Blocks
(Not Provided)
#6 Flat Head Screwfor Use with End Mounts
(Provided)
Speed Nutand Screw
(Two Provided withEach Extension Bracket)
Speed Nut and Screw (Two Provided with Each
Extension Bracket)
Natural ShadesRemote Control Guide
Guía de persianas naturales con control remoto
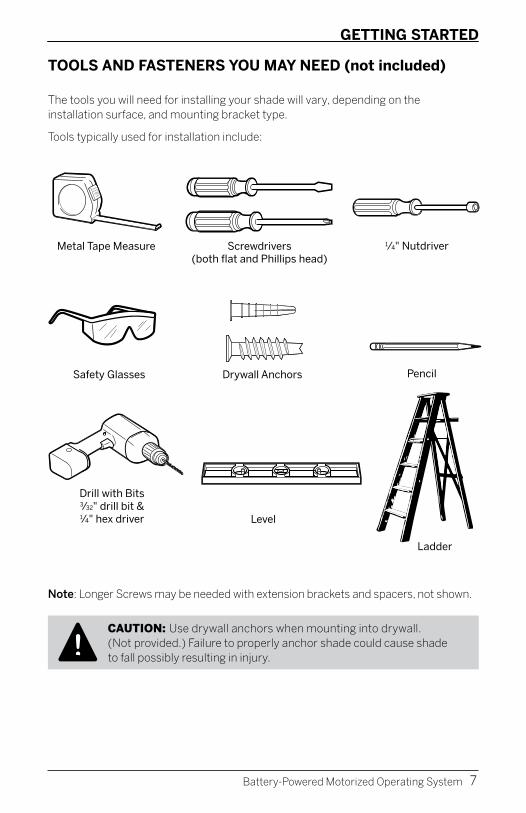
7Battery-Powered Motorized Operating System
GETTING STARTED
TOOLS AND FASTENERS YOU MAY NEED (not included)
The tools you will need for installing your shade will vary, depending on the installation surface, and mounting bracket type.
Tools typically used for installation include:
Metal Tape Measure
Safety Glasses
Drill with Bits3⁄32" drill bit &1⁄4" hex driver
Ladder
Screwdrivers (both flat and Phillips head)
Drywall Anchors
Level
1⁄4" Nutdriver
Pencil
Note: Longer Screws may be needed with extension brackets and spacers, not shown.
CAUTION: Use drywall anchors when mounting into drywall. (Not provided.) Failure to properly anchor shade could cause shade to fall possibly resulting in injury. !
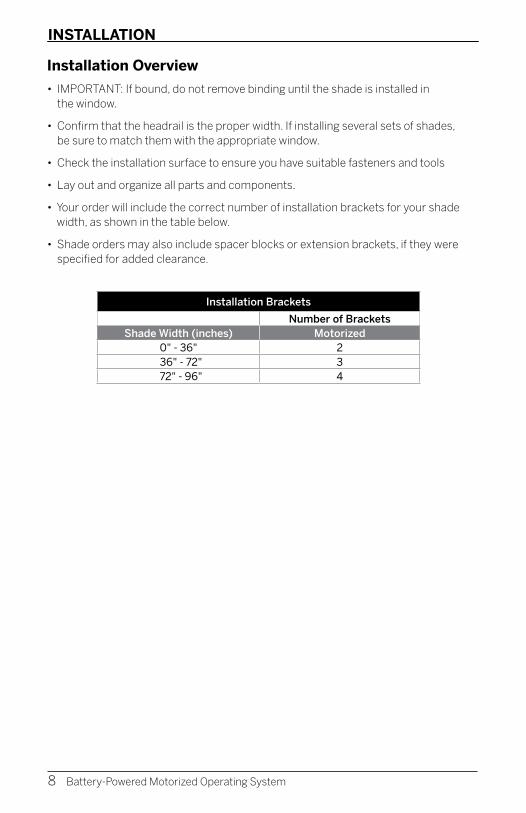
8 Battery-Powered Motorized Operating System
INSTALLATION
Installation Brackets
Number of BracketsShade Width (inches) Motorized
0" - 36" 2 36" - 72" 3 72" - 96" 4
Installation Overview
• IMPORTANT: If bound, do not remove binding until the shade is installed in the window.
• Confirm that the headrail is the proper width. If installing several sets of shades, be sure to match them with the appropriate window.
• Check the installation surface to ensure you have suitable fasteners and tools
• Lay out and organize all parts and components.
• Your order will include the correct number of installation brackets for your shade width, as shown in the table below.
• Shade orders may also include spacer blocks or extension brackets, if they were specified for added clearance.
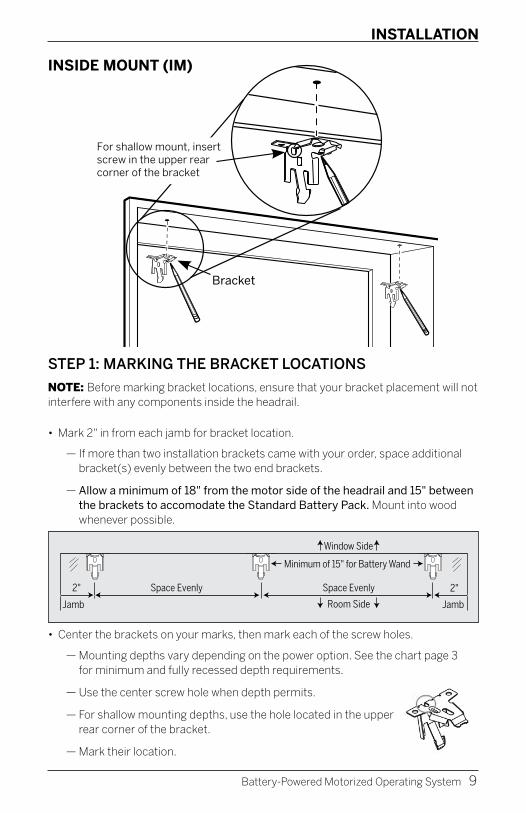
2" Space Evenly
Jamb Jamb
Space Evenly
Room Side
2"
Minimum of 15" for Battery Wand
Window Side
Bracket
For shallow mount, insert screw in the upper rear corner of the bracket
Bracket
STEP 1: MARKING THE BRACKET LOCATIONS
NOTE: Before marking bracket locations, ensure that your bracket placement will not interfere with any components inside the headrail.
• Mark 2" in from each jamb for bracket location.
— If more than two installation brackets came with your order, space additional bracket(s) evenly between the two end brackets.
— Allow a minimum of 18" from the motor side of the headrail and 15" between the brackets to accomodate the Standard Battery Pack. Mount into wood whenever possible.
• Center the brackets on your marks, then mark each of the screw holes.
— Mounting depths vary depending on the power option. See the chart page 3 for minimum and fully recessed depth requirements.
— Use the center screw hole when depth permits.
— For shallow mounting depths, use the hole located in the upper rear corner of the bracket.
— Mark their location.
Battery-Powered Motorized Operating System
INSTALLATION
INSIDE MOUNT (IM)
9
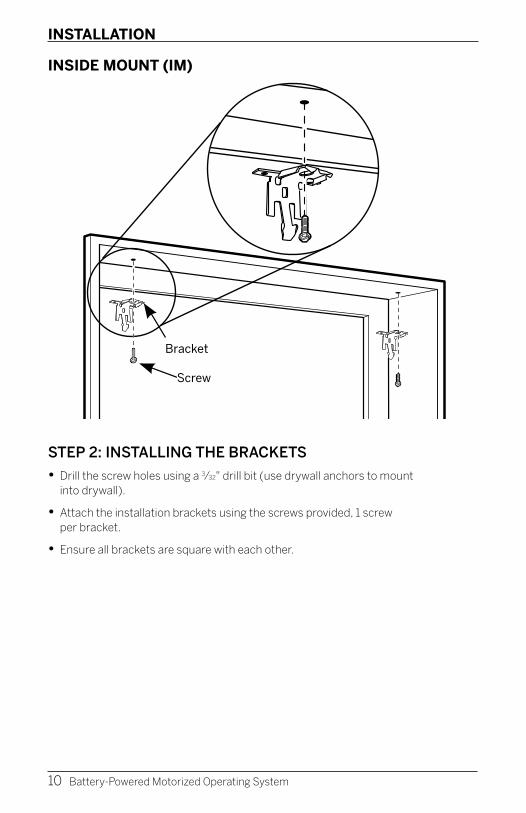
Screw
BracketBracket
Screw
STEP 2: INSTALLING THE BRACKETS
• Drill the screw holes using a 3⁄32" drill bit (use drywall anchors to mount into drywall).
• Attach the installation brackets using the screws provided, 1 screw per bracket.
• Ensure all brackets are square with each other.
INSIDE MOUNT (IM)
INSTALLATION
10 Battery-Powered Motorized Operating System
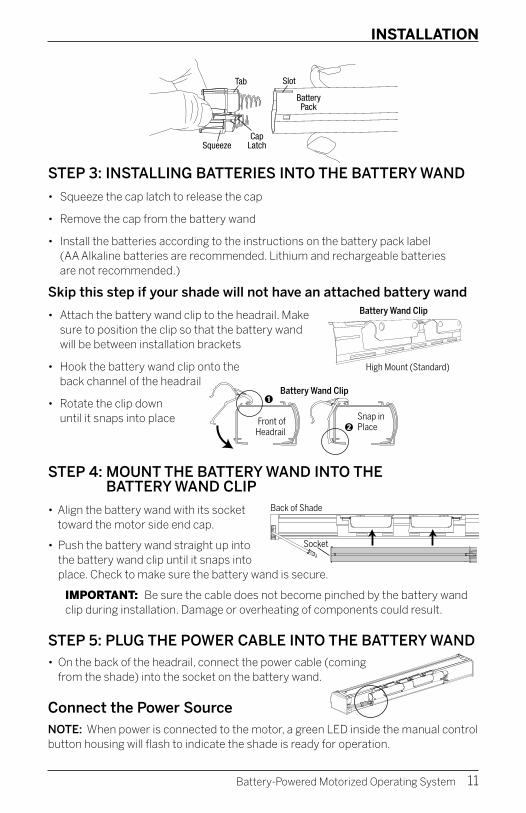
Front of Headrail
Battery Wand Clip
Snap in Place
Back of Shade
Socket
Tab Slot
CapLatch
BatteryPack
Squeeze
INSTALLATION
Battery-Powered Motorized Operating System
STEP 3: INSTALLING BATTERIES INTO THE BATTERY WAND
• Squeeze the cap latch to release the cap
• Remove the cap from the battery wand
• Install the batteries according to the instructions on the battery pack label (AA Alkaline batteries are recommended. Lithium and rechargeable batteries are not recommended.)
Skip this step if your shade will not have an attached battery wand
• Attach the battery wand clip to the headrail. Make sure to position the clip so that the battery wand will be between installation brackets
• Hook the battery wand clip onto the back channel of the headrail
• Rotate the clip down until it snaps into place
STEP 4: MOUNT THE BATTERY WAND INTO THE BATTERY WAND CLIP
• Align the battery wand with its socket toward the motor side end cap.
• Push the battery wand straight up into the battery wand clip until it snaps into place. Check to make sure the battery wand is secure.
IMPORTANT: Be sure the cable does not become pinched by the battery wand clip during installation. Damage or overheating of components could result.
STEP 5: PLUG THE POWER CABLE INTO THE BATTERY WAND• On the back of the headrail, connect the power cable (coming
from the shade) into the socket on the battery wand.
Connect the Power SourceNOTE: When power is connected to the motor, a green LED inside the manual control button housing will flash to indicate the shade is ready for operation.
Battery Wand Clip
High Mount (Standard)
11
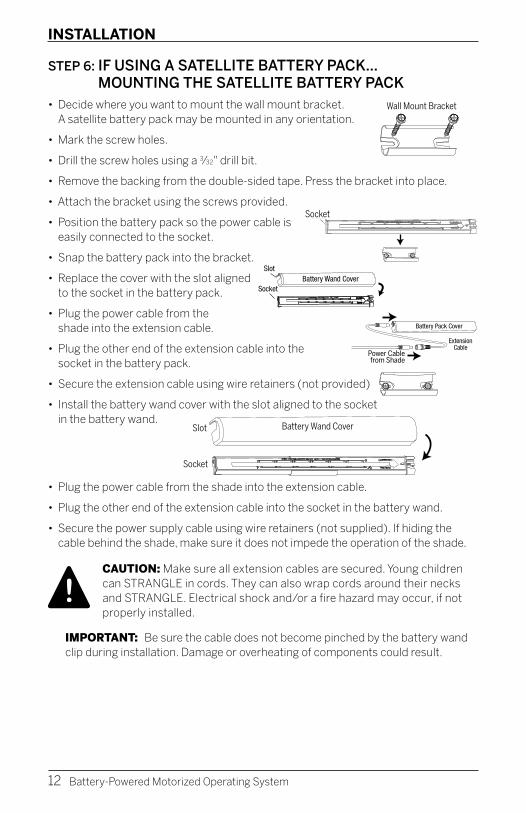
Battery Pack Cover
ExtensionCable
Power Cablefrom Shading
Battery Wand CoverSocket
Slot
Socket
Wall Mount Bracket
!
Power Cable from Shade
Socket
Wall Mount Bracket
Socket
Battery Wand CoverSlot
Socket
STEP 6: IF USING A SATELLITE BATTERY PACK... MOUNTING THE SATELLITE BATTERY PACK
• Decide where you want to mount the wall mount bracket. A satellite battery pack may be mounted in any orientation.
• Mark the screw holes.
• Drill the screw holes using a 3⁄32" drill bit.
• Remove the backing from the double-sided tape. Press the bracket into place.
• Attach the bracket using the screws provided.
• Position the battery pack so the power cable is easily connected to the socket.
• Snap the battery pack into the bracket.
• Replace the cover with the slot aligned to the socket in the battery pack.
• Plug the power cable from the shade into the extension cable.
• Plug the other end of the extension cable into the socket in the battery pack.
• Secure the extension cable using wire retainers (not provided)
• Install the battery wand cover with the slot aligned to the socket in the battery wand.
• Plug the power cable from the shade into the extension cable.
• Plug the other end of the extension cable into the socket in the battery wand.
• Secure the power supply cable using wire retainers (not supplied). If hiding the cable behind the shade, make sure it does not impede the operation of the shade.
CAUTION: Make sure all extension cables are secured. Young children can STRANGLE in cords. They can also wrap cords around their necks and STRANGLE. Electrical shock and/or a fire hazard may occur, if not properly installed.
IMPORTANT: Be sure the cable does not become pinched by the battery wand clip during installation. Damage or overheating of components could result.
Battery-Powered Motorized Operating System
INSTALLATION
12
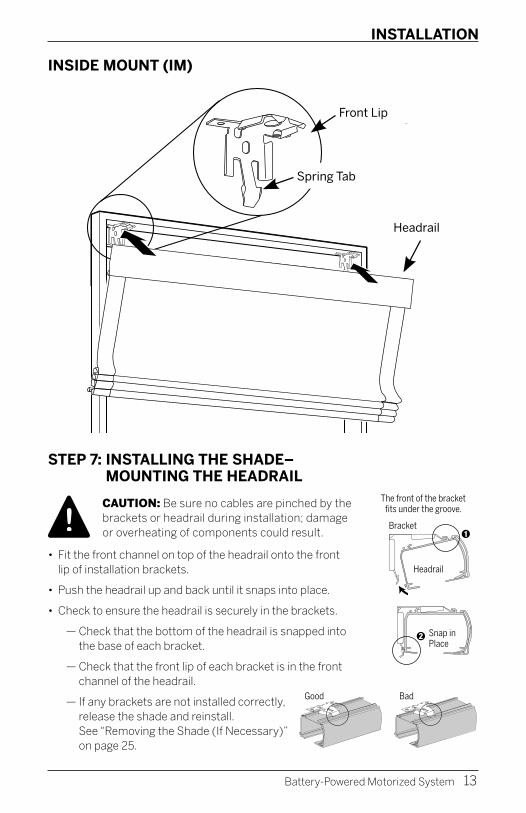
Headrail
Front lip
Spring tab
INSIDE MOUNT (IM)
!
Snap in Place
Headrail
Bracket
Good Bad
The front of the bracketfits under the groove.
STEP 7: INSTALLING THE SHADE– MOUNTING THE HEADRAIL
CAUTION: Be sure no cables are pinched by the brackets or headrail during installation; damage or overheating of components could result.
• Fit the front channel on top of the headrail onto the front lip of installation brackets.
• Push the headrail up and back until it snaps into place.
• Check to ensure the headrail is securely in the brackets.
— Check that the bottom of the headrail is snapped into the base of each bracket.
— Check that the front lip of each bracket is in the front channel of the headrail.
— If any brackets are not installed correctly, release the shade and reinstall. See “Removing the Shade (If Necessary)” on page 25.
Battery-Powered Motorized System
Front Lip
Spring Tab
Headrail
INSTALLATION
13
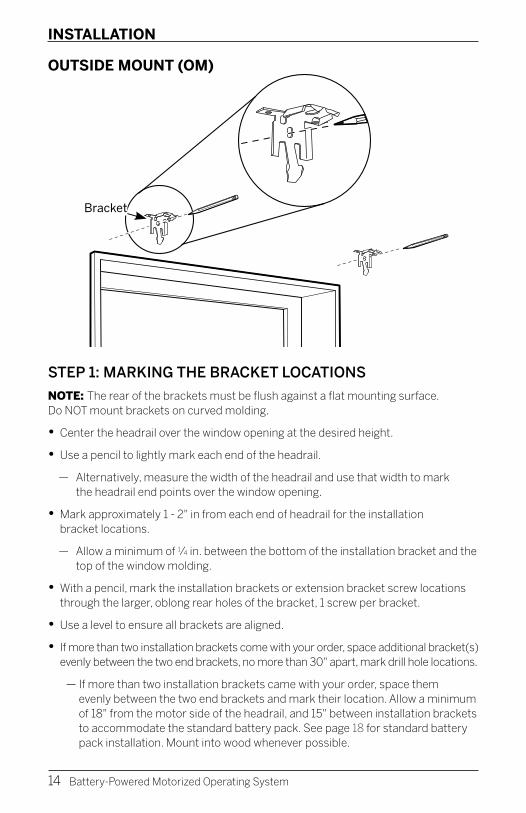
Bracket
OUTSIDE MOUNT (OM)
STEP 1: MARKING THE BRACKET LOCATIONS
NOTE: The rear of the brackets must be flush against a flat mounting surface. Do NOT mount brackets on curved molding.
• Center the headrail over the window opening at the desired height.
• Use a pencil to lightly mark each end of the headrail.
— Alternatively, measure the width of the headrail and use that width to mark the headrail end points over the window opening.
• Mark approximately 1 - 2" in from each end of headrail for the installation bracket locations.
— Allow a minimum of 1⁄4 in. between the bottom of the installation bracket and the top of the window molding.
• With a pencil, mark the installation brackets or extension bracket screw locations through the larger, oblong rear holes of the bracket, 1 screw per bracket.
• Use a level to ensure all brackets are aligned.
• If more than two installation brackets come with your order, space additional bracket(s) evenly between the two end brackets, no more than 30" apart, mark drill hole locations.
— If more than two installation brackets came with your order, space them evenly between the two end brackets and mark their location. Allow a minimum of 18" from the motor side of the headrail, and 15" between installation brackets to accommodate the standard battery pack. See page 18 for standard battery pack installation. Mount into wood whenever possible.
Bracket
Battery-Powered Motorized Operating System
INSTALLATION
14
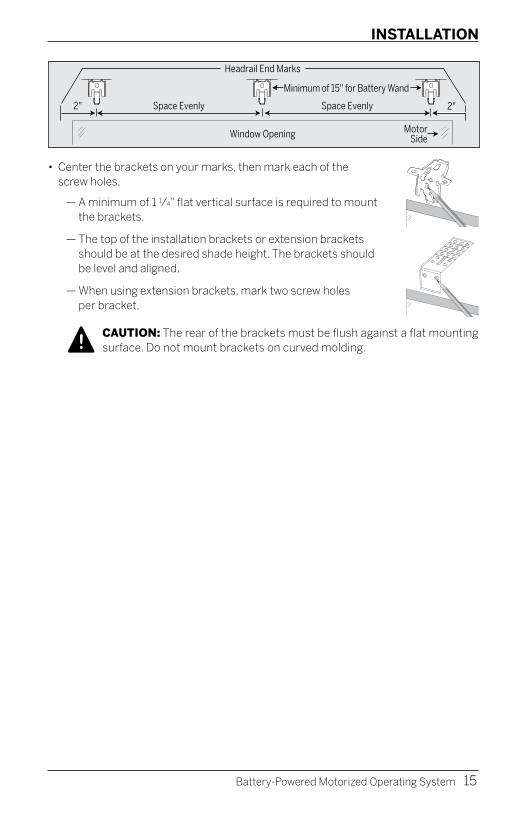
Minimum of 15" for Battery Wand
Headrail End Marks
Window Opening
2" Space Evenly Space Evenly
MotorSide
2"
• Center the brackets on your marks, then mark each of the screw holes.
— A minimum of 1 1⁄4" flat vertical surface is required to mount the brackets.
— The top of the installation brackets or extension brackets should be at the desired shade height. The brackets should be level and aligned.
— When using extension brackets, mark two screw holes per bracket.
CAUTION: The rear of the brackets must be flush against a flat mounting surface. Do not mount brackets on curved molding.
Battery-Powered Motorized Operating System
INSTALLATION
15
!
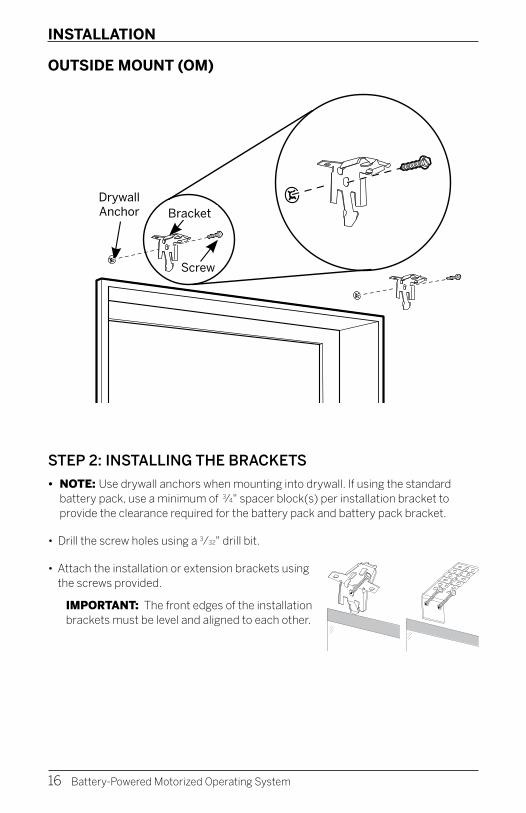
Drywall Anchor
Screw
Bracket
OUTSIDE MOUNT (OM)
STEP 2: INSTALLING THE BRACKETS
• NOTE: Use drywall anchors when mounting into drywall. If using the standard battery pack, use a minimum of 3⁄4" spacer block(s) per installation bracket to provide the clearance required for the battery pack and battery pack bracket.
• Drill the screw holes using a 3⁄32" drill bit.
• Attach the installation or extension brackets using the screws provided.
IMPORTANT: The front edges of the installation brackets must be level and aligned to each other.
Bracket
Screw
Drywall Anchor
Battery-Powered Motorized Operating System
INSTALLATION
16
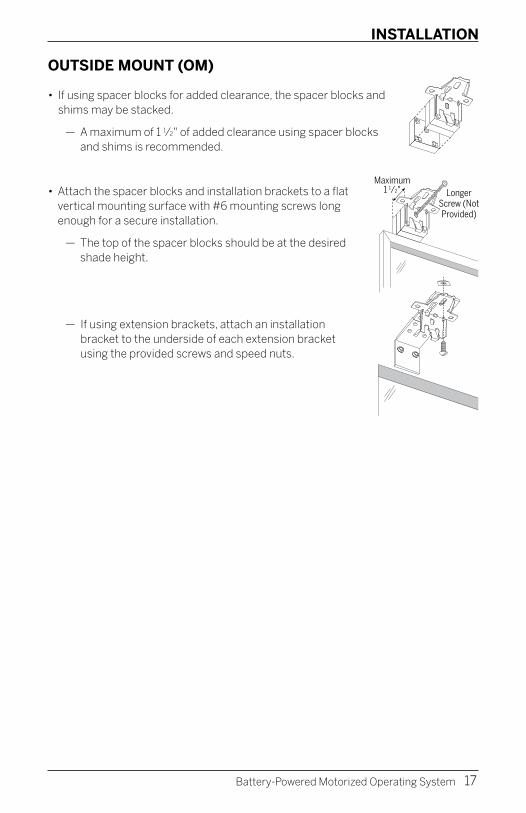
• If using spacer blocks for added clearance, the spacer blocks and shims may be stacked.
— A maximum of 1 1⁄2" of added clearance using spacer blocks and shims is recommended.
• Attach the spacer blocks and installation brackets to a flat vertical mounting surface with #6 mounting screws long enough for a secure installation.
— The top of the spacer blocks should be at the desired shade height.
— If using extension brackets, attach an installation bracket to the underside of each extension bracket using the provided screws and speed nuts.
OUTSIDE MOUNT (OM)
Battery-Powered Motorized Operating System
Maximum1 1⁄2" Longer
Screw (Not Provided)
INSTALLATION
17
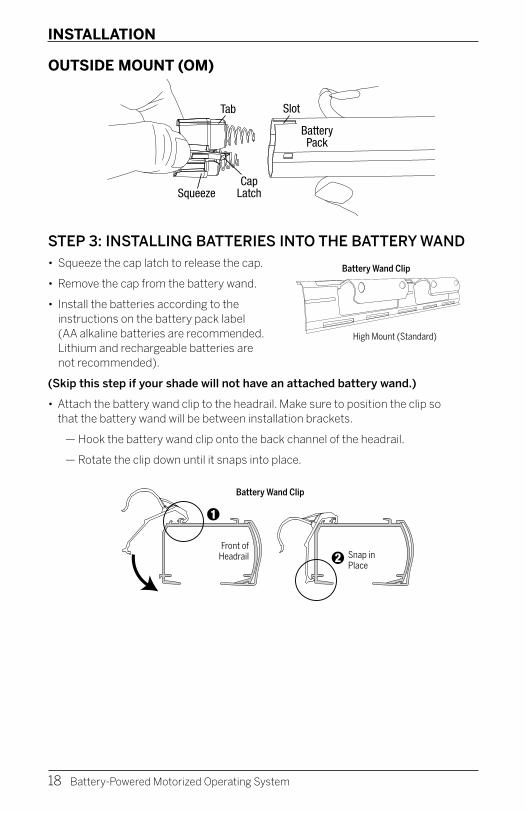
Tab Slot
CapLatch
BatteryPack
Squeeze
STEP 3: INSTALLING BATTERIES INTO THE BATTERY WAND• Squeeze the cap latch to release the cap.
• Remove the cap from the battery wand.
• Install the batteries according to the instructions on the battery pack label (AA alkaline batteries are recommended. Lithium and rechargeable batteries are not recommended).
(Skip this step if your shade will not have an attached battery wand.)
• Attach the battery wand clip to the headrail. Make sure to position the clip so that the battery wand will be between installation brackets.
— Hook the battery wand clip onto the back channel of the headrail.
— Rotate the clip down until it snaps into place.
Battery Wand Clip
High Mount (Standard)
Battery-Powered Motorized Operating System
OUTSIDE MOUNT (OM)
Front of Headrail
Battery Wand Clip
Snap in Place
INSTALLATION
18
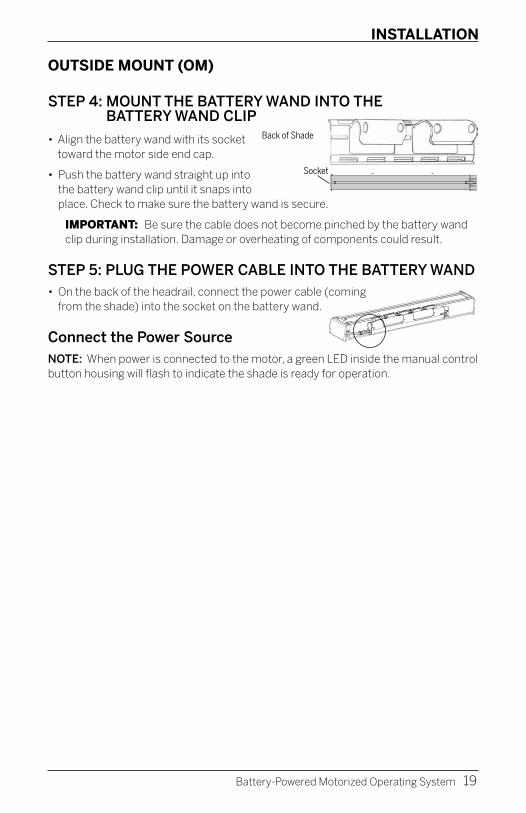
STEP 4: MOUNT THE BATTERY WAND INTO THE BATTERY WAND CLIP
• Align the battery wand with its socket toward the motor side end cap.
• Push the battery wand straight up into the battery wand clip until it snaps into place. Check to make sure the battery wand is secure.
IMPORTANT: Be sure the cable does not become pinched by the battery wand clip during installation. Damage or overheating of components could result.
STEP 5: PLUG THE POWER CABLE INTO THE BATTERY WAND• On the back of the headrail, connect the power cable (coming
from the shade) into the socket on the battery wand.
Connect the Power SourceNOTE: When power is connected to the motor, a green LED inside the manual control button housing will flash to indicate the shade is ready for operation.
OUTSIDE MOUNT (OM)
Battery-Powered Motorized Operating System
Back of Shade
Socket
INSTALLATION
19
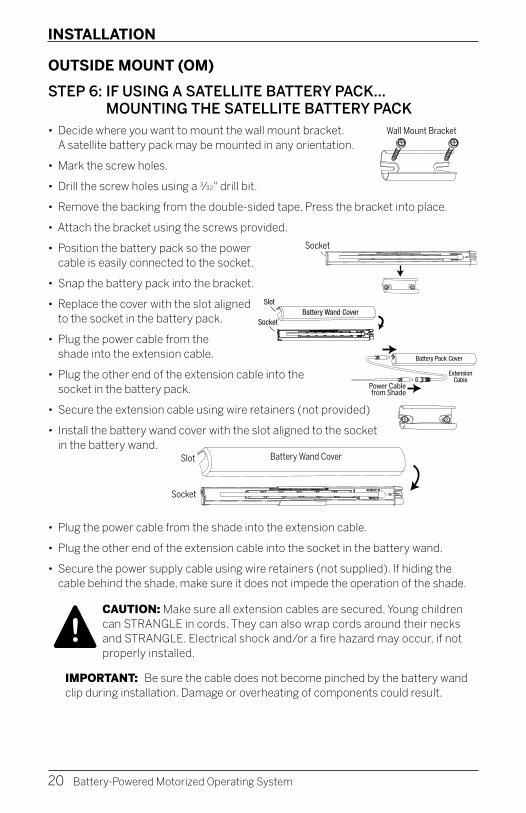
Wall Mount Bracket
Socket
Battery Wand CoverSocket
Slot
Battery Pack Cover
ExtensionCable
Power Cablefrom Shading
Socket
Battery Wand CoverSlot
Socket
Wall Mount Bracket
Power Cable from Shade
Socket
STEP 6: IF USING A SATELLITE BATTERY PACK... MOUNTING THE SATELLITE BATTERY PACK
• Decide where you want to mount the wall mount bracket. A satellite battery pack may be mounted in any orientation.
• Mark the screw holes.
• Drill the screw holes using a 3⁄32" drill bit.
• Remove the backing from the double-sided tape. Press the bracket into place.
• Attach the bracket using the screws provided.
• Position the battery pack so the power cable is easily connected to the socket.
• Snap the battery pack into the bracket.
• Replace the cover with the slot aligned to the socket in the battery pack.
• Plug the power cable from the shade into the extension cable.
• Plug the other end of the extension cable into the socket in the battery pack.
• Secure the extension cable using wire retainers (not provided)
• Install the battery wand cover with the slot aligned to the socket in the battery wand.
• Plug the power cable from the shade into the extension cable.
• Plug the other end of the extension cable into the socket in the battery wand.
• Secure the power supply cable using wire retainers (not supplied). If hiding the cable behind the shade, make sure it does not impede the operation of the shade.
CAUTION: Make sure all extension cables are secured. Young children can STRANGLE in cords. They can also wrap cords around their necks and STRANGLE. Electrical shock and/or a fire hazard may occur, if not properly installed.
IMPORTANT: Be sure the cable does not become pinched by the battery wand clip during installation. Damage or overheating of components could result.
Battery-Powered Motorized Operating System
!
OUTSIDE MOUNT (OM)
INSTALLATION
20

Headrail
Front lip
Spring tab
Headrail
Front lip
Spring tab
Front Lip
Spring Tab
Headrail
STEP 7: INSTALLING THE SHADE–MOUNTING THE HEADRAIL
CAUTION: Be sure no cables are pinched by the brackets or headrail during installation; damage or overheating of components could result.
• Fit the front channel on top of the headrail onto the front lip of installation brackets.
• Push the headrail up and back until it snaps into place.
• Check to ensure the headrail is securely in the brackets.
— Check that the bottom of the headrail is snapped into the base of each bracket.
— Check that the front lip of each bracket is in the front channel of the headrail.
— If any brackets are not installed correctly, release the shade and reinstall. See “Removing the Shade (If Necessary)” on page 25.
Snap in Place
Battery-Powered Motorized Operating System
!
Headrail
Bracket
Good Bad
The front of the bracketfits under the groove.
OUTSIDE MOUNT (OM)
INSTALLATION
21
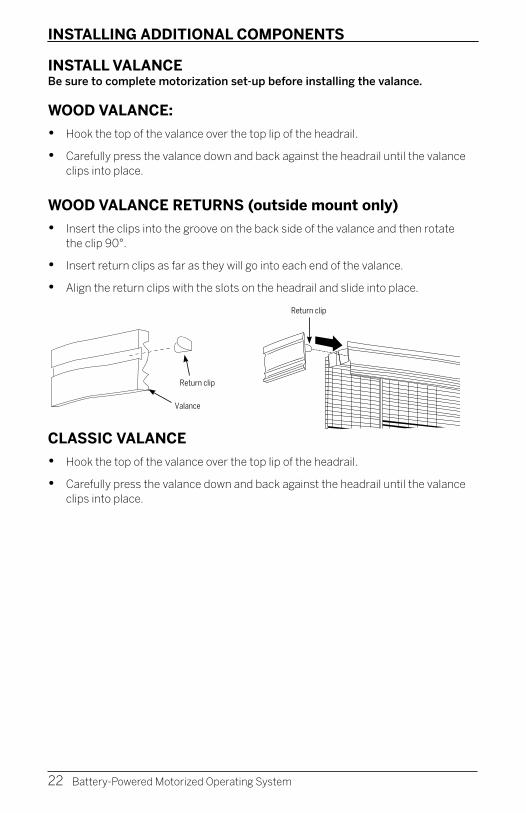
Return clip
Valance
Return clip
Hook-and-loop strips
Valance return
Return clip
Valance
Return clip
Hook-and-loop strips
Valance return
INSTALL VALANCE Be sure to complete motorization set-up before installing the valance.
WOOD VALANCE:
• Hook the top of the valance over the top lip of the headrail.
• Carefully press the valance down and back against the headrail until the valance clips into place.
WOOD VALANCE RETURNS (outside mount only)
• Insert the clips into the groove on the back side of the valance and then rotate the clip 90°.
• Insert return clips as far as they will go into each end of the valance.
• Align the return clips with the slots on the headrail and slide into place.
CLASSIC VALANCE
• Hook the top of the valance over the top lip of the headrail.
• Carefully press the valance down and back against the headrail until the valance clips into place.
INSTALLING ADDITIONAL COMPONENTS
22 Battery-Powered Motorized Operating System

Return clip
Valance
Return clip
Hook-and-loop strips
Valance return
INSTALLING ADDITIONAL COMPONENTS
23Battery-Powered Motorized Operating System
ATTACH VALANCE RETURNS (outside mount only)
• If your valance return has hook and loop strips only -
— Align the valance return with the end of the headrail, so that the hook-and-loop strips are at the top.
— Firmly press the valance return into place so that the hook-and-loop strips engage.
• If your valance return has both hook-and-loop strips and plastic corners -
— Peel the backing from the plastic to expose the adhesive.
— Align the valance return with the end of the headrail, so that the hook and loop strips are at the top.
— Firmly press the valance return into place so that the hook-and-loop strips engage and the plastic adheres to the back of the valance
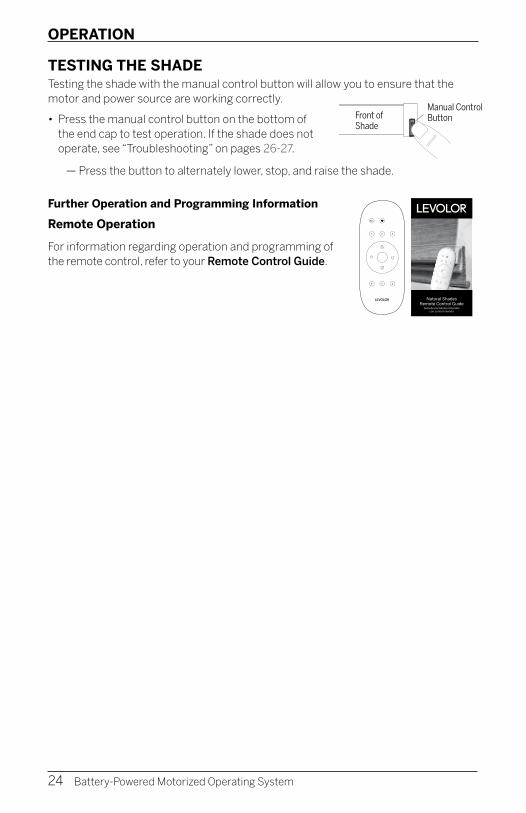
ALL
1 2 3
4 5 6
TESTING THE SHADE Testing the shade with the manual control button will allow you to ensure that the motor and power source are working correctly.
• Press the manual control button on the bottom of the end cap to test operation. If the shade does not operate, see “Troubleshooting” on pages 26-27.
— Press the button to alternately lower, stop, and raise the shade.
Further Operation and Programming Information
Remote Operation
For information regarding operation and programming of the remote control, refer to your Remote Control Guide.
Manual Control Button
Battery-Powered Motorized Operating System
Front of Shade
OPERATION
24
Natural ShadesRemote Control Guide
Guía de persianas naturales con control remoto

RESETTING THE SHADE (IF NECESSARY)Basic Reset
The basic reset is used to reset the shade’s travel limits.
Bottom-Up Shades:
1. Press and hold the manual control button for 6 seconds. The shade will move slightly.
2. Release the manual control button. The shade will raise to its fully open position to set the upper travel limit, then lower to the fully closed position to set the lower travel limit. The shade will move slightly one more time to indicate that the travel limits have been reset.
Resetting Shade ProgrammingThis reset erases all shade programming from memory, including group assignments, preventing any input device from operating the shade. Its primary use is during installation to correct group and network assignments. This reset does not affect travel limits.
1. Press and hold the manual control button for 12 seconds. The shade will move slightly once after 6 seconds, then again after 12 seconds. Release the button.
2. Refer to “Joining a Shade to a Group” in the remote guide to program the shade to a group.
Remove
Bracket
Back of Shade
Headrail
BottomTab
REMOVING THE SHADE (IF NECESSARY)• Lower the shade approximately 4".
• While holding the headrail, push back on the bottom tab of the installation bracket to release the bottom edge of the headrail.
• After releasing the bottom edge, roll the back of the headrail down and out from the bracket.
Battery-Powered Motorized Operating System
OPERATION | UNINSTALL
25
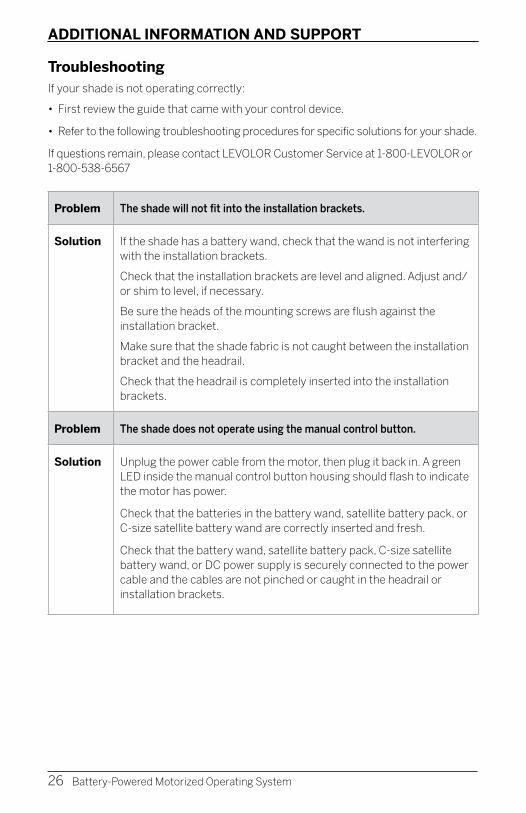
Problem The shade will not fit into the installation brackets.
Solution If the shade has a battery wand, check that the wand is not interfering with the installation brackets.
Check that the installation brackets are level and aligned. Adjust and/or shim to level, if necessary.
Be sure the heads of the mounting screws are flush against the installation bracket.
Make sure that the shade fabric is not caught between the installation bracket and the headrail.
Check that the headrail is completely inserted into the installation brackets.
Problem The shade does not operate using the manual control button.
Solution Unplug the power cable from the motor, then plug it back in. A green LED inside the manual control button housing should flash to indicate the motor has power.
Check that the batteries in the battery wand, satellite battery pack, or C-size satellite battery wand are correctly inserted and fresh.
Check that the battery wand, satellite battery pack, C-size satellite battery wand, or DC power supply is securely connected to the power cable and the cables are not pinched or caught in the headrail or installation brackets.
TroubleshootingIf your shade is not operating correctly:
• First review the guide that came with your control device.
• Refer to the following troubleshooting procedures for specific solutions for your shade.
If questions remain, please contact LEVOLOR Customer Service at 1-800-LEVOLOR or 1-800-538-6567
ADDITIONAL INFORMATION AND SUPPORT
26 Battery-Powered Motorized Operating System
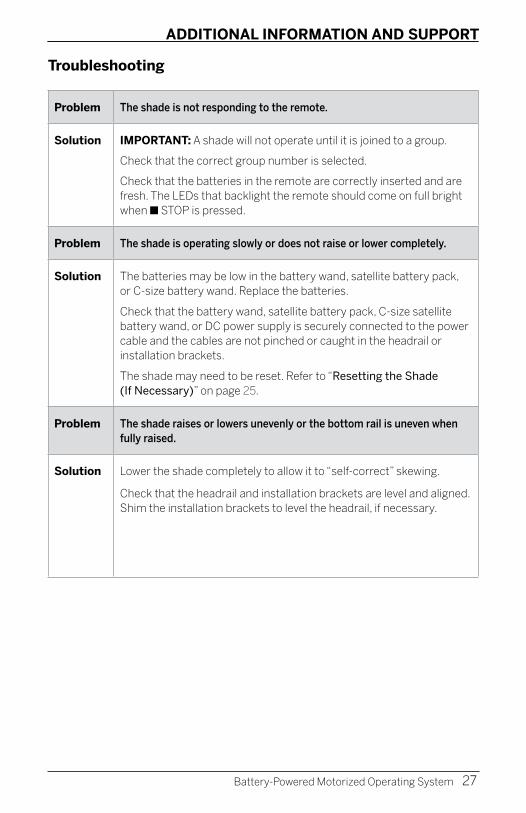
Problem The shade is not responding to the remote.
Solution IMPORTANT: A shade will not operate until it is joined to a group.
Check that the correct group number is selected.
Check that the batteries in the remote are correctly inserted and are fresh. The LEDs that backlight the remote should come on full bright when ■ STOP is pressed.
Problem The shade is operating slowly or does not raise or lower completely.
Solution The batteries may be low in the battery wand, satellite battery pack, or C-size battery wand. Replace the batteries.
Check that the battery wand, satellite battery pack, C-size satellite battery wand, or DC power supply is securely connected to the power cable and the cables are not pinched or caught in the headrail or installation brackets.
The shade may need to be reset. Refer to “Resetting the Shade (If Necessary)” on page 25.
Problem The shade raises or lowers unevenly or the bottom rail is uneven when fully raised.
Solution Lower the shade completely to allow it to “self-correct” skewing.
Check that the headrail and installation brackets are level and aligned. Shim the installation brackets to level the headrail, if necessary.
Troubleshooting
27Battery-Powered Motorized Operating System
ADDITIONAL INFORMATION AND SUPPORT
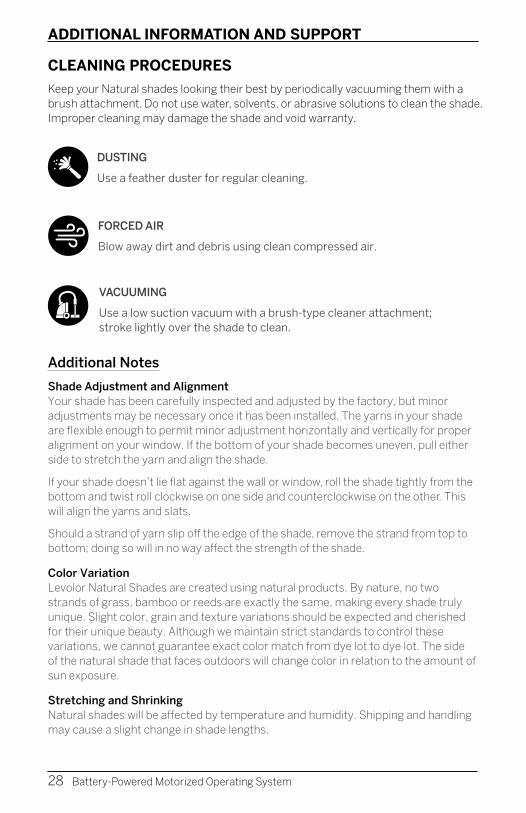
ADDITIONAL INFORMATION AND SUPPORT
28 Battery-Powered Motorized Operating System
Additional Notes
Shade Adjustment and Alignment Your shade has been carefully inspected and adjusted by the factory, but minor adjustments may be necessary once it has been installed. The yarns in your shade are flexible enough to permit minor adjustment horizontally and vertically for proper alignment on your window. If the bottom of your shade becomes uneven, pull either side to stretch the yarn and align the shade.
If your shade doesn’t lie flat against the wall or window, roll the shade tightly from the bottom and twist roll clockwise on one side and counterclockwise on the other. This will align the yarns and slats.
Should a strand of yarn slip off the edge of the shade, remove the strand from top to bottom; doing so will in no way affect the strength of the shade.
Color Variation Levolor Natural Shades are created using natural products. By nature, no two strands of grass, bamboo or reeds are exactly the same, making every shade truly unique. Slight color, grain and texture variations should be expected and cherished for their unique beauty. Although we maintain strict standards to control these variations, we cannot guarantee exact color match from dye lot to dye lot. The side of the natural shade that faces outdoors will change color in relation to the amount of sun exposure.
Stretching and Shrinking Natural shades will be affected by temperature and humidity. Shipping and handling may cause a slight change in shade lengths.
CLEANING PROCEDURES
Keep your Natural shades looking their best by periodically vacuuming them with a brush attachment. Do not use water, solvents, or abrasive solutions to clean the shade. Improper cleaning may damage the shade and void warranty.
DUSTING
Use a feather duster for regular cleaning.
FORCED AIR
Blow away dirt and debris using clean compressed air.
VACUUMING
Use a low suction vacuum with a brush-type cleaner attachment; stroke lightly over the shade to clean.

WARRANTYFor complete warranty information visit LEVOLOR.com or call Customer Service at 1-800-LEVOLOR or 1-800-538-6567.
CONTACTING US
To contact LEVOLOR Customer Service regarding any questions or concerns you may have about your new shades, you may reach us at 1-800-LEVOLOR (8:30 am – 6:30 pm EST)
www.LEVOLOR.com
ADDITIONAL PARTS AND SERVICES
Additional or replacement parts can be ordered, or shades can be repaired or restrung through our repair center. Please contact LEVOLOR customer service through www.LEVOLOR.com for a return authorization number.
ADDITIONAL INFORMATION AND SUPPORT
29Battery-Powered Motorized Operating System

Sistema de funcionamiento motorizado con batería
Persianas naturalINSTALACIÓN • MANEJO • CUIDADO

CONTENIDO
TERMINOLOGÍA DE VENTANAS Y PERSIANAS
Tipos de montaje y terminología de ventanas .................................... 33Estilos de elevación ............................................................................... 34
INTRODUCCIÓNVista del producto ................................................................................. 35Componentes incluidos ........................................................................ 36Herramientas y elementos de fijación que puede necesitar ...............37
COLOCACIÓNDescripción general de la colocación ................................................... 38MONTAJE INTERIOR (MI) ............................................................... 39-43MONTAJE EXTERIOR (ME) ............................................................. 44-51Coloque la cenefa .............................................................................52-53
MANEJOCómo probar la persiana ...................................................................... 54Cómo reiniciar el recorrido de las persianas ....................................... 55
DESINSTALACIÓNCómo sacar las persianas..................................................................... 55
INFORMACIÓN ADICIONAL Y ASISTENCIASolución de problemas ....................................................................56-57 Procedimientos de limpieza ................................................................. 58Garantía ................................................................................................. 59Póngase en contacto con nosotros ...................................................... 59
Cumplimiento en relación con la radiofrecuencia de la FCCEste dispositivo cumple con la Parte 15 de las Normas de la FCC. El funcionamiento está sujeto a estas dos condiciones: (1) Este dispositivo no puede causar interferencias nocivas. (2) Este dispositivo debe aceptar cualquier interferencia recibida, incluidas las que puedan causar un funcionamiento no deseado.
Este equipo ha sido probado y se ha comprobado que cumple con los límites para un dispositivo digital de Clase B, en conformidad con la Parte 15 de las Normas de la FCC. Estos límites están diseñados para proporcionar una protección razonable contra interferencias perjudiciales en una colocación residencial. Este equipo genera, utiliza y puede emitir energía de radiofrecuencia y, si no se coloca y utiliza de acuerdo con las instrucciones, puede causar interferencias perjudiciales en las comunicaciones de radio. Sin embargo, no hay garantía de que no ocurrirá interferencia en una colocación en particular. Si este equipo causa interferencias perjudiciales en la recepción de radio o televisión, lo cual puede determinarse encendiendo y apagando el equipo, se recomienda que el usuario intente corregir la interferencia tomando una o más de las siguientes medidas:
• Vuelva a orientar o ubicar la antena de recepción.• Aumente la separación entre el equipo y el receptor.• Conecte el equipo a una toma de corriente en un circuito diferente al cual está conectado el receptor.• Solicite ayuda al distribuidor o a un técnico de radio y televisión experimentado.
Cualquier cambio o modificación no aprobado expresamente por la parte responsable del cumplimiento podría anular la autoridad del usuario para hacer funcionar el equipo.
© 2020 LEVOLOR®, Inc.32 Sistema de funcionamiento motorizado con batería
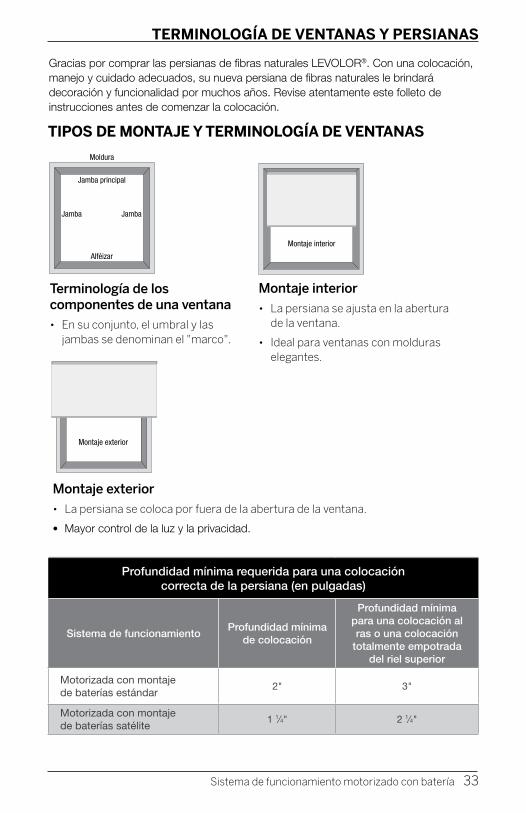
Montaje exteriorMontaje interior
Moldura
Jamba principal
Alféizar
Jamba Jamba
Moldura
Jamba principal
Alféizar
Jamba Jamba
Montaje exteriorMontaje interior
Moldura
Jamba principal
Alféizar
Jamba Jamba
Gracias por comprar las persianas de fibras naturales LEVOLOR®. Con una colocación, manejo y cuidado adecuados, su nueva persiana de fibras naturales le brindará decoración y funcionalidad por muchos años. Revise atentamente este folleto de instrucciones antes de comenzar la colocación.
Montaje interior
• La persiana se ajusta en la abertura de la ventana.
• Ideal para ventanas con molduras elegantes.
Terminología de los componentes de una ventana
• En su conjunto, el umbral y las jambas se denominan el "marco".
Montaje exterior
• La persiana se coloca por fuera de la abertura de la ventana.
• Mayor control de la luz y la privacidad.
Profundidad mínima requerida para una colocación correcta de la persiana (en pulgadas)
Sistema de funcionamientoProfundidad mínima
de colocación
Profundidad mínima para una colocación al ras o una colocación
totalmente empotrada del riel superior
Motorizada con montaje de baterías estándar
2" 3"
Motorizada con montaje de baterías satélite
1 1⁄4" 2 1⁄4"
TERMINOLOGÍA DE VENTANAS Y PERSIANAS
Sistema de funcionamiento motorizado con batería 33
TIPOS DE MONTAJE Y TERMINOLOGÍA DE VENTANAS
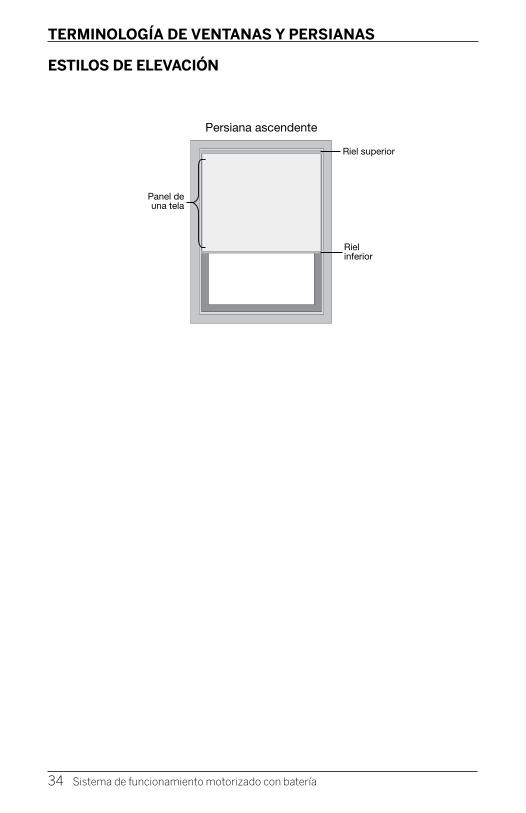
TERMINOLOGÍA DE VENTANAS Y PERSIANAS
ESTILOS DE ELEVACIÓN
Persiana ascendente
Riel superior
Riel inferior
Panel de una tela
34 Sistema de funcionamiento motorizado con batería
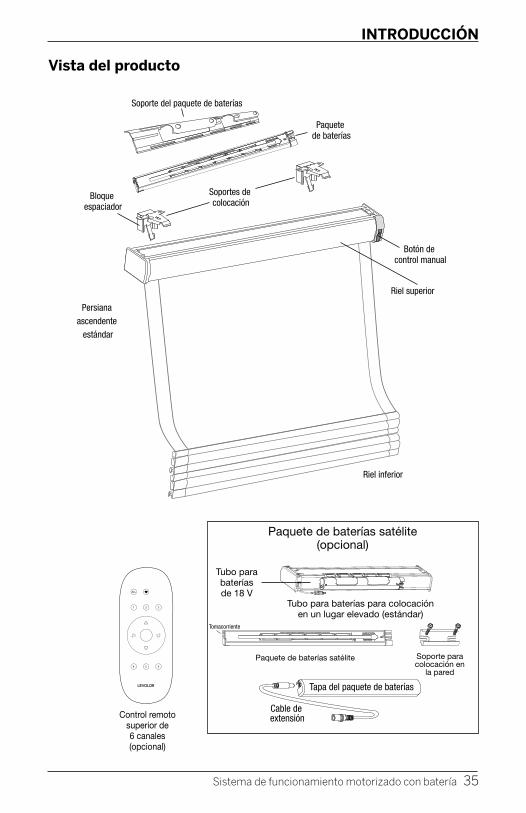
INTRODUCCIÓN
Vista del producto
No se muestra: Persianas descendentes y persianas descendentes y ascendentes
Soporte del paquete de baterías
Paquete de baterías
Persiana ascendente
estándar
Soportes de colocación
Bloque espaciador
Riel inferior
Riel superior
Botón de control manual
ALL
1 2 3
4 5 6
Tomacorriente
Tapa del paquete de baterías
Cable de extensión
Soporte para colocación en la pared
Control remoto superior de 6 canales (opcional)
Paquete de baterías satélite (opcional)
Tubo para baterías de 18 V
Soporte para colocación en
la pared
Paquete de baterías satélite
Tubo para baterías para colocación en un lugar elevado (estándar)
Sistema de funcionamiento motorizado con batería 35
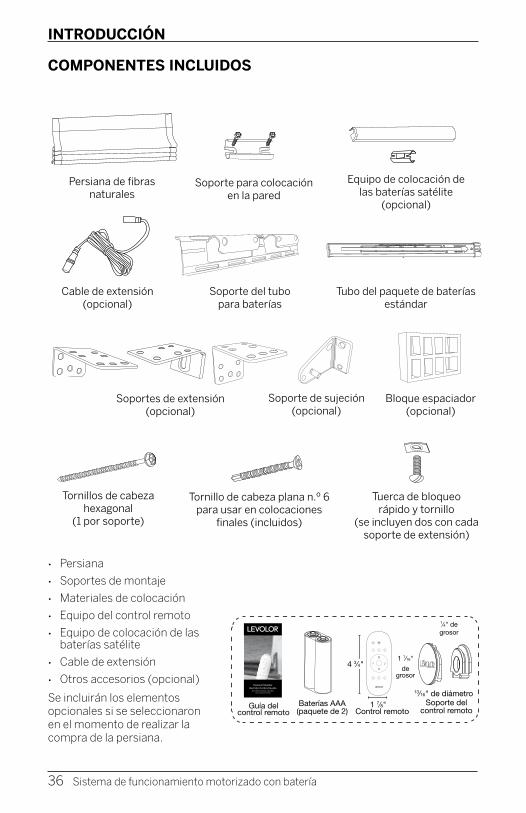
Tornillo de cabeza hexagonal n.º 6 x 11∕2"
(Incluido).
Tornillo de cabeza hexagonal n.º 6 más largo para usar con los
bloques espaciadores (No incluido).
Tornillo de cabeza plana n.º 6 para usar en colocaciones
�nales (Incluido).
Tuerca de velocidad y tornillo (Se incluyen
dos incluidos con cada soporte de extensión).
Socket
Soporte para colocación en la pared
Tornillo de cabeza hexagonal n.º 6 x 11∕2"
(Incluido).
Tornillo de cabeza hexagonal n.º 6 más largo para usar con los
bloques espaciadores (No incluido).
Tornillo de cabeza plana n.º 6 para usar en colocaciones
�nales (Incluido).
Tuerca de velocidad y tornillo (Se incluyen
dos incluidos con cada soporte de extensión).
Soporte de sujeción(opcional)
INTRODUCCIÓN
• Persiana
• Soportes de montaje
• Materiales de colocación
• Equipo del control remoto
• Equipo de colocación de las baterías satélite
• Cable de extensión
• Otros accesorios (opcional)
Se incluirán los elementos opcionales si se seleccionaron en el momento de realizar la compra de la persiana.
1 7⁄8"
1 1⁄16"
de grosor
4 3⁄4"
ALL
1 2 3
4 5 6
Baterías AAA (paquete de 2) Control remoto
Soporte del control remoto
13⁄16" de diámetro
1⁄4" de grosor
COMPONENTES INCLUIDOS
Tornillos de cabeza hexagonal
(1 por soporte)
Soporte del tubo para baterías
Cable de extensión(opcional)
Tubo del paquete de baterías estándar
Soportes de extensión(opcional)
Bloque espaciador(opcional)
Equipo de colocación de las baterías satélite
(opcional)
Soporte para colocación en la pared
Persiana de fibras naturales
Tornillo de cabeza plana n.º 6 para usar en colocaciones
finales (incluidos)
Tuerca de bloqueo rápido y tornillo
(se incluyen dos con cada soporte de extensión)
36
Guía del control remoto
Natural ShadesRemote Control Guide
Guía de persianas naturales con control remoto
Sistema de funcionamiento motorizado con batería
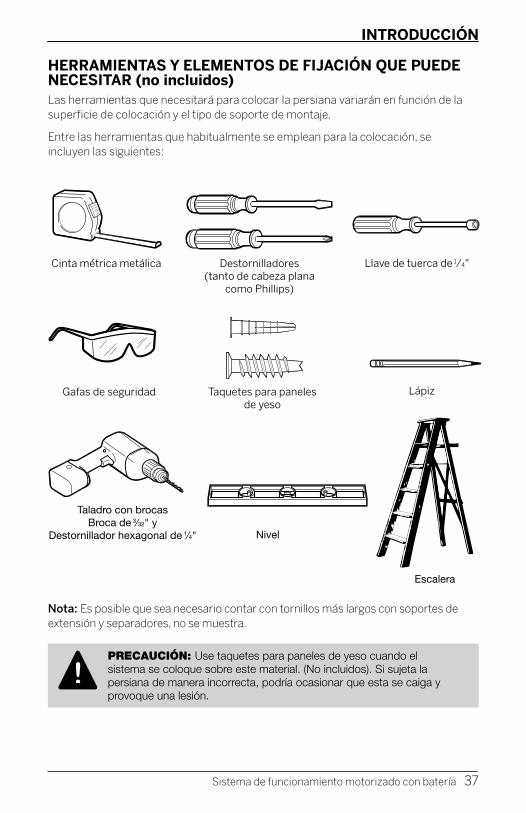
INTRODUCCIÓN
HERRAMIENTAS Y ELEMENTOS DE FIJACIÓN QUE PUEDE NECESITAR (no incluidos)Las herramientas que necesitará para colocar la persiana variarán en función de la superficie de colocación y el tipo de soporte de montaje.
Entre las herramientas que habitualmente se emplean para la colocación, se incluyen las siguientes:
Nota: Es posible que sea necesario contar con tornillos más largos con soportes de extensión y separadores, no se muestra.
PRECAUCIÓN: Use taquetes para paneles de yeso cuando el sistema se coloque sobre este material. (No incluidos). Si sujeta la persiana de manera incorrecta, podría ocasionar que esta se caiga y provoque una lesión.
!
Cinta métrica metálica
Gafas de seguridad
Taladro con brocasBroca de 3⁄32" y
Destornillador hexagonal de 1⁄4"
Escalera
Destornilladores (tanto de cabeza plana
como Phillips)
Taquetes para paneles de yeso
Nivel
Llave de tuerca de 1⁄4"
Lápiz
Sistema de funcionamiento motorizado con batería 37
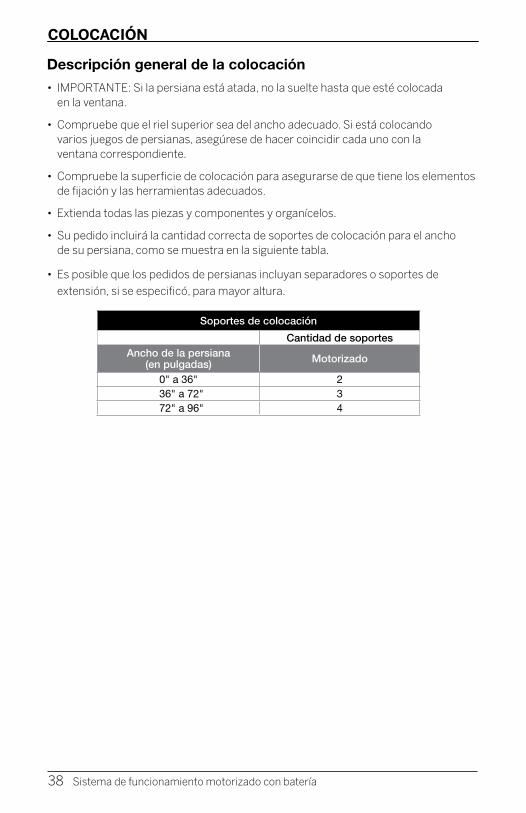
COLOCACIÓN
Descripción general de la colocación
• IMPORTANTE: Si la persiana está atada, no la suelte hasta que esté colocada en la ventana.
• Compruebe que el riel superior sea del ancho adecuado. Si está colocando varios juegos de persianas, asegúrese de hacer coincidir cada uno con la ventana correspondiente.
• Compruebe la superficie de colocación para asegurarse de que tiene los elementos de fijación y las herramientas adecuados.
• Extienda todas las piezas y componentes y organícelos.
• Su pedido incluirá la cantidad correcta de soportes de colocación para el ancho de su persiana, como se muestra en la siguiente tabla.
• Es posible que los pedidos de persianas incluyan separadores o soportes de
extensión, si se especificó, para mayor altura.
Soportes de colocación
Cantidad de soportesAncho de la persiana
(en pulgadas) Motorizado
0" a 36" 2 36" a 72" 3 72" a 96" 4
38 Sistema de funcionamiento motorizado con batería

Soporte
Para colocaciones de poca profundidad, inserte el tornillo en la esquina superior trasera del soporte.
2" Deje un espacio uniforme
Jamba Jamba
Deje un espacio uniforme
Lado que mira hacia la habitación
2"
Mínimo de 15" para el tubo para baterías
Lado que mira hacia la ventana
PASO 1: MARCAR LA UBICACIÓN DE LOS SOPORTESNOTA: Antes de marcar la ubicación de los soportes, asegúrese de que la colocación no interfiera con ningún componente dentro del riel superior.
• Marque 2" en cada jamba para ubicar el soporte.
— Si en su compra se incluyen más de dos soportes de colocación, ubique los soportes adicionales espaciándolos de manera uniforme entre los dos soportes de los extremos.
— Deje un mínimo de 18" desde la parte del motor del riel superior y 15" entre los soportes, a fin de colocar el paquete de baterías estándar. Coloque la persiana sobre madera siempre que sea posible.
• Coloque los soportes en el centro de las marcas que hizo y, luego marque cada
orificio para los tornillos.
— La profundidad de la colocación varía según la opción de encendido. Consulte el gráfico en la página 33 para conocer los requisitos mínimos de profundidad para las persianas totalmente empotradas.
— Use el centro del orificio del tornillo cuando la profundidad lo permita.
— Para colocaciones de poca profundidad, use el orificio ubicado en la esquina superior trasera del soporte.
— Marque la ubicación.
COLOCACIÓN
MONTAJE INTERIOR (MI)
Sistema de funcionamiento motorizado con batería 39
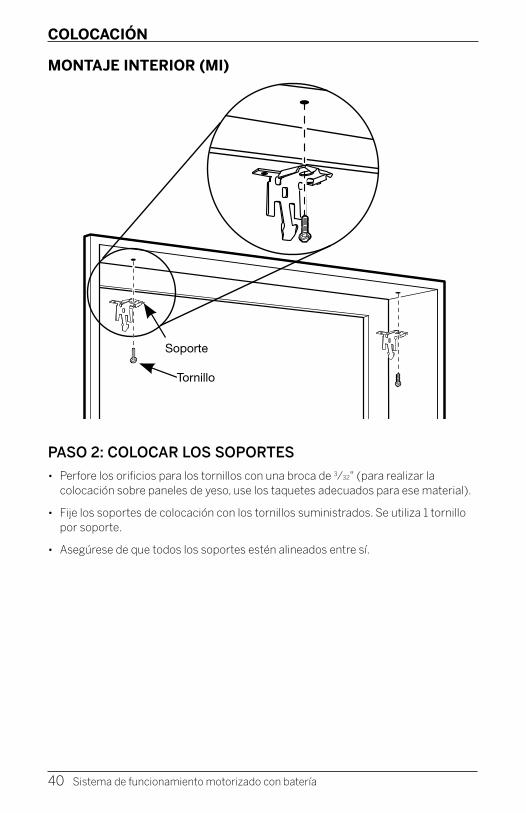
Tornillo
SoporteSoporte
Tornillo
PASO 2: COLOCAR LOS SOPORTES
• Perfore los orificios para los tornillos con una broca de 3⁄32" (para realizar la colocación sobre paneles de yeso, use los taquetes adecuados para ese material).
• Fije los soportes de colocación con los tornillos suministrados. Se utiliza 1 tornillo por soporte.
• Asegúrese de que todos los soportes estén alineados entre sí.
MONTAJE INTERIOR (MI)
COLOCACIÓN
40 Sistema de funcionamiento motorizado con batería
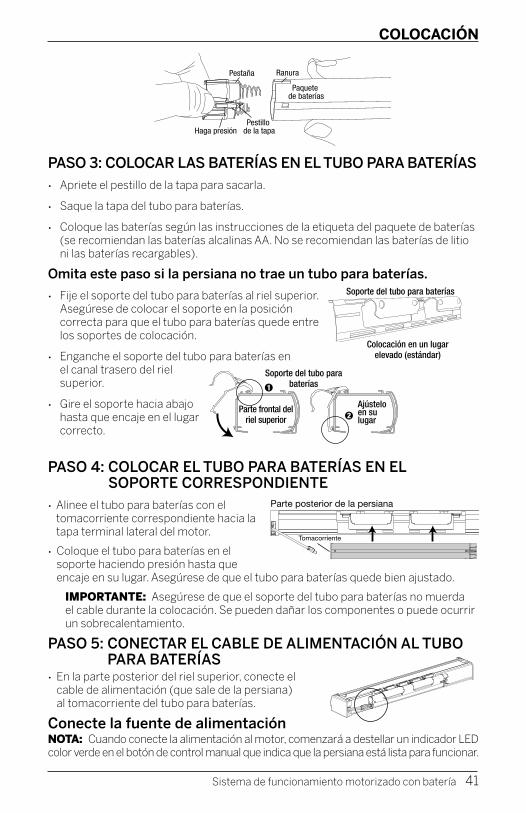
Pestaña Ranura
Pestillo de la tapa
Paquete de baterías
Haga presión
Soporte del tubo para baterías
Ajústelo en su lugar
Parte frontal del riel superior
Soporte del tubo para baterías
Colocación en un lugar elevado (estándar)
Parte posterior de la persiana
Tomacorriente
COLOCACIÓN
PASO 3: COLOCAR LAS BATERÍAS EN EL TUBO PARA BATERÍAS• Apriete el pestillo de la tapa para sacarla.
• Saque la tapa del tubo para baterías.
• Coloque las baterías según las instrucciones de la etiqueta del paquete de baterías (se recomiendan las baterías alcalinas AA. No se recomiendan las baterías de litio ni las baterías recargables).
Omita este paso si la persiana no trae un tubo para baterías.
• Fije el soporte del tubo para baterías al riel superior. Asegúrese de colocar el soporte en la posición correcta para que el tubo para baterías quede entre los soportes de colocación.
• Enganche el soporte del tubo para baterías en el canal trasero del riel superior.
• Gire el soporte hacia abajo hasta que encaje en el lugar correcto.
PASO 4: COLOCAR EL TUBO PARA BATERÍAS EN EL SOPORTE CORRESPONDIENTE
• Alinee el tubo para baterías con el tomacorriente correspondiente hacia la tapa terminal lateral del motor.
• Coloque el tubo para baterías en el soporte haciendo presión hasta que encaje en su lugar. Asegúrese de que el tubo para baterías quede bien ajustado.
IMPORTANTE: Asegúrese de que el soporte del tubo para baterías no muerda el cable durante la colocación. Se pueden dañar los componentes o puede ocurrir un sobrecalentamiento.
PASO 5: CONECTAR EL CABLE DE ALIMENTACIÓN AL TUBO PARA BATERÍAS
• En la parte posterior del riel superior, conecte el cable de alimentación (que sale de la persiana) al tomacorriente del tubo para baterías.
Conecte la fuente de alimentaciónNOTA: Cuando conecte la alimentación al motor, comenzará a destellar un indicador LED color verde en el botón de control manual que indica que la persiana está lista para funcionar.
Sistema de funcionamiento motorizado con batería 41
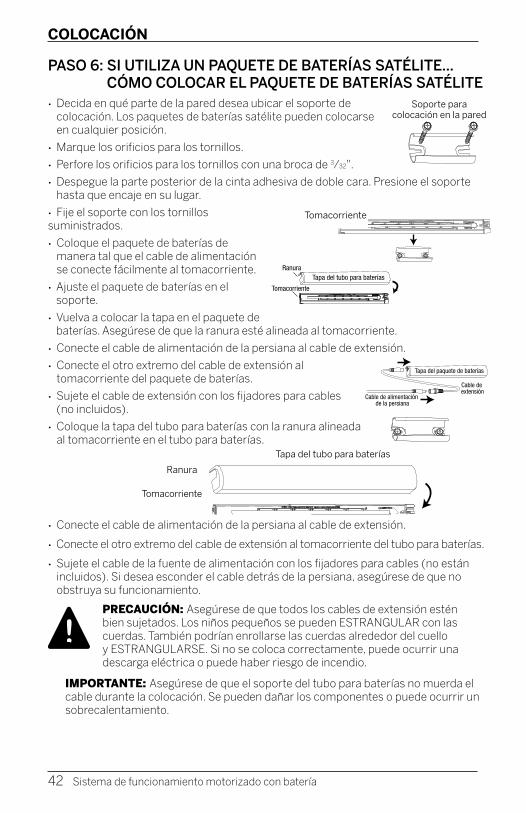
Tapa del tubo para baterías
Ranura
Tomacorriente
Tapa del tubo para baterías
Tomacorriente
Ranura
TomacorrienteTomacorriente
Tapa del paquete de baterías
Cable de extensión
Cable de alimentación de la persiana
Tomacorriente
Soporte para colocación en la pared
Soporte para colocación en la pared
PASO 6: SI UTILIZA UN PAQUETE DE BATERÍAS SATÉLITE... CÓMO COLOCAR EL PAQUETE DE BATERÍAS SATÉLITE
• Decida en qué parte de la pared desea ubicar el soporte de colocación. Los paquetes de baterías satélite pueden colocarse en cualquier posición.
• Marque los orificios para los tornillos.
• Perfore los orificios para los tornillos con una broca de 3⁄32".
• Despegue la parte posterior de la cinta adhesiva de doble cara. Presione el soporte hasta que encaje en su lugar.
• Fije el soporte con los tornillos suministrados.
• Coloque el paquete de baterías de manera tal que el cable de alimentación se conecte fácilmente al tomacorriente.
• Ajuste el paquete de baterías en el soporte.
• Vuelva a colocar la tapa en el paquete de baterías. Asegúrese de que la ranura esté alineada al tomacorriente.
• Conecte el cable de alimentación de la persiana al cable de extensión.
• Conecte el otro extremo del cable de extensión al tomacorriente del paquete de baterías.
• Sujete el cable de extensión con los fijadores para cables (no incluidos).
• Coloque la tapa del tubo para baterías con la ranura alineada al tomacorriente en el tubo para baterías.
• Conecte el cable de alimentación de la persiana al cable de extensión.
• Conecte el otro extremo del cable de extensión al tomacorriente del tubo para baterías.
• Sujete el cable de la fuente de alimentación con los fijadores para cables (no están incluidos). Si desea esconder el cable detrás de la persiana, asegúrese de que no obstruya su funcionamiento.
PRECAUCIÓN: Asegúrese de que todos los cables de extensión estén bien sujetados. Los niños pequeños se pueden ESTRANGULAR con las cuerdas. También podrían enrollarse las cuerdas alrededor del cuello y ESTRANGULARSE. Si no se coloca correctamente, puede ocurrir una descarga eléctrica o puede haber riesgo de incendio.
IMPORTANTE: Asegúrese de que el soporte del tubo para baterías no muerda el cable durante la colocación. Se pueden dañar los componentes o puede ocurrir un sobrecalentamiento.
!
COLOCACIÓN
42 Sistema de funcionamiento motorizado con batería
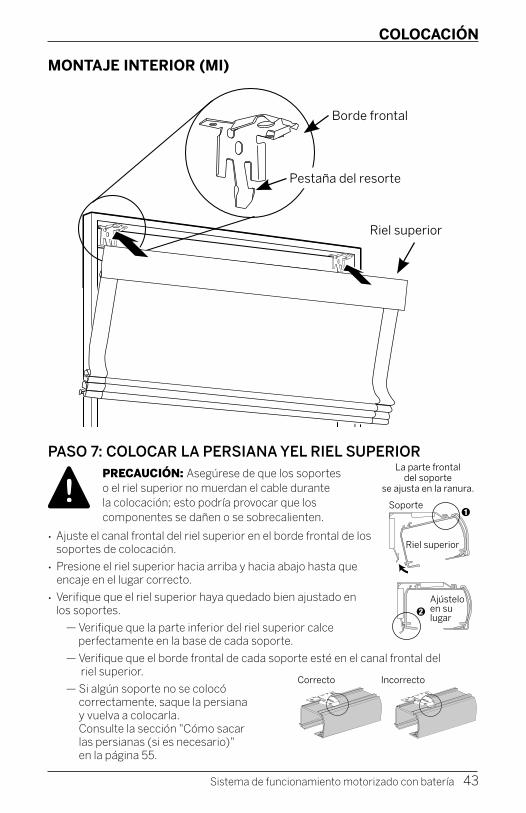
Riel superior
Borde frontal
Pestaña del resorte
Ajústelo en su lugar
Riel superior
Soporte
La parte frontal del soporte
se ajusta en la ranura.
Correcto Incorrecto
MONTAJE INTERIOR (MI)
!PASO 7: COLOCAR LA PERSIANA YEL RIEL SUPERIOR
PRECAUCIÓN: Asegúrese de que los soportes o el riel superior no muerdan el cable durante la colocación; esto podría provocar que los componentes se dañen o se sobrecalienten.
• Ajuste el canal frontal del riel superior en el borde frontal de los soportes de colocación.
• Presione el riel superior hacia arriba y hacia abajo hasta que encaje en el lugar correcto.
• Verifique que el riel superior haya quedado bien ajustado en los soportes.
— Verifique que la parte inferior del riel superior calce perfectamente en la base de cada soporte.
— Verifique que el borde frontal de cada soporte esté en el canal frontal del riel superior.
— Si algún soporte no se colocó correctamente, saque la persiana y vuelva a colocarla. Consulte la sección "Cómo sacar las persianas (si es necesario)" en la página 55.
COLOCACIÓN
Sistema de funcionamiento motorizado con batería 43
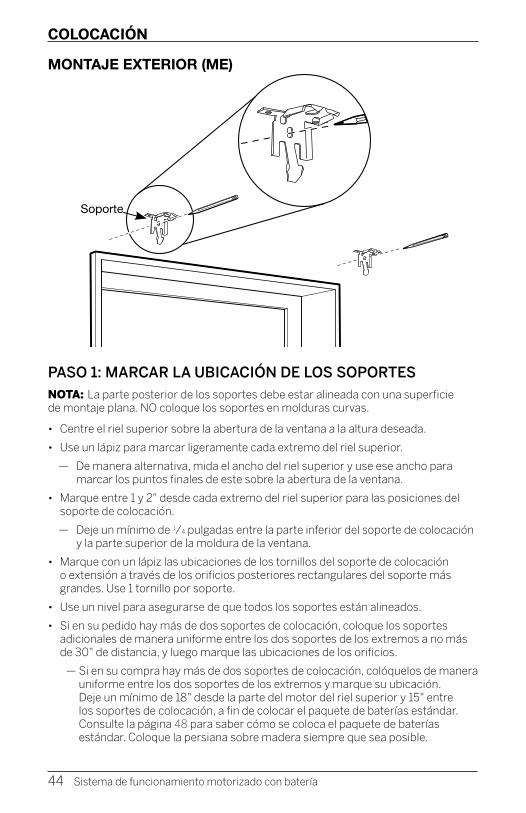
Soporte
MONTAJE EXTERIOR (ME)
PASO 1: MARCAR LA UBICACIÓN DE LOS SOPORTESNOTA: La parte posterior de los soportes debe estar alineada con una superficie de montaje plana. NO coloque los soportes en molduras curvas.
• Centre el riel superior sobre la abertura de la ventana a la altura deseada.
• Use un lápiz para marcar ligeramente cada extremo del riel superior.
— De manera alternativa, mida el ancho del riel superior y use ese ancho para marcar los puntos finales de este sobre la abertura de la ventana.
• Marque entre 1 y 2" desde cada extremo del riel superior para las posiciones del soporte de colocación.
— Deje un mínimo de 1/4 pulgadas entre la parte inferior del soporte de colocación y la parte superior de la moldura de la ventana.
• Marque con un lápiz las ubicaciones de los tornillos del soporte de colocación o extensión a través de los orificios posteriores rectangulares del soporte más grandes. Use 1 tornillo por soporte.
• Use un nivel para asegurarse de que todos los soportes están alineados.
• Si en su pedido hay más de dos soportes de colocación, coloque los soportes adicionales de manera uniforme entre los dos soportes de los extremos a no más de 30" de distancia, y luego marque las ubicaciones de los orificios.
— Si en su compra hay más de dos soportes de colocación, colóquelos de manera uniforme entre los dos soportes de los extremos y marque su ubicación. Deje un mínimo de 18" desde la parte del motor del riel superior y 15" entre los soportes de colocación, a fin de colocar el paquete de baterías estándar. Consulte la página 48 para saber cómo se coloca el paquete de baterías estándar. Coloque la persiana sobre madera siempre que sea posible.
Soporte
COLOCACIÓN
44 Sistema de funcionamiento motorizado con batería
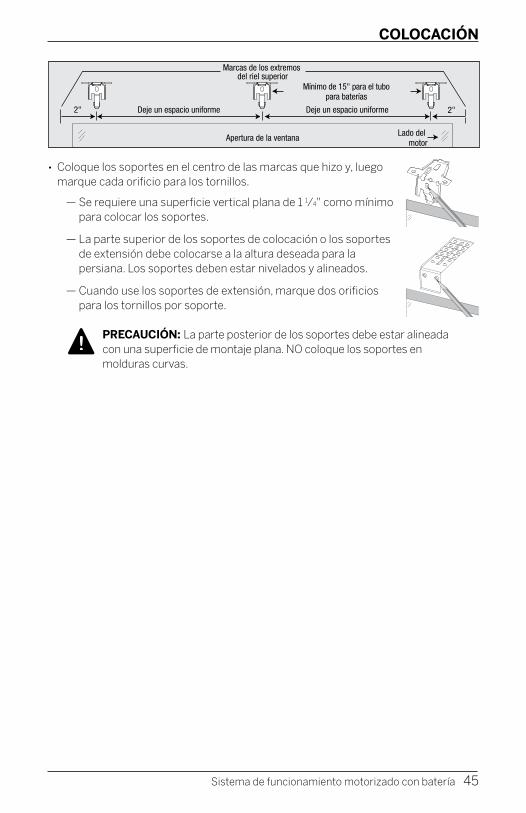
Mínimo de 15" para el tubo para baterías
Marcas de los extremos del riel superior
Apertura de la ventana
2" Deje un espacio uniforme Deje un espacio uniforme
Lado del motor
2"
• Coloque los soportes en el centro de las marcas que hizo y, luego marque cada orificio para los tornillos.
— Se requiere una superficie vertical plana de 1 1⁄4" como mínimo para colocar los soportes.
— La parte superior de los soportes de colocación o los soportes de extensión debe colocarse a la altura deseada para la persiana. Los soportes deben estar nivelados y alineados.
— Cuando use los soportes de extensión, marque dos orificios para los tornillos por soporte.
PRECAUCIÓN: La parte posterior de los soportes debe estar alineada con una superficie de montaje plana. NO coloque los soportes en molduras curvas.
!
COLOCACIÓN
Sistema de funcionamiento motorizado con batería 45
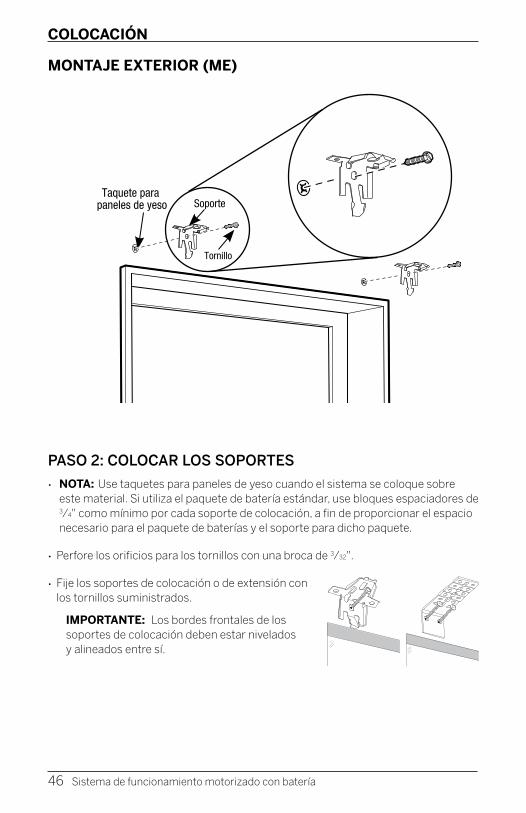
Taquete para paneles de yeso
Tornillo
Soporte
MONTAJE EXTERIOR (ME)
PASO 2: COLOCAR LOS SOPORTES
• NOTA: Use taquetes para paneles de yeso cuando el sistema se coloque sobre este material. Si utiliza el paquete de batería estándar, use bloques espaciadores de 3⁄4" como mínimo por cada soporte de colocación, a fin de proporcionar el espacio necesario para el paquete de baterías y el soporte para dicho paquete.
• Perfore los orificios para los tornillos con una broca de 3⁄32".
• Fije los soportes de colocación o de extensión con los tornillos suministrados.
IMPORTANTE: Los bordes frontales de los soportes de colocación deben estar nivelados y alineados entre sí.
COLOCACIÓN
46 Sistema de funcionamiento motorizado con batería
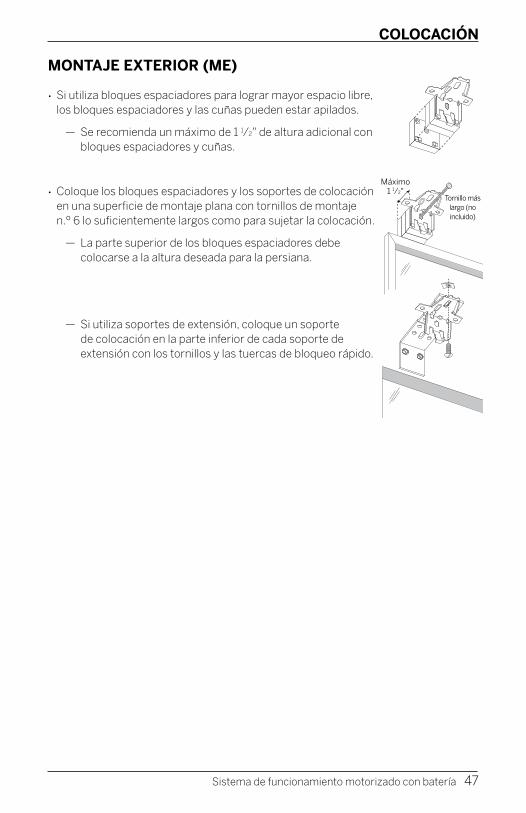
Máximo1 1⁄2"
Tornillo más largo (no incluido)
• Si utiliza bloques espaciadores para lograr mayor espacio libre, los bloques espaciadores y las cuñas pueden estar apilados.
— Se recomienda un máximo de 1 1⁄2" de altura adicional con bloques espaciadores y cuñas.
• Coloque los bloques espaciadores y los soportes de colocación en una superficie de montaje plana con tornillos de montaje n.º 6 lo suficientemente largos como para sujetar la colocación.
— La parte superior de los bloques espaciadores debe colocarse a la altura deseada para la persiana.
— Si utiliza soportes de extensión, coloque un soporte de colocación en la parte inferior de cada soporte de extensión con los tornillos y las tuercas de bloqueo rápido.
MONTAJE EXTERIOR (ME)
COLOCACIÓN
Sistema de funcionamiento motorizado con batería 47
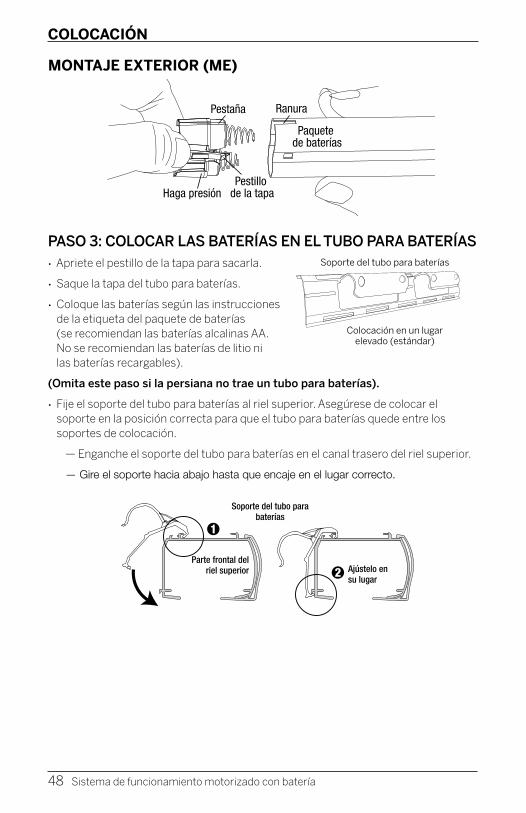
Pestaña Ranura
Pestillo de la tapa
Paquete de baterías
Haga presión
Soporte del tubo para baterías
Colocación en un lugar elevado (estándar)
PASO 3: COLOCAR LAS BATERÍAS EN EL TUBO PARA BATERÍAS• Apriete el pestillo de la tapa para sacarla.
• Saque la tapa del tubo para baterías.
• Coloque las baterías según las instrucciones de la etiqueta del paquete de baterías (se recomiendan las baterías alcalinas AA. No se recomiendan las baterías de litio ni las baterías recargables).
(Omita este paso si la persiana no trae un tubo para baterías).
• Fije el soporte del tubo para baterías al riel superior. Asegúrese de colocar el soporte en la posición correcta para que el tubo para baterías quede entre los soportes de colocación.
— Enganche el soporte del tubo para baterías en el canal trasero del riel superior.
— Gire el soporte hacia abajo hasta que encaje en el lugar correcto.
Parte frontal del riel superior
Soporte del tubo para baterías
Ajústelo en su lugar
MONTAJE EXTERIOR (ME)
COLOCACIÓN
48 Sistema de funcionamiento motorizado con batería
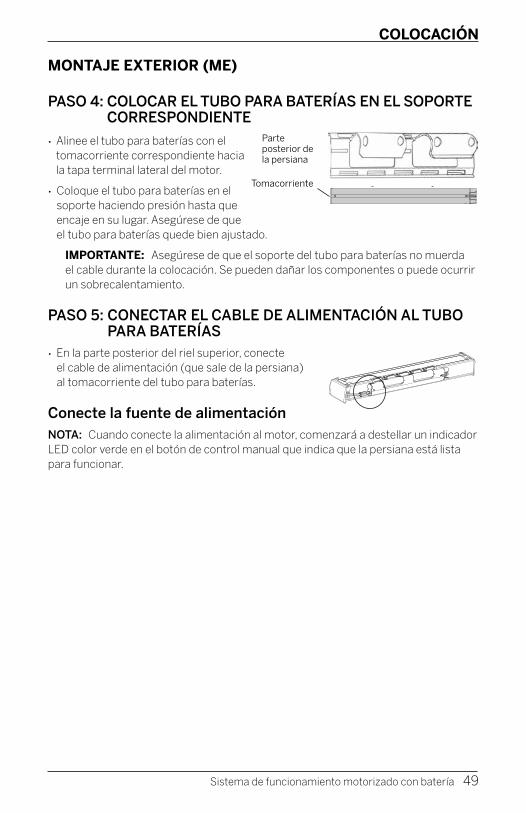
Parte posterior de la persiana
Tomacorriente
PASO 4: COLOCAR EL TUBO PARA BATERÍAS EN EL SOPORTE CORRESPONDIENTE
• Alinee el tubo para baterías con el tomacorriente correspondiente hacia la tapa terminal lateral del motor.
• Coloque el tubo para baterías en el soporte haciendo presión hasta que encaje en su lugar. Asegúrese de que el tubo para baterías quede bien ajustado.
IMPORTANTE: Asegúrese de que el soporte del tubo para baterías no muerda el cable durante la colocación. Se pueden dañar los componentes o puede ocurrir un sobrecalentamiento.
PASO 5: CONECTAR EL CABLE DE ALIMENTACIÓN AL TUBO PARA BATERÍAS
• En la parte posterior del riel superior, conecte el cable de alimentación (que sale de la persiana) al tomacorriente del tubo para baterías.
Conecte la fuente de alimentaciónNOTA: Cuando conecte la alimentación al motor, comenzará a destellar un indicador LED color verde en el botón de control manual que indica que la persiana está lista para funcionar.
MONTAJE EXTERIOR (ME)
COLOCACIÓN
Sistema de funcionamiento motorizado con batería 49
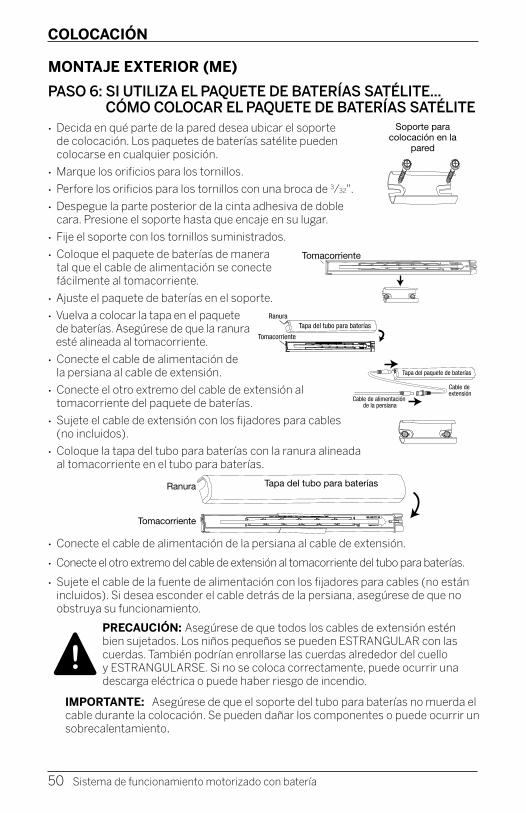
Soporte para colocación en la pared
Soporte para colocación en la
pared
TomacorrienteTomacorriente
Tapa del tubo para baterías
Tomacorriente
Ranura
Tapa del paquete de baterías
Cable de extensión
Cable de alimentación de la persiana
Tomacorriente
Tapa del tubo para bateríasRanura
Tomacorriente
PASO 6: SI UTILIZA EL PAQUETE DE BATERÍAS SATÉLITE... CÓMO COLOCAR EL PAQUETE DE BATERÍAS SATÉLITE
• Decida en qué parte de la pared desea ubicar el soporte de colocación. Los paquetes de baterías satélite pueden colocarse en cualquier posición.
• Marque los orificios para los tornillos.
• Perfore los orificios para los tornillos con una broca de 3⁄32".
• Despegue la parte posterior de la cinta adhesiva de doble cara. Presione el soporte hasta que encaje en su lugar.
• Fije el soporte con los tornillos suministrados.
• Coloque el paquete de baterías de manera tal que el cable de alimentación se conecte fácilmente al tomacorriente.
• Ajuste el paquete de baterías en el soporte.
• Vuelva a colocar la tapa en el paquete de baterías. Asegúrese de que la ranura esté alineada al tomacorriente.
• Conecte el cable de alimentación de la persiana al cable de extensión.
• Conecte el otro extremo del cable de extensión al tomacorriente del paquete de baterías.
• Sujete el cable de extensión con los fijadores para cables (no incluidos).
• Coloque la tapa del tubo para baterías con la ranura alineada al tomacorriente en el tubo para baterías.
• Conecte el cable de alimentación de la persiana al cable de extensión.
• Conecte el otro extremo del cable de extensión al tomacorriente del tubo para baterías.
• Sujete el cable de la fuente de alimentación con los fijadores para cables (no están incluidos). Si desea esconder el cable detrás de la persiana, asegúrese de que no obstruya su funcionamiento.
PRECAUCIÓN: Asegúrese de que todos los cables de extensión estén bien sujetados. Los niños pequeños se pueden ESTRANGULAR con las cuerdas. También podrían enrollarse las cuerdas alrededor del cuello y ESTRANGULARSE. Si no se coloca correctamente, puede ocurrir una descarga eléctrica o puede haber riesgo de incendio.
IMPORTANTE: Asegúrese de que el soporte del tubo para baterías no muerda el cable durante la colocación. Se pueden dañar los componentes o puede ocurrir un sobrecalentamiento.
!
MONTAJE EXTERIOR (ME)
COLOCACIÓN
50 Sistema de funcionamiento motorizado con batería

Headrail
Front lip
Spring tab
Riel superior
Borde frontal
Pestaña del resorte
Ajústelo en su lugar
Riel superior
Soporte
La parte frontal del soporte se ajusta
a la ranura.
Correcto Incorrecto
PASO 7: COLOCAR LA PERSIANA Y EL RIEL SUPERIOR PRECAUCIÓN: Asegúrese de que los soportes o el riel
superior no muerdan el cable durante la colocación; esto podría provocar que los componentes se dañen o se sobrecalienten.
• Ajuste el canal frontal del riel superior en el borde frontal de los soportes de colocación.
• Presione el riel superior hacia arriba y hacia abajo hasta que encaje en el lugar correcto.
• Verifique que el riel superior haya quedado bien ajustado en los soportes.
— Verifique que la parte inferior del riel superior calce perfectamente en la base de cada soporte.
— Verifique que el borde frontal de cada soporte esté en el canal frontal del riel superior.
— Si algún soporte no se colocó correctamente, saque la persiana y vuelva a colocarla. Consulte la sección "Cómo sacar las persianas (si es necesario)" en la página 55.
!
MONTAJE EXTERIOR (ME)
COLOCACIÓN
Sistema de funcionamiento motorizado con batería 51
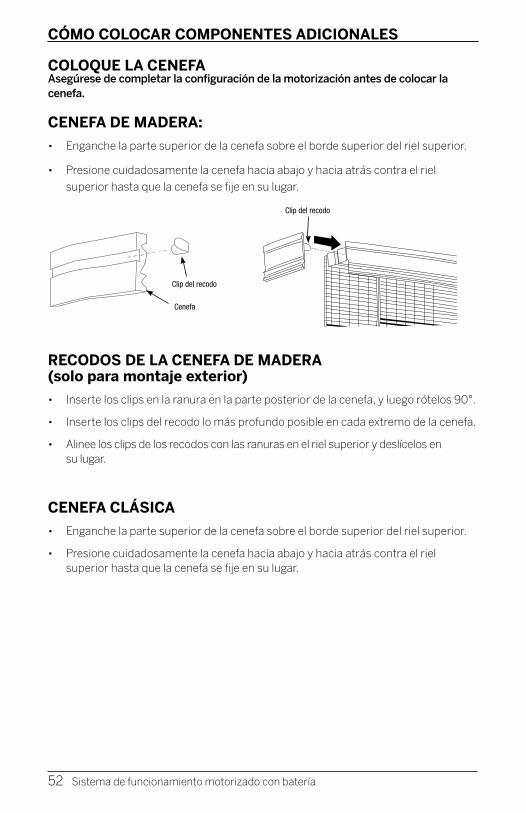
Clip del recodo
Cenefa
Clip del recodo
Tiras de velcro
Recodo de cenefa
Clip del recodo
Cenefa
Clip del recodo
Tiras de velcro
Recodo de cenefa
COLOQUE LA CENEFA Asegúrese de completar la configuración de la motorización antes de colocar la cenefa.
CENEFA DE MADERA:
• Enganche la parte superior de la cenefa sobre el borde superior del riel superior.
• Presione cuidadosamente la cenefa hacia abajo y hacia atrás contra el riel
superior hasta que la cenefa se fije en su lugar.
RECODOS DE LA CENEFA DE MADERA (solo para montaje exterior)
• Inserte los clips en la ranura en la parte posterior de la cenefa, y luego rótelos 90°.
• Inserte los clips del recodo lo más profundo posible en cada extremo de la cenefa.
• Alinee los clips de los recodos con las ranuras en el riel superior y deslícelos en su lugar.
CENEFA CLÁSICA
• Enganche la parte superior de la cenefa sobre el borde superior del riel superior.
• Presione cuidadosamente la cenefa hacia abajo y hacia atrás contra el riel superior hasta que la cenefa se fije en su lugar.
CÓMO COLOCAR COMPONENTES ADICIONALES
52 Sistema de funcionamiento motorizado con batería
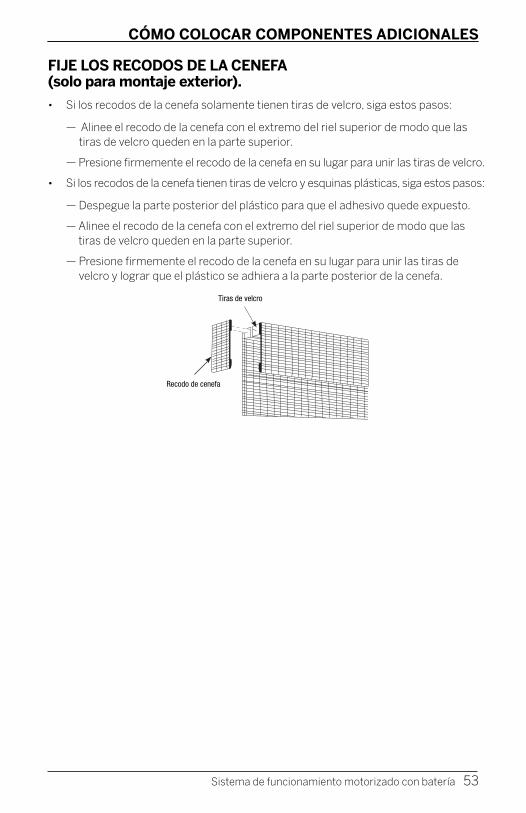
Clip del recodo
Cenefa
Clip del recodo
Tiras de velcro
Recodo de cenefa
CÓMO COLOCAR COMPONENTES ADICIONALES
FIJE LOS RECODOS DE LA CENEFA (solo para montaje exterior).
• Si los recodos de la cenefa solamente tienen tiras de velcro, siga estos pasos:
— Alinee el recodo de la cenefa con el extremo del riel superior de modo que las tiras de velcro queden en la parte superior.
— Presione firmemente el recodo de la cenefa en su lugar para unir las tiras de velcro.
• Si los recodos de la cenefa tienen tiras de velcro y esquinas plásticas, siga estos pasos:
— Despegue la parte posterior del plástico para que el adhesivo quede expuesto.
— Alinee el recodo de la cenefa con el extremo del riel superior de modo que las tiras de velcro queden en la parte superior.
— Presione firmemente el recodo de la cenefa en su lugar para unir las tiras de velcro y lograr que el plástico se adhiera a la parte posterior de la cenefa.
Sistema de funcionamiento motorizado con batería 53
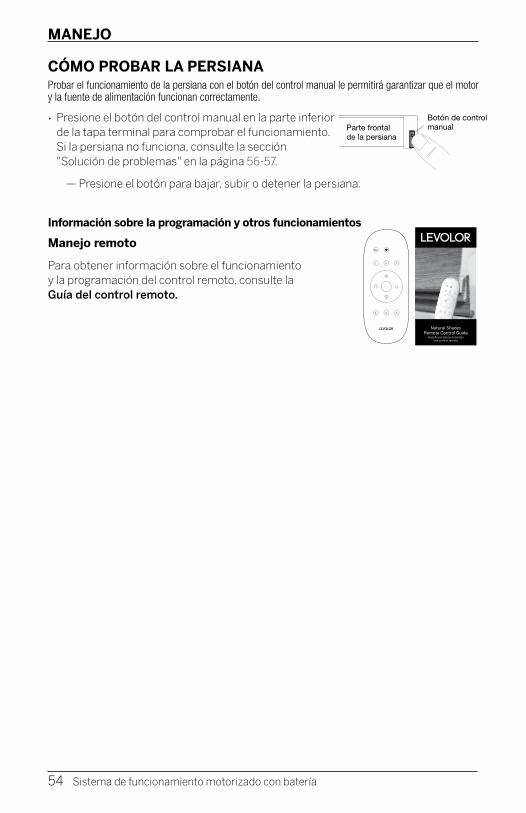
Botón de control manualParte frontal
de la persiana
ALL
1 2 3
4 5 6
CÓMO PROBAR LA PERSIANA Probar el funcionamiento de la persiana con el botón del control manual le permitirá garantizar que el motor y la fuente de alimentación funcionan correctamente.
• Presione el botón del control manual en la parte inferior de la tapa terminal para comprobar el funcionamiento. Si la persiana no funciona, consulte la sección "Solución de problemas" en la página 56-57.
— Presione el botón para bajar, subir o detener la persiana.
Información sobre la programación y otros funcionamientos
Manejo remoto
Para obtener información sobre el funcionamiento y la programación del control remoto, consulte la Guía del control remoto.
MANEJO
54 Sistema de funcionamiento motorizado con batería
Natural ShadesRemote Control Guide
Guía de persianas naturales con control remoto
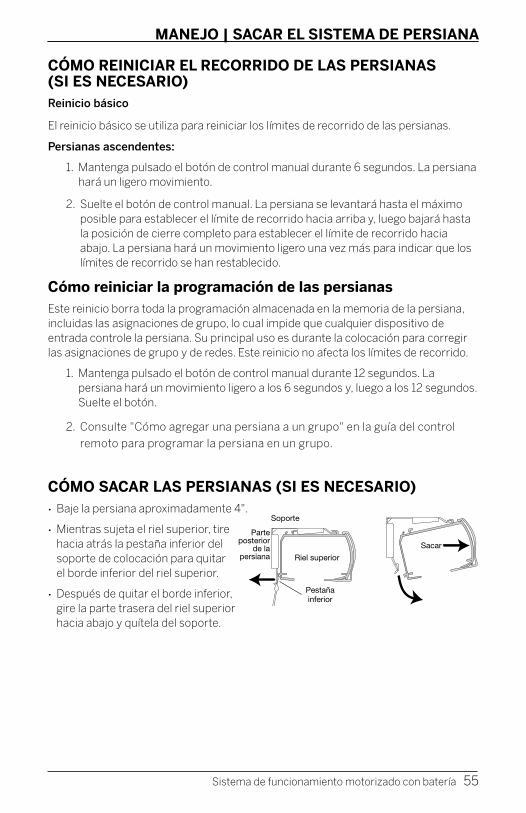
Soporte
Parte posterior
de la persiana Riel superior
Pestañainferior
Sacar
CÓMO REINICIAR EL RECORRIDO DE LAS PERSIANAS (SI ES NECESARIO)Reinicio básico
El reinicio básico se utiliza para reiniciar los límites de recorrido de las persianas.
Persianas ascendentes:
1. Mantenga pulsado el botón de control manual durante 6 segundos. La persiana hará un ligero movimiento.
2. Suelte el botón de control manual. La persiana se levantará hasta el máximo posible para establecer el límite de recorrido hacia arriba y, luego bajará hasta la posición de cierre completo para establecer el límite de recorrido hacia abajo. La persiana hará un movimiento ligero una vez más para indicar que los límites de recorrido se han restablecido.
Cómo reiniciar la programación de las persianasEste reinicio borra toda la programación almacenada en la memoria de la persiana, incluidas las asignaciones de grupo, lo cual impide que cualquier dispositivo de entrada controle la persiana. Su principal uso es durante la colocación para corregir las asignaciones de grupo y de redes. Este reinicio no afecta los límites de recorrido.
1. Mantenga pulsado el botón de control manual durante 12 segundos. La persiana hará un movimiento ligero a los 6 segundos y, luego a los 12 segundos. Suelte el botón.
2. Consulte "Cómo agregar una persiana a un grupo" en la guía del control
remoto para programar la persiana en un grupo.
MANEJO | SACAR EL SISTEMA DE PERSIANA
Sistema de funcionamiento motorizado con batería 55
CÓMO SACAR LAS PERSIANAS (SI ES NECESARIO)• Baje la persiana aproximadamente 4".
• Mientras sujeta el riel superior, tire hacia atrás la pestaña inferior del soporte de colocación para quitar el borde inferior del riel superior.
• Después de quitar el borde inferior, gire la parte trasera del riel superior hacia abajo y quítela del soporte.
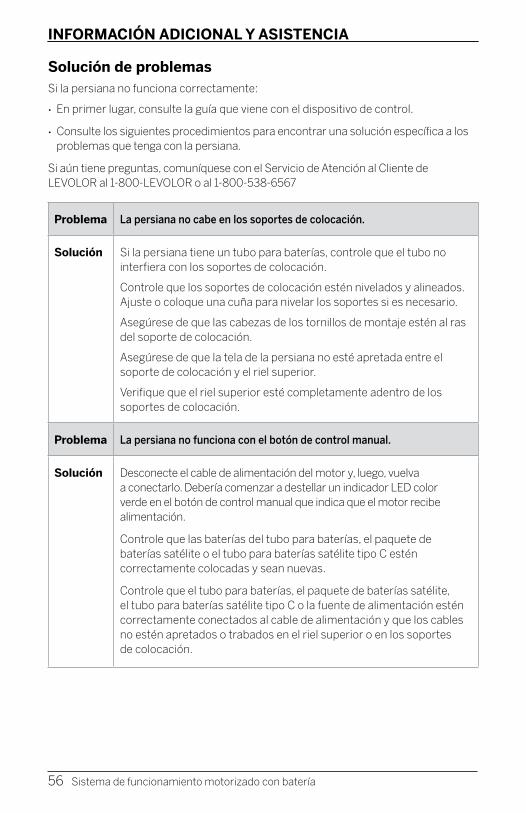
Solución de problemasSi la persiana no funciona correctamente:
• En primer lugar, consulte la guía que viene con el dispositivo de control.
• Consulte los siguientes procedimientos para encontrar una solución específica a los problemas que tenga con la persiana.
Si aún tiene preguntas, comuníquese con el Servicio de Atención al Cliente de LEVOLOR al 1-800-LEVOLOR o al 1-800-538-6567
Problema La persiana no cabe en los soportes de colocación.
Solución Si la persiana tiene un tubo para baterías, controle que el tubo no interfiera con los soportes de colocación.
Controle que los soportes de colocación estén nivelados y alineados. Ajuste o coloque una cuña para nivelar los soportes si es necesario.
Asegúrese de que las cabezas de los tornillos de montaje estén al ras del soporte de colocación.
Asegúrese de que la tela de la persiana no esté apretada entre el soporte de colocación y el riel superior.
Verifique que el riel superior esté completamente adentro de los soportes de colocación.
Problema La persiana no funciona con el botón de control manual.
Solución Desconecte el cable de alimentación del motor y, luego, vuelva a conectarlo. Debería comenzar a destellar un indicador LED color verde en el botón de control manual que indica que el motor recibe alimentación.
Controle que las baterías del tubo para baterías, el paquete de baterías satélite o el tubo para baterías satélite tipo C estén correctamente colocadas y sean nuevas.
Controle que el tubo para baterías, el paquete de baterías satélite, el tubo para baterías satélite tipo C o la fuente de alimentación estén correctamente conectados al cable de alimentación y que los cables no estén apretados o trabados en el riel superior o en los soportes de colocación.
INFORMACIÓN ADICIONAL Y ASISTENCIA
56 Sistema de funcionamiento motorizado con batería
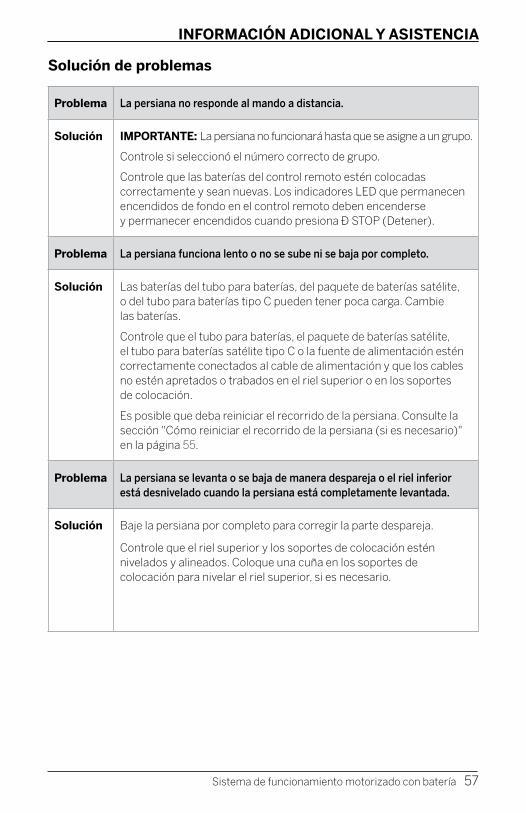
Problema La persiana no responde al mando a distancia.
Solución IMPORTANTE: La persiana no funcionará hasta que se asigne a un grupo.
Controle si seleccionó el número correcto de grupo.
Controle que las baterías del control remoto estén colocadas correctamente y sean nuevas. Los indicadores LED que permanecen encendidos de fondo en el control remoto deben encenderse y permanecer encendidos cuando presiona ■ STOP (Detener).
Problema La persiana funciona lento o no se sube ni se baja por completo.
Solución Las baterías del tubo para baterías, del paquete de baterías satélite, o del tubo para baterías tipo C pueden tener poca carga. Cambie las baterías.
Controle que el tubo para baterías, el paquete de baterías satélite, el tubo para baterías satélite tipo C o la fuente de alimentación estén correctamente conectados al cable de alimentación y que los cables no estén apretados o trabados en el riel superior o en los soportes de colocación.
Es posible que deba reiniciar el recorrido de la persiana. Consulte la sección "Cómo reiniciar el recorrido de la persiana (si es necesario)" en la página 55.
Problema La persiana se levanta o se baja de manera despareja o el riel inferior está desnivelado cuando la persiana está completamente levantada.
Solución Baje la persiana por completo para corregir la parte despareja.
Controle que el riel superior y los soportes de colocación estén nivelados y alineados. Coloque una cuña en los soportes de colocación para nivelar el riel superior, si es necesario.
Solución de problemas
INFORMACIÓN ADICIONAL Y ASISTENCIA
Sistema de funcionamiento motorizado con batería 57
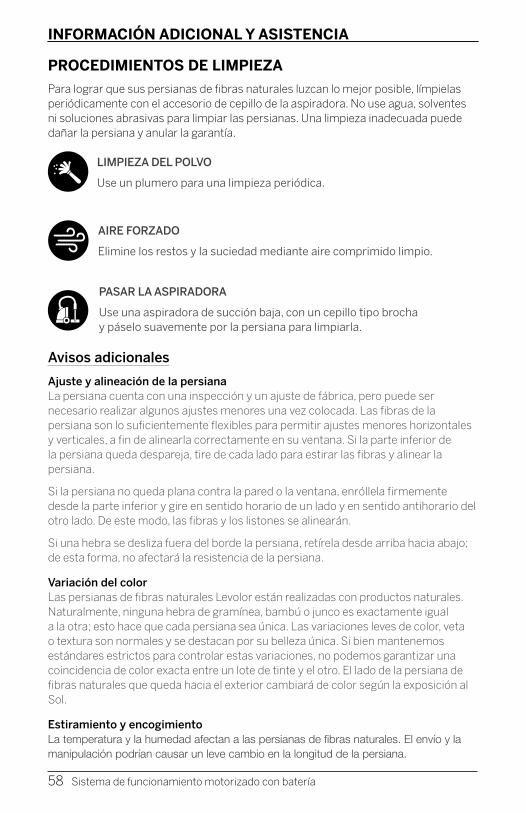
INFORMACIÓN ADICIONAL Y ASISTENCIA
PROCEDIMIENTOS DE LIMPIEZA
Para lograr que sus persianas de fibras naturales luzcan lo mejor posible, límpielas periódicamente con el accesorio de cepillo de la aspiradora. No use agua, solventes ni soluciones abrasivas para limpiar las persianas. Una limpieza inadecuada puede dañar la persiana y anular la garantía.
Avisos adicionales
Ajuste y alineación de la persiana La persiana cuenta con una inspección y un ajuste de fábrica, pero puede ser necesario realizar algunos ajustes menores una vez colocada. Las fibras de la persiana son lo suficientemente flexibles para permitir ajustes menores horizontales y verticales, a fin de alinearla correctamente en su ventana. Si la parte inferior de la persiana queda despareja, tire de cada lado para estirar las fibras y alinear la persiana.
Si la persiana no queda plana contra la pared o la ventana, enróllela firmemente desde la parte inferior y gire en sentido horario de un lado y en sentido antihorario del otro lado. De este modo, las fibras y los listones se alinearán.
Si una hebra se desliza fuera del borde la persiana, retírela desde arriba hacia abajo; de esta forma, no afectará la resistencia de la persiana.
Variación del color Las persianas de fibras naturales Levolor están realizadas con productos naturales. Naturalmente, ninguna hebra de gramínea, bambú o junco es exactamente igual a la otra; esto hace que cada persiana sea única. Las variaciones leves de color, veta o textura son normales y se destacan por su belleza única. Si bien mantenemos estándares estrictos para controlar estas variaciones, no podemos garantizar una coincidencia de color exacta entre un lote de tinte y el otro. El lado de la persiana de fibras naturales que queda hacia el exterior cambiará de color según la exposición al Sol.
Estiramiento y encogimiento La temperatura y la humedad afectan a las persianas de fibras naturales. El envío y la manipulación podrían causar un leve cambio en la longitud de la persiana.
58 Sistema de funcionamiento motorizado con batería
LIMPIEZA DEL POLVO
Use un plumero para una limpieza periódica.
AIRE FORZADO
Elimine los restos y la suciedad mediante aire comprimido limpio.
PASAR LA ASPIRADORA
Use una aspiradora de succión baja, con un cepillo tipo brocha y páselo suavemente por la persiana para limpiarla.
GARANTÍAPara obtener información completa sobre la garantía, visite LEVOLOR.com o llame al Servicio de Atención al Cliente al 1-800-LEVOLOR o al 1-800-538-6567.
PÓNGASE EN CONTACTO CON NOSOTROS
Para ponerse en contacto con el Servicio de Atención al Cliente de LEVOLOR y plantear alguna duda o problema que pueda tener acerca de su nueva persiana, llámenos al 1-800-LEVOLOR (de 8:30 a. m. a 6:30 p. m., EST)
www.LEVOLOR.com
PIEZAS ADICIONALES Y SERVICIOS
Puede solicitar piezas adicionales o de repuesto; así mismo, las persianas se pueden reparar o se les puede cambiar la cuerda en nuestro centro de reparaciones. Comuníquese con el Servicio de Atención al Cliente de LEVOLOR a través de www.LEVOLOR.com para obtener un número de autorización de devolución.
INFORMACIÓN ADICIONAL Y ASISTENCIA
Sistema de funcionamiento motorizado con batería 59

©2020 LEVOLOR®, Inc. 5775 Glenridge Drive Building A Atlanta, GA 30328 101179919-0050-035