NATURAL SCIENCES & TECHNOLOGY - National Education ...
176
Interesting Science fact #3 If the Sun were the size of a beach ball, then Jupiter would be the size of a golf ball, and the Earth would be as small as a pea. NATURAL SCIENCES & TECHNOLOGY LESSON PLAN GRADE 6 TERM 2
-
Upload
khangminh22 -
Category
Documents
-
view
1 -
download
0
Transcript of NATURAL SCIENCES & TECHNOLOGY - National Education ...
Interesting Science fact #3
If the Sun were the size of a beach ball, then Jupiter would be the size
of a golf ball, and the Earth would be as small as a pea.
NATURALSCIENCES
& TECHNOLOGY
LESSON PLANGRADE 6 TERM 2

2 3Grade 6 NATURAL SCIENCES & TECHNOLOGY Term 2 Grade 6 NATURAL SCIENCES & TECHNOLOGY Term 2
A MESSAGE FROM THE NECT
NATIONAL EDUCATION COLLABORATION TRUST (NECT)
Dear Teachers
This learning programme and training is provided by the National Education Collaboration Trust (NECT) on behalf of the Department of Basic Education (DBE)! We hope that this programme provides you with additional skills, methodologies and content knowledge that you can use to teach your learners more effectively.
What is NECT?In 2012 our government launched the National Development Plan (NDP) as a way to eliminate poverty and reduce inequality by the year 2030. Improving education is an important goal in the NDP which states that 90% of learners will pass Maths, Science and languages with at least 50% by 2030. This is a very ambitious goal for the DBE to achieve on its own, so the NECT was established in 2015 to assist in improving education.
The NECT has successfully brought together groups of people interested in education to work together to improve education. These groups include the teacher unions, businesses, religious groups, trusts, foundations and NGOs.
What are the learning programmes?One of the programmes that the NECT implements on behalf of the DBE is the ‘District Development Programme’. This programme works directly with district officials, principals, teachers, parents and learners; you are all part of this programme!
The programme began in 2015 with a small group of schools called the Fresh Start Schools (FSS). Curriculum learning programmes were developed for Maths, Science and Language teachers in FSS who received training and support on their implementation. The FSS teachers remain part of the programme, and we encourage them to mentor and share their experience with other teachers.
The FSS helped the DBE trial the NECT learning programmes so that they could be improved and used by many more teachers. NECT has already this scale-up process in its Universalisation Programme and in its Provincialisation Programme.
Everyone using the learning programmes comes from one of these groups; but you are now brought together in the spirit of collaboration that defines the manner in which the NECT works. Teachers with more experience using the learning programmes will deepen their knowledge and understanding, while some teachers will be experiencing the learning programmes for the first time.
Let’s work together constructively in the spirit of collaboration so that we can help South Africa eliminate poverty and improve education!
www.nect.org.za

2 3Grade 6 NATURAL SCIENCES & TECHNOLOGY Term 2 Grade 6 NATURAL SCIENCES & TECHNOLOGY Term 2
CONTENTSPROGRAMME ORIENTATION 4
CAPS AND THE LESSON PLANS 8
TOPIC OVERVIEW SOLIDS, LIQUIDS AND GASES 1A 15-16
Week 1 Lesson 1A ARRANGEMENTS OF PARTICLES 17
TOPIC OVERVIEW MIXTURES 1B - 2A 23-24
Week 1 Lesson 1B A MIXTURE OF TWO SOLIDS 25
Week 1 Lesson 1C MIXTURES OF MATERIALS 30
Week 2 Lesson 2A SEPARATING MIXTURES 37
TOPIC OVERVIEW SOLUTIONS AS A SPECIAL MIXTURES 2B - 4C 42-43
Week 2 Lesson 2B MIXTURES 44
Week 2 Lesson 2C SOLUTIONS HAVE A UNIFORM APPEARANCE 49
Week 3 Lesson 3A SOLUTES CAN DISSOLVE 54
Week 3 Lesson 3B SEPARATING SOLUTIONS 59
Week 3 Lesson 3C CRYSTALLISATION 64
Week 4 Lesson 4A RATES OF DISSOLVING 70
Week 4 Lesson 4B SATURATED SOLUTIONS 74
Week 4 Lesson 4C INSOLUBLE SUBSTANCES 80
TOPIC OVERVIEW DISSOLVING 5A - 5B 85-86
Week 5 Lesson 5A FACTORS THAT AFFECT DISSOLVING 87
Week 5 Lesson 5B INVESTIGATING RATES OF DISSOLVING 92
TOPIC OVERVIEW MIXTURES AS WATER RESOURCES 5C - 7A 98-99
Week 5 Lesson 5C WATER POLLUTION 100
Week 6 Lesson 6A WATER POLLUTION: INSOLUBLE SUBSTANCES 105
Week 6 Lesson 6B WATER POLLUTION:SOLUBLE SUBSTANCES AND GERMS 110
Week 6 Lesson 6C Wetlands: removing substances from water 116
Week 7 Lesson 7A Wetlands: Regulating the flow of water 122
TOPIC OVERVIEW PROCESS TO PURIFY WATER 7B - 8C 128-129
Week 7 Lesson 7B THE IMPORTANCE OF CLEAN WATER 130
Week 7 Lesson 7C INVESTIGATING FILTERING, SETTLING AND DECANTING 135
Week 8 Lesson 8A MUNICIPAL WATER 141
Week 8 Lesson 8B INVESTIGATE HOW TO PURIFY WATER 147
Week 8 Lesson 8C DESIGN, MAKE AND EVALUATE A SIMPLE SYSTEM 152
GRADE 6 ASSESSMENT 159
Term 2 ASSESSMENT 160
Term 2 PRACTICAL TASK - INTRODUCTION 162
Term 2 PRACTICAL TASK - MEMORANDUM 163
Term 2 TERM EXAM 165
Term 2 MEMORANDUM 174

4 5Grade 6 NATURAL SCIENCES & TECHNOLOGY Term 2 Grade 6 NATURAL SCIENCES & TECHNOLOGY Term 2
PROGRAMME ORIENTATIONWelcome to the NECT Natural Sciences & Technology learning programme! This CAPS compliant programme consists of:
• A full set of lesson plans for the term (3 lessons per week)• A resource pack with images to support the lesson plans• A full colour poster for one topic• An outline of the assessment requirements for the term• A tracker to help you monitor your progress
Lesson Plan Structure
1. The Term 1 lesson plan is structured to run for 8 weeks.
2. Each week, there are three lessons, of the following notional time:
1 x 1 hour 30 minutes
2 x 1 hour
This time allocation of 3.5 hours per week is CAPS aligned.
Lesson Plan Contents
1. The lesson plan starts with a CONTENTS PAGE that lists all the topics for the term, together with a breakdown of the lessons for that topic. You will notice that lessons are named by the week and lesson number, for example, Week 8 Lesson 8C.
2. Every topic begins with a 2 - 4 page TOPIC OVERVIEW. The topic overview pages are grey, making them easy to identify. The topic overview can be used to introduce the topic to learners. The topic overview includes:
a. A general introduction to the topic that states how long the topic runs for, the value of the topic in the final exam and the number of lessons in the topic.
b. A table showing the position of the topic in the term.
c. A sequential table that shows the prior knowledge required for this topic, the current knowledge and skills that will be covered, and how this topic will be built on in future years. Use this table to give learners an informal quiz to test their prior knowledge. If learners are clearly lacking in the knowledge and skills required, you may need to take a lesson to cover some of the essential content and skills. It is also useful to see what you are preparing learners for next, by closely examining the ‘looking forward’ column.
d. A glossary of SCIENTIFIC VOCABULARY, together with an explanation of each word or phrase. It is a good idea to display these words and their definitions somewhere in the classroom, for the duration of the topic. It is also a good idea to allow learners some time to copy down these words into their personal dictionaries or science exercise books. You must explicitly teach the words and their meanings as and when you encounter these words in the topic. A good way to teach learners new vocabulary is to use ‘PATS’:

4 5Grade 6 NATURAL SCIENCES & TECHNOLOGY Term 2 Grade 6 NATURAL SCIENCES & TECHNOLOGY Term 2
PROGRAMME ORIENTATIONo POINT – if the word is a noun, point at the object or at a picture of the object as you say the
word.
o ACT – if the word is a verb, try to act out or gesture to explain the meaning of the word, as you say it.
o TELL – if the word has a more abstract meaning, then tell the learners the meaning of the word. You may need to code switch at this point, but also try to provide a simple English explanation.
o SAY – say the word in a sentence to reinforce the meaning.
e. Understanding the uses / value of natural sciences & technology. It is very important to give learners a sense of how science applies to their daily lives, and of the value that science adds to their lives. Hold a brief discussion on this point when introducing the topic, and invite learners to elaborate on the uses and value that this topic will have to their lives.
f. Personal reflection. At the end of every topic, come back to the topic overview, and complete this table. In particular, it is important to note your challenges and ideas for future improvement, so that you can improve your teaching the next year.
3. After the topic overview, you will find the INDIVIDUAL LESSONS. Every lesson is structured in exactly the same way. This helps you and the learners to anticipate what is coming next, so that you can focus on the content and skills. Together with the title, each lesson plan includes the following:
a. Policy and Outcomes. This provides you with the CAPS reference, and an overview of the skills that will be covered in the lesson. You can immediately see the SCIENCE PROCESS + DESIGN SKILLS AND DESIGN SKILLS that will be covered, and whether they are lower or higher order skills.
b. Possible Resources. Here, you will see the resources that you should ideally have for the lesson. If you need to use the poster or pages from the resource pack, this will be listed here. There is also a space for improvised resources, and you are invited to add your own ideas here.
c. Classroom Management. Every lesson starts in the same way. Before the lesson, you must write a question that relates to the previous lesson on the chalkboard. Train your learners to come in to the classroom, to take out their exercise books, and to immediately try to answer this question. This links your lesson to the previous lesson, and it effectively settles your learners.
Once learners have had a few minutes to answer, read the question and discuss the answer. You may want to offer a small reward to the learner who answers first, or best. Get your learners used to this routine.
Next, make sure that you are ready to begin your lesson, have all your resources ready, have notes written up on the chalkboard, and be fully prepared to start. Remember, learners will get restless and misbehave if you do not keep them busy and focussed.
Accessing Information. This section contains the key content that you need to share with learners. Generally, it involves sharing some new information that is written on the chalkboard, explaining this information, and allowing learners some time to copy the information into their exercise books. Train learners to do this quickly and efficiently. Learners must anticipate this part of the lesson, and must have their books, pens, pencils and rulers ready.

6 7Grade 6 NATURAL SCIENCES & TECHNOLOGY Term 2 Grade 6 NATURAL SCIENCES & TECHNOLOGY Term 2
PROGRAMME ORIENTATIONExplain to learners that this is an important resource for them, because these are the notes they will revise when preparing for tests and exams.
Checkpoint 1. Straight after ‘Accessing Information’, you will find two checkpoint questions. These questions help you to check that learners understand the new content thus far.
e. Conceptual Development. At this point, learners will have to complete an activity to think about and apply their new knowledge, or to learn a new skill. This is the most challenging part of the lesson. Make sure that you fully understand what is required, and give learners clear instructions.
Checkpoint 2. Straight after ‘Conceptual Development, you will find two checkpoint questions. These questions help you to check that learners understand the new concepts and skills that they have engaged with.
f. Reference Points for Further Development. This is a useful table that lists the relevant sections in each approved textbook. You may choose to do a textbook activity with learners in addition to the lesson plan activity, or even in place of the lesson plan activity. You may also want to give learners an additional activity to do for homework.
g. Additional Activities / Reading. This is the final section of the lesson plan. This section provides you with web links related to the topic. Try to get into the habit of visiting these links as part of your lesson preparation. As a teacher, it is always a good idea to be more informed than your learners.
4. At the end of the week, make sure that you turn to the TRACKER, and make note of your progress. This helps you to monitor your pacing and curriculum coverage. If you fall behind, make a plan to catch up.
5. POSTER AND RESOURCE PACK. You will have seen that the Possible Resource section in the lesson plan will let you know which poster or reference pages you will need to use in a lesson.
Please note that you will only be given these resources once. It is important for you to manage and store these resources properly. Do this by:
• Writing your name on all resources
• Sticking Resource onto cardboard or paper
• Laminating all resources, or covering them in contact paper
• Filing the resource papers in plastic sleeves once you have completed a topic
Have a dedicated wall or notice board in your classroom for Natural Science and Technology.
• Use this space to display the resources for the topic
• Display the vocabulary words and meaning here, as well as the resources
• Try to make this an attractive and interesting space
• Display learners’ work on this wall – this gives learners a sense of ownership and pride.

6 7Grade 6 NATURAL SCIENCES & TECHNOLOGY Term 2 Grade 6 NATURAL SCIENCES & TECHNOLOGY Term 2
PROGRAMME ORIENTATION6. ASSESSMENT. At the end of the lesson plans, you will find the CAPS assessment requirements
for the term. You should refer to your prescribed textbooks and departmental resources for examples of the relevant assessments.
Lesson Plan Routine
Train your learners to know and anticipate the routine of Natural Science and Technology lessons. You will soon see that a good knowledge of this routine will improve time-on-task and general classroom discipline and that you will manage to work at a quicker pace.
Remember, every Natural Science and Technology lesson follows this routine:
1. Classroom Management: settle learners by having two questions written on the chalkboard. Learners take out their exercise books and pens, and immediately answer the questions. Discuss the answers to the questions, and reward the successful learner.
2. Accessing Information: have key information written on the chalkboard. Explain this to learners. Allow learners to copy this information into their books.
3. Checkpoint 1: ask learners two questions to check their understanding.
4. Conceptual Development: complete an activity to apply new knowledge or skills.
5. Checkpoint 2: ask learners two questions to check their understanding.
6. Reference Points for Further Development: links to textbook activities – you may choose to use these activities as additional classwork activities, or as homework activities.
7. Tracker: fill in your tracker at the end of the week to track your progress.

8 9Grade 6 NATURAL SCIENCES & TECHNOLOGY Term 2 Grade 6 NATURAL SCIENCES & TECHNOLOGY Term 2
A vehicle to implement CAPS
Teaching Natural Sciences & Technology can be exciting and rewarding. These lesson plans have been designed to guide you to implement the CAPS policy in a way that makes the teaching and learning experience rewarding for both the teacher and the learners.
To support the policy’s fundamentals of teaching Natural Sciences & Technology, these lesson plans use the CAPS content as a basis and:
• provide a variety of teaching techniques and approaches
• promote enjoyment and curiosity
• highlight the relationship between Natural Science and Technology and other subjects
• where appropriate, draw on and emphasise cultural contexts and indigenous knowledge systems
• show the relationship between science, learners, their societies and their environments
• aim to prepare learners for economic activity and self-expression
Content and Time Allocation
These lessons plans have been developed to comply with CAPS in respect of both content and time allocation. In developing these lesson plans, we took into consideration the realities of teachers and to this end, we made some simple adjustments, without deviating from policy, to make the teaching of these lesson plans more achievable. The kinds of adjustments made include using some of the practical tasks in the lesson plans for assessment purposes; and building in time for revision and exams during terms 2 and 4.
CAPS assigns one knowledge strand to form the basis of content in each term. These strands are as follows:
• Term 1: Life and Living
• Term 2: Matter and Materials
• Term 3: Energy and Change
• Term 4: Planet Earth and Beyond
In most terms, there are Technology knowledge strands that complement the Natural Sciences strands. There are three Technology strands, they are:
• Structures
• Systems and Control
• Processing
PROGRAMME ORIENTATION

8 9Grade 6 NATURAL SCIENCES & TECHNOLOGY Term 2 Grade 6 NATURAL SCIENCES & TECHNOLOGY Term 2
Gra
de 6
Term
1Te
rm 2
Term
3Te
rm 4
Stra
nds
NS
& T
ech
Stra
nds
NS
& T
ech
Stra
nds
NS
& T
ech
Stra
nds
NS
& T
ech
Life
and
Liv
ing
Proc
essi
ngM
atte
r and
M
ater
ials
Proc
essi
ngEn
ergy
and
C
hang
eSy
stem
s an
d C
ontr
olPl
anet
Ear
th
and
Bey
ond
Syst
ems
and
Con
trol
Phot
osyn
thes
is
Nut
rient
s in
Fo
od
Nut
ritio
n
Eco
Syst
ems
and
food
web
s
Food
Pr
oces
sing
Solid
s, li
quid
s an
d ga
ses
Mix
ture
s
Solu
tions
as
spe
cial
m
ixtu
res
Mix
ture
s an
d w
ater
re
sour
ces
Proc
esse
s to
pu
rify
wat
erEl
ectri
c ci
rcui
ts
Elec
trica
l co
nduc
tors
an
d in
sula
tors
Mai
ns
elec
trici
ty
Syst
ems
to
solv
e pr
oble
ms
The
sola
r sy
stem
Mov
emen
ts o
f th
e ea
rth a
nd
plan
ets
The
mov
emen
t of
the
Moo
n
Syst
ems
look
ing
into
spa
ce
Syst
ems
to e
xplo
re
the
Moo
n an
d M
ars
Thes
e le
sson
pla
ns h
ave
been
des
igne
d ag
ains
t the
stip
ulat
ed C
APS
requ
irem
ents
with
topi
cs b
eing
allo
cate
d fo
r the
tim
e pr
escr
ibed
by
CAP
S.
(Rem
embe
r tha
t som
e sl
ight
cha
nges
hav
e be
en in
corp
orat
ed to
acc
omm
odat
e tim
e fo
r rev
isio
n, te
sts
and
exam
inat
ions
).
PROGRAMME ORIENTATIONThe distribution of these strands across the year is summarised in the table below:

10 11Grade 6 NATURAL SCIENCES & TECHNOLOGY Term 2 Grade 6 NATURAL SCIENCES & TECHNOLOGY Term 2
PROGRAMME ORIENTATIONThese lesson plans have been designed against the stipulated CAPS requirements with topics being allocated for the time prescribed by CAPS. (Remember that some slight changes have been incorporated to accommodate time for revision, tests and examinations).
The time allocation by topic is summarised in the table below.
Remember that one week equates to 3,5 hours or three lessons: two lessons of 1 hour each; and one lesson of 1½ hours.
GRADE 4 GRADE 5 GRADE 6
TERM Topic Time in weeks
Topic Time in weeks
Topic Time in weeks
Term 1:
Life and Living
• Living and non-living things
• Structures of plants and animals
• What plants need to grow
• Habitats of animals
• Structures for animal shelters
2
2½
1
1
2½
(10 wks)
• Plants and animals on Earth
• Animal Skeletons
• Food Chains• Life cycles• Skeletons and
Structures
2½
1½
2½1½
2
(10 wks)
• Photosynthesis• Nutrients in
Food• Nutrition• Food
Processing• Eco Systems
and food webs
2½1½
1½
2½
2
(10 wks)
Term 2:
Matter and Materials
• Materials around us
• Solid materials
• Strengthening materials
• Strong frame structures
3½
2
2
2½
(10 wks)
• Metals and non-metals
• Uses of metals
• Processing materials
• Processed materials
2
2½
3½
2
(10 wks)
• Solids, liquids and gases
• Mixtures
• Solutions as special mixtures
• Dissolving
• Mixtures and water resources
• Processes to purify water
½
1
2½
1
2½
2½
(10 wks)

10 11Grade 6 NATURAL SCIENCES & TECHNOLOGY Term 2 Grade 6 NATURAL SCIENCES & TECHNOLOGY Term 2
PROGRAMME ORIENTATION
Term 3:
Energy and Change
• Energy and Energy transfer
• Energy around us
• Movement energy in a system
• Energy and sound
2½
2½
2½
2½
(10 wks)
• Stored energy in fuels
• Energy and electricity
• Energy and movement
• Systems for moving things
3
3
1
3
(10 wks)
• Electric circuits
• Electrical conductors and insulators
• Systems to solve problems
• Mains electricity
2½
2
2½
3
(10 wks)
Term 4:
Planet Earth and Beyond
• Planet Earth
• The Sun
• The Earth & the Sun
• The Moon
• Rocket Systems
2
1
1
2
2
(8 wks)
• Planet Earth
• Surface of the Earth
• Sedimentary Rocks
• Fossils
1
2½
2
2½
(8 wks)
• The solar system
• Movements of the earth and planets
• The movement of the Moon
• Systems looking into space
• Systems to explore the Moon and Mars
2½
1
1
1
2½
(8 wks)
TOTALS 38 weeks 38 weeks 38 weeks

12 13Grade 6 NATURAL SCIENCES & TECHNOLOGY Term 2 Grade 6 NATURAL SCIENCES & TECHNOLOGY Term 2
PROGRAMME ORIENTATIONREFLECTING ON THE LESSONS THAT YOU TEACH
It is important to reflect on your teaching. Through reflection, we become aware of what is working and what is not, what we need to change and what we do not. Reflecting on your use of these lesson plans will also help you use them more effectively and efficiently.
These lesson plans have been designed to help you deliver the content and skills associated with CAPS. For this reason, it is very important that you stick to the format and flow of the lessons. CAPS requires a lot of content and skills to be covered – this makes preparation and following the lesson structure very important.
Use the tool below to help you reflect on the lessons that you teach. You do not need to use this for every lesson that you teach – but it is a good idea to use it a few times when you start to use these lessons. This way, you can make sure that you are on track and that you and your learners are getting the most out of the lessons.
LESSON REFLECTION TOOL
Preparation
1. What preparation was done?
2. Was preparation sufficient?
3. What could have been done better?
4. Were all of the necessary resources available?
Classroom Management
Yes No
5. Was there a question written in the board?
6. Was there an answer written on the board?
7. Was the answer discussed with the learners in a meaningful way?
8. Overall reflection on this part of the lesson:
What was done well?
What could have been done better?

12 13Grade 6 NATURAL SCIENCES & TECHNOLOGY Term 2 Grade 6 NATURAL SCIENCES & TECHNOLOGY Term 2
PROGRAMME ORIENTATION
Accessing Information
Yes No
9. Was the text and/ or diagrams written on the chalkboard before the lesson started?
10. Was the work on the board neat and easy for the learners to read?
11. Was the explanation on the content easy to follow?
12. Was the information on the board used effectively to help with the explanations?
13. Was any new vocabulary taught effectively? (in context and using strategies like PATS)
14. Were the learners actively engaged? (asked questions, asked for their opinions and to give ideas or suggestions)
15. Were the checkpoint questions used effectively?
16. Overall reflection on this part of the lesson:
What was done well?
What could have been done better?

14 15Grade 6 NATURAL SCIENCES & TECHNOLOGY Term 2 Grade 6 NATURAL SCIENCES & TECHNOLOGY Term 2
Conceptual Development
Yes No17. Was the information taught in the ‘Accessing Information’ part of the
lesson used to foreground the activity?
18. Were clear instructions given for the conceptual development activity?
19. Were the outcomes/answers to the activities explained to the learners?
20. Could the learners ask questions and were explanations given?
21. Was a model answer supplied to the learners? (written or drawn on the board)
21. Were the checkpoint questions used effectively?
22. At the end of the lesson, were the learners asked if they had questions or if they needed any explanations?
23. Overall reflection on this part of the lesson:
What was done well?
What could have been done better?
PROGRAMME ORIENTATION
14 15Grade 6 NATURAL SCIENCES & TECHNOLOGY Term 2 Grade 6 NATURAL SCIENCES & TECHNOLOGY Term 2
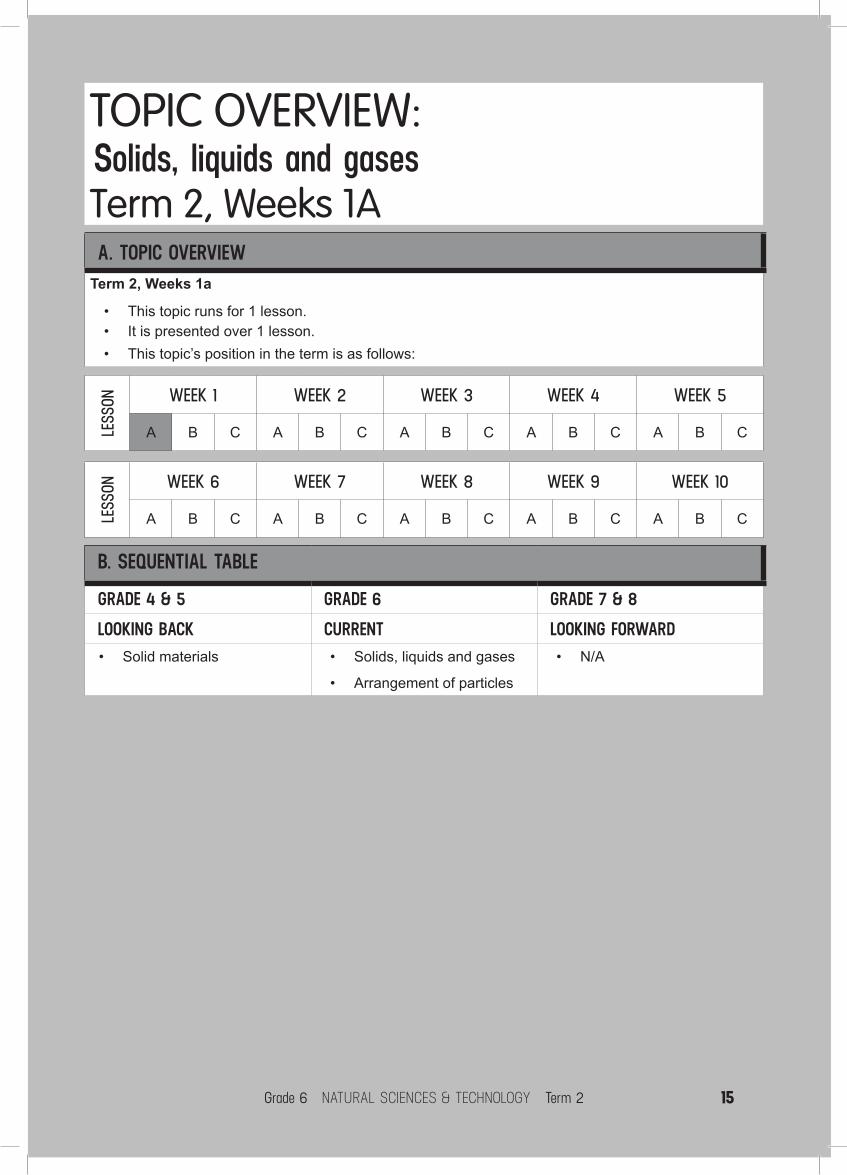
TOPIC OVERVIEW:Solids, liquids and gasesTerm 2, Weeks 1A A. TOPIC OVERVIEW
Term 2, Weeks 1a
• This topic runs for 1 lesson.• It is presented over 1 lesson.• This topic’s position in the term is as follows:
LESS
ON WEEK 1 WEEK 2 WEEK 3 WEEK 4 WEEK 5
A B C A B C A B C A B C A B C
LESS
ON WEEK 6 WEEK 7 WEEK 8 WEEK 9 WEEK 10
A B C A B C A B C A B C A B C
B. SEQUENTIAL TABLE
GRADE 4 & 5 GRADE 6 GRADE 7 & 8
LOOKING BACK CURRENT LOOKING FORWARD• Solid materials • Solids, liquids and gases
• Arrangement of particles
• N/A

16 17Grade 6 NATURAL SCIENCES & TECHNOLOGY Term 2 Grade 6 NATURAL SCIENCES & TECHNOLOGY Term 2
C. SCIENTIFIC VOCABULARYEnsure that you teach the following vocabulary at the appropriate place in the topic:
TERM EXPLANATION
1. matter A physical substance that occupies space; it is anything that has mass and takes up space.
2. regular Arranged in a definite pattern
3. state The physical condition that something is in
D. UNDERSTANDING THE USES / VALUE OF SCIENCEUnderstanding the nature of solids, liquids and gases is important for working in the fields of physics and chemistry.
E. PERSONAL REFLECTIONReflect on your teaching at the end of each topic:
Date completed:
Lesson successes:
Lesson challenges:
Notes for future improvement:
16 17Grade 6 NATURAL SCIENCES & TECHNOLOGY Term 2 Grade 6 NATURAL SCIENCES & TECHNOLOGY Term 2
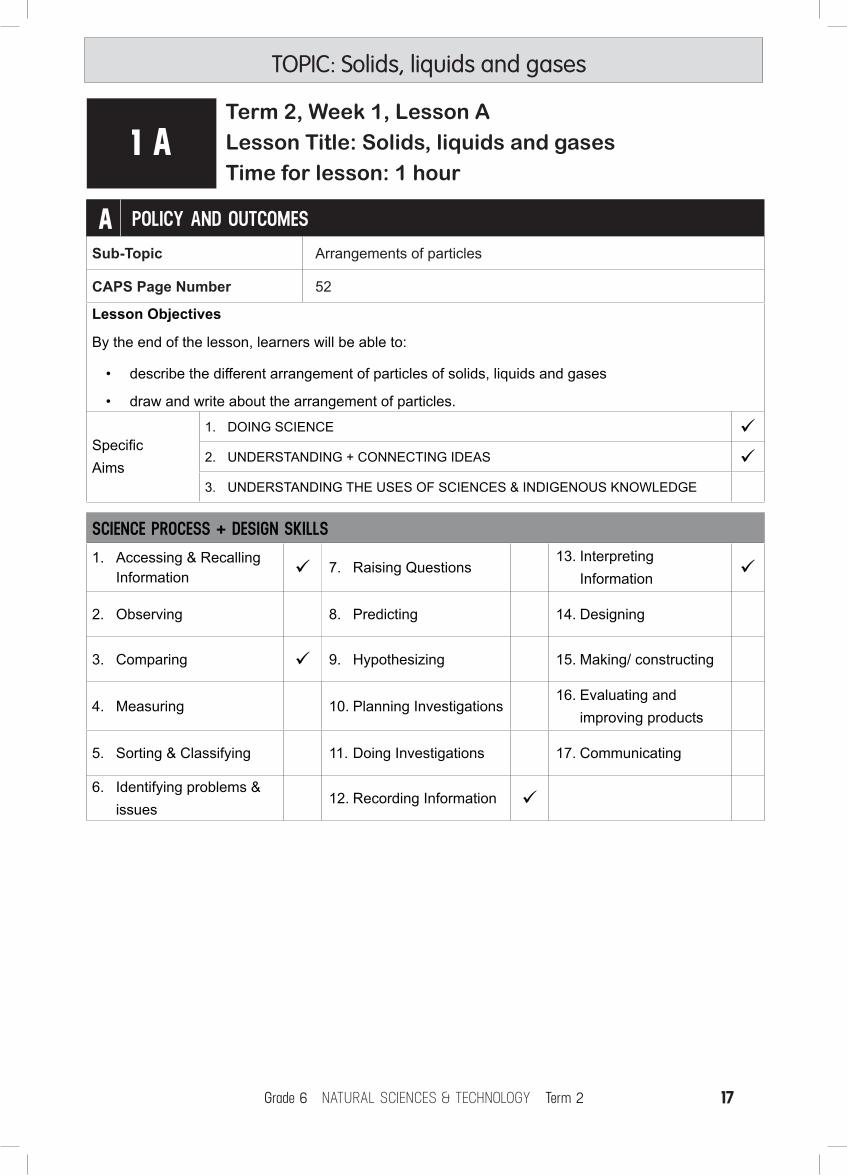
TOPIC: Solids, liquids and gases
1 ATerm 2, Week 1, Lesson ALesson Title: Solids, liquids and gases Time for lesson: 1 hour
A POLICY AND OUTCOMESSub-Topic Arrangements of particles
CAPS Page Number 52
Lesson Objectives
By the end of the lesson, learners will be able to:
• describe the different arrangement of particles of solids, liquids and gases
• draw and write about the arrangement of particles.
Specific Aims
1. DOING SCIENCE 2. UNDERSTANDING + CONNECTING IDEAS 3. UNDERSTANDING THE USES OF SCIENCES & INDIGENOUS KNOWLEDGE
SCIENCE PROCESS + DESIGN SKILLS1. Accessing & Recalling
Information 7. Raising Questions13. Interpreting
Information
2. Observing 8. Predicting 14. Designing
3. Comparing 9. Hypothesizing 15. Making/ constructing
4. Measuring 10. Planning Investigations16. Evaluating and
improving products
5. Sorting & Classifying 11. Doing Investigations 17. Communicating
6. Identifying problems & issues
12. Recording Information

18 19Grade 6 NATURAL SCIENCES & TECHNOLOGY Term 2 Grade 6 NATURAL SCIENCES & TECHNOLOGY Term 2
B POSSIBLE RESOURCESFor this lesson, you will need:
IDEAL RESOURCES IMPROVISED RESOURCES
Poster: Solutions as special mixtures
C CLASSROOM MANAGEMENT1. Make sure that you are ready and prepared.2. Write the following question onto the chalkboard before the lesson starts:
Is a herbivore a producer or a consumer?
3. Learners should enter the classroom and answer the question in their workbooks.
4. Discuss the answer with the learners.
5. Write the model answer onto the chalkboard.
A herbivore is a consumer as it does not make its own food.
D ACCESSING INFORMATION1. Write the following onto the chalkboard (always try to do this before the lesson starts):
SOLIDS, LIQUIDS AND GASES
1. All matter is made of particles (very small parts).
2. Matter cannot be created (made) or destroyed.
3. It can only change from one state to another (like from ice to water).
4. Particles are arranged differently in solids, liquids and gases.
5. The particles for solids are closely packed together in a regular pattern with little spaces between them.
6. The particles vibrate very little in one place.
7. In liquids, the particles are closely packed in no fixed pattern.
8. The particles can move around each other.
9. In gases, the particles are far apart.
10. The spaces between the particles are big and particles move in all directions.
TOPIC: Solids, liquids and gases

18 19Grade 6 NATURAL SCIENCES & TECHNOLOGY Term 2 Grade 6 NATURAL SCIENCES & TECHNOLOGY Term 2
1 A
2. Explain this to the learners as follows:
a. Remind the learners that they studied solids, liquids and gases in Grade 4.
b. They learnt that solids, liquids and gases make up all the materials around us.
c. They also learnt that solids keep their shape, liquids flow and take the shape of their container; and gases, such as air, spread out and have no shape but they can be contained (held in a container).
d. They also learnt that heating and cooling cause solids, liquids and gases to change their state (they can melt, evaporate, condense, or freeze).
e. Show learners the poster: Solutions as special mixtures.
f. Point out that in solids the particles are closely packed together and arranged in a regular pattern. The spaces between the particles are small and they vibrate (move backwards and forwards) in one place.
g. In liquids the particles are closely packed but there is no pattern in the way they are arranged. The spaces between the particles are small but the particles can still move around each other.
h. The particles for gases are arranged far apart from each other.
i. The spaces between the particles are big and the particles move in all directions.
3. Give learners some time to copy this information into their workbooks.
Solids Liquids Gases
Particles are close together and form a regular pattern.Particles are small and vibrate in one place.
Particles have more space between them and are not in a pattern. Particles are small but they move around each other.
Particles are far apart with big spaces between them. Particles are big and move in all directions.
Have a fixed shape Flow and take the shape of the container they are in
Spread out and have no shape; they completely fill their container.
TOPIC: Solids, liquids and gases
20 21Grade 6 NATURAL SCIENCES & TECHNOLOGY Term 2 Grade 6 NATURAL SCIENCES & TECHNOLOGY Term 2
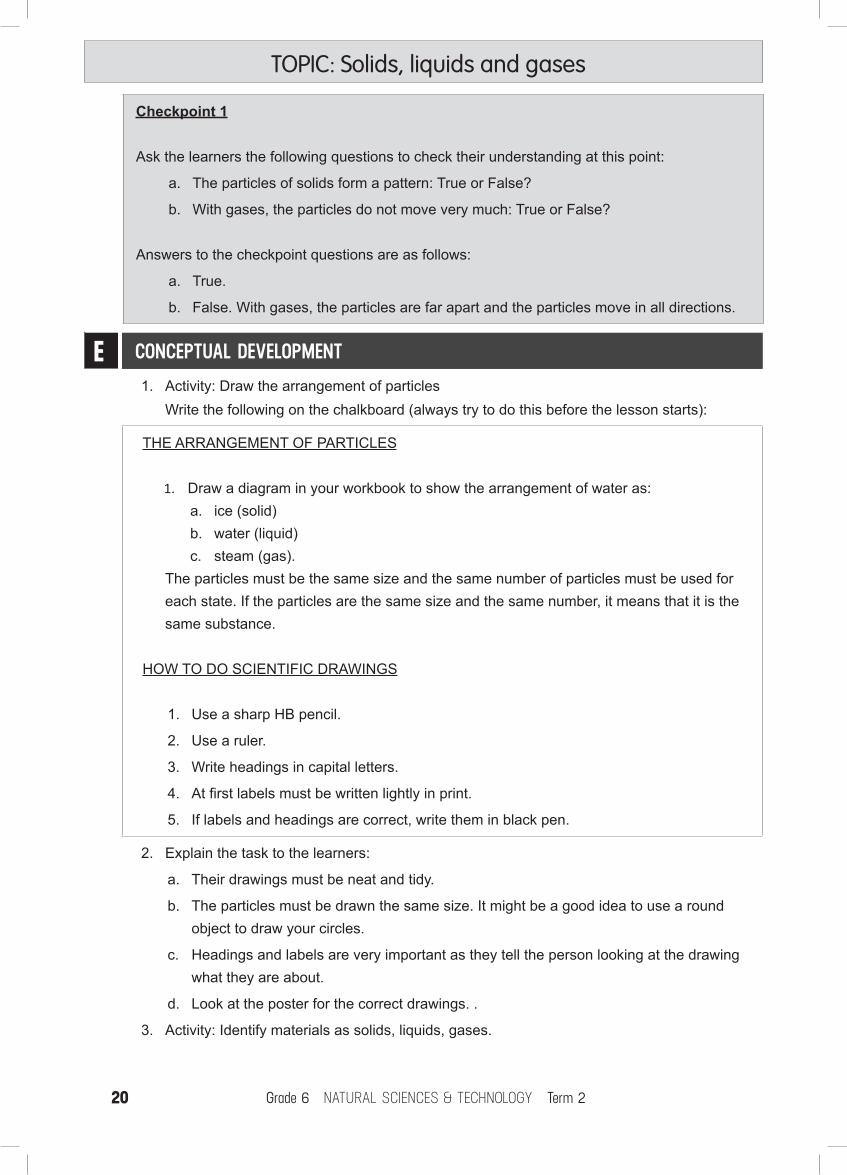
E CONCEPTUAL DEVELOPMENT1. Activity: Draw the arrangement of particles
Write the following on the chalkboard (always try to do this before the lesson starts):
THE ARRANGEMENT OF PARTICLES
1. Draw a diagram in your workbook to show the arrangement of water as:a. ice (solid)b. water (liquid)c. steam (gas).
The particles must be the same size and the same number of particles must be used for each state. If the particles are the same size and the same number, it means that it is the same substance.
HOW TO DO SCIENTIFIC DRAWINGS
1. Use a sharp HB pencil.
2. Use a ruler.
3. Write headings in capital letters.
4. At first labels must be written lightly in print.
5. If labels and headings are correct, write them in black pen.
2. Explain the task to the learners:
a. Their drawings must be neat and tidy.
b. The particles must be drawn the same size. It might be a good idea to use a round object to draw your circles.
c. Headings and labels are very important as they tell the person looking at the drawing what they are about.
d. Look at the poster for the correct drawings. .
3. Activity: Identify materials as solids, liquids, gases.
Checkpoint 1
Ask the learners the following questions to check their understanding at this point:
a. The particles of solids form a pattern: True or False?
b. With gases, the particles do not move very much: True or False?
Answers to the checkpoint questions are as follows:
a. True.
b. False. With gases, the particles are far apart and the particles move in all directions.
TOPIC: Solids, liquids and gases

20 21Grade 6 NATURAL SCIENCES & TECHNOLOGY Term 2 Grade 6 NATURAL SCIENCES & TECHNOLOGY Term 2
IDENTIFY MATERIALS AS SOLIDS, LIQUIDS OR GASES
1. Draw a table with three columns. 2. Write the following heading in each column: solids, liquids, gases.3. Place the following items in the correct column:
water, stone, cooking oil, cooking gas, juice, wood, plastic, fabric, air, tea.
4. A model answer is:
IDENTIFY MATERIALS AS SOLIDS, LIQUIDS OR GASES
5. ACTIVITY: FILL IN THE MISSING WORDS
Rewrite the sentences filling in the missing words from the list. Underline the words you fill in.
solids, matter, regular, big, small, liquids, gases, particles, move
1. All ____ is made up of particles.
2. In ____ , the particles are closely packed in a _____ pattern.
3. In ____ , the particles are ____ and far apart.
4. In ____ , there are spaces between the ____ so they can ____ around each other.
5. In ____ , the particles vibrate in one place.
6. In ____ , the particles move in all directions.
7. In ____ , the particles are ____ and move around each other.
ACTIVITY: FILL IN THE MISSING WORDS solids, matter, regular, big, small, liquids, gases, particles, move
1. All matter is made up of particles.
2. In solids, the particles are closely packed in a regular pattern.
3. In gases, the particles are big and far apart.
4. In liquids, there are spaces between the particles so they can move around each other.
5. In solids, the particles vibrate in one place.
6. In gases, the particles move in all directions.
7. In liquids, the particles are small and move around each other.
SOLIDS LIQUIDS GASESstone
wood
plastic
fabric
water
cooking oil
juice
tea
cooking gas
air
TOPIC: Solids, liquids and gases

22 23Grade 6 NATURAL SCIENCES & TECHNOLOGY Term 2 Grade 6 NATURAL SCIENCES & TECHNOLOGY Term 2
Checkpoint 2
Ask the learners the following questions to check their understanding at this point:
a. Is air a solid, liquid or a gas?
b. Which has particles arranged in a pattern – a solid, liquid or gas?
Answers to the checkpoint questions are as follows:
a. Air is a gas.
b. A solid has particles arranged in a pattern.
7. Ask the learners if they have any questions and provide answers and explanations.
F REFERENCE POINTS FOR FURTHER DEVELOPMENTIf you need additional information or activities on this topic, you can find these in your textbook on the following pages:
NAME OF TEXTBOOK TOPIC PAGE NUMBER
Study & Master Solids, liquids and gases 59-61
Viva Solids, liquids and gases 54-57
Platinum Solids, liquids and gases 56-60
Solutions for All Solids, liquids and gases 89-93
Day-by-Day Solids, liquids and gases 58-63
Oxford Solids, liquids and gases 48-49
Spot On Solids, liquids and gases 32
Top Class Solids, liquids and gases 51-53
Sasol Inzalo Bk A Solids, liquids and gases 104-117
G ADDITIONAL ACTIVITIES/ READINGIn addition, further reading, listening or viewing activities related to this sub-topic are available through the following web links:
1. https://goo.gl/Aw1VgN (1min 50sec) [Arrangement of molecules in matter]
2. https://goo.gl/j4MUXU (5min 41sec) [3 States of matter]
3. https://goo.gl/bq2AW6 (3min) [States of matter]
TOPIC: Solids, liquids and gases
22 23Grade 6 NATURAL SCIENCES & TECHNOLOGY Term 2 Grade 6 NATURAL SCIENCES & TECHNOLOGY Term 2
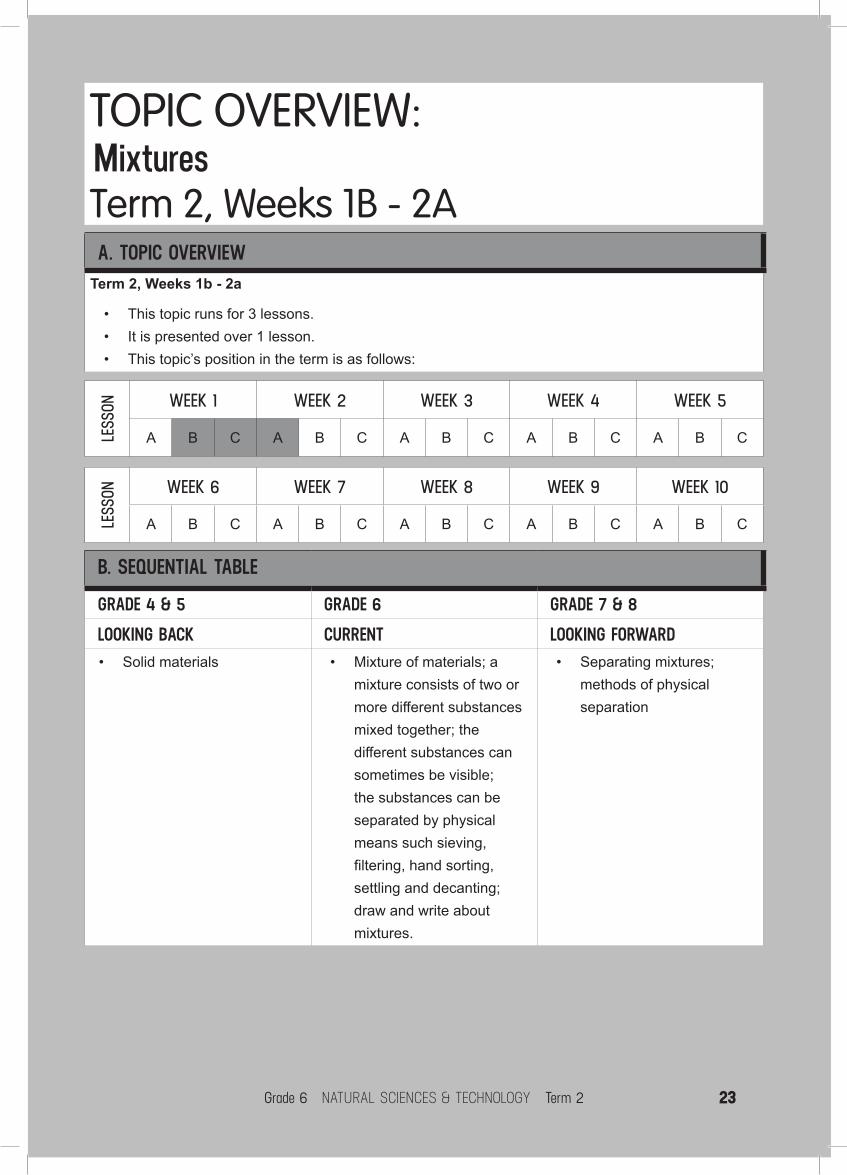
TOPIC OVERVIEW:MixturesTerm 2, Weeks 1B - 2A A. TOPIC OVERVIEW
Term 2, Weeks 1b - 2a
• This topic runs for 3 lessons.• It is presented over 1 lesson.• This topic’s position in the term is as follows:
LESS
ON WEEK 1 WEEK 2 WEEK 3 WEEK 4 WEEK 5
A B C A B C A B C A B C A B C
LESS
ON WEEK 6 WEEK 7 WEEK 8 WEEK 9 WEEK 10
A B C A B C A B C A B C A B C
B. SEQUENTIAL TABLE
GRADE 4 & 5 GRADE 6 GRADE 7 & 8
LOOKING BACK CURRENT LOOKING FORWARD• Solid materials • Mixture of materials; a
mixture consists of two or more different substances mixed together; the different substances can sometimes be visible; the substances can be separated by physical means such sieving, filtering, hand sorting, settling and decanting; draw and write about mixtures.
• Separating mixtures; methods of physical separation

24 25Grade 6 NATURAL SCIENCES & TECHNOLOGY Term 2 Grade 6 NATURAL SCIENCES & TECHNOLOGY Term 2
C. SCIENTIFIC VOCABULARYEnsure that you teach the following vocabulary at the appropriate place in the topic:
TERM EXPLANATION
1. visible It is able to be seen.
2. substances Any material that has physical properties; it can be a solid, liquid or gas.
3. filtering Pass through something to remove unwanted material
4. cordial A fruit-flavoured concentrate to make fruit juice
5. physical Something that can be touched.
6. decanting Separating by pouring off the top of a liquid
D. UNDERSTANDING THE USES / VALUE OF SCIENCEIt is important to know what a mixture is as it leads to an understanding of how to make certain mixtures and how to separate certain mixtures. Separating mixtures can be important in some circumstances, like knowing how to purify dirty water. Another example of where it is useful to separate mixtures is when metal, such as gold, is separated from ore. Metals are used in the production of many products, such as weapons, tools and household products.
E. PERSONAL REFLECTIONReflect on your teaching at the end of each topic:
Date completed:
Lesson successes:
Lesson challenges:
Notes for future improvement:

24 25Grade 6 NATURAL SCIENCES & TECHNOLOGY Term 2 Grade 6 NATURAL SCIENCES & TECHNOLOGY Term 2
TOPIC: Mixtures
1 BTerm 2, Week 1, Lesson BLesson Title: MixturesTime for lesson: 1 hour
A POLICY AND OUTCOMESSub-Topic A mixture of two solids
CAPS Page Number 52
Lesson Objectives
By the end of the lesson, learners will be able to:
• define a mixture• describe different types of mixtures.
Specific Aims
1. DOING SCIENCE 2. UNDERSTANDING + CONNECTING IDEAS 3. UNDERSTANDING THE USES OF SCIENCES & INDIGENOUS KNOWLEDGE
SCIENCE PROCESS + DESIGN SKILLS1. Accessing & Recalling
Information 7. Raising Questions13. Interpreting
Information
2. Observing 8. Predicting 14. Designing
3. Comparing 9. Hypothesizing 15. Making/ constructing
4. Measuring 10. Planning Investigations16. Evaluating and
improving products
5. Sorting & Classifying 11. Doing Investigations 17. Communicating
6. Identifying problems & issues
12. Recording Information

26 27Grade 6 NATURAL SCIENCES & TECHNOLOGY Term 2 Grade 6 NATURAL SCIENCES & TECHNOLOGY Term 2
B POSSIBLE RESOURCESFor this lesson, you will need:
IDEAL RESOURCES IMPROVISED RESOURCES
Resource 1: Mixtures: Two solids
Resource 2: Mixtures: Two solids
Poster: Solutions as special mixtures
Rice and beans
Plastic cups/tubs and spoons
C CLASSROOM MANAGEMENT1. Make sure that you are ready and prepared.2. Write the following question onto the chalkboard before the lesson starts:
Can you describe the arrangement of particles for gases?
3. Learners should enter the classroom and answer the question in their workbooks.
4. Discuss the answer with the learners.
5. Write the model answer onto the chalkboard.
For gases, the particles are far apart from each other and they move all over the place.
D ACCESSING INFORMATION1. Write the following onto the chalkboard (always try to do this before the lesson starts):
MIXTURES
1. A mixture is two or more different substances that have been mixed together.
2. Sometimes, when two substances are mixed, it looks like one substance.
3. The different substances are no longer visible.
4. Sometimes we can clearly see and identify the different substances.
TOPIC: Mixtures

26 27Grade 6 NATURAL SCIENCES & TECHNOLOGY Term 2 Grade 6 NATURAL SCIENCES & TECHNOLOGY Term 2
1 A2. Explain this to the learners as follows:
a. We often mix two substances together.
b. We mix soap with water to wash ourselves.
c. We mix sugar in the tea we drink.
d. Sometimes when substances are mixed, you cannot see the separate substances. They are not visible.
e. Sometimes when two substances are mixed, you can still clearly see the separate substances.
f. You would be able to pick out the separate substances after they were mixed.
3. Give learners time to copy this information into their workbooks.
Checkpoint 1
Ask the learners the following questions to check their understanding at this point:
a. What is a mixture?
b. What does it mean when we say that the substances are no longer visible when mixed?
Answers to the checkpoint questions are as follows:
a. A mixture is two or more substances that have been mixed together.
b. It means that the substances cannot be seen as separate substances once they are mixed.
TOPIC: Mixtures

28 29Grade 6 NATURAL SCIENCES & TECHNOLOGY Term 2 Grade 6 NATURAL SCIENCES & TECHNOLOGY Term 2
E CONCEPTUAL DEVELOPMENT1. Activity: Mixing solids
Write the following on the chalkboard (always try to do this before the lesson starts):
MIXING SOLIDS
MATERIALS:
rice
beans
spoons
small tubs or plastic cups for mixing
METHOD:
1. Place two spoons of rice in the cup/tub.
2. Place two spoons of beans in the cup/tub.
3. Stir the rice and beans until they are mixed.
QUESTIONS:
1. Is the rice a solid, liquid or a gas?
2. Are the beans a solid, liquid or a gas?
3. Can you separate the rice and beans from each other so that they are what they were before they were mixed?
4. Do they still look the same as before they were mixed?
5. Do they still feel the same as before they were mixed?
2. Explain the following to the learners:
a. Show learners Resource 1: ‘Mixtures: two solids’ and Resource 2: ‘Mixtures: two solids’.
b. Explain to the learners that these are all mixtures of solids.
c. Solids can be separated again once they have been mixed with each other.
d. The solids do not change in any way.
e. Can they think of other mixtures in which the different materials are still clearly visible after mixing? In other words, they do not change.
f. Do this as a teacher demonstration or get each group of six learners to do this investigation.
g. Show the learners Resource 1: ‘Mixtures: Two solids’ and Resource 2: ‘Mixtures: Two solids’.
h. Point out how the four mixtures are solids mixed together.
i. Point out how the four solids are clearly visible after mixing.
j. Explain how each of the solids can be separated again after they have been mixed.
TOPIC: Mixtures

28 29Grade 6 NATURAL SCIENCES & TECHNOLOGY Term 2 Grade 6 NATURAL SCIENCES & TECHNOLOGY Term 2
Checkpoint 2
Ask the learners the following questions to check their understanding at this point:
a. From an earlier investigation in this lesson, can you give an example of two solids that were mixed together?
b. In the Resource Pack that your teacher showed you, can you give an example of two solids that have been mixed together?
Answers to the checkpoint questions are as follows:
a. We mixed rice and beans together.
b. Any of these answers is correct: rice and beans, different frozen vegetables, different coloured daisies, wildebeest and zebra.
3. Ask the learners if they have any questions and provide answers and explanations.
F REFERENCE POINTS FOR FURTHER DEVELOPMENTIf you need additional information or activities on this topic, you can find these in your textbook on the following pages:
NAME OF TEXTBOOK TOPIC PAGE NUMBER
Study & Master Mixtures 62-63
Viva Mixtures 58-59
Platinum Mixtures 62-63
Solutions for All Mixtures 95-97
Day-by-Day Mixtures 64-71
Oxford Mixtures 51-53
Spot On Mixtures 35
Top Class Mixtures 54
Sasol Inzalo Bk A Mixtures 119-123
G ADDITIONAL ACTIVITIES/ READINGIn addition, further reading, listening or viewing activities related to this sub-topic are available through the following web links:
1. http://www.ducksters.com/science/chemistry/chemical_mixtures.php [Science mixtures]
TOPIC: Mixtures

30 31Grade 6 NATURAL SCIENCES & TECHNOLOGY Term 2 Grade 6 NATURAL SCIENCES & TECHNOLOGY Term 2
TOPIC: Mixtures
1 CTerm 2, Week 1, Lesson CLesson Title: Mixtures with liquidsTime for lesson: 1½ hours
A POLICY AND OUTCOMESSub-Topic Mixtures of materials
CAPS Page Number 52
Lesson Objectives
By the end of the lesson, learners will be able to:
• investigate different liquids mixed together• give examples of different liquids that are often mixed.
Specific Aims
1. DOING SCIENCE 2. UNDERSTANDING + CONNECTING IDEAS 3. UNDERSTANDING THE USES OF SCIENCES & INDIGENOUS KNOWLEDGE
SCIENCE PROCESS + DESIGN SKILLS1. Accessing & Recalling
Information 7. Raising Questions13. Interpreting
Information
2. Observing 8. Predicting 14. Designing
3. Comparing 9. Hypothesizing 15. Making/ constructing
4. Measuring 10. Planning Investigations 16. Evaluating and
improving products
5. Sorting & Classifying 11. Doing Investigations 17. Communicating
6. Identifying problems & issues
12. Recording Information

30 31Grade 6 NATURAL SCIENCES & TECHNOLOGY Term 2 Grade 6 NATURAL SCIENCES & TECHNOLOGY Term 2
B POSSIBLE RESOURCESFor this lesson, you will need:
IDEAL RESOURCES IMPROVISED RESOURCES
Resource 3: Mixtures: A solid and a liquid
Poster: Solutions as special mixtures
Sand, water, cooking oil, cordial, three paper cups or glasses per group, paper towel, spoon
C CLASSROOM MANAGEMENT1. Make sure that you are ready and prepared.2. Write the following question onto the chalkboard before the lesson starts:
What is a mixture?
3. Learners should enter the classroom and answer the question in their workbooks.
4. Discuss the answer with the learners.
5. Write the model answer onto the chalkboard.
A mixture is two or more substances that have been mixed together.
D ACCESSING INFORMATION1. Write the following onto the chalkboard (always try to do this before the lesson starts):
MIXTURES OF LIQUIDS AND SOLIDS
1. We can mix substances that are in different states (solids, liquids and gases).
2. For example, we can mix a solid and a liquid together.
3. Sometimes a mixture of a liquid and a solid can be separated by filtering.
4. We can also make mixtures of two or more liquids.
5. Sometimes you will not be able to see (observe) the different liquids that have been mixed.
6. Sometimes you will still be able to see the different liquids.
TOPIC: Mixtures

32 33Grade 6 NATURAL SCIENCES & TECHNOLOGY Term 2 Grade 6 NATURAL SCIENCES & TECHNOLOGY Term 2
1 A2. Explain this to the learners as follows:
a. Mixtures can be made from different states of matter.
b. This means you can mix a solid and a liquid, or a gas and a liquid.
c. They will investigate this in the next part of the lesson.
3. Give learners time to copy this information into their workbooks.
Checkpoint 1
Ask the learners the following questions to check their understanding at this point:
a. True or False: Mixtures cannot be made with different states of matter? b. True or False: Sometimes a mixture of a solid and liquid can be separated by filtering?
Answers to the checkpoint questions are as follows:
a. False. Mixtures can be made with different states of matter, like a solid with a liquid.
b. True.
E CONCEPTUAL DEVELOPMENT1. Activity: Mixing solids and liquids
Write the following on the chalkboard (always try to do this before the lesson starts):
INVESTIGATION: OBSERVING WHEN SOLIDS ARE MIXED WITH LIQUIDS
YOU WILL NEED:
1. sand
2. water
3. a paper cup or glass
4. a paper towel
5. a spoon
METHOD
1. Place five spoons of sand in the cup/glass.
2. Pour in water until it is half-full.
3. Stir the sand and water until they are mixed.
ACTIVITY AND QUESTIONS
1. Draw two pictures of the mixture in the glass: one straight after the mixture is stirred and one after the mixture has been left to stand for five minutes
2. Can you see the sand grains?
3. Can you separate the mixture into sand grains and water? Think about how you could use the paper towel
TOPIC: Mixtures

32 33Grade 6 NATURAL SCIENCES & TECHNOLOGY Term 2 Grade 6 NATURAL SCIENCES & TECHNOLOGY Term 2
4. If you mixed sugar and water together, would you be able to separate these two substances using a paper towel? Say why or why not.
2. Explain the following to the learners:
a. Read through the investigation on the chalkboard with the learners.
b. Make sure the learners understand the instructions.
c. Read through the questions with the learners.
d. Get groups of learners to do the investigation.
e. Show learners the poster.
f. Point out the sugar going into the tea cup. The sugar will dissolve into the tea.
3. Give learners time to answer the questions in their workbooks.
4. Go through some of the answers with the learners and discuss these with the class.
MODEL ANSWER
Sand and water mixed Sand settled at bottom of glass
2. Yes, the sand grains are still visible. 3. Yes, the sand and water can be separated. You could pour the mixture through a paper
towel into another glass. The paper towel would keep the sand from going through with the water.
4. No, the sugar and water cannot be separated as the sugar will have dissolved into the water.
5. Activity: Mixing liquids and liquids
Write the following on the chalkboard (always try to do this before the lesson starts):
Sand
Water
TOPIC: Mixtures

34 35Grade 6 NATURAL SCIENCES & TECHNOLOGY Term 2 Grade 6 NATURAL SCIENCES & TECHNOLOGY Term 2
INVESTIGATION: OBSERVING WHEN LIQUIDS ARE MIXED WITH LIQUIDS
YOU WILL NEED:
cooking oil
cordial (concentrated juice to be mixed with water)
water
two paper cups or glasses
a spoon
METHOD
1. Place one spoon of oil in one of the cups/glasses.
2. Pour in water until it is half-full.
3. Stir the oil and water until they are mixed.
4. Place one spoon of cordial in the other cup/glass.
5. Pour in water until it is half-full.
6. Let them stand for two minutes.
7. Observe what happens.
QUESTIONS
1. Are the oil and water mixed or separate in the first cup/glass?
2. Draw a picture of the mixture in the glass. Give the drawing a heading.
3. Are the cordial and water mixed or separate in the second cup/glass?
4. Draw a picture of the mixture in the second cup/glass. Give the drawing a heading.
5. Write two sentences about what you found out in this investigation.
6. Explain the following to the learners:
a. Read through the investigation on the chalkboard with the learners.
b. Make sure the learners understand the instructions.
c. Read through the questions with the learners.
d. Get groups of learners to do the investigation.
e. Show learners the poster.
f. Point out the oil being mixed with water.
7. Give learners time to answer the questions in their workbooks.
8. Go through some of the answers with the learners and discuss these with the class.
TOPIC: Mixtures

34 35Grade 6 NATURAL SCIENCES & TECHNOLOGY Term 2 Grade 6 NATURAL SCIENCES & TECHNOLOGY Term 2
MODEL ANSWER
1. The oil and water are separate.
2.
3. The cordial and water are mixed. 4.
5. The oil and water did not mix together. The cordial and water did mix.
Checkpoint 2
Ask the learners the following questions to check their understanding at this point:
a. What happens when oil is mixed with water?
b. What happens when cordial is mixed with water?
Answers to the checkpoint questions are as follows:
a. Oil and water do not mix.
b. The cordial mixes with water and does not stay separate.
6. Ask the learners if they have any questions and provide answers and explanations.
TOPIC: Mixtures

36 37Grade 6 NATURAL SCIENCES & TECHNOLOGY Term 2 Grade 6 NATURAL SCIENCES & TECHNOLOGY Term 2
F REFERENCE POINTS FOR FURTHER DEVELOPMENTIf you need additional information or activities on this topic, you can find these in your textbook on the following pages:
NAME OF TEXTBOOK TOPIC PAGE NUMBER
Study & Master Mixtures 63
Viva Mixtures 58-59
Platinum Mixtures 64-65
Solutions for All Mixtures 98-100
Day-by-Day Mixtures 64-71
Oxford Mixtures 51-53
Spot On Mixtures -
Top Class Mixtures 55-56
Sasol Inzalo Bk A Mixtures 124-128
G ADDITIONAL ACTIVITIES/ READINGIn addition, further reading, listening or viewing activities related to this sub-topic are available through the following web links:
1. https://goo.gl/ufMRz5 (6min 26sec) [Matter - liquids]
2. https://goo.gl/isoQjV (2min 39sec) [Explore activity: mixtures and solutions]
TOPIC: Mixtures

36 37Grade 6 NATURAL SCIENCES & TECHNOLOGY Term 2 Grade 6 NATURAL SCIENCES & TECHNOLOGY Term 2
TOPIC: Mixtures
2 ATerm 2, Week 2, Lesson ALesson Title: Mixtures of materialsTime for lesson: 1 hour
A POLICY AND OUTCOMESSub-Topic Separating mixtures
CAPS Page Number 52
Lesson Objectives
By the end of the lesson, learners will be able to:
• suggest a few ways to separate mixtures• demonstrate different methods of separating mixtures.
Specific Aims
1. DOING SCIENCE 2. UNDERSTANDING + CONNECTING IDEAS 3. UNDERSTANDING THE USES OF SCIENCES & INDIGENOUS KNOWLEDGE
SCIENCE PROCESS + DESIGN SKILLS1. Accessing & Recalling
Information 7. Raising Questions13. Interpreting
Information
2. Observing 8. Predicting 14. Designing
3. Comparing 9. Hypothesizing 15. Making/ constructing
4. Measuring 10. Planning Investigations16. Evaluating and
improving products
5. Sorting & Classifying 11. Doing Investigations 17. Communicating
6. Identifying problems & issues
12. Recording Information

38 39Grade 6 NATURAL SCIENCES & TECHNOLOGY Term 2 Grade 6 NATURAL SCIENCES & TECHNOLOGY Term 2
B POSSIBLE RESOURCESFor this lesson, you will need:
IDEAL RESOURCES IMPROVISED RESOURCES
Poster: Solutions as special mixtures
C CLASSROOM MANAGEMENT1. Make sure that you are ready and prepared.2. Write the following question onto the chalkboard before the lesson starts:
Which two liquids do not mix?
3. Learners should enter the classroom and answer the question in their workbooks.
4. Discuss the answer with the learners.
5. Write the model answer onto the chalkboard.
Oil and water do not mix.
D ACCESSING INFORMATION1. Write the following onto the chalkboard (always try to do this before the lesson starts):
SEPARATING MIXTURES BY PHYSICAL MEANS
1. Mixtures can be separated using simple physical methods.
2. Sieve separate solids with different particle sizes.
3. The larger particles cannot get through the sieve.
4. Sand is sieved for building purposes.
5. Filtering separates a solid and a liquid.
6. The solid particles collect in the filter and the liquid goes through.
7. Decanting is used for two liquids that do not mix well and separate when left.
8. Oil can be poured off water.
9. Settling is used for a mixture of a solid and a liquid.
10. The heavier particles settle and collect at the bottom of the container.
11. The liquid can be poured out.
12. Hand sorting is used for two or more solids that are big enough to be picked out by hand.
TOPIC: Mixtures

38 39Grade 6 NATURAL SCIENCES & TECHNOLOGY Term 2 Grade 6 NATURAL SCIENCES & TECHNOLOGY Term 2
2. Explain this to the learners as follows:
a. Remind learners that a mixture is two or more substances mixed together.
b. In mixtures where these substances are still visible when mixed, these substances can be separated by physical means.
c. Read through the information on the chalkboard.
d. Make sure the learners understand this information.
e. Learners need to know about hand sorting, sieving, settling, decanting and filtering.
3. Give learners time to copy this information into their workbooks.
Checkpoint 1
Ask the learners the following questions to check their understanding at this point:
a. What is decanting?
b. What is sieving?
Answers to the checkpoint questions are as follows:
a. Decanting is when two liquids do not mix together. They can be separated by letting the liquids settle, and then pouring off the top liquid.
b. Sieving is used in mixtures that consist of solid substances with particles of different sizes. The mixture is pushed through a sieve and only the smaller particles get through.
E CONCEPTUAL DEVELOPMENT1. Activity: Choose the best method of separation.
Write the following on the chalkboard (always try to do this before the lesson starts):
CHOOSE THE BEST METHOD OF SEPARATION BY PHSYICAL MEANS
hand sorting, sieving, settling, decanting, filterings
From the above list, choose the best method of separation for the following:
a. water and oil
b. peanuts and raisins
c. salt and sand
d. sand and water
e. crushed chalk and water.
TOPIC: Mixtures

40 41Grade 6 NATURAL SCIENCES & TECHNOLOGY Term 2 Grade 6 NATURAL SCIENCES & TECHNOLOGY Term 2
2. Explain the following to the learners:
a. Read through the activity on the chalkboard.
b. Make sure the learners understand what they should do.
c. The learners must use their notes from earlier on in this lesson to help them.
3. Give learners time to complete this activity.
4. When all learners have completed the activity, get them to pair up and discuss their answers with each other. Give them three minutes to do this.
5. Go over the correct answers with the learners. Learners must go back and look at the reasons for each method in their notes if they made an error.
CHOOSE THE BEST METHOD OF SEPARATION BY PHYSICAL MEANS
a. water and oil - decanting
b. peanuts and raisins – hand sorting
c. salt and sand - sieving
d. sand and water - settling
e. crushed chalk and water - filtering
Checkpoint 2
Ask the learners the following questions to check their understanding at this point:
a. Which method of separation would you use for different size buttons?
b. Which method of separation would you use for chalk and water?
Answers to the checkpoint questions are as follows:
a. Hand sorting would be the best method for separating buttons of different sizes.
b. Filtering would be the best method used to separate chalk and water.
6. Ask the learners if they have any questions and provide answers and explanations.
TOPIC: Mixtures

40 41Grade 6 NATURAL SCIENCES & TECHNOLOGY Term 2 Grade 6 NATURAL SCIENCES & TECHNOLOGY Term 2
F REFERENCE POINTS FOR FURTHER DEVELOPMENTIf you need additional information or activities on this topic, you can find these in your textbook on the following pages:
NAME OF TEXTBOOK TOPIC PAGE NUMBER
Study & Master Mixtures 63-64
Viva Mixtures 60-61
Platinum Mixtures 66-67
Solutions for All Mixtures 101-104
Day-by-Day Mixtures 71-72
Oxford Mixtures 53-55
Spot On Mixtures 34
Top Class Mixtures 53-57
Sasol Inzalo Bk A Mixtures 128-130
G ADDITIONAL ACTIVITIES/ READINGIn addition, further reading, listening or viewing activities related to this sub-topic are available through the following web links:
1. https://goo.gl/9kg7v3 [Tom Newby School - Grade 6]
2. https://goo.gl/igRpWC (5min 12sec) [Science - separation and mixture]
3. https://goo.gl/4YtY8x (6min 9sec) [Separation of mixtures]
TOPIC: Mixtures
42 43Grade 6 NATURAL SCIENCES & TECHNOLOGY Term 2 Grade 6 NATURAL SCIENCES & TECHNOLOGY Term 2
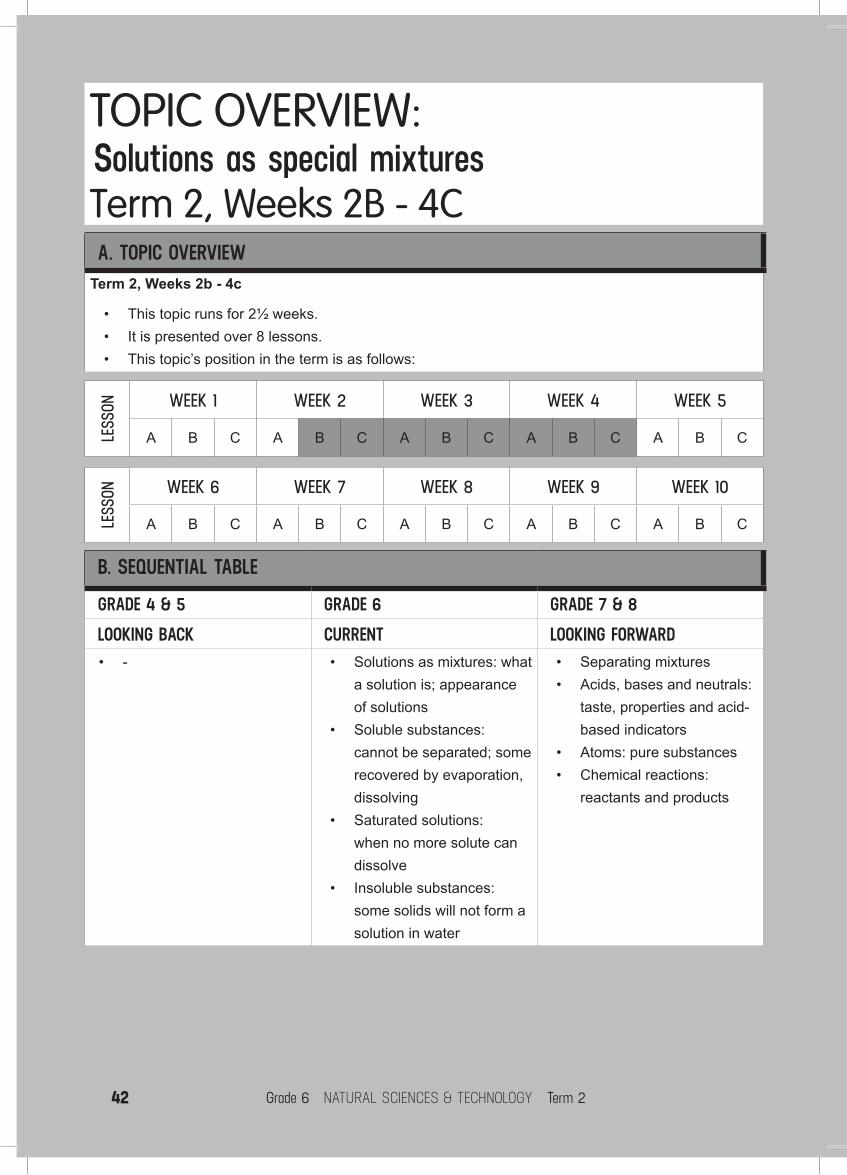
TOPIC OVERVIEW:Solutions as special mixturesTerm 2, Weeks 2B - 4C A. TOPIC OVERVIEW
Term 2, Weeks 2b - 4c
• This topic runs for 2½ weeks.• It is presented over 8 lessons.• This topic’s position in the term is as follows:
LESS
ON WEEK 1 WEEK 2 WEEK 3 WEEK 4 WEEK 5
A B C A B C A B C A B C A B C
LESS
ON WEEK 6 WEEK 7 WEEK 8 WEEK 9 WEEK 10
A B C A B C A B C A B C A B C
B. SEQUENTIAL TABLE
GRADE 4 & 5 GRADE 6 GRADE 7 & 8
LOOKING BACK CURRENT LOOKING FORWARD• - • Solutions as mixtures: what
a solution is; appearance of solutions
• Soluble substances: cannot be separated; some recovered by evaporation, dissolving
• Saturated solutions: when no more solute can dissolve
• Insoluble substances: some solids will not form a solution in water
• Separating mixtures• Acids, bases and neutrals:
taste, properties and acid-based indicators
• Atoms: pure substances• Chemical reactions:
reactants and products
42 43Grade 6 NATURAL SCIENCES & TECHNOLOGY Term 2 Grade 6 NATURAL SCIENCES & TECHNOLOGY Term 2
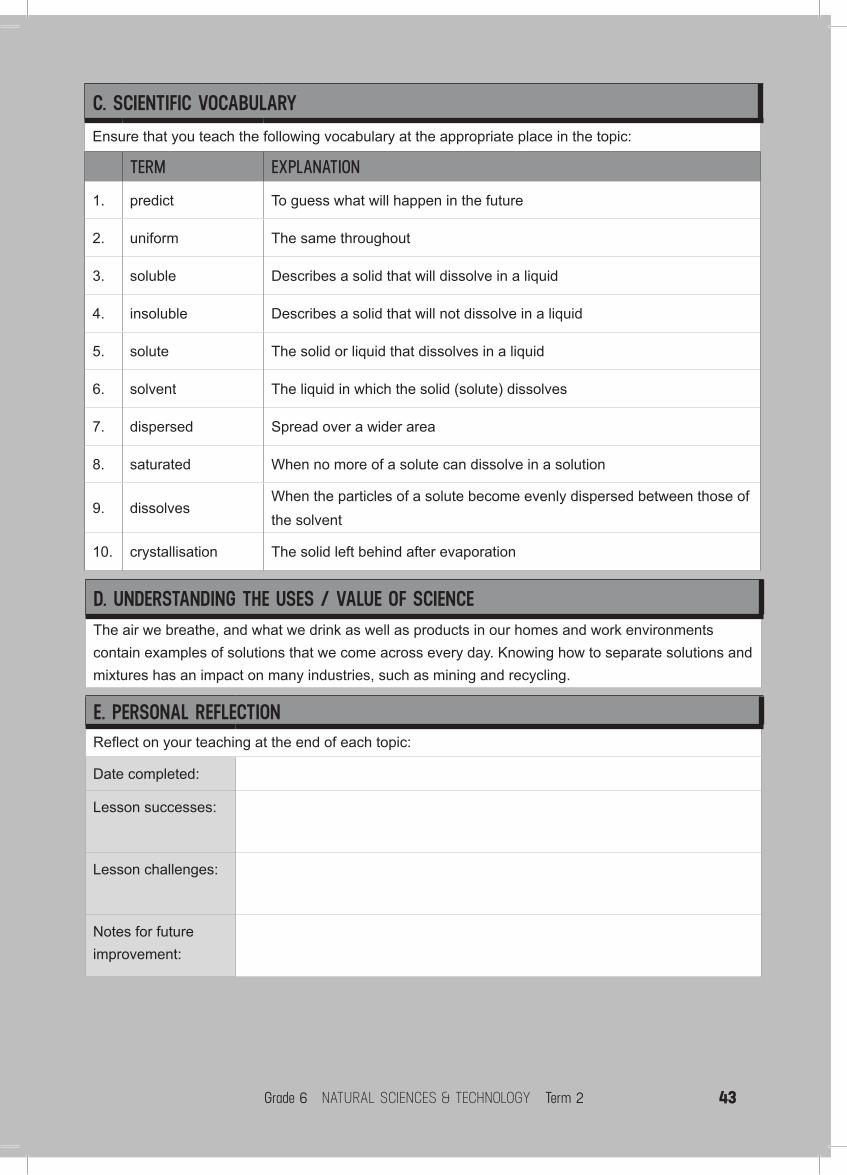
C. SCIENTIFIC VOCABULARYEnsure that you teach the following vocabulary at the appropriate place in the topic:
TERM EXPLANATION
1. predict To guess what will happen in the future
2. uniform The same throughout
3. soluble Describes a solid that will dissolve in a liquid
4. insoluble Describes a solid that will not dissolve in a liquid
5. solute The solid or liquid that dissolves in a liquid
6. solvent The liquid in which the solid (solute) dissolves
7. dispersed Spread over a wider area
8. saturated When no more of a solute can dissolve in a solution
9. dissolves When the particles of a solute become evenly dispersed between those of the solvent
10. crystallisation The solid left behind after evaporation
D. UNDERSTANDING THE USES / VALUE OF SCIENCEThe air we breathe, and what we drink as well as products in our homes and work environments contain examples of solutions that we come across every day. Knowing how to separate solutions and mixtures has an impact on many industries, such as mining and recycling.
E. PERSONAL REFLECTIONReflect on your teaching at the end of each topic:
Date completed:
Lesson successes:
Lesson challenges:
Notes for future improvement:

44 45Grade 6 NATURAL SCIENCES & TECHNOLOGY Term 2 Grade 6 NATURAL SCIENCES & TECHNOLOGY Term 2
TOPIC: Solutions as special mixtures
2 BTerm 2, Week 2, Lesson BLesson Title: Solutions are mixturesTime for lesson: 1½ hours
A POLICY AND OUTCOMESSub-Topic Mixtures
CAPS Page Number 52
Lesson Objectives
By the end of the lesson, learners will be able to:
• suggest a few ways to separate mixtures
• demonstrate different methods of separating mixtures.
Specific Aims
1. DOING SCIENCE 2. UNDERSTANDING + CONNECTING IDEAS 3. UNDERSTANDING THE USES OF SCIENCES & INDIGENOUS KNOWLEDGE
SCIENCE PROCESS + DESIGN SKILLS1. Accessing & Recalling
Information 7. Raising Questions13. Interpreting
Information
2. Observing 8. Predicting 14. Designing
3. Comparing 9. Hypothesizing 15. Making/ constructing
4. Measuring 10. Planning Investigations16. Evaluating and
improving products
5. Sorting & Classifying 11. Doing Investigations 17. Communicating
6. Identifying problems & issues
12. Recording Information
44 45Grade 6 NATURAL SCIENCES & TECHNOLOGY Term 2 Grade 6 NATURAL SCIENCES & TECHNOLOGY Term 2
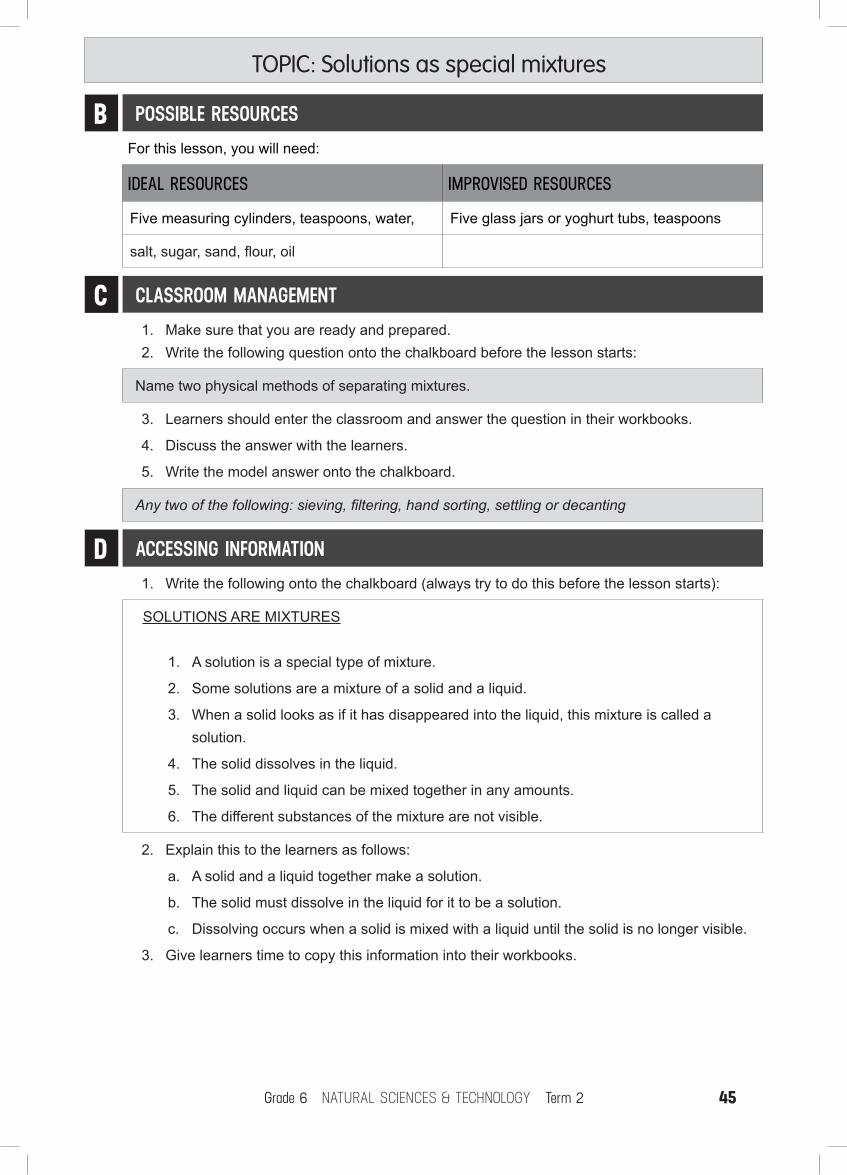
B POSSIBLE RESOURCESFor this lesson, you will need:
IDEAL RESOURCES IMPROVISED RESOURCES
Five measuring cylinders, teaspoons, water, Five glass jars or yoghurt tubs, teaspoons
salt, sugar, sand, flour, oil
C CLASSROOM MANAGEMENT1. Make sure that you are ready and prepared.2. Write the following question onto the chalkboard before the lesson starts:
Name two physical methods of separating mixtures.
3. Learners should enter the classroom and answer the question in their workbooks.
4. Discuss the answer with the learners.
5. Write the model answer onto the chalkboard.
Any two of the following: sieving, filtering, hand sorting, settling or decanting
D ACCESSING INFORMATION1. Write the following onto the chalkboard (always try to do this before the lesson starts):
SOLUTIONS ARE MIXTURES
1. A solution is a special type of mixture.
2. Some solutions are a mixture of a solid and a liquid.
3. When a solid looks as if it has disappeared into the liquid, this mixture is called a solution.
4. The solid dissolves in the liquid.
5. The solid and liquid can be mixed together in any amounts.
6. The different substances of the mixture are not visible.
2. Explain this to the learners as follows:
a. A solid and a liquid together make a solution.
b. The solid must dissolve in the liquid for it to be a solution.
c. Dissolving occurs when a solid is mixed with a liquid until the solid is no longer visible.
3. Give learners time to copy this information into their workbooks.
TOPIC: Solutions as special mixtures

46 47Grade 6 NATURAL SCIENCES & TECHNOLOGY Term 2 Grade 6 NATURAL SCIENCES & TECHNOLOGY Term 2
Checkpoint 1
Ask the learners the following questions to check their understanding at this point:
a. Is a solution a mixture: True or False?b. Is a solution created when salt dissolves in water: True or False?
Answers to the checkpoint questions are as follows:
a. True. A solution is a special type of mixture.
b. True. If salt dissolves in water, a solution is created.
E CONCEPTUAL DEVELOPMENTThis activity will be done in groups.
1. To do this activity, each group will need the following:
• 4 glasses or glass jars
• a container of water
• a stick or spoon for stirring
• a tablespoon of salt
• a tablespoon of sugar
• a tablespoon of cooking oil
• a tablespoon of sand
2. Ensure you have these materials prepared for each group before the lesson starts.
3. Tell the learners that they are going to be doing an investigation where they will be looking at solutions.
4. They will be looking at four different substances and will be investigating whether they dissolve in water.
5. Divide the learners into groups of six.
6. Write the following onto the chalkboard (always try to do this before the lesson starts):
TOPIC: Solutions as special mixtures

46 47Grade 6 NATURAL SCIENCES & TECHNOLOGY Term 2 Grade 6 NATURAL SCIENCES & TECHNOLOGY Term 2
TOPIC: Solutions as special mixtures
PRACTICAL TASK1. This practical task will be done in groups of 6.2. Each group will be doing tasks to explore the solubility of 4 different substances.3. Each person in the group must participate in the investigation and complete the answers
to the written activities in their workbooks.4. Each group will need the following materials and equipment to do the investigation:
• 4 glasses or glass jars • a container of water• a stick or spoon for stirring• a tablespoon of salt• a tablespoon of sugar• a tablespoon of cooking oil• a tablespoon of sand
7. Read through the practical task with the learners.
8. Remind the learners that earlier in the lesson they learnt that solutions are special mixtures.
9. When a solid or another liquid (called the solute) looks like it has disappeared into the liquid (called the solvent), this mixture is called a solution. The solute has dissolved into the liquid or solvent.
10. Tell the learners that today they are going to be investigating the solubility of 4 different solutes and recording their findings for assessment.
11. Have each group collect the equipment they will need (as listed on the board) for the task.
12. The following will need to be written onto the chalkboard:
Task 1 [12 marks]
sugar salt sand oil
Prediction: Will this solute dissolve in water?Is the mixture a solution after stirring?What does the mixture look like after standing still for 5 minutes?

48 49Grade 6 NATURAL SCIENCES & TECHNOLOGY Term 2 Grade 6 NATURAL SCIENCES & TECHNOLOGY Term 2
13. Have the learners draw the above table into their workbooks.
14. Write the following “Investigation method” onto the chalkboard:
METHOD
a. Three-quarters fill each glass jar with water.There should be four.
b. Add a tablespoon of sugar to the first jar. Do not stir.
c. Add a tablespoon of salt to the second jar. Do not stir.
d. Add a tablespoon of sand to the third jar. Do not stir.
e. Add a tablespoon of oil to the fourth jar. Do not stir.
f. Predict which of these solutes will dissolve in the water.
g. Write your answers on the table in your workbook.
h. Now stir each jar for about a minute.
i. Let the water become still in each jar.
j. Look carefully at the liquid in each jar.
k. Which one of these solutes have dissolved into the water and become a solution? Write the answers on the table in your workbook.
l. Leave the jars to stand still for another 5 minutes. What do you notice has happened after 5 minutes? Write your answers on the table in your workbook.
15. Read through the task with the learners.
16. Tell the learners that for each jar they will need to predict what they think the outcome will be. By predicting, we mean that we think about what might happen and then make a guess.
17. Ask them if they have any questions.
18. Tell the learners they have 15 minutes to complete task 1.
19. Supervise the learners whilst they complete the task and answer any questions that they may have.
20. After 15 minutes call the learners back to attention.
21. Tell the learners that they are now going to draw a diagram of what three of the jars look like after the 5 minutes have passed.
22. They are going to draw the salt solution, the sand jar and the oil jar.
23. The diagrams must be labelled.
24. The following will need to be written on the chalkboard:
TOPIC: Solutions as special mixtures

48 49Grade 6 NATURAL SCIENCES & TECHNOLOGY Term 2 Grade 6 NATURAL SCIENCES & TECHNOLOGY Term 2
Task 2 [8 marks]
2.1 Draw and label the jar with the salt solution. Label:
• Jar
• Salt solution
2.2 Draw and label the jar with the sand mixture. Label:
• Jar
• Muddy water
• Settled sand
2.3 Draw and label the jar with the oil. Label:
• Jar
• Water
• Oil
1. Read through task 2 with the learners.
2. Ask them if they have any questions.
3. Tell the learners they have 5 minutes to complete task 2.
4. Supervise the learners whilst they complete the task and answer any questions they may have.
5. After 5 minutes call the learners back to attention.
6. Have learners hand in their workbooks for assessment.
7. Learners must then tidy up investigation areas and hand back equipment.
TOPIC: Solutions as special mixtures

50 51Grade 6 NATURAL SCIENCES & TECHNOLOGY Term 2 Grade 6 NATURAL SCIENCES & TECHNOLOGY Term 2
F REFERENCE POINTS FOR FURTHER DEVELOPMENTIf you need additional information or activities on this topic, you can find these in your textbook on the following pages:
NAME OF TEXTBOOK TOPIC PAGE NUMBER
Study & Master Solutions as special mixtures 65-66
Viva Solutions as special mixtures 63-65
Platinum Solutions as special mixtures 70-71
Solutions for All Solutions as special mixtures 107
Day-by-Day Solutions as special mixtures 74-75
Oxford Solutions as special mixtures 56-57
Spot On Solutions as special mixtures 37
Top Class Solutions as special mixtures 58-59
Sasol Inzalo Bk A Solutions as special mixtures 134-141
G ADDITIONAL ACTIVITIES/ READINGIn addition, further reading, listening or viewing activities related to this sub-topic are available through the following web links:
1. http://www.tomnewbyschool.co.za/wp-content/uploads/2016/04/Grd-6-NS-TECH-T2-2016-approved.pdf [Thomas Newby Gr 6 Term 2]
2. https://goo.gl/ty15pc [Solutions]
3. https://k12opened.com/ebooks/sci/ebook-mixtures-solutions/index.html [Mixtures and solutions]
TOPIC: Solutions as special mixtures

50 51Grade 6 NATURAL SCIENCES & TECHNOLOGY Term 2 Grade 6 NATURAL SCIENCES & TECHNOLOGY Term 2
TOPIC: Solutions as special mixtures
2 CTerm 2, Week 2, Lesson CLesson Title: Solutions have a uniform appearanceTime for lesson: 1 hour
A POLICY AND OUTCOMESSub-Topic Solutions
CAPS Page Number 53
Lesson Objectives
By the end of the lesson, learners will be able to:
• describe the uniformity of solutions• contrast mixtures that are not uniform.
Specific Aims
1. DOING SCIENCE 2. UNDERSTANDING + CONNECTING IDEAS 3. UNDERSTANDING THE USES OF SCIENCES & INDIGENOUS KNOWLEDGE
SCIENCE PROCESS + DESIGN SKILLS1. Accessing & Recalling
Information 7. Raising Questions13. Interpreting
Information
2. Observing 8. Predicting 14. Designing
3. Comparing 9. Hypothesizing 15. Making/ constructing
4. Measuring 10. Planning Investigations16. Evaluating and
improving products
5. Sorting & Classifying 11. Doing Investigations 17. Communicating
6. Identifying problems & issues
12. Recording Information
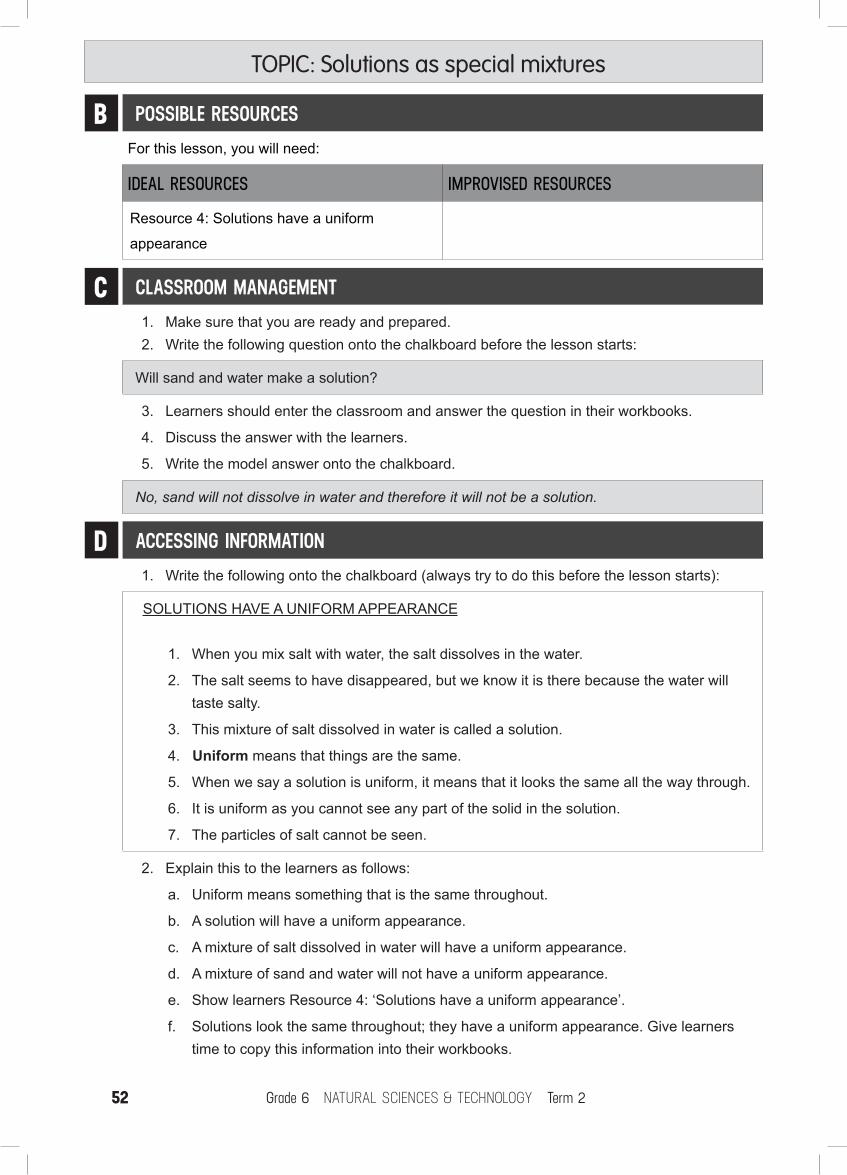
52 53Grade 6 NATURAL SCIENCES & TECHNOLOGY Term 2 Grade 6 NATURAL SCIENCES & TECHNOLOGY Term 2
B POSSIBLE RESOURCESFor this lesson, you will need:
IDEAL RESOURCES IMPROVISED RESOURCES
Resource 4: Solutions have a uniform
appearance
C CLASSROOM MANAGEMENT1. Make sure that you are ready and prepared.2. Write the following question onto the chalkboard before the lesson starts:
Will sand and water make a solution?
3. Learners should enter the classroom and answer the question in their workbooks.
4. Discuss the answer with the learners.
5. Write the model answer onto the chalkboard.
No, sand will not dissolve in water and therefore it will not be a solution.
D ACCESSING INFORMATION1. Write the following onto the chalkboard (always try to do this before the lesson starts):
SOLUTIONS HAVE A UNIFORM APPEARANCE
1. When you mix salt with water, the salt dissolves in the water.
2. The salt seems to have disappeared, but we know it is there because the water will taste salty.
3. This mixture of salt dissolved in water is called a solution.
4. Uniform means that things are the same.
5. When we say a solution is uniform, it means that it looks the same all the way through.
6. It is uniform as you cannot see any part of the solid in the solution.
7. The particles of salt cannot be seen.
2. Explain this to the learners as follows:
a. Uniform means something that is the same throughout.
b. A solution will have a uniform appearance.
c. A mixture of salt dissolved in water will have a uniform appearance.
d. A mixture of sand and water will not have a uniform appearance.
e. Show learners Resource 4: ‘Solutions have a uniform appearance’.
f. Solutions look the same throughout; they have a uniform appearance. Give learners time to copy this information into their workbooks.
TOPIC: Solutions as special mixtures
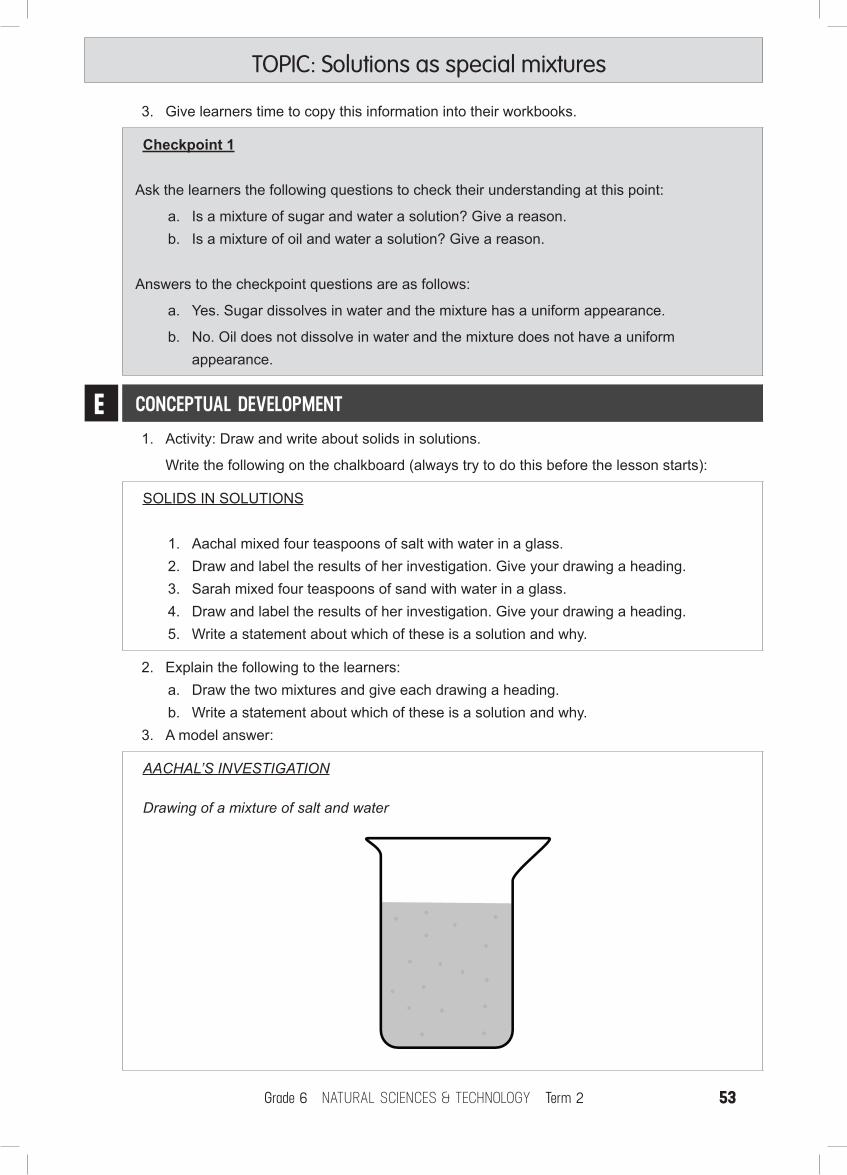
52 53Grade 6 NATURAL SCIENCES & TECHNOLOGY Term 2 Grade 6 NATURAL SCIENCES & TECHNOLOGY Term 2
3. Give learners time to copy this information into their workbooks.
Checkpoint 1
Ask the learners the following questions to check their understanding at this point:
a. Is a mixture of sugar and water a solution? Give a reason. b. Is a mixture of oil and water a solution? Give a reason.
Answers to the checkpoint questions are as follows:
a. Yes. Sugar dissolves in water and the mixture has a uniform appearance.
b. No. Oil does not dissolve in water and the mixture does not have a uniform appearance.
E CONCEPTUAL DEVELOPMENT1. Activity: Draw and write about solids in solutions.
Write the following on the chalkboard (always try to do this before the lesson starts):
SOLIDS IN SOLUTIONS
1. Aachal mixed four teaspoons of salt with water in a glass. 2. Draw and label the results of her investigation. Give your drawing a heading. 3. Sarah mixed four teaspoons of sand with water in a glass. 4. Draw and label the results of her investigation. Give your drawing a heading. 5. Write a statement about which of these is a solution and why.
2. Explain the following to the learners:a. Draw the two mixtures and give each drawing a heading. b. Write a statement about which of these is a solution and why.
3. A model answer:
AACHAL’S INVESTIGATION
Drawing of a mixture of salt and water
TOPIC: Solutions as special mixtures

54 55Grade 6 NATURAL SCIENCES & TECHNOLOGY Term 2 Grade 6 NATURAL SCIENCES & TECHNOLOGY Term 2
SARAH’S INVESTIGATION
Drawing of a mixture of sand and waterA model answer:
5. Aachal’s mixture is a solution as the salt dissolves in the water and the mixture is uniform. With Sarah’s mixture, the sand does not dissolve in the water and the mixture is not uniform; therefore, the mixture is not a solution.
Checkpoint 2
Ask the learners the following questions to check their understanding at this point:
a. Will flour and water make a solution?b. Will maize meal and water make a solution?
Answers to the checkpoint questions are as follows:
a. No, flour does not dissolve in water.
b. No, maize meal does not dissolve in water.
4. Ask the learners if they have any questions and provide answers and explanations.
Sand
Water
TOPIC: Solutions as special mixtures

54 55Grade 6 NATURAL SCIENCES & TECHNOLOGY Term 2 Grade 6 NATURAL SCIENCES & TECHNOLOGY Term 2
F REFERENCE POINTS FOR FURTHER DEVELOPMENTIf you need additional information or activities on this topic, you can find these in your textbook on the following pages:
NAME OF TEXTBOOK TOPIC PAGE NUMBER
Study & Master Solutions as special mixtures 65-66
Viva Solutions as special mixtures 63-65
Platinum Solutions as special mixtures 70-71
Solutions for All Solutions as special mixtures 107
Day-by-Day Solutions as special mixtures 76-77
Oxford Solutions as special mixtures 56-57
Spot On Solutions as special mixtures 37
Top Class Solutions as special mixtures 58-59
Sasol Inzalo Bk A Solutions as special mixtures 134-141
G ADDITIONAL ACTIVITIES/ READINGIn addition, further reading, listening or viewing activities related to this sub-topic are available through the following web links:
1. http://www.tomnewbyschool.co.za/wp-content/uploads/2016/04/Grd-6-NS-TECH-T2-2016-approved.pdf [Thomas Newby Gr 6 Term 2]
2. https://goo.gl/ty15pc [Solutions]
3. https://k12opened.com/ebooks/sci/ebook-mixtures-solutions/index.html [Mixtures ad solutions]
TOPIC: Solutions as special mixtures

56 57Grade 6 NATURAL SCIENCES & TECHNOLOGY Term 2 Grade 6 NATURAL SCIENCES & TECHNOLOGY Term 2
TOPIC: Solutions as special mixtures
3 ATerm 2, Week 3, Lesson ALesson Title: Solutes can dissolveTime for lesson: 1 hour
A POLICY AND OUTCOMESSub-Topic Solutions
CAPS Page Number 53
Lesson Objectives
By the end of the lesson, learners will be able to:
• describe the uniformity of solutions• contrast mixtures that are not uniform.
Specific Aims
1. DOING SCIENCE 2. UNDERSTANDING + CONNECTING IDEAS 3. UNDERSTANDING THE USES OF SCIENCES & INDIGENOUS KNOWLEDGE
SCIENCE PROCESS + DESIGN SKILLS1. Accessing & Recalling
Information 7. Raising Questions13. Interpreting
Information
2. Observing 8. Predicting 14. Designing
3. Comparing 9. Hypothesizing 15. Making/ constructing
4. Measuring 10. Planning Investigations16. Evaluating and
improving products
5. Sorting & Classifying 11. Doing Investigations 17. Communicating
6. Identifying problems & issues
12. Recording Information

56 57Grade 6 NATURAL SCIENCES & TECHNOLOGY Term 2 Grade 6 NATURAL SCIENCES & TECHNOLOGY Term 2
B POSSIBLE RESOURCESFor this lesson, you will need:
IDEAL RESOURCES IMPROVISED RESOURCES
Three beakers, sand, oil, salt, water,
teaspoons
Glasses instead of beakers
C CLASSROOM MANAGEMENT1. Make sure that you are ready and prepared.2. Write the following question onto the chalkboard before the lesson starts:
If a solution has a uniform appearance, what does this mean?
3. Learners should enter the classroom and answer the question in their workbooks.
4. Discuss the answer with the learners.
5. Write the model answer onto the chalkboard.
It means that the solution looks the same throughout.
D ACCESSING INFORMATION1. Write the following onto the chalkboard (always try to do this before the lesson starts):
SOLUBLE SUBSTANCES
1. Solids can be soluble or insoluble.
2. A soluble solid will dissolve in water.
3. Salt and sugar are soluble in water.
4. When a solid is soluble in a liquid, the appearance of the solution will be uniform.
5. It will look the same throughout the mixture.
6. The salt or the sugar is called the solute.
7. The solute is the solid that dissolves in the liquid.
8. The water is called the solvent. 9. The solvent is the liquid in which the solid dissolves.
10. The mixture of the solute and the solvent is called the solution.
DEFINITIONS
1. A solute is what we call the solid or liquid that dissolves in a liquid.
2. A solvent is what we call the liquid in which the solid (solute) dissolves.
3. The mixture of a solute and a solvent is called a solution.
4. A solid is soluble if it can dissolve in a liquid.
5. A solid is insoluble if it cannot dissolve in a liquid.
TOPIC: Solutions as special mixtures

58 59Grade 6 NATURAL SCIENCES & TECHNOLOGY Term 2 Grade 6 NATURAL SCIENCES & TECHNOLOGY Term 2
2. Explain this to the learners as follows:
a. Read through the first section on the chalkboard.
b. The vocabulary is important in this section of work.
c. A solute is what we call the solid or liquid that dissolves in a liquid.
d. The solute is the substance that looks as if it has disappeared.
e. A solvent is what we call the liquid in which the solid (solute) dissolves.
f. The solvent is the substance that you can still see in a solution.
g. The mixture of a solute and a solvent is called a solution.
3. Give learners time to copy this information into their workbooks.
Checkpoint 1
Ask the learners the following questions to check their understanding at this point:
a. What words do we use to describe the solid that dissolves in liquid?
b. What is a solution?
Answers to the checkpoint questions are as follows:
a. We say it is a soluble solid.
b. A solution is a mixture of a solute and a solvent.
E CONCEPTUAL DEVELOPMENT1. Draw the following table on the chalkboard (always try to do this before the lesson starts):
TABLE OF MIXTURES
Complete the table:
Mixture Is the mixture a solution after stirring? Yes/No
Which substance is the solvent in all the solutions?
Which substance is the solute in all the solutions?
oil and water
vinegar and water
sand and water
sugar and water
salt and water
TOPIC: Solutions as special mixtures

58 59Grade 6 NATURAL SCIENCES & TECHNOLOGY Term 2 Grade 6 NATURAL SCIENCES & TECHNOLOGY Term 2
2. Explain the following to the learners:
a. Remind learners of a previous lesson in which they mixed different solids and liquids.
b. The first column has a list of mixtures.
c. In the second column, write ‘yes’ if the mixture is a solution (if the solid dissolves in water); otherwise write ‘no’.
d. In the next column, state what the solvent is (the liquid in which the solid dissolves) for each solution.
e. In the last column, state what the solute is (the solid or liquid that dissolves) for each solution.
3. Give learners time to complete this task in their workbooks.
4. A model answer:
TABLE OF MIXTURES
Checkpoint 2
Ask the learners the following questions to check their understanding at this point:
a. What is a mixture of salt and water called?
b. Which is the solvent in this solution?
Answers to the checkpoint questions are as follows:
a. A mixture of salt and water is called a solution.
b. Water is the solvent in this solution.
5. Ask the learners if they have any questions and provide answers and explanations.
Mixture Is the mixture a solution after stirring? Yes/No
Which substance is the solvent in all the solutions?
Which substance is the solute in all the solutions?
oil and water No
vinegar and water Yes water vinegar
sand and water No
sugar and water Yes water sugar
salt and water Yes water salt
TOPIC: Solutions as special mixtures

60 61Grade 6 NATURAL SCIENCES & TECHNOLOGY Term 2 Grade 6 NATURAL SCIENCES & TECHNOLOGY Term 2
F REFERENCE POINTS FOR FURTHER DEVELOPMENTIf you need additional information or activities on this topic, you can find these in your textbook on the following pages:
NAME OF TEXTBOOK TOPIC PAGE NUMBER
Study & Master Solutions as special mixtures 67
Viva Solutions as special mixtures 63
Platinum Solutions as special mixtures 72-73
Solutions for All Solutions as special mixtures 107
Day-by-Day Solutions as special mixtures 78
Oxford Solutions as special mixtures 56-57
Spot On Solutions as special mixtures 36
Top Class Solutions as special mixtures 58-61
Sasol Inzalo Bk A Solutions as special mixtures 134-142
G ADDITIONAL ACTIVITIES/ READINGIn addition, further reading, listening or viewing activities related to this sub-topic are available through the following web links:
1. https://goo.gl/brzXzZ (4min 10sec) [The Great Picnic Mix-up]
2. https://goo.gl/HUHP3v (6min 33sec) [Solution Solvent Solute]
3. https://goo.gl/8jZgJz [Solutions]
TOPIC: Solutions as special mixtures

60 61Grade 6 NATURAL SCIENCES & TECHNOLOGY Term 2 Grade 6 NATURAL SCIENCES & TECHNOLOGY Term 2
TOPIC: Solutions as special mixtures
3 BTerm 2, Week 3, Lesson BLesson Title: Separating solutionsTime for lesson: 1½ hours
A POLICY AND OUTCOMESSub-Topic Solutions
CAPS Page Number 53
Lesson Objectives
By the end of the lesson, learners will be able to:
• state which solutes can be separated from solvents• investigate solutions to see if the solute can be separated.
Specific Aims
1. DOING SCIENCE 2. UNDERSTANDING + CONNECTING IDEAS 3. UNDERSTANDING THE USES OF SCIENCES & INDIGENOUS KNOWLEDGE
SCIENCE PROCESS + DESIGN SKILLS1. Accessing & Recalling
Information 7. Raising Questions 13. Interpreting
Information
2. Observing 8. Predicting 14. Designing
3. Comparing 9. Hypothesizing 15. Making/ constructing
4. Measuring 10. Planning Investigations16. Evaluating and
improving products
5. Sorting & Classifying 11. Doing Investigations 17. Communicating
6. Identifying problems & issues
12. Recording Information

62 63Grade 6 NATURAL SCIENCES & TECHNOLOGY Term 2 Grade 6 NATURAL SCIENCES & TECHNOLOGY Term 2
B POSSIBLE RESOURCESFor this lesson, you will need:
IDEAL RESOURCES IMPROVISED RESOURCES
A beaker or a glass, water, sugar, salt,
teaspoons, evaporating dish, a Bunsen burner,
matches
saucer, gas burner
C CLASSROOM MANAGEMENT1. Make sure that you are ready and prepared.2. Write the following question onto the chalkboard before the lesson starts:
Is water a solvent or a solute?
3. Learners should enter the classroom and answer the question in their workbooks.
4. Discuss the answer with the learners.
5. Write the model answer onto the chalkboard.
Water is a solvent as substances dissolve in it.
D ACCESSING INFORMATION1. Write the following onto the chalkboard (always try to do this before the lesson starts):
SEPARATING SOLUTIONS
1. The different substances in a solution have different properties.
2. They can be separated.
3. Hand sorting, sieving, decanting, filtering and settling are not suitable for separating solutions.
4. The particles in a solution are too small for hand sorting, sieving or filtering.
5. The solid particles do not settle to the bottom for decanting or settling.
6. Evaporation is a process where a liquid is heated so that the liquid changes into a gas.
7. This will separate the solid from the liquid.
8. This is how salt is separated from sea water.
TOPIC: Solutions as special mixtures

62 63Grade 6 NATURAL SCIENCES & TECHNOLOGY Term 2 Grade 6 NATURAL SCIENCES & TECHNOLOGY Term 2
2. Explain this to the learners as follows:
a. Separating a solid from the solvent in a solution cannot be done by hand sorting, sieving or filtering.
b. The particles are too small.
c. Evaporation is a separation process.
d. When the solution is heated, the liquid turns into a gas.
e. The solid is left behind.
f. The solid forms crystals.
g. This is known as crystallisation.
3. Give learners time to copy this information into their workbooks.
Checkpoint 1
Ask the learners the following questions to check their understanding at this point:
a. Can you name a method of separation that will not work for a solution?
b. Can you name a separation method that will work to separate a solid from a liquid in a solution?
Answers to the checkpoint questions are as follows:
a. Either of the following: hand sorting, sieving, filtering, decanting or settling
b. Evaporation will separate a solid from a liquid in a solution.
E CONCEPTUAL DEVELOPMENT1. Activity: Investigate solutions to see if the solute can be recovered by evaporation.
Write the following on the chalkboard (always try to do this before the lesson starts):
INVESTIGATION
YOU WILL NEED: a beaker or a glass water sugar teaspoon evaporating dish or a saucer a Bunsen burner matches.
METHOD 1
1. Make a solution from three teaspoons of sugar and a small amount of warm water.
2. Place the dish on a sunny window sill.
3. Check the dish every day until all the water has evaporated.
TOPIC: Solutions as special mixtures

64 65Grade 6 NATURAL SCIENCES & TECHNOLOGY Term 2 Grade 6 NATURAL SCIENCES & TECHNOLOGY Term 2
METHOD 2
1. Make a sugar solution.
2. Your teacher will place the sugar solution in a dish on a tripod over the Bunsen burner.
3. The solution will be heated slowly until all the liquid has changed into a gas.
2. Explain the following to the learners:
a. The first method of using the sun for evaporation can be done by the learners.
b. The second method of separation done by boiling will need to be a teacher demonstration.
3. Activity: Evaporation as a separation process
Write the following on the chalkboard (always try to do this before the lesson starts):
EVAPORATION AND BOILING AS A SEPARATION PROCESSES
1. What was left at the bottom of the evaporation dish after these two methods of separation were used?
2. Which method was the best and why?
4. Explain the following to the learners:
a. Answer the two questions.
b. The second question needs a reason.
5. A model answer:
EVAPORATION AND BOILING AS A SEPARATION PROCESSES
1. Sugar crystals were left at the bottom.
2. Either of the following:
-Evaporation is the best method as little equipment is needed.
-Boiling is the best method as it is much faster than evaporation.
6. Repeat the process with a salt solution.
Checkpoint 2
Ask the learners the following questions to check their understanding at this point:
a. Can a solute be separated from a solvent by evaporation: True or False?
b. Can a solute be separated from a solvent by hand sorting: True or False?
Answers to the checkpoint questions are as follows:
a. True
b. False. The particles are too small for hand sorting.
7. Ask the learners if they have any questions and provide answers and explanations.
TOPIC: Solutions as special mixtures

64 65Grade 6 NATURAL SCIENCES & TECHNOLOGY Term 2 Grade 6 NATURAL SCIENCES & TECHNOLOGY Term 2
F REFERENCE POINTS FOR FURTHER DEVELOPMENTIf you need additional information or activities on this topic, you can find these in your textbook on the following pages:
NAME OF TEXTBOOK TOPIC PAGE NUMBER
Study & Master Solutions as special mixtures 68-71
Viva Solutions as special mixtures 64-65
Platinum Solutions as special mixtures 74-77
Solutions for All Solutions as special mixtures 107-108
Day-by-Day Solutions as special mixtures 79-81
Oxford Solutions as special mixtures 60
Spot On Solutions as special mixtures 37
Top Class Solutions as special mixtures 60-61
Sasol Inzalo Bk A Solutions as special mixtures 22-23
G ADDITIONAL ACTIVITIES/ READINGIn addition, further reading, listening or viewing activities related to this sub-topic are available through the following web links:
1. https://goo.gl/uNnVff (5min 12 sec) [Science - separation and mixtures]
2. https://goo.gl/ja8tyf (6min 24sec) [Science - separating substances]
3. https://goo.gl/kS37Js (4min 11sec) [Methods of separating substances from mixtures]
TOPIC: Solutions as special mixtures

66 67Grade 6 NATURAL SCIENCES & TECHNOLOGY Term 2 Grade 6 NATURAL SCIENCES & TECHNOLOGY Term 2
TOPIC: Solutions as special mixtures
3 CTerm 2, Week 3, Lesson CLesson Title: CrystallisationTime for lesson: 1½ hours
A POLICY AND OUTCOMESSub-Topic Solutions
CAPS Page Number 53
Lesson Objectives
By the end of the lesson, learners will be able to:
• draw and write about crystallization• give examples of solutions that will crystallise.
Specific Aims
1. DOING SCIENCE 2. UNDERSTANDING + CONNECTING IDEAS 3. UNDERSTANDING THE USES OF SCIENCES & INDIGENOUS KNOWLEDGE
SCIENCE PROCESS + DESIGN SKILLS1. Accessing & Recalling
Information 7. Raising Questions13. Interpreting
Information
2. Observing 8. Predicting 14. Designing
3. Comparing 9. Hypothesizing 15. Making/ constructing
4. Measuring 10. Planning Investigations16. Evaluating and
improving products
5. Sorting & Classifying 11. Doing Investigations 17. Communicating
6. Identifying problems & issues
12. Recording Information

66 67Grade 6 NATURAL SCIENCES & TECHNOLOGY Term 2 Grade 6 NATURAL SCIENCES & TECHNOLOGY Term 2
B POSSIBLE RESOURCESFor this lesson, you will need:
IDEAL RESOURCES IMPROVISED RESOURCES
Sugar; water; saucepan; wooden spoon;
medium-sized glass jar; cotton string long
enough to hang in the jar; screw to hold the
string down; pencil to tie the string to; wax
paper
Use newspaper instead of wax paper.
Resource 5: Making crystals
C CLASSROOM MANAGEMENT1. Make sure that you are ready and prepared.2. Write the following question onto the chalkboard before the lesson starts:
What method of separation is used to separate a solute from a solution?
3. Learners should enter the classroom and answer the question in their workbooks.
4. Discuss the answer with the learners.
5. Write the model answer onto the chalkboard.
Either answer: Evaporation or boiling are methods of separating a solute from a solution.
D ACCESSING INFORMATION1. Write the following onto the chalkboard (always try to do this before the lesson starts):
CRYSTALLISATION
1. Crystallisation is the process of forming crystals from a solution.
2. Evaporation is a process where liquid is heated so that the liquid changes to a gas.
3. The solvent evaporates.
4. Crystals of the solute are left behind.
2. Explain this to the learners as follows:
a. In the previous lesson, they learnt about the process of separation by evaporation or boiling.
b. Evaporation is when the solution is heated to that the liquid changes to a gas and leaves crystals of the solute behind.
3. Give learners time to copy this information into their workbooks.
TOPIC: Solutions as special mixtures

68 69Grade 6 NATURAL SCIENCES & TECHNOLOGY Term 2 Grade 6 NATURAL SCIENCES & TECHNOLOGY Term 2
Checkpoint 1
Ask the learners the following questions to check their understanding at this point:
a. What do we call the process of forming crystals from a solution?b. What separation method do we use for this?
Answers to the checkpoint questions are as follows:
a. This is called crystallisation.
b. We use evaporation for crystallisation.
E CONCEPTUAL DEVELOPMENT1. Activity: Investigation: making crystals.
Write the following on the chalkboard (always try to do this before the lesson starts):
INVESTIGATION MAKING CRYSTALS
YOU WILL NEED:
two cups of sugarone cup of watersaucepanwooden spoonmedium-sized glass jarcotton string long enough to hang in the jarscrew to hold the string downpencil to tie the string towax paper.
METHOD 1
1. Place water in the saucepan and bring to the boil.
2. Add sugar and stir continually.
3. Stir until the mixture becomes clear.
4. Pour slowly into the glass jar.
5. Tie the string to the pencil.
6. Tie the screw to other end of the string.
7. Dip the string into the jar for a few minutes.
8. Take out and place it on the wax paper to dry.
9. Dip the string in the mixture again.
10. Place the jar on the window sill. It is important that you do not touch the string.
11. Leave for 24 hours.
TOPIC: Solutions as special mixtures

68 69Grade 6 NATURAL SCIENCES & TECHNOLOGY Term 2 Grade 6 NATURAL SCIENCES & TECHNOLOGY Term 2
2. Explain the following to the learners:
a. The method written on the chalkboard is aimed at making sugar crystals.
b. An adult must be present at all times, as water will be brought to boiling point.
c. This can be done as a teacher demonstration.
d. Show the learners Resource 5: ‘Making crystals’.
e. Explain how the string must have a pencil attached on one end to keep the one end of the string out of the jar.
f. The other end must be attached to a screw to keep the string in the solution.
g. The picture shows the sugar crystals that you should get after leaving the solution for 24 hours.
3. Activity: Draw the crystal-making process.
Write the following on the chalkboard (always try to do this before the lesson starts):
THE CRYSTAL MAKING PROCESS
1. Draw a flow diagram to show the method to make crystals.
2. Draw the crystals that were formed by the investigation.
4. Explain the following to the learners:
a. Draw a flow diagram showing the process of making crystals.
b. Learners can only draw the crystals that were formed, in the next lesson. .
5. A model answer:
THE CRYSTAL MAKING PROCESS
a. Flow Diagram of the Making of Sugar Crystals
boil water in saucepan add sugar and stir until solution is clear pour into jar slowly
dip string in jar again leave for 24 hours take string out of jar and observe crystals
tie pencil to one end of string and screw to other
end
dip screw end of string into jar for ten seconds take out and dry on paper
TOPIC: Solutions as special mixtures

70 71Grade 6 NATURAL SCIENCES & TECHNOLOGY Term 2 Grade 6 NATURAL SCIENCES & TECHNOLOGY Term 2
b. Drawing of sugar crystals:
Checkpoint 2
Ask the learners the following questions to check their understanding at this point:
a. What is the solvent in the solution for making sugar crystals?b. What is the solute in the solution for making sugar crystals?
Answers to the checkpoint questions are as follows:
a. Water is the solvent used for the solution for sugar crystals.
b. Sugar is the solute used for the solution for sugar crystals.
7. Ask the learners if they have any questions and provide answers and explanations.
TOPIC: Solutions as special mixtures

70 71Grade 6 NATURAL SCIENCES & TECHNOLOGY Term 2 Grade 6 NATURAL SCIENCES & TECHNOLOGY Term 2
F REFERENCE POINTS FOR FURTHER DEVELOPMENTIf you need additional information or activities on this topic, you can find these in your textbook on the following pages:
NAME OF TEXTBOOK TOPIC PAGE NUMBER
Study & Master Solutions as special mixtures 67
Viva Solutions as special mixtures -
Platinum Solutions as special mixtures -
Solutions for All Solutions as special mixtures 108
Day-by-Day Solutions as special mixtures 81
Oxford Solutions as special mixtures 60-61
Spot On Solutions as special mixtures -
Top Class Solutions as special mixtures 61-62
Sasol Inzalo Bk A Solutions as special mixtures 22-23
G ADDITIONAL ACTIVITIES/ READINGIn addition, further reading, listening or viewing activities related to this sub-topic are available through the following web links:
1. https://goo.gl/Ce5YTz (1min) [Crystallisation]
2. https://goo.gl/r5YxiB (4min 58sec) [Crystallisation]
3. https://www.education.com/science-fair/article/sugar-crystallization [Crystallisation]
TOPIC: Solutions as special mixtures

72 73Grade 6 NATURAL SCIENCES & TECHNOLOGY Term 2 Grade 6 NATURAL SCIENCES & TECHNOLOGY Term 2
TOPIC: Solutions as special mixtures
4 ATerm 2, Week 4, Lesson ALesson Title: Rates of dissolvingTime for lesson: 1 hour
A POLICY AND OUTCOMESSub-Topic Soluble substances
CAPS Page Number 53
Lesson Objectives
By the end of the lesson, learners will be able to:
• draw and write about crystallization• give examples of solutions that will crystallise.
Specific Aims
1. DOING SCIENCE 2. UNDERSTANDING + CONNECTING IDEAS 3. UNDERSTANDING THE USES OF SCIENCES & INDIGENOUS KNOWLEDGE
SCIENCE PROCESS + DESIGN SKILLS1. Accessing & Recalling
Information 7. Raising Questions13. Interpreting
Information
2. Observing 8. Predicting 14. Designing
3. Comparing 9. Hypothesizing 15. Making/ constructing
4. Measuring 10. Planning Investigations16. Evaluating and
improving products
5. Sorting & Classifying 11. Doing Investigations 17. Communicating
6. Identifying problems & issues
12. Recording Information

72 73Grade 6 NATURAL SCIENCES & TECHNOLOGY Term 2 Grade 6 NATURAL SCIENCES & TECHNOLOGY Term 2
B POSSIBLE RESOURCESFor this lesson, you will need:
IDEAL RESOURCES IMPROVISED RESOURCES
Resource 7: Soluble particles
C CLASSROOM MANAGEMENT1. Make sure that you are ready and prepared.2. Write the following question onto the chalkboard before the lesson starts:
What method of separation is used to make crystals?
3. Learners should enter the classroom and answer the question in their workbooks.
4. Discuss the answer with the learners.
5. Write the model answer onto the chalkboard.
Evaporation is used to make crystals.
D ACCESSING INFORMATION1. Write the following onto the chalkboard (always try to do this before the lesson starts):
SOLUBLE PARTICLES
1. In a solution, the salt is the solute and water is the solvent.
2. When the salt dissolves in the water, it seems as if the salt disappears.
3. We can taste that the salt is there.
4. The solute (salt) particles are spread in between the particles of water (solvent).
2. Explain this to the learners as follows:
a. In a solution, it seems as if the solute disappears into the solvent.
b. In a solution, the solute particles are spread between the solvent particles.
c. Show learners Resource 7: ‘Soluble particles’.
d. A salt solution and a sugar solution are examples.
e. Evidence of the salt and sugar still being in the solution is that we can taste them.
3. Give learners time to copy this information into their workbooks.
TOPIC: Solutions as special mixtures

74 75Grade 6 NATURAL SCIENCES & TECHNOLOGY Term 2 Grade 6 NATURAL SCIENCES & TECHNOLOGY Term 2
Checkpoint 1
Ask the learners the following questions to check their understanding at this point:
a. How do we know that salt particles are soluble?
b. How do we know that salt is still in a salt solution even if we cannot see it?
Answers to the checkpoint questions are as follows:
a. The salt dissolves in the water.
b. We can taste the salt.
E CONCEPTUAL DEVELOPMENT1. Activity: Soluble particles
Draw the following on the chalkboard (always try to do this before the lesson starts):
SOLUBLE PARTICLES
2. Explain the following to the learners:
a. When salt (the solute) is dissolved in water (the solvent), the salt is not visible.
b. The salt particles are dispersed between the water particles.
c. Remind learners that substances in a solution cannot be separated by physical means, like hand sorting, sieving, filtering, settling or decanting.
d. Substances can be separated by evaporation or boiling.
e. Ask the learners to draw the diagram in their workbooks.
3. Give learners time to complete this activity in their workbooks.
Salt particles Salt & water particlesWater particlesSalt particles move into the spaces between water particles
TOPIC: Solutions as special mixtures

74 75Grade 6 NATURAL SCIENCES & TECHNOLOGY Term 2 Grade 6 NATURAL SCIENCES & TECHNOLOGY Term 2
Checkpoint 2
Ask the learners the following questions to check their understanding at this point:
a. What separation methods would not work for a solution?b. What separation methods will work for a solution?
Answers to the checkpoint questions are as follows:
a. Any of the physical methods such as hand sorting, sieving, filtering, settling or decanting
b. Evaporation and boiling are methods used to separated solutions.
4. Ask the learners if they have any questions and provide answers and explanations.
F REFERENCE POINTS FOR FURTHER DEVELOPMENTIf you need additional information or activities on this topic, you can find these in your textbook on the following pages:
NAME OF TEXTBOOK TOPIC PAGE NUMBER
Study & Master Solutions as special mixtures 67
Viva Solutions as special mixtures 63
Platinum Solutions as special mixtures -
Solutions for All Solutions as special mixtures 108
Day-by-Day Solutions as special mixtures 81
Oxford Solutions as special mixtures 60
Spot On Solutions as special mixtures -
Top Class Solutions as special mixtures 61
Sasol Inzalo Bk A Solutions as special mixtures 139-141
G ADDITIONAL ACTIVITIES/ READINGIn addition, further reading, listening or viewing activities related to this sub-topic are available through the following web links:
1. https://goo.gl/pqAFZx (1min 50sec) [Soluble and insoluble]
2. https://goo.gl/R6MdAL (4min 9sec) [What happens when stuff dissolves?]
TOPIC: Solutions as special mixtures

76 77Grade 6 NATURAL SCIENCES & TECHNOLOGY Term 2 Grade 6 NATURAL SCIENCES & TECHNOLOGY Term 2
TOPIC: Solutions as special mixtures
4 BTerm 2, Week 4, Lesson BLesson Title: Soluble substancesTime for lesson: 1½ hours
A POLICY AND OUTCOMESSub-Topic Saturated solutions
CAPS Page Number 53
Lesson Objectives
By the end of the lesson, learners will be able to:
• describe a saturated solution• demonstrate how to make a saturated solution.
Specific Aims
1. DOING SCIENCE 2. UNDERSTANDING + CONNECTING IDEAS 3. UNDERSTANDING THE USES OF SCIENCES & INDIGENOUS KNOWLEDGE
SCIENCE PROCESS + DESIGN SKILLS1. Accessing & Recalling
Information 7. Raising Questions13. Interpreting
Information
2. Observing 8. Predicting 14. Designing
3. Comparing 9. Hypothesizing 15. Making/ constructing
4. Measuring 10. Planning Investigations16. Evaluating and
improving products
5. Sorting & Classifying 11. Doing Investigations 17. Communicating
6. Identifying problems & issues
12. Recording Information

76 77Grade 6 NATURAL SCIENCES & TECHNOLOGY Term 2 Grade 6 NATURAL SCIENCES & TECHNOLOGY Term 2
B POSSIBLE RESOURCESFor this lesson, you will need:
IDEAL RESOURCES IMPROVISED RESOURCES
Salt, teaspoons, water, a glass beaker a glass
C CLASSROOM MANAGEMENT1. Make sure that you are ready and prepared.2. Write the following question onto the chalkboard before the lesson starts:
Which two separation methods would you use to separate a solution?
3. Learners should enter the classroom and answer the question in their workbooks.
4. Discuss the answer with the learners.
5. Write the model answer onto the chalkboard.
I would use evaporation and boiling to separate a solution.
D ACCESSING INFORMATION1. Write the following onto the chalkboard (always try to do this before the lesson starts):
SATURATED SOLUTIONS
1. When the particles of a solute spread throughout the particles of a solvent, we say the solute dissolves in the solvent.
2. This is called a solution.
3. If more and more solute is mixed into the solution, the solute begins to settle at the bottom.
4. We say the solution has become saturated.
5. More solute can be dissolved in a solvent that is heated than in a cold solvent.
6. A saturated solution is one that has no more space for any more particles of the solute.
2. Explain this to the learners as follows:
a. A solution is saturated when no more solute can dissolve in it.
b. When solute starts collecting at the bottom of a beaker, then the solution has become saturated.
c. More salt can dissolve in hot water than in cold water.
d. More sugar can dissolve in hot water, like tea, than in cold water.
3. Give learners time to copy this information into their workbooks.
TOPIC: Solutions as special mixtures

78 79Grade 6 NATURAL SCIENCES & TECHNOLOGY Term 2 Grade 6 NATURAL SCIENCES & TECHNOLOGY Term 2
Checkpoint 1
Ask the learners the following questions to check their understanding at this point:
a. What is a solution?
b. What is a saturated solution?
Answers to the checkpoint questions are as follows:
a. A solution is made up of a solute dissolved in a solvent.
b. A saturated solution is when there is no more space in the solvent for any more particles of the solute.
E CONCEPTUAL DEVELOPMENT1. Activity: Make a saturated solution of salt.
Write the following on the chalkboard (always try to do this before the lesson starts):
MAKE A SATURATED SOLUTION OF SALT
YOU WILL NEED:
saltteaspoons watera glass beaker
METHOD 1
1. Fill the beaker a quarter full with water.
2. Add flat teaspoons of salt one by one to the water, stirring after each teaspoonful has been added.
3. Count the number of teaspoons of salt that you have added until the salt does not dissolve anymore.
4. When the salt does not dissolve any more, it will start settling on the bottom of the beaker.
5. This is a saturated solution.
2. Explain the following to the learners:
a. This activity can be done as a teacher demonstration or with learners in groups.
b. Read through the list of what is needed and the method.
c. The number of teaspoons of salt must be recorded (this can be done on the chalkboard if the teacher demonstrates, or in workbooks if learners are working in groups).
d. After each teaspoon is added, the solution must be stirred until the salt is dissolved.
e. When the salt cannot dissolve any more, then stop adding more salt.
TOPIC: Solutions as special mixtures

78 79Grade 6 NATURAL SCIENCES & TECHNOLOGY Term 2 Grade 6 NATURAL SCIENCES & TECHNOLOGY Term 2
3. Activity: Make a saturated solution of salt with a heated solvent. Write the following on the chalkboard (always try to do this before the lesson starts):
MAKE A SATURATED SOLUTION OF SALT
YOU WILL NEED:
saltteaspoons watera glass beakera Bunsen burner with a tripod
METHOD
1. Fill the beaker a quarter full with water.
2. Heat the water over a Bunsen burner until the water boils.
3. Take the beaker off the Bunsen burner.
4. Add flat teaspoons of salt one by one to the water, stirring after each teaspoonful has been added.
5. Count the number of teaspoons of salt that you have added until the salt does not dissolve any more.
6. When the salt does not dissolve any more, it will start settling on the bottom of the beaker.
7. This is a saturated solution.
4. Explain the following to the learners:
a. This activity can be done as a teacher demonstration or with learners in groups.
b. Read through the list of what is needed and the method.
c. If there is no Bunsen burner, water can be heated in a kettle.
d. If you use a Bunsen burner, be very careful of the beaker and boiling water.
e. The beaker needs to be taken carefully off the Bunsen burner.
f. The number of teaspoons of salt must be recorded (this can be done on the chalkboard if the teacher is demonstrating, or in workbooks if learners are working in groups).
g. After each teaspoon is added, the solution must be stirred until the salt is dissolved.
h. When the salt cannot dissolve any more, then stop adding more salt.
i. Compare the number of teaspoons of salt that make a saturated solution in cold water to that of heated water.
j. Learners must write a conclusion in their workbooks.
TOPIC: Solutions as special mixtures

80 81Grade 6 NATURAL SCIENCES & TECHNOLOGY Term 2 Grade 6 NATURAL SCIENCES & TECHNOLOGY Term 2
5. Activity: Write a conclusion
Write the following on the chalkboard:
CONCLUSION:
6. Explain the following to the learners:
a. Write a conclusion about the saturated solutions in cold water and in heated water.
7. A model answer:
CONCLUSION
The saturated solution that was heated had three more teaspoons of salt added to it, compared to the saturated solution with cold water.
Checkpoint 2
Ask the learners the following questions to check their understanding at this point:
a. When is a solution saturated?b. Can you name a solute that you used to dissolve in water to make a saturated
solution?
Answers to the checkpoint questions are as follows:
a. A solution is saturated when it cannot hold any more solute (the extra solute will settle at the bottom of the beaker).
b. We used salt to make a saturated solution.
8. Ask the learners if they have any questions and provide answers and explanations.
TOPIC: Solutions as special mixtures

80 81Grade 6 NATURAL SCIENCES & TECHNOLOGY Term 2 Grade 6 NATURAL SCIENCES & TECHNOLOGY Term 2
F REFERENCE POINTS FOR FURTHER DEVELOPMENTIf you need additional information or activities on this topic, you can find these in your textbook on the following pages:
NAME OF TEXTBOOK TOPIC PAGE NUMBER
Study & Master Solutions as special mixtures 71
Viva Solutions as special mixtures 70
Platinum Solutions as special mixtures 80
Solutions for All Solutions as special mixtures 109-112
Day-by-Day Solutions as special mixtures 82
Oxford Solutions as special mixtures 62-63
Spot On Solutions as special mixtures 38
Top Class Solutions as special mixtures 63
Sasol Inzalo Bk A Solutions as special mixtures 145-147
G ADDITIONAL ACTIVITIES/ READINGIn addition, further reading, listening or viewing activities related to this sub-topic are available through the following web links:
1. https://goo.gl/aKXRWh (37sec) [Unsaturated solutions and saturated solutions]
2. https://goo.gl/ETjpYa (3min 33sec) [Saturated solutions]
3. https://goo.gl/mdK2Us (1min 12sec) [Saturated and unsaturated solutions]
TOPIC: Solutions as special mixtures

82 83Grade 6 NATURAL SCIENCES & TECHNOLOGY Term 2 Grade 6 NATURAL SCIENCES & TECHNOLOGY Term 2
TOPIC: Solutions as special mixtures
4 CTerm 2, Week 4, Lesson CLesson Title: Insoluble substancesTime for lesson: 1 hour
A POLICY AND OUTCOMESSub-Topic Insoluble substances
CAPS Page Number 53
Lesson Objectives
By the end of the lesson, learners will be able to:
• define what an insoluble substance is• describe how to find out whether a substance is insoluble.
Specific Aims
1. DOING SCIENCE 2. UNDERSTANDING + CONNECTING IDEAS 3. UNDERSTANDING THE USES OF SCIENCES & INDIGENOUS KNOWLEDGE
SCIENCE PROCESS + DESIGN SKILLS1. Accessing & Recalling
Information 7. Raising Questions13. Interpreting
Information
2. Observing 8. Predicting 14. Designing
3. Comparing 9. Hypothesizing 15. Making/ constructing
4. Measuring 10. Planning Investigations16. Evaluating and
improving products
5. Sorting & Classifying 11. Doing Investigations 17. Communicating
6. Identifying problems & issues
12. Recording Information

82 83Grade 6 NATURAL SCIENCES & TECHNOLOGY Term 2 Grade 6 NATURAL SCIENCES & TECHNOLOGY Term 2
B POSSIBLE RESOURCESFor this lesson, you will need:
IDEAL RESOURCES IMPROVISED RESOURCES
Resource 8: Insoluble substances
C CLASSROOM MANAGEMENT1. Make sure that you are ready and prepared.2. Write the following question onto the chalkboard before the lesson starts:
What is a saturated solution?
3. Learners should enter the classroom and answer the question in their workbooks.
4. Discuss the answer with the learners.
5. Write the model answer onto the chalkboard.
A saturated solution is when there is no more space in the solvent for any more particles of the solute.
D ACCESSING INFORMATION1. Write the following onto the chalkboard (always try to do this before the lesson starts):
INSOLUBLE SUBSTANCES
1. There are many substances that do not dissolve in liquid.
2. Sand does not dissolve in water.
3. Oil does not dissolve in water.
4. We describe these solids as ‘insoluble’.
2. Explain this to the learners as follows:
a. In lesson 2A, learners wrote down information about separating mixtures by physical means.
b. These methods were hand sorting, sieving, filtering, settling, filtering and decanting.
c. Remind the learners of these different separation methods.
d. These methods separate mixtures that have an insoluble solid mixed with another substance.
e. Show the learners Resource 8: ‘Insoluble substances’.
f. The first image is of a muddy river: the sand does not dissolve in the water.
g. The second image shows that oil does not dissolve in water.
h. Both sand and oil are insoluble solids.
3. Give learners time to copy this information into their workbooks.
TOPIC: Solutions as special mixtures

84 85Grade 6 NATURAL SCIENCES & TECHNOLOGY Term 2 Grade 6 NATURAL SCIENCES & TECHNOLOGY Term 2
Checkpoint 1
Ask the learners the following questions to check their understanding at this point:
a. What is an insoluble substance?
b. Can you give an example of an insoluble substance?
Answers to the checkpoint questions are as follows:
a. It is a substance that does not dissolve in water.
b. Any appropriate answer: examples are oil and sand.
E CONCEPTUAL DEVELOPMENT1. Activity: Filtering an insoluble solid from a liquid.
Write the following on the chalkboard (always try to do this before the lesson starts):
FILTERING AN INSOLUBLE SOLID FROM A LIQUID
YOU WILL NEED:
two beakersfilter papera funnelflourwater
METHOD
1. Make a solution of one teaspoon of flour and 20 ml of water.
2. Stir the solution for one minute.
3. Place the filter paper in the funnel.
4. Place the funnel over the second beaker.
5. Pour the flour and water solution through the funnel.
QUESTIONS
1. What is left on the filter paper?
2. What does the water look like that has gone through the filter?
2. Explain the following to the learners:
a. Read through the activity with the learners.
b. This can be done as a teacher demonstration or by arranging learners in groups of four to six.
c. The solution of flour and water must be well stirred before putting it through the funnel.
d. When they have finished the activity, the learners must answer the questions in their workbooks.
TOPIC: Solutions as special mixtures

84 85Grade 6 NATURAL SCIENCES & TECHNOLOGY Term 2 Grade 6 NATURAL SCIENCES & TECHNOLOGY Term 2
3. A model answer:
FILTERING AN INSOLUBLE SOLID FROM A LIQUID
1. Flour is left on the filter paper.
2. The water is much clearer than when it was mixed with the flour.
Checkpoint 2
Ask the learners the following questions to check their understanding at this point:
a. Can you name two ways of separating an insoluble solid from a liquid?
b. What separation method would you use to separate flour and water?
Answers to the checkpoint questions are as follows:
a. Filtering and settling are two ways of separating an insoluble solid from a liquid.
b. Filtering is the method used for separating flour and water.
3. Ask the learners if they have any questions and provide answers and explanations.
TOPIC: Solutions as special mixtures

86 87Grade 6 NATURAL SCIENCES & TECHNOLOGY Term 2 Grade 6 NATURAL SCIENCES & TECHNOLOGY Term 2
F REFERENCE POINTS FOR FURTHER DEVELOPMENTIf you need additional information or activities on this topic, you can find these in your textbook on the following pages:
NAME OF TEXTBOOK TOPIC PAGE NUMBER
Study & Master Solutions as special mixtures 72-74
Viva Solutions as special mixtures 71-72
Platinum Solutions as special mixtures -
Solutions for All Solutions as special mixtures 115-119
Day-by-Day Solutions as special mixtures 83
Oxford Solutions as special mixtures 64-65
Spot On Solutions as special mixtures 39
Top Class Solutions as special mixtures 64
Sasol Inzalo Bk A Solutions as special mixtures 149-150
G ADDITIONAL ACTIVITIES/ READINGIn addition, further reading, listening or viewing activities related to this sub-topic are available through the following web links:
1. http://k8schoollessons.com/insoluble-and-soluble-materials/ [Insoluble and soluble materials]
2. https://goo.gl/5YSHta (5min 50sec) [Separation techniques for insoluble substances]
3. https://goo.gl/LGxAF7 (2min 20sec) [Dissolving experiment]
TOPIC: Solutions as special mixtures

86 87Grade 6 NATURAL SCIENCES & TECHNOLOGY Term 2 Grade 6 NATURAL SCIENCES & TECHNOLOGY Term 2
TOPIC OVERVIEW:DissolvingTerm 2, Weeks 5A - 5B A. TOPIC OVERVIEW
Term 2, Weeks 5a - 5b
• This topic runs for ½ week.• It is presented over 2 lessons.• This topic’s position in the term is as follows:
LESS
ON WEEK 1 WEEK 2 WEEK 3 WEEK 4 WEEK 5
A B C A B C A B C A B C A B C
LESS
ON WEEK 6 WEEK 7 WEEK 8 WEEK 9 WEEK 10
A B C A B C A B C A B C A B C
B. SEQUENTIAL TABLE
GRADE 4 & 5 GRADE 6 GRADE 7 & 8
LOOKING BACK CURRENT LOOKING FORWARD• N/A • Rates of dissolving: factors
such as temperature, stirring, shaking and the grain size of the solute all affect the rate
• Properties of acids, bases and neutrals

88 89Grade 6 NATURAL SCIENCES & TECHNOLOGY Term 2 Grade 6 NATURAL SCIENCES & TECHNOLOGY Term 2
C. SCIENTIFIC VOCABULARYEnsure that you teach the following vocabulary at the appropriate place in the topic:
TERM EXPLANATION
1. rate How fast something happens
2. conditionsThe state of something according to its appearance, quality and working order
D. UNDERSTANDING THE USES / VALUE OF SCIENCEUnderstanding the nature of solids, liquids and gases is important for working in the fields of physics and chemistry.
E. PERSONAL REFLECTIONReflect on your teaching at the end of each topic:
Date completed:
Lesson successes:
Lesson challenges:
Notes for future improvement:

88 89Grade 6 NATURAL SCIENCES & TECHNOLOGY Term 2 Grade 6 NATURAL SCIENCES & TECHNOLOGY Term 2
TOPIC: Dissolving
5 ATerm 2, Week 5, Lesson ALesson Title: Factors that affect dissolvingTime for lesson: 1 hour
A POLICY AND OUTCOMESSub-Topic Rates of dissolving
CAPS Page Number 54
Lesson Objectives
By the end of the lesson, learners will be able to:
• define what dissolving is• describe how to find out whether solid can dissolve or not.
Specific Aims
1. DOING SCIENCE 2. UNDERSTANDING + CONNECTING IDEAS 3. UNDERSTANDING THE USES OF SCIENCES & INDIGENOUS KNOWLEDGE
SCIENCE PROCESS + DESIGN SKILLS1. Accessing & Recalling
Information 7. Raising Questions13. Interpreting
Information
2. Observing 8. Predicting 14. Designing
3. Comparing 9. Hypothesizing 15. Making/ constructing
4. Measuring 10. Planning Investigations16. Evaluating and
improving products
5. Sorting & Classifying 11. Doing Investigations 17. Communicating
6. Identifying problems & issues
12. Recording Information

90 91Grade 6 NATURAL SCIENCES & TECHNOLOGY Term 2 Grade 6 NATURAL SCIENCES & TECHNOLOGY Term 2
B POSSIBLE RESOURCESFor this lesson, you will need:
IDEAL RESOURCES IMPROVISED RESOURCES
Two glass beakers, water, fine salt, coarse salt, teaspoon, measuring cylinder (250ml), watch or clock with a second hand or stopwatch
Use a cellphone as a stopwatch; use jam jars for glass beakers, use a teacup to measure 250 ml.
C CLASSROOM MANAGEMENT1. Make sure that you are ready and prepared.2. Write the following question onto the chalkboard before the lesson starts:
Is oil a soluble substance?
3. Learners should enter the classroom and answer the question in their workbooks.
4. Discuss the answer with the learners.
5. Write the model answer onto the chalkboard.
No, oil does not dissolve in water so it is insoluble.
D ACCESSING INFORMATION1. Write the following onto the chalkboard (always try to do this before the lesson starts):
FACTORS AFFECTING THE RATE OF DISSOLIVING
1. When salt is added to water, the salt dissolves.
2. How quickly the salt dissolves in the water is called the rate of dissolving.
3. Stirring can make sugar dissolve in tea faster than without stirring.
4. Heating up the solution can increase the speed at which the solute dissolves.
5. Heating a solution adds energy to the particles of the substances.
6. This makes the particles move faster.
7. It also allows the particles of the solute to disperse faster through the solvent.
8. Sugar will dissolve quickly in hot tea but slowly in cold water.
9. The grain size of the solute can also affect the rate of dissolving.
10. The larger the grain size the slower the rate of dissolving.
11. Coarse salt will dissolve at a slower rate than fine salt.
2. Explain this to the learners as follows:
a. Remind the learners that, when a solute dissolves in a solvent, the solute particles move in between the solvent particles.
b. We cannot see the salt because it has dissolved.
TOPIC: Dissolving

90 91Grade 6 NATURAL SCIENCES & TECHNOLOGY Term 2 Grade 6 NATURAL SCIENCES & TECHNOLOGY Term 2
c. We can taste the salt in the water.
d. The rate of dissolving means how fast a solute will dissolve in a solvent.
e. Three things affect the rate that a solid will dissolve in a liquid: stirring, heating and grain size.
f. Read through the information on the chalkboard explaining these three things.
3. Give learners time to copy this information into their workbooks.
Checkpoint 1
Ask the learners the following questions to check their understanding at this point:
a. What is meant by ‘rate’?
b. Can you name three things that can affect the rate of dissolving?
Answers to the checkpoint questions are as follows:
a. Rate means how fast something happens.
b. Stirring, heating and grain size can affect the rate of dissolving.
E CONCEPTUAL DEVELOPMENT1. Activity: Investigate how grain size affects the rate of dissolving.
Write the following on the chalkboard (always try to do this before the lesson starts):
INVESTIGATE HOW GRAIN SIZE AFFECTS THE RATE OF DISSOLVING
YOU WILL NEED:
two beakerswaterfine saltcoarse saltteaspoonmeasuring cylinder (250ml)watch or clock with a second hand or stopwatch.
METHOD 1
1. Use the measuring cylinder to pour exactly 200 ml of water into each of the two beakers.
2. Measure a flat teaspoon (5ml) of fine salt.
3. Add it to the first beaker.
4. Stir the solution and time how long it takes for all the salt to dissolve.
5. Record the time in minutes and seconds.
6. Repeat the above four steps but use coarse salt.
TOPIC: Dissolving

92 93Grade 6 NATURAL SCIENCES & TECHNOLOGY Term 2 Grade 6 NATURAL SCIENCES & TECHNOLOGY Term 2
7. Copy and complete the table in your workbooks. 8. Write a conclusion by completing the sentence.
TABLE OF RESULTS
CONCLUSION
1. The fine salt dissolved in ___ minutes and ___ seconds.
2. The coarse salt dissolved in ___ minutes and ___ seconds.
3. Therefore the ___ salt took the shortest time to dissolve.
4. The ___ salt had the fastest rate of dissolving.
2. Explain the following to the learners:
a. This can be done in groups or as a teacher demonstration.
b. Gather all the equipment first.
c. They should draw the table in their workbooks before they start.
d. To make this a fair test, the amount of salt must be the same.
e. Accurate recording of time is important: start timing as soon as the salt is tipped into the beaker.
f. Learners must write the conclusion by completing the sentences in their workbooks.
3. Times for the table will differ. The coarse salt will take longer to dissolve.
4. Model answer for the conclusion:
CONCLUSION
1. The fine salt dissolved in ___ minutes and ___ seconds.
2. The coarse salt dissolved in ___ minutes and ___ seconds.
3. Therefore, the fine salt took the shortest time to dissolve.
4. The fine salt had the fastest rate of dissolving.
Type of Salt Time taken to dissolve
fine salt
coarse salt
TOPIC: Dissolving

92 93Grade 6 NATURAL SCIENCES & TECHNOLOGY Term 2 Grade 6 NATURAL SCIENCES & TECHNOLOGY Term 2
Checkpoint 2
Ask the learners the following questions to check their understanding at this point:
a. Coarse salt will dissolve faster than fine salt: True or False?
b. In the experiment, the same amount of water had to be used in both beakers. Why?
Answers to the checkpoint questions are as follows:
a. False. Fine salt will dissolve faster than coarse salt.
b. For the experiment to be fair, the same amount of water had to be used.
5. Ask the learners if they have any questions and provide answers and explanations.
F REFERENCE POINTS FOR FURTHER DEVELOPMENTIf you need additional information or activities on this topic, you can find these in your textbook on the following pages:
NAME OF TEXTBOOK TOPIC PAGE NUMBER
Study & Master Dissolving 75-76
Viva Dissolving 73-75; 77-78
Platinum Dissolving 81-83
Solutions for All Dissolving 127-128
Day-by-Day Dissolving 86-87
Oxford Dissolving 66-69
Spot On Dissolving 40-41
Top Class Dissolving 66-67; 71
Sasol Inzalo Bk A Dissolving 156-160
G ADDITIONAL ACTIVITIES/ READINGIn addition, further reading, listening or viewing activities related to this sub-topic are available through the following web links:
1. http://e-classroom.co.za/wp-content/uploads/2015/05/EngGr6T2-NS-Matter-and-materials-Dissolving-Rates-of-dissolving.pdf [Dissolving]
2. https://goo.gl/y72oK6 (2min 44sec) [Factors that affect dissolving]
3. https://goo.gl/tEMx7R (7min 37sec) [Rate of dissolving]
TOPIC: Dissolving

94 95Grade 6 NATURAL SCIENCES & TECHNOLOGY Term 2 Grade 6 NATURAL SCIENCES & TECHNOLOGY Term 2
TOPIC: Dissolving
5 BTerm 2, Week 5, Lesson BLesson Title: Investigating rates of dissolvingTime for lesson: 1 hour
A POLICY AND OUTCOMESSub-Topic Rates of dissolving
CAPS Page Number 54
Lesson Objectives
By the end of the lesson, learners will be able to:
• investigate the effects of three factors on the rate of dissolving• record the results of the investigations in a table• draw a bar graph to display the results of an investigation.
Specific Aims
1. DOING SCIENCE 2. UNDERSTANDING + CONNECTING IDEAS 3. UNDERSTANDING THE USES OF SCIENCES & INDIGENOUS KNOWLEDGE
SCIENCE PROCESS + DESIGN SKILLS1. Accessing & Recalling
Information 7. Raising Questions 13. Interpreting
Information
2. Observing 8. Predicting 14. Designing
3. Comparing 9. Hypothesizing 15. Making/ constructing
4. Measuring 10. Planning Investigations16. Evaluating and
improving products
5. Sorting & Classifying 11. Doing Investigations 17. Communicating
6. Identifying problems & issues
12. Recording Information

94 95Grade 6 NATURAL SCIENCES & TECHNOLOGY Term 2 Grade 6 NATURAL SCIENCES & TECHNOLOGY Term 2
B POSSIBLE RESOURCESFor this lesson, you will need:
IDEAL RESOURCES IMPROVISED RESOURCES
Three beakers, cold water, warm water, hot water, a teaspoon, salt
Glass jars for beakers
C CLASSROOM MANAGEMENT1. Make sure that you are ready and prepared.2. Write the following question onto the chalkboard before the lesson starts:
What are the three factors that affect the rate of dissolving?
3. Learners should enter the classroom and answer the question in their workbooks.
4. Discuss the answer with the learners.
5. Write the model answer onto the chalkboard.
Stirring, temperature and grain size affect the rate of dissolving.
D ACCESSING INFORMATION1. Write the following onto the chalkboard (always try to do this before the lesson starts):
A FAIR TEST
1. Scientists plan their investigations carefully.
2. This means that conditions must be the same so that they do not affect the results.
3. For example, the containers must be the same size.
4. The same amounts of liquids and solids must be used for each test.
5. The same samples might need to be tested for the same time.
2. Explain this to the learners as follows:
a. To do a scientific investigation, the tests must be fair.
b. This means the same amount of liquids and solids should be used.
c. If you used twice the amount of salt in the same amount of liquid for a test, it would not be a fair test.
3. Give learners time to copy this information into their workbooks.
TOPIC: Dissolving

96 97Grade 6 NATURAL SCIENCES & TECHNOLOGY Term 2 Grade 6 NATURAL SCIENCES & TECHNOLOGY Term 2
Checkpoint 1
Ask the learners the following questions to check their understanding at this point:
a. In an investigation of the rates of dissolving, the amount of liquid used should be kept the same: True or False?
b. In an investigation of the rates of dissolving, the amounts of solids used should be kept the same: True or False?
Answers to the checkpoint questions are as follows:
a. True
b. True
E CONCEPTUAL DEVELOPMENT1. Activity: Investigate how grain size affects the rate of dissolving.
Write the following on the chalkboard (always try to do this before the lesson starts):
INVESTIGATE THE RATE OF DISSOLVING AT DIFFERENT TEMPERATURES
YOU WILL NEED:
three beakerscold waterwarm waterhot watera teaspoonsalt.
METHOD 1
1. Label the beakers COLD, WARM and HOT.
2. Add 125ml of cold water to the beaker marked COLD.
3. Add one flat teaspoon (5ml) of salt to this beaker.
4. Stir the mixture until all the salt dissolves.
5. Record the time it takes to dissolve fully.
6. Repeat steps 2 to 5 with warm water and hot water.
7. Work carefully and safely with the hot water.
8. Fill the results in on the table.
9. Record how long it takes for all the salt to dissolve.
TOPIC: Dissolving

96 97Grade 6 NATURAL SCIENCES & TECHNOLOGY Term 2 Grade 6 NATURAL SCIENCES & TECHNOLOGY Term 2
Table to record time taken for salt to dissolve:
10. Write a conclusion in your workbooks.
11. Display the results in a bar graph similar to the one below. Fill in the times from your investigation.
Results of dissolving practical task
2. Explain the following to the learners:
a. This investigation can be done by groups of learners or as a teacher demonstration.
b. Make sure that the investigation is carried out accurately.
c. Learners must draw the table in their workbooks before they start the investigation.
d. A conclusion must be written on completion of this investigation.
e. Explain to the learners how to draw a bar graph.
f. The temperature must be on the vertical axis.
g. The types of water must be on the horizontal axis.
h. Learners must then fill in the data from their investigations.
i. Learners must complete the bar graph by drawing in the bars.
j. The left axis must be given a label: Time (minutes).
Water temperature Time (minutes and seconds)
cold water
warm water
hot water
Tim
e in
min
utes
TOPIC: Dissolving

98 99Grade 6 NATURAL SCIENCES & TECHNOLOGY Term 2 Grade 6 NATURAL SCIENCES & TECHNOLOGY Term 2
3. A model answer:
Conclusion:
The rate of dissolving was fastest with the hot water and slowest with the cold water.
4. Write the following on the chalkboard (always try to do this before the lesson starts):
INVESTIGATE THE RATE OF DISSOLVING WHEN A MIXTURE IS STIRRED
YOU WILL NEED:
two beakerswatera teaspoonsalt.
METHOD 1
1. Label the beakers STIRRED and NOT STIRRED.
2. Add 125ml of water to each beaker.
3. Add one flat teaspoon (5ml) of salt to each beaker.
4. Stir the mixture of the beaker marked STIRRED until all the salt dissolves.
5. Record the time it takes to dissolve fully.
6. Repeat steps 4 to 5 but do not stir the mixture.
7. Write a conclusion in your workbooks.
5. A model answer:
Conclusion:
The rate of dissolving was fastest when the mixture was stirred.
Checkpoint 2
Ask the learners the following questions to check their understanding at this point:
a. What is the temperature of the water in which salt dissolves at the fastest rate: hot, warm or cold?
b. What else will make the rate of dissolving faster?
Answers to the checkpoint questions are as follows:
a. Salt will dissolve the fastest in hot water.
b. Stirring will make salt dissolve faster.
6. Ask the learners if they have any questions and provide answers and explanations.
TOPIC: Dissolving

98 99Grade 6 NATURAL SCIENCES & TECHNOLOGY Term 2 Grade 6 NATURAL SCIENCES & TECHNOLOGY Term 2
F REFERENCE POINTS FOR FURTHER DEVELOPMENTIf you need additional information or activities on this topic, you can find these in your textbook on the following pages:
NAME OF TEXTBOOK TOPIC PAGE NUMBER
Study & Master Dissolving 77-80
Viva Dissolving 75-80
Platinum Dissolving 86-87
Solutions for All Dissolving 131-143
Day-by-Day Dissolving 87-90
Oxford Dissolving 67-6
Spot On Dissolving 40-41
Top Class Dissolving 72-73
Sasol Inzalo Bk A Dissolving 161-169
G ADDITIONAL ACTIVITIES/ READINGIn addition, further reading, listening or viewing activities related to this sub-topic are available through the following web links:
1. https://goo.gl/XnmGnV [Rates of dissolving]
2. https://goo.gl/BkdK3Y (1min 34sec) [How water dissolves salt]
3. https://goo.gl/QjZ7ep (1min 37sec) [Rate of dissolving wrt temperature]
TOPIC: Dissolving

100 101Grade 6 NATURAL SCIENCES & TECHNOLOGY Term 2 Grade 6 NATURAL SCIENCES & TECHNOLOGY Term 2
TOPIC OVERVIEW:Mixtures as water resourcesTerm 2, Weeks 5C - 7A A. TOPIC OVERVIEW
Term 2, Weeks 5c - 7a
• This topic runs for 1½ weeks.• It is presented over 5 lessons.• This topic’s position in the term is as follows:
LESS
ON WEEK 1 WEEK 2 WEEK 3 WEEK 4 WEEK 5
A B C A B C A B C A B C A B C
LESS
ON WEEK 6 WEEK 7 WEEK 8 WEEK 9 WEEK 10
A B C A B C A B C A B C A B C
B. SEQUENTIAL TABLE
GRADE 4 & 5 GRADE 6 GRADE 7 & 8
LOOKING BACK CURRENT LOOKING FORWARD• Living and non-living things• What plants need to grow
• Water pollution: pollution by insoluble substances, soluble substances, living germs
• Importance of wetlands: natural wetlands remove soluble and insoluble substances, regulate flow of water
• Requirements for sustaining life
• Sorting and recycling materials
• Ecosystems: balance of ecosystems; conservation of ecosystems
• Micro-organisms: harmful micro-organisms

100 101Grade 6 NATURAL SCIENCES & TECHNOLOGY Term 2 Grade 6 NATURAL SCIENCES & TECHNOLOGY Term 2
C. SCIENTIFIC VOCABULARYEnsure that you teach the following vocabulary at the appropriate place in the topic:
TERM EXPLANATION
1. precious Of great value, not to be wasted
2. threat A person or thing likely to cause damage or danger
3. essential Absolutely necessary, or extremely important
4. suffocate Die from lack of air or inability to breathe
5. fertilisers Substances put into soil to make crops grow
6. insecticides Chemicals used to kill insect pests
7. filterA sieve that can separate solid substances from a liquid and so making the liquid cleaner
8. brainstormA group discussion to think of as many ideas as you can in order to solve a problem
9. slogan Short, catchy saying
10. visual A picture or drawing
11. harm Cause damage or hurt
D. UNDERSTANDING THE USES / VALUE OF SCIENCEWater is one of our most precious resources. Our lives depend on the availability of clean water. If we pollute our water, it will not be safe for us to drink. Preventing water pollution is necessary. Wetlands promote biodiversity as they provide habitats to a variety of animals and plants.
E. PERSONAL REFLECTIONReflect on your teaching at the end of each topic:
Date completed:
Lesson successes:
Lesson challenges:
Notes for future improvement:

102 103Grade 6 NATURAL SCIENCES & TECHNOLOGY Term 2 Grade 6 NATURAL SCIENCES & TECHNOLOGY Term 2
TOPIC: Mixtures as water resources
5 CTerm 2, Week 5, Lesson CLesson Title: Water pollutionTime for lesson: 1 hour
A POLICY AND OUTCOMESSub-Topic Water pollution
CAPS Page Number 54
Lesson Objectives
By the end of the lesson, learners will be able to:
• investigate the effects of three factors on the rate of dissolving• record the results of the investigations in a table• draw a bar graph to display the results of an investigation.
Specific Aims
1. DOING SCIENCE 2. UNDERSTANDING + CONNECTING IDEAS 3. UNDERSTANDING THE USES OF SCIENCES & INDIGENOUS KNOWLEDGE
SCIENCE PROCESS + DESIGN SKILLS1. Accessing & Recalling
Information 7. Raising Questions13. Interpreting
Information
2. Observing 8. Predicting 14. Designing
3. Comparing 9. Hypothesizing 15. Making/ constructing
4. Measuring 10. Planning Investigations16. Evaluating and
improving products
5. Sorting & Classifying 11. Doing Investigations 17. Communicating
6. Identifying problems & issues 12. Recording Information

102 103Grade 6 NATURAL SCIENCES & TECHNOLOGY Term 2 Grade 6 NATURAL SCIENCES & TECHNOLOGY Term 2
B POSSIBLE RESOURCESFor this lesson, you will need:
IDEAL RESOURCES IMPROVISED RESOURCES
Resource 9: Water pollution: A river in Grabouw
Resource 10: iSimangaliso Wetland Park
Resource 11: Stop water pollution poster
Resource 12: Water pollution poster
A piece of A4 blank paper for each pair of learners
C CLASSROOM MANAGEMENT1. Make sure that you are ready and prepared.2. Write the following question onto the chalkboard before the lesson starts:
Will sugar dissolve faster in cold water, warm water or hot water?
3. Learners should enter the classroom and answer the question in their workbooks.
4. Discuss the answer with the learners.
5. Write the model answer onto the chalkboard.
Sugar will dissolve faster in hot water.
D ACCESSING INFORMATION1. Write the following onto the chalkboard (always try to do this before the lesson starts):
WATER POLLUTION
1. South Africa is a dry country.
2. Water pollution is when water is made dirty.
3. Polluted water cannot be used as it is unhealthy.
4. South Africa’s water is a precious resource.
5. It is under threat.
6. Water in an ecosystem is essential because living things need it to live.
7. Water also provides a place to live.
8. There are many water habitats: the ocean, rivers, ponds, wetlands and lakes.
TOPIC: Mixtures as water resources

104 105Grade 6 NATURAL SCIENCES & TECHNOLOGY Term 2 Grade 6 NATURAL SCIENCES & TECHNOLOGY Term 2
2. Explain this to the learners as follows:
a. South Africa gets an average rainfall of 450mm per year.
b. The world average is 860mm per year.
c. South Africa gets just over half the world average.
d. South Africa’s water is a precious resource.
e. You have already learnt about the importance of water for plants and animals.
f. Animals and plants need water to survive.
g. We need to look after our water and not pollute it.
h. Water in an ecosystem is essential because living things need it to live.
i. Water also provides a place to live.
j. There are many water habitats: the ocean, rivers, ponds, wetlands and lakes.
3. Give learners time to copy this information into their workbooks.
Checkpoint 1
Ask the learners the following questions to check their understanding at this point:
a. What is water pollution?b. Can you name three water habitats?
Answers to the checkpoint questions are as follows:
a. Water pollution is when water is made dirty.
b. Any three of the following: the ocean, rivers, ponds, wetlands, lakes.
E CONCEPTUAL DEVELOPMENT1. Activity: Investigate how grain size affects the rate of dissolving.
Write the following on the chalkboard (always try to do this before the lesson starts):
WATER POLLUTION
1. Water pollution affects drinking water.
2. People can catch diseases and die from drinking polluted water.
3. Cholera and diarrhoea are common diseases caused by polluted water.
4. Keeping our water clean is important for our health.
5. Everyone can get involved in dealing with water pollution.
TOPIC: Mixtures as water resources

104 105Grade 6 NATURAL SCIENCES & TECHNOLOGY Term 2 Grade 6 NATURAL SCIENCES & TECHNOLOGY Term 2
ACTIVITY
1. Design a poster to encourage everyone to keep our water clean.
2. With a friend, brainstorm ideas about a poster.
3. Write down or draw these ideas.
4. You must have a slogan.
5. A slogan is a short phrase used in advertising.
6. Make your poster visual with not too much writing.
2. Explain to the learners the following:
a. A poster can have a lot of impact on the people who read it.
b. A poster should have a large drawing and not too much writing.
c. Show learners Resource 11: ‘Stop water pollution poster’.
d. If this poster was put up near a river, it would make people think that they should not dump their rubbish into the river.
e. Show learners Resource 12: ‘Water pollution poster’.
f. This poster shows that anything put into our rivers will affect our drinking water.
g. Let learners work in pairs.
h. Give each pair of learners a blank A4 piece of paper on which to draw their poster.
3. Give learners time to copy the information about water pollution into their workbooks.
4. Give learners time to design and draw their poster.
5. When all learners have completed their posters, put these up around the classroom.
6. These posters could also be put up around the school.
Checkpoint 2
Ask the learners the following questions to check their understanding at this point:
a. Can you name one disease that it is possible to get from polluted water?b. What is a slogan?
Answers to the checkpoint questions are as follows:
a. Either cholera or diarrhoea is an acceptable answer.
b. A slogan is a short phrase used in advertising.
7. Ask the learners if they have any questions and provide answers and explanations
TOPIC: Mixtures as water resources
106 107Grade 6 NATURAL SCIENCES & TECHNOLOGY Term 2 Grade 6 NATURAL SCIENCES & TECHNOLOGY Term 2
F REFERENCE POINTS FOR FURTHER DEVELOPMENTIf you need additional information or activities on this topic, you can find these in your textbook on the following pages:
NAME OF TEXTBOOK TOPIC PAGE NUMBER
Study & Master Mixtures and water resources 81
Viva Mixtures and water resources 82-83
Platinum Mixtures and water resources 91-92
Solutions for All Mixtures and water resources 145-147
Day-by-Day Mixtures and water resources 94
Oxford Mixtures and water resources 70
Spot On Mixtures and water resources 42-43
Top Class Mixtures and water resources 74-75
Sasol Inzalo Bk A Mixtures and water resources 174-178
G ADDITIONAL ACTIVITIES/ READINGIn addition, further reading, listening or viewing activities related to this sub-topic are available through the following web links:
1. http://eschooltoday.com/pollution/water-pollution/what-is-water-pollution.html [Your cool facts and tips on water pollution]
2. https://goo.gl/CyyCCW (2min 6sec) [What is pollution?]
3. https://goo.gl/cdzqG2 (2min 46sec) [Water pollution for kids]
4. https://goo.gl/ckWUTN (2min 49sec) [What is pollution? Lessons for kids]
TOPIC: Mixtures as water resources
106 107Grade 6 NATURAL SCIENCES & TECHNOLOGY Term 2 Grade 6 NATURAL SCIENCES & TECHNOLOGY Term 2
TOPIC: Mixtures as water resources
6 ATerm 2, Week 6, Lesson ALesson Title: Water pollution: insoluble substancesTime for lesson: 1 hour
A POLICY AND OUTCOMESSub-Topic Water pollution
CAPS Page Number 55
Lesson Objectives
By the end of the lesson, learners will be able to:
• describe how insoluble substances pollute our waters• find ways to lessen the impact of insoluble substances causing water pollution.
Specific Aims
1. DOING SCIENCE 2. UNDERSTANDING + CONNECTING IDEAS 3. UNDERSTANDING THE USES OF SCIENCES & INDIGENOUS KNOWLEDGE
SCIENCE PROCESS + DESIGN SKILLS1. Accessing & Recalling
Information 7. Raising Questions13. Interpreting
Information
2. Observing 8. Predicting 14. Designing
3. Comparing 9. Hypothesizing 15. Making/ constructing
4. Measuring 10. Planning Investigations16. Evaluating and
improving products
5. Sorting & Classifying 11. Doing Investigations 17. Communicating
6. Identifying problems & issues
12. Recording Information

108 109Grade 6 NATURAL SCIENCES & TECHNOLOGY Term 2 Grade 6 NATURAL SCIENCES & TECHNOLOGY Term 2
B POSSIBLE RESOURCESFor this lesson, you will need:
IDEAL RESOURCES IMPROVISED RESOURCES
Resource 9: A river in Grabouw
Resource 13: A dead bird in an oil spill
Resource 14: A whale caught in a fishing net
Resource 16: Dead fish and plastic bottles
A piece of A4 blank paper for each pair of learners
C CLASSROOM MANAGEMENT1. Make sure that you are ready and prepared.2. Write the following question onto the chalkboard before the lesson starts:
What is water pollution?
3. Learners should enter the classroom and answer the question in their workbooks.
4. Discuss the answer with the learners.
5. Write the model answer onto the chalkboard.
Water pollution occurs when water is made dirty.
D ACCESSING INFORMATION1. Write the following onto the chalkboard (always try to do this before the lesson starts):
INSOLUBLE SUBSTANCES THAT POLLUTE WATER
1. Insoluble substances do not dissolve in water.
2. In water, these substances make the water look dirty and smell bad.
3. Examples are plastic bags, tyres, broken bottles, oil, and tin cans.
4. People pollute water by dumping insoluble waste into rivers, dams or the sea.
5. Plastic waste kills many animals every year.
6. Oil spills from ships pollute the sea and harm sea life.
7. Oil does not wash off the birds’ feathers.
8. Birds cannot fly with oil on their feathers.
9. They then starve and die.
10. Fish, seals, penguins and whales get tangled in fishing lines.
11. This causes injuries to their bodies.
12. Insoluble substances are visible – you can see that they are waste.
TOPIC: Mixtures as water resources

108 109Grade 6 NATURAL SCIENCES & TECHNOLOGY Term 2 Grade 6 NATURAL SCIENCES & TECHNOLOGY Term 2
2. Explain this to the learners as follows:
a. Remind learners that they learnt that an insoluble substance is one that will not dissolve in a liquid.
b. Insoluble substances cause a lot of water pollution when they are dumped into rivers and the oceans.
c. Show learners Resource 9: ‘A river in Grabouw’.
d. Point out all the insoluble substances dumped in the river.
e. Show learners Resource 14: ‘A whale caught in a fishing net’.
f. Point out how the fishing net prevented the whale from opening its mouth in order for it to breathe and eat.
g. Show learners Resource 16: ‘Dead fish and plastic bottles’.
h. Point out how the water becomes polluted and the habitat for living things is then threatened.
i. Plastic, oil, glass, and tins are examples of insoluble substances.
j. Oil spills from ships cause a lot of water pollution.
k. Oil gets onto the wings of water birds and they cannot fly.
l. Show learners Resource 13: ‘A dead bird in an oil spill’.
m. Oil also stops oxygen from mixing with the water so fish and mammals die.
3. Give learners time to copy this information into their workbooks.
Checkpoint 1
Ask the learners the following questions to check their understanding at this point:
a. Can you give an example of an insoluble substance that causes water pollution?b. What insoluble substance does not wash off birds’ feathers?
Answers to the checkpoint questions are as follows:
a. Any of the following answers are correct: any plastic item, oil, glass, and tins.
b. Oil does not wash off birds’ feathers.
TOPIC: Mixtures as water resources

110 111Grade 6 NATURAL SCIENCES & TECHNOLOGY Term 2 Grade 6 NATURAL SCIENCES & TECHNOLOGY Term 2
E CONCEPTUAL DEVELOPMENT1. Write the following on the chalkboard (always try to do this before the lesson starts):
ACTIVITY: INSOLUBLE SUBSTANCES CAUSE WATER POLLUTION
1. Draw and fill in the diagram below. 2. Add in as many lines as you need. 3. At the end of each line, write in an insoluble substance that pollutes our waters. Write
as many insoluble substances as you can.
4. Write down two sentences describing two ways in which you could help stop water pollution caused by insoluble substances.
2. Explain the following to the learners:
a. Ask learners to draw the diagram and to fill in as many insoluble substances that pollute our waters as possible.
b. Learners must then write two sentences with suggestions on what they could do to stop water pollution.
c. When learners have completed this activity, discuss the answers in class.
3. A model answer:
ACTIVITY: INSOLUBLE SUBSTANCES CAUSE WATER POLLUTION
1. Answers may vary. Check that all answers are insoluble substances.
4. Discuss the answers that learners have written down. Possible answers are:
a. I could get a group of friends, give them gloves and we could do a clean-up.
b. We could write a letter to packaging companies asking them to use paper and cardboard for packaging instead of plastic.
c. We could put up posters around the school to educate learners about water pollution.
Insoluble substances that cause water
pollution
broken glass bottles
plastic bottles
tin cans
plastic bags
oil
Insoluble substances that cause water
pollution
TOPIC: Mixtures as water resources
110 111Grade 6 NATURAL SCIENCES & TECHNOLOGY Term 2 Grade 6 NATURAL SCIENCES & TECHNOLOGY Term 2
F REFERENCE POINTS FOR FURTHER DEVELOPMENTIf you need additional information or activities on this topic, you can find these in your textbook on the following pages:
NAME OF TEXTBOOK TOPIC PAGE NUMBER
Study & Master Mixtures and water resources 82
Viva Mixtures and water resources 84
Platinum Mixtures and water resources 92-93
Solutions for All Mixtures and water resources 147
Day-by-Day Mixtures and water resources 95
Oxford Mixtures and water resources 71
Spot On Mixtures and water resources 43
Top Class Mixtures and water resources 75-76
Sasol Inzalo Bk A Mixtures and water resources 174-177
G ADDITIONAL ACTIVITIES/ READINGIn addition, further reading, listening or viewing activities related to this sub-topic are available through the following web links:
1. https://goo.gl/3eZZao [e-classroom Water Pollution]
2. https://goo.gl/mUTvNN (2min 49sec) [Save water to help the Earth]
3. https://goo.gl/9pio8D (1min 55sec) [What is water pollution?]
4. https://goo.gl/De95sW (2min 8sec) [The life of water]
Checkpoint 2
Ask the learners the following questions to check their understanding at this point:
a. Can you describe how an insoluble substance can kill a whale? b. How does an oil spill kill fish?
Answers to the checkpoint questions are as follows:
a. A fishing net can get caught around the mouth of the whale which will then suffocate or starve.
b. Oil stops oxygen from mixing with the water, and the fish then suffocate.
5. Ask the learners if they have any questions and provide answers and explanations.
TOPIC: Mixtures as water resources

112 113Grade 6 NATURAL SCIENCES & TECHNOLOGY Term 2 Grade 6 NATURAL SCIENCES & TECHNOLOGY Term 2
TOPIC: Mixtures as water resources
6 BTerm 2, Week 6, Lesson BLesson Title: Water pollution:soluble substances and germsTime for lesson: 1 hour
A POLICY AND OUTCOMESSub-Topic Water pollution
CAPS Page Number 55
Lesson Objectives
By the end of the lesson, learners will be able to:
• describe how soluble substances and living germs pollute our waters• find ways to lessen the impact of soluble substances and living germs causing water pollution.
Specific Aims
1. DOING SCIENCE 2. UNDERSTANDING + CONNECTING IDEAS 3. UNDERSTANDING THE USES OF SCIENCES & INDIGENOUS KNOWLEDGE
SCIENCE PROCESS + DESIGN SKILLS1. Accessing & Recalling
Information 7. Raising Questions 13. Interpreting
Information
2. Observing 8. Predicting 14. Designing
3. Comparing 9. Hypothesizing 15. Making/ constructing
4. Measuring 10. Planning Investigations16. Evaluating and
improving products
5. Sorting & Classifying 11. Doing Investigations 17. Communicating
6. Identifying problems & issues 12. Recording Information

112 113Grade 6 NATURAL SCIENCES & TECHNOLOGY Term 2 Grade 6 NATURAL SCIENCES & TECHNOLOGY Term 2
B POSSIBLE RESOURCESFor this lesson, you will need:
IDEAL RESOURCES IMPROVISED RESOURCES
Resource 15: Dirty water flowing into a river
Resource 17: Washing on a river bank
C CLASSROOM MANAGEMENT1. Make sure that you are ready and prepared.2. Write the following question onto the chalkboard before the lesson starts:
Why is an oil spill dangerous for birds?
3. Learners should enter the classroom and answer the question in their workbooks.
4. Discuss the answer with the learners.
5. Write the model answer onto the chalkboard.
Oil does not wash off the birds’ feathers and then they cannot fly, so they die.
D ACCESSING INFORMATION1. Write the following onto the chalkboard (always try to do this before the lesson starts):
SOLUBLE SUBSTANCES THAT POLLUTE WATER
1. Washing powder and dishwashing liquid are soluble.
2. When these substances go into our natural water, they pollute the water.
3. Farmers use chemical fertilisers.
4. These fertilisers make crops grow.
5. Farmers spray chemicals on their crops to kill pests.
6. These chemicals are called insecticides.
7. Fertilisers and chemicals dissolve in rainwater and get washed into rivers and the ocean.
8. These soluble substances pollute water and kill many animals that live in water habitats.
9. Factories and mines produce waste materials that pollute water.
10. These waste materials contain acid and other poisonous substances.
11. Living organisms are harmed by these poisonous substances.
TOPIC: Mixtures as water resources

114 115Grade 6 NATURAL SCIENCES & TECHNOLOGY Term 2 Grade 6 NATURAL SCIENCES & TECHNOLOGY Term 2
2. Explain this to the learners as follows:
a. Living organisms are affected by water pollution.
b. Harmful substances get washed into rivers and oceans.
c. These poisonous substances harm and also kill living organisms.
d. Show learners Resource 17: ‘Washing on a river bank’.
e. Washing powder gets mixed into the water and this pollutes the river.
f. Washing needs to be done elsewhere and the dirty water should not be thrown into the river.
g. Show learners Resource 15: ‘Dirty water flowing onto a river’.
h. Factories put a lot of polluted water back into our rivers.
i. The water needs to be treated before this happens.
j. Read through the information on the chalkboard.
k. Make sure the learners understand this information.
3. Give learners time to copy this information into their workbooks.
4. Write the following on the chalkboard (always try to do this before the lesson starts):
GERMS THAT POLLUTE WATER
1. Germs are living organisms that cannot be seen.
2. In many places in South Africa, there are no proper toilets or washing facilities.
3. Human waste gets dumped or washed into nearby rivers.
4. Human waste has living germs that can cause diseases.
5. Diarrhoea and cholera can occur.
5. Explain this to the learners as follows:
a. Germs are living creatures that are invisible.
b. Germs in drinking water cause diseases.
c. Diarrhoea causes a person to lose lots of water.
d. Young children can die from this.
Checkpoint 1
Ask the learners the following questions to check their understanding at this point:
a. What two things do farmers use that pollute water?b. Can you name one disease that is caused by polluted water?
Answers to the checkpoint questions are as follows:
a. Farmers use fertilisers and insecticides which pollute water.
b. Either of the following answers: diarrhoea or cholera.
TOPIC: Mixtures as water resources

114 115Grade 6 NATURAL SCIENCES & TECHNOLOGY Term 2 Grade 6 NATURAL SCIENCES & TECHNOLOGY Term 2
E CONCEPTUAL DEVELOPMENT1. Write the following on the chalkboard (always try to do this before the lesson starts):
ACTIVITY: INSOLUBLE SUBSTANCES CAUSE WATER POLLUTION
1. Draw and fill in the diagram below. 2. Add in as many lines as you need. 3. At the end of each line, write in an insoluble substance that pollutes our waters. Write
as many insoluble substances as you can.
4. Write down two sentences describing two ways in which people could help stop water pollution caused by soluble substances or germs.
2. Explain the following to the learners:
a. Ask learners to draw the diagram and to fill in as many soluble substances that pollute our waters as possible.
b. Learners must then write two sentences with suggestions on what they could do to stop water pollution caused by soluble substances or germs.
c. When learners have completed this activity, discuss the answers in class.
3. A model answer:
ACTIVITY: INSOLUBLE SUBSTANCES CAUSE WATER POLLUTION
1. Answers may vary. Check that all answers are insoluble substances.
2. Discuss the answers that learners have written down. Possible answers are:
a. People could use as little soap and detergents as possible.
b. Farmers need to use as little fertiliser and insecticides as possible.
c. Farmers should try to use natural fertilisers and insecticides instead of chemical ones.
Soluble substances that cause water
pollution
fertilisers
insecticides
Human waste
Washing powder
Dishwashing liquid
Soluble substances that cause water
pollution
TOPIC: Mixtures as water resources

116 117Grade 6 NATURAL SCIENCES & TECHNOLOGY Term 2 Grade 6 NATURAL SCIENCES & TECHNOLOGY Term 2
d. Children must not play or drink polluted water.
e. Everyone must wash their hands with soap after going to the toilet.
f. Broken toilets should be reported.
Checkpoint 2
Ask the learners the following questions to check their understanding at this point:
a. Can you name two soluble substances that pollute our water?b. Can you give one action that can be taken with soluble substances to make our waters
less polluted?
Answers to the checkpoint questions are as follows:
a. Any of the following two: washing powder, dishwashing liquid, human waste, insecticides, and fertilisers.
b. Any one of the following: People could use as little soap and detergents as possible; farmers need to use as little fertiliser and insecticides as possible; farmers should try to use natural fertilisers and insecticides, instead of chemical ones; and broken toilets should be reported.
4. Ask the learners if they have any questions and provide answers and explanations.
TOPIC: Mixtures as water resources

116 117Grade 6 NATURAL SCIENCES & TECHNOLOGY Term 2 Grade 6 NATURAL SCIENCES & TECHNOLOGY Term 2
F REFERENCE POINTS FOR FURTHER DEVELOPMENTIf you need additional information or activities on this topic, you can find these in your textbook on the following pages:
NAME OF TEXTBOOK TOPIC PAGE NUMBER
Study & Master Mixtures and water resources 82-83
Viva Mixtures and water resources 83-84
Platinum Mixtures and water resources 94-95
Solutions for All Mixtures and water resources 147-152
Day-by-Day Mixtures and water resources 95-97
Oxford Mixtures and water resources 72-73
Spot On Mixtures and water resources 42-43
Top Class Mixtures and water resources 76-78
Sasol Inzalo Bk A Mixtures and water resources 175-177
G ADDITIONAL ACTIVITIES/ READINGIn addition, further reading, listening or viewing activities related to this sub-topic are available through the following web links:
1. https://goo.gl/uPpFgG [Mixtures and water resources]
2. https://goo.gl/NgBGnJ (2min 29sec) [Why care about water?]
3. https://goo.gl/9yPmnH (4min 15sec] [The basics of freshwater]
TOPIC: Mixtures as water resources

118 119Grade 6 NATURAL SCIENCES & TECHNOLOGY Term 2 Grade 6 NATURAL SCIENCES & TECHNOLOGY Term 2
TOPIC: Mixtures as water resources
6 CTerm 2, Week 6, Lesson CLesson Title: Wetlands: removing substances from waterTime for lesson: 1½ hours
A POLICY AND OUTCOMESSub-Topic Importance of wetlands
CAPS Page Number 55
Lesson Objectives
By the end of the lesson, learners will be able to:
• describe what a wetland is • describe how wetlands remove harmful substances from water.
Specific Aims
1. DOING SCIENCE 2. UNDERSTANDING + CONNECTING IDEAS 3. UNDERSTANDING THE USES OF SCIENCES & INDIGENOUS KNOWLEDGE
SCIENCE PROCESS + DESIGN SKILLS1. Accessing & Recalling
Information 7. Raising Questions 13. Interpreting
Information
2. Observing 8. Predicting 14. Designing
3. Comparing 9. Hypothesizing 15. Making/ constructing
4. Measuring 10. Planning Investigations16. Evaluating and
improving products
5. Sorting & Classifying 11. Doing Investigations 17. Communicating
6. Identifying problems & issues
12. Recording Information

118 119Grade 6 NATURAL SCIENCES & TECHNOLOGY Term 2 Grade 6 NATURAL SCIENCES & TECHNOLOGY Term 2
B POSSIBLE RESOURCESFor this lesson, you will need:
IDEAL RESOURCES IMPROVISED RESOURCES
Resource 18: The Okavango Delta: Botswana
Resource 19: A natural wetland in Cape Town
Resource 33: How a wetland works
Resource 34: How a wetland works
Resource 35: How a wetland works
Resource 36: How a wetland works
C CLASSROOM MANAGEMENT1. Make sure that you are ready and prepared.2. Write the following question onto the chalkboard before the lesson starts:
What is one soluble substance that pollutes our waters?
3. Learners should enter the classroom and answer the question in their workbooks.
4. Discuss the answer with the learners.
5. Write the model answer onto the chalkboard.
Any of the following answers: fertilisers, insecticides, washing powder, dishwashing liquid.
D ACCESSING INFORMATION1. Write the following onto the chalkboard (always try to do this before the lesson starts):
WETLANDS
1. A wetland is a flat piece of land covered in shallow pools of water for most of the year.
2. Swamps, vleis and shallow lakes are examples of wetlands.
3. The water can be fresh or salty.
4. Wetlands are the habitat for many animals and plants.
5. They are important centres of biodiversity.
6. Some animals, like crocodiles and frogs, live there all the time.
7. Others, like fish and some birds, visit the area from time to time.
8. Wetlands can be large or small.
9. Wetlands clean our water.
TOPIC: Mixtures as water resources

120 121Grade 6 NATURAL SCIENCES & TECHNOLOGY Term 2 Grade 6 NATURAL SCIENCES & TECHNOLOGY Term 2
10. When water passes over a wetland, it slows down.
11. Some of the substances and particles in the water settle on the soil.
12. The plants in the wetland act as a filter.
13. They trap the larger dirt particles.
14. In wetlands, substances are separated from water by settling and filtering.
2. Explain this to the learners as follows:
a. Wetlands are important as they clean water.
b. Wetlands are flat pieces of land that are covered by water.
c. They can be large, like the Okavango Swamp.
d. They can be small, like a large puddle.
e. They are filled with water for most of the year.
f. Wetlands are filters.
g. The plants trap large particles of dirt in the water.
h. The slowing down of the flowing water makes some substances settle on the soil.
i. Show learners Resource 18: ‘The Okavango Delta: Botswana’.
j. This is one of the seven natural wonders of Africa.
k. It covers a large area.
l. Water is cleaned as it moves through the swamp area because the soluble substances settle when the flow of water slows down.
m. Show learners Resource 19: ‘A natural wetland in Cape Town’.
n. Point out the plants around the water.
o. These plants act as a filter to clean dirty water.
3. Give learners time to copy this information into their workbooks.
Checkpoint 1
Ask the learners the following questions to check their understanding at this point:a. What is a wetland?b. What two methods of separating do wetlands use to remove substances from water?
Answers to the checkpoint questions are as follows:a. A wetland is a flat piece of land that is covered in shallow water for most of the year. b. Wetlands separate substances from water by filtering and settling.
TOPIC: Mixtures as water resources

120 121Grade 6 NATURAL SCIENCES & TECHNOLOGY Term 2 Grade 6 NATURAL SCIENCES & TECHNOLOGY Term 2
E CONCEPTUAL DEVELOPMENT1. Write the following on the chalkboard (always try to do this before the lesson starts):
ACTIVITY: HOW WETLANDS CLEAN WATER
Rewrite and complete the sentences by choosing a word from the list.
biodiversity, filtering, settling, salty, plants
1. Wetlands are important centres for ____ as many different animals and ____ live there.
2. Wetlands separate substances from the water by ____ and ____.
3. The water in wetlands can be fresh or ___.
2. Explain the following to the learners:
c. Read through the list of words to make sure the learners understand their meaning.
d. Learners must rewrite the sentences and underline the word they have chosen.
3. A model answer:
ACTIVITY: HOW WETLANDS CLEAN WATER
1. Wetlands are important centres of biodiversity as many different animals and plants live there.
2. Wetlands separate substances from the water by filtering and settling.
3. The water in wetlands can be fresh or salty.
4. Draw the following on the chalkboard (always try to do this before the lesson starts:
HOW A WETLAND WORKS
Bacteria break down pollutants
Flow of ground water
Waterlogged soil stores water
Stored water is released slowly
Slows down flow of water
Pollutants and sediments are filtered
Provides habitat for plants and animals
How a wetland works
Clean water flows out
TOPIC: Mixtures as water resources

122 123Grade 6 NATURAL SCIENCES & TECHNOLOGY Term 2 Grade 6 NATURAL SCIENCES & TECHNOLOGY Term 2
5. Explain this to the learners as follows:
a. A wetland slows down the flow of water.
b. Insoluble substances are filtered by the plants.
c. Particles settle on the soil.
d. The soil holds water and stops flooding.
e. The stored water is released slowly.
f. Learners must do the drawing in their workbooks and include the arrows and labels.
g. Their drawing must have a heading.
h. Resources 33 – 36 needs to be handed out for learners to copy the drawing. Draw it onto the chalkboard if you can.
Checkpoint 2
Ask the learners the following questions to check their understanding at this point:
a. What type of water is found in wetlands?b. What two animals live in wetlands all year?
Answers to the checkpoint questions are as follows:
a. Water found in wetlands is salty or fresh.
b. Crocodiles and frogs live in wetlands all year.
6. Ask the learners if they have any questions and provide answers and explanations.
TOPIC: Mixtures as water resources

122 123Grade 6 NATURAL SCIENCES & TECHNOLOGY Term 2 Grade 6 NATURAL SCIENCES & TECHNOLOGY Term 2
F REFERENCE POINTS FOR FURTHER DEVELOPMENTIf you need additional information or activities on this topic, you can find these in your textbook on the following pages:
NAME OF TEXTBOOK TOPIC PAGE NUMBER
Study & Master Mixtures and water resources 81-83
Viva Mixtures and water resources 82-85
Platinum Mixtures and water resources 92-95
Solutions for All Mixtures and water resources 146-151
Day-by-Day Mixtures and water resources 98-99
Oxford Mixtures and water resources 74-75
Spot On Mixtures and water resources 42-43
Top Class Mixtures and water resources 74-77
Sasol Inzalo Bk A Mixtures and water resources 174-176
G ADDITIONAL ACTIVITIES/ READINGIn addition, further reading, listening or viewing activities related to this sub-topic are available through the following web links:
1. https://goo.gl/uPpFgG [Mixtures and water resources]
2. https://goo.gl/NgBGnJ (2min 29sec) [Why care about water?]
3. https://goo.gl/9yPmnH (4min 15sec] [The basics of freshwater]
TOPIC: Mixtures as water resources

124 125Grade 6 NATURAL SCIENCES & TECHNOLOGY Term 2 Grade 6 NATURAL SCIENCES & TECHNOLOGY Term 2
TOPIC: Mixtures as water resources
7 ATerm 2, Week 7, Lesson ALesson Title: Wetlands: Regulating the flow of waterTime for lesson: 1 hour
A POLICY AND OUTCOMESSub-Topic Importance of wetlands
CAPS Page Number 55
Lesson Objectives
By the end of the lesson, learners will be able to:
• describe how wetlands control floods• name some of South Africa’s wetlands
Specific Aims
1. DOING SCIENCE 2. UNDERSTANDING + CONNECTING IDEAS 3. UNDERSTANDING THE USES OF SCIENCES & INDIGENOUS KNOWLEDGE
SCIENCE PROCESS + DESIGN SKILLS1. Accessing & Recalling
Information 7. Raising Questions 13. Interpreting
Information
2. Observing 8. Predicting 14. Designing
3. Comparing 9. Hypothesizing 15. Making/ constructing
4. Measuring 10. Planning Investigations16. Evaluating and
improving products
5. Sorting & Classifying 11. Doing Investigations 17. Communicating
6. Identifying problems & issues 12. Recording Information

124 125Grade 6 NATURAL SCIENCES & TECHNOLOGY Term 2 Grade 6 NATURAL SCIENCES & TECHNOLOGY Term 2
B POSSIBLE RESOURCESFor this lesson, you will need:
IDEAL RESOURCES IMPROVISED RESOURCES
Resource 18: The Okavango Delta: Botswana
Resource 19: A wetland area in Cape Town
C CLASSROOM MANAGEMENT1. Make sure that you are ready and prepared.2. Write the following question onto the chalkboard before the lesson starts:
What is a wetland?
3. Learners should enter the classroom and answer the question in their workbooks.
4. Discuss the answer with the learners.
5. Write the model answer onto the chalkboard.
A wetland is flat piece of land covered in shallow water for most of the year.
D ACCESSING INFORMATION1. Write the following onto the chalkboard (always try to do this before the lesson starts):
WETLANDS CONTROL THE FLOW OF WATER
1. The mud and plants in a wetland act like a sponge.
2. They soak up water like a sponge.
3. When there is heavy rain, the wetland holds the water.
4. This prevents places downstream from being flooded.
5. This water slowly leaves the wetland and runs into the river.
6. Wetlands help to keep a steady flow of clean water.
7. They reduce the effects of floods and droughts.
8. The help to slow down soil erosion.
2. Explain this to the learners as follows:
a. Wetlands soak up water when it rains.
b. Long after the rains, the wetlands still hold this water in the soil and plants.
c. This water leaves the wetland slowly.
d. Wetlands are important as they make water available all year and they lessen the effect of flooding.
e. Show learners Resource 18: The Okavango Delta: Botswana.
f. The rains arrive in this area in late November and December.
TOPIC: Mixtures as water resources

126 127Grade 6 NATURAL SCIENCES & TECHNOLOGY Term 2 Grade 6 NATURAL SCIENCES & TECHNOLOGY Term 2
g. The Delta contains the water from these rains and releases them slowly throughout the rest of the year.
h. Show learners Resource 19: A wetland area in Cape Town.
i. This area is important for biodiversity and to clean the water that runs through it.
3. Give learners time to copy this information into their workbooks.
Checkpoint 1
Ask the learners the following questions to check their understanding at this point:
a. How do wetlands act like a sponge?
b. Can you name two good things that wetlands do?
Answers to the checkpoint questions are as follows:
a. Wetlands soak up water like a sponge.
b. Either two of the following: Wetlands help keep a steady flow of water throughout the year; Wetlands help reduce the effect of floods; Wetlands help to slow down soil erosion.
E CONCEPTUAL DEVELOPMENT1. Write the following on the chalkboard (always try to do this before the lesson starts):
THREATS TO WETLANDS
1. About half of South Africa’s wetlands have been lost.
2. They are often cleared for farmland.
3. Buildings are built on the flat piece of land in cities and towns.
4. The animals have to move away.
5. The plants normally die.
6. This will affect the quality of water in the river.
7. The water will not be as clean.
8. The flow of water will not be steady.
2. Explain the following to the learners:
a. Wetlands are an important resource as they keep our water clean.
b. We need to protect our wetlands.
c. If wetlands are lost, then biodiversity will be lost too.
TOPIC: Mixtures as water resources

126 127Grade 6 NATURAL SCIENCES & TECHNOLOGY Term 2 Grade 6 NATURAL SCIENCES & TECHNOLOGY Term 2
3. Write the following on the chalkboard (always try to do this before the lesson starts):
TASK: THE IMPACT OF LOSS OF WETLANDS
1. Write a report about the impact of loss of wetlands.
2. Give your report a title.
3. Include the following in your paragraph:
- what a wetland is
- why they are important for biodiversity
- why they are important for water quality
- why wetlands have been destroyed
- how this loss affects biodiversity and water quality.
4. Explain the following to the learners:
e. Wetlands are an important resource as they keep our water clean.
f. We need to protect our wetlands.
g. If wetlands are lost, then biodiversity will be lost too.
h. A report is a piece of writing that states the facts.
i. Tell learners to collect their facts first.
j. They can include diagrams.
k. The report must have a heading and clear paragraphs.
l. Read through the points to be included in the report to the learners.
m. If there is a wetland near the school, take the learners out to note the animals and plants that live in the habitats provided by the wetland.
n. Their report can be written about this particular habitat.
5. A model answer (answers will vary):
REPORT ON THE LOSS OF WETLANDS
A wetland is a flat piece of land covered by water for most of the year. It provides a habitat for many different animals and plants. Wetlands have high biodiversity. Animals like crocodiles and frogs live in wetlands throughout the year. Other animals visit the area at certain times of the year.
Wetlands also clean the water. They are natural filtration systems. Dirty water gets filtered as it moves through plants. Plants trap particles and disease-carrying organisms (germs) which would make the water unsafe.
Wetlands control the flow of water by storing rain water. This water is then released slowly to the rivers. This keeps rivers flowing at a steadier rate throughout the year.
TOPIC: Mixtures as water resources

128 129Grade 6 NATURAL SCIENCES & TECHNOLOGY Term 2 Grade 6 NATURAL SCIENCES & TECHNOLOGY Term 2
Nearly half of South Africa’s wetlands have been destroyed. Farmers clear the area to plant crops. Builders clear the flat piece of land as it is ideal for shopping centres or other buildings. Without wetlands, the quality of our water will not be as good as wetlands filter dirty water. The habitats of many different animals and plants will be destroyed and this is not good for the environment. It is very important that we protect wetland areas and do not allow them to be destroyed.
Checkpoint 2
Ask the learners the following questions to check their understanding at this point:
a. Can you name two reasons why wetlands are destroyed?b. If a wetland is destroyed, will the flow of water be steady?
Answers to the checkpoint questions are as follows:
a. Wetlands are destroyed by farmers to make land available for crops and builders destroy wetlands as they need flat pieces of ground for building.
b. No, as wetlands control the flow of water so that water flows more steadily.
6. Ask the learners if they have any questions and provide answers and explanations.
TOPIC: Mixtures as water resources

128 129Grade 6 NATURAL SCIENCES & TECHNOLOGY Term 2 Grade 6 NATURAL SCIENCES & TECHNOLOGY Term 2
F REFERENCE POINTS FOR FURTHER DEVELOPMENTIf you need additional information or activities on this topic, you can find these in your textbook on the following pages:
NAME OF TEXTBOOK TOPIC PAGE NUMBER
Study & Master Mixtures and water resources 83-84
Viva Mixtures and water resources 85-91
Platinum Mixtures and water resources 96-99
Solutions for All Mixtures and water resources 152-154
Day-by-Day Mixtures and water resources 99
Oxford Mixtures and water resources 75
Spot On Mixtures and water resources 44-45
Top Class Mixtures and water resources 79-80
Sasol Inzalo Bk A Mixtures and water resources 177-185
G ADDITIONAL ACTIVITIES/ READINGIn addition, further reading, listening or viewing activities related to this sub-topic are available through the following web links:
1. https://goo.gl/WeUZ5d (6min 50sec) [Fabulous Wetlands with Bill Nye the Science Guy]
2. https://goo.gl/pNh2nc (3min 44sec) [What makes a wetland a wetland?]
3. https://goo.gl/WJn3bA (5min 55sec) [Wetlands SABC Digital News]
TOPIC: Mixtures as water resources

130 131Grade 6 NATURAL SCIENCES & TECHNOLOGY Term 2 Grade 6 NATURAL SCIENCES & TECHNOLOGY Term 2
TOPIC OVERVIEW:Processes to purify waterTerm 2, Weeks 7B - 8C A. TOPIC OVERVIEW
Term 2, Weeks 7b - 8c
• This topic runs for 1½ weeks.• It is presented over 5 lessons.• This topic’s position in the term is as follows:
LESS
ON WEEK 1 WEEK 2 WEEK 3 WEEK 4 WEEK 5
A B C A B C A B C A B C A B C
LESS
ON WEEK 6 WEEK 7 WEEK 8 WEEK 9 WEEK 10
A B C A B C A B C A B C A B C
B. SEQUENTIAL TABLE
GRADE 4 & 5 GRADE 6 GRADE 7 & 8
LOOKING BACK CURRENT LOOKING FORWARD• N/A • The importance of a clean
supply of water to people, plants, animals
• Methods of cleaning water: sieving, filtering, settling, decanting, boiling, adding chemicals
• Municipal water cleaned before and after use
• Design, make and evaluate a water filter
• Micro-organisms: harmful micro-organisms

130 131Grade 6 NATURAL SCIENCES & TECHNOLOGY Term 2 Grade 6 NATURAL SCIENCES & TECHNOLOGY Term 2
C. SCIENTIFIC VOCABULARYEnsure that you teach the following vocabulary at the appropriate place in the topic:
TERM EXPLANATION
1. purify Remove dirt from something; to make clean
2. plant A place where industrial or manufacturing processes take place
3. fine Very thin or narrow; very small particles
4. sediment Matter that settles to the bottom of a liquid
5. aquifers An underground water supply
6. murky Cloudy, not clear
7. coagulationA process which leads to solid particles sticking together. Chemicals must first be added.
8. disinfection The process of cleaning something to destroy bacteria or germs
D. UNDERSTANDING THE USES / VALUE OF SCIENCEA clean, unpolluted supply of water is important for all living things. Polluted water increases the risk of disease which would impact heavily on a country’s health system. Knowing how to purify water will be hugely beneficial to anyone, in case the need ever arises that a clean supply of water is not easily available.
E. PERSONAL REFLECTIONReflect on your teaching at the end of each topic:
Date completed:
Lesson successes:
Lesson challenges:
Notes for future improvement:

132 133Grade 6 NATURAL SCIENCES & TECHNOLOGY Term 2 Grade 6 NATURAL SCIENCES & TECHNOLOGY Term 2
TOPIC: Mixtures as water resources
7 BTerm 2, Week 7, Lesson BLesson Title: The importance of clean waterTime for lesson: 1 hour
A POLICY AND OUTCOMESSub-Topic Clean water
CAPS Page Number 55
Lesson Objectives
By the end of the lesson, learners will be able to:
• give reasons as to why clean water is important for living things• list some of the diseases associated with unclean water.
Specific Aims
1. DOING SCIENCE 2. UNDERSTANDING + CONNECTING IDEAS 3. UNDERSTANDING THE USES OF SCIENCES & INDIGENOUS KNOWLEDGE
SCIENCE PROCESS + DESIGN SKILLS1. Accessing & Recalling
Information 7. Raising Questions13. Interpreting
Information
2. Observing 8. Predicting 14. Designing
3. Comparing 9. Hypothesizing 15. Making/ constructing
4. Measuring 10. Planning Investigations16. Evaluating and
improving products
5. Sorting & Classifying 11. Doing Investigations 17. Communicating
6. Identifying problems & issues
12. Recording Information

132 133Grade 6 NATURAL SCIENCES & TECHNOLOGY Term 2 Grade 6 NATURAL SCIENCES & TECHNOLOGY Term 2
B POSSIBLE RESOURCESFor this lesson, you will need:
IDEAL RESOURCES IMPROVISED RESOURCES
Resource 20: Clean drinking water
Resource 21: Woman carrying water
C CLASSROOM MANAGEMENT1. Make sure that you are ready and prepared.2. Write the following question onto the chalkboard before the lesson starts:
Why is it important that a wetland acts like a sponge?
3. Learners should enter the classroom and answer the question in their workbooks.
4. Discuss the answer with the learners.
5. Write the model answer onto the chalkboard.
It is important that a wetland acts like a sponge because it stores water during rains and then releases this water slowly. It regulates the flow of water.
D ACCESSING INFORMATION1. Write the following onto the chalkboard (always try to do this before the lesson starts):
CLEAN WATER IS IMPORTANT
1. Fresh water is found in streams, rivers and lakes.
2. All other water is either too salty (from the sea), frozen (in glaciers) or stored underground.
3. We can only use 1% of all the water on Earth.
4. Many people on Earth do not have access to clean drinking water.
5. Many people, especially children, die from diarrhoea each year.
6. These deaths could be prevented by increasing access to clean water.
7. Many people have to walk far to fetch clean drinking water.
8. All living things need clean water to survive.
9. Animals need water to digest food and remove waste.
10. Plants need nutrients that have dissolved in the water.
2. Explain this to the learners as follows:
a. All living things need clean water to survive.
b. We would dehydrate without water and eventually die.
c. Show learners Resource 20: ‘Clean drinking water’.
TOPIC: Mixtures as water resources

134 135Grade 6 NATURAL SCIENCES & TECHNOLOGY Term 2 Grade 6 NATURAL SCIENCES & TECHNOLOGY Term 2
d. Explain that clean drinking water is necessary for survival.
e. Many children die from diarrhoea each year.
f. They get this disease from drinking dirty water and living in unhygienic conditions.
g. Washing hands after going to the toilet is an important habit to get into.
h. Plants get some of their nutrients from water.
i. Many people on Earth do not have access to clean drinking water.
j. Show learners Resource 21: ‘Woman carrying water’.
k. Many people have to walk a long way each day to get clean water.
3. Give learners time to copy this information into their workbooks.
Checkpoint 1
Ask the learners the following questions to check their understanding at this point:
a. Where is fresh water found?
b. Why do plants need water?
Answers to the checkpoint questions are as follows:
a. Fresh water is found in streams, rivers and lakes.
b. Plants get some of their nutrients from water.
E CONCEPTUAL DEVELOPMENT1. Write the following on the chalkboard (always try to do this before the lesson starts):
A WATER TREATMENT PLANT
1. Municipalities are responsible for looking after the water treatment facilities in towns and cities.
2. This plant must purify water to keep people healthy.
3. A water treatment plant cleans water from rivers, dams and aquifers.
4. Water is pumped to the water treatment plant.
5. The dirty water first settles in big tanks.
6. Large particles sink to the bottom of the tanks.
7. The water is filtered through a big sieve.
8. It is then filtered through a very fine material called a membrane.
9. A chemical called chlorine is added to kill germs.
10. Other chemicals are added to remove bad tastes or smells from the water.
11. The water is pumped to houses and factories.
12. Water is also cleaned after we use it.
13. Untreated sewerage can cause pollution and disease.
TOPIC: Mixtures as water resources

134 135Grade 6 NATURAL SCIENCES & TECHNOLOGY Term 2 Grade 6 NATURAL SCIENCES & TECHNOLOGY Term 2
2. Explain this to the learners as follows:a. Water goes through a process which makes it clean. b. It settles first so that large particles can sink to the bottom. c. Then it is filtered twice. d. Finally, chlorine is added to it to kill germs.
3. Write the following on the chalkboard (always try to do this before the lesson starts):
ACTIVITY: THE PROCESS OF CLEANING WATER IN A WATER TREATMENT PLANT
Draw a flow diagram to show the process that water goes through before it reaches houses and factories.
4. Explain the following to the learners:
a. Using the information on the chalkboard, the learners must draw a flow diagram in their workbooks to show the process of cleaning water in a water treatment plant. A model answer (answers will vary):
b. A model answer:
THE PROCESS OF CLEANING WATER IN A TREATMENT PLANT
Checkpoint 2
Ask the learners the following questions to check their understanding at this point:a. Where does a water treatment plant get its water from?b. What chemical is added to the water to kill germs?
Answers to the checkpoint questions are as follows:a. The plant pumps water from rivers, dams and aquifers. b. Chlorine is added to the water to kill germs.
6. Ask the learners if they have any questions and provide answers and explanations.
Water is pumped from the river to the plant.
Water is filtered again through a membrane.
Dirty water settles in big tanks.
Chemicals like chlorine are added.
Water is filtered through a sieve.
Water is pumped to factories and houses.
TOPIC: Mixtures as water resources

136 137Grade 6 NATURAL SCIENCES & TECHNOLOGY Term 2 Grade 6 NATURAL SCIENCES & TECHNOLOGY Term 2
F REFERENCE POINTS FOR FURTHER DEVELOPMENTIf you need additional information or activities on this topic, you can find these in your textbook on the following pages:
NAME OF TEXTBOOK TOPIC PAGE NUMBER
Study & Master Processes to purify water 88-90
Viva Processes to purify water 92-95
Platinum Processes to purify water 102
Solutions for All Processes to purify water 165-169
Day-by-Day Processes to purify water 104
Oxford Processes to purify water 76-77
Spot On Processes to purify water 46
Top Class Processes to purify water -
Sasol Inzalo Bk A Processes to purify water 188-189
G ADDITIONAL ACTIVITIES/ READINGIn addition, further reading, listening or viewing activities related to this sub-topic are available through the following web links:
1. https://goo.gl/kVzJEL [Processes to purify water]
2. https://goo.gl/TFjX6W (14min 15sec) [Water - who needs it?]
3. https://goo.gl/h5agiH (2min 29sec) [Why care about water?]
TOPIC: Mixtures as water resources
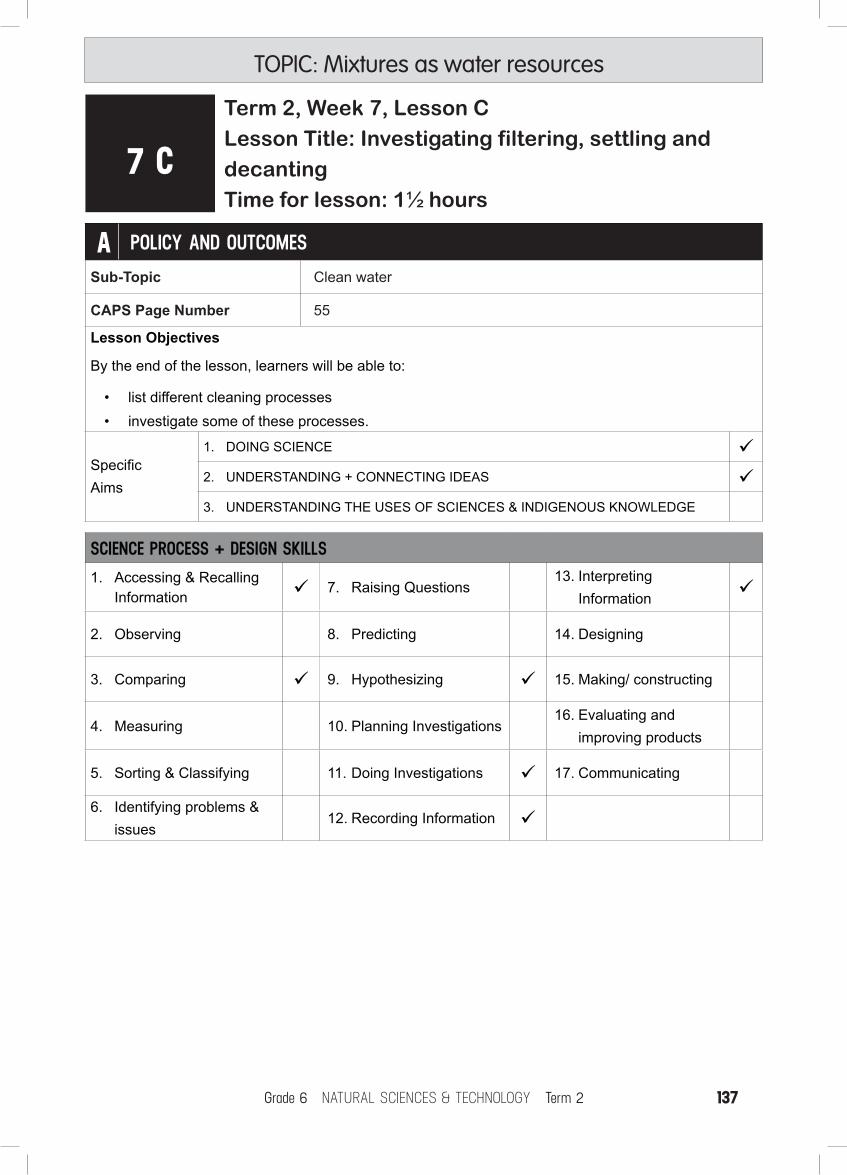
136 137Grade 6 NATURAL SCIENCES & TECHNOLOGY Term 2 Grade 6 NATURAL SCIENCES & TECHNOLOGY Term 2
TOPIC: Mixtures as water resources
7 CTerm 2, Week 7, Lesson CLesson Title: Investigating filtering, settling and decantingTime for lesson: 1½ hours
A POLICY AND OUTCOMESSub-Topic Clean water
CAPS Page Number 55
Lesson Objectives
By the end of the lesson, learners will be able to:
• list different cleaning processes• investigate some of these processes.
Specific Aims
1. DOING SCIENCE 2. UNDERSTANDING + CONNECTING IDEAS 3. UNDERSTANDING THE USES OF SCIENCES & INDIGENOUS KNOWLEDGE
SCIENCE PROCESS + DESIGN SKILLS1. Accessing & Recalling
Information 7. Raising Questions13. Interpreting
Information
2. Observing 8. Predicting 14. Designing
3. Comparing 9. Hypothesizing 15. Making/ constructing
4. Measuring 10. Planning Investigations16. Evaluating and
improving products
5. Sorting & Classifying 11. Doing Investigations 17. Communicating
6. Identifying problems & issues
12. Recording Information

138 139Grade 6 NATURAL SCIENCES & TECHNOLOGY Term 2 Grade 6 NATURAL SCIENCES & TECHNOLOGY Term 2
B POSSIBLE RESOURCESFor this lesson, you will need:
IDEAL RESOURCES IMPROVISED RESOURCES
Four beakers, a jug, a sieve or tea strainer, filter paper or a cloth, a funnel, a tablespoon, garden soil, water
C CLASSROOM MANAGEMENT1. Make sure that you are ready and prepared.2. Write the following question onto the chalkboard before the lesson starts:
What disease do people get from drinking diry water?
3. Learners should enter the classroom and answer the question in their workbooks.
4. Discuss the answer with the learners.
5. Write the model answer onto the chalkboard.
People get diarrhoea from drinking dirty water.
D ACCESSING INFORMATION1. Write the following onto the chalkboard (always try to do this before the lesson starts):
SIEVING, FILTERING, SETTLING AND DECANTING TO REMOVE SOLIDS
1. Water can be cleaned.
2. Sieving cleans dirty water that contains large, insoluble substances.
3. The holes in a sieve allow water to pass through while keeping larger substances behind.
4. The smaller the holes in the sieve are, the cleaner the water will be.
5. Filtering is like sieving but the dirty water will go through some sort of material, like a cloth or paper filter.
6. Settling occurs when dirty water is left for some time. The heavier, solid substances then sink to the bottom.
7. Decanting separates a liquid into different containers.
8. The settled substances must not be disturbed.
9. After all the solid substances are taken from the water, the germs must be removed.
BOILING AND ADDING CHEMICALS TO KILL GERMS
1. Boiling water kills the germs and parasites in the water. 2. The water must be boiled for three minutes. 3. It takes a long time to cool down.
TOPIC: Mixtures as water resources

138 139Grade 6 NATURAL SCIENCES & TECHNOLOGY Term 2 Grade 6 NATURAL SCIENCES & TECHNOLOGY Term 2
4. Chemicals, such as chlorine, kill germs.
5. To kill germs, one teaspoon of bleach can be added to 20 litres of water.
6. Leave the water to stand for two hours.
2. Explain this to the learners as follows:
a. Water can be cleaned to make it safer to drink.
b. Sieving, filtering and decanting all remove solid substances from the water.
c. Sieving depends on the size of the holes which allow solid particles of various sizes to be separated.
d. Filtering can be done through a cloth.
e. The finer the cloth, the cleaner the water will be.
f. Decanting must be done carefully so that the solids do not mix when the container is lifted.
g. These methods do not remove germs, though.
h. In order to get rid of germs, these three methods must be used together with boiling or adding chemicals to the water.
3. Give learners time to copy this information into their workbooks.
Checkpoint 1
Ask the learners the following questions to check their understanding at this point:
a. Which four methods of separation remove solid particles from the liquid in water?
b. Which two methods of cleaning water remove germs from water?
Answers to the checkpoint questions are as follows:
a. Sieving, filtering, settling and decanting remove solid particles.
b. Boiling and adding chemicals will kill the germs in water.
E CONCEPTUAL DEVELOPMENT1. Write the following on the chalkboard (always try to do this before the lesson starts):
ACTIVITY: INVESTIGATE SETTLING, FILTERING, SIEVING AND DECANTING
YOU WILL NEED:four beakersa juga sieve or tea strainerfilter paper or a clotha funnela tablespoongarden soilwater
TOPIC: Mixtures as water resources
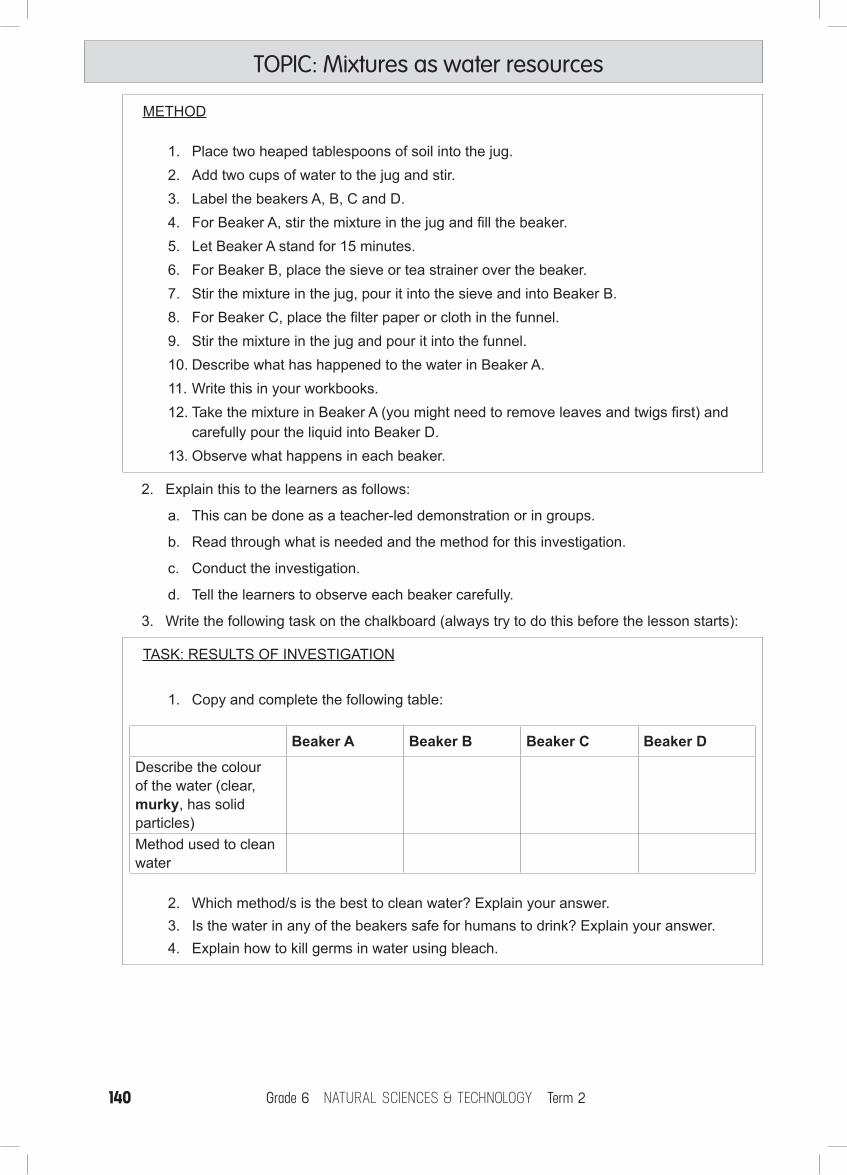
140 141Grade 6 NATURAL SCIENCES & TECHNOLOGY Term 2 Grade 6 NATURAL SCIENCES & TECHNOLOGY Term 2
METHOD
1. Place two heaped tablespoons of soil into the jug. 2. Add two cups of water to the jug and stir. 3. Label the beakers A, B, C and D. 4. For Beaker A, stir the mixture in the jug and fill the beaker. 5. Let Beaker A stand for 15 minutes. 6. For Beaker B, place the sieve or tea strainer over the beaker.7. Stir the mixture in the jug, pour it into the sieve and into Beaker B. 8. For Beaker C, place the filter paper or cloth in the funnel. 9. Stir the mixture in the jug and pour it into the funnel. 10. Describe what has happened to the water in Beaker A. 11. Write this in your workbooks. 12. Take the mixture in Beaker A (you might need to remove leaves and twigs first) and
carefully pour the liquid into Beaker D. 13. Observe what happens in each beaker.
2. Explain this to the learners as follows:
a. This can be done as a teacher-led demonstration or in groups.
b. Read through what is needed and the method for this investigation.
c. Conduct the investigation.
d. Tell the learners to observe each beaker carefully.
3. Write the following task on the chalkboard (always try to do this before the lesson starts):
TASK: RESULTS OF INVESTIGATION
1. Copy and complete the following table:
2. Which method/s is the best to clean water? Explain your answer. 3. Is the water in any of the beakers safe for humans to drink? Explain your answer. 4. Explain how to kill germs in water using bleach.
Beaker A Beaker B Beaker C Beaker DDescribe the colour of the water (clear, murky, has solid particles)Method used to clean water
TOPIC: Mixtures as water resources

140 141Grade 6 NATURAL SCIENCES & TECHNOLOGY Term 2 Grade 6 NATURAL SCIENCES & TECHNOLOGY Term 2
4. Model answer:
TASK: RESULTS OF INVESTIGATION
1. Answers might vary depending on the size of the holes in the sieve and the filter paper or cloth used.
2. Which method is the best to clean water? Explain your answer.
Filtering is the best method as the water was the clearest after it had been filtered.
3. No, none of the water is safe to drink as it might have germs. The water would have to be boiled or have chemicals added to kill the germs.
4. You add one teaspoon of bleach to a bucket of 20 litres of water.
Checkpoint 2
Ask the learners the following questions to check their understanding at this point:
a. Is water safe to drink after it has been filtered?
b. How would you kill germs in water?
Answers to the checkpoint questions are as follows:
a. No, water is not safe to drink after it has been filtered as it will still contain germs.
b. To kill germs, water must be boiled or have chemicals added to it. A teaspoon of bleach can be added to 20 litres of water.
5. Ask the learners if they have any questions and provide answers and explanations.
Beaker A Beaker B Beaker C Beaker D
Describe the colour of the water (clear, murky, has solid particles)
Water is murky and has solid particles.
Water is murky and solid particles are small.
Water is clear. Water is slightly murky with no solid particles.
Method used to clean water
settling sieving filtering decanting
TOPIC: Mixtures as water resources

142 143Grade 6 NATURAL SCIENCES & TECHNOLOGY Term 2 Grade 6 NATURAL SCIENCES & TECHNOLOGY Term 2
F REFERENCE POINTS FOR FURTHER DEVELOPMENTIf you need additional information or activities on this topic, you can find these in your textbook on the following pages:
NAME OF TEXTBOOK TOPIC PAGE NUMBER
Study & Master Processes to purify water 89
Viva Processes to purify water 95
Platinum Processes to purify water 102-105
Solutions for All Processes to purify water 170-173
Day-by-Day Processes to purify water 104-107
Oxford Processes to purify water 77
Spot On Processes to purify water 46
Top Class Processes to purify water 86-87
Sasol Inzalo Bk A Processes to purify water 190-192
G ADDITIONAL ACTIVITIES/ READINGIn addition, further reading, listening or viewing activities related to this sub-topic are available through the following web links:
1. https://goo.gl/ZX8SWj (5min 45sec) [Science: separation methods]
2. https://goo.gl/CUVbYt (8min 10sec) [Environment: ways of cleaning water]
3. https://www.nasa.gov/pdf/146846main_Cleaning_Water_Educator.pdf [Cleaning water]
TOPIC: Mixtures as water resources

142 143Grade 6 NATURAL SCIENCES & TECHNOLOGY Term 2 Grade 6 NATURAL SCIENCES & TECHNOLOGY Term 2
TOPIC: Mixtures as water resources
8 ATerm 2, Week 8, Lesson ALesson Title: Municipal waterTime for lesson: 1 hour
A POLICY AND OUTCOMESSub-Topic Clean water
CAPS Page Number 55
Lesson Objectives
By the end of the lesson, learners will be able to:
• describe how municipalities clean water• describe how this is done before we use it• describe how this is done after we use it
Specific Aims
1. DOING SCIENCE 2. UNDERSTANDING + CONNECTING IDEAS 3. UNDERSTANDING THE USES OF SCIENCES & INDIGENOUS KNOWLEDGE
SCIENCE PROCESS + DESIGN SKILLS1. Accessing & Recalling
Information 7. Raising Questions13. Interpreting
Information
2. Observing 8. Predicting 14. Designing
3. Comparing 9. Hypothesizing 15. Making/ constructing
4. Measuring 10. Planning Investigations16. Evaluating and
improving products
5. Sorting & Classifying 11. Doing Investigations 17. Communicating
6. Identifying problems & issues
12. Recording Information

144 145Grade 6 NATURAL SCIENCES & TECHNOLOGY Term 2 Grade 6 NATURAL SCIENCES & TECHNOLOGY Term 2
B POSSIBLE RESOURCESFor this lesson, you will need:
IDEAL RESOURCES IMPROVISED RESOURCES
Resource 22: A settling tank
Resource 23: A water treatment plant
Resources 24-27: How municipalities clean their water
C CLASSROOM MANAGEMENT1. Make sure that you are ready and prepared.2. Write the following question onto the chalkboard before the lesson starts:
Can you explain how to kill germs in water using bleach?
3. Learners should enter the classroom and answer the question in their workbooks.
4. Discuss the answer with the learners.
5. Write the model answer onto the chalkboard.
Add one teaspoon to 20 litres of water and leave the water to stand for two hours.
D ACCESSING INFORMATION1. Write and draw the following on the chalkboard (always try to do this before the lesson
starts):
MUNICIPAL WATER: BEFORE IT IS USED
1. Water that comes out of a tap is supplied to residents and businesses by their local municipality.
2. Water is purified before and after it is used.
3. It is purified in water purification plants.
4. At the purification station, the first step is coagulation.
5. Here chemicals are added to make solid particles stick together.
6. Water then goes into a tank where it settles.
7. The sediment sinks to the bottom.
8. The water is then filtered through sand to remove dirt and other substances.
9. Chlorine, a chemical, is then added to get rid of germs.
10. This is known as disinfection.
11. Water is stored until it is needed.
TOPIC: Mixtures as water resources

144 145Grade 6 NATURAL SCIENCES & TECHNOLOGY Term 2 Grade 6 NATURAL SCIENCES & TECHNOLOGY Term 2
MUNICIPAL WATER: AFTER IT IS USED
1. Waste water that is piped away from homes is called sewage.
How municipalities clean water
MUNICIPAL WATER: AFTER IT IS USED
1. Waste water that is piped away from homes is called sewage.
2. The pipes take the sewage to sewage treatment plants.
3. The same kinds of processes are used to clean the water: coagulation, settlement, filtration, disinfection.
2. Explain this to the learners as follows:
a. Municipalities need to have proper water purification methods to provide clean water to people.
b. Dirty water will go through four processes: coagulation, settlement, filtration and disinfection.
c. Show learners Resource 22: ‘Settling tanks’.
d. These tanks enable water to settle so that the sediment sinks to the bottom.
e. Show learners Resource 23: ‘A water treatment plant’.
f. The Resource shows what a water purification plant looks like.
g. Point out the settling tanks.
h. Show learners Resource 24: ‘How municipalities clean water’.
i. Go through the process of the cleaning of water on the drawing.
j. Give learners Resources 24- 27 to help learners to copy the drawing into their workbooks.
k. They will copy this drawing into their workbooks.
3. Give learners time to copy this information into their workbooks.
Coagulation
Storage
Disinfection
Sedimentation
Filtration
TOPIC: Mixtures as water resources
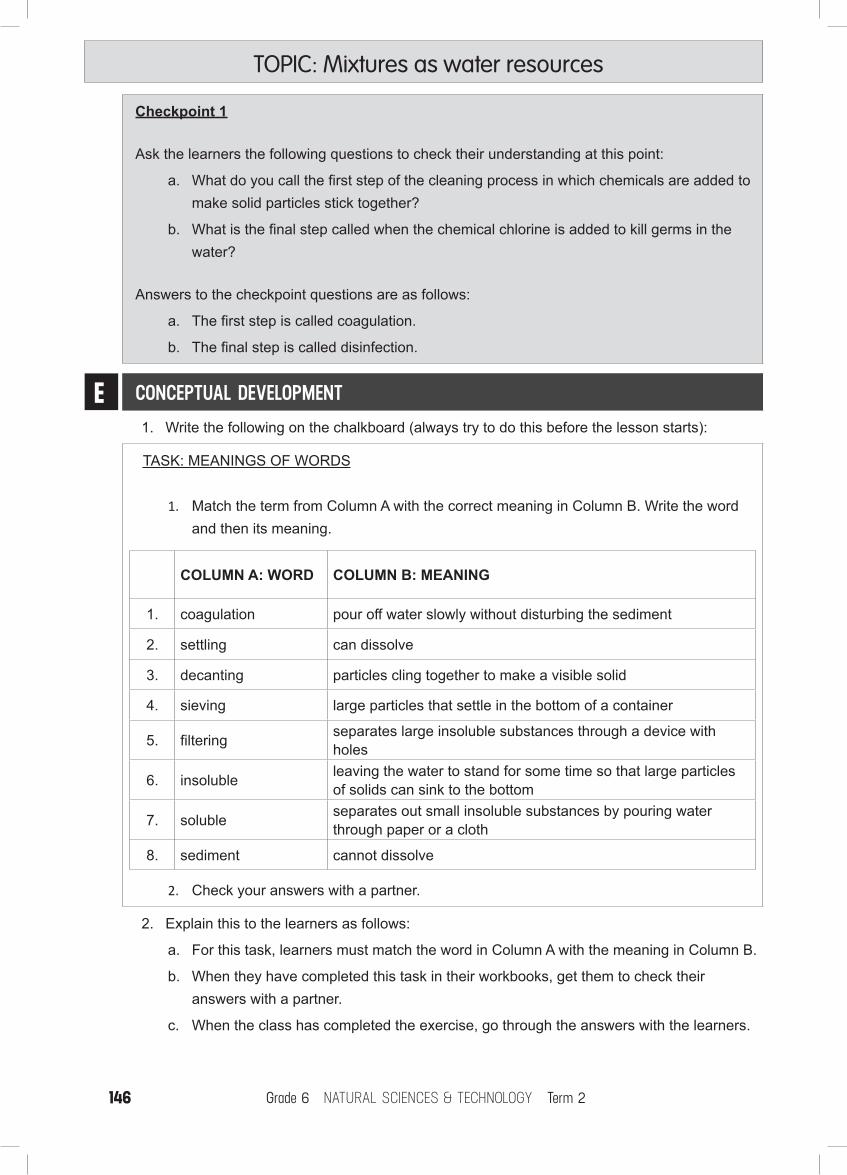
146 147Grade 6 NATURAL SCIENCES & TECHNOLOGY Term 2 Grade 6 NATURAL SCIENCES & TECHNOLOGY Term 2
E CONCEPTUAL DEVELOPMENT1. Write the following on the chalkboard (always try to do this before the lesson starts):
TASK: MEANINGS OF WORDS
1. Match the term from Column A with the correct meaning in Column B. Write the word and then its meaning.
2. Check your answers with a partner.
2. Explain this to the learners as follows:
a. For this task, learners must match the word in Column A with the meaning in Column B.
b. When they have completed this task in their workbooks, get them to check their answers with a partner.
c. When the class has completed the exercise, go through the answers with the learners.
Checkpoint 1
Ask the learners the following questions to check their understanding at this point:
a. What do you call the first step of the cleaning process in which chemicals are added to make solid particles stick together?
b. What is the final step called when the chemical chlorine is added to kill germs in the water?
Answers to the checkpoint questions are as follows:
a. The first step is called coagulation.
b. The final step is called disinfection.
COLUMN A: WORD COLUMN B: MEANING
1. coagulation pour off water slowly without disturbing the sediment
2. settling can dissolve
3. decanting particles cling together to make a visible solid
4. sieving large particles that settle in the bottom of a container
5. filtering separates large insoluble substances through a device with holes
6. insoluble leaving the water to stand for some time so that large particles of solids can sink to the bottom
7. soluble separates out small insoluble substances by pouring water through paper or a cloth
8. sediment cannot dissolve
TOPIC: Mixtures as water resources

146 147Grade 6 NATURAL SCIENCES & TECHNOLOGY Term 2 Grade 6 NATURAL SCIENCES & TECHNOLOGY Term 2
3. Model answer:
TASK: MEANING OF WORDS
Checkpoint 2
Ask the learners the following questions to check their understanding at this point:
a. What is ‘sediment’?b. What is ‘decanting’?
Answers to the checkpoint questions are as follows:
a. Sediment results when large particles settle in the bottom of a container.
b. Decanting takes place when the liquid is carefully poured off a mixture that has settled.
4. Ask the learners if they have any questions and provide answers and explanations.
1. coagulation: particles cling together to make a visible solid
2. settling: leaving the water to stand for some time so that large particles of solids can sink to the bottom
3. decanting: pour off water slowly without disturbing the sediment
4. sieving: separates large insoluble substances through a device with holes
5. filtering: separates out small insoluble substances by pouring water through paper or a cloth
6. insoluble: cannot dissolve
7. soluble: can dissolve
8. sediment: large particles that settle in the bottom of a container
TOPIC: Mixtures as water resources

148 149Grade 6 NATURAL SCIENCES & TECHNOLOGY Term 2 Grade 6 NATURAL SCIENCES & TECHNOLOGY Term 2
F REFERENCE POINTS FOR FURTHER DEVELOPMENTIf you need additional information or activities on this topic, you can find these in your textbook on the following pages:
NAME OF TEXTBOOK TOPIC PAGE NUMBER
Study & Master Processes to purify water 90
Viva Processes to purify water 94-97
Platinum Processes to purify water 105
Solutions for All Processes to purify water 174-175
Day-by-Day Processes to purify water 108-109
Oxford Processes to purify water 76-77
Spot On Processes to purify water -
Top Class Processes to purify water 89-90
Sasol Inzalo Bk A Processes to purify water 199-201
G ADDITIONAL ACTIVITIES/ READINGIn addition, further reading, listening or viewing activities related to this sub-topic are available through the following web links:
1. https://goo.gl/7K1PVg [Exploring drinking water treatment]
2. https://goo.gl/AEhn73 (4min 19sec) [Water and you]
3. https://goo.gl/4HkjyS (7min 47sec) [The sewage treatment process]
4. https://goo.gl/uooqbe (4min 55sec) [How does water get to your tap?]
TOPIC: Mixtures as water resources

148 149Grade 6 NATURAL SCIENCES & TECHNOLOGY Term 2 Grade 6 NATURAL SCIENCES & TECHNOLOGY Term 2
TOPIC: Mixtures as water resources
8 BTerm 2, Week 8, Lesson BLesson Title: Investigate how to purify waterTime for lesson: 1 hour
A POLICY AND OUTCOMESSub-Topic Clean water
CAPS Page Number 55
Lesson Objectives
By the end of the lesson, learners will be able to:
• describe different ways to purify water • investigate how to best purify water.
Specific Aims
1. DOING SCIENCE 2. UNDERSTANDING + CONNECTING IDEAS 3. UNDERSTANDING THE USES OF SCIENCES & INDIGENOUS KNOWLEDGE
SCIENCE PROCESS + DESIGN SKILLS1. Accessing & Recalling
Information 7. Raising Questions13. Interpreting
Information
2. Observing 8. Predicting 14. Designing
3. Comparing 9. Hypothesizing 15. Making/ constructing
4. Measuring 10. Planning Investigations16. Evaluating and
improving products
5. Sorting & Classifying 11. Doing Investigations 17. Communicating
6. Identifying problems & issues 12. Recording Information

150 151Grade 6 NATURAL SCIENCES & TECHNOLOGY Term 2 Grade 6 NATURAL SCIENCES & TECHNOLOGY Term 2
B POSSIBLE RESOURCESFor this lesson, you will need:
IDEAL RESOURCES IMPROVISED RESOURCES
Resource 28 – Resource 32: A homemade water filter
C CLASSROOM MANAGEMENT1. Make sure that you are ready and prepared.2. Write the following question onto the chalkboard before the lesson starts:
When do municipalities clean water?
3. Learners should enter the classroom and answer the question in their workbooks.
4. Discuss the answer with the learners.
5. Write the model answer onto the chalkboard.
Municipalities clean water before and after we use it.
D ACCESSING INFORMATION1. Write the following on the chalkboard (always try to do this before the lesson starts):
INVESTIGATE HOW TO PURIFY WATER
1. Settling, decanting, filtering, boiling and adding chemicals are all ways of cleaning water.
2. Boiling and adding chemicals are the only ways to get rid of germs.
2. Explain this to the learners as follows:
a. Go through the different methods of cleaning water.
3. Give learners time to copy this information into their workbooks.
Checkpoint 1
Ask the learners the following questions to check their understanding at this point:
a. Can you name five ways to clean water?
b. Which two ways of cleaning water will kill germs?
Answers to the checkpoint questions are as follows:
a. Settling, decanting, filtering, boiling and adding chemicals are all ways of cleaning water.
b. Boiling and adding chemicals are the only ways to kill germs.
TOPIC: Mixtures as water resources

150 151Grade 6 NATURAL SCIENCES & TECHNOLOGY Term 2 Grade 6 NATURAL SCIENCES & TECHNOLOGY Term 2
E CONCEPTUAL DEVELOPMENT1. Write the following on the chalkboard (always try to do this before the lesson starts):
TASK: MEANINGS OF WORDS
1. Water from rivers and other natural resources may often be muddy and dirty. 2. If the water supply to your tap has been affected by a tornado or other disaster, you
might need to clean the water in some way. 3. When you have made a water filter, you should run water through it a few times to
clean it. 4. Draw this diagram of a homemade water filter:
5. Answer these questions:
f. Why do you need to run water through the filter a few times before using it?
g. Do you think that this water filter would clean the water so that you could drink it?
h. Can you give a reason for your answer?
Top cut to allow water to be pouredinto filtration system
Gravel to filter out larger sediment
Activated carbon to remove contaminants and impurities, utilizing chemical absorption.
Cloth to hold back carbon and let purified water through
Removable cap
Sand to filter out fine impurities.Organsisms and particles colllect in thetop layers of teh sand, graduallyforming a biological zone to filterout bacteria, viruses and parasites.
TOPIC: Mixtures as water resources

152 153Grade 6 NATURAL SCIENCES & TECHNOLOGY Term 2 Grade 6 NATURAL SCIENCES & TECHNOLOGY Term 2
2. Explain this to the learners as follows:
a. There may be times when you might need to clean water.
b. There are many ways to clean water.
c. Not all ways make water drinkable.
d. Give learners Resource 28 to Resource 32.
e. Point to all the different layers of materials in the diagram of a homemade water filter.
f. The top layer is to catch large solid particles.
g. The bottom layers are to catch the smaller particles.
h. Go through the question with the learners.
i. It is important that they know that clean water is not always drinkable.
3. Give learners time to copy the diagram of a water filter and to answer question 4 in their workbooks.
4. Write the model answer on the chalkboard (always try to do this before the lesson starts)
MODEL ANSWER
5. a. You need to run water through it a few times to clean it.
5. b. No, it is not clean enough to drink.
5. c. The water may contain germs that would make people sick. The germs are not visible.
Checkpoint 2
Ask the learners the following questions to check their understanding at this point:
a. What material would you put at the top of a homemade water filter?b. What material would you put at the bottom of a homemade water filter?
Answers to the checkpoint questions are as follows:
a. Answers may vary: small stones, gravel.
b. Answers may vary: a cloth, cotton wool.
5. Ask the learners if they have any questions and provide answers and explanations.
TOPIC: Mixtures as water resources

152 153Grade 6 NATURAL SCIENCES & TECHNOLOGY Term 2 Grade 6 NATURAL SCIENCES & TECHNOLOGY Term 2
F REFERENCE POINTS FOR FURTHER DEVELOPMENTIf you need additional information or activities on this topic, you can find these in your textbook on the following pages:
NAME OF TEXTBOOK TOPIC PAGE NUMBER
Study & Master Processes to purify water 91-93
Viva Processes to purify water 98-99
Platinum Processes to purify water 106
Solutions for All Processes to purify water 175-176
Day-by-Day Processes to purify water 109-110
Oxford Processes to purify water 78
Spot On Processes to purify water 47-48
Top Class Processes to purify water 88
Sasol Inzalo Bk A Processes to purify water 194
G ADDITIONAL ACTIVITIES/ READINGIn addition, further reading, listening or viewing activities related to this sub-topic are available through the following web links:
1. https://www.wikihow.com/Make-a-Water-Filter [Make a water filter]
2. http://www.instructables.com/id/Simple-Water-Filter-out-of-a-Waterbottle/ [Simple water filter]
TOPIC: Mixtures as water resources

154 155Grade 6 NATURAL SCIENCES & TECHNOLOGY Term 2 Grade 6 NATURAL SCIENCES & TECHNOLOGY Term 2
TOPIC: Mixtures as water resources
8 CTerm 2, Week 8, Lesson CLesson Title: Design, make and evaluate a simple systemTime for lesson: 1½ hours
A POLICY AND OUTCOMESSub-Topic Clean water
CAPS Page Number 55
Lesson Objectives
By the end of the lesson, learners will be able to:
• write a design brief and specifications • make a water filtering system• evaluate the water filter system.
Specific Aims
1. DOING SCIENCE 2. UNDERSTANDING + CONNECTING IDEAS 3. UNDERSTANDING THE USES OF SCIENCES & INDIGENOUS KNOWLEDGE
SCIENCE PROCESS + DESIGN SKILLS1. Accessing & Recalling
Information 7. Raising Questions13. Interpreting
Information
2. Observing 8. Predicting 14. Designing
3. Comparing 9. Hypothesizing 15. Making/ constructing
4. Measuring 10. Planning Investigations16. Evaluating and
improving products
5. Sorting & Classifying 11. Doing Investigations 17. Communicating
6. Identifying problems & issues
12. Recording Information

154 155Grade 6 NATURAL SCIENCES & TECHNOLOGY Term 2 Grade 6 NATURAL SCIENCES & TECHNOLOGY Term 2
B POSSIBLE RESOURCESFor this lesson, you will need:
IDEAL RESOURCES IMPROVISED RESOURCES
Coarse sand, fine sand, cotton wool, dirty water, a pair of scissors, a bucket, a 2 litre plastic bottle
C CLASSROOM MANAGEMENT1. Make sure that you are ready and prepared.2. Write the following question onto the chalkboard before the lesson starts:
What material would you put at the bottom of a water filter?
3. Learners should enter the classroom and answer the question in their workbooks.
4. Discuss the answer with the learners.
5. Write the model answer onto the chalkboard.
Answers may vary: A clean cloth or cotton wool may be used.
D ACCESSING INFORMATION1. Write the following on the chalkboard (always try to do this before the lesson starts):
PROBLEM
A tornado has hit the water treatment plant and there is no available drinking water. Design a water filter system to provide drinking water for your home.
DESIGN BRIEF, SPECIFICATIONS AND CONSTRAINTS
1. Write a design brief for this problem by completing the sentence below:
Design and make a _______ (what it is you are designing and making) for _______ (who this is for) as ______ (state the problem here).
2. Write a list of specifications and constraints. Specifications tell you what your product will look like and should do. Constraints are things that control what you do by keeping you within limits. Write specifications in point form by answering these questions:
a. What must the water filter be able to do?
b. What will you use for the filter?
c. What recyclable materials could you use?
d. How will you collect the water that has been filtered?
TOPIC: Mixtures as water resources

156 157Grade 6 NATURAL SCIENCES & TECHNOLOGY Term 2 Grade 6 NATURAL SCIENCES & TECHNOLOGY Term 2
DESIGN
a. Draw a design for a water filter system.
b. Label your drawing.
c. Make a list of tools and materials you will need.
d. Materials available are: coarse sand, fine sand, cotton wool, and dirty water.
e. Tools available are: a pair of scissors and a bucket.
f. Learners must bring two plastic bottles and anything else that could be of use.
2. Explain this to the learners as follows:
a. All designers use design briefs, specifications and constraints.
b. Once the learners have drawn a design, they must list a list of tools and materials to be used.
c. They must list these in their workbooks before they start designing.
3. Give learners time to write down their design brief, specifications, constraints, list of tools and materials. They must then draw their design in their workbooks.
4. A model answer (answers will vary):
DESIGN BRIEF
Design and make a water filter system for my family as no clean water is being supplied by the water treatment plant.
SPEICIFATIONS AND CONSTRAINTS
a. The water filter must be able to clean water by removing all the insoluble substances.
b. I will use leaves, gravel, sand, and a cloth in a plastic bottle to make a water filter.
c. I can use a plastic bottle and a clean dish cloth.
d. I will put another plastic bottle underneath the filter to catch the water.
Checkpoint 1
Ask the learners the following questions to check their understanding at this point:
a. What is a design brief?b. What are constraints?
Answers to the checkpoint questions are as follows:
a. A design brief is a sentence explaining what it is that you need to design and make, and who it is for.
b. Constraint are things that control what you do by keeping you within limits.
TOPIC: Mixtures as water resources

156 157Grade 6 NATURAL SCIENCES & TECHNOLOGY Term 2 Grade 6 NATURAL SCIENCES & TECHNOLOGY Term 2
E CONCEPTUAL DEVELOPMENT1. Write the following on the chalkboard (always try to do this before the lesson starts):
MAKE A WATER FILTER
1. Gather all the tools and materials according to your list. 2. Work safely: do not run or hold the pair of scissors downwards. Make sure you focus
when you cut plastic bottles. 3. Make your water filter. 4. Run water through your water filter to clean it before you use it.
EVALUATE YOUR WATER FILTER
1. Run two cups of dirty water through your water filter into the second plastic bottle.
2. Write down what you observe in your workbook.
3. If you could change your design in any way, what would you do? Write your changes down in your workbook.
2. Explain this to the learners as follows:
a. Learners must gather all the tools and materials and start making their water filter according to their design.
b. When they are ready, they must check their filter.
c. Learners must then test and evaluate their water filter.
3. Give learners time to make and evaluate their water filter.
4. A model answer:
EVALUATION
1. The water was clear so the water filter had cleaned the dirty water.
2. I would add more cotton wool at the end of the filter to get rid of the smaller particles.
Checkpoint 2
Ask the learners the following questions to check their understanding at this point:
a. Can you give two safety rules when making a product?
b. Why do we evaluate the products we make?
Answers to the checkpoint questions are as follows:
a. No running, and holding your pair of scissors down are two safety rules.
b. We evaluate the products so that we can keep improving the design.
5. Ask the learners if they have any questions and provide answers and explanations.
TOPIC: Mixtures as water resources

158 159Grade 6 NATURAL SCIENCES & TECHNOLOGY Term 2 Grade 6 NATURAL SCIENCES & TECHNOLOGY Term 2
F REFERENCE POINTS FOR FURTHER DEVELOPMENTIf you need additional information or activities on this topic, you can find these in your textbook on the following pages:
NAME OF TEXTBOOK TOPIC PAGE NUMBER
Study & Master Processes to purify water 93
Viva Processes to purify water 98-102
Platinum Processes to purify water 108-109
Solutions for All Processes to purify water 175-184
Day-by-Day Processes to purify water 110-111
Oxford Processes to purify water 77-78
Spot On Processes to purify water 47-49
Top Class Processes to purify water 88-89
Sasol Inzalo Bk A Processes to purify water 194-198
G ADDITIONAL ACTIVITIES/ READINGIn addition, further reading, listening or viewing activities related to this sub-topic are available through the following web links:
1. http://filterbutler.com/blog/make-homemade-water-filter/ [How to make your own homemade water filter]
2. https://goo.gl/sVBYD5 (3min 45sec) [How to make a water filter from a plastic bottle]
TOPIC: Mixtures as water resources

158 159Grade 6 NATURAL SCIENCES & TECHNOLOGY Term 2 Grade 6 NATURAL SCIENCES & TECHNOLOGY Term 2
NATURALSCIENCES
& TECHNOLOGY
ASSESSMENTGRADE 6 TERM 2
160 161Grade 6 NATURAL SCIENCES & TECHNOLOGY Term 2 Grade 6 NATURAL SCIENCES & TECHNOLOGY Term 2
CAPS Assessment
Assessment is a continuous planned process that involves identifying, gathering, interpreting and diagnosing information about the performance of learners.
Assessment involves generating and collecting evidence of learner achievement and progress, and using this information to understand and provide assistance to the learner during the process of teaching and learning.
Assessment should be both formal and informal:
a. Informal Assessment involves regular checking of learners’ class work and practical tasks; asking questions; discussions; informal classroom interactions; and giving constructive feedback. Informal assessment marks do not need to be recorded, but the teacher can make notes for future reference.
b. Formal Assessment provides teachers with a systematic way of evaluating how well learners are progressing. Formal Assessment consists of selected assessment tasks. These tasks are stipulated by CAPS and the marks need to be recorded. These tasks are done throughout the year, and include practical tasks, tests and examinations.
i. Tests and Examinations
Examinations must include questions on both Natural Sciences and Technology. The weighting of the marks should reflect the time allocated to each section in the curriculum content. Tests and exams should consist of a range of questions that cover different cognitive levels: recall; understanding; application; evaluation; analysis; and synthesis. CAPS aligned tests and examinations, with accompanying memoranda, are provided with these lesson plans.
ii. Practical Tasks
Practical tasks give learners the opportunity to demonstrate knowledge, skills and understanding. Practical tasks form part of the activities included in these lesson plans. Each term, one practical task has been selected for assessment. A rubric is provided to conduct the assessment.
A minimum mark allocation is prescribed in CAPS for tests, practical tasks and examinations for each grade. For this grade, these are summarised in the table below:
GRADE 6 ASSESSMENT
• This section presents the CAPS assessment requirements for this grade for this term.• See your prescribed textbooks for examples of the required assessments.• An example of a practical task and an exam has been included.

160 161Grade 6 NATURAL SCIENCES & TECHNOLOGY Term 2 Grade 6 NATURAL SCIENCES & TECHNOLOGY Term 2
GRADE 6 ASSESSMENT G
rade
6Pr
ogra
mm
e of
For
mal
Ass
essm
ent
Term
1Te
rm 2
Term
3Te
rm 4
Form
s of
as
sess
men
tPr
actic
al T
ask/
In
vest
igat
ion
(40%
)Te
st
(60%
)Pr
actic
al T
ask/
In
vest
igat
ion
(40%
)
* Ex
amin
atio
n (6
0%)
Prac
tical
Tas
k/
Inve
stig
atio
n (4
0%)
Test
(60%
)* E
xam
inat
ion
Tool
s of
as
sess
men
tM
emo
& ru
bric
Mem
oM
emo
& ru
bric
Mem
oM
emo
& ru
bric
Mem
oM
emo
Min
imum
Mar
ks20
4020
6020
4060
Tim
e al
loca
tion
Dep
ende
nt o
n na
ture
of
the
task
and
con
text
60
min
utes
Dep
ende
nt o
n na
ture
of
the
task
and
con
text
90 m
inut
esD
epen
dent
on
natu
re
of th
e ta
sk a
nd c
onte
xt60
min
utes
90 m
inut
es
Con
tent
and
sk
ills
focu
s Te
rm 1
Term
1Te
rm 2
Term
1 (4
0%)
Term
2 (6
0%)
Term
3Te
rm 3
Term
3 (4
0%)
Term
4 (6
0%)
No.
of T
asks
22
21

162 163Grade 6 NATURAL SCIENCES & TECHNOLOGY Term 2 Grade 6 NATURAL SCIENCES & TECHNOLOGY Term 2
PRACTICAL TASK - INTRODUCTION
NS & TECHGRADE 6PRACTICAL TASKTERM 2
20 MARKS
Time allocation: 60 minutes (20 minutes preparation, 40 minutes task time)
NOTE TO THE TEACHER
1. This practical activity will be completed as part of Section E of lesson 2B.
2. This practical will take place during the lesson after the teaching component in Section D, “Accessing Information”.
3. The first 20 minutes will be used to teach section D and prepare learners for the practical task.
4. The next 40 minutes will be used to complete the practical activity as outlined in Section E.
5. The instructions and content of the practical task should be written on the chalkboard for the learners.
6. The memorandum for assessing the practical task is provided.
7. This practical will be done in groups of 6.
8. Each group will need the following equipment and materials to complete the practical task: • 4 glasses or glass jars• a container of water• a stick or spoon for stirring• a tablespoon of salt• a tablespoon of sugar• a tablespoon of sand• a tablespoon of cooking oil
9. The learners should complete the drawings with a sharp pencil if possible and the written answers should be completed in pen.
GRADE 6 ASSESSMENT

162 163Grade 6 NATURAL SCIENCES & TECHNOLOGY Term 2 Grade 6 NATURAL SCIENCES & TECHNOLOGY Term 2
PRACTICAL TASK - MEMORANDUM
NS & TECHGRADE 6 PRACTICAL TASKTERM 2
20 MARKS
(see Section E of Lesson 2B for instructions and questions)
Topic Activity Expected answer/outcome Marks
1
Solutions as special mixtures
sugar salt sand oil
Predict Will vary Will vary Will vary Will vary
Solution Yes Yes No No
After 5 minutes
Sugar has dissolved and can’t be seen
Salt has dissolved and can’t be seen
Water is muddy, and sand has settled on the bottom
Oil has risen to the top.
12
2
Solutions as special mixtures
2.1 2
Solutions as special mixtures
2.2 3
GRADE 6 ASSESSMENT
jarsalt solution
jar
muddy water
settled sand

164 165Grade 6 NATURAL SCIENCES & TECHNOLOGY Term 2 Grade 6 NATURAL SCIENCES & TECHNOLOGY Term 2
Solutions as special mixtures
2.3 3
TOTAL 20
GRADE 6 ASSESSMENT
jar
oil layer
water

164 165Grade 6 NATURAL SCIENCES & TECHNOLOGY Term 2 Grade 6 NATURAL SCIENCES & TECHNOLOGY Term 2
GRADE 6 ASSESSMENT
TERM EXAM
NS & TECHGRADE 6EXAMTERM 2
60 MARKS90 MINUTES
NOTE TO THE TEACHER:If possible, photocopy this test for each learner. If this is not possible, write the test on the chalkboard.
INSTRUCTIONS TO LEARNERS1. Answer all questions in blue or black ink. 2. Read each question carefully before answering it.3. Pay attention to the mark allocations.4. Plan your time carefully.5. Write your answers in the spaces provided.6. Write neatly.
Practice QuestionRead the question and circle the letter that shows the correct answer.
1. Which of the following is not a living thing?
A. breadB. eggs
C. rice
D. mielie meal
You have answered correctly if you have circled B

166 167Grade 6 NATURAL SCIENCES & TECHNOLOGY Term 2 Grade 6 NATURAL SCIENCES & TECHNOLOGY Term 2
NS & TECHGRADE 6TERM 2 EXAM
60 MARKS
PART 1: Life and Living
Question 1: Multiple choice [4]
Read each question and circle the letter that shows the correct answer.
1.1. Which one of these is NOT needed for photosynthesis to take place?
a. Sunlight
b. Water
c. Oxygen
d. Carbon dioxide
1.2. Which of these statements is TRUE?
a. Animals use carbon dioxide from the air and release oxygen.
b. Plants use oxygen from the air and release carbon dioxide.
c. Animals are producers.
d. Animals depend on plants for food and oxygen.
1.3. Which of these statements is FALSE?
a. Animals need food to give their bodies energy.
b. Everything animals eat contains nutrients.
c. Carbohydrates build and protect our bodies.
d. Proteins help repair and grow our body.
1.4. Which one of these is a complete food chain?
a. locustlizardeagle
b. lizardcat
c. grassmousesnake
d. mousesnakemongooseleopard
GRADE 6 ASSESSMENT

166 167Grade 6 NATURAL SCIENCES & TECHNOLOGY Term 2 Grade 6 NATURAL SCIENCES & TECHNOLOGY Term 2
GRADE 6 ASSESSMENT
Question 2: Match the columns [4]
Instructions:
• Match the sentences in COLUMN A with the words in COLUMN B.• Draw a line to join the sentence in COLUMN A with the correct word in
COLUMN B. Do this as shown in the example below.
COLUMN A COLUMN B
example mielies A. Fruit
2.1 lettuce B. Leaf
2.2 banana C. Root
2.3 sugar cane D. Stem
2.4 carrot E. Seed
Question 3 [5]
This is what Zanele and Thumi have in their school bags for lunch today:
Brown bread with margarine and polony.A packet of peanuts.A fatcake (vetkoek). An orange. An amasi drink. A bottle of coke.
Answer these questions:
3.1. Name two starch carbohydrates from this lunch. ________________________________________________
3.2. Name two proteins from this lunch. _________________________________________________
3.3. Name two sources of fats and oils from this lunch __________________________________________________
3.4. What food group is there too little of in this lunch? __________________________________________________
3.5. What do you think is the most unhealthy thing in these lunches? Give a reason for your answer. __________________________________________________ __________________________________________________

168 169Grade 6 NATURAL SCIENCES & TECHNOLOGY Term 2 Grade 6 NATURAL SCIENCES & TECHNOLOGY Term 2
Question 4 [5]
Write the word that is being described in the sentence.
Only write the answer.
4.1. When the sea is at its highest level on the beach. ________________________
4.2. Process whereby plants make their own food. ________________________
4.3. Part of the plant that adsorbs nutrients and water from the soil. ___________________
4.4. The system of the body that fights disease. _____________________________
4.5. Something that is added to processed food to stop it from rotting. ___________________________________________
Question 5 [6]
Use the words in the block below to complete the sentence:
webs, energy, carnivores, feeding relationships, producers, herbivores, consumers, omnivores
5.1. In an ecosystem, plants and animals are connected by their _________.
5.2. A food chain shows the movement of _________ from one living thing to another.
5.3. Food _________are made up of many food chains.
5.4. Plants are called __________ as they make their own food.
5.5. Animals are called __________ as they must eat plants or other animals.
5.6. Animals that only eat plants are called ______________
GRADE 6 ASSESSMENT

168 169Grade 6 NATURAL SCIENCES & TECHNOLOGY Term 2 Grade 6 NATURAL SCIENCES & TECHNOLOGY Term 2
Question 6 [5]
Look at the diagram below:
(Note to teacher: Copy this picture or use Term 1 Resource 1)
Using what you know and the words in the box below, explain the process of photosynthesis.
sunlight, energy, water, minerals, soil, glucose, oxygen, carbon dioxide
_________________________________________________________________
_________________________________________________________________
_________________________________________________________________
_________________________________________________________________
_________________________________________________________________
_________________________________________________________________
GRADE 6 ASSESSMENT
Sunlight
Oxygen
Carbon dioxide
Water
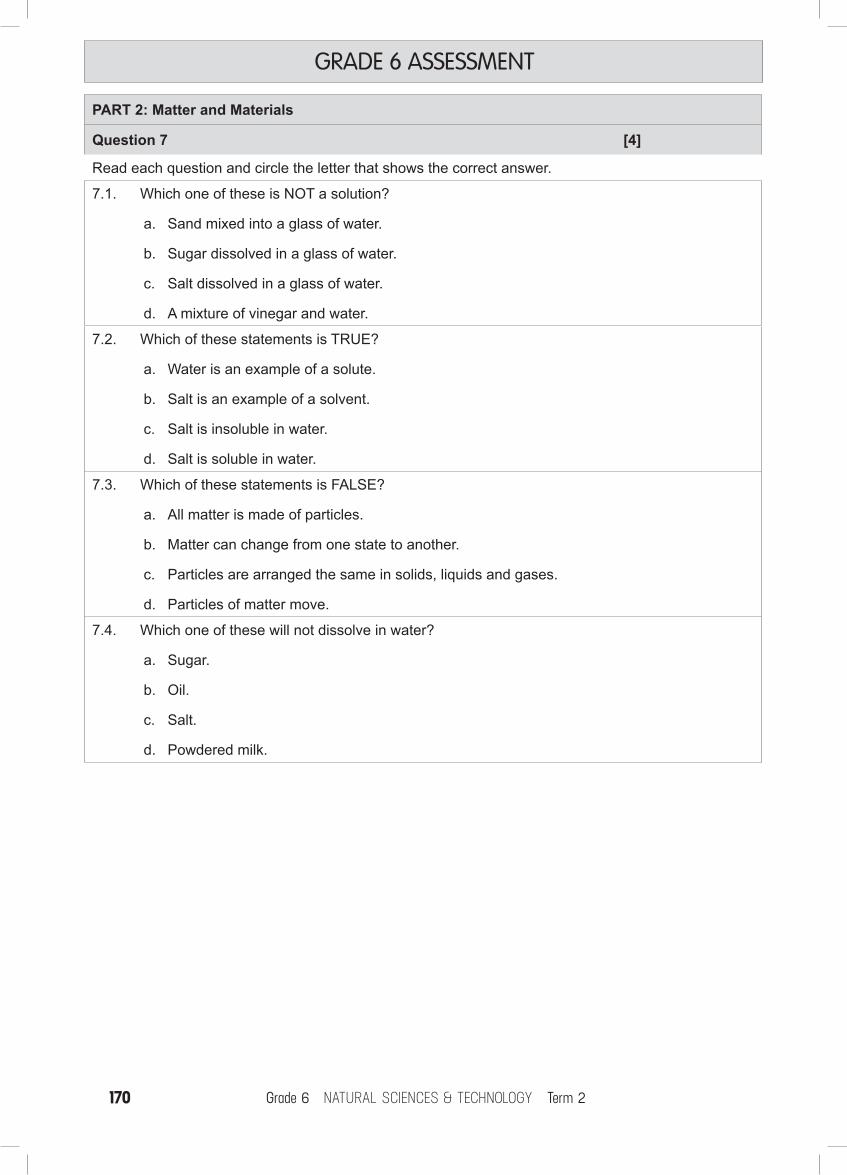
170 171Grade 6 NATURAL SCIENCES & TECHNOLOGY Term 2 Grade 6 NATURAL SCIENCES & TECHNOLOGY Term 2
PART 2: Matter and Materials
Question 7 [4]
Read each question and circle the letter that shows the correct answer.
7.1. Which one of these is NOT a solution?
a. Sand mixed into a glass of water.
b. Sugar dissolved in a glass of water.
c. Salt dissolved in a glass of water.
d. A mixture of vinegar and water.
7.2. Which of these statements is TRUE?
a. Water is an example of a solute.
b. Salt is an example of a solvent.
c. Salt is insoluble in water.
d. Salt is soluble in water.
7.3. Which of these statements is FALSE?
a. All matter is made of particles.
b. Matter can change from one state to another.
c. Particles are arranged the same in solids, liquids and gases.
d. Particles of matter move.
7.4. Which one of these will not dissolve in water?
a. Sugar.
b. Oil.
c. Salt.
d. Powdered milk.
GRADE 6 ASSESSMENT

170 171Grade 6 NATURAL SCIENCES & TECHNOLOGY Term 2 Grade 6 NATURAL SCIENCES & TECHNOLOGY Term 2
GRADE 6 ASSESSMENT
Question 8: Match the columns [4]
Instructions:
• Match the sentences in COLUMN A with the words in COLUMN B.• Draw a line to join the sentence in COLUMN A with the correct word in
COLUMN B. Do this as shown in the example below.
COLUMN A COLUMN B
example A suitable way to separate samp and beans.
A. Decanting
8.1 Particles are closely packed together in a regular pattern and vibrate a little.
B. Solid
8.2 Particles are far apart and can move in all directions.
C. Sieving
8.3 A suitable way to separate oil and water.
D. Gas
8.4 A suitable way to separate sand and salt.
E. Hand sorting
Question 9 [6]
Complete the following sentences using words in the block below:
soluble, solvent, solute, solution, insoluble, dissolve
Rewrite the sentences and underline your answers.
9.1. A ________________ is what we call a solid or liquid that dissolves in a liquid. (1)
9.2. A ________________ is what we call the liquid in which the solid dissolves. (1)
9.3. The mixture of a solute and a solvent is called a _________________. (1)
9.4. A soluble solid will _________________ in water. (1)
9.5. A solid is ____________________ if it can dissolve in a liquid. (1)
9.6. A solid is ____________________ if it cannot dissolve in a liquid. (1)

172 173Grade 6 NATURAL SCIENCES & TECHNOLOGY Term 2 Grade 6 NATURAL SCIENCES & TECHNOLOGY Term 2
Question 10 [6]
Read the following statement:
“The loss of small, seemingly unimportant wetlands will have long lasting effects on the environment. Wetlands need to be protected and conserved.”
Using what you have learnt, and the words in the box below, write 5-7 sentences about what you understand is the importance of a wetland.
mud, plants, water, soak, flood, droughts, erosion, animals, filtering, settling, biodiversity
_______________________________________________________________________________
_______________________________________________________________________________
_______________________________________________________________________________
_______________________________________________________________________________
_______________________________________________________________________________
Question 11 [6]
Say whether the following sentences are TRUE or FALSE.
11.1. A solution is saturated when no more solute can dissolve in it. ____________
11.2. Salt dissolves faster in cold water than hot water. _________
11.3. Cholera is a disease carried in polluted water. _____________
11.4. The water in wetlands can be fresh or salty. _____________
11.5. Crystallization is the process of forming crystals from a solution. __________
11.6. Separating a solid from a solvent can be done by hand sorting. ___________
Question 12 [5]
A sugar solution can be separated so that the sugar crystals are once again separated from the water.
12.1. Name the two separation methods that can be used to do this: (2) __________________________________
12.2. Which of these two methods of separation would be faster in a fair test? (1) __________________________________
12.3. What is the meaning of a “fair test” when doing Science? (1) _________________________________
12.4. Name two methods that are not suitable for separating a solution. (2) _________________________________
12.5. South Africa is bordered by two oceans. How do you think we could use the process of separating solutions to solve our water crisis? (1) _________________________________
TOTAL [60]
GRADE 6 ASSESSMENT

172 173Grade 6 NATURAL SCIENCES & TECHNOLOGY Term 2 Grade 6 NATURAL SCIENCES & TECHNOLOGY Term 2
GRADE 6 ASSESSMENT
TERM 2 EXAM – MEMORANDUM
NS & TECHGRADE 6 MEMORANDUMTERM 2
60 MARKS90 MINUTES
Caps Topic Questions Expected answer(s) Marks
PART 1: Life and the Living
1
Photosynthesis 1.1 C 1
Photosynthesis 1.2 D 1
Ecosystems and food webs
1.3 C 1
Ecosystems and food webs
1.4 C 1
2
Photosynthesis 2.1 B 1
Photosynthesis 2.2 A 1
Photosynthesis 2.3 D 1
Photosynthesis 2.4 C 1
3
Nutrition 3.1 • Bread• Fatcake (vetkoek)
½ x 2 =1
Nutrition 3.2 (Any 2)• Polony• Peanuts• Amasi
½ x 2 =1
Nutrition 3.3 (Any 2)• Margarine• Fatcake• Amasi• Peanuts• Polony
½ x 2 =1
Nutrition 3.4 Fruit and vegetable ½ x 2 =1
Nutrition 3.5 • The coke• Very high in sugar
½ x 2 =1

174 175Grade 6 NATURAL SCIENCES & TECHNOLOGY Term 2 Grade 6 NATURAL SCIENCES & TECHNOLOGY Term 2
4.
Ecosystems and food webs 4.1 high tide 1
Photosynthesis 4.2 photosynthesis 1
Photosynthesis 4.3 roots 1
Nutrition 4.4 immune system 1
Nutrition 4.3 preservatives 1
5
Ecosystems and food webs
5.1 feeding relationships 1
Ecosystems and food webs
5.2 energy 1
Ecosystems and food webs
5.3 webs 1
Ecosystems and food webs
5.4 producers 1
Ecosystems and food webs
5.5 consumers 1
Ecosystems and food webs
5.6 herbivores 1
6
Plants and animals on Earth
6 (Any 5)
• Plants need food.• Plants can make their own food, this process
is called photosynthesis.• Plants change energy from sunlight into
energy for food.• This food type is called glucose.• Photosynthesis happens in the green parts of
the plant, mainly the leaves.• Plants need water, sunlight and carbon
dioxide to photosynthesize.• Water and nutrients are absorbed from the
soil by the roots.• Carbon dioxide is absorbed by the green
plants of the leaves.• Oxygen is given off during photosynthesis.
5
GRADE 6 ASSESSMENT
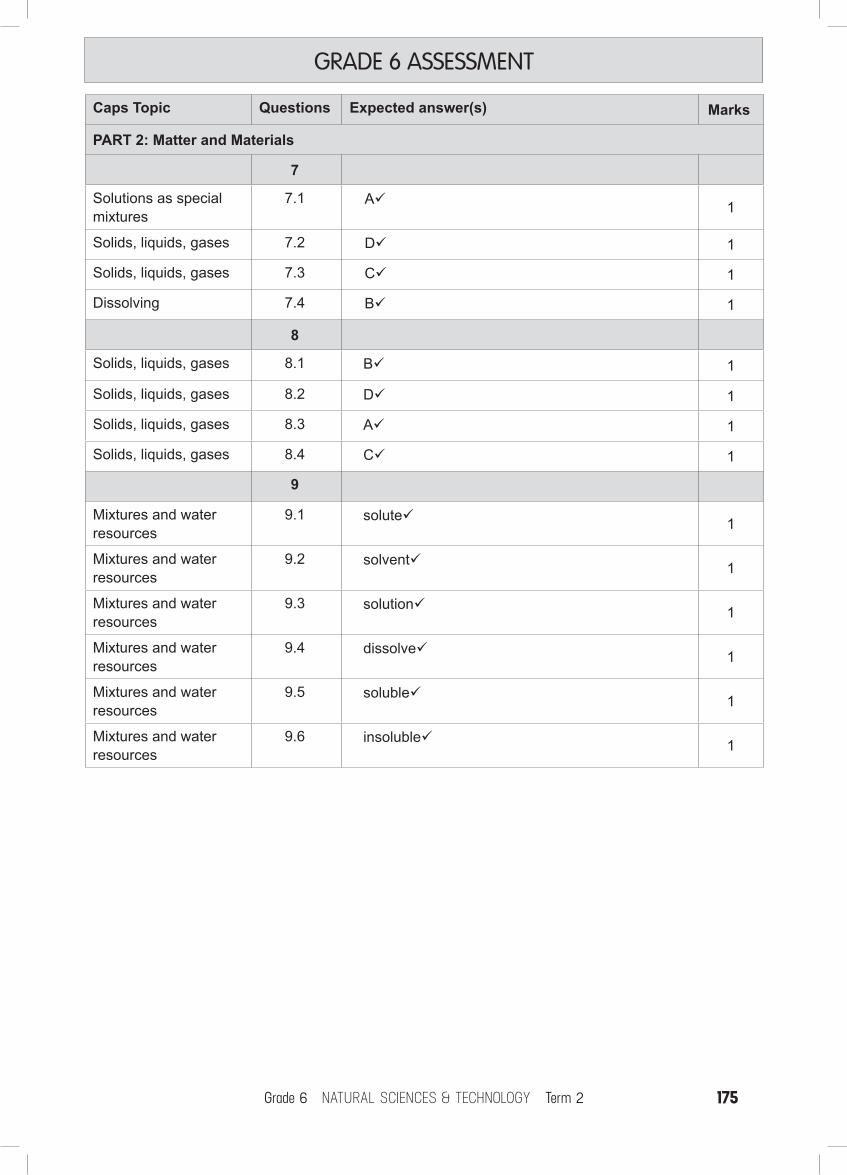
174 175Grade 6 NATURAL SCIENCES & TECHNOLOGY Term 2 Grade 6 NATURAL SCIENCES & TECHNOLOGY Term 2
GRADE 6 ASSESSMENT
Caps Topic Questions Expected answer(s) Marks
PART 2: Matter and Materials
7
Solutions as special mixtures
7.1 A 1
Solids, liquids, gases 7.2 D 1
Solids, liquids, gases 7.3 C 1
Dissolving 7.4 B 1
8
Solids, liquids, gases 8.1 B 1
Solids, liquids, gases 8.2 D 1
Solids, liquids, gases 8.3 A 1
Solids, liquids, gases 8.4 C 1
9
Mixtures and water resources
9.1 solute 1
Mixtures and water resources
9.2 solvent 1
Mixtures and water resources
9.3 solution 1
Mixtures and water resources
9.4 dissolve 1
Mixtures and water resources
9.5 soluble 1
Mixtures and water resources
9.6 insoluble 1

176 PBGrade 6 NATURAL SCIENCES & TECHNOLOGY Term 2 Grade 6 NATURAL SCIENCES & TECHNOLOGY Term 2
10
Mixtures and water resources
10 (Any 6)
• A wetland is an important centre of biodiversity
• They are the habitat for many plants and animals
• Wetlands absorb and clean our water• They clean the water by filtration and settling
of impurities• When water passes over a wetland, it slows
down because the wetland holds the water• This helps to prevent flooding after heavy
rains• This also helps to prevent soil erosion• The plants in a wetland act as a filter • The plants and the mud act like a sponge
6
11Dissolving 11.1 True 1
Dissolving 11.2 False 1
Mixtures and water resources
11.3 True 1
Mixtures and water resources
11.4 True 1
Solutions as special mixtures
11.5 True 1
Solutions as special mixtures
11.6 False 1
12Solutions as special mixtures
12.1 EvaporationBoiling
½ x 2 = 1
Solutions as special mixtures
12.2 Boiling 1
Solutions as special mixtures
12.3 Only one part or factor in the investigation is changed, whilst keeping all the rest the same 1
Solutions as special mixtures
12.4 (Any 2) DecantingSettlingHand sortingSievingFiltering
½ x 2 = 1
Mixtures and water resources
12.5 We can use evaporation to separate salt from sea water 1
TOTAL 60
GRADE 6 ASSESSMENT