Motor Coach DVD User's Guide - REI Customer Support
19
Motor Coach DVD User’s Guide DVD/CD/USB 1080P HDMI-E Output © 2018 Radio Engineering Industries, Inc.
-
Upload
khangminh22 -
Category
Documents
-
view
1 -
download
0
Transcript of Motor Coach DVD User's Guide - REI Customer Support

Motor Coach DVD User’s Guide DVD/CD/USB 1080P HDMI-E Output
© 2018 Radio Engineering Industries, Inc.
1
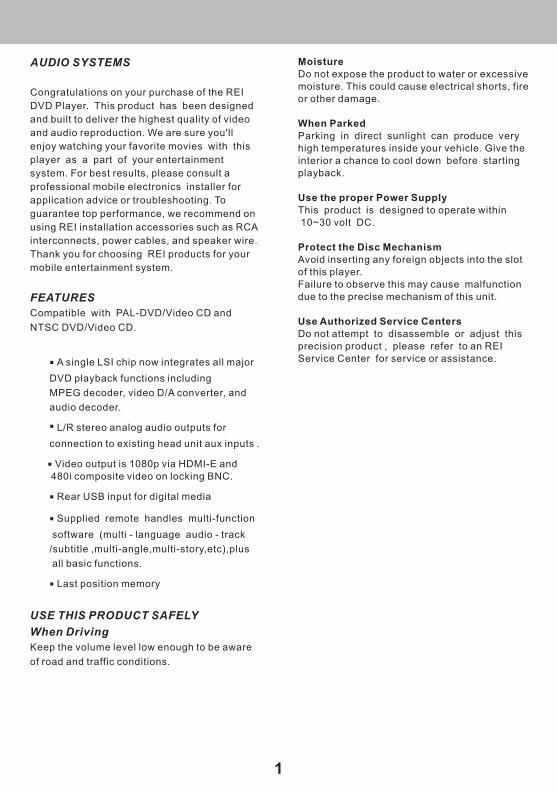
AUDIO SYSTEMS
Congratulations on your purchase of the REI
DVD Player. This product has been designed
and built to deliver the highest quality of video
and audio reproduction. We are sure you'll
enjoy watching your favorite movies with this
player as a part of your entertainment
system. For best results, please consult a
professional mobile electronics installer for
application advice or troubleshooting. To
guarantee top performance, we recommend on
using REI installation accessories such as RCA
interconnects, power cables, and speaker wire.
Thank you for choosing REI products for your
mobile entertainment system.
FEATURES
Compatible with PAL-DVD/Video CD and
NTSC DVD/Video CD.
A single LSI chip now integrates all major
DVD playback functions including
MPEG decoder, video D/A converter, and
audio decoder.
L/R stereo analog audio outputs for
connection to existing head unit aux inputs .
Video output is 1080p via HDMI-E and 480i composite video on locking BNC.
Rear USB input for digital media
Supplied remote handles multi-function
software (multi - language audio - track
/subtitle ,multi-angle,multi-story,etc),plus
all basic functions.
Last position memory
USE THIS PRODUCT SAFELY
When Driving
Keep the volume level low enough to be aware
of road and traffic conditions.
MoistureDo not expose the product to water or excessivemoisture. This could cause electrical shorts, fireor other damage.
When ParkedParking in direct sunlight can produce very high temperatures inside your vehicle. Give the interior a chance to cool down before startingplayback.
Use the proper Power SupplyThis product is designed to operate within 10~30 volt DC.
Protect the Disc MechanismAvoid inserting any foreign objects into the slotof this player.Failure to observe this may cause malfunction due to the precise mechanism of this unit.
Use Authorized Service CentersDo not attempt to disassemble or adjust this precision product , please refer to an REIService Center for service or assistance.
2
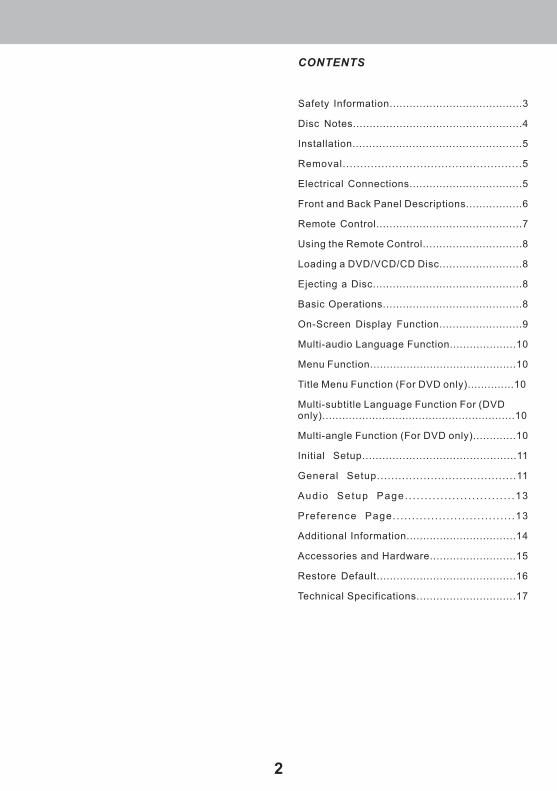
CONTENTS
Safety Information........................................3
Disc Notes...................................................4
Installation...................................................5
Removal...................................................5
Electrical Connections..................................5
Front and Back Panel Descriptions.................6
Remote Control............................................7
Using the Remote Control..............................8
Loading a DVD/VCD/CD Disc.........................8
Ejecting a Disc.............................................8
Basic Operations..........................................8
On-Screen Display Function.........................9
Multi-audio Language Function....................10
Menu Function............................................10
Title Menu Function (For DVD only)..............10
Multi-subtitle Language Function For (DVD only)..........................................................10
Multi-angle Function (For DVD only).............10
Initial Setup..............................................11
General Setup.......................................11
Aud io Setup Page. . . . . . . . . . . . . . . . . . . . . . . . . . . .13
Preference Page. . . . . . . . . . . . . . . . . . . . . . . . . . . . . . . .13
Additional Information.................................14
Accessories and Hardware..........................15
Restore Default..........................................16
Technical Specifications..............................17
3
Safety information
Caution:
This Mobile DVD player is a class A laser
product. The player uses a visible/ invisible
laser beam which could cause
hazardous radiation exposure if directed. Be
sure to operate the mobile DVD player correctly
as instructed. Use of controls, adjustments or
performance of procedures other than those
specified here may result in hazardous
radiation exposure. Do not open covers and-do
not repair by yourself , refer servicing to
qualified personal.
Warning:
to reduce the risk of fire or electric shock,
do not expose this equipment to rain or
moisture.
to reduce the risk of fire of electric shock,
and annoying interference, use only the
recommended accessories.
Reverse engineering or disassembly is prohibited.
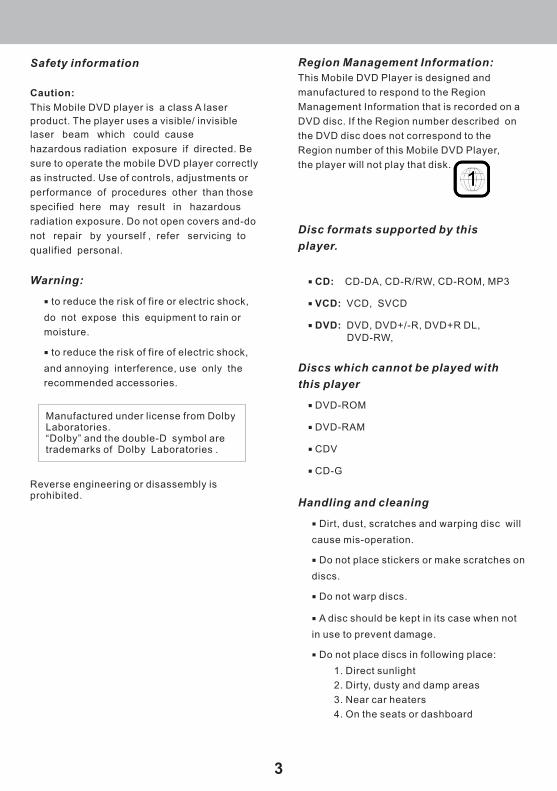
Region Management Information:
This Mobile DVD Player is designed and
manufactured to respond to the Region
Management Information that is recorded on a
DVD disc. If the Region number described on
the DVD disc does not correspond to the
Region number of this Mobile DVD Player,
the player will not play that disk.
Disc formats supported by this
player.
CD: CD-DA, CD-R/RW, CD-ROM, MP3
VCD: VCD, SVCD
DVD: DVD, DVD+/-R, DVD+R DL, DVD-RW,
Discs which cannot be played with
this player
DVD-ROM
DVD-RAM
CDV
CD-G
Handling and cleaning
Dirt, dust, scratches and warping disc will
cause mis-operation.
Do not place stickers or make scratches on
discs.
Do not warp discs.
A disc should be kept in its case when not
in use to prevent damage.
Do not place discs in following place:
1. Direct sunlight
2. Dirty, dusty and damp areas
3. Near car heaters
4. On the seats or dashboard
Manufactured under license from Dolby Laboratories.“Dolby” and the double-D symbol are trademarks of Dolby Laboratories .

4
Disc Cleaning
Use a dry soft cloth to wipe the surface. If
the disc is dirty, use a soft cloth and wipe clean
with isopropyl (rubbing) alcohol. Never use solvents such as benzine , thinner or conventional record cleaners as they may
mar the surface of the disc.
Note:
A disc may become somewhat scratched
(although not enough to make it unplayable)
depending on how it is handled and the
conditions of exposure. Note that these
scratches are not an indication of a problem
with the Player.
Preparing New Discs with
Rough Spots
A new disc may have rough edges on its inside
and outside edges. If a disc with rough edges is
used and the proper preparation is not
performed, the player will not play the disc.
Therefore, remove the rough edges in advance
by using a ball point pen or pencil as shown on
the bottom . To remove the rough edges , press
the side of the pen or pencil against the inside
and outside edges of the disc.
Label side up
Do not touch the underside of the disc
Do not bend
Wipe the disc from centerToward the outside edge
Rough spots on outside edge
Ball point penor pencil
Rough spotson inside edge

5
using
the supplied screws (M3x4).
Step2:Attach the L-form brackets to the player
Dash Mount Installation Option
Figure: Electrical Connections
ScrewM3x4
ScrewM3x4
ScrewM3x6
SCREW M2.6X4
SCREW M2.6X4
Step1:
(1) Slide both removal keys into the sides of the DVD player until they lock. Pull both keys to release the DVD player from the DIN collar.
DIN COLLAR
Step2:
Insert the DIN collar into the dash opening and bend the lock tabs outward securing it into place.
(1) Slide the DVD player into the DIN collar until both side clips lock.
(2)Attach Trim collar onto the front panel.
Step1:
Remove the 2 side brackets
(1)
(2)
(2)
Electrical Connections
Removal
Bracket Mount Installation Option
Step1:
Verify radio opening is cut to the above minimum dimensions. Test fit the DIN collar to verity opening is adequate and does not compress the collar in any direction.
TRIM COLLAR
EnterEnter/Add/Add
/CH+/CH+
/CH-/CH-
6
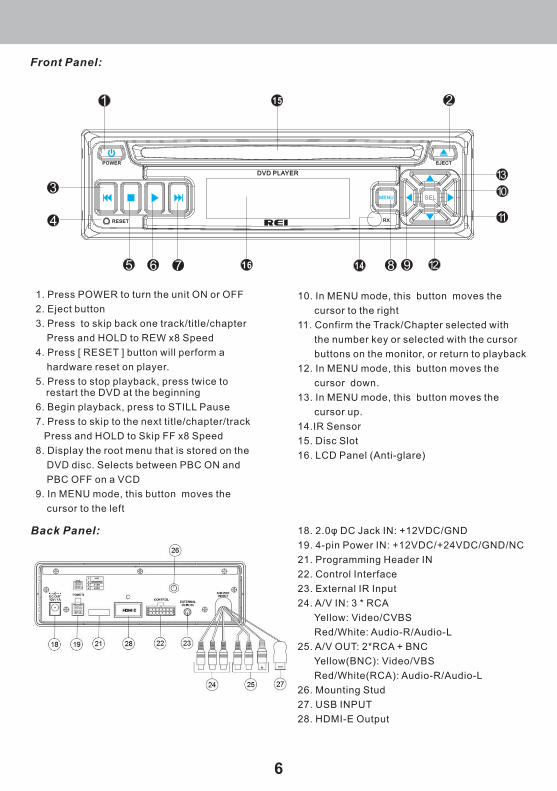
10. In MENU mode, this button moves the
cursor to the right
11. Confirm the Track/Chapter selected with
the number key or selected with the cursor
buttons on the monitor, or return to playback
12. In MENU mode, this button moves the
cursor down.
13. In MENU mode, this button moves the
cursor up.
14.IR Sensor
15. Disc Slot
16. LCD Panel (Anti-glare)
1. Press POWER to turn the unit ON or OFF
2. Eject button
3. Press to skip back one track/title/chapter
Press and HOLD to REW x8 Speed
4. Press [ RESET ] button will perform a
hardware reset on player.
5. Press to stop playback, press twice to restart the DVD at the beginning
6. Begin playback, press to STILL Pause
7. Press to skip to the next title/chapter/track
8. Display the root menu that is stored on the
DVD disc. Selects between PBC ON and
PBC OFF on a VCD
9. In MENU mode, this button moves the
cursor to the left
Press and HOLD to Skip FF x8 Speed
14
15
16
Back Panel:
Front Panel:
18. 2.0φ DC Jack IN:
19. 4-pin Power IN: +12VDC/+24VDC/GND/NC
21. Programming Header IN
22. Control Interface
23. External IR Input
24. A/V IN: 3 * RCA
Yellow: Video/CVBS
Red/White: Audio-R/Audio-L
25. A/V OUT: 2*RCA + BNC
Yellow(BNC): Video/VBS
Red/White(RCA): Audio-R/Audio-L
26. Mounting Stud
27. USB INPUT
28. HDMI-E Output
+12VDC/GND
MENU SEL
EJECTPOWER
RESET RX
DVD PLAYER
7
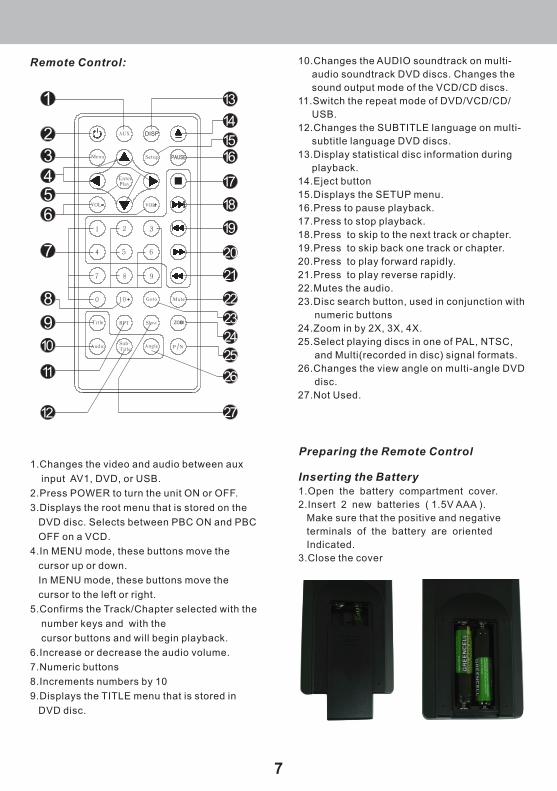
Remote Control: 10.Changes the AUDIO soundtrack on multi-
audio soundtrack DVD discs. Changes the
sound output mode of the VCD/CD discs.
11.Switch the repeat mode of DVD/VCD/CD/
USB.
12.Changes the SUBTITLE language on multi-
subtitle language DVD discs.
13.Display statistical disc information during
playback.
14.Eject button
15.Displays the SETUP menu.
16.Press to pause playback.
17.Press to stop playback.
18.Press to skip to the next track or chapter.
19.Press to skip back one track or chapter.
20.Press to play forward rapidly.
21.Press to play reverse rapidly.
22.Mutes the audio.
23.Disc search button, used in conjunction with
numeric buttons
24.Zoom in by 2X, 3X, 4X.
25.Select playing discs in one of PAL, NTSC,
and Multi(recorded in disc) signal formats.
26.Changes the view angle on multi-angle DVD
disc.
27.Not Used.
DISP
PAUSE
ZOOM
1.Changes the video and audio between aux
input AV1, DVD, or USB.
2.Press POWER to turn the unit ON or OFF.
3.Displays the root menu that is stored on the
DVD disc. Selects between PBC ON and PBC
OFF on a VCD.
4.In MENU mode, these buttons move the
cursor up or down.
In MENU mode, these buttons move the
cursor to the left or right.
5.Confirms the Track/Chapter selected with the
number keys and with the
cursor buttons and will begin playback.
6.Increase or decrease the audio volume.
7.Numeric buttons
8.Increments numbers by 10
9.Displays the TITLE menu that is stored in
DVD disc.
Preparing the Remote Control
Inserting the Battery1.Open the battery compartment cover.
2.Insert 2 new batteries ( 1.5V AAA ).
Make sure that the positive and negative
terminals of the battery are oriented
Indicated.
3.Close the cover

8
Using the Remote ControlPoint the remote control toward the front of
the player(or at the aux ir sensor)
Operation angle: About ±30 degree in each
direction of the front of the IR mark.
To prevent damage to the unit, be sure to
follow the connection diagram(page 5).
Loading a DVD/VCD/CD Disc( Figure: Electrical Connections2 )
1.Turn the ignition to the Accessory (ACC)
position.
2.Press the POWER button.
3.Insert the disc into the disc slot with the
label side of the disc facing up.
4.The player will stars playback automatically.
Ejecting a discPress (EJECT) button to eject the disc.
Basic Operations
1.Press the (Stop) button to stop playback .
Press the (play) button for playback.
2.Press the (Stop) button twice to stop
the playback and go back to the initial Track/
Chapter.
Rapid Forward/ReversePress FF & REW during play. Each time
the button is pressed the speed changes
(depending on the disc format) as follows:
DVD/VCD/CD/MP3:
Normal 2X 4X 8X»16X
Skipping a TrackPress / on the remote handset or on the
front panel during playback. Press to skip to
next track, and to back one track.
» » » »32X
Pause (still picture)Pressing PAUSE(ll)button during playback, will still pause playback temporarily.
Press the PAUSE button a second time to resume playback.
RepeatPress the REPEAT(REP) button to select a repeat mode as follows:
DVD:
Press the REPEAT(REP) button to select a repeat mode as follows. OFF » Chapter » Title » REP All
SVCD/VCD/CD:
Press the REPEAT(REP) button to select a repeat mode as follows.
OFF » TRACK » ALL
1.Repeat Track mode will continuously repeat
the current track/song.
2.in Repeat ALL mode, all tracks /songs on the
disc are repeated.
ZOOMIf the ZOOM button is pressed, the image will be enlarged each time by 2X, 3X, 4X, 1/ 2, 1/3, 1/4. Please note that some DVD disc videos can not be zoomed.
TITLEPressing the TITLE button when DVD is in playback will bring up the TITLE menu.
GOTOPress GOTO button to start the searching function.
1.CD/MP3/Movie ClipsPress GOTO button, the status bar will appears and allow users to input text.Use the UP/DOWN arrows or Numeric Keys to select desired Track.

9
Press GOTO again to exit.
2. VCD/SVCDPress GOTO button, the display bar will appear and allow users to input text.Use the UP/DOWN arrows or Numeric Keys to play the desired Track.Press GOTO again to exit.
3. DVDPress GOTO button, the “GOTO” menu will appear for user to adjust parameters during disc playback such as title, chapter, repeat modes, angle, audio and subtitle.
Mute Function
Press MUTE button on the remote control to mute the audio.
Press it again or VOL+/VOL- to restore the audio.
VOL+ / VOL-
Volume Control:
Press VOL+ on the remote control to increase the audio level and press the VOL- to decrease the audio level.
Remote Sensor (IR)
Can be used as an External sensor for adjusting DVD player with the remote.
Turning the player on/off
Press the POWER button on front panel or on the remote control to turn the player on or off.
Audio/Video Mode
Whenever you press the AUX button, the input source will change as follows:
DVD » AV1
AUDIO/VIDEO IN
The unit accepts an auxiliary (AUX) composite external source.
1. Connect the equipment and the unit with A/V cables. The AUDIO OUT of the external device connects to the AUDIO IN jacks of the player, the VIDEO OUT of the external device is connected to the VIDEO IN jack of the player.
2.
» USB
Turn on the external device and the player.
9
3. Select the input source by pressing the AUX button on the remote control. Select the AV1 input for external device.
4. The signals are also routed through the video output jack and the audio output jack of the DVD unit. In some cases,
On-Screen Display Function
Press the DISP button during playback to show the timing contents of the current disc on the upper side of the screen.
(1) DVD:
Title Elapsed
TT 01/03 CH 02/31 00:01:36
an In-Line RCA Audio Noise Filter/Ground Loop Isolator may be necessary.
USB SOURCE
1. Select the USB input source by pressing the AUX button on the remote control. The USB icon will display, a slight delay is possible during the loading of the device.
10
Multi-audio Language Function
(1) DVD:
Press AUDIO button during playback.
Each time the button is pressed, the audio soundtrack language is changed in a sequential order.
Notes:
The number of languages varies according to the disc. Some disc may only contain one language soundtrack. When alternate language soundtracks are not available, the “INVALID KEY” symbol will be displayed on the upper left corner of the screen.
(2) VCD:
Press AUDIO during playback.
It is possible to switch the sound between mono and stereo sound.
STEREO » MONO (L) » MONO (R)
AUTO (R) « AUTO (L)
MENU Function (for DVD and USB only)
Press MENU button while the disc/USB media is playing and the menu will be displayed. You can navigate with the remote control navigation keys and select a feature with the ENTER key.
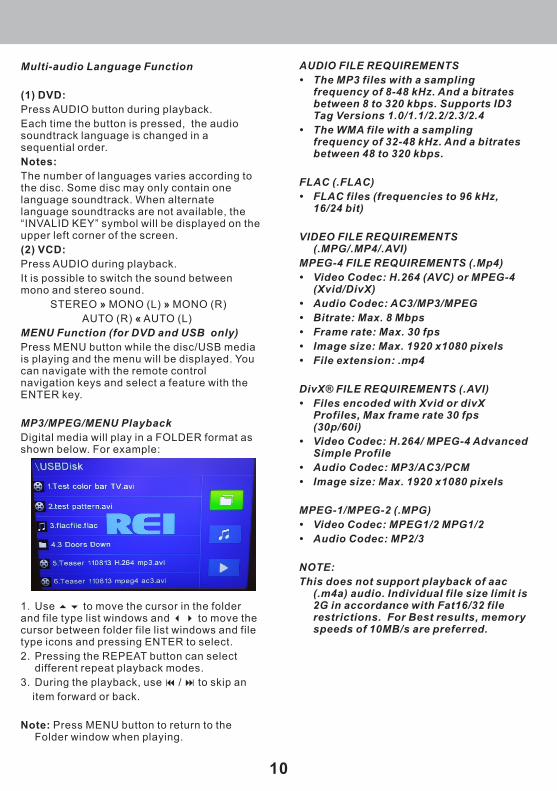
MP3/MPEG/MENU Playback
Digital media will play in a FOLDER format as shown below. For example:
1. Use 56 to move the cursor in the folder and file type list windows and 34 to move the cursor between folder file list windows and file type icons and pressing ENTER to select.
2. Pressing the REPEAT button can select different repeat playback modes.
3. During the playback, use 9 / : to skip an
item forward or back.
Note: Press MENU button to return to the Folder window when playing.
AUDIO FILE REQUIREMENTS
• The MP3 files with a sampling frequency of 8-48 kHz. And a bitrates between 8 to 320 kbps. Supports ID3 Tag Versions 1.0/1.1/2.2/2.3/2.4
• The WMA file with a sampling frequency of 32-48 kHz. And a bitrates between 48 to 320 kbps.
FLAC (.FLAC)
• FLAC files (frequencies to 96 kHz, 16/24 bit)
VIDEO FILE REQUIREMENTS (.MPG/.MP4/.AVI)
MPEG-4 FILE REQUIREMENTS (.Mp4)
• Video Codec: H.264 (AVC) or MPEG-4 (Xvid/DivX)
• Audio Codec: AC3/MP3/MPEG
• Bitrate: Max. 8 Mbps
• Frame rate: Max. 30 fps
• Image size: Max. 1920 x1080 pixels
• File extension: .mp4
DivX® FILE REQUIREMENTS (.AVI)
• Files encoded with Xvid or divX Profiles, Max frame rate 30 fps (30p/60i)
• Video Codec: H.264/ MPEG-4 Advanced Simple Profile
• Audio Codec: MP3/AC3/PCM
• Image size: Max. 1920 x1080 pixels
MPEG-1/MPEG-2 (.MPG)
• Video Codec: MPEG1/2 MPG1/2
• Audio Codec: MP2/3
NOTE:
This does not support playback of aac (.m4a) audio. Individual file size limit is 2G in accordance with Fat16/32 file restrictions. For Best results, memory speeds of 10MB/s are preferred.

11
Multi-Subtitle Language Function (for DVD only)
Press SUBTITLE during playback.
Each time the button is pressed, the subtitle language is changed in a sequential order.
Notes:
The number of subtitle languages varies according to the disc.
Some discs may contain no subtitles. Thus “OFF” is the only available selection.
Multi-Angle Function (for DVD only)
Press ANGLE during playback.
Each time the button is pressed, the angle changes in sequential order.
Note:
The number of angles is different according to the disc.
The function only works for discs having scenes recorded at different angles.
When alternate angles are not available, the “INVALID KEY” message will be displayed on the top left corner of the screen.
Title Menu Function (for DVD only)
If the DVD has multiple titles recorded on the disc, it can select preferred titles from the title menu to start playback.
1. Press TITLE button during playback. The title menu is displayed.
2. Navigate with the cursor shown on the monitor to select the preferred title and confirm by pressing the ENTER key.
INITIAL SETUP
SETUP MENU --- MAIN PAGE
1. Press SETUP on remote.
2. The initial SETUP menu is displayed.
3. Select the submenu by using the 3 /4 buttons to navigate and highlight an icon.
There are Two setup pages available.
A. General Setup Page
This setup page includes all the items for system and external TV display features, Angle Mark, OSD Language, Close Captions, Screen Saver, and Last Memory. Please refer to the GENERAL SYSTEM SETUP section for details.
C. Preference Page
This setup page includes the adjustments for TV Type, PBC, Audio, Subtitle, Disc Menu, Parental, & Default. Please refer to the Preference Page section for details.
4. Press ENTER button to start navigating the selected page, or 3button to go back.
5. Use 5 / 6 buttons to highlight the yellow cursor to the item you want to adjust.
(For 4:3 TV)
Normal/LB (For 4:3 TV)
GENERAL SETUP PAGE
TV DISPLAY
This is to select the appropriate aspect (4:3 or 16:9) according to the connected monitor.
(1) Normal/PS
Playback in the PAN & SCAN style. (If wide screen monitor is connected, the left and right edges are cut off.)
(2)
Playback in the letterbox style. (If wide screen is connected, black bands appear at bottom and top of the screen.)
(3) Wide (For 16:9 TV)
Select when connected to a wide-screen monitor.
12
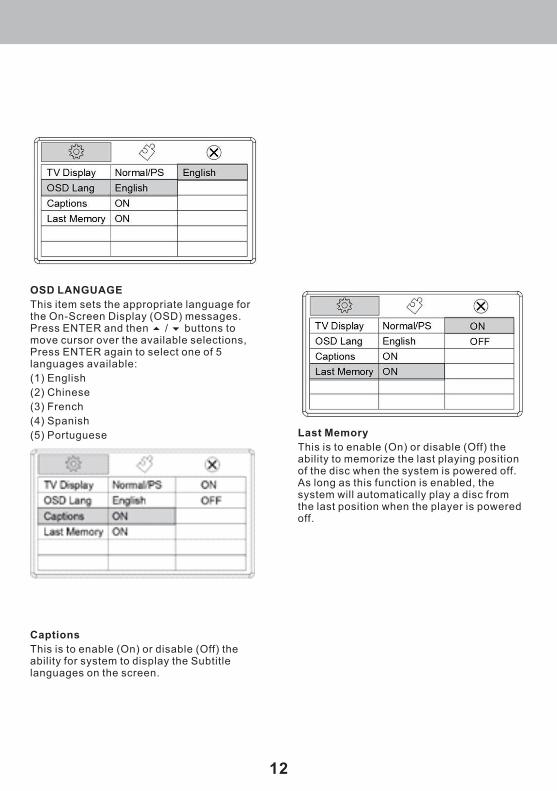
OSD LANGUAGE
This item sets the appropriate language for the On-Screen Display (OSD) messages. Press ENTER and then 5 / 6 buttons to move cursor over the available selections, Press ENTER again to select one of 5 languages available:
(1) English
(2) Chinese
(3) French
(4) Spanish
(5) Portuguese
Captions
This is to enable (On) or disable (Off) the ability for system to display the Subtitle languages on the screen.
Last Memory
This is to enable (On) or disable (Off) the ability to memorize the last playing position of the disc when the system is powered off. As long as this function is enabled, the system will automatically play a disc from the last position when the player is powered off.

13
PREFERENCE PAGE
PBC
Select either ON or OFF to enable menu’s when playing back VCD’s or SVCD’s.
AUDIO
This item sets the default AUDIO soundtrack for DVD discs. Select the preferred AUDIO soundtrack by using5 / 6 button to move cursor over the available selections, and confirm by pressing ENTER.
Type
This player can play discs whose contents are recorded in either PAL or NTSC formats.
Select either format when you’re connected to a corresponding NTSC or PAL monitor.
Subtitle
Select the preferred SUBTITLE language by using the cursor buttons and confirm by pressing ENTER.
Disc Menu
Select the preferred DISC MENU language by using the cursor buttons and confirm by pressing ENTER.

14
Additional Information
Notes
To avoid shorts in the electrical system, be sure
to disconnect the power cable before beginning installation.
Never feed power to other equipment by cutting
the insulation of the power supply lead of the
unit and tapping into that lead . The current
capacity of the lead will be exceeded, causing overheating.
With DVD-R/DVD-RW discs, only recordings
made in the video format ( Video mode ) can
be played back . DVD-RW discs recorded in
the Video Recording format (VR mode) cannot
be played back.
Even with DVD-R/DVD-RW discs featuring
recordings made in the Video format ( Video
mode) , playback may not be possible with
this unit due to disc characteristics or scratches
or dirt on the disc. Dirt or condensation on the
lens inside this unit may also prevent playback.
Playback of discs recorded with a PC using
the correct format is possible but depending
on the application software , environmental
settings and other factors playback may not be
possible ( For details , inquire at the store or
dealer where you purchased the application
software.)
CD - Extra discs can be played back as music
CDs.
CD-R/CD-RW discs are considered normal playback discs if they were recorded with an music CD Recorder.
Playback of music CD-R/CD-RW discs even
those recorded with a music CD recorder,
may not be possible with this unit due to disc
characteristics or dirt on the disc . Dirt or
condensation on the lens inside this unit may
also prevent playback.
Titles and other text information recorded on
a CD-R/CD-RW discs can not be displayed by
this unit.
If you insert a CD-RW disc into this unit to
playback, it will take a bit longer time than when
you do with a conventional CD or CD-R disc.
Read the precautions with the CD-R/CD-RW
discs before using.

15
Accessories and Hardware
Note:The use of any accessories except for those provided might result in damage to the unit. Make sure to only use the accessories shipped with the unit, as shown above.
User Manual
En
ter
En
ter
/Ad
d/A
dd
/CH
+/C
H+
/CH
-/C
H-
No. Item Diagram Quantity
1
2
3
4
5
6
7
8
9
User Manual
Remote Control
A/V Connections
L/R- Brackets
Screws ( (M3x6)
M3x4)
External RemoteSensor
DIN Collar
Trim Collar
Power SupplyConnections
10
11
Release Key
Side BKT
12 Screws (M2.6x4) 2
2
2
44
2
1
13 Washer & Nut 1
1
1
1
1
1
1

16
Restore DefaultNavigate to the “Preference Page” in the DVD player’s SETUP menu, and then select item “Default” by pressing ENTER button. Press the ENTER button again to restore the initial factory settings.
Preference Page
TV Display
OSD Lang
Captions
TV Type
PBC
Aud io
Normal/PS
English
On
NTSC
Off
ENG
General Setup
Last Memory On
Subtitle
D isc Menu
Off
ENG
Note:
Default Tables
17
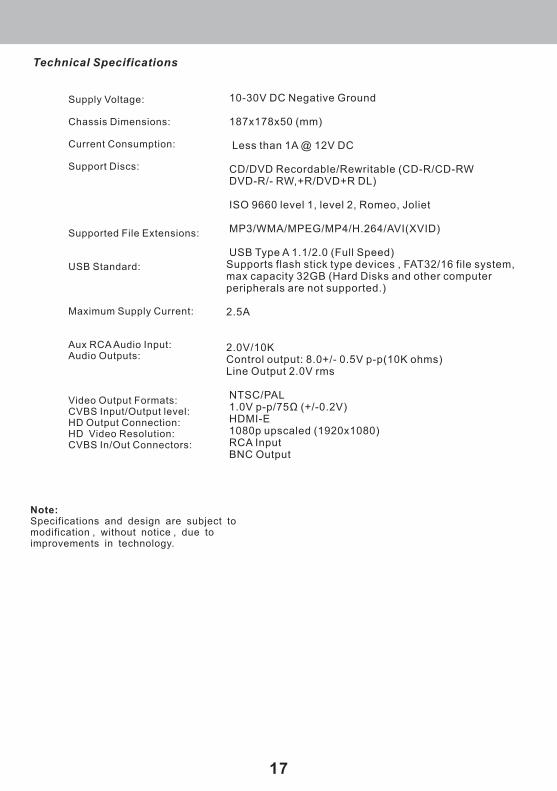
Technical Specifications
Supply Voltage:
Chassis Dimensions:
Current Consumption:
Supported File Extensions:
USB Standard:
Maximum Supply Current:
Aux RCA Audio Input:Audio Outputs:
Video Output Formats: CVBS Input/Output level: HD Output Connection:HD Video Resolution:CVBS In/Out Connectors:
Support Discs:
Note:Specifications and design are subject to modification , without notice , due to improvements in technology.
10-30V DC Negative Ground
187x178x50 (mm)
Less than 1A @ 12V DC
CD/DVD Recordable/Rewritable (CD-R/CD-RW DVD-R/- RW,+R/DVD+R DL)
ISO 9660 level 1, level 2, Romeo, Joliet
MP3/WMA/MPEG/MP4/H.264/AVI(XVID)
USB Type A 1.1/2.0 (Full Speed)Supports flash stick type devices , FAT32/16 file system, max capacity 32GB (Hard Disks and other computer peripherals are not supported.)
2.5A
2.0V/10KControl output: 8.0+/- 0.5V p-p(10K ohms)Line Output 2.0V rms
NTSC/PAL 1.0V p-p/75Ω (+/-0.2V) HDMI-E 1080p upscaled (1920x1080) RCA Input BNC Output

MENU SEL
EJECTPOWER
RESET RX
DVD PLAYER
MA2A909001-1R
Radio Engineering Industries, Inc.
Rev D.4 Date: 07/11/18
www.radioeng.com