Red Hat Linux 7.3 The Official Red Hat Linux Reference Guide
Upload
khangminh22Category
view
0download
0
www.novell.com
Migrating from NetWare to OES 2
prepared for
Novell OES 2 User Community
Published: 0

Disclaimer Novell, Inc. makes no representations or warranties with respect to the contents or use of this document, and specifically disclaims any express or implied warranties of merchantability or fitness for any particular purpose.
Trademarks Novell is a registered trademark of Novell, Inc. in the United States and other countries.
* All third-party trademarks are property of their respective owner.
Copyright 2007 Novell, Inc. All rights reserved. No part of this publication may be reproduced, photocopied, stored on a retrieval system, or transmitted without the express written consent of Novell, Inc.
Novell, Inc.
404 Wyman
Suite 500
Waltham
Massachusetts 02451
USA
Prepared By Novell Services and User Community
Migrating from NetWare to OES 2—Best Practice Guide
November, 2007
Novell OES 2 User Community
The latest version of this document, along with other OES 2 Linux Best Practice Guides, can be accessed as follows:
OES 2 AutoYast Server Configuration Guide: http://www.novell.com/rc/docrepository/public/5010/basedocument.2007-10-02.8560630553/AutoYaST Installation Best Practices Guide_en.pdf
OES 2 Migration Utilities Best Practices Guide: http://www.novell.com/rc/docrepository/public/5010/basedocument.2007-10-08.7682961184/Migration Utilities BPG 1.0_1_en.pdf
Virtualization Best Practices Guide: http://www.novell.com/rc/docrepository/public/5010/basedocument.2007-10-08.0859331720/Virtualization BPG 1.0_1_en.pdf

ContentsAcknowledgments..................................................................................iv
Getting Started......................................................................................1
Why OES 2?..............................................................................................1
Which Services Are Right for OES 2? ................................................................4
What Migration Tools Are Available?................................................................5
How Much Training Is Needed?.......................................................................7
Before You Start...................................................................................10
Take Inventory........................................................................................10
OES 2 Server Software..........................................................................12OES 2 Server Hardware ........................................................................12Plan Before You Migrate........................................................................14Hardware Considerations......................................................................16Application Compatibility Considerations...................................................16Other Considerations...........................................................................17
eDirectory Installation & Migration.............................................................18
Choosing an eDirectory Version....................................................................18
Analyzing eDirectory Design ........................................................................20
Choosing an eDirectory Installation or Migration Strategy.....................................21
Installation Prerequisites............................................................................23
Check Existing Directory Health..............................................................23Check Requirements and Prerequisites......................................................25
Installing eDirectory 8.8 on OES 2 (Linux)........................................................29
Installing eDirectory during the OES 2 Linux (SLES 10) Installation.....................29Installing the eDirectory Server in a New eDirectory Tree...............................30Installing an eDirectory Server into an Existing Tree......................................32Adding LDAP Authentication Through eDirectory..........................................34Additional Information.........................................................................35Using ndsconfig to Install eDirectory ........................................................35
Configuring eDirectory on OES 2...................................................................38
eDirectory Migration.................................................................................38
Migration Process Using Replicas.............................................................39Migration Process Using migedir..............................................................39Move, Create, or Import Users................................................................42
Remove Directory Services from NetWare........................................................42
Accessing eDirectory Management Tools .........................................................43
Additional eDirectory Resources...................................................................44
File System Installation & Migration...........................................................46
Supported File Systems..............................................................................47
Novell File Systems.............................................................................47
i

Traditional Linux File Systems................................................................52Best Bets..........................................................................................55File System and Directory Structure Comparison..........................................56Linux File Permissions..........................................................................58
Planning File System Migration.....................................................................61
Plan the File System Layout...................................................................62Identify Needed File System Components ..................................................62Plan the NSS Implementation.................................................................63Identify NSS Coexistence and Migration Issues.............................................63Additional Information.........................................................................64
Installing NSS on Linux...............................................................................64
Migrating NSS Data and Devices from NetWare to Linux.......................................66
NSS Migration Prerequisites....................................................................66Moving Devices...................................................................................69Setting Up File Access for Users..............................................................70Deactivating and Reactivating Pools.........................................................70Migrating NSS Data..............................................................................70Additional Information .........................................................................71
Post Migration Procedures...........................................................................71
Restore Rights and Ownership................................................................71
Migrating Background Infrastructure Services...............................................72
Novell Cluster Services...............................................................................73
GroupWise Collaboration Services .................................................................74
Installing or Upgrading GroupWise on OES 2................................................74Migrating NetWare GroupWise to OES 2.....................................................75
Service Location Protocol (SLP)....................................................................77
Overview..........................................................................................77Configure SLP on Linux.........................................................................78
DNS/DHCP..............................................................................................80
Time Synchronization................................................................................81
Anti-Virus and Backup Software....................................................................83
ZENworks...............................................................................................84
Workstations...........................................................................................84
Printing.................................................................................................85
Set Up Workstation Printer Agents...........................................................85Set Up iPrint on OES 2 .........................................................................85Migrate iPrint to OES 2.........................................................................86
Securing the OES 2 Server...........................................................................86
Server Consolidation & Virtualization.........................................................92
Consolidation..........................................................................................92
Virtualization..........................................................................................92
XEN and NetWare...............................................................................93
ii

XEN and Other Operating Systems............................................................93
Candidates for Virtualization and Consolidation.................................................94
Novell Fast Track Virtualization Engagements...................................................94
Additional Information...............................................................................95
Appendix A: Preparing to Install OES 2........................................................96
Gather Installation Information....................................................................97
Plan Disk Partitioning ...............................................................................98
OES 2 Installation and Configuration Notes.....................................................100
Building an AutoYaST Repository (Images) ....................................................105
iii

Acknowledgments
It's always risky to try to thank everyone who has a contributed to a task of this scope, but we'll attempt it anyway.
First of all, thanks to those who provided direction to the project:
• Allen Tietjen VP Product Management, Workgroup and Collaboration• Jason Williams Senior Product Manager, Workgroup and Collaboration• Ben Hendrick Major Account Partner, Novell Technical Services• Bryon Griffin Practice Lead, Workgroup & Collaboration
For technical advice, thanks to
• Charles Coffing SUSE Engineer• Jim Schnitter Senior Worldwide Support Engineer• Patrick Mullin Senior Technical Specialist, Workgroup & Collaboration• Jim Short WSS Engineer• Moises Morales ZENworks Support Engineer• Mark Post WSS Engineer
For their patience in answering questions and providing pre-release information, thanks to the OES migration and documentation teams:
• Stephanie Leavitt Documentation Manager• Larry Tomkinson Senior Technical Writer• Ken Neff Senior Technical Writer• The Bangalore Migration team:
• Shyamsundar R and team Migration engineers• Jyotsana Kitchloo Documentation• R. Rathinamurthy Developer• Narayan Nampoorthi Manager• K AnilKumar Test Engineer• Nesbeth Fernandes Test Engineer• KS Rekha DT & Doc Manager
Thanks to the technical staff who worked with early-adopter customers and provided much of the information included in the guidebased on customer experience:
• Michael Saunders Senior Technical Specialist, Workgroup Solutions• Joe Harmon TSE III, Linux Specialist• Gilson Melo Linux SWAT Team• Mark Gonnelly Senior Consultant, Workgroup Solutions• Kevin Vinson Senior Consultant, Workgroup Solutions
And thanks to our external partners, contributors, and reviewers, the following among them:
• Michael Faris Sr. Network Engineer, Aviall• Tom Veite Novacoast - IT Professional Services• Sami Kapanen Sysadmin, HAMK University of Applied Sciences, Hämeenlinna, Finland• Jim Pye PyeNet Universal
iv

• Danny J. Wall Health First, Inc.
And a personal thank you to Chase Jones, Workgroup Product Marketing Manager, for juggling all the wires behind the scenes.
Joyce Whiting - Compiler
v


Getting Started
Getting Started
This document is designed to provide an overview of NetWare to OES 2 Linux migration design and implementation considerations and link you to available resources for in-depth information whether it be Novell Training Services, the Novell Web and WIKIs, product documentation, or Cool Solutions and other articles.
This document is one of a series of three that discuss best practices for migrating from NetWare to OES 2 Linux. See also:
• OES 2 Migration Utilities Best Practice Guide • OES 2 Consolidation & Migration Best Practice Guide
These additional documents can be accessed from the NetWare to Linux Migration Sources on the Novell Open Enterprise Server Migration Web site.
Use this document to determine "what" you need to do in making the move to OES-Linux. Follow the links to additional information that explains "how."
Why OES 2?There are distinct advantages in moving to OES 2 on Linux over staying on NetWare, particularly if you are using versions of NetWare prior to 6.5.
OES 2 Linux includes all the network services that organizations traditionally expect from Novell. Services included in OES 1 for Linux enjoyed feature-parity with NetWare 6.5 almost across-the-board; OES 2 offers clear advantages. When it's time to upgrade services, the logical move is to migrate to a Linux OS as well.
• ZENworks imaging is faster from a Linux server than a NetWare server. • Performance is improved over and above NetWare, 65% in some of Novell's testing
because of the enhanced support for 64-bit systems. • iFolder 3.6 is included.• NSS on OES 2 Linux is now feature compatible with NSS on NetWare.• Dynamic Storage Technology (DST) is new and included. OES 2 introduces Novell DST,
a unique storage solution that lets administrators combine a primary file tree and a shadow file tree so they appear to NCP and Samba/CIFS users as one file tree. Administrators can create policies that dictate what data is considered active (data accessed in the last 30 days, for example) or inactive. Active data can remain on high-performing and highly available storage and inactive data automatically moved to a shadow file on a different, less expensive storage device, such as a SATA or JBOD device. Even though the data has been physically moved, it will appear to users and third-party applications as if it is still in its original location. This lets you manage storage costs in new and efficient ways that were not previously possible.
The primary and shadow trees can be located on different file systems, different servers, or even different types of storage.
• Clustering enhancements make moving clusters to Linux even more feasible.• In addition to the legacy Server Consolidation and Migration Toolkit, OES 2 includes new
migration tools for migrating data and services from NetWare to OES 2 Linux. • XEN Virtualization Technology is improved.
0 - 0 1
Getting Started
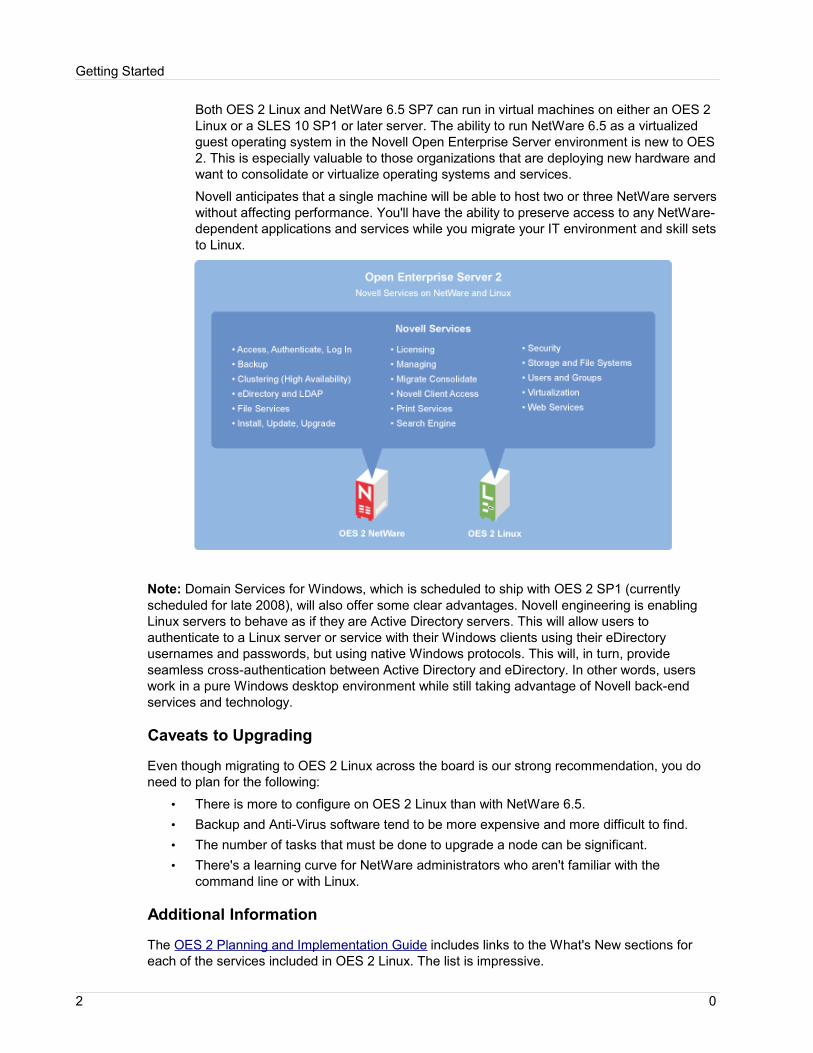
Both OES 2 Linux and NetWare 6.5 SP7 can run in virtual machines on either an OES 2 Linux or a SLES 10 SP1 or later server. The ability to run NetWare 6.5 as a virtualized guest operating system in the Novell Open Enterprise Server environment is new to OES 2. This is especially valuable to those organizations that are deploying new hardware and want to consolidate or virtualize operating systems and services.
Novell anticipates that a single machine will be able to host two or three NetWare servers without affecting performance. You'll have the ability to preserve access to any NetWare-dependent applications and services while you migrate your IT environment and skill sets to Linux.
Note: Domain Services for Windows, which is scheduled to ship with OES 2 SP1 (currently scheduled for late 2008), will also offer some clear advantages. Novell engineering is enabling Linux servers to behave as if they are Active Directory servers. This will allow users to authenticate to a Linux server or service with their Windows clients using their eDirectory usernames and passwords, but using native Windows protocols. This will, in turn, provide seamless cross-authentication between Active Directory and eDirectory. In other words, users work in a pure Windows desktop environment while still taking advantage of Novell back-end services and technology.
Caveats to Upgrading
Even though migrating to OES 2 Linux across the board is our strong recommendation, you do need to plan for the following:
• There is more to configure on OES 2 Linux than with NetWare 6.5.• Backup and Anti-Virus software tend to be more expensive and more difficult to find.• The number of tasks that must be done to upgrade a node can be significant.• There's a learning curve for NetWare administrators who aren't familiar with the
command line or with Linux.
Additional Information
The OES 2 Planning and Implementation Guide includes links to the What's New sections for each of the services included in OES 2 Linux. The list is impressive.
2 0

Getting Started
Take a minute to have a look. A table listing OES 2 services by platform is also included: see Table 3-1, "Service Comparison Between OES 2 Linux and OES 2 NetWare (NetWare 6.5 SP7)."
Novell Connection m agazine has run a series of articles, written by Ken Baker, over the last several months that highlight OES 2 features. We recommend them as an excellent source for information about What's New in OES2. See the following:
• Sneak Peek • Dynamic Storage Technology • Migrating from NetWare to OES • Finalizing the Transition to Linux -The Wait Is Over • Managing NetWare on a Virtualized Machine
What Our Customers Recommend
Periodically, Novell polls customers to get a reality check. The table below summarizes customer advice from a survey of OES Linux customers.
From December 2006 Novell Customer Survey
Customer TipsLearn basic Linux skills first (before starting) or have someone handy; make sure you:
• Understand the Linux file system and rights.• Know Linux command line tools for the equivalent NetWare commands (DSTrace,
DSRepair, etc.). Learn the commands by setting up a test server and playing out the scenario you want to see on your production server.
• Understand that in-house Linux expertise is a necessary pre-requisite. (The good news is that fully 89% of survey respondents who have deployed OES Linux already had Linux expertise on their deployment teams.)
Plan ahead and know your NetWare, Linux, and eDirectory environments very well: • Make sure eDirectory is clean and you are current on all patches.• Plan the deployment scenario and find the holes and gotchas. • Plan data locations, file systems, and LUM configuration objects. • Perform a complete inventory of all applications (and their dependencies) before you get
too far into planning in case they or their dependencies can't be moved to OES/SLES.
Migrate slowly and cautiously, but start now• Start in small scale (a couple of servers) or just move DHCP for a couple of weeks, then
DNS for a couple of weeks, then GroupWise, Webaccess, etc. • Be careful; you can harm your OES production environment if you don't understand what
you are doing; don't start with your most "important" servers.
Test, test, test. Test everything multiple times, including 3rd party products like back-up solutions, before full deployment.
• Create an initial test box if you don't have previous Linux experience.• Use VMware (or other virtualization products) and install many times to get the feel for it
then test, test, test.
Give it a try. Moving to OES Linux is easy and relatively painless.
Start your migration in a lab environment first and play with the product.• Try installing Linux at home and use it as your primary O/S.
0 - 0 3
Getting Started
• Make sure you have a test environment that mimics your production installation.
It works the same as NetWare. The Novell management Interfaces look the same. iPrint, iManager, etc.-- all of the benefits of NetWare are available on OES Linux.
Don't freak out about the Linux non-eDirectory integrated tools (like DNS, DHCP, etc.). Become familiar with the basic commands for eDirectory management, such as ndsconfig.
Do your homework and read everything you can find. Scour the discussion forums and see what problems others are having and how they solved them, ask questions, and make notes.
Learn the web tools (iMonitor and iManager) for server management.
Avoid mixing Linux and NetWare, if possible. Create separate servers providing other services such as DNS, DHCP, etc., on Linux first to gain familiarity with Linux as a whole.
YaST is your friend. It's not always the answer though. Learn which things are best configured in the configuration files and which things you really "should" use YaST for.
Find out how well your hardware vendor supports Linux. Make sure your hardware vendor not only "supports Linux," but also provides regular driver updates for the version of SLES you are planning to deploy.
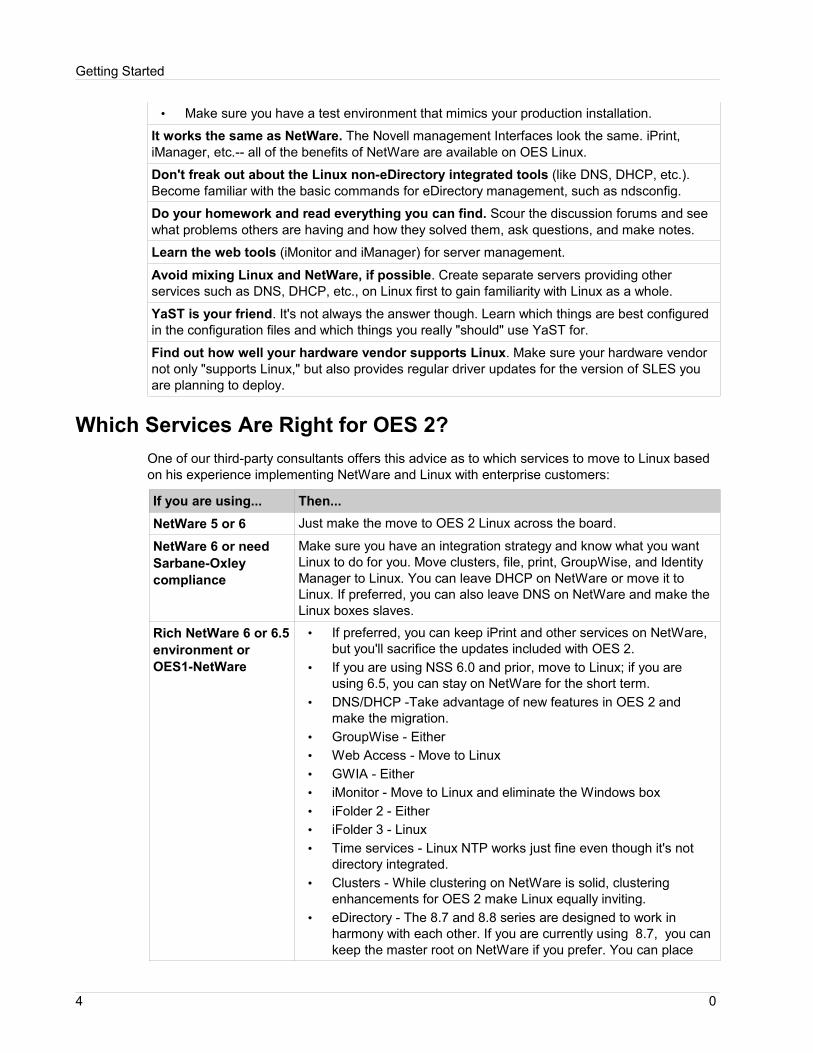
Which Services Are Right for OES 2? One of our third-party consultants offers this advice as to which services to move to Linux based on his experience implementing NetWare and Linux with enterprise customers:
If you are using... Then...NetWare 5 or 6 Just make the move to OES 2 Linux across the board.
NetWare 6 or need Sarbane-Oxley compliance
Make sure you have an integration strategy and know what you want Linux to do for you. Move clusters, file, print, GroupWise, and Identity Manager to Linux. You can leave DHCP on NetWare or move it to Linux. If preferred, you can also leave DNS on NetWare and make the Linux boxes slaves.
Rich NetWare 6 or 6.5 environment or OES1-NetWare
• If preferred, you can keep iPrint and other services on NetWare, but you'll sacrifice the updates included with OES 2.
• If you are using NSS 6.0 and prior, move to Linux; if you are using 6.5, you can stay on NetWare for the short term.
• DNS/DHCP -Take advantage of new features in OES 2 and make the migration.
• GroupWise - Either• Web Access - Move to Linux• GWIA - Either• iMonitor - Move to Linux and eliminate the Windows box• iFolder 2 - Either• iFolder 3 - Linux• Time services - Linux NTP works just fine even though it's not
directory integrated.• Clusters - While clustering on NetWare is solid, clustering
enhancements for OES 2 make Linux equally inviting.• eDirectory - The 8.7 and 8.8 series are designed to work in
harmony with each other. If you are currently using 8.7, you can keep the master root on NetWare if you prefer. You can place
4 0

Getting Started
If you are using... Then...replicas on either. The strong recommendation is to move to eDirectory 8.8 with OES 2 Linux.
What Migration Tools Are Available?OES 2 contains the following utilities, each of which fulfills a specific migration and/or service-consolidation purpose as explained below.
OES 2 Migration Tools
With OES 2, the migration tool model has changed. You no longer use the Server Consolidation and Migration Toolkit (SCMT) used with OES 1. Instead, SCMT has been replaced with an OES Migration Tool plus individual migration utilities specific to each service. SCMT is still an optional route for some migrations, but we recommend using the OES Migration Tool rather than SCMT wherever possible.
One advantage of using the individual tools is that you can take a phased approach to migration instead of having to do everything at once. You can start by migrating one service at a time, testing and evaluating its success before moving on to the next service. You can even migrate a single volume today and migrate more volumes later. Or you can migrate ten printers one week, ten more the next and so on.
Data. The primary purpose of the OES Migration Tools is to migrate data from the NetWare platform to the OES 2 Linux platform. Data migration tools can also be used to migrate data from OES 1.0 Linux servers and from Microsoft* Windows servers. A good place to start is the OES 2 Migration Tools Administration Guide which provides general information about migrating data. A helpful Migration Command Reference section is included.
Services. The best information about migrating individual services is included in the administration guide for each of the services. Links to these sections are available in Section 1.3 of the OES 2 Migration Tools Administration Guide.
In many cases, you will first need to install the service on an OES 2 Linux server and then use the specific migration tool to migrate data and configuration information to Linux. Both command line and GUI migration tools are available for most services; however, OES 2 must first be installed on Linux to access the GUI tools which are then available via YaST under the Migration and Open Enterprise Server categories.
Note the following:
• The OES Migration Tools are run exclusively on the destination Linux server and pull data from the NetWare source server. A Windows workstation is not required.
• The migration tools are made up of individual commands that work together to perform a full migration when run in the proper order.
eDirectory. A new utility (migedir) is available with eDirectory 8.8 but is not integrated with and is not compatible with other OES Migration Tools. This tool must be used in stand-alone mode. Use it when the only thing you want to migrate from NetWare to Linux is eDirectory. Compatibility with other migration tools so you can use them all in concert is scheduled for inclusion in SP1.
0 - 0 5

Getting Started
Server Consolidation and Migration Tool (SCMT)
The primary purpose of the Server Consolidation and Migration Tool (SCMT) is to migrate and consolidate users, file permissions, passwords, file systems, and Active Directory domains from existing NetWare or Microsoft* Windows servers.
There is no supported “in-place” upgrade methodology to move to OES 2 Linux from NetWare. While you can use the Server Consolidation Utility v4.11 (part of the latest release of the Novell Server Consolidation and Migration Toolkit) for migrating to OES 2 Linux, SCMT should be considered an optional tool. The following table outlines the requirements for using the Server Consolidation Utility.
Supported Source Server Versions for Server Consolidation Utility 4.11
Minimum Supported (Tested) OS Version Other RequirementsNetWare 4.11 SP9 & NetWare 4.2 with NDS 6.21
To NetWare only; IPX must be loaded on the destination server.
NetWare 5.0 SP6a with NDS 7.62c or NDS 8.85c
To NetWare only; TCP/IP must be loaded on the source server.
NetWare 5.1 SP8 or later with NDS 7.62c or NDS 8.85cNetWare 6.0 SP5 or later with eDirectory 8.6.2NetWare 6.5 SP2 or later with eDirectory 8.7.xOpen Enterprise Server for NetWare FCS (NetWare 6.5 SP3) or later with eDirectory 8.7.x
Supported Destination Server Versions for Server Consolidation Utility 4.11
Minimum Supported (Tested) OS Version Other RequirementsOpen Enterprise Server for NetWare SP1 (NetWare 6.5 SP4) or laterOpen Enterprise Server for Linux SP1 or later NSS volumes only when coming
from NetWare
NetWare Migration Wizard
The primary purpose of the Novell NetWare Migration Wizard is to migrate NetWare servers to new hardware.
When the migration is complete, the new server replaces and assumes the identity of the old server on the network.
Note: If you are migrating data to OES 2 Linux, use the OES Migration Tools or the Server Consolidation utility instead.
Additional Information• OES 2 Migration Utilities: Best Practices Guide (a companion to this guide). This
guide summarizes the procedures for migrating data and services from NetWare to OES 2 Linux. Summaries of the migration procedures for many OES 2 Linux services are included along with cross-references to additional information. This guide is available
6 0

Getting Started
from the NetWare to Linux Migration Sources on the Novell Open Enterprise Server Migration Web site.
• OES 2 Consolidation & Virtualization: Best Practice Guide (a companion to this guide). This guide includes planning information for instituting virtualization services (primarily XEN and VMware) on OES 2 Linux. This guide is available from the NetWare to Linux Migration Sources on the Novell Open Enterprise Server Migration Web site.
• Novell Migration Web site. For information on the migration tools and resources currently available from Novell, visit www.novell.com/oesmigration. This migration web site provides dynamic access to content from the Novell Open Enterprise Server Migration Support Forum and the Cool Solutions Community, as well as collateral, documentation, articles, web links, and third-party resources. It also provides access to a community of users who share migration best practices.
• Novell documentation. OES 2: Migration Tools Administration Guide. • Links to Migration Sections. For a complete list of links to data and service migration
instructions in the OES 2 documentation, See Section 1.3 in the OES 2: Migration Tools Administration Guide.
How Much Training Is Needed?Some of our customers are hesitant to move to Linux because they don't currently have the needed expertise to learn the intricacies of a new OS when the old one works just fine and their administrators are not used to working at the command line. Moving to Linux can be a difficult paradigm shift since there's not enough that's similar between the two environments to intuitively know what to do. Retraining costs are issues that Novell recognizes and strives to mitigate through our courseware, some of it free for the download.
We recognize that the time and resource crunch is a problem for customers and recommend following the example of one of our customers. Four months prior to roll out, Novell provided OES and SLES training for their administrators at their site and on their hardware and software.
When we survey customers, they consistently tell us they want training that addresses:
• Differences in day-to-day support and management versus NetWare• How to install and/or upgrade existing NetWare servers to OES Linux• Differences between NetWare and Linux: services, features, and interoperability• Troubleshooting
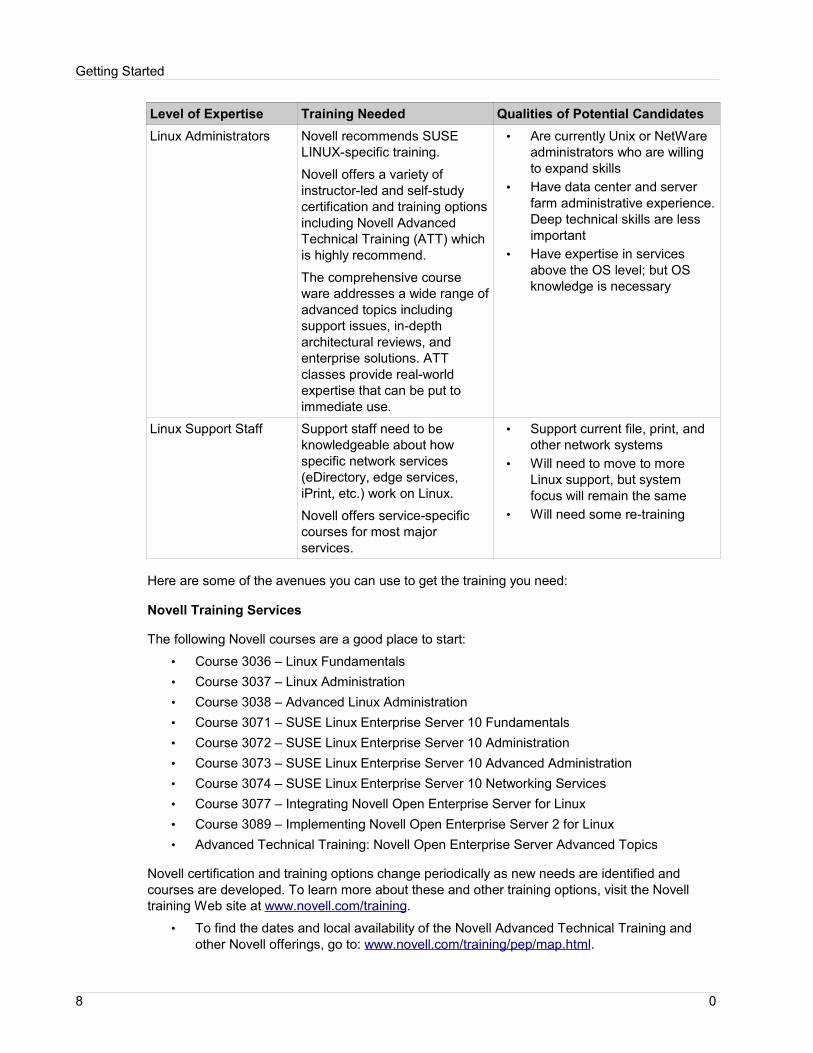
Novell recommends that you conduct a training needs assessment. You'll want to determine whether current skill sets are absent, adequate, or proficient so that you can recommend a training package. Three levels of Linux expertise are recommended:
Level of Expertise Training Needed Qualities of Potential CandidatesCertified Linux Experts You’ll probably want at least
some of your technical staff to be Linux certified (LPI level1 and/or LPI level 2). Many third-party Linux certification courses are available to meet this need.
• Are typically already Unix (AIX, Solaris, etc.) experts
• Have some Linux experience• Are willing to attend additional
class and lab sessions• Are willing to serve as trainers
and mentors• Have accredited certifications
0 - 0 7
Getting Started
Level of Expertise Training Needed Qualities of Potential CandidatesLinux Administrators Novell recommends SUSE
LINUX-specific training.
Novell offers a variety of instructor-led and self-study certification and training options including Novell Advanced Technical Training (ATT) which is highly recommend.
The comprehensive course ware addresses a wide range of advanced topics including support issues, in-depth architectural reviews, and enterprise solutions. ATT classes provide real-world expertise that can be put to immediate use.
• Are currently Unix or NetWare administrators who are willing to expand skills
• Have data center and server farm administrative experience. Deep technical skills are less important
• Have expertise in services above the OS level; but OS knowledge is necessary
Linux Support Staff Support staff need to be knowledgeable about how specific network services (eDirectory, edge services, iPrint, etc.) work on Linux.
Novell offers service-specific courses for most major services.
• Support current file, print, and other network systems
• Will need to move to more Linux support, but system focus will remain the same
• Will need some re-training
Here are some of the avenues you can use to get the training you need:
Novell Training Services
The following Novell courses are a good place to start:
• Course 3036 – Linux Fundamentals• Course 3037 – Linux Administration• Course 3038 – Advanced Linux Administration• Course 3071 – SUSE Linux Enterprise Server 10 Fundamentals• Course 3072 – SUSE Linux Enterprise Server 10 Administration• Course 3073 – SUSE Linux Enterprise Server 10 Advanced Administration• Course 3074 – SUSE Linux Enterprise Server 10 Networking Services• Course 3077 – Integrating Novell Open Enterprise Server for Linux• Course 3089 – Implementing Novell Open Enterprise Server 2 for Linux• Advanced Technical Training: Novell Open Enterprise Server Advanced Topics
Novell certification and training options change periodically as new needs are identified and courses are developed. To learn more about these and other training options, visit the Novell training Web site at www.novell.com/training.
• To find the dates and local availability of the Novell Advanced Technical Training and other Novell offerings, go to: www.novell.com/training/pep/map.html.
8 0

Getting Started
• To request additional information on ATT course, send an e-mail to [email protected]
• To subscribe to the Technical Training Newsletter, see: http://www.novell.com/info/list
Product Documentation. Yes, the old adage is true: "If all else fails, read the documentation." This document contains numerous cross-references to sections relative to a specific topic or service. If you can't find what you need on Novell's documentation site, add a comment–tell us what we missed–and we'll see that you get the answer you need. Open Enterprise 2 documentation is available at the following URL: http://www.novell.com/documentation/oes2/index.html.
BrainStorm. Novell partner BrainStorm, Inc. provides an Administrator’s Command Reference for Novell Open Enterprise Server that shows common NetWare commands and their Linux counterparts. This reference card should prove extremely helpful in bridging the gap between NetWare and Linux commands.
0 - 0 9

Before You Start
Before You Start
Take InventoryWhether you will be doing your own migration or using Novell Global Services or another consulting firm, you will need to know how your current network is set up. Ensuring a successful migration requires that the information gathered is complete and accurate. This section provides an overview of the information you will need. Complete details for installing, migrating to, and upgrading to OES 2 Linux are available in the OES 2: Planning and Implementation Guide.
The bulk of the information needed for the OES 2 Linux Upgrade/Migration cannot be gathered using common applications or utilities but relies heavily on the gathering of accurate information including the following:
• Network diagrams:• Router/switch/firewall diagrams; note particularly any blocked ports• Current WAN diagram including link speeds for all sites running NetWare (see
example collection tables below (Tables B and C). Duplicate the tables or use a spreadsheet, as necessary, to accommodate multiple sites.)
• eDirectory design:• NDS/eDirectory tree diagrams.• Partition and replication diagrams
• List of servers in the tree• Design documents: time synchronization, SLP, etc. as applicable.• Any standards documents (server standards, naming standards)• Hardware assessment (does current hardware meet at least minimum OES 2 Linux
requirements?)
The following tables suggest additional information you may need to collect before you begin planning your migration.
Table A—Sample Information to Gather
Verify the Following
Instructions Yes/No Explanation
NDS Versions Is there any NDS v6, v7, and/or v8? Yes
NoAre any versions of NDS/eDirectory for non-NetWare operating systems installed at the site (i.e. NDS for NT, NAM, DirXML, IDM)?
Yes
No
Bindery Services Are any bindery contexts currently in use? If so, briefly describe how bindery services are used.
Yes
No
Protocols Is there any IPX in the NetWare environment?
Yes
No
10 0

Before You Start
Verify the Following
Instructions Yes/No Explanation
Clustering Are there any NetWare clusters in the environment?
Yes
NoPrinting Does the network printing environment
consist of legacy queue-based or NDPS-based printing?
Yes
No
Legacy Applications Do any of the NetWare servers run legacy applications (applications developed in-house specifically for NetWare)?
Yes
No
3rd-Party Applications
Are any 3rd-Party applications currently running on the NetWare servers (Backup/Restore, Anti-Virus, and so forth)?
• Verify with the vendors whether these applications are supported on SLES 10/OES 2 Linux and whether they are Novell YES Approved.
• Which applications will be ported from current platforms?
Yes
No
NetWare Volumes Are NetWare traditional volumes being used on the NetWare servers?
Yes
NoDatabases Are any databases (critical or otherwise)
stored on the NetWare servers? Yes
NoServer Certifications How are NetWare and Linux servers within
the environment currently built (from a set list of packages/modules to specific partitioning of the hard drives).
Security Are there any security standards that must be met on Linux? Unlike NetWare, Linux security is much more modular/granular.
E-mail Infrastructure How is the E-mail infrastructure currently set up?
Table B–Sample WAN Environment Overview
Site Location WAN Speed
# of Servers
Server Breakdown
Home Office Local 25 3-NW4.11
3-NW5.0
4-NW5.1
3-NW6.0
3-NW6.5
5-W2K3
2-W2K
2-RHEL31.2.3.
0 - 0 11

Before You Start
Table C–Sample WAN Location Environment Overview
Site Location
# of NetWare Servers
NetWare Versions
Server Notes # of Clients
Client Breakdown
Client Notes
Southwest Office
6 2-NW3.12 1-NW4.11 3-NW6.5
3.12 Servers and 4.11 servers are being retired. Users will be migrated to NetWare 6.5 servers
30 4–Win98 6-WinW2K 20-WinXP
Win9x clients will be migrated to Windows XP Professional SP2
1.2.3.
OES 2 Server Software
As part of the OES 2 Linux installation, you will install SUSE Linux Enterprise Server 10 SP1 as the core and the OES 2 components as “add-ons.” In other words,
OES 2 = SUSE Linux Enterprise Server 10 SP1 + Novell OES 2 Linux Services
The OES 2 service components (add-on packages) are listed below:
• Novell eDirectory (default)• Novell iManager (default)• Novell Linux User Management (default)• Novell eGuide (default)• Novell iFolder 2.x (optional)• Novell iPrint (default)• Novell NetStorage (default)• Novell QuickFinder (default)• Novell NSS (optional)• Novell Cluster Services (optional)• Novell NCP Server (default)• Novell IP Management (optional)• Novell Samba Configuration (default)• Novell Backup Services – SMS (default)• Novell Health Monitoring (optional)• Novell iFolder 3.x Web Access (optional)• Novell iFolder 3.x (optional)
OES 2 Server Hardware
The following table outlines both “minimum” and “recommended" requirements for running OES 2 on the Linux platform.
12 0

Before You Start
Minimum and Recommended Hardware Requirements
System Component
Minimum Requirements Recommended Requirements
Computer Server-class computer with Intel Pentium * II or AMD * K7 450 MHz processor
Server-class computer that has been certified by the hardware vendor for SLES 10 SP1.
Pentium III, Pentium III Xeon *, Pentium 4, Intel * Xeon 700 MHz, AMD K8 CPUs (Athlon64 and Opteron*), Intel EM64T or higher processor.
Note: While OES 2 runs in both 32-bit and 64-bit modes, some services run only in 32-bit mode.
Memory 1 GB of RAM 2 GB of RAMFree Disk Space 10 GB of available,
unpartitioned disk space.20 GB of available, unpartitioned disk space. Additional disk space might be required depending on which OES components are selected and how they are used.
CD-ROM Drive 4X CD-ROM or DVD drive if installing from physical media
48X CD-ROM drive or DVD drive if installing from physical media
Network Board Ethernet 100 MbpsIP Address • One IP Address on a
subnet
• Subnet Mask• Default Gateway
Internet connectivity from the server in order to complete registration and configure patches
Mouse N/A USB or PS/2Server Computer BIOS
If doing a CD-ROM installation, prepare the BIOS on your server computer so that it boots from the CD-ROM drive first.
Note: The RAM and disk space amounts shown here are for system components only. The OES 2 Linux components you install might require additional RAM and disk space.
Note: A Linux certification and support matrix for HP Proliant server hardware can be found at the following link: http://h18004.www1.hp.com/products/servers/linux/hpLinuxcert-novell.html
This site indicates that "HP recommends that our customers update to the latest service packs and security releases from the Novell Customer Center. HP is committed to supporting all customers that install service packs and security updates released by Novell."
0 - 0 13

Before You Start
Plan Before You Migrate
The key to a successful migration is to know where you are and where you want to be. Here are a few of the questions you need to ask:
• Will this be a migration, consolidation, or both? This might be a good time to consider taking advantage of today's more powerful hardware platforms and doing some server consolidation. Server consolidation often pays off in lower hardware costs, as well as lower cooling, power consumption, and rack space costs. For example, Novell recently consolidated fourteen older file and print servers to two new servers.
Migrations on a 1:1 basis are less complex.
Consolidations require more planning.
• What workloads will the Linux server will be used for and which packages will be needed to support that workload? Install only needed packages, not everything that's available.
OES 2 services resolve their own dependencies (auto-install any additional software needed by that service).
If a service (iPrint, DNS. DHCP, Apache2, Java) is already running well on NetWare, decide whether there is an advantage in moving it to Linux.
• Which combinations of eDirectory, file, print, GroupWise, WebAccess, etc., might reasonably work together on the same host server?
• Does your current eDirectory still meet your needs or is it time to redesign?• Which file system should be used: Linux traditional volumes (ReiserFS and ext3) or NSS
or other? • Does it make sense to have different servers using different file systems depending
on the server's primary role? • Are you already using Novell Storage Services volumes on NetWare? If so, you'll
want to preserve all the rights, metadata, and trustee information associated with the data on those volumes, so it makes sense to stay with Novell Storage Services.
• Are your volumes are already in a SAN environment with Novell Storage Services? If so, migrating to a SAN environment that uses Novell Storage Services on Linux will be quite easy. Using DFS junctions also requires Novell Storage Services to support volume moves and splits. And if business continuity clusters are in your plans, you might find them easier to implement if you're using Novell Storage Services.
Note: Cases can be made for using ext3 or ReiserFS as well. ReiserFS is optimized for small files and performance. In fact, both Novell IS&T and the GroupWise engineering team recommend using ReiserFS for GroupWise servers, primarily due to performance increases and the fact that GroupWise doesn't utilize the advanced features of Novell Storage Services. The performance levels for ext3 are similar to those of ReiserFS.
Dynamic Storage Technology, formerly known as shadow volumes, works with Novell Storage Services, ReiserFS and ext3; however, be aware that it cannot move data from a Novell Storages Service volume to an ext3 or ReiserFS volume, or vice versa.
• Is there any easy way to migrate dozens of servers or must the migration take place one server at a time?
• Is the network functioning optimally, or do you need to make changes before you migrate?
• Is the eDirectory partition and replication layout optimal:• Where are replica rings located?
14 0

Before You Start
• Which servers have partitions on them? • Where do your want replication rings and partitions to be after you finish your
migration?
If you fail to plan properly in this area, you can count on running into network replication problems. Refer to the Novell eDirectory 8.8 Administration Guide, particularly Section Section 2.0, "Designing Your Novell eDirectory Network," for detailed information.
• Are required ports available?• Do you need a plan for Samba and LUM?
• Samba domain object placement will only allow users from that container or below• A Universal Password policy is required for Samba, but there are possible conflicts
with any existing Universal Passwords.Refer to the OES 2: Samba Administration Guide for detailed information.
• How can time best be synchronized?• Use NTP as the time source (on NetWare, Linux, or both?).• Make sure the TCP/IP protocol is loaded on computers using NTP.• Set NetWare to use XNTPD. Novell timesync.nlm uses NTP stratum 5 (always). By
default, NetWare uses timesync.nlm but XNTD can be made the default by editing the sys:\system\timeserv.ncf file
• Make sure NetWare and Linux servers are NOT using the same ultimate time source. NTP uses a time provider group in which all servers in a geographical network obtain time from other servers in the same network. Only one network server should communicate with a server outside the network in order to keep traffic across routers and WANs at a minimum.
• Be aware that there is no eDirectory time setting in Linux for less than 2 seconds.Refer to the OES 2: Novell NTP for NetWare Administration Guide for detailed information about planning a time synchronization strategy.
• If clusters are part of your plan, how will your cluster environment impact your migration efforts? • What is the primary role of your cluster (GroupWise high availability, file and print
services, directory services)?• Do you need to consider splitting large clusters into multiple, smaller clusters, one for
each service?
By separating clusters this way, problems in one service cluster won't spill over and potentially affect other clustered services.
Splitting your clusters can also simplify administration efforts, since you can independently manage each cluster. Also, if you need to do a cluster update, a rolling upgrade of a six-node cluster is much easier than a rolling upgrade of a 32-node cluster.
• Are you planning to implement Novell Business Continuity Clustering to allow automated management of site-to-site failovers; if so, how will this affect your migration efforts and will your network topology be affected? Business Continuity Clustering allows you to define which of your resources are considered "vital" so only those services move to an off-site location rather than the entire cluster.
• Which clustering technology will you be using?
In a NetWare environment, you'll likely use Novell Cluster Services. On the Linux side, you can choose between Heartbeat 2 or Novell Cluster Services. Novell Cluster Services is typically the preferred choice because of its richer failover services and
0 - 0 15
Before You Start
easier configuration and management. And if you plan to implement Business Continuity Clustering, you will need to use Novell Cluster Services.
Refer to the OES 2: Novell Cluster Services 1.8.4 for Linux Administration Guide for detailed information.
Hardware Considerations
Servers. Our customers tell us that choosing the right hardware for Linux is not a straight-forward task. There are so many hardware vendors and so many choices per vendor, that selecting the right box for the service being implemented is not easy. Many hardware vendors are themselves scrambling to sort the variables and provide support for Linux. Dell, IBM, and HP hardware all deserve careful evaluation if you are installing OES 2 Linux. The bottom line is that you will need to work with hardware vendors on server sizing guidelines to select the right server, the right configuration, and the right part number.
Storage Management. When determining what HBAs to use for SAN-attached OES 2 servers, it is important that all of the software and hardware components be taken into account. Linux drivers are available for almost all of the enterprise class HBAs on the market and many of them are OES 2 certified. Past history has shown, however, that the hardware vendors tend to be more restrictive with certification than the operating system is. Any HBA used with OES 2 must be certified by both the storage vendor for a specific model as well as the FC switch vendor.
Application Compatibility Considerations
One of the more important inhibiting factors in moving from NetWare to Linux has been finding a Linux-compatible version of the applications you are hosting on the server (or an acceptable substitute). As it becomes profitable for vendors to supply Linux versions, this situation is changing, sometimes rapidly, but you'll still need to inventory the applications currently being hosted on NetWare and make sure a Linux version is available and that it's certified for OES 2 Linux. Because of the plethora of applications being used by our customers, it is impossible for Novell to make recommendations in every instance so you may have to contact the vendor directly. But do check Novell's Open Enterprise Server Partner Products site for the latest certifications (this page is constantly being updated; the URL remains the same):
http://www.novell.com/partnerguide/section/677.html
With OES 2, virtualization has been optimized so that you can now run NetWare 6.5. SP7 (included with OES 2) as a paravirtualized guest operating system on Linux. Doing so provides another option for running NetWare-dependent applications and services. For example, most 3rd-party NLMs can be accommodated this way.
Additional Information
Installing Hosts. For information about installing a virtual machine host and setting up virtual machines in general, see Virtualization: Getting Started, particularly section 3.0, "OES 2 Linux Virtual Machines."
Installing Quest Operating Systems. For information about installing NetWare 6.5 SP7 and OES 2 Linux as guest operating systems, see Section 2, "NetWare Virtual Machines" and Section 3, "OES Linux Virtual Machines," in the Virtualization: Guest Operating System Guide.
16 0

Before You Start
Other Considerations
Make sure services such as DNS, DHCP, SLP, and NTP are optimally configured and in good working order. This is critical for all installations and migrations.
LAN/WAN Communications
If your organization has many small, single-server remote sites, it's probable that the WAN links vary greatly in performance. Make sure there are no indications of any systemic problems and that all replica rings are maintaining proper synchronization before you begin your migration.
LDAP
Novell recommends implementing multiple LDAP servers due to the critical nature of the LDAP service. LDAP servers should be fronted with an L4 switch for load sharing and redundancy. If an L4 switch is not available, then DNS round-robin could be used as an alternative.
0 - 0 17

eDirectory Installation & Migration
eDirectory Installation & Migration
This section provides an overview of eDirectory installation and migration practices. Other documents, particularly OES 2 product documentation, including the following should be used as the authoritative sources for information:
• OES 2: Linux Installation Guide • Novell eDirectory 8.8 Installation Guide • Novell eDirectory 8.8 Administration Guide • OES 2: Planning and Implementation Guide
Copious cross-references to these documents, as well as others, where applicable, are included.
Some of the information in this section has been compiled from early-adopter consulting engagements. We thank our customers and our experts, particularly Michael Saunders and Gilson Melo for their contributions to this section.
Choosing an eDirectory VersionNovell currently supports two series of eDirectory: 8.7.3.x and 8.8.x. While they have somewhat different feature sets, these two series are tested and certified to inter-operate within the same tree. Note, too, that eDirectory needs to be hosted on a current fully-supported OS. At this time, the only version of NetWare that is under full support is NetWare 6.5.
OES 2 Linux utilizes eDirectory 8.8.2. It is preferable, but not required, to upgrade existing servers to either eDirectory 8.7.3.9 or 8.8.2 before or during the process of introducing OES 2 Linux into the environment.
• eDirectory is 8.8.2 is only supported on current AIX, Linux, Windows, and NetWare 6.5 platforms.
• eDirectory 8.7.3.9 is supported on all the same platforms as well as all NetWare 5.1 and above.
Note: If you are using NetWare 5.1 with NDS8, the latest NDS8 and eDirectory 8.7 schema extensions must be applied.
• NDS 6.x on NetWare 4.11 is not upgradeable and not certified compatible with current eDirectory versions. All NetWare 4.11 servers should be upgraded to current NetWare or removed from the tree.
The Novell Planning and Implementation Guide includes a table that lists the operating systems and eDirectory versions that OES 2 Linux has been tested with and found to be compatible.
Novell also publishes a matrix (refer to TID:10099872) that documents the tested and certified compatibility between current and older releases of eDirectory. In some cases, interoperability between versions outside the matrix will work but have not been fully tested. However, there are known issues that will cause stability, performance, and functionality problems. This is also the case with older versions of NetWare that are no longer supported, even if they are running current versions of eDirectory.
In an ideal situation, Novell recommends that all servers in a tree be of the same fully-supported eDirectory and OS versions. This, however, may not be practical in some environments. If you
18 0

eDirectory Installation & Migration
are using several versions of eDirectory or NetWare in different segments of your tree, Novell recommends that these servers not hold partition replicas.
Do the following to ensure eDirectory compatibility throughout the tree:
• Upgrade all servers to a currently supported version of the OS (NetWare 6.5, SLES, RH or AIX).
• Upgrade all servers to eDirectory 8.7.3.9.
• Retire and remove all NetWare 4.11/NDS 6.x servers from the tree.
• Introduce eDirectory 8.8.x into the tree as required.
As you become familiar with some of the added features in eDirectory 8.8.2, it is likely that further implementations of 8.8.2 will be undertaken. Many of these features will be available if just the dedicated DS Master servers are upgraded. This can be done in-place without the need for a full OS upgrade to these existing servers.
There are valid cases for both eDirectory 8.7.3 and eDirectory 8.8. It’s not a problem if you migrate to OES 2 Linux and decide to stay with version 8.7.3, but there are some advantages to moving to eDirectory 8.8 (v8.8 SP2 is included with OES 2 Linux).
eDirectory 8.7.3
If you are already using 8.7.3 in your organization and are comfortable with it, you don't necessarily need to upgrade:
• Has been in the market for 3 years• Ships as part of OES 1 and NetWare 6.5• Is fully inter-operable with 8.8
eDirectory 8.8• Is the newest directory from Novell and is the core directory for OES 2.• Supports newer advances in Novell Identity Manager and Novell Access Manager• Includes enhanced features and scalability• Has a longer support cycle than 8.7
If you’re planning to take advantage of Domain Services for Windows in Novell Open Enterprise Server 2 when it ships with SP1, you’ll need to deploy eDirectory 8.8 somewhere in your organization. This service enables Linux servers to integrate with Active Directory so users can authenticate from Windows to Linux servers without the need for a Novell client on the desktop.
New Linux Features with eDirectory 8.8
New features of eDirectory v8.8 make it a compelling option on Linux:
• Multiple instances of eDirectory, trees, and replicas of the same tree or partition on a single host (eDirectory 8.8 only) and a utility, ndsmanage, to track instances
• Universal password enforcement• Priority sync to synchronize modified, critical data immediately (passwords, for example)
between two or more eDirectory 8.8 servers hosting the same partition• Data encryption stored on the disk or transmitted between two or more eDirectory 8.8
servers
0 - 0 19

eDirectory Installation & Migration
• Enhancements to increase bulk load performance• Command line options for the Import Conversion Export (ICE) utility corresponding to
those in iManager• LDAP-based backups for attributes and attribute values one object at a time• Enhanced error logging to indicate message severity levels, configuration errors, and
iMonitor and SAL message filtering• Deployment via ZENworks Linux Management 7.2• Installation and configuration via YaST• Custom locations for applications, data, and configuration files• FHS and LSB compliance • Server health check utility• Non-root installation• SecretStore Integration
For complete information, refer to the Novell eDirectory 8.8 What's New Guide available at www.novell.com/documentation/edir88.
Novell Products Supported with eDir 8.8
For a list of products supported by eDirectory 8.8, refer to TID:10099872 (http://support.novell.com/cgi-bin/search/searchtid.cgi?10099872.htm).
Analyzing eDirectory Design Installing eDirectory on OES 2 Linux provides an excellent opportunity to review current directory structure to make sure existing directory strategies still meet your organization's needs and growth patterns.
If you decide to redesign your system, you need to determine whether to keep services in their original tree or move them to a new tree. As part of this process, you’ll probably also want to remove any objects that are no longer being used.
It is important that any eDirectory tree that caters primarily to file and print be designed first and foremost around the WAN configuration, particularly if your organization includes several remote facilities. In most cases, you'll want to provide a partition for each remote location, even when they are single-server sites.
If, for example, you have five NetWare 6.5 servers in place that are primarily dedicated to providing eDirectory replica services, all of the Master replicas could be contained on one of these servers along with multiple replicas of the higher levels of the tree. Each remote server should include a R/W replica of its local partition. Make sure you have three writable replicas in place to provide adequate redundancy.
Evaluate whether changes are necessary to better accommodate each of the following:
• Type of tree: Does a Traditional (pyramid-shaped, single tree environment) or specialized tree (flat tree designed for a specific situation (identity vault or LDAP authentication, for example)) make better sense in your environment? Many Novell customers are opting for a flat tree so LDAP can walk the tree more efficiently to find a user object.
• Physical network layout (location-based and designed around WAN links): Analyze the number of offices; where they are located; how many users are at each site; how sites
20 0

eDirectory Installation & Migration
communicate with each other; whether offices share the same data; how is data routed among the sites.
• Organizational structure (function-based design): Is your organization static or dynamic? What growth patterns do you anticipate?
• Security: How secure does your data need to be; does some data need enhanced security?
• Server configuration: What types of servers are on your network; do they need to interact; where are they located; what applications and services does each host; are they managed locally or centrally?
• User accessibility needs: Which applications and services are needed by which users; do users need to read data or modify it; which rights need to flow from the root; how many users need remote access; where will remote users access data from?
• Application needs: Which offices use the same applications; how many users per application; are applications installed locally or centrally?
• Administrative strategies. Do you intend to manage eDirectory centrally or from many dispersed locations?
• Naming standards for eDirectory objects: What naming standards are in force? Do any of them need to be changed or updated?
• Scalability and interoperability: How important are these on your network? Are you willing to compromise scalability and/or performance for other worthwhile goals?
• Speed and efficiency: How important are these on your network? Are you willing to compromise speed and efficiency for other worthwhile goals?
• Fault tolerance: What steps have you taken to provide fault tolerance? Do additional options need to be implemented?
If you decide to re-engineer your tree, it’s a good idea to create the new tree in a lab to make sure you understand its structure and that it’s actually going to work the way you want before you put it into production.
For additional eDirectory design information, refer to Section 2.0, "Designing Your Novell eDirectory Network" in the Novell eDirectory 8.8 Administration Guide. This section provides information about the following:
• Section 2.1, eDirectory Design Basics • Section 2.2, Designing the eDirectory Tree • Section 2.3, Guidelines for Partitioning Your Tree • Section 2.4, Guidelines for Replicating Your Tree • Section 2.5, Planning the User Environment • Section 2.6, Designing eDirectory for e-Business • Section 2.7, Understanding the Novell Certificate Server • Section 2.8, Synchronizing Network Time • Section 2.9, Security Considerations
Choosing an eDirectory Installation or Migration StrategyThere are several basic strategies for setting up eDirectory on OES 2 Linux or migrating to the OES 2 Linux platform:
0 - 0 21

eDirectory Installation & Migration
Installing eDirectory fresh on Linux. Customers who have adopted this strategy are usually unhappy with their existing tree (the tree hasn't kept up with organizational changes and growth). Moving to Linux provides an opportunity to update the tree by starting from scratch. These customers also tend to consolidate more services when they add new Linux servers. And they often incorporate specialty trees such as an Identity vault on SUSE rather than OES 2 Linux.
In cases where eDirectory or the operating system and services are outdated, it sometimes makes sense to just redo the whole environment (new tree design, partitioning, replication strategies, newer utilities/services) rather than port the existing structure.
The single biggest issue in many organizations is that NetWare and eDirectory haven't been patched, so starting fresh is the easier option. This is true of file and print as well. Most customers who use this strategy are moving to OES Linux from NetWare 5 and NDS 6 (which is limited to 1500 users).
Adding a branch to an existing tree. These customers migrate objects to a new OES 2 Linux branch and then gradually retire the older NetWare branch. By adding a branch, it's easier to drag and drop users and login scripts, certificates, and PKI so they don't have to be recreated.
Migrating with the migedir utility. You can install eDirectory fresh on OES 2 Linux and then run the migedir utility to migrate from NetWare eDirectory 8.7.3 IR5 or higher (the only supported source system). The migedir utility is designed to be used when you want to migrate eDirectory and server identity alonenot with other migration services.
Important: Even though eDirectory migration using migedir is tested and certified by Novell test labs, it's not a complete solution for migrating from NetWare to Linux. The migedir utility is intended as a standalone migration utility and can't be used in concert with any of the other OES Migration Tools. Once the migedir utility is used, the services on the source server (NetWare 6.5) are no longer available. Compatibility issues with other utilities are scheduled to be addressed in OES 2 SP1, but until then you must choose between using migedir and using the OES Migration Tools.
Using migedir, both eDirectory data and server identity are migrated to provide seamless accessibility after migration. The migedir migration utility also performs many pre-migration tasks, health validations, server backups, server migration, and post-migration tasks for you. The eDirectory database is upgraded to a new format when SP2 is installed. The appropriate upgrade utility is called after the packages are upgraded to eDirectory 8.8.
The strategy you choose must also be conditioned by the following:
• Workstation implementation. The workstation environment has a direct affect on the backend infrastructure. Many customers are retiring Novell Client 32 and doing a desktop refresh using a mix, depending on their needs, of native Windows, CIFS, Samba, Kerberos, and SUSE Linux Enterprise Desktop (SLED)–all managed with ZEN. In fact, approximately 50% of our customers use multiple protocols on the desktop. The backend has to accommodate all of them. It usually takes customers a year or more to complete a desktop migration.
• 32 vs 64 bit . Almost all hardware is now 64-bit, but many Novell applications and services, including eDirectory, are 32-bit. Even though most of the 32-bit applications run on 64-bit hardware (a few don't), the power of the hardware is wasted. It's possible to take advantage of 64-bit hardware by running eDirectory on the 32-bit portion and using the rest for other processing; this, of course, increases performance. There's not as much advantage with other applications and services as there is with eDirectory.
22 0

eDirectory Installation & Migration
Additional Information
Upgrading eDirectory prior to migrating. In many cases, you'll need to upgrade existing eDirectory versions before installing OES 2 Linux or migrating from NetWare. See Section 3.5, "Upgrading eDirectory" in the Novell eDirectory 8.8 Installation Guide.
Installing eDirectory on OES 2 Linux. Refer to Section 3, "Installing or Upgrading Novell eDirectory on Linux" in the Novell eDirectory 8.8 Installation Guide. Instructions for installing eDirectory as a pattern install when you install OES 2 Linux are found in the OES 2 Linux Installation Guide.
Migrating eDirectory from NetWare to OES 2 Linux. For information on the migedir utility, refer to Section 11, "Migrating eDirectory from NetWare to OES 2 Linux" in the Novell eDirectory 8.8 Installation Guide.
Migrating to eDirectory with or without upgrading the operation system. See sections 10.1 and 10.2 in the Novell eDirectory 8.8 Installation Guide.
Installation PrerequisitesCheck Existing Directory Health
Execute a directory health check BEFORE doing anything. Problems with eDirectory can derail a roll out very quickly. Make sure there are no significant health issues before you begin the migration. The primary goal of this evaluation is to determine whether the prerequisites have been met for introducing OES 2 Linux and eDirectory 8.8 into an existing tree or migrating eDirectory from NetWare to Linux.
Note: When you upgrade to eDirectory 8.8 or use the migedir utility to migrate eDirectory from NetWare to Linux, a server health check is conducted by default to ensure that the server is safe for the upgrade or migration.
Whichever option you choose, make sure each of the following is checked:
• eDirectory Version. Running different versions of NDS or eDirectory on the same version of NetWare can cause synchronization problems. All NDS versions should be at the latest version on their respective operating system platforms. If your version of NDS or eDirectory is outdated, download the latest software patch from Novell Directory Services Patches and Files.
• Time Synchronization. NDS communication uses timestamps to uniquely identify objects and the object's modification time for synchronization purposes. Time stamps are assigned to each object and property to ensure the correct order for object and property updates. If servers in the tree are not synchronized to the correct local time (or more importantly, to each other) replica synchronization will not be reliable and severe object corruption and data loss can be experienced. To avoid these problems, time needs to be in sync across all servers in the network.
• Server-to-Server Synchronization. NDS servers communicate changes made to objects and partition boundaries. This step verifies that no errors exist when NDS performs synchronization processes.
• Replica Ring Synchronization. This operation reads the Synchronization Status attribute from the replica object on each server that holds replicas of the partitions. It displays the time of the last successful synchronization to all servers as well as any errors that have occurred since.
0 - 0 23

eDirectory Installation & Migration
• Synchronization Tolerances. This operation indicates the time periods since a server has synced with inbound and outbound data changes, how much data is outstanding, etc.
• Background Processes. These processes perform a variety of tasks including replication of changes and maintenance of system information.
• External References. Check External References to determine if a replica containing the object can be located.
• Hung Obituaries. These are object delete and move operations that have not completed successfully because mixed versions of DS have been used. Significant overhead is expended by the replica servers in retrying the obituary process constantly without success. Check the Flag States of the obituaries on all servers in the backlink lists for the obituaries. • Collision and Unknown Objects. In most cases, these objects can be deleted, but
each should be investigated for origin and references first.• Replica States. Check the partitions and states of the replicas stored in the server's
NDS database files.• eDirectory Schema Synchronization. Each NDS server has schema definitions that
are used for creating and maintaining objects. Verify that schema synchronization between servers is working correctly.
Health Check Tools
Depending on your preference, you can perform an eDirectory server health check several ways:
• Use migedir Diagnostic Tools. If you are using migedir to migrate eDirectory from NetWare to Linux, the built-in diagnostic tool is probably sufficient.
• Use the new command-line health check utility with eDirectory 8.8. Novell eDirectory 8.8 provides a diagnostic tool to help you determine whether your server is safe before upgrading. These health checks run by default with every upgrade and they occur before the actual package upgrade. However, you can run the diagnostic tool, ndscheck (or dscheck on NetWare), to complete a health check at anytime. Versions are available for the following: • Linux and UNIX. Health checks are run by default before an upgrade operation starts
(to skip the default health checks, use the -j option with nds-install).• NetWare and Windows. Server health checks happen as part of the installation
wizard.
Basic server health and partition and replica health are checked and the results displayed on the screen and logged in the ndscheck.log. If the health checks are done as part of the upgrade and critical errors are found, the upgrade is aborted.
In earlier releases of eDirectory, the upgrade did not check the health of the server before proceeding with the upgrade. As a result, the upgrade operation sometimes failed, leaving eDirectory in an inconsistent state. In some cases, it was impossible to roll back to the pre-upgrade settings. This new health check tool resolves this, helping you make sure your server is ready to upgrade.
For additional information, including command parameters for each operating system, refer to Appendix B, "Server Health Checks," in the Novell eDirectory 8.8 Installation Guide.
• Use iMonitor. You can use either of two methods (manual and automated) in iMonitor, a web-based diagnostic tool:
• Use the Navigator Frame (iMonitor > Navigator > Reports).
24 0

eDirectory Installation & Migration
• Use the Assistant Frame (iMonitor > Assistant > Agent Health).
Even with a large number of servers, this procedure tends to run very quickly (less than 5 minutes for 15-20 servers if all of the servers are healthy). The process is the same for all operating systems. Be aware that if you use the automated process, the report will run without authentication (that is, it will run as [Public]); however, this should be fine for a health check report. Health check reports can also be scheduled.
An excellent discussion of this method is available via a Cool Solutions article. See http://www.novell.com/coolsolutions/feature/15336.html.
• Follow the instructions in "NDS / eDirectory Health Check Procedures - Cross Platform" (TID 10060600). This Novell Technical Information Document (TID), though somewhat "dated," describes the health-check process in detail but requires using both DSREPAIR and DSTRACE, the operation of which varies from platform to platform (instructions for each platform are included in the TID). Background processes are verified using a rather invasive method of forcing the process to run. To run this check on all servers in the environment, you need to connect to each server remotely to execute the commands, a time-consuming process if you have a large number of servers.
You can view a tutorial or access a text version of the TID at http://support.novell.com/additional/tutorials/index.html
Additional Information
Training on the tools and techniques used to keep eDirectory healthy is available in course 3007: eDirectory Tools and Diagnostics (eDirectory 8.7.3). In this course you learn how to
• Perform eDirectory health checks• Perform eDirectory operations properly• Properly diagnose, troubleshoot, and resolve eDirectory issues• Use eDirectory troubleshooting tools and utilities
Other eDirectory courses are available and recommended:
• Fundamentals of Novell eDirectory, Course 3017 (eDirectory 8.7.3) • Novell eDirectory 8.8 Design and Implementation, Course 3067 (eDirectory 8.8)
To learn more about these courses, visit the Novell Training Services site (index) and select eDirectory.
Check Requirements and Prerequisites
System requirements and prerequisites are summarized below. Refer to sections 3.1 and 3.2 of the Novell eDirectory 8.8 Installation Guide for a complete listing and explanation.
eDirectory System RequirementsSupported OS
• OES Linux SP2 32 bit
• SUSE® Linux Enterprise Server 8.x - 32 bit
• SUSE® Linux Enterprise Server 9 - 32 bit (SP1, SP2 & SP3) and 64 bit (SP3) or later
• SUSE® Linux Enterprise Server 10 - 32 bit and 64 bit
Note: To determine the version of SUSE Linux you are running, see the /etc/SuSE-release file.
0 - 0 25

eDirectory Installation & Migration
RAM 256 MB RAM minimum (in addition to that required by the Linux OS)
Disk Space • 90 MB for the eDirectory server
• 25 MB for the eDirectory administration utilities
• 74 MB for every 50,000 users (custom schema extensions may increase this requirement)
Rights Administrative rights to the existing eDirectory tree so that you can modify the schema.
Check currently installed Novell and Third Party applications to determine if eDirectory 8.8 is supported before upgrading your existing eDirectory environment. You can find the current status for Novell products in TID 10099872 ''What Novell products are supported with Novell eDirectory 8.8?"
If a product is not supported, you should not install eDirectory 8.8 on the same server as that product. In addition, that product should not be configured to search an eDirectory 8.8 server. As long as these conditions are met, you can still install eDirectory 8.8 on some servers and run with a mixed tree.
eDirectory Hardware Requirements
Hardware requirements depend on the specific implementation of eDirectory. Two factors increase performance: more cache memory and faster processors. For best results, cache as much of the DIB set as the hardware allows.
eDirectory scales well on a single processor, but takes advantage of multiple processors. Adding processors improves performance in some areas–for example, logins and having multiple threads active on multiple processors. eDirectory itself is not processor intensive, but it is I/O intensive.
The following table illustrates typical system requirements for eDirectory on Linux:
Objects Processor Memory Hard Disk100,000 Pentium III 450-700 MHz (single) 384 MB 144 MB
1 million Pentium III 450-700 MHz (dual) 2 GB 1.5 GB
10 million Pentium III 450-700 MHz (2 to 4) 2+ GB 15 GB
Requirements for processors might be greater than the table indicates, depending on the services hosted by the computer as well as the number of authentications, reads, and writes the computer handles. Processes such as encryption and indexing can be processor intensive.
Other Prerequisites
1. Back up eDirectory before any upgrades, installations, or migrations.
2. (Conditional) If you need to upgrade to eDir 8.7.3 IR5, consider the following:
• The root of the production tree needs to be eDir 8.7.3 IR5 or later.• The Certificate Authority server needs to be the most recent. (i.e. NW 6.5 SP7 or
OES 2).• Any older (NDS product) servers should not hold any replicas of the tree.
For additional upgrade information see the Novell eDirectory 8.8 Installation Guide.
26 0
eDirectory Installation & Migration
3. (Conditional) Make sure gettext is installed if you will be using the nds-install utility to perform the installation.
To check, run the following command:rpm -q gettext
This displays the package and the version (if it is installed).
If you need to install gettext, see http://www.gnu.org/software/gettext/.
4. Enable the Linux host for multicast routing.
To determine whether the host is so enabled, enter the following command:/bin/netstat -nrs
The following entry should be present in the routing table:224.0.0.0 0.0.0.0
If the entry is not present, log in as root and enter the following command to enable multicast routing:
route add -net 224.0.0.0 netmask 240.0.0.0 dev -interface
The -interface could be a value such as eth0, hme0, hme1, or hme2, depending on the NIC that is installed and used.
5. Make sure NICI is installed. Instructions differ depending on whether a root or nonroot user is doing the installation.
NICI 2.7 and eDirectory 8.8 support key sizes up to 4096 bits. If you want to use a 4 KB key size, every server must be upgraded to eDirectory 8.8. In addition, every workstation using the management utilities, for example, iManager and ConsoleOne, must have NICI 2.7 installed on it.
When you upgrade your Certificate Authority (CA) server to eDirectory 8.8, the key size (2 KB) does not change. The only way to create a 4 KB key size is to recreate the CA on an eDirectory 8.8 server and change the default key size from 2 KB to 4 KB during the CA creation.
See Section 3.6.2, "Installing NICI" in the Novell eDirectory 8.8 Installation Guide.
eDirectory prompts for the installation of NICI during installation if it is not already installed.
Warning: Novell strongly encourages using the NICI install program provided on each platform to install and configure NICI. NICI installed by other means can cause irreparable damage. It might be necessary to remove NICI, perhaps remove other items such as certificates that you have purchased, and reinstall NICI properly.
6. For secure Novell eDirectory operations, download the NICI Foundation Key file.
You can obtain an evaluation file from the Novell eDirectory Eval License Download Web site. You'll need the NICI Foundation Key in order to create Certificate Authority and Key Material objects.
7. Make sure SLP is installed and configured.
With eDirectory 8.8, SLP is not installed as part of the eDirectory installation. If you plan to use SLP to resolve tree names, it needs to be installed and configured before
0 - 0 27
eDirectory Installation & Migration
proceeding with the eDirectory installation. SLP DAs also need to be stable. Only a root user can install SLP.
See Section 3.6.1, "Using SLP with eDirectory" in the Novell eDirectory 8.8 Installation Guide for information.
Enter the following command:rpm -ivh SLP_rpm_file_name_with path
where path is the setup directory in the build (for example, /home/build/Linux/Linux/setup/novell-NDSslp-8.8-20i386.rpm directory)
8. Synchronize the time on all network servers in the tree.
Use Network Time Protocol's (NTP) xntpd to synchronize time. To synchronize time on Linux with NetWare servers, use timesync.nlm 5.09 or later. You are prompted to synchronize time during the eDirectory configuration process if you are installing eDirectory as an add-on to the OES 2 Linux installation.
9. Make sure the compat-libstdc++RPM is present on your host machine.
10. (Conditional) For YaST based installations, install the java 1_4_2 jre package. This contains libjava.so and libjvm.so.
11. If you are installing a secondary server, make sure all replicas in the partition that you install the product on are in the On state.
You will need Supervisor rights to the container the server is being installed into and to the partition where you want to add the server and Browse and Read and Compare rights to the Security container object.
(Conditional) If you are installing a secondary server into an existing tree as a non-administrator user, ensure that at least one of the servers in the tree has the same or higher eDirectory version as that of the secondary being added as container admin. If the secondary being added is of a later version, then the schema needs to be extended by the admin of the tree before adding the secondary using container admin.
12. If you will be installing ConsoleOne, make sure the file system supports symbolic links
13. Force the Backlink process to Run.
Because the internal eDirectory identifiers change when upgrading, the backlink process must update backlinked objects for them to be consistent.
Backlinks keep track of external references to objects on other servers. For each external reference on a server, the backlink process ensures that the real object exists in the correct location and verifies all backlink attributes on the master of the replica. The backlink process occurs two hours after the database is open, and then every 780 minutes (13 hours). The interval is configurable from 2 minutes to 10,080 minutes (7 days).
After migrating to eDirectory, start the ndstrace process by issuing the ndstrace -l>log& command, which runs the process in the background. You can force the backlink to run by issuing the ndstrace -c set ndstrace=*B command from the ndstrace command prompt. Then you can unload the ndstrace process by issuing the ndstrace -u command. Running the backlink process is especially important on servers that do not contain a replica.
28 0

eDirectory Installation & Migration
Installing eDirectory 8.8 on OES 2 (Linux)Several different installation options are possible:
• Installing eDirectory along with the OES 2 Linux operating system (OES 2 Linux installation) using a pattern eDirectory install.
This service selects and installs these companion services:
• Novell Backup/Storage Management Services (SMS)• Novell Linux User Management (LUM)• Novell Remote Manager (NRM)
To install eDirectory (and other add-on services) when you install OES 2 Linux, select the pattern during the initial server installation or install them later.
• Using the nds-install utility. This utility is found in the Setup directory of the downloaded file for the Linux platform.
• Using ZENworks Linux Management (both command line and GUI).• Using ndsconfig (adding and removing replicas, configuring multiple instances, or
installing into a tree with dotted name containers).
The eDirectory pattern install is documented in OES 2: Linux Installation Guide. See "Customizing the Software Selections" and "Installing or Configuring OES 2 Services on an Existing OES 2 Linux or SLES 10 SP1 Server."
Instructions for using nds-install, ndsconfig, and ZENworks are included in the Novell eDirectory 8.8 Installation Guide. See section 3.0, "Installing or Upgrading Novell eDirectory on Linux."
Installing eDirectory during the OES 2 Linux (SLES 10) Installation
To install any of the OES 2 patterns (eDirectory among them) when you install the operating system, you need to customize the software selections; otherwise, only the base SLES 10 and base OES packages are installed.
None of the OES Services is selected by default. This lets you fully customize your OES server. Some services require eDirectory to be installed on the local server. Where this is the case, you will be prompted to install eDirectory if it isn't already installed. If you want OES components to use a local eDirectory database, we recommend that you install eDirectory before installing any other OES components.
Note: You will be asked whether to configure Linux User Management (LUM) when you install eDirectory. LUM needs to be enabled for all NSS users and will be needed when you migrate files from NetWare NSS volumes to OES Linux NSS volumes to prevent file ownership problems. You will also need LUM if your eDirectory users will log in to Linux. Setting up LUM on SLES v10 is described in TID 3994289.
Complete the following steps to install eDirectory"
1. On the installation program's Installation Settings page, click Software and select eDirectory (see the screen shot below).
Important: If you deselect a pattern after selecting it, the installation program won't install the pattern or any of the dependent patterns. Rather than deselecting a pattern, click Cancel, and then click the Software heading again to choose your selections again.
Selecting a pattern automatically selects the other patterns that it depends on.
0 - 0 29

eDirectory Installation & Migration
2. When the software components you want to install have been selected, click Accept.
3. (Conditional) If the prompt for Automatic Changes displays, click Continue.
4. (Conditional) If prompted, resolve any dependency conflicts.
5. Continue with the OES 2 Linux (SLES 10) installation, and, when finished, reboot the server.
6. Review the selected installation settings. When they are correct, click Accept.
7. On the Confirm Installation page, click Install.
The base installation settings are applied and the packages are installed.
After the server reboots, you can configure services as needed, eDirectory among them (see "Configuring eDirectory on OES 2" on page 38).
You can also install and configure any of the patterns later. See Section 4.1, "Installing or Configuring OES 2 Services on an Existing OES 2 Linux or SLES 10 SP1 Server" in the OES 2 Linux Installation Guide.
Installing the eDirectory Server in a New eDirectory Tree
If you are creating a new eDirectory tree on your network, note that the first server is important for two reasons:
• Basic eDirectory tree structure is created during the first installation.
30 0

eDirectory Installation & Migration
• The first server permanently hosts the Certificate Authority for your organization.
1. In the OES 2 Linux installation program's eDirectory Configuration - New or Existing Tree page, select New Tree and specify a name for the eDirectory tree you want to create.
2. Select the Use eDirectory Certificates for HTTPS Services check box to replace the existing YaST server certificate and key files with eDirectory server certificate and key files (default).
Important: Selecting the Use eDirectory Certificates for HTTPS Services check box overwrites existing certificate configuration files. On an existing SLES 10 server that already has certificates installed and configured, leave this option deselected to preserve the existing certificate configuration.
Most OES services that provide HTTPS connectivity are configured by default to use the self-signed common server certificate created by YaST. Self-signed certificates provide minimal security and limited trust, so consider using eDirectory certificates instead.
If you select this option, eDirectory automatically backs up the currently installed certificate and key files and replaces them with files created by the eDirectory Organizational CA (or Tree CA).
The default YaST server certificate and key files are:
• Key file: /etc/ssl/servercerts/serverkey.pem • Certificate file: /etc/ssl/servercerts/servercert.pem
The eDirectory server certificate and key files are:
• Key file: /etc/ssl/servercerts/eDirkey.pem • Certificate file: /etc/ssl/servercerts/eDircert.pem For more information, see "Certificate Management in the OES 2: Planning and Implementation Guide.
3. Click Next and from the New Tree Information page, specify the information requested (FDN and password).
4. Click Next and from the eDirectory Configuration - Local Server Configuration page, specify the information requested:
• The context for the server object in the eDirectory tree.• A location for the eDirectory database. The default path is
/var/opt/novell/eDirectory/data/dib, but you can use this option to change the location if you expect the number of objects in your tree to be large and the current file system does not have sufficient space.
• The ports to use for servicing LDAP requests. The default ports are 389 unsecure and 636 secure.
• The ports to use for providing access to iMonitor. The default ports are 8028 unsecure and 8030 secure.
5. When the configuration is complete, click Next.
6. Specify options for synchronizing server time.
0 - 0 31

eDirectory Installation & Migration
On the eDirectory Configuration - NTP & SLP page, select the Network Time Protocol NTP server field to specify the time source all servers in the tree will use.
7. Specify SLP configuration options.
On the eDirectory Configuration - NTP & SLP page, specify the SLP options you need.
8. Select the Novell Modular Authentication Services (NMAS) login method.
On the Novell Modular Authentication Services page, select all the login methods you want to install.
9. Configure any other server services you have selected.
10. After selecting and resolving all product configuration options, click Next to configure all of the components and finish the installation.
Installing an eDirectory Server into an Existing Tree
Consider the following before installing into an existing tree:
• Check DNS and SLP. If you will be installing an eDirectory server into an existing tree, make sure DNS and SLP are working well. If you still have problems, consider using DNS entries in the /etc/hosts file and adding a DNS entry for the Treename.
• Check eDirectory versions. Make sure the eDirectory versions in the tree are compatible with eDirectory 8.8.2. Novell's Linux impact team suggests that every server in the tree be at 8.7.3.x for an 8.8 install because of schema extension issues. If you are running a currently supported OS (NW 6.5, SLES 9/10 or OES) and currently supported eDirectory (8.7.3 or 8.8) you should have no problems. If you are running anything earlier (OS or eDir), eDirectory may or may not work depending on which functions you are using. You would also be on your own if you call Support because earlier versions are no longer supported in the life cycle matrix.
• Update Master replicas. If you are installing OES 2 Linux servers into a tree containing NetWare 6.5 servers, be sure that all of the NetWare eDirectory master and replica servers have been updated to SP6 or later prior to installing OES 2 Linux and eDirectory.
See also Choosing an eDirectory Version on page 18 for additional recommendations.
• Verify eDirectory Health. Novell Support has reported a significant number of installation incidents related to eDirectory health and time synchronization. To avoid such problems, do the following prior to installing:• Understand coexistence and migration issues • Make sure eDirectory is healthy
• Check Time Synchronization (Existing Tree)
OES 2 Linux and NetWare servers can receive network time from either an existing eDirectory server or from an NTP time source. The critical point is that the entire tree must be synchronized to the same time sources. For example, do not set your new OES 2 server to receive time from an NTP source unless the whole tree is synchronized to the same NTP source.
If you are installing into an existing tree, the OES 2 Linux install proposes to use the IP address of the eDirectory server (either NetWare or Linux) as the NTP time source. This default should be sufficient unless one of the following is true:
32 0

eDirectory Installation & Migration
• The server referenced is a NetWare 5.0 or earlier server, in which case you need to identify and specify the address of another server in the tree that is running either a later version of NetWare or OES 2 Linux.
• You will have more than 30 servers in your tree. In this case, you'll need to configure the server to fit in your planned time synchronization hierarchy. For more information, see "Planning a Time Synchronization Hierarchy before Installing OES" in the OES 2: Planning and Implementation Guide.
The OES 2 Linux install activates the xntp daemon and configures it to synchronize server time with the specified NTP time source. After the install completes, you can configure the daemon to work with additional time sources to ensure fault tolerance. For more information, see Changing Time Synchronization Settings on a SLES 10 Server in the OES 2: Planning and Implementation Guide.
Also refer to Section 12.3, "Time Synchronization" in the OES 2: Planning and Implementation Guide for additional information and cross references.
To install eDirectory
1. In the OES 2 Linux installation program's eDirectory Configuration - New or Existing Tree screen, select Existing Tree and specify a name for the eDirectory tree you want to join.
2. Select the Use eDirectory Certificates for HTTPS Services check box to replace the existing YaST server certificate and key files with eDirectory server certificate and key files (default).
Refer to Step 2 above relative to HTTPS Services.
3. At the eDirectory Configuration - Existing Tree Information dialog, specify the required information:
• The IP address of an existing eDirectory server with a replica• The NCP port on the existing server• The LDAP and secure LDAP port on the existing server• The fully distinguished name and context for the user Admin on the existing server• The password for user Admin on the existing server
4. When the configuration is complete, click Next.
5. In the eDirectory Configuration - Local Server Configuration dialog, specify the following information:
• The context for the server object in the eDirectory tree.• A location for the eDirectory database. The default path is
/var/opt/novell/eDirectory/data/dib, but you can use this option to change the location if you expect the number of objects in your tree to be large and the current file system does not have sufficient space.
• The ports to use for servicing LDAP requests. The default ports are 389 unsecure and 636 secure.
• The ports to use for providing access to iMonitor. The default ports are 8028 unsecure and 8030 secure.
6. After selecting the services to be installed, click Accept.
0 - 0 33

eDirectory Installation & Migration
7. Change the default configuration information as needed:
a. Specify options for synchronizing server time
On the eDirectory Configuration - NTP & SLP page, select the Network Time Protocol NTP server field to specify the time source all servers in the tree will use.
b. Specify SLP configuration options.
On the eDirectory Configuration - NTP & SLP page, specify the SLP options you need.
c. Select the Novell Modular Authentication Services (NMAS) login method.
On the Novell Modular Authentication Services page, select all the login methods you want to install.
d. Configure any other server services you have selected.
8. After selecting and resolving all product configuration options, click Next to configure all of the components and finish the installation.
Adding LDAP Authentication Through eDirectory
This section was originally published as part of a Cool Solutions AppNote: "Complete NetWare to OES Linux Migration Guide" written by Mike Faris, Sr. Network Engineer at Aviall. It is reprinted here with permission.
Managing and maintaining password files can be a hassle. To make this easier, especially if you have a number of OES 2 Linux servers, configure local authentication to use LDAP and eDirectory, and then simply add designated users and administrators, to the LUM group; this gives them local access. Root and other predefined local accounts are not affected. Follow the steps below.
1. Type yast at the command line.
2. Select the Network/Advanced section and then > LDAP client.
3. Select Use LDAP.
4. Add the LDAP server in the server field and the search base where users are located.
For example:
Base DN: o=[org]Addresses of LDAP Servers: my-edir-serv.mydomain.com
5. Select LDAP TLS/SSL.
6. Select Advanced Configuration and specify the following:
User Map: o=[org]Password Map: o=[org]Group Map: dc=[org]Password Change Protocol: ndsGroup member Attribute: member
34 0

eDirectory Installation & Migration
7. Select Administration Settings from the top of the box.
Configuration Base DN: o=[org]Administration DN: o=[org]
8. Select Accept and save your changes by clicking Finish.
9. Edit the /etc/nsswitch.conf file by modifying the following lines:
passwd: compat nam
group: compat nam
passwd_compat: ldap files
group_compat: ldap files
Additional Information
There are two primary sources for eDirectory installation and configuration information. You'll want to check both the OES 2 Linux Installation Guide and the Novell eDirectory 8.8 Installation Guide as indicated below:
Instructions for completing eDirectory installation and configuration steps are included in the following sections of the OES 2 Linux Installation Guide:
• Section 3.0, "Installing Open Enterprise Server 2 Linux," particularly Section 3.3, "Installing OES 2 Linux As a New Installation"
• Section 4.0, "Installing or Configuring OES 2 Services on an Existing OES 2 Linux or SLES 10 SP1 Server "
Other installation-specific options are documented in the following sections of the Novell eDirectory 8.8 Installation Guide:
• Section 3.6.1, “Using SLP with eDirectory” • Section 3.6.2, “Installing NICI” • Section 3.6.3, “Using the nds-install Utility to Install eDirectory Components” • Section 3.6.4, “Installing Through ZENworks Linux Management on OES Linux SP2” • Section 3.6.5, “Nonroot User Installing eDirectory 8.8” • Section 3.6.6, “Using the ndsconfig Utility to Add or Remove the eDirectory Replica
Server”• Section 3.6.7, “Using ndsconfig to Configure Multiple Instances of eDirectory 8.8”• Section 3.6.8, “Using ndsconfig to Install a Linux Server into a Tree with Dotted Name• Containers” • Section 3.6.9, “Using the nmasinst Utility to Configure NMAS” • Section 3.6.10, “nonroot user SNMP configuration”
Using ndsconfig to Install eDirectory
You can use the ndsconfig utility to add an eDirectory replica server to an existing tree or add an eDirectory server to an existing tree.
This utility is located in the Setup directory of the downloaded file for the Linux platform. The utility adds the required packages based on the components you choose to install.
Administrator rights are required.
0 - 0 35

eDirectory Installation & Migration
1. Enter the following command at the Setup directory:./nds-install
2. To install eDirectory components, use the following syntax:nds-install [-c <component1> [-c <component2>]...] [-h] [--help] [-i] [-j] [-u]
Parameter Explanation-c Specifies the component to be installed based on the packages available. You
can install more than one component by using the -c option multiple times.
There are two components you can install: the eDirectory server and the eDirectory administration utilities.
• To install the server, enter -c server.
• To install the administration utilities, enter -c admutils.
For example, to install Novell eDirectory Server packages, enter the following command:
./nds-install -c server-h or --help Displays help for nds-install.-i Prevents the nds-install script from invoking the ndsconfig upgrade if a DIB is
detected at the time of the upgrade.-j Jumps or overrides the health check option before installing eDirectory. For
more information about health checks, refer to Section B.0, "eDirectory Health Checks (in the Novell eDirectory 8.8 Installation Guide)
-u Specifies the option to use in an unattended install mode.
For the unattended install to proceed, you need to enter at least the -c option at the command line, or else the install will abort
Create a New Tree
To create a new tree, enter
ndsconfig new
You can specify the following parameters:[-t <treename>] [-n <server context>] [-a <admin FDN>] [-i] [-S <server name>] [-d <path for dib>] [-m <module>] [e] [-L <ldap port>] [-l <SSL port>] [-o <http port>] [-O <https port>] [-p <IP address:[port]>]
36 0
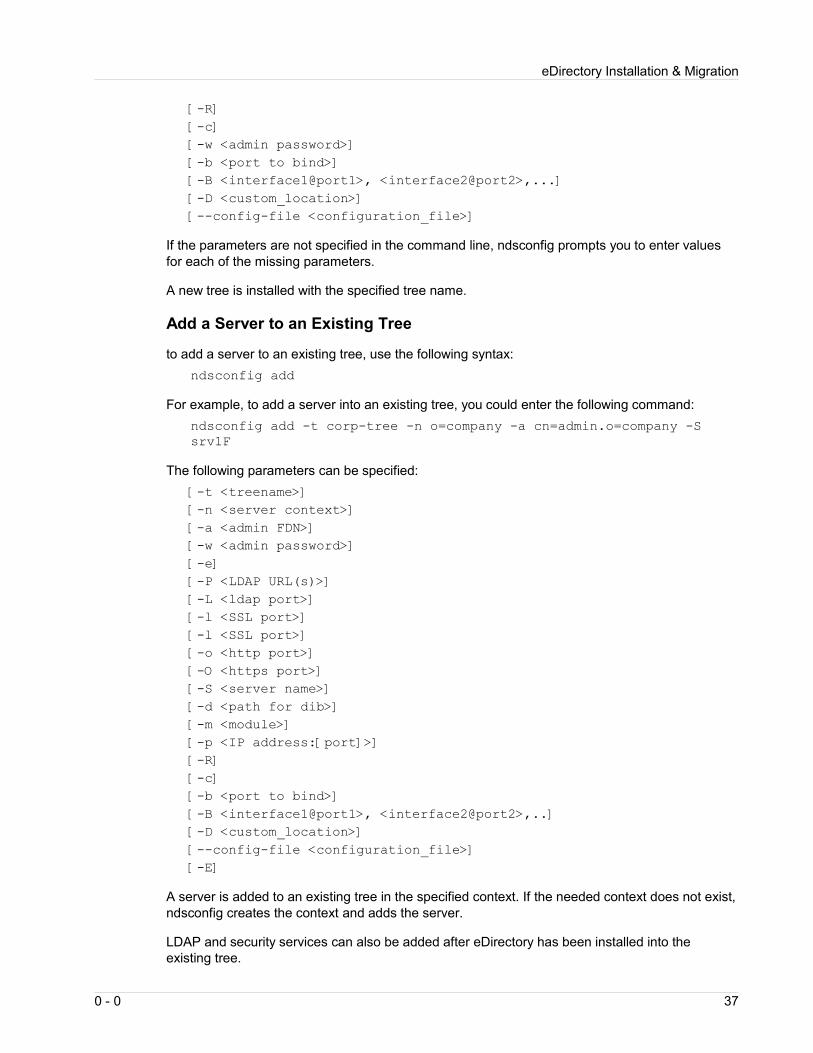
eDirectory Installation & Migration
[-R] [-c] [-w <admin password>] [-b <port to bind>] [-B <interface1@port1>, <interface2@port2>,...] [-D <custom_location>] [--config-file <configuration_file>]
If the parameters are not specified in the command line, ndsconfig prompts you to enter values for each of the missing parameters.
A new tree is installed with the specified tree name.
Add a Server to an Existing Tree
to add a server to an existing tree, use the following syntax: ndsconfig add
For example, to add a server into an existing tree, you could enter the following command:ndsconfig add -t corp-tree -n o=company -a cn=admin.o=company -S srv1F
The following parameters can be specified:[-t <treename>] [-n <server context>] [-a <admin FDN>] [-w <admin password>] [-e] [-P <LDAP URL(s)>][-L <ldap port>] [-l <SSL port>][-l <SSL port>][-o <http port>] [-O <https port>] [-S <server name>] [-d <path for dib>][-m <module>][-p <IP address:[port]>] [-R][-c] [-b <port to bind>] [-B <interface1@port1>, <interface2@port2>,..][-D <custom_location>] [--config-file <configuration_file>][-E]
A server is added to an existing tree in the specified context. If the needed context does not exist, ndsconfig creates the context and adds the server.
LDAP and security services can also be added after eDirectory has been installed into the existing tree.
0 - 0 37
eDirectory Installation & Migration
An explanation of ndsconfig parameters is included in Section 3.6.6, "Using the ndsconfig Utility to Add or Remove the eDirectory Replica Server" in the Novell eDirectory 8.8 Installation Guide.
Note: You can also use ndsmanage to create a new tree or add eDirectory to an existing tree. See Section 3.6.7, "Using ndsconfig to Configure Multiple Instances of eDirectory 8.8."
Configuring eDirectory on OES 2YaST Configuration
If you install eDirectory as part of the OES 2 Linux installation, you can set or change default configuration parameters during the installation process. Also included are options to create a new tree and install the server in that new tree or install the server into an existing tree (see Installing eDirectory 8.8 on OES 2 (Linux on page 29).
If you need to reconfigure eDirectory after installation, use iMonitor or iManager rather than YaST. The configuration provided in YaST is intended for the initial eDirectory installation and configuration only.
Other Linux Configuration Utilities
Novell eDirectory takes advantage of several other configuration utilities to simplify the configuration of various eDirectory components on Linux systems. If you use any of the utilities listed below, follow the instructions provided.
• ndsconfig - Add an eDirectory Replica Server to an existing tree or create a new tree and configure existing servers. See Section 4.6.6 and Section 9.1.1 in the Novell eDirectory 8.8 Installation Guide.
• ndsmanage - Add eDirectory instances to an existing tree or create a new tree and configure eDirectory.
• ldapconfig - Modify, view, and refresh the attributes of LDAP servers and LDAP group objects. See also "Using the ladapconfig Utility on Linux and UNIX" in the Novell eDirectory 8.8 Administration Guide.
• nmasinst - Configure Novell Modular Authentication Service. See Section 3.6.9, "Using the nmasinst Utility to Configure NMAS." You can also configure NMAS with ndsconfig. See Section 3.6.9 "Using the nmasinst Utility to Configure NMAS" in the Novell eDirectory 8.8 Installation Guide.
Additional Information
See Section 3.5.3, "Configuring eDirectory 8.8 Through YaST After Upgrade" and Section 9.0, "Configuring Novell eDirectory on Linux, Solaris, AIX, or HP-UX Systems" in the Novell eDirectory 8.8 Installation Guide. Configuration parameters are explained in Section 9.2.
eDirectory MigrationOES 2 (with eDirectory 8.8) includes a migration tool, migedir, that works well if you intend to migrate only eDirectory. The eDirectory migration utility handles the scenario in which the entire server identity is migrated to the target server. This means that eDirectory no longer exists on the source and, hence, other OES Migration Tools will not work against this NetWare server.
If you intend to migrate other services from NetWare to OES 2 Linux, the migedir utility can't be used; you can however, move eDirectory using a process that takes advantage of replicas.
38 0

eDirectory Installation & Migration
In this scenario, you copy the existing eDirectory information from a NetWare server to a new OES 2 Linux server, without the Linux server assuming the NetWare server's identity. You can then migrate objects to the new OES Linux branch and then gradually retire the older NetWare branch. Once you've added a branch, it's easy to drag and drop users and login scripts, certificates, and PKI so they don't have to be recreated.
Both processes are explained in this section.
Migration Process Using Replicas
1. Create a new OES 2 server and create a new eDirectory 8.8 tree on Linux.
2. Create an eDirectory replica on the target Linux server by attaching it to the same replica ring as the source NetWare server.
This creates two instances of eDirectory in the environment. The OES Migration Tools do a non-destructive migration of all services; hence, they need both servers with their respective directories up and running.
3. Allow the Linux directory to synchronize.
If necessary, you can rework the layout of your tree structure, remap the location of all user objects in your new tree, and delete any user objects that are no longer needed.
4. Once eDirectory synchronization of the replica is complete, run the required service migrations with the OES Migration Tools.
5. Retire the older NetWare server.
Except where dependencies exist, there is no required order for migrating services in the same tree. An example of a dependency would be that the Archive and Versioning service depends on the file system.
Migration Process Using migedireDirectory migration from NetWare requires both the migration of eDirectory data and the server identity to provide seamless accessibility after the migration. The eDirectory migration utility provided with eDirectory 8.8 SP2 (the migedir command line utility) performs many pre-migration tasks, health validations, server backups, server migration, and post-migration tasks for you. All eDirectory objects, including user objects, are moved.
The eDirectory database is upgraded to a new format when SP2 is installed. The appropriate upgrade utility is called after the packages are upgraded to eDirectory 8.8.
eDirectory migration is performed independent of the OES migration framework. The complete migration task is performed by invoking the migedir command line utility.
This section provides basic information. Refer to the eDirectory installation, upgrade, and migration sections in the Novell eDirectory 8.8 Installation Guide for complete information.
Important: Even though eDirectory migration using migedir is tested and certified by Novell test labs, it is not a complete solution for migrating from NetWare to Linux. The migedir utility is intended as a standalone migration utility to be used when you want to migrate eDirectory alone and can't be used in concert with any of the other OES Migration Tools. Once the migedir utility is used, the services on the source server (NetWare 6.5) are no longer available. Compatibility issues with other utilities are scheduled to be addressed in OES 2 SP1, but until then you must choose between using migedir and using other OES Migration Tools.
0 - 0 39

eDirectory Installation & Migration
The migedir migration utility handles the following:
Pre-migration. The utility performs the following checks:
• The health and state of the replicas in the ring are verified.• Configuration information for the server being migrated is collected and written to a
configuration file to be used by other operations during the migration.• Time synchronization is verified between the source and target servers.• The target server is checked for any existing eDirectory instances.
• If an instance exists, the user is prompted and the existing instance removed before proceeding with the migration.
• If the instance doesn’t exist, a new instance is configured and used.
Migration. The utility migrates the eDirectory instance based on the collected configuration information. This involves backing up the source server data, locking the eDirectory instance on the source server, migrating data (all eDirectory objects) to the target server, and restoring the eDirectory instance on the target server. Dependent NICI files are also migrated.
The utility also configures the local instance on the target server with the source server details obtained during the previous checks.
Post-migration. After migration, the following tasks are performed by the utility:
• The nds.conf configuration file is modified with the source server eDirectory instance information, such as tree name and server name.
• The eDirectory instance on the target server is restarted so it can use the new data.• Network address repair is performed to start the synchronization of the new IP address in
the replica ring.
Prerequisites
Source NetWare Server
The source NetWare server should be running and should not be part of any partition operation at the time of the migration.
The source has to be eDirectory 8.7.3 IR5.
Linux Target Server• The target server must be running OES 2 Linux.• eDirectory 8.8 SP2 RPMs should already be installed. You can install and configure
eDirectory through YaST.• The default eDirectory 8.8 SP2 instance must already be configured and be active (this
instance will be overwritten during the migration).• The target Linux server must be able to access the NetWare server remotely. (The
eDirectory migration utility runs only on the target server.)
Valid Platforms
The eDirectory migration utility is designed to run only on OES 2 Linux, which is the target platform for migration. Hardware and supported platform requirements are the same as those for OES 2 Linux.
40 0
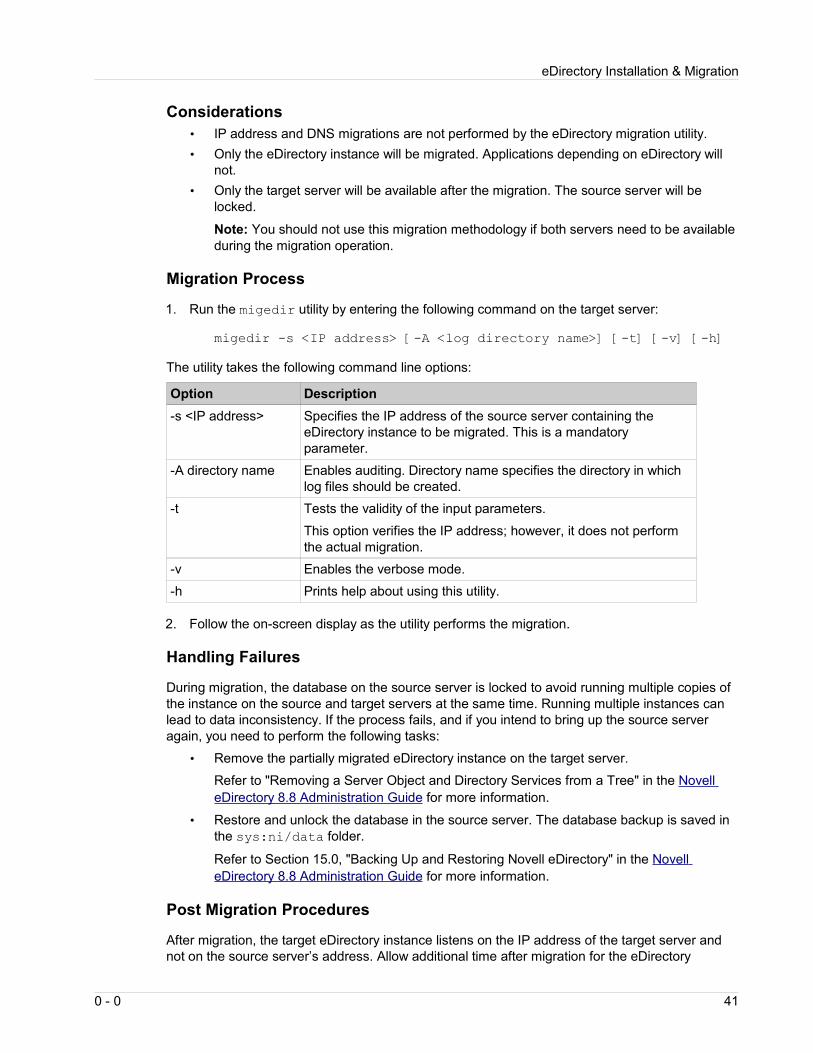
eDirectory Installation & Migration
Considerations• IP address and DNS migrations are not performed by the eDirectory migration utility.• Only the eDirectory instance will be migrated. Applications depending on eDirectory will
not.• Only the target server will be available after the migration. The source server will be
locked.
Note: You should not use this migration methodology if both servers need to be available during the migration operation.
Migration Process
1. Run the migedir utility by entering the following command on the target server:
migedir -s <IP address> [-A <log directory name>] [-t] [-v] [-h]
The utility takes the following command line options:
Option Description-s <IP address> Specifies the IP address of the source server containing the
eDirectory instance to be migrated. This is a mandatory parameter.
-A directory name Enables auditing. Directory name specifies the directory in which log files should be created.
-t Tests the validity of the input parameters.
This option verifies the IP address; however, it does not perform the actual migration.
-v Enables the verbose mode.-h Prints help about using this utility.
2. Follow the on-screen display as the utility performs the migration.
Handling Failures
During migration, the database on the source server is locked to avoid running multiple copies of the instance on the source and target servers at the same time. Running multiple instances can lead to data inconsistency. If the process fails, and if you intend to bring up the source server again, you need to perform the following tasks:
• Remove the partially migrated eDirectory instance on the target server.
Refer to "Removing a Server Object and Directory Services from a Tree" in the Novell eDirectory 8.8 Administration Guide for more information.
• Restore and unlock the database in the source server. The database backup is saved in the sys:ni/data folder.
Refer to Section 15.0, "Backing Up and Restoring Novell eDirectory" in the Novell eDirectory 8.8 Administration Guide for more information.
Post Migration Procedures
After migration, the target eDirectory instance listens on the IP address of the target server and not on the source server’s address. Allow additional time after migration for the eDirectory
0 - 0 41

eDirectory Installation & Migration
instance to synchronize the new IP address in the replica ring. Successful eDirectory migration can be verified by performing eDirectory operations on the new IP address.
Important: If you want to use the existing security certificates, you must change the IP address of the target server to that of the source server. If you don’t want to do this, you must issue new certificates.
If you change the IP address of the target server after migration, you must modify the nds.conf file, restart the eDirectory instance, and repair the network address and partitions replica manually. For more information on repairing eDirectory instances, refer to Section 11.9, "Advanced DSRepair Options" in the Novell eDirectory 8.8 Administration Guide.
Move, Create, or Import Users
If you have opted to create a new tree and don't use the migedir utility to migrate eDirectory from NetWare to Linux, you'll need to decide how to move user objects from one tree to another. Several options are available:
Use Novell Identity Manager. One method is setting up a Novell Identity Manager connection between your old tree and your new one. This will allow you to easily synchronize user objects to the new tree. You can also use Identity Manager to remap the location of all user objects in your new tree.
Create and Import an LDIF file. Create an LDIF file containing user objects and use iManager to import it. Configure the LDIF file so it creates a Users' organization container and then places an object for each user in it.
Note: See the Cool Solutions AppNote: "Moving User Home Directories the sed Way" written by Jim Pye for another way to use ICE tools to modify the LDIF file before importing users and other objects into the new tree. Modifying LDIF files with sed can be helpful if you need to automate mass changes.
1. Create an LDIF file containing user objects.
2. Use iManager to import the file (eDirectory Maintenance > Import Convert Export Wizard)
3. Add the User Objects to the tree (in the 0=Users container).
4. Create the containers you need (iManager > Roles and Tasks > eDirectory Administration > Create Object).
5. Once the user objects have been imported and the lower level container created, move users from the Users container to the appropriate containers (iManager > Roles and Tasks > eDirectory Administration > Move Object).
Remove Directory Services from NetWareAt some point, you may want to remove directory services from NetWare. Follow the instructions below:
Important: Removing eDirectory from a NetWare server makes the NetWare volumes and file system inaccessible. Removing eDirectory also removes the roll-forward log directory and all existing logs. If you anticipate needing the logs to restore eDirectory on this server in the future, first copy the roll-forward logs to another location before removing eDirectory. For information
42 0

eDirectory Installation & Migration
about roll-forward logs, see "Using Roll-Forward Logs" in the Novell eDirectory 8.8 Administration Guide.
1. At the NetWare server console, run NWCONFIG.
2. Select Directory Options > Remove Directory Services from This Server.
3. Follow the online instructions.
Accessing eDirectory Management Tools Several tools, many of them Web-based, can be used to manage aspects of eDirectory. Primary tools are listed here.
ConsoleOne. Is not supported to perform administration tasks against an OES2 Linux server. If you have a service that requires ConsoleOne (such as Novell GroupWise), it is supported for administration of those applications.
iManager 2.7. This utility manages both NetWare and Linux servers from any server or workstation running Internet Explorer 5.5 SP2 or later or Netscape 6.2 or later. Use iManager to set up and manage your Novell eDirectory tree, to manage eDirectory objects, schema, partitions, and replicas, and to create and manage users, groups, and other objects.
iMonitor. Novell iMonitor provides cross-platform monitoring and diagnostic capability for all servers in an eDirectory tree. Servers can be monitored from any location on the network where a Web browser is available. For information, see Section 8.0, "Using Novell iMonitor 2.4" in the Novell eDirectory 8.8 Administration Guide.
Novell Remote Manager (NRM) for Linux. This browser-based utility can be used to manage Linux servers from a remote location. Use it to monitor server health, change the server configuration, or perform diagnostic and debugging tasks. It does not require a special client, provides a graphical interface, and provides added functionality that is not available in other management utilities. For information, see the OES 2: Novell Remote Manager Administration Guide for Linux.
Novell Import Conversion Export Utility (ICE). The Novell Import Conversion Export utility lets you
• Import data from LDIF files to an LDAP directory• Export data from the LDAP directory to an LDIF file• Migrate data between LDAP servers• Perform a schema compare and update• Load information into eDirectory using a template• Import schema from SCH files to an LDAP directory
You can run the Novell Import Conversion Export client utility from the command line, from a snap-in to ConsoleOne, or from the Import Convert Export Wizard in Novell iManager. The comma-delimited data handler, however, is available only in the command line utility and Novell iManager.
Refer to Section 6.1, "Novell Import Conversion Export Utility" in the Novell eDirectory 8.8 Administration Guide.
0 - 0 43

eDirectory Installation & Migration
eDirectory Management Toolbox (eMBox). This tool lets you access all of the eDirectory backend utilities remotely as well as on the server. eMBox works with Novell iManager to provide Web-based access to eDirectory utilities such as DSRepair, DSMerge, Backup and Restore, and Service Manager.
eMBox must be loaded and running on the eDirectory server and Role Based Services must be configured through iManager to the tree that is to be administered in order for eMBox tools to run.
Note: For additional information, refer to Section 20.0, "The eDirectory Management Toolbox" in the Novell eDirectory 8.8 Administration Guide.
Commandline Configuration Tools. The following commandline tools, specific to eDirectory, are also available:
• ndsconfig Utility. Use this utility to configure eDirectory, to add the eDirectory replica server to an existing tree, or to create a new tree.
See Section 9.2 in the Novell eDirectory 8.8 Installation Guide for configuration parameters and Section 3.6.6 for instructions for adding or removing replica servers.
• ldapconfig Utility. Use this utility to configure the LDAP Server and LDAP Group Objects. For more information, see “Using the ldapconfig Utility on Linux and UNIX” in the Novell eDirectory 8.8 Administration Guide.
• nmasinst Utility. Use this utility to configure Novell Modular Authentication Service. From eDirectory 8.7.3 onwards, by default, ndsconfig configures NMAS. You can also use nmasinst on Linux to configure NMAS. ndsconfig only configures NMAS and does not install the login methods. To install these login methods, you need to use nmasinst after you have configured eDirectory with ndsconfig. See Section 3.6.9 in the Novell eDirectory 8.8 Installation Guide.
• General Utilities. Refer to Section B.1, "General Utilities" in the Novell eDirectory 8.8 Administration Guide for a list and description of commandline tools along with syntax and to Section B.2 for LDAP-specific commands.
Information about these and other utilities is also included in the OES 2: Utilities Reference.
Additional eDirectory Resources• eDirectory 8.8 Documentation
http://www.novell.com/documentation/edir88/
• eDirectory Cool Solutions
http://www.novell.com/coolsolutions/edirectory/
• eDirectory Health Check - Online Training
http://support.novell.com/additional/tutorials/tid10060600/
• eDirectory Health Check - Cool Solutions
http://www.novell.com/coolsolutions/feature/15336.html
• Bridging from NW to OES
http://www.novell.com/training/promotions/netwaretolinux/modules.html
• eDirectory Training Courses
http://www.novell.comCour /training/courseware/catalog.jsp?pl=112
Refer to the chart below:
44 0

eDirectory Installation & Migration
Class Level Duration Delivery Method
Product Association
3007Novell eDirectory Tools and Diagnostics
3 - Advanced 5 Days Classroom, Self-Study Kit
eDirectory 8.7.3
3017 Fundamentals of Novell eDirectory
2 - Intermediate 5 Days Classroom,
Self-Study Kit eDirectory 8.7.3
3067
Novell eDirectory Design and Implementation: eDirectory 8.8
2 - Intermediate 3 Days Classroom,
Self-Study Kit eDirectory 8.8
Advanced Technical Training, Novell eDirectory 8.8
4 - Expert 3 Days Classroom eDirectory 8.8
0 - 0 45

File System Installation & Migration
File System Installation & Migration
With Linux, over 20 different file system choices are available, ranging from very simple to extremely complex and rich systems. Novell surveys indicate that almost two-thirds of OES Linux customers use either ReiserFS (because of its simplicity) or Novell® Storage Services™ (because they are already familiar with it or need the associated rights), with ext3 running a close third.
If you are already using Novell Storage System (NSS) on NetWare, you can continue its use, or opt for a traditional Linux file system in those cases where it's to your advantage. Primary Novell and Linux file system options are compared in this section, but other systems are available. Use the information and cross-references in this section to match the file system to the data, workload, and access control you need (sometimes very simple is good enough).
Note: OES 2 Linux requires a Linux traditional file system volume for the operating system.
Additional Information: A detailed comparison of Linux traditional file system features can be found at: http://en.wikipedia.org/wiki/Comparison_of_file_systems. An additional Novell discussion of file systems can be found at http://wiki.novell.com/index.php/File_System_Primer.
Both OES 2 Linux and NetWare support Novell Storage Services as well as their respective traditional file systems. The following table and illustration compare the file systems available with NetWare and those available with OES 2 Linux.
File Systems Available on NetWare and Linux
NetWare LinuxNetWare Traditional File System (NWFS)
(legacy system supported through NW 6.0)
Open source version of the NetWare File System (limited functionality)
Novell Storage Services Novell Storage Services (OES Linux) Linux Traditional File Systems (ReiserFS, ext2, ext3, JFS, XFS, Others)
46 0
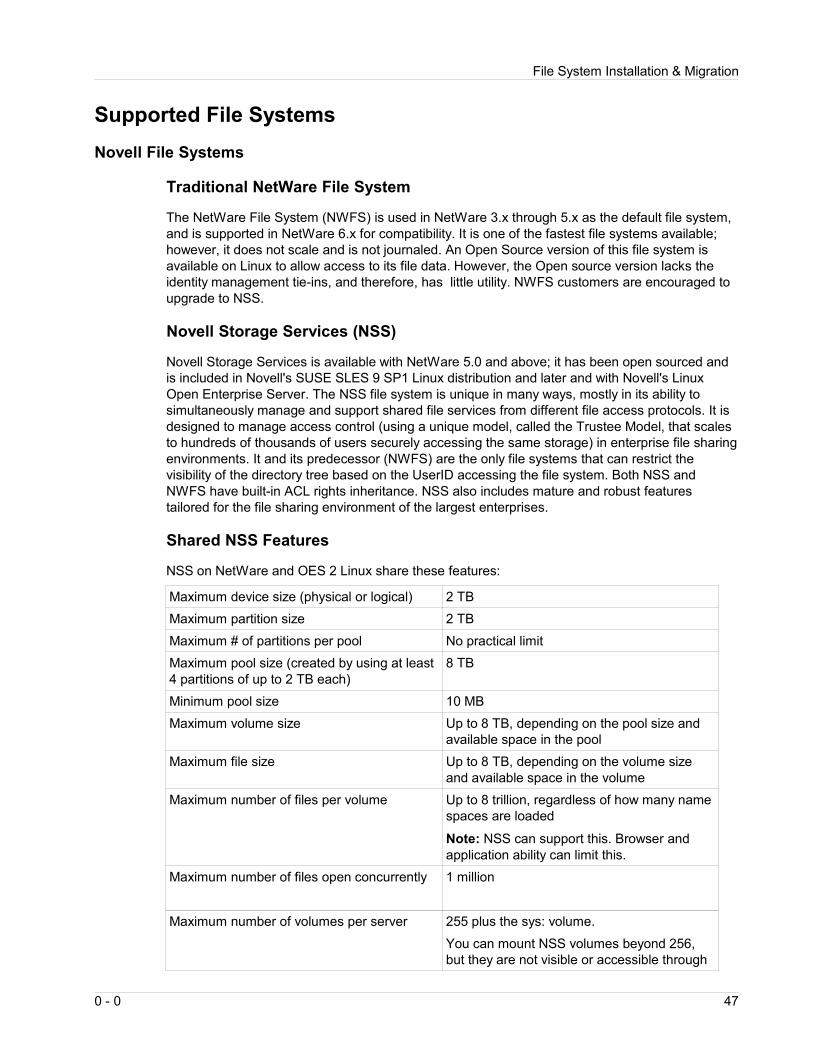
File System Installation & Migration
Supported File SystemsNovell File Systems
Traditional NetWare File System
The NetWare File System (NWFS) is used in NetWare 3.x through 5.x as the default file system, and is supported in NetWare 6.x for compatibility. It is one of the fastest file systems available; however, it does not scale and is not journaled. An Open Source version of this file system is available on Linux to allow access to its file data. However, the Open source version lacks the identity management tie-ins, and therefore, has little utility. NWFS customers are encouraged to upgrade to NSS.
Novell Storage Services (NSS)
Novell Storage Services is available with NetWare 5.0 and above; it has been open sourced and is included in Novell's SUSE SLES 9 SP1 Linux distribution and later and with Novell's Linux Open Enterprise Server. The NSS file system is unique in many ways, mostly in its ability to simultaneously manage and support shared file services from different file access protocols. It is designed to manage access control (using a unique model, called the Trustee Model, that scales to hundreds of thousands of users securely accessing the same storage) in enterprise file sharing environments. It and its predecessor (NWFS) are the only file systems that can restrict the visibility of the directory tree based on the UserID accessing the file system. Both NSS and NWFS have built-in ACL rights inheritance. NSS also includes mature and robust features tailored for the file sharing environment of the largest enterprises.
Shared NSS Features
NSS on NetWare and OES 2 Linux share these features:
Maximum device size (physical or logical) 2 TBMaximum partition size 2 TBMaximum # of partitions per pool No practical limitMaximum pool size (created by using at least 4 partitions of up to 2 TB each)
8 TB
Minimum pool size 10 MBMaximum volume size Up to 8 TB, depending on the pool size and
available space in the poolMaximum file size Up to 8 TB, depending on the volume size
and available space in the volumeMaximum number of files per volume Up to 8 trillion, regardless of how many name
spaces are loaded
Note: NSS can support this. Browser and application ability can limit this.
Maximum number of files open concurrently 1 million
Maximum number of volumes per server 255 plus the sys: volume.
You can mount NSS volumes beyond 256, but they are not visible or accessible through
0 - 0 47

File System Installation & Migration
the normal NetWare APIs.
Minimum server memory to activate a volume Requires only 4 MB available RAM to activate a single volume of any size and any number of files. Loads a file’s metadata into memory only when you access the file.
Software RAID support RAID 0 (striping)
RAID 1 (mirroring)
RAID 5 (striping with parity)
RAID 10 (mirroring RAID 0 devices)
RAID 15 (mirroring RAID 5 devices)Data shredding Yes, up to 7 timesFile compression YesData migration YesDirectory quotas YesUser space quotas (user space restrictions) YesSalvage or purge deleted files, directories, or volumes
Yes
Distributed File Services for moving and splitting NSS volumes
Yes
Novell Archive and Version Services YesDevice maintenance support Activate and deactivate devices by pool.
Novell Storage Services is generally best file system solution for customers migrating file sharing services from NetWare. NSS file systems created on NetWare can be mounted on Linux.
The following characteristics of NSS on OES 2 Linux should be noted in doing your planning:
• NSS volumes are cross-compatible between Linux and NetWare. NSS data volumes can be mounted on either NetWare or Linux and data moved between them.
• NSS devices and storage can be managed in the Web-based Novell iManager utility. NSS also supports third-party tools on both platforms for advanced data protection and management, virus scanning, and traditional archive and backup solutions.
• In a mixed-platform cluster with Novell Cluster Services, NSS volumes can fail over between Linux and NetWare, allowing for full data, trustee, and file system feature preservation when migrating data to Linux.
• In addition, NSS on OES 2 Linux:• Retains all files, rights, meta-data, restrictions, etc.• Includes NetWare Trustee access control (richer than POSIX) • Retains file system access (NCP) • Retains all file system administration and management features• Can be easily clustered with Novell Cluster Services (NCS)• Is best for shared LAN file serving: excellent scalability in number of files; scales to
millions of files in a single directory
48 0

File System Installation & Migration
• Supports multiple data streams and rich metadata (its features are a superset of existing file systems on the market for data stream, metadata, namespace, and attribute support)
• Is journaled
NSS Features Added to OES 2 Linux
The following features have been added to NSS for OES 2 Linux since the initial release of OES 1 Linux.
• New Location for the NSS Configuration Files
In this release, NSS configuration files have moved from the /opt/novell/nss/conf directory to the /etc/opt/novell/nss directory.
• Encrypted Volumes • Extended Attributes (XAttr) • Group I/O Management • Enhanced Hard Links • High Memory Management • Lightweight Audit Format (LAF) Audit Log Messages • Metadata Migration (METAMIG) Utility
The Metadata Migration utility is available for OES 1 Linux and later.
• NOATIME and NODIRATIME Support • Novell Archive and Version Services • Novell Distributed File Services • Pool Snapshots
Note: Different pool snapshot technologies are used for NSS pools on NetWare and NSS pools on Linux. You can create pool snapshots on either platform, but you should not move them to another platform. Pool snapshots taken on Linux do not work on NetWare, and vice versa.
Snapshots taken on a given platform are unusable if you move the pool’s devices cross-platform. Before you move a pool with existing snapshots to a different platform, delete all existing snapshots for the pool.
On Linux, do not use pool snapshots for clustered pools.
• Support for NSS software RAIDs 5 and 15 has been added for OES SP1 Linux and later• User Quotas • Linux User Management enhancements
Changes in NCP Server for Linux now make it possible for file ownership to be tracked for users of NSS volumes on Linux without requiring the user to be Linux-enabled with Linux User Management.
NSS Features Not Implemented in OES 2 Linux
NSS on OES 2 Linux provides an upgrade to NSS on Linux that is comparable to NSS on NetWare. In some cases, Linux is more feature-rich; for example, Linux and Vista Archive Versioning Service clients work only against a Linux server and not a NetWare server. There are, however, a few instances, where some of the supported features are not yet as feature rich as their counterparts on NetWare.
0 - 0 49

File System Installation & Migration
The following NSS features are available for NSS on NetWare but are not supported for NSS on Linux:
• NSS multiple path I/O to devices. Multipath I/O is not supported on Linux. Instead, use the same Linux multipath I/O management tools you use for Linux traditional file systems. You should configure multipath I/O before using NSS management tools to create NSS software RAIDs, pools, or volumes on devices. For information, see "Managing Multipath I/O for Devices" in the SUSE Linux Enterprise Server 10 Storage Administration Guide.
The devices used by NSS pools can take advantage of multiple path I/O support only when they are assigned to a NetWare server. The NSS multipath priorities and failover preferences do not apply when the devices are on the Linux server.
• CD and DVD media and image files. These are handled differently:
On NetWare, CDs, DVDs, CD and DVD image files, and DOS partitions are mounted as NSS volumes. Disks in USB floppy drives are mounted as local DOS FAT partitions.
On Linux, these alternative media and partitions are mounted using Linux traditional file systems options.
For information, see "Some Other Supported File Systems" in the SUSE Linux Enterprise 10 Installation and Administration Guide.
• Transaction Tracking System (TTS). TTS is not supported on Linux. On Linux, file content tracking capability is available for Linux traditional volumes (not NSS volumes) when you mount the volume with the Journal mode setting for file system journaling. The Journal mode logs all file system data including the data blocks and the metadata. For information about the journaling capabilities of Linux traditional file systems, see "Major File Systems in Linux" in the SUSE Linux Enterprise 10 Installation and Administration Guide.
• Modified File List. The Modified File List attribute for NSS volumes is available only for NSS volumes on NetWare.
The following are treated differently on Linux than on NetWare:
Feature NetWare LinuxFile access protocols NCP
AFP, NFS, and CIFS
NCP
NFS and CIFS (Samba) require users to be Linux-enabled with Linux User Management.
AFP is available only through third-party software.
Management interfaces
Novell iManager
NSSMU for NetWare
Utilities in the server console ( NSSMU, RIGHTS, FLAG)
NSS commands in the server console
Novell iManager
NSSMU for Linux
EVMS ( evmsgui)
Utilities in the terminal console (NSSMU, RIGHTS, NSSCON, ATTRIB, RAVSUi, RAVVIEW, nbackup)
NSS commands in the NSS Console ( NSSCON)
50 0

File System Installation & Migration
Feature NetWare LinuxNovell Remote Manager for NetWare
Novell NetStorage for NetWare (via Web browser only, not WebDAV)
Novell Client
RIGHTS utility for NetWare
Novell Remote Manager for Linux (for Dynamic Storage Technology shadow volumes and for managing NCP Server connections to NSS volumes)
Novell NetStorage for Linux (via Web browser only, not WebDAV)
Novell Client
RIGHTS utility for LinuxPool snapshot
(retain point-in-time version of a pool using block-level copy on write)
NetWare
• Allows backup of block-level changes only, without deactivating the volume.
• Uses a brief freeze-release process to capture information for last remaining open files.
The stored-on pool must be on a separate partition.
Volume encryption You must mount encrypted volumes only from NSSMU on the first mount after a system reboot so that you can enter the password. The NSSCON utility does not support entering a password from the command line.
File system trustees and trustee rights to control access to directories and files
Works with or without concurrent running of NCP Server.
Requires NCP Server to enforce the rights and access on the extended attributes.
File system directory and file attributes to control functions available for directories and files
Files and Folders plug-in to iManager
Novell NetStorage
Novell Client™
Files and Folders plug-in to iManager.
See also "Displaying Key NSS Directory and File Attributes as Linux POSIX Permissions" in the OES 2: File Systems Management Guide.
Default mount location for NSS pools
Not applicable /opt/novell/nss/mnt/.pools/poolname
Default mount location for NSS volumes
Server root
/media/nss/volumename
Volume name space Accommodates all name spaces (DOS, Macintosh, Long, and UNIX).
Accommodates all name spaces (DOS, Macintosh, Long, and UNIX).
UNIX is the default name space, which is case sensitive. However, you can specify Long name spaces on mounting the NSS volume to make its directory names and
0 - 0 51

File System Installation & Migration
Feature NetWare Linuxfilenames case insensitive.
Software RAID support
RAID 0 (striping)
RAID 1 (mirroring)
RAID 5 (striping with parity)
RAID 10 (mirroring RAID 0 devices)
RAID 15 (mirroring RAID 5 devices)
RAID 0 (Striping)
RAID 1 (mirroring)
RAID 5 (striping with parity)
RAID 10 (mirroring RAID 0 devices)
RAID 15 (mirroring RAID 5 devices)
RAID 0, 1, 4, 5 and 6. RAID 10 can be created using the mdadm(8) command as a complex RAID using the RAID10 option, or as a nested RAID.
For information, see the SUSE Linux Enterprise Storage 10 Storage Administration Guide .
Novell Distributed File Services
For information, see the OES 2: Novell Distributed File Services Administration Guide.
Supported NSS volumes on OES 2 Linux can contain junctions or be a junction target.
DFS does not support junctions on NCP volumes.
Novell Dynamic Storage Technology
For information, see the OES 2: Novell Dynamic Storage Technology Administration Guide.
Not Supported Available in the initial OES 2 release.
Note: For additional information, see Section F.0, "Comparison of NSS on NetWare and NSS on Linux" in the OES 2: NSS File System Administration Guide.
Traditional Linux File Systems
As the table below indicates, the OES Linux kernel supports a variety of Linux traditional file systems in addition to NSS. In fact, a Linux traditional file system is required for the system volume. The upper level of the kernel deals equally with these file systems through an abstract layer, the virtual file system (VFS).
Linux file systems differ somewhat from NetWare and Windows file systems. This section provides only minimal highlights. If you decide to use any of the traditional Linux file systems, you'll want more detail. Which file system you use largely depends on the purpose you are using the file system for. Some typical Linux traditional file systems and their recommended use are described in the following table:
52 0

File System Installation & Migration
Linux Traditional File Systems
Linux Traditional File System
Description Recommended Use
Second Extended File System (ext2)
ext2 is a legacy file system with a solid reputation for simplicity, quickness, and stability. It uses less memory than other options and is sometimes faster.
ext2 does not maintain a journal so it is not recommended for any server that needs high availability. Novell recommends moving to ext3.
ext2 is the right file system for /boot
Third Extended File System (ext3)
ext3 has the same data and metadata format as its predecessor (ext2). It is considered the "Linux" file system. It's fast performing and offers options to coordinate its metadata journaling with data writes.
• Robust and quick• Does not scale well to large
volumes or large numbers of files (over 500), even with the htrees scalability feature recently added. (htree is not available with OES/SUSE Linux Enterprise Server 9, but is included with OES 2).
• Journaled • POSIX extended access
control
ext3 is best for general purpose file and print, and databases such as Oracle, that feature only a few large files.
It is not recommended for GroupWise and other email packages as there are more than 500 files in a folder and GW will not run.
If used for GroupWise, enable the htree feature in ext3.
Reiser File System (ReiserFS)
ReiserFS has a solid reputation for its simplicity, quickness, and stability.
It supports metadata journaling, but does not include data journaling or ordered writes. Its disk space utilization, disk access performance, and crash recovery are better than ext2/3.
• Best performance on Linux given a great number of small files.
• Outscales ext3 with htrees. • Uses disk space efficiently• Journaled • POSIX extended access
controls
Reiser is best suited for collaboration (email), iFolder3, and web-serving applications.
It's designed to transact many small files being opened, read, written, and closed in a short timespan.
The downside is that tools for automatically fixing the file system in the event of a rebuild are not as robust as the NSS pool and volume rebuild
Journaled File System (JFS)
JFS was developed by IBM* to support high throughput server
Recommended for high-end hardware (64-bit, multiprocessor
0 - 0 53
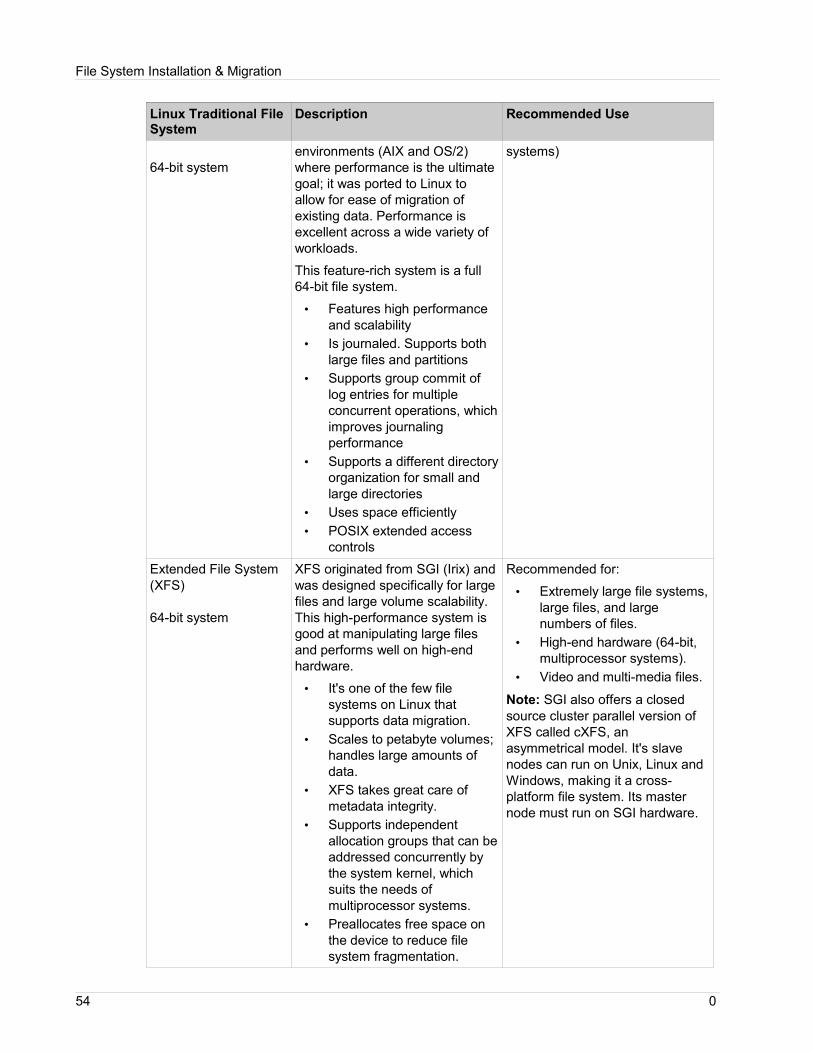
File System Installation & Migration
Linux Traditional File System
Description Recommended Use
64-bit systemenvironments (AIX and OS/2) where performance is the ultimate goal; it was ported to Linux to allow for ease of migration of existing data. Performance is excellent across a wide variety of workloads.
This feature-rich system is a full 64-bit file system.
• Features high performance and scalability
• Is journaled. Supports both large files and partitions
• Supports group commit of log entries for multiple concurrent operations, which improves journaling performance
• Supports a different directory organization for small and large directories
• Uses space efficiently• POSIX extended access
controls
systems)
Extended File System (XFS)
64-bit system
XFS originated from SGI (Irix) and was designed specifically for large files and large volume scalability. This high-performance system is good at manipulating large files and performs well on high-end hardware.
• It's one of the few file systems on Linux that supports data migration.
• Scales to petabyte volumes; handles large amounts of data.
• XFS takes great care of metadata integrity.
• Supports independent allocation groups that can be addressed concurrently by the system kernel, which suits the needs of multiprocessor systems.
• Preallocates free space on the device to reduce file system fragmentation.
Recommended for:
• Extremely large file systems, large files, and large numbers of files.
• High-end hardware (64-bit, multiprocessor systems).
• Video and multi-media files.
Note: SGI also offers a closed source cluster parallel version of XFS called cXFS, an asymmetrical model. It's slave nodes can run on Unix, Linux and Windows, making it a cross- platform file system. Its master node must run on SGI hardware.
54 0

File System Installation & Migration
Linux Traditional File System
Description Recommended Use
However, delayed writes can result in data loss if the system crashes.
• Journaled (an asymmetric parallel cluster file system version is also available)
• POSIX extended access controls
Best Bets
Collaboration: GroupWise and other email/collaboration solutions typically deal with many little files. Since only the application process accesses the file system, the added overhead of rich ACL and file attributes found in NSS or NTFS is redundant. The characteristics needed are a file system whose performance remains relatively constant regardless of the number of files in the volume, and that performs well with small files. Best bets are ReiserFS and XFS.
Database: MySQL, Oracle, SQL, Progress, etc., typically deal with a few, very large files that are left open most all of the time. Virtually any file system with Direct IO capabilities (APIs that allow the database to directly manipulate the file buffers) can be used. Since databases do not create many files, file systems that do not scale to many files, but still have Direct IO interfaces will work fine. Reiser, ext3, and XFS all are recommended. If you are using MS SQL server, NTFS is required.
Web Services: Web services can encompass a broad set of workloads. For simple web services, virtually any file system can be used. Since these typically don't need rich access control file systems, you can avoid the extra overhead of NTFS or NSS to get slightly better performance. However, if the web services solution leverages identity and requires user security for many people (more than 50 accounts), then NSS is the better choice.
File Serving (NAS): Two NAS use cases need to be considered:
• Serving files to application servers in a tiered service oriented architecture (SOA).
Minimal access control is required, so choose a file system that is scalable and fast: Reiser, XFS, VxFS .
• Serving files to end users' desktops and workstations.
Quite heavy access control is required, so the access control and security management capabilities of NSS with CIFS and NCP file access protocols begin to be important.
NSS provides security between users and, at the same time, allows for very granular sharing between given users and groups. NSS includes a visibility feature that prevents unauthorized users from even seeing subdirectory structures they don't have rights to.
For additional information, see Section 1.2, "Linux Traditional File Systems" in the OES 2: File System Management Guide and "File Systems in Linux" in the SUSE Linux Enterprise Server 10 Administration Guide.
0 - 0 55

File System Installation & Migration
File System and Directory Structure Comparison
Both NetWare and Linux file systems use directories and subdirectories. Linux directories can contain any number of subdirectories:
NetWare LinuxSYS Volume Root File system “/”Directories
• LOGIN• PUBLIC• SYSTEM• ETC• and so on...
Directories (conform to File system Hierarchy Standard v2.2)
• var• opt• bin• home• and so on
• NetWare separates directories with a backslash. Linux uses a forward slash. • NetWare filenames are not case sensitive. Linux file names are.• File names in Linux:
• Can contain 255 characters.• Can include special characters (like *?$) but these are sometimes not useful (for
instance, a filename that starts with a $ can be mistaken for a variable).• The path, including slashes (/), can be 4096 characters long.
• File types in Linux include the following:• Normal files• Directories• Links• Device Files• Sockets• FIFOs (first-in-first-out)
• In Linux• The file system is organized in one hierarchical tree.• Partitions/volumes do not appear as drives, but are integrated into the file system
tree under directories.• Users store files in a directory; the operating system takes care of the physical
storage, without regard to whether the file is stored locally on a hard drive or remotely on a file server.
• Every device and hard disk partition is represented in the Linux file system as a subdirectory of the root directory. Directories that are only one level below the root directory are preceded by a slash, to indicate their position and prevent confusion with other directories that could have the same name. For example, the floppy disk drive in Linux might be /etc/floppy.
• The root directory lives in the root partition, but other directories (and the devices they represent) can reside anywhere.
• Removable devices and hard disk partitions other than the root are mounted (attached) to subdirectories in the directory tree. This is done either at system initialization or in response to a mount command.
56 0

File System Installation & Migration
The table below lists some common second-level Linux directories:
Linux Directory Description/boot Kernel and files needed for booting/root Home directory of the sysadmin user/bin System binaries, user programs with normal user permissions/sbin System binaries/executables that need root permission /data A user-defined directory/dev System device files/tree/etc System configuration files/home Users’ home directories/home/username A user’s personal home directory/tmp System temporary files/usr(Unix Special Resources)
Applications software, containing another layer of directories:
/usr/X11R6 File of the X Window system
/usr/bin Executable programs
/usr/lib Libraries for programs in /usr/bin and /usr/src
/usr/sbin Programs for system administration
/usr/src Source files, for instance of the kernel/var System variables (spool directories for mail and print; log and lock files,
etc.)/lib Libraries needed for installed programs to run/media Mountpoints for removable media/mnt Mountpoints for temporarily mounted file systems/srv Data directories for servers/opt Application directories/proc Information about the running system. It's created by the kernel on
system startup and is not stored on the hard disk/sys Similar to /proc, this directory contains information about the hardware
Common Linux File Commands
touch Create a file/update access time on a file
cat View a filemore View a file and scroll
less View a file and scrollhead View the first few lines (default 10)tail View the last few lines (default 10)ln Create a linkcp Copy a filemv Move/rename the file
0 - 0 57

File System Installation & Migration
OES Linux File System Hierarchy
As a general rule, OES uses the Filesystem Hierarchy Standard (FHS) for file location, but there are exceptions; you'll want to check each application to determine where its files are located.
Linux File Permissions
File permissions, or rights, with traditional Linux file systems are not nearly as granular as the rights system available with NetWare; however, they should be adequate for most situations.
NetWare File System Rights and Linux Permissions Compared
NetWare Rights Linux PermissionsSupervisor Set UID (Advanced)Read ReadWrite WriteCreateEraseModifyFile ScanAccess ControlExecute (file attribute) eXecute
Trustee Rights Management Utilities
NetWare Rights Linux PermissionsNRMNetStorage (browser) NetStorage (browser)Novell Client Novell Client
Rights utility Rights utility
If you are using NSS volumes, you can use the Trustee Rights Utility for Linux to specify trustee rights for directories and files in NSS volumes on OES Linux. This utility does not provide support for Trustees on Linux file systems or for NSS volumes on NetWare. However, the trustee information does work seamlessly with NetWare if the volume is moved to NetWare.
Traditionally, three sets of permissions are defined for each file object on a Linux system. These sets include the read (r), write (w), and execute (x) permissions or their numerical counterpart (4, 2, 1). In addition, it is possible to set the set user id, the set group id, and the sticky bit.
• File permissions are assigned in three categories or to everyone (all):
users (u) groups (g) others (o) all (a)
• The root user receives the permissions available to all three categories of users.
58 0

File System Installation & Migration
• Permissions and meanings change depending on whether they are applied to files or directories.
The following tables summarize these concepts:
Permission Definition for Files Definition for DirectoriesRead (r or 4) Allows a user to open and
read the contents of a fileAllows a user to list the contents of the directory (if they’ve also been given execute permission)
Write (w or 2) Allows a user to open, read, write to, and edit file contents
Allows a user to add to or remove files from the directory (if they’ve also been given execute permission)
Execute (x or 1 ) Allows a user to execute the file in memory (if it is a program file) and shell scripts
Allows a user to enter the directory and work with directory contents.
Additional File PermissionsSUID File executes with the
permissions of the user who owns the file
No effect
SGID File executes with the permissions of the group that owns the file
All files and sub-directories owned by the Group owner.
Sticky Bit No effect Files and sub-directories can only be deleted by the owner or root.
For example,
• In order to remove a file, you must have write permission to it. • In order to view the contents of a directory (see what files it contains), you need read
permission for that directory. • In order to access a file (read from it, write to it, or execute it) in the directory, you need
execute permission for the directory. • File permissions can be assigned with the chmod command (which accepts either letters or
numbers to represent users, groups, and others) as indicated in the table below. • If the numbering system is used, 655, for example:
• The first number in the group of three is the user's accumulative rights (r+w+x).• The second number is the group's accumulative rights. • The third number represents others accumulative rights.
Linux File Permission Examples Using Either Letters or Numbers
chmod g+w file Add write permission for the group to the file chmod o-r file Remove read permission for otherschmod a+r file Assign all (user, group, others) only read permission,
no matter what permissions they had before
0 - 0 59
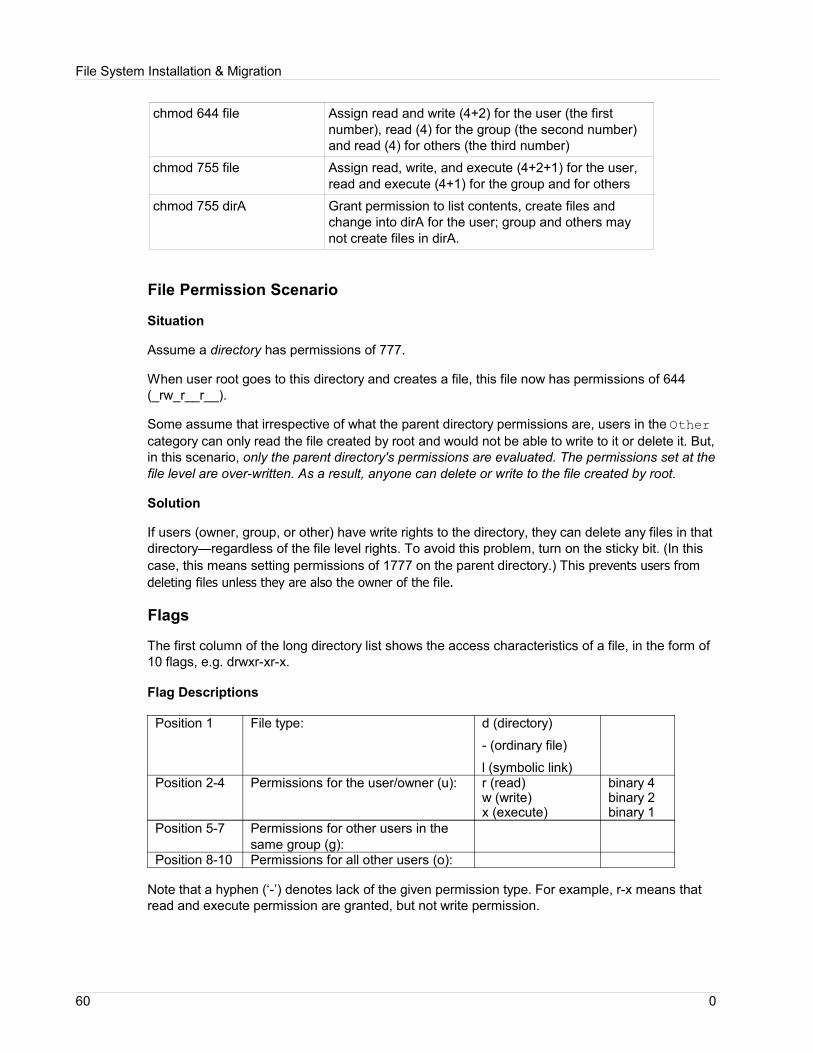
File System Installation & Migration
chmod 644 file Assign read and write (4+2) for the user (the first number), read (4) for the group (the second number) and read (4) for others (the third number)
chmod 755 file Assign read, write, and execute (4+2+1) for the user, read and execute (4+1) for the group and for others
chmod 755 dirA Grant permission to list contents, create files and change into dirA for the user; group and others may not create files in dirA.
File Permission Scenario
Situation
Assume a directory has permissions of 777.
When user root goes to this directory and creates a file, this file now has permissions of 644 (_rw_r__r__).
Some assume that irrespective of what the parent directory permissions are, users in the Other category can only read the file created by root and would not be able to write to it or delete it. But, in this scenario, only the parent directory's permissions are evaluated. The permissions set at the file level are over-written. As a result, anyone can delete or write to the file created by root.
Solution
If users (owner, group, or other) have write rights to the directory, they can delete any files in that directory—regardless of the file level rights. To avoid this problem, turn on the sticky bit. (In this case, this means setting permissions of 1777 on the parent directory.) This prevents users from deleting files unless they are also the owner of the file.
Flags
The first column of the long directory list shows the access characteristics of a file, in the form of 10 flags, e.g. drwxr-xr-x.
Flag Descriptions
Position 1 File type: d (directory)
- (ordinary file)
l (symbolic link)Position 2-4 Permissions for the user/owner (u): r (read) binary 4
w (write) binary 2x (execute) binary 1
Position 5-7 Permissions for other users in the same group (g):
Position 8-10 Permissions for all other users (o):
Note that a hyphen (‘-’) denotes lack of the given permission type. For example, r-x means that read and execute permission are granted, but not write permission.
60 0

File System Installation & Migration
Access Control Lists in Linux
The traditional permission concept for Linux file system objects is adequate for most practical cases. However, for more complex scenarios or advanced applications, permissions can be expanded with POSIX file ACLs (access control lists).
ACLs allow permissions to be assigned to individual users or groups even if these do not correspond to the original owner or the owning group. They are a feature of the Linux kernel and are currently supported by ReiserFS, Ext2, Ext3, JFS, and XFS.
For example, when you replace a Windows server with a Linux server, some of the connected workstations may continue to run under Windows even after the migration. In this case, the Linux system offers file and print services to the Windows clients via Samba which supports access control lists. User permissions can be configured both on the Linux server and in Windows with a graphical user interface (only Windows NT and later).
Note: For an OES Linux server, you can control access to services locally or with eDirectory.
For additional information, instructions for setting ACLs, and example scenarios, see Section 14, "Access Control Lists in Linux" in the SUSE Linux Enterprise Server 10 Installation and Administration Guide.
File Ownership• File ownership can only be changed by the root user.• Group ownership can changed by the root user or by the file owner, but only for
groups the owner is a member of.
Example Ownership Commands
chown Change owner of a file/directorychown user file Change owner of a file to a userchown user.group file Change owner to user and groupchgrp Change the owning group
Planning File System MigrationUse collection tables to gather the information you need to plan the file services migration:
• Will you be using NSS, traditional Linux file services, or a mix?• Do you plan to implement Samba, iFolder, or NetStorage?• How many servers will be needed and which file system will be installed on each?• Will the eDirectory LDAP server be hosted on the same server as the file services?• Will other OES 2 Linux services be hosted on the same machine?• What file system rights and permissions will be needed? Are default Linux permissions
sufficient?
Sample Collection Table
Server Location File System Type
Hosted Services
Rights Needed
Samba iFolder NetStorage
Notes
Server1 SW Office ReiserFS GroupWise r-w-x
0 - 0 61

File System Installation & Migration
Server Location File System Type
Hosted Services
Rights Needed
Samba iFolder NetStorage
Notes
Server 2 SW Office ReiserFS Operating System
r-w-x
Server 2 SW Office ext3 Oracle r-w-xServer 3 Baltimore NSS file/print full Samba
iFolderNetStorage
Plan the File System Layout
Consider the following:
• Protect the server's root file system.
Partition off anything that users can write to as well as logs and cache.
• /var• /home• /var/opt/novell/ifolder3
• Protect the DIB set
Create a partition for /var/nds/dib. All core dumps are saved here, so allow at least 2GB.
Identify Needed File System Components
You'll need to determine which file service features best meet your requirements. All file system features in OES 2 Linux are mutually compatible; you can install NSS on OES 2 Linux, use traditional Linux file systems (ext3, ReiserFS), or use a mix.
In addition, the following file system components are available and need to be assessed if they will be included:
• iFolder3• Samba• NetStorage
RAM. Only iFolder3 requires additional RAM.
Disk Space. For the file services you plan to install, compute the total additional disk space required (above the basic system requirement). Refer to the following for rules-of-thumb.
• iFolder: Plan for 15 MB as well as storage for the user data for all iFolder user accounts. As a guide, multiply the expected number of users times the storage quota to be allotted for each iFolder user account. Allow for growth as well.
• Samba: Allocate enough additional disk space for the partition containing the /home directory to meet your users’ file storage needs.
• NetStorage: There are no disk space requirements associated with NetStorage since it only provides access to other file storage services.
Other Considerations. Refer to the documentation for each service to gather any additional information before installing the service.
62 0

File System Installation & Migration
Plan the NSS Implementation
As you plan your NSS implementation, the following file system guidelines should be noted:
• You can move NSS volumes cross-platform to a Linux server and vice versa; However, you should not move an NSS system (SYS:) volume from NetWare to Linux unless you intend to use it as a data volume (or not at all) while it is mounted on the Linux server.
If you move an NSS system pool cross-platform, any volumes it contains function as data volumes on Linux, including the sys: volume.
• NSS volumes that were originally created on NetWare can be moved cross-platform to Linux. But only volumes that were originally created on NetWare can be moved back from Linux to NetWare.
• On Linux, users of the NSS volume must be Linux enabled with Linux User Management in the following situations:• If the user accesses the data via any non-NCP protocol such as Samba/CIFS.• If the user needs to use any Linux service or utility to access the data, such as FTP.
For additional information, see Section 22.2, "Access Control Issues for NSS on Linux" in the OES 2: NSS File System Administration Guide.
• You can move storage devices containing NSS volumes between NetWare servers and OES 2 Linux servers. When you move an unshared device to a different server, you must decommission its volumes in eDirectory for the current server, then recommission them for the new server. For shared NSS pools and volumes, Novell Cluster Services provides this service automatically.
• You cannot install the Linux operating system on an NSS volume. OES 2 Linux requires a Linux traditional file system volume for the operating system, such as Ext3 or ReiserFS. Use NSS on Linux for data pools and volumes.
• You cannot SAN boot cross-platform.• You cannot move Linux traditional file systems cross-platform to a NetWare server.• You cannot create or mount Linux traditional file systems on a NetWare server.• You cannot install the NetWare operating system on a Linux traditional file system
volume nor on an NSS volume on Linux.• NSS pools that are a source pool or a destination pool for NSS pool snapshots on
NetWare cannot move cross-platform if you want to keep the pool snapshots. A pool snapshot is no longer available if you move its source pool or destination pool to a Linux server. The snapshot no longer works even after you move the pools back to NetWare.
Before you move an NSS pool cross-platform, make sure you delete any of its snapshots stored on other pools and any snapshots for other pools it might contain.
Identify NSS Coexistence and Migration Issues
For a complete discussion of the issues involved in the coexistence and migration of Novell Storage Services for OES 2 that might affect your planning, see the following sections in the OES 2: NSS File System Administration Guide:
• Section 6, "Cross-Platform Compatibility Issues Between NetWare and OES 2 Linux"
Discusses pool snapshots, NSS volumes and features, file access, and management tools
• Section 7.0, "Migrating NSS Devices from NetWare to OES 2 Linux"
0 - 0 63

File System Installation & Migration
Includes guidelines for moving NSS pools and volumes between NetWare and OES Linux servers and instructions for moving both clustered and non-clustered devices from previous versions of NetWare and OES1 Linux
Additional Information
Refer to the following sections in the OES 2: NSS File System Administration Guide:
• Section F.0, "Comparison of NSS on NetWare and NSS on Linux"• Section G.0, "Comparison of NSS on NetWare and the NetWare Traditional File System"• Section H.0, "Comparison of NSS for Linux and Linux Traditional File Systems"
• For information about installing and configuring NSS, see Section 3.0, Installing and Configuring Novell Storage Services.
• For guidelines and instructions about upgrading the media format of NSS volumes to use hard links, see Section 5.0, Upgrading the NSS Media Format.
• For guidelines about setting up NSS volumes and services on a virtual server, see Section 4.0, Using NSS in a Virtual Guest Server Environment.
• For management tools overviews and quick references, see Section 8.0, Management Tools for NSS.
• For information to help you plan storage services to use with the NSS file system and services, see Section 9.0, Planning for NSS Storage Solutions.
Installing NSS on LinuxImportant: Although the NSS kernel modules are included in SLES 9 and later, they are not usable without OES 2 because NSS is a unique file system that is tightly integrated with identity management. The root user is the only local user who can see NSS volumes on an OES Linux server. NSS needs Linux User Management (LUM) and Novell eDirectory to establish non-root connections to the volume. It is OES that provides Linux User Management, eDirectory, Novell Core Protocol Server, and volume and user space management tools that make NSS volumes usable on an Linux server.
The reasons the NSS kernel module ( km_nss) and its sources are delivered with SUSE Linux Enterprise Server 9 and later include the following:
• Kernel modules need to be open-source to meet the GPL requirements.• If a customer adds a kernel patch for some third-party module, application, or
service, the NSS sources must be in the kernel code in order to get recompiled with the patch. Otherwise, an OES deployment using NSS would break.
To install NSS on Linux, include the NSS pattern install when you install the OES 2 Linux server. Make the following selections:
1. Select EVMS as the volume manager.
If you are installing OES 2 Linux on a system with a single device and plan to create NSS volumes, that device must be managed by the Enterprise Volume Management System (EVMS) volume manager instead of the default Linux Volume Manager 2 (LVM2). You should also choose the EVMS install option if you plan to use free space on the system device to create NSS volumes. The volume manager for the system device is configured in the Partitioning section of the Installation Settings for the YaST install.
64 0

File System Installation & Migration
2. Install the NSS pattern.
a. On the Installations Settings page in the YaST install, click Software to go to the Software Selections and System Tasks page.
b. From the OES Services options, select Novell Storage Services.
The following additional OES 2 services are automatically selected:
• Novell Backup / Storage Management Services• Novell eDirectory• Novell Linux User Management• NCP Server / Dynamic Storage Technology
3. Install iManager somewhere in the same tree as the NSS server.
• Same server. If you install iManager and NSS on the same server, the storage-related plug-ins are automatically installed.
• Different server. If you install iManager on a different server, make sure you install the storage-related plug-ins needed to manage the NSS file system and services. See Section 8.1, "Novell iManager and Storage-Related Plug-Ins in the OES 2: NSS File System Administration Guide.
4. Enable NSS.
When you install NSS during the initial install, NSS is enabled automatically.
5. Create a Linux Identity for Users
In order to use Linux services and utilities on an OES 2 Linux server, eDirectory users must also have a Linux identity. The Linux User Management (LUM) technology creates the local user identity and stores the UID for the user in eDirectory.
You don't need to Linux-enable users unless you plan to use the following NSS capabilities:
• User quotas• Hard links
For information about how to Linux-enable users, see the OES 2: Novell Linux User Management Technology Guide.
6. Upgrade the media format for hard link support (optional).
The new hard link support in NSS requires a media format upgrade after you have installed or upgraded the operating system. For guidelines and media upgrade instructions, see Section 3.5, "Upgrading the NSS Media Format" in the OES 2: NSS File System Administration Guide.
Additional Information
For additional information on installing NSS on Linux, see the following sections,in the OES 2: NSS File System Administration Guide:
• Section 9.0, "Planning for NSS Storage Solutions" • Section 3.0, "Installing and Configuring Novell Storage Services"• Section D.1, "Installing Linux with EVMS as the Volume Manager on the System Device"
0 - 0 65

File System Installation & Migration
You can also install NSS after the OES 2 Linux install by selecting NSS from the software options in YaST.
EVMS Requirement
OES 2 for Linux requires EVMS to understand and manage NSS partitions. However, the Linux kernel won't allow EVMS to manage LVM partitions and volumes, so LVM installs by default. Thus, the disk(s) where the boot partition (such as /boot for Grub) and system partition (such as for the swap and / ( root) volumes) reside are typically unavailable to NSS. This means that single drive servers require additional configuration to include both Linux system volumes and NSS on the same drive.
The device where you want to create NSS volumes must be managed by EVMS if you plan to use the Storage plug-in to iManager or NSSMU to create and manage NSS partitions, pools, and volumes.
To create an NSS data volume on the same device as your boot partition or system partition, make sure to configure the device for EVMS during the install. For information, see Section A.0 "Installing Linux with EVMS as the Volume Manager of the System Device" in the OES 2: Linux Installation Guide.
When your data volumes are on non-system devices, do not configure devices during the install. Instead, leave the devices as unconfigured free space and do not assign a volume manager for them. After the install, create the volumes with NSSMU or the Storage plug-in to iManager.
Migrating NSS Data and Devices from NetWare to LinuxTwo primary tools are recommended for migrating file system data (including NSS data) from NetWare to Linux:
• Command Line Utilities (migfiles)• The File System Migration Tool
Prerequisites for both source and destination servers are the same for either method.
Before beginning the migration, make sure you understand "Section 7.0, "Migrating NSS Devices from NetWare to OES 2 Linux" in the OES 2: NSS File System Administration Guide. This section includes the following subsections:
• Section 7.1, Guidelines for Moving Devices Cross-Platform • Section 7.2, Moving Non-Clustered Devices From NetWare Servers to OES 2 Linux
Servers • Section 7.3, Moving Non-Clustered Devices From NetWare 6.0 to OES 2 Linux • Section 7.4, Moving Non-Clustered Devices From NetWare 6.0 to NetWare 6.5 or OES
NetWare • Section 7.5, Moving Clustered Devices with NSS Volumes Cross-Platform • Section 7.6, Upgrading NetWare 5.1 NSS Volumes and NetWare Traditional Volumes to
NSS Volumes
NSS Migration Prerequisites
Source NetWare Server
1. Upgrade previous versions of NetWare (and Linux) as necessary:
66 0

File System Installation & Migration
Migrating Data from Previous Versions of NetWare. If you have data you want to migrate on servers running older versions of NetWare (such as NetWare 5.0 or 6.0), you must first upgrade the servers to NetWare 5.1 SP8 or NetWare 6.5 SP6 and then use the OES Migration Tools 1.0 or SCMT 1.2 to migrate the data.
• To upgrade Legacy NSS Volumes: Mount the NSS volume on a NetWare 6. x server. The mounting process starts the upgrade which takes some time (often several days; however the process runs in the background).
Leave the upgraded NSS volume mounted on NetWare 6.x afterwards since the media format is not backward compatible with NetWare 5.1 servers.
• To convert traditional NetWare volumes to NSS volumes: Use the Volume Copy Utility to upgrade legacy NetWare 5.1 Traditional volumes to NSS volumes on NetWare.
Note: After upgrading a NetWare server to OES NetWare, it is possible for a Traditional volume to still reside on that server, but this creates a problem when migrating from NetWare to OES Linux because the Traditional volume data cannot be read on OES Linux. You should move the data from the Traditional volume to an NSS volume before upgrading, either by directly copying it, using the Volume Copy Utility (VCU), or using the Server Consolidation and Migration Tool (SCMT).
For additional information, see Section C.O, "Upgrading Legacy NSS and NetWare Traditional Volumes" in the OES 2: NSS File System Administration Guide.
Migrating Data from OES 1.0 Linux. If you have data you want to migrate on OES 1.0 Linux initial release or SP1 servers, you must first update to SP2 and apply the latest OES patches and then use the OES Migration Tools 1.0 to migrate the data.
See section 2.0, "Migrating Data from NetWare or OES 1 Linux to OES 2 Linux" in the OES 2: Migration Tools Administration Guide for migration instructions.
2. Migrate Upgraded NSS Volumes to OES 2 Linux.
Mount NSS volumes from NetWare 6.5 SP3 and earlier directly onto OES SP2 Linux and earlier. You can mount NSS volumes from NetWare 6.0 servers directly onto OES SP2 Linux servers.
3. Make sure the media format is consistent with the format that will be used by the destination server. (If you will be taking advantage of the new media format on the destination server that allows hard links, see Section 5.0, "Upgrading the NSS Media Format" in the OES 2: Migration Tools Administration Guide before proceeding.
You can move NetWare 6.5 SP 4 or later NSS media to an OES 2 Linux server if the operating platform can support the NSS media format. NetWare 6.5 SP3, OES 1 SP2 Linux, and earlier servers do not have this support.
4. Ensure that the latest version of Storage Management Services (SMS) is running on the source NetWare server.
SMS updates can be downloaded from the Novell Downloads Web site.
5. When migrating data from a Traditional NetWare volume, make sure all name spaces (DOS, LONG, NFS, and MAC) are loaded on the source NetWare server.
If the source server is running NetWare 5.1 SP8 and your data contains extended ASCII or Unicode characters, add the following setting to the /etc/opt/novell/sms/tsafs.cfg file:
useCodeSet= xxx
0 - 0 67

File System Installation & Migration
For xxx, substitute the code page value set on the NetWare server. For example, the default code page is 437. (Alternate forms include CP437, CSPC8CODEPAGE437, and IBM437.) For more information and a list of code page values, see “Code Pages” in the NetWare 5.1 Server Operating System Guide.
6. Restart SMS by running the following command:
rcnovell-smdrd restart
7. Although data on the source server is not deleted as part of the migration, you should make a current backup of the data as a precaution.
A module named tcnvlnx.nlm is copied to the SYS:system folder of the source NetWare server and a tcnvlnx.cfg configuration file is also created in the same folder. The module generates an output file containing a listing of files, directories, and associated trustees. This output file in stored in the SYS:system/tcnvlnx directory.
Destination OES 2 Server
You'll need to install NSS on the OES 2 Linux destination server before moving devices (shared or unshared) or data from NSS on NetWare to NSS on Linux.
The following prerequisites must also be met on the destination OES 2 Linux server.
For NSS Destination Volumes
1. Use the Novell Storage Services Management Utility (nssmu) or iManager to create the NSS volumes to which you will be migrating the data. Make sure you allocate sufficient space for the volume to hold all of the source data.
Make sure the destination volumes have properties similar to those of the source volumes. For example, if compression is turned on for the source volume, turn on compression for the destination volume as well. The same applies to user quotas and other NSS features.
2. (Conditional) If you want to use the CASA secret store to store usernames and passwords during the migration (via the--use-casa option),
a. Make sure the following RPM is installed on the OES 2 Linux server: CASA-1.7- xxx.i586.rpm
b. Restart the CASA daemon by entering the following command:/etc/init.d/miCASA restart
For more information, see "Using CASA with Linux" in the Novell Common Authentication Services Adapter (CASA) documentation.
For NCP Destination Volumes
If you have installed the NCP server for Linux, you can create NCP volumes on top of Ext3 or Reiser file systems on Linux. NCP allows you to use the same method of file system trustees and trustee rights to control access to data on Linux Traditional volumes as you use on NSS volumes and NetWare Traditional volumes.
Since both NSS volumes and NCP volumes use the Novell trustee model for controlling access to data, if you migrate data from an NSS volume on NetWare to an NCP volume, the trustees and
68 0

File System Installation & Migration
trustee rights are enforced. You will need to make sure trustees are authorized users of the destination server
• NCP Server must be installed and running on the OES 2 Linux server.• Linux User Management must be installed and enabled.• Users must be Novell eDirectory users that are Linux enabled for the server
Be aware of the following:
• User Quotas. NCP volumes do not support user quotas. If they are set on the NSS volume, they are not enforced on the NCP volume.
• Deleted Files. NCP volumes do not support deleted file salvage and purge. If you have deleted files on the NSS volume, they are not migrated. If you want to salvage deleted files, do it before you migrate the data.
• Encryption. NCP volumes do not support volume encryption. If you migrate data from an encrypted NSS volume, the data is not encrypted on the NCP volume. Novell strongly recommends not migrating data from an encrypted NSS volume to an NCP volume.
Note: Moving files is now supported between NCP volumes. For example, you can move a file from an NCP volume on NSS to an NCP volume on a Traditional Linux file system. Trustee rights to files are maintained. However, file attributes unique to NSS, such as those associated with quotas and salvaging, are lost if the target volume is not NSS. In addition, NSS file attributes can now be set on NSS volumes from an NCP client.
If you will be moving NSS data to NCP destination volumes, complete the following:
1. Use the NCP Server Console utility (ncpcon) to create the NCP destination volumes.
2. Make sure the user performing the migration (usually the eDirectory admin) has read/write access to the POSIX path that corresponds to the NCP volume. One way to ensure this is to make admin the owner of the POSIX directory where the NCP volume is created.
See Section 4.0, "Migrating Data from NSS Volumes to NCP Volumes" in the OES 2: NCP Server for Linux Administration Guide for detailed instructions.
Moving Devices
NSS supports moves of devices containing NSS volumes between any servers that support a compatible media format, including moves between NetWare servers and OES 2 Linux servers.
The OES 2: NSS File System Administration Guide includes a table specifying which operating systems can be moved cross-platform between servers in the same Novell eDirectory tree. See "Table 5-1 Cross-Platform Compatibility of NSS Volumes by Operating Platforms." Links are also provided to examples of each category of move.
• Unshared Devices. When you move an unshared device to a different server, you must decommission its volumes in eDirectory for the current server, and then recommission them for the new server in order to preserve the NSS pool and volumes on the device when you move it.
• Decommission the volume by removing its related Storage object from eDirectory for the original server.
• Recommission the volume by creating a new Storage object in eDirectory for the destination server.
0 - 0 69

File System Installation & Migration
When moving a non-clustered device, you must also move any other devices that contribute segments to the NSS pools on the device you are moving.
• Shared Devices. When you move shared devices cross-platform, Novell Cluster Services automatically manages Storage object updates to eDirectory. You can use a shared NSS data pool and volume in a mixed cluster configuration, using Novell Cluster Services for Linux, if all nodes in the cluster support the same NSS media format.
• For information about upgrading to the latest media format, see Section 5.0, "Upgrading the NSS Media Format" in the OES 2: NSS File System Administration Guide.
• To use NSS with Novell Cluster Services, see the OES 2: Novell Cluster Services 1.8.4 for Linux Administration Guid e .
Setting Up File Access for Users
File access for users on the OES 2 Linux server can be set up either before or after you move an NSS volume from NetWare to Linux.
• Same tree. File system trustees and trustee rights continue to work after the move.• Different tree. Use eDirectory to enable or reassign affected users for access in the
destination tree.
One of the following protocols and services must also be set up and configured:
• NCP Server and Services: Install and configure NCP Server to allow users to access the volume with the Novell Client or other NCP services. For information, see the O ES 2: NCP Server for Linux Administration Guide.
• Other Protocols and Services: Install and configure other protocols, such as Samba or NFS as needed.
If you use non-NCP protocols or Linux services for user access on the destination OES 2 Linux server, you must Linux-enable the current users of the volumes with Linux User Management before you move the devices if you want file ownership information to be usable after the move.
• To enable multiple users at once, use the nambulkadd command. User IDs are automatically refreshed after the enabling process ends.
• To enable a single user at a time, use iManager.
Deactivating and Reactivating Pools
For each NSS pool, decommission the pool and its volumes on the original server and reactivate them on the destination server. See the following sections in the OES 2: NSS File System Administration Guide.
• Section 7.2.3, "Decommissioning Each NSS Pool and Its Volumes on the Original Server"• Section 7.2.4, "Recommissioning Each NSS Pool and Its Volumes on the Destination
Server"
Migrating NSS Data
NSS data can be migrated to OES 2 Linux from NSS volumes on NetWare using the command line or GUI migration tools provided with OES 2 Linux.
• Migrating Data with Command Line Tool (migfiles). If you are using the command line tools, the procedures for migrating file system data from NetWare NSS or Traditional
70 0

File System Installation & Migration
volumes varies depending on whether the source and destination servers are in the same eDirectory tree or in different trees.
See Section 2.2, "Using the Migration Commands" in the OES 2: Migration Tools Administration Guide for detailed instructions.
• Migrating Data Volumes with the File System Migration Tool. When you install an OES 2 Linux server, the File System Migration tool is automatically installed in YaST. This tool lets you perform basic data migrations from NetWare or OES 1 Linux to OES 2 Linux using a graphical user interface (GUI) instead of command-line utilities.
The File System Migration tool supports only full volume migrations. Source volumes on OES1 Linux servers must be NSS volumes.
Access the tool from the graphical desktop at the destination OES 2 Linux server, by selecting Computer > YaST Administrator Settings > Open Enterprise Server > File System Migration Utility.
See Section 2.3, "Using the File System Migration Tool" in the OES 2: Migration Tools Administration Guide for detailed instructions.
Additional Information • For a general discussion of migration issues in OES 2, see "Migrating and Consolidating
Existing Servers and Data" in the OES 2: Planning and Implementation Guide.• For guidelines about users and access, see Section 22.2, "Access Control Issues for
NSS on Linux" in the OES 2: NSS File System Administration Guide.
Post Migration ProceduresRestore Rights and Ownership
After files are transferred, file permissions may need to be reset. As discussed earlier, Linux file system permissions are different from and not as granular as those used by NetWare or Microsoft Windows systems. This becomes extremely apparent for directories where multiple groups previously had access to the data within a file. On Linux file systems, this is not possible so an alternative must be found.
Novell recommends the following permissions as a starting point. You may need to change the permissions to better fit your needs.
Type of files
Permissions:
user group other
numeric value
Home directories (ex: /home/<userid>) rwx --- --- 700User files (ex: /home/<userid>/<myfile>) rw- r-- --- 740Share directories for a team (where the group is used for access.)
rwx rwx --- 760
Shared team files (where the group is used for access.) rw- rw- --- 660
0 - 0 71

Migrating Background Infrastructure Services
Migrating Background Infrastructure Services
Some of the information in this section has been compiled from early-adopter consulting engagements. We thank our customers and our experts, particularly Michael Saunders, Gilson Melo, Jim Short, and Tom Veite for their contributions to this section.
In addition to the information found here, we recommend referring to the OES 2 Migration Tools Administration Guide as well as migration information specific to each service (generally included in the Administration Guide for the service). Links to the migration sections of each service guide are provided in Section 1.3, "Other Migration Tools, in the OES 2 Migration Tools Administration Guide.
In addition to the information found here, we recommend referring to the OES 2 Migration Tools Administration Guide as well as migration information specific to each service (generally included in the Administration Guide for the service). Links to the migration sections of each service guide are provided in Section 1.3 of the OES 2 Migration Tools Administration Guide.
When you migrate services from NetWare to OES 2 Linux, some services have to be rebuilt on Linux and data (where it exists) migrated. Other services can be easily implemented and include a migration tool specific to the service; for example, you use migedir to move eDirectory from NetWare to Linux. For many services, both command line and GUI migration tools are available; however, OES 2 Linux must first be installed to access the GUI tools which are then available via YaST under the Migration and Open Enterprise Server categories.
Each of the sections below includes cross-references to additional migration information specific to that service.
Services not included in this section. A synopsis of service-specific migration information, including services not discussed in this section, can be found in the "OES 2 Migration Utilities Best Practices Guide" which can be accessed from the NetWare to Linux Migration Sources on the Novell Open Enterprise Server Migration Web site. The following services are included:
• Data Migration• eDirectory• DNS/DHCP• iPrint• Novell Archive & Versioning Services• Distributed File Services (DFS)• NetStorage• Novell Cluster Services (NCS)• Novell Remote Manager (NRM)• Novell Storage Services (NSS)• Novell Backup/Storage Management Services (SMS)• NetWare Core Protocol (NCP)• Novell FTP• Novell iManager• Novell QuickFinder
72 0

Migrating Background Infrastructure Services
Novell Cluster ServicesReview the Current Cluster
Typically, the primary purpose of a cluster is providing file and print services. Make sure you check the volume resources since it is easy to overload these services. As a general guideline, Novell recommends that NSS volume resources be kept at a total capacity of 80% or less. If you need to reduce the number of standalone servers in production, the logical approach is to migrate data and services into the high availability resources of a cluster.
• Review the health of NCS background operations to resolve any operational issues with the cluster.
• Make sure all cluster nodes are up to the latest support pack levels.• Avoid spanning LUNs across NSS pools• Review and modify, where necessary, the cluster design to take full advantage of the
High Availability capabilities of current release software.
Novell recommends the following steps to address both the reliability and the performance of your current cluster:
• Make sure all NetWare nodes are at NetWare 6.5 SP6
• Use relatively small LUNs and data volumes
• Introduce OES 2 Linux nodes as required
• Reconfigure the SAN to host DST shadow volumes
Migration to OES 2 Linux
There are a couple of possible migration paths for moving existing NetWare clusters to Linux: converting the existing clusters (also referred to as a rolling cluster conversion) or using a parallel build.
• Cluster Conversion (Same Cluster). In order to convert existing clusters, new OES 2 Linux servers need to be built with the same LUN visibility as the existing NetWare nodes and the new servers added to the existing cluster. The new Linux nodes would then mount the existing volumes and services and then the NetWare servers could be removed from the cluster and removed from eDirectory. While it is feasible to use a mixed NetWare and Linux cluster temporarily as a migration strategy, Novell does not recommend it as a permanent production implementation.
Important. The NetWare 6.5 SP1 kernel includes several patches and updates. If you will be using a mixed NetWare and Linux cluster to facilitate a migration to OES 2 Linux based clusters, then upgrade the NetWare cluster servers to NetWare 6.5 SP1 before Linux is introduced. All standalone servers can remain NetWare 6.5 SP5 as OES 2 Linux is introduced into the environment.
• Parallel Build (New Cluster). A parallel-build Linux migration strategy would entail building a new separate OES 2 Linux cluster on the same SAN as the existing NetWare-based clusters. Doing so allows resources to be moved to the new cluster by changing LUN visibility from the old cluster nodes to the new. This can also be done in a phased approach. After the last resource is moved, the NetWare cluster can be removed from the tree. Since it is a new cluster, the virtual server names would change and login scripts and other references would need to be updated during the migration process.
0 - 0 73

Migrating Background Infrastructure Services
There are pros and cons to each approach so you'll need to do a more detailed analysis and/or secure assistance from Novell Consulting before deciding on or implementing a cluster migration.
Novell Cluster Services software must be running on the Linux server (SLES 10 and OES 2 must be installed on every server you want to add to a cluster). You can install Novell Cluster Services and create a new cluster, or add a server to an existing cluster either during the SLES 10/OES installation or afterwards, using YaST.
See Section 3.5.2, "Installing Novell Cluster Services during the OES Installation" and Section 3.5.3, "Installing Novell Cluster Services after the OES Installation" in the OES 2: Novell Cluster Services 1.8.4 for Linux Administration Guide.
Additional Information
Refer to the following sections in the OES 2: Novell Cluster Services 1.8.4 for Linux Administration Guide for additional information about migrating Novell Cluster Services:
• Section 3.6, "Converting a NetWare Cluster to Linux"• Section 3.7, "Upgrading an OES 1 Linux Cluster to OES 2"• Section 4.1, "Migrating Resources"
A synopsis of the process for migrating clusters can be found in the "OES 2 Migration Utilities Best Practices Guide" which can be accessed from the NetWare to Linux Migration Sources on the Novell Open Enterprise Server Migration Web site.
An additional resource is a document created in conjunction with Dell: "Managing Live Migrations from Novell NetWare to SUSE Linux Enterprise Server." This document references OES1, but should apply equally to OES 2. It is currently being updated for OES 2.
GroupWise Collaboration Services Installing or Upgrading GroupWise on OES 2
Instructions for installing GroupWise 7 SP2 on OES 2 Linux are included in the GroupWise 7 Support Pack 2 Readme. Use the instructions in the Readme in conjunction with those in the GroupWise 7 Installation Guide.
The following should be noted:
• When you use the Linux GroupWise Installation program to install a Support Pack, use the Install option to install the updated RPM for each agent. If you encounter a problem starting the agent, use the Configure option to update the configuration information.
• When you upgrade a server where GroupWise WebAccess is installed, new versions of Apache and Tomcat are installed. Therefore, you must reinstall and reconfigure the WebAccess Application. A script is available to help you with the reconfiguration process (see the Readme). You don't need to reinstall the WebAccess Agent.
• When you upgrade from Open Enterprise Server (OES) 1 to OES 2 or from SUSE Linux Enterprise Server (SLES) 9 to SLES 10 with GroupWise installed on your SLES server, you may encounter package conflicts that must be resolved. Instructions for handling this situation are included in the Readme.
• Section 5.3 in the Readme documents Linux installation issues. Other sections of the Readme are also pertinent and should be reviewed before installing SP2.
74 0

Migrating Background Infrastructure Services
Minimum System Requirements • 32-bit/x86 processor or 64-bit/x86 processor running in 32-bit mode • Any of the following server operating systems, plus the latest support pack:
• Novell Open Enterprise Server (NetWare or Linux version) • NetWare 5.1, NetWare 6.0, or NetWare 6.5 • SUSE® Linux Enterprise Server 9 • SUSE® Linux Enterprise Server 10 • Windows 2000 Server or Windows 2003 Server
• eDirectory® 8.7 or later
Novell GroupWise ships with the eDirectory version required to run it. You do not need to purchase eDirectory separately, unless you need it for other reasons.
• ConsoleOne® 1.3.6 or later
ConsoleOne on Linux requires Java Virtual Machine (JVM) 1.4.2, plus The X Window System, version X11R6 or later.
• Windows 2000/XP/2003 and the Novell Client on any administrator machine where you run ConsoleOne or the GroupWise Installation program
For SP2, the following additional environments are supported:
• XEN virtualization on SUSE® Linux Enterprise Server (SLES) 10• Heartbeat 2.0 clustering on SLES 10• Novell Cluster Services on Open Enterprise Server 2• Microsoft* Windows* 2003 R2• Microsoft Vista for the GroupWise Windows client
Migrating NetWare GroupWise to OES 2
There are two methods for migrating NetWare GroupWise to OES 2 Linux: manual or automated:
• Manual. Instructions for manually moving existing GroupWise 7 users, post offices, and domains from NetWare or Windows to Linux are included in the GroupWise 7 Installation Guide. See Sections 18 - 24.
• Automated. The GroupWise Server Migration Utility can be used to transfer GroupWise agents, domains, post offices and data from a NetWare or Windows* server to a Linux server. These tasks can also be performed manually.
Available as a free download from the Novell Downloads Web site, the GroupWise Server Migration Utility (gwsvrmig100.exe) is currently supported on GroupWise 6.5 or later. It migrates the GroupWise system to servers running SUSE Linux Enterprise Server 9 or 10 or Novell Open Enterprise Server 1 with the latest support packs. Novell is in the process of certifying GroupWise 7 on Open Enterprise Server 2 Linux and recommending changes for the NetWare to OES 2 Linux migration.
The GroupWise Server Migration Utility allows you to identify the relevant components (Post Office agents, Message Transfer agents, Monitor agent and so forth) to be migrated from NetWare or Windows servers to a Linux server. The utility then installs necessary software, configures the agents and migrates the data—all in real time. The process is flexible, allowing you to choose which components to migrate and when.
During the initial transfer, the software, settings and agents on the original server are maintained, ensuring consistent uptime and enabling you to continue running GroupWise on the original server.
0 - 0 75

Migrating Background Infrastructure Services
After the initial transfer is complete, the GroupWise Server Migration Utility guides you through a process of testing the system running on the new Linux server. As a final step, the utility migrates any data that was altered since the initial transfer and activates the GroupWise services on the Linux server. This is the only point in the process when post office agents will need to be taken down.
For migration instructions, refer to the GroupWise Server Migration Utility Installation and Migration Guide.
Note the following:
• NetWare version update. Update the NetWare GroupWise system to GroupWise 7 before migrating it to OES 2 Linux.
• Linux version update. If you are updating your version of Linux as well as updating GroupWise, perform the Linux operating system upgrade first.
Caveats
The GroupWise issues listed in this section are concerns identified by customers in their implementations. Some were most probably one-offs and related to the environment and will likely not occur in your environment. Many have already been addressed by GroupWise engineering. When they do occur, we recommend the GroupWise 7 Support Pack 2 Readme as the primary resource for information and/or suggested work-arounds.
• Migrating vs installing GWIA and WebAccess. Novell Support recommends deleting the NetWare-based GWIA and WebAccess objects and then installing new GWIA and WebAccess services on Linux, even though there are instructions for migrating the GWIA and WebAccess services from NetWare to Linux in the documentation.
• GWCHECK not supported on OES 2 Linux. GWCHECK does not work on OES 2 and won't anytime soon (Java issue). The suggested workaround is to run gwcheck with the storelowercase option from another platform against the migrated database on OES 2. This recommended procedure is currently (October 2007) being added to the migration section of the GW7SP2 Installation Guide.
• Locating expath.cfg. There is some indication that the GWIA admin can't locate expath.cfg when installing GWIA on an NCS-clustered 64-bit OES 2 Linux (XEN) with NSS storage. Testing is currently in progress to discover whether this is an issue or a factor of the customer environment.
• Post-migration domain database corruption. Corruption in the post-migration domain databases was experienced at one site; this is being analyzed to see if there is an issue with the migration procedure or if there is corruption in the customer's current production domain databases. Do make sure there are no issues with the pre-migration database before beginning the migration.
• ConsoleOne script. You need to edit the ConsoleOne script (as referenced in TID 3805759) to add "C1_JRE_HOME=/usr/lib/jvm/jre" after "export LD_LIBRARY_PATH."
• File Locking issues with NSS. Because of long-standing file lock issues with NFS*, you cannot use an NFS mount to mount a server file system where your GroupWise system is located to a workstation where you are running ConsoleOne. Novell recommends using an SMB mount instead.
• Accessing GroupWise from ConsoleOne. Some customers have had problems accessing a GroupWise / OES server from ConsoleOne after migration to OES. Refer to the following Cool Solution tip and the proposed solution if you experience this problem.
76 0

Migrating Background Infrastructure Services
"Accessing a GroupWise / OES Server from ConsoleOne after OES Migration"
http://www.novell.com/coolsolutions/tip/19682.html
Additional Information• Product Documentation
• GroupWise 7 Installation Guide. See Sections 18 - 24. • GroupWise Server Migration Utility Installation and Migration Guide . • GroupWise Utilities Web page . Includes links to all GroupWise utilities.
• GroupWise 7 Support Pack 2 Readme The readme discusses some of the issues and recommendations for installation on OES 2 Linux and upgrading from OES 1 Linux to OES 2 Linux, but does not specifically address migrating from NetWare to OES 2 Linux.
• Product Flyer Automate Migrations to Linux* with the GroupWise® Server Migration Utility
• Novell GroupWise Web site
Access http://www.novell.com/products/groupwise/
• Additional GroupWise articlesAccess http://www.novell.com/products/groupwise/productinfo/
Service Location Protocol (SLP)Overview
One of the key roles of a server on an IP-only network is to provide network services. To use a service, an application must be able to find the location of the service on the network. Without an advertisement or discovery mechanism, users have to know the IP address or DNS name of the server hosting the tree in order to log in and use network services. With SLP, however, services can register their availability with an SLP agent when they are brought up. The agent keeps track of which services are available and where they are located.
Four components are included with SLP:
• Service Agent (SA) - works on behalf of the services running on its server. When the server starts up, the services on that server register themselves with the server's SA. The SA maintains a local database of its service URLs. An SA replies to UAs who request services and can register its services with DAs.
• User Agent (UA) - works on behalf of an application to retrieve service URLs and attributes of network services, understands the service and resource needs of the application and retrieves that server information from an SA or a DA.
• Directory Agent (DA) - acts as a centralized repository for service location information, receiving registration requests from SAs and then use the service information to answer requests from UAs.
• Scope - a defined group of network services that groups users or services into manageable entities. A Scope is supported by UAs, SAs, and DAs.
SLP can be configured in a variety of ways. Key factors are the size of the network and how geographically dispersed the network is:
0 - 0 77

Migrating Background Infrastructure Services
• Implement UAs and SAs only. The network is automatically configured in this manner when you install the first eDirectory server; it's sufficient for networks with fewer than 25 servers and 1,000 clients but requires more network bandwidth than configurations that employ a DA. With small networks, the multicast traffic usually remains within acceptable limits. Another disadvantage is that administrators must configure network routers to forward multicast packets. If the network uses routers, users may only be able to locate services located on the same network segment as the one their workstation resides on.
• Implement UAs, SAs, and DAs. The use of a DA eliminates all UA multicasts and SA responses to those multicasts. This option is recommended for larger networks and for networks with routers that don't support multicasting.
If your network has multiple sites separated by WAN links, Novell recommends using multiple DAs.
If users need to access remote services, configure UAs with the addresses of both (local and remote) DAs. SLP does not define a protocol for synchronizing service information between DAs.
• Implement Scopes. If all services in a large network are registered with a single DA and, therefore, a single service cache, the amount of service information can become unwieldy and difficult to manage and response times suffer. Novell recommends grouping services (based on geography, department, or shared services) into scopes and then assigning one or more DAs to service the scopes. This speeds up access to requested services while reducing network traffic.
Note: The Novell version of SLP takes certain liberties with the SLP standard in order to provide a more robust service advertising environment, but it does so at the expense of some scalability. For a discussion of SLP and OpenSLP and references to documents essential to understanding the protocol, refer to Appendix C, "Service Location Protocol" in the Novell eDirectory 8.8 Installation Guide.
Configure SLP on Linux
NetWare and OES 2 Linux include separate but compatible SLP solutions: SLP and OpenSLP respectively. Which solution you use largely depends on which platform you use for the eDirectory Tree.
NetWare Tree. If you have a NetWare tree, you automatically have Novell SLP on your network and you can continue to use it as the SLP service for both NetWare and Linux OES 2 platforms. If you decide to use OpenSLP, NetWare servers can also be configured to use OpenSLP.
On NetWare, SLP services are integrated with and configured to work with eDirectory and other services automatically; if eDirectory is configured correctly, the services will work without SLP.
Linux Tree. Two scenarios are possible:
• SLP. Novell provides a basic level of SLP support when eDirectory is installed on a Linux server. Linux servers are configured with an SA that registers SLP-aware applications (such as eDirectory) with the server. UA and SA services are provided by the slpuasa daemon (the slpuasa init script is located in /etc/init.d). DAs are not supported on Linux.
• Open SLP. Novell recommends using OpenSLP instead. OpenSLP is the default SLP service installed on SLES 10. The default discovery mechanism is actually DNS, but SLP must be present for any applications that require it, especially in those cases where the OES 2 Linux server is the fourth or later server added to a tree and doesn’t have an eDirectory replica automatically installed. OpenSLP needs to be installed on servers prior to installing eDirectory. (The eDirectory installation routine detects OpenSLP and does
78 0

Migrating Background Infrastructure Services
not install the slpuasa daemon.) OpenSLP is capable of operating within most existing configurations.
Important: Novell recommends setting up SLP (or OpenSLP) services on every OES 2 Linux server, particularly before you set up the fourth OES 2 Linux or any NetWare servers in your tree.
You'll need to set up OpenSLP on your OES 2 Linux server if both of the following apply:
• You plan to install more than three servers into a new tree being created on an OES 2 Linux server.
• You either don’t have an existing Novell SLP service, or you don’t want to continue using Novell SLP.
On OES 2 Linux, the OpenSLP service must be manually configured to work with eDirectory and other services. The server must either:
• Have an eDirectory replica installed.
This is not automatic after the third server installed in a tree, nor is having more than three to five replicas on servers in the tree recommended.
• Have eDirectory registered with the OpenSLP service running on the server.
This requires configuring SLP either during the OES 2 Linux installation or manually.
If you need OpenSLP and you don’t already have an OpenSLP Directory Agent (DA) set up on your network, we recommend setting up the first OES 2 Linux server in your tree as an OpenSLP DA. Although SLP services can be managed without having a Directory Agent, that approach is far less robust, requires multicasting, and for OES 2 Linux involves disabling the firewall.
After creating the DA, you can then configure all subsequently installed servers to either point to that DA or to other DAs you create later.
Although SLP provides a default scope if no scope is specified, it is always good practice to define one or more by configuring the net.slp.useScopes line in slp.conf.
To configure SLP on Linux, you will need to enable multicasting and configure OpenSLP.
Enable Multicasting
SLP relies on multicasting; however, most Linux systems are not configured, by default, to provide multicast support. Enter the following at the shell prompt to determine whether multicasting is supported:
route -n
If multicasting is supported, you'll see an entry in the routing table for the 224.0.0.0 destination.
If not,
1. Open a terminal session.
2. Change to the root user account.
3. At the shell prompt, enter the following command:
route add -net 224.0.0.0 netmask 240.0.0.0 dev interface
(eth0 is usually the interface parameter)
4. Verify that the route has been added by entering route -n at the shell prompt.
0 - 0 79
Migrating Background Infrastructure Services
Install and Configure OpenSLP
Open SLP is available as an RPM and provides UA, SA. and DA functionality. You can download a copy from http://www.openslp.org./, It is also included with SLES 10 SP1.
OpenSLP installs like any other RPM using the rpm -i command. The slpd daemon is installed in the /usr/sbin directory on the server.
Once installed, you can configure the slpd daemon by editing the /etc/slp.conf file.
• To configure the daemon to run every time the server is booted using the following command:
chkconfig slpd 345• To configure an OES 2 Linux server as a DA, edit the "Static Scope and DA
Configuration" portion of the file.• To run the daemon, enter slpd at the shell prompt.
For additional OpenSLP set up instructions, see Section 5.2.3, '"Setting Up OpenSLP on OES 2 Networks" in the OES 2: Planning and Implementation Guide.
Caveats• DA synchronization is not part of OpenSLP.• OpenSLP-based user agents or service agents can access Novell SLP-based directory
agents when configured to do so. However, directory agent types must be either one type or the other. The SLP daemon (slpd) cannot access both Novell SLP and OpenSLP DAs from the same configuration.
Additional Information
Novell eDirectory 8.8 Administration Guide
• Section 15.8, "Setting Up SLP on Linux or Solaris" • Appendix C, "Configuring OpenSLP for eDirectory"
Novell eDirectory 8.8 Installation Guide, Appendix C, "SLP"
OES 2: Planning and Implementation Guide
• Section 5.2.3, '"Setting Up OpenSLP on OES 2 Networks" • Section 12.5, "SLP"
DNS/DHCPWith OES 2, DNS and DHCP have been integrated with eDirectory. This means you can transition your existing DNS and DHCP infrastructure from NetWare to Linux, as well as centrally administer them the same way you do on NetWare. To accomplish eDirectory integration on the DNS side, Novell did a full port of NetWare DNS to Linux to make it functionally equivalent to DNS in NetWare 6.5. Novell plans in the future to fully integrate all of the required functionality into the Open Source “BIND” project.
A direct migration of DNS/DHCP from NetWare to Linux is not supported. However, you can install a DNS/DHCP server on Linux and then use iManager to move DNS servers within the same eDirectory Tree or across eDirectory trees.
80 0

Migrating Background Infrastructure Services
The administration of DNS does not change between NetWare and OES 2; either iManager or the Java console can be used as the administrative tool. If you are using Novell's NetWare based DNS and DHCP services and hosting it via a cluster, this configuration can also be carried forward into an OES 2 environment.
Novell recommends that all servers, virtual cluster servers, and the tree object be registered in DNS regardless of platform. A full verification should be performed and any required additions made. All new servers, either virtual or physical, should be registered as they are deployed.
The DHCP services in OES 2 Linux have been enhanced to store configuration information in eDirectory just as NetWare implementations do.
Once the DNS/DHCP information has been mirgated to OES2 Linux, administration can be performed through iManager and also an update to the DNS/DHCP Java Console.
Migrating DNS/DHCP
From iManager
The DNS/DHCP management utility in iManager 2.7 is available to convert existing NetWare DNS configurations to OES 2 Linux. This can be performed on a server by server basis, or all at once. The source server must be at least NetWare 6.5 SP5.
From YaST
The OES Migration Tools can also be used to migrate DHCP configurations from NetWare to OES 2 Linux. Again, the source server must be at least NetWare 6.5 SP5.
1. Open YaST.
2. Select Open Enterprise Server > Migrate Novell DHCP Server package and follow the screen prompts.
From the Command LineRun /opt/novell/migration/bin/migdhcp.sh
Note: Some DHCP features available with NetWare are not supported on Linux. See Section 12.2.2, "DHCP Differences Between NetWare and OES 2 Linux" in the OES 2: Planning and Implementation Guide for additional information.
Additional Information
See also the OES 2 DNS/DHCP Administration Guide for Linux.
Time SynchronizationTime synchronization is not provided by eDirectory, but is important in maintaining the integrity of the tree. In previous versions of eDirectory, replica synchronization depended on time synchronization. Currently, replica synchronization works independently (doesn't depend on either NetWare timesync.nlm or NTP) but does rely on accurate time stamps; replica synchronization will still occur without proper time synchronization, but events may happen out of proper sequence and result in inconsistent information about what took place and in what order.
In short, the servers that host eDirectory replicas need to be synchronized. OES 2 Linux uses the Network Time Protocol (NTP) to maintain a common time for all servers on the network. NTP is
0 - 0 81

Migrating Background Infrastructure Services
an industry standard protocol that uses UDP (part of the TCP/IP protocol suite) on port 123 to communicate between time providers and time consumers.
A computer functioning as a time provider understands the NTP protocol and provides NTP time to other servers and workstations on the network. Time consumers also understand the NTP protocol and seek NTP time from an NTP time provider and can, in turn, act as a time provider for other network servers and workstations.
All computers on the network with Internet access can get time from NTP servers on the Internet. NTP synchronizes clocks to the Universal Time Coordinated (UTC) standard, which is the international time standard. The hierarchy that indicates where each server is getting its time is referred to as a stratum, with the first time provider designated as stratum 1.
A server that gets its time from a stratum 1 server is stratum 2, and so on. timesync.nlm is stratum 5 always. Both NTP providers and consumers work with operating systems that are NTP-compliant.
By default, NTP uses its own internal clock as the time provider but can be configured to use other time providers via the /etc/ntp.conf file. It's best to synchronize with multiple servers to help protect clients from an incorrect or downed server.
NTP time can be supplied from several sources:
• Public Time Server. For small organizations (fewer than 100 servers), synchronizing servers to accurate public NTP servers provides sufficient time synchronization. To reduce traffic, it's best to have one or two servers synchronize with a public NTP source and have those servers provide time for the remaining servers. See http://ntp.isc.org/bin/view/Servers/WebHome.
• Reference Clock. Reference clocks are devices that synchronize via a variety of technologies including long wave radio signals, GPS transmissions, or CDMA technology. These can be expensive.
• Server's Local Clock. The server's internal clock can be used as a time source, but because time can wander, this is generally not a preferred solution.
• Network NTP Time Source. This is the recommended option for larger networks. In this case, you'll need to set up a server as an NTP time provider and then add the IP address of the time source to the /etc/ntp.conf file for servers that will use the designated server as the time provider.
General Guidelines
Consider setting up a master timeserver to make sure the entire directory tree has its time synchronized accurately.
• Designate the most reliable server in the subnet as the time provider.• Configure at least two time providers to set fault tolerance.• Configure time consumers to contact a time provider within its own local network (so they
don't contact time providers across costly WANs).• Generally, only one server in a network should communicate with an external time
provider. This reduces network traffic across geographical locations and minimizes traffic across routers and WANs.
Note: The time synchronization modules in Novell Open Enterprise Server (OES) have been designed to ensure that new OES 2 servers can be introduced into an existing network environment without disrupting any of the products and services that are in place.
82 0

Migrating Background Infrastructure Services
Both the Linux and NetWare installs automate the time synchronization process where possible. For complete information about planning and implementing a time synchronization strategy and setting up time providers and consumers, see Section 12, Time Synchronization, particularly Section 12.3.4, "Implementing Time Synchronization" in the OES 2: Planning and Implementation Guide.
Additional Information
For information about the files and programs included with NTP, refer to http://www.ntp.org.
For information on migrating NetWare NTP or TimeSync services to NTP on OES 2 Linux, see Section 4.0, "Migrating From NetWare to OES 2 Linux," in the OES 2: Novell TimeSync for NetWare Administration Guide.
For information about setting up time synchronization on OES 2 servers, see Section 13, "Time Synchronization," in the OES 2: Planning and Implementation Guide.
Anti-Virus and Backup SoftwareSeveral industry leaders in the anti-virus and backup markets have publicly committed to support Novell Open Enterprise Server 2, the following among them:
• Symantec's Veritas NetBackup and Backup Exec and Symantec AntiVirus• BrightStor ARCserve Backup • McAfee anti-virus software
Anti-Virus Software
Symantec and McAfee based anti-virus solutions should work well in an OES 2 Linux environment. However, specific support for OES 2 is not provided by either vendor at this time. Symantec, and all other major vendors currently providing anti-virus and backup software for Novell operating systems, have committed to having OES 2 support in the release of their products that follows the OES 2 launch. Novell is working with vendors to get products certified. At the time of this writing, the McAfee LinuxShield product line supports both SLES 10 and the OES 1 Linux products. Since SLES 10 is the base product underlying OES 2 Linux, we anticipate that McAfee will have a supported solution available very shortly.
Important. If you run server-based anti-virus software, configure it so that it does not scan GroupWise directory structures such as domains and post offices where file locking conflicts can create problems for the GroupWise agents. If you need virus scanning on GroupWise data, check the GroupWise Partner Products page (http://www.novell.com/partnerguide/p100031.html) for compatible products.
A list of currently certified anti-virus software vendors can be accessed from
http://www.novell.com/products/openenterpriseserver/partners_communities.html
Backup Software
Tivoli Storage Manager. If you are using Tivoli Storage Manager (TSM) v5.4 as a data backup solution, you will need to run the latest TSM 5.4 agents for OES 2 Linux to get full functionality including the proper back up of rights and trustees from NSS volumes.
Use the following command to back-up the trustee assignments in OES 2/ NSS with Tivioli Storage Manager (TSM) v5.4:
0 - 0 83

Migrating Background Infrastructure Services
nss /ListXattrNWMetadata
Agent installs will need to be scratch installations on OES 2; no migration from NetWare is possible or required. New backup jobs should be configured and tested as the new Linux servers are put into production.
CommVault Galaxy. CommVault Galaxy version 6.1 doesn't support OES Linux. CommVault will be releasing version 7 SP1 in October, which will support SUSE Linux Enterprise Server 10, SP1. They currently plan to have full support for OES 2 by December 2007.
If you decide to use this software, you'll need to run the latest CommVault iData and Media agents for OES 2 Linux to get full functionality including properly backing up rights and trustees from NSS volumes. These agent installs will be scratch installations on OES 2; no migration from NetWare is required. New backup jobs should be configured and tested as the new Linux servers are put into production.
A list of currently certified anti-virus software vendors can be accessed from
http://www.novell.com/products/openenterpriseserver/partners_communities.html
ZENworksMany ZENworks features, such as polices and application distribution, are purely eDirectory and file system dependent. There is no dependency on the server OS. The remaining services, such as inventory and imaging, that do have modules that run on a server are dependent on a host OS.
The ZENworks 7 suite of products is fully tested and supported on the SLES 10 platform. Testing on the SLES 10 sp1 and OES 2 platforms is ongoing. If you are using ZENworks, Novell recommends keeping server-based ZENworks modules on the current NetWare platforms until such time as Novell has fully tested and certified the product suite (ZDM 7 and ZSM 7 ) on the OES 2 platform.
WorkstationsWith OES 2 SP1, Novell will enable Linux servers to behave as if they are Active Directory servers. This will allow users to authenticate to a Linux server or service with their Windows clients using their eDirectory usernames and passwords, but using native Windows protocols. This will provide seamless cross-authentication between Active Directory and eDirectory. In other words, users will work in a pure Windows desktop environment while still taking advantage of Novell back-end services and technology.
This Windows server access technology will use cross-protocol locking to allow support for both NetWare Core Protocol (NCP) and pure Microsoft protocol clients; however, it will be possible to disable NCP clients on a case-by-case basis if needed. Either way, access rights will be enforced by NSS.
You can enable Windows server access technology when the server is first installed or after the fact by creating Windows shares using Novell iManager or the Microsoft Management Console. You can also perform certain file system and directory tasks, as well as centrally administer SAMBA shares, using either Novell iManager or Microsoft Management Console.
As OES 2 is implemented, existing clients can be used (Windows XP, 2000, NT, Vista). However, an upgrade to the latest clients and workstation OS will be required to take full advantage of the new features of eDirectory and OES 2 such as NMAS and Password Self Service. The iPrint
84 0
Migrating Background Infrastructure Services
agent will also need to be installed on all workstations to use this functionality in the OES 2 environment.
PrintingThe currently supported printing infrastructure from Novell, iPrint, is a greatly enhanced version of NDPS and is Novell's recommendation going forward. iPrint is completely IP-based and platform independent on both the client and server side. There is no requirement for an NCP client on the workstation. Printer provisioning and deployment is Web-based. iPrint is also fully cluster-aware.
While iPrint is supported on both the Linux and NetWare platforms, the back end infrastructure is different. iPrint on Linux does not support NDPS/NCP client-based printing. Both platforms support the same iPrint workstation agent. Automated migration tools are available to deploy the iPrint agent to any workstations still using NDPS. This can also be done using a ZENworks application deployment. A silent install option is available.
Tip: If any printers in your environment have IPX enabled but not configured, disable IPX. This is an unnecessary use of JetDirect and LAN bandwidth.
Set Up Workstation Printer Agents
Novell recommends deploying the iPrint agent to workstations before converting the backend infrastructure to OES 2 Linux. This will allow for the phased removal of the NDPS-based printers from the workstations before it becomes a requirement with the deployment of iPrint on OES 2. This will allow for a phased and transparent OES 2 printing migration for users.
An additional consideration is the use of literal IP addresses vs DNS entries with the printer configurations deployed to the workstations. If the printer/manager configurations are using IP address assignments rather than DNS, Novell recommends deploying the iPrint agent to all of the workstations and changing the existing iPrint managers to a DNS configuration. This will allow you to convert to iPrint on Linux without having to revisit the workstations.
If you use DNS, the new iPrint infrastructure can be migrated to Linux in phases while leaving the existing NetWare infrastructure in place. The users are converted over when the DNS entry for each individual print manager is changed.
Set Up iPrint on OES 2
iPrint can be installed and configured on OES 2 Linux in parallel with an existing print environment to allow for a gradual phased migration of users to the iPrint infrastructure. While iPrint can be used to support queue-based printing, it is not the preferred method (the only normal requirement to maintain a queue is to support legacy DOS-based applications that print directly to a queue rather than to a windows printer or LPT port).
Source and target servers can be in the same or different eDirectory trees. The source server for an iPrint migration to OES 2 Linux must be NetWare 6.5 SP5 or above.
To set up iPrint on OES 2 Linux, you'll need to
• Install iPrint on the OES 2 target Linux server using the iPrint pattern install. See Section 3.0, "Setting Up iPrint on Your Server."
• Create an OES 2 Driver Store on the network. See Section 3.2.1, "Creating a Driver Store."
• Create a Print Manager on the target server. See Section 3.2.3, "Creating a Print Manager."
0 - 0 85

Migrating Background Infrastructure Services
All references are to the OES 2 iPrint for Linux Administration Guide.
Migrate iPrint to OES 2
Novell recommends the following steps to bring a current printing environment up to supported standards before migrating print infrastructure to OES 2 Linux or Linux clusters as required:
• Install and configure iPrint on any NetWare 6.5 clusters.• Install and configure all network printers in iPrint.• Install and configure web-based client deployment tools.• Set up iPrint on OES 2 Linux.• Deploy iPrint agents to workstations.
Novell's Server Consolidation and Migration Tool or the YaST iPrint Migration Utility are available to copy a NetWare-based iPrint/NDPS environment to a Linux iPrint infrastructure. This will allow for a phased parallel installation approach to a Linux migration with a minimum of user or administrative impact. Using a mixed Linux and NetWare based printing environment within the same tree is fully supported.
Additional Information
See the OES 2: iPrint for Linux Administration Guide, particularly the following sections:
• Section 5.4.1, "Migrating Your iPrint System using the YaST iPrint Migration Utility"• Section 5.4.2, "Using the Command Line Utilities to Migrate to OES 2 Linux"
Securing the OES 2 ServerThis section was originally published as part of a Cool Solutions AppNote, "Complete NetWare to OES Linux Migration Guide," written by Mike Faris, Sr. Network Engineer at Aviall. It is reprinted here with permission.
These recommendations are optional and should be used only as a guide in securing your server. Make sure these recommendations are in line with your organization's security policies regarding hardening your servers.
GRUB Boot Loader
Password protect the boot loader to prevent editing of the boot environment or passing kernel level commands to the system at boot time. Use the md5crypt command within GRUB to encrypt a password. Then use this hash to edit the menu.lst file and insert the password line as shown below.
Be sure NOT to use the same password as root or any other user password on the system. If you “fat finger” the password without testing it first you will not be able to make changes to the boot process upon boot up.
# grub
GRUB version 0.97 (640K lower / 3072K upper memory)
[ Minimal BASH-like line editing is supported. For the first word, TAB lists possible command completions. Anywhere else TAB lists the possible completions of a device/filename. ]
86 0

Migrating Background Infrastructure Services
grub> md5crypt
Password: *******Encrypted: $1$vUYoM$OAxm9NVNUBsCeP1dl50
grub>quit
vi /boot/grub/menu.lst
color white/blue black/light-graydefault 0timeout 8
password --md5 $1$vUYoM$OAxm9NVNUBsCeP1dl50title linux kernel (hd0,0)/boot/vmlinuz root=/dev/sda1 vga=795
BIOS
Password protect changes to the BIOS to prevent changing the boot order of the device. In production systems, booting from CD or floppy should be disabled.
Tuning Network Kernel Parameters
There are a few parameters that can be applied to the kernel through the proc file system to improve protection of the server.
Modify /etc/sysconfig/sysctl to add these options along with the default configuration options.
net.ipv4.ip_forward = 0 -- Disables IP forwarding.net.ipv4.conf.all.accept_source_route = 0 -- Disables source routing.net.ipv4.tcp_syncookies = 1 -- TCP syn flood protection parameter.net.ipv4.tcp_max_syn_backlog = 4096 Additional TCP syn flood protection.net.ipv4.conf.all.rp_filter = 1 Enables anti-spoofing protection.net.ipv4.conf.all.send_redirects = 0 Disables the sending of ICMP redirects.net.ipv4.conf.all.accept_redirects = 0 Disables receipt of ICMP redirects.net.ipv4.conf.default.accept_redirects = 0 Disables ICMP redirects for newly activated.
Warning Banners
Include a warning message for all direct methods of connection to the server.
/etc/motd. Add a warning banner to this file.
/etc/issue. Add a warning banner to this file and copy the /etc/issue file to /etc/issue.net
0 - 0 87

Migrating Background Infrastructure Services
SSH connections. For SSH connections, edit the /etc/ssh/sshd_config file. Below is the what needs to be changed to point the banner at the /etc/issue.net file.
# vi /etc/ssh/sshd_config
??.# no default banner pathBanner /etc/issue.net#VerifyReverseMapping no
# override default of no subsystems
SSH Configuration
In addition to setting a banner as above, SSH should be restricted to version 2. Version 1 has some inherent weaknesses and so should be avoided. Edit this file and make the changes listed in Bold in the example below. Most settings are fairly self explanatory. Hosts should not be automatically trusted through the rhosts types of authentication or even with a machine-based certificate as with the RSA variants. Root should not be allowed direct access. For administration, connect to the machine as a regular user and then SU to root for additional needed rights.
#Port 22
Protocol 2
#ListenAddress 0.0.0.0
#ListenAddress ::
SyslogFacility AUTH
#
#LoginGraceTime 600
PermitRootLogin no
#StrictModes yes
RhostsAuthentication no
# Don't read the user's ~/.rhosts and ~/.shosts files
IgnoreRhosts yes
# For this to work you will also need host keys in
/etc/ssh/ssh_known_hosts
RhostsRSAAuthentication no
# similar for protocol version 2
HostbasedAuthentication no
PermitEmptyPasswords no
Further Securing Remote Login
In addition to the restrictions made on SSH, we should also further disable remote interactive login for root in case, mistakenly or maliciously, telnet or some other method of tty access was enabled again. Modify the /etc/securetty file. All lines except the TTY1 should be commented out. This is needed for console access. SSH is running its own daemon and is not affected by these settings.
# This file contains the device names of tty lines (one per line,# without leading /dev/) on which root is allowed to login.#
88 0

Migrating Background Infrastructure Services
tty1#tty2#tty3#tty4#tty5#tty6# for devfs:#vc/1#vc/2#vc/3#vc/4#vc/5#vc/6
Protect this file further by executing the following to ensure that only root can read the file and nobody can write to it, even root, until root again chmod's the file with more permissions.:
chown root:root /etc/securetty
chmod 400 /etc/securetty
Modify /etc/inittab
/etc/inittab has several settings that should be hardened.
• Disable Ctrl-Alt-Delete from shutting down the server.• Edit the default run level. • Protect the server even in Single User mode.• Disable extra console login daemons (Ctrl-Alt-Fx) to further protect console access.
See the settings in Bold.# The default runlevel is defined hereid:3:initdefault:
# First script to be executed, if not booting in emergency (-b) modesi::bootwait:/etc/init.d/boot# what to do in single-user models:S:wait:/etc/init.d/rc S~~:S:wait:/sbin/sulogin
# what to do when CTRL-ALT-DEL is pressed. Comment to disable.#ca::ctrlaltdel:/sbin/shutdown -r -t 4 now
The "3" in the id:3:initdefault line designates that the default run level is level 3 which does not load the GUI. The GUI can be loaded as necessary with the startx command but should not remain loaded nor should it load by default on the server.
The line beginning with "~~:S" is the command for what to do in single user mode. (i.e. typing "single" as a boot parameter in grub -- which now requires password access anyway). Change the "respawn" command to "wait." This will prompt for the root password before continuing.
The "ca::ctrlaltdel:/sbin/shutdown --r --t4 now" line is the command to execute when Ctrl-Alt-Delete is pressed. This should be commented out as shown to disable this
0 - 0 89

Migrating Background Infrastructure Services
functionality and prevent someone with physical access from shutting down the machine without a valid login.
Xwindows - GUI Protection
Although X-windows does not loading by default on the server, this can be changed easily by an administrator; it is also available to load manually by changing run levels or typing startx at the console prompt. Therefore, implement the following extra safeguards:
Disable XDMCP Remote machines should not be able to get an X terminal login window. Edit the following lines in /etc/X11/xdm/Xaccess to prepend them with a "!" as shown.
!* #NO host can get a login window!* CHOOSER BROADCAST #NO indirect host can get a chooser
90 0

Migrating Background Infrastructure Services
Disable listening on port 6000This prevents the X system from listening for X events from remote machines. Local X access at the console is not affected. Edit the config file /etc/X11/xdm/Xservers as shown below to add the "-nolisten tcp" switch to this line.
:0 local /usr/X11R6/bin/X :0 vt07 -nolisten tcp
Restrict cron and at daemonsCron and at daemons run processes on the system as root so prevent access to them, as well as the crontab command and files, so that malicious code can't be "scheduled." The binaries are also world executable and SUID to root so they can be dangerous. Restrict access to them with the following steps.
Create cron.allow and at.allow filesThese files will restrict access to cron to only the users listed in the files. All others will be denied. The only user in the list should be root. These files don't exist by default so you need to create them with the echo command as follows. Delete any deny files (/var/spool/cron/deny).
# echo root > /etc/cron.allow# echo root > /etc/at.allow
Modify permissions on cron/at related filesSince all cron and at files are read and written to by processes that are SUID root, normal system users won't ever need direct access to the files so they should be secured to prevent tampering.
# chown -R root:root /etc/cron* /var/spool/cron# chmod -R go-rwx /etc/cron* /var/spool/cron
Additional Information
See Section 21.0, "Security," in the OES 2: Planning and Implementation Guide. The following sections are included:
• Section 21.1, Overview of OES Security Services • Section 21.2, Planning for Security • Section 21.3, Configuring and Administering Security• Section 21.4, Links to Product Security Considerations Sections (this section provides
links to security sections in the various OES 2 installation and administration guides for OES 2 services).
The Security table of contents for the OES 2 documentation is also an excellent resource for accessing security information. See
http://www.novell.com/documentation/oes2/security.html#security
0 - 0 91

Server Consolidation & Virtualization
Server Consolidation & Virtualization
In most cases, the newer hardware being used in today's data center is considerably more powerful than that used previously. In addition, OES 2 Linux is equipped to take full advantage of these powerful servers. It is therefore reasonable to expect to consolidate the services of multiple existing NetWare platforms onto a smaller number of physical OES 2 Linux servers. This will reduce hardware, infrastructure, administrative, and licensing costs.
ConsolidationNovell has two tools available to perform migration and consolidation tasks.
OES Migration Tool. Novell offers the OES Migration Tool which is installed by default on OES 2 Linux servers. All operations are performed from the destination Linux server. A workstation is not required. Novell recommends using this as the primary migration tool with OES 2 Linux.
Server Consolidation and Migration Tool (SCMT). This tool is designed for consolidation procedures and is quite flexible. SCMT 1.2 is required for use with OES 2. SCMT uses a workstation to configure and initiate operations. The actual file copy is server to server.
Collectively, these tools allow for the seamless transfer of data, services, identities, printers, rights, and trustees from many NetWare servers to a smaller number of newer NetWare or Linux servers. Data and services from standalone NetWare servers can also be migrated to NetWare or Linux cluster servers.
It should be noted that each of these tools, and in some cases individual migration scenarios, have minimum prerequisite configurations that must be met for the source NetWare server. Typically, the source NetWare server must be running NetWare 6.5 SP6 or SP7. Evaluate the source servers on a case-by-case basis to determine which need to be patched in-place as part of the migration process.
For example, if you have many existing NetWare servers performing similar tasks for different business units, Novell's strong recommendation is that the OES 2 Linux conversion be used as an opportunity to facilitate consolidation of similar file and print servers into a more powerful and possibly expanded cluster implementation. Special-purpose and single-purpose servers are more unique and do not readily lend themselves to consolidation. They do, however, lend themselves to XEN virtualization.
VirtualizationWhen SUSE Linux Enterprise Server 10 was released, it included the ability to run multiple self-contained virtual machines on a single physical server using XEN-based virtualization. This implementation provided out-of-the-box support for fully virtualized and paravirtualized Linux guest operating systems.
OES 2 adds the ability to run NetWare 6.5 SP7 as a paravirtualized guest operating system. You can also mix and match, hosting a SUSE Linux Enterprise server and a few NetWare servers, or vice versa on the same physical machine. In most cases, services run in a virtualized environment just as they do on a physical server and require no special configuration or other changes. You may, however, need to assign additional memory to the virtual machine depending on the load.
92 0

Server Consolidation & Virtualization
SUSE Linux Enterprise Server 10 , SP1 (which is included with OES 2):
• Fully supports XEN 3.0 virtualization on both 32- and 64-bit x86-based architectures • Offers support for paravirtualization through the XEN hypervisor (full virtualization if you
are running on Intel VT-x and AMD-V or using support through partners like VMware for XEN 3.0)
• Supports both Intel* VT and AMD-V chipsets (SUSE Linux Enterprise Server 10 was the first operating system of any type to support Intel VT and AMD-V).
• Offers graphical (YaST) and command-line virtual machine management tools for easy VM administration and configuration.
XEN and NetWare
With OES 2 XEN, the NetWare 6.5 SP7 operating system can run inside a virtual machine as a paravirtualized guest operating system on top of the virtual machine monitor (the XEN hypervisor). The virtual machine monitor runs between the server hardware and the SUSE Linux operating system kernel and has the responsibility for allocating resources to the virtualized guest operating systems. It presents them with virtual machines that act like the guest servers’ native architectures.
Administrators manage NetWare in a virtual machine much the same way they manage NetWare on a physical machine. Management tools such as ConsoleOne, iManager, and Novell Remote Manager all work the same. In addition, you inherit the ability to take advantage of Linux management utilities and console commands, because the virtual machine is running in a Linux environment.
One of the major benefits of running NetWare as a virtual machine is that you can run it on existing hardware or on chipsets specifically enabled for virtualization. Even if you choose to stay on existing hardware, and if your current NetWare servers have fairly low CPU utilization, you can probably host multiple NetWare virtual machines on one of your existing servers.
If preferred, you can take advantage of the newer 64-bit processors; you are no longer 32-bit bound. You can take full advantage of the extra processing power, added memory capabilities, and improved heat and energy savings offered by 64-bit dual-core and multi-core processors.
You can also host both Linux and NetWare as virtual machines on a single box. This can facilitate migration from NetWare to Linux by allowing you to preserve access to any NetWare-dependent applications and services while you transition your IT environment and skill sets to Linux. You can also leverage a response file created during the installation of a NetWare virtual machine to create multiple NetWare virtual machines.
XEN and Other Operating Systems
XEN can also support unmodified operating systems such as Windows XP, but requires the computer running the virtualization host server to support hardware-assisted virtualization technology such as AMD* Virtualization or Intel* Virtualization Technology. Some guest operating systems hosted in full virtualization mode can be configured to run XEN-based drivers instead of operating-system-specific drivers. This improves performance dramatically in guest operating systems.
In other words, you can run XEN
• In paravirtualization mode with older CPUs and for best performance• In full virtualization mode with Intel VT-x and AMD-V (to run Windows 2003 Server, for
example)
0 - 0 93

Server Consolidation & Virtualization
XEN management of VMs and Guest OSs is CIM-based and supports both local and remote management consoles. Some management capabilities have been provided via YaST (start up, shut down or suspend virtual machine operating system instances and migrate VMs from one physical server to another).
Candidates for Virtualization and ConsolidationMany different types of servers can be virtualized including Linux, Windows, and NetWare. We recommend setting up a proof-of-concept XEN server to host these guests, placing many of your single purpose servers in this environment, and then rolling them to production when you are satisfied that this alternative meets your expectations.
You will need to take a close look at the current workloads of the servers you plan to consolidate. Understanding server workloads can help you prevent overloading the host with multiple servers of the same type and potentially running out of CPU, memory, or disk bandwidth.
• Disk intensive? If you load up a single physical server with multiple virtual machines that are all extremely disk-intensive, you might use up the entire bandwidth of your disk array, or you could run into contention problems if the virtual machines use the same fibre channel or iSCSI array.
• CPU intensive? Likewise, you might not want to add several servers that are CPU-intensive to the same virtual host.
The following types of servers lend themselves to virtualization:
Field Servers – Does your network include field offices that host a significant number of services with different configuration requirements? If so, each of these different configurations could be virtualized into a single XEN OES 2 Linux physical server.
Specialized Servers – Do you have several servers with single or specialized purposes? Most don't require a great deal of hardware resources. These servers and services could be virtualized onto a small number of powerful XEN OES 2 Linux physical servers.
General Purpose Servers – Does your data center include numerous servers that provide the same or similar services, for example, general purpose file and print servers? This situation presents an opportunity to consolidate existing disparate file and print services into a cluster environment. If the clusters are migrated to OES 2 Linux on new hardware, a significant increase in performance and scalability could be realized.
Novell Fast Track Virtualization EngagementsIf you need help determining direction for your virtualization initiative, Novell Consulting offers a two-week Virtualization Fast Track Engagement that can help you investigate options.
Fast Track engagements typically focus on two basic environments, either XEN, VMware, or both, but options for considering other vendor software can be included as needed.
Fast Track Use Scenarios
The following use scenarios, whichever one best meets your needs, can be explored:
• Application virtualization - Provision applications in a full- or paravirtualized environment. Provide application portability and flexibility across hardware platforms.
94 0

Server Consolidation & Virtualization
• Consolidation - Consolidate physical servers and applications into one or more virtualized environments. Leverage excess data center capacity and improve response times by balancing computing loads across data center resources at peak times.
• Business Continuity - Provide fail-over for applications and/or hardware by moving a virtual machine from one box to another with only minimal disruption to service (not noticeable to service consumers).
• Migration - Migrate applications to another machine and/or operating system or from a physical to a virtual environment. This can include migrating server workloads to virtual farms so physical resources can be redeployed for other uses.
• Deployment - Deploy virtualized operating environments.
Additional InformationIf you are not familiar with the virtualization features of OES 2, we recommend the following resources as a starting point:
Virtualization Best Practice Guide. Recommendations for including virtualized servers in your environment are available in the "OES 2: Virtualization & Consolidation Best Practice Guide" available from the NetWare to Linux Migration Sources on the Novell Open Enterpirise Server Migration Web site.
Novell Connection magazine. This magazine has run a series of articles over the past several months, written by Ken Baker, that introduce new OES 2 features; some of these are devoted wholly to virtualization; others contain sections explaining the advantages of virtualization and how virtualization works on OES 2. We recommend them as a quick read and an excellent source for information. See the following:
• Sneak Peek • Migrating from NetWare to OES • Finalizing the Transition to Linux -The Wait Is Over • Managing NetWare on a Virtualized Machine
Novell Product Documentation. The product documentation is, of course, the primary source for information. See the following:
• Installing Hosts. For complete information about installing a virtual machine host and setting up virtual machines in general, see Virtualization: Getting Started, particularly section 3.0, "OES 2 Linux Virtual Machines."
• Installing Quest Operating Systems. For complete information about installing NetWare 6.5 SP7 and OES 2 Linux as guest operating systems, see Section 2, "NetWare Virtual Machines" and Section 3, "OES Linux Virtual Machines," in the Virtualization: Guest Operating System Guide.
• Running OES 2 Services on Virtual Machines. For information about installing and running OES 2 services on virtual machines, see the links in the Virtualization page of the OES 2 Online Documentation.
0 - 0 95

Appendix A: Preparing to Install OES 2
Appendix A: Preparing to Install OES 2
Instructions for installing OES 2 Linux are not provided in this section; instead, some of the options you will need to evaluate before you install are presented here.
There are several good sources for installation instructions, the following among them:
• OES 2: Linux Installation Guide • "Complete NetWare to OES Linux Migration Guide" - a Novell Cool Solutions AppNote
written by Mike Faris, Sr. Network Engineer at Aviall.
This is an excellent and succinct discussion of everything Mike did to migrate a remote location from NetWare to OES Linux. The Security Hardening section is particularly noteworthy. His installation notes are provided below.
http://www.novell.com/coolsolutions/appnote/19259.html
• "Installing Open Enterprise Server 2 into an Existing Tree" - A Cool Solutions AppNote written by Joe Harmon:
http://www.novell.com/coolsolutions/appnote/19585.html
• "Installing & Configuring an OES 2 AutoYaST Server" written by Gilson Melo.
http://www.novell.com/rc/docrepository/public/5010/basedocument.2007-10-02.8560630553/AutoYaST%20Installation%20Best%20Practices%20Guide_en.pdf
• "Installing and Configuring Samba on Open Enterprise Server 2" - a Novell Cool Solutions AppNote written by Joe Harmon:
http://www.novell.com/coolsolutions/appnote/19526.html
This AppNote walks you through the process of installing and configuring Samba after the installation of OES 2. The following topics are discussed:
• Installation • Configuring LUM • Configuring Universal Passwords • Configuring Samba • eDirectory Rights • Testing Samba Access
• "Setting Up Dynamic Storage Technology with Open Enterprise Server 2" - A Cool Solutions AppNote written by Joe Harmon:
http://www.novell.com/coolsolutions/appnote/19516.html
This AppNote explains how to set up Dynamic Storage Technology on OES 2. If you ever want to move older and/or unused data to older storage, remove unwanted JPG, MP3, ISO, and zip files from your system, or just have smaller backups, you'll want to read this AppNote. The following are discussed:
• Setting Up Dynamic Storage Technology • Retaining Trustees with Linux Backups • DST Policies • Using Policies • Backup and Restore with DST
96 0

Appendix A: Preparing to Install OES 2
Use the preparatory information in this section in conjunction with the installation methods referenced above.
Gather Installation InformationDuring the OES 2 installation process, you'll need to supply environment-specific information as indicated in the following table:
SUSE Version SLES 10 SP1
64 or 32-bit Intel
Memory Memory requirements for the hardware, memory size, and CPU
Hardware Manufacturer /model of the server hardware
Shell environment Default OK?
Volume Manager If so, which one: LVM or EVMS
IP Information Router, host name, netmask, default gateway, IP addresses, domain name, etc.
Storage Is local or SAN storage being used? If SAN, you'll need the storage array, model and HBA model and manufacturer.
Is multipathing an option? If so, will you be using PowerPath or other?
Booting Local or network? PXE or ISO?
File System See the File System section of this document for recommendations (dependent on the services the server will host)
X Windows Will X Windows be running? It's needed if an Oracle image is being created.
Disk Partitioning • How should partitions defined?
• How should left-over disk space (if any) be allocated?
• Are any specific mount points needed?
Miscellaneous installation options should be set as follows:
Parameter ValueMin UID 1000Max UID 65000Boot Loader GrubHW Clock set to UTCTime Zone set Appropriate time zoneMotd Set to Security SettingLastlog enabled YesDefault Runlevel 3Permission Security Secure (SUSE default)
0 - 0 97

Appendix A: Preparing to Install OES 2
Plan Disk Partitioning Review your disk partitioning requirements and the following recommendations before beginning the installation.
Disk Partitioning Recommendations
The following partitions, at a minimum, should be created. Additional partitions can be created as needed.
/boot Locate this partition at the start of the disk. It should be at least 8 MB or one cylinder./swap Set this to twice the RAM installed on the server—up to 1GB./(root)
Allow at least 4 GB. Allocate any remaining space not being used for NSS for other partitions (listed below).
/var Calculate space requirements, such as those for iFolder defaults, and add them to /var./opt Calculate requirements based on programs being used that store data in /opt. /home Calculate requirements for users' home directories./usr 4 GB or more./tmp/srv If using Web server or FTP; unnecessary otherwise
• Place user home directories on a separate partition.• Place system logs (usually in /var) on a separate partition.• Place application specific files on a separate partition.• If the log files are flooded (have too many entries, for whatever reason), neither the
service nor the system function optimally; therefore /var, which holds the log files, should be a separate partition. If logging is mandatory for an application, it should stop providing its service until it can log again.
• The /tmp directory can be flooded by accident or on purpose as it is writable by everyone, and therefore, could impact system and service stability as well.
• User /home and the service directories /srv should be separated for the same reason.• If you are building a mail server, note that mail spools can grow quite large. You'll need to
anticipate this when you are defining partition sizes.• Keeping /usr and /local separate makes updating easier if you want to reinstall the
system from scratch.
The following table indicates the recommended security flags for each partition. A question mark indicates that some software might not work if this flag is set.
Mount point Mount options//var nosuid/tmp nosuid/home nosuid, nodev, noexec?/srv nosuid?, nodev?, noexec?, ro? [after installation]/usr/local nosuid?, nodev?, ro? [after installation]
98 0

Appendix A: Preparing to Install OES 2
Please note that the installation process for proprietary software might fail if files in /tmp cannot be suid and devices may not work in /usr/local, etc. In such cases, remount those partitions temporarily with security deactivated.
Partitioning X86 Machines• Maximum of four primary partitions or three primary partitions and one extended partition
(an extended partition can hold 15 (SCSI) or 63 (IDE) logical partitions).• Each partition is assigned a partition type, depending on the file system planned for the
partition. • Each partition holds its own file system. • Partitions are mounted into the file system tree at mountpoints. The content of the
partition is visible to users below the mountpoint.• One of the partitions has to hold the root file system (other partitions can be integrated
into the root file system using the mount command).• The /etc/fstab file holds partition and mount point information to allow automatic mounting
at boot time.• Device files are used to address partitions; for example:
/dev/hda Master disk on the first IDE channel
/dev/hda1 First primary partition on that disk
/dev/hda5 First logical partition with an extended partition on that disk
/dev/sdb Second SCSI disk
/dev/sdb3 Third primary partition on that disk
Disk Partition Statistics
Use the following to get information about system storage usage:
df disk free prints information about partitions
df -h Provides information in Megabyte or Gigabyte as applicable(human readable format)
du Displays disk usage
du /dirA Displays size of each file and directory in dirA
du -sh Prints a summary of information in Megabyte or Gigabyte
Combining Hard Disk Partitions• Partitions from two or more hard disks can be combined using the logical volume
manager (LVM).• Partitions (physical volumes) can be combined into a volume group, which in turn, can be
divided into logical volumes that contain their own file systems.
Doing this increases flexibility as physical volumes can be easily added to the volume group if more storage space is needed. Logical volumes can be increased while the machine is up and running.
0 - 0 99

Appendix A: Preparing to Install OES 2
OES 2 Installation and Configuration NotesThis section was originally published as a Cool Solutions AppNote: "Complete NetWare to OES Linux Migration Guide" written by Mike Faris, Sr. Network Engineer at Aviall. It is reprinted here with permission. We recommend reviewing the complete AppNote before beginning your installation.
This section does NOT walk all the way through an OES 2 Installation. It is intended to specify critical changes that must be made to the default installation of OES Linux to ensure the migration is transparent to the user.
Process
When the installation reaches the Installations Settings screen, delete the recommended partitions and the partition table on the system disk so that the device can be marked to use EVMS as the volume manager instead of LVM.
Important. These partitioning instructions suggest combining the /boot partition and the / (root) partition on a single disk. This is NOT considered "best practice" except when you are configuring a workgroup class server that has only a single logical disk - usually provided through a RAID5. In this case, there is no convenient way to separate /boot and / onto dedicated disks. This means that having the boot partition under the control of EVMS is unavoidable.
1. Set up partitioning.
a. In the list of Installation Settings, select Partitioning.
b. In the Partitioning menu, select Create Custom Partition Setup, then click Next.
c. Select Custom Partition - for Experts, then click Next to open the Expert Partitioner options.
d. Select Expert > Delete Partition Table and Disk Label, then click Yes twice to continue through the Warning advisories.
This deletes the recommended partitions and the partition table on the system disk.
2. Create a primary partition on the system disk to use as the boot partition:
a. Click Create.
b. From the list of devices, select the device you want to use for the boot partition; for example, /dev/sda, then click OK.
c. Select Primary Partition, then click OK.
d. Select Format, then select the native Linux file system you want to use, such as Ext3. (A native Linux File System must be chosen for the system disk).
e. In the Size (End Value) field, specify 300 MB.
f. Set the mount point to /boot.
g. Click OK.
The partition appears as a logical device in the devices list, ex: /dev/sda1.
100 0

Appendix A: Preparing to Install OES 2
3. Create a second primary partition on the system disk to use for swap and system volumes as follows:
a. Click Create.
b. From the list of devices, select the device you want to use for the second primary partition, ex: /dev/sda, then click OK.
c. Select Primary Partition, then click OK.
d. Select Do Not Format, then select Linux LVM (0x8E) from the list of file system IDs.
e. In Size (End Value field), set the cylinder End value to the size of your disk minus what you want to use for swap; for example, 12 GB.
f. Leave unpartitioned space available.
g. Click OK.
The partition appears as a logical device in the devices list; for example, /dev/sda2.
4. Modify the volume management type from LVM to EVMS for the second primary partition you created in Step 3 as follows:
a. At the bottom of the page, click EVMS.
Available partitions for EVMS appear as devices under /dev/evms, such as /dev/evms/sda2.
b. In the EVMS Configurator, select the LVM partition created in Step 3, then click Create Container.
c. In the Create EVMS Container dialog box, select the partition, specify the container name (such as system), then click Add Volume to create the lvm/system container, where system is the container name.
d. Click OK.
The EVMS Configurator displays the lvm/system container you just created, its size, and the amount of free space.
5. Create the swap volume in the lvm/system container as follows:
a. Select lvm/system, then click Add.
b. In the Create Logical Volume dialog box, select Format, then select Swap from the File System drop-down menu.
• Specify swap as the volume name.• Specify the size of the swap volume as 2 GB. • Specify the mount point as swap.
c. Click OK.
6. Create the system volume in the lvm/system container as follows:
a. Select lvm/system, then click Add.
b. In the Create Logical Volume dialog box, select Format, then select the file system to use from the File System drop-down menu, such as Ext3.
0 - 0 101

Appendix A: Preparing to Install OES 2
c. In the Volume Name field:
• Specify a volume name, such as sysx.• Specify the Size of the system volume as the remaining space available in the
lvm/system partition by clicking Max. • Specify the mount point as / (root volume).
d. Click OK and then Next to return to the list of devices.
The table below is an example of the physical and logical devices you should see.
Device Size F Type Mount Start End Used By/dev/sda 149 GB ST34001A 0 19456 /dev/sda1 300 MB F Linux native /boot 0 38 /dev/sda2 20.0 GB Linux LVM 39 2649 EVMS
lvm/system
/dev/evms/lvm/system/sysx 14.9 GB F EVMS / - - /dev/evms/lvm/system/swap 2.0 GB F EVMS swap - -
e. Click Next to return to the Installation Settings page.
f. Disregard the message warning that you should not mix EVMS and non-EVMS partitions on the same device.
7. From the Installations Settings screen, click Software > Details, and then select any additional patterns you intend to install on this server.
8. Select the TimeZone for this server's location and then click and select a Runlevel.
Selecting Runlevel 3 (no GUI) provides better performance and better security, but many administrators prefer working with GUI over a command line interface. Note, too, that some products (GroupWise, for example) default to GUI installs.
9. Continue with the OES installation.
Important. If you are installing OES 1, after the install is complete and before you reboot the server, make sure to perform the mandatory post-install configuration of the related system settings to ensure that the system device functions properly under EVMS. Otherwise, the system fails to boot properly. This configuration process is automated for OES 2.
Post-Install Configuration (OES 1 only)
After the OES 1 installation is complete, you must perform the following tasks to ensure that the system device functions properly under EVMS.
Note: For OES 2 it is no longer necessary to modify fstab, disable boot.lvm and boot.md services, enable the boot.evms service and modify boot.evms script. These instructions are included only in case they prove convenient for you.
102 0

Appendix A: Preparing to Install OES 2
Edit the /etc/fstab File
When you boot the system, the kernel reads the /etc/fstab file to identify which file systems should be mounted and then mounts them. This file contains a table of file system information about the root (/), /boot, and swap partitions plus other partitions and file systems you want to mount.
The /boot partition is separate from the EVMS container where you placed the root (/) and swap partitions and is not managed by EVMS at this time. However, in the following steps, you disable boot.lvm and boot.md, then enable boot.evms. In effect, this forces EVMS to scan all the partitions at boot time, including the /boot partition, and it activates /boot under the /dev/evms directory. Therefore, this makes /boot a partition that is discovered by EVMS at startup, and requires that the device be listed under /dev/evms in the fstab file so it can be found when booting with boot.evms.
After the install, you must edit the /etc/fstab file to modify the location of the /boot partition so it is under the /dev/evms directory. For example, change /dev/sda1 to /dev/evms/sda1. Replace sda1 with the device name you used for your /boot partition.
Important: When working in the /etc/fstab file, do not leave any stray characters or spaces in the file. This is a configuration file and it is highly sensitive to such mistakes.
1. Open the /etc/fstab file in a text editor.
2. Locate the line that contains the /boot partition.
Look for a line similar to this: /dev/sda1 /boot ext3 defaults 1 1
3. In the Device Name column, modify the location of the /boot partition from /dev to /dev/evms so it can be managed by EVMS. Modify only the device name by adding /evms to the path:
/dev/evms/sda1 /boot ext3 defaults 1 1
4. Save the file, but do NOT reboot the server.
Disable boot.lvm and boot.md
Disable boot.lvm and boot.md so they do not run at boot time. EVMS now handles the boot.
1. In YaST, click System > Runlevel Editor > Expert Mode.
2. Select boot.lvm.
3. Click Set/Reset > Disable the Service.
4. Select boot.md.
5. Click Set/Reset > Disable the Service.
6. Click Finish, then click Yes, but do NOT reboot the server.
Enable the boot.evms Service
The boot.evms service should be enabled automatically after the install, but you should verify that it is enabled.
1. In YaST, click System > Runlevel Editor > Expert Mode.
0 - 0 103

Appendix A: Preparing to Install OES 2
2. Select boot.evms.
3. Click Set/Reset > Enable the Service.
The B runlevel option is automatically selected.
4. Click Finish, and then click Yes, but do NOT reboot the server.
Edit the /etc/init.d/boot.evms Script
1. Open the /etc/init.d/boot.evms script in a text editor.
2. Add the following lines to the Stop section:mount -n -o remount,rw /
echo -en "\nDeleting devices nodes"
rm -rf /dev/evms
mount -n -o remount,ro /
The Stop section looks like this after the edit:stop)
echo -n "Stopping EVMS"
mount -n -o remount,rw /
echo -en "\nDeleting devices nodes"
rm -rf /dev/evms
mount -n -o remount,ro /
rc_status -v
;;
3. Save the file.
Reboot the Server and Verify the System Services
After the post-install configuration is complete, reboot the server and make sure the server is operating as expected.
104 0

Appendix A: Preparing to Install OES 2
Building an AutoYaST Repository (Images) Linux installations provide many options about what to install, what hardware to configure, which network interfaces to configure, etc. If you are setting up a new Linux network with a large number of machines, the same issues need to be addressed and the same questions answered repeatedly. You can use AutoYaST or manually-created XML control files to create a baseline configuration that automates parameter and option selections so they only need to be specified once and can then be reused in providing an automated, even unattended, installation process to install multiple systems sharing the same environment and similar but not necessarily identical hardware. The XML control file can be modified for use in other scenarios (with different hardware or application sets, for example).
The XML control files can be created with AutoYaST or manually. In either case, the process is not full-proof and you'll need to fine-tune the XML script (with any text editor) to get the results you expect. AutoYaST is a powerful tool and often under-used, but make sure you review default settings for appropriateness in your environment. Any setting, command, or option that can be selected in YaST can be scripted for AutoYaST.
In deploying image files, you'll need to:
1. Set up a Master Installation server (resource sever) to hold the following:
• Network installation source files for SLES 10 SP1 and OES 2 Linux•
• YOU cache• AutoYaST XML file repository• Software install depot for other non-Novell software
2. Determine how to access the installation program.
• Manual install from CD• Copy ISOs on for later use and netinstall.sh• Use NFS exports
/srv/instserv
3. Create the XML control files and store them on the Master Installation server.
4. Set up network booting (PXE or ISO preferred).
5. Deploy the build in a test environment.
6. Deploy the build in a production environment.
Additional Information• "Customizing AutoYaST for OES 2 Installation," a Cool Solution article written by Mike
Faris, Sr. Network Engineer at Aviall. Mike notes that "the problem with previous versions of AutoYaST [was their] lack of true server uniqueness as eDirectory servers demand. Which means if you used AutoYaST you couldn't configure eDirectory, Hostname, IP, server context. These tasks still needed to be configured post-installation.
0 - 0 105

Appendix A: Preparing to Install OES 2
"Beginning with SLES10 and SUSE 10.1 a new option for AutoYaST was added. The ability to 'ask' a user for this data during the installation, thus automating these post-installation tasks."To take advantage of this new feature, Mike "created an installation server with both SLES 10 SP1 and OES 2 and used TFTP and NFS as protocols so [he] could use a PXE boot on the new servers. . . . [Mike] selected all the options [he wanted for his] organization, including partitioning, software, grub, etc." Refer to the complete article for additional details: http://www.novell.com/coolsolutions/feature/19871.html
• "Novell OES 2 AutoYaST Server Configuration," a Cool Solution article written by Gilson Melo. This document includes instructions for setting up an AutoYaST XML file to facilitate network (remote) installations. It can be accessed from the following:
• "Automating OES 2 Installation Using PXE Boot and AutoYaST," a Cool Solutions article by Mike Faris, Sr. Network Engineer at Aviall.Mike's article provides instructions for Installing OES 2 using PXE Boot and AutoYaST to eliminate the need for boot media, installation media, and inconsistent server installations. The article can be located at: http://www.novell.com/coolsolutions/feature/19873.html
• Sample XML files can be downloaded from Forge:
http://forgeftp.novell.com/yast/doc/
106 0

Copyright © 2022 FDOKUMEN