MES Royalty Accounting
70
Note: It is important to read this manual in order to use the Label Accounting properly. MES Royalty Accounting Manual
-
Upload
khangminh22 -
Category
Documents
-
view
0 -
download
0
Transcript of MES Royalty Accounting

Note: It is important to read this manual in order to use the Label Accounting properly.
MES Royalty Accounting Manual

REBEAT Digital – Manual Label Accounting – Last updated on 26 March 2020 Page 2 of 70
Index
1 First Steps ........................................................................................................................................ 4 1.1 Start the Label Accounting............................................................................................... 4 1.2 Change settings ................................................................................................................ 4
1.2.1 Template for contract partners ........................................................................... 5 1.2.2 Template for Email .............................................................................................. 6 1.2.3 Settings for your email account ........................................................................... 8 1.2.4 Calculation basis .................................................................................................. 8 1.2.5 Select Currency .................................................................................................... 9 1.2.6 Accounting ........................................................................................................... 9 1.2.7 Artist Dashboard ................................................................................................ 11
1.3 Create contracting partner ............................................................................................ 12 1.3.1 Create contracting partners individually ........................................................... 13 1.3.2 Import contracting partners .............................................................................. 14
1.4 Create contracts ............................................................................................................ 15 1.4.1 Accounting model .............................................................................................. 15 1.4.2 Contract Term .................................................................................................... 15 1.4.3 Assign contracting partners to a contract ......................................................... 17 1.4.4 Contractual Conditions ...................................................................................... 17 1.4.5 Selecting the Tracks ........................................................................................... 19
1.5 Template for statements ............................................................................................... 20 1.6 Quantity-based settings ................................................................................................. 22
Accounting ............................................................................................................................................. 23 1.7 Start Accounting Preview .............................................................................................. 23 1.8 Check the Preview ......................................................................................................... 23 1.9 Start the Accounting ...................................................................................................... 24 1.10 Send Statements via Email ............................................................................................ 24 1.11 Rollback (delete a generated accounting) ..................................................................... 24
2 Additional Module Subaccounting ................................................................................................ 26 2.1 Information about REBEAT Subaccounting ................................................................... 26 2.2 Generating new sub-labels and -artists ......................................................................... 26 2.3 Contracts for new sub-labels and –artists ..................................................................... 28 2.4 Accounting for Sub-labels and -artists ........................................................................... 29
3 Statistics ........................................................................................................................................ 30 3.1 About Label Accounting Statistics ................................................................................. 30 3.2 Functionality .................................................................................................................. 31
3.2.1 Main Menu ........................................................................................................ 31 3.2.2 Navigation Panel ................................................................................................ 31 3.2.3 Quick Access Toolbar ......................................................................................... 32 3.2.4 Multi-function Toolbar ...................................................................................... 32 3.2.5 Data Chart .......................................................................................................... 33
3.3 Contracting Statistics ..................................................................................................... 34 3.4 Accounting Statistics ...................................................................................................... 34

REBEAT Digital – Manual Label Accounting – Last updated on 26 March 2020 Page 3 of 70
4 Additional Module Mechanical Royalties ..................................................................................... 35 4.1 Information about REBEAT Mechanical Royalties ......................................................... 35 4.2 Generating new publishers/authors .............................................................................. 35 4.3 Assigning a publisher to a product ................................................................................ 36
5 Additional Module Revenue Import ............................................................................................. 37 5.1 Information about REBEAT Revenue Import ................................................................. 37 5.2 Structure and organization ............................................................................................ 37
5.2.1 Licensing ............................................................................................................ 37 5.2.2 Physical Media Products .................................................................................... 41
5.3 Sales Import Wizard ....................................................................................................... 48 5.4 Product Import Wizard .................................................................................................. 53 5.5 Sales Table ..................................................................................................................... 59
5.5.1 Entering new data.............................................................................................. 59 5.5.2 Changing and deleting entries ........................................................................... 62 5.5.3 Save, Load .......................................................................................................... 62 5.5.4 Filter data ........................................................................................................... 62 5.5.5 Change display ................................................................................................... 63
6 Cost accounting ............................................................................................................................. 66 6.1 Accounts ........................................................................................................................ 66
6.1.1 Account number ................................................................................................ 67 6.1.2 Designation ........................................................................................................ 67 6.1.3 Account type ...................................................................................................... 67 6.1.4 Description ......................................................................................................... 67 6.1.5 Standard text ..................................................................................................... 67
6.2 Booking .......................................................................................................................... 67 6.2.1 Number .............................................................................................................. 68 6.2.2 Sales date ........................................................................................................... 68 6.2.3 Accounting period ............................................................................................. 68 6.2.4 Account .............................................................................................................. 68 6.2.5 Cost unit ............................................................................................................. 68 6.2.6 Cost center ......................................................................................................... 68 6.2.7 Project ................................................................................................................ 68 6.2.8 Unit .................................................................................................................... 68 6.2.9 Amount .............................................................................................................. 68 6.2.10 Configuration ................................................................................................... 68
6.3 Configuration ................................................................................................................. 68 6.3.1 Designation ........................................................................................................ 69 6.3.2 Description ......................................................................................................... 69 6.3.3 Percentage Payable ........................................................................................... 69 6.3.4 Deduction 1 ....................................................................................................... 69 6.3.5 Deduction 2 ....................................................................................................... 69 6.3.6 Deduction 3 ....................................................................................................... 69 6.3.7 Formula/rule ...................................................................................................... 69
6.4 Account-related conditions ........................................................................................... 69 6.5 Accounting ..................................................................................................................... 70
6.5.1 Preview .............................................................................................................. 70 6.5.2 Finalization ......................................................................................................... 70

REBEAT Digital – Manual Label Accounting – Last updated on 26 March 2020 Page 4 of 70
1 First Steps
1.1 Start the Label Accounting
To start the Label Accounting in your REBEAT Music Enterprise Software please click the menu item “Accounting” and then select “Label Accounting”. In the course of the start of the Label Accounting the software will check if you have uploaded any new products since you last session. If so, then the metadata of these products will be imported into the Label Accounting automatically. The first screen of the Label Accounting shows the Dashboard. This is where you can see your sales data and accounting history, as well as your contract partners and the products you have uploaded with REBEAT Digital so far. The calculation basis of the top catalogue is the accounting data since the first sale has happened. This time period can’t be changed.
1.2 Change settings
Before you can start to use the Label Accounting there are some settings you need to specify. To do so, please click on the menu item “Extras” and select “Global Settings”.

REBEAT Digital – Manual Label Accounting – Last updated on 26 March 2020 Page 5 of 70
1.2.1 Template for contract partners
One of the first steps is to create your contracting partners, e.g. by importing them from a .csv file. In order to do this, you need to specify which information about your contracting partners you wish to select and use during the accounting process (e.g. first name, last name, date of birth, etc.) Define additional fields In case you wish to add additional fields, all you need to do is define a unique ID in the row “ID” and then key in the applicable definition in the corresponding row “Field Name”. Note: IDs need to be unique, whereas one and the same definition can be used several times in the row “field name”. Finally, the third row “Field Type” enables you to specify the format of the entry (e.g. date, email address, single or multi-line text, phone number, etc.). Of course you can change or delete any of these fields at any time - even after you have saved contracting partners. It is recommended to use a meaningful entry in the row “field name” as this will be of importance for the succeeding setup of contracting partners (see the following image): Rearrange Field order: The order of the specified fields can easily be rearranged via Drag&Drop of the ID field. Simply click on the required ID field, hold down the mouse button, move the field to the desired position and then release the mouse button.

REBEAT Digital – Manual Label Accounting – Last updated on 26 March 2020 Page 6 of 70
Delete fields: To delete a field from the list, select the corresponding line and then hit the “Delete”-symbol (see the following image):
Save settings: Once you have finished the setup of your template click on the floppy disk symbol to save your settings (see the following image):
1.2.2 Template for Email
In one of the later steps (explained in detail in chapter 1.3 ) you will create contracting partners and select the language for correspondence with them. This language setup will in turn influence the sending of email statements at the end of the accounting process since the text in this email will be based on the language specified. However, in order to enable all these future steps, at first it is necessary to create an individual text template for every language. This chapter will describe in detail how to set up such a language template. Please open the tabstrip “Template Language and Email”:
Add language Click on the button „Choose language“ to include additional languages in your template. The languages you select here will later be available in the setup of your contracting partners. Once you have selected all required languages please close the window „Choose Language“. Your selection will automatically be saved.
REBEAT Digital – Manual Label Accounting – Last updated on 26 March 2020 Page 7 of 70
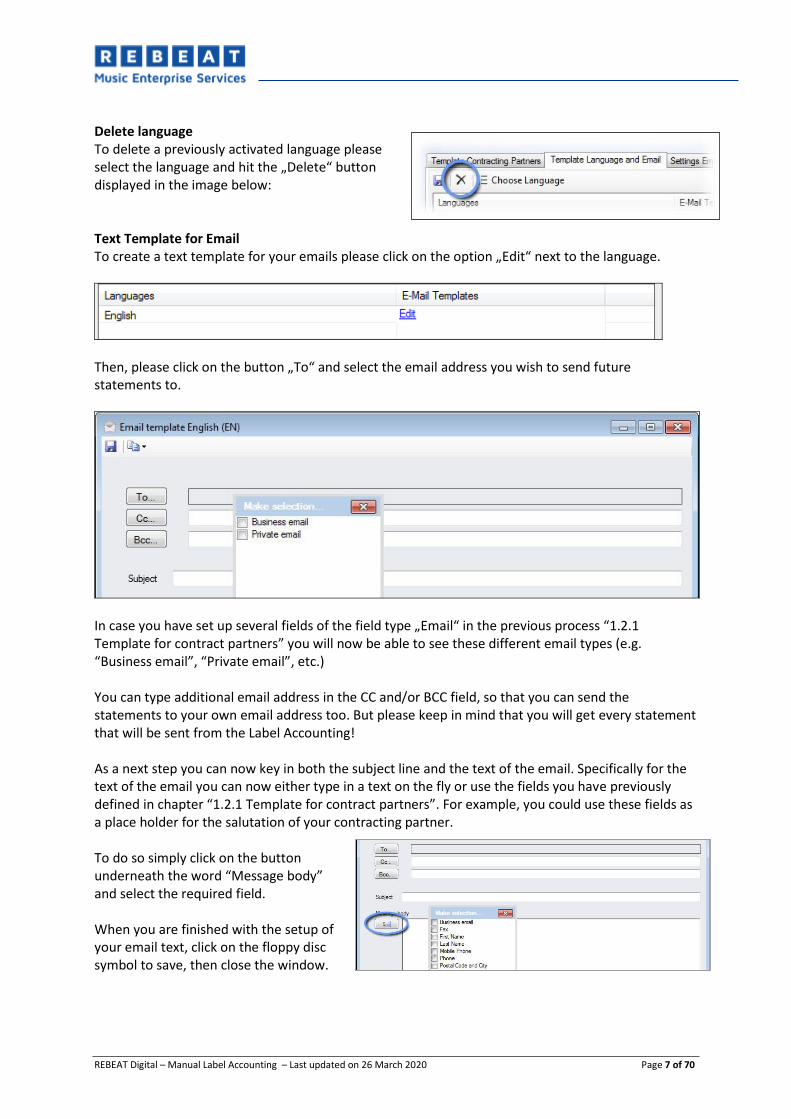
Delete language To delete a previously activated language please select the language and hit the „Delete“ button displayed in the image below: Text Template for Email To create a text template for your emails please click on the option „Edit“ next to the language.
Then, please click on the button „To“ and select the email address you wish to send future statements to.
In case you have set up several fields of the field type „Email“ in the previous process “1.2.1 Template for contract partners” you will now be able to see these different email types (e.g. “Business email”, “Private email”, etc.) You can type additional email address in the CC and/or BCC field, so that you can send the statements to your own email address too. But please keep in mind that you will get every statement that will be sent from the Label Accounting! As a next step you can now key in both the subject line and the text of the email. Specifically for the text of the email you can now either type in a text on the fly or use the fields you have previously defined in chapter “1.2.1 Template for contract partners”. For example, you could use these fields as a place holder for the salutation of your contracting partner. To do so simply click on the button underneath the word “Message body” and select the required field. When you are finished with the setup of your email text, click on the floppy disc symbol to save, then close the window.

REBEAT Digital – Manual Label Accounting – Last updated on 26 March 2020 Page 8 of 70
1.2.3 Settings for your email account
Directly from the Label Accounting you can send out statements to your artists via your personal email address (e.g. Hotmail, Yahoo, gmx, etc.) To do so, please open the tabstrip named “Settings Email Account” and key in the required information. Once you are finished, click on the “Save Settings” button in order to test your email setup and save the email settings. Note: information on the settings of most common email servers can be found on the Internet or directly on the websites of the respective mail services. Since these settings are different from provider to provider our support team will not be able to help you here. In case of questions we recommend to directly contact your system administrator or email provider. Thanks for your understanding.
1.2.4 Calculation basis
In this tabstrip you can specify the payment type to serve as the calculation basis for your revenue accounting.

REBEAT Digital – Manual Label Accounting – Last updated on 26 March 2020 Page 9 of 70
1.2.5 Select Currency
Here you can select the currency you want to be used on the accounting statements for your customers. By default, the system will display today’s currency exchange rate of the European Central Bank. You can change this value anytime. If you want to restore the day’s exchange rate, click the “Refresh” button right next to the input field. Please save every change made for the currency settings.
1.2.6 Accounting
Here you can adjust the settings for the label accounting. These settings are global. Some of them can be overwritten individually on a contract or contractual partner. It is not necessary to save these entries, as they will be saved automatically.

REBEAT Digital – Manual Label Accounting – Last updated on 26 March 2020 Page 10 of 70
1.2.6.1 Accounting model
Here you can set up the accounting or contract model of you company. If your contract model is turnover-based, which means the revenues are distributed to the contractual partners depending on their turnover, please select the model „turnover-based“. If revenues are distributed depending on sold units, please select the model „quantity-based“. With the link „settings“ you can set up the grading of units based on sales type. You can find more information in the chapter Quantity-based settings. The accounting model can be overwritten individually on each contract.
1.2.6.2 Payment Threshold
Here you can set a minimum limit that your contractual partner needs to reach before payout. The setting will be visible on the accounting PDF file and will be shown to your contractual partner with a balance calculation. The minimum limit can be set for each contractual partner individually. It is not necessary to save these entries, as they will be saved automatically.
1.2.6.3 Accounting start
Please select the earliest month and year that should be included in your accounting. If you are not sure, please select January 2010.
REBEAT Digital – Manual Label Accounting – Last updated on 26 March 2020 Page 11 of 70
1.2.6.4 Bank account
You can enter your bank account information here. This information is important, if you want to automatize collective transfer with the help of a bank file in your direct banking. Currently it is only possible to create a bank file for the ELBA system (Austria). If you would like to add your bank, please contact our support. We will check with your bank whether an automation is possible, and if so, we will include it in the system.
1.2.7 Artist Dashboard
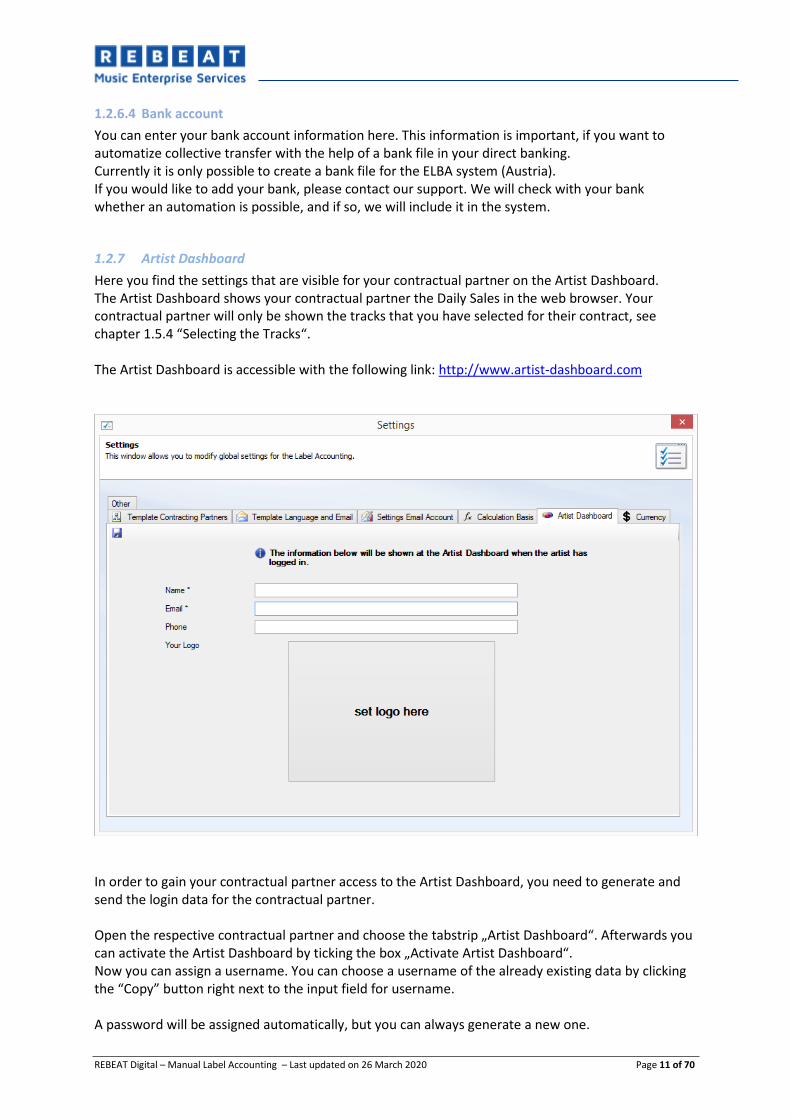
Here you find the settings that are visible for your contractual partner on the Artist Dashboard. The Artist Dashboard shows your contractual partner the Daily Sales in the web browser. Your contractual partner will only be shown the tracks that you have selected for their contract, see chapter 1.5.4 “Selecting the Tracks“. The Artist Dashboard is accessible with the following link: http://www.artist-dashboard.com
In order to gain your contractual partner access to the Artist Dashboard, you need to generate and send the login data for the contractual partner. Open the respective contractual partner and choose the tabstrip „Artist Dashboard“. Afterwards you can activate the Artist Dashboard by ticking the box „Activate Artist Dashboard“. Now you can assign a username. You can choose a username of the already existing data by clicking the “Copy” button right next to the input field for username. A password will be assigned automatically, but you can always generate a new one.

REBEAT Digital – Manual Label Accounting – Last updated on 26 March 2020 Page 12 of 70
Afterward you can check the access by clicking „show preview“. Your standard web browser will open. You will be redirected to http://www.artist-dashboard.com automatically and will be logged in with the set login data. After a successful login, you can send the login data to your contractual partner, if you have an email contact address. You need appropriate settings for sending mails to your contractual partners. See chapter 1.3.2 “Template for Email“ and chapter 1.3.3 “Settings for your email account“. The Artist Dashboard shows no references to REBEAT Digital at all and is only available in English.
1.3 Create contracting partner
Up until now, your list of contracting parties is still empty. To create new contracting partners you can either set them up individually and one by one, or you can import contracting partners via a pre-existing .csv file. Both options are described in the following steps.
REBEAT Digital – Manual Label Accounting – Last updated on 26 March 2020 Page 13 of 70
1.3.1 Create contracting partners individually
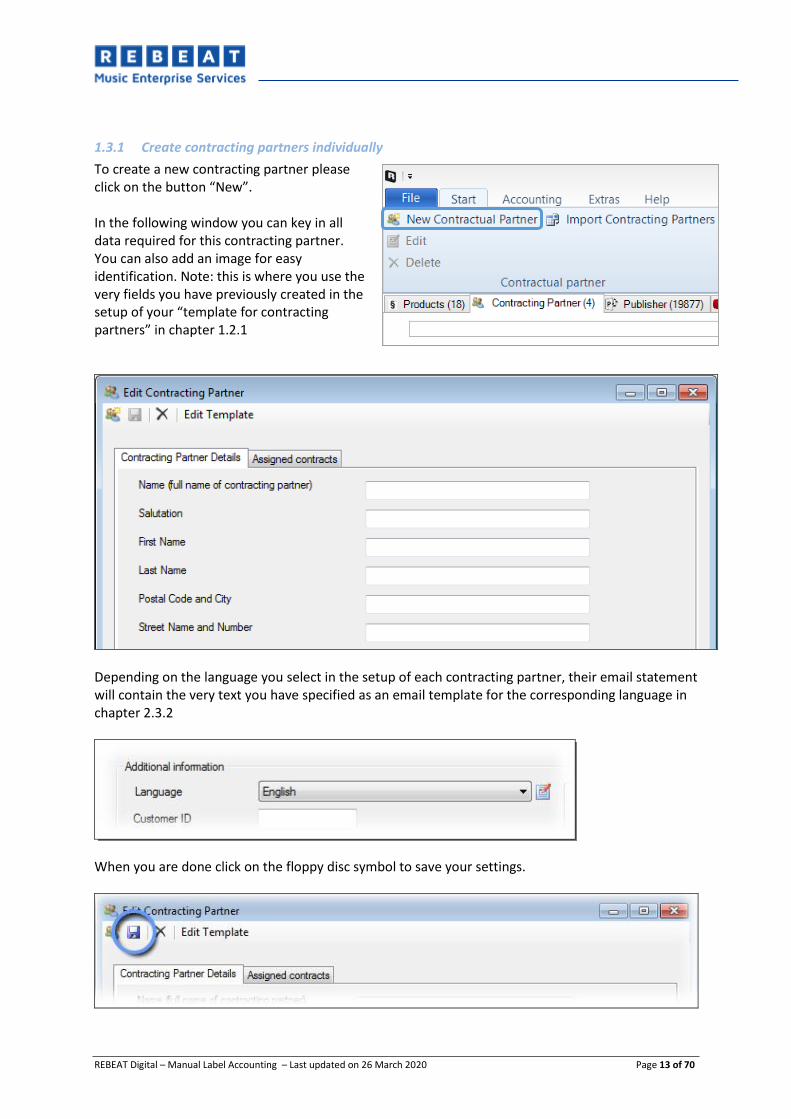
To create a new contracting partner please click on the button “New”. In the following window you can key in all data required for this contracting partner. You can also add an image for easy identification. Note: this is where you use the very fields you have previously created in the setup of your “template for contracting partners” in chapter 1.2.1
Depending on the language you select in the setup of each contracting partner, their email statement will contain the very text you have specified as an email template for the corresponding language in chapter 2.3.2
When you are done click on the floppy disc symbol to save your settings.

REBEAT Digital – Manual Label Accounting – Last updated on 26 March 2020 Page 14 of 70
You can now create additional contracting partners by clicking on the „new partner“ button (see image below):
Please close the “Edit Contracting Partner” window once you are finished with creating your contracting partners. In the “Contracting Partner” tabstrip you can now see an overview of all contracting partners you have created.
1.3.2 Import contracting partners
As an alternative to the manual creation of your contracting partners you can also import contracting partners from a pre-existing .csv (comma separated values) file. For example, you could export a list of contacts from your MS Outlook mail program into a .csv file, which you then import into the Label Accounting of the REBEAT Music Enterprise Software. Instructions on how to export contacts from programs like MS Outlook can be found in the respective program’s help menu or on the internet. Please note that our support team cannot help you in the process of creating .csv files in third-party applications. Thanks for your understanding. To import your .csv file into the Label accounting please open the menu „Start“ and select the option „Import Contracting Partners“
Please follow the instructions of the import wizard which will guide you through the process of importing your contract partners step by step.

REBEAT Digital – Manual Label Accounting – Last updated on 26 March 2020 Page 15 of 70
1.4 Create contracts
At this point, you have now both successfully imported your REBEAT products into the Label Accounting and created your contracting partners. In the next step you will create contracts for your individual products. Each contract will include all conditions and revenue shares you have agreed upon with the corresponding contracting partners, e.g. the contract term, the applicable revenue shares, etc. To create a new contract for a product please select the product from the list in the „Products“ tabstrip. In the window to the right you can now set up the applicable contractual conditions for this product.
1.4.1 Accounting model
Here you can set up the accounting model on contract level. By default, the globally selected accounting model is set up. See chapter Accounting model.
1.4.2 Contract Term
To specify the term of the contract please select the starting date of the contract term.
In case you do not want to specify an end date for the contract simply activate the check box “for the time being” In case you wish to specify an end date for the contract please deactivate the check box “for the time being” and instead select an end date for the contract.

REBEAT Digital – Manual Label Accounting – Last updated on 26 March 2020 Page 16 of 70
Then click on the disk icon to save your settings. If required, you can also key in additional information on this contract and even add files (e.g. a scan of the original contract document) by clicking on the “Files” button. Additional contract versions with a different contract term At any time, you can add an additional contract version with a different contract term. However, please note that the time frame of this new version must not overlap with the term specified in the previous version of the contract. For example, if you have already created a contract with a term ranging from 01/2010 to 12/2010 you could add an additional contract version with a term ranging from 01/2011 to 12/2011. To do so please click on the button „New Version“.
Note: it is recommended to first finish all settings of the previous contract versions. Otherwise you will have to specify all conditions for each and every contract version, which could lead to mistakes. Timeline A graphic display of the contract terms will provide you with an overview on the different contract terms you have set up for the product. You can access this overview by clicking on the button “Timeline”.

REBEAT Digital – Manual Label Accounting – Last updated on 26 March 2020 Page 17 of 70
1.4.3 Assign contracting partners to a contract
Important: Before you start the accounting process please ensure that each contract has at least one contracting partner assigned. In case you have no contracting partner to assign to a contract because the whole turnover shall remain with you, then simply create a contracting partner under your own name. Assign the contracting partner that represents yourself to the contract with a contractual condition of 0 % for each track. Important: Do not set the revenue share to 100 %, because this would distort the calculation of your share To assign different contracting partners to a contract please click on the “+” button highlighted in the image below: Then select the applicable contracting partners for this contract. You can select several contracting partners, all of which you have created in chapter 1.3 “Create contracting partner”. Once you have selected all contracting partners for this contract please close the “Select Contracting Partners” window. The system will automatically save your selection.
1.4.4 Contractual Conditions
1.4.4.1 Account-related conditions
The tab “account-related conditions” refers to the cost accounting and is explained in more detail in the chapter “Account-related conditions” in accordance with the cost accounting. If you do not wish to use the cost accounting, you can ignore this tab.
1.4.4.2 Product-related conditions
For each and every track of the product you can now specify the royalty share that each contracting partner you have assigned shall receive. Simply click on the respective contracting partner and type in the revenue share percentage for each track. Percentage Please click on the respective contractual partner and enter the percentage per track.

REBEAT Digital – Manual Label Accounting – Last updated on 26 March 2020 Page 18 of 70
Grading If required, you can specify a grading in revenue shares. This means that a contracting partner will only receive the selected share once the revenues for the track have reached a certain threshold. Territory In addition, it is possible to specify the revenue share for your contracting partner for each and every territory individually. By default, the shares will be calculated on the basis of worldwide revenues. To change this setting, click on the “worldwide” button and select the required territory. Additional contractual conditions for a track Should you wish to add additional contractual conditions to a track all you have to do is create a new line by clicking on the button at the beginning of each line (see image below):
Now you can specify additional contractual conditions, e.g. a different revenue share in a specific country, additional thresholds, etc.
Delete contractual conditions In order to delete contractual conditions please click on the „delete“ button (see image below):
Copy contractual conditions to other tracks With just a few mouse clicks you can copy the contractual conditions of an individual track to all other tracks of the respective product. To do so please click on the “copy” button as displayed in the image below:
Note: this action will delete all contractual conditions you have previously specified for these tracks.

REBEAT Digital – Manual Label Accounting – Last updated on 26 March 2020 Page 19 of 70
Copy contractual conditions to other products The button “Copy to other contracts” enables you to assign previously specified contracting partners and contractual conditions to other products in your list. To do so, please select the source product from which you want to copy the contracting partners and contractual conditions. Then click on the button “Copy to other Contracts” and follow the instructions of the assistant wizard.
Note: this action will only copy contracting partners and contractual conditions, but it will NOT copy the term of a contract. In other words, it is still necessary to set up the contract term for each and every contract individually (see chapter 1.4.2 “Contract Term” in this manual). Important: Please take care that you have set up a contract, that you have assigned contract partners and that you have specified contractual conditions (revenue shares, territory, contract term, etc.) for each and every product. Otherwise it will not be possible to run the accounting process.
1.4.5 Selecting the Tracks
Select the relevant tracks for each contractual partner. Only the selected tracks will be considered for the accounting process. This selection also serves as activation for the Daily Sales in the Artist Dashboard. You can check or uncheck all tracks by ticking or unticking the box „Check all“ (see figure below). Tracks that have not been selected will be portrayed distinctively, in order to enable a quick overview.

REBEAT Digital – Manual Label Accounting – Last updated on 26 March 2020 Page 20 of 70
1.5 Template for statements
At the end of the accounting process you can send statements to your contracting partners. The layout of such a statement can be modified to a large extend. For example, you can add your own logo. In order to edit the statement template, click on the menu “Accounting” and then “Edit Statement Template”.
Note: There is only one statement template for all languages. That means, no matter what language you have set for your contracting partners, they all get the same template. That is why all parts of the templates which you cannot edit (such as Customer No or Date) are in English. Currently you can select two different statement styles: Classic or Template 1. We recommend “Template 1”, as it has a more modern design. Click on the drop-down list in the menu bar and make your selection.
You can also define decimal places, color scheme and display here.
You can view your statement template in advance by clicking on the preview symbol . Header and footer Use your own text in the header and footer. Double-click into the area where you would like to have the text placed and then enter the text.

REBEAT Digital – Manual Label Accounting – Last updated on 26 March 2020 Page 21 of 70
Your own logo To add your own logo to the statement template just double-click at the icon in the header.
Recipient Add all required fields for the recipient by double-clicking at the icon in the recipient area.
Then select the fields in the same order you would like to have them placed in the recipient area.
When you have finished editing the statement template click on Save and close the window.

REBEAT Digital – Manual Label Accounting – Last updated on 26 March 2020 Page 22 of 70
1.6 Quantity-based settings
Here you can set up the prices of the grading of units based on sales type.
Example: For a physical sale EUR 2,50 are set up as a calculation base for pay-out for the artist. A digital album sale has the same weighting, therefore the equivalent unit is “1”, while a track download is weighted with “10” and a stream with “10000”. This means it would take 10000 streams of a track in order to pay out EUR 2,50. If you need to add further grading, you can add another line by clicking the “add symbol”. You can apply changes in all columns, except “equivalent units”. This column defines the basis with the value “1”. Make sure to save your changes before closing the window.

REBEAT Digital – Manual Label Accounting – Last updated on 26 March 2020 Page 23 of 70
2 Accounting Important: Before you start the accounting process please ensure that each contract has at least one contracting partner assigned. Furthermore, please make sure that the contract term of each product covers the whole accounting period you are going to select. There must be no time gaps between the various contract versions. Otherwise it is not possible to start the accounting process! Please note: Once you have finished the accounting process the affected contracts (contract term, contractual conditions, contracting partners) can’t be edited anymore.
2.1 Start Accounting Preview
In order to start the accounting, you have to start the preview. To do so please click at the menu item “Accounting” and then “Accounting”. Then define the end time of the accounting. Note: You can’t change the start time of the accounting! To avoid time gaps in the accounting it has to start right after the previous accounting. The very first accounting always starts with January 2010. After you have specified the end time, click on “Generate Preview”.
2.2 Check the Preview
You will see a preview of your accounting data for verification. By clicking at the option ‘Start Accounting’ the accounting will be generated. See next chapter. In case that the option ‘Start Accounting’ is not available, but the option ‘Show Details of Unassigned Contracts’ means that some contract details are missing. Before you can start the accounting process keep in mind that each contract has to have at least one contracting partner assigned. Furthermore, please make sure that the contract term of each product covers the whole accounting period you are going to select. There must be no time gaps between the various contract versions. To get a list of the products where some contract details are missing, click at the option ‘Show Details of Unassigned Contracts’.

REBEAT Digital – Manual Label Accounting – Last updated on 26 March 2020 Page 24 of 70
Then close the preview and check the details of the contract of the listed products. Once you have edited the contract details please start the preview again.
2.3 Start the Accounting
Once you have checked the data of the preview you can start the accounting by clicking at the option “Start Accounting”. Choose the folder where you would like your exported statements (pdf file) and accounting details (csv file) to be saved. Click ‘Next’ and check the data. Then click ‚Start Now‘. The accounting for the chosen time period will be generated.
2.4 Send Statements via Email
Once the accounting has been generated, you can email the statements to your contracting partner directly from the Label Accounting. This option is only available if you have made the settings for your email account successfully (see chapter 1.2.3).
Of course you can send the statements with your own email program. You can find the statements in the folder you have chosen in the chapter before. Close the accounting window when you have finished the accounting process.
2.5 Rollback (delete a generated accounting)
To undo (delete) an accounting, go to the “Accounting” and choose “Accounting History”.

REBEAT Digital – Manual Label Accounting – Last updated on 26 March 2020 Page 25 of 70
In the Accounting history overview you can see the accounting processes which you have finished so far. You can undo any accounting by selecting the applicable accounting row and clicking the delete button. For better traceability, all statements (pdf files) and accounting data (csv files) that have been created so far will not be deleted. Furthermore, the numbering sequence of the statements will be continued. So despite the rollback, there will never be two statements with the same number for a contracting partner.

REBEAT Digital – Manual Label Accounting – Last updated on 26 March 2020 Page 26 of 70
3 Additional Module Subaccounting
3.1 Information about REBEAT Subaccounting
Subaccounting is an optional, additional module for the REBEAT Digital Business Edition. This module enables REBEAT users to take over the individual accounting from third party labels for sales made through REBEAT Digital distribution. The accounting process proceeds fully automatic as normal and can be used for an infinite number of sub-labels and artists, on any number of levels. The ingenious thing about it: The sub-labels receive the accounting with a customized layout, directly from the REBEAT user, without any reference to REBEAT itself.
3.2 Generating new sub-labels and -artists
New sub-labels and –artists can be generated with the button „New“ (see chapter 1.4.1):
In the subsequent window you can add all relevant data about this contracting partner. Important: If the accounting statements of a sub-label have to be based on an independent layout, you need to create this layout now. Choose “Invoice Layout Template” from the dropdown menu and switch the standard option “Default” to the name of your newly created contract partner. Then click on the “Edit” icon on the right.

REBEAT Digital – Manual Label Accounting – Last updated on 26 March 2020 Page 27 of 70
By clicking on the “Edit“ Icon, you can create the statement layout for the chosen sub-label (see chapter 1.6). Don’t forget to save the finished layout. After you have entered all the data, click „save“, in order to save the newly created sub-label:
You can generate new artists in the same way, who can then be assigned to the sub-label that they should receive their accounting from.

REBEAT Digital – Manual Label Accounting – Last updated on 26 March 2020 Page 28 of 70
3.3 Contracts for new sub-labels and –artists
After you have generated your sub-labels and –artists, you need to assign them to the respective products and in doing that, generate new contracts. First, the sub-labels need to be assigned to the contracts as new contracting partners (see chapter 1.5.2). Choose a product from the product list on the right window frame and add it with the “+” button to a sub-label:
In order to add artists to this sub-label, go to the tabstrip “Contracting Partner“ on the right, choose the respective artist and add it with the “+” button directly to the recently added sub-label. Then you can drag and drop the artist to the desired level:
Repeat this process with as many artists as necessary, in order to map the desired contract conditions for this product. Subaccounting enables you to generate an infinite number of levels for sub-labels and artists. The result will be a tree diagram, which depicts the assignment of artists to sub-labels for the chosen product: Now you can define the percentage of the sales that each sub-label and its artists should receive per track individually. A detailed description of this procedure can be found in chapter 1.5.3.
REBEAT Digital – Manual Label Accounting – Last updated on 26 March 2020 Page 29 of 70
Remember to save the finished contract version:
If created contract conditions with sub-labels and artists are valid for more than one product, they can be duplicated easily (see chapter 1.5.3).
3.4 Accounting for Sub-labels and -artists
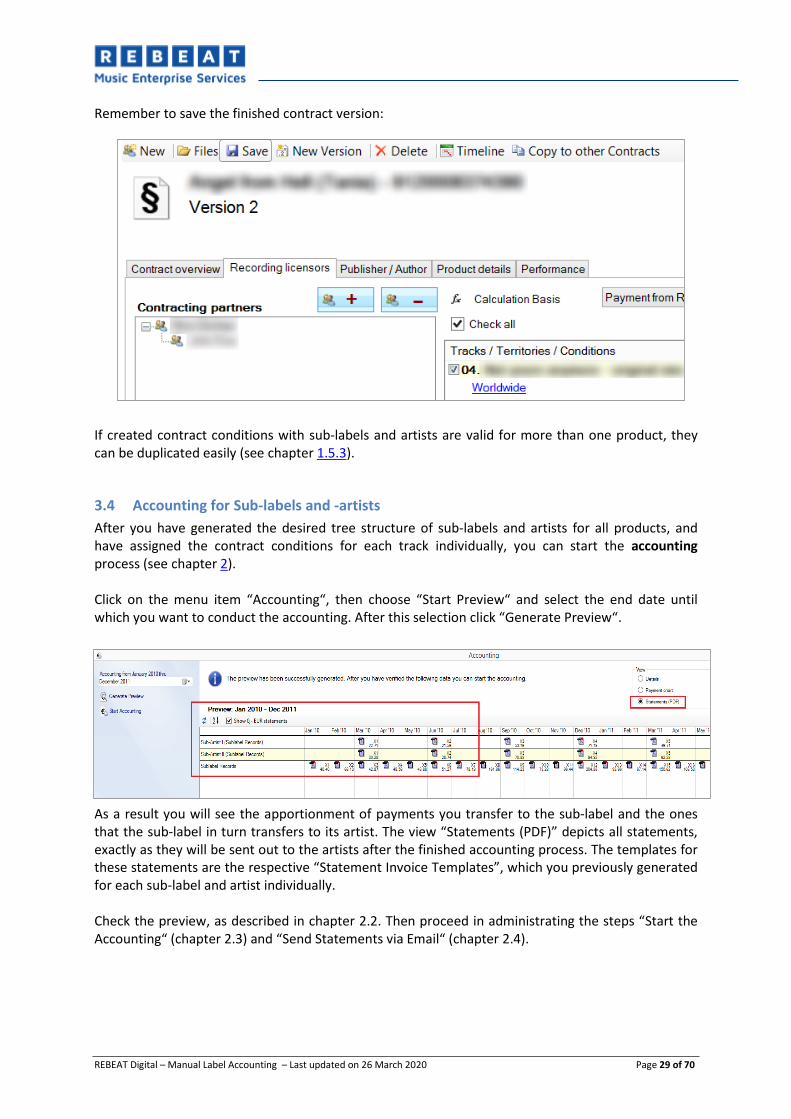
After you have generated the desired tree structure of sub-labels and artists for all products, and have assigned the contract conditions for each track individually, you can start the accounting process (see chapter 2). Click on the menu item “Accounting“, then choose “Start Preview“ and select the end date until which you want to conduct the accounting. After this selection click “Generate Preview“.
As a result you will see the apportionment of payments you transfer to the sub-label and the ones that the sub-label in turn transfers to its artist. The view “Statements (PDF)” depicts all statements, exactly as they will be sent out to the artists after the finished accounting process. The templates for these statements are the respective “Statement Invoice Templates”, which you previously generated for each sub-label and artist individually. Check the preview, as described in chapter 2.2. Then proceed in administrating the steps “Start the Accounting“ (chapter 2.3) and “Send Statements via Email“ (chapter 2.4).

REBEAT Digital – Manual Label Accounting – Last updated on 26 March 2020 Page 30 of 70
4 Statistics
4.1 About Label Accounting Statistics
The Label Accounting Statistics show your accounting data in a tabular and graphic form. Open the statistics by clicking on the menu point “Start” and “Statistics” in the Label Accounting menu.
The “Welcome Page“ will open in a new window and you will be asked to wait, while your data is processed.
After the background tasks are finished, your contracting and accounting statistics will be available (see figure below). The tabstrip “Contract Statistics“ will be activated by default.

REBEAT Digital – Manual Label Accounting – Last updated on 26 March 2020 Page 31 of 70
4.2 Functionality
4.2.1 Main Menu
In the main menu you will find two navigation arrows and an element to expand the navigation menu in the top left corner. By clicking on the active left arrow or the menu item “Welcome Page”, you will go back to the homepage. This is similar to opening the statistics and reloading the data. As a result, you will be shown the refreshed “Contract Statistics”.
4.2.2 Navigation Panel
On the left side of the statistics window, you will find a navigation panel in order to display the chosen statistics in the main window. You can re-position this panel on your desktop. If you want to place the panel on its original position, you can do this by right-clicking on the title bar of the navigation panel and choosing “dockable”. By left-clicking on the navigation panel, you can drag and drop it onto the statistics window. Then you will see a positioning marker which will help you position the navigation panel.

REBEAT Digital – Manual Label Accounting – Last updated on 26 March 2020 Page 32 of 70
You can also automatically hide the navigation panel by clicking on the push icon. Then the navigation planel will only be visible, if you move the cursor over the tabstrip “Statistics“ on the left margin of the window.
4.2.3 Quick Access Toolbar
The main windows of the respective statistics come with a quick access toolbar. You can position symbols of the multi-function toolbar there for quick access. This version however only provides nonpermanent settings, which means that the new positioning won’t be available after re-starting. The screenshot on the left shows the "refresh“ icon in the quick access toolbar. By right-clicking on this symbol, you can remove it by choosing “remove from quick access toolbar”. By clicking on the arrow symbol a context menu opens, which enables you to change the quick access toolbar and minimize the multi-function toolbar below.
4.2.4 Multi-function Toolbar
The multi-function toolbar shows functions in the form of symbols. In the current version, you will only find the function „refresh“ here. By cklicking on this symbol, the statistics data will be refreshed and the updated data will be shown in the main window. Meanwhile you will be asked to wait.

REBEAT Digital – Manual Label Accounting – Last updated on 26 March 2020 Page 33 of 70
4.2.5 Data Chart
The data chart shows the respective data. The column headers offer different functions.
1. Sort in ascending/descending order: The data of this column will be sorted alphabetically or numerally in ascending/descending order. The datacontext will be preserved.
2. Column statistics: By clicking on the “sum“ symbol, you will be shown a submenu where you can choose the display for the column statistics. These statistics will be shown in the footer oft he respective column.
3. Fixing columns: By clicking the push pin symbol, you can fix the respective column, which will move to the left window frame. This column will be excluded from scrolling horizontally. All additional columns will be fixed this way and will be moved to the left window frame in the right order.
If you click into the row, a separate window will open and show the detailed chart for this row. The title bar shows the contract name.
If you move the cursor on top of the bars, you will be shown the x,y-values. You can open several new windows to compare the charts, if necessary. If you do not close the window manually, all windows will be closed when you close or refresh the statistics.

REBEAT Digital – Manual Label Accounting – Last updated on 26 March 2020 Page 34 of 70
4.3 Contracting Statistics
The contracting statistics show your accounting data for each contract in tabular form.
• 1st column “Contract“: refers to the product title of the tabstrip “Products” from Label Accounting.
• 2nd column “Valid from“:date from which the contract is valid.
• 3rd column “Valid until“: if the contract has been cancelled, this column shows the date until which the contract was valid.
• 4th column “Advance payment“:value of the contractually agreed advance payment, if such an agreement has been made.
• 5th column “Balance“:actual balance concerning the advance payment of column 4.
• 6th column “Statements (currency)“: overview chart of all accounting data of the respective contract in this row. If you move the cursor over the bar, you will see 4 static values:
o “First value“ = the value of the first accounting o “Last value” = the value of the last accounting
o “High value” = the value of the highest accounting
o “Low value” = the value of the lowest accounting
All values, which correspond with the label, are displayed in the standardized currency.
4.4 Accounting Statistics
The accounting statistics show the accounting data of each contracting partner in tabular form.
• 1st column “Contracting partner”: contracting party whose accounting is depicted by the bar.
• 2nd column “Billing interval”: accounting interval.
• 3rd column “Total sum in (currency) since (beginning of the contract)”: total amount of all
accounting runs since the beginning of the contract.
• 4th column “Statements”: overview of all accounting runs of the contracting party of this row.
If you move the cursor over the bar element, you will see 4 static values:
o “First value” = the value of the first accounting
o “Last value” = the value of the last accounting
o “High value” = the value of the highest accounting
o “Low value” = the value of the lowest accounting
All values, which correspond with the label, are displayed in the standardized currency.

REBEAT Digital – Manual Label Accounting – Last updated on 26 March 2020 Page 35 of 70
5 Additional Module Mechanical Royalties
5.1 Information about REBEAT Mechanical Royalties
Mechanical Royalties is another optional, additional module for the REBEAT Music Enterprise Software. This module enables REBEAT users to process the mechanical royalties accounting in the US for download sales made through REBEAT digital distribution.
As with label accounting, publishers can be set up easily with just a few mouse clicks, if the according publisher cannot be found in the provided publisher database with more than 20.000 entries.
Likewise, the royalty accounting process runs on a fully automated basis and the accounting statements can be sent out automatically.
5.2 Generating new publishers/authors
Before creating a new publisher, you might want to take a look at the publisher database (tabstrip publisher – see figure below) and see if there is an entry for this publisher/author already. If the publisher/author is not in the database, you can generate a new entry with the button “New” and “New Publisher”.
In the subsequent window you can add all relevant data about this publisher/author. After you have entered all the data, click „save“, in order to save the newly created publisher/author.

REBEAT Digital – Manual Label Accounting – Last updated on 26 March 2020 Page 36 of 70
5.3 Assigning a publisher to a product
After you have generated your publishers/authors, you need to assign them to the respective products. Choose a product from the product list on the left, which will then open on the right side of the window. Click on the tabstrip “publisher/author”. Add a publisher/author to this product with the “+” button and fill in the appropriate percentage on the right side. Repeat this process as many times as necessary in order to add the respective publishers/authors to the product. Note: The sum of the entered percentage always needs to add up to 100 (or 99,9). If you’re adding more than one publisher to a product, you need to split the percentage accordingly (that means if you add for example 3 publishers, you need to fill in 33,3% for each one). If you want to remove a publisher again, you can do that by clicking on the “-“ button. Remember to save the finished version.
After you have generated and assigned the publishers/authors for all products, you can start the accounting process (see chapter 2).

REBEAT Digital – Manual Label Accounting – Last updated on 26 March 2020 Page 37 of 70
6 Additional Module Revenue Import
6.1 Information about REBEAT Revenue Import
The module Revenue Import is another, optional module for the REBEAT Music Enterprise Software. This module enables you to add different revenues to the Label Accounting and process all revenues together with the digital sales accounting. For this, different input and import functions are available, which you will be guided through step-by-step.
To open the module, please click “Revenue Import” (see screenshot below).
6.2 Structure and organization
The Revenue Import module is constructed in the form of a tree structure. The root node at the top shows the module name. As can be seen in the figure below, the second level contains the income source (licensing and physical media products).
6.2.1 Licensing
This screenshot shows the income source “Licensing“ with two licensing sub categories (sync-deals and licenses for physical media products). Here you can create nested structures for your individual licensing model. You can rename the respective groups, shift them (by drag & drop), copy and delete them. Note: you can only delete groups that do not contain already accounted licenses.

REBEAT Digital – Manual Label Accounting – Last updated on 26 March 2020 Page 38 of 70
6.2.1.1 Create a new license
You can create a new license by right-clicking on the selected group and selecting “license new“, or by clicking on the same icon in the revenue menu bar (see screenshot below). The license editor will open. Enter the necessary data in the license editor and save it afterwards. The newly created license shows up in the tree structure immediately, underneath the chosen license group.
6.2.1.2 Edit license
You can edit a license by right-clicking on the product and choosing “edit license“, or by clicking on the same icon in the revenue menu bar (see figure).

REBEAT Digital – Manual Label Accounting – Last updated on 26 March 2020 Page 39 of 70
The license editor will open up. Here you can edit the track titel or artist.
6.2.1.3 Creating a license of a physical product
By editing a product, you can easily create a licensing contract for an already existing physical product (see 6.2.2.1). The editor for the physical product will open up (see screenshot below). The table in the bottom left corner lists all tracks of the product. Select one of them and click on the drop-down menu “create license”. By selecting the desired folder structure, the license will be created there.

REBEAT Digital – Manual Label Accounting – Last updated on 26 March 2020 Page 40 of 70
6.2.1.4 Edit licensing contract
Please double-click on the license on the left side, for which you would like to edit the contract.
The licensing contract will then open on the right side. Here you can determine the contractual conditions for recording licensors and licensees. More information about assigning contractual partners can be found in chapter 1.4.2. The assignment of licensees is done in the same way as assigning recording licensors. Please click on the tabstrip “licensee” (see figure below).
Please click the button in order to add one or more licensees. A window with the licensees
will open. In case you have not created any licensees yet, please click on the symbol . Fill in the name of the licensee and all other relevent data in the licensee editor and save it.
The licensee then automatically appears on the licensing contract. On the right side of the licensee list you can define the products for which you have issued licenses. Normally these are CD releases, but it is also possible to represent sync deals this way.
Click on the plus button on the right margin, in order to assign one or more products to the chosen licensee. For each product a separate block will appear, where you need to fill in the product information.

REBEAT Digital – Manual Label Accounting – Last updated on 26 March 2020 Page 41 of 70
Please enter the product information and save the contract. The product information will appear on the PDF statements and detailed CSV files after the accounting run. This is why it is necessary to add all the product information here. The figure below shows an example of what this information could look like.
6.2.2 Physical Media Products
The figure below shows the income source “Physical Media Products” and the respective products of this category, which comprises physical products, such as CD, DVD, Blue-Ray, etc.
You can add products manually or with an Import Wizard. Furthermore, you can copy and add products and their related contracts from the digital sector. You also have a filter option for products and articles. These functions will be explained in greater detail below. Each node has its own context menu, which can be opened by right-clicking on the respective node.

REBEAT Digital – Manual Label Accounting – Last updated on 26 March 2020 Page 42 of 70
6.2.2.1 Creating, editing and deleting products and articles
For adding products manually, please click on the distribution type “Physical Media Products“ and “New article“ (see screenshot below).
A new window with the product editor will open (see screenshot below).

REBEAT Digital – Manual Label Accounting – Last updated on 26 March 2020 Page 43 of 70
The product editor offers the possibility to adopt the metadata from an already existing, digital product. Select the proper product from the drop-down menu and click “Adopt“ (see screenshot below).
Once you’ve done that, all fields will be filled in, using the data from the digital product. First you will be asked, whether the contract belonging to the digital product should be adopted as well. If you click “yes”, the digital contract and its contractual partners will be copied.

REBEAT Digital – Manual Label Accounting – Last updated on 26 March 2020 Page 44 of 70
Please check the metadata in the product editor and change or add data if needed. The editor also offers the possibility to add further tracks that are not included on the digital product, such as bonus tracks, etc. If all data is correct and valid, click “save” and close the editor.
Once it has been saved, the new physical product will appear in the tree structure underneath the distribution type “Physical Media Products“.

REBEAT Digital – Manual Label Accounting – Last updated on 26 March 2020 Page 45 of 70
Products that are colored red in the structure do not have contractual partners and conditions yet. Add contractual partners (recording licensors) by double-clicking on the product. Note: For a successful accounting run, all contracts need to be complete and valid. If you want to edit a product, please select the product and then click on the editing symbol (see figure below).
If you want to delete a product and its contract, select the product and click on the delete symbol (see screenshot below).

REBEAT Digital – Manual Label Accounting – Last updated on 26 March 2020 Page 46 of 70
6.2.2.2 Product Copy Wizard
The Product Copy Wizard enables you to adopt your products and their contracts from the digital sector into Revenue Import with only a few mouse clicks. Thus, the manual effort is reduced to a minimum. The Product Copy Wizard is an assistant that guides you through the whole copy process step-by-step.
Start the Product Copy Wizard by clicking on the -symbol in the Revenue Import menu bar or by clicking on “Adopt digital product“ in the main menu bar in “Revenue Import Options“.
Next the welcome page of the assistant opens.

REBEAT Digital – Manual Label Accounting – Last updated on 26 March 2020 Page 47 of 70
On this page you need to decide whether you want to adopt the digital products including their contracts or only the product data without contracts. Once you’ve made a selection, click „Next“. Select the digital products you want to adopt to Revenue Import by checking the box next to the products. We recommend using the filter and search function to select the required products. After you’ve made your selection, you can move on to the next page of the assistant by clicking “Next”. Please check the selected products in the overview. If all requested products are there, click “Next” to start the copy process.

REBEAT Digital – Manual Label Accounting – Last updated on 26 March 2020 Page 48 of 70
If the copy process finishes successfully, you will reach the last page of the assistant automatically.
Click on “Finish” to close the assistant.
6.3 Sales Import Wizard
The Sales Import Wizard enables you to import external sales figures from a comma-separated values file (e.g. csv-file). Before you start the import process, please make sure that the first row of this file has a column heading and you have at least read-only access. The Revenue Import Wizard is an assistant that will guide you step by step through the import process. These steps are explained in detail on the next pages. Open the Sales Import Wizard
by clicking on the icon in the Revenue Import menu bar. The welcome page of the assistant opens. Click “Next“ to move on to the next page of the assistant.

REBEAT Digital – Manual Label Accounting – Last updated on 26 March 2020 Page 49 of 70
Choose your importfile on this page. You can either insert the complete file path in the field “file” (see 1. In the screenshot) or you can use the assistant for selecting your file by clicking on the “…” button (see 2. in the screenshot). Once you’ve made your selection, the button “Next” will be activated. Note: By clicking on „open sample file“ you can take a look at a sample file, save it locally and do a test run. In the section “Kind of sale“, you choose the type (see 3. in the figure above) to which the sales data will be added. Example: If the file you want to import contains physical products sales data, choose “Physical Media Products“ (see 3. in the figure above). The data will then be added automatically to the existing products of this type. In this case the assignment will be based on the EAN code. Once you’ve finished, click “Next“.
If you have already created a template during previous import processes, you can select it here. A template offers you the possibility to skip several set-up steps for recurring import processes and therefore saves a lot of time. How to generate a template will be explained in a later step of the assistant. Once you’ve made a selection, click “Next”.

REBEAT Digital – Manual Label Accounting – Last updated on 26 March 2020 Page 50 of 70
Here you can choose the currency that represents the sales data in your file with today’s currency exchange rate. In the green box you find today’s currency exchange rate. This rate can also be changed manually.
Depending on whether or not you have selected a template on the previous page, the assistant will lead you to different pages. If you did not select a template, the following page appears:
On this page you will choose the import settings, which are very important for form and content.
REBEAT Digital – Manual Label Accounting – Last updated on 26 March 2020 Page 51 of 70
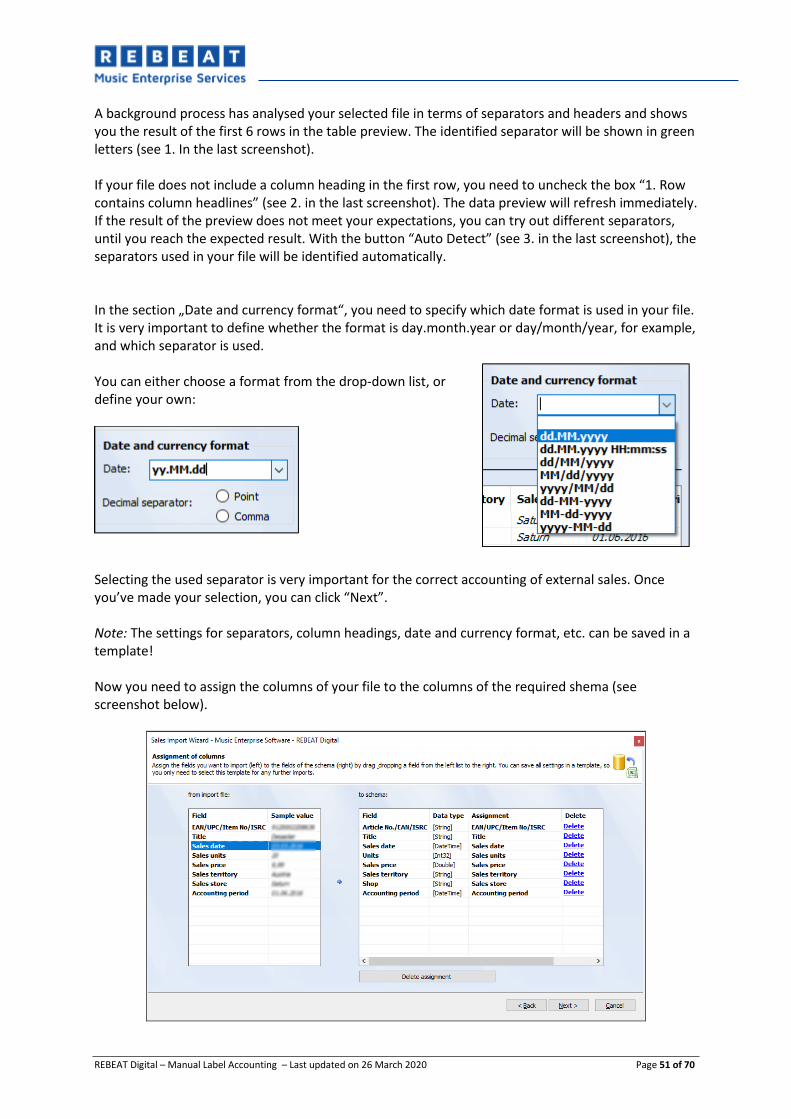
A background process has analysed your selected file in terms of separators and headers and shows you the result of the first 6 rows in the table preview. The identified separator will be shown in green letters (see 1. In the last screenshot). If your file does not include a column heading in the first row, you need to uncheck the box “1. Row contains column headlines” (see 2. in the last screenshot). The data preview will refresh immediately. If the result of the preview does not meet your expectations, you can try out different separators, until you reach the expected result. With the button “Auto Detect” (see 3. in the last screenshot), the separators used in your file will be identified automatically. In the section „Date and currency format“, you need to specify which date format is used in your file. It is very important to define whether the format is day.month.year or day/month/year, for example, and which separator is used. You can either choose a format from the drop-down list, or define your own:
Selecting the used separator is very important for the correct accounting of external sales. Once you’ve made your selection, you can click “Next”. Note: The settings for separators, column headings, date and currency format, etc. can be saved in a template! Now you need to assign the columns of your file to the columns of the required shema (see screenshot below).

REBEAT Digital – Manual Label Accounting – Last updated on 26 March 2020 Page 52 of 70
The assignment of columns can easily be carried out by drag and drop. Click on a field of your file, hold the left mouse button and drag the field to the proper row on the right. It is very important that the source data type is the same as the target data type. In the figure above, you see the finished assignment. Note: The assignment can be saved in a template. If you click “delete assignment”, the assignment will be deleted and it won’t be possible to go to the next page of the assistant. Only once you’ve assigned all fields, you can click “Next“ and move on to the template page.
As mentioned before, you have the possibility to save all settings in a template. You can select this template for a new import process and don’t have to set it all up again. Just enter a template name and click “Save”. Saving a template is optional, so you can proceed by clicking “Next“ if you don’t want to save a template. The following preview page shows the data of the first 100 rows, according to your settings. If they are correct, you can click “Import”. If not, you can go back to the part that needs to be corrected.

REBEAT Digital – Manual Label Accounting – Last updated on 26 March 2020 Page 53 of 70
Only files that comprise all data in all rows will be imported successfully. If any data is missing, a list with all faulty rows will appear. If that is the case, you need to check the content of the file and start the import process anew. If you have saved a template, the new import attempt will be processed a lot faster. If the import was successful, you will see the import result. We advise you to check it with your internal accounting data.
Is the number of rows correct? Is the total sum correct? Is the currency correct?
If the data is not correct, you have the possibility to revoke the import process. You can find more information about this in section 6.4 The sales table.
6.4 Product Import Wizard
The Product Import Wizard enables you to import physical products from a comma separated file (e.g. csv file). Before the import process, please make sure that the first row of the file has a column heading and you have at least read-only access. The Product Import Wizard is an assistant that will guide you through the import process step-by-step. Open the Product Import Wizard by
clicking on the icon in the Revenue Import menu bar. The welcome page of the assistant will open. Click “Next“ to move on to the next page of the assistant.

REBEAT Digital – Manual Label Accounting – Last updated on 26 March 2020 Page 54 of 70
On this page you need to choose your importfile. If you know the complete path with file names, you can enter it in the field “file” (see 1. in the figure above) or you can use the file-assistant for selecting your file by clicking on the “…” button (see 2. in the figure above).
Once you’ve made your selection, the button “Next” will be activated. Note: By clicking on „open sample file“ you can take a look at a sample file, save it locally and do a test run. In the section “Distribution type“, you choose the product type (see 3. in the figure above). Example: If the file you want to import contains physical product data such as CDs, DVDs, Blue Rays, etc., choose “Physical Media Products“ (see 3. in the figure above). The data will then be added automatically to the existing products of this type. Once you’ve finished, click “Next“.

REBEAT Digital – Manual Label Accounting – Last updated on 26 March 2020 Page 55 of 70
If you have already created a template during previous import processes, you can select it here. A template offers you the possibility to skip several set-up steps for recurring import processes and therefore save a lot of time. How to generate a template will be explained in a later step of the assistant.
Once you’ve made a selection, click “Next”. Depending on whether or not you have selected a template on the previous page, the assistant will lead you to different pages. If you did not select a template, the following window opens. Here you can choose the import settings, which are very important for form and content.

REBEAT Digital – Manual Label Accounting – Last updated on 26 March 2020 Page 56 of 70
A background process has analysed your selected file in terms of separators and headers and shows you the result of the first 6 rows in the table preview. The identified separator will be shown in green letters (see 1. in figure above). If your file does not include a column heading in the first row, you need to uncheck the box “1. Row contains column headlines” (see 2. in figure above). The data preview will refresh immediately. If the result of the preview does not meet your expectations, you can try out different separators, until you reach the expected result. With the button “Auto Detect” (see 3. in figure above), the separators used in your file will be identified automatically. In the section “Date and currency format“, you need to specify which date format is used in your file. It is very important to define whether the format is day.month.year or day/month/year, for example, and which separator is used. You can either choose a format from the drop-down list, or define your own:
Selecting the used separator is very important for the correct identification of prices. Once you’ve made your selection, you can click “Next”. Note: The settings for separators, column headings, date and currency format, etc. can be saved in a template! Now you need to assign the column of your file to the columns of the required shema (see figure below).

REBEAT Digital – Manual Label Accounting – Last updated on 26 March 2020 Page 57 of 70
The assignment of columns can easily be carried out by drag and drop. Click on a field of your file, hold the left mouse button and drag the field to the proper row on the right. It is very important that the source data type is the same as the target data type. In the figure above, you see the finished assignment. If you click on “Delete assignment”, assignments will be deleted. Note: The assignment can be saved in a template. Once you’ve assigned all fields, you can click “Next“ and move on to the template page. You can save all settings to a template and use it for the next import process instead of setting everything up again. Just enter a template name and click “Save”.
Saving a template is optional, so you can proceed by clicking “Next“ if you don’t want to save a template. The following preview page shows the data of the first 100 rows, according to your settings. If they are correct, you can click “Import”. If not, you can go back to the part that needs to be corrected. Only files that comprise all data in all rows will be imported successfully.

REBEAT Digital – Manual Label Accounting – Last updated on 26 March 2020 Page 58 of 70
If any data is missing, a list with all faulty rows will appear. If that is the case, you need to check the content of the file and start the import process anew. If you have saved a template, the new import attempt will be processed a lot faster. If the import was successful, you will see the import result. Note! If you import a valid file a second time, the products will not be created a second time. However, you will receive a success message with a relevant note (see figure below).
After the successful import process, the imported products will be displayed in the following “Revenue Import“ structure:

REBEAT Digital – Manual Label Accounting – Last updated on 26 March 2020 Page 59 of 70
6.5 Sales Table
The sales table enables you to manage your external revenues that derive from licensing, physical
products, etc. Open the sales table by clicking on the - symbol in the “Revenue Import“ menu bar (see 1 in the figure below).
The table opens on the right side in the labelaccounting and shows you all sales figures in table form. If you have imported the data with the Sales Import Wizard (see section 6.2), the data will appear here. You can add data rows manually, change existing entries and delete them. How these actions are executed will be described on the next pages.
6.5.1 Entering new data
The first row of the sales table is the data input row (see figure above). This row is marked with an * at the beginning and has a gray background. You will find the note “Click here…“ at the beginning of the line. To create a new entry for the table, please click on this line. The line then changes thus: The line marker changes to a red exclamation mark and thus indicates one or more errors in the line. At this point this is normal, as the row is still empty and does not represent a complete data set. Each column with a red exclamation mark means that data needs to be entered. As soon as a valid value has been entered, the exclamation mark disappears. If you have entered the data in each column, the red marker will disappear. This means the row is accurate and can be adopted. The background of the row is blue, which indicates that this row is currently processed.

REBEAT Digital – Manual Label Accounting – Last updated on 26 March 2020 Page 60 of 70
While you move from column to column to enter your data, drop-down lists will make it easier for you. No column can remain empty. Here is a detailed function description of each column:
• Article No. / EAN / ISRC: In this column you will find a drop-down list which lists all article numbers, EAN and ISRC codes that you have imported from external products. Here you can choose the appropriate entry. You can also add a new, unknown value for a product that has not been imported yet (see column “Title“).
• Title: The column “Title“ is a text column, which updates automatically, after you selected an entry in the column „Article No./EAN/ISRC. The product title will be added automatically, based on the selection. If you entered a new, unknown value in the column “Article No./EAN/ISRC“, you need to enter a product title manually. Once a product title is entered, the exclamation mark disappears when clicking into the next column.
• Sales date: This column is a drop-down list where you can select the sales date. You also have the possibility to enter the date manually. Once you’ve made your selection, the exclamation mark will disappear.
• Units: The column “Units“ only accepts numerical entries. Please enter the sold units of a product here. Once you’ve made the entry, the exclamation mark will disappear when clicking into the next column.
• Sales price: This column only accepts numerical entries. Please enter the total sum of product sales here. This price will not be multiplied by units!
• Currency: In this column you will find a drop-down list, where you can select the currency which represents your sales data. Depending on the selection in this column, the column “Exchange rate (EUR)” will update automatically.
• Exchange rate (EUR): The column “Exchange Rate (EUR)“ only accepts numerical entries. After you have selected the currency, this column automatically displays today’s currency exchange rate to EURO. You can also overwrite this value manually.

REBEAT Digital – Manual Label Accounting – Last updated on 26 March 2020 Page 61 of 70
• Sales territory: In this column you will find a drop-down list from which you can choose the country in which the sales occurred.
• Shop: In this column you can enter the shop in which the sales occurred.
• Accounting period: In this column you will find a drop-down list that displays all months of this year. Please select the month for which you want to process the accounting of the sales.
• Distribution type: In this column you will find a drop-down list where you can choose the distribution type of your product.
As soon as you have entered data into all columns of the new row, all exclamation marks and error marks will disappear. See figure below:
Leave the row by clicking or scroll to the top to add a new row. All new rows are highlighted in green. This means that they have been newly created and not been saved yet. Only once you click “Save”, the row will be adopted.

REBEAT Digital – Manual Label Accounting – Last updated on 26 March 2020 Page 62 of 70
After saving, data lines can have different colors:
• White background: The product for this revenue is identified. The accounting process is carried out according to the chosen accounting period. The data can be changed until the final accounting process.
• Red background: The product for this revenue is unidentified. A correspondent product needs to be created manually or with the Product Import Wizard. The accounting process will then be carried out according to the chosen accounting period, once the product has been added. The data can be changed until the final accounting process.
• Gray background: The revenues of this data row have already been accounted and cannot be changed anymore.
6.5.2 Changing and deleting entries
You can change and delete all entries of the table that do not have a gray background. Changes and deletion are only valid once you click on “Save“.
6.5.3 Save, Load
If you have created new entries in the sales table, you need to save them. If a row has not been saved yet, it has a green background. You can add several new rows and save them all at once, or you can save each row separately. Click “Save“ to save your changes. The button is only activated once there have been changes in the table. If you want to undo your entry, click “Load”. This is only possible if the entry has not been saved yet. The following dialogue will appear:
If you click “Yes“, all changes that have been made after you saved the last time will be discarded and the table will reload.
6.5.4 Filter data
In order to separate certain table entries, you can filter the data. You will find a filter icon on every column head for this purpose.

REBEAT Digital – Manual Label Accounting – Last updated on 26 March 2020 Page 63 of 70
If you click on the filter icon, a drop-down list with the column specific selection will open. The first four rows of this selection are always the same:
• ALL: Shows all data rows (no filter).
• Custom : A custom-filter dialogue window will open, which enables you to select specific filter options (see figure below).
• Blanks: Shows all rows without entries. Since all columns have to be filled in, this filter won’t show any rows.
• No Blanks: Shows all rows with entries. Since all columns have to be filled in, this filter will show all rows.
• Concrete column value: Shows all rows that conform to the filter value.
6.5.5 Change display
6.5.5.1 Rename columns
By clicking „rename columns” you can assign different names to the columns (see figure below).
In the window that opens up, you can make changes or reset to default.

REBEAT Digital – Manual Label Accounting – Last updated on 26 March 2020 Page 64 of 70
6.5.5.2 Digits
In the menu of the table you can select the number of digits displayed after the decimal point from a dropdown list.
6.5.5.3 Tree structure
The sales history gives you an overview of your sales data grouped into accounted and not accounted, sales date and import group.
An import group consists of all data that has been imported from a file with the Sales Import Wizard. By shifting the groups (see figure below), you can adapt the tree structure and save it as a template, in order to be able to come back to this view later.
The sales history serves to display your data in a structured, clear way, but it also enables you to delete whole data groups (such as import group or sales date) with one mouse click. If you want to delete certain rows or data groups, just right-click on the row or group element and choose “Delete” (see figure below).
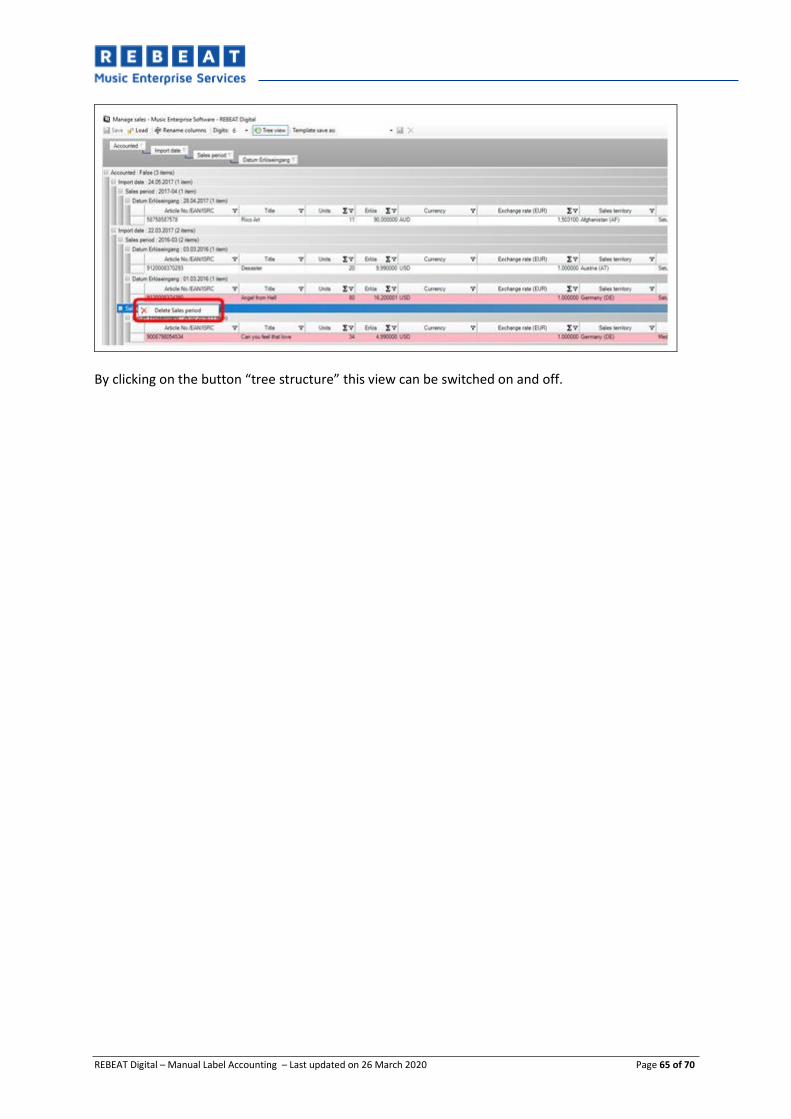
REBEAT Digital – Manual Label Accounting – Last updated on 26 March 2020 Page 65 of 70
By clicking on the button “tree structure” this view can be switched on and off.

REBEAT Digital – Manual Label Accounting – Last updated on 26 March 2020 Page 66 of 70
7 Cost accounting With the cost accounting you have the possibility to book your costs, expenditures, revenues and services to accounts, allocate them to different cost units and add them to your accounting process. Bookings for each account will be displayed on the PDF statements for each contractual partner. The cost accounting consists of three parts: accounts, bookings and configurations. You can open the cost accounting by clicking „Start“ in the menu bar and then „Accounts and Bookings“.
7.1 Accounts
In the account section you can define your revenue and expenditure accounts. Please click „accounts“ in the menu. It will show a list of all existing accounts. Initially there is an account with the designation „Digital“. You can use this account for different digital income streams, as for example revenues of different distributors or stores. An account consists of an account number, designation and account type. If you want, you can also add a description and a standard text to the account.

REBEAT Digital – Manual Label Accounting – Last updated on 26 March 2020 Page 67 of 70
7.1.1 Account number
The account number is a numerical value that consists of numbers only. We recommend assigning numbers for revenue accounts in the increments of 10 starting from 2000, for expenditure accounts in the increments of 10 starting from 5000.
7.1.2 Designation
Enter a short, account-related designation here, for example: licensing revenues, production costs, etc.
7.1.3 Account type
You will need to set up the account type when creating a new account, for example: revenues or expenditures.
7.1.4 Description
Optional. You can enter a short description of the account.
7.1.5 Standard text
Optional. The standard text you enter here will be recommended as default value for every booking made using this account.
7.2 Booking
A booking can be done for each account type. It will either be revenues or expenditures. You can make that selection right on top, if you click on „new booking“.

REBEAT Digital – Manual Label Accounting – Last updated on 26 March 2020 Page 68 of 70
7.2.1 Number
A distinct, continuous booking number.
7.2.2 Sales date
Please enter the sales date of the booking here.
7.2.3 Accounting period
Please enter the accounting period in which the booking should be accounted.
7.2.4 Account
Here you can select the desired account.
7.2.5 Cost unit
Please select the cost unit here. A cost unit can be a contract or contractual partner. Revenues and expenditures go to this cost unit.
7.2.6 Cost center
Please select the cost center here. A cost center is the originator of revenues and/or expenditures.
7.2.7 Project
Optional. A project can be a tour, an album production, the production of a music video, etc.
7.2.8 Unit
Please enter the amount of sales here.
7.2.9 Amount
Please enter the booking amount here. For a reverse posting, please enter a negative amount.
7.2.10 Configuration
Please select the configuration that should be applied for the booking. More details on configurations can be found in the next chapter.
7.3 Configuration
With a configuration (rule), you can decide how an amount should be accounted. For example, if you have physical distribution and want to keep back 10% returns, you can set this up with a configuration.

REBEAT Digital – Manual Label Accounting – Last updated on 26 March 2020 Page 69 of 70
7.3.1 Designation
Enter a short, explicit designation for the configuration here.
7.3.2 Description
Optional. Describe the configuration.
7.3.3 Percentage Payable
If only a part of the amount should be allocated, please enter a different percentage rate than 100.
7.3.4 Deduction 1
In case you need to set a deduction, please enter the percentage and a designation for the deduction. For example: 10% packaging.
7.3.5 Deduction 2
In case you need to set a second deduction, please enter the percentage and a designation for the deduction.
7.3.6 Deduction 3
In case you need to set a third deduction, please enter the percentage and a designation for the deduction.
7.3.7 Formula/rule
Please enter the formula (rule), which should be applied for the deduction. For example: The sum is € 100. You select the percentage of the royalty share (in this example 90%) = Percentage payable (90%) – Deduction 1 (5%) – Deduction 2 (1,25%) – Deduction 3 (10%) = 75,99 € Royalty share is the percentaged value that you assign to contracts for each contractual partner in the tab „account-related conditions“ (see next chapter).
7.4 Account-related conditions
Here you can enter the percentaged value for each account and contractual partner. Click on the plus (+) symbol in order to add contractual partners and afterwards enter the percentage in the respective column. For example: if 20% of licensing revenues should be accounted to the contractual partner, enter 20 into the respective contractual partner column. If the full 100% should be accounted, enter 100. When a booking (revenue or expenditure) is added to the cost unit, the endprice will be calculated depending on the configuration you entered (see previous chapter).
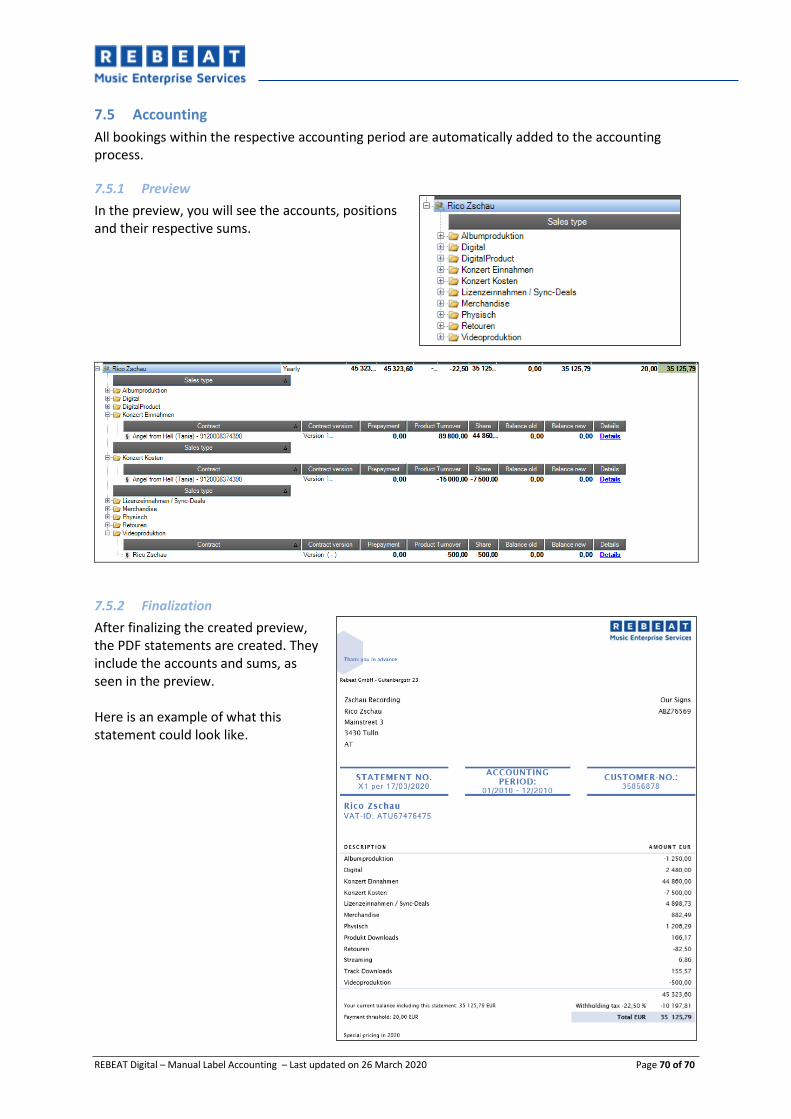
REBEAT Digital – Manual Label Accounting – Last updated on 26 March 2020 Page 70 of 70
7.5 Accounting
All bookings within the respective accounting period are automatically added to the accounting process.
7.5.1 Preview
In the preview, you will see the accounts, positions and their respective sums.
7.5.2 Finalization
After finalizing the created preview, the PDF statements are created. They include the accounts and sums, as seen in the preview. Here is an example of what this statement could look like.