MDU Map v1.1 - MkrGeo
22
MDU Map v1.1 USER GUIDE The map is tailored for the fixed line team who works both in the office and on site. Major purpose of this tool is making the first part of the job quicker through a swift access to the order via tracker and performance this order on the map. Each job is easily researchable with instant access to the sharepoint and local directory. 1. GETTING AROUND All elements marked red are parts of this tool. They are easy recognizable on the map both in desktop and mobile version. 1 – Zoom in/out scale - a zoom on every single “step” likewise in Google Maps, the best zoom level for UK overall map is 7. 2 – Location tool – turned orange, when active. This is an instant location finder, useful mostly for people working on site. 3 - Job search engine – by job name or address you can find the order, which you are interested in. 4 – Select on click – is responsible for finding jobs located within the distance given once you click anywhere on the map. 5 – Select map layers – you have the choice of few maps both tiles and overlaid.
-
Upload
khangminh22 -
Category
Documents
-
view
0 -
download
0
Transcript of MDU Map v1.1 - MkrGeo

MDU Map v1.1
USER GUIDE
The map is tailored for the fixed line team who works both in the office and on site. Major
purpose of this tool is making the first part of the job quicker through a swift access to the
order via tracker and performance this order on the map. Each job is easily researchable with
instant access to the sharepoint and local directory.
1. GETTING AROUND
All elements marked red are parts of this tool. They are easy recognizable on the map both
in desktop and mobile version.
1 – Zoom in/out scale - a zoom on every single “step” likewise in Google Maps, the best
zoom level for UK overall map is 7.
2 – Location tool – turned orange, when active. This is an instant location finder, useful
mostly for people working on site.
3 - Job search engine – by job name or address you can find the order, which you are
interested in.
4 – Select on click – is responsible for finding jobs located within the distance given once
you click anywhere on the map.
5 – Select map layers – you have the choice of few maps both tiles and overlaid.
6 – Instant Street View option – available on click at the location.
7 – Address finder – an analog tool to job finder (3).
8 – Job contractor selection – gives a way to untick the orders, which you are not involved
with.
9 – Map scale – changeable as your zoom level changes.
10 – Coordinates – points actual crosshair location.
11 – Crosshair – indicates a very middle of the map. Is important because of permalink
attributes, coordinates shown in the left bottom corner (10) and Street View access (6).
12 – Map overlay – an example of CityFibre map overlaid on the basic tile OSM map with
some transparency.
13a – Job location on the map – according to the legend the order has a specified colour.
13b – Job legend – leads to distinguish orders from major contractors and clients.
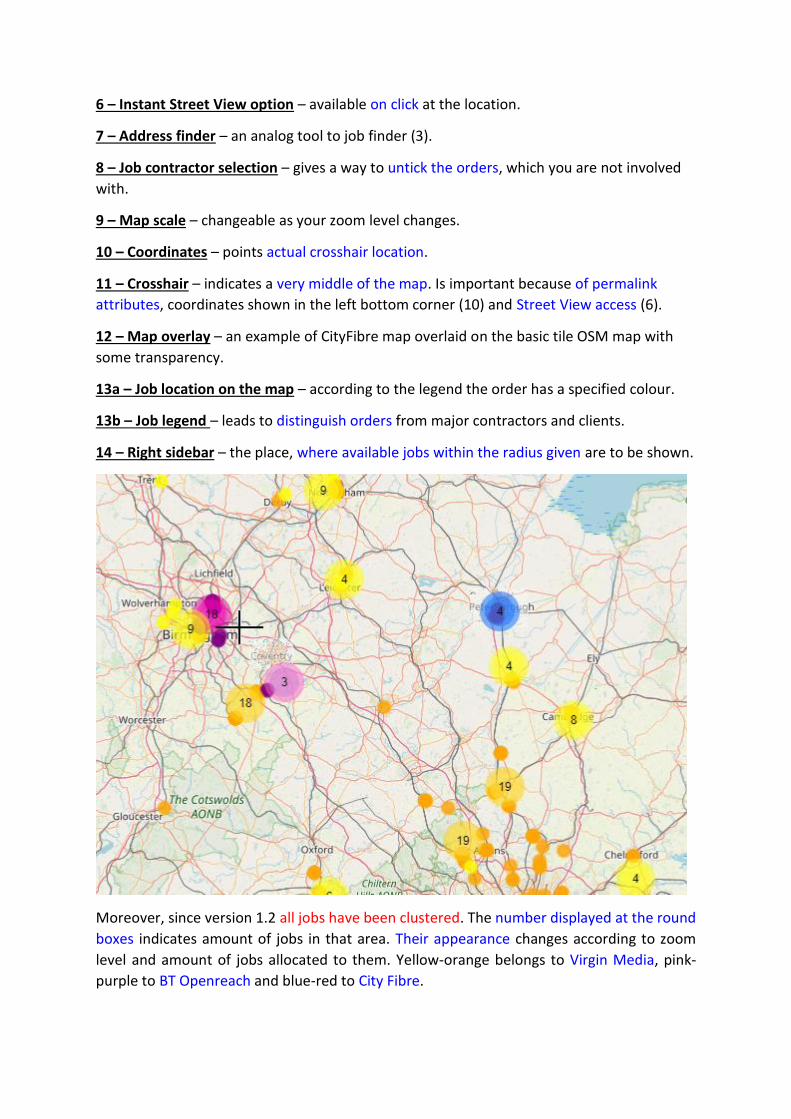
14 – Right sidebar – the place, where available jobs within the radius given are to be shown.
Moreover, since version 1.2 all jobs have been clustered. The number displayed at the round
boxes indicates amount of jobs in that area. Their appearance changes according to zoom
level and amount of jobs allocated to them. Yellow-orange belongs to Virgin Media, pink-
purple to BT Openreach and blue-red to City Fibre.
Some changes happened also in the top bar. Since version 1.2 you will be informed about
current map version as well as you get the instant access to the most up-to-date user guide
and mobile version of this map.
2. NAVIGATION
There zoom in/out scale is located at the top left corner. You can also do zoom in/out by
scrolling the mouse. However, these both operation trigger only such a step-by-step zoom,
moving the level enlargement from one to another (for example from level 8 to level 9).
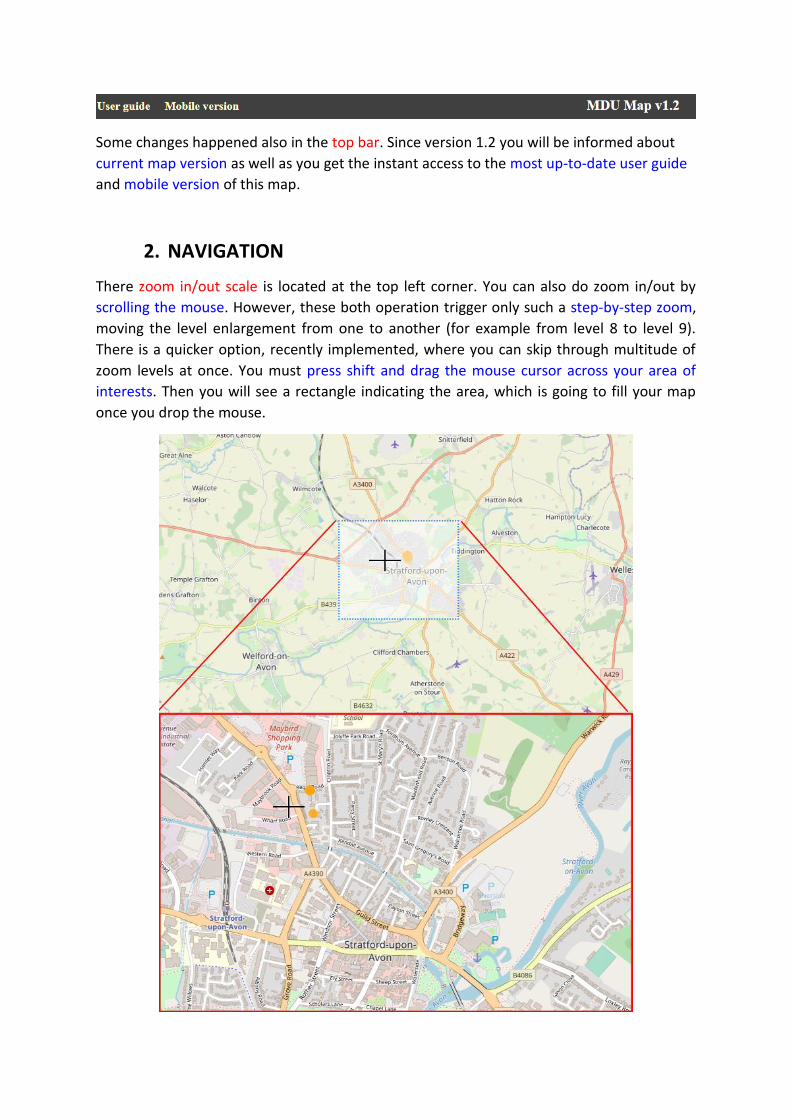
There is a quicker option, recently implemented, where you can skip through multitude of
zoom levels at once. You must press shift and drag the mouse cursor across your area of
interests. Then you will see a rectangle indicating the area, which is going to fill your map
once you drop the mouse.
Another beneficial feature is the job highlight, which happen after mouse hover on some
order. It applies only to the single points instead of clusters. When you hover one of them,
then you will see the name of job combined with bigger signature.
3. SEARCHING THE JOB
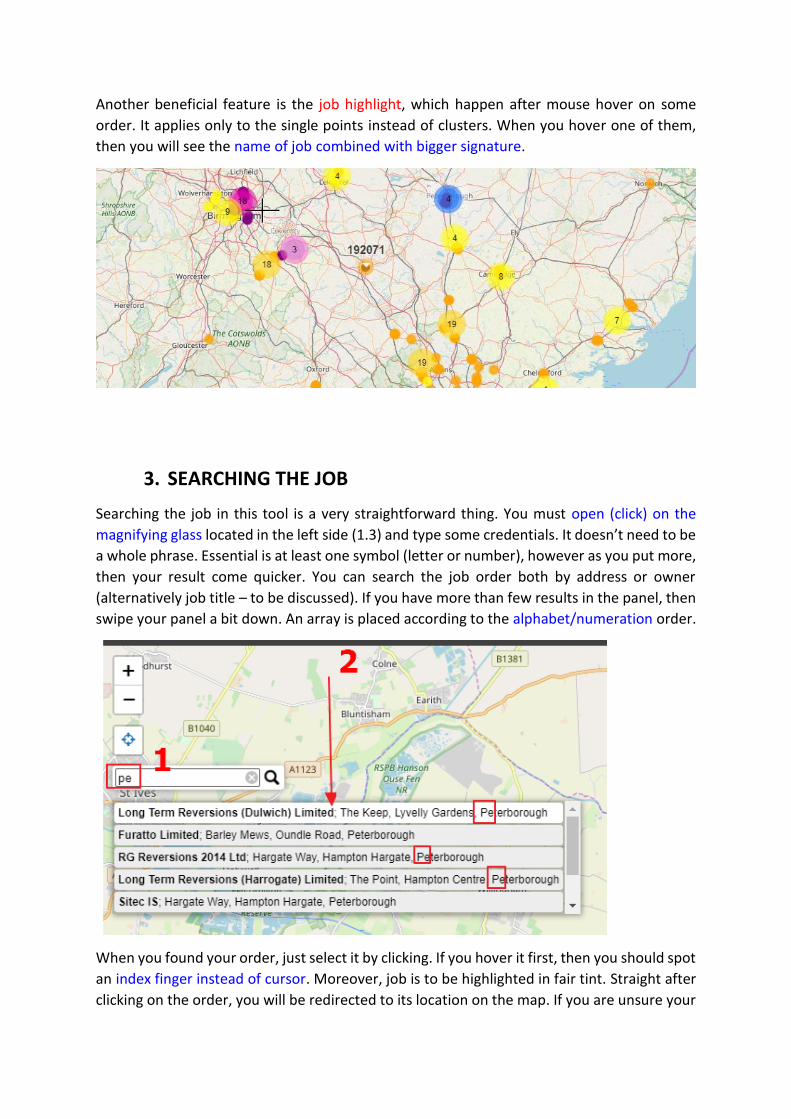
Searching the job in this tool is a very straightforward thing. You must open (click) on the
magnifying glass located in the left side (1.3) and type some credentials. It doesn’t need to be
a whole phrase. Essential is at least one symbol (letter or number), however as you put more,
then your result come quicker. You can search the job order both by address or owner
(alternatively job title – to be discussed). If you have more than few results in the panel, then
swipe your panel a bit down. An array is placed according to the alphabet/numeration order.
When you found your order, just select it by clicking. If you hover it first, then you should spot
an index finger instead of cursor. Moreover, job is to be highlighted in fair tint. Straight after
clicking on the order, you will be redirected to its location on the map. If you are unsure your
position afterwards, scroll down the mouse wheel in order to zoom out a bit. A dot, pointing
roughly the job location should be displayed immediately underneath the crosshair position.
Having your order found, you can next see it on Street View, copy the permalink with rough
location or see the relevant data by clicking on the dot.
4. SEARCHING AN ADDRESS
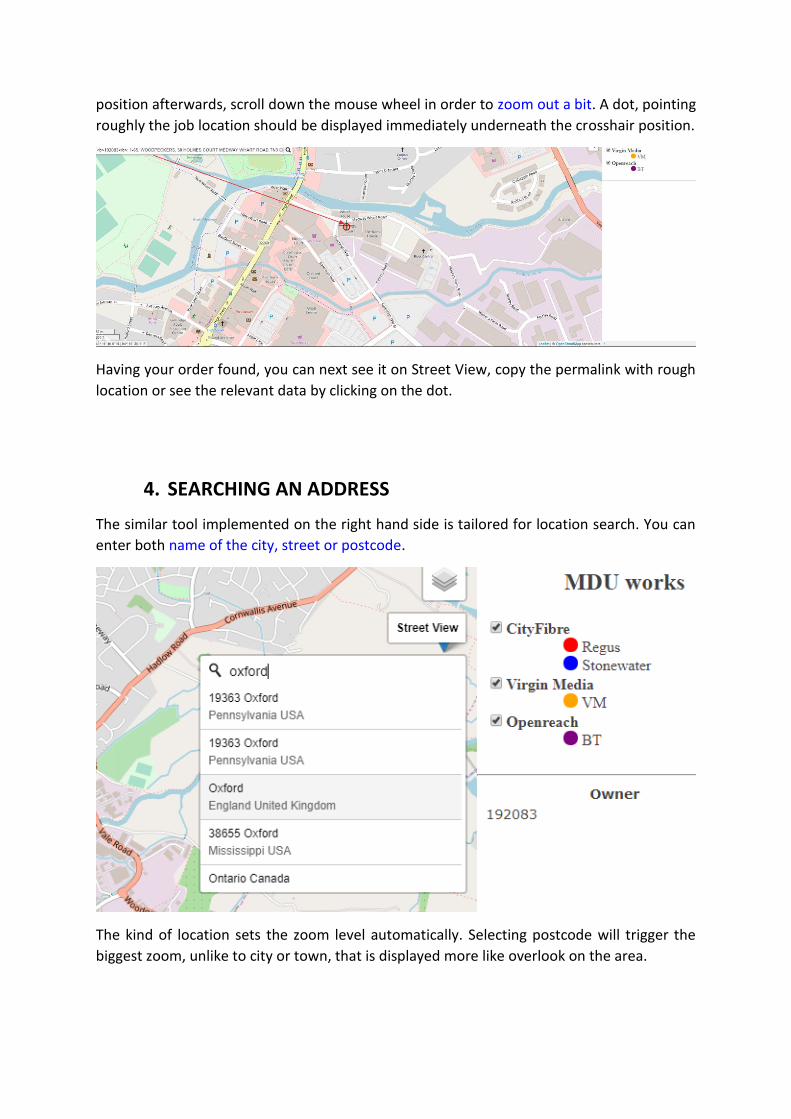
The similar tool implemented on the right hand side is tailored for location search. You can
enter both name of the city, street or postcode.
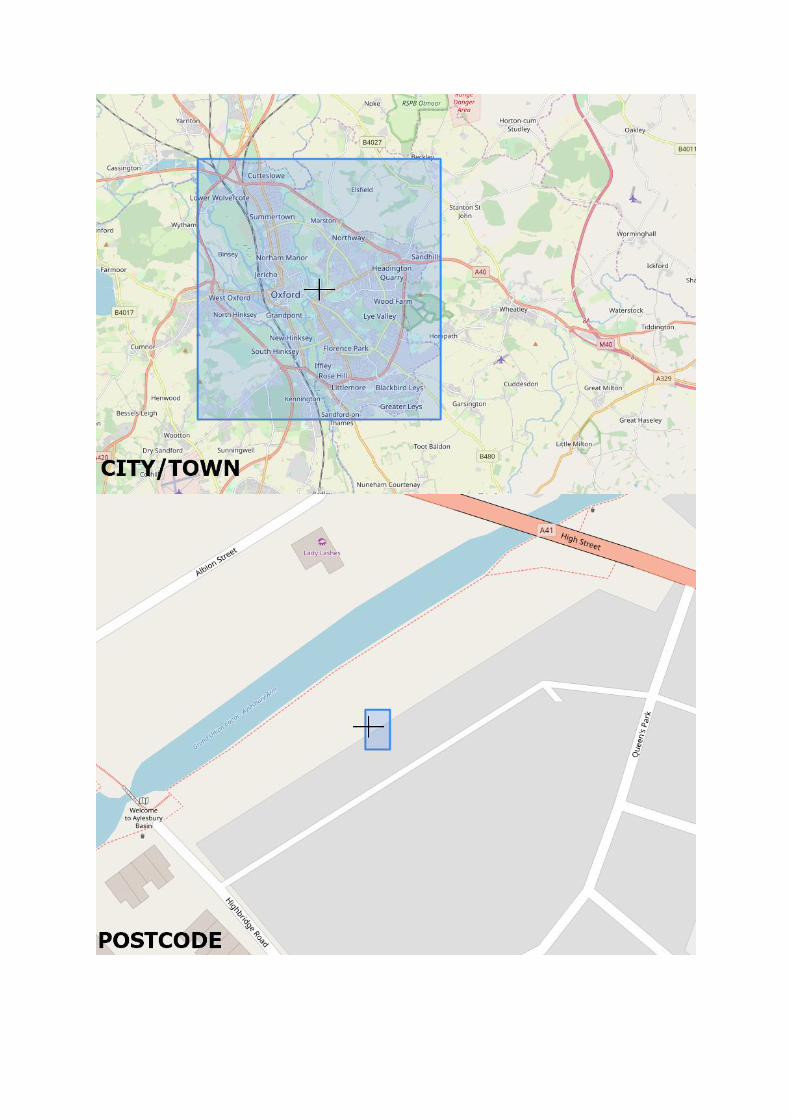
The kind of location sets the zoom level automatically. Selecting postcode will trigger the
biggest zoom, unlike to city or town, that is displayed more like overlook on the area.
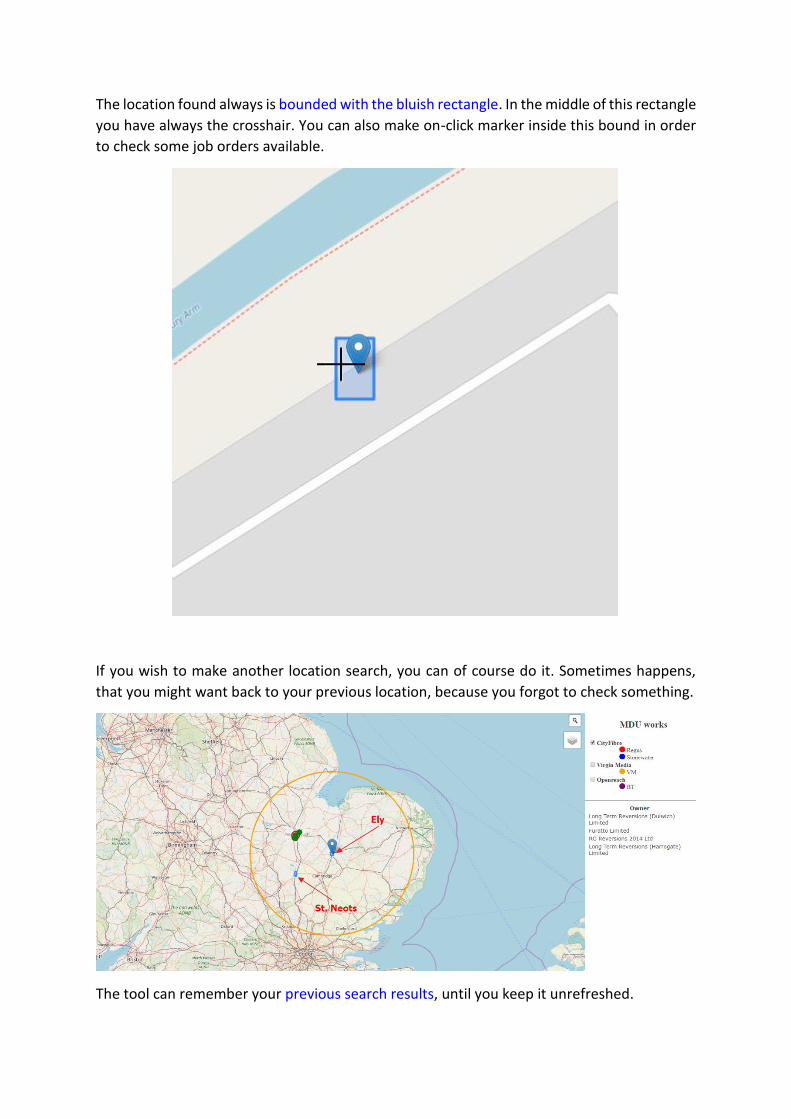
The location found always is bounded with the bluish rectangle. In the middle of this rectangle
you have always the crosshair. You can also make on-click marker inside this bound in order
to check some job orders available.
If you wish to make another location search, you can of course do it. Sometimes happens,
that you might want back to your previous location, because you forgot to check something.
The tool can remember your previous search results, until you keep it unrefreshed.
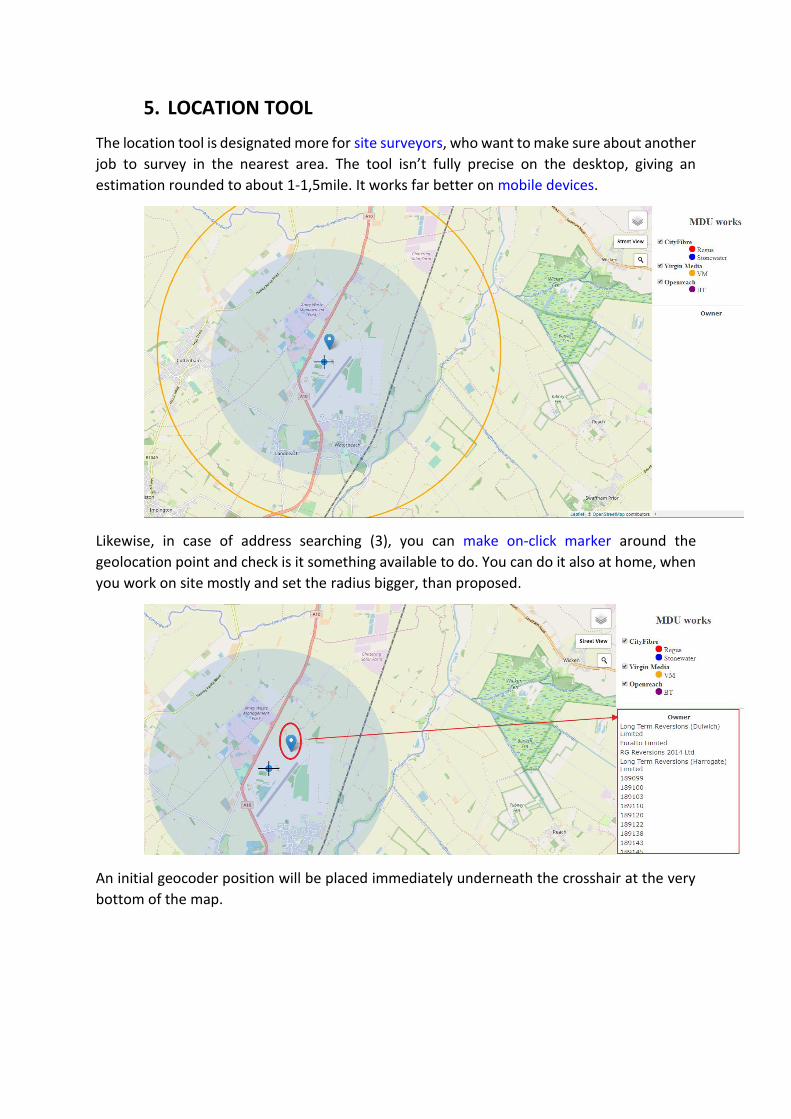
5. LOCATION TOOL
The location tool is designated more for site surveyors, who want to make sure about another
job to survey in the nearest area. The tool isn’t fully precise on the desktop, giving an
estimation rounded to about 1-1,5mile. It works far better on mobile devices.
Likewise, in case of address searching (3), you can make on-click marker around the
geolocation point and check is it something available to do. You can do it also at home, when
you work on site mostly and set the radius bigger, than proposed.
An initial geocoder position will be placed immediately underneath the crosshair at the very
bottom of the map.

6. ON-CLICK FEATURE
One of the major features of this application is the “on-click” option. As discussed above we
can use it for finding the jobs (2) in the area given alongside with address search (3) or
geolocation tool (4) or for simply checking what is nearby the job, which we are looking at
right now. In the top right corner of this map you have a few options to set your radius
between 1 mile and 75 miles. The biggest one corresponds to 2-3hour drive time from your
initial location.
Once you selected the proper radius, make an “on-click” marker on your map and see, what
can be available right now to work at.
Once you are going to select some order, it’s highlighted in yellow.
After clicking, you are instantly redirected likewise in the manual job search case (2).

7. STREET VIEW ACCESS
Street view access is also one of the major advantages of the following application. If you
want to be redirected to Google right now, just press the “Street View” button. It’s advisable
to take a look at least on the crosshair, which indicates the coordinates of the map center.
These coordinates appear to be the same in the Street View permalink, which is a key figure
in this feature. If you found your order and have the crosshair placed on it (2), then after
clicking the “Street View” button you should get the StreetSide imagery from Google.
When you have the Street View open, we can point a few pivot things here:
1 – as you may have noticed, the Street View is opened always in the new window, which is

very good for us. Remember, that every next clicking on the “Street View” button will only
refresh this window. If you want to keep this view open is better to copy the URL to another
tab.
2 – Look at the Google Street View permalink – it’s the same (or almost the same) like location
of your order, map center coordinates and your map permalink. As you move the view, it
changes.
3 – The Google Marker – the quickest way to get this view (and location marked) in Google
Maps instead of Street View. The marker turns red once hover it.
4 – Back to Google Maps, where you have a view of the area, but without the location
marked!
5 – The Google Maps view, widely known.
Basically the “Street View” option in the MDU map works pretty much the same like in the
showmystreet.com website, where you have an instant Google StreetSide view after address
input.
After clicking the Google Marker (6.3), we have a following view. Our location appears on the
Google Maps, whereas the Street View is confined to the left side bar. We can always back to
this view by clicking on the image. Remember, that Google Maps open in the new window or
in the bottom left corner.
However, the most important attitude of this option is the “Search nearby” function, that may
help us to find something closest to our location (i.e. Hospital, necessary in the RAMS
documents). We can use this Google Maps tip & trick by clicking on the middle button under
the address.
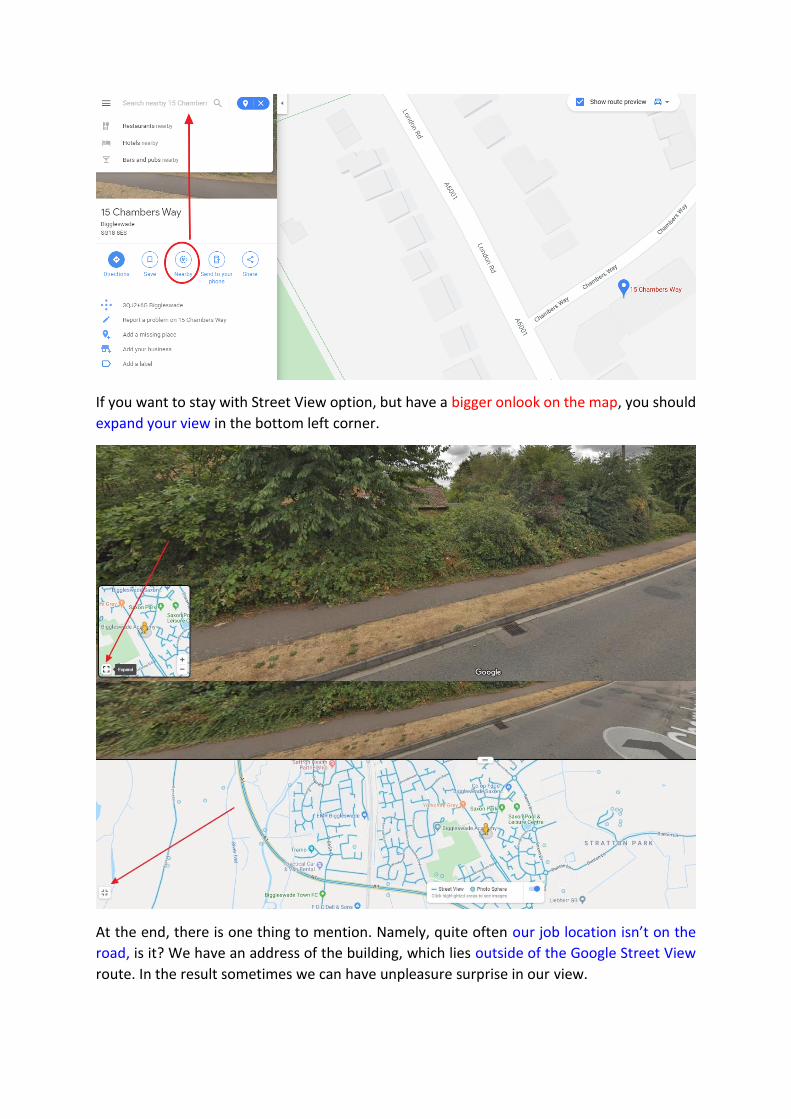
If you want to stay with Street View option, but have a bigger onlook on the map, you should
expand your view in the bottom left corner.
At the end, there is one thing to mention. Namely, quite often our job location isn’t on the
road, is it? We have an address of the building, which lies outside of the Google Street View
route. In the result sometimes we can have unpleasure surprise in our view.
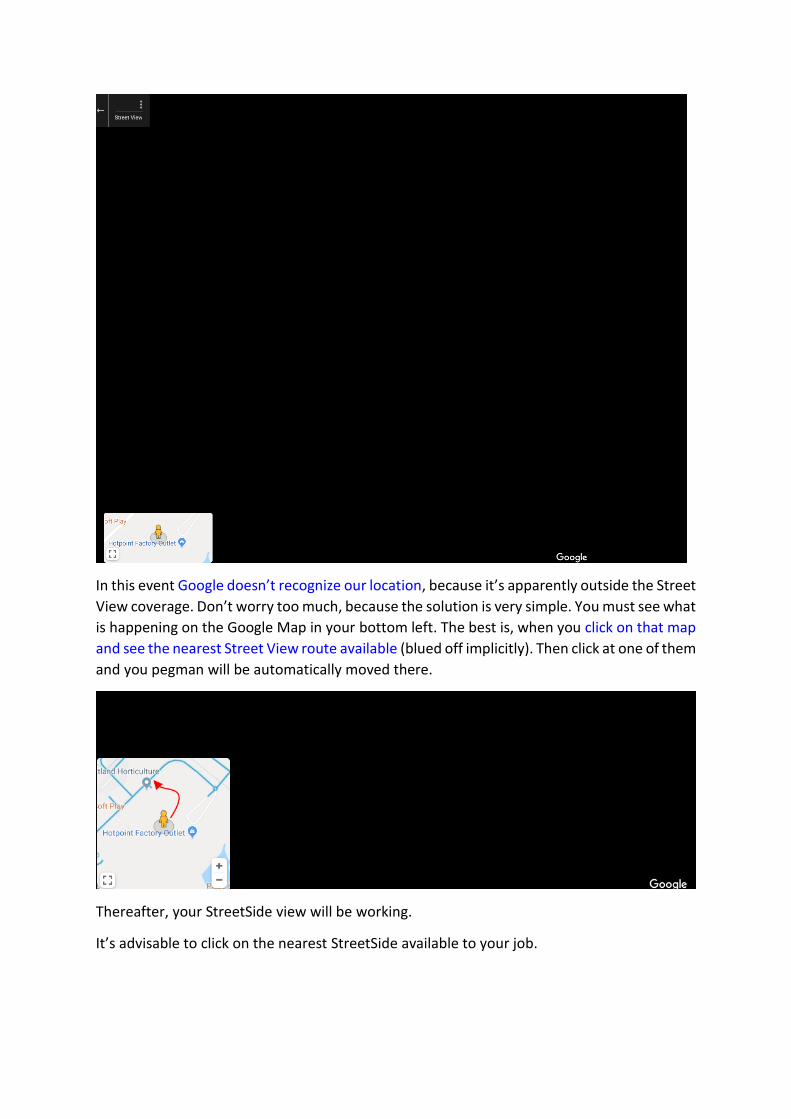
In this event Google doesn’t recognize our location, because it’s apparently outside the Street
View coverage. Don’t worry too much, because the solution is very simple. You must see what
is happening on the Google Map in your bottom left. The best is, when you click on that map
and see the nearest Street View route available (blued off implicitly). Then click at one of them
and you pegman will be automatically moved there.
Thereafter, your StreetSide view will be working.
It’s advisable to click on the nearest StreetSide available to your job.
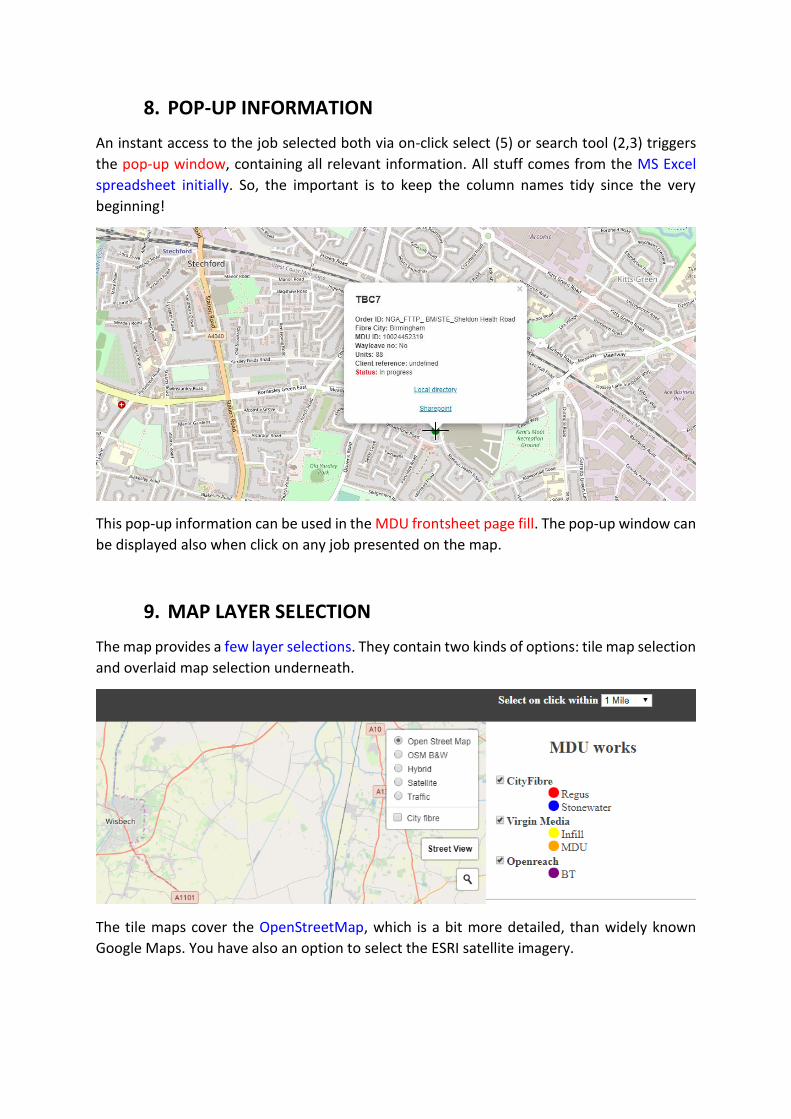
8. POP-UP INFORMATION
An instant access to the job selected both via on-click select (5) or search tool (2,3) triggers
the pop-up window, containing all relevant information. All stuff comes from the MS Excel
spreadsheet initially. So, the important is to keep the column names tidy since the very
beginning!
This pop-up information can be used in the MDU frontsheet page fill. The pop-up window can
be displayed also when click on any job presented on the map.
9. MAP LAYER SELECTION
The map provides a few layer selections. They contain two kinds of options: tile map selection
and overlaid map selection underneath.
The tile maps cover the OpenStreetMap, which is a bit more detailed, than widely known
Google Maps. You have also an option to select the ESRI satellite imagery.
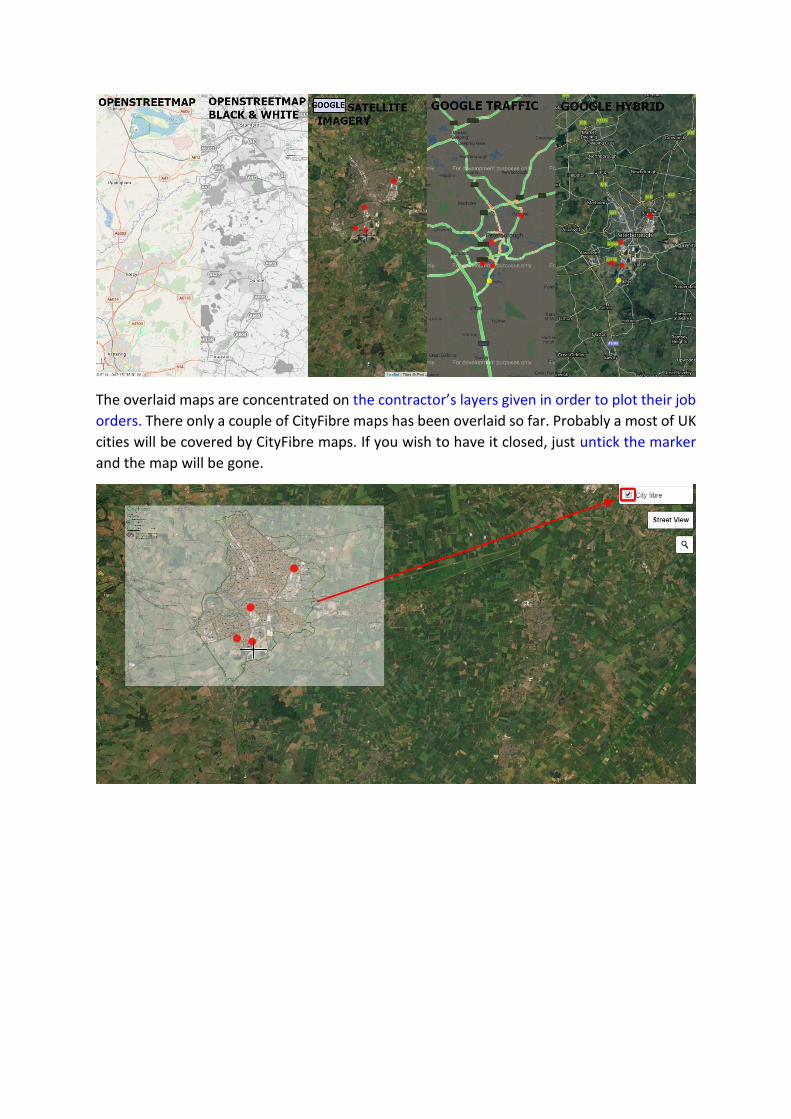
The overlaid maps are concentrated on the contractor’s layers given in order to plot their job
orders. There only a couple of CityFibre maps has been overlaid so far. Probably a most of UK
cities will be covered by CityFibre maps. If you wish to have it closed, just untick the marker
and the map will be gone.
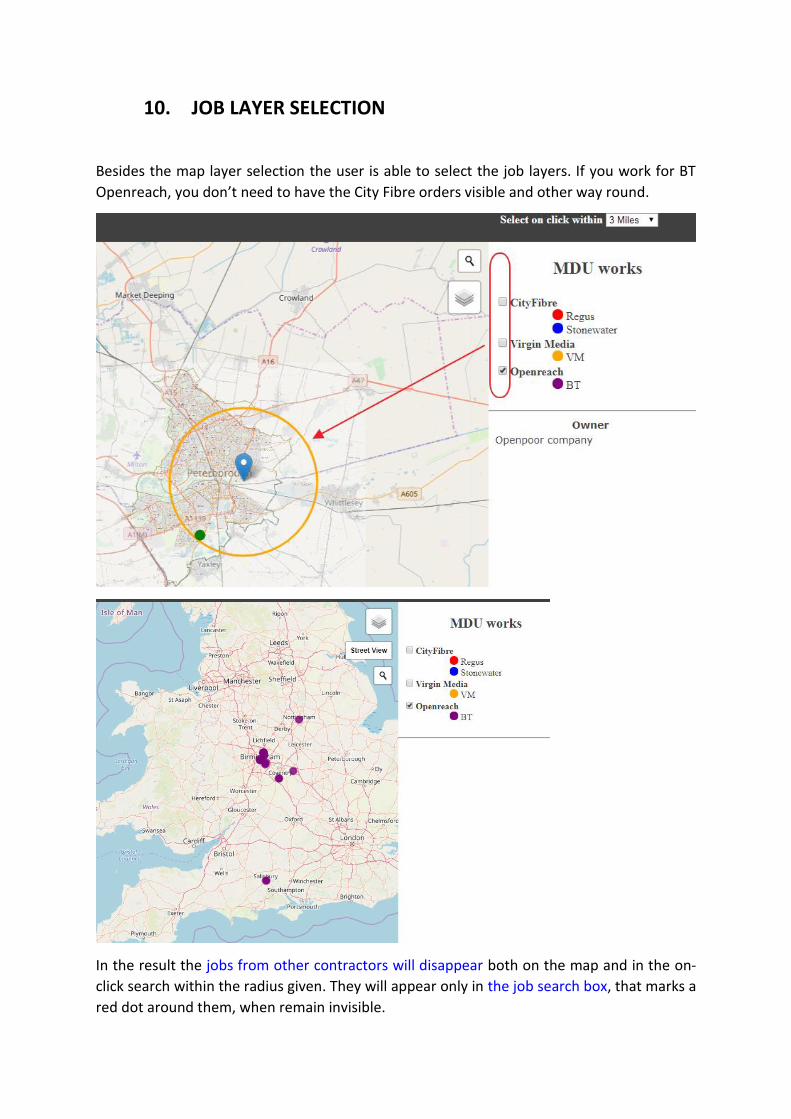
10. JOB LAYER SELECTION
Besides the map layer selection the user is able to select the job layers. If you work for BT
Openreach, you don’t need to have the City Fibre orders visible and other way round.
In the result the jobs from other contractors will disappear both on the map and in the on-
click search within the radius given. They will appear only in the job search box, that marks a
red dot around them, when remain invisible.

When you deselect some group of jobs, you must repeat your on-click feature (7) in order to
refresh the search result.

11. LINK MANAGEMENT
Beside the description seen in our pop-up window (7), we can two links underneath. One
leads to the local directory (1). Another one leads to the sharepoint location (2).
The local directory cannot be open directly in Chrome & Firefox & Opera browsers due to the
security reasons. One solution, that can be applied is chrome plugins installation. There are
two plugins: “Enable local file links” and “Local explorer”. However, usage of them doesn’t
lead directly to the folder, because our directory is opened in the browser.

We want it opened in our job folder for sure. To this we must copy of the path marked red
(1a) and paste it in some Windows folder path opened and press ENTER as per below (2a):
At the outcome you will see the job folder opened.
There is still another, a bit quicker way to gain this result. We must open this application in
the IE browser instead. When you repeat the process described above by clicking on the
directory link, you get nothing. This is, why the IE differs from another browsers. There are no
plugins that may allow this application to open our job folder. We can use an alternative way
to have our folder opened. Move your cursor on the directory link and right-click it. You will
have a few options, from which you must select “Copy link”.
Next our link should be pasted in the URL path on the top. I would advice you to open a new
tab for this purpose first, although this is not a must. Press ENTER, when copied. In the result
the IE opens our job folder straight in the Windows application, which is good.
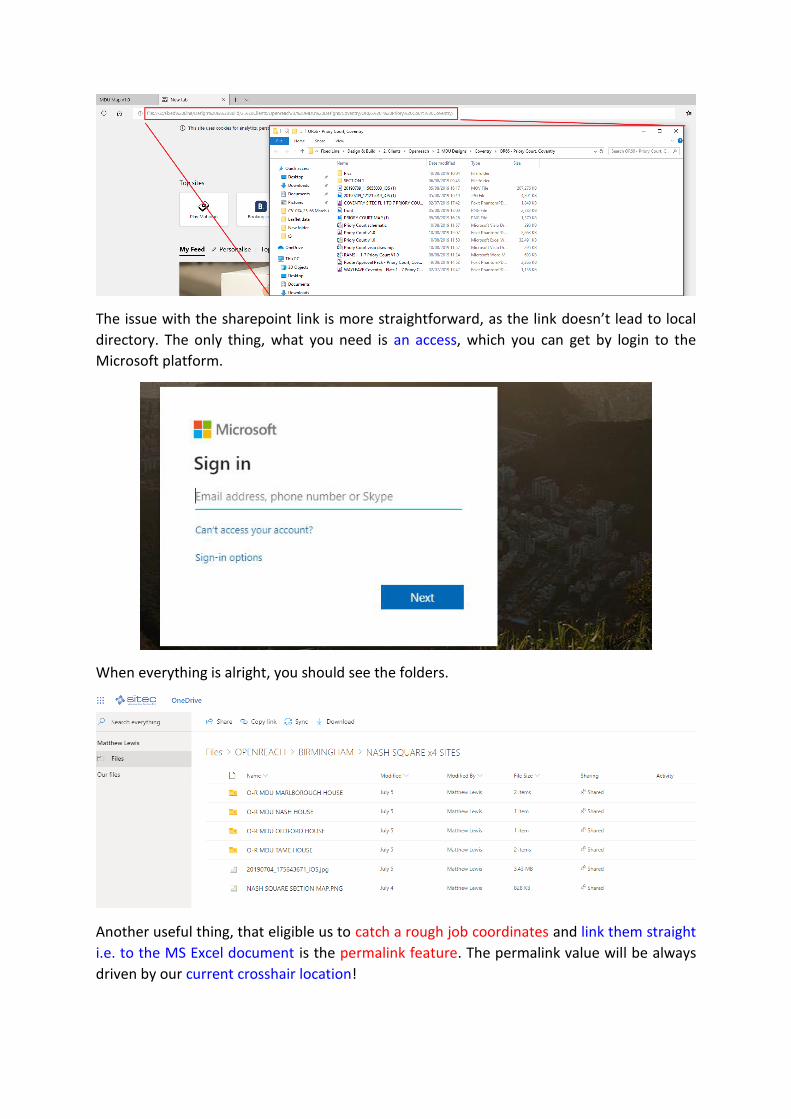
The issue with the sharepoint link is more straightforward, as the link doesn’t lead to local
directory. The only thing, what you need is an access, which you can get by login to the
Microsoft platform.
When everything is alright, you should see the folders.
Another useful thing, that eligible us to catch a rough job coordinates and link them straight
i.e. to the MS Excel document is the permalink feature. The permalink value will be always
driven by our current crosshair location!
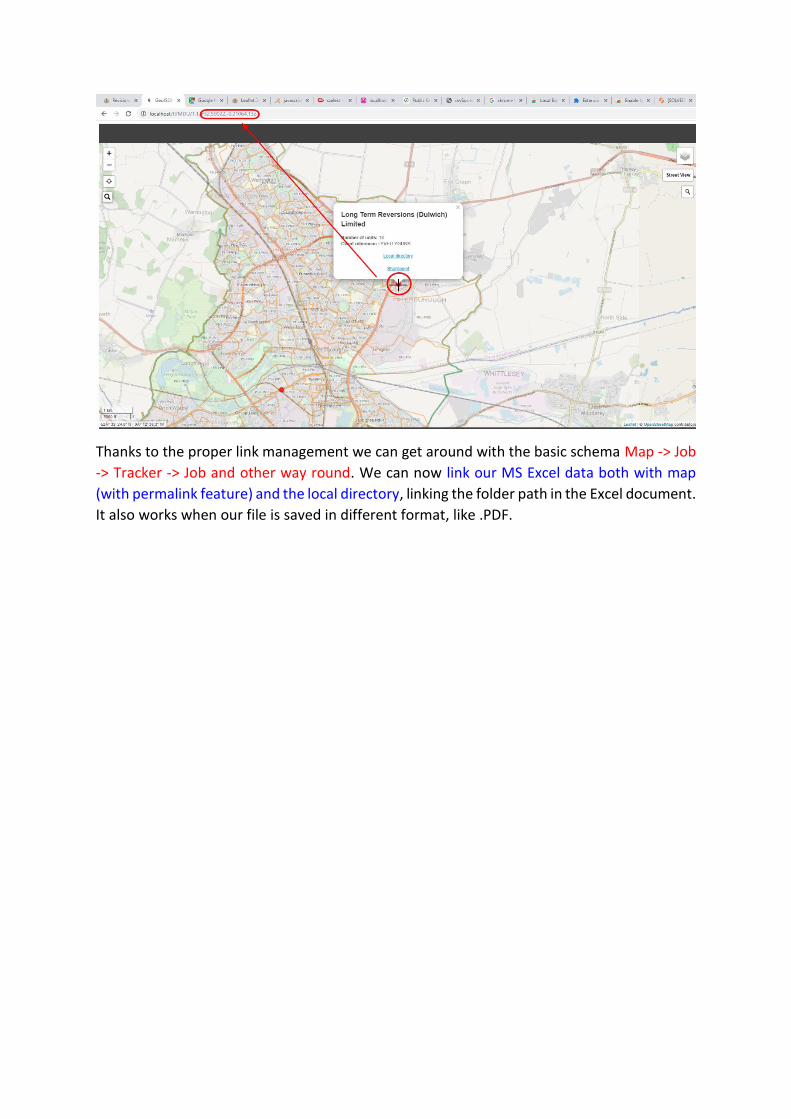
Thanks to the proper link management we can get around with the basic schema Map -> Job
-> Tracker -> Job and other way round. We can now link our MS Excel data both with map
(with permalink feature) and the local directory, linking the folder path in the Excel document.
It also works when our file is saved in different format, like .PDF.

12. CREDITS
OpenStreetMap Leaflet JavaScript API map software
StackExchange
GitHub
CityFibre
Mariusz Krukar
Sitec IS
Cambridge Research Park
October, 2019