Roll Failures Manual - Karl Buch Walzengiesserei GmbH & Co ...
Upload
khangminh22Category
view
2download
0
DATA DISPLAY GROUP
The information contained in this document has been carefully researched and is, to the best of our knowledge, accurate. However, we assume no liability for any product failures or damages, immediate or consequential, resulting from the use of the information provided herein. Our products are not intended for use in systems in which failures of product could result in personal injury. All trademarks mentioned herein are property of their respective owners. All specifications are subject to change without notice.
Manual ArtistaMEDIA Network Media Player
PA-09-XXX
Version 1.12
05.10.2011

DATA DISPLAY GROUP
Manual
Table of Contents 1 Revision History ............................................................................................................................ 4
2 General Description .................................................................................................................... 4
3 What’s new in this Release........................................................................................................ 4
4 System Requirements................................................................................................................. 5
5 Getting Started ............................................................................................................................. 5
5.1 Network Configuration of ArtistaMEDIA via Web Frontend........................................................................... 5
5.2 Network Configuration of ArtistaControlCenter (ACC) .................................................................................... 6
6 Content Update Procedures .................................................................................................... 6
6.1 Content Update with USB Flash Drive.................................................................................................................... 6
6.2 Content Update with ArtistaControlCenter (ACC) ............................................................................................. 7
6.3 Content Auto Update from FTP Server .................................................................................................................. 8 6.3.1 Setup of FTP Server....................................................................................................................................................... 8 6.3.2 Configuration of ArtistaMEDIA ................................................................................................................................. 8 6.3.3 Content Update ............................................................................................................................................................. 9
7 ArtistaMEDIA Web Frontend..................................................................................................10
7.1 Normal Operating Mode...........................................................................................................................................10 7.1.1 Login................................................................................................................................................................................10 7.1.2 Home ...............................................................................................................................................................................11 7.1.3 Network Configuration..............................................................................................................................................12 7.1.4 Content Auto Update.................................................................................................................................................14 7.1.5 Advanced Configuration...........................................................................................................................................16 7.1.6 Display.............................................................................................................................................................................17 7.1.7 Audio ...............................................................................................................................................................................18 7.1.8 Date and Time ..............................................................................................................................................................19 7.1.9 Password Settings .......................................................................................................................................................20 7.1.10 Firmware Update.........................................................................................................................................................21 7.1.11 System Information ....................................................................................................................................................22 7.1.12 Restart Artista ...............................................................................................................................................................23
7.2 Maintenance Mode.....................................................................................................................................................24 7.2.1 Home ...............................................................................................................................................................................24 7.2.2 Network Configuration..............................................................................................................................................25 7.2.3 Firmware Update.........................................................................................................................................................26 7.2.4 System Information ....................................................................................................................................................27 7.2.5 Restart Artista ...............................................................................................................................................................28
8 Log Files.........................................................................................................................................28
8.1 Log File for Content Updates ..................................................................................................................................29
8.2 Log File for Player Statistics......................................................................................................................................30
9 Specification of Playlist File ....................................................................................................31
ArtistaMEDIA Version 1.12 05.10.2011
Page 2 of 49

DATA DISPLAY GROUP
Manual
10 Supported Media Formats......................................................................................................34
11 Firmware Update .......................................................................................................................36
12 Network Factory Default Values ...........................................................................................37
13 Reset ArtistaMEDIA to Network Factory Default Values ..............................................37
14 Pre-configured Default Values ..............................................................................................38
15 Functions of the LEDs on the ArtistaMEDIA Board ........................................................38
16 Firmware Release History........................................................................................................38
17 Known Issues ...............................................................................................................................42
18 Trouble Shooting .......................................................................................................................42
19 Additional Documents for ArtistaMEDIA...........................................................................43
20 News and Updates for Artista Products .............................................................................43
21 Glossary .........................................................................................................................................44
22 Additional Information about Media Files ........................................................................44
22.1 Required Software Tools...........................................................................................................................................44 22.1.1 TMPGEnc 4.0 XPress ...................................................................................................................................................44 22.1.2 avidemux........................................................................................................................................................................44
22.2 Converting .mpg Files to .avi Files with avidemux...........................................................................................45
22.3 Converting various Video Formats to MPEG-2..................................................................................................46
22.4 Playing Back ArtistaMEDIA AVI Files with Windows Media Player or ACC ...............................................47
22.5 Playing Back MP4 Files with Windows Media Player or ACC on Windows XP ........................................48
ArtistaMEDIA Version 1.12 05.10.2011
Page 3 of 49

DATA DISPLAY GROUP
Manual
1 Revision History
Date Rev.No. Description Page 07.05.2008 1.0 Preliminary release all 09.07.2008 1.1 Updated for the first product release all 26.09.2008 1.2 Added section 13, ArtistaMEDIA Firmware Update 18 09.10.2008 1.3 Some updates in section 13, ArtistaMEDIA Firmware Update 18 11.11.2008 1.4 Updated for firmware version 1.2.0
Added appendix about content creation Updated company logos and contact info on last page
all
22.07.2009 1.5 Updated for firmware version 2.2.0 all 13.11.2009 1.6 Updated for firmware version 2.4.0 all 09.12.2009 1.7 Added specification of playlist file 31, 32 22.04.2010 1.8 Updated for firmware version 2.6.0 all 17.12.2010 1.9 Updated for firmware version 2.8.1
Removed information about updating firmware version 1.0.0 to 1.2.0
all
04.03.2011 1.10 Updated for firmware version 2.10.0 all 05.04.2011 1.11 Updated for firmware version 2.10.1 4, 35,
39 05.10.2011 1.12 Updated for firmware version 2.12.0 4, 35,
38, 42
2 General Description
ArtistaMEDIA is the media player of the Artista product family. Compared to ArtistaUSB and ArtistaNET, which both have been designed for displaying still images, ArtistaMEDIA has been designed for playing back audio and video files. ArtistaMEDIA is equipped with an Ethernet interface for configuration via a standard web browser and for media content updates over network. The latter can also be done via USB Flash Drives. The media files are stored locally on a Compact Flash card or an IDE Hard Disk Drive. TFT flat panels with LVDS interface and resolutions up to Full-HD (1920x1080) can be connected directly to the board. Both hardware and software of ArtistaMEDIA has been developed by Distec GmbH. 3 What’s new in this Release
The latest firmware version 2.12.0 adds the following new main features to ArtistaMEDIA: Support for display resolution 800x480
A detailed list of all changes in the firmware can be found in section Firmware Release History.
ArtistaMEDIA Version 1.12 05.10.2011
Page 4 of 49
DATA DISPLAY GROUP
Manual
4 System Requirements
To use ArtistaMEDIA you need the following equipment: Standard PC with Windows XP, Vista or Windows 7 and with USB and Ethernet interface for
configuration of the ArtistaMEDIA board and content updates Web browser (e.g. Internet Explorer) for configuration of the ArtistaMEDIA board ArtistaControlCenter (ACC) software installed on the Windows PC for playlist creation and
content updates via USB flash drive or over network Optional: FTP server for automatic content updates over network
5 Getting Started
5.1 Network Configuration of ArtistaMEDIA via Web Frontend
To change the configuration of the ArtistaMEDIA board, perform firmware updates or get some system information, a Web Frontend is available. To get access to it with a standard Web Browser within your local area network (LAN) installation, you have to setup the network configuration of ArtistaMEDIA properly. The network interface of ArtistaMEDIA can be configured dynamically by using a DHCP server or statically by the system administrator. Every single ArtistaMEDIA board must be configured before it can be installed into your LAN infrastructure. To configure the network settings of ArtistaMEDIA the first time, you have to execute the following steps:
Ask your network administrator if ArtistaMEDIA should be configured to DHCP or to a static IP address
If static configuration should be used, ask for the IP address which can be assigned to the ArtistaMEDIA board for use within your LAN
Connect ArtistaMEDIA directly to your PC using a cross-link Ethernet cable or an Ethernet Switch and two Patch Cables
Power up ArtistaMEDIA Configure your PC to a static IP address within the subnet 192.168.0 (e.g. 192.168.0.100) Start the Web Browser and enter the address http://192.168.0.1 A logon dialog will appear. Enter “Artista” for both, user name and password The main menu of the ArtistaMEDIA Web Frontend will appear Select the entry “Network Configuration” For dynamic network configuration enable the check-box “Use DHCP”. For static network
configuration, enter the new IP address into the field “ArtistaMEDIA IP Address” Also adjust the other entries according to your requirements, press the button “Submit
Configuration” and wait until ArtistaMEDIA saved all settings Disconnect ArtistaMEDIA from power supply, connect it to your LAN and power up the
board again Now you can access the Web Frontend of ArtistaMEDIA for further configuration from any
PC within the same subnet with a standard Web Browser (for different subnets a Gateway is required in the network)
ArtistaMEDIA Version 1.12 05.10.2011
Page 5 of 49

DATA DISPLAY GROUP
Manual
5.2 Network Configuration of ArtistaControlCenter (ACC)
ArtistaControlCenter (ACC) is Windows software, which can be used to update the media content on the ArtistaMEDIA board over Ethernet. To use this functionality, ACC must be installed on the Windows Host system and configured properly. For further details on this issue, please read the “ArtistaControlCenter ACC Operating Manual”. This document comes with the ACC installation. Please pay attention to enter the same IP address or Host Name you already have assigned to ArtistaMEDIA in section Network Configuration of ArtistaMEDIA via Web Frontend to the field “Host name or IP” into the “Network Setup” dialog within ACC. To make sure, that everything is configured correctly, the connection test can be performed within ACC. If the results are positive, your ACC is prepared for content updates over Ethernet. 6 Content Update Procedures
There are three different methods to update content on ArtistaMEDIA: 1. Use an USB Flash drive that contains the new show, insert it into the board and wait until
the new show starts on the player 2. Use ACC to transmit the new show over network directly to the player 3. Use a FTP server to store the new show. ArtistaMEDIA checks this server periodically for
changes and downloads the new playlist and media files automatically If the FTP method is used, the other two methods are disabled and vice versa. A detailed description of the content update procedures can be found below. 6.1 Content Update with USB Flash Drive
To update the media files stored on ArtistaMEDIA with an USB Flash Drive, the following steps have to be executed (firmware version 2.2.0 or higher is required):
Use ACC to create a show and export it to the USB Flash Drive. This creates the directory “ArtistaMediaContent” in the root directory of the USB Flash Drive. This folder must contain the file “playlist.xml” and all the related media files
Plug the USB Flash Drive into the USB port of ArtistaMEDIA and wait ArtistaMEDIA will automatically start to copy the new content (playlist and media files) to
the internal data storage (Compact Flash Card or Hard Disk Drive). Depending on the size of the new media files, this can take several minutes. ArtistaMEDIA continues to play the old playlist in the meantime
After copying the new content to the internal storage, ArtistaMEDIA will start to play back the new playlist in an endless loop. The old playlist and media files are deleted from internal data storage at the same time
ArtistaMEDIA Version 1.12 05.10.2011
Page 6 of 49

DATA DISPLAY GROUP
Manual
USB Flash Drive can be removed from ArtistaMEDIA now
ArtistaMEDIA creates a small log file in the root directory of the USB Flash Drive. This file is called “ArtistaMediaUsbUpdate.log” and contains some useful information about the content update process
6.2 Content Update with ArtistaControlCenter (ACC)
ArtistaControlCenter (ACC) is Windows software, which can be used to create shows and update the media files on ArtistaMEDIA over Ethernet. To use this functionality, ACC must be installed on the Windows Host system and configured properly (see section Network Configuration of ArtistaControlCenter (ACC)). For further details on this issue, please read the “ArtistaControlCenter ACC Operating Manual”. This document comes with the ACC installation. To update the media files stored on ArtistaMEDIA with ACC over network, the following steps have to be executed (ACC version 2.6.0 or higher and ArtistaMEDIA firmware version 2.2.0 or higher is required):
Start the ArtistaControlCenter (ACC) software (make sure that the steps described in the section Network Configuration of ArtistaControlCenter (ACC) are already done)
Open a valid ArtistaControlCenter configuration file (*.acc) for ArtistaMEDIA. If you don’t have one available, this must be created first
Select “Network -> Upload current configuration” Select the desired ArtistaMEDIA and playlist and press “Start” in the “Upload to remote
host” dialog ACC will upload the selected playlist and media files (configuration) to ArtistaMEDIA.
Depending on the size of the new media files, this can take several minutes During this process, ArtistaMEDIA will continue to play the old playlist until the new playlist
has been transmitted completely After the transmission of the new playlist has been finished, ArtistaMEDIA stops playback of
the old playlist, deletes it from the internal data storage (Compact Flash Card or Hard Disk Drive) and starts the new playlist in and endless loop again
ArtistaMEDIA Version 1.12 05.10.2011
Page 7 of 49

DATA DISPLAY GROUP
Manual
6.3 Content Auto Update from FTP Server
ArtistaMEDIA can be configured to update the playlist and media files over network automatically. If this content auto update function is enabled, the other two content update procedures with ArtistaControlCenter (ACC) and USB flash drives are disabled (both methods are mutual exclusive). Auto update means, that the playlist and the media files can be stored on a FTP server in the network and ArtistaMEDIA periodically checks this location for new content. If there is any change on the FTP server, ArtistaMEDIA automatically downloads the new files and saves them on the local storage. The configuration of the board regarding the FTP server is done with the Web Frontend. 6.3.1 Setup of FTP Server
Before the auto update function of ArtistaMEDIA can be used, a FTP server must be setup in the network. The IP address and the login information (user name and password) of the server must be known. If you are working with server names instead of IP addresses, the IP address of the name server must be known as well. On the FTP server a directory must be created (e.g. “media”). It must contain the playlist file (“playlist.xml”) and the corresponding media files which will be downloaded by ArtistaMEDIA. 6.3.2 Configuration of ArtistaMEDIA
Open the ArtistaMEDIA Web Frontend and select the menu “Content Auto Update”. Here all information about the FTP server must be set. Detailed information about the settings:
Setting Description FTP Server Media Content Directory
Path and name of the directory for the playlist file and the corresponding media files on the FTP server must be entered here (case sensitive)
FTP Content Auto Update Poll Interval
Enter a time interval in seconds here. ArtistaMEDIA will use this interval for checking the FTP server for new playlist and media files. If the value is set to “0”, the Content Auto Update function is disabled and the ACC and USB content upload methods are enabled
FTP Content Auto Update Timeout
Enter a time interval in seconds here. In case of connection problems to the FTP server, ArtistaMEDIA stops trying to access the server after the time configured here
Press “Submit configuration”. ArtistaMEDIA will check the access to the FTP server. Check
the output messages on the Web Frontend for failures carefully
If access to the FTP server is available and the content can be found, restart the ArtistaMEDIA board by pressing “Restart Artista -> Restart ArtistaMEDIA” in the Web Frontend. This is required to apply the changes.
ArtistaMEDIA Version 1.12 05.10.2011
Page 8 of 49

DATA DISPLAY GROUP
Manual
6.3.3 Content Update
After setting up the FTP server and the ArtistaMEDIA board properly as described in the two sections above, the media files on the ArtistaMEDIA board can be updated simply by updating the files on the FTP server. ArtistaMEDIA will periodically check the FTP directories with the time interval configured in the Web Frontend for any changes and will download the new playlist and media files automatically. ArtistaMEDIA uses the following sequence for content update:
Check the size and date of the playlist.xml file on the FTP server. If it is different to the version which currently used, download the new one
Parse all media file names in the new playlist Check, which media files are new or changed and thus not available on the local storage yet Download all new media files in the background and store them locally If download is completed, stop the current play back Delete all outdated media files from the local storage Start play back with the new playlist again
ArtistaMEDIA handles the auto content update by applying the rules mentioned below:
The playlist must be called “playlist.xml” (case sensitive) and must be valid (refer to example playlist)
To decide, if a playlist is new, ArtistaMEDIA compares the date and the size in bytes of the “playlist.xml” file on the FTP server and the one currently used
ArtistaMEDIA checks the available space on the local storage automatically: o If the new playlist and the associated media files exceed the available space on the
local storage, the new playlist will be ignored o If the files currently stored on the local storage of ArtistaMEDIA plus the new files
which should be downloaded according to the new playlist.xml are exceeding the available space on the local storage, the new playlist will be ignored
If the new playlist contains media files, which are not available on the FTP server nor on the local storage, the new playlist will be ignored
ArtistaMEDIA detects changes in the file name and the file size of the media files on the FTP server
If there is no file in the directory on the FTP server, ArtistaMEDIA continues to play the current playlist
First check for new files on the FTP server happens immediately after power on of the ArtistaMEDIA board
Consecutive checks will be done periodically with the time interval specified in the Web Frontend
ArtistaMEDIA Version 1.12 05.10.2011
Page 9 of 49

DATA DISPLAY GROUP
Manual
7 ArtistaMEDIA Web Frontend
To configure ArtistaMEDIA for your needs, a Web Frontend is available. You just have to open your Web Browser and enter the IP address of your board into the URL field. A logon dialog appears where you have to enter the user name and the password of your board. After that, the Home page of the ArtistaMEDIA Web Frontend appears. The following sections describe which parameters can be configured, how the firmware can be updated and which status information can be retrieved from the board. 7.1 Normal Operating Mode
7.1.1 Login
The Web Frontend of ArtistaMEDIA requires a user name and a password for login. On default, these both values are set to “Artista”.
ArtistaMEDIA Version 1.12 05.10.2011
Page 10 of 49

DATA DISPLAY GROUP
Manual
7.1.2 Home
The picture below shows the welcome screen of the ArtistaMEDIA Web Frontend in normal operating mode. A detailed description of the menus on the left can be found in the next sections.
ArtistaMEDIA Version 1.12 05.10.2011
Page 11 of 49

DATA DISPLAY GROUP
Manual
7.1.3 Network Configuration
The picture below shows the network configuration menu of the ArtistaMEDIA Web Frontend in normal operating mode.
ArtistaMEDIA Version 1.12 05.10.2011
Page 12 of 49

DATA DISPLAY GROUP
Manual
The following parameters can be configured here:
Network configuration method DHCP or static ArtistaMEDIA IP address (to be manually configured for static configuration only) Subnet mask (to be manually configured for static configuration only) Gateway IP address (to be manually configured for static configuration only) DNS server IP address (to be manually configured for static configuration only) Domain (to be manually configured for static configuration only) ArtistaMEDIA host name ArtistaMEDIA description ArtistaMEDIA upload control port ArtistaMEDIA upload data port ArtistaMEDIA server IP address ArtistaMEDIA group ID
The default values can be found in section Network Factory Default Values. Discard Changes: This button reverses your changes in the network configuration, if you have not pressed “Submit Configuration” yet. Submit Configuration: This button saves the changes in the network configuration on the board. You have to reboot the ArtistaMEDIA board to make the changes take effect. Select the menu “Restart Artista” to do this. Load Factory Defaults: This button can be used to preload the network configuration values with the factory default values. Press “Submit Configuration” to save these values on the board and restart it to make the new settings take effect.
ArtistaMEDIA Version 1.12 05.10.2011
Page 13 of 49

DATA DISPLAY GROUP
Manual
7.1.4 Content Auto Update
The picture below shows the content auto update configuration menu of the ArtistaMEDIA Web Frontend in normal operating mode.
Setting Description FTP Server Media Content Directory
The name of the directory for the playlist and the appropriate media files on the FTP server must be entered here (case sensitive)
FTP Content Auto Update Poll Interval
Enter a time interval in seconds here. ArtistaMEDIA uses this interval for checking the FTP server for new playlist and media files. If the value is set to “0”, the Content Auto Update feature is disabled and content update via ACC or USB flash drives is enabled instead
FTP Content Auto Update Timeout
Enter a time interval in seconds here. If there is currently no connection to the FTP server, ArtistaMEDIA stops trying to access the server after the time configured here
ArtistaMEDIA Version 1.12 05.10.2011
Page 14 of 49
DATA DISPLAY GROUP
Manual
Discard Changes: This button reverses your changes in the configuration, if you have not pressed “Submit Configuration” yet. Submit Configuration: By pressing this button ArtistaMEDIA checks the access to the FTP server and saves the current configuration on the board. Check the output messages on the Web Frontend if ArtistaMEDIA was able to log in the FTP server. If access to the FTP server is available and the content can be found you have to restart the ArtistaMEDIA board to make the changes take effect. Select the menu “Restart Artista” to do this.
ArtistaMEDIA Version 1.12 05.10.2011
Page 15 of 49
DATA DISPLAY GROUP
Manual
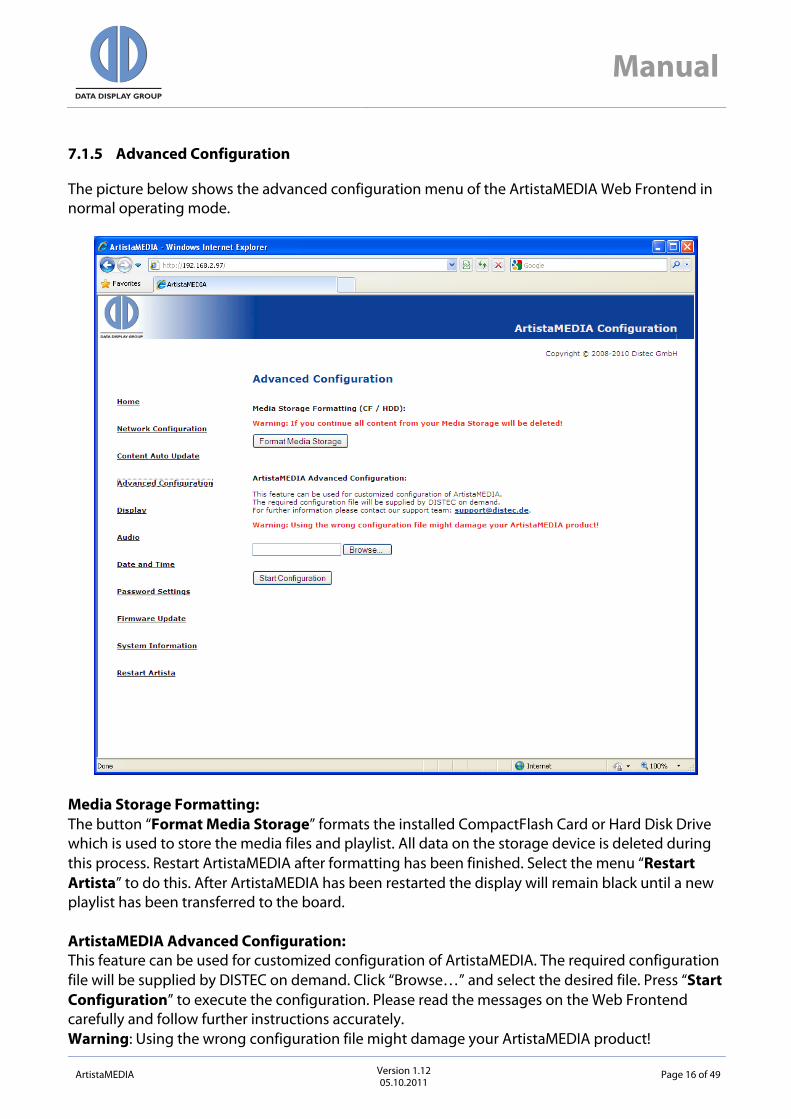
7.1.5 Advanced Configuration
The picture below shows the advanced configuration menu of the ArtistaMEDIA Web Frontend in normal operating mode.
Media Storage Formatting: The button “Format Media Storage” formats the installed CompactFlash Card or Hard Disk Drive which is used to store the media files and playlist. All data on the storage device is deleted during this process. Restart ArtistaMEDIA after formatting has been finished. Select the menu “Restart Artista” to do this. After ArtistaMEDIA has been restarted the display will remain black until a new playlist has been transferred to the board. ArtistaMEDIA Advanced Configuration: This feature can be used for customized configuration of ArtistaMEDIA. The required configuration file will be supplied by DISTEC on demand. Click “Browse…” and select the desired file. Press “Start Configuration” to execute the configuration. Please read the messages on the Web Frontend carefully and follow further instructions accurately. Warning: Using the wrong configuration file might damage your ArtistaMEDIA product!
ArtistaMEDIA Version 1.12 05.10.2011
Page 16 of 49

DATA DISPLAY GROUP
Manual
7.1.6 Display
The picture below shows the display configuration menu of the ArtistaMEDIA Web Frontend in normal operating mode.
The following parameters can be configured here:
Default backlight brightness Video scaling for the panel
ArtistaMEDIA Version 1.12 05.10.2011
Page 17 of 49
DATA DISPLAY GROUP
Manual
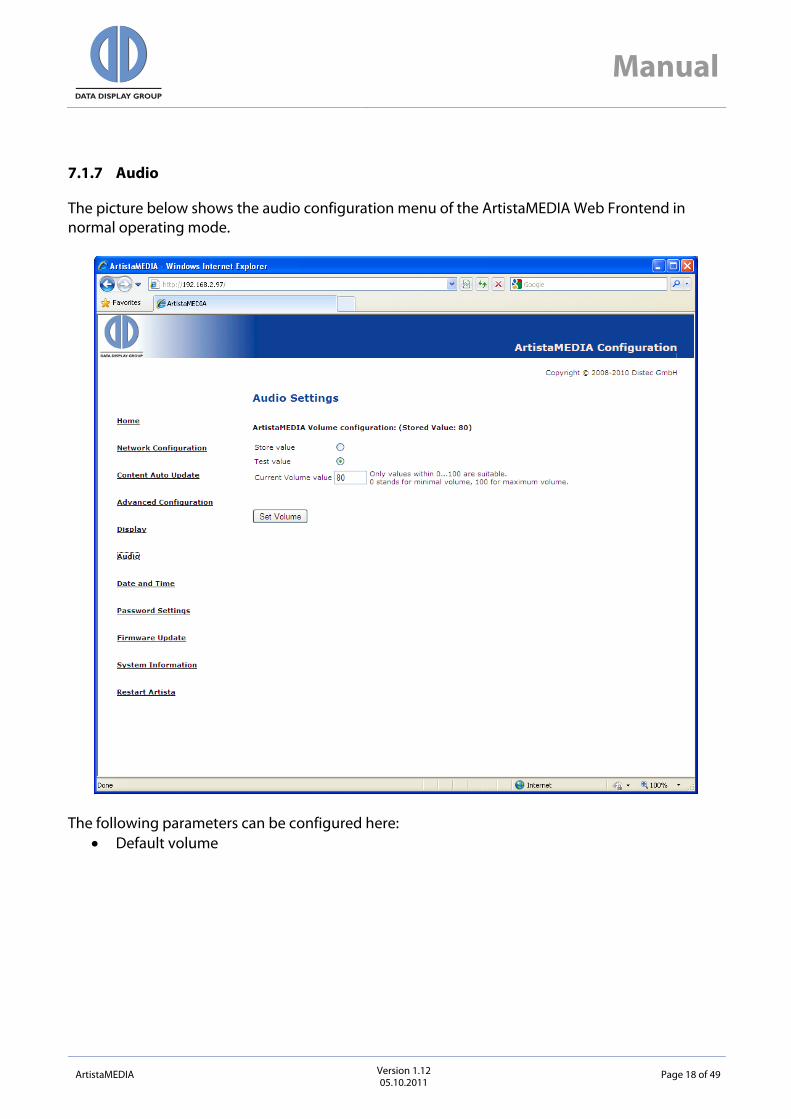
7.1.7 Audio
The picture below shows the audio configuration menu of the ArtistaMEDIA Web Frontend in normal operating mode.
The following parameters can be configured here:
Default volume
ArtistaMEDIA Version 1.12 05.10.2011
Page 18 of 49

DATA DISPLAY GROUP
Manual
7.1.8 Date and Time
The picture below shows the date and time configuration menu of the ArtistaMEDIA Web Frontend in normal operating mode.
This menu can be used to configure ArtistaMEDIA with the current date and time. This is very useful to get valid time stamps in the log files (for more details refer to section Log Files). ArtistaMEDIA has a battery powered hardware clock onboard. This allows that the board keeps the correct date and time, even when it is switched off. At the moment when this page is selected, the fields are preloaded with the current date and time values of the ArtistaMEDIA board. The “Refresh” button can be used to update the fields in the Web Frontend again. To change the current setting, just enter the new values into the “Date” and “Time” fields. The date must be entered in day (two digits), month (two digits) and year (four digits) format. The time must be entered in hour (two digits in 24 h format, e.g. 1 p.m. is 13), minute, second (both with two digits) format.
ArtistaMEDIA Version 1.12 05.10.2011
Page 19 of 49

DATA DISPLAY GROUP
Manual
The button “Set New Date and Time” must be pressed to store the new setting on the ArtistaMEDIA board. 7.1.9 Password Settings
The picture below shows the password configuration menu of the ArtistaMEDIA Web Frontend in normal operating mode.
The following parameters can be configured here:
User name for login dialog of Web Frontend Password for login dialog of Web Frontend
The default values can be found in section Network Factory Default Values.
ArtistaMEDIA Version 1.12 05.10.2011
Page 20 of 49

DATA DISPLAY GROUP
Manual
7.1.10 Firmware Update
The picture below shows the firmware update menu of the ArtistaMEDIA Web Frontend in normal operating mode.
This procedure for firmware updates is supported for firmware version 1.2.0 and higher. If the installed firmware version is 1.0.0 a different update procedure must be used. Please contact Distec support for further information. Enter Maintenance Mode: This button is used to restart ArtistaMEDIA in maintenance mode. To get the welcome page of the ArtistaMEDIA maintenance mode press the reload button of your browser after about 2 minutes. Follow the update instructions in section Firmware Update then.
ArtistaMEDIA Version 1.12 05.10.2011
Page 21 of 49

DATA DISPLAY GROUP
Manual
7.1.11 System Information
The picture below shows the system information summary of the ArtistaMEDIA Web Frontend in normal operating mode.
The following information about your ArtistaMEDIA board can be retrieved here:
Firmware version Network configuration Current settings for audio volume, backlight brightness, etc. Log file for content update statistics Log file for player statistics
ArtistaMEDIA Version 1.12 05.10.2011
Page 22 of 49

DATA DISPLAY GROUP
Manual
7.1.12 Restart Artista
The picture below shows the restart ArtistaMEDIA menu of the ArtistaMEDIA Web Frontend in normal operating mode.
Some configuration changes (e.g. network or content auto update configuration) require a restart of the ArtistaMEDIA board for the modifications to take effect. This can be done by pressing the button “Restart ArtistaMEDIA”.
ArtistaMEDIA Version 1.12 05.10.2011
Page 23 of 49

DATA DISPLAY GROUP
Manual
7.2 Maintenance Mode
Beside the normal operating mode ArtistaMEDIA also has a maintenance mode. This mode is used in two cases:
1. Firmware update Enter the Web Frontend in normal operating mode Select the menu “Firmware Update” Press the button “Enter Maintenance Mode” ArtistaMEDIA reboots now in maintenance mode
2. Reset the network configuration of the board to the factory defaults
If you follow the instructions in section Reset ArtistaMEDIA to Network Factory Default Values, ArtistaMEDIA boots in maintenance mode as well.
Note: If ArtistaMEDIA is running in maintenance mode, the player and the display is switched off. The header of the Web Frontend is red and has the caption “ArtistaMEDIA Maintenance Mode”. 7.2.1 Home
The picture below shows the ArtistaMEDIA Web Frontend welcome screen if the board is running in maintenance mode.
ArtistaMEDIA Version 1.12 05.10.2011
Page 24 of 49

DATA DISPLAY GROUP
Manual
7.2.2 Network Configuration
The picture below shows the network configuration menu in maintenance mode. It has the same function as the network configuration menu in normal operating mode.
Discard Changes: This button reverses your changes in the network configuration, if you have not pressed “Submit Configuration” yet. Submit Configuration: This button saves the changes in the network configuration on the board. You have to restart the ArtistaMEDIA board to make the changes take effect. Select the menu “Restart Artista” to do this.
ArtistaMEDIA Version 1.12 05.10.2011
Page 25 of 49

DATA DISPLAY GROUP
Manual
Load Factory Defaults: This button can be used to preload the network configuration fields in the Web Frontend with the factory defaults. Press “Submit Configuration” to save these values on the board and restart it to make the new settings take effect. 7.2.3 Firmware Update
The picture below shows the firmware update menu in maintenance mode.
To install a firmware update the following steps have to be executed:
Press “Browse …” and select the firmware update package in the file system of your PC Press “Upload Firmware Image to ArtistaMEDIA” Firmware update takes about 2 minutes. Messages showing the progress of the update
process are displayed on the Web Frontend When the update process has been finished, restart the ArtistaMEDIA board by selecting
the menu “Restart Artista” and pressing the button “Enter Normal Operating Mode” Further details on the firmware update procedure can be found in section Firmware Update.
ArtistaMEDIA Version 1.12 05.10.2011
Page 26 of 49

DATA DISPLAY GROUP
Manual
7.2.4 System Information
The picture below shows the system information menu in maintenance mode. It has the same function as the system information menu in normal operating mode, but in maintenance mode not all values are displayed. The current settings are just displayed and can not be changed here.
ArtistaMEDIA Version 1.12 05.10.2011
Page 27 of 49

DATA DISPLAY GROUP
Manual
7.2.5 Restart Artista
The picture below shows the restart Artista menu in maintenance mode.
Press the button “Enter Normal Operating Mode” to leave the maintenance mode and restart ArtistaMEDIA in normal operating mode. After about 2 minutes the board will start playback of the current playlist again. Press the reload button of your Browser to get the Web Frontend menu of normal operating mode. 8 Log Files
ArtistaMEDIA creates two different log files which are stored on the local storage (CompactFlash card or Hard Disk Drive). They can be viewed and retrieved with the Web Frontend. There is one log file that contains all information regarding the content updates. The other log file contains all player related information and can be used to get player statistics. Open the Web Frontend and select the page “System Information”. On the bottom of this page between two and four buttons are displayed. Press the button “Get Current Updater Log File” or “Get Current Player Log File” to get the latest information. If these both files achieve the maximum allowed size, backup copies are created. These can be viewed by pressing the buttons “Get Previous Updater Log File” and “Get Previous Player Log File”. If the current log files achieve the maximum size again, the old backup log files are overwritten then.
ArtistaMEDIA Version 1.12 05.10.2011
Page 28 of 49
DATA DISPLAY GROUP
Manual
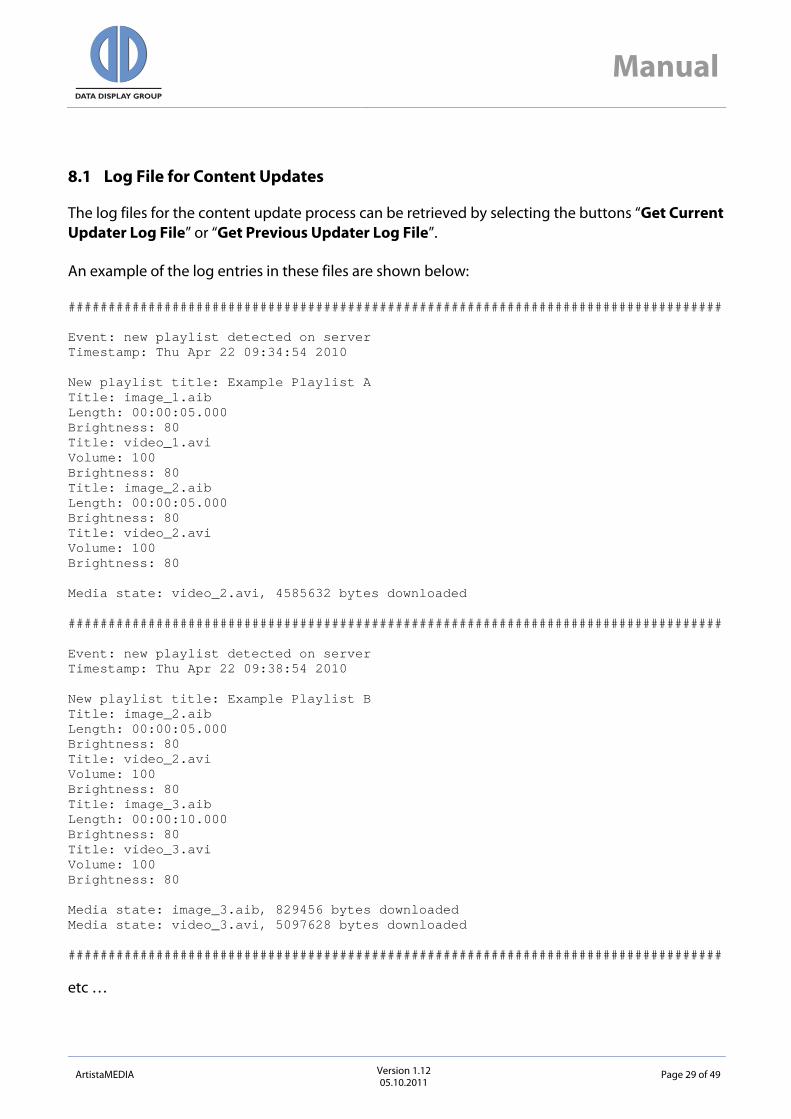
8.1 Log File for Content Updates
The log files for the content update process can be retrieved by selecting the buttons “Get Current Updater Log File” or “Get Previous Updater Log File”. An example of the log entries in these files are shown below: ################################################################################## Event: new playlist detected on server Timestamp: Thu Apr 22 09:34:54 2010 New playlist title: Example Playlist A Title: image_1.aib Length: 00:00:05.000 Brightness: 80 Title: video_1.avi Volume: 100 Brightness: 80 Title: image_2.aib Length: 00:00:05.000 Brightness: 80 Title: video_2.avi Volume: 100 Brightness: 80 Media state: video_2.avi, 4585632 bytes downloaded ################################################################################## Event: new playlist detected on server Timestamp: Thu Apr 22 09:38:54 2010 New playlist title: Example Playlist B Title: image_2.aib Length: 00:00:05.000 Brightness: 80 Title: video_2.avi Volume: 100 Brightness: 80 Title: image_3.aib Length: 00:00:10.000 Brightness: 80 Title: video_3.avi Volume: 100 Brightness: 80 Media state: image_3.aib, 829456 bytes downloaded Media state: video_3.avi, 5097628 bytes downloaded ################################################################################## etc …
ArtistaMEDIA Version 1.12 05.10.2011
Page 29 of 49
DATA DISPLAY GROUP
Manual
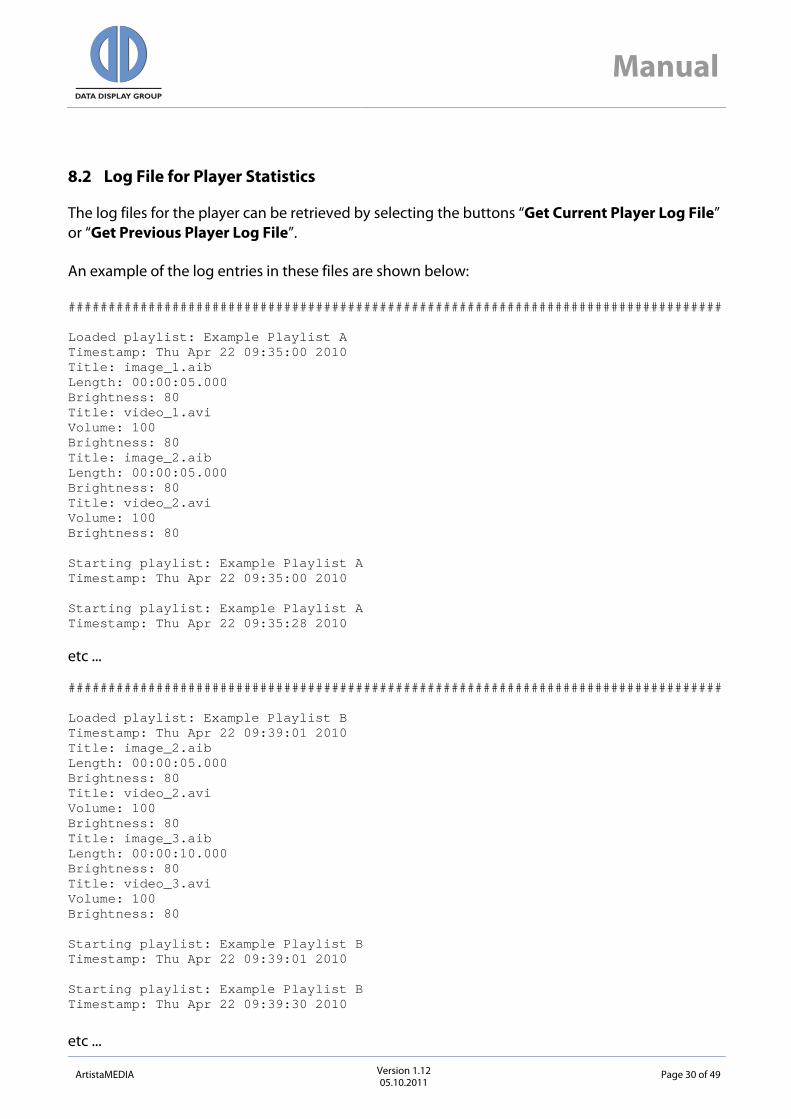
8.2 Log File for Player Statistics
The log files for the player can be retrieved by selecting the buttons “Get Current Player Log File” or “Get Previous Player Log File”. An example of the log entries in these files are shown below: ################################################################################## Loaded playlist: Example Playlist A Timestamp: Thu Apr 22 09:35:00 2010 Title: image_1.aib Length: 00:00:05.000 Brightness: 80 Title: video_1.avi Volume: 100 Brightness: 80 Title: image_2.aib Length: 00:00:05.000 Brightness: 80 Title: video_2.avi Volume: 100 Brightness: 80 Starting playlist: Example Playlist A Timestamp: Thu Apr 22 09:35:00 2010 Starting playlist: Example Playlist A Timestamp: Thu Apr 22 09:35:28 2010 etc ... ################################################################################## Loaded playlist: Example Playlist B Timestamp: Thu Apr 22 09:39:01 2010 Title: image_2.aib Length: 00:00:05.000 Brightness: 80 Title: video_2.avi Volume: 100 Brightness: 80 Title: image_3.aib Length: 00:00:10.000 Brightness: 80 Title: video_3.avi Volume: 100 Brightness: 80 Starting playlist: Example Playlist B Timestamp: Thu Apr 22 09:39:01 2010 Starting playlist: Example Playlist B Timestamp: Thu Apr 22 09:39:30 2010 etc ...
ArtistaMEDIA Version 1.12 05.10.2011
Page 30 of 49

DATA DISPLAY GROUP
Manual
9 Specification of Playlist File
Since firmware version 2.2.0 ArtistaMEDIA supports playlists to define the order, in which several media files are played back. Further, the audio volume, the display brightness or the image length is defined here. The playlist file must be called “playlist.xml” (case sensitive). The internal structure of the playlist file is as follows: <?xml version="1.0" encoding="UTF-8"?> <AMPlaylistDoc Title="Example Playlist" Version="2.0"> <AMPlaylist_Entry> <AMEntry_Title>image_1.aib</AMEntry_Title> <AMEntry_LengthMs>5000</AMEntry_LengthMs> <AMEntry_Brightness>80</AMEntry_Brightness> </AMPlaylist_Entry> <AMPlaylist_Entry> <AMEntry_Title>video_1.avi</AMEntry_Title> <AMEntry_Vol>100</AMEntry_Vol> <AMEntry_Brightness>80</AMEntry_Brightness> </AMPlaylist_Entry> <AMPlaylist_Entry> <AMEntry_Title>video_2.mp4</AMEntry_Title> <AMEntry_Vol>100</AMEntry_Vol> <AMEntry_Brightness>80</AMEntry_Brightness> </AMPlaylist_Entry> </AMPlaylistDoc> When executing a playlist, ArtistaMEDIA starts at the first entry. After playback of this media file has been finished it automatically jumps to the next entry and plays it. When the end of the playlist is reached, the board starts from the beginning again. The playlist is played back in an endless loop until a new playlist is available.
ArtistaMEDIA Version 1.12 05.10.2011
Page 31 of 49

DATA DISPLAY GROUP
Manual
Detailed description of the tags in the playlist file:
Tag Description Notes <?xml version="1.0" encoding="UTF-8"?>
XML header: Don’t change this line
<AMPlaylistDoc …> </AMPlaylistDoc>
Tags the beginning and the end of the playlist. This tag has two attributes:
Title: Keeps the name of the playlist. The name defined here can be found in the log files for reference, e.g. “Example Playlist”
Version: Keeps the version number of the playlist structure. Version “1.0”: can contain videos only Version “2.0”: can contain images and videos
Attribute “Version” is supported since firmware version 2.6.0
<AMPlaylist_Entry> </AMPlaylist_Entry>
Tags the beginning and the end of one playlist entry. Each playlist entry consists of further tags called <AMEntry_Title>, <AMEntry_Vol>, <AMEntry_Brightness> or <AMEntry_LengthMs> For further details on these tags see below
Tag <AMEntry_ LengthMs> is supported since firmware version 2.6.0
<AMEntry_Title> </AMEntry_Title>
Name of the media file, e.g. “video_1.avi” Constraints:
The media file name must not include any special characters. Just alpha-numeric characters and . - _ can be used (7-bit ASCII)
The media file name must not exceed 200 characters
The extension of the file must be “.aib”, “.avi” or “.mp4”
File extension “.aib” is supported since firmware version 2.6.0 File extension “.mp4” is supported since firmware version 2.8.1
<AMEntry_Brightness> </AMEntry_Brightness>
Relative display brightness setting. This value can be set to any integer value between 0 and 100 and defines the percentage of the default brightness. The display default brightness can be set in the Web Frontend in the Display menu. E.g.
Default brightness is set to 80 and the brightness entry in the playlist is 100, then the resulting display brightness is 80
Default brightness is set to 80 and the brightness entry in the playlist is 50, then the resulting display brightness is 40
Default brightness is set to 80 and the brightness entry in the playlist is 0, then the resulting display brightness is 0
This tag is used for images and videos
ArtistaMEDIA Version 1.12 05.10.2011
Page 32 of 49
DATA DISPLAY GROUP
Manual
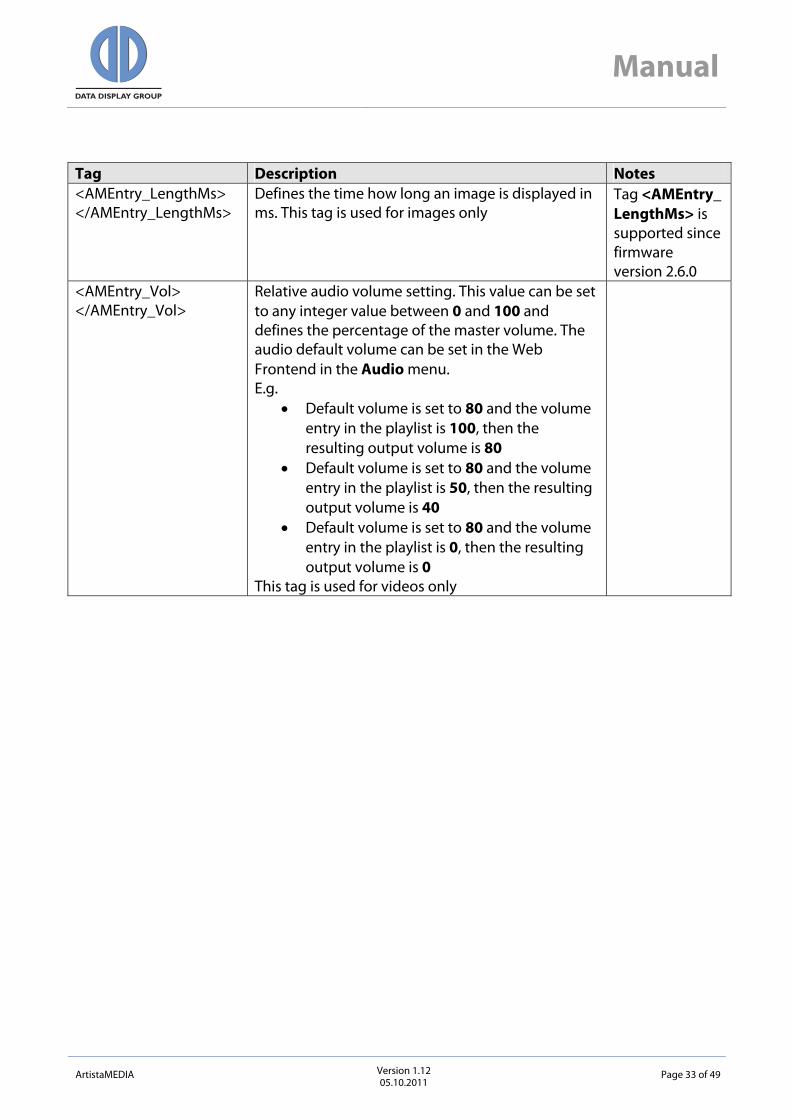
Tag Description Notes <AMEntry_LengthMs> </AMEntry_LengthMs>
Defines the time how long an image is displayed in ms. This tag is used for images only
Tag <AMEntry_ LengthMs> is supported since firmware version 2.6.0
<AMEntry_Vol> </AMEntry_Vol>
Relative audio volume setting. This value can be set to any integer value between 0 and 100 and defines the percentage of the master volume. The audio default volume can be set in the Web Frontend in the Audio menu. E.g.
Default volume is set to 80 and the volume entry in the playlist is 100, then the resulting output volume is 80
Default volume is set to 80 and the volume entry in the playlist is 50, then the resulting output volume is 40
Default volume is set to 80 and the volume entry in the playlist is 0, then the resulting output volume is 0
This tag is used for videos only
ArtistaMEDIA Version 1.12 05.10.2011
Page 33 of 49

DATA DISPLAY GROUP
Manual
10 Supported Media Formats
The tables below describe which video and image formats are supported by ArtistaMEDIA. Supported video formats:
Supported Container Format
File Extension
Video Codec Audio Codec Notes
AVI (Audio Video Interleave)
.avi MPEG-2 MPEG-1 Layer 2 (MP2)
MPEG-4 AVC .mp4 MPEG-4 AVC / H.264
AAC LC
Detailed description of supported video Codecs:
Video Codec Parameter Supported Values Notes Profile Main Level Main Video Resolution / Frame Rate
720 x 480 / 29.97 fps
720 x 576 / 25 fps
fps: Frames per second
Scan Mode Progressive Scan
MPEG-2
Aspect Ratio 4:3 16:9
Profile Baseline Level up to 3.0 Video Resolution / Frame Rate
720 x 480 / 29.97 fps
720 x 576 / 25 fps
fps: Frames per second
Scan Mode Progressive Scan
MPEG-4 AVC / H.264
Aspect Ratio 4:3 16:9
Detailed description of supported audio Codecs:
Audio Codec Parameter Supported Values Notes Sample Rate 48 kHz Bit Rate up to 384 kbit/sec
MPEG-1 Layer 2 (MP2)
Channels Stereo AAC LC Sample Rate 48 kHz
ArtistaMEDIA Version 1.12 05.10.2011
Page 34 of 49

DATA DISPLAY GROUP
Manual
Bit Rate up to 384 kbit/sec Channels Stereo
Supported image formats:
Supported Image Format
File Extension
Parameter Supported Values Notes
Resolution 720 x 480 720 x 576 800 x 480 800 x 600 1024 x 768 1280 x 768 1280 x 800 1280 x 1024 1366 x 768 1440 x 900 1680 x 1050 1920 x 480 1920 x 1080
Artista proprietary image format
AIB .aib
Color Depth 16 bits per pixel
ArtistaMEDIA Version 1.12 05.10.2011
Page 35 of 49
DATA DISPLAY GROUP
Manual
11 Firmware Update
This section describes how firmware updates can be installed on ArtistaMEDIA boards. Before the update process can be started, the following checks are necessary:
Open the Web Frontend in normal operating mode (refer to sections Network Configuration of ArtistaMEDIA via Web Frontend and ArtistaMEDIA Web Frontend for more details)
Select the menu “System Information” Check the “Config Name” in the section “Firmware Information”:
o PA-09-…: A standard ArtistaMEDIA firmware is installed. Firmware update packages for the standard ArtistaMEDIA product can be installed. Firmware update packages for customized PU-09-… products can not be installed here
o PU-09-…: A customized ArtistaMEDIA firmware is installed. A special firmware update package for your specific product must be installed. Firmware update packages for the standard firmware can not be installed on these customized products
Check the “Filesystem Version” in the section “Firmware Information”: o Version 1.0.0: It is not possible to update ArtistaMEDIA firmware version 1.0.0 to
version 2.2.0 or higher versions directly. The firmware must be updated to version 1.2.0 first. Contact Distec support for further assistance
o Version 1.2.0: It is not possible to update ArtistaMEDIA firmware version 1.2.0 to version 2.8.1 or higher versions directly. The firmware must be updated to version 2.6.0 first. Contact Distec support for further assistance
o Version 2.2.0 or higher: The procedure to update the firmware to the latest version over network by using the Web Frontend is described below
Procedure to update the firmware on ArtistaMEDIA:
Save the firmware update package on the file system of your PC Open the Web Frontend in normal operating mode Select the menu “Firmware Update” Press the button “Enter Maintenance Mode” Wait about 1 minute until the board has been restarted in maintenance mode Press the reload button of your Browser to get the home page of the ArtistaMEDIA Web
Frontend in maintenance mode Select the menu “Firmware Update” in maintenance mode again Press “Browse …” and select the firmware update package on the file system of your PC Press the button “Upload Firmware Image to ArtistaMEDIA” Firmware update takes about 2 minutes. Messages showing the progress of the update
process are displayed on the Web Frontend When the update process has been finished, restart the ArtistaMEDIA board by selecting
the menu “Restart Artista” and pressing the button “Enter Normal Operating Mode” After about 2 minutes ArtistaMEDIA will be running in normal operating mode again Playback of the current playlist will be started
ArtistaMEDIA Version 1.12 05.10.2011
Page 36 of 49

DATA DISPLAY GROUP
Manual
Press the reload button of your Browser to get the home page of the ArtistaMEDIA Web Frontend in normal operating mode
Select the menu “System Information” and verify, that the “Filesystem Version” has the new version number now
Firmware update has been finished successfully then 12 Network Factory Default Values
ArtistaMEDIA has the following network factory default values. These values are used on delivery of the ArtistaMEDIA boards and remain until the user re-configures them by using the Web Frontend. NOTE: Dynamic network configuration (DHCP) is disabled by default.
DHCP: disabled Static IP address of the ArtistaMEDIA board: 192.168.0.1 Subnet mask: 255.255.255.0 Gateway: 192.168.0.100 Password for Web Frontend: Artista ACC upload control port: 28243 ACC upload data port: 1024
ArtistaMEDIA can be reset to these values by using the procedure described in section Reset ArtistaMEDIA to Network Factory Default Values. 13 Reset ArtistaMEDIA to Network Factory Default Values
If you want to reset the network configuration of your ArtistaMEDIA board to the factory defaults mentioned in section Network Factory Default Values (e.g. because you don’t know the IP address of your ArtistaMEDIA board and can not access it via the Web Frontend any more), you have to execute the following steps:
Power down ArtistaMEDIA Pull down the factory reset pin (CON18, Pin 9) to Ground level and power up ArtistaMEDIA
again Keep the pin pulled down until both LEDs LED6 and LED7 are flashing once. This is about 10
seconds after powering on the board. Now the pin can be released again ArtistaMEDIA will boot in Maintenance Mode now by using the network default values. In
maintenance mode the video playback is deactivated and the panel will stay black Access the ArtistaMEDIA board via the Web Frontend by using the IP address 192.168.0.1 Enter the menu “Network Configuration” and enter a proper network configuration for
your ArtistaMEDIA board. Press “Submit Configuration” to save the new settings Select the menu “Restart Artista” and press the button “Enter Normal Operating Mode” ArtistaMEDIA will boot in normal operating mode now and will start playing back the
playlist again, if there is one available on the internal storage
ArtistaMEDIA Version 1.12 05.10.2011
Page 37 of 49

DATA DISPLAY GROUP
Manual
14 Pre-configured Default Values
TBD 15 Functions of the LEDs on the ArtistaMEDIA Board
There are several LEDs available on the ArtistaMEDIA board. The functions of all the LEDs are described below.
Reference Label Colour Function LED 1 +5V Red On: Panel power supply is configured to +5 V
Off: If both LED1 and LED2 are off, the panel power supply is configured to + 3.3 V
LED 2 +12V Blue On: Panel Power Supply is configured to +12 V Off: If both LED1 and LED2 are off, the panel power supply is configured to + 3.3 V
LED 3 GP3 Red TBD LED 4 GP4 Green TBD LED 5 ACTIVE Green On: Signals activity on the IDE bus (Compact Flash card or
Hard Disk Drive) LED 6 GP1 Red Flashing once if the network configuration has been reset to
the factory default values (for more details see section Reset ArtistaMEDIA to Network Factory Default Values)
LED 7 GP2 Green Flashing once if the network configuration has been reset to the factory default values (for more details see section Reset ArtistaMEDIA to Network Factory Default Values)
16 Firmware Release History
F/W Version
Date Description
2.12.0 05.10.2011 Added support to display still images (AIB format) with the resolution of 800 x 480
Fixed issue where in very rare situations a video couldn’t be started after a still image in native display resolution has been shown. After this issue occurred, the next videos and still images couldn’t be displayed properly any more. A player restart was necessary to recover from that error
Fixed issue where sometimes the beginning of a video was corrupted for about a second when a still image in native display resolution has been shown before
ArtistaMEDIA Version 1.12 05.10.2011
Page 38 of 49

DATA DISPLAY GROUP
Manual
F/W Version
Date Description
2.10.1 05.04.2011 Fixed issue where still images with larger resolutions than the native display resolution have not been displayed
Fixed issue where download of files from some FTP servers did not work (error message in log file was: “Error performing request: FTP: unknown PASV reply(13)”)
2.10.0 04.03.2011 Added support to display still images (AIB format) with the following resolutions: 800 x 600, 1024 x 768, 1280 x 768, 1280 x 800, 1280 x 1024, 1366 x 768, 1440 x 900, 1680 x 1050, 1920 x 480, 1920 x 1080
Added support to show the splash screen in native display resolution during startup of ArtistaMEDIA
Fixed issue where some AVI and MP4 videos which have been encoded with VBR did not start to play (execution of the playlist has been stopped and the last frame of the previous video remained on the display)
2.8.1 20.10.2010 Added support for MP4 video files (MPEG-4 AVC / H.264) Added support for dynamic network configuration (DHCP) Added splash screen which shows IP address, host name and
Gateway address during startup of ArtistaMEDIA Fixed issue where content update from USB flash drive didn’t work
when it was inserted before startup of ArtistaMEDIA Fixed issue where still images have not been updated on
ArtistaMEDIA when the file name didn’t change Fixed issue where the last image of the previous video has been
displayed just before the start of the second video for some ms in mixed video – still image – video playlists
Improved Web Frontend: - Updated “Network Configuration”, added DHCP and Domain - Moved configuration of name server (DNS) from “Content Auto Update” to “Network Configuration” - Removed configuration of “FTP Connection Type” from “Content Auto Update”, “passive” connection type is used now by default - General update of “System Information” - Added status message after button “Restart ArtistaMEDIA” has been pressed
General update of maintenance system General update of video player engine
ArtistaMEDIA Version 1.12 05.10.2011
Page 39 of 49

DATA DISPLAY GROUP
Manual
F/W Version
Date Description
2.6.0 22.04.2010 Added support for still images in the playlist (AIB format with resolutions of 720 x 480 or 720 x 576)
Increased max. number of supported playlist entries from 16 to 512 Solved issue where the content on the USB Flash Drive has been
copied to the internal storage even in cases where it has not been used because the board was configured to “Content Auto Update”
Solved issue where media files with unsupported file extensions in the playlist have not been detected and ignored during content updates
Improved fall back behavior with unsupported or corrupt media files
2.4.0 13.11.2009 Improved behavior regarding gap between two videos: - Compared to firmware version 2.2.0 the best case load time for videos has been decreased from 2.2 sec to about 1 sec - The last frame of the previous video is visible until the next clip starts playing. Thus no switching to black on the display any more Notes: - If the new video has a different mode (e.g. 480p vs. 576p), the display still switches to black - If the new clip has a different brightness, the load time increases - Each minute of clip length increases the load time by about 0.1 sec
Solved issue where brightness setting in playlist.xml has not been used by ArtistaMEDIA
Solved issue where the FTP connection has not been closed after accessing the FTP server in “Content Auto Update” mode
Solved issue where ArtistaMEDIA did not find the FTP server if the user entered the server name instead of the IP address in the Web Frontend in “Content Auto Update” mode
Improved entries in the Updater log file for the case if just a clip has been changed on the FTP server
Solved issue where clips with spaces in their file name could not be updated and played back on ArtistaMEDIA
Solved issue where clips with file extensions other than .avi (all letters lower case) could not be updated and played back on ArtistaMEDIA
Solved issue where clips with up to 8 letters and all letters in capitals could not be updated with USB flash drive
ArtistaMEDIA Version 1.12 05.10.2011
Page 40 of 49

DATA DISPLAY GROUP
Manual
F/W Version
Date Description
2.2.0 22.07.2009 Added playlist support, audio volume can be set for each clip individually
Added “Content Auto Update” function. Content is stored on a FTP server. ArtistaMEDIA checks it for content updates periodically and downloads changes automatically
Improved content update. While receiving new content, ArtistaMEDIA continues to play the old content. When all new files are available, ArtistaMEDIA switches to the new content
Improved content update over network. Content update over network is optimized to minimize network traffic. Just new files are transmitted
Added automatic video mode detection. Video modes 720 x 480 @ 29,97 fps and 720 x 576 @ 25 fps are detected automatically now. No configuration in Web Frontend necessary any more
Added date and time configuration in Web Frontend. The onboard clock is used to create valid timestamps for the log files
Added log file to get statistics about content updates Added log file to get statistics about played clips
1.2.0 05.11.2008 Solved audio/video sync issue during playback of videos with 25 and 29.97 fps
Solved issue with empty Gateway IP address in Web Frontend (if it was set to empty, the ArtistaMEDIA board was not reachable any more)
Solved audio clipping for audio clips with high recording level Improved Maintenance Mode for firmware updates Improved content upload over ACC and SDK Improved factory default values Enhanced support for Artista SDK Artista SDK support can be disabled by setting the ArtistaMEDIA
Server IP address to empty in the Web Frontend ArtistaMEDIA Upload Data Port can be configured in Web Frontend
now Added button in Web Frontend to format the media storage Reworked Web Frontend to Data Display Group CI
1.0.0 09.07.2008 Initial Release
ArtistaMEDIA Version 1.12 05.10.2011
Page 41 of 49

DATA DISPLAY GROUP
Manual
17 Known Issues
The table below lists all known issues of the latest firmware version 2.12.0:
Known Issue Detailed Information Playlists with both AVI and MP4 video files are not working reliable
It is not recommended to have playlists with both AVI and MP4 videos in one show. It is recommended to have either AVI or MP4 videos in the playlist
Display switches to black between videos and still images if both have different resolution
If a playlist contains videos and still images in native display resolution, the display is black for about 1 … 2 seconds between both. If the still images are in video mode resolution, there is no black gap between both
Video playback jerks during insertion and removal of USB Flash Drives
ArtistaMEDIA continues to play the current playlist while updating the content from USB Flash Drives. But during insertion and removal of the USB device it can happen that playback jerks for some seconds
Video file (AVI or MP4) must contain audio track
The video file must contain a video and an audio track. Clips without audio track can not be played back; execution of the playlist will be stopped and the last frame of the previous video remains on the display. ArtistaMEDIA continues to play when new content is available
Compatibility break in USB content update
F/W version 1.2.0: video.avi directly in root directory of USB Flash Drive
F/W version 2.2.0 or above: playlist.xml and all video clips in folder ArtistaMediaContent on USB Flash Drive
Compatibility break in ACC content update
F/W version 1.2.0: ACC version 2.0.0 up to 2.4.1 required F/W version 2.2.0 or above: ACC version 2.6.0 or above
required Compatibility break in SDK content update
F/W version 1.2.0: SDK version 3.0.0 or above required F/W version 2.2.0 or above: SDK version 4.4.0 or above
required 18 Trouble Shooting
Problem Reason Solution
ArtistaMEDIA Version 1.12 05.10.2011
Page 42 of 49

DATA DISPLAY GROUP
Manual
19 Additional Documents for ArtistaMEDIA
The following documents are available for ArtistaMEDIA:
Document Name Description ArtistaMEDIA Manual This document ArtistaMEDIA Data Sheet Technical specification of the ArtistaMEDIA board ArtistaMEDIA Accessories Lists all accessories available for ArtistaMEDIA ArtistaControlCenter ACC Operating Manual
Manual for ACC. Comes with the ACC installation setup
20 News and Updates for Artista Products
The latest version of drivers and software packages can be found at: German Site: http://www.distec.de/de/Downloads/Artista.html English Site: http://www.distec.de/en/Downloads/Artista.html The latest version of documents can be found at: German Site: http://www.distec.de/de/Downloads/Docu.html English Site: http://www.distec.de/en/Downloads/Docu.html
ArtistaMEDIA Version 1.12 05.10.2011
Page 43 of 49

DATA DISPLAY GROUP
Manual
21 Glossary
TBD 22 Additional Information about Media Files
This section gives some additional information about how to create media files for ArtistaMEDIA and how to play back these files on a Windows PC. 22.1 Required Software Tools
Below you can find a list of tools which are very useful to prepare the media files for ArtistaMEDIA. All these tools require a standard PC with Windows XP, Service Pack 2 or above. 22.1.1 TMPGEnc 4.0 XPress
This tool is very useful to convert media files with different video and audio formats to the formats supported by ArtistaMEDIA. Further it can be used to multiplex (combine an audio- and a video elementary stream to a media file, which contains both in one file) and de-multiplex (the reverse process of multiplexing) media files. Free trial and commercial full versions of this tool are available here: http://tmpgenc.pegasys-inc.com/en/index.html 22.1.2 avidemux
This tool can be used to convert *.mpg files to *.avi files. This tool is free and available here: http://avidemux.sourceforge.net/
ArtistaMEDIA Version 1.12 05.10.2011
Page 44 of 49

DATA DISPLAY GROUP
Manual
22.2 Converting .mpg Files to .avi Files with avidemux
If you have a *.mpg file, which contains MPEG-2 video and MPEG-1 Layer 2 audio as required, it can be converted to *.avi by using the tool “avidemux” very easily. If you are not sure, if the correct audio and video elementary streams are used, you can verify and change it with TMPGEnc. The following steps have to be performed:
Open the *.mpg file with “File -> Open …” A dialog “This looks like mpeg. Do you want to index it?” appears. Click “Yes”. Use the default settings in the “Video”, “Audio” and “Format” drop down menus (see also
Picture 1): o Video: Copy o Audio: Copy o Format: AVI
Save the AVI file by selecting “File -> Save -> Save Video…” and typing the file name with the extension “avi” into the field “Name” (e.g. “output.avi”)
The “output.avi” file can be played back on ArtistaMEDIA then
Settings to convert a *.mpg file to AVI
ArtistaMEDIA Version 1.12 05.10.2011
Page 45 of 49

DATA DISPLAY GROUP
Manual
22.3 Converting various Video Formats to MPEG-2
There are many different video formats available. If the video clip you want to play back with ArtistaMEDIA is not available in MPEG-2 you have to convert it to the supported format, before you can use it with ArtistaMEDIA. This section describes how video formats can be converted to MPEG-2 using TMPGEnc. The following steps have to be performed:
Open the file with “Source -> Add file” and click “OK” after reviewing the clip settings Select “Format” The “Output format selection” dialog appears. Here the correct output settings have to be
selected for ArtistaMEDIA. We created templates for TMPGEnc which should help you to load the correct settings. The following templates are available and can obtained from your sales contact at DATA DISPLAY:
o ntsc_720x480_p_4_3.txp4e [email protected] fps, progressive, 4:3 format o ntsc_720x480_p_16_9.txp4e [email protected] fps, progressive, 16:9 format o pal_720x576_p_4_3.txp4e 720x576@25 fps, progressive, 4:3 format o pal_720x576_p_16_9.txp4e 720x576@25 fps, progressive, 16:9 format
Select “Browse…” and load the template that is suitable to your ArtistaMEDIA installation. Select “Encode”, define an output file name and select the “Start encode” button. The
resulting output file has the extension *.mpg and is a MPEG Program Stream. This file has to be converted to AVI before it can be played back on ArtistaMEDIA. A description of this process can be found in the next section “Converting MPEG to AVI Files”.
ArtistaMEDIA Version 1.12 05.10.2011
Page 46 of 49

DATA DISPLAY GROUP
Manual
22.4 Playing Back ArtistaMEDIA AVI Files with Windows Media Player or ACC
To play AVI files with MPEG-2 video as they are required for ArtistaMEDIA on a Windows PC with Windows Media Player or ACC, a set of plug-ins must be installed on the PC. ffdshow is a free set of DirectShow filters, which enables the Windows Media Player and ACC to play *.avi files with MPEG-2 video. It can be downloaded here:
http://sourceforge.net/projects/ffdshow-tryout/ Go to “Download” and use the latest available generic build
or http://codecs.com/download/FFDShow.htm Go to “Download FFDShow MPEG-4”. This package also contains the required plug-ins
The downloaded EXE file must be installed on the Windows PC. The default settings suggested by the setup wizard should be used. After the installation is finished, the following setting must be verified:
Open the dialog “Start -> All Programs -> ffdshow -> Video decoder configuration” Select the menu “Codecs” on the left side Enable the format “MPEG in AVI” by selecting “libavcodec” or “libmpeg2”
Apply the setting Now the ArtistaMEDIA AVI files can be played back with Windows Media Player or ACC on a
standard Windows XP PC
ArtistaMEDIA Version 1.12 05.10.2011
Page 47 of 49

DATA DISPLAY GROUP
Manual
ArtistaMEDIA Version 1.12 05.10.2011
Page 48 of 49
22.5 Playing Back MP4 Files with Windows Media Player or ACC on Windows XP
To play MP4 files on a Windows XP system with Windows Media Player or ACC, additional software must be installed. This is not the case for Windows Vista or Windows 7 as they are supporting MP4 playback out of the box. “DirectShow FilterPack” is a light-weight package of DirectShow media filters which, together with FFDShow, will enable you to play MP4 files on Windows XP. It can be downloaded here:
http://www.codecs.com/download/DirectShow_FilterPack.htm Follow the link “Download DirectShow FilterPack” to store the software package on your PC
System Requirements:
Windows XP FFDShow (see Playing Back ArtistaMEDIA AVI Files with Windows Media Player or ACC) DirectShow based media player like Windows Media Player or ACC
Installation:
Extract the downloaded ZIP package on your PC. The archive contains a file called “DSFP-x.yy.exe” (x and yy are placeholders for version numbers)
Execute this file and extract the software package. If you select "C:\Program Files" for example, the whole content will be extracted to "C:\Program Files\DirectShow FilterPack"
Browse to the directory you just extracted the whole content to Browse the sub-directory “MP4 Splitter” Run “install.bat” to install and register the DirectShow filter on your system
In every subdirectory of "C:\Program Files\DirectShow FilterPack" you'll find an "install.bat" and "uninstall.bat" to install or uninstall every filter separately. If you don't plan on using a specific DirectShow filter, you can savely remove it's directory.
Removal:
Browse to the "DirectShow FilterPack" directory Browse the sub-directory “MP4 Splitter” Run " uninstall.bat" to uninstall the DirectShow filter from your system Delete the "DirectShow FilterPack" directory
DATA DISPLAY GROUP
Manual
Our company network supports you worldwide with offices in Germany, Turkey, Great Britain and the USA. For more information please contact:
DISTEC GmbH DATA DISPLAY TEKNOLOJI Distec GmbH Augsburger Str. 2b 82110 Germering Germany Phone: +49 (0)89 / 89 43 63-0 Fax: +49 (0)89 / 89 43 63-131 E-Mail: [email protected] Internet: www.distec.de
Data Display Teknoloji Elektronik San Ve Diş Tic A.Ş. Kustepe Leylak Sok. Nursanlar Is Merkezi Kat. 6 No: 21 Sisli / Istanbul Turkey Phone: +90 (0)212 / 356 04 20 Fax: +90 (0)212 / 356 04 25 E-Mail: [email protected] Internet: www.datadisplay.com.tr
DISPLAY TECHNOLOGY A Data Display Company Display Technology Ltd. 5 The Oaks Business Village Revenge Road, Lordswood Chatham, Kent, ME5 8LF United Kingdom Phone: + 44 (0)1634 / 67 27 55 Fax: + 44 (0)1634 / 67 27 54 E-Mail: [email protected] Internet: www.displaytechnology.co.uk
Apollo Display Technologies, Corp. 87 Raynor Avenue, Unit 1 Ronkonkoma, NY 11779 United States of America Phone: +1 631 / 580-43 60 Fax: +1 631 / 580-43 70 E-Mail: [email protected] Internet: www.apollodisplays.com
ArtistaMEDIA Version 1.12 05.10.2011
Page 49 of 49
Copyright © 2022 FDOKUMEN