MAKING PURE CORN WHISKEY - NoPanic
114
A Professional Guide for Amateur- and Micro-Distillers MAKING PURE CORN WHISKEY by Ian Smiley BSc
-
Upload
khangminh22 -
Category
Documents
-
view
0 -
download
0
Transcript of MAKING PURE CORN WHISKEY - NoPanic
A Professional Guide forAmateur- and Micro-Distillers
MAKING PURE CORN WHISKEY
by Ian Smiley BSc
i
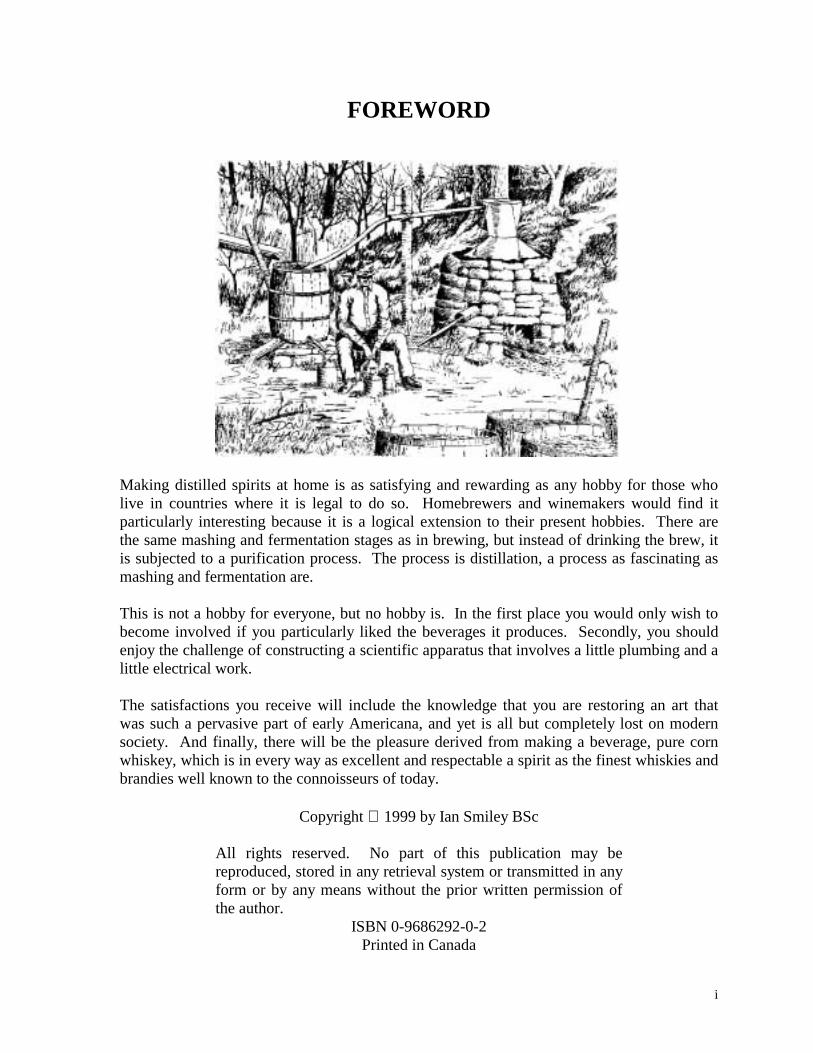
FOREWORD
Making distilled spirits at home is as satisfying and rewarding as any hobby for those who live in countries where it is legal to do so. Homebrewers and winemakers would find it particularly interesting because it is a logical extension to their present hobbies. There are the same mashing and fermentation stages as in brewing, but instead of drinking the brew, it is subjected to a purification process. The process is distillation, a process as fascinating as mashing and fermentation are. This is not a hobby for everyone, but no hobby is. In the first place you would only wish to become involved if you particularly liked the beverages it produces. Secondly, you should enjoy the challenge of constructing a scientific apparatus that involves a little plumbing and a little electrical work. The satisfactions you receive will include the knowledge that you are restoring an art that was such a pervasive part of early Americana, and yet is all but completely lost on modern society. And finally, there will be the pleasure derived from making a beverage, pure corn whiskey, which is in every way as excellent and respectable a spirit as the finest whiskies and brandies well known to the connoisseurs of today.
Copyright 1999 by Ian Smiley BSc
All rights reserved. No part of this publication may be reproduced, stored in any retrieval system or transmitted in any form or by any means without the prior written permission of the author.
ISBN 0-9686292-0-2 Printed in Canada


iii
DEDICATION
I dedicate this book to my wife Eleanor, whose help and support were invaluable to its completion.

v
TABLE OF CONTENTS
Chapter Page Number
1 Introduction …………………………………………………… 1 2 Pure Corn Whiskey …………………………………………… 3
Beer and Wine …………………………………………… 3 Distillation – what is it? …………………………………… 3 Simple Distillation ………………………………………... 4 Fractional Distillation …………………………………… 5 Whiskey, Brandy, Rum, etc. ………………………………. 5 Pure Corn whiskey ………………………………………… 5
3 The question of Legality ……………………………………… 7 4 The History of Corn Whiskey ………………………………… 11 5 Equipment …………………………………………………… 21
The Mashing Vessel ……………………………………… 22 The Fermenters …………………………………………… 22 Ancillary Equipment ……………………………………… 22 Transfer Hoses …………………………………………… 23 Immersion chiller ………………………………………… 24 Beer Stripper (Optional) ………………………………… 26 Spirit Still ………………………………………………… 32
6 Ingredients …………………………………………………… 47 Corn ……………………………………………………… 47 Malt ……………………………………………………… 47 Water ……………………………………………………... 49 Yeast ……………………………………………………… 50 Calcium sulphate (CaSO4) ……………………………… 51 Gluco-amylase …………………………………………… 52 95% Sulphuric Acid (H2SO4) …………………………… 52 Calcium Carbonate (CaCO3) …………………………… 53
7 Mashing ………………………………………………………... 55 Principles ………………………………………………… 55 Mash Water ………………………………………… 55 Measuring pH ………………………………………... 56 Adjusting pH ………………………………………… 56 Temperature ………………………………………… 56 Iodine Starch Test …………………………………... 57 Procedure ………………………………………………… 58 Equipment …………………………………………… 58 Ingredients …………………………………………… 58 Method ……………………………………………… 58 8 Fermentation ………………………………………………… 61 Principles ………………………………………………… 61 Grain Mash Fermentation …………………………... 61
vi
TABLE OF CONTENTS (Continued)
Chapter Page Number
Fermentation Times ………………………………… 62 Specific Gravity (SG) ……………………………… 62 Measuring SG ……………………………………… 63 Calculating Alcohol Content ………………………... 64 Straining the Mash …………………………………... 65 Procedure ………………………………………………… 65 Ingredients …………………………………………… 65 Equipment …………………………………………... 66 Method ……………………………………………… 66 9 Distillation ……………………………………………………... 69 Principles ………………………………………………… 69 Whiskey Distillation ………………………………... 71 Foreshots …………………………………………… 72 Heads ………………………………………………... 72 Middle-run …………………………………………... 72 Tails ………………………………………………... 72 Feints ………………………………………………… 72 Canadian Style ……………………………………... 73 Kentucky Style ……………………………………… 74 Tennessee Style ……………………………………… 74 Procedure ………………………………………………… 75 Transferring the Mash to the Still …………………… 75 Transferring the Low-wines to the Still ……………... 75 Measuring Alcohol Content ………………………… 76 Method ……………………………………………… 76 Beer Stripping (Optional) ………………………... 76 Spirit-Run ………………………………………... 77 Flow Rate ………………………………………... 85 Diluting ………………………………………… 86 Blending ………………………………………… 87 Storage …………………………………………... 87 10 Summary of Procedures ……………………………………… 89 Mashing …………………………………………………... 89 Fermentation ……………………………………………… 89 Beer-Stripping Distillation (Optional) …………………… 89 Spirit-Run ………………………………………………... 90 11 Appendix A – Other Mashing Methods ……………………... 91 Flaked Grains …………………………………………… 91 Cereal Grains …………………………………………… 91
vii
TABLE OF CONTENTS (Continued)
Chapter Page Number
Method …………………………………………………… 91 Equipment …………………………………………… 91 Ingredients …………………………………………... 91 Millet ……………………………………………………... 93 12 Appendix B – Temperature Corrections for Hydrometers …... 95 13 Appendix C – Spirit-Run Record ...………………………… 97 14 Bibliography ..…………………………………………………. 99 15 Index .……………………………………………………………101

viii

1
INTRODUCTION Numerous books have been written on homebrewing and home winemaking, and some have even been written on home distillation to produce pure ethanol for making: gin; vodka; and essence-based spirits, but very few have been written on distillation for making whiskey on the small scale required by hobbyists. This book has been written in an attempt to rectify this situation, and to accommodate the recent advent of micro-distilleries and distillery pubs that are reintroducing the art of making corn whiskey and other grain whiskies made famous by the early frontier folk. This book should appeal to readers who have no experience with brewing or fermentation, as well as readers who do. A basic knowledge of the simplest forms of all-grain brewing is definitely an asset, but not a necessity. All the mashing, fermentation, and distillation principles are explained in sufficient detail for the novice to learn everything they need to know to produce the finest pure corn whiskey. Also, this book gives a brief history of corn whiskey and how it was the pivotal industry that sustained the early settlers who opened up the American frontier. The history not only serves to remind the reader of corn whiskey, but of the rich culture, strong principles, and self reliance that are at the foundation of American society, of which corn whiskey was such an important part. A chapter will be devoted to the question of legality since it is highly important for everyone to know exactly where they stand and to be comfortable with what they are doing. It is hoped that legislators and law enforcement agencies will read this chapter and, with its perspective, be prepared to be receptive when law reformers come knocking at their doors. The temperatures in this text are quoted in oC followed by oF in brackets (e.g. 65.5oC (150oF)). Often the oC temperature will be expressed to one place of decimal. This is not done as a matter of precision but because most of the oC temperatures quoted are translated from oF, so in order to remain equivalent to the oF temperatures some will need to be expressed to one place of decimal. Also, the temperatures quoted in the procedures are the optimum temperatures and every effort should be made to adhere to them. However, variations of a degree or two either way would not result in failure of a process, but rather a slower reaction, or the production of more unfermentable sugars and less fermentable ones, etc. In other words, a slightly less than optimum result, but otherwise perfectly workable. Before getting down to the details of mashing, fermentation, and distillation a few general observations will be made in the next chapter on the subject of what pure corn whiskey is and of alcoholic beverages in general.

3
PURE CORN WHISKEY All alcoholic beverages are made by fermenting a sugar solution (a.k.a. a fermentable substrate) with yeast, a process that converts the sugar (C6H12O6) to ethanol (C2H5OH) and carbon dioxide (CO2). Usually, one does not start with a pure sugar and water substrate, but with fruit juices for wine, mashed grains for whiskey, molasses for rum, and many others. Regardless of the sugar source the alcohol is the same. In addition to the variations imposed by the source of sugar, the yeasts themselves and the conditions under which they are used also make their contribution to the character of the final product. This is because yeasts produce small quantities of other substances known as “congeners” in addition to the main product, ethanol. It is no wonder, therefore, that the flavour, colour, aroma, and general quality of fermented beverages vary so widely. No alcoholic beverage (with the possible exception of vodka) consists simply of alcohol and water with no other constituent present. If it did, it would be colourless, odorless, and tasteless. The colour, aroma, and flavour of beers, wines, and spirits are due to the congeners present. Beer and Wine Alcoholic beverages can be divided into two broad categories according to whether or not there is a distillation stage following fermentation. Beer and wine fall into the non-distilled category whereas whiskey, rum, brandy, gin, etc. have all been distilled. The latter are often referred to as “spirits” or “hard liquor”. Wine and beer are produced by fermenting their respective substrates (i.e. fruit juices for wine, grain mash for beer) with yeast, then clearing, aging, and packaging the fermented substrate as the finished wine or beer. Distillation – what is it? Distillation is simply the heating of a liquid to the boiling point followed by condensing the vapours on a cold surface back into a liquid. To remove the hardness from water it can be boiled in a kettle and the steam that is produced condensed against a cold surface to give pure water free of minerals and dissolved ions. The calcium and magnesium salts that constitute the hardness remain behind in the kettle. Nature carries out Her own distillation in the form of rain. The sun evaporates water from the surface of lakes and oceans leaving salt and impurities behind. Clouds form, condense, and a close approximation to pure water falls to Earth. So distillation is not a mysterious subject, nor is it threatening. It is as commonplace as a rain-shower or a teakettle boiling and causing condensation on a nearby window.
4
As you can imagine, the actual practice of distillation as a controlled procedure is a little more complicated than this and later chapters will provide an exact description of how to build the equipment required and the procedures involved in operating it. There are actually two different types of still, the choice of which to use depending on the level of purity required in the product. Traditionally, whiskey is made in one type, a pot still. It’s rather simple in design because only a moderate level of purity is required. Gin and vodka production on the other hand requires a more sophisticated type of still called a fractionating still because a very high level of purity is desired. A detailed description of the two types will be provided in the chapter on Distillation because it is quite important for the reader to appreciate the differences. However, in this text the high-separation type of still is chosen over the traditional pot still for making whiskey because of the exacting control it affords over the level of separation. High-separation stills can be operated in a manner whereby they give much less than maximum separation, which is exactly how they are very efficiently used to make whiskey. This is covered in detail in the Distillation chapter. An advantage that falls out of this is that the high-separation still can also be used to produce pure ethanol for making gin and vodka. For a well-written text on how to do this read, John Stone Making Gin and Vodka, www.gin-vodka.com. The high-separation still design described in this text can be used to make gin and vodka exactly as described in that book. Simple Distillation As mentioned before, the fermentation of sugars derived from grapes, barley, corn, potatoes, molasses, milk or any other source produces a wide variety of chemicals, the major one being ethyl alcohol (ethanol). Minor constituents will be propyl, butyl, and amyl alcohols. These minor constituents are collectively called “fusel alcohols” (in the past they were called “fusel oils”, but they’re not oils they’re higher alcohols). They are responsible for the unpleasant side effects of drinking such as headaches and hangovers. When such a mixture is distilled, the first vapours to come over will be rich in the more volatile components such as methanol and acetone. This first fraction is referred to as the “foreshots”. There is no sharp separation so, long before the foreshots are completely exhausted, the ethanol begins to appear but is collected into a “heads” phase to buffer the transition between the foreshots and the beverage alcohol. Later, when the ethanol phase is tapering off, the “tails” begin to emerge. These are the least volatile components of the mixture. At first, come the less volatile esters, and then the propyl, butyl, and amyl alcohols known as fusel alcohols. Thus, in a simple distillation using a pot still there are four main fractions: the foreshots; the heads; the middle run; and the tails. The middle run is mainly ethanol with trace amounts of heads and tails, the amount of each depending on where the cut-offs are made.
5
Fractional Distillation As mentioned above, simple distillation of a mixture of liquids does not produce a clear-cut separation of the various components. If such a separation is required it is necessary to resort to the use of a fractionating column. The theory and practice of this will be described in detail in a later chapter but a few words will be said about it here. The procedure involves the use of a vertical column attached to the top of the boiler. The column is packed with inert particles such as short lengths of glass tubing known as Rashig rings, ceramic “saddles”, wire gauze, or in fact any non-reactive material with a large surface area. The vapours from the boiling liquid pass up the column, are condensed to a liquid at the top, and run back down through the packing in the column. This counter-current flow of vapour up and liquid down has the effect of producing a series of mini distillations at the surface of each piece of glass or metal in the column. It is equivalent to carrying out a simple distillation in a pot still and then redistilling the product over and over again. The final result is an almost perfect separation of the mixture into its various components, allowing each one to be drawn off in sequence from the top of the column in the order of its boiling point. Thus, the most highly volatile components emerge first while the least volatile components emerge last. Whiskey, Brandy, Rum, etc. The distillation of these products is done using a pot still or a special-purpose fractionating still, and this effects only a crude separation of the fermented substrate into foreshots, heads, middle-run, and tails. The skill in making a palatable whiskey consists of: mashing the grains into fermentable sugars; fermenting the mash under conditions that give rise to a certain mixture of chemicals; and, distilling the mixture and discarding a portion of the heads and a portion of the tails. The middle fraction, consisting chiefly of ethanol, will also contain the retained portion of heads and tails (i.e. the congeners). It is these congeners that impart the characteristic flavour and aroma. At this point there is no colour. Colour is imparted by storing the spirits in oak barrels for a number of years, a process that also modifies the chemical make-up of the whiskey to give unique characteristics of a particular distiller. Pure Corn Whiskey Corn whiskey is the whiskey produced by mashing corn (i.e. using malt enzymes to convert its starches to sugars), fermenting the corn mash with yeast, and distilling the fermented mash. The mashed corn produces a particular profile of congeners that characterizes the flavour of corn whiskey. Historically, the distillers of corn whiskey took pride in the tradition of producing whiskey and made their whiskey entirely from grain and malt. But, with the advent of the prohibition (U.S. 1921-1933) there was a surge of new distillers who had no particular attachment to whiskey making as an art or historical tradition. These new prohibition distillers became
6
notorious for stretching their corn mash with sugar. Some recipes were less than 10% corn, the rest being sugar and water. While using sugar to produce a “thin mash” will produce as much alcohol and with much less effort, the flavour of the finished whiskey is very harsh, thin, and insipid. This prohibition type of corn-whiskey production became so prevalent that whiskey made from pure grain (i.e. no sugar) became a rare delicacy, and was attributed the name “pure corn whiskey”. Unfortunately, when the prohibition ended these sugar recipes persisted into the subsequent generations of corn-whiskey distilling so the traditional pure corn whiskey remained a scarce commodity. Note: Commercial whiskey producers are bound by law to use all grain in their mashes, and no spirit made with sugar can be called “whiskey”. For a more detailed account of the history of corn whiskey during the prohibition read, Joseph E. Dabney, Mountain Spirits, Asheville NC, Bright Mountain Books.
7
THE QUESTION OF LEGALITY This chapter is written specifically for readers who live in countries where it is presently illegal for amateurs to produce their own spirits by distillation. The rest can happily jump ahead to the chapters dealing with corn whiskey and how to make it. The conflict between governments and “moonshiners” has been going on for centuries and the reasons are not hard to find. From the government point of view, alcohol in one form or another is in such demand that it can be heavily taxed without fear of killing the goose that lays the golden eggs. From the moonshiners’ or smugglers’ point of view, the spread between the cost of manufacture of alcohol and the cost to the consumer after tax is so great that the incentive to circumvent the law is considerable. The dollar figures involved are informative. When alcohol is made on a large scale, as it is for the fuel-alcohol industry (gasohol) its cost of manufacture is about 25 cents per litre. This is for 100% alcohol. If diluted to 40%, as in whiskey, a litre would contain about 10 cents worth of alcohol. The retail price of a litre of whiskey will lie somewhere between $10.00 and $20.00 depending on the country and the level of taxation (this price range does not include specialty whiskies that can run in excess of $50.00 per 750 ml bottle). Some of the difference of course, is due to the scale of manufacture, packaging, marketing, aging, transportation, profit margin, etc., but even allowing for these factors the tax burden on the consumer is extremely high. Is it any wonder that an unscrupulous operator will attempt to sell his alcohol direct to the consumer, perhaps at half the normal retail price, which would still give him a very handsome profit? Or, is it any wonder that the authorities crack down hard on anyone attempting to interfere with their huge source of revenue? The battle between illicit distillers (moonshiners) or illicit importers (smugglers) and the authorities has now become the stuff of legends. Consider the number of stories written or movies made about rumrunners and road hustlers! Or, about the battles between gangsters and police during the prohibition in the United States! Unfortunately, such stories have been taken too much to heart by the general public so that the whole idea of home distillation is now perceived as being inherently more wicked than the gentle art of beer or wine making. It is understandable, and fully supported by the author, that a government would wish to put a stop to smuggling and moonshining for illicit commercial purposes, that is to say in order to sell the product and avoid the payment of taxes. But why would there be a complete ban on distillation by amateurs on a small scale and for their own use? Beer and wine making by amateurs is perfectly legal on the small scale for personal consumption, and total government tax revenues on beer and wine are the same or more than for distilled spirits. Some people have suggested that improper distillation can produce poisons that cause blindness, but this is a myth. Blindness, in this context, is caused by drinking methyl alcohol (wood alcohol). People who went blind from drinking illicit liquor did so by drinking concoctions that were heavily adulterated with store-bought wood alcohol. There’s a tendency for people to think that any mention of illicit liquor is referring to a product of illicit
8
distillation. Many such illicit liquors are concocted by mixing ingredients from someone’s garage or basement and are not produced by fermentation or distillation. Although a trace amount of methyl alcohol is produced by fermentation, it does not occur at a concentration capable of poisoning an individual. Such trace amounts of methyl alcohol are removed from spirits by distillation, but remain in undistilled beverages like beer and wine. The truth is, there is very very little methyl alcohol produced by fermentation, so it poses no threat to consumers of beer or wine where it remains in solution, or to consumers of distilled spirits where it has been removed. And, in the event of poor distillation procedures where it may not be completely removed, it still poses no more threat than it does in beer or wine where it’s not removed at all. In attempting to find the reason for governments to ban home distillation, the first thing that comes to mind is the potential loss of revenue. After all, if everyone started making his or her own spirits at home the loss of revenue could be considerable. But this cannot be the real reason because the home production of beer and wine for one’s own use is legal, and both are taxable when sold commercially. So, evidently the authorities are not concerned about the loss of revenue from home beer and wine making. And further thought, makes it very unlikely that amateur production of spirits would have any appreciable effect on commercial sales. For one thing, the process is considerably more technical and equipment intensive than beer or winemaking, so it’s very unlikely the practice would become any more widespread than beer and wine making. So, if distillation were legalized for amateurs, it would probably become nothing more than an interesting hobby like making beer or wine, and offer little competition to commercial spirit production. So, why is the home production of distilled alcoholic beverages illegal, where the home production of non-distilled alcoholic beverages is not? The drug involved is ethyl alcohol, an acknowledged mood-modifier, but ethyl alcohol itself is not singled out by governments as the bad actor. The alcohol in beer, wine, and whiskey are identical, and imbibed in similar quantities will have identical effects in terms of mood modification. No, apparently distillation per se is perceived as evil, to the point where even owning the equipment is illegal. A few attempts have been made to ascertain the reasons behind the official attitude to distillation but nothing has yielded a logical explanation. Perhaps, the laws regarding home distillation are simply outmoded and are nothing more than a residual from a previous social paradigm, and since the appeal of distillation up until now has been confined to a comparatively small and esoteric group of people, there hasn’t been a sufficient protest from the public to challenge the laws. The above discussion has been argued at some length because it is important for the reader to feel comfortable with the moral aspects of distillation, and not feel obliged to be furtive about it. Also, it’s important to illustrate the difficulties that would be encountered in any attempt to change the law. There would be no point in approaching government officials who in many cases are sympathetic to the arguments but are powerless to do anything about it. It

9
would be necessary to first air the subject in the news media to get the public (the voters) up to speed and then work through politicians. To paraphrase Thomas Jefferson in 1800, “...the infernal whiskey excise is hostile to the genius of a free people”. Jefferson, as President of the time, repealed the whiskey excise on June 30, 1802 as one of his early objectives.

11
THE HISTORY OF CORN WHISKEY This chapter, which chronicles the evolution of corn whiskey, is summarized from Joseph E. Dabney’s authoritative book on the Appalachian moonshine culture, Mountain Spirits1. Mountain Spirits is highly recommended reading if you are interested in a more detailed history of corn whiskey. To appreciate the roots of American whiskey distilling, which was born in the Appalachian frontier in the 1700s and 1800s, we must trace back to our Scottish, Irish, French, German, and English ancestors who brought the distilling art to North America over two centuries ago. The first distillers in Western Civilization were probably the famous old Arabian and Egyptian alchemists who were trying to discover the elixir of life, which was supposed to impart long (or eternal) life, health, and youth. The first alembics (distilling pots) were built in Egypt, and the term “alcohol” is derived from the Arabian term “al-kohl”, which is described as a material produced by refinement. One of the popular heroes of the subsequent distillation saga was an Arabian alchemist, Abou-Moussah-Djafar-Al-Sofi (nicknamed Geber), who lived around 700 AD and who put the distillation principles to paper. Ironically, the Arabs were prohibited by their religion from drinking alcohol. When distillation was first discovered, it was considered by the Europeans to have been a revelation from God. Indeed, for many years after reaching Italy, Spain, and the heart of Europe, the secret of distilling was hoarded by the monks in the monasteries for those who were closest to God. The result of distillation was dubbed “aqua-vitae” (water of life), and was revered as a highly prized wonder drug dispensed by the monks, alchemists, and the apothecarists. Then from aqua-vitae we go to whiskey. The popular beliefs are that the distilling secret went from the Arabians to the Spaniards (possibly by the invading Moors in the 8th century) to Ireland where whiskey was invented. Another theory is that St. Patrick brought the secret back to Ireland from Egypt around 400 AD where he learned it from the famed alchemists. But then, St. Pat wasn’t Irish. He was a Scot Lowlander born at Dumbarton near the Firth of Clyde, where he lived until he was kidnapped by Irish Celts at age 16 and spirited away to Northern Ireland, which in a way would give the credit for whiskey to the Scots. The question of who invented whiskey, the Scots or the Irish is disputed to this day and will probably never be settled. However, there is no doubt that Ireland and Scotland were both in the vanguard of the distilling saga and that it was in those countries that the name “whiskey” came into being. The Gaels of the old Ireland called it “usquebaugh”, Gaelic for aqua-vitae.
1 Mountain Spirits, published originally by Scribner and now in paperback, along with its companion volume, More Mountain Spirits, both published by Bright Mountain Books, Asheville, N.C.
12
From this it became “uisge-betha”, “uisge”, and then simple “whiskey”. The ancient Irish called their early whiskey “poteen” (pronounced put-cheen), which means, small pot. In nearby Scotland, whiskey was highly admired and extensively manufactured as early as the late 1400s. While grain spirits were known in Scotland’s Highlands and its Lowlands to the west as “usquebaugh”, the early Scot distillers, just as the Irish, had their more familiar colloquialism, “poit du”, meaning black pot. The Scots traditionally have spelled “whisky” without an “e”, right to this day. So do the Canadians. The Irish and Americans spell it with an “e”. Just why this is so, nobody seems to know. This leads us into considering that hardy race of people, the “Scotch-Irish” of Ulster, or “Ulster Presbyterians”. The Scotch-Irish brought corn whiskey-making to America. More than anyone else, they popularized it, despite the mighty inroads of “rumbullion” (rum). King James I, the first joint king of the two countries to come from Scotland, planted Scottish Protestants in the province of Ulster (the ten counties of the Catholic Northern Ireland) beginning in 1610. The intent, in part, was to make the “wild Irish” more peaceful. Just before James’ predecessor, Queen Elizabeth I, had died, her British troops had finally brought the rebellious Irish in Ulster to heel after having literally burned and starved them into submission. At that point, Ulster’s two clan chieftains, the Earl of Tyrone (Hugh O’Neill) and the Earl of Fyrconnel (Red Hugh O’Donnell), who had led the bloody rebellion with the backing of the Pope and with the help of troops from Spain, fled to France. With their departure, almost three million acres (1.2 million hectares) of land reverted to the British crown. With the flight of the earls, King James gave his support to the expanded plantation idea, hoping “that the sea-coasts of Ulster might be possessed by Scots, who would be traders proper for his Majesty’s future advantage.” Doubtless he also envisioned the opportunity to spread the Protestant faith to Ulster. The Scottish lairds who received big land grants from James drew thousands of willing settlers from the ranks of the poor across the Lowlands, who leapt at the opportunity presented by the Ulster land. The Lowlanders could get on a 31-year “feu”, virtually a lifetime lease. Under general circumstances that were far better than those available under the caste system in Scotland. Further, social order did not operate so rigidly in Ulster. Immigrants, however lowly in station, considered themselves “royal colonists”. They could live where they pleased, could own a gun, could distill and drink their corn whiskey without interference (that is, before it was subjected to an excise), and perhaps most important of all, they could worship as and where they pleased, which meant, of course, in the Presbyterian “kirk”. By 1640, there were 40,000 Scots in Ulster, drawn mainly by economic opportunities. Additional thousands came in succeeding years because of religious freedom. Now, it was during the Ulster colonization that the English Parliament adopted excise laws on spirits, mainly to raise money to finance the suppression of the Civil War which broke out
13
in 1642. With the advent of this excise, smuggling of spirits in Britain became rampant. In addition to what they already knew, the Scotch-Irish learned everything possible of the distilling art from the renowned Irish poteen makers. During their years in Ulster, the Scots learned to drain the marshy bogs, converting former wasteland into fertile farms. The city of Belfast became a monument to Scot enterprise. The deep-water port was literally carved out of the bog, becoming Northern Ireland’s centre of export and import. The Scots introduced the potato, and, with the help of newly arrived Huguenot Protestants from France, who were great industrial technologists, they developed booming woolen and linen manufacturing industries. But all of these industries were soon in dire straits, because the English industrial and agricultural interests could not stand the competition. Parliament was persuaded to enact laws that in effect eliminated the exporting of goods and livestock from Ulster. Of all the harsh penalties to hit the Ulstermen, “rack-renting” was the worst. The Scottish proprietors, who had benefited from the great improvements made by their tenants, “screwed up” and “racked” the rents to double and triple their previous amounts. The Scotch-Irish farmers, feeling a sense of injury, refused to accept the outrageous rack-rent. The new leases therefore went to native Irishmen. The intransigent and dispossessed farmer had an alternative of leaving the country, to either go to Scotland, or to cross to America. As a result, America beckoned. After only five generations in Ulster, the Scotch-Irish were ready to move on. And move they did, bringing with them to this country an almost pathological thirst to own land, a strong Protestant faith, and a great tradition of whiskey making and free trading. The first big wave of Scotch-Irish immigration began about 1717 when Lord Donegal led the way in rack-renting his Ulster tenants in County Antrim, which was followed by four other waves of immigration, and continued until 1776. It is estimated that a quarter million Scotch-Irish poured into America during the five heavy waves of the great migration. While they landed at many ports from Boston to Charleston, most of them came into Philadelphia, New Castle, and Chester, flocking into Pennsylvania and its “three lower counties” which were to become Delaware. As pioneers, the Scotch-Irish proved their mettle. They were a new kind of settler, the real pioneer, who brought strong convictions to America, including a love of whiskey and a love of liberty. To say that the drinking and the making of liquor came naturally with the American frontier would be an understatement. To the colonist, suspicious if not deathly afraid of the “poisonous” water of the New World and faced with the reality of the rugged frontier, strong drinks were a dire necessity. From the earliest days at Jamestown, the colonists up and down the seaboard looked on alcoholic beverages as essential for survival.
14
It was only natural, therefore, that brewing and distilling would command an early and important role in the New World. The Virginia Assembly in 1623 called on all newcomers to bring in malt to brew liquor to tide them over until their constitutions became accustomed to Virginia Water. By 1625 two brew houses had begun operation in Virginia. Several years earlier, an Episcopalian missionary, Captain George Thorpe, had learned how to convert Indian maize into liquor and had set up a crude distillery at Berkeley Plantation on the banks of the James River. To a friend in London he wrote that he had found a way “to make so good a drink of Indian corn as I protest I have diverse times refused to drink good strong English beer and chosen to drink that.” While Indian corn (i.e. the everyday North American food-grade corn) was destined to become the base for the true blue American drink, the first spirits made and consumed in volume in America came from the fruits that grew wild and from the lush orchards that soon proliferated under the hands of the early day Johnny Appleseeds. In the years leading up to the migration of the Scotch-Irish to the American frontier in the 1700s, the early Americans began making wine from pumpkins, grapes, currants, elderberries, and parsnips. Indeed, it appeared there was no fruit or grain that was not “grist for the mill” to satisfy the colonists’ desire for fermented and/or distilled spirits. They were distilling ardent spirits from blackberries, persimmons, plums, whortleberries, sassafras bark, birch barks, corn stalks, hickory nuts, pumpkins, the pawpaw, turnips, carrots, potatoes, and small grains. Towards the late 1600s, apple cider, applejack, and apple brandy became the staple alcoholic beverages of New England and south along the eastern seaboard. In every colony, breweries and distilleries sprang up, most of them on individual farms. The stillhouse, usually a windowless log cabin, became an important appurtenance on many plantations in the South and on the farmsteads of Pennsylvania, Maryland, Delaware, New Amsterdam, and New England. One basic role of spirits in the early days of the colonies was as medicine. Settlers drank spirits to prevent malaria and to speed the recovery of anyone taken ill. Whiskey was to the pioneer what tranquilizers, stimulants, disinfectants, vitamins, rubbing alcohol, and anesthetics are to us today. During the years leading up to the Revolutionary War, rum became the distilled drink of Colonial America. Rum was consumed in many forms, from straight to mixed with cider or beer to mixes with sugar, water, and nutmeg. Some rum drinkers even plunged red-hot loggerheads into their tankards of “flip”, a rum, beer, and sugar combination. By the early 1700s, the colonists were consuming twelve million gallons of rum per year. Despite its ascendancy, rum began losing ground to the increasingly popular corn and rye whiskey coming from the American frontier. Throughout the colonies, the pioneers had been perfecting the distilling of corn.
15
It is about this point in time that we rejoin our friends, the Scotch-Irish from Ulster. Down the Great Valley of Pennsylvania and Virginia, through the 1730s to the 1770s, rolled one of the greatest movements of people in American history, people who were destined to change the drinking habits of the North American continent, and more important, play an important role in opening up the western frontier and waging the War of Independence. The majority of the Scotch-Irish immigrants headed to the wide open Southwest, the great American frontier of Virginia, the Carolinas, Tennessee, and Georgia. Between 1720 and 1775, some two to three hundred thousand Ulstermen got off ships at the Delaware River ports of Chester, New Castle, and Philadelphia, and most of them swung down the verdant Great Valley of Pennsylvania, continuing into the Valley of Virginia, today’s Shenandoah Valley. By the time of the Declaration of Independence, Virginia Valley was well populated, and North Carolina’s backcountry had sixty thousand settlers. Anson, Orange, and Rowan Counties, North Carolina, which in 1746 had less than a hundred fighting men, had blossomed to at least three thousand by 1750. North Carolina Governor Tyron reported that in 1765 alone, more than a thousand immigrant wagons passed through Salisbury. Neighbouring South Carolina had eighty-three thousand people on its backwaters. Wherever the Ulsterman went, he took his whiskey. Pennsylvania’s Dr. Benjamin Rush put down some disparaging descriptions of the fellow Presbyterians he had observed on a tour of the frontier. He blamed what he felt were the Ulsterman’s indolent habits on the ever-present stillhouses. Rush blamed whiskey-making for all of the Ulsterman’s troubles, including his quarreling ways, his unkempt farms, and stump-filled fields. He reported that the Scotch-Irish loves spirituous liquors, and eats, drinks, and sleeps in dirt and rags in his little cabin. What Rush did not acknowledge was that whiskey-making had a very practical purpose for the Scotch-Irish. A settler’s first job on arriving in the wilderness was to clear enough land for his cabin and then get in a crop, usually corn, which was easy to produce with only a hoe. Food wasn’t a problem because the forests abounded with wild game of all sorts and the rivers were full of fish. What the settler needed was a cash crop to enable him to pay his taxes and thus retain his precious property, usually a few hundred acres. This was where his whiskey-distilling became an extremely important adjunct to his farming. With their whiskey, they had “legal tender” to pay their taxes and obtain the few necessities that they could not make for themselves, such as salt, nails, and cloth. Many Scotch-Irish had brought along their copper worms and small pot stills slung under their ark-like wagons, or on their packhorses. Some, however, brought only a knowledge of how to build a rig, and some, not even that. They quickly learned from one of their neighbours. The fact that the settler was locked within the fastness of great mountain chains was another reason why it was almost inevitable that he would turn to whiskey-distilling. For although they could produce from forty to sixty bushels of corn per acre (and sometimes more on rich bottom land), it was virtually impossible for them to get ground cornmeal or flour to markets
16
on the seaboard. They could easily and economically convert their corn or rye into spirits, however, and then with a packhorse, transport the liquid equivalent of twenty-four bushels of corn. A packhorse could carry eight bushels of grain, which would fetch about two dollars, not enough to cover the transportation cost. However, a packhorse could carry two eight-gallon kegs of whiskey, which would fetch at least 16 dollars. Practically every farmer, therefore, made whiskey. The frontiersmen found “whiskey farming” sensible, no different from turning corn into pork, or, as in the case of his compatriots in New England, harvesting syrup from maple trees. By the mid-1700s, columns of steel blue smoke poured from hundreds of stills over the six-hundred-mile backcountry along the Appalachian Mountain chain. “Where there’s smoke, there’s bound to be whiskey” was the favourite expression of the time. Across the western frontier of Pennsylvania during the final days of the Revolutionary War, a strong full-bodied whiskey called “Monongahely rye” was becoming famous and became well known back east in Philadelphia and even down the Ohio and Mississippi Rivers. In Philadelphia, it commanded a dollar a gallon, and was recognized as hard currency much more stable than the continental dollar. Easily divisible, and constantly increasing in value as it aged in oaken kegs or sloshed around on a trip over the mountains or down the Ohio River, it was indeed the frontier farmer’s greatest bank balance. They could easily barter their whiskey for the necessities of life, for salt at five dollars a bushel, or nails at fifteen cents a pound. With enough whiskey, he could buy a farm. Every fall, the farmer-distillers of the Monongahela River County around Pittsburgh would put together mule trains and traverse the Alleghenies via the rutted Forbes Road. Strapped across the back of each animal would be two eight-gallon kegs of whiskey, 24 bushels of grain in liquid form, 128 pounds in all (each gallon weighing eight pounds). No wonder that practically every farmer became a “whiskey grower”, converting his surplus grain into spirits. Stills made by the coppersmiths of York, Lancaster, and Philadelphia proliferated on the frontier, particularly in southwest Pennsylvania. By 1790, of the 2,500 known distilleries in operation in the 13 states, 570 were concentrated in the four counties around Pittsburgh, 272 in Washington County alone. Hugh Brackenridge, the famed Pittsburgh lawyer of the era, declared the still was “the necessary appendage of every farm, where the farmer was able to procure it”. A complete copper still and worm was literally worth a 200-acre farm within ten miles of Pittsburgh. Although not every farmer could afford a still, there was at least one in every settlement, with from six to 30 families sharing its output. Now in 1790 word got around that the Secretary of the Federal Treasury, Alexander Hamilton, had devised a new scheme to pay off the country’s 21 million dollar war debt: he would tax whiskey distilleries and whiskey production! The shock waves reverberated through the backcountry, riveting the frontiersmen with rage.
17
Instead of receiving the appreciation due its soldiers for their heroic role in the fight against England, the West found itself confronting a discriminatory excise on its whiskey. Why didn’t the federal government open up river trade with the Southwest via the Ohio and Mississippi Rivers? Why didn’t it build some good roads to the eastern markets? No. What it planned to do was equivalent to a slap in the face. Despite the West’s protest and the opposition of many politicians, Congress paid no heed and on March 3, 1791, voted Hamilton’s proposal into law. As amended later in an attempt to mollify the westerners, the tax was set at seven cents per gallon of liquor produced, or 54 cents per gallon capacity of each still. Adding insult to injury, the law also offered rewards to “informers” who would spy and report on unregistered stills. This law provoked a furious reaction, and many incidents began to occur, which included gangs going around destroying the stills of the few distillers that acquiesced and paid the excise. The most significant event revolving around the excise was the Whiskey Rebellion, which started with such a roar, and ended with a whimper. The frontiersmen formed a rebellious force of over 5,000 insurgents and descended on Pittsburgh ready to put the torch to the town, but the towns folk met the throng at the town limits, bearing whiskey and wagonloads of dried venison, bear meat, hams, and poultry, all designed to discourage a rampage through the city. The hospitality worked, and the threat of serious violence was subjugated. Certain citizens of Philadelphia, particularly George Washington and Alexander Hamilton, were not smiling over the ominous turn of events. At Hamilton’s urging, President Washington called on the governors of Maryland, Virginia, Pennsylvania, and New Jersey to draft armies for the job that lay ahead. Some 13,000 troops, including 11,000 infantrymen, were put on alert by the four governors, awaiting one last attempt to settle the issue without marching. Washington sent commissioners to Pittsburgh, and it was agreed to hold a referendum asking the anti-excisers to submit to the new law by pledging oaths of allegiance. Those who signed would be pardoned for past offences. But the Westerners resented the oath, and the percentage of people who signed was far from overwhelming. Washington, under pressure from Hamilton, feeling no other recourse was left to him, ordered the troops to march. Meanwhile, in Monongahela County, as the government forces swelled, the ranks of the rebels became contrastingly thin. Some 2,000 insurgents quickly disappeared from the area, among them, most of the ringleaders of the rebellion. Many fled down the Ohio River into Kentucky and beyond. On November 13, 1794 the government troops squashed the rebellion, and numerous arrests were made. In the end, Washington pardoned all who were arrested and the rebellion was over.
18
The rebellion cost 1.5 million dollars to squelch, much more than the total excise collected in a year’s time. But the effort apparently had the effect that Hamilton desired: it gave credibility to the power of the federal government. But the settlers did not stop making whiskey during the excise years. Indeed, the rebellion helped set the stage for the beginning of America’s widespread distilling activity, for it pushed whiskey-making deeper into the West and South, into Kentucky and down the Appalachians into the Carolinas and Georgia. Many a Monongahelan lashed his still onto a pack horse and headed for the promised land, where people could carry out “stillin” to their hearts’ content away from the prying eyes of the excise man. Soon almost every farm down the Appalachians and into Kentucky and Tennessee had a still of some type. Many farmer-distillers had two copper pot stills, a large one for the first run (i.e. a beer stripper), usually 150 to 200 gallons, and a smaller one (i.e. a spirit still), around 50 to 80 gallons, for the second since less volume was required for the doubling run (spirit-run). In 1794, the British gave up their northwest posts and in 1795 Spain signed Pinckney’s Treaty, allowing Americans to ship their whiskey and other products down the Mississippi. These developments added considerably to the Kentucky and Tennessee boom. In just two months of 1795, upwards of 30,000 people crossed the Cumberland River into middle Tennessee. Soon, 20-ton barges were plying the Tennessee River from east Tennessee, loaded with barrels of frontier spirits, destination: New Orleans. Meanwhile, across the “southwestern” frontier (today’s southeastern U.S.) deep into Virginia, the Carolinas, Georgia, Kentucky, and Tennessee, the great common denominator was corn. It provided hoecakes and hominy for the settlers, feed for the hogs and horses and, perhaps most important, the base for the settlers’ favourite drink. Moreover, corncobs could be used as fuel and shucks to fill a mattress. Getting the corn ground presented a problem, but the frontiersmen weren’t long in meeting the challenge. “Grist” mills sprung up on many a stream, alongside waterwheels. Looking back on it, it seems a miracle that the people on the frontier came up with such contraptions. But the mountain people were ingenious. They had to be. There were scarcely any roads, and they could only carry in what could be packed on a horse. The water-powered gristmills became one of the real milestones of Appalachian Americana. Like the stillhouse, the gristmill became a commodity landmark and a centre of activity. Many historians give Reverend Elijah Craig, a Baptist preacher, the credit for discovering bourbon whiskey. In 1781, he set up a gristmill at Royal Spring in what is today Scott County, Kentucky. He employed his surplus corn and rye meal to make whiskey (bourbon, by today’s Federal Government definition, is comprised of at least 51% corn and a large adjunct of rye). The story goes that he happened into storing his whiskey in charred oak barrels by using a barrel that had been accidentally burned on the inside and subsequently discovered its lubricious effects on the whiskey. Charred oak purges the clear whiskey of many of its impurities and gives it an amber colour, plus a smooth oak-flavoured bouquet and
19
body. Today, charring the oak bourbon barrels is a federal requirement for the maturing of bourbon (minimum three years). Other accounts attribute the charred barrel to early coopers who burned straw inside new barrels to clear them of rough edges, splinters, and bacteria. Still others say that barrels were burned originally to clear out the rank odour of fish or molasses. Regardless of how the corn-rye mix or the charred oak barrel came to be, they formed the definition of bourbon whiskey, and other styles of American straight whiskey. Today, the U.S. Federal Government regulation for Straight Bourbon Whiskey is: a whiskey made from a mash of at least 51% corn; distilled until the emerging distillate is no more than 160 proof; and aged in new charred white oak barrels for a minimum of three years. As well, in order to use the name “bourbon” it must be made in the appellation region (no pun intended) of Bourbon County Kentucky. The excise years were drawing to a close. In 1800, a significant year for whiskey distillers everywhere, but particularly for those on the southern and western frontiers, Democrat Thomas Jefferson, with the great support of the democratic peoples of the West, won an overwhelming victory over the Hamiltonian Federalists and became President. One of Jefferson’s early objectives was eliminating the “infernal” whiskey excise, which he felt was hostile to the genius of a free people. Craig and his fellow whiskey distillers across the West and South celebrated the repeal, which came on June 30, 1802. So the frontiersmen at last were free from the excise. And, except for a three-year imposition of a tax following the War of 1812, they had a relatively long era without visits from gaugers, excisemen, and collectors. This reprieve lasted until 1862. During this happy period, they refined their distilling as well as American whiskey.

21
EQUIPMENT Traditionally, whiskey is made in a gooseneck or a pot still. Pot stills are too rudimentary in design and do not afford sufficient separation of the mash compounds to make a good quality whiskey. For this reason, they are never recommended for the production of beverage alcohol anymore. Gooseneck or whiskey stills have been used for centuries for making whiskey and are used just as much today as they have ever been. Some of the world’s finest whiskies are made in such stills, and some artisans argue that the finest whiskies can only be made in this design of still. However, the operation of gooseneck and whiskey stills is very temperamental and subjective, and requires a great deal of skill to maintain a careful balance of heat and flow rate. Commercial whiskey distillery operators require years of training and experience to become accredited distillers. A lot of whiskey nowadays is produced in special-purpose fractionating stills. These stills are high-separation stills that can separate out each compound in a mash by virtue of its boiling point. The level of separation in such stills can be very precisely controlled up or down and their operation is much more consistent and systematic than whiskey stills. And, it is because of these characteristics that the high-separation fractionating still design has been chosen for making whiskey in this text. A secondary advantage that arises from using a fractionating still is that it can also be used to produce pure alcohol for making vodka, gin, and essence-based spirits. An excellent book describing exactly how to do that is, John Stone, Making Gin & Vodka, www.gin-vodka.com. More will be said about stills in the chapter on Distillation. The components of the distillation equipment described here can be purchased from domestic hardware stores and plumbing suppliers. They need some modification and adaptation, but the task is well within the capabilities of the average handyman. As for scale of operation, the equipment and procedures described in this book are based on the mashing and fermentation of 30L (8 US gallons) of corn mash to yield about 2L (2.1 US quarts) of 40% alc/vol corn whiskey and about 900 ml (1 US quart) of 91% alc/vol feints. Feints will be explained in the chapter on Distillation. There are four major equipment items. They are: the mashing vessel; the fermenter; the beer stripper (optional); and the spirit still.
22
The Mashing Vessel An excellent mashing vessel for producing 30L of corn mash is a 34-40L (9-10 US gallon) stainless steel stockpot with an aluminum plate bonded to the bottom, and a lid. This can be purchased at restaurant-supply stores. As well, you will require a large plastic or wooden spoon or paddle to stir the mash, and a floating dairy thermometer or a brewers’ mashing thermometer in the range of 0-110oC (32-230oF). These can be purchased at home beer and wine making supply shops. The mash pot can easily be heated on any standard kitchen gas or electric stove burner. It’s best to use the larger burners rather than the smaller burners, but both will work. The Fermenters For fermenting you will require at least three 30L (8 US gallon) food-grade plastic pails with lids. 30L pails hold 30L with 2 or 3 cm (an inch or so) to spare. Such pails can be obtained as empty bulk food containers from restaurants or health-food stores, or purchased quite cheaply at home beer and wine making supply stores as specially designed fermenters with volume graduations on the side and with a hole in the lid for a fermentation lock. Ancillary Equipment Siphon: You will need a 2M (6’) piece of ½" vinyl siphon tube with a racking cane. A racking cane is a hard cane-shaped acrylic tube of a size that the ½" vinyl siphon tube will fit over. These can be purchased at any home beer and wine making supply shop. Refractometer: If you buy a refractometer you won’t need a winemaking hydrometer. A refractometer measures the sugar content of a small sample of mash. They are fairly expensive and can generally only be purchased from a scientific supplier. Hydrometer: A standard winemaking hydrometer can be purchased at any home beer and wine making supply shop. You will not need a hydrometer if you have a refractometer. Proof Hydrometer: A proof hydrometer is a hydrometer for measuring % alcohol content of a distilled spirit. A lot of home beer and wine making supply shops carry them. They can also be purchased from scientific and laboratory suppliers. Hydrometer Cylinder: A 250-ml graduated cylinder can be used for both the winemaking hydrometer and the proof hydrometer. It also makes an excellent receiver for the spirit still where the quantities of each phase need to be measured and recorded. Most home beer and wine making supply shops carry hydrometer cylinders, but they are usually not graduated (i.e. have markings on the side indicating the volume). Most people will have to go to a scientific supplier for a 250-ml graduated cylinder. Also, make sure the cylinder is made of glass or some other alcohol-resistant material. A lot of home beer and winemaking supply shops sell acrylic hydrometer cylinders. Acrylic is not acceptable for containing distilled
23
spirits. Acrylic cylinders are okay for a wine or beer up to 10-20%, but for a 40-50% first run or a 90+% spirit-run they will dissolve. pH Meter: A pH meter is a device for measuring the pH of an aqueous solution (i.e. the acidity or alkalinity of a solution in water). Each time a pH meter is used it needs to be calibrated to a specific pH using a special buffering solution of known pH. For mashing, the pH-meter precision should be calibrated to around pH 6 (say a buffering solution of pH 6.01). However, buffering solutions of pH 6.01 are hard to find, so you may have to settle for a pH 4.01. pH meters are fairly expensive, but they save a lot of time compared to using pH papers. For the better ones (better referring to reliability and accuracy) you will probably have to go to a scientific supplier. However, a lot of homebrewing supply shops now carry lower-end models that are very reasonably priced and are more than satisfactory for mashing. These will do just fine. If you decide not to invest in a pH meter, pH papers will certainly suffice, but they are much more time consuming. pH Papers: If you don’t have a pH meter you will require two ranges of pH papers: pH 2-12; and pH 4.5-6.5. Transfer Hoses Both the beer stripper and the spirit still (both described below) are filled, emptied, and flushed out using the upper and lower ball valves on the sides of their boilers. Generally, the upper ball valve is used for filling and flushing and the lower is used for draining. Although, some setups may favour using the lower ball valve for filling as well. To make the required transfer hoses, you will need: Qty Description 8-16M (25-50’) 3/8" clear vinyl hose 4 female garden-hose couplings 5 ½" hose clamps 1 siphon starter (alcohol resistant if using a beer stripper) Filler-hose: The filler-hose should be about 1.8M (6’) long. It will need to reach to the top ball valve on the boiler from the mash container, which must be placed at a height above the boiler. Attach a female garden-hose coupling to one end of the filler-hose and secure it with a ½" hose clamp. Attach the siphon starter to the other end and secure it with a ½" hose clamp. Drain-hose: The drain-hose will need to reach from the bottom ball valve to a floor drain.
24
Cut the drain-hose to length, attach a female garden-hose coupling to one end, and secure it with a ½" hose clamp. The other end is led to a floor drain. Flushing-hose: The flushing-hose will need to reach from a faucet equipped with a garden-hose fitting to the upper ball valve. Cut the flushing-hose to length, attach female garden-hose couplings to both ends, and secure them with ½" hose clamps. Immersion Chiller (Optional) An immersion chiller is used to chill the mash down to fermentation temperature after the mashing process is complete. This will be explained in the chapter on Mashing. For the batch size discussed in this book (30L), the mash will cool to fermentation temperature in 8 to 10 hours. Leaving it overnight can easily accommodate this. But for larger quantities, it will require force cooling with an immersion chiller. An immersion chiller is basically a coil of 3/8" copper tubing about 8M (25’) long that is immersed in the hot mash with cold water flowing through the tubing. The immersion chiller described here will force cool a 30L (8 US gallons) batch of mash from 63oC (145oF) to 38oC (100oF) in about 10 minutes. It can be used to chill batch sizes up to 75L (20 US gallons) in about 30 minutes. To make an immersion chiller, you will need: Qty Description 8M (25’) 3/8" copper tubing 6M (20’) 3/8" clear vinyl hose 1 female garden-hose coupling 1 faucet-to-garden-hose adapter 3 ½" hose clamps 1.8M (6’) bare copper wire Bend the 3/8" copper tubing into a coil about 25cm (10") in diameter. Usually, copper tubing comes coiled at about that diameter so this step will probably already be done for you. Next, with the coil sitting on a flat surface with the coils running parallel to the surface, bend the two ends of the tube (one from the top, the other from the bottom of the coil) upward so that both stand roughly 50cm (20") from the surface. Place the coil in the mash pot and, at a point where they clear the top of the mash pot, bend the ends in smooth arcs until they are horizontal and side-by-side. Take care not to crimp the tubing.
25
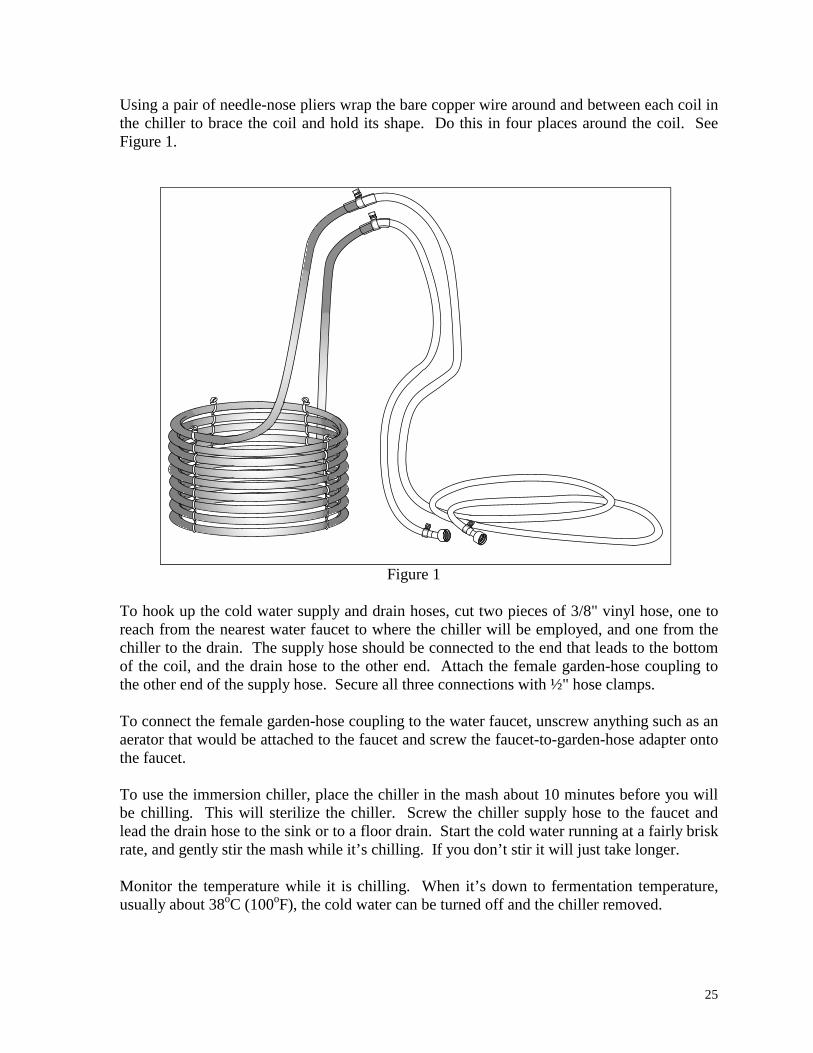
Using a pair of needle-nose pliers wrap the bare copper wire around and between each coil in the chiller to brace the coil and hold its shape. Do this in four places around the coil. See Figure 1.
Figure 1 To hook up the cold water supply and drain hoses, cut two pieces of 3/8" vinyl hose, one to reach from the nearest water faucet to where the chiller will be employed, and one from the chiller to the drain. The supply hose should be connected to the end that leads to the bottom of the coil, and the drain hose to the other end. Attach the female garden-hose coupling to the other end of the supply hose. Secure all three connections with ½" hose clamps. To connect the female garden-hose coupling to the water faucet, unscrew anything such as an aerator that would be attached to the faucet and screw the faucet-to-garden-hose adapter onto the faucet. To use the immersion chiller, place the chiller in the mash about 10 minutes before you will be chilling. This will sterilize the chiller. Screw the chiller supply hose to the faucet and lead the drain hose to the sink or to a floor drain. Start the cold water running at a fairly brisk rate, and gently stir the mash while it’s chilling. If you don’t stir it will just take longer. Monitor the temperature while it is chilling. When it’s down to fermentation temperature, usually about 38oC (100oF), the cold water can be turned off and the chiller removed.
26
Beer Stripper (Optional) Beer stripping is a fast, crude primary distillation of the fermented mash in a high volume pot still in order to obtain most of the alcohol and the impurities in a smaller volume of water. This smaller volume, about a quarter of the original volume of the mash, is easier and cleaner to handle in the smaller precision equipment (i.e. the spirit still) used for the final spirit-run. The purpose of beer stripping in the production of whiskey is purely for operational expedience. It enables a comparatively large volume of mash to be quickly reduced to a much smaller volume that can then be refined to the finished whiskey in the smaller spirit still, thereby increasing the output of a single run in the spirit still by up to five times. However, the beer-stripping step can be omitted and the fermented mash can be loaded straight into the spirit still and refined directly into the finished whiskey. In fact, many distillers, including the author, contend that whiskey produced by a single spirit-run has a fresher, more natural flavour than one produced by the usual double distillation. So, if your batch sizes are kept to the 30L of corn mash described in this book, then you would be better off not building a beer stripper and going directly to the spirit still after fermentation. In fact, the spirit still (described below) is actually large enough to accommodate exactly two 30L batches of corn mash. 30L of corn mash yields 20L of liquid to be distilled after straining. Two such batches would yield a total of 40L to be distilled. The spirit still has a capacity of 45L. Another point to consider is that beer stripping can be conducted in the spirit still if necessary. It’s certainly slower but will work just as well in the end if an unusual requirement arose where it were desirable to do so. As much as 300L of corn mash could be strained then stripped in five runs using the spirit still. The resulting 30 to 35L of distillate could be placed back in the spirit still along with a 5L adjunct of feints, for a single spirit-run that would produce about 25L of 40% alc/vol whiskey and about 10L of 91% alc/vol feints. An effective and fairly inexpensive beer stripper can be fabricated from a 113L (30 US gallon) domestic electric hot water heater. A sketch of the water heater and the modifications required are shown in Figure 2. The following is a list of all the components required to build a beer stripper. With the exception of the thermometer and the cork, all of these components can be purchased at home building supply stores and/or plumbing supply shops. Qty Description
113L (30 US gallon) electric hot water heater ¾" copper or brass male adapter (male thread to female sweat) ¾" copper union ¾" x 1½" copper coupling
30 cm (1’) ¾" copper pipe
27
1.8M (6’) 1½" copper pipe 1½" copper tee 1½" copper elbow
5M (16’) 3/16" copper tubing 2 ¾" ball valves 2 ¾" plumbing to garden-hose adapters
humidifier tap-valve kit (½" saddle valve and 8M (25’) 3/16" plastic tubing laboratory thermometer (0 o-110 oC (32 o-230 oF)) 1½" cork 90o electrical box connector 240V electric clothes drier cord lead-free solder kit Teflon tape
Figure 2 The various adapters and fittings used for the modifications are connected together by either threaded plumbing fittings or soldered sweat fittings. Teflon tape should be used on all threaded connections to ensure a watertight seal. Simply wrap the Teflon tape around the male threads two or three times before inserting the connector into the female fitting. Most solder contains lead, an element known to be deadly poisonous. Only lead-free plumbing solder should be used for the soldered connections in a still.
28
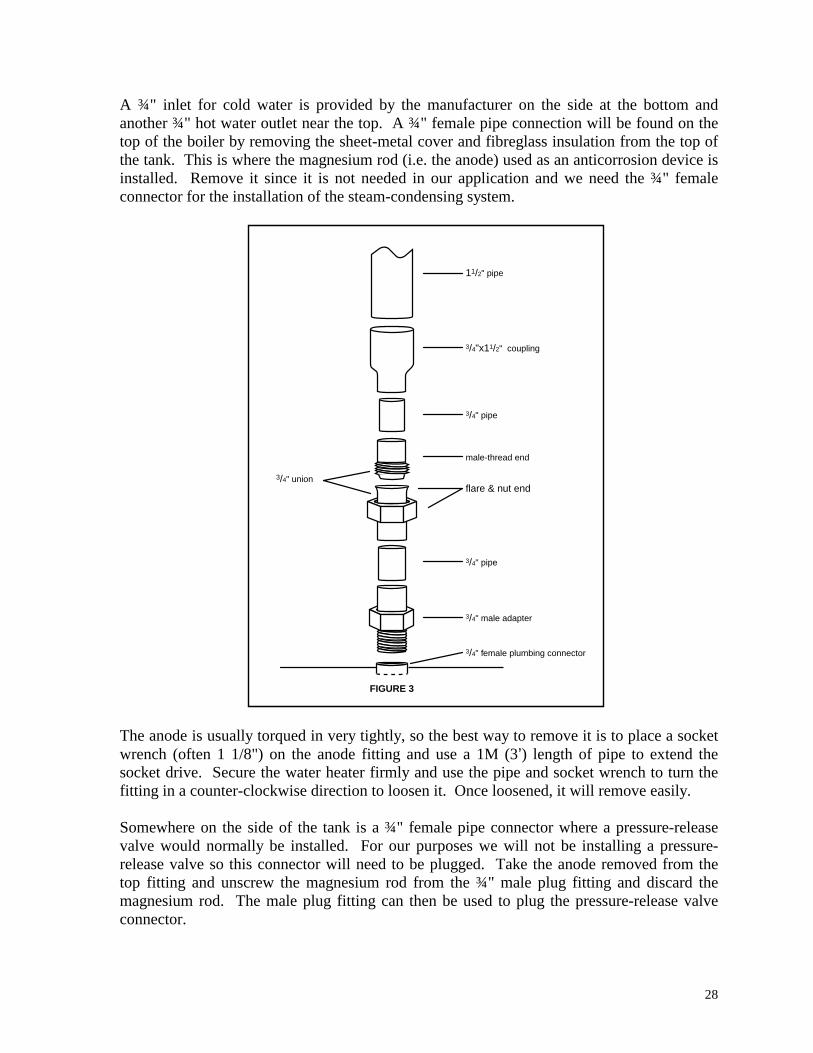
A ¾" inlet for cold water is provided by the manufacturer on the side at the bottom and another ¾" hot water outlet near the top. A ¾" female pipe connection will be found on the top of the boiler by removing the sheet-metal cover and fibreglass insulation from the top of the tank. This is where the magnesium rod (i.e. the anode) used as an anticorrosion device is installed. Remove it since it is not needed in our application and we need the ¾" female connector for the installation of the steam-condensing system.
FIGURE 3
11/2" pipe
3/4" union
3/4" pipe
3/4" male adapter
3/4" pipe
male-thread end
3/4" female plumbing connector
3/4"x11/2" coupling
flare & nut end
The anode is usually torqued in very tightly, so the best way to remove it is to place a socket wrench (often 1 1/8") on the anode fitting and use a 1M (3’) length of pipe to extend the socket drive. Secure the water heater firmly and use the pipe and socket wrench to turn the fitting in a counter-clockwise direction to loosen it. Once loosened, it will remove easily. Somewhere on the side of the tank is a ¾" female pipe connector where a pressure-release valve would normally be installed. For our purposes we will not be installing a pressure-release valve so this connector will need to be plugged. Take the anode removed from the top fitting and unscrew the magnesium rod from the ¾" male plug fitting and discard the magnesium rod. The male plug fitting can then be used to plug the pressure-release valve connector.
29
The steam-condensing system, as shown in Figure 2, is made from 1½" copper pipe. A series of adapters will be needed to go from the ¾" female pipe thread in the top of the boiler where the anode was, to the 1½" copper pipe used for the rest of the system. See Figure 3. Connect a ¾" copper or brass male adapter (¾" male thread to ¾" female sweat) to the female pipe thread in the top of the tank. Next, solder a 7½ cm (3") piece of ¾" copper pipe into the sweat fitting of the adapter. On the piece of copper pipe, solder the flare-and-nut end of a ¾" copper union. Now, solder a 1½" x ¾" copper coupling to a 30 cm (1’) piece of 1½" copper pipe. Solder a 5 cm (2") piece of ¾" copper pipe into the other end of the 1½" x ¾" copper coupling. Solder the other end of the ¾" pipe into the male-thread end of the copper union. The 30 cm (1’) piece of 1½" copper pipe can now be connected to and disconnected from the boiler by means of the union. It’s useful to use some Teflon tape at the interface of the union to ensure a good watertight seal. On the 30 cm (1’) piece of 1½" copper pipe, solder a 1½" tee as shown in Figure 2. Solder a 60 cm (2’) piece of 1½" copper pipe horizontally to the tee, then to a 1½" copper elbow, then from the elbow to a 90 cm (3’) piece of 1½" copper pipe. As shown in Figure 2 the 1½" copper tee permits the fitting of a cork and laboratory thermometer (range 0-110o C (32-230o F)) to read the temperature of the vapours distilling over. These vapours are condensed by means of cold water running through 3/16" copper tubing inserted in the down stream vertical section of the 1½" pipe. Use 5M (16’) or so of 3/16" copper tubing wound around a piece of 1" copper pipe to form a coil about 60 cm (2’) long which can be inserted in the vertical 1½" copper pipe as shown. The coils of copper tubing should be wound as tightly together as possible. The two ends of the 3/16" tubing are either brought out through holes drilled in the top elbow where they are soldered into place or, more simply, brought out through a large cork inserted in a copper tee. However, corks require replacing periodically, and in that way are somewhat problematic. As for supplying cold water to the 3/16" copper coil, known as a heat exchanger, a standard forced-air furnace humidifier tap-valve kit can be used. Such a kit consists of a ½" saddle valve and about 8M (25’) of plastic tubing designed to connect to 3/16" copper tubing. The saddle valve clamps around a standard ½" cold-water pipe, and by turning the valve it pierces the pipe. This leaves you with a needle valve supplying cold water to the plastic tube. The plastic tube can be cut in two at a suitable place so the piece connected to the saddle valve can be connected to the inlet of the heat exchanger, and the other connected to the output and led to a drain. As a rule, heat exchangers make most efficient use of cooling water when the cold water is input at the opposite end of the coil to the end where the hot vapours are approaching the coil. So in the case of the beer stripper, the cold water should enter the tube that leads to the end of the coil closest to the bottom, and exhausted at the top of the coil. It’s interesting to note that this design of heat exchanger is remarkably efficient, and requires a surprisingly slow trickle of cold water to thoroughly condense the vapours. When the beer
30
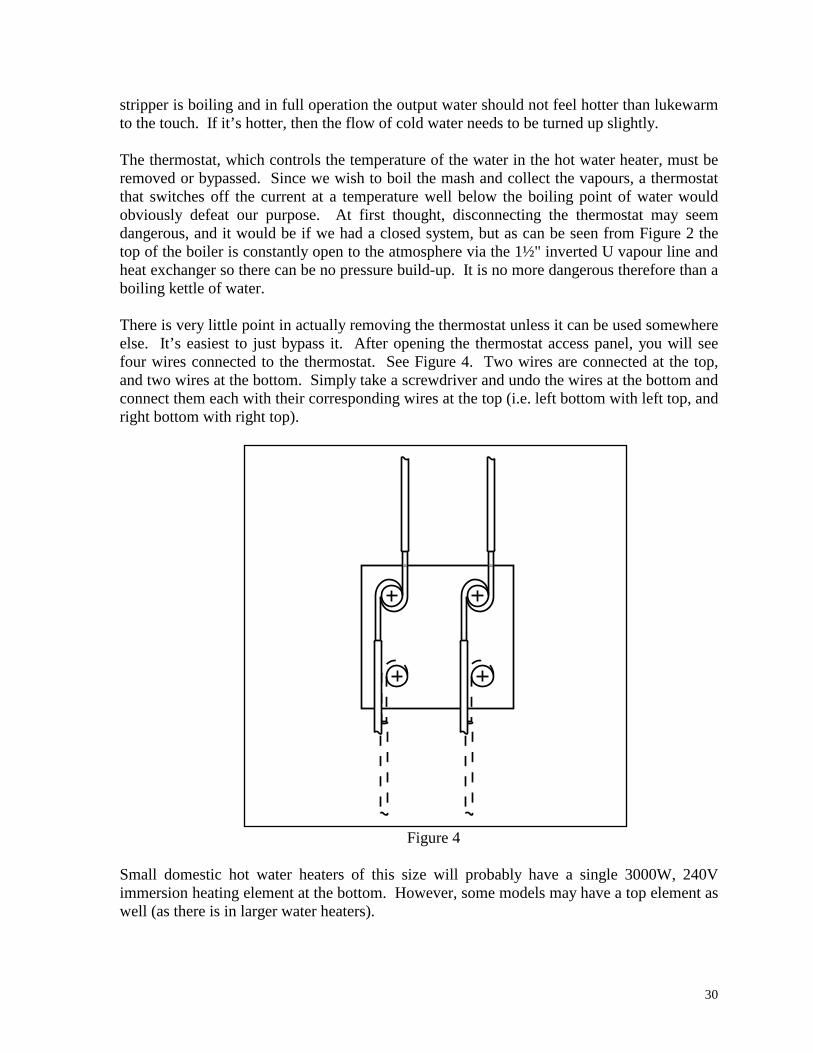
stripper is boiling and in full operation the output water should not feel hotter than lukewarm to the touch. If it’s hotter, then the flow of cold water needs to be turned up slightly. The thermostat, which controls the temperature of the water in the hot water heater, must be removed or bypassed. Since we wish to boil the mash and collect the vapours, a thermostat that switches off the current at a temperature well below the boiling point of water would obviously defeat our purpose. At first thought, disconnecting the thermostat may seem dangerous, and it would be if we had a closed system, but as can be seen from Figure 2 the top of the boiler is constantly open to the atmosphere via the 1½" inverted U vapour line and heat exchanger so there can be no pressure build-up. It is no more dangerous therefore than a boiling kettle of water. There is very little point in actually removing the thermostat unless it can be used somewhere else. It’s easiest to just bypass it. After opening the thermostat access panel, you will see four wires connected to the thermostat. See Figure 4. Two wires are connected at the top, and two wires at the bottom. Simply take a screwdriver and undo the wires at the bottom and connect them each with their corresponding wires at the top (i.e. left bottom with left top, and right bottom with right top).
Figure 4 Small domestic hot water heaters of this size will probably have a single 3000W, 240V immersion heating element at the bottom. However, some models may have a top element as well (as there is in larger water heaters).
31
If there is a top element, it must be disconnected permanently because as used in this application the top element would not always be immersed and would burn out. If there is a top element that requires disconnecting, it’s possible the lower element is only a 1500W heater. If this is the case, it should be replaced with a 3000W one. A 3000W element should provide about 6L of distillate per hour. There will be a hole at the top or side of the sheet-metal cover of the hot-water tank where the wires to the 240V immersion element come out. Connect the wires to a 240V electric-clothes-drier cord. The drier cord will have four wires: black; red; white; and a green or bare ground wire. The two wires to the 240V immersion heater will be black and red, and there will be a green or bare ground wire, but there will be no white wire. Connect the corresponding coloured wires of the element and the drier cord together using wire connectors, leaving the white wire on the drier cord free but covered by a wire connector or electrical tape. The drier cord is then secured to the sheet-metal cover using a 90o electrical box connector. The beer stripper can now be plugged into a standard 240V electric-clothes-drier socket. If you are fortunate, the beer stripper will be located in a place near an electric drier and can take turns using its socket. If not, you will have to install a 240V service with a clothes-drier socket. An electric-stove socket will also work, but it’s different from a drier socket because a stove requires a higher-amperage circuit. If an electric-stove socket were handy, then wire the beer stripper with an electric-stove cord instead. The two side connectors to the boiler (¾" male-threaded plumbing connectors) should be fitted with ¾" ball valves. Fit each ball valve with a garden-hose adapter. It’s wise to avoid the temptation to save money by fitting the side connectors with standard garden-hose faucets. Garden-hose faucets are quite narrow internally, and can get plugged up with yeast deposits. Also, they are very difficult to flush out, and restrict water flow when rinsing out the boiler. The upper and lower ball valves on the boiler are used in conjunction with the transfer hoses described above. Typically, the upper ball valve is used to siphon the mash into the beer stripper, and the lower one is used to drain it. Although, some arrangements may best use the lower ball valve for filling as well as draining. To fill the beer stripper, the container with the strained mash is placed at a level higher than the boiler. The filler-hose is connected to the upper ball valve of the boiler and the other end with the siphon starter is placed in the mash container. The operator then opens the upper ball valve and, ensuring the bottom one is closed, operates the siphon starter to initiate the siphon from the mash container to the boiler. When the transfer is complete, the upper ball valve is closed and the filler-hose is removed from the boiler. After the beer stripping is complete, the still can be drained by attaching the drain hose to the lower ball valve. Lead the drain hose to a drain and open the lower ball valve.

32
After the beer stripper has been drained, it can be flushed out by connecting the flushing-hose to the top ball valve and a faucet. With the bottom ball valve still connected to the drain hose and with both valves wide open, the operator can flush water from the faucet through the boiler to rinse it out. The upper side connector where the upper ball valve is connected is a ¾" pipe that leads into the centre of the hot-water heater and bends upward and leads to within a cm (½") or so from the very top of the tank. This is because, as a hot-water heater, the hot water must be drawn off the very top of the tank. In this application it serves very well to create a fountain effect inside the boiler when you are flushing it out. Spirit Still The crude distillate from the beer stripper, or the raw fermented corn mash if a beer stripper is not employed, is transferred to a fractional distillation apparatus called the “spirit still” as shown in Figure 5.
Figure 5
33
The fractional distillation apparatus described here is a high-separation still capable of producing pure alcohol, and would not normally be viewed as a spirit still appropriate for producing whiskey. However, as explained later in the chapter on Distillation, the fractionating still can be operated in a manner that reduces the separation to a level suited to producing whiskey. This design was chosen in order to afford the amateur a more consistent and systematic mode of operation, unlike the precarious and temperamental operation of a more traditional whiskey still. Also, traditional whiskey stills are much more predisposed to yielding an excess of fusel alcohols into the distillate if they are inadvertently operated too hot or too late into the process. A fractionating still offers much more control over separation making it easier to guard against this. Note: An excess of fusel alcohols (formerly called fusel oils) does not create a poisonous condition in the whiskey, but it will make the whiskey taste base and grainy, and will cause the consumer to get a very bad hangover. An obvious advantage to building a fractionating still to make whiskey is that the still can also be used to produce pure alcohol for making gin, vodka, and essence-based spirits. Material of Construction: There are three materials that stills are commonly made from, and they are: glass; copper; and stainless steel. Glass is the most aesthetically pleasing, but not at all practical. A glass still would be very expensive to make, could not typically be made by one’s self at home, and would be very fragile. Stainless steel is an excellent material for a still, but again is not one that an amateur will find easy to work with. Parts such as stainless steel tees are difficult to find and can mean the fabricator would have to do some cutting, shaping, and butt-welding. Also, stainless steel requires very skilled high-temperature welding. And, stainless steel parts are very expensive. Copper is, by far, the most practical material for making stills. The parts are relatively inexpensive, and are readily available from any home building supply store or plumbing supply shop and, most importantly, it can be worked with and soldered together easily by amateurs. Commercial whiskey distilleries have used copper stills for centuries so it is clearly a very acceptable metal to use. In fact, it’s important that there be some copper in the construction of any still. Even if the still were made of glass or stainless steel, some components such as the packing should be made of copper. Fermentation produces small amounts of sulphides such as dimethyl sulphide and hydrogen sulphide. Copper reacts instantly with these sulphides thereby removing them from the distillate. If a still were made with no copper, and sulphides persisted into the finished whiskey, the whiskey would have a rubbery, cooked cabbage smell and taste to it. Fortunately, sulphides will dissipate from the whiskey over a period of a few weeks. Anyway, this becomes one more reason to choose copper.
34
Construction: The following is a list of all the components required to build a fractionating spirit still. With the exception of the thermometer and the cork, all of these components can be purchased at home building supply stores and/or plumbing supply shops. Qty Description 45L (12 US gallon) electric hot water heater 3000W, 240V water heater element ¾" copper or brass male adapter (male thread to female sweat) 2 ¾" x 1¼" copper coupling (only one is required if you are using a 1¼" cork
for the thermometer) 1¼" copper union
7.5 cm (3") ¾" copper pipe 1.8M (6’) 1¼" copper pipe
1¼" copper tee 1¼" copper elbow
10 cm (4") 3/8" copper tubing 3/8" needle valve
8M (25’) 3/16" copper tubing 2 ¾" ball valves 2 ¾" plumbing to garden-hose adapters
humidifier tap-valve kit (½" saddle valve and 8M (25’) 3/16" plastic tubing) laboratory thermometer (0o-110 o C (32 o -230 o F)) 1¼" cork (or wine-bottle cork)
16 copper or stainless steel scouring pads 90o electrical box connector 120V 3-prong plug heavy-duty extension cord grounded electrical timer lead-free solder kit Teflon tape
1.8M (6’) piece of 1 3/8" I.D. x ½" wall Armiflex 2 3" hose clamps
adjustable shelf and mounting brackets As mentioned in the section on the beer-stripper construction, it’s important to use lead-free plumbing solder for constructing a still. Also, remember to use Teflon tape on all threaded connections to ensure a watertight seal. Simply wrap the Teflon tape around the male threads two or three times before inserting the connector into the female fitting. As shown in Figure 5, the apparatus consists of a boiler with a 114 cm (45") reflux column made from 1¼" copper pipe. At the top of the column is the still head where the vapours rising from the boiler are condensed and split into two streams. The major stream flows back down the column while the remaining stream flows into the receiver. Let’s look at each part of the still in more detail.
35
The Boiler: Just as we did for the beer-stripper we use a domestic electric hot water heater for the boiler but in this case it is quite a bit smaller in size. A 45L (12 US gallon) size, very common for cottages or small apartments, is ideal and is usually heated by a single 1500W, 120V immersion element. The thermostat will have to be bypassed. Remove the thermostat access panel and bypass it just as is done in the case of the beer stripper. See Figure 4. The packed 1¼" column has only a limited capacity to allow vapours to rise up through the packing against the downward flow of condensed liquid (see the section on the Principles of Fractional Distillation in the chapter on Distillation) so the boil-up rate must not be too great or the column will choke. The 1500W heater supplied is, in fact, unnecessarily large so the power output must be reduced. A simple and cheap way to do this is to substitute a 750W heater for the 1500W one supplied. However, 750W elements are hard, if not impossible, to find nowadays, so an excellent way to accomplish this same end is to purchase a 3000W, 240V heater and run it on 120V. The current is cut in half, as is the voltage, so the wattage is reduced to one-quarter (i.e. 3000 x ¼ = 750W). A bonus with this arrangement is that the current density in the heater will be so much below its rated capacity that it should have a very extended life. There will be a hole at the top or side of the sheet-metal cover of the hot-water tank where the wires to the 120V immersion element come out. Connect the wires to a 120V three-prong plug. The two wires to the 120V immersion heater will be black and white, and there will be a green or bare ground wire. The three-prong plug has a round-shaped ground prong and two blade-shaped power prongs. One blade-shaped prong is wider than the other. Connect the white wire to the widest blade-shaped prong, and the black wire to the other blade-shaped prong. Connect the green or bare ground wire to the round-shaped prong. The wires are then secured to the sheet-metal cover using a 90o electrical box connector. Use a heavy-duty extension cord to plug the still into a standard 120V wall socket. A grounded electrical timer can be used at the wall socket to turn the still on (or off) at a prescribed time. A still with 20L or so of mash will take about 3½ hours to boil (and about 5½ hours with 40L). It’s useful to have the still switch on automatically at, say 4 o’clock in the morning, and come to boil at 7:30. By 8:00 it will be equilibrating and ready to run off. This eliminates having to wait 3½ to 4 hours for boil-up and equilibration before beginning the run. Of course, it’s important to note that the heat-exchanger water will have to be running before boil-up, or the alcohol and congeners will not be condensed and therefore lost to the air. One way to mitigate this is to set the timer to shut off 15 minutes or so before it’s expected to come to boil. The operator then attends to the still 20 or 30 minutes prior to expected boil-up and turns on the heat-exchanger water and disables the timer shutoff.

36
Another way is to simply turn the heat-exchanger water on at setup time and let it run all night. It is just a slow trickle. Perhaps you’re not concerned about such a small loss. A more creative way to address turning on the heat-exchanger water is to employ a 120V water solenoid. The water solenoid would be placed on the water supply tube to the heat exchanger and plugged into the same extension cord as the still. This way the heat-exchanger water would start running at the same time as the timer switched the still on. A further refinement would be to attach a thermostor to the stillhead and set the thermostor to activate the water solenoid when the temperature of the stillhead exceeded a certain value. This way the heat-exchanger water wouldn’t start running until the still actually began boiling To the two side connectors of the boiler (¾" male-threaded plumbing connectors) attach ¾" ball valves. Fit the ball valves with female garden-hose couplings. Remove the sheet-metal cover from the top of the tank. This is where the magnesium rod (i.e. the anode) used as an anticorrosion device is installed. Remove it since it is not needed in our application and we need the ¾" female connector for the installation of the reflux column. The anode is usually torqued in very tightly, so the best way to remove it is to place a socket wrench (often 1 1/8") on the anode fitting and use a 1M (3’) length of pipe to extend the socket drive. Secure the water heater firmly and use the pipe and socket wrench to turn the fitting in a counter-clockwise direction to loosen it. Once loosened, it will remove easily. Somewhere on the side of the tank is a ¾" female pipe connector where a pressure-release valve would normally be installed. For our purposes we will not be installing a pressure-release valve, so this connector will need to be plugged. Take the anode removed from the top fitting and unscrew the magnesium rod from the ¾" male plug fitting and discard the magnesium rod. The male plug fitting can then be used to plug the pressure-release valve connector. To attach the column to the boiler, as shown in Figure 6, a series of adapters will be needed to go from the ¾" female pipe thread in the top of the boiler where the anode was, to the 1¼" copper pipe used for the reflux column. Connect a ¾" copper or brass male adapter (¾" male thread to ¾" female sweat) to the female pipe thread in the top of the tank. Next, solder a 5 cm (2") piece of ¾" copper pipe to the sweat fitting of the adapter. Onto the piece of copper pipe, solder a ¾" x 1¼" copper coupling. Onto the copper coupling solder a 5 cm (2") piece of 1¼" copper pipe. Onto the piece of copper pipe solder the flare-and-nut end of a 1¼" copper union. Solder a 114 cm (45") piece of 1¼" copper pipe into the male-thread end of the 1¼" copper union. The 114-cm (45") piece of 1¼" copper pipe (the reflux column) can now be connected to and disconnected from the boiler by means of the union.
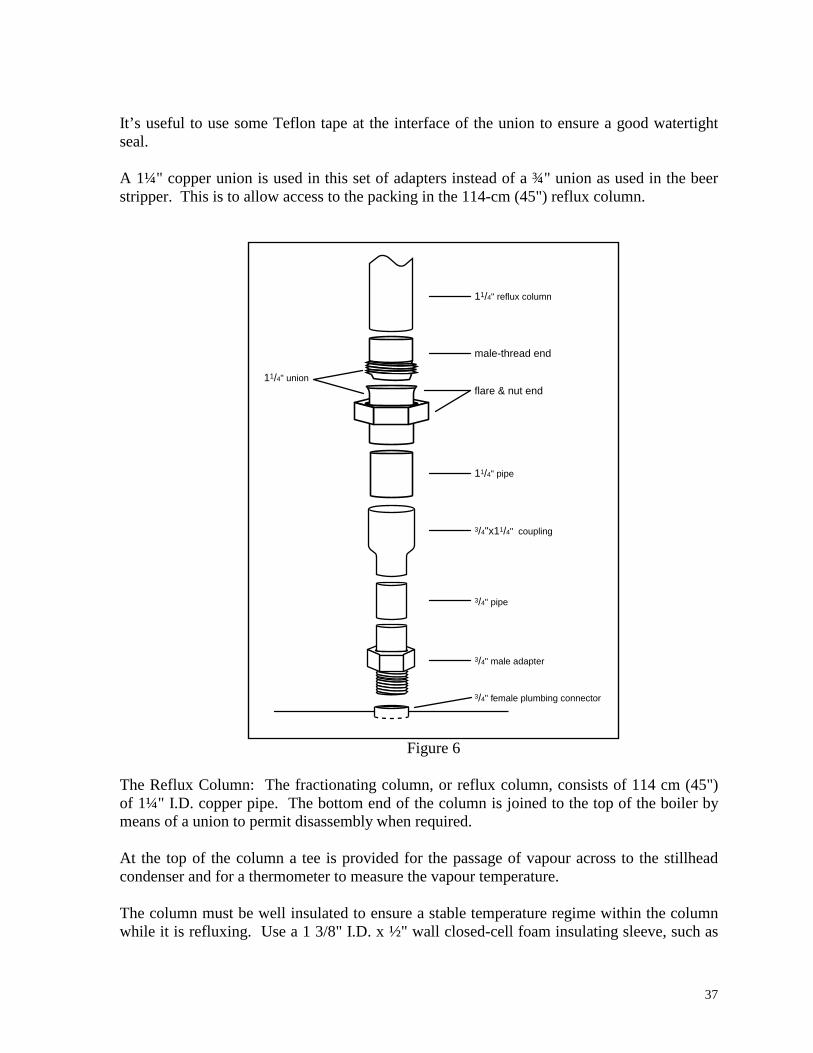
37
It’s useful to use some Teflon tape at the interface of the union to ensure a good watertight seal. A 1¼" copper union is used in this set of adapters instead of a ¾" union as used in the beer stripper. This is to allow access to the packing in the 114-cm (45") reflux column.
11/4" reflux column
11/4" union
11/4" pipe
3/4" pipe
3/4" male adapter
3/4" female plumbing connector
3/4"x11/4" coupling
male-thread end
flare & nut end
Figure 6 The Reflux Column: The fractionating column, or reflux column, consists of 114 cm (45") of 1¼" I.D. copper pipe. The bottom end of the column is joined to the top of the boiler by means of a union to permit disassembly when required. At the top of the column a tee is provided for the passage of vapour across to the stillhead condenser and for a thermometer to measure the vapour temperature. The column must be well insulated to ensure a stable temperature regime within the column while it is refluxing. Use a 1 3/8" I.D. x ½" wall closed-cell foam insulating sleeve, such as
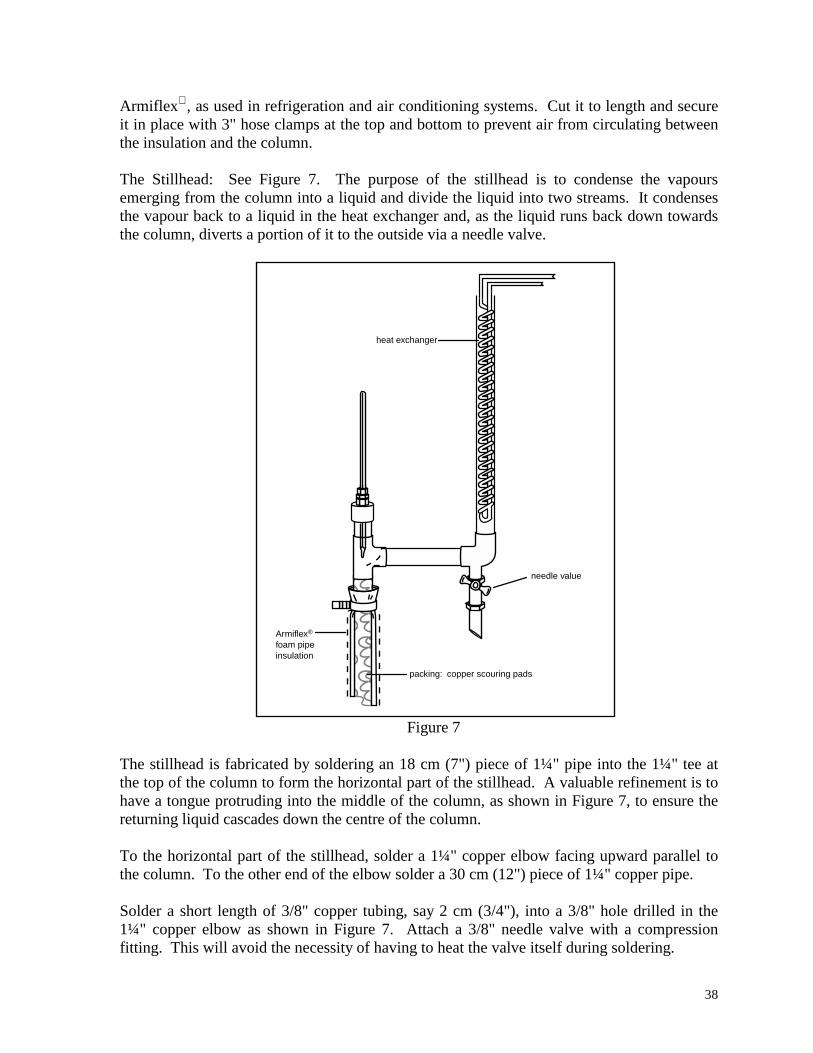
38
Armiflex , as used in refrigeration and air conditioning systems. Cut it to length and secure it in place with 3" hose clamps at the top and bottom to prevent air from circulating between the insulation and the column. The Stillhead: See Figure 7. The purpose of the stillhead is to condense the vapours emerging from the column into a liquid and divide the liquid into two streams. It condenses the vapour back to a liquid in the heat exchanger and, as the liquid runs back down towards the column, diverts a portion of it to the outside via a needle valve.
heat exchanger
needle value
packing: copper scouring pads
Armiflex®
foam pipeinsulation
Figure 7 The stillhead is fabricated by soldering an 18 cm (7") piece of 1¼" pipe into the 1¼" tee at the top of the column to form the horizontal part of the stillhead. A valuable refinement is to have a tongue protruding into the middle of the column, as shown in Figure 7, to ensure the returning liquid cascades down the centre of the column. To the horizontal part of the stillhead, solder a 1¼" copper elbow facing upward parallel to the column. To the other end of the elbow solder a 30 cm (12") piece of 1¼" copper pipe. Solder a short length of 3/8" copper tubing, say 2 cm (3/4"), into a 3/8" hole drilled in the 1¼" copper elbow as shown in Figure 7. Attach a 3/8" needle valve with a compression fitting. This will avoid the necessity of having to heat the valve itself during soldering.
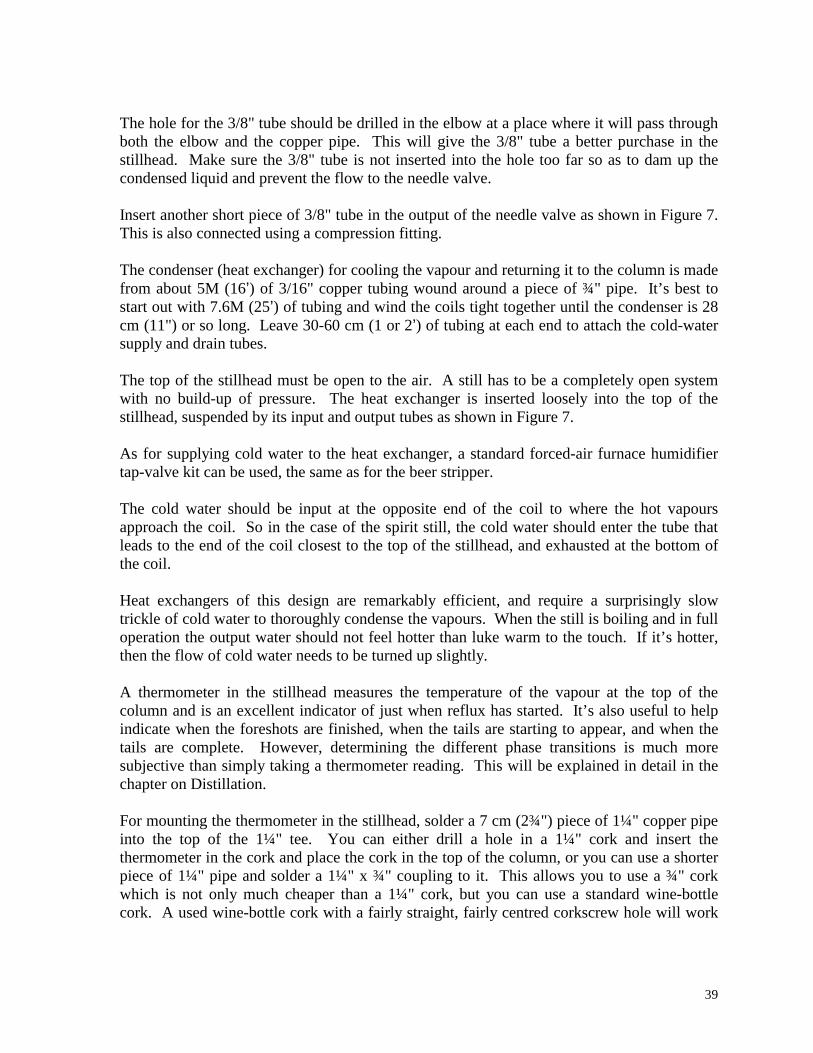
39
The hole for the 3/8" tube should be drilled in the elbow at a place where it will pass through both the elbow and the copper pipe. This will give the 3/8" tube a better purchase in the stillhead. Make sure the 3/8" tube is not inserted into the hole too far so as to dam up the condensed liquid and prevent the flow to the needle valve. Insert another short piece of 3/8" tube in the output of the needle valve as shown in Figure 7. This is also connected using a compression fitting. The condenser (heat exchanger) for cooling the vapour and returning it to the column is made from about 5M (16’) of 3/16" copper tubing wound around a piece of ¾" pipe. It’s best to start out with 7.6M (25’) of tubing and wind the coils tight together until the condenser is 28 cm (11") or so long. Leave 30-60 cm (1 or 2’) of tubing at each end to attach the cold-water supply and drain tubes. The top of the stillhead must be open to the air. A still has to be a completely open system with no build-up of pressure. The heat exchanger is inserted loosely into the top of the stillhead, suspended by its input and output tubes as shown in Figure 7. As for supplying cold water to the heat exchanger, a standard forced-air furnace humidifier tap-valve kit can be used, the same as for the beer stripper. The cold water should be input at the opposite end of the coil to where the hot vapours approach the coil. So in the case of the spirit still, the cold water should enter the tube that leads to the end of the coil closest to the top of the stillhead, and exhausted at the bottom of the coil. Heat exchangers of this design are remarkably efficient, and require a surprisingly slow trickle of cold water to thoroughly condense the vapours. When the still is boiling and in full operation the output water should not feel hotter than luke warm to the touch. If it’s hotter, then the flow of cold water needs to be turned up slightly. A thermometer in the stillhead measures the temperature of the vapour at the top of the column and is an excellent indicator of just when reflux has started. It’s also useful to help indicate when the foreshots are finished, when the tails are starting to appear, and when the tails are complete. However, determining the different phase transitions is much more subjective than simply taking a thermometer reading. This will be explained in detail in the chapter on Distillation. For mounting the thermometer in the stillhead, solder a 7 cm (2¾") piece of 1¼" copper pipe into the top of the 1¼" tee. You can either drill a hole in a 1¼" cork and insert the thermometer in the cork and place the cork in the top of the column, or you can use a shorter piece of 1¼" pipe and solder a 1¼" x ¾" coupling to it. This allows you to use a ¾" cork which is not only much cheaper than a 1¼" cork, but you can use a standard wine-bottle cork. A used wine-bottle cork with a fairly straight, fairly centred corkscrew hole will work
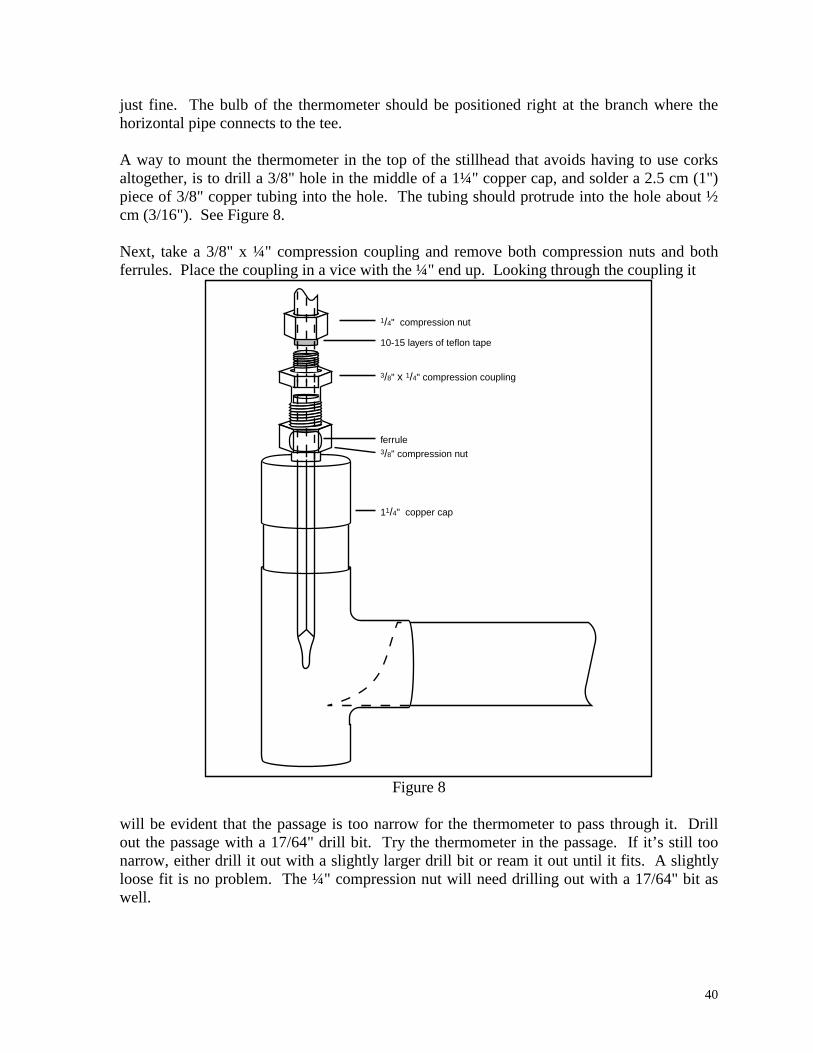
40
just fine. The bulb of the thermometer should be positioned right at the branch where the horizontal pipe connects to the tee. A way to mount the thermometer in the top of the stillhead that avoids having to use corks altogether, is to drill a 3/8" hole in the middle of a 1¼" copper cap, and solder a 2.5 cm (1") piece of 3/8" copper tubing into the hole. The tubing should protrude into the hole about ½ cm (3/16"). See Figure 8. Next, take a 3/8" x ¼" compression coupling and remove both compression nuts and both ferrules. Place the coupling in a vice with the ¼" end up. Looking through the coupling it
1/4" compression nut
11/4" copper cap
3/8" x 1/4" compression coupling
3/8" compression nut
10-15 layers of teflon tape
ferrule
Figure 8
will be evident that the passage is too narrow for the thermometer to pass through it. Drill out the passage with a 17/64" drill bit. Try the thermometer in the passage. If it’s still too narrow, either drill it out with a slightly larger drill bit or ream it out until it fits. A slightly loose fit is no problem. The ¼" compression nut will need drilling out with a 17/64" bit as well.

41
Place the 3/8" compression nut and ferrule around the piece of 3/8" tubing that’s soldered into the 1¼" cap and tighten the compression coupling into place. Next, solder the 1¼" cap onto the piece of 1¼" pipe on top of the tee. Gauge the position of the thermometer bulb so it extends to the branch of the tee, but stays well above the tongue. It’s important that the thermometer does not come into contact with the condensed liquid or the temperature reading will be incorrect. To install the thermometer in the ¼" end of the compression coupling, discard the ¼" ferrule and wrap 10-15 layers of Teflon tape around the shaft of the thermometer where it meets the compression coupling. Use enough Teflon tape so that the thermometer fits snuggly into the ¼" compression nut. And finally, tighten the ¼" compression nut to secure the thermometer in place. The overall height of the spirit still will be about 2.16M (7’1"-7’2") given that the 45L (12 US gallon) hot water heater is 56 cm (22") high. If height is at a premium, it helps to minimize the length of the copper tubes used as connectors for the plumbing adapters (see Figure 6) from the boiler to the column. Also, the 114-cm (45") column could be made a few centimeters shorter if required. Packing: The packing inside a fractionating column is very important, and many articles in the scientific literature have been devoted to the subject. What is needed are pieces of glass, ceramic, or metal which are inert to the liquid being refluxed and which have the following characteristics: they should not pack tightly, but should be of such a shape that they leave plenty of free space for vapour to rise up against a descending flow of liquid; and they should have a large surface area and crevices where liquid can be trapped. An excellent and cheap packing is copper or stainless steel scouring pads as used in the kitchen for cleaning pots and pans. Copper ones are by far more common and typically come in packages of two. Generally, you will need about 16 of the size sold in most supermarkets (i.e. 8 packages of 2). To install them in the reflux column, remove the rubber band that holds them together and gently push them up the column from the bottom. Pack them firmly but avoid causing tight compaction. The packing should go up the column as far as where the tongue from the horizontal section of the stillhead enters the column at the tee. The tongue also serves as a convenient stop for the scouring pads as they are being packed in the column. Once the spirit still is set up and ready to operate, you will need a way to mount a receiver under the output of the needle valve. One very good way to do this is to stand the still up against a wall (typically in the basement) with the horizontal section of the stillhead parallel to the wall. Mount an adjustable shelf on the wall behind the still, and adjust the shelf so as to place a receiver about 3 or 4 cm (1½-2") below the output from the needle valve. Filling and Draining the Spirit Still: The upper and lower ball valves on the boiler are used in conjunction with the transfer hoses described above. Typically, the upper ball valve is
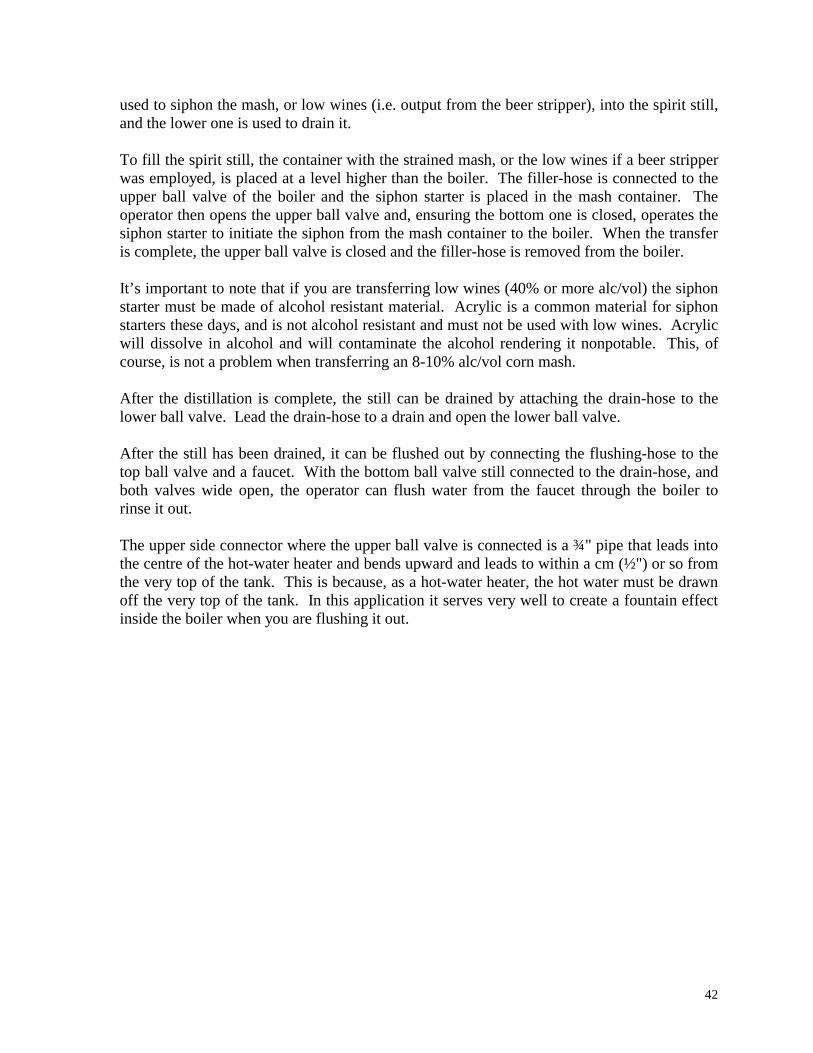
42
used to siphon the mash, or low wines (i.e. output from the beer stripper), into the spirit still, and the lower one is used to drain it. To fill the spirit still, the container with the strained mash, or the low wines if a beer stripper was employed, is placed at a level higher than the boiler. The filler-hose is connected to the upper ball valve of the boiler and the siphon starter is placed in the mash container. The operator then opens the upper ball valve and, ensuring the bottom one is closed, operates the siphon starter to initiate the siphon from the mash container to the boiler. When the transfer is complete, the upper ball valve is closed and the filler-hose is removed from the boiler. It’s important to note that if you are transferring low wines (40% or more alc/vol) the siphon starter must be made of alcohol resistant material. Acrylic is a common material for siphon starters these days, and is not alcohol resistant and must not be used with low wines. Acrylic will dissolve in alcohol and will contaminate the alcohol rendering it nonpotable. This, of course, is not a problem when transferring an 8-10% alc/vol corn mash. After the distillation is complete, the still can be drained by attaching the drain-hose to the lower ball valve. Lead the drain-hose to a drain and open the lower ball valve. After the still has been drained, it can be flushed out by connecting the flushing-hose to the top ball valve and a faucet. With the bottom ball valve still connected to the drain-hose, and both valves wide open, the operator can flush water from the faucet through the boiler to rinse it out. The upper side connector where the upper ball valve is connected is a ¾" pipe that leads into the centre of the hot-water heater and bends upward and leads to within a cm (½") or so from the very top of the tank. This is because, as a hot-water heater, the hot water must be drawn off the very top of the tank. In this application it serves very well to create a fountain effect inside the boiler when you are flushing it out.

43
Photo by Lance Larson Complete Spirit Still
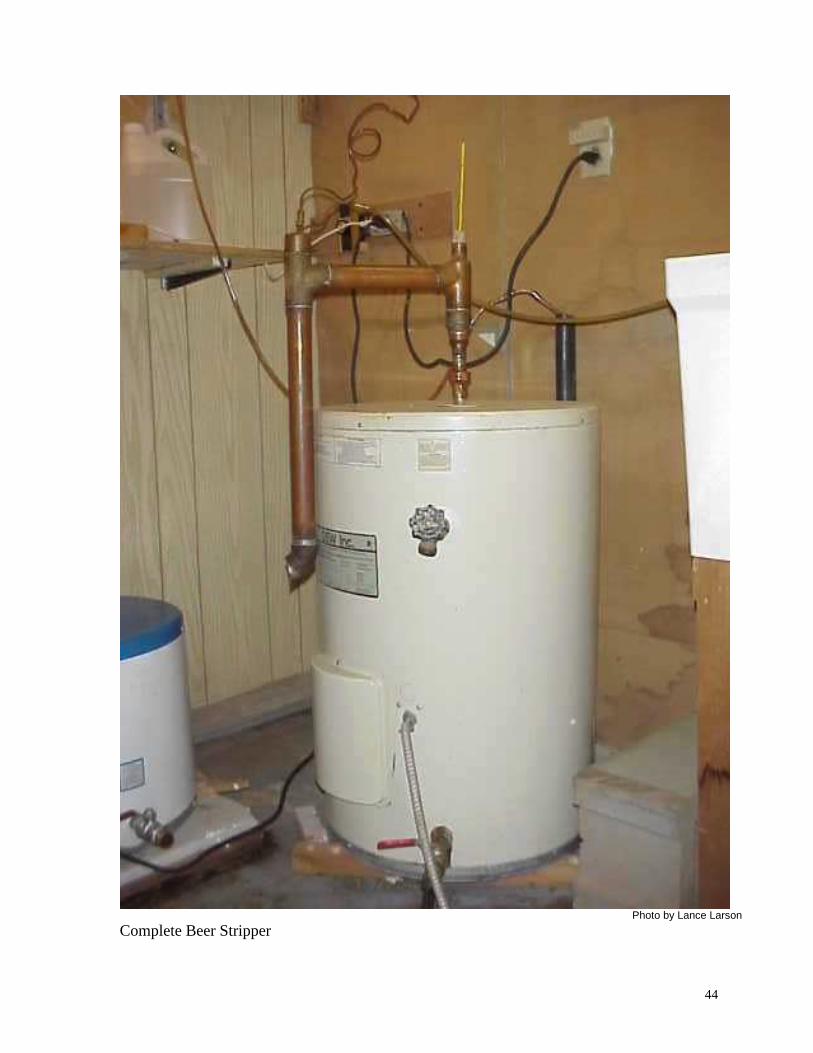
44
Photo by Lance Larson Complete Beer Stripper
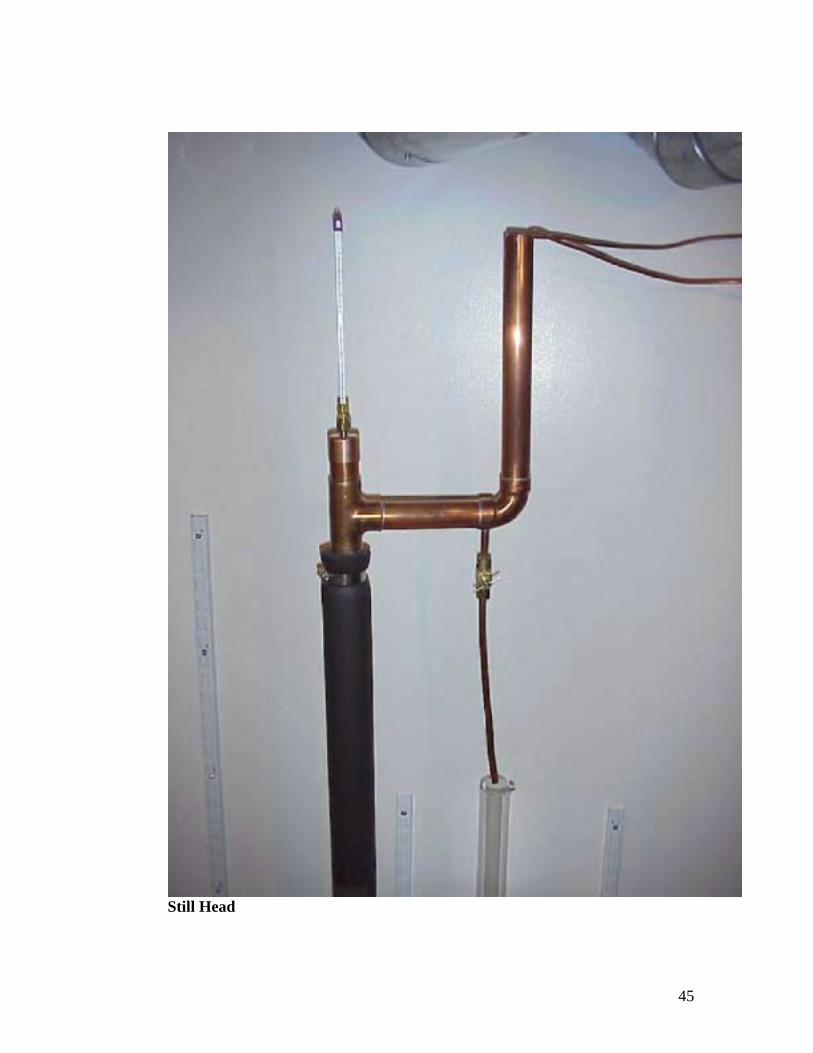
45
Still Head
45
Still Head with Heat Exchanger Revealed
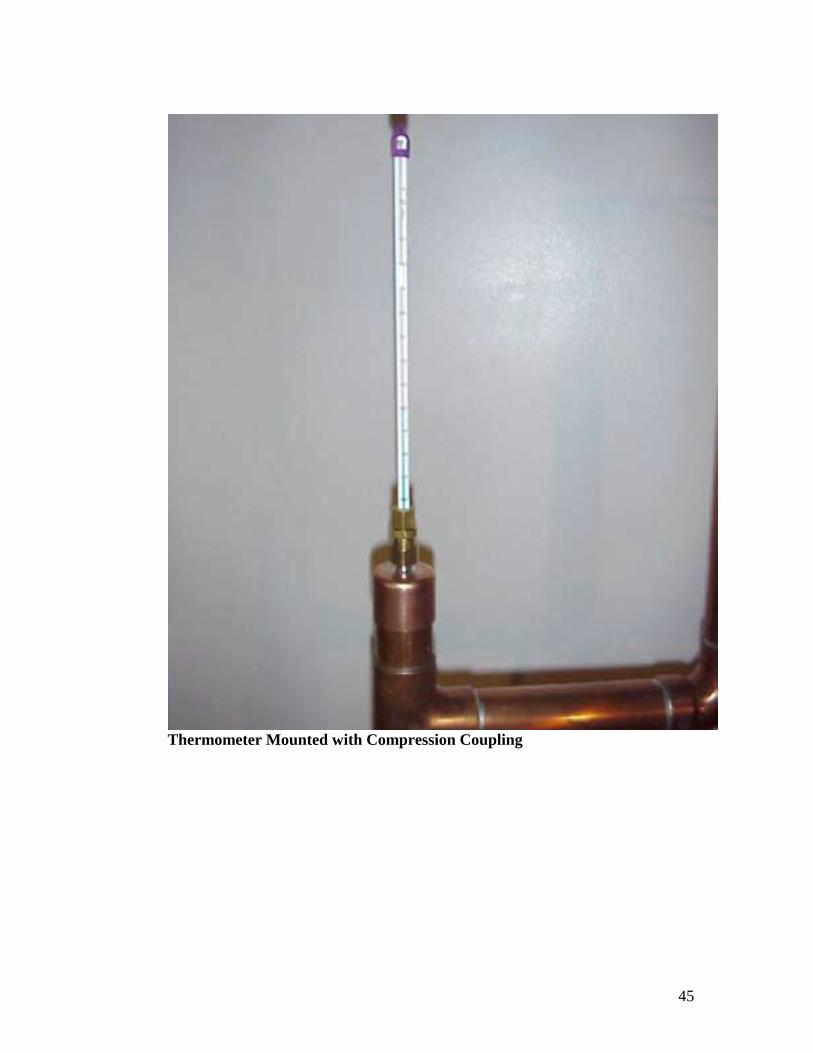
45
Thermometer Mounted with Compression Coupling
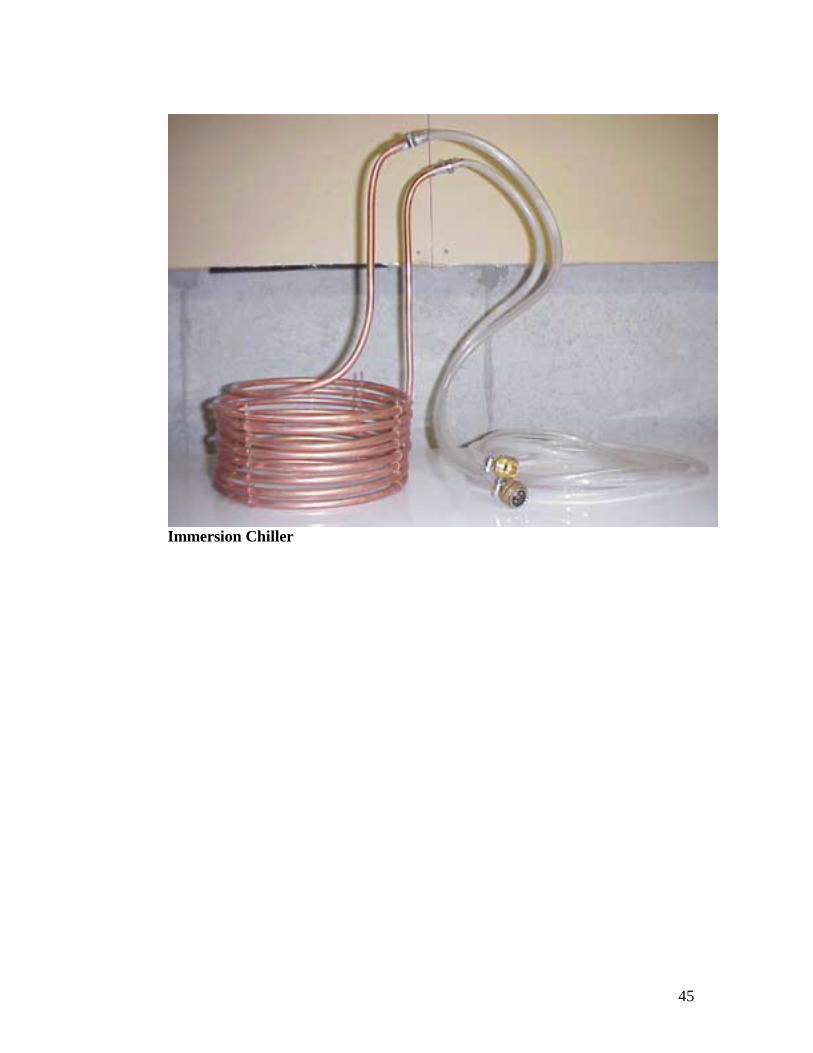
45
Immersion Chiller
47
INGREDIENTS Pure Corn whiskey is made from the simple and natural ingredients: corn; malt; water; and yeast. The mash should be composed of 80 to 90% corn with a 10 to 20% adjunct of malt to supply enzymes. Malt enzymes will be explained below and in the chapter on Mashing. Corn Corn in most of its forms (e.g. cornmeal, corn flour, flaked maize) can be used to make whiskey. The corn must be top quality food-grade corn. Any attempts to use cow corn or chicken feed will only produce inferior results, possibly with noxious off-flavours due to additives that may be present in the feed. The starches in hard grains such as cornmeal or corn flour require dispersing in the mash water by performing a full boil for about 20 or 30 minutes. This is described in Appendix A – Other Mashing Methods. However, with flaked maize, which is already-dispersed corn that has been hot-rolled the way rolled oats are made, the grain starches readily disperse into the 65.5oC (150oF) mash water without the need of boiling. Not having to boil the grain makes for a considerably more convenient mashing process, and for that reason flaked maize has been chosen as the primary form of corn in this text. How to mash other forms of corn as well as other types of grain is described in Appendix A. Flaked maize can be purchased at most health food or bulk food stores. Some such stores don’t stock it because the demand for it for home use is fairly low, but most will gladly order it for you since it comes from the same distributors that supply all their other grain products. You may have to ask them to order it anyway even if they do carry it since you will generally want a 22.7K (50 lb) bag of it, which is often more than they will have on hand. Ordering it typically takes about a week. It can also be purchased at home brewers’ supply shops. At full retail price, flaked maize usually costs a little more than cornmeal, but if you buy a 22.7K (50 lb) bag it will be cheaper than the retail price of cornmeal. Malt The word “malt” describes a process, as much as it is the name of certain grain products. Any type of grain can be malted. That is, sprouted then kiln dried to kill the sprouts. When grain is just beginning to sprout it produces many different enzymes to break down the endosperm (i.e. the large starchy mass in each kernel of grain) to provide food to nourish the rapidly growing grain plant. The sprouts are heated in a kiln at this early stage to kill them and preserve both the enzymes and the endosperm before the young plants consume them. The malt can then be used as a source of enzymes to convert grain starches, including its own, to fermentable sugars in a beer or whiskey mash.
48
Of the many different enzymes produced during malting, the diastatic enzymes (i.e. enzymes that convert starch to sugar) are the most important to mashing. Also of importance to mashing are the protein degrading enzymes. These produce nutrients that improve yeast performance in the subsequent fermentation step. Most of the common grains (e.g. corn, rye, barley, wheat) are available in malted form, but barley malt is by far the most widely used for making whiskey, and is therefore the choice in this text. The best place to buy barley malt is from home brewers’ supply shops. These shops sell many varieties of barley malt, but only certain ones are suitable for making whiskey. First of all, malt extract (available as syrup or powder) has no diastatic enzymes and cannot be used for mashing. Only certain varieties of all-grain barley malts have the diastatic enzymes needed to convert the comparatively large quantities of starches in a whiskey mash to sugar. All-grain barley malts come in different varieties from pale malts to caramelized malts to a full spectrum of roasted malts. Only the pale ale or light lager malts stated to be of high diastatic power are suited to making whiskey. The caramelized and roasted malts have, for all practical purposes, no diastatic power. Fortunately, the above-mentioned pale ale and light lager malts are the main staples of all-grain brewing and are the most abundant varieties stocked by the home brewers’ shops. They are usually the least expensive varieties as well. There are two types of high diastatic pale malts, two-row and six-row, and most home brewers’ shops carry both. Six-row barley malt is well known to have the highest diastatic power. Six-row barley kernels are smaller than two-row because their endosperms are smaller. Even though the kernels are smaller, each kernel produces the same amount of enzymes as larger kernels. With smaller kernels there are more kernels per kilogram of malt, and therefore more enzymes per kilogram. However, this is no longer of concern. The well-modified high diastatic two-row pale malts made nowadays have very nearly the same diastatic power as the six-row malts and work just as well for making whiskey. A lot of home brewers’ shops also carry wheat malt and rye malt among their malt selection. These malts tend to be of high diastatic power and are well suited to whiskey making. Their use will not be covered in this book, but they can be substituted unit for unit for barley malt in any of the procedures described in the following chapters. After you are comfortable with the processes of whiskey making, it is worthwhile experimenting with different grain malts. One last word about malt is the crush. In order to mash with malted grains they have to be crushed with a grain grinder. Nearly all home brewers’ shops will crush the grain for you, or avail you of an on-premise grinder you can use to crush the malt you are buying. Beer mash requires sparging (i.e. a process of rinsing the sweet liquid from the spent grains after the starch conversion is complete). In order to sparge, the grain must form a filter bed that is loose enough to allow the liquid to pass through it. This requires a fairly coarse crush.
49
Whiskey mash doesn’t require sparging so the crush can be much finer. A finer crush exposes slightly more of the enzymes and starch to the mash and is therefore beneficial. If the grain grinder is adjustable, adjust it for a fairly fine crush. If it’s not adjustable, as a lot of roller mills aren’t, the regular brewers’ grind will work just fine. Water The Scots and the Irish have maintained for centuries that the secret to making good whiskey lies in the mash water used. Modern science has revealed that the characteristics of the mash water are not only important to the quality of the whiskey, but some (e.g. iron content, and pH) are pivotal to the function of the malt enzymes. The water used must be very nearly devoid of iron. A high iron content will denature (i.e. destroy) the enzymes. On the other hand, a fairly high calcium content (50-250 Parts Per Million (ppm)) is beneficial to the subsequent fermentation and the resulting flavour of the finished whiskey. Sulphates are preferable to carbonates or bicarbonates, but all are acceptable in the process. If you are adding calcium (explained in the chapter on Mashing) choose calcium sulphate (gypsum) over calcium carbonate (precipitated chalk) pH: pH is a measure of the acidity or alkalinity of an aqueous solution (i.e. a solution in water). A pH of 7 is exactly neutral, neither acid nor alkaline (e.g. pure water). A pH below 7 is acidic, the lower the pH the stronger the acidity. A pH above 7 is alkaline, the higher the pH the stronger the alkalinity. The full range of the pH scale is from 1 through 14. Malt enzymes will function in a pH from as low as 4.6 to as high as 8.0. However, at the extremes the starch conversion will be very slow and incomplete. The optimum range is from 5.2 to 5.5, but conversion does work very well at 6.0 and even as high as 7.0. Most source waters, even some of the best, will require some pH adjustment. This will be discussed in detail in the chapter on Mashing. Very few source waters are too acidic for mashing. Almost all are either close to neutral or are alkaline. Virtually all municipal tap waters are alkaline. Most have a pH between 8 and 9, but some are carefully adjusted to around pH 7.4. If a municipal tap water were even slightly acidic (e.g. pH 6.9), over a period of years the water would corrode the metallic parts in the water distribution system. Because of this, municipal water treatment plants ensure the water is not acidic by passing the water over crushed limestone, which is a crude unrefined form of calcium oxide (CaO). CaO turns to calcium hydroxide (Ca(OH)2) when mixed with water. This process is very cursory and does not offer very precise control over the resulting pH, so the resulting pH typically varies between 8 and 9. Some municipal water treatment plants use purified calcium hydroxide (Ca(OH)2) instead of crushed limestone and adjust the pH to an exact value such as 7.4. Either way, the pH needs adjustment downward for mashing.

50
Most municipal water treatment plants will happily send you a copy of their current water analysis. All you really need to look at is: the overall hardness level; iron content; calcium content; and pH. Although hardness, in of itself, is not bad for mashing, it’s generally preferable to have fairly soft water (i.e. overall hardness level of 8 or less). Iron content should be very low, if not zero (i.e. less than 25 ppm). A preferred calcium content is between 50 and 250 ppm, but if it’s higher this is not a significant concern, and if it’s lower gypsum can be added. The pH will invariably be too high, but this can be adjusted as discussed in the chapter on Mashing. If suitable source water is not available, you can use deionized or distilled water as sold in pharmacies and supermarkets. It’s advisable to add 10 ml (2 tsp) of gypsum (calcium sulphate, CaSO4) per 20L of pure water. This will establish a calcium content of about 150 ppm. In the end, what we are doing here is emulating some variation of the mountain spring waters used to make the world’s finest whiskies. Some of the more well-known regions are: the Scottish Highlands; Ireland; Kentucky; Tennessee; and many other areas in the Appalachian Mountains. Yeast Yeast is a living organism and is in the mould family of plant cells. The yeast used for fermenting grain mash can be any brewers’ yeast. Bakers’ yeast is simply a form of brewers’ yeast, and works just as well. However, commercial whiskey distilleries use specific strains of brewers’ yeast, and these strains are closely guarded proprietary secrets. And, each whiskey distillery seems to have its own strain. A home brewer can go to a commercial brewery and most breweries will gladly give them a sample of their particular strain of brewers’ yeast. But, a home distiller cannot seem to get a commercial whiskey distillery to share their proprietary yeast strain. Anyway, baker’s yeast works excellently, and each different strain of pure brewers’ yeast (e.g. as produced by Wyeast , Brewers’ Choice , or YeastLabs ) (available at home brewers’ supply shops) gives a slightly different nuance or character to the finished whiskey. With one strain of pure yeast the whiskey will have a distinct nutty character, with another the whiskey will have a creamy flavour, and so on. It’s certainly worthwhile experimenting with different strains of brewers’ yeast, but until you are thoroughly comfortable with the process, it’s highly recommended that you stay with bakers’ yeast. Turbo Yeasts: Over the past ten years, a series of yeast preparations for home distillers has been introduced called Turbo Yeasts. Most of these Turbo Yeasts are produced in Sweden, and they are absolutely excellent for producing pure alcohol for vodka, gin, and essence-based spirits. Turbo Yeasts come in packages of 90 to 200g and are typically formulated to ferment a 25L batch of straight sugar and water. They usually ferment 5 to 8K of sugar per batch and they produce from 13 to 20% alcohol depending on how much sugar they are
51
designed to ferment. For the 13 to 14% formulations, they ferment in two to four days. For the higher alcohol contents like 17, 18, and 20%, they take up to two weeks. Turbo Yeasts are comprised of a high-alcohol-tolerant yeast strain mixed with yeast nutrients to supplement the nutrient-lacking sugar-and-water substrate they are designed to ferment. These Turbo Yeasts have improved significantly every year since they were introduced about ten years ago, and it is anticipated that the advancements in genetically engineered yeast strains will open the door to other dimensions of improvements. However, grain-mash fermentation has little to gain from Turbo Yeasts. As mentioned above, Turbo Yeasts are formulated to ferment very high percentages of alcohol in very nutrient-deficient substrates. Grain mash fermentations are neither high-alcohol nor nutrient deficient, and therefore do not need a Turbo Yeast. It’s much like adding chemical fertilizer to watermelons growing in a manure heap. It’s great stuff, but they just don’t need it. Where to buy yeast: Most people are familiar with buying bakers’ yeast in supermarkets in small envelopes or jars intended for home baking. But, for the quantities required for making whiskey this would be a prohibitively expensive way to buy bakers’ yeast. Bakers’ yeast can be purchased very cheaply in bulk from: a supermarket baking section; delicatessen; health-food store; or bulk-food store. Most bakers’ yeast nowadays comes in dried granules called “active dried yeast”, however, some bakeries still sell it in “yeast cakes” which is a wet creamy form that resembles a pound of butter in its packaging. This form doesn’t keep nearly as long as active dried yeast, and you have to use 2½ times as much to get the same number of yeast cells. For example, if a recipe called for 60g of active dried bakers’ yeast, you would have to use 150g of bakers’ yeast cake. For pure brewers’ yeasts, you can buy them at home brewers’ supply shops. These yeasts usually come in liquid form in vials or foil envelopes. They are quite expensive and the quantity is usually quite low. In order to use these yeasts you will have to make a yeast starter to build up the yeast population as is done for home brewing. This is usually explained on the yeast packaging. For any yeast you are buying you should always check the “use by” date. Expired yeast will not work for fermentation. Calcium Sulphate (CaSO4) Calcium sulphate, aka gypsum, is used to increase the calcium content of the mash water. This helps to prepare a mash water that emulates the properties of the mountain spring waters used to make the finest whiskies in the world. Calcium sulphate can be purchased at home winemaking and brewers’ supply shops or at chemical suppliers.
52
Gluco-amylase Gluco-amylase is a laboratory-prepared enzyme that is used in mashing to reduce, if not eliminate, the proportion of unfermentable sugars in the mash. Mashing using malt enzymes produces a small proportion of unfermentable sugars (dextrins, and polysaccharides). In brewing, these unfermentable sugars are essential to the body and malt character of the beer, but in distilling they only represent lost alcohol yield. By employing gluco-amylase, these unfermentable sugars are converted to fermentable sugars and thereby increase the overall yield. Gluco-amylase as used in the distilling industry is produced by pharmaceutical companies and is not easily accessible in small quantities by the home distiller. Another form of it is packaged for homebrewers to be used in making dry beer, and can be purchased at home brewers’ supply shops. It’s often just called “amylase” in these shops. Some home distillers have observed that the use of homebrewers gluco-amylase has very little affect on the reduction of unfermentable sugars, and have decided to stop using it altogether. It’s suggested that you prepare a batch or two without using gluco-amylase and compare the Terminating Gravity (TG), explained in the Chapter on Fermentation, to the TG of batches prepared with gluco-amylase. If the gluco-amylase is working well you will observe a noticeably lower TG when it is used. 95% Sulphuric Acid (H2SO4) 95% sulphuric acid is used to adjust the pH of the mash water downward. This is covered in the chapter on Mashing. Very small amounts, in the order of 10 to 15 drops per 20L, are ever used. Sulphuric acid is an extremely dangerous and corrosive strong acid and should not, under any circumstances, come into contact with any part of the body or clothing. It should always be stored in a tightly closed container, out of the reach of children. Furthermore, it should only be handled by persons suitably schooled in laboratory procedures for handling strong acids. If you are not comfortable with the idea of handling strong acids; citric or tartaric acid (available at home winemaking supply shops) is perfectly harmless and not poisonous, and can be used with acceptable results. However, since they are weak acids, more will be required to achieve the same pH-lowering results. If using sulphuric acid, it should be the common commercial grade available from chemical suppliers as 95% H2SO4, NOT battery acid used in the automotive industry. Automotive battery acid contains depolarizing agents and other toxic compounds. Also, it’s typically only about 5% H2SO4.
53
Calcium Carbonate (CaCO3) Calcium carbonate, aka precipitated chalk, is used to adjust the pH of the mash water upward. This is covered in the chapter on Mashing. Calcium carbonate can be purchased at home brewers’ supply shops or at chemical suppliers.

55
MASHING PRINCIPLES Mashing is the biochemical process where starches are converted to sugars. Starches are long chains of sugar (glucose) molecules connected by ether linkages. An ether linkage is where two sugar molecules join together and one water molecule is removed. In mashing, enzymes cause water molecules to be reintroduced to the ether linkages, thereby breaking them and freeing the individual sugars from the chains. This process of breaking the ether linkages is called hydrolysis. The term “starch” refers to a family of molecules, all of which are chains of sugars. Some starches are chains of as many as 400 sugar molecules, and others are chains of as few as four sugar molecules. Shorter-chain starches are soluble in water. Longer-chain starches are insoluble in water. The mashing process is comprised of two phases: liquefaction; and, saccharification. The liquefaction phase involves the action of alpha-amylase enzymes reducing the longer-chain insoluble starches to shorter-chain soluble starches. Hence, “liquifying”. The second phase, saccharification, involves the action of beta-amylase enzymes reducing the shorter-chain soluble starches to sugar molecules. In the production of grain liquors, the starches are supplied by the grains being mashed (e.g. corn, rye, millet, wheat, etc.). Grains are, for the most part, made up of starch, protein, and fiber. Although, different grains are comprised of slightly different proportions of starch, protein, and fiber, they are all roughly 50% starch. And, mashing acts on that 50% starch. Malted grains (e.g. corn malt, rye malt, barley malt) supply the enzymes used for the production of grain liquors. Barley malt is by far the most widely used, and is the choice in this text. There are laboratory enzyme preparations available for mashing, but they are most commonly used in very large-scale alcohol production. These laboratory enzymes will not be discussed here, with the exception of gluco-amylase, discussed in the chapter on Ingredients. For malt enzymes to work properly, there are certain optimum conditions that are important to observe. These conditions are as follows. Mash Water: The water used must be very nearly devoid of iron. A high iron content will denature (i.e. destroy) the enzymes. However, a fairly high calcium content (50-250 ppm) is beneficial to the subsequent fermentation and the resulting flavour of the finished whiskey. Sulphates are preferable to carbonates and bicarbonates, but all are acceptable in the process.
56
If suitable source water is not available, you can use deionized or distilled water. The addition of 10-ml (2-tsp) of gypsum (calcium sulphate, CaSO4) per 20L is beneficial if using pure water.
pH: Unless you have an accurate pH meter, it’s very difficult to measure the pH of the mash after the grain has been added. Most people use pH papers and, for all practical purposes, pH papers can only be used to measure the pH of the mash water before the grain is added. Because the addition of the grain to the mash water will cause the pH of the mash water to go down slightly, combined with the fact that the conversion process itself results in a slight lowering of pH, it is best to establish a mash-water pH on the high side of optimum, say 5.8 or 6.0. Measuring pH: To measure the pH of the mash water, thoroughly rinse a clean shot glass in the water to be measured. Draw off a small sample of the water in the shot glass, say 2-ml. Cut a 1½ cm (3/4”) strip of pH paper (of whichever range is required), and place it in the 2 ml sample. Allow the pH paper to steep in the water sample for a few minutes to enable the indicator to mix with the water and change colour. Hold the shot glass up to the light and compare the colour with the colour table on the pH-paper packaging and determine the pH of the water. Adjusting pH: A pH of 5.8 to 6.0 should be established for the mash water. It is very rare that the pH of the source water is too low and requires adjusting upward. However, if this is necessary, calcium carbonate (CaCO3), aka precipitated chalk, should be used to raise the pH. CaCO3 should be used in comparatively small additions since a relatively small amount will raise the pH a surprisingly large amount. As is the condition with most source waters, the pH will likely need to be reduced. Since sulphates are notionally more beneficial to mashing than other radicals, 95% sulphuric acid (H2SO4) should be used one drop at a time to lower the pH. As a general guideline, 20L of source water at pH 8.5 would take about 11 drops of 95% H2SO4 to reduce the pH to 5.8. Warning: See 95% sulphuric acid in the chapter on Ingredients for important information about safety and alternatives for sulphuric acid. In order to avoid overshooting the target pH, it’s useful to add the CaCO3 or H2SO4 in small incremental additions, taking measurements after each addition until the target pH is achieved. Temperature: The optimum temperature range for alpha-amylase enzymes (liquefying enzymes) is from 67oC to 71oC (152oF to 160oF). The optimum temperature range for beta-amylase enzymes (saccharifying enzymes) is from 60oC to 66oC (140oF to 151oF).
57
Since a temperature that favours alpha-amylase activity, 67-71oC (152-160oF), tends to produce a mash with a high proportion of unfermentable sugars (i.e. dextrins and polysaccharides), and tends to denature beta-amylase enzymes; it is best to hold to temperatures in the range that favours beta-amylase activity, 60oC–66oC (140-151oF). The alpha-amylase will work at the lower temperatures, just not as fast as it would in its optimum range. If the mashing apparatus, or the mashing quantity, is capable of holding a single temperature constantly for 60 to 90 minutes then 63oC (145oF) is the optimum conversion temperature. In fact, many commercial whiskey distilleries use 63oC (145oF) as their conversion temperature. On the other hand, if one is using a more rudimentary mashing apparatus, such as a large pot on a kitchen stove, then it is better to establish a conversion temperature of 65.5oC (150oF). During the 60 to 90 minute conversion rest, the temperature will slowly cool to about 60oC (140oF), thereby keeping the temperature within the optimum range throughout the conversion cycle. It’s important to note, that a mash at 71oC (160oF) or higher will rapidly denature the enzymes and may result in an incomplete conversion. Also, a large proportion of the resulting sugars would be unfermentable. And as a final note, a mash temperature of 75.5oC (168oF) or higher will instantly denature the enzymes. In fact, heating a mash to 75.5oC (168oF) after conversion is complete, is regularly done in the commercial brewing industry to “mash out” or halt all enzyme activity. Iodine Starch Test: After the 90-minute (or longer) conversion rest, the starches will be completely converted to sugars. This can be tested for by means of an iodine starch test. After the conversion rest, there will be a clear light yellow liquid about 7 or 8 cm (3”) deep on top of the mash. Using the floating thermometer, carefully dab a few drops of this clear yellow liquid on a white porcelain saucer or plate, taking care to avoid getting any of the mash solids suspended below the clear liquid in the sample. Dab a drop or two of tincture of iodine into the sample on the porcelain saucer or plate. If there is any starch at all in the sample, the sample will turn an inky blue as soon as the iodine contacts it. If there is no starch, the sample will stay more or less the colour of the iodine. You may observe tiny granular dots of blue in the sample when the iodine is added. This is not an indication of starch, but a result of cellulose from tiny particles of mash solids suspended in the sample. Iodine turns a dark blue, almost black, in the presence of cellulose in water. This is why you should take care to avoid getting the mash solids in the sample. Anyway, this cellulose indication can be ignored, and you can conclude there are no residual starches in the mash. When the iodine starch test is complete discard the sample. Do not attempt to return it to the mash.
58
PROCEDURE This section describes how to make 30L of corn mash (approximately 20L to be distilled after straining) in a large pot on a kitchen stove. This will yield approximately 2L of 45% alc/vol corn whiskey plus about a litre of feints. It is highly recommended that you not attempt to scale this procedure up to a larger quantity until you have familiarized yourself with the process by mashing this smaller quantity two or three times. Equipment • 34-40L pot with lid
• a large plastic or wooden stirring spoon • a floating dairy thermometer, graduated from 0oC to 110oC (32oF to 230oF) • pH papers, range 5.0-6.5
• pH papers, range 2-12 • tincture of iodine • measuring spoons • eye dropper
Ingredients
• 23L of fairly soft municipal tap water. E.g. hardness level of 4; almost no iron; 100 ppm calcium; pH 8.5.
• 10-ml (2-tsp) Gypsum (CaSO4) • 95% sulphuric acid (H2SO4); or, citric or tartaric acid • 7L flaked maize • 1½ L crushed 2-row or 6-row pale barley malt • 5-ml (1-tsp) Gluco-amylase
Method This method is one of the simplest and least time consuming methods of mashing. Also, it scales up to large mashing quantities very well. The principle behind this method, which is a single infusion-mash method, is to use flaked maize rather than undispersed hard grain such as corn meal. This eliminates the need to perform a full boil to disperse the grain starches. With flaked maize, which is already-dispersed corn that is hot-rolled the way rolled oats are made, the grain starches easily disperse into the 65.5oC (150oF) mash water without the need of boiling. See “Appendix A – Other Mashing Methods” for procedures on how to mash other types of grain and hard cereal grains (i.e. non-flaked grains). Prepare the mash water by placing 23L of tap water in the large pot on the stove. Thoroughly mix the 10-ml (2-tsp) of gypsum into the water, and measure the pH using the
59
range 2-12 pH papers. Use this pH measurement to determine what pH adjustment the water requires. Let’s assume the pH, as with most municipal tap waters, is approximately 8 or 9. Begin adding 95% H2SO4 one drop at a time, mixing thoroughly, and measuring the pH with the range 5.0-6.5 pH papers between each drop until the pH is 5.8. If citric or tartaric acid is used, which are both powders, the additions should be 1¼ ml (¼ tsp), and will take about 10 ml (2 tsp) or so in total to achieve pH 5.8 to 6.0 from a source water of pH 8.5. If you accidentally overshoot pH 5.8 with the acid, you can correct by simply making additions of 500 ml of source water (i.e. pH 8 or 9) and measuring the pH, until the target pH of 5.8 is achieved. Once this correction is complete, it will be necessary to remove a total equivalent volume of mash water as was added to do the correction and discard it, leaving 23L of mash water at pH 5.8. Of course, if the pH of the source water were below 5.8, the water would require treating with calcium carbonate (CaCO3) instead of H2SO4. Similarly, an accidental overshoot can be corrected the same way with additions of the source water. After the mash water is prepared, turn the stove on high, cover the pot, and let the water heat up to the conversion strike temperature, 74oC (165oF). You will have to periodically stir the water thoroughly and measure the temperature as the water heats up until the strike temperature is reached. When the water is at the strike temperature, turn off the heat, and stir in the 7L of flaked maize. The temperature should come to rest at about 68oC (155oF) or higher. Stir the mash for about five minutes while the starches disperse (i.e. gel into a thick porridge). It should take about 15 to 25 minutes for the temperature to cool to 66.5oC (152oF). The mash should be stirred every five minutes or so until it cools to that temperature. When the mash is at 66.5oC (152oF), stir in the 1½L of crushed barley malt and the 5-ml (1-tsp) of gluco-amylase. The mash temperature should rest at 65oC (149oF). Cover the mash pot and leave it for 90 minutes or longer for the starches to convert to sugars. It’s helpful to stir the mash every 15 minutes or so during the 90-minute conversion rest. The mash can even be left for eight or ten hours (e.g. overnight) to cool to fermentation temperature (i.e. under 38oC (100oF)). Or, an immersion chiller can be used to force cool the mash to fermentation temperature after the 90-minute conversion rest is complete. After the conversion rest, the starches should be completely converted to sugars. This can be tested for by the iodine starch test described above.

61
FERMENTATION PRINCIPLES Fermentation is the biochemical process where sugar (C6H12O6) is converted to alcohol (C2H5OH) and carbon dioxide (CO2). Yeast enzymes called zymase effect this process. Yeast is a living organism and is in the mould family of plant cells. Yeast has two primary modes of metabolism: aerobic; and, anaerobic. “Aerobic” means in the presence of oxygen, and “anaerobic” means in the absence of oxygen. In it’s aerobic state, yeast multiplies and increases its population within the fermentable substrate. In its anaerobic state, yeast stops multiplying and begins converting sugar to alcohol and carbon dioxide. This transition from aerobic to anaerobic metabolism is a very natural process in fermentation. Anyone who has made homemade wine or beer observes this every time they add the yeast starter. First, the wine or beer goes through an eight to 20-hour lag time, and then the fermentation appears to start. During the lag time the yeast is consuming the dissolved oxygen in the substrate and is multiplying very rapidly. This is the aerobic phase. When the dissolved oxygen is completely consumed the, now abundant, yeast population begins producing alcohol and carbon dioxide. This is the anaerobic phase. The carbon dioxide is observed as the profuse bubbling that is characteristic of fermentation. In order for yeast cells to be healthy and viable, the yeast needs certain nutrients, particularly, in the aerobic phase where cell multiplication is taking place. Among the many nutrients, nitrogen and amino acids are very important to yeast growth. Some fermentation methods, such as the fermentation of straight sugar and water, can avoid supplying nutrients by adding a very large charge of yeast. This avoids the need for an aerobic phase of cell multiplication because a sufficient population of yeast cells is present from the outset. However, the yeast has limits under these conditions. A straight sugar and water substrate with no yeast nutrients will rarely attain more than 8% alcohol before the yeast dies off. In the case of fermenting grain mash or crushed grapes, adding yeast nutrients is definitely not required. Grain mashes and grape juice are bristling with nutrients, and ferment very fast and completely. Grain Mash Fermentation Grain mash, fresh out of the mash pot has a copious supply of fermentable sugars and yeast nutrients, but has very little, if any, dissolved oxygen for the aerobic phase of fermentation. This is a result of the long rests at high temperatures. You’ll notice that boiled water tastes very different from water that hasn’t been boiled. This is because the boiling drives off the dissolved oxygen. On the small scale of 30L of corn mash, the mash can be thoroughly oxygenated by pouring it vigorously from one fermentation pail to another about four to six times. Also, vigorous stirring and rousing with a large spoon or paddle will work.
62
One fairly creative method of aeration is to use an aquarium pump to bubble air through an aeration stone immersed in the mash for about 30 minutes. This concept scales up very well to larger mashing operations. The idea being, to use larger pumps and aeration stones. Fermentation Times In the fermentation of wine and beer, the ferment undergoes primary and secondary fermentations. The primary fermentation is the vigorous fermentation that takes place over the first few days after the yeast is added. The secondary fermentation is the long slow fermentation that follows the primary fermentation. The primary fermentation only lasts a few days, but the secondary fermentation will slowly tick over for weeks, months in the case of wine fermentation. A mash intended for distillation only undergoes a primary fermentation. Grain mash fermentations are typically 72-80 hours long, and then they are distilled. In fact, a secondary fermentation would be very deleterious to the ester profile of the mash and would ruin the finished whiskey. During the primary fermentation the yeast is consuming readily available fermentable sugars. When the fermentable sugars have been exhausted, the yeast metabolism changes and begins breaking down unfermentable sugars and other organic compounds and consumes them. This involves the secretion of very different enzymes such as permease that enable the consumption of unfermentable sugars (dextrins and polysaccharides). This altered chemistry results in the formation of a family of esters, which have come to be called the “dreaded esters” by the author. The dreaded esters have very nearly the same boiling point as the alcohol/water azeotrope (i.e. 78.15oC (172.67oF)), and are almost impossible to separate out by distillation. Therefore, they pervade into the finished whiskey and ruin its flavour. The only use for whiskey laced with the dreaded esters, is to rectify it to 95% alcohol by redistillation in a high-separation still, and treat it with activated carbon to render pure alcohol to be used for making vodka, gin, or liqueurs. In order to be sure to avoid the dreaded esters, a mash fermentation should be distilled as soon as the vigorous primary fermentation slows down to a slow spurious bubbling, regardless of how complete the fermentation was, generally no more than 96 hours after adding the yeast. Specific Gravity (SG) SG is the measure of the density of a given liquid relative to water. The SG of pure water is, by definition, 1.000. If a liquid were exactly twice as dense as water it would have a SG of 2.000. For the most part, SG is used in mashing to determine the amount of sugar dissolved in the mash. Dissolved sugar increases the density of the mash. Water that is 1% sugar has a SG of
63
1.004, water that is 2% sugar has a SG of 1.008, and so on. Also, SG is used to determine the progress and the end point of fermentation. As the fermentation converts the sugar to alcohol and carbon dioxide, the SG of the mash decreases. It often decreases below 1.000 because the presence of the alcohol, SG .8, and the absence of the sugar render the mash less dense than water, SG 1.000. The originating specific gravity (OG) of a grain mash should be between 1.060 and 1.070. If the OG is very much higher than about 1.070, the alcohol content during fermentation will exceed 10%. As the alcohol content exceeds 10%, the yeast metabolism changes slightly, which can adversely affect the flavour profile. Also, the fermentation can drag out and risk the formation of the dreaded esters. It is possible, however, that there are specific yeast strains that surmount this problem. Perhaps, one of the closely guarded secrets held by the commercial whiskey distilleries. The 30L of corn mash described in the chapter on Mashing is formulated to yield an OG of about 1.065. If it turns out to be too high, it should be diluted with water until it’s within the range 1.060-1.070. If it’s too low, there’s no problem. It will work just as well, except the yield will be slightly lower. Measuring SG There are two ways to measure SG. The best way is to use a refractometer. A refractometer is used by taking a few drops of the mash onto the slide of the refractometer, and looking through the eyepiece to observe the reading. Refractometers present their measurements on the Brix Balling scale. This scale is simply the percent sugar content of the sample. For example, a Brix of 16 means the sample is 16% sugar. The Brix scale maps to the SG scale by: Brix / 250 + 1 = SG. To go the other way: (SG-1) X 250 = Brix. The main advantages to using a refractometer are: it only requires a very small sample; the sample does not require temperature correction; and, the measurement is not affected by the presence of mash solids suspended in the sample. The other way to measure SG is by using an instrument called a hydrometer. A standard winemaking hydrometer, available at home winemaking supply shops, is excellently suited for measuring mash SG. A hydrometer cylinder, also available at home winemaking supply shops, is used to collect a sample and float the hydrometer to take the reading. The hydrometer works by floating in a sample of a liquid in the hydrometer cylinder. If the liquid is relatively dense, the hydrometer will float higher in the liquid. If the liquid is relatively less dense, the hydrometer will float lower in the liquid. The hydrometer has a scale along its stem, and the observer reads the scale just below the meniscus (i.e. the surface tension) of the liquid level to determine the SG. The density of liquids varies with temperature. Most hydrometers are calibrated at 15.5oC (60oF). This means that in order to get an accurate SG measurement, the sample must be at that temperature. Another way to get an accurate measurement is to measure the temperature
64
of the sample, take the hydrometer reading, and then use the temperature-correction table at Appendix B to make the necessary temperature correction to the hydrometer reading. For example, if a sample of mash were 33oC (90oF) and the hydrometer reading was 1.060, the temperature correction for 33oC (90oF) from the table at Appendix B is +.005. You would then add .005 to the hydrometer reading of 1.060 and get 1.065. This means the hydrometer reading of the sample at 15.5oC (60oF) would be 1.065, the correct SG of the sample. To measure the Originating Gravity (OG) of a grain mash, it’s important to collect a sample of the mash that’s almost devoid of mash solids. When a mash has completed its conversion rest and has settled for a while, there’s a clear light yellow liquid on top of the mash. A sample of this clear liquid can be carefully collected in a hydrometer cylinder and measured with a standard winemaking hydrometer. Be sure to measure the temperature of this sample and use the temperature-correction table at Appendix B to correct the SG to 15.5oC (60oF), or you can chill the sample to 15.5oC (60oF) before taking the reading. The terminating SG (TG) can easily be measured with a refractometer, but cannot be accurately measured with a hydrometer until the fermentation is completely finished. This is because it’s almost impossible to collect a clear sample of the mash that’s devoid of mash solids until then. However, you can get along without an accurate TG, since all you really need to know is the change in SG over each twelve hour period or so. When the SG shows a very small, if any, change since the last reading then you can conclude the fermentation is finished. Calculating Alcohol Content When the fermentation is finished and you have strained the mash (to be discussed later), the strained mash can be left to settle for 30 to 60 minutes before it’s transferred to the still. A fairly clear sample can then be collected from the surface and the TG can be measured with a hydrometer with reasonable accuracy. Remember to make the necessary temperature correction as when taking the OG reading. The alcohol content can then be calculated as follows: For SG:
(OG-TG) X 1000 / 7.4 = % alc/vol
E.g. (1.065-1.002) X 1000 / 7.4 = 8.5% alc/vol For Brix:
(OB-TB) X 4 / 7.4 = % alc/vol
E.g. (17-1) X 4 / 7.4 = 8.65% alc/vol
65
Also, most winemaking hydrometers have a potential-alcohol scale on them. By simply looking up the SG reading on the hydrometer that corresponds to the difference of the OG and TG (i.e. OG-TG), you can rotate the hydrometer and read the alcohol content off the potential-alcohol scale. Straining the Mash After the fermentation (described below) is complete, usually 72-80 hours (never leave it more than 96 hours from when the yeast was added), the mash can then be strained and transferred to the still. For the 30L of corn mash, it can be strained using a large nylon or cotton straining bag, available at home beer and wine making supply shops. A 20L pail or 30L fermenter can be fitted with pieces of fine rope, like binder twine, so as to cradle a colander or straining basket near the top of the pail to support the straining bag. The straining bag is then opened up and placed in the colander or straining basket. The mash can be poured into the straining bag until it’s full of mash solids. The straining bag can then be twisted closed and squeezed by hand. When most of the liquid has been wrung out of the mash solids, they can be discarded and the process repeated until the entire mash has been strained. Approximately, 60% of the entire mash liquid will run off in the first pour into the straining bag. After the first pour and straining, the receiving pail may have become quite full and need transferring to another container. Of course, this manual straining cannot be done on a large scale. For large mashing operations a pneumatic grape press used for winemaking works excellently. There are other forms of these grape presses, some are hydraulic, others use an Archimedes’ screw. All work equally well, remove almost all the liquid, and operate on large volumes of mash very fast. After the mash is strained, the spent grains are excellent fodder for any composter. The yeast benefits the composting activity. On the large scale, the spent grains can be dried in the sun (to eliminate the residual alcohol) and sold or given to a livestock farmer as a form of high-protein high-fiber livestock feed. The spent grains are high in protein and fiber because the starches (originally 50% of the grain mass) have been almost completely removed by the mashing and fermentation, leaving behind only the protein and fibre. PROCEDURE This section describes how to ferment the 30L of corn mash produced in the section on mashing. Ingredients • 30L corn mash from the Mashing section • 60g (1/3 cup) active dried bakers’ yeast
66
Or 150g (1/3 lb) bakers’ yeast cake
Equipment • 2 30+L primary fermenters with at least one lid
Or 1 30+L primary fermenter with lid, and an aquarium pump with an aeration stone
• 1 standard winemaking hydrometer and cylinder Or
1 Refractometer • 1 floating dairy thermometer graduated from 0oC-110oC (32oF-230oF) Method Initially, the mash will be in the pot on the stove with the lid on. The mash should have been left to settle for at least 90 minutes, possibly as long as overnight, and cooled to below 38oC (100oF). The mash solids will have settled out, and there should be 7 or 8 cm (3”) of clear yellow liquid on top of the mash. Measure the OG of the clear yellow liquid by using a refractometer, or by using a hydrometer. If using the hydrometer, measure the temperature of the sample before measuring the SG and refer to the temperature-correction table at Appendix B to correct for the temperature, or chill the sample to 15.5oC (60oF) before measuring the SG. The OG should be in the range 1.060-1.070. If it exceeds 1.070, thoroughly stir the mash until it is mixed. Take a hydrometer reading of the mixed mash. This can be done by simply floating the hydrometer in the mash and reading the SG. This avoids having to collect a sample in the cylinder. Also, no temperature correction is necessary for this measurement. This value will be markedly higher than the OG measured in the clear sample, and will not be an accurate SG measurement of the mash. Now, small additions of tap water, say 250 ml at a time, can be made to the mash, and mixed in thoroughly until the hydrometer reading has decreased by the amount the OG exceeded 1.070. The OG can now be updated by subtracting the amount it was reduced by the water additions. For example, say the OG measured in the clear sample was 1.075. This would mean that the SG of the mash would need to come down .005. After mixing the mash thoroughly, the straight uncorrected hydrometer reading may be, say 1.080. Now, 250-ml additions of water can be thoroughly stirred into the mash, and straight uncorrected readings taken until the reading has come down .005 points from the 1.080 (i.e. to 1.075). The OG gravity can be updated to OG - .005 = new OG (i.e. 1.075 - .005 = 1.070). The mash produced in the chapter on Mashing is not likely to require such a correction if the quantities were adhered to.
67
Next, the mash needs to be transferred to a clean 30+L fermenter. The temperature should have cooled to below 38oC (100oF) before it is transferred. For the 30L batch, the mash can be left to cool until the temperature is below 38oC (100oF). For larger batch sizes, it will be necessary to employ an immersion chiller to force cool the mash. Once the mash has cooled to below 38oC (100oF) it can be transferred. This can be done by pouring the mash from the mash pot to a clean 30+L fermenter. If the full mash pot is too heavy or too awkward to pick up and pour, the mash can be ladled with a one or two litre measuring cup into the fermenter until the volume is down to a manageable level. For larger batch sizes, a grain pump can be used to make all transfers. Grain pumps are like sewage pumps in that they are capable of pumping liquids that are full of suspended solids. Some brewing operations use sewage pumps (new ones, never used for sewage) for making such transfers. Also, sewage pumps are sometimes used for Recirculating Infusion Mash Systems (RIMS) that constantly circulate a mash during the mashing cycle. This maintains a uniform temperature and provides the stirring function for large-scale mashing. The mash is now ready for aerating (i.e. providing dissolved oxygen). For the 30L batch, you can vigorously pour the mash from one fermenter to another four to six times. This works extremely well. You can also use an aquarium pump to pump air through an aeration stone placed in the mash. The aeration stone should be left to bubble in the mash for about 30 minutes. The yeast can be added while the aeration stone is still bubbling in the mash. On the larger scale, bubbling through an aeration stone can be used, perhaps using a larger pump and larger stone. Also, mechanically rousing the mash in a manner that causes splashing for 20 or 30 minutes will work well. If the mashing apparatus is equipped with a RIMS, as discussed above, the RIMS can be set up so that the output splashes into the mash. Fifteen to 30 minutes of such splashing would thoroughly aerate the mash. After the mash has been aerated, the yeast can be pitched (i.e. added to the mash). Place the fermenter where it’s going to sit undisturbed for the next three days, and make sure the ambient temperature is between 21 and 33oC (70 and 90oF). Making sure the present mash temperature is below 38oC (100oF), add the yeast. For the 30L batch, add 60g (1/3 cup) of active dried bakers’ yeast or 150g (1/3 lb) of bakers’ yeast cake, and stir. After 30 minutes the yeast will have hydrated in the liquid and can be thoroughly stirred in. Within 60 minutes of pitching the yeast, vigorous fermentation will be evident (i.e. vigorous bubbling). The bubbling will continually rouse the mash throughout the fermentation, ensuring the mash stays thoroughly mixed. Leave the mash for 72 hours from when the yeast was pitched. It’s helpful to stir the mash thoroughly every 24 hours, but not necessary.
68
After 72 hours the fermentation will either be complete and the activity will have diminished to a slow spurious bubbling, or the fermentation will still be active and only have slowed down slightly. If the latter is the case, monitor it every six hours or so until the fermentation is very slow and therefore, finished. Fermentation shouldn’t take more than 84 hours. When the fermentation is complete, it’s important that the mash be strained, placed in the still, and heated to above 52oC (125oF) within 24 hours or off flavours (i.e. dreaded esters) may develop. When the fermentation is complete the mash is ready to be strained. For the 30L of corn mash, it can be strained by hand using a straining bag as described above. Larger volumes will require a mechanical pressing using a device such as a pneumatic winepress, also described above. After straining, the volume of liquid retrieved will be about 70% of the entire-mash volume. If the mash were mechanically pressed, the volume of liquid retrieved is closer to 80% of the entire-mash volume. In the case of the 30L of corn mash strained by hand, between 20 and 22L of liquid will be retrieved. After the mash is strained and has settled for 30 to 60 minutes, a fairly clear sample of the mash liquid can be collected from the surface, and the Terminating Gravity (TG) can be measured. With the OG and the TG, the alcohol percentage can be calculated using the formula:
(OG – TG) x 1000 / 7.4 = % alc/vol. After the completion of this fermentation step, you will have about 20L of fermented and strained corn mash at about 8.5% alc/vol, and you will be ready to proceed to the distillation step.
69
DISTILLATION PRINCIPLES Distillation is a physical process where compounds are separated by virtue of their different boiling points. If two compounds occurred together that had the same boiling point, they would not be separable by distillation. Fortunately, very few compounds have common boiling points with other compounds. The separation in distillation occurs when a mixture of compounds in the still is brought to boil. Compounds with lower boiling points vaporize at lower temperatures than compounds with higher boiling points. This means that the vapour, or steam, rising off the boiling mixture has a more copious amount of the lower-boiling-point compounds than of the higher-boiling-point compounds. Next, this vapour is collected and cooled to condense it back into a liquid. The resulting liquid, called the distillate, contains a considerably higher concentration of the lower-boiling-point compounds than of the higher-boiling-point ones. In a simplified example, assume a mixture of 90% water and 10% ethanol is to be separated by distillation. Water has a boiling point of 100oC (212oF) and ethanol has a boiling point of 78.4oC (173.1oF). The ethanol will boil and vaporize well before the water, so when the vapours are collected and condensed, the resulting distillate will have a very high concentration of ethanol and comparatively little water. Of course, the distillate will not be pure ethanol because some water will vaporize at the boiling point of ethanol, even if the water itself is not boiling. Because all the compounds in a still will vaporize to a greater or lesser extent during boiling, the separation of the compounds will not be perfect, so more elaborate stills have been developed to intensify the separation of the vapours once they have left the boiler. In modern high-separation stills this is done by employing a reflux column to manage the vapours after they leave the boiler and before they are condensed back into a liquid. There are many different designs of stills. The most basic and rudimentary design is a “pot still” such as a closed pot, like a pressure cooker, with a pipe leading from the lid into a condenser coil. The condenser coil can either be long enough to air cool the vapours or it can be shorter and immersed in a water jacket. Such a still would afford minimum separation since there is almost no separation of the vapours once they leave the boiler. Although this design of still is not suitable for producing beverage alcohol by modern standards, it will still concentrate an 8 or 10% alcohol mash to 60% in a fairly fast run. The next level of still is the “whiskey still”, sometimes called a “gooseneck” still. This design has been in use for centuries for commercial whiskey production, and is just as popular today in modern whiskey distilleries as it has ever been. A whiskey still has a large boiler with a long broad neck rising from it. The neck bends at the top and leads to a condenser coil immersed in water. This design is very similar to the pot still design, except the tall broad neck affords enough separation to hold back most of the fusel alcohols from the
70
distillate. This design of still is sufficient for the production of whiskey, brandy, and rum, for which it is very widely used commercially. The whiskey still is not suitable, however, for the production of vodka or gin, which requires a high-separation still capable of producing pure alcohol. The high-separation still design is called a “column still” or a “fractionating still”. A fractionating still is used to produce pure alcohol by fractional distillation for making vodka and gin, or for pharmaceutical and laboratory use. The fractionating still has already been described to some extent in the Equipment chapter. It will be useful to refer back to the diagrams and pictures in that chapter as you read on. In a fractionating still the vapours emerging from the boiling mixture pass up a column packed with small pieces of glass, ceramic, stainless steel, copper or other material, inert to the process. In larger fractionating stills, the columns have baffle plates with holes in them instead of packing material. Each piece of packing, or the baffle plates, can hold a small amount of liquid, either internally (if they have internal crevices) or in the interstices between adjacent particles. At the top of the column the emerging vapour is condensed into a liquid by means of cold water running through a heat exchanger. The condensed liquid runs back down the column until it reaches the boiler where it is reheated, converted into vapour once more, and once again moves up the column. At equilibrium, which may take several hours to achieve in the case of pure-alcohol production, the system consists of vapour rising up the column meeting a flow of liquid running down the column. At each vapour-liquid interface on the packing material within the column, a partial separation occurs wherein the more volatile components of the mixture go into the vapour phase and rise to the top while the less volatile components go into the liquid phase and are carried down into the boiler. At equilibrium, the many components in the mixture become stacked up in the column in the order of their boiling points, the most volatile at the top and the least volatile at the bottom. In commercial operations, which use a continuous-run design of fractionating still, the fermented mash is fed into the boiler from a reservoir, the different components of the mixture are drawn off at various heights along the column, and the spent residue is drained off. This process can continue indefinitely as long as fermented mash is fed into the boiler. Acetone, for example, would be continuously drawn off from the top of the column while ethanol would be continuously drawn off from a point a little further down. Very small operations such as we are concerned with here do not employ a continuous-run system. Rather, fractional distillation is carried out batchwise. After column equilibrium is established, with acetone and methanol at the top and fusel alcohols at the bottom we start to progressively draw off liquid from the top of the column. First come the acetone and then the methanol and all the other low-boiling-point compounds. Then the ethanol starts to appear, and when it does, a small portion of it is drawn off and bottled for use. The remainder is allowed to run back down the column to continue the counter-current flow and the separation process. Eventually, the ethanol will be exhausted and the higher alcohols, the
71
so-called fusel alcohols, will start to emerge. At this point (or in practice somewhat before) the boiler is switched off. Water is an important constituent of the fermentation substrate and, with a boiling point of 100oC (212oF), lies intermediate between the least and most volatile components of the mixture. It has one important difference from the other components, however, in that it forms an azeotrope with ethanol. An azeotrope is a mixture of two liquids with a boiling point different from either constituent. In the case of ethanol and water, the azeotrope occurs at a mixture of 97.3% ethanol and 2.7% water, and has a boiling point of 78.15oC (172.67oF), .25oC lower than the 78.4oC (173.12oF) of pure ethanol. As far as the system is concerned this azeotrope is a single compound with a boiling point of 78.15oC (172.67oF) and proceeds to separate it on that basis. The ethanol which is purified by a fractionating column is not, therefore, pure 100% ethanol but pure 97.3%, the “impurity” being pure water. No amount of redistillation under the conditions we are using will influence this percentage. 97.3% alc/vol is the theoretical maximum purity that can be derived by the above process. If it is absolutely essential to remove all the water, for example if it is to be mixed with gasoline to produce gasohol, then special methods are available to accomplish this. For our purposes, however, where we are going to dilute the alcohol with water to 40 or 50% anyway, the presence of 2.7% water is of no consequence. The high level of separation of a fractionating still is a function of the reflux taking place by the condensed liquid flowing down the column interfacing with the vapours rising up the column. When distillate is drawn off the still at the top of the column it is important that only about 10% is drawn off and about 90% is allowed to return down the column to maintain the reflux, and hence the high separation. If the operator of a fractionating still wanted to reduce the level of separation afforded by the still, they could do so by drawing off a greater proportion of the distillate leaving less reflux, say 30% drawn off and 70% reflux. Or, even 90% drawn off and 10% reflux. This means that a high-separation fractionating still offers very precise control over separation level by simply adjusting the proportion of reflux. Thereby, making it possible to produce spirits that require much less separation, such as whiskey, in a fractionating still. And, it is because of this precise control over separation level that the author has chosen a fractionating still in this text as the design for making whiskey. Whiskey Distillation: In the production of pure alcohol, a high-separation still is employed to separate out most of the water and all of the congeners (i.e. impurities) and deliver only the alcohol. But in the production of whiskey, certain proportions of the congeners need to be left in the distillate. So, only moderate separation can occur. For this reason, whiskey is usually made in gooseneck stills that give comparatively low separation. However, some modern whiskey distilleries use a form of fractionating still to maintain better control over the process. Whiskey is distilled in two runs: a primary distillation, or beer-stripping run; and, a spirit-run. The beer-stripping run is generally done in a very crude high volume pot still called a
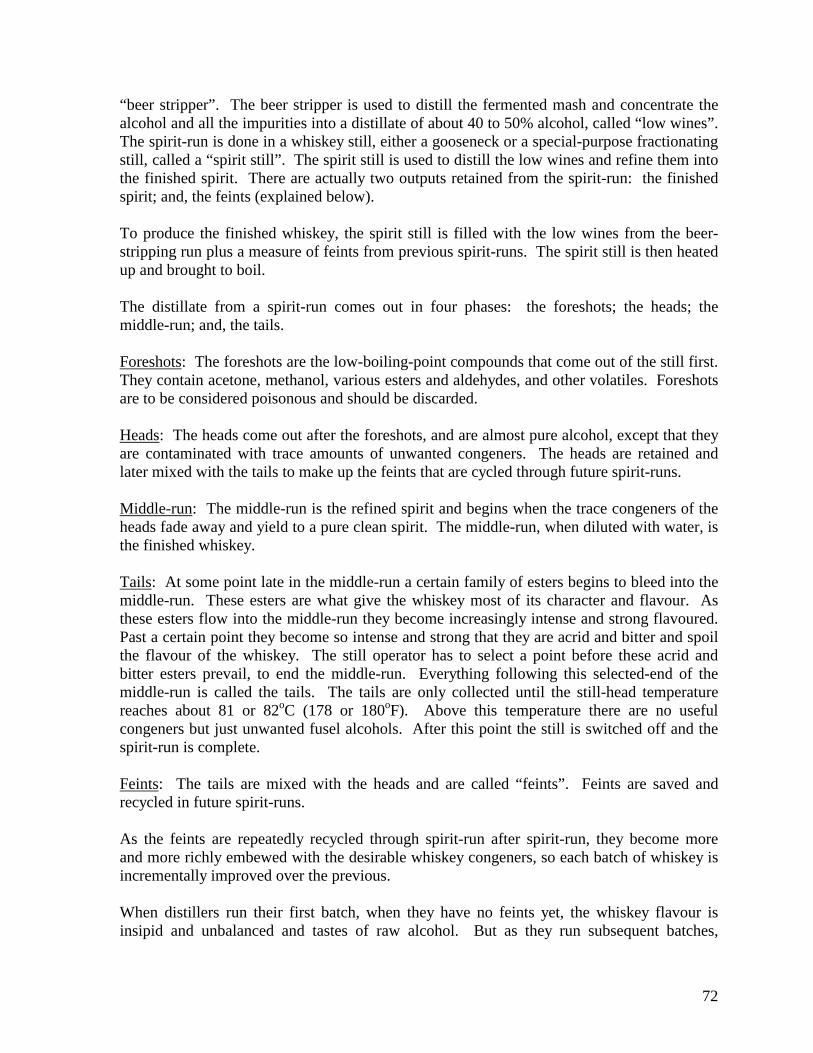
72
“beer stripper”. The beer stripper is used to distill the fermented mash and concentrate the alcohol and all the impurities into a distillate of about 40 to 50% alcohol, called “low wines”. The spirit-run is done in a whiskey still, either a gooseneck or a special-purpose fractionating still, called a “spirit still”. The spirit still is used to distill the low wines and refine them into the finished spirit. There are actually two outputs retained from the spirit-run: the finished spirit; and, the feints (explained below). To produce the finished whiskey, the spirit still is filled with the low wines from the beer-stripping run plus a measure of feints from previous spirit-runs. The spirit still is then heated up and brought to boil. The distillate from a spirit-run comes out in four phases: the foreshots; the heads; the middle-run; and, the tails. Foreshots: The foreshots are the low-boiling-point compounds that come out of the still first. They contain acetone, methanol, various esters and aldehydes, and other volatiles. Foreshots are to be considered poisonous and should be discarded. Heads: The heads come out after the foreshots, and are almost pure alcohol, except that they are contaminated with trace amounts of unwanted congeners. The heads are retained and later mixed with the tails to make up the feints that are cycled through future spirit-runs. Middle-run: The middle-run is the refined spirit and begins when the trace congeners of the heads fade away and yield to a pure clean spirit. The middle-run, when diluted with water, is the finished whiskey. Tails: At some point late in the middle-run a certain family of esters begins to bleed into the middle-run. These esters are what give the whiskey most of its character and flavour. As these esters flow into the middle-run they become increasingly intense and strong flavoured. Past a certain point they become so intense and strong that they are acrid and bitter and spoil the flavour of the whiskey. The still operator has to select a point before these acrid and bitter esters prevail, to end the middle-run. Everything following this selected-end of the middle-run is called the tails. The tails are only collected until the still-head temperature reaches about 81 or 82oC (178 or 180oF). Above this temperature there are no useful congeners but just unwanted fusel alcohols. After this point the still is switched off and the spirit-run is complete. Feints: The tails are mixed with the heads and are called “feints”. Feints are saved and recycled in future spirit-runs. As the feints are repeatedly recycled through spirit-run after spirit-run, they become more and more richly embewed with the desirable whiskey congeners, so each batch of whiskey is incrementally improved over the previous. When distillers run their first batch, when they have no feints yet, the whiskey flavour is insipid and unbalanced and tastes of raw alcohol. But as they run subsequent batches,
73
carrying over the feints from their previous batches, the whiskey gets better and better with each batch. Most distillers do not recycle all the feints on-hand through subsequent spirit-runs. They include a certain measure, and each distiller’s measure becomes a main part of the unique signature of that distiller’s whiskey. Another important part of defining a particular distiller’s unique product is how late the middle-run is allowed to bleed into the tails. At the time that the tails bleed into the middle-run (and visa versa), the percent alcohol of the emerging distillate begins to trail off quite rapidly. Most of the middle-run will come out at close to 95% alc/vol. But, towards the end it drops quite sharply, and the distillate is generally not collected into the middle-run below about 70% alc/vol. This sharp drop in alcohol concentration is used as an indicator to identify where the middle-run ends and the tails begin for a particular whiskey. An early middle-run would end while the percentage were still 85-90%; a medium middle-run would end between 75-85%; and a late middle-run would end between 70-75%. Some Scottish malt whiskeys go below 70%, and there’s the odd one that goes as low as 60%. Unfortunately, for small operations such as we are concerned with it’s too costly to measure the percent alcohol of the small samples (i.e. 2-3 ml) that would need to be measured in order to determine the alcohol content of the emerging distillate. In large-scale commercial operations, it’s a simple matter to collect a 250-ml sample of emerging distillate, measure the percent alcohol, and empty it into the receiver. So, for small operations the transition points between the phases are determined by collecting a few drops of the emerging distillate on a spoon and tasting it. This is definitely more of an art than a science and practically defies description, but once an operator has experienced these transition points two or three times it becomes very clear how this works. In order to facilitate this familiarization, tables with the times, flow rates, and volumes of each phase for actual distillation runs of batches of corn mash as described in this text is included in the Procedure section to guide a first-time distiller by indicating the length of time and volume to expect for each phase. This puts the distiller in the correct ballpark for each transition point so they can familiarize themselves with the taste changes that occur across the transitions. Even if a distiller simply duplicated the volumes on the above-mentioned tables in their run of corn mash, they would produce a reasonably good Kentucky-style corn whiskey. Even in this modern day of advanced instrumentation, commercial whiskey distillers still rely on tasting the emerging distillate to do the final determination of the transition points. According to North American definitions for whiskey (not official U.S. Government nomenclature), the following guidelines describe and name the different whiskey styles. Canadian Style: If the middle-run is ended while the emerging distillate is still between 85-90% alc/vol, the whiskey flavour is very mellow and smooth and lacks strong definition of the character of the grain used to make the whiskey.
74
Kentucky Style: If the middle-run is allowed to continue until the emerging distillate is between 75-85% alc/vol, the whiskey flavour takes on a very pronounced and distinctive character that clearly reveals the character of the grain used. Tennessee Style: If the middle-run captures emerging distillate that’s below 75% alc/vol (usually no lower than 70%), the whiskey flavour is very strong and distinctive, and has a sharp bite to it that is very much an acquired taste. However, most whiskey drinkers eventually come to prefer this style as their palate for whiskey matures. Almost all the Irish whiskies and Scottish single-malt whiskies fall into this category (although I’m certain their distillers would have a different name for the style). Another dimension to whiskey character is whether it is “early cut”, “late cut”, or “narrow cut”. To understand early, late, and narrow cut whiskey, picture the entire output from the spirit-run as a time-line progressing from foreshots, through heads, middle-run, and tails. Now, look at the middle-run as a “cut” from that time-line. An early cut would be a middle-run that began earlier and ended earlier on that time-line. This would produce a whiskey with more of the early congeners and less of the late congeners. Similarly, a late-cut would be a middle-run that began later and ended later on the time-line. The whiskey would have more of the late congeners and less of the early congeners. As for a narrow cut, the middle-run is started later and ended earlier, making the middle-run smaller and therefore narrow on the time-line. Early cut whiskies tend to have more of the distinctive character of the grain (e.g. corn, rye). Late cut whiskies tend to be sharper and have more bite. Narrow cut whiskies are smoother and mellower and have less distinctive flavour and less bite. As for the dimension of whiskey flavour contributed by the proportion of feints added to the spirit-run, the more feints the more body and richness the whiskey flavour will have. In effect, the feints don’t change the whiskey’s flavour, but rather contribute more of the flavour. After numerous spirit-runs, more and more feints will accumulate. At some point, the distiller can dilute the feints with water and do a special spirit-run on the accumulated feints alone. Many distillers contend that the whiskey produced by this special run is the smoothest, richest, most flavourful whiskey of all, and it is often escalated to the status of the distiller’s “Special Reserve” or “The Queen’s own cask”. And finally, the feature that is reputed to impart the most unique signature on the whiskey flavour is the spirit still itself. There’s a certain mystique surrounding this dimension, because no one appears to have a complete explanation why there’s such a profound difference between whiskey distilled in one still and whiskey distilled in another apparently identical still. It’s likely to be a combination of the height of the column, the width of the
75
column, the distribution of the heat, and so on. When single-malt whiskey distilleries fabricate new stills they replicate their old stills right down to duplicating every dinge or kink or irregularity in thickness of the copper wall, to minimize any difference a new still may have over the old stills. PROCEDURE This section describes how to distill the 20L of strained corn mash from the chapter on Fermentation to produce about 2L of pure corn whiskey at 45% alc/vol and about 920 ml of feints at 91% alc/vol. The distillations will be carried out using the still or stills described in the chapter on Equipment. Transferring the Mash to the Still: After the mash has been strained it can be transferred to the still. However, it’s useful to cover the strained mash and allow it to settle for two or three hours. This will allow the suspended yeast and very fine mash solids to settle out, leaving a clear yellow liquid, with the suspended solids packing down to a sediment about 8 cm (3”) deep. The clear liquid can be siphoned off the sediment into another container, or directly into the still. If an adjunct of feints is to be included in the distillation run, it should be mixed with the mash or low wines before siphoning into the still. To transfer the mash to the still place the mash container about half a meter to a meter (1½’ to 3’) above the top of the boiler. Connect the filler-hose to the top ball valve on the still. Open the top ball valve (make sure the bottom one is closed), and place the siphon starter in the mash. Pump the siphon starter until the siphon starts. Allow the mash to run into the still. When it’s finished, close the ball valve and remove the filler-hose. Transferring Low Wines to the Still: Low wines are typically about 40 to 50% ethanol. This concentration of ethanol will dissolve acrylic. Unfortunately, a lot of home winemaking equipment, such as siphon starters, are made of acrylic and cannot be used in contact with low wines. In the event that you can’t find a siphon starter made of alcohol-resistant material, the low wines can be transferred to the still by placing the filler-hose with the siphon-starter removed in the low wines, opening the top ball valve (ensuring the bottom one is closed), and sucking on the end of the filler-hose with the garden-hose fitting. When the filler-hose is nearly full of low wines, pinch the tube, and quickly screw the fitting to the upper ball valve. After the fitting is secure, release the pinch on the tube and the low wines will flow into the still. When it’s finished, close the ball valve and remove the filler-hose. This will likely require more than one try, and may result in a small spill of low wines. Before long, you should be able to locate an alcohol-resistant siphon starter.

76
Measuring Alcohol Content: Measuring alcohol content is done by using an instrument called a “proof hydrometer”. A proof hydrometer is essentially measuring the Specific Gravity (SG) of the liquid but presents the reading on two scales: alcohol percentage; and, alcohol proof. They’re calibrated based on the assumption that the liquid being measured is a mixture of ethanol and water and nothing else. And, for distilled spirits this is a very safe assumption. It’s important to note that a proof hydrometer cannot be used to measure the alcohol content of mash, wine, beer, or any undistilled form of beverage alcohol. Such beverages contain residual sugars and acids and many other compounds that radically alter the SG, and hence a proof-hydrometer measurement. In this text the term “proof” as a unit of alcohol content has been avoided in favour of “percent alcohol”. There are at least three different proof scales, and each one requires mental arithmetic in order to be meaningful. So, for simplicity all references to alcohol content will be expressed as percent alcohol by volume (i.e. % alc/vol). To use a proof hydrometer, collect a 250-ml sample of the spirit to be measured in a 250-ml graduated cylinder (a 250-ml graduated cylinder holds 300 ml) and float the proof hydrometer in the sample. Next, read the alcohol content off the percent alcohol scale. Alcohol volume is very sensitive to thermal expansion and contraction. Proof hydrometers are calibrated at 15.56oC (60oF) and a variation of only a few degrees from this temperature will skew the measurement dramatically. So, to obtain an accurate measurement, the temperature of the sample must be adjusted to 15.56oC (60oF). Method Beer Stripping (optional): The first step is to do a crude primary distillation on the corn mash. This can be done using a beer stripper as described in the chapter on Equipment. However, many home distillers do not bother building a beer stripper and simply use the spirit still with the needle valve set to almost maximum flow rate to effect a primary distillation. The purpose of the beer stripping is mostly to facilitate the operational efficiency of the process. It enables a large volume of mash to be reduced to a more manageable volume of higher percent alc/vol to be processed in the spirit still. A distiller could even save the low wines from several beer-stripping runs, then do one big spirit-run on the accumulated low wines, this way contending with only one set of transition points between phases of a single larger run. However, a primary distillation is not essential to the production of whiskey. One could simply conduct a spirit-run on the fermented corn mash, and bypass the beer-stripping run entirely. In fact, many distillers including the author contend that whiskey made by a single spirit-run produces a more complex and more natural flavoured whiskey than one produced by the customary two distillations. So, the beer-stripping run is optional. Larger scale operations would typically do better with a beer-stripping run, in that it is more operationally manageable. But, if you are doing a small run such as a single batch of corn mash as
77
produced in the chapter on Fermentation, skipping the beer-stripping run and going straight to the spirit-run is most likely the best and easiest way to go. There are two ways to do a beer-stripping run. One is to use a beer stripper made from a 113L electric hot-water heater as described in the chapter on Equipment. Transfer the corn mash to the beer stripper, close both ball valves, start running cold water through the condenser, and turn on the electric current. Place a suitably sized receiver under the output of the beer stripper. You will be collecting between 3 and 3½L of low wines for every 20L of 8% alc/vol corn mash you place in the beer stripper. With a 3000W heater, 60L of corn mash will come to boil in less than two hours, and then low wines will start flowing from the condenser. The temperature of the vapour coming over from the boiler at the start will be about 80oC (176oF) and will rise to 98oC (208.4oF) or so as the ethanol in the boiler becomes exhausted. 60L will take about 2½ hours. Although there will be a little ethanol remaining in the boiler at this point, the amount will be too small to warrant the cost of the electricity to drive it over. The other way to do a beer-stripping run is to use the fractionating spirit still described in the chapter on Equipment. If you are only doing between 20 and 40L batches of corn mash, this is probably the most practical way to go, rather than going to the expense of building a beer stripper. To use the spirit still, transfer the corn mash to the boiler, close both ball valves, start running cold water through the heat exchanger, and turn on the electric current. Place a suitably sized receiver under the output, and open the needle valve approximately half way. If you are stripping the 20L of corn mash from the fermentation section, a 4L (gallon) jug will make an ample receiver for the low wines. With a 750W heater, 20L of corn mash will come to boil in about 3½ hours, and then the low wines will start dripping from the needle valve. When you observe the low wines dripping into the receiver, open the needle valve all the way and then close it slightly so the distillate is flowing at noticeably less than the maximum rate. This is to prevent loss due to uncondensed vapours escaping out of the needle valve by ensuring that liquid is backing up on the needle valve. 20L will take from 5 to 6 hours to strip. Spirit-run: The spirit-run is the distillation that produces the finished whiskey, and requires very careful attention to equilibration, flow rate, transition points between phases, and measurements of quantities of the phases collected. Because of this, the description of the procedure will stay closely focused on the distillation of the 20L of fermented corn mash produced in the previous chapters, and on using the spirit still described in the chapter on Equipment. If a beer-stripping run was performed, load the low wines into the spirit still. There must be at least 5L of liquid in the still to ensure the heating element is immersed at all times. If there are less that 8L of low wines, simply top the volume of low wines up to 8L or so with water. 8L ensures there will still be 5L in the still at the end of the spirit-run. This will make no
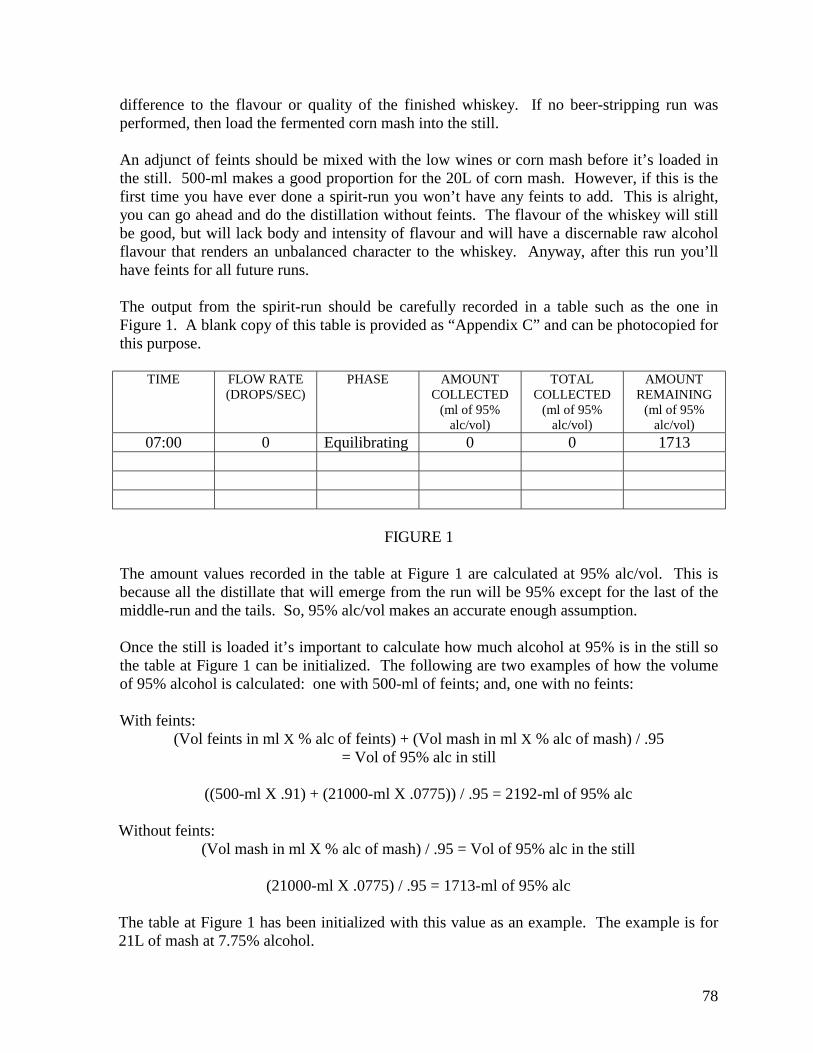
78
difference to the flavour or quality of the finished whiskey. If no beer-stripping run was performed, then load the fermented corn mash into the still. An adjunct of feints should be mixed with the low wines or corn mash before it’s loaded in the still. 500-ml makes a good proportion for the 20L of corn mash. However, if this is the first time you have ever done a spirit-run you won’t have any feints to add. This is alright, you can go ahead and do the distillation without feints. The flavour of the whiskey will still be good, but will lack body and intensity of flavour and will have a discernable raw alcohol flavour that renders an unbalanced character to the whiskey. Anyway, after this run you’ll have feints for all future runs. The output from the spirit-run should be carefully recorded in a table such as the one in Figure 1. A blank copy of this table is provided as “Appendix C” and can be photocopied for this purpose.
TIME FLOW RATE (DROPS/SEC)
PHASE AMOUNT COLLECTED
(ml of 95% alc/vol)
TOTAL COLLECTED
(ml of 95% alc/vol)
AMOUNT REMAINING
(ml of 95% alc/vol)
07:00 0 Equilibrating 0 0 1713
FIGURE 1
The amount values recorded in the table at Figure 1 are calculated at 95% alc/vol. This is because all the distillate that will emerge from the run will be 95% except for the last of the middle-run and the tails. So, 95% alc/vol makes an accurate enough assumption. Once the still is loaded it’s important to calculate how much alcohol at 95% is in the still so the table at Figure 1 can be initialized. The following are two examples of how the volume of 95% alcohol is calculated: one with 500-ml of feints; and, one with no feints: With feints:
(Vol feints in ml X % alc of feints) + (Vol mash in ml X % alc of mash) / .95 = Vol of 95% alc in still
((500-ml X .91) + (21000-ml X .0775)) / .95 = 2192-ml of 95% alc
Without feints:
(Vol mash in ml X % alc of mash) / .95 = Vol of 95% alc in the still
(21000-ml X .0775) / .95 = 1713-ml of 95% alc The table at Figure 1 has been initialized with this value as an example. The example is for 21L of mash at 7.75% alcohol.
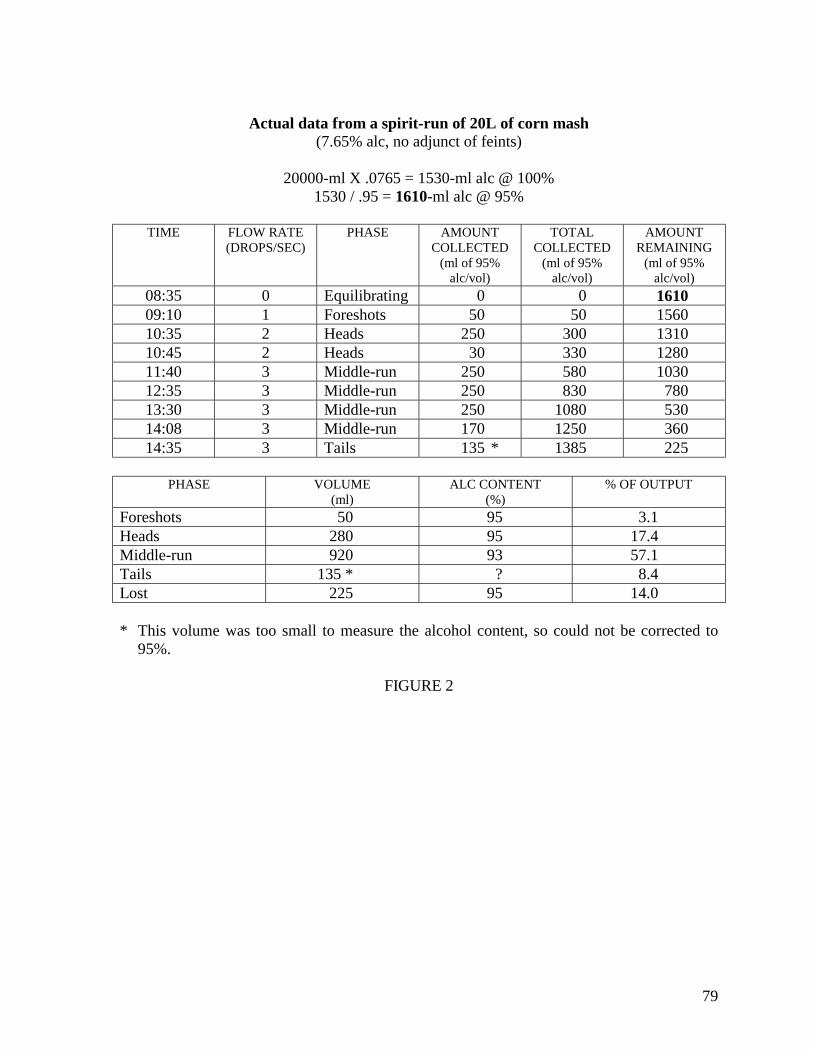
79
Actual data from a spirit-run of 20L of corn mash
(7.65% alc, no adjunct of feints)
20000-ml X .0765 = 1530-ml alc @ 100% 1530 / .95 = 1610-ml alc @ 95%
TIME FLOW RATE
(DROPS/SEC) PHASE AMOUNT
COLLECTED (ml of 95%
alc/vol)
TOTAL COLLECTED
(ml of 95% alc/vol)
AMOUNT REMAINING
(ml of 95% alc/vol)
08:35 0 Equilibrating 0 0 1610 09:10 1 Foreshots 50 50 1560 10:35 2 Heads 250 300 1310 10:45 2 Heads 30 330 1280 11:40 3 Middle-run 250 580 1030 12:35 3 Middle-run 250 830 780 13:30 3 Middle-run 250 1080 530 14:08 3 Middle-run 170 1250 360 14:35 3 Tails 135 * 1385 225
PHASE VOLUME
(ml) ALC CONTENT
(%) % OF OUTPUT
Foreshots 50 95 3.1 Heads 280 95 17.4 Middle-run 920 93 57.1 Tails 135 * ? 8.4 Lost 225 95 14.0 * This volume was too small to measure the alcohol content, so could not be corrected to
95%.
FIGURE 2
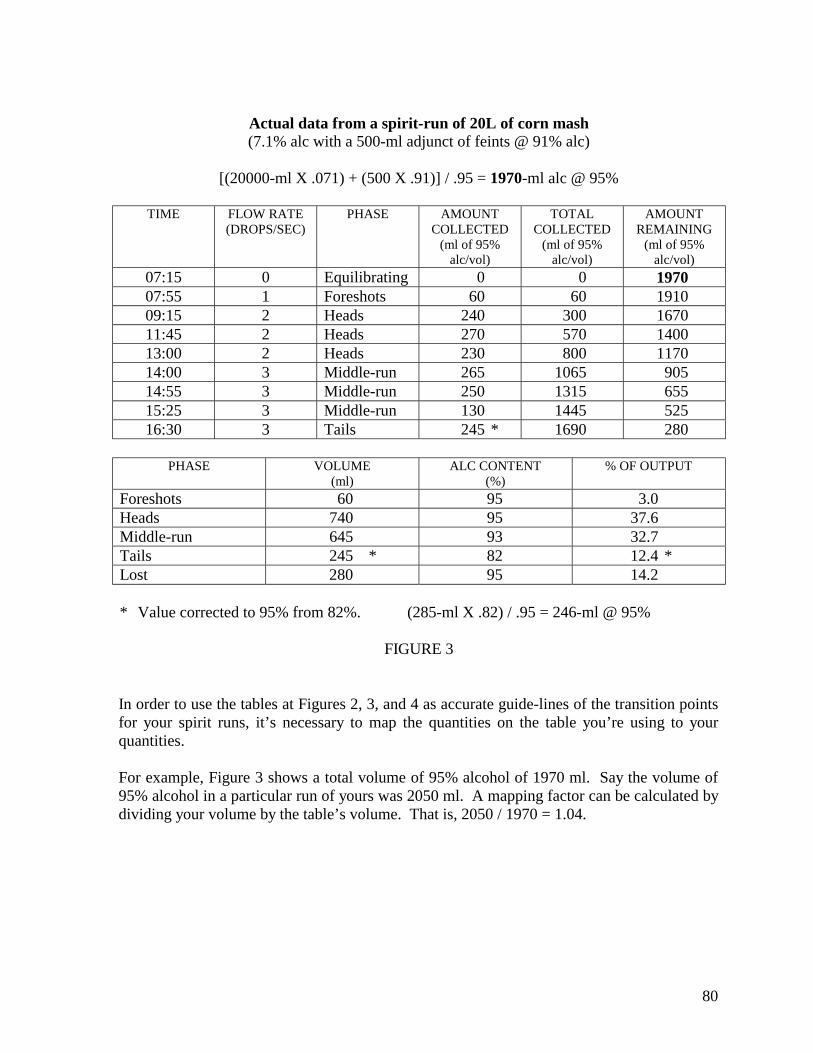
80
Actual data from a spirit-run of 20L of corn mash (7.1% alc with a 500-ml adjunct of feints @ 91% alc)
[(20000-ml X .071) + (500 X .91)] / .95 = 1970-ml alc @ 95%
TIME FLOW RATE
(DROPS/SEC) PHASE AMOUNT
COLLECTED (ml of 95%
alc/vol)
TOTAL COLLECTED
(ml of 95% alc/vol)
AMOUNT REMAINING
(ml of 95% alc/vol)
07:15 0 Equilibrating 0 0 1970 07:55 1 Foreshots 60 60 1910 09:15 2 Heads 240 300 1670 11:45 2 Heads 270 570 1400 13:00 2 Heads 230 800 1170 14:00 3 Middle-run 265 1065 905 14:55 3 Middle-run 250 1315 655 15:25 3 Middle-run 130 1445 525 16:30 3 Tails 245 * 1690 280
PHASE VOLUME
(ml) ALC CONTENT
(%) % OF OUTPUT
Foreshots 60 95 3.0 Heads 740 95 37.6 Middle-run 645 93 32.7 Tails 245 * 82 12.4 * Lost 280 95 14.2 * Value corrected to 95% from 82%. (285-ml X .82) / .95 = 246-ml @ 95%
FIGURE 3 In order to use the tables at Figures 2, 3, and 4 as accurate guide-lines of the transition points for your spirit runs, it’s necessary to map the quantities on the table you’re using to your quantities. For example, Figure 3 shows a total volume of 95% alcohol of 1970 ml. Say the volume of 95% alcohol in a particular run of yours was 2050 ml. A mapping factor can be calculated by dividing your volume by the table’s volume. That is, 2050 / 1970 = 1.04.
81
At the bottom of Figure 3 is a table showing the total volumes for each phase:
PHASE VOLUME (ml)
ALC CONTENT (%)
% OF OUTPUT
Foreshots 60 95 3.0 Heads 740 95 37.6 Middle-run 645 93 32.7 Tails 245 * 82 12.4 * Lost 280 95 14.2 * Value corrected to 95% from 82%. (285-ml X .82) / .95 = 246-ml @ 95% For all the volumes in the volume column, multiply them by the mapping factor, 1.04, and enter the results in the corresponding volume column of the table for your run. This would enable you to very closely emulate the actual spirit run documented by Figure 3. Having such a table as a guideline can be very reassuring to a novice distiller just becoming familiar with judging the transition points. In actual practice, it’s not necessary to map up the foreshots if you don’t want to. They can stay at 40 to 60 ml for up to a 50% larger run, but make sure that the difference is added to the quantity of heads, so when the transition point to the middle run occurs the same amount of distillate will have passed whether you mapped up the foreshots or not. Using Figure 2 or 3, depending on whether your run has an adjunct of feints or not, map the volumes of each phase from the bottom table onto your table (copied from Appendix C). You are now ready to begin your spirit run. Close both ball valves, start running cold water through the heat exchanger, ensure the needle valve is closed, place a 250-ml graduated cylinder under the output, turn on the electric current, and wait for it to boil. With a 750W heater, 20L of corn mash will take about 3½ hours to boil. 8L of diluted low wines will take about an hour and a half. When it comes to boil the still-head thermometer will read about 78oC (172.5oF). Leave the needle valve closed for 20 or 30 minutes to allow the still to equilibrate. If the still is left to equilibrate longer, this is not a problem. When the still has equilibrated, open the needle valve and adjust the flow rate to one drop per second. This can be done by counting the drops for ten seconds. If the number of drops is ten then it’s running at one drop per second, and if it’s not then the needle valve can be adjusted and the drops counted for ten seconds again and so on until the flow rate is one drop per second. The spirit-run is now in the foreshots phase and the foreshots are now running into the graduated cylinder at one drop per second. The foreshots can be identified by taking a few drops on a spoon and smelling them. The foreshots should be treated as poisonous and so tasting should not be attempted at this point. Anyway, the solvent-like smell of the foreshots is strong enough to dissuade anyone from tasting them. For the 20L of corn mash, you can
82
collect 40-ml of foreshots and transfer them to a container clearly labeled “Foreshots”. They should be discarded, used as gas-line antifreeze, fondue fuel, barbecue starter, paint-brush cleaner, or whatever other use you may have for a highly flammable, volatile, and poisonous solvent. After the foreshots have been transferred the flow rate can be increased to 2 drops per second (i.e. 20 drops per ten seconds). This is the beginning of the heads phase. The transition from the foreshots to the heads phase is very simple because it’s quite arbitrary. After about 40 ml or so of foreshots have passed, the pungent solvent-like smell will have diminished considerably, and since the heads phase serves as a large buffer between the foreshots and the middle-run (i.e. the finished whiskey) it’s not necessary to bleed out every trace of foreshots before starting the heads phase. Using your table, mapped from Figure 2 or 3, you can estimate roughly how much heads to expect before switching to the middle-run. This transition is not so easy to determine. What the operator needs to know is what pure alcohol tastes like. Unlike what most people think, pure alcohol is not harsh or overpowering. Rather, it is very smooth and sweet and can be described as devoid of harshness. After 100-ml or so of heads have passed, collect a few drops on a spoon and smell it and taste it. The novice distillers will think they are tasting pure alcohol, but there will be a detectable harshness and a background of off flavour. The off flavour at this point is due to unwanted esters and aldehydes, which are not poisonous. At this early point while this off flavour is most evident, take a number of drops onto a spoon or into a wineglass and add an equal volume of water. Swirl it around and smell it and taste it. The water will amplify this off flavour and smell so it can be more easily detected. As the heads phase progresses, this off flavour will fade away. Continue to monitor the flavour by diluting with water, and when no trace of this off flavour can be detected, allow another 20 or 30 ml to pass then switch to the middle-run. Once you are familiar with the subtle off flavour of the heads, you will be able to pick it out very easily, and will only have to dilute the sample to detect it right at the end of the heads phase when the off flavour has all but completely faded away. Be sure to transfer the heads to a container clearly labeled “Corn Feints” and store them for future spirit-runs. At this point the middle-run has started and the flow rate can be increased to 3 drops per second (i.e. 30 drops per ten seconds). Again, referring to your table, determine roughly how much middle-run to expect before switching to the tails. Although the transition from middle-run to tails is marked by a considerably more obvious flavour change, it is still quite tricky to determine exactly how far you want to let it go before switching. For the first 75 to 80% of the middle-run the distillate will taste of little more than pure alcohol, but towards the end it will begin to take on a very pleasant flavour that is definitely characteristic of fine whiskey. By sampling a few drops off a spoon every few minutes, you’ll notice that this flavour is becoming more and more intense. At first the increasing intensity will taste more and more pleasant, but after a point it will become cloying and overpowering. After a few more minutes it will become very acrid and bitter. The distiller has to decide how far they want to collect this flavour. As a guideline, even the mildest of
83
whiskies do collect a small amount of the cloying and overpowering flavour at the early stage of its presence, and the stronger flavoured whiskies retain progressively more. But don’t go too far! The middle-run must be terminated before these acrid and bitter flavours emerge. It defies description, but there is a level of harshness that virtually no experienced distiller goes to, and it creeps up rapidly so when the intense esters are prevailing stay close by and monitor it frequently and be prepared to switch receivers quickly. When the end of the middle-run is near and the tails are approaching, it’s wise to start emptying the receiver into the middle-run container frequently. If you start emptying the receiver every 20 ml or so, then when the acrid and bitter flavours emerge (i.e. the beginning of the tails) then only 20 ml or less will be contaminated with tails. It’s important to note, that when the acrid and bitter flavours do emerge, the entire contents of the receiver at that time must be relegated to tails. If the acrid and bitter flavours were mixed with the middle-run they would spoil the overall flavour of the finished whiskey. This is why it’s important to minimize the quantity in the receiver that gets contaminated, so as to avoid losing very much of the desirable flavours leading up to the tails. It’s a good idea for novice distillers to make a point of purposely ending the middle-run on the early side for the first couple of runs, and then go progressively later in subsequent runs as they become more familiar with this transition point. For the first runs which are ended on the early side, it’s important to continue tasting the distillate after the middle-run has been ended to become familiar with the changes in flavour leading up to the acrid and bitter flavours which mark the beginning of the tails. Spirit-runs that are ended on the early side are smoother and milder, so the progression from the first runs ending early to subsequent runs ending later allows the novice distiller to taste a spectrum of corn whiskey flavour from mild to fuller bodied. This affords an opportunity to systematically determine which they prefer. But remember, if the first run has no adjunct of feints its flavour will be uncharacteristically thin and insipid and taste of raw alcohol. After the middle-run is completed, it’s important that the entire middle-run be placed in a single container and thoroughly mixed. This, when diluted, is the finished corn whiskey. The remaining distillate is the tails and should be collected until the still-head temperature is about 82oC (179.5oF). The end of the tails phase can also be determined by tasting a few drops on a spoon. When all the acrid and bitter flavours yield to a grainy watery sweet flavour, then switch the still off. The spirit-run is complete. The tails should be transferred to the container labeled “Corn Feints” where they are mixed with the heads, and are collectively known as “feints”. Do not empty the residue out of the boiler until you are sure you are satisfied with the whiskey. If you inadvertently spoil the middle-run by misjudging the transition points between heads and middle-run or between middle-run and tails, you can simply return the heads, middle-run (diluted or not), and tails to the residue in the boiler and redo the entire
84
spirit-run. There is no need to return the foreshots. The subsequent run can be executed without that phase. The spirit-run can be rerun in this manner several times if required, which is often necessary for a novice distiller becoming familiar with the transition points. This rerun can even be done when a significant portion of the middle-run has been consumed during evaluation. The middle-run cut will just be smaller. In the tables at Figures 2, 3, and 4, which are data from actual spirit-runs, you will observe that each run records a loss of alcohol around 10-14%. This loss is almost entirely due to alcohol left in the boiler after the still is switched off. A fractionating still of this design does not need to sustain a loss anywhere near this magnitude. The only reason it occurs is because the distillate that emerges after the stillhead temperature is 82oC (179.5oF) is not usable in subsequent whiskey distillations. In other words, above 82oC (179.5oF) the distillate is not suitable for tails and therefore cannot be mixed with the feints. If the tails were collected all the way up to a stillhead temperature of 97oC (207oF) the tails would contain almost all the fusel alcohols and heavier compounds. The concern here is that after repeated distillations where the feints are recycled through numerous spirit-runs, the fusel alcohols would literally accumulate from batch to batch, to the extent that the feints would become contaminated with such a high concentration of fusel alcohols that it would pervade into the finished whiskey. This would not only spoil the flavour of the whiskey, but would predispose the whiskey to causing bad hangovers. A condition normally avoided when making whiskey in a high-separation still. However, all is not lost. If the operator were to create a fifth phase, namely the “redistill” phase, all the distillate after the tails could be collected in a separate container labeled “Redistill”. The redistill could not be used in the production of whiskey, but once it had accumulated to 10 or 20 litres (2½ - 5 US gallons) it could be redistilled in the spirit still in a manner that rectifies it to pure alcohol. The alcohol could be used to make gin, vodka, or essence-based spirits. It could also be used as grain neutral (i.e. approximately pure alcohol) to be diluted to 40 - 50% alc/vol and blended with whiskey to adjust the intensity of its flavour. This will be discussed later. When the spirit-run is complete the packing in the column will be flooded with tails. These should be thoroughly washed from the column by pouring generous quantities of boiling water down from the top. Next, the boiler should be drained and flushed. This can be done by attaching the drain-hose to the bottom ball valve and leading the tube to a floor drain then opening the valve. After
85
the boiler has drained it can be flushed by attaching one end of the flushing-hose to the upper ball valve and the other to a tap with a garden-hose thread. Open the upper ball valve and turn on the tap for a few seconds, let it drain, turn on the tap again, let it drain, and so on until it’s flushed. Flow Rate: In the spirit-run procedures documented in Figures 2 and 3 above, the flow rates were set very low. This was done to slow the rate that the transition points occurred to allow novice distillers an opportunity to familiarize themselves with identifying them and switching the phases. The low flow rate results in the spirit-run operating at a relatively high level of separation. And, this is evident in the alcohol content of the tails (e.g. 82%). In a gooseneck still the tails are typically between 50 and 70% alc/vol. At the relatively higher level of separation the tail congeners are passed across while the water and fusel alcohols are held back. In the end the same spirit is produced but with less water and fusel alcohols. However, there is no question that there are subtle differences between whiskies distilled at differing separation levels. When you are comfortable with identifying the transition points and switching the phases, you can start running the flow rates considerably faster, even to the point of having the distillate flowing continuously from the still (i.e. not dripping). However, the foreshots should still be taken off at no more than one or two drops per second. The heads should run a little slower than the middle-run and tails, but many distillers run the heads at the same rate. The way to determine if the flow rates are too fast or can be increased is to monitor the alcohol content of the tails. If the alcohol content of the tails is above 70%, you know that the flow rate can still be increased. If the alcohol content of the tails is getting down to the low 50s, then you’re probably running on the fast side and should slow it down a little. These determinations, of course, can only be made from one run to the next. With small runs like the 20L discussed above, the transition points will come by fast and you will have to pay close attention to avoid misjudging the switches of the phases. However, larger runs will have longer transitions and will be much easier to judge at the higher flow rates. Naturally, higher flow rates and larger runs, particularly in the case of spirit-runs of large volumes of low wines from multiple beer stripping runs, scale nicely to larger operations. See the table at Figure 4 for actual data from a spirit-run operated at higher flow rates. The flow rates can be run even faster than those of Figure 4 and once you are comfortable with judging the transition points this is well worth experimenting with.

86
Actual data from a spirit-run of 20.5L of corn mash (7.3% alc with a 500-ml adjunct of feints @ 92% alc)
[(20500-ml X .073) + (500 X .92)] / .95 = 2060-ml alc @ 95%
TIME FLOW RATE
(DROPS/SEC) PHASE AMOUNT
COLLECTED (ml of 95%
alc/vol)
TOTAL COLLECTED
(ml of 95% alc/vol)
AMOUNT REMAINING
(ml of 95% alc/vol)
12:20 0 Equilibrating 0 0 2060 12:55 1.2 Foreshots 60 60 2000 14:05 2.5 Heads 270 330 1730 15:20 2.5 Heads 250 580 1480 16:00 2.5 Heads 140 720 1340 16:45 3.5 Middle-run 250 970 1090 17:30 3.5 Middle-run 250 1220 840 18:15 3.5 Middle-run 250 1470 590 18:35 3.5 Middle-run 100 1570 490 18:45 3.5 Middle-run 40 1610 450 18:47 3.5 Middle-run 10 1620 440 19:30 3.5 Tails 175 * 1795 265
PHASE VOLUME
(ml) ALC CONTENT
(%) % OF OUTPUT
Foreshots 60 95 2.9 Heads 660 95 32.0 Middle-run 900 93 43.7 Tails 175 * 75 8.5 * Lost 265 95 12.9 * Volume corrected to 95% alc/vol from 75%. (220-ml X .75%) / .95 = 175-ml @ 95%
FIGURE 4 Diluting: The final stage in making pure corn whiskey is to dilute the middle-run to between 40 and 50% alc/vol. It’s a good idea to use distilled or deionized water as sold at supermarkets and pharmacies to dilute corn whiskey. However, many people simply use soft or filtered tap water. Hard water should be avoided because, not only can it impart off flavours, but it can cast a white precipitate that often results in a turbid or cloudy appearance, or a chalky sediment at the bottom of the bottle. This precipitate is perfectly harmless, but is aesthetically unpleasing. An example of diluting the middle-run to produce an excellent corn whiskey is to mix 900 ml of middle-run with 1100 ml of distilled water to produce 2L of 45% alc/vol corn whiskey.
87
Blending: Whiskey produced in a high-separation spirit still tends to have a very rich and intense flavour profile. This is because high-separation stills concentrate more of the desirable congeners into the middle-run while keeping the undesirable ones out, as opposed to lower-separation stills which lose more of the desirable congeners to the heads and the tails in the course of keeping the undesirable ones out. In the end, whiskey made in a high-separation still is clean and rich, but may or may not be too intense. There are several ways to reduce the intensity of the flavour. One is to blend the whiskey with grain-neutral. Grain-neutral is about 95% alc/vol and is, for all practical purposes, almost pure alcohol that is very nearly devoid of all congeners. The grain-neutral should be diluted with pure water to the same alcohol content as the whiskey. A small sample, say 30 ml (1 oz), of the whiskey can be blended 50/50 with diluted grain-neutral and tasted. If the flavour has become too insipid or is still too intense, the ratio can be adjusted slightly and tasted again. This is repeated until the right blend is achieved. Typically, the right blend is somewhere around 50/50. There are certain advantages to blending with grain-neutral to reduce flavour intensity, and they are that the high-separation spirit still is eminently suited to producing pure alcohol and therefore grain neutral. Also, it’s considerably easier to produce large volumes of pure alcohol than it is to produce large volumes of whiskey, so blending 50/50 or so with grain neutral becomes a very economical way to stretch your whiskey. However, purists can quite rightly argue that once blended with grain-neutral, pure corn whiskey is no longer pure. So, in order to reduce flavour intensity without violating the purity of the whiskey, the distillation process must be adjusted. First, by reducing the adjunct of feints, the intensity of the whiskey flavour will decrease. How much of course, can only be determined from one run to the next. But, don’t reduce the adjunct of feints to less than 250 ml to 20L of strained mash. If it’s still too intense, start taking a slightly narrower cut. That is to say, let the heads run a little later and end the middle-run a little earlier. This way less congeners go into the middle-run and therefore the flavour is less intense. And finally, you can run the flow-rate faster and thereby reduce the level of separation. This will cause more of the desirable congeners to bleed into the heads and the tails. Hence, behaving more like a low-separation still Storage: Distilled spirits should be stored in glass, not plastic. Corn whiskey, by tradition, does not require maturing or aging in oak or charred oak barrels. Pure corn whiskey can be consumed right away. However, many distillers including the author contend that corn whiskey does improve for about five weeks after it’s made. No one appears to have an explanation for this, and many people believe it’s just folklore. The same, by the way, is also

88
true for other non-aged spirits such as gin and vodka, and most producers of these spirits ensure their product is not shipped for about three months after bottling.
89
SUMMARY OF PROCEDURES The following is a consolidated summary of the procedures used to make pure corn whiskey that were detailed in the chapters on Mashing, Fermentation, and Distillation. MASHING 1. Prepare 23L of pH 5.8 mash water in a large pot on a stove. 2. Turn the stove on high. 3. Monitor the temperature until it’s 74oC (165oF). 4. Turn off the heat, and stir in 7L of flaked maize. 5. Stir the mash until the starches disperse, and the temperature drops to 66.5oC (152oF). 6. Stir in 1½L of crushed barley malt and 5-ml (1-tsp) of gluco-amylase. 7. Cover and leave for 90 minutes or longer. FERMENTATION 8. Measure the OG of the mash. 9. Ensure OG is below 1.070 (i.e. ideally between 1.060 and 1.070). Adjust with water
if necessary. 10. Ensure mash temperature is below 38oC (100oF). Chill if necessary. 11. Transfer the mash to a 30+L fermenter. 12. Aerate the mash. 13. Ensure ambient temperature is between 21 and 33oC (70 and 90oF). 14. Pitch 60g (1/3 cup) of active dried bakers’ yeast, or 150g (1/3 lb) of bakers’ yeast
cake. 15. Allow to ferment to completion (typically, 72 to 84 hours). 16. Strain the mash. 17. Measure the TG of the mash. 18. Measure the volume of the mash. 19. Calculate the percent alc/vol of the mash. BEER-STRIPPING DISTILLATION (Optional) 20. Transfer the fermented and strained corn mash to the beer stripper. 21. Close both ball valves. 22. Start running cold water through the condenser. 23. Turn on the electric current. 24. Place a suitably sized receiver under the output of the beer stripper. 25. Collect the low wines until the still-head temperature reaches 98oC (208.4oF) or so
(approximately 4½ hours from when the electric current is switched on).
90
SPIRIT-RUN 26. Add 500-ml of feints to the fermented mash, or the low wines from the beer-stripping
run. 27. Transfer the fermented mash, or the low wines to the spirit still. 28. Ensure spirit still contains at least 8L. Top up with water if necessary. 29. Close both ball valves. 30. Calculate the volume of 95% alc/vol in the still and enter it into a table like the one at
Appendix C. 31. Map the table 2, 3, or 4 volumes to your volumes and enter them in your table. 32. Start running cold water through the heat exchanger. 33. Ensure the needle valve is closed. 34. Place a 250-ml graduated cylinder under the output. 35. Turn on the electric current. 36. Wait for it to boil. 20L of corn mash will take about 3½ hours. 8L of low wines will
take about 1½ hours. 37. Equilibration: After it comes to boil leave the needle valve closed for 20 or 30
minutes to allow the still to equilibrate. 38. Foreshots: Open the needle valve and adjust the flow rate to one drop per second. 39. Collect 40-ml or so of foreshots and transfer them to a container labeled “Foreshots”. 40. Heads: Increase the flow rate to 2 drops per second. 41. Using the mapped volumes from your table, estimate roughly how much heads to
expect. 42. Determine the end of the heads phase by diluting and tasting samples of the distillate. 43. Allow an additional 20 or 30 ml of distillate to pass into the heads. 44. Middle-run: Transfer all the heads to a container labeled “Corn Feints” and begin
collecting the middle-run. 45. Using the mapped volumes from your table, estimate roughly how much middle-run
to expect. 46. Towards the end of the middle-run, taste the distillate periodically to determine the
onset of the tails. 47. Tails: Decide where to end the middle-run and switch receivers. 48. Collect the tails until the still-head temperature is about 82oC (179.5oF). 49. Switch off the still. 50. Transfer all the tails to the container labeled “Corn Feints”. 51. Place the entire middle-run in a single container and mix. 52. Flush the column with boiling water. 53. Drain and flush the boiler. 54. Dilute the middle-run to between 40 and 50% alc/vol with distilled or deionized
water. 55. The diluted middle-run is the finished corn whiskey, and can be consumed right
away. However, the flavour will benefit by aging for up to five weeks in glass.
91
APPENDIX A OTHER MASHING METHODS
This section describes other mashing methods than the one given in the chapter on Mashing. The method described in the chapter on Mashing employs flaked maize, which is much easier to mash than undispersed forms of corn such as corn meal or corn flour. Undispersed grains require a full decoction (i.e. boil) to completely disperse their starches in the mash water, where flaked grains do not. Also discussed here, is the mashing of other cereal grains than corn. Flaked Grains All flaked grains can be mashed the same as flaked maize. Flaked maize was chosen as the example simply because corn is the subject matter of this text. Examples of other flaked grains that are used to make whiskey are: flaked rye; flaked wheat; flaked barley; and, flaked oats (i.e. rolled oats). Flaked oats (not popular as a whiskey grain) are called “rolled oats” and are probably never referred to as “flaked oats”. Cereal Grains To mash cereal grains that are not flaked, they need to be boiled in order to disperse their starches in the mash water. To do this, the grain mash needs to be liquefied with some of the malt enzymes or the mash would turn to a thick porridge that would not boil but would burn on the bottom of the boiling vessel. Examples of widely used cereal grains for making whiskey are: corn meal; rye meal; wheat meal; and barley meal. The flour of the same grains can also be used, but requires mixing with cold water prior to adding to hot mash water to prevent clumping. Method Equipment • 34-40L pot with lid
• a large plastic or wooden stirring spoon • a floating dairy thermometer, graduated from 0oC to 110oC (32oF to 230oF) • pH papers, range 5.0-6.5
• pH papers, range 2-12 • tincture of iodine • measuring spoons • eye dropper
Ingredients
• 23L of fairly soft municipal tap water. E.g. hardness level of 4; almost no iron; 100 ppm calcium; pH 8.5.
• 10-ml (2-tsp) Gypsum (CaSO4)
92
• 95% sulphuric acid (H2SO4) • 7L cereal grain (e.g. cornmeal, rye meal, wheat meal) • 1½ L crushed 2-row or 6-row pale barley malt • 5-ml (1-tsp) Gluco-amylase
Prepare 23L of pH 6 to 7 mash water as described in the chapter on Mashing. Turn the stove on high, cover the pot, and let the water heat up to the conversion strike temperature, 73oC (163oF). You will have to frequently stir the water thoroughly and measure the temperature as the water heats up until the strike temperature is reached. When the water is at the strike temperature, turn off the heat, and stir in the cereal grain. The temperature should come to rest at about 66oC (151oF) and the mash will become a thick porridge. At this point, it’s only important that the mash is under 71oC (160oF). Next, stir in about 100-ml of the crushed barley malt. Cover the pot and leave it for about 20 minutes. It’s helpful to stir the mash every few minutes. At this point, the mash should be liquid and easy to stir. Turn the stove back on to high and stir continually while the heat is on to avoid scorching the grain on the bottom of the pot. It may be necessary to set the stove to a lower heat to avoid scorching if the pot doesn’t have a thick aluminum plate bonded to the bottom. A mechanical stirring device is very helpful for this stage. Continue heating and stirring until the mash comes to boil. This will take about 40 minutes with the stove set on high. When the mash is boiling, cover the pot to the extent that it doesn’t foam over, and leave to boil for about 20 or 30 minutes. If the pot is a pressure cooker, secure the lid in place as per the pressure cooker instructions. Under pressure, the mash will only require 10 or 15 minutes. There is no need to stir during the boil, as the rolling motion of the boil will rouse the mash enough to prevent scorching. After the boil (or pressure cook), turn the heat off and allow the mash to cool, or force cool with an immersion chiller, to the conversion strike temperature, 66.5oC (152oF). Next stir in the remainder of the 1½L of crushed barley malt and the 5-ml (1-tsp) of gluco-amylase. The mash temperature should rest at about 65oC (149oF). Cover the mash pot and leave it for 90 minutes or longer to convert. It’s helpful to stir the mash every 15 minutes or so during the 90-minute conversion rest. The mash can even be left for eight or ten hours (e.g. overnight) to cool to fermentation temperature (i.e. under 38oC (100oF)). An immersion chiller can be used to force cool the mash to fermentation temperature any time after the 90-minute conversion rest is complete. After the conversion rest, the starches should be completely converted to sugars. This can be tested for by the iodine starch test described in the chapter on Mashing. The mash is now ready for fermentation as per the chapter on Fermentation.

93
Millet Millet is a cereal grain that is very commonly used in home whiskey making, and is contended by many distillers to make the best whiskey of all the grains. Millet is a very soft grain compared to the other grains discussed above, and for that reason doesn’t require a full boil. To mash millet, use millet meal and mash it by the same method described above for cereal grains, except that when the liquefied mash comes to boil, skip the 20 or 30-minute boil. The mash can then be cooled straight away to the conversion strike temperature and converted. Another method is to bring the mash water to boil, turn the heat off, stir in the millet meal, and cool or force cool the mash to the conversion strike temperature. Then proceed as per the method for cereal grains.

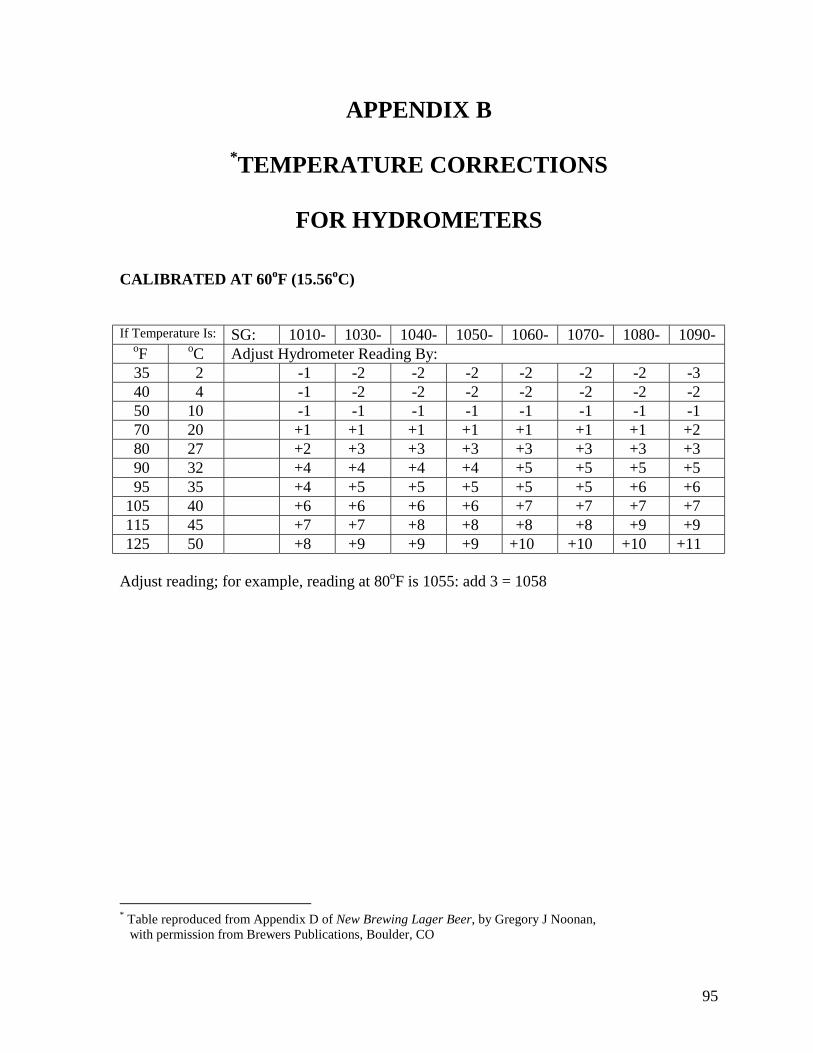
95
APPENDIX B
*TEMPERATURE CORRECTIONS
FOR HYDROMETERS CALIBRATED AT 60oF (15.56oC) If Temperature Is: SG: 1010- 1030- 1040- 1050- 1060- 1070- 1080- 1090-
oF oC Adjust Hydrometer Reading By: 35 2 -1 -2 -2 -2 -2 -2 -2 -3 40 4 -1 -2 -2 -2 -2 -2 -2 -2 50 10 -1 -1 -1 -1 -1 -1 -1 -1 70 20 +1 +1 +1 +1 +1 +1 +1 +2 80 27 +2 +3 +3 +3 +3 +3 +3 +3 90 32 +4 +4 +4 +4 +5 +5 +5 +5 95 35 +4 +5 +5 +5 +5 +5 +6 +6 105 40 +6 +6 +6 +6 +7 +7 +7 +7 115 45 +7 +7 +8 +8 +8 +8 +9 +9 125 50 +8 +9 +9 +9 +10 +10 +10 +11 Adjust reading; for example, reading at 80oF is 1055: add 3 = 1058
* Table reproduced from Appendix D of New Brewing Lager Beer, by Gregory J Noonan, with permission from Brewers Publications, Boulder, CO

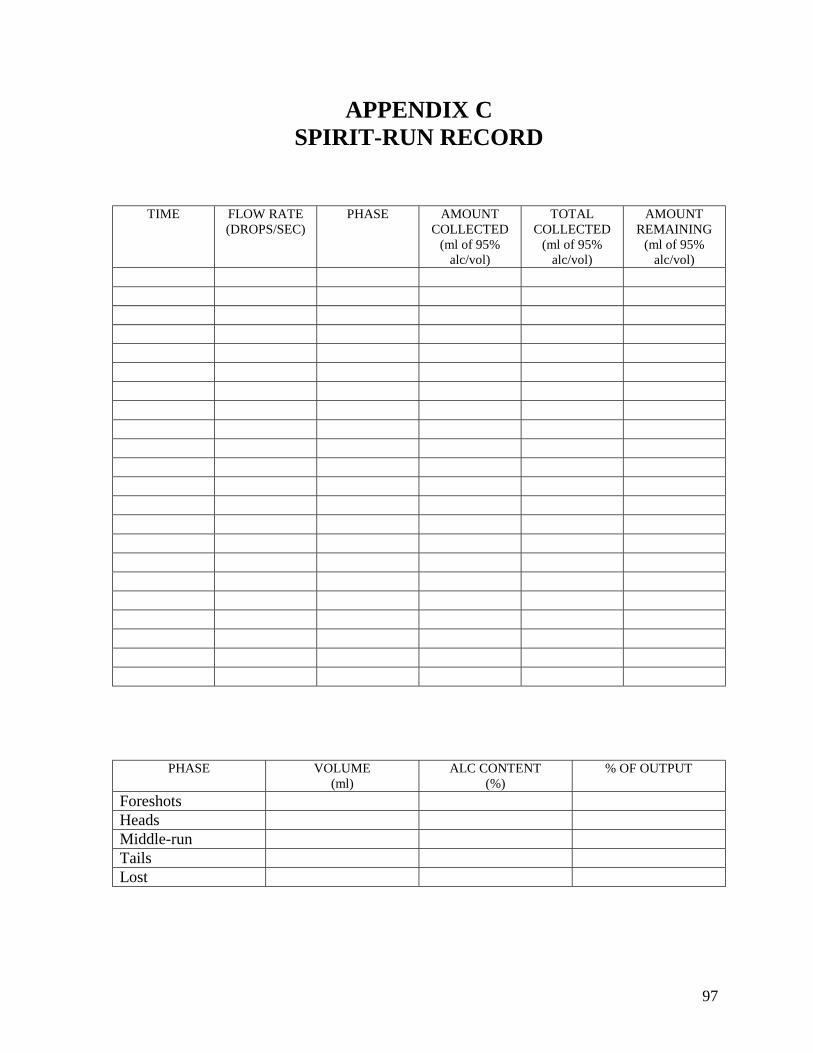
97
APPENDIX C SPIRIT-RUN RECORD
TIME FLOW RATE (DROPS/SEC)
PHASE AMOUNT COLLECTED
(ml of 95% alc/vol)
TOTAL COLLECTED
(ml of 95% alc/vol)
AMOUNT REMAINING
(ml of 95% alc/vol)
PHASE VOLUME (ml)
ALC CONTENT (%)
% OF OUTPUT
Foreshots Heads Middle-run Tails Lost


99
BIBLIOGRAPHY Stone, John. Making Gin & Vodka. www.gin-vodka.com, 1997. Noonan, Gregory J. New Brewing Lager Beer. Boulder, CO: Brewers Publications, 1996. Dabney, Joseph E. Mountain Spirits. Asheville, NC: Bright Mountain Books, 1974.

101
INDEX
A
acetone................................................................. 72 acidity .................................................................. 49 acrylic ...................................................... 22, 42, 75 aerating ................................................................ 67 aeration stone....................................................... 67 aerobic ................................................................. 61 alcohol ........................................................... 11, 61 alcohol content .................................................... 64 alcohol percentage ............................................... 68 alcoholic beverages ............................................... 3 aldehydes ............................................................. 72 alkalinity.............................................................. 49 amino acids.......................................................... 61 amylase................................................................ 56
alpha .......................................................... 55, 56 beta ............................................................ 55, 56
anaerobic ............................................................. 61 anode ............................................................. 28, 36 Appalachian frontier ............................................ 11 aquarium pump.................................................... 67 aqua-vitae ............................................................ 11 aqueous solution ............................................ 23, 49 azeotrope ............................................................. 71
B
baffle plates ......................................................... 70 barley................................................................... 48 barley malt ............................................... 48, 55, 58 barley meal .......................................................... 91 beer ........................................................................ 3 beer stripper......................................................... 26 beer stripping....................................................... 76 bicarbonates......................................................... 49 blending............................................................... 87 blindness................................................................ 7 boiler.................................................................... 35 boiling point .................................................... 3, 69 bourbon................................................................ 18 brandy.................................................................. 70 Brix Balling ......................................................... 63
C
calcium carbonate................................................ 49 calcium content.................................................... 49 calcium hydroxide ............................................... 49 calcium oxide ...................................................... 49 calcium sulphate .................................................. 49 Canadian style ..................................................... 73 carbon dioxide ..................................................... 61
carbonates ............................................................49 cereal grains .........................................................91 column still...........................................................70 condenser coil ......................................................69 congeners .........................................................3, 71 conversion ............................................................59 corn flour........................................................47, 91 corn mash .......................................................58, 65 corn meal..............................................................91 corn whiskey ....................................................5, 83 cornmeal...............................................................47 crushed limestone.................................................49
D
decoction..............................................................91 deionized water ....................................................86 dextrins.....................................................52, 57, 62 diastatic enzymes .................................................48 diluting .................................................................86 distillation ........................................................3, 77 Distillation............................................................69 distilled water.................................................50, 86 drain-hose.............................................................23 draining ................................................................41
E
early cut................................................................74 electrical timer .....................................................35 endosperm............................................................47 enzymes .........................................................48, 55 equilibrate ............................................................81 equilibrium...........................................................70 esters ....................................................4, 62, 72, 83 ethanol..................................................................69 ether linkage.........................................................55 ethyl alcohol...........................................................4
F
feints.........................................................72, 74, 83 fermentable substrate .............................................3 fermentation .....................................................4, 61 fermenter ..............................................................66 fermenters ............................................................22 filler-hose .............................................................23 filling....................................................................41 finished whiskey ..................................................72 flaked barley.........................................................91 flaked maize .............................................47, 58, 91 flaked oats ............................................................91 flaked rye .............................................................91

102
flaked wheat ........................................................ 91 flow rate............................................................... 85 flushing................................................................ 42 flushing-hose ....................................................... 24 force cool............................................................. 67 foreshots .................................................... 4, 72, 81 fractional distillation............................................ 70 fractionating still.................................. 5, 21, 33, 70 fusel alcohols................................................... 4, 33 fusel oils ................................................................ 4
G
gasohol .................................................................. 7 gin.................................................................. 21, 70 gluco-amylase................................................ 52, 58 glucose................................................................. 55 gooseneck ............................................................ 21 gooseneck still ..................................................... 69 government............................................................ 7 grain neutral......................................................... 84 grain pump........................................................... 67 grain-neutral ........................................................ 87 grist mill .............................................................. 18 gypsum .................................................... 49, 51, 58
H
hangovers ........................................................ 4, 84 hard water ............................................................ 86 heads.......................................................... 4, 72, 82 heat exchanger ............................................... 29, 39 height of the spirit still......................................... 41 history of corn whiskey ....................................... 11 hot water heater ............................................. 30, 35 hydrolysis ............................................................ 55 hydrometer............................................... 22, 63, 66 hydrometer cylinder............................................. 22
I
immersion chiller........................................... 24, 67 immersion heater ........................................... 31, 35 infusion-mash ...................................................... 58 ingredients ........................................................... 47 intensity of the flavour......................................... 87 iodine starch test .................................................. 57 iron content.......................................................... 49
K
Kentucky style ..................................................... 74
L
late cut ................................................................. 74 lead-free plumbing solder.............................. 27, 34 liquification ......................................................... 55
low wines .......................................................72, 75
M
malt ......................................................................47 malt extract...........................................................48 mash water .....................................................55, 58 mashing ................................................................55 mashing vessel .....................................................22 measuring alcohol content....................................76 methanol...............................................................72 methyl alcohol........................................................7 middle run ..............................................................4 middle-run......................................................72, 82 millet ....................................................................93 Monongahely rye .................................................16 moonshiners ...........................................................7 Mountain Spirits.....................................................6 municipal tap waters ............................................49
N
narrow cut ............................................................74 needle valve .........................................................39 nitrogen ................................................................61
O
oak barrels..................................................5, 18, 87 originating gravity..........................................63, 66 oxygen............................................................61, 67
P
packing.................................................................41 percent alcohol .....................................................76 permease ..............................................................62 pH.............................................................23, 49, 56 pH meter...............................................................23 pH papers .......................................................23, 56 poit du ..................................................................12 polysaccharides ........................................52, 57, 62 pot still .......................................................4, 21, 69 poteen...................................................................12 potential-alcohol scale..........................................65 precipitated chalk .....................................49, 53, 56 primary distillation...............................................71 primary fermentation............................................62 prohibition..............................................................5 proof.....................................................................76 proof hydrometer............................................22, 76 pure alcohol..........................................................84 pure corn whiskey ................................................87
Q
Queen’s own cask ................................................74

103
R
racking cane......................................................... 22 rack-renting ......................................................... 13 Recirculating Infusion Mash Systems (RIMS).... 67 redistill................................................................. 84 reflux ................................................................... 71 reflux column ...................................................... 37 refractometer ........................................... 22, 63, 66 rolled oats ............................................................ 91 rum ...................................................................... 70 rye........................................................................ 48 rye malt................................................................ 48 rye meal ............................................................... 91
S
saccharification.................................................... 55 Scotch-Irish ......................................................... 12 secondary fermentation ....................................... 62 separation....................................................... 69, 71 siphon starter ................................................. 23, 75 siphon tube .......................................................... 22 smugglers .............................................................. 7 source waters ....................................................... 49 sparging ............................................................... 48 Special Reserve ................................................... 74 specific gravity ........................................ 62, 63, 66 spirit still.............................................................. 32 spirit-run ........................................................ 71, 77 spirits ..................................................................... 3 starches .......................................................... 55, 57 still ............................................................. 4, 69, 75 stillhead ............................................................... 38 storage ................................................................. 87 straining the mash.......................................... 65, 68 substrate............................................................... 61 Sulphates ............................................................. 49 sulphides.............................................................. 33 sulphuric acid .......................................... 52, 56, 58
T
tails ............................................................ 4, 72, 83 Teflon tape..................................................... 27, 34 temperature...................................................... 1, 56 Tennessee style.................................................... 74
terminating gravity.........................................64, 68 thermometer .......................................22, 29, 39, 66 thermostat.............................................................30 thermostor ............................................................36 thin mash................................................................6 transfer hoses .......................................................23 transition points..............................................82, 83
U
uisge-betha ...........................................................12 Ulster Presbyterians .............................................12
V
vapours.................................................................69 vodka..........................................................3, 21, 70
W
water.....................................................................49 water jacket ..........................................................69 water solenoid ......................................................36 wheat ....................................................................48 wheat malt ............................................................48 wheat meal ...........................................................91 whiskey ............................................................4, 12 whiskey distillation ..............................................71 Whiskey Rebellion...............................................17 whiskey still .........................................................69 wine........................................................................3 wood alcohol ..........................................................7
Y
yeast ...............................................................61, 65 active dried.......................................................51 bakers' ..............................................................50 brewers' ............................................................50 distillers' ...........................................................50 pure ..................................................................50 turbo .................................................................50 yeast cake .........................................................51
Z
zymase .................................................................61