Making a Lamp and Shade - Rockler
8
Making a Lamp and Shade By Rob Johnstone and Nick Brady Making objects that are both functional and beautiful has always been a woodworking objective. This turned lamp with custom shade is a good example. 38 August 2021 Woodworker’s Journal
-
Upload
khangminh22 -
Category
Documents
-
view
2 -
download
0
Transcript of Making a Lamp and Shade - Rockler

Making a Lamp and Shade
By Rob Johnstone and Nick Brady
Making objects that are both functional and beautiful has
always been a woodworking objective. This turned lamp
with custom shade is a good example.
38 August 2021 Woodworker’s Journal
268.038-045 P3 Turned Lamp.indd 38 5/28/21 4:09 PM

Woodworker’s Journal August 2021 39
Sometimes it’s better to be lucky than good. I fi rst heard that from a football coach, but it has proven to be true many times in my life. With these turned lamps, I’ll
admit that I started out very lucky.I had known that I would be creating a turned lamp for this
August issue for quite a while. Many different options were swirling around in my mind: multispecies glue-ups, recycled things like a fence post or barn beam, combining materials like epoxy and punky, rotten wood — they all had some interest to me. Then one day while driving by a municipal lawn waste site, I saw some big sections of tree trunks laying around. I often look for possible turning stock opportunities at this site and mostly I am disappointed, but not this time. I was checking out what I thought was a big chunk of maple when I rolled it over and saw the signifi cant red streaking running through the grain. It was box elder, a relative of maple. And on top of that, the section I was looking at revealed very curly grain; it looked like grain from a burl, but there was no appar-ent burl. The piece was big and heavy, and I had no chainsaw with me, so I squatted down and used my legs to lift it without sending me to a chiropractor. When I eventually sectioned up the piece, the grain was even better than I had hoped.
With input from Jeff Jacobson, our art director, I fi gured out how to saw up two large sections and a couple of smaller pieces to get the best yield from this massive log. My cordless chainsaw and a band saw helped me create two pieces that could be mounted on the lathe.
Rough-turning on the LatheNext up, how to go about loading the fi rst blank for turning. I chose to use a faceplate to mount the chunk. It was about 9" long, 7" wide and still very green, so it was pretty heavy. The faceplate coupled with pressure from the tailstock held it securely as I started to shape the piece.
Using a spindle roughing-out gouge, I fi rst reduced the blank to a rough cylinder. There were signifi cant bark inclu-sions and the blank was not remotely balanced. But with a bit
By a stroke of luck, the author found this large piece of box elder featuring some lovely red color and curly grain. Box elder is a relative of maple.
Next stop was a large band saw to further break down the box elder into mountable and turnable blanks.
Trimming with a chainsaw started the process of harvesting the parts. Careful planning ahead made it possible to yield several turnable pieces.
For a video demonstrating how to turn a
lamp body and install the lamp hardware,
please visit woodworkersjournal.com and click on
“More on the Web” under the Magazine tab.
MORE ON THE WEBwww.woodworkersjournal.com
MORE ON THE WEBwww.woodworkersjournal.com
MORE ON THE WEBwww.woodworkersjournal.com
MORE ON THE WEBwww.woodworkersjournal.com
MORE ON THE WEBwww.woodworkersjournal.com
VIDEO
268.038-045 P3 Turned Lamp.indd 39 5/28/21 4:09 PM

August 2021 Woodworker’s Journal40
of patience, I cut enough away for it to spin smoothly. With the rough stuff done, it was time to consider the shape. We decided to build a shop-made lampshade, with its top much narrower than the bottom (you’ll see that project on page 42). So I settled on a curved shape for my turning with a similar ratio of narrow top to wide bottom — but whereas the shade would be geometric in composition, the base would be much more organic. Shaped like a vase or wine carafe, it has a short 31⁄4"-diameter foot, swelling to roughly a 61⁄2" wide diameter and narrowing down to a small 2" top end.
I really enjoy woodturning but confess I still have much to learn. Using various gouges, square- and round-end scrapers and carbide-insert tools from Rockler, I refined the shape until I was pleased with the results. I’m sure a more experienced turner would have achieved a smoother surface, but this curly green wood was still a bit fuzzy when I was done turning. Luckily, I’m nearly a rocket scientist when it comes to sand-ing! (Sigh.) While the box elder’s figure was fun to see as I turned the rough shape, the figure really showed its stunning character as I smoothed the piece with ever-finer sandpaper. I sanded the lamp body up to 320-grit.
To begin the finishing steps, I decided to use some Glu-Boost Fill n’ Finish as a pore filler. It’s a cyanoacrylate product that basically does not cure until it is sprayed with a hardener. I turned the lathe down to its slowest speed (56 rpm) and carefully squeezed the product onto the lamp body while holding a clean cloth under the application area. I rubbed the product into the grain and then sprayed the hardener on it. The results were amazing: a super-smooth surface with the pores perfectly filled. I sanded that surface with 320- and 400-grit sandpaper, then wiped on a thin coat of gloss water-based polyurethane. When it dried, I burnished the poly with a coarse paper towel and repeated the process two more times.
Ready for Hardware and WiringWith that completed, I parted off the top of the turning and drilled a 3/8"-diameter hole through the lamp body from top to bottom, using a 913⁄ 16" Fisch Brad Point Bit (Rockler item 57974) right on the lathe. I unmounted the lamp body and used a Forstner bit to bore a recess into its base. Then on the router table, I formed a shallow slot to allow the lamp cord an exit from the bottom.
Installing the lamp hardware (Rockler item 67833) was super easy; I just followed the package directions. My wooden lamp body was then complete, so I turned another version (see page 45). If you turn a lamp, pages 42 to 45 will teach you how to make a shop-made lampshade to go with it. Rockler offers lamp shade options too, or buy one from other sources.
Step 2: Refining the lamp base’s outer shape.
Step 3: Sanding the curves smooth.
Step 1: Roughing out the blank.
268.038-045 P3 Turned Lamp.indd 40 5/28/21 4:09 PM

Woodworker’s Journal August 2021 41
Once the lamp body was sanded to 320-grit, GluBoost’s cyanoacrylate-based Fill n’ Finish pore filler was applied as a base coat over the raw wood. It was followed by subsequent coats of gloss water-based polyurethane.
After the finishing process was completed, it was time to part off the end of the lamp body. Doing that shortened its overall length to be less than the 3/8"-diameter drill bit that would be used in the next step.
The author was able to bore a 3/8"-diameter hole through the lamp body using a Jacobs® chuck and long drill bit mounted on the tailstock. The lathe’s faceplate has a hole in its center so the bit could exit safely.
With the wire threaded up through the lamp body and the hardware installed, tie a UL knot in the wire (above). Then follow the directions to attach the hot and neutral wires to the appropriate screws on the socket (right). Insert the socket into the hardware to complete the lamp body.
268.038-045 P3 Turned Lamp.indd 41 6/1/21 12:17 PM

August 2021 Woodworker’s Journal42
Nick Brady is a relatively new builder and project designer in Rockler’s shop at company headquarters, but he’s been a hobbyist woodworker for a long time and formerly was a middle-school band teacher. This lampshade project proved to be a bit of a mathematical brainteaser, but Nick says he enjoyed the challenge it presented!
Building a Framed Lampshade
This six-paneled, maple and rice paper lampshade proj-ect will test your precision and patience. After exper-imenting with many different angle combinations for
cutting the wooden parts, I was able to put together a list of measurements and a couple of assembly jigs to help improve your success in making a framed shade like mine. Note that the overall height of my shade is intended to complement the size of the box elder lamp Rob made on page 38.
Cutting Panel Sides, Bottoms and TopsI started by ripping a piece of 1/2"-thick maple stock, mea-suring 5" x 24", into six long strips that would become the 12 side pieces for the shade’s six panels. To do that, I tilted my table saw blade carefully to 29 degrees using a Wixey Digital Angle Gauge (see below), and bevel-ripped both long edges of the board. Returning the saw blade to 90 degrees, I then ripped two 1/2"-wide x 24"-long strips with the bevel cuts on one edge of each. Repeat this process to make four more long strips with one beveled edge and one square edge. Now take what remains of this piece of stock and rip it into six more 1/2"-wide strips with your blade kept at 90 degrees. You can see both groups of long strips in the middle photo, next page.
Each of the bevel-edged strips you just made will become two panel side pieces. Using a miter gauge on the table saw, I cut a dozen of these panel sides to 11" long, carefully squaring up their ends.
Wixey’s Digital Angle Gauge (Rockler item 57097) is a helpful battery-powered accessory for setting blade tilt angles without using a protractor or conventional bevel gauge. It features an LED readout that reports angle settings to a tenth of a degree. To use the gauge,
set its magnetized base against a saw blade and zero out the display. When you tilt the blade, the Angle Gauge will report its exact tilt as it changes. For this lampshade project’s 29-degree bevels, the gauge’s simple and accurate operation came in very handy!
268.038-045 P3 Turned Lamp.indd 42 6/1/21 12:18 PM

Woodworker’s Journal August 2021 43
You’ll use the remaining six long strips with square edges to make the panel top and bottom pieces. To do this, swivel your miter gauge to 12 degrees and cut six pieces for the panel bottoms to 5¾" long. Cut six pieces for the panel tops to 11⁄2" long. Use a stop block clamped to your saw’s rip fence to control the length of these long and short parts. And when you’re orienting the angled cuts on the ends of each bottom or top workpiece, cut them so the angles are facing one another, as shown in the bottom right photo, this page. Finish sand all the wood parts you’ve made so far.
Panel Gluing and Clamping JigGluing and clamping these side, top and bottom pieces together to form panels will be a lot easier if you use a simple jig. You can see mine at the top of the next page. It consists of three fixed pieces of 1/2" MDF that will form an outer frame around the panel when you assemble it. A wedged piece slides along one of the jig’s frame pieces to provide clamping pressure. I used a large piece of melamine as the base for my jig, because glue won’t stick to it. Cut three 2"-wide pieces of MDF for the jig frame parts. Bevel one edge of one piece to
Make sides for the shade’s six panels by first bevel-ripping both edges of the maple workpiece to 29 degrees.
Reset the blade to 90 degrees, and adjust the rip fence so the beveled offcut will be 1/2" wide. Rip this strip free to form two panel sides. Repeat for the other edge.
Six bevel-edged strips (left) and six flat-edged strips (right) will form the shade’s six panel frames.
Crosscut the six bevel-edged strips into 12 side pieces for the shade panels. With a miter gauge set square to the blade, trim them each 11" long, making sure to square their ends (inset). The au-thor used a flip stop on his miter gauge to set these part lengths.
Cut the ends of the panel top and bottom pieces to 12 degrees. Swivel your miter gauge to that angle, and trim one end of the square-edged strips to shape. Then use a step-off block on the rip fence to set the long bottom and short top part lengths.
29 degrees, and crosscut it 11¾" long. Fasten this piece to the jig base with screws so its square edge is flush to one of the base’s long edges. Orient its beveled edge down so it will press a panel side down and flat when in use. Now miter cut the ends of a second MDF frame piece to 12 degrees, and
268.038-045 P3 Turned Lamp.indd 43 5/28/21 4:09 PM

August 2021 Woodworker’s Journal44
make it 87⁄8" long. Keep its long edges square. Attach this frame piece to the jig with screws so one of its angled ends aligns with the same edge of the jig base as the first frame piece did and so it forms an angle with the first frame piece. The third frame piece I attached was the wedged clamping side. I first beveled the edge of this MDF frame piece to 29 degrees, then split the workpiece across its diagonal with the
blade at 90 degrees to form two wedges. Attach the wedge without the bevel to the jig base so the other wedge (with the beveled edge) can slide along it to provide tension against the panel parts as you glue them up. Cut and screw a cleat over the fixed wedge to hold down the sliding wedge during clamp-ing. Then use your jig to glue and clamp two side pieces, a top and bottom to form each of the six panels (see left photo). When you install the maple parts in the jig, face the bevels on the panel side pieces so they engage the bevels on the jig’s side and wedge. Gently tap the wedge into place.
Second Jig Combines Panels into a ShadeOnce the glue dried on my shade’s six panels, I created another quick jig from MDF that would be used to glue the panels together in an upright position (see photo, above). To arrange the jig’s six blocking pieces into a hexagon shape, I simply taped the panel frames together temporarily, butted the blocks against them and attached the blocks to the jig base with screws. I cut a shallow bevel along the inside edge of each block to improve its hold-down ability.
Ready to Install Rice PaperThe best way to adhere the rice paper to the panels, I learned, is to use a mixture of wood glue and water thinned to the con-
Spread glue on the part ends, and insert the panel workpieces into the jig. The bevels on the panel sides should engage the jig’s inner beveled edges.
The author used this melamine and MDF jig to set and hold side, top and bottom pieces in place when gluing up the shade’s six panels. One of the jig’s three sides consists of a wedged interface to provide progressive clamping pressure.
This second jig with six blocks will hold the six panel frames together for final assembly after the rice paper is installed. Prepare it for use with the six shade frames dry assembled and taped temporarily together.
Tap the jig’s adjustable wedge against the fixed wedge to secure the maple parts. Its beveled edge faces down to engage the panel side bevel.
T x W x L
MATERIAL LIST
1 Panel Sides (12) 1/2" x 1/2" x 11"2 Panel Bottoms (6) 1/2" x 1/2" x 53⁄ 4"3 Panel Tops (6) 1/2" x 1/2" x 11⁄ 2"4 Mounting Support (1) 1/4" x 1/2" x 37⁄ 16"
12°
29° Beveled Edge
Wedge
268.038-045 P3 Turned Lamp.indd 44 5/28/21 4:10 PM
Woodworker’s Journal August 2021 45
Nick Brady is a project builder in Rockler’s shop.
sistency of white school glue. I brushed glue onto the narrower (inner) face of each panel, making sure to not get any glue on the frame edges. I then carefully set the panel down onto flattened rice paper I had taped to a larger melamine surface, making sure there were no ripples in the paper. I found it easiest to place the bottom down first and then gently set the top down.
When gluing the panels to the paper, make sure they don’t sit too long, or the glue could soak through to your work sur-face. As soon as the glue tacks up, trim the rice paper overly large and turn the panels paper-side up. Allow the glue to dry for a few more minutes, then trim off the rest of the extra paper flush to the wood edges.
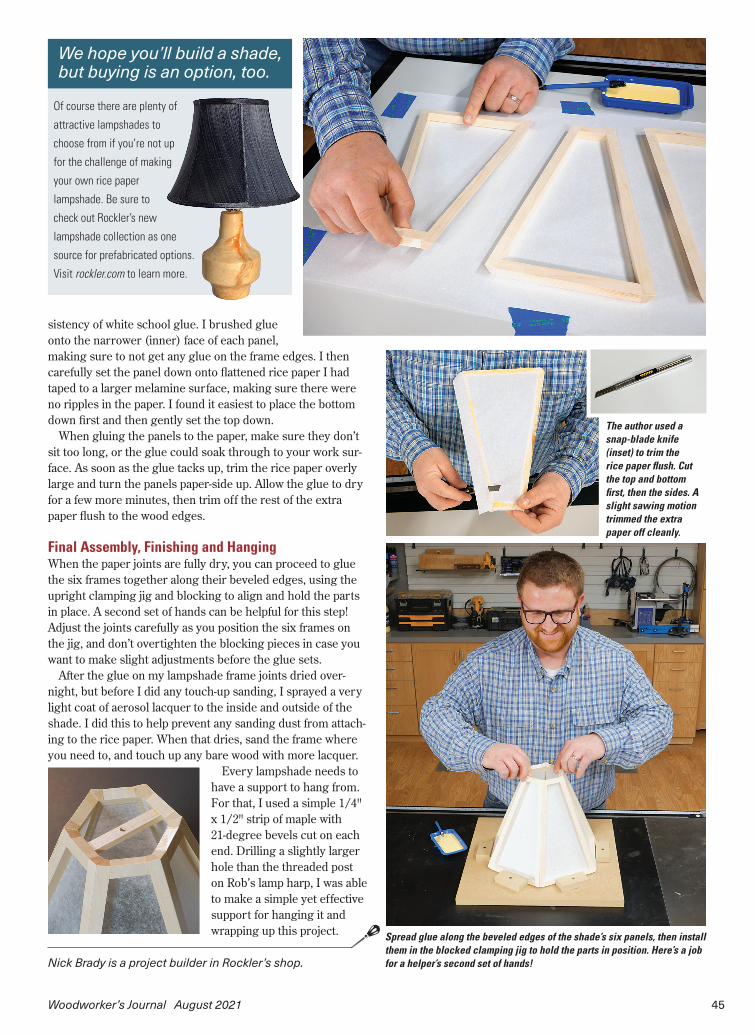
Final Assembly, Finishing and Hanging When the paper joints are fully dry, you can proceed to glue the six frames together along their beveled edges, using the upright clamping jig and blocking to align and hold the parts in place. A second set of hands can be helpful for this step! Adjust the joints carefully as you position the six frames on the jig, and don’t overtighten the blocking pieces in case you want to make slight adjustments before the glue sets.
After the glue on my lampshade frame joints dried over-night, but before I did any touch-up sanding, I sprayed a very light coat of aerosol lacquer to the inside and outside of the shade. I did this to help prevent any sanding dust from attach-ing to the rice paper. When that dries, sand the frame where you need to, and touch up any bare wood with more lacquer.
Every lampshade needs to have a support to hang from. For that, I used a simple 1/4" x 1/2" strip of maple with 21-degree bevels cut on each end. Drilling a slightly larger hole than the threaded post on Rob’s lamp harp, I was able to make a simple yet effective support for hanging it and wrapping up this project.
The author used a snap-blade knife (inset) to trim the rice paper flush. Cut the top and bottom first, then the sides. A slight sawing motion trimmed the extra paper off cleanly.
Spread glue along the beveled edges of the shade’s six panels, then install them in the blocked clamping jig to hold the parts in position. Here’s a job for a helper’s second set of hands!
We hope you’ll build a shade, but buying is an option, too.
Of course there are plenty of
attractive lampshades to
choose from if you’re not up
for the challenge of making
your own rice paper
lampshade. Be sure to
check out Rockler’s new
lampshade collection as one
source for prefabricated options.
Visit rockler.com to learn more.
268.038-045 P3 Turned Lamp.indd 45 6/2/21 9:42 AM