Make a Bootable USB Flash Drive from the Restored Edition of Hiren's Boot CD 1 Linux Method 2 2...
10
Make a Bootable USB Flash Drive from the Restored Edition of Hiren’s Boot CD [email protected] Contents 1 Linux Method 2 2 Windows Method 3 3 Alternative Windows Method (RMPrepUSB) 4 4 HBCD on a Partitioned USB Flash Drive 5 4.1 Create the partitions .................................. 5 4.2 Format the partitions and transfer HBCD to USB ................. 6 4.3 Making the second partition visible to Windows ................... 6 5 Computers without optical drive 10 Introduction We describe how the files of the restored/extended Hiren’s BootCD (HBCD) can be transferred to a USB memory stick (flash drive) and how the later can be made bootable using exclusively tools provided by the HBCD. The quickest and most accurate method is to use Linux command line tools, however Windows can be also used with equally good results. The restored edition of Hiren’s Boot CD employs a combination of the bootloaders syslinux and grub4dos; so the method described in Hiren’s web page 1 does not work for the restored edition. Until recently, because of the limitations of the bootloader syslinux, USB flash drives could only be formated FAT32. Now syslinux can boot from NTFS partitions (it is even possible to boot HBCD from large external hard disks) so we describe this option too. Multipartitioning USB flash drives has some difficulty because Windows can only recognize the first partition. We describe how to partition a USB flash drive and then persuade Windows to recognize the partitions. Warning: If you use a method other than the ones described here, please note that simply copying the files over to an already used USB stick is unlikely to work and some utilities may fail to boot. When transferring iso images to bootable USB sticks or drives, care must be taken so that iso images are written contiguously. If an iso image is fragmented it will not boot. Fragmentation happens when files are written in space left by the deletion of other files. For example if a small file is deleted and subsequently a larger file is written, chances are, the larger file will be fragmented. Always use a freshly formated stick where nothing has been deleted. Using defragmentation software on USB flash drives is not recommended because the repeated read/writes will shorten their life span. 1 http://www.hiren.info/pages/bootcd-on-usb-disk 1
Transcript of Make a Bootable USB Flash Drive from the Restored Edition of Hiren's Boot CD 1 Linux Method 2 2...

Make a Bootable USB Flash Drive from the Restored Edition of
Hiren’s Boot CD
Contents
1 Linux Method 2
2 Windows Method 3
3 Alternative Windows Method (RMPrepUSB) 4
4 HBCD on a Partitioned USB Flash Drive 54.1 Create the partitions . . . . . . . . . . . . . . . . . . . . . . . . . . . . . . . . . . 54.2 Format the partitions and transfer HBCD to USB . . . . . . . . . . . . . . . . . 64.3 Making the second partition visible to Windows . . . . . . . . . . . . . . . . . . . 6
5 Computers without optical drive 10
Introduction
We describe how the files of the restored/extended Hiren’s BootCD (HBCD) can be transferredto a USB memory stick (flash drive) and how the later can be made bootable using exclusivelytools provided by the HBCD. The quickest and most accurate method is to use Linux commandline tools, however Windows can be also used with equally good results. The restored editionof Hiren’s Boot CD employs a combination of the bootloaders syslinux and grub4dos; so themethod described in Hiren’s web page1 does not work for the restored edition. Until recently,because of the limitations of the bootloader syslinux, USB flash drives could only be formatedFAT32. Now syslinux can boot from NTFS partitions (it is even possible to boot HBCD fromlarge external hard disks) so we describe this option too. Multipartitioning USB flash driveshas some difficulty because Windows can only recognize the first partition. We describe how topartition a USB flash drive and then persuade Windows to recognize the partitions.Warning: If you use a method other than the ones described here, please note that simplycopying the files over to an already used USB stick is unlikely to work and some utilities mayfail to boot. When transferring iso images to bootable USB sticks or drives, care must be takenso that iso images are written contiguously. If an iso image is fragmented it will not boot.Fragmentation happens when files are written in space left by the deletion of other files. Forexample if a small file is deleted and subsequently a larger file is written, chances are, the largerfile will be fragmented. Always use a freshly formated stick where nothing has been deleted.Using defragmentation software on USB flash drives is not recommended because the repeatedread/writes will shorten their life span.
1http://www.hiren.info/pages/bootcd-on-usb-disk1
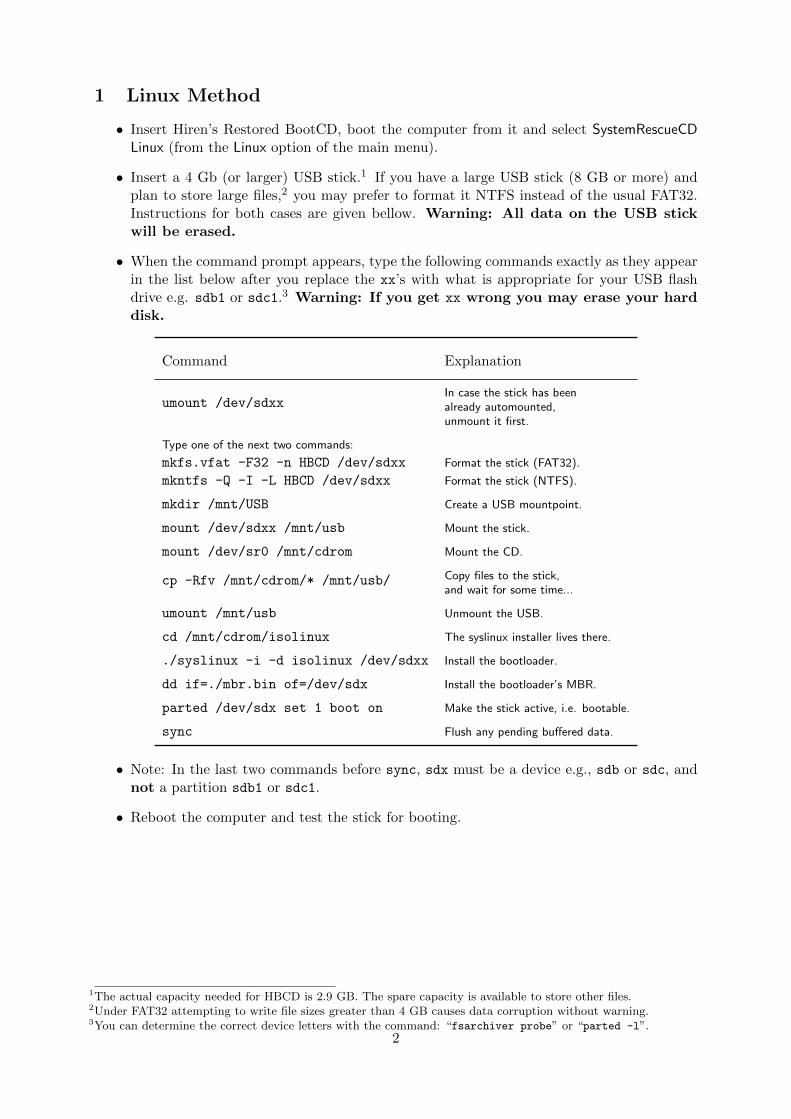
1 Linux Method
• Insert Hiren’s Restored BootCD, boot the computer from it and select SystemRescueCDLinux (from the Linux option of the main menu).
• Insert a 4 Gb (or larger) USB stick.1 If you have a large USB stick (8 GB or more) andplan to store large files,2 you may prefer to format it NTFS instead of the usual FAT32.Instructions for both cases are given bellow. Warning: All data on the USB stickwill be erased.
• When the command prompt appears, type the following commands exactly as they appearin the list below after you replace the xx’s with what is appropriate for your USB flashdrive e.g. sdb1 or sdc1.3 Warning: If you get xx wrong you may erase your harddisk.
Command Explanation
In case the stick has beenalready automounted,umount /dev/sdxx
unmount it first.
Type one of the next two commands:
mkfs.vfat -F32 -n HBCD /dev/sdxx Format the stick (FAT32).
mkntfs -Q -I -L HBCD /dev/sdxx Format the stick (NTFS).
mkdir /mnt/USB Create a USB mountpoint.
mount /dev/sdxx /mnt/usb Mount the stick.
mount /dev/sr0 /mnt/cdrom Mount the CD.
Copy files to the stick,cp -Rfv /mnt/cdrom/* /mnt/usb/and wait for some time...
umount /mnt/usb Unmount the USB.
cd /mnt/cdrom/isolinux The syslinux installer lives there.
./syslinux -i -d isolinux /dev/sdxx Install the bootloader.
dd if=./mbr.bin of=/dev/sdx Install the bootloader’s MBR.
parted /dev/sdx set 1 boot on Make the stick active, i.e. bootable.
sync Flush any pending buffered data.
• Note: In the last two commands before sync, sdx must be a device e.g., sdb or sdc, andnot a partition sdb1 or sdc1.
• Reboot the computer and test the stick for booting.
1The actual capacity needed for HBCD is 2.9 GB. The spare capacity is available to store other files.2Under FAT32 attempting to write file sizes greater than 4 GB causes data corruption without warning.3You can determine the correct device letters with the command: “fsarchiver probe” or “parted -l”.
2
2 Windows Method
• Insert Hiren’s Restored BootCD, boot the computer from it and select Mini Windows XPor Mini Windows 7.
• Insert a 4 Gb (or larger) USB stick.1 Warning: All data on the USB stick will beerased.
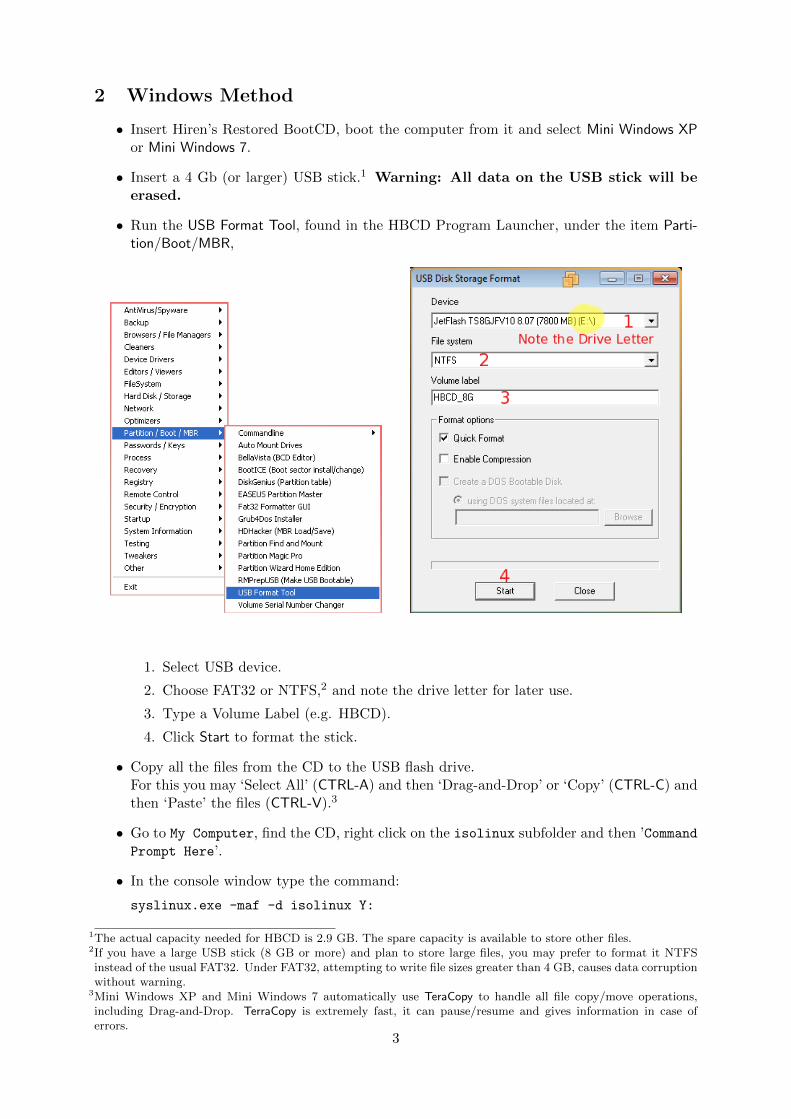
• Run the USB Format Tool, found in the HBCD Program Launcher, under the item Parti-tion/Boot/MBR,
1. Select USB device.
2. Choose FAT32 or NTFS,2 and note the drive letter for later use.
3. Type a Volume Label (e.g. HBCD).
4. Click Start to format the stick.
• Copy all the files from the CD to the USB flash drive.For this you may ‘Select All’ (CTRL-A) and then ‘Drag-and-Drop’ or ‘Copy’ (CTRL-C) andthen ‘Paste’ the files (CTRL-V).3
• Go to My Computer, find the CD, right click on the isolinux subfolder and then ’CommandPrompt Here’.
• In the console window type the command:
syslinux.exe -maf -d isolinux Y:
1The actual capacity needed for HBCD is 2.9 GB. The spare capacity is available to store other files.2If you have a large USB stick (8 GB or more) and plan to store large files, you may prefer to format it NTFSinstead of the usual FAT32. Under FAT32, attempting to write file sizes greater than 4 GB, causes data corruptionwithout warning.
3Mini Windows XP and Mini Windows 7 automatically use TeraCopy to handle all file copy/move operations,including Drag-and-Drop. TerraCopy is extremely fast, it can pause/resume and gives information in case oferrors.
3
where ‘Y’ is the USB drive as noted from above. This command installs the bootloader,the MBR and activates the USB for booting.
• Safely remove the stick and test for booting.
3 Alternative Windows Method (RMPrepUSB)
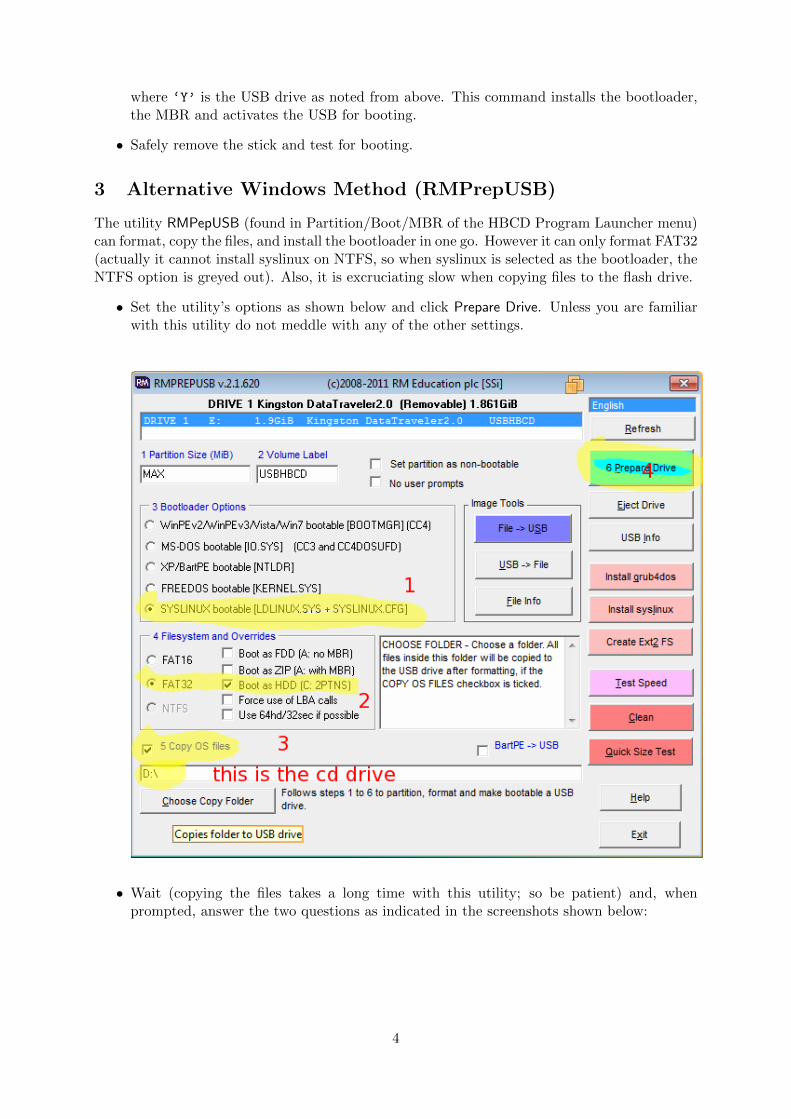
The utility RMPepUSB (found in Partition/Boot/MBR of the HBCD Program Launcher menu)can format, copy the files, and install the bootloader in one go. However it can only format FAT32(actually it cannot install syslinux on NTFS, so when syslinux is selected as the bootloader, theNTFS option is greyed out). Also, it is excruciating slow when copying files to the flash drive.
• Set the utility’s options as shown below and click Prepare Drive. Unless you are familiarwith this utility do not meddle with any of the other settings.
• Wait (copying the files takes a long time with this utility; so be patient) and, whenprompted, answer the two questions as indicated in the screenshots shown below:
4
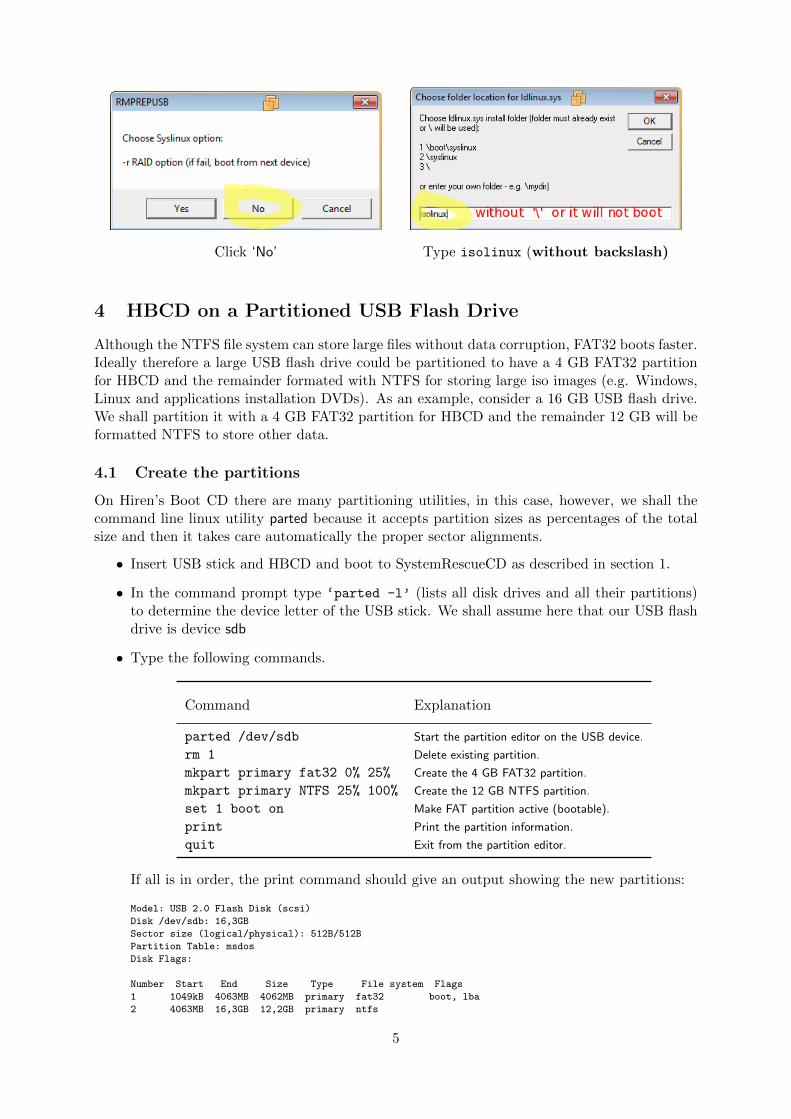
Click ‘No’ Type isolinux (without backslash)
4 HBCD on a Partitioned USB Flash Drive
Although the NTFS file system can store large files without data corruption, FAT32 boots faster.Ideally therefore a large USB flash drive could be partitioned to have a 4 GB FAT32 partitionfor HBCD and the remainder formated with NTFS for storing large iso images (e.g. Windows,Linux and applications installation DVDs). As an example, consider a 16 GB USB flash drive.We shall partition it with a 4 GB FAT32 partition for HBCD and the remainder 12 GB will beformatted NTFS to store other data.
4.1 Create the partitions
On Hiren’s Boot CD there are many partitioning utilities, in this case, however, we shall thecommand line linux utility parted because it accepts partition sizes as percentages of the totalsize and then it takes care automatically the proper sector alignments.
• Insert USB stick and HBCD and boot to SystemRescueCD as described in section 1.
• In the command prompt type ‘parted -l’ (lists all disk drives and all their partitions)to determine the device letter of the USB stick. We shall assume here that our USB flashdrive is device sdb
• Type the following commands.
Command Explanation
parted /dev/sdb Start the partition editor on the USB device.
rm 1 Delete existing partition.
mkpart primary fat32 0% 25% Create the 4 GB FAT32 partition.
mkpart primary NTFS 25% 100% Create the 12 GB NTFS partition.
set 1 boot on Make FAT partition active (bootable).
print Print the partition information.
quit Exit from the partition editor.
If all is in order, the print command should give an output showing the new partitions:
Model: USB 2.0 Flash Disk (scsi)
Disk /dev/sdb: 16,3GB
Sector size (logical/physical): 512B/512B
Partition Table: msdos
Disk Flags:
Number Start End Size Type File system Flags
1 1049kB 4063MB 4062MB primary fat32 boot, lba
2 4063MB 16,3GB 12,2GB primary ntfs
5
4.2 Format the partitions and transfer HBCD to USB
The following commands are similar to those in section 1. We format the two partitions and wecopy the HBCD files to the first partition.
Command Explanation
mkfs.vfat -F32 -n HBCD /dev/sdb1 Format 1st partition (FAT32)
mkntfs -Q -I -L DATA /dev/sdb2 Format 2nd partition (NTFS)
mkdir /mnt/USB Create a USB mountpoint.
mount /dev/sdb1 /mnt/usb Mount the stick.
mount /dev/sr0 /mnt/cdrom Mount the CD.
Copy files to the stick,cp -Rfv /mnt/cdrom/* /mnt/usb/and wait for some time...
umount /mnt/usb Unmount the USB.
cd /mnt/cdrom/isolinux The syslinux installer lives there.
./syslinux -i -d isolinux /dev/sdb1 Install the bootloader.
dd if=./mbr.bin of=/dev/sdb Install the bootloader’s MBR.
sync Flush any pending buffered data.
Reboot the computer and test the stick for booting.The second (NTFS) partition is also ready for use.
4.3 Making the second partition visible to Windows
Windows sees USB flash drives as Removable Storage Devices (same category as CD and DVD)and as such will not permit their partitioning.1 Moreover, if we create partitions with otherutilities (as we did just now) Windows will recognize only the first partition. This section showshow to install a driver that will make widows see the flash drive as a Local Disk and thereforerecognise all the partitions.
• Insert HBCD USB as created in the previous section and boot from it into Mini WindowsXP. We can do this because the first partition is always visible.
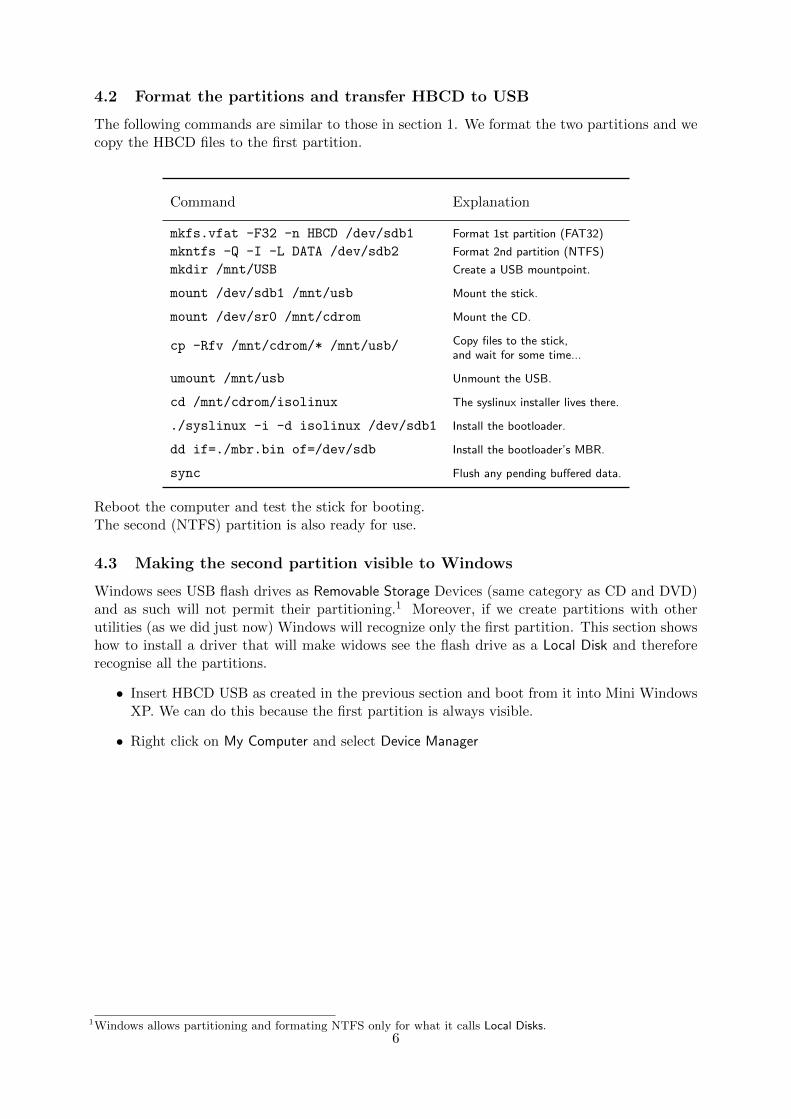
• Right click on My Computer and select Device Manager
1Windows allows partitioning and formating NTFS only for what it calls Local Disks.6
Right click on USB device Select Properties
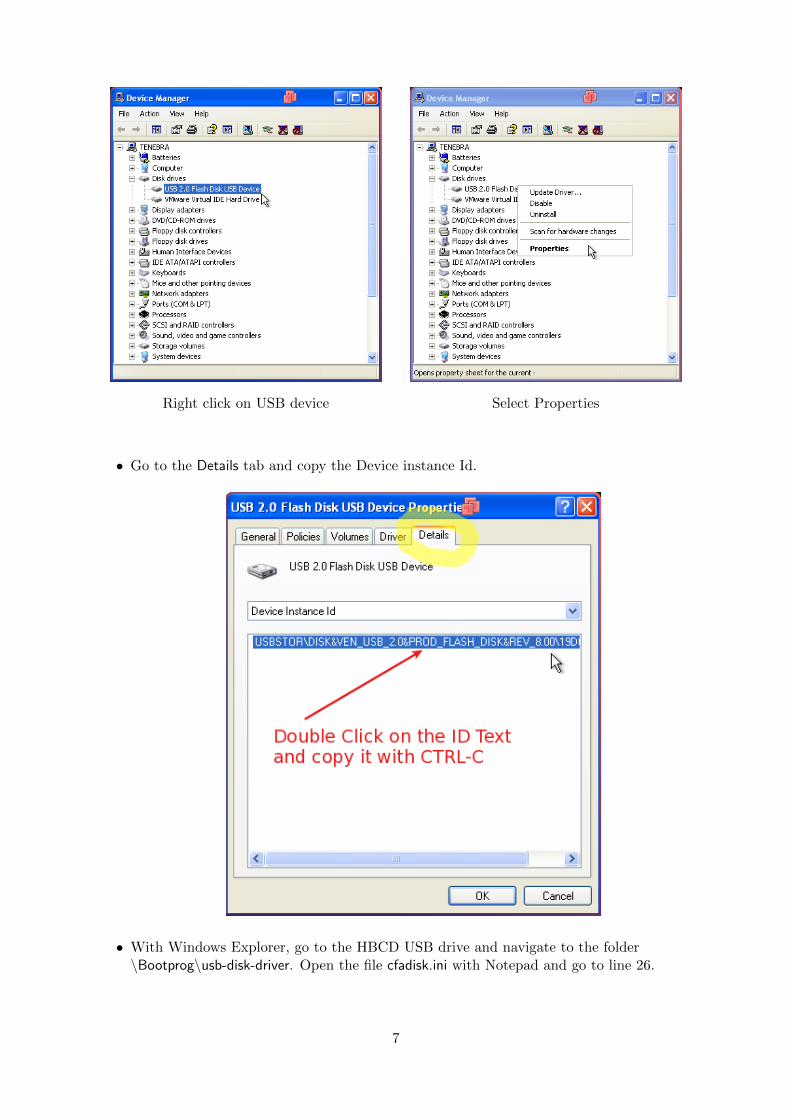
• Go to the Details tab and copy the Device instance Id.
• With Windows Explorer, go to the HBCD USB drive and navigate to the folder\Bootprog\usb-disk-driver. Open the file cfadisk.ini with Notepad and go to line 26.
7
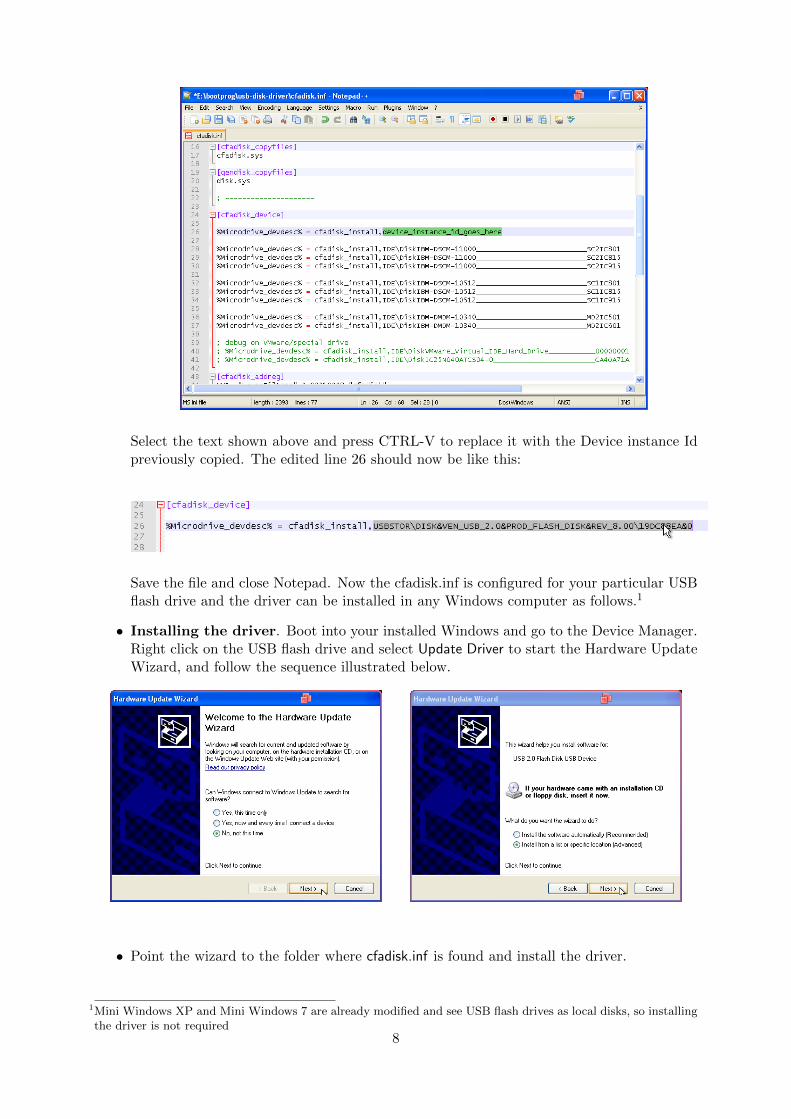
Select the text shown above and press CTRL-V to replace it with the Device instance Idpreviously copied. The edited line 26 should now be like this:
Save the file and close Notepad. Now the cfadisk.inf is configured for your particular USBflash drive and the driver can be installed in any Windows computer as follows.1
• Installing the driver. Boot into your installed Windows and go to the Device Manager.Right click on the USB flash drive and select Update Driver to start the Hardware UpdateWizard, and follow the sequence illustrated below.
• Point the wizard to the folder where cfadisk.inf is found and install the driver.
1Mini Windows XP and Mini Windows 7 are already modified and see USB flash drives as local disks, so installingthe driver is not required
8
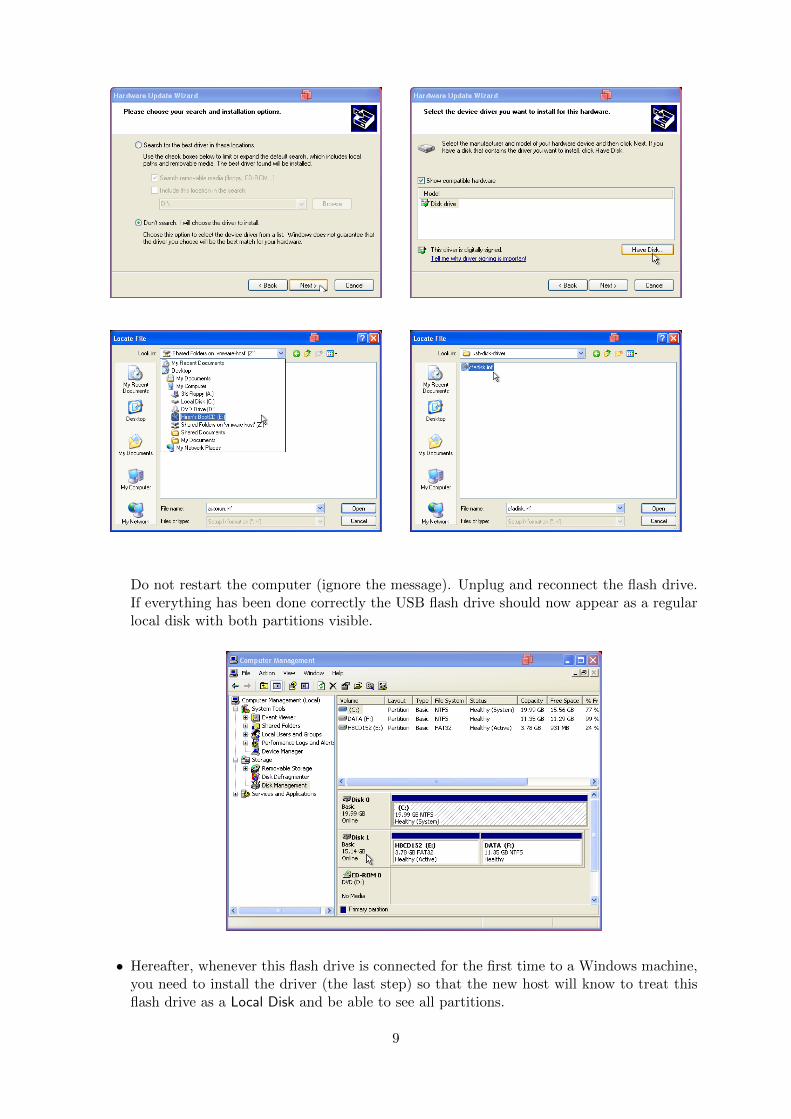
Do not restart the computer (ignore the message). Unplug and reconnect the flash drive.If everything has been done correctly the USB flash drive should now appear as a regularlocal disk with both partitions visible.
• Hereafter, whenever this flash drive is connected for the first time to a Windows machine,you need to install the driver (the last step) so that the new host will know to treat thisflash drive as a Local Disk and be able to see all partitions.
9
5 Computers without optical drive
If your computer has no optical drive and has Windows XP or Windows 7 installed you havethe following options:
• Use a CD emulator such as Alcohol 120% or Daemon Tools to mount the .iso, start theHBCD Program Launcher and run the utilities from the emulated optical drive, as de-scribed above. The utilities are portable and work with all Windows versions.
• Use Virtual PC software such as VMware Workstation, VirtualBox or Qemu to create avirtual PC in your computer and boot the .iso directly. In this case any of the 3 abovemethods are possible.
If the computer has only Linux, then you need to have the partition editor parted and the boot-loader syslinux installed. Test their availability with:parted --version
andsyslinux --version (need >4.5).If not available install them from your distro’s repositories.Then follow the instructions as above, but instead of the cdrom, mount the .iso with a commandlike:mount -o loop,user <path-to-iso-file.iso> /mnt/cdrom
10