LUNA MKII • DEESIDE SCALE CONTEST '08
100
www.aviationmodeller.com REVIEW REVIEW With 03/09 ● FREE-FLIGHT FREE-FLIGHT ● ELECTRICS ELECTRICS ● MET MET AL AL WORK WORK ● CONTROL-LINE CONTROL-LINE ● VINT VINT AGE AGE ● TURBINES TURBINES PLUS: PLUS: inside LUNA MKII Pound for pound, the best two- metre moulded slope/thermal machine on the market? REVIEW REVIEW MINI FIREWORKS An old dog learns some new tricks with this lightweight discus- launched glider from PCM ● ● DEESIDE SCALE CONTEST ‘08 DEESIDE SCALE CONTEST ‘08 ● MET MET AL AL WORKING FOR AEROMODELLERS P WORKING FOR AEROMODELLERS P AR AR T 2 T 2 PHOTOGRAPHY PHOTOGRAPHY WATCH THE BIRDIE! Part 2: The practical issues involved in taking great airborne photos 9 771360 552065 03 March 2009 £3.80 AMI COVER MAR O9 COVER TONY OK 13/1/09 13:54 Page 1
-
Upload
khangminh22 -
Category
Documents
-
view
2 -
download
0
Transcript of LUNA MKII • DEESIDE SCALE CONTEST '08

ww
w.a
viat
ionm
odel
ler.
com
REVIEWREVIEW
With
03/09
●● FREE-FLIGHT FREE-FLIGHT ●● ELECTRICS ELECTRICS ●● METMETALALWORKWORK●● CONTROL-LINE CONTROL-LINE ●● VINTVINTAGE AGE ●● TURBINESTURBINESPLUS:PLUS:
inside
LUNA MKIIPound for pound, the best two-metre moulded slope/thermal
machine on the market?
REVIEWREVIEW
MINI FIREWORKSAn old dog learns some new
tricks with this lightweight discus-launched glider from PCM
●● DEESIDE SCALE CONTEST ‘08DEESIDE SCALE CONTEST ‘08●● METMETALALWORKING FOR AEROMODELLERS PWORKING FOR AEROMODELLERS PARART 2T 2
PHOTOGRAPHYPHOTOGRAPHY
WATCH THE BIRDIE!Part 2: The practical
issues involved in taking great airborne photos
9771360
552065
03
Mar
ch
2009 £
3.8
0
AMI COVER MAR O9 COVER TONY OK 13/1/09 13:54 Page 1

MULTIPLEX 14/11/08 10:30 Page 1

March ‘09 - Aviation Modeller International 3
P03 8/1/09 15:21 Page 3

MARCH 2009 VOL.14 NO.4 - www.aviationmodeller.com
4 Aviation Modeller International - March ‘09
FLIGHTLINE
AVIATION MODELLER INTERNATIONAL is published monthly onthe fourth Thursday of each month. This magazine shall not, withoutwritten consent of the publisher, be lent, resold or otherwise dis-posed of by way of trade in excess of the maximum recommendedretail price. All rights strictly reserved. No part of this publicationmay be reproduced in any way without prior agreement of the pub-lisher. All material and artwork originated by Model Activity PressLtd., photographs, drawings and plans used in the magazinebecome the publisher’s copyright under copyright law. The companyreserves the right to suspend or refuse any advertisements withoutgiving reasons. Whilst every care is taken to avoid mistakes. ModelActivity Press Ltd. cannot be liable in any way for any errors oromissions. Nor can the publications accept responsibility for thebona fides of advertisers.
Newstrade distribution: Odyssey Publisher Services, 7St.Andrews Way, Devons Road, Bromley by Bow, London E3 3PA(tel: 0870 240 2058)
Model Trade Sales: For all credit card orders including subscrip-tions please call or fax: 01493 377267. Between 9-30am -14.00pm or email: [email protected] 2pm please call our main office (see below) Model Activity Press Ltd., 5 Chiltern Business Centre, 63-65Woodside Rd., Amersham, Bucks, HP6 6AA. Tel: 01494 433453Fax: 01494 433468Email: [email protected]
Annual subscriptions: 12 issues per year:- U.K. inland: £42.00 p.a.; Europe £55.00Rest of world (Surface mail): £59.00 p.a.e-mail: [email protected]
US POSTAL SERVICEAVIATION MODELLER INTERNATIONAL published monthly. Publishedby Model Activity Press, 2221 Niagara Falls Boulevard, NiagaraFalls, NY 14304-5709.Periodicals postage pending at Buffalo, NY.US Postmaster: Send address changes to Aviation ModellerInternational, PO Box 2165, Williamsville, NY 14231
ISSN No: 1360-5526. Copyright: Model Activity Press 2007
Printed by: William Gibbons & Sons Ltd, Willenhall.
PUBLISHER Tony Dowdeswell [email protected] DIRECTORMimi Dowdeswell [email protected] Dorling [email protected]: 01758 750538 Skype: enginetorque
ASSOCIATE EDITORAlec Gee [email protected]
EDITORIAL CONSULTANTR.G.Moulton [email protected]
ADVERTISEMENT SALESLisa Dawson (Tel: 01684 311514)Skype: [email protected]
DESIGNERPeter Hutchinson [email protected]
INDEX TO ADVERTISERSBlitz Helicopters Ltd 23BMFA 03Classifieds 96Dealer Directory 96Graupner 99Inwood Model Supplies 23Jamara 100Just Engines 61Macgregor 19Multiplex 02Sinsheim GmbH shows 61Sportsmoto.co.uk 23
Sussex Model Centre 06-07Weston UK 03Web Directory 92-94
HOUSE ADVERTISEMENTSAir Archive Books 25Back Issues 95Binders 61Cliff Charlesworth 60Subscriptions 83
20T-REX500CFEasy to
assemble anda versatile per-
former, thisnew electrichelicopterfrom Alignticks all the
boxes
4214 DEESIDE SCALE CONTEST ‘08Our man tarries awhile on the marsh to report ‘a good scale do’!
R/C helipcopters are a unique game within the hobby, and theflying technique is easier to master than ever before, now thatelectric power is as much a practical proposition for helis as itis for fixed wing aircraft. The Align T-Rex 500CF is anoutstanding example, as Greg Butterworth reports on page 20.
ON THE COVER
��
CONTENTS Tony OK 13/1/09 14:14 Page 2
March ‘09 - Aviation Modeller International 5
MODEL ACTIVITY PRESS LTD
5 Chiltern Business Centre, 63-65Woodside Rd., Amersham, Bucks. HP6 6AA
Tel: 0044 (0)1494 433453Fax: 0044 (0)1494 433468
email: [email protected]: modelactivitypress.com
8 PREFLIGHTHeard at the Hangar Doors
10 SHOPTALKNew products review
11 WHAT, WHERE, WHENClassified events diary
12 INCOMINGGot a beef, useful comment, or sound advice on any aspect of the hobby that you’d like to pass on? Good - then here’s your right to reply!
14 DEESIDE SCALE CONTEST ‘08Our man tarries awhile on the marsh to report ‘a good scale do’!
20 T-REX 500CFEasy to assemble and a versatile performer, this new electric helicopter from Align ticks all the boxes
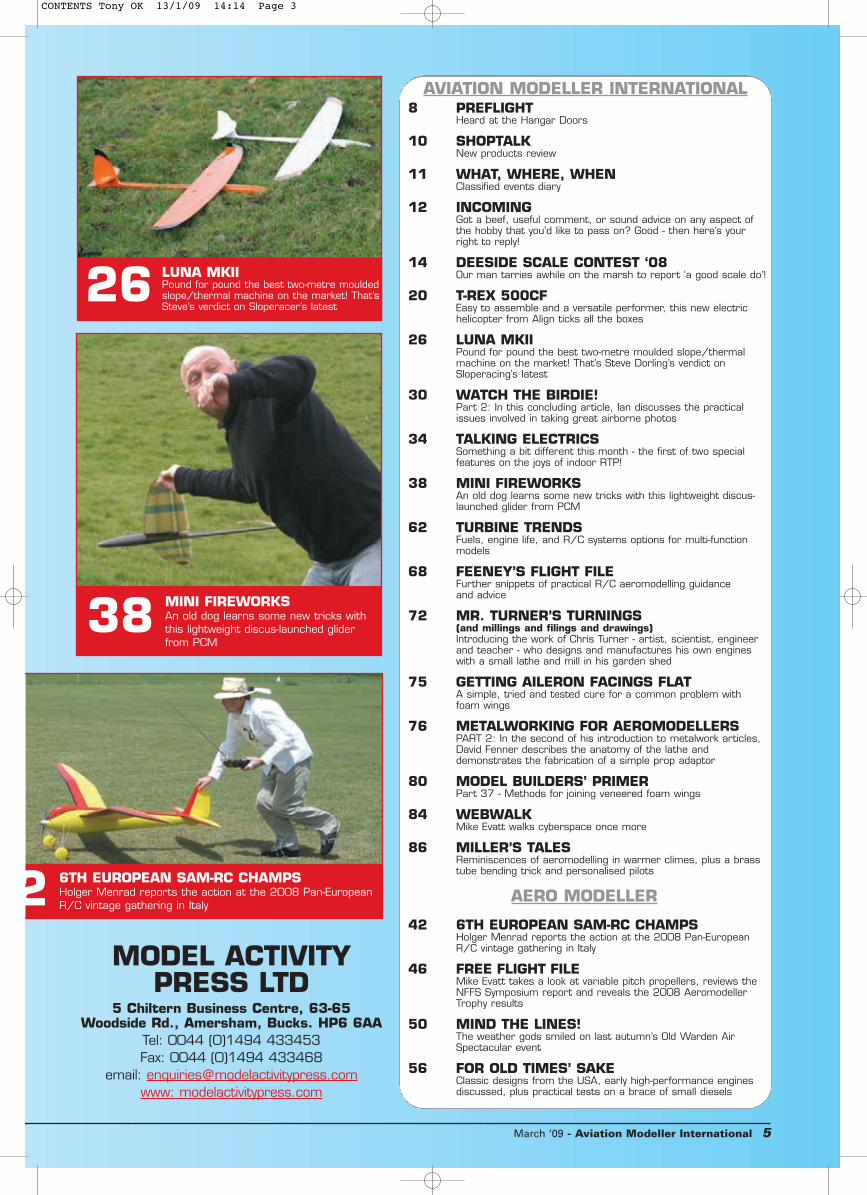
26 LUNA MKIIPound for pound the best two-metre moulded slope/thermal machine on the market! That’s Steve Dorling’s verdict on Sloperacing’s latest
30 WATCH THE BIRDIE!Part 2: In this concluding article, Ian discusses the practical issues involved in taking great airborne photos
34 TALKING ELECTRICSSomething a bit different this month - the first of two special features on the joys of indoor RTP!
38 MINI FIREWORKSAn old dog learns some new tricks with this lightweight discus-launched glider from PCM
62 TURBINE TRENDSFuels, engine life, and R/C systems options for multi-function models
68 FEENEY’S FLIGHT FILEFurther snippets of practical R/C aeromodelling guidance and advice
72 MR. TURNER’S TURNINGS(and millings and filings and drawings)Introducing the work of Chris Turner - artist, scientist, engineer and teacher - who designs and manufactures his own engines with a small lathe and mill in his garden shed
75 GETTING AILERON FACINGS FLATA simple, tried and tested cure for a common problem with foam wings
76 METALWORKING FOR AEROMODELLERSPART 2: In the second of his introduction to metalwork articles, David Fenner describes the anatomy of the lathe and demonstrates the fabrication of a simple prop adaptor
80 MODEL BUILDERS’ PRIMERPart 37 - Methods for joining veneered foam wings
84 WEBWALKMike Evatt walks cyberspace once more
86 MILLER’S TALESReminiscences of aeromodelling in warmer climes, plus a brass tube bending trick and personalised pilots
42 6TH EUROPEAN SAM-RC CHAMPSHolger Menrad reports the action at the 2008 Pan-European R/C vintage gathering in Italy
46 FREE FLIGHT FILEMike Evatt takes a look at variable pitch propellers, reviews the NFFS Symposium report and reveals the 2008 Aeromodeller Trophy results
50 MIND THE LINES!The weather gods smiled on last autumn’s Old Warden Air Spectacular event
56 FOR OLD TIMES’ SAKEClassic designs from the USA, early high-performance engines discussed, plus practical tests on a brace of small diesels
AVIATION MODELLER INTERNATIONAL
AERO MODELLER
26 LUNA MKIIPound for pound the best two-metre mouldedslope/thermal machine on the market! That’sSteve’s verdict on Sloperacer’s latest
38 MINI FIREWORKSAn old dog learns some new tricks withthis lightweight discus-launched gliderfrom PCM
2 6TH EUROPEAN SAM-RC CHAMPSHolger Menrad reports the action at the 2008 Pan-European R/C vintage gathering in Italy
CONTENTS Tony OK 13/1/09 14:14 Page 3

SUUSEX 13/1/09 10:01 Page 2

SUUSEX 13/1/09 10:02 Page 3

HEARD AT THE HANGAR DOORS
8 Aviation Modeller International - March ’09
PRE-FLIGHT
EDITORIAL
Well Christmas came and went, with 2009 seamlesslyfollowing the very limp-wristed 2008, which is nowfading to obscurity without much to show for it!There was some uncommonly grand weather overthe holiday here, somewhat made up for that
appalling summer, leading to my going for the odd drive in the sportsjobbie, hopping on one of my motorcycles, scrambling up a few moun-tains and I even got to fly a model aeroplane!
Certainly, avoiding conurbations seemed eminently sensible, giventhat hoards of unsavoury proletariat scavengers would now be desper-ately clawing through the desperation of the ‘January Sales’ and even‘parks’ now describe retail rather than leisure facilities, so they’re to
be given a big miss too. Those do at least serve to keep all the ani-mals in the zoo, so to speak! This annual mindless mayhem gets in theway of everything ‘normal’ so leaving the great unwashed stuffingthemselves silly on yesterday’s lightly killed guinea fowl, swilled downwith liberal doses of Chateau Vin Deux wobbly legs, before nipping intothe Trafford Centre to buy a ruddy lawnmower, I took full advantage ofperfect winter photography conditions which are rare and precious inthis business!
Calm conditions, albeit allied to temperatures well below freezing forthe entire holiday period, resulted in brilliant blue skies for a couple ofweeks solid and that induced my group of like-minded friends to gatherfor a bit of festive fun. We’re all lucky enough to have fields to fly fromnext to our homes, so we partied from house to house flying a bunchof models from dawn till dusk (and beyond...), ninety-nine percent ofwhich turned out to be Multiplex Elapor foamies, from Easy Gliders toFunjets and everything in between pretty much, which says a greatdeal about the sheer success of these amazingly capable models. As aself-confessed aeromodelling ‘snob’ who harks back to the glory daysof diesels, sticks and tissue, with everything liberally clear doped withcellulose, I do feel as though I’ve strayed from ‘the path of true right-eousness’ somewhat! There is, on the other side of that coin,absolutely no doubt that we simply wouldn’t have flown for the timethat we did, were it not for these incredibly tough (and repairable...)models that saw us dive into the house for a squirt of CA and a ‘win-ter warmer’ pausing only to unhook a freshly charged battery, beforenipping back to the field for another sortie and with a Flycam 2 aboardthe Cularis we captured the magic of it all on video to play back overthe dinner party afterwards - great fun, inexpensive and achievable byalmost anyone!
Yes, this is certainly a super hobby but it keeps getting in the way ofmy love of the mountains, although I have vowed to take a backpackedslope glider up the next ridge I climb - anyone fancy joining me for asortie? Moel Siabod certainly has dynamic sloping ‘potential’, as thephotograph shows!
Steve Dorling
Stop press! AttentionMacGregor JR DSX 9 users
J ust as this was about to go to print wereceived the following notice fromMacGregor!
MacGregor Industries Limited would like toinform all customers for JR DSX9 radio controlsystems of an important Service Notice. ThisNotice shows how to perform a very simplemechanical modification to prevent possiblechaffing of the stick wiring on one channel. No elec-trical work is required and the performance of theradio is unaffected.
DSX9 sets sold by MacGregor after 8 January2009 have all been modified and are identified by ablue sticker on the base of the transmitter.
The Service Notice can be viewedat:http://www.macgregor.co.uk/Support/dsx9_
wiring.htmThis modification should be easy for most cus-
tomers to perform at home. However, those whoare unable to do so should contact their retailer,who will arrange this modification for them.
For customers without access to a computer, aprinted copy is available on request from theMacGregor Service Department. Please call01628 760430.
Kevin Crozier, MacGregor Industries Limited, Tel:01628 760430 Fax: 01628 760435.www.macgregor.co.uk
Just a final note on this one: the foregoingapplies only to Mode 2 transmitter set-ups. Model1 wallahs should contact MacGregor.
Surveying the potential of Moel
Siabod with fellow glider guider
and mountain walker, Paul Jubb.
PREFLIGHT ETC Tony OK 13/1/09 10:41 Page 2

March ‘09 - Aviation Modeller International 9
Free Flight Conference
T he BMFA Free Flight Tech. Committeehave arranged a conference on freeflight in the UK at The Gliding Centre,
Husbands Bosworth Airfield, Lutterworth,Leicestershire (www.theglidingcentre.co.uk)on Sunday 1 March from 9.30 until 4.00pm.The objective is to discuss and develop ideasfor the way forward to ensure free flightremains a vibrant aeromodelling activity withas many active participants as possibleacross the whole age range.
Subjects covered will include:● The contest calendar, including the Free
Flight and Space Nationals, the galas and
decentralised events.● The classes and rules.● The team selection meetings and selec-
tion methods.● The advance of technology, particularly in
the FAI classes.The day will feature speakers from within
the FFTC presenting the current thinking andideas, together with other speakers who wishto make a contribution to the debate. This isyour chance to have your say so please get intouch with the Chairman of the FFTC, MikeWoodhouse (call 01603 457754), to book aten-minute slot. After the presentations therewill be a chance to make individual points and
there will then be an open forum to bringtogether the various views and ideas. Lunchwill be provided and there will be breaks forcoffee.
BookingThere is no charge to attend the session,
however in order to ensure that they caterfor the right number they would like to know ifyou are coming: Please advise Chris Strachan- Tel: 01223 860498 or E mail: [email protected]
Make a date to be there and have your sayon the direction that free flight takes withinthe UK!
Electric-powered gliders
T his latest initiative could meana bright future and new chal-lenge for R/C electric soaring
enthusiasts worldwide. The BMFArecently introduced a new competi-tion format for electrically-poweredgliders. The format uses a tinyaltimeter unit in the model to switchoff the electric drive motor at a fixedheight above launch. This makes itpossible for any electric soaring pilotto compete on an equal footing withother glider pilots in a true thermalsoaring competition, without theexpense and difficulties involved withdeveloping a highly efficient driveline.
Models will compete in two sepa-rate classes for up to 2 metreswingspan and up to 4 metreswingspan. Competitions qualifying forthe BMFA UK eSoaring League areplanned at a number of venues inthe UK. The 2 metre model class, inparticular, will enable newcomersand those on a limited budget tocompete using one of the dozens ofARTF electric gliders readily availablefrom most model shops today.
The competition format is also ide-ally suited to a worldwide postal for-mat and there is already consider-able interest in Eastern Europe, theUS and Australia.
Anyone who is interested in elec-tric-powered gliders can obtain fur-ther information from the eSoaringwebsite at www.eSoaring.net or byemailing pro Martin Bell at:www.ElectricSoaring.co.uk - Email:[email protected] Mobile: 07785113922 - Electric SoaringCompetition - website:www.eSoaring.net
SAM 35 Gala - ‘Theme for a Dream’ contest
Y ou know how it is! You sit in your favouritearmchair thinking of the new seasonahead and what to build and fly. It is such
a pleasurable experience. But then your minddrifts off to those heady days of youth whenwinds were light and summer days were endlessand that favourite model of yours comes intoyour mind’s eye. You remember the saving up,the obtaining of the wood and glue or possiblythe kit, the discussion with your dad or uncle orfriend about how to build this wondrous modelaeroplane and how it might fly! Then the buildwith its challenges and worries until the model isfinally finsihed. You gaze at your creation in admi-ration and find family and friends to admire itwith you. You’ve built several models before butnone have been too successful - will this be theone that really flies?
Then the preparation for flight and the big daywhen you go off to the field to fly your model. Allyour hopes are fulfilled, this one really does fly,against all previous experience it stays in the airlong enough for you to admire its flight! Yourwhole being is swept up with the excitement andaccomplishment. It is a day and a model you willnever forget throughout your whole lifetime!
Well SAM 35 would like you to share thismodel and your memories by bringing a replicaor the original to the SAM 35 Gala on 27-28June 2009. They will provide a compound andmarquee for all the models to be displayed and ifyou wish to bring a simple storyboard to tell ofyour modelling adventure so much the better.Special certificates to commemorate the occa-sion will be presented to every modeller bringingtheir ‘dream’ model for display and special tro-phies will be presented for those judged best inclass for F/F, R/C, C/L, Scale and Indoor. Asyou can see, whatever you built the organiserswill be delighted to see it at the SAM 35 Gala! Inaddition, a special trophy will be awarded to who-ever in the judges’ opinion produces the best sto-ryboard. As this will be a particularly historicoccasion they will be making a complete videoand photographic record of the occasion somagazine and newsletter editors of whatevermodel discipline are most welcome to attend. Itshould be noted that models are not required tofly to receive certificates and trophies but ofcourse for those who wish to recreate that‘magic moment’ where better in the world than
the grass airfield at Old Warden?So if this has captured that old spark of enthu-
siasm for a special moment in your life, why notdig out the old plan and start building, or if it’sstill in the loft carefully lift it out and see what alittle renovation can do for your original creation.Think you may not be able to make Old Wardenon 27-28 June? Then while you may miss out onthe fun you can still send your model by proxywith a modelling friend or clubmate and stillreceive a special certificate. The organisers aimto bring the biggest number of vintage model air-craft and their builders ever achieved, all withspecial memories for those involved, together atOld Warden,. So put the dates in your diary now.Certificates will be presented on both days, judg-ing for trophies will take place on both days andbe presented at a special prizegiving in the after-noon of Sunday 28th.
For further details contact :- Brian Lever SAM35 President, 3 The Park, Peakirk,Peterborough. PE6 7NG. Tel: 01733 252416,email: [email protected]
Good luck with your model memories and ren-ovation/replica build. See you at the SAM 35Gala.
Those old free-flight sports jobs bring out the boy ineveryone.
THE WRITE STUFF?WANABE A CONTRIBUTOR? Have you got what it takes? If you can write a bit, take a
decent digital photograph and produce work to deadlines, then we need you. AMI depends oncontributions from others to vary and diversify the content – drop a note in the Ed’s email
box and he will call you to discuss.
PREFLIGHT ETC Tony OK 13/1/09 10:41 Page 3

10 Aviation Modeller International - March ’09
‘THE MAN WHOWOULD NOT DIE’
T his is the remarkable story of‘Lucky’ Herschel McKee - barn-stormer, war hero, test pilot,
motor racer, scoundrel! This whiskydrinking decorated hero of both WorldWars was a bigamist and full-timescoundrel indeed! Herschel JessupMcKee was all of the above and thensome - a compulsive risk taker whocrashed in racing cars, on motorcyclesand in aeroplanes, only ever sufferingminor setbacks, had no fear, nor worriesit seems and was fantastic to a fault!Once introduced, life will never be thesame again. A brilliant read and full ofenergy - highly recommended for a rainyday!
ULTRA POWERFUL SERVOS FROM JR
J R have expanded their already extensive range of servos with some new units for very specialist tasks. Two of these are their ‘FullMetal Jacket’ digital servos that feature their highest quality servo motor, mated to a ‘Super Hybrid Gear Train’ made in aluminiumand S45C ‘super iron.
Of these two, the DS6301 is an ultra high torque type that delivers a huge 33 kg/cm. with a full 60 degree travel in 0.17 seconds.Alternatively, the DS6305 delivers 16 kg/cm over a 60 degree travel arc in just 0.08 secs. - and it’s all done from a 4.8v. power sourcebecause JR emphatically advise against any higher voltage power supply.
Both are special-order items that take a month to deliver and each costs £284.96.Also on the way is the DS9501, low profile digital servo, designed to deliver extra punch with a drive output of 6.2 kg/cm for a full
travel time of 0.17 secs. If you want greater travel speed, then the DS9505 is even faster with a travel time of just 0.12 secs.Price is expected to be £109.95.
HAYNES - ‘FASTER THAN SOUND’
B ill Gunston OBE is a highly respected author in the world of aviation and his ‘FasterThan Sound’ is now printed in a second edition by Haynes and makes for fascinat-ing reading, with some truly inspirational illustrations. In the late 1940s, test pilots
in the USA and Great Britain pierced the ‘sound barrier’ for the first time, showing theworld that it need not be a barrier at all. In the years that followed, even the commercialaviation world enjoyed supersonic flight with Concorde and military aviation developmentsinvoked some truly heroic innovations with quantum leaps in speed during that supersonicera! Today supersonic flight is taken as a given, but back then the fastest piston-enginedmachinery, along with the early jets, suffered catastrophic failures as the transonic bound-ary was broached. Bill describes in a thoroughly informative manner the concept of thesound barrier, the theory and the implications of the speed of sound and man’s attemptsto break through it - a thoroughly good read and a great addition to your library!
LATEST PRODUCT NEWS
SHOPTALK Seen these? Some of the lat-est goodies available in modelshops and on-line this month
PREFLIGHT ETC Tony OK 13/1/09 10:41 Page 4

March ’09 - Aviation Modeller International 11
JART LTJart - named after the lawn darts - was
the tag chosen for Californian slope guruReed Sherman when his combined graphicsdesigner and aeromodelling skills were putto good use, resulting in the most gor-geously sleek and purposeful looking aero-batic slope glider! Reed has managed tocombine the looks of a fighter jet with theaesthetic elegance of a full-size sailplane,
resulting in a machine that looks as thoughit’s going through the sound barrier whenparked up and in the air. It’s every bit aspurposeful as its appearance would sug-gest! Until now, if you wanted a Jart of yourown, then you downloaded the (free) planfrom jartworld.com and got your sandingblock out, but now, after bowing to constantpressure, Reed has come up with the JartLT - or lightweight Jart - and she’s a real
beauty, with a gel-coated epoxy glass fuse-lage allied to Oracovered built-up wings anda full hardware pack. For a current pricedelivered to your door, visitwww.jartworld.com where, additionally, thefull Jart experience may be enjoyed. AMI willhave a full review of the Jart LT in nextmonth’s magazine!
● James Benson, Truro ● S Baxter, Knaresbrook ● R. Randall, Coventry● R.D.R. Woods, Letchworth ● R.Gibbs, SwindonWe hope you have a lot of fun with your prizes.
COMPETITIONCOMPETITION WINNERS…WINNERS…Our December issue competition certainly seems to have struck a chord with many of our
readers anxious to sample the Silverlit i-Bird R.C indoor ornithopter.
The FIVE lucky winners, who will be able to get very flap-happy at theirnext Club meetings are:-
PREFLIGHT ETC Tony OK 13/1/09 10:42 Page 5

12 Aviation Modeller International - March ’09
WHAT, WHERE, WHENEVENTS
Entries in ‘Whatm where, when’ are completely free. Send them in writing to our Amersham officesor by email to: [email protected]
FLYING FOR FUN
APRIL 25-26LLEYN MAC WARBIRDS WEEKEND. Aninformal meeting for all types of warbird R/Cmodels. All welcome. Contact Dylan Robertson 07917410707 or email to [email protected]
MAY 30-31 2009KINTYRE RADIO MODEL CLUB’s ever pop-ular fun-fly at RAF Machrihanish nearCampbeltown, Argyll, for all disciplines -radio, free-flight, control-line and indoor. Forinformation and vehicle registration, contactBryan Passey on (01546-602918) [email protected]
FREE FLIGHT EVENTS
MARCH 81st BMFA AREA CENTRALISED MEET-ING. Area Venues. C/P (White), F1A(K&MAA/Plugge), F1G, Vintage (Plugge),HLG/CLG (Plugge). Contact: BMFA AreaComp Secs.
MARCH 222nd BMFA AREA CENTRALISED MEET-ING. Area Venues. C/G, F1B(Weston/Plugge), F1J/BMFA1/2A, MiniVintage (Plugge), P30 (Plugge). Contact:Area Comp Secs.
APRIL 53rd BMFA AREA CENTRALISED MEET-ING. Area Venues. C/R (Gamage),F1C/F1Q (Halfax/Plugge), F1H, SLOP(Plugge), Tailless (Plugge). Contact: AreaComp Secs.
APRIL 10(Good Friday) BMFA NORTHERN GALA.Venue: RAF Church Fenton. B/G (CMA),B/R (Caton), B/P (Hamley), O/E, SLOP(Falcons), F1G, F1H, F1J/BMFA1/2A, Mini-vintage, CO2, E30, HLG, CLG. Contact:Dennis Davitt 0113 2675433.
BMFA LONDON GALA & CLUB CHAMPS.Venue: Salisbury Plain. 18th: C/R, C/G,C/P, (Club Champs), Vintage, P30, CO2,CLG. 19th: F1G, F1H, F1J/BMFA1/2,SLOP, Mini Vintage, E30, HLG. Contact:M.Dilly 0208 777 5533.
MAY 9-10BMFA STONEHENGE CUP (World CupEvent). Venue: Salisbury Plain. F1A, F1B,F1C/P (Dick Johnson Memorial), F1Q.Contact: P.Williams 01252 842120.
MAY 171st BMFA F1E MEETING (TeamSelection). Venue: Near Sheffield. F1E. FreeFlight Soaring. Contact: Ian Kaynes 01252512538.
MAY 23-25BMFA F/F NATIONALS. Venue: BarkstonHeath. B/G (Thurston), B/R (ModelAircraft), B/P (Shelley), O/E, Tailless (LadyShelley), Women’s BG/BR/BP (SAA), JuniorBG/BR/BP (Frog Junior), CLG, F1A(Ronytube), F1B (Fred Boxall), F1C/F1Q(Eddie Cosh), Vintage (Jubilee), SLOP (PeterHarris), HLG (Nats), P30, Novice Glider &Rubber (J) (junior kit glider & junior kit rubber), F1H (BA), F1G (308), F1J/BMFA1/2A(Hales), Mini-vintage, CO2 (Sparklets), E30,Vintage Glider. Combined Classic. Plus Juniorchampionships (Heather) and overall catego-ry championships. Also Bowden, and Non-Championship F/F Scale and SAM events.Contact: Mike Woodhouse 01603 457754.
INDOOR FLYING
JANUARY 24WALTHAM CHASE AEROMODELLERSIndoor R/C meeting at the Main Hall, HavantLeisure Centre, Civic Centre Road, Havant,Hants. 7pm till 10pm, NO F/F. Admission£6 for fliers (including juniors), £1 specta-tors, accompanied children free. FliteHook inattendance, this event is supported by BMFASouthern Area. All welcome, proof of insur-ance required. Contact Chris Carr on 0238043 7805, Alan Wallington on 01489895157 or visit www.wcaer.fsnet.co.uk
JANUARY 25OFMAC INDOOR FLYING at The CastleLeisure Centre, Wallingford. 10am till 6pm,Fun-fly for all, Free-flight, Rubber, CO2,Electric. Refreshments available, Flitehook inattendance. Take your own table and chairas there is a shortage. Contact DaveDobson on 01491 837789.
JANUARY 31TONBRIDGE GASSERS & RUBBERFANCIERS Indoor Flying at The AngelCentre, Tonbridge Kent located in Tonbridgetown centre in Angel Lane at rear of HighStreet next to Sainsburys where there is alarge car park adjoining the leisure centre.Free-flight 6pm to 10pm and lightweightR/C 9.30pm to 10pm. Entry £6 per flyerand £3 for spectators. Contact Eric on01622 737814 or Stuart on 07956066463 before travelling.
FEBRUARY 8WORCESTER INDOOR FREE-FLIGHT atThe Sports Hall, Bishop Perowne College,Merriman’s Hill Road, Worcester. WR3 8LE.2pm till 5pm, Rubber, Electric and CO2.BMFA insurance mandatory, please take owntable and chairs. For further information anddirections contact Ed Garner on 01905381579 or 07866 923674.
FEBRUARY 14NORTH LONDON MFC INDOOR R/Cmeeting at Furzefield Sports Centre, PottersBar, Herts, EN6 3BW (J24/M25). 6pm till10pm, admission £8 fliers, £2 spectators.All-up weight limit: fixed-wing 225g. and 36”span, helis 400g. BMFA insurance required.Contact Peter Elliott on 01707 336982.
FEBRUARY 21WALTHAM CHASE AEROMODELLERSIndoor R/C meeting at the Main Hall, HavantLeisure Centre, Civic Centre Road, Havant,Hants. 7pm till 10pm, NO F/F. Admission£6 for fliers (including juniors), £1 specta-tors, accompanied children free. FliteHook inattendance, this event is supported by BMFASouthern Area. All welcome, proof of insur-ance required. Contact Chris Carr on 0238043 7805, Alan Wallington on 01489895157 or visit www.wcaer.fsnet.co.uk
FEBRUARY 22OFMAC INDOOR FLYING at The CastleLeisure Centre, Wallingford. 10am till 6pm,Fun-fly for all, Free-flight, Rubber, CO2,Electric. Refreshments available, Flitehook inattendance. Take your own table and chairas there is a shortage. Contact DaveDobson on 01491 837789.
FEBRUARY 24BOURNEMOUTH MAS INDOOR FLYINGMEETING at the Allendale Centre, HanhamRd., Wimborne, Dorset, BH21 1AS,7.00p.m. to 10.00p.m. Free-flight only.Prizes for longest flight and longest flight by ascale model. Flitehook in attendance. Freeparking in public car park in Allendale Road.Contact John Taylor on 01202 511502 orRoy Tiller at: [email protected]
FEBRUARY 28TONBRIDGE GASSERS & RUBBERFANCIERS Indoor Flying at The AngelCentre, Tonbridge Kent located in Tonbridgetown centre in Angel Lane at rear of HighStreet next to Sainsburys where there is alarge car park adjoining the leisure centre.Free-flight 6pm to 10pm and lightweightR/C 9.30pm to 10pm. Entry £6 per flyerand £3 for spectators. Contact Eric on01622 737814 or Stuart on 07956066463 before travelling.
MARCH 8WORCESTER INDOOR FREE-FLIGHT atThe Sports Hall, Bishop Perowne College,Merriman’s Hill Road, Worcester. WR3 8LE.2pm till 5pm, Rubber, Electric and CO2.BMFA insurance mandatory, please take owntable and chairs. For further information anddirections contact Ed Garner on 01905381579 or 07866 923674.
MARCH 14NORTH LONDON MFC INDOOR R/Cmeeting at Furzefield Sports Centre, PottersBar, Herts, EN6 3BW (J24/M25). 6pm till10pm, admission £8 fliers, £2 spectators.
All-up weight limit: fixed-wing 225g. and 36”span, helis 400g. BMFA insurance required.Contact Peter Elliott on 01707 336982.
MARCH 15IMPINGTON VCMAC INDOOR MEETINGat Impington Village College, Cambridge.9.00am to 5.00pm. Go along and flyindoors all day. RTP and small electric heli-copter flying in separate hall. Model Exhibitionand a Seminar by Roger Simmonds:- JetexReborn. ‘Success with Small Scale FreeFlight Jets’. Details and free plans ofBostonian and Frog Junior models for compson the day. Contact Chris Strachan Tel:-01223 860498 email: [email protected]
MARCH 21WALTHAM CHASE AEROMODELLERSIndoor R/C meeting at the Main Hall, HavantLeisure Centre, Civic Centre Road, Havant,Hants. 7pm till 10pm, NO F/F. Admission£6 for fliers (including juniors), £1 specta-tors, accompanied children free. FliteHook inattendance, this event is supported by BMFASouthern Area. All welcome, proof of insur-ance required. Contact Chris Carr on 0238043 7805, Alan Wallington on 01489895157 or visit www.wcaer.fsnet.co.uk
MARCH 29OFMAC INDOOR FLYING at The CastleLeisure Centre, Wallingford. 10am till 6pm,Fun-fly for all, Free-flight, Rubber, CO2,Electric. Refreshments available, Flitehook inattendance. Take your own table and chairas there is a shortage. Contact DaveDobson on 01491 837789.
APRIL 5WORCESTER INDOOR FREE-FLIGHT atThe Sports Hall, Bishop Perowne College,Merriman’s Hill Road, Worcester. WR3 8LE.2pm till 5pm, Rubber, Electric and CO2.BMFA insurance mandatory, please take owntable and chairs. For further information anddirections contact Ed Garner on 01905381579 or 07866 923674.
APRIL 11NORTH LONDON MFC INDOOR R/Cmeeting at Furzefield Sports Centre, PottersBar, Herts, EN6 3BW (J24/M25). 6pm till10pm, admission £8 fliers, £2 spectators.All-up weight limit: fixed-wing 225g. and 36”span, helis 400g. BMFA insurance required.Contact Peter Elliott on 01707 336982.
APRIL 28BOURNEMOUTH MAS INDOOR FLYINGMEETING at the Allendale Centre, HanhamRd., Wimborne, Dorset, BH21 1AS,7.00p.m. to 10.00p.m. Free-flight only.Prizes for longest flight and longest flight by ascale model. Flitehook in attendance. Freeparking in public car park in Allendale Road.Contact John Taylor on 01202 511502 orRoy Tiller at: [email protected]
MODEL & FULL-SIZE AIR SHOWS
MAY 310th ANNIVERSARY ABINGDON AIR &COUNTY SHOW at Abingdon airfield, DaltonBarracks, Abingdon, Oxon supporting theThames Valley & Chiltern Air Ambulance. Athree-hour flying display plus static aircraft,historic vehicles, craft marquee, children’samusements, tank rides, Dr. Who’s Tardisand the Daleks, Farmers Market and muchmore for all the family. Public admission £10adults, £5 children 5-15years and senior citi-zens. Under 5s free and car-parking is alsofree. Discount rate admission tickets avail-able early in the New Year from the web-site:www.abingdonfayre.com and also fromselected local outlets.
PYLON RACING
APRIL 5CLUB 2000 Pylon Racing at Northampton.Contact Graham Clarke on 02476 411142(home) or 02476 256200 (work) or visitthe Pylon website at:www.ukpylonracing.co.uk for details andmaps.
MAY 10CLUB 2000 Pylon Racing at Northampton.
Contact Graham Clarke on 02476 411142(home) or 02476 256200 (work) or visitthe Pylon website at:www.ukpylonracing.co.uk for details andmaps.
R/C SCALE COMPETITIONS
MAY 24LADMAS LOW KEY SCALE COMP at theclub’s large flying field at Halsall (Nr.Southport, Lancs). All types of fixed-wingscale aircraft are welcome. All 35 MHz fre-quencies and 2.4 GHz. Insurance compulso-ry. Minimum ‘A’ certificate, ‘B’ cert and fail-safes over 7kg. Simple flying only event tointroduce newcomers to competition flying.Contact John [email protected] or 07973952457 for details.
SPACE MODELLING
APRIL 18-191st FAIR SPACE TEAM TRIALS. Venue:Salisbury Plain. S1, S3, S4, S5, S6, S7, S9. Contact: G.Seabrook 01483 285456.
MAY 23-24FAIR SPACE NATIONAL CHAMPI-ONSHIPS and 2nd Space Team Trials.Venue: Barkston Heath. S1, S3, S4, S5, S6,S7, S8E/P, S9. Contact: G.Seabrook 01483285456.
SWAPS/AUCTIONS/BRING &BUY/COLLECTORS
FEBRUARY 22MODELLERS’ SWAPMEET at HurworthGrange, Hurworth, Darlington, Co. Durham.10am till 1pm. This event, now in its fifthyear, gets bigger every time and offers anideal opportunity in the North East for aero-modellers to sell, buy, swap, browse or sim-ply network. For details, bookings, etc., con-tact Sam on Weston on 01748 824702 oremail: [email protected]
MARCH 7REDDITCH ELECTRIC FLYERS AnnualBring & Buy at Walkwood Middle School,Feckenham Road, Redditch, Worcs, B975AQ. For anything R/C related - aircraft,cars, boats, helicopters, etc. Doors open forvendors at 8.30am to 3pm, general public10am till 2pm. Admisssion £1 on the door.2m tables £5 in advance, 2m pitch (bringown tables) £4 in advance. Refreshmentsavailable. Table sales contact:[email protected] orcall Bob Moseley on 01527 545620evenings/weekends. More details plus book-ing forms at: www.redditchelectricflyers.co.uk
LUTON AIRCRAFT ENTHUSISTS’ FAIR atVauxhall Recreation Club, Gipsy Lane, Luton,Beds. LU1 3JH. 10.30am till 3.30pm. Goalong to buy or sell anything aircraft-related,including models, accessories, books, etc.Enquiries and stall bookings to Keith Manningon 01372 725063 (evenings), email: [email protected] or visit www.air-craftenthusiastsfair.co.uk
MARCH 1524th ANNUAL NORTHWICH SWAP-MEET at the Memorial Hall, Northwich.9am till 1pm. For table bookings and otherinfo, contact Wayne and Ruth Howman on01565 631190.
MARCH 20DUMBARTON & DISTRICT MAC AUC-TION SALE of scale aircraft and everythingelse associated with the hobby. Entry from6.30pm and the auction starts at 8pm.Refreshments available and there will betrade stands and various exhibits. ContactMaurice Irvine on 01475 689711 or email:[email protected] for venue andother details.
MARCH 22HORAM MODEL FLYING CLUB AnnualSwapmeet at Horam Village Hall, a quarterof a mile south of the village on A267. Starts10am. Entrance fee £2, tables £6 and £2for helper. For table bookings contact R.Richardson on 01825 762372 or by emailto: [email protected]
PREFLIGHT ETC Tony OK 13/1/09 10:42 Page 6

IncomingHot Hacker!
Hi Steve,Thought you might like to hear about the little Hacker Cubyou recently reviewed - here’s my ‘tuned’ version, i.e. with anoutrunner up the front. Ho ho!Had to delve into my box of spares to get some GWSBeaver wheels to clear the enormous prop off the ground andI also found that if I went by the book (which I did for 99.9%of the build) the control runs came in too low to meet theservo horns, so I put the ‘Z’-bends on the servo horns instead.Of course the front bulkhead had to be moved back to retainthe aesthetics and I presumed the balance, but what a fabu-lous little model - it was a treat to build, although out here Icould not get any accelerator for CA so used a combination ofadhesives, some five-minute epoxy for the wings, motor bulk-head and tail, with thin and thick CA for the rest with the odddab of white silicone sealant for the wing servo.She was purchased from the lovely Peggy Chng (no, that isnot a typing error) of Singapore Hobby Supplies PTE Ltd.Peggy is a very knowledgeable lady when it comes to modelaircraft and is not only charming but very helpful, as are allthe staff there. The shop is tiny, but there again, so isSingapore.
I have enclosed some snaps. Cheers, Derek
Silicone warningHi Steve,I am partway through enjoying your latest; the following maybe useful as a letter to the editor.As a returnee to the model aero scene, after some 40 oddyears, I have found many of the articles in AMI to be extreme-ly helpful in getting up to speed with modern developments.
Peter Miller’s most recent andvery interesting article (Jan.‘09 issue) included discussionon clunk tanks and their instal-lation. He mentioned that sili-cone sealer is proof against allfuels. This is probably true forthe traditional diesel and glowbrews, but may I add a wordof caution in connection withpetrol power, which seems tobe gaining in popularity for larger models.This is based on automotive experience. Some years ago, Iprepared an ageing TVR Tasmin for hill-climb competition. Oneof the repairs entailed curing a leak around the fuel gaugesender flange, and yes you’ve guessed, I used a well known sil-icone sealer. On the way home from the next event, the carlost almost all power, and came home on a Relay truck.Subsequent strip down revealed an orange goo clogging upthe pipe leading to the fuel pump and its inlet filter. It is probably the case that some silicone sealers are moreequal than others, but nevertheless, some care may be need-ed if they are used with petrol power, particularly in locationswhere the silicone may be drawn into the fuel system.Best regards, David Fenner
Yes indeed - silicone will not withstand petrol for longand paraffin-based diesel fuel will eventually cause it toswell, too - Ed.
Boll-Aero successSteve,I enclose a photo of my Boll-Aero engine in a Bumble Beefree-flighter I have made from the drawings in AMI. I too builtthe Midge and run it successfully in a K.K. Bandit free-flighter.My Boll-Aero runs well and was easy to build, ideal as a firsttimer. I find it a bit bulky and
there were a couple of prob-lems with the drawings butoverall it’s excellent. In fact Iwas assembling it with dieselfuel as a lubricant (without thecarb.), turned it over with aprop fitted and it fired in myhand!
I have it fitted in my BumbleBee free-flighter and wasgoing to fly it at Middle Wallopa couple of weeks ago but theweather had other ideas. Anymore engine designs in themagazine would be great.
Regards and thanks,Mike Blankley
March ‘09 - Aviation Modeller International 13
Got a beef, useful comment, or sound advice on any aspect of the hobbythat you’d like to pass on? Good - then here’s your right to reply!
AIRMAIL
Letters sent in will, wherever possible, be reproduced unexpurgated, unless overly lengthy or libellous. We cannot handle hand-written correspondence, but emails are invited to [email protected]
Pretty as a picture - engine,model and ‘model’! Both engineand aeroplane from AMI plans.
Derek’s sprightly Cub enjoys a power hike!
Silicone and petrol engines donot mix - beware!
LETTERS 13/1/09 09:26 Page 3

The Deeside Club used to be calledthe Heswall Club, which by my reck-oning makes it the only Englishmodel flying club within Wales.Their field is down on the Dee
Marshes, a surprisingly lovely location in earlyautumn. We had a glorious day for one ofPhillip Kent’s famed ‘all welcome’ UnlimitedCompetitions. All day the sun shone, the larkssang, and the bacon butties sizzled on thegriddle. To put you in the picture, if the exalt-ed BMFA Scale Nats are for the Beethovensof Scale, Phillip’s contests represent the ‘easylistening’ end of the scale continuum: popular,accessible, and great fun.
First offYou know it’s going to be a good scale dowhen you spot three Brian Taylor plans as youstride through the pits. First off was ColinBostwick’s Spitfire XIV. Later Marks of Spitfirelook just that bit more aggressive, and thisone is a cracker. Colin’s Spit is Laser 120-powered, but he had a petite problemettewith the undercarriage. A lost grub screw lim-ited him to a single flight, which was ashame, since this is a great model. Anotherexcellent Spitfite XIV, this time in the famedGinger Lacey colours, was just a few pacesaway. This one is also Laser 120-powered,but was owned by Dominic Brassey-Williams,
14 Aviation Modeller International - March ‘09
DEESIDE SCALECONTEST ‘08Our man tarries awhile on the marsh to report ‘a good scale do’!
R/C SCALE - By Alex Whittaker
Rhyl Club member Richard Thomas’P51-D ARTF from Hangar 9; Roto 35ccon a 20 x 10.
Phillip Kent (left) congratulates Alan Glover on his victory.
DEESIDE SCALE 12/1/09 11:10 Page 2
a young rising star on the local Clubman scalecircuit. As I have discovered on my travelsaround regional Clubman scale comps, youngand capable Dominic is usually in with ashout.
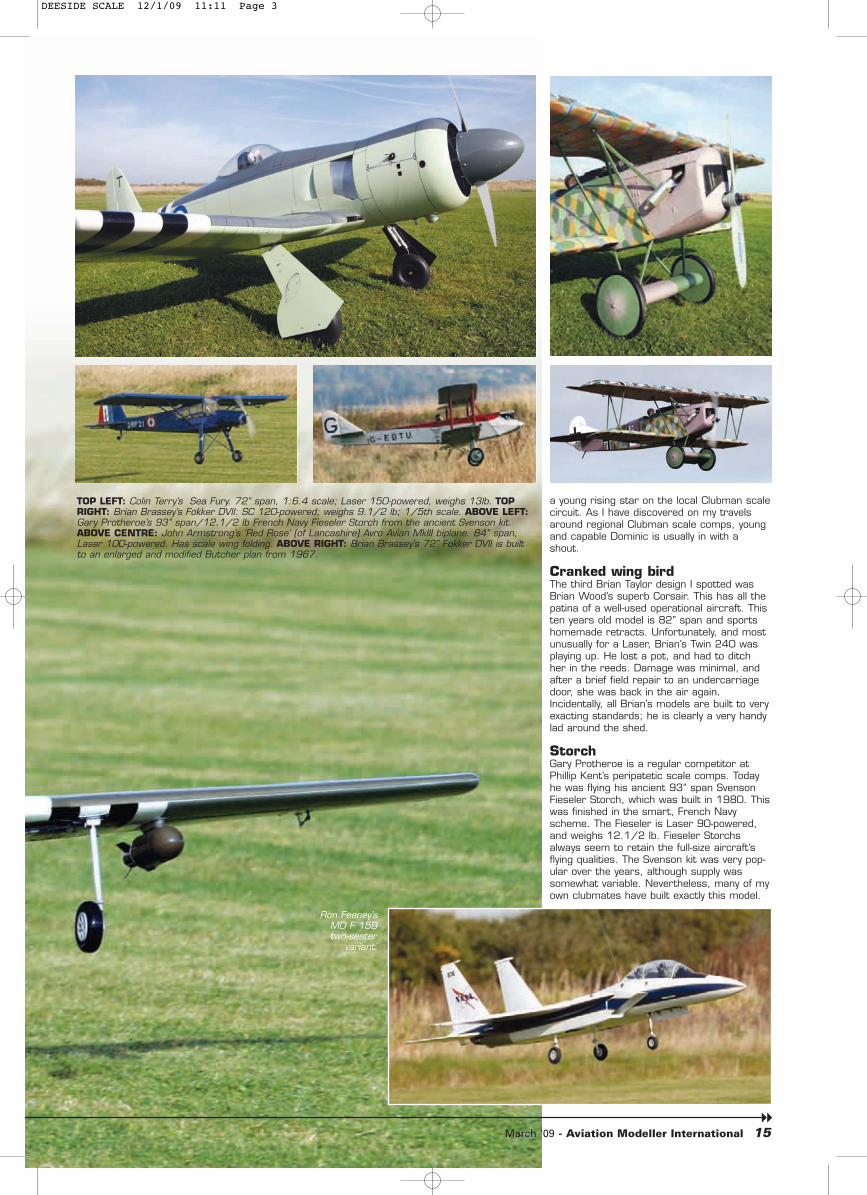
Cranked wing birdThe third Brian Taylor design I spotted wasBrian Wood’s superb Corsair. This has all thepatina of a well-used operational aircraft. Thisten years old model is 82” span and sportshomemade retracts. Unfortunately, and mostunusually for a Laser, Brian’s Twin 240 wasplaying up. He lost a pot, and had to ditchher in the reeds. Damage was minimal, andafter a brief field repair to an undercarriagedoor, she was back in the air again.Incidentally, all Brian’s models are built to veryexacting standards; he is clearly a very handylad around the shed.
StorchGary Protheroe is a regular competitor atPhillip Kent’s peripatetic scale comps. Todayhe was flying his ancient 93” span SvensonFieseler Storch, which was built in 1980. Thiswas finished in the smart, French Navyscheme. The Fieseler is Laser 90-powered,and weighs 12.1/2 lb. Fieseler Storchsalways seem to retain the full-size aircraft’sflying qualities. The Svenson kit was very pop-ular over the years, although supply wassomewhat variable. Nevertheless, many of myown clubmates have built exactly this model.
March ‘09 - Aviation Modeller International 15�
TOP LEFT: Colin Terry’s Sea Fury. 72” span, 1:6.4 scale; Laser 150-powered, weighs 13lb. TOPRIGHT: Brian Brassey’s Fokker DVII: SC 120-powered; weighs 9.1/2 lb; 1/5th scale. ABOVE LEFT:Gary Protheroe’s 93” span/12.1/2 lb French Navy Fieseler Storch from the ancient Svenson kit.ABOVE CENTRE: John Armstrong’s ‘Red Rose’ (of Lancashire) Avro Avian MkIII biplane. 84” span,Laser 100-powered. Has scale wing folding. ABOVE RIGHT: Brian Brassey’s 72” Fokker DVII is builtto an enlarged and modified Butcher plan from 1967.
Ron Feeney’sMD F 15Btwo-seater
variant.
DEESIDE SCALE 12/1/09 11:11 Page 3

Tiger MothAndy Bowman was giving the beans to hisimmaculate blue and silver Tiger Moth, G-ANDE. This nifty model is built from the Flairkit. Andy was chucking the Tiggie all over thesky with great skill, which delighted his audi-ence. Later, Andy was awarded third place.Andy hails from the Skem Club, that well-known hotbed of scale endeavour, where Ihave many mates.
Avro Avian MK IIIJohn Armstrong’s ‘Red Rose’ Avro Avian Mk.III biplane is an exquisite Class 1 scale model.G-EBTU spans 84” and is Laser 100-pow-ered. She even has the correct folding wingsof the prototype. In fact, when you take agood gander, this superb model is a master-class of scale techniques. The scale engine isperfect, the metal panel work is utterly con-vincing, as is the minutely observed rigging.
As a point of scale trivia, G-EBUG, the sisterto ‘Red Rose’ in silver and blue, was flown bynoted American aviatrix Emilia Earhart.
Fokker DVIIBrian Brassey brought his very appealingFokker D VII, built from the Norman Butcherplan. Norman Butcher was the Editor of RadioModeller whom, I believe, now lives in Spain.Brian scaled up the original 1967 plan to1/5th scale, and she is SC 120-powered, andweighs in at 9.1/2 lb. Like a Come Dancingdiva with her sequins, Brian patiently applied allthe lozenges by hand. (He’s bigger than me, soI’ll get a clack for that!). This was one of myfavourite models on the day, and a lovely sightin the air. I have long adored all Fokker aircraft,and I’ve even flown in one or two. Brian hasmuch modified the original plan, and the colourscheme faithfully replicates that of LeutnantRudolf Stark’s aircraft which flew in the RoyalBavarian Jagdstaffel 35b.
Sea FuryTo my mind, the Hawker Sea Fury is the very
16 Aviation Modeller International - March ‘09
ABOVE LEFT: Brian Wood’s Brian Taylor design Corsair, powered by a Laser 240 Twin. ABOVERIGHT: Colin Bostwick built and flew this fabulous Laser 120-powered Spitfire 14. Brian Taylor plan.
Dominic Brassey-William’s Spitfire IV inGinger Lacey’s colours. O.S. 120-powered,from the Brian Taylor plan.
ABOVE: Andy Bowman’s immaculate Tiger Moth from the celebrated Flair kit. BELOW: GarethGordon’s Thunder Tiger 90 FS-powered World Models Extra 330 ARTF.
DEESIDE SCALE 12/1/09 11:11 Page 4

pinnacle of the British piston-engined fighter.It always seems to look pugnacious, and yetageless. Like all the great fighters, it projectsaggression, even when parked. Colin Terry’ssuperb model is scratch built from a three-view - with no plan - and has a balsa skinnedwing and fuselage. She’s Laser 150-powered,spans 72” and weighs 13 lb. Power is deliv-ered via 16 x 8 prop. That authentic lookingspinner is a full 4.3/4” diameter. She hasUnitract pneumatic retract gear, and she alsohas flaps. A very fine model indeed.
MustangMy pal Richard Thomas from the Rhyl club hadbrought his very quick Mustang. This P51-D isan ARTF from Hangar 9, extravagantly poweredby a Roto 35cc, on a 20 x 10 prop.Unfortunately, on one flight Richard was broughtdown by enemy action, when he just clipped thetall and treacherous reeds. Damage was annoy-ing, but not too serious, but Big Dick never losthis sense of humour, which I always feel is themark of a proper modeller.
MDF?I like modern jets almost as much as I like earlyjets. Also, modern model jet turbines are utterlyfantastic. Therefore I was delighted when RonFeeney flew his fine MD F-15B in the contest. Incase the designation has you guessing, this isthe two-seater variant of the F-15 Eagle.Although it looked like the well-known Phil Avondskit, Ron’s model was reformulated around a res-
urrected scrap g.r.p. fuselage. Ron’s jet is pow-ered by a Wren Supersport turbine and weighs17.1/2 lb. Ron flew her very smoothly indeed.Against a deep blue sky the jet loops were enor-mous and the vertical climbs appeared endless.We are so lucky to live in the age when modeljet turbines have become perfected.
JungmeisterBucker Jungmeisters seem to wax and wane inpopularity. Once they were everywhere, then therise of the Extra and its sleek clones saw themoff for a while. However, there now seems to bea nostalgia factor creeping in, and I saw threelast season. The Jungmeister is a superb scalesubject, two wings and a round engine, a hump-
ty-back, and loads of little fiddly bits - well it can’tfail, can it? My mate Keith Fear had brought hissilver Bucker Jungmeister to Deeside. His modelis in the well known G-TAFF colours, but built toan obscure Polish plan. I wondered if this mightbe the 1/4 scale version by dearly beloved PavelBosak, but Keith couldn’t remember. It goeswithout saying that the chunky yet handyJungmeister flew very well.
Stampe on itIn the final reckoning, things were close. Pippingyoung Dominic Brassey-Williams by a narrowlead was Alan Glover with his Stampe biplane.This was built from the well known Precedentkit. It is 80” span, Laser 150 powered, and
March ‘09 - Aviation Modeller International 17
FAR LEFT: Keith Fear’sG-TAFF Bu 133 BuckerJungmeister on a take-off mini-flick. Built froma Polish plan. ABOVE:Steve Dorling’s sprightlybut now ancient Moki135-powered GoldbergUltimate - adequatelypowered! LEFT: ColinTerry’s superb Sea Fury.72” span, 1:6.4 scale;Laser 150-powered,weighs 13lb.
ABOVE: Rhyl Club’s Richard Thomas carryingout Colin Campbell’s ARTF Chipmunk. RIGHT:Colin Campbell’s ARTF DH Chipmunk fromSeagull. O.S. 61 SFX-powered. 62” span, weighs8lb.
ABOVE LEFT: Colin Terry settles his Sea Fury on the strip. ABOVE RIGHT: Kerin Taylor steadies ourEditor’s steed before flight.
DEESIDE SCALE 12/1/09 11:11 Page 5

weighs 14 lb. Alan flew this model in a very con-trolled and disciplined manner. His flight remind-ed me of seeing Brian Lecomber aerobat a full-size Stampe in the 1980s. He was a worthywinner and Phillip Kent presented him with hiscertificate.
The verdictPhillip Kent has struck gold with these lowkey/high fun comps. They suite the modern zeit-geist and attract modellers whom otherwisemight run a mile from a competition. They makerelatively modest demands on the host club, and
they bring ARTFers and Thousand Hour Scalitestogether, which is a Good Thing. On top of this,The Deeside Club made us all exceedingly wel-come - and the bacon butties were sublime. ■
18 Aviation Modeller International - March ‘08
ResultsThe Top 5 places were:1st Alan Glover Stampe 189 pts2nd Dominic Brassey Spitfire XIV 186 pts3rd= Andy Bowman Tiger Moth 185 pts3rd= Gareth Gordon Extra 185 pts3rd= Ron Sweeney F-15b 185 pts
Kerin Taylor’s Ripmax ARTF DH Comet GrosvenorHouse. Twin O.S. 52 four-stroke power.
ABOVE LEFT: Lyndsay Todd’s colourful 90” span Stearman from the Flair Kit. Zenoah 45 power; weighs 22.1/2 lb. ABOVE RIGHT: That little triangle ofrough caught out many flyers besides Lyndsay!
ABOVE: Keith Fear’s Bu 133 BuckerJungmesiter reed-hopping. RIGHT: The winner!Alan Glover’s 80” span, Laser 150-poweredStampe, from the famed Precedent kit. BELOW:Ron Feeney’s fine MD F-15B variant. WrenSupersport turbine-powered; weighs 17.1/2 lb.Placed third.
DEESIDE SCALE 12/1/09 11:12 Page 6

MACGREGOR 10/12/08 14:28 Page 1

20 Aviation Modeller International - March ‘09
T-REX 500CFEasy to assemble and a versatile performer, this new electric
helicopter from Align ticks all the boxes
BENCHMARKS - By Greg Butterworth
TREX 500 12/1/09 11:37 Page 2

Align have stormed the helicopter market and suc-cessfully cracked the mass market with their 600offerings in both electric and nitro formats. Wehave tested the 600CF within these pages andbeen more than impressed with the performance of
both power variants. So where next for Align and their design-ers?
The answer comes in a bit of range infilling and the latestoffering fits neatly in between the 600s and the smaller 450series with which Align first made their mark around four yearsago.
Helicopters with 500mm blades have not been prevalent withkit manufacturers, but taking into account that Align wereahead of the pack with the release of their 600-sized machineit is not surprising to find them pushing into new markets. Wetest here the 500CF boasting carbon fibre mainframes. As withother sizes, glass frames are also available at a slightly lowercost. As with all Align models I was impressed by the quality offinish on the 500’s components and the considerable propor-tion that were in metal rather than the often-used plastic ofother manufacturers.
With batteries for the 600 models still costing in the orderof £190 for decent Flightpower 6S packs and, as good as the450SE is, it is still a small and potentially fragile machine. The500 addresses both problems being sized between the two andcapable of running on lower capacity main packs, albeit with thebenefit of 6S performance. For the cost conscious the 500 canbe flown on a pair of 2100 mAh 450 packs running in seriesto provide the required 6S format. Failing that, packs specifical-ly for the T-rex 500 range from around £60 to £100 for highperformance variants.
With the 6S format it will handle more extreme outdoor con-ditions well and is perfect for summer evenings and perhapsnot too large for the odd indoor winter night.
When one considers the RRP kit price of £295 for the car-bon version (the glass fibre-framed kit is some £30 cheaper)and the fact that it includes a capable BEC equipped speed con-troller with governor plus the 1600KV motor, it representsgood value against its rivals that often are not so well specified.Included in the full kit are good quality carbon blades whilstcombo kits are available without blades.
You will need to source suitable radio equipment of receiver,three mini cyclic servos, and mini tail gyro/servo combinationalso need to be sourced. You will need to factor in the costs ofmain propulsion battery (or batteries) and suitable chargingequipment.
Opening the boxOpening up the very compact box it really is a work of art tosee how small a helicopter can be packed when you try! A goodlook through the box and a check on the components reveals aconsistently high level of quality which augers well for astraightforward build using the comprehensive manual supplied.
Some basic tools are required to assemble the T-Rex 500correctly, Allen screwdrivers and small pliers proving useful. Asmall amount of cyano acrylate glue is also required. Align sup-ply the usual threadlocks nominated as R48 and T43. Theseare two different types of threadlock for varied applications onthe metal-to-metal or plastic fixings. Make sure that all compo-nents calling for such treatment are threadlocked.... even thefactory-assembled components which need to be stripped andchecked during assembly.
The manual is very clear and each step is logically ordered.By following the sequence suggested, building this helicoptershould be a relatively easy task even for a complete beginner.Align have a standard assembly process referring each manualsection to a particular bagged selection of parts. Each sectionhas its own bag and this for the uninitiated ensures that a logi-cal process is concluded before moving on to the next.Complemented by the clear diagrams in the manual, parts iden-tification is similarly improved by restricting them to theirappropriate section. If you get to the end of a section withparts left over then you have probably made a mistake!
So let’s startWe start with the head and the main rotor housing to which wefit the flybar seesaw, mounted on two ball-races supported onM3 collar screws. Around this seesaw the flybar and its linkagecradle is assembled together with the SF mixing arms, againball-raced and mounted to the flybar seesaw.
The three servo/120 degree CCPM swash plate is pre-assembled and ready to use. We first assemble the washoutaround its aluminium base and it is useful at this stage to dropthe 8mm main shaft through the swash, washout and head tolocate and true the components. The head block is retained onthe mast with the customary ‘Jesus bolt’. Very quickly the head
March ‘09 - Aviation Modeller International 21�
Glassfibrecanopy, great
moulding, light-weight andpre-paintedready to fit.
Handed carbonside frames
and basemoulding form
the basis ofconstruction.
The addition ofan undercar-riage makesfor a stable
building plat-form.
Quality carbonblades are per-
fectly capablefor advanced
flying.
Align520L/1600K
V motor andmatched 60Amp speed
controller assupplied in the
standard kit.
TREX 500 12/1/09 11:38 Page 3

is taking shape.The blade grips are next, nicely made
and of aluminium construction, the qualityreally shows in areas such as this. Formany models such aluminium grips are anexpensive aftermarket upgrade. With avery similar design to the earlier Alignmodels the blade holders are mounted to afeathering spindle supported on rubberdampers within the head block. The bladeholders themselves are each supportedupon two substantial 4mm ball-races andan additional thrust-race.
The plastic flybar paddles are lightenedwith holes across their length. These arecovered with adhesive transfers beforescrewing onto the threaded end of each
flybar to a consistent distance each sidebefore levelling against each other.
The head is topped off with an alumini-um head stopper - useful when slowing thehead after a flight with the palm of thehand.
Main framesFor now we are done with the head andour attention turns to the main frames,bolted together initially around two mainshaft bearing blocks sandwiched betweenthe frames. Fastenings for the frame con-struction are a mix of 2.6mm self-tappersand 3mm button-head socket screws. Aswith previous models these are soft andbest described as single use although an
upgraded stainless set is available.Alignment of the main bearings isenhanced if the main shaft is inserted as aguide whilst bolting up these blocks. Theframes are then further braced with themoulded plastic base plate and aluminiummotor mount to the front of the frames.The fixings from each side have neatcupped washers supplied with the kit.
The strong plastic undercarriage legsare mounted at this stage to the plasticbase plate of the frame and the aluminiumskids inserted. This makes the frame niceand stable to work on for the remainder ofthe build.
With relatively little done to the framesat this stage, we install the CCPM servos
22 Aviation Modeller International - March ‘09
Specification
LENGTH850 mmHEIGHT310 mmMAIN BLADES425 mmMAIN ROTOR DIAMETER970 mmTAIL ROTOR DIAMETER200 mmMOTOR PINION12T/ 13TMAIN GEAR162TFLYING WEIGHT1.7 kgBATTERY 1Align 2100 6s1p (20C)MOTOR (SUPPLIED IN KIT)Align 520L/1600KV
TOP LEFT: Boom-mounted tail servo mated to Futaba GY401 gyro locks the tail in. TOP RIGHT: Nice lightened 3D tailplane with boom struts supportingthe boom incorporated in the mounting plate. ABOVE LEFT: Main gear installed and battery in place. All radio cabling is neatly routed and protected inconduit. ABOVE RIGHT: Tail rotor gearbox and assembly follows typical T-Rex style and design with toothed belt drive within the boom.
BELOW LEFT: View from beneath, showing easily accessible motor for ease of maintenance.BELOW RIGHT: Close up of the completed head assembly; it’s predominantly metal - ensure thatthreadlock is employed wherever the manual dictates.
TREX 500 12/1/09 11:38 Page 4

which are mounted close tothe cyclic controls of theswash plate and provide directto head connections. The rec-ommended servos for thismachine are Hi-Tec HS-82MGor HS-5245MG, both of whichfit the mountings within theframes for such mini-servos.For these servos Align haveprovided suitable mountingblocks and heads with the cor-rect geometry. Without theCCPM cyclic levers of previousmodels the installation is sim-plified and speeded up, as wellas weight saved along theway.
Once the three CCPM ser-vos are in place the batterytray and front canopy sup-ports further strengthen theside frame assemblies.
Tail endTurning to the rear of themain frames we now assemblethe tail boom casing whichencompasses the tail drivegear assembly and its associ-ated toothed belt. The drivegear, mounted on a pair ofbearings, sandwiches betweenthe plastic tail boom mountswhich in turn are clampedbetween the frames at therear on four hexagonal spac-ers.
Following the manual, thehead assembly is now fixedthrough the main bearings andsecured to the autorotationand main gear assembly. Alocking collar on the mainshaft above the upper bearingtakes out the play in theassembly and is best adjustedby allowing the frames to hangunder their own weight whilstholding the head.
Next stage of assemblysees the tail boom inserted inthe back of the main frames.The tail boom is slotted to lineup with a pin inside the tailboom case. The tail drive beltis inserted through the boomwith a 90° rotation in the beltto fit it onto the tail drive pul-ley. Follow the clear illustrationin the manual because if the90° rotation is made thewrong direction then your tail
rotor will turn the wrong way.With the boom in place and
clamped on, the tail rotorservo mount can be assem-bled and fixed onto the clampsslid onto the boom togetherwith the tail pushrod guides.
The two handed tail gearboxcasings are next assembledaround the rear of the boomand encase the tail driveshaft. The drive shaft is sup-ported throughout with bear-ings for free movement anddriven by the belt drive alreadyin place. A small hole on theboom corresponds to the pinwithin the plastic moulding ofthe gearbox case and ensuresits accurate positioning. Belttension is taken up by pullingthe boom backwards whilsttightening the clamps at itsforward location with the mainframes.
The tail rotor blade gripshave their bearings pre-installed and are boltedthrough into the tail rotor huband should have a VERY smallamount of threadlock appliedto them.
The tail rotor control mech-anism is nearly complete nowand needs bringing together,including the tail pitch assem-bly and the pre-assembled tailrotor control arm whichscrews directly onto the tailgearbox.
Tail boom braces and thelightened plastic 3D-style hori-zontal and vertical stabiliserfins are added to the boomcompleting the rear end of themachine.
We turn next to installationof the drive system. Themotor needs its pinioninstalled before it is offered upand mounted to the alloyengine plate using M3 bolts.The pinion is secured onto themotor shaft using an M4 set-screw requiring plenty ofthreadlock onto a flat on themotor shaft - the speed canbe pretty significant and we donot want the pinion to workloose. Align provide a choiceof pinions allowing a selectionof flying styles.
Meshing the main gear and
March ‘09 - Aviation Modeller International 23
We will say this only once!Our Free Catalogue gives best prices for all
Just ring: 01480 411519, Fax 01480 433792 Inwood Model Supplies, 5 St Margarets Way,
Stukeley Industrial Estate, Huntingdon, Cambs, PE29 6EBVirtual catalogue at www.inwoodmodels.co.uk
Email : [email protected]
Radios, Servos, Receivers, Batteries,Engines, Paints, Films, Tanks, Kits,
Propellors, Nuts, Bolts, Washers, Wire, Tissue, Wheels,
Glue, Chargers
TREX 500 12/1/09 11:38 Page 5

pinion well is essential before tighteningthe engine mount bolts to ensure a reliableand friction-free installation that willenhance power output.
ElectronicsWe chose to use the recommended Hi-TecHS82MG servos in our review model; theframes and fittings are suited to these andwith the metal gears of this mini-servo weshould be equipped for the demands of thedirect to head CCPM linkages.
Pushrod connections to the swash arevery simple, given the removal of thetransfer linkages and seesaws often found.It is still however vitally important toensure that the servo outputs are all lev-elled, servo throws balanced and linkagesadjusted to ensure parallel movement ofthe swash through its range.
Tail rotor control was managed by a sim-ilar HS82 servo running through a FutabaGY401 gyro.
The whole radio installation once inplace can be neatened up with the routingof servo leads through the airframe withinprotective hosing secured with small cableties at various points away from any rotat-ing components.
The JR receiver was installed under thebattery tray to the front of the frames,nicely out of harm’s way.
Speed control was achieved with thesupplied RCM-BL60G electronic speed con-troller. This unit was secured to the sideframes alongside the motor and in the air-flow to maximise cooling. This speed con-troller provides our receiver with a regulat-
ed voltage supplied that can be chosen at5, 5.5 or 6 volts depending upon servoand gyro used. An effective governor forhead speed is also included within the con-troller.
We used the recommended Align 6S2500mAh packs for the flight testing ofthe 500CF. These packs proved entirelyadequate for our purposes and allowedsome spirited flying with flights betweenseven and eight minutes duration.
Finishing the whole ‘copter off requiressimple fitment of the ready cut and attrac-tive painted epoxy fuselage in housescheme. Two schemes are available ineither red or yellow with more optionalschemes available as aftermarket acces-sories.
In conclusionBuilding the T-Rex 500 was straightfor-ward and a pleasurable task with no itemscausing any concern for any level ofbuilder. As we have come to expect, themanual is very thorough and clear at everystage. Being that bit larger than the small-er 450 the fiddly bits were less fiddly andeasy to access with fat fingers. The T-Rex500 is therefore easy to recommend forbeginners to the heli scene.
Since its completion I have now hadmany successful flights with the T-Rex 500and enjoyed them all. Within the hangar Iam fortunate to have a number of theAlign variants, both nitro and electric. Tochoose a favourite is impossible since theyall have their own individual performancebenefits. The current high prices of scarce
high nitro fuels may push the economics infavour of electric. The 600 is of coursemore stable given its size but the smallerfootprint and reduced weight of the 500makes it very manoeuvrable and highly aer-obatic.
The standard carbon blades are of ahigh quality and have performed wellthrough my mild aerobatics and basic 3D.Loops and rolls are powerful and effort-less. Performance is such that confidencein the machine is quickly gained. With the6S power configuration, higher head speedallows for good autorotation performanceand the nicely balanced blades performwell all the way down with energy inreserve for a nice flare
Downsides are few, but if I had to high-light any it would be the lack of flying whilstyou wait to recharge. You can always buyadditional batteries but that can get pricey.A clear advantage is always returninghome with a clean airframe and a modelthe wife can’t complain about in the house!
If I have a gripe it’s the frame fixingbolts - pretty please would you make themof something more substantial thancheese... but there is a fully recommendedstainless set available anyway at around£20.
One great source of reference as alwayshas been the Internet where much datacan be found on setups and background tothe T-Rex of all variants. One such websiteworthy of mention iswww.thetrex600forum.com where a wholecommunity dedicated to the Align helicop-ters lurks electronically. ■
24 Aviation Modeller International - March ‘08
TREX 500 12/1/09 11:39 Page 6

Book 1 Book 2 Book 3
AirArchive Book 3 - AIRCRAFT OF WWII
The period of World War Two, from 1939 - 1945 raised the impor-tance of combat aircraft, of all types, from useful secondary mili-tary tool, to a status of prime importance in securing military vic-
tory. During this period, the impetus of military need that and the
unlimited availability of national treasure to fund hitherto unheardof operational demands, drove creative aeronautical engineers
toward achievements in aircraft performance and capability neverpreviously envisaged.
Over land, aircraft came to be seen as a decisive factor in the tac-tical role of blunting and defeating ground forces initiatives, andin the strategic task of destroying the enemy’s means of waging
war.On the oceans of the world, the carrier bourne strike aircraft
quickly became the prime weapon of naval warfare, relegating thebattleships and heavy cruisers to secondary roles - for none could
safely operate without effective air cover.
In Book 3:-
BOEING PT-13 & 17 STEARMAN● Type history ● Stearman in detail ● Stearman Sketchpage ●
Flying colours - service colour schemes ● Scale drawings 1:40
FAIREY SWORDFISH● Type history ● Swordfish in detail ● Scale drawings 1:60 ●
Swordfish Sketchpage
RYAN PT-22● Type history ● PT-22 in detail ● Flying colours - service colour
schemes ● Scale drawings 1:40
VICKERS SUPERMAINE WALRUS● Type history ● Walrus in Detail ● Flying colours - service colour
schemes ● Scale drawings 1:50
WESTLAND LYSANDER● Type history ● In detail - close-up ● Flying colours - service
colour schemes ● Scale drawings
AirArchive Book 1 - WWI GERMAN
The ebb and flow of air superiority during the four and half yearsof The Great War, WWI, was punctuated by a succession of fighteraircraft types, each designed as a means of wrestling command of
the skies from the opposing side.This volume of the AirArchive series deals with fighter machines
of the Imperial German Air Service, from the Fokker and Pfalzmonoplanes of 1915, through to the deadly Fokker DVII and DVIIIthat were the pinnacle of German air combat capability when the
Armistice of November 1918 cleared the European skies of airduelling.
In Book 1:-
FOKKER EINDECKER
● Type history ● Flying colours - service colour schemes ● Scale drawings 1:40
PFALZ E.I - E.IV
● Type history ● Scale drawings 1:40
HABERSTADT D.V
● Type history ● Flying colours - service colour schemes ● Scale drawings 1:40
ALBATROS D.II
● Type history ● Flying colours - service colour schemes ● Scale drawings 1:40
FOKKER D.VII
● Type history ● Fokker Warpaint ● In detail - close-up ● Flyingcolours - service colour schemes ● Scale drawings 1:40
FOKKER D.VIII & E.V
● Type history ● In detail - close-up pictures ● Flying colours - service colour schemes ● Scale drawings 1:40
A new series of reference books for aviation enthusasts in general, and scale modellers inparticular. This new range covers the stories of the world’s most famous aircraft, with manyhistorical photographs, colour schemes, super-detail close-ups and fine-line scale drawings
These are the first three in this new range:-
Price £19.95 each plus £3.00 p&p
AirArchive Book 2 - AIRCRAFT OF THE
1920-1939 ‘GOLDEN AGE’After the end of WW1 in late 1918, thousands of military aircraft, ofall types, were burned in huge bonfires or otherwise destroyed as
nations disarmed. All this led to very hard times for the aircraftindustry that had previously been developing and building aircraft at
a vast rate. But new types did trickle throughand the aircraft industry, worldwide, did manage to hang on, mak-
ing the most of what military and civil orders haphazardly camealong, until the worsening international political situation in theearly 1930s began to prompt moves to progressive re-armament
and demands for more capable military aircraft of all types.This volume of the AirArchive series concentrates on some of the
most famous, glamourous aircraft of that ‘Golden Age’.
In Book 2:-
GRUMMAN F3F-2● Type history ● Flying colours - service colour schemes
● Scale drawings 1:40 ● Detail close-uos ● F3F Sketchpage
CURTISS HAWK P-6E● Type history ● Flying colours - service colour schemes
● Scale drawings 1:40
HAWKER FURY● Type history ● Flying colours - service colour schemes
● Scale drawings 1:40
De HAVILLAND DH82a TIGER MOTH● Type history ● Tiger Moth sketch page ● Flying colours - serv-
ice colour schemes ● Tiger Moth in detail ● Scale drawings 1:40
COMPER SWIFT● Type history ● Scale drawings 1:40 ● In detail - close-up
● Colour Schemes
Model Activity Press Ltd.,5 Chiltern Business Centre, 63-65 Woodside Rd., Amersham, Bucks, HP6 6AA.
Tel: 01494 433453 Fax: 01494 433468. www: modelactivitypress.com
AIRARCHIVE AD 1P Tony OK 11/6/08 11:00 am Page 2

Awhile back, a good friend of mineintroduced me to the Luna,which is a lovely two-metre classall-moulded glider, a type thathas been popular on the slopes
for a few years now and typified by machin-ery such as the Blade, which I was flying atthe time. Up to that moment, I had beenquite happy with my trusty old Blade, but see-ing Steve’s Luna in the flesh was an eye-
opener, immediately invoking dissatisfactionwith the Blade, which was clearly quitepedestrian, showing marked limitationsthroughout the performance envelope, notthe least of which showed up in the landings,with Steve’s Luna cruising to a halt, courtesyof its excellent crow braking. Whereas theBlade was always a crash in the making, withits lack of flaps - it was time to ‘move up’ asthey say! Unfortunately at that precise
moment, my Blade bit the dust in a big wayand, wouldn’t you know it, the Luna became‘unobtanium’ with those who owned one, jeal-ously guarding them until, that is, a year orso later, when the Mk II became availablefrom Sloperacer. I needed no second bidding,my order was placed and soon after a verystriking orange and black Luna was sitting onthe workbench!
Unburstable!The Mk II shows marked improvements overthe Mk 1 version - made in China, the newLuna is far stronger and more accurate in itsconstruction, with all trailing edges knifesharp and beautifully straight when viewedend on. The fuselage is altogether changedtoo, with a stronger and slightly blunter nosecone and a much stronger tail boom, thisallied to a larger fin and rudder with verypleasing lines. When I couldn’t source a Lunalast year, I did consider the 2m all-mouldedRuby as an alternative, but the fin on thatone is about as ugly as the Luna’s is prettyand that sort of thing always puts me off.
26 Aviation Modeller International - March ‘09
LUNA MKIIPound for pound the best two-metre moulded slope/thermal machine on the mar-
ket! That’s Steve’s verdict on Sloperacer’s latest
BENCHMARKS - By Steve ‘Brad’ Bradley
The two models are similar, but not identical -the Editor’s well-flown Mk 1 sitting alongside myMk 2.
LUNA 12/1/09 10:59 Page 2

Subsequent owner reports on the Ruby haveshown the model to be very lightly construct-ed and relatively flimsy, whilst the Luna onthe other hand has earned an enviable repu-tation for being unburstable, so that was adecision made!
There isn’t anything of particular note topoint out about the build on this model -everything is very straightforward, given thatwe’re describing an assembly rather than atrue build with a moulded glider like the Luna!I chose the now, almost ‘standard’ and quitesuperb value for money Hitec HS85MG servofor everything - four of these in the wingsoperating flaps and ailerons, with a furtherpair in the front fuselage actuating the rud-der and all-flying tail via a cable and carbonrod respectively, hooked up via the nowequally ubiquitous Multiplex green six-pinplugs. Some advocate running single posi-tives and negatives to these, but not I - youwant redundancy in your aeroplane wiring ifpossible, just as the full-size boys do it! Youwill need to make up a ballast tube, or alter-natively, order one from Sloperacer as mymodel didn’t have this included, and likewisea set of clevises and pushrod ends and soforth for your control linkages!
Assembly and installationTake your time - make up your aileron andflap control rods carefully using locking nutsand solder to keep things fixed and if you’venever assembled a ‘mouldie’ before, then gettogether with someone who has - the proce-dure is simple in the extreme, but good engi-neering skills are important if you’re to getthe best from your Luna as you certainlydon’t want anything letting go during a onehundred m.p.h. plus dive across the slope.Good installations generally lead to a longlasting model, whereas a poor installation willprove frustrating and at worst let you downat the wrong moment, destroying your prideand joy in and instant. An extra half hour on
that linkage will pay dividends in the long run!Due to the revised fuselage shape, a stan-
dard AA four- or five-cell battery will fit com-fortably in the nose; I went with a four-cellAA 2000 NiMH! For those using other thanmy chosen HS85MG servos - anything lessthan about 13mm thick and producing 2.5kg/cm torque will do the job in the wings,but to be frank there isn’t anything to touchthe HS85MG for the money and with thou-sands in use on the slopes worldwide, theyare well proven too. I would think that Hitecmust sell a dozen of these for every othersimilar spec’d servo out there!
I fitted a JR RS70 synth mini Rx, bearingin mind that unless you have one of the bet-ter transmitters you’ll need a seven-channeldevice, even though you only use six, as youcan’t use the throttle channel when flap mix-
ing!One small point - don’t cut too large an
access hole through the wing seat for yourwiring outlet to the wing plugs. This will(does...) weaken the fuselage in that area onany moulded glider, leading to cracks fromtwisting moments induced during landings,that being the only consideration really whengrinding and drilling for your fuselage installa-tion. Again, there is very little work to dohere.
Moving on to the wing panels, there is onlyone way to install a wing servo these days -the excellent Cubitt servo mounts which com-pletely eliminate the abhorrent practice offloating servos in on a sea of five-minuteepoxy and the Cubitt mounts facilitate simpleservo removal if need be, too - excellent!
There is a little work to do on the drag
March ‘09 - Aviation Modeller International 27�
ABOVE LEFT: Compare and contrast - the Mk 1 and 2 fins are markedly different. ABOVE RIGHT: The huge fin and rudder have a lovely shape and givethe Luna superb authority in yaw - very effective rudder control on this one.
Off for a bit of Luna formation flying with Steve - nice part of the world but your Ford Ka isn’t going tohack it up here!
BELOW LEFT: Radio installation is a breeze on the Luna, just be methodical and plan forward. See text regarding the cut out for the wing plugs.BELOW RIGHT: The beauty of a 2 metre cross-tail model like this one is the way it ‘flat-packs’ for transport purposes.
LUNA 12/1/09 11:00 Page 3

spars to facilitate full flap movement, butthere isn’t really a need to achieve the oftvaunted 90 degrees of down flap as theseare very effective on this model even at halfthat travel, and being top-driven unlike someother models, there is no slop in the linkageseither - superb! I achieved about 80 degreesof flap with no real issues and in the air theirperformance is striking, hauling the machineto a stop immediately, which makes landingsa snap! On the opposite side of the coin, youwon’t achieve more than about five degreesof up flap before becoming hinge-bound - justget as much as you can and go with that for‘flapperon mix’ and you’ll be fine as the rollrate is crisp on this one, courtesy of themodel’s size and the general aileronresponse!
All flying tails are easy - line everything up,either by eye or with an incidence meter andyou’re done. Nothing particularly difficultabout this and the same goes for the rudderlinkage - it’s all very straightforward, as youmight assume!
MixesEverybody will have their own ideas on setupsand mixes, but for starters you’ll definitely
want ‘crow’ mixed in on a switch and proba-bly allied to your throttle stick too, so thatyou can vary the brakes on the way down -so many make the mistake of using brakeswhen not needed at all, or using more brakethan needed, with the resultant ‘stop anddrop’ to terra-firma ugly and so oftendestructive. My chums on the slopes tell methat the word is ‘commitment’ with slopelandings, oh and to remember to fold thebrakes away before you touch down, for fearof dragging a flap! Other than that, you’llwant a switchable flapperon mix and possibly
28 Aviation Modeller International - March ‘09
In its element over the very pic-turesque Glaslyn valley with theold slate port of Porthmadog inthe far distance.
ABOVE LEFT: Wings are two-piece with a cranked carbon joiner. Four machine screws affix to fuse-lage top. ABOVE RIGHT: If fitted, your ballast tube sits at a jaunty angle under the wing seat.Loading and unloading ballast takes seconds - just pop the nose cone off and you’re done!
LUNA 12/1/09 11:00 Page 4

a drooped trailing edge for ‘thermal’ but don’tget too hung up on mixes and programminguntil you fly the model - you can fine tunethings later. I went for the safe option on thebalance point, i.e. exactly where advised andthat proved perfect for me - you can go aftwith it a tad afterwards if you’re seeking theultimate in performance, but I like the feel ofmine as is!
Flying - what it’s all aboutI’ve seen the Editor and Andy Ellison flying
the wings off their Lunas on many occa-sions, from hills various, so I knew what toexpect but I was very pleasantly surprised byjust how easy this one is to handle, feelingimmediately ‘right’ from the very firstmoment she was released into her naturalenvironment. I can’t speak with huge authori-ty on all-moulded gliders, having only ownedthree to date, but for me the Luna is a beau-ty with real grace and poise and what a love-ly thing she is in the air with attractive linesfrom any angle. The Luna has a great turnof speed - accelerates briskly with a sniff ofdown elevator, holds the most beautiful ther-mal turns and when put into a fast bank sheholds a line beautifully too. Two words sumup the Luna - ‘efficient and poised’ for shefeels like a ‘sports car’ thoroughbred on theslope.
To date I’ve not had the opportunity to bal-last my Luna, but I’ve seen the earlier ver-sion hauled around in fine style with a pound
of lead aboard and in a good blow too. Andydesperately attempted to prove that ‘brilliantgliders don’t come in at these sort of prices’when he first got his hands on the earlierversion, vainly attempting to pull the wingsoff his Mk 1 - to no avail, despite five-hun-dred foot vertical dives with square pull upsand the like, so you’re most unlikely to breakthis one in the air. More to the point, I madea complete hash of a landing when attempt-ing to set mine down on a turbulent edge.Remembering back to what I said about
using too much air-brake, I stopped my Lunaabout twenty feet aloft and the vicious turbu-lence punched her into the top of the ridgeon the nose and one wingtip! Fearing theworst, I wandered over to survey the dam-age, but there was none - not a crack or amark even. Somewhat helped, no doubt, bythe soft ground, but amazing considering thesickening noise which suggested the worst!
So what’s to criticise about this one then?Well not a lot really. I didn’t much care forthe cranked and round section carbon wingjoiner - square would be better, but in prac-tice it’s not a big deal. The tail tubes don’tterminate in a blind orifice, which meansthat you can push the joiners inside if youare ham-handed - either CA them in (lightlyand only on one side) or bear in mind thisshortfall. Other than that, the Luna is, poundfor pound, the best ‘two-metre’ mouldedslope/thermal machine on the market andthat’s not just my opinion, as a trawl around
the Internet shows on forums generally! Thisisn’t a good model - it’s a great model and Ilove it! In fact it would still be a great modelat half the price again as its performanceand looks are a country mile ahead of thenon-moulded stuff of comparable size andcost out there. The original Luna was a bitof a bargain and the Mk 2 certainly is. Welldone Sloperacer - I’m now looking enviouslyat the Editor’s new 3m Javelin from thesame source - that one looks a real beautytoo! ■
March ‘09 - Aviation Modeller International 29
Specification
SPAN:2 metresLENGTH:1170mm WEIGHT:1600gWING SECTION:MH32CONSTRUCTION:All hollow moulded epoxy glassSERVOS:6 x Hitec HS85MGWING:2 piece, 4 servo wing for easy trans-port TAIL:All-moving BALLAST:2lb ballasting capacityRRP:£235
Contacthttp://sloperacer.co.ukEmail: [email protected]: 07952 249117
ABOVE: Looking very clean with everything folded away. Ballasted or unballasted, she’s very fast witha great turn of acceleration. BELOW LEFT: Now you can see why the crow braking is so effective -superb brakes! BELOW RIGHT: There isn’t a single straight line anywhere on the Luna, save for thetrailing edges. A very elegant machine I think you’ll agree!
LUNA 12/1/09 11:00 Page 5
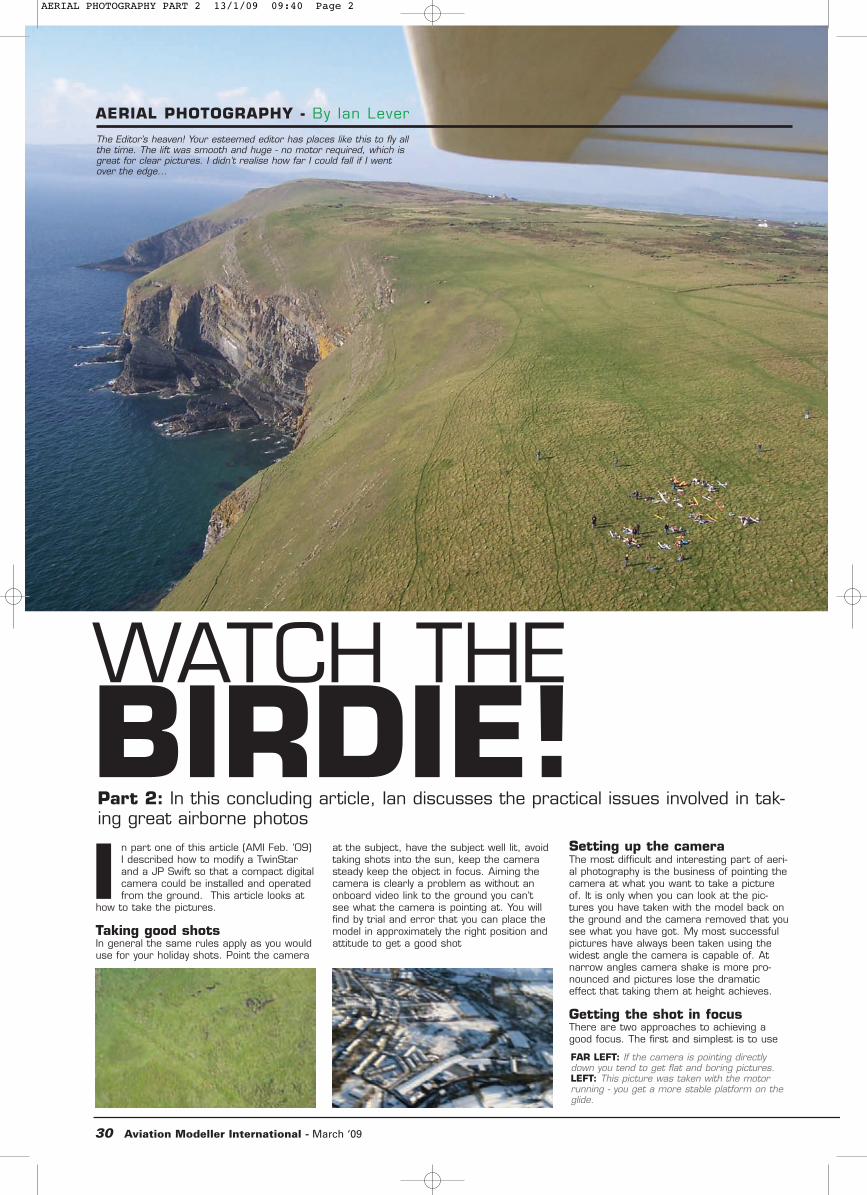
In part one of this article (AMI Feb. ‘09)I described how to modify a TwinStarand a JP Swift so that a compact digitalcamera could be installed and operatedfrom the ground. This article looks at
how to take the pictures.
Taking good shotsIn general the same rules apply as you woulduse for your holiday shots. Point the camera
at the subject, have the subject well lit, avoidtaking shots into the sun, keep the camerasteady keep the object in focus. Aiming thecamera is clearly a problem as without anonboard video link to the ground you can’tsee what the camera is pointing at. You willfind by trial and error that you can place themodel in approximately the right position andattitude to get a good shot
Setting up the cameraThe most difficult and interesting part of aeri-al photography is the business of pointing thecamera at what you want to take a pictureof. It is only when you can look at the pic-tures you have taken with the model back onthe ground and the camera removed that yousee what you have got. My most successfulpictures have always been taken using thewidest angle the camera is capable of. Atnarrow angles camera shake is more pro-nounced and pictures lose the dramaticeffect that taking them at height achieves.
Getting the shot in focusThere are two approaches to achieving agood focus. The first and simplest is to use
30 Aviation Modeller International - March ‘09
WATCH THEBIRDIE!Part 2: In this concluding article, Ian discusses the practical issues involved in tak-ing great airborne photos
AERIAL PHOTOGRAPHY - By Ian Lever
The Editor’s heaven! Your esteemed editor has places like this to fly allthe time. The lift was smooth and huge - no motor required, which isgreat for clear pictures. I didn’t realise how far I could fall if I wentover the edge...
FAR LEFT: If the camera is pointing directlydown you tend to get flat and boring pictures.LEFT: This picture was taken with the motorrunning - you get a more stable platform on theglide.
AERIAL PHOTOGRAPHY PART 2 13/1/09 09:40 Page 2

the landscape setting on the camera. Thishas two effects. First, it disables the flashfunction on the camera which means that youdon’t waste time waiting for the flash tocharge before taking the next shot. Second,the focus is fixed at infinity so that theground will be in clear focus when you areabove 30 feet altitude. For air-to-groundshots I have found this to be the best setting.The alternative is to use the auto setting onthe camera which enables the autofocus set-ting. This usually operates so that pressingthe shutter button lightly causes the camerato focus on what it is pointing at and press-ing the button further takes the picture. This,in my experience, is only worth the trouble ofsetting it up when trying close air-to air-shots.
There is one other setting which is worthexperimenting with and that is the burst
mode. Here the camera takes pictures aslong as the shutter is pressed. Depending onthe camera it may take three or four framesper second for a limited period. When flyingclose it may just result in one frame wherethe subject is in the middle.
Setting up the transmitterYou need a transmitter which has a freechannel to operate the servo which will oper-ate the shutter and the facility to be able toadjust the servo travel so that the servo armmoves far enough to operate the shutter, butnot so far that the servo is stalled with con-sequent risk of servo damage - or worse,high current drain which causes receiver fail-ure.
On the simple models I have used for thejob, channel 6 has been free and I haveassigned a three-position switch on my
Multiplex Royal Evo 9 to channel 6. It is afairly straightforward job to rig the model withcamera installed and powered up on thebench so that at the first position the servoarm is not touching the shutter button andthat at the second position the camera goesinto autofocus, while at the third position theshutter is operated and the shot is taken. Ifyou are using the landscape mode then onlytwo positions will be needed as focus will befixed at infinity.
Positioning the camera in themodelI am talking here about the angle of the cam-era as it points out of the aeroplane. Thisangle makes a difference to the shots. If thecamera points straight out of the side of themodel you will take pictures which include anout-of-focus shot of the wing. Assuming you
March ‘09 - Aviation Modeller International 31�
ABOVE LEFT: Bright sunshine always improves the shot when from the side or behind the camera. ABOVE RIGHT: A good first shot (and continuingfavourite) is to aim the camera at yourself on the ground - from around 50 feet in this case.
My home town from four miles awayand 1,400 feet. More height gives awider picture.
AERIAL PHOTOGRAPHY PART 2 13/1/09 09:40 Page 3

are flying straight and level (more on thislater) this has a number of effects on theshot.
Firstly, the shot will be aimed at the hori-zon so that you will get a panoramic image ofthe area with a significant amount of sky.Secondly, part of the picture will be obscuredby the wing. Thirdly, you get an impressionthat this is an aerial shot because you cansee the wing. If you point the camera downat an angle of 30 degrees or thereaboutsyou will see (depending on the height of theshot) mostly the ground and just enough sky
to make the shot make sense. The shot willnot be obscured by the wing.
Taking the pictures - generalThe same rules which apply to any photo-graph apply here. Bright sunlight will meanthe camera will automatically select fastershutter speeds with less chance of camerashake. Bright sunshine will also providesmore detail and colour in the shot, whichadds interest. Shots with the sun behind thecamera will generally come out better thanshots into the sun. However, accidental shots
into the sun sometimes produce dramaticresults.
Height: The higher you are the larger thearea you will see. Some of my shots takenfrom 1500 feet have radically changed myview of the areas I live and fly in. Heightenables you to see things from a perspectiveyou just would not ordinarily see. Some of themost interesting shots are those of the flyingsite and people flying. Here shots fromaround 50 feet to 100 feet seem to workwell.
Speed: The more stable the model whenyou take the shot the better. Pointing into thewind with the motor off and the model flyingas slow as possible in a straight line will pro-vide the best chance of avoiding camerashake. If you have access to a slope, this pro-vides ideal conditions as you can effectivelyhang the model in a stationary position whilstyou take the pictures.
Direction: The side of the model fromwhich the camera points out makes a differ-ence. To make this clear, if the wind is blow-ing from the west and the camera is pointingout of the left side of the model with themodel flying into wind at mid-day, the camerawill be pointing directly into the sun and tak-ing good pictures becomes difficult. Underthese circumstances a camera pointing outof the right side of the model is preferable. Ihave cut holes in my JP Swift so that I canpoint the camera out of both sides to allowfor this.
Taking the shotsIt is worth spending some time playing withthe camera in the model on the ground toget a feel for the way your camera works andin particular how long it takes to recoverbetween shots. If you take shots too closetogether you may find pictures which have
32 Aviation Modeller International - March ‘09
TOP LEFT: Low shots of the flyers are always interesting to those in the frame. TOP CENTRE: Shots from height can give a new perspective on your fly-ing location. TOP RIGHT: Shooting whilst doing a turn with the camera on the outside is likely to end up like this! ABOVE LEFT: Judging the relative posi-tion of models is difficult for both pilots. Here the subject is too low. ABOVE CENTRE: It helps if the subject model can slowly overtake you. ABOVERIGHT: See if you can hang the camera plane and let the subject plane approach the camera.
ABOVE LEFT: Careful flying has brought the twomodels into line flying at the same speed. FARLEFT: If you spend a lot of time trying to fly inclose formation this is a risk. The Twinstar’swing was sliced off. The other model was okay,the camera miraculously survived and theTwinstar was soon flying again. LEFT: Flying atdifferent times of day provides opportunity forvariety in shots.
AERIAL PHOTOGRAPHY PART 2 13/1/09 09:41 Page 4

not been properly recorded on the camera’smemory. I have found that counting to threeat each stage of operating the camera allowsit time to perform the function of focusing,taking the picture and storing it. The proce-dure (if using all three switch positions) is tomove the switch from ‘off’ to ‘focus’ - one,two, three, move to operate shutter - one,two, three, move back to first position - one,two, three. You are ready to take the nextshot.
Aiming the shotI found a good first exercise was to try to takea picture of myself from various heights. If youcan see the side of the model with the cam-era pointing out then there is a fair chancethat the camera can see you. It also gives youa chance to practise shots with the model indifferent attitudes. A shot with the modelstraight and level into wind with the motor offis the most straightforward. If you want amore vertical shot then a gentle banking turnwith the camera on the inside of the turn willalso succeed. The movement of the camerarelative to the ground is reduced under thesecircumstances so can reduce blur. Converselya shot with the camera on the outside of theturn will probably result in a blurred shot ofthe sky.
Taking a shot of anything else on the groundis largely a matter of trial and error. Point thecamera in the general direction of an area youwant to snap and take lots of pictures. I foundthat my ability to point the model and camerain the right direction has improved over time.
During the course of a flight I often find Ihave taken more than 100 shots. Half the funis in sifting through them on the computerscreen afterwards to see what you havetaken. Using a modern compact camera withgood resolution you will pick up surprisingamounts of detail.
Air-to-airWhen you have taken shots of your flying sitewith you and your mates on it and the areasurrounding it, I bet you will be keen to try air-to-air shots. This is great fun and in my experi-ence the most difficult task.
Pointing the camera at the ground is easyas you are guaranteed to have something inthe shot. Trying to photograph another modelin the air is a real challenge to both flying andphotographic skills. To succeed you need awilling clubmate to fly within the frame of theshot fairly close to the camera model, parallelto it, and at the same speed for long enoughfor a shot to be taken. This is not easy, is areal test of flying skill and a mid-air collision isa real possibility so you and your mate need tobe prepared for that to happen and unlessyour flying skills are better than mine (not diffi-cult) then a coming together is likely if youspend enough time in close formation. I havefound that the following helps:
Flying slow relative to the ground gives youboth more time to align your models. Havingboth models directly in front of you and flyingaway from you makes it easier to judge theirheight relative to each other. A nice steadybreeze to help reduce ground speed helps.
You don’t want to be too high as thatmakes alignment fiendishly difficult, 100 feetto 200 feet is about right. On the slope youcan be at eye level. It may help to use theburst setting on your camera, if it has one, sothat a rapid series of pictures is taken, one ofwhich may be of the subject aeroplane.
If the camera plane flies slowly and is slowlyovertaken by the other model it provides moreopportunities for a shot to work. It is impor-tant for the pilot of the other model to knowwhere the camera is pointing so that he cantry and position his model in shot. You need tostand close so that you can have a constant
dialogue about position. There are fourapproaches which I have found to work.
The first is with the camera pointingstraight out of the model and with both cam-era plane and subject plane at the sameheight and flying alongside each other. Thesecond is with the camera angled down at 20to 30 degrees and the subject model flyingpast to one side and below the camera plane.The third is for the subject plane to hang sta-tionary into the wind (only easily possible on aslope site) so that the camera plane can fly inan arc round it. The fourth is to rely on pureluck - if you take enough pictures and otherpeople are in the air, the chances are somepictures will have models in them!
The ideal is to fly off a slope; under thoseconditions with models of a similar speed, youcan both hang both models in the air in closeproximity and snap away with a reasonableexpectation that some shots will succeed.
ConclusionI hope I have shown that it is not difficult witha modern compact digital camera to takegood quality aerial photos. The whole processof building the model and flying it adds a newdimension to model flying. After a flying ses-sion I love scrolling through the pictures tosee what the camera has seen, often withsurprising results. If you have not tried italready, why not give it a go? ■
March ‘09 - Aviation Modeller International 33
TOP LEFT: The world looks different at different times of the year. TOP RIGHT: If you can slow thesubject model right down, a banked turn with the camera on the inside of the turn around the subjectcan produce good results. ABOVE LEFT: Sometimes attempts to move closer produce an interestingshot accidentally. ABOVE RIGHT: A slow banked turn with the camera on the inside of the turn canproduce sharp pictures.
Shots into the sun don’t usually work. Occasionally, and accidentally, a shot into the sun can work withdramatic results.
AERIAL PHOTOGRAPHY PART 2 13/1/09 09:41 Page 5

34 Aviation Modeller International - March ‘09
TALKINGELECTRICS
Something a bit differentthis month - the first oftwo special features onthe joys of RTP!
ELECTRIC TECHNIQUE - By Andrew Gibbs
Welcome again to Talking Electrics. This month, wefocus on a little-known aspect of electric modelling,electric RTP. A number of readers have expressedan interest in seeing RTP appear in the column,which is great because there’s so much material
that the editor and I have decided to spread this feature over twoissues.
Electric ‘Round the Pole’, or RTP, has been around for many years.The first references I’ve found to RTP are a mention of an exhibitionin January 1945, and an advertisement in an August 1948 copy ofAeromodeller (see image). For those who aren’t familiar with thisform of flight, models are flown in circles around a pole in a similarway to control-line flying except that the pilot stands outside the circleusing a slot-car type hand throttle to control the model. A surprisingdegree of control is possible by this means.
Model(s) of the monthModel of the Month focuses this month on father and son teamDavid and Will Beavor, who are leading exponents of RTP. David and
Will are real craftsmen and always build beautiful models. We’vealready seen some of their scale R/C achievements in previouscolumns. Several of their RTP models are detailed in the accompany-
ABOVE: This aerobatic model was designed by Will Beavor and was originally published as a plan in Aeromodeller. It’s called Barnstormer, and underthe right conditions it can perform loops. To do this the model needs to be trimmed to fly slowly at part throttle. The application of full power then caus-es the model to loop. BELOW: The Hercules is a large model for RTP; it is of all built-up construction, spans 840mm (33”) and weighs a hefty 285g(10oz).This model didn’t start off flying as well as it looks - the model has a semi-symmetrical wing of narrow chord, which isn’t very suitable for this par-ticular job. Once flaps had been added, the wing worked much better and the model now flies more slowly and gracefully. The hum from four motorsadds to the overall effect.
TALKING ELECTRICS copy 13/1/09 12:14 Page 2

ing captions. Many thanks for sharing your fine work, gentlemen.My first encounter with RTP was in 1976 at a school demonstra-
tion given by a fellow pupil, and I was immediately hooked. I was per-haps 12 years old and already very keen on models, all free-flighttypes at that time. However, here was a form of controlled model fly-ing, which had the advantage of not relying on those mysteriouslyhard-to-start beasts, internal combustion engines. Instead, for power asmall electric motor was used and this was, I think, the genesis of mylove of electrically-powered model aircraft.
A major advantage of RTP for a young schoolboy was that it was avery low cost way to fly - several models could be made from a single12” bargain balsa bundle, the motors were cheap and what little elec-tricity was used was paid for by my parents! I immediately set aboutgetting the necessary equipment and spent many hours building andflying all manner of electric RTP models.
My power supply, being an ex-model train unit, was rather poorlysuited to the job though at the time I never really understood why. Myhigher powered motors never did well on my system although this did-n’t stop me having a lot of fun. Eventually I did get to grips withengines, control-line, radio-control and so on, and these took overfrom RTP.
Interest revivedMy interest in RTP was revived at the 2002 UK Nationals, where Ichanced upon a beautiful model of a Lockheed Hercules, completewith four tiny electric motors and working navigation lights for sale inthe swap meet. No one else seemed interested in this small miracle,so I bought it in the meet’s dying minutes.
I first flew the model indoors on five metre (16 feet) lines; it flewwell but was too fast to look really scale-like. I added some large sim-ple balsa flaps set at 20 degrees to the trailing edge of the wing.These also served to increase the wing area a little, as per the full-size. The flaps had the desired effect and the model then flew muchmore slowly, and with a certain graceful quality.
I also tried the model on seven metre (23 feet) lines but theincreased length caused the balance of forces on the model to changeto its detriment. This, combined with the fact that the tip weight wasnow insufficient for the increased length, caused the lines to becomeslack and the subsequent crash towards the centre of the circlebecame almost inevitable. The model sustained considerable damagebut happily it has since been repaired, this time with more tip weight.
Later on in this article, there’s a more detailed discussion of thetechnical aspects of RTP flying. This type of flying is more technicalthan you might suppose, and it’s a great vehicle to learn about thephysics of circular forces, electricity and aerodynamics!
What is such fun about RTP is that you really feel as though you arecontrolling the model; you feel connected to it in a similar sort of wayto control-line flying. However, because you are standing outside theflying circle, you get to see the model cruising past and this can bevery satisfying to watch, especially if it’s a scale model, in a similar way(for me at least) that makes free-flight models so fascinating. The onlycontrol is the throttle; another thing that RTP teaches of direct rele-vance to R/C flying is that the throttle is much more of an altitudecontrol than a speed control. Loops are even possible with the rightmodel when it’s trimmed correctly. More than one model can be flown
at the same time, so formation flying and combat are both possibili-ties.
Sharing the funAs I wanted to share the fun of RTP with other members of my club, Ilashed up a simple ‘trainer’ by taping a hook and an old slot car elec-tric motor to a small, formerly rubber-powered model. This model was490mm (19”) span, 75mm (3”) chord and weighed 47g (1.3/4 oz)complete with ancient Scalextric motor. It became very scruffy, but stillflew exceptionally well. The high aspect ratio, cambered wing seemedto be the main reason for this. Many fellow members enjoyed flyingthe model which accumulated many hours of flight time and sustained
March ‘09 - Aviation Modeller International 35�
ABOVE LEFT: This advert appeared in the August 1948 issue of Aeromodeller. WW2 had finished three years previously, and rationing was still to beenforced for another six years. I imagine the idea of electric-powered model flight might have seemed very exciting in such times! ABOVE RIGHT: Thisimage shows the basic RTP set-up. This image is by kind permission of Ballards from whose excellent catalogue it was taken.
This profile model of the Beavors’ Republic F-84 Thunderjet uses a cunning-ly disguised propeller rotating in a slot in the fuselage. The pair of large,low-slung bombs (or are they fuel tanks?) probably also help to keep fingersaway from the blades. This model beautifully illustrates the pleasure of sim-ple RTP models.
David Beavor designed and built this simply exquisite Sopwith Pup. Themodel appeared in Aeromodeller some years ago. It must be a real pleas-ure to see this lovely scale creation wafting past.
TALKING ELECTRICS copy 13/1/09 12:14 Page 3
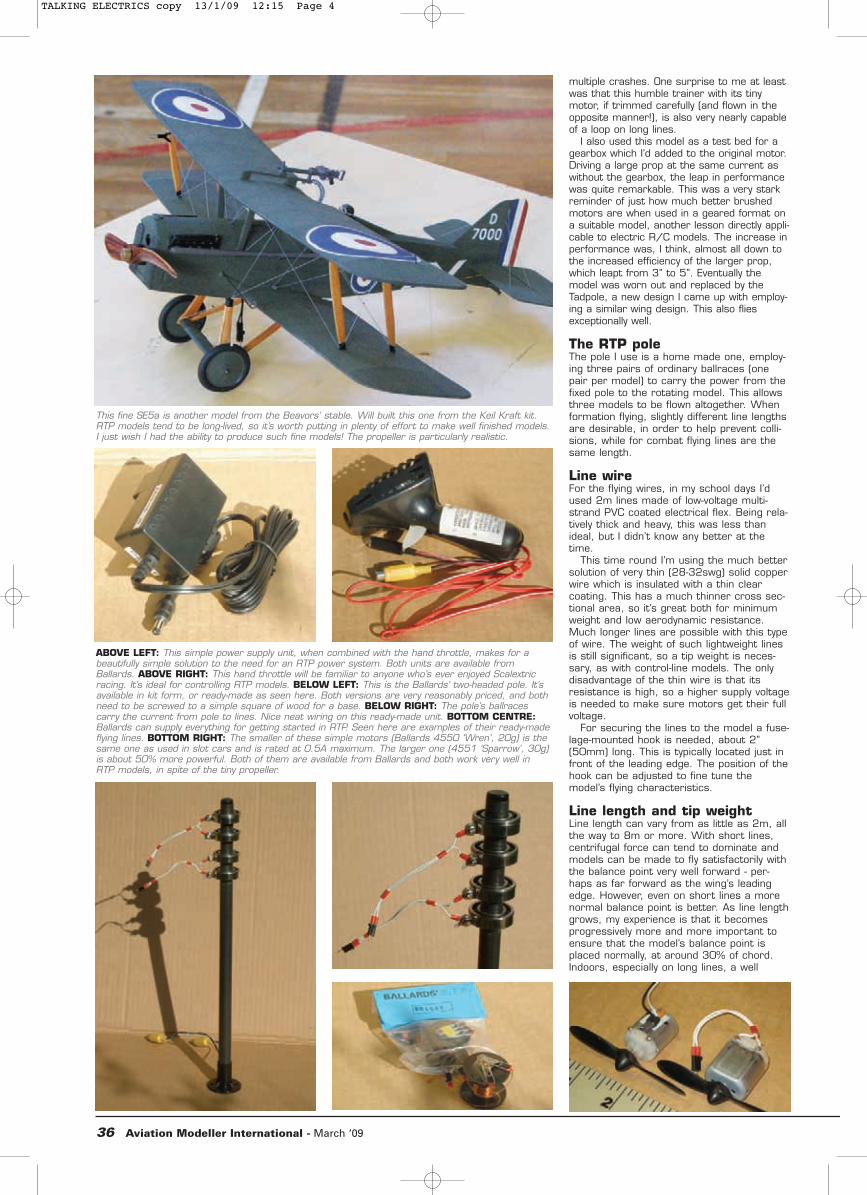
multiple crashes. One surprise to me at leastwas that this humble trainer with its tinymotor, if trimmed carefully (and flown in theopposite manner!), is also very nearly capableof a loop on long lines.
I also used this model as a test bed for agearbox which I’d added to the original motor.Driving a large prop at the same current aswithout the gearbox, the leap in performancewas quite remarkable. This was a very starkreminder of just how much better brushedmotors are when used in a geared format ona suitable model, another lesson directly appli-cable to electric R/C models. The increase inperformance was, I think, almost all down tothe increased efficiency of the larger prop,which leapt from 3” to 5”. Eventually themodel was worn out and replaced by theTadpole, a new design I came up with employ-ing a similar wing design. This also fliesexceptionally well.
The RTP poleThe pole I use is a home made one, employ-ing three pairs of ordinary ballraces (onepair per model) to carry the power from thefixed pole to the rotating model. This allowsthree models to be flown altogether. Whenformation flying, slightly different line lengthsare desirable, in order to help prevent colli-sions, while for combat flying lines are thesame length.
Line wireFor the flying wires, in my school days I’dused 2m lines made of low-voltage multi-strand PVC coated electrical flex. Being rela-tively thick and heavy, this was less thanideal, but I didn’t know any better at thetime.
This time round I’m using the much bettersolution of very thin (28-32swg) solid copperwire which is insulated with a thin clearcoating. This has a much thinner cross sec-tional area, so it’s great both for minimumweight and low aerodynamic resistance.Much longer lines are possible with this typeof wire. The weight of such lightweight linesis still significant, so a tip weight is neces-sary, as with control-line models. The onlydisadvantage of the thin wire is that itsresistance is high, so a higher supply voltageis needed to make sure motors get their fullvoltage.
For securing the lines to the model a fuse-lage-mounted hook is needed, about 2”(50mm) long. This is typically located just infront of the leading edge. The position of thehook can be adjusted to fine tune themodel’s flying characteristics.
Line length and tip weightLine length can vary from as little as 2m, allthe way to 8m or more. With short lines,centrifugal force can tend to dominate andmodels can be made to fly satisfactorily withthe balance point very well forward - per-haps as far forward as the wing’s leadingedge. However, even on short lines a morenormal balance point is better. As line lengthgrows, my experience is that it becomesprogressively more and more important toensure that the model’s balance point isplaced normally, at around 30% of chord.Indoors, especially on long lines, a well
36 Aviation Modeller International - March ‘09
This fine SE5a is another model from the Beavors’ stable. Will built this one from the Keil Kraft kit.RTP models tend to be long-lived, so it’s worth putting in plenty of effort to make well finished models.I just wish I had the ability to produce such fine models! The propeller is particularly realistic.
ABOVE LEFT: This simple power supply unit, when combined with the hand throttle, makes for abeautifully simple solution to the need for an RTP power system. Both units are available fromBallards. ABOVE RIGHT: This hand throttle will be familiar to anyone who’s ever enjoyed Scalextricracing. It’s ideal for controlling RTP models. BELOW LEFT: This is the Ballards’ two-headed pole. It’savailable in kit form, or ready-made as seen here. Both versions are very reasonably priced, and bothneed to be screwed to a simple square of wood for a base. BELOW RIGHT: The pole’s ballracescarry the current from pole to lines. Nice neat wiring on this ready-made unit. BOTTOM CENTRE:Ballards can supply everything for getting started in RTP. Seen here are examples of their ready-madeflying lines. BOTTOM RIGHT: The smaller of these simple motors (Ballards 4550 ‘Wren’, 20g) is thesame one as used in slot cars and is rated at 0.5A maximum. The larger one (4551 ‘Sparrow’, 30g)is about 50% more powerful. Both of them are available from Ballards and both work very well inRTP models, in spite of the tiny propeller.
TALKING ELECTRICS copy 13/1/09 12:15 Page 4

March ‘09 - Aviation Modeller International 37
trimmed model may be observed to be truly flying, with the linesappearing slightly slack.
Like to have a go?If you fancy having a go at RTP, and I hope you will, a great way to start iswith a small profile model, about the same size as the trainer I made, usinga slot-car type motor for power and a small (75mm/3”) prop. Profile mod-els can be built very quickly as they are so simple. It’s best to avoid long-nosed types because the weight of the motor can easily make small modelsnose heavy (unless you use a simple extension shaft).
If all this has whetted your appetite, you may like to know of Ballards, aspecialist RTP retailer in the UK (01892 531 803). They do an interestingand very informative catalogue for just £2.
We will finish up this RTP feature next month. In the meantime, with theeditor’s approval (I hope this is okay with you, Steve), I have a smallannouncement to make:
New Gibbs Guides websiteI’d like to let readers know that GibbsGuides.com now has a new website up
and running. A growing number of free-to-access informational articlesappear on the site, and I hope these will help to demystify electrics for read-ers. You can also subscribe to a free newsletter which will contain valuableinformation on electric modelling each time it’s sent out. Please feel free tovisit the site at www.gibbsguides.com ■
Continues next month
Contact informationAndrew Gibbs, Gibbs Guides, 33 Aldwick Gardens, Bognor Regis,PO21 3QR. 01243 861 804 (latest 8.00 p.m. please).e-mail: [email protected] website - www.gibbsguides.com
BALLARDS54 Grosvenor Road, Tunbridge Wells, Kent, TN1 2AS, UK01892 531 803email - [email protected] (NB: write ‘RTP’ in the subject line)website - www.ballardshop.com
TOP LEFT: These are the components that make up the Ballards fighter. It’s loosely based on the Hurricane, and builds quickly. TOP RIGHT: The Ballardsfighter, completed. I elected to leave off the moulded plastic fuselage sides to save weight. I actually built two of these for combat use. One is a little lighterthan the other, and this difference translates into a significantly better performance. I also shortened the nose of both models to bring the balance pointcloser to the 1/3 chord point, and this also has really helped their performance. ABOVE LEFT: This RTP power supply unit allows up to three models tofly simultaneously, with each model receiving an appropriate voltage. There’s no need to have a unit of this complexity, though it is useful. ABOVE RIGHT:This is the rear face of the PSU I built. The holes are the outlets for the twin cooling fans. The black socket is for a multi-way connector, linking the PSU tothe pole via a single thick cable. A piece of card is used to allow models to pass over the cable without becoming tripped up.
LEFT: This elderly Pitts Special was built fromthe Ballards kit. It’s a bit motheaten, havingspent years in an attic. I remember lusting afterone of these as a young boy! ABOVE: This is thegeared motor from the Pitts Special. It’s a bit ofan antique, and nowhere near as powerful as amodern motor. Full throttle current on this one isabout 2.5A, making it a 30W motor.
TALKING ELECTRICS copy 13/1/09 12:16 Page 5

DLG for slope flyers?As a slope hack I am of course ideally quali-fied to review a high performance DLG(Discus-Launched Glider) and thoroughly testthe claim that it is also suitable for beginners!It was probably because I was asked byanother slope hack (who, true to form, didn’tthink it through either) but I like to believe itwas to advance the humanitarian notion wecan all benefit from learning something newand I remember that rare occasion veryclearly.
It was on a Sunday morning of another F3Fslope race event about to be called off due tolack of wind. I sat there with a magnificentslope taunting me. Of course we had theusual entertainment: A few couldn’t resist and
scratched precariously. These brave soulsrisked not only pride but also internationalhumiliation as the audience included some ofthe best European flyers!
One of them, a German competitor, readiedhis small lightweight. A comical run, skip butadmittedly impressive ‘360’ put paid to anyjibes as his DLG zoomed, making the telltalesound of high speed respected by all racers.The fact that it stayed up was enough tomake it more successful than anyone else’sattempts. But not only that, it was rolled,bunted and even went into an imaginary F3Frun. The final straw was when he caught it byits wing tip, spun and did it all again!
A light came on in my tiny brain at thatmoment.
Which DLG to have?One like his will do! Until I discovered it was,in fact, a ‘state-of-the-art’ competition DLG,with RDS and Dissler wing, which meant it isvery costly and had a year-long waiting list. (Itwas a SALpeter, incidentally.)
So when the makers of all things ‘bling’ andmanufacturer of the ‘Erwin’ introduced a 1mversion of their acclaimed Fireworks series ofDLGs, it was that light again! PCM describetheir Mini Fireworks as having ‘maximum funfactor’ and ‘extreme starting heights’, butthey had me at ‘Hello!’
There are two versions, a rudder/elevator(mini-S) and an even newer 3-channel,aileron/flap/elevator (mini-Q). Flat fieldersand beginners will go for the lighter mini-S,
38 Aviation Modeller International - March ‘09
MINIFIREWORKS
An old dog learns some new tricks with this lightweight discus-launched glider from PCM
BENCHMARKS - By Tony Fu
MINI Q 12/1/09 10:50 Page 2

but I couldn’t control my slope hack predispo-sition and went for the aerobatic 3-channel,mini-Q.
I got mine from T9HobbySport; R/E ver-sions are £135 and £160 for the three-chan-nel.
What do you get?The Mini Fireworks sports a modified Drelasection, AG03, an HLG section especially forlow drag during the high speed launch phaseand good manoeuvrability for working small,low level lift. The wing is a diminutive 950mmand a glass/balsa sandwich, hollow mouldwith carbon reinforcement in the spars, tipsand ailerons. The wing mounting holes aredone and suitably reinforced.
The tips are trademark PCM and, like theircompetition DLGs, contoured in carbon forgood finger hugging. These are mirrored atboth ends for right or left flingers.
The ailerons are full span, bottom-hingedwith tape and the hinge gap is therefore onthe top surface. It is not sealed. This isbecause the section is designed to delaminatethe air by the time it reaches the hinge point.So, true to the minimal design philosophy, thegap is left and not an oversight.
The fuselage is a pod and boom with aremovable nose cone and moulded in carbon.The pod and cone moulds are paper thin andfeel like a soft shell crab! Fortunately, a liteplyradio tongue adds some rigidity and also tiesin the boom, which strengthens things upconsiderably. The boom is made of sternerstuff and oval in cross-section to add extrastrength. Booms need to be rigid to resistenergy sapping bending which will, during themore exuberant launches, reduce launchheights.
The fin and tail is 4mm lightweight balsasheet, with only the profile cut. You have toshape this yourself to make an aerodynamicsection!
Finally, you get some very thin multistrandcable, a bit of wire, carbon pushrods, verynice carbon control horns, some glass cloth,carbon tow, wing bolts and a paper templatefor sanding the fin and tail sections. Oh, andbest of all, you also get a CD containing verycomprehensive building instructions with lotsof useful photos and excellent throw setupssuggestions.
The build This is fairly straightforward but more involvedthan a normal mouldie. It’s pretty much toinstructions so not a lot to report except gofor smaller cells, 1/2 AAA, 210 mAh for thelightest setup. PCM’s photos show this small-er battery which helped me achieve the quot-ed weight of 165g.
Flying First flight was at the slope, naturally, andunusually in perfectly suited conditions with
March ‘09 - Aviation Modeller International 39�
LEFT: As it comes - tiny and doesn’t seem verymuch for your money! ABOVE: Prepare first andmake sanding blocks and templates for sandingthe section in the fin and tailplane. A piece ofglass makes an excellent flat surface to work on.
Finished back end reinforced with glass. Look in the open hinge and see the thin wire spring thatkeeps the elevator open. The carbon horn has a thin multi-strand wire hooked over and pulls againstthe spring. Simple, accurate and very light.
Standard liteply radio tongue, reinforced with carbon tows using thin cyano.
Modified with a former, which wasn’t part of the instructions. The lightening holes gave about thesame amount of wood removed as that added!
ABOVE LEFT: Modification added a bit more rigidity to the ‘soft shell crab!’ It also locates the tongueaccurately. ABOVE RIGHT: Beautiful CNC produced carbon aileron horns in place.
MINI Q 12/1/09 10:50 Page 3

only lightweights flying. The trim was onlymarginally out on the elevator thankfully andeasily clicked out. The aerobatic setup with10mm snap flap up and down (!) and loads ofequal aileron throw (18mm) is not what youwould expect for a thermal soarer. The CGwas moved back from the recommended62mm which was nose-heavy for the slope. Iended up with 64mm. Slopers will appreciatethis and in light slope lift it batted around withease. It rolls easily and loops (and bunts) canbe made ridiculously small.
It’s surprisingly quick, too; no paper bagthis, despite its obvious light weight and gen-erous dihedral. It does a surprisinglyrespectable reversal, and inverted isn’t badeither. In fact you can easily gain height invert-ed. So, the mini-Q is teaching me somethingalready! Of course, you won’t get great energyretention, it’s just too light, but it uses the
available lift very effectively and gainingenough height to point the nose down wasnot a problem.
Next time was a virtually windless day inthe company of a full-sized carbon FireworksIII. Well, what a hilarious session that turnedout to be! After some trimming in start modethe mini-Q easily launched as high as its big-ger brother, impressive! The best bit undoubt-edly was catching the little beast. Brakes setwith just down flap were surprisingly effective,definitely no sign of tip stall. These funny mid-dle-aged men were getting a bit of a sweaton; coats were coming off!
The antics got worse; launch, then goadingeach other to do sillier and sillier things as wereverted to type and all this when everythingelse was grounded. Its aerobatic envelopewas fully explored and coming straight from alaunch attempting a rolling circle is exciting
stuff with the ground coming in ever closerand closer!
As for extending flight times, I’ve had a fewsessions at this. Now no way am I a thermalsoarer, but even I could see that the biggerFireworks III floated around better. The mini-Qhas a faster glide - slow it down too muchand it loses height. It veers off easily andspeeds up and slows down without input fromme. In fact every little bump in the air and itresponds. I know it’s trying to tell me some-thing...
ConclusionsThe Mini Fireworks is an entertaining aero-plane and I’ve had a few, but nothing so smalland seemingly fragile. You will, however, needbe obsessive about keeping the weight downand be prepared for the more than averagebuild work.
For your efforts you will be rewarded with aminimalist lightweight with a difference forthose low to windless days, as this is built towithstand a few ‘Gs’ and high speed.
A sports aeroplane it is then but with someimportant differences: Want a bit of exercise?Try the run, skip and spin. How about just aquick flying session without the long trek tothe slope or, even better, slope soaring a treeor a building? For the even more reckless,loops at ridiculously low levels and catchinginverted keeps my slope hack mentalityamused.
There is, of course, the deeper intellectualchallenge of gaining lift and nothing will trainyou better. The mini-Q circles in the tiniest ofspaces and responds to bumps and lumps inthe air more sensitively than anything else Ihave flown. And yes, you will need to searchout and actually find lift; this will not hangthere waiting for lift to come.
Overall, even without taking its more attrac-tive cost into account, the mini-Q is a betterintroduction to DLGs than most. It does itwith a lot of fun which sugar coats the medi-cine of learning to thermal soar in earnest.And despite the fact that it may not floatquite as well as a full-size machine it justmight have the right balance to provide thenecessary encouragement, especially if youpredominantly slope fly like me.
It will creep up on you, timing your flightswill be the first indication. This will give instantfeedback on your progress and it’s a majorpart of the enjoyment. Then you’ll be thinkingdays when the wind doesn’t blow aren’t sodisappointing; in fact they’re something tolook forward to. A transformation will havestarted... Now, where are my shorts and san-dals? ■
40 Aviation Modeller International - March ‘09
Here’s one with HS55 squeezed in, a new lighter tail and fin allowed lighter 210 mAh battery to beused. Since changed 55s to SD100 and got the weight down to 165g. Yippee!
ABOVE LEFT: Ready to go and finished with logos printed on tissue and lacquer in place. ABOVERIGHT: It’s tiny at 950mm span. The tail was finished in water-soluble lacquer for lightness but somecarbon tows were added to stiffen the fin and elevator. A highlighter marker adds a little trim match-ing those on the wing.
BELOW LEFT: A bit of exercise, hilarious fun but keep that arm straight! Who said you can’t teach an old dog new tricks! BELOW RIGHT: Brakes arevery effective and catching is much simpler than any other model in my fleet.
MINI Q 12/1/09 10:50 Page 4

March 2009
●● FOR OLD TIMES’ SAKE FOR OLD TIMES’ SAKE ●● FREE-FLIGHT FILEFREE-FLIGHT FILE
6TH EUROPEAN SAM-RC CHAMPSCHAMPIONSHIPSHolger Menrad reports the action at the 2008 Pan-European R/C vintage
gathering in Italy
MIND THE MIND THE LINES!LINES!The weather gods smiled on lastAutumn’s Old Warden Air Spectacular event
AERO COVER MAR 09 Tony OK 13/1/09 11:56 Page 1

The friends of the SAM-RCEurochamps met in 2008 inItaly, for the second time intwo years from June 13thto 16th. Hungary had been
the intended venue for 2008, but thiscould not be achieved due to the sud-den and unfortunate death of GyulaMunnich who had been organizerdsignate for Hungary. Fortunately,Nick Bruschi stepped in to managethe competition in Italy again. Welldone, Nick! All participants should beobliged to him, having saved the con-tinuity of the competition. Manythanks to him and also to SergioScirocchi, the president of the ItalianSAM Chapter 62 and his willinghelpers, last but not least MaurizioBaccello who had done a lot of valu-able work for the Champs.
We all enjoyed going to Italyagain. A very favorable airfield,accommodation in a nice location
on the Adriatic coast and a well pre-pared organization which made thewhole event an agreeable stay. Wewere also able to welcome ourAmerican friends. Ed Hamler hadorganized a cruise in theMediterranean Sea for the US groupand other tourist activities during thedays prior to the SAM event.
The competitionDuring the first day, Friday June 13th,OTVR (gliders) and NMR 2.5 (Nostalgia2.5 cc engines) had been scheduled.(‘Nostalgia’ denotes models before1957), with four flights for everymodel, in individual time periods duringthe day. As previously, the gliders classhad the biggest number of entries.
Nearly 40% of the registered modelswere gliders.
The NMR 2.5 class proved to be anew experiment. The Nostalgia classhad been initially introduced in the US
42 Aeromodeller - March ‘09
6TH EUROPEANSAM-RC CHAMPS
Holger Menrad reports the action at the 2008 Pan-European R/C vintage gathering in Italy
VINTAGE R/C - By Holger Menrad
Welcome from SAM Italy
Logo RC-Eurochamps 2008 in Italy.
SAM EURO 08 12/1/09 10:42 Page 2

SAM Champs by the late Loren Schmidt inorder to encompass models and engines of alater generation which possibly might befavoured by younger model flyers. This 2.5 ccclass seems to be a special arrangement forthe European vintage flying sport, as we had atremendous development delay during andshortly after WW II. The reduction of anengine capacity to 2.5 cc should allow use ofthe most common engines in Europe duringthat time period.
However, the practical experience in this firststep to a possibly new combustion engineclass had shown only a rather limited partici-pation. Maybe this idea was too new, and itmay need some further time to be developed.Or maybe it is of interest only for a limitednumber of specialists? Time will show the fur-ther development. Anyway it was a valuableattempt to increase the rather low number ofpowered models during the European RC -Champs, and we appreciate the idea and theeffort of the organizer to give more chancesto the application of combustion engines.
Weather conditions during the first day werenot the best. Medium winds with strong sud-den gusts across the landing area caused sev-eral models to disappear into the neighbouringcorn field where retrieval was difficult. All thathad been interrupted by light rainfall but theplanned flying schedule had been completed.
During the second competition day, heavyrainfall and extremely strong winds brought ahalt to activity activity in some of the worstweather conditions seen in that area duringrecent years. It started during the night andcontinued the whole day, so no flying at allwas possible, washing out the day’s events forthe OTMR (gas models), Electric Old Timerand Texaco models which should fly during this
day.The third competition day had to cover all
the remaining flight classes besides the sched-uled NMR (Nostalgia), 1/2A Electric OldTimer (Speed 400) and 1/2A Texaco. Arestricted flight program and flexible adoptionto the situation by the organizers managed allthat without problems. Instead of four, onlytwo scoring flights were permitted in eachclass. Excellent weather conditions with sun-shine and light winds favoured this last day ofthe competition. Finally at the closing awardsceremony, the 6th European SAM RC-Championship came to a satisfying end.
Unfortunately there had been some confu-sion in a few instances during the limitedengine run (LER) competitions. It had been dif-ficult to convince some timing officials aboutthe effect of sonic speed. When the engine isstopped at the kind of height that some mod-els can achieve, the engine noise will be heardfor a moment after the engine has stopped,which can be in the range of one second(sonic speed about 320 metres, 350 yardsper second). We had this problem alreadyduring previous events. Hopefully it will be bet-ter understood and eliminated for the future.
Apart from this exception, all other organiza-
March ‘09 - Aeromodeller 43�
TOP LEFT: Nick Bruschi at the introduction ceremony. TOP RIGHT: Many gliders (26% of all participating models). ABOVE LEFT: Eduard Grilz, Germanywith his glider Weltensegler, wingspan 248 cm ( 97.6”). ABOVE RIGHT: Ulf Mett, Germany and his daughter Cris start the Lerche glider.
BELOW LEFT: One of the biggest gliders with a wingspan of about 3.5 m (138”). BELOW RIGHT: Anice gas model. Ohlsson with a wingspan of about 3 m (118”). Texaco class with a 10 cc MVVSdiesel. BOTTOM RIGHT: The big Lanzo Bomber is seen at every vintage flying event.
SAM EURO 08 12/1/09 10:42 Page 3

tion was well done, including a nice banquetand a happy winners’ award ceremony at theend of the last day.
The participantsAs usual in the recent years, participantscame from different European countries main-ly from Italy (of course) and from EasternEurope, the Czech Republic, Slovakia andHungary. It had been a great pleasure to wel-come our special friends from the US.Together with several Germans, we had nearly200 pre-entries and finally more than 160models were flown during the contest.
However to our disappointment, there wasno-one from our friends in the UK. We hopeto welcome some of them this? The distance
from England to Germany will be only half ofthat to Italy.
The modelsMany of the participants brought designs fromtheir own home country, representing an inter-esting variation of different concepts.
As already noted, the dominating model typewere gliders, with a wide variety of designs fromCzech Republic, Slovakia, Italy and other coun-tries. Also some German gliders were presentwith good results.
Among the power types, US models like thePlayboy were popular in competition, with severaldesigns from different countries. Some modelsproved to be top performers and some Italianmodels were particularly attractive, for instancethe ‘K.L. 69’ from Fabrizio Landini , and the‘Streamlined Ciclon’ from Giovanni Ridenti, whichtook first place in the Texaco class. These werenot only attractive, they also produced the bestcmpetition results. Fabrizio’s K.L. 69 flew in theTexaco class also, with a wingspan of 305 cm(120”), weight 3,200 gr (112.8 oz) and wasequipped with a 10 cc MVVS diesel.
Another example of an interesting model wasthe ‘Under Construction’ built by HeinrichDabrowski, Germany. This Michael J. Roll designwas published in the 1938 Aeronautics Yearbookby Franc Zaic. Technical data: Wingspan 322 cm(127”), wing area 74 qdm, (4.8 in2), weight2659 gr (93.8 oz). The model was flown in theTexaco class with an Irvine 40 diesel and ACP16x6 propeller.
Heinrich Dabrowski from Germany is always
good for new, interesting and obscure modeldesigns. We know him and his models alreadyfrom former Eurochamps meetings, and he isexpected to bring to every Champs one or morenew models. And Heinrich is not only a perfectmodel builder, he also demonstrates them in veryconvincing competition ratings.
US SAM Champs and theEurochamps
The US SAM rules are the basis also for theEuropean events, with some rvisions regardingthe different situations.
There are every year two completely differentevents in European vintage flying:
● Many years ago David Baker, the founderand present honorary president of SAM 1066had started the Eerochamps for free flightmodels which is normally flown on the MiddleWallop airfield in southern England, end ofAugust. A traditional event with a lot of inter-national participation.
● About seven years ago some Europeanparticipants at the US SAM Champs had theidea for the R/C-Eurochamps in Europe, limit-ed to R/C models. Nick Bruschi together withhis Italian vintage modeller friends organizedthe first competition in Italy. A rapidly growingevent that meanwhile is scheduled every mid-June in successive European countries.
Some figures may show the differencebetween the European RC-Champs to the tra-ditional US SAM Champs:
During the R/C-Eurochamps of the recent
44 Aeromodeller - March ‘09
ABOVE LEFT: The Dallaire Sportster, an elegant and successful model, beautifully built by GabrieleMontebelli, Italy. ABOVE RIGHT: Giovanni Ridenti, Italy with his Streamlined Ciclone. First place in theTexaco class. LEFT: Ed Hamler, USA hand launches his Airborn in the 1/2A Texaco class.
ABOVE LEFT: HeinrichDabrowski, Germanylaunching his bigUnder Construction.ABOVE CENTRE: ALanzo Bomber return-ing from a flight.ABOVE RIGHT: Thenice and fragile lookingKL 69 from FabrizioLandini. Details seetext. FAR LEFT:Heinrich Dabrowski,Germany with his suc-cessful Scimitar. Firstplace in the 2.5 ccNostalgia class. LEFT:Family cooperation.Nick Bruschi and hiswife.
SAM EURO 08 12/1/09 10:42 Page 4

four years (2005 to 2008) we could count inan average:
About 150 active models participating inthe classes:
● Gliders (26%), ● Gas models and Nostalgia (7 and 8%), ● TEXACO (16%), ● 1/2A TEXACO (13%), ● Electric Oldtimer and 1/2A Electric (15% each).
While in the US, the dominating number ofmodels are (petrol) engine designs, it is obvi-ous that we have, in keeping with traditionalEuropean model history, a large proportion ofgliders, a very limited number of traditionalengine models (Gas and Nostalgia) and a con-tinuously growing number of electric models.
A new introduction for 2008 had been the2.5 cc Nostalgia class (5% participation).Maybe some other attempts will be advisablein order to increase the number of combus-tion engine models and to find out which waywill be the most effective decision for this pur-pose. A wider range of permissible enginesmay help to convince some modellers to par-ticipate in the engine classes if there are less
problems in obtaining a competitive qualifyingengine.
This yearThe 2009 RC-EUROCHAMPS will be organized bythe German SAM 85 at the town of Suhl in
Thueringen, in central Germany, near to the tradi-tional Wasserkuppe area, from June 10 to 14.We hope to welcome there many of our foreignfriends. This event will be only about 780 km(less than 500 miles) from the ferry port Calais,so we hope to see our UK friends there this time. ■
March ‘09 - Aeromodeller 45
Results6th SAM RC-EUROCHAMPS in Italy, Valle Gaffaro
OTMR, Gliders, 38 modelsPos. Name Country Model Score1 Gelencser, Kalman Hungary Harkaly 7642 Gelencser, Kalman Hungary Ju 52 7453 Mersecci, Rover Italy Cingo cengo 726
NMR 2.5 Nostalgia 2.5 cc, 8 modelsPos. Name Country Model Score1 Dabrowski, Heinrich Germany Scimitar 6742 Hrncar, Lubomir Slovakia Jaded Maid 5463 Bortolai, Tiziano Italy Mini Hogan 393
NMR Nostalgia, 10 modelsPos. Name Country Model Score1 Bruschi, Domenico Italy Herky 9872 Dabrowski, Heinrich Germany Gool 7043 Gianati, Walter Italy Cloudster 632
OTMR Oldtimer Gas models, 9 modelsPos. Name Country Model Score1 Dabrowski, Heinrich Germany Playboy Sr. 14632 Dabrowski, Heinrich Germany Westerner 13003 Hamler, Ed USA Airborn 1268
TEXACO, 23 modelsPos. Name Country Model Score1 Ridenti, Giovanni Italy Streamlined Ciclone 30032 Cancelli, Marcello Italy KI 61 24563 Binelle, Luigi Italy Il Duca 2234
1/2A TEXACO, 17 modelsPos. Name Country Model Score1 Gianati, Marco Italy Playboy Sr. 16232 Gelencser, Kalman Hungary Tm 17 12873 Mett, Ulf Germany ETB 42 1287
ELOT, Electric Oldtimer, 33 modelsPos. Name Country Model Score1 Mersecchi, Rover Italy De Filippis 32542 Mersecchi, Rover Italy Sine 46 24523 Harding, Dave USA Stardust Special 1935
1/2A ELRTTR, Electric 1/2A , 23 modelsPos. Name Country Model Score1 Sladec, Lubomir Slovakia President 22802 Mokran, Stefan Slovakia Ciclone 19023 Mett, Ulf Germany ETB 42 1845
All kind of engine modifications are permitted inthe TEXACO class. Here is home made cylinderhead for a Super Cyclone ignition engine.
ABOVE & BELOW: Pylons, the higher the better?
BELOW LEFT: Winner award ceremony Nostalgia class: First: Nick Bruschi, Italy, second: HeinrichDabrowski, Germany, third: Walter Gianati, Italy BELOW RIGHT: Heinrich Dabrowski, Germany winsthe trophy for the alltogether most rating points.
SAM EURO 08 12/1/09 10:42 Page 5

CommentIt is remiss of me for not noticing before thatthe Free Flight Team Trials held in 2008 toselect the team to represent Britain at the2009 World Free Flight Championships inCroatia in the summer was particularly spe-cial for one man! That man was Phil Ball. Philgained a place on the F1A glider team and asa result he is one of only three Britons everto be chosen for all three international out-door free-flight classes, F1A glider, F1BWakefield rubber and F1C power. The othertwo being the late Jack North of Croydon &DMAC and Ray Monks of Birmingham MAC.Ray Monks did go one better however addingFID indoor rubber to his list of team places.
Phil is a member of the Grantham MAC andhis earlier team places have taken him toGermany, Italy, USA, Hungary, Romania andPortugal and was part of the gold medal win-ning F1C power team at the last two. Philalso managed the British team at the WorldJunior Championships in Yugoslavia andCzechoslovakia and has served on the free-flight technical committee for several years.He has also won the BMFA SeniorChampionship on a number of occasions.
46 Aeromodeller - March ‘09
PHIL BALL JOINSTHE ELITE CLUBMike Evatt takes a look at variable pitch propellers, reviews the NFFS Symposiumreport and reveals the 2008 Aeromodeller Trophy results
FREE FLIGHT FILE - By Mike Evatt
Phil Ball is pleased to be in the F1A team.
Phil prepares to fire up his F1C in foreign parts.
Phil launches an open rubbermodel when open meant open.
FREE FLIGHT FILE 12/1/09 10:23 Page 2

Phil recently retired from Rolls Royce atDerby, where he was a development engineerworking on advanced turbine blades. Always aprolific aeromodeller Phil prefers to designand build his own models. Now he has moretime on his hands one wonders what newheights he can scale!
Variable pitch propellersVariable pitch propellers are becoming verypopular in most of the rubber powered com-petition classes where rubber weight isrestricted and it is necessary to take steps tosqueeze out that last morsel of performance.Certainly in F1B rubber and F1D indoor rub-ber a VP propeller assembly is the front endof choice. Of late there is much interest beingshown in applying this technology to F1G(Coupe D’Hiver) rubber also. What I willattempt to do in this and other related arti-cles is to outline the principles behind thetechnology and point reader in the direction ofcommercial units as well as offering sugges-tions to those who would like to make theirown.
The basic principle is that the torque appliedto the propeller shaft modifies the blade anglein the anticipation that the resultant thrust isdeployed more effectively to power themodel’s climb phase.
Many years ago I was given an old propellerassembly by my local model shop proprietor(the great Ted Evans of ‘Jaguar’ fame). Thisturned out to be a variable pitch and variablediameter free wheeling featherer that he hadused in the late 1930s. This was my firstrecollection of seeing a variable pitch pro-peller.
Nearly a decade later the August 1968 edi-tion of Aeromodeller magazine was notablenot just for a photograph of a young RogerBaggott on the cover but for an article enti-tled “Torque Operated Variable PitchPropellers” by Reiner Hofsass. This was a rel-atively unsophisticated design in terms ofmanufacture with lots of soldered piano wirebut it did seem to work for Reiner and his col-
league Walter Czinzel. More compact ver-sions were developed and used with goodeffect over the years. I built one of these, thepitch change was a massive 27 degrees andas I recall the climb was almost at a constantangle and constant velocity but on my limitedtesting only a marginal increase in durationwas observed in still air although perform-ance in a thermal appeared to be enhanced.However the model had poorer performancein turbulence - it was unable to punch throughthe turbulent layer.
About 25 years ago Alex Andriukov wasdeveloping his now legendary VP DPR F1B
hub. Alex was probably the first to combine allthe functions and to use locked out and feath-ered blades at launch. This complex unit wasbeyond the scope of most modellers manufac-turing skills so it was no surprise that com-mercial production started in the early1990s.
Over the ensuing years many other flyersand suppliers have produced VP hubs.
The Bob Piserchio F1B hub was featured inthe NFFS Symposium Report 1988. This wasa relatively simple unit with a 15 degree pitchshift and a claimed height gain of 25-30 feet.
The Cyclon Russian-made VP Hub appeared
March ‘09 - Aeromodeller 47�
Drawing of the Hofsass VP propeller hub.
TOP: Spring loaded torque armsfrom a Hofsass unit. ABOVE: AlexAndriukov’s website athttp://home.pacbell.net/andriuko.RIGHT: Drawing of Alex Andriukov’sVP propeller hub.
FREE FLIGHT FILE 12/1/09 10:23 Page 3

in the early 1990s - the VISH unit. This had alinear cam with about 6 degrees of rotation.It may be of interest to note that this compa-ny also made a torque operated variablediameter unit but it was never sold in the UK.This only had 20mm or so of diameterincrease which may not have been sufficientto show a duration improvement.
The Carl Perkins’ VP hub for F1B was fea-tured in the NFFS Digest (circa 1995 exactdate unknown). This used a 7 degree shiftand featured a neat auto-rudder release.
W Hobby markets an F1B VP hub - this hasa tensioning device to adjust the hub for dif-ferent motor strandage and has whatappears to be a non-linear cam. Once againthe pitch shift is around 7 degrees.
Evgeny Gorban produces both F1B and F1G
VP units. This section was never intended to be a
comprehensive guide to Variable PitchPropellers through the ages but rather to putcurrent thinking into context.
The National Free Flight SocietySymposium Report 2008 - Areview
Late in the year, just in time for Christmasand New Year reading, the NFFS Symposiumreport is published. The Symposium is pre-sented annually by the National Free FlightSociety of the USA. The primary purpose ofthe Symposium is to promote and encouragethe investigation, discussion and documenta-tion of the technical and theoretical side offree flight. Papers addressing historical,administrative, documentary and philosophicalaspects of the sport are also welcomed.Outstanding models and modellers are hon-oured.
It is nearly always a fascinating read and areference tome for the bookshelf for years tocome. It attempts in some measure to putsome numbers to the phenomenon that weobserve every time we fly a model. It also hassome pretty good cartoons by WillNakashima and Cass Pangell.
So if you would like to understand a littlemore about model aerodynamics then look nofurther.
I won’t even attempt to review each paperof which there are sixteen but rather give anindication of the sorts of things to expect inits 164 pages.
On the theory side there are papers on F1AAirfoil Design and wing optimisation,Theoretical optimal design of three panelwings, Variable camber F1A and F1B modelsand Improving the span-wise lift distribution incircling flight.
Turning to the more practical side we have:
F1E Dynamic hand-launch bunting system, Asystems approach to FAC scale design,Energy testing and the performance of rubberpowered models, The evolution, status andfuture of mechanical timers for free flight andIs digital free flight your future?
The 2008 Models of the Year, selected by committee under Bill Booth Jr feature:
Spin-Up Indoor HLG by Mark BennsTurn-Up Outdoor HLG by Tim BatiukF1B No.11 by Blake JensenR60 AMA A/B power model by Reid SimpsonDay Break, Dawn Mulvihill open rubber model by Carl Redlin
And special recognition is given to:Scat Electronic News by Roger Morell!USA FIP Junior development program by Jim Parker and Bob van NestIndoor Speciality Tools by Ray Harlan
Hall of Fame recognition has been selected by a committee under Louis Joyner for: Walter Rozelle, Rex Hinson, Herb Kothe, Alexander Andriukov, Roger Simpson, and Reid Simpson
The Symposium Report closes with a reportby the NFFS President Phil Sullivan and biog-raphical notes on the authors.
The 2008 Report is available from IanKaynes at Free Flight News for £19.50including postage in UK or Europe.
Free Flight News7 Ashley RoadFarnborough,Hampshire UK. GU14 7EZ
48 Aeromodeller - March ‘09
TOP LEFT: An Andriukov front end for F1B. TOP RIGHT: An Andriukov front end reveals its complexity. ABOVE LEFT: The author’s VP front end for F1G.ABOVE RIGHT: The inside of author’s VP front end for F1G.
A coffee table classic from NFFS.
FREE FLIGHT FILE 12/1/09 10:23 Page 4

2008 Coupe Europa and theAeromodeller TrophyI am indebted to Martin Dilly and DavidBeales for the details of the 2008 CoupeEuropa competition held at Middle Wallop on30th November.
This event was run by the Croydon &DMAC and the organisers were surprisedand gratified at the turnout, considering thefoul weather that was forecast and dulyarrived. The wind speed, wind direction andsporadic drizzle dictated a reduced max of90 seconds, but thankfully no fly-off wasrequired.
Phil Brown, a very welcome relative new-comer to contest flying, flies beautifully-builtlarge F1Gs and was very active throughoutthe contest, chasing his models immediatelyafter launch, clad in an increasingly soggy-looking black leotard as worn by cyclists. Hisefforts were rewarded by a convincing F1G
first place, almost a minute ahead of TrevorGrey.
Trevor flew a rather scruffy old F1G butshowed that he’d lost none of his skill as arubber flyer after his recent concentrationon electric models.
Third placing Andrew Longhurst, is a smallrubber specialist and was particularly active,flying in both Vintage CD’H and F1G classes.
Previous winner Rex Oldridge decided toattend at the last minute in spite of the fore-cast and was well rewarded by winning theAAA Trophy for Vintage Coupe d’Hiver. Rex,who has built most of the Vintage Coupedesigns, flew his ‘Bagatelle’ so well that ifhe’d flown to the same standard for fiveflights, would have won F1G.
The Tolhurst family were a blur of activity,with Peter flying both Vintage and F1G, andtaking an excellent second place in Vintagewith a Michel Etienvre design. Son Oliver suc-cessfully retained the status of junior Coupe
champion with four well-judged F1G flights.Renowned rough weather expert Spencer
Willis dropped his first F1G flight, so turnedto Vintage, securing third place, using a‘Bagatelle’ for his first flight and a ‘Macahon’for the rest.
The tradition of the Aeromodeller Trophygoes back to 1975 and the meeting beingthe final round of the Southern CoupeD’Hiver League also drew competitors. Theproceedings were rounded off with a bless-edly warm and dry prizegiving in theMuseum, with welcome warm drinks and bis-cuits for all. ■
March ‘09 - Aeromodeller 49
ResultsF1G - Aeromodeller Trophy (22 flew)1. P. Brown 4312. T. Grey 3803. A. Longhurst 375
Vintage Coupe d’Hiver - AAA Trophy (5 flew)1. R. Oldridge 2212. P. Tolhurst 2143. S. Willis 1774. R. Woodruffe 1555. R. Willes 22
Flitehook Team Trophy Crookham Contest Modellers
David Bealeslaunches inF1G, buthopes thatisn’t thetimekeeper.
Crookham’sPeter Hall
launches histissue andMylar cov-ered F1G.
BELOW LEFT: John Cooper of Biggles flying F1G hunkers down against the wind and rain at Middle Wallop. BELOW RIGHT: Andrew Longhurst took thirdplace in the Aeromodeller F1G Trophy at Middle Wallop.
FREE FLIGHT FILE 12/1/09 10:23 Page 5

It was that time of the year. Autumn was upon us as summer hadbeen unofficially cancelled (or written off) and it was time to visit OldWarden. Many people say there is something magical about theplace and I believe they are right. After the mediocre weather of lastyear, the one place that can boast of two previous weekends of per-
fect flying conditions is (you’ve guessed it) - Old Warden. The forecast for
the coming weekend in late September was good, but I still carried mygiant golf umbrella in reserve. I was accompanied by Alex Whittaker,renowned AMI and FSM contributor, after I had convinced him that OldWarden was the place to go before you are fitted for your angelic wings.
Welcome to Old WardenWe were welcomed to the Shuttleworth site with the launching of a Virginhot air balloon. We thought it was specially for us, but Pete Tindalassured us that it was fairly commonplace at this centre of traditional avi-ation. We set up camp and then journeyed into Old Warden village as Ihad a hankering to visit the Hare and Hounds, the only pub in the village.It looked traditional from the outside but sadly (in a way) it was very nou-velle cuisine on the inside, with a bowl of soup costing nearly as much asa gallon of 5% nitro! Somewhat disappointed, a further voyage intoBiggleswade for the traditional fish and chip supper proved to be infinitelymore enjoyable.
Back at base camp, we were invited for a lemonade at Tindal Terrace,with Sandra in charge of catering. Long chats about the developments inthe various areas of aeromodelling kept everybody interested until wecrept back to the command module remarkably early. The morning cameas a bit of a shock as a heavy fog had descended on the airfield but achance meeting with a local flier who indicated that it would lift by ‘ten-nish’ brightened the outlook.
It wasn’t long before the foggy dew was disturbed by the buzzing ofsomething aerial. It was the Coventry Crusher, Pete Iliffe, disturbing the
50 Aeromodeller - March ‘09
MIND THELINES!The weather gods smiled on last autumn’s Old Warden Air Spectacular event
CONTROL-LINE - By Mike Parry
The Britten Norman Trilander, powered by three ASP 15s and flown by Trevor Tabor.
Covered in Modelspan, this Veron Midget Mustang was built by Chris Edwards.
MIND THE LINES! 9/1/09 12:06 Page 2

misty murk with a neat Etomic Ember. It was an excellent flier, weighing inat 17g. and flying on 2.4 GHz with geared longitudinal servos. Pete hadoriginally purchased it for the control system which he hoped to transferinto one of his beautifully built scale models but he liked flying it so muchhe was keeping it until it was dinged to death! It certainly flew well andwith radio, model, LiPo and all the bits for just over fifty notes, it was abargain!
The fog provided a slight delay in the proceedings and as we began tomove towards the flightline we were distracted by the machinations in theMidland’s mess tent. Master modeller Chris Edwards rolled out a superbVeron Midget Mustang, originating from the excellent Replikit. Due tohouse a restored AM 25, the model is clad in genuine Modelspan, and isneatly finished with a cowl held in place by one dowel and two magic mag-nets (great idea!). Any ideas of seeing any air beneath its wings weredashed when Chris explained that the model had been commissioned fordisplay only. Still he did not disappoint when he opened his car boot andlifted out a Performance Kits X-AC-6, a peculiar shaped creation designedto test the capabilities of an asymmetric model. Free-flight and poweredby a Mills 1cc Aurora, I did see the model flying high, and strangely sta-ble, in the noonday sunlight. Chris’ Brummie buddy, Bob Everett, contin-ued the master display when he unveiled his Dasboot, based on aStarlifter. Difficult to describe, it was something like a speedboat, a blimpand a German WW2 weird design, but beautifully built and covered in yel-low tissue. With a PAW 1.5cc up front, and Commander Chip Hazard(beheaded dolly) in the cockpit, it was a delight and flew well.
The fog lifts!As the fog lifted enough to see the tented village near the flightline, peo-ple got itchy feet and models and flight boxes were toted to the variousareas. There were a few tentative flights in the R/C area, but everyonewas flying close to their chests due to the limited visibility. The first com-petitive flight came from Roy Cherry as he lifted his Saturn off the dampgrass in F2B aerobatics. A good flight in the mid-nine hundreds set themark for the rest of the field and John Allcock and Brian Turner were notfar behind. Peter Jackson showed a return to form as he went into thelead flying his Jen 57-powered Gatekeeper. The model was built in 2002and Peter used it to finish 3rd at the 2003 Nats. Pete Tindal was enjoy-ing himself until his Chipmunk cut out while at the top of the cloverleaf,due to fuel shortage. Mick Castell was up with the front runners, guiding
March ‘09 - Aeromodeller 51�
ABOVE LEFT: Combat winners (l. to r.) Roger Fisher 2nd, Chris Fisher 1st, and Mike Loughlin 3rd. ABOVE RIGHT: Combat league awards, (l. to r.) MickLewis 2nd, Richard Herbert 1st, Richard Evans 3rd. BELOW LEFT: Trevor Tabor uses the down-the-line system to control throttles and flaps in theTrilander. BELOW RIGHT: Using an appropriate black box, the contents are a restyled Sanwa radio set with switches and trims re-sited.
ABOVE LEFT: The early morning mist was just dispersing when Roy Cherrytook off for the dawn patrol. ABOVE RIGHT: Back in the pits, Roy Cherrychecks the inside leg measurement on his tuned pipe.
ABOVE: Brian Turner goes overhead as judgeJohn Bonner looks on. ABOVE RIGHT: GaryChurch takes to the air with his Ron Parsons’Pallas. RIGHT: The Parson’s Pallas in flight, acommanding presence in the air.
ABOVE: A well executed inverted landing by PeteTindal - unfortunately not required in the schedule!BELOW: Another masterpiece from Mick Castell,a profile Cardinal.
MIND THE LINES! 9/1/09 12:07 Page 3

his Cardinal, powered by a Merco 61 metamorph, through the schedulebefore Paul Winter slid into 3rd place with his 78 oz. Strega, with a Saito72 up front. He was also in practise mode for his future trip to Dallas,USA, to meet, and fly with, Al Rabe. Some people have all the fun!
A few paces up from the aerobatics circle, HMS Incontinent laybecalmed, guarded by an Atomic submarine in the sea-green CarrierDeck circle. Trevor Tabor, ably assisted by Alan Morgan, brought one of
the larger models, a three-engined Britten Norman Trislander. Brightlyclad in original yellow Aurigny colours, Trevor had worked on the full-sizewhen it was based at Stansted. The model flew well with the three ASP15s, being rarely challenged as it cruised around, using flaps, throttlecontrol and offset ailerons. To add to the scale display, Alan Morganwound up the two ASP 21s in his Handley Page Harrow, to run a tankthrough the brand new motors. The throttle response was good and it
52 Aeromodeller - March ‘09
TOP LEFT: The Cardinal goes inverted, Mick Castell on the handle. TOP CENTRE: The Ohlson sparkie in the Voetsak, the first control-line model to beflown in GB. ABOVE RIGHT: Terry Baker keeps his model, a Vector 40, at the regulation five feet. ABOVE LEFT: This young pilot had great fun masteringhis model. He’s now off to Specsavers for some cool shades... ABOVE CENTRE: Ray Skinner, and pit-person Susan, enjoyed the day flying his modifiedFlitestreak.
ABOVE LEFT: Alan Morgan and Trevor Tabor flew two-up in a demonstration of ARTF-DTW scale flying. ABOVE CENTRE: The Handley Page Harrow is con-structed from a Complete-a-Pac kit and powered by two brand new ASP 21s. ABOVE RIGHT: Peter Jackson, calm and peaceful, with his Gatekeeper inverted.
ABOVE: Pete Tindal checks out his Novi, in allorientations to ensure a good engine run.RIGHT: The Stunt Queen, flown by PeterRabjohn, is a typical model of its period, fastand manoeuvrable.
MIND THE LINES! 9/1/09 12:08 Page 4

wasn’t long before the Harrow, built from a Complet-a-Pac kit, took to theair for its first flight - superb! Being nosy, I noticed a neat line-up of largescale control-line models which I interpreted as the results of the poorsummer weather and some dedicated shed-time, but more of this later!
Other disciplinesAs a relaxing interlude I visited the free-flight area and came across RobSmith who has embraced the Ebenezer theme and applied the formula toany design that appeals to him. His Me 334, with band-on wing and magnet-ic under-fin, was a delight and after a frantic trimming session, the modelflew and drew a lot of attention. On the R/C line, Ken Sheppard flew hisnicely appointed DH racer, powered by a Zenoah 45 as a warm-up for anoth-er test flight. He then rolled out his Lanier XL4, powered by an LA40. Apartfrom the odd shape, the Lanier features a louvre-like vacu-wing which createsa low pressure area on top of the wing and so generates lift. Clever, and itworks, but Ken did say the model has its own unique flight characteristics.Another model that impressed was the Consolidated Constellation, built andflown by Phillip Noel. Built to 1/17th scale, it spans 88” and is powered byfour 480 brushed motors. It looked so realistic in the air and a 1/10thscale version is on the way with a span of 148 inches, using a genuine scalewing section and four Scorpion 4020/10 motors.
Back to C/LEnough distraction for the day, let’s get back to the control-line camp.
On the way back I came across Colin Monk who was test flying aHornet, built by Hugh Sewell, and powered by an O.S. Max 35. Colinwas just here for the fun and although he could have flown in F2B, hepreferred to just test out his new model. He’s not a bad designer him-self, having created the Billy Bunter control-line model. Ray and SusanSkinner were here for fun. You could tell by the smiles on their faces.The Oliver Tiger-powered Pluto had undercarriage problems but thepink Phantom (Susan’s model) flew well. Ray gave us all a treat whenhe flew an own-design, based on a scaled-down Flitestreak. Poweredby an E.D. Baby, bought when Ray was eight years old, the smile oneverybody’s face was worth its weight in gold. In F2B Ray Cherry wasbusy measuring his tuned pipe as his engine was slightly ‘off’, whilePeter Jackson had broken the 1K barrier as did Paul Winter. There
March ‘09 - Aeromodeller 53
ABOVE: The Gatekeeper, powered by a Jen 57, in the cloverleaf. RIGHT:David Underwood flew his crisp, clean Jameson Special in Vintage. FARRIGHT: The Devil Bat was flown in Vintage by Richard Soames.
MIND THE LINES! 9/1/09 12:08 Page 5

was little change in the places and Peter Jackson duly took top placeon the podium.
Results - F2B1st Peter Jackson 1049.9 1019.3 = 2069.22nd Roy Cherry 998.1 975.7 = 1973.83rd Paul Winter 1002 959.2 = 1961.2
In the early evening, the mysterious scale models made an appearanceon the airstrip. Alan Morgan and Trevor Tabor were happy to explain theirinnovative work. The wealth of scale R/C ARTF models had promptedthem to convert some of the range into control-line operation, using DTWcontrol (Down the Wire). By the time Morgan, with the P-47, and Tabor,with the P-36A, had retracted the wheels and lifted the flaps, the twolarge models were aloft, amply powered by Laser motors. Control wasimplemented by use of a Futaba Challenger radio, demounted and re-established inside a Maplins box after removing the encoder (without ananaesthetic!). At the model end, an old Sanwa receiver, with the decoderremoved, feeds the signal to the servos.
The lines are pike fishing line, which is insulated (and strong!) and pro-vides the avenue for the electronic signal. The on/off switches and trimswitches are transferred from the Challenger and mounted in the Maplins‘black box’ for control of as many surfaces/gadgets as you have switch-es. The system works and I witnessed two-up scale flying, with all thebells and whistles in operation.
With the brain box still buzzing at the potential of this idea, up strollsMike Welch with a strange, dark blue model. Yet another breakthroughas the carrier deck expert flew the first electric ducted-fan carrier modelon a brief flight, using short lines as a proving flight. A satisfied grin fromMr. Welch indicated that the formula worked and possibly could open upa whole new area of carrier deck. As I have a number of redundantradios, servos and bits gathering dust, I now avidly scour the R/C magsfor suitable (cheap) scale projects for possible conversion. Watch thisspace!
The mist was just lifting as the Iliffe Swalbe cruised past the CommandModule on Sunday morning and woke up the press corps at rest. Niceone, Peter, but his glory was short-lived as he noted that the damp airwas leaving his immaculate tissue covering a little limp. Sunday was slight-ly different as aerobatics would host the Vintage and Classic events and,up at the ‘naughty boys’ corner’, Vintage Combat would take placethroughout the day. You certainly get variety at Old Warden, and plenty ofit! The first round flights gave a predictable verdict on the outcome ofboth Vintage (pre-1959 designs) and Classic (pre-1969 designs), with thetop three scorers finishing in the same positions after three flights. InVintage, David Underwood paraded a beautifully finished Jamison Special,powered by an LA 40, to finish in 5th place. Mick Taylor took top honoursin both classes, with a fine display of disciplined, consistent flying.
Results - Vintage1st Mick Taylor 340 330 = 6702nd Mick Castell 324 319 = 6433rd Geoff Stevenson 302 245 = 547
Results - Classic App1st Mick Taylor 966 961 35 = 19622nd Pete Tindal 878 832.5 37.5 = 17483rd Gary Church 784.5 792 35 = 1576.5
The balmy September weather provided ideal conditions for some excel-lent combat flying. A significant number of bouts produced prolongedduelling of the highest standard, raising the adrenaline and excitementlevel all round. Over a prolonged duel the experienced fliers seemed tobenefit and the usual names of Lewis, Evans and Herbert featured in thewinning zone. Ominously, Mike Loughlin and the Family Fisher, Roger andChris, flew through the early rounds and seemed comfortable with theirprogress. General talk was of the prospective shortage of Taipan propsand the change of formula to allow the use of the Rothwell R320 as analternative motor to the PAW 19. After each ‘landing’, the question askedwas “Is the prop okay?”
By the quarter final stage the mighty had all fallen in battle, Loughlin
54 Aeromodeller - March ‘09
ABOVE LEFT: Richard Soames winds up for an overhead manoeuvre.TOP RIGHT: Ideal weather conditions contributed to some closely-foughtbouts in Vintage Combat. ABOVE RIGHT: Roger Fisher (blue) and HarryWalker tussle for position. BELOW LEFT: Tim Hobbins is happy the parts-count is quite low. BELOW RIGHT: The engine of choice for VintageCombat, the PAW 19, is due to cease production in 18 months.
ABOVE LEFT: Mick Lewis (blue) and Bob Payne seek advantage, closelywatched by circle judge Simon Timperley. ABOVE RIGHT: Richard Evanswarms up his PAW, firmly attached to the green/yellow Orcrist. BELOW:Evans hooks the blue streamer on his wing but misses the cut.
BELOW LEFT: Mike Loughlin launches the ill-fated Chris Fisher Warlock.BELOW CENTRE: I knew there would be trouble! BELOW RIGHT:Watched by an appreciative audience, Andy Housden’s Seamew makes alow fly-by of HMS Incontinent.
MIND THE LINES! 9/1/09 12:09 Page 6

disposing of Richard Evans, Hobbins taking two cuts to the Lewis oneand, after a re-fly, Chris Fisher beating Richard Herbert by three cuts totwo. By the later stages, it was Squig V Squig, as Tim Hobbins foughtMike Loughlin for 3rd place and came up short by three clear cuts. In thefinal it was Dad V Lad in a close-fought fight. The dad’s Anduril took firstcut but the lad’s Warlock flew back to counter-snip, Chris finally takingRoger Fisher’s knot to clinch the win. It was a fitting finish to an excellentday’s flying and a very good season, despite the weather. Yet again, themagic of Old Warden had woven its mystical spell. ■
Results - Vintage CombatLeague Positions1st Chris Fisher1st Richard Herbert2nd Roger Fisher2nd Mick Lewis3rd Mike Loughlin3rd Richard Evans
March ‘09 - Aeromodeller 55
ABOVE LEFT: Grantham MFC’s Tim Bland gets going in Carrier Deck. ABOVE RIGHT: The Housden Seamewhooks a line and lands. BELOW LEFT: History is made as the first jet model (electric ducted-fan), flown by PeterTribe, takes off from a carrier in British waters! BELOW RIGHT: Ever the Champion, Mick Taylor was undefeatedin Classic and Vintage over the weekend. RIGHT: Close formation flying is not normally a feature of a normalcombat bout.
ABOVE LEFT: Tim Hobbins (yellow) and Mick Lewis go overhead in search of the high ground. ABOVE RIGHT: Chris Fisher (blue) took a notable scalp indefeating Richard Herbert by three cuts to two cuts. BELOW LEFT: The Fisher family use metal engine mounts a la F2D. BELOW CENTRE: Tim Hobbins(yellow) and Mike Loughlin fight it out for the bronze medal position. BELOW RIGHT: “Now son, a word in your ear - you will be gentle with me, won’t you?”
MIND THE LINES! 9/1/09 12:10 Page 7

Interesting modelsThis month I am featuring American designs,built and flown in three different countries. TheAmericans had a large number of powerdesigns published in the late nineteen-thirtiesand early ‘forties, as they produced quite largenumbers of model petrol engines during thatperiod.
The first model featured is the EasternStates ‘Gas Champ’, that took first and thirdplaces at the All Eastern States Meet in1940, held at Hadley Field in New Jersey. Thewinning model, designed and built by RussellSimmons, used the new front rotary valveSuper Cyclone .65 spark engine, designed byMel Anderson. The original model usedstreamlined wheel pants to reduce drag fromthe 3.1/2” diameter wheels.
I would have liked to feature the plans ofthis champion model, but it covered fourpages when published in Model Airplane Newsmagazine in December 1940. Russell men-tioned that five planes had been built (by differ-ent club members) when his article was writ-ten, the models using the Ohlsson 60 Customengine but lacking wheel pants to reduce over-all weight. He also states: ‘Be sure you havethe 1/4” wash-in on the left wing, and youmay need more with the more powerfulmotors.’
The model featured here is a 95% versionbuilt and flown R/C-assist by Ian Avery fromKiama in Australia. The photos were taken atthe Australian Old Timer Nats, held at Loxton,South Australia, in April 2006. It was flownwith an O.S. 32 two-stroke helicopter engine,the model weighing 54 oz. and covered withSuper Monokote iron-on. The original ‘GasChamp’, flown in 1940, was 76” span.
The next photo was taken by Tom Ryan atthe 2001 SAM Champs at Las Vegas and fea-tures a nicely finished ‘Anderson Pylon’, scaledto 1,500 sq. in. wing area and powered witha modern O.S. 61 two-stroke glow engine. Theoriginal ‘Anderson Pylon’ was designed andflown by Alva Anderson from 1937, poweredwith a Forster 99 spark engine in this 90”span Texaco design. This was the first pylondesign and it was copied by Carl Goldberg forduration flying with his famous ‘Zipper’ design,kitted in 1939.
The model shown here was built by PederSamuelson and flown in Duration events, themodel having Monokote iron-on covering thathas the problem of slackening in the heat of
the desert. Peder used 65% nitro glow fuel toobtain maximum power from the O.S. 61,along with in-flight mixture control.
Back to Middle Wallop in 2008, wherePeter Carter had a number of new Vintagemodels, one being the 60” span ‘Falcon’design by Paul Plecan and published inSeptember 1940 Model Airplane News maga-zine. The original was powered with a BunchGwin Aero 45 spark engine, but Peter hasused a black head A.M. 25 diesel, one of theengines I tested in last month’s column.
The model built by Peter has Sig Coverallcovering with red paint trim and flew very well.I featured the design and plan in this columnback in November 2005; it is a fairly complexPlecan design - unlike his later models thatwere simple to build.
Another American design, seen flying here,is called the ‘1938 Berryloid Trophy Winner’,designed and flown in 1938 by HaroldCoovert. Berryloid Paints gave a trophy for thebest painted and finished model at the USNats each year. The model shown flying wasbuilt by Brian Ferrett and is powered with anoriginal English Mechanair 5.9 c.c. red headspark engine from 1946 turning a 12 x 6nylon Tornado prop. The original 72” spandesign was published in November 1938 AirTrails magazine.
CumulusThe plan featured this month is the 1949
design by Carl Goldberg, which was another ofhis rather complex designs. The 54” span‘Cumulus’ was kitted by American HobbySpecialists (Top Flite Models) in Chicago, acompany Carl was involved in until he formedCarl Goldberg Models in 1956.
Model Aviation in the UK obtained the publi-cation rights for the design and it was fea-tured over ten pages in Model Aviation 1950.It was also announced by Keil Kraft that theyhad British kitting rights for the ‘Cumulus’, butI suspect they found it far too complex andexpensive to kit this design.
I remember I purchased Model Aviation1950 when I was a boy, but never saw any-one who had built this model, as full-size planswere not obtainable and American kits wereunavailable at this time in Australia. The maga-
zine article had three pages of constructiondrawings, along with two-and-a-half pages offull-size parts, as all wing and tail ribs were dif-ferent. It was all too complex, with many differ-ent formers in the fuselage which was sheet-ed with 1/16” balsa. The retracting singleundercarriage wheel was, however, fairly sim-ple to install.
I have to admire John Maddaford who, likeme, had found the design far too demandingto build when he was a boy, but had decidedto finally build the model he admired as a lad.John has used tissue, red dope and fuel-proofer on the sheeted parts, these being thefuselage, pylon and fin. Chinese silk is used on
56 Aeromodeller - March ‘09
FOR OLD TIMES’ SAKEClassic designs from the USA, early high-performance engines discussed, pluspractical tests on a brace of small diesels
VINTAGE - By Don Howie
Ian Avery’s Eastern States ‘Gas Champ’ climbs awayin a Duration event at 2006 Oz Nats at Loxton, S.A.Engine is an O.S. 32 two-stroke heli glow.
FOR OLD TIMES SAKE 9/1/09 11:50 Page 2

the wings and tail, left as the original, naturalsilk colour.
The engine shown on the plan is a 1948McCoy 19 rear induction glow and John hasused a similar engine, this being the modelwith shiny-finish castings. This McCoy modeluses a single rear ball-bearing and the rearventuri is part of the crankcase casting - all, Isuspect, to reduce the cost of manufacture.
The engine and undercarriage tray is remov-able and this is shown in the photo, all beingvery well executed by John Maddaford. Thedesigner trimmed the model to climb and glideto the left. This was obtained by bending therudder and banking the wing slightly left.
Racing enginesStarting in 1940 with the Hornet 60 modelrace car engine that used twin ballraces,ringed aluminium piston and rear disc induc-tion, this type of race car engine was devel-oped by Dick McCoy, also in California during1942, in very limited numbers.
At the end of the Second World War, theMcCoy ‘MCCR’ .60 cu. in. (10 c.c. capacity)car engine was put into production by Duro-Matic Products Co. in Hollywood, California,proving to be the standard design of racingengine for the next 30 years or so. The 10c.c. racing engines were used for model carracing at this time, but by 1948 control-lineSpeed flying was becoming popular and itevolved into a number of classes with differentengine sizes.
McCoy introduced racing engines with reardisc induction in .19, .29, .49 and .60 cu. in.capacities to take advantage of the Americancontrol-line Speed classes. Salvatore Angeloniin Italy has a good collection of the McCoyrear induction racing engines of the nineteen-forties and ‘fifties and these are shown in thephoto. Plain bearing versions, such as theSportsman .36 and .56 cu. in. were also
made in the nineteen-forties. By 1949 most ofthe engines sold were glow-plug versions,rather than spark-ignition models.
The only other American racing engines tomatch the McCoys were the Dooling 61 andDooling 29, with the Dooling 61 becoming thedominant car engine from the late nineteen-forties. In the later part of the ‘fifties, BillWisniewski was working for K&BManufacturing in California and, along with hisfriend Roger Theobald, decided to design rac-ing engines in the FAI .15 size (2.5 c.c.), theiraim being to win the World Championships inC/L Speed.
Bill designed two engines for K&B,
released in 1961, these being the Torpedo15R and the Torpedo 29R, shown in thephoto. The end result was that Bill and Rogerwon FAI control-line Speed at the WorldChamps in 1964 with an engine designed byBill Wisniewski.
In the mid nineteen-sixties Gerald Nelsonfrom Hayward, California, introduced 40-sizepylon racing, as the new proportional controlradios were now coming onto the market.Semi-scale models at 450 sq. in. wing area ofthe small full-size pylon racers such as Bonzo,Rivets, Shoestring, etc., were becoming popu-lar, with plans and parts provided by NelsonModel Products Inc.
March ‘09 - Aeromodeller 57�
TOP LEFT: Builder Avery with the 95% (original was 76” span) ‘Gas Champ’; covering is Super Monokote and the model weighs 54 oz. TOP RIGHT: Big(enlarged to 1,500 sq. in. wing area) ‘Anderson Pylon’ with builder Peder Samuelson at 2001 Las Vegas SAM Champs. Power is an O.S.61 with in-flightfuel/air mixture control. Tom Ryan photo. ABOVE LEFT: Peter Carter from the Aldershot club, at ‘08 Middle Wallop SAM 1066 Champs with his PaulPlecan 60” span ‘Falcon’. Has A.M 25 diesel power. ABOVE RIGHT: ‘1938 Berryloid Trophy Winner’ sails by at Middle Wallop. Built and flown by BrianFerrett, 72” span model has an original 1946 Mechanair 5.9 c.c. red head spark engine.
Noted engine builder John Maddaford with his 54” span Carl Goldberg ‘Cumulus’ at 2008 SAM 1066Championships.
FOR OLD TIMES SAKE 9/1/09 11:51 Page 3

K&B saw the trend and the Torpedo 40Series 67 was introduced in November 1966.This engine would dominate American FI R/CPylon Racing with high nitro fuels for the nextfive years. I have included a photo of theTorpedo 40 Series 71, fitted with throttle thatis used to cut the engine after the ten-laprace.
The FAI introduced a 40-size class of R/Cpylon racing using standard (no nitro) fuel and
much worldwide development of racingengines emerged. Most notable is the changeto front rotary induction, which reduces dragand friction, along with special insert glow-plugs.
ErcolinoAn interesting diesel obtained in Italy, thanksto Bob Scott in Tuscany, is the Ercolino 2 c.c.model made by Alberto Dalloglio Motori, Via
Gramsci, La Spezia, Italy. It is claimed to be areplica of the first Italian diesel made in 1942.
The engine has a 12mm bore, 18mmstroke and weighs 150g, the size being simi-lar to the Swiss Dyno I from 1941, on whichmost of the very early model diesel engineswere based. The suggested prop size is280mm x 160mm which converts to an 11 x6 size. The quality of this replica engine is out-standing, with amazing attention to details
58 Aeromodeller - March ‘09
Beautifully drawn ‘Cumulus’ plans from Model Aviation 1950. An elegant but challenging build... See text.
LEFT: Advert from 1950 Model Aviation Model PlanesAnnual, trailing ‘Cumulus’ design and promising plans for themodel in their next issue. BELOW: Business end of JohnMaddaford’s ‘Cumulus’. Tray for engine (a 1948 McCoy 19)and undercarriage is detachable as per original plan, asseen here.
FOR OLD TIMES SAKE 9/1/09 11:51 Page 4

such as the compression lever and needlevalve. Even the small screw cap on the top ofthe fuel tank shows that making engines is awork of art for Alberto.
The engine was set up at home with wood-en mount as I did not wish to mark this quiteexpensive diesel by fitting it to a test stand. Ared Taipan 11 x 5 composite prop was drilledout to 8mm to fit the prop driver. The enginewas quite tight at TDC so I decided to give itat least 30 minutes’ running before taking revfigures. The engine needs a prime to start andit is very docile to handle and easy to start.
After considerable running-in I took a revreading on the 11 x 5 Taipan, the engine hold-ing 5,500 r.p.m. and running nicely. I contin-ued to run the engine and a photo is shown -it was not very noisy in the back yard. Aftermore running it still held 5,500 revs so I con-cluded it must now be run in.
I decided several days later to test theengine on a larger prop, so a 12 x 5 powerprop wood was drilled out to 8mm and fittedto the engine. Starting was again very easyand the engine ran very steadily on this largewooden propeller, the revs on this 12 x 5being 5,000 maximum.
I think that the ideal size in an Old Timerradio-assist Texaco model would be an 11 x 7,this pitch giving enough forward speed at5,000 r.p.m. The fuel tank is large enough,the engine is very economical at 5,000 r.p.m.and will run out the fuel tank without changeof settings. I found this engine a delight tohandle, due, I suspect, to the outstandingworkmanship of Alberto Dalloglio.
C.S. Micro dieselThe original Micro diesel was released in early1948, made in Detroit, USA. The engine hada .500” bore, .775” stroke and weight of5.1/2 oz. Capacity was .13 cu. in. or 2.13c.c. The engine was fitted with an aluminiumfuel tank that could be taken apart for clean-ing.
The C.S. (China) replica is very similar, themain difference being the fitting of a clear
plastic fuel tank which is much more practicalfor free-flight sport models. The engine wasowned by Bill Britcher, so it was tested at hishome.
Bill mentioned that it liked to run on largeprops so the first one fitted was 12 x 5 TopFlite power prop wood. The engine was fairlyeasy-starting and on the 12 x 5 it was slightlyuneven, the revs going from 4,800 to 5,000r.p.m. - similar revs to the Ercolino on this sizeprop but the Ercolino was much smoother.
Bill said it needed a larger prop, so a 14 x
4 Top Flite Super M wooden propeller was fit-ted. The engine again started easily and wasvery even-running on this large prop, holding4,300 revs. A 2.13 c.c. diesel turning a 14 x4 is quite amazing and equal to an old sparkengine of about 7.5 c.c., built in the nineteen-thirties!
The Micro diesel running at these revs hadamazing economy, taking considerable time torun out the fuel tank. So, if you need a dieselfor economy that should fly a fairly large free-flight model, this may be the answer. ■
March ‘09 - Aeromodeller 59
LEFT: K&B racingengines designedby BillWisniewski; left,the Torpedo 15Rreleased in May1961 for FAI C/LSpeed. Right,Torpedo 29RSeries 64, firstreleased in 1961and FAI Speedwinner in ‘64.RIGHT: Writer’sreplica Ercolino 2c.c. diesel, madeby AlbertoDalloglio in Italy.The original 1942Ercolino is said tobe the first Italian-made diesel.
BELOW: McCoy racing engines from 1946 to the nineteen-fifties from the collection of SalvatoreAngeloni; sizes here include .19, .29, .36, .49, .56 and .60 cu. in. RIGHT: The K&B Torpedo 40Series 71 early R/C pylon racing engine. They are now used in Nostalgia event models in Australia.
ABOVE LEFT: The little Ercolino running beauti-fully on an 11 x 5 Taipan composite prop. Engineexudes outstanding quality and performs well onlarge propellers. See text. ABOVE: C.S. (China)replica 1948 Micro 2.13 c.c. diesel; originalhad aluminium fuel tank but this modern versionuses plastic, more practical for F/F. LEFT: Thereplica Micro diesel proved to be remarkablyeconomical and enjoyed large props; here it hap-pily turns a 14 x 4 wood at 4,300 revs.Amazing!
FOR OLD TIMES SAKE 9/1/09 11:51 Page 5

ASK-18A 1/4 scale 157.5” (4000mm)
span replica of one of the best andmost elegant pre-glass fibre era club
single seat sailplanes. A great flier.Two sheet plans.
Plan price £20.00Plan No.006
GRUNAU BABY
A superb example of the machinewhich is the epitome of pre-WW2vintage open cockpit gliders. 1/4
scale model plans 133.5”(3390mm). Two sheet plan.Plan price £20.00
Plan No.083Photo documentation available from
designer.
MU13- D31/4 scale 157.5” (4000mm)span, super lightweight model of afamous German Soarer. Threesheet plan.Plan price £20.00Plan No.125
HUTTER H-171/3 scale 129.9” (3300mm) spanreplica of a loverly vintage scale‘floater’. Light yet tough. Two sheetplan.Plan price £18.50Plan No 081
DFS REIHER 111/4 scale replice of the famouspre- WW2 vintage gull wingGerman sailplane. This is one forthe enthusiast who loves building.Three large sheet plan
Plan price £20.00Plan No.158
OLYMPIA 2B(DFS MEISE).147.6” (3750mm) span of areally lovely soarer of the pre-glass fibre ‘hotship’ era. 1/4scale model on two large plansheets.Plan price £20.00Plan No.139
LO 1001/4 scale 98.4” (2500mm)span model of a famous aerobat-ic sailplane. Two sheet plan.Plan price £15.00Plan No.217Photo documentation availablefrom designer
Cliff Charlesworth has been designing big scale radio controlled gliders and sailplanesfor the past 30 years. Each of these designs embodies years of experience in this fasci-
nating field.
CLIFF CHARLESWORCLIFF CHARLESWORTHTHSCALE GLIDER PLANSSCALE GLIDER PLANS
KAISER Ka6E1/4 scale 147.6” (3750mm)wing span model of a highlyelegant high performancesailplane. Two large plansheets.Plan price £20.00Plan No220
KAISER Ka-71/4 scale 157.5” (4000mm)wing span model of the famousGerman two seater glider.Performance is superb and sim-ulates the full size very nicely.Plans on two large sheets.Plan price £22.00Plan No.101
KAISER Ka-81/4 scale 147.6” (3750mm)wing span Class 1 scale modelof the most popular Club glider.Very docile and a joy to fly. Twolarge sheet plans.Plan price £22.00Plan No.098
ASK-13147.6” (3750mm) span replica ofthe most popular club two seaterglider and trainer in Europe, with afirst class performance. Plans ontwo large sheets. 1/4 scale.Plan price £22.00Plan No.004
T61 FALKEA 1/4 scale model with awing span of 147.6”(3750mm). Suits 60-.90cu.in.motors. Plan price £22.00Plan No.223
Please return this completed coupon together with your cheque made payable to:
Model Activity Press, 5 Chiltern Business Centre, 63-65 Woodside Road, Amersham, Bucks, HP6 6AA
❑ I enclose a cheque for £................ made payable to MAP Ltd❑ Charge my credit card for the total amount of £......... ❑ Visa ❑ Delta ❑ Eurocard ❑ MastercardCardholder’s Name:..........................................................................3 Digit Secuirty No...........................Card Number:................/................../................./.................. Expiry Date:..................................................Signature:................................................................ Date:..................../......................./.................
MODEL NAME PRICE
TOTAL
SF28A TANDEM FALKETwo seat version of the T61, scale to1:4 with a wing span of 157.5”(4000mm). For 60-.90 cu.in.motors.Plan price £22.00Plan NO.176
Name:.......................................................Address:.......................................................................................................................................................................Postcode:..........................Tel:........................................
PLANS ORDER FORMAMI MAR 09
Postage & Packing chargesTotal Order Value UK Europe W/Wide
£10-£20 £5.00 £5.95 £9.00
£20-£50 £7.00 £8.50 £16.50
Allow up to 28 days for delivery
Overseas payments by credit/debit card
please.
PLAN NO.
Subscribe on-line through our SECURE web site:- www.modelactivitypress.com
POSTAGE
Payments made by credit card
must include the last three digits
of the card security number, full
mailing address including house
number and the postal code.
Cliff Charlesworth AD 8/1/09 15:00 Page 1

March ‘09 - Aviation Modeller International 61
““WWee’’rree sseerriioouussaabboouutt eennggiinneess””
Just Engines, Newby Cross Farm, Newby Cross,Carlisle, CA5 6JP, England.Tel/Fax: (0) 1228 712800
Email: [email protected] Address: www.justengines.co.uk
✯✯✯✯✯✯✯✯✯✯✯✯✯✯✯✯✯✯✯✯✯✯✯✯✯✯✯✯✯✯✯✯✯✯
✯✯✯✯✯✯✯✯✯✯✯✯✯✯✯✯✯✯✯✯✯✯✯✯✯✯✯✯✯✯✯✯✯✯
www.justengines.co.uk‘Just Engines continues to lead the way in custom manufacturing,
always striving to tailor customer needs with our top qualityengines and accessories.Whether it be constructing a unique
‘one-of-a-kind’ tailor made silencer for the OS IL300 or repairinga glow plug thread, our skilled engineers are always putting the
customer first. In addition our knowledgeable team work hard toprovide unrivalled customer service, always aiming to give the
best on-hand advice no matter what the question.We care aboutwhat we do from taking the time to ensure your spinner comeswith the correct adapter for your engine to making sure that theproducts we sell are of the highest standard. Remember – we are
serious about engines and we’re here to help.’
Please send me............AMI binder(s) at £9.50 each inc. postage and packing
(overseas add £2 for surface mail) Please make cheques/PO orders made payable to
Model Activity Press Ltd, 5 Chiltern Business Centre, 63-65 Woodside Rd., Amersham, Bucks, HP6 6AA.
Name:.................................................................................Address:.............................................................................................
........................................................................................................................................................................................................
................................................................................................................Postcode:.......................................................................
Credit Card
No..............................................................................Expiry date/Issue no...............................3 Digit Security No..................
Archive your copies of AVIATION MODELLER INTERNATIONALmagazine, in these top quality binders. Each holds 12 issues (1 year)
�SWITCH❏ ❏ ❏
AM
I M
AR
09
JUST ENGINES 12/1/09 12:10 Page 3

Jet fuelIt is usually called paraffin in the UK. The termkerosene (or just kero) was originally a US regis-tered trademark that eventually became generic,and is usual in Canada, the USA, and Australia.In my own turbines I have used aviation jet fuelfrom the airport. I successfully used the ‘paraffin’sold in my local ironmonger for heaters andlamps. I have also burned ‘kerosene’ sold by aheating oil supplier as domestic central heatingfuel, and I noticed no difference whatever. Sohow do these relate?
Jet fuel is clear-to-straw-coloured, and is a mix-ture of a large number of different hydrocarbons.The normal fuel is a paraffin-based fuel classifiedas Jet A in the USA and Jet A-1 elsewhere. JetA has the higher freezing point of -40 °C (vs -47for Jet A-1). Both have a density of around 0.8
62 Aviation Modeller International - March ‘09
TURBINETRENDSFuels, engine life, and R/C systems options for multi-function models
GAS TURBINES - By Alasdair Sutherland
The new Jet Trainer has been a great success, both on wheels and floats andI have never felt the need to fit air intakes.
TURBINE TRENDS 9/1/09 11:39 Page 2

kg/litre. Militaries use a different classification system
of JP numbers. JP-8 is similar to Jet A-1, whileother fuels were specially developed with higherflashpoints, like JP-5 for use on aircraft carriersand and JP-7 for the SR-71 Blackbird. It seemswe can burn whatever we can get, as long as itis clean.
A water content up to 30ppm (parts per mil-lion) is acceptable; above that water can give thefuel a hazy appearance. Jet fuels may also con-tain a number of additives:
● Antioxidants to prevent gumming ● Antistatic agents, to dissipate static electricity ● Corrosion inhibitors● Fuel System Icing Inhibitor to avoid fuel system icing● Biocide to avoid build-up of bacterial colonies in the fuel system.
Incidentally, I notice that a few aircraft enginemanufacturers have begun offering diesel aircraftengines which run on jet fuel, because it isalready available in most airports. Kerosene hasalways been a major constituent of model dieselfuel, so who has been copying whom?
Who needs intakes?In the last column I included a couple of photosand the briefest of details of my own-design JetTrainer, called ‘JayTee’ for want of originality andinspiration. I hot wire cut the wings from whitefoam and covered them with obeche veneer.Thirty six inch panels either side of the fuselageon a wing joining tube, plus wingtips, made upthe 80” span. The fuselage is made from liteplywith a curved balsa top that extends to the tail,the tailplane is built up from laser-cut balsa ribs,partially sheeted with balsa, and the fin has abalsa framework, also sheeted with 1/16” sheetbalsa. A very sturdy epoxy/glass main undercar-riage for 4” main wheels was made by Iain of IADModel Designs and the short noseleg is heavypiano wire with a 3” wheel. On wheels it weighed13 lb without fuel and my original Wren MW54with 14 lb thrust hurls it around the sky. Even onlong wet grass take-off was no problem, and big
flaps endow it with short field landing perform-ance to match. After some 25 flights I mountedit on floats and they too have been a great suc-cess.
Everyone who has seen it fly says, “very nice,looks good, flies well, but where are theINTAKES?” Well folks, I deliberately missed outthe intakes because I always intended it as awaterplane and I don’t want it taking in water.The underside of the engine is open, so that aircan easily get to the front of the engine. After awhile the drip, drip of “but where are theintakes?” got to me and I decided to try them. Imade them from balsa sheet, suitably roundedoff, and glued to the fuselage sides over holesthat were first covered with wire mesh. The ideawas that air would go in the front and through
the mesh to the engine, but anything heavierwould go straight past and out the hole at theback.
It is cheap to hope! Of three attempts on chop-py water, two were successful but the third cameto a hissing stop with clouds of steam and whitekerosene vapour. I suspect that some waterentered the intake, passed through the mesh,and the FOD guard and into the engine where itput the fire out. The model still has intakes but itflies off water with the covers fitted.
Since then I have added a further baffle belowthe front of the engine so that even when thewater is rough I am unlikely to get water in thefront. I have checked the engine parameterswhen running and it seems to make no differ-ence. The engine manages to draw nice fresh air
March ‘09 - Aviation Modeller International 63�
TOP LEFT: The early jet trainer models like this Kangaroo had the engine mounted up on top of the wing, fully exposed. TOP RIGHT: John Agnew’s FoxCub jet trainer with a Wren 44 hanging out in the open - but you never see full-size aircraft like this. ABOVE LEFT: On my model I tried to hide the engineaway but still have it easy to mount and to work on. ABOVE RIGHT: In this shot of the underside you can see that the engine is fully accessible frombelow, and you can also see that there are no intakes on the fuselage sides. The air gets to the engine from below. Note also the burnt oil marks on theceramic blanket covering the underside.
TOP LEFT: My newly added air intakes are under the wing, so here is a shot showing the air intakebefore the wing is attached. TOP RIGHT: Looking into the intake from in front, note the steel mesh inthe fuselage side and the hole at the back that was meant to let the water go straight through.ABOVE LEFT: After suffering an instance of water ingestion, I fitted these covers over the intakes forwaterplane flying. ABOVE RIGHT: I have now added this extra shield under the front of the enginewhich still allows plenty of air to get round to the front but will make water ingestion even less likely.
TURBINE TRENDS 9/1/09 11:40 Page 3

from the gap around the sides, without suckingin water. What I infer from these experiments isthat air intakes for turbines are quite unimpor-tant, unlike ducted-fans which do require verycarefully designed intake ducts.
Engine lifeMany’s the hour I have spent watching the engineinstruments in wonder, as they sit rock solidlyexpressing the amazing reliability of modern tur-bine engines. Hour after hour they point withnever a flicker to cause any concern, but justhow long do aircraft engines last? Dave Kelly, aBritish Airways engineer who is also a fellowmodel turbine enthusiast, passed on the followingnews story.
A Rolls Royce RB211 engine, fitted to aBoeing 747 when it was delivered to BritishAirways in 1999, recently set a world record forthe longest continuous service of 41,500 hours,about 23 million miles worth, without beingunbolted from its aeroplane. During their lifethese engines are continuously monitored, by thepilots and the ground engineers, and have regu-lar checks. Their oil is routinely examined formetallic particles that could betray wear in acomponent, but as long as they check outhealthy they are left to get on with the job, muchlike your car engine. The average life of a 747’sRB211, before being removed for a strip-downcheck, is 30,000 hours. What about model tur-bines?
JetCat of Germany is the biggest-selling brandso I checked their website, but it’s all in German!All I managed to decipher is that the serviceinterval for JetCat engines is 50 hours. I thenchecked the JetCat USA site, where I could readthat the US importer gives a three-year warranty,but it is conditional upon returning the engine for
overhaul every 25 hours. Mexico’s Jet Centralengines enjoy a lifetime warranty, but againdependent on a maintenance check every 25hours. Graupner Booster engines have a 50-hourmaintenance interval, while another Germanmanufacturer, Funsonic, give a warranty limitedto 200 runs or 25 hours.
After 180 flights (plus a few ground runs) Inoticed that my Wren 54 was up to around 30hours total running, which means each run mustbe almost ten minutes, including start-up andtaxying, so I thought I’d better check. The Wrenwarranty on their engines is for one year, 200starts, or 20 hours running whichever comesfirst. They say that a bearing change may berequired after 25 to 30 hours running on theirJet engines. I rang them up and was told not toworry. You can hear when the bearings arebecoming worn as the sound of the enginechanges and there is a ‘grumbling’ sound onspool-down. Mine sounds fine, and will get serv-iced when needed, like RB221s.
Radio systems for jetsEven on jets I have used just the standard radiosetup - that’s the one where you plug all the ser-vos into the receiver (using a ‘Y’-lead and exten-sions if necessary) plus a battery, via its switch.My Baby Boomerang flies like this, and now mynew O/D jet trainer JayTee is set up in this sim-ple mode. Over many years of flying, failures havebeen extremely rare, so rare that I am preparedto accept the very slight risk involved in keepingthings simple.
But jets are rarely simple, as they normallyhave flaps, retracts, brakes, gear doors, nose-wheel steering, and multiple servos - whosemountings are often pre-determined in modernARF models. It is not unusual to find that, having
connected two flap servos or a pair of rudderservos with a ‘Y’-lead, one goes the wrong way.One solution is to fit a Servo Reverser, a smallback box. The other, and more common, solutionis to plug the second servo into a spare channelwhich is then mixed with the command channel,thus giving control of throw as well as direction.
So a reasonably big jet will have two aileronservos, two flap servos, two elevator servos,maybe two rudders, nosewheel steering, a brakeservo, servos for gear doors, and all theseextras will want an auxiliary channel and a mixerso unless you have a top-of-the-range 12-channelset you will pretty soon run out of channels (andmixers).
One solution to that problem is the ‘Matchbox’,another little black box into which you put oneservo command signal and out from which youcontrol two or more servos each with its ownthrow and direction adjustment that lets youexactly match the two servos.
Similarly, the ‘Sequencer’ is a black box thattakes in the undercarriage up/down commandand controls servos for undercarriage doors andretracts while allowing adjustment of throws, andeven the door opening and closing delays.
Lots of AmpsThe bigger and faster jets can end up with a lotof servos, usually very high torque power hungrydigital servos, that when loaded can pull a lot ofamps of electric current through your receiver. Isthat wise? Can they take it?
SM Services and PowerBox make systems likethe Powersave, designed to remove the need forthe current drawn by all servos from passingthrough the receiver and is for use with receiversthat ARE voltage sensitive. The Opto Isolator doesthe same, and also isolates long extensions fromthe receiver circuits. Some systems use a singlebattery, but many have separate battery inputsfor the receiver and servos.
RedundancyIt’s the hard word if it relates to your employ-ment, but a comfort when it relates to your mod-els. It can mean that failure of a single compo-nent will not ensure the destruction of yourmodel. On my Rookie, for example, I used twobatteries through a little black box called a‘backer’, which takes two 6v inputs and feeds thebetter one to the receiver, less a managementfee of about one volt. I have a voltage monitor onthe receiver and always check each battery inturn, with the other switched off. The radio isguaranteed to get at least five volts even if onebattery goes flat. The PowerBox units mentionedabove also use this redundant battery feature.
However, you are still depending on a singlereceiver, and all the wiring in between the twoboxes, so how about the alternative of two sepa-rate receivers, each with its own Xtal, switch,battery and aerial, and each controlling enough
64 Aviation Modeller International - March ‘09
My latest jet is a Composite-ARF Lightning, bought second-hand and requiring only a receiver - but thequestion is, which one? The previous owner used a 12-channel Futaba, so my 8-channel JR set willnot be adequate on its own.
ABOVE LEFT: Connecting the servos to my JR Rx through an Opto Isolator would solve the high current problem, but I would need MatchBoxes to syn-chronise throw and direction of the multiple servos. ABOVE RIGHT: My preferred solution, and a very expensive one, is to use a Weatronic Dual receiver,a very large item when compared to a CD as you can see, but it should do absolutely everything required in this and future ambitious models.
TURBINE TRENDS 9/1/09 11:40 Page 4

control surfaces to get the aeroplane down safe-ly? I considered that option for my next big jet,and then I discovered Weatronics.
Enter WeatronicI had heard of the Weatronic dual receivers on35 MHz before, but until now I failed to realisewhat they could do. They answer is All of theAbove, plus a lot more besides. Each Weatronicbox contains two complete and independentreceivers (each with an aerial), two voltage regu-lators, and sockets for a multitude of servos.Each individual servo connects straight into thebox, and software allows the user to set thedirection and extent of travel by connecting it to aPC. The functions of a sequencer for retractsand gear doors are built in. Even the batteryswitches have been replaced by a built-in fail-safeswitch function for the two separate batteries. Itappears to offer complete redundancy for all fail-ures.
Thus the use of separate voltage regulators,switches, servo reversers, matchboxes,
sequencers and all their interconnecting wiring isreplaced by this single box. Not only that, but itrecords performance parameters as it goes, sothat you can check up on it later. AND the toplevel ones have a built-in gyro for smoothing outone control axis, AND a GPS receiver whichstores on the memory card the position, heightand groundspeed several times a second.
I bought one of these amazing devices for mylatest model, a Composite-ARF Lightning, and Iintended to tell you all about the setup, but I haverun out of space. Besides which, the first onewouldn’t talk to my computer. I sent it back andthe second one connected to the computer, butwould not talk to my transmitter! Simple, it is not.Hopefully I’ll tell you all about it next time... ■
Websiteshttp://www.wrenturbines.co.uk/http://www.weatronic.com/http://www.smservices.net/http://www.powerbox-systems.com
March ‘09 - Aviation Modeller International 65
Craig Gottschang from Georgia built this model of the Fairchild A-10 ‘Warthog’ from the Mibo-Jetskit. Wingspan is 10 feet, fuselage length 9 feet and power is provided by a pair of JetCat P-120derated to about 23 lb (100 N) thrust.
The dry weight of the Warthog with all 11 pylons loaded (3 on fuselage, 4 on each wing) is 53 lb (24kg). Control is through a Weatronic Rx to about 12 servos and several electronic valves that controlrudders, elevators, ailerons, throttle, flaps, landing gear, brakes and gear doors, etc.
TOP: Steve Rickett originally used a pair ofFutaba receivers, each with its own team of ser-vos, to divide the control system of his Comet toprovide redundancy. ABOVE: Steve has nowconverted to a Weatronic dual receiver on 35MHz for this most impressive twin P-120 pow-ered 183 inch span monster.
TURBINE TRENDS 9/1/09 11:41 Page 5

Look through the lens on your home computer...
This range of DETAIL PHOTO COLLECTIONS provides extensive close-ups of a wide range of popular aircraft all on CD in RGB J-peg (jpg) format for you to look at in large format on your
computer screen.
AeroDetail seriesWhat makes a good scale model GREAT? It’s the detail of course!
But finding all the detail needed to finish a scale model can be difficult - it’s not always at all practical to get at the full size machine and record all the close-up detail you’ll need.
AERONCA SEDAN - AERONCA SEDAN - (80 images)The last and most graceful of the Aeronca line oflight/sports aircraft in fine detail.
AAVROVRO 504K - 504K - (140 images)The Shuttleworth Museum’s superbly maintained machine,in full detail.
NEWNEW... ... ARROW ACTIVE II - ARROW ACTIVE II - (50 images)Sole remaining example of this 1930s racing and aerobaticbiplane restored to pristine condition..
BEECH STBEECH STAGGERAGGERWING -WING - (45 images)The distinctive back-staggered 1930s biplane with retract-ing undercarriage.
BELL P-39Q AIRACOBRA - BELL P-39Q AIRACOBRA - (130 images)Superbly restored example of this much maligned WW2fighter aircraft, that was used with great success byRussian forces in the ground attack role and with sawmuch action in the south Pacific, from where this restoredexample was recovered.
BLERIOT MONOPLANE - BLERIOT MONOPLANE - (74 images)The Shuttleworth Museum’s machine, the oldest originalexample still flying. Much close-up detail showing all theexposed rigging, structure and the ‘bedstead’ main under-carriage, plus Anzani engine.
BOEING PTBOEING PT-13/17 STEARMAN - -13/17 STEARMAN - (54 images)Subject aircraft is a current British civil register exampleused for airshow displays.
BRISTOL BULLDOG - BRISTOL BULLDOG - (60 images)This collection depicts the example assembled from twodonor airframes and restored to superb standard bySkysport Engineering. It can now be seen at the Royal AirForce museum, Hendon.
BRISTOL F2B ‘BRISFIT’ - BRISTOL F2B ‘BRISFIT’ - (28 images)Full close-up detail, including photos of engine cowls, forboth Rolls Royce Falcon and Hispano-Suiza engines.
NEWNEW... ... BRISTOL M.1c - BRISTOL M.1c - (100 images)Early WW1 fighter monoplane. Example depicted is thefaithfully authentic replica built by the Northern Aero Worksand operated by the Shuttleworth Trust museum.
BUCKER BESTMAN - BUCKER BESTMAN - (43 images)Authentic example as exhibited at the Fantasy of Flightmuseum in WW2 Luftwaffe colour scheme.
BUCKER JUNGMEISTER - BUCKER JUNGMEISTER - (79 images)Radial engine version. Example from Fantasy of Flight muse-um.
CHANCE VOUGHT F4U-1D CORSAIR -CHANCE VOUGHT F4U-1D CORSAIR - (132 images)The famous ‘bent wing bird’ and super detail.
NEWNEW... ... CHILCHILTON DW1 - TON DW1 - (90 images)Original upright engined version of this diminutive British lowwing sports/racer.
CHRISLEA SUPER ACE - CHRISLEA SUPER ACE - (123 images)Late 1940s civil light aircraft with distinctive twin fins andnosewheel type undercarriage. A fully restored example.
CHRISTEN EAGLE - CHRISTEN EAGLE - (90 images)The spectacular, stylish aerobatic biplane revealed in close-up. Example shown is the two seat version.
CIERCIERVVA C.30 AUTOGIRO - A C.30 AUTOGIRO - (35 images)A study of the example hung in the Fantasy of FlightMuseum, finished in RAF WW2 colours.
COMPER SWIFT - COMPER SWIFT - (91 images)1930s racingg aircraft. Example depicted is the radialengined example at Shuttleeworth Mussem.
CURCURTISS HATISS HAWK 75 - WK 75 - (130 images)The ‘export’ version of the Curtiss P-36 that saw service induring WW2 with Finland and during the ‘Battle of France’in May/June 1940. Example shown is a combat veteran.
CURCURTISS JN-4 ‘JENNY’ - TISS JN-4 ‘JENNY’ - (130 images)An authentic, restored example in full detail
NEWNEW... ... CURCURTIS P-40B TOMAHATIS P-40B TOMAHAWK - WK - (130 images)Rare. full restored example of the early version of theCurtiss fighter aircrfaft that was at Pearl Harbour onDec. 7th 1941 - and survived the attack!
CURCURTISS P-40N - TISS P-40N - (100 images)One of the later versions of the famous Curtiss Warhawk,the WW2 fighter aircraft that saw service in just aboutevery combat theatre of operations.
De HADe HAVILLAND DH84 DRAGON -VILLAND DH84 DRAGON - (40 images)Forerunner of the m ore famous DH 89 Dragon Rapide,this collection depicts a superbly restored example.
De HADe HAVILLAND DH89 DRAGON RAPIDE - VILLAND DH89 DRAGON RAPIDE - (100 images)Graceful twin engine biplane airliner that saw service frompre-WW2 through to the mid 1950s. Several are still fly-ing and three are shown in this picture collection.
NEWNEW... ... De HADe HAVILLANDVILLAND DH 53 - DH 53 - (60 images)1920s lightweight low wing sports aircraft designed to alow-power specification. Machine illustrated is the soleremaining example.
NEWNEW... ... De HADe HAVILLANDVILLAND DH 60 - DH 60 - (140 images)The aircraft that set the British ‘club’ flying movement onthe road to success during the 1930s.
DH TIGER MOTH - DH TIGER MOTH - (110 images)Much close-up detail of civil register example, plus furtherdetail of the IWM Duxford’s example in Royal Navy trainercolours, showing the blind flying hood.
DHC CHIPMUNK - DHC CHIPMUNK - (70 images)A bumper bundle of images that provides a vast array ofdetail pictures, plus photos of examples in both RAF train-er and civil colours.
ERCO ERCOUPE 415 & AERCO ERCOUPE 415 & AVVALONALON ERCOUPE - ERCOUPE - (115 images)The elegant twin finned light/sport aircraft. Both originalType 415 and later Avalon resurection examples.
CDS ADVERT 11/07 22/4/08 10:12 am Page 2

FFAIRCHILD RANGER - AIRCHILD RANGER - (60 images)Elegant U.S. high wing light aircraft in full detail. Twoexamples shown.
FIESELER STORCH - FIESELER STORCH - (90 images)Arguably the first military STOL aircraft, this stalkey look-ing aircraft has long been a modellers’ favourite. Twoexamples are represented, the machine at the Fantasyof Flight Museum, Florida and the RAF Museum Cosford’sexample.
FOKKER D.VIII - FOKKER D.VIII - (69 images)The Fantasy of Flight museum’s example of the late WW1Imperial German Air Service monoplane fighter, in fulldetail.
NEWNEW... ... FOCKE WULF FW 190A - FOCKE WULF FW 190A - (90 images)Germany’s ‘butcher bird’ fighter of WW2, active on allcombat fronts from 1941 onwards.
GLOSTER GLADIAGLOSTER GLADIATOR - TOR - (50 images)The Royal Air Force’s last biplane fighter, star of late1930s air shows and flown in combat during earlyWW2, including Battle of France, Battle of Britain,Mediterranean operations and North Africa.
GRUMMAN F3F - GRUMMAN F3F - (34 images)A study of the faithfully replicated example of the 1930sUS Navy biplane fighter as seen at the 2001 FlyingLegends Show.
GRUMMAN F6F-5 HELLCAGRUMMAN F6F-5 HELLCAT - T - (95 Images)The US Navy’s most effective WW2 fighter.
GRUMMAN F7F TIGERCAGRUMMAN F7F TIGERCAT - T - (63 Images)Late WW 2 long range patrol fighter.
GRUMMAN F8F BEARCAGRUMMAN F8F BEARCAT - T - (96 Images)Hottest Navy piston engined fighter of them all!
GRUMMAN FM-2 WILDCAGRUMMAN FM-2 WILDCAT - T - (95 Images)WW2 Naval Fightger, served with the escort carriers.
HAHAWKER FURWKER FURY - Y - (55 Images)No authentic example now exists, but the accurate replicaphotographed in extensive detail in this collection is asgood a guide as can be found of this elegant 1930s RAFfighter. Includes some general arrangement picturesauthentic to the period.
HAHAWKER HARWKER HART &T & HIND - HIND - (115 images)A combo collection featuring the RAF Museam’s Hartbomber and Hart Trainer, plus Shuttleworth’s Hind.
HAHAWKER HURRICANE MK.1 & MK.IV - WKER HURRICANE MK.1 & MK.IV - (170 images)Two versions of the famous ‘Hurri’ – one a true Battle ofBritain survivor painstakingly restored to perfect authen-ticity, plus the cannon-armed, Mk.IV ‘tank buster’.
HAHAWKER SEA FURWKER SEA FURY FB.XI - Y FB.XI - (140 images)Hottest of all the piston-engine fighter aircraft, the carrier-bourne Sea Fury is also admired for its elegant profile.
NEWNEW... ... HAHAWKER TOMTIT - WKER TOMTIT - (140 images)Mid 1930s RAF biplane trainer aircraft, from the eraopen cockpits of silver dope and polished metal.
KAKAWWASAKI KI100 - ASAKI KI100 - (62 images)
LUSCOMBE SILLUSCOMBE SILVVAIRE - AIRE - (74 images)The elegant late 1940s US light aircraft. Several exam-ples provided, with much close-up detail for modellers.
LUTON MINOR - LUTON MINOR - (32 images)Just one example of this light aircraft, to which the ownerhas applied many mods and variations.
LLVG C.VI - VG C.VI - (110 images)The sole survivor of its type from the WW1 era, pho-tographed in extensive detail. This is the machine housedat and flown from the Shuttleworth Collection airfield, OldWarden and now in storage, awaiting display at the RAFMuseum.
MARMARTIN B-26 MARAUDER - TIN B-26 MARAUDER - (100 images)The Fantasy of Flight Museum’s example, photographedpre-restoration, soon after it was flown into the Museumsite, thus in original, unrestored condition.
MESSERSCHMITT ME 410A-1/U2 - MESSERSCHMITT ME 410A-1/U2 - (79 images)
MILES MAGISTER - MILES MAGISTER - (100 images)A firm favourite with scale modellers, this extensive collec-tion of images depicts two examples in different Royal AirForce training colour schemes.
MORANE SAULNIER MS406 -MORANE SAULNIER MS406 - (92 images) French WW2 fighter that fought in the Battle of France,1940. Swiss restored example.
NORNORTH AMERICAN ATH AMERICAN ATT-6 HA-6 HAVVARD - ARD - (76 images)AT-6, SNJ, Texan, Harvard - call it what you will. 55,000were built - this example is in US Army colours, with com-prehensive close-up detail, nose to tail.
NORNORTH AMERICAN A-36 INVTH AMERICAN A-36 INVADER/APADER/APACHE -ACHE -(69 images)The ground attack variant of the Alison engined P-51A.Photos, in detail, of the world’s only airworthy example.
NORNORTH AMERICAN P-51B MUSTTH AMERICAN P-51B MUSTANG - ANG - (102 images)First of the Rolls Royce Merlin engined Mustangs, this col-lection depicts the Fantasy of Flight Musem’s restoredexample, with overly polished plain metal surfaces. Muchdetail.
Also, 41 images of The Fighter Collection’s P-51C in baremetal restoration, showing much surface and internal air-frame detail. A real bumper bundle! (over 100 images)
NORNORTH AMERICAN P-51D MUSTTH AMERICAN P-51D MUSTANG - ANG - (102 images)The definitive, bubble canopy Merlin Mustang. In detail,showing several restored examples. This is the Fantasy ofFlight Museum’s over-polished example , but the close -updetail is all there.
NORNORTH AMERICAN B-25 MITCHELL - TH AMERICAN B-25 MITCHELL - (74 images)Fantasy of Flight Museum’s example. Photographed soonafter superb restoration. Full nose to tail detail.
NORNORTH AMERICAN TTH AMERICAN T-28 - -28 - (118 Images)US Air Force & Navy basic trainer.
NEWNEW... ... PERCIVPERCIVAL MEW GULL - AL MEW GULL - (35 images)Famous 1930s racing and record setting aircraft that willforever linked with the achievements of British aviator AlexHenshaw.
PERCIVPERCIVAL PROVOST - AL PROVOST - (30 images)Airworthy, preserved example of the RAF piston-enginedbasic trainer used in the 1950s. Full detail.
PIPER L-4 GRASSHOPPER - PIPER L-4 GRASSHOPPER - (80 images)Military version of the famous Piper J-3 Cub used duringWW2 and close recconiasance and spotter aircraft andfor many other tasks.
PIPER SUPER CUB - PIPER SUPER CUB - (80 images)The later, ‘cleaned-up’ version of the famous Piper J-3,with more elegant engine cowl. Two examples shown.
PIPER TOMAHAPIPER TOMAHAWK - WK - (54 images)Cranfield Flying School example of this civil ab-initio traineraircraft.
PITTS S.1 - PITTS S.1 - (36 images)Homebuilt example by Bob Millinchip, as seen at 2002PFA Rally. Complete detail study
POLIKARPOV I-15 - POLIKARPOV I-15 - (100 images)The ultra agile Russian biplane fighter aircraft that sawwidespread service prior to and in the early years ofWW2 and during the Spanish civil war. Example illustrat-ed is a superbly restored machine.
POLIKARPOV PO-2 - POLIKARPOV PO-2 - (170 images)The world’s most numerously produced aircraft of alltime, the P0-2 was a great maid-of-all-work used by bothmilitary and civil groups in the old Soviet Union and itssatellite states. Example depicted is pristine, and now instorage at IWM Cosford.
REPUBLIC P-47D THUNDERBOLREPUBLIC P-47D THUNDERBOLT - T - (105 images)Bubble-canopy version of the much loved ‘Jug’, pho-tographed in fine detail.
RRYYAN PTAN PT-22 - -22 - (92 Images)American primary trainer.
S.E.5a - S.E.5a - (100 plus images)Shuttleworth Museum’s airworthy example presented infull detail.
SOPWITH PUP - SOPWITH PUP - (50 images)The charismatic Sopwith Scout (to give its correct desig-nation) is a great scale modellers’ favourite. Exampledepicted is the one preserved and regularly flown at theShuttleworth Collection, Old Warden.
SOPWITH TRIPLANE - SOPWITH TRIPLANE - (120 images)The last example of the ‘Tripehound’ is the one built (dur-ing 1980s) from original Sopwith drawings by NorthernAero Works and given sequential manufacturer’s numberby Sir Thomas Sopwith himself in recognition of the out-standing workmanship. Extensive detail.
STINSON 105 - STINSON 105 - (75 images)Light, private aircraft of the 1940-50s era, with lots ofcharacter.
SUPERMARINE SEAFIRE MK.XVII - SUPERMARINE SEAFIRE MK.XVII - (64 images)The Seafire 17 was no navalised Spit. A true ground-upnaval fighter.
SUPERMARINE SPITFIRE MK.XIV - SUPERMARINE SPITFIRE MK.XIV - (58 images)2nd of the Griffon-engined Spits (Mk.XII was first), the big-ger engine forced a change of the classic Spifire shape.
SUPERMARINE SPITFIRE MK.XVI (BUBBLESUPERMARINE SPITFIRE MK.XVI (BUBBLECANOPY) - CANOPY) - (116 images)Last of the Merlin-engined Spifires. This collection depictsthe ‘cut-down’ fuselage, bubble cockpit canopy later ver-sion.
SUPERMARINE SPITFIRE Mk Vc - SUPERMARINE SPITFIRE Mk Vc - (160 images)Shuttleworth Museum’s airworthy example presented init’s latest form with classic rounded wingtip planform.
SUPERMARINE SPITFIRE MK.IX - SUPERMARINE SPITFIRE MK.IX - (90 images)The most numerous version of the classic Spifire thatturned the tables on the Luftwaffe’s Focke Wulf Fw 190.
STEEN SKYBOLSTEEN SKYBOLT - T - (89 images)Attractive US aerobatic biplane, presented in full detail.
NEWNEW... ... THULIN TUMMELISA - THULIN TUMMELISA - (55 images)Swedish 1919-era fighter trainer that served the Swedishair arm for many years. Example depicted is a faithfulreproduction.
TIPSY BELFTIPSY BELFAIR - AIR - (35 images)Highly attractive Belgian low wing light aircraft from theera of simple, open cockpit private flying. Machine offersscale modellers pleasant lines and simple shape.
VICKERS SUPERMARINE WVICKERS SUPERMARINE WALRUS - ALRUS - (80 images)The famous ‘Shagbag’ biplane seaplane, used duringWW2 as an air-sea rescue craft and fleet gunnery spot-ter.
WWACO YMF-5 - ACO YMF-5 - (130 images)Beautiful and graceful spatted undercarriage biplane ofthe 1930s ‘golden aviation era’. Example photographed isan accurate-in-every-detail modern replica.
WESTLAND LWESTLAND LYSANDER - YSANDER - (39 images)The Shuttleworth Museum’s airworthy example shown inboth camouflage and Special Operations black finishes.Full close-up detail.
WHITMAN TWHITMAN TAILAILWIND - WIND - (62 images)Two examples shown, of this US homebuilt lightplane, withboxey shape ideal for modellers. Complete close-up detail.
Only £12.99 each including P&P(Allow up to 28 days for delivery)
For all credit card orders please call or fax: 01493 377267. Between 9-30am - 14.00pmor email: [email protected] After 2pm please call our main office
T e l : 0 1 4 9 4 4 3 3 4 5 3 F a x : 0 1 4 9 4 4 3 3 4 6 8
Model Activity Press Ltd.5 Chiltern Business Centre, 63-65 Woodside Road, Amersham, Bucks, HP6 6AA.
CDS ADVERT 11/07 22/4/08 10:12 am Page 3

Nutty professor!It’s hard to get overly exited about the nutsand bolts that play such a crucial part inholding the various important bits of our fly-ing R/C model aircraft airframes together.But, precisely for that reason, becausethey are so mundane and yet so relied-upon, these items should be properly tight-ened up in all ‘holding-together’ situations.With that in mind, Leeds aeromodeller andPeriod re-enactor Malcolm Fisher has beensharing his wisdom on the matter with me,showing that adept nut and bolt fettlingtakes both thought and preparation. Andnow, dear readers, I shall pass on his wisewords to you...
The nut on the back-end of a silencer isa ‘lock-nut’ as it’s used to lock the boltwhich is threaded through the silencerfrom the front. It isn’t the same as a ‘self-locking nut’ which can take a number offorms. Some have an insert, often nylon, at
the top of the nut. Some have an insert,again nylon or fibre, part-way down thethreads. Others have a sort of ‘split-ring’,again at the top of the nut. Using these willsupposedly not allow them to come looselike an ordinary nut, and they don’t requirea second nut.
Proper’ lock-nuts are the same as nor-mal nuts, but usually thinner. The two nutsare screwed onto a bolt, and then one isheld while the other is turned tightlyagainst it. The original recommended pro-cedure was to put the lock-nut on first andthen the normal nut. They were tighteneddown together and then the ordinary nutwas held while the thinner lock-nut wasturned BACK against it.
Most people use two normal nuts, tight-en the first and then follow it with a secondand tighten that while holding the first onestill. Both methods work. Self-locking nutsare easier and quicker.
I can honestly say that I have not readsuch a detailed account of how nuts andbolts form an intimate and, hopefully, long-lasting relationship before, and this infor-mation will be very handy to refer to infuture. Many thanks, Malcolm.
Broke-bolt mountingStill on this unbearably exciting theme,lemme tell you how I fixed a particularlytricky bolt-related problem after really‘screwing up’ the situation.
There I was, happily tightening the four4BA anchor bolts that held the hard-plasticengine mount to the firewall on my latestmodel. Three had been tightened fine and Iwas almost finished tightening the fourth,when suddenly all ‘screwing-purchase’ dis-appeared! Incredibly, the bolt had broken intwo, leaving part of its shaft still stuck inthe firewall captive nut!
With the engine mount removed, it was
68 Aviation Modeller International - March ‘09
FEENEY’SFLIGHT FILEFurther snippets of practical R/C aeromodelling guidance and advice
R/C TECHNIQUE - By Gerard Feeney
Are all your airframe nuts and boltstightened up properly? Read the
text for the gory details!
FEENEY FILE 9/1/09 10:40 Page 2

a very awkward situation to behold. I could-n’t gain access to the bolt rear through thetank bay and, at the front, only about1/16” or less of the broken bolt shaft pro-jected into the engine bay. I didn’t want tohammer-tap the broken bolt and captivenut rearwards out of the firewall, if possi-ble, as the captive nut had been securelyglued in place, and it would be next toimpossible to get the captive nut back inposition again.
After much fiddling with needle-nose pli-ers and tweezers through the now vacatedengine bay, I was getting nowhere and feel-ing more than a little aggravated! I couldbarely grip the broken bolt and, when I did,it wouldn’t rotate. Then, I thought of a verysimple rescue plan - but, would it work?
I cut off a short length of silicone fueltubing and, very gently but firmly, slipped itthrough the engine bay and onto the smallbit of projecting bolt shaft. It gripped okay,but could it be used for ‘unscrewing pur-poses’ as I had suddenly envisioned onlymoments before?
The fantastic news was that it wouldunwind out the broken bolt! By simply fin-ger-rotating the fuel tube in an anti-clock-wise manner, it dutifully unscrewed the ten-tatively-attached bolt fragment with amazingefficiency. What surprised me was just howeasily the damaged bolt shaft unwound, incomparison to trying to unscrew it with thepliers!
The engine mount was now re-attached,using the three original bolts and one new4BA replacement. I was exceedingly carefulthis time not to over-tighten all four bolts,while still ensuring that they were fullyscrewed down.
This broken bolt incident was a freakoccurrence for me - I have never had ithappen before and, hopefully, it’ll never hap-pen again. I suspect that the kit bolts I wasusing were a tad dodgy, as they seemed tobe made from soft alloy. Also, some bolt‘screwing-resistance’ had been encoun-tered, as a chunk of rigid packing foaminside the tank bay was obstructing its pen-etration. Nevertheless, the bolt shouldn’thave snapped and from now on I will onlyuse better quality, independently-purchased,4BA anchor bolts to attach kit-modelengine mounts to firewalls.
Head caseWe’re still not finished with bothersomebolts! Like many modellers, I have beenfrustrated when trying to unscrew enginecylinder head bolts which are gummed-upby ancient ‘heat-welded’ castor oil deposits.Luckily, Peter Miller has some answers, solet’s hear what he has to say...
First, soak the engine cylinder head in
paraffin or WD40 for a time. Either ofthese oils should penetrate down the bolts.For Philips-head bolts there are severalthings you can now do. But first, makesure that the bolts’ head-slots are perfectlyclean.
Place the correct size of screwdriver inthe bolt’s head-slot and hit it with a ham-mer, straight down with a good sharp blow.This will often break the gummed-up oil sealand loosen the bolt. Some heat applied tothe cylinder head can also help, followed bythe aforementioned sharp hammer bolt-blow.
If this fails, hold the engine securely,preferably in a vice, so that it can’t turn.There’s no need to clamp it too tightly, justhold it steady in the vice. Place the screw-driver in the bolt head-slot and hold thescrewdriver with pliers. Next, turn thescrewdriver very slightly in the ‘undoingdirection’, only just enough to start it risingin the slot. Hold firmly with the pliers andhit the screwdriver with the hammer. Thisaction can often start the stuck bolt turn-ing. It is the same principle as the ‘impactscrewdriver’. Use the same dislodging tech-niques on all the stuck Philips-head bolts.
If these ideas don’t work, you may haveto drill the bolt heads off and remove thecylinder head that way. The ‘circumcised’bolt stubs will then come out with the aidof pliers, and new bolts can be fitted.
Allen-head bolt removal is more problem-atic. The straight-down hammer blows may
work but the ‘turning-and-hitting’ won’tbecause there is no cam action with anAllen-head bolt.
Thank you, Peter. I sometimes have sawna slot through ‘fused’ Allen-head enginebolts in-situ and then used a straight-bladescrewdriver to unscrew them. Of course,that only works if a Junior hacksaw bladecan gain ‘elbow-room’ to cut across thebolt head(s) in the first place. Access isokay on backplate-retaining bolts but notgenerally workable on cylinder head-retain-ing bolts. Actually, sometimes it is at thecorners, depending on the cylinder head‘finning’ layout and the way you align thehacksaw blade.
Textbook exampleSticky-back Solartrim is fabulous for beauti-fying Solarfilm-covered models in both sim-ple and elaborate trim patterns. However,Solartrim becomes considerably less self-adhesive with age, and trim pattern edgescan lift when exposed to airflow and engineexhaust goo no matter how well they’re ini-tially stuck down. So, keep those stuck-onSolartrim designs in position for longerusing the following simple trick...
Thoroughly clean the trim pattern(s) andthe surrounding base film with meths andkitchen towel. Be careful not to aggravatethe edge-lifting any further by gently tissue-rubbing in directions that keep the raisededges flat. When the trim patterns andadjacent areas are sparkling clean, re-seal
March ‘09 - Aviation Modeller International 69�
Gerard broke a bolt when fitting the engine mount into his latest model. But that problem generated ahighly effective ‘sheared bolt-shaft’ removal method!
BELOW LEFT: Engine cylinder head-retaining bolts can be particularly hard to remove if gummed-up. The text has helpful, practical tips from Peter Milleron how to sort the situation. BELOW RIGHT: Stop Solartrim designs from lifting with clear sticky-back schoolbook-covering film stuck on top.
FEENEY FILE 9/1/09 10:40 Page 3

the ‘iffy’ edges with a modellers’ warm minitacking iron.
Now, using a sharp Number 11 scalpeland straight-edge, cut up custom-sizedpieces of clear self-adhesive schoolbook-covering film (available in rolls in almost allnewsagents) and overlay these bits of clearfilm on top and to each side of the liftingtrim shape edges. Normally, it’s just theforward-facing edges and tips of trimembellishments that lift, so you don’t haveto do much ‘laminating’.
If your Solartrim is old and a bit ‘stick-less’ to begin with, apply the clear self-adhesive schoolbook-covering film over sus-pect edges when you first cover and trimthe airframe so that the exhaust gunkdoesn’t have a chance to ‘get under yourskin’.
Of course, the most sensible action is topurchase brand-new Solarfilm and Solartrimfor your model-finishing job - that way every-thing should bond together firmly from theoutset.
‘Terminal’ conditionAvoid possible dangerous ‘short-out’ acci-dents with your two- and twelve-volt gel cellbatteries by sheathing their positive andnegative terminals with a piece of siliconefuel tube when not in use. By just slippingthe fuel tube over both terminals, they aresimply but effectively insulated whilst in theflight box or in storage. The two-volt gel cell
glow-plug battery particularly benefits fromthis short-out protection, as it’s notunknown for a metallic object in one’s flightbox to fall onto the battery terminals whenthe box is being carried to and from the fly-ing site. The twelve-volt battery is, naturally,always connected up in the flight box if onehas a ‘power panel’ arrangement, but acci-dents can still happen if it has beenremoved or if you have a spare twelve-voltbattery lying about in the workshop.
Boxing matchTalking of flight boxes, can you believe thatmine is thirty years old in 2009? Yes, it’strue - I built my one and only flight box froma ‘Pilot’ kit way back in 1979, when I was ayoung and foolish teenager of nineteen!Now, three decades later, I’m still foolishand the box is encrusted with grime, has adodgy bottom that keeps giving way, andlooks decidedly shabby and old - a bit likeits owner, really!
I prefer my flight boxes like my swimwear- as small as possible, while still accommo-dating all my important bits ‘n’ piecesinside! In this respect the Pilot flight box ismy kind of design, because it’s not overlylarge while still being able to hold all theitems I need for my ‘field trips’. Its‘enclosed-box’ design features a bolt-lockedcarrying-handle that doubles as a modelengine-starting stand with the top-hinged lidclosed. I rarely use that ‘model-starting
support’ feature, preferring to leave thebox’s hinged lid open. I can then easily rum-mage through the various internal compart-ments on the rare occasions that I need tofiddle with the model during a flying ses-sion.
In the past my box contained a twelve-volt gel cell battery and power panel, butthat stuff has long since gone as it was tooheavy and unnecessary. Now I just carry atwo-volt gel cell, glow-plug connector leadand ‘chicken-stick’ for engine starting, plusa minimalistic inventory of other knick-knacks.
I subscribe to the ‘non-electricstarter/non-power panel’ school of R/Cglow-engine model operation. In otherwords, I prefer to use old-fashioned ‘touchy-feely’ engine-starting techniques, whichhave faithfully served to flick-start all enginesizes in my R/C aeromodelling career sofar. I most certainly don’t believe in givingmyself a hernia lugging around a half-tonnuclear-powered ‘Start-up Station’ equippedwith an industrial-grade electric starter andflashing power panel displays, worthy of theStarship Enterprise bridge, just to fire upsports models. In my opinion, that burlyflight box approach is only necessary if youoperate quarter-scale gas turbine-poweredB-52s! But, it seems to indicate a lack ofstarting technique, wrapped up in overkill,when used with ‘ordinary’ glow engine-pow-ered R/C sports models of up to 100”span, in my view.
As with the traditional/ARTF aeromodel-ling scene, I think that flight boxes can fallinto the ‘charming’ and ‘garish’ categories.For me, a beautifully-constructed woodenflight box, not too big, nicely finished in var-nish or fuel-proof paint, and with tastefully-applied decals, is a joy to behold. If saidtype of flight box then contains all theimportant items neatly, whilst still remain-ing light enough to easily carry around, it’sworthy of being called a ‘model’ flight box -in every sense of the word.
On the other hand, the various largeplastic/metal ‘tool-boxes’ and similar mas-sive receptacles (sometimes fitted withwheels to allow their enormous bulk to bedragged more easily across the bumpyground), whilst undoubtedly capable ofgreat carrying-capacity, are quite unsexy inmy eyes. I acknowledge that large-scale, jetand multi-engine R/C models require suchbulky paraphernalia-carrying ‘coffins’, buthow many of those exotic aircraft do youcome across at the average rough-pasture
70 Aviation Modeller International - March ‘09
Shield and sheath your gel cell batteries’ terminals with silicone fuel tube.
BELOW LEFT: Gerard’s thirty-year-old flight box may look rough (like himself!) but it still proves to be ultra-reliable. BELOW RIGHT: Gerard really approvesof the hand-cranked fuel pump he has fitted to his downmarket flight box. If you want hassle-free fuel tank filling and emptying, get one of these items now!
FEENEY FILE 9/1/09 10:40 Page 4

flying site? In my experience, the starting and field
equipment needed for my R/C modelscould fit into a container half the size of mylong-serving Pilot flight box. Are you com-pletely sure that all the gear you drag toand from the flying field every weekend isabsolutely necessary? (In case you’re won-dering, my current model is a SIG ‘Four-Star 60’ of 71” span and powered by anO.S. 61FX.)
When my trusty old flight box finally dies(that won’t be for a long time yet, as I keepmending its rotting floor!) I won’t buy any ofthe wooden or plastic/metal flight boxes onthe market for two reasons: First, thewooden designs are too big, bulky andheavy, and the main central storage areascan’t be covered by a lid if it rains. Second,I don’t fancy the plastic/metal flight boxesfor some deep-seated personal reason. LikeARTF models, I feel that these containershave no character or personal input, but ofcourse that doesn’t stop them from beingcapable of holding far too many non-essen-tial items to strain your back on the way tothe patch...
My next flight box, if and when it’s need-ed, will instead be an own-design timberitem, made from high-quality ply and lovinglysanded and clear-varnished. Its designparameters will be thus: It must hold a half-gallon of fuel, a hand-cranked fuel pump, atwo-volt glow battery, glow-plug connectorlead and chicken-stick, some glow-plugs, aplug spanner, a few props, various pliersand small spanners, plus a roll of kitchentowel. When that design concept can beenclosed neatly within a hinged-lid carrying-handle-equipped box, in as small a space aspossible, I will be happy!
A final thought: Padraic Cryan uses alarge plastic bag to carry his R/C modelaircraft starting accessories about and itworks fine. However, I think that his choiceof ‘flight box’ is almost as repugnant as theplastic/metal monstrosities - not leastbecause I don’t believe in free advertisingfor a large supermarket chain every time Ivisit the flying site!
‘Cranky’ modeller!I can highly recommend one item in mygeriatric low-tech flight box - namely, thehand-cranked fuel pump. What a wonderfuldevice this is! It’s light, reliable, efficientand non-reliant on electric current to getthe fuel flowing. When screwed to the box
exterior and connected with silicone fueltube to the fuel-carrying container, I crankthe handle clockwise to fill the tank andanti-clockwise to empty it. I’ve used minefor years without a hitch, and it’s one ofthe few R/C aeromodelling accessoriesthat I would confidently endorse as being adarned good buy!
Read-only memorySome time ago, a friend lent me his copyof Ray Malmström’s classic old book called‘Aeromodelling’. Thumbing through it, I wasaffected by both a sense of nostalgia andsadness. The nostalgia came from re-read-ing traditional F/F and C/L model aircraftbuilding and flying techniques. The sadnessemerged from thinking of how few oftoday’s so-called ARTF ‘aeromodellers’ knowabout this kind of thing - the core principlesof the aeromodelling hobby.
I wonder how many people who spendtheir cash these days on brightly-colouredshiny boxes with pre-made, pre-covered,aeroplane-shaped bits inside would be capa-ble of building from the full-size modeldesign plans contained in this book? Veryfew, I fear, if some of the ‘modern aero-modellers’ I’ve met are anything to go by!Perhaps in a future rant I will mention the
guy who joined his ARTF R/C trainer’swings in anhedral form, and the other chapwho wanted his father to supply him withan ARTF trainer literally ‘ready to fly’ with-out any input whatsoever from him, asassembling the pre-made/pre-finished bitswas too much trouble!
Here’s an opportunity to combine tradi-tional and modern R/C aeromodelling prac-tices: Why not Google Ray’s Malmström’sbook and buy it on-line or get it in a sec-ond-hand bookshop or library? Then have agood read. That way, you’ll see how ‘flyingmodels’ are built and what the underlyingconstructional and aeronautical principlesare that allow your ARTF ‘clone’ to take tothe skies in the 21st Century. Can you han-dle that challenge?
Instant messageBefore I go, I must quote Malcolm Fisher’sshort and to-the-point comment regardingARTF models...
“ARTFs have their place, but to me theyare not ‘proper’ modelling, just an assemblyof ready-made components to which areadded an engine and radio.”
Whatdya you think? Feel free to get intouch at:- [email protected] with anycomments you may have. ■
March ‘09 - Aviation Modeller International 71
Padraic Cryan’s ‘plastic bag flight box’ philosophy has worked flawlessly for him thus far.
ABOVE LEFT: A classic aeromodelling manual from Ray Malmström - but how many of today’s ‘aeromodellers’ would understand the concepts explainedtherein? ABOVE RIGHT: Hey you - modern ARTF ‘aeromodeller’! Would you be able to create a flying model aircraft from these drawings?
FEENEY FILE 9/1/09 10:40 Page 5

That perfect dayFor me, that perfect day is in late spring or sum-mer, at the end of the afternoon, when there isnot a cloud in the sky and the breeze gently fadesaway. This is the time to enjoy gentle flying ofcharismatic vintage-type model aeroplanes bygentlemen pilots; savouring the nostalgia of thepioneering days of aviation, when it was an art,albeit supported by engineering and science.
It was such a day more than a few monthsago that some of the more experienced gentle-men in our club got their old and revered modelsinto the air for a gentle potter about in the mel-low warm sunlight. One in particular caught myeye - well, more accurately, my ears. Was it aTaylorcraft or a Cub? But what of the sound?Yes, it is the engine that seems to fire every sev-enteen yards of flight (whether it needs to or not)that is so evocative of the old light aircraft that -erm, well, my Dad told me about!
I remarked on the sound to one of the otherclubmates, like me, standing and watching inappreciation of the sight and sounds of real,hand-built, models. “Yes, that is Chris Turner’smodel - he makes his own engines, you know!”
I wondered whether I, as most recent new-comer to the club, was having my leg pulled.However, when Chris had brought his model backgently to kiss the earth in a perfect scale landing,I approached to ask about the engine. Yes, Chrisdoes indeed make his own engines. Not onlythat, he designs his own engines to boot! Onclose inspection, he makes them in entirety.Chris stops short of mining the iron ore, smeltingit, rolling and transporting it. He also buys hisglow-plugs and fuel (what a cheat!) but prettymuch everything else comes from Mr. Turner’sfevered brow and dark satanic shed! This guy isthe real thing.
The engine I was looking at, with great inter-
72 Aviation Modeller International - March ‘09
MR. TURNER’STURNINGS(and millings and filings and drawings)Introducing the work of Chris Turner - artist, scientist,engineer and teacher - who designs and manufactures hisown engines with a small lathe and mill in his garden shed
AEROMODEL ENGINEERING - By Nick Reffold
ABOVE: Chris Turner’s isometric concept sketch... BELOW: ... turned into the ‘five-cylinder radial’. Itpulls his Hawker Tomtit around the skies with authority.
TURNER ENGINES 12/1/09 10:14 Page 2

est, looked for all the world like a five-cylinderradial. In fact, there is a single combustion cham-ber. One dummy cylinder houses the carburettor.Two others muffle the exhaust, the first of whichprovides fuel tank pressure. The fifth cylinder isto enable crankcase pressure relief. Take a look,feast your eyes, at the photos to appreciate theingenuity of Chris Turner’s engine design.
Mention of these events to the Editor onemorning, by exchange of emails, sparked theidea of a piece in the magazine. So, when the oldtimers on the patch start banging on about‘Cheque Book Modelling’, the delights of dealingwith dope, bravely bashing balsa, frenetic free-flight and all other alliterations, you can takethem to task. You can point to their shop-boughtshiny bling-ridden engines and remind them thatMr. Turner makes exceedingly good engines!
InvitationChris was kind enough to invite me to his hometo look over his plans, drawings, models, enginesand workshop. Chatting away excitedly for whatseemed like minutes but was hours, I learnedhow Chris gestates his embryo engine designs.How he nurtures them in sketches and drawingsand mills, drills, files and turns the metal intoeffective and efficient propulsion units for hismodels. It begs the question, of course, do youdesign the aeroplane for the engine or viceversa? It turns out - a bit of both!
The first engine that Chris built was closelybased on a plan set developed by Derek Giles forthe Nexus Plans Service and available fromMyHobbyStore.com. They are still advertised ont’internet - indeed I bought plans of the original.60 engine and the later 60/60 twin that wasdeveloped by Richard Green.
The skills that Mr. Turner developed from build-ing a couple of ‘donks’ from plans enabled him todesign and build more engines. In particular,Chris has told me, he has learned to designdetails of the engines to make them easier tomanufacture. For example, early in his ‘knit yourown engine’ activities, he made valve guides anddrilled into them two little blind holes to allow himto engage the guide with a special tool. Manyengineers would recognize this as similar to a
‘spanner head’ screw. Chris realized that hecould avoid this step if he screwed the cylinderhead onto the guide whilst it was still held in thelathe chuck. Once screwed home, he was able topart off the guide with a small hacksaw. This is,in my opinion, the elegantly simple thinking thatgave Great Britain early and massive leads in thedevelopment of engineering for mass production.
As Chris accumulated more knowledge ofmaterials and manufacture, his projects havebecome more ambitious. Usually, once Chris hascompleted his conceptual sketching, he thendraws, to large scale, details of components tofigure out how to make them.
Chris taught secondary school pupils for manyyears in craft, design and technology. He told medelightful tales of making simple machines withhousehold items - like Blue Peter on steroids!What was even more delightful was that he toldme with much happiness of the joy that the chil-dren got from such simple investigations of theworld of science and engineering. I remember aninspirational teacher when I was a boy - a man
who had been a navigation officer in the RoyalNavy. He gave me a fascinating insight into prac-tical uses of mathematics with examples ofspherical trigonometry with which to navigatearound the globe. And the rest, as they say, ishistory!
Concept designChris still teaches art on a part-time basis. He isan accomplished ‘free form’ artistic draughtsmanand painter. He is also an adept and disciplinedexponent of the rigorous methods of engineeringdrawing.
Having taught engineering drawing myself, Icould readily appreciate the skills and disciplineChris has required to sketch isometric represen-tations of his engine concepts. It is probably adying art now, as so many young engineers aretaught Computer Aided Drafting (CAD) from theoutset of their studies. I confess that I held onuntil the last in my insistence on studying sketch-ing skills for young undergraduates. I never gotany complaints from older colleagues but the stu-
March ‘09 - Aviation Modeller International 73�
FAR LEFT: The first engineChris built was the single-cylin-der, seen here mounted in hisveteran TaylorCraft Cub. LEFT:Cylinder heads for the 60/60twin. Note on the right-hand sidehead, you see two valve guides.One has been drilled to accept atool to drive it home. The otherwas screwed in whilst being heldin the lathe and then parted offwith a small saw. Brilliant!BELOW: Chris apologized forthe state of this drawing. Iwould have none of it.Necessary and proficient.
BELOW LEFT: This 90 twin, also based on the Matador design, runs beautifully. Chris even winds his own valve springs from piano (music) wire from thelocal model shop. BELOW CENTRE: Here, Chris has drawn the cylinder head (at 20:1 scale) to work out how he is to make the component. Lying on thedrawing is his carburettor, milled and turned from aluminium bar stock. BELOW RIGHT: Here, Mr. Turner shows his detailed drawing for the conrods inthe 90 twin. Simple but effective!
TURNER ENGINES 12/1/09 10:14 Page 3
dents did not always appreciate the importanceof such skills. There is an old adage ‘If it looksright...’ and that sentiment ain’t going to go awayany time soon - however many computer proces-sors Intel can bang out!
Also, I could never see the point of CAD model-ling and plotting and printing simple drawings ifyou could do it with the craftsmen in the work-shops with a pen and an envelope and a cuppa! Itavoids that awful moment when an eager design-er is told by the patient but weary foreman - “Youcan’t make it and even if you could, it wouldn’twork!” Don’t ask how I know about that!
Please take some time to examine the photo-graphs of Chris’ sketches and drawings on thesepages. Typical of the man is that he apologisesfor presenting ‘tatty’ pieces of paper with hisbeautiful work. I know that the knowledgeablereader cannot fail to admire his isometric sketch-es (see the headline picture).
Many of Mr. Turner’s drawings are well usedand he apologises for their appearance. Noapologies needed! The drawings are evidence oftheir proper use by this accomplished artisan.They remind us of the days when engineersdesigned at the board, making working drawings,trying out ideas, rejecting the impractical or overelaborate, seeking to refine and re-tracing (asChris did here with the valve gear) until he isclear in his own mind what is the plan. Note thecarefully applied tea splodges, adding colour andauthenticity to the plan!
The thought that kept buzzing in my mind aftervisiting Chris was ‘what a waste’! There are somany talented people in retirement who have somuch skill, experience and knowledge that is sosorely needed. Just imagine what benefit couldbe gained by manufacturers and distributors ofmodelling goods were they to consult people likeChris to examine their new products.
Detail designDetail design is much more complex than justsketching something similar to a commerciallyproduced engine. The method of making theparts and assembling them into a working enginewill be very much different. Chris does not havecomputer aided this and that to help him, soevery turning, milling, sawing or filing operation isrehearsed on paper before he repairs to theworkshop to start work.
One of his Work In Progress projects is a five-cylinder radial engine for which he needed a 2:1ratio gearbox. Lacking tooling for bevelled helicalgears, he opted for an epicyclic gearbox. Designfor this included a simple cardboard model; next,Chris made, by hand, a simple spurgeared transmission, thoroughly toestablish the possibility of hand-craft-ing a gear train - brilliant!
Spring in your stepPerhaps it is just me, but the storythat made me chuckle most heartilywas when I asked him where hesourced his valve springs from. I wasastonished to learn that he ‘rolls hisown’ from common or garden varietypiano wire from the LMS around adowel.
How, I asked Chris, does he makethe crankshafts? Surely you need
some kind of drop forged steel billet to machineto the tolerances required. He told me that hehad decided that a large cap head bolt (or screw)would be made of a suitable alloy and proceededto the nearest engineering fastening emporiumto buy one large hexagon cap head bolt! As anaside, whilst there seems to be no universallyagreed terminology for such fasteners, somewould call it a hex cap screw! There is no doubt,however, that Chris’ idea was one of admirable‘common sense’.
Eating the puddingWhatever one thinks of the delightfully individualis-tic approach that Chris has applied to providingpower for his models, the proof of the pudding isin the eating. Or, perhaps, the proof of theengine is in the flying! It is probable that muchdebate might ensue at the regular club nightswhen discussing ‘What do you look for in a modelaeroplane engine’?
Top of my wish list would be reliability - I reallyloathe ‘dead stick’ landings, especially if I have notflown much in recent times. Are Mr. Turner’sengines reliable? You betcha! They start readilyand keep ticking in the air.
On one occasion, Chris thought that his enginewas a little down on power and sounded a bitodd! When he dismantled the engine he foundthat the little end plain bearing was somewhatdistorted - in fact it looked like a ‘U’-shaped chan-nel where it had failed through bearing stress.Now, had one bought a shiny expensive propri-etary engine from the LMS, one would be roundthere like a bat out of hell seeking recompenseand apologies. Chris just toddles down to the fac-tory - er, shed - and bashes out a new part fromsomething a bit stronger. It is remarkable that anengine can run at all with a little end of the con-rod sheared through like that but it certainly illus-trates that the rod is almost always in compres-sion throughout the four-stroke cycle.
Back to the futureSo, what of future plans for the ‘Emmet Brown’of Kintbury, West Berkshire? Well, Chris is cur-rently finalising the detailed design of his new 90twin which is of modular design, enabling rapidremoval of the gearbox from the rear of thecrankcase. The distant future may see a fullyfunctional five-cylinder radial. Chris has also dis-cussed, with the ‘high priced help’ of this augustorgan, producing plans for one or more of hisdesigns so that readers might have a crack atknitting their own engines.
So, readers, it is over to you. If sufficient inter-est becomes evident, we might just be able tomake plans available with some notes to amplifyand explain the cutting edge (pun, sorry!) technol-ogy and techniques required to produce some-thing that you can proudly speak of as your ownhome-built model engine. ■
74 Aviation Modeller International - March ‘09
The latest project is this 90 twin. Itis designed to be ‘modular’. The
gearbox is entirely Chris’ own design.Note manifolds and headers from
DIY store plumbing tube. Cast ironcylinders (and piston rings). Apart
from fixings, everything was made byChris in his shed. Respect!
LEFT: Thegreat man atthe lathe in histiny shed.BELOW LEFT:Chris used ahigh tensilesteel Allen headbolt as a suit-able materialfor a crank-shaft. Modern‘managementspeak’ aficiona-dos would callit ‘thinking out-side the box’. Icall it brilliant!BELOWRIGHT: Imagineour surprise tofind this man-gled connectingrod when Chrisstripped downone of hisengines thathad been run-ning okay butsounded ‘a bitdodgy’.
TURNER ENGINES 12/1/09 10:15 Page 4

Gluing facings, especially thinones like 1/64” ply strips,onto the cut edge along theaileron hinge line on a foamwing can present a bit of a
problem. They can’t easily be pinned inplace to make good contact while the gluesets, and if held with masking tape, theytend to take up a convex shape acrosstheir depth. The convexity results from thepressure of the tape pulling the edgesdown, causing the middle to bulge out-wards (Figure 1).
It is also the pressure of the tape thatcauses them to undulate along their length(Figure 2), by holding the facing tightlyagainst the wing where the tape is appliedand allowing it to relax in between. Whilstthis effect can be reduced somewhat byusing more pieces of tape set closertogether, it is never completely eliminateduntil each piece is almost in contact withits neighbour.
To eliminate both these problemsrequires only a simple solution. On top ofthe facing, and under the tape, place alength of balsa or other wood, at least1/2” thick, and as wide as, or just slightlywider than, the facing itself. When thetape is pulled tight, this piece of woodholds the masking tape clear of the edgesof the facing, so relieving them of any ten-sion that might cause curvature. At thesame time, it applies roughly equal pres-sure to the whole gluing area, not onlyeliminating the undulations, but also mak-ing for a stronger joint altogether (Figure3). The wood needs to be quite sturdy soas not to become bowed itself between thelengths of tape.
Inset ailerons are a little trickier, becauseit is rare to find a piece of suitable wood ofexactly the right length to fit the aileronspace, and perhaps not worth cutting a bitoff a longer length to get it right. Severalpieces can be used to fill the gap, and ifthere are small spaces between them itwon’t affect the result, so odds and endsthat will suffice can usually be found. Ofcourse, each piece must be taped close toboth ends, so it may require the use of alittle more masking tape, but that’s a smallprice to pay. ■
TECHNIQUE - By Steve Griffiths
March ‘09 - Aviation Modeller International 75
GETTING AILERONFACINGS FLAT
A simple, tried and tested cure for a common problem with foam wings
AILERON FACINGS 9/1/09 11:07 Page 3

In the previous article, I attempted to out-line a few of the advantages and opportu-nities which arise for model-making, ifmetalworking techniques are developed,also to present an overview of some of
the basics. Let us now consider types ofmachine tool. For the processes of turning,drilling and milling, it is convenient to separate
those operations where the job is rotated (typi-cally, turning) from those where the tool spins(drilling and milling). A well-equipped modelengineer’s workshop may well have one ormore lathes, a mill, a drill press, and someform of grinding facility. As noted previously,the choice of machinery will be influenced by anumber of factors - notably, what it is that you
intend to make or work on.Those, who also pursue an interest in motor-
cycle or car restoration or competition willneed larger capacity than is required for small-scale work. As the scale gets smaller, so doesthe need for such a variety of machines. Asmall lathe may be adapted for light milling anddrilling, and so, once you are equipped withone of these, much becomes possible. As anexample, the 10 c.c. glow engine depicted inthe earlier article, was made entirely on anageing 3.1/2in lathe, and while in these daysof low cost engines it is less likely that manyaeromodellers will wish to make their own,those who reside some distance from theirnearest model shop may discover a newfoundconvenience in being able to make up oddaccessories.
What’s in a latheIn its simplest form, it boils down to a rotatingspindle holding the workpiece, into which a cut-ting tool is moved to generate a specific diame-ter and length and perhaps cut a shape. If youhave a look at supplier catalogues, it will beapparent that the leading criteria used indescribing a lathe are the dimensions for (a)swing, (b) between centres, and whether it hasa gap or straight bed. The first of these - swing
76 Aviation Modeller International - March ‘09
METALWORKINGFOR AEROMODELLERSPART 2: In the second of his introduction to metalwork articles, David describes theanatomy of the lathe and demonstrates the fabrication of a simple prop adaptor
AEROMODEL ENGINEERING - By David Fenner
1: Overview giving location of principal parts of lathe. 2: The ‘gap’ may be seen below the chuck. Thismachine also has a ‘quick change’ gearbox for screw cutting, and inverter drive for variable speed. 3:Headstock with gear cover removed. Visible are the electrical controls, the spindle speed readout,chuck and change gear train. 4: The tailstock may be clamped in position along the bed by means ofthe handle to the rear. A drill chuck is in place carrying a centre drill.
10
4
32
METALWORK PART2 9/1/09 11:21 Page 2

- gives an indication of the diameter of workthat can be accommodated, though it must bepointed out that two measurement standardsoperate - radial and diametral. ‘Between cen-tres’ gives an indication of the space betweencentres fitted to the headstock and tailstock,and hence the maximum length of workpiece.A straight bed is most frequently encounterednowadays, as typified by the Mini-Lathe shownin photo 1, and in this picture, the salientparts are identified. A gap bed is one wherethe bed casting is profiled to admit larger diam-eter work close to the chuck. Myford ML 7and Super 7 (photo 2) machines have this fea-ture. A further embellishment here, to befound on some larger machines, is the ‘remov-able gap’ where a section of bed close to thechuck may be unbolted to admit large work, orrefitted to give maximum support to the saddlewhen working close to the chuck.
The headstock (photo 3) comprises a maincasting, accurately aligned with the bed, carry-ing the hollow spindle, to which is bolted thechuck. (The chuck here is a three-jaw, self-cen-tring, used for round and hex bar. The othermain chuck types are the four-jaw, independ-ent, used for rectangular and odd shaped
work, and the collet chuck used where extremeaccuracy and tubular parts are involved. It isalso possible to mount work on a face plateusing suitable clamps.) The spindle on thismachine is bored through 20mm diameter,and has a No. 3 Morse taper. The drive in thiscase is by a variable speed motor via a two-speed gearbox, allowing the selection of anyspindle speed from about 50 to 3000 r.p.m.,maintaining good torque at low speeds. Withthe falling cost of electronics, more of thehobby-size machines are now equipped with avariable speed system. Many older secondhandlathes, such as the Myford, have a fixed speedmotor driving through a system of belts andpulleys to give a selection of speeds. However,it may be noted that the Myford in photo 2has been fitted with an inverter drive to givevariable speed.
The tailstock (photo 4) has a main castingwhich slides along the bed, with which it isaligned and may be clamped in position usingthe handle visible to the rear. The second maincomponent is the barrel which is bored, in thiscase with a No. 2 Morse taper, and is movedaxially by a screw driven by the hand wheel.Work may be drilled using a drill gripped in thetailstock chuck, and long work may be steadiedusing a tailstock centre.
The toolpost (photo 5) is where a turningtool will be mounted, and the movement of thetool will then be effected by moving the saddle -along the bed, giving constant diameter, bymoving the cross slide across the bed for fac-ing cuts, and the topslide (photo 6) which canbe set at an angle to cut short tapers. Severaldesigns of toolpost are regularly seen; one thathelps to speed up tool changing is a ‘Quickchange’ toolpost, such as that shown in photo7.
Associated with the headstock and drive, isthe train of change wheels (photo 8). Theseconvey the drive from the spindle to the lead-screw, which, in turn, when the feed isengaged, will drive the saddle along the bed.Changing the gear ratio permits fine feed orscrewcutting work to be handled. On somemachines, such as the Myford in photo 2, aquick change gearbox may be either added orfitted as standard. This avoids the inconven-ience of removing and refitting gears so thatthe gearing for any required screw thread with-in the machine’s capability may be set simply bymoving levers.
March ‘09 - Aviation Modeller International 77�
TOP LEFT: This toolpost is a rocker type which takes two tools and allows a measure of height adjustment. ABOVE RIGHT: Topslide may be rotated, itstravel being accurately controlled by the small handle and graduated collar. This photo also shows the home-made extra long cross slide. ABOVE LEFT:This toolpost is a home-brewed quick change type, having two tool positions. Several tool holders are needed to make it an effective proposition.
ABOVE: Drive is taken by a train of gears fromthe spindle (top) down to the lead screw (lowerright). The tumbler arrangement provides a feedreversal facility, useful for left hand threads.BELOW: This easily made gauge speeds up toolheight setting.
8
7
65
9
METALWORK PART2 9/1/09 11:22 Page 3

Cutting metalIn many metal cutting situations, the cuttingaction may be compared to that of a carpen-ter’s plane. A sharp blade is guided so that itpeels off a thin slice of material. In the case ofthe plane, the slice thickness is controlled bythe blade setting, whilst on a machine tool it isdetermined by the feed rate. In the case of thelathe, we mount a cutting tool at centre height.This ensures that cutting can continue rightdown to the middle of the work. If the tool istoo high, then it will rub and stop cutting atsmall diameters, and if set too high, then it willsimply pass beneath the centre of the work.
To achieve this setting, it is helpful to makeup a setting gauge as shown in photo 9. Todetermine the centre height dimension with ref-erence to the saddle, first place a length of barin the chuck and measure from the top downto the saddle surface, then deduct half the bardiameter. Now that the price of six inch digitalcalipers (photo 10) has fallen to the pointwhere there is change from a ten pound note,I would suggest that one of these be pur-chased for checking dimensions.
As a first exercise we’ll make up a simpleadaptor to fit a prop drilled for an old Merco61, to a more modern SC46 (photo 11). TheMerco shaft has a diameter of 0.312in. whilethe SC is 0.250in.
Start by cutting a short length of bar of suffi-cient diameter and length. In turning work, ‘suf-ficient length’ frequently means adding on a bit
for gripping in the chuck, so here I’ve cut aninch or so of bar having a diameter of about3/4in. On more complex parts, some thoughtmay be needed, concerning the sequence ofoperations. This example is pretty straightfor-ward, but in general, if the drilling and diame-tral turning are done without disturbing thework in the chuck, then relative concentricity ofthe machined features will be good.
Start by taking a facing cut (photo 12) thenfit a centre drill in the tailstock chuck and drillin an eighth of an inch or so (photo 13).Centre drills are shaped to cut a recess for atailstock centre and, due to their short stubbyshape, when used to start a hole, they can berelied on to stay on centre and not wander off.We aim to produce a hole of 1/4in. diameter,and because drills frequently cut oversize, thedrilling is done in two stages, first with a15/64in. then with the 1/4in. (photo 14).Shaving out just the last few thous as a secondoperation gives a hole very close to size, andoften avoids the need for reaming. Next setthe saddle stop so that the tool will cut thelength required and take a series of cuts, grad-ually reducing the diameter, (photo 15). (Thespeed and depth of cut will depend on your cut-ting tool and the workpiece material.)
Once the diameter is down to the target0.312, we need to think about parting off. Thisis an operation that causes difficulty for someamateurs using lightweight lathes. This isbecause, under load, a tool mounted in thenormal front toolpost may deflect downwards
and into the job, causing a dig in. The usualtooling solutions are 1) use a rear toolpost andinverted tool, which deflects up and out, or 2)if the chuck is not a ‘screw on’ type, use afront-mounted inverted tool and run themachine in reverse. If neither of these is avail-able, all is not lost. Fit a Vee tool and cut aguide groove leaving a little extra meat on thepart (photo 16). You can then use an ordinaryhacksaw to start cutting partway. If the part isthen rotated and a fresh cut started, the veewill ensure that you don’t stray far off the line.Photo 17 shows this underway and also illus-trates a simple wooden bed guard to avoiddamaging the machine when the saw finallycuts through. The sawn off part is thenreversed in the chuck (photo 18) and facingcuts taken to reduce the flange thickness tothe desired amount. Finally, the Vee tool isused to cut a chamfer (photo 19), removingthe sharp edge and improving the appearance.Photo 20 shows the adaptor in place on theSC 46.
I hope that this has whetted a few appetitesto look at adding a small lathe to the workshoparmoury. If the editor agrees, then I hope tooffer a future note on making spinner nuts andstreamlined aluminium spinners.
Further readingFor those who wish to delve further into theintricacies of amateur metalwork, there are anumber of magazines and books which may beof interest.
78 Aviation Modeller International - March ‘09
10: A digital caliper (above) is cheap and accurate enough for most work.A micrometer (below) gives more accurate readings but is limited inrange. 11: Older Merco 61 (upper right) has thicker shaft than the newSC46.
10
11
12: If the tool is at the right height, then a facing cut will progress to the centre with little or no pip. 13: A centre drill is used as the first step in machin-ing a hole.
1312
METALWORK PART2 9/1/09 11:22 Page 4

From America, ‘Home Shop Machinist’,‘Machinist’s Workshop’ and more recently‘Digital Machinist’ are magazines all aimed atthe home enthusiast, the last being directedtowards CNC applications. In this country,‘Model Engineers’ Workshop’ specialises in thisarea.
A number of books have appeared over thelast fifty years or so, giving advice on lathe-work. Those I can personally recommendinclude:
1 ‘Lathework - A Complete Course’ by Harold Hall 2 ‘A Man and his Lathe’ by L.H. Sparey3 ‘Myford ML7 Lathe Manual’ by Ian Bradley4 ‘The Amateur’s Lathe’ by L.H.Sparey5 ‘The Compact Lathe’ by Stan Bray6 ‘The Taig Lathe’ by Tony Jeffree7 ‘Unimat 111 Lathe Accessories’ by Bob Loader
8 ‘The Model Engineer’s Handbook’ by Tubal Cain (more a ‘data encyclopaedia’ than ‘how to’ book)9 ‘Lathe Accessories how to make and use them’ by E.T. Westbury
Of those books mentioned above, while someare aimed at users of particular machines, oth-ers are more general in their approach. Thosewhich are machine specific will neverthelesscontain many ideas which may be adapted forother equipment.
For users of the Mini-Lathe, it is anticipatedthat a book carrying just that title and by thisauthor will become available later in the year,within the Workshop Practice series published
by Special Interest Model Books.Books aimed at minority markets are not
often to be found on high street bookshopshelves, although they may, of course, beordered. Some will be stocked by specialist out-lets such as Camden Miniature SteamServices and TEE publishing, also by several ofthe machinery and tooling suppliers such asChronos, and Arc Euro Trade. ■
March ‘09 - Aviation Modeller International 79
14: After drilling 15/64in. the final step is to run in the 1/4in. drill. 15: A series of cuts is taken to reduce the diameter. 16: The Vee tool is employedto cut a groove. 17: ‘Parting off’ with a hacksaw. 18: Sawn surface is still visible, prior to a facing cut.
181716
1514
19: A chamfer has been cut with the Vee tool.This may also be done with a file, but with lessprecision. 20: The completed adaptor fitted tothe SC46.
20
19
METALWORK PART2 9/1/09 11:22 Page 5

Join the panelsIf the root faces are flat and fit together with no major gaps, PVA is thebest adhesive to use for joining wings cut from white foam. If the cores areof pink or blue foam, epoxy resin will be better as these foams are not soabsorbent. PVA dries by evaporation so it can take a lot longer to form abond on pink and blue foam, and even then may not be as strong asrequired. If the root joint is not so good, it really should be re-worked until itis acceptable. However, if you are still left with some gaps, then I would sug-gest joining the panels using epoxy resin (not the quick-setting variety or youmay not have time to align them accurately before it starts to cure) mixedwith material to bulk it out a little, and filling any remaining gaps when thejoint is set. Besides the adhesive, you will need some masking tape to holdthe joint tightly closed while setting. If the joint is not good, it is even moreimportant than usual to ensure it is braced adequately.
Block up to set dihedralMost wings will have some dihedral, and to get this accurate it is wise tosupport the wings on blocks to keep the tips at the correct height while theglue is drying. Typically, the dihedral is not expressed as the true value atthe chord line, but as the vertical distance from the bench to the undersideof the tip of each panel when its root is in contact with the bench (Fig.14.107, A, d1). Sometimes, it is expressed as the height d2 under onetip when the other panel is laid flat on the bench. Note that for the samewing, d2 is slightly less than twice d1, but for dihedral angles up to about10 degrees and wings of moderate size it is so close that it can be consid-ered to be equal to twice d1. If you need to develop one from the other andare concerned to have it exact, a little trigonometry will produce the correctvalue, and trigonometry (or a scale drawing) will also be needed if the dihe-dral is specified as an angle, as very occasionally happens. The blocks don’t
need to be at the tips, so if you can’t find anything exactly the right size,smaller ones can be slid under the panels to positions that raise the tips tothe correct height with the roots on the bench (Fig. 14.107, B). Whenthe skins are balsa, some softer packing between the blocks and the wingswill help to protect them from damage from the edges of the blocks.
To block up the wing correctly, the chord line should be horizontal, and itwill help to achieve this by packing near the leading and trailing edges at theroot (Fig. 14.107, C). Of course, if the wing has washout the angle of thechord line will vary along the span, but generally the variation is smallenough to have no significant effect. Occasionally, the wing will be designedto have its upper surface horizontal, and in this case the panels can be
joined inverted on the bench with no blocks needed, other than those to setthe chord line level.
Before proceeding, it is important to check that with the panels blockedup to the required dihedral the root faces are in close contact. Fix the pan-els together with a strip of masking tape across the joint underneath at thedeepest point on the chord and sit them on the blocks. If the centre is heldoff the bench (Fig. 14.107, D), or there is a gap along the top of the joint(Fig. 14.107, E), the root faces must be reworked to get the properangle. When correct, the joint should be closed along its full length. Onmost models a small variation in dihedral is unlikely to have any major effecton the model’s performance, so if a small movement of the blocks correctsany gap in the centre joint this may be an acceptable alternative to rework-ing the root faces, and the following points may help you to make the rightdecision. In general, on a rudder-elevator model, a reduction in dihedral willreduce lateral stability and turning response, whereas an increase will havethe opposite effects. However, too much dihedral will cause Dutch rolling,where the model rocks constantly from side to side, and is therefore to beavoided. On an aileron model, an increase in dihedral will also improve later-al stability when upright, but may reduce roll response and make invertedflight less stable.
Check for wing twistWhen satisfied that the dihedral is correct, the wings must be checked toensure that each panel is at the correct angle across its span, whether ornot washout is incorporated. If, in flight, the wings are at different angles ofattack, one will generate more lift than the other, producing a tendency forthe model to roll; the faster it flies, the greater the rolling force will be - obvi-ously this is undesirable. A difference between the angles of attack at thetips will have a more adverse effect than at the root, due to forces acting at
a greater distance from the centre line generating more leverage thanthose acting closer in. Theoretically, the wing panels should be precise mir-ror-images of each other, but small variations can creep in during construc-tion, as none of us is perfect. It is also possible that they may have warped,and maybe differently, if they have been stored in less than ideal conditions.Correcting warps and other dissimilarities in foam wings can be a difficultprocess, but if the differences are not too great, it is usually possible tomake compensatory adjustments as the panels are joined. If severe warpshave developed, it may not be possible to proceed until extensive remedialaction has been taken, possibly extending to re-making the offendingpanel(s).
CONSTRUCTION TECHNIQUES - By Steve Griffiths
80 Aviation Modeller International - March ‘09
MODEL BUILDERS’
PRIMER Part 37 - Methods for joining veneered foam wings
MODEL BUILDERS PRIMER PART 37 9/1/09 10:28 Page 2

Wrap short lengths of masking tape round the leading and trailing edgesat the centre joint (Fig. 14.108, A), so that these edges register exactlytogether, and replace the panels on the dihedral blocks. The mating facesshould match reasonably precisely across the full chord; any small discrep-ancies here may be ignored. From behind the wing, sight with one eyealong the chord line at the centre joint: the view should be roughly as illus-trated (Fig. 14.108, B), where the upper surface is shown lighter thanthe lower. If there is washout, there may appear to be more of the lowersurface at the tips than at the centre, but both wings should appear identi-cal. Now move the sight-line upwards until one lower surface vanishes fromview. The other should vanish at exactly the same time (Fig. 14.108, C),and if this is so, there is no major discrepancy between the panels: if asmall amount of one underside remains visible, compensatory action proba-bly can be taken when joining the panels. If, on the other hand, a significantamount of one undersurface is visible when the other has disappeared (Fig.14.108, D), then one or both panels may be badly out of true, and eachmust be checked before a decision is taken as to whether to scrap andremanufacture either.
Assuming the visual check allows construction to continue, prepare twostraight strips of any lightish material that will not bend under its ownweight (e.g. 1/2” square hard balsa), later to be attached to each uppersurface as near the tip as possible; they will need to be blocked up to spanthe surface curvature (Fig. 14.109, A). The strips should be as long as ispracticable with a minimum length of a foot or so, and you may find it help-ful to make one rather longer than the other. Their purpose is to act assighting strips when the panels are brought together for joining, to ensurethat the chord lines at both tips are at the same angle. It is therefore mostimportant that each is at the same angle to the chord line, so the blocksused must be absolutely identical in size and position on each panel, ontowhich they may be fixed with pins or tape in such a way that they remainfirmly in place. The actual angle they make with the chord line is immaterial,as it is the only relative angle of the tips that is to be judged. Separate thepanels and test-fit the strips. To check that they are aligned correctly, placethe panels tip to tip so that the chord-lines lie together, and the two stripsshould be exactly parallel when viewed from a panel root (Fig. 14.109, B).Adjust if necessary, then remove them, marking them to ensure they will goback on the right panels.
Glue and tape the jointIf using PVA, start by spreading adhesive on both root faces and rubbingthem together. With epoxy, it is a good idea first to pierce shallow holes1/4” or so apart all over the mating surfaces with a sharp pointed instru-ment: when these are filled with epoxy they help just a little to strengthenthe joint. Having made the holes, spread the epoxy and at the same timeforce it into them before rubbing the joint. Whichever adhesive you usemust allow at least 10 minutes working time before it grabs, as there maybe some adjustments to make at the joint before the panels are left to set.
Remove any surplus adhesive that has been squeezed out, and lay thepanels inverted on the bench (suitably protected with paper or polythene),touching at the root. In most cases they will make contact only at the thick-est point on the upper edge, due to the curvature there. Stretch a length ofmasking tape spanwise across the joint at the thickest point so that thepanels are pulled tightly together (Fig. 14.110, A). Raise the joint off thebench until it closes fully and stretch two more strips across so it is heldshut across the full chord (Fig. 14.110, B), turn it right side up and let itsettle back on the blocks. Now attach the sighting strips at the tips, standback and sight over the length of the wing from the end that has the short-er strip. Adjust your sight line until the strips are roughly coincident (Fig.14.111, A) and it will be obvious if they are at different angles (as shown),
implying that so are the chord lines at the tips. If this is the case, twist thepanels at the centre joint until the sighting strips are dead parallel This willgive a small step across the joint at either or both leading and trailing edges(Fig. 14.111, B) - better a small step at each than one larger one. Placeshims of balsa or ply, the thickness of the steps, at each side of the joint(Fig. 14.111, C) right on the leading and trailing edges (two shims will beunderneath) and immediately wrap masking tape round each edge (Fig.14.111, D) to hold the shims in place and fix the edges in position.Alternatively, balsa leading and trailing edges may be fixed in this positionwith cyano. This should lock in the adjustment made to the panels at thecentre joint, but may need a little further adjustment or different shims if
March ‘09 - Aviation Modeller International 81�
MODEL BUILDERS PRIMER PART 37 9/1/09 10:28 Page 3

the sighting strips are now not quite parallel. When satisfied, stretch a strip of masking tape along the leading edge
(and wrapped around it), and another similarly along the trailing edge(Fig. 14.112, A) while keeping the dihedral, and then carefully turn thewings over and stretch more strips of tape across the joint on the othersurface (Fig. 14.112, B). These will almost certainly lift off the joint asthey are stretched across the “V” formed by the wings, and will needanother strip, or maybe two, stretched chordwise around the joint andover them to keep them under tension (Fig. 14.112, C). Rub themdown as it is applied, and finish by wrapping the ends round the leadingand trailing edges and over the whole joint on the underside. Stand thewing on the bench and put the blocks and packing under the panels in theappropriate positions and check that the dihedral and tip angles remaincorrect: make sure that the centre remains in contact with the bench,weighting it if necessary. Weights should be placed as near the centre-lineas possible to avoid bending the panels and having them spring back laterwith the wrong amount of dihedral.
With the centre joint made and set, the joint braces can be preparedand slots cut to house them. Braces can be cut as plain rectangles (Fig.14.113, A), to match the section of the wing across the joint (Fig.14.113, B), or tapered (Fig. 14.113, C); each of these shapes has dif-ferent advantages and disadvantages. From the point of view of bondingthe panels together, the greater the gluing area the better, but thetapered shape has a better distribution of strength and lessens the sud-den change in strength at its ends, reducing the chance of the panelbreaking at the end of the braces. Provided that several braces of differ-ent lengths are used, this is unlikely to occur anyway, but if there is only asingle one, then I would recommend that it is made quite long with a gen-tle taper to narrow ends (Fig. 14.113, D). Try to avoid making a bracewith a sharp internal angle at the centre (Fig. 14.113, E), as this putsits weakest point right where it needs to be strongest (B is only a littlebetter), and although it may be no narrower there than the width of thesimple rectangle in A, the shape means that much of the stress on it willbe concentrated at the apex of the angle. Stresses are concentratedwherever there is a discontinuous change in material strength, so thereis an increased chance of breakage occurring there. This is why several
differently sized braces are better than one, and why gently taperingbraces with narrow ends are better than untapered ones. In all casesthey should be cut with the grain of the external layers of ply runningspanwise for maximum strength.
When the braces are inserted into one face so as not to come rightthrough the wing, it can be quite difficult to match the inner edge to theinside of the other surface of the wing. In most cases other than on aparallel-tapered unswept wing this edge would need to be curved tomatch precisely, and even more so if the wing is swept. Hence it is sim-pler to make the inner edge either straight or with a plain taper (as in C),which also makes it easier to rout out the slot to the correct depth.
Generally the worst part of fitting braces is finishing them off after fit-ting; sanding the edge of a piece of ply flush without damaging softerbalsa or veneer skins is quite difficult. This problem can be avoided bymaking the braces a little narrower than the section into which they areto fit and edging them with soft balsa (Fig. 14.113, F) that will standproud when they are in, and can then be sanded flush more easily.Alternatively, they can be made shallower than the slot into which they areto fit, sunk beneath the surface, and the gaps filled with balsa afterwardsto be sanded flush. If the braces are to pass through both skins, bothedges can be capped in this fashion.
Often there will need to be a brace or facing across the leading edge,which will frequently be cut off flat to butt against a former in the fuse-lage. Where this brace also forms the front of a fairing attached to thewing to blend it into the fuselage (Fig. 14.114, A), it is wise not to fit ituntil the fuselage is built and the wing can be seated, so it can be alignedand shaped correctly. In other cases, where there is no fairing on thewing, the brace can be fitted at this stage; wing fairings should not be fit-
ted until the centre-joint of the wing is braced and bandaged. If the apexof the wing needs to be cut off to fit the fuselage (Fig. 14.114, B), itshould be cut back sufficiently so that the ply facing can be fixed in posi-tion and shaped appropriately. Besides reinforcing the butt joint at theleading edge, this ply can support a dowel used to hold the wing in place,and then sometimes it is best to make it deeper so there is ample mate-rial around the dowel hole, if this extra can be accommodated, and buildup behind it (later) (Fig. 14.114, C) with scrap balsa before drilling thedowel hole into the wing. Leading edge dowels are also made more serv-iceable by fitting another brace further back, through which the back endof the dowel can be located, and which will help to prevent the dowelfrom ripping the inside of the wing if it should be knocked askew (Fig.14.114, D). For 3/16” and 1/4” dowel, the second brace should bebetween about 11/2” and 2” behind the leading edge: any further andthe dowel may break between the braces if subjected to sudden lateralshock, any less and the brace may be torn loose too easily. This distancemay be reduced for thinner dowel or increased for thicker. In reality, it isbetter to glue a tube into the wing and have the dowel a good fit butloose in it, so that a broken dowel can be replaced without hassle. Theinner end of the tube should be securely stopped so the dowel doesn’tvanish into the wing, and a slightly larger hole will be needed, so bear thisin mind when making braces for the leading edge. Having decided on theshapes of the various braces, cut them to size and sand off any splintersat the edges. ■
82 Aviation Modeller International - March ‘09
MODEL BUILDERS PRIMER PART 37 9/1/09 10:28 Page 4

■■ I enclose a cheque for..............................................................................
■■ Charge my credit card for the total amount of.....................................
Cardholders name.........................................................................................
Card number......................../........................./........................./...................
3 Digit Security No.......................ExpiryDate..............................................
Signature........................................................................................................
■■ Visa ■■ Switch ■■ Mastercard
Payments made by credit card must include the last three digits of the
card security number, full mailing address including house number and
the postal code.
Please return your completed coupon together with your
cheque/eurocheque/money order made payable to:
Model Activity Press Ltd
photocopied coupons acceptable AMI MAR 09
3 Issues 6 Issues 12 Issues 24 Issues
U.K ❑ £10.50 ❑ £21.00 ❑ £42.00 ❑ £84.00
❑ £13.75 ❑ £27.50 ❑ £55.00 ❑ £110.00
AMI
EUROPE
MODEL ACTIVITY PRESS Ltd.,5 Chiltern Business Centre, 63-65 Woodside
Road, Amersham, Bucks, HP6 6AATel: 01494 433453 Fax: 01494 433468
E-Mail: [email protected]
�SWITCH
R.O.W. ❑ £14.75 ❑ £29.50 ❑ £59.00 ❑ £118.00
For all credit card orders including subscriptionsplease call or fax: 01493 377267.
Between 9-30am - 14.00pm or email: [email protected]
After 2pm please call our main office (see below)
PLEASE ADD ME TO YOUR SUBSCRIPTION LIST AS
INDICATED IN THE TABLE ABOVE
Starting from Issue:..........................................................................
Name:.................................................................................................
Address: ...........................................................................................
.............................................................................................................
.............................................................................................................
..........................................................................................................
Postcode:............................Telephone:............................................
Subscribe Please complete this order form IN FULL
AMI IS ACCLAIMED WORLDWIDE FOR THE QUALITY OF ITS CONTENT SO DON’T EVER MISS AN ISSUE…
Do you have difficulty finding AMIeach month?
That’s no surprise … all specialist interestmagazines are struggling to get space onnewsagents’ shelves, now increasinglydevoted to all those boring look-alikelifestyle magazines at the expense ofanything that’s worth a good read!If you want to be sure of receiving youcopy of the magazine that covers thewhole world of aeromodelling, then youneed to subscribe.
That way you get …
●●Full month-by-month continuityFull month-by-month continuity●●You’ll pay lessYou’ll pay less●●You’ll avoid the hike to the shopYou’ll avoid the hike to the shopto get a copy … if you’re lucky!to get a copy … if you’re lucky!
...delivered DIRECT to your doorstep!Don’t miss a single issue
NEW AMI SUBS 1p Tony OK 8/1/09 14:55 Page 2

Aurorra Limited claim to be theelectric propulsion specialists!Their website may be found athttp://www.aurorra.co.uk Thestaff at Aurorra, feel that in order
to develop reliable and top quality products theyneed feedback from skilled pilots flying differentmodels in the hobby. This feedback is evident intheir product range. If you seek an electricpower unit for your latest creation then take a
look at their range of 600 watt brushlessmotors.
Progress Aero Works was set up by GigEifflaender at the outbreak of WWII. Gig wasan accomplished control-line aerobatics flyer, bygaining victory flying aerobatics at the EuropeanChampionships in Belgium and a host of othernational events all using engines designed andbuilt by himself. PAW is still a family businesscontinued today by Gig’s sons Paul and Tony.
Their website at http://www.paw.ac givesdetails of their latest product range.
Control-line flying historically has been a con-venient way to get into model flying fordecades. Hangar 9 have recreated all the funof control-line flying with the PT-19 Profile C/L36 ARF model in the form of one of America’sfinest World War II trainers. In addition to itssturdy but light all-wood construction, the PT-19also includes a comfortable easy-grip wooden
control handle, a spool of braided music wirefor the control-lines, a fuel tank and an alumini-um spinner nut. With nearly every necessarycomponent included and the illustrated assem-bly guide the PT-19 makes it easy for modellersto get into control line flying without any prob-lems. Take a look at Horizon Hobby UK’s web-site at http://www.horizonhobby.co.uk
Optifueltm is a new nitromethane based fuelfor 2-stroke and 4-stroke engines of all sizes. It
has been developed by professionals to give theuser high power, excellent throttle responseand a very clean burn with no carbon build up.Optifueltm is manufactured in a brand newflame proof plant designed specifically for theproduction of nitromethane based fuels anduses the latest weighing technology. Optifueltmis the product of extensive flight testing withhundreds of hours logged using the latest datalogger technologies. The finest grade raw mate-
rials are used with 100% synthetic Klotz oilonly. For more details log on tohttp://www.optifuel.co.uk
‘Stick ‘n Tissue’ is the name of the Marin AeroClub blog. Its members are from all over theSan Francisco Bay area and share a commoninterest in building and flying model aeroplanes.This website at http://marinaero.blogspot.comis a fascinating collection of information withmany photographs and a great number of inter-
TECHNO MODELLING - By Mike Evatt
84 Aviation Modeller International - March ‘09
EBWALKW Mike Evatt walks cyberspace once more
ABOVE LEFT: A PT-19 control-line trainer from Hangar 9. ABOVE CENTRE: Optifueltm is a new nitromethane based fuel for 2-stroke and 4-stroke engines.ABOVE RIGHT: ‘Stick ‘n Tissue’ is the name of the Marin Aero Club blog.
ABOVE LEFT: Aurorra Limited claim to be the electric propulsion specialists. ABOVE RIGHT: Progress Aero Works manufacture some very respectablelarge diesel engines.
http://www.paw.ac
http://www.horizonhobby.co.uk http://www.optifuel.co.uk http://marinaero.blogspot.com
http://www.aurorra.co.uk
WEBWALK copy 12/1/09 10:06 Page 2

esting links to follow.‘T9hobbysport’ is two guys based in Yorkshire,
importing high quality mouldies into the UK! The‘mouldies’ they sell are all high spec and theycan honestly say that they do what they aresupposed to do, whether you are a slope-racerwanting to win an F3f competition or just sim-ply enjoy the thrill of flying some of the best glid-ers in the world. They do not sell models thatthey would not fly themselves. Check them outat http://www.t9hobbysport.com
While the name MacGregor Industries isfamiliar to many modellers as a distributor of
radio-control products, it is less well known thatthere is a separate division that operates as avery successful plastic engineering company.MacGregor Industries Ltd. (Plastics Division) isa supplier of machined plastic components,with a diverse customer base across military,civil aviation and medical engineering. As suchthey hold a vast stock of bulk plastic productsin sheet and rod form, a selection of which arenow available to modellers and craft enthusi-asts via the Plastic Division’s new web-site:
http://www.hobbyplastic.co.uk Keep a sharplook out in the Off-Cuts section where the smallleft-overs from engineering jobs will be madeavailable at bargain prices.
I have Ken Baker to thank for this next link.Log-on to http://www.scalesoaring.co.uk andfollow the link ‘Vintage gliders’ then‘Documentation’. Then click Fafnir! Fafnir is athing of beauty and was designed by Lippisch.Dr. Alexander Martin Lippisch was a Germanpioneer of aerodynamics who made importantcontributions to the understanding of flyingwings and ground effect craft. His most
famous design was the Messerschmitt Me163 rocket-powered interceptor. Plans for aradio-control model (5.5M span) of this famousGerman glider are available free of charge forthe benefit of the modelling community. Rightclick to download the Fafnir Plans - (2.1Mbytes)in PDF format.
The Telemaster is back! This classic model isnow available in the UK as a builder’s kit orARTF in a variety of sizes ranging from 3 ft(90cms) wingspan up to a massive 12 ft
(360cms).The Micro Telemaster is a fully ‘built up’ kit
featuring traditional methods of construction.The only concessions to modern methods arethe beautiful laser-cutting of all sheet parts andthe recommendation to use CA glue. It is deliv-ered in a sturdy cardboard box and comes withfull-size plan and a very comprehensive set ofinstructions on 21 pages of A4 paper completewith appropriate photos. http://www.telemastersalesuk.co.uk is the URL if you want to knowmore.
ModelPower.co.uk is a family run businesswhich started in 1992. They supply recharge-able batteries, chargers and many other acces-sories. They also attend many exhibitionsaround the UK and so you more than likelyhave seen them face to face.
Their web presence at http://store.modelpower.co.uk gives full details of their range ofproducts which includes much much more thanjust batteries!
In 1949, a group of 11 very enthusiasticmodellers assembled to form an organisationfor those interested in model aviation. Theirvision was for an association to officially repre-sent the aircraft modelling fraternity in Canada.Today, the Model Aeronautics Association ofCanada has grown from that group of 11 to abody of Canadian modellers over 13,000strong, representing all facets of this excitinghobby, from the Atlantic to the Pacific and isthe official governing body for model aviation inCanada. Their web gallery athttp://www.maac.ca has many interestingphotographs.
That’s all there is time for from me thismonth so go push that button and if you findsomething out there of interest that might begood to share, email me at [email protected] ■
March ‘09 - Aviation Modeller International 85
ABOVE LEFT: T9hobbysport’ is two guys based in Yorkshire. ABOVE RIGHT: Hobbyplastic.co.uk specialises in selling plastic products to modellers.
ABOVE LEFT: Fafnir is a thing of beauty. ABOVE RIGHT: The Telemaster is back!
ABOVE LEFT: ModelPower.co.uk for all your battery needs and more. ABOVE RIGHT: Excellent images from Canada.
http://www.hobbyplastic.co.uk
http://www.scalesoaring.co.uk http://www.telemastersalesuk.co.uk
http://store.modelpower.co.uk http://www.maac.ca
http://www.t9hobbysport.com
WEBWALK copy 12/1/09 10:06 Page 3

RHUBARB AND GOSSIP - By Peter Miller
86 Aviation Modeller International - March ‘09
MILLER’S TALESReminiscences of aeromodelling in warmer climes, plus a brass tube bending trick
and personalised pilots
Winter bluesAt this time of year, when Sundays are oftenwet, windy, cold and generally miserable, itdoesn’t take long for me to be wishing I wasback in Aden. Having said that, last summerwasn’t much better but at least the rain waswarmer.
We had a great club at R.A.F. Khormaksar.The clubroom had been built out of old pack-ing cases and was equipped with fans andeven a fridge. The weather was hot, often
1200F in the shade in the hot season. In thecool season it was too cold to go swimmingwhen the temperature dropped to 800F.
There was no rain. Well, not strictly true. Isaw two days when it rained in my time outthere. There was a windy season and thatmeant blowing sand and dust but I do notremember it stopping us from flying veryoften.
We had a control-line circle right outsidethe clubroom and we would fly there every
evening. We did get the odd noise complaintfrom the footballers. They claimed they could-n’t hear the referee’s whistle. They were toldto get a bigger pea! Football was played on ahard gypsum surface, not grass. Footballersgot horrible grazes when they fell and thesetook ages to heal.
Free-flight and radio-control was flown outat Sheikh Othman airfield, an abandoneddesert airfield. We used to book a three-tontruck to get the club there. Because of theheat we would leave the clubhouse at about4 a.m. and get to the field as dawn wasbreaking. We would fly until about eleven andthen come back to camp.
Quite often we would not bother to go tobed and just spent the night building and nat-tering until it was time to go. Some of theclub members were married and lived in mar-ried quarters; they did their building at home.The rest of us worked in the club. It was avery close-knit group. We spent most of ouroff duty time in the club and if one persondecided to go to town to the model shop sev-eral others would go along as well. Likewisewe would go to the pool or the camp cinemaas a group.
There were two shops in Steamer Pointthat sold modelling equipment. Engines weredirt cheap compared with the UK and wecould buy O.S. and Enya engines as well asFrog and Davies Charlton. One little incident
My Big Ship cruises past. I really lovethe relaxation of this model after all myhairy aerobatic aircraft.
TeamRacing infront of theclub inAden. Leftto right:Ray, MickBiddick,Jock Reidwith Roy aspit crew.
MILLERS' TALES 37 9/1/09 10:52 Page 2

March ‘09 - Aviation Modeller International 87
sticks in my mind. One morning I was off dutyand was running up an Enya 60. No silencerin those days, of course. An R.A.F. policeLand Rover pulled up and the ‘snoop’ saidsomething, but of course I couldn’t hear aword over the engine.
It was not a good idea to upset ‘snoops’too much so I stopped the engine and heasked me to stop running the engine as theMedical Officer who was running the familiesclinic in the nearby Family Centre couldn’thear anything through his stethoscope!
Needless to say, I did.
Bending brass tubeI needed to make an extension for thesilencer on my SC 30 FS as the existing pipewas aimed directly at the wing hold downbands. Now one can buy flexible tube or sili-cone tube but I wanted it right then.
Looking through my stock of materials Ifound some 1/4” bore brass tube. Now any-one who has tried bending that knows that itwill kink instantly. However there is a tech-nique which I knew of from my days as amaintenance fitter, although I had never triedit myself.
You will need a small gas torch and a lot ofsmall pieces of lead. Lead shot is ideal. Youwill also need some safety goggles. Plug oneend of the tube with some hard wood. Andstand it upright. Play the gas torch at the
lower end of the tube and feed the lead downinto it. Move the torch up and down so thatthe lead melts without any voids or gaps.Done this way it is unlikely that the lead willspit out of the top but keep you face awayfrom the top of the tube.
When the tube is nearly full, stop and allowit to cool completely. Do not try to cool the
tube artificially. The tube can now be bent,preferably round a former. There may besome very slight kinking on the inside of thebend but nothing serious. Once you are satis-fied with the shape, all you have to do is meltthe lead back out.
At one place I worked they had some mate-rial called Cerrobend. This was just like lead
All-night build-ing sessionbefore goingto fly free-flightin the dawn.Bob fastasleep.
MILLERS' TALES 37 9/1/09 10:52 Page 3

but would melt in boiling water. Unfortunately Inever acquired any for myself. I see that onecan now buy ‘Bendalloy’ and that does thesame thing.
Safety notes. Always use goggles andgloves in case the lead spits. It can do this ifthere is any moisture around. By applying theheat to the tube low down and feeding thelead down the tube you should avoid anytrapped air which might also cause a spitback.
Put yourself in the cockpitI was building a semi-scale profile control-linemodel and decided to put myself in the cock-pit! This is a well known technique used onPeanut scale models and small indoor R/Cmodels.
You just need two photos, one from eachside, preferably taken against a clear blue sky.These days getting them to the correct size iseasy. I will tell you how I did mine.
It helps if you have a reasonable photo pro-gram. I used Photoshop Elements 2, but oth-ers can do the same thing. Select the portionyou want to used and then use ‘Invert’ so thatyou are selecting the background. UsingBrightness, increase to maximum and thenreduce contrast to minimum. If you have apale blue background you can skip this stage.
Save the pictures and then open a plainpage in your word processing program. Nowinsert the pictures. Take a cut out shape ofthe canopy or cockpit. Click on the first pic-ture. This should bring a frame round it. Placethe cursor on one corner and hold the leftmouse button down. You can now drag thatcorner in and out. This will reduce the size ofthe picture until the pilot’s head fits the cutout frame of the canopy.
Just cut this out and stick it onto your pro-file model’s canopy or a piece of scrap sheetbalsa profile pilot if you have an open cockpitand then fuel-proof the picture.
Taming a bruteRecently we have had a couple of incidentswhere a propeller change has made a hugedifference to the model’s flight performance.The first was my Big Ship, a 130% version ofthe Little Ship. This model has a wing span of58” and about 600 sq. in. of area and isquite light.
Due to a slight building error I had about 1(too much negative incidence on the tailplane.As a result the model kept rearing up as soonas I applied any power. I was using a wideblade 9 x 6 on the SC 30 FS so I changedthis to a narrow blade prop of the same size.This tamed the problem until I could alter thetail incidence.
Strangely enough, the next example waswith a real Little Ship. This one is electric-pow-ered and fitted with a brushless motor turninga 10” prop. It has been flying for years usingNiCads but the owner decided to go the LiPoroute.
On his first flight with the new setup hecouldn’t control the model, it was all over thesky and every time he opened the throttle ittried to turn on its back. The massive amountof extra thrust and the torque were far toomuch for the model.
I gave him an 8 x 4 prop and that curedthe problem. Now he flies round in the sameway as he used to but for about half an hourinstead of the previous ten minutes.
One of the old dodges used for trimmingfree-flight models was to fit the propeller back-wards. This reduces the power dramaticallywhile still allowing the engine to be set at fullr.p.m.
A club member, who shall remain name-less, wondered why his model just would notfly properly. In the end we spotted that he hadfitted his prop on the wrong way round. ■
88 Aviation Modeller International - March ‘09
A street in Steamer Point. There were two shops selling modelling supplies in the town.
My brass tube extension, with the gentle bend formed by filling the tube with lead.
ABOVE LEFT: This is my best side! You need a left and right side or you can flip the picture. ABOVERIGHT: The picture with all the background removed. BELOW: The picture glued to the canopy. Thisis the right side view, or course.
MILLERS' TALES 37 9/1/09 10:53 Page 4

R/C SPORT POWER
R/C SPORT ELECTRIC
R/C SCALE ELECTRIC
GROIN STRAINPlan price £11.25. Plan No.084
INTERCEPTORPlan price £15.00. Plan No.094
MEAN MACHINEPlan price £12.50. Plan No.133
FAN PHANTOMPlan price £11.25. Plan No.060
KIRBY T31-M MOTOR TUTORPlan price £13.50. Plan No.219
PFALZ E.1 EINDECKERPlan price £12.50. Plan No.229
Semi-scale replica of the McDonnell Douglas F-4Phantom, designed for ducted fan operation with.21-.25 cu.in power. Requires four function R/C. 28”(711mm) wing span.
A 52” (1321mm) wingspan profile sport scale modelof the Italian SIAI Marchetti SF260. Uses veneer/foamconstruction and builds into a one-piece model. Forfour function R/C systems and .32-.40 cu.in. motors.
Purpose designed model for aerial photography, usessimple, practical layout. Plan shows camera installation innose pod. Wingspan 72”(1829mm), for 45-50cc motors.
A 72” (1829mm) wingspan, sports parasol with theair of a 1930s “fighter”. Suits four function R/C sys-tems and engines around the .40 size.
46” span fighter style delta wing for .35-.45 motorsand three function radio. One piece airframeemploys completely conventional balsa/ply con-struction. Pusher engine installation.
Something very different for those in search of a realbreak with convention ! A 62” span pusher canardmodel for .45 2-strokes and 4-function radio. Has firstclass flying characteristics and flies as though “on rails”.
For something diffferent, try streamer-chasingaerial combat with these profile fuselage R/Cstunters. Quickly built and expendable. Planshows two different fuselages and common wing.
A big, super stately 72” (1829mm) span high wingsports R/C model for rudder, elevator and throttlecontrols and .40-.60 cu.in. motors. Ideal for thosewho appreciate a steady, no- drama flight pattern.(Two sheet plan).
Snappy sportster, which is simple to build, withconstant chord wing planform. Offers sparklingperformance on any engine in the .35-.40 range. 4function radio normal, but could be flown with onlytwo function gear operating aileron and elevator.Wing span 53”. (1346mm).
An ultra simple, ultra aerobatic fun-fly model for.20 - .36 motors. 47“ (1194 mm) wingspan for fourfunction radio control systems.
Vintage style fun flyer, using 2-3 function R/C, or canalso be flown free flight. 64” (1626 mm.) wingspanmodel suits .10-.15 cu. in. motors and highly detailedplan comes complete with pattern set for the majorcomponents.
Here's a really big aerobatic trainer, right in the largemodel class. 96” wingspan, smooth flier, designed for28 -42cc motors like the Champion spark ignition.Features conventional wooden fuselage structure andfoam core wings. Utilises Scale Sopwith Pup cowl.Four function radio. Big, two sheet plan.
Designed by David Boddington this is a compact, 49”span aerobatic model for .32-.46 2-strokes and 4/5function radio. A lot of fun for those who want moreout of their model flying than straight and level stuff!
Low wing sports aerobatic design for 4-functionradio systems, featuring simple fuselage structureand constant chord wing. 60” (1524mm) wingspandesign suits .25-.30 size motors
Twin rotor autogyro for engines of about .25 cu.in.and three function radio controlling rudder, eleva-tor and throttle. It’s great fun!
Vintage style 66” (1676mm) wingspan sports R/Cmodel for rudder/elevator/throttle controls. Easy tobuild and great for those calm summer evenings.Recommended power range, .30-.40. Two sheet plan
66” (1680mm) span shoulder wing R/C sportsterfor 4-function R/C equipment features simplesquare-box basic fuselage with rounded top-deckand foam core wing construction. Power range is.30-.40 two stroke, or .40-.56 four stroke
EL FORTEPlan price £12.50. Plan No.058
DUCK SOUPPlan price £13.50. Plan No.044
SKYBIRD 40Plan price £12.50. Plan No.174
RAY’S BIRDPlan price £14.50. Plan No.157
SKY EYEPlan price £12.50. Plan No.170
MILITARY COMBAT PAIRPlan price £12.50. Plan No.122
HAZY DAZEPlans & Patterns price £13.50. Plan No.087
CHAMPIONPlan price £14.75. Plan No.027
JOLENEPlan price £12.50. Plan No.096
WARRIORPlan price £11.25. Plan No.213
ROTACKPlan price £11.50. Plan No.161
OL’ SAMPlan price £13.50. Plan No.140
SUNDOWNERPlan price £10.00. Plan No.236
Moulded cowl £15.00
Electric powered duration style R/C model for threefunction R/C gear on rudder, elevator and speed con-trol. 58.5” (1485mm) span, for speed 400 type motors
An easy to build and friendly to fly 60” (1524mm)span sport/trainer for .15 to .25 two strokes or .20 to.30 four strokes and 3/4 channel R/C. Can also beflown with electric option using Speed 600 motor.
A 48” (1220mm) span sports model with a touch ofthe 1930’s trainer, designed for geared 400 electricpower and 3-function R/C
SOU’WESTERPlan price £10.00. Plan No.179
TROOPERPlan price £11.50. Plan No.197
TRISHAPlan price £12.50. Plan No.224
Electric powered ducted fan replica, 930-6 sizemotors and fans such an Wemotec/RK720/ Turbo1000 etc. Wing span 59” (1500mm) for 4/5 functionR/C. (Two sheet plans).
Sport-scale model of the early British WW1 fightingscout aircraft.1/9th scale model spans 37.5”(953mm) and is electric powered using 400 sizemotor and three function controls on rudder, eleva-tor and speed control. One-piece airframe.
An elegant 72” (1830mm) span motor-glider forSpeed 600 electric motors and 4-channel R/C.
Geared 400 size motor powered sport scale modelof the ever popular British WW1 Scout aircraft for3-function R/C. 36” (914mm) wing span.
An electric powered model of Germany’s ‘other’WW1 eindecker fighter, it’s easier to build than theFokker. This 67” (1702mm) wing span model isdesigned for 600 size motors - the prototype useda Robbe Planeta geared 3.75:1, driven from an8.4v. power pack.
SOPWITH PUP ELECTRIC
Plan price £11.75. Plan No.173
De HAVILLAND VAMPIREPlan price £17.50. Plan No.041
AIRCO
DH2
Plan price
£11.75.
Plan No.003
3
PIXELPlan price £12.5. Plan No.254
Styled on the Keil Kraft rubber powered ‘Pixie’, thedelightfully shaped Pixel is an R/C sports flier for geared400 size electric motors and three function radio on rud-der, elevator and throttle. Wing span 50.2” (1275mm)
The R.A.F’s maritime recce / anti submarine patrolaircraft, modelled by renowned electric scaleexpert Chris Golds. 86” (2185mm) span model flieson four Speed 400 electric motors, driving pusherprops. Full step-by-step written instructions.
DANCING GIRLPlan price £12.50. Plan No.255
Semi-scale R/C model based on the diminutiveAmerican ‘Cosmic Wind’ racers, this 53” (1346mm) spanfully aerobatic machine suits .46 cu.in two strokeengines, or .52 four strokes. Four function radio required.
AMI July 2004
AMI June 1997
AMI March1996
AMI Aug 1998
AMI Sept1997
AMI Nov 1997
AMI June1998
AMI Feb1999
AMI Aug2001
AMI Feb1996
AMI April1997
AMI April1997
AMI Jan1999
AMI April1996
AMI Nov1996
AMI Sept2002
AMI Nov2001
FSM Sept 2004
FSMMar/Apr
1998
FSM Jan/Feb 2001
FSM Feb 2003
AMI Sept1996
AMI June1997
AMI Aug2004
AMI Feb2001
FSM May2003
B.Ae NIMRODPlan price £19.50. Plan No.258
AMI March 2003
FSM Nov/Dec 1999
AMI PLANS SERVICE REDESIGN3 * 8/1/09 13:53 Page 3

R/C GLIDERS & SAILPLANES
R/C SCALE GLIDERS
R/C SCALE I.C POWER
CONTROL LINE
MESSERSCHMITT Me 163B KOMETPlan price £12.50. Plan No.123
MITSUBISHI ZEROPlan price £17.50. Plan No.113
ZLIN 50 L/MPlan price £13.50. Plan No.251
CURTISS JN4 ‘JENNY’Plan price £17.50. Plan No.038
COMPER SWIFT (1/4 Scale)Plan price £17.50. Plan No.246
A 42” (1067mm) wing span sport scale model of anearly WW1 fighting scout, designed for geared 400size electric motors and three function R/C gear onrudder, elevator and speed conrols.
A 33” (838mm) wing span sport scale model of theFrench WW1 fighting scout, designed for geared 400size electric motor power and 3-function radio operat-ing rudder, elevator and speed controls.
MORANE SAULNIER TYPE NPlan price £11.75. Plan No.114
NIEUPORT 11 ELECTRICPlan price £11.75. Plan No.130
An attractive vintage style control line stunter for2.5-3.5cc diesels or glow motors. Wing span37.5“(953mm).
Control line aerobatic model with attractive radialstyle cowl for .09 (1.5cc) motors.
The kit for Frog’s once popular control line profilescale D.H. Mosquito has long since ceased to be avail-able, but control line fliers can still get the plan.36”(914mm) span model suits two 1-1.5cc motors.
Semi-scale control line aerobatic model based onthe Supermarine Spitfire. 59” (1500mm) wingspanmodel suits .40-.60 motors.
A proven contest winning control line aerobaticdesign, by respected US aerobatics expert AllenBrickhaus. 690 sq.in. wing area model utilises foamwing construction and is designed for .61 size motors
FIFTY FOURPlan price £11.25. Plan No.064
WILD BOYPlan price £11.25. Plan No.212
FROG PROFILE
MOSQUITO
Plan price £11.50.
Plan No.066
STUNTFIREPlan price £13.50. Plan No.191
Mr. BRICKHAUS’S OPUSPlan price £12.50. Plan No.141
Compact, 48.5” (1232mm) slope soarer for 2-func-tion R/C operation on ailerons and elevator.
A 63” (1600mm) span power-assisted sailplane forfree flight or 2-function R/C, using a 0.75-1.5ccmotor or electric equivalent.
Here’s a fine sailplane for slope soaring, flat field orcross country work. 112” (2845mm) wingspanmodel features flaps and requires a minimum of 4-function radio control.
A 60” (1524 mm.) span, high performance slope soarer,featuring tough balsa and plywood construction. V-tailmodel can be flown with just elevator and ailerons orwith a “mixer” for “rudder/elevator” tail surface control,can easily handle strong wind conditions but is alsoquite a “floater” for use in light winds. Highly aerobatic.
Handy sized 36” (914mm) span slope soarer with afast and furious performance on 2-function R/Cdriving aileron and elevator controls.
MINIKINPlan price £11.25. Plan No.127
PIGLETPlan price £11.25. Plan No.143
PATRICIANPlan price £12.50. Plan No.147
TIMBERLEENAPlan price £11.50. Plan No.200
MINI DRAKEPlan price £10.00. Plan No.126
A 44.5 inch (1130 mm) wingspan scale slope soarer(PSS) design for 2-function radio control systems.
The V-1 “Buzz Bomb” of WW2 replicated to 40”(1016mm) span, for Estes rocket power or PSS, withaileron, elevator and rocket fire function controls.
VI DOODLE BUGPlan price £11.75. Plan No.206
A great first-time scale model for novices and sportfliers who want real scale accuracy. 79” (2002mm)span 1:5.33 scale model suits .40-.60 range ofengines. Two sheet plan. Glass fibre cowl available.
81” wingspan 1:6.4 scale replica of the classic Americanbiplane. Easy to fly with all the character of the full size.Suits .52 -.75 motors and four function radio.
Classic German WW1 fighter are available in 1/4and 1/5th scales. Larger model spans 83.7”(2125mm) and suits 25cc motors, while the 1/5thscale version spans 66.9” (1700mm), for .90-1.08cu.in motors.
54”(1370mm) span sport-scale replica of the AmericanWW2 warbird,designed for .52 size four stroke motorsor .40 two strokes.Both foam core and conventional balsabuilt up wing construction shown.Model designed to takeoff from simple wire drop- off dolly, shown on the plan.
A 54.5” (1384) span model of a 1950s counter-insurgenceground attack aircraft. Features simple constant-chord wing andrequires a .30-.40 size two-stroke motor and minimum 4 func-tion radio. Optional scale flaps also shown on plan
A 43” (1092mm) wingspan sport-scale model of thefamous German WW2 fighter. Designed for ,25cu,in sizetwo-stroke engines and up to four function radio controlequipment. Minimum controls are aileron and elevator.
A 63.4” (1610mm) span scale model of the famousJapanese WW2 fighter aircraft. Plan shows flaps andretracting undercarriage, including tailwheel. Suits .45-.60 cu.in motors
A 1/6th scale 67” (1702mm) span model for 120 andlarger four stoke engines, designed for 4 channel R/C.Five sheet plan.
Graham Smith’s 54” (1372mm) span sport scale aero-bat suits .40-.46 two-stroke or .52 four stroke engines.4-channel R/C operates this 1/6th scale model.
Magnificent 1/4 scale model of the 1930 Kings Cupair racer spanning 99” (2515mm). Requires 4-func-tion R/C and .90-1.20 cu. in. motors.
A 1/8th scale, 46.5” (1180 mm) scale model of the 1930sAmerican racing aircraft. Practical lightweight airframe,with basic fuselage box-frame around which the scalestringered fuselage shape is developed. Constructionshown for all-wood engine cowl and wheel spats. Suits.20-,25 cu. in two stroke motors, or .25-.30 four strokesand four function R/C equipment. Two sheet plan.
Something completley different. The Japanese WW2rocket kamikaze, designed to be aerotowed to heightbefore firing Estes rocket motors. 38.5” (980mm) spanfoam wing. Aileron, elevator and rocket fire controlfunctions, plus tow release
PIPER SUPER CUBPlan price £16.50. Plan No.146
Cowl £22.50
YOKOSUKA MZY-7 ‘OHKA’Plan price £11.75. Plan No.216
HOWARD DGA-6 ‘MISTER MULLIGAN’Plan price £14.00. Plan No.119
FLETCHER
FD-25B
DEFENDERPlan price £11.75.
Plan No.059 Canopy £15.50
MILES
HAWK
SPEED SIX
Plan price £19.50.
Plan No.115
MESSERSCHMITT Me 109Plan price £11.500. Plan No.294
CURTISS
P-40
KITTYHAWKPlan price
£11.75.
Plan No.037
D.H. 103
HORNETPlan price £22.50.
Plan No.052
POLIKARPOV I-152Plan price £24.50. Plan No.227
ALBATROS
DII1/4 Scale Plan No.007. Price £22.50
1/5 Scale Plan No.009. Price £22.50
WW1 fighter aircraft modelled to both 1/4 and 1/5thscale by Australian R/C WW1 scale expert GarySunderland. 1/4 scale version spans 82.5” (2095mm)and is designed for 30cc (1.8 cu.in.) two-stroke engines.1/5th scale model spans 65.7/8” (1673mm) and suits15.cc (.90 cu.in.) four stroke engines. Three sheet plans.
An enlarged version of Chris Golds’ 1/6th scale R/Celectric scale model for i.c. power, using a .60-.90 cu.in.four-stroke engine or equivalent two-stroke engine.This is a straight blow-up of Chris’ original and noproving prototype has been built - but it is a perfectlyworkable enlargement, showing increased wood sizesas appropriate. Wing span 72” (2835mm).
FOKKER D.VIIPlan price(either scale) £26.50.
1/4 Plan No.241 1/5th Plan No.242
1/7th scale, 57.75” (1466mm) span model of the WW2RAF trainer aircraft, designed for .40-.50 size motors.Both conventional wood and foam core wing con-struction shown.
MILES MAGISTERPlan price £13.50. Plan No.250
Build this classic and cute little homebuilt aircraft from the1950’s era. 47.5” (1270mm) span sport-scale model canbe flown on .20-.30 cu.in two stroke engines or .30-.40four strokes. Four function radio control system required
STITS PLAYBOYPlan price £14.50 Plan No.260
FSMSept/Oct
1999
FSMMay/June1999
AMI Oct1996
AMI Sept1997
AMI Dec1995
AMI June2001
AMI June2002
AMI May1997
AMI Aug1996
FSM Mar 2002
FSMApril2004
FSMFeb2004
AMIDec
1996
FSMJuly/Aug2001
AMIJune2003
FSMMar/Apr
1998
AMISept2003
FSM Mar/Apr2000
FSM Jan/Feb 1999
AMI April 1999
AMI Sept 1997
AMI Aug1997
AMI Nov1998
AMI Feb1998
AMI Aug1999
FSMMar/Apr
1998
AMI Dec1998
FSM Aug2004
FSM Apr2002
FSMMar/Apr2001
FSMSept/Oct
2000
FSM April 2003
A 1/5th scale 149.5”(3797mm) wingspan R/Creplica of a Polish sailplane, fea-turing elegant, long gull type wingstyle for rudder, elevator, aileronand wing spoiler controls. Can byused for slope soaring, flat fieldsoaring or aero-towing.
PWS 101Plan price £19.50.
Plan No.153
80” (mm) wingspan sport-scalereplica of the hottest productionpiston engined fighter ever. Suits engines .40-.53.
AMI PLANS SERVICE REDESIGN3 * 8/1/09 13:54 Page 4

De HAVILLAND DH 60 MOTHPlan price £19.50. Plan No.054
VANNUS & VANNUS MINORPlan price £12.50. Plan No.208
PLANS ORDER FORM Name....................................................................................
Address.......................................................................................................................................................
.....................................................................................................................................................................
............................................................................................................Postcode.........................................
MODEL NAME PRICE
TOTAL❑ I enclose a cheque for £............................... made payable to MAP Ltd
❑ Charge my credit card for the total amount of £................. ❑ Visa ❑ Delta ❑ Switch ❑ Mastercard
Cardholder’s Name:...........................................................................................................................................
Card Number:..................../........................../......................../....................... Expiry Date:............................
Signature:........................................................................................................ Date:........................................
Postage & Packing chargesTotal Order Value UK Europe W/Wide
Up to £10 £2.50 £2.95 £5.75
£10-£20 £5.00 £5.95 £9.00
£20-£50 £7.00 £8.50 £16.50
Allow up to 28 days for delivery Overseas payments by credit/debit card please
Please return this completed coupon together with your cheque made payable to:
Model Activity Press, 5 Chiltern Business Centre, 63-65 Woodside Road, Amersham, Bucks, HP6 6AA
�SWITCH
AMI MAR 09
Plan No.
DE HAVILLAND CLASSICS
GLORIOUS GLADYSPlan price £10.00. Plan No.076
FREE FLIGHT SPORTS
BRISTOL M1C MONOPLANE SCOUTPlan price £11.75. Plan No.019
LOCKHEED C-130 HERCULESPlan price £13.50. Plan No.111
FOKKER SPIN (SPIDER)Plan price £11.75. Plan No.136
FREE FLIGHT CONTEST
A 1/8th scale 81” (2057mm) span model of the Navalsearch aircraft. Flaps and retracts shown, plus bombdoors, extending radome and tail hook, plus optional fold-ing wings. Minimum of 4-function R/C. (Two sheet plan)
FAIREY
GANNET
A.S.1Plan price
£19.50. Plan No.065
An 80” (2032 mm) wingspan, 1:4.33 scale replica for.90 - 1.20 cu. in. motors and four function radio controlsystems.Two sheets .
A 60” (1524mm) wing span replica of the famousbiplane light airliner for two 400-size electric motors.All-wood conventional airframe, with blue foam fordouble-curvature fairings on the engine nacelles.Three-sheet plan, complete with detailed step-by-stepwritten building instructions.
De HAVILLAND
DH89a DRAGON RAPIDEPlan price £24.00. Plan No.234
A 39.5” (1003mm) span sports free flight model in thestyle of dawn-of-aviation craft, for engines like the Mills.75 diesel. Simple open frame construction.
A free flight sports biplane, loosely styled on thefamous Gloster Gladiator biplane fighter. Spans32.5” (826mm), for 0.75cc (.049)motors.
96 “. of sheer elegance for free flight or R/C assistand engines of .60-.90 cu.in. Rudder and elevatorcontrol surfaces shown. A real beauty.
A 50” span scale like free flight biplane with all the airof a pre WW2 R.A.F. patrol flying boat. Designed fortwo .75cc (.049 cu. in) engines or similar.
A tailless free flight sports model for .049 i.c.motors or equivalent electric power -spans 42”(1067mm). Smaller version spans 28” (711mm),designed for Cox .020 or KP01 electric power.
SALAAMPlan price £12.50. Plan No.165
ODDIE 94Plan price £12.50. Plan No.137
MERCURY 3Plan price £20.00. Plan No.116
A high performance Open Rubber free flight contestmodel with a string of competition successes.Features geodetic wing structure and diamond sec-tion fuselage. 52.5”(1334mm) wing span.
A 46.5” (1181mm) span free flight scale model ofthe British WW1 scout aircraft for 1.5cc motors.Can be converted to R/C.
Four engined free flight ... and it works! A 54”(1393mm) span electric powered model for four KP01motors. Basic fuselage is foam block
P.30 Class contest rubber powered model thatoffers fine performance for sport free flight too.Has novel dethermaliser system
A 1/8th scale free flight version of Anthony Fokker’s1913 “Spider”. 54” (1375mm) span model for 1.5ccdiesel engine.
FREE FLIGHT SCALE
THIRTY SOMETHINGPlan price £10.00. Plan No.201
Practical 1/5th scale 64” (1626mm) span replica featur-ing accurate rib-for-rib airframe structure. A good sizemodel, without being too big for transport. 4-functionR/C required. Three sheet plan set.
Fully aerobatic scale replica of the full-size competitionmachine. 55” (1400mm) span model suits .90- 1.20 cu.in motors and 4-function R/C. (Two sheet plan).
ULTIMATE 10-300Plan price £16.50. Plan No.204
Glass fibre cowl £22.50
Cockpit canopy £15.50 Wheel pants £17.50
SE5a Plan price £24.00. Plan No.183
Postage
FSMJuly/Aug1998
FSM May/June1998
FSM Nov/Dec2000
FSM June 2008
FSM Sept/Oct 1997
AMI Feb 1996
AMI Jan 1996
AMI Feb 1997
AMI Dec 1995
FSM Nov2003
AMI OCT 1996
FSMSEPT/OCT
1998
AMI JAN 1998
FSM March 2003
AMI May 1998
AMI JULY 1998
GLOSTER
GLADIATORPlan price £17.50. Plan No.078
The RAF’s last fighter biplane, a classic of it’s era,modelled to 1/7th scale with a wingspan of 54.5(1384mm). Suits .46-.60 motors.
WOODBURY
GORSE
BASHER
Plan price £11.25.
Plan No.214
AMI PLANS SERVICE REDESIGN3 * 8/1/09 13:54 Page 5

AL’S HOBBIES
your service!!....WEB DIRECTORY
www.alshobbies.com
@
INWOOD MODEL SUPPLIES
www.inwoodmodels.co.uk
GEE DEE
www.geedee-modelshop.com
FLYING TOYS
www.flyingtoys.com
GREEN AIR DESIGNS
www.greenairdesigns.com
FAST LAD PERFORMANCE
www.fast-lad.co.uk
IAD MODEL DESIGNS
www.iadmodeldesigns.co.uk
BRENTFORD RADIO CONTROL
www.brentfordrc.com
ELITE MODELS LTD
www.elitemodelsonline.co.uk
TO ADVERTISE YOUR WEBSITE HERE..
CONTACT: LISA DAWSON. TEL: 01684 311514EMAIL: [email protected]
WEB DIRECTORY 9/1/09 09:26 Page 2

your service!!....WEB DIRECTORY@
PS AERO PRODUCTS
www.psaeroproducts.com
MOTORS AND ROTORS
www.motorsandrotors.comwww.modelactivitypress.com
MODEL ACTIVITY PRESSMIKES MODELS
www.mikes-models.co.uk
TO ADVERTISE YOUR WEBSITE HERE..
CONTACT: LISA DAWSON. TEL: 01684 311514EMAIL: [email protected]
www.micronradiocontrol.co.uk
MICRON RADIO CONTROL MIDLAND HELICOPTERS
www.modelhelicopters.co.uk
JAY R/C
www.jayrc.co.uk
PHOENIX MODEL PRODUCTS
www.phoenixmp.com
PETERBOROUGH MODEL CENTRE
www.peterboroughmodelcentre.co.uk
RC-CASTLE
www.rc-castle.com
RADIO ACTIVE
www.radioactivemfg.com www.revolutionmodels.co.uk
REVOLUTION MODELS
WEB DIRECTORY 9/1/09 09:27 Page 3

your service!!....WEB DIRECTORY@SUSSEX MODEL CENTRE
www.sussex-model-centre.co.uk
STEVE WEBB MODELS LTD
www.stevewebb.co.uk
Please send me............AMI binder(s) at £9.50 each inc. postage and packing
(overseas add £2 for surface mail) Please make cheques/PO orders made payable to
Model Activity Press Ltd, 5 Chiltern Business Centre, 63-65 Woodside Rd., Amersham, Bucks, HP6 6AA.
Name:.................................................................................Address:.............................................................................................
........................................................................................................................................................................................................
................................................................................................................Postcode:.......................................................................
Credit Card
No..............................................................................Expiry date/Issue no...............................3 Digit Security No..................
Archive your copies of AVIATION MODELLER INTERNATIONALmagazine, in these top quality binders. Each holds 12 issues (1 year)
�SWITCH❏ ❏ ❏
AM
I M
AR
09
www.robotbirds.com
ROBOTBIRDS.COM
THE COST-EFFECTIVEWAY TO ADVERTISE
YOUR WEBSITE
WESTON UK
www.westonuk.co.uk
WEB DIRECTORY 9/1/09 09:27 Page 4

AMI BACK ISSUES
MAY 03 JUNE 03 JULY 03 SEP 03 OCT 03 NOV 03 FEB 04 APRIL 04
JULY 04 FEB 05 MAY 05 JULY 05 SEP 05 NOV 05 MAY 06 JUNE 06
JULY 06 AUG 06 SEP 06 OCT 06 NOV 06 DEC 06 MAR 07 MAY 07
JUNE 07 JULY 07 AUG 07 SEP 07 OCT 07 NOV 07 FEB 08 MAR 08
MODEL ACTIVITY PRESS Ltd., 5 Chiltern Business Centre,63-65 Woodside Road, Amersham, Bucks, HP6 6AA.
Te l : 01494 433453/Fax : 01494 433468 E -ma i l : mode lact i v i t y@bt in ternet . com
12345
Title Issue
Name:.................................................................Address:........................................................................................................................................Postcode:.......................Tel:.................................Method of Payment.I enclose a cheque/PO for..............................payable to MAP Ltd
Please debit my Credit/Debit card for.........................................(Mastercard / Visa / Switch)Credit/Debit card number:........................................................Expiry Date:.........................3 Digit Security Code......................Issue No. (Switch only)...............�SWITCH
AMI MARCH 09
Payments made by credit card must include the last threedigits of the card security number, full mailing addressincluding house number and the postal code.
(Please allow 28 days for delivery)
Please complete this order form IN FULL
Only £5.00 each (including P&P)
SOLD OUT
SOLD OUT
SOLD OUT
SOLD OUT
AMI B-I NEW 8/1/09 14:15 Page 1

MARKET PLACE
96 Aviation Modeller International - March ‘09
DEALER DIRECTORYADVERTISEMENT RATES - £20.00 per insertion (minimum 12 insertions) All advertisements are subject to VAT
REVOLUTION MODELSWoodfield House, WoodfieldRoad, Altrincham, Cheshire, WA14 4ED. Tel: (44)0161 9290129 Fax: (44)0161 9295984Email: [email protected]: http://www.revolutionmodels.co.ukSpecialists in R/C helicopters
CHESHIRE
�SWITCH
GEE DEE LTD21 Heathcoat Street off Goosegate,Nottingham, NG1 3AFTel: 0115 941 2211Fax: 0115 947 6272Email: [email protected]: www.geedee-modelshop.comOpen Mon-Sat 9.30-5.30Early Closing Thursday
NOTTS
PAISLEY MODEL CENTRE80-82 Arkleston RoadPaisley, Renfrewshire, PA1 3TSTel: 0141 889 4221 Fax: 0141 842 1322Website: www.paisleymodelcentre.comEmail: [email protected]
Mon-Sat 9am-5.30pm,Thurs 9am-7.30pm
SCOTLAND
�SWITCH
HOBBY CORNER112 Chester Rd., Garden Village,Wrexham, Wales. LL11 2SN.Tel/Fax: 01978 355231Email: [email protected]: www.hobbycorner.co.ukOpen: Tues-Sat 9.30-5.30 (lunch 1-2)Specialise in: Radio Control and modelling supplies.Mail Order.
WALES
�SWITCH
WE BUY AND SELL R/C ModelAircraft, Gliders, Boats,
Helicopters, Cars, Engines, Kits & R/C Equipment. If you are
selling up and don’t want the hassle phone
01483 421425 for cash deal.www.radiocontrolmodels.co.uk
SWINDON MODEL CENTRE2 Theatre Square, Civic Centre,Swindon.Tel: 01793 526878Open daily 9am - 5.30pmEarly closing Wednesday 2.00Saturday 5.00
WILTSHIRE
�SWITCH
PETERBOROUGHMODEL CENTRE LTD1D, Mancetter Sq. Lincoln Rd.Peterborough, Cambs. PE4 6BTel & Fax: 01733 322894.E-mail:[email protected]: www.peterboroughmodelcentre.co.ukMon, Weds, Thurs, Sat: 9-5.30Fri: 9-6.30 Tues, Sun: CLOSED.Specialise in: R/C Heli, Aircraft, Jets,Boats and Cars. Mail order
CAMBS
�SWITCH
ASHFORD MODEL SUPPLY CENTRE Unit 23, Ellingham Way, Ellingham Ind.Est., Ashford, Kent. TN23 6NFTel: 01233 635837 Fax: 08707 063357E-mail:[email protected]: www.ashfordmodelsupplycentre.co.ukTues, Thurs, Fri, Sat: 9am-6pm. Weds: 9am-1pmSpecialise in pusher configurationsRETAIL SHOP - INTERNET SHOP - MAIL ORDER
KENT
�SWITCH
TONY’S MODELS & HOBBIES214 Saffron Lane, Leicester,Leics. LE2 7NFTel/fax: 0116 244 2223Email: [email protected] dates/times: Mon-Sat: 9.30am-5.30pmLEICESTER’S PREMIER MODEL SPOT
LEICESTERSHIRE
WHIPTON CRAFT &MODEL CENTRE72a Thackeray Rd. Whipton,Exeter, Devon. EX4 8EXTel: 01392 664 074Opening dates/times:Mon-Sat: 9.45am-5pm Weds: 9.45am-1pmSpecialise in: R/C FLIGHT
DEVON
�SWITCH
MIDLAND HELICOPTERSUnit 11, Newton Road,Harrowbrook Ind EstHinckley, LE10 3DSFax/Tel 01455 630890Specialists in Radio Control Helicopterswww.modelhelicopters.co.uk
LEICESTERSHIRE
�SWITCH
PENN MODELS LTD134 Moss Grove, Kingswinford, W. Mids. DY6 9ESTel: 01384 400 085Fax: 01384 400 045Email: [email protected]: www.pennmodelsrc.co.ukOpening dates/times: Mon- Fri: 9.30-6 Sat: 9-5.30 Sun: CLOSEDSpecialise in: Everything R/CMail Order
WEST MIDLANDS
�SWITCH
MILLENNIUM MODEL SERVICES (MMS)55-57 Annesley Rd. Hucknall,Nottingham, Notts. NG15 7ADTel: 01159 640 957Email: [email protected]: www.millenniummodelservices.co.ukOpening dates/times:Mon- Fri: 9am-5pm, Sat: 9am - 4pmWeds/Sun: CLOSEDSpecialise in: Specialists in ALL R/C disciplines Mail Order
NOTTS
�SWITCH
WE’VEWE’VEMOVED!MOVED!
CLASSIFIEDS
WE’VEWE’VEMOVED!MOVED!
BOB’S HOBBY CENTER540 N. Goldenrod Rd., OrlandoFlorida 32807, USA.Tel: 00 1 407 277 1248Fax: 00 1 407 282 7281Email: [email protected]: www.bobshobbycenter.comOpen: Mon-Fri 10am-6pm, Sat 9am-6pm UK OWNERSSpecialise in: Aircraft, Heli’s, Jet(Simjet, BVM), Cars, Boats & more...
USA WE’VEWE’VEMOVED!MOVED!
HALLAM MODELControline Kits of Trainers, Stunt,Combat. Lines, Props, Tanks etc..Mail order only. SAE for details.
69 Bolehill Lane, Sheffield, S10 1SA. Tel: 01142 665624
NEXUS MODELLING SUPPLIES 30 Purleigh Rd., Corsham, Wilts.SN13 9LJTel: 01249 716 113Email: [email protected]: www.nexusmodels.co.ukFOR ALL YOUR MODELLING NEEDS
NEW OWNERS: ADRIAN & KAREN FINCH
WILTSHIRE
�SWITCH
UNDER UNDER
NEWNEWOWNERSHIPOWNERSHIP
MANUFACTURER OF QUALITY KITS SINCE 1976
MIDDLE PHASE versatile slope soarer trainerPHASE 6 advanced fully aerobatic slope soarerUNO-WOT basic power trainer/sport aerobaticmodelWOT 4 amazing aerobatic trainer/stunt modelACRO-WOT stylish fully aerobatic low wingerWOTS-WOT realistic yet highly aerobatic bi-planeXTRA-WOT 25% enlarged and restyled ACRO-WOTSUPER STARLIGHT fully moulded high per-formance F3J sailplane
UNO-WOT and WOT 4 now fully proven forelectric power - see website for details
ALPHA-WING range of flexible compositeundercarriages and GRP wheel spats
Unit 1, Freehold Street, Shoreham,W.Sussex BN43 5TQ.Tel/Fax:01273 452642
www.chrisfoss.co.ukTRADE AND EXPORT ENQUIRIES WELCOME
TO ADVERTISECONTACT: LISA DAWSON
Tel:- 01684 311514 Email: [email protected]
TO ADVERTISECONTACT: LISA DAWSON
Tel:- 01684 311514 Email: [email protected]
AMI CLASSIFIEDS NEW 9/1/09 11:27 Page 2

March ‘09 - Aviation Modeller International 97�
60 inch TIGER MOTH complete andready to fly. Fitted with unusedO.S.52FS. All you need is your Rx, Xtal.£165 o.n.o. Call 01427 788315 (Lincoln).AMI0209BIG LIFT 7ft soan two-piece wing.Servos, Rx, batteries. Ready to fly, inexcellent condition, complete withZenoah 26cc petrol engine. £195. Tel:02380 263068. (Hants).AMI0209RASCAL 40, with new ASP 40ZS,Hitec servos & Rx. Excellent condition,ready to fly. Tel: 02380 263068.(Hants).AMI0209GRAUPNER TAXI II 65” span new withEvolution .46 two-stroke, servos, Rx,ready-to-fly. Excellent condition. £185.02380 263068. (Hants).AMI0209FREE FLIGHT POWER MODEL ‘BAN-SHEE’ fitted vintage engine E.D. compe-tition special, hardly used seelig timer.Ideal Christmas present. £200 ono andmany other models.Tel: 01793 722859.AMI 01/09LARGE COLLECTION OF R/C MOD-ELS plus many part built models. Wouldfill a transit van. Prefer to sell as job lot.Offers.
Tel: 01875 835296.AMI 01/09PARKZONE P-51D MUSTANG neverflown new complete with remote con-trols. £60.Tel: 07968 473886 S.E. London or0208 7694699. AMI 01/09RED ZEPHYR 72” Vintage model com-plete with OS40 four-stroke and Sanwaradio £70 ono, proceeds to go to chari-ty.Tel: 01920 467184. Herts.AMI 01/09UNSTARTED C/L KITS, Marquis,Junior Nobler £22 each. SIG Akrobat,Brodak Nobler £38 each. Postageextra.Tel: 01323 892659 South Coast.AMI 01/09PIPER CUB 81” SPAN Futaba radioSaito £180. 65FS. Never flown,buyer collectsTel: 01462 631546AMI 12/08CESSNA 182 KIT by Pica Irvine, 72Futaba radio, 72” wing span. Buyer col-lects, £150Tel: 01462 631546AMI 12/08ZACK EXTREME JOHN RUTTERdesign, 46” span, OS 40FS, flown once,Futaba radio £100, buyer collects.Tel: 01462 631546AMI 12/08
OLIVER TIGER III. E.S. REPICA withchrome liner. Boxed £85. Tel: 01202477128 (Dorset).AMI0209UNRUN VECO 19 with Perry carb, nobox. £20. O.S.MAX 15 RC, run about10 mins, boxed. £15. Tel: 07757094858. (West Yorks.).AMI0209FOX 15 STUNT, angled plug. Fox 19Stunt, boxed. Both new – offers? TwoCox TD .051 motors in 1/2A models.FSB D/T Timers new. Also many yearsof Aeromodeller mags, mostly mint con-dition. Offers? Tel: 01422 203244.AMI0209MVVS 26cc GLOW ENGINE IFS. Newin box £100, or swop for aircraft. Tel:01305 759659/ 07990 780448(Weymouth),AMI0209SMALL COLLECTION OF OLIVERTIGERS. Mk.3, Mk.4 & Tiger Cubs. Allin excellent condition. Tel 01454613561 (Sth Glos.)AMI0209ZENOAH 38 CC petrol engine. GoodCondition £135. Also Zenoah 45ccPetrol engine in good condition. Tel:02380 263068. (Hants).AMI0209O.S. F.P.15 stunt boxed w/silencer£25. D.C. Wasp £20. Cox black Widow£15. Cox Golden Bee £20. Babe Bee
£10. Cox .049 w/back plate mounting£10.Tel: 07807 100163 Stockport.AMI 01/09ENYA 15 Two-stroke £15. Enya 45MkII two-stroke £20. Super Tigre 61two-stroke £30.Tel: 01438 215657.AMI 01/09MACKAY 30CC PETROL engine greatcondition, boxed, instructions £250.Tel: Dave 01282 611796 Lancs.AMI 01/09ENGINE OS MAX 15-III glow plug withprop and spinner £55.Tel: 01329 289392.AMI 01/09PAW 2.49CC CT2 TBR, c.1994,boxed, unused, plus muffler (unfitted)comp lock, spare N.V.A. (00.140”) £50.UK Post paid.Tel: 01253 302571 evenings.AMI 01/09DC SABRE IN BOX £20. DC Sabrewith spare piston/liner £20. DC Merlin£15. COX 049 £15. Collect or postextra.Tel: 01920 467184.AMI 01/09SUPER ATOMM 0.25CC Diesel repli-ca, new, £125. Hallum 0.75cc dieselreplica, new, £110. Clan 0.48cc, NIB,£75. Dyno 0.6cc replica, new, £85.Tel: 01334 828755 (John)AMI 12/081960 TAPLIN TWIN on mounting withfuel tank, £250.Tel: 0208 866 6177AMI 12/08
THIRTEEN R/C AIRCRAFT MAGS, Apr’92-Apr ’95 plus 22 x AMI June ’96-Mar’98, complete with V/G condition plans.£30 lot plus p&p, Tel: 01932 240047(Weybridge).AMI0209ORIGINAL A.P.S. 1/8 SCALE RUB-BER POWERED TIGER MOTH PLAN,designed by C.Rupert Moore. (not builton) £12 inclusive of p&p. Tel: 01932240047 (Weybridge).AMI0209ELECTRIC FLIGHT INTERNATIONALfrom 1998-2002 five volumes inbinders £30 plus P&P.Tel: 01302 783641.AMI 01/09AEROMODELLER MAGAZINES.57/58/59 - £35. 62/63 - £25.65/66/67 £35. 70-83 £130.Tel: Brian 01483 722134.AMI 01/09VINTAGE PLANS BROCHURE free.Send A4 SAE 75p to T. Penhall, 62Gordon Road, Little Paxton,Cambridgeshire PE19 6NB.AMI 12/08
COMPLETE AIRCRAFT& AIRFRAMES
ENGINES
READER EXCHANGE
MAGAZINES, BOOKS AND PLANS
ULTIMATE EXTRA TWIN 64” span, with two O.S. 40s, 10
Futaba servos. Unflown & immaculate(Cost £400) Will sell at £225 o.n.o.
Tel: 01202 477128 (Dorset). AMI0209
MILES M.13 HOBBY 1/6th scale, fitted with RCV four-sttroke.
Futaba servos. Two-panel removeablewing. One proving flight only. Fast! £200
o.n.o.. Buyer collects (Swindon).Tel: 0788 1658 162AMI0209
AMI CLASSIFIEDS NEW 9/1/09 11:28 Page 3

98 Aviation Modeller International - March ‘09
WANTED
FREE ADS COUPON
Name......................................................................
Address..................................................................
..............................................................................
..............................................................................
Postcode.................................................................
Home tel no.............................................................
Signature.....................................Date.....................
WRITE NEATLY AND CLEARLY IN BLOCK CAPITALS PLEASE
Please send your completed coupon to :Classified Advertising Dept, Model Activity Press Ltd., 5 Chiltern Business Centre, 63-65
Woodside Rd., Amersham, Bucks, HP6 6AA
MODEL FOR SALE ?
A unique readers service from Model Activity Press : PLANES SALES.Send us a (good!) colour picture of your model and we will print it with your advertisement
-at no cost- in either Aviation Modeller International and/or Flying Scale Models. Please tick the appropriate boxes below :
SHOW IT IN COLOUR FOR FREE!
Please indicate your requirements by ticking the appropriate boxAviation Modeller International ■■
Flying Scale Models ■■
Please tick appropriate boxFOR SALE - ❐ COMPLETE AIRCRAFT & AIRFRAMES ❐ ENGINES ❐ MISC❐ RADIO CONTROL EQUIPMENT ❐ MAGS, BOOKS AND PLANSWANTED -❐ COMPLETE AIRCRAFT & AIRFRAMES ❐ ENGINES ❐ MISC❐ RADIO CONTROL EQUIPMENT ❐ MAGS, BOOKS AND PLANS
PLEASE WRITE NEATLY AND CLEARLY!!!.......THANKYOU
WANTED ANYONE INTER-STED IN FLYING CON-TROL-LINE in Malvern orWorchester area.Contact Geoff.Tel: 01684 564838.email: [email protected] 03/09EARLY E.D. HUNTER forflying, need Austin crafttimers, old type ignition coilsMcCoy 49 spark motor, foruse or suitable for repair.Tel: 07931 466650 Herts.AMI 03/09LARGE OR SMALL COL-LECTIONS of diesel petrolglow engines in any condi-tion. Kits, Frog models, oldmodel cars, books.Tel: 01634 723450.AMI 03/09FLAIR FOKKER DR.1 orD.VII, built-up in good flyingtrim to go with my SE 5a.Cash waiting. Tel. Tony:01787 269302 eves. only(Sudbury, Suffolk).AMI 02/09HELP TO GET my 1/12thscale Vickers Wellingtonscale aircraft flying. Needssome more work. Allexpenses met. Tel Frank:01708 854333 (Essex).AMI 02/09Photocopy of Aeromodellerplan for Mooco andCrossbow. Also build-instruc-tions if possible. Tel: 01915288033.AMI 02/09FEBRUAY ’08 FLYINGSCALE MODELS (CessnaBird Dog issue). Will paywell. Tel: 01255 813994/email: [email protected] 02/09E.D. HUNTER 3.46 sparesexcept c/case.Tel: 01233 623054 (Kent).AMI 01/09NEEDLE VALVE ASSEM-BLY for Mk 6 Eta 29 5ccglow motor.Tel: 01546 602918.AMI 01/09VINTAGE MULTI CHAN-NEL (IE Reed) radio controlequipment.Tel: Dvid Gibbs 01476575554 or 07814003712.Email:[email protected] 01/09JETEX:- Atom 35,Scorpion, 200, 300. Anyother Jetex equipment. Willbuy or exchange for anyglows/diesels I have forsale.
Tel: 01908 617015.Email: [email protected] 01/09MODEL BUILDER MAGSfrom 1971 to 1976 com-plete years.Email: [email protected] 01/09KEILKRAFT DOLPHINPLANTel: Brian 01483 722134.AMI 01/09LARGE OUTDOORWINDER for large rubbermodel with counter ring.Tel: Don 01827 330085.AMI 01/09CAN YOU HELP ME, getmy 1/12 scale VickersWellington flying? I will coverall costs, it needs engines.Servos, radio and somework.Tel: Frank 01708 854333Essex.AMI 01/09WANTED UNBUILTKEILKRAFT Gaucho F/Fand Mini Moa glider, KK Kit.Tel: 01279 861693(Evenings except Thursdays)AMI 12/08ANY UNMADE PLASTICMODEL KITS wanted.Airrfix, Frog, Revell, Tamiya,etc. Also Aviation, RAF andairline collectables wanted.Books, toys, models etc.Write: 27a The Grove,Biggin Hill, Kent, TN16 3TAAMI 12/08AVIATION BOOKS WANT-ED, particularly After theBattle, Harleyford, Putnams,Profile, Squadron Signal,Armour. Also aircraft dis-play models.Write: 27a The Grove,Biggin Hill, Kent, TN16 3TAAMI 12/08OS35FP P/C OR C/L IN,as new or excellent condi-tion. Fair price paid forgenuine example.Tel: 0115 9374 356AMI 12/08MODEL AIRPLANE NEWSPLAN 86A FW152 C/LS/Scale stunt published1969. Also, Jaypee C/.LAeromodeller April 1973,Boeing B47 AeromodellerFeb 1973.Tel: Richard 02476382113 (after 6pm)AMI 12/08
AMI CLASSIFIEDS NEW 9/1/09 11:28 Page 4

GRAUPNER 22/12/08 16:28 Page 1

JAMARA 12/1/09 12:05 Page 1