
Linux Domain Identity, Authentication, and Policy Guide
475
Red Hat Enterprise Linux 7.3 Linux Domain Identity, Authentication, and Policy Guide THIS GUIDE IS NOT MAINTAINED. USE WITH CAUTION. Last Updated: 2019-11-15
-
Upload
khangminh22 -
Category
Documents
-
view
1 -
download
0
Transcript of Linux Domain Identity, Authentication, and Policy Guide
Red Hat Enterprise Linux 7.3
Linux Domain Identity, Authentication, andPolicy Guide
THIS GUIDE IS NOT MAINTAINED. USE WITH CAUTION.
Last Updated: 2019-11-15


Red Hat Enterprise Linux 7.3 Linux Domain Identity, Authentication, andPolicy Guide
THIS GUIDE IS NOT MAINTAINED. USE WITH CAUTION.
Aneta Šteflová PetrováRed Hat Customer Content Services
Marc MuehlfeldRed Hat Customer Content Services
Tomáš ČapekRed Hat Customer Content Services
Ella Deon BallardRed Hat Customer Content Services
Legal Notice
Copyright © 2016 Red Hat.
This document is licensed by Red Hat under the Creative Commons Attribution-ShareAlike 3.0Unported License. If you distribute this document, or a modified version of it, you must provideattribution to Red Hat, Inc. and provide a link to the original. If the document is modified, all Red Hattrademarks must be removed.
Red Hat, as the licensor of this document, waives the right to enforce, and agrees not to assert,Section 4d of CC-BY-SA to the fullest extent permitted by applicable law.
Red Hat, Red Hat Enterprise Linux, the Shadowman logo, the Red Hat logo, JBoss, OpenShift,Fedora, the Infinity logo, and RHCE are trademarks of Red Hat, Inc., registered in the United Statesand other countries.
Linux ® is the registered trademark of Linus Torvalds in the United States and other countries.
Java ® is a registered trademark of Oracle and/or its affiliates.
XFS ® is a trademark of Silicon Graphics International Corp. or its subsidiaries in the United Statesand/or other countries.
MySQL ® is a registered trademark of MySQL AB in the United States, the European Union andother countries.
Node.js ® is an official trademark of Joyent. Red Hat is not formally related to or endorsed by theofficial Joyent Node.js open source or commercial project.
The OpenStack ® Word Mark and OpenStack logo are either registered trademarks/service marksor trademarks/service marks of the OpenStack Foundation, in the United States and othercountries and are used with the OpenStack Foundation's permission. We are not affiliated with,endorsed or sponsored by the OpenStack Foundation, or the OpenStack community.
All other trademarks are the property of their respective owners.
Keywords
1. FreeIPA. 2. Identity Management. 3. IdM. 4. IPA.
Abstract
Identity and policy management, for both users and machines, is a core function for most enterpriseenvironments. Identity Management provides a way to create an identity domain that allowsmachines to enroll to a domain and immediately access identity information required for single sign-on and authentication services, as well as policy settings that govern authorization and access. Inaddition to this guide, you can find documentation on other features and services related to RedHat Enterprise Linux Identity Management in the following guides: The System-Level
Authentication Guide documents different applications and services available to configureauthentication on local systems, including the authconfig utility, the System Security ServicesDaemon (SSSD) service, the Pluggable Authentication Module (PAM) framework, Kerberos, thecertmonger utility, and single sign-on (SSO) for applications. The Windows Integration Guidedocuments how to integrate Linux domains with Microsoft Windows Active Directory (AD) usingIdentity Management. Among other topics, the guide covers various aspects of direct and indirectAD integration, using SSSD to access a Common Internet File System (CIFS), and the realmdsystem.

. . . . . . . . . . . . . . . . . . . . . . . . . . . . . . . . . . . . . . . . . . . . . . . . . . . . . . . . . . . . . . . . . . . . . . . . . . . . . . . . . . . . . . . . . . . . . . . . . . . . . . . . . . . . . . . . . . . . . . . . . . . . . . . . . . . . . . . . . . . . . . . . . . . . . . . . . . . . . . . . . . . . . . . . . . . . . . . . . . . . . . . . . . . . . . . . . . . . . . . . . . . . . . . . . . . . . . . . . . . . . . . . . . . . . . . . . . . . . . . . . . . . . . . . . . . . . . . . . . . . . . . . . . . . . . . . . . . . . . . .
. . . . . . . . . . . . . . . . . . . . . . . . . . . . . . . . . . . . . . . . . . . . . . . . . . . . . . . . . . . . . . . . . . . . . . . . . . . . . . . . . . . . . . . . . . . . . . . . . . . . . . . . . . . . . . . . . . . . . . . . . . . . . . . . . . . . . . . . . . . . . . . . . . . . . . . . . . . . . . . . . . . . . . . . . . . . . . . . . . . . . . . . . . . . . . . . . . . . . . . . . . . . . . . . . . . . . . . . . . . . . . . . . . . . . . . . . . . . . . . . . . . . . . . . . . . . . . . . . . . . . . . . . . . . . . . . . . . . . . . .
. . . . . . . . . . . . . . . . . . . . . . . . . . . . . . . . . . . . . . . . . . . . . . . . . . . . . . . . . . . . . . . . . . . . . . . . . . . . . . . . . . . . . . . . . . . . . . . . . . . . . . . . . . . . . . . . . . . . . . . . . . . . . . . . . . . . . . . . . . . . . . . . . . . . . . . . . . . . . . . . . . . . . . . . . . . . . . . . . . . . . . . . . . . . . . . . . . . . . . . . . . . . . . . . . . . . . . . . . . . . . . . . . . . . . . . . . . . . . . . . . . . . . . . . . . . . . . . . . . . . . . . . . . . . . . . . . . . . . . . .
. . . . . . . . . . . . . . . . . . . . . . . . . . . . . . . . . . . . . . . . . . . . . . . . . . . . . . . . . . . . . . . . . . . . . . . . . . . . . . . . . . . . . . . . . . . . . . . . . . . . . . . . . . . . . . . . . . . . . . . . . . . . . . . . . . . . . . . . . . . . . . . . . . . . . . . . . . . . . . . . . . . . . . . . . . . . . . . . . . . . . . . . . . . . . . . . . . . . . . . . . . . . . . . . . . . . . . . . . . . . . . . . . . . . . . . . . . . . . . . . . . . . . . . . . . . . . . . . . . . . . . . . . . . . . . . . . . . . . . . .
. . . . . . . . . . . . . . . . . . . . . . . . . . . . . . . . . . . . . . . . . . . . . . . . . . . . . . . . . . . . . . . . . . . . . . . . . . . . . . . . . . . . . . . . . . . . . . . . . . . . . . . . . . . . . . . . . . . . . . . . . . . . . . . . . . . . . . . . . . . . . . . . . . . . . . . . . . . . . . . . . . . . . . . . . . . . . . . . . . . . . . . . . . . . . . . . . . . . . . . . . . . . . . . . . . . . . . . . . . . . . . . . . . . . . . . . . . . . . . . . . . . . . . . . . . . . . . . . . . . . . . . . . . . . . . . . . . . . . . . .
. . . . . . . . . . . . . . . . . . . . . . . . . . . . . . . . . . . . . . . . . . . . . . . . . . . . . . . . . . . . . . . . . . . . . . . . . . . . . . . . . . . . . . . . . . . . . . . . . . . . . . . . . . . . . . . . . . . . . . . . . . . . . . . . . . . . . . . . . . . . . . . . . . . . . . . . . . . . . . . . . . . . . . . . . . . . . . . . . . . . . . . . . . . . . . . . . . . . . . . . . . . . . . . . . . . . . . . . . . . . . . . . . . . . . . . . . . . . . . . . . . . . . . . . . . . . . . . . . . . . . . . . . . . . . . . . . . . . . . . .
. . . . . . . . . . . . . . . . . . . . . . . . . . . . . . . . . . . . . . . . . . . . . . . . . . . . . . . . . . . . . . . . . . . . . . . . . . . . . . . . . . . . . . . . . . . . . . . . . . . . . . . . . . . . . . . . . . . . . . . . . . . . . . . . . . . . . . . . . . . . . . . . . . . . . . . . . . . . . . . . . . . . . . . . . . . . . . . . . . . . . . . . . . . . . . . . . . . . . . . . . . . . . . . . . . . . . . . . . . . . . . . . . . . . . . . . . . . . . . . . . . . . . . . . . . . . . . . . . . . . . . . . . . . . . . . . . . . . . . . .
. . . . . . . . . . . . . . . . . . . . . . . . . . . . . . . . . . . . . . . . . . . . . . . . . . . . . . . . . . . . . . . . . . . . . . . . . . . . . . . . . . . . . . . . . . . . . . . . . . . . . . . . . . . . . . . . . . . . . . . . . . . . . . . . . . . . . . . . . . . . . . . . . . . . . . . . . . . . . . . . . . . . . . . . . . . . . . . . . . . . . . . . . . . . . . . . . . . . . . . . . . . . . . . . . . . . . . . . . . . . . . . . . . . . . . . . . . . . . . . . . . . . . . . . . . . . . . . . . . . . . . . . . . . . . . . . . . . . . . . .
. . . . . . . . . . . . . . . . . . . . . . . . . . . . . . . . . . . . . . . . . . . . . . . . . . . . . . . . . . . . . . . . . . . . . . . . . . . . . . . . . . . . . . . . . . . . . . . . . . . . . . . . . . . . . . . . . . . . . . . . . . . . . . . . . . . . . . . . . . . . . . . . . . . . . . . . . . . . . . . . . . . . . . . . . . . . . . . . . . . . . . . . . . . . . . . . . . . . . . . . . . . . . . . . . . . . . . . . . . . . . . . . . . . . . . . . . . . . . . . . . . . . . . . . . . . . . . . . . . . . . . . . . . . . . . . . . . . . . . . .
. . . . . . . . . . . . . . . . . . . . . . . . . . . . . . . . . . . . . . . . . . . . . . . . . . . . . . . . . . . . . . . . . . . . . . . . . . . . . . . . . . . . . . . . . . . . . . . . . . . . . . . . . . . . . . . . . . . . . . . . . . . . . . . . . . . . . . . . . . . . . . . . . . . . . . . . . . . . . . . . . . . . . . . . . . . . . . . . . . . . . . . . . . . . . . . . . . . . . . . . . . . . . . . . . . . . . . . . . . . . . . . . . . . . . . . . . . . . . . . . . . . . . . . . . . . . . . . . . . . . . . . . . . . . . . . . . . . . . . . .
Table of Contents
CHAPTER 1. INTRODUCTION TO RED HAT IDENTITY MANAGEMENT1.1. THE GOAL OF RED HAT IDENTITY MANAGEMENT1.2. THE IDENTITY MANAGEMENT DOMAIN
PART I. INSTALLING IDENTITY MANAGEMENT
CHAPTER 2. INSTALLING AND UNINSTALLING AN IDENTITY MANAGEMENT SERVER2.1. PREREQUISITES FOR INSTALLING A SERVER2.2. PACKAGES REQUIRED TO INSTALL AN IDM SERVER2.3. INSTALLING AN IDM SERVER: INTRODUCTION2.4. UNINSTALLING AN IDM SERVER2.5. RENAMING A SERVER
CHAPTER 3. INSTALLING AND UNINSTALLING IDENTITY MANAGEMENT CLIENTS3.1. PREREQUISITES FOR INSTALLING A CLIENT3.2. PACKAGES REQUIRED TO INSTALL A CLIENT3.3. INSTALLING A CLIENT3.4. SETTING UP AN IDM CLIENT THROUGH KICKSTART3.5. TESTING THE NEW CLIENT3.6. UNINSTALLING A CLIENT3.7. RE-ENROLLING A CLIENT INTO THE IDM DOMAIN3.8. RENAMING CLIENT MACHINES
CHAPTER 4. INSTALLING AND UNINSTALLING IDENTITY MANAGEMENT REPLICAS4.1. EXPLAINING IDM REPLICAS4.2. DEPLOYMENT CONSIDERATIONS FOR REPLICAS4.3. PREREQUISITES FOR INSTALLING A REPLICA SERVER4.4. PACKAGES REQUIRED TO INSTALL A REPLICA4.5. CREATING THE REPLICA: INTRODUCTION4.6. TESTING THE NEW REPLICA4.7. UNINSTALLING A REPLICA
PART II. THE BASICS OF MANAGING AN IDENTITY MANAGEMENT DOMAIN
CHAPTER 5. THE BASICS OF MANAGING THE IDM SERVER AND SERVICES5.1. STARTING AND STOPPING THE IDM SERVER5.2. LOGGING INTO IDM USING KERBEROS5.3. THE IDM COMMAND-LINE UTILITIES5.4. THE IDM WEB UI
CHAPTER 6. MANAGING REPLICATION TOPOLOGY6.1. EXPLAINING REPLICATION AGREEMENTS, TOPOLOGY SUFFIXES, AND TOPOLOGY SEGMENTS6.2. WEB UI: USING THE TOPOLOGY GRAPH TO MANAGE REPLICATION TOPOLOGY6.3. COMMAND LINE: MANAGING TOPOLOGY USING THE IPA TOPOLOGY* COMMANDS6.4. REMOVING A SERVER FROM THE TOPOLOGY6.5. MANAGING SERVER ROLES
CHAPTER 7. DISPLAYING AND RAISING THE DOMAIN LEVEL7.1. DISPLAYING THE CURRENT DOMAIN LEVEL7.2. RAISING THE DOMAIN LEVEL
CHAPTER 8. UPGRADING IDENTITY MANAGEMENT8.1. MIGRATING THE IDM SERVER TO RED HAT ENTERPRISE LINUX 7
779
13
141419
203333
3535353639414141
42
4545454949495656
57
5858586063
696971
767880
848485
8687
Table of Contents
1

. . . . . . . . . . . . . . . . . . . . . . . . . . . . . . . . . . . . . . . . . . . . . . . . . . . . . . . . . . . . . . . . . . . . . . . . . . . . . . . . . . . . . . . . . . . . . . . . . . . . . . . . . . . . . . . . . . . . . . . . . . . . . . . . . . . . . . . . . . . . . . . . . . . . . . . . . . . . . . . . . . . . . . . . . . . . . . . . . . . . . . . . . . . . . . . . . . . . . . . . . . . . . . . . . . . . . . . . . . . . . . . . . . . . . . . . . . . . . . . . . . . . . . . . . . . . . . . . . . . . . . . . . . . . . . . . . . . . . . . .
. . . . . . . . . . . . . . . . . . . . . . . . . . . . . . . . . . . . . . . . . . . . . . . . . . . . . . . . . . . . . . . . . . . . . . . . . . . . . . . . . . . . . . . . . . . . . . . . . . . . . . . . . . . . . . . . . . . . . . . . . . . . . . . . . . . . . . . . . . . . . . . . . . . . . . . . . . . . . . . . . . . . . . . . . . . . . . . . . . . . . . . . . . . . . . . . . . . . . . . . . . . . . . . . . . . . . . . . . . . . . . . . . . . . . . . . . . . . . . . . . . . . . . . . . . . . . . . . . . . . . . . . . . . . . . . . . . . . . . . .
. . . . . . . . . . . . . . . . . . . . . . . . . . . . . . . . . . . . . . . . . . . . . . . . . . . . . . . . . . . . . . . . . . . . . . . . . . . . . . . . . . . . . . . . . . . . . . . . . . . . . . . . . . . . . . . . . . . . . . . . . . . . . . . . . . . . . . . . . . . . . . . . . . . . . . . . . . . . . . . . . . . . . . . . . . . . . . . . . . . . . . . . . . . . . . . . . . . . . . . . . . . . . . . . . . . . . . . . . . . . . . . . . . . . . . . . . . . . . . . . . . . . . . . . . . . . . . . . . . . . . . . . . . . . . . . . . . . . . . . .
. . . . . . . . . . . . . . . . . . . . . . . . . . . . . . . . . . . . . . . . . . . . . . . . . . . . . . . . . . . . . . . . . . . . . . . . . . . . . . . . . . . . . . . . . . . . . . . . . . . . . . . . . . . . . . . . . . . . . . . . . . . . . . . . . . . . . . . . . . . . . . . . . . . . . . . . . . . . . . . . . . . . . . . . . . . . . . . . . . . . . . . . . . . . . . . . . . . . . . . . . . . . . . . . . . . . . . . . . . . . . . . . . . . . . . . . . . . . . . . . . . . . . . . . . . . . . . . . . . . . . . . . . . . . . . . . . . . . . . . .
. . . . . . . . . . . . . . . . . . . . . . . . . . . . . . . . . . . . . . . . . . . . . . . . . . . . . . . . . . . . . . . . . . . . . . . . . . . . . . . . . . . . . . . . . . . . . . . . . . . . . . . . . . . . . . . . . . . . . . . . . . . . . . . . . . . . . . . . . . . . . . . . . . . . . . . . . . . . . . . . . . . . . . . . . . . . . . . . . . . . . . . . . . . . . . . . . . . . . . . . . . . . . . . . . . . . . . . . . . . . . . . . . . . . . . . . . . . . . . . . . . . . . . . . . . . . . . . . . . . . . . . . . . . . . . . . . . . . . . . .
. . . . . . . . . . . . . . . . . . . . . . . . . . . . . . . . . . . . . . . . . . . . . . . . . . . . . . . . . . . . . . . . . . . . . . . . . . . . . . . . . . . . . . . . . . . . . . . . . . . . . . . . . . . . . . . . . . . . . . . . . . . . . . . . . . . . . . . . . . . . . . . . . . . . . . . . . . . . . . . . . . . . . . . . . . . . . . . . . . . . . . . . . . . . . . . . . . . . . . . . . . . . . . . . . . . . . . . . . . . . . . . . . . . . . . . . . . . . . . . . . . . . . . . . . . . . . . . . . . . . . . . . . . . . . . . . . . . . . . . .
. . . . . . . . . . . . . . . . . . . . . . . . . . . . . . . . . . . . . . . . . . . . . . . . . . . . . . . . . . . . . . . . . . . . . . . . . . . . . . . . . . . . . . . . . . . . . . . . . . . . . . . . . . . . . . . . . . . . . . . . . . . . . . . . . . . . . . . . . . . . . . . . . . . . . . . . . . . . . . . . . . . . . . . . . . . . . . . . . . . . . . . . . . . . . . . . . . . . . . . . . . . . . . . . . . . . . . . . . . . . . . . . . . . . . . . . . . . . . . . . . . . . . . . . . . . . . . . . . . . . . . . . . . . . . . . . . . . . . . . .
. . . . . . . . . . . . . . . . . . . . . . . . . . . . . . . . . . . . . . . . . . . . . . . . . . . . . . . . . . . . . . . . . . . . . . . . . . . . . . . . . . . . . . . . . . . . . . . . . . . . . . . . . . . . . . . . . . . . . . . . . . . . . . . . . . . . . . . . . . . . . . . . . . . . . . . . . . . . . . . . . . . . . . . . . . . . . . . . . . . . . . . . . . . . . . . . . . . . . . . . . . . . . . . . . . . . . . . . . . . . . . . . . . . . . . . . . . . . . . . . . . . . . . . . . . . . . . . . . . . . . . . . . . . . . . . . . . . . . . . .
. . . . . . . . . . . . . . . . . . . . . . . . . . . . . . . . . . . . . . . . . . . . . . . . . . . . . . . . . . . . . . . . . . . . . . . . . . . . . . . . . . . . . . . . . . . . . . . . . . . . . . . . . . . . . . . . . . . . . . . . . . . . . . . . . . . . . . . . . . . . . . . . . . . . . . . . . . . . . . . . . . . . . . . . . . . . . . . . . . . . . . . . . . . . . . . . . . . . . . . . . . . . . . . . . . . . . . . . . . . . . . . . . . . . . . . . . . . . . . . . . . . . . . . . . . . . . . . . . . . . . . . . . . . . . . . . . . . . . . . .
CHAPTER 9. BACKING UP AND RESTORING IDENTITY MANAGEMENT9.1. FULL-SERVER BACKUP AND DATA-ONLY BACKUP9.2. RESTORING A BACKUP
PART III. MANAGING USER AND SYSTEM IDENTITIES IN A LINUX DOMAIN
CHAPTER 10. MANAGING USER ACCOUNTS10.1. SETTING UP USER HOME DIRECTORIES10.2. USER LIFE CYCLE10.3. EDITING USERS10.4. ENABLING AND DISABLING USER ACCOUNTS10.5. ALLOWING NON-ADMIN USERS TO MANAGE USER ENTRIES10.6. USING AN EXTERNAL PROVISIONING SYSTEM FOR USERS AND GROUPS
CHAPTER 11. MANAGING USER GROUPS11.1. HOW USER GROUPS WORK IN IDM11.2. ADDING AND REMOVING USER GROUPS11.3. HOW USER GROUP MEMBERSHIP WORKS IN IDM11.4. ADDING AND REMOVING USER GROUP MEMBERS11.5. DISABLING USER PRIVATE GROUPS11.6. SETTING SEARCH ATTRIBUTES FOR USERS AND USER GROUPS
CHAPTER 12. USER AUTHENTICATION12.1. USER PASSWORDS12.2. ONE-TIME PASSWORDS12.3. RESTRICTING ACCESS TO SERVICES AND HOSTS BASED ON HOW USERS AUTHENTICATE12.4. MANAGING PUBLIC SSH KEYS FOR USERS12.5. SMART CARDS12.6. USER CERTIFICATES
CHAPTER 13. UNIQUE UID AND GID NUMBER ASSIGNMENTS13.1. ID RANGES13.2. ID RANGE ASSIGNMENTS DURING INSTALLATION13.3. DISPLAYING CURRENTLY ASSIGNED ID RANGES13.4. AUTOMATIC ID RANGE EXTENSION AFTER DELETING A REPLICA13.5. MANUAL ID RANGE EXTENSION AND ASSIGNING A NEW ID RANGE13.6. ENSURING THAT ID VALUES ARE UNIQUE13.7. REPAIRING CHANGED UID AND GID NUMBERS
CHAPTER 14. USER AND GROUP SCHEMA14.1. ABOUT CHANGING THE DEFAULT USER AND GROUP SCHEMA14.2. APPLYING CUSTOM OBJECT CLASSES TO NEW USER ENTRIES14.3. APPLYING CUSTOM OBJECT CLASSES TO NEW GROUP ENTRIES14.4. SPECIFYING DEFAULT USER AND GROUP ATTRIBUTES
CHAPTER 15. ID VIEWSPotential Negative Impact on SSSD Performance15.1. ATTRIBUTES AN ID VIEW CAN OVERRIDE15.2. GETTING HELP FOR ID VIEW COMMANDS15.3. DEFINING A DIFFERENT ATTRIBUTE VALUE FOR A USER ACCOUNT ON DIFFERENT HOSTS
CHAPTER 16. MANAGING HOSTS16.1. ABOUT HOSTS, SERVICES, AND MACHINE IDENTITY AND AUTHENTICATION16.2. ABOUT HOST ENTRY CONFIGURATION PROPERTIES16.3. ADDING HOST ENTRIES
939397
100
101101102
111113114117
125125126128129131132
134134136144146149151
153153153154154154155156
157159159161
163
167167167168168
174174175176
Linux Domain Identity, Authentication, and Policy Guide
2

. . . . . . . . . . . . . . . . . . . . . . . . . . . . . . . . . . . . . . . . . . . . . . . . . . . . . . . . . . . . . . . . . . . . . . . . . . . . . . . . . . . . . . . . . . . . . . . . . . . . . . . . . . . . . . . . . . . . . . . . . . . . . . . . . . . . . . . . . . . . . . . . . . . . . . . . . . . . . . . . . . . . . . . . . . . . . . . . . . . . . . . . . . . . . . . . . . . . . . . . . . . . . . . . . . . . . . . . . . . . . . . . . . . . . . . . . . . . . . . . . . . . . . . . . . . . . . . . . . . . . . . . . . . . . . . . . . . . . . . .
. . . . . . . . . . . . . . . . . . . . . . . . . . . . . . . . . . . . . . . . . . . . . . . . . . . . . . . . . . . . . . . . . . . . . . . . . . . . . . . . . . . . . . . . . . . . . . . . . . . . . . . . . . . . . . . . . . . . . . . . . . . . . . . . . . . . . . . . . . . . . . . . . . . . . . . . . . . . . . . . . . . . . . . . . . . . . . . . . . . . . . . . . . . . . . . . . . . . . . . . . . . . . . . . . . . . . . . . . . . . . . . . . . . . . . . . . . . . . . . . . . . . . . . . . . . . . . . . . . . . . . . . . . . . . . . . . . . . . . . .
. . . . . . . . . . . . . . . . . . . . . . . . . . . . . . . . . . . . . . . . . . . . . . . . . . . . . . . . . . . . . . . . . . . . . . . . . . . . . . . . . . . . . . . . . . . . . . . . . . . . . . . . . . . . . . . . . . . . . . . . . . . . . . . . . . . . . . . . . . . . . . . . . . . . . . . . . . . . . . . . . . . . . . . . . . . . . . . . . . . . . . . . . . . . . . . . . . . . . . . . . . . . . . . . . . . . . . . . . . . . . . . . . . . . . . . . . . . . . . . . . . . . . . . . . . . . . . . . . . . . . . . . . . . . . . . . . . . . . . . .
. . . . . . . . . . . . . . . . . . . . . . . . . . . . . . . . . . . . . . . . . . . . . . . . . . . . . . . . . . . . . . . . . . . . . . . . . . . . . . . . . . . . . . . . . . . . . . . . . . . . . . . . . . . . . . . . . . . . . . . . . . . . . . . . . . . . . . . . . . . . . . . . . . . . . . . . . . . . . . . . . . . . . . . . . . . . . . . . . . . . . . . . . . . . . . . . . . . . . . . . . . . . . . . . . . . . . . . . . . . . . . . . . . . . . . . . . . . . . . . . . . . . . . . . . . . . . . . . . . . . . . . . . . . . . . . . . . . . . . . .
. . . . . . . . . . . . . . . . . . . . . . . . . . . . . . . . . . . . . . . . . . . . . . . . . . . . . . . . . . . . . . . . . . . . . . . . . . . . . . . . . . . . . . . . . . . . . . . . . . . . . . . . . . . . . . . . . . . . . . . . . . . . . . . . . . . . . . . . . . . . . . . . . . . . . . . . . . . . . . . . . . . . . . . . . . . . . . . . . . . . . . . . . . . . . . . . . . . . . . . . . . . . . . . . . . . . . . . . . . . . . . . . . . . . . . . . . . . . . . . . . . . . . . . . . . . . . . . . . . . . . . . . . . . . . . . . . . . . . . . .
. . . . . . . . . . . . . . . . . . . . . . . . . . . . . . . . . . . . . . . . . . . . . . . . . . . . . . . . . . . . . . . . . . . . . . . . . . . . . . . . . . . . . . . . . . . . . . . . . . . . . . . . . . . . . . . . . . . . . . . . . . . . . . . . . . . . . . . . . . . . . . . . . . . . . . . . . . . . . . . . . . . . . . . . . . . . . . . . . . . . . . . . . . . . . . . . . . . . . . . . . . . . . . . . . . . . . . . . . . . . . . . . . . . . . . . . . . . . . . . . . . . . . . . . . . . . . . . . . . . . . . . . . . . . . . . . . . . . . . . .
. . . . . . . . . . . . . . . . . . . . . . . . . . . . . . . . . . . . . . . . . . . . . . . . . . . . . . . . . . . . . . . . . . . . . . . . . . . . . . . . . . . . . . . . . . . . . . . . . . . . . . . . . . . . . . . . . . . . . . . . . . . . . . . . . . . . . . . . . . . . . . . . . . . . . . . . . . . . . . . . . . . . . . . . . . . . . . . . . . . . . . . . . . . . . . . . . . . . . . . . . . . . . . . . . . . . . . . . . . . . . . . . . . . . . . . . . . . . . . . . . . . . . . . . . . . . . . . . . . . . . . . . . . . . . . . . . . . . . . . .
. . . . . . . . . . . . . . . . . . . . . . . . . . . . . . . . . . . . . . . . . . . . . . . . . . . . . . . . . . . . . . . . . . . . . . . . . . . . . . . . . . . . . . . . . . . . . . . . . . . . . . . . . . . . . . . . . . . . . . . . . . . . . . . . . . . . . . . . . . . . . . . . . . . . . . . . . . . . . . . . . . . . . . . . . . . . . . . . . . . . . . . . . . . . . . . . . . . . . . . . . . . . . . . . . . . . . . . . . . . . . . . . . . . . . . . . . . . . . . . . . . . . . . . . . . . . . . . . . . . . . . . . . . . . . . . . . . . . . . . .
16.4. DISABLING AND RE-ENABLING HOST ENTRIES16.5. MANAGING PUBLIC SSH KEYS FOR HOSTS16.6. SETTING ETHERS INFORMATION FOR A HOST16.7. MANAGING HOST GROUPS
CHAPTER 17. MANAGING SERVICES17.1. ADDING AND EDITING SERVICE ENTRIES AND KEYTABS17.2. CONFIGURING CLUSTERED SERVICES17.3. USING THE SAME SERVICE PRINCIPAL FOR MULTIPLE SERVICES17.4. RETRIEVE EXISTING KEYTABS FOR MULTIPLE SERVERS17.5. DISABLING AND RE-ENABLING SERVICE ENTRIES
CHAPTER 18. DELEGATING USER ACCESS TO HOSTS AND SERVICES18.1. DELEGATING SERVICE MANAGEMENT18.2. DELEGATING HOST MANAGEMENT18.3. DELEGATING HOST OR SERVICE MANAGEMENT IN THE WEB UI18.4. ACCESSING DELEGATED SERVICES
CHAPTER 19. PERFORMANCE TUNING FOR BULK PROVISIONING OF ENTRIESRecommendations and Prerequisites for Bulk ProvisioningBacking up the Current DS Tuning Parameter ValuesAdjusting the Database, Domain Entry, and DN Cache SizeDisabling Unnecessary Services and Adjusting Database LocksImporting the EntriesRe-enabling the Disabled Services and Restoring the Original Attribute Values
CHAPTER 20. MANAGING CERTIFICATES FOR USERS, HOSTS, AND SERVICES20.1. MANAGING CERTIFICATES WITH THE INTEGRATED IDM CAS20.2. MANAGING CERTIFICATES ISSUED BY EXTERNAL CAS20.3. LISTING AND DISPLAYING CERTIFICATES20.4. CERTIFICATE PROFILES20.5. CERTIFICATE AUTHORITY ACL RULES20.6. USING CERTIFICATE PROFILES AND ACLS TO ISSUE USER CERTIFICATES WITH THE IDM CAS
CHAPTER 21. MANAGING KERBEROS PRINCIPAL ALIASES FOR USERS, HOSTS, AND SERVICES21.1. KERBEROS PRINCIPAL ALIAS21.2. KERBEROS ENTERPRISE PRINCIPAL ALIAS
CHAPTER 22. STORING AUTHENTICATION SECRETS WITH VAULTS22.1. HOW VAULTS WORK22.2. PREREQUISITES FOR USING VAULTS22.3. GETTING HELP FOR VAULT COMMANDS22.4. STORING A USER'S PERSONAL SECRET22.5. STORING A SERVICE SECRET IN A VAULT22.6. STORING A COMMON SECRET FOR MULTIPLE USERS
CHAPTER 23. INTEGRATING WITH NIS DOMAINS AND NETGROUPS23.1. ABOUT NIS AND IDENTITY MANAGEMENT23.2. SETTING THE NIS PORT FOR IDENTITY MANAGEMENT23.3. CREATING NETGROUPS23.4. EXPOSING AUTOMOUNT MAPS TO NIS CLIENTS23.5. MIGRATING FROM NIS TO IDM
CHAPTER 24. MANAGING DNS24.1. INSTALLING DNS SERVICES INTO AN EXISTING SERVER
179179185186
189189191
192192194
195195196196197
199199199
200202203203
206206210212214219224
231231
232
234234236236237238242
244244245246251251
259259
Table of Contents
3

. . . . . . . . . . . . . . . . . . . . . . . . . . . . . . . . . . . . . . . . . . . . . . . . . . . . . . . . . . . . . . . . . . . . . . . . . . . . . . . . . . . . . . . . . . . . . . . . . . . . . . . . . . . . . . . . . . . . . . . . . . . . . . . . . . . . . . . . . . . . . . . . . . . . . . . . . . . . . . . . . . . . . . . . . . . . . . . . . . . . . . . . . . . . . . . . . . . . . . . . . . . . . . . . . . . . . . . . . . . . . . . . . . . . . . . . . . . . . . . . . . . . . . . . . . . . . . . . . . . . . . . . . . . . . . . . . . . . . . . .
. . . . . . . . . . . . . . . . . . . . . . . . . . . . . . . . . . . . . . . . . . . . . . . . . . . . . . . . . . . . . . . . . . . . . . . . . . . . . . . . . . . . . . . . . . . . . . . . . . . . . . . . . . . . . . . . . . . . . . . . . . . . . . . . . . . . . . . . . . . . . . . . . . . . . . . . . . . . . . . . . . . . . . . . . . . . . . . . . . . . . . . . . . . . . . . . . . . . . . . . . . . . . . . . . . . . . . . . . . . . . . . . . . . . . . . . . . . . . . . . . . . . . . . . . . . . . . . . . . . . . . . . . . . . . . . . . . . . . . . .
. . . . . . . . . . . . . . . . . . . . . . . . . . . . . . . . . . . . . . . . . . . . . . . . . . . . . . . . . . . . . . . . . . . . . . . . . . . . . . . . . . . . . . . . . . . . . . . . . . . . . . . . . . . . . . . . . . . . . . . . . . . . . . . . . . . . . . . . . . . . . . . . . . . . . . . . . . . . . . . . . . . . . . . . . . . . . . . . . . . . . . . . . . . . . . . . . . . . . . . . . . . . . . . . . . . . . . . . . . . . . . . . . . . . . . . . . . . . . . . . . . . . . . . . . . . . . . . . . . . . . . . . . . . . . . . . . . . . . . . .
. . . . . . . . . . . . . . . . . . . . . . . . . . . . . . . . . . . . . . . . . . . . . . . . . . . . . . . . . . . . . . . . . . . . . . . . . . . . . . . . . . . . . . . . . . . . . . . . . . . . . . . . . . . . . . . . . . . . . . . . . . . . . . . . . . . . . . . . . . . . . . . . . . . . . . . . . . . . . . . . . . . . . . . . . . . . . . . . . . . . . . . . . . . . . . . . . . . . . . . . . . . . . . . . . . . . . . . . . . . . . . . . . . . . . . . . . . . . . . . . . . . . . . . . . . . . . . . . . . . . . . . . . . . . . . . . . . . . . . . .
. . . . . . . . . . . . . . . . . . . . . . . . . . . . . . . . . . . . . . . . . . . . . . . . . . . . . . . . . . . . . . . . . . . . . . . . . . . . . . . . . . . . . . . . . . . . . . . . . . . . . . . . . . . . . . . . . . . . . . . . . . . . . . . . . . . . . . . . . . . . . . . . . . . . . . . . . . . . . . . . . . . . . . . . . . . . . . . . . . . . . . . . . . . . . . . . . . . . . . . . . . . . . . . . . . . . . . . . . . . . . . . . . . . . . . . . . . . . . . . . . . . . . . . . . . . . . . . . . . . . . . . . . . . . . . . . . . . . . . . .
. . . . . . . . . . . . . . . . . . . . . . . . . . . . . . . . . . . . . . . . . . . . . . . . . . . . . . . . . . . . . . . . . . . . . . . . . . . . . . . . . . . . . . . . . . . . . . . . . . . . . . . . . . . . . . . . . . . . . . . . . . . . . . . . . . . . . . . . . . . . . . . . . . . . . . . . . . . . . . . . . . . . . . . . . . . . . . . . . . . . . . . . . . . . . . . . . . . . . . . . . . . . . . . . . . . . . . . . . . . . . . . . . . . . . . . . . . . . . . . . . . . . . . . . . . . . . . . . . . . . . . . . . . . . . . . . . . . . . . . .
. . . . . . . . . . . . . . . . . . . . . . . . . . . . . . . . . . . . . . . . . . . . . . . . . . . . . . . . . . . . . . . . . . . . . . . . . . . . . . . . . . . . . . . . . . . . . . . . . . . . . . . . . . . . . . . . . . . . . . . . . . . . . . . . . . . . . . . . . . . . . . . . . . . . . . . . . . . . . . . . . . . . . . . . . . . . . . . . . . . . . . . . . . . . . . . . . . . . . . . . . . . . . . . . . . . . . . . . . . . . . . . . . . . . . . . . . . . . . . . . . . . . . . . . . . . . . . . . . . . . . . . . . . . . . . . . . . . . . . . .
24.2. BIND IN IDENTITY MANAGEMENT24.3. SUPPORTED DNS ZONE TYPES24.4. DNS CONFIGURATION PRIORITIES24.5. MANAGING MASTER DNS ZONES24.6. MANAGING DYNAMIC DNS UPDATES24.7. MANAGING DNS FORWARDING24.8. MANAGING REVERSE DNS ZONES24.9. DEFINING DNS QUERY POLICY24.10. DNS LOCATIONS
PART IV. DEFINING DOMAIN-WIDE SYSTEM POLICIES
CHAPTER 25. USING AUTOMOUNT25.1. ABOUT AUTOMOUNT AND IDM25.2. CONFIGURING AUTOMOUNT25.3. SETTING UP A KERBEROS-AWARE NFS SERVER25.4. CONFIGURING LOCATIONS25.5. CONFIGURING MAPS
CHAPTER 26. DEFINING PASSWORD POLICIES26.1. ABOUT PASSWORD POLICIES AND POLICY ATTRIBUTES26.2. VIEWING PASSWORD POLICIES26.3. CREATING AND EDITING PASSWORD POLICIES26.4. MANAGING PASSWORD EXPIRATION LIMITS26.5. CHANGING THE PRIORITY OF GROUP PASSWORD POLICIES26.6. SETTING ACCOUNT LOCKOUT POLICIES26.7. ENABLING A PASSWORD CHANGE DIALOG
CHAPTER 27. MANAGING THE KERBEROS DOMAIN27.1. ABOUT KERBEROS27.2. SETTING KERBEROS TICKET POLICIES27.3. REFRESHING KERBEROS TICKETS27.4. KERBEROS FLAGS FOR SERVICES AND HOSTS27.5. CACHING KERBEROS PASSWORDS27.6. REMOVING KEYTABS
CHAPTER 28. USING SUDO28.1. THE SUDO UTILITY IN IDENTITY MANAGEMENT28.2. SUDO RULES IN IDENTITY MANAGEMENT28.3. CONFIGURING THE LOCATION FOR LOOKING UP SUDO POLICIES28.4. ADDING SUDO COMMANDS, COMMAND GROUPS, AND RULES28.5. MODIFYING SUDO COMMANDS AND COMMAND GROUPS28.6. MODIFYING SUDO RULES28.7. LISTING AND DISPLAYING SUDO COMMANDS, COMMAND GROUPS, AND RULES28.8. DISABLING AND ENABLING SUDO RULES28.9. REMOVING SUDO COMMANDS, COMMAND GROUPS, AND RULES
CHAPTER 29. CONFIGURING HOST-BASED ACCESS CONTROL29.1. ABOUT HOST-BASED ACCESS CONTROL29.2. CREATING HOST-BASED ACCESS CONTROL ENTRIES FOR SERVICES AND SERVICE GROUPS29.3. DEFINING HOST-BASED ACCESS CONTROL RULES29.4. TESTING HOST-BASED ACCESS CONTROL RULES
CHAPTER 30. DEFINING SELINUX USER MAPS30.1. ABOUT IDENTITY MANAGEMENT, SELINUX, AND MAPPING USERS
259260261261276282288290291
295
296296296301
304306
313313315
320323323324326
327327328330331
334335
336336336337339343343354354355
357357358362370
375375
Linux Domain Identity, Authentication, and Policy Guide
4

. . . . . . . . . . . . . . . . . . . . . . . . . . . . . . . . . . . . . . . . . . . . . . . . . . . . . . . . . . . . . . . . . . . . . . . . . . . . . . . . . . . . . . . . . . . . . . . . . . . . . . . . . . . . . . . . . . . . . . . . . . . . . . . . . . . . . . . . . . . . . . . . . . . . . . . . . . . . . . . . . . . . . . . . . . . . . . . . . . . . . . . . . . . . . . . . . . . . . . . . . . . . . . . . . . . . . . . . . . . . . . . . . . . . . . . . . . . . . . . . . . . . . . . . . . . . . . . . . . . . . . . . . . . . . . . . . . . . . . . .
. . . . . . . . . . . . . . . . . . . . . . . . . . . . . . . . . . . . . . . . . . . . . . . . . . . . . . . . . . . . . . . . . . . . . . . . . . . . . . . . . . . . . . . . . . . . . . . . . . . . . . . . . . . . . . . . . . . . . . . . . . . . . . . . . . . . . . . . . . . . . . . . . . . . . . . . . . . . . . . . . . . . . . . . . . . . . . . . . . . . . . . . . . . . . . . . . . . . . . . . . . . . . . . . . . . . . . . . . . . . . . . . . . . . . . . . . . . . . . . . . . . . . . . . . . . . . . . . . . . . . . . . . . . . . . . . . . . . . . . .
. . . . . . . . . . . . . . . . . . . . . . . . . . . . . . . . . . . . . . . . . . . . . . . . . . . . . . . . . . . . . . . . . . . . . . . . . . . . . . . . . . . . . . . . . . . . . . . . . . . . . . . . . . . . . . . . . . . . . . . . . . . . . . . . . . . . . . . . . . . . . . . . . . . . . . . . . . . . . . . . . . . . . . . . . . . . . . . . . . . . . . . . . . . . . . . . . . . . . . . . . . . . . . . . . . . . . . . . . . . . . . . . . . . . . . . . . . . . . . . . . . . . . . . . . . . . . . . . . . . . . . . . . . . . . . . . . . . . . . . .
. . . . . . . . . . . . . . . . . . . . . . . . . . . . . . . . . . . . . . . . . . . . . . . . . . . . . . . . . . . . . . . . . . . . . . . . . . . . . . . . . . . . . . . . . . . . . . . . . . . . . . . . . . . . . . . . . . . . . . . . . . . . . . . . . . . . . . . . . . . . . . . . . . . . . . . . . . . . . . . . . . . . . . . . . . . . . . . . . . . . . . . . . . . . . . . . . . . . . . . . . . . . . . . . . . . . . . . . . . . . . . . . . . . . . . . . . . . . . . . . . . . . . . . . . . . . . . . . . . . . . . . . . . . . . . . . . . . . . . . .
. . . . . . . . . . . . . . . . . . . . . . . . . . . . . . . . . . . . . . . . . . . . . . . . . . . . . . . . . . . . . . . . . . . . . . . . . . . . . . . . . . . . . . . . . . . . . . . . . . . . . . . . . . . . . . . . . . . . . . . . . . . . . . . . . . . . . . . . . . . . . . . . . . . . . . . . . . . . . . . . . . . . . . . . . . . . . . . . . . . . . . . . . . . . . . . . . . . . . . . . . . . . . . . . . . . . . . . . . . . . . . . . . . . . . . . . . . . . . . . . . . . . . . . . . . . . . . . . . . . . . . . . . . . . . . . . . . . . . . . .
. . . . . . . . . . . . . . . . . . . . . . . . . . . . . . . . . . . . . . . . . . . . . . . . . . . . . . . . . . . . . . . . . . . . . . . . . . . . . . . . . . . . . . . . . . . . . . . . . . . . . . . . . . . . . . . . . . . . . . . . . . . . . . . . . . . . . . . . . . . . . . . . . . . . . . . . . . . . . . . . . . . . . . . . . . . . . . . . . . . . . . . . . . . . . . . . . . . . . . . . . . . . . . . . . . . . . . . . . . . . . . . . . . . . . . . . . . . . . . . . . . . . . . . . . . . . . . . . . . . . . . . . . . . . . . . . . . . . . . . .
. . . . . . . . . . . . . . . . . . . . . . . . . . . . . . . . . . . . . . . . . . . . . . . . . . . . . . . . . . . . . . . . . . . . . . . . . . . . . . . . . . . . . . . . . . . . . . . . . . . . . . . . . . . . . . . . . . . . . . . . . . . . . . . . . . . . . . . . . . . . . . . . . . . . . . . . . . . . . . . . . . . . . . . . . . . . . . . . . . . . . . . . . . . . . . . . . . . . . . . . . . . . . . . . . . . . . . . . . . . . . . . . . . . . . . . . . . . . . . . . . . . . . . . . . . . . . . . . . . . . . . . . . . . . . . . . . . . . . . . .
. . . . . . . . . . . . . . . . . . . . . . . . . . . . . . . . . . . . . . . . . . . . . . . . . . . . . . . . . . . . . . . . . . . . . . . . . . . . . . . . . . . . . . . . . . . . . . . . . . . . . . . . . . . . . . . . . . . . . . . . . . . . . . . . . . . . . . . . . . . . . . . . . . . . . . . . . . . . . . . . . . . . . . . . . . . . . . . . . . . . . . . . . . . . . . . . . . . . . . . . . . . . . . . . . . . . . . . . . . . . . . . . . . . . . . . . . . . . . . . . . . . . . . . . . . . . . . . . . . . . . . . . . . . . . . . . . . . . . . . .
. . . . . . . . . . . . . . . . . . . . . . . . . . . . . . . . . . . . . . . . . . . . . . . . . . . . . . . . . . . . . . . . . . . . . . . . . . . . . . . . . . . . . . . . . . . . . . . . . . . . . . . . . . . . . . . . . . . . . . . . . . . . . . . . . . . . . . . . . . . . . . . . . . . . . . . . . . . . . . . . . . . . . . . . . . . . . . . . . . . . . . . . . . . . . . . . . . . . . . . . . . . . . . . . . . . . . . . . . . . . . . . . . . . . . . . . . . . . . . . . . . . . . . . . . . . . . . . . . . . . . . . . . . . . . . . . . . . . . . . .
. . . . . . . . . . . . . . . . . . . . . . . . . . . . . . . . . . . . . . . . . . . . . . . . . . . . . . . . . . . . . . . . . . . . . . . . . . . . . . . . . . . . . . . . . . . . . . . . . . . . . . . . . . . . . . . . . . . . . . . . . . . . . . . . . . . . . . . . . . . . . . . . . . . . . . . . . . . . . . . . . . . . . . . . . . . . . . . . . . . . . . . . . . . . . . . . . . . . . . . . . . . . . . . . . . . . . . . . . . . . . . . . . . . . . . . . . . . . . . . . . . . . . . . . . . . . . . . . . . . . . . . . . . . . . . . . . . . . . . . .
30.2. CONFIGURING SELINUX USER MAP ORDER AND DEFAULTS30.3. MAPPING SELINUX USERS AND IDM USERS
CHAPTER 31. DEFINING AUTOMATIC GROUP MEMBERSHIP FOR USERS AND HOSTS31.1. ABOUT AUTOMEMBERSHIP31.2. DEFINING AUTOMEMBERSHIP RULES (BASIC PROCEDURE)31.3. EXAMPLES OF USING AUTOMEMBER GROUPS
PART V. CONFIGURING THE IDENTITY MANAGEMENT SERVER
CHAPTER 32. DEFINING ACCESS CONTROL FOR IDM USERS32.1. ACCESS CONTROLS FOR IDM ENTRIES32.2. DEFINING SELF-SERVICE SETTINGS32.3. DELEGATING PERMISSIONS OVER USERS32.4. DEFINING ROLE-BASED ACCESS CONTROLS
CHAPTER 33. IDENTITY MANAGEMENT FILES AND LOGS33.1. A REFERENCE OF IDM SERVER CONFIGURATION FILES AND DIRECTORIES33.2. IDM DOMAIN SERVICES AND LOG ROTATION33.3. ABOUT DEFAULT.CONF AND CONTEXT CONFIGURATION FILES33.4. CHECKING IDM SERVER LOGS
CHAPTER 34. MANAGING CERTIFICATES AND CERTIFICATE AUTHORITIES34.1. LIGHTWEIGHT SUB-CAS34.2. RENEWING CERTIFICATES34.3. INSTALLING A CA CERTIFICATE MANUALLY34.4. CHANGING THE CERTIFICATE CHAIN34.5. ALLOWING IDM TO START WITH EXPIRED CERTIFICATES34.6. INSTALLING THIRD-PARTY CERTIFICATES FOR HTTP OR LDAP34.7. CONFIGURING OCSP RESPONDERS34.8. INSTALLING A CA INTO AN EXISTING IDM DOMAIN34.9. REPLACING THE WEB SERVER'S AND LDAP SERVER'S CERTIFICATE
CHAPTER 35. DISABLING ANONYMOUS BINDS
CHAPTER 36. MIGRATING FROM AN LDAP DIRECTORY TO IDM36.1. AN OVERVIEW OF AN LDAP TO IDM MIGRATION36.2. EXAMPLES FOR USING IPA MIGRATE-DS36.3. MIGRATING AN LDAP SERVER IDENTITY MANAGEMENT36.4. MIGRATING OVER SSL
APPENDIX A. TROUBLESHOOTING IDENTITY MANAGEMENTA.1. IDENTITY MANAGEMENT SERVERSA.2. IDENTITY MANAGEMENT REPLICASA.3. IDENTITY MANAGEMENT CLIENTSA.4. LOGGING IN AND AUTHENTICATION PROBLEMS
APPENDIX B. MANAGING REPLICAS AT DOMAIN LEVEL 0B.1. REPLICA INFORMATION FILEB.2. CREATING REPLICASB.3. MANAGING REPLICAS AND REPLICATION AGREEMENTSB.4. PROMOTING A REPLICA TO A MASTER CA SERVER
APPENDIX C. REVISION HISTORY
377380
385385386389
392
393393394397399
416416419
420421
427427429431
432432433434435436
437
438438445448450
451451452457458
460460460464467
469
Table of Contents
5

Linux Domain Identity, Authentication, and Policy Guide
6
CHAPTER 1. INTRODUCTION TO RED HATIDENTITY MANAGEMENTThis chapter explains the purpose of Red Hat Identity Management. It also provides basic informationabout the Identity Management domain, including the client and server machines that are part of thedomain.
1.1. THE GOAL OF RED HAT IDENTITY MANAGEMENT
Red Hat Identity Management (IdM) provides a centralized and unified way to manage identity stores aswell as authentication and authorization policies in a Linux-based domain. IdM significantly reduces theadministrative overhead of managing different services individually and having to use different tools ondifferent machines.
IdM is one of the few centralized identity, policy, and authorization software solutions that support:
advanced features of Linux operating system environments
unifying large groups of Linux machines
native integration with Active Directory
IdM creates a Linux-based and Linux-controlled domain:
IdM builds on existing, native Linux tools and protocols. While it has its own processes andconfiguration, its underlying technologies are familiar and trusted by Linux administrators andare well-established on Linux systems.
IdM servers and clients are Red Hat Enterprise Linux machines. However, even though IdM doesnot support Windows clients directly, it allows integration with Active Directory environment.
NOTE
This guide describes using IdM in Linux environments only. For more informationon integration with Active Directory, see the Windows Integration Guide.
For information on the Samba suite, which allows integrating Linux machines intoActive Directory environment, see the Using Samba, Kerberos, and Winbindchapter in the Windows Integration Guide.
1.1.1. Examples of Benefits Brought by IdM
Managing identities and policies with several Linux servers
Without IdM: Each server is administered separately. All passwords are saved on the local machines.The IT administrator manages users on every machine, sets authentication and authorization policiesseparately, and maintains local passwords.
With IdM: The IT administrator is able to:
maintain the identities in one central place: the IdM server
apply policies uniformly to multiples of machines at the same time
set different access levels for users by using host-based access control, delegation, and
CHAPTER 1. INTRODUCTION TO RED HAT IDENTITY MANAGEMENT
7

set different access levels for users by using host-based access control, delegation, andother rules
centrally manage privilege escalation rules
define how home directories are mounted
Enterprise single sign-on
Without IdM: Users log in to the system and are prompted for password every single time they accessa service or application. These passwords might be different, and the users have to remember whichcredential to use for which application.
With IdM: After users log in to the system, they can access multiple services and applications withoutbeing repeatedly asked for their credentials. This helps:
improve usability
reduce the security risk of passwords put on sticky notes
boost user productivity
Managing a mixed Linux and Windows environment
Without IdM: Windows systems are managed in an Active Directory forest. However, development,production, and other teams have many Linux systems, which are excluded from the Active Directoryenvironment.
With IdM: The IT administrator is able to:
manage the Linux systems using native Linux tools
integrate the Linux systems with the Windows systems, thus preserving a centralized userstore
expand the Linux base easily
separate management of Linux and Active Directory machines and allow Linux and Windowsadmins to control their environment directly
1.1.2. Contrasting Identity Management with a Standard LDAP Directory
A standard LDAP directory, such as Red Hat Directory Server, is a general-purpose directory: it can becustomized to fit a broad range of use cases.
Schema: a flexible schema that can be customized for a vast array of entries, such as users,machines, network entities, physical equipment, or buildings.
Typically used as: a back-end directory to store data for other applications, such as businessapplications that provide services on the Internet.
Identity Management (IdM) has a specific purpose: managing identities as well as authentication andauthorization policies that relate to these identities.
Schema: a specific schema that defines a particular set of entries relevant to its purpose, such asentries for user or machine identities.
Linux Domain Identity, Authentication, and Policy Guide
8
Typically used as: the identity and authentication server to manage identities within theboundaries of an enterprise or a project.
The underlying directory server technology is the same for both Red Hat Directory Server and IdM.However, IdM is optimized to manage identities. This limits its general extensibility, but also bringscertain benefits: simpler configuration, better automation of resource management, and increasedefficiency in managing identities.
1.2. THE IDENTITY MANAGEMENT DOMAIN
The Identity Management (IdM) domain consists of a group of machines that share the sameconfiguration, policies, and identity stores. The shared properties allow the machines within the domainto be aware of each other and operate together.
From the perspective of IdM, the domain includes the following types of machines:
IdM servers, which work as domain controllers
IdM clients, which are enrolled with the servers
Additionally, IdM servers are also IdM clients enrolled with themselves: server machines provide thesame functionality as clients.
IdM supports Red Hat Enterprise Linux machines as the IdM servers and clients.
NOTE
This guide describes using IdM in Linux environments. For more information onintegration with Active Directory, see the Windows Integration Guide.
1.2.1. Identity Management Servers
The IdM servers act as central repositories for identity and policy information. They also host theservices used by domain members. IdM provides a set of management tools to manage all the IdM-associated services centrally: the IdM web UI and command-line utilities.
For information on installing IdM servers, see Chapter 2, Installing and Uninstalling anIdentity Management Server.
To support redundancy and load balancing, the data and configuration can be replicated from one IdMserver to another: a replica of the initial server. You can configure servers and their replicas to providedifferent services to clients. For more details on IdM replicas, see Chapter 4, Installing and UninstallingIdentity Management Replicas.
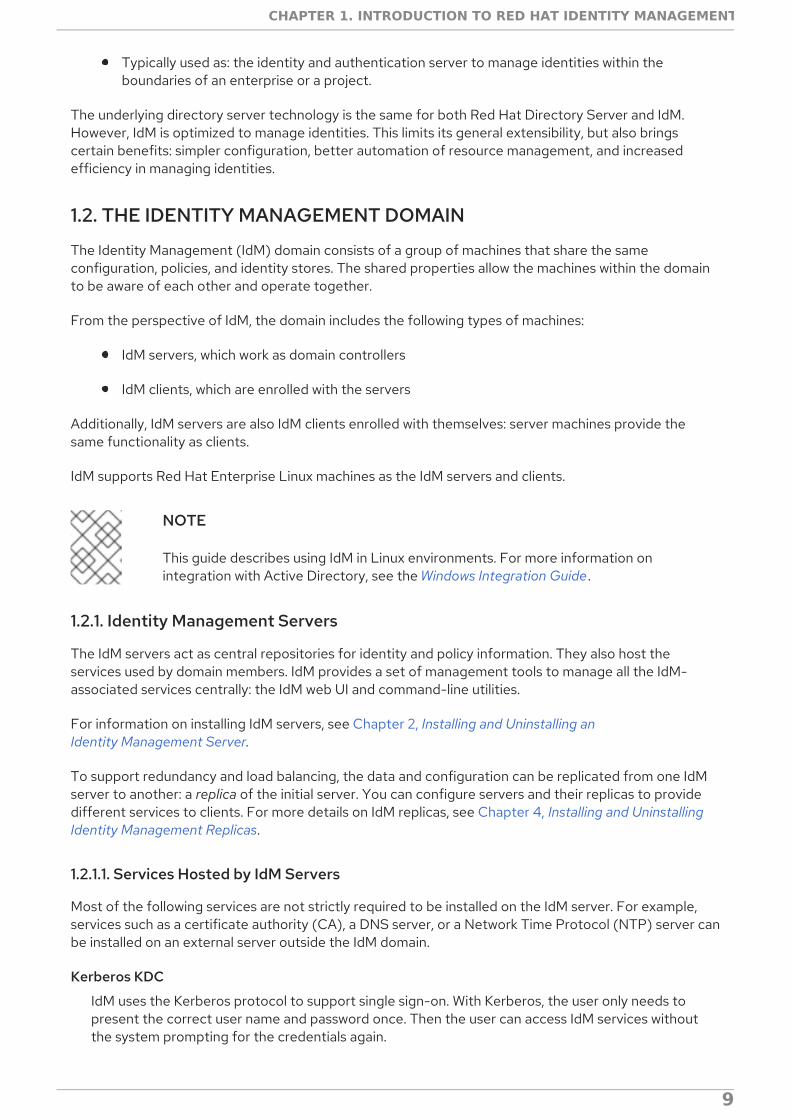
1.2.1.1. Services Hosted by IdM Servers
Most of the following services are not strictly required to be installed on the IdM server. For example,services such as a certificate authority (CA), a DNS server, or a Network Time Protocol (NTP) server canbe installed on an external server outside the IdM domain.
Kerberos KDC
IdM uses the Kerberos protocol to support single sign-on. With Kerberos, the user only needs topresent the correct user name and password once. Then the user can access IdM services withoutthe system prompting for the credentials again.
CHAPTER 1. INTRODUCTION TO RED HAT IDENTITY MANAGEMENT
9

For details on how Kerberos works, see the System-Level Authentication Guide .
For information on how to authenticate using Kerberos in IdM, see Section 5.2, “Logging intoIdM Using Kerberos”.
For information on managing Kerberos in IdM, see Chapter 27, Managing the KerberosDomain.
LDAP directory server
IdM includes an internal LDAP directory server instance where it stores all the IdM information, suchas information related to Kerberos, user accounts, host entries, services, policies, DNS, and others.
The LDAP directory server instance is based on the same technology as Red Hat Directory Server.However, it is tuned to IdM-specific tasks.
NOTE
This guide refers to this component as Directory Server.
Certificate authority
In most deployments, an integrated certificate authority (CA) is installed with the IdM server. You canalso install the server without the integrated CA, as long as you create and provide all requiredcertificates independently.
For more details on installing an IdM server with the different CA configurations, seeSection 2.3.2, “Determining What CA Configuration to Use” .
NOTE
This guide refers to this component as Certificate System when addressing theimplementation and as certificate authority when addressing the services provided bythe implementation.
Domain Name System (DNS)
IdM uses DNS for dynamic service discovery. The IdM client installation utility can use informationfrom DNS to automatically configure the client machine. After the client is enrolled in the IdMdomain, it uses DNS to locate IdM servers and services within the domain.
For more information about service discovery, see the System-Level Authentication Guide .
For information on using DNS with IdM and important prerequisites, see Section 2.1.3, “HostName and DNS Configuration”.
For details on installing an IdM server with or without integrated DNS, see Section 2.3.1,“Determining Whether to Use Integrated DNS”.
Network Time Protocol
Many services require that servers and clients have the same system time, within a certain variance.For example, Kerberos tickets use time stamps to determine their validity and to prevent replayattacks. If the times between the server and client skew outside the allowed range, the Kerberostickets are invalidated.
By default, IdM uses the Network Time Protocol (NTP) to synchronize clocks over a network. With
Linux Domain Identity, Authentication, and Policy Guide
10
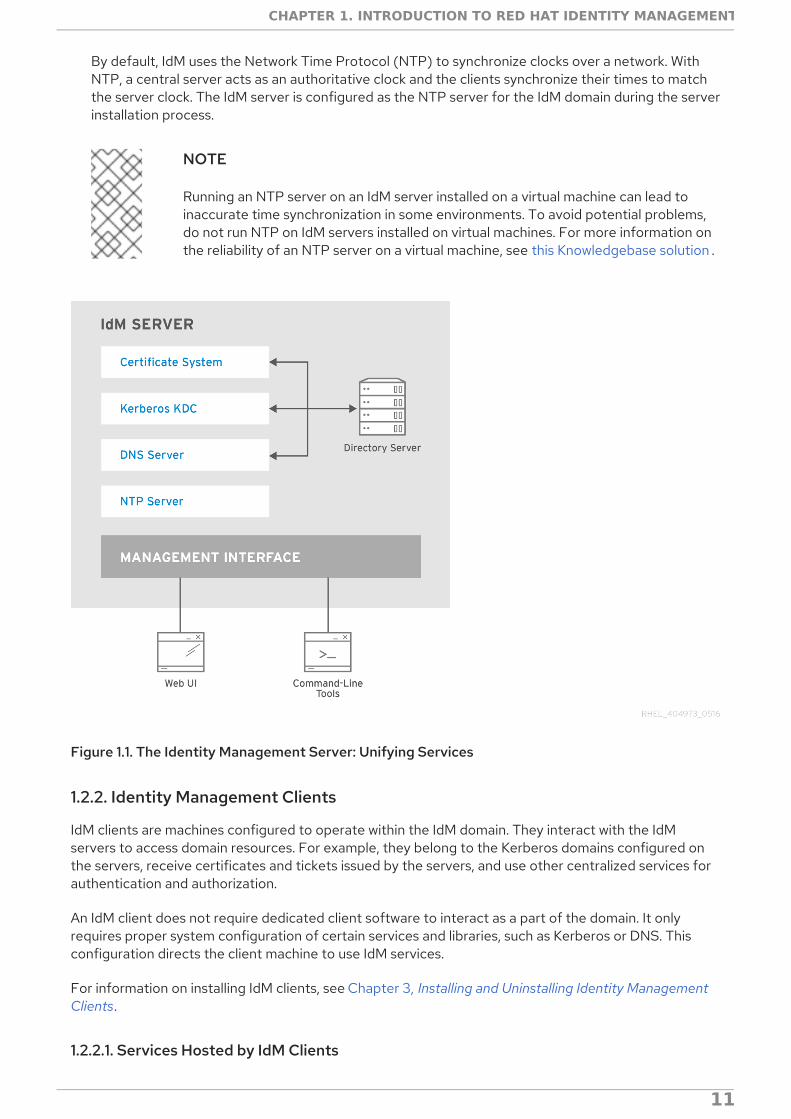
By default, IdM uses the Network Time Protocol (NTP) to synchronize clocks over a network. WithNTP, a central server acts as an authoritative clock and the clients synchronize their times to matchthe server clock. The IdM server is configured as the NTP server for the IdM domain during the serverinstallation process.
NOTE
Running an NTP server on an IdM server installed on a virtual machine can lead toinaccurate time synchronization in some environments. To avoid potential problems,do not run NTP on IdM servers installed on virtual machines. For more information onthe reliability of an NTP server on a virtual machine, see this Knowledgebase solution .
Figure 1.1. The Identity Management Server: Unifying Services
1.2.2. Identity Management Clients
IdM clients are machines configured to operate within the IdM domain. They interact with the IdMservers to access domain resources. For example, they belong to the Kerberos domains configured onthe servers, receive certificates and tickets issued by the servers, and use other centralized services forauthentication and authorization.
An IdM client does not require dedicated client software to interact as a part of the domain. It onlyrequires proper system configuration of certain services and libraries, such as Kerberos or DNS. Thisconfiguration directs the client machine to use IdM services.
For information on installing IdM clients, see Chapter 3, Installing and Uninstalling Identity ManagementClients.
1.2.2.1. Services Hosted by IdM Clients
CHAPTER 1. INTRODUCTION TO RED HAT IDENTITY MANAGEMENT
11
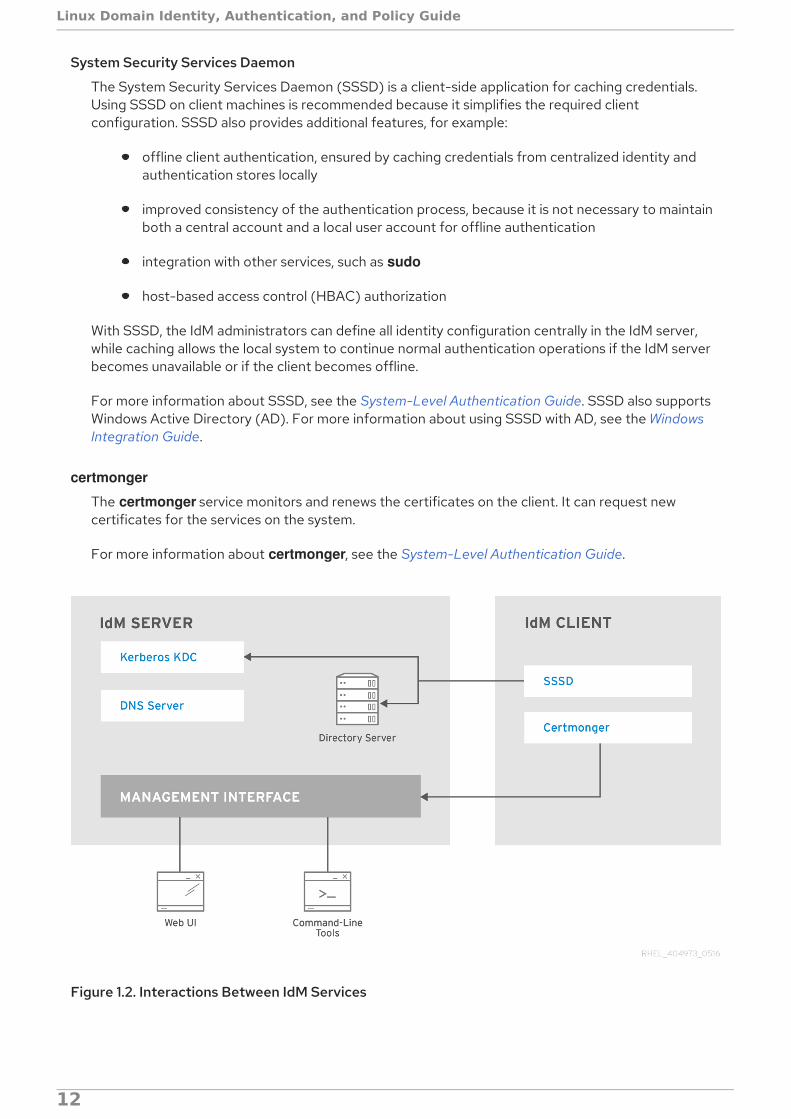
System Security Services Daemon
The System Security Services Daemon (SSSD) is a client-side application for caching credentials.Using SSSD on client machines is recommended because it simplifies the required clientconfiguration. SSSD also provides additional features, for example:
offline client authentication, ensured by caching credentials from centralized identity andauthentication stores locally
improved consistency of the authentication process, because it is not necessary to maintainboth a central account and a local user account for offline authentication
integration with other services, such as sudo
host-based access control (HBAC) authorization
With SSSD, the IdM administrators can define all identity configuration centrally in the IdM server,while caching allows the local system to continue normal authentication operations if the IdM serverbecomes unavailable or if the client becomes offline.
For more information about SSSD, see the System-Level Authentication Guide. SSSD also supportsWindows Active Directory (AD). For more information about using SSSD with AD, see the WindowsIntegration Guide.
certmonger
The certmonger service monitors and renews the certificates on the client. It can request newcertificates for the services on the system.
For more information about certmonger, see the System-Level Authentication Guide.
Figure 1.2. Interactions Between IdM Services
Linux Domain Identity, Authentication, and Policy Guide
12
PART I. INSTALLING IDENTITY MANAGEMENT
PART I. INSTALLING IDENTITY MANAGEMENT
13

CHAPTER 2. INSTALLING AND UNINSTALLING ANIDENTITY MANAGEMENT SERVERAn Identity Management (IdM) server is a domain controller: it defines and manages the IdM domain. Toset set up an IdM server, you must:
1. Install the necessary packages
2. Configure the machine using setup scripts
Red Hat strongly recommends to set up multiple domain controllers within your domain for loadbalancing and redundancy. These additional servers are replicas of the initial master IdM server.
This chapter describes installing the first, initial IdM server. For information on installing a replica fromthe initial server, see Chapter 4, Installing and Uninstalling Identity Management Replicas .
2.1. PREREQUISITES FOR INSTALLING A SERVER
2.1.1. Hardware Recommendations
RAM is the most important hardware feature to size properly. To determine how much RAM you require,consider these recommendations:
For 10,000 users and 100 groups: at least 2 GB of RAM and 1 GB swap space
For 100,000 users and 50,000 groups: at least 16 GB of RAM and 4 GB of swap space
NOTE
A basic user entry or a simple host entry with a certificate is approximately 5 - 10 KiB insize.
For larger deployments, it is more effective to increase the RAM than to increase disk space becausemuch of the data is stored in cache.
To increase performance, you can tune the underlying Directory Server to increase performance. Fordetails, see Optimizing System Performance in the Directory Server Performance Tuning Guide.
2.1.2. System Requirements
Identity Management 4.4 is supported on Red Hat Enterprise Linux 7.3. Install an IdM server on a cleansystem without any custom configuration for services such as DNS, Kerberos, or Directory Server.
The IdM server installation overwrites system files to set up the IdM domain. IdM backs up the originalsystem files to /var/lib/ipa/sysrestore/.
FIPS requirements
Installing and running IdM in the Federal Information Processing Standard (FIPS) mode is notsupported. Disable FIPS on your system before installing an IdM server, replica, or client, and do notenable it after the installation.
NSCD requirements
Red Hat recommends to disable the Name Service Cache Daemon (NSCD) on Identity Management
Linux Domain Identity, Authentication, and Policy Guide
14

Red Hat recommends to disable the Name Service Cache Daemon (NSCD) on Identity Managementmachines. Alternatively, if disabling NSCD is not possible, only enable NSCD for maps that SSSDdoes not cache.
Both NSCD and the SSSD service perform caching, and problems can occur when systems use bothservices simultaneously. See the System-Level Authentication Guide for information on how toavoid conflicts between NSCD and SSSD.
2.1.3. Host Name and DNS Configuration
WARNING
Be extremely cautious and ensure that:
you have a tested and functional DNS service available
the service is properly configured
This requirement applies to IdM servers with integrated DNS services as well as toIdM servers installed without DNS. DNS records are vital for nearly all IdM domainfunctions, including running LDAP directory services, Kerberos, and Active Directoryintegration.
Note that the primary DNS domain and Kerberos realm cannot be changed afterthe installation.
The server host must have DNS properly configured regardless of whether the DNS server is integratedwithin IdM or hosted externally.
Identity Management requires one separate DNS domain to be used for service records. To avoidconflicts on the DNS level, the primary DNS domain used for IdM cannot be shared with any othersystem.
Note that host names of IdM clients are not required to be part of the primary DNS domain.
NOTE
For information on configuring users to access an IdM client using a host name from theActive Directory DNS domain, while the client itself is joined to IdM, see IdM clients in anActive Directory DNS Domain in the Windows Integration Guide.
Verifying the Server Host NameThe host name must be a fully qualified domain name, such as server.example.com. To verify yourmachine's host name, use the hostname utility:
[root@server ~]# hostnameserver.example.com
CHAPTER 2. INSTALLING AND UNINSTALLING AN IDENTITY MANAGEMENT SERVER
15
The output of hostname must not be localhost or localhost6.
IMPORTANT
The fully qualified domain name must be a valid DNS name, which means only numbers,alphabetic characters, and hyphens (-) are allowed. Other characters, like underscores, inthe host name cause DNS failures. Additionally, the host name must be all lower-case; nocapital letters are allowed.
For other recommended naming practices, see the Red Hat Enterprise Linux SecurityGuide.
The fully qualified domain name must not resolve to the loopback address. It must resolve to themachine's public IP address, not to 127.0.0.1.
Verifying the Forward and Reverse DNS Configuration
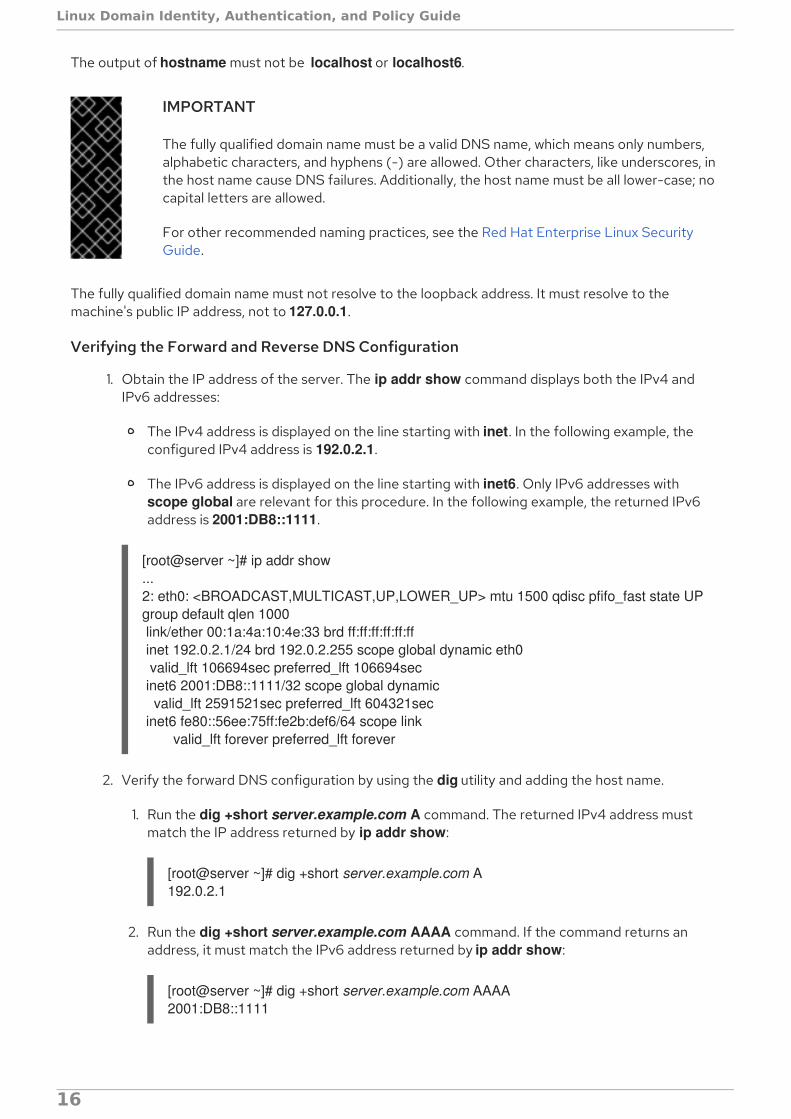
1. Obtain the IP address of the server. The ip addr show command displays both the IPv4 andIPv6 addresses:
The IPv4 address is displayed on the line starting with inet. In the following example, theconfigured IPv4 address is 192.0.2.1.
The IPv6 address is displayed on the line starting with inet6. Only IPv6 addresses with scope global are relevant for this procedure. In the following example, the returned IPv6address is 2001:DB8::1111.
[root@server ~]# ip addr show...2: eth0: <BROADCAST,MULTICAST,UP,LOWER_UP> mtu 1500 qdisc pfifo_fast state UP group default qlen 1000 link/ether 00:1a:4a:10:4e:33 brd ff:ff:ff:ff:ff:ff inet 192.0.2.1/24 brd 192.0.2.255 scope global dynamic eth0 valid_lft 106694sec preferred_lft 106694sec inet6 2001:DB8::1111/32 scope global dynamic valid_lft 2591521sec preferred_lft 604321sec inet6 fe80::56ee:75ff:fe2b:def6/64 scope link valid_lft forever preferred_lft forever
2. Verify the forward DNS configuration by using the dig utility and adding the host name.
1. Run the dig +short server.example.com A command. The returned IPv4 address mustmatch the IP address returned by ip addr show:
[root@server ~]# dig +short server.example.com A192.0.2.1
2. Run the dig +short server.example.com AAAA command. If the command returns anaddress, it must match the IPv6 address returned by ip addr show:
[root@server ~]# dig +short server.example.com AAAA2001:DB8::1111
NOTE
Linux Domain Identity, Authentication, and Policy Guide
16
NOTE
If no output is returned for the AAAA record, it does not indicate incorrectconfiguration; no output only means that no IPv6 address is configured inDNS for the server machine. If you do not intend to use the IPv6 protocol inyour network, you can proceed with the installation in this situation.
3. Verify the reverse DNS configuration (PTR records) by using the dig utility and adding the IPaddress.
1. Run the dig +short -x IPv4 address command. The server host name must be displayed inthe command output. For example:
[root@server ~]# dig +short -x 192.0.2.1server.example.com
2. Use dig to query the IPv6 address as well if the dig +short -x server.example.com AAAAcommand in the previous step returned an IPv6 address. Again, the server host name mustbe displayed in the command output. For example:
[root@server ~]# dig +short -x 2001:DB8::1111server.example.com
NOTE
If dig +short server.example.com AAAA in the previous step did notdisplay any IPv6 address, querying the AAAA record does not outputanything. In this case, this is normal behavior and does not indicate incorrectconfiguration.
If a different host name or no host name is displayed, even though dig +short server.example.com in the previous step returned an IP address, it indicates that the reverseDNS configuration is incorrect.
Verifying the Standards-compliance of DNS ForwardersWhen configuring IdM with integrated DNS, verify that all DNS forwarders you want to use with the IdMDNS server comply with the Extension Mechanisms for DNS (EDNS0) and DNS Security Extensions(DNSSEC) standards. To do this, inspect the output of the following command for each forwarderseparately:
$ dig +dnssec @IP_address_of_the_DNS_forwarder . SOA
The expected output displayed by the command contains the following information:
status: NOERROR
flags: ra
EDNS flags: do
The RRSIG record must be present in the ANSWER section
If any of these items is missing from the output, inspect the documentation of your DNS forwarder and
CHAPTER 2. INSTALLING AND UNINSTALLING AN IDENTITY MANAGEMENT SERVER
17
If any of these items is missing from the output, inspect the documentation of your DNS forwarder andverify that EDNS0 and DNSSEC are supported and enabled. In latest versions of the BIND server, the dnssec-enable yes; option must be set in the /etc/named.conf file.
For example, the expected output can look like this:
;; ->>HEADER<<- opcode: QUERY, status: NOERROR, id: 48655;; flags: qr rd ra ad; QUERY: 1, ANSWER: 2, AUTHORITY: 0, ADDITIONAL: 1
;; OPT PSEUDOSECTION:; EDNS: version: 0, flags: do; udp: 4096
;; ANSWER SECTION:. 31679 IN SOA a.root-servers.net. nstld.verisign-grs.com. 2015100701 1800 900 604800 86400. 31679 IN RRSIG SOA 8 0 86400 20151017170000 20151007160000 62530 . GNVz7SQs [...]
The /etc/hosts File
IMPORTANT
Do not modify the /etc/hosts file manually. If /etc/hosts has been modified, make sure itscontents conform to the following rules.
The following is an example of a correctly configured /etc/hosts file. It properly lists the IPv4 and IPv6localhost entries for the host, followed by the IdM server IP address and host name as the first entry.Note that the IdM server host name cannot be part of the localhost entry.
127.0.0.1 localhost.localdomain localhost::1 localhost6.localdomain6 localhost6192.0.2.1 server.example.com server2001:DB8::1111 server.example.com server
2.1.4. Port Requirements
IdM uses a number of ports to communicate with its services. These ports, listed in Table 2.1,“Identity Management Ports”, must be open and available for IdM to work. They cannot be in use byanother service or blocked by a firewall. To make sure that these ports are available, try nc, telnet, or nmap to connect to a port or run a port scan.
Table 2.1. Identity Management Ports
Service Ports Protocol
HTTP/HTTPS 80, 443 TCP
LDAP/LDAPS 389, 636 TCP
Kerberos 88, 464 TCP and UDP
DNS 53 TCP and UDP
Linux Domain Identity, Authentication, and Policy Guide
18

NTP 123 UDP
Service Ports Protocol
NOTE
Do not be concerned that IdM uses ports 80 and 389.
Port 80 (HTTP) is used to provide Online Certificate Status Protocol (OCSP)responses and Certificate Revocation Lists (CRL). Both are digitally signed andtherefore secured against man-in-the-middle attacks.
Port 389 (LDAP) uses STARTTLS and GSSAPI for encryption.
In addition, IdM can listen on port 8080 and in some installations also on ports 8443 and 749. However,these three ports are only used internally: even though IdM keeps them open, they are not required to beaccessible from outside. It is recommended that you do not open ports 8080, 8443, and 749 andinstead leave them blocked by a firewall.
Opening the Required PortsOpening ports requires the firewalld service to be running. To start firewalld as well as to configure it tostart automatically when the system boots:
[root@server ~]# systemctl start firewalld.service[root@server ~]# systemctl enable firewalld.service
NOTE
You can determine whether firewalld is currently running using the systemctl status firewalld.service command.
To open all the IdM required ports in the default zone and make the change both permanent andruntime:
1. Run the firewall-cmd command with the --permanent option specified.
[root@server ~]# firewall-cmd --permanent --add-port={80/tcp,443/tcp,389/tcp,636/tcp,88/tcp,464/tcp,53/tcp,88/udp,464/udp,53/udp,123/udp}
2. Reload the firewall-cmd configuration to ensure that the change takes place immediately.
[root@server ~]# firewall-cmd --reload
For more information on firewalld and on opening and closing ports on a system, see the Red HatSecurity Guide or the firewall-cmd(1) man page.
2.2. PACKAGES REQUIRED TO INSTALL AN IDM SERVER
To install the packages required for a server without integrated DNS services:
CHAPTER 2. INSTALLING AND UNINSTALLING AN IDENTITY MANAGEMENT SERVER
19

# yum install ipa-server
To install the packages required for a server with integrated DNS services:
# yum install ipa-server ipa-server-dns
NOTE
To determine whether DNS is right for your use case, see Section 2.3.1, “DeterminingWhether to Use Integrated DNS”.
The ipa-server packages automatically installs other required packages as dependencies, such as:
389-ds-base for the Directory Server LDAP service
krb5-server package for the Kerberos service
various IdM-specific tools
2.3. INSTALLING AN IDM SERVER: INTRODUCTION
NOTE
The installation procedures and examples in the following sections are not mutuallyexclusive: you can combine them to achieve the required result. For example, you caninstall a server with integrated DNS and with an externally hosted root CA.
The ipa-server-install utility installs and configures an IdM server.
Before installing a server, see these sections:
Section 2.3.1, “Determining Whether to Use Integrated DNS”
Section 2.3.2, “Determining What CA Configuration to Use”
The ipa-server-install utility provides a non-interactive installation mode which allows automated andunattended server setup. For details, see Section 2.3.7, “Installing a Server Non-Interactively”
The ipa-server-install installation script creates a log file at /var/log/ipaserver-install.log. If theinstallation fails, the log can help you identify the problem.
2.3.1. Determining Whether to Use Integrated DNS
IdM supports installing a server with integrated DNS or without integrated DNS.
An IdM server with integrated DNS services
The integrated DNS server provided by IdM is not designed to be used as a general-purpose DNSserver. It only supports features related to IdM deployment and maintenance. It does not supportsome of the advanced DNS features.
Red Hat strongly recommends IdM-integrated DNS for basic usage within the IdM deployment:
Linux Domain Identity, Authentication, and Policy Guide
20
Red Hat strongly recommends IdM-integrated DNS for basic usage within the IdM deployment:When the IdM server also manages DNS, there is tight integration between DNS and native IdM toolswhich enables automating some of the DNS record management.
Note that even if an IdM server is used as a master DNS server, other external DNS servers can stillbe used as slave servers.
For example, if your environment is already using another DNS server, such as an Active Directory-integrated DNS server, you can delegate only the IdM primary domain to the IdM-integrated DNS.You are not required to migrate DNS zones over to the IdM-integrated DNS.
To install a server with integrated DNS, see Section 2.3.3, “Installing a Server with Integrated DNS”
An IdM server without integrated DNS services
An external DNS server is used to provide the DNS services. Consider installing an IdM serverwithout DNS in these situations:
If you require advanced DNS features beyond the scope of the IdM DNS
In environments with a well-established DNS infrastructure which allows you to use externalDNS servers
To install a server without integrated DNS, see Section 2.3.4, “Installing a Server Without IntegratedDNS”
IMPORTANT
Make sure your system meets the DNS requirements described in Section 2.1.3, “HostName and DNS Configuration”.
Maintenance Requirements for Integrated or External DNSWhen using an integrated DNS server, most of the DNS record maintenance is automated. You onlymust:
set up correct delegation from the parent domain to the IdM servers
For example, if the IdM domain name is ipa.example.com, it must be properly delegated fromthe example.com domain.
NOTE
You can verify the delegation using the following command:
# dig @IP_address +norecurse +short ipa.example.com. NS
IP_address is the IP address of the server that manages the example.com DNSdomain. If the delegation is correct, the command lists the IdM servers that havea DNS server installed.
When using an external DNS server, you must:
manually create the new domain on the DNS server
CHAPTER 2. INSTALLING AND UNINSTALLING AN IDENTITY MANAGEMENT SERVER
21

fill the new domain manually with records from the zone file that is generated by the IdMinstaller
manually update the records after installing or removing a replica, as well as after any changes inthe service configuration, such as after an Active Directory trust is configured
Preventing DNS Amplification AttacksThe default configuration of the IdM-integrated DNS server allows all clients to issue recursive queriesto the DNS server. If your server is deployed in a network with an untrusted client, change the server'sconfiguration to limit recursion to authorized clients only. [1]
To ensure that only authorized clients are allowed to issue recursive queries, add the appropriate accesscontrol list (ACL) statements to the /etc/named.conf file on your server. For example:
acl authorized { 192.0.2.0/24; 198.51.100.0/24; };options { allow-query { any; }; allow-recursion { authorized; };};
2.3.2. Determining What CA Configuration to Use
IdM supports installing a server with an integrated IdM certificate authority (CA) or without a CA.
Server with an integrated IdM CA
This is the default configuration suitable for most deployments. Certificate System uses a CA signingcertificate to create and sign the certificates in the IdM domain.
WARNING
Red Hat strongly recommends to keep the CA services installed on more thanone server. For information on installing a replica of the initial server includingthe CA services, see Section 4.5.4, “Installing a Replica with a CA” .
If you install the CA on only one server, you risk losing the CA configurationwithout a chance of recovery if the CA server fails. See Section A.2.6,“Recovering a Lost CA Server” for details.
The CA signing certificate must signed by a root CA, which is the highest CA in the CA hierarchy. Theroot CA can be the IdM CA itself or an externally-hosted CA.
The IdM CA is the root CA
This is the default configuration.
To install a server with this configuration, see Section 2.3.3, “Installing a Server with IntegratedDNS” and Section 2.3.4, “Installing a Server Without Integrated DNS” .
An external CA is the root CA
The IdM CA is subordinate to an external CA. However, all certificates for the IdM domain are still
Linux Domain Identity, Authentication, and Policy Guide
22

The IdM CA is subordinate to an external CA. However, all certificates for the IdM domain are stillissued by the Certificate System instance.
The external CA can be a corporate CA or a third-party CA, such as Verisign or Thawte. Thecertificates issued within the IdM domain are potentially subject to restrictions set by the externalroot CA for attributes like the validity period.
To install a server with an externally-hosted root CA, see Section 2.3.5, “Installing a Server with anExternal CA as the Root CA”
Server without a CA
This configuration options is suitable for very rare cases when restrictions within the infrastructure donot allow to install certificate services with the server.
You must request these certificates from a third-party authority prior to the installation:
An LDAP server certificate and a private key
An Apache server certificate and a private key
Full CA certificate chain of the CA that issued the LDAP and Apache server certificates
Managing certificates without the integrated IdM CA presents a significant maintenance burden.Most notably:
Creating, uploading, and renewing certificates is a manual process.
The certmonger service is not used to track certificates. Therefore, it does not warn you ofimpending certificate expiration.
To install a server without an integrated CA, see Section 2.3.6, “Installing Without a CA”
2.3.3. Installing a Server with Integrated DNS
NOTE
If you are unsure what DNS or CA configuration is appropriate for you, see Section 2.3.1,“Determining Whether to Use Integrated DNS” and Section 2.3.2, “Determining What CAConfiguration to Use”.
To install a server with integrated DNS, you must provide the following information during theinstallation process:
DNS forwarders
The following DNS forwarder settings are supported:
one or more forwarders (the --forwarder option in non-interactive installation)
no forwarders (the --no-forwarders option in non-interactive installation)
If you are unsure whether to use DNS forwarding, see Section 24.7, “Managing DNS Forwarding” .
CHAPTER 2. INSTALLING AND UNINSTALLING AN IDENTITY MANAGEMENT SERVER
23
Reverse DNS zones
The following reverse DNS zone settings are supported:
automatic detection of the reverse zones that need to be created in IdM DNS (the defaultsetting in interactive installation, the --auto-reverse option in non-interactive installation)
no reverse zone auto-detection (the --no-reverse option in interactive installation)
For non-interactive installation, add the --setup-dns option as well.
Example 2.1. Installing a Server with Integrated DNS
This procedure installs a server:
with integrated DNS
with integrated IdM CA as the root CA, which is the default CA configuration
1. Run the ipa-server-install option.
# ipa-server-install
2. The script prompts to configure an integrated DNS service. Enter yes.
Do you want to configure integrated DNS (BIND)? [no]: yes
3. The script prompts for several required settings.
To accept the default values in brackets, press Enter.
To provide a value different than the proposed default value, enter the required value.
Server host name [server.example.com]:Please confirm the domain name [example.com]:Please provide a realm name [EXAMPLE.COM]:
WARNING
Red Hat strongly recommends that the Kerberos realm name is thesame as the primary DNS domain name, with all letters uppercase. Forexample, if the primary DNS domain is ipa.example.com, use IPA.EXAMPLE.COM for the Kerberos realm name.
Different naming practices will prevent you from using Active Directorytrusts and can have other negative consequences.
4. Enter the passwords for the Directory Server superuser, cn=Directory Manager, and for the admin IdM system user account.
Linux Domain Identity, Authentication, and Policy Guide
24

Directory Manager password:IPA admin password:
5. The script prompts for DNS forwarders.
Do you want to configure DNS forwarders? [yes]:
To configure DNS forwarders, enter yes, and then follow the instructions on thecommand line.
The installation process will add the forwarder IP addresses to the /etc/named.conf fileon the installed IdM server.
For the forwarding policy default settings, see the --forward-policy description inthe ipa-dns-install(1) man page.
See also the section called “Forward Policies” for details.
If you do not want to use DNS forwarding, enter no.
6. The script prompts to check if any DNS reverse (PTR) records for the IP addressesassociated with the server need to be configured.
Do you want to search for missing reverse zones? [yes]:
If you run the search and missing reverse zones are discovered, the script asks you whetherto create the reverse zones along with the PTR records.
Do you want to create reverse zone for IP 192.0.2.1 [yes]: Please specify the reverse zone name [2.0.192.in-addr.arpa.]: Using reverse zone(s) 2.0.192.in-addr.arpa.
NOTE
Using IdM to manage reverse zones is optional. You can use an external DNSservice for this purpose instead.
7. Enter yes to confirm the server configuration.
Continue to configure the system with these values? [no]: yes
8. The installation script now configures the server. Wait for the operation to complete.
9. Add DNS delegation from the parent domain to the IdM DNS domain. For example, if theIdM DNS domain is ipa.example.com, add a name server (NS) record to the example.comparent domain.
IMPORTANT
This step must be repeated each time an IdM DNS server is installed.
The script recommends you to back up the CA certificate and to make sure the required network
CHAPTER 2. INSTALLING AND UNINSTALLING AN IDENTITY MANAGEMENT SERVER
25
The script recommends you to back up the CA certificate and to make sure the required networkports are open. For information about IdM port requirements and instructions on how to open theseports, see Section 2.1.4, “Port Requirements” .
To test the new server:
1. Authenticate to the Kerberos realm using the admin credentials. This verifies that admin isproperly configured and the Kerberos realm is accessible.
# kinit admin
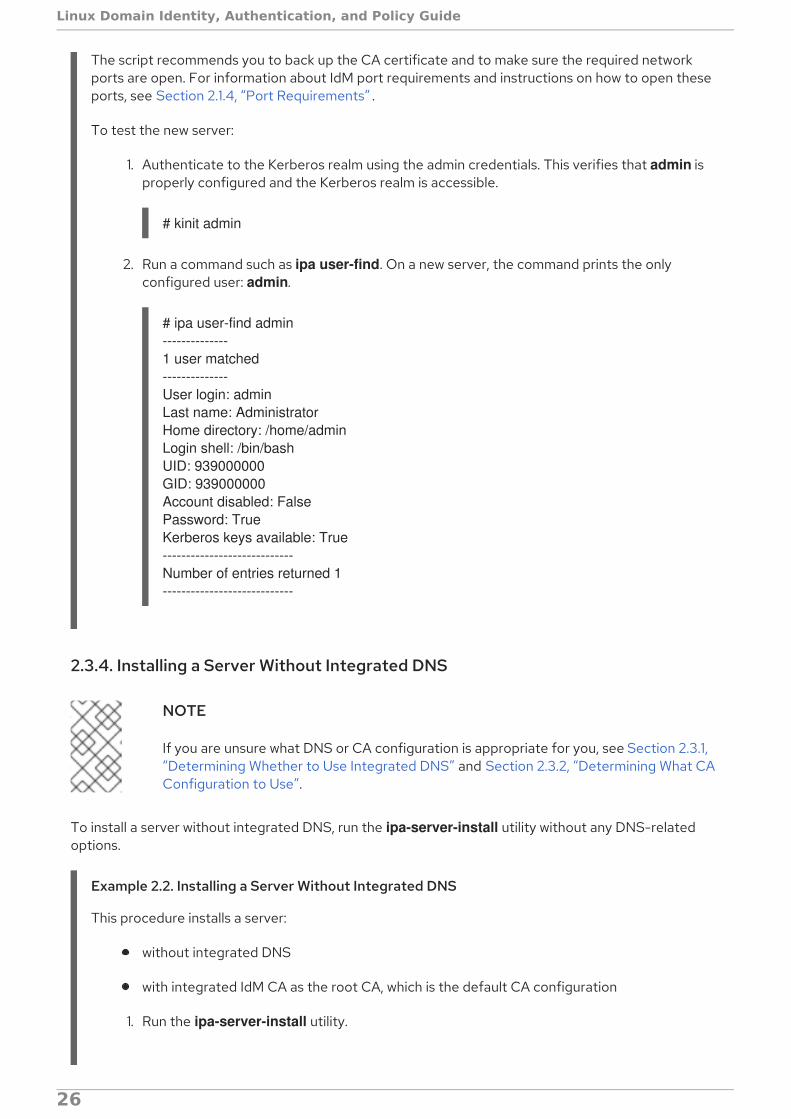
2. Run a command such as ipa user-find. On a new server, the command prints the onlyconfigured user: admin.
# ipa user-find admin--------------1 user matched--------------User login: admin Last name: Administrator Home directory: /home/admin Login shell: /bin/bash UID: 939000000 GID: 939000000 Account disabled: False Password: True Kerberos keys available: True ----------------------------Number of entries returned 1----------------------------
2.3.4. Installing a Server Without Integrated DNS
NOTE
If you are unsure what DNS or CA configuration is appropriate for you, see Section 2.3.1,“Determining Whether to Use Integrated DNS” and Section 2.3.2, “Determining What CAConfiguration to Use”.
To install a server without integrated DNS, run the ipa-server-install utility without any DNS-relatedoptions.
Example 2.2. Installing a Server Without Integrated DNS
This procedure installs a server:
without integrated DNS
with integrated IdM CA as the root CA, which is the default CA configuration
1. Run the ipa-server-install utility.
Linux Domain Identity, Authentication, and Policy Guide
26
# ipa-server-install
2. The script prompts to configure an integrated DNS service. Press Enter to select the defaultno option.
Do you want to configure integrated DNS (BIND)? [no]:
3. The script prompts for several required settings.
To accept the default values in brackets, press Enter.
To provide a value different than the proposed default value, enter the required value.
Server host name [server.example.com]:Please confirm the domain name [example.com]:Please provide a realm name [EXAMPLE.COM]:
WARNING
Red Hat strongly recommends that the Kerberos realm name is thesame as the primary DNS domain name, with all letters uppercase. Forexample, if the primary DNS domain is ipa.example.com, use IPA.EXAMPLE.COM for the Kerberos realm name.
Different naming practices will prevent you from using Active Directorytrusts and can have other negative consequences.
4. Enter the passwords for the Directory Server superuser, cn=Directory Manager, and for the admin IdM system user account.
Directory Manager password:IPA admin password:
5. Enter yes to confirm the server configuration.
Continue to configure the system with these values? [no]: yes
6. The installation script now configures the server. Wait for the operation to complete.
7. The installation script produces a file with DNS resource records: the /tmp/ipa.system.records.UFRPto.db file in the example output below. Add these recordsto the existing external DNS servers. The process of updating the DNS records variesdepending on the particular DNS solution.
...Restarting the KDCPlease add records in this file to your DNS system: /tmp/ipa.system.records.UFRBto.db
CHAPTER 2. INSTALLING AND UNINSTALLING AN IDENTITY MANAGEMENT SERVER
27
Restarting the web server...
IMPORTANT
The server installation is not complete until you add the DNS records to theexisting DNS servers.
The script recommends you to back up the CA certificate and to make sure the required networkports are open. For information about IdM port requirements and instructions on how to open theseports, see Section 2.1.4, “Port Requirements” .
To test the new server:
1. Authenticate to the Kerberos realm using the admin credentials. This verifies that admin isproperly configured and the Kerberos realm is accessible.
# kinit admin
2. Run a command such as ipa user-find. On a new server, the command prints the onlyconfigured user: admin.
# ipa user-find admin--------------1 user matched--------------User login: admin Last name: Administrator Home directory: /home/admin Login shell: /bin/bash UID: 939000000 GID: 939000000 Account disabled: False Password: True Kerberos keys available: True ----------------------------Number of entries returned 1----------------------------
2.3.5. Installing a Server with an External CA as the Root CA
NOTE
If you are unsure what DNS or CA configuration is appropriate for you, see Section 2.3.1,“Determining Whether to Use Integrated DNS” and Section 2.3.2, “Determining What CAConfiguration to Use”.
To install a server that uses an external CA as the root CA, add the --external-ca option to the ipa-server-install utility. Other than that, most of the installation procedure is the same as in Section 2.3.3,“Installing a Server with Integrated DNS” or Section 2.3.4, “Installing a Server Without Integrated DNS” .
Linux Domain Identity, Authentication, and Policy Guide
28
During the configuration of the Certificate System instance, the utility will print the location of thecertificate signing request (CSR): /root/ipa.csr:
...
Configuring certificate server (pki-tomcatd): Estimated time 3 minutes 30 seconds [1/8]: creating certificate server user [2/8]: configuring certificate server instanceThe next step is to get /root/ipa.csr signed by your CA and re-run /sbin/ipa-server-install as: /sbin/ipa-server-install --external-cert-file=/path/to/signed_certificate --external-cert-file=/path/to/external_ca_certificate
When this happens:
1. Submit the CSR located in /root/ipa.csr to the external CA. The process differs depending onthe service to be used as the external CA.
IMPORTANT
It might be necessary to request the appropriate extensions for the certificate.The CA signing certificate generated for the Identity Management server mustbe a valid CA certificate. This requires either that the Basic Constraint be set toCA=true or that the Key Usage Extension be set on the signing certificate toallow it to sign certificates.
2. Retrieve the issued certificate and the CA certificate chain for the issuing CA in a base 64-encoded blob (either a PEM file or a Base_64 certificate from a Windows CA). Again, theprocess differs for every certificate service. Usually, a download link on a web page or in thenotification email allows the administrator to download all the required certificates.
IMPORTANT
Be sure to get the full certificate chain for the CA, not just the CA certificate.
3. Run ipa-server-install again, this time specifying the locations and names of the newly-issuedCA certificate and the CA chain files. For example:
# ipa-server-install --external-cert-file=/tmp/servercert20110601.pem --external-cert-file=/tmp/cacert.pem
NOTE
The ipa-server-install --external-ca command can sometimes fail with the followingerror:
ipa : CRITICAL failed to configure ca instance Command '/usr/sbin/pkispawn -s CA -f /tmp/configuration_file' returned non-zero exit status 1Configuration of CA failed
This failure occurs when the *_proxy environmental variables are set. For a solution onhow to fix this problem, see Section A.1.1, “External CA Installation Fails”
CHAPTER 2. INSTALLING AND UNINSTALLING AN IDENTITY MANAGEMENT SERVER
29
2.3.6. Installing Without a CA
NOTE
If you are unsure what DNS or CA configuration is appropriate for you, see Section 2.3.1,“Determining Whether to Use Integrated DNS” and Section 2.3.2, “Determining What CAConfiguration to Use”.
To install a server without a CA, you must provide the required certificates manually by adding options tothe ipa-server-install utility. Other than that, most of the installation procedure is the same as inSection 2.3.3, “Installing a Server with Integrated DNS” or Section 2.3.4, “Installing a Server WithoutIntegrated DNS”.
NOTE
The command-line options in this section are incompatible with the --external-ca option.
To provide the LDAP server certificate and private key:
--dirsrv-cert-file for the certificate and private key files for the LDAP server certificate
--dirsrv-pin for the password to access the private key in the files specified in --dirsrv-cert-file
To provide the Apache server certificate and private key:
--http-cert-file for the certificate and private key files for the Apache server certificate
--http-pin for the password to access the private key in the files specified in --http-cert-file
To provide the full CA certificate chain of the CA that issued the LDAP and Apache server certificates:
--dirsrv-cert-file and --http-cert-file for the certificate files with the full CA certificate chain ora part of it
You can add these options multiple times. They accept:
PEM-encoded and DER-encoded X.509 certificate files
PKCS#1 and PKCS#8 private key files
PKCS#7 certificate chain files
PKCS#12 files
The files provided using --dirsrv-cert-file and --http-cert-file must contain exactly one servercertificate and exactly one private key.
NOTE
The content of the files provided using --dirsrv-cert-file and --http-cert-file isoften identical.
If necessary, add --ca-cert-file for the certificate files to complete the full CA certificate chain.
Linux Domain Identity, Authentication, and Policy Guide
30

You can add this option multiple times. It accepts:
PEM-encoded and DER-encoded X.509 certificate files
PKCS#7 certificate chain files
The files provided using --dirsrv-cert-file and --http-cert-file combined with the files providedusing --ca-cert-file must contain the full CA certificate chain of the CA that issued the LDAPand Apache server certificates.
For example:
[root@server ~]# ipa-server-install --http-cert-file /tmp/server.crt --http-cert-file /tmp/server.key --http-pin secret --dirsrv-cert-file /tmp/server.crt --dirsrv-cert-file /tmp/server.key --dirsrv-pin secret --ca-cert-file ca.crt
NOTE
Earlier versions of Identity Management used the --root-ca-file option to specify thePEM file of the root CA certificate. This is no longer necessary because the trusted CA isalways the issuer of the DS and HTTP server certificates. IdM now automaticallyrecognizes the root CA certificate from the certificates specified by --dirsrv-cert-file, --http-cert-file, and --ca-cert-file.
2.3.7. Installing a Server Non-Interactively
NOTE
If you are unsure what DNS or CA configuration is appropriate for you, see Section 2.3.1,“Determining Whether to Use Integrated DNS” and Section 2.3.2, “Determining What CAConfiguration to Use”.
The minimum required options for a non-interactive installation are:
--ds-password to provide the password for the Directory Manager (DM), the Directory Serversuper user
--admin-password to provide the password for admin, the IdM administrator
--realm to provide the Kerberos realm name
--unattended to let the installation process select default options for the host name anddomain name
Optionally, you can provide custom values for these settings:
--hostname for the server host name
--domain for the domain name
CHAPTER 2. INSTALLING AND UNINSTALLING AN IDENTITY MANAGEMENT SERVER
31
WARNING
Red Hat strongly recommends that the Kerberos realm name is the same as theprimary DNS domain name, with all letters uppercase. For example, if the primaryDNS domain is ipa.example.com, use IPA.EXAMPLE.COM for the Kerberos realmname.
Different naming practices will prevent you from using Active Directory trusts andcan have other negative consequences.
For a complete list of options accepted by ipa-server-install, run the ipa-server-install --helpcommand.
Example 2.3. Basic Installation without Interaction
1. Run the ipa-server-install utility, providing the required settings. For example, the followinginstalls a server without integrated DNS and with an integrated CA:
# ipa-server-install --realm EXAMPLE.COM --ds-password DM_password --admin-password admin_password --unattended
2. The setup script now configures the server. Wait for the operation to complete.
3. The installation script produces a file with DNS resource records: the /tmp/ipa.system.records.UFRPto.db file in the example output below. Add these recordsto the existing external DNS servers. The process of updating the DNS records variesdepending on the particular DNS solution.
...Restarting the KDCPlease add records in this file to your DNS system: /tmp/ipa.system.records.UFRBto.dbRestarting the web server...
IMPORTANT
The server installation is not complete until you add the DNS records to theexisting DNS servers.
The script recommends you to back up the CA certificate and to make sure the required networkports are open. For information about IdM port requirements and instructions on how to open theseports, see Section 2.1.4, “Port Requirements” .
To test the new server:
1. Authenticate to the Kerberos realm using the admin credentials. This verifies that admin isproperly configured and the Kerberos realm is accessible.
# kinit admin
Linux Domain Identity, Authentication, and Policy Guide
32
2. Run a command such as ipa user-find. On a new server, the command prints the onlyconfigured user: admin.
# ipa user-find admin--------------1 user matched--------------User login: admin Last name: Administrator Home directory: /home/admin Login shell: /bin/bash UID: 939000000 GID: 939000000 Account disabled: False Password: True Kerberos keys available: True ----------------------------Number of entries returned 1----------------------------
2.4. UNINSTALLING AN IDM SERVER
To uninstall an IdM server, add the --uninstall option to the ipa-server-install utility:
[root@server ~]# ipa-server-install --uninstall
If the server included integrated DNS, update the name server (NS) records in the parent domain toensure they do not point to the uninstalled server.
NOTE
At domain level 0, the procedure for uninstalling an IdM replica is different fromuninstalling a server. For information about uninstalling a replica, see Section B.3.6,“Removing a Replica”.
2.5. RENAMING A SERVER
It is not possible to change the host name of an IdM server after it was set up. However, you can replacethe server with a replica with a different name.
1. Create a new replica of the server, with a CA and with the new required host name or IP address.This is described in Chapter 4, Installing and Uninstalling Identity Management Replicas .
2. Stop the initial IdM server instance.
[root@old_server ~]# ipactl stop
3. Verify that all other replicas and clients are working as before.
4. Uninstall the initial IdM server, as described in Section 2.4, “Uninstalling an IdM Server”
CHAPTER 2. INSTALLING AND UNINSTALLING AN IDENTITY MANAGEMENT SERVER
33

[1] For details, see the DNS Amplification Attacks page.
Linux Domain Identity, Authentication, and Policy Guide
34

CHAPTER 3. INSTALLING AND UNINSTALLINGIDENTITY MANAGEMENT CLIENTSThis chapter explains how to configure a system to join an Identity Management (IdM) domain as a clientmachine enrolled with a server.
NOTE
See Section 1.2, “The Identity Management Domain” for details on clients and servers inthe IdM domain.
3.1. PREREQUISITES FOR INSTALLING A CLIENT
DNS requirements
Employ proper DNS delegation. For details on DNS requirements in IdM, see Section 2.1.3, “HostName and DNS Configuration”.
Do not alter the resolv.conf file on clients.
Port requirements
IdM clients connect to a number of ports on IdM servers to communicate with their services. Theseports must be open on the IdM servers to work. For more information on which ports IdM requires,see Section 2.1.4, “Port Requirements” .
On a client, open these ports in the outgoing direction. If you are using a firewall that does not filteroutgoing packets, such as firewalld, the ports are already available in the outgoing direction.
FIPS requirements
Installing and running IdM in the Federal Information Processing Standard (FIPS) mode is notsupported. Disable FIPS on your system before installing an IdM server, replica, or client, and do notenable it after the installation.
NSCD requirements
Red Hat recommends to disable the Name Service Cache Daemon (NSCD) on Identity Managementmachines. Alternatively, if disabling NSCD is not possible, only enable NSCD for maps that SSSDdoes not cache.
Both NSCD and the SSSD service perform caching, and problems can occur when systems use bothservices simultaneously. See the System-Level Authentication Guide for information on how toavoid conflicts between NSCD and SSSD.
3.2. PACKAGES REQUIRED TO INSTALL A CLIENT
Install the ipa-client package:
# yum install ipa-client
The ipa-client package automatically installs other required packages as dependencies, such as theSystem Security Services Daemon (SSSD) packages.
CHAPTER 3. INSTALLING AND UNINSTALLING IDENTITY MANAGEMENT CLIENTS
35
To be able to manage the IdM domain from the client machine, install the ipa-admintools package aswell. The package installs command-line tools for IdM administrators. If you want to use the clientmachine as a regular client system, ipa-admintools is not necessary.
3.3. INSTALLING A CLIENT
The ipa-client-install utility installs and configures an IdM client. The installation process requires you toprovide credentials that can be used to enroll the client. The following authentication methods aresupported:
Credentials of a user authorized to enroll clients, such as admin
By default, ipa-client-install expects this option. See Section 3.3.1, “Installing a Client Interactively”for an example.
To provide the user credentials directly to ipa-client-install, use the --principal and --passwordoptions.
A random, one-time password pre-generated on the server
To use this authentication method, add the --random option to ipa-client-install option. SeeExample 3.1, “Installing a Client Non-interactively Using a Random Password” .
A principal from a previous enrollment
To use this authentication method, add the --keytab option to ipa-client-install. See Section 3.7,“Re-enrolling a Client into the IdM Domain” for details.
See the ipa-client-install(1) man page for details.
The following sections document basic installation scenarios. For more details on using ipa-client-install and a complete list of the accepted options, see the ipa-client-install(1) man page.
3.3.1. Installing a Client Interactively
The following procedure installs a client while prompting the user for input when required. The userprovides credentials of a user authorized to enroll clients into the domain, such as the admin user.
1. Run the ipa-client-install utility.
Add the --enable-dns-updates option to update the DNS records with the client machine's IPaddress if one of the following applies:
the IdM server the client will be enrolled with was installed with integrated DNS
the DNS server on the network accepts DNS entry updates with the GSS-TSIG protocol
2. The installation script attempts to obtain all the required settings automatically.
a. If your DNS zone and SRV records are set properly on your system, the script automaticallydiscovers all the required values and prints them. Enter yes to confirm.
Client hostname: client.example.comRealm: EXAMPLE.COMDNS Domain: example.comIPA Server: server.example.com
Linux Domain Identity, Authentication, and Policy Guide
36

BaseDN: dc=example,dc=com
Continue to configure the system with these values? [no]: yes
If you want to install the system with different values, cancel the current installation. Thenrun ipa-client-install again, and specify the required values using command-line options.
For details, see the DNS Autodiscovery section in the ipa-client-install(1) man page.
b. If the script fails to obtain some settings automatically, it prompts you for the values.
IMPORTANT
The fully qualified domain name must be a valid DNS name, which means onlynumbers, alphabetic characters, and hyphens (-) are allowed. Othercharacters, like underscores, in the host name cause DNS failures.Additionally, the host name must be all lower-case; no capital letters areallowed.
For other recommended naming practices, see the Red Hat Enterprise LinuxSecurity Guide.
3. The script prompts for a user whose identity will be used to enroll the client. By default, this isthe admin user:
User authorized to enroll computers: adminPassword for [email protected]
4. The installation script now configures the client. Wait for the operation to complete.
Client configuration complete.
5. Run the ipa-client-automount utility, which automatically configures NFS for IdM. SeeSection 25.2.1, “Configuring NFS Automatically” for details.
3.3.2. Installing a Client Non-interactively
For a non-interactive installation, provide all required information to the ipa-client-install utility usingcommand-line options. The minimum required options for a non-interactive installation are:
options for specifying the credentials that will be used to enroll the client; see Section 3.3,“Installing a Client” for details
--unattended to let the installation run without requiring user confirmation
If your DNS zone and SRV records are set properly on your system, the script automatically discovers allthe other required values. If the script cannot discover the values automatically, provide them usingcommand-line options.
--hostname to specify a static host name for the client machine
IMPORTANT
CHAPTER 3. INSTALLING AND UNINSTALLING IDENTITY MANAGEMENT CLIENTS
37
IMPORTANT
The fully qualified domain name must be a valid DNS name, which means onlynumbers, alphabetic characters, and hyphens (-) are allowed. Other characters,like underscores, in the host name cause DNS failures. Additionally, the hostname must be all lower-case; no capital letters are allowed.
For other recommended naming practices, see the Red Hat Enterprise LinuxSecurity Guide.
--server to specify the host name of the IdM server the client will be enrolled with
--domain to specify the DNS domain name of the IdM server the client will be enrolled with
--realm to specify the Kerberos realm name
Add the --enable-dns-updates option to update the DNS records with the client machine's IP address ifone of the following applies:
the IdM server the client will be enrolled with was installed with integrated DNS
the DNS server on the network accepts DNS entry updates with the GSS-TSIG protocol
For a complete list of options accepted by ipa-client-install, see the ipa-client-install(1) man page.
Example 3.1. Installing a Client Non-interactively Using a Random Password
This procedure installs a client without prompting the user for any input. The process includes pre-generating a random one-time password on the server that is used to authorize the enrollment.
1. On an existing server:
a. Log in as the administrator:
$ kinit admin
b. Add the new machine as an IdM host. Use the --random option with the ipa host-addcommand to generate the random password.
$ ipa host-add client.example.com --random--------------------------------------------------Added host "client.example.com"-------------------------------------------------- Host name: client.example.com Random password: W5YpARl=7M.n Password: True Keytab: False Managed by: server.example.com
The generated password will become invalid after you use it to enroll the machine intothe IdM domain. It will be replaced with a proper host keytab after the enrollment isfinished.
2. On the machine where you want to install the client, run ipa-client-install, and use theseoptions:
Linux Domain Identity, Authentication, and Policy Guide
38
--password for the random password from the ipa host-add output
NOTE
The password often contains special characters. Therefore, enclose it insingle quotes (').
--unattended to let the installation run without requiring user confirmation
If your DNS zone and SRV records are set properly on your system, the script automaticallydiscovers all the other required values. If the script cannot discover the values automatically,provide them using command-line options.
For example:
# ipa-client-install --password 'W5YpARl=7M.n' --domain d-abc.idm.lab.eng.brq.redhat.com --server vm-058-105.abc.idm.lab.eng.brq.redhat.com --unattended
3. Run the ipa-client-automount utility, which automatically configures NFS for IdM. SeeSection 25.2.1, “Configuring NFS Automatically” for details.
3.4. SETTING UP AN IDM CLIENT THROUGH KICKSTART
A Kickstart enrollment automatically adds a new system to the IdM domain at the time Red HatEnterprise Linux is installed. For details on Kickstart, see Kickstart Installations in the Installation Guide.
Preparing for a Kickstart client installation includes these steps:
1. Section 3.4.1, “Pre-creating a Client Host Entry on the IdM Server”
2. Section 3.4.2, “Creating a Kickstart File for the Client”
3.4.1. Pre-creating a Client Host Entry on the IdM Server
1. Log in as admin:
$ kinit admin
2. Create the host entry on the IdM server, and set a temporary password for the entry:
$ ipa host-add client.example.com --password=secret
The password is used by Kickstart to authenticate during the client installation and expires afterthe first authentication attempt. After the client is successfully installed, it authenticates usingits keytab.
3.4.2. Creating a Kickstart File for the Client
A Kickstart file used to set up an IdM client must include the following:
CHAPTER 3. INSTALLING AND UNINSTALLING IDENTITY MANAGEMENT CLIENTS
39
The ipa-client package in the list of packages to be installed:
%packages@ X Window System@ Desktop@ Sound and Videoipa-client...
See Package Selection in the Installation Guide for details.
Post-installation instructions that:
ensure SSH keys are generated before enrollment
runs the ipa-client-install utility, specifying:
all required information to access and configure the IdM domain services
the password which you set when pre-creating the client host on the IdM server, inSection 3.4.1, “Pre-creating a Client Host Entry on the IdM Server”
For example:
%post --log=/root/ks-post.log
# Generate SSH keys to ensure that ipa-client-install uploads them to the IdM server/usr/sbin/sshd-keygen
# Run the client install script/usr/sbin/ipa-client-install --hostname=client.example.com --domain=EXAMPLE.COM --enable-dns-updates --mkhomedir -w secret --realm=EXAMPLE.COM --server=server.example.com
For a non-interactive installation, add also the --unattended option.
To let the client installation script request a certificate for the machine:
Add the --request-cert option to ipa-client-install.
Set the system bus address to /dev/null for both the getcert and ipa-client-install utility inthe kickstart chroot environment. To do this, add these lines to the post-installationinstruction file before the ipa-client-install instruction:
# env DBUS_SYSTEM_BUS_ADDRESS=unix:path=/dev/null getcert list# env DBUS_SYSTEM_BUS_ADDRESS=unix:path=/dev/null ipa-client-install
NOTE
Red Hat recommends not to start the sshd service prior to the kickstartenrollment. While starting sshd before enrolling the client generates the SSHkeys automatically, using the above script is the preferred solution.
See Post-installation Script in the Installation Guide for details.
For details on using Kickstart, see How Do You Perform a Kickstart Installation? in the Installation Guide.
Linux Domain Identity, Authentication, and Policy Guide
40
For details on using Kickstart, see How Do You Perform a Kickstart Installation? in the Installation Guide.For examples of Kickstart files, see Sample Kickstart Configurations.
3.5. TESTING THE NEW CLIENT
To test the new client, check that you are able to obtain information about users defined on the server.For example, to check the default admin user:
$ id adminuid=1254400000(admin) gid=1254400000(admins) groups=1254400000(admins)
3.6. UNINSTALLING A CLIENT
Uninstalling a client removes the client from the IdM domain, along with all of the IdM-specificconfiguration for system services, such as SSSD. This restores the client machine's previousconfiguration.
1. Run the ipa-client-install --uninstall command:
# ipa-client-install --uninstall
2. Remove the DNS entries for the client host manually from the server. See Section 24.5.6,“Deleting Records from DNS Zones”.
3.7. RE-ENROLLING A CLIENT INTO THE IDM DOMAIN
If a client virtual machine has been destroyed and you still have its keytab, you can re-enroll the client:
Interactively, using administrator credentials. See Section 3.7.1, “Re-enrolling a ClientInteractively Using the Administrator Account”.
Non-interactively, using a previously backed-up keytab file. See Section 3.7.2, “Re-enrolling aClient Non-interactively Using the Client Keytab”.
NOTE
You can only re-enroll clients whose domain entry is still active. If you uninstalled a client(using ipa-client-install --uninstall) or disabled its host entry (using ipa host-disable),you cannot re-enroll it.
During re-enrollment, IdM performs the following:
Revokes the original host certificate
Generates a new host certificate
Creates new SSH keys
Generates a new keytab
3.7.1. Re-enrolling a Client Interactively Using the Administrator Account
CHAPTER 3. INSTALLING AND UNINSTALLING IDENTITY MANAGEMENT CLIENTS
41

1. Re-create the client machine with the same host name.
2. Run the ipa-client-install --force-join command on the client machine:
# ipa-client-install --force-join
3. The script prompts for a user whose identity will be used to enroll the client. By default, this isthe admin user:
User authorized to enroll computers: adminPassword for [email protected]
3.7.2. Re-enrolling a Client Non-interactively Using the Client Keytab
Re-enrollment using the client keytab is appropriate for automated installation or in other situationswhen using the administrator password is not feasible.
1. Back up the original client's keytab file, for example in the /tmp or /root directory.
2. Re-create the client machine with the same host name.
3. Re-enroll the client, and specify the keytab location using the --keytab option:
# ipa-client-install --keytab /tmp/krb5.keytab
NOTE
The keytab specified in the --keytab option is only used when authenticating toinitiate the enrollment. During the re-enrollment, IdM generates a new keytab forthe client.
3.8. RENAMING CLIENT MACHINES
This section explains how to rename an IdM client. The process involves:
the section called “Identifying Current Service and Keytab Configuration” .
the section called “Removing the Client Machine from the IdM Domain” .
the section called “Re-enrolling the Client with a New Host Name” .
WARNING
Renaming a client is a manual procedure. Red Hat does not recommend it unlesschanging the host name is absolutely required.
Identifying Current Service and Keytab Configuration
Before uninstalling the current client, make note of certain settings for the client. You will apply this
Linux Domain Identity, Authentication, and Policy Guide
42
Before uninstalling the current client, make note of certain settings for the client. You will apply thisconfiguration after re-enrolling the machine with a new host name.
1. Identify which services are running on the machine:
a. Use the ipa service-find command, and identify services with certificates in the output:
$ ipa service-find client.example.com
b. In addition, each host has a default host service which does not appear in the ipa service-find output. The service principal for the host service, also called a host principal, is host/client.example.com.
2. Identify all host groups to which the machine belongs.
# ipa hostgroup-find client.example.com
3. For all service principals displayed by ipa service-find client.example.com, determine thelocation of the corresponding keytabs on client.example.com.
Each service on the client system has a Kerberos principal in the formservice_name/hostname@REALM, such as ldap/[email protected].
Removing the Client Machine from the IdM Domain
1. Unenroll the client machine from the IdM domain. See Section 3.6, “Uninstalling a Client”.
2. For each identified keytab other than /etc/krb5.keytab, remove the old principals:
[root@client ~]# ipa-rmkeytab -k /path/to/keytab -r EXAMPLE.COM
3. On an IdM server, remove the host entry. This removes all services and revokes all certificatesissued for that host:
[root@server ~]# ipa host-del client.example.com
At this point, the host is completely removed from IdM.
Re-enrolling the Client with a New Host Name
1. Rename the machine as required.
2. Re-enroll the machine as an IdM client. See Section 3.7, “Re-enrolling a Client into the IdMDomain”.
3. On an IdM server, add a new keytab for every service identified in the section called “IdentifyingCurrent Service and Keytab Configuration”.
[root@server ~]# ipa service-add service_name/new_host_name
4. Generate certificates for services that had a certificate assigned in the section called“Identifying Current Service and Keytab Configuration”. You can do this:
Using the IdM administration tools. See Chapter 20, Managing Certificates for Users, Hosts,and Services.
CHAPTER 3. INSTALLING AND UNINSTALLING IDENTITY MANAGEMENT CLIENTS
43

Using the certmonger utility. See Working with certmonger in the System-LevelAuthentication Guide or the certmonger(8) man page.
5. Re-add the client to the host groups identified in the section called “Identifying Current Serviceand Keytab Configuration”. See Section 16.7.2, “Adding Host Group Members” .
Linux Domain Identity, Authentication, and Policy Guide
44
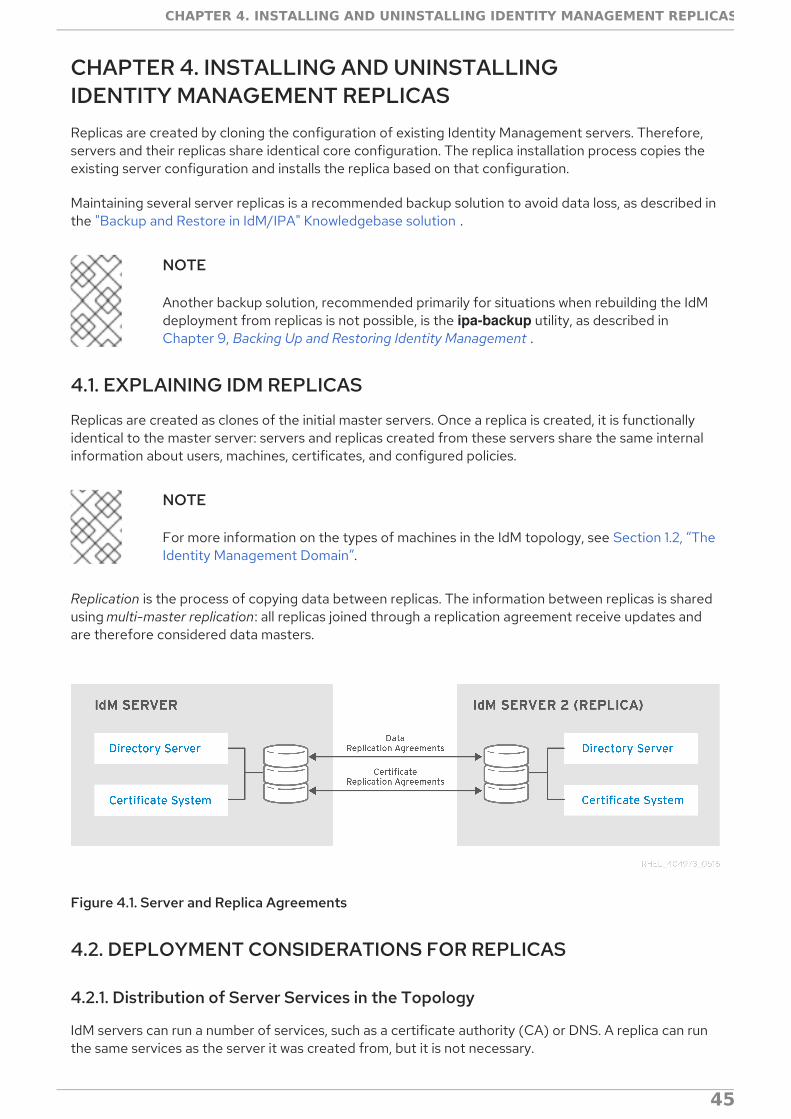
CHAPTER 4. INSTALLING AND UNINSTALLINGIDENTITY MANAGEMENT REPLICASReplicas are created by cloning the configuration of existing Identity Management servers. Therefore,servers and their replicas share identical core configuration. The replica installation process copies theexisting server configuration and installs the replica based on that configuration.
Maintaining several server replicas is a recommended backup solution to avoid data loss, as described inthe "Backup and Restore in IdM/IPA" Knowledgebase solution .
NOTE
Another backup solution, recommended primarily for situations when rebuilding the IdMdeployment from replicas is not possible, is the ipa-backup utility, as described inChapter 9, Backing Up and Restoring Identity Management .
4.1. EXPLAINING IDM REPLICAS
Replicas are created as clones of the initial master servers. Once a replica is created, it is functionallyidentical to the master server: servers and replicas created from these servers share the same internalinformation about users, machines, certificates, and configured policies.
NOTE
For more information on the types of machines in the IdM topology, see Section 1.2, “TheIdentity Management Domain”.
Replication is the process of copying data between replicas. The information between replicas is sharedusing multi-master replication: all replicas joined through a replication agreement receive updates andare therefore considered data masters.
Figure 4.1. Server and Replica Agreements
4.2. DEPLOYMENT CONSIDERATIONS FOR REPLICAS
4.2.1. Distribution of Server Services in the Topology
IdM servers can run a number of services, such as a certificate authority (CA) or DNS. A replica can runthe same services as the server it was created from, but it is not necessary.
CHAPTER 4. INSTALLING AND UNINSTALLING IDENTITY MANAGEMENT REPLICAS
45

For example, you can install a replica without DNS services, even if the initial server runs DNS. Similarly,you can set up a replica as a DNS server even if the initial server was installed without DNS.
Figure 4.2. Replicas with Different Services
CA Services on ReplicasIf you set up a replica without a CA, it will forward all requests for certificate operations to the CA serverin your topology.
WARNING
Red Hat strongly recommends to keep the CA services installed on more than oneserver. For information on installing a replica of the initial server including the CAservices, see Section 4.5.4, “Installing a Replica with a CA” .
If you install the CA on only one server, you risk losing the CA configuration withouta chance of recovery if the CA server fails. See Section A.2.6, “Recovering a LostCA Server” for details.
If you set up a CA on the replica, its configuration must mirror the CA configuration of the initial server.
For example, if the server includes an integrated IdM CA as the root CA, the replica must also beinstalled with an integrated CA as the root CA.
See Section 2.3.2, “Determining What CA Configuration to Use” for the supported CAconfiguration options.
4.2.2. Replica Topology Recommendations
Red Hat recommends to follow these guidelines:
Configure no more than 60 replicas in a single IdM domain
Linux Domain Identity, Authentication, and Policy Guide
46

Red Hat guarantees to support environments with 60 replicas or less.
Configure at least two, but no more than four replication agreements per each replica
Configuring additional replication agreements ensures that information is replicated not just betweenthe initial replica and the master server, but between other replicas as well.
If you create replica B from server A and then replica C from server A, replicas B and C arenot directly joined, so data from replica B must first be replicated to server A beforepropagating to replica C.
Figure 4.3. Replicas B and C Are Not Joined in a Replication Agreement
Setting up an additional replication agreement between replica B and replica C ensures thedata is replicated directly, which improves data availability, consistency, failover tolerance,and performance.
Figure 4.4. Replicas B and C Are Joined in a Replication Agreement
See Chapter 6, Managing Replication Topology for details on managing replicationagreements.
Configuring more than four replication agreements per replica is unnecessary. A large number ofreplication agreements per server does not bring significant additional benefits, because oneconsumer server can only be updated by one master at a time, so the other agreements aremeanwhile idle and waiting. Additionally, configuring too many replication agreements can have anegative impact on overall performance.
NOTE
CHAPTER 4. INSTALLING AND UNINSTALLING IDENTITY MANAGEMENT REPLICAS
47

NOTE
The ipa topologysuffix-verify command checks if your topology meets the mostimportant recommendations. Run ipa topologysuffix-verify --help for details.
The command requires you to specify the topology suffix. See Section 6.1, “ExplainingReplication Agreements, Topology Suffixes, and Topology Segments” for details.
Figure 4.5. Topology Example
4.2.2.1. Tight Cell Topology
One of the most resilient topologies is to create a cell configuration for the servers and replicas with asmall number of servers in a cell:
Each of the cells is a tight cell, where all servers have replication agreements with each other.
Each server has one replication agreement with another server outside the cell. This ensuresthat every cell is loosely coupled to every other cell in the domain.
To accomplish a tight cell topology:
Have at least one IdM server in each main office, data center, or locality. Preferably, have twoIdM servers.
Do not have more than four servers per data center.
In small offices, rather than using a replica, use SSSD to cache credentials and an off-site IdMserver as the data back end.
Linux Domain Identity, Authentication, and Policy Guide
48
4.3. PREREQUISITES FOR INSTALLING A REPLICA SERVER
The installation requirements for replicas are the same as for IdM servers. Make sure that the replicamachine meets all of the prerequisites listed in Section 2.1, “Prerequisites for Installing a Server” .
In addition to the general server requirements, you must also meet the following conditions:
The replica must be running the same or later version of IdM
For example, if the master server is running on Red Hat Enterprise Linux 7.3 and uses the IdM 4.4packages, then the replica must also run on Red Hat Enterprise Linux 7.3 or later and use IdM version4.4 or later. This ensures that configuration can be properly copied from the server to the replica.
IMPORTANT
IdM does not support creating a replica of an earlier version than the version of themaster. If you try to create a replica using an earlier version, the installation fails.
The replica needs additional ports to be open
In addition to the standard IdM server port requirements described in Section 2.1.4, “PortRequirements”, make sure you also meet the following:
At domain level 0, keep the TCP port 22 open during the replica setup process. This port isrequired in order to use SSH to connect to the master server.
NOTE
For details on domain levels, see Chapter 7, Displaying and Raising the DomainLevel.
If one of the servers is running Red Hat Enterprise Linux 6 and has a CA installed, keep alsoTCP port 7389 open during and after the replica configuration. In a purely Red HatEnterprise Linux 7 environment, port 7389 is not required.
NOTE
The ipa-replica-install script includes the ipa-replica-conncheck utility that verifiesthe status of the required ports. You can also run ipa-replica-conncheck separatelyfor troubleshooting purposes. For information on how to use the utility, see the ipa-replica-conncheck(1) man page.
For information on how to open ports using the firewall-cmd utility, see Section 2.1.4, “PortRequirements”.
4.4. PACKAGES REQUIRED TO INSTALL A REPLICA
Replica package requirements are the same as server package requirements. See Section 2.2,“Packages Required to Install an IdM Server”.
4.5. CREATING THE REPLICA: INTRODUCTION
CHAPTER 4. INSTALLING AND UNINSTALLING IDENTITY MANAGEMENT REPLICAS
49
The ipa-replica-install utility is used to install a new replica from an existing IdM server.
NOTE
This chapter describes the simplified replica installation introduced in Red HatEnterprise Linux 7.3. The procedures require domain level 1 (see Chapter 7, Displaying andRaising the Domain Level).
For documentation on installing a replica at domain level 0, see Appendix B, ManagingReplicas at Domain Level 0.
You can install a new replica:
on an existing IdM client by promoting the client to a replica: see the section called “Promotingan Existing Client to a Replica”
on a machine that has not yet been enrolled in the IdM domain: see the section called “Installinga Replica on a Machine That Is Not a Client”
In both of these situations, you can customize your replica by adding options to ipa-replica-install: seethe section called “Using ipa-replica-install to Configure the Replica for Your Use Case” .
IMPORTANT
If the IdM server you are replicating has a trust with Active Directory, set up the replica asa trust agent after running ipa-replica-install. See Trust Controllers and Trust Agents inthe Windows Integration Guide.
Promoting an Existing Client to a ReplicaTo install the replica on an existing client, you must make sure the client is authorized to be promoted.To achieve this, choose one of the following:
Provide a privileged user's credentials
The default privileged user is admin. There are multiple ways to provide the user's credentials. Youcan:
let IdM prompt you to get the credentials interactively
NOTE
This is the default way to provide the privileged user's credentials. If nocredentials are available when ipa-replica-install runs, the installationautomatically prompts you.
log in as the user before running ipa-replica-install on the client:
$ kinit admin
add the user's principal name and password to ipa-replica-install directly:
# ipa-replica-install --principal admin --admin-password admin_password
Linux Domain Identity, Authentication, and Policy Guide
50
Add the client to the ipaservers host group
Membership in ipaservers grants the machine elevated privileges analogous to a privileged user'scredentials. You will not be required to provide the user's credentials.
Example: Section 4.5.1, “Promoting a Client to a Replica Using a Host Keytab”
Installing a Replica on a Machine That Is Not a ClientWhen run on a machine that has not yet been enrolled in the IdM domain, ipa-replica-install first enrollsthe machine as a client and then installs the replica components.
To install a replica in this situation, choose one of the following:
Provide a privileged user's credentials
The default privileged user is admin. To provide the credentials, add the principal name andpassword to ipa-replica-install directly:
# ipa-replica-install --principal admin --admin-password admin_password
Provide a random password for the client
You must generate the random password on a server before installing the replica. You will not berequired to provide the user's credentials during the installation.
Example: Section 4.5.2, “Installing a Replica Using a Random Password”
By default, the replica is installed against the first IdM server discovered by the client installer. To installthe replica against a particular server, add the following options to ipa-replica-install:
--server for the server's fully qualified domain name (FQDN)
--domain for the IdM DNS domain
Using ipa-replica-install to Configure the Replica for Your Use CaseWhen run without any options, ipa-replica-install only sets up basic server services. To install additionalservices, such as DNS or a certificate authority (CA), add options to ipa-replica-install.
WARNING
Red Hat strongly recommends to keep the CA services installed on more than oneserver. For information on installing a replica of the initial server including the CAservices, see Section 4.5.4, “Installing a Replica with a CA” .
If you install the CA on only one server, you risk losing the CA configuration withouta chance of recovery if the CA server fails. See Section A.2.6, “Recovering a LostCA Server” for details.
For example scenarios of installing a replica with the most notable options, see:
CHAPTER 4. INSTALLING AND UNINSTALLING IDENTITY MANAGEMENT REPLICAS
51

Section 4.5.3, “Installing a Replica with DNS” , using --setup-dns and --forwarder
Section 4.5.4, “Installing a Replica with a CA” , using --setup-ca
Section 4.5.5, “Installing a Replica from a Server without a CA” , using --dirsrv-cert-file, --dirsrv-pin, --http-cert-file, and --http-pin
For a complete list of the options used to configure the replica, see the ipa-replica-install(1) man page.
4.5.1. Promoting a Client to a Replica Using a Host Keytab
In this procedure, an existing IdM client is promoted to a replica using its own host keytab to authorizethe promotion.
The procedure does not require you to provide the administrator or Directory Manager (DM) credentials.It is therefore more secure because no sensitive information is exposed on the command line.
1. On an existing server:
a. Log in as the administrator.
$ kinit admin
b. Add the client machine to the ipaservers host group.
$ ipa hostgroup-add-member ipaservers --hosts client.example.com Host-group: ipaservers Description: IPA server hosts Member hosts: server.example.com, client.example.com-------------------------Number of members added 1-------------------------
Membership in ipaservers grants the machine elevated privileges analogous to theadministrator's credentials.
2. On the client, run the ipa-replica-install utility.
# ipa-replica-install
4.5.2. Installing a Replica Using a Random Password
In this procedure, a replica is installed from scratch on a machine that is not yet an IdM client. Toauthorize the enrollment, a client-specific random password valid for one client enrollment only is used.
The procedure does not require you to provide the administrator or Directory Manager (DM) credentials.It is therefore more secure because no sensitive information is exposed on the command line.
1. On an existing server:
a. Log in as the administrator.
$ kinit admin
Linux Domain Identity, Authentication, and Policy Guide
52

b. Add the new machine as an IdM host. Use the --random option with the ipa host-addcommand to generate a random one-time password to be used for the replica installation.
$ ipa host-add client.example.com --random--------------------------------------------------Added host "client.example.com"-------------------------------------------------- Host name: client.example.com Random password: W5YpARl=7M.n Password: True Keytab: False Managed by: server.example.com
The generated password will become invalid after you use it to enroll the machine into theIdM domain. It will be replaced with a proper host keytab after the enrollment is finished.
c. Add the machine to the ipaservers host group.
$ ipa hostgroup-add-member ipaservers --hosts client.example.com Host-group: ipaservers Description: IPA server hosts Member hosts: server.example.com, client.example.com-------------------------Number of members added 1-------------------------
Membership in ipaservers grants the machine elevated privileges required to set up thenecessary server services.
2. On the machine where you want to install the replica, run ipa-replica-install, and provide therandom password using the --password option. Enclose the password in single quotes (')because it often contains special characters:
# ipa-replica-install --password 'W5YpARl=7M.n'
4.5.3. Installing a Replica with DNS
NOTE
This procedure is valid for installing a replica on a client as well as on a machine that is notpart of the IdM domain yet. See Section 4.5, “Creating the Replica: Introduction” fordetails.
1. Run ipa-replica-install with these options:
--setup-dns to create a DNS zone if it does not exist already and configure the replica asthe DNS server
--forwarder to specify a forwarder, or --no-forwarder if you do not want to use anyforwarders
To specify multiple forwarders for failover reasons, use --forwarder multiple times.
CHAPTER 4. INSTALLING AND UNINSTALLING IDENTITY MANAGEMENT REPLICAS
53

For example:
# ipa-replica-install --setup-dns --forwarder 192.0.2.1
NOTE
The ipa-replica-install utility accepts a number of other options related to DNSsettings, such as --no-reverse or --no-host-dns. For more information aboutthem, see the ipa-replica-install(1) man page.
2. If the initial server was created with DNS enabled, the replica is automatically created with theproper DNS entries. The entries ensure that IdM clients will be able to discover the new server.
If the initial server did not have DNS enabled, add the DNS records manually. The following DNSrecords are necessary for the domain services:
_ldap._tcp
_kerberos._tcp
_kerberos._udp
_kerberos-master._tcp
_kerberos-master._udp
_ntp._udp
_kpasswd._tcp
_kpasswd._udp
This example shows how to verify that the entries are present:
a. Set the appropriate values for the DOMAIN and NAMESERVER variables:
# DOMAIN=example.com# NAMESERVER=replica
b. Use the following command to check for the DNS entries:
# for i in _ldap._tcp _kerberos._tcp _kerberos._udp _kerberos-master._tcp _kerberos-master._udp _ntp._udp ; dodig @${NAMESERVER} ${i}.${DOMAIN} srv +nocmd +noquestion +nocomments +nostats +noaa +noadditional +noauthoritydone | egrep "^_"
_ldap._tcp.example.com. 86400 IN SRV 0 100 389 server1.example.com._ldap._tcp.example.com. 86400 IN SRV 0 100 389 server2.example.com._kerberos._tcp.example.com. 86400 IN SRV 0 100 88 server1.example.com....
3. Optional, but recommended. Manually add other DNS servers as backup servers in case thereplica becomes unavailable. See Section 24.1.1, “Setting up Additional Name Servers”. This is
Linux Domain Identity, Authentication, and Policy Guide
54

recommended especially for situations when the new replica is your first DNS server in the IdMdomain.
4.5.4. Installing a Replica with a CA
NOTE
This procedure is valid for installing a replica on a client as well as on a machine that is notpart of the IdM domain yet. See Section 4.5, “Creating the Replica: Introduction” fordetails.
1. Run ipa-replica-install with the --setup-ca option.
[root@replica ~]# ipa-replica-install --setup-ca
2. The --setup-ca option copies the CA configuration from the initial server's configuration,regardless of whether the IdM CA on the server is a root CA or whether it is subordinated to anexternal CA.
NOTE
For details on the supported CA configurations, see Section 2.3.2, “DeterminingWhat CA Configuration to Use”.
4.5.5. Installing a Replica from a Server without a CA
NOTE
This procedure is valid for installing a replica on a client as well as on a machine that is notpart of the IdM domain yet. See Section 4.5, “Creating the Replica: Introduction” fordetails.
Run ipa-replica-install, and provide the required certificate files by adding these options:
--dirsrv-cert-file
--dirsrv-pin
--http-cert-file
--http-pin
For details about the files that are provided using these options, see Section 2.3.6, “InstallingWithout a CA”.
For example:
[root@replica ~]# ipa-replica-install --dirsrv-cert-file /tmp/server.key --dirsrv-pin secret --http-cert-file /tmp/server.crt --http-cert-file /tmp/server.key --http-pin secret --dirsrv-cert-file /tmp/server.crt
NOTE
CHAPTER 4. INSTALLING AND UNINSTALLING IDENTITY MANAGEMENT REPLICAS
55
NOTE
Do not add the --ca-cert-file option. The ipa-replica-install utility takes this partof the certificate information automatically from the master server.
4.6. TESTING THE NEW REPLICA
To check if replication works as expected after creating a replica:
1. Create a user on one of the servers:
[root@server1 ~]$ ipa user-add test_user --first=Test --last=User
2. Make sure the user is visible on the other server:
[root@server2 ~]$ ipa user-show test_user
4.7. UNINSTALLING A REPLICA
At domain level 1, the process for uninstalling a replica is the same as uninstalling a server. SeeSection 2.4, “Uninstalling an IdM Server” .
For information on uninstalling a replica at domain level 0, see Section B.3.6, “Removing a Replica” .
Linux Domain Identity, Authentication, and Policy Guide
56

PART II. THE BASICS OF MANAGING ANIDENTITY MANAGEMENT DOMAIN
PART II. THE BASICS OF MANAGING AN IDENTITY MANAGEMENT DOMAIN
57
CHAPTER 5. THE BASICS OF MANAGING THE IDM SERVERAND SERVICESThis chapter describes the Identity Management command-line and UI tools that are available tomanage the IdM server and services, including methods for authenticating to IdM.
5.1. STARTING AND STOPPING THE IDM SERVER
A number of different services are installed together with an IdM server, including Directory Server,Certificate Authority (CA), DNS, Kerberos, and others. Use the ipactl utility to stop, start, or restart theentire IdM server along with all the installed services.
To start the entire IdM server:
# ipactl start
To stop the entire IdM server:
# ipactl stop
To restart the entire IdM server:
# ipactl restart
If you only want to stop, start, or restart an individual service, use the systemctl utility, described in theSystem Administrator's Guide. For example, using systemctl to manage individual services is usefulwhen customizing the Directory Server behavior: the configuration changes require restarting theDirectory Server instance, but it is not necessary to restart all the IdM services.
IMPORTANT
To restart multiple IdM domain services, Red Hat always recommends to use ipactl.Because of dependencies between the services installed with the IdM server, the order inwhich they are started and stopped is critical. The ipactl utility ensures that the servicesare started and stopped in the appropriate order.
5.2. LOGGING INTO IDM USING KERBEROS
IdM uses the Kerberos protocol to support single sign-on. With Kerberos, the user only needs to presentthe correct user name and password once. Then the user can access IdM services without the systemprompting for the credentials again.
By default, only machines that are members of the IdM domain can use Kerberos to authenticate to IdM.However, it is possible to configure external systems for Kerberos authentication as well; for moreinformation, see Section 5.4.3, “Configuring an External System for Kerberos Authentication to the WebUI”.
Using kinitTo log in to IdM from the command line, use the kinit utility.
NOTE
Linux Domain Identity, Authentication, and Policy Guide
58

NOTE
To use kinit, the krb5-workstation package must be installed.
When run without specifying a user name, kinit logs into IdM under the user name of the user that iscurrently logged-in on the local system. For example, if you are logged-in as local_user on the localsystem, running kinit attempts to authenticate you as the local_user IdM user:
[local_user@server ~]$ kinitPassword for [email protected]:
NOTE
If the user name of the local user does not match any user entry in IdM, theauthentication attempt fails.
To log in as a different IdM user, pass the required user name as a parameter to the kinit utility. Forexample, to log in as the admin user:
[local_user@server ~]$ kinit adminPassword for [email protected]:
Obtaining Kerberos Tickets AutomaticallyThe pam_krb5 pluggable authentication module (PAM) and SSSD can be configured to automaticallyobtain a TGT for a user after a successful login in to the desktop environment on an IdM client machine.This ensures that after logging in, the user is not required to run kinit.
On IdM systems that have IdM configured in SSSD as the identity and authentication provider, SSSDobtains the TGT automatically after the user logs in with the corresponding Kerberos principal name.
For information on configuring pam_krb5, see the pam_krb5(8) man page. For general informationabout PAM, see the System-Level Authentication Guide .
Storing Multiple Kerberos TicketsBy default, Kerberos only stores one ticket per logged-in user in the credential cache. Whenever a userruns kinit, Kerberos overwrites the currently-stored ticket with the new ticket. For example, if you use kinit to authenticate as user_A, the ticket for user_A will be lost after you authenticate again as user_B.
To obtain and store another TGT for a user, set a different credential cache, which ensures the contentsof the previous cache are not overwritten. You can do this in one of the following two ways:
Run the export KRB5CCNAME=path_to_different_cache command, and then use kinit toobtain the ticket.
Run the kinit -c path_to_different_cache command, and then reset the KRB5CCNAMEvariable.
To restore the original TGT stored in the default credential cache:
1. Run the kdestroy command.
2. Restore the default credential cache location using the unset $KRB5CCNAME command.
CHAPTER 5. THE BASICS OF MANAGING THE IDM SERVER AND SERVICES
59

Checking the Current Logged-in UserTo verify what TGT is currently stored and used for authentication, use the klist utility to list cachedtickets. In the following example, the cache contains a ticket for user_A, which means that only user_Ais currently allowed to access IdM services:
$ klistTicket cache: KEYRING:persistent:0:0Default principal: [email protected]
Valid starting Expires Service principal11/10/2015 08:35:45 11/10/2015 18:35:45 krbtgt/[email protected]
5.3. THE IDM COMMAND-LINE UTILITIES
The basic command-line script for IdM is named ipa. The ipa script is a parent script for a number ofsubcommands. These subcommands are then used to manage IdM. For example, the ipa user-addcommand adds a new user:
$ ipa user-add user_name
Command-line management has certain benefits over management in UI; for example, the command-line utilities allow management tasks to be automated and performed repeatedly in a consistent waywithout manual intervention. Additionally, while most management operations are available both fromthe command line and in the web UI, some tasks can only be performed from the command line.
NOTE
This section only provides a general overview of the ipa subcommands. More informationis available in the other sections dedicated to specific areas of managing IdM. Forexample, for information about managing user entries using the ipa subcommands, seeChapter 10, Managing User Accounts.
5.3.1. Getting Help for ipa Commands
The ipa script can display help about a particular set of subcommands: a topic. To display the list ofavailable topics, use the ipa help topics command:
$ ipa help topics
automember Auto Membership Rule.automount Automountcaacl Manage CA ACL rules....
To display help for a particular topic, use the ipa help topic_name command. For example, to displayinformation about the automember topic:
$ ipa help automember
Auto Membership Rule.
Bring clarity to the membership of hosts and users by configuring inclusiveor exclusive regex patterns, you can automatically assign a new entries into
Linux Domain Identity, Authentication, and Policy Guide
60

a group or hostgroup based upon attribute information.
...
EXAMPLES:
Add the initial group or hostgroup: ipa hostgroup-add --desc="Web Servers" webservers ipa group-add --desc="Developers" devel...
The ipa script can also display a list of available ipa commands. To do this, use the ipa help commandscommand:
$ ipa help commandsautomember-add Add an automember rule.automember-add-condition Add conditions to an automember rule....
For detailed help on the individual ipa commands, add the --help option to a command. For example:
$ ipa automember-add --help
Usage: ipa [global-options] automember-add AUTOMEMBER-RULE [options]
Add an automember rule.Options: -h, --help show this help message and exit --desc=STR A description of this auto member rule...
For more information about the ipa utility, see the ipa(1) man page.
5.3.2. Setting a List of Values
IdM stores entry attributes in lists. For example:
ipaUserSearchFields: uid,givenname,sn,telephonenumber,ou,title
Any update to a list of attributes overwrites the previous list. For example, an attempt to add a singleattribute by only specifying this attribute replaces the whole previously-defined list with the single newattribute. Therefore, when changing a list of attributes, you must specify the whole updated list.
IdM supports the following methods of supplying a list of attributes:
Using the same command-line argument multiple times within the same command invocation.For example:
$ ipa permission-add --permissions=read --permissions=write --permissions=delete
Enclosing the list in curly braces, which allows the shell to do the expansion. For example:
$ ipa permission-add --permissions={read,write,delete}
CHAPTER 5. THE BASICS OF MANAGING THE IDM SERVER AND SERVICES
61

5.3.3. Using Special Characters
When passing command-line arguments in ipa commands that include special characters, such as anglebrackets (< and >), ampersand (&), asterisk (*), or vertical bar (|), you must escape these characters byusing a backslash (\). For example, to escape an asterisk (*):
$ ipa certprofile-show certificate_profile --out=exported\*profile.cfg
Commands containing unescaped special characters do not work as expected because the shell cannotproperly parse such characters.
5.3.4. Searching IdM Entries
Listing IdM EntriesUse the ipa *-find commands to search for a particular type of IdM entries. For example:
To list all users:
$ ipa user-find---------------4 users matched--------------- ...
To list user groups whose specified attributes contain keyword:
$ ipa group-find keyword----------------2 groups matched---------------- ...
To configure the attributes IdM searches for users and user groups, see Section 11.6, “SettingSearch Attributes for Users and User Groups”.
When searching user groups, you can also limit the search results to groups that contain a particularuser:
$ ipa group-find --user=user_name
You can also search for groups that do not contain a particular user:
$ ipa group-find --no-user=user_name
Showing Details for a Particular EntryUse the ipa *-show command to display details about a particular IdM entry. For example:
$ ipa host-show server.example.com Host name: server.example.com Principal name: host/[email protected] ...
Linux Domain Identity, Authentication, and Policy Guide
62

5.3.4.1. Adjusting the Search Size and Time Limit
Some search results, such as viewing lists of users, can return a very large number of entries. By tuningthese search operations, you can improve overall server performance when running the ipa *-findcommands, such as ipa user-find, and when displaying corresponding lists in the web UI.
The search size limit:
Defines the maximum number of entries returned for a request sent to the server from a client,the IdM command-line tools, or the IdM web UI.
Default value: 100 entries.
The search time limit:
Defines the maximum time that the server waits for searches to run. Once the search reachesthis limit, the server stops the search and returns the entries that discovered in that time.
Default value: 2 seconds.
If you set the values to -1, IdM will not apply any limits when searching.
IMPORTANT
Setting search size or time limits too high can negatively affect server performance.
Web UI: Adjusting the Search Size and Time LimitTo adjust the limits globally for all queries:
1. Select IPA Server → Configuration.
2. Set the required values in the Search Options area.
3. Click Save at the top of the page.
Command Line: Adjusting the Search Size and Time LimitTo adjust the limits globally for all queries, use the ipa config-mod command and add the --searchrecordslimit and --searchtimelimit options. For example:
$ ipa config-mod --searchrecordslimit=500 --searchtimelimit=5
From the command line, you can also adjust the limits only for a specific query. To do this, add the --sizelimit or --timelimit options to the command. For example:
$ ipa user-find --sizelimit=200 --timelimit=120
5.4. THE IDM WEB UI
The Identity Management web UI is a web application for IdM administration. It has most of thecapabilities of the ipa command-line utility. Therefore, the users can choose whether they want tomanage IdM from the UI or from the command line.
NOTE
CHAPTER 5. THE BASICS OF MANAGING THE IDM SERVER AND SERVICES
63
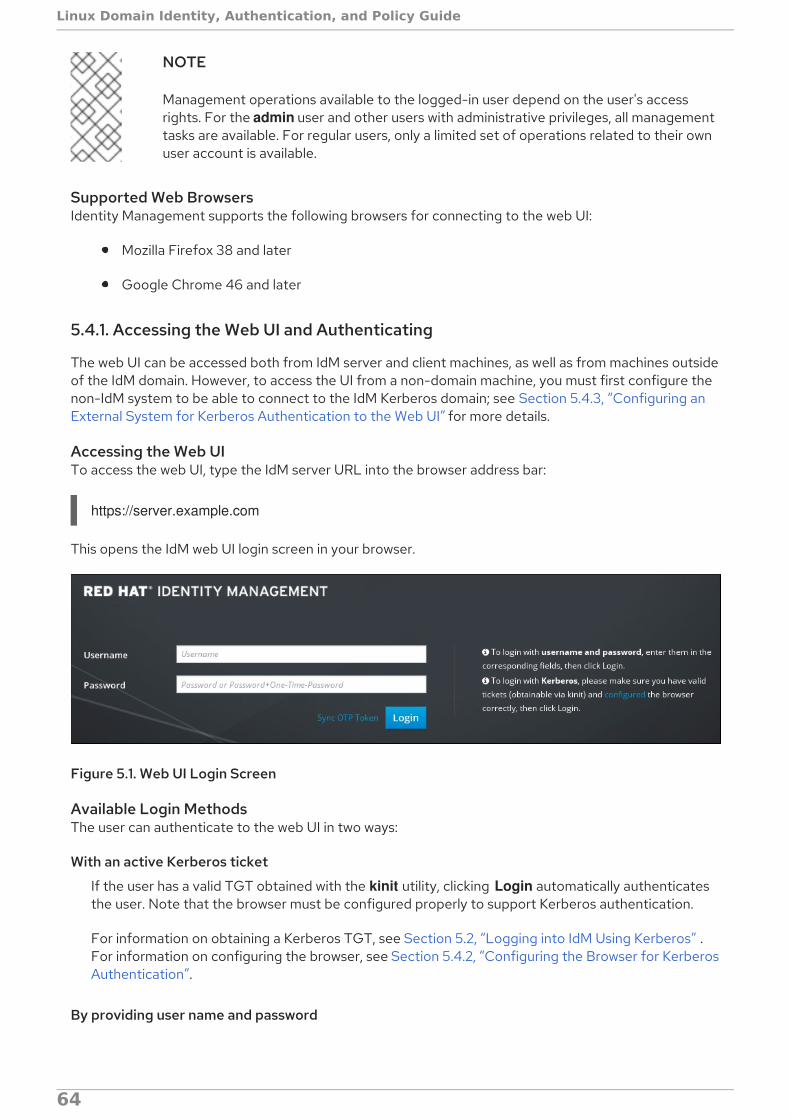
NOTE
Management operations available to the logged-in user depend on the user's accessrights. For the admin user and other users with administrative privileges, all managementtasks are available. For regular users, only a limited set of operations related to their ownuser account is available.
Supported Web BrowsersIdentity Management supports the following browsers for connecting to the web UI:
Mozilla Firefox 38 and later
Google Chrome 46 and later
5.4.1. Accessing the Web UI and Authenticating
The web UI can be accessed both from IdM server and client machines, as well as from machines outsideof the IdM domain. However, to access the UI from a non-domain machine, you must first configure thenon-IdM system to be able to connect to the IdM Kerberos domain; see Section 5.4.3, “Configuring anExternal System for Kerberos Authentication to the Web UI” for more details.
Accessing the Web UITo access the web UI, type the IdM server URL into the browser address bar:
https://server.example.com
This opens the IdM web UI login screen in your browser.
Figure 5.1. Web UI Login Screen
Available Login MethodsThe user can authenticate to the web UI in two ways:
With an active Kerberos ticket
If the user has a valid TGT obtained with the kinit utility, clicking Login automatically authenticatesthe user. Note that the browser must be configured properly to support Kerberos authentication.
For information on obtaining a Kerberos TGT, see Section 5.2, “Logging into IdM Using Kerberos” .For information on configuring the browser, see Section 5.4.2, “Configuring the Browser for KerberosAuthentication”.
By providing user name and password
To authenticate using a user name and password, enter the user name and password on the web UI
Linux Domain Identity, Authentication, and Policy Guide
64
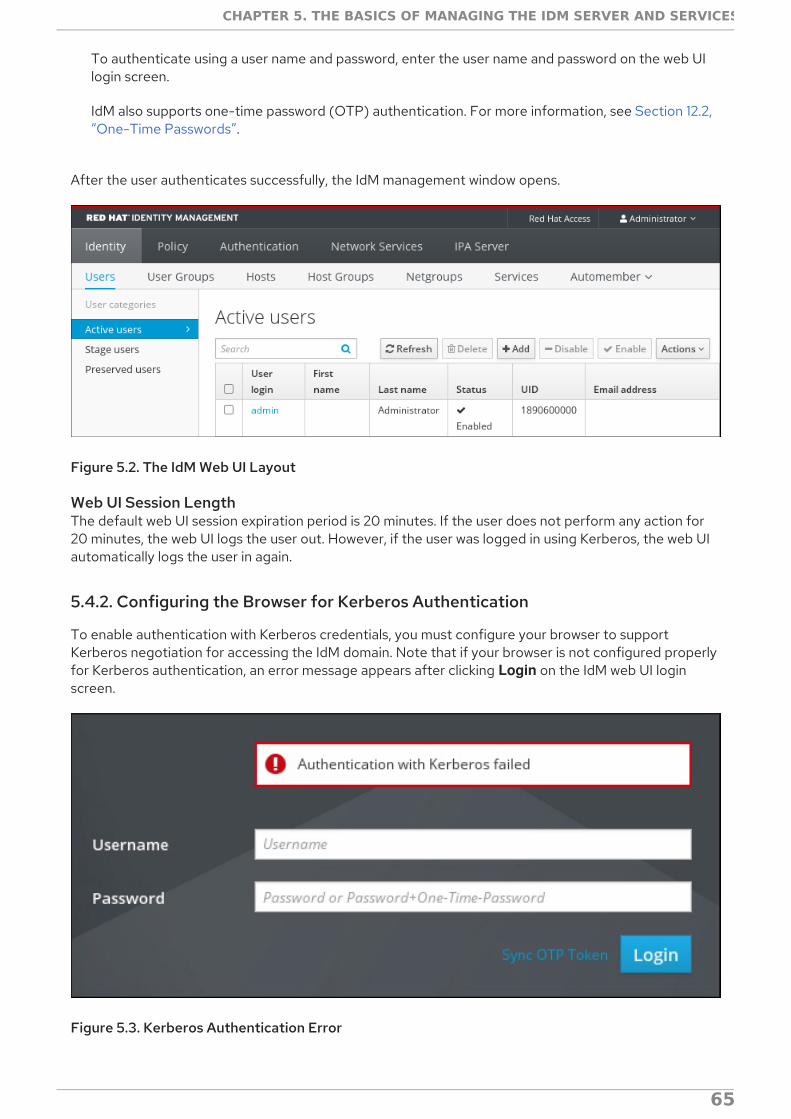
To authenticate using a user name and password, enter the user name and password on the web UIlogin screen.
IdM also supports one-time password (OTP) authentication. For more information, see Section 12.2,“One-Time Passwords”.
After the user authenticates successfully, the IdM management window opens.
Figure 5.2. The IdM Web UI Layout
Web UI Session LengthThe default web UI session expiration period is 20 minutes. If the user does not perform any action for20 minutes, the web UI logs the user out. However, if the user was logged in using Kerberos, the web UIautomatically logs the user in again.
5.4.2. Configuring the Browser for Kerberos Authentication
To enable authentication with Kerberos credentials, you must configure your browser to supportKerberos negotiation for accessing the IdM domain. Note that if your browser is not configured properlyfor Kerberos authentication, an error message appears after clicking Login on the IdM web UI loginscreen.
Figure 5.3. Kerberos Authentication Error
CHAPTER 5. THE BASICS OF MANAGING THE IDM SERVER AND SERVICES
65
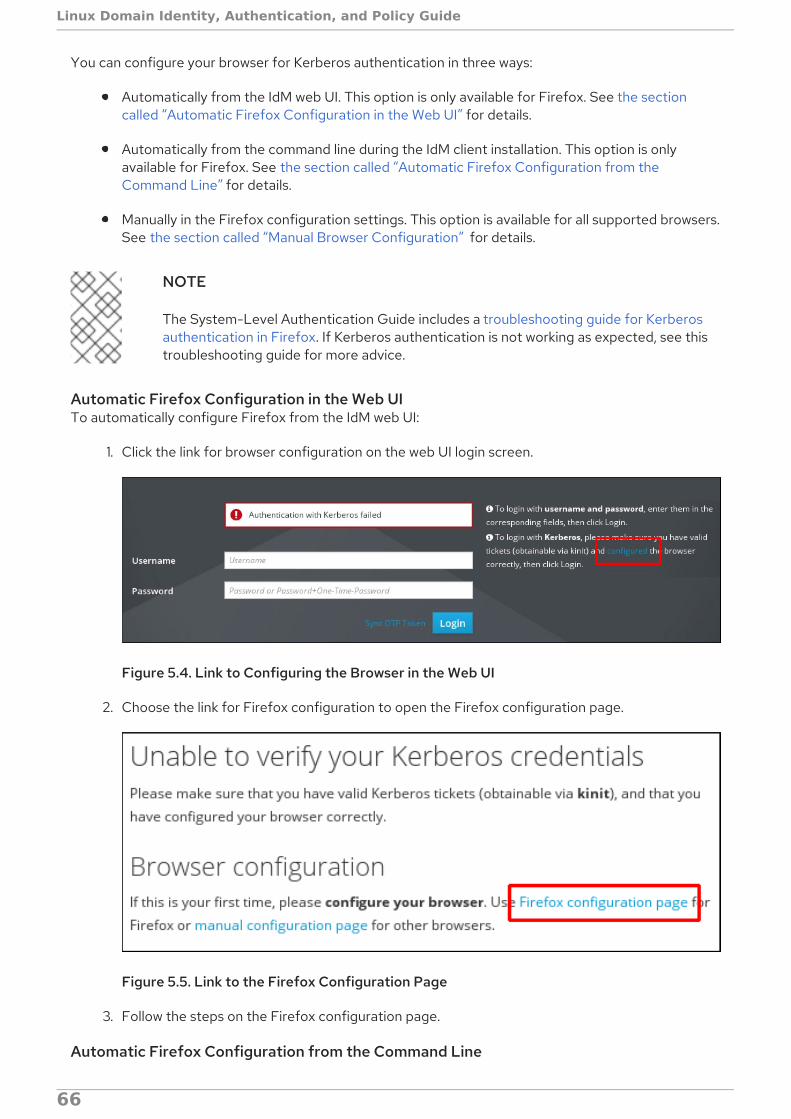
You can configure your browser for Kerberos authentication in three ways:
Automatically from the IdM web UI. This option is only available for Firefox. See the sectioncalled “Automatic Firefox Configuration in the Web UI” for details.
Automatically from the command line during the IdM client installation. This option is onlyavailable for Firefox. See the section called “Automatic Firefox Configuration from theCommand Line” for details.
Manually in the Firefox configuration settings. This option is available for all supported browsers.See the section called “Manual Browser Configuration” for details.
NOTE
The System-Level Authentication Guide includes a troubleshooting guide for Kerberosauthentication in Firefox. If Kerberos authentication is not working as expected, see thistroubleshooting guide for more advice.
Automatic Firefox Configuration in the Web UITo automatically configure Firefox from the IdM web UI:
1. Click the link for browser configuration on the web UI login screen.
Figure 5.4. Link to Configuring the Browser in the Web UI
2. Choose the link for Firefox configuration to open the Firefox configuration page.
Figure 5.5. Link to the Firefox Configuration Page
3. Follow the steps on the Firefox configuration page.
Automatic Firefox Configuration from the Command Line
Linux Domain Identity, Authentication, and Policy Guide
66
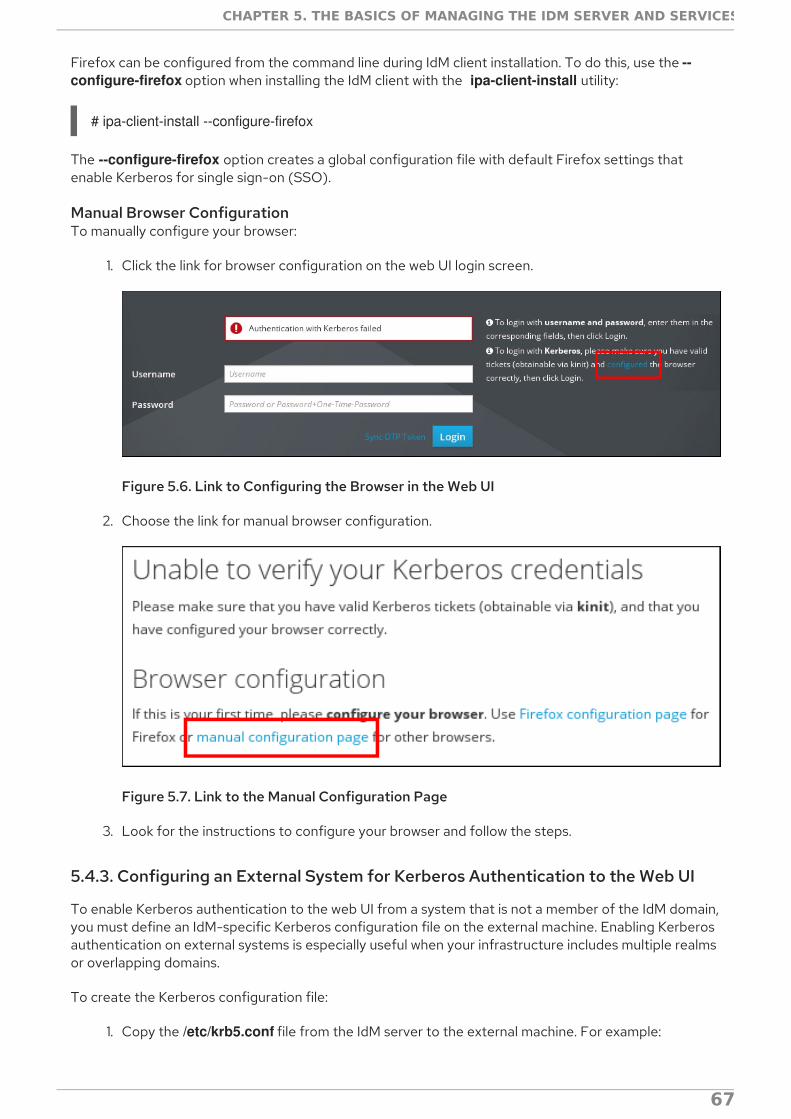
Firefox can be configured from the command line during IdM client installation. To do this, use the --configure-firefox option when installing the IdM client with the ipa-client-install utility:
# ipa-client-install --configure-firefox
The --configure-firefox option creates a global configuration file with default Firefox settings thatenable Kerberos for single sign-on (SSO).
Manual Browser ConfigurationTo manually configure your browser:
1. Click the link for browser configuration on the web UI login screen.
Figure 5.6. Link to Configuring the Browser in the Web UI
2. Choose the link for manual browser configuration.
Figure 5.7. Link to the Manual Configuration Page
3. Look for the instructions to configure your browser and follow the steps.
5.4.3. Configuring an External System for Kerberos Authentication to the Web UI
To enable Kerberos authentication to the web UI from a system that is not a member of the IdM domain,you must define an IdM-specific Kerberos configuration file on the external machine. Enabling Kerberosauthentication on external systems is especially useful when your infrastructure includes multiple realmsor overlapping domains.
To create the Kerberos configuration file:
1. Copy the /etc/krb5.conf file from the IdM server to the external machine. For example:
CHAPTER 5. THE BASICS OF MANAGING THE IDM SERVER AND SERVICES
67
# scp /etc/krb5.conf [email protected]:/etc/krb5_ipa.conf
WARNING
Do not overwrite the existing krb5.conf file on the external machine.
2. On the external machine, set the terminal session to use the copied IdM Kerberos configurationfile:
$ export KRB5_CONFIG=/etc/krb5_ipa.conf
3. Configure the browser on the external machine as described in Section 5.4.2, “Configuring theBrowser for Kerberos Authentication”.
Users on the external system can now use the kinit utility to authenticate against the IdM serverdomain.
5.4.4. Proxy Servers and Port Forwarding in the Web UI
Using proxy servers to access the web UI does not require any additional configuration in IdM.
Port forwarding is not supported with the IdM server. However, because it is possible to use proxyservers, an operation similar to port forwarding can be configured using proxy forwarding with OpenSSHand the SOCKS option. This can be configured using the -D option of the ssh utility; for moreinformation on using -D, see the ssh(1) man page.
Linux Domain Identity, Authentication, and Policy Guide
68

CHAPTER 6. MANAGING REPLICATION TOPOLOGYThis chapter describes how to manage replication between servers in an Identity Management (IdM)domain.
NOTE
This chapter describes simplified topology management introduced in Red HatEnterprise Linux 7.3. The procedures require domain level 1 (see Chapter 7, Displaying andRaising the Domain Level).
For documentation on managing topology at domain level 0, see Section B.3, “ManagingReplicas and Replication Agreements”.
For details on installing an initial replica and basic information on replication, see Chapter 4, Installingand Uninstalling Identity Management Replicas.
6.1. EXPLAINING REPLICATION AGREEMENTS, TOPOLOGY SUFFIXES,AND TOPOLOGY SEGMENTS
Replication AgreementsData stored on an IdM server is replicated based on replication agreements: when two servers have areplication agreement configured, they share their data.
Replication agreements are always bilateral: the data is replicated from the first replica to the other oneas well as from the other replica to the first one.
NOTE
For additional details, see Section 4.1, “Explaining IdM Replicas” .
Topology SuffixesTopology suffixes store the data that is replicated. IdM supports two types of topology suffixes: domainand ca. Each suffix represents a separate back end, a separate replication topology.
When a replication agreement is configured, it joins two topology suffixes of the same type on twodifferent servers.
The domain suffix: dc=example,dc=com
The domain suffix contains all domain-related data.
When two replicas have a replication agreement between their domain suffixes, they share directorydata, such as users, groups, and policies.
The ca suffix: o=ipaca
The ca suffix contains data for the Certificate System component. It is only present on servers with acertificate authority (CA) installed.
When two replicas have a replication agreement between their ca suffixes, they share certificatedata.
CHAPTER 6. MANAGING REPLICATION TOPOLOGY
69
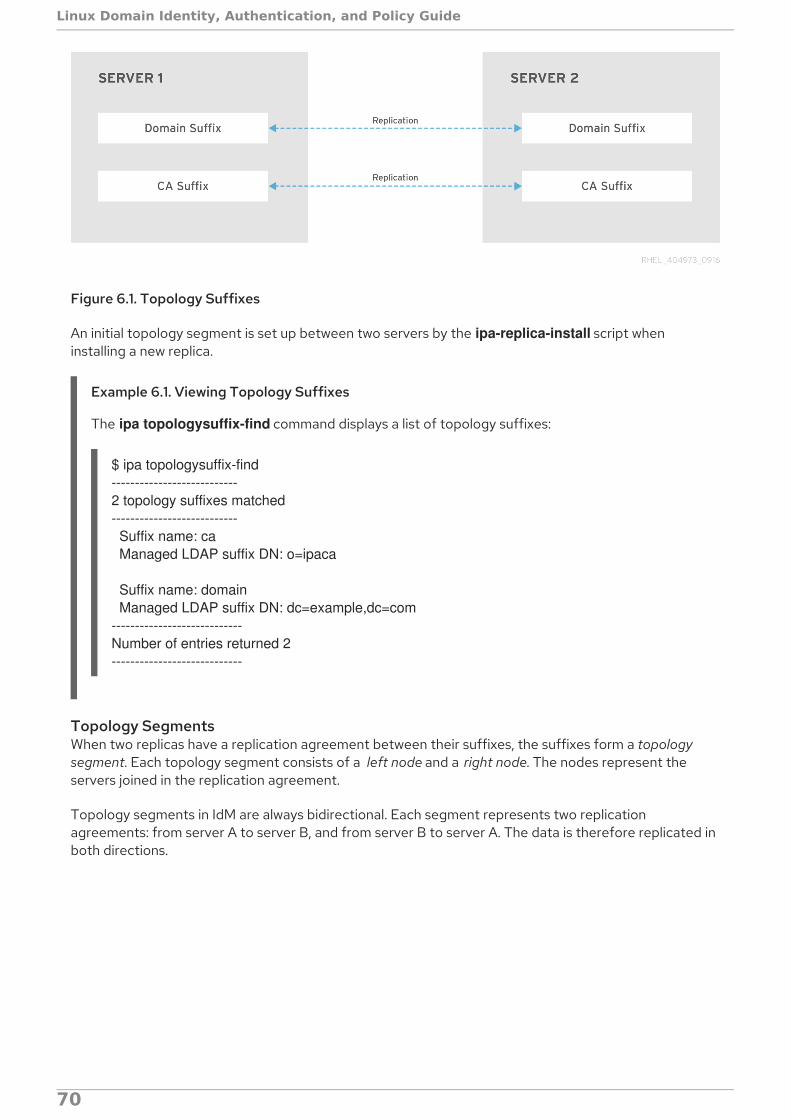
Figure 6.1. Topology Suffixes
An initial topology segment is set up between two servers by the ipa-replica-install script wheninstalling a new replica.
Example 6.1. Viewing Topology Suffixes
The ipa topologysuffix-find command displays a list of topology suffixes:
$ ipa topologysuffix-find---------------------------2 topology suffixes matched--------------------------- Suffix name: ca Managed LDAP suffix DN: o=ipaca
Suffix name: domain Managed LDAP suffix DN: dc=example,dc=com----------------------------Number of entries returned 2----------------------------
Topology SegmentsWhen two replicas have a replication agreement between their suffixes, the suffixes form a topologysegment. Each topology segment consists of a left node and a right node. The nodes represent theservers joined in the replication agreement.
Topology segments in IdM are always bidirectional. Each segment represents two replicationagreements: from server A to server B, and from server B to server A. The data is therefore replicated inboth directions.
Linux Domain Identity, Authentication, and Policy Guide
70
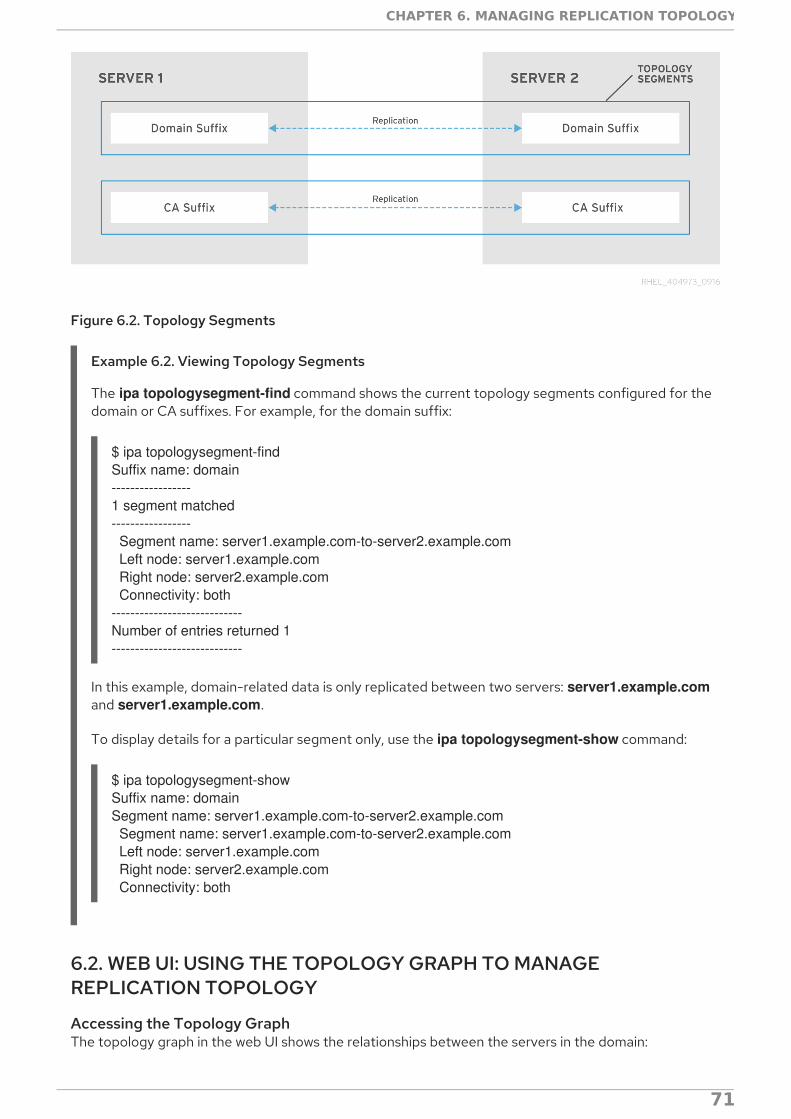
Figure 6.2. Topology Segments
Example 6.2. Viewing Topology Segments
The ipa topologysegment-find command shows the current topology segments configured for thedomain or CA suffixes. For example, for the domain suffix:
$ ipa topologysegment-findSuffix name: domain-----------------1 segment matched----------------- Segment name: server1.example.com-to-server2.example.com Left node: server1.example.com Right node: server2.example.com Connectivity: both----------------------------Number of entries returned 1----------------------------
In this example, domain-related data is only replicated between two servers: server1.example.comand server1.example.com.
To display details for a particular segment only, use the ipa topologysegment-show command:
$ ipa topologysegment-showSuffix name: domainSegment name: server1.example.com-to-server2.example.com Segment name: server1.example.com-to-server2.example.com Left node: server1.example.com Right node: server2.example.com Connectivity: both
6.2. WEB UI: USING THE TOPOLOGY GRAPH TO MANAGEREPLICATION TOPOLOGY
Accessing the Topology GraphThe topology graph in the web UI shows the relationships between the servers in the domain:
CHAPTER 6. MANAGING REPLICATION TOPOLOGY
71

1. Select IPA Server → Topology → Topology Graph.
2. If you make any changes to the topology that are not immediately reflected in the graph, click Refresh.
Customizing the Topology ViewYou can move individual topology nodes by dragging the mouse:
Figure 6.3. Moving Topology Graph Nodes
You can zoom in and zoom out the topology graph using the mouse wheel:
Figure 6.4. Zooming the Topology Graph
You can move the canvas of the topology graph by holding the left mouse button:
Linux Domain Identity, Authentication, and Policy Guide
72
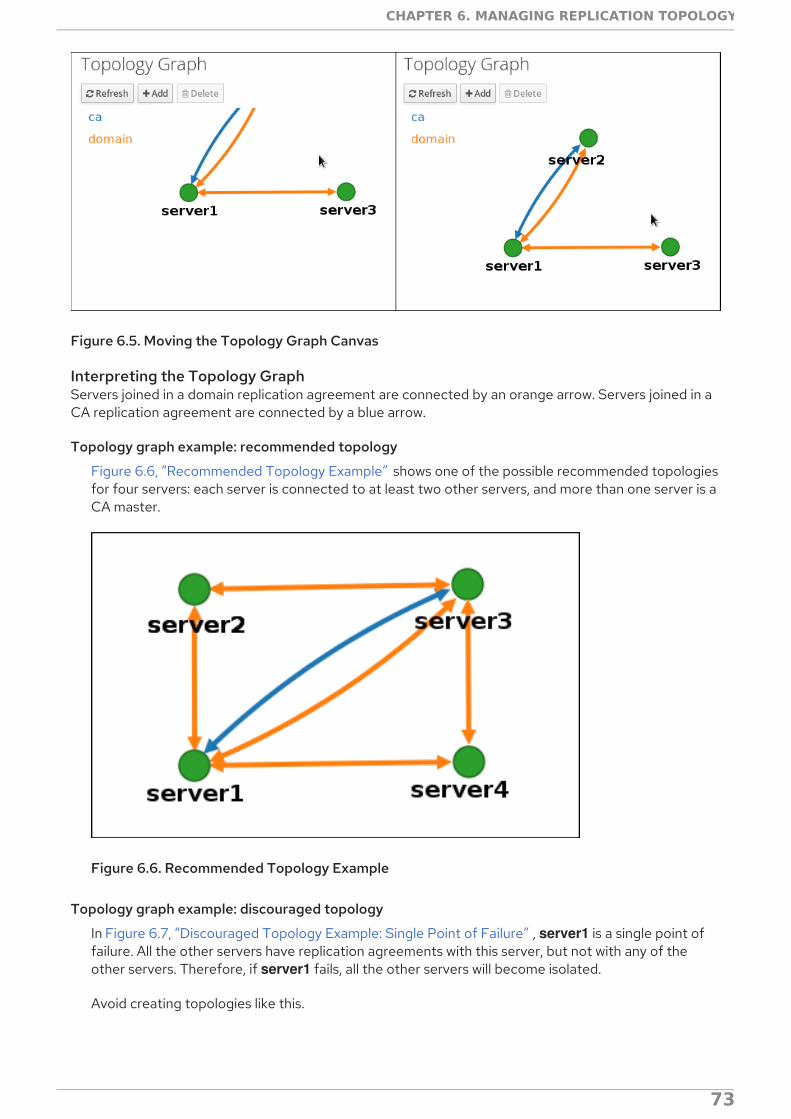
Figure 6.5. Moving the Topology Graph Canvas
Interpreting the Topology GraphServers joined in a domain replication agreement are connected by an orange arrow. Servers joined in aCA replication agreement are connected by a blue arrow.
Topology graph example: recommended topology
Figure 6.6, “Recommended Topology Example” shows one of the possible recommended topologiesfor four servers: each server is connected to at least two other servers, and more than one server is aCA master.
Figure 6.6. Recommended Topology Example
Topology graph example: discouraged topology
In Figure 6.7, “Discouraged Topology Example: Single Point of Failure” , server1 is a single point offailure. All the other servers have replication agreements with this server, but not with any of theother servers. Therefore, if server1 fails, all the other servers will become isolated.
Avoid creating topologies like this.
CHAPTER 6. MANAGING REPLICATION TOPOLOGY
73

Figure 6.7. Discouraged Topology Example: Single Point of Failure
For details on topology recommendations, see Section 4.2, “Deployment Considerations for Replicas” .
6.2.1. Setting up Replication Between Two Servers
1. In the topology graph, hover your mouse over one of the server nodes.
Figure 6.8. Domain or CA Options
2. Click on the domain or the ca part of the circle depending on what type of topology segmentyou want to create.
3. A new arrow representing the new replication agreement appears under your mouse pointer.Move your mouse to the other server node, and click on it.
Linux Domain Identity, Authentication, and Policy Guide
74

Figure 6.9. Creating a New Segment
4. In the Add Topology Segment window, click Add to confirm the properties of the newsegment.
IdM creates a new topology segment between the two servers, which joins them in a replicationagreement. The topology graph now shows the updated replication topology:
Figure 6.10. New Segment Created
6.2.2. Stopping Replication Between Two Servers
1. Click on an arrow representing the replication agreement you want to remove. This highlightsthe arrow.
CHAPTER 6. MANAGING REPLICATION TOPOLOGY
75
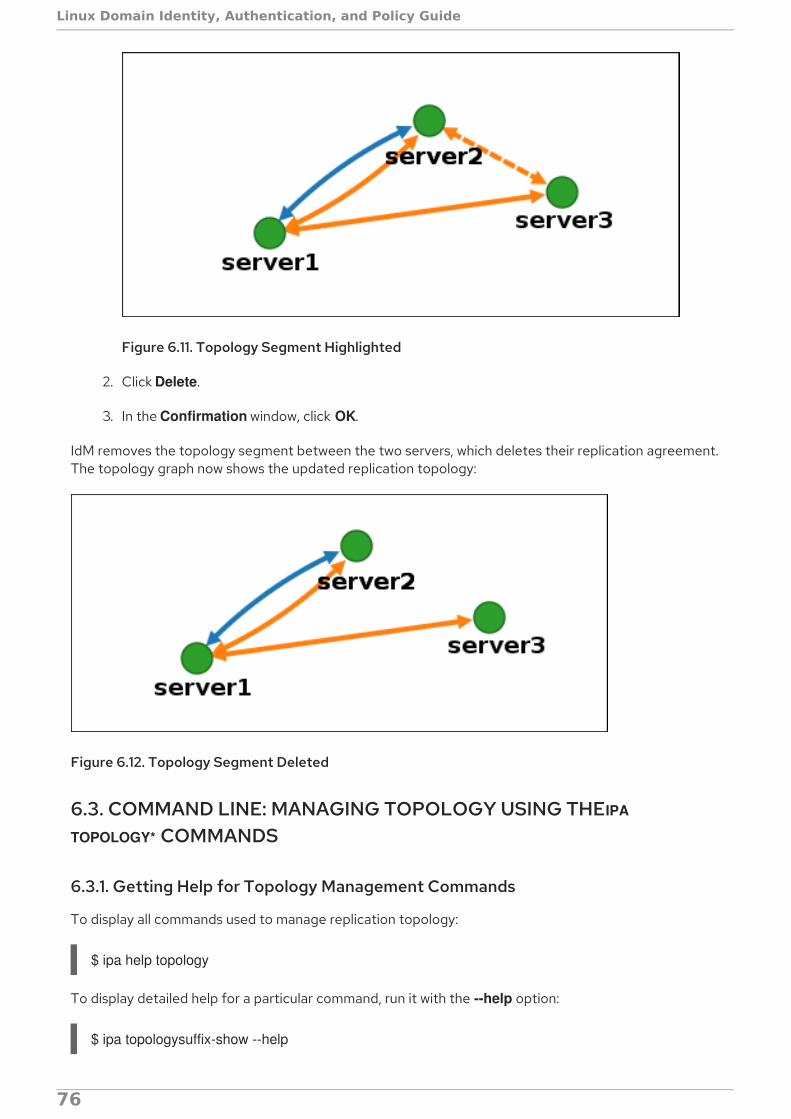
Figure 6.11. Topology Segment Highlighted
2. Click Delete.
3. In the Confirmation window, click OK.
IdM removes the topology segment between the two servers, which deletes their replication agreement.The topology graph now shows the updated replication topology:
Figure 6.12. Topology Segment Deleted
6.3. COMMAND LINE: MANAGING TOPOLOGY USING THE IPA
TOPOLOGY* COMMANDS
6.3.1. Getting Help for Topology Management Commands
To display all commands used to manage replication topology:
$ ipa help topology
To display detailed help for a particular command, run it with the --help option:
$ ipa topologysuffix-show --help
Linux Domain Identity, Authentication, and Policy Guide
76
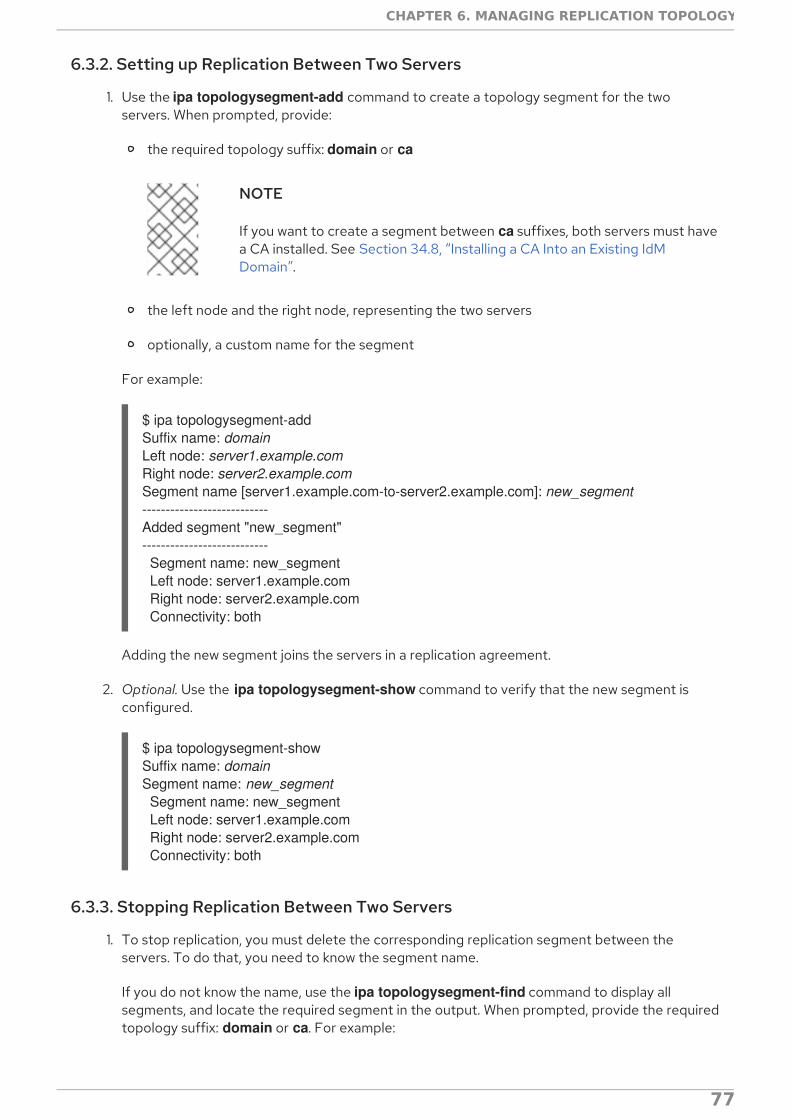
6.3.2. Setting up Replication Between Two Servers
1. Use the ipa topologysegment-add command to create a topology segment for the twoservers. When prompted, provide:
the required topology suffix: domain or ca
NOTE
If you want to create a segment between ca suffixes, both servers must havea CA installed. See Section 34.8, “Installing a CA Into an Existing IdMDomain”.
the left node and the right node, representing the two servers
optionally, a custom name for the segment
For example:
$ ipa topologysegment-addSuffix name: domainLeft node: server1.example.comRight node: server2.example.comSegment name [server1.example.com-to-server2.example.com]: new_segment---------------------------Added segment "new_segment"--------------------------- Segment name: new_segment Left node: server1.example.com Right node: server2.example.com Connectivity: both
Adding the new segment joins the servers in a replication agreement.
2. Optional. Use the ipa topologysegment-show command to verify that the new segment isconfigured.
$ ipa topologysegment-showSuffix name: domainSegment name: new_segment Segment name: new_segment Left node: server1.example.com Right node: server2.example.com Connectivity: both
6.3.3. Stopping Replication Between Two Servers
1. To stop replication, you must delete the corresponding replication segment between theservers. To do that, you need to know the segment name.
If you do not know the name, use the ipa topologysegment-find command to display allsegments, and locate the required segment in the output. When prompted, provide the requiredtopology suffix: domain or ca. For example:
CHAPTER 6. MANAGING REPLICATION TOPOLOGY
77
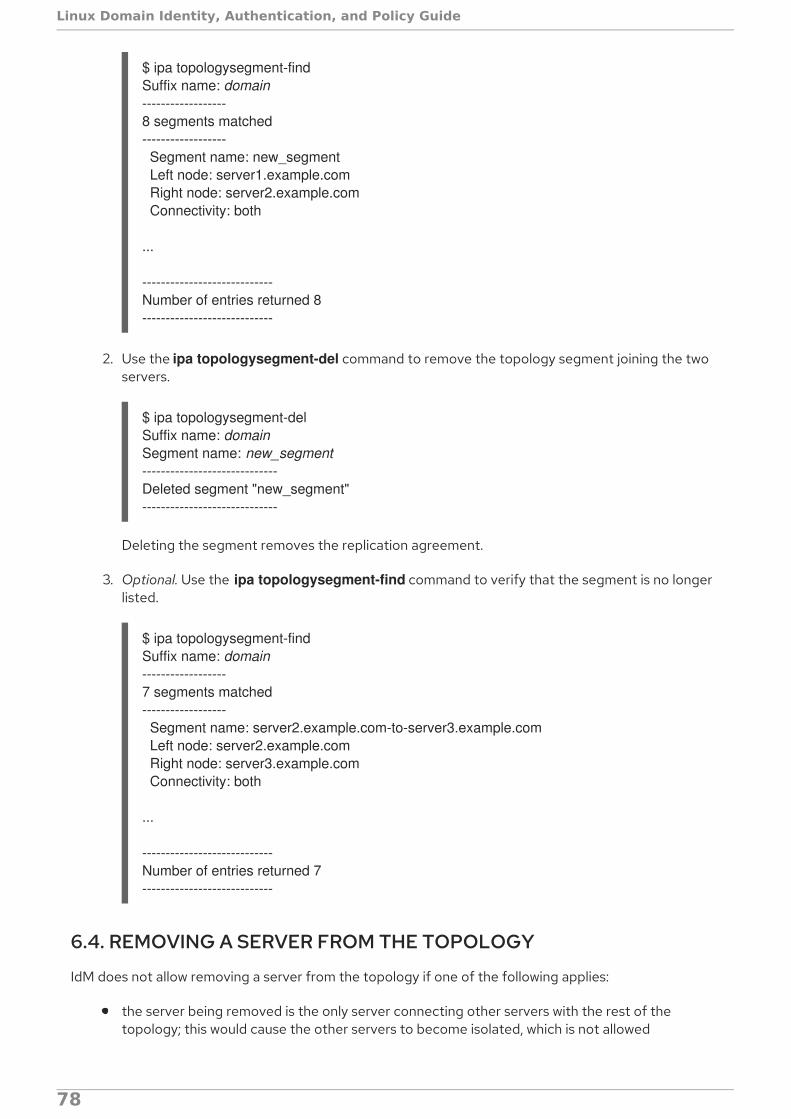
$ ipa topologysegment-findSuffix name: domain------------------8 segments matched------------------ Segment name: new_segment Left node: server1.example.com Right node: server2.example.com Connectivity: both
...
----------------------------Number of entries returned 8----------------------------
2. Use the ipa topologysegment-del command to remove the topology segment joining the twoservers.
$ ipa topologysegment-delSuffix name: domainSegment name: new_segment-----------------------------Deleted segment "new_segment"-----------------------------
Deleting the segment removes the replication agreement.
3. Optional. Use the ipa topologysegment-find command to verify that the segment is no longerlisted.
$ ipa topologysegment-findSuffix name: domain------------------7 segments matched------------------ Segment name: server2.example.com-to-server3.example.com Left node: server2.example.com Right node: server3.example.com Connectivity: both
...
----------------------------Number of entries returned 7----------------------------
6.4. REMOVING A SERVER FROM THE TOPOLOGY
IdM does not allow removing a server from the topology if one of the following applies:
the server being removed is the only server connecting other servers with the rest of thetopology; this would cause the other servers to become isolated, which is not allowed
Linux Domain Identity, Authentication, and Policy Guide
78
the server being removed is your last CA or DNS server
In these situations, the attempt fails with an error. For example, on the command line:
$ ipa server-delServer name: server1.example.comRemoving server1.example.com from replication topology, please wait...ipa: ERROR: Server removal aborted:
Removal of 'server1.example.com' leads to disconnected topology in suffix 'domain':Topology does not allow server server2.example.com to replicate with servers: server3.example.com server4.example.com...
6.4.1. Web UI: Removing a Server from the Topology
To remove a server from the topology without uninstalling the server components from the machine:
1. Select IPA Server → Topology → IPA Servers.
2. Click on the name of the server you want to delete.
Figure 6.13. Selecting a Server
3. Click Delete Server.
6.4.2. Command Line: Removing a Server from the Topology
IMPORTANT
Removing a server is an irreversible action. If you remove a server, the only way tointroduce it back into the topology is to install a new replica on the machine.
To remove server1.example.com:
1. On another server, run the ipa server-del command to remove server1.example.com. Thecommand removes all topology segments pointing to the server:
[user@server2 ~]$ ipa server-del
CHAPTER 6. MANAGING REPLICATION TOPOLOGY
79
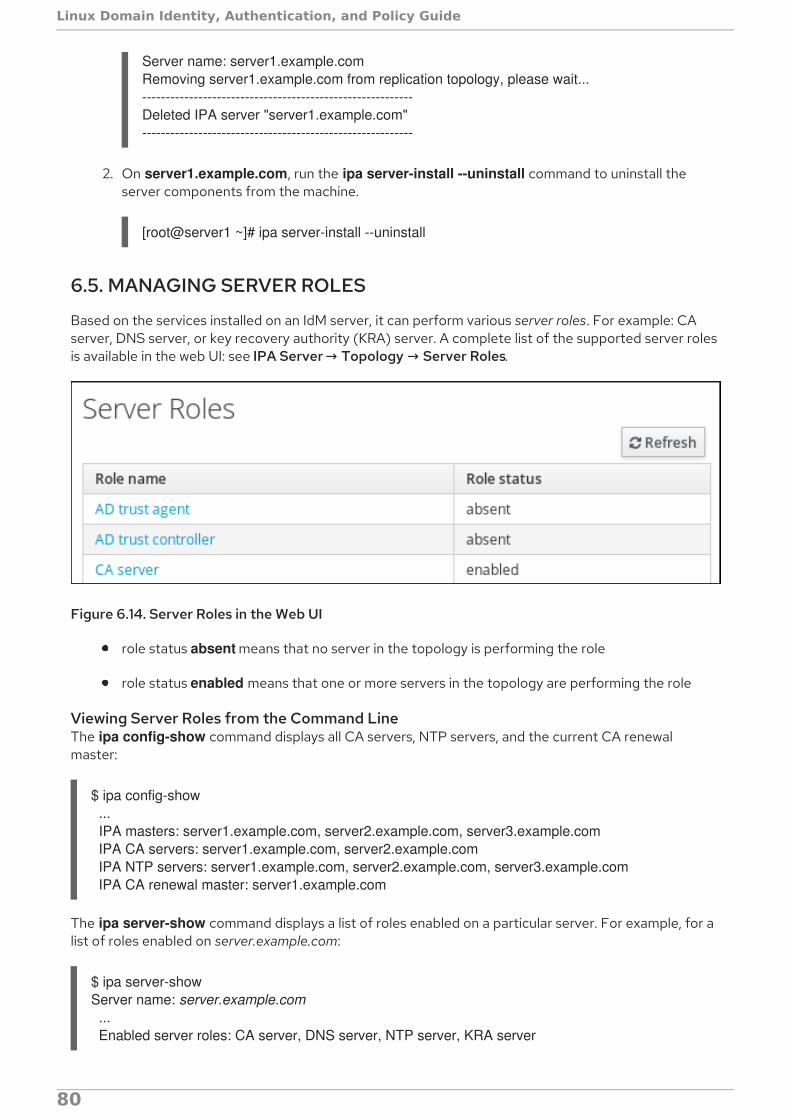
Server name: server1.example.comRemoving server1.example.com from replication topology, please wait...----------------------------------------------------------Deleted IPA server "server1.example.com"----------------------------------------------------------
2. On server1.example.com, run the ipa server-install --uninstall command to uninstall theserver components from the machine.
[root@server1 ~]# ipa server-install --uninstall
6.5. MANAGING SERVER ROLES
Based on the services installed on an IdM server, it can perform various server roles. For example: CAserver, DNS server, or key recovery authority (KRA) server. A complete list of the supported server rolesis available in the web UI: see IPA Server → Topology → Server Roles.
Figure 6.14. Server Roles in the Web UI
role status absent means that no server in the topology is performing the role
role status enabled means that one or more servers in the topology are performing the role
Viewing Server Roles from the Command LineThe ipa config-show command displays all CA servers, NTP servers, and the current CA renewalmaster:
$ ipa config-show ... IPA masters: server1.example.com, server2.example.com, server3.example.com IPA CA servers: server1.example.com, server2.example.com IPA NTP servers: server1.example.com, server2.example.com, server3.example.com IPA CA renewal master: server1.example.com
The ipa server-show command displays a list of roles enabled on a particular server. For example, for alist of roles enabled on server.example.com:
$ ipa server-showServer name: server.example.com ... Enabled server roles: CA server, DNS server, NTP server, KRA server
Linux Domain Identity, Authentication, and Policy Guide
80

The ipa server-find --servrole searches for all servers with a particular server role enabled. Forexample, to search for all CA servers:
$ ipa server-find --servrole "CA server"---------------------2 IPA servers matched--------------------- Server name: server1.example.com ...
Server name: server2.example.com ...----------------------------Number of entries returned 2----------------------------
6.5.1. Promoting a Replica to a Master CA Server
NOTE
This section describes changing the CA renewal master at domain level 1 (see Chapter 7,Displaying and Raising the Domain Level). For documentation on changing the CArenewal master at domain level 0, see Section B.4, “Promoting a Replica to a Master CAServer”.
In a topology that includes multiple replicas, one of them acts as the master CA server: it manages therenewal of CA subsystem certificates and generates certificate revocation lists (CRLs). By default, themaster CA is the initial server from which replicas were created.
If you plan to take the master CA server offline or decommission it, promote another CA server to takethe its place as the new CA renewal master:
1. Configure the replica to handle CA subsystem certificate renewal.
See Section 6.5.1.1, “Changing the Current CA Renewal Master” for domain level 1.
See Section B.4.1, “Changing Which Server Handles Certificate Renewal” for domain level 0.
2. Configure the replica to generate CRLs. See Section 6.5.1.2, “Changing Which Server GeneratesCRLs”.
6.5.1.1. Changing the Current CA Renewal Master
Web UI: Changing the Current CA Renewal Master
1. Select IPA Server → Configuration.
2. In the IPA CA renewal master field, select the new CA renewal master.
Command Line: Changing the Current CA Renewal MasterUse the ipa config-mod --ca-renewal-master-server command:
$ ipa config-mod --ca-renewal-master-server new_ca_renewal_master.example.com ...
CHAPTER 6. MANAGING REPLICATION TOPOLOGY
81
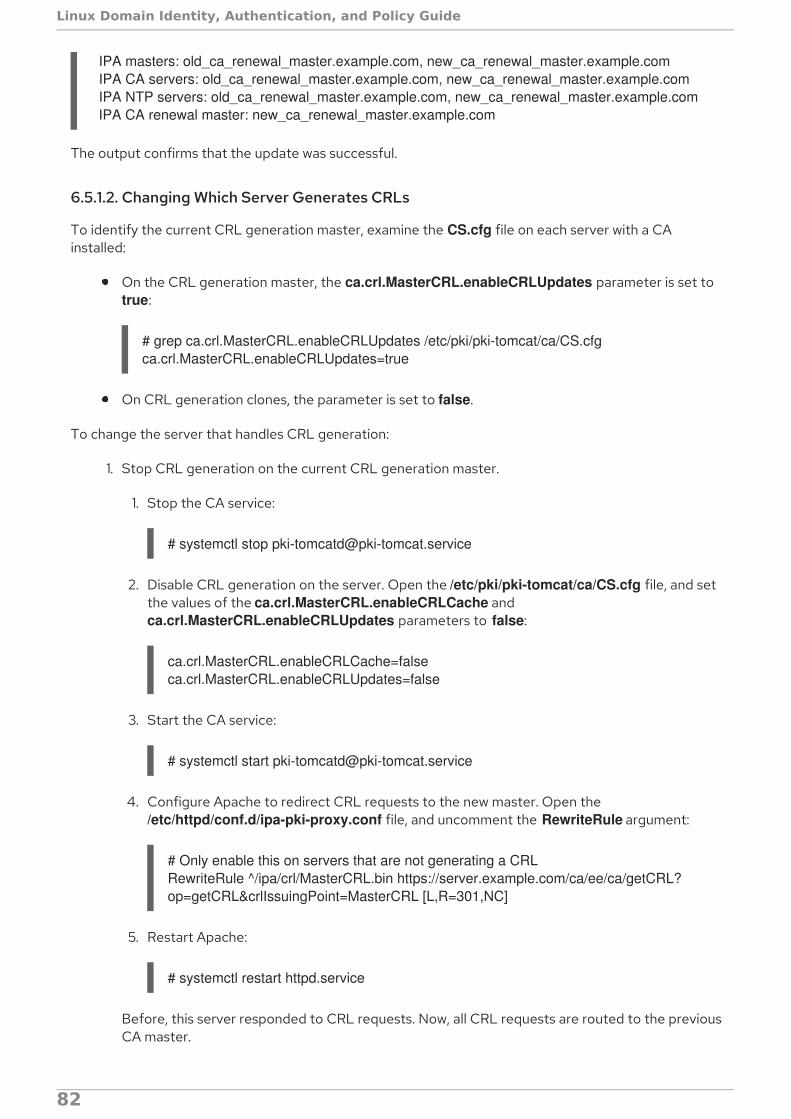
IPA masters: old_ca_renewal_master.example.com, new_ca_renewal_master.example.com IPA CA servers: old_ca_renewal_master.example.com, new_ca_renewal_master.example.com IPA NTP servers: old_ca_renewal_master.example.com, new_ca_renewal_master.example.com IPA CA renewal master: new_ca_renewal_master.example.com
The output confirms that the update was successful.
6.5.1.2. Changing Which Server Generates CRLs
To identify the current CRL generation master, examine the CS.cfg file on each server with a CAinstalled:
On the CRL generation master, the ca.crl.MasterCRL.enableCRLUpdates parameter is set to true:
# grep ca.crl.MasterCRL.enableCRLUpdates /etc/pki/pki-tomcat/ca/CS.cfg ca.crl.MasterCRL.enableCRLUpdates=true
On CRL generation clones, the parameter is set to false.
To change the server that handles CRL generation:
1. Stop CRL generation on the current CRL generation master.
1. Stop the CA service:
# systemctl stop [email protected]
2. Disable CRL generation on the server. Open the /etc/pki/pki-tomcat/ca/CS.cfg file, and setthe values of the ca.crl.MasterCRL.enableCRLCache and ca.crl.MasterCRL.enableCRLUpdates parameters to false:
ca.crl.MasterCRL.enableCRLCache=falseca.crl.MasterCRL.enableCRLUpdates=false
3. Start the CA service:
# systemctl start [email protected]
4. Configure Apache to redirect CRL requests to the new master. Open the /etc/httpd/conf.d/ipa-pki-proxy.conf file, and uncomment the RewriteRule argument:
# Only enable this on servers that are not generating a CRLRewriteRule ^/ipa/crl/MasterCRL.bin https://server.example.com/ca/ee/ca/getCRL?op=getCRL&crlIssuingPoint=MasterCRL [L,R=301,NC]
5. Restart Apache:
# systemctl restart httpd.service
Before, this server responded to CRL requests. Now, all CRL requests are routed to the previousCA master.
Linux Domain Identity, Authentication, and Policy Guide
82

2. Configure the other server to generate CRLs.
1. Stop the CA service:
# systemctl stop [email protected]
2. Enable CRL generation on the server. Set the values of the ca.crl.MasterCRL.enableCRLCache and ca.crl.MasterCRL.enableCRLUpdatesparameters to true:
ca.crl.MasterCRL.enableCRLCache=trueca.crl.MasterCRL.enableCRLUpdates=true
3. Start the CA service:
# systemctl start [email protected]
4. Configure Apache to disable redirecting CRL requests. Open the /etc/httpd/conf.d/ipa-pki-proxy.conf file, and comment out the RewriteRule argument:
#RewriteRule ^/ipa/crl/MasterCRL.bin https://server.example.com/ca/ee/ca/getCRL?op=getCRL&crlIssuingPoint=MasterCRL [L,R=301,NC]
Before, all CRL requests were routed to the previous CA master. Now, this server willrespond to CRL requests.
5. Restart Apache:
# systemctl restart httpd.service
CHAPTER 6. MANAGING REPLICATION TOPOLOGY
83

CHAPTER 7. DISPLAYING AND RAISING THE DOMAIN LEVELThe domain level indicates what operations and capabilities are available in the IdM topology.
Domain level 1
Examples of available functionality:
simplified ipa-replica-install (see Section 4.5, “Creating the Replica: Introduction” )
enhanced topology management (see Chapter 6, Managing Replication Topology)
IMPORTANT
Domain level 1 was introduced in Red Hat Enterprise Linux 7.3 with IdM version 4.4. Touse the domain level 1 features, all your replicas must be running Red HatEnterprise Linux 7.3 or later.
If your first server was installed with Red Hat Enterprise Linux 7.3, the domain level for your domain isautomatically set to 1.
If you upgrade all servers to IdM version 4.4 from earlier versions, the domain level is not raisedautomatically. If you want to use domain level 1 features, raise the domain level manually, as describedin Section 7.2, “Raising the Domain Level”.
Domain level 0
Examples of available functionality:
ipa-replica-install requires a more complicated process of creating a replica information fileon the initial server and copying it to the replica (see Section B.2, “Creating Replicas”)
more complicated and error-prone topology management using ipa-replica-manage and ipa-csreplica-manage (see Section B.3, “Managing Replicas and Replication Agreements” )
7.1. DISPLAYING THE CURRENT DOMAIN LEVEL
Command Line: Displaying the Current Domain Level
1. Log in as the administrator:
$ kinit admin
2. Run the ipa domainlevel-get command:
$ ipa domainlevel-get-----------------------Current domain level: 0-----------------------
Web UI: Displaying the Current Domain LevelSelect IPA Server → Domain Level.
Linux Domain Identity, Authentication, and Policy Guide
84

7.2. RAISING THE DOMAIN LEVEL
IMPORTANT
This is a non-reversible operation. If you raise the domain level from 0 to 1, you cannotdowngrade from 1 to 0 again.
Command Line: Raising the Domain Level
1. Log in as the administrator:
$ kinit admin
2. Run the ipa domainlevel-set command and provide the required level:
$ ipa domainlevel-set 1-----------------------Current domain level: 1-----------------------
Web UI: Raising the Domain Level
1. Select IPA Server → Domain Level.
2. Click Set Domain Level.
CHAPTER 7. DISPLAYING AND RAISING THE DOMAIN LEVEL
85

CHAPTER 8. UPGRADING IDENTITY MANAGEMENTIdentity Management can be migrated from a Red Hat Enterprise Linux 6.5 system to a Red HatEnterprise Linux 7.3 system. This is similar to creating and promoting a replica to replace a server; thisprocess migrates the data and configuration from one instance to another. The older IdM instance canthen be decommissioned and replaced by the new IdM instance.
WARNING
If any of the instances in your IdM deployment are using Red Hat Enterprise Linux6.5 or earlier, upgrade them to Red Hat Enterprise Linux 6.6 before upgrading aRed Hat Enterprise Linux 7.0 IdM server to the 7.1 version or before connecting aRed Hat Enterprise Linux 7.1 IdM replica.
Before upgrading IdM, make sure you have applied the RHBA-2015:0231-2 advisory,which provides the 2.3-6.el6_6 version of the bind-dyndb-ldap packages and isavailable with the Red Hat Enterprise Linux 6.6 Extended Update Support (EUS).Using a previous bind-dyndb-ldap version results in inconsistent behavior in DNSforward zones serving between the Red Hat Enterprise Linux 6.6 DNS servers andRed Hat Enterprise Linux 7 DNS servers.
The following migration rules should be noted when upgrading Identity Management:
When a replica is created, it must be of an equal or later version than the master it is based on.
For example, you can install a Red Hat Enterprise Linux 7 replica against a Red Hat Enterprise Linux 6master, but you cannot install a Red Hat Enterprise Linux 6 replica against a Red Hat Enterprise Linux7 master.
Schema changes are replicated between servers.
Once one master server is updated, all servers and replicas receive the updated schema, even if theirpackages are not yet updated. This ensures that any new entries which use the new schema can stillbe replicated among all the servers in the IdM domain.
IMPORTANT
Linux Domain Identity, Authentication, and Policy Guide
86

IMPORTANT
Due to CVE-2014-3566, the Secure Socket Layer version 3 (SSLv3) protocol needs to bedisabled in the mod_nss module. You can ensure that by following these steps:
1. Edit the /etc/httpd/conf.d/nss.conf file and set the NSSProtocol parameter to TLSv1.0 (for backward compatibility) and TLSv1.1.
NSSProtocol TLSv1.0,TLSv1.1
2. Restart the httpd service.
# systemctl restart httpd.service
Note that Identity Management in Red Hat Enterprise Linux 7 automatically performs theabove steps when the yum update ipa-* command is launched to upgrade the mainpackages.
8.1. MIGRATING THE IDM SERVER TO RED HAT ENTERPRISE LINUX 7
When migrating an IdM server from Red Hat Enterprise Linux 6 to Red Hat Enterprise Linux 7:
1. A new server is created on Red Hat Enterprise Linux 7.
2. All data are migrated over to the new server.
3. All services, such as CRL and certificate creation, DNS management, Kerberos KDCadministration, are transitioned over to the new system.
IMPORTANT
Migrating an IdM server from Red Hat Enterprise Linux 6 to Red Hat Enterprise Linux 7involves installing a replica, which requires certain system configuration. For informationon these prerequisites, see Section 4.3, “Prerequisites for Installing a Replica Server” .
To migrate an IdM server from Red Hat Enterprise Linux 6 to Red Hat Enterprise Linux 7:
1. Update the Red Hat Enterprise Linux 6 system to the latest Red Hat Enterprise Linux 6 version,and upgrade the ipa-* packages.
[root@rhel6 ~]# yum update ipa-*
2. Open the required ports. Note that the firewalld service needs to be running. You can findinformation on which ports IdM requires and how to start firewalld in Section 2.1.4, “PortRequirements”.
For example, to open all the IdM required ports in the default zone and make the change bothpermanent and runtime:
a. Run the firewall-cmd command with the --permanent option specified.
[root@rhel7 ~]# firewall-cmd --permanent --add-port={80/tcp,443/tcp,389/tcp,636/tcp,88/tcp,464/tcp,88/udp,464/udp,22/tcp}
CHAPTER 8. UPGRADING IDENTITY MANAGEMENT
87

b. Reload the firewall-cmd configuration to ensure that the change takes place immediately.
[root@rhel7 ~]# firewall-cmd --reload
3. Install the IdM packages on the Red Hat Enterprise Linux 7 system.
[root@rhel7 ~]# yum install ipa-server ipa-server-dns
4. Copy the Python schema update script from the Red Hat Enterprise Linux 7 system to theRed Hat Enterprise Linux 6 system.
[root@rhel7 ~]# scp /usr/share/ipa/copy-schema-to-ca.py rhel6:/root/
Updating the script in this way is necessary due to schema changes between IdM version 3.1 andlater IdM versions.
5. Run the schema update script on the Red Hat Enterprise Linux 6 system.
[root@rhel6 ~]# python copy-schema-to-ca.py ipa : INFO Installed /etc/dirsrv/slapd-PKI-IPA//schema/60kerberos.ldifipa : INFO Installed /etc/dirsrv/slapd-PKI-IPA//schema/60samba.ldifipa : INFO Installed /etc/dirsrv/slapd-PKI-IPA//schema/60ipaconfig.ldifipa : INFO Installed /etc/dirsrv/slapd-PKI-IPA//schema/60basev2.ldifipa : INFO Installed /etc/dirsrv/slapd-PKI-IPA//schema/60basev3.ldifipa : INFO Installed /etc/dirsrv/slapd-PKI-IPA//schema/60ipadns.ldifipa : INFO Installed /etc/dirsrv/slapd-PKI-IPA//schema/61kerberos-ipav3.ldifipa : INFO Installed /etc/dirsrv/slapd-PKI-IPA//schema/65ipasudo.ldifipa : INFO Installed /etc/dirsrv/slapd-PKI-IPA//schema/05rfc2247.ldifipa : INFO Restarting CA DSipa : INFO Schema updated successfully
6. On the Red Hat Enterprise Linux 6 system, create the replica file for the Red HatEnterprise Linux 7 system; in this example, the new replica server is rhel7.example.com with the192.0.2.1 IP address.
[root@rhel6 ~]# ipa-replica-prepare rhel7.example.com --ip-address 192.0.2.1
Directory Manager (existing master) password: Preparing replica for rhel7.example.com from rhel6.example.com Creating SSL certificate for the Directory Server Creating SSL certificate for the dogtag Directory Server Saving dogtag Directory Server port Creating SSL certificate for the Web Server Exporting RA certificate Copying additional files Finalizing configuration Packaging replica information into /var/lib/ipa/replica-info-rhel7.example.com.gpg Adding DNS records for rhel7.example.com Using reverse zone 2.0.192.in-addr.arpa. The ipa-replica-prepare command was successful
7. Install the replica, using the new replica file, on the Red Hat Enterprise Linux 7 system. Use the -
Linux Domain Identity, Authentication, and Policy Guide
88
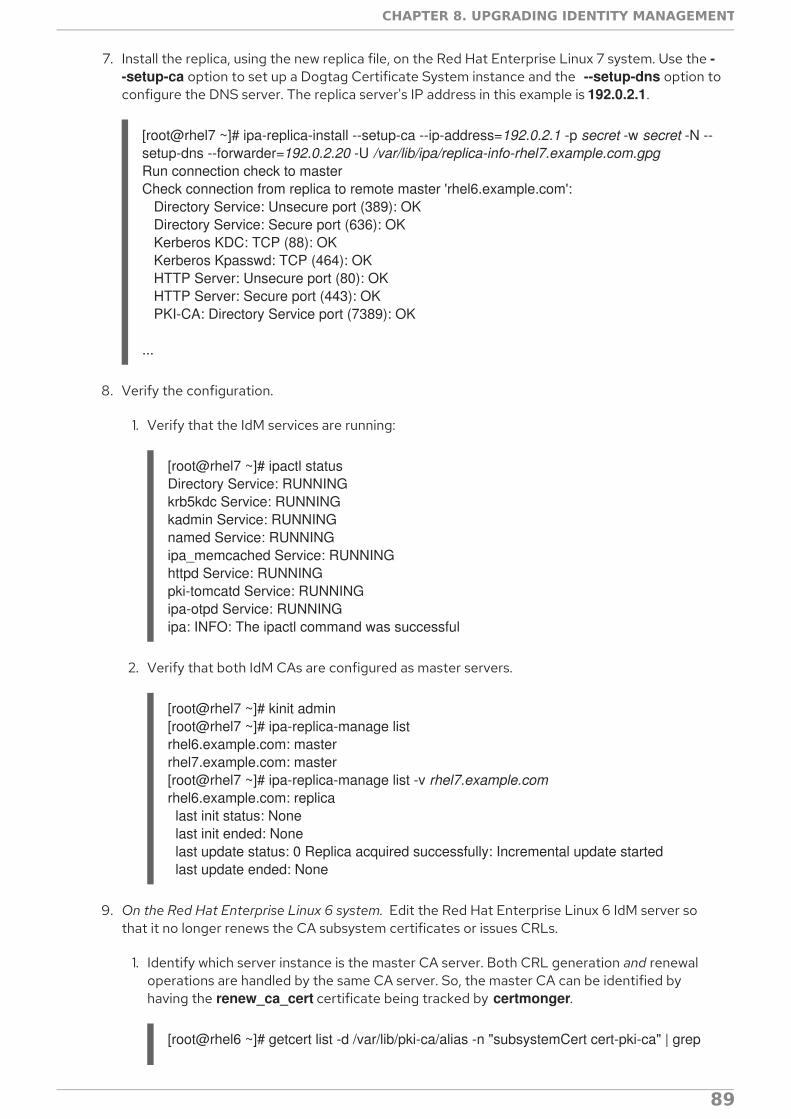
7. Install the replica, using the new replica file, on the Red Hat Enterprise Linux 7 system. Use the --setup-ca option to set up a Dogtag Certificate System instance and the --setup-dns option toconfigure the DNS server. The replica server's IP address in this example is 192.0.2.1.
[root@rhel7 ~]# ipa-replica-install --setup-ca --ip-address=192.0.2.1 -p secret -w secret -N --setup-dns --forwarder=192.0.2.20 -U /var/lib/ipa/replica-info-rhel7.example.com.gpgRun connection check to masterCheck connection from replica to remote master 'rhel6.example.com': Directory Service: Unsecure port (389): OK Directory Service: Secure port (636): OK Kerberos KDC: TCP (88): OK Kerberos Kpasswd: TCP (464): OK HTTP Server: Unsecure port (80): OK HTTP Server: Secure port (443): OK PKI-CA: Directory Service port (7389): OK
...
8. Verify the configuration.
1. Verify that the IdM services are running:
[root@rhel7 ~]# ipactl statusDirectory Service: RUNNINGkrb5kdc Service: RUNNINGkadmin Service: RUNNINGnamed Service: RUNNINGipa_memcached Service: RUNNINGhttpd Service: RUNNINGpki-tomcatd Service: RUNNINGipa-otpd Service: RUNNINGipa: INFO: The ipactl command was successful
2. Verify that both IdM CAs are configured as master servers.
[root@rhel7 ~]# kinit admin[root@rhel7 ~]# ipa-replica-manage listrhel6.example.com: masterrhel7.example.com: master[root@rhel7 ~]# ipa-replica-manage list -v rhel7.example.comrhel6.example.com: replica last init status: None last init ended: None last update status: 0 Replica acquired successfully: Incremental update started last update ended: None
9. On the Red Hat Enterprise Linux 6 system. Edit the Red Hat Enterprise Linux 6 IdM server sothat it no longer renews the CA subsystem certificates or issues CRLs.
1. Identify which server instance is the master CA server. Both CRL generation and renewaloperations are handled by the same CA server. So, the master CA can be identified byhaving the renew_ca_cert certificate being tracked by certmonger.
[root@rhel6 ~]# getcert list -d /var/lib/pki-ca/alias -n "subsystemCert cert-pki-ca" | grep
CHAPTER 8. UPGRADING IDENTITY MANAGEMENT
89

post-save post-save command: /usr/lib64/ipa/certmonger/renew_ca_cert "subsystemCert cert-pki-ca"
2. On the original master CA , disable tracking for all of the original CA certificates.
[root@rhel6 ~]# getcert stop-tracking -d /var/lib/pki-ca/alias -n "auditSigningCert cert-pki-ca"Request "20161127184547" removed.[root@rhel6 ~]# getcert stop-tracking -d /var/lib/pki-ca/alias -n "ocspSigningCert cert-pki-ca"Request "20161127184548" removed.[root@rhel6 ~]# getcert stop-tracking -d /var/lib/pki-ca/alias -n "subsystemCert cert-pki-ca"Request "20161127184549" removed.[root@rhel6 ~]# getcert stop-tracking -d /etc/httpd/alias -n ipaCertRequest "20161127184550" removed.
3. Reconfigure the original master CA to retrieve renewed certificates from a new master CA.
1. Copy the renewal helper into the certmonger service directory, and set the appropriatepermissions.
[root@rhel6 ~]# cp /usr/share/ipa/ca_renewal /var/lib/certmonger/cas/ca_renewal[root@rhel6 ~]# chmod 0600 /var/lib/certmonger/cas/ca_renewal
2. Update the SELinux configuration.
[root@rhel6 ~]# /sbin/restorecon /var/lib/certmonger/cas/ca_renewal
3. Restart certmonger.
[root@rhel6 ~]# service certmonger restart
4. Check that the CA is listed to retrieve certificates. This is printed in the CAconfiguration.
[root@rhel6 ~]# getcert list-cas... CA 'dogtag-ipa-retrieve-agent-submit': is-default: no ca-type: EXTERNAL helper-location: /usr/libexec/certmonger/dogtag-ipa-retrieve-agent-submit
5. Get the CA certificate database PIN.
[root@rhel6 ~]# grep internal= /var/lib/pki-ca/conf/password.conf
6. Configure certmonger to track the certificates for external renewal. This requires thedatabase PIN.
[root@rhel6 ~]# getcert start-tracking -c dogtag-ipa-retrieve-agent-submit -d
Linux Domain Identity, Authentication, and Policy Guide
90

/var/lib/pki-ca/alias -n "auditSigningCert cert-pki-ca" -B /usr/lib64/ipa/certmonger/stop_pkicad -C '/usr/lib64/ipa/certmonger/restart_pkicad "auditSigningCert cert-pki-ca"' -T "auditSigningCert cert-pki-ca" -P database_pinNew tracking request "20161127184743" added.[root@rhel6 ~]# getcert start-tracking -c dogtag-ipa-retrieve-agent-submit -d /var/lib/pki-ca/alias -n "ocspSigningCert cert-pki-ca" -B /usr/lib64/ipa/certmonger/stop_pkicad -C '/usr/lib64/ipa/certmonger/restart_pkicad "ocspSigningCert cert-pki-ca"' -T "ocspSigningCert cert-pki-ca" -P database_pinNew tracking request "20161127184744" added.[root@rhel6 ~]# getcert start-tracking -c dogtag-ipa-retrieve-agent-submit -d /var/lib/pki-ca/alias -n "subsystemCert cert-pki-ca" -B /usr/lib64/ipa/certmonger/stop_pkicad -C '/usr/lib64/ipa/certmonger/restart_pkicad "subsystemCert cert-pki-ca"' -T "subsystemCert cert-pki-ca" -P database_pinNew tracking request "20161127184745" added.[root@rhel6 ~]# getcert start-tracking -c dogtag-ipa-retrieve-agent-submit -d /etc/httpd/alias -n ipaCert -C /usr/lib64/ipa/certmonger/restart_httpd -T ipaCert -p /etc/httpd/alias/pwdfile.txtNew tracking request "20161127184746" added.
4. Stop CRL generation on the original master CA.
1. Stop CA service.
[root@rhel6 ~]# service pki-cad stop
2. Open the CA configuration file.
[root@rhel6 ~]# vim /var/lib/pki-ca/conf/CS.cfg
3. Change the values of the ca.crl.MasterCRL.enableCRLCache and ca.crl.MasterCRL.enableCRLUpdates parameters to false to disable CRL generation.
ca.crl.MasterCRL.enableCRLCache=falseca.crl.MasterCRL.enableCRLUpdates=false
4. Start the CA service.
[root@rhel6 ~]# service pki-cad start
5. Configure Apache to redirect CRL requests to the new master.
1. Open the CA proxy configuration.
[root@rhel6 ~]# vim /etc/httpd/conf.d/ipa-pki-proxy.conf
2. Uncomment the RewriteRule on the last line and replace the example server URL withthe new Red Hat Enterprise Linux 7 server URL.
RewriteRule ^/ipa/crl/MasterCRL.bin https://rhel7.example.com/ca/ee/ca/getCRL?op=getCRL&crlIssuingPoint=MasterCRL [L,R=301,NC]
3. Restart Apache.
CHAPTER 8. UPGRADING IDENTITY MANAGEMENT
91

[root@rhel6 ~]# service httpd restart
10. On the Red Hat Enterprise Linux 7 system. Configure the new Red Hat Enterprise Linux 7 IdMinstance as the CA master. See Section 6.5.1, “Promoting a Replica to a Master CA Server” .
11. Stop all services on the Red Hat Enterprise Linux 6 system; this forces domain discovery to theRed Hat Enterprise Linux 7 server.
[root@rhel6 ~]# ipactl stopStopping CA ServiceStopping pki-ca: [ OK ]Stopping HTTP ServiceStopping httpd: [ OK ]Stopping MEMCACHE ServiceStopping ipa_memcached: [ OK ]Stopping DNS ServiceStopping named: . [ OK ]Stopping KPASSWD ServiceStopping Kerberos 5 Admin Server: [ OK ]Stopping KDC ServiceStopping Kerberos 5 KDC: [ OK ]Stopping Directory ServiceShutting down dirsrv: EXAMPLE-COM... [ OK ] PKI-IPA... [ OK ]
12. For each server in the environment, create a replica file from the Red Hat Enterprise Linux 7master server, and install it on the new Red Hat Enterprise Linux 7 replica system. Creatingreplicas is covered in Chapter 4, Installing and Uninstalling Identity Management Replicas .
13. Decommission the Red Hat Enterprise Linux 6 host.
1. Remove the Red Hat Enterprise Linux 6 server from the IdM server topology by running theipa-replica-manage del command on the Red Hat Enterprise Linux 7 system .
[root@rhel7 ~]# ipa-replica-manage del rhel6.example.comConnection to 'rhel6.example.com' failed: Forcing removal of rhel6.example.comSkipping calculation to determine if one or more masters would be orphaned.Deleting replication agreements between rhel6.example.com and rhel7.example.comFailed to get list of agreements from 'rhel6.example.com': Forcing removal on 'rhel7.example.com'Any DNA range on 'rhel6.example.com' will be lostDeleted replication agreement from 'rhel7.example.com' to 'rhel6.example.com'Background task created to clean replication data. This may take a while.This may be safely interrupted with Ctrl+C
2. Remove the local IdM configuration.
[root@rhel6 ~]# ipa-server-install --uninstall
Linux Domain Identity, Authentication, and Policy Guide
92

CHAPTER 9. BACKING UP AND RESTORING IDENTITYMANAGEMENTRed Hat Enterprise Linux Identity Management provides a solution to manually back up and restore theIdM system, for example when a server stops performing correctly or data loss occurs. During backup,the system creates a directory containing information on your IdM setup and stores it. During restore,you can use this backup directory to bring your original IdM setup back.
IMPORTANT
Use the backup and restore procedures described in this chapter only if you cannotrebuild the lost part of the IdM server group from the remaining servers in thedeployment, by reinstalling the lost replicas as replicas of the remaining ones.
The "Backup and Restore in IdM/IPA" Knowledgebase solution describes how to avoidlosses by maintaining several server replicas. Rebuilding from an existing replica with thesame data is preferable, because the backed-up version usually contains older, thuspotentially outdated, information.
The potential threat scenarios that backup and restore can prevent include:
Catastrophic hardware failure on a machine occurs and the machine becomes incapable offurther functioning. In this situation, you can reinstall the operating system from scratch,configure the machine with the same fully qualified domain name (FQDN) and host name, installthe IdM packages as well as all other optional packages relating to IdM that were present on theoriginal system, and restore the full backup of the IdM server.
An upgrade on an isolated machine fails. The operating system remains functional, but the IdMdata is corrupted, which is why you want to restore the IdM system to a known good state.
IMPORTANT
In cases of hardware or upgrade failure, such as the two mentioned above,restore from backup only if all replicas or a replica with a special role, such as theonly certificate authority (CA), were lost. If a replica with the same data stillexists, it is recommended to delete the lost replica and then rebuild it from theremaining one.
Undesirable changes were made to the LDAP content, for example entries were deleted, andyou want to revert them. Restoring backed-up LDAP data returns the LDAP entries to theprevious state without affecting the IdM system itself.
The restored server becomes the only source of information for IdM; other master servers are re-initialized from the restored server. Any data created after the last backup was made are lost. Thereforeyou should not use the backup and restore solution for normal system maintenance. If possible, alwaysrebuild the lost server by reinstalling it as a replica.
The backup and restore features can be managed only from the command line and are not available inthe IdM web UI.
9.1. FULL-SERVER BACKUP AND DATA-ONLY BACKUP
IdM offers two backup options:
CHAPTER 9. BACKING UP AND RESTORING IDENTITY MANAGEMENT
93

Full-IdM server backup
Full-server backup creates a backup copy of all the IdM server files as well as LDAP data, whichmakes it a standalone backup. IdM affects hundreds of files; the files that the backup process copiesis a mix of whole directories and specific files, such as configuration files or log files, and relatedirectly to IdM or to various services that IdM depends on. Because the full-server backup is a raw filebackup, it is performed offline. The script that performs the full-server backup stops all IdM servicesto ensure a safe course of the backup process.
For the full list of files and directories that the full-server backup copies, see Section 9.1.3, “List ofDirectories and Files Copied During Backup”.
Data-only Backup
The data-only backup only creates a backup copy of LDAP data and the changelog. The processbacks up the IPA-REALM instance and can also back up multiple back ends or only a single back end;the back ends include the IPA back end and the CA Dogtag back end. This type of backup alsobacks up a record of the LDAP content stored in LDIF (LDAP Data Interchange Format). The data-only backup can be performed both online and offline.
By default, IdM stores the created backups in the /var/lib/ipa/backup/ directory. The namingconventions for the subdirectories containing the backups are:
ipa-full-YEAR-MM-DD-HH-MM-SS in the GMT time zone for the full-server backup
ipa-data-YEAR-MM-DD-HH-MM-SS in the GMT time zone for the data-only backup
9.1.1. Creating a Backup
Both full-server and data-only backups are created using the ipa-backup utility which must always berun as root.
To create a full-server backup, run ipa-backup.
IMPORTANT
Performing a full-server backup stops all IdM services because the process must runoffline. The IdM services will start again after the backup is finished.
To create a data-only backup, run the ipa-backup --data command.
You can add several additional options to ipa-backup:
--online performs an online backup; this option is only available with data-only backups
--logs includes the IdM service log files in the backup
For further information on using ipa-backup, see the ipa-backup(1) man page.
9.1.2. Encrypting Backup
You can encrypt the IdM backup using the GNU Privacy Guard (GPG) encryption.
To create a GPG key:
1. Create a keygen file containing the key details, for example, by running cat >keygen <<EOF
Linux Domain Identity, Authentication, and Policy Guide
94
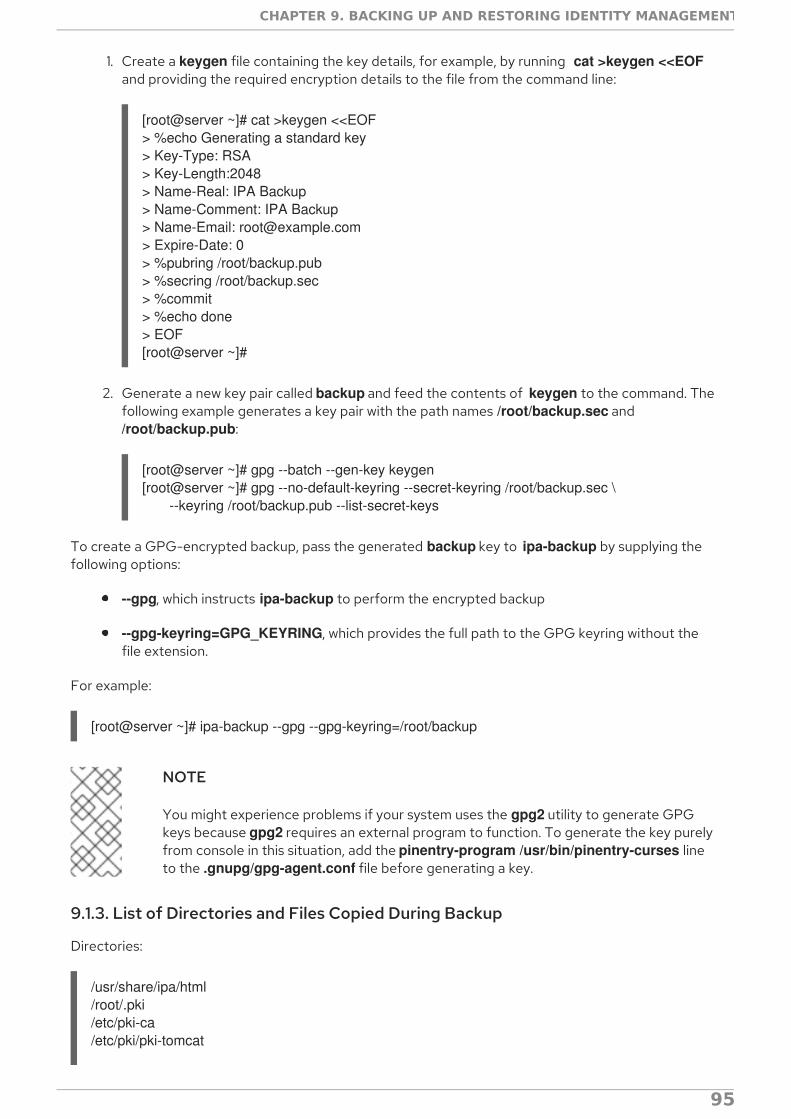
1. Create a keygen file containing the key details, for example, by running cat >keygen <<EOFand providing the required encryption details to the file from the command line:
[root@server ~]# cat >keygen <<EOF> %echo Generating a standard key> Key-Type: RSA> Key-Length:2048> Name-Real: IPA Backup> Name-Comment: IPA Backup> Name-Email: [email protected]> Expire-Date: 0> %pubring /root/backup.pub> %secring /root/backup.sec> %commit> %echo done> EOF[root@server ~]#
2. Generate a new key pair called backup and feed the contents of keygen to the command. Thefollowing example generates a key pair with the path names /root/backup.sec and /root/backup.pub:
[root@server ~]# gpg --batch --gen-key keygen[root@server ~]# gpg --no-default-keyring --secret-keyring /root/backup.sec \ --keyring /root/backup.pub --list-secret-keys
To create a GPG-encrypted backup, pass the generated backup key to ipa-backup by supplying thefollowing options:
--gpg, which instructs ipa-backup to perform the encrypted backup
--gpg-keyring=GPG_KEYRING, which provides the full path to the GPG keyring without thefile extension.
For example:
[root@server ~]# ipa-backup --gpg --gpg-keyring=/root/backup
NOTE
You might experience problems if your system uses the gpg2 utility to generate GPGkeys because gpg2 requires an external program to function. To generate the key purelyfrom console in this situation, add the pinentry-program /usr/bin/pinentry-curses lineto the .gnupg/gpg-agent.conf file before generating a key.
9.1.3. List of Directories and Files Copied During Backup
Directories:
/usr/share/ipa/html/root/.pki/etc/pki-ca/etc/pki/pki-tomcat
CHAPTER 9. BACKING UP AND RESTORING IDENTITY MANAGEMENT
95
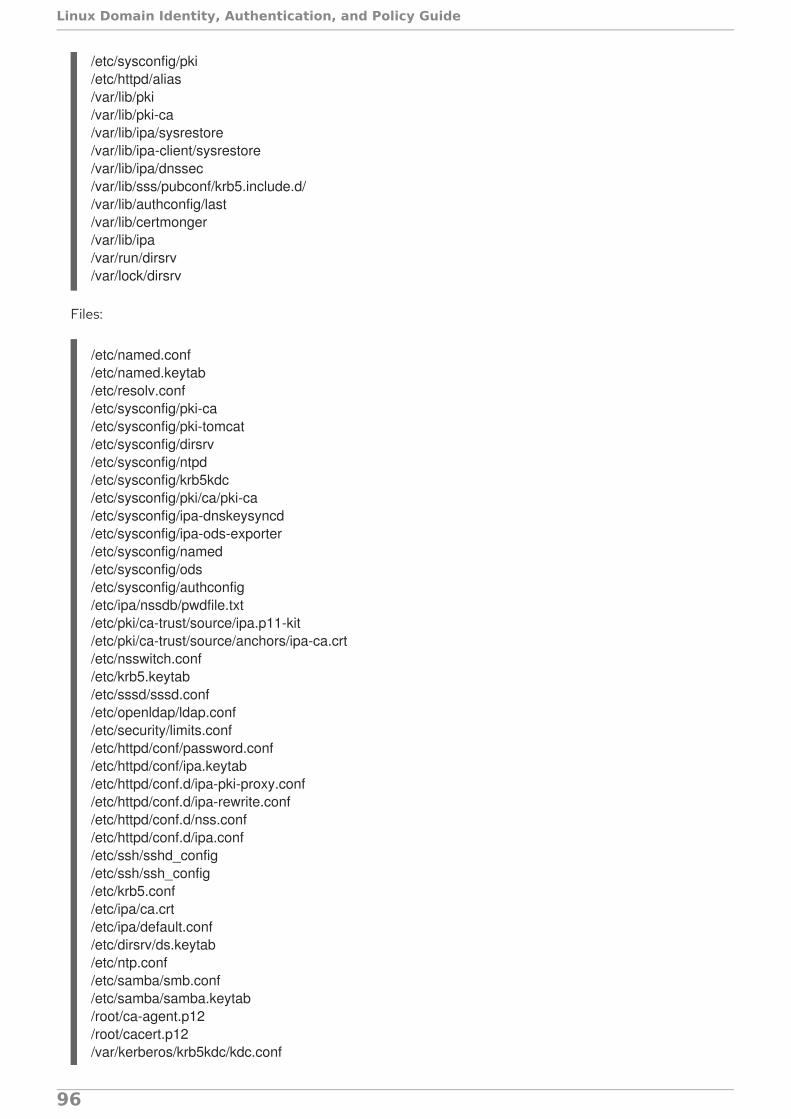
/etc/sysconfig/pki/etc/httpd/alias/var/lib/pki/var/lib/pki-ca/var/lib/ipa/sysrestore/var/lib/ipa-client/sysrestore/var/lib/ipa/dnssec/var/lib/sss/pubconf/krb5.include.d//var/lib/authconfig/last/var/lib/certmonger/var/lib/ipa/var/run/dirsrv/var/lock/dirsrv
Files:
/etc/named.conf/etc/named.keytab/etc/resolv.conf/etc/sysconfig/pki-ca/etc/sysconfig/pki-tomcat/etc/sysconfig/dirsrv/etc/sysconfig/ntpd/etc/sysconfig/krb5kdc/etc/sysconfig/pki/ca/pki-ca/etc/sysconfig/ipa-dnskeysyncd/etc/sysconfig/ipa-ods-exporter/etc/sysconfig/named/etc/sysconfig/ods/etc/sysconfig/authconfig/etc/ipa/nssdb/pwdfile.txt/etc/pki/ca-trust/source/ipa.p11-kit/etc/pki/ca-trust/source/anchors/ipa-ca.crt/etc/nsswitch.conf/etc/krb5.keytab/etc/sssd/sssd.conf/etc/openldap/ldap.conf/etc/security/limits.conf/etc/httpd/conf/password.conf/etc/httpd/conf/ipa.keytab/etc/httpd/conf.d/ipa-pki-proxy.conf/etc/httpd/conf.d/ipa-rewrite.conf/etc/httpd/conf.d/nss.conf/etc/httpd/conf.d/ipa.conf/etc/ssh/sshd_config/etc/ssh/ssh_config/etc/krb5.conf/etc/ipa/ca.crt/etc/ipa/default.conf/etc/dirsrv/ds.keytab/etc/ntp.conf/etc/samba/smb.conf/etc/samba/samba.keytab/root/ca-agent.p12/root/cacert.p12/var/kerberos/krb5kdc/kdc.conf
Linux Domain Identity, Authentication, and Policy Guide
96
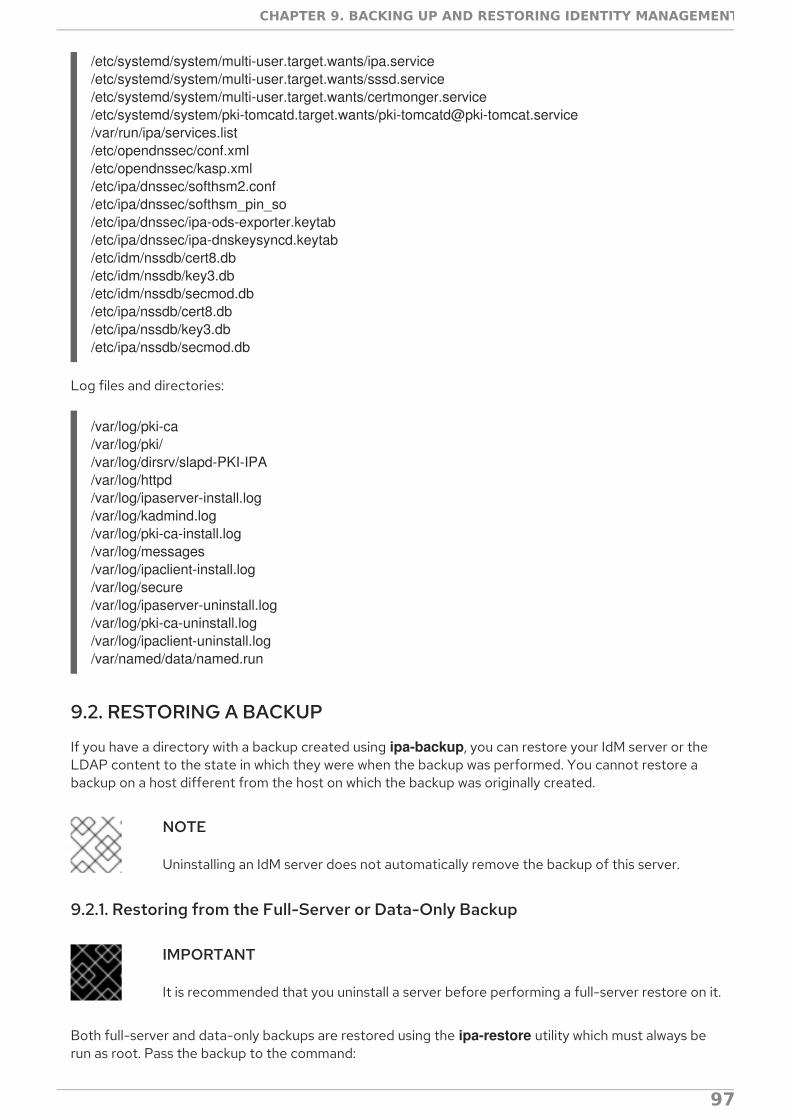
/etc/systemd/system/multi-user.target.wants/ipa.service/etc/systemd/system/multi-user.target.wants/sssd.service/etc/systemd/system/multi-user.target.wants/certmonger.service/etc/systemd/system/pki-tomcatd.target.wants/[email protected]/var/run/ipa/services.list/etc/opendnssec/conf.xml/etc/opendnssec/kasp.xml/etc/ipa/dnssec/softhsm2.conf/etc/ipa/dnssec/softhsm_pin_so/etc/ipa/dnssec/ipa-ods-exporter.keytab/etc/ipa/dnssec/ipa-dnskeysyncd.keytab/etc/idm/nssdb/cert8.db/etc/idm/nssdb/key3.db/etc/idm/nssdb/secmod.db/etc/ipa/nssdb/cert8.db/etc/ipa/nssdb/key3.db/etc/ipa/nssdb/secmod.db
Log files and directories:
/var/log/pki-ca/var/log/pki//var/log/dirsrv/slapd-PKI-IPA/var/log/httpd/var/log/ipaserver-install.log/var/log/kadmind.log/var/log/pki-ca-install.log/var/log/messages/var/log/ipaclient-install.log/var/log/secure/var/log/ipaserver-uninstall.log/var/log/pki-ca-uninstall.log/var/log/ipaclient-uninstall.log/var/named/data/named.run
9.2. RESTORING A BACKUP
If you have a directory with a backup created using ipa-backup, you can restore your IdM server or theLDAP content to the state in which they were when the backup was performed. You cannot restore abackup on a host different from the host on which the backup was originally created.
NOTE
Uninstalling an IdM server does not automatically remove the backup of this server.
9.2.1. Restoring from the Full-Server or Data-Only Backup
IMPORTANT
It is recommended that you uninstall a server before performing a full-server restore on it.
Both full-server and data-only backups are restored using the ipa-restore utility which must always berun as root. Pass the backup to the command:
CHAPTER 9. BACKING UP AND RESTORING IDENTITY MANAGEMENT
97

Pass only the name of the directory with the backup if it is located in the default /var/lib/ipa/backup/ directory.
Pass the full path to the backup if the directory containing the backup is not located in thedefault directory. For example:
[root@server ~]# ipa-restore /path/to/backup
The ipa-restore utility automatically detects what type of backup the backup directory contains and bydefault performs the same type of restore.
You can add the following options to ipa-restore:
--data performs a data-only restore from a full-server backup, that is, restores only the LDAPdata component from a backup directory containing the full-server backup
--online restores the LDAP data in a data-only restore online
--instance specifies which 389 DS instance is restored. IdM in Red Hat Enterprise Linux 7 onlyuses the IPA-REALM instance, but it might be possible, for example, to create a backup on asystem with separate instances; in such cases, --instance allows you to restore only IPA-REALM. For example:
[root@server ~]# ipa-restore --instance=IPA-REALM /path/to/backup
You can use this option only when performing a data-only restore.
--backend specifies which back end is restored; without this option, ipa-restore restores allback ends it discovers. The arguments defining the possible back ends are userRoot, whichrestores the IPA data back end, and ipaca, which restores the CA back end.
You can use this option only when performing a data-only restore.
--no-logs restores the backup without restoring the log files
To avoid authentication problems on an IdM master, clear the SSSD cache after a restore:
1. Stop the SSSD service:
[root@server ~]# systemctl stop sssd
2. Remove all cached content from SSSD:
[root@server ~]# find /var/lib/sss/ ! -type d | xargs rm -f
3. Start the SSSD service:
[root@server ~]# systemctl start sssd
NOTE
It is recommended that you reboot your system after restoring from backup.
Linux Domain Identity, Authentication, and Policy Guide
98

For further information on using ipa-restore, see the ipa-restore(1) man page.
9.2.2. Restoring with Multiple Master Servers
Restoring from backup sets the restored server as the new data master, and you will be required toreinitialize all other masters after the restore. To reinitialize the other masters, run the ipa-replica-manage command and, on masters that have a CA installed, the ipa-csreplica-manage command. Forexample:
[root@server ~]# ipa-replica-manage re-initialize --from=restored_master_FQDN
For further information on replication during restore and on restoration on other masters, see the ipa-restore(1) man page.
9.2.3. Restoring from an Encrypted Backup
If you want to restore from a backup encrypted with GPG, provide the full path to the private and publickeys using the --gpg-keyring option. For example:
[root@server ~]# ipa-restore --gpg-keyring=/root/backup /path/to/backup
CHAPTER 9. BACKING UP AND RESTORING IDENTITY MANAGEMENT
99

PART III. MANAGING USER AND SYSTEM IDENTITIES IN ALINUX DOMAIN
Linux Domain Identity, Authentication, and Policy Guide
100
CHAPTER 10. MANAGING USER ACCOUNTSThis chapter covers general management and configuration of user accounts.
10.1. SETTING UP USER HOME DIRECTORIES
It is recommended that every user has a home directory configured. The default expected location foruser home directories is in the /home/ directory. For example, IdM expects a user with the user_loginlogin to have a home directory set up at /home/user_login.
NOTE
You can change the default expected location for user home directories using the ipa config-mod command.
IdM does not automatically create home directories for users. However, you can configure a PAM homedirectory module to create a home directory automatically when a user logs in. Alternatively, you can addhome directories manually using NFS shares and the automount utility.
10.1.1. Mounting Home Directories Automatically Using the PAM Home DirectoryModule
Supported PAM Home Directory ModulesTo configure a PAM home directory module to create home directories for users automatically whenthey log in to the IdM domain, use one of the following PAM modules:
pam_oddjob_mkhomedir
pam_mkhomedir
IdM first attempts to use pam_oddjob_mkhomedir. If this module is not installed, IdM attempts to use pam_mkhomedir instead.
Configuring the PAM Home Directory ModuleEnabling the PAM home directory module has local effect. Therefore, you must enable the moduleindividually on each client and server where it is required.
To configure the module during the installation of the server or client, use the --mkhomedir option withthe ipa-server-install or ipa-client-install utility when installing the machine.
To configure the module on an already installed server or client, use the authconfig utility. For example:
# authconfig --enablemkhomedir --update
For more information on using authconfig to create home directories, see the System-LevelAuthentication Guide.
10.1.2. Mounting Home Directories Manually
You can use an NFS file server to provide a /home/ directory that will be available to all machines in theIdM domain, and then mount the directory on an IdM machine using the automount utility.
Potential Problems When Using NFS
CHAPTER 10. MANAGING USER ACCOUNTS
101

Using NFS can potentially have negative impact on performance and security. For example, using NFScan lead to security vulnerabilities resulting from granting root access to the NFS user, performanceissues with loading the entire /home/ directory tree, or network performance issues for using remoteservers for home directories.
To reduce the effect of these problems, it is recommended to follow these guidelines:
Use automount to mount only the user's home directory and only when the user logs in. Do notuse it to load the entire /home/ tree.
Use a remote user who has limited permissions to create home directories, and mount the shareon the IdM server as this user. Because the IdM server runs as an httpd process, it is possible touse sudo or a similar program to grant limited access to the IdM server to create homedirectories on the NFS server.
Configuring Home Directories Using NFS and automountTo manually add home directories to the IdM server from separate locations using NFS shares and automount:
1. Create a new location for the user directory maps.
$ ipa automountlocation-add userdirsLocation: userdirs
2. Add a direct mapping to the new location's auto.direct file. The auto.direct file is the automount map automatically created by the ipa-server-install utility. In the followingexample, the mount point is /share:
$ ipa automountkey-add userdirs auto.direct --key=/share --info="-ro,soft, server.example.com:/home/share"
Key: /shareMount information: -ro,soft, server.example.com:/home/share
For more details on using automount with IdM, see Chapter 25, Using Automount.
10.2. USER LIFE CYCLE
Identity Management supports three user account states: stage, active, and preserved.
Stage users are not allowed to authenticate. This is an initial state. Some of the user accountproperties required for active users might not yet be set.
Active users are allowed to authenticate. All required user account properties must be set in thisstate.
Preserved users are former active users. They are considered inactive and cannot authenticateto IdM. Preserved users retain most of the account properties they had as active users, but theyare not part of any user groups.
NOTE
The list of users in the preserved state can provide a history of past useraccounts.
Linux Domain Identity, Authentication, and Policy Guide
102
User entries can also be permanently deleted from the IdM database. Deleting a user entry permanentlyremoves the entry itself and all its information from IdM, including group memberships and passwords.Any external configuration for the user, such as the system account and home directory, is not deleted,but is no longer accessible through IdM.
IMPORTANT
Deleted user accounts cannot be restored. When you delete a user account, all theinformation associated with the account is lost permanently.
A new administrator user can only be created by another administrator, such as the default admin user.If you accidentally delete all administrator accounts, the Directory Manager must create a newadministrator manually in the Directory Server.
User Life Cycle Management OperationsTo manage user provisioning, the administrator can move user accounts from one state to another. Newuser accounts can be added as either active or stage, but not as preserved.
IdM supports the following operations for user life cycle management:
stage → active
When an account in the stage state is ready to be properly activated, the administrator moves it tothe active state.
active → preserved
After the user leaves the company, the administrator moves the account to the preserved state.
preserved → active
A former user joins the company again. The administrator restores the user account by moving itfrom the preserved state back to the active state.
preserved → stage
A former user is planning to join the company again. The administrator moves the account from the preserved state to the stage state to prepare the account for later reactivation.
You can also permanently delete active, stage, and preserved users from IdM. Note that you cannotmove stage users to the preserved state, you can only delete them permanently.
CHAPTER 10. MANAGING USER ACCOUNTS
103

Figure 10.1. User Life Cycle Operations
10.2.1. Adding Stage or Active Users
Adding Users in the Web UI
1. Select the Identity → Users tab.
2. Select the Active users or Stage users category, depending on whether you want to add auser in the active or stage state.
Figure 10.2. Selecting User Category
For more information about the active or stage user life cycle states, see Section 10.2, “UserLife Cycle”.
3. Click Add at the top of the users list.
Linux Domain Identity, Authentication, and Policy Guide
104

Figure 10.3. Adding a User
4. Fill in the Add User form.
Note that if you do not set a user login manually, IdM generates the login automatically based onthe specified first name and last name.
5. Click Add.
Alternatively, click Add and Add Another to start adding another user or Add and Edit to startediting the new user entry. For information on editing user entries, see Section 10.3, “EditingUsers”.
Adding Users from the Command LineTo add a new user in the active state, use the ipa user-add command. To add a new user in the stagestate, use the ipa stageuser-add command.
NOTE
For more information about the active or stage user life cycle states, see Section 10.2,“User Life Cycle”.
When run without any options, ipa user-add and ipa stageuser-add prompt you for the minimumrequired user attributes and use default values for the other attributes. Alternatively, you can addoptions specifying various attributes directly to the commands.
In the interactive session, after you run the command without any options, IdM proposes anautomatically generated user login based on the provided first name and last name and displays it inbrackets ([ ]). To accept the default login, confirm by pressing Enter. To specify a custom login, do notconfirm the default and specify the custom login instead.
$ ipa user-addFirst name: first_nameLast name: last_nameUser login [default_login]: custom_login
Adding options to ipa user-add and ipa stageuser-add enables you to define custom values for manyof the user attributes. This means that you can specify more information than in the interactive session.For example, to add a stage user:
$ ipa stageuser-add stage_user_login --first=first_name --last=last_name --email=email_address
For a complete list of options accepted by ipa user-add and ipa stageuser-add, run the commandswith the --help option added.
CHAPTER 10. MANAGING USER ACCOUNTS
105
10.2.1.1. User Name Requirements
IdM supports user names that can be described by the following regular expression:
[a-zA-Z0-9_.][a-zA-Z0-9_.-]{0,252}[a-zA-Z0-9_.$-]?
NOTE
User names ending with the trailing dollar sign ($) are supported to enable Samba 3.xmachine support.
If you add a user whose user name contains uppercase characters, IdM automatically converts the nameto lowercase when saving it. Therefore, IdM always requires users to enter their user names all lowercasewhen logging in. Additionally, it is not possible to add users whose user names only differ in letter casing,such as user and User.
The default maximum length for user names is 32 characters. To change it, use the ipa config-mod --maxusername command. For example, to increase the maximum user name length to 64 characters:
$ ipa config-mod --maxusername=64 Maximum username length: 64 ...
10.2.1.2. Defining a Custom UID or GID Number
If you add a new user entry without specifying a custom UID or GID number, IdM automatically assignsan ID number that is next available in the ID range. This means that users' ID numbers are always unique.For more information about ID ranges, see Chapter 13, Unique UID and GID Number Assignments .
When you specify a custom ID number, the server does not validate whether the custom ID number isunique. Due to this, multiple user entries might have the same ID number assigned. Red Hatrecommends to prevent having multiple entries with the same ID number.
10.2.2. Listing Users and Searching for Users
Listing Users in the Web UI
1. Select the Identity → Users tab.
2. Select the Active users, Stage users, or Preserved users category.
Linux Domain Identity, Authentication, and Policy Guide
106
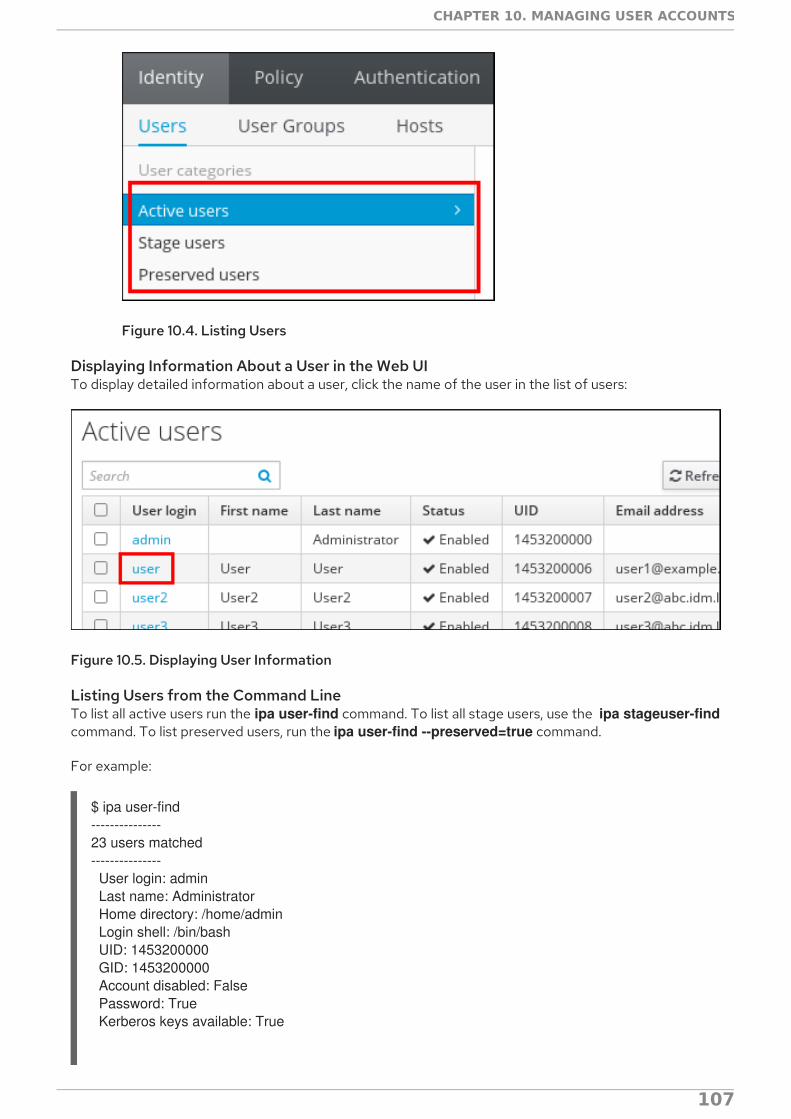
Figure 10.4. Listing Users
Displaying Information About a User in the Web UITo display detailed information about a user, click the name of the user in the list of users:
Figure 10.5. Displaying User Information
Listing Users from the Command LineTo list all active users run the ipa user-find command. To list all stage users, use the ipa stageuser-findcommand. To list preserved users, run the ipa user-find --preserved=true command.
For example:
$ ipa user-find---------------23 users matched--------------- User login: admin Last name: Administrator Home directory: /home/admin Login shell: /bin/bash UID: 1453200000 GID: 1453200000 Account disabled: False Password: True Kerberos keys available: True
CHAPTER 10. MANAGING USER ACCOUNTS
107

User login: user...
By adding options and arguments to ipa user-find and ipa stageuser-find, you can define the searchcriteria and filter the search results. For example, to display all active users with a specific title defined:
$ ipa user-find --title=user_title---------------2 users matched--------------- User login: user... Job Title: Title...
User login: user2... Job Title: Title...
Similarly, to display all stage users whose login contains user:
$ ipa user-find user---------------3 users matched---------------User login: user...
User login: user2...
User login: user3...
For a complete list of options accepted by ipa user-find and ipa stageuser-find, run the commandswith the --help option added.
Displaying Information about a User from the Command LineTo display information about an active or preserved user, use the ipa user-show command:
$ ipa user-show user_login User login: user_login First name: first_name Last name: last_name...
To display information about a stage user, use the ipa stageuser-show command:
10.2.3. Activating, Preserving, Deleting, and Restoring Users
This section describes moving user accounts between different user life cycle states. For details on thelife cycle states in IdM, see Section 10.2, “User Life Cycle” .
Linux Domain Identity, Authentication, and Policy Guide
108

Managing User Life Cycle in the Web UITo activate a stage user:
In the Stage users list, select the user to activate, and click Activate.
Figure 10.6. Activating a User
To preserve or delete a user:
1. In the Active users or Stage users lists, select the user. Click Delete.
Figure 10.7. Deleting a User
2. If you selected an active user, select delete or preserve. If you selected a stage user, you canonly delete the user. The default UI option is delete.
For example, to preserve an active user:
Figure 10.8. Selecting the Delete Mode in the Web UI
CHAPTER 10. MANAGING USER ACCOUNTS
109
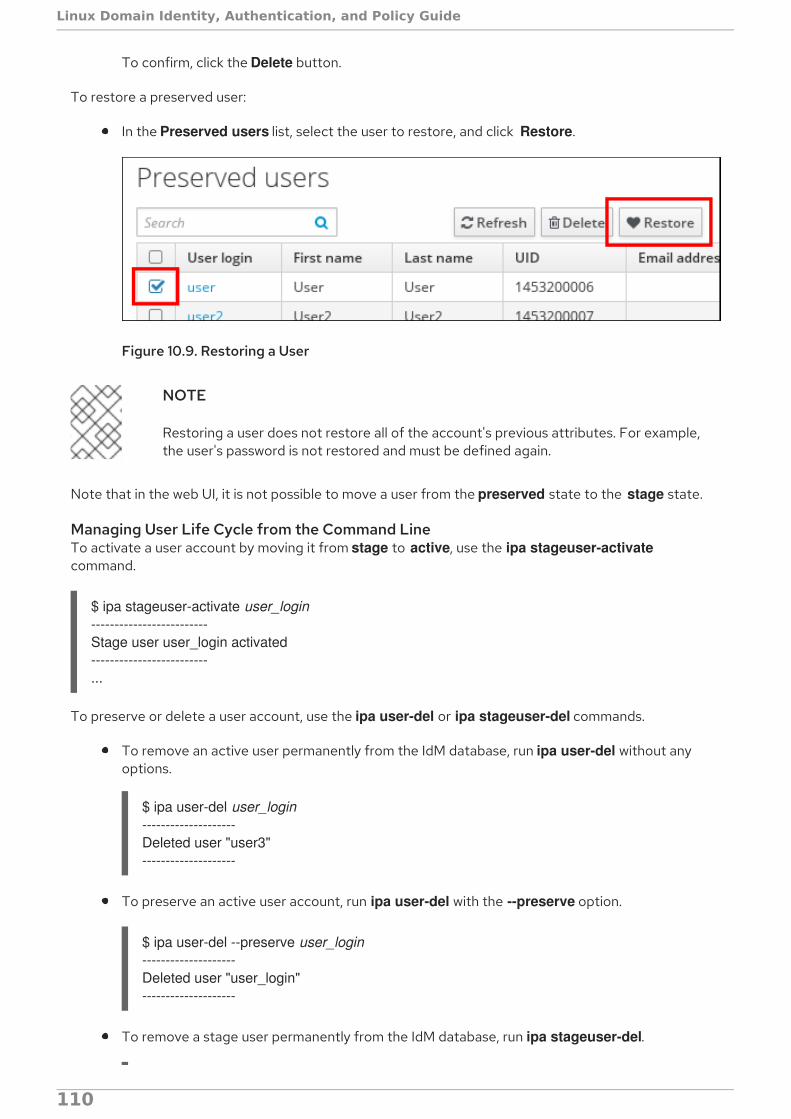
To confirm, click the Delete button.
To restore a preserved user:
In the Preserved users list, select the user to restore, and click Restore.
Figure 10.9. Restoring a User
NOTE
Restoring a user does not restore all of the account's previous attributes. For example,the user's password is not restored and must be defined again.
Note that in the web UI, it is not possible to move a user from the preserved state to the stage state.
Managing User Life Cycle from the Command LineTo activate a user account by moving it from stage to active, use the ipa stageuser-activatecommand.
$ ipa stageuser-activate user_login-------------------------Stage user user_login activated-------------------------...
To preserve or delete a user account, use the ipa user-del or ipa stageuser-del commands.
To remove an active user permanently from the IdM database, run ipa user-del without anyoptions.
$ ipa user-del user_login--------------------Deleted user "user3"--------------------
To preserve an active user account, run ipa user-del with the --preserve option.
$ ipa user-del --preserve user_login--------------------Deleted user "user_login"--------------------
To remove a stage user permanently from the IdM database, run ipa stageuser-del.
Linux Domain Identity, Authentication, and Policy Guide
110
$ ipa stageuser-del user_login--------------------------Deleted stage user "user_login"--------------------------
NOTE
When deleting multiple users, use the --continue option to force the command tocontinue regardless of errors. A summary of the successful and failed operations isprinted to the stdout standard output stream when the command completes.
$ ipa user-del --continue user1 user2 user3
If --continue is not used, the command proceeds with deleting users until it encountersan error, after which it stops and exits.
To restore a preserved user account by moving it from preserved to active, use the ipa user-undelcommand.
$ ipa user-undel user_login------------------------------Undeleted user account "user_login"------------------------------
To restore a preserved user account by moving it from preserved to stage, use the ipa user-stagecommand.
$ ipa user-stage user_login------------------------------Staged user account "user_login"------------------------------
NOTE
Restoring a user account does not restore all of the account's previous attributes. Forexample, the user's password is not restored and must be defined again.
For more information about these commands and the options they accept, run them with the --helpoption added.
10.3. EDITING USERS
Editing Users in the Web UI
1. Select the Identity → Users tab.
2. Search the Active users, Stage users, or Preserved users category to find the user to edit.
3. Click the name of the user to edit.
CHAPTER 10. MANAGING USER ACCOUNTS
111
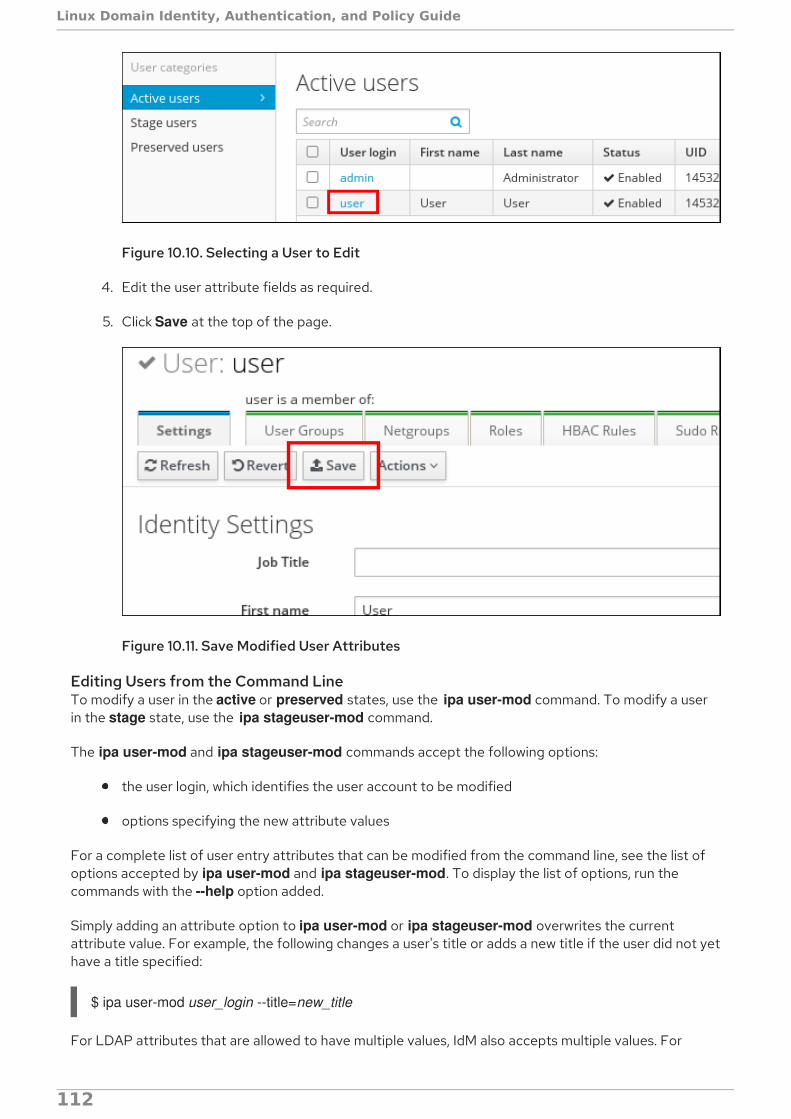
Figure 10.10. Selecting a User to Edit
4. Edit the user attribute fields as required.
5. Click Save at the top of the page.
Figure 10.11. Save Modified User Attributes
Editing Users from the Command LineTo modify a user in the active or preserved states, use the ipa user-mod command. To modify a userin the stage state, use the ipa stageuser-mod command.
The ipa user-mod and ipa stageuser-mod commands accept the following options:
the user login, which identifies the user account to be modified
options specifying the new attribute values
For a complete list of user entry attributes that can be modified from the command line, see the list ofoptions accepted by ipa user-mod and ipa stageuser-mod. To display the list of options, run thecommands with the --help option added.
Simply adding an attribute option to ipa user-mod or ipa stageuser-mod overwrites the currentattribute value. For example, the following changes a user's title or adds a new title if the user did not yethave a title specified:
$ ipa user-mod user_login --title=new_title
For LDAP attributes that are allowed to have multiple values, IdM also accepts multiple values. For
Linux Domain Identity, Authentication, and Policy Guide
112
example, a user can have two email addresses saved in their user account. To add an additional attributevalue without overwriting the existing value, use the --addattr option together with the option to specifythe new attribute value. For example, to add a new email address to a user account that already has anemail address specified:
$ ipa user-mod user --addattr=mobile=new_mobile_number--------------------Modified user "user"-------------------- User login: user... Mobile Telephone Number: mobile_number, new_mobile_number...
To set two attribute values at the same time, use the --addattr option twice:
$ ipa user-mod user --addattr=mobile=mobile_number_1 --addattr=mobile=mobile_number_2
The ipa user-mod command also accepts the --setattr option for setting attribute values and the --delattr option for deleting attribute values. These options are used in a way similar to using --addattr.For details, see the output of the ipa user-mod --help command.
NOTE
To overwrite the current email address for a user, use the --email option. However, toadd an additional email address, use the mail option with the --addattr option:
$ ipa user-mod user [email protected]
$ ipa user-mod user [email protected]
10.4. ENABLING AND DISABLING USER ACCOUNTS
The administrator can disable and enable active user accounts. Disabling a user account deactivates theaccount. Disabled user accounts cannot be used to authenticate. A user whose account has beendisabled cannot log into IdM and cannot use IdM services, such as Kerberos, or perform any tasks.
Disabled user accounts still exist within IdM and all of the associated information remains unchanged.Unlike preserved user accounts, disabled user accounts remain in the active state. Therefore, they aredisplayed in the output of the ipa user-find command. For example:
$ ipa user-find... User login: user First name: User Last name: User Home directory: /home/user Login shell: /bin/sh UID: 1453200009 GID: 1453200009 Account disabled: True
CHAPTER 10. MANAGING USER ACCOUNTS
113

Password: False Kerberos keys available: False...
Any disabled user account can be enabled again.
NOTE
After disabling a user account, existing connections remain valid until the user's KerberosTGT and other tickets expire. After the ticket expires, the user will not be able renew it.
Enabling and Disabling User Accounts in the Web UI
1. Select the Identity → Users tab.
2. From the Active users list, select the required user or users, and then click Disable or Enable.
Figure 10.12. Disabling or Enabling a User Account
Disabling and Enabling User Accounts from the Command LineTo disable a user account, use the ipa user-disable command.
$ ipa user-disable user_login----------------------------Disabled user account "user_login"----------------------------
To enable a user account, use the ipa user-enable command.
$ ipa user-enable user_login----------------------------Enabled user account "user_login"----------------------------
10.5. ALLOWING NON-ADMIN USERS TO MANAGE USER ENTRIES
By default, only the admin user is allowed to manage user life cycle and disable or enable useraccounts. To allow another, non-admin user to do this, create a new role, add the relevant permissions tothis role, and assign the non-admin user to the role.
By default, IdM includes the following privileges related to managing user accounts:
Modify Users and Reset passwords
Linux Domain Identity, Authentication, and Policy Guide
114

This privilege includes permissions to modify various user attributes.
User Administrators
This privilege includes permissions to add active users, activate non-active users, remove users,modify user attributes, and other permissions.
Stage User Provisioning
This privilege includes a permission to add stage users.
Stage User Administrator
This privilege includes permissions to perform a number of life cycle operations, such as adding stageusers or moving users between life cycle states. However, it does not include permissions to moveusers to the active state.
For information on defining roles, permissions, and privileges, see Section 32.4, “Defining Role-BasedAccess Controls”.
Allowing Different Users to Perform Different User Management OperationsThe different privileges related to managing user accounts can be added to different users. Forexample, you can separate privileges for employee account entry and activation by:
Configuring one user as a stage user administrator , who is allowed to add future employees toIdM as stage users, but not to activate them.
Configuring another user as a security administrator, who is allowed to activate the stage usersafter their employee credentials are verified on the first day of employment.
To allow a user to perform certain user management operations, create a new role with the requiredprivilege or privileges, and assign the user to that role.
Example 10.1. Allowing a Non-admin User to Add Stage Users
This example shows how to create a user who is only allowed to add new stage users, but not toperform any other stage user management operations.
1. Log in as the admin user or another user allowed to manage role-based access control.
$ kinit admin
2. Create a new custom role to manage adding stage users.
a. Create the System Provisioning role.
$ ipa role-add --desc "Responsible for provisioning stage users" "System Provisioning"--------------------------------Added role "System Provisioning"--------------------------------Role name: System ProvisioningDescription: Responsible for provisioning stage users
b. Add the Stage User Provisioning privilege to the role. This privilege provides the ability
CHAPTER 10. MANAGING USER ACCOUNTS
115
b. Add the Stage User Provisioning privilege to the role. This privilege provides the abilityto add stage users.
$ ipa role-add-privilege "System Provisioning" --privileges="Stage User Provisioning"Role name: System ProvisioningDescription: Responsible for provisioning stage usersPrivileges: Stage User Provisioning----------------------------Number of privileges added 1----------------------------
3. Grant a non-admin user the rights to add stage users.
a. If the non-admin user does not yet exist, create a new user. In this example, the user isnamed stage_user_admin.
$ ipa user-add stage_user_admin --passwordFirst name: first_nameLast name: last_namePassword:Enter password again to verify:...
b. Assign the stage_user_admin user to the System Provisioning role.
$ ipa role-add-member "System Provisioning" --users=stage_user_adminRole name: System ProvisioningDescription: Responsible for provisioning stage usersMember users: stage_user_adminPrivileges: Stage User Provisioning-------------------------Number of members added 1-------------------------
c. To make sure the System Provisioning role is configured correctly, you can use the ipa role-show command to display the role settings.
$ ipa role-show "System Provisioning"--------------1 role matched--------------Role name: System provisioningDescription: Responsible for provisioning stage usersMember users: stage_user_adminPrivileges: Stage User Provisioning----------------------------Number of entries returned 1----------------------------
4. Test adding a new stage user as the stage_user_admin user.
a. Log in as stage_user_admin. Note that if you created stage_user_admin as a new userin one of the previous steps, IdM will ask you to change the initial password set by admin.
Linux Domain Identity, Authentication, and Policy Guide
116
$ kinit stage_user_adminPassword for [email protected]:Password expired. You must change it now.Enter new password: Enter it again:
b. To make sure your Kerberos ticket for admin has been replaced with a Kerberos ticketfor stage_user_admin, you can use the klist utility.
$ klistTicket cache: KEYRING:persistent:0:krb_ccache_xIlCQDWDefault principal: [email protected]
Valid starting Expires Service principal02/25/2016 11:42:20 02/26/2016 11:42:20 krbtgt/EXAMPLE.COM
c. Add a new stage user.
$ ipa stageuser-add stage_userFirst name: first_nameLast name: last_nameipa: ERROR: stage_user: stage user not found
NOTE
The error that IdM reports after adding a stage user is expected. The stage_user_admin is only allowed to add stage users, not to displayinformation about them. Therefore, instead of displaying a summary ofthe newly added stage_user settings, IdM displays the error.
The stage_user_admin user is not allowed to display information about stage users. Therefore, anattempt to display information about the new stage_user user while logged in as stage_user_adminfails:
$ ipa stageuser-show stage_useripa: ERROR: stage_user: stage user not found
To display information about stage_user, you can log in as admin:
$ kinit adminPassword for [email protected]:$ ipa stageuser-show stage_user User login: stage_user First name: Stage Last name: User...
10.6. USING AN EXTERNAL PROVISIONING SYSTEM FOR USERS ANDGROUPS
Identity Management supports configuring your environment, so that an external solution for managing
CHAPTER 10. MANAGING USER ACCOUNTS
117
Identity Management supports configuring your environment, so that an external solution for managingidentities is used to provision user and group identities in IdM. This section describes an example of suchconfiguration. The example includes:
Section 10.6.1, “Configuring User Accounts to Be Used by the External Provisioning System”
Section 10.6.2, “Configuring IdM to Automatically Activate Stage User Accounts”
Section 10.6.3, “Configuring the LDAP Provider of the External Provisioning System to Managethe IdM Identities”
10.6.1. Configuring User Accounts to Be Used by the External Provisioning System
This procedure shows how to configure two IdM user accounts to be used by the external provisioningsystem. By adding the accounts to a group with an appropriate password policy, you enable the externalprovisioning system to manage user provisioning in IdM.
1. Create a user, provisionator, with the privileges to add stage users. The user account will beused by the external provisioning system to add new stage users.
a. Add the provisionator user account:
$ ipa user-add provisionator --first=provisioning --last=account --password
b. Grant the provisionator user the required privileges.
Create a custom role, System Provisioning, to manage adding stage users:
$ ipa role-add --desc "Responsible for provisioning stage users" "System Provisioning"
Add the Stage User Provisioning privilege to the role. This privilege provides the ability toadd stage users:
$ ipa role-add-privilege "System Provisioning" --privileges="Stage User Provisioning"
Add the provisionator user to the role:
$ ipa role-add-member --users=provisionator "System Provisioning"
2. Create a user, activator, with the privileges to manage user accounts. The user account will beused to automatically activate stage users added by the external provisioning system.
a. Add the activator user account:
$ ipa user-add activator --first=activation --last=account --password
b. Grant the activator user the required privileges.
Add the user to the default User Administrator role:
$ ipa role-add-member --users=activator "User Administrator"
3. Create a user group for service and application accounts:
Linux Domain Identity, Authentication, and Policy Guide
118

$ ipa group-add service-accounts
4. Update the password policy for the group. The following policy prevents password expirationand lockout for the account but compensates the potential risks by requiring complexpasswords:
$ ipa pwpolicy-add service-accounts --maxlife=10000 --minlife=0 --history=0 --minclasses=4 --minlength=20 --priority=1 --maxfail=0 --failinterval=1 --lockouttime=0
5. Add the provisioning and activation accounts to the group for service and application accounts:
$ ipa group-add-member service-accounts --users={provisionator,activator}
6. Change the passwords for the user accounts:
$ kpasswd provisionator$ kpasswd activator
Changing the passwords is necessary because passwords of new IdM users expire immediately.
Additional resources :
For details on adding new users, see Section 10.2.1, “Adding Stage or Active Users” .
For details on granting users the privileges required to manage other user accounts, seeSection 10.5, “Allowing Non-admin Users to Manage User Entries” .
For details on managing IdM password policies, see Chapter 26, Defining Password Policies .
10.6.2. Configuring IdM to Automatically Activate Stage User Accounts
This procedure shows how to create a script for activating stage users. The system runs the scriptautomatically at specified time intervals. This ensures that new user accounts are automaticallyactivated and available for use shortly after they are created.
IMPORTANT
The procedure assumes that the new user accounts do not require validation before thescript adds them to IdM. For example, validation is not required when the users havealready been validated by the owner of the external provisioning system.
It is sufficient to enable the activation process on only one of your IdM servers.
1. Generate a keytab file for the activation account:
# ipa-getkeytab -s example.com -p "activator" -k /etc/krb5.ipa-activation.keytab
If you want to enable the activation process on more than one IdM server, generate the keytabfile on one server only. Then copy the keytab file to the other servers.
2. Create a script, /usr/local/sbin/ipa-activate-all, with the following contents to activate all users:
CHAPTER 10. MANAGING USER ACCOUNTS
119

#!/bin/bash
kinit -k -i activator
ipa stageuser-find --all --raw | grep " uid:" | cut -d ":" -f 2 | while read uid; do ipa stageuser-activate ${uid}; done
3. Edit the permissions and ownership for the ipa-activate-all script to make it executable:
# chmod 755 /usr/local/sbin/ipa-activate-all# chown root:root /usr/local/sbin/ipa-activate-all
4. Create a systemd unit file, /etc/systemd/system/ipa-activate-all.service, with the followingcontents:
[Unit]Description=Scan IdM every minute for any stage users that must be activated
[Service]Environment=KRB5_CLIENT_KTNAME=/etc/krb5.ipa-activation.keytabEnvironment=KRB5CCNAME=FILE:/tmp/krb5cc_ipa-activate-allExecStart=/usr/local/sbin/ipa-activate-all
5. Create a systemd timer, /etc/systemd/system/ipa-activate-all.timer, with the followingcontents:
[Unit]Description=Scan IdM every minute for any stage users that must be activated
[Timer]OnBootSec=15minOnUnitActiveSec=1min
[Install]WantedBy=multi-user.target
6. Enable ipa-activate-all.timer:
# systemctl enable ipa-activate-all.timer
Additional resources:
For more information on systemd unit files, see the Managing Services with systemd Unit Fileschapter of the System Administrator's Guide.
10.6.3. Configuring the LDAP Provider of the External Provisioning System toManage the IdM Identities
This section shows templates for various user and group management operations. Using thesetemplates, you can configure the LDAP provider of your provisioning system to manage IdM useraccounts. For example, you can configure the system to inactivate a user account after the employeehas left the company.
Linux Domain Identity, Authentication, and Policy Guide
120
Managing User Accounts Using LDAPYou can add new user entries, modify existing entries, move users between different life cycle states, ordelete users by editing the underlying Directory Server database. To edit the database, use the ldapmodify utility.
The following LDIF-formatted templates provide information on what attributes to modify using ldapmodify. For detailed example procedures, see Example 10.2, “Adding a Stage User with ldapmodify” and Example 10.3, “Preserving a User with ldapmodify”.
Adding a new stage user
Adding a user with UID and GID automatically assigned:
dn: uid=user_login,cn=staged users,cn=accounts,cn=provisioning,dc=example,dc=comchangetype: addobjectClass: topobjectClass: inetorgpersonuid: user_loginsn: surnamegivenName: first_namecn: full_name
Adding a user with UID and GID statically assigned:
dn: uid=user_login,cn=staged users,cn=accounts,cn=provisioning,dc=example,dc=comchangetype: addobjectClass: topobjectClass: personobjectClass: inetorgpersonobjectClass: organizationalpersonobjectClass: posixaccountuid: user_loginuidNumber: UID_numbergidNumber: GID_numbersn: surnamegivenName: first_namecn: full_namehomeDirectory: /home/user_login
You are not required to specify any IdM object classes when adding stage users. IdM adds theseclasses automatically after the users are activated.
Note that the distinguished name (DN) of the created entry must start with uid=user_login.
Modifying existing users
Before modifying a user, obtain the user's distinguished name (DN) by searching by the user's login.In the following example, the user_allowed_to_read user in the following example is a user allowed toread user and group information, and password is this user's password:
# ldapsearch -LLL -x -D "uid=user_allowed_to_read,cn=users,cn=accounts,dc=example, dc=com" -w "password" -H ldap://server.example.com -b "cn=users, cn=accounts, dc=example, dc=com" uid=user_login
To modify a user's attribute:
CHAPTER 10. MANAGING USER ACCOUNTS
121
dn: distinguished_namechangetype: modifyreplace: attribute_to_modifyattribute_to_modify: new_value
To disable a user:
dn: distinguished_namechangetype: modifyreplace: nsAccountLocknsAccountLock: TRUE
To enable a user:
dn: distinguished_namechangetype: modifyreplace: nsAccountLocknsAccountLock: FALSE
To preserve a user:
dn: distinguished_namechangetype: modrdnnewrdn: uid=user_logindeleteoldrdn: 0newsuperior: cn=deleted users,cn=accounts,cn=provisioning,dc=example
Updating the nssAccountLock attribute has no effect on stage and preserved users. Even thoughthe update operation completes successfully, the attribute value remains nssAccountLock: TRUE.
Creating a new group
To create a new group:
dn: cn=group_distinguished_name,cn=groups,cn=accounts,dc=example,dc=comchangetype: addobjectClass: topobjectClass: ipaobjectobjectClass: ipausergroupobjectClass: groupofnamesobjectClass: nestedgroupobjectClass: posixgroupcn: group_namegidNumber: GID_number
Modifying groups
Before modifying a group, obtain the group's distinguished name (DN) by searching by the group'sname.
# ldapsearch -YGSSAPI -H ldap://server.example.com -b "cn=groups,cn=accounts,dc=example,dc=com" "cn=group_name"
To delete an existing group:
Linux Domain Identity, Authentication, and Policy Guide
122
dn: group_distinguished_namechangetype: delete
To add a member to a group:
dn: group_distinguished_namechangetype: modifyadd: membermember: uid=user_login,cn=users,cn=accounts,dc=example,dc=com
To remove a member from a group:
dn: distinguished_namechangetype: modifydelete: membermember: uid=user_login,cn=users,cn=accounts,dc=example,dc=com
Do not add stage or preserved users to groups. Even though the update operation completessuccessfully, the users will not be updated as members of the group. Only active users can belong togroups.
Example 10.2. Adding a Stage User with ldapmodify
To add a new stageuser user using the standard interorgperson object class:
1. Use ldapmodify to add the user.
# ldapmodify -Y GSSAPISASL/GSSAPI authentication startedSASL username: admin@EXAMPLESASL SSF: 56SASL data security layer installed.dn: uid=stageuser,cn=staged users,cn=accounts,cn=provisioning,dc=examplechangetype: addobjectClass: topobjectClass: inetorgpersoncn: Stagesn: User
adding new entry "uid=stageuser,cn=staged users,cn=accounts,cn=provisioning,dc=example"
2. Consider validating the contents of the stage entry to make sure your provisioning systemadded all required POSIX attributes and the stage entry is ready to be activated. To displaythe new stage user's LDAP attributes using the ipa stageuser-show --all --raw command.Note that the user is explicitly disabled by the nsaccountlock attribute:
$ ipa stageuser-show stageuser --all --raw dn: uid=stageuser,cn=staged users,cn=accounts,cn=provisioning,dc=example uid: stageuser sn: User cn: Stage has_password: FALSE
CHAPTER 10. MANAGING USER ACCOUNTS
123
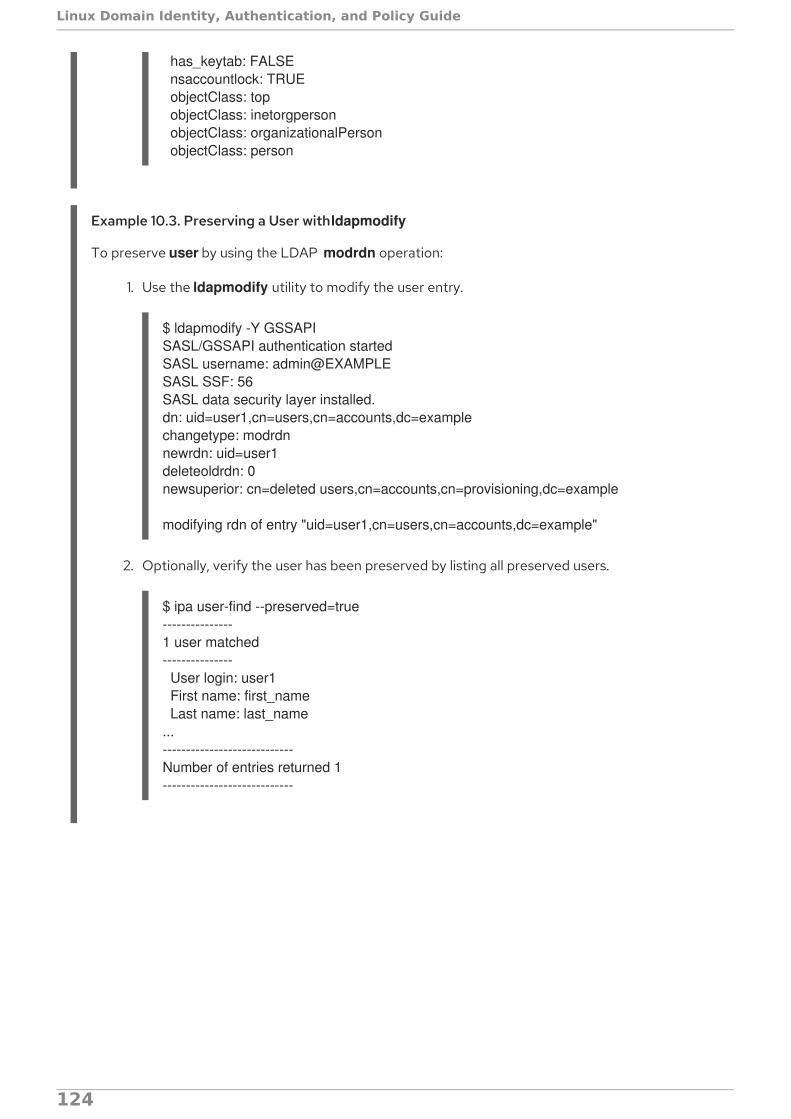
has_keytab: FALSE nsaccountlock: TRUE objectClass: top objectClass: inetorgperson objectClass: organizationalPerson objectClass: person
Example 10.3. Preserving a User with ldapmodify
To preserve user by using the LDAP modrdn operation:
1. Use the ldapmodify utility to modify the user entry.
$ ldapmodify -Y GSSAPISASL/GSSAPI authentication startedSASL username: admin@EXAMPLESASL SSF: 56SASL data security layer installed.dn: uid=user1,cn=users,cn=accounts,dc=examplechangetype: modrdnnewrdn: uid=user1deleteoldrdn: 0newsuperior: cn=deleted users,cn=accounts,cn=provisioning,dc=example
modifying rdn of entry "uid=user1,cn=users,cn=accounts,dc=example"
2. Optionally, verify the user has been preserved by listing all preserved users.
$ ipa user-find --preserved=true---------------1 user matched--------------- User login: user1 First name: first_name Last name: last_name...----------------------------Number of entries returned 1----------------------------
Linux Domain Identity, Authentication, and Policy Guide
124

CHAPTER 11. MANAGING USER GROUPS
NOTE
Automembership rules can determine automatically what groups are appropriate for anew user and add the user to these groups. See Chapter 31, Defining Automatic GroupMembership for Users and Hosts.
11.1. HOW USER GROUPS WORK IN IDM
11.1.1. What User Groups Are
A user group is a set of users with common privileges, password policies, and other characteristics. Forexample, you can define groups around company departments, physical locations, or access controlrequirements.
11.1.2. Types of Groups in IdM
POSIX groups (the default)
POSIX groups support POSIX attributes for their members. Note that groups that interact withActive Directory cannot use POSIX attributes.
Non-POSIX groups
All group members of this type of group must belong to the IdM domain.
External groups
External groups allow adding group members that exist in an identity store outside of the IdMdomain. The external store can be a local system, an Active Directory domain, or a directory service.
Non-POSIX and external groups do not support POSIX attributes. For example, these groups do nothave a GID defined.
Example 11.1. Searching for Different Types of Groups
1. Run the ipa group-find command to display all user groups.
2. Run the ipa group-find --posix command to display all POSIX groups.
3. Run the ipa group-find --nonposix command to display all non-POSIX groups.
4. Run the ipa group-find --external command to display all external groups.
11.1.3. User Groups Created by Default
IdM creates these groups by default:
ipausers: contains all IdM users
admins: contains users with administrative privileges, initially the default admin user
CHAPTER 11. MANAGING USER GROUPS
125

editors: contains users allowed to edit other IdM users in the web UI, without all the rights of anadministrative user
trust admins: contains users with privileges to manage Active Directory trusts
Adding a user to a user group applies the privileges and policies associated with the group. For example,adding a user to the admins group grants the user administrative privileges.
In addition, IdM creates user private groups by default whenever a new user is created in IdM.
The user private group has the same name as the user for which it was created.
The user is the only member of the user private group.
GID of the private groups matches the UID of the user.
Example 11.2. Viewing User Private Groups
Run the ipa group-find --private command to display all user private groups:
$ ipa group-find --private----------------2 groups matched---------------- Group name: user1 Description: User private group for user1 GID: 830400006 Group name: user2 Description: User private group for user2 GID: 830400004----------------------------Number of entries returned 2----------------------------
In some situations, it is better to avoid creating user private groups, such as when a NIS group or anothersystem group already uses the GID that would be assigned to the user private group. See Section 11.5,“Disabling User Private Groups”.
11.2. ADDING AND REMOVING USER GROUPS
To add a user group using:
the web UI, see the section called “Web UI: Adding a User Group”
the command line, see the section called “Command Line: Adding a User Group”
IdM enables specifying a custom GID when creating a user group. If you do this, be careful to avoid IDconflicts. See Section 13.6, “Ensuring That ID Values Are Unique” . If you do not specify a custom GID,IdM automatically assigns a GID from the available ID range.
To remove a user group using:
the web UI, see the section called “Web UI: Removing a User Group”
Linux Domain Identity, Authentication, and Policy Guide
126
the command line, see the section called “Command Line: Removing a User Group”
Note that removing a group does not delete the group members from IdM.
Web UI: Adding a User Group
1. Click Identity → User Groups.
2. Click Add to start adding the user group.
3. Fill out the information about the user group.
For details on group types, see Section 11.1.2, “Types of Groups in IdM” .
4. Click Add to confirm.
Command Line: Adding a User Group
1. Log in as the administrator:
$ kinit admin
2. Use the ipa group-add command:
$ ipa group-add group_name-----------------------Added group "group_name"------------------------
By default, ipa group-add adds a POSIX group.
To define custom values for other group attributes, add options to ipa group-add. Most notably:
--nonposix to create a non-POSIX group
--external to create an external group
For details on group types, see Section 11.1.2, “Types of Groups in IdM” .
Web UI: Removing a User Group
1. Click Identity → User Groups.
2. Select the group to remove, and click Delete.
Command Line: Removing a User Group
1. Log in as the administrator:
$ kinit admin
2. Use the ipa group-del group_name command:
$ ipa group-del group_name--------------------------Deleted group "group_name"
CHAPTER 11. MANAGING USER GROUPS
127

--------------------------
11.3. HOW USER GROUP MEMBERSHIP WORKS IN IDM
11.3.1. Supported Group Members
A user group in IdM can include:
IdM users
IdM user groups
external users, which are users that exist outside IdM
11.3.2. Direct and Indirect Group Members
In Figure 11.1, “Direct and Indirect User Group Membership” , group B is a member of group A:
User 1 and User 2 are direct members of group A.
User 3, User 4, and User 5 are indirect members of group A.
Figure 11.1. Direct and Indirect User Group Membership
Group attributes in IdM apply to both direct and indirect members: when group B is a member of groupA, all users in group B are considered members of group A. For example, if you set a password policy forgroup A, the policy applies to all users in group B as well.
Example 11.3. Viewing Direct and Indirect Group Members
1. Create two groups: group_A and group_B. See Section 11.2, “Adding and Removing UserGroups”.
2. Add:
one user as a member of group_A
another user as a member of group_B
group_B as a member of group_A
See Section 11.4, “Adding and Removing User Group Members” .
Linux Domain Identity, Authentication, and Policy Guide
128

3. In the web UI: Select Identity → User Groups, and click the name of group_A. Switchbetween Direct Membership and Indirect Membership.
Figure 11.2. Indirect and Direct Members
4. From the command line: Use the ipa group-show command:
$ ipa group-show group_A ... Member users: user_1 Member groups: group_B Indirect Member users: user_2
11.4. ADDING AND REMOVING USER GROUP MEMBERS
To add members to user groups using:
the IdM web UI, see the section called “Web UI: Adding a Member to a User Group”
the command line, see the section called “Command Line: Adding a Member to a User Group”
IMPORTANT
When adding another user group as a member, do not create recursive groups. Forexample, if Group A is a member of Group B, do not add Group B as a member of GroupA. Recursive groups can cause unpredictable behavior.
To remove members from user groups using:
the IdM web UI, see the section called “Web UI: Removing a Member from a User Group”
the command line, see the section called “Command Line: Removing a Member from a UserGroup”
Web UI: Adding a Member to a User Group
1. Click Identity → User Groups.
2. Click the name of the user group.
3. Depending on what kind of member you want to add, select Users, User Groups, or External.
CHAPTER 11. MANAGING USER GROUPS
129

Figure 11.3. Adding User Group Members
4. Click Add.
5. Select the member you want to add, and click Add to confirm.
Command Line: Adding a Member to a User Group
1. Optional. Use the ipa group-find command to find the group.
2. Use the ipa group-add-member command to add a new member. Specify what member to addusing these options:
--users adds an IdM user
--external adds a user that exists outside the IdM domain, in the format of DOMAIN\user_name or user_name@domain
--groups adds an IdM user group
For example, to add user1, user2, and group1 to a group called group_name::
$ ipa group-add-member group_name --users=user1 --users=user2 --groups=group1
Web UI: Removing a Member from a User Group
1. Click Identity → User Groups.
2. Click the name of the user group.
3. Depending on what kind of member you want to remove, select Users, User Groups, or External.
Figure 11.4. Removing User Group Members
Linux Domain Identity, Authentication, and Policy Guide
130

4. Select the check box next to the required member.
5. Click Delete.
Command Line: Removing a Member from a User Group
1. Optional. Use the ipa group-show command to confirm that the group includes the memberyou want to remove.
2. Use the ipa group-remove-member command to remove the member. Specify what memberto remove using these options:
--users removes an IdM user
--external removes a user that exists outside the IdM domain, in the format of DOMAIN\user_name or user_name@domain
--groups removes an IdM user group
For example, to remove user1, user2, and group1 from a group called group_name:
$ ipa group-remove-member group_name --users=user1 --users=user2 --groups=group1
11.5. DISABLING USER PRIVATE GROUPS
To ensure that IdM does not create a default user private group for a new user, choose one of thefollowing:
Section 11.5.1, “Creating a User without a User Private Group”
Section 11.5.2, “Disabling User Private Groups Globally for All Users”
Even after you disable creating default user private groups, IdM will still require a GID when adding newusers. To ensure that adding the user succeeds, see Section 11.5.3, “Adding a User with User PrivateGroups Disabled”.
NOTE
If you want to disable creating default user private groups because of GID conflicts,consider changing the default UID and GID assignment ranges. See Chapter 13, UniqueUID and GID Number Assignments.
11.5.1. Creating a User without a User Private Group
Add the --noprivate option to the ipa user-add command. Note that for the command to succeed, youmust specify a custom private group. See Section 11.5.3, “Adding a User with User Private GroupsDisabled”.
11.5.2. Disabling User Private Groups Globally for All Users
1. Log in as the administrator:
$ kinit admin
2. IdM uses the Directory Server Managed Entries Plug-in to manage user private groups. List the
CHAPTER 11. MANAGING USER GROUPS
131

2. IdM uses the Directory Server Managed Entries Plug-in to manage user private groups. List theinstances of the plug-in:
$ ipa-managed-entries --list
3. To ensure IdM does not create user private groups, disabling the plug-in instance responsiblefor managing user private groups:
$ ipa-managed-entries -e "UPG Definition" disableDisabling Plugin
NOTE
To re-enable the UPG Definition instance later, use the ipa-managed-entries -e "UPG Definition" enable command.
4. Restart Directory Server to load the new configuration.
# systemctl restart dirsrv.target
11.5.3. Adding a User with User Private Groups Disabled
To make sure adding a new user succeeds when creating default user private groups is disabled, chooseone of the following:
Specify a custom GID when adding a new user. The GID does not have to correspond to analready existing user group.
For example, when adding a user from the command line, add the --gid option to the ipa user-add command.
Use an automembership rule to add the user to an existing group with a GID. See Chapter 31,Defining Automatic Group Membership for Users and Hosts .
11.6. SETTING SEARCH ATTRIBUTES FOR USERS AND USER GROUPS
When searching entries for a specified keyword using the ipa user-find keyword and ipa group-find keyword commands, IdM only searches certain attributes. Most notably:
In user searches: first name, last name, user name (login ID), job title, organization unit, phonenumber, UID, email address.
In group searches: group name, description.
The following procedure shows how to configure IdM to search other attributes as well. Note that IdMalways searches the default attributes. For example, even if you remove the job title attribute from thelist of user search attributes, IdM will still search user titles.
PrerequisitesBefore adding a new attribute, make sure that a corresponding index exists within the LDAP directoryfor this attribute. Most standard LDAP attributes have indexes in LDAP, but if you want to add a customattribute, you must create an index manually. See Creating Standard Indexes in the Directory ServerAdministration Guide.
Linux Domain Identity, Authentication, and Policy Guide
132

Web UI: Setting Search Attributes
1. Select IPA Server → Configuration.
2. In the User Options area, set the user search attributes in User search fields.
3. In the Group Options area, set the group search attributes in Group search fields.
4. Click Save at the top of the page.
Command Line: Setting Search AttributesUse the ipa config-mod command with these options:
--usersearch defines a new list of search attributes for users
--groupsearch defines a new list of search attributes for groups
For example:
$ ipa config-mod --usersearch={uid,givenname,sn,telephonenumber,ou,title}$ ipa config-mod --groupsearch={cn,description}
CHAPTER 11. MANAGING USER GROUPS
133

CHAPTER 12. USER AUTHENTICATIONThis chapter describes managing user authentication mechanisms, including information on how tomanage users' passwords, SSH keys, and certificates, or how to configure one-time password (OTP) andsmart card authentication.
NOTE
For documentation on how to log in to Identity Management (IdM) using Kerberos, seeChapter 5, The Basics of Managing the IdM Server and Services .
12.1. USER PASSWORDS
12.1.1. Changing and Resetting User Passwords
Regular users without the permission to change other users' passwords can only change their ownpersonal password. Personal passwords set by regular users must meet the IdM password policies. Formore information about configuring these policies, see Chapter 26, Defining Password Policies .
The administrator and users with password change rights can set initial passwords for new users as wellas reset passwords for existing users. These passwords are not required to meet the IdM passwordpolicies and will expire when the user first logs in using the password. When this happens, IdM asks theuser to change the expired password immediately. This ensures that user passwords always remainconfidential.
NOTE
The LDAP Directory Manager (DM) user can change user passwords using LDAP tools.The new password can override any IdM password policies. Passwords set by DM do notexpire after the first login.
12.1.1.1. Web UI: Changing Your Own Personal Password
1. In the top right corner, click User name → Change password.
Figure 12.1. Resetting Password
2. Enter the new password.
Linux Domain Identity, Authentication, and Policy Guide
134

12.1.1.2. Web UI: Resetting Another User's Password
1. Select Identity → Users.
2. Click the name of the user to edit.
3. Click Actions → Reset password.
Figure 12.2. Resetting Password
4. Enter the new password, and click Reset Password.
Figure 12.3. Confirming New Password
12.1.1.3. Command Line: Changing or Resetting Another User's Password
To change your own personal password or to change or reset another user's password, add the --password option to the ipa user-mod command. The command will prompt you for the new password.
$ ipa user-mod user --passwordPassword: Enter Password again to verify: --------------------Modified user "user"--------------------...
CHAPTER 12. USER AUTHENTICATION
135
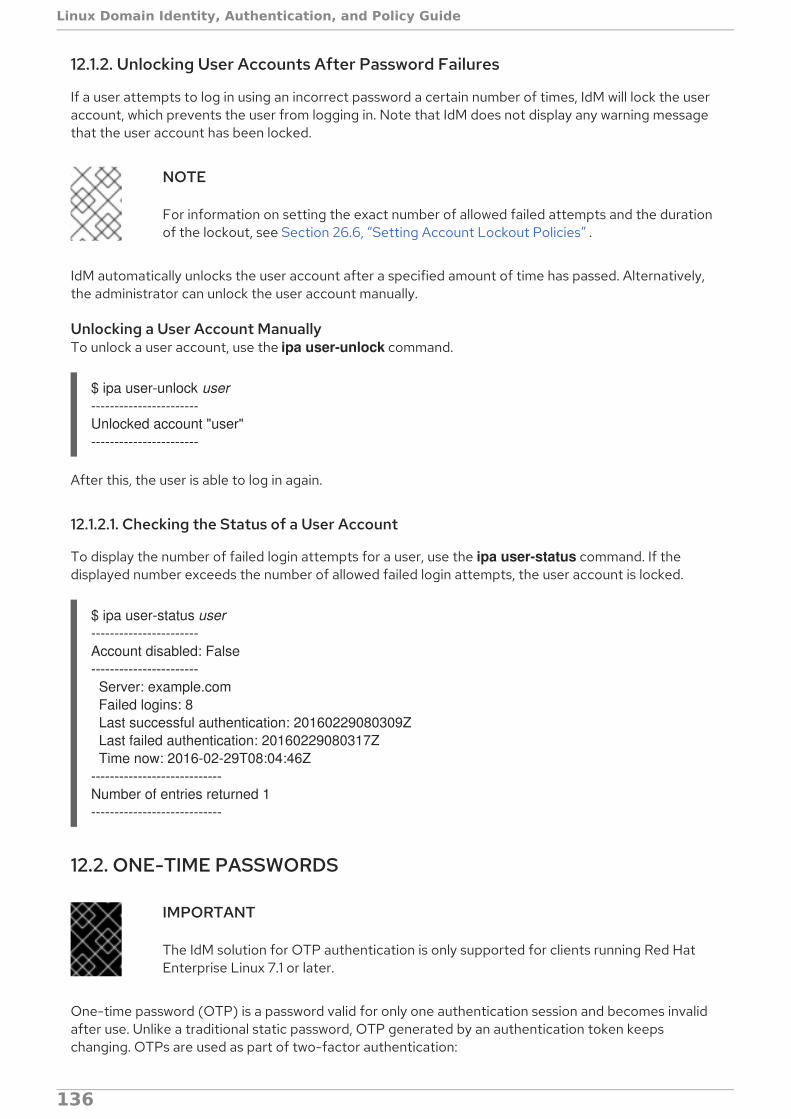
12.1.2. Unlocking User Accounts After Password Failures
If a user attempts to log in using an incorrect password a certain number of times, IdM will lock the useraccount, which prevents the user from logging in. Note that IdM does not display any warning messagethat the user account has been locked.
NOTE
For information on setting the exact number of allowed failed attempts and the durationof the lockout, see Section 26.6, “Setting Account Lockout Policies” .
IdM automatically unlocks the user account after a specified amount of time has passed. Alternatively,the administrator can unlock the user account manually.
Unlocking a User Account ManuallyTo unlock a user account, use the ipa user-unlock command.
$ ipa user-unlock user-----------------------Unlocked account "user"-----------------------
After this, the user is able to log in again.
12.1.2.1. Checking the Status of a User Account
To display the number of failed login attempts for a user, use the ipa user-status command. If thedisplayed number exceeds the number of allowed failed login attempts, the user account is locked.
$ ipa user-status user-----------------------Account disabled: False----------------------- Server: example.com Failed logins: 8 Last successful authentication: 20160229080309Z Last failed authentication: 20160229080317Z Time now: 2016-02-29T08:04:46Z----------------------------Number of entries returned 1----------------------------
12.2. ONE-TIME PASSWORDS
IMPORTANT
The IdM solution for OTP authentication is only supported for clients running Red HatEnterprise Linux 7.1 or later.
One-time password (OTP) is a password valid for only one authentication session and becomes invalidafter use. Unlike a traditional static password, OTP generated by an authentication token keepschanging. OTPs are used as part of two-factor authentication:
Linux Domain Identity, Authentication, and Policy Guide
136
1. The user authenticates with a traditional password.
2. The user provides an OTP code generated by a recognized OTP token.
Two-factor authentication is considered safer than authentication using a traditional password alone.Even if a potential intruder intercepts the OTP during login, the intercepted OTP will already be invalidby that point because it can only be used for successful authentication once.
WARNING
The following security and other limitations currently relate to the OTP support inIdM:
The most important security limitation is the potential vulnerability to replayattacks across the system. Replication is asynchronous, and an OTP codecan therefore be reused during the replication period. A user might be ableto log on to two servers at the same time. However, this vulnerability isusually difficult to exploit due to comprehensive encryption.
It is not possible to obtain a ticket-granting ticket (TGT) using a client thatdoes not support OTP authentication. This might affect certain use cases,such as authentication using the mod_auth_kerb module or the GenericSecurity Services API (GSSAPI).
12.2.1. How OTP Authentication Works in IdM
12.2.1.1. OTP Tokens Supported in IdM
Software and Hardware TokensIdM supports both software and hardware tokens.
User-managed and Administrator-managed TokensUsers can manage their own tokens, or the administrator can manage their tokens for them:
User-managed tokens
Users have full control over user-managed tokens in Identity Management: they are allowed tocreate, edit, or delete their tokens.
Administrator-managed tokens
The administrator adds administrator-managed tokens to the users' accounts. Users themselveshave read-only access for such tokens: they do not have the permission to manage or modify thetokens and they are not required to configure them in any way.
Note that users cannot delete or deactivate a token if it is their only active token at the moment.Similarly, the administrator cannot delete or deactivate the last remaining active token assigned to auser.
Supported OTP AlgorithmsIdentity Management supports the following two standard OTP mechanisms:
CHAPTER 12. USER AUTHENTICATION
137
The HMAC-Based One-Time Password (HOTP) algorithm is based on a counter. HMAC standsfor Hashed Message Authentication Code.
The Time-Based One-Time Password (TOTP) algorithm is an extension of HOTP to supporttime-based moving factor.
12.2.1.2. Available OTP Authentication Methods
When enabling OTP authentication, you can choose from the following authentication methods:
Two-factor authentication (password + OTP)
With this method, the user is always required to enter both a standard password and an OTP code.
Password
With this method, the user still has the option to authenticate using a standard password only.
RADIUS proxy server authentication
For information on configuring a RADIUS server for OTP validation, see Section 12.2.6, “Migratingfrom a Proprietary OTP Solution”.
Global and User-specific Authentication MethodsYou can configure these authentication methods either globally or for individual users:
By default, user-specific authentication method settings take precedence over global settings.If no authentication method is set for a user, the globally-defined methods apply.
You can disable per-user authentication method settings for any user. This ensures IdM ignoresthe per-user settings and always applies the global settings for the user.
Combining Multiple Authentication MethodsIf you set multiple methods at once, either one of them will be sufficient for successful authentication.For example:
If you configure both two-factor and password authentication, the user must provide thepassword (first factor), but providing the OTP (second factor) is optional when using thecommand line:
First Factor: Second Factor (optional):
In the web UI, the user must still provide both factors.
NOTE
Individual hosts or services might be configured to require a certain authenticationmethod, for example OTP. If you attempt to authenticate to such hosts or services usingthe first factor only, you will be denied access. See Section 12.3, “Restricting Access toServices and Hosts Based on How Users Authenticate”.
However, a minor exception exists when RADIUS and another authentication method are configured:
Kerberos will always use RADIUS, but LDAP will not. LDAP only recognizes the password and
Linux Domain Identity, Authentication, and Policy Guide
138
Kerberos will always use RADIUS, but LDAP will not. LDAP only recognizes the password andtwo-factor authentication methods.
If you use an external two-factor authentication provider, use Kerberos from your applications. Ifyou want to let users authenticate with a password only, use LDAP. It is recommended that theapplications leverage Apache modules and SSSD, which allows to configure either Kerberos orLDAP.
12.2.1.3. GNOME Keyring Service Support
IdM integrates OTP authentication with the GNOME Keyring service. Note that GNOME Keyringintegration requires the user to enter the first and second factors separately:
First factor: static_passwordSecond factor: one-time_password
12.2.1.4. Offline Authentication with OTP
IdM supports offline OTP authentication. However, to be able to log in offline, the user must firstauthenticate when the system is online by entering the static password and OTP separately:
First factor: static_passwordSecond factor: one-time_password
If both passwords are entered separately like this when logging in online, the user will subsequently beable to authenticate even if the central authentication server is unavailable. Note that IdM only promptsfor the first-factor traditional static password when the user authenticates offline.
IdM also supports entering both the static password and OTP together in one string in the First factorprompt. However, note that this is not compatible with offline OTP authentication. If the user entersboth factors in a single prompt, IdM will always have to contact the central authentication server whenauthenticating, which requires the system to be online.
IMPORTANT
If you use OTP authentication on devices that also operate offline, such as laptops,Red Hat recommends to enter the static password and OTP separately to make sureoffline authentication will be available. Otherwise, IdM will not allow you to log in after thesystem goes offline.
If you want to benefit from OTP offline authentication, apart from entering the static and OTPpasswords separately, also make sure to meet the following conditions:
The cache_credentials option in the /etc/sssd/sssd.conf file is set to True, which enablescaching the first factor password.
The first-factor static password meets the password length requirement defined in the cache_credentials_minimal_first_factor_length option set in /etc/sssd/sssd.conf. Thedefault minimal length is 8 characters. For more information about the option, see thesssd.conf(5) man page.
Note that even if the krb5_store_password_if_offline option is set to true in /etc/sssd/sssd.conf,SSSD does not attempt to refresh the Kerberos ticket-granting ticket (TGT) when the system goesonline again because the OTP might already be invalid at that point. To obtain a TGT in this situation,
CHAPTER 12. USER AUTHENTICATION
139

the user must authenticate again using both factors.
12.2.2. Enabling OTP Authentication
For details on the available OTP-related authentication methods, see Section 12.2.1.2, “Available OTPAuthentication Methods”.
To enable OTP authentication using:
the web UI, see the section called “Web UI: Enabling OTP Authentication” .
the command line, see the section called “Command Line: Enabling OTP Authentication” .
Web UI: Enabling OTP AuthenticationTo set authentication methods globally for all users:
1. Select IPA Server → Configuration.
2. In the User Options area, select the required Default user authentication types.
Figure 12.4. User Authentication Methods
To ensure the global settings are not overridden with per-user settings, select Disable per-user override. If you do not select Disable per-user override, authentication methods configured per usertake precedence over the global settings.
To set authentication methods individually on a per-user basis:
1. Select Identity → Users, and click the name of the user to edit.
2. In the Account Settings area, select the required User authentication types.
Figure 12.5. User Authentication Methods
Command Line: Enabling OTP AuthenticationTo set authentication methods globally for all users:
1. Run the ipa config-mod --user-auth-type command. For example, to set the globalauthentication method to two-factor authentication:
$ ipa config-mod --user-auth-type=otp
Linux Domain Identity, Authentication, and Policy Guide
140
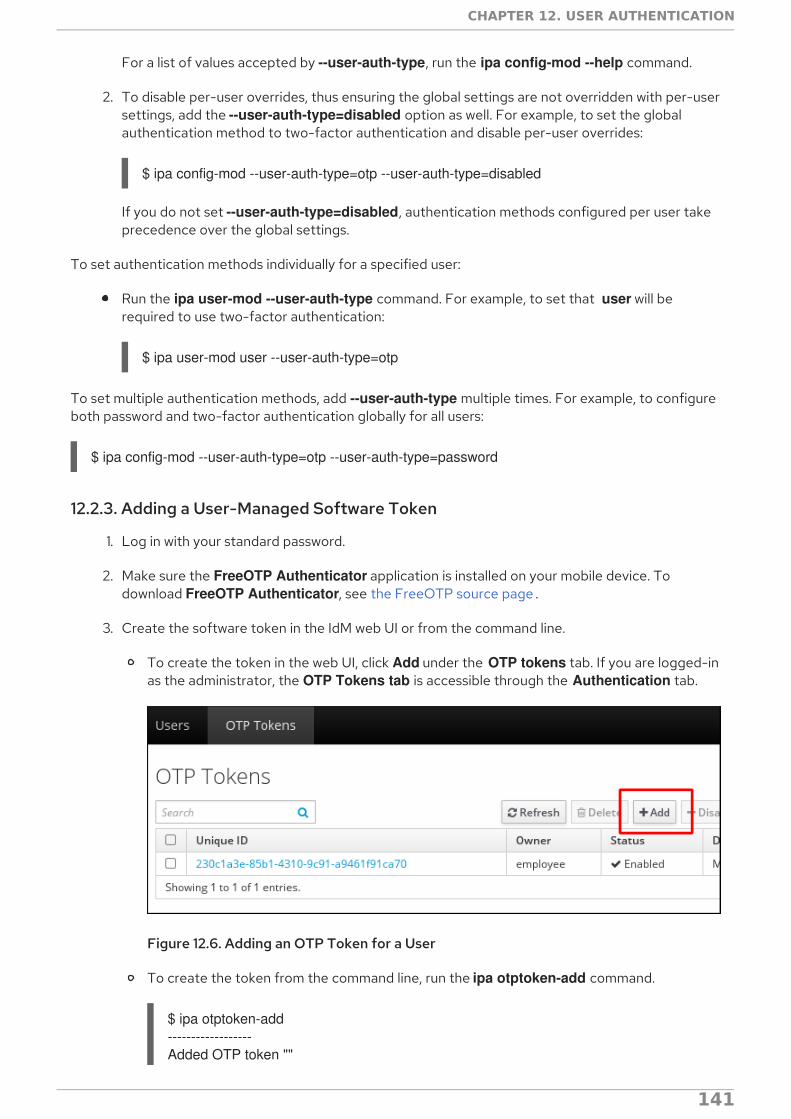
For a list of values accepted by --user-auth-type, run the ipa config-mod --help command.
2. To disable per-user overrides, thus ensuring the global settings are not overridden with per-usersettings, add the --user-auth-type=disabled option as well. For example, to set the globalauthentication method to two-factor authentication and disable per-user overrides:
$ ipa config-mod --user-auth-type=otp --user-auth-type=disabled
If you do not set --user-auth-type=disabled, authentication methods configured per user takeprecedence over the global settings.
To set authentication methods individually for a specified user:
Run the ipa user-mod --user-auth-type command. For example, to set that user will berequired to use two-factor authentication:
$ ipa user-mod user --user-auth-type=otp
To set multiple authentication methods, add --user-auth-type multiple times. For example, to configureboth password and two-factor authentication globally for all users:
$ ipa config-mod --user-auth-type=otp --user-auth-type=password
12.2.3. Adding a User-Managed Software Token
1. Log in with your standard password.
2. Make sure the FreeOTP Authenticator application is installed on your mobile device. Todownload FreeOTP Authenticator, see the FreeOTP source page .
3. Create the software token in the IdM web UI or from the command line.
To create the token in the web UI, click Add under the OTP tokens tab. If you are logged-inas the administrator, the OTP Tokens tab is accessible through the Authentication tab.
Figure 12.6. Adding an OTP Token for a User
To create the token from the command line, run the ipa otptoken-add command.
$ ipa otptoken-add------------------Added OTP token ""
CHAPTER 12. USER AUTHENTICATION
141
------------------ Unique ID: 7060091b-4e40-47fd-8354-cb32fecd548a Type: TOTP...
For more information about ipa otptoken-add, run the command with the --help optionadded.
4. A QR code is displayed in the web UI or on the command line. Scan the QR code with FreeOTP Authenticator to provision the token to the mobile device.
12.2.4. Adding a User-Managed YubiKey Hardware Token
A programmable hardware token, such as a YubiKey token, can only be added from the command line.To add a YubiKey hardware token as the user owning the token:
1. Log in with your standard password.
2. Insert your YubiKey token.
3. Run the ipa otptoken-add-yubikey command.
If the YubiKey has an empty slot available, the command will select the empty slotautomatically.
If no empty slot is available, you must select a slot manually using the --slot option.Forexample:
$ ipa otptoken-add-yubikey --slot=2
Note that this overwrites the selected slot.
12.2.5. Adding a Token for a User as the Administrator
To add a software token as the administrator:
1. Make sure you are logged-in as the administrator.
2. Make sure the FreeOTP Authenticator application is installed on the mobile device. Todownload FreeOTP Authenticator, see the FreeOTP source page .
3. Create the software token in the IdM web UI or from the command line.
To create the token in the web UI, select Authentication → OTP Tokens and click Add atthe top of the list of OTP tokens. In the Add OTP Token form, select the owner of thetoken.
Linux Domain Identity, Authentication, and Policy Guide
142
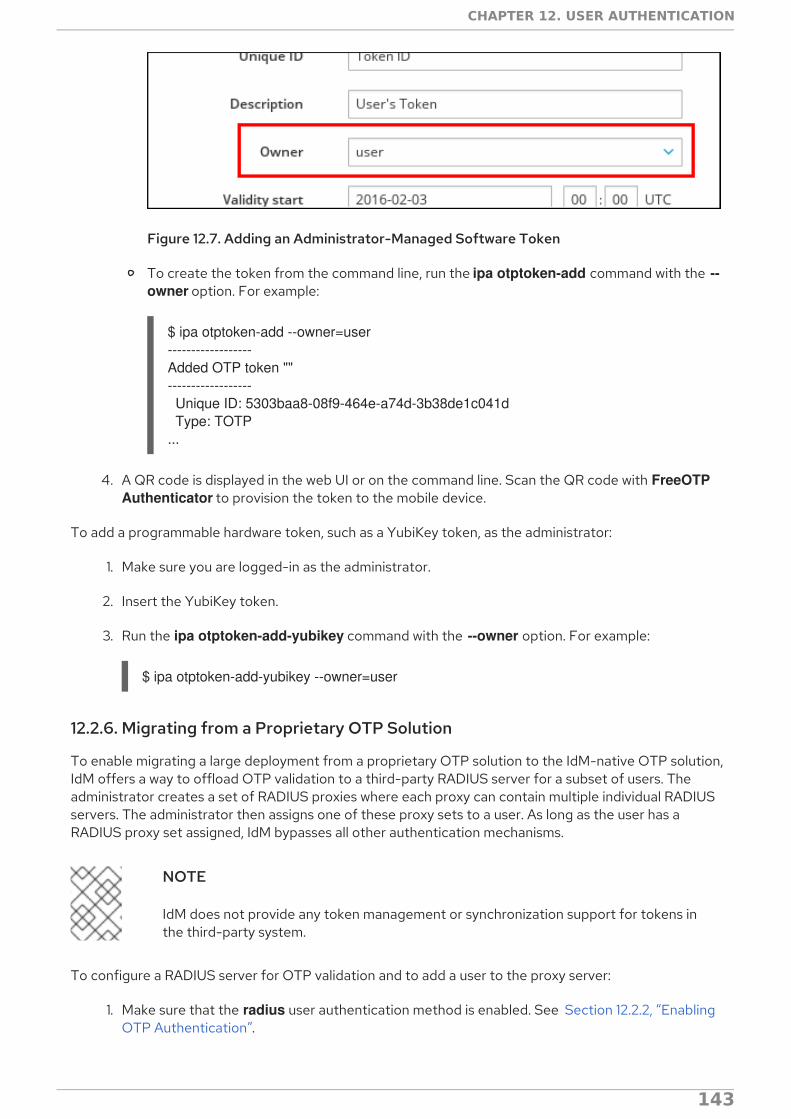
Figure 12.7. Adding an Administrator-Managed Software Token
To create the token from the command line, run the ipa otptoken-add command with the --owner option. For example:
$ ipa otptoken-add --owner=user------------------Added OTP token ""------------------ Unique ID: 5303baa8-08f9-464e-a74d-3b38de1c041d Type: TOTP...
4. A QR code is displayed in the web UI or on the command line. Scan the QR code with FreeOTP Authenticator to provision the token to the mobile device.
To add a programmable hardware token, such as a YubiKey token, as the administrator:
1. Make sure you are logged-in as the administrator.
2. Insert the YubiKey token.
3. Run the ipa otptoken-add-yubikey command with the --owner option. For example:
$ ipa otptoken-add-yubikey --owner=user
12.2.6. Migrating from a Proprietary OTP Solution
To enable migrating a large deployment from a proprietary OTP solution to the IdM-native OTP solution,IdM offers a way to offload OTP validation to a third-party RADIUS server for a subset of users. Theadministrator creates a set of RADIUS proxies where each proxy can contain multiple individual RADIUSservers. The administrator then assigns one of these proxy sets to a user. As long as the user has aRADIUS proxy set assigned, IdM bypasses all other authentication mechanisms.
NOTE
IdM does not provide any token management or synchronization support for tokens inthe third-party system.
To configure a RADIUS server for OTP validation and to add a user to the proxy server:
1. Make sure that the radius user authentication method is enabled. See Section 12.2.2, “EnablingOTP Authentication”.
2. Run the ipa radiusproxy-add proxy_name command to add a RADIUS proxy. The command
CHAPTER 12. USER AUTHENTICATION
143

2. Run the ipa radiusproxy-add proxy_name command to add a RADIUS proxy. The commandprompts you for the required information.
3. Run the ipa user-mod radiususer --radius=proxy_name command to assign a user to theadded proxy.
4. If required, configure the user name to be sent to RADIUS by running the ipa user-mod radiususer --radius-username=radius_user command.
After this, the user OTP authentication will now be processed through the RADIUS proxy server.
When the user is ready to be migrated to the IdM native OTP system, you can simply remove theRADIUS proxy assignment for the user.
12.2.7. Promoting the Current Credentials to Two-Factor Authentication
If both password and two-factor authentication are configured, but you only authenticated using thepassword, you might be denied access to certain services or hosts (see Section 12.3, “Restricting Accessto Services and Hosts Based on How Users Authenticate”). In this situation, promote your credentialsfrom one-factor to two-factor authentication by authenticating again:
1. Lock your screen. The default keyboard shortcut to lock the screen is Super key+L.
2. Unlock your screen. When asked for credentials, use both password and OTP.
12.2.8. Resynchronizing an OTP Token
See Section A.4.4, “OTP Token Out of Sync” .
12.3. RESTRICTING ACCESS TO SERVICES AND HOSTS BASED ONHOW USERS AUTHENTICATE
The authentication mechanisms supported by IdM vary in their authentication strength. For example,authentication using a one-time password (OTP) in combination with a standard password is consideredsafer than authentication using a standard password only. This section shows how to limit access toservices and hosts based on how the user authenticates.
For example, you can configure:
services critical to security, such as VPN, to require a strong authentication method
non-critical services, such as local logins, to allow authentication using a more user-friendly,weaker authentication method
Linux Domain Identity, Authentication, and Policy Guide
144
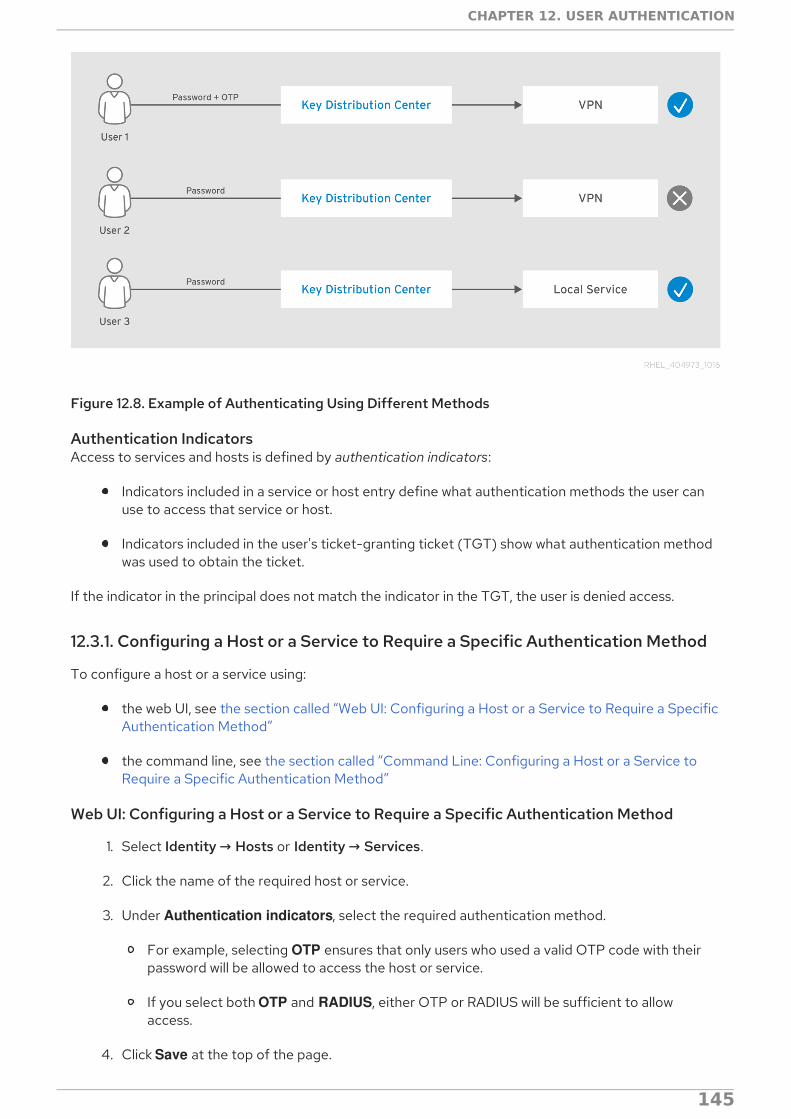
Figure 12.8. Example of Authenticating Using Different Methods
Authentication IndicatorsAccess to services and hosts is defined by authentication indicators:
Indicators included in a service or host entry define what authentication methods the user canuse to access that service or host.
Indicators included in the user's ticket-granting ticket (TGT) show what authentication methodwas used to obtain the ticket.
If the indicator in the principal does not match the indicator in the TGT, the user is denied access.
12.3.1. Configuring a Host or a Service to Require a Specific Authentication Method
To configure a host or a service using:
the web UI, see the section called “Web UI: Configuring a Host or a Service to Require a SpecificAuthentication Method”
the command line, see the section called “Command Line: Configuring a Host or a Service toRequire a Specific Authentication Method”
Web UI: Configuring a Host or a Service to Require a Specific Authentication Method
1. Select Identity → Hosts or Identity → Services.
2. Click the name of the required host or service.
3. Under Authentication indicators, select the required authentication method.
For example, selecting OTP ensures that only users who used a valid OTP code with theirpassword will be allowed to access the host or service.
If you select both OTP and RADIUS, either OTP or RADIUS will be sufficient to allowaccess.
4. Click Save at the top of the page.
CHAPTER 12. USER AUTHENTICATION
145

Command Line: Configuring a Host or a Service to Require a Specific AuthenticationMethod
1. Optional. Use the ipa host-find or ipa service-find commands to identify the host or service.
2. Use the ipa host-mod or the ipa service-mod command with the --auth-ind option to add therequired authentication indicator. For a list of the values accepted by --auth-ind, see the outputof the ipa host-mod --help or ipa service-mod --help commands.
For example, --auth-ind=otp ensures that only users who used a valid OTP code with theirpassword will be allowed to access the host or service:
$ ipa host-mod server.example.com --auth-ind=otp---------------------------------------------------------Modified host "server.example.com"--------------------------------------------------------- Host name: server.example.com ... Authentication Indicators: otp ...
If you add indicators for both OTP and RADIUS, either OTP or RADIUS will be sufficient to allowaccess.
12.4. MANAGING PUBLIC SSH KEYS FOR USERS
Identity Management allows you to upload a public SSH key to a user entry. The user who has access tothe corresponding private SSH key can use ssh to log into an IdM machine without using Kerberoscredentials. If pam_krb5 is configured properly or if SSSD is used as the IdM server's identity provider,the user also receives a Kerberos ticket-granting ticket (TGT) after login; see the section called“Obtaining Kerberos Tickets Automatically” for more details.
Note that users can still authenticate by providing their Kerberos credentials if they are logging in from amachine where their private SSH key file is not available.
Caching and Retrieving SSH Keys AutomaticallyDuring an IdM server or client installation, SSSD is automatically configured on the machine to cacheand retrieve user and host SSH keys. This allows IdM to serve as a universal and centralized repository ofSSH keys.
If the server or client was not configured during installation, you can configure SSSD on the machinemanually. For information on how to do this, see the System-Level Authentication Guide . Note thatcaching SSH keys by SSSD requires administrative privileges on the local machines.
SSH Key Format RequirementsIdM accepts the following two SSH key formats:
OpenSSH-style key
See RFC 4716 for more details about this format.
Raw RFC 4253-style key
See RFC 4253 for more details about this format.
Note that IdM automatically converts RFC 4253-style keys into OpenSSH-style keys before savingthem into the IdM LDAP server.
Linux Domain Identity, Authentication, and Policy Guide
146
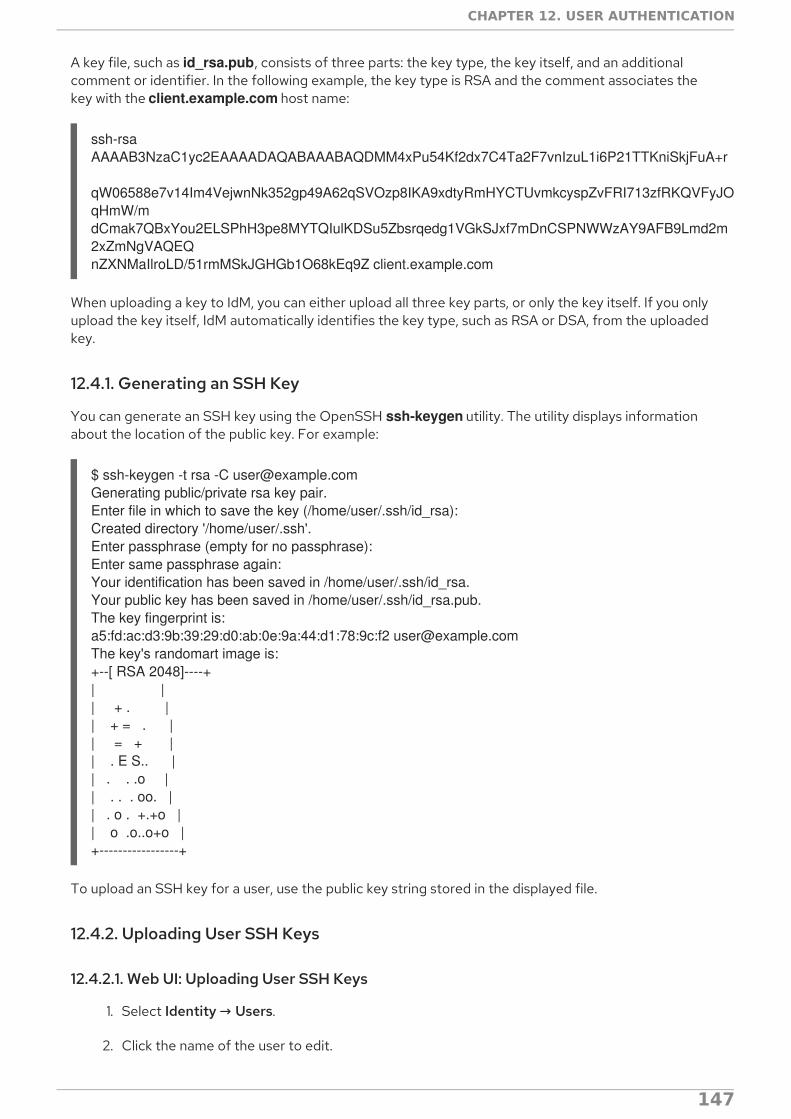
A key file, such as id_rsa.pub, consists of three parts: the key type, the key itself, and an additionalcomment or identifier. In the following example, the key type is RSA and the comment associates thekey with the client.example.com host name:
ssh-rsa AAAAB3NzaC1yc2EAAAADAQABAAABAQDMM4xPu54Kf2dx7C4Ta2F7vnIzuL1i6P21TTKniSkjFuA+r
qW06588e7v14Im4VejwnNk352gp49A62qSVOzp8IKA9xdtyRmHYCTUvmkcyspZvFRI713zfRKQVFyJOqHmW/mdCmak7QBxYou2ELSPhH3pe8MYTQIulKDSu5Zbsrqedg1VGkSJxf7mDnCSPNWWzAY9AFB9Lmd2m2xZmNgVAQEQnZXNMaIlroLD/51rmMSkJGHGb1O68kEq9Z client.example.com
When uploading a key to IdM, you can either upload all three key parts, or only the key itself. If you onlyupload the key itself, IdM automatically identifies the key type, such as RSA or DSA, from the uploadedkey.
12.4.1. Generating an SSH Key
You can generate an SSH key using the OpenSSH ssh-keygen utility. The utility displays informationabout the location of the public key. For example:
$ ssh-keygen -t rsa -C [email protected] public/private rsa key pair.Enter file in which to save the key (/home/user/.ssh/id_rsa):Created directory '/home/user/.ssh'.Enter passphrase (empty for no passphrase):Enter same passphrase again:Your identification has been saved in /home/user/.ssh/id_rsa.Your public key has been saved in /home/user/.ssh/id_rsa.pub.The key fingerprint is:a5:fd:ac:d3:9b:39:29:d0:ab:0e:9a:44:d1:78:9c:f2 [email protected] key's randomart image is:+--[ RSA 2048]----+| || + . || + = . || = + || . E S.. || . . .o || . . . oo. || . o . +.+o || o .o..o+o |+-----------------+
To upload an SSH key for a user, use the public key string stored in the displayed file.
12.4.2. Uploading User SSH Keys
12.4.2.1. Web UI: Uploading User SSH Keys
1. Select Identity → Users.
2. Click the name of the user to edit.
CHAPTER 12. USER AUTHENTICATION
147

3. Under the Settings tab in the Account Settings area, click SSH public keys: Add.
Figure 12.9. SSH public keys in the Account Settings
4. Paste in the Base 64-encoded public key string, and click Set.
Figure 12.10. Pasting in the Public Key
5. Click Save at the top of the page.
12.4.2.2. Command Line: Uploading User SSH Keys
Use the ipa user-mod command and pass the Base 64-encoded public key string using the --sshpubkey option.
For example, to upload the key type, the key itself, and the host name identifier:
$ ipa user-mod user --sshpubkey="ssh-rsa AAAAB3Nza...SNc5dv== client.example.com"
To upload multiple keys, use --sshpubkey multiple times. For example, to upload two SSH keys:
--sshpubkey="AAAAB3Nza...SNc5dv==" --sshpubkey="RjlzYQo...ZEt0TAo="
NOTE
Linux Domain Identity, Authentication, and Policy Guide
148
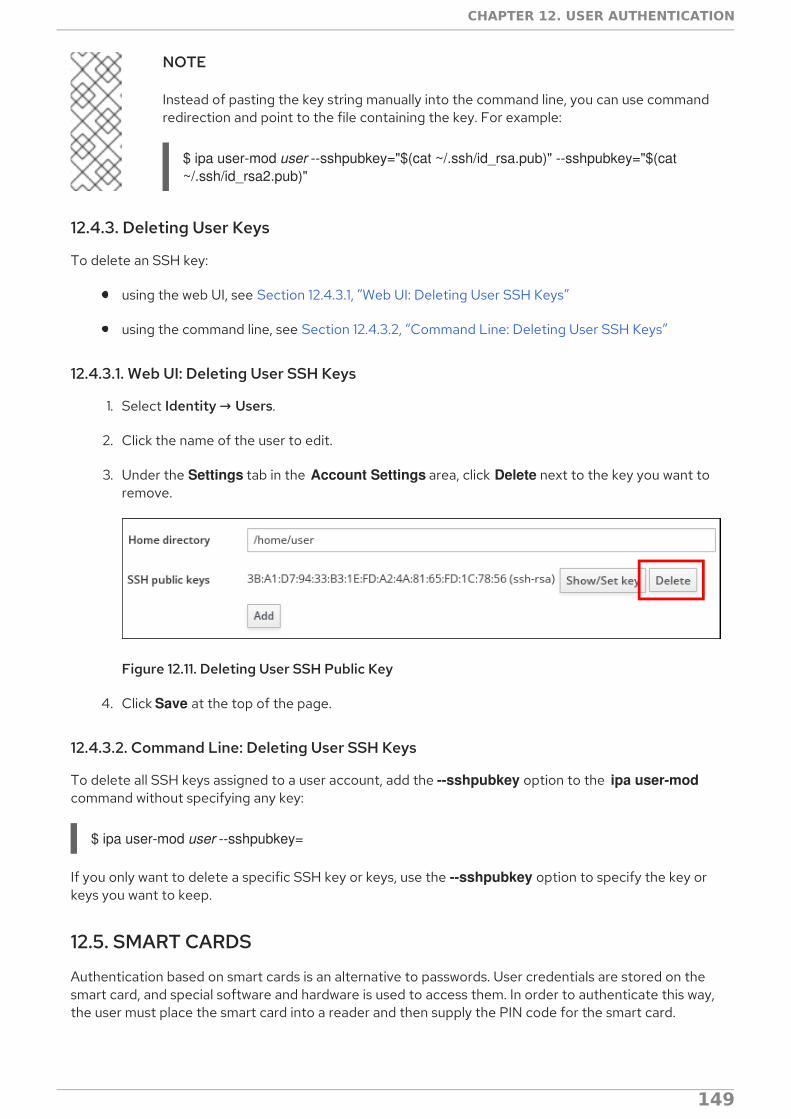
NOTE
Instead of pasting the key string manually into the command line, you can use commandredirection and point to the file containing the key. For example:
$ ipa user-mod user --sshpubkey="$(cat ~/.ssh/id_rsa.pub)" --sshpubkey="$(cat ~/.ssh/id_rsa2.pub)"
12.4.3. Deleting User Keys
To delete an SSH key:
using the web UI, see Section 12.4.3.1, “Web UI: Deleting User SSH Keys”
using the command line, see Section 12.4.3.2, “Command Line: Deleting User SSH Keys”
12.4.3.1. Web UI: Deleting User SSH Keys
1. Select Identity → Users.
2. Click the name of the user to edit.
3. Under the Settings tab in the Account Settings area, click Delete next to the key you want toremove.
Figure 12.11. Deleting User SSH Public Key
4. Click Save at the top of the page.
12.4.3.2. Command Line: Deleting User SSH Keys
To delete all SSH keys assigned to a user account, add the --sshpubkey option to the ipa user-modcommand without specifying any key:
$ ipa user-mod user --sshpubkey=
If you only want to delete a specific SSH key or keys, use the --sshpubkey option to specify the key orkeys you want to keep.
12.5. SMART CARDS
Authentication based on smart cards is an alternative to passwords. User credentials are stored on thesmart card, and special software and hardware is used to access them. In order to authenticate this way,the user must place the smart card into a reader and then supply the PIN code for the smart card.
CHAPTER 12. USER AUTHENTICATION
149
12.5.1. Smart Card and Smart Card Reader Support in Identity Management
If your smart card is supported by the opensc or coolkey package, the required PKCS #11 module isalready present in the central /etc/pki/nssdb/ NSS database after the installation of these packages.
If your smart card is not supported, run the following steps:
1. Add the required PKCS #11 module manually using the modutil utility. For example:
[root@ipaclient ~]# modutil -dbdir /etc/pki/nssdb/ -add "My PKCS#11 module" -libfile libmypkcs11.so...Module "My PKCS#11 Module" added to database.
For detailed information on using modutil, see the modutil(1) man page.
2. Add all certificate authority (CA) certificates to the NSS database that are required to validatethe certificate on the smart card. For example, to add the CA certificate in the ca_certificate.pem file to the NSS database:
[root@ipaclient ~]# certutil -A -d /etc/pki/nssdb/ -n 'CA certificate' -t CT,C,C -a -i ca_certificate.pem
For detailed information on using certutil, see the certutil(1) man page.
12.5.2. Exporting a Certificate From a Smart Card
1. Place the smart card into the reader.
2. Run the following command to list the certificates on the smart card:
[user@ipaclient ~]$ certutil -L -d /etc/pki/nssdb/ -h allCertificate Nickname Trust Attributes SSL,S/MIME,JAR/XPI
my_certificate CT,C,C
In the output, locate the certificate to use for authentication, and note its nickname.
3. To extract the certificate in Base 64 format to user.crt, use the nickname from the previousstep:
[user@ipaclient ~]$ certutil -L -d /etc/pki/nssdb/ -n 'my_certificate' -r | base64 -w 0 > user.crt
The base64 utility is part of the coreutils package.
12.5.3. Storing Smart Card Certificates for IdM Users
To add a smart card certificate to an IdM user account, see Section 20.2, “Managing Certificates Issuedby External CAs”.
12.5.4. Smart Card Certificates in a Trusted Active Directory Environment
For information where to store certificates in a trusted Active Directory environment, see the
Linux Domain Identity, Authentication, and Policy Guide
150
For information where to store certificates in a trusted Active Directory environment, see thecorresponding chapter in the Windows Integration Guide.
12.5.5. Smart Card Authentication on Identity Management Clients
Red Hat Identity Management (IdM) supports two smart card-based authentication options:
Local authentication
Text console
Graphical console, such as the Gnome Display Manager (GDM)
Local authentication services, like su, or sudo
Remote authentication with ssh
Certificates on a smart card are stored together with the PIN-protected SSH private key.
NOTE
IdM only supports the above-mentioned local authentication services and ssh for smartcard authentication. Other services, such as FTP, are not supported.
With SSSD-based smart card authentication configured, the system prompts for the smart card PINcode after the user attempts to log in. The user is successfully authenticated if the supplied PIN iscorrect, the certificate on the smart card is valid,and belongs to the user attempting to log in, and otherconfigurable criteria are met.
12.5.5.1. Configuring Smart Card Authentication on an IdM Client
To be able to authenticate using smart cards on a client, run the following steps:
1. Set the following option in your /etc/sssd/sssd.conf to true:
[pam]pam_cert_auth=true
2. Restart SSSD:
[root@ipaclient ~]# systemctl restart sssd
12.5.5.2. SSH Log in Using a Smart Card
If you are logging in with ssh when authenticating with a smart card, you have to additionally specify thefollowing path to the smart card reader module. For example:
$ ssh -I /usr/lib/libmypkcs11.so -l [email protected] host.example.comEnter PIN for 'Smart Card':
12.6. USER CERTIFICATES
CHAPTER 12. USER AUTHENTICATION
151

For information on user certificates, see Chapter 20, Managing Certificates for Users, Hosts, andServices.
Linux Domain Identity, Authentication, and Policy Guide
152

CHAPTER 13. UNIQUE UID AND GID NUMBER ASSIGNMENTSAn IdM server generates user ID (UID) and group ID (GID) values and simultaneously ensures thatreplicas never generate the same IDs. The need for unique UIDs and GIDs might even be across IdMdomains, if a single organization uses multiple separate domains.
13.1. ID RANGES
The UID and GID numbers are divided into ID ranges. By keeping separate numeric ranges for individualservers and replicas, the chances are minimal that an ID value issued for an entry is already used byanother entry on another server or replica.
The Distributed Numeric Assignment (DNA) plug-in, as part of the back end 389 Directory Serverinstance for the domain, ensures that ranges are updated and shared between servers and replicas; theplug-in manages the ID ranges across all masters and replicas. Every server or replica has a current IDrange and an additional next ID range that the server or replica uses after the current range has beendepleted. For more information about the DNA Directory Server plug-in, see theRed Hat Directory Server Deployment Guide.
13.2. ID RANGE ASSIGNMENTS DURING INSTALLATION
During server installation, the ipa-server-install command by default automatically assigns a randomcurrent ID range to the installed server. The setup script randomly selects a range of 200,000 IDs from atotal of 10,000 possible ranges. Selecting a random range in this way significantly reduces theprobability of conflicting IDs in case you decide to merge two separate IdM domains in the future.
However, you can define a current ID range manually during server installation by using the following twooptions with ipa-server-install:
--idstart gives the starting value for UID and GID numbers; by default, the value is selected atrandom,
--idmax gives the maximum UID and GID number; by default, the value is the --idstart startingvalue plus 199,999.
If you have a single IdM server installed, a new user or group entry receives a random ID from the wholerange. When you install a new replica and the replica requests its own ID range, the initial ID range for theserver splits and is distributed between the server and replica: the replica receives half of the remainingID range that is available on the initial master. The server and replica then use their respective portionsof the original ID range for new entries. Also, if less than 100 IDs from the ID range that was assigned to areplica remain, meaning the replica is close to depleting its allocated ID range, the replica contacts theother available servers with a request for a new ID range.
A server receives an ID range the first time the DNA plug-in is used; until then, the server has no IDrange defined. For example, when you create a replica from a master server, the replica does not receivean ID range immediately. The replica requests an ID range from the initial master only when the first ID isabout to be assigned on the replica.
NOTE
CHAPTER 13. UNIQUE UID AND GID NUMBER ASSIGNMENTS
153
NOTE
If the initial master stops functioning before the replica requests an ID range from it, thereplica is unable to contact the master with a request for the ID range. An attempt to adda new user on the replica fails. In such situations, you can find out what ID range isassigned to the disabled master and assign an ID range to the replica manually, which isdescribed in Section 13.5, “Manual ID Range Extension and Assigning a New ID Range” .
13.3. DISPLAYING CURRENTLY ASSIGNED ID RANGES
To display which ID ranges are configured for a server, use the following commands:
ipa-replica-manage dnarange-show displays the current ID range that is set on all servers or, ifyou specify a server, only on the specified server, for example:
# ipa-replica-manage dnarange-showmasterA.example.com: 1001-1500masterB.example.com: 1501-2000masterC.example.com: No range set
# ipa-replica-manage dnarange-show masterA.example.commasterA.example.com: 1001-1500
ipa-replica-manage dnanextrange-show displays the next ID range currently set on all serversor, if you specify a server, only on the specified server, for example:
# ipa-replica-manage dnanextrange-showmasterA.example.com: 1001-1500masterB.example.com: No on-deck range setmasterC.example.com: No on-deck range set
# ipa-replica-manage dnanextrange-show masterA.example.com masterA.example.com: 1001-1500
For more information about these two commands, see the ipa-replica-manage(1) man page.
13.4. AUTOMATIC ID RANGE EXTENSION AFTER DELETING A REPLICA
When you delete a functioning replica, the ipa-replica-manage del command retrieves the ID rangesthat were assigned to the replica and adds them as a next range to other available IdM replicas. Thisensures that ID ranges remain available to be used by other replicas.
After you delete a replica, you can verify which ID ranges are configured for other servers by using the ipa-replica-manage dnarange-show and ipa-replica-manage dnanextrange-show commands,described in Section 13.3, “Displaying Currently Assigned ID Ranges” .
13.5. MANUAL ID RANGE EXTENSION AND ASSIGNING A NEW IDRANGE
In certain situations, it is necessary to manually adjust an ID range:
An assigned ID range has been depleted
A replica has exhausted the ID range that was assigned to it, and requesting additional IDs failed
Linux Domain Identity, Authentication, and Policy Guide
154

because no more free IDs are available in the ID ranges of other replicas. You want to extend the IDrange assigned to the replica. This might involve splitting an existing ID range or extending it past theinitial configured ID range for the server. Alternatively, you might want to assign a new ID range.
NOTE
If you assign a new ID range, the UIDs of the already existing entries on the server orreplica stay the same. This does not pose a problem because even if you change thecurrent ID range, IdM keeps a record of what ranges were assigned in the past.
A replica stopped functioning
ID range is not automatically retrieved when a replica dies and needs to be deleted, which means theID range previously assigned to the replica becomes unavailable. You want to recover the ID rangeand make it available for other replicas.
If you want to recover the ID range belonging to a server that stopped functioning and assign it toanother server, first find out what are the ID range values using the ipa-replica-manage dnarange-show command described in Section 13.3, “Displaying Currently Assigned ID Ranges” , and thenmanually assign that ID range to the server. Also, to avoid duplicate UIDs or GIDs, make sure that noID value from the recovered range was previously assigned to a user or group; you can do this byexamining the UIDs and GIDs of existent users and groups.
To manually define the ID ranges, use the following two commands:
ipa-replica-manage dnarange-set allows you to define the current ID range for a specifiedserver:
# ipa-replica-manage dnarange-set masterA.example.com 1250-1499
ipa-replica-manage dnanextrange-set allows you to define the next ID range for a specifiedserver:
# ipa-replica-manage dnanextrange-set masterB.example.com 1001-5000
For more information about these commands, see the ipa-replica-manage(1) man page.
IMPORTANT
Be careful not to create overlapping ID ranges. If any of the ID ranges you assign toservers or replicas overlap, it could result in two different servers assigning the same IDvalue to different entries.
Do not set ID ranges that include UID values of 1000 and lower; these values are reserved for systemuse. Also, do not set an ID range that would include the 0 value; the SSSD service does not handle the 0ID value.
When extending an ID range manually, make sure that the newly extended range is included in the IdM IDrange; you can check this using the ipa idrange-find command. Run the ipa idrange-find -h commandto display help for how to use ipa idrange-find.
13.6. ENSURING THAT ID VALUES ARE UNIQUE
CHAPTER 13. UNIQUE UID AND GID NUMBER ASSIGNMENTS
155
It is recommended to avoid conflicting UIDs or GIDs. UIDs and GIDs should always be unique: two usersshould not have the same UID, and two groups should not have the same GID.
Automatic ID assignment
When a user or a group is created interactively or without a manually specified ID number, the serverassigns the next available ID number from the ID range to the user account. This ensures that theUID or GID is always unique.
Manual ID assignment
When you assign an ID to a user or a group entry manually, the server does not verify that thespecified UID or GID is unique; it does not warn you of a conflict if you choose a value that is alreadyused by another entry.
As explained in Section 13.7, “Repairing Changed UID and GID Numbers” , the SSSD service does nothandle entries with identical IDs. If two entries share the same ID number, a search for this ID onlyreturns the first entry. However, if you search for other attributes or run the ipa user-find --allcommand, both entries are returned.
UIDs and GIDs are both selected from the same ID range. A user and a group can have the same ID; noconflict arises in this situation because the UID and the GID are set in two different attributes: uidNumber and gidNumber.
NOTE
Setting the same ID for both a user and a group allows you to configure user privategroups. To create a unique system group for a user in this way, set the same ID value for auser and also for a group, in which the only member is the mentioned user.
13.7. REPAIRING CHANGED UID AND GID NUMBERS
When a user logs into an IdM system or service, SSSD on that system caches their user name togetherwith the UID and GID of the user. SSSD then uses the UID as the identifying key for the user. If a userwith the same user name but a different UID attempts to log into the system, SSSD registers twodifferent UIDs and assumes that there are two different users with conflicting user names. This can posea problem if a UID of a user changes. In such a situation, SSSD incorrectly interprets the user with amodified UID as a new user, instead of recognizing that it as the same user with a different UID. If theUID of an existing user changes, the user cannot log into SSSD and associated services and domains.This also affects client applications that use SSSD for identity information.
To work around this problem, if a UID or GID changes, clear the SSSD cache, which ensures that the useris able to log in again. For example, to clear the SSSD cache for a specified user, use the sss_cacheutility as follows:
[root@server ~]# sss_cache -u user
Linux Domain Identity, Authentication, and Policy Guide
156
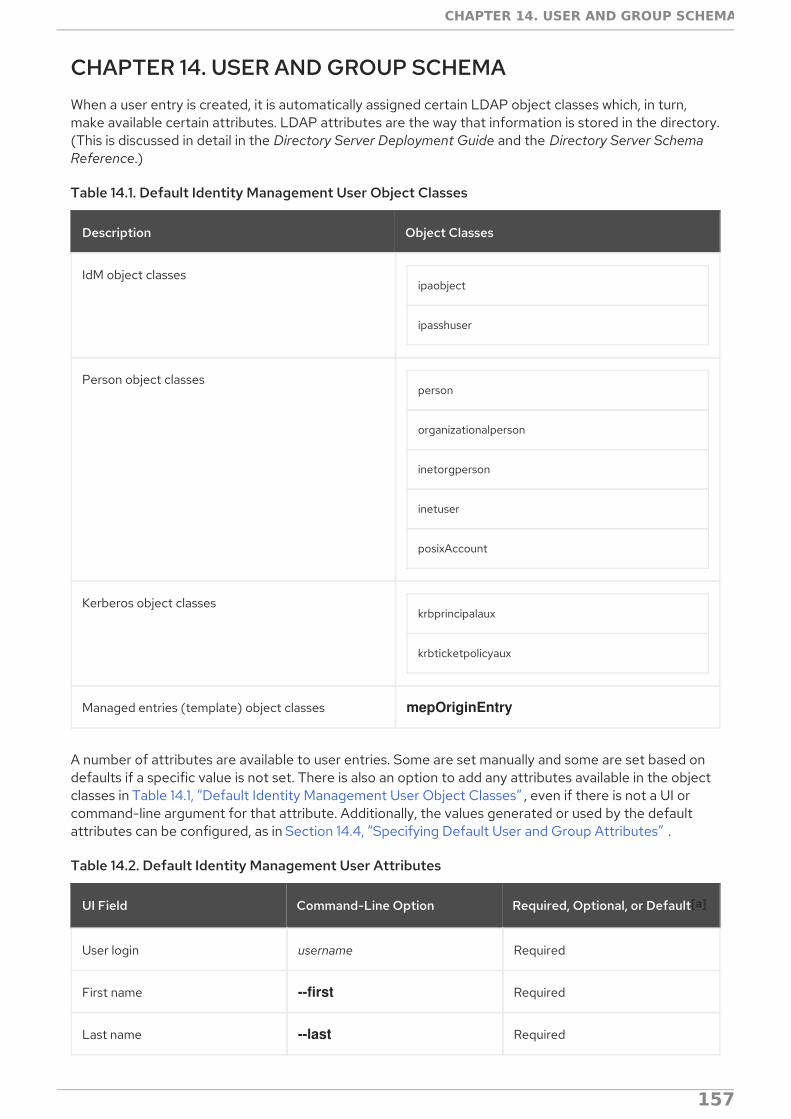
CHAPTER 14. USER AND GROUP SCHEMAWhen a user entry is created, it is automatically assigned certain LDAP object classes which, in turn,make available certain attributes. LDAP attributes are the way that information is stored in the directory.(This is discussed in detail in the Directory Server Deployment Guide and the Directory Server SchemaReference.)
Table 14.1. Default Identity Management User Object Classes
Description Object Classes
IdM object classesipaobject
ipasshuser
Person object classesperson
organizationalperson
inetorgperson
inetuser
posixAccount
Kerberos object classeskrbprincipalaux
krbticketpolicyaux
Managed entries (template) object classes mepOriginEntry
A number of attributes are available to user entries. Some are set manually and some are set based ondefaults if a specific value is not set. There is also an option to add any attributes available in the objectclasses in Table 14.1, “Default Identity Management User Object Classes” , even if there is not a UI orcommand-line argument for that attribute. Additionally, the values generated or used by the defaultattributes can be configured, as in Section 14.4, “Specifying Default User and Group Attributes” .
Table 14.2. Default Identity Management User Attributes
UI Field Command-Line Option Required, Optional, or Default[a]
User login username Required
First name --first Required
Last name --last Required
CHAPTER 14. USER AND GROUP SCHEMA
157

Full name --cn Optional
Display name --displayname Optional
Initials --initials Default
Home directory --homedir Default
GECOS field --gecos Default
Shell --shell Default
Kerberos principal --principal Default
Email address --email Optional
Password --password [b] Optional
User ID number --uid Default
Group ID number --gidnumber Default
Street address --street Optional
City --city Optional
State/Province --state Optional
Zip code --postalcode Optional
Telephone number --phone Optional
Mobile telephone number --mobile Optional
Pager number --pager Optional
Fax number --fax Optional
Organizational unit --orgunit- Optional
Job title --title Optional
Manager --manager Optional
UI Field Command-Line Option Required, Optional, or Default[a]
Linux Domain Identity, Authentication, and Policy Guide
158
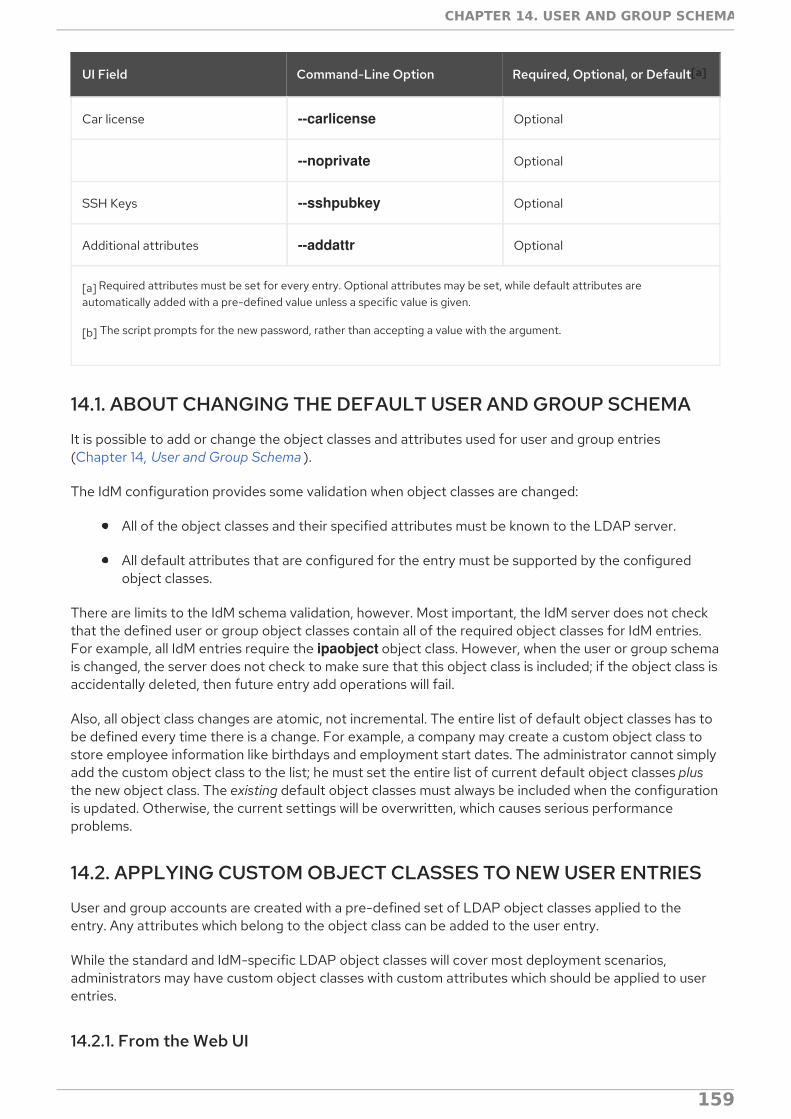
Car license --carlicense Optional
--noprivate Optional
SSH Keys --sshpubkey Optional
Additional attributes --addattr Optional
[a] Required attributes must be set for every entry. Optional attributes may be set, while default attributes areautomatically added with a pre-defined value unless a specific value is given.
[b] The script prompts for the new password, rather than accepting a value with the argument.
UI Field Command-Line Option Required, Optional, or Default[a]
14.1. ABOUT CHANGING THE DEFAULT USER AND GROUP SCHEMA
It is possible to add or change the object classes and attributes used for user and group entries(Chapter 14, User and Group Schema ).
The IdM configuration provides some validation when object classes are changed:
All of the object classes and their specified attributes must be known to the LDAP server.
All default attributes that are configured for the entry must be supported by the configuredobject classes.
There are limits to the IdM schema validation, however. Most important, the IdM server does not checkthat the defined user or group object classes contain all of the required object classes for IdM entries.For example, all IdM entries require the ipaobject object class. However, when the user or group schemais changed, the server does not check to make sure that this object class is included; if the object class isaccidentally deleted, then future entry add operations will fail.
Also, all object class changes are atomic, not incremental. The entire list of default object classes has tobe defined every time there is a change. For example, a company may create a custom object class tostore employee information like birthdays and employment start dates. The administrator cannot simplyadd the custom object class to the list; he must set the entire list of current default object classes plusthe new object class. The existing default object classes must always be included when the configurationis updated. Otherwise, the current settings will be overwritten, which causes serious performanceproblems.
14.2. APPLYING CUSTOM OBJECT CLASSES TO NEW USER ENTRIES
User and group accounts are created with a pre-defined set of LDAP object classes applied to theentry. Any attributes which belong to the object class can be added to the user entry.
While the standard and IdM-specific LDAP object classes will cover most deployment scenarios,administrators may have custom object classes with custom attributes which should be applied to userentries.
14.2.1. From the Web UI
1. Add all of the custom schema elements to the 389 Directory Server instance used by
CHAPTER 14. USER AND GROUP SCHEMA
159
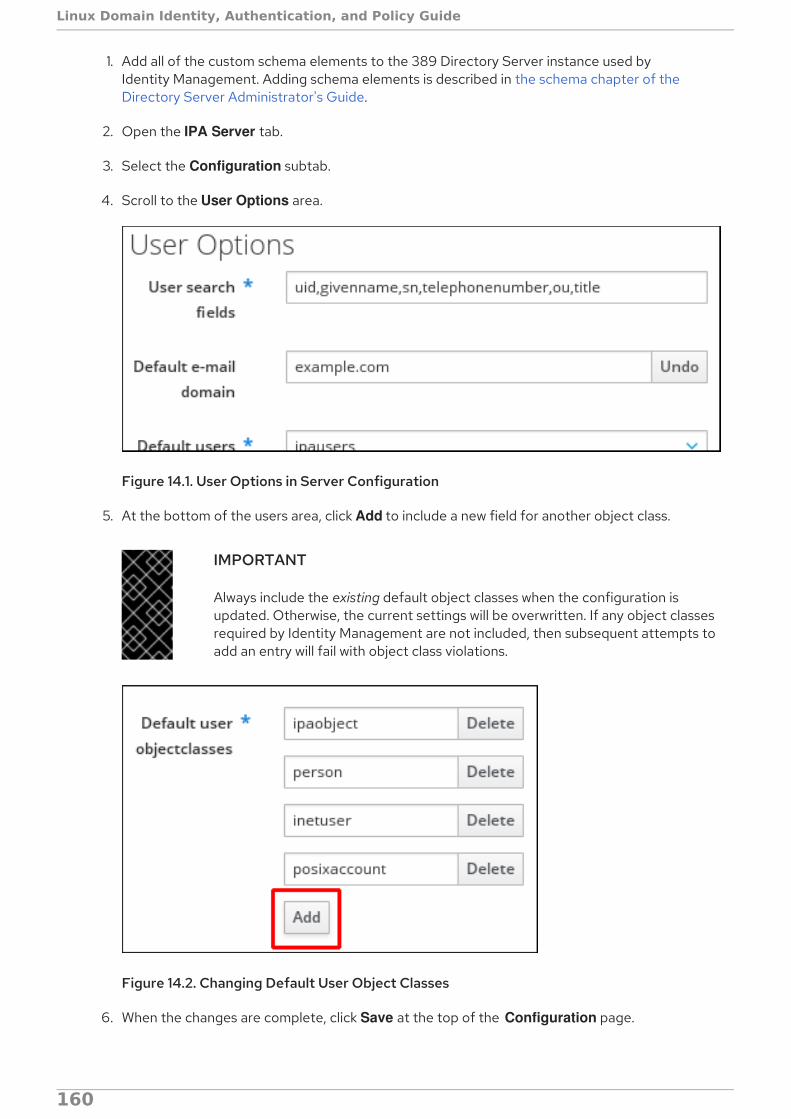
1. Add all of the custom schema elements to the 389 Directory Server instance used byIdentity Management. Adding schema elements is described in the schema chapter of theDirectory Server Administrator's Guide.
2. Open the IPA Server tab.
3. Select the Configuration subtab.
4. Scroll to the User Options area.
Figure 14.1. User Options in Server Configuration
5. At the bottom of the users area, click Add to include a new field for another object class.
IMPORTANT
Always include the existing default object classes when the configuration isupdated. Otherwise, the current settings will be overwritten. If any object classesrequired by Identity Management are not included, then subsequent attempts toadd an entry will fail with object class violations.
Figure 14.2. Changing Default User Object Classes
6. When the changes are complete, click Save at the top of the Configuration page.
Linux Domain Identity, Authentication, and Policy Guide
160

14.2.2. From the Command Line
1. Add all of the custom schema elements to the 389 Directory Server instance used byIdentity Management. Adding schema elements is described in the schema chapter of theDirectory Server Administrator's Guide.
2. Add the new object class to the list of object classes added to entries. The option for userobject classes is --userobjectclasses.
IMPORTANT
Always include the existing default object classes when the configuration isupdated. Otherwise, the current settings will be overwritten. If any object classesrequired by Identity Management are not included, then subsequent attempts toadd an entry will fail with object class violations.
All object classes must be included in the list of object classes. The information passed with the config-mod command overwrites the previous values. This can be done by specifying eachobject class with a --userobjectclasses argument or by listing all of the object classes in acomma-separated list inside curly braces, such as {attr1,attr2,attr3}. For long lists, it can beeasier to use the curly braces than multiple options. For example:
[bjensen@server ~]$ ipa config-mod --userobjectclasses={top,person,organizationalperson,inetorgperson,inetuser,posixaccount,krbprincipalaux,krbticketpolicyaux,ipaobject,ipasshuser,employeeinfo}
14.3. APPLYING CUSTOM OBJECT CLASSES TO NEW GROUP ENTRIES
As with user entries, administrators may have custom object classes with custom attributes which shouldbe applied to group entries. These can be added automatically by adding the object classes to the IdMserver configuration.
14.3.1. From the Web UI
1. Add all of the custom schema elements to the 389 Directory Server instance used byIdentity Management. Adding schema elements is described in the schema chapter of theDirectory Server Administrator's Guide.
2. Open the IPA Server tab.
3. Select the Configuration subtab.
4. Scroll to the Group Options area.
CHAPTER 14. USER AND GROUP SCHEMA
161
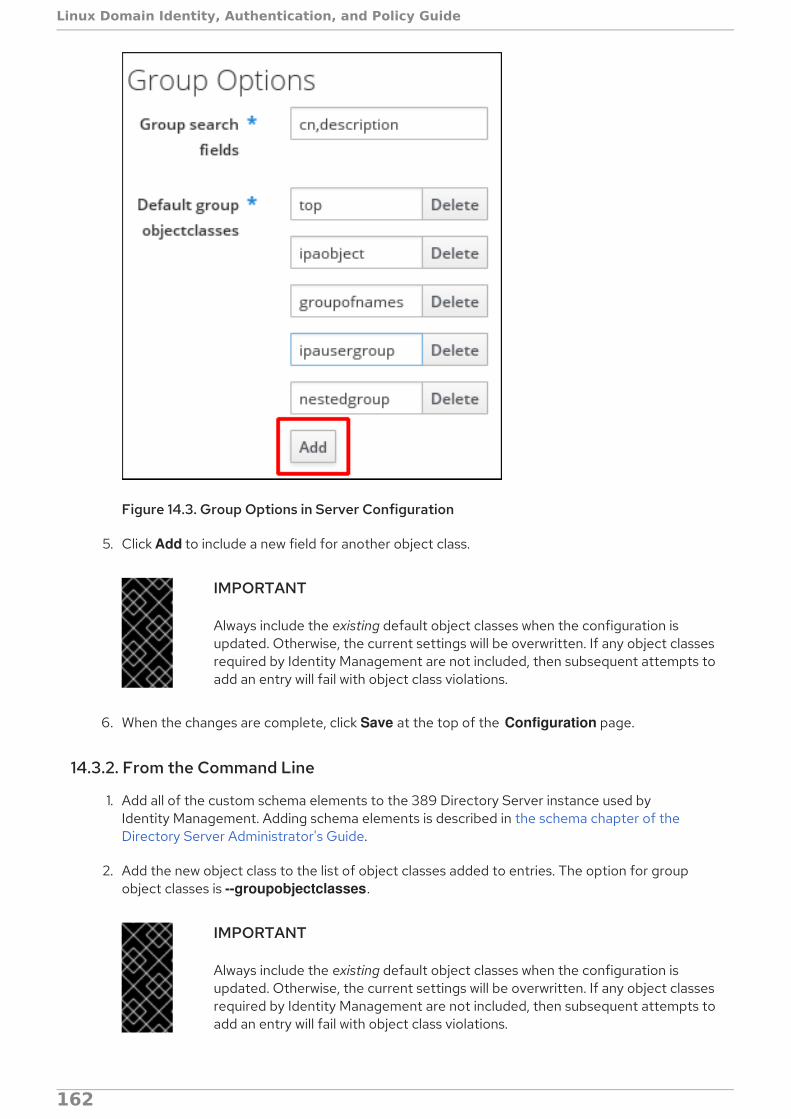
Figure 14.3. Group Options in Server Configuration
5. Click Add to include a new field for another object class.
IMPORTANT
Always include the existing default object classes when the configuration isupdated. Otherwise, the current settings will be overwritten. If any object classesrequired by Identity Management are not included, then subsequent attempts toadd an entry will fail with object class violations.
6. When the changes are complete, click Save at the top of the Configuration page.
14.3.2. From the Command Line
1. Add all of the custom schema elements to the 389 Directory Server instance used byIdentity Management. Adding schema elements is described in the schema chapter of theDirectory Server Administrator's Guide.
2. Add the new object class to the list of object classes added to entries. The option for groupobject classes is --groupobjectclasses.
IMPORTANT
Always include the existing default object classes when the configuration isupdated. Otherwise, the current settings will be overwritten. If any object classesrequired by Identity Management are not included, then subsequent attempts toadd an entry will fail with object class violations.
Linux Domain Identity, Authentication, and Policy Guide
162
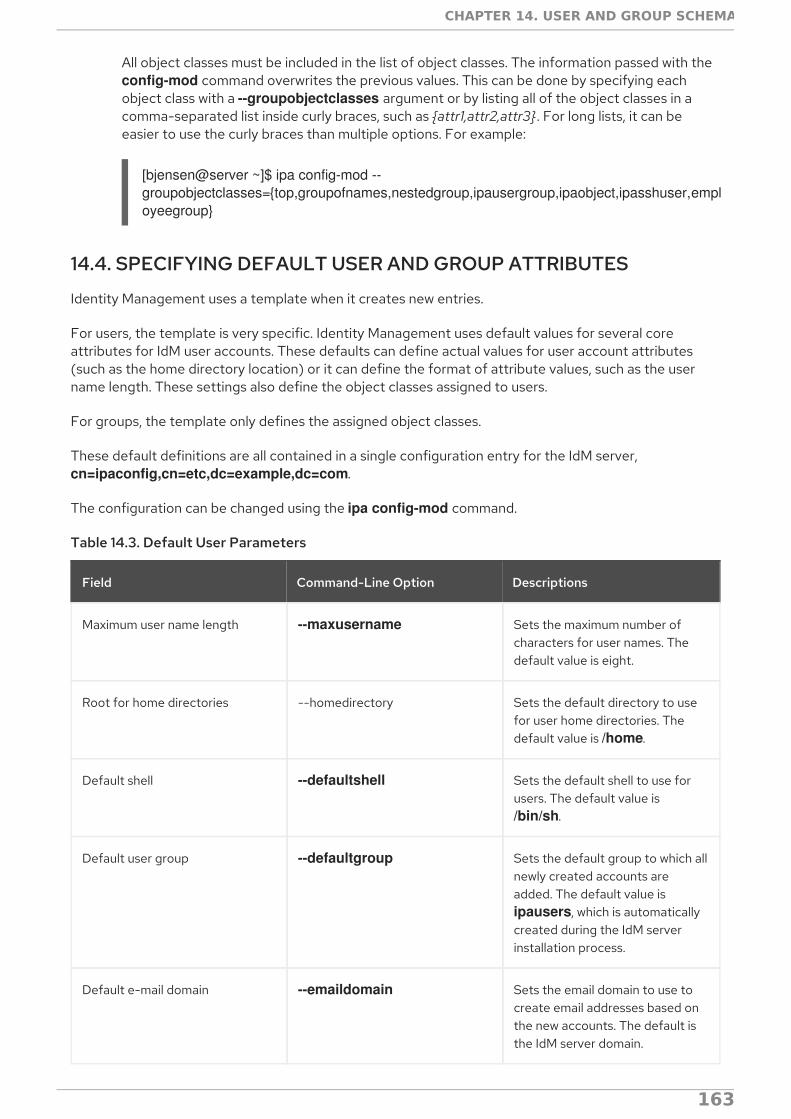
All object classes must be included in the list of object classes. The information passed with the config-mod command overwrites the previous values. This can be done by specifying eachobject class with a --groupobjectclasses argument or by listing all of the object classes in acomma-separated list inside curly braces, such as {attr1,attr2,attr3}. For long lists, it can beeasier to use the curly braces than multiple options. For example:
[bjensen@server ~]$ ipa config-mod --groupobjectclasses={top,groupofnames,nestedgroup,ipausergroup,ipaobject,ipasshuser,employeegroup}
14.4. SPECIFYING DEFAULT USER AND GROUP ATTRIBUTES
Identity Management uses a template when it creates new entries.
For users, the template is very specific. Identity Management uses default values for several coreattributes for IdM user accounts. These defaults can define actual values for user account attributes(such as the home directory location) or it can define the format of attribute values, such as the username length. These settings also define the object classes assigned to users.
For groups, the template only defines the assigned object classes.
These default definitions are all contained in a single configuration entry for the IdM server, cn=ipaconfig,cn=etc,dc=example,dc=com.
The configuration can be changed using the ipa config-mod command.
Table 14.3. Default User Parameters
Field Command-Line Option Descriptions
Maximum user name length --maxusername Sets the maximum number ofcharacters for user names. Thedefault value is eight.
Root for home directories --homedirectory Sets the default directory to usefor user home directories. Thedefault value is /home.
Default shell --defaultshell Sets the default shell to use forusers. The default value is /bin/sh.
Default user group --defaultgroup Sets the default group to which allnewly created accounts areadded. The default value is ipausers, which is automaticallycreated during the IdM serverinstallation process.
Default e-mail domain --emaildomain Sets the email domain to use tocreate email addresses based onthe new accounts. The default isthe IdM server domain.
CHAPTER 14. USER AND GROUP SCHEMA
163

Search time limit --searchtimelimit Sets the maximum amount oftime, in seconds, to spend on asearch before the server returnsresults.
Search size limit --searchrecordslimit Sets the maximum number ofrecords to return in a search.
User search fields --usersearch Sets the fields in a user entry thatcan be used as a search string.Any attribute listed has an indexkept for that attribute, so settingtoo many attributes could affectserver performance.
Group search fields --groupsearch Sets the fields in a group entrythat can be used as a searchstring.
Certificate subject base Sets the base DN to use whencreating subject DNs for clientcertificates. This is configuredwhen the server is set up.
Default user object classes --userobjectclasses Defines an object class that isused to create IdM user accounts.This can be invoked multipletimes. The complete list of objectclasses must be given becausethe list is overwritten when thecommand is run.
Default group object classes --groupobjectclasses Defines an object class that isused to create IdM groupaccounts. This can be invokedmultiple times. The complete listof object classes must be givenbecause the list is overwrittenwhen the command is run.
Password expiration notification --pwdexpnotify Sets how long, in days, before apassword expires for the server tosend a notification.
Password plug-in features Sets the format of passwords thatare allowed for users.
Field Command-Line Option Descriptions
14.4.1. Viewing Attributes from the Web UI
Linux Domain Identity, Authentication, and Policy Guide
164
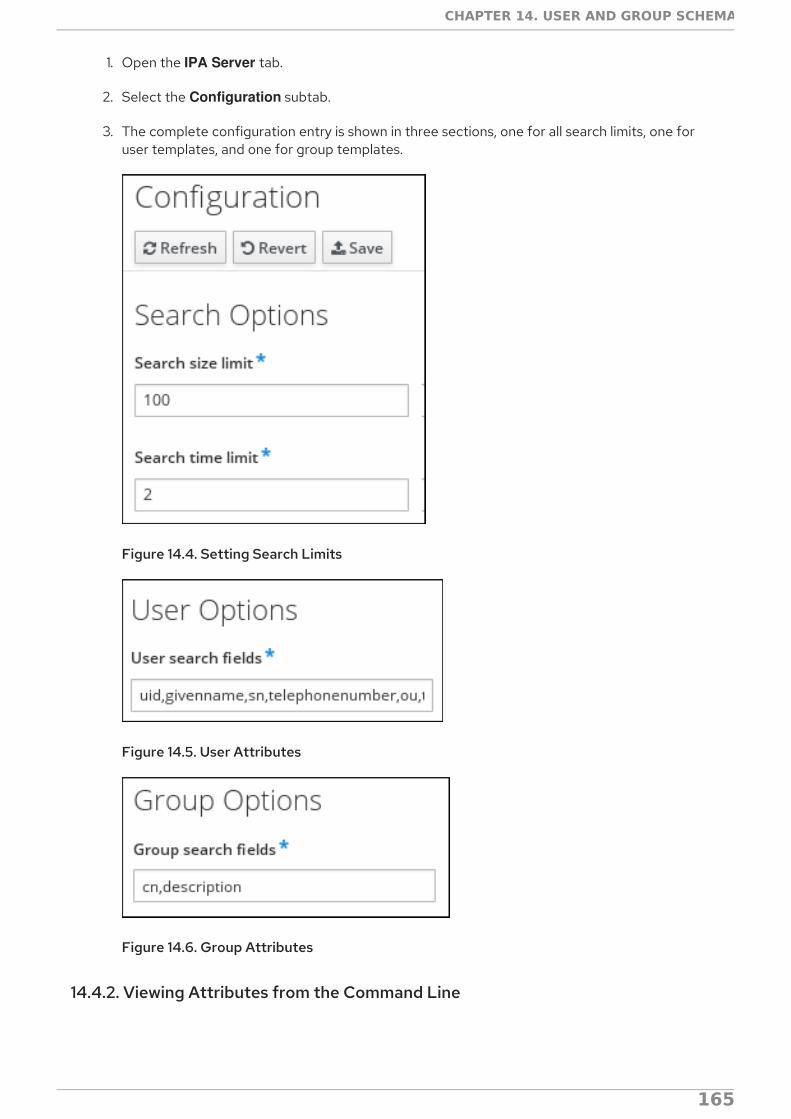
1. Open the IPA Server tab.
2. Select the Configuration subtab.
3. The complete configuration entry is shown in three sections, one for all search limits, one foruser templates, and one for group templates.
Figure 14.4. Setting Search Limits
Figure 14.5. User Attributes
Figure 14.6. Group Attributes
14.4.2. Viewing Attributes from the Command Line
The config-show command shows the current configuration which applies to all new user accounts. By
CHAPTER 14. USER AND GROUP SCHEMA
165

The config-show command shows the current configuration which applies to all new user accounts. Bydefault, only the most common attributes are displayed; use the --all option to show the completeconfiguration.
[bjensen@server ~]$ kinit admin[bjensen@server ~]$ ipa config-show --alldn: cn=ipaConfig,cn=etc,dc=example,dc=com Maximum username length: 32 Home directory base: /home Default shell: /bin/sh Default users group: ipausers Default e-mail domain: example.com Search time limit: 2 Search size limit: 100 User search fields: uid,givenname,sn,telephonenumber,ou,title Group search fields: cn,description Enable migration mode: FALSE Certificate Subject base: O=EXAMPLE.COM Default group objectclasses: top, groupofnames, nestedgroup, ipausergroup, ipaobject Default user objectclasses: top, person, organizationalperson, inetorgperson, inetuser, posixaccount, krbprincipalaux, krbticketpolicyaux, ipaobject, ipasshuser Password Expiration Notification (days): 4 Password plugin features: AllowNThash SELinux user map order: guest_u:s0$xguest_u:s0$user_u:s0$staff_u:s0-s0:c0.c1023$unconfined_u:s0-s0:c0.c1023 Default SELinux user: unconfined_u:s0-s0:c0.c1023 Default PAC types: MS-PAC, nfs:NONE cn: ipaConfig objectclass: nsContainer, top, ipaGuiConfig, ipaConfigObject
Linux Domain Identity, Authentication, and Policy Guide
166

CHAPTER 15. ID VIEWSID views enable you to specify new values for POSIX user or group attributes, as well as to define onwhich client host or hosts the new values will apply.
For example, you can use ID views to:
define different attribute values for different environments; see Section 15.3, “Defining aDifferent Attribute Value for a User Account on Different Hosts”
replace a previously generated attribute value with a different value
NOTE
ID views also have several use cases in environments involving Active Directory. Fordetails, see the ID Views and Migrating Existing Environments to Trust chapter in theWindows Integration Guide.
Potential Negative Impact on SSSD PerformanceApplying an ID view can have a negative impact on SSSD performance, because certain optimizationsand ID views cannot run at the same time. For example, ID views prevent SSSD from optimizing theprocess of looking up groups on the server:
With ID views, SSSD must check every member on the returned list of group member names ifthe group name is overridden.
Without ID views, SSSD can only collect the user names from the member attribute of thegroup object.
This negative effect mostly becomes apparent when the SSSD cache is empty or after clearing thecache, which makes all entries invalid.
15.1. ATTRIBUTES AN ID VIEW CAN OVERRIDE
ID views consist of user and group ID overrides. The overrides define the new attribute values.
User and group ID overrides can define new values for the following attributes:
User attributes
Login name (uid)
GECOS entry (gecos)
UID number (uidNumber)
GID number (gidNumber)
Login shell (loginShell)
Home directory (homeDirectory)
SSH public keys (ipaSshPubkey)
Certificate (userCertificate)
CHAPTER 15. ID VIEWS
167
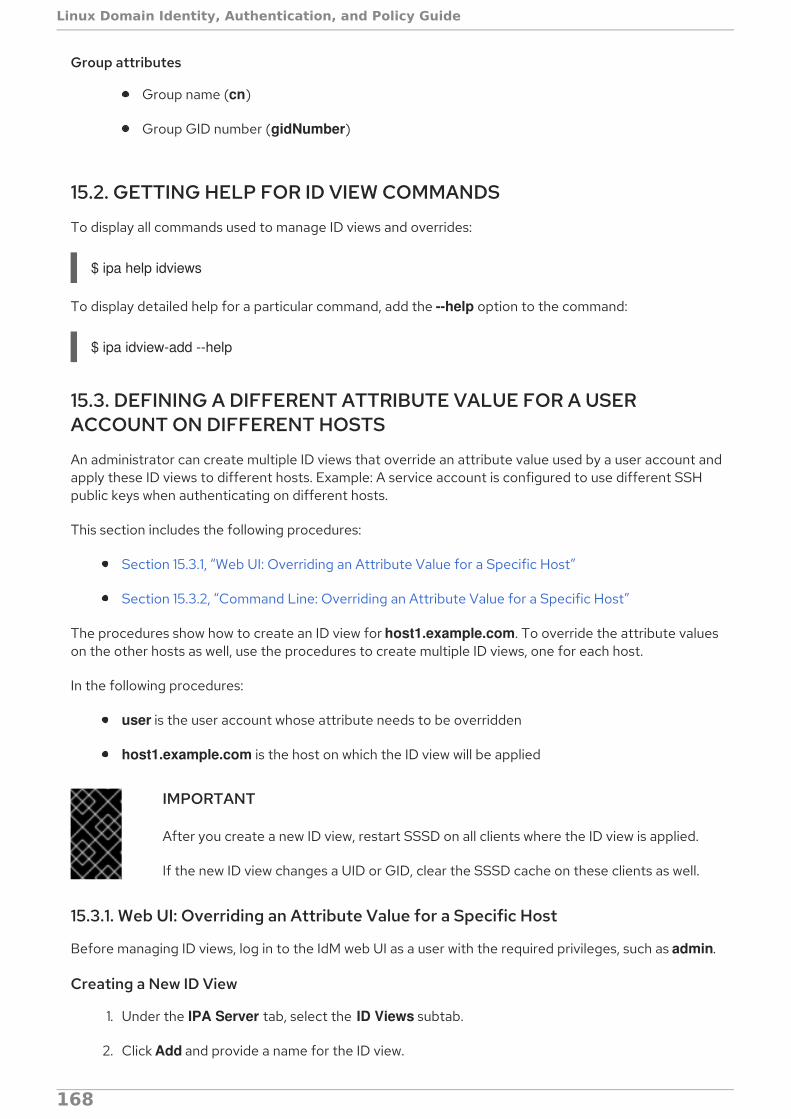
Group attributes
Group name (cn)
Group GID number (gidNumber)
15.2. GETTING HELP FOR ID VIEW COMMANDS
To display all commands used to manage ID views and overrides:
$ ipa help idviews
To display detailed help for a particular command, add the --help option to the command:
$ ipa idview-add --help
15.3. DEFINING A DIFFERENT ATTRIBUTE VALUE FOR A USERACCOUNT ON DIFFERENT HOSTS
An administrator can create multiple ID views that override an attribute value used by a user account andapply these ID views to different hosts. Example: A service account is configured to use different SSHpublic keys when authenticating on different hosts.
This section includes the following procedures:
Section 15.3.1, “Web UI: Overriding an Attribute Value for a Specific Host”
Section 15.3.2, “Command Line: Overriding an Attribute Value for a Specific Host”
The procedures show how to create an ID view for host1.example.com. To override the attribute valueson the other hosts as well, use the procedures to create multiple ID views, one for each host.
In the following procedures:
user is the user account whose attribute needs to be overridden
host1.example.com is the host on which the ID view will be applied
IMPORTANT
After you create a new ID view, restart SSSD on all clients where the ID view is applied.
If the new ID view changes a UID or GID, clear the SSSD cache on these clients as well.
15.3.1. Web UI: Overriding an Attribute Value for a Specific Host
Before managing ID views, log in to the IdM web UI as a user with the required privileges, such as admin.
Creating a New ID View
1. Under the IPA Server tab, select the ID Views subtab.
2. Click Add and provide a name for the ID view.
Linux Domain Identity, Authentication, and Policy Guide
168

Figure 15.1. Adding an ID View
3. Click Add to confirm.
The new ID view is now displayed in the list of ID views.
Figure 15.2. List of ID Views
Adding a User Override to the ID View
1. In the list of ID views, click the name of the ID view.
Figure 15.3. Editing an ID View
2. Under the Users tab, click Add to add the user override.
CHAPTER 15. ID VIEWS
169

3. Select the user account whose attribute value to override, and click Add.
The user override is now displayed on the example_for_host1 ID view page.
Figure 15.4. List of Overrides
Specifying the Attribute to Override
1. Click the override that you want to use to change the attribute value.
Figure 15.5. Editing an Override
2. Define the new value for the attribute.
For example, to override the SSH public key used by the user account:
a. Click SSH public keys: Add.
Linux Domain Identity, Authentication, and Policy Guide
170
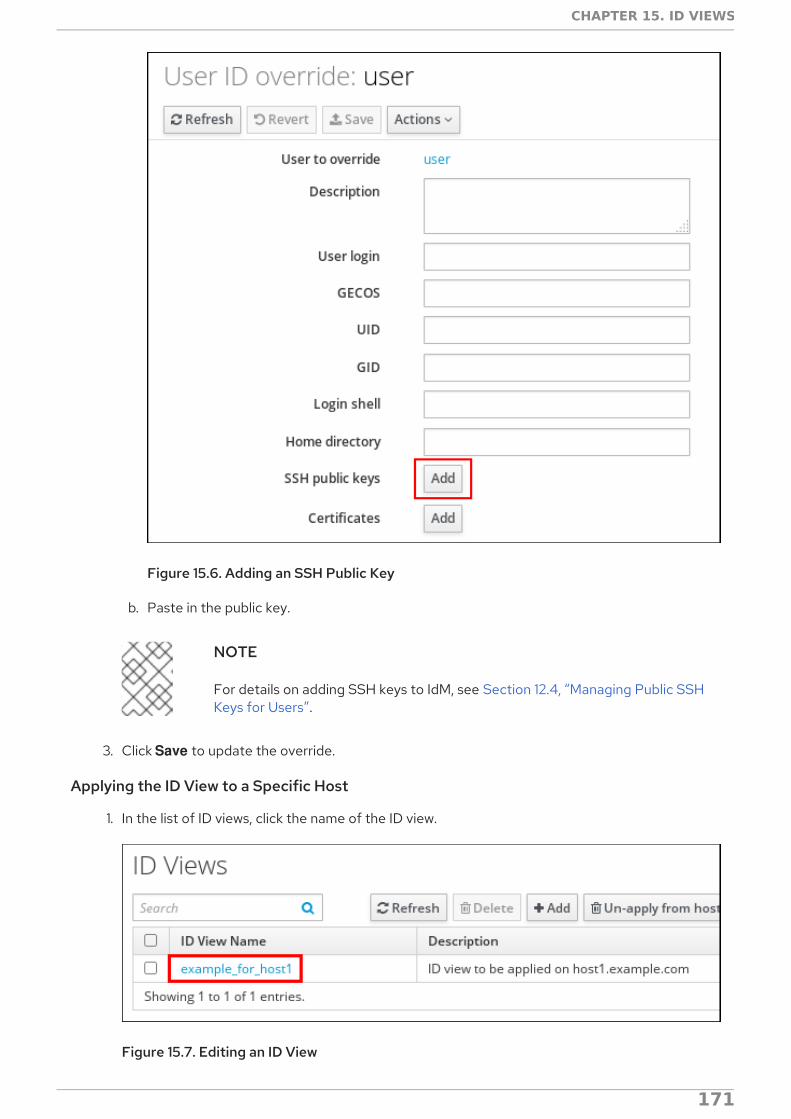
Figure 15.6. Adding an SSH Public Key
b. Paste in the public key.
NOTE
For details on adding SSH keys to IdM, see Section 12.4, “Managing Public SSHKeys for Users”.
3. Click Save to update the override.
Applying the ID View to a Specific Host
1. In the list of ID views, click the name of the ID view.
Figure 15.7. Editing an ID View
CHAPTER 15. ID VIEWS
171

2. Under the Hosts tab, click Apply to hosts.
3. Select the host1.example.com host, and move it to the Prospective column.
4. Click Apply.
The host is now displayed in the list of hosts to which the ID view applies.
Figure 15.8. Listing Hosts to Which an ID View Applies
15.3.2. Command Line: Overriding an Attribute Value for a Specific Host
Before managing ID views, request a ticket for a user with the required privileges. For example:
$ kinit admin
1. Create a new ID view. For example, the create an ID view named example_for_host1:
$ ipa idview-add example_for_host1---------------------------Added ID View "example_for_host1"--------------------------- ID View Name: example_for_host1
2. Add a user override to the example_for_host1 ID view. The ipa idoverrideuser-add commandrequires the name of the ID view and the user to override.
To specify the new attribute value, add the corresponding command-line option as well. Fora list of the available options, run ipa idoverrideuser-add --help. For example, use the --sshpubkey option to override the SSH public key value:
$ ipa idoverrideuser-add example_for_host1 user --sshpubkey="ssh-rsa AAAAB3NzaC1yrRqFE...gWRL71/miPIZ [email protected]"-----------------------------Added User ID override "user"----------------------------- Anchor to override: user SSH public key: ssh-rsa AAAB3NzaC1yrRqFE...gWRL71/miPIZ [email protected]
Linux Domain Identity, Authentication, and Policy Guide
172

NOTE
For details on adding SSH keys to IdM, see Section 12.4, “Managing PublicSSH Keys for Users”.
The ipa idoverrideuser-add --certificate command replaces all existing certificates for theaccount in the specified ID view. To append an additional certificate, use the ipa idoverrideuser-add-cert command instead:
$ ipa idoverrideuser-add-cert example_for_host1 user --certificate="MIIEATCC..."
Using the ipa idoverrideuser-mod command, you can also specify new attribute values foran existing user override.
3. Apply example_for_host1 to the host1.example.com host:
$ ipa idview-apply example_for_host1 --hosts=host1.example.com-----------------------------Applied ID View "example_for_host1"-----------------------------hosts: host1.example.com---------------------------------------------Number of hosts the ID View was applied to: 1---------------------------------------------
NOTE
The ipa idview-apply command also accepts the --hostgroups option. Theoption applies the ID view to hosts that belong to the specified host group, butdoes not associate the ID view with the host group itself. Instead, the --hostgroups option expands the members of the specified host group andapplies the --hosts option individually to every one of them.
CHAPTER 15. ID VIEWS
173
CHAPTER 16. MANAGING HOSTSBoth DNS and Kerberos are configured as part of the initial client configuration. This is required becausethese are the two services that bring the machine within the IdM domain and allow it to identify the IdMserver it will connect with. After the initial configuration, IdM has tools to manage both of these servicesin response to changes in the domain services, changes to the IT environment, or changes on themachines themselves which affect Kerberos, certificate, and DNS services, like changing the client hostname.
This chapter describes how to manage identity services that relate directly to the client machine:
DNS entries and settings
Machine authentication
Host name changes (which affect domain services)
16.1. ABOUT HOSTS, SERVICES, AND MACHINE IDENTITY ANDAUTHENTICATION
The basic function of an enrollment process is to create a host entry for the client machine in the IdMdirectory. This host entry is used to establish relationships between other hosts and even services withinthe domain. These relationships are part of delegating authorization and control to hosts within thedomain.
A host entry contains all of the information about the client within IdM:
Service entries associated with the host
The host and service principal
Access control rules
Machine information, such as its physical location and operating system
Some services that run on a host can also belong to the IdM domain. Any service that can store aKerberos principal or an SSL certificate (or both) can be configured as an IdM service. Adding a serviceto the IdM domain allows the service to request an SSL certificate or keytab from the domain. (Only thepublic key for the certificate is stored in the service record. The private key is local to the service.)
An IdM domain establishes a commonality between machines, with common identity information,common policies, and shared services. Any machine which belongs to a domain functions as a client ofthe domain, which means it uses the services that the domain provides. An IdM domain (as described inChapter 1, Introduction to Red Hat Identity Management) provides three main services specifically formachines:
DNS
Kerberos
Certificate management
Machines are treated as another identity that is managed by IdM. Clients use DNS to identify IdMservers, services, and domain members — which, like user identities are stored in the389 Directory Server instance for the IdM server. Like users, machines can be authenticated to thedomain using Kerberos or certificates to verify the machine's identity.
Linux Domain Identity, Authentication, and Policy Guide
174

From the machine perspective, there are several tasks that can be performed that access these domainservices:
Joining the DNS domain (machine enrollment)
Managing DNS entries and zones
Managing machine authentication
Authentication in IdM includes machines as well as users. Machine authentication is required for the IdMserver to trust the machine and to accept IdM connections from the client software installed on thatmachine. After authenticating the client, the IdM server can respond to its requests. IdM supports threedifferent approaches to machine authentication:
SSH keys. The SSH public key for the host is created and uploaded to the host entry. Fromthere, the System Security Services Daemon (SSSD) uses IdM as an identity provider and canwork in conjunction with OpenSSH and other services to reference the public keys locatedcentrally in Identity Management. This is described in Section 16.5, “Managing Public SSH Keysfor Hosts”.
Key tables (or keytabs, a symmetric key resembling to some extent a user password) andmachine certificates. Kerberos tickets are generated as part of the Kerberos services andpolicies defined by the server. Initially granting a Kerberos ticket, renewing the Kerberoscredentials, and even destroying the Kerberos session are all handled by the IdM services.Managing Kerberos is covered in Chapter 27, Managing the Kerberos Domain.
Machine certificates. In this case, the machine uses an SSL certificate that is issued by the IdMserver's certificate authority and then stored in IdM's Directory Server. The certificate is thensent to the machine to present when it authenticates to the server. On the client, certificates aremanaged by a service called certmonger.
16.2. ABOUT HOST ENTRY CONFIGURATION PROPERTIES
A host entry can contain information about the host that is outside its system configuration, such as itsphysical location, its MAC address, and keys and certificates.
This information can be set when the host entry is created if it is created manually; otherwise, most ofthat information needs to be added to the host entry after the host is enrolled in the domain.
Table 16.1. Host Configuration Properties
UI Field Command-Line Option Description
Description --desc=description A description of the host.
Locality --locality=locality The geographic location of thehost.
Location --location=location The physical location of the host,such as its data center rack.
Platform --platform=string The host hardware orarchitecture.
CHAPTER 16. MANAGING HOSTS
175
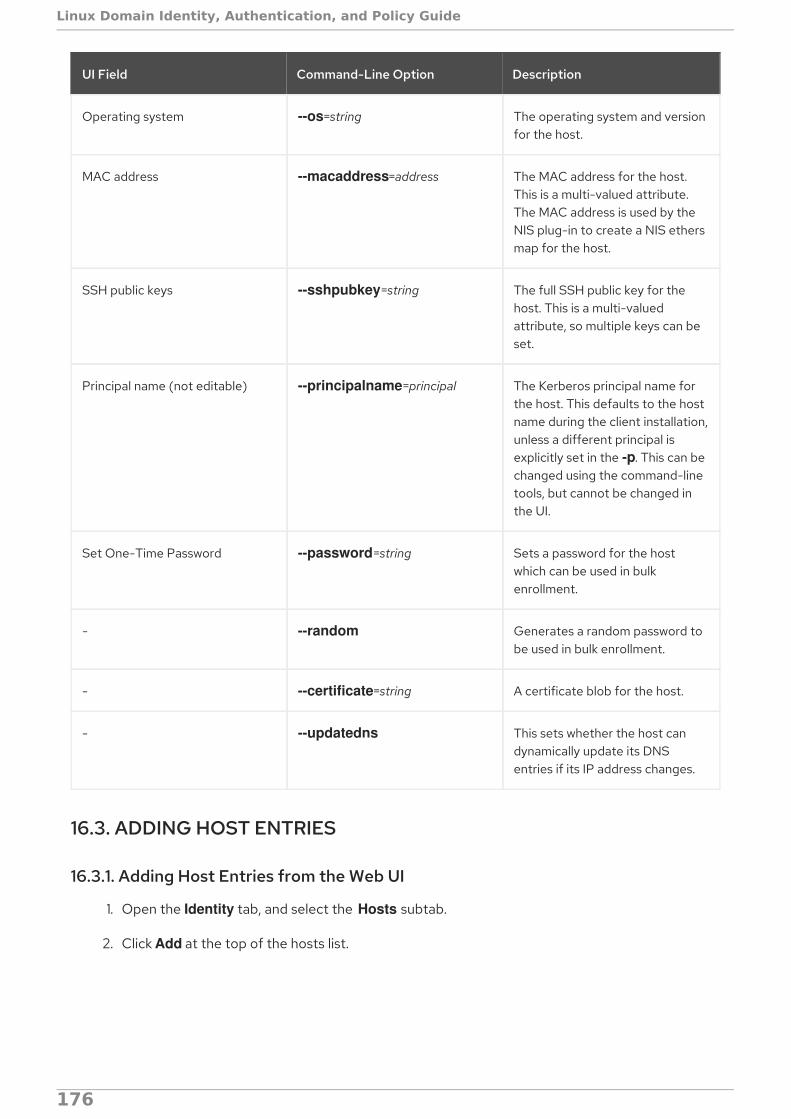
Operating system --os=string The operating system and versionfor the host.
MAC address --macaddress=address The MAC address for the host.This is a multi-valued attribute.The MAC address is used by theNIS plug-in to create a NIS ethersmap for the host.
SSH public keys --sshpubkey=string The full SSH public key for thehost. This is a multi-valuedattribute, so multiple keys can beset.
Principal name (not editable) --principalname=principal The Kerberos principal name forthe host. This defaults to the hostname during the client installation,unless a different principal isexplicitly set in the -p. This can bechanged using the command-linetools, but cannot be changed inthe UI.
Set One-Time Password --password=string Sets a password for the hostwhich can be used in bulkenrollment.
- --random Generates a random password tobe used in bulk enrollment.
- --certificate=string A certificate blob for the host.
- --updatedns This sets whether the host candynamically update its DNSentries if its IP address changes.
UI Field Command-Line Option Description
16.3. ADDING HOST ENTRIES
16.3.1. Adding Host Entries from the Web UI
1. Open the Identity tab, and select the Hosts subtab.
2. Click Add at the top of the hosts list.
Linux Domain Identity, Authentication, and Policy Guide
176
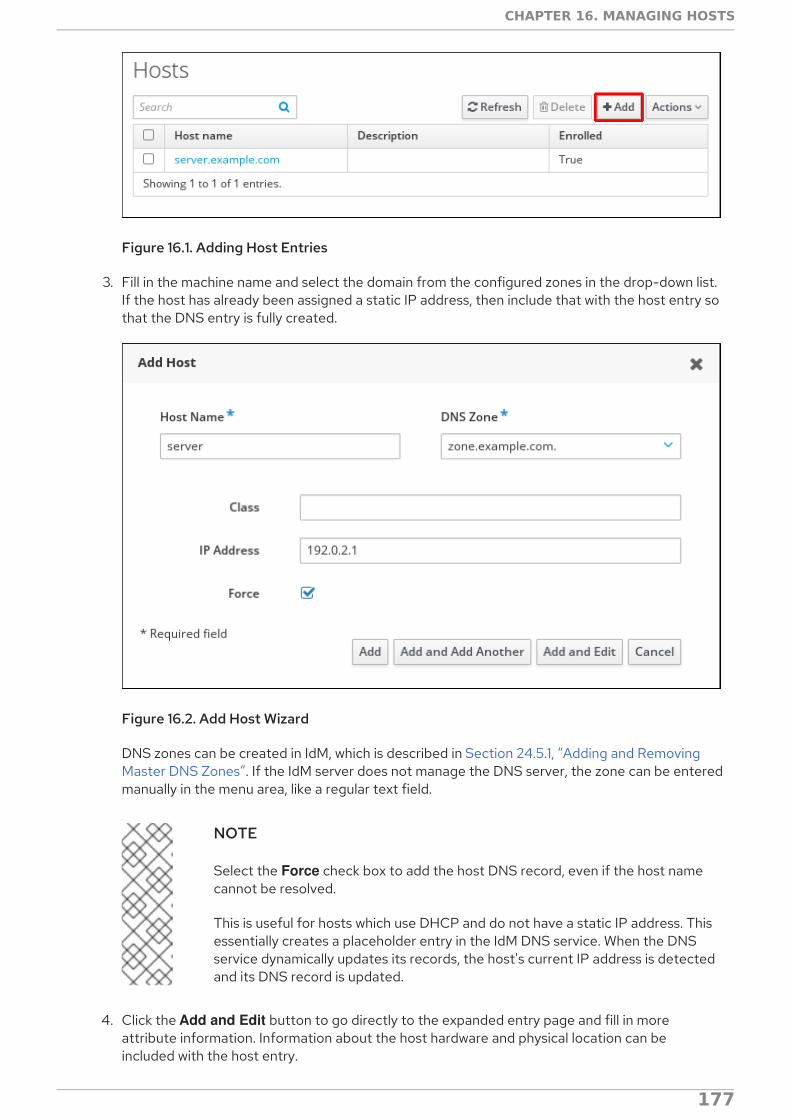
Figure 16.1. Adding Host Entries
3. Fill in the machine name and select the domain from the configured zones in the drop-down list.If the host has already been assigned a static IP address, then include that with the host entry sothat the DNS entry is fully created.
Figure 16.2. Add Host Wizard
DNS zones can be created in IdM, which is described in Section 24.5.1, “Adding and RemovingMaster DNS Zones”. If the IdM server does not manage the DNS server, the zone can be enteredmanually in the menu area, like a regular text field.
NOTE
Select the Force check box to add the host DNS record, even if the host namecannot be resolved.
This is useful for hosts which use DHCP and do not have a static IP address. Thisessentially creates a placeholder entry in the IdM DNS service. When the DNSservice dynamically updates its records, the host's current IP address is detectedand its DNS record is updated.
4. Click the Add and Edit button to go directly to the expanded entry page and fill in moreattribute information. Information about the host hardware and physical location can beincluded with the host entry.
CHAPTER 16. MANAGING HOSTS
177

Figure 16.3. Expanded Entry Page
16.3.2. Adding Host Entries from the Command Line
Host entries are created using the host-add command. This commands adds the host entry to the IdMDirectory Server. The full list of options with host-add are listed in the ipa host manpage. At its mostbasic, an add operation only requires the client host name to add the client to the Kerberos realm and tocreate an entry in the IdM LDAP server:
$ ipa host-add client1.example.com
If the IdM server is configured to manage DNS, then the host can also be added to the DNS resourcerecords using the --ip-address and --force options.
Example 16.1. Creating Host Entries with Static IP Addresses
$ ipa host-add --force --ip-address=192.168.166.31 client1.example.com
Commonly, hosts may not have a static IP address or the IP address may not be known at the time theclient is configured. For example, laptops may be pre-configured as Identity Management clients, butthey do not have IP addresses at the time they are configured. Hosts which use DHCP can still beconfigured with a DNS entry by using --force. This essentially creates a placeholder entry in the IdM DNSservice. When the DNS service dynamically updates its records, the host's current IP address is detectedand its DNS record is updated.
Example 16.2. Creating Host Entries with DHCP
$ ipa host-add --force client1.example.com
Linux Domain Identity, Authentication, and Policy Guide
178
Host records are deleted using the host-del command. If the IdM domain uses DNS, then the --updatedns option also removes the associated records of any kind for the host from the DNS.
$ ipa host-del --updatedns client1.example.com
16.4. DISABLING AND RE-ENABLING HOST ENTRIES
Active hosts can be accessed by other services, hosts, and users within the domain. There can besituations when it is necessary to remove a host from activity. However, deleting a host removes theentry and all the associated configuration, and it removes it permanently.
16.4.1. Disabling Host Entries
Disabling a host prevents domain users from access it without permanently removing it from thedomain. This can be done by using the host-disable command.
For example:
[jsmith@ipaserver ~]$ kinit admin[jsmith@ipaserver ~]$ ipa host-disable server.example.com
IMPORTANT
Disabling a host entry not only disables that host. It disables every configured service onthat host as well.
16.4.2. Re-enabling Hosts
Disabling a host essentially kills its current, active keytabs. Removing the keytabs effectively removesthe host from the IdM domain without otherwise touching its configuration entry.
To re-enable a host, simply use the ipa-getkeytab command. The -s option sets which IdM server torequest the keytab, -p gives the principal name, and -k gives the file to which to save the keytab.
For example, requesting a new host keytab:
[jsmith@ipaserver ~]$ ipa-getkeytab -s ipaserver.example.com -p host/server.example.com -k /etc/krb5.keytab -D fqdn=server.example.com,cn=computers,cn=accounts,dc=example,dc=com -w password
If the ipa-getkeytab command is run on an active IdM client or server, then it can be run without anyLDAP credentials (-D and -w). The IdM user uses Kerberos credentials to authenticate to the domain.To run the command directly on the disabled host, then supply LDAP credentials to authenticate to theIdM server. The credentials should correspond to the host or service which is being re-enabled.
16.5. MANAGING PUBLIC SSH KEYS FOR HOSTS
OpenSSH uses public keys to authenticate hosts. One machine attempts to access another machineand presents its key pair. The first time the host authenticates, the administrator on the target machinehas to approve the request manually. The machine then stores the host's public key in a known_hostsfile. Any time that the remote machine attempts to access the target machine again, the target machinesimply checks its known_hosts file and then grants access automatically to approved hosts.
CHAPTER 16. MANAGING HOSTS
179

There are a few problems with this system:
The known_hosts file stores host entries in a triplet of the host IP address, host name, and key.This file can rapidly become out of date if the IP address changes (which is common in virtualenvironments and data centers) or if the key is updated.
SSH keys have to be distributed manually and separately to all machines in an environment.
Administrators have to approve host keys to add them to the configuration, but it is difficult toverify either the host or key issuer properly, which can create security problems.
On Red Hat Enterprise Linux, the System Security Services Daemon (SSSD) can be configured to cacheand retrieve host SSH keys so that applications and services only have to look in one location for hostkeys. Because SSSD can use Identity Management as one of its identity information providers,Identity Management provides a universal and centralized repository of keys. Administrators do notneed to worry about distributing, updating, or verifying host SSH keys.
16.5.1. About the SSH Key Format
When keys are uploaded to the IdM entry, the key format can be either an OpenSSH-style key or a rawRFC 4253-style blob . Any RFC 4253-style key is automatically converted into an OpenSSH-style keybefore it is imported and saved into the IdM LDAP server.
The IdM server can identify the type of key, such as an RSA or DSA key, from the uploaded key blob.However, in a key file such as ~/.ssh/known_hosts, a key entry is identified by the host name and IPaddress of the server, its type, then lastly the key itself. For example:
host.example.com,1.2.3.4 ssh-rsa AAA...ZZZ==
This is slightly different than a user public key entry, which has the elements in the order type key==comment:
"ssh-rsa ABCD1234...== ipaclient.example.com"
All three parts from the key file can be uploaded to and viewed for the host entry. In that case, the hostpublic key entry from the ~/.ssh/known_hosts file needs to be reordered to match the format of a userkey, type key== comment :
ssh-rsa AAA...ZZZ== host.example.com,1.2.3.4
The key type can be determined automatically from the content of the public key, and the comment isoptional, to make identifying individual keys easier. The only required element is the public key blobitself.
16.5.2. About ipa-client-install and OpenSSH
The ipa-client-install script, by default, configures an OpenSSH server and client on the IdM clientmachine. It also configures SSSD to perform host and user key caching. Essentially, simply configuringthe client does all of the configuration necessary for the host to use SSSD, OpenSSH, andIdentity Management for key caching and retrieval.
If the SSH service is enabled with the client installation (which is the default), then an RSA key is createdwhen the ssh service is first started.
NOTE
Linux Domain Identity, Authentication, and Policy Guide
180

NOTE
When the machine is added as an IdM client using ipa-client-install, the client is createdwith two SSH keys, RSA and DSS.
There is an additional client configuration option, --ssh-trust-dns, which can be run with ipa-client-install and automatically configures OpenSSH to trust the IdM DNS records, where the key fingerprintsare stored.
Alternatively, it is possible to disable OpenSSH at the time the client is installed, using the --no-sshdoption. This prevents the install script from configuring the OpenSSH server.
Another option, --no-dns-sshfp, prevents the host from creating DNS SSHFP records with its own DNSentries. This can be used with or without the --no-sshd option.
16.5.3. Uploading Host SSH Keys Through the Web UI
1. The key for a host can probably be retrieved from a ~/.ssh/known_hosts. For example:
server.example.com,1.2.3.4 ssh-rsa AAAAB3NzaC1yc2EAAAABIwAAAQEApvjBvSFSkTU0WQW4eOweeo0DZZ08F9Ud21xlLy6FOhzwpXFGIyxvXZ52+siHBHbbqGL5+14N7UvElruyslIHx9LYUR/pPKSMXCGyboLy5aTNl5OQ5EHwrhVnFDIKXkvp45945R7SKYCUtRumm0Iw6wq0XD4o+ILeVbV3wmcB1bXs36ZvC/M6riefn9PcJmh6vNCvIsbMY6S+FhkWUTTiOXJjUDYRLlwM273FfWhzHK+SSQXeBp/zIn1gFvJhSZMRi9HZpDoqxLbBB9QIdIw6U4MIjNmKsSI/ASpkFm2GuQ7ZK9KuMItY2AoCuIRmRAdF8iYNHBTXNfFurGogXwRDjQ==
If necessary, generate a host key. When using the OpenSSH tools, make sure to use a blankpassphrase and to save the key to a different location than the user's ~/.ssh/ directory, so it willnot overwrite any existing keys.
[jsmith@server ~]$ ssh-keygen -t rsa -C "server.example.com,1.2.3.4"Generating public/private rsa key pair.Enter file in which to save the key (/home/jsmith/.ssh/id_rsa): /home/jsmith/.ssh/host_keysEnter passphrase (empty for no passphrase):Enter same passphrase again:Your identification has been saved in /home/jsmith/.ssh/host_keys.Your public key has been saved in /home/jsmith/.ssh/host_keys.pub.The key fingerprint is:4f:61:ee:2c:f7:d7:da:41:17:93:de:1d:19:ac:2e:c8 server.example.comThe key's randomart image is:+--[ RSA 2048]----+| .. || .+|| o .* || o . .. *|| S + . o+|| E . .. .|| . = . o || o . ..o|| .....|+-----------------+
2. Copy the public key from the key file. The full key entry has the form host name,IP type key== .
CHAPTER 16. MANAGING HOSTS
181
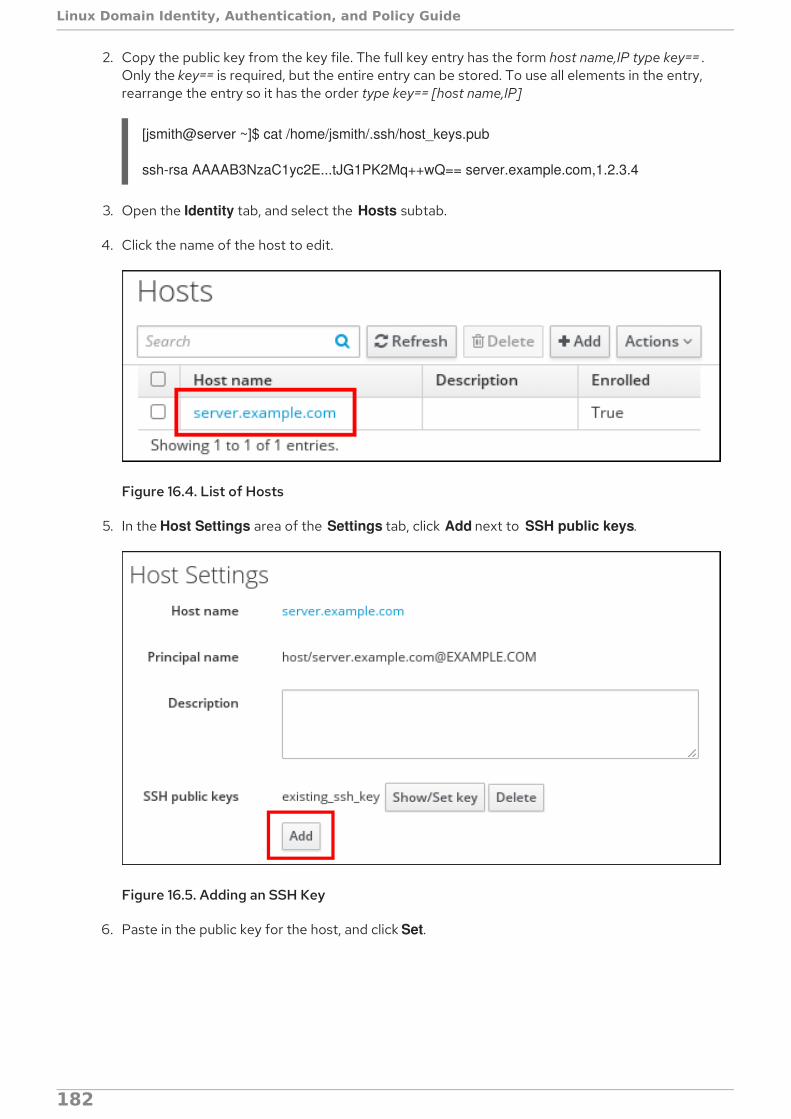
2. Copy the public key from the key file. The full key entry has the form host name,IP type key== .Only the key== is required, but the entire entry can be stored. To use all elements in the entry,rearrange the entry so it has the order type key== [host name,IP]
[jsmith@server ~]$ cat /home/jsmith/.ssh/host_keys.pub
ssh-rsa AAAAB3NzaC1yc2E...tJG1PK2Mq++wQ== server.example.com,1.2.3.4
3. Open the Identity tab, and select the Hosts subtab.
4. Click the name of the host to edit.
Figure 16.4. List of Hosts
5. In the Host Settings area of the Settings tab, click Add next to SSH public keys.
Figure 16.5. Adding an SSH Key
6. Paste in the public key for the host, and click Set.
Linux Domain Identity, Authentication, and Policy Guide
182

Figure 16.6. Setting an SSH Key
The SSH public keys area now shows the new key. Clicking Show/Set key opens the submittedkey.
7. To upload multiple keys, click the Add link below the list of public keys, and upload the otherkeys.
8. When all the keys have been submitted, click Save at the top of the host's page to save thechanges.
When the public key is saved, the entry is displayed as the key fingerprint, the comment (if one wasincluded), and the key type[2].
After uploading the host keys, configure SSSD to use Identity Management as one of its identitydomains and set up OpenSSH to use the SSSD tooling for managing host keys. This is covered in the"Configuring Services: OpenSSH and Cached Keys" in the System-Level Authentication Guide.
16.5.4. Adding Host Keys from the Command Line
Host SSH keys are added to host entries in IdM, either when the host is created using host-add or bymodifying the entry later.
NOTE
RSA and DSS host keys are created by the ipa-client-install command, unless the SSHservice is explicitly disabled in the installation script.
1. Run the host-mod command with the --sshpubkey option to upload the base64-encodedpublic key to the host entry.
CHAPTER 16. MANAGING HOSTS
183
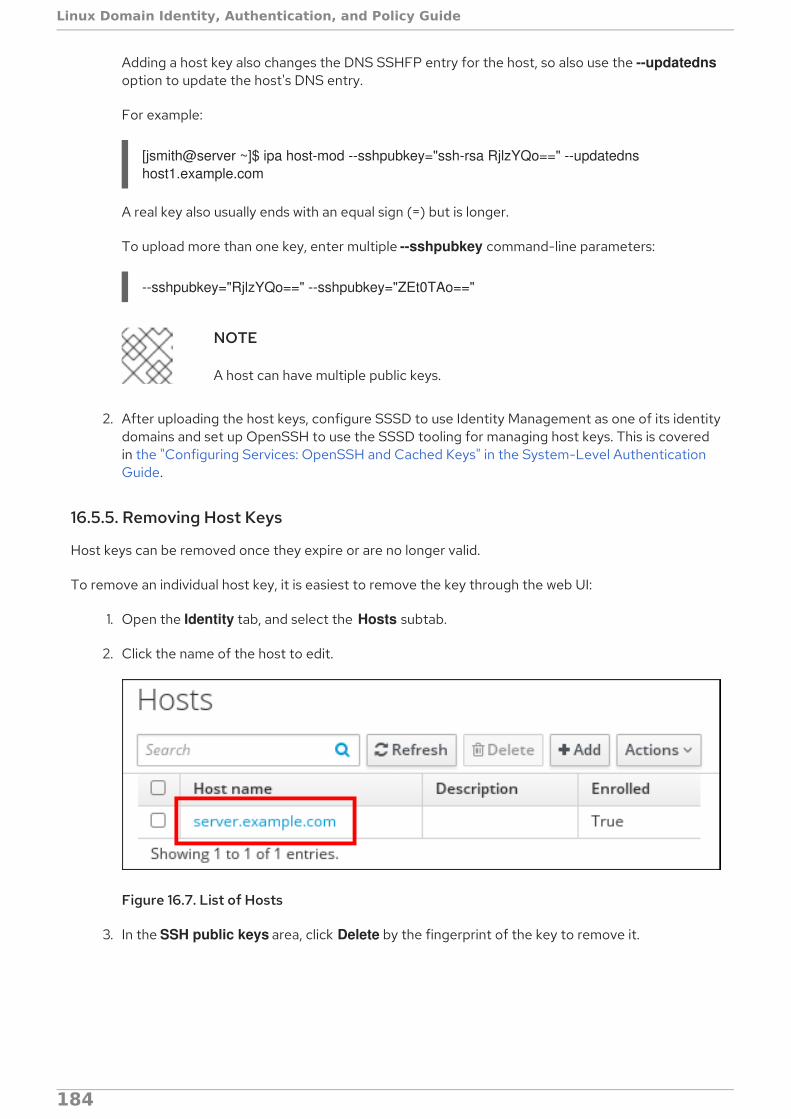
Adding a host key also changes the DNS SSHFP entry for the host, so also use the --updatednsoption to update the host's DNS entry.
For example:
[jsmith@server ~]$ ipa host-mod --sshpubkey="ssh-rsa RjlzYQo==" --updatedns host1.example.com
A real key also usually ends with an equal sign (=) but is longer.
To upload more than one key, enter multiple --sshpubkey command-line parameters:
--sshpubkey="RjlzYQo==" --sshpubkey="ZEt0TAo=="
NOTE
A host can have multiple public keys.
2. After uploading the host keys, configure SSSD to use Identity Management as one of its identitydomains and set up OpenSSH to use the SSSD tooling for managing host keys. This is coveredin the "Configuring Services: OpenSSH and Cached Keys" in the System-Level AuthenticationGuide.
16.5.5. Removing Host Keys
Host keys can be removed once they expire or are no longer valid.
To remove an individual host key, it is easiest to remove the key through the web UI:
1. Open the Identity tab, and select the Hosts subtab.
2. Click the name of the host to edit.
Figure 16.7. List of Hosts
3. In the SSH public keys area, click Delete by the fingerprint of the key to remove it.
Linux Domain Identity, Authentication, and Policy Guide
184

Figure 16.8. Public Key Deletion
4. Click Save at the top of the host's page to save the changes.
The command-line tools can be used to remove all keys. This is done by running ipa host-mod with the --sshpubkey= set to a blank value; this removes all public keys for the host. Also, use the --updatednsoption to update the host's DNS entry. For example:
[jsmith@server ~]$ kinit admin[jsmith@server ~]$ ipa host-mod --sshpubkey= --updatedns host1.example.com
16.6. SETTING ETHERS INFORMATION FOR A HOST
NIS can host an ethers table which can be used to manage DHCP configuration files for systems basedon their platform, operating system, DNS domain, and MAC address — all information stored in hostentries in IdM.
In Identity Management, each system is created with a corresponding ethers entry in the directory, inthe ou=ethers subtree.
cn=server,ou=ethers,dc=example,dc=com
This entry is used to create a NIS map for the ethers service which can be managed by the NIScompatibility plug-in in IdM.
To configure NIS maps for ethers entries:
1. Add the MAC address attribute to a host entry. For example:
[jsmith@server ~]$ kinit admin[jsmith@server ~]$ ipa host-mod --macaddress=12:34:56:78:9A:BC server.example.com
CHAPTER 16. MANAGING HOSTS
185
2. Open the nsswitch.conf file.
3. Add a line for the ethers service, and set it to use LDAP for its lookup.
ethers: ldap
4. Check that the ethers information is available for the client.
[root@server ~]# getent ethers server.example.com
16.7. MANAGING HOST GROUPS
Host groups are a way of centralizing control over important management tasks, particularly accesscontrol.
All groups in Identity Management are essentially static groups, meaning that the members of the groupare manually and explicitly added to the group. IdM allows nested groups, where a group is a member ofanother group. In that case, all of the group members of the member group automatically belong to theparent group, as well.
Because groups are easy to create, it is possible to be very flexible in what groups to create and howthey are organized. Groups can be defined around organizational divisions like departments, physicallocations, or IdM or infrastructure usage guidelines for access controls.
16.7.1. Creating Host Groups
16.7.1.1. Creating Host Groups from the Web UI
1. Open the Identity tab, and select the Host Groups subtab.
2. Click Add at the top of the groups list.
3. Enter the name and a description for the group.
4. Click the Add and Edit button to go immediately to the member selection page.
5. Select the members, as described in Section 16.7.2.2, “Adding Host Group Members from theWeb UI”.
16.7.1.2. Creating Host Groups from the Command Line
New groups are created using the hostgroup-add command. (This adds only the group; members areadded separately.)
Two attributes are always required: the group name and the group description. If those attributes arenot given as arguments, then the script prompts for them.
$ ipa hostgroup-add groupName --desc="description"
16.7.2. Adding Host Group Members
16.7.2.1. Showing and Changing Group Members
Members can be added to a group through the group configuration. There are tabs for all the member
Linux Domain Identity, Authentication, and Policy Guide
186
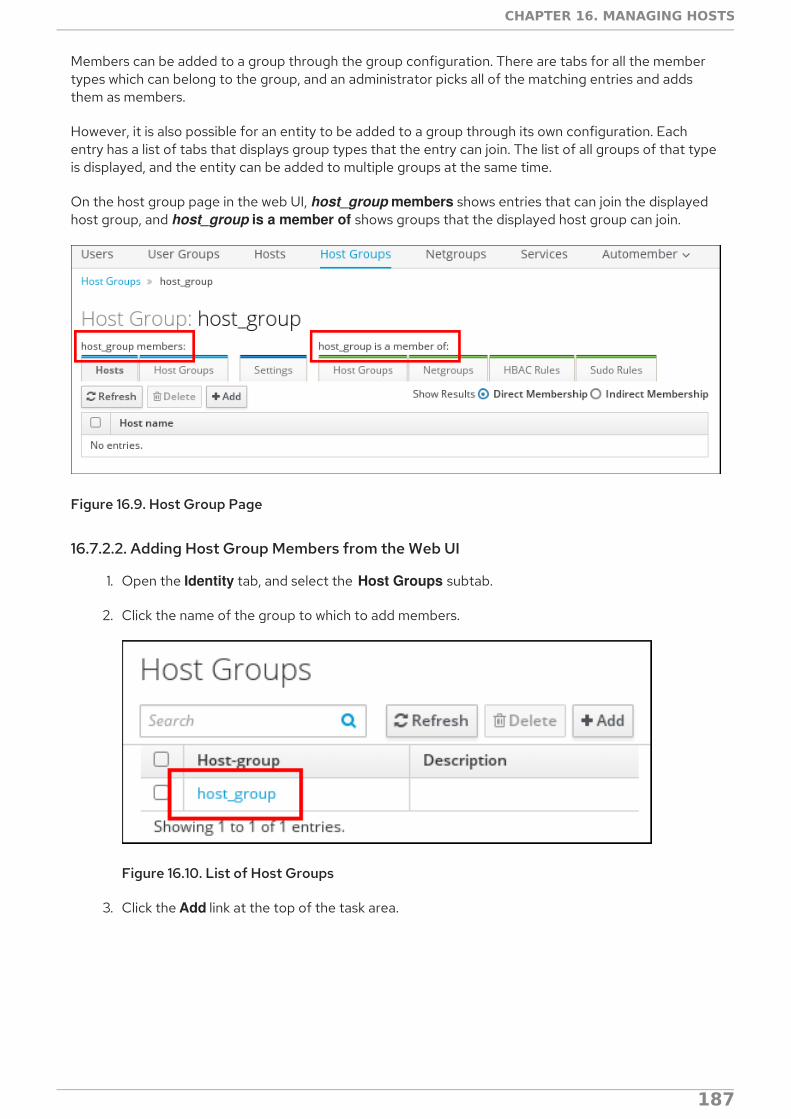
Members can be added to a group through the group configuration. There are tabs for all the membertypes which can belong to the group, and an administrator picks all of the matching entries and addsthem as members.
However, it is also possible for an entity to be added to a group through its own configuration. Eachentry has a list of tabs that displays group types that the entry can join. The list of all groups of that typeis displayed, and the entity can be added to multiple groups at the same time.
On the host group page in the web UI, host_group members shows entries that can join the displayedhost group, and host_group is a member of shows groups that the displayed host group can join.
Figure 16.9. Host Group Page
16.7.2.2. Adding Host Group Members from the Web UI
1. Open the Identity tab, and select the Host Groups subtab.
2. Click the name of the group to which to add members.
Figure 16.10. List of Host Groups
3. Click the Add link at the top of the task area.
CHAPTER 16. MANAGING HOSTS
187

Figure 16.11. Adding a Member to a Host Group
4. Move the names of the hosts to add to the Prospective column, and then click Add to confirm.
16.7.2.3. Adding Host Group Members from the Command Line
Members are added to a host group using the hostgroup-add-member command. This command canadd both hosts as group members and other groups as group members.
The syntax of the hostgroup-add-member command requires only the group name and the hosts toadd. Lists of entries can be set by using the option multiple times with the same command or by listingthe options in a comma-separated list inside curly braces, such as --option={val1,val2,val3}.
$ ipa hostgroup-add-member groupName [--hosts=host1 ...] [--hostgroups=hostGroup1 ...]
For example, this adds three hosts to the caligroup group:
$ ipa hostgroup-add-member caligroup --hosts=ipaserver.example.com --hosts=client1.example.com --hosts=client2.example.com Group name: caligroup Description: for machines in california GID: 387115842 Member hosts: ipaserver.example.com,client1.example.com,client2.example.com-------------------------Number of members added 3-------------------------
Likewise, other groups can be added as members, which creates nested groups:
$ ipa hostgroup-add-member caligroup --groups=mountainview --groups=sandiego Group name: caligroup Description: for machines in california GID: 387115842 Member groups: mountainview,sandiego ------------------------- Number of members added 2 -------------------------
[2] The key type is determined automatically from the key itself, if it is not included in the uploaded key.
Linux Domain Identity, Authentication, and Policy Guide
188

CHAPTER 17. MANAGING SERVICESSome services that run on a host can also belong to the IdM domain. Any service that can store aKerberos principal or an SSL certificate (or both) can be configured as an IdM service. Adding a serviceto the IdM domain allows the service to request an SSL certificate or keytab from the domain. (Only thepublic key for the certificate is stored in the service record. The private key is local to the service.)
An IdM domain establishes a commonality between machines, with common identity information,common policies, and shared services. Any machine which belongs to a domain functions as a client ofthe domain, which means it uses the services that the domain provides. An IdM domain (as described inChapter 1, Introduction to Red Hat Identity Management) provides three main services specifically formachines:
DNS
Kerberos
Certificate management
17.1. ADDING AND EDITING SERVICE ENTRIES AND KEYTABS
As with host entries, service entries for the host (and any other services on that host which will belong tothe domain) must be added manually to the IdM domain. This is a two step process. First, the serviceentry must be created, and then a keytab must be created for that service which it will use to access thedomain.
By default, Identity Management saves its HTTP keytab to /etc/httpd/conf/ipa.keytab.
NOTE
This keytab is used for the web UI. If a key were stored in ipa.keytab and that keytab fileis deleted, the IdM web UI will stop working, because the original key would also bedeleted.
Similar locations can be specified for each service that needs to be made Kerberos aware. There is nospecific location that must be used, but, when using ipa-getkeytab, you should avoid using /etc/krb5.keytab. This file should not contain service-specific keytabs; each service should have itskeytab saved in a specific location and the access privileges (and possibly SELinux rules) should beconfigured so that only this service has access to the keytab.
17.1.1. Adding Services and Keytabs from the Web UI
1. Open the Identity tab, and select the Services subtab.
2. Click the Add button at the top of the services list.
3. Select the service type from the drop-down menu, and give it a name.
4. Select the host name of the IdM host on which the service is running. The host name is used toconstruct the full service principal name.
5. Click the Add button to save the new service principal.
6. Use the ipa-getkeytab command to generate and assign the new keytab for the serviceprincipal.
CHAPTER 17. MANAGING SERVICES
189
[root@ipaserver ~]# # ipa-getkeytab -s ipaserver.example.com -p HTTP/server.example.com -k /etc/httpd/conf/krb5.keytab -e aes256-cts
The realm name is optional. The IdM server automatically appends the Kerberos realm forwhich it is configured. You cannot specify a different realm.
The host name must resolve to a DNS A record for it to work with Kerberos. You can use the--force flag to force the creation of a principal should this prove necessary.
The -e argument can include a list of encryption types to include in the keytab. Thissupersedes any default encryption type. Lists of entries can be set by using the optionmultiple times with the same command invocation or by listing the options in a comma-separated list inside curly braces, such as --option={val1,val2,val3}.
WARNING
Creating a new key resets the secret for the specified principal. This meansthat all other keytabs for that principal are rendered invalid.
17.1.2. Adding Services and Keytabs from the Command Line
1. Create the service principal. The service is recognized through a name like service/FQDN:
# ipa service-add serviceName/hostname
For example:
$ ipa service-add HTTP/server.example.com-------------------------------------------------------Added service "HTTP/[email protected]"------------------------------------------------------- Principal: HTTP/[email protected] Managed by: ipaserver.example.com
2. Create the service keytab file using the ipa-getkeytab command. This command is run on theclient in the IdM domain. (Actually, it can be run on any IdM server or client, and then the keyscopied to the appropriate machine. However, it is simplest to run the command on the machinewith the service being created.)
The command requires the Kerberos service principal (-p), the IdM server name ( -s), the file towrite (-k), and the encryption method ( -e). Be sure to copy the keytab to the appropriatedirectory for the service.
For example:
# ipa-getkeytab -s server.example.com -p HTTP/server.example.com -k /etc/httpd/conf/krb5.keytab -e aes256-cts
The realm name is optional. The IdM server automatically appends the Kerberos realm for
Linux Domain Identity, Authentication, and Policy Guide
190
The realm name is optional. The IdM server automatically appends the Kerberos realm forwhich it is configured. You cannot specify a different realm.
The host name must resolve to a DNS A record for it to work with Kerberos. You can use the--force flag to force the creation of a principal should this prove necessary.
The -e argument can include a comma-separated list of encryption types to include in thekeytab. This supersedes any default encryption type. Lists of entries can be set by using theoption multiple times with the same command invocation or by listing the options in acomma-separated list inside curly braces, such as --option={val1,val2,val3}.
WARNING
The ipa-getkeytab command resets the secret for the specified principal.This means that all other keytabs for that principal are rendered invalid.
17.2. CONFIGURING CLUSTERED SERVICES
The IdM server is not cluster aware . However, it is possible to configure a clustered service to be part ofIdM by synchronizing Kerberos keys across all of the participating hosts and configuring services runningon the hosts to respond to whatever names the clients use.
1. Enroll all of the hosts in the cluster into the IdM domain.
2. Create any service principals and generate the required keytabs.
3. Collect any keytabs that have been set up for services on the host, including the host keytab at /etc/krb5.keytab.
4. Use the ktutil command to produce a single keytab file that contains the contents of all of thekeytab files.
1. For each file, use the rkt command to read the keys from that file.
2. Use the wkt command to write all of the keys which have been read to a new keytab file.
5. Replace the keytab files on each host with the newly-created combined keytab file.
6. At this point, each host in this cluster can now impersonate any other host.
7. Some services require additional configuration to accommodate cluster members which do notreset host names when taking over a failed service.
For sshd, set GSSAPIStrictAcceptorCheck no in /etc/ssh/sshd_config.
For mod_auth_kerb, set KrbServiceName Any in /etc/httpd/conf.d/auth_kerb.conf.
NOTE
CHAPTER 17. MANAGING SERVICES
191

NOTE
For SSL servers, the subject name or a subject alternative name for the server'scertificate must appear correct when a client connects to the clustered host. If possible,share the private key among all of the hosts.
If each cluster member contains a subject alternative name which includes the names ofall the other cluster members, that satisfies any client connection requirements.
17.3. USING THE SAME SERVICE PRINCIPAL FOR MULTIPLE SERVICES
Within a cluster, the same service principal can be used for multiple services, spread across differentmachines.
1. Retrieve a service principal using the ipa-getkeytab command.
# ipa-getkeytab -s kdc.example.com -p HTTP/server.example.com -k /etc/httpd/conf/krb5.keytab -e aes256-cts
2. Either direct multiple servers or services to use the same file, or copy the file to individualservers as required.
17.4. RETRIEVE EXISTING KEYTABS FOR MULTIPLE SERVERS
In some scenarios, like in a cluster environment, the same keytab file is required for a servicerepresented on one common host name by different machines. IdM commands can be used to retrievethe same keytab on each of the hosts.
To prepare the common host name and the service principal, run the following commands on an IdMserver:
1. Authenticate as admin user:
[root@ipaserver ~]# kinit admin
2. Add a common forward DNS record for all IP addresses that share this host name:
[root@ipaserver ~]# ipa dnsrecord-add idm.example.com cluster --a-rec={192.0.2.40,192.0.2.41} Record name: cluster A record: 192.0.2.40, 192.0.2.41
3. Create a new host entry object for the common DNS name:
[root@ipaserver ~]# ipa host-add cluster.idm.example.com------------------------------------Added host "cluster.idm.example.com"------------------------------------ Host name: cluster.idm.example.com Principal name: host/[email protected] Password: False Keytab: False Managed by: cluster.idm.example.com
Linux Domain Identity, Authentication, and Policy Guide
192

4. Add the service principal for the host:
[root@ipaserver ~]# ipa service-add HTTP/cluster.idm.example.com------------------------------------------------------------Added service "HTTP/[email protected]"------------------------------------------------------------ Principal: HTTP/[email protected] Managed by: cluster.idm.example.com
5. Add the hosts to the service, that should be able to retrieve the keytab from IdM:
[root@ipaserver ~]# ipa service-allow-retrieve-keytab HTTP/cluster.idm.example.com --hosts={node01.idm.example.com,node02.idm.example.com} Principal: HTTP/[email protected] Managed by: cluster.idm.example.com Hosts allowed to retrieve keytab: node01.idm.example.com, node02.idm.example.com-------------------------Number of members added 2-------------------------
6. Grant permission to create a new keytab to one host:
[root@ipaserver ~]# ipa service-allow-create-keytab HTTP/cluster.idm.example.com --hosts=node01.idm.example.comPrincipal: HTTP/[email protected] by: cluster.idm.example.comHosts allowed to retrieve keytab: node01.idm.example.com, node02.idm.example.comHosts allowed to create keytab: node01.idm.example.com-------------------------Number of members added 1-------------------------
On the clients, follow these steps:
1. Authenticate with the hosts Kerberos keytab:
# kinit -kt /etc/krb5.keytab
2. 1. On the client you granted the respective permission to, generate a new keytab and store itin a file:
[root@node01 ~]# ipa-getkeytab -s ipaserver.idm.example.com -p HTTP/cluster.idm.example.com -k /tmp/client.keytab
2. On all other clients, retrieve the existing keytab from the IdM server by adding the -r optionto the command:
[root@node02 ~]# ipa-getkeytab -r -s ipaserver.idm.example.com -p HTTP/cluster.idm.example.com -k /tmp/client.keytab
CHAPTER 17. MANAGING SERVICES
193
WARNING
Be aware that if you omit the -r option, a new keytab will be generated.This invalidates all previously retrieved keytabs for this service principal.
17.5. DISABLING AND RE-ENABLING SERVICE ENTRIES
Active services can be accessed by other services, hosts, and users within the domain. There can besituations when it is necessary to remove a host or a service from activity. However, deleting a service ora host removes the entry and all the associated configuration, and it removes it permanently.
17.5.1. Disabling Service Entries
Disabling a service prevents domain users from access it without permanently removing it from thedomain. This can be done by using the service-disable command.
For a service, specify the principal for the service. For example:
[jsmith@ipaserver ~]$ kinit admin[jsmith@ipaserver ~]$ ipa service-disable HTTP/server.example.com
IMPORTANT
Disabling a host entry not only disables that host. It disables every configured service onthat host as well.
17.5.2. Re-enabling Services
Disabling a service essentially kills its current, active keytabs. Removing the keytabs effectively removesthe service from the IdM domain without otherwise touching its configuration entry.
To re-enable a service, simply use the ipa-getkeytab command. The -s option sets which IdM server torequest the keytab, -p gives the principal name, and -k gives the file to which to save the keytab.
For example, requesting a new HTTP keytab:
[root@ipaserver ~]# ipa-getkeytab -s ipaserver.example.com -p HTTP/server.example.com -k /etc/httpd/conf/krb5.keytab -e aes256-cts
Linux Domain Identity, Authentication, and Policy Guide
194

CHAPTER 18. DELEGATING USER ACCESS TO HOSTS ANDSERVICESManage means being able to retrieve a keytab and certificates for another host or service. Every hostand service has a managedby entry which lists what hosts or services can manage it. By default, a hostcan manage itself and all of its services. It is also possible to allow a host to manage other hosts, orservices on other hosts, by updating the appropriate delegations or providing a suitable managedbyentry.
An IdM service can be managed from any IdM host, as long as that host has been granted, or delegated,permission to access the service. Likewise, hosts can be delegated permissions to other hosts within thedomain.
Figure 18.1. Host and Service Delegation
NOTE
If a host is delegated authority to another host through a managedBy entry, it does notmean that the host has also been delegated management for all services on that host.Each delegation has to be performed independently.
18.1. DELEGATING SERVICE MANAGEMENT
A host is delegated control over a service using the service-add-host command. There are two parts todelegating the service: specifying the principal and identifying the hosts with the control:
# ipa service-add-host principal --hosts=hostnames
For example:
[root@server ~]# ipa service-add-host HTTP/web.example.com --hosts=client1.example.com
Once the host is delegated authority, the host principal can be used to manage the service:
CHAPTER 18. DELEGATING USER ACCESS TO HOSTS AND SERVICES
195
[root@server ~]# kinit -kt /etc/krb5.keytab host/`hostname`# ipa-getkeytab -s `hostname` -k /tmp/test.keytab -p HTTP/web.example.comKeytab successfully retrieved and stored in: /tmp/test.keytab
To create a ticket for this service, create a certificate request on the host with the delegated authorityand use the cert-request command to create a service entry and load the certification information:
[root@server ~]# ipa cert-request --add --principal=HTTP/web.example.com web.csr Certificate: MIICETCCAXqgA...[snip] Subject: CN=web.example.com,O=EXAMPLE.COM Issuer: CN=EXAMPLE.COM Certificate Authority Not Before: Tue Feb 08 18:51:51 2011 UTC Not After: Mon Feb 08 18:51:51 2016 UTC Fingerprint (MD5): c1:46:8b:29:51:a6:4c:11:cd:81:cb:9d:7c:5e:84:d5 Fingerprint (SHA1): 01:43:bc:fa:b9:d8:30:35:ee:b6:54:dd:a4:e7:d2:11:b1:9d:bc:38 Serial number: 1005
For more information on creating certificate requests and using ipa cert-request, see Section 20.1.1,“Requesting New Certificates for a User, Host, or Service”.
18.2. DELEGATING HOST MANAGEMENT
Hosts are delegated authority over other hosts through the host-add-managedby command. Thiscreates a managedby entry. Once the managedby entry is created, then the host can retrieve a keytabfor the host it has delegated authority over.
1. Log in as the admin user.
[root@server ~]# kinit admin
2. Add the managedby entry. For example, this delegates authority over client2 to client1.
[root@server ~]# ipa host-add-managedby client2.example.com --hosts=client1.example.com
3. Obtain a ticket as the host client1 and then retrieve a keytab for client2:
[root@server ~]# kinit -kt /etc/krb5.keytab host/`hostname`[root@server ~]# ipa-getkeytab -s `hostname` -k /tmp/client2.keytab -p host/client2.example.comKeytab successfully retrieved and stored in: /tmp/client2.keytab
18.3. DELEGATING HOST OR SERVICE MANAGEMENT IN THE WEB UI
Each host and service entry has a configuration tab that indicates what hosts have been delegatedmanagement control over that host or service.
1. Open the Identity tab, and select the Hosts or Services subtab.
2. Click the name of the host or service that you are going to grant delegated management to .
3. Click the Hosts subtab on the far right of the host/service entry. This is the tab which lists hosts
Linux Domain Identity, Authentication, and Policy Guide
196
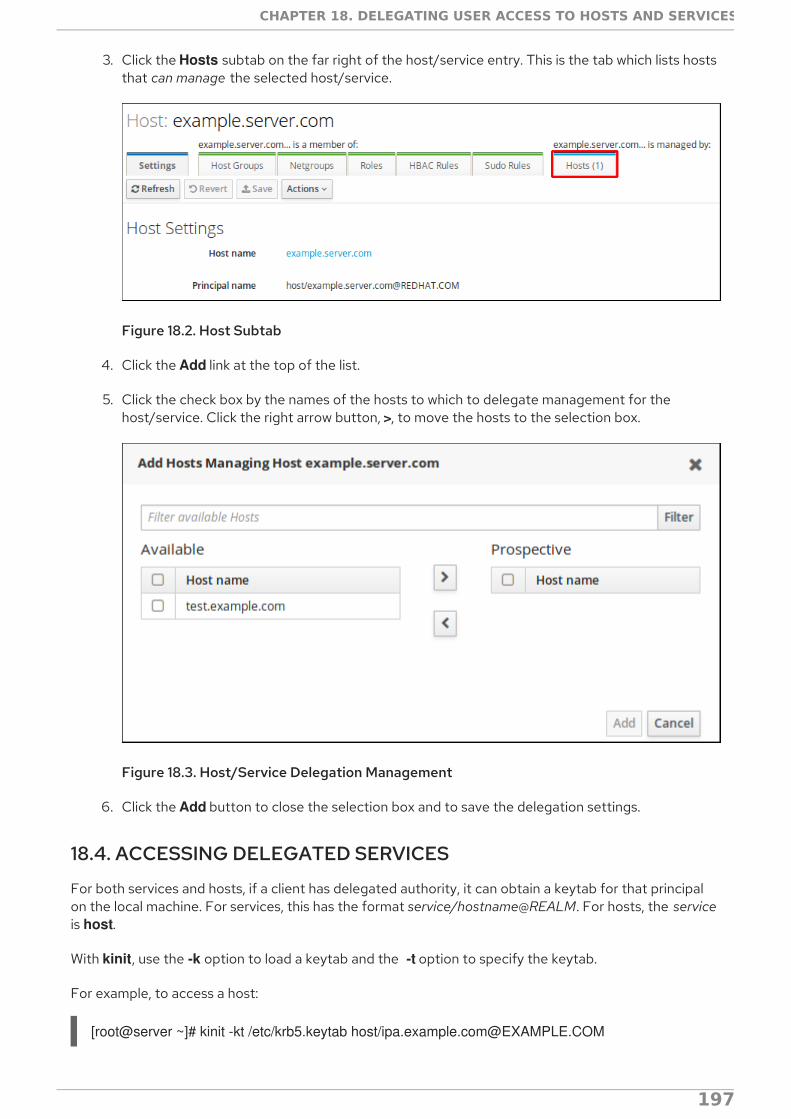
3. Click the Hosts subtab on the far right of the host/service entry. This is the tab which lists hoststhat can manage the selected host/service.
Figure 18.2. Host Subtab
4. Click the Add link at the top of the list.
5. Click the check box by the names of the hosts to which to delegate management for thehost/service. Click the right arrow button, >, to move the hosts to the selection box.
Figure 18.3. Host/Service Delegation Management
6. Click the Add button to close the selection box and to save the delegation settings.
18.4. ACCESSING DELEGATED SERVICES
For both services and hosts, if a client has delegated authority, it can obtain a keytab for that principalon the local machine. For services, this has the format service/hostname@REALM. For hosts, the serviceis host.
With kinit, use the -k option to load a keytab and the -t option to specify the keytab.
For example, to access a host:
[root@server ~]# kinit -kt /etc/krb5.keytab host/[email protected]
CHAPTER 18. DELEGATING USER ACCESS TO HOSTS AND SERVICES
197

To access a service:
[root@server ~]# kinit -kt /etc/httpd/conf/krb5.keytab HTTP/[email protected]
Linux Domain Identity, Authentication, and Policy Guide
198

CHAPTER 19. PERFORMANCE TUNING FOR BULKPROVISIONING OF ENTRIESAdding a large number of entries using the usual workflow, such as Chapter 10, Managing User Accountsfor adding users, can be very slow. This chapter describes how to tune the process to ensure theprovisioning is completed as quickly as possible.
As part of the procedure:
Identity Management (IdM) reads entries to be provisioned from an LDIF file and then importsthem to the target IdM LDAP instance.
The administrator sets custom values for certain attributes, such as cache sizes, and disablesthe MemberOf and Schema Compatibility plug-ins. The procedure includes running the fixup-memberof.pl plug-in on the provisioned entries to compensate for disabling MemberOf.
This procedure has been designed and tested to provision the following entry types: user, user group,host, host group, sudo rules, and host-based access control (HBAC) rules.
Recommendations and Prerequisites for Bulk ProvisioningRecommendations:
When provisioning a large number of entries (10,000 or more), do not allow any LDAP client toaccess the server on which the entries are provisioned or to rely on the information from theserver. For example, you can achieve this by disabling ports 389 and 636 on the server andusing LDAPI to work over Unix sockets.
Reason: The MemberOf plug-in is disabled on the server, which means that membershipinformation on the server is not valid.
Stop applications that are not required to be running during the provisioning.
Reason: This helps free as much memory on the machine as possible. The free memory will beused by the file system cache, thus improving the performance of the provisioning.
Note that the procedure below already includes steps to stop the IdM services, and restart onlythe Directory Server (DS) instance. IdM services, especially tomcat, consume a lot of memory,but are not used during the provisioning.
Run the procedure on a fresh IdM deployment with only one server. Create replicas only afterthe provisioning has been completed.
Reason: The provisioning throughput is much faster than replication. In a deployment with morethat one server, information on the replicas would become significantly outdated.
Prerequisites:
Generate an LDIF file containing the entries you want to provision. For example, if you aremigrating an existing IdM deployment, create the LDIF file by exporting all the entries using the ldapsearch utility.
For details on the LDIF format, see About the LDIF File Format in the Red Hat Directory ServerAdministration Guide.
Backing up the Current DS Tuning Parameter Values
1. Retrieve the current values for the DS tuning parameters:
CHAPTER 19. PERFORMANCE TUNING FOR BULK PROVISIONING OF ENTRIES
199

1. Retrieve the current values for the DS tuning parameters:
the database cache size and database locks:
# ldapsearch -D "cn=directory manager" -w secret -b "cn=config,cn=ldbm database,cn=plugins,cn=config" nsslapd-dbcachesize nsslapd-db-locks ...nsslapd-dbcachesize: 10000000nsslapd-db-locks: 50000...
the entry cache size and DN cache size:
# ldapsearch -D "cn=directory manager" -w secret -b "cn=userRoot,cn=ldbm database,cn=plugins,cn=config" nsslapd-cachememsize nsslapd-dncachememsize
...nsslapd-cachememsize: 10485760nsslapd-dncachememsize: 10485760...
2. Make note of the obtained values. You will reset the parameters back to these values after youfinish the provisioning.
Adjusting the Database, Domain Entry, and DN Cache SizeFor the database cache size:
1. Determine the required value.
The recommended value is typically between 200 MB and 500 MB. The value appropriate foryour use case depends on the memory available on your system:
More than 8 GB of memory → 500 MB
8 GB - 4 GB of memory → 200 MB
Less than 4 GB of memory → 100 MB
2. Set the determined value by using this template:
dn: cn=config,cn=ldbm database,cn=plugins,cn=configchangetype: modifyreplace: nsslapd-dbcachesizensslapd-dbcachesize: db_cache_size_in_bytes
For an example of modifying LDAP attributes using the ldapmodify utility, see Example 19.1,“Using ldapmodify to Change an LDAP Attribute” .
Example 19.1. Using ldapmodify to Change an LDAP Attribute
1. Run the ldapmodify command, and then add the statements to modify the attribute value.For example:
# ldapmodify -D "cn=directory manager" -w secret -xdn: cn=config,cn=ldbm database,cn=plugins,cn=config
Linux Domain Identity, Authentication, and Policy Guide
200

changetype: modifyreplace: nsslapd-dbcachesizensslapd-dbcachesize: 200000000
2. Press Ctrl+D to confirm and send the changes to the server. If the operation finishessuccessfully, the following message is displayed:
modifying entry "cn=config,cn=ldbm database,cn=plugins,cn=config"
For the domain entry cache size:
1. Determine the required value.
The recommended value is between 100 MB and 400 MB. The appropriate value depends onthe memory available on your system:
More than 4 GB of memory → 400 MB
2 GB - 4 GB of memory → 200 MB
Less than 2 GB of memory → 100 MB
If you are provisioning a large static group, it is recommended that the entry cache is largeenough to fit all entries: groups and members.
2. Set the determined value by using this template:
dn: cn=userRoot,cn=ldbm database,cn=plugins,cn=configchangetype: modifyreplace: nsslapd-cachememsizensslapd-cachememsize: entry_cache_size_in_bytes
For the domain name (DN) cache size:
1. For the best possible performance, it is recommended that the DN cache fits all the DNs of theprovisioned entries. To estimate the value appropriate for your use case:
a. Determine the number of all DN entries in the file. The DN entries are on lines starting with dn: . For example, using # grep, sed, and wc:
# grep '^dn: ' ldif_file | sed 's/^dn: //' | wc -l92200
b. Determine the size of all DN entry strings in the LDIF file.
# grep '^dn: ' ldif_file | sed 's/^dn: //' | wc -c9802460
c. Get the average DN size: divide the size of all DN entry strings by the number of all the DNentries in the file.
For example: 9,802,460 / 92,200 ≈ 106
CHAPTER 19. PERFORMANCE TUNING FOR BULK PROVISIONING OF ENTRIES
201

d. Get the average memory size: multiple the average DN size by 2, and then add 32 to theresult.
For example: (106 * 2) + 32 = 244
e. Get the appropriate DN cache size: multiply the average memory size by the total numberof DN entries in the LDIF file.
For example: 244 * 92,200 = 22,496,800
2. Set the determined value by using this template:
dn: cn=userRoot,cn=ldbm database,cn=plugins,cn=configchangetype: modifyReplace: nsslapd-dncachememsizeNsslapd-dncachememsize: dn_cache_size
Disabling Unnecessary Services and Adjusting Database Locks
1. Disable the MemberOf and Schema Compatibility plug-ins:
dn: cn=MemberOf Plugin,cn=plugins,cn=configchangetype: modifyreplace: nsslapd-pluginEnablednsslapd-pluginEnabled: off
dn: cn=Schema Compatibility,cn=plugins,cn=configchangetype: modifyreplace: nsslapd-pluginEnablednsslapd-pluginEnabled: off
Disabling MemberOf significantly speeds up the provisioning. Disabling Schema Compatibilityalso helps reduce the duration of the operation.
For an example of modifying LDAP attributes using the ldapmodify utility, see Example 19.1,“Using ldapmodify to Change an LDAP Attribute” .
2. If no replicas are installed in your topology (as recommended in the section called“Recommendations and Prerequisites for Bulk Provisioning”), disable the ContentSynchronization and Retro Changelog plug-ins:
dn: cn=Content Synchronization,cn=plugins,cn=configchangetype: modifyreplace: nsslapd-pluginEnablednsslapd-pluginEnabled: off
dn: cn=Retro Changelog Plugin,cn=plugins,cn=configchangetype: modifyreplace: nsslapd-pluginEnablednsslapd-pluginEnabled: off
Disabling these additional plug-ins helps improve the performance of the provisioning.
3. Stop the IdM server. This also stops the DS instance.
Linux Domain Identity, Authentication, and Policy Guide
202
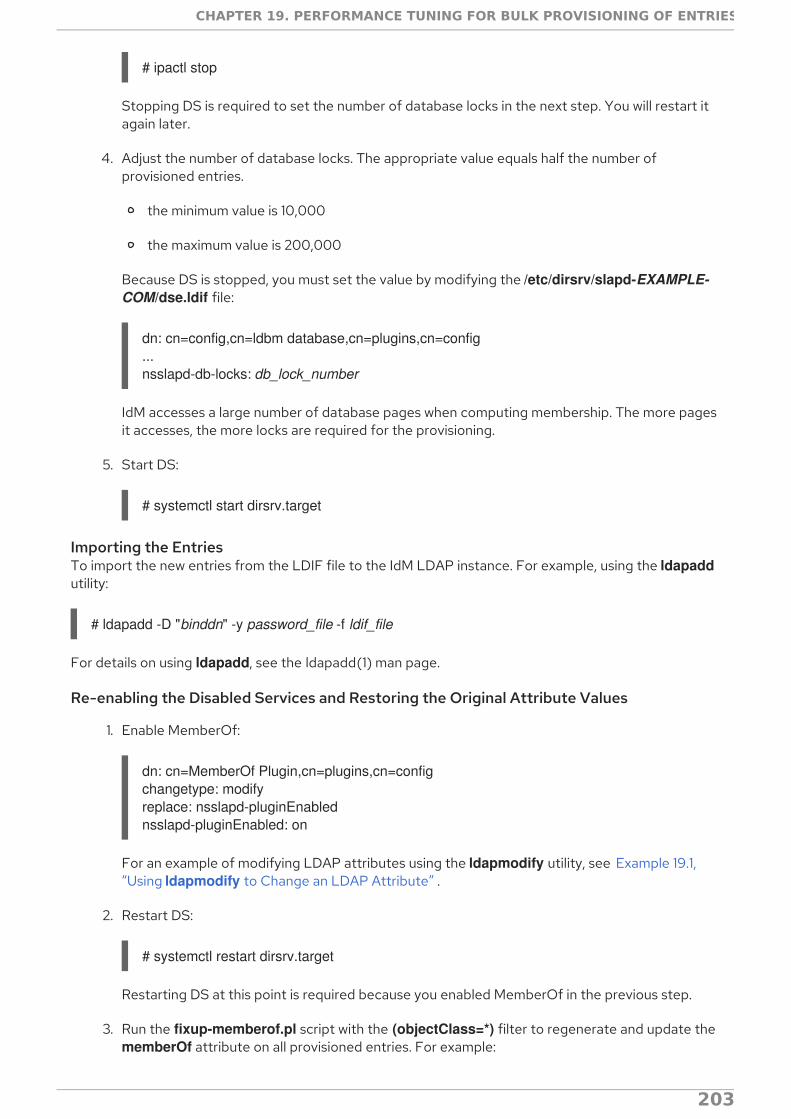
# ipactl stop
Stopping DS is required to set the number of database locks in the next step. You will restart itagain later.
4. Adjust the number of database locks. The appropriate value equals half the number ofprovisioned entries.
the minimum value is 10,000
the maximum value is 200,000
Because DS is stopped, you must set the value by modifying the /etc/dirsrv/slapd-EXAMPLE-COM/dse.ldif file:
dn: cn=config,cn=ldbm database,cn=plugins,cn=config...nsslapd-db-locks: db_lock_number
IdM accesses a large number of database pages when computing membership. The more pagesit accesses, the more locks are required for the provisioning.
5. Start DS:
# systemctl start dirsrv.target
Importing the EntriesTo import the new entries from the LDIF file to the IdM LDAP instance. For example, using the ldapaddutility:
# ldapadd -D "binddn" -y password_file -f ldif_file
For details on using ldapadd, see the ldapadd(1) man page.
Re-enabling the Disabled Services and Restoring the Original Attribute Values
1. Enable MemberOf:
dn: cn=MemberOf Plugin,cn=plugins,cn=configchangetype: modifyreplace: nsslapd-pluginEnablednsslapd-pluginEnabled: on
For an example of modifying LDAP attributes using the ldapmodify utility, see Example 19.1,“Using ldapmodify to Change an LDAP Attribute” .
2. Restart DS:
# systemctl restart dirsrv.target
Restarting DS at this point is required because you enabled MemberOf in the previous step.
3. Run the fixup-memberof.pl script with the (objectClass=*) filter to regenerate and update the memberOf attribute on all provisioned entries. For example:
CHAPTER 19. PERFORMANCE TUNING FOR BULK PROVISIONING OF ENTRIES
203

# fixup-memberof.pl -D "cn=directory manager" -j password_file -Z server_id -b "suffix" -f "(objectClass=*)" -P LDAP
Running fixup-memberof.pl is necessary because the MemberOf plug-in was disabled whenyou imported the entries. To be able to continue with the provisioning, the script must completesuccessfully.
For details on fixup-memberof.pl, see the fixup-memberof.pl(8) man page.
4. Enable the Schema Compatibility plug-in:
dn: cn=Schema Compatibility,cn=plugins,cn=configchangetype: modifyreplace: nsslapd-pluginEnablednsslapd-pluginEnabled: on
5. If you disabled the Content Synchronization and Retro Changelog plug-ins in the section called“Disabling Unnecessary Services and Adjusting Database Locks”, re-enable them:
dn: cn=Content Synchronization,cn=plugins,cn=configchangetype: modifyreplace: nsslapd-pluginEnablednsslapd-pluginEnabled: on
dn: cn=Retro Changelog Plugin,cn=plugins,cn=configchangetype: modifyreplace: nsslapd-pluginEnablednsslapd-pluginEnabled: on
6. Restore the original values for the database cache, entry cache, and DN cache size that youbacked up in the section called “Backing up the Current DS Tuning Parameter Values” :
dn: cn=config,cn=ldbm database,cn=plugins,cn=configchangetype: modifyreplace: nsslapd-dbcachesizensslapd-dbcachesize: backup_db_cache_size
dn: cn=userRoot,cn=ldbm database,cn=plugins,cn=configchangetype: modifyReplace: nsslapd-dncachememsizeNsslapd-dncachememsize: backup_dn_cache_size-replace: nsslapd-cachememsizensslapd-cachememsize: backup_entry_cache_size
7. Stop DS:
# systemctl stop dirsrv.target
8. Restore the original value for database locks that you backed up in the section called “Backingup the Current DS Tuning Parameter Values”. Because DS is stopped, you must set the value bymodifying the /etc/dirsrv/slapd-EXAMPLE-COM/dse.ldif file:
Linux Domain Identity, Authentication, and Policy Guide
204

dn: cn=config,cn=ldbm database,cn=plugins,cn=config...nsslapd-db-locks: backup_db_lock_number
9. Start the IdM server:
# ipactl start
This starts all IdM services, including DS.
CHAPTER 19. PERFORMANCE TUNING FOR BULK PROVISIONING OF ENTRIES
205
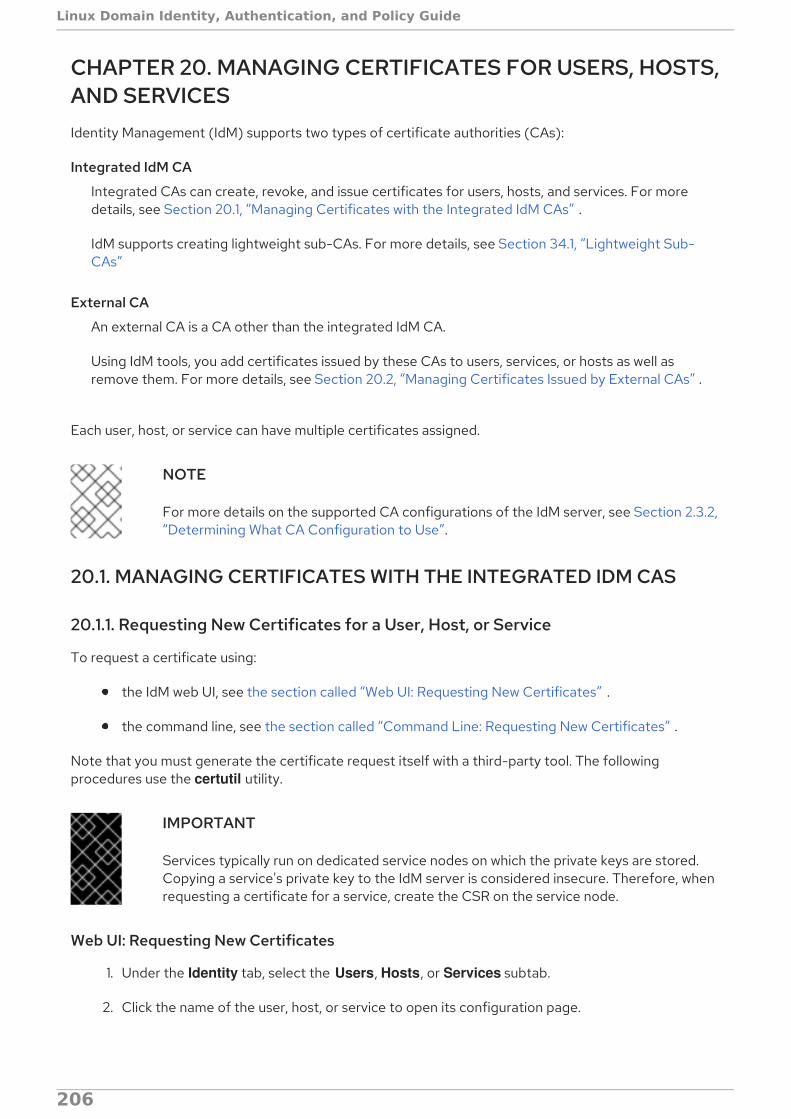
CHAPTER 20. MANAGING CERTIFICATES FOR USERS, HOSTS,AND SERVICESIdentity Management (IdM) supports two types of certificate authorities (CAs):
Integrated IdM CA
Integrated CAs can create, revoke, and issue certificates for users, hosts, and services. For moredetails, see Section 20.1, “Managing Certificates with the Integrated IdM CAs” .
IdM supports creating lightweight sub-CAs. For more details, see Section 34.1, “Lightweight Sub-CAs”
External CA
An external CA is a CA other than the integrated IdM CA.
Using IdM tools, you add certificates issued by these CAs to users, services, or hosts as well asremove them. For more details, see Section 20.2, “Managing Certificates Issued by External CAs” .
Each user, host, or service can have multiple certificates assigned.
NOTE
For more details on the supported CA configurations of the IdM server, see Section 2.3.2,“Determining What CA Configuration to Use”.
20.1. MANAGING CERTIFICATES WITH THE INTEGRATED IDM CAS
20.1.1. Requesting New Certificates for a User, Host, or Service
To request a certificate using:
the IdM web UI, see the section called “Web UI: Requesting New Certificates” .
the command line, see the section called “Command Line: Requesting New Certificates” .
Note that you must generate the certificate request itself with a third-party tool. The followingprocedures use the certutil utility.
IMPORTANT
Services typically run on dedicated service nodes on which the private keys are stored.Copying a service's private key to the IdM server is considered insecure. Therefore, whenrequesting a certificate for a service, create the CSR on the service node.
Web UI: Requesting New Certificates
1. Under the Identity tab, select the Users, Hosts, or Services subtab.
2. Click the name of the user, host, or service to open its configuration page.
Linux Domain Identity, Authentication, and Policy Guide
206

Figure 20.1. List of Hosts
3. Click Actions → New Certificate.
4. Optional: Select the issuing CA and profile ID.
5. Follow the instructions on the screen for using certutil.
6. Click Issue.
Command Line: Requesting New Certificates
1. Generate a certificate request.
a. Create a certificate database or use an existing one. To create a new database:
# certutil -N -d path_to_database
b. Create the certificate request and use output redirection to save it to a file.
# certutil -R -d path_to_database -a -g key_size -s "CN=server.example.com,O=EXAMPLE.COM" > certificate_request.csr
2. Submit the certificate request file to the server. Be sure to specify the Kerberos principal toassociate with the newly-issued certificate.
# ipa cert-request certificate_request.csr --principal=host/server.example.com
IdM uses the following defaults:
Certificate profile: caIPAserviceCert
To select a custom profile, use the --profile-id option with the ipa cert-request command.
Integrated CA: ipa (IdM root CA)
To select a sub-CA, use the --ca option with the ipa cert-request command.
20.1.2. Revoking Certificates with the Integrated IdM CAs
If you need to invalidate the certificate before its expiration date, you can revoke it. To revoke acertificate using:
CHAPTER 20. MANAGING CERTIFICATES FOR USERS, HOSTS, AND SERVICES
207
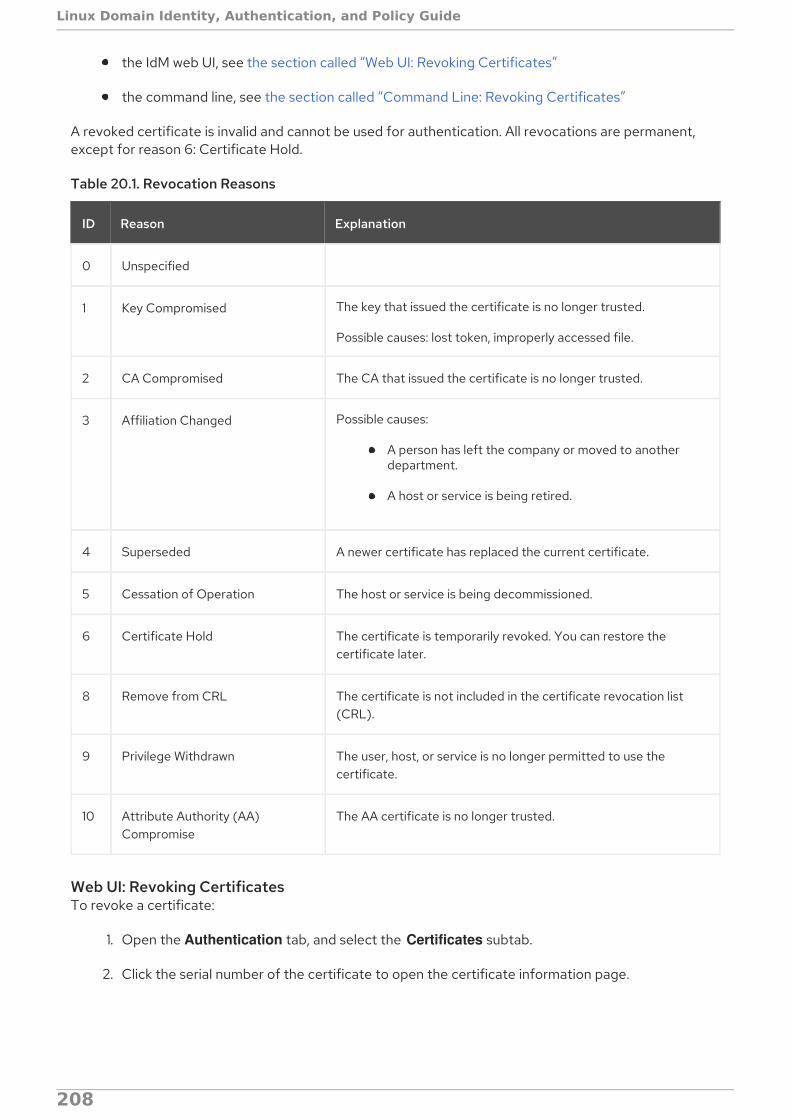
the IdM web UI, see the section called “Web UI: Revoking Certificates”
the command line, see the section called “Command Line: Revoking Certificates”
A revoked certificate is invalid and cannot be used for authentication. All revocations are permanent,except for reason 6: Certificate Hold.
Table 20.1. Revocation Reasons
ID Reason Explanation
0 Unspecified
1 Key Compromised The key that issued the certificate is no longer trusted.
Possible causes: lost token, improperly accessed file.
2 CA Compromised The CA that issued the certificate is no longer trusted.
3 Affiliation Changed Possible causes:
A person has left the company or moved to anotherdepartment.
A host or service is being retired.
4 Superseded A newer certificate has replaced the current certificate.
5 Cessation of Operation The host or service is being decommissioned.
6 Certificate Hold The certificate is temporarily revoked. You can restore thecertificate later.
8 Remove from CRL The certificate is not included in the certificate revocation list(CRL).
9 Privilege Withdrawn The user, host, or service is no longer permitted to use thecertificate.
10 Attribute Authority (AA)Compromise
The AA certificate is no longer trusted.
Web UI: Revoking CertificatesTo revoke a certificate:
1. Open the Authentication tab, and select the Certificates subtab.
2. Click the serial number of the certificate to open the certificate information page.
Linux Domain Identity, Authentication, and Policy Guide
208
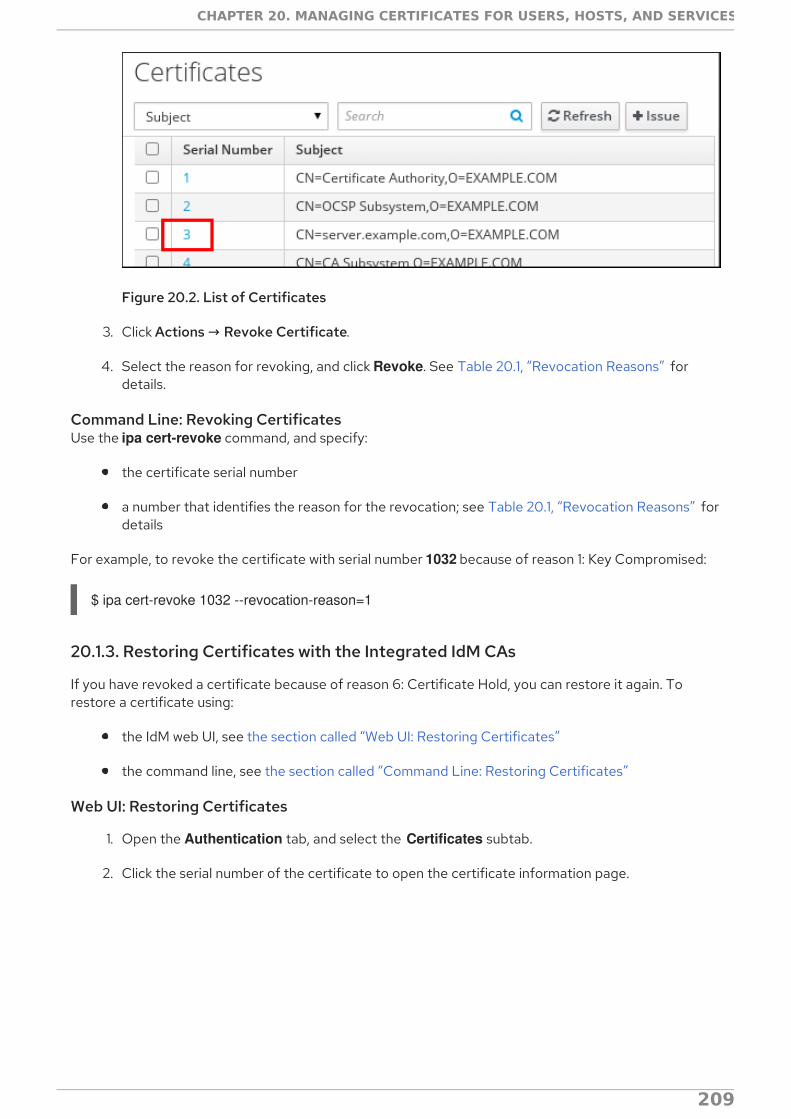
Figure 20.2. List of Certificates
3. Click Actions → Revoke Certificate.
4. Select the reason for revoking, and click Revoke. See Table 20.1, “Revocation Reasons” fordetails.
Command Line: Revoking CertificatesUse the ipa cert-revoke command, and specify:
the certificate serial number
a number that identifies the reason for the revocation; see Table 20.1, “Revocation Reasons” fordetails
For example, to revoke the certificate with serial number 1032 because of reason 1: Key Compromised:
$ ipa cert-revoke 1032 --revocation-reason=1
20.1.3. Restoring Certificates with the Integrated IdM CAs
If you have revoked a certificate because of reason 6: Certificate Hold, you can restore it again. Torestore a certificate using:
the IdM web UI, see the section called “Web UI: Restoring Certificates”
the command line, see the section called “Command Line: Restoring Certificates”
Web UI: Restoring Certificates
1. Open the Authentication tab, and select the Certificates subtab.
2. Click the serial number of the certificate to open the certificate information page.
CHAPTER 20. MANAGING CERTIFICATES FOR USERS, HOSTS, AND SERVICES
209

Figure 20.3. List of Certificates
3. Click Actions → Restore Certificate.
Command Line: Restoring CertificatesUse the ipa cert-remove-hold command and specify the certificate serial number. For example:
$ ipa cert-remove-hold 1032
20.2. MANAGING CERTIFICATES ISSUED BY EXTERNAL CAS
20.2.1. Command Line: Adding and Removing Certificates Issued by External CAs
To add a certificate to a user, host, or service:
ipa user-add-cert
ipa host-add-cert
ipa service-add-cert
To remove a certificate from a user, host, or service:
ipa user-remove-cert
ipa host-remove-cert
ipa service-remove-cert
A certificate issued by an external CA is not revoked after you remove it from IdM. This is because thecertificate does not exist in the IdM CA database. You can only revoke these certificates manually fromthe external CA side.
The commands require you to specify the following information:
the name of the user, host, or service
the Base64-encoded DER certificate
To run the commands interactively, execute them without adding any options.
To provide the required information directly with the command, use command-line arguments and
Linux Domain Identity, Authentication, and Policy Guide
210

To provide the required information directly with the command, use command-line arguments andoptions:
$ ipa user-add-cert user --certificate=MIQTPrajQAwg...
NOTE
Instead of copy-pasting the certificate contents into the command line, you can convertthe certificate to the DER format and then re-encode it to base64. For example, to addthe user_cert.pem certificate to user:
$ ipa user-add-cert user --certificate="$(openssl x509 -outform der -in user_cert.pem | base64 -w 0)"
20.2.2. Web UI: Adding and Removing Certificates Issued by External CAs
To add a certificate to a user, host, or service:
1. Open the Identity tab, and select the Users, Hosts, or Services subtab.
2. Click on the name of the user, host, or service to open its configuration page.
3. Click Add, next to the Certificates entry.
Figure 20.4. Adding a Certificate to a User Account
4. Paste the certificate in Base64 or PEM encoded format into the text field, and click Add.
5. Click Save to store the changes.
To remove a certificate from a user, host, or service:
1. Open the Identity tab, and select the Users, Hosts, or Services subtab.
CHAPTER 20. MANAGING CERTIFICATES FOR USERS, HOSTS, AND SERVICES
211

2. Click on the name of the user, host, or service to open its configuration page.
3. Click the Actions next to the certificate to delete, and select Delete.
4. Click Save to store the changes.
20.3. LISTING AND DISPLAYING CERTIFICATES
Listing and Displaying Certificates in the Web UITo list certificates assigned to a user, host, or service entry:
1. Open the Identity tab, and select the Users, Hosts, or Services subtab.
2. Click on the name of the user, host, or service to open its configuration page.
Figure 20.5. List of Hosts
3. The configuration page lists all certificates assigned to the entry. Additionally, clicking Showdisplays a particular certificate.
To list all certificates registered on the IdM server:
1. Open the Authentication tab, and select the Certificates subtab.
2. A list of all certificates is displayed in the Certificates section. To display a particular certificate,click on its serial number.
Figure 20.6. List of Certificates
Listing Certificates from the Command LineTo list all certificates in the IdM database, run the ipa cert-find command.
Linux Domain Identity, Authentication, and Policy Guide
212

$ ipa cert-find-----------------------10 certificates matched----------------------- Serial number (hex): 0x1 Serial number: 1 Status: VALID Subject: CN=Certificate Authority,O=EXAMPLE.COM...-----------------------------Number of entries returned 10-----------------------------
You can filter the search results by specifying certain certificate properties, such as issue date or validitydate. For example, to search by an issue date interval, use the --issuedon-from or --issuedon-tooptions to specify the start and end points or a period of time.
ipa cert-find --issuedon-from=2016-01-07 --issuedon-to=2016-02-07
For a complete list of options used to filter the search for a certificate, run ipa cert-find with the --helpoption added.
Displaying Certificates from the Command LineTo display a certificate, use the ipa cert-show command and specify the serial number.
$ ipa cert-show 132Serial number: 132 Certificate: MIIDtzCCAp+gAwIBAgIBATANBgkqhkiG9w0BAQsFADBBMR8wHQYDVQQKExZMQUIu...LxIQjrEFtJmoBGb/TWRlwGEWy1ayr4iTEf1ayZ+RGNylLalEAtk9RLjEjg== Subject: CN=Certificate Authority,O=EXAMPLE.COM Issuer: CN=Certificate Authority,O=EXAMPLE.COM Not Before: Sun Jun 08 05:51:11 2014 UTC Not After: Thu Jun 08 05:51:11 2034 UTC Fingerprint (MD5): 46:53:2b:e9:88:c8:6b:ca:ec:5b:81:80:af:17:ea:85 Fingerprint (SHA1): 19:bc:93:e9:af:8c:ee:61:a3:10:07:6a:27:8b:5f:0a:25:d2:b0:72 Serial number (hex): 0x132 Serial number: 132
To display the certificates assigned to a user, host, or service entry, use ipa cert-show and specify theentry. For example, to display the certificate assigned to a user:
$ ipa user-show user User login: user ... Certificate: MIICfzCCAWcCAQA... ...
You can also save a certificate to a file by adding the --out option to ipa cert-show.
$ ipa cert-show certificate_serial_number --out=path_to_file
Note that if the user, host, or service has more than one certificate, the --out option exports all of them.
CHAPTER 20. MANAGING CERTIFICATES FOR USERS, HOSTS, AND SERVICES
213

Note that if the user, host, or service has more than one certificate, the --out option exports all of them.The certificate or certificates are exported as PEM objects.
20.4. CERTIFICATE PROFILES
A certificate profile defines the content of certificates belonging to the particular profile, as well asconstraints for issuing the certificates, enrollment method, and input and output forms for enrollment. Asingle certificate profile is associated with issuing a particular type of certificate. Different certificateprofiles can be defined for users, services, and hosts in IdM.
The CA uses certificate profiles in signing of certificates to determine:
whether the CA can accept a certificate signing request (CSR)
what features and extensions should be present on the certificate
IdM includes the following two certificate profiles by default: caIPAserviceCert and IECUserRoles. Inaddition, custom profiles can be imported.
Custom certificate profiles allow issuing certificates for specific, unrelated purposes. For example, it ispossible to restrict use of a particular profile to only one user or one group, preventing other users andgroups from using that profile to issue a certificate for authentication.
For details on supported certificate profile configuration, see Defaults Reference and ConstraintsReference in the Red Hat Certificate System Administration Guide.
NOTE
By combining certificate profiles and CA ACLs, Section 20.5, “Certificate Authority ACLRules”, the administrator can define and control access to custom certificate profiles. Fora description of using profiles and CA ACLs to issue user certificates, see Section 20.6,“Using Certificate Profiles and ACLs to Issue User Certificates with the IdM CAs”.
20.4.1. Certificate Profile Management from the Command Line
The certprofile plug-in for management of IdM profiles allows privileged users to import, modify, orremove IdM certificate profiles. To display all commands supported by the plug-in, run the ipa certprofile command:
$ ipa certprofileManage Certificate Profiles
...
EXAMPLES:
Import a profile that will not store issued certificates: ipa certprofile-import ShortLivedUserCert \ --file UserCert.profile --desc "User Certificates" \ --store=false
Delete a certificate profile: ipa certprofile-del ShortLivedUserCert...
Linux Domain Identity, Authentication, and Policy Guide
214

Note that to perform the certprofile operations, you must be operating as a user who has the requiredpermissions. IdM includes the following certificate profile-related permissions by default:
System: Read Certificate Profiles
Enables users to read all profile attributes.
System: Import Certificate Profile
Enables users to import a certificate profile into IdM.
System: Delete Certificate Profile
Enables users to delete an existing certificate profile.
System: Modify Certificate Profile
Enables users to modify the profile attributes and to disable or enable the profile.
All these permissions are included in the default CA Administrator privilege. For more information onIdM role-based access controls and managing permissions, see Section 32.4, “Defining Role-BasedAccess Controls”.
NOTE
When requesting a certificate, the --profile-id option can be added to the ipa cert-request command to specify which profile to use. If no profile ID is specified, the default caIPAserviceCert profile is used for the certificate.
This section only describes the most important aspects of using the ipa certprofile commands forprofile management. For complete information about a command, run it with the --help option added,for example:
$ ipa certprofile-mod --helpUsage: ipa [global-options] certprofile-mod ID [options]
Modify Certificate Profile configuration.Options: -h, --help show this help message and exit --desc=STR Brief description of this profile --store=BOOL Whether to store certs issued using this profile...
Importing Certificate ProfilesTo import a new certificate profile to IdM, use the ipa certprofile-import command. Running thecommand without any options starts an interactive session in which the certprofile-import scriptprompts your for the information required to import the certificate.
$ ipa certprofile-import
Profile ID: smimeProfile description: S/MIME certificatesStore issued certificates [True]: TRUEFilename of a raw profile. The XML format is not supported.: smime.cfg------------------------
CHAPTER 20. MANAGING CERTIFICATES FOR USERS, HOSTS, AND SERVICES
215

Imported profile "smime"------------------------ Profile ID: smime Profile description: S/MIME certificates Store issued certificates: TRUE
The ipa certprofile-import command accepts several command-line options. Most notably:
--file
This option passes the file containing the profile configuration directly to ipa certprofile-import. Forexample:
$ ipa certprofile-import --file=smime.cfg
--store
This option sets the Store issued certificates attribute. It accepts two values:
True, which delivers the issued certificates to the client and stores them in the target IdMprincipal's userCertificate attribute.
False, which delivers the issued certificates to the client, but does not store them in IdM. Thisoption is most commonly-used when issuing multiple short-term certificates is required.
Import fails if the profile ID specified with ipa certprofile-import is already in use or if the profile contentis incorrect. For example, the import fails if a required attribute is missing or if the profile ID valuedefined in the supplied file does not match the profile ID specified with ipa certprofile-import.
To obtain a template for a new profile, you can run the ipa certprofile-show command with the --outoption, which exports a specified existing profile to a file. For example:
$ ipa certprofile-show caIPAserviceCert --out=file_name
You can then edit the exported file as required and import it as a new profile.
Displaying Certificate ProfilesTo display all certificate profiles currently stored in IdM, use the ipa certprofile-find command:
$ ipa certprofile-find------------------3 profiles matched------------------ Profile ID: caIPAserviceCert Profile description: Standard profile for network services Store issued certificates: TRUE
Profile ID: IECUserRoles...
To display information about a particular profile, use the ipa certprofile-show command:
$ ipa certprofile-show profile_ID Profile ID: profile_ID Profile description: S/MIME certificates
Linux Domain Identity, Authentication, and Policy Guide
216

Store issued certificates: TRUE
Modifying Certificate ProfilesTo modify an existing certificate profile, use the ipa certprofile-mod command. Pass the requiredmodifications with the command using the command-line options accepted by ipa certprofile-mod. Forexample, to modify the description of a profile and change whether IdM stores the issued certificates:
$ ipa certprofile-mod profile_ID --desc="New description" --store=False------------------------------------Modified Certificate Profile "profile_ID"------------------------------------ Profile ID: profile_ID Profile description: New description Store issued certificates: FALSE
To update the certificate profile configuration, import the file containing the updated configurationusing the --file option. For example:
$ ipa certprofile-mod profile_ID --file=new_configuration.cfg
Deleting Certificate ProfilesTo remove an existing certificate profile from IdM, use the ipa certprofile-del command:
$ ipa certprofile-del profile_ID-----------------------Deleted profile "profile_ID"-----------------------
20.4.2. Certificate Profile Management from the Web UI
To manage certificate profiles from the IdM web UI:
1. Open the Authentication tab and the Certificates subtab.
2. Open the Certificate Profiles section.
Figure 20.7. Certificate Profile Management in the Web UI
In the Certificate Profiles section, you can display information about existing profiles, modify their
CHAPTER 20. MANAGING CERTIFICATES FOR USERS, HOSTS, AND SERVICES
217

In the Certificate Profiles section, you can display information about existing profiles, modify theirattributes, or delete selected profiles.
For example, to modify an existing certificate profile:
1. Click on the name of the profile to open the profile configuration page.
2. In the profile configuration page, fill in the required information.
3. Click Save to confirm the new configuration.
Figure 20.8. Modifying a Certificate Profile in the Web UI
If you enable the Store issued certificates option, the issued certificates are delivered to the client aswell as stored in the target IdM principal's userCertificate attribute. If the option is disabled, the issuedcertificates are delivered to the client, but not stored in IdM. Storing certificates is often disabled whenissuing multiple short-lived certificates is required.
Note that some certificate profile management operations are currently unavailable in the web UI:
It is not possible to import a certificate profile in the web UI. To import a certificate, use the ipa certprofile-import command.
It is not possible to set, add, or delete attribute and value pairs. To modify the attribute andvalue pairs, use the ipa certprofile-mod command.
It is not possible to import updated certificate profile configuration. To import a file containingupdated profile configuration, use the ipa certprofile-mod --file=file_name command.
For more information about the commands used to manage certificate profiles, see Section 20.4.1,“Certificate Profile Management from the Command Line”.
20.4.3. Upgrading IdM Servers with Certificate Profiles
When upgrading an IdM server, the profiles included in the server are all imported and enabled.
Linux Domain Identity, Authentication, and Policy Guide
218
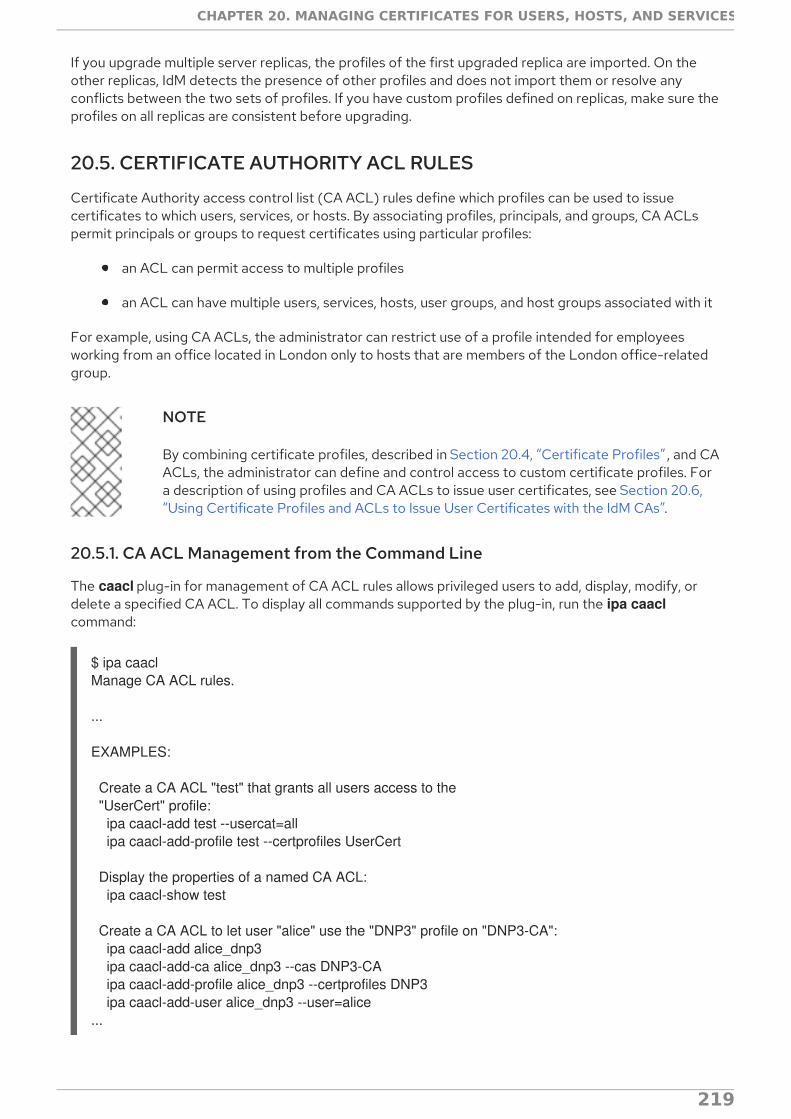
If you upgrade multiple server replicas, the profiles of the first upgraded replica are imported. On theother replicas, IdM detects the presence of other profiles and does not import them or resolve anyconflicts between the two sets of profiles. If you have custom profiles defined on replicas, make sure theprofiles on all replicas are consistent before upgrading.
20.5. CERTIFICATE AUTHORITY ACL RULES
Certificate Authority access control list (CA ACL) rules define which profiles can be used to issuecertificates to which users, services, or hosts. By associating profiles, principals, and groups, CA ACLspermit principals or groups to request certificates using particular profiles:
an ACL can permit access to multiple profiles
an ACL can have multiple users, services, hosts, user groups, and host groups associated with it
For example, using CA ACLs, the administrator can restrict use of a profile intended for employeesworking from an office located in London only to hosts that are members of the London office-relatedgroup.
NOTE
By combining certificate profiles, described in Section 20.4, “Certificate Profiles” , and CAACLs, the administrator can define and control access to custom certificate profiles. Fora description of using profiles and CA ACLs to issue user certificates, see Section 20.6,“Using Certificate Profiles and ACLs to Issue User Certificates with the IdM CAs”.
20.5.1. CA ACL Management from the Command Line
The caacl plug-in for management of CA ACL rules allows privileged users to add, display, modify, ordelete a specified CA ACL. To display all commands supported by the plug-in, run the ipa caaclcommand:
$ ipa caaclManage CA ACL rules.
...
EXAMPLES:
Create a CA ACL "test" that grants all users access to the "UserCert" profile: ipa caacl-add test --usercat=all ipa caacl-add-profile test --certprofiles UserCert
Display the properties of a named CA ACL: ipa caacl-show test
Create a CA ACL to let user "alice" use the "DNP3" profile on "DNP3-CA": ipa caacl-add alice_dnp3 ipa caacl-add-ca alice_dnp3 --cas DNP3-CA ipa caacl-add-profile alice_dnp3 --certprofiles DNP3 ipa caacl-add-user alice_dnp3 --user=alice...
Note that to perform the caacl operations, you must be operating as a user who has the required
CHAPTER 20. MANAGING CERTIFICATES FOR USERS, HOSTS, AND SERVICES
219
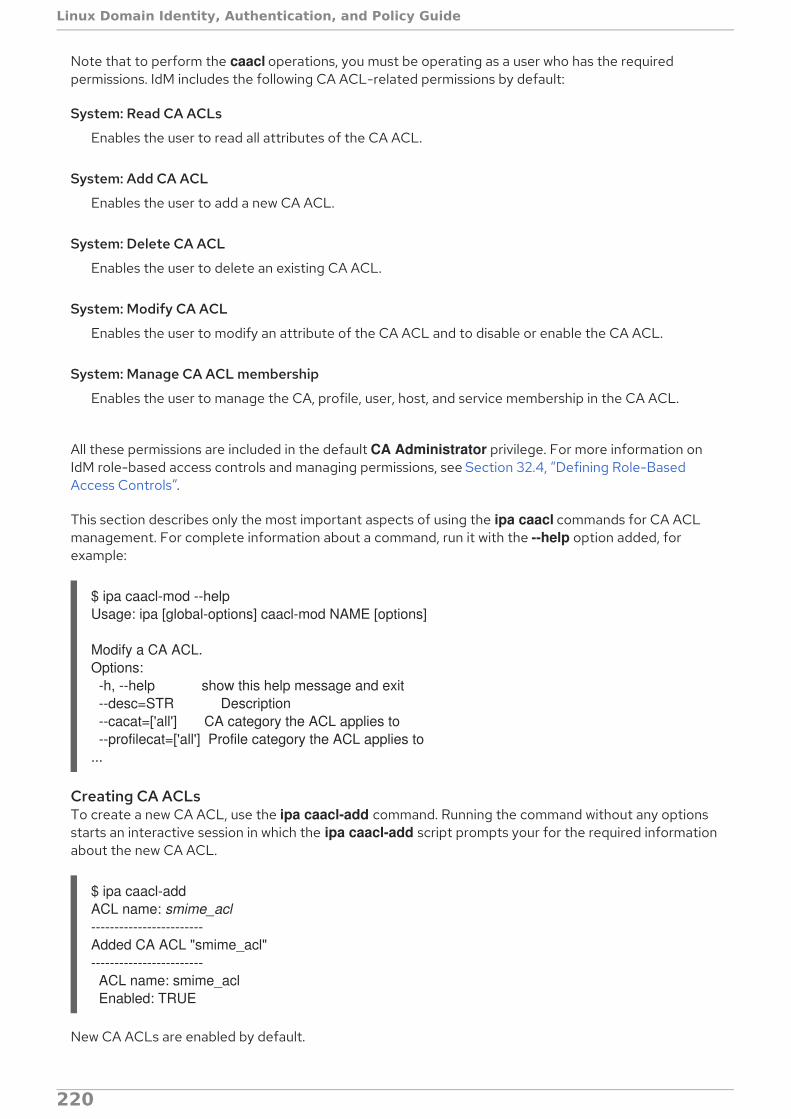
Note that to perform the caacl operations, you must be operating as a user who has the requiredpermissions. IdM includes the following CA ACL-related permissions by default:
System: Read CA ACLs
Enables the user to read all attributes of the CA ACL.
System: Add CA ACL
Enables the user to add a new CA ACL.
System: Delete CA ACL
Enables the user to delete an existing CA ACL.
System: Modify CA ACL
Enables the user to modify an attribute of the CA ACL and to disable or enable the CA ACL.
System: Manage CA ACL membership
Enables the user to manage the CA, profile, user, host, and service membership in the CA ACL.
All these permissions are included in the default CA Administrator privilege. For more information onIdM role-based access controls and managing permissions, see Section 32.4, “Defining Role-BasedAccess Controls”.
This section describes only the most important aspects of using the ipa caacl commands for CA ACLmanagement. For complete information about a command, run it with the --help option added, forexample:
$ ipa caacl-mod --helpUsage: ipa [global-options] caacl-mod NAME [options]
Modify a CA ACL.Options: -h, --help show this help message and exit --desc=STR Description --cacat=['all'] CA category the ACL applies to --profilecat=['all'] Profile category the ACL applies to...
Creating CA ACLsTo create a new CA ACL, use the ipa caacl-add command. Running the command without any optionsstarts an interactive session in which the ipa caacl-add script prompts your for the required informationabout the new CA ACL.
$ ipa caacl-addACL name: smime_acl------------------------Added CA ACL "smime_acl"------------------------ ACL name: smime_acl Enabled: TRUE
New CA ACLs are enabled by default.
Linux Domain Identity, Authentication, and Policy Guide
220

The most notable options accepted by ipa caacl-add are the options that associate a CA ACL with aCA, certificate profile, user, host, or service category:
--cacat
--profilecat
--usercat
--hostcat
--servicecat
IdM only accepts the all value with these options, which associates the CA ACL with all CAs, profiles,users, hosts, or services. For example, to associate the CA ACL with all users and user groups:
$ ipa caacl-add ca_acl_name --usercat=all
CA, profile, user, host, and service categories are an alternative to adding particular objects or groups ofobjects to a CA ACL, which is described in the section called “Adding Entries to CA ACLs and RemovingEntries from CA ACLs”. Note that it is not possible to use a category and also add objects or groups ofthe same type; for example, you cannot use the --usercat=all option and then add a user to the CA ACLwith the ipa caacl-add-user --users=user_name command.
NOTE
Requesting a certificate for a user or group using a certificate profile fails if the user orgroup are not added to the corresponding CA ACL. For example:
$ ipa cert-request CSR-FILE --principal user --profile-id profile_idipa: ERROR Insufficient access: Principal 'user' is not permitted to use CA '.' with profile 'profile_id' for certificate issuance.
You must either add the user or group to the CA ACL, as described in the section called“Adding Entries to CA ACLs and Removing Entries from CA ACLs”, or associate the CAACL with the all user category.
Displaying CA ACLsTo display all CA ACLs, use the ipa caacl-find command:
$ ipa caacl-find-----------------2 CA ACLs matched----------------- ACL name: hosts_services_caIPAserviceCert Enabled: TRUE...
Note that ipa caacl-find accepts the --cacat, --profilecat, --usercat, --hostcat, and --servicecatoptions, which can be used to filter the results of the search to CA ACLs with the corresponding CA,certificate profile, user, host, or service category. Note that IdM only accepts the all category with theseoptions. For more information about the options, see the section called “Creating CA ACLs” .
To display information about a particular CA ACL, use the ipa caacl-show command:
CHAPTER 20. MANAGING CERTIFICATES FOR USERS, HOSTS, AND SERVICES
221

$ ipa caacl-show ca_acl_name ACL name: ca_acl_name Enabled: TRUE Host category: all...
Modifying CA ACLsTo modify an existing CA ACL, use the ipa caacl-mod command. Pass the required modifications usingthe command-line options accepted by ipa caacl-mod. For example, to modify the description of a CAACL and associate the CA ACL with all certificate profiles:
$ ipa caacl-mod ca_acl_name --desc="New description" --profilecat=all---------------------------Modified CA ACL "ca_acl_name"--------------------------- ACL name: smime_acl Description: New description Enabled: TRUE Profile category: all
The most notable options accepted by ipa caacl-mod are the --cacat, --profilecat, --usercat, --hostcat,and --servicecat options. For a description of these options, see the section called “Creating CA ACLs” .
Disabling and Enabling CA ACLsTo disable a CA ACL, use the ipa caacl-disable command:
$ ipa caacl-disable ca_acl_name---------------------------Disabled CA ACL "ca_acl_name"---------------------------
A disabled CA ACL is not applied and cannot be used to request a certificate. Disabling a CA ACL doesnot remove it from IdM.
To enable a disabled CA ACL, use the ipa caacl-enable command:
$ ipa caacl-enable ca_acl_name---------------------------Enabled CA ACL "ca_acl_name"---------------------------
Deleting CA ACLsTo remove an existing CA ACL, use the ipa caacl-del command:
$ ipa caacl-del ca_acl_name
Adding Entries to CA ACLs and Removing Entries from CA ACLsUsing the ipa caacl-add-* and ipa caacl-remove-* commands, you can add new entries to a CA ACL orremove existing entries.
ipa caacl-add-ca and ipa caacl-remove-ca
Adds or removes a CA.
Linux Domain Identity, Authentication, and Policy Guide
222

ipa caacl-add-host and ipa caacl-remove-host
Adds or removes a host or host group.
ipa caacl-add-profile and ipa caacl-remove-profile
Adds or removes a profile.
ipa caacl-add-service and ipa caacl-remove-service
Adds or removes a service.
ipa caacl-add-user and ipa caacl-remove-user
Adds or removes a user or group.
For example:
$ ipa caacl-add-user ca_acl_name --groups=group_name
Note that it is not possible to add an object or a group of objects to a CA ACL and also use a category ofthe same object, as described in the section called “Creating CA ACLs” ; these settings are mutuallyexclusive. For example, if you attempt to run the ipa caacl-add-user --users=user_name command ona CA ACL specified with the --usercat=all option, the command fails:
$ ipa caacl-add-user ca_acl_name --users=user_nameipa: ERROR: users cannot be added when user category='all'
NOTE
Requesting a certificate for a user or group using a certificate profile fails if the user orgroup are not added to the corresponding CA ACL. For example:
$ ipa cert-request CSR-FILE --principal user --profile-id profile_idipa: ERROR Insufficient access: Principal 'user' is not permitted to use CA '.' with profile 'profile_id' for certificate issuance.
You must either add the user or group to the CA ACL, or associate the CA ACL with the all user category, as described in the section called “Creating CA ACLs” .
For detailed information on the required syntax for these commands and the available options, run thecommands with the --help option added. For example:
$ ipa caacl-add-user --help
20.5.2. CA ACL Management from the Web UI
To manage CA ACLs from the IdM web UI:
1. Open the Authentication tab and the Certificates subtab.
2. Open the CA ACLs section.
CHAPTER 20. MANAGING CERTIFICATES FOR USERS, HOSTS, AND SERVICES
223
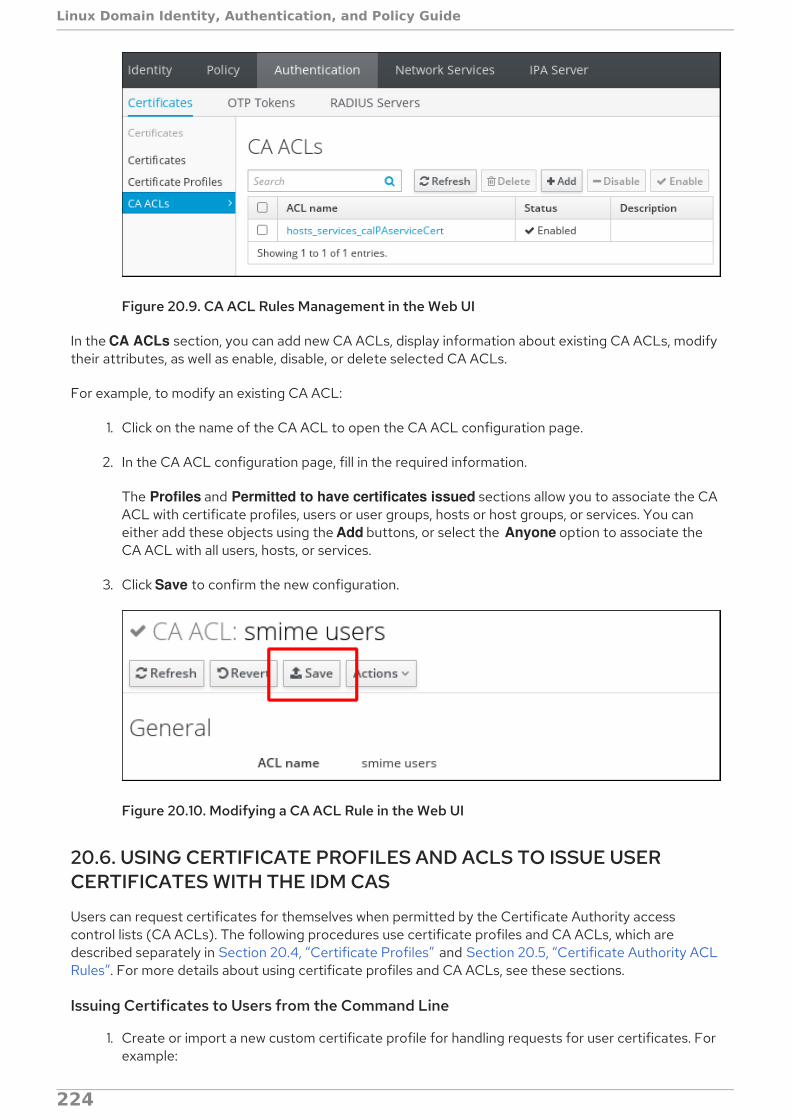
Figure 20.9. CA ACL Rules Management in the Web UI
In the CA ACLs section, you can add new CA ACLs, display information about existing CA ACLs, modifytheir attributes, as well as enable, disable, or delete selected CA ACLs.
For example, to modify an existing CA ACL:
1. Click on the name of the CA ACL to open the CA ACL configuration page.
2. In the CA ACL configuration page, fill in the required information.
The Profiles and Permitted to have certificates issued sections allow you to associate the CAACL with certificate profiles, users or user groups, hosts or host groups, or services. You caneither add these objects using the Add buttons, or select the Anyone option to associate theCA ACL with all users, hosts, or services.
3. Click Save to confirm the new configuration.
Figure 20.10. Modifying a CA ACL Rule in the Web UI
20.6. USING CERTIFICATE PROFILES AND ACLS TO ISSUE USERCERTIFICATES WITH THE IDM CAS
Users can request certificates for themselves when permitted by the Certificate Authority accesscontrol lists (CA ACLs). The following procedures use certificate profiles and CA ACLs, which aredescribed separately in Section 20.4, “Certificate Profiles” and Section 20.5, “Certificate Authority ACLRules”. For more details about using certificate profiles and CA ACLs, see these sections.
Issuing Certificates to Users from the Command Line
1. Create or import a new custom certificate profile for handling requests for user certificates. Forexample:
Linux Domain Identity, Authentication, and Policy Guide
224
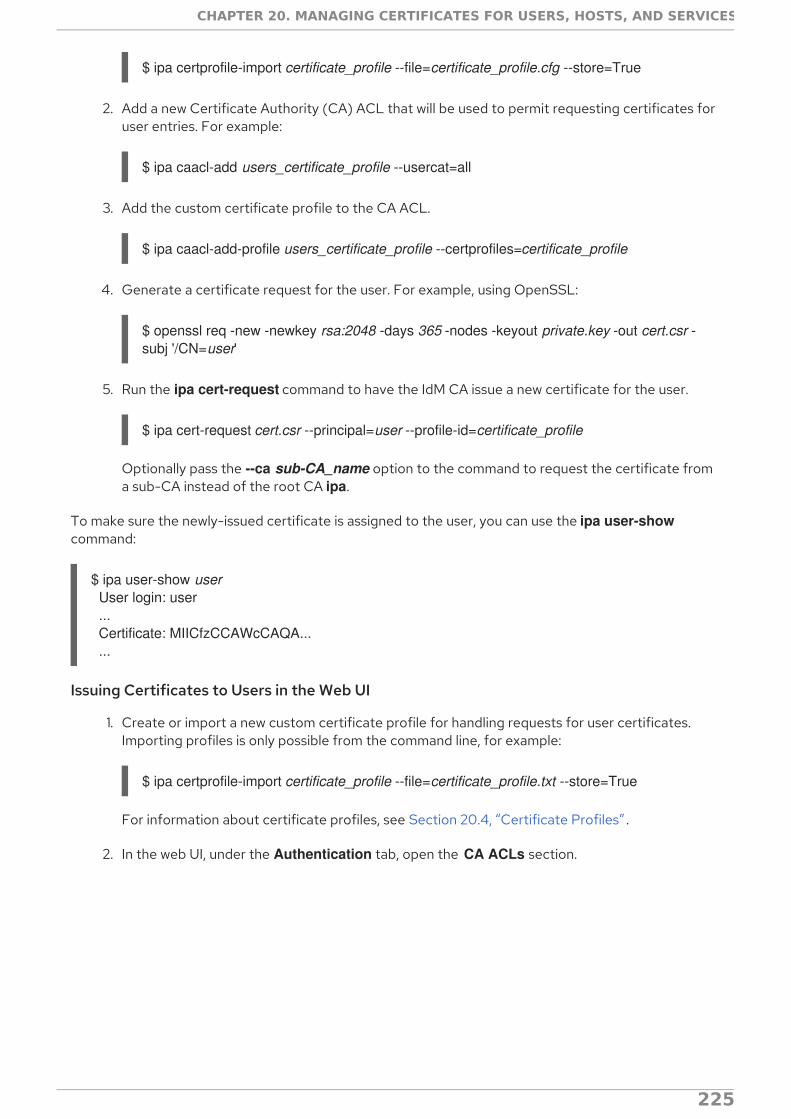
$ ipa certprofile-import certificate_profile --file=certificate_profile.cfg --store=True
2. Add a new Certificate Authority (CA) ACL that will be used to permit requesting certificates foruser entries. For example:
$ ipa caacl-add users_certificate_profile --usercat=all
3. Add the custom certificate profile to the CA ACL.
$ ipa caacl-add-profile users_certificate_profile --certprofiles=certificate_profile
4. Generate a certificate request for the user. For example, using OpenSSL:
$ openssl req -new -newkey rsa:2048 -days 365 -nodes -keyout private.key -out cert.csr -subj '/CN=user'
5. Run the ipa cert-request command to have the IdM CA issue a new certificate for the user.
$ ipa cert-request cert.csr --principal=user --profile-id=certificate_profile
Optionally pass the --ca sub-CA_name option to the command to request the certificate froma sub-CA instead of the root CA ipa.
To make sure the newly-issued certificate is assigned to the user, you can use the ipa user-showcommand:
$ ipa user-show user User login: user ... Certificate: MIICfzCCAWcCAQA... ...
Issuing Certificates to Users in the Web UI
1. Create or import a new custom certificate profile for handling requests for user certificates.Importing profiles is only possible from the command line, for example:
$ ipa certprofile-import certificate_profile --file=certificate_profile.txt --store=True
For information about certificate profiles, see Section 20.4, “Certificate Profiles” .
2. In the web UI, under the Authentication tab, open the CA ACLs section.
CHAPTER 20. MANAGING CERTIFICATES FOR USERS, HOSTS, AND SERVICES
225
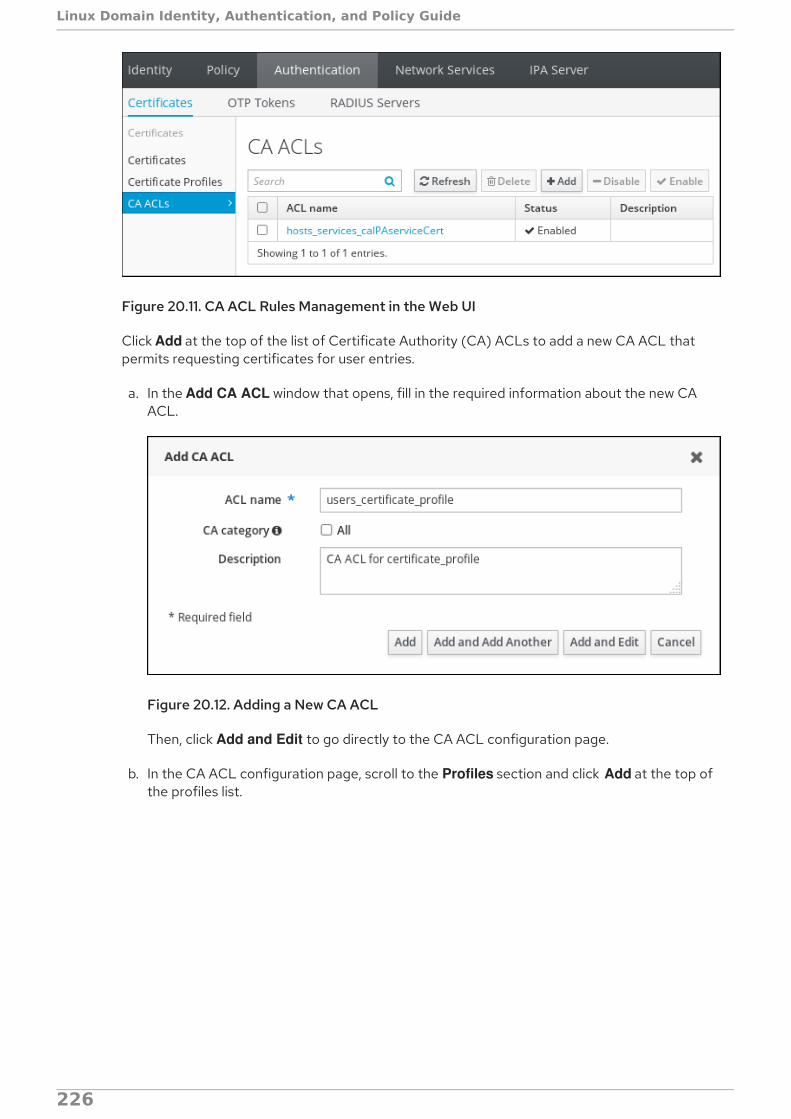
Figure 20.11. CA ACL Rules Management in the Web UI
Click Add at the top of the list of Certificate Authority (CA) ACLs to add a new CA ACL thatpermits requesting certificates for user entries.
a. In the Add CA ACL window that opens, fill in the required information about the new CAACL.
Figure 20.12. Adding a New CA ACL
Then, click Add and Edit to go directly to the CA ACL configuration page.
b. In the CA ACL configuration page, scroll to the Profiles section and click Add at the top ofthe profiles list.
Linux Domain Identity, Authentication, and Policy Guide
226

Figure 20.13. Adding a Certificate Profile to the CA ACL
c. Add the custom certificate profile to the CA ACL by selecting the profile and moving it tothe Prospective column.
Figure 20.14. Selecting a Certificate Profile
Then, click Add.
d. Scroll to the Permitted to have certificates issued section to associate the CA ACL withusers or user groups.
You can either add users or groups using the Add buttons, or select the Anyone option toassociate the CA ACL with all users.
CHAPTER 20. MANAGING CERTIFICATES FOR USERS, HOSTS, AND SERVICES
227
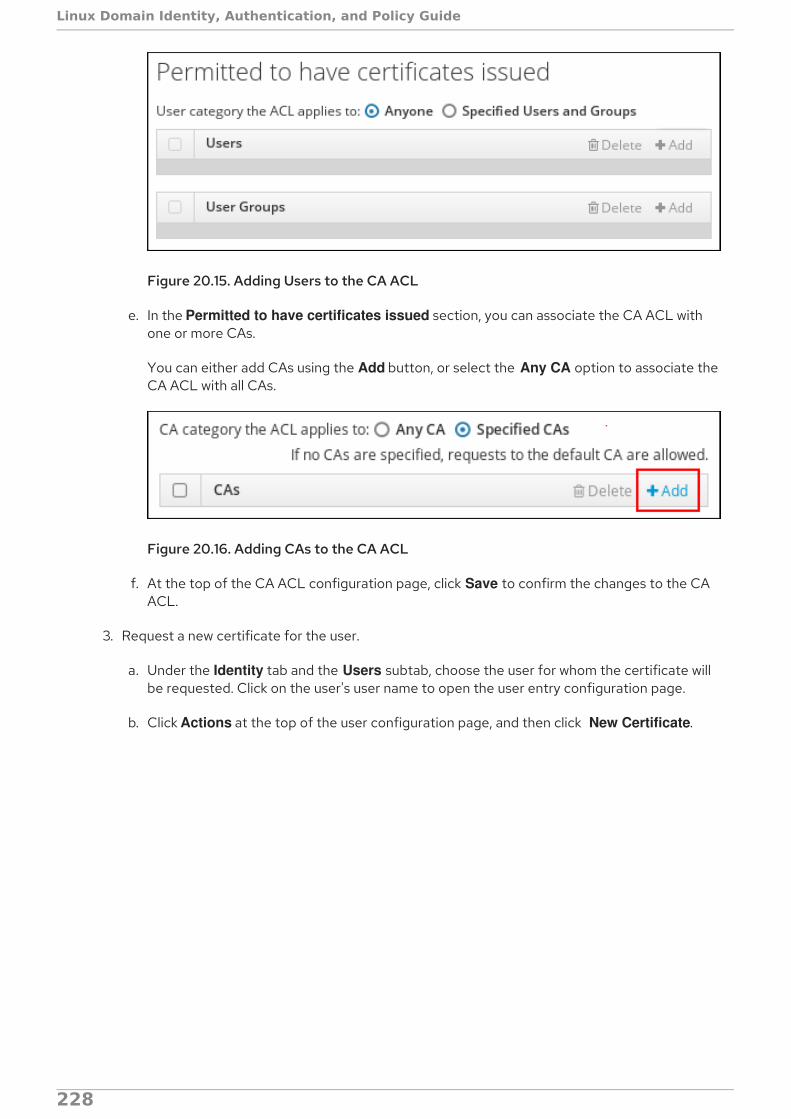
Figure 20.15. Adding Users to the CA ACL
e. In the Permitted to have certificates issued section, you can associate the CA ACL withone or more CAs.
You can either add CAs using the Add button, or select the Any CA option to associate theCA ACL with all CAs.
Figure 20.16. Adding CAs to the CA ACL
f. At the top of the CA ACL configuration page, click Save to confirm the changes to the CAACL.
3. Request a new certificate for the user.
a. Under the Identity tab and the Users subtab, choose the user for whom the certificate willbe requested. Click on the user's user name to open the user entry configuration page.
b. Click Actions at the top of the user configuration page, and then click New Certificate.
Linux Domain Identity, Authentication, and Policy Guide
228
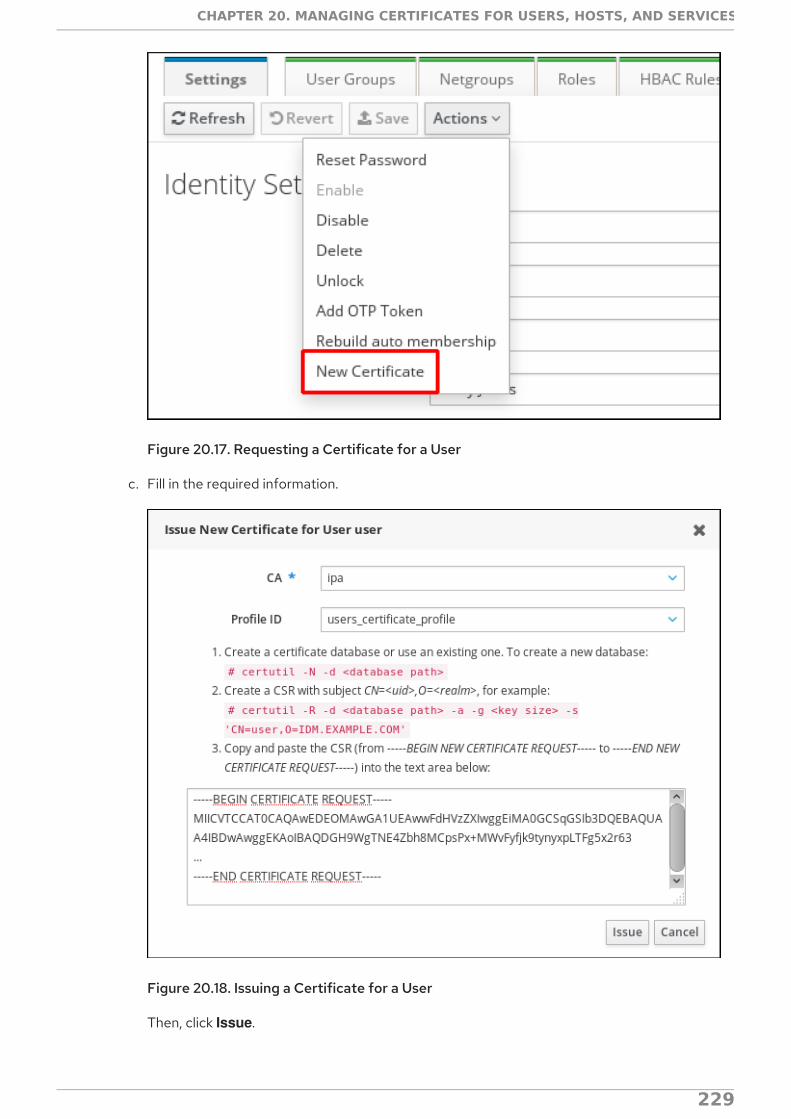
Figure 20.17. Requesting a Certificate for a User
c. Fill in the required information.
Figure 20.18. Issuing a Certificate for a User
Then, click Issue.
CHAPTER 20. MANAGING CERTIFICATES FOR USERS, HOSTS, AND SERVICES
229

After this, the newly issued certificate is visible in the user configuration page.
Linux Domain Identity, Authentication, and Policy Guide
230

CHAPTER 21. MANAGING KERBEROS PRINCIPAL ALIASESFOR USERS, HOSTS, AND SERVICESWhen you create a new user, host, or service, a Kerberos principal in the following format is automaticallyadded:
user_name@REALM
host/host_name@REALM
service_name/host_name@REALM
In some scenarios, it is beneficial for the administrator to enable users, hosts, or services to authenticateagainst Kerberos applications using an alias, for example:
The user name changed, but the user should be able to login using both the previous and newuser name.
The user needs to log in using the email address even if the IdM Kerberos realm differs from theemail domain.
Note that if you rename a user, the object keeps the aliases and the previous canonical principal name.
21.1. KERBEROS PRINCIPAL ALIAS
Adding a Kerberos Principal AliasTo add the alias name useralias to the account user, enter:
[root@ipaserver ~]# ipa user-add-principal user useralias--------------------------------Added new aliases to user "user"-------------------------------- User login: user Principal alias: [email protected], [email protected]
To add an alias to a host or service, use the ipa host-add-principal or ipa service-add-principalcommand respectively instead.
If you use an alias name to authenticate, pass the -C option to the kinit command:
[root@ipaserver ~]# kinit -C useraliasPassword for [email protected]:
Removing a Kerberos Principal AliasTo remove the alias useralias from the account user, enter:
[root@ipaserver ~]# ipa user-remove-principal user useralias--------------------------------Removed aliases from user "user"-------------------------------- User login: user Principal alias: [email protected]
To remove an alias from a host or service, use the ipa host-remove-principal or ipa service-remove-
CHAPTER 21. MANAGING KERBEROS PRINCIPAL ALIASES FOR USERS, HOSTS, AND SERVICES
231

To remove an alias from a host or service, use the ipa host-remove-principal or ipa service-remove-principal command respectively instead.
Note that you cannot remove the canonical principal name:
[root@ipaserver ~]# ipa user-show user User login: user ... Principal name: [email protected] ...
[root@ipaserver ~]# ipa user-remove-principal user useripa: ERROR: invalid 'krbprincipalname': at least one value equal to the canonical principal name must be present
21.2. KERBEROS ENTERPRISE PRINCIPAL ALIAS
Enterprise principal aliases can use any domain suffix except for user principal name (UPN) suffixes,NetBIOS names, or domain names of trusted Active Directory forest domains.
NOTE
When adding or removing enterprise principal aliases, escape the @ symbol using twobackslashes (\\). Otherwise, the shell interprets the @ symbol as part of the Kerberosrealm name and leads to the following error:
ipa: ERROR: The realm for the principal does not match the realm for this IPA server
Adding a Kerberos Enterprise Principal AliasTo add the enterprise principal alias [email protected] to the user account:
[root@ipaserver ~]# ipa user-add-principal user user\\@example.com--------------------------------Added new aliases to user "user"-------------------------------- User login: user Principal alias: [email protected], user\@[email protected]
To add an enterprise alias to a host or service, use the ipa host-add-principal or ipa service-add-principal command respectively instead.
If you use an enterprise principal name to authenticate, pass the -E option to the kinit command:
[root@ipaserver ~]# kinit -E [email protected] for user\@[email protected]:
Removing a Kerberos Enterprise Principal AliasTo remove the enterprise principal alias [email protected] from the account user, enter:
[root@ipaserver ~]# ipa user-remove-principal user user\\@example.com--------------------------------Removed aliases from user "user"
Linux Domain Identity, Authentication, and Policy Guide
232

-------------------------------- User login: user Principal alias: [email protected]
To remove an alias from a host or service, use the ipa host-remove-principal or ipa service-remove-principal command respectively instead.
CHAPTER 21. MANAGING KERBEROS PRINCIPAL ALIASES FOR USERS, HOSTS, AND SERVICES
233

CHAPTER 22. STORING AUTHENTICATION SECRETS WITHVAULTSA vault is a secure location for storing, retrieving, sharing, and recovering secrets. A secret is security-sensitive data that should only be accessible by a limited group of people or entities. For example,secrets include:
passwords
PINs
private SSH keys
Users and services can access the secrets stored in a vault from any machine enrolled in theIdentity Management (IdM) domain.
NOTE
Vault is only available from the command line, not from the IdM web UI.
Use cases for vaults include:
Storing personal secrets of a user
See Section 22.4, “Storing a User's Personal Secret” for details.
Storing a secret for a service
See Section 22.5, “Storing a Service Secret in a Vault” for details.
Storing a common secret used by multiple users
See Section 22.6, “Storing a Common Secret for Multiple Users” for details.
Note that to use vaults, you must meet the conditions described in Section 22.2, “Prerequisites for UsingVaults”.
22.1. HOW VAULTS WORK
22.1.1. Vault Owners, Members, and Administrators
IdM distinguishes the following vault user types:
Vault owner
A vault owner is a user or service with basic management privileges on the vault. For example, a vaultowner can modify the properties of the vault or add new vault members.
Each vault must have at least one owner. A vault can also have multiple owners.
Vault member
A vault member is a user or service who can access a vault created by another user or service.
Vault administrator
Vault administrators have unrestricted access to all vaults and are allowed to perform all vault
Linux Domain Identity, Authentication, and Policy Guide
234

Vault administrators have unrestricted access to all vaults and are allowed to perform all vaultoperations.
NOTE
Symmetric and asymmetric vaults are protected with a password or key and applyspecial access control rules (see Section 22.1.2, “Standard, Symmetric, andAsymmetric Vaults”). The administrator must meet these rules to:
access secrets in symmetric and asymmetric vaults
change or reset the vault password or key
A vault administrator is any user with the Vault Administrators privilege. See Section 32.4, “DefiningRole-Based Access Controls” for information on defining user privileges.
Certain owner and member privileges depend on the type of the vault. See Section 22.1.2, “Standard,Symmetric, and Asymmetric Vaults” for details.
Vault UserThe output of some commands, such as the ipa vault-show command, also displays Vault user for uservaults:
$ ipa vault-show my_vault Vault name: my_vault Type: standard Owner users: user Vault user: user
The vault user represents the user in whose container the vault is located. For details on vaultcontainers and user vaults, see Section 22.1.4, “Vault Containers” and Section 22.1.3, “User, Service, andShared Vaults”.
22.1.2. Standard, Symmetric, and Asymmetric Vaults
The following vault types are based on the level of security and access control:
Standard vault
Vault owners and vault members can archive and retrieve the secrets without having to use apassword or key.
Symmetric vault
Secrets in the vault are protected with a symmetric key. Vault members and vault owners can archiveand retrieve the secrets, but they must provide the vault password.
Asymmetric vault
Secrets in the vault are protected with an asymmetric key. Users archive the secret using a public keyand retrieve it using a private key. Vault members can only archive secrets, while vault owners canboth archive and retrieve secrets.
22.1.3. User, Service, and Shared Vaults
CHAPTER 22. STORING AUTHENTICATION SECRETS WITH VAULTS
235
The following vault types are based on ownership:
User vault: a private vault for a user
Owner: a single user.
Any user can own one or more user vaults.
Service vault: a private vault for a service
Owner: a single service.
Any service can own one or more service vaults.
Shared vault
Owner: the vault administrator who created the vault. Other vault administrators also have fullaccess to the vault.
Shared vaults can be used by multiple users or services.
22.1.4. Vault Containers
A vault container is a collection of vaults.
IdM provides the following default vault containers:
User container: a private container for a user
This container stores: user vaults for a particular user.
Service container: a private container for a service
This container stores: service vaults for a particular service.
Shared container
This container stores: vaults that can be shared by multiple users or services.
IdM creates user and service containers for each user or service automatically when the first privatevault for the user or service is created. After the user or service is deleted, IdM removes the containerand its contents.
22.2. PREREQUISITES FOR USING VAULTS
To enable vaults, install the Key Recovery Authority (KRA) Certificate System component on one of theservers in your IdM domain:
# ipa-kra-install
22.3. GETTING HELP FOR VAULT COMMANDS
To display all commands used to manage vaults and vault containers:
$ ipa help vault
Linux Domain Identity, Authentication, and Policy Guide
236
To display detailed help for a particular command, add the --help option to the command:
$ ipa vault-add --help
Vault Commands Fail with vault not found ErrorSome commands require you to specify the owner or the type of the vault using the following options:
--user or --service specify the owner of the vault you want to view
$ ipa vault-show user_vault --user user
--shared specify that the vault you want to view is a shared vault
For example, if you attempt to view another user's vault without adding --user, IdM informs you it didnot find the vault:
[admin@server ~]$ ipa vault-show user_vaultipa: ERROR: user_vault: vault not found
22.4. STORING A USER'S PERSONAL SECRET
This section shows how a user can create one or more private vaults to securely store personal secrets.The user then retrieves the secrets when required, on any machine in the domain. For example, the usercan archive a personal certificate in a vault, thus storing the certificate securely in a centralized location.
This section includes these procedures:
Section 22.4.1, “Archiving a User's Personal Secret”
Section 22.4.2, “Retrieving a User's Personal Secret”
In the procedures:
user is the user who wants to create the vault
my_vault is the vault used to store the user's certificate
the vault type is standard, so that accessing the archived certificate does not require the userto provide a vault password
secret.txt is the file containing the certificate that the user wants to store in the vault
secret_exported.txt is the file to which the user exports the archived certificate
22.4.1. Archiving a User's Personal Secret
Create a private user vault and store your certificate in it. The vault type is standard, which ensures youwill not be required to authenticate when accessing the certificate.
1. Log in as user:
$ kinit user
2. Use the ipa vault-add command to create a standard vault:
CHAPTER 22. STORING AUTHENTICATION SECRETS WITH VAULTS
237
$ ipa vault-add my_vault --type standard----------------------Added vault "my_vault"---------------------- Vault name: my_vault Type: standard Owner users: user Vault user: user
3. Use the ipa vault-archive --in command to archive the secret.txt file into the vault:
$ ipa vault-archive my_vault --in secret.txt-----------------------------------Archived data into vault "my_vault"-----------------------------------
NOTE
One vault can only store one secret.
22.4.2. Retrieving a User's Personal Secret
Export the certificate from your private standard vault.
1. Log in as user:
$ kinit user
2. Use the ipa vault-retrieve --out command to retrieve the contents of the vault and save theminto the secret_exported.txt file.
$ ipa vault-retrieve my_vault --out secret_exported.txt--------------------------------------Retrieved data from vault "my_vault"--------------------------------------
22.5. STORING A SERVICE SECRET IN A VAULT
This section shows how an administrator can use vaults to securely store a service secret in a centralizedlocation. The service secret is encrypted with the service public key. The service then retrieves thesecret using its private key on any machine in the domain. Only the service and the administrator areallowed to access the secret.
This section includes these procedures:
Section 22.5.1, “Creating a User Vault to Store a Service Password”
Section 22.5.2, “Provisioning a Service Password from a User Vault to Service Instances”
Section 22.5.3, “Retrieving a Service Password for a Service Instance”
Section 22.5.4, “Changing Service Vault Password”
Linux Domain Identity, Authentication, and Policy Guide
238

In the procedures:
admin is the administrator who manages the service password
http_password is the name of the private user vault created by the administrator
password.txt is the file containing the service password
password_vault is the vault created for the service
HTTP/server.example.com is the service whose password is being archived
service-public.pem is the service public key used to encrypt the password stored in password_vault
22.5.1. Creating a User Vault to Store a Service Password
Create an administrator-owned user vault, and use it to store the service password. The vault type isstandard, which ensures the administrator is not required to authenticate when accessing the contentsof the vault.
1. Log in as the administrator:
$ kinit admin
2. Create a standard user vault:
$ ipa vault-add http_password --type standard---------------------------Added vault "http_password"--------------------------- Vault name: http_password Type: standard Owner users: admin Vault user: admin
3. Archive the service password into the vault:
$ ipa vault-archive http_password --in password.txt----------------------------------------Archived data into vault "http_password"----------------------------------------
WARNING
After archiving the password into the vault, delete password.txt from yoursystem.
22.5.2. Provisioning a Service Password from a User Vault to Service Instances
CHAPTER 22. STORING AUTHENTICATION SECRETS WITH VAULTS
239

Using an asymmetric vault created for the service, provision the service password to a service instance.
1. Log in as the administrator:
$ kinit admin
2. Obtain the public key of the service instance. For example, using the openssl utility:
a. Generate the service-private.pem private key.
$ openssl genrsa -out service-private.pem 2048Generating RSA private key, 2048 bit long modulus.+++...........................................+++e is 65537 (0x10001)
b. Generate the service-public.pem public key based on the private key.
$ openssl rsa -in service-private.pem -out service-public.pem -puboutwriting RSA key
3. Create an asymmetric vault as the service instance vault, and provide the public key:
$ ipa vault-add password_vault --service HTTP/server.example.com --type asymmetric --public-key-file service-public.pem----------------------------Added vault "password_vault"----------------------------Vault name: password_vaultType: asymmetricPublic key: LS0tLS1C...S0tLS0tCg==Owner users: adminVault service: HTTP/[email protected]
The password archived into the vault will be protected with the key.
4. Retrieve the service password from the administrator's private vault, and then archive it into thenew service vault:
$ ipa vault-retrieve http_password --out password.txt-----------------------------------------Retrieved data from vault "http_password"-----------------------------------------
$ ipa vault-archive password_vault --service HTTP/server.example.com --in password.txt-----------------------------------Archived data into vault "password_vault"-----------------------------------
This encrypts the password with the service instance public key.
Linux Domain Identity, Authentication, and Policy Guide
240
WARNING
After archiving the password into the vault, delete password.txt from yoursystem.
Repeat these steps for every service instance that requires the password. Create a new asymmetricvault for each service instance.
22.5.3. Retrieving a Service Password for a Service Instance
A service instance can retrieve the service vault password using the locally-stored service private key.
1. Log in as the administrator:
$ kinit admin
2. Obtain a Kerberos ticket for the service:
# kinit HTTP/server.example.com -k -t /etc/httpd/conf/ipa.keytab
3. Retrieve the service vault password:
$ ipa vault-retrieve password_vault --service HTTP/server.example.com --private-key-file service-private.pem --out password.txt------------------------------------Retrieved data from vault "password_vault"------------------------------------
22.5.4. Changing Service Vault Password
If a service instance is compromised, isolate it by changing the service vault password and then re-provisioning the new password to non-compromised service instances only.
1. Archive the new password in the administrator's user vault:
$ ipa vault-archive http_password --in new_password.txt----------------------------------------Archived data into vault "http_password"----------------------------------------
This overwrites the current password stored in the vault.
2. Re-provision the new password to each service instance excluding the compromised instance.
a. Retrieve the new password from the administrator's vault:
$ ipa vault-retrieve http_password --out password.txt-----------------------------------------
CHAPTER 22. STORING AUTHENTICATION SECRETS WITH VAULTS
241

Retrieved data from vault "http_password"-----------------------------------------
b. Archive the new password into the service instance vault:
$ ipa vault-archive password_vault --service HTTP/server.example.com --in password.txt-----------------------------------Archived data into vault "password_vault"-----------------------------------
WARNING
After archiving the password into the vault, delete password.txt fromyour system.
22.6. STORING A COMMON SECRET FOR MULTIPLE USERS
This section shows how an administrator can create a shared vault and allow other users to access thesecret in the vault. The administrator archives a common password into the vault, and the other usersare able to retrieve the password on any machine in the domain.
This section includes these procedures:
Section 22.6.2, “Retrieving a Secret from a Shared Vault as a Member User”
Section 22.6.1, “Creating the Shared Vault with the Common Secret”
In the procedures:
shared_vault is the vault used to store the common password
admin is the administrator who creates the shared vault
the vault type is standard, so that accessing the archived password does not require the user toprovide a vault password
secret.txt is the file containing the common secret
user1 and user2 are the users allowed to access the vault
22.6.1. Creating the Shared Vault with the Common Secret
Create a shared vault and use it to store the common secret. Add the users who will be accessing thesecret as vault members. The vault type is standard, which ensures any user accessing the secret will notbe required to authenticate.
1. Log in as the administrator:
$ kinit admin
Linux Domain Identity, Authentication, and Policy Guide
242
2. Create the shared vault:
$ ipa vault-add shared_vault --shared --type standard---------------------------Added vault "shared_vault"--------------------------- Vault name: shared_vault Type: standard Owner users: admin Shared vault: True
3. Archive the secret into the vault. Add the --shared option to specify that the vault is in theshared container:
$ ipa vault-archive shared_vault --shared --in secret.txt-----------------------------------Archived data into vault "shared_vault"-----------------------------------
NOTE
One vault can only store one secret.
4. Add user1 and user2 as vault members:
ipa vault-add-member shared_vault --shared --users={user1,user2}Vault name: shared_vaultType: standardOwner users: adminShared vault: TrueMember users: user1, user2-------------------------Number of members added 2-------------------------
22.6.2. Retrieving a Secret from a Shared Vault as a Member User
Log in as a member user of the vault, and export the file with the secret from the vault.
1. Log in as the user1 member user:
$ kinit user1
2. Retrieve the secret from the shared vault:
$ ipa vault-retrieve shared_vault --shared --out secret_exported.txt-----------------------------------------Retrieved data from vault "shared_vault"-----------------------------------------
CHAPTER 22. STORING AUTHENTICATION SECRETS WITH VAULTS
243
CHAPTER 23. INTEGRATING WITH NIS DOMAINS ANDNETGROUPSNetwork information service (NIS) is one of the most common ways to manage identities andauthentication on Unix networks. It is simple and easy to use, but it also has inherent security risks and alack of flexibility that can make administering NIS domains problematic.
Identity Management supplies a way to integrate netgroups and other NIS data into the IdM domain,which incorporates the stronger security structure of IdM over the NIS configuration. Alternatively,administrators can simply migrate user and host identities from a NIS domain into the IdM domain.
23.1. ABOUT NIS AND IDENTITY MANAGEMENT
Network information service (NIS) centrally manages authentication and identity information such asusers and passwords, hosts and IP addresses, and POSIX groups. This was originally called Yellow Pages(abbreviated YP) because of its simple focus on identity and authentication lookups.
NIS is considered too insecure for most modern network environments because it provides no hostauthentication mechanisms and it transmits all of its information over the network unencrypted, includingpassword hashes. Still, while NIS has been falling out of favor with administrators, it is still actively usedby many system clients. There are ways to work around those insecurities by integrating NIS with otherprotocols which offer enhanced security.
In Identity Management, NIS objects are integrated into IdM using the underlying LDAP directory. LDAPservices offer support for NIS objects (as defined in RFC 2307), which Identity Management customizesto provide better integration with other domain identities. The NIS object is created inside the LDAPservice and then a module like nss_ldap or SSSD fetches the object using an encrypted LDAPconnection.
NIS entities are stored in netgroups. A netgroup allows nesting (groups inside groups), which standardUnix groups do not support. Also, netgroups provide a way to group hosts, which is also missing in Unixgroup.
NIS groups work by defining users and hosts as members of a larger domain. A netgroup sets a trio ofinformation — host, user, domain. This is called a triple.
host,user,domain
A netgroup triple associates the user or the host with the domain; it does not associate the user and thehost with each other. Therefore, a triple usually defines a host or a user for better clarity andmanagement.
host.example.com,,nisdomain.example.com-,jsmith,nisdomain.example.com
NIS distributes more than just netgroup data. It stores information about users and passwords, groups,network data, and hosts, among other information. Identity Management can use a NIS listener to mappasswords, groups, and netgroups to IdM entries.
In IdM LDAP entries, the users in a netgroup can be a single user or a group; both are identified by the memberUser parameter. Likewise, hosts can be either a single host or a host group; both are identifiedby the memberHost attribute.
dn: ipaUniqueID=d4453480-cc53-11dd-ad8b-0800200c9a66,cn=ng,cn=accounts,...
Linux Domain Identity, Authentication, and Policy Guide
244
objectclass: topobjectclass: ipaAssociationobjectclass: ipaNISNetgroupipaUniqueID: d4453480-cc53-11dd-ad8b-0800200c9a66cn: netgroup1memberHost: fqdn=host1.example.com,cn=computers,cn=accounts,...memberHost: cn=VirtGuests,cn=hostgroups,cn=accounts,...memberUser: cn=jsmith,cn=users,cn=accounts,...memberUser: cn=bjensen,cn=users,cn=accounts,...memberUser: cn=Engineering,cn=groups,cn=accounts,...nisDomainName: nisdomain.example.com
In Identity Management, these netgroup entries are handled using the netgroup-* commands, whichshow the basic LDAP entry:
[root@server ~]# ipa netgroup-show netgroup1Netgroup name: netgroup1Description: my netgroupNIS domain name: nisdomainMember User: jsmithMember User: bjensenMember User: EngineeringMember Host: host1.example.comMember Host: VirtGuests
When a client attempts to access the NIS netgroup, then Identity Management translates the LDAPentry into a traditional NIS map and sends it to a client over the NIS protocol (using a NIS plug-in) or ittranslates it into an LDAP format that is compliant with RFC 2307 or RFC 2307bis.
23.2. SETTING THE NIS PORT FOR IDENTITY MANAGEMENT
The IdM server binds to its NIS services over a random port that is selected when the server starts. Itsends that port assignment to the portmapper so that NIS clients know what port to use to contact theIdM server.
Administrators may need to open a firewall for NIS clients or may have other services that need to knowthe port number in advance and need that port number to remain the same. In that case, anadministrator can specify the port to use.
NOTE
Any available port number below 1024 can be used for the NIS Plug-in setting.
The NIS configuration is in the NIS Plug-in in Identity Management's internal Directory Server instance.To specify the port:
1. Enable the NIS listener and compatibility plug-ins:
[root@ipaserver ~]# ipa-nis-manage enable[root@ipaserver ~]# ipa-compat-manage enable
2. Edit the plug-in configuration and add the port number as an argument. For example, to set theport to 514:
CHAPTER 23. INTEGRATING WITH NIS DOMAINS AND NETGROUPS
245
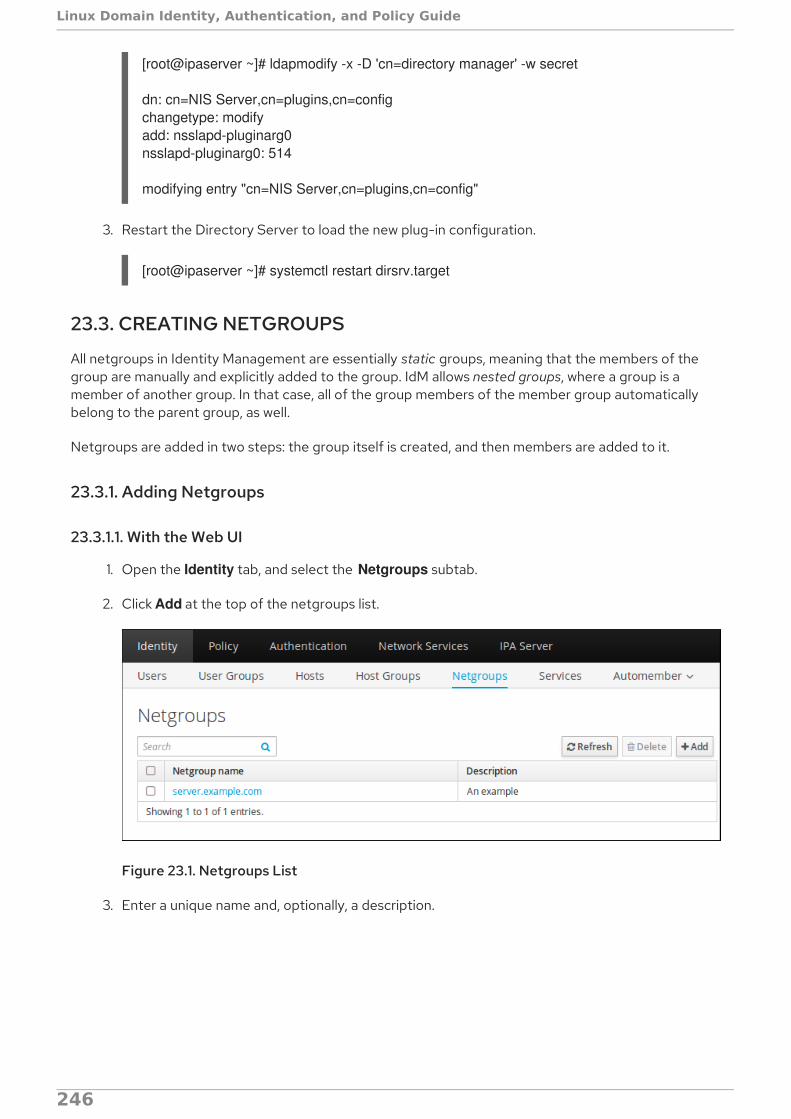
[root@ipaserver ~]# ldapmodify -x -D 'cn=directory manager' -w secret
dn: cn=NIS Server,cn=plugins,cn=configchangetype: modifyadd: nsslapd-pluginarg0nsslapd-pluginarg0: 514
modifying entry "cn=NIS Server,cn=plugins,cn=config"
3. Restart the Directory Server to load the new plug-in configuration.
[root@ipaserver ~]# systemctl restart dirsrv.target
23.3. CREATING NETGROUPS
All netgroups in Identity Management are essentially static groups, meaning that the members of thegroup are manually and explicitly added to the group. IdM allows nested groups, where a group is amember of another group. In that case, all of the group members of the member group automaticallybelong to the parent group, as well.
Netgroups are added in two steps: the group itself is created, and then members are added to it.
23.3.1. Adding Netgroups
23.3.1.1. With the Web UI
1. Open the Identity tab, and select the Netgroups subtab.
2. Click Add at the top of the netgroups list.
Figure 23.1. Netgroups List
3. Enter a unique name and, optionally, a description.
Linux Domain Identity, Authentication, and Policy Guide
246
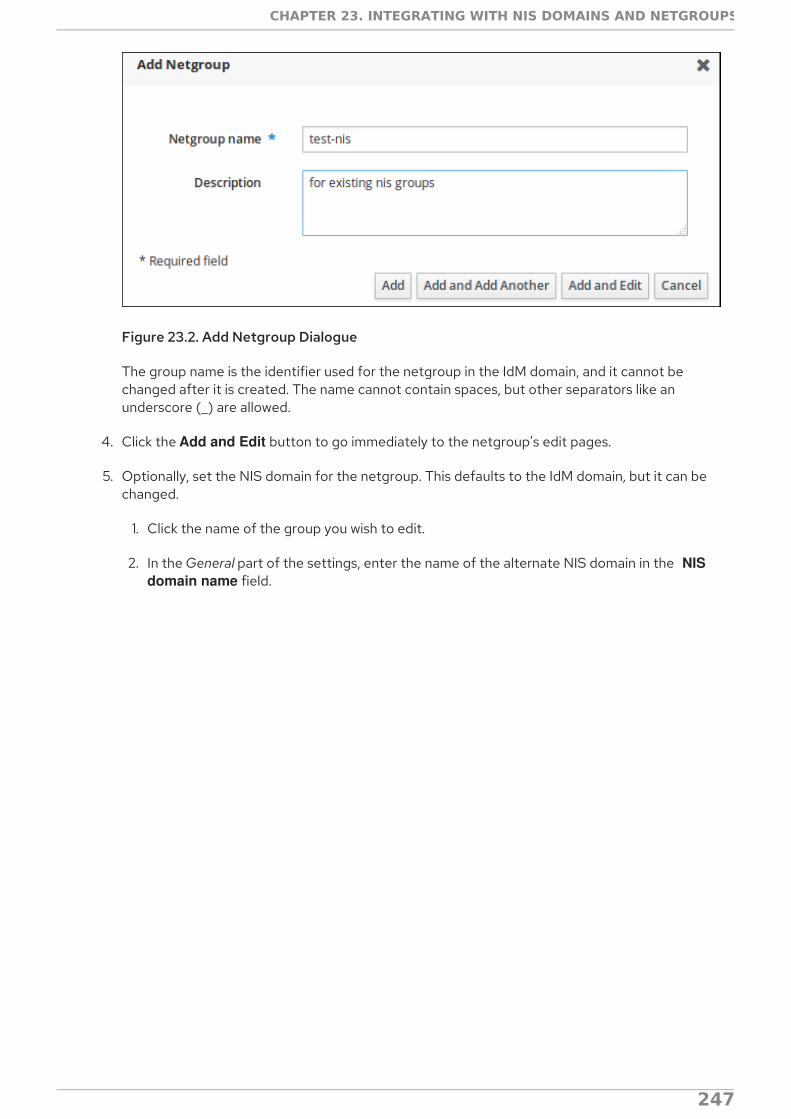
Figure 23.2. Add Netgroup Dialogue
The group name is the identifier used for the netgroup in the IdM domain, and it cannot bechanged after it is created. The name cannot contain spaces, but other separators like anunderscore (_) are allowed.
4. Click the Add and Edit button to go immediately to the netgroup's edit pages.
5. Optionally, set the NIS domain for the netgroup. This defaults to the IdM domain, but it can bechanged.
1. Click the name of the group you wish to edit.
2. In the General part of the settings, enter the name of the alternate NIS domain in the NIS domain name field.
CHAPTER 23. INTEGRATING WITH NIS DOMAINS AND NETGROUPS
247

Figure 23.3. Netgroup Tab
The NIS domain name field sets the domain that appears in the netgroup triple. It does notaffect which NIS domain the Identity Management listener responds to.
6. Add members, as described in Section 23.3.2.1, “With the Web UI” .
23.3.1.2. With the Command Line
New netgroups are added using the netgroup-add command. This adds only the group; members areadded separately. Two attributes are always required: the group name and the group description. Ifthose attributes are not given as arguments, then the script prompts for them. There is also an option toset the NIS domain name to use for the group; this defaults to the IdM domain, but it can be set tosomething different, depending on the network configuration.
[jsmith@server ~]$ ipa netgroup-add --desc="description" [--nisdomain=domainName] groupName
For example:
[root@server ~][root@server ~]# ipa netgroup-add --desc="my new netgroup" example-netgroup[root@server ~]# ipa netgroup-add-member --hosts=ipa.example.com example-netgroup[root@server ~]# ypcat -d example.com -h ipa.example.com netgroup(ipa.example.com,-,example.com)
Linux Domain Identity, Authentication, and Policy Guide
248
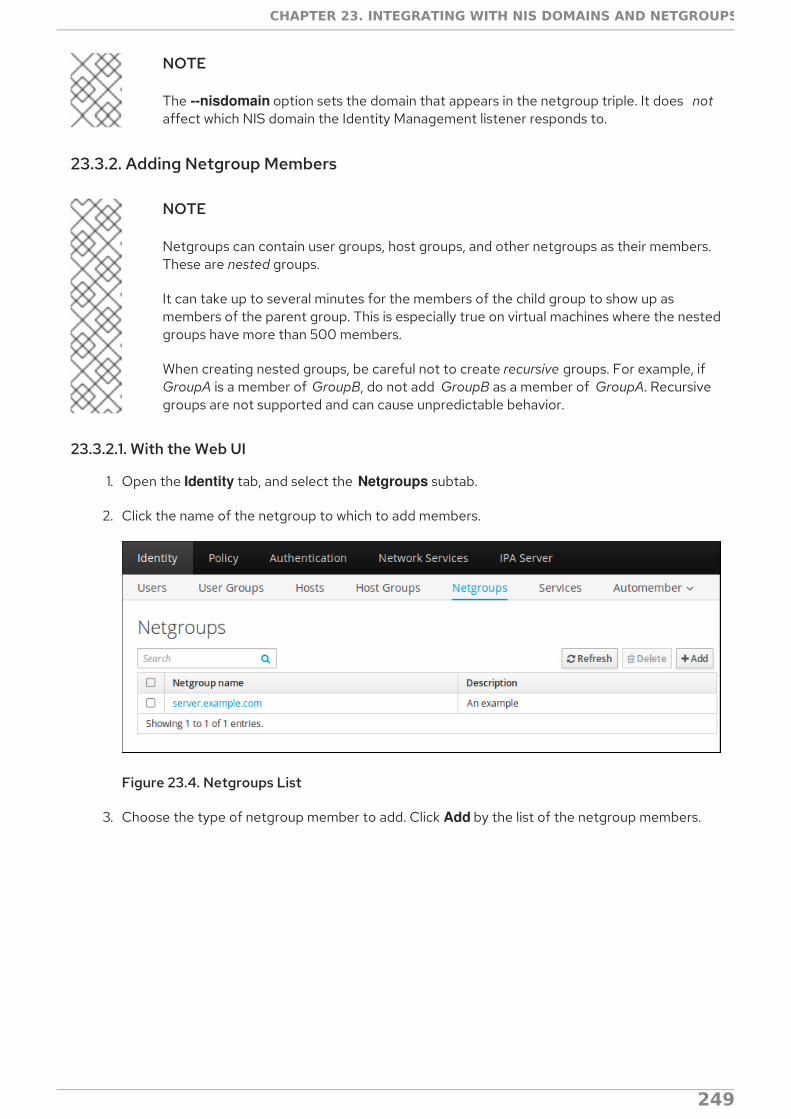
NOTE
The --nisdomain option sets the domain that appears in the netgroup triple. It does notaffect which NIS domain the Identity Management listener responds to.
23.3.2. Adding Netgroup Members
NOTE
Netgroups can contain user groups, host groups, and other netgroups as their members.These are nested groups.
It can take up to several minutes for the members of the child group to show up asmembers of the parent group. This is especially true on virtual machines where the nestedgroups have more than 500 members.
When creating nested groups, be careful not to create recursive groups. For example, ifGroupA is a member of GroupB, do not add GroupB as a member of GroupA. Recursivegroups are not supported and can cause unpredictable behavior.
23.3.2.1. With the Web UI
1. Open the Identity tab, and select the Netgroups subtab.
2. Click the name of the netgroup to which to add members.
Figure 23.4. Netgroups List
3. Choose the type of netgroup member to add. Click Add by the list of the netgroup members.
CHAPTER 23. INTEGRATING WITH NIS DOMAINS AND NETGROUPS
249

Figure 23.5. User Menu in the Netgroup Tab
4. Click the check box by the names of the users to add, and click the right arrow button, >, tomove the names to the selection box.
Figure 23.6. Add User Menu in the Netgroup Tab
5. Click Add.
23.3.2.2. With the Command Line
Once the group is configured, begin adding netgroup members with the netgroup-add-membercommand. Users, groups, hosts, host groups, and other netgroups can all be added to the netgroupentry. The entry name of the NIS group being edited usually comes at the end of the command:
# ipa netgroup-add-member --users=users --groups=groups --hosts=hosts --hostgroups=hostGroups --netgroups=netgroups groupName
Linux Domain Identity, Authentication, and Policy Guide
250

To set more than one member, either use the option multiple times or use a comma-separated listinside a set of curly braces (for example, --option={val1,val2,val3}). For example, this sets two users andtwo hosts with the other configuration:
[root@server ~]# ipa netgroup-add-member --users=jsmith --users=bjensen --groups=ITadmin --hosts=host1.example.com --hosts=host2.example.com --hostgroups=EngDev --netgroups=nisgroup2 example-group
23.4. EXPOSING AUTOMOUNT MAPS TO NIS CLIENTS
When the NIS service is enabled on a system, the IdM server is automatically configured to set the NISdomain to the IdM domain's name, and to include IdM users, groups, and netgroups as passwd, group,and netgroup maps in the NIS domain.
If any automount maps are already defined, these maps need to be manually added to the NISconfiguration in Identity Management for them to be exposed to NIS clients. The NIS server is managedby a special plug-in entry in the IdM LDAP directory; this is a container entry, and each NIS domain andmap used by the NIS server is configured as a child entry beneath that container. The NIS domain entrymust contain:
the name of the NIS domain
the name of the NIS map
information on how to find the directory entries to use as the NIS map's contents
information on which attributes to use as the NIS map's key and value
Most of these settings will be the same for every map.
The IdM server stores the automount maps, grouped by automount location, in the cn=automountbranch of the IdM directory tree.
The NIS domain and map is added using LDAP tools, like ldapadd, and editing the directory directly. Forexample, this adds an automount map that is named auto.example in a location named default and for aserver named nisserver:
[root@server ~]# ldapadd -h nisserver.example.com -x -D "cn=Directory Manager" -w secret
dn: nis-domain=example.com+nis-map=auto.example,cn=NIS Server,cn=plugins,cn=configobjectClass: extensibleObjectnis-domain: example.comnis-map: auto.examplenis-filter: (objectclass=automount)nis-key-format: %{automountKey}nis-value-format: %{automountInformation}nis-base: automountmapname=auto.example,cn=default,cn=automount,dc=example,dc=com
A similar add operation needs to be run for every map that is configured.
23.5. MIGRATING FROM NIS TO IDM
There is no direct migration path from NIS to Identity Management. This is a manual process with threemajor steps: setting up netgroup entries in IdM, exporting the existing data from NIS, and importing that
CHAPTER 23. INTEGRATING WITH NIS DOMAINS AND NETGROUPS
251
data into IdM. There are several options for how to set up the IdM environment and how to export data;the best option depends on the type of data and the overall network environment that you have.
23.5.1. Preparing Netgroup Entries in IdM
The first step is to identify what kinds of identities are being managed by NIS. Frequently, a NIS server isused for either user entries or host entries, but not for both, which can simplify the data migrationprocess.
For user entries
Determine what applications are using the user information in the NIS server. While some clients (like sudo) require NIS netgroups, many clients can use Unix groups instead. If no netgroups are required,then simply create corresponding user accounts in IdM and delete the netgroups entirely. Otherwise,create the user entries in IdM and then create an IdM-managed netgroup and add those users asmembers. This is described in Section 23.3, “Creating Netgroups” .
For host entries
Whenever a host group is created in IdM, a corresponding shadow NIS group is automatically created.These netgroups can then be managed using the ipa-host-net-manage command.
For a direct conversion
It may be necessary to have an exact conversion, with every NIS user and host having an exactcorresponding entry in IdM. In that case, each entry can be created using the original NIS names:
1. Create an entry for every user referenced in a netgroup.
2. Create an entry for every host referenced in a netgroup.
3. Create a netgroup with the same name as the original netgroup.
4. Add the users and hosts as direct members of the netgroup. Alternatively, add the users andhosts into IdM groups or other netgroups, and then add those groups as members to thenetgroup.
23.5.2. Enabling the NIS Listener in Identity Management
The IdM Directory Server can function as a limited NIS server. The slapi-nis plug-in sets up a special NISlistener that receives incoming NIS requests and manages the NIS maps within the Directory Server.Identity Management uses three NIS maps:
passwd
group
netgroup
Using IdM as an intermediate NIS server offers a reasonable way to handle NIS requests while migratingNIS clients and data.
The slapi-nis plug-in is not enabled by default. To enable NIS for Identity Management:
1. Obtain new Kerberos credentials as an IdM admin user.
[root@ipaserver ~]# kinit admin
Linux Domain Identity, Authentication, and Policy Guide
252
2. Enable the NIS listener and compatibility plug-ins:
[root@ipaserver ~]# ipa-nis-manage enable[root@ipaserver ~]# ipa-compat-manage enable
3. Restart the port mapper and Directory Server service:
[root@server ~]# systemctl start rpcbind.service[root@server ~]# systemctl restart dirsrv.target
23.5.3. Exporting and Importing the Existing NIS Data
NIS can contain information for users, groups, DNS and hosts, netgroups, and automount maps. Any ofthese entry types can be migrated over to the IdM server.
Migration is performed by exporting the data using ypcat and then looping through that output andcreating the IdM entries with the corresponding ipa *-add commands. While this could be donemanually, it is easiest to script it. These examples use a shell script.
23.5.3.1. Importing User Entries
The /etc/passwd file contains all of the NIS user information. These entries can be used to create IdMuser accounts with UID, GID, gecos, shell, home directory, and name attributes that mirror the NISentries.
For example, this is nis-user.sh:
This can be run for a given NIS domain:
[root@nis-server ~]# kinit admin[root@nis-server ~]# ./nis-user.sh nisdomain nis-master.example.com
NOTE
#!/bin/sh# 1 is the nis domain, 2 is the nis master serverypcat -d $1 -h $2 passwd > /dev/shm/nis-map.passwd 2>&1
IFS=$'\n'for line in $(cat /dev/shm/nis-map.passwd); do IFS=' ' username=$(echo $line|cut -f1 -d:) # Not collecting encrypted password because we need cleartext password to create kerberos key uid=$(echo $line|cut -f3 -d:) gid=$(echo $line|cut -f4 -d:) gecos=$(echo $line|cut -f5 -d:) homedir=$(echo $line|cut -f6 -d:) shell=$(echo $line|cut -f7 -d:)
# Now create this entry echo passw0rd1|ipa user-add $username --first=NIS --last=USER --password --gidnumber=$gid --uid=$uid --gecos=$gecos --homedir=$homedir --shell=$shell ipa user-show $usernamedone
CHAPTER 23. INTEGRATING WITH NIS DOMAINS AND NETGROUPS
253
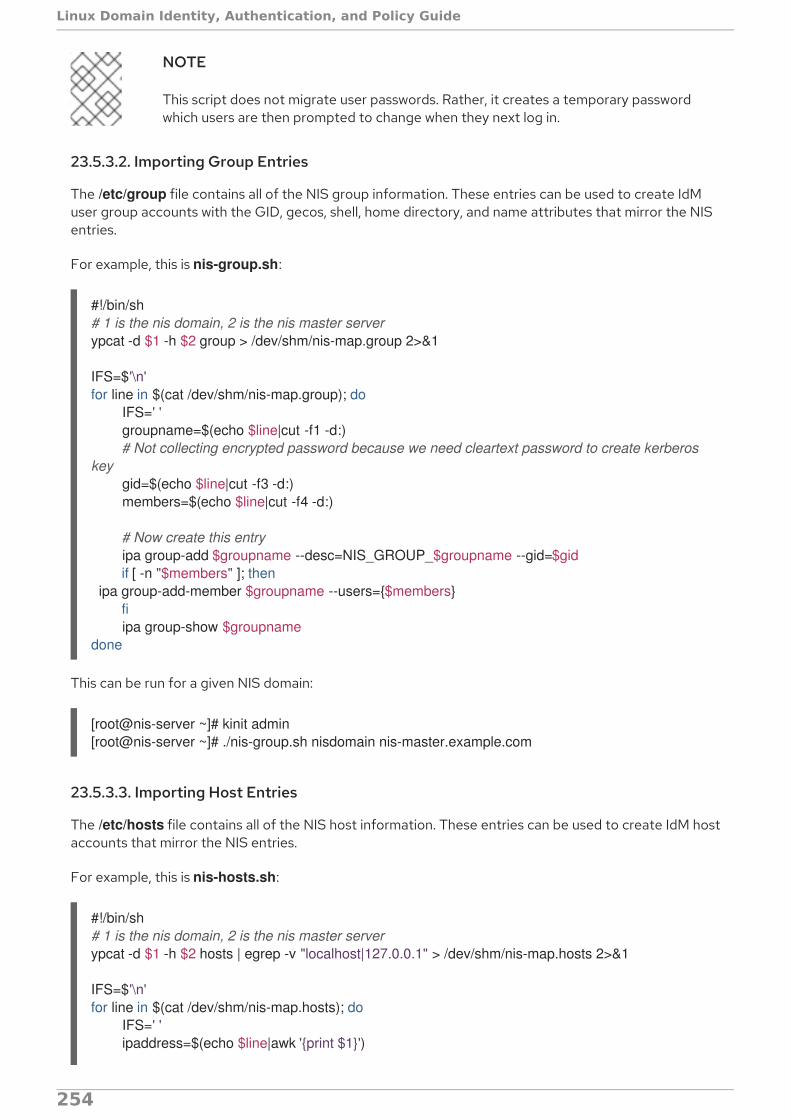
NOTE
This script does not migrate user passwords. Rather, it creates a temporary passwordwhich users are then prompted to change when they next log in.
23.5.3.2. Importing Group Entries
The /etc/group file contains all of the NIS group information. These entries can be used to create IdMuser group accounts with the GID, gecos, shell, home directory, and name attributes that mirror the NISentries.
For example, this is nis-group.sh:
This can be run for a given NIS domain:
[root@nis-server ~]# kinit admin[root@nis-server ~]# ./nis-group.sh nisdomain nis-master.example.com
23.5.3.3. Importing Host Entries
The /etc/hosts file contains all of the NIS host information. These entries can be used to create IdM hostaccounts that mirror the NIS entries.
For example, this is nis-hosts.sh:
#!/bin/sh# 1 is the nis domain, 2 is the nis master serverypcat -d $1 -h $2 group > /dev/shm/nis-map.group 2>&1
IFS=$'\n'for line in $(cat /dev/shm/nis-map.group); do IFS=' ' groupname=$(echo $line|cut -f1 -d:) # Not collecting encrypted password because we need cleartext password to create kerberos key gid=$(echo $line|cut -f3 -d:) members=$(echo $line|cut -f4 -d:)
# Now create this entry ipa group-add $groupname --desc=NIS_GROUP_$groupname --gid=$gid if [ -n "$members" ]; then ipa group-add-member $groupname --users={$members} fi ipa group-show $groupnamedone
#!/bin/sh# 1 is the nis domain, 2 is the nis master serverypcat -d $1 -h $2 hosts | egrep -v "localhost|127.0.0.1" > /dev/shm/nis-map.hosts 2>&1
IFS=$'\n'for line in $(cat /dev/shm/nis-map.hosts); do IFS=' ' ipaddress=$(echo $line|awk '{print $1}')
Linux Domain Identity, Authentication, and Policy Guide
254

This can be run for a given NIS domain:
[root@nis-server ~]# kinit admin[root@nis-server ~]# ./nis-hosts.sh nisdomain nis-master.example.com
NOTE
This script example does not account for special host scenarios, such as using aliases.
23.5.3.4. Importing Netgroup Entries
The /etc/netgroup file contains all of the NIS netgroup information. These entries can be used to createIdM netgroup accounts that mirror the NIS entries.
For example, this is nis-netgroup.sh:
hostname=$(echo $line|awk '{print $2}') master=$(ipa env xmlrpc_uri |tr -d '[:space:]'|cut -f3 -d:|cut -f3 -d/) domain=$(ipa env domain|tr -d '[:space:]'|cut -f2 -d:) if [ $(echo $hostname|grep "\." |wc -l) -eq 0 ]; then hostname=$(echo $hostname.$domain) fi zone=$(echo $hostname|cut -f2- -d.) if [ $(ipa dnszone-show $zone 2>/dev/null | wc -l) -eq 0 ]; then ipa dnszone-add --name-server=$master --admin-email=root.$master fi ptrzone=$(echo $ipaddress|awk -F. '{print $3 "." $2 "." $1 ".in-addr.arpa."}') if [ $(ipa dnszone-show $ptrzone 2>/dev/null|wc -l) -eq 0 ]; then ipa dnszone-add $ptrzone --name-server=$master --admin-email=root.$master fi # Now create this entry ipa host-add $hostname --ip-address=$ipaddress ipa host-show $hostnamedone
#!/bin/sh# 1 is the nis domain, 2 is the nis master serverypcat -k -d $1 -h $2 netgroup > /dev/shm/nis-map.netgroup 2>&1
IFS=$'\n'for line in $(cat /dev/shm/nis-map.netgroup); do IFS=' ' netgroupname=$(echo $line|awk '{print $1}') triples=$(echo $line|sed "s/^$netgroupname //") echo "ipa netgroup-add $netgroupname --desc=NIS_NG_$netgroupname" if [ $(echo $line|grep "(,"|wc -l) -gt 0 ]; then echo "ipa netgroup-mod $netgroupname --hostcat=all" fi if [ $(echo $line|grep ",,"|wc -l) -gt 0 ]; then echo "ipa netgroup-mod $netgroupname --usercat=all" fi
for triple in $triples; do triple=$(echo $triple|sed -e 's/-//g' -e 's/(//' -e 's/)//')
CHAPTER 23. INTEGRATING WITH NIS DOMAINS AND NETGROUPS
255

As explained briefly in Section 23.1, “About NIS and Identity Management” , NIS entries exist in a set ofthree values, called a triple. The triple is host,user,domain, but not every component is required;commonly, a triple only defines a host and domain or user and domain. The way this script is written, the ipa netgroup-add-member command always adds a host, user, and domain triple to the netgroup.
Any missing element is added as a blank, so the triple is properly migrated. For example, for the triple server,,domain the options with the member add command are --hosts=server --users="" --nisdomain=domain.
This can be run for a given NIS domain by specifying the NIS domain and NIS server:
[root@nis-server ~]# kinit admin[root@nis-server ~]# ./nis-hosts.sh nisdomain nis-master.example.com
23.5.3.5. Importing Automount Maps
Automount maps are actually a series of nested and inter-related entries that define the location (theparent entry), and then associated keys and maps.
While the data are the same in the NIS and IdM entries, the way that data are defined is different. TheNIS information is exported and then used to construct an LDAP entry for the automount location andassociated map; a script then creates an entry for every configured key for the map.
Unlike the other NIS migration script examples, this script takes options to create an automount locationand a map name, along with the migrated NIS domain and server.
if [ $(echo $triple|grep ",.*,"|wc -l) -gt 0 ]; then hostname=$(echo $triple|cut -f1 -d,) username=$(echo $triple|cut -f2 -d,) domain=$(echo $triple|cut -f3 -d,) hosts=""; users=""; doms=""; [ -n "$hostname" ] && hosts="--hosts=$hostname" [ -n "$username" ] && users="--users=$username" [ -n "$domain" ] && doms="--nisdomain=$domain" echo "ipa netgroup-add-member $hosts $users $doms" else netgroup=$triple echo "ipa netgroup-add $netgroup --desc=NIS_NG_$netgroup" fi donedone
if [ $(echo $triple|grep ",.*,"|wc -l) -gt 0 ]; then hostname=$(echo $triple|cut -f1 -d,) username=$(echo $triple|cut -f2 -d,) domain=$(echo $triple|cut -f3 -d,) hosts=""; users=""; doms=""; [ -n "$hostname" ] && hosts="--hosts=$hostname" [ -n "$username" ] && users="--users=$username" [ -n "$domain" ] && doms="--nisdomain=$domain" echo "ipa netgroup-add-member $hosts $users $doms"
#!/bin/sh# 1 is for the automount entry in ipa
Linux Domain Identity, Authentication, and Policy Guide
256

This can be run for a given NIS domain:
[root@nis-server ~]# kinit admin[root@nis-server ~]# ./nis-hosts.sh location nisdomain nis-master.example.com map
23.5.4. Setting Weak Password Encryption for NIS User Authentication to IdM
A NIS server can handle CRYPT password hashes. Once an existing NIS server is migrated to IdM (and itsunderlying LDAP database), it may still be necessary to preserve the NIS-supported CRYPT passwords.However, the LDAP server does not use CRYPT hashes by default. It uses salted SHA (SSHA) or SSHA-256. If the 389 Directory Server password hash is not changed, then NIS users cannot authenticate tothe IdM domain. The kinit command is not affected by the server's password hashing configuration.
To set the underlying 389 Directory Server to use CRYPT as the password hash, change the passwordStorageScheme attribute using ldapmodify:
[root@server ~]# ldapmodify -D "cn=directory server" -w secret -p 389 -h ipaserver.example.com
dn: cn=configchangetype: modifyreplace: passwordStorageSchemepasswordStorageScheme: crypt
NOTE
ipa automountlocation-add $1
# 2 is the nis domain, 3 is the nis master server, 4 is the map nameypcat -k -d $2 -h $3 $4 > /dev/shm/nis-map.$4 2>&1
ipa automountmap-add $1 $4
basedn=$(ipa env basedn|tr -d '[:space:]'|cut -f2 -d:)cat > /tmp/amap.ldif <<EOFdn: nis-domain=nisdomain.example.com+nis-map=$4,cn=NIS Server,cn=plugins,cn=configobjectClass: extensibleObjectnis-domain: $3nis-map: $4nis-base: automountmapname=$4,cn=nis,cn=automount,$basednnis-filter: (objectclass=*)nis-key-format: %{automountKey}nis-value-format: %{automountInformation}EOFldapadd -x -h $3 -D "cn=directory manager" -w secret -f /tmp/amap.ldif
IFS=$'\n'for line in $(cat /dev/shm/nis-map.$4); do IFS=" " key=$(echo "$line" | awk '{print $1}') info=$(echo "$line" | sed -e "s#^$key[ \t]*##") ipa automountkey-add nis $4 --key="$key" --info="$info"done
CHAPTER 23. INTEGRATING WITH NIS DOMAINS AND NETGROUPS
257

NOTE
Changing the password storage scheme only applies the scheme to new passwords; itdoes not retroactively change the encryption method used for existing passwords.
If weak cryptography is required for password hashes, it is better to change the setting asearly as possible so that more user passwords use the weaker password hash.
Linux Domain Identity, Authentication, and Policy Guide
258

CHAPTER 24. MANAGING DNSAn Identity Management server can be installed without integrated DNS services so that it uses anexternal DNS service or with DNS configured. See Section 2.3, “Installing an IdM Server: Introduction”and Section 2.3.1, “Determining Whether to Use Integrated DNS” for details.
If the DNS service is configured within the domain, IdM offers the administrator a significant amount offlexibility and control over DNS settings. For example, DNS entries for the domain, such as host entries,locations, or records, can be managed using native IdM tools, and clients can update their own DNSrecords dynamically.
Most documentation material and tutorials available for BIND version 9.9 are also applicable to IdMDNS, because majority of configuration options work in the same way in BIND and IdM. This chaptermostly focuses on notable differences between BIND and IdM.
24.1. INSTALLING DNS SERVICES INTO AN EXISTING SERVER
It is possible to install DNS services into an IdM server that was originally installed without them. To dothis, make sure the ipa-server-dns package is installed, and then use the ipa-dns-install utility.
Configuring DNS services using ipa-dns-install follows the same principles as installing DNS with the ipa-server-install utility, as described in Section 2.3.3, “Installing a Server with Integrated DNS” .
For more information about ipa-dns-install, see the ipa-dns-install(1) man page.
24.1.1. Setting up Additional Name Servers
IdM adds the newly-configured IdM DNS server to the list of DNS servers in the /etc/resolv.conf file. Itis recommended to manually add other DNS servers as backup servers in case the IdM server becomesunavailable. For example:
search example.com
; the IdM servernameserver 192.0.2.1
; backup DNS serversnameserver 198.51.100.1nameserver 198.51.100.2
For more details about configuring /etc/resolv.conf, see the resolv.conf(5) man page.
24.2. BIND IN IDENTITY MANAGEMENT
IdM integrates BIND DNS server version 9.9 with an LDAP database used for data replication and withKerberos for DNS update signing using the GSS-TSIG protocol [3]. This enables convenient DNSmanagement using IdM tools and at the same time increases resiliency because IdM-integrated DNSservers support multi-master operations, allowing all IdM-integrated DNS servers to accept DNSupdates from clients without single point of failure.
The default IdM DNS configuration is suitable for internal networks that are not accessible from thepublic Internet. If the IdM DNS server is accessible from the public Internet, Red Hat recommends toapply the usual hardening applicable to the BIND service, described in the Red Hat Enterprise LinuxNetworking Guide.
CHAPTER 24. MANAGING DNS
259
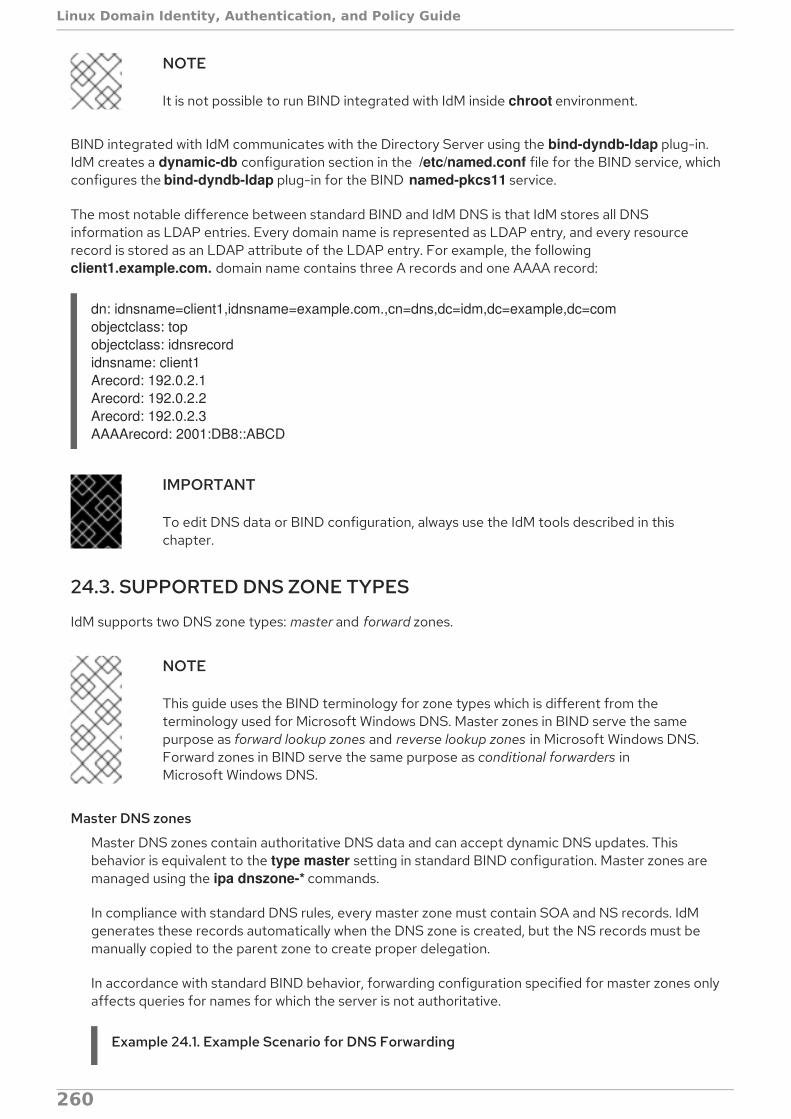
NOTE
It is not possible to run BIND integrated with IdM inside chroot environment.
BIND integrated with IdM communicates with the Directory Server using the bind-dyndb-ldap plug-in.IdM creates a dynamic-db configuration section in the /etc/named.conf file for the BIND service, whichconfigures the bind-dyndb-ldap plug-in for the BIND named-pkcs11 service.
The most notable difference between standard BIND and IdM DNS is that IdM stores all DNSinformation as LDAP entries. Every domain name is represented as LDAP entry, and every resourcerecord is stored as an LDAP attribute of the LDAP entry. For example, the following client1.example.com. domain name contains three A records and one AAAA record:
dn: idnsname=client1,idnsname=example.com.,cn=dns,dc=idm,dc=example,dc=comobjectclass: topobjectclass: idnsrecordidnsname: client1Arecord: 192.0.2.1Arecord: 192.0.2.2Arecord: 192.0.2.3AAAArecord: 2001:DB8::ABCD
IMPORTANT
To edit DNS data or BIND configuration, always use the IdM tools described in thischapter.
24.3. SUPPORTED DNS ZONE TYPES
IdM supports two DNS zone types: master and forward zones.
NOTE
This guide uses the BIND terminology for zone types which is different from theterminology used for Microsoft Windows DNS. Master zones in BIND serve the samepurpose as forward lookup zones and reverse lookup zones in Microsoft Windows DNS.Forward zones in BIND serve the same purpose as conditional forwarders inMicrosoft Windows DNS.
Master DNS zones
Master DNS zones contain authoritative DNS data and can accept dynamic DNS updates. Thisbehavior is equivalent to the type master setting in standard BIND configuration. Master zones aremanaged using the ipa dnszone-* commands.
In compliance with standard DNS rules, every master zone must contain SOA and NS records. IdMgenerates these records automatically when the DNS zone is created, but the NS records must bemanually copied to the parent zone to create proper delegation.
In accordance with standard BIND behavior, forwarding configuration specified for master zones onlyaffects queries for names for which the server is not authoritative.
Example 24.1. Example Scenario for DNS Forwarding
Linux Domain Identity, Authentication, and Policy Guide
260
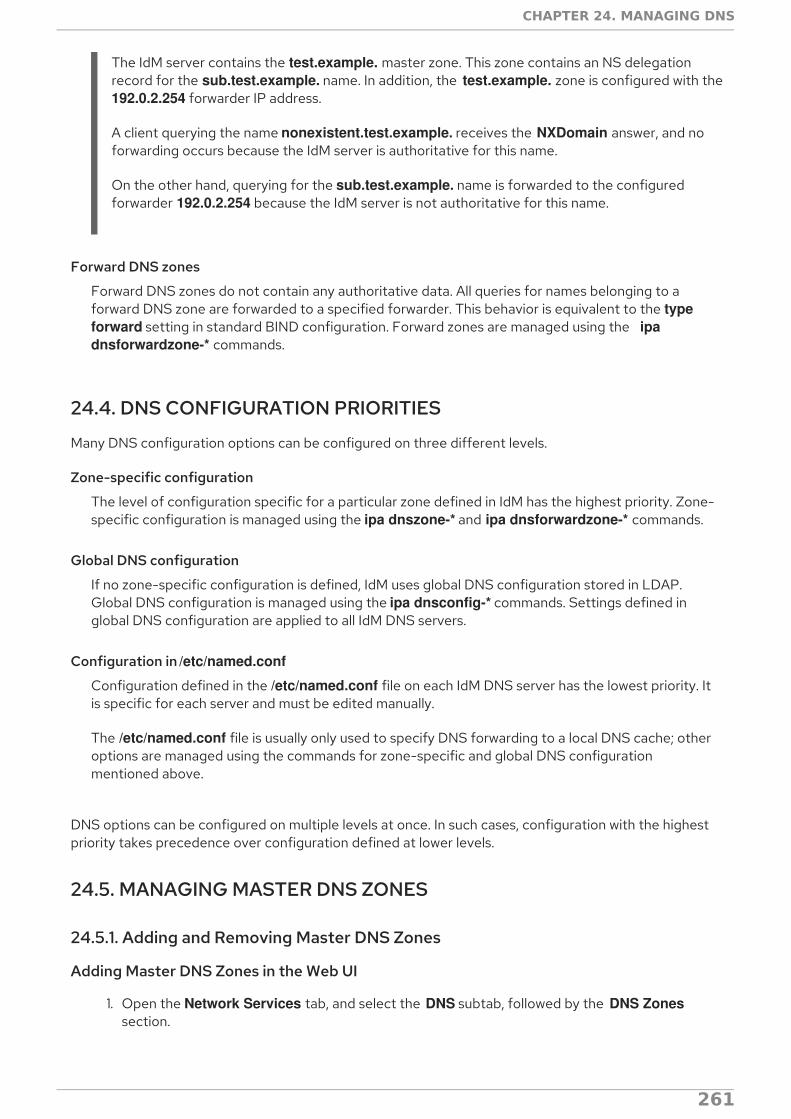
The IdM server contains the test.example. master zone. This zone contains an NS delegationrecord for the sub.test.example. name. In addition, the test.example. zone is configured with the192.0.2.254 forwarder IP address.
A client querying the name nonexistent.test.example. receives the NXDomain answer, and noforwarding occurs because the IdM server is authoritative for this name.
On the other hand, querying for the sub.test.example. name is forwarded to the configuredforwarder 192.0.2.254 because the IdM server is not authoritative for this name.
Forward DNS zones
Forward DNS zones do not contain any authoritative data. All queries for names belonging to aforward DNS zone are forwarded to a specified forwarder. This behavior is equivalent to the type forward setting in standard BIND configuration. Forward zones are managed using the ipa dnsforwardzone-* commands.
24.4. DNS CONFIGURATION PRIORITIES
Many DNS configuration options can be configured on three different levels.
Zone-specific configuration
The level of configuration specific for a particular zone defined in IdM has the highest priority. Zone-specific configuration is managed using the ipa dnszone-* and ipa dnsforwardzone-* commands.
Global DNS configuration
If no zone-specific configuration is defined, IdM uses global DNS configuration stored in LDAP.Global DNS configuration is managed using the ipa dnsconfig-* commands. Settings defined inglobal DNS configuration are applied to all IdM DNS servers.
Configuration in /etc/named.conf
Configuration defined in the /etc/named.conf file on each IdM DNS server has the lowest priority. Itis specific for each server and must be edited manually.
The /etc/named.conf file is usually only used to specify DNS forwarding to a local DNS cache; otheroptions are managed using the commands for zone-specific and global DNS configurationmentioned above.
DNS options can be configured on multiple levels at once. In such cases, configuration with the highestpriority takes precedence over configuration defined at lower levels.
24.5. MANAGING MASTER DNS ZONES
24.5.1. Adding and Removing Master DNS Zones
Adding Master DNS Zones in the Web UI
1. Open the Network Services tab, and select the DNS subtab, followed by the DNS Zonessection.
CHAPTER 24. MANAGING DNS
261

Figure 24.1. Managing DNS Master Zones
2. To add a new master zone, click Add at the top of the list of all zones.
Figure 24.2. Adding a Master DNS Zone
3. Provide the zone name, and click Add.
Figure 24.3. Entering a New Master Zone
Adding Master DNS Zones from the Command LineThe ipa dnszone-add command adds a new zone to the DNS domain. Adding a new zone requires you tospecify the name of the new subdomain. You can pass the subdomain name directly with the command:
$ ipa dnszone-add newserver.example.com
If you do not pass the name to ipa dnszone-add, the script prompts for it automatically.
Linux Domain Identity, Authentication, and Policy Guide
262

The ipa dnszone-add command also accepts various command-line options. For a complete list ofthese options, run the ipa dnszone-add --help command.
Removing Master DNS ZonesTo remove a master DNS zone in the web UI, in the list of all zones, select the check box by the zonename and click Delete.
Figure 24.4. Removing a Master DNS Zone
To remove a master DNS zone from the command line, use the ipa dnszone-del command. Forexample:
$ ipa dnszone-del server.example.com
24.5.2. Adding Additional Configuration for Master DNS Zones
IdM creates a new zone with certain default configuration, such as the refresh periods, transfer settings,or cache settings.
DNS Zone Configuration AttributesThe available zone settings are listed in Table 24.1, “Zone Attributes”. Along with setting the actualinformation for the zone, the settings define how the DNS server handles the start of authority (SOA)record entries and how it updates its records from the DNS name server.
Table 24.1. Zone Attributes
Attribute Command-Line Option Description
Authoritative nameserver
--name-server Sets the domain name of the master DNS nameserver, also known as SOA MNAME.
By default, each IdM server advertises itself in theSOA MNAME field. Consequently, the value stored inLDAP using --name-server is ignored.
Administrator e-mailaddress
--admin-email Sets the email address to use for the zoneadministrator. This defaults to the root account onthe host.
SOA serial --serial Sets a serial number in the SOA record. Note thatIdM sets the version number automatically and usersare not expected to modify it.
CHAPTER 24. MANAGING DNS
263

SOA refresh --refresh Sets the interval, in seconds, for a secondary DNSserver to wait before requesting updates from theprimary DNS server.
SOA retry --retry Sets the time, in seconds, to wait before retrying afailed refresh operation.
SOA expire --expire Sets the time, in seconds, that a secondary DNSserver will try to perform a refresh update beforeending the operation attempt.
SOA minimum --minimum Sets the time-to-live (TTL) value in seconds fornegative caching according to RFC 2308.
SOA time to live --ttl Sets TTL in seconds for records at zone apex. In zoneexample.com, for instance, all records (A, NS, orSOA) under name example.com are configured,but no other domain names, like test.example.com,are affected.
Default time to live --default-ttl Sets the default time-to-live (TTL) value in secondsfor negative caching for all values in a zone thatnever had an individual TTL value set before.Requires a restart of the named-pkcs11 service onall IdM DNS servers after changes to take effect.
BIND update policy --update-policy Sets the permissions allowed to clients in the DNSzone.
See Dynamic Update Policies in the BIND 9Administrator Reference Manual for more informationon update policy syntax.
Dynamic update --dynamic-update=TRUE|FALSE
Enables dynamic updates to DNS records for clients.Note that if this is set to false, IdM client machineswill not be able to add or update their IP address. SeeSection 24.6.1, “Enabling Dynamic DNS Updates” formore information.
Allow transfer --allow-transfer=string Gives a semi-colon-separated list of IP addresses ornetwork names which are allowed to transfer thegiven zone.
Zone transfers are disabled by default. The default --allow-transfer value is none.
Allow query --allow-query Gives a semi-colon-separated list of IP addresses ornetwork names which are allowed to issue DNSqueries.
Attribute Command-Line Option Description
Linux Domain Identity, Authentication, and Policy Guide
264
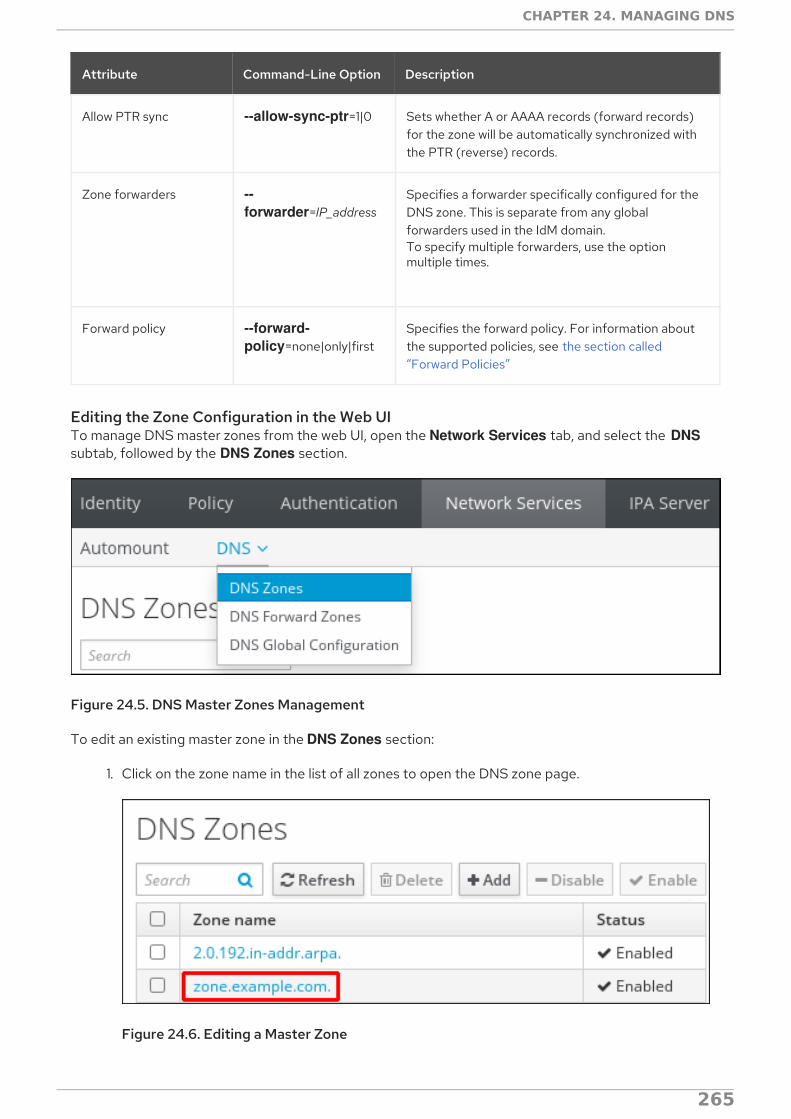
Allow PTR sync --allow-sync-ptr=1|0 Sets whether A or AAAA records (forward records)for the zone will be automatically synchronized withthe PTR (reverse) records.
Zone forwarders --forwarder=IP_address
Specifies a forwarder specifically configured for theDNS zone. This is separate from any globalforwarders used in the IdM domain.To specify multiple forwarders, use the optionmultiple times.
Forward policy --forward-policy=none|only|first
Specifies the forward policy. For information aboutthe supported policies, see the section called“Forward Policies”
Attribute Command-Line Option Description
Editing the Zone Configuration in the Web UITo manage DNS master zones from the web UI, open the Network Services tab, and select the DNSsubtab, followed by the DNS Zones section.
Figure 24.5. DNS Master Zones Management
To edit an existing master zone in the DNS Zones section:
1. Click on the zone name in the list of all zones to open the DNS zone page.
Figure 24.6. Editing a Master Zone
CHAPTER 24. MANAGING DNS
265
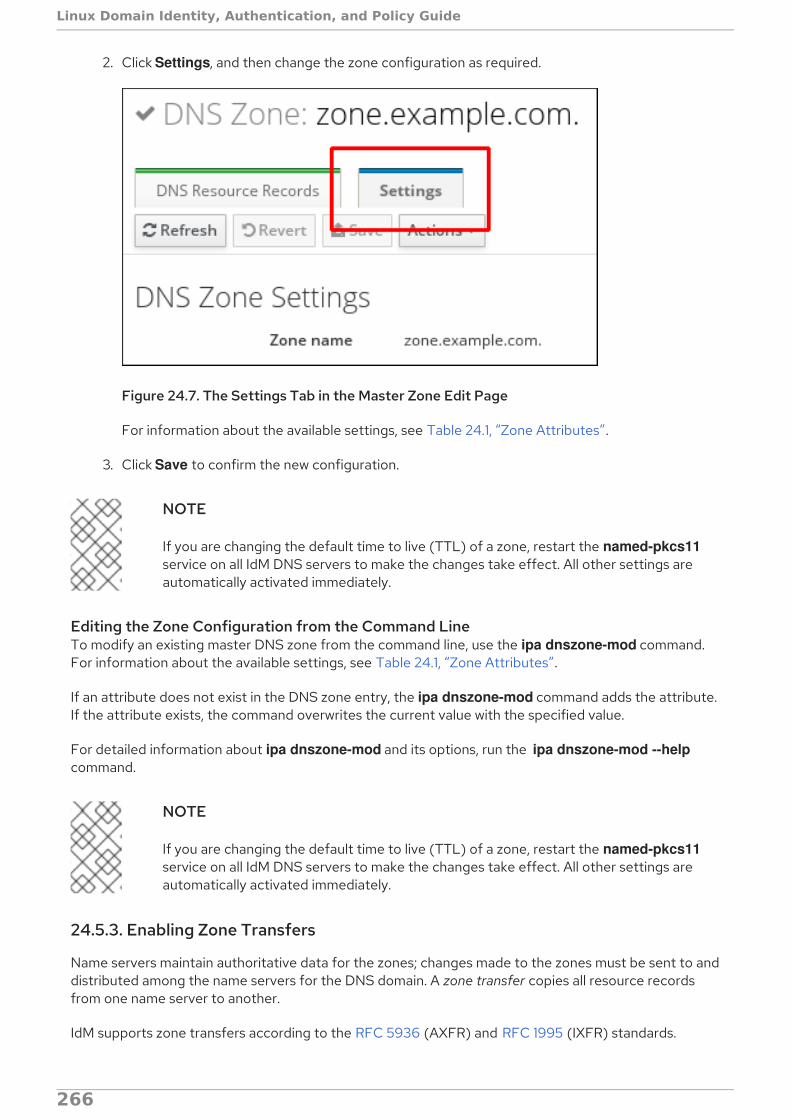
2. Click Settings, and then change the zone configuration as required.
Figure 24.7. The Settings Tab in the Master Zone Edit Page
For information about the available settings, see Table 24.1, “Zone Attributes”.
3. Click Save to confirm the new configuration.
NOTE
If you are changing the default time to live (TTL) of a zone, restart the named-pkcs11service on all IdM DNS servers to make the changes take effect. All other settings areautomatically activated immediately.
Editing the Zone Configuration from the Command LineTo modify an existing master DNS zone from the command line, use the ipa dnszone-mod command.For information about the available settings, see Table 24.1, “Zone Attributes”.
If an attribute does not exist in the DNS zone entry, the ipa dnszone-mod command adds the attribute.If the attribute exists, the command overwrites the current value with the specified value.
For detailed information about ipa dnszone-mod and its options, run the ipa dnszone-mod --helpcommand.
NOTE
If you are changing the default time to live (TTL) of a zone, restart the named-pkcs11service on all IdM DNS servers to make the changes take effect. All other settings areautomatically activated immediately.
24.5.3. Enabling Zone Transfers
Name servers maintain authoritative data for the zones; changes made to the zones must be sent to anddistributed among the name servers for the DNS domain. A zone transfer copies all resource recordsfrom one name server to another.
IdM supports zone transfers according to the RFC 5936 (AXFR) and RFC 1995 (IXFR) standards.
Linux Domain Identity, Authentication, and Policy Guide
266
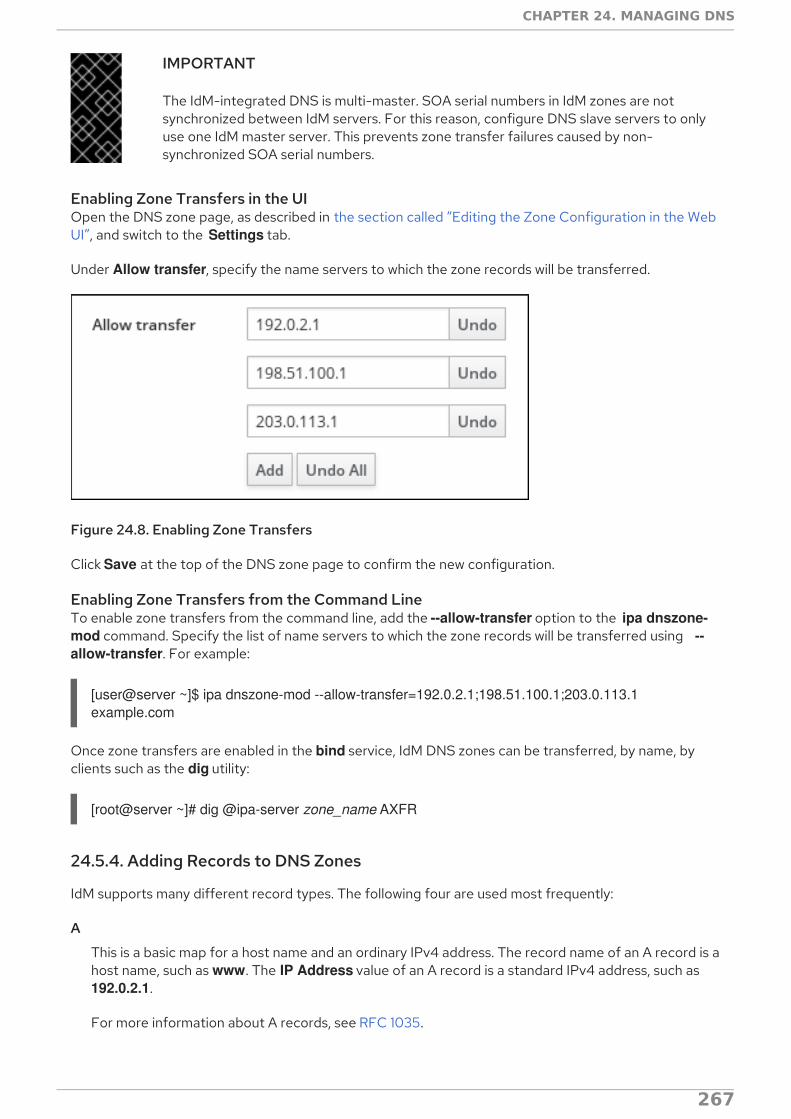
IMPORTANT
The IdM-integrated DNS is multi-master. SOA serial numbers in IdM zones are notsynchronized between IdM servers. For this reason, configure DNS slave servers to onlyuse one IdM master server. This prevents zone transfer failures caused by non-synchronized SOA serial numbers.
Enabling Zone Transfers in the UIOpen the DNS zone page, as described in the section called “Editing the Zone Configuration in the WebUI”, and switch to the Settings tab.
Under Allow transfer, specify the name servers to which the zone records will be transferred.
Figure 24.8. Enabling Zone Transfers
Click Save at the top of the DNS zone page to confirm the new configuration.
Enabling Zone Transfers from the Command LineTo enable zone transfers from the command line, add the --allow-transfer option to the ipa dnszone-mod command. Specify the list of name servers to which the zone records will be transferred using --allow-transfer. For example:
[user@server ~]$ ipa dnszone-mod --allow-transfer=192.0.2.1;198.51.100.1;203.0.113.1 example.com
Once zone transfers are enabled in the bind service, IdM DNS zones can be transferred, by name, byclients such as the dig utility:
[root@server ~]# dig @ipa-server zone_name AXFR
24.5.4. Adding Records to DNS Zones
IdM supports many different record types. The following four are used most frequently:
A
This is a basic map for a host name and an ordinary IPv4 address. The record name of an A record is ahost name, such as www. The IP Address value of an A record is a standard IPv4 address, such as 192.0.2.1.
For more information about A records, see RFC 1035.
CHAPTER 24. MANAGING DNS
267

AAAA
This is a basic map for a host name and an IPv6 address. The record name of an AAAA record is ahost name, such as www. The IP Address value is a standard hexadecimal IPv6 address, such as 2001:DB8::1111.
For more information about AAAA records, see RFC 3596.
SRV
Service (SRV) resource records map service names to the DNS name of the server that is providingthat particular service. For example, this record type can map a service like an LDAP directory to theserver which manages it.
The record name of an SRV record has the format _service._protocol, such as _ldap._tcp. Theconfiguration options for SRV records include priority, weight, port number, and host name for thetarget service.
For more information about SRV records, see RFC 2782.
PTR
A pointer record type (PTR) record adds a reverse DNS record, which maps an IP address to adomain name.
NOTE
All reverse DNS lookups for IPv4 addresses use reverse entries that are defined in the in-addr.arpa. domain. The reverse address, in human-readable form, is the exactreverse of the regular IP address, with the in-addr.arpa. domain appended to it. Forexample, for the network address 192.0.2.0/24, the reverse zone is 2.0.192.in-addr.arpa.
The record name of a PTR record must be in the standard format specified in RFC 1035, extended inRFC 2317, and RFC 3596. The host name value must be a canonical host name of the host for whichyou want to create the record. For more information, see Example 24.8, “PTR Record”.
NOTE
Reverse zones can also be configured for IPv6 addresses, with zones in the .ip6.arpa.domain. For more information about IPv6 reverse zones, see RFC 3596.
When adding DNS resource records, note that many of the records require different data. For example,a CNAME record requires a host name, while an A record requires an IP address. In the web UI, the fieldsin the form for adding a new record are updated automatically to reflect what data is required for thecurrently selected type of record.
DNS Wildcard SupportIdM supports the special record * in a DNS zone as wildcard.
Example 24.2. Demonstrating DNS Wildcard Results
1. Configure the following in your DNS zone example.com:
A wildcard A record *.example.com.
Linux Domain Identity, Authentication, and Policy Guide
268

An MX record for mail.example.com, but no A record for this host.
No record for demo.example.com.
2. Query existing and non-existing DNS records and types. You will receive the followingresults:
# host -t MX mail.example.com.mail.example.com mail is handled by 10 server.example.com.
# host -t MX demo.example.com.demo.example.com. has no MX record.
# host -t A mail.example.com.mail.example.com has no A record
# host -t A demo.example.com.random.example.com has address 192.168.1.1
For more details, see RFC1034.
Adding DNS Resource Records from the Web UI
1. Open the DNS zone page, as described in the section called “Editing the Zone Configuration inthe Web UI”.
2. In the DNS Resource Records section, click Add to add a new record.
Figure 24.9. Adding a New DNS Resource Record
3. Select the type of record to create and fill out the other fields as required.
CHAPTER 24. MANAGING DNS
269
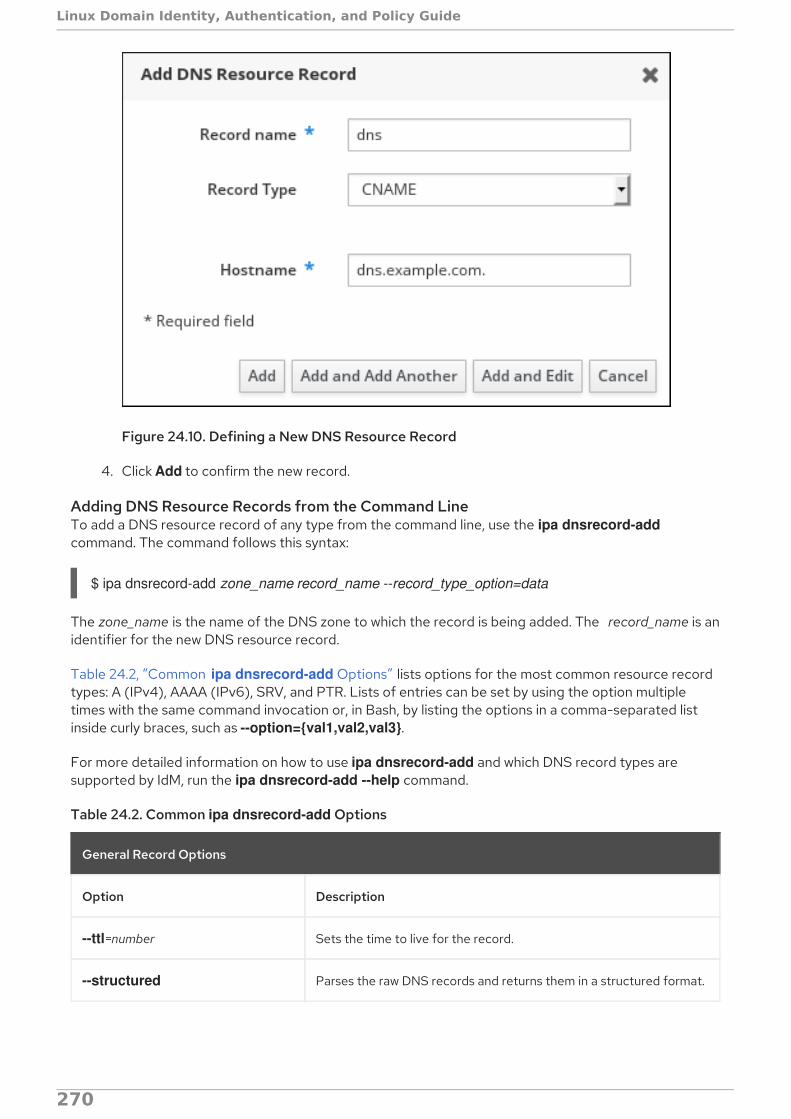
Figure 24.10. Defining a New DNS Resource Record
4. Click Add to confirm the new record.
Adding DNS Resource Records from the Command LineTo add a DNS resource record of any type from the command line, use the ipa dnsrecord-addcommand. The command follows this syntax:
$ ipa dnsrecord-add zone_name record_name --record_type_option=data
The zone_name is the name of the DNS zone to which the record is being added. The record_name is anidentifier for the new DNS resource record.
Table 24.2, “Common ipa dnsrecord-add Options” lists options for the most common resource recordtypes: A (IPv4), AAAA (IPv6), SRV, and PTR. Lists of entries can be set by using the option multipletimes with the same command invocation or, in Bash, by listing the options in a comma-separated listinside curly braces, such as --option={val1,val2,val3}.
For more detailed information on how to use ipa dnsrecord-add and which DNS record types aresupported by IdM, run the ipa dnsrecord-add --help command.
Table 24.2. Common ipa dnsrecord-add Options
General Record Options
Option Description
--ttl=number Sets the time to live for the record.
--structured Parses the raw DNS records and returns them in a structured format.
Linux Domain Identity, Authentication, and Policy Guide
270
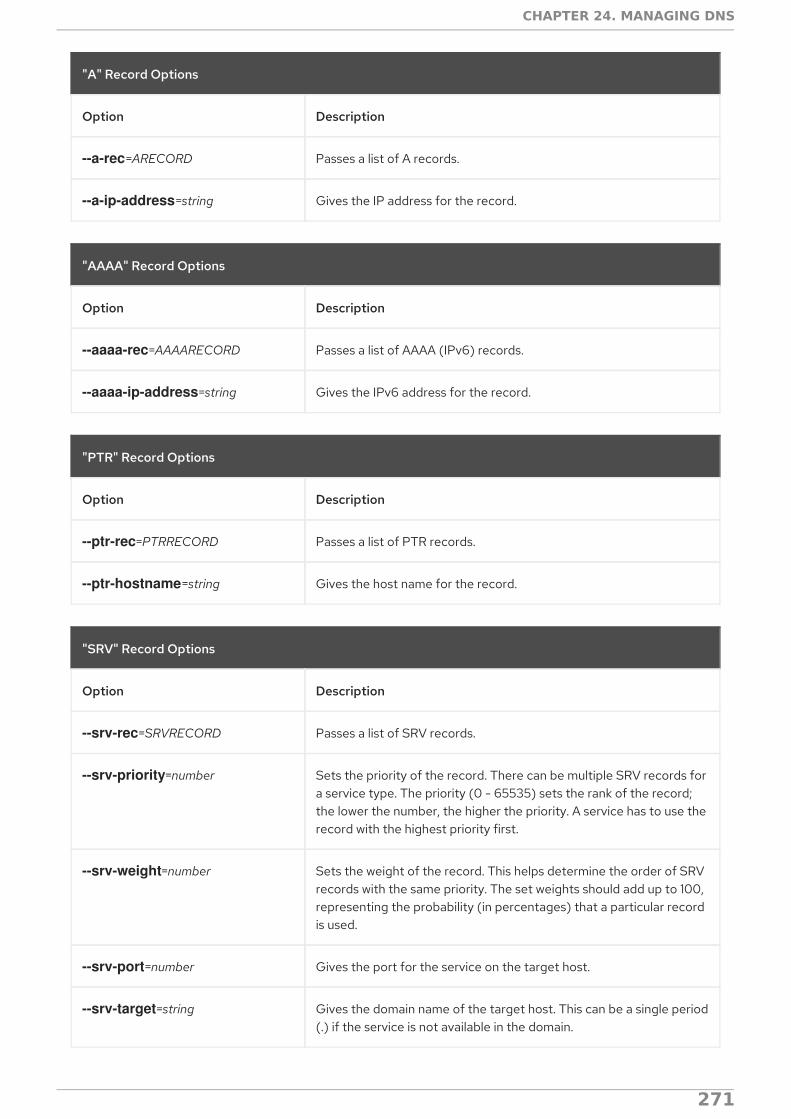
"A" Record Options
Option Description
--a-rec=ARECORD Passes a list of A records.
--a-ip-address=string Gives the IP address for the record.
"AAAA" Record Options
Option Description
--aaaa-rec=AAAARECORD Passes a list of AAAA (IPv6) records.
--aaaa-ip-address=string Gives the IPv6 address for the record.
"PTR" Record Options
Option Description
--ptr-rec=PTRRECORD Passes a list of PTR records.
--ptr-hostname=string Gives the host name for the record.
"SRV" Record Options
Option Description
--srv-rec=SRVRECORD Passes a list of SRV records.
--srv-priority=number Sets the priority of the record. There can be multiple SRV records fora service type. The priority (0 - 65535) sets the rank of the record;the lower the number, the higher the priority. A service has to use therecord with the highest priority first.
--srv-weight=number Sets the weight of the record. This helps determine the order of SRVrecords with the same priority. The set weights should add up to 100,representing the probability (in percentages) that a particular recordis used.
--srv-port=number Gives the port for the service on the target host.
--srv-target=string Gives the domain name of the target host. This can be a single period(.) if the service is not available in the domain.
CHAPTER 24. MANAGING DNS
271

24.5.5. Examples of Adding or Modifying DNS Resource Records from the CommandLine
Example 24.3. Adding a IPv4 Record
The following example creates the record www.example.com with the IP address 192.0.2.123.
$ ipa dnsrecord-add example.com www --a-rec 192.0.2.123
Example 24.4. Adding a IPv4 Wildcard Record
The following example creates a wildcard A record with the IP address 192.0.2.123:
$ ipa dnsrecord-add example.com "*" --a-rec 192.0.2.123
Example 24.5. Modifying a IPv4 Record
When creating a record, the option to specify the A record value is --a-record. However, whenmodifying an A record, the --a-record option is used to specify the current value for the A record.The new value is set with the --a-ip-address option.
$ ipa dnsrecord-mod example.com www --a-rec 192.0.2.123 --a-ip-address 192.0.2.1
Example 24.6. Adding an IPv6 Record
The following example creates the record www.example.com with the IP address 2001:db8::1231:5675.
$ ipa dnsrecord-add example.com www --aaaa-rec 2001:db8::1231:5675
Example 24.7. Adding an SRV Record
In the following example, _ldap._tcp defines the service type and the connection protocol for theSRV record. The --srv-rec option defines the priority, weight, port, and target values.
For example:
[root@server ~]# ipa dnsrecord-add server.example.com _ldap._tcp --srv-rec="0 51 389 server1.example.com."[root@server ~]# ipa dnsrecord-add server.example.com _ldap._tcp --srv-rec="1 49 389 server2.example.com."
The weight values (51 and 49 in this example) add up to 100 and represent the probability (inpercentages) that a particular record is used.
Example 24.8. PTR Record
Linux Domain Identity, Authentication, and Policy Guide
272
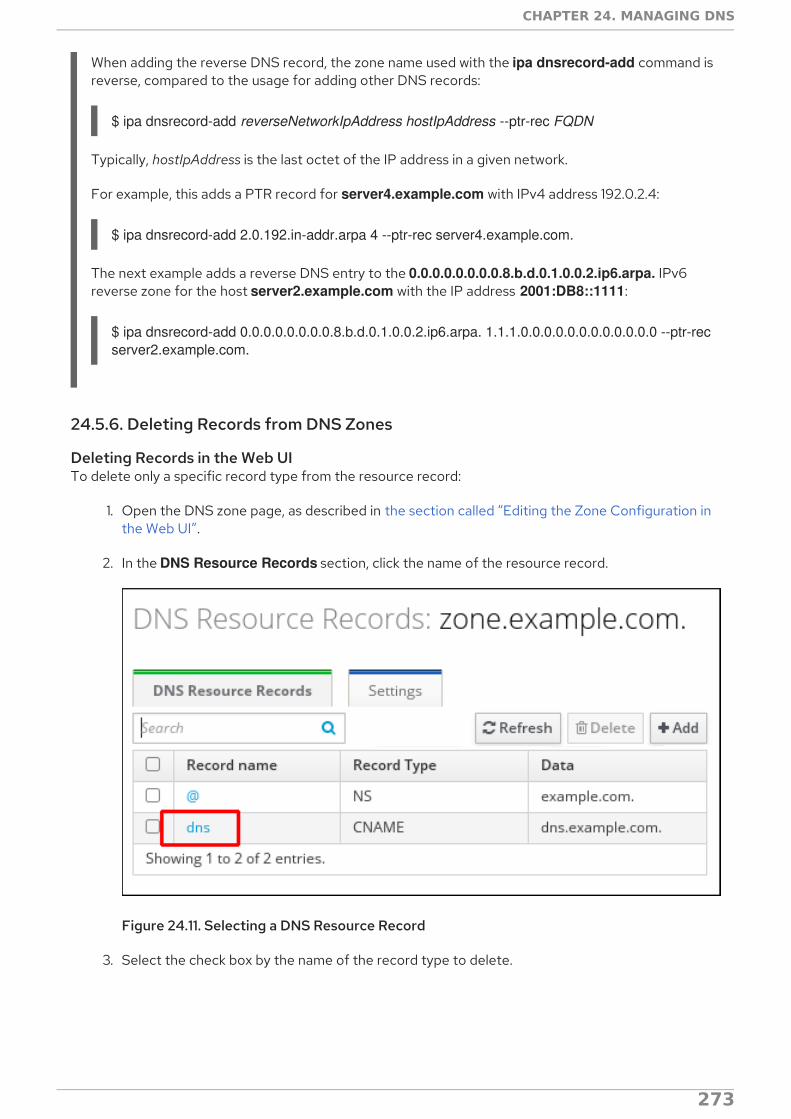
When adding the reverse DNS record, the zone name used with the ipa dnsrecord-add command isreverse, compared to the usage for adding other DNS records:
$ ipa dnsrecord-add reverseNetworkIpAddress hostIpAddress --ptr-rec FQDN
Typically, hostIpAddress is the last octet of the IP address in a given network.
For example, this adds a PTR record for server4.example.com with IPv4 address 192.0.2.4:
$ ipa dnsrecord-add 2.0.192.in-addr.arpa 4 --ptr-rec server4.example.com.
The next example adds a reverse DNS entry to the 0.0.0.0.0.0.0.0.8.b.d.0.1.0.0.2.ip6.arpa. IPv6reverse zone for the host server2.example.com with the IP address 2001:DB8::1111:
$ ipa dnsrecord-add 0.0.0.0.0.0.0.0.8.b.d.0.1.0.0.2.ip6.arpa. 1.1.1.0.0.0.0.0.0.0.0.0.0.0.0 --ptr-rec server2.example.com.
24.5.6. Deleting Records from DNS Zones
Deleting Records in the Web UITo delete only a specific record type from the resource record:
1. Open the DNS zone page, as described in the section called “Editing the Zone Configuration inthe Web UI”.
2. In the DNS Resource Records section, click the name of the resource record.
Figure 24.11. Selecting a DNS Resource Record
3. Select the check box by the name of the record type to delete.
CHAPTER 24. MANAGING DNS
273
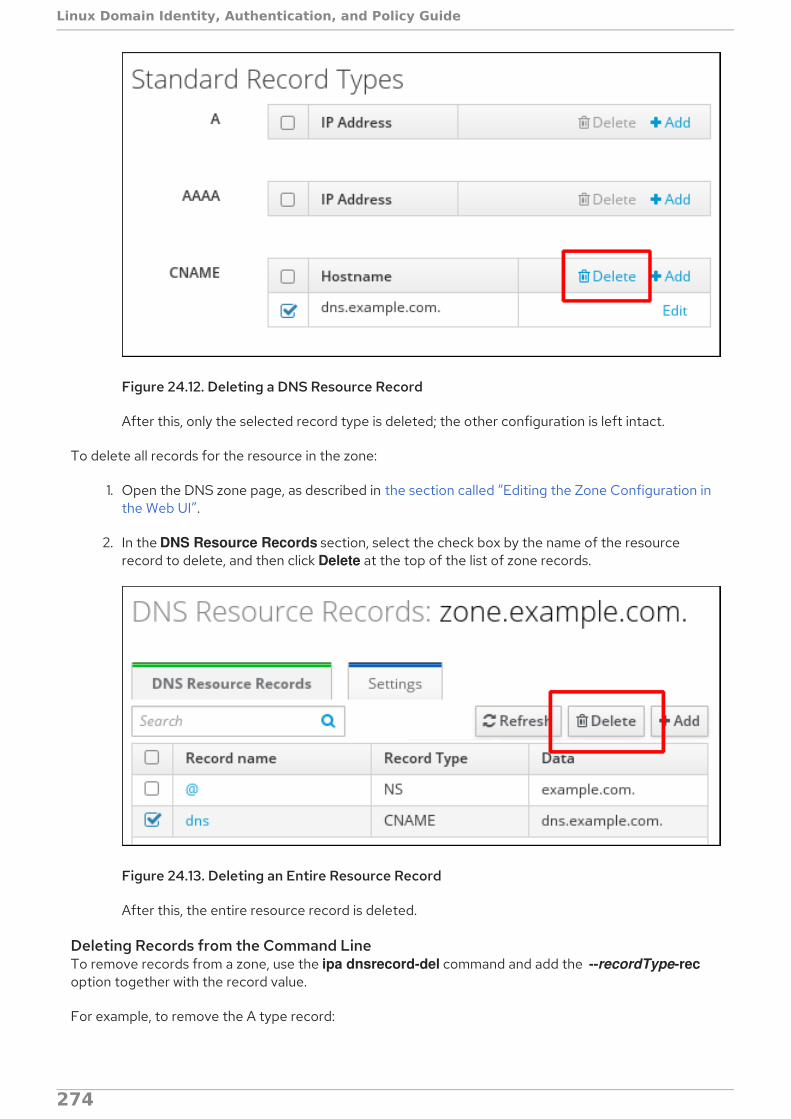
Figure 24.12. Deleting a DNS Resource Record
After this, only the selected record type is deleted; the other configuration is left intact.
To delete all records for the resource in the zone:
1. Open the DNS zone page, as described in the section called “Editing the Zone Configuration inthe Web UI”.
2. In the DNS Resource Records section, select the check box by the name of the resourcerecord to delete, and then click Delete at the top of the list of zone records.
Figure 24.13. Deleting an Entire Resource Record
After this, the entire resource record is deleted.
Deleting Records from the Command LineTo remove records from a zone, use the ipa dnsrecord-del command and add the --recordType-recoption together with the record value.
For example, to remove the A type record:
Linux Domain Identity, Authentication, and Policy Guide
274
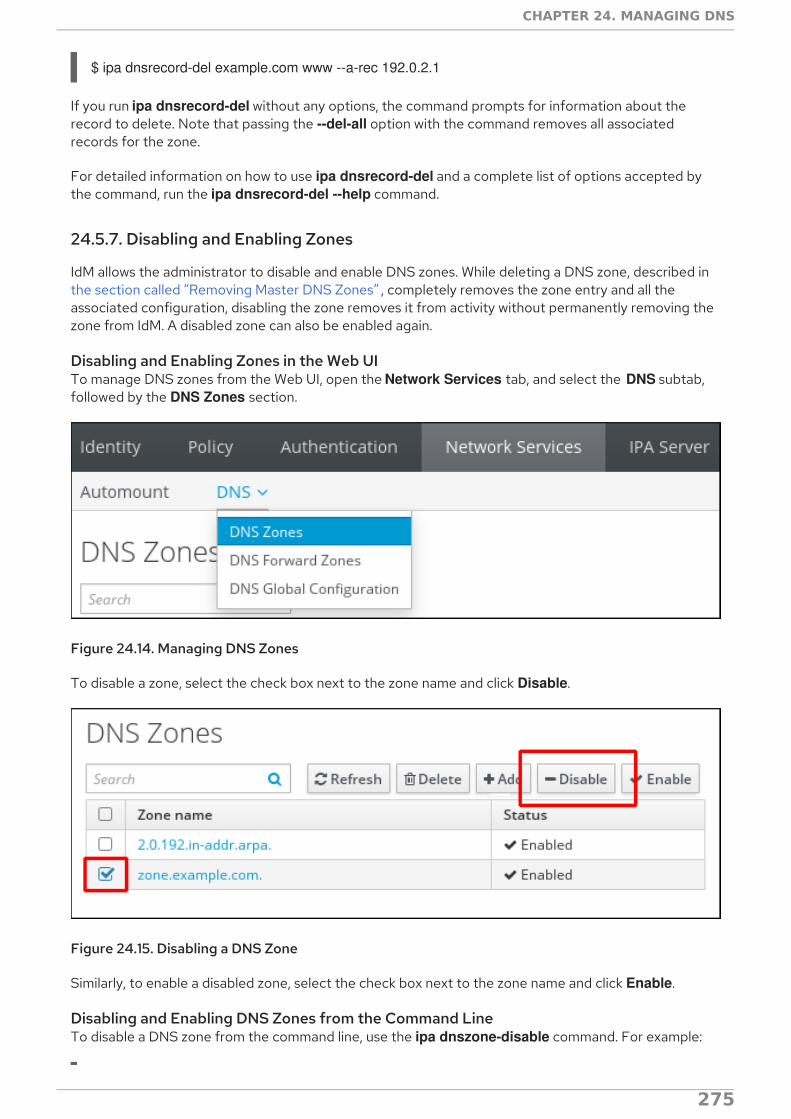
$ ipa dnsrecord-del example.com www --a-rec 192.0.2.1
If you run ipa dnsrecord-del without any options, the command prompts for information about therecord to delete. Note that passing the --del-all option with the command removes all associatedrecords for the zone.
For detailed information on how to use ipa dnsrecord-del and a complete list of options accepted bythe command, run the ipa dnsrecord-del --help command.
24.5.7. Disabling and Enabling Zones
IdM allows the administrator to disable and enable DNS zones. While deleting a DNS zone, described inthe section called “Removing Master DNS Zones” , completely removes the zone entry and all theassociated configuration, disabling the zone removes it from activity without permanently removing thezone from IdM. A disabled zone can also be enabled again.
Disabling and Enabling Zones in the Web UITo manage DNS zones from the Web UI, open the Network Services tab, and select the DNS subtab,followed by the DNS Zones section.
Figure 24.14. Managing DNS Zones
To disable a zone, select the check box next to the zone name and click Disable.
Figure 24.15. Disabling a DNS Zone
Similarly, to enable a disabled zone, select the check box next to the zone name and click Enable.
Disabling and Enabling DNS Zones from the Command LineTo disable a DNS zone from the command line, use the ipa dnszone-disable command. For example:
CHAPTER 24. MANAGING DNS
275
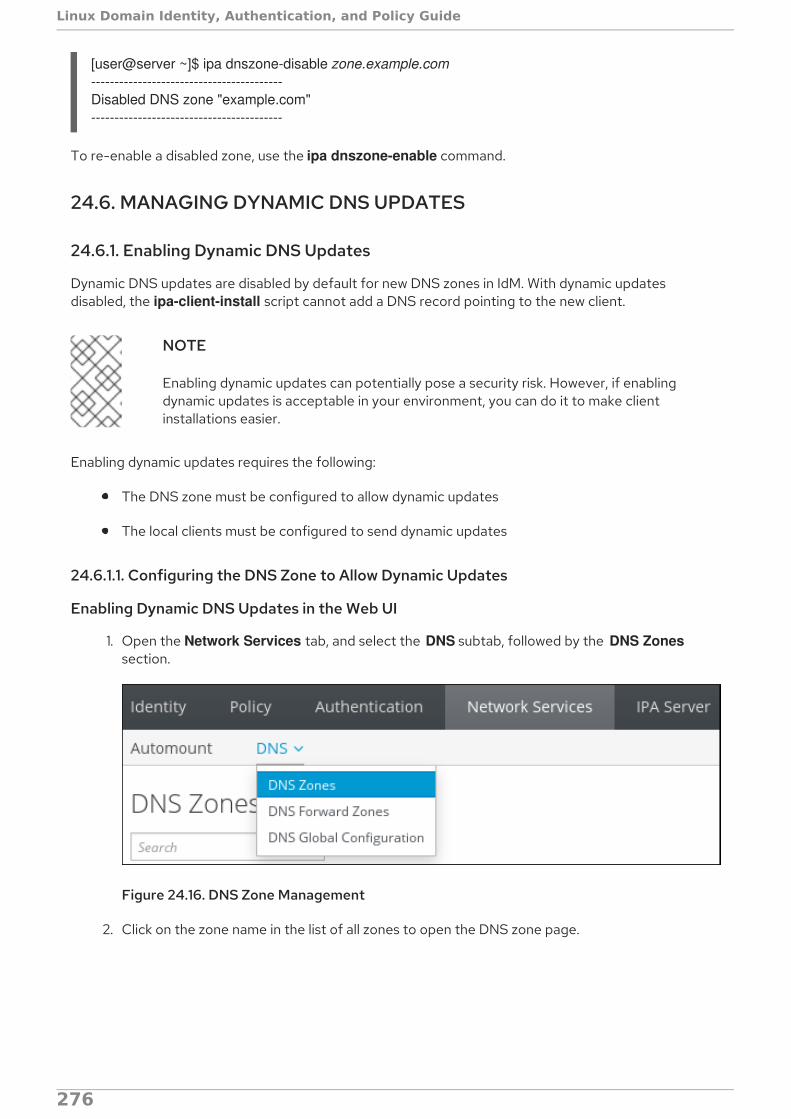
[user@server ~]$ ipa dnszone-disable zone.example.com----------------------------------------- Disabled DNS zone "example.com" -----------------------------------------
To re-enable a disabled zone, use the ipa dnszone-enable command.
24.6. MANAGING DYNAMIC DNS UPDATES
24.6.1. Enabling Dynamic DNS Updates
Dynamic DNS updates are disabled by default for new DNS zones in IdM. With dynamic updatesdisabled, the ipa-client-install script cannot add a DNS record pointing to the new client.
NOTE
Enabling dynamic updates can potentially pose a security risk. However, if enablingdynamic updates is acceptable in your environment, you can do it to make clientinstallations easier.
Enabling dynamic updates requires the following:
The DNS zone must be configured to allow dynamic updates
The local clients must be configured to send dynamic updates
24.6.1.1. Configuring the DNS Zone to Allow Dynamic Updates
Enabling Dynamic DNS Updates in the Web UI
1. Open the Network Services tab, and select the DNS subtab, followed by the DNS Zonessection.
Figure 24.16. DNS Zone Management
2. Click on the zone name in the list of all zones to open the DNS zone page.
Linux Domain Identity, Authentication, and Policy Guide
276

Figure 24.17. Editing a Master Zone
3. Click Settings to switch to the DNS zone settings tab.
Figure 24.18. The Settings Tab in the Master Zone Edit Page
4. Scroll down to the Dynamic update field, and set the value to True.
Figure 24.19. Enabling Dynamic DNS Updates
5. Click Save at the top of the page to confirm the new configuration.
Enabling Dynamic DNS Updates from the Command Line
CHAPTER 24. MANAGING DNS
277
To allow dynamic updates to the DNS zones from the command line, use the ipa dnszone-modcommand with the --dynamic-update=TRUE option. For example:
[user@server ~]$ ipa dnszone-mod server.example.com --dynamic-update=TRUE
24.6.1.2. Configuring the Clients to Send Dynamic Updates
Clients are automatically set up to send DNS updates when they are enrolled in the domain, by using the --enable-dns-updates option with the ipa-client-install script.
[root@client ~]# ipa-client-install --enable-dns-updates
The DNS zone has a time-to-live value set for records within its SOA configuration. However, the time-to-live for the dynamic updates is managed on the local system by the System Security Service Daemon(SSSD). To change the time-to-live value for the dynamic updates, edit the SSSD file to set a value; thedefault is 1200 seconds.
1. Open the SSSD configuration file.
[root@server ~]# vim /etc/sssd/sssd.conf
2. Find the domain section for the IdM domain.
[domain/ipa.example.com]
3. If dynamic updates have not been enabled for the client, then set the dyndns_update value totrue.
dyndns_updates = true
4. Add or edit the dyndns_ttl parameter to set the value, in seconds, for the update time-to-live.
dyndns_ttl = 2400
24.6.2. Synchronizing A/AAAA and PTR Records
A and AAAA records are configured separately from PTR records in reverse zones. Because theserecords are configured independently, it is possible for A/AAAA records to exist without correspondingPTR records, and vice versa.
There are some DNS setting requirements for PTR synchronization to work:
Both forward and reverse zones must be managed by the IdM server.
Both zones must have dynamic updates enabled.
Enabling dynamic updates is covered in Section 24.6.1, “Enabling Dynamic DNS Updates” .
PTR synchronization must be enabled for the master forward zone, not for the reverse zone.
The PTR record will be updated only if the name of the requesting client matches the name inthe PTR record.
IMPORTANT
Linux Domain Identity, Authentication, and Policy Guide
278
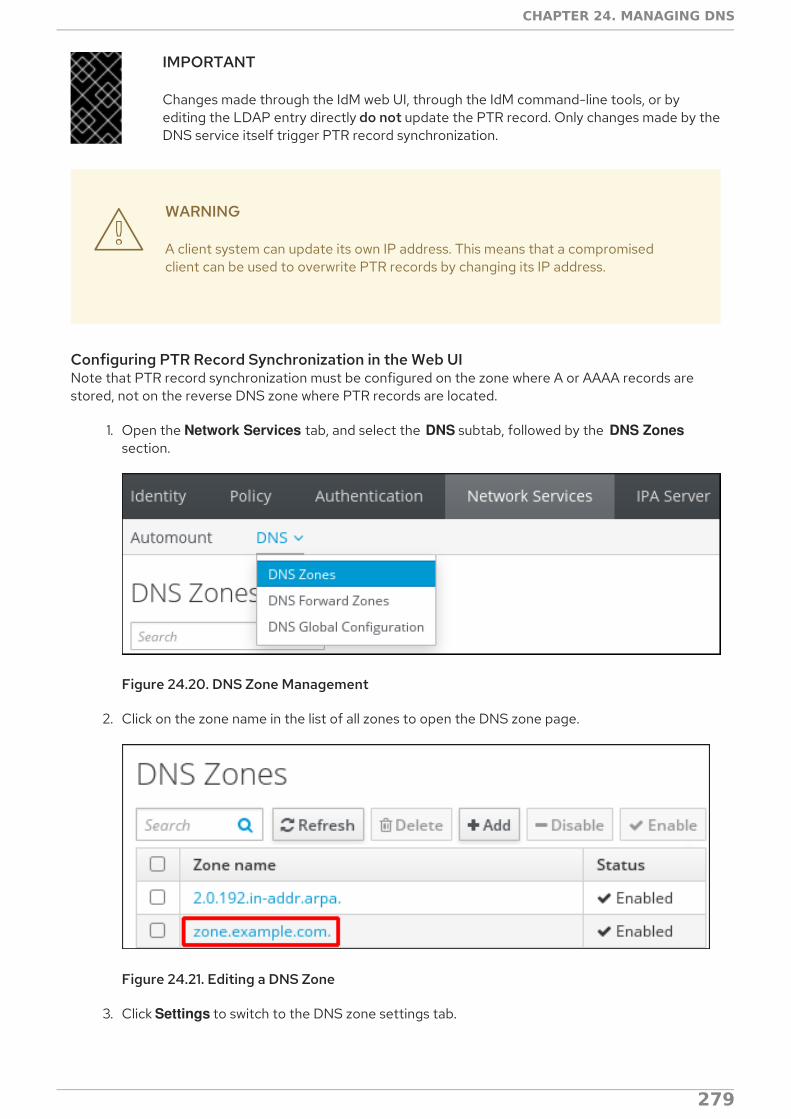
IMPORTANT
Changes made through the IdM web UI, through the IdM command-line tools, or byediting the LDAP entry directly do not update the PTR record. Only changes made by theDNS service itself trigger PTR record synchronization.
WARNING
A client system can update its own IP address. This means that a compromisedclient can be used to overwrite PTR records by changing its IP address.
Configuring PTR Record Synchronization in the Web UINote that PTR record synchronization must be configured on the zone where A or AAAA records arestored, not on the reverse DNS zone where PTR records are located.
1. Open the Network Services tab, and select the DNS subtab, followed by the DNS Zonessection.
Figure 24.20. DNS Zone Management
2. Click on the zone name in the list of all zones to open the DNS zone page.
Figure 24.21. Editing a DNS Zone
3. Click Settings to switch to the DNS zone settings tab.
CHAPTER 24. MANAGING DNS
279
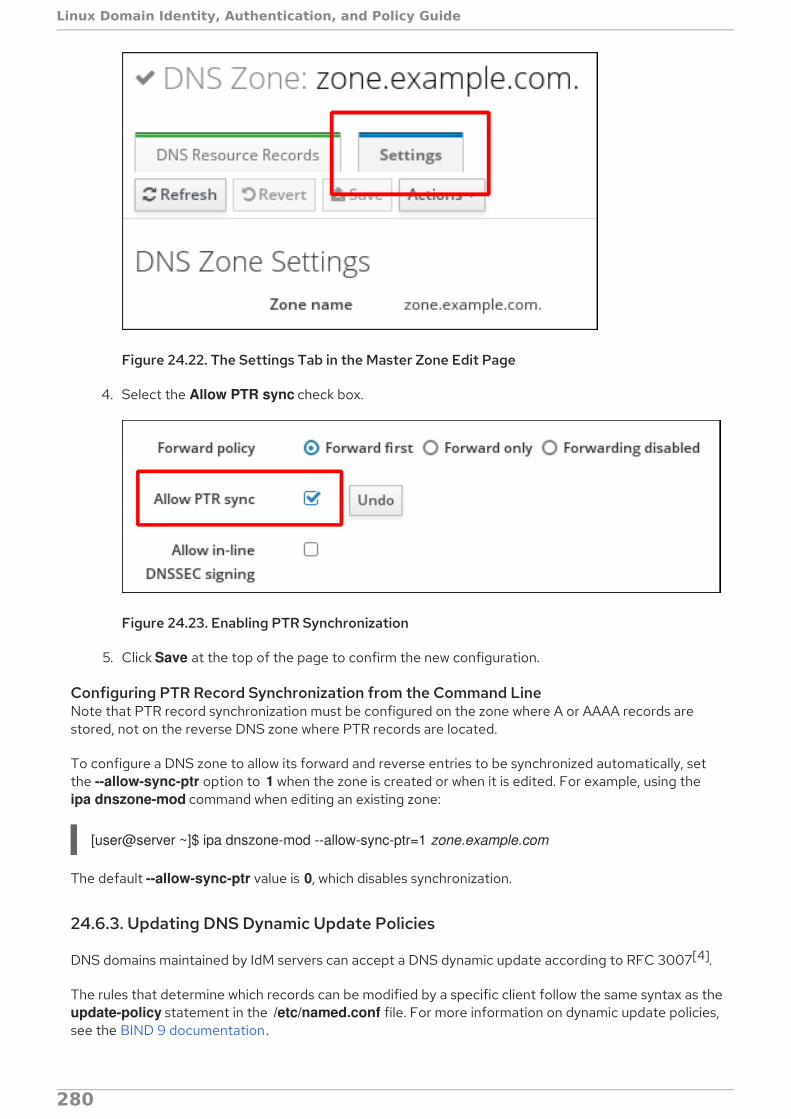
Figure 24.22. The Settings Tab in the Master Zone Edit Page
4. Select the Allow PTR sync check box.
Figure 24.23. Enabling PTR Synchronization
5. Click Save at the top of the page to confirm the new configuration.
Configuring PTR Record Synchronization from the Command LineNote that PTR record synchronization must be configured on the zone where A or AAAA records arestored, not on the reverse DNS zone where PTR records are located.
To configure a DNS zone to allow its forward and reverse entries to be synchronized automatically, setthe --allow-sync-ptr option to 1 when the zone is created or when it is edited. For example, using the ipa dnszone-mod command when editing an existing zone:
[user@server ~]$ ipa dnszone-mod --allow-sync-ptr=1 zone.example.com
The default --allow-sync-ptr value is 0, which disables synchronization.
24.6.3. Updating DNS Dynamic Update Policies
DNS domains maintained by IdM servers can accept a DNS dynamic update according to RFC 3007[4].
The rules that determine which records can be modified by a specific client follow the same syntax as theupdate-policy statement in the /etc/named.conf file. For more information on dynamic update policies,see the BIND 9 documentation.
Note that if dynamic DNS updates are disabled for the DNS zone, all DNS updates are declined without
Linux Domain Identity, Authentication, and Policy Guide
280

Note that if dynamic DNS updates are disabled for the DNS zone, all DNS updates are declined withoutreflecting the dynamic update policy statement. For information on enabling dynamic DNS updates, seeSection 24.6.1, “Enabling Dynamic DNS Updates” .
Updating DNS Update Policies in the Web UI
1. Open the Network Services tab, and select the DNS subtab, followed by the DNS Zonessection.
Figure 24.24. DNS Zone Management
2. Click on the zone name in the list of all zones to open the DNS zone page.
Figure 24.25. Editing a DNS Zone
3. Click Settings to switch to the DNS zone settings tab.
CHAPTER 24. MANAGING DNS
281

Figure 24.26. The Settings Tab in the Master Zone Edit Page
4. Set the required update policies in a semi-colon separated list in the BIND update policy textbox.
Figure 24.27. DNS Update Policy Settings
5. Click Save at the top of the DNS zone page to confirm the new configuration.
Updating DNS Update Policies from the Command LineTo set the DNS update policy from the command line, use the --update-policy option and add theaccess control rule in a statement after the option. For example:
$ ipa dnszone-mod zone.example.com --update-policy "grant EXAMPLE.COM krb5-self * A; grant EXAMPLE.COM krb5-self * AAAA; grant EXAMPLE.COM krb5-self * SSHFP;"
24.7. MANAGING DNS FORWARDING
DNS forwarding affects how DNS queries are answered. By default, the BIND service integrated withIdM is configured to act as both an authoritative and recursive DNS server.
When a DNS client queries a name belonging to a DNS zone for which the IdM server is authoritative,
Linux Domain Identity, Authentication, and Policy Guide
282

When a DNS client queries a name belonging to a DNS zone for which the IdM server is authoritative,BIND replies with data contained in the configured zone. Authoritative data always takes precedenceover any other data.
When a DNS client queries a name for which the IdM server is not authoritative, BIND attempts toresolve the query using other DNS servers. If no forwarders are defined, BIND asks the root servers onthe Internet and uses recursive resolution algorithm to answer the DNS query.
In some cases, it is not desirable to let BIND contact other DNS servers directly and perform therecursion based on data available on the Internet. These cases include:
Split DNS configuration, also known as DNS views configuration, where DNS servers returndifferent answers to different clients. Split DNS configuration is typical for environments wheresome DNS names are available inside the company network, but not from the outside.
Configurations where a firewall restricts access to DNS on the Internet.
Configurations with centralized filtering or logging on the DNS level.
Configurations with forwarding to a local DNS cache, which helps optimize network traffic.
In such configurations, BIND does not use full recursion on the public Internet. Instead, it uses anotherDNS server, a so-called forwarder, to resolve the query. When BIND is configured to use a forwarder,queries and answers are forwarded back and forth between the IdM server and the forwarder, and theIdM server acts as the DNS cache for non-authoritative data.
Forward PoliciesIdM supports the first and only standard BIND forward policies, as well as the none IdM-specific forwardpolicy.
Forward first (default)
DNS queries are forwarded to the configured forwarder. If a query fails because of a server error ortimeout, BIND falls back to the recursive resolution using servers on the Internet. The forward firstpolicy is the default policy. It is suitable for traffic optimization.
Forward only
DNS queries are forwarded to the configured forwarder. If a query fails because of a server error ortimeout, BIND returns an error to the client. The forward only policy is recommended forenvironments with split DNS configuration.
None: Forwarding disabled
DNS queries are not forwarded. Disabling forwarding is only useful as a zone-specific override forglobal forwarding configuration. This options is the IdM equivalent of specifying an empty list offorwarders in BIND configuration.
Forwarding Does Not Combine Data from IdM and Other DNS ServersForwarding cannot be used to combine data in IdM with data from other DNS servers. The BIND servicedoes not forward queries to another server if the queried DNS name belongs to a zone for which the IdMserver is authoritative. As a consequence, forwarding is not used when the client queries a name thatdoes not exist in an IdM-managed zone.
Example 24.9. Example Scenario
The IdM server is authoritative for the test.example. DNS zone. BIND is configured to forward
CHAPTER 24. MANAGING DNS
283

The IdM server is authoritative for the test.example. DNS zone. BIND is configured to forwardqueries to the DNS server with the 192.0.2.254 IP address.
When a client sends a query for the nonexistent.test.example. DNS name, BIND detects that theIdM server is authoritative for the test.example. zone and does not forward the query to the 192.0.2.254. server. As a result, the DNS client receives the NXDomain answer, informing the userthat the queried domain does not exist.
24.7.1. Configuring Global Forwarders
Global forwarders are DNS servers used for resolving all DNS queries for which an IdM server is notauthoritative, as described in Section 24.7, “Managing DNS Forwarding” .
The administrator can configure IP addresses and forward policies for global forwarding in the followingtwo ways:
Using the ipa dnsconfig-mod command or the IdM web UI
Configuration set using these native IdM tools is immediately applied to all IdM DNS servers. Asexplained in Section 24.4, “DNS Configuration Priorities” , global DNS configuration has higherpriority than local configuration defined in the /etc/named.conf files.
By editing the /etc/named.conf file
Manually editing the /etc/named.conf on every IdM DNS server allows using a different globalforwarder and policy on each of the servers. Note that the BIND service must be restarted afterchanging /etc/named.conf.
Configuring Forwarders in the Web UITo define the DNS global configuration in the IdM web UI:
1. Click the Network Services tab, and select the DNS subtab, followed by the DNS Global Configuration section.
2. To add a new global forwarder, click Add and enter the IP address. To define a new forwardpolicy, select it from the list of available policies.
Linux Domain Identity, Authentication, and Policy Guide
284
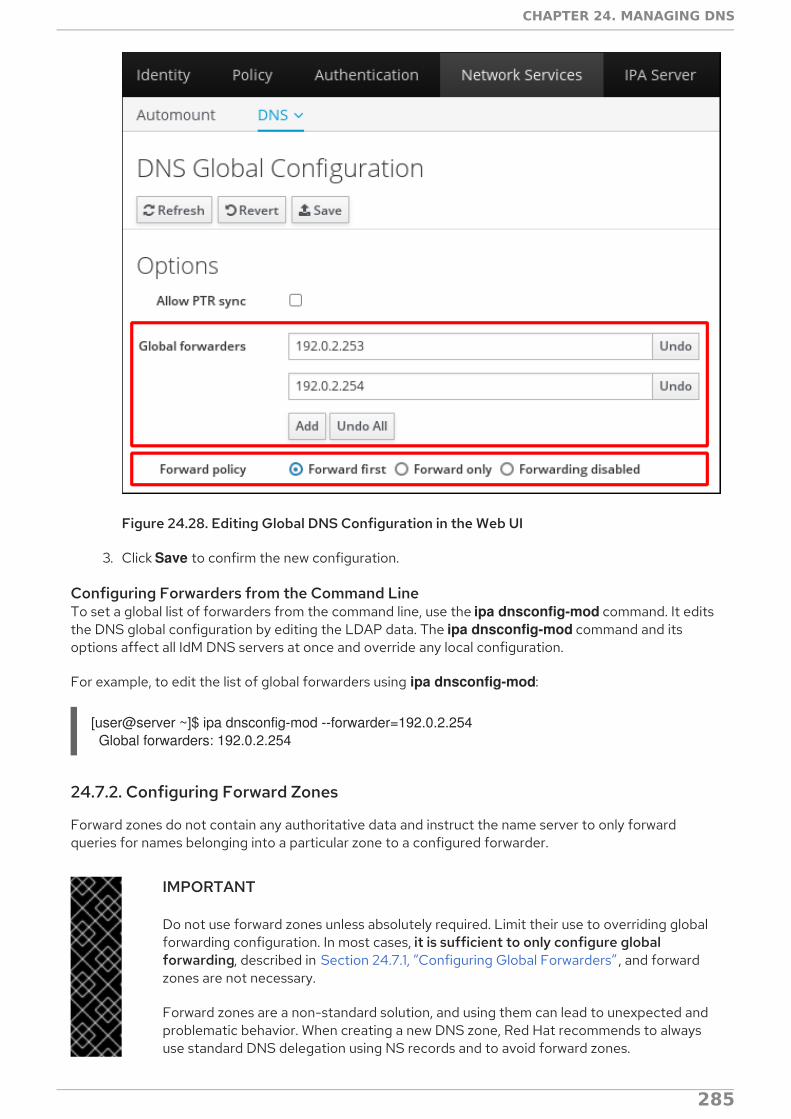
Figure 24.28. Editing Global DNS Configuration in the Web UI
3. Click Save to confirm the new configuration.
Configuring Forwarders from the Command LineTo set a global list of forwarders from the command line, use the ipa dnsconfig-mod command. It editsthe DNS global configuration by editing the LDAP data. The ipa dnsconfig-mod command and itsoptions affect all IdM DNS servers at once and override any local configuration.
For example, to edit the list of global forwarders using ipa dnsconfig-mod:
[user@server ~]$ ipa dnsconfig-mod --forwarder=192.0.2.254 Global forwarders: 192.0.2.254
24.7.2. Configuring Forward Zones
Forward zones do not contain any authoritative data and instruct the name server to only forwardqueries for names belonging into a particular zone to a configured forwarder.
IMPORTANT
Do not use forward zones unless absolutely required. Limit their use to overriding globalforwarding configuration. In most cases, it is sufficient to only configure globalforwarding, described in Section 24.7.1, “Configuring Global Forwarders” , and forwardzones are not necessary.
Forward zones are a non-standard solution, and using them can lead to unexpected andproblematic behavior. When creating a new DNS zone, Red Hat recommends to alwaysuse standard DNS delegation using NS records and to avoid forward zones.
CHAPTER 24. MANAGING DNS
285
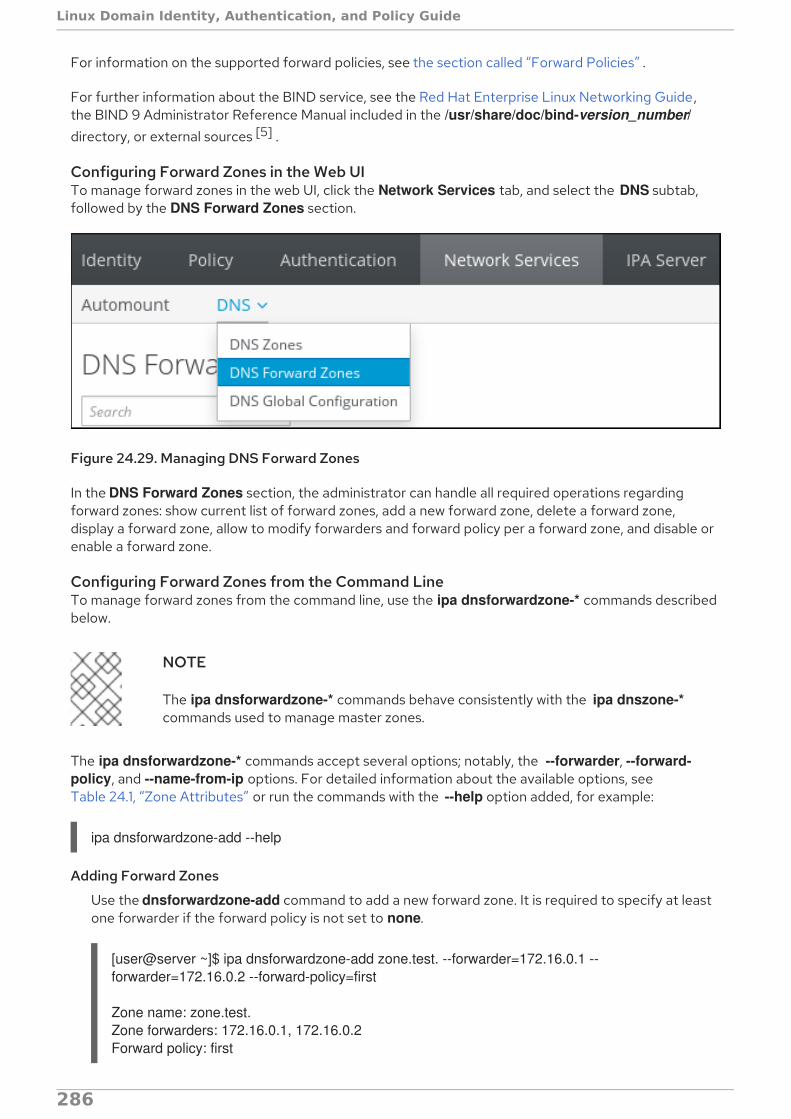
For information on the supported forward policies, see the section called “Forward Policies” .
For further information about the BIND service, see the Red Hat Enterprise Linux Networking Guide,the BIND 9 Administrator Reference Manual included in the /usr/share/doc/bind-version_number/directory, or external sources [5] .
Configuring Forward Zones in the Web UITo manage forward zones in the web UI, click the Network Services tab, and select the DNS subtab,followed by the DNS Forward Zones section.
Figure 24.29. Managing DNS Forward Zones
In the DNS Forward Zones section, the administrator can handle all required operations regardingforward zones: show current list of forward zones, add a new forward zone, delete a forward zone,display a forward zone, allow to modify forwarders and forward policy per a forward zone, and disable orenable a forward zone.
Configuring Forward Zones from the Command LineTo manage forward zones from the command line, use the ipa dnsforwardzone-* commands describedbelow.
NOTE
The ipa dnsforwardzone-* commands behave consistently with the ipa dnszone-*commands used to manage master zones.
The ipa dnsforwardzone-* commands accept several options; notably, the --forwarder, --forward-policy, and --name-from-ip options. For detailed information about the available options, seeTable 24.1, “Zone Attributes” or run the commands with the --help option added, for example:
ipa dnsforwardzone-add --help
Adding Forward Zones
Use the dnsforwardzone-add command to add a new forward zone. It is required to specify at leastone forwarder if the forward policy is not set to none.
[user@server ~]$ ipa dnsforwardzone-add zone.test. --forwarder=172.16.0.1 --forwarder=172.16.0.2 --forward-policy=first
Zone name: zone.test.Zone forwarders: 172.16.0.1, 172.16.0.2Forward policy: first
Linux Domain Identity, Authentication, and Policy Guide
286
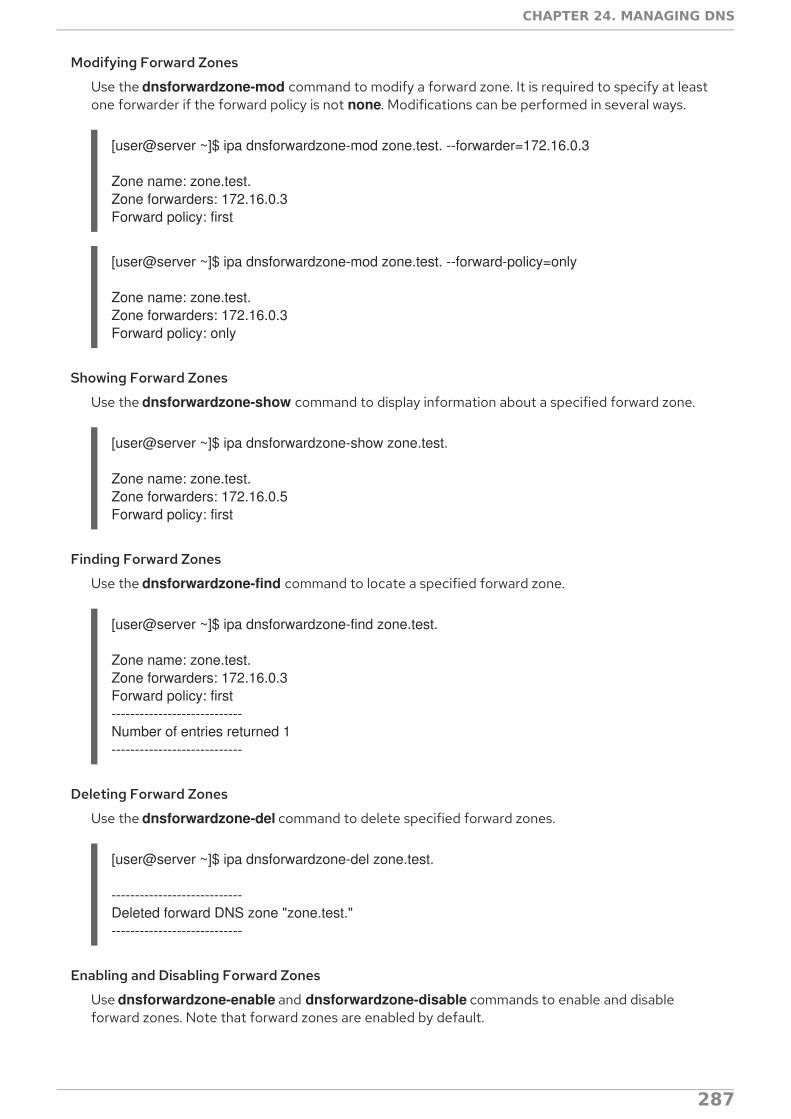
Modifying Forward Zones
Use the dnsforwardzone-mod command to modify a forward zone. It is required to specify at leastone forwarder if the forward policy is not none. Modifications can be performed in several ways.
[user@server ~]$ ipa dnsforwardzone-mod zone.test. --forwarder=172.16.0.3
Zone name: zone.test.Zone forwarders: 172.16.0.3Forward policy: first
[user@server ~]$ ipa dnsforwardzone-mod zone.test. --forward-policy=only
Zone name: zone.test.Zone forwarders: 172.16.0.3Forward policy: only
Showing Forward Zones
Use the dnsforwardzone-show command to display information about a specified forward zone.
[user@server ~]$ ipa dnsforwardzone-show zone.test.
Zone name: zone.test.Zone forwarders: 172.16.0.5Forward policy: first
Finding Forward Zones
Use the dnsforwardzone-find command to locate a specified forward zone.
[user@server ~]$ ipa dnsforwardzone-find zone.test.
Zone name: zone.test.Zone forwarders: 172.16.0.3Forward policy: first----------------------------Number of entries returned 1----------------------------
Deleting Forward Zones
Use the dnsforwardzone-del command to delete specified forward zones.
[user@server ~]$ ipa dnsforwardzone-del zone.test.
----------------------------Deleted forward DNS zone "zone.test."----------------------------
Enabling and Disabling Forward Zones
Use dnsforwardzone-enable and dnsforwardzone-disable commands to enable and disableforward zones. Note that forward zones are enabled by default.
CHAPTER 24. MANAGING DNS
287

[user@server ~]$ ipa dnsforwardzone-enable zone.test.
----------------------------Enabled forward DNS zone "zone.test."----------------------------
[user@server ~]$ ipa dnsforwardzone-disable zone.test.
----------------------------Disabled forward DNS zone "zone.test."----------------------------
Adding and Removing Permissions
Use dnsforwardzone-add-permission and dnsforwardzone-remove-permission commands toadd or remove system permissions.
[user@server ~]$ ipa dnsforwardzone-add-permission zone.test.
---------------------------------------------------------Added system permission "Manage DNS zone zone.test."--------------------------------------------------------- Manage DNS zone zone.test.
[user@server ~]$ ipa dnsforwardzone-remove-permission zone.test.
---------------------------------------------------------Removed system permission "Manage DNS zone zone.test."--------------------------------------------------------- Manage DNS zone zone.test.
24.8. MANAGING REVERSE DNS ZONES
A reverse DNS zone can be identified in the following two ways:
By the zone name, in the format reverse_ipv4_address.in-addr.arpa or reverse_ipv6_address.ip6.arpa.
The reverse IP address is created by reversing the order of the components of the IP address.For example, if the IPv4 network is 192.0.2.0/24, the reverse zone name is 2.0.192.in-addr.arpa.(with the trailing period).
By the network address, in the format network_ip_address/subnet_mask_bit_count
To create the reverse zone by its IP network, set the network information to the (forward-style)IP address, with the subnet mask bit count. The bit count must be a multiple of eight for IPv4addresses or a multiple of four for IPv6 addresses.
Adding a Reverse DNS Zone in the Web UI
1. Open the Network Services tab, and select the DNS subtab, followed by the DNS Zonessection.
Linux Domain Identity, Authentication, and Policy Guide
288

Figure 24.30. DNS Zone Management
2. Click Add at the top of the list of all zones.
Figure 24.31. Adding a Reverse DNS Zone
3. Fill in the zone name or the reverse zone IP network.
a. For example, to add a reverse DNS zone by the zone name:
Figure 24.32. Creating a Reverse Zone by Name
b. Alternatively, to add a reverse DNS zone by the reverse zone IP network:
CHAPTER 24. MANAGING DNS
289

Figure 24.33. Creating a Reverse Zone by IP Network
The validator for the Reverse zone IP network field warns you about an invalid networkaddress during typing. The warning will disappear once you enter the full network address.
4. Click Add to confirm the new reverse zone.
Adding a Reverse DNS Zone from the Command LineTo create a reverse DNS zone from the command line, use the ipa dnszone-add command.
For example, to create the reverse zone by the zone name:
[user@server]$ ipa dnszone-add 2.0.192.in-addr.arpa.
Alternatively, to create the reverse zone by the IP network:
[user@server ~]$ ipa dnszone-add --name-from-ip=192.0.2.0/24
Other Management Operations for Reverse DNS ZonesSection 24.5, “Managing Master DNS Zones” describes other zone management operations, some ofwhich are also applicable to reverse DNS zone management, such as editing or disabling and enablingDNS zones.
24.9. DEFINING DNS QUERY POLICY
To resolve host names within the DNS domain, a DNS client issues a query to the DNS name server. Forsome security contexts or for performance, it might be advisable to restrict what clients can query DNSrecords in the zone.
DNS queries can be configured when the zone is created or when it is modified by using the --allow-query option with the ipa dnszone-mod command to set a list of clients which are allowed to issuequeries.
For example:
[user@server ~]$ ipa dnszone-mod --allow-query=192.0.2.0/24;2001:DB8::/32;203.0.113.1 example.com
Linux Domain Identity, Authentication, and Policy Guide
290
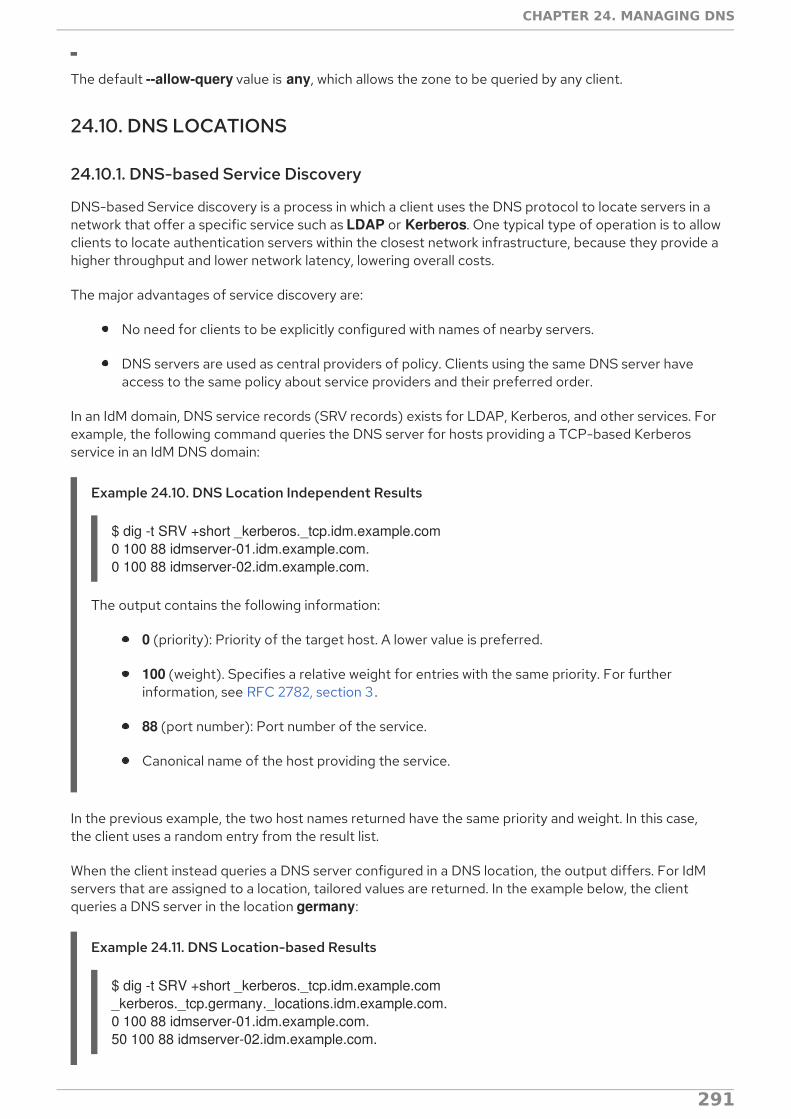
The default --allow-query value is any, which allows the zone to be queried by any client.
24.10. DNS LOCATIONS
24.10.1. DNS-based Service Discovery
DNS-based Service discovery is a process in which a client uses the DNS protocol to locate servers in anetwork that offer a specific service such as LDAP or Kerberos. One typical type of operation is to allowclients to locate authentication servers within the closest network infrastructure, because they provide ahigher throughput and lower network latency, lowering overall costs.
The major advantages of service discovery are:
No need for clients to be explicitly configured with names of nearby servers.
DNS servers are used as central providers of policy. Clients using the same DNS server haveaccess to the same policy about service providers and their preferred order.
In an IdM domain, DNS service records (SRV records) exists for LDAP, Kerberos, and other services. Forexample, the following command queries the DNS server for hosts providing a TCP-based Kerberosservice in an IdM DNS domain:
Example 24.10. DNS Location Independent Results
$ dig -t SRV +short _kerberos._tcp.idm.example.com0 100 88 idmserver-01.idm.example.com.0 100 88 idmserver-02.idm.example.com.
The output contains the following information:
0 (priority): Priority of the target host. A lower value is preferred.
100 (weight). Specifies a relative weight for entries with the same priority. For furtherinformation, see RFC 2782, section 3.
88 (port number): Port number of the service.
Canonical name of the host providing the service.
In the previous example, the two host names returned have the same priority and weight. In this case,the client uses a random entry from the result list.
When the client instead queries a DNS server configured in a DNS location, the output differs. For IdMservers that are assigned to a location, tailored values are returned. In the example below, the clientqueries a DNS server in the location germany:
Example 24.11. DNS Location-based Results
$ dig -t SRV +short _kerberos._tcp.idm.example.com_kerberos._tcp.germany._locations.idm.example.com.0 100 88 idmserver-01.idm.example.com.50 100 88 idmserver-02.idm.example.com.
CHAPTER 24. MANAGING DNS
291
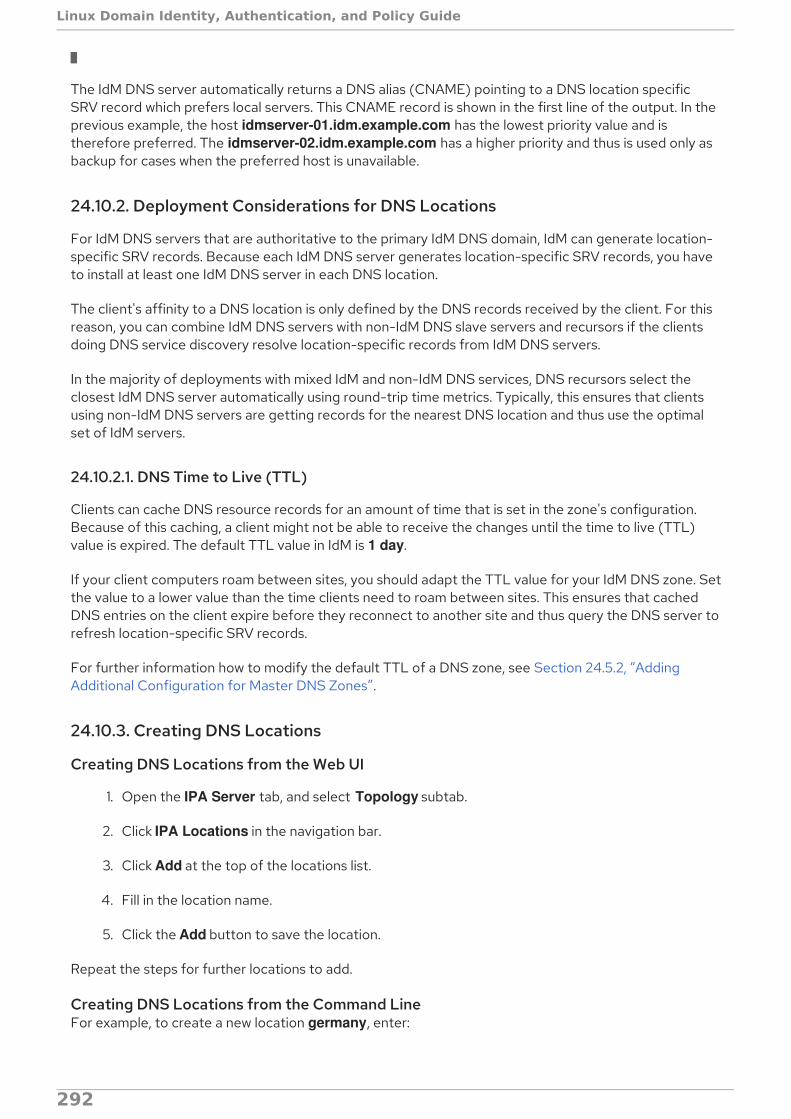
The IdM DNS server automatically returns a DNS alias (CNAME) pointing to a DNS location specificSRV record which prefers local servers. This CNAME record is shown in the first line of the output. In theprevious example, the host idmserver-01.idm.example.com has the lowest priority value and istherefore preferred. The idmserver-02.idm.example.com has a higher priority and thus is used only asbackup for cases when the preferred host is unavailable.
24.10.2. Deployment Considerations for DNS Locations
For IdM DNS servers that are authoritative to the primary IdM DNS domain, IdM can generate location-specific SRV records. Because each IdM DNS server generates location-specific SRV records, you haveto install at least one IdM DNS server in each DNS location.
The client's affinity to a DNS location is only defined by the DNS records received by the client. For thisreason, you can combine IdM DNS servers with non-IdM DNS slave servers and recursors if the clientsdoing DNS service discovery resolve location-specific records from IdM DNS servers.
In the majority of deployments with mixed IdM and non-IdM DNS services, DNS recursors select theclosest IdM DNS server automatically using round-trip time metrics. Typically, this ensures that clientsusing non-IdM DNS servers are getting records for the nearest DNS location and thus use the optimalset of IdM servers.
24.10.2.1. DNS Time to Live (TTL)
Clients can cache DNS resource records for an amount of time that is set in the zone's configuration.Because of this caching, a client might not be able to receive the changes until the time to live (TTL)value is expired. The default TTL value in IdM is 1 day.
If your client computers roam between sites, you should adapt the TTL value for your IdM DNS zone. Setthe value to a lower value than the time clients need to roam between sites. This ensures that cachedDNS entries on the client expire before they reconnect to another site and thus query the DNS server torefresh location-specific SRV records.
For further information how to modify the default TTL of a DNS zone, see Section 24.5.2, “AddingAdditional Configuration for Master DNS Zones”.
24.10.3. Creating DNS Locations
Creating DNS Locations from the Web UI
1. Open the IPA Server tab, and select Topology subtab.
2. Click IPA Locations in the navigation bar.
3. Click Add at the top of the locations list.
4. Fill in the location name.
5. Click the Add button to save the location.
Repeat the steps for further locations to add.
Creating DNS Locations from the Command LineFor example, to create a new location germany, enter:
Linux Domain Identity, Authentication, and Policy Guide
292

[root@server ~]# ipa location-add germany----------------------------Added IPA location "germany"---------------------------- Location name: germany
Repeat the step for all locations to add.
24.10.4. Assigning an IdM Server to a DNS Location
Assigning an IdM Server to a DNS Location from the Web UI
1. Open the IPA Server tab, and select Topology subtab.
2. Click IPA Servers in the navigation.
3. Click on the IdM server name.
4. Select a DNS location, and optionally set a service weight:
Figure 24.34. Assigning a Server to a DNS Location
5. Click Save.
6. Restart the named-pkcs11 service on the host you assigned in the previous steps the DNSlocation to:
[root@idmserver-01 ~]# systemctl restart named-pkcs11
Repeat the steps for further IdM servers you want to assign a DNS location to.
Assigning an IdM Server to a DNS Location from the Command Line
1. Optional: List all configured DNS locations:
[root@server ~]# ipa location-find
CHAPTER 24. MANAGING DNS
293

-----------------------2 IPA locations matched-----------------------Location name: australiaLocation name: germany-----------------------------Number of entries returned: 2-----------------------------
2. Assign the server to the DNS location. For example, to assign the location germany to theserver idmserver-01.idm.example.com, run:
[root@server ~]# ipa server-mod idmserver-01.idm.example.com --location=germanyipa: WARNING: Service named-pkcs11.service requires restart on IPA serveridmserver-01.idm.example.com to apply configuration changes.--------------------------------------------------Modified IPA server "idmserver-01.idm.example.com"--------------------------------------------------Servername: idmserver-01.idm.example.comMin domain level: 0Max domain level: 1Location: germanyEnabled server roles: DNS server, NTP server
3. Restart the named-pkcs11 service on the host you assigned in the previous steps the DNSlocation to:
[root@idmserver-01 ~]# systemctl restart named-pkcs11
Repeat the steps for further IdM servers you want to assign a DNS location to.
[3] For more information about GSS-TSIG, see RFC 3545.
[4] For the full text of RFC 3007, see http://tools.ietf.org/html/rfc3007
[5] For more information, refer to the BIND 9 Configuration Reference.
Linux Domain Identity, Authentication, and Policy Guide
294
PART IV. DEFINING DOMAIN-WIDE SYSTEM POLICIES
PART IV. DEFINING DOMAIN-WIDE SYSTEM POLICIES
295

CHAPTER 25. USING AUTOMOUNTAutomount is a way to manage, organize, and access directories across multiple systems. Automountautomatically mounts a directory whenever access to it is requested. This works exceptionally well withinan IdM domain since it allows directories on clients within the domain to be shared easily. This isespecially important with user home directories, see Section 10.1, “Setting up User Home Directories” .
In IdM, automount works with the internal LDAP directory and also with DNS services if configured.
25.1. ABOUT AUTOMOUNT AND IDM
Automount provides a coherent structure to the way that directories are organized. Every directory iscalled a mount point or a key. Multiple keys that are grouped together create a map, and maps areassociated according to their physical or conceptual location.
The base configuration file for automount is the auto.master file in the /etc directory. If necessary,there can be multiple auto.master configuration files in separate server locations.
When the autofs utility is configured on a server and the server is a client in an IdM domain, then allconfiguration information for automount is stored in the IdM directory. Rather than in separate text files,the autofs configuration containing maps, locations, and keys are stored as LDAP entries. For example,the default map file, auto.master, is stored as:
dn: automountmapname=auto.master,cn=default,cn=automount,dc=example,dc=comobjectClass: automountMapobjectClass: topautomountMapName: auto.master
IMPORTANT
Identity Management works with an existing autofs deployment but does not set up orconfigure autofs itself.
Each new location is added as a container entry under cn=automount,dc=example,dc=com, and eachmap and each key are stored beneath that location.
As with other IdM domain services, automount works with IdM natively. The automount configurationcan be managed by IdM tools:
The ipa automountlocation* commands for Locations,
The ipa automountmap* commands for direct and indirect maps,
The ipa automountkey* commands for keys.
For automount to work within the IdM domain, the NFS server must be configured as an IdM client.Configuring NFS itself is covered in the Red Hat Enterprise Linux Storage Administration Guide .
25.2. CONFIGURING AUTOMOUNT
in Identity Management, configuring automount entries like locations and maps requires an existingautofs/NFS server. Creating automount entries does not create the underlying autofs configuration. Autofs can be configured manually using LDAP or SSSD as a data store, or it can be configuredautomatically.
Linux Domain Identity, Authentication, and Policy Guide
296

NOTE
Before changing the automount configuration, test that for at least one user, their /homedirectory can be mounted from the command line successfully. Making sure that NFS isworking properly makes it easier to troubleshoot any potential IdM automountconfiguration errors later.
25.2.1. Configuring NFS Automatically
After a system is configured as an IdM client, which includes IdM servers and replicas that are configuredas domain clients as part of their configuration, autofs can be configured to use the IdM domain as itsNFS domain and have autofs services enabled.
By default, the ipa-client-automount utility automatically configures the NFS configuration files, /etc/sysconfig/nfs and /etc/idmapd.conf. It also configures SSSD to manage the credentials for NFS. Ifthe ipa-client-automount command is run without any options, it runs a DNS discovery scan to identifyan available IdM server and creates a default location called default.
[root@ipa-server ~]# ipa-client-automountSearching for IPA server...IPA server: DNS discoveryLocation: defaultContinue to configure the system with these values? [no]: yesConfigured /etc/nsswitch.confConfigured /etc/sysconfig/nfsConfigured /etc/idmapd.confStarted rpcidmapdStarted rpcgssdRestarting sssd, waiting for it to become available.Started autofs
It is possible to specify an IdM server to use and to create an automount location other than default:
[root@server ~]# ipa-client-automount --server=ipaserver.example.com --location=boston
Along with setting up NFS, the ipa-client-automount utility configures SSSD to cache automountmaps, in case the external IdM store is ever inaccessible. Configuring SSSD does two things:
It adds service configuration information to the SSSD configuration. The IdM domain entry isgiven settings for the autofs provider and the mount location.
autofs_provider = ipaipa_automount_location = default
And NFS is added to the list of supported services (services = nss,pam,autofs...) and given ablank configuration entry ([autofs]).
The Name Service Switch (NSS) service information is updated to check SSSD first forautomount information, and then the local files.
automount: sss files
There may be some instances, such as highly secure environments, where it is not appropriate for a clientto cache automount maps. In that case, the ipa-client-automount command can be run with the --no-
CHAPTER 25. USING AUTOMOUNT
297

sssd option, which changes all of the required NFS configuration files, but does not change the SSSDconfiguration.
[root@server ~]# ipa-client-automount --no-sssd
If --no-sssd is used, the list of configuration files updated by ipa-client-automount is different:
The command updates /etc/sysconfig/autofs instead of /etc/sysconfig/nfs.
The command configures /etc/autofs_ldap_auth.conf with the IdM LDAP configuration.
The command configures /etc/nsswitch.conf to use the LDAP services for automount maps.
NOTE
The ipa-client-automount command can only be run once. If there is an error in theconfiguration, than the configuration files need to be edited manually.
25.2.2. Configuring autofs Manually to Use SSSD and Identity Management
1. Edit the /etc/sysconfig/autofs file to specify the schema attributes that autofs searches for:
## Other common LDAP naming#MAP_OBJECT_CLASS="automountMap"ENTRY_OBJECT_CLASS="automount"MAP_ATTRIBUTE="automountMapName"ENTRY_ATTRIBUTE="automountKey"VALUE_ATTRIBUTE="automountInformation"
2. Specify the LDAP configuration. There are two ways to do this. The simplest is to let theautomount service discover the LDAP server and locations on its own:
LDAP_URI="ldap:///dc=example,dc=com"
Alternatively, explicitly set which LDAP server to use and the base DN for LDAP searches:
LDAP_URI="ldap://ipa.example.com"SEARCH_BASE="cn=location,cn=automount,dc=example,dc=com"
NOTE
The default value for location is default. If additional locations are added(Section 25.4, “Configuring Locations”), then the client can be pointed to usethose locations, instead.
3. Edit the /etc/autofs_ldap_auth.conf file so that autofs allows client authentication with the IdMLDAP server.
Change authrequired to yes.
Set the principal to the Kerberos host principal for the NFS client server,
Linux Domain Identity, Authentication, and Policy Guide
298

Set the principal to the Kerberos host principal for the NFS client server,host/fqdn@REALM. The principal name is used to connect to the IdM directory as part ofGSS client authentication.
If necessary, run klist -k to get the exact host principal information.
4. Configure autofs as one of the services which SSSD manages.
1. Open the SSSD configuration file.
[root@server ~]# vim /etc/sssd/sssd.conf
2. Add the autofs service to the list of services handled by SSSD.
[sssd]services = nss,pam,autofs
3. Create a new [autofs] section. This can be left blank; the default settings for an autofsservice work with most infrastructures.
[nss]
[pam]
[sudo]
[autofs]
[ssh]
[pac]
4. Optionally, set a search base for the autofs entries. By default, this is the LDAP search base,but a subtree can be specified in the ldap_autofs_search_base parameter.
[domain/EXAMPLE]...ldap_search_base = "dc=example,dc=com"ldap_autofs_search_base = "ou=automount,dc=example,dc=com"
5. Restart SSSD:
[root@server ~]# systemctl restart sssd.service
6. Check the /etc/nsswitch.conf file, so that SSSD is listed as a source for automount
<autofs_ldap_sasl_conf usetls="no" tlsrequired="no" authrequired="yes" authtype="GSSAPI" clientprinc="host/[email protected]" />
CHAPTER 25. USING AUTOMOUNT
299
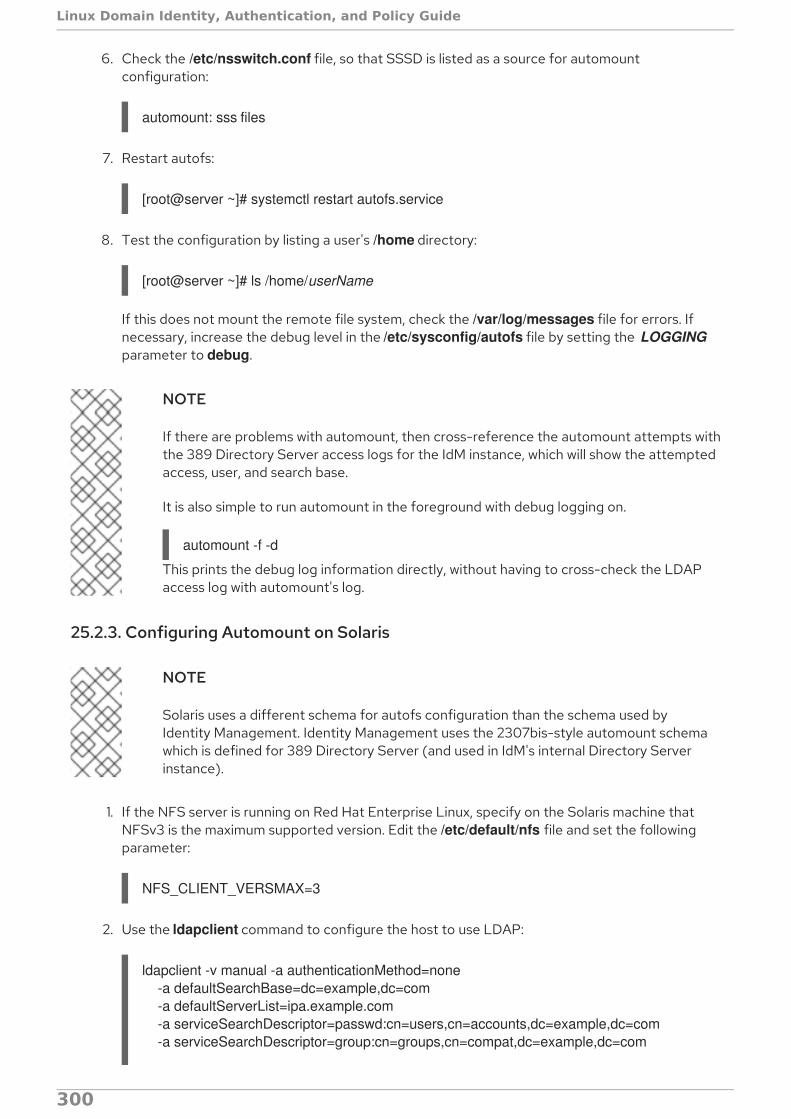
6. Check the /etc/nsswitch.conf file, so that SSSD is listed as a source for automountconfiguration:
automount: sss files
7. Restart autofs:
[root@server ~]# systemctl restart autofs.service
8. Test the configuration by listing a user's /home directory:
[root@server ~]# ls /home/userName
If this does not mount the remote file system, check the /var/log/messages file for errors. Ifnecessary, increase the debug level in the /etc/sysconfig/autofs file by setting the LOGGINGparameter to debug.
NOTE
If there are problems with automount, then cross-reference the automount attempts withthe 389 Directory Server access logs for the IdM instance, which will show the attemptedaccess, user, and search base.
It is also simple to run automount in the foreground with debug logging on.
automount -f -d
This prints the debug log information directly, without having to cross-check the LDAPaccess log with automount's log.
25.2.3. Configuring Automount on Solaris
NOTE
Solaris uses a different schema for autofs configuration than the schema used byIdentity Management. Identity Management uses the 2307bis-style automount schemawhich is defined for 389 Directory Server (and used in IdM's internal Directory Serverinstance).
1. If the NFS server is running on Red Hat Enterprise Linux, specify on the Solaris machine thatNFSv3 is the maximum supported version. Edit the /etc/default/nfs file and set the followingparameter:
NFS_CLIENT_VERSMAX=3
2. Use the ldapclient command to configure the host to use LDAP:
ldapclient -v manual -a authenticationMethod=none -a defaultSearchBase=dc=example,dc=com -a defaultServerList=ipa.example.com -a serviceSearchDescriptor=passwd:cn=users,cn=accounts,dc=example,dc=com -a serviceSearchDescriptor=group:cn=groups,cn=compat,dc=example,dc=com
Linux Domain Identity, Authentication, and Policy Guide
300
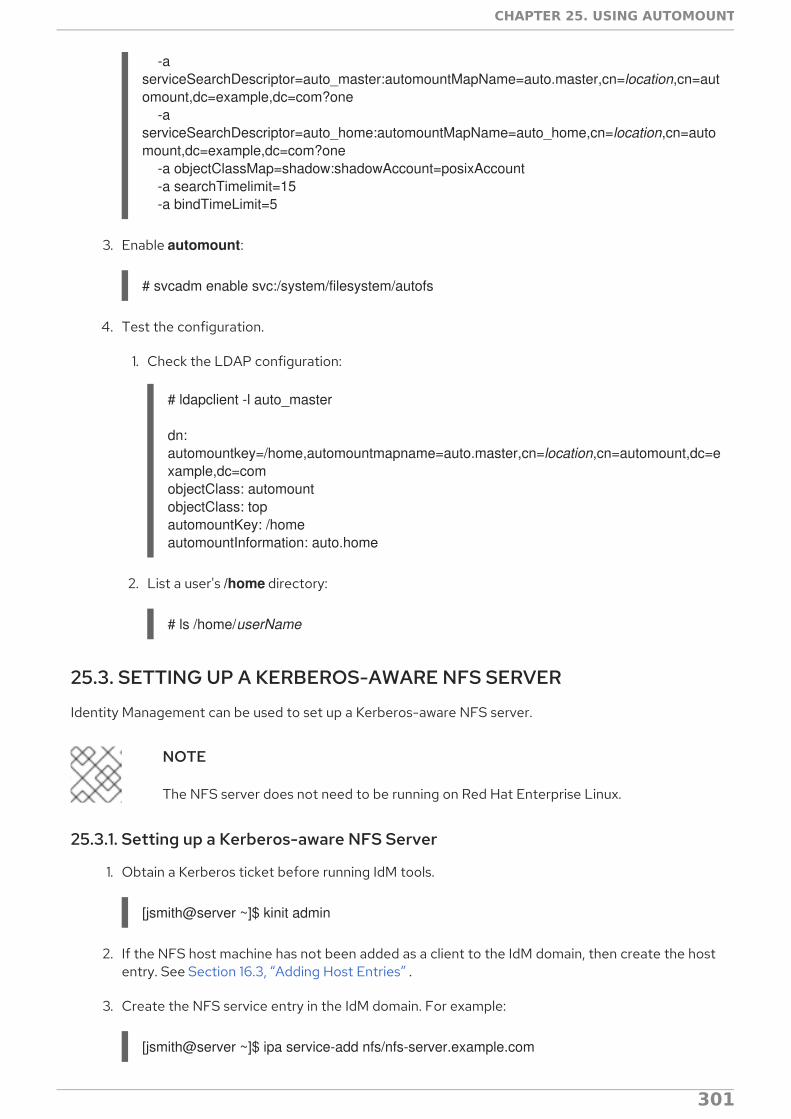
-a serviceSearchDescriptor=auto_master:automountMapName=auto.master,cn=location,cn=automount,dc=example,dc=com?one -a serviceSearchDescriptor=auto_home:automountMapName=auto_home,cn=location,cn=automount,dc=example,dc=com?one -a objectClassMap=shadow:shadowAccount=posixAccount -a searchTimelimit=15 -a bindTimeLimit=5
3. Enable automount:
# svcadm enable svc:/system/filesystem/autofs
4. Test the configuration.
1. Check the LDAP configuration:
# ldapclient -l auto_master
dn: automountkey=/home,automountmapname=auto.master,cn=location,cn=automount,dc=example,dc=comobjectClass: automountobjectClass: topautomountKey: /homeautomountInformation: auto.home
2. List a user's /home directory:
# ls /home/userName
25.3. SETTING UP A KERBEROS-AWARE NFS SERVER
Identity Management can be used to set up a Kerberos-aware NFS server.
NOTE
The NFS server does not need to be running on Red Hat Enterprise Linux.
25.3.1. Setting up a Kerberos-aware NFS Server
1. Obtain a Kerberos ticket before running IdM tools.
[jsmith@server ~]$ kinit admin
2. If the NFS host machine has not been added as a client to the IdM domain, then create the hostentry. See Section 16.3, “Adding Host Entries” .
3. Create the NFS service entry in the IdM domain. For example:
[jsmith@server ~]$ ipa service-add nfs/nfs-server.example.com
CHAPTER 25. USING AUTOMOUNT
301

For more information, see Section 17.1, “Adding and Editing Service Entries and Keytabs” .
4. Generate an NFS service keytab for the NFS server using the ipa-getkeytab command, andsave the keys directly to the host keytab. For example:
[jsmith@server ~]$ ipa-getkeytab -s ipaserver.example.com -p nfs/nfs-server.example.com -k /etc/krb5.keytab
NOTE
Verify that the NFS service has been properly configured in IdM, with its keytab,by checking the service entry:
[jsmith@server ~]$ ipa service-show nfs/nfs-server.example.com Principal: NFS/[email protected] Keytab: True
NOTE
This procedure assumes that the NFS server is running on a Red HatEnterprise Linux system or a UNIX system which can run ipa-getkeytab.
If the NFS server is running on a system which cannot run ipa-getkeytab, thencreate the keytab using system tools. Two things must be done:
The key must be created in the /root (or equivalent) directory.
The ktutil command can merge the keys into the system /etc/krb5.keytabfile. The ktutil man page describes how to use the tool.
5. Install the NFS packages. For example:
[root@nfs-server ~]# yum install nfs-utils
6. Configure weak crypto support. This is required for every NFS client if any client (such as aRed Hat Enterprise Linux 5 client) in the domain will use older encryption options like DES.
1. Edit the krb5.conf file to allow weak crypto.
[root@nfs-server ~]# vim /etc/krb5.conf
allow_weak_crypto = true
2. Update the IdM server Kerberos configuration to support the DES encryption type.
[jsmith@ipaserver ~]$ ldapmodify -x -D "cn=directory manager" -w password -h ipaserver.example.com -p 389
dn: cn=EXAMPLEREALM,cn=kerberos,dc=example,dc=comchangetype: modifyadd: krbSupportedEncSaltTypeskrbSupportedEncSaltTypes: des-cbc-crc:normal
Linux Domain Identity, Authentication, and Policy Guide
302

-add: krbSupportedEncSaltTypeskrbSupportedEncSaltTypes: des-cbc-crc:special-add: krbDefaultEncSaltTypeskrbDefaultEncSaltTypes: des-cbc-crc:special
7. Run the ipa-client-automount command to configure the NFS settings.
By default, this enables secure NFS in the /etc/sysconfig/nfs file and sets the IdM DNS domainin the Domain parameter in the /etc/idmapd.conf file.
8. Edit the /etc/exports file and add the Kerberos information:
/export *(rw,sec=krb5:krb5i:krb5p)
9. Restart the NFS server and related services.
[root@nfs-server ~]# systemctl restart nfs.service[root@nfs-server ~]# systemctl restart nfs-server.service[root@nfs-server ~]# systemctl restart nfs-secure.service[root@nfs-server ~]# systemctl restart nfs-secure-server.service
10. Configure the NFS server as an NFS client, following the directions in Section 25.3.2, “Setting upa Kerberos-aware NFS Client”.
25.3.2. Setting up a Kerberos-aware NFS Client
1. Obtain a Kerberos ticket before running IdM tools.
[jsmith@server ~]$ kinit admin
2. If the NFS client is not enrolled as a client in the IdM domain, then set up the required hostentries, as described in Section 16.3, “Adding Host Entries” .
3. Run the ipa-client-automount command to configure the NFS settings.
By default, this enables secure NFS in the /etc/sysconfig/nfs file and sets the IdM DNS domainin the Domain parameter in the /etc/idmapd.conf file.
4. Start the GSS daemon.
[root@nfs-client-server ~]# systemctl start rpc-gssd.service[root@nfs-client-server ~]# systemctl start rpcbind.service[root@nfs-client-server ~]# systemctl start nfs-idmapd.service
5. Mount the directory.
[root@nfs-client-server ~]# echo "$NFSSERVER:/this /mnt/this nfs4 sec=krb5i,rw,proto=tcp,port=2049" >>/etc/fstab[root@nfs-client-server ~]# mount -av
6. Configure SSSD on the client system to manage home directories and renew Kerberos tickets.
CHAPTER 25. USING AUTOMOUNT
303

1. Enable SSSD with the --enablemkhomedir option.
[root@nfs-client-server ~]# authconfig --update --enablesssd --enablesssdauth --enablemkhomedir
2. Restart the OpenSSH client.
[root@nfs-client-server ~]# systemctl start sssh.service
3. Edit the IdM domain section in the SSSD configuration file to set the keytab renewaloptions.
[root@nfs-client-server ~]# vim /etc/sssd/sssd.conf
[domain/EXAMPLE.COM]cache_credentials = Truekrb5_store_password_if_offline = Trueipa_domain = example.comid_provider = ipaauth_provider = ipa...krb5_renewable_lifetime = 50dkrb5_renew_interval = 3600
4. Restart SSSD.
[root@nfs-client-server ~]# systemctl restart sssd.service
25.4. CONFIGURING LOCATIONS
A location is a set of maps, which are all stored in auto.master, and a location can store multiple maps.The location entry only works as a container for map entries; it is not an automount configuration in andof itself.
IMPORTANT
Identity Management does not set up or configure autofs. That must be done separately.Identity Management works with an existing autofs deployment.
25.4.1. Configuring Locations through the Web UI
1. Click the Policy tab.
2. Click the Automount subtab.
3. Click the Add link at the top of the list of automount locations.
Linux Domain Identity, Authentication, and Policy Guide
304

4. Enter the name for the new location.
5. Click the Add and Edit button to go to the map configuration for the new location. Createmaps, as described in Section 25.5.1.1, “Configuring Direct Maps from the Web UI” andSection 25.5.2.1, “Configuring Indirect Maps from the Web UI” .
25.4.2. Configuring Locations through the Command Line
To create a map, using the automountlocation-add and give the location name.
$ ipa automountlocation-add location
For example:
$ ipa automountlocation-add raleigh----------------------------------
CHAPTER 25. USING AUTOMOUNT
305

Added automount location "raleigh"---------------------------------- Location: raleigh
When a new location is created, two maps are automatically created for it, auto.master and auto.direct. auto.master is the root map for all automount maps for the location. auto.direct is the default map fordirect mounts and is mounted on /-.
To view all of the maps configured for a location as if they were deployed on a filesystem, use the automountlocation-tofiles command:
$ ipa automountlocation-tofiles raleigh/etc/auto.master:/- /etc/auto.direct---------------------------/etc/auto.direct:
25.5. CONFIGURING MAPS
Configuring maps not only creates the maps, it associates mount points through the keys and it assignsmount options that should be used when the directory is accessed. IdM supports both direct andindirect maps.
NOTE
Different clients can use different map sets. Map sets use a tree structure, so mapscannot be shared between locations.
IMPORTANT
Identity Management does not set up or configure autofs. That must be done separately.Identity Management works with an existing autofs deployment.
25.5.1. Configuring Direct Maps
Direct maps define exact locations, meaning absolute paths, to the file mount point. In the locationentry, a direct map is identified by the preceding forward slash:
---------------------------/etc/auto.direct:/shared/man server.example.com:/shared/man
25.5.1.1. Configuring Direct Maps from the Web UI
1. Click the Policy tab.
2. Click the Automount subtab.
3. Click name of the automount location to which to add the map.
Linux Domain Identity, Authentication, and Policy Guide
306

4. In the Automount Maps tab, click the + Add link to create a new map.
5. In pop-up window, select the Direct radio button and enter the name of the new map.
CHAPTER 25. USING AUTOMOUNT
307
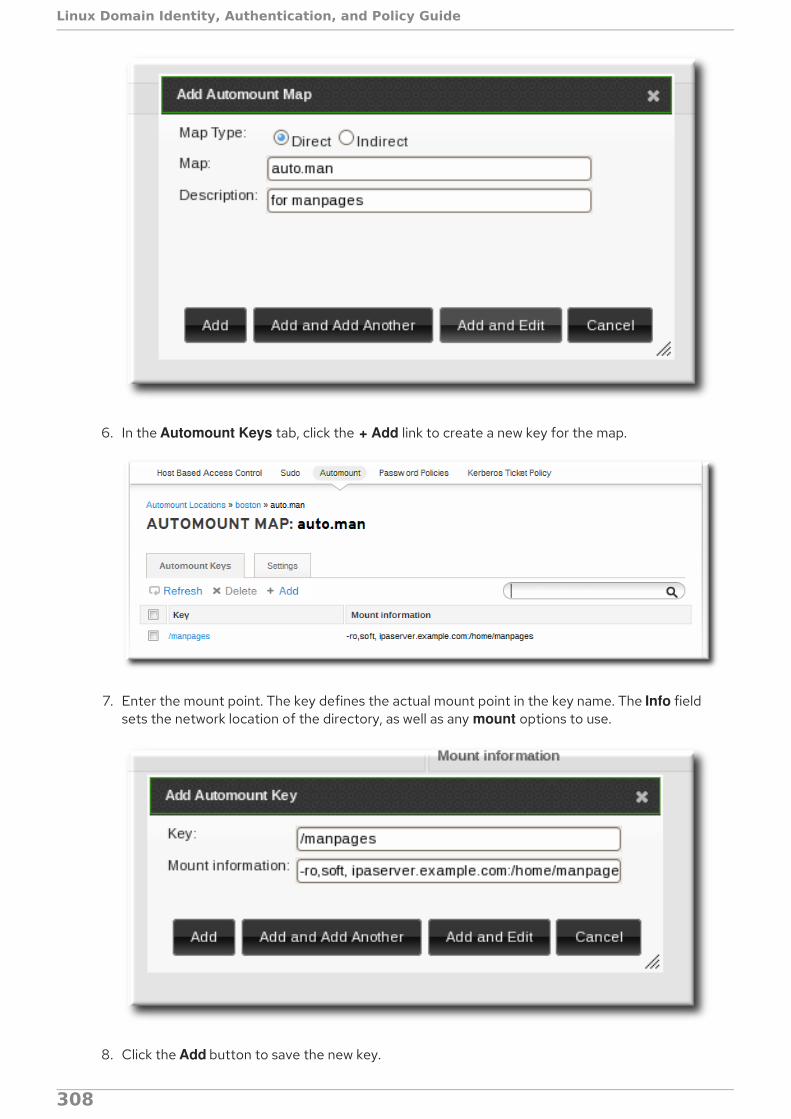
6. In the Automount Keys tab, click the + Add link to create a new key for the map.
7. Enter the mount point. The key defines the actual mount point in the key name. The Info fieldsets the network location of the directory, as well as any mount options to use.
8. Click the Add button to save the new key.
Linux Domain Identity, Authentication, and Policy Guide
308
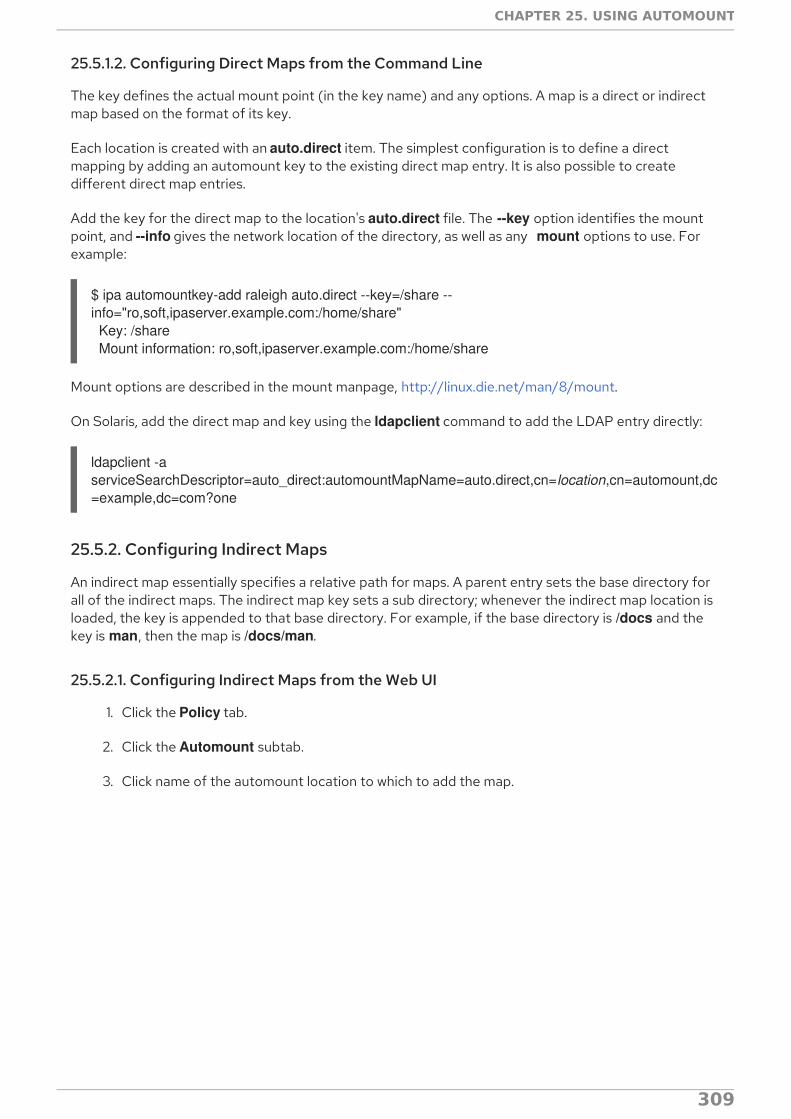
25.5.1.2. Configuring Direct Maps from the Command Line
The key defines the actual mount point (in the key name) and any options. A map is a direct or indirectmap based on the format of its key.
Each location is created with an auto.direct item. The simplest configuration is to define a directmapping by adding an automount key to the existing direct map entry. It is also possible to createdifferent direct map entries.
Add the key for the direct map to the location's auto.direct file. The --key option identifies the mountpoint, and --info gives the network location of the directory, as well as any mount options to use. Forexample:
$ ipa automountkey-add raleigh auto.direct --key=/share --info="ro,soft,ipaserver.example.com:/home/share" Key: /share Mount information: ro,soft,ipaserver.example.com:/home/share
Mount options are described in the mount manpage, http://linux.die.net/man/8/mount.
On Solaris, add the direct map and key using the ldapclient command to add the LDAP entry directly:
ldapclient -a serviceSearchDescriptor=auto_direct:automountMapName=auto.direct,cn=location,cn=automount,dc=example,dc=com?one
25.5.2. Configuring Indirect Maps
An indirect map essentially specifies a relative path for maps. A parent entry sets the base directory forall of the indirect maps. The indirect map key sets a sub directory; whenever the indirect map location isloaded, the key is appended to that base directory. For example, if the base directory is /docs and thekey is man, then the map is /docs/man.
25.5.2.1. Configuring Indirect Maps from the Web UI
1. Click the Policy tab.
2. Click the Automount subtab.
3. Click name of the automount location to which to add the map.
CHAPTER 25. USING AUTOMOUNT
309
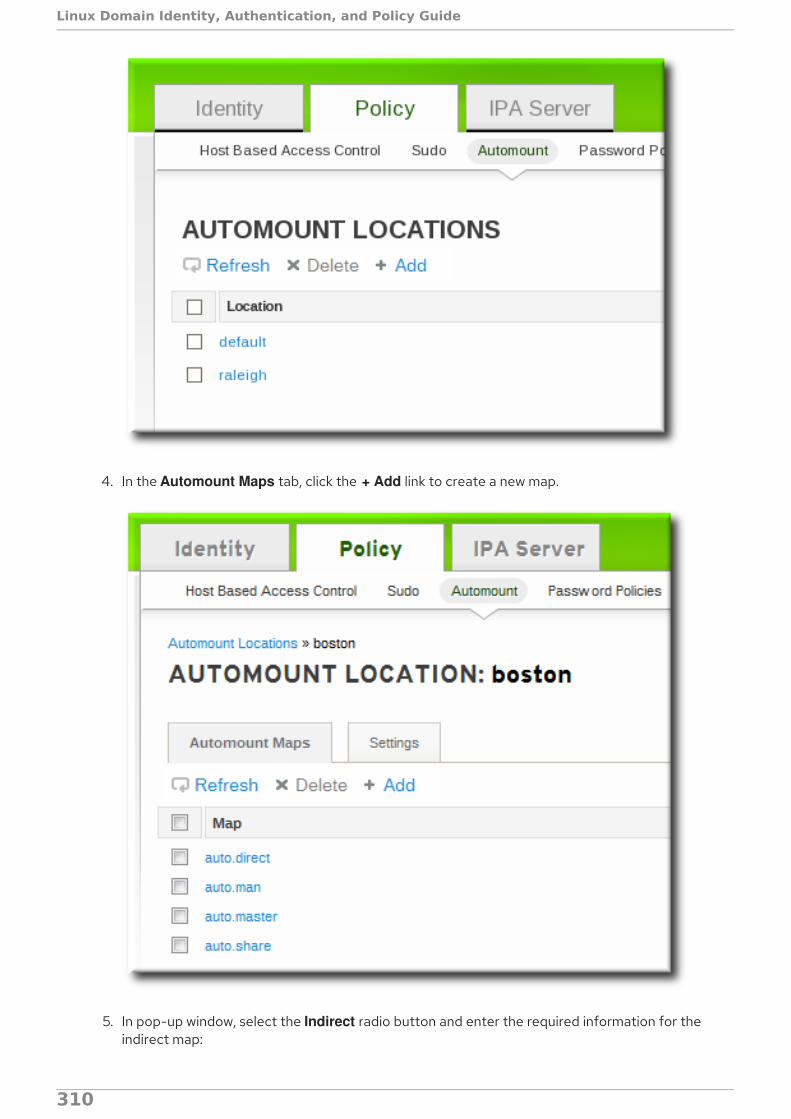
4. In the Automount Maps tab, click the + Add link to create a new map.
5. In pop-up window, select the Indirect radio button and enter the required information for theindirect map:
Linux Domain Identity, Authentication, and Policy Guide
310
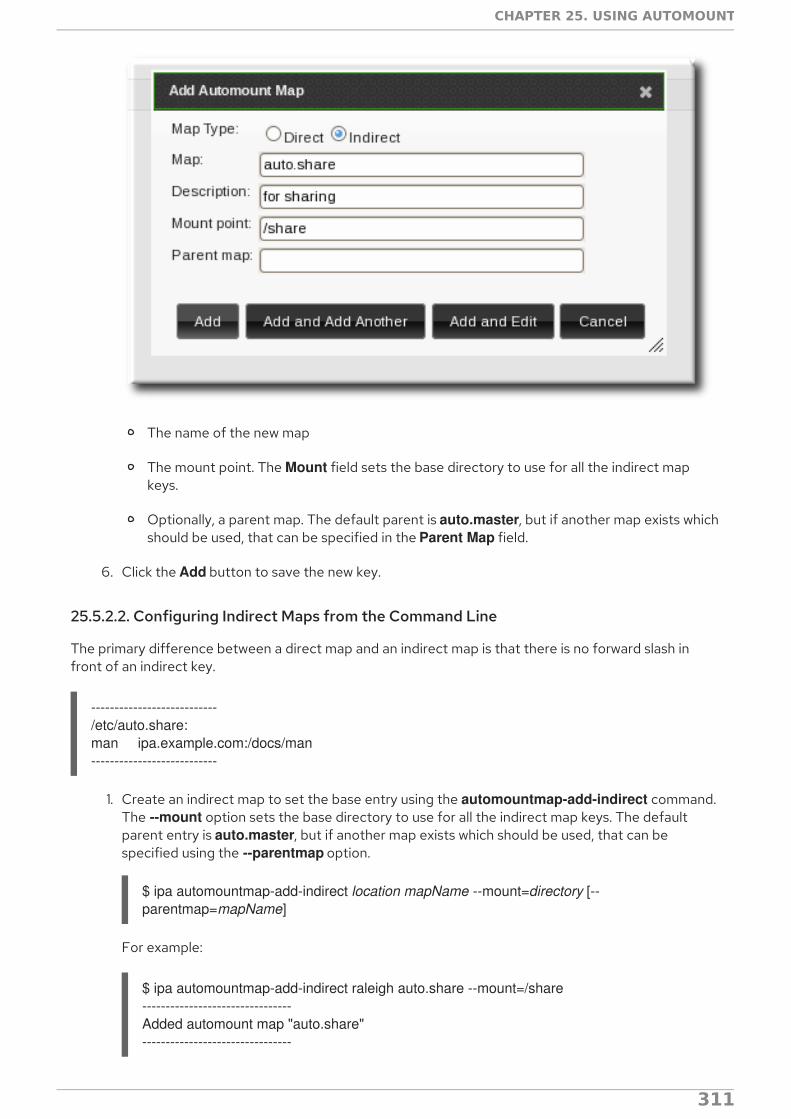
The name of the new map
The mount point. The Mount field sets the base directory to use for all the indirect mapkeys.
Optionally, a parent map. The default parent is auto.master, but if another map exists whichshould be used, that can be specified in the Parent Map field.
6. Click the Add button to save the new key.
25.5.2.2. Configuring Indirect Maps from the Command Line
The primary difference between a direct map and an indirect map is that there is no forward slash infront of an indirect key.
---------------------------/etc/auto.share:man ipa.example.com:/docs/man---------------------------
1. Create an indirect map to set the base entry using the automountmap-add-indirect command.The --mount option sets the base directory to use for all the indirect map keys. The defaultparent entry is auto.master, but if another map exists which should be used, that can bespecified using the --parentmap option.
$ ipa automountmap-add-indirect location mapName --mount=directory [--parentmap=mapName]
For example:
$ ipa automountmap-add-indirect raleigh auto.share --mount=/share--------------------------------Added automount map "auto.share"--------------------------------
CHAPTER 25. USING AUTOMOUNT
311

2. Add the indirect key for the mount location:
$ ipa automountkey-add raleigh auto.share --key=docs --info="ipa.example.com:/export/docs"-------------------------Added automount key "docs"------------------------- Key: docs Mount information: ipa.example.com:/export/docs
3. To verify the configuration, check the location file list using automountlocation-tofiles:
$ ipa automountlocation-tofiles raleigh/etc/auto.master:/- /etc/auto.direct/share /etc/auto.share---------------------------/etc/auto.direct:---------------------------/etc/auto.share:man ipa.example.com:/export/docs
On Solaris, add the indirect map using the ldapclient command to add the LDAP entry directly:
ldapclient -a serviceSearchDescriptor=auto_share:automountMapName=auto.share,cn=location,cn=automount,dc=example,dc=com?one
25.5.3. Importing Automount Maps
If there are existing automount maps, these can be imported into the IdM automount configuration.
ipa automountlocation-import location map_file [--continuous]
The only required information is the IdM automount location and the full path and name of the map file.The --continuous option tells the automountlocation-import command to continue through the mapfile, even if the command encounters errors.
For example:
$ ipa automountlocation-import raleigh /etc/custom.map
Linux Domain Identity, Authentication, and Policy Guide
312

CHAPTER 26. DEFINING PASSWORD POLICIESAll users must have a password which they use to authenticate to the Kerberos domain.Identity Management defines and enforces rules about password complexity, password histories, andaccount lockouts in order to maintain security.
NOTE
IdM, by default, does not expose passwords to clients, even hashed passwords, for systemsecurity.
26.1. ABOUT PASSWORD POLICIES AND POLICY ATTRIBUTES
A password policy sets certain standards for passwords, such as the password complexity and the rulesfor changing passwords. A password policy minimizes the inherent risk of using passwords by ensuringthat they meet adequate complexity standards to thwart brute force attacks and they are changedfrequently enough to mitigate the risk of someone revealing or discovering a password.
There are three main configuration areas that are defined within the password policy:
Strength or complexity requirements
History
Account lockout
The IdM password policy is enforced jointly by the KDC and the LDAP server. While the password policyis set in the LDAP directory and is based on 389 Directory Server password policy attributes, the policyis ultimately constrained by the KDC password policy framework. The KDC policy is less flexible than the389 Directory Server policy framework, so the IdM password policy can only implement password policyelements supported in the KDC. Any other policy settings made within the 389 Directory Server are notvisible or enforced in Identity Management.
Password policies are assigned either globally or to groups in IdM, not to individual users. The passwordpolicy is assigned a priority, so that if a user belongs to multiple groups with different password policies,the policy with the highest priority will take precedence.
The different policy attributes that can be set are listed in Table 26.1, “Password Policy Settings”.
Table 26.1. Password Policy Settings
Configuration Property Command-Line Option Description
Options for both the UI and CLI
Minimum Password Lifetime --minlife Sets the minimum period of time,in hours, that a user's passwordmust be in effect before the usercan change it. This can prevent auser from changing a passwordand then immediately changing itto the original value. The defaultvalue is one hour.
CHAPTER 26. DEFINING PASSWORD POLICIES
313
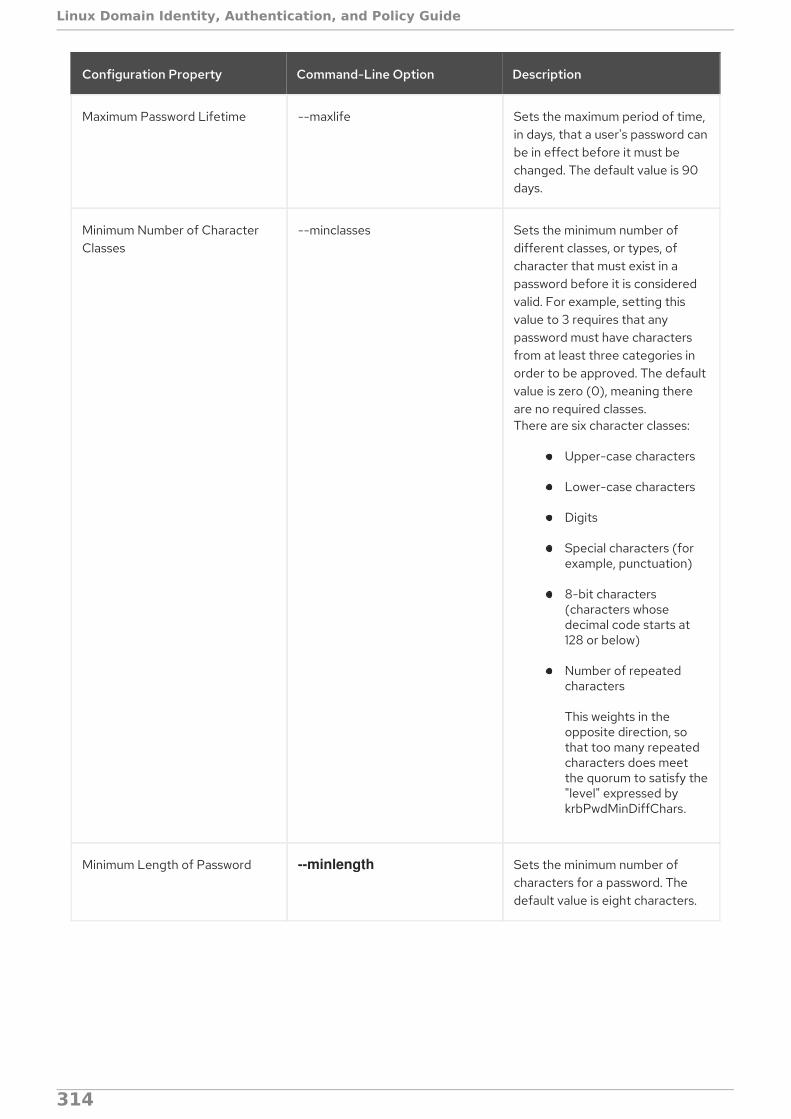
Maximum Password Lifetime --maxlife Sets the maximum period of time,in days, that a user's password canbe in effect before it must bechanged. The default value is 90days.
Minimum Number of CharacterClasses
--minclasses Sets the minimum number ofdifferent classes, or types, ofcharacter that must exist in apassword before it is consideredvalid. For example, setting thisvalue to 3 requires that anypassword must have charactersfrom at least three categories inorder to be approved. The defaultvalue is zero (0), meaning thereare no required classes.There are six character classes:
Upper-case characters
Lower-case characters
Digits
Special characters (forexample, punctuation)
8-bit characters(characters whosedecimal code starts at128 or below)
Number of repeatedcharacters
This weights in theopposite direction, sothat too many repeatedcharacters does meetthe quorum to satisfy the"level" expressed bykrbPwdMinDiffChars.
Minimum Length of Password --minlength Sets the minimum number ofcharacters for a password. Thedefault value is eight characters.
Configuration Property Command-Line Option Description
Linux Domain Identity, Authentication, and Policy Guide
314

Password History --history Sets the number of previouspasswords that are stored andwhich a user is prevented fromusing. For example, if this is set toten, IdM prevents a user fromreusing any of their previous tenpasswords. The default value iszero (0), which disables passwordhistory.
NOTE
Even with thepassword historyset to zero, userscannot reuse acurrent password.
Options for the CLI only
Priority --priority Sets the priority which determineswhich policy is in effect. The lowerthe number, the higher priority.Although this priority is requiredwhen the policy is first created inthe UI, it cannot be reset in the UI.It can only be reset using the CLI.
Maximum Consecutive Failures --maxfail Specifies the maximum number ofconsecutive failures to input thecorrect password before theuser's account is locked.
Fail Interval --failinterval Specifies the period (in seconds)after which the failure count willbe reset.
Lockout Time --lockouttime Specifies the period (in seconds)for which a lockout is enforced.
Configuration Property Command-Line Option Description
26.2. VIEWING PASSWORD POLICIES
There can be multiple password policies configured in IdM. There is always a global policy, which is setwhen the server is created. Additional policies can be created for groups in IdM.
The UI lists all of the group password policies and the global policy on the Password Policies page.
Using the CLI, both global and group-level password policies can be viewed using the pwpolicy-showcommand. The CLI can also display the password policy in effect for a user.
CHAPTER 26. DEFINING PASSWORD POLICIES
315
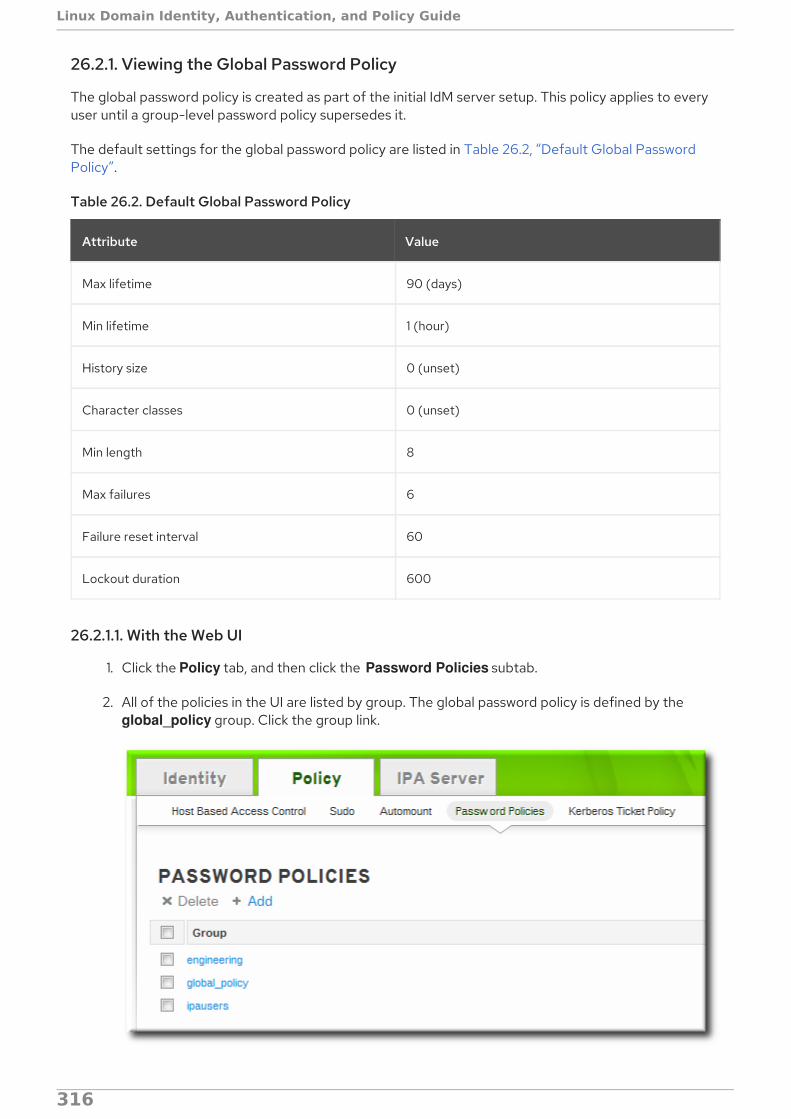
26.2.1. Viewing the Global Password Policy
The global password policy is created as part of the initial IdM server setup. This policy applies to everyuser until a group-level password policy supersedes it.
The default settings for the global password policy are listed in Table 26.2, “Default Global PasswordPolicy”.
Table 26.2. Default Global Password Policy
Attribute Value
Max lifetime 90 (days)
Min lifetime 1 (hour)
History size 0 (unset)
Character classes 0 (unset)
Min length 8
Max failures 6
Failure reset interval 60
Lockout duration 600
26.2.1.1. With the Web UI
1. Click the Policy tab, and then click the Password Policies subtab.
2. All of the policies in the UI are listed by group. The global password policy is defined by the global_policy group. Click the group link.
Linux Domain Identity, Authentication, and Policy Guide
316

3. The global policy is displayed.
26.2.1.2. With the Command Line
To view the global policy, simply run the pwpolicy-show command with no arguments:
[root@server ~]# kinit admin[root@server ~]# ipa pwpolicy-show
Group: global_policy Max lifetime (days): 90 Min lifetime (hours): 1 History size: 0 Character classes: 0 Min length: 8
CHAPTER 26. DEFINING PASSWORD POLICIES
317

Max failures: 6 Failure reset interval: 60 Lockout duration: 600
26.2.2. Viewing Group-Level Password Policies
26.2.2.1. With the Web UI
1. Click the Policy tab, and then click the Password Policies subtab.
2. All of the policies in the UI are listed by group. Click the name of the group which is assigned thepolicy.
3. The group policy is displayed.
Linux Domain Identity, Authentication, and Policy Guide
318

26.2.2.2. With the Command Line
For a group-level password policy, specify the group name with the command:
[root@server ~]# kinit admin[root@server ~]# ipa pwpolicy-show ipausers Group: ipausers Max lifetime (days): 120 Min lifetime (hours): 10 Min length: 10 Priority: 50
26.2.3. Viewing the Password Policy in Effect for a User
A user may belong to multiple groups, each with their own separate password policies. These policies arenot additive. Only one policy is in effect at a time and it applies to all password policy attributes. To seewhich policy is in effect for a specific user, the pwpolicy-show command can be run for a specific user.The results also show which group policy is in effect for that user.
[root@server ~]# kinit admin[root@server ~]# ipa pwpolicy-show --user=jsmith Group: global_policy Max lifetime (days): 90
CHAPTER 26. DEFINING PASSWORD POLICIES
319

Min lifetime (hours): 1 History size: 0 Character classes: 0 Min length: 8 Max failures: 6 Failure reset interval: 60 Lockout duration: 600
26.3. CREATING AND EDITING PASSWORD POLICIES
A password policy can be selective; it may only define certain elements. A global password policy setsdefaults that are used for every user entry, unless a group policy takes priority.
NOTE
A global policy always exists, so there is no reason to add a global password policy.
Group-level policies override the global policies and offer specific policies that only apply to groupmembers. Password policies are not cumulative. Either a group policy or the global policy is in effect for auser or group, but not both simultaneously.
Group-level policies do not exist by default, so they must be created manually.
NOTE
It is not possible to set a password policy for a non-existent group.
26.3.1. Creating Password Policies in the Web UI
1. Click the Policy tab, and then click the Password Policies subtab.
2. All of the policies in the UI are listed by group. The global password policy is defined by the global_policy group. Click the group link.
3. Click the Add link at the top.
Linux Domain Identity, Authentication, and Policy Guide
320

4. In the pop-up box, select the group for which to create the password policy.
5. Set the priority of the policy. The higher the number, the lower the priority. Conversely, thehighest priority policy has the lowest number.
Only one password policy is in effect for a user, and that is the highest priority policy.
NOTE
The priority cannot be changed in the UI once the policy is created.
CHAPTER 26. DEFINING PASSWORD POLICIES
321

6. Click the Add and Edit button so that the policy form immediately opens.
7. Set the policy fields. Leaving a field blank means that attribute is not added the password policyconfiguration.
Max lifetime sets the maximum amount of time, in days, that a password is valid before auser must reset it.
Min lifetime sets the minimum amount of time, in hours, that a password must remain ineffect before a user is permitted to change it. This prevents a user from attempting tochange a password back immediately to an older password or from cycling through thepassword history.
History size sets how many previous passwords are stored. A user cannot re-use a passwordthat is still in the password history.
Character classes sets the number of different categories of character that must be used inthe password. This does not set which classes must be used; it sets the number of different(unspecified) classes which must be used in a password. For example, a character class canbe a number, special character, or capital; the complete list of categories is in Table 26.1,“Password Policy Settings”. This is part of setting the complexity requirements.
Min length sets how many characters must be in a password. This is part of setting thecomplexity requirements.
26.3.2. Creating Password Policies with the Command Line
Password policies are added with the pwpolicy-add command.
[root@server ~]# kinit admin[root@server ~]# ipa pwpolicy-add groupName --attribute-value
For example:
[root@server ~]# kinit admin[root@server ~]# ipa pwpolicy-add exampleGroup --minlife=7 --maxlife=49 --history= --priority=1 Group: exampleGroupMax lifetime (days): 49Min lifetime (hours): 7Priority: 1
NOTE
Setting an attribute to a blank value effectively removes that attribute from the passwordpolicy.
26.3.3. Editing Password Policies with the Command Line
As with most IdM entries, a password policy is edited by using a *-mod command, pwpolicy-mod, andthen the policy name. However, there is one difference with editing password policies: there is a globalpolicy which always exists. Editing a group-level password policy is slightly different than editing theglobal password policy.
Editing a group-level password policy follows the standard syntax of *-mod commands. It uses the
Linux Domain Identity, Authentication, and Policy Guide
322
Editing a group-level password policy follows the standard syntax of *-mod commands. It uses the pwpolicy-mod command, the name of the policy entry, and the attributes to change. For example:
[jsmith@ipaserver ~]$ ipa pwpolicy-mod exampleGroup --lockouttime=300 --history=5 --minlength=8
To edit the global password policy, use the pwpolicy-mod command with the attributes to change, butwithout specifying a password policy name. For example:
[jsmith@ipaserver ~]$ ipa pwpolicy-mod --lockouttime=300 --history=5 --minlength=8
26.4. MANAGING PASSWORD EXPIRATION LIMITS
Password policies are applied at the time a password is changed. So, when a password is set, itconforms to the password policy in effect at that time. If the password policy is changed later, thatchange is not applied, retroactively, to the password.
Setting password expiration periods is configured as part of the group password policy. Creating andediting password policies (including the expiration attribute in the policy) is covered in Section 26.3,“Creating and Editing Password Policies”.
With password expiration periods, there are two attributes that are related:
The maximum lifetime setting given in the password policy (--maxlife)
The actual date that the password for a given user expires (krbPasswordExpiration)
Changing the password expiration time in the password policy does not affect the expiration date for auser, until the user password is changed. If the password expiration date needs to be changedimmediately, it can be changed by editing the user entry.
To force the expiration date to change, reset the krbPasswordExpiration attribute value for the user.This can only be done using ldapmodify. For example, for a single user:
[bjensen@ipaserver ~]$ ldapmodify -D "cn=Directory Manager" -w secret -h ipaserver.example.com -p 389 -vv
dn: uid=jsmith,cn=users,cn=accounts,dc=example,dc=comchangetype: modifyreplace: krbpasswordexpirationkrbpasswordexpiration: 20140202203734Z-
Multiple entries can be edited simultaneously by referencing an LDIF file in the -f option with the ldapmodify command.
NOTE
If an administrator resets a password, it makes the previous password expired and forcesthe user to update the password. When the user updates the password, it automaticallyuses the new password policies, including a new expiration date.
26.5. CHANGING THE PRIORITY OF GROUP PASSWORD POLICIES
A user may belong to multiple groups, each with different password policies. Since only one policy can
CHAPTER 26. DEFINING PASSWORD POLICIES
323

A user may belong to multiple groups, each with different password policies. Since only one policy canbe in effect for a user, there has to be a method to assign precedence to policies. That is done throughpriority.
The highest priority is zero (0). The lower the number, the higher the priority.
This is set initially when the password policy is created. It can be modified after the policy is created byresetting the --priority option.
[root@server ~]# kinit admin[root@server ~]# ipa pwpolicy-mod examplegroup --priority=10
When a user belongs to multiple groups, the group password policy with the lowest priority number hasthe highest priority.
26.6. SETTING ACCOUNT LOCKOUT POLICIES
A brute force attack occurs when an attacker attempts to guess a password by simply flooding theserver with multiple login attempts. An account lockout policy prevents brute force attacks by blockingan account from logging into the system after a certain number of login failures — even if the correctpassword is subsequently entered.
NOTE
A user account can be manually unlocked by an administrator using the ipa user-unlockcommand. Also see Section 12.1.2, “Unlocking User Accounts After Password Failures” .
26.6.1. In the UI
These attributes are available in the password policy form when a group-level password policy is createdor when any password policy, including the global password policy, is edited.
1. Click the Policy tab, and then click the Password Policies subtab.
2. Click the name of the policy to edit.
3. Set the account lockout attribute values.
Linux Domain Identity, Authentication, and Policy Guide
324

There are three parts to the account lockout policy:
Max Failures sets the number of failed login attempts before the account is locked.
Failure reset interval sets the number of seconds after a failed login attempt before thecounter resets. Since mistakes do happen honestly, the count of failed attempts is not keptforever; it naturally lapses after the set amount of time.
Lockout duration sets the number of seconds for an account to remain locked after themaximum number of failed attempts is reached. Note that if this field is set to 0, the accountwill be permanently locked in such a case.
26.6.2. In the CLI
There are three parts to the account lockout policy:
The --maxfail option specifies the number of failed login attempts before the account is locked.
The --failinterval option sets the number of seconds after a failed login attempt before thecounter resets. Since mistakes do happen honestly, the count of failed attempts is not keptforever; it naturally lapses after the set amount of time.
The --lockouttime option sets the number of seconds for an account to remain locked after themaximum number of failed attempts is reached. Note that if the 0 value is used, the account willbe permanently locked in such a case.
These account lockout options can all be set when a password policy is created with pwpolicy-add oradded later using pwpolicy-mod. For example:
CHAPTER 26. DEFINING PASSWORD POLICIES
325
[jsmith@ipaserver ~]$ kinit admin[jsmith@ipaserver ~]$ ipa pwpolicy-mod examplegroup --maxfail=4 --lockouttime=600 --failinterval=30
26.7. ENABLING A PASSWORD CHANGE DIALOG
There may be situations when a user exists in Identity Management but does not have a valid Kerberosticket, meaning he cannot authenticate to the IdM domain. This is possible for new users or for userswhose domain passwords have expired. Much like enabling password authentication in the web UI, it ispossible to enable password-based authentication to the client. This opens up a password changedialog box to allow the user to reset the expired password.
The password change dialog is enabled by using OpenSSH's challenge-response authentication.
The challenge-response dialog is optional. In many environments, it is not necessary because SSSD canhandle changing expired passwords by invoking the required PAM modules. However, using thechallenge-response option in OpenSSH makes it possible to do password changes directly in PAM andto support full PAM conversations.
This is not enabled by default, but it can be enabled by editing the OpenSSH configuration.
1. Open the /etc/ssh/sshd_config file.
2. Set ChallengeResponseAuthentication to yes.
Linux Domain Identity, Authentication, and Policy Guide
326

CHAPTER 27. MANAGING THE KERBEROS DOMAINKerberos authentication is the core of authentication within the IdM domain. The IdM server actuallyruns a Kerberos server within it, and this Kerberos server can be configured for custom policies formanaging tickets and keytabs.
For more information on Kerberos concepts, see the MIT Kerberos documentation,http://web.mit.edu/kerberos/www/.
IMPORTANT
Identity Management has its own command-line tools to use to manage Kerberospolicies. Do not use kadmin or kadmin.local to manage IdM Kerberos settings.
27.1. ABOUT KERBEROS
Kerberos provides an authentication layer between services and users. Kerberos centralizesauthentication into a single location; a user authenticates to the Kerberos server, and then when thatuser attempts to access any resource on the network, that resource can check the key distributioncenter (KDC) for the stored user credentials. This allows users to access multiple resources withouthaving to supply credentials separately to each and every one.
All of the users and services, combined, and all of the KDCs and Kerberos servers that are aware of eachother constitute a realm. Each user, machine, and service within the realm is identified by a unique namecalled the principal. The user or service uses the principal and a verifying credential (usually a password)to authenticate to the KDC. The credential that is shared with the KDC is a key and it is stored in a filecalled a key table or keytab.
When the KDC verifies the user's identity, it issues a ticket. The ticket is a long-term pass to any serviceand machine on the realm. The KDC issues the user a special kind of ticket called a ticket-granting ticket(TGT). Whenever the user tries to access a resource within the Kerberos realm, the resource sends arequest for a ticket specifically for it. The TGT is used to issue a resource-specific ticket that theresource then uses to authenticate the user and grant access.
NOTE
When an IdM client is first configured, the host principal is automatically retrieved by thesetup script and stored in the /etc/krb5.keytab file. This host principal is stored within thehost record so that local service commands cannot be used with this principal. Thisprepares the client to function in the IdM realm.
27.1.1. About Principal Names
The principal identifies not only the user or service, but also the realm that the entity belongs to. Aprincipal name has two parts, the identifier and the realm:
identifier@REALM
For a user, the identifier is only the Kerberos user name. For a service, the identifier is a combination ofthe service name and the host name of the machine it runs on:
service/FQDN@REALM
CHAPTER 27. MANAGING THE KERBEROS DOMAIN
327

The service name is a case-sensitive string that is specific to the service type, like host, ldap, http, and DNS. Not all services have obvious principal identifiers; the sshd daemon, for example, uses the hostservice principal.
The host principal is usually stored in /etc/krb5.keytab.
When Kerberos requests a ticket, it always resolves the domain name aliases (DNS CNAME records) tothe corresponding DNS address (A or AAAA records). The host name from the address record is thenused when service or host principals are created.
For example:
www.example.com CNAME web-01.example.comweb-01.example.com A 192.0.2.145
A service attempts to connect to the host using its CNAME alias:
$ ssh www.example.com
The Kerberos server requests a ticket for the resolved host name, [email protected], so the host principal must be host/[email protected].
27.1.2. About Protecting Keytabs
To protect keytab files, reset the permissions and ownership to restrict access to the files to only thekeytab owner. For example, set the owner of the Apache keytab (/etc/httpd/conf/ipa.keytab) to apacheand the mode to 0600.
27.2. SETTING KERBEROS TICKET POLICIES
The Kerberos ticket policy sets basic restrictions on managing tickets within the Kerberos realm, such asthe maximum ticket lifetime and the maximum renewal age (the period during which the ticket isrenewable).
The Kerberos ticket policy is set globally so that it applies to every ticket issued within the realm. IdMalso has the ability to set user-level ticket policies which override the global policies. This can be used,for example, to set extended expiration times for administrators or to set shorter expiration times forsome employees.
27.2.1. Setting Global Ticket Policies
27.2.1.1. From the Web UI
1. Click the Policy tab, and then click the Kerberos Ticket Policy subtab.
2. Change the ticket lifetime policies.
Linux Domain Identity, Authentication, and Policy Guide
328
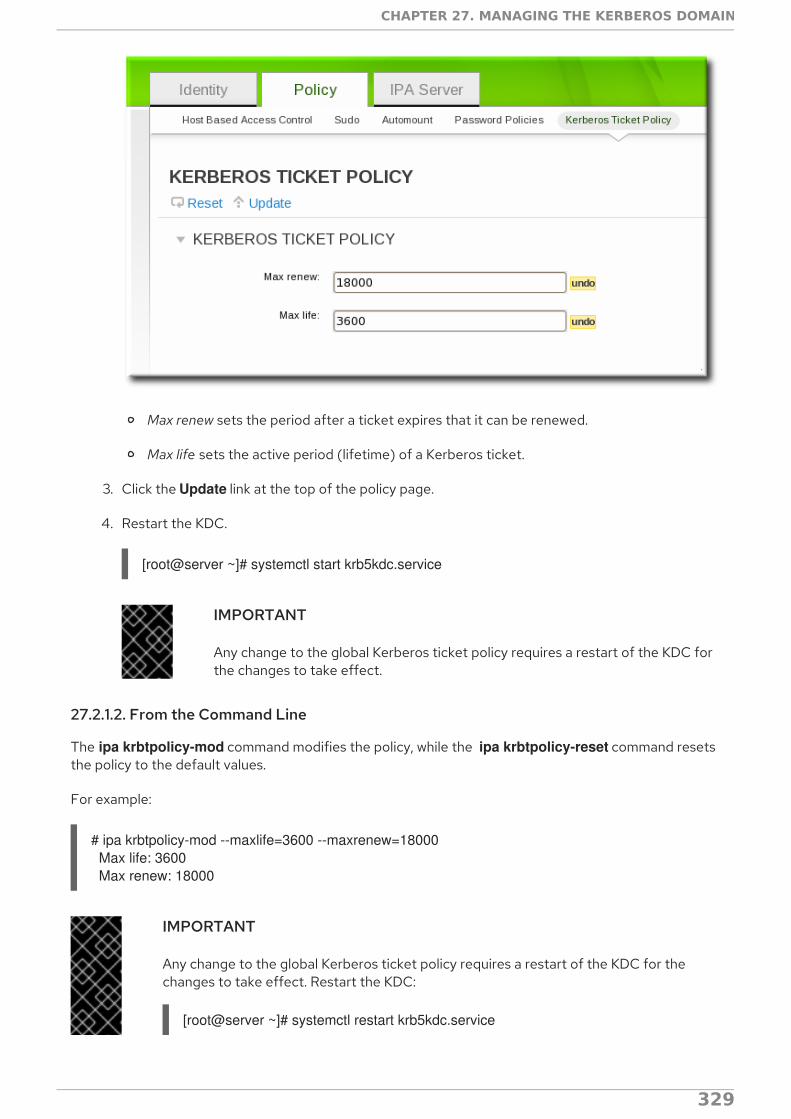
Max renew sets the period after a ticket expires that it can be renewed.
Max life sets the active period (lifetime) of a Kerberos ticket.
3. Click the Update link at the top of the policy page.
4. Restart the KDC.
[root@server ~]# systemctl start krb5kdc.service
IMPORTANT
Any change to the global Kerberos ticket policy requires a restart of the KDC forthe changes to take effect.
27.2.1.2. From the Command Line
The ipa krbtpolicy-mod command modifies the policy, while the ipa krbtpolicy-reset command resetsthe policy to the default values.
For example:
# ipa krbtpolicy-mod --maxlife=3600 --maxrenew=18000 Max life: 3600 Max renew: 18000
IMPORTANT
Any change to the global Kerberos ticket policy requires a restart of the KDC for thechanges to take effect. Restart the KDC:
[root@server ~]# systemctl restart krb5kdc.service
CHAPTER 27. MANAGING THE KERBEROS DOMAIN
329
27.2.2. Setting User-Level Ticket Policies
User-level Kerberos ticket policies are set using the same commands as global policies, but the user isspecified in the command.
For example:
# ipa krbtpolicy-mod jsmith --maxlife=3600 Max life: 3600
IMPORTANT
User-level policies take effect immediately on the next requested ticket (such as running kinit), without having to restart the KDC service.
27.3. REFRESHING KERBEROS TICKETS
Kerberos keys are analogous to passwords. As with password policies, Kerberos tickets come undersecurity policies which require them to be manually refreshed after a specified interval.
The version of the key is shown in its key version number (KVNO). Refreshing (also called rotating) theprincipal's key increments the KVNO in the keytab entry. When a key is refreshed, a new entry is addedto the keytab with a higher KVNO. The original key remains in the keytab but is no longer used to issuetickets.
Each keytab for the IdM realm has an entry in the IdM LDAP server, which includes its last change time.The principals which need to be refreshed can be regenerated using the ipa-getkeytab command.
NOTE
The ipa-getkeytab command does not delete the old keytab in case it already exists inthe file.
1. Find all keytabs issued before the requisite date. For example, this looks for any principalscreated between midnight on January 1, 2010, and 11:59 PM on December 31, 2010:
[root@server ~]# ldapsearch -x -b "cn=computers,cn=accounts,dc=example,dc=com" "(&(krblastpwdchange>=20100101000000)(krblastpwdchange<=20101231235959))" dn krbprincipalname... [root@server ~]# ldapsearch -x -b "cn=services,cn=accounts,dc=example,dc=com" "(&(krblastpwdchange>=20100101000000)(krblastpwdchange<=20101231235959))" dn krbprincipalname
Host (machine) principals are stored under the cn=computers,cn=accounts,dc=example,dc=com subtree.
Service principals are stored under the cn=services,cn=accounts,dc=example,dc=comsubtree.
Filter by the last change date (krblastpwdchange).
Limit the search result information to only the entry name and principal by specifying the dn
Linux Domain Identity, Authentication, and Policy Guide
330
Limit the search result information to only the entry name and principal by specifying the dn krbprincipalname attributes.
Dates are expressed in YYYYMMDD format, and times in HHMMSS format (GMT).
2. Retrieve a new keytab for the principal using the ipa-getkeytab command. This requires thelocation of the original keytab for the service or host (-k), the principal (-p), and the IdM serverhost name (-s).
For example, this refreshes the host principal with a keytab in the default location of /etc/krb5.keytab:
# ipa-getkeytab -p host/[email protected] -s ipa.example.com -k /etc/krb5.keytab
This refreshes the keytab for the Apache service, with a keytab in the default location of /etc/httpd/conf/ipa.keytab:
# ipa-getkeytab -p HTTP/[email protected] -s ipa.example.com -k /etc/httpd/conf/ipa.keytab
3. Regenerate the keytab using ipa-getkeytab for every service.
The klist command displays the new key version number for the refreshed keytab. The original keytabstill exists in the database, and it is listed with the previous KVNO.
# klist -kt /etc/krb5.keytabKeytab: WRFILE:/etc/krb5.keytabKVNO Timestamp Principal---- ----------------- -------------------------------------------------------- 1 06/09/10 11:23:01 host/[email protected](aes256-cts-hmac-sha1-96) 2 06/09/11 05:58:47 host/[email protected](aes256-cts-hmac-sha1-96) 1 03/09/11 13:57:16 krbtgt/[email protected](aes256-cts-hmac-sha1-96) 1 03/09/11 13:57:16 HTTP/[email protected](aes256-cts-hmac-sha1-96) 1 03/09/11 13:57:16 ldap/[email protected](aes256-cts-hmac-sha1-96)
Tickets issued against the old keytab continue to work, while new tickets are issued using the key withthe highest KVNO. This avoids any disruption to system operations.
IMPORTANT
Some services, such as NFSv4, only support a limited set of encryption types. Pass theappropriate arguments to the ipa-getkeytab command to configure the keytab properly.
27.4. KERBEROS FLAGS FOR SERVICES AND HOSTS
Various Kerberos flags can be used to define certain specific aspects of the Kerberos ticket behavior.You can add these flags to service and host Kerberos principals.
Principals in IdM accept the following two Kerberos flags:
OK_AS_DELEGATE
Use this flag to specify Kerberos tickets trusted for delegation.
CHAPTER 27. MANAGING THE KERBEROS DOMAIN
331

AD clients check the OK_AS_DELEGATE flag on the Kerberos ticket to determine whether the usercredentials can be forwarded or delegated to the specific server; AD forwards the TGT only toservices or hosts with OK_AS_DELEGATE set. With this flag, SSSD can add the AD user TGT to thedefault Kerberos credentials cache on the IdM client machine.
REQUIRES_PRE_AUTH
Use this flag to specify that only pre-authenticated tickets are allowed to authenticate to theprincipal.
With the REQUIRES_PRE_AUTH flag set, the KDC requires additional authentication: the KDCissues the TGT for a principal with REQUIRES_PRE_AUTH only if the TGT has been pre-authenticated.
You can use REQUIRES_PRE_AUTH to disable pre-authentication for selected services or hosts,which lowers the load on the KDC but also slightly increases the possibility of a brute-force attack ona long-term key to succeed.
27.4.1. Setting Kerberos Flags from the Web UI
From the IdM web UI, you can currently only add the OK_AS_DELEGATE flag to a principal:
1. Select the Services subtab, accessible through the Identity main tab.
Figure 27.1. List of Services
2. Click on the service to which you want to add the flag.
3. Check the Trusted for delegation option.
Linux Domain Identity, Authentication, and Policy Guide
332

Figure 27.2. Adding the OK_AS_DELEGATE Flag
27.4.2. Setting Kerberos Flags from the Command Line
To add a flag to a principal from the command line or to remove a flag, add one of the following optionsto the ipa service-mod command:
--ok-as-delegate for OK_AS_DELEGATE
--requires-pre-auth for REQUIRES_PRE_AUTH
To add a flag, set the corresponding option to 1. For example, to add the OK_AS_DELEGATE flag tothe test/[email protected] principal:
$ ipa service-mod test/[email protected] --ok-as-delegate=1
To remove a flag or to disable it, set the corresponding option to 0. For example, to disable the REQUIRES_PRE_AUTH flag for the test/[email protected] principal:
$ ipa service-mod test/[email protected] --requires-pre-auth=0
To find out if OK_AS_DELEGATE is currently set for a principal, run the kvno utility and then the klist -f command. OK_AS_DELEGATE is represented by the O character in the klist -f output:
$ kvno test/[email protected]$ klist -fTicket cache: KEYRING:persistent:0:0Default principal: [email protected]
CHAPTER 27. MANAGING THE KERBEROS DOMAIN
333
Valid starting Expires Service principal02/19/2014 09:59:02 02/20/2014 08:21:33 test/ipa/[email protected] Flags: FATO
To find out what flags are currently set for a principal, use the kadmin.local utility. The current flags aredisplayed on the Attributes line of kadmin.local output, for example:
# kadmin.localkadmin.local: getprinc test/ipa.example.comPrincipal: test/[email protected] date: [never]Last password change: Mon Sep 16 15:44:21 EDT 2013Password expiration date: [none]Maximum ticket life: 1 day 00:00:00Maximum renewable life: 7 days 00:00:00Last modified: Mon Oct 14 23:42:53 EDT 2013 (admin/[email protected])Last successful authentication: Wed Mar 11 08:01:03 EDT 2015Last failed authentication: [never]Failed password attempts: 0Number of keys: 6Key: vno 1, aes256-cts-hmac-sha1-96, no saltKey: vno 1, aes128-cts-hmac-sha1-96, no saltKey: vno 1, des3-cbc-sha1, no saltKey: vno 1, arcfour-hmac, no saltKey: vno 1, camellia128-cts-cmac, no saltKey: vno 1, camellia256-cts-cmac, no saltMKey: vno 1Attributes: REQUIRES_PRE_AUTH OK_AS_DELEGATE OK_TO_AUTH_AS_DELEGATEPolicy: [none]
27.5. CACHING KERBEROS PASSWORDS
A machine may not always be on the same network as the IdM domain; for example, a machine may needto be logged into a VPN before it can access the IdM domain. If a user logs into a system when it isoffline and then later attempts to connect to IdM services, then the user is blocked because there is noIdM Kerberos ticket for that user. IdM works around that limitation by using SSSD to store the Kerberospasswords in the SSSD cache.
This is configured by default by the ipa-client-install script. A configuration parameter is added to the /etc/sssd/sssd.conf file which specifically instructs SSSD to store those Kerberos passwords for theIdM domain:
[domain/example.com]cache_credentials = Trueipa_domain = example.comid_provider = ipaauth_provider = ipaaccess_provider = ipachpass_provider = ipaipa_server = _srv_, server.example.comkrb5_store_password_if_offline = true
This default behavior can be disabled during the client installation by using the --no-krb5-offline-passwords option.
Linux Domain Identity, Authentication, and Policy Guide
334
This behavior can also be disabled by editing the /etc/sssd/sssd.conf file and removing the krb5_store_password_if_offline line or changing its value to false.
[domain/example.com]...krb5_store_password_if_offline = false
The SSSD configuration options for Kerberos authentication is covered in the "Configuring Domains"section of the SSSD chapter in the System-Level Authentication Guide.
27.6. REMOVING KEYTABS
Refreshing Kerberos tickets adds a new key to the keytab, but it does not clear the keytab. If a host isbeing unenrolled and re-added to the IdM domain or if there are Kerberos connection errors, then it maybe necessary to remove the keytab and create a new keytab.
This is done using the ipa-rmkeytab command. To remove all principals on the host, specify the realmwith the -r option:
# ipa-rmkeytab -r EXAMPLE.COM -k /etc/krb5.keytab
To remove the keytab for a specific service, use the -p option to specify the service principal:
# ipa-rmkeytab -p ldap/client.example.com -k /etc/krb5.keytab
CHAPTER 27. MANAGING THE KERBEROS DOMAIN
335

CHAPTER 28. USING SUDO
Identity Management provides a mechanism for predictably and consistently applying sudo policiesacross the IdM domain. Every system in the IdM domain can be configured as a sudo client.
28.1. THE SUDO UTILITY IN IDENTITY MANAGEMENT
The sudo utility gives administrative access to specified users. When trusted users precede anadministrative command with sudo, they are prompted for their own password. Then, when they havebeen authenticated and assuming that the command is permitted, the administrative command isexecuted as if they were the root user. For more information about sudo, see the SystemAdministrator's Guide.
28.1.1. The Identity Management LDAP Schema for sudo
IdM has a specialized LDAP schema for sudo entries. The schema supports:
Host groups as well as netgroups. Note that sudo only supports netgroups.
sudo command groups, which contain multiple commands.
NOTE
Because sudo does not support host groups or command groups, IdM translates the IdM sudo configuration into the native sudo configuration when the sudo rules are created.For example, IdM creates a corresponding shadow netgroup for every host group, whichallows the IdM administrator to create sudo rules that reference host groups, while thelocal sudo command uses the corresponding netgroup.
By default, the sudo information is not available anonymously over LDAP. Therefore, IdM defines adefault sudo user at uid=sudo,cn=sysaccounts,cn=etc,$SUFFIX. You can change this user in theLDAP sudo configuration file at /etc/sudo-ldap.conf.
28.1.2. NIS Domain Name Requirements
The NIS domain name must be set for netgroups and sudo to work properly. The sudo configurationrequires NIS-formatted netgroups and a NIS domain name for netgroups. However, IdM does notrequire the NIS domain to actually exist. It is also not required to have a NIS server installed.
NOTE
The ipa-client-install utility sets a NIS domain name automatically to the IdM domainname by default.
28.2. SUDO RULES IN IDENTITY MANAGEMENT
Using sudo rules, you can define who can do what, where, and as whom .
Who are the users allowed to use sudo.
What are the commands that can be used with sudo.
Linux Domain Identity, Authentication, and Policy Guide
336

Where are the target hosts on which the users are allowed to use sudo.
As whom is the system or other user identity which the users assume to perform tasks.
28.2.1. External Users and Hosts in sudo Rules
IdM accepts external entities in sudo rules. External entities are entities that are stored outside of theIdM domain, such as users or hosts that are not part of the IdM domain.
For example, you can use sudo rules to grant root access to a member of the IT group in IdM, where theroot user is not a user defined in the IdM domain. Or, for another example, administrators can blockaccess to certain hosts that are on a network but are not part of the IdM domain.
28.2.2. User Group Support for sudo Rules
You can use sudo to give access to whole user groups in IdM. IdM supports both Unix and non-POSIXgroups. Note that creating non-POSIX groups can cause access problems because any users in a non-POSIX group inherit non-POSIX permissions from the group.
28.2.3. Support for sudoers Options
IdM supports sudoers options. For a complete list of the available sudoers options, see the sudoers(5)man page.
Note that IdM does not allow white spaces or line breaks in sudoers options. Therefore, instead ofsupplying multiple options in a comma-separated list, add them separately. For example, to add two sudoers options from the command line:
$ ipa sudorule-add-option sudo_rule_nameSudo Option: first_option$ ipa sudorule-add-option sudo_rule_nameSudo Option: second_option
Similarly, make sure to supply long options on one line. For example, from the command line:
$ ipa sudorule-add-option sudo_rule_nameSudo Option: env_keep="COLORS DISPLAY EDITOR HOSTNAME HISTSIZE INPUTRC KDEDIR LESSSECURE LS_COLORS MAIL PATH PS1 PS2 XAUTHORITY"
28.3. CONFIGURING THE LOCATION FOR LOOKING UP SUDO POLICIES
The centralized IdM database for sudo configuration makes the sudo policies defined in IdM globallyavailable to all domain hosts. On Red Hat Enterprise Linux 7.1 systems and later, the ipa-server-installand ipa-client-install utilities automatically configure the system to use the IdM-defined policies bysetting SSSD as the data provider for sudo.
The location for looking up the sudo policies is defined on the sudoers line of the /etc/nsswitch.conffile. On IdM systems running Red Hat Enterprise Linux 7.1 and later, the default sudoers configuration innsswitch.conf is:
sudoers: files sss
The files option specifies that the system uses the sudo configuration defined in the /etc/sudoers local
CHAPTER 28. USING SUDO
337

The files option specifies that the system uses the sudo configuration defined in the /etc/sudoers localSSSD configuration file. The sss option specifies that the sudo configuration defined in IdM is used.
28.3.1. Configuring Hosts to Use IdM sudo Policies in Earlier Versions of IdM
To implement the IdM-defined sudo policies on IdM systems running Red Hat Enterprise Linux versionsearlier than 7.1, configure the local machines manually. You can do this using SSSD or LDAP. Red Hatstrongly recommends to use the SSSD-based configuration.
28.3.1.1. Applying the sudo Policies to Hosts Using SSSD
Follow these steps on each system that is required to use SSSD for sudo rules:
1. Configure sudo to look to SSSD for the sudoers file.
# vim /etc/nsswitch.conf
sudoers: files sss
Leaving the files option in place allows sudo to check its local configuration before checkingSSSD for the IdM configuration.
2. Add sudo to the list of services managed by the local SSSD client.
# vim /etc/sssd/sssd.conf
[sssd]config_file_version = 2services = nss, pam, sudodomains = IPADOMAIN
3. Set a name for the NIS domain in the sudo configuration. sudo uses NIS-style netgroups, sothe NIS domain name must be set in the system configuration for sudo to be able to find thehost groups used in the IdM sudo configuration.
1. Enable the rhel-domainname service if it is not already enabled to ensure that the NISdomain name will be persistent across reboots.
# systemctl enable rhel-domainname.service
2. Set the NIS domain name to use with the sudo rules.
# nisdomainname example.com
3. Configure the system authentication settings to persist the NIS domain name. For example:
# echo "NISDOMAIN=example.com.com" >> /etc/sysconfig/network
This updates the /etc/sysconfig/network and /etc/yp.conf files with the NIS domain.
4. Optionally, enable debugging in SSSD to show what LDAP settings it is using.
Linux Domain Identity, Authentication, and Policy Guide
338

[domain/IPADOMAIN]debug_level = 6....
The LDAP search base used by SSSD for operations is recorded in the sssd_DOMAINNAME.log log.
28.3.1.2. Applying the sudo Policies to Hosts Using LDAP
IMPORTANT
Only use the LDAP-based configuration for clients that do not use SSSD. Red Hatrecommends to configure all other clients using the SSSD-based configuration, asdescribed in Section 28.3.1.1, “Applying the sudo Policies to Hosts Using SSSD” .
For information on applying sudo policies using LDAP, see the Identity Management Guide for Red HatEnterprise Linux 6.
The LDAP-based configuration is expected to be used primarily for clients based on Red HatEnterprise Linux versions earlier than Red Hat Enterprise Linux 7. It is therefore only described in thedocumentation for Red Hat Enterprise Linux 6.
28.4. ADDING SUDO COMMANDS, COMMAND GROUPS, AND RULES
28.4.1. Adding sudo Commands
Adding sudo Commands in the Web UI
1. Under the Policy tab, click Sudo → Sudo Commands.
2. Click Add at the top of the list.
3. Fill out the information about the command. Enter the full system path to the commandexecutable.
CHAPTER 28. USING SUDO
339
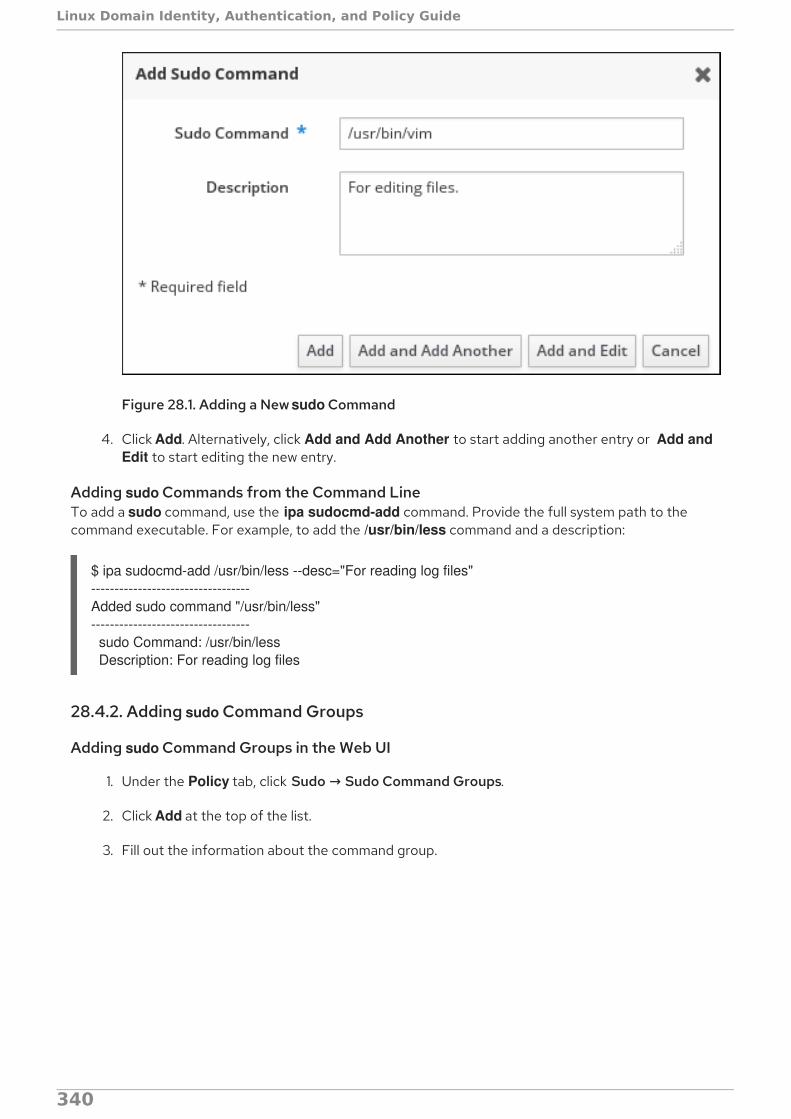
Figure 28.1. Adding a New sudo Command
4. Click Add. Alternatively, click Add and Add Another to start adding another entry or Add and Edit to start editing the new entry.
Adding sudo Commands from the Command LineTo add a sudo command, use the ipa sudocmd-add command. Provide the full system path to thecommand executable. For example, to add the /usr/bin/less command and a description:
$ ipa sudocmd-add /usr/bin/less --desc="For reading log files"----------------------------------Added sudo command "/usr/bin/less"---------------------------------- sudo Command: /usr/bin/less Description: For reading log files
28.4.2. Adding sudo Command Groups
Adding sudo Command Groups in the Web UI
1. Under the Policy tab, click Sudo → Sudo Command Groups.
2. Click Add at the top of the list.
3. Fill out the information about the command group.
Linux Domain Identity, Authentication, and Policy Guide
340
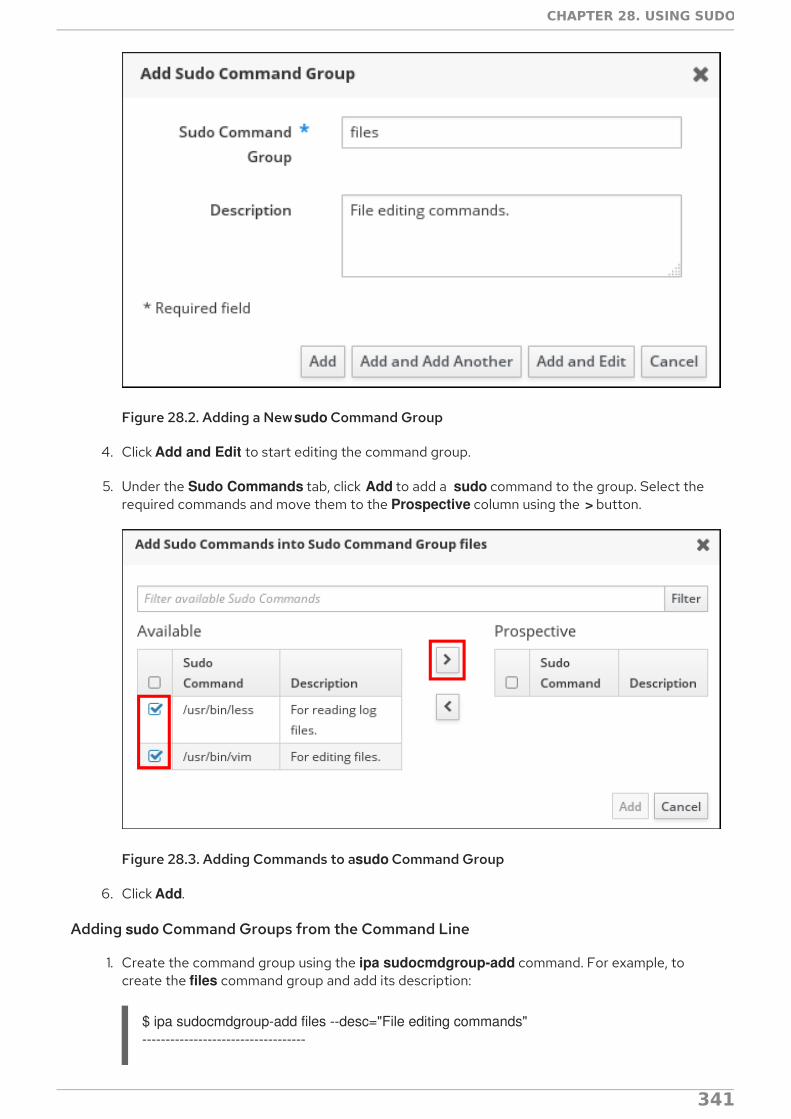
Figure 28.2. Adding a New sudo Command Group
4. Click Add and Edit to start editing the command group.
5. Under the Sudo Commands tab, click Add to add a sudo command to the group. Select therequired commands and move them to the Prospective column using the > button.
Figure 28.3. Adding Commands to a sudo Command Group
6. Click Add.
Adding sudo Command Groups from the Command Line
1. Create the command group using the ipa sudocmdgroup-add command. For example, tocreate the files command group and add its description:
$ ipa sudocmdgroup-add files --desc="File editing commands"-----------------------------------
CHAPTER 28. USING SUDO
341

Added sudo command group "files"----------------------------------- sudo Command Group: files Description: File editing commands
2. Include a sudo command in the group using the ipa sudocmdgroup-add-member command.Note that you can only include commands that have already been added to IdM, as described inSection 28.4.1, “Adding sudo Commands”.
$ ipa sudocmdgroup-add-member files --sudocmds "/usr/bin/vim" sudo Command Group: files Description: File editing commands Member sudo commands: /usr/bin/vim-------------------------Number of members added 1-------------------------
28.4.3. Adding sudo Rules
Adding sudo Rules in the Web UI
1. Under the Policy tab, click Sudo → Sudo Rules.
2. Click Add at the top of the list.
3. Enter the name for the rule.
Figure 28.4. Naming a New sudo Rule
4. Click Add. Alternatively, click Add and Add Another to start adding another entry or Add and Edit to start editing the new entry.
For information on how to edit the new sudo rule, see Section 28.6, “Modifying sudo Rules”.
Adding sudo Rules from the Command LineTo add a new sudo rule, use the ipa sudorule-add command. For example, to add a rule named files-commands:
$ ipa sudorule-add files-commands--------------------------------Added Sudo Rule "files-commands"
Linux Domain Identity, Authentication, and Policy Guide
342

-------------------------------- Rule name: files-commands Enabled: TRUE
For more information on using ipa sudorule-add and the options it accepts, run the command with the --help option added.
For information on how to edit the new sudo rule, see Section 28.6, “Modifying sudo Rules”.
For a complete example of adding a new sudo rule and editing it from the command line, seeExample 28.1, “Adding and Modifying a New sudo Rule from the Command Line” .
28.5. MODIFYING SUDO COMMANDS AND COMMAND GROUPS
Modifying sudo Commands and Command Groups in the Web UI
1. Under the Policy tab, click Sudo → Sudo Commands or Sudo → Sudo Command Groups.
2. Click the name of the command or command group to display its configuration page.
3. Change the settings as required. On some configuration pages, the Save button is available atthe top of the page. On these pages, you must click the button to confirm the changes.
Modifying sudo Commands and Command Groups from the Command LineTo modify a command or command group, use the following commands:
ipa sudocmd-mod
ipa sudocmdgroup-mod
Add command-line options to the above-mentioned commands to update the sudo command orcommand group attributes. For example, to add a new description for the /usr/bin/less command:
$ ipa sudocmd-mod /usr/bin/less --desc="For reading log files"-------------------------------------Modified Sudo Command "/usr/bin/less"------------------------------------- Sudo Command: /usr/bin/less Description: For reading log files Sudo Command Groups: files
For more information about these commands and the options they accept, run them with the --helpoption added.
28.6. MODIFYING SUDO RULES
Modifying sudo Rules in the Web UI
1. Under the Policy tab, click Sudo → Sudo Rules.
2. Click the name of the rule to display its configuration page.
3. Change the settings as required. On some configuration pages, the Save button is available atthe top of the page. On these pages, click the button to confirm the changes.
CHAPTER 28. USING SUDO
343
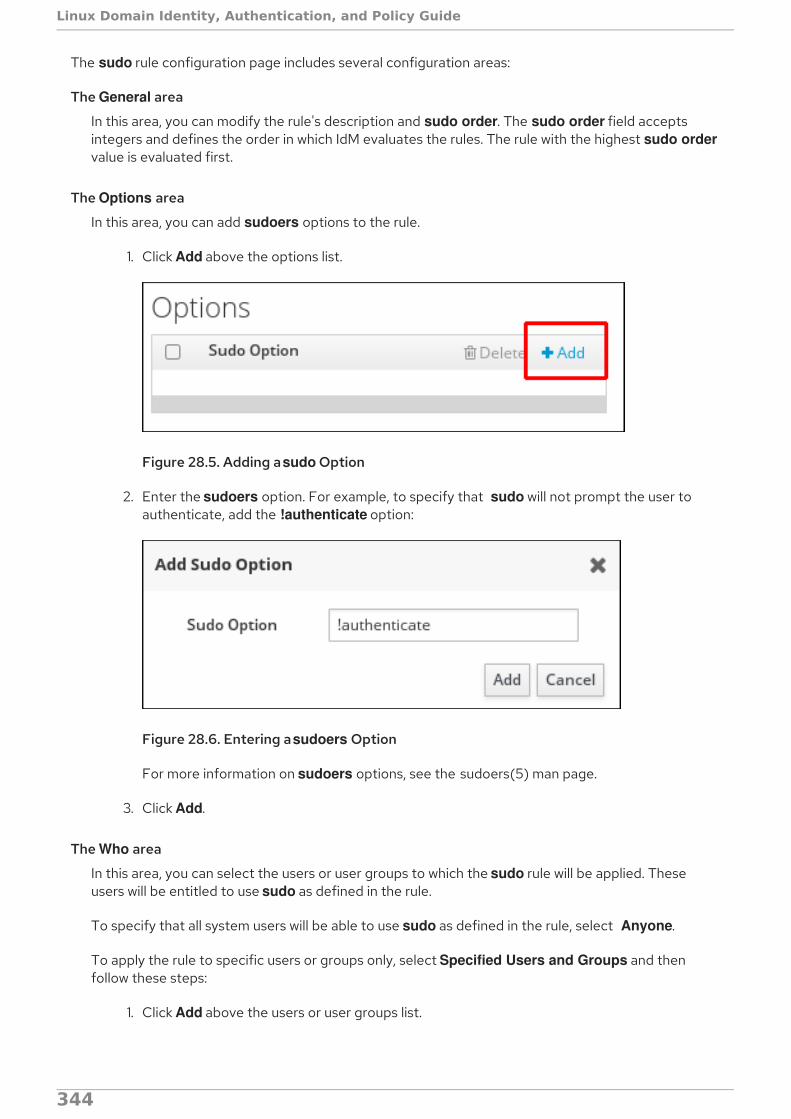
The sudo rule configuration page includes several configuration areas:
The General area
In this area, you can modify the rule's description and sudo order. The sudo order field acceptsintegers and defines the order in which IdM evaluates the rules. The rule with the highest sudo ordervalue is evaluated first.
The Options area
In this area, you can add sudoers options to the rule.
1. Click Add above the options list.
Figure 28.5. Adding a sudo Option
2. Enter the sudoers option. For example, to specify that sudo will not prompt the user toauthenticate, add the !authenticate option:
Figure 28.6. Entering a sudoers Option
For more information on sudoers options, see the sudoers(5) man page.
3. Click Add.
The Who area
In this area, you can select the users or user groups to which the sudo rule will be applied. Theseusers will be entitled to use sudo as defined in the rule.
To specify that all system users will be able to use sudo as defined in the rule, select Anyone.
To apply the rule to specific users or groups only, select Specified Users and Groups and thenfollow these steps:
1. Click Add above the users or user groups list.
Linux Domain Identity, Authentication, and Policy Guide
344
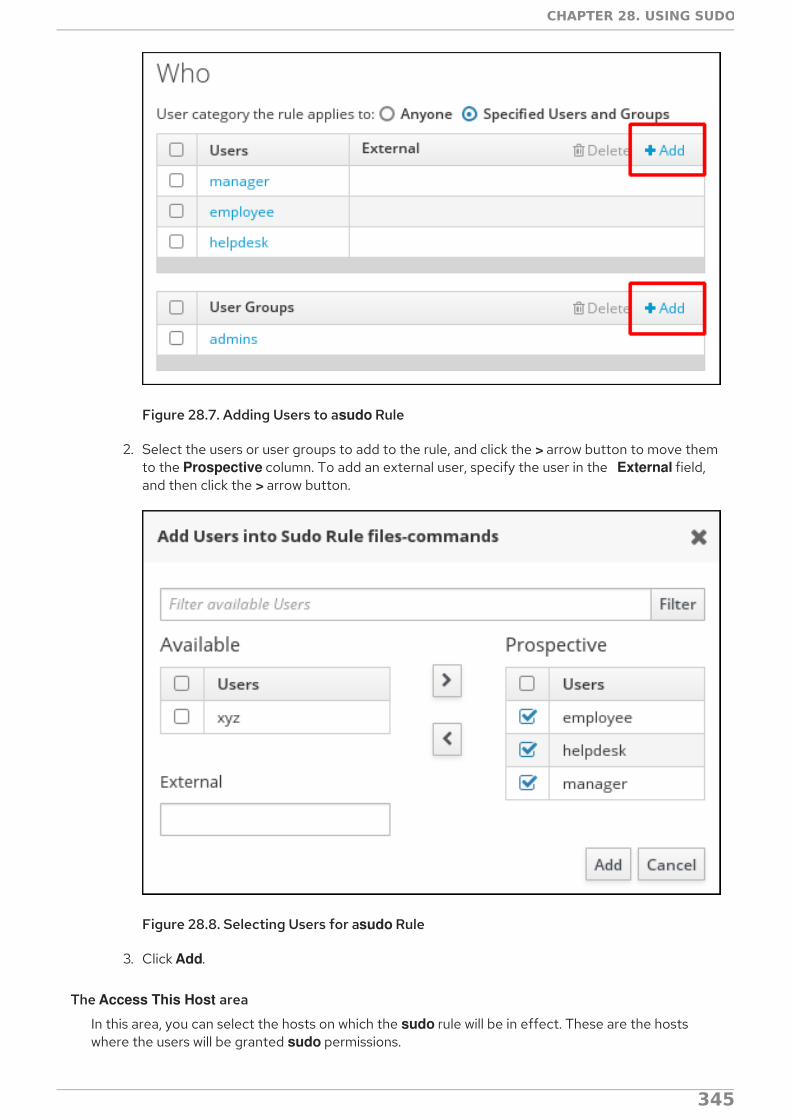
Figure 28.7. Adding Users to a sudo Rule
2. Select the users or user groups to add to the rule, and click the > arrow button to move themto the Prospective column. To add an external user, specify the user in the External field,and then click the > arrow button.
Figure 28.8. Selecting Users for a sudo Rule
3. Click Add.
The Access This Host area
In this area, you can select the hosts on which the sudo rule will be in effect. These are the hostswhere the users will be granted sudo permissions.
CHAPTER 28. USING SUDO
345
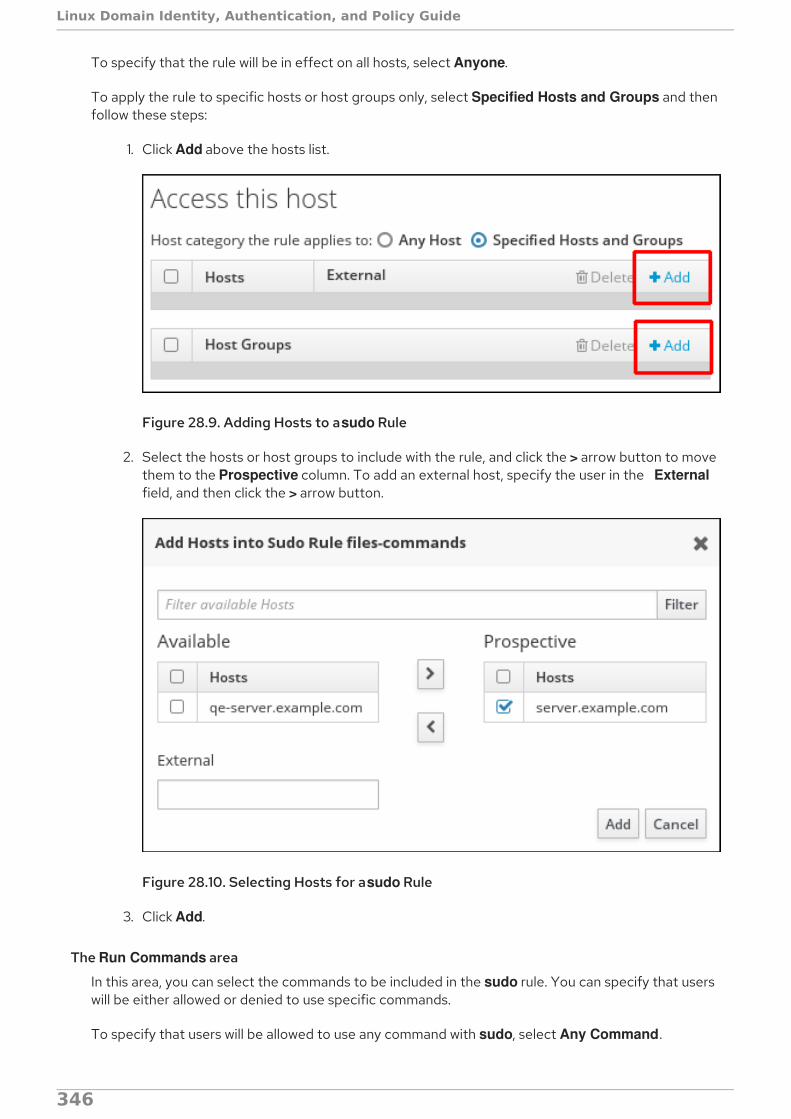
To specify that the rule will be in effect on all hosts, select Anyone.
To apply the rule to specific hosts or host groups only, select Specified Hosts and Groups and thenfollow these steps:
1. Click Add above the hosts list.
Figure 28.9. Adding Hosts to a sudo Rule
2. Select the hosts or host groups to include with the rule, and click the > arrow button to movethem to the Prospective column. To add an external host, specify the user in the Externalfield, and then click the > arrow button.
Figure 28.10. Selecting Hosts for a sudo Rule
3. Click Add.
The Run Commands area
In this area, you can select the commands to be included in the sudo rule. You can specify that userswill be either allowed or denied to use specific commands.
To specify that users will be allowed to use any command with sudo, select Any Command.
Linux Domain Identity, Authentication, and Policy Guide
346
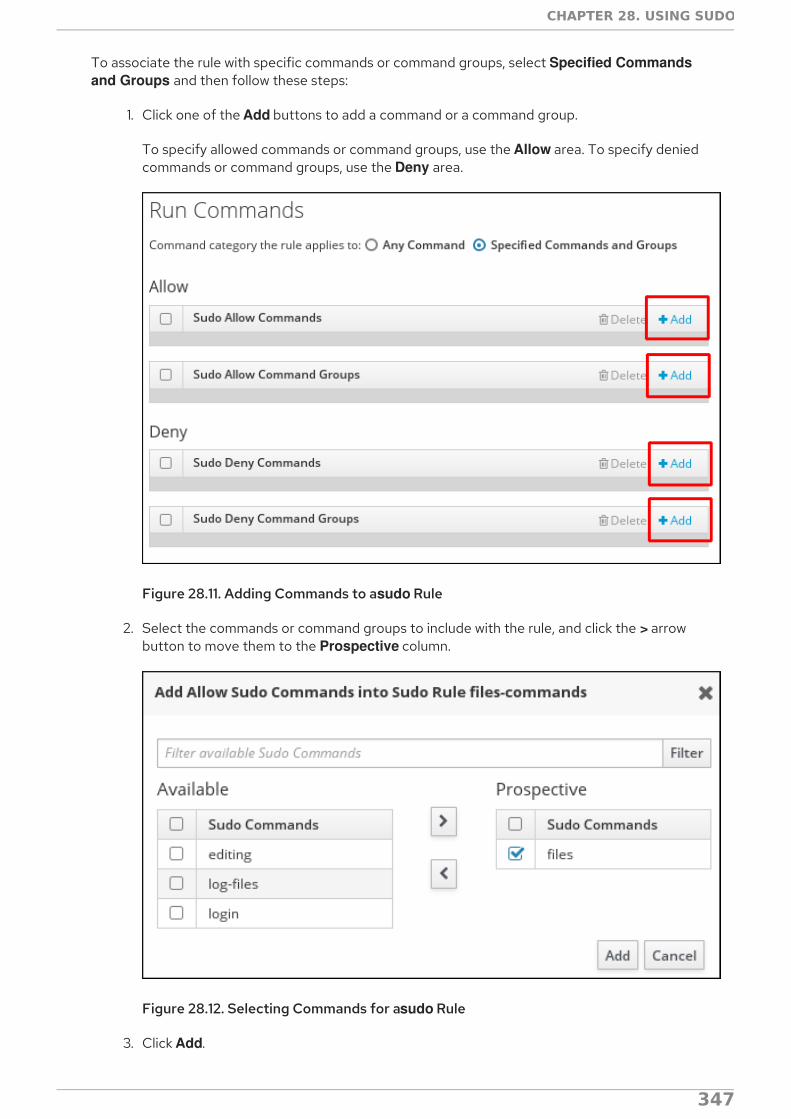
To associate the rule with specific commands or command groups, select Specified Commands and Groups and then follow these steps:
1. Click one of the Add buttons to add a command or a command group.
To specify allowed commands or command groups, use the Allow area. To specify deniedcommands or command groups, use the Deny area.
Figure 28.11. Adding Commands to a sudo Rule
2. Select the commands or command groups to include with the rule, and click the > arrowbutton to move them to the Prospective column.
Figure 28.12. Selecting Commands for a sudo Rule
3. Click Add.
CHAPTER 28. USING SUDO
347

The As Whom area
In this area, you can configure the sudo rule to run the given commands as a specific, non-root user.
Note that if you add a group of RunAs users, UIDs of the members of the group will be used to runthe command. If you add a RunAs group, the GID of the group will be used to run the command.
To specify that the rule will be run as any user on the system, select Anyone. To specify that the rulewill be run as any group on the system, select Any Group.
1. Click Add above the users list.
Figure 28.13. Configuring sudo Rules to Execute Commands as a Specific User
2. Select the required users or groups, and use the > arrow button to move them to the Prospective column. To add an external entity, specify it in the External field, and then clickthe > arrow button.
Linux Domain Identity, Authentication, and Policy Guide
348
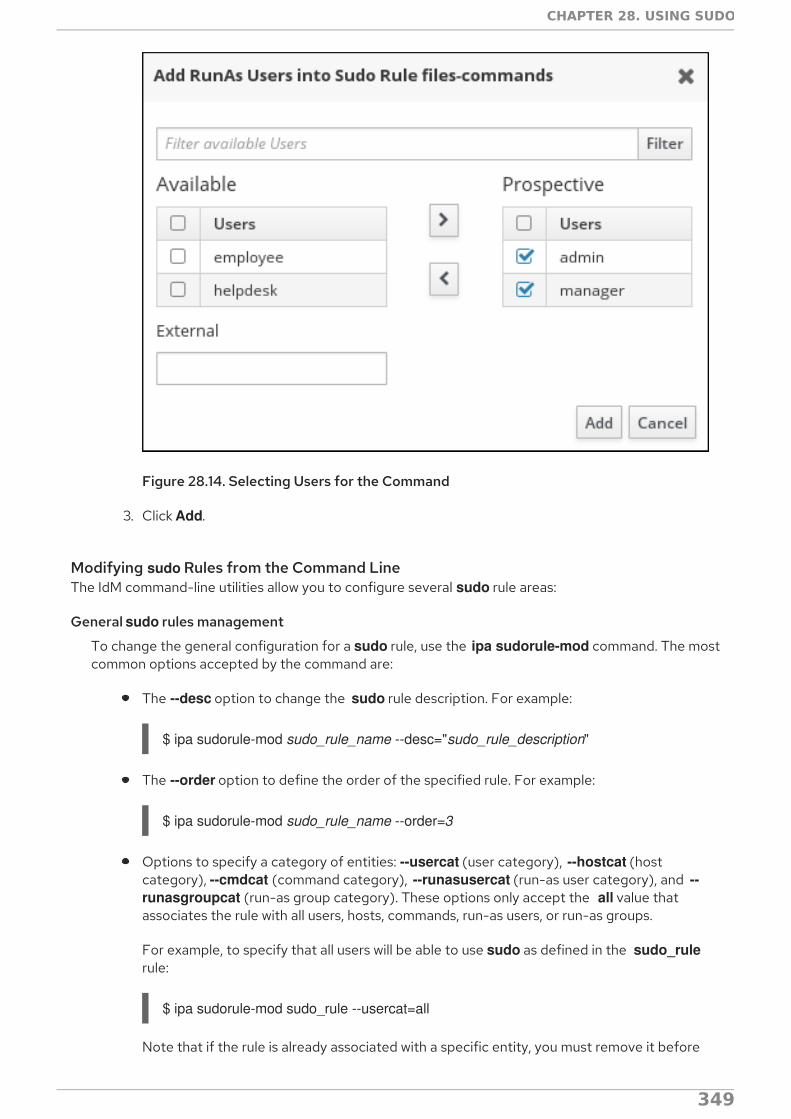
Figure 28.14. Selecting Users for the Command
3. Click Add.
Modifying sudo Rules from the Command LineThe IdM command-line utilities allow you to configure several sudo rule areas:
General sudo rules management
To change the general configuration for a sudo rule, use the ipa sudorule-mod command. The mostcommon options accepted by the command are:
The --desc option to change the sudo rule description. For example:
$ ipa sudorule-mod sudo_rule_name --desc="sudo_rule_description"
The --order option to define the order of the specified rule. For example:
$ ipa sudorule-mod sudo_rule_name --order=3
Options to specify a category of entities: --usercat (user category), --hostcat (hostcategory), --cmdcat (command category), --runasusercat (run-as user category), and --runasgroupcat (run-as group category). These options only accept the all value thatassociates the rule with all users, hosts, commands, run-as users, or run-as groups.
For example, to specify that all users will be able to use sudo as defined in the sudo_rulerule:
$ ipa sudorule-mod sudo_rule --usercat=all
Note that if the rule is already associated with a specific entity, you must remove it before
CHAPTER 28. USING SUDO
349

defining the corresponding all category. For example, if sudo_rule was previouslyassociated with a specific user using the ipa sudorule-add-user command, you must firstuse the ipa sudorule-remove-user command to remove the user.
For more details and a complete list of options accepted by ipa sudorule-mod, run the commandwith the --help option added.
Managing sudo options
To add a sudoers option, use the ipa sudorule-add-option command.
For example, to specify that users using sudo based on the files-commands rule will not be requiredto authenticate, add the !authenticate option:
$ ipa sudorule-add-option files-commandsSudo Option: !authenticate---------------------------------------------------------Added option "!authenticate" to Sudo Rule "files-commands"---------------------------------------------------------
For more information on sudoers options, see the sudoers(5) man page.
To remove a sudoers option, use the ipa sudorule-remove-option command. For example:
$ ipa sudorule-remove-option files-commandsSudo Option: authenticate-------------------------------------------------------------Removed option "authenticate" from Sudo Rule "files-commands"-------------------------------------------------------------
Managing who is granted the permission to use sudo
To specify an individual user, add the --users option to the ipa sudorule-add-user command. Tospecify a user group, add the --groups option to ipa sudorule-add-user.
For example, to add user and user_group to the files-commands rule:
$ ipa sudorule-add-user files-commands --users=user --groups=user_group...-------------------------Number of members added 2-------------------------
To remove an individual user or group, use the ipa sudorule-remove-user. For example, to remove auser:
$ ipa sudorule-remove-user files-commands[member user]: user[member group]:...---------------------------Number of members removed 1---------------------------
Managing where the users are granted the sudo permissions
Linux Domain Identity, Authentication, and Policy Guide
350

To specify a host, add the --hosts option to the ipa sudorule-add-host command. To specify a hostgroup, add the --hostgroups option to ipa sudorule-add-host.
For example, to add example.com and host_group to the files-commands rule:
$ ipa sudorule-add-host files-commands --hosts=example.com --hostgroups=host_group...-------------------------Number of members added 2-------------------------
To remove a host or host group, use the ipa sudorule-remove-host command. For example:
$ ipa sudorule-remove-host files-commands[member host]: example.com[member host group]:...---------------------------Number of members removed 1---------------------------
Managing what commands can be used with sudo
You can specify that users will be either allowed or denied to use specific commands.
To specify an allowed command or command group, add the --sudocmds or --sudocmdgroupsoption to the ipa sudorule-add-allow-command. To specify a denied command or command group,add the --sudocmds or --sudocmdgroups option to the ipa sudorule-add-deny-commandcommand.
For example, to add the /usr/bin/less command and the files command group as allowed to the files-commands rule:
$ ipa sudorule-add-allow-command files-commands --sudocmds=/usr/bin/less --sudocmdgroups=files...-------------------------Number of members added 2-------------------------
To remove a command or command group from a rule, use the ipa sudorule-remove-allow-command or ipa sudorule-remove-deny-command commands. For example:
$ ipa sudorule-remove-allow-command files-commands[member sudo command]: /usr/bin/less[member sudo command group]:...---------------------------Number of members removed 1---------------------------
Note that the --sudocmds option only accepts commands added to IdM, as described inSection 28.4.1, “Adding sudo Commands”.
Managing as whom the sudo commands are run
CHAPTER 28. USING SUDO
351
To use the UIDs of an individual user or users in a group as the identity under which the commandsare run, use the --users or --groups options with the ipa sudorule-add-runasuser command.
To use the GID of a user group as the identity for the commands, use the ipa sudorule-add-runasgroup --groups command.
If you specify no user or group, sudo commands will be run as root.
For example, to specify that the identity of user will be used to execute the commands in the sudorule:
$ ipa sudorule-add-runasuser files-commands --users=user...RunAs Users: user...
For more information on the ipa sudorule-* commands, see the output of the ipa help sudorulecommand or run a particular command with the --help option added.
Example 28.1. Adding and Modifying a New sudo Rule from the Command Line
To allow a specific user group to use sudo with any command on selected servers:
1. Obtain a Kerberos ticket for the admin user or any other user allowed to manage sudo rules.
$ kinit adminPassword for [email protected]:
2. Add a new sudo rule to IdM.
$ ipa sudorule-add new_sudo_rule --desc="Rule for user_group"---------------------------------Added Sudo Rule "new_sudo_rule"--------------------------------- Rule name: new_sudo_rule Description: Rule for user_group Enabled: TRUE
3. Define the who: specify the group of users who will be entitled to use the sudo rule.
$ ipa sudorule-add-user new_sudo_rule --groups=user_group Rule name: new_sudo_rule Description: Rule for user_group Enabled: TRUE User Groups: user_group-------------------------Number of members added 1-------------------------
4. Define the where: specify the group of hosts where the users will be granted the sudopermissions.
$ ipa sudorule-add-host new_sudo_rule --hostgroups=host_group
Linux Domain Identity, Authentication, and Policy Guide
352

Rule name: new_sudo_rule Description: Rule for user_group Enabled: TRUE User Groups: user_group Host Groups: host_group-------------------------Number of members added 1-------------------------
5. Define the what: to allow the users to run any sudo command, add the all commandcategory to the rule.
$ ipa sudorule-mod new_sudo_rule --cmdcat=all------------------------------Modified Sudo Rule "new_sudo_rule"------------------------------ Rule name: new_sudo_rule Description: Rule for user_group Enabled: TRUE Command category: all User Groups: user_group Host Groups: host_group
6. To let the sudo commands be executed as root, do not specify any run-as users or groups.
7. Add the !authenticate sudoers option to specify that the users will not be required toauthenticate when using the sudo command.
$ ipa sudorule-add-option new_sudo_ruleSudo Option: !authenticate-----------------------------------------------------Added option "!authenticate" to Sudo Rule "new_sudo_rule"----------------------------------------------------- Rule name: new_sudo_rule Description: Rule for user_group Enabled: TRUE Command category: all User Groups: user_group Host Groups: host_group Sudo Option: !authenticate
8. Display the new sudo rule configuration to verify it is correct.
$ ipa sudorule-show new_sudo_rule Rule name: new_sudo_rule Description: Rule for user_group Enabled: TRUE Command category: all User Groups: user_group Host Groups: host_group Sudo Option: !authenticate
28.7. LISTING AND DISPLAYING SUDO COMMANDS, COMMAND
CHAPTER 28. USING SUDO
353
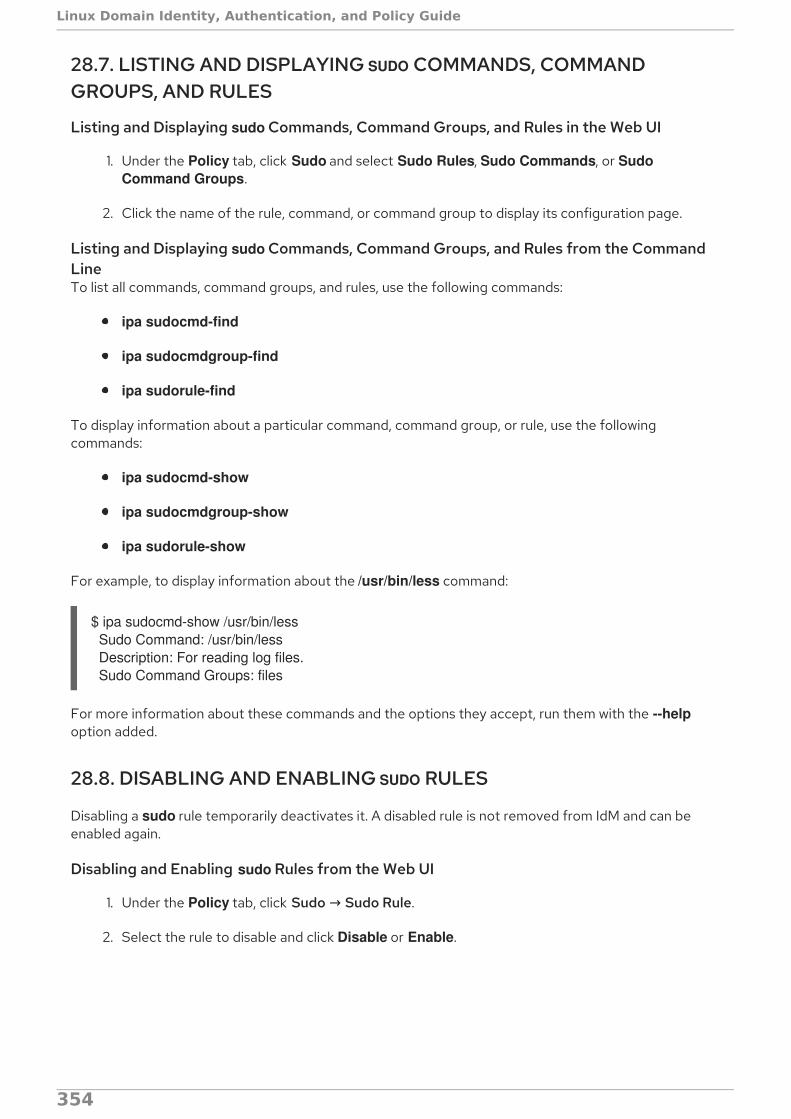
28.7. LISTING AND DISPLAYING SUDO COMMANDS, COMMANDGROUPS, AND RULES
Listing and Displaying sudo Commands, Command Groups, and Rules in the Web UI
1. Under the Policy tab, click Sudo and select Sudo Rules, Sudo Commands, or Sudo Command Groups.
2. Click the name of the rule, command, or command group to display its configuration page.
Listing and Displaying sudo Commands, Command Groups, and Rules from the CommandLineTo list all commands, command groups, and rules, use the following commands:
ipa sudocmd-find
ipa sudocmdgroup-find
ipa sudorule-find
To display information about a particular command, command group, or rule, use the followingcommands:
ipa sudocmd-show
ipa sudocmdgroup-show
ipa sudorule-show
For example, to display information about the /usr/bin/less command:
$ ipa sudocmd-show /usr/bin/less Sudo Command: /usr/bin/less Description: For reading log files. Sudo Command Groups: files
For more information about these commands and the options they accept, run them with the --helpoption added.
28.8. DISABLING AND ENABLING SUDO RULES
Disabling a sudo rule temporarily deactivates it. A disabled rule is not removed from IdM and can beenabled again.
Disabling and Enabling sudo Rules from the Web UI
1. Under the Policy tab, click Sudo → Sudo Rule.
2. Select the rule to disable and click Disable or Enable.
Linux Domain Identity, Authentication, and Policy Guide
354
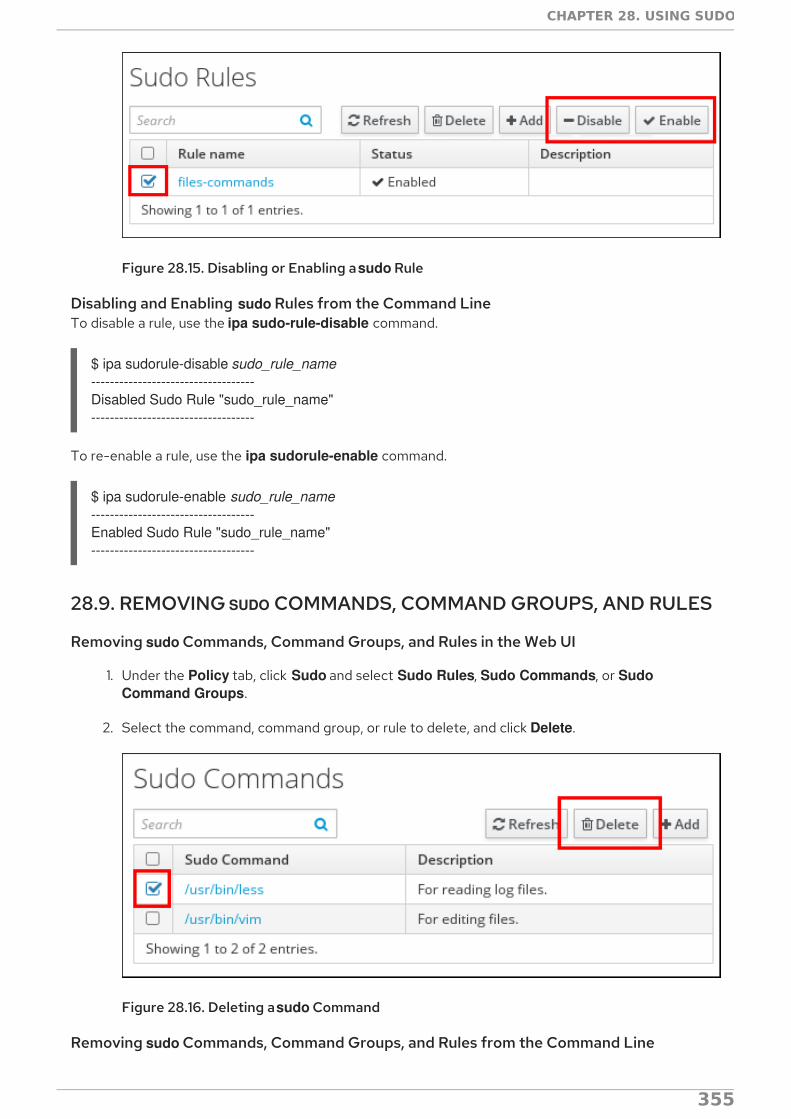
Figure 28.15. Disabling or Enabling a sudo Rule
Disabling and Enabling sudo Rules from the Command LineTo disable a rule, use the ipa sudo-rule-disable command.
$ ipa sudorule-disable sudo_rule_name-----------------------------------Disabled Sudo Rule "sudo_rule_name"-----------------------------------
To re-enable a rule, use the ipa sudorule-enable command.
$ ipa sudorule-enable sudo_rule_name-----------------------------------Enabled Sudo Rule "sudo_rule_name"-----------------------------------
28.9. REMOVING SUDO COMMANDS, COMMAND GROUPS, AND RULES
Removing sudo Commands, Command Groups, and Rules in the Web UI
1. Under the Policy tab, click Sudo and select Sudo Rules, Sudo Commands, or Sudo Command Groups.
2. Select the command, command group, or rule to delete, and click Delete.
Figure 28.16. Deleting a sudo Command
Removing sudo Commands, Command Groups, and Rules from the Command Line
CHAPTER 28. USING SUDO
355

To delete a command, command group, or rule, use the following commands:
ipa sudocmd-del
ipa sudocmdgroup-del
ipa sudorule-del
For more information about these commands and the options they accept, run them with the --helpoption added.
Linux Domain Identity, Authentication, and Policy Guide
356

CHAPTER 29. CONFIGURING HOST-BASED ACCESSCONTROLIdM can control access to both machines and the services on those machines within the IdM domain.The rules define who can access what within the domain, not the level of access (which are defined bysystem or application settings). These access control rules grant access, with all other users and hostsimplicitly denied.
This is called host-based access control because the rule defines what hosts ( targets) within the domaina user is allowed to access. This access can be further broken down to users and services on thosehosts.
NOTE
Using host-based access control requires SSSD to be installed and configured on the IdMclient machine.
29.1. ABOUT HOST-BASED ACCESS CONTROL
Host-based access control rules can be applied to individual hosts. However, using host groups allowscentralized, and potentially simplified, access control management because an access control rule onlyneeds to be defined once and then it is applied immediately and consistently to all the hosts within thegroup.
Figure 29.1. Host Groups and Host-Based Access Control
NOTE
While access must be explicitly granted to users and hosts within the IdM domain, IdMservers are configured by default with an allow all access control rule which allows accessfor every host within the domain to every host within the domain.
To create an IdM server without the default allow all rule, run ipa-server-install with the --no_hbac_allow option.
The rule first defines things that can be accessed, and there are two types of entities:
CHAPTER 29. CONFIGURING HOST-BASED ACCESS CONTROL
357
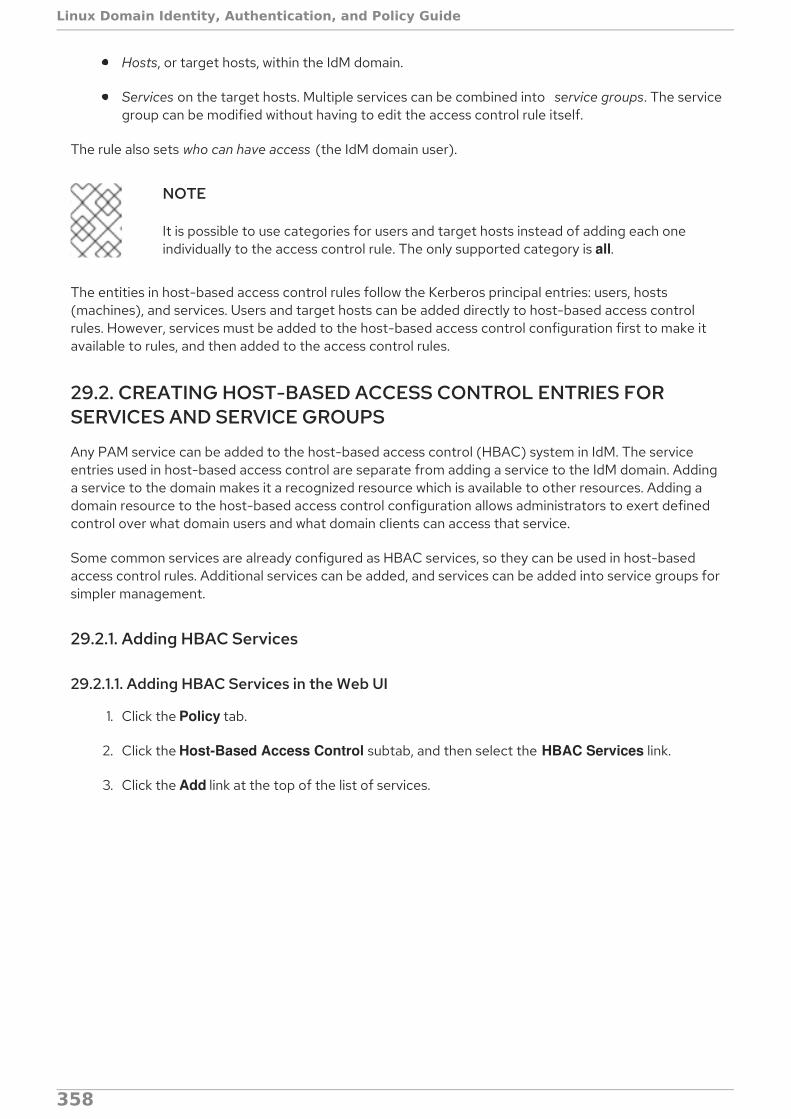
Hosts, or target hosts, within the IdM domain.
Services on the target hosts. Multiple services can be combined into service groups. The servicegroup can be modified without having to edit the access control rule itself.
The rule also sets who can have access (the IdM domain user).
NOTE
It is possible to use categories for users and target hosts instead of adding each oneindividually to the access control rule. The only supported category is all.
The entities in host-based access control rules follow the Kerberos principal entries: users, hosts(machines), and services. Users and target hosts can be added directly to host-based access controlrules. However, services must be added to the host-based access control configuration first to make itavailable to rules, and then added to the access control rules.
29.2. CREATING HOST-BASED ACCESS CONTROL ENTRIES FORSERVICES AND SERVICE GROUPS
Any PAM service can be added to the host-based access control (HBAC) system in IdM. The serviceentries used in host-based access control are separate from adding a service to the IdM domain. Addinga service to the domain makes it a recognized resource which is available to other resources. Adding adomain resource to the host-based access control configuration allows administrators to exert definedcontrol over what domain users and what domain clients can access that service.
Some common services are already configured as HBAC services, so they can be used in host-basedaccess control rules. Additional services can be added, and services can be added into service groups forsimpler management.
29.2.1. Adding HBAC Services
29.2.1.1. Adding HBAC Services in the Web UI
1. Click the Policy tab.
2. Click the Host-Based Access Control subtab, and then select the HBAC Services link.
3. Click the Add link at the top of the list of services.
Linux Domain Identity, Authentication, and Policy Guide
358

4. Enter the service name and a description.
5. Click the Add button to save the new service.
6. If a service group already exists, then add the service to the desired group, as described inSection 29.2.2.1, “Adding Service Groups in the Web UI” .
29.2.1.2. Adding Services in the Command Line
The service is added to the access control system using the hbacsvc-add command, specifying theservice by the name that PAM uses to evaluate the service.
For example, this adds the tftp service:
# ipa hbacsvc-add --desc="TFTP service" tftp------------------------- Added HBAC service "tftp"
CHAPTER 29. CONFIGURING HOST-BASED ACCESS CONTROL
359

------------------------- Service name: tftp Description: TFTP service
If a service group already exists, then the service can be added to the group using the hbacsvcgroup-add-member command, as in Section 29.2.2.2, “Adding Service Groups in the Command Line” .
29.2.2. Adding Service Groups
Once the individual service is added, it can be added to the access control rule. However, if there is alarge number of services, then it can require frequent updates to the access control rules as serviceschange. Identity Management also allows groups of services to be added to access control rules. Thismakes it much easier to manage access control, because the members of the service group can bechanged without having to edit the rule itself.
29.2.2.1. Adding Service Groups in the Web UI
1. Click the Policy tab.
2. Click the Host-Based Access Control subtab, and then select the HBAC Service Groups link.
3. Click the Add link at the top of the list of service groups.
4. Enter the service group name and a description.
Linux Domain Identity, Authentication, and Policy Guide
360

5. Click the Add and Edit button to go immediately to the service group configuration page.
6. At the top of the HBAC Services tab, click the Add link.
7. Click the check box by the names of the services to add, and click the right arrows button, >>, tomove the command to the selection box.
8. Click the Add button to save the group membership.
29.2.2.2. Adding Service Groups in the Command Line
First create the service group entry, then create the service, and then add that service to the servicegroup as a member. For example:
CHAPTER 29. CONFIGURING HOST-BASED ACCESS CONTROL
361

[jsmith@server ~]$ kinit admin[jsmith@server ~]$ ipa hbacsvcgroup-add --desc="login services" login--------------------------------Added HBAC service group "login"-------------------------------- Service group name: login Description: login services
[jsmith@server ~]$ ipa hbacsvc-add --desc="SSHD service" sshd------------------------- Added HBAC service "sshd" ------------------------- Service name: sshd Description: SSHD service
[jsmith@server ~]$ ipa hbacsvcgroup-add-member --hbacsvcs=sshd login Service group name: login Description: login services-------------------------Number of members added 1-------------------------
NOTE
IdM defines two default service groups: SUDO for sudo services and FTP for serviceswhich provide FTP access.
29.3. DEFINING HOST-BASED ACCESS CONTROL RULES
Access controls, at a high level, define who has access to what. The who is an IdM user, and the what canbe either a host (target host), service, or service group, or a combination of the three.
29.3.1. Setting Host-Based Access Control Rules in the Web UI
1. Click the Policy tab.
2. Click the Host-Based Access Control subtab, and then select the HBAC Rules link.
3. Click the Add link at the top of the list of host-based access control rules.
4. Enter the name for the rule.
Linux Domain Identity, Authentication, and Policy Guide
362
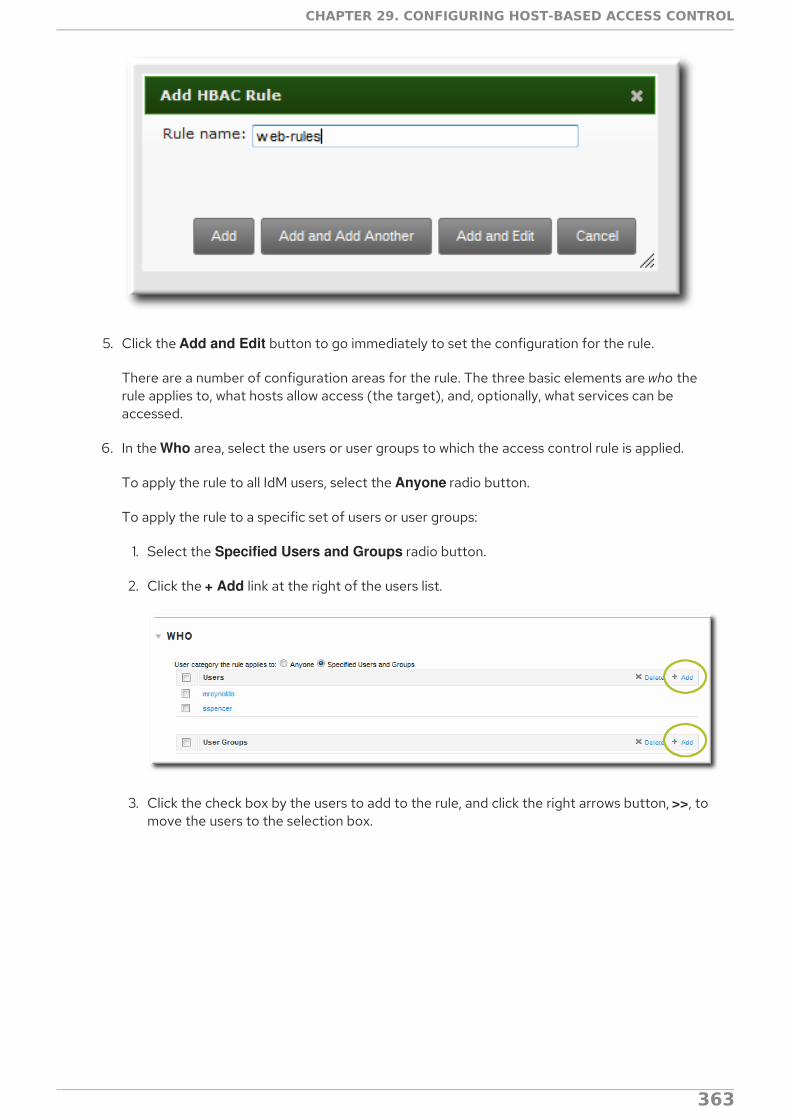
5. Click the Add and Edit button to go immediately to set the configuration for the rule.
There are a number of configuration areas for the rule. The three basic elements are who therule applies to, what hosts allow access (the target), and, optionally, what services can beaccessed.
6. In the Who area, select the users or user groups to which the access control rule is applied.
To apply the rule to all IdM users, select the Anyone radio button.
To apply the rule to a specific set of users or user groups:
1. Select the Specified Users and Groups radio button.
2. Click the + Add link at the right of the users list.
3. Click the check box by the users to add to the rule, and click the right arrows button, >>, tomove the users to the selection box.
CHAPTER 29. CONFIGURING HOST-BASED ACCESS CONTROL
363
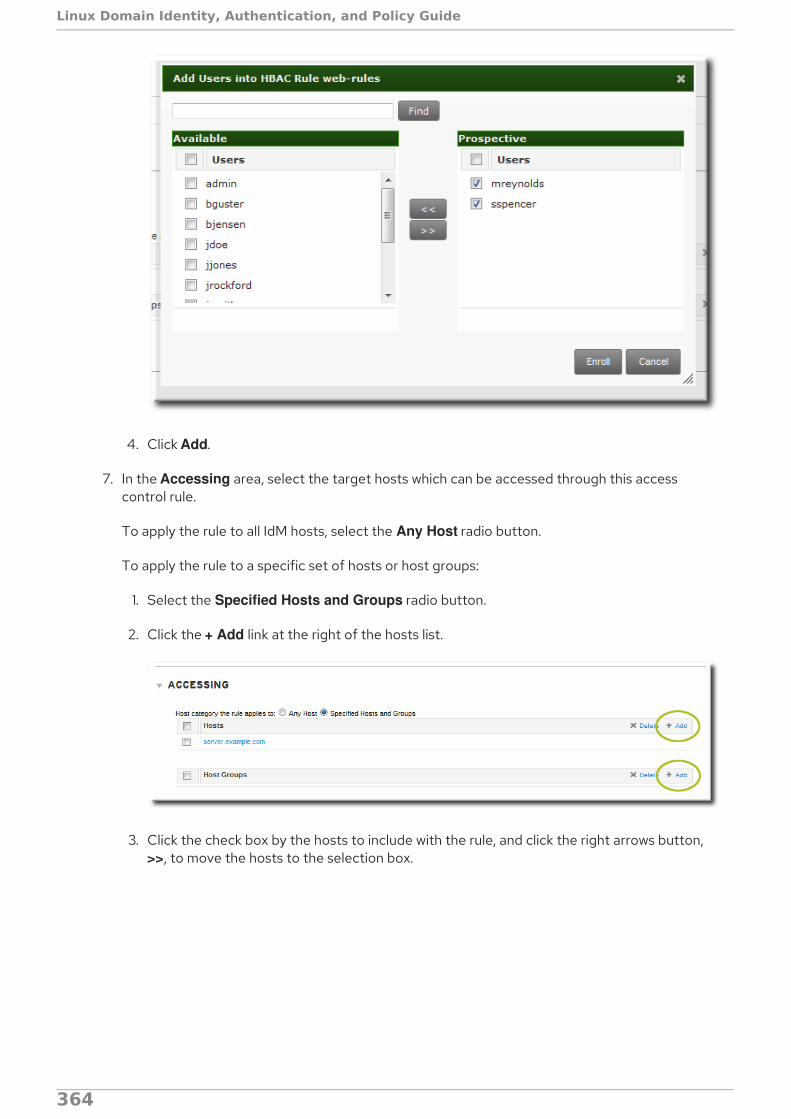
4. Click Add.
7. In the Accessing area, select the target hosts which can be accessed through this accesscontrol rule.
To apply the rule to all IdM hosts, select the Any Host radio button.
To apply the rule to a specific set of hosts or host groups:
1. Select the Specified Hosts and Groups radio button.
2. Click the + Add link at the right of the hosts list.
3. Click the check box by the hosts to include with the rule, and click the right arrows button, >>, to move the hosts to the selection box.
Linux Domain Identity, Authentication, and Policy Guide
364

4. Click Add.
8. In the Via Service area, select specific services on the target hosts which the users are allowedto use to access target machines.
To apply the rule to all IdM hosts, select the Any Service radio button.
To apply the rule to a specific set of hosts or host groups:
1. Select the Specified Services and Groups radio button.
2. Click the + Add link at the right of the commands list.
3. Click the check box by the services or groups to include with the rule, and click the rightarrows button, >>, to move the services to the selection box.
CHAPTER 29. CONFIGURING HOST-BASED ACCESS CONTROL
365
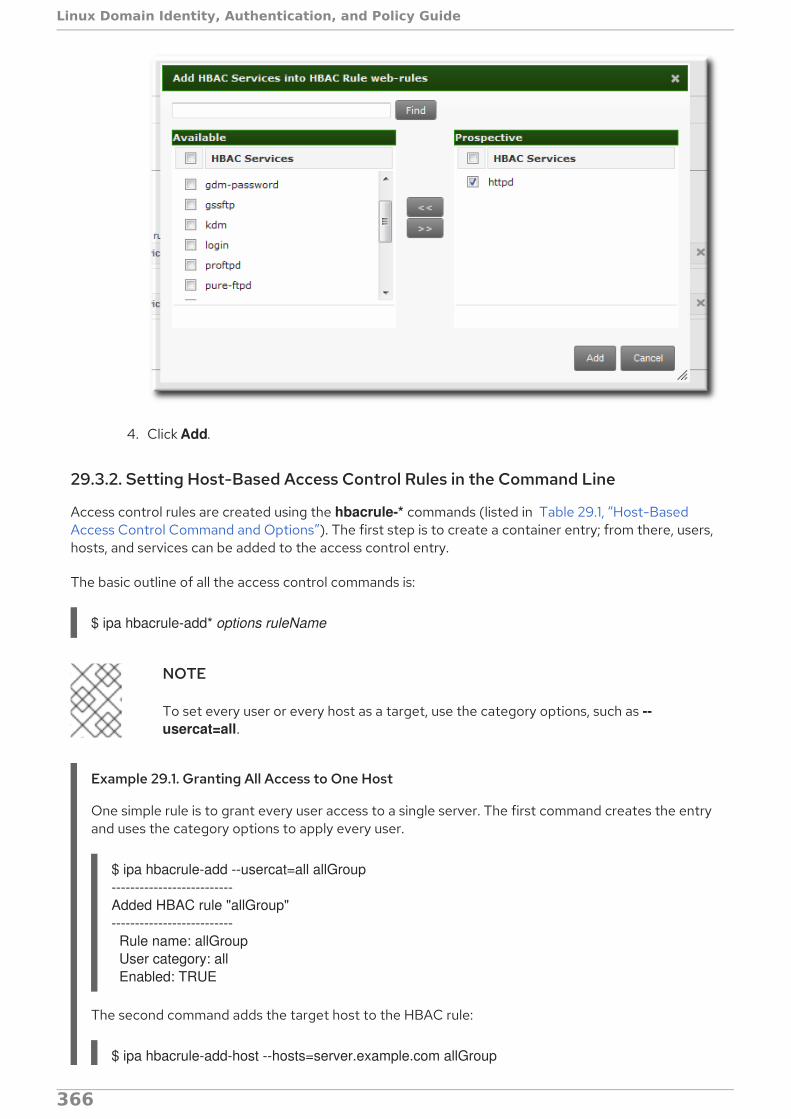
4. Click Add.
29.3.2. Setting Host-Based Access Control Rules in the Command Line
Access control rules are created using the hbacrule-* commands (listed in Table 29.1, “Host-BasedAccess Control Command and Options”). The first step is to create a container entry; from there, users,hosts, and services can be added to the access control entry.
The basic outline of all the access control commands is:
$ ipa hbacrule-add* options ruleName
NOTE
To set every user or every host as a target, use the category options, such as --usercat=all.
Example 29.1. Granting All Access to One Host
One simple rule is to grant every user access to a single server. The first command creates the entryand uses the category options to apply every user.
$ ipa hbacrule-add --usercat=all allGroup--------------------------Added HBAC rule "allGroup"-------------------------- Rule name: allGroup User category: all Enabled: TRUE
The second command adds the target host to the HBAC rule:
$ ipa hbacrule-add-host --hosts=server.example.com allGroup
Linux Domain Identity, Authentication, and Policy Guide
366
Rule name: allGroup User category: all Enabled: TRUE Successful hosts/hostgroups: member host: server.example.com-------------------------Number of members added 1-------------------------
Example 29.2. Adding Control for a Single User to a Service
Another access control method is to specify which services users are allowed to use to access thetarget hosts.
First, for the user to have access to every machine, every host must be added as both a host andtarget. This can be done using the category options:
$ ipa hbacrule-add --hostcat=all sshd-jsmith
Since the access control rule applies to a specific user, the user is added to the rule using the hbacrule-add-user command:
$ ipa hbacrule-add-user --users=jsmith sshd-jsmith
Then, the service is added to the access control rule. (The service should have already been added tothe access control system using the hbacsvc-add command.) This is the service that the user canuse to connect to the machine.
$ ipa hbacrule-add-service --hbacsvcs=sshd sshd-jsmith
Example 29.3. Adding a Service Group to the Rule
While a single service can be added to a rule, it is also possible to add an entire service group. Like asingle service, this uses the hbacrule-add-service command, only with the --hbacsvcgroups optionthat specifies the group name.
$ ipa hbacrule-add-service --hbacsvcgroups=login loginRule
Table 29.1. Host-Based Access Control Command and Options
Command Description Arguments Source or Target Entry
CHAPTER 29. CONFIGURING HOST-BASED ACCESS CONTROL
367
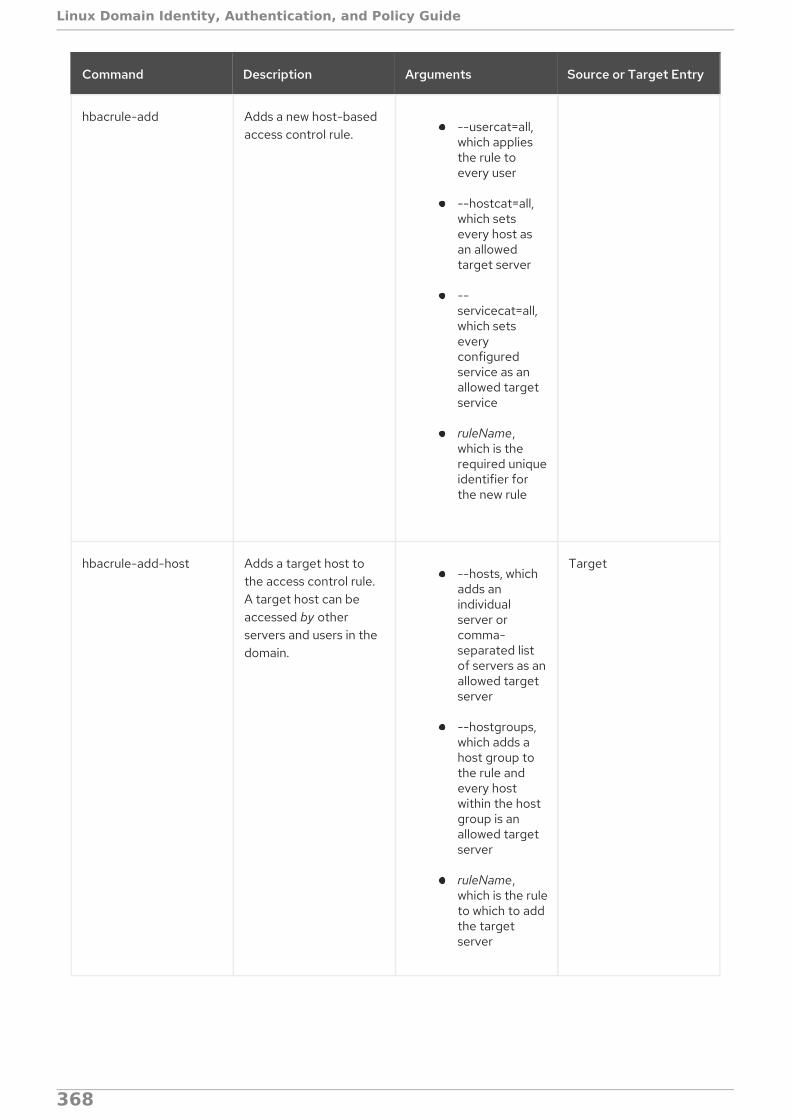
hbacrule-add Adds a new host-basedaccess control rule. --usercat=all,
which appliesthe rule toevery user
--hostcat=all,which setsevery host asan allowedtarget server
--servicecat=all,which setseveryconfiguredservice as anallowed targetservice
ruleName,which is therequired uniqueidentifier forthe new rule
hbacrule-add-host Adds a target host tothe access control rule.A target host can beaccessed by otherservers and users in thedomain.
--hosts, whichadds anindividualserver orcomma-separated listof servers as anallowed targetserver
--hostgroups,which adds ahost group tothe rule andevery hostwithin the hostgroup is anallowed targetserver
ruleName,which is the ruleto which to addthe targetserver
Target
Command Description Arguments Source or Target Entry
Linux Domain Identity, Authentication, and Policy Guide
368
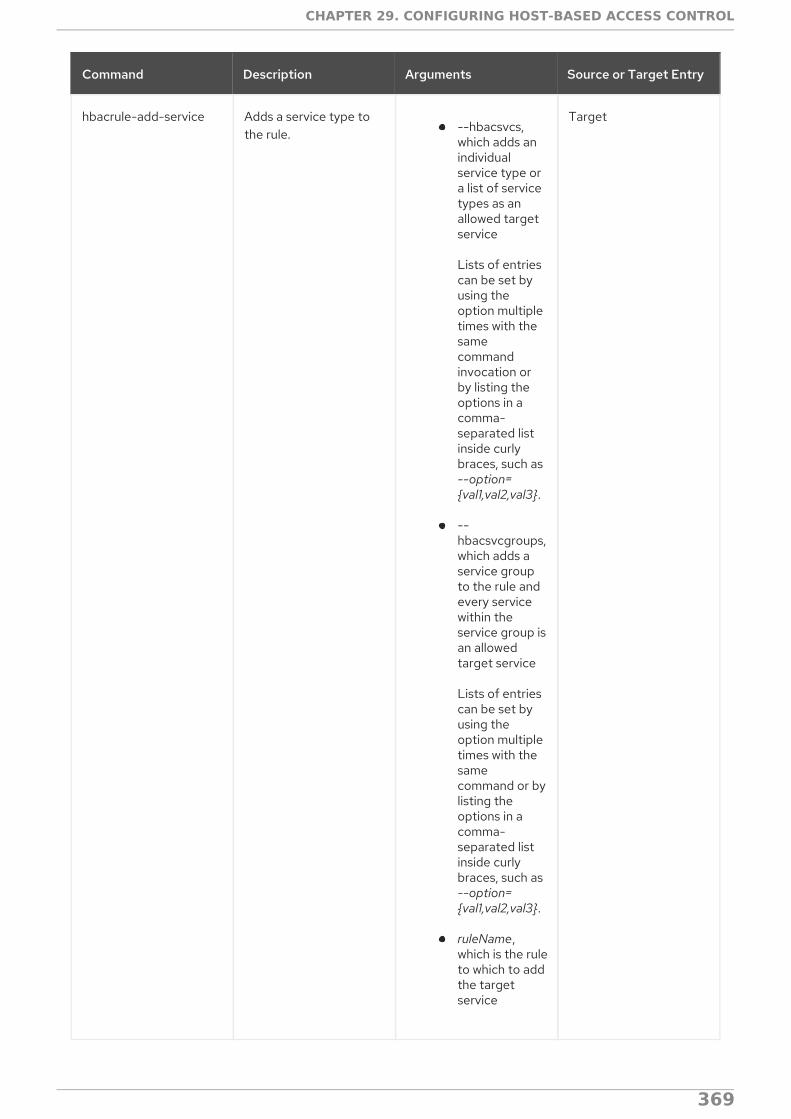
hbacrule-add-service Adds a service type tothe rule. --hbacsvcs,
which adds anindividualservice type ora list of servicetypes as anallowed targetservice
Lists of entriescan be set byusing theoption multipletimes with thesamecommandinvocation orby listing theoptions in acomma-separated listinside curlybraces, such as--option={val1,val2,val3}.
--hbacsvcgroups,which adds aservice groupto the rule andevery servicewithin theservice group isan allowedtarget service
Lists of entriescan be set byusing theoption multipletimes with thesamecommand or bylisting theoptions in acomma-separated listinside curlybraces, such as--option={val1,val2,val3}.
ruleName,which is the ruleto which to addthe targetservice
Target
Command Description Arguments Source or Target Entry
CHAPTER 29. CONFIGURING HOST-BASED ACCESS CONTROL
369

hbacrule-add-user Adds a user to theaccess control rule. Theuser is then able toaccess any allowedtarget host or servicewithin the domain.
--users, whichadds anindividual useror comma-separated listof users to therule
--groups,which adds auser group tothe rule and,thus, every userwithin thegroup
ruleName,which is the ruleto which to addthe user
Source
hbacrule-disable |hbacrule-enable
Disables or enables ahost-based accesscontrol rule. Rules canbe disabled if theirbehavior needs to beevaluated (fortroubleshooting or totest a new rule).
ruleName, which is therule to disable or enable
Command Description Arguments Source or Target Entry
29.4. TESTING HOST-BASED ACCESS CONTROL RULES
Implementing host-based access controls effectively can be tricky because it requires that all of thehosts be properly configured and the access is properly applied to users and services.
The hbactest command can test different host-based access control scenarios to make sure that therules are working as expected.
NOTE
The hbactest command does not work with trusted Active Directory users.Active Directory user/group associations are determined dynamically, as a user logs in,and those data are not stored in the IdM LDAP directory. The hbactest command, then, isunable to resolve the group memberships to check how access control rules will beapplied.
29.4.1. The Limits of Host-Based Access Control Configuration
The access control configuration should always be tested before it is implemented to preventauthorization failures.
Host-based access control rules depend on a lot of interactions — between hosts, services, DNS
Linux Domain Identity, Authentication, and Policy Guide
370
Host-based access control rules depend on a lot of interactions — between hosts, services, DNSlookups, and users. If any element is misconfigured, then the rule can behave in unexpected ways.
Identity Management includes a testing tool to verify that access control rules are behaving in theexpected way by testing the access in a defined scenario. There are several situations where this testingis useful:
A new rule needs to be tested before it is implemented.
There are problems with the existing rules, and the testing tool can identify what rule is behavingbadly.
A subset of existing rules can be tested to see how they are performing.
29.4.2. Test Scenarios for Host-Based Access Control (CLI-Based)
NOTE
The hbactest command does not work with trusted Active Directory users.Active Directory user/group associations are determined dynamically, as a user logs in,and those data are not stored in the IdM LDAP directory. The hbactest command, then, isunable to resolve the group memberships to check how access control rules will beapplied.
The hbactest command tests configured host-based access control rules in very specific situations. Atest run defines:
The user to run the operation as to test the rule performance for that user (--user).
Using the login client Y (--service).
To target host Z (--host).
The rule to test (--rules); if this is not used, then all enabled rules are tested.
Optional The hbactest returns detailed information about which rules were matched, notmatched, or invalid. This detailed rule output can be disabled using --nodetail, so the test simplyruns and returns whether access was granted.
NOTE
The hbactest script does not actually connect to the target host. Instead, it uses the ruleswithin the IdM database to simulate how those rules would be applied in a specificsituation as if an SSSD client were connecting to the IdM server.
More briefly, it performs a simulated test run based on the given information andconfiguration, but it does not actually attempt a service request against the target host.
Example 29.4. Testing All Active Rules
The most basic command checks all active rules. It requires a specific connection scenario, so theuser, login service and target host have to be given, and the testing tool checks the connection.
[jsmith@server ~]$ kinit admin
CHAPTER 29. CONFIGURING HOST-BASED ACCESS CONTROL
371
[jsmith@server ~]$ ipa hbactest --user=jsmith --host=target.example.com --service=ssh-------------------- Access granted: True -------------------- Matched rules: allow_all Matched rules: sshd-jsmith Matched rules: web-rules Not matched rules: allGroup
Example 29.5. Testing a Specific Rule
It is possible to check a specific rule (or several rules).
[jsmith@server ~]$ kinit admin[jsmith@server ~]$ ipa hbactest --user=jsmith --host=target.example.com --service=ssh --rules=myrule---------------------Access granted: True--------------------- notmatched: myrule
Example 29.6. Testing Specific Rules Plus All Enabled
The --rules option lists specific rules to test, but it may be useful to test the specified rules against allof the enabled rules in the domain. This can be done by adding the --enabled option, which includesthe (unspecified) enabled rules along with the specified rules.
[jsmith@server ~]$ kinit admin[jsmith@server ~]$ ipa hbactest --user=jsmith --host=target.example.com --service=ssh --rules=myrule --enabled--------------------Access granted: True-------------------- matched: my-second-rule notmatched: my-third-rule matched: myrule matched: allow_all
It is possible to run a similar comparison against disabled rules by using the --disabled option. Withthe --rules option, the specified rule plus all of the disabled rules are checked. With the --disabledoption, all disabled rules are checked.
29.4.3. Testing Host-Based Access Control Rules in the UI
As Section 29.4.1, “The Limits of Host-Based Access Control Configuration” details, misconfiguring ahost-based access-control rule can result in unpredictable behavior when users or services attempt toconnect to a remote host.
Testing host-based access control can help confirm that the rule performs as expected before it isdeployed or to troubleshoot a rule once it is already active.
NOTE
Linux Domain Identity, Authentication, and Policy Guide
372
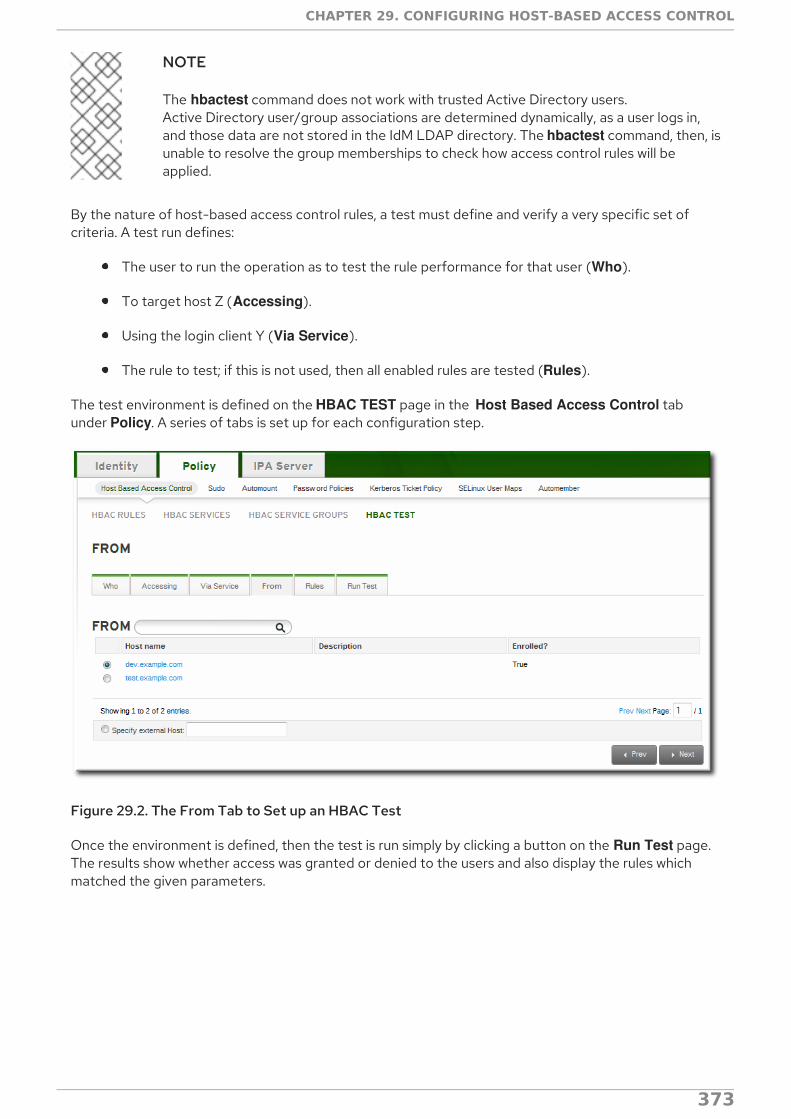
NOTE
The hbactest command does not work with trusted Active Directory users.Active Directory user/group associations are determined dynamically, as a user logs in,and those data are not stored in the IdM LDAP directory. The hbactest command, then, isunable to resolve the group memberships to check how access control rules will beapplied.
By the nature of host-based access control rules, a test must define and verify a very specific set ofcriteria. A test run defines:
The user to run the operation as to test the rule performance for that user (Who).
To target host Z (Accessing).
Using the login client Y (Via Service).
The rule to test; if this is not used, then all enabled rules are tested (Rules).
The test environment is defined on the HBAC TEST page in the Host Based Access Control tabunder Policy. A series of tabs is set up for each configuration step.
Figure 29.2. The From Tab to Set up an HBAC Test
Once the environment is defined, then the test is run simply by clicking a button on the Run Test page.The results show whether access was granted or denied to the users and also display the rules whichmatched the given parameters.
CHAPTER 29. CONFIGURING HOST-BASED ACCESS CONTROL
373

Figure 29.3. HBAC Test Results
NOTE
To change some of the parameters and check for other results, click the New Testbutton at the bottom of the test results page. If that button is not selected, the form isnot reset, so a new test will not run, even if test settings are changed.
Linux Domain Identity, Authentication, and Policy Guide
374

CHAPTER 30. DEFINING SELINUX USER MAPSSecurity-enhanced Linux (SELinux) sets rules over what system users can access processes, files,directories, and system settings. Both the system administrator and system applications can definesecurity contexts that restrict or allow user access and even access from other applications.
As part of defining centralized security policies in the Identity Management domain,Identity Management provides a way to map IdM users to (existing) SELinux user contexts and grant orrestrict access to clients and services within the IdM domain, per host, based on the defined SELinuxpolicies.
30.1. ABOUT IDENTITY MANAGEMENT, SELINUX, AND MAPPINGUSERS
NOTE
Identity Management does not create or modify the SELinux contexts on a system.Rather, it uses existing contexts as the basis to map IdM users (in the domain) to SELinuxusers (on a system).
Security-enhanced Linux defines kernel-level, mandatory access controls for how users, processes, andapplications can interact with other resources on a system. These rules for interactions, called contexts,look at the data and behavior characteristics of different objects on the system and then set rules,called policies, based on the security implications of each specific object. This is in contrast to higher-level discretionary access controls which are concerned primarily with file ownership and user identity,without accounting for data criticality or application behavior. Every resource on a system (users,applications, files, processes) is assigned a context.
System users are associated with an SELinux role. The role is assigned both a multi-layer securitycontext (MLS) and a multi-category security context (MCS). The MLS/MCS contexts confine users towhat processes, files, and operations they can access on the system.
CHAPTER 30. DEFINING SELINUX USER MAPS
375

Figure 30.1. SELinux Users in the SELinux Manager
This is all described in detail in Red Hat Enterprise Linux 6 Security-Enhanced Linux .
SELinux users and policies function at the system level, not the network level. This means that SELinuxusers are configured independently on each system. While this is acceptable in many situations —SELinux has common defined system users and SELinux-aware services define their own policies — ithas some issues when dealing with remote users and systems that access local resources. Remote usersand services can get shuffled into a default guest context without a lot of intelligence about what theiractual SELinux user and role should be.
This is how Identity Management can cleanly integrate an identity domain with local SELinux services.Identity Management can map IdM users to configured SELinux roles per host. Mapping SELinux andIdM users improves user administration:
Remote users can be granted appropriate SELinux user contexts based on their IdM groupassignments. This also allows administrators to consistently apply the same policies to the sameusers without having to create local accounts or reconfigure SELinux.
SELinux users are automatically updated as hosts are added to the IT environment or as usersare added, removed, or changed, without having to edit local systems.
SELinux policies can be planned and related to domain-wide security policies through settingslike IdM host-based access control rules.
Administrators gain environment-wide visibility and control over how users and systems areassigned in SELinux.
SELinux user maps are comprised of three parts: the SELinux user for the system, an IdM user, and anIdM host. These define two separate relationships. First, it defines a map for the SELinux user on aspecific host (the local or target system). Second, it defines a map for the SELinux user and the IdM
Linux Domain Identity, Authentication, and Policy Guide
376
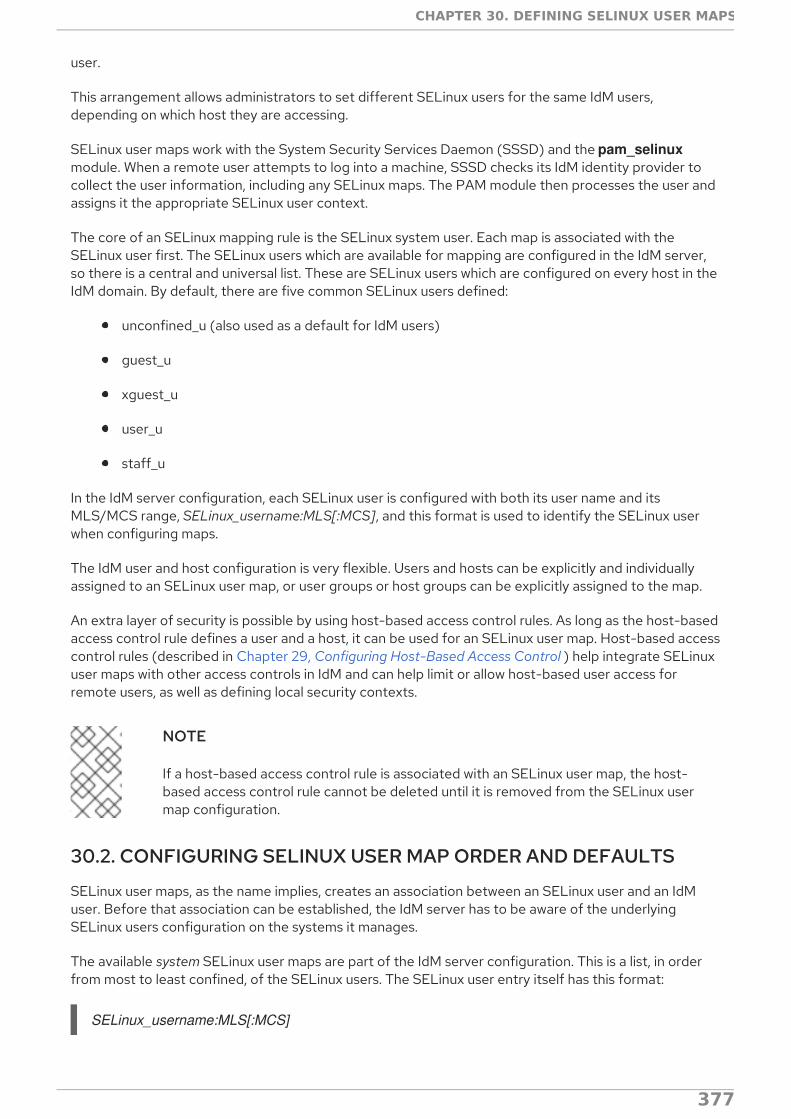
user.
This arrangement allows administrators to set different SELinux users for the same IdM users,depending on which host they are accessing.
SELinux user maps work with the System Security Services Daemon (SSSD) and the pam_selinuxmodule. When a remote user attempts to log into a machine, SSSD checks its IdM identity provider tocollect the user information, including any SELinux maps. The PAM module then processes the user andassigns it the appropriate SELinux user context.
The core of an SELinux mapping rule is the SELinux system user. Each map is associated with theSELinux user first. The SELinux users which are available for mapping are configured in the IdM server,so there is a central and universal list. These are SELinux users which are configured on every host in theIdM domain. By default, there are five common SELinux users defined:
unconfined_u (also used as a default for IdM users)
guest_u
xguest_u
user_u
staff_u
In the IdM server configuration, each SELinux user is configured with both its user name and itsMLS/MCS range, SELinux_username:MLS[:MCS], and this format is used to identify the SELinux userwhen configuring maps.
The IdM user and host configuration is very flexible. Users and hosts can be explicitly and individuallyassigned to an SELinux user map, or user groups or host groups can be explicitly assigned to the map.
An extra layer of security is possible by using host-based access control rules. As long as the host-basedaccess control rule defines a user and a host, it can be used for an SELinux user map. Host-based accesscontrol rules (described in Chapter 29, Configuring Host-Based Access Control ) help integrate SELinuxuser maps with other access controls in IdM and can help limit or allow host-based user access forremote users, as well as defining local security contexts.
NOTE
If a host-based access control rule is associated with an SELinux user map, the host-based access control rule cannot be deleted until it is removed from the SELinux usermap configuration.
30.2. CONFIGURING SELINUX USER MAP ORDER AND DEFAULTS
SELinux user maps, as the name implies, creates an association between an SELinux user and an IdMuser. Before that association can be established, the IdM server has to be aware of the underlyingSELinux users configuration on the systems it manages.
The available system SELinux user maps are part of the IdM server configuration. This is a list, in orderfrom most to least confined, of the SELinux users. The SELinux user entry itself has this format:
SELinux_username:MLS[:MCS]
CHAPTER 30. DEFINING SELINUX USER MAPS
377

The individual user entries are separated with a dollar sign ($).
Since there is no requirement on user entries to have an SELinux map, many entries may be unmapped.The IdM server configuration sets a default SELinux user (one of the users from the total SELinux maplist) to use for unmapped IdM user entries. This way, even unmapped IdM users have a functionalSELinux context.
NOTE
This configuration defines the map order of available system SELinux users. This does notdefine any IdM user SELinux policies. The IdM user - SELinux user map must be definedand then users are added to the map, as in Section 30.3, “Mapping SELinux Users andIdM Users”.
30.2.1. In the Web UI
1. In the top menu, click the IPA Server main tab and the Configuration subtab.
2. Scroll to the bottom of the list of server configuration areas, to SELINUX OPTIONS.
3. Set the SELinux user configuration.
There are two areas that can be edited: the prioritized list of SELinux users and the defaultSELinux user to use for unmapped IdM users.
The SELinux user map order gives the list of SELinux users, defined on the local Linux system, which are available for configuring mapping rules. This is a prioritized list, from most to leastconfined. Each SELinux user has the format SELinux_user:MLS.
The Default SELinux user field sets the SELinux user to use for unmapped IdM users.
Linux Domain Identity, Authentication, and Policy Guide
378

4. Click the Update link at the top of the page to save the changes.
30.2.2. In the CLI
Before SELinux mapping rules can be created, there has to be a defined and universal list of SELinuxusers which are available to be mapped. This is set in the IdM server configuration:
[jsmith@server ~]$ ipa config-show... SELinux user map order: guest_u:s0$xguest_u:s0$user_u:s0$staff_u:s0-s0:c0.c1023$unconfined_u:s0-s0:c0.c1023 Default SELinux user: unconfined_u:s0-s0:c0.c1023
The SELinux user settings can be edited using the config-mod command.
Example 30.1. List of SELinux Users
The complete list of SELinux users is passed in the --ipaselinuxusermaporder option. This list setsa priority order, from most to least confined users.
The SELinux user entry itself has this format:
SELinux_user:MLS:MCS
CHAPTER 30. DEFINING SELINUX USER MAPS
379

The individual user entries are separated with a dollar sign ($).
For example:
[jsmith@server ~]$ ipa config-mod --ipaselinuxusermaporder="unconfined_u:s0-s0:c0.c1023$guest_u:s0$xguest_u:s0$user_u:s0-s0:c0.c1023$staff_u:s0-s0:c0.c1023"
NOTE
The default SELinux user, used for unmapped entries, must be included in the user maplist or the edit operation fails. Likewise, if the default is edited, it must be changed to auser in the SELinux map list or the map list must be updated first.
Example 30.2. Default SELinux User
IdM users are not required to have a specific SELinux user mapped to their account. However, thelocal system still checks the IdM entry for an SELinux user to use for the IdM user account. Thedefault SELinux user sets the fallback user to use for unmapped IdM user entries; this is, by default,the default SELinux user for system users on Red Hat Enterprise Linux, unconfined_u.
This default user can be changed with the --ipaselinuxusermapdefault. For example:
[jsmith@server ~]$ ipa config-mod --ipaselinuxusermapdefault="guest_u:s0"
30.3. MAPPING SELINUX USERS AND IDM USERS
An SELinux map associates an SELinux user context on a local system with an IdM user (or users) withinthe domain. An SELinux map has three parts: the SELinux user context and an IdM user/host pairing.That IdM user/host pair can be defined in one of two ways: it can be set for explicit users on explicithosts (or user and host groups), or it can be defined using a host-based access control rule.
30.3.1. In the Web UI
1. In the top menu, click the Policy main tab and the SELinux User Mappings subtab.
2. In the list of mappings, click the Add button to create a new map.
3. Enter the name for the map and the SELinux user exactly as it appears in the IdM serverconfiguration. SELinux users have the format SELinux_username:MLS[:MCS].
Linux Domain Identity, Authentication, and Policy Guide
380
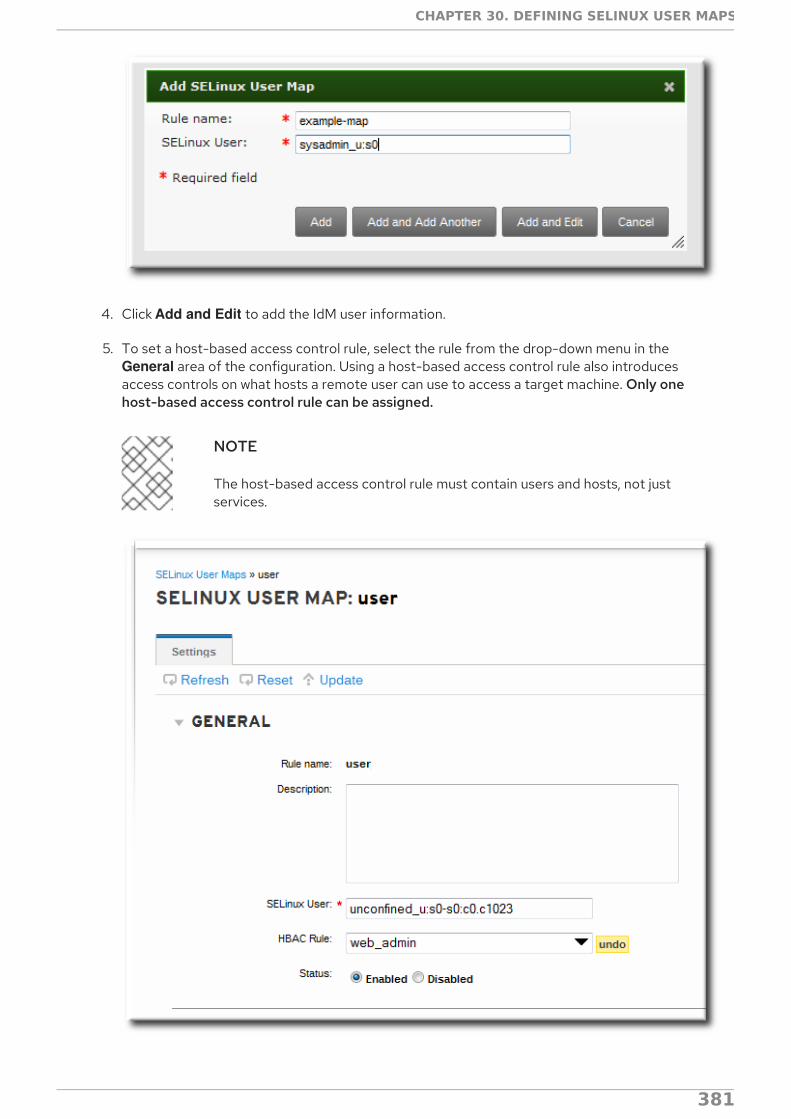
4. Click Add and Edit to add the IdM user information.
5. To set a host-based access control rule, select the rule from the drop-down menu in the General area of the configuration. Using a host-based access control rule also introducesaccess controls on what hosts a remote user can use to access a target machine. Only onehost-based access control rule can be assigned.
NOTE
The host-based access control rule must contain users and hosts, not justservices.
CHAPTER 30. DEFINING SELINUX USER MAPS
381

Alternatively, scroll down the Users and Hosts areas, and click the Add link to assign users, usergroups, hosts, or host groups to the SELinux map.
Select the users (or hosts or groups) on the left, click the right arrows button (>>) to move themto the Prospective column, and click the Add button to add them to the rule.
NOTE
Linux Domain Identity, Authentication, and Policy Guide
382

NOTE
Either a host-based access control rule can be given or the users and hosts canbe set manually. Both options cannot be used at the same time.
6. Click the Update link at the top to save the changes to the SELinux user map.
30.3.2. In the CLI
An SELinux map rule has three fundamental parts:
The SELinux user (--selinuxuser)
The user or user groups which are associated with the SELinux user (--users or --groups)
The host or host groups which are associated with the SELinux user (--hosts or --hostgroups)
Alternatively, a host-based access control rule which specifies both hosts and users in it (--hbacrule)
A rule can be created with all information at once using the selinuxusermap-add command. Users andhosts can be added to a rule after it is created by using the selinuxusermap-add-user and selinuxusermap-add-host commands, respectively.
Example 30.3. Creating a New SELinux Map
The --selinuxuser value must be the SELinux user name exactly as it appears in the IdM serverconfiguration. SELinux users have the format SELinux_username:MLS[:MCS].
Both a user and a host (or appropriate groups) must be specified for the SELinux mapping to bevalid. The user, host, and group options can be used multiple times or can be used once with acomma-separated listed inside curly braces, such as --option={val1,val2,val3}.
[jsmith@server ~]$ ipa selinuxusermap-add --users=jsmith --users=bjensen --users=jrockford --hosts=server.example.com --hosts=test.example.com --selinuxuser="xguest_u:s0" selinux1
Example 30.4. Creating an SELinux Map with a Host-Based Access Control Rule
The --hbacrule value identifies the host-based access control rule to use for mapping. Using a host-based access control rule introduces access controls on what hosts a remote user can use to accessa target machine, along with applying SELinux contexts after the remote user has logged into thetarget machine.
The access control rule must specify both users and hosts appropriately so that the SELinux mapcan construct the SELinux user, IdM user, and host triple.
Only one host-based access control rule can be specified.
[jsmith@server ~]$ ipa selinuxusermap-add --hbacrule=webserver --selinuxuser="xguest_u:s0" selinux1
Host-based access control rules are described in Chapter 29, Configuring Host-Based AccessControl.
CHAPTER 30. DEFINING SELINUX USER MAPS
383
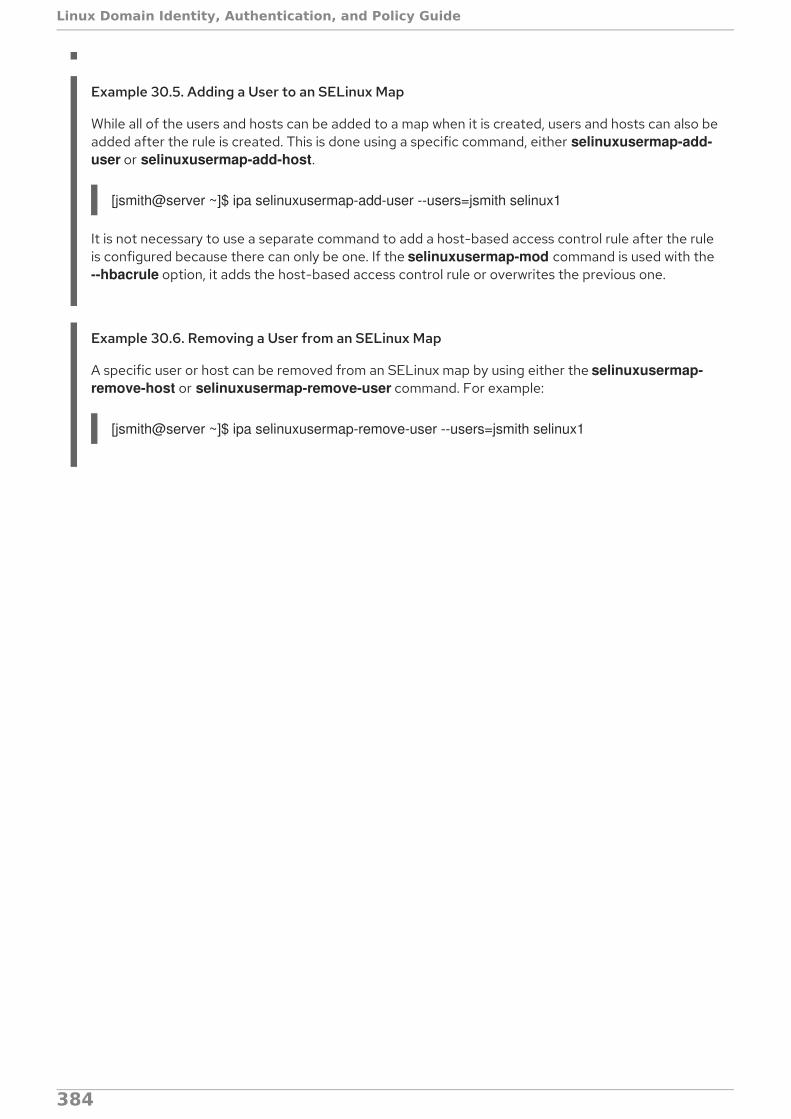
Example 30.5. Adding a User to an SELinux Map
While all of the users and hosts can be added to a map when it is created, users and hosts can also beadded after the rule is created. This is done using a specific command, either selinuxusermap-add-user or selinuxusermap-add-host.
[jsmith@server ~]$ ipa selinuxusermap-add-user --users=jsmith selinux1
It is not necessary to use a separate command to add a host-based access control rule after the ruleis configured because there can only be one. If the selinuxusermap-mod command is used with the --hbacrule option, it adds the host-based access control rule or overwrites the previous one.
Example 30.6. Removing a User from an SELinux Map
A specific user or host can be removed from an SELinux map by using either the selinuxusermap-remove-host or selinuxusermap-remove-user command. For example:
[jsmith@server ~]$ ipa selinuxusermap-remove-user --users=jsmith selinux1
Linux Domain Identity, Authentication, and Policy Guide
384
CHAPTER 31. DEFINING AUTOMATIC GROUP MEMBERSHIPFOR USERS AND HOSTSMost of the policies and configuration within the Identity Management domain are based on groups.Various settings, such as sudo rules, automount, or access control, are defined for groups. Thesesettings are then applied to individual group members.
Managing group membership is an important factor in managing users and hosts. Creating automembergroups defines rules to add users and hosts to specified groups automatically, as soon as a new entry isadded.
31.1. ABOUT AUTOMEMBERSHIP
One of the most critical tasks for managing policies, identities, and security is managing groupmembership in Identity Management. Groups are the core of most policy configuration.
By default, hosts do not belong to any group when they are created; users are added to the catchall ipausers group. Even if custom groups are configured and all policy configuration is in place, users andhosts cannot take advantage of those policies until they are joined to groups. Of course, this can bedone manually, but it is both more efficient and more consistent if group membership can be assignedautomatically.
This is done with automembership groups.
Automembership is essentially an automatic, global entry filter that organizes entries, at least in part,based on specific criteria. An automember rule, then, is the way that that filter is specified.
For example, there can be a lot of different, repeatable ways to categorize identities within the IT andorganizational environment:
Adding all hosts or all users to a single global group.
Adding employees to specific groups based on their employee type, ID number, manager, orphysical location.
Dividing hosts based on their class entered by the administrator.
Automembers provide a way to pre-sort those entries. That makes it easier to configure the actualbehavior that you want to configure — like granting different sudo rules to different user types ormachines on different subnets or have different automount settings for different users.
NOTE
Automembership only applies to new users or hosts. Changing the configuration for anexisting user or group does not trigger a change of group membership.
Automembership is a target set on an existing user group or host group. An automembership rule iscreated as a policy. This is a sister entry to the actual group entry and it signals that the given group isused for automatic group membership.
Once the rule is created — once the group is identified as being a target — then the next step is to defineautomember conditions. Conditions are regular expression filters that are used to identify groupmembers. Conditions can be inclusive or exclusive, meaning that matching entries can be added orignored based on those conditions.
CHAPTER 31. DEFINING AUTOMATIC GROUP MEMBERSHIP FOR USERS AND HOSTS
385
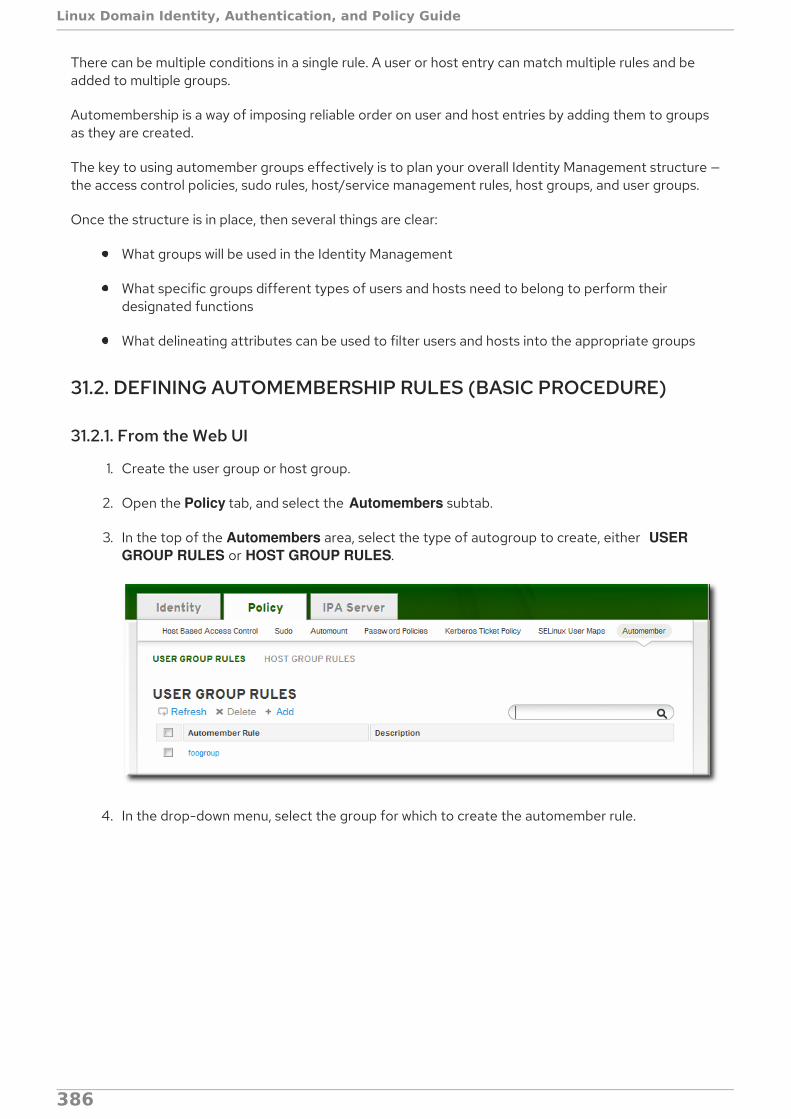
There can be multiple conditions in a single rule. A user or host entry can match multiple rules and beadded to multiple groups.
Automembership is a way of imposing reliable order on user and host entries by adding them to groupsas they are created.
The key to using automember groups effectively is to plan your overall Identity Management structure —the access control policies, sudo rules, host/service management rules, host groups, and user groups.
Once the structure is in place, then several things are clear:
What groups will be used in the Identity Management
What specific groups different types of users and hosts need to belong to perform theirdesignated functions
What delineating attributes can be used to filter users and hosts into the appropriate groups
31.2. DEFINING AUTOMEMBERSHIP RULES (BASIC PROCEDURE)
31.2.1. From the Web UI
1. Create the user group or host group.
2. Open the Policy tab, and select the Automembers subtab.
3. In the top of the Automembers area, select the type of autogroup to create, either USER GROUP RULES or HOST GROUP RULES.
4. In the drop-down menu, select the group for which to create the automember rule.
Linux Domain Identity, Authentication, and Policy Guide
386

5. Click the Add and Edit button.
6. In the edit page for the rule, click the + Add by the type of condition to create to identifyentries.
7. Select the attribute to use as the basis for the search and then set the regular expression to useto match the attribute value.
Conditions can look for entries either to include in the group or to explicitly exclude from thegroup. The format of a condition is a Perl-compatible regular expression (PCRE). For moreinformation on PCRE patterns, see the pcresyntax(3) man page.
NOTE
CHAPTER 31. DEFINING AUTOMATIC GROUP MEMBERSHIP FOR USERS AND HOSTS
387
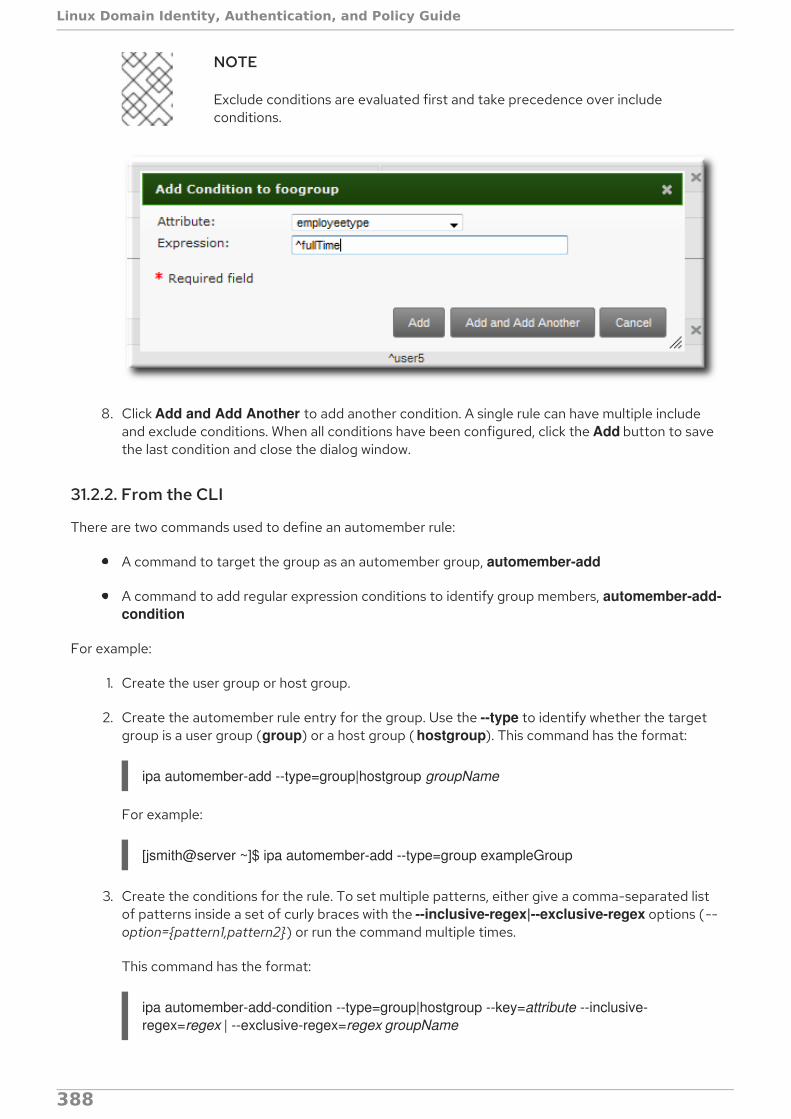
NOTE
Exclude conditions are evaluated first and take precedence over includeconditions.
8. Click Add and Add Another to add another condition. A single rule can have multiple includeand exclude conditions. When all conditions have been configured, click the Add button to savethe last condition and close the dialog window.
31.2.2. From the CLI
There are two commands used to define an automember rule:
A command to target the group as an automember group, automember-add
A command to add regular expression conditions to identify group members, automember-add-condition
For example:
1. Create the user group or host group.
2. Create the automember rule entry for the group. Use the --type to identify whether the targetgroup is a user group (group) or a host group ( hostgroup). This command has the format:
ipa automember-add --type=group|hostgroup groupName
For example:
[jsmith@server ~]$ ipa automember-add --type=group exampleGroup
3. Create the conditions for the rule. To set multiple patterns, either give a comma-separated listof patterns inside a set of curly braces with the --inclusive-regex|--exclusive-regex options (--option={pattern1,pattern2}) or run the command multiple times.
This command has the format:
ipa automember-add-condition --type=group|hostgroup --key=attribute --inclusive-regex=regex | --exclusive-regex=regex groupName
As with the automember rule, the condition must specify the type of group (--type) and the
Linux Domain Identity, Authentication, and Policy Guide
388
As with the automember rule, the condition must specify the type of group (--type) and thename of the target group (groupName).
The condition must also specify the attribute (the key) and any patterns for the attribute value.The --key is the attribute name that is the focus of the condition. Then, there is a regularexpression pattern to identify matching values; matching entries can either be included (--inclusive-regex) or excluded (--exclusive-regex) from the group. Exclusion rules takeprecedence.
For example, to include all employees with Barbara Jensen as a manager, but excluding thetemporary employees:
[jsmith@server ~]$ ipa automember-add-condition --type=group --key=manager --inclusive-regex=^uid=bjensen$ exampleGroup[jsmith@server ~]$ ipa automember-add-condition --type=group --key=employeetype --exclusive-regex=^temp exampleGroup
NOTE
The regular expression can match any part of the string. Using a caret (^) meansthat it must match at the beginning, and using a dollar sign ($) means that it mustmatch at the end. Wrapping the pattern in ^ and $ means that the string as awhole must match.
For more information on Perl-compatible regular expression (PCRE) patterns, see thepcresyntax(3) man page.
To remove a condition for a rule, pass the full condition information, both the key and the regularexpression:
[jsmith@server ~]$ ipa automember-remove-condition --key=fqdn --type=hostgroup --inclusive-regex=^web[1-9]+\.example\.com webservers
To remove the entire rule, simply run the automember-del command.
31.3. EXAMPLES OF USING AUTOMEMBER GROUPS
NOTE
These examples are shown using the CLI; the same configuration can be performed in theweb UI.
A Note on Creating Default Groups
One common environment requirement is to have some sort of default group that users or hosts areadded to. There are a couple of different ways to approach that.
All entries can be added to a single, global group regardless of what other groups they are alsoadded to.
Entries can be added to specific automember groups. If the new entry does not match anyautogroup, then it is added to a default or fallback group.
These strategies are mutually exclusive. If an entry matches a global group, then it does match an
CHAPTER 31. DEFINING AUTOMATIC GROUP MEMBERSHIP FOR USERS AND HOSTS
389
These strategies are mutually exclusive. If an entry matches a global group, then it does match anautomember group and would, therefore, not be added to the fallback group.
31.3.1. Setting an All Users/Hosts Rule
To add all users or all hosts to a single group, use an inclusive regular expression for some attribute (suchas cn or fqdn) which all entries will contain.
A regular expression to match all entries is simply .*. For example, to add all hosts to the same hostgroup:
[jsmith@server ~]$ ipa automember-add-condition --type=hostgroup allhosts --inclusive-regex=.* --key=fqdn--------------------------------Added condition(s) to "allhosts"-------------------------------- Automember Rule: allhosts Inclusive Regex: fqdn=.*----------------------------Number of conditions added 1----------------------------
Every host added after that is automatically added to the allhosts group:
[jsmith@server ~]$ ipa host-add test.example.com-----------------------------Added host "test.example.com"----------------------------- Host name: test.example.com Principal name: host/[email protected] Password: False Keytab: False Managed by: test.example.com
[jsmith@server ~]$ ipa hostgroup-show allhosts Host-group: allhosts Description: Default hostgroup Member hosts: test.example.com
For more information on PCRE patterns, see the pcresyntax(3) man page.
31.3.2. Defining Default Automembership Groups
There is a special command to set a default group, automember-default-group-set. This sets the groupname (--default-group) and group type(--type), similar to an automember rule, but there is no conditionto match. By definition, default group members are unmatched entries.
For example:
[jsmith@server ~]$ ipa automember-default-group-set --default-group=ipaclients --type=hostgroup[jsmith@server ~]$ ipa automember-default-group-set --default-group=ipausers --type=group
A default group rule can be removed using the automember-default-group-remove command. Since
Linux Domain Identity, Authentication, and Policy Guide
390

A default group rule can be removed using the automember-default-group-remove command. Sincethere is only one default group for a group type, it is only necessary to give the group type, not thegroup name:
[jsmith@server ~]$ ipa automember-default-group-remove --type=hostgroup
31.3.3. Using Automembership Groups with Windows Users
When a user is created in IdM, that user is automatically added as a member to the ipausers group(which is the default group for all new users, apart from any automember group). However, when aWindows user is synced over from Active Directory, that user is not automatically added to the ipausersgroup.
New Windows users can be added to the ipausers group, as with users created in Identity Management,by using an automember group. Every Windows user is added with the ntUser object class; that objectclass can be used as an inclusive filter to identify new Windows users to add to the automember group.
First, define the ipausers group as an automember group:
[jsmith@server ~]$ ipa automember-add --type=group ipausers
Then, use the ntUser object class as a condition to add users:
[jsmith@server ~]$ ipa automember-add-condition ipausers --key=objectclass --type=group --inclusive-regex=ntUser
CHAPTER 31. DEFINING AUTOMATIC GROUP MEMBERSHIP FOR USERS AND HOSTS
391

PART V. CONFIGURING THE IDENTITY MANAGEMENTSERVER
Linux Domain Identity, Authentication, and Policy Guide
392

CHAPTER 32. DEFINING ACCESS CONTROL FOR IDM USERSAccess control is a set of security features which defines who can access certain resources, such asmachines, services or entries, and what kinds of operations they are allowed to perform.Identity Management provides several access control areas to make it clear what kind of access is beinggranted and to whom it is granted. As part of this, Identity Management draws a distinction betweenaccess controls to resources within the domain and access control to the IdM configuration itself.
This chapter details the different internal access control mechanisms that are available for users withinIdM to the IdM server and other IdM users.
32.1. ACCESS CONTROLS FOR IDM ENTRIES
Access control defines the rights or permissions users have been granted to perform operations onother users or objects.
The Identity Management access control structure is based on standard LDAP access controls. Accesswithin the IdM server is based on the IdM users, stored in the back end Directory Server instance, whoare allowed to access other IdM entities, also stored as LDAP entries in the Directory Server instance.
An access control instruction (ACI) has three parts:
Actor
This is the entity who is being granted permission to do something. In LDAP access control models,this is called the bind rule because it defines who the user is and can optionally require other limits onthe bind attempt, such as restricting attempts to a certain time of day or a certain machine.
Target
This defines the entry which the actor is allowed to perform operations on.
Operation type
Operation type — the last part determines what kinds of actions the user is allowed to perform. Themost common operations are add, delete, write, read, and search. In Identity Management, all usersare implicitly granted read and search rights to all entries in the IdM domain, with restrictions only forsensitive attributes like passwords and Kerberos keys. Anonymous users are restricted from seeingsecurity-related configuration, like sudo rules and host-based access control.
When any operation is attempted, the first thing that the IdM client does is send user credentials as partof the bind operation. The back end Directory Server checks those user credentials and then checks theuser account to see if the user has permission to perform the requested operation.
32.1.1. Access Control Methods in Identity Management
To make access control rules simple and clear to implement, Identity Management divides accesscontrol definitions into three categories:
Self-service rules
Self-service rules, which define what operations a user can perform on his own personal entry. Theaccess control type only allows write permissions to attributes within the entry; it does not allow addor delete operations for the entry itself.
Delegation rules
Delegation rules, which allow a specific user group to perform write (edit) operations on specific
CHAPTER 32. DEFINING ACCESS CONTROL FOR IDM USERS
393
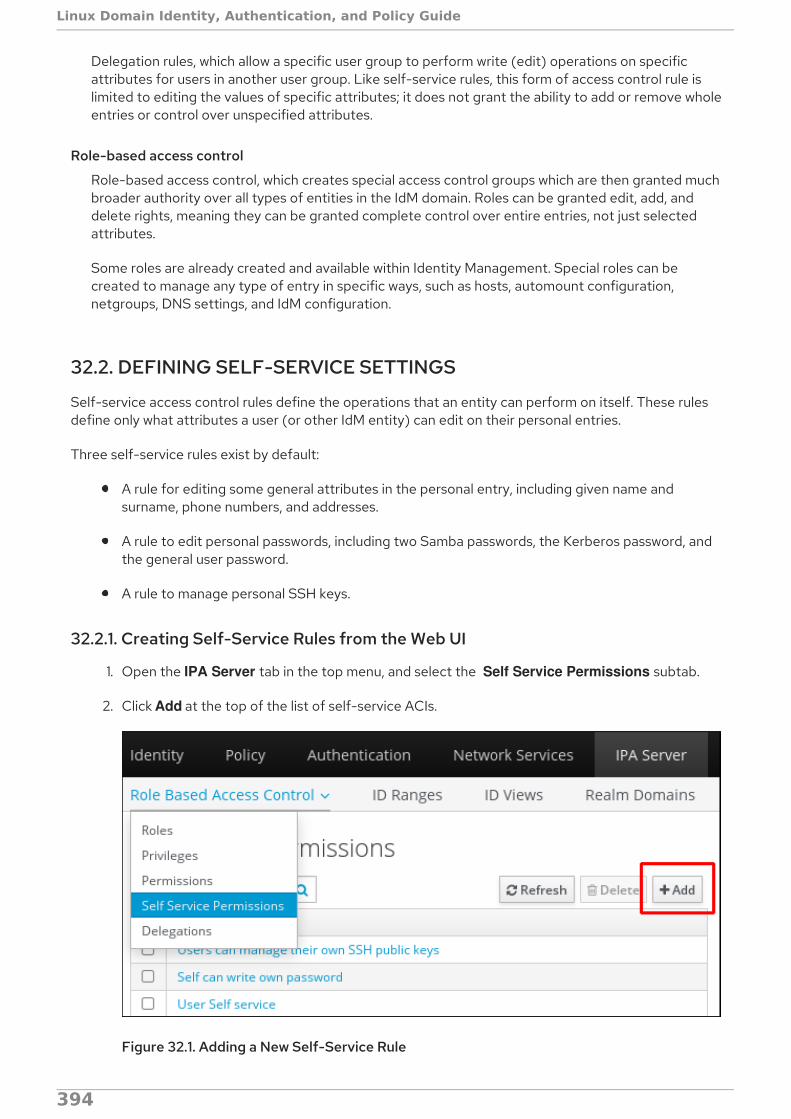
Delegation rules, which allow a specific user group to perform write (edit) operations on specificattributes for users in another user group. Like self-service rules, this form of access control rule islimited to editing the values of specific attributes; it does not grant the ability to add or remove wholeentries or control over unspecified attributes.
Role-based access control
Role-based access control, which creates special access control groups which are then granted muchbroader authority over all types of entities in the IdM domain. Roles can be granted edit, add, anddelete rights, meaning they can be granted complete control over entire entries, not just selectedattributes.
Some roles are already created and available within Identity Management. Special roles can becreated to manage any type of entry in specific ways, such as hosts, automount configuration,netgroups, DNS settings, and IdM configuration.
32.2. DEFINING SELF-SERVICE SETTINGS
Self-service access control rules define the operations that an entity can perform on itself. These rulesdefine only what attributes a user (or other IdM entity) can edit on their personal entries.
Three self-service rules exist by default:
A rule for editing some general attributes in the personal entry, including given name andsurname, phone numbers, and addresses.
A rule to edit personal passwords, including two Samba passwords, the Kerberos password, andthe general user password.
A rule to manage personal SSH keys.
32.2.1. Creating Self-Service Rules from the Web UI
1. Open the IPA Server tab in the top menu, and select the Self Service Permissions subtab.
2. Click Add at the top of the list of self-service ACIs.
Figure 32.1. Adding a New Self-Service Rule
Linux Domain Identity, Authentication, and Policy Guide
394

3. Enter the name of the rule in the pop-up window. Spaces are allowed.
Figure 32.2. Form for Adding a Self-Service Rule
4. Select the check boxes by the attributes which this ACI will permit users to edit.
5. Click the Add button to save the new self-service ACI.
32.2.2. Creating Self-Service Rules from the Command Line
A new self-service rule can be added using the selfservice-add command. These two options arerequired:
--permissions to set which permissions – such as write, add, or delete – the ACI grants
--attrs to give the full list of attributes which this ACI grants permission to.
[jsmith@server ~]$ ipa selfservice-add "Users can manage their own name details" --permissions=write --attrs=givenname --attrs=displayname --attrs=title --attrs=initials-----------------------------------------------------------Added selfservice "Users can manage their own name details"----------------------------------------------------------- Self-service name: Users can manage their own name details Permissions: write Attributes: givenname, displayname, title, initials
32.2.3. Editing Self-Service Rules
In the self-service entry in the web UI, the only element that can be edited is the list of attributes that
CHAPTER 32. DEFINING ACCESS CONTROL FOR IDM USERS
395
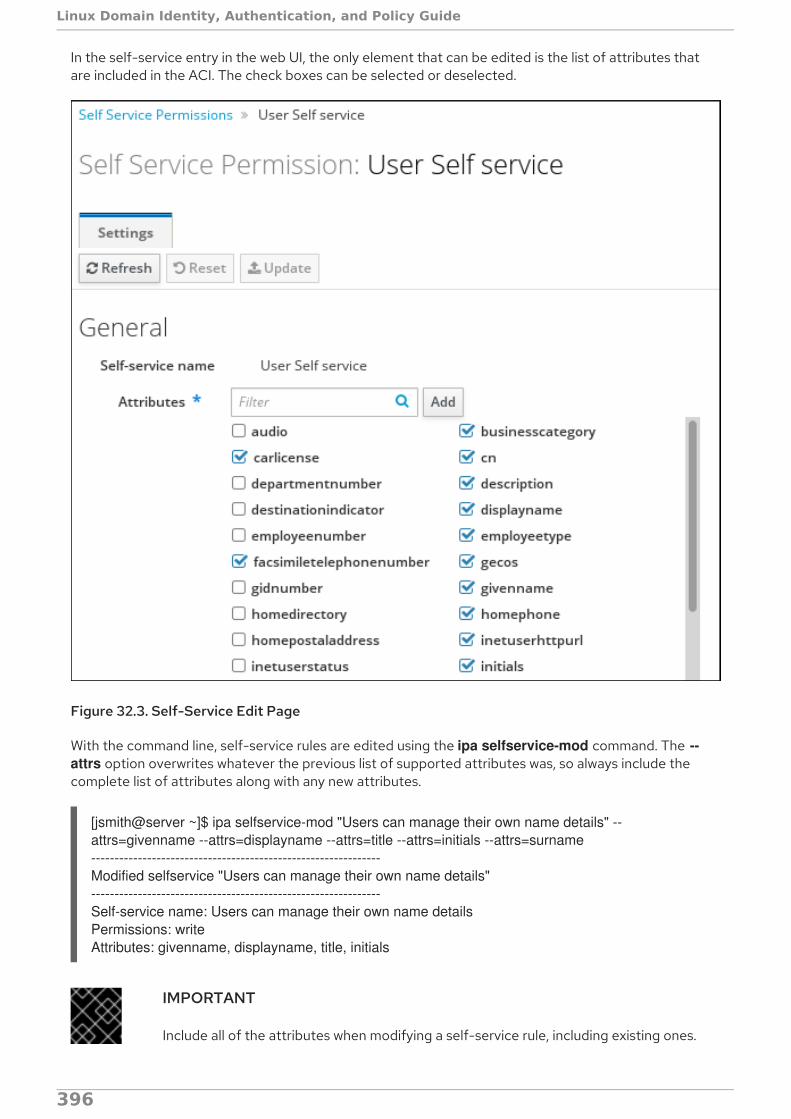
In the self-service entry in the web UI, the only element that can be edited is the list of attributes thatare included in the ACI. The check boxes can be selected or deselected.
Figure 32.3. Self-Service Edit Page
With the command line, self-service rules are edited using the ipa selfservice-mod command. The --attrs option overwrites whatever the previous list of supported attributes was, so always include thecomplete list of attributes along with any new attributes.
[jsmith@server ~]$ ipa selfservice-mod "Users can manage their own name details" --attrs=givenname --attrs=displayname --attrs=title --attrs=initials --attrs=surname--------------------------------------------------------------Modified selfservice "Users can manage their own name details"--------------------------------------------------------------Self-service name: Users can manage their own name detailsPermissions: writeAttributes: givenname, displayname, title, initials
IMPORTANT
Include all of the attributes when modifying a self-service rule, including existing ones.
Linux Domain Identity, Authentication, and Policy Guide
396
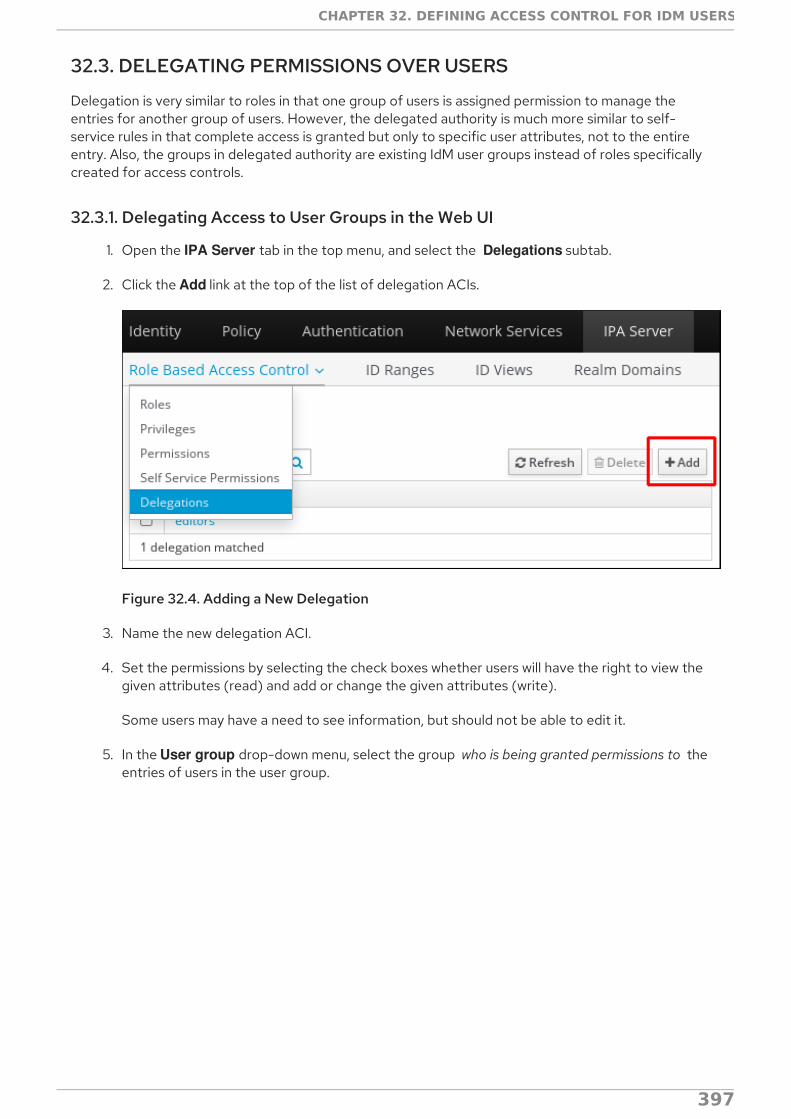
32.3. DELEGATING PERMISSIONS OVER USERS
Delegation is very similar to roles in that one group of users is assigned permission to manage theentries for another group of users. However, the delegated authority is much more similar to self-service rules in that complete access is granted but only to specific user attributes, not to the entireentry. Also, the groups in delegated authority are existing IdM user groups instead of roles specificallycreated for access controls.
32.3.1. Delegating Access to User Groups in the Web UI
1. Open the IPA Server tab in the top menu, and select the Delegations subtab.
2. Click the Add link at the top of the list of delegation ACIs.
Figure 32.4. Adding a New Delegation
3. Name the new delegation ACI.
4. Set the permissions by selecting the check boxes whether users will have the right to view thegiven attributes (read) and add or change the given attributes (write).
Some users may have a need to see information, but should not be able to edit it.
5. In the User group drop-down menu, select the group who is being granted permissions to theentries of users in the user group.
CHAPTER 32. DEFINING ACCESS CONTROL FOR IDM USERS
397

Figure 32.5. Form for Adding a Delegation
6. In the Member user group drop-down menu, select the group whose entries can be edited bymembers of the delegation group.
7. In the attributes box, select the check boxes by the attributes to which the member user groupis being granted permission.
8. Click the Add button to save the new delegation ACI.
32.3.2. Delegating Access to User Groups in the Command Line
A new delegation access control rule is added using the delegation-add command. There are threerequired arguments:
--group, the group who is being granted permissions to the entries of users in the user group.
--membergroup, the group whose entries can be edited by members of the delegation group.
--attrs, the attributes which users in the member group are allowed to edit.
For example:
Linux Domain Identity, Authentication, and Policy Guide
398
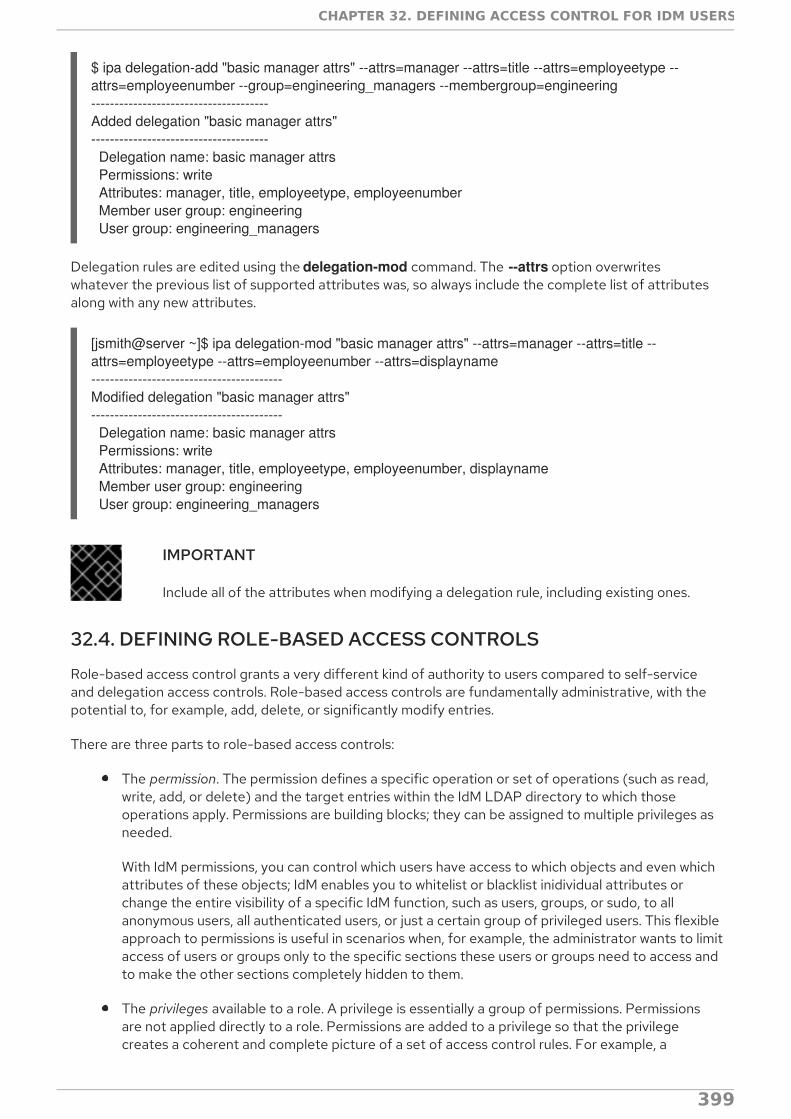
$ ipa delegation-add "basic manager attrs" --attrs=manager --attrs=title --attrs=employeetype --attrs=employeenumber --group=engineering_managers --membergroup=engineering--------------------------------------Added delegation "basic manager attrs"-------------------------------------- Delegation name: basic manager attrs Permissions: write Attributes: manager, title, employeetype, employeenumber Member user group: engineering User group: engineering_managers
Delegation rules are edited using the delegation-mod command. The --attrs option overwriteswhatever the previous list of supported attributes was, so always include the complete list of attributesalong with any new attributes.
[jsmith@server ~]$ ipa delegation-mod "basic manager attrs" --attrs=manager --attrs=title --attrs=employeetype --attrs=employeenumber --attrs=displayname-----------------------------------------Modified delegation "basic manager attrs"----------------------------------------- Delegation name: basic manager attrs Permissions: write Attributes: manager, title, employeetype, employeenumber, displayname Member user group: engineering User group: engineering_managers
IMPORTANT
Include all of the attributes when modifying a delegation rule, including existing ones.
32.4. DEFINING ROLE-BASED ACCESS CONTROLS
Role-based access control grants a very different kind of authority to users compared to self-serviceand delegation access controls. Role-based access controls are fundamentally administrative, with thepotential to, for example, add, delete, or significantly modify entries.
There are three parts to role-based access controls:
The permission. The permission defines a specific operation or set of operations (such as read,write, add, or delete) and the target entries within the IdM LDAP directory to which thoseoperations apply. Permissions are building blocks; they can be assigned to multiple privileges asneeded.
With IdM permissions, you can control which users have access to which objects and even whichattributes of these objects; IdM enables you to whitelist or blacklist inidividual attributes orchange the entire visibility of a specific IdM function, such as users, groups, or sudo, to allanonymous users, all authenticated users, or just a certain group of privileged users. This flexibleapproach to permissions is useful in scenarios when, for example, the administrator wants to limitaccess of users or groups only to the specific sections these users or groups need to access andto make the other sections completely hidden to them.
The privileges available to a role. A privilege is essentially a group of permissions. Permissionsare not applied directly to a role. Permissions are added to a privilege so that the privilegecreates a coherent and complete picture of a set of access control rules. For example, a
CHAPTER 32. DEFINING ACCESS CONTROL FOR IDM USERS
399

permission can be created to add, edit, and delete automount locations. Then that permissioncan be combined with another permission relating to managing FTP services, and they can beused to create a single privilege that relates to managing filesystems.
The role. This is the list of IdM users who are able to perform the actions defined in theprivileges.
It is possible to create entirely new permissions, as well as to create new privileges based on existingpermissions or new permissions.
32.4.1. Roles
32.4.1.1. Creating Roles in the Web UI
1. Open the IPA Server tab in the top menu, and select the Role Based Access Control subtab.
2. Click the Add link at the top of the list of role-based ACIs.
Figure 32.6. Adding a New Role
3. Enter the role name and a description.
Figure 32.7. Form for Adding a Role
4. Click the Add and Edit button to save the new role and go to the configuration page.
Linux Domain Identity, Authentication, and Policy Guide
400
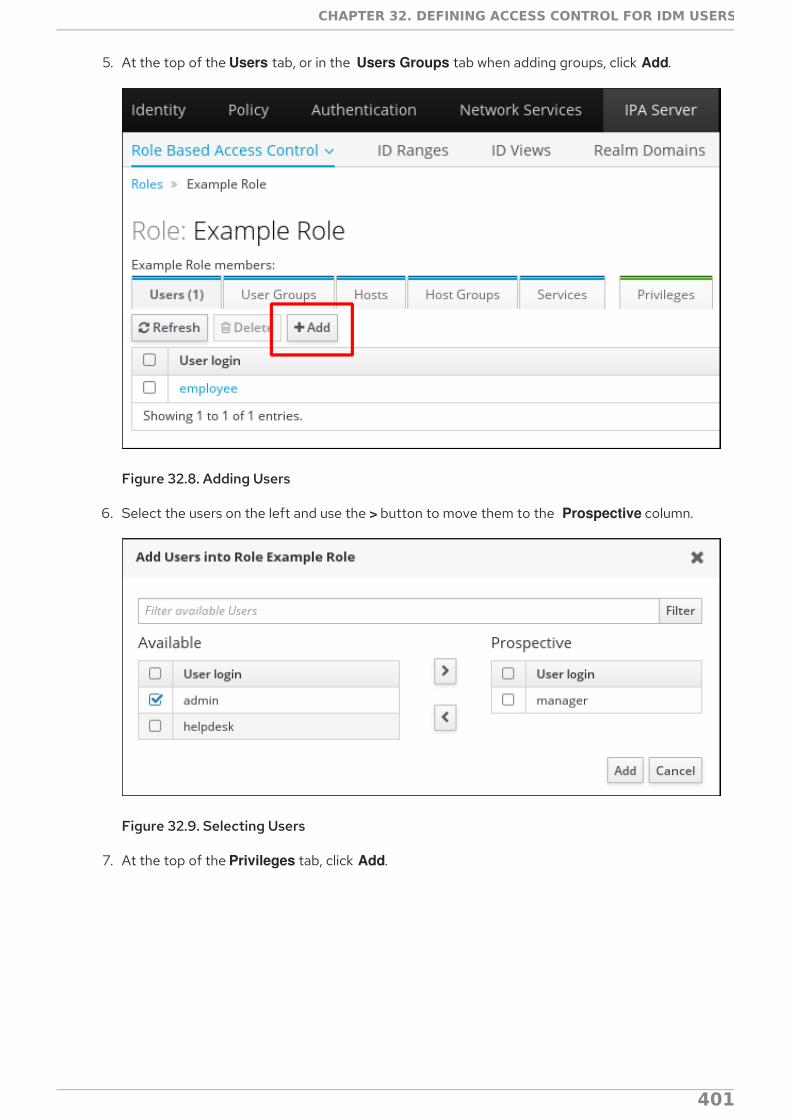
5. At the top of the Users tab, or in the Users Groups tab when adding groups, click Add.
Figure 32.8. Adding Users
6. Select the users on the left and use the > button to move them to the Prospective column.
Figure 32.9. Selecting Users
7. At the top of the Privileges tab, click Add.
CHAPTER 32. DEFINING ACCESS CONTROL FOR IDM USERS
401
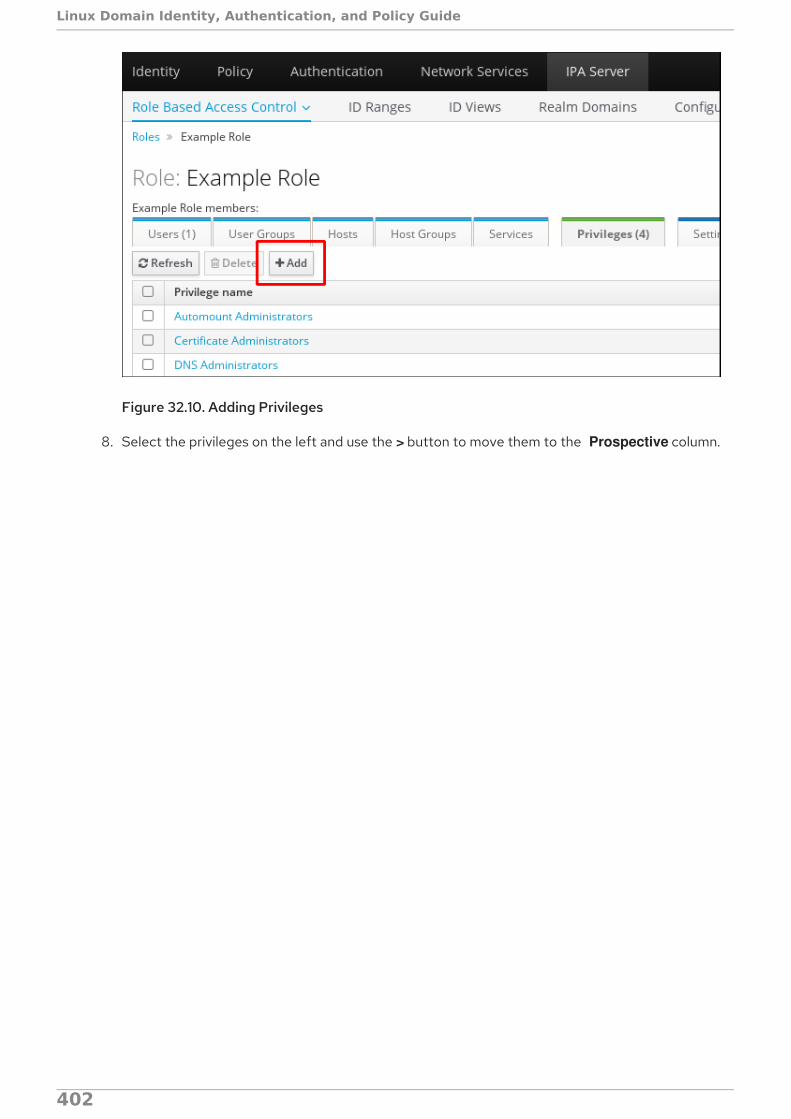
Figure 32.10. Adding Privileges
8. Select the privileges on the left and use the > button to move them to the Prospective column.
Linux Domain Identity, Authentication, and Policy Guide
402

Figure 32.11. Selecting Privileges
9. Click the Add button to save.
32.4.1.2. Creating Roles in the Command Line
1. Add the new role:
[root@server ~]# kinit admin[root@server ~]# ipa role-add --desc="User Administrator" useradmin ------------------------ Added role "useradmin" ------------------------ Role name: useradmin Description: User Administrator
2. Add the required privileges to the role:
[root@server ~]# ipa role-add-privilege --privileges="User Administrators" useradmin Role name: useradmin Description: User Administrator Privileges: user administrators
CHAPTER 32. DEFINING ACCESS CONTROL FOR IDM USERS
403

---------------------------- Number of privileges added 1----------------------------
3. Add the required groups to the role. In this case, we are adding only a single group, useradmin,which already exists.
[root@server ~]# ipa role-add-member --groups=useradmins useradmin Role name: useradmin Description: User Administrator Member groups: useradmins Privileges: user administrators ------------------------- Number of members added 1-------------------------
32.4.2. Permissions
32.4.2.1. Creating New Permissions from the Web UI
1. Open the IPA Server tab in the top menu, and select the Role Based Access Control subtab.
2. Select the Permissions task link.
Figure 32.12. Permissions Task
3. Click the Add button at the top of the list of permissions.
Linux Domain Identity, Authentication, and Policy Guide
404

Figure 32.13. Adding a New Permission
4. Define the properties for the new permission in the form that shows up.
CHAPTER 32. DEFINING ACCESS CONTROL FOR IDM USERS
405

Figure 32.14. Form for Adding a Permission
5. Click the Add button under the form to save the permission.
You can specify the following permission properties:
1. Enter the name of the new permission.
2. Select the appropriate Bind rule type:
permission is the default permission type, granting access through privileges and roles
Linux Domain Identity, Authentication, and Policy Guide
406
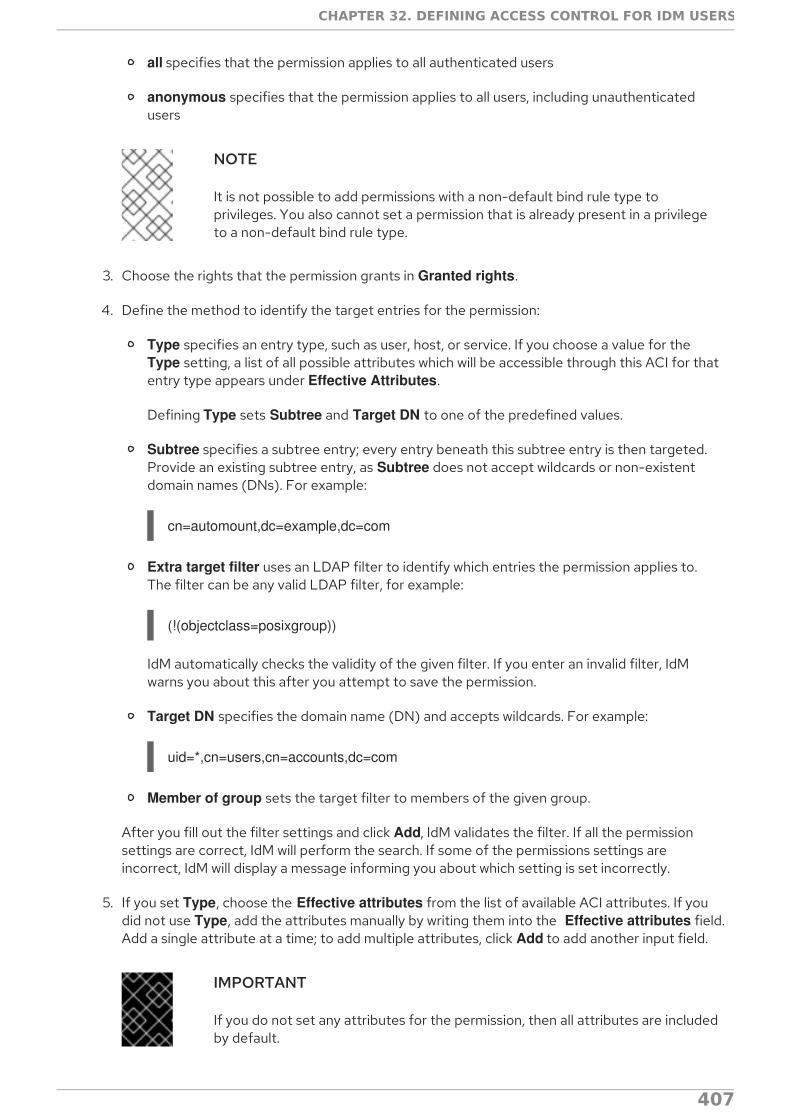
all specifies that the permission applies to all authenticated users
anonymous specifies that the permission applies to all users, including unauthenticatedusers
NOTE
It is not possible to add permissions with a non-default bind rule type toprivileges. You also cannot set a permission that is already present in a privilegeto a non-default bind rule type.
3. Choose the rights that the permission grants in Granted rights.
4. Define the method to identify the target entries for the permission:
Type specifies an entry type, such as user, host, or service. If you choose a value for the Type setting, a list of all possible attributes which will be accessible through this ACI for thatentry type appears under Effective Attributes.
Defining Type sets Subtree and Target DN to one of the predefined values.
Subtree specifies a subtree entry; every entry beneath this subtree entry is then targeted.Provide an existing subtree entry, as Subtree does not accept wildcards or non-existentdomain names (DNs). For example:
cn=automount,dc=example,dc=com
Extra target filter uses an LDAP filter to identify which entries the permission applies to.The filter can be any valid LDAP filter, for example:
(!(objectclass=posixgroup))
IdM automatically checks the validity of the given filter. If you enter an invalid filter, IdMwarns you about this after you attempt to save the permission.
Target DN specifies the domain name (DN) and accepts wildcards. For example:
uid=*,cn=users,cn=accounts,dc=com
Member of group sets the target filter to members of the given group.
After you fill out the filter settings and click Add, IdM validates the filter. If all the permissionsettings are correct, IdM will perform the search. If some of the permissions settings areincorrect, IdM will display a message informing you about which setting is set incorrectly.
5. If you set Type, choose the Effective attributes from the list of available ACI attributes. If youdid not use Type, add the attributes manually by writing them into the Effective attributes field.Add a single attribute at a time; to add multiple attributes, click Add to add another input field.
IMPORTANT
If you do not set any attributes for the permission, then all attributes are includedby default.
CHAPTER 32. DEFINING ACCESS CONTROL FOR IDM USERS
407

32.4.2.2. Creating New Permissions from the Command Line
To add a new permission, issue the ipa permission-add command. Specify the properties of thepermission by supplying the corresponding options:
Supply the name of the permission. For example:
[root@server ~]# ipa permission-add "dns admin permission"
--bindtype specifies the bind rule type. This options accepts the all, anonymous, and permission arguments. For example:
--bindtype=all
If you do not use --bindtype, the type is automatically set to the default permission value.
NOTE
It is not possible to add permissions with a non-default bind rule type toprivileges. You also cannot set a permission that is already present in a privilegeto a non-default bind rule type.
--permissions lists the rights granted by the permission. You can set multiple attributes byusing multiple --permissions options or by listing the options in a comma-separated list insidecurly braces. For example:
--permissions=read --permissions=write--permissions={read,write}
--attrs gives the list of attributes over which the permission is granted. You can set multipleattributes by using multiple --attrs options or by listing the options in a comma-separated listinside curly braces. For example:
--attrs=description --attrs=automountKey--attrs={description,automountKey}
The attributes provided with --attrs must exist and be allowed attributes for the given objecttype, otherwise the command fails with schema syntax errors.
--type defines the entry object type, such as user, host, or service. Each type has its own set ofallowed attributes. For example:
[root@server ~]# ipa permission-add "manage service" --permissions=all --type=service --attrs=krbprincipalkey --attrs=krbprincipalname --attrs=managedby
--subtree gives a subtree entry; the filter then targets every entry beneath this subtree entry.Provide an existing subtree entry; --subtree does not accept wildcards or non-existent domainnames (DNs). Include a DN within the directory.
Because IdM uses a simplified, flat directory tree structure, --subtree can be used to targetsome types of entries, like automount locations, which are containers or parent entries for otherconfiguration. For example:
Linux Domain Identity, Authentication, and Policy Guide
408
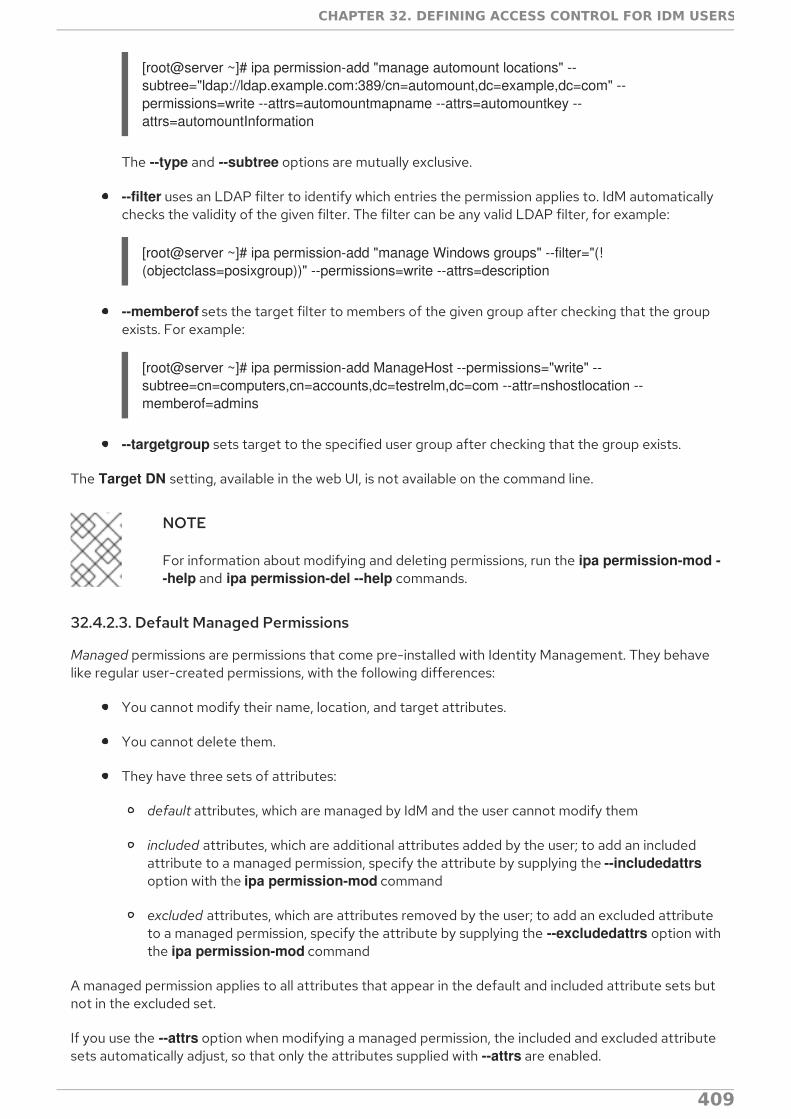
[root@server ~]# ipa permission-add "manage automount locations" --subtree="ldap://ldap.example.com:389/cn=automount,dc=example,dc=com" --permissions=write --attrs=automountmapname --attrs=automountkey --attrs=automountInformation
The --type and --subtree options are mutually exclusive.
--filter uses an LDAP filter to identify which entries the permission applies to. IdM automaticallychecks the validity of the given filter. The filter can be any valid LDAP filter, for example:
[root@server ~]# ipa permission-add "manage Windows groups" --filter="(!(objectclass=posixgroup))" --permissions=write --attrs=description
--memberof sets the target filter to members of the given group after checking that the groupexists. For example:
[root@server ~]# ipa permission-add ManageHost --permissions="write" --subtree=cn=computers,cn=accounts,dc=testrelm,dc=com --attr=nshostlocation --memberof=admins
--targetgroup sets target to the specified user group after checking that the group exists.
The Target DN setting, available in the web UI, is not available on the command line.
NOTE
For information about modifying and deleting permissions, run the ipa permission-mod --help and ipa permission-del --help commands.
32.4.2.3. Default Managed Permissions
Managed permissions are permissions that come pre-installed with Identity Management. They behavelike regular user-created permissions, with the following differences:
You cannot modify their name, location, and target attributes.
You cannot delete them.
They have three sets of attributes:
default attributes, which are managed by IdM and the user cannot modify them
included attributes, which are additional attributes added by the user; to add an includedattribute to a managed permission, specify the attribute by supplying the --includedattrsoption with the ipa permission-mod command
excluded attributes, which are attributes removed by the user; to add an excluded attributeto a managed permission, specify the attribute by supplying the --excludedattrs option withthe ipa permission-mod command
A managed permission applies to all attributes that appear in the default and included attribute sets butnot in the excluded set.
If you use the --attrs option when modifying a managed permission, the included and excluded attributesets automatically adjust, so that only the attributes supplied with --attrs are enabled.
CHAPTER 32. DEFINING ACCESS CONTROL FOR IDM USERS
409

NOTE
While you cannot delete a managed permission, setting its bind type to permission andremoving the managed permission from all privileges effectively disables it.
Names of all managed permissions start with System:, for example System: Add Sudo rule or System:Modify Services.
Earlier versions of IdM used a different scheme for default permissions, which, for example, forbade theuser from modifiying the default permissions and the user could only assign them to privileges. Most ofthese default permissions have been turned into managed permissions, however, the followingpermissions still use the previous scheme:
Add Automember Rebuild Membership Task
Add Replication Agreements
Certificate Remove Hold
Get Certificates status from the CA
Modify DNA Range
Modify Replication Agreements
Remove Replication Agreements
Request Certificate
Request Certificates from a different host
Retrieve Certificates from the CA
Revoke Certificate
Write IPA Configuration
If you attempt to modify a managed permission from the web UI, the attributes that you cannot modifywill be grayed-out.
Linux Domain Identity, Authentication, and Policy Guide
410
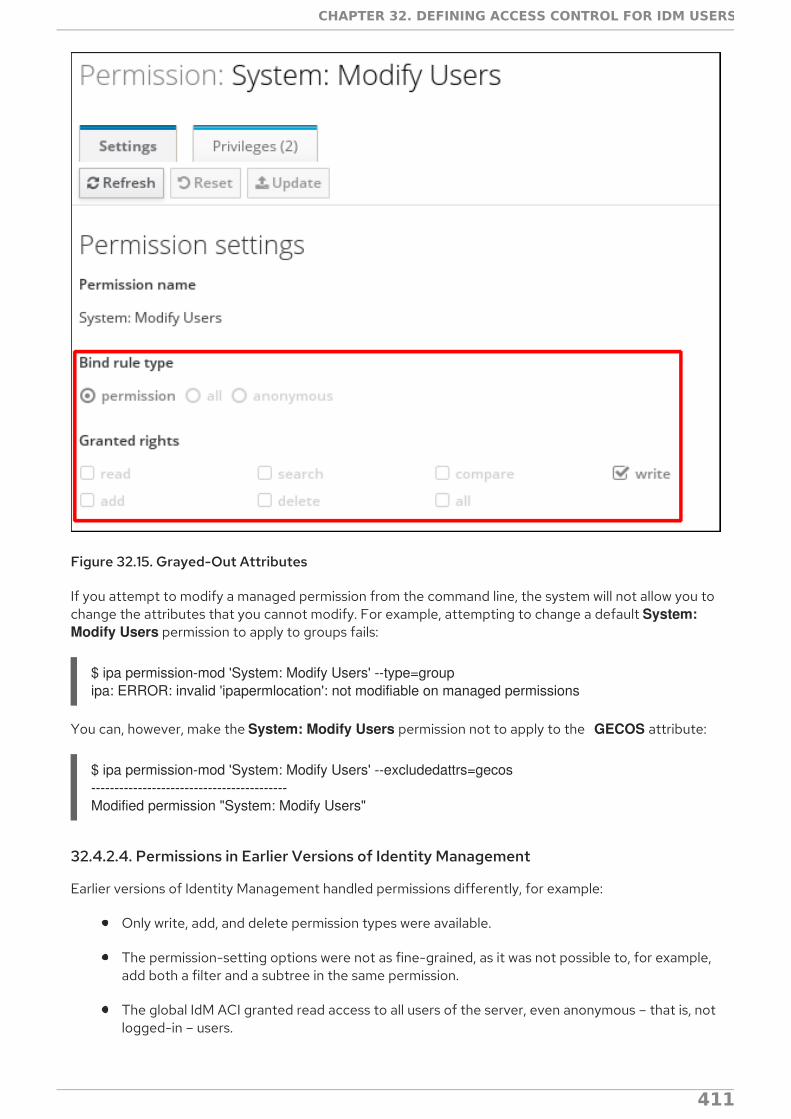
Figure 32.15. Grayed-Out Attributes
If you attempt to modify a managed permission from the command line, the system will not allow you tochange the attributes that you cannot modify. For example, attempting to change a default System: Modify Users permission to apply to groups fails:
$ ipa permission-mod 'System: Modify Users' --type=groupipa: ERROR: invalid 'ipapermlocation': not modifiable on managed permissions
You can, however, make the System: Modify Users permission not to apply to the GECOS attribute:
$ ipa permission-mod 'System: Modify Users' --excludedattrs=gecos------------------------------------------Modified permission "System: Modify Users"
32.4.2.4. Permissions in Earlier Versions of Identity Management
Earlier versions of Identity Management handled permissions differently, for example:
Only write, add, and delete permission types were available.
The permission-setting options were not as fine-grained, as it was not possible to, for example,add both a filter and a subtree in the same permission.
The global IdM ACI granted read access to all users of the server, even anonymous – that is, notlogged-in – users.
The new way of handling permissions has significantly improved the IdM capabilities for controlling user
CHAPTER 32. DEFINING ACCESS CONTROL FOR IDM USERS
411

The new way of handling permissions has significantly improved the IdM capabilities for controlling useror group access, while retaining backward compatibility with the earlier versions. Upgrading from anearlier version of IdM deletes the global IdM ACI on all servers and replaces it with managed permissions .
Permissions created in the previous way are automatically converted to the new style whenever youmodify them. If you do not attempt to change them, the previous-style permissions stay unconverted.Once a permission uses the new style, it can never downgrade to the previous style.
NOTE
It is still possible to assign permissions to privileges on servers running an earlier versionof IdM.
The ipa permission-show and ipa permission-find commands recognize both the new-stylepermissions and the previous-style permissions. While the outputs from both of these commands displaypermissions in the new style, they do not change the permissions themselves; they upgrade thepermission entries before outputting the data only in memory, without committing the changes toLDAP.
Both the previous-style and the new-style permissions have effect on all servers – those runningprevious versions of IdM, as well as those running the current IdM version. However, you cannot createor modify the new-style permissions on servers running previous versions of IdM.
32.4.3. Privileges
32.4.3.1. Creating New Privileges from the Web UI
1. Open the IPA Server tab in the top menu, and select the Role Based Access Control subtab.
2. Select the Privileges task link.
Figure 32.16. Privileges Task
3. Click the Add link at the top of the list of privileges.
Linux Domain Identity, Authentication, and Policy Guide
412

Figure 32.17. Adding a New Privilege
4. Enter the name and a description of the privilege.
Figure 32.18. Form for Adding a Privilege
5. Click the Add and Edit button to go to the privilege configuration page to add permissions.
6. Select the Permissions tab.
7. Click Add at the top of the list of permissions to add permission to the privilege.
CHAPTER 32. DEFINING ACCESS CONTROL FOR IDM USERS
413

Figure 32.19. Adding Permissions
8. Click the check box by the names of the permissions to add, and use the > button to move thepermissions to the Prospective column.
Figure 32.20. Selecting Permissions
Linux Domain Identity, Authentication, and Policy Guide
414

9. Click the Add button to save.
32.4.3.2. Creating New Privileges from the Command Line
Privilege entries are created using the privilege-add command, and then permissions are added to theprivilege group using the privilege-add-permission command.
1. Create the privilege entry.
[jsmith@server ~]$ ipa privilege-add "managing filesystems" --desc="for filesystems"
2. Assign the desired permissions. For example:
[jsmith@server ~]$ ipa privilege-add-permission "managing filesystems" --permissions="managing automount" --permissions="managing ftp services"
CHAPTER 32. DEFINING ACCESS CONTROL FOR IDM USERS
415

CHAPTER 33. IDENTITY MANAGEMENT FILES AND LOGSIdentity Management is a unifying framework that combines disparate Linux services into a singlemanagement context. However, the underlying technologies — such as Kerberos, DNS,389 Directory Server, and Dogtag Certificate System — retain their own configuration files and log files.Identity Management directly manages each of these elements through their own configuration filesand tools.
This chapter covers the directories, files, and logs used specifically by IdM. For more information aboutthe configuration files or logs for a specific server used within IdM, see the product documentation.
33.1. A REFERENCE OF IDM SERVER CONFIGURATION FILES ANDDIRECTORIES
Table 33.1. IdM Server Configuration Files and Directories
Directory or File Description
Server Configuration
/etc/ipa/ The main IdM configuration directory.
/etc/ipa/default.conf The primary configuration file for IdM.
/etc/ipa/server.conf An optional configuration file for IdM. This does notexist by default, but can be created to load customconfiguration when the IdM server is started.
/etc/ipa/cli.conf An optional configuration file for IdM command-linetools. This does not exist by default, but can becreated to apply custom configuration when the ipais used.
/etc/ipa/ca.crt The CA certificate issued by the IdM server's CA.
~/.ipa/ A user-specific IdM directory that is created on thelocal system in the system user's home directory thefirst time the user runs an IdM command.
IdM Logs
~/.ipa/log/cli.log The log file for errors returned by XML-RPC calls andresponses by the IdM command-line tools. This iscreated in the home directory for the system userwho runs the tools, who may have a different namethan the IdM user.
/var/log/ipaclient-install.log The installation log for the client service.
/var/log/ipaserver-install.log The installation log for the IdM server.
Linux Domain Identity, Authentication, and Policy Guide
416
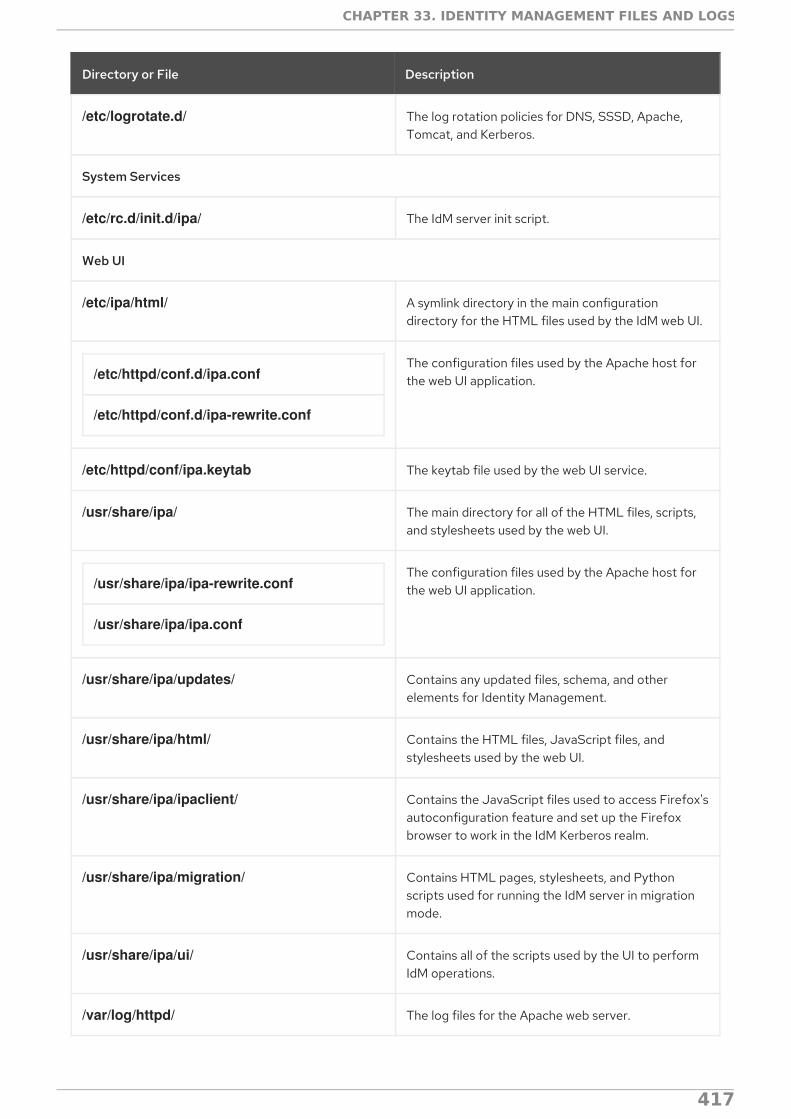
/etc/logrotate.d/ The log rotation policies for DNS, SSSD, Apache,Tomcat, and Kerberos.
System Services
/etc/rc.d/init.d/ipa/ The IdM server init script.
Web UI
/etc/ipa/html/ A symlink directory in the main configurationdirectory for the HTML files used by the IdM web UI.
/etc/httpd/conf.d/ipa.conf
/etc/httpd/conf.d/ipa-rewrite.conf
The configuration files used by the Apache host forthe web UI application.
/etc/httpd/conf/ipa.keytab The keytab file used by the web UI service.
/usr/share/ipa/ The main directory for all of the HTML files, scripts,and stylesheets used by the web UI.
/usr/share/ipa/ipa-rewrite.conf
/usr/share/ipa/ipa.conf
The configuration files used by the Apache host forthe web UI application.
/usr/share/ipa/updates/ Contains any updated files, schema, and otherelements for Identity Management.
/usr/share/ipa/html/ Contains the HTML files, JavaScript files, andstylesheets used by the web UI.
/usr/share/ipa/ipaclient/ Contains the JavaScript files used to access Firefox'sautoconfiguration feature and set up the Firefoxbrowser to work in the IdM Kerberos realm.
/usr/share/ipa/migration/ Contains HTML pages, stylesheets, and Pythonscripts used for running the IdM server in migrationmode.
/usr/share/ipa/ui/ Contains all of the scripts used by the UI to performIdM operations.
/var/log/httpd/ The log files for the Apache web server.
Directory or File Description
CHAPTER 33. IDENTITY MANAGEMENT FILES AND LOGS
417
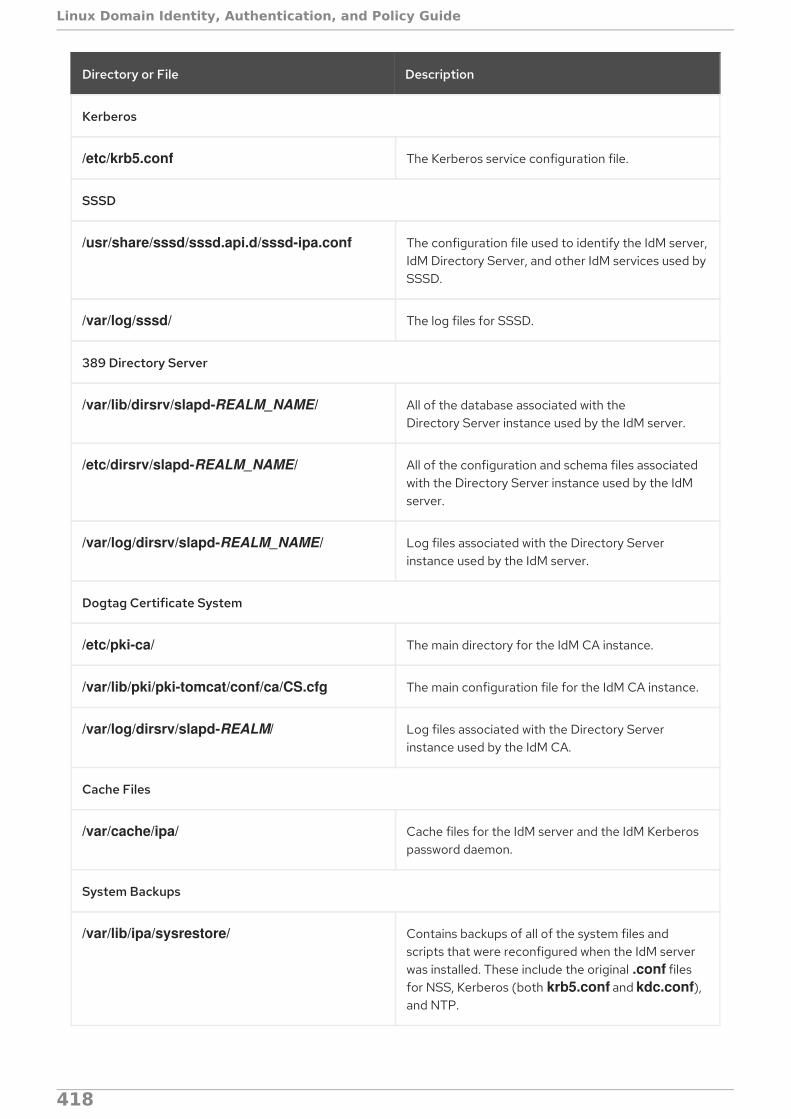
Kerberos
/etc/krb5.conf The Kerberos service configuration file.
SSSD
/usr/share/sssd/sssd.api.d/sssd-ipa.conf The configuration file used to identify the IdM server,IdM Directory Server, and other IdM services used bySSSD.
/var/log/sssd/ The log files for SSSD.
389 Directory Server
/var/lib/dirsrv/slapd-REALM_NAME/ All of the database associated with theDirectory Server instance used by the IdM server.
/etc/dirsrv/slapd-REALM_NAME/ All of the configuration and schema files associatedwith the Directory Server instance used by the IdMserver.
/var/log/dirsrv/slapd-REALM_NAME/ Log files associated with the Directory Serverinstance used by the IdM server.
Dogtag Certificate System
/etc/pki-ca/ The main directory for the IdM CA instance.
/var/lib/pki/pki-tomcat/conf/ca/CS.cfg The main configuration file for the IdM CA instance.
/var/log/dirsrv/slapd-REALM/ Log files associated with the Directory Serverinstance used by the IdM CA.
Cache Files
/var/cache/ipa/ Cache files for the IdM server and the IdM Kerberospassword daemon.
System Backups
/var/lib/ipa/sysrestore/ Contains backups of all of the system files andscripts that were reconfigured when the IdM serverwas installed. These include the original .conf filesfor NSS, Kerberos (both krb5.conf and kdc.conf),and NTP.
Directory or File Description
Linux Domain Identity, Authentication, and Policy Guide
418
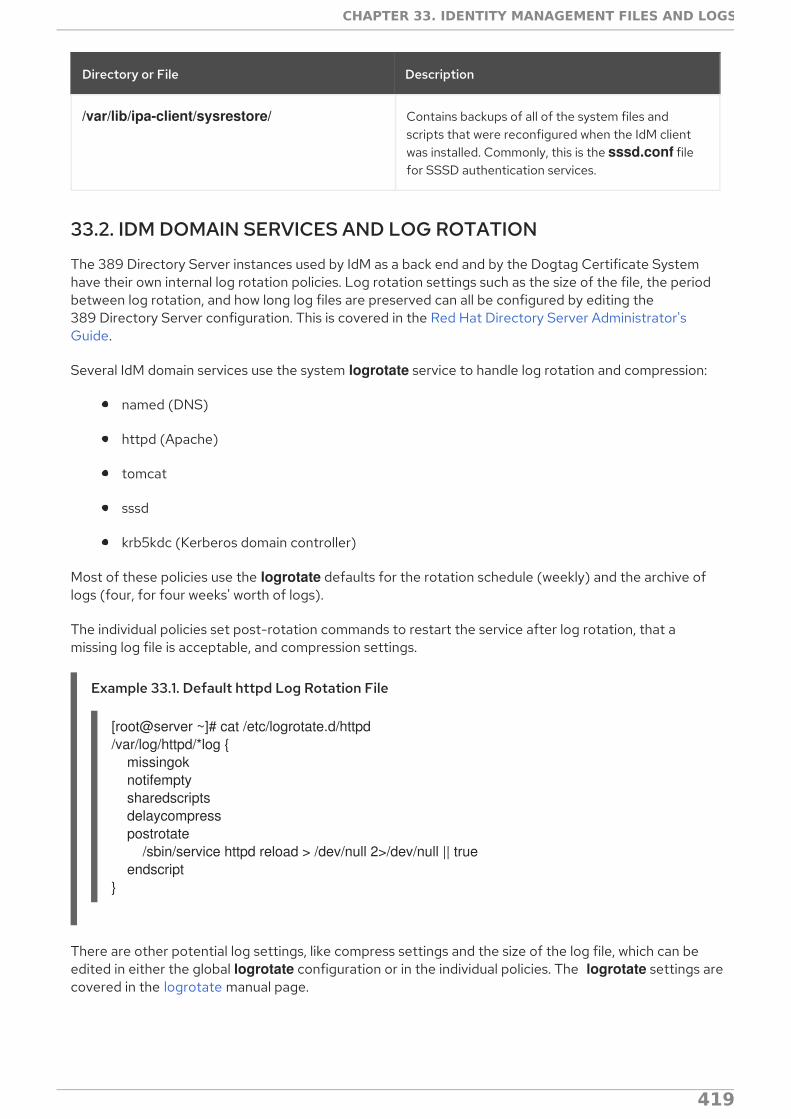
/var/lib/ipa-client/sysrestore/ Contains backups of all of the system files andscripts that were reconfigured when the IdM clientwas installed. Commonly, this is the sssd.conf filefor SSSD authentication services.
Directory or File Description
33.2. IDM DOMAIN SERVICES AND LOG ROTATION
The 389 Directory Server instances used by IdM as a back end and by the Dogtag Certificate Systemhave their own internal log rotation policies. Log rotation settings such as the size of the file, the periodbetween log rotation, and how long log files are preserved can all be configured by editing the389 Directory Server configuration. This is covered in the Red Hat Directory Server Administrator'sGuide.
Several IdM domain services use the system logrotate service to handle log rotation and compression:
named (DNS)
httpd (Apache)
tomcat
sssd
krb5kdc (Kerberos domain controller)
Most of these policies use the logrotate defaults for the rotation schedule (weekly) and the archive oflogs (four, for four weeks' worth of logs).
The individual policies set post-rotation commands to restart the service after log rotation, that amissing log file is acceptable, and compression settings.
Example 33.1. Default httpd Log Rotation File
[root@server ~]# cat /etc/logrotate.d/httpd/var/log/httpd/*log { missingok notifempty sharedscripts delaycompress postrotate /sbin/service httpd reload > /dev/null 2>/dev/null || true endscript}
There are other potential log settings, like compress settings and the size of the log file, which can beedited in either the global logrotate configuration or in the individual policies. The logrotate settings arecovered in the logrotate manual page.
CHAPTER 33. IDENTITY MANAGEMENT FILES AND LOGS
419

WARNING
Two policies set special create rules: the policies for the named and tomcatservices. All of the services create a new log file with the same name, default owner,and default permissions as the previous log. For the named and tomcat logs, the create is set with explicit permissions and user/group ownership.
[root@server ~]# cat /etc/logrotate.d/named/var/named/data/named.run { missingok create 0644 named named postrotate /sbin/service named reload 2> /dev/null > /dev/null || true endscript}
Do not change the permissions or the user and group which own the log files.This is required for both IdM operations and SELinux settings. Changing theownership of the log rotation policy or of the files can cause the IdM domainsservices to fail or to be unable to start.
33.3. ABOUT DEFAULT.CONF AND CONTEXT CONFIGURATION FILES
Certain global defaults — like the realm information, the LDAP configuration, and the CA settings — arestored in the default.conf file. This configuration file is referenced when the IdM client and servers startand every time the ipa command is run to supply information as operations are performed.
The parameters in the default.conf file are simple attribute=value pairs. The attributes are case-insensitive and order-insensitive.
[global]basedn=dc=example,dc=comrealm=EXAMPLE.COMdomain=example.comxmlrpc_uri=https://server.example.com/ipa/xmlldap_uri=ldapi://%2fvar%2frun%2fslapd-EXAMPLE-COM.socketenable_ra=Truera_plugin=dogtagmode=production
When adding more configuration attributes or overriding the global values, users can create additionalcontext configuration files. A server.conf and cli.conf file can be created to create different optionswhen the IdM server is started or when the ipa command is run, respectively. The IdM server checks the server.conf and cli.conf files first, and then checks the default.conf file.
Any configuration files in the /etc/ipa directory apply to all users for the system. Users can set individualoverrides by creating default.conf, server.conf, or cli.conf files in their local IdM directory, ~/.ipa/. Thisoptional file is merged with default.conf and used by the local IdM services.
Linux Domain Identity, Authentication, and Policy Guide
420
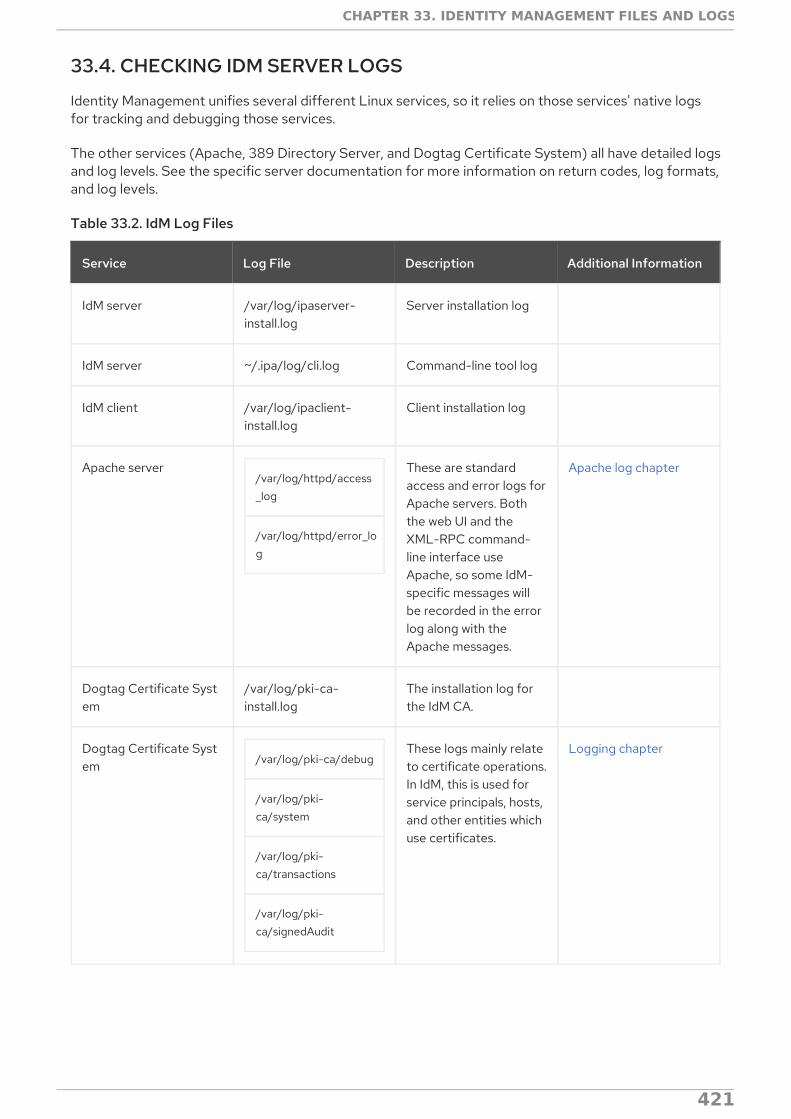
33.4. CHECKING IDM SERVER LOGS
Identity Management unifies several different Linux services, so it relies on those services' native logsfor tracking and debugging those services.
The other services (Apache, 389 Directory Server, and Dogtag Certificate System) all have detailed logsand log levels. See the specific server documentation for more information on return codes, log formats,and log levels.
Table 33.2. IdM Log Files
Service Log File Description Additional Information
IdM server /var/log/ipaserver-install.log
Server installation log
IdM server ~/.ipa/log/cli.log Command-line tool log
IdM client /var/log/ipaclient-install.log
Client installation log
Apache server/var/log/httpd/access_log
/var/log/httpd/error_log
These are standardaccess and error logs forApache servers. Boththe web UI and theXML-RPC command-line interface useApache, so some IdM-specific messages willbe recorded in the errorlog along with theApache messages.
Apache log chapter
Dogtag Certificate System
/var/log/pki-ca-install.log
The installation log forthe IdM CA.
Dogtag Certificate System /var/log/pki-ca/debug
/var/log/pki-ca/system
/var/log/pki-ca/transactions
/var/log/pki-ca/signedAudit
These logs mainly relateto certificate operations.In IdM, this is used forservice principals, hosts,and other entities whichuse certificates.
Logging chapter
CHAPTER 33. IDENTITY MANAGEMENT FILES AND LOGS
421
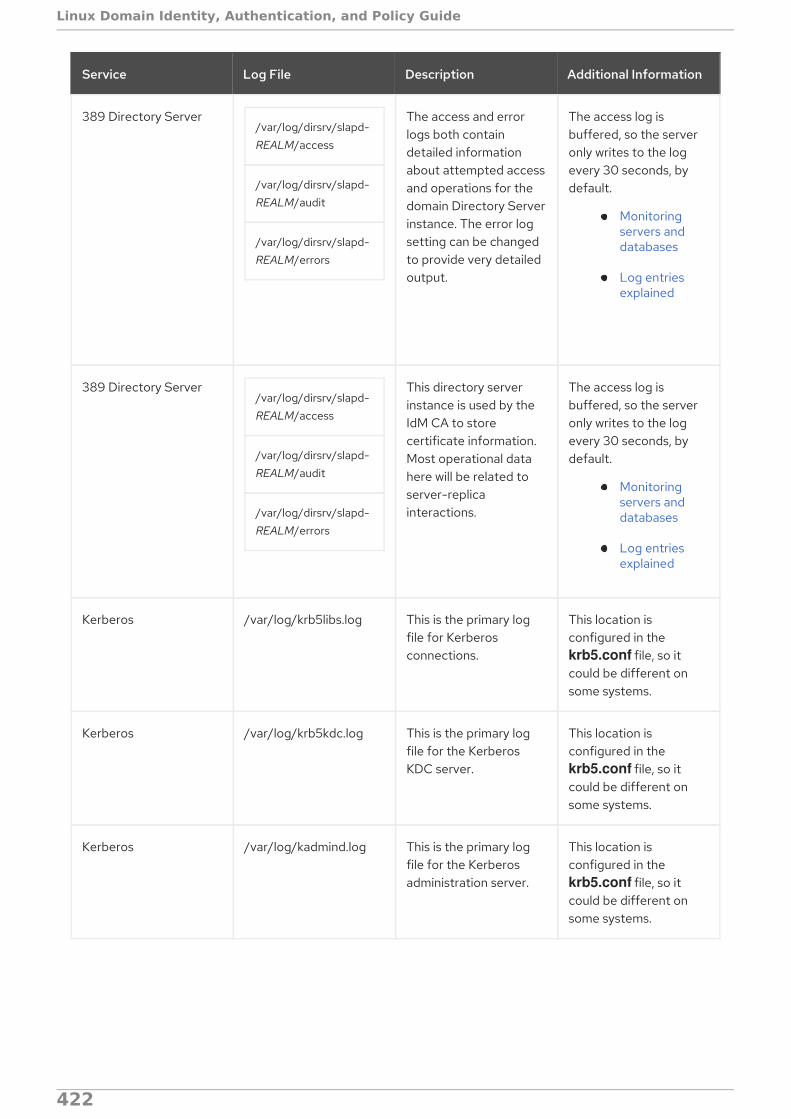
389 Directory Server/var/log/dirsrv/slapd-REALM/access
/var/log/dirsrv/slapd-REALM/audit
/var/log/dirsrv/slapd-REALM/errors
The access and errorlogs both containdetailed informationabout attempted accessand operations for thedomain Directory Serverinstance. The error logsetting can be changedto provide very detailedoutput.
The access log isbuffered, so the serveronly writes to the logevery 30 seconds, bydefault.
Monitoringservers anddatabases
Log entriesexplained
389 Directory Server/var/log/dirsrv/slapd-REALM/access
/var/log/dirsrv/slapd-REALM/audit
/var/log/dirsrv/slapd-REALM/errors
This directory serverinstance is used by theIdM CA to storecertificate information.Most operational datahere will be related toserver-replicainteractions.
The access log isbuffered, so the serveronly writes to the logevery 30 seconds, bydefault.
Monitoringservers anddatabases
Log entriesexplained
Kerberos /var/log/krb5libs.log This is the primary logfile for Kerberosconnections.
This location isconfigured in the krb5.conf file, so itcould be different onsome systems.
Kerberos /var/log/krb5kdc.log This is the primary logfile for the KerberosKDC server.
This location isconfigured in the krb5.conf file, so itcould be different onsome systems.
Kerberos /var/log/kadmind.log This is the primary logfile for the Kerberosadministration server.
This location isconfigured in the krb5.conf file, so itcould be different onsome systems.
Service Log File Description Additional Information
Linux Domain Identity, Authentication, and Policy Guide
422
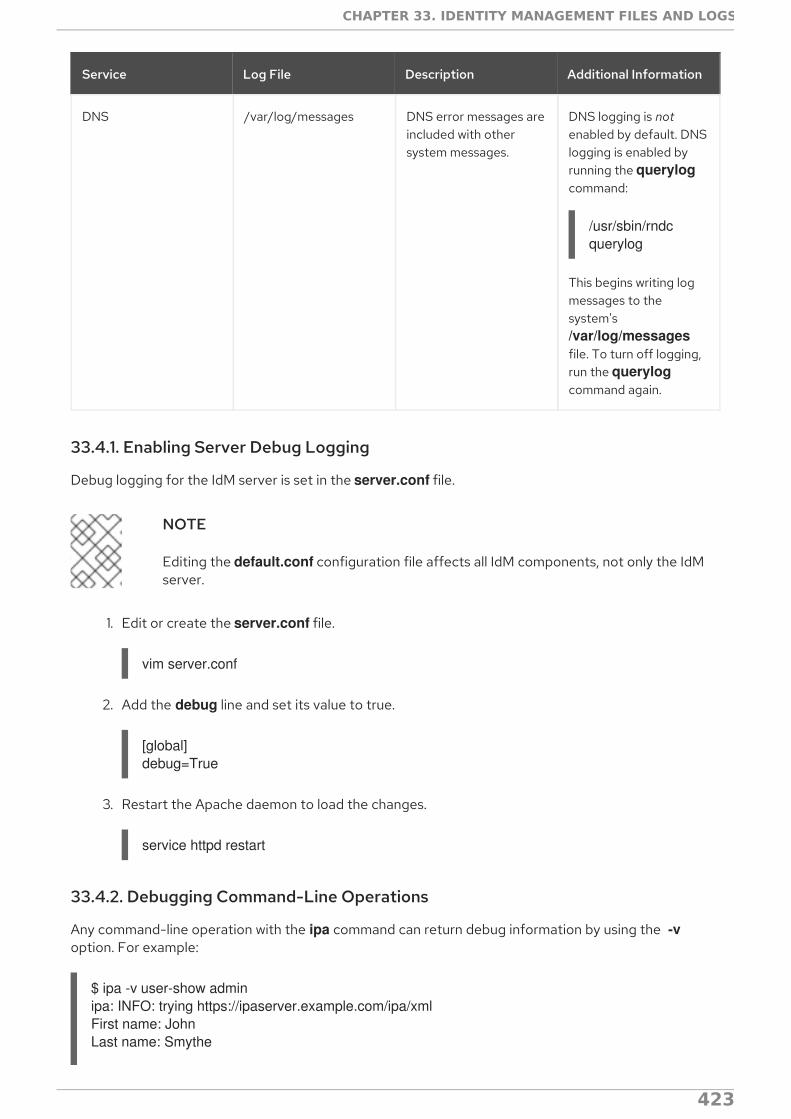
DNS /var/log/messages DNS error messages areincluded with othersystem messages.
DNS logging is notenabled by default. DNSlogging is enabled byrunning the querylogcommand:
/usr/sbin/rndc querylog
This begins writing logmessages to thesystem's /var/log/messagesfile. To turn off logging,run the querylogcommand again.
Service Log File Description Additional Information
33.4.1. Enabling Server Debug Logging
Debug logging for the IdM server is set in the server.conf file.
NOTE
Editing the default.conf configuration file affects all IdM components, not only the IdMserver.
1. Edit or create the server.conf file.
vim server.conf
2. Add the debug line and set its value to true.
[global]debug=True
3. Restart the Apache daemon to load the changes.
service httpd restart
33.4.2. Debugging Command-Line Operations
Any command-line operation with the ipa command can return debug information by using the -voption. For example:
$ ipa -v user-show adminipa: INFO: trying https://ipaserver.example.com/ipa/xmlFirst name: JohnLast name: Smythe
CHAPTER 33. IDENTITY MANAGEMENT FILES AND LOGS
423

User login [jsmythe]:ipa: INFO: Forwarding 'user_add' to server u'https://ipaserver.example.com/ipa/xml'--------------------Added user "jsmythe"-------------------- User login: jsmythe First name: John Last name: Smythe Full name: John Smythe Display name: John Smythe Initials: JS Home directory: /home/jsmythe GECOS field: John Smythe Login shell: /bin/sh Kerberos principal: [email protected] UID: 1966800003 GID: 1966800003 Keytab: False Password: False
Using the option twice, -vv, displays the XML-RPC exchange:
$ ipa -vv user-add
ipa: INFO: trying https://ipaserver.example.com/ipa/xmlFirst name: JaneLast name: RussellUser login [jrussell]:ipa: INFO: Forwarding 'user_add' to server u'https://ipaserver.example.com/ipa/xml'send: u'POST /ipa/xml HTTP/1.0\r\nHost: ipaserver.example.com\r\nAccept-Language: en-us\r\nAuthorization: negotiate YIIFgQYJKoZIhvcSAQICAQBuggVwMIIFbKADAgEFoQMCAQ6iBwMFACAAAACjggGHYYIBgzCCAX+gAwIBBaEZGxdSSFRTLkVORy5CT1MuUkVESEFULkNPTaI5MDegAwIBA6EwMC4bBEhUVFAbJmRlbGwtcGUxODUwLTAxLnJodHMuZW5nLmJvcy5yZWRoYXQuY29to4IBIDCCARygAwIBEqEDAgECooIBDgSCAQpV2YEWv03X+SENdUBfOhMFGc3Fvnd51nELV0rIB1tfGVjpNlkuQxXKSfFKVD3vyAUqkii255T0mnXyTwayE93W1U4sOshetmG50zeU4KDmhuupzQZSCb5xB0KPU4HMDvP1UnDFJUGCk9tcqDJiYE+lJrEcz8H+Vxvvl+nP6yIdUQKqoEuNhJaLWIiT8ieAzk8zvmDlDzpFYtInGWe9D5ko1Bb7Npu0SEpdVJB2gnB5vszCIdLlzHM4JUqX8p21AZV0UYA6QZOWX9OXhqHdElKcuHCN2s9FBRoFYK83gf1voS7xSFlzZaFsEGHNmdA0qXbzREKGqUr8fmWmNvBGpDiR2ILQep09lL56JqSCA8owggPGoAMCARKiggO9BIIDuarbB67zjmBu9Ax2K+0klSD99pNv97h9yxol8c6NGLB4CmE8Mo39rL4MMXHeOS0OCbn+TD97XVGLu+cgkfVcuIG4PMMBoajuSnPmIf7qDvfa8IYDFlDDnRB7I//IXtCc/Z4rBbaxk0SMIRLrsKf5wha7aWtN1JbizBMQw+J0UlN8JjsWxu0Ls75hBtIDbPf3fva3vwBf7kTBChBsheewSAlck9qUglyNxAODgFVvRrXbfkw51Uo++9qHnhh+zFSWepfv7US7RYK0KxOKFd+uauY1ES+xlnMvK18ap2pcy0odBkKu1kwJDND0JXUdSY08MxK2zb/UGWrVEf6GIsBgu122UGiHp6C+0fEu+nRrvtORY65Bgi8E1vm55fbb/9dQWNcQheL9m6QJWPw0rgc+E5SO99ON6x3Vv2+Zk17EmbZXinPd2tDe7fJ9cS9o/z7Qjw8z8vvSzHL4GX7FKi2HJdBST3nEgOC8PqO46UnAJcA8pf1ZkwCK9xDWH+5PSph6WnvpRqugqf/6cq+3jk3MEjCrx+JBJ8QL6AgN3oEB4kvjZpAC+FfTkdX59VLDwfL/r0gMw3ZNk0nLLCLkiiYUMTEHZBzJw9kFbsX3LmS8qQQA6rQ2L782DYisElywfZ/0Sax8JO/G62Zvy7BHy7SQSGIvcdAOafeNyfxaWM1vTpvSh0GrnllYfs3FhZAKnVcLYrlPTapR23uLgRMv+0c9wAbwuUDfKgOOl5vAd1j55VUyapgDEzi/URsLdVdcF4zigt4KrTByCwU2/pI6FmEPqB2tsjM2A8JmqA+9Nt8bjaNdNwCOWE0dF50zeL9P8oodWGkbRZLk4DLIurpCW1d6IyTBhPQ5qZqHJWeoGiFa5y94zBpp27goMPmE0BskXT0JQmveYflOeKEMSzyiWPL2mwi7KEMtfgCpwTIGP2LRE/QxNvPGkwFfO+PDjZGVw+APKkMKqclVXxhtJA/2NmBrO1pZIIJ9R+41sR/QoACcXIUXJnhrTwwR1viKCB5Tec87gN+e0Cf0g+fmZuXNRscwJfhYQJYwJqdYzGtZW+h8jDWqa2EPcDwIQwyFAgXNQ/aMvh1yNTECpLEgrMhYmFAUDLQzI2BDnfbDftIs0rXjSC0oZn/Uaoqdr4F5syOrYAxH47bS6MW8CxyylreH8nT2qQXjenakLFHcNjt4M1nOc/igzNSeZ28qW9WSr4bCdkH+ra3BVpT/AF0WHWkxGF4vWr/iNHCjq8fLF+DsAEx0Zs696Rg0fW
Linux Domain Identity, Authentication, and Policy Guide
424

Zy079A\r\nUser-Agent: xmlrpclib.py/1.0.1 (by www.pythonware.com)\r\nContent-Type: text/xml\r\nContent-Length: 1240\r\n\r\n'send: "<?xml version='1.0' encoding='UTF-8'?>\n<methodCall>\n<methodName>user_add</methodName>\n<params>\n<param>\n<value><array><data>\n<value><string>jrussell</string></value>\n</data></array></value>\n</param>\n<param>\n<value><struct>\n<member>\n<name>all</name>\n<value><boolean>0</boolean></value>\n</member>\n<member>\n<name>displayname</name>\n<value><string>Jane Russell</string></value>\n</member>\n<member>\n<name>cn</name>\n<value><string>Jane Russell</string></value>\n</member>\n<member>\n<name>noprivate</name>\n<value><boolean>0</boolean></value>\n</member>\n<member>\n<name>uidnumber</name>\n<value><int>999</int></value>\n</member>\n<member>\n<name>raw</name>\n<value><boolean>0</boolean></value>\n</member>\n<member>\n<name>version</name>\n<value><string>2.11</string></value>\n</member>\n<member>\n<name>gecos</name>\n<value><string>Jane Russell</string></value>\n</member>\n<member>\n<name>sn</name>\n<value><string>Russell</string></value>\n</member>\n<member>\n<name>krbprincipalname</name>\n<value><string>[email protected]</string></value>\n</member>\n<member>\n<name>givenname</name>\n<value><string>Jane</string></value>\n</member>\n<member>\n<name>initials</name>\n<value><string>JR</string></value>\n</member>\n</struct></value>\n</param>\n</params>\n</methodCall>\n"reply: 'HTTP/1.1 200 OK\r\n'header: Date: Thu, 15 Sep 2011 00:50:39 GMTheader: Server: Apache/2.2.15 (Red Hat)header: WWW-Authenticate: Negotiate YIGZBgkqhkiG9xIBAgICAG+BiTCBhqADAgEFoQMCAQ+iejB4oAMCARKicQRvVl5x6Zt9PbWNzvPEWkdu+3PTCq/ZVKjGHM+1zDBz81GL/f+/Pr75zTuveLYn9de0C3k27vz96fn2HQsy9qVH7sfqn0RWGQWzl+kDkuD6bJ/Dp/mpJvicW5gSkCSH6/UCNuE4I0xqwabLIz8MM/5oheader: Connection: closeheader: Content-Type: text/xml; charset=utf-8body: "<?xml version='1.0' encoding='UTF-8'?>\n<methodResponse>\n<params>\n<param>\n<value><struct>\n<member>\n<name>result</name>\n<value><struct>\n<member>\n<name>dn</name>\n<value><string>uid=jrussell,cn=users,cn=accounts,dc=example,dc=com</string></value>\n</member>\n<member>\n<name>has_keytab</name>\n<value><boolean>0</boolean></value>\n</member>\n<member>\n<name>displayname</name>\n<value><array><data>\n<value><string>Jane Russell</string></value>\n</data></array></value>\n</member>\n<member>\n<name>uid</name>\n<value><array><data>\n<value><string>jrussell</string></value>\n</data></array></value>\n</member>\n<member>\n<name>objectclass</name>\n<value><array><data>\n<value><string>top</string></value>\n<value><string>person</string></value>\n<value><string>organizationalperson</string></value>\n<value><string>inetorgperson</string></value>\n<value><string>inetuser</string></value>\n<value><string>posixaccount</string></value>\n<value><string>krbprincipalaux</string></value>\n<value><string>krbticketpolicyaux</string></value>\n<"body: 'value><string>ipaobject</string></value>\n</data></array></value>\n</member>\n<member>\n<name>loginshell</name>\n<value><array><data>\n<value><string>/bin/sh</string></value>\n</data></array></value>\n</member>\n<member>\n<name>uidnumber</name>\n<value><array><data>\n<value><string>1966800004</string></value>\n</data></array></value>\n</member>\n<member>\n<name>initials</name>\n<value><array><data>\n<value><string>JR</string></value>\n</data></array></value>\n</member>\n<member>\n<name>gidnumber</name>\n<value><array><data>\n<value><string>1966800004</string></value>\n</data></array></value>\n</member>\n<member>\n<name>gecos</name>\n<value><array><data>\n<value><string>Jane Russell</string></value>\n</data></array>
CHAPTER 33. IDENTITY MANAGEMENT FILES AND LOGS
425

</value>\n</member>\n<member>\n<name>sn</name>\n<value><array><data>\n<value><string>Russell</string></value>\n</data></array></value>\n</member>\n<member>\n<name>homedirectory</name>\n<value><array><data>\n<value><string>/home/jrussell</string></value>\n</data></array></value>\n</member>\n<member>\n<name>has_password</name>\n<value><boolean>0</'body: 'boolean></value>\n</member>\n<member>\n<name>krbprincipalname</name>\n<value><array><data>\n<value><string>[email protected]</string></value>\n</data></array></value>\n</member>\n<member>\n<name>givenname</name>\n<value><array><data>\n<value><string>Jane</string></value>\n</data></array></value>\n</member>\n<member>\n<name>cn</name>\n<value><array><data>\n<value><string>Jane Russell</string></value>\n</data></array></value>\n</member>\n<member>\n<name>ipauniqueid</name>\n<value><array><data>\n<value><string>bba27e6e-df34-11e0-a5f4-001143d2c060</string></value>\n</data></array></value>\n</member>\n</struct></value>\n</member>\n<member>\n<name>value</name>\n<value><string>jrussell</string></value>\n</member>\n<member>\n<name>summary</name>\n<value><string>Added user "jrussell"</string></value>\n</member>\n</struct></value>\n</param>\n</params>\n</methodResponse>\n'---------------------Added user "jrussell"--------------------- User login: jrussell First name: Jane Last name: Russell Full name: Jane Russell Display name: Jane Russell Initials: JR Home directory: /home/jrussell GECOS field: Jane Russell Login shell: /bin/sh Kerberos principal: [email protected] UID: 1966800004 GID: 1966800004 Keytab: False Password: False
IMPORTANT
The -v and -vv options are global options and must be used before the subcommandwhen running ipa.
Linux Domain Identity, Authentication, and Policy Guide
426

CHAPTER 34. MANAGING CERTIFICATES AND CERTIFICATEAUTHORITIES
34.1. LIGHTWEIGHT SUB-CAS
If your IdM installation is configured with the integrated Certificate System (CS) certificate authority(CA), you are able to create lightweight sub-CAs. They enable you to configure services, like virtualprivate network (VPN) gateways, to accept only certificates issued by one sub-CA. At the same time,you can configure other services to accept only certificates issued by a different sub-CA or the root CA.
If you revoke the intermediate certificate of a sub-CA, all certificates issued by this sub-CA areautomatically invalid.
If you set up IdM using the integrated CA, the automatically created ipa CA is the root CA of thecertificate system. All sub-CAs you create, are subordinated to this root CA.
34.1.1. Creating a Lightweight Sub-CA
For details on creating a sub-CA, see
the section called “Creating a Sub-CA from the Web UI”
the section called “Creating a Sub-CA from the Command Line”
Creating a Sub-CA from the Web UITo create a new sub-CA named vpn-ca:
1. Open the Authentication tab, and select the Certificates subtab.
2. Select Certificate Authorities and click Add.
3. Enter the name and subject DN for the CA.
Figure 34.1. Adding a CA
The subject DN must be unique in the IdM CA infrastructure.
Creating a Sub-CA from the Command LineTo create a new sub-CA named vpn-ca, enter:
CHAPTER 34. MANAGING CERTIFICATES AND CERTIFICATE AUTHORITIES
427
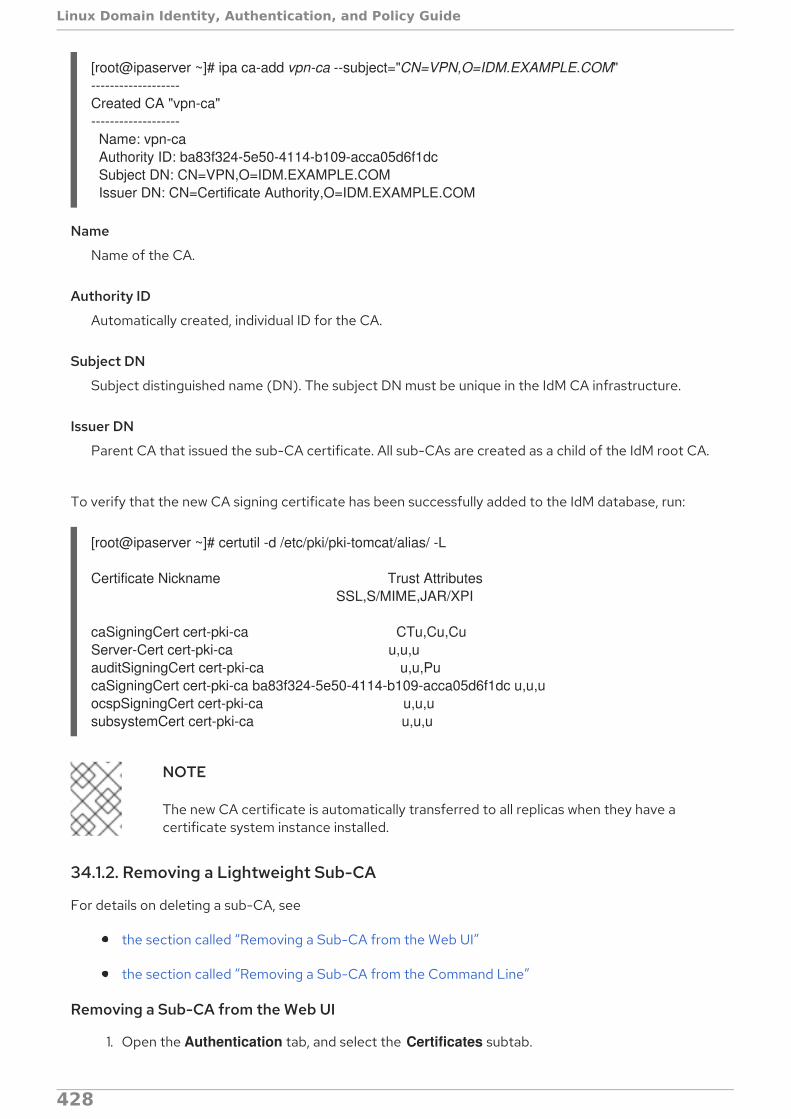
[root@ipaserver ~]# ipa ca-add vpn-ca --subject="CN=VPN,O=IDM.EXAMPLE.COM"-------------------Created CA "vpn-ca"------------------- Name: vpn-ca Authority ID: ba83f324-5e50-4114-b109-acca05d6f1dc Subject DN: CN=VPN,O=IDM.EXAMPLE.COM Issuer DN: CN=Certificate Authority,O=IDM.EXAMPLE.COM
Name
Name of the CA.
Authority ID
Automatically created, individual ID for the CA.
Subject DN
Subject distinguished name (DN). The subject DN must be unique in the IdM CA infrastructure.
Issuer DN
Parent CA that issued the sub-CA certificate. All sub-CAs are created as a child of the IdM root CA.
To verify that the new CA signing certificate has been successfully added to the IdM database, run:
[root@ipaserver ~]# certutil -d /etc/pki/pki-tomcat/alias/ -L
Certificate Nickname Trust Attributes SSL,S/MIME,JAR/XPI
caSigningCert cert-pki-ca CTu,Cu,CuServer-Cert cert-pki-ca u,u,uauditSigningCert cert-pki-ca u,u,PucaSigningCert cert-pki-ca ba83f324-5e50-4114-b109-acca05d6f1dc u,u,uocspSigningCert cert-pki-ca u,u,usubsystemCert cert-pki-ca u,u,u
NOTE
The new CA certificate is automatically transferred to all replicas when they have acertificate system instance installed.
34.1.2. Removing a Lightweight Sub-CA
For details on deleting a sub-CA, see
the section called “Removing a Sub-CA from the Web UI”
the section called “Removing a Sub-CA from the Command Line”
Removing a Sub-CA from the Web UI
1. Open the Authentication tab, and select the Certificates subtab.
Linux Domain Identity, Authentication, and Policy Guide
428
2. Select Certificate Authorities.
3. Select the sub-CA to remove and click Delete.
4. Click Delete to confirm.
Removing a Sub-CA from the Command LineTo delete a sub-CA, enter:
[root@ipaserver ~]# ipa ca-del vpn-ca-------------------Deleted CA "vpn-ca"-------------------
34.2. RENEWING CERTIFICATES
For details on:
automatic certificate renewal, see Section 34.2.1, “Renewing Certificates Automatically”
manual certificate renewal, see Section 34.2.2, “Renewing CA Certificates Manually”
34.2.1. Renewing Certificates Automatically
The certmonger service automatically renews the following certificates 28 days before their expirationdate:
CA certificate issued by the IdM CA as the root CA
Subsystem and server certificates issued by the integrated IdM CA that are used by internal IdMservices
To automatically renew sub-CA CA certificates, they must be listed on the certmonger tracking list. Toupdate the tracking list:
[root@ipaserver ~]# ipa-certupdatetrying https://idmserver.idm.example.com/ipa/jsonForwarding 'schema' to json server 'https://idmserver.idm.example.com/ipa/json'trying https://idmserver.idm.example.com/ipa/jsonForwarding 'ca_is_enabled' to json server 'https://idmserver.idm.example.com/ipa/json'Forwarding 'ca_find/1' to json server 'https://idmserver.idm.example.com/ipa/json'Systemwide CA database updated.Systemwide CA database updated.The ipa-certupdate command was successful
NOTE
If you are using an external CA as the root CA, you must renew the certificates manually,as described in Section 34.2.2, “Renewing CA Certificates Manually” . The certmongerservice cannot automatically renew certificates signed by an external CA.
For more information on how certmonger monitors certificate expiration dates, see TrackingCertificates with certmonger in the System-Level Authentication Guide.
To verify that automatic renewal works as expected, examine certmonger log messages in the
CHAPTER 34. MANAGING CERTIFICATES AND CERTIFICATE AUTHORITIES
429
To verify that automatic renewal works as expected, examine certmonger log messages in the /var/log/messages file:
After a certificate is renewed, certmonger records message like the following to indicate thatthe renewal operation has succeeded or failed:
Certificate named "NSS Certificate DB" in token "auditSigningCert cert-pki-ca" in database "/var/lib/pki-ca/alias" renew success
As the certificate nears its expiration, certmonger logs the following message:
certmonger: Certificate named "NSS Certificate DB" in token "auditSigningCert cert-pki-ca" in database "/var/lib/pki-ca/alias" will not be valid after 20160204065136.
34.2.2. Renewing CA Certificates Manually
You can use the ipa-cacert-manage utility to manually renew:
self-signed IdM CA certificate
externally-signed IdM CA certificate
The certificates renewed with the ipa-cacert-manage renew command use the same key pair andsubject name as the old certificates. Renewing a certificate does not remove its previous version toenable certificate rollover.
For details, see the ipa-cacert-manage(1) man page.
34.2.2.1. Renewing a Self-Signed IdM CA Certificate Manually
1. Run the ipa-cacert-manage renew command. The command does not require you to specifythe path to the certificate.
2. The renewed certificate is now present in the LDAP certificate store and in the /etc/pki/pki-tomcat/alias NSS database.
3. Run the ipa-certupdate utility on all servers and clients to update them with the informationabout the new certificate from LDAP. You must run ipa-certupdate on every server and clientseparately.
IMPORTANT
Always run ipa-certupdate after manually installing a certificate. If you do not,the certificate will not be distributed to the other machines.
To make sure the renewed certificate is properly installed, use the certutil utility to list the certificatesin the database. For example:
# certutil -L -d /etc/pki/pki-tomcat/alias
34.2.2.2. Renewing an Externally-Signed IdM CA Certificate Manually
1. Run the ipa-cacert-manage renew --external-ca command.
Linux Domain Identity, Authentication, and Policy Guide
430
2. The command creates the /var/lib/ipa/ca.crt CSR file. Submit the CSR to the external CA to getthe renewed CA certificate issued.
3. Run ipa-cacert-manage renew again, and this time specify the renewed CA certificate and theexternal CA certificate chain files using the --external-cert-file option. For example:
# ipa-cacert-manage renew --external-cert-file=/tmp/servercert20110601.pem --external-cert-file=/tmp/cacert.pem
4. The renewed CA certificate and the external CA certificate chain are now present in the LDAPcertificate store and in the /etc/pki/pki-tomcat/alias/ NSS database.
5. Run the ipa-certupdate utility on all servers and clients to update them with the informationabout the new certificate from LDAP. You must run ipa-certupdate on every server and clientseparately.
IMPORTANT
Always run ipa-certupdate after manually installing a certificate. If you do not,the certificate will not be distributed to the other machines.
To make sure the renewed certificate is properly installed, use the certutil utility to list the certificatesin the database. For example:
# certutil -L -d /etc/pki/pki-tomcat/alias/
34.3. INSTALLING A CA CERTIFICATE MANUALLY
To install a new certificate to IdM, use the ipa-cacert-manage install command. For example, thecommand allows you to change the current certificate when it is nearing its expiration date.
1. Run the ipa-cacert-manage install command, and specify the path to the file containing thecertificate. The command accepts PEM-formatted certificate files:
[root@server ~]# ipa-cacert-manage install /etc/group/cert.pem
The certificate is now present in the LDAP certificate store.
2. Run the ipa-certupdate utility on all servers and clients to update them with the informationabout the new certificate from LDAP. You must run ipa-certupdate on every server and clientseparately.
IMPORTANT
Always run ipa-certupdate after manually installing a certificate. If you do not,the certificate will not be distributed to the other machines.
The ipa-cacert-manage install command can take the following options:
-n
gives the nickname of the certificate; the default value is the subject name of the certificate
CHAPTER 34. MANAGING CERTIFICATES AND CERTIFICATE AUTHORITIES
431

-t
specifies the trust flags for the certificate in the certutil format; the default value is C,,. Forinformation about the format in which to specify the trust flags, see the ipa-cacert-manage(1) manpage.
34.4. CHANGING THE CERTIFICATE CHAIN
You can modify the certificate chain by renewing the CA certificate using the ipa-cacert-manage renew.
Self-signed CA certificate → externally-signed CA certificate
Add the --external-ca option to ipa-cacert-manage renew. This renews the self-signed CAcertificate as an externally-signed CA certificate.
For details on running the command with this option, see Section 34.2.2, “Renewing CA CertificatesManually”.
Externally-signed CA certificate → self-signed CA certificate
Add the --self-signed option to ipa-cacert-manage renew. This renew the externally-signed CAcertificate as a self-signed CA certificate.
34.5. ALLOWING IDM TO START WITH EXPIRED CERTIFICATES
After the IdM administrative server certificates expire, most IdM services become inaccessible. You canconfigure the underlying Apache and LDAP services to allow SSL access to the services even if thecertificates are expired.
If you allow limited access with expired certificates:
Apache, Kerberos, DNS, and LDAP services will continue working. With these services active,users will be able to log in to the IdM domain.
Client services that require SSL for access will still fail. For example, sudo will fail because itrequires SSSD on IdM clients, and SSSD needs SSL to contact IdM.
IMPORTANT
This procedure is intended only as a temporary workaround. Renew the requiredcertificates as quickly as possible, and then revert the described changes.
1. Configure the mod_nss module for the Apache server to not enforce valid certificates.
a. Open the /etc/httpd/conf.d/nss.conf file.
b. Set the NSSEnforceValidCerts parameter to off:
NSSEnforceValidCerts off
2. Restart Apache.
Linux Domain Identity, Authentication, and Policy Guide
432
# systemctl restart httpd.service
3. Make sure that validity checks are disabled for the LDAP directory server. To do this, verify thatthe nsslapd-validate-cert attribute is set to warn:
# ldapsearch -h server.example.com -p 389 -D "cn=directory manager" -w secret -LLL -b cn=config -s base "(objectclass=*)" nsslapd-validate-cert
dn: cn=confignsslapd-validate-cert: warn
If the attribute is not set to warn, change it:
# ldapmodify -D "cn=directory manager" -w secret -p 389 -h server.example.com dn: cn=configchangetype: modifyreplace: nsslapd-validate-certnsslapd-validate-cert: warn
4. Restart the directory server.
# systemctl restart dirsrv.target
34.6. INSTALLING THIRD-PARTY CERTIFICATES FOR HTTP OR LDAP
Installing a new SSL server certificate for the Apache Web Server, the Directory Server, or both replacesthe current SSL certificate with a new one. To do this, you need:
your private SSL key (ssl.key in the procedure below)
your SSL certificate (ssl.crt in the procedure below)
For a list of accepted formats of the key and certificate, see the ipa-server-certinstall(1) man page.
PrerequisitesThe ssl.crt certificate must be signed by a CA known by the service you are loading the certificate into. Ifthis is not the case, install the CA certificate of the CA that signed ssl.crt into IdM, as described inSection 34.3, “Installing a CA Certificate Manually” for details.
This ensures that IdM recognizes the CA, and thus accepts ssl.crt.
Installing the Third-Party Certificate
1. Use the ipa-server-certinstall utility to install the certificate. Specify where you want to installit:
--http installs the certificate in the Apache Web Server
--dirsrv installs the certificate on the Directory Server
For example, to install the SSL certificate into both:
# ipa-server-certinstall --http --dirsrv ssl.key ssl.crt
CHAPTER 34. MANAGING CERTIFICATES AND CERTIFICATE AUTHORITIES
433

2. Restart the server into which you installed the certificate.
To restart the Apache Web Server:
# systemctl restart httpd.service
To restart the Directory Server:
# systemctl restart [email protected]
3. To verify that the certificate has been correctly installed, make sure it is present in thecertificate database.
To display the Apache certificate database:
# certutil -L -d /etc/httpd/alias
To display the Directory Server certificate database:
# certutil -L -d /etc/dirsrv/slapd-REALM/
34.7. CONFIGURING OCSP RESPONDERS
Every CA integrated with the IdM server uses an internal online certificate status protocol (OCSP)responder. The IdM service allowing to access the OCSP responders is available at http://ca-server.example.com/ca/ocsp. Clients can connect to this URL to check the validity of a certificate.
NOTE
For details on OCSP, see the Red Hat Certificate System documentation. For example,2.2.4. Revoking Certificates and Checking Status in the Planning, Installation, andDeployment Guide.
34.7.1. Changing the CRL Update Interval
The CRL file is automatically generated by the IdM CA every four hours by default. To change thisinterval:
1. Stop the CA server.
# systemctl stop [email protected]
2. Open the /var/lib/pki/pki-tomcat/conf/ca/CS.cfg file, and change the ca.crl.MasterCRL.autoUpdateInterval value to the new interval setting. For example, togenerate the CRL every 60 minutes:
ca.crl.MasterCRL.autoUpdateInterval=60
3. Start the CA server.
Linux Domain Identity, Authentication, and Policy Guide
434

# systemctl start [email protected]
34.8. INSTALLING A CA INTO AN EXISTING IDM DOMAIN
If an IdM domain was installed without a Certificate Authority (CA), you can install the CA servicessubsequently. Depending on your environment, you can install the IdM Certificate Server CA or use anexternal CA.
NOTE
For details on the supported CA configurations, see Section 2.3.2, “Determining What CAConfiguration to Use”.
IdM Certificate Server
1. Use the following command to install the IdM Certificate Server CA:
[root@ipa-server ~] ipa-ca-install
2. Run the ipa-certupdate utility on all servers and clients to update them with the informationabout the new certificate from LDAP. You must run ipa-certupdate on every server andclient separately.
IMPORTANT
Always run ipa-certupdate after manually installing a certificate. If you do not,the certificate will not be distributed to the other machines.
External CA
The subsequent installation of an external CA consists of multiple steps:
1. Start the installation:
[root@ipa-server ~] ipa-ca-install --external-ca
After this step an information is shown that a certificate signing request (CSR) was saved.Submit the CSR to the external CA and copy the issued certificate to the IdM server.
2. Continue the installation with passing the certificates and full path to the external CA files toipa-ca-install:
[root@ipa-server ~]# ipa-ca-install --external-cert-file=/root/master.crt --external-cert-file=/root/ca.crt
3. Run the ipa-certupdate utility on all servers and clients to update them with the informationabout the new certificate from LDAP. You must run ipa-certupdate on every server andclient separately.
IMPORTANT
CHAPTER 34. MANAGING CERTIFICATES AND CERTIFICATE AUTHORITIES
435

IMPORTANT
Always run ipa-certupdate after manually installing a certificate. If you do not,the certificate will not be distributed to the other machines.
The CA installation does not replace the existing service certificates for the LDAP and web server withones issued by the new installed CA. For details how to replace the certificates, see Section 34.9,“Replacing the Web Server's and LDAP Server's Certificate”.
34.9. REPLACING THE WEB SERVER'S AND LDAP SERVER'SCERTIFICATE
To replace the service certificates for the web server and LDAP server:
1. Request a new certificate. You can do this using:
the integrated CA: see Section 20.1.1, “Requesting New Certificates for a User, Host, orService” for details.
an external CA: generate a private key and certificate signing request (CSR). For example,using OpenSSL:
$ openssl req -new -newkey rsa:2048 -days 365 -nodes -keyout new.key -out new.csr -subj '/CN=idmserver.idm.example.com,O=IDM.EXAMPLE.COM'
Submit the CSR to the external CA. The process differs depending on the service to beused as the external CA.
2. Replace the Apache web server's private key and certificate:
[root@ipaserver ~]# ipa-server-certinstall -w --pin=password new.key new.crt
3. Replace the LDAP server's private key and certificate:
[root@ipaserver ~]# ipa-server-certinstall -d --pin=password new.key new.cert
Linux Domain Identity, Authentication, and Policy Guide
436
CHAPTER 35. DISABLING ANONYMOUS BINDSAccessing domain resources and running client tools always require Kerberos authentication. However,the back end LDAP directory used by the IdM server allows anonymous binds by default. This potentiallyopens up all of the domain configuration to unauthorized users, including information about users,machines, groups, services, netgroups, and DNS configuration.
It is possible to disable anonymous binds on the 389 Directory Server instance by using LDAP tools toreset the nsslapd-allow-anonymous-access attribute.
1. Change the nsslapd-allow-anonymous-access attribute to rootdse.
$ ldapmodify -x -D "cn=Directory Manager" -W -h server.example.com -p 389 -ZZEnter LDAP Password:dn: cn=configchangetype: modifyreplace: nsslapd-allow-anonymous-accessnsslapd-allow-anonymous-access: rootdse
modifying entry "cn=config"
IMPORTANT
Anonymous access can be completely allowed (on) or completely blocked (off).However, completely blocking anonymous access also blocks external clientsfrom checking the server configuration. LDAP and web clients are not necessarilydomain clients, so they connect anonymously to read the root DSE file to getconnection information.
The rootdse allows access to the root DSE and server configuration without anyaccess to the directory data.
2. Restart the 389 Directory Server instance to load the new setting.
# systemctl restart dirsrv.target
CHAPTER 35. DISABLING ANONYMOUS BINDS
437

CHAPTER 36. MIGRATING FROM AN LDAP DIRECTORY TOIDMAs an administrator, you previously deployed an LDAP server for authentication and identity lookupsand now you want to migrate the back end to Identity Management. You want to use the IdM migrationtool to transfer user accounts, including passwords, and group, without losing data. Additionally you wantto avoid expensive configuration updates on the clients.
The migration process described here, assumes a simple deployment scenario with one name space inLDAP and one in IdM. For more complex environments, such as multiple name spaces or customschema, contact the Red Hat support services.
36.1. AN OVERVIEW OF AN LDAP TO IDM MIGRATION
The actual migration part of moving from an LDAP server to Identity Management — the process ofmoving the data from one server to the other — is fairly straightforward. The process is simple: movedata, move passwords, and move clients.
The most expensive part of the migration is deciding how clients are going to be configured to useIdentity Management. For each client in the infrastructure, you need to decide what services (such asKerberos and SSSD) are being used and what services can be used in the final IdM deployment.
A secondary, but significant, consideration is planning how to migrate passwords. Identity Managementrequires Kerberos hashes for every user account in addition to passwords. Some of the considerationsand migration paths for passwords are covered in Section 36.1.2, “Planning Password Migration” .
36.1.1. Planning the Client Configuration
Identity Management can support a number of different client configurations, with varying degrees offunctionality, flexibility, and security. Decide which configuration is best for each individual client basedon its operating system, functional area (such as development machines, production servers, or userlaptops), and your IT maintenance priorities.
IMPORTANT
The different client configurations are not mutually exclusive . Most environments will havea mix of different ways that clients use to connect to the IdM domain. Administratorsmust decide which scenario is best for each individual client.
36.1.1.1. Initial Client Configuration (Pre-Migration)
Before deciding where you want to go with the client configuration in Identity Management, firstestablish where you are before the migration.
The initial state for almost all LDAP deployments that will be migrated is that there is an LDAP serviceproviding identity and authentication services.
Linux Domain Identity, Authentication, and Policy Guide
438

Figure 36.1. Basic LDAP Directory and Client Configuration
Linux and Unix clients use PAM_LDAP and NSS_LDAP libraries to connect directly to the LDAPservices. These libraries allow clients to retrieve user information from the LDAP directory as if the datawere stored in /etc/passwd or /etc/shadow. (In real life, the infrastructure may be more complex if aclient uses LDAP for identity lookups and Kerberos for authentication or other configurations.)
There are structural differences between an LDAP directory and an IdM server, particularly in schemasupport and the structure of the directory tree. (For more background on those differences, seeSection 1.1.2, “Contrasting Identity Management with a Standard LDAP Directory” .) While thosedifferences may impact data (especially with the directory tree, which affects entry names), they havelittle impact on the client configuration, so it really has little impact on migrating clients toIdentity Management.
36.1.1.2. Recommended Configuration for Red Hat Enterprise Linux Clients
Red Hat Enterprise Linux has a service called the System Security Services Daemon (SSSD). SSSD usesspecial PAM and NSS libraries (pam_sss and nss_sss, respectively) which allow SSSD to be integratedvery closely with Identity Management and leverage the full authentication and identity features inIdentity Management. SSSD has a number of useful features, like caching identity information so thatusers can log in even if the connection is lost to the central server; these are described in the System-Level Authentication Guide.
Unlike generic LDAP directory services (using pam_ldap and nss_ldap), SSSD establishes relationshipsbetween identity and authentication information by defining domains. A domain in SSSD defines fourback end functions: authentication, identity lookups, access, and password changes. The SSSD domainis then configured to use a provider to supply the information for any one (or all) of those four functions.An identity provider is always required in the domain configuration. The other three providers areoptional; if an authentication, access, or password provider is not defined, then the identity provider isused for that function.
SSSD can use Identity Management for all of its back end functions. This is the ideal configurationbecause it provides the full range of Identity Management functionality, unlike generic LDAP identityproviders or Kerberos authentication. For example, during daily operation, SSSD enforces host-basedaccess control rules and security features in Identity Management.
NOTE
During the migration process from an LDAP directory to Identity Management, SSSD canseamlessly migrate user passwords without additional user interaction.
CHAPTER 36. MIGRATING FROM AN LDAP DIRECTORY TO IDM
439

Figure 36.2. Clients and SSSD with an IdM Back End
The ipa-client-install script automatically configured SSSD to use IdM for all four of its back endservices, so Red Hat Enterprise Linux clients are set up with the recommended configuration by default.
NOTE
This client configuration is only supported for Red Hat Enterprise Linux 6.1 and later andRed Hat Enterprise Linux 5.7 later, which support the latest versions of SSSD and ipa-client. Older versions of Red Hat Enterprise Linux can be configured as described inSection 36.1.1.3, “Alternative Supported Configuration” .
36.1.1.3. Alternative Supported Configuration
Unix and Linux systems such as Mac, Solaris, HP-UX, AIX, and Scientific Linux support all of the servicesthat IdM manages but do not use SSSD. Likewise, older Red Hat Enterprise Linux versions (6.1 and 5.6)support SSSD but have an older version, which does not support IdM as an identity provider.
When it is not possible to use a modern version of SSSD on a system, then clients can be configured toconnect to the IdM server as if it were an LDAP directory service for identity lookups (using nss_ldap)and to IdM as if it were a regular Kerberos KDC (using pam_krb5).
Figure 36.3. Clients and IdM with LDAP and Kerberos
If a Red Hat Enterprise Linux client is using an older version of SSSD, SSSD can still be configured to usethe IdM server as its identity provider and its Kerberos authentication domain; this is described in theSSSD configuration section of the System-Level Authentication Guide.
Any IdM domain client can be configured to use nss_ldap and pam_krb5 to connect to the IdM server.For some maintenance situations and IT structures, a scenario that fits the lowest common denominatormay be required, using LDAP for both identity and authentication (nss_ldap and pam_ldap). However,it is generally best practice to use the most secure configuration possible for a client. This means SSSDor LDAP for identities and Kerberos for authentication.
Linux Domain Identity, Authentication, and Policy Guide
440
36.1.2. Planning Password Migration
Probably the most visible issue that can impact LDAP-to-Identity Management migration is migratinguser passwords.
Identity Management (by default) uses Kerberos for authentication and requires that each user hasKerberos hashes stored in the Identity Management Directory Server in addition to the standard userpasswords. To generate these hashes, the user password needs to be available to the IdM server in cleartext. When you create a user, the password is available in clear text before it is hashed and stored inIdentity Management. However, when the user is migrated from an LDAP directory, the associated userpassword is already hashed, so the corresponding Kerberos key cannot be generated.
IMPORTANT
Users cannot authenticate to the IdM domain or access IdM resources until they haveKerberos hashes.
If a user does not have a Kerberos hash[6], that user cannot log into the IdM domain even if he has a useraccount. There are three options for migrating passwords: forcing a password change, using a web page,and using SSSD.
Migrating users from an existing system provides a smoother transition but also requires parallelmanagement of LDAP directory and IdM during the migration and transition process. If you do notpreserve passwords, the migration can be performed more quickly but it requires more manual work byadministrators and users.
36.1.2.1. Method 1: Using Temporary Passwords and Requiring a Change
When passwords are changed in Identity Management, they will be created with the appropriateKerberos hashes. So one alternative for administrators is to force users to change their passwords byresetting all user passwords when user accounts are migrated. The new users are assigned a temporarypassword which they change at the first login. No passwords are migrated.
For details, see Section 12.1.1, “Changing and Resetting User Passwords” .
36.1.2.2. Method 2: Using the Migration Web Page
When it is running in migration mode, Identity Management has a special web page in its web UI that willcapture a cleartext password and create the appropriate Kerberos hash.
https://ipaserver.example.com/ipa/migration
Administrators could tell users to authenticate once to this web page, which would properly update theiruser accounts with their password and corresponding Kerberos hash, without requiring passwordchanges.
36.1.2.3. Method 3: Using SSSD (Recommended)
SSSD can work with IdM to mitigate the user impact on migrating by generating the required user keys.For deployments with a lot of users or where users should not be burdened with password changes, thisis the best scenario.
1. A user tries to log into a machine with SSSD.
CHAPTER 36. MIGRATING FROM AN LDAP DIRECTORY TO IDM
441

2. SSSD attempts to perform Kerberos authentication against the IdM server.
3. Even though the user exists in the system, the authentication will fail with the error key type isnot supported because the Kerberos hashes do not yet exist.
4. SSSD then performs a plain text LDAP bind over a secure connection.
5. IdM intercepts this bind request. If the user has a Kerberos principal but no Kerberos hashes,then the IdM identity provider generates the hashes and stores them in the user entry.
6. If authentication is successful, SSSD disconnects from IdM and tries Kerberos authenticationagain. This time, the request succeeds because the hash exists in the entry.
That entire process is entirely transparent to the user; as far as users know, they simply log into a clientservice and it works as normal.
36.1.2.4. Migrating Cleartext LDAP Passwords
Although in most deployments LDAP passwords are stored encrypted, there may be some users or someenvironments that use cleartext passwords for user entries.
When users are migrated from the LDAP server to the IdM server, their cleartext passwords are notmigrated over. Identity Management does not allow cleartext passwords. Instead, a Kerberos principal iscreated for the user, the keytab is set to true, and the password is set as expired. This means thatIdentity Management requires the user to reset the password at the next login.
NOTE
If passwords are hashed, the password is successfully migrated through SSSD and themigration web page, as in Section 36.1.2.2, “Method 2: Using the Migration Web Page”and Section 36.1.2.3, “Method 3: Using SSSD (Recommended)” .
36.1.2.5. Automatically Resetting Passwords That Do Not Meet Requirements
If user passwords in the original directory do not meet the password policies defined inIdentity Management, then the passwords must be reset after migration.
Password resets are done automatically the first time the users attempts to kinit into the IdM domain.
[jsmith@server ~]$ kinit Password for [email protected]: Password expired. You must change it now.Enter new password: Enter it again:
36.1.3. Migration Considerations and Requirements
As you are planning a migration from an LDAP server to Identity Management, make sure that yourLDAP environment is able to work with the Identity Management migration script.
36.1.3.1. LDAP Servers Supported for Migration
The migration process from an LDAP server to Identity Management uses a special script, ipa migrate-ds, to perform the migration. This script has certain expectations about the structure of the LDAP
Linux Domain Identity, Authentication, and Policy Guide
442
directory and LDAP entries in order to work. Migration is supported only for LDAPv3-compliantdirectory services, which include several common directories:
Sun ONE Directory Server
Apache Directory Server
OpenLDAP
Migration from an LDAP server to Identity Management has been tested with Red Hat Directory Serverand OpenLDAP.
NOTE
Migration using the migration script is not supported for Microsoft Active Directorybecause it is not an LDAPv3-compliant directory. For assistance with migrating fromActive Directory, contact Red Hat Professional Services.
36.1.3.2. Migration Environment Requirements
There are many different possible configuration scenarios for both Red Hat Directory Server andIdentity Management, and any of those scenarios may affect the migration process. For the examplemigration procedures in this chapter, these are the assumptions about the environment:
A single LDAP directory domain is being migrated to one IdM realm. No consolidation isinvolved.
User passwords are stored as a hash in the LDAP directory. For a list of supported hashes, seethe passwordStorageScheme attribute in the Password Policy Attributes table in the Red HatDirectory Server 10 Administration Guide.
The LDAP directory instance is both the identity store and the authentication method. Clientmachines are configured to use pam_ldap or nss_ldap to connect to the LDAP server.
Entries use only the standard LDAP schema. Entries that contain custom object classes orattributes are not migrated to Identity Management.
36.1.3.3. Migration — IdM System Requirements
With a moderately-sized directory (around 10,000 users and 10 groups), it is necessary to have apowerful enough target system (the IdM system) to allow the migration to proceed. The minimumrequirements for a migration are:
4 cores
4GB of RAM
30GB of disk space
A SASL buffer size of 2MB (default for an IdM server)
In case of migration errors, increase the buffer size:
[root@ipaserver ~]# ldapmodify -x -D 'cn=directory manager' -w password -h ipaserver.example.com -p 389
CHAPTER 36. MIGRATING FROM AN LDAP DIRECTORY TO IDM
443

dn: cn=configchangetype: modifyreplace: nsslapd-sasl-max-buffer-sizensslapd-sasl-max-buffer-size: 4194304
modifying entry "cn=config"
Set the nsslapd-sasl-max-buffer-size value in bytes.
36.1.3.4. Migration Tools
Identity Management uses a specific command, ipa migrate-ds, to drive the migration process so thatLDAP directory data are properly formatted and imported cleanly into the IdM server. When using ipa migrate-ds, the remote system user, specified by the --bind-dn option, needs to have read access tothe userPassword attribute, otherwise passwords will not be migrated.
The Identity Management server must be configured to run in migration mode, and then the migrationscript can be used. For details, see Section 36.3, “Migrating an LDAP Server Identity Management” .
36.1.3.5. Improving Migration Performance
An LDAP migration is essentially a specialized import operation for the 389 Directory Server instancewithin the IdM server. Tuning the 389 Directory Server instance for better import operationperformance can help improve the overall migration performance.
There are two parameters that directly affect import performance:
The nsslapd-cachememsize attribute, which defines the size allowed for the entry cache. Thisis a buffer, that is automatically set to 80% of the total cache memory size. For large importoperations, this parameter (and possibly the memory cache itself) can be increased to moreefficiently handle a large number of entries or entries with larger attributes.
For details how to modify the attribute using the ldapmodify, see corresponding section in theRed Hat Directory Server Performance Tuning Guide.
The system ulimit configuration option sets the maximum number of allowed processes for asystem user. Processing a large database can exceed the limit. If this happens, increase thevalue:
[root@server ~]# ulimit -u 4096
For further information, see Red Hat Directory Server Performance Tuning Guide athttps://access.redhat.com/documentation/en-US/Red_Hat_Directory_Server/10/html-single/Performance_Tuning_Guide/index.html.
36.1.3.6. Migration Sequence
There are four major steps when migrating to Identity Management, but the order varies slightlydepending on whether you want to migrate the server first or the clients first.
With a client-based migration, SSSD is used to change the client configuration while an IdM server isconfigured:
1. Deploy SSSD.
Linux Domain Identity, Authentication, and Policy Guide
444

2. Reconfigure clients to connect to the current LDAP server and then fail over to IdM.
3. Install the IdM server.
4. Migrate the user data using the IdM ipa migrate-ds script. This exports the data from the LDAPdirectory, formats for the IdM schema, and then imports it into IdM.
5. Take the LDAP server offline and allow clients to fail over to Identity Management transparently.
With a server migration, the LDAP to Identity Management migration comes first:
1. Install the IdM server.
2. Migrate the user data using the IdM ipa migrate-ds script. This exports the data from the LDAPdirectory, formats it for the IdM schema, and then imports it into IdM.
3. Optional. Deploy SSSD.
4. Reconfigure clients to connect to IdM. It is not possible to simply replace the LDAP server. TheIdM directory tree — and therefore user entry DNs — is different than the previous directorytree.
While it is required that clients be reconfigured, clients do not need to be reconfiguredimmediately. Updated clients can point to the IdM server while other clients point to the oldLDAP directory, allowing a reasonable testing and transition phase after the data are migrated.
NOTE
Do not run both an LDAP directory service and the IdM server for very long inparallel. This introduces the risk of user data being inconsistent between the twoservices.
Both processes provide a general migration procedure, but it may not work in every environment. Set upa test LDAP environment and test the migration process before attempting to migrate the real LDAPenvironment.
36.2. EXAMPLES FOR USING IPA MIGRATE-DS
The data migration is performed using the ipa migrate-ds command. At its simplest, the commandtakes the LDAP URL of the directory to migrate and exports the data based on common defaultsettings.
ipa migrate-ds ldap://ldap.example.com:389
Migrated entries
The migrate-ds command only migrates accounts containing a gidNumber attribute, that is requiredby the posixAccount object class, and a sn attribute, that is required by the person object class.
Customizing the process
The ipa migrate-ds command enables you to customize how data is identified and exported. This isuseful if the original directory tree has a unique structure or if some entries or attributes withinentries should be excluded. For further details, pass the --help to the command.
CHAPTER 36. MIGRATING FROM AN LDAP DIRECTORY TO IDM
445
Bind DN
By default, the DN "cn=Directory Manager" is used to bind to the remote LDAP directory. Pass the --bind-dn option to the command to specify a custom bind DN. For further information, seeSection 36.1.3.4, “Migration Tools”.
Naming context changes
If the Directory Server naming context differs from the one used in Identity Management, the baseDNs for objects is transformed. For example: uid=user,ou=people,dc=ldap,dc=example,dc=com ismigrated to uid=user,ou=people,dc=idm,dc=example,dc=com. Pass the --base-dn to the ipa migrate-ds command to set the base DN used on the remote LDAP server for the migration.
36.2.1. Migrating Specific Subtrees
The default directory structure places person entries in the ou=People subtree and group entries in the ou=Groups subtree. These subtrees are container entries for those different types of directory data. Ifno options are passed with the migrate-ds command, then the utility assumes that the given LDAPdirectory uses the ou=People and ou=Groups structure.
Many deployments may have an entirely different directory structure (or may only want to export certainparts of the directory tree). There are two options which allow administrators to specify the RDN of adifferent user or group subtree on the source LDAP server:
--user-container
--group-container
NOTE
In both cases, the subtree must be the RDN only and must be relative to the base DN. Forexample, the >ou=Employees,dc=example,dc=com directory tree can be migratedusing --user-container=ou=Employees.
For example:
[root@ipaserver ~]# ipa migrate-ds --user-container=ou=employees \ --group-container="ou=employee groups" \ ldap://ldap.example.com:389
Pass the --scope option to the ipa migrate-ds command, to set a scope:
onelevel: Default. Only entries in the specified container are migrated.
subtree: Entries in the specified container and all sub-containers are migrated.
base: Only the specified object itself is migrated.
36.2.2. Specifically Including or Excluding Entries
By default, the ipa migrate-ds script imports every user entry with the person object class and everygroup entry with the groupOfUniqueNames or groupOfNames object class..
In some migration paths, only specific types of users and groups may need to be exported, or,conversely, specific users and groups may need to be excluded.One option is to set positively which types of users and groups to include. This is done by setting which
Linux Domain Identity, Authentication, and Policy Guide
446

One option is to set positively which types of users and groups to include. This is done by setting whichobject classes to search for when looking for user or group entries.
This is a really useful option when there are custom object classes used in an environment for differentuser types. For example, this migrates only users with the custom fullTimeEmployee object class:
[root@ipaserver ~]# ipa migrate-ds --user-objectclass=fullTimeEmployee ldap://ldap.example.com:389
Because of the different types of groups, this is also very useful for migrating only certain types ofgroups (such as user groups) while excluding other types of groups, like certificate groups. For example:
[root@ipaserver ~]# ipa migrate-ds --group-objectclass=groupOfNames --group-objectclass=groupOfUniqueNames ldap://ldap.example.com:389
Positively specifying user and groups to migrate based on object class implicitly excludes all other usersand groups from migration.
Alternatively, it can be useful to migrate all user and group entries except for just a small handful ofentries. Specific user or group accounts can be excluded while all others of that type are migrated. Forexample, this excludes a hobbies group and two users:
[root@ipaserver ~]# ipa migrate-ds --exclude-groups="Golfers Group" --exclude-users=jsmith --exclude-users=bjensen ldap://ldap.example.com:389
Exclude statements are applied to users matching the pattern in the uid and to groups matching it in thecn attribute.
Specifying an object class to migrate can be used together with excluding specific entries. For example,this specifically includes users with the fullTimeEmployee object class, yet excludes three managers:
[root@ipaserver ~]# ipa migrate-ds --user-objectclass=fullTimeEmployee --exclude-users=jsmith --exclude-users=bjensen --exclude-users=mreynolds ldap://ldap.example.com:389
36.2.3. Excluding Entry Attributes
By default, every attribute and object class for a user or group entry is migrated. There are some caseswhere that may not be realistic, either because of bandwidth and network constraints or because theattribute data are no longer relevant. For example, if users are going to be assigned new usercertificates as they join the IdM domain, then there is no reason to migrate the userCertificate attribute.
Specific object classes and attributes can be ignored by the migrate-ds by using any of several differentoptions:
--user-ignore-objectclass
--user-ignore-attribute
--group-ignore-objectclass
--group-ignore-attribute
For example, to exclude the userCertificate attribute and strongAuthenticationUser object class forusers and the groupOfCertificates object class for groups:
CHAPTER 36. MIGRATING FROM AN LDAP DIRECTORY TO IDM
447
[root@ipaserver ~]# ipa migrate-ds --user-ignore-attribute=userCertificate --user-ignore-objectclass=strongAuthenticationUser --group-ignore-objectclass=groupOfCertificates ldap://ldap.example.com:389
NOTE
Make sure not to ignore any required attributes. Also, when excluding object classes,make sure to exclude any attributes which are only supported by that object class.
36.2.4. Setting the Schema to Use
Identity Management uses the RFC2307bis schema to define user, host, host group, and other networkidentities. However, if the LDAP server used as source for a migration uses the RFC2307 schemainstead, pass the --schema option to the ipa migrate-ds command:
[root@ipaserver ~]# ipa migrate-ds --schema=RFC2307 ldap://ldap.example.com:389
36.3. MIGRATING AN LDAP SERVER IDENTITY MANAGEMENT
IMPORTANT
This is a general migration procedure, but it may not work in every environment.
It is strongly recommended that you set up a test LDAP environment and test themigration process before attempting to migrate the real LDAP environment.
1. Install the IdM server, including any custom LDAP directory schema, on a different machinefrom the existing LDAP directory.
NOTE
Custom user or group schemas have limited support in IdM. They can causeproblems during the migration because of incompatible object definitions.
2. Disable the compat plug-in.
[root@server ~]# ipa-compat-manage disable
This step is not necessary if the data provided by the compat tree is required during themigration.
3. Restart the IdM Directory Server instance.
[root@server ~]# systemctl restart dirsrv.target
4. Configure the IdM server to allow migration:
[root@server ~]# ipa config-mod --enable-migration=TRUE
5. Run the IdM migration script, ipa migrate-ds. At its most basic, this requires only the LDAP URL
Linux Domain Identity, Authentication, and Policy Guide
448
5. Run the IdM migration script, ipa migrate-ds. At its most basic, this requires only the LDAP URLof the LDAP directory instance to migrate:
[root@server ~]# ipa migrate-ds ldap://ldap.example.com:389
Simply passing the LDAP URL migrates all of the directory data using common default settings.The user and group data can be selectively migrated by specifying other options, as covered inSection 36.2, “Examples for Using ipa migrate-ds”.
If the compat plug-in was not disabled in the previous step, pass the --with-compat option to ipa migrate-ds.
Once the information is exported, the script adds all required IdM object classes and attributesand converts DNs in attributes to match the IdM directory tree, if the naming context differs.For example: uid=user,ou=people,dc=ldap,dc=example,dc=com is migrated to uid=user,ou=people,dc=idm,dc=example,dc=com.
6. Re-enable the compat plug-in, if it was disabled before the migration.
[root@server ~]# ipa-compat-manage enable
7. Restart the IdM Directory Server instance.
[root@server ~]# systemctl restart dirsrv.target
8. Disable the migration mode:
[root@server ]# ipa config-mod --enable-migration=FALSE
9. Optional. Reconfigure non-SSSD clients to use Kerberos authentication ( pam_krb5) instead ofLDAP authentication (pam_ldap). Use PAM_LDAP modules until all of the users have beenmigrated; then it is possible to use PAM_KRB5. For further information, see the correspondingsection in the System-level Authentication Guide.
10. There are two ways for users to generate their hashed Kerberos password. Both migrate theusers password without additional user interaction, as described in Section 36.1.2, “PlanningPassword Migration”.
1. Using SSSD:
1. Move clients that have SSSD installed from the LDAP back end to the IdM back end,and enroll them as clients with IdM. This downloads the required keys and certificates.
On Red Hat Enterprise Linux clients, this can be done using the ipa-client-installcommand. For example:
[root@server ~]# ipa-client-install --enable-dns-update
2. Using the IdM migration web page:
1. Instruct users to log into IdM using the migration web page:
https://ipaserver.example.com/ipa/migration
CHAPTER 36. MIGRATING FROM AN LDAP DIRECTORY TO IDM
449

11. To monitor the user migration process, query the existing LDAP directory to see which useraccounts have a password but do not yet have a Kerberos principal key.
[user@server ~]$ ldapsearch -LL -x -D 'cn=Directory Manager' -w secret -b 'cn=users,cn=accounts,dc=example,dc=com' '(&(!(krbprincipalkey=*))(userpassword=*))' uid
NOTE
Include the single quotes around the filter so that it is not interpreted by the shell.
12. When the migration of all clients and users is complete, decommission the LDAP directory.
36.4. MIGRATING OVER SSL
To encrypt the data transmission between LDAP and IdM during a migration:
1. Store the certificate of the CA, that issued the remote LDAP server's certificate, in a file on theIdM server. For example: /etc/ipa/remote.crt.
2. Follow the steps described in Section 36.3, “Migrating an LDAP Server Identity Management” .However for an encrypted LDAP connection during the migration, use the ldaps protocol in theURL and pass the --ca-cert-file option to the command. For example:
[root@ipaserver ~]# ipa migrate-ds --ca-cert-file=/etc/ipa/remote.crt ldaps://ldap.example.com:636
[6] It is possible to use LDAP authentication in Identity Management instead of Kerberos authentication, whichmeans that Kerberos hashes are not required for users. However, this limits the capabilities ofIdentity Management and is not recommended.
Linux Domain Identity, Authentication, and Policy Guide
450

APPENDIX A. TROUBLESHOOTING IDENTITY MANAGEMENTFor troubleshooting advice for:
servers, see Section A.1, “Identity Management Servers”
replicas, see Section A.2, “Identity Management Replicas”
clients, see Section A.3, “Identity Management Clients”
authentication, see Section A.4, “Logging In and Authentication Problems”
A.1. IDENTITY MANAGEMENT SERVERS
A.1.1. External CA Installation Fails
The ipa-server-install --external-ca command fails with the following error:
ipa : CRITICAL failed to configure ca instance Command '/usr/sbin/pkispawn -s CA -f /tmp/configuration_file' returned non-zero exit status 1Configuration of CA failed
The env|grep proxy command displays variables such as the following:
env|grep proxyhttp_proxy=http://example.com:8080ftp_proxy=http://example.com:8080https_proxy=http://example.com:8080
What this means:The *_proxy environmental variables are preventing the server from being installed.
To fix the problem:
1. Use the following shell script to unset the *_proxy environmental variables:
# for i in ftp http https; do unset ${i}_proxy; done
2. Run the pkidestroy utility to remove the unsuccessful CA subsystem installation:
# pkidestroy -s CA -i pki-tomcat; rm -rf /var/log/pki/pki-tomcat /etc/sysconfig/pki-tomcat /etc/sysconfig/pki/tomcat/pki-tomcat /var/lib/pki/pki-tomcat /etc/pki/pki-tomcat /root/ipa.csr
3. Remove the failed IdM server installation:
# ipa-server-install --uninstall
4. Retry running ipa-server-install --external-ca.
A.1.2. named Daemon Fails to Start
After installing an IdM server with integrated DNS, the named-pkcs11 fails to start. The
APPENDIX A. TROUBLESHOOTING IDENTITY MANAGEMENT
451

After installing an IdM server with integrated DNS, the named-pkcs11 fails to start. The /var/log/messages file includes an error message related to the named-pkcs11 service and the ldap.solibrary:
ipaserver named[6886]: failed to dynamically load driver 'ldap.so': libldap-2.4.so.2: cannot open shared object file: No such file or directory
What this means:The bind-chroot package is installed and is preventing the named-pkcs11 service from starting.
To fix the problem:
1. Uninstall the bind-chroot package.
# yum remove bind-chroot
2. Restart the IdM server.
# ipactl restart
A.2. IDENTITY MANAGEMENT REPLICAS
This guide describes common replication problems for Identity Management in Red HatEnterprise Linux.
Additional resources:
For troubleshooting advice on replication in Red Hat Directory Server, see Section “SolvingCommon Replication Conflicts” in the Directory Server Administration Guide.
For advice on how to test that replication is working, see Section 4.6, “Testing the New Replica” .
The Directory Server repl-monitor script shows in-progress status of replication, which can helpyou troubleshoot replication problems. For documentation on the script, see Section “repl-monitor (Monitors Replication Status)” in the Directory Server Administration Guide.
A.2.1. Authenticating AD Users Against a New Replica Fails
After installing a new replica in an Identity Management-Active Directory trust setup, attempts toauthenticate Active Directory (AD) users against the IdM replica fail.
What this means:The replica is neither a trust controller nor trust agent. Because of this, it cannot serve information fromthe AD trust.
To fix the problem:Configure the replica as a trust agent. See Trust Controllers and Trust Agents in the WindowsIntegration Guide.
A.2.2. Replica Starts with SASL, GSS-API, and Kerberos Errors in theDirectory Server Logs
When the replica starts, a series of SASL bind errors are recorded in the Directory Server (DS) logs. Theerrors state the GSS-API connection failed because it could not find a credentials cache:
Linux Domain Identity, Authentication, and Policy Guide
452

slapd_ldap_sasl_interactive_bind - Error: could not perform interactive bind for id [] mech [GSSAPI]: error -2 (Local error) (SASL(-1): generic failure: GSSAPI Error: Unspecified GSS failure. Minor code may provide more information (Credentials cache file '/tmp/krb5cc_496' not found)) ...
Additionally, other messages can occur stating that the server could not obtain Kerberos credentials forthe host principal:
set_krb5_creds - Could not get initial credentials for principal [ldap/ replica1.example.com] in keytab [WRFILE:/etc/dirsrv/ds.keytab]: -1765328324 (Generic error)
What this means:IdM uses GSS-API for Kerberos connections. The DS instance keeps the Kerberos credentials cache inmemory. When the DS process ends, such as when the IdM replica stops, the credentials cache isdestroyed.
When the replica restarts, DS starts before the KDC server starts. Because of this start order, theKerberos credentials are not yet saved in the credentials cache when DS starts, which is what causes theerrors.
After the initial failure, DS re-attempts to establish the GSS-API connection after the KDC starts. Thissecond attempt is successful and ensures that the replica works as expected.
You can ignore the described startup errors as long as the GSS-API connection is successfullyestablished and the replica works as expected. The following message shows that the connection wassuccessful:
Replication bind with GSSAPI auth resumed
A.2.3. The DNS forward Record Does Not Match the Reverse Address
When configuring a new replica, installation fails with a series of certificate errors, followed by a DNSerror stating the DNS forward record does not match the reverse address.
ipa: DEBUG: approved_usage = SSLServer intended_usage = SSLServeripa: DEBUG: cert valid True for "CN=replica.example.com,O=EXAMPLE.COM"ipa: DEBUG: handshake complete, peer = 192.0.2.2:9444Certificate operation cannot be completed: Unable to communicate with CMS (Not Found)
...
ipa: DEBUG: Created connection context.ldap2_21534032ipa: DEBUG: Destroyed connection context.ldap2_21534032The DNS forward record replica.example.com. does not match the reverse address replica.example.org
What this means:Multiple host names are used for a single PTR record. The DNS standard allows such configuration, butit causes an IdM replica installation to fail.
To fix the problem:Verify the DNS configuration, as described in the section called “Verifying the Forward and ReverseDNS Configuration”.
APPENDIX A. TROUBLESHOOTING IDENTITY MANAGEMENT
453

A.2.4. Serial Numbers Not Found Errors
NOTE
This solution is applicable at domain level 0. See Chapter 7, Displaying and Raising theDomain Level for details.
An error stating that a certificate serial number was not found appears on a replicated server:
Certificate operation cannot be completed: EXCEPTION (Certificate serial number 0x2d not found)
What this means:A certificate replication agreement between two replicas has been removed but a data replicationagreement is still in place. Both replicas are still issuing certificates, but information about thecertificates is no longer replicated.
Example situation:
1. Replica A issues a certificate to a host.
2. The certificate is not replicated to replica B, because the replicas have no certificate replicationagreement established.
3. A user attempts to use replica B to manage the host.
4. Replica B returns an error that it cannot verify the host's certificate serial number. This isbecause replica B has information about the host in its data directory, but it does not have thehost certificate in its certificate directory.
To fix the problem:
1. Enable certificate server replication between the two replicas using the ipa-csreplica-manage connect command. See Section B.3.3, “Creating and Removing Replication Agreements” .
2. Re-initialize one of the replicas from the other to synchronize them. See Section B.3.5, “Re-initializing a Replica”.
WARNING
Re-initializing overwrites data on the re-initialized replica with the datafrom the other replica. Some information might be lost.
A.2.5. Cleaning Replica Update Vector (RUV) Errors
NOTE
This solution is applicable at domain level 0. See Chapter 7, Displaying and Raising theDomain Level for details.
Linux Domain Identity, Authentication, and Policy Guide
454

After a replica has been removed from the IdM topology, obsolete RUV records are now present on oneor more remaining replicas.
Possible causes:
The replica has been removed without properly removing its replication agreements first, asdescribed in the section called “Removing Replication Agreements” .
The replica has been removed when another replica was offline.
What this means:The other replicas still expect to receive updates from the removed replica.
NOTE
The correct procedure for removing a replica is described in Section B.3.6, “Removing aReplica”.
To fix the problem:Clean the RUV records on the replica that expects to receive the updates.
1. List the details about the obsolete RUVs using the ipa-replica-manage list-ruv command. Thecommand displays the replica IDs:
# ipa-replica-manage list-ruvserver1.example.com:389: 6server2.example.com:389: 5server3.example.com:389: 4server4.example.com:389: 12
2. Clear the corrupt RUVs using the ipa-replica-manage clean-ruv replica_ID command. Thecommand removes any RUVs associated with the specified replica.
Repeat the command for every replica with obsolete RUVs. For example:
# ipa-replica-manage clean-ruv 6# ipa-replica-manage clean-ruv 5# ipa-replica-manage clean-ruv 4# ipa-replica-manage clean-ruv 12
WARNING
Proceed with extreme caution when using ipa-replica-manage clean-ruv.Running the command against a valid replica ID will corrupt all the dataassociated with that replica in the replication database.
If this happens, re-initialize the replica from another replica as described inSection B.3.5, “Re-initializing a Replica”.
APPENDIX A. TROUBLESHOOTING IDENTITY MANAGEMENT
455
3. Run ipa-replica-manage list-ruv again.
If the command no longer displays any corrupt RUVs, the records have been successfullycleaned.
If the command still displays corrupt RUVs, clear them manually using this task:
dn: cn=clean replica_ID, cn=cleanallruv, cn=tasks, cn=configobjectclass: extensibleObjectreplica-base-dn: dc=example,dc=comreplica-id: replica_ID replica-force-cleaning: nocn: clean replica_ID
If you are not sure on which replica to clean the RUVs:
1. Search all your servers for active replica IDs. Make a list of uncorrupted and reliable replica IDs.
To find the IDs of valid replicas, run this LDAP query for all the nodes in your topology:
# ldapsearch -p 389 -h IdM_node -D "cn=directory manager" -W -b "cn=config" "(objectclass=nsds5replica)" nsDS5ReplicaId
2. Run ipa-replica-manage list-ruv on every server. Note any replica IDs that are not on the list ofuncorrupted replica IDs.
3. Run ipa-replica-manage clean-ruv replica_ID for every corrupted replica ID.
A.2.6. Recovering a Lost CA Server
NOTE
This solution is applicable at domain level 0. See Chapter 7, Displaying and Raising theDomain Level for details.
You only had one server with CA installed. This server failed and is now lost.
What this means:The CA configuration for your IdM domain is no longer available.
To fix the problem:If you have a backup of the original CA server available, you can restore the server and install the CA ona replica.
1. Recover the CA server from backup. See Section 9.2, “Restoring a Backup” for details.
This makes the CA server available to the replica.
2. Delete the replication agreements between the initial server and the replica to avoid replicationconflicts. See Section B.3.3, “Creating and Removing Replication Agreements” .
3. Install the CA on the replica. See Section 6.5.1, “Promoting a Replica to a Master CA Server” .
4. Decommission the original CA server. See Section B.3.6, “Removing a Replica” .
Linux Domain Identity, Authentication, and Policy Guide
456

If you do not have a backup of the original CA server, the CA configuration was lost when the serverfailed and cannot be recovered.
A.3. IDENTITY MANAGEMENT CLIENTS
This section describes common client problems for IdM in Red Hat Enterprise Linux.
Additional resources:
To validate your /etc/sssd.conf file, see System-Level Authentication Guide.
A.3.1. The Client Is Unable to Resolve Reverse Lookups when Using an External DNS
An external DNS server returns a wrong host name for the IdM server. The following errors related to theIdM server appear in the Kerberos database:
Jun 30 11:11:48 server1 krb5kdc[1279](info): AS_REQ (4 etypes {18 17 16 23}) 192.0.2.1: NEEDED_PREAUTH: admin EXAMPLE COM for krbtgt/EXAMPLE COM EXAMPLE COM, Additional pre-authentication requiredJun 30 11:11:48 server1 krb5kdc[1279](info): AS_REQ (4 etypes {18 17 16 23}) 192.0.2.1: ISSUE: authtime 1309425108, etypes {rep=18 tkt=18 ses=18}, admin EXAMPLE COM for krbtgt/EXAMPLE COM EXAMPLE COMJun 30 11:11:49 server1 krb5kdc[1279](info): TGS_REQ (4 etypes {18 17 16 23}) 192.0.2.1: UNKNOWN_SERVER: authtime 0, admin EXAMPLE COM for HTTP/[email protected], Server not found in Kerberos database
What this means:The external DNS name server returns the wrong host name for the IdM server or returns no answer atall.
To fix the problem:
1. Verify your DNS configuration, and make sure the DNS domains used by IdM are properlydelegated. See Section 2.1.3, “Host Name and DNS Configuration” for details.
2. Verify your reverse (PTR) DNS records settings. See Chapter 24, Managing DNS for details.
A.3.2. The Client Is Not Added to the DNS Zone
When running the ipa-client-install utility, the nsupdate utility fails to add the client to the DNS zone.
What this means:The DNS configuration is incorrect.
To fix the problem:
1. Verify your configuration for DNS delegation from the parent zone to IdM. See Section 2.1.3,“Host Name and DNS Configuration” for details.
2. Make sure that dynamic updates are allowed in the IdM zone. See Section 24.6.1, “EnablingDynamic DNS Updates” for details.
For details on managing DNS in IdM, see Section 24.8, “Managing Reverse DNS Zones” . For details onmanaging DNS in Red Hat Enterprise Linux, see Section 11.2.3. “Editing Zone Files” in the NetworkingGuide.
APPENDIX A. TROUBLESHOOTING IDENTITY MANAGEMENT
457
A.3.3. Client Connection Problems
Users cannot log in to a machine. Attempts to access user and group information, such as with the getent passwd admin command, fail.
What this means:Client authentication problems often indicate problems with the System Security Services Daemon(SSSD) service.
To fix the problem:Examine the SSSD logs in the /var/log/sssd/ directory. The directory includes a log file for the DNSdomain, such as sssd_example.com.log.
If the logs do not include enough information, increase the log level:
1. In the /etc/sssd/sssd.conf file, look up the [domain/example.com] section. Adjust the debug_level option to record more information in the logs.
debug_level = 9
2. Restart the sssd service.
# systemctl start sssd
3. Examine sssd_example.com.log again. The file now includes more error messages.
A.4. LOGGING IN AND AUTHENTICATION PROBLEMS
A.4.1. Kerberos GSS Failures When Running ipa Commands
Immediately after installing a server, Kerberos errors occur when attempting to run an ipa command.For example:
ipa: ERROR: Kerberos error: ('Unspecified GSS failure. Minor code may provide more information', 851968)/('Decrypt integrity check failed', -1765328353)
What this means:DNS is not properly configured.
To fix the problem:Verify your DNS configuration.
See Section 2.1.3, “Host Name and DNS Configuration” for DNS requirements for IdM servers.
See Section 5.2.2. “DNS and Realm Settings” in the Windows Integration Guide for DNSrequirements for Active Directory trust.
A.4.2. Kerberos Authentication Not Working in the UI
Turn on verbose logging for the authentication process to help diagnose the problem. For advice onhow to do this in Firefox, see Section “Firefox Configuration for Kerberos Troubleshooting” in theSystem-Level Authentication Guide.
Linux Domain Identity, Authentication, and Policy Guide
458
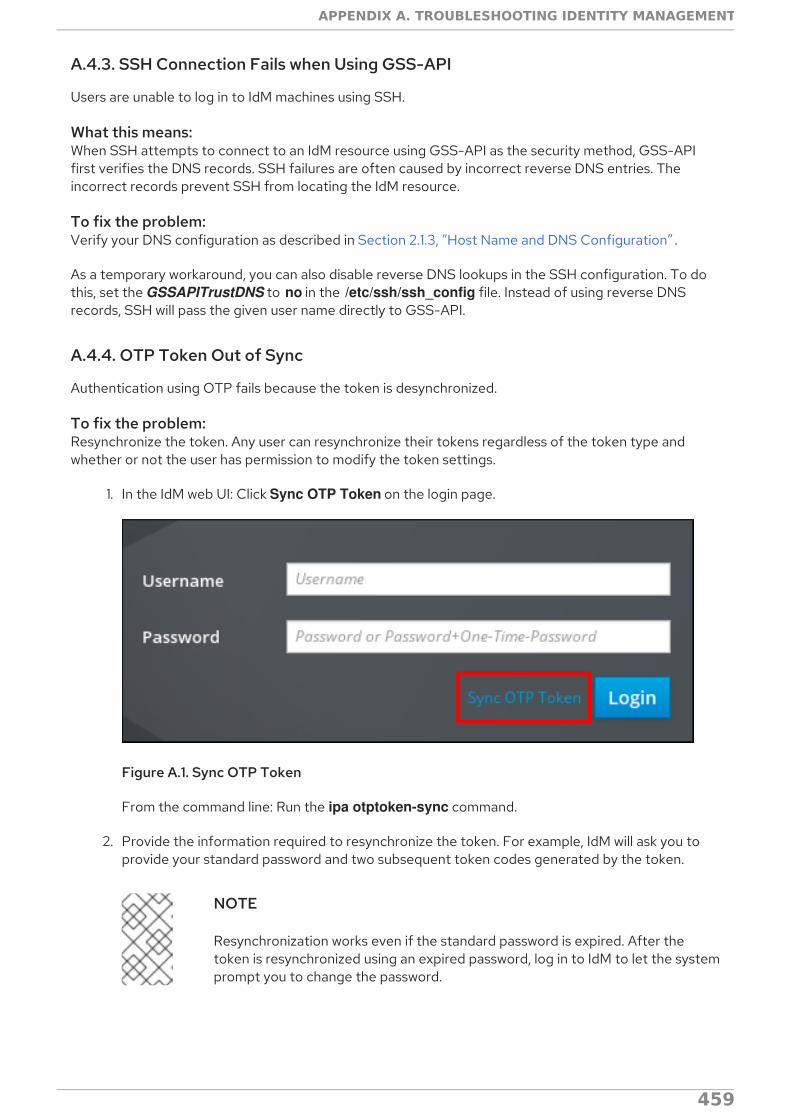
A.4.3. SSH Connection Fails when Using GSS-API
Users are unable to log in to IdM machines using SSH.
What this means:When SSH attempts to connect to an IdM resource using GSS-API as the security method, GSS-APIfirst verifies the DNS records. SSH failures are often caused by incorrect reverse DNS entries. Theincorrect records prevent SSH from locating the IdM resource.
To fix the problem:Verify your DNS configuration as described in Section 2.1.3, “Host Name and DNS Configuration” .
As a temporary workaround, you can also disable reverse DNS lookups in the SSH configuration. To dothis, set the GSSAPITrustDNS to no in the /etc/ssh/ssh_config file. Instead of using reverse DNSrecords, SSH will pass the given user name directly to GSS-API.
A.4.4. OTP Token Out of Sync
Authentication using OTP fails because the token is desynchronized.
To fix the problem:Resynchronize the token. Any user can resynchronize their tokens regardless of the token type andwhether or not the user has permission to modify the token settings.
1. In the IdM web UI: Click Sync OTP Token on the login page.
Figure A.1. Sync OTP Token
From the command line: Run the ipa otptoken-sync command.
2. Provide the information required to resynchronize the token. For example, IdM will ask you toprovide your standard password and two subsequent token codes generated by the token.
NOTE
Resynchronization works even if the standard password is expired. After thetoken is resynchronized using an expired password, log in to IdM to let the systemprompt you to change the password.
APPENDIX A. TROUBLESHOOTING IDENTITY MANAGEMENT
459
APPENDIX B. MANAGING REPLICAS AT DOMAIN LEVEL 0This appendix describes managing replicas at domain level 0 (see Chapter 7, Displaying and Raising theDomain Level). For documentation on managing replicas at domain level 1, see:
Section 4.5, “Creating the Replica: Introduction”
Chapter 6, Managing Replication Topology
B.1. REPLICA INFORMATION FILE
During the replica creation process, the ipa-replica-prepare utility creates a replica information filenamed after the replica server in the /var/lib/ipa/ directory. The replica information file is a GPG-encrypted file containing realm and configuration information for the master server.
The ipa-replica-install replica setup script configures a Directory Server instance based on theinformation contained in the replica information file and initiates the replica initialization process, duringwhich the script copies over data from the master server to the replica. A replica information file canonly be used to install a replica on the specific machine for which it was created. It cannot be used tocreate multiple replicas on multiple machines.
B.2. CREATING REPLICAS
The following sections describe the most notable replica installation scenarios.
The procedures and examples are not mutually exclusive; it is possible to use the CA, DNS, andother command-line options simultaneously. Examples in the following sections are called outseparately simply to make it more clear what each configuration area requires.
The ipa-replica-install utility accepts a number of other options as well. For a complete list, theipa-replica-install(1) man page.
B.2.1. Installing a Replica without DNS
1. On the master IdM server , run the ipa-replica-prepare utility and add the fully qualified domainname (FQDN) of the replica machine. Note that the ipa-replica-prepare script does notvalidate the IP address or verify if the IP address of the replica is reachable by other servers.
IMPORTANT
The fully qualified domain name must be a valid DNS name, which means onlynumbers, alphabetic characters, and hyphens (-) are allowed. Other characters,like underscores, in the host name cause DNS failures. Additionally, the hostname must be all lower-case; no capital letters are allowed.
For other recommended naming practices, see the Red Hat Enterprise LinuxSecurity Guide.
If the master server is configured with integrated DNS, specify the IP address of the replicamachine using the --ip-address option. The installation script then asks if you want to configurethe reverse zone for the replica. Only pass --ip-address if the IdM server was configured withintegrated DNS. Otherwise, there is no DNS record to update, and the attempt to create thereplica fails when the DNS record operation fails.
Enter the initial master server's Directory Manager (DM) password when prompted. The output
Linux Domain Identity, Authentication, and Policy Guide
460

Enter the initial master server's Directory Manager (DM) password when prompted. The outputof ipa-replica-prepare displays the location of the replica information file. For example:
[root@server ~]# ipa-replica-prepare replica.example.com --ip-address 192.0.2.2Directory Manager (existing master) password:
Do you want to configure the reverse zone? [yes]: noPreparing replica for replica.example.com from server.example.comCreating SSL certificate for the Directory ServerCreating SSL certificate for the dogtag Directory ServerSaving dogtag Directory Server portCreating SSL certificate for the Web ServerExporting RA certificateCopying additional filesFinalizing configurationPackaging replica information into /var/lib/ipa/replica-info-replica.example.com.gpgAdding DNS records for replica.example.comWaiting for replica.example.com. A or AAAA record to be resolvableThis can be safely interrupted (Ctrl+C)The ipa-replica-prepare command was successful
WARNING
Replica information files contain sensitive information. Take appropriatesteps to ensure that they are properly protected.
For other options that can be added to ipa-replica-prepare, see the ipa-replica-prepare(1) manpage.
2. On the replica machine , install the ipa-server package.
[root@replica ~]# yum install ipa-server
3. Copy the replica information file from the initial server to the replica machine:
[root@server ~]# scp /var/lib/ipa/replica-info-replica.example.com.gpg root@replica:/var/lib/ipa/
4. On the replica machine , run the ipa-replica-install utility and add the location of the replicationinformation file to start the replica initialization process. Enter the original master server'sDirectory Manager and admin passwords when prompted, and wait for the replica installationscript to complete.
[root@replica ~]# ipa-replica-install /var/lib/ipa/replica-info-replica.example.com.gpgDirectory Manager (existing master) password:
Run connection check to masterCheck connection from replica to remote master 'server.example.com':
APPENDIX B. MANAGING REPLICAS AT DOMAIN LEVEL 0
461

...
Connection from replica to master is OK.Start listening on required ports for remote master checkGet credentials to log in to remote [email protected] password:
Check SSH connection to remote master
...
Connection from master to replica is OK.
...
Configuring NTP daemon (ntpd) [1/4]: stopping ntpd [2/4]: writing configuration
...
Restarting Directory server to apply updates [1/2]: stopping directory server [2/2]: starting directory serverDone.Restarting the directory serverRestarting the KDCRestarting the web server
NOTE
If the replica file being installed does not match the current host name, the replicainstallation script displays a warning message and asks for confirmation. In somecases, such as on multi-homed machines, you can confirm to continue with themismatched host names.
For command-line options that can be added to ipa-replica-install, see the ipa-replica-prepare(1) man page. Note that one of the options ipa-replica-install accepts is the --ip-address option. When added to ipa-replica-install, --ip-address only accepts IP addressesassociated with the local interface.
B.2.2. Installing a Replica with DNS
To install a replica with integrated DNS, follow the procedure for installing without DNS described inSection B.2.1, “Installing a Replica without DNS” , but add these options to ipa-replica-install:
--setup-dns
--forwarder
See Section 4.5.3, “Installing a Replica with DNS” for details.
For example:
Linux Domain Identity, Authentication, and Policy Guide
462

[root@replica ~]# ipa-replica-install /var/lib/ipa/replica-info-replica.example.com.gpg --setup-dns --forwarder 198.51.100.0
After running ipa-replica-install, make sure proper DNS entries were created, and optionally add otherDNS servers as backup servers. See Section 4.5.3, “Installing a Replica with DNS” for details.
B.2.3. Installing a Replica with Various CA Configurations
WARNING
Red Hat strongly recommends to keep the CA services installed on more than oneserver. For information on installing a replica of the initial server including the CAservices, see Section 4.5.4, “Installing a Replica with a CA” .
If you install the CA on only one server, you risk losing the CA configuration withouta chance of recovery if the CA server fails. See Section A.2.6, “Recovering a LostCA Server” for details.
Installing a Replica from a Server with a Certificate System CA InstalledTo set up a CA on the replica when the initial server was configured with an integrated Red HatCertificate System instance (regardless of whether it was a root CA or whether it was subordinate to anexternal CA), follow the basic installation procedure described in Section B.2.1, “Installing a Replicawithout DNS”, but add the --setup-ca option to the ipa-replica-install utility. The --setup-ca optioncopies the CA configuration from the initial server's configuration.
[root@replica ~]# ipa-replica-install /var/lib/ipa/replica-info-replica.example.com.gpg --setup-ca
Installing a Replica from a Server without a Certificate System CA InstalledFor a CA-less replica installation, follow the basic procedure described in Section B.2.1, “Installing aReplica without DNS”, but add the following options when running the ipa-replica-prepare utility on theinitial server:
--dirsrv-cert-file
--dirsrv-pin
--http-cert-file
--http-pin
See Section 4.5.5, “Installing a Replica from a Server without a CA” for details.
For example:
[root@server ~]# ipa-replica-prepare replica.example.com --dirsrv-cert-file /tmp/server.key --dirsrv-pin secret --http-cert-file /tmp/server.crt --http-cert-file /tmp/server.key --http-pin secret --dirsrv-cert-file /tmp/server.crt
APPENDIX B. MANAGING REPLICAS AT DOMAIN LEVEL 0
463

B.2.4. Adding Additional Replication Agreements
Installing a replica using ipa-replica-install creates an initial replication agreement between the masterserver and the replica. To connect the replica to other servers or replicas, add additional agreementsusing the ipa-replica-manage utility.
If the master server and the new replica have a CA installed, a replication agreement for CA is alsocreated. To add additional CA replication agreements to other servers or replicas, use the ipa-csreplica-manage utility.
For more information on adding additional replication agreements, see Section B.3, “Managing Replicasand Replication Agreements”.
B.3. MANAGING REPLICAS AND REPLICATION AGREEMENTS
This chapter provides details on replication agreements and describes how to manage them.
NOTE
For guidelines on setting up additional replication agreements, see Section 4.2.2, “ReplicaTopology Recommendations”.
B.3.1. Explaining Replication Agreements
Replicas are joined in a replication agreement that copies data between them. Replication agreementsare bilateral: the data is replicated from the first replica to the other one as well as from the other replicato the first one.
NOTE
An initial replication agreement is set up between two replicas by the ipa-replica-installscript. See Chapter 4, Installing and Uninstalling Identity Management Replicas for detailson installing the initial replica.
Types of Replication AgreementsIdentity Management supports the following three types of replication agreements:
Replication agreements to replicate directory data, such as users, groups, and policies. You canmanage these agreements using the ipa-replica-manage utility.
Replication agreements to replicate certificate server data. You can manage these agreementsusing the ipa-csreplica-manage utility.
Synchronization agreements to replicate user information with an Active Directory server. Theseagreements are not described in this guide. For documentation on synchronizing IdM andActive Directory, see the Windows Integration Guide.
The ipa-replica-manage and ipa-csreplica-manage utilities use the same format and arguments. Thefollowing sections of this chapter describe the most notable replication management operationsperformed using these utilities. For detailed information about the utilities, see the ipa-replica-manage(1) and ipa-csreplica-manage(1) man pages.
B.3.2. Listing Replication Agreements
To list the directory data replication agreements currently configured for a replica, use the ipa-replica-
Linux Domain Identity, Authentication, and Policy Guide
464

To list the directory data replication agreements currently configured for a replica, use the ipa-replica-manage list command:
1. Run ipa-replica-manage list without any arguments to list all replicas in the replicationtopology. In the output, locate the required replica:
$ ipa-replica-manage listserver1.example.com: masterserver2.example.com: masterserver3.example.com: masterserver4.example.com: master
2. Add the replica's host name to ipa-replica-manage list to list the replication agreements.
$ ipa-replica-manage list server1.example.comserver2.example.com: replicaserver3.example.com: replica
The output displays the replicas to which server1.example.com sends updates.
To list certificate server replication agreements, use the ipa-csreplica-manage list command.
B.3.3. Creating and Removing Replication Agreements
Creating Replication AgreementsTo create a new replication agreement, use the ipa-replica-manage connect command:
$ ipa-replica-manage connect server1.example.com server2.example.com
The command creates a new bilateral replication agreement going from server1.example.com toserver2.example.com and from server2.example.com to server1.example.com.
If you only specify one server with ipa-replica-manage connect, IdM creates a replication agreementbetween the local host and the specified server.
To create a new certificate server replication agreement, use the ipa-csreplica-manage connectcommand.
Removing Replication AgreementsTo remove a replication agreement, use the ipa-replica-manage disconnect command:
$ ipa-replica-manage disconnect server1.example.com server4.example.com
This command disables replication from server1.example.com to server4.example.com and fromserver4.example.com to server1.example.com.
The ipa-replica-manage disconnect command only removes the replication agreement. It leaves bothservers in the Identity Management replication topology. To remove all replication agreements and datarelated to a replica, use the ipa-replica-manage del command, which removes the replica entirely fromthe Identity Management domain.
$ ipa-replica-manage del server2.example.com
To remove a certificate server replication agreement, use the ipa-csreplica-manage disconnect
APPENDIX B. MANAGING REPLICAS AT DOMAIN LEVEL 0
465

To remove a certificate server replication agreement, use the ipa-csreplica-manage disconnectcommand. Similarly, to remove all certificate replication agreements and data between two servers, usethe ipa-csreplica-manage del command.
B.3.4. Initiating a Manual Replication Update
Data changes between replicas with direct replication agreements between each other are replicatedalmost instantaneously. However, replicas that are not joined in a direct replication agreement do notreceive updates as quickly.
In some situations, it might be necessary to manually initiate an unplanned replication update. Forexample, before taking a replica offline for maintenance, all the queued changes waiting for the plannedupdate must be sent to one or more other replicas. In this situation, you can initiate a manual replicationupdate before taking the replica offline.
To manually initiate a replication update, use the ipa-replica-manage force-sync command. The localhost on which you run the command is the replica that receives the update. To specify the replica thatsends the update, use the --from option.
$ ipa-replica-manage force-sync --from server1.example.com
To initiate a replication update for certificate server data, use the ipa-csreplica-manage force-synccommand.
B.3.5. Re-initializing a Replica
If a replica has been offline for a long period of time or its database has been corrupted, you can re-initialize it. Re-initialization is analogous to initialization, which is described in Section 4.5, “Creating theReplica: Introduction”. Re-initialization refreshes the replica with an updated set of data.
NOTE
Waiting for a regular replication update or initiating a manual replication update will nothelp in this situation. During these replication updates, replicas only send changed entriesto each other. Unlike re-initialization, replication updates do not refresh the wholedatabase.
To re-initialize a data replication agreement on a replica, use the ipa-replica-manage re-initializecommand. The local host on which you run the command is the re-initialized replica. To specify thereplica from which the data is obtained, use the --from option:
$ ipa-replica-manage re-initialize --from server1.example.com
To re-initialize a certificate server replication agreement, use the ipa-csreplica-manage re-initializecommand.
B.3.6. Removing a Replica
Deleting or demoting a replica removes the IdM replica from the topology so that it no longer processesIdM requests. It also removes the host machine itself from the IdM domain.
To delete a replica, perform these steps on the replica:
1. List all replication agreements for the IdM domain. In the output, note the host name of the
Linux Domain Identity, Authentication, and Policy Guide
466

1. List all replication agreements for the IdM domain. In the output, note the host name of thereplica.
$ ipa-replica-manage listserver1.example.com: masterserver2.example.com: masterserver3.example.com: masterserver4.example.com: master
2. Use the ipa-replica-manage del command to remove all agreements configured for the replicaas well as all data about the replica.
$ ipa-replica-manage del server3.example.com
3. If the replica was configured with its own CA, then also use the ipa-csreplica-manage delcommand to remove all certificate server replication agreements.
$ ipa-csreplica-manage del server3.example.com
NOTE
This step is only required if the replica itself was configured with an IdM CA. It isnot required if only the master server or other replicas were configured with a CA.
4. Uninstall the IdM server package.
$ ipa-server-install --uninstall -U
B.4. PROMOTING A REPLICA TO A MASTER CA SERVER
In a topology including multiple replicas, one server acts as the master CA: it manages the renewal of CAsubsystem certificates and generates certificate revocation lists (CRLs). By default, the master CA isthe initial server from which replicas were created.
If you plan to take the master CA server offline or decommission it, promote a replica to take the itsplace as the master CA:
Make sure the replica is configured to handle CA subsystem certificate renewal. SeeSection B.4.1, “Changing Which Server Handles Certificate Renewal” .
Configure the replica to generate CRLs. See Section 6.5.1.2, “Changing Which Server GeneratesCRLs”.
B.4.1. Changing Which Server Handles Certificate Renewal
To determine which server is the current renewal master:
On Red Hat Enterprise Linux 7.3 and later, use the ipa config-show | grep "CA renewal master" command:
$ ipa config-show | grep "CA renewal master"IPA CA renewal master: server.example.com
APPENDIX B. MANAGING REPLICAS AT DOMAIN LEVEL 0
467
On Red Hat Enterprise Linux 7.2 and earlier, use the ldapsearch utility. In the followingexample, the renewal master is server.example.com:
$ ldapsearch -H ldap://$HOSTNAME -D 'cn=Directory Manager' -W -b 'cn=masters,cn=ipa,cn=etc,dc=example,dc=com' '(&(cn=CA)(ipaConfigString=caRenewalMaster))' dnEnter LDAP Password: # extended LDIF## LDAPv3# base <cn=masters,cn=ipa,cn=etc,dc=example,dc=com> with scope subtree# filter: (&(cn=CA)(ipaConfigString=caRenewalMaster))# requesting: dn #
# CA, server.example.com, masters, ipa, etc, example.comdn: cn=CA,cn=server.example.com,cn=masters,cn=ipa,cn=etc,dc=example,dc=com
# search resultsearch: 2result: 0 Success
# numResponses: 2# numEntries: 1
To configure another server to handle certificate renewal, use the ipa-csreplica-manage utility:
# ipa-csreplica-manage set-renewal-master
The command also automatically reconfigures the previous CA from renewal master to clone.
Linux Domain Identity, Authentication, and Policy Guide
468

APPENDIX C. REVISION HISTORYNote that revision numbers relate to the edition of this manual, not to version numbers of Red HatEnterprise Linux.
Revision 7.0-23 Tue Oct 18 2016 Aneta Šteflová PetrováVersion for 7.3 GA publication.
Revision 7.0-22 Fri Jul 29 2016 Aneta PetrováAdded a chapter on using vaults.
Revision 7.0-21 Thu Jul 28 2016 Marc MuehlfeldUpdated introduction, other minor fixes.
Revision 7.0-19 Tue Jun 28 2016 Aneta PetrováUpdated diagrams. Added a section on benefits of using IdM to the intro chapter. Other minor fixes and tweaks.
Revision 7.0-18 Fri Jun 10 2016 Aneta PetrováUpdated introduction, server installation, and troubleshooting chapters. Added a chapter for user, host, and service certificates.Merged changing domain DNS config chapter into other chapters. Other minor fixes.
Revision 7.0-17 Fri May 27 2016 Aneta PetrováAdded a diagram for user lifecycle.
Revision 7.0-16 Thu Mar 24 2016 Aneta PetrováAdded user lifecycle. Updated the User Accounts, User Authentication, and Managing Replicas chapters.
Revision 7.0-15 Thu Mar 03 2016 Aneta PetrováUpdated several DNS sections. Moved restricting domains for PAM services to the System-Level Authentication Guide.
Revision 7.0-14 Tue Feb 09 2016 Aneta PetrováAdded smart cards, ID views, and OTP. Updated some web UI screenshots and the Basics of Management and RestrictingDomains chapters. Moved uninstallation procedures into installation chapters. Commented out index. Other minor updates.
Revision 7.0-13 Thu Nov 19 2015 Aneta PetrováMinor updates to certificate profile management and promoting a replica to master.
Revision 7.0-12 Fri Nov 13 2015 Aneta PetrováVersion for 7.2 GA release with updates to DNS and other sections.
Revision 7.0-11 Thu Nov 12 2015 Aneta PetrováVersion for 7.2 GA release.
Revision 7.0-10 Fri Mar 13 2015 Tomáš ČapekAsync update with last-minute edits for 7.1.
Revision 7.0-8 Wed Feb 25 2015 Tomáš ČapekVersion for 7.1 GA release.
Revision 7.0-6 Fri Dec 05 2014 Tomáš ČapekRebuild to update the sort order on the splash page.
Revision 7.0-4 Wed Jun 11 2014 Ella Deon BallardInitial release.
APPENDIX C. REVISION HISTORY
469

Linux Domain Identity, Authentication, and Policy Guide
470