Learn techniques that will take your programming skills to the ...
23
Learn techniques that will take your programming skills to the next level!
-
Upload
khangminh22 -
Category
Documents
-
view
1 -
download
0
Transcript of Learn techniques that will take your programming skills to the ...
Learn techniques that will take yourprogramming skills to the next level!

Introduction & Contents
Hello there! Good to see you again.
So, you want to to take your code to the next level?
Now that we’ve gotten used to the basics of program flow, storing data in variables and how loops work,we can talk about more advanced techniques which will give you a huge boost of confidence in yourprogramming.
This project book is all about storing and accessing data. Setting up our data in the right way can save usmassive amounts of time and provide opportunities for some rather impressive projects!
Over the next few pages, you’ll be introduced to some new concepts - For Loops, Arrays, Functions andStructures.
Mastering these techniques takes time, patience and practise. Don’t be disheartened if you find some ofthese tricky to understand at first - we know you can do it.
Good luck, and see you in the first project!
Contents:
Project 1: For the Love of Loops - P2
Learn a new tool for your programming - ForLoops!
In this project we go through identifying and usingfor loops in a simple program.
Project 2: Fortune Teller - P3
This project will teach you another vitalprogramming concept - arrays.
Learn what an array is, how to set them up and usethem to take your projects to the next level!
Project 3: Picture This… - P5
In this project we learn how to load an image fromthe FUZE⁴ media library. Use the image we loadedto draw to the screen. Make your favouritemonster appear!
Project 4: Out of Control - P7
In this project we will look more deeply into howthe Joy-Con controllers work and how to use themin your own projects. A simple project whichachieves a lot!
Project 5: Strictly Structures - P8
We take data storage a step further and learnabout a more advanced way to set up programs.Say hello to structures!
Project 6: Monster Madness - P10
We take all the concepts learned thus far andcombine them in a silly, visually exciting projectfeaturing lots of monsters!
Project 7: Perfectly Functional - P13
Learn about the final important concept for thisbook - functions! In this project we take a closerlook at just what a function is, and how we canmake our own!
Project 8: Mega Quiz - P14
We put everything we’ve learned so far into a bigquiz project. Think you know how to make a quizprogram? Think again!
Glossary of New Commands - P21
Quickly reference any troublesome commands inour glossary. Covers all new commands introducedin the booklet.
Page 1

“For the Love of Loops”
Project: 1
Page 2
It’s a strange name, For Loop, isn’t it? Doesn’t really make any sense at first. Well, by the end of this pageyou’ll know exactly what one is and how you can use this incredibly useful tool in your own programs!
A For Loop is a special type of loop which repeats a certain number of times. It can repeat any number oftimes you need it to and what’s more, it comes with a very clever feature built-in.
1. for num = 0 to 10 loop
2. print( num )
3. update()
4. sleep( 1 )
5. repeat
Here’s what a for loop looks like. Type in the program on the leftinto a new FUZE⁴ project and run. You should see the numbers 0-9print across the screen.
Just like with a normal loop, the instructions between the loop andrepeat keywords will keep happening. However, this time they willonly happen for a total of 10 times.
So what about this num variable? Well, here’s the clever part.
1. for num = 0 to 10 step 2 loop
2. print( num )
3. print()
4. update()
5. sleep( 0.1 )
6. repeat
Sometimes you might need your for loop to count up ina different number than 1 each time.
For this, you’ll need to use step.
By adding step 2 before the loop keyword, we can makeour for loop count up in 2’s instead!
We’ve added an empty print() line to the program tomake our numbers print down the screen instead ofacross, and decreased the sleep() time to make theprogram a bit faster.
HACKER CHALLENGE:By using a negative step, can you make your For Loop count backwards instead?
Can you use our variable counter so that the sleep() command waits for longer each time?
For loops contain variables which act as a counter during the loop. You can use these variables within theloop to make clever things happen!
In the example, our variable is called num because we want to print() the number. This could be calledanything of course!
While the loop goes around, this variable increases by 1 each time. The first time FUZE⁴ reads line 2 ournum variable contains a 0. On the next time num = 1, then num = 2, and so on.
When we set up a for loop, we must write the start and end values on the line. However, there is a smallcomplication. FUZE⁴ will count up to but not including the last number. This is why we never see thenumber 10.
Experiment by changing the range of numbers in the first line. Get a feel for what to expect when tryingdifferent things. It might not seem like much yet, but this is one of the most vital techniques to understandmore complex programs.
Great job! Now you understand what a for loop is, the next step is learning how to use them. Their mostuseful application is when combined with another very useful technique. See you on the next page!

“Fortune Teller”
Project: 2
Remember, this book is all about data. In programming, we can do some very impressive things by simplysetting up our data in a different way.
To take our programming skills to the next level, we’ll need to cover a type of data storage called anarray. This is another invaluable tool for programming. Every single video game you’ve ever played usedlots and lots of arrays.
An array is a table of variables. We use them to store multiple pieces of information for easy access.Think of it like a chest of drawers, where each drawer has a number. These numbers always start at 0.
This project is to create a Fortune Teller game. We will set up a simple array of various sentences. Next,we will need to ask a question and receive a random answer chosen from our array. Let’s get into it!
1. array fortune[4] First order of business is to create our array.
Writing the statement above creates an empty array of 4 elements. An empty chest of drawers with 4drawers! Each element (drawer) is given a number. So, our array looks something like this:
fortune[0] fortune[1] fortune[2] fortune[3]
Of course, at the minute our array is completely empty. Let’s put in some information! Below we areadding a sentence to each element:
1. array fortune[4]
2. fortune[0] = “It is certain! “
3. fortune[1] = “You might be in luck! “
4. fortune[2] = “It’s not looking good… “
5. fortune[3] = “Definitely not. “
There we have it!
To store information in an array, write the elementyou would like to access followed by an equals andthe information you want to store.
There is another way we can set this up. Arrays arevery flexible in FUZE⁴.
1. fortune = [
2. “It is certain! “,
3. “You might be in luck! “,
4. “It’s not looking good… “,
5. “Definitely not. “
6. ]
Here is a different way to set up your array. Both ofthese ways work in the same way. Use whichever oneyou find most comfortable to look at!
Which one you choose depends on what you aregoing to use your array for.
When defining an array like this, you must usecommas to separate the information. The last piece ofinformation does not need a comma after it.
HACKER CHALLENGE:Add at least 2 more sentences to your array.
Page 3
Either way, it’s up to you which method to choose. You could even write the entire thing on one line, aslong as you get the punctuation correct! This might be a bit tricky to read though…
Now that we’ve got our array set up, let’s put it to use! Turn the page and we’ll finish the program.

Project: 2b“Fortune Teller”
1. array fortune[4]
2. fortune[0] = “It is certain! “
3. fortune[1] = “You might be in luck! “
4. fortune[2] = “It’s not looking good… “
5. fortune[3] = “Definitely not. “
6.
7. loop
8. clear()
9. print( “Ask me anything! \n “ )
10. update()
11. sleep( 1 )
12. question = input( “Type your question here. “ )
13. sleep( 1 )
14. print( “Are you ready to know your fortune?
\n“ )
15. update()
16. sleep( 1 )
17. print( “The answer to your question is… \n” )
18. update()
19. sleep( 1 )
20. num = random( 4 )
21. print( fortune[num], “\n” )
22. update()
23. sleep( 1 )
24. print( “Let’s play again! “ )
25. update()
26. sleep( 2 )
Let’s go over what’s happening here.
We have added a large section of codefrom line 7 onwards.
We are using a loop so that ourprogram continues to run seamlesslyuntil we decide to stop.
For the most part, we are using thesame technique as the “Quiz” project -using print() statements followed byupdate() and sleep() to provide pausesbetween printing messages.
Just like the quiz project, we use theinput() function to allow the user totype in a question.
We must store their question as avariable, even if we don’t use it.
Once they type their question andpress the + button, we print somesentences to build the tension!
The important part of our program isline 21. This is where we actuallyaccess the information from our array.
To give a random answer, we mustcreate a random index. Line 20 createsa variable called num which stores arandom number chosen out of 4 (0-3).
We then use the num variable as anindex into our array!
You can think of this as rolling a dice,then choosing an answer based on thenumber!
HACKER CHALLENGE:Add sentences to your array until you have at least 8. You can make them about anything you like - it doesn’t even have tobe a fortune teller!Make sure that your sentences actually appear in the program! HINT: You’ll need to edit line 20: num = random( 4 )
Well done! You’ve added a crucial technique to your programming skills. It may not seem like it yet, butthe concept of an array is immensely useful. From databases to painting software, from video channelson the internet to video games of all types - they all use arrays in various ingenius ways.
Learning this technique is going to be very important in your coding journey. Make sure you read thisproject carefully, try to do it from the start by yourself - but don’t worry if you need some help!
Page 4
3

Project: 3“Picture This…”
The FUZE⁴ media library is full to the brim with incredible artwork to use in your creations, so let’s getusing them! This project will teach you how to load an image into a program and draw it. To begin, we’llneed to load an image from the Media Library and store it in a variable within a program.
Your program should look like thisbefore continuing.
Page 5
Start a new project. On line one, type the code you see on the left here.Once you’ve typed it, put your cursor inside the brackets.
1. img = loadImage( “Untied Games/Creeper” )
1. img = loadImage( )
When your cursor is inside the brackets for loadImage(), you’ll see the Media key on the FUZE⁴ on-screenkeyboard start to flash. This means it’s ready to go into the media library for us to load an image easily!
As you can see on the left, the Media button on thekeyboard is glowing. When this is happening, click on thebutton using the Joy-Con, or press F2 on the USBkeyboard.
When you go into the Media section, you’ll see anumber of Artist Thumbnails. Scroll down and findUntied Games.
Click on their icon and find the JRPG folder. You’ll thensee a number of awesome assets!
Find the “Creeper” image and select it with the Abutton, or Enter on the USB keyboard.
You should see the screen on the left. At this point,notice the option underneath the image. We can nowpress the Y button to paste the filename into our code.
Once you press the Y button, you will be taken back tothe code editor and you’ll see the filename appear inthe brackets!
This is the easiest method to get assets from the Medialibrary into your code. Give it some practise and feelfree to use a different image!
1
2

“Picture This…”
Project: 3b
Now that we’ve got our image file stored in a variable, we can use another function to draw this image tothe screen.
3. loop4. clear()5. drawImage( img, 0, 0 )6. update()7. repeat
Add the lines on the left to your program. As you can see, weare using a simple loop to update the screen, with only onemain command inside: drawImage()
In the brackets for drawImage(), we need the variable whichstores the image and some screen co-ordinates (x, y). Theimage will be drawn from the origin point at the co-ordinate.
The origin point is the top left corner of the image - this includes any blank space in the picture. If wechange the co-ordinate in drawImage(), we are changing where this top left corner is placed on-screen.
3. loop4. clear()5. drawImage( img, 0, 0, 4 )6. update()7. repeat
You might notice that the image is very small! This won’t do at all. By using an extra piece of informationin our drawImage() statement, we can change the size of our image.
Adding an extra number after the Y axis position in thedrawImage() function gives the image a scalemultiplier. By putting a 4 here, we are multiplying thesize of the image by 4.
Try moving the image to somewhere else on-screen,then changing the scale multiplier.
But what if we want to do more than just move the image and change the size? We might want to spinthe image around or apply a new colour to the image. Luckily, there is a function in FUZE⁴ to do just that!
3. loop4. clear()5. drawImageEx( img, { 0, 0 }, 90, { 4, 4 }, red )6. update()7. repeat
Don’t be scared by the strange lookingbrackets! These are called curly brackets,and we use them with something calledvectors.
We won’t be going into detail on vectorsin this workbook. For now, let’s explainwhat’s going on here.
The drawImageEx() function allows us to do all sorts of things with an image. Here are the arguments:
drawImageEx( image, location, rotation, scale, tint )
The location of the image is just a pair of co-ordinates in curly brackets. The next value (rotation) is anumber of degrees to rotate the image by.
Things are a little different for the scale - we now have separate x and y scale values in curly brackets, thisgives you total control over the size of your image! Lastly, we have a tint colour to apply to the image. Trysome different colours and see the effect it has!
HACKER CHALLENGE:1. Can you add a rotation variable to your program and change it in the loop to cause your image to spin around?2. Can you add a scale variable to your program and change it in the loop to cause your image to grow or shrink?
3
4
5
Page 6

“Out of Control”
Project: 4
Learning how to use the Joy-Con controllers in your own projects is a great feeling. Suddenly yourprograms will begin to feel like real game projects. Outside of making a game, it opens up a whole worldof interactivity for any sort of program! Are you ready? It’s time to take control of this situation.
Page 7
1. loop
2. clear()
3. c = controls( 0 )
4. print( c.a )
5. update()
6. repeat
1. loop
2. clear()
3. c = controls( 0 )
4. if c.a then
5. print( “That’s the A button!” )
6. endif
7. update()
8. repeat
In this example we are using a simple if statementto display a message when we are pressing the Abutton.
Notice the print() statement is inside the ifstatement which checks if c.a is true.
When we want to check if the A button is pressed,we only need to write if c.a then.
If the message displays only when the A button ispressed, your program is working perfectly!
If we run this program on the left, all we will see is a single 0in the top left corner of the screen. See what happens whenyou press the A button!
Notice the strange looking variable on line 4. We have our cvariable, followed by “.a”.
The controls function is special. It adds a number ofproperties to the variable we assign it to.
1. c = controls( 0 ) If we want to access the controllers, we need to use afunction called controls().
If you’ve looked at any of the FUZE⁴ demo projects, you might have seen a line of code which looks likethe one just above in the grey box. The 0 in the brackets tells FUZE⁴ which pair of Joy-Con’s we are using.
Sometimes instead of a c variable, you’ll see a letter j instead. The name isn’t important, but notice thatwe are assigning the result of the controls() function to a variable.
Once we do this we can access any of the buttons, any of the control sticks and even the gyroscope formotion controls!
Programs which use the controls often need to be checking them constantly, or we wouldn’t be able tocontrol things very well! This means we will be using a loop:
If we can now use c.a to check the A button, how do you think we check the B button? Yes. You arecorrect. I don’t even need to hear your answer! It really is that simple.
HACKER CHALLENGE: Can you add more If Statements to the program to display a message when the B,X and Y buttons are pressed?
Project: 5“Strictly Structures”
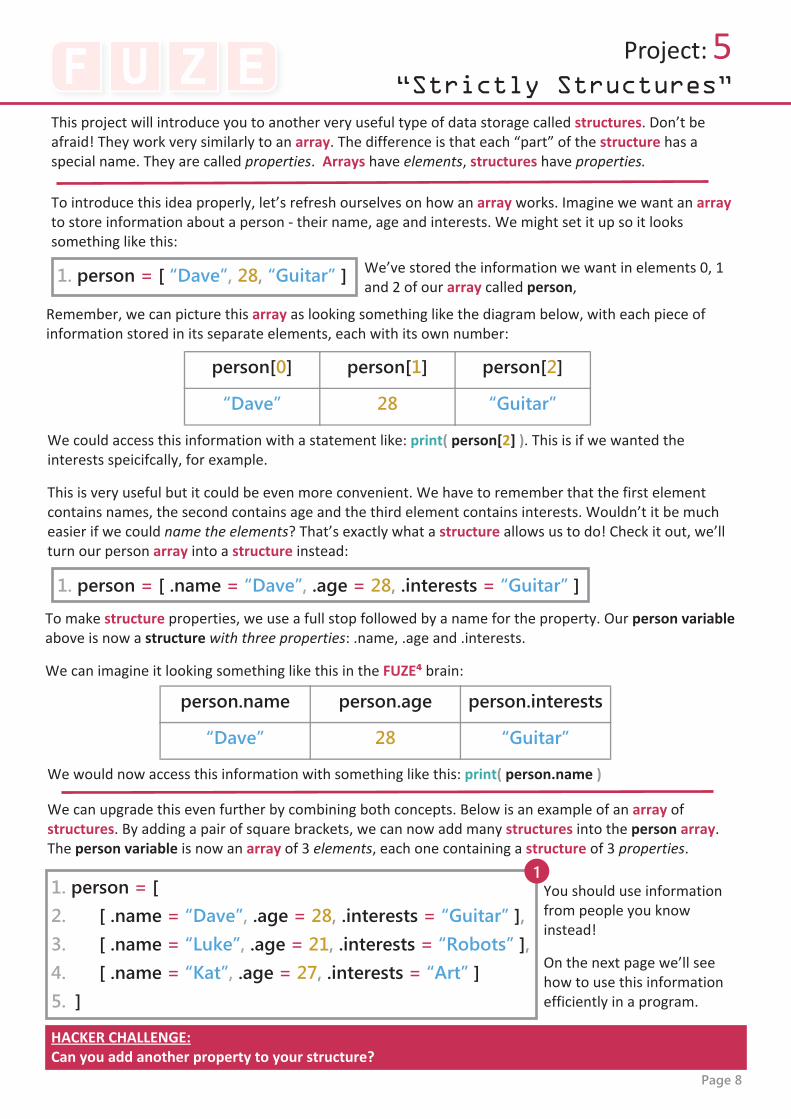
This project will introduce you to another very useful type of data storage called structures. Don’t beafraid! They work very similarly to an array. The difference is that each “part” of the structure has aspecial name. They are called properties. Arrays have elements, structures have properties.
person[0] person[1] person[2]
“Dave” 28 “Guitar”
1. person = [ “Dave”, 28, “Guitar” ] We’ve stored the information we want in elements 0, 1and 2 of our array called person,
Remember, we can picture this array as looking something like the diagram below, with each piece ofinformation stored in its separate elements, each with its own number:
We could access this information with a statement like: print( person[2] ). This is if we wanted theinterests speicifcally, for example.
This is very useful but it could be even more convenient. We have to remember that the first elementcontains names, the second contains age and the third element contains interests. Wouldn’t it be mucheasier if we could name the elements? That’s exactly what a structure allows us to do! Check it out, we’llturn our person array into a structure instead:
1. person = [ .name = “Dave”, .age = 28, .interests = “Guitar” ]
To introduce this idea properly, let’s refresh ourselves on how an array works. Imagine we want an arrayto store information about a person - their name, age and interests. We might set it up so it lookssomething like this:
To make structure properties, we use a full stop followed by a name for the property. Our person variableabove is now a structure with three properties: .name, .age and .interests.
We can imagine it looking something like this in the FUZE⁴ brain:
person.name person.age person.interests
“Dave” 28 “Guitar”
We would now access this information with something like this: print( person.name )
1. person = [2. [ .name = “Dave”, .age = 28, .interests = “Guitar” ],3. [ .name = “Luke”, .age = 21, .interests = “Robots” ],4. [ .name = “Kat”, .age = 27, .interests = “Art” ]5. ]
HACKER CHALLENGE:Can you add another property to your structure?
We can upgrade this even further by combining both concepts. Below is an example of an array ofstructures. By adding a pair of square brackets, we can now add many structures into the person array.The person variable is now an array of 3 elements, each one containing a structure of 3 properties.
You should use informationfrom people you knowinstead!
On the next page we’ll seehow to use this informationefficiently in a program.
Page 8
“Stricly Structures”
Project: 5b
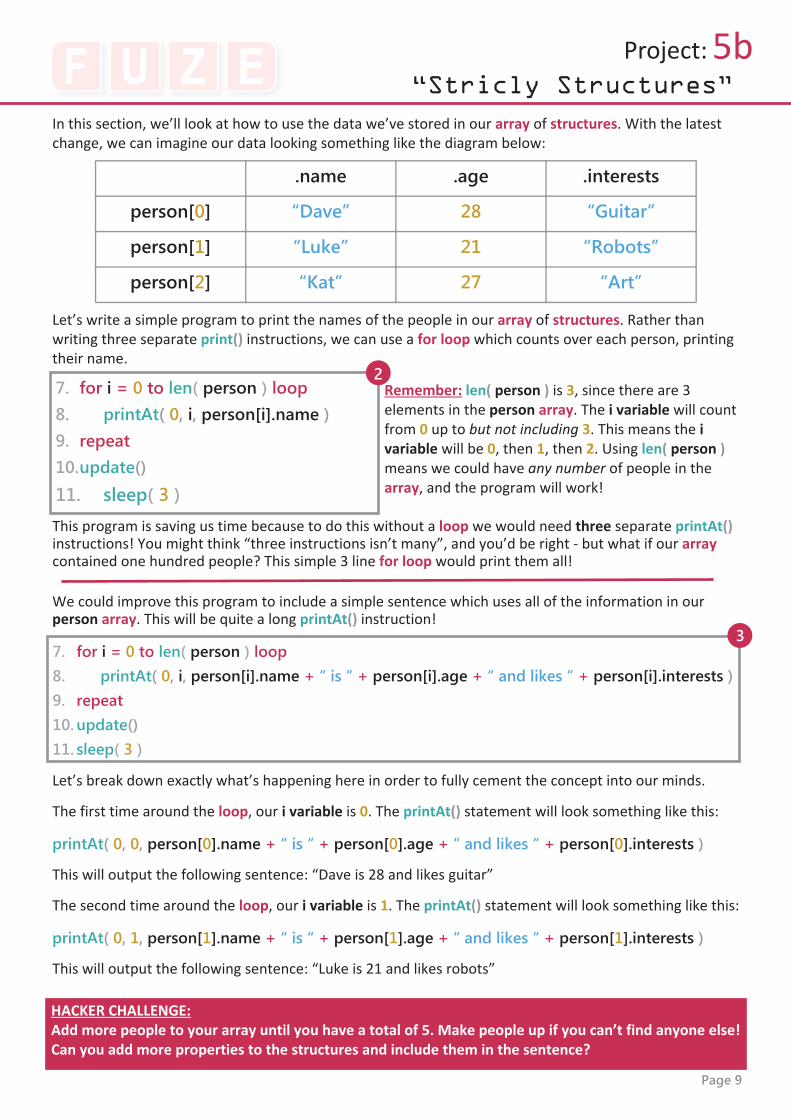
In this section, we’ll look at how to use the data we’ve stored in our array of structures. With the latestchange, we can imagine our data looking something like the diagram below:
7. for i = 0 to len( person ) loop8. printAt( 0, i, person[i].name + “ is “ + person[i].age + “ and likes “ + person[i].interests )9. repeat10. update()11. sleep( 3 )
7. for i = 0 to len( person ) loop8. printAt( 0, i, person[i].name )9. repeat10. update()11. sleep( 3 )
.name .age .interests
person[0] “Dave” 28 “Guitar”
person[1] “Luke” 21 “Robots”
person[2] “Kat” 27 “Art”
Let’s write a simple program to print the names of the people in our array of structures. Rather thanwriting three separate print() instructions, we can use a for loop which counts over each person, printingtheir name.
Remember: len( person ) is 3, since there are 3elements in the person array. The i variable will countfrom 0 up to but not including 3. This means the ivariable will be 0, then 1, then 2. Using len( person )means we could have any number of people in thearray, and the program will work!
We could improve this program to include a simple sentence which uses all of the information in ourperson array. This will be quite a long printAt() instruction!
This program is saving us time because to do this without a loop we would need three separate printAt()instructions! You might think “three instructions isn’t many”, and you’d be right - but what if our arraycontained one hundred people? This simple 3 line for loop would print them all!
Let’s break down exactly what’s happening here in order to fully cement the concept into our minds.
The first time around the loop, our i variable is 0. The printAt() statement will look something like this:
printAt( 0, 0, person[0].name + “ is “ + person[0].age + “ and likes “ + person[0].interests )
This will output the following sentence: “Dave is 28 and likes guitar”
The second time around the loop, our i variable is 1. The printAt() statement will look something like this:
printAt( 0, 1, person[1].name + “ is “ + person[1].age + “ and likes “ + person[1].interests )
This will output the following sentence: “Luke is 21 and likes robots”
HACKER CHALLENGE:Add more people to your array until you have a total of 5. Make people up if you can’t find anyone else!Can you add more properties to the structures and include them in the sentence?
Page 9
3

Project: 6“Monster Madness”
In this project we’ll combine everything we’ve learned so far into a silly, colourful project! Using arrays,structures and for loops, we’ll be applying these concepts into a basic template for drawing lots ofimages on the screen and making things happen to all of them at once using the Joy-Con controllers.
This project will be the first look at setting up a more “professional” sort of program. Remember, thetheme of this workbook is data. Setting up our data is going to very important here, there’s a lot to learn,so put your coding hats on! Start a new project and enter the code below.
1. images = [2. loadImage( “Untied Games/Creeper” ),3. loadImage( “Untied Games/Man Eater” ),4. loadImage( “Untied Games/Slime” ),5. loadImage( “Untied Games/Goblin” )6. ]
We’ll begin with an array of images to use in our program. Each element of the array will be aloadImage() instruction, containing a graphic from the artist Untied Games.
Of course, you don’t have to use thesame images as we do! Feel free tobrowse the FUZE⁴ media library and pastedifferent filenames into your code.
Important: Make sure you use singleimage, 2D graphics. This program won’twork with 3D models or tilesheets!
Once we’ve completed this array, we’ll need to create an array of structures to store all of our monstersto put on screen. We’ll be setting this up a little differently this time, since we want to have lots ofmonsters on screen. Take a look at the code below:
8. numMonsters = 509. array monsters[numMonsters] = [10. .image = 0,11. .rotation = 0,12. .scale = {1, 1},13. .position = {0, 0}14. ]
Wow, this is already starting to look quite complex!
Don’t worry - this is exactly like our person array fromthe previous project, but it’s laid out a little differently.
monsters is an array of 50 elements, each one astructure containing 4 properties.
Rather than putting values in for each structure likewe did before, we are starting with default values forall of the structures.
Now that’s out of the way, we need to populate our monsters array with values. We need to set differentvalues for all 50 elements - this will take a while if we do it manually! Instead, we will use a for loop andsome random values to make it interesting!
16. for i = 0 to len( monsters ) loop17. monsters[i].image = images[random( len( images ) )]18. monsters[i].rotation = random( 360 )19. monsters[i].scale = {1, 1} * ( random( 4 ) + 1 )20. monsters[i].position = {random( gwidth() ), random( gheight() )}21. repeat
There it is! This is quite a complicated looking for loop, but don’t worry - it’s simple when you break itdown. On the next page, we’ll look at each of these lines in more detail so as to understand the reasonsbehind them.
See you on the next page! Well done - not much more to do now!Page 10
2
3

Project: 6b“Monster Madness”
17. monsters[i].image = images[random( len( images ) )]
18. monsters[i].rotation = random( 360 )
19. monsters[i].scale = {1, 1} * ( random( 4 ) + 1 )
20. monsters[i].position = {random( gwidth() ), random( gheight() )}
Alright, let’s look at each of the lines in the for loop in more detail. What we’re doing in this for loop ispopulating the array. When we declare it on line 9, we are simply starting with default values. It’s our jobnow to put the things we need into our array!
First, we need to assign an image to the .image property. We have our images stored in the images array,so we need to select a random one then assign it to the property.
It looks a bit tricky, but what we are doing is simple. We choose a random number out of the length ofthe images array, then use that number to index the array. We could use random( 4 ) instead, but usinglen( images ) allows us to add more images and the program will work!
The next two steps are more simple. We choose a random rotation angle (out of 360) for the .rotationproperty, followed by a random scale.
We use {1, 1} multiplied by a random number out of 5 (with a minimum of 1) here. When you multiply avector like {1, 1} by a number, both of the numbers are multiplied!
Lastly, we give the monster a random position. The position is stored in a pair of curly brackets as avector, since we’ll be using drawImageEx() to make them appear on screen.
Using random( gwidth() ) we are choosing a random number out of the whole screen’s x axis. We userandom( gheight() ) for the y axis and there we go! We now have a random position in the property.
23. loop24 clear()25. c = controls( 0 )26.27. update()28. repeat
The next step is to build the basic program loop. We’ll start with just the shell, then add to it on the nextpage.
We simply want to clear() and update() the screen with a controls() check between them.
Example:len( images ) = 4 How many images in the arrayrandom( 4 ) = 1 The random resultmonsters[i].image = images[1] The chosen image
Page 11
4
Project: 6c“Monster Madness”
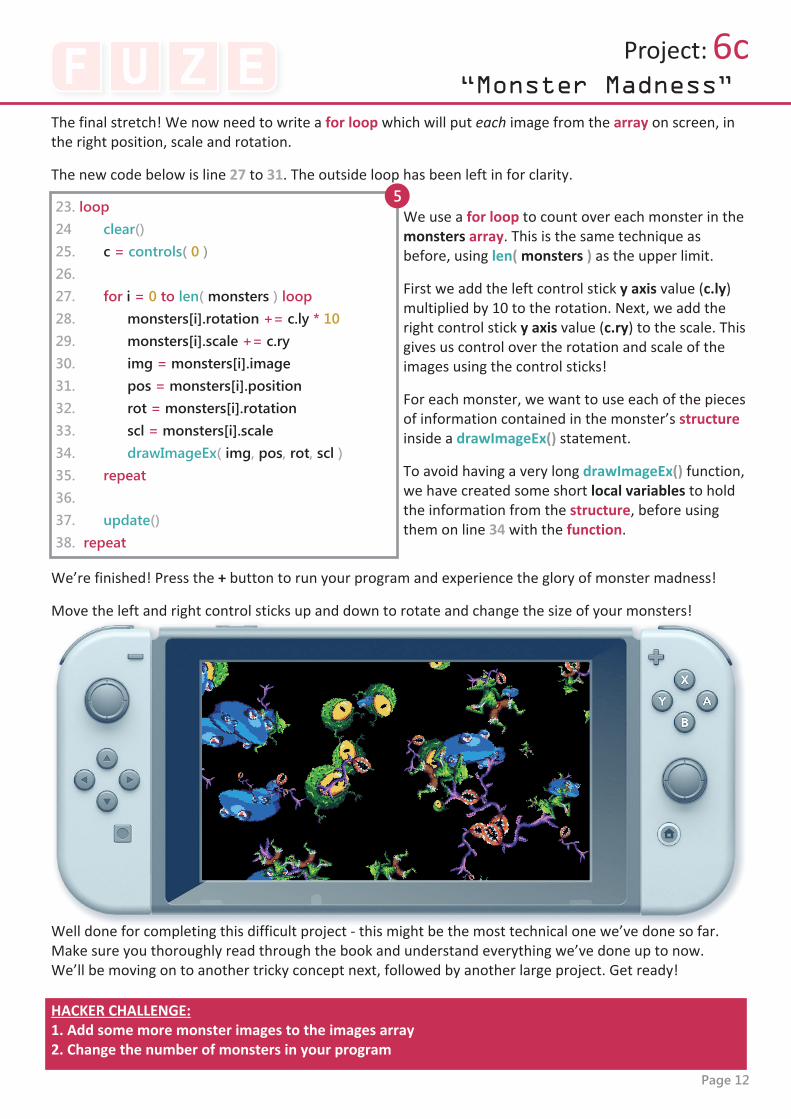
The final stretch! We now need to write a for loop which will put each image from the array on screen, inthe right position, scale and rotation.
The new code below is line 27 to 31. The outside loop has been left in for clarity.
23. loop24 clear()25. c = controls( 0 )26.27. for i = 0 to len( monsters ) loop28. monsters[i].rotation += c.ly * 1029. monsters[i].scale += c.ry30. img = monsters[i].image31. pos = monsters[i].position32. rot = monsters[i].rotation33. scl = monsters[i].scale34. drawImageEx( img, pos, rot, scl )35. repeat36.37. update()38. repeat
We use a for loop to count over each monster in themonsters array. This is the same technique asbefore, using len( monsters ) as the upper limit.
First we add the left control stick y axis value (c.ly)multiplied by 10 to the rotation. Next, we add theright control stick y axis value (c.ry) to the scale. Thisgives us control over the rotation and scale of theimages using the control sticks!
For each monster, we want to use each of the piecesof information contained in the monster’s structureinside a drawImageEx() statement.
To avoid having a very long drawImageEx() function,we have created some short local variables to holdthe information from the structure, before usingthem on line 34 with the function.
We’re finished! Press the + button to run your program and experience the glory of monster madness!
Move the left and right control sticks up and down to rotate and change the size of your monsters!
HACKER CHALLENGE:1. Add some more monster images to the images array2. Change the number of monsters in your program
Well done for completing this difficult project - this might be the most technical one we’ve done so far.Make sure you thoroughly read through the book and understand everything we’ve done up to now.We’ll be moving on to another tricky concept next, followed by another large project. Get ready!
Page 12
5

“Perfectly Functional”
Project: 7
Time to level up your skills even further! In this project we’ll be diving deeper into what exactly a functionis, and even how to create our own. This incredibly useful technique is guaranteed to level you up!We’ve already used functions plenty, but perhaps you don’t realise it yet. Every time we write print() orink(), we are using a function. We can also make our own to do anything we want!
A function is a series of instructions which receives an input and gives us an output - even if that input andoutput is nothing. Think of it like a separate little program within your main program.
Let’s make a very simple example of a custom function. Imagine we want to convert a number of milesinto kilometres. We would need to input a number of miles, and the function will output anumber of kilometres. Take a look at the examples below - no need to write them.
function milesToKm( miles )return miles * 1.609
myWalk = milesToKm( 3 )print( myWalk )
We begin with the function keyword. This tells FUZE⁴ we’re about tocreate our own function. Next, we name it. Here we’ve called itmilesToKm.
Next, in the brackets we tell FUZE⁴ the information to expect. We want this function to convert a number,so we must provide it with one. We name this piece of information as a variable which is used only withinthat function. This is called a local variable.
On the second line, we use the return keyword and state the value we want to return. To convert milesinto kilometres, we multiply the number of miles by 1.609.
We could use this to figure out how many kilometres a 3 mile walkis. We create a variable and assign the result of our new function toit!
1. ink( fuzePink )2. print( “Hello!” )3. update()4. sleep( 1 )
Consider the code on the left - no need to write it yet.
We have a program which prints “Hello!” in fuzePink and sleeps forone second. These four lines are necessary if we want to make textappear with a delay afterwards. Remember the quiz game? We usedthis technique repeatedly to make our text appear at certain times.
We can write a function to use these four lines of code over and over again without having to type themeach time. Pretty useful! Alright, time to actually write some code!
1. function fuzePrint( colour, text, delay )2. ink( colour )3. print( text )4. update()5. sleep( delay )6. return void
It doesn’t stop there! As we said before, functions don’t always need to return anything. Sometimes theycan simply execute a sequence of instructions. Here’s a very practical example:
8. fuzePrint( fuzePink, “Hello!”, 1 )
In this example, we are providing our functionwith a colour, some text, and a time delay. Theselocal variables are all used in the instructionswithin the function.
With that done, we can use this as many times aswe want in our program!
Simply call your function and put the desiredcolour, text and delay time in the brackets!
HACKER CHALLENGE:1. Can you add a size control to your function using textSize()?
Page 13

Project: 8“Mega Quiz”
We’re going back to our roots in this project. It’s time to use everything we’ve learned so far to make aprogram. That’s right - loops, variables, if statements, arrays, for loops, structures and functions!
In this project we’ll be making the ultimate quiz game. This will take the ideas we worked on in theprevious book to another level. This will be the most impressive quiz project you’ve ever worked on, thepinnacle of interactive trivia-based question games. Are you ready?
The biggest difference between the old quiz and this one will be the way the program works. In the firstbook, we wrote each question as a separate list of instructions - it involved repeating ourselves a lot, andlots more typing than we really need.
There is a way to turn our entire quiz into a single loop - it just requires us to set up our data moreeffectively. Let’s use what we’ve learned about structures to set up a question and answer table.
For a bit of extra brilliance, we’ll make this a multiple-choice quiz. This means we need an array ofstructures, where each element of the array is a structure of 3 properties: the question, the possibleanswers, and the correct answer.
1. quiz = [2. [4. .question = “What is an array?”,3. .answers = [ “A table of data”, “A sausage”, “A type of small dog” ],4. .correct = 05. ],6. [7. .question = “What is a loop?” ,8. .answers = [ “A type of cheese”, “A repeated set of instructions”, “A dance” ],9. .correct = 110. ]11. ]
Here is what the array should look like. This one contains 2 questions, stored in quiz[0] and quiz[1]. Wecould access the question of either with a statement like: print( quiz[0].question )
The .answers property contains another array of 3 elements, each one a possible answer. The .correctproperty stores the number which corresponds to the correct answer. For example, the .answersproperty in question 1 contains:
.answers[0] - “A table of data”
.answers[1] - “A sausage”
.answers[2] - “A type of small dog”
The correct answer is of course .answers[0], so the .correct property stores a 0!
HACKER CHALLENGE:Make sure to use your own questions!
Page 14
Project: 8b“Mega Quiz”
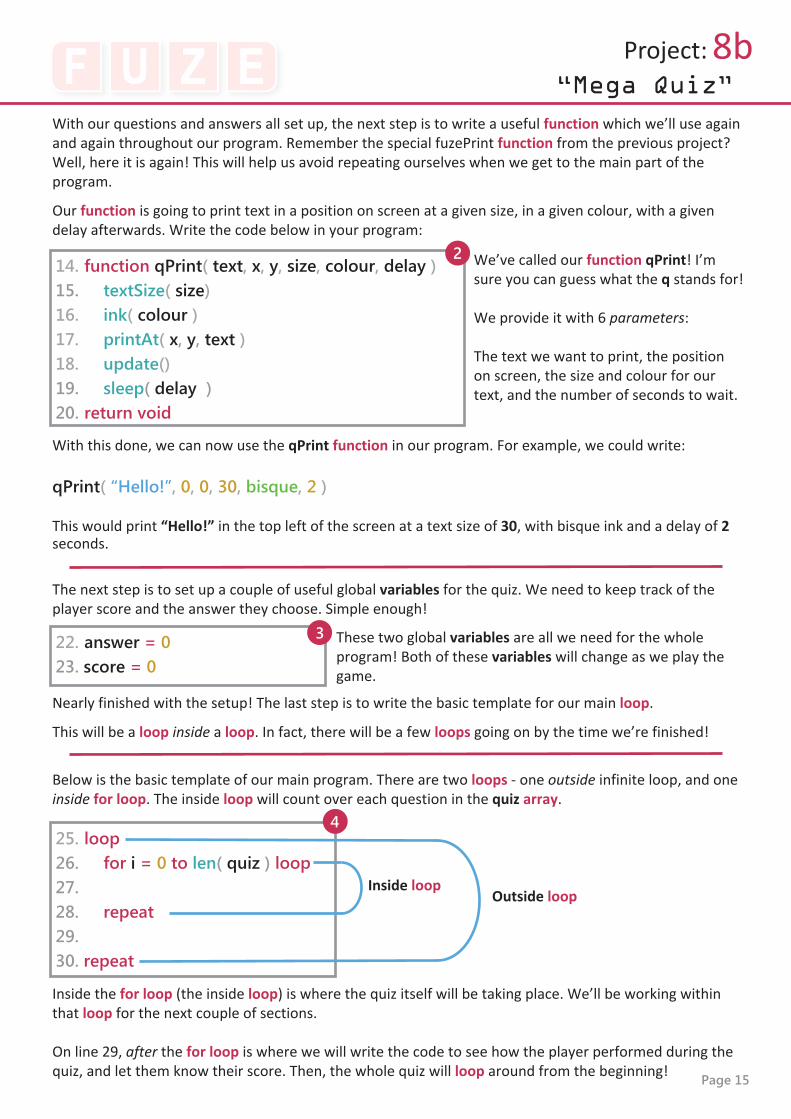
With our questions and answers all set up, the next step is to write a useful function which we’ll use againand again throughout our program. Remember the special fuzePrint function from the previous project?Well, here it is again! This will help us avoid repeating ourselves when we get to the main part of theprogram.
Our function is going to print text in a position on screen at a given size, in a given colour, with a givendelay afterwards. Write the code below in your program:
14. function qPrint( text, x, y, size, colour, delay )15. textSize( size)16. ink( colour )17. printAt( x, y, text )18. update()19. sleep( delay )20. return void
We’ve called our function qPrint! I’msure you can guess what the q stands for!
We provide it with 6 parameters:
The text we want to print, the positionon screen, the size and colour for ourtext, and the number of seconds to wait.
With this done, we can now use the qPrint function in our program. For example, we could write:
qPrint( “Hello!”, 0, 0, 30, bisque, 2 )
This would print “Hello!” in the top left of the screen at a text size of 30, with bisque ink and a delay of 2seconds.
The next step is to set up a couple of useful global variables for the quiz. We need to keep track of theplayer score and the answer they choose. Simple enough!
22. answer = 023. score = 0
These two global variables are all we need for the wholeprogram! Both of these variables will change as we play thegame.
Nearly finished with the setup! The last step is to write the basic template for our main loop.
This will be a loop inside a loop. In fact, there will be a few loops going on by the time we’re finished!
25. loop26. for i = 0 to len( quiz ) loop27.28. repeat29.30. repeat
Below is the basic template of our main program. There are two loops - one outside infinite loop, and oneinside for loop. The inside loop will count over each question in the quiz array.
Outside loopInside loop
Inside the for loop (the inside loop) is where the quiz itself will be taking place. We’ll be working withinthat loop for the next couple of sections.
On line 29, after the for loop is where we will write the code to see how the player performed during thequiz, and let them know their score. Then, the whole quiz will loop around from the beginning!
3
4
Page 15
Project: 8c“Mega Quiz”
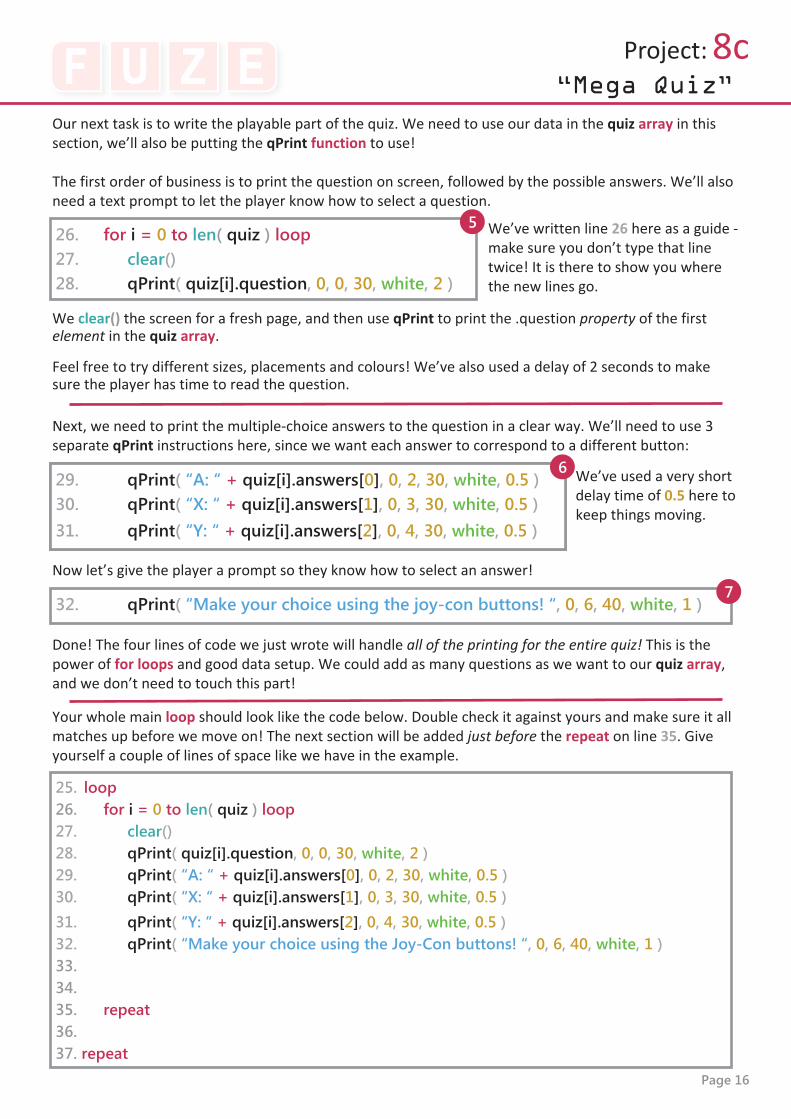
Our next task is to write the playable part of the quiz. We need to use our data in the quiz array in thissection, we’ll also be putting the qPrint function to use!
The first order of business is to print the question on screen, followed by the possible answers. We’ll alsoneed a text prompt to let the player know how to select a question.
26. for i = 0 to len( quiz ) loop27. clear()28. qPrint( quiz[i].question, 0, 0, 30, white, 2 )
We’ve written line 26 here as a guide -make sure you don’t type that linetwice! It is there to show you wherethe new lines go.
We clear() the screen for a fresh page, and then use qPrint to print the .question property of the firstelement in the quiz array.
Feel free to try different sizes, placements and colours! We’ve also used a delay of 2 seconds to makesure the player has time to read the question.
29. qPrint( “A: “ + quiz[i].answers[0], 0, 2, 30, white, 0.5 )30. qPrint( “X: “ + quiz[i].answers[1], 0, 3, 30, white, 0.5 )31. qPrint( “Y: “ + quiz[i].answers[2], 0, 4, 30, white, 0.5 )
Next, we need to print the multiple-choice answers to the question in a clear way. We’ll need to use 3separate qPrint instructions here, since we want each answer to correspond to a different button:
Now let’s give the player a prompt so they know how to select an answer!
We’ve used a very shortdelay time of 0.5 here tokeep things moving.
32. qPrint( “Make your choice using the joy-con buttons! “, 0, 6, 40, white, 1 )
Done! The four lines of code we just wrote will handle all of the printing for the entire quiz! This is thepower of for loops and good data setup. We could add as many questions as we want to our quiz array,and we don’t need to touch this part!
29. qPrint( “A: “ + quiz[i].answers[0], 0, 2, 30, white, 0.5 )30. qPrint( “X: “ + quiz[i].answers[1], 0, 3, 30, white, 0.5 )31. qPrint( “Y: “ + quiz[i].answers[2], 0, 4, 30, white, 0.5 )
25. loop26. for i = 0 to len( quiz ) loop27. clear()28. qPrint( quiz[i].question, 0, 0, 30, white, 2 )29. qPrint( “A: “ + quiz[i].answers[0], 0, 2, 30, white, 0.5 )30. qPrint( “X: “ + quiz[i].answers[1], 0, 3, 30, white, 0.5 )31. qPrint( “Y: “ + quiz[i].answers[2], 0, 4, 30, white, 0.5 )32. qPrint( “Make your choice using the Joy-Con buttons! “, 0, 6, 40, white, 1 )33.34.35. repeat36.37. repeat
Your whole main loop should look like the code below. Double check it against yours and make sure it allmatches up before we move on! The next section will be added just before the repeat on line 35. Giveyourself a couple of lines of space like we have in the example.
5
6
7
Page 16

Project: 8d“Mega Quiz”
Well done for making it this far! We’re getting into the mechanics of how to select an answer now. Forthis, we’ll need to write a little routine inside our for loop. Get ready for some if statements!
51. if answer == quiz[i].correct then52. qPrint( “Correct! “, 0, 8, 50, green, 1 )53. score += 154. else55. qPrint( “Bad Luck… Incorrect! “, 0, 8, 50, red, 1 )56. endif57. repeat
34. press = false35. while press == false loop36.37. repeat38. repeat
The new code we’ve added are lines 34 - 37. The repeatkeyword on line 38 should already be there for you, this is therepeat which matches the for i = 0 to len( quiz ) instruction online 26.
Once we’ve added this new while loop, we’ll be working insideit, on line 36.
But what is going on with this strange looking while loop?
Before we start it, we define a local variable called press. This variable will tell us when a button ispressed to select an answer. We want this loop to repeat until the player presses a button.
Because we wrote while press == false loop, this loop will stop when the press variable becomes true.
This will allow us to easily stop the the loop when the player selects a question!
34. press = false35. while press == false loop36. c = controls( 0 )37. if c.a then38. press = true39. answer = 040. endif41. if c.x then42. press = true43. answer = 144. endif45. if c.y then46. press = true47. answer = 248. endif49. repeat
Give yourself one line of space, then on line 51 we must write the if statement which checks the answeragainst the correct answer for the current question. This section should be very familiar from the previousquiz game! Notice the repeat on line 57. This repeat is the one tied to the for loop on line 26.
On the left we have the code which allows the player toinput an answer. The new code is from line 36 to line 48.
This loop will continue to run until the player selects ananswer using the Joy-Con controller buttons.
Inside our while loop, we first call the controls() functionand assign it to a variable called c.
We can then check the buttons we want by using three ifstatements. Since each button provides a different answer,we have used three separate if statements here, each oneassigning a different number to the answer variable.
In each if statement, we make the press variable true inorder to break out of the loop.
8
9
10
Page 17
Project: 8e“Mega Quiz”
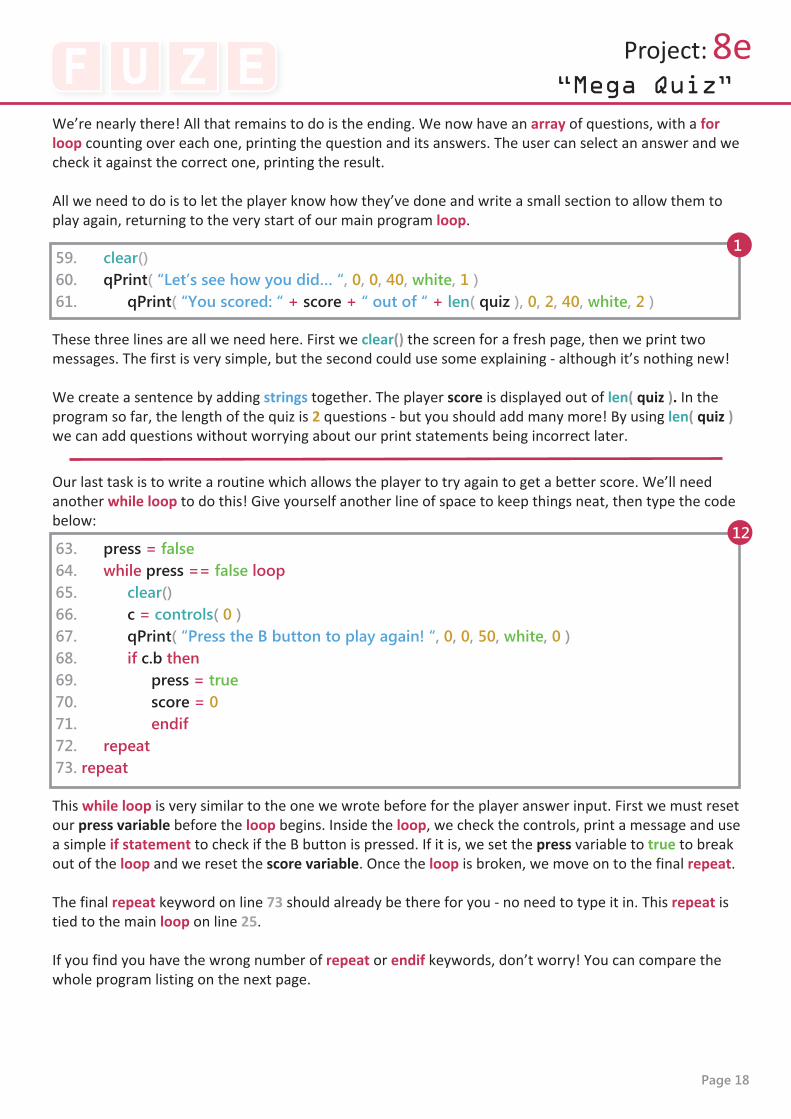
We’re nearly there! All that remains to do is the ending. We now have an array of questions, with a forloop counting over each one, printing the question and its answers. The user can select an answer and wecheck it against the correct one, printing the result.
All we need to do is to let the player know how they’ve done and write a small section to allow them toplay again, returning to the very start of our main program loop.
59. clear()60. qPrint( “Let’s see how you did… “, 0, 0, 40, white, 1 )61. qPrint( “You scored: “ + score + “ out of “ + len( quiz ), 0, 2, 40, white, 2 )
These three lines are all we need here. First we clear() the screen for a fresh page, then we print twomessages. The first is very simple, but the second could use some explaining - although it’s nothing new!
We create a sentence by adding strings together. The player score is displayed out of len( quiz ). In theprogram so far, the length of the quiz is 2 questions - but you should add many more! By using len( quiz )we can add questions without worrying about our print statements being incorrect later.
Our last task is to write a routine which allows the player to try again to get a better score. We’ll needanother while loop to do this! Give yourself another line of space to keep things neat, then type the codebelow:
63. press = false64. while press == false loop65. clear()66. c = controls( 0 )67. qPrint( “Press the B button to play again! “, 0, 0, 50, white, 0 )68. if c.b then69. press = true70. score = 071. endif72. repeat73. repeat
This while loop is very similar to the one we wrote before for the player answer input. First we must resetour press variable before the loop begins. Inside the loop, we check the controls, print a message and usea simple if statement to check if the B button is pressed. If it is, we set the press variable to true to breakout of the loop and we reset the score variable. Once the loop is broken, we move on to the final repeat.
The final repeat keyword on line 73 should already be there for you - no need to type it in. This repeat istied to the main loop on line 25.
If you find you have the wrong number of repeat or endif keywords, don’t worry! You can compare thewhole program listing on the next page.
1
12
Page 18

“Mega Quiz”
Project: 8f
1. quiz = [2. [3. .question = “What is an array?” ,4. .answers = [ “A table of data”, “A sausage”, “A type of small dog” ],5. .correct = 06. ],7. [8. .question = “What is a loop?” ,9. .answers = [ “A type of cheese”, “A repeated set of instructions”, “A dance” ],10. .correct = 111. ]12. ]13.14. function qPrint( text, x, y, size, colour, delay )15. textSize( size )16. ink( colour )17. printAt( x, y, text )18. update()19. sleep( delay )20. return void21.22. answer = 023. score = 0
HACKER CHALLENGE:1. Check all of your code and make sure it’s in perfect working order!2. EASY! Can you add more questions to your quiz for a total of 5?3. TRICKY! Can you add one more potential answer to your questions? You’ll have to add quite a fewthings for this to work!You’ll need to modify the quiz array, add another qPrint instruction, and addanother if statement to the while loop which checks the player input.
Congratulations! You’ve completed the FUZE Project Workbook 2. Give yourself a high five! Or a pat onthe back. Even just a satisfied smile will do!
By now you should be understanding the basics more clearly, feeling confident with loops, variables andif statements and even beginning to set up data in more complicated and efficient ways.
Learning to code is not easy - it’s all very well and good being told what an array or a structure is butthese ideas don’t “click” into place until you’ve had some practice. There’s the magic word - Practice!
Keep going. Play with these projects and write them in different ways, change numbers, multiply insteadof add - there’s no wrong way to experiment with them! You will learn something new by simply tryingthings out. Don’t worry if it doesn’t work, it’s a chance to learn something new!
Below (and on the following page) is the full program listing for the quiz project with correct linenumbers. Be sure that yours matches up before you start changing things. Making a copy is a great idea!
Page 19

“Mega Quiz”
Project: 8f
25. loop26. for i = 0 to len( quiz ) loop27. clear()28. qPrint( quiz[i].question, 0, 0, 30, white, 2 )29. qPrint( “A: “ + quiz[i].answers[0], 0, 2, 30, white, 0.5 )30. qPrint( “X: “ + quiz[i].answers[1], 0, 3, 30, white, 0.5 )31. qPrint( “Y: “ + quiz[i].answers[2], 0, 4, 30, white, 0.5 )32. qPrint( “Make your choice using the Joy-Con buttons! “, 0, 6, 40, white, 1 )33.34. press = false35. while press == false loop36. c = controls( 0 )37. if c.a then38. press = true39. answer = 040. endif41. if c.x then42. press = true43. answer = 144. endif45. if c.y then46. press = true47. answer = 248. endif49. repeat50.51. if answer == quiz[i].correct then52. qPrint( “Correct! “, 0, 8, 50, green, 1 )53. score += 154. else55. qPrint( “Bad Luck… Incorrect! “, 0, 8, 50, red, 1 )56. endif57. repeat58.59. clear()60. qPrint( “Let’s see how you did… “, 0, 0, 40, white, 1 )61. qPrint( “You scored: “ + score + “ out of “ + len( quiz ), 0, 2, 40, white, 2 )62.63. press = false64. while press == false loop65. clear()66. c = controls( 0 )67. qPrint( “Press the B button to play again! “, 0, 0, 50, white, 0 )68. if c.b then69. press = true70. score = 071. endif72. repeat73. repeat
Page 20
Glossary
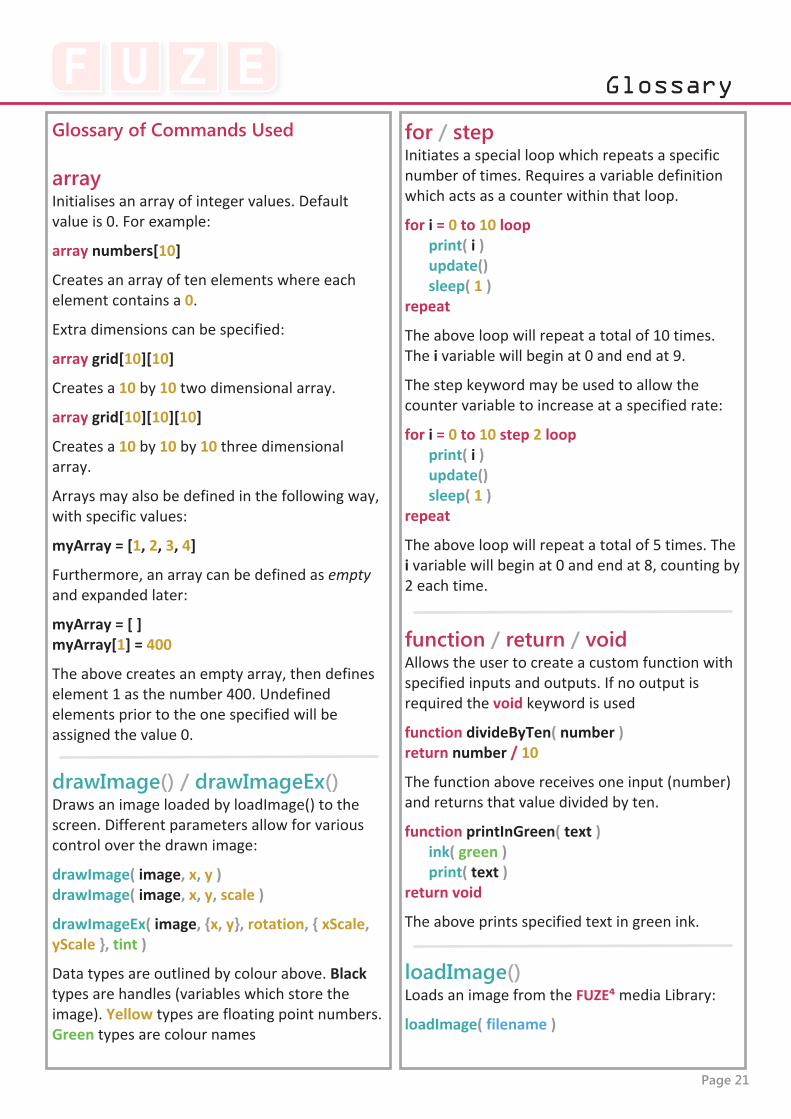
Glossary of Commands Used
arrayInitialises an array of integer values. Defaultvalue is 0. For example:
array numbers[10]
Creates an array of ten elements where eachelement contains a 0.
Extra dimensions can be specified:
array grid[10][10]
Creates a 10 by 10 two dimensional array.
array grid[10][10][10]
Creates a 10 by 10 by 10 three dimensionalarray.
Arrays may also be defined in the following way,with specific values:
myArray = [1, 2, 3, 4]
Furthermore, an array can be defined as emptyand expanded later:
myArray = [ ]myArray[1] = 400
The above creates an empty array, then defineselement 1 as the number 400. Undefinedelements prior to the one specified will beassigned the value 0.
drawImage() / drawImageEx()Draws an image loaded by loadImage() to thescreen. Different parameters allow for variouscontrol over the drawn image:
drawImage( image, x, y )drawImage( image, x, y, scale )
drawImageEx( image, {x, y}, rotation, { xScale,yScale }, tint )
Data types are outlined by colour above. Blacktypes are handles (variables which store theimage). Yellow types are floating point numbers.Green types are colour names
for / stepInitiates a special loop which repeats a specificnumber of times. Requires a variable definitionwhich acts as a counter within that loop.
for i = 0 to 10 loopprint( i )update()sleep( 1 )
repeat
The above loop will repeat a total of 10 times.The i variable will begin at 0 and end at 9.
The step keyword may be used to allow thecounter variable to increase at a specified rate:
for i = 0 to 10 step 2 loopprint( i )update()sleep( 1 )
repeat
The above loop will repeat a total of 5 times. Thei variable will begin at 0 and end at 8, counting by2 each time.
function / return / voidAllows the user to create a custom function withspecified inputs and outputs. If no output isrequired the void keyword is used
function divideByTen( number )return number / 10
The function above receives one input (number)and returns that value divided by ten.
function printInGreen( text )ink( green )print( text )
return void
The above prints specified text in green ink.
loadImage()Loads an image from the FUZE⁴ media Library:
loadImage( filename )
Page 21
Published in the United Kingdom ©2020 FUZE Technologies Ltd. FUZEand the FUZE logos and associated designs, documentation and
materials are copyright FUZE Technologies Ltd.
FUZE registered trademark #UK00002655290
No part of this document may be copied, reproduced and ordistributed without written consent from FUZE Technologies Ltd. All
rights reserved.
FUZE is developed in the UK by:
FUZE Technologies Ltd.15 Clearfields Farm
Wotton UnderwoodAylesbury,
BuckinghamshireHP18 0RS
England
Contact informationemail: [email protected]
phone: +44(0) 1844 239 432
@fuzeArena