Laboratory Handbook - PRIMARY HEALTHCARE - Ideal Clinic
142
PRIMARY HEALTHCARE LABORATORY HANDBOOK A STEP-BY-STEP GUIDE May 2018
-
Upload
khangminh22 -
Category
Documents
-
view
0 -
download
0
Transcript of Laboratory Handbook - PRIMARY HEALTHCARE - Ideal Clinic

PRIMARY HEALTHCARE LABORATORY HANDBOOKA STEP-BY-STEP GUIDE
May 2018

ACKNOWLEDGEMENTS The Department of Health and the National Health Laboratory Service (NHLS) would like to
acknowledge the following individuals/resources for their contribution in the development of
this handbook:
Ideal Clinic Team y Dr Shaidah Asmall (Senior Technical Advisor NDoH)
y Dr Ruth Lekalakala (Pathologist Microbiology NHLS)
y Mr Naseem Cassim (Senior Researcher (Public Health) NHLS)
Department of Health (DoH) stakeholders y Ms Jeanette Hunter (NDoH DDG: Primary Healthcare)
y Dr Yogan Pillay (NDoH DDG: HIV and AIDS, TB and Maternal, Child and Women’s Health)
y Dr Anban Pillay (NDoH DDG: Health Regulatory and Compliance Management)
y National District Health Services Committee
y National and PHC Essential Medicine List Committees
y National Clinical Programme Managers
y Provincial Laboratory Co-ordinators
y Provincial representatives who participated in the National Consultation Workshop
NHLS Resources y NHLS Laboratory Handbook (served as a reference document)
y NHLS Tshwane Laboratory User Handbook
NHLS Stakeholders y NHLS CEO
y NHLS Executive Management Team
y NHLS Business Managers
y NHLS Expert Committees
y Representatives who participated in the National Consultation Workshop
Design & Layout: www.itldesign.co.za

1
PRIMARY HEALTHCARE
LABORATORY HANDBOOK
A STEP-BY-STEP GUIDE

2
Primary Healthcare Laboratory HANDBOOK
2
TABLE OF CONTENTS
LIST OF FIGURES 4
LIST OF ACRONYMS 6
PRIMARY HEALTHCARE LABORATORY HANDBOOK 9
Introduction to the handbook .................................................................................................................. 10
Legal mandate .........................................................................................................................................12
Clinic-laboratory interface ..................................................................................................................13
Overview of the handbook .........................................................................................................................15
Laboratory services within a patient-centric PHC service .....................................................16
PHC Essential Laboratory List ...................................................................................................................17
High-level processes for the core elements in relation to patient care ............................19
SECTION ONE: COMPLETE REQUEST FORM 21
Information to be provided on NHLS request forms .......................................................................23
SECTION TWO: COLLECT SPECIMEN 31
The PHC Essential Laboratory List .........................................................................................................32
General precautions for all specimen collection ...............................................................................37
Specific Specimen Collection Procedures .........................................................................................40
1. Blood collection in adults and children ....................................................................................41
2. Blood collection in neonates and infants ............................................................................... 43
Specific precautions for Microbiology testing .................................................................................. 44
1. Sputum specimen ............................................................................................................................ 45
2. Urine specimen ..................................................................................................................................47
3. Stool specimen ................................................................................................................................. 49
4. Special collection instructions for other microbiology specimens .............................. 50
Cytology specimen ........................................................................................................................................51
1. Conventional Pap smear collection .............................................................................................51
2. Liquid based cytology ................................................................................................................... 54
3. Fine needle aspirate collection ...................................................................................................56
4. Dried blood spots collection for Early Infant Diagnosis ...................................................58
Special precautions for Chemical Pathology tests ..........................................................................62
1. Cholesterol and lipogram ...............................................................................................................62

3
Primary Healthcare Laboratory HANDBOOK
Consequences of improper specimen collection ..............................................................................63
SECTION THREE: PACKAGE SPECIMEN 65
Label specimens ........................................................................................................................................... 66
Recording of specimen in the patient file............................................................................................67
Specimen packaging................................................................................................................................... 69
General precautions .................................................................................................................................... 70
SECTION FOUR: SPECIMEN STORAGE 73
Specimen recording in the Facility Specimen Register ................................................................74
Specimen storage conditions ...................................................................................................................75
Consequences of improper specimen storage ..................................................................................77
SECTION FIVE: SPECIMEN COLLECTION BY COURIER 79
SECTION SIX: MANAGE LABORATORY RESULTS 83
How to access results ................................................................................................................................. 84
Delivery of printed laboratory results by the courier ............................................................. 84
Electronic access to laboratory results .......................................................................................85
How to access laboratory results telephonically ......................................................................88
Review laboratory results.......................................................................................................................... 89
File laboratory results ................................................................................................................................. 90
SECTION SEVEN: ORDER SPECIMEN COLLECTION MATERIALS 93
Ordering and receiving Specimen collection materials ............................................................... 98
SECTION EIGHT: ACCESS TO ADDITIONAL INFORMATION 103
Access to the National Laboratory Handbook ................................................................................104
How to obtain laboratory contact details ..........................................................................................105
References .....................................................................................................................................................106
APPENDICES 107
Appendix A: PHC Essential Laboratory List .....................................................................................108
Appendix B: Detailed Essential laboratory test list .........................................................................110
Appendix C: Rapid tests performed at the health facility ............................................................ 114
Appendix D: Laboratory contact list .................................................................................................... 115
Appendix E: N1 & N2: Laboratory request forms ............................................................................ 122
Appendix F: N3: PHC Order Book for Specimen collection materials ....................................130
Appendix G: N4: PHC Facility Specimen Register ........................................................................ 133
Appendix H: Patient Folder: Clinical Consultation and Laboratory Results Forms .......... 135
Appendix I: Examples: Incorrectly completed forms .................................................................... 137

4
Primary Healthcare Laboratory HANDBOOK
LIST OF FIGURES
Figure 1: Core elements of the PHC Laboratory Handbook ................................................................15
Figure 2: Laboratory services within the ICSM model ..........................................................................16
Figure 3: High-level processes for the core elements in relation to patient care .......................19
Figure 4: N1: PHC Request Form .................................................................................................................25
Figure 5: Example of completed N1: Routine CCMT Request Form ...............................................26
Figure 6: Example of a completed N1: Microscopy, Culture and Sensitivity (MC&S) Request Form ....................................................................................................................................27
Figure 7: N2: Cytology Request Form .......................................................................................................28
Figure 8: Example of completed N2: Cytology Request Form .........................................................29
Figure 9: How to wash hands using soap and water ............................................................................38
Figure 10: Fight germs by washing your hands ......................................................................................38
Figure 11: How to perform the hand rub and hand wash ....................................................................39
Figure 12: Venipuncture step-by-step for adults and children ......................................................... 42
Figure 13: Blood collection in neonates and infants ............................................................................. 43
Figure 14: Collection of sputum specimens for TB testing................................................................ 46
Figure 15: Pap smear specimen collection materials .............................................................................51
Figure 16: Specimen collection for Pap smear using Cervi-brush ...................................................53
Figure 17: Recording the patient details on the LBC vial ................................................................... 54
Figure 18: Sample collection using the cervexbrush .............................................................................55
Figure 19: Tighten LBC vial cap .....................................................................................................................55
Figure 20: Sample collection using the endocervical brush ..............................................................55
Figure 21: Deliver material on slide and use second slide to make a smear ................................57
Figure 22: Example of a prepared smear ..................................................................................................57
Figure 23: Example of a required materials .............................................................................................58
Figure 24: Preparation for procedure .........................................................................................................58
Figure 25: DBS step-by-step sample collection .................................................................................... 60
Figure 26: DBS drying method..................................................................................................................... 60
Figure 27: Examples of acceptable DBS cards ........................................................................................61
Figure 28: Examples of unacceptable DBS cards ...................................................................................61

5
Primary Healthcare Laboratory HANDBOOK
Figure 29: How to apply the request form barcode ............................................................................ 66
Figure 30: How to apply the request form barcode to sterile specimen jar .............................. 66
Figure 31: Clinical Consultation Form .........................................................................................................67
Figure 32: Patient folder: Laboratory Results Form ............................................................................. 68
Figure 33: Specimen bag with test tubes in the allocated compartment ................................... 69
Figure 34: Example of a completed Facility Specimen Register cover ..........................................81
Figure 35: Example of a completed N4: Specimen Facility Register ..............................................81
Figure 36: Sealed envelope containing patient results ....................................................................... 84
Figure 37: Bi-directional SMS printer ..........................................................................................................85
Figure 38: TrakCare Lab WebView link ..................................................................................................... 86
Figure 39: Trak Care WebView login screen ............................................................................................87
Figure 40: Trak Care WebView patient search screen .........................................................................88
Figure 41: Patient folder: Laboratory Results ...........................................................................................91
Figure 42: Request forms and specimen collection materials for PHC to be ordered ........... 96
Figure 43: N3 PHC Order Book: Materials for Specimen Collection Request Form .................97
Figure 44: NHLS website access to the National Laboratory Handbook for all levels of care ....................................................................................................................104
Figure 45: NHLS website providing laboratory contact detail .......................................................105

6
Primary Healthcare Laboratory HANDBOOK
LIST OF ACRONYMS
Acronym Description
ALP Alkaline Phosphatase
ALT Alanine Transaminase
DBS Dried blood spot
CCMT Comprehensive Care, Management and Treatment of HIV and AIDS
CRAG Cryptococcal Antigen test
DMT District management team
DoB Date of birth
DoH Department of Health
EDTA Ethylene-diamine-tetra-acetic acid
EID Early infant diagnosis
ELL Essential laboratory list
EML Essential medicines list
FBC Full blood count
FNA Fine needle aspirate
FT4 Free Thyroxine 4
GGT Gamma GT
HbA1c Glycated Haemoglobin
HCW Healthcare worker
HIV Human Immunodeficiency Virus
HPCSA Health Professions Council for South Africa
HPRS Health Patient Registration System
HSV Herpes simplex virus
ICSM Integrated Clinical Services Management
INR International normalized ratio
LBC Liquid-based cytology
LDL-C LDL-Cholesterol
LIS Laboratory Information System

7
Primary Healthcare Laboratory HANDBOOK
Acronym Description
MC&S Microscopy, culture and sensitivity
MP Medical practice number
MTB Mycobacterium tuberculosis
NDHSC National District Health Services Committee
NDoH National Department of Health
NHLS National Health Laboratory Service
PCR Polymerase Chain Reaction
PHC Primary healthcare
PFMA The Public Finance Management Act
POC Point-of-care
PPT Plasma preparation tube
PSA Prostate-Specific Ag
Rh Rhesus Factor
RIF Rifampicin
RTC Regional Training Centres
SANC South African Nursing Council
SLA Service level agreement
SMS Short message service
SOP Standard operating procedure
SST Serum separator tube
TAT Turn-around times
TB Tuberculosis
TSH Thyroid-stimulating hormone
WBC White Blood Cell

8
Primary Healthcare Laboratory HANDBOOK
Notes and things to remember
appe
ndix A
Page 105
References to appendices
References to forms
A key to icons used this handbook
form N1
form N2
form N3
GEN
ERAL
PRINCIPLES Principles to be followed
Instructions for procedures
WHAT TO DO
HOW TO DO IT
form N4

9
Primary Healthcare Laboratory HANDBOOK
PRIMARY HEALTHCARE LABORATORY HANDBOOKa step-by-step guide
INTRODUCTIONOVERVIEW
10
Primary Healthcare Laboratory HANDBOOK
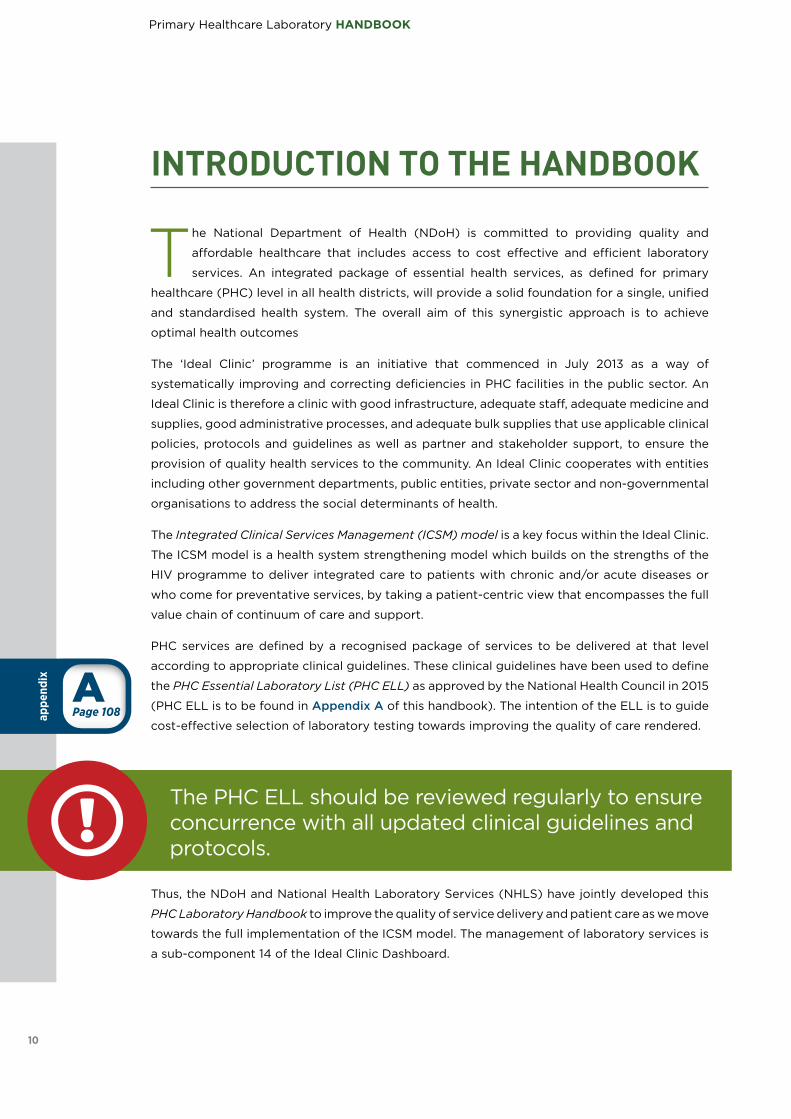
INTRODUCTION TO THE HANDBOOK
The National Department of Health (NDoH) is committed to providing quality and
affordable healthcare that includes access to cost effective and efficient laboratory
services. An integrated package of essential health services, as defined for primary
healthcare (PHC) level in all health districts, will provide a solid foundation for a single, unified
and standardised health system. The overall aim of this synergistic approach is to achieve
optimal health outcomes
The ‘Ideal Clinic’ programme is an initiative that commenced in July 2013 as a way of
systematically improving and correcting deficiencies in PHC facilities in the public sector. An
Ideal Clinic is therefore a clinic with good infrastructure, adequate staff, adequate medicine and
supplies, good administrative processes, and adequate bulk supplies that use applicable clinical
policies, protocols and guidelines as well as partner and stakeholder support, to ensure the
provision of quality health services to the community. An Ideal Clinic cooperates with entities
including other government departments, public entities, private sector and non-governmental
organisations to address the social determinants of health.
The Integrated Clinical Services Management (ICSM) model is a key focus within the Ideal Clinic.
The ICSM model is a health system strengthening model which builds on the strengths of the
HIV programme to deliver integrated care to patients with chronic and/or acute diseases or
who come for preventative services, by taking a patient-centric view that encompasses the full
value chain of continuum of care and support.
PHC services are defined by a recognised package of services to be delivered at that level
according to appropriate clinical guidelines. These clinical guidelines have been used to define
the PHC Essential Laboratory List (PHC ELL) as approved by the National Health Council in 2015
(PHC ELL is to be found in Appendix A of this handbook). The intention of the ELL is to guide
cost-effective selection of laboratory testing towards improving the quality of care rendered.
The PHC ELL should be reviewed regularly to ensure concurrence with all updated clinical guidelines and protocols.
Thus, the NDoH and National Health Laboratory Services (NHLS) have jointly developed this
PHC Laboratory Handbook to improve the quality of service delivery and patient care as we move
towards the full implementation of the ICSM model. The management of laboratory services is
a sub-component 14 of the Ideal Clinic Dashboard.
appe
ndix A
Page 108

11
Primary Healthcare Laboratory HANDBOOK
Ideal Clinic Dashboard: Elements for management of laboratory services
Nat
iona
l Cor
e St
and
ard
s
Com
pon
ent
Sub
-com
pon
ent
ELE
ME
NTS
Wei
ght
MM
Leve
l of
resp
onsi
bili
ty
Che
ck li
st
Per
form
ance
DO
MA
IN 3
: CLI
NIC
AL
SUP
PO
RT
SE
RV
ICE
S
3. P
harm
aceu
tica
ls a
nd L
abor
ator
y Se
rvic
es
14. Management of laboratory services: Monitor consistent availability and use of laboratory services
106 Primary Healthcare Laboratory Handbook is available E & NDoH
107Required functional diagnostic equipment and concurrent consumables for point of care testing are available
E K HFY
108Required specimen collection materials and stationery are available
E K HFY
109Specimens are collected, packaged, stored and prepared for transportation according to the Primary Healthcare Laboratory Handbook
E K HF
Y
110Laboratory results are received from the laboratory within the specified turnaround times
E & HFY
y The PHC Laboratory Handbook is available.
y Required functional diagnostic equipment and concurrent consumables for point of care
testing are available.
y Required specimen collection materials and stationery are available.
y Specimens are collected, packaged, stored and prepared for transportation according to
the PHC Laboratory Handbook.
y The laboratory results are received from the laboratory within the specified turn-around
times.
The relevant elements of the sub-components are:
The development of the PHC Laboratory Handbook is based on the following objectives:
Sub component 14
To entrench a common integrated
approach to enhance the quality
of PHC services
1The
standardisation of clinic-
laboratory processes.
2To ensure
cost effective laboratory
service utilisation.
3To provide standardised systems and procedures for requesting
laboratory tests, related specimen collection materials
and for access to results.
4

12
Primary Healthcare Laboratory HANDBOOK
The aim of this handbook is to improve accessibility of laboratory services and enhance
appropriate laboratory utilisation. The standardisation of clinic-laboratory processes will
facilitate appropriate test selection and adequate collection, packaging, storage, recording and
submission of specimens. Furthermore, it is expected that these standardised processes will
harmonise and strengthen the interaction between health facilities and the laboratory service.
It is envisaged that this laboratory handbook will bring closer cooperation between facility
managers and their local laboratory managers to ensure optimal quality health services.
Legal mandate
a. The content of this handbook is informed by the following legislation:
y National Health Act (61 of 2003) as amended
y National Health Laboratory Service Act (37 of 2000)
y National Health Laboratory Service Amendment Bill (1093 of 2015)
y The Public Finance Management Act (Act 1 of 1999)
y Public Service Act Proclamation (103 of 1994)
b. Provision of laboratory services
y The NHLS is a national public entity established in terms of the National Health
Laboratory Service Act, 2000 (Act 37 of 2000) to provide quality, affordable and
sustainable health laboratory and related public health services.
y Laboratory services as defined by the NHLS Act and the NHLS Amendment Bill are
provided by the NHLS as guided by service level agreements (SLAs) with all the
provinces.
y Confidentiality: The NHLS ensures protection of personal information by ensuring that
all employees are aware that patient information is confidential. There is a standard
operating procedure (SOP) on confidentiality that all employees are expected to
comply with. Access to electronic information is managed through a formal registration
process and password-protected access. Therefore, laboratory employees and
registered healthcare workers are allocated appropriate access levels depending
on their scope of work and/or responsibilities. Hard copy patient results should be
delivered in sealed envelopes.
It is anticipated that orientation on the use of this PHC Laboratory Handbook will be provided
in a cascade training approach jointly by the local NHLS laboratory and the Regional Training
Centres of the provincial departments of health.

13
Primary Healthcare Laboratory HANDBOOK
The health facility operational manager may use either the PHC Laboratory Handbook
(Appendix D) or the NHLS website (www.nhls.ac.za) to determine their local NHLS support
laboratory and details as above (refer to Section 8 (page 105 for step-by-step instructions on
how to find laboratory contact details). At the district level, the NHLS business manager should
participate regularly in the quarterly district management team (DMT) meetings to ensure
concerns are addressed, such as:
appe
ndixD
Page 113
Clinic-laboratory interface
The health facility and the local NHLS laboratory manager should meet on a regular basis to
address issues related to laboratory services. Through open communication channels, minor
problems could be solved rapidly without the need for escalation. Ultimately, both managers
take the responsibility of providing good quality healthcare services to their local communities.
It is therefore critical for the health facility manager to know the following:
LOCAL SUPPORTING LABORATORY: LOCATION AND CONTACT DETAILS
LABORATORY MANAGER: CONTACT DETAILS
LABORATORY COURIER SERVICE ARRANGEMENT
Poor laboratory performance: ◦ Turn-around times (TAT)
◦ Availability of specimen
collection materials
◦ Adherence to agreed
laboratory courier collection
schedules
Poor facility performance: ◦ Incomplete request forms
◦ Inadequate specimen
collection
◦ Inappropriate specimen
storage
Revision and review of the laboratory courier service to align with facility requirements:
◦ Frequency of daily collection
(per heath facility)
◦ Days when collection will take
place
◦ Collection times

14
Primary Healthcare Laboratory HANDBOOK
Where these local approaches have failed, the following escalation procedure should be followed:
Refer to Appendix D for local laboratory contact details and corresponding hours of operation.
appe
ndix D
Page 115
level
1
working days to respond2
CONTACT THE LOCAL LABORATORY MANAGER
level
2
working days to respond4
CONTACT THE BUSINESS MANAGER
level
3
working days to respond7
CONTACT THE PROVINCIAL AREA MANAGER

15
Primary Healthcare Laboratory HANDBOOK
OVERVIEW OF THE HANDBOOK
This handbook has been designed to provide the facility manager with guidance to
manage and monitor consistent availability of appropriate laboratory services.
The handbook provides a step-by-step guide for the process of identifying, collecting
and submitting laboratory specimens by PHC facilities to their local NHLS laboratory. It has
been developed to enhance the appropriate use of the diagnostic laboratory services as part
of the ICSM approach. In addition, it aims to foster an understanding of appropriate, relevant
and cost effective tests that should be performed at the PHC level. The core elements of the
handbook are depicted graphically below.
COMPLETE REQUEST FORM
Step-by-step guide to complete the request form as well as complying with the minimum clinical data
set requirements
section
1section
2section
3section
4COLLECT SPECIMEN
FROM PATIENTStep-by-step guide
to collect the various specimens required for
the tests identified in the Essential Lab List.
PACKAGE SPECIMENStep-by-step guide to package the collected patient specimens in
the specimen bags after attaching the request form
barcode
SPECIMEN STORAGEStep-by-step guide on the correct storage of patient
specimens prior to and after the daily courier
collection time/s
SPECIMEN COLLECTION BY COURIER
Step-by-step guide to preparing specimens for
collection by courier
section
5section
6section
7section
8RESULTS ACCESS
Step-by-step guide on the different ways to access patient results - from the
delivery of printed reports to web-based access
ORDER SPECIMEN COLLECTION MATERIALS
Step-by-step guide to ordering laboratory request
forms and specimen collection materials from
your local laboratory
ACCESS TO ADDITIONAL INFORMATION
This provides resources for additional information and contact details about
laboratory services
Figure 1: Core elements of the PHC Laboratory Handbook
RESULTS ORDER

16
Primary Healthcare Laboratory HANDBOOK
Laboratory services within a patient-centric PHC service
The use of clinical guidelines or standard treatment guidelines assists clinicians to identify
the appropriate laboratory tests to be performed using a patient-focused consultation and
management approach as part of the ICSM model described below. This enhances a rational
application of the selection of appropriate tests from the PHC-ELL.
DiagnosisRisk identificationCondition specific
Assessment (risk/clinical)
History PresentationSymptomsPast history
Known conditions
ExaminationVital screening
Physical examination
Laboratory investigations
Patient management
AdviseTreat
Refer or follow up
Figure 2: Laboratory services within the ICSM model
REFERRAL

17
Primary Healthcare Laboratory HANDBOOK
PHC Essential Laboratory List
Key:
PHC This test may be requested by all healthcare professional, i.e. nurse and doctor
PHC with Doctor (Dr)
This test may only be requested by a doctor
Test Category
Chemical Pathology
ALP (Alkaline Phosphatase) PHC with Dr
ALT (Alanine Transaminase) PHC
Amylase/Lipase PHC with Dr
Calcium (serum) PHC with Dr
Cholesterol PHC
Creatinine (eGFR) (serum) PHC
CRP (C-reactive protein) PHC with Dr
Folate (serum) PHC with Dr
FT4 (Free Thyroxine 4) PHC with Dr
Gamma GT (GGT) (Serum) PHC with Dr
Glucose PHC
HbA1c (Glycated Haemoglobin) PHC
LDL-Cholesterol (LDL-C) PHC with Dr
Phenytoin PHC with Dr
Pleural effusion Protein PHC with Dr
Potassium (serum) PHC
Prostate-Specific Ag (PSA) PHC with Dr
Sodium (serum) PHC with Dr
Total Bilirubin PHC with Dr
Triglycerides PHC
TSH (Thyroid-stimulating hormone) PHC
Uric Acid (serum) PHC
Urine albumin: creatinine ratio PHC with Dr
Urine protein: creatinine ratio PHC with Dr
Vitamin B12 PHC with Dr
Haematology
Differential count PHC with Dr
Full Blood Count (FBC) PHC with Dr

18
Primary Healthcare Laboratory HANDBOOK
Test Category
Haemoglobin PHC with Dr
INR (International Normalized Ratio) PHC with Dr
Platelets PHC with Dr
Red Cell Antibody screen (Coomb’s Test) or the “Direct
Antiglobulin Test (DAT)” PHC
White Blood Cell (WBC) PHC
Blood Grouping
ABO (Blood grouping) PHC
Rhesus Factor (Rh) PHC
Microbiology
CRAG (Cryptococcal Antigen test) PHC with Dr
Hepatitis A IgM PHC with Dr
Hepatitis B Surface Ag PHC with Dr
Pleural effusion MCS PHC with Dr
Stool parasites – Bilharzia & other parasites. PHC with Dr
Syphilis Serology PHC
MCS (Microscopy, culture band sensitivity) PHC with Dr
HIV
CD4 Count PHC
HIV Elisa (discordant rapids) PHC
HIV PCR for infants PHC
Viral Load PHC
TB
TB Culture PHC
TB Drug Susceptibility PHC
TB Line Probe Assay (Hain MTBDR) PHC
TB Smear microscopy PHC
X-pert MTB/RIF PHC
Cytopathology
Cytology for aspirates including lymph nodes PHC with Dr
Pap smear PHC

19
Primary Healthcare Laboratory HANDBOOK
High-level processes for the core elements in relation to patient care
The flow diagram below depicts the high-level processes for each of the core elements in the
handbook as they relate to clinical service delivery.
Figure 3: High-level processes for the core elements in relation to patient care
Complete request form
Collect specimen
Package specimens
Storage of specimen
Courier collection
Manage laboratory results
Identify test/s to be performed
Record test request in patient
folder
Record in the facility specimen
book
Hand over samples to the
courier
Access/receive laboratory results
Clinical assessment
Label specimen
Review laboratory results
SECTION ONE
SECTION TWO
SECTION THREE
SECTION FOUR
SECTION FIVE
SECTION SIXFile laboratory
results in patient folder

20
Primary Healthcare Laboratory HANDBOOK
COMPLETE REQUEST FORM
section
1 Collect specimen
section
2Package specimen
section
3

21
Primary Healthcare Laboratory HANDBOOK
SECTION ONE
COMPLETE REQUEST FORM
Specimen storage
section
4Specimen collection by courier
section
5Manage
laboratory results
section
6Order
specimen collection materials
section
7section
8Access to additional
information

SE
CT
ION
ON
E
22
Primary Healthcare Laboratory HANDBOOKap
pend
ix BPage 110
Based on the clinical assessment of the patient, identify the appropriate and relevant laboratory tests to be performed based on clinical guidelines and then confirm specific test requirements from the PHC ELL detailed list.
GEN
ERAL
PRINCIPLES
You will find a copy of the PHC ELL detailed list in Appendix B of this document.
Laboratory investigations do not replace the need for a clinical examination of the patient.
PHC REQUEST FORM For general routine tests
form
N1Page 25
form
N2Page 28
CYTOLOGY REQUEST FORM For Pap smears and other cytology requests only
Principles for appropriate laboratory testing by healthcare professionals
y Laboratory investigations should be requested for a specified clinical indication and
not merely as a routine procedure.
y The authorised requesting healthcare professional must have a clear indication and define the
purpose or reason for each laboratory investigation.
The following questions may assist in defining the purpose/indication: y Will the result modify or change the diagnosis, management or treatment of the patient?
(i.e. is it clinically justified?)
y Was this test requested previously, is there any reason to repeat (i.e. do the previous results
still have clinical relevance?)
y Proper clinical examination should precede the selection of diagnostic laboratory tests.
y Tests should not be repeated because results are not available, unless the laboratory confirms that
the specimen was not received by the laboratory e.g. lost in transit or rejected for a specific reason
e.g. insufficient specimen.
NHLS provides specific request forms that must be completed for all specimens submitted to the laboratory:
Complete the appropriate form in full so that the laboratory can process specimens correctly
(see pages 26, 27 and 29 for samples of completed forms).

Co
mp
lete
req
uest
form
23
Primary Healthcare Laboratory HANDBOOK
INFORMATION TO BE PROVIDED ON NHLS REQUEST FORMS
The following information should be provided on the N1 and N2 request forms:
Patient information y Patient name and surname, gender,
age and date of birth, folder, Health
Patient Registration System (HPRS) and
identification (ID) number/passport
number
Why? To ensure that the laboratory data
is matched to the correct patient and that
appropriate age and gender adjusted
reference intervals are supplied.
Facility information y Facility name
y Facility code: Laboratory Information
System facility location code if known
y Service point: a specific location within the
facility e.g. MOU or adherence clubs
Why? To ensure that the laboratory results are
sent to the appropriate health facility.
Collection date and time
y Date and time of collection
Why? To ensure laboratory can determine
viability of specimen for processing.
Healthcare worker information y Full name, HPCSA or SANC number and
contact details
Why? To ensure that the laboratory can
contact the healthcare worker (HCW) if the
need arises.
Phlebotomist’s information (where there is a phlebotomy service) y Name of the person collecting the
specimens
Why? Information is required should the
person collecting the specimens not be the
same as requesting healthcare worker.
Tests requested y Mark appropriate tests as indicated by
clinical guidelines from the list of tests in
the ELL
Why? To ensure each specimen is correctly
processed only for tests requested.
Concise description of the clinical problem/diagnosis
Why? To assist in the extent of specimen
processing and results interpretation.
Comprehensive Care, Management and Treatment of HIV and AIDS requests y For all patients who are HIV positive and
all patients (irrespective of HIV status) that
require an Xpert test, please tick the CCMT
box next to the NHLS logo on the top left
of the N1 request form.
N1: Request Form and N2: Cytology Request Form.
Why? This is for billing purposes, to ensure
that laboratory tests are correctly allocated to
conditional grant account/s in your province.

SE
CT
ION
ON
E
24
Primary Healthcare Laboratory HANDBOOK
y Facility name
y Patient’s folder or HPRS number
y Patient’s national ID number or passport
number (if available)
y Patient’s name
y Patient’s surname
y Patient’s date of birth
y Patient’s gender
y Healthcare worker’s name
y Healthcare worker’s HPCSA or SANC
number
y Healthcare worker’s signature
y Collection date
The following information is mandatory for data capturing, processing and reporting of results on laboratory specimens:

Co
mp
lete
req
uest
form
25
Primary Healthcare Laboratory HANDBOOK
Figure 4: N1: PHC Request Form
form
N1

SE
CT
ION
ON
E
26
Primary Healthcare Laboratory HANDBOOK
Figure 5: Example of correctly completed N1: Routine CCMT Request Form
N1: Routine CCMT request (Sample information, not real individual)
Co
mp
lete
req
uest
form
27
Primary Healthcare Laboratory HANDBOOK
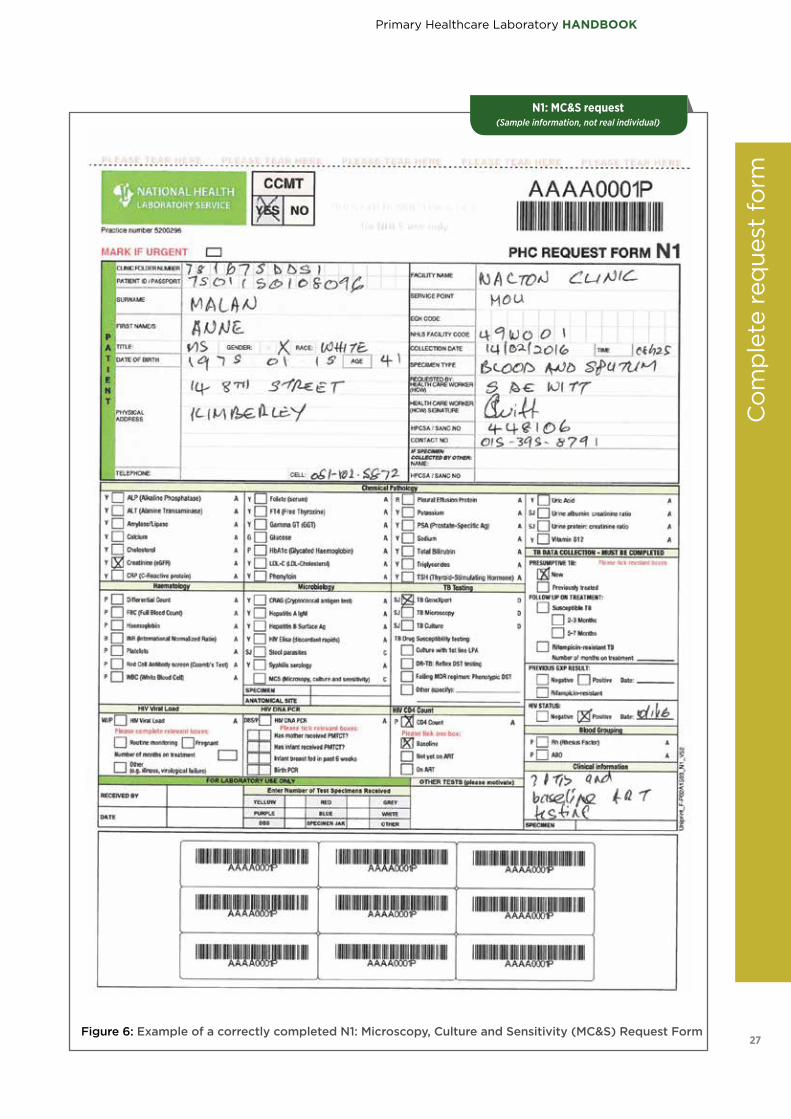
Figure 6: Example of a correctly completed N1: Microscopy, Culture and Sensitivity (MC&S) Request Form
N1: MC&S request (Sample information, not real individual)

SE
CT
ION
ON
E
28
Primary Healthcare Laboratory HANDBOOK
Figure 7: N2: Cytology Request Form
form
N2

Co
mp
lete
req
uest
form
29
Primary Healthcare Laboratory HANDBOOK
Figure 8: Example of correctly completed N2: Cytology Request Form
N2: Cytology request (Sample information, not real individual)

30
SE
CT
ION
TW
OPrimary Healthcare Laboratory HANDBOOK
Package specimen
section
3Complete request
form
section
1
COLLECT SPECIMEN
section
2

31
Primary Healthcare Laboratory HANDBOOK
Specimen collection by courier
Manage laboratory
results
Order specimen collection materials
SECTION TWO
COLLECT SPECIMEN
Specimen storage
section
4section
5section
6section
7section
8Access to additional
information

32
Primary Healthcare Laboratory HANDBOOK
Detailed PHC ELL* (See Key for this table on page 36)
Test Category Estimated TAT (Hrs)*
Specimen Type
Tube Type
Special Instructions
Specimen Storage Proviso
ABO (Blood grouping)
PHC 243 mL clotted blood
Purple A
ALP (Alkaline Phosphatase)
PHC with Dr 243 mL clotted blood
Yellow A
ALT(Alanine Transaminase)
PHC 243 mL clotted blood
Yellow A
Amylase/Lipase PHC with Dr 24-485 mL clotted blood
Yellow A
Calcium (serum) PHC with Dr 245 mL clotted blood
Yellow
Avoid stasis/prolonged tourniquet application.
A
CD4 Count PHC 244 mL EDTA blood
Purple Do not store in refrigerator.
A
Cholesterol PHC 24-485 mL clotted blood
Yellow
Patient should be fasting. Refer to section 2.13.1 (Cholesterol and lipogram)
A
CRAG (Cryptococcal Antigen test)
PHC with Dr 245 ml EDTA Blood
Purple AOnly performed where CD4 <= 100
Creatinine (eGFR) (serum)
PHC 243 mL clotted blood
Yellow A
SE
CT
ION
TW
O
y The Essential Laboratory List identifies
all laboratory tests that can be
requested by PHC facilities (with and
without a doctor).
y The ELL details estimated turnaround times,
specimen types, specimen collection tubes,
specimen storage conditions and special
instructions for each test.
This section offers a series of step-by-step guides to the collection of various specimens required for the tests identified in the ELL.
THE PHC ESSENTIAL LABORATORY LIST
1. Familiarise yourself with the detailed PHC Essential Laboratory List in the table
below.
appe
ndix B
Page 110
GEN
ERAL
PRINCIPLES

33
Co
llect
sp
ecim
en
Primary Healthcare Laboratory HANDBOOK
Test Category Estimated TAT (Hrs)*
Specimen Type
Tube Type
Special Instructions
Specimen Storage Proviso
CRP (C-reactive protein)
PHC with Dr 245 mL clotted blood
Yellow A
Cytology for aspirates including lymph nodes
PHC with Dr
Refer to NHLS National Laboratory Handbook
Differential count PHC with Dr 245 ml EDTA Blood
Purple A
Folate (serum) PHC with Dr 24-484 mL EDTA blood
Yellow A
FT4 (Free Throxine 4)
PHC with Dr 24-485 mL clotted blood
Yellow A
To be performed only after TSH levels indicate need for FT4 testing
Full Blood Count (FBC)
PHC with Dr 24 5ml EDTA blood Purple A
Gamma GT (GGT) (Serum)
PHC with Dr 243 mL clotted blood
Yellow A
Haemoglobin PHC with Dr 24 5ml EDTA blood Purple A
Only requested following an abnormal Hb performed in the health facility
HbA1c (Glycated Haemoglobin)
PHC 244 mL EDTA blood
Purple A
Hepatitis AIgM PHC with Dr 24-485ml Clotted/EDTA blood
Yellow/ A
Hepatitis B Surface Ag
PHC with Dr 24-485ml Clotted/EDTA blood
Yellow A
HIV Elisa (discordant rapids)
PHC 243 mL clotted blood
Yellow A
Only to be requested when discordant rapid HIV results are obtained for the same patient.
HIV PCR for infants PHC 24-48Dry blood spot (DBS)/EDTA blood
PurpleMinimum volume 500µl. Dedicated tube required.
A

34
SE
CT
ION
TW
OPrimary Healthcare Laboratory HANDBOOK
Test Category Estimated TAT (Hrs)*
Specimen Type
Tube Type
Special Instructions
Specimen Storage Proviso
INR (International Normalized Ratio)
PHC with Dr 245ml Sodium Citrate blood
BlueTo reach lab within 24 hrs.
A
LDL-Cholesterol (LDL-C)
PHC with Dr 243 mL clotted blood
Yellow
Patient should be fasting. Refer to section 2.13.1 (Cholesterol and lipogram)
A
MCS (Microscopy, culture band sensitivity)
PHC with Dr 24-72Refer to PHC Laboratory Handbook
CCSF is not on the ELL for PHC facilities.
Pap smear PHC Up to 6 weeksRefer to PHC Laboratory Handbook
B
Phenytoin PHC with Dr 24-485 mL clotted blood
Yellow
IV treatment: 2-4 h after last dose. Oral treatment: Collect specimens at same time of day for serial monitoring.
A
Platelets PHC with Dr 24 5ml EDTA blood Purple A
Pleural effusion MCS
PHC with Dr 24 Pleural effusion Red Do not use tubes with preservatives
A
Can only be requested by health facilities with X-Ray
Pleural effusion Protein
PHC with Dr 24 Pleural effusionRed
Do not use tubes with preservatives
A
Can only be requested by health facilities with X-Ray
Potassium (serum) PHC 243 mL clotted blood
Yellow
Avoid haemolysis and delay in transit time.
A
Prostate-Specific Ag (PSA)
PHC with Dr 245 mL clotted blood
Yellow AMay not to be used as a screening test.
Red Cell Antibody screen (Coomb’s Test) or the “Direct Antiglobulin Test (DAT)”
PHC 24 5ml EDTA blood Purple AUsed for detection of antibodies on red cells.
Rhesus Factor (Rh) PHC 243 mL clotted blood
Yellow A
Sodium (serum) PHC with Dr 243 mL clotted blood
Yellow A

35
Co
llect
sp
ecim
en
Primary Healthcare Laboratory HANDBOOK
Test Category Estimated TAT (Hrs)*
Specimen Type
Tube Type
Special Instructions
Specimen Storage Proviso
Stool parasites – Bilharzia & other parasites.
PHC with Dr 24 Stool C
Syphilis Serology PHC 245ml clotted blood
Yellow A
TB Culture PHCBetween 5 days and 6 weeks
Sputum D
TB Drug Susceptibility
PHCBetween 5 days and 6 weeks
Sputum D
TB Line Probe Assay (Hain MTBDR)
PHC 24-48 Sputum D
TBSmear microscopy
PHC 24 Sputum D
Triglycerides PHC 24-485 mL clotted blood
Yellow
Patient should be fasting. Refer to section 2.13.1 (Cholesterol, triglyceride, lipogram, lipoprotein electrophoresis)
A
TSH (Thyroid-stimulating hormone)
PHC 24-483 mL clotted blood
Yellow A
Uric Acid (serum) PHC 243 mL clotted blood
Yellow A
Urine albumin:creatinine ratio
PHC with Dr 24 Urine A
Urine protein:creatinine ratio
PHC with Dr 24 Urine A
Viral Load PHC 24-485ml EDTA/PPT blood
Purple/White
A
Vitamin B12 PHC with Dr 24-485 mL clotted blood
Yellow A
White Blood Cell (WBC)
PHC 24 5ml EDTA blood Purple A
Xpert MTB/RIF PHC 24 Sputum D
*Estimated TAT: Time from specimen leaving the facility, to results being available and/or delivered to the facility

36
SE
CT
ION
TW
OPrimary Healthcare Laboratory HANDBOOK
Key to specimen handling for Detailed PHC ELL
Specimen handling Length of storage
A
Specimens must be kept away from
direct sunlight. Specimens should not
be exposed to dramatic temperature
fluctuations and vibrations (of
particular relevance when being
transported.
Where room temperature exceeds 25°C
specimens should be stored in the
fridge or cooler box (+- 5°C) to preserve
specimen integrity. Specimens should
not be exposed to dramatic temperature
fluctuations.
B
When the smear has been fixed,
inside a slide carrier (envelope), and
store at room temperature
24 hours at room temperature (20-25°C)
C
Collect specimens and place into
the transport medium provided
(where appropriate). Store at room
temperature
24 hours at room temperature (20-25°C).
Urine specimens should be stored in the
fridge (2-5 °C)
D
Specimens should be collected in
clean leak proof containers free
from paraffin and other waxes or
oils. Specimens should be kept cool
during transportation but should not
be frozen.
Specimen should be transported
immediately at ambient temperature to
the nearest local laboratory. Specimens
delayed prior to transportation should be
stored refrigerated (2-8°C). Specimens
should reach the laboratory no later than
48 hours after specimen collection.

37
Co
llect
sp
ecim
en
Primary Healthcare Laboratory HANDBOOK
GENERAL PRECAUTIONS FOR ALL SPECIMEN COLLECTION
It is of critical importance that HCW’s implement the guidelines for the proper collection, storage and transport of specimens. All diagnostic information is contingent on the quality of the specimen received.
y Identify and assemble the individual specimen collection materials required, i.e. vacutainer
test tube/s, sterile specimen jars, etc., to perform the tests requested.
y Wash hands using soap and water. If water and soap are not available, use disinfectants.
(Refer to the figures on the following page)
y Dry hands thoroughly.
y Put on gloves.
y Follow strict aseptic technique when collecting specimens.
y Collect recommended specimen quantities for the requested test to avoid specimen
rejection due to insufficient specimen.
Standard infection control precautions:

38
SE
CT
ION
TW
OPrimary Healthcare Laboratory HANDBOOK
Figure 9: How to wash hands using soap and water
DON’T FORGET TO WASH YOUR HANDS!
Use warm water and soap
Rub your hands together to create a lather
Scrub for at least 20 seconds
Rinse all of the soap off your hands
Dry with a paper towel or air dryer
Try singing the ABCs, Twinkle Twinkle Little Star, Happy Birthday or any short song or rhyme while you scrub to make sure you are
washing for long enough
Wet your hands Soap Lather and scrub - 20 seconds
FIGHT GERMS BY WASHING YOUR HANDS!
1 2 3
Rinse - 10 seconds Turn off tap Dry your hands4 5 6
• between your fingers
• under your nails
• the tops of your hands
DONT FORGET TO WASH:
Source: https://coolrain44.files.wordpress.com/2009/07/handwashing_fight_germs.gi
Figure 10: Fight germs by washing your hands

39
Co
llect
sp
ecim
en
Primary Healthcare Laboratory HANDBOOK
Source: http://www.who.int/patientsafety/en/
Figure 11: How to perform the hand rub and hand wash

40
SE
CT
ION
TW
OPrimary Healthcare Laboratory HANDBOOK
Principles for collecting specimens y Verify the identity of the patient and make sure that the correct folder or HPRS
number is specified on both the N1 Request Form and specimen container (e.g.
tube).
y Ensure that sufficient specimen for the requested test is collected in appropriate
container.
y Check specimen containers for expiry dates where applicable.
y Use good phlebotomy technique to avoid hemolysis or venous stasis.
y Do not attempt to augment low specimen volumes by transferring blood from tubes
containing anticoagulant/preservative into clotted blood specimens.
y The following order of draw should be followed for PHC when performing a venipuncture:
SPECIFIC SPECIMEN COLLECTION PROCEDURES
y Specimens that have inappropriately clotted, e.g. Full blood count (FBC)
y Specimens that are haemolysed, e.g. haemoglobin.
y Specimens collected in the wrong anticoagulant, e.g. Glucose in a red top Vacutainer tube.
y Specimens that are too old to be processed, e.g. Potassium received more than 24 hours
after collection will not be processed.
y Vacutainer test tubes that are under-filled, e.g. International Normalised Ratio (INR) in a
blue top Vacutainer tube.
Specimens may be rejected based on the following criteria:
GEN
ERAL
PRINCIPLES
1. Sodium citrate (blue top)
2. Clotted blood (red top)
3. Gel containing tube/s (SST/yellow top)
4. EDTA tubes (purple top)
5. Sodium fluoride (grey top)

41
Primary Healthcare Laboratory HANDBOOK
appe
ndixB
Page 110
1. Approach the patient in a friendly, calm
manner. Provide for the patient’s comfort
as much as possible, and gain their co-
operation.
2. Identify the patient correctly.
3. Adhere to standard Infection control
precautions.
4. Correctly complete the N1 Request form.
5. Verify the patient’s condition, i.e. fasting,
dietary restrictions, timing, and medical
treatment and provide the relevant
information on the N1: Request Form.
6. Label all tubes in the presence of
the patient. Label the tubes with the
correct patient information, i.e. patient’s
name and folder number or patient’s
identification label.
7. Position the patient, i.e. sit in a chair, lie
down or sit up in bed, with a supported
hyper-extended arm.
8. Select the venipuncture site.
9. Use aseptic techniques by washing hands
and using gloves.
10. Apply the tourniquet above the selected
venipuncture site. Do not place the
tourniquet too tightly.
11. The patient should make a fist without
pumping the hand.
12. Disinfect the puncture site using alcohol
containing disinfection, preferably 70%
alcohol swabs. Cleanse in a circular
motion, beginning at the puncture site
and working outward. Allow to air dry
prior to venipuncture.
13. Grasp the patient’s arm firmly using
your thumb to draw the skin taut and
anchor the vein. The needle should be at
an appropriate angle with the surface of
the arm. Swiftly insert the needle through
the skin and into the lumen of the vein.
Avoid excessive trauma and probing.
14. Push the Vacutainer tube completely onto
the needle. Blood should begin to flow
into the tube. Where applicable, a syringe
and needle may be used.
15. Mix each Vacutainer tube gently as you
withdraw the tube from the needle.
16. When the last Vacutainer tube has been
inserted into the needle, release the
tourniquet.
17. Remove the needle from the patient’s arm
using a swift backward motion.
18. Dispose of needle in the sharps container
without recapping.
19. Press down on the puncture site with
gauze when the needle has been
removed, applying adequate pressure to
avoid the formation of a haematoma.
20. Have the patient hold a small gauze pad
over the puncture site for a couple of
minutes to stop the bleeding. Cover the
puncture site with sterile gauze, held in
place with an elastic plaster.
21. Dispose of the gauze and other used
materials, e.g. gloves, in the appropriate
medical waste containers.
22. Label each specimen with one of the
peel-off, pre-printed barcode labels from
the N1 request form.
WHAT TO DOHOW TO DO IT
1. Blood collection in adults and children
Ensure maximal compliance to the Detailed ELL (Appendix B), for tests requiring special
patient preparation or precautionary measures during collection.
Follow this procedure for the performance of the venipuncture in adults and children.
Co
llect
sp
ecim
en f
rom
pat
ient
formN1
REFER TO FIGURE 12

42
SE
CT
ION
TW
OPrimary Healthcare Laboratory HANDBOOK
Figure 12: Venipuncture step-by-step for adults and children
Collect supplies. Label all tubes at the patient bedside. Label the tubes with the correct patient information.
Put tourniquet on patient above venipuncture site.
Have patient form a fist so veins are more prominent.
After palpating the path of the vein, clean the venipuncture site with 70% alcohol swabs using a circular motion. Allow the area to dry.
Assemble needle and vacuum tube holder.
Remove cap from needle. Push the Vacutainer tube completely onto the needle. Blood should begin to flow into the tube.
Fill the tube until it is full or until vacuum is exhausted. Mix immediately.
When the last Vacutainer tube has been inserted into the needle, release the tourniquet.
Place dry gauze over the venipuncture site as you remove the needle.
Apply mild pressure to the gauze swab and slowly remove the needle.
Properly dispose of all contaminated supplies.
Apply simple plaster or continue applying mild pressure until bleeding has stopped.
1 2 3
4 5 6
7 8 9
10 11 12
13 14

43
Co
llect
sp
ecim
en
Primary Healthcare Laboratory HANDBOOK
2. Blood collection in neonates and infants
Follow this procedure for the performance of the venipuncture in neonates and infants
Heel-toe or finger-prick method
1. Allow drops of blood to collect and fall into the microtainer, gently shaking the tube after
each drop to prevent clotting.
2. Do not squeeze the puncture site as this will dilute the blood with tissue fluid.
3. Provide a minimum of at least 250µl.
4. Place the lid on the microtainer (if purple top, invert several times to prevent clot
formation).
Formal venipuncture
1. Blood can also be sampled into microtainer tubes through venipuncture.
2. Collect a minimum of 1ml of blood.
Figure 13: Blood collection in neonates and infants
WHAT TO DOHOW TO DO IT
y Follow the above principles and use the appropriate puncture sites, syringes, needles and
tube sizes, e.g. microtainer tubes.
Special precautions for blood collection in neonates and infants:

44
SE
CT
ION
TW
OPrimary Healthcare Laboratory HANDBOOK
SPECIFIC PRECAUTIONS FOR MICROBIOLOGY TESTING
Principles for microbiology testing y Verify the identity of the patient and make sure that the correct folder or
HPRS number and patient name is specified on both the N1 Request Form
and specimen container.
y Clearly label the specimen container with the patient’s name, folder/HPRS number, date
and time of specimen collection and label all specimens with one of the peel-off pre-
printed barcoded labels from the N1 request form.
y The type of specimen including collection site should be provided, e.g. sputum, gastric
aspirate, type of urine or fluid as well as type of swab e.g. superficial swab, infected
wound, throat swab, vaginal swab, etc. but NOT pus swab.
y Utilise appropriate specimen collection materials prescribed and check specimen
container/s for expiry dates where applicable.
y Ensure that sufficient specimen for the requested test/s is collected in appropriate
container/s.
y Collect specimen before administering antimicrobial agents where applicable, e.g.
specimens for MC&S.
y Follow strict aseptic technique when collecting specimens to minimise contamination as
the recovery of contaminants or normal microbial flora will be misleading, and result in
inappropriate patient management.
y Collect specimens from anatomic sites that are most likely to yield pathogens where
applicable.
y Identify the specimen source and/or specific site correctly to ensure appropriate
processing in the laboratory.
y Tissue or fluid submitted for culture is always superior to material on swabs.
Remember “Junk in, junk out”.
GEN
ERAL
PRINCIPLES
form N1

45
Co
llect
sp
ecim
en
Primary Healthcare Laboratory HANDBOOK
GEN
ERAL
PRINCIPLES1. Sputum specimen
Principles for sputum collection y Explain the procedure for sputum collection to the patient (refer to Figure 14
on the next page).
y Ensure that the specimen collection area is well ventilated and offers the
patient some privacy.
y Send the patient to the designated sputum collection area (where applicable).
y Collection is preferable in the morning (better yield). However, do not miss the opportunity
to collect the sputum specimen at the time of consultation.
y The patient should be instructed to expectorate sputum from a deep, productive cough
with no nasal secretions or saliva into the sterile specimen jar.
y The healthcare worker must check that an adequate sputum specimen has been collected.
y For children who are not able to expectorate a sputum specimen, a naso-gastric aspirate
may be submitted to the laboratory.
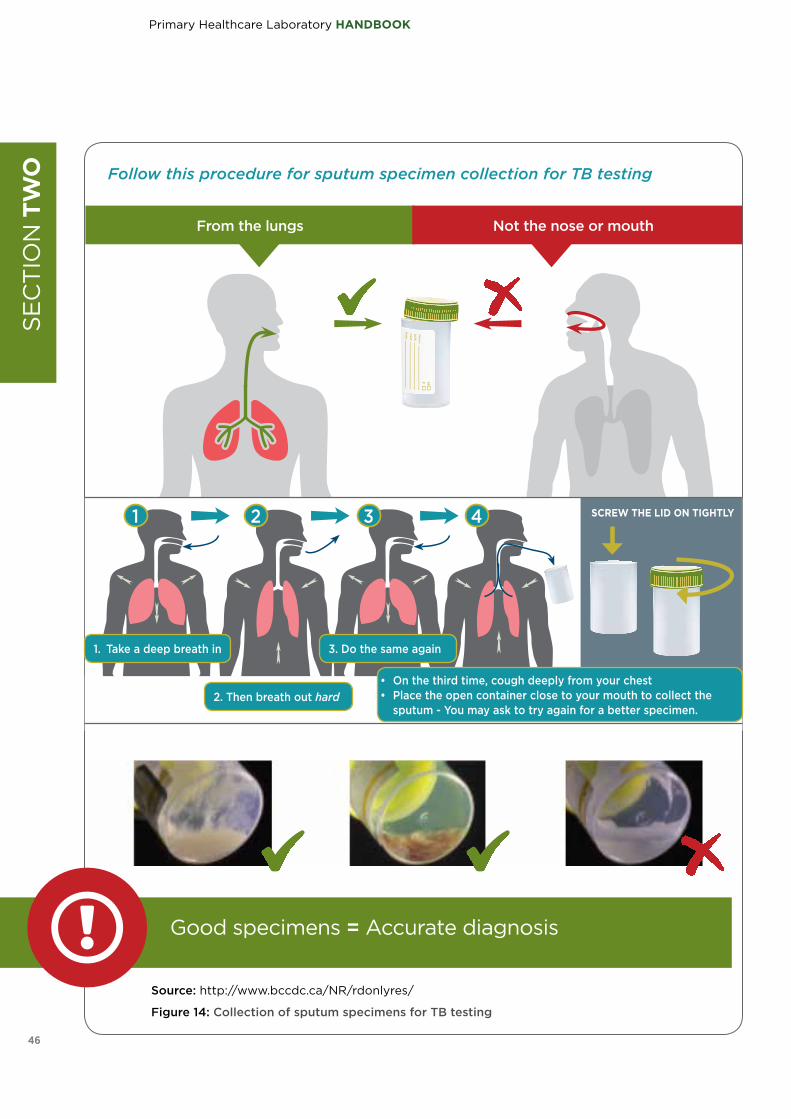
Follow this procedure for sputum collection
1. Rinse mouth with water (to prevent contamination with food particle, mouth
wash or oral drugs).
2. Take a deep breath and exhale two times.
3. On the third time, cough deeply from your chest.
4. Place the open sterile specimen jar close to your mouth to collect the sputum (5-10 ml).
5. Screw the lid on tightly (to avoid spillage).
6. Hand the sterile specimen jar with collected sputum to the healthcare worker.
7. Wash your hands after sputum collection.
Sputum specimens with sub-optimal volume (less than 5ml) will not be processed as this may produce a false-positive result.
On the following page is a pictorial guide to collecting sputum specimens for TB testing.
WHAT TO DOHOW TO DO IT
46
SE
CT
ION
TW
OPrimary Healthcare Laboratory HANDBOOK
Follow this procedure for sputum specimen collection for TB testing
Source: http://www.bccdc.ca/NR/rdonlyres/
Figure 14: Collection of sputum specimens for TB testing
From the lungs Not the nose or mouth
Good specimens = Accurate diagnosis
SCREW THE LID ON TIGHTLY
1. Take a deep breath in 3. Do the same again
• On the third time, cough deeply from your chest• Place the open container close to your mouth to collect the
sputum - You may ask to try again for a better specimen.2. Then breath out hard
1 2 3 4

47
Co
llect
sp
ecim
en
Primary Healthcare Laboratory HANDBOOK
2. Urine specimen
Principles for urine specimen collection
y Appropriate collection of urine specimens is critical to ensure the validity and
reliability of results interpretation.
y Urine is normally a sterile body fluid, however, contamination by normal flora of
the perineum, urethra and vagina can occur during collection.
y Never submit urine collected in a bedpan or urinal.
y Urine can be collected at any time of day and can be stored for up to 24 hours in a
refrigerator (2-5°C).
y Ensure the specimen is labeled, properly sealed and stored upright in the specimen plastic
bags (in the compartment for sterile specimen jars).
y Early morning urine specimens have the best yield. However, do not miss the opportunity
to collect the urine specimen at the time of consultation.
Do not force fluids prior to urine collection as this will dilute colony counts and result in potential misinterpretation.
Do not use urine specimen collected for laboratory processing for point of care (POC) urine dipstick testing.
y The healthcare worker must clearly label the specimen container with the patient’s name,
folder number, date and time of specimen collection and label all specimens with one of
the peel-off pre-printed barcoded labels from the N1 request form.
GEN
ERAL
PRINCIPLES
formN1

48
SE
CT
ION
TW
OPrimary Healthcare Laboratory HANDBOOK
WHAT TO DO
HOW TO DO IT
1. It is advisable that you attach the
bag before feeding the baby.
2. Make sure the pubic and genital areas have
been thoroughly washed, and are clean, dry
and free from powder.
3. Wash your hands and remove the strip of
protective paper on the bag, exposing the
adhesive.
4. Do not place your fingers inside the bag as
this will contaminate the sample.
5. Female Collection: Position the wider part of
the opening of the bag so that it covers the
upper part of the genitalia, ensuring that the
small end of the opening is applied firmly to
the skin in the area between the vagina and
rectum. Apply gentle pressure to the adhesive
area to seal.
6. Male Collection: The wider section of the
opening is placed under the scrotum, the
penis inserted into the bag and firm pressure
applied to the adhesive area to seal.
7. Check every 15 minutes to see if the baby has
passed urine.
8. It is not advisable to apply a tight nappy.
9. Do not leave the paediatric bag on the baby
for more than one hour.
10. Discontinue using if skin develops symptoms
of an allergy.
11. When the specimen has been collected,
remove the bag gently by tucking up. Then
fold the two adhesive surfaces together and
seal the bag.
12. Hold the bag over a sterile urine container and
using clean scissors, cut off a corner, let the
urine run in the jar, replace the lid and dispose
of the plastic collection bag.
13. Store in the refrigerator (2-5ºC).
14. Please return container to the health facility
promptly.
15. Inform staff that sample was collected using a
paediatric bag.
1. Wash hands well.2. Cleanse the urethral opening and vaginal
vestibule with gauze/cotton wool soaked in water/saline.
3. Hold the labia apart during voiding.4. The patient should pass a few milliliters of
urine into the toilet bowl, DO NOT STOP THE FLOW, and then collect the midstream portion of urine into the sterile specimen jar.
Females
1. Wash hands well.2. Cleanse the penis, retract the foreskin and wash with
gauze/cotton wool soaked in water/saline.3. Circumcised men are not required to cleanse the peri-
urethral area before voiding.4. Keep foreskin retracted while voiding.5. The patient should pass a few milliliters of urine into the
toilet bowl, DO NOT STOP THE FLOW, and then collect the midstream portion of urine into the sterile specimen jar.
Males
Follow this procedure for urine specimen collection in adults
Provide these gender-specific instructions to patients for the collection of clean-catch
midstream urine:
WHAT TO DO
HOW TO DO IT
Follow this procedure for urine specimen collection in children

49
Primary Healthcare Laboratory HANDBOOK
3. Stool specimen
Follow this procedure for stool specimen collection
1. Obtain unformed stool specimens.
2. Take parts of the stool that look bloody or slimy (contain mucous/pus).
3. Fill each container at least 1/3 full.
DO NOT overfill the sterile specimen jar.
4. Replace the lid.
5. Complete the N1 PHC request form. Please provide the suspected clinical diagnosis to
enhance appropriate processing of the specimen in the laboratory.
6. Do not submit more than one stool specimen for any individual patient within a 24 hour
period.
y Stool specimens can be collected at any time of day and can be stored at room
temperature for up to 24hr. Where room temperature exceed 25°C then store in a
refrigerator (2-5°C).
y Do not use a laxative before collecting the stool sample.
y Empty bladder completely (so stool sample is not contaminated with urine).
Prior to collection of specimen
1. Collect the stool specimen
into sterile specimen jar.
2. Do not let water touch the
stool sample.
Specimen collection from adults:
1. Do not submit stool sample in nappies.
2. For children with diarrhoea, or liquid
stool, fasten a nappy liner to the nappy
using childproof safety pins. Remove the
stool specimen from the nappy using a
disposable plastic spoon and put into the
sterile specimen jar.
Specimen collection from children:
WHAT TO DOHOW TO DO IT
formN1
Co
llect
sp
ecim
en f
rom
pat
ient

50
SE
CT
ION
TW
OPrimary Healthcare Laboratory HANDBOOK
4. Special collection instructions for other microbiology specimens
Specimen Special collection instructions
Aspirates or swabs
from abscesses,
wound and fluid
specimens
General precautions: The site, amount and method used to collect these specimens play a critical
role in determining the usefulness of the culture results.
For purposes of meaningful culture results, proper disinfection of the skin and
collection of representative specimens is advised.
Therefore, collection of a tissue biopsy, aspirates and aliquots of pus/fluid is
superior to a swab.
Sterile specimen jars or sterile Vacutainer tubes without additives should be
used for collection of such specimens.
Do not place biopsy specimen in formalin or wrap in gauze.
Swabs of superficial wounds and ulcers: The surfaces are usually colonised and cultures from such specimens often
yield mixed bacterial flora, which do not reflect the organisms of true
infectious significance.
Therefore, every effort should be made to obtain specimens from deeper
aspects of these lesions with careful avoidance of the contaminated tissue
surface.
Submit the specimen in a sterile container and deliver to the laboratory
without delay.
Aspirates:Decontaminate the collection site with 70% alcohol and/or with 10% povidone-
iodine solution and allow to air- dry.
Aspirate the deepest part of the lesion using a 3-5ml syringe and a
22-23 gauge needle.
The aspirating syringe can be used as the transport container if the needle is
removed and the syringe is capped.
Alternatively, transfer the aspirate into a sterile container and transport to the
laboratory promptly.
Burn wounds The surface of burn wounds is commonly colonised by the patient’s own
microbial flora or by environmental organisms therefore collection of a
representative specimen is important.
Swab cultures of burn wounds are not adequate for the detection of true and
potential pathogens therefore biopsy specimens are recommended.
The collected punch biopsy should be submitted in a sterile container.

51
Primary Healthcare Laboratory HANDBOOK
GEN
ERAL
PRINCIPLES
CYTOLOGY SPECIMEN
1. Conventional Pap smear collection
Principles for conventional Pap smear collection y Assemble specimen collection materials.
y Prepare the patient.
y Have a good light source.
y Check the expiry date on the bottle of fixative.
y Glass slides with a ground glass end must be used for this purpose and the patient’s name
and folder number must be written on the slide at the frosted end using a lead pencil.
y Complete the specific N2: Cytology Request Form for Pap smears.
y Any previous investigations must be mentioned with dates and laboratory numbers, if
available.
Figure 15: Pap smear specimen collection materials
FIXATIVE
100 ml
FENCOTT
CYTOLOGICAL FIXATIVE
PENCIL
GLASS SLIDE WITH
FROSTED END
COMBINED SPATULA
SPECULUM
CERVICAL BRUSH
formN2
Co
llect
sp
ecim
en f
rom
pat
ient
52
SE
CT
ION
TW
OPrimary Healthcare Laboratory HANDBOOK
WHAT TO DO
HOW TO DO IT
y Scanty material
y Un-labeled slides
y Delayed fixation
y Unfixed slides
y Smear too thick
y Broken slides (poor packaging)
y Improper transportation of smears
without a slide holder
y Use of lubricants prior to sampling.
y Excessive bleeding, i.e. bloody smear.
The following contributes to unsatisfactory Pap smear results:
Follow this procedure for optimal Pap smear specimen collection (refer to Figure 16)
1. Spread labia and insert the speculum correctly (speculum can be dry or moisten with
lukewarm water only).
2. Visualize entire cervix using a good light source.
y How to visualise the cervical os when not seen:
◦ Ask the patient to cough or push or bear colon.
◦ For obese patients, use condom over the Cusco or speculum [which is cut on top] to
prevent the fat tissue falling on the vaginal pathway thus obscuring the cervix.
◦ Put a pillow or a rolled towel under the pelvic area under the back.
◦ Rotate speculum or Cusco up or down or sideways to locate the cervix until the cervical
os is visualised.
3. Remove any obscuring discharge and excess blood with a ring forceps holding a folded
gauze pad.
4. Use the wooden spatula to sample the cervical material.
5. Apply firm pressure and rotate spatula more than 360 degrees.
6. Apply material uniformly along the length of a slide and not onto the frosted end.
7. Fix rapidly with spray fixative (within 10 seconds).
8. Allow fixative to air-dry.
9. The slides must be placed in slide holders before transport to the laboratory.

53
Co
llect
sp
ecim
en
Primary Healthcare Laboratory HANDBOOK
Figure 16: Specimen collection for Pap smear using Cervi-brush
WHAT TO DOHOW TO DO IT
Follow this procedure for using a Cervi-brush
1. Insert into cervical os.
2. Sample the entire transformation zone by rolling the brush shaft between your thumb
and forefinger while turning the brush 360°, five time in a clockwise direction. Maintain
gentle pressure.
3. Spread the collected sample on the entire length of the clear slide with one side of the
brush.
4. Turn the brush over and again spread the material on the entire length of the slide.
Smears made by each side of the brush should slightly overlap.
5. Spray fix immediately (within 10 seconds).
6. Allow slide to dry (after fixation) before packing to send off..Z

54
SE
CT
ION
TW
OPrimary Healthcare Laboratory HANDBOOK
WHAT TO DO
HOW TO DO IT
WHAT TO DO
HOW TO DO IT
Follow this procedure for proper fixation technique
1. Air-drying of a specimen causes distortion and loss of cytoplasmic density. Crisp
nuclear chromatic patterns are lost, and the cytoplasm cannot be coloured properly.
For this reason, rapid fixation is a vital step in cytological preparations.
2. When the clinician is preparing a slide e.g. pap smear or bronchial, oesophageal or gastric
brushings, the smear should be made in one direction with one motion and the doctor
should avoid using the same area of the slide twice. All prepared slides should be sprayed
with cytological fixative immediately to prevent specimen degeneration.
3. Check expiry date on spray fixative.
2. Liquid based cytology
Follow this procedure for liquid based cytology collection
1. Prepare all consumables before starting the procedure.
2. Complete patient details on both the N2 request form as well as the liquid-based
cytology (LBC) vial. Specimens may be returned if details are missing from the vial.
3. Prepare collection materials.
4. Ensure the entire plastic seal is removed from the lid of the LBC vial and discarded.
Figure 17: Recording the patient details on the LBC vial
Prepare the patient1. Counsel the patient by explaining the LBC sample collection procedure and when to return to
the health facility.
2. Put the patient in lithotomic position.
3. Ensure that you have a good light source.
4. Spread the labia and insert the speculum correctly.
5. Do not use any lubricants such as KY Jelly as these may interfere with the test process. Use
sterile warm water or running tap water if the vagina is dry.
6. Visualize the entire cervix.
7. Remove any obscuring discharge, blood or mucus.

55
Co
llect
sp
ecim
en
Primary Healthcare Laboratory HANDBOOK
Method using Cervex brush (broom-like brush) y Insert the central bristles of the brush into the endocervical canal
deep enough to allow the shorter bristles to fully contact the ectocervix.
y Rotate the brush 360°, 5 times.
y Rinse the cervex brush immediately into the LBC vial solution vial by
pushing it into the bottom of the vial 10 times, forcing the bristles apart.
y As a final step, swirl the brush vigorously to further release material.
y Visually inspect the cervex brush to ensure that no material remains
attached.
y Discard the collection device (into the biohazard waste box).
Do not leave the head of the brush inside the vial.
y Tighten the cap so that the black torque line on the cap passes the
black torque line on the vial (to ensure there is no leakage of the sample).
y Do not over-tighten. [It will break the sensors of the processing machine
in the Lab].
y Place the vial and requisition form in a specimen bag for transportation to
the laboratory.
Method using endocervical brush (combi-brush) y Push gently, and rotate the brush 360° in a clockwise direction. Rotate
1½ times.
Do not use an endocervical brush if the woman is wearing Intrauterine Contraceptive Device (IUCD), is pregnant or has a stenosed cervix.
y Rinse the endocervical brush immediately into the LBC vial solution by
pushing it into the bottom of the vial 10 times, forcing the bristles apart.
y As a final step, swirl the brush vigorously to further release material.
y Visually inspect the endocervical brush to ensure that no material remains
attached.
y Discard the collection device (into the biohazard waste box).
Figure 18: Sample collection using the cervexbrush
Figure 20: Sample collection using the endocervical brush
Figure 19: Tighten LBC vial cap
WHAT TO DOHOW TO DO IT

56
SE
CT
ION
TW
OPrimary Healthcare Laboratory HANDBOOK
3. Fine needle aspirate collection
This procedure is for visible or easily accessible palpable lesions and is NOT suitable for deep-seated lesions, which should be conducted under radiological guidance.
Follow this procedure for fine needle aspirate collection
1. Explain the fine needle aspirate (FNA) procedure to the patient.
2. Write all required information, including the clinical information, especially the site
and nature of the lesion, as specified on the CN2 Cytology Request Form.
Follow this procedure to prepare the FNA smear
1. Label all slides using a pencil (on the frosted portion) with the patient’s name and folder
number
Do not label slides with barcodes; barcodes must be attached to the slide holder.
2. Examine the nature of the lesion i.e. solid, cystic, mobile etc.
3. Clean the skin with antiseptic.
4. Insert the sterile 22g needle with an attached 10 or 20ml syringe into the lesion with the
dominant hand while stabilising the mass with the non-dominant hand.
5. Retract the syringe to produce and maintain a negative pressure of about 5ml.
6. Move the needle in various directions to sample cells from different areas of the mass
while maintaining the negative pressure.
7. When only the nub of the syringe is filled with aspirate material, withdrawn the needle
while maintaining a negative pressure until the subcutaneous tissue is reached. Then
release the piston of the syringe to equalize the pressure.
8. Withdrawn the needle and then completely disconnect it from the syringe.
9. Fill the syringe with air, and reconnect to the needle.
10. Express the material at the frosted end of the glass slide.
11. Place a second glass slide face down, parallel to the bottom slide and pull both slides
apart in separate directions.
WHAT TO DO
HOW TO DO IT
form N2

57
Co
llect
sp
ecim
en
Primary Healthcare Laboratory HANDBOOK
Figure 21: Deliver material on slide and use second slide to make a smear
y Fix one of the slides immediately using spray fixative; leave the other slide to air dry.
Clearly mark which slide is fixed and which is air dried.
y Label all slides in pencil with the patient’s name or hospital number.
The cytology staff will gladly show any clinician how to perform a fine needle aspiration.
y Hold the aerosol spray fixative 17-22cm from the glass slide.
y Hold the glass slide horizontally while spraying with fixative. If the slide is held at an angle,
the material may be sprayed off the slide.
The expiry date on the bottle of spray should be checked regularly.
y Clearly mark which of the slides is fixed, and which is air-dried.
Figure 22: Example of a prepared smear
PRESS SLIDES FIRMLY TOGETHER TO SPREAD MATERIAL TO EDGES

58
SE
CT
ION
TW
OPrimary Healthcare Laboratory HANDBOOK
WHAT TO DO
HOW TO DO IT
4. Dried blood spots collection for Early Infant Diagnosis
Follow this procedure for the collection of dried blood spots:
1. Assemble the materials to perform dried blood spots (DBS) collection:
y DBS card
y Desiccant sachet
y Disinfectant, i.e. alcohol swab
y Safety lancet
y Drying rack
y Plastic bag
y Gauze/cotton wool
y N1 PHC Request Form
y Powder free gloves
2. Confirm the patient’s identity and check the expiry date on the filter paper card.
3. Write the name, date of birth and date of sample collection onto the filter paper card and complete the
request form.
Show the mother how to warm the baby’s foot to increase circulation.
Use aseptic techniques as described here:1. Wash your hands.
2. Put gloves on.
3. Select an appropriate puncture site.
◦ Young infants – heel or big toe
◦ Infants older than 9 months – finger
4. Clean the selected site with the skin
disinfectant swab and allow to dry for
30 seconds.
Figure 23: Example of a required materials
Figure 24: Preparation for procedure
1 2 3 4
1 2
3 4RE
FE
R T
O F
IGU
RE
24

59
Co
llect
sp
ecim
en
Primary Healthcare Laboratory HANDBOOK
RE
FE
R T
O F
IGU
RE
25
Method for collecting the sample:5. Position the foot or hand with the puncture site. Puncture the site using a freshly
unpacked sterile lancet.
6. Whilst holding the foot correctly, apply and release pressure to allow a drop of blood to form. Do
not squeeze or “milk” the puncture site as this may dilute the blood with tissue fluid.
Wipe away the first blood drop using a clean cotton wool swab. The initial drop contains tissue
fluid that may dilute the specimen.
Allow another large blood drop to form.
Lightly touch filter paper card onto blood drop. Apply blood only to the printed side of the filter
paper card. Allow blood to soak through and to radiate to completely fill the circle but do not
layer more than one blood drop onto the same circle. Do not touch the blood spots with your
hands or gloves!
Allow the next drop of blood to form and soak it onto the next marked circle. Repeat until at least
three marked circles are filled with blood.
The pre-printed circles hold ±75 µl blood each when completely filled. Samples with insufficient
blood cannot be processed since the Polymerase Chain Reaction (PCR) result may be unreliable.
7. Apply pressure to the puncture site using clean gauze (or cotton wool) to stop further bleeding
and apply a plaster strip to puncture site.
8. Dispose of the lancet safely into a sharps/infectious waste disposal container.
Method for drying:
1. Place the card in the drying rack without the blood touching the rack.
Do not allow blood spots to come into contact with any surface or each other.
2. Allow to dry thoroughly for at least three hours while keeping it away from sunlight,
dust and insects.
3. Place the card with a desiccant sachet into an airtight sealable bag.
4. Close bag and send it together with the request form to the laboratory.
During transport the samples should not be left in the car as exposure to sunlight and heat may deteriorate the samples.
WHAT TO DOHOW TO DO IT
RE
FE
R T
O F
IGU
RE
26

60
SE
CT
ION
TW
OPrimary Healthcare Laboratory HANDBOOK
Figure 25: DBS step-by-step sample collection
Heel prick method Toe prick method
Source: NHLS, ‘Taking blood from infants for the HIV PCR test standard Operating Procedure’
Figure 26: DBS drying method
1 2 3
5 6
66
7 8
5 6
66
7 8

61
Primary Healthcare Laboratory HANDBOOK
Features of an acceptable DBS card
1. At least three pre-printed circles should be completely filled with blood.
2. The N1 PHC Request Form barcode label should be affixed, and the DBS card
completely and accurately labelled.
1 2
3 4 5 6
Figure 28: Examples of unacceptable DBS cards
Figure 27: Examples of acceptable DBS cards
Features of an unacceptable DBS card
y Patient details on DBS card are ineligible
y Patient details on the DBS card do not match the information provided on the
N1: Request Form.
y Insufficient sample for processing.
y Blood spotted outside the pre-printed circle.fo
rmN1
formN1
Co
llect
sp
ecim
en f
rom
pat
ient

62
SE
CT
ION
TW
OPrimary Healthcare Laboratory HANDBOOK
SPECIAL PRECAUTIONS FOR CHEMICAL PATHOLOGY TESTS
For some specific tests, special precautions need to be complied with, e.g. fasting for a cholesterol test. Take note the precautions.
1. Cholesterol and lipogram
The patient should adhere to their normal diet and lifestyle for two weeks preceding the test.
Blood should be collected with minimal stasis in the seated position after an overnight fast of
10-12 hours (water permitted). In patients who have suffered a myocardial infarction, sampling
should be done either within 24 hours or after three months. Due to large biological variability
and pre-analytical errors, decisions to initiate treatment with lipid-modifying drugs should
be based on at least two separate results obtained one week or more apart, using the same
laboratory to minimise variability. If there is a discrepancy of more than 10% between these two,
a third specimen is advisable.
Take note of the special precautions which need to be complied with for some specific tests.

63
Co
llect
sp
ecim
en
Primary Healthcare Laboratory HANDBOOK
Haemolysed samplesWill lead to inaccurate results, e.g.
incorrectly elevated Potassium.
Insufficient samplesWill lead to rejection and/or delayed
processing.
Inadequate mixingWill result in clotting of the specimen
collected in an anticoagulant tube thus no further processing will be
undertaken.
CONSEQUENCES OF IMPROPER SPECIMEN COLLECTION
Improper specimen collection can mean that specimens are rejected and can have the following consequences:
y Specimens that have inappropriately clotted, e.g. FBC.
y Specimens that are haemolysed, e.g. haemoglobin.
y Specimens collected in the wrong anticoagulant, e.g. Glucose in a red top Vacutainer tube.
y Specimens that are too old to be processed, e.g. Potassium received more than 24 hours
after collection will not be processed.
y Vacutainer test tubes that are under-filled, e.g. INR in a blue top Vacutainer tube.
Specimens may be rejected based on the following criteria:
Poor Sample storage and transport could lead to:
y Specimen contamination and failure to isolate the
causative microorganism.
y Improper treatment of the patient.

64
SE
CT
ION
TH
REE
Primary Healthcare Laboratory HANDBOOK
Complete request
form
PACKAGE SPECIMEN
section
3
section
1Collect
specimen
section
2

65
Primary Healthcare Laboratory HANDBOOK
Specimen collection by courier
Manage laboratory
results
Order specimen collection materials
SECTION THREE
PACKAGE SPECIMEN
Specimen storage
section
4section
5section
6section
7section
8Access to additional
information

66
SE
CT
ION
TH
REE
Primary Healthcare Laboratory HANDBOOK
WHAT TO DO
HOW TO DO IT
Once the request form (N1 or N2) has been completed and specimens collected, follow the packaging instructions discussed below.
LABEL SPECIMENS
Follow this procedure for the labeling of specimens
1. Write the patient’s name and surname and clinic folder or HPRS number clearly,
using a pen or marker on each specimen.
2. Peel off barcode labels from the N1: PHC and N2: Cytology Request Forms and
attach to each specimen collected.
3. Where seven or more specimens are collected from one patient, complete a second
request form and use the barcodes from the second form for additional specimens.
There are nine barcodes provided with the N1: Request Form (seven for specimens and
two reserved for facility record keeping).
4. Please place the barcode horizontally for Vacutainer tubes (refer to the figure below).
Place the barcode across the Vacutainer test tubes so that they are clearly visible and can
be scanned easily in the laboratory.
Figure 30: How to apply the request form barcode to sterile specimen jar
Apply bar code lengthwise DO NOT WRAP AROUND
Figure 29: How to apply the request form barcode
form N1
form N2
Place the barcode horizontally on sterile specimens.

67
Primary Healthcare Laboratory HANDBOOK
RECORDING OF SPECIMEN IN THE PATIENT FILE
Follow this procedure for the recording the specimen
y Peel off one barcode sticker from the N1: PHC or N2: Cytology request form and stick
it in the Lab Investigation section of the Clinical Consultation Form (Figure 31 below)
in the patient folder.
y Where a second N1: PHC Request Form is used place the second barcode in the Lab
Investigation section of the patient folder for tracking purposes to access laboratory
results for the additional tests.
Figure 31: Clinical Consultation Form
WHAT TO DOHOW TO DO IT
Patient folder
Clinical Management
formN1
formN2
Pac
kag
e sp
ecim
en

68
SE
CT
ION
TH
REE
Primary Healthcare Laboratory HANDBOOK
y Indicate the date and testss requested in the Laboratory Test Results form (Figure 32
below) of the patient record by placing a tick next to each test requested to assist with
tracking results.
Figure 32: Patient folder: Laboratory Results Form
Patient folder
Lab Results

69
Primary Healthcare Laboratory HANDBOOK
SPECIMEN PACKAGING
Principles for specimen packaging y All specimens must be placed in the appropriate compartment of the specimen
plastic bags provided.
Use only ONE specimen plastic bag per patient.
y The specimen plastic bags are designed to accommodate the N1: PHC and N2: Cytology Request Form and specimens for each individual patient only.
The specimen plastic bags have separate compartments for:
Pac
kag
e sp
ecim
en
GEN
ERAL
PRINCIPLES
N1: PHC & N2:Cytology Laboratory Request Forms
Fold the form in half and insert into compartment with patient information
facing outward. This will enable the laboratory to read the N1: PHC Request
Form without unpacking the entire package.
Figure 33: Specimen bag with test tubes in the allocated compartment
Sterile specimen jar Larger specimen compartment
reserved for specimen jars.
Vacutainer test tubesReserved for collected blood
specimens.
1 2 3
70
Primary Healthcare Laboratory HANDBOOK
form N1
form N2
GENERAL PRECAUTIONS
Principles for packaging of specimens
y All specimens must be packaged carefully to avoid
breakage or leakage of the specimen.
y All specimens must be packed in compliance
with the transportation guidelines for medical
specimens with at least one complete N1: PHC or N2: Cytology Request Form per patient.
The request form should never be placed inside the plastic bag with the specimen but must be placed in outside pouch of transparent plastic bag.
y Un-labeled or improperly labeled specimens.
y Improperly sealed specimens resulting in contamination (visually apparent).
y Specimens received in leaking, cracked or broken containers.
y Specimens not appropriate for a particular test.
Reasons for specimens found to be unacceptable or rejected by the laboratory include:
GEN
ERAL
PRINCIPLES
SE
CT
ION
TH
REE

71
Pac
kag
e sp
ecim
en
Primary Healthcare Laboratory HANDBOOK
72
SE
CT
ION
FO
UR
Primary Healthcare Laboratory HANDBOOK
Complete request
form
SPECIMENSTORAGE
section
4
section
1Collect
specimen
section
2Package specimen
section
3

73
Primary Healthcare Laboratory HANDBOOK
Manage laboratory
results
Order specimen collection materials
SECTION FOUR
SPECIMEN STORAGE
Specimen collection by courier
section
5section
6section
7section
8Access to additional
information

74
SE
CT
ION
FO
UR
Primary Healthcare Laboratory HANDBOOK
SPECIMEN RECORDING IN THE FACILITY SPECIMEN REGISTER
Principles for recording facility specimens
NHLS provides a specific register that must be completed for all specimens within the facility:
y Ensure that all specimens within the facility are recorded in the N4: Facility Specimen Register and placed in the specimen collection box immediately.
Use one row per patient in the register
GEN
ERAL
PRINCIPLES
PHC FACILITY SPECIMEN REGISTER For recording of facility specimens
form
N4Page 81
y Peel off the barcode sticker from the N1: PHC or N2: Cytology request form and place in
the N4: PHC Facility Specimen Register.
y Complete the following information in the N4: PHC Facility Specimen Register:
◦ Date, time
◦ Patient folder/HPRS number and,
◦ Tick the appropriate disciplines for the test/s requested (refer to N1 request form).
y Seal the specimen plastic bag.
y Drop off the samples in the designated area, i.e. specimen collection box or specimen
fridge/facility cooler box for collection by the NHLS courier (based on test specific
specimen storage conditions).
Barcode sticker goes
hereDate & time
go hereFolder
number goes here
Tick as appropriate

75
Primary Healthcare Laboratory HANDBOOK
GEN
ERAL
PRINCIPLES
SPECIMEN STORAGE CONDITIONS
Principles for specimen storage
y All specimens awaiting collection by courier must be stored according to the
determined storage conditions for each ELL test in Appendix B (refer to the
table below).
y The specimen stability and viability may change over time due to inappropriate storage.
Do not remove specimens from the specimen plastic bag once already packaged.
Do not refrigerate cytology smears.
Specimen handling and storage conditions
ELL KEY SAMPLE HANDLING STORAGE CONDITIONS
A y Specimens must be kept away from direct sunlight
y Specimens should not be exposed to dramatic temperature fluctuations
y Specimens can be stored for up to 24 hours at room temperature (20-25°C)
y Where room temperature exceeds 25°C, specimens must be stored in a fridge (2-5°C) to preserve specimen integrity)
B y When the smear has been fixed, insert into a slide holder and store in specimen storage bag
y Do not use an envelope
y Store at room temperature (20-25°C) until collection
C y Collect specimens in sterile specimen jar or tubes
y Where appropriate, place in the transport medium provided
y All specimens except urine can be stored up to 24 hours at room temperature (20-25°C)
y Urine and stool specimens must be stored in the fridge (2-5°C)
D y Specimens should be collected in clean leak proof containers
y Specimens can be stored up to 24 hours at room temperature (20-25°C) or up to 48 hours in a fridge (2-5°C)
y Where room temperature exceeds 25°C, specimens must be stored in the fridge (2-5V) to preserve specimen integrity
y Do not freeze specimen
Sp
ecim
en s
tora
ge

76
SE
CT
ION
FO
UR
Primary Healthcare Laboratory HANDBOOK
Adhere to the specified specimen storage conditions, even after the completed daily collection schedule.
Specimens should not be exposed to vibrations (especially during
transportation).
Specimen transport and storage conditions, together with the time
interval between collection and testing may affect the quality of test
results.
If the courier doesn’t collect:

77
Sp
ecim
en s
tora
ge
Primary Healthcare Laboratory HANDBOOK
CONSEQUENCES OF IMPROPER SPECIMEN STORAGE
y Dramatic temperature fluctuations could lead to the loss of viability of causative
microorganism or overgrowth of normal commensal organisms, thus negatively affecting
patient care.

78
SE
CT
ION
FIV
EPrimary Healthcare Laboratory HANDBOOK
Collect specimen
Package specimen
section
3Specimen storage
section
4Complete request
form
section
1section
2

79
Sp
ecim
en c
olle
ctio
n by
co
urie
r
Primary Healthcare Laboratory HANDBOOK
Manage laboratory
results
Order specimen collection materials
SECTION FIVE
SPECIMEN COLLECTION BY COURIER
SPECIMENCOLLECTION BY
COURIER
section
5
section
6section
7section
8Access to additional
information

80
SE
CT
ION
FIV
EPrimary Healthcare Laboratory HANDBOOK
A courier service is provided by the NHLS to collect patient specimens daily (or as agreed with the DMT).
y The laboratory manager must provide each facility manager with a
written designated collection time schedule (early/mid/late morning
and/or early/mid/late afternoon).
y Ensure that you familiarise yourself with the designated collection
schedule for your facility.
y The courier should arrive daily at the scheduled time. If not, follow
the escalation procedure to alert the laboratory manager.
y The couriers are identified by their name tags. The vehicles are branded
with the NHLS logo and contact details.
Follow this procedure for recording specimen handed over to the NHLS courier
1. On arrival at the facility, the courier must report to reception.
2. Designated facility staff must ensure that the number of specimen packages from the
specimen collection box, fridge or cooler box correspond to the number of entries in the
N4: PHC Facility Specimen Register.
3. Check specimen fridge or cooler box on each NHLS courier visit to ensure that all
specimens are sent timeously.
4. Designated facility staff must then handover specimens from the specimen collection box,
fridge or cooler box to the courier.
5. Draw a line in the N4: PHC Facility Specimen Register after the last specimen entered for
that specific courier collection to clearly reflect the number of specimens collected.
6. The NHLS courier must enter his full name, collection date and time in the N4: PHC Facility Specimen Register at the above mentioned line for auditing purposes.
7. Tear off the top copy of the completed N4: PHC Facility Specimen Register and hand to
the courier with the specimens. Leave the carbon copy in the N4 Register.
8. Designated facility staff member to sign the NHLS courier log sheet to confirm specimen
collection, where applicable.
y Register number: consecutive numbering of the register, e.g. 1, 2, 3, etc.
y Start and end date: period during which the register was used
y Facility name: add facility name.
For each new PHC Facility Specimen Register (N4) being used, complete the following information in the space provided on the front cover:
WHAT TO DO
HOW TO DO IT
form N4

81
Primary Healthcare Laboratory HANDBOOK
Sp
ecim
en c
olle
ctio
n by
co
urie
r
00101/03/2016
S. Themba, CHC
N4: PHC Facility Specimen Register (Sample information, not real individual)
Figure 34: Example of a completed Facility Specimen Register cover
N4: PHC Facility Specimen Register (Sample information, not real individual)
Figure 35: Example of a completed N4: Specimen Facility Register
Line drawn after last entry - courier signed

82
SE
CT
ION
SIX
Primary Healthcare Laboratory HANDBOOK
Collect specimen
section
2Package specimen
section
3Specimen storage
section
4Complete request
form
section
1

83
Primary Healthcare Laboratory HANDBOOK
Order specimen collection materials
SECTION SIX
MANAGE LABORATORY RESULTS
MANAGE LABORATORY
RESULTS
section
6
section
7section
8Specimen collection by courier
section
5
RESULTS
Access to additional
information

84
Primary Healthcare Laboratory HANDBOOK
Delivery of printed laboratory results by the courierThe NHLS courier will deliver printed laboratory results in a sealed
envelope to each health facility on a regular basis.
SE
CT
ION
SIX
Figure 36: Sealed envelope containing patient results
y Each sealed envelope must display the
facility name.
y Ensure that the delivered envelope is the
correct one for that facility
y Where applicable, sign the log sheet
provided by the courier.
NATIONAL HEALTH LABORATORY SERVICE
PRIVATE & CONFIDENTIAL
URGENT CLINICAL REPORTS
SENTRECIEVED
DATE
TIME
BY WHOM
DRIVER
HOW TO ACCESS RESULTSThere are multiple mechanisms for health facilities to receive or access laboratory results.
Printed laboratory resultsRoutine delivery of printed patient results by the courier. This is the primary mechanism for receiving
results.
HOW TO ACCESS RESULTS
Telephonic access Call your local laboratory to
request the patient results using barcode.
Electronic access to laboratory results
NHLS WebView portal• The NHLS web view results portal (Trak Care
Lab WebView) is available provided you have a computer with internet access.
• All users need to be individually registered to use this service. Please request user registration form from your local laboratory manager.
• Following registration, you will be allocated a username and password to access results.
1
2
3
1
NHLS SMS printer• The listed laboratory results will be printed automatically by the SMS printer at the facility.
• However, if the results are misplaced or not received within 24hrs, then scan the request form barcode to access and print the laboratory results.
1 2 3
4 5 6
7 8 9
* 0PLS
CALL #
SCANNER
PAPER
STATUS
POWER
PAPER ORIENTATION
TLC GSM PLUS II
SIM CARD NUMBER

85
Man
age
lab
ora
tory
res
ults
Primary Healthcare Laboratory HANDBOOK
WHAT TO DOHOW TO DO IT
Figure 37: Bi-directional SMS printer
Follow this procedure to access laboratory results using the bi-directional SMS printer
1. Ensure the printer is switched on and that the barcode scanner is connected
2. Press the # key.
3. After receiving the “Scan Barcode” message, you can now scan the N1 Request Form
barcode.
4. Your requested patient results will print if available. Only authorized results will print on the
SMS printer.
Electronic access to laboratory results
USING THE SMS PRINTER TO ACCESS LABORATORY RESULTS
The following tests results are currently available for printing on the SMS printer: y CD4
y HIV Viral load
y HIV DNA PCR (Early Infant Diagnosis)
y Xpert MTB/RIF
y TB Microscopy (Auramine/ZN)
y CRAg1 2 3
4 5 6
7 8 9
* 0PLS
CALL #
SCANNER
PAPER
STATUS
POWER
PAPER ORIENTATION
TLC GSM PLUS II
SIM CARD NUMBER
2

86
SE
CT
ION
SIX
Primary Healthcare Laboratory HANDBOOK
WHAT TO DO
HOW TO DO IT
Follow this procedure to access laboratory results by accessing the Webview portal
1. Navigate to the NHLS website: http://www.nhls.ac.za.
2. Click on the “Login to Lab Results” icon.
3. Select the “TrakCare Lab WebView All Provinces” link.
4. Click on the “TrakCare Lab WebView portal” link.
5. An online user manual is provided on the landing screen.
USING THE WEBVIEW PORTAL TO ACCESS LABORATORY RESULTS
Figure 38: TrakCare Lab WebView link

87
Primary Healthcare Laboratory HANDBOOK
Logging in
1. Enter your username and password.
If you do not yet have your login details, contact your local laboratory manager.
Figure 39: Trak Care WebView login screenS
pec
imen
co
llect
ion
by c
our
ier
WHAT TO DOHOW TO DO IT
File Edit View Favorites Tools Help
Welcome to NHLS-LABTRAK
Username
Password
Logon
TrakCare Lab L6.10
© 1995-2013 InterSystems Corporation. All Rights Reserved.

88
SE
CT
ION
SIX
Primary Healthcare Laboratory HANDBOOK
After loginOnce you are logged in, the patient search screen is displayed. This screen enables the user to
search the database for patient results.
Figure 40: Trak Care WebView patient search screen
y If multiple search criteria are entered, only specimens that match all the search criteria can
be found.
y Search for patient results using the following fields:
◦ Request form barcode number (in the specimen reference field).OR
◦ Patient folder number.
◦ Surname: Type in patient surname (Not case sensitive).
◦ Name: Type in patient name.
y If you are unsuccessful, then add the following fields to the search criteria:-
◦ Date of birth: Type in date of birth, in the format DD/MM/YYYY. A calendar icon next to
the field allows one to select a Date of birth on the calendar.
◦ Patient location: This is the health facility from which the specimen originated.
How to access laboratory results telephonically
Follow this procedure to access laboratory results telephonically
y Call your local laboratory to request the patient’s results.
y For laboratory contact details please refer to Appendix D.
y The request form barcode should be provided to the laboratory employees when
searching for results.
y This barcode links each patient’s results to a specific patient visit based on the request
form.
3
appe
ndix D
Page 115
Home l Tools l Logout
Patient Find
Patient Find
Patient FindSurname
Name
Soundex
Sex
Date of Birth
National ID Type
National ID
MRN
Genetics Case Number
Alt Ref Number
Doctor Code
Patient Location Structured
Patient Location
Synonym Patient Location
Hospital Folder Number
Episode
Specimen Reference
Date From
Date To
Department
Test Set
Clear (L)
Search (S)
Surname Name MRN Sex Date of Birth Read Viewed Hospital Number Laboratory

89
Primary Healthcare Laboratory HANDBOOK
Sp
ecim
en c
olle
ctio
n by
co
urie
rREVIEW LABORATORY RESULTS
The laboratory results will consist of the following:1. Patient specific laboratory test results
2. Result interpretation
3. Test reference ranges (as appropriate)
Should you require assistance to interpret any laboratory results, please contact your local laboratory manager.
The facility manager must designate a competent professional nurse to review the printed laboratory results
Follow this procedure to review the printed laboratory results (delivered and SMS printed):
1. Open the sealed envelope and ensure that all results are for your health facility.
2. Return incorrectly addressed or inserted laboratory results to the courier
3. Screen all the delivered and SMS printed results to identify abnormal results.
4. Where abnormal results are identified, the patient must be requested to return to the
health facility immediately (as per clinical protocol).
5. The professional nurse must enter the date and time of review on each laboratory result
sheet.
6. Update the N4: PHC Facility Specimen Register i.e. enter date of receipt of test results in
the last column of N4, against the specific discipline.
WHAT TO DOHOW TO DO IT
formN4

90
SE
CT
ION
SIX
Primary Healthcare Laboratory HANDBOOK
Principles for dealing with laboratory results y Reviewed results must be filed within five working days in patient folder by
allocated administration staff member.
y On pre-retrieval of the patient’s folder for a planned return to the health facility,
ascertain whether all the laboratory reports have been received and filed (from
the facility lab request form).
y If they have not been filed in the folder, use one of the above mechanisms to obtain all
outstanding results.
y Update the Laboratory Results page in the patient folder. (Refer to figure 41)
GEN
ERAL
PRINCIPLES
FILE LABORATORY RESULTS
Enter date of specimen collection at the top of
each column
Enter normal results using a black pen
Enter abnormal results using a red pen.
13th June 2017

91
Man
age
lab
ora
tory
res
ults
Primary Healthcare Laboratory HANDBOOK
Folate (serum)
Figure 41: Patient folder: Laboratory Results
Patient folder
Lab Results

92
SE
CT
ION
SEV
ENPrimary Healthcare Laboratory HANDBOOK
Collect specimen
section
2Package specimen
section
3Specimen storage
section
4Collect
specimen
section
1

93
Primary Healthcare Laboratory HANDBOOK
Access to additional
information
SECTION SEVEN
ORDER SPECIMEN COLLECTION MATERIALS
ORDER SPECIMEN COLLECTION MATERIALS
section
7
section
8Specimen collection by courier
section
5Manage
laboratory results
section
6
ORDER

94
Primary Healthcare Laboratory HANDBOOK
Ensure regular stock checks and stock rotation, using oldest stock first. Why? Never allow stock to reach expiry
date.
Submit requests timeously.
Why? To ensure sufficient stocks of
specimen collection materials at the health
facility at all times.
Determine the quantity of request forms (N1 and N2), specimen collection materials and disposables that you need to order based on entries for the last two weeks in the N4: PHC Facility Specimen Register.
Why? Use this information to identify the
next order quantity.
Use the N3: PHC specimen collection material order book to request additional specimen collection materials from your local NHLS laboratory:
For each new N3 register used, insert the following information in the space provided:
y Register number: please number each register sequentially, i.e. 1, 2, etc.
y Start and end date: period during which the book was used.
y Facility name: add your facility name.
It is imperative that the health facility manager align requests for specimen collection materials
with the number of specimens submitted to the laboratory.
Specimen collection materials are provided exclusively for the collection of laboratory specimens and may not be used for other purposes, e.g. storing tablets or creams.
Please refer to the two workflows on pages 98 and 100 for the health facility and laboratory that
relate to specimen collection materials. Each workflow describes all the steps to be followed
by the health facility and laboratory to ensure specimen collection materials availability at all
times at the facility.
form N3
SE
CT
ION
SEV
EN
PHC FACILITY SPECIMEN REGISTER For recording of facility specimens
form
N3Page 97

95
Ord
er s
pec
imen
co
llect
ion
mat
eria
ls
Primary Healthcare Laboratory HANDBOOK

96
SE
CT
ION
SEV
ENPrimary Healthcare Laboratory HANDBOOK
Figure 42: Request forms and specimen collection materials for PHC to be ordered
form
N3

97
Ord
er s
pec
imen
co
llect
ion
mat
eria
ls
Primary Healthcare Laboratory HANDBOOK
form
N3
Figure 43: N3 PHC Order Book: Materials for Specimen Collection Request Form

98
SE
CT
ION
SEV
ENPrimary Healthcare Laboratory HANDBOOK
WHAT TO DO
HOW TO DO IT
ORDERING AND RECEIVING SPECIMEN COLLECTION MATERIALS
Follow this process to order and receive specimen collection materials in the health facility.
STEP 1Conduct a stock take of
specimen collection materials in the health facility
The first step is for the health facility
to conduct a stock take of all specimen
collection materials. This includes
visiting all consulting rooms to ensure
that an accurate assessment is made
of the collection material quantities in
the health facility.
STEP 2Review the Facility Specimen Register (N4) entries for the last two weeks to determine
number of patients that received a laboratory test.
The number of patients could be used to determine
the quantity of N1 PHC Request Forms required. Pay
attention to the unit of measure indicated in the N3
Specimen Collection Order Book, as the request forms
are provided in books of 50 forms each.
STEP 3Complete the N3 form
Using the information obtained from
the stock take and review of the Facility
Specimen Register (N4) complete the
Specimen
Collection Order Book (N3). Indicate the
stock on hand and quantity requested for
each item.

99
Ord
er s
pec
imen
co
llect
ion
mat
eria
ls
Primary Healthcare Laboratory HANDBOOK
STEP 4Hand completed N3 form
to the courier
Ensure that the NHLS courier completes
the section for collection by courier. The
health facility will now have a record
of the quantity of materials ordered as
well as proof that the completed form
was collected by the courier in the N3
Specimen Collection Order Book (N3).
Tear off the completed N3 form, place in
the box with laboratory specimens and
hand over to the NHLS courier.
STEP 5Receive the specimen collection
materials
Update the Specimen Collection Order
Book (N3) in the section at the bottom
of the book “Materials Received by
Facility”. In the Acknowledgement
of Receipt column, confirm that the
quantity dispatched by your local
laboratory is the quantity received.
Should you not have received the specimen collection
materials timeously or all the order with no clear
communication regarding a back-order, please follow the escalation procedure.
Start by escalating the issue to your local laboratory
manager.
In the health facility

100
SE
CT
ION
SEV
ENPrimary Healthcare Laboratory HANDBOOK
WHAT TO DO
HOW TO DO IT
form N3
Follow this process in the laboratory to approve, prepare and dispatch specimen collection materials to the health facility.
Laboratory receives the completed N3: Specimen
Collection Order form.
2
Laboratory staff complete the section titled ‘Order received by laboratory’
The laboratory staff member responsible for receiving the N3: Specimen
Collection Materials forms, must complete the section ‘Order received by
laboratory’. The staff member must enter their name, signature and date
on which the completed N3 form was received from the facility.
3
Courier completes form
In the health facility, the NHLS
courier is required to complete the
N3: Specimen Collection Order Book prior to the top form being
torn off and given to the courier.
1
Approve or amend the request for specimen collection material
The staff member assigned to
approve specimen collection material
orders must approve the request by
indicating the quantity of request
forms, specimen collection materials
and disposals that were approved on
the N3 form. Should the laboratory
choose to not approve the full request
for specimen collection materials, this
must be communicated to the health
facility manager in writing.
4Add the quantity of specimen
collection materials actually supplied
Add the quantity of request forms, specimen
collection materials and disposables actually
supplied on the N3 form as well as reasons
if not decreased quanitity supplied. If the
requested quantities of any forms, specimen
collection material and disposables is not
supplied, clearly communicate the reasons.
For example:
a) Awaiting stock (back-order) and
estimated date of re-delivery – ensure
process in laboratory to track and fulfill
back-orders.
b) Stock request did not fit profile of usage
at the facility thus, order decreased.
5

101
Ord
er s
pec
imen
co
llect
ion
mat
eria
ls
Primary Healthcare Laboratory HANDBOOK
In the laboratory
Sign the N3 form by completing
the section titled ‘Despatch by laboratory’.
6
Make a copy of the completed N3 form.
7
Label a plastic bag with the health
facility name.
8
Package the request forms, specimen collection
materials and disposibles to be issued in the labeled plastic bag.
9
Add a copy of the completed N3 form to the plastic bag and seal the
plastic bag.
10
File the original completed N3 form within
the laboratory (preferably in a folder per health facility).
11
12Hand the sealed
plastic bag containing the specimen collection materials and duplicate form to the courier for delivery to
the health facility.

102
Primary Healthcare Laboratory HANDBOOKS
EC
TIO
N E
IGH
T
Collect specimen
section
2Package specimen
section
3Specimen storage
section
4Collect
specimen
section
1

103
Primary Healthcare Laboratory HANDBOOK
SECTION EIGHT
ACCESS TO ADDITIONAL INFORMATION
ACCESS TO ADDITIONAL
INFORMATION
section
8Specimen collection by courier
section
5Manage
laboratory results
section
6Order
specimen collection materials
section
7

104
Primary Healthcare Laboratory HANDBOOK
appe
ndix D
Page 115
If you require any additional information that is not provided in this handbook, refer to either the national laboratory handbook or call your local laboratory manager (Appendix D).
Access to the National Laboratory Handbook
If you require any additional information for a test that is not listed in this handbook, i.e.
more esoteric tests, access the online National Laboratory Handbook:
1. Log on to the NHLS website (www.nhls.ac.za).
2. Click on the “Diagnostic Services” hyperlink
3. Click on the “Lists of tests” hyperlink
4. Click on the “Click here to view the handbook” hyperlink
5. Use the displayed National Laboratory Handbook to search for the specific information
required.
SE
CT
ION
EIG
HT
Figure 44: NHLS website access to the National Laboratory Handbook for all levels of care
WHAT TO DO
HOW TO DO IT

105
Primary Healthcare Laboratory HANDBOOK
How to obtain laboratory contact details
The contact details and operating hours for all NHLS laboratories are provided in
Appendix D. Alternatively, visit the NHLS website to obtain contact details for any laboratory
within the network.
1. Log on to the NHLS website (www.nhls.ac.za).
2. Click on the “About Us” hyperlink
3. Click on the “Laboratories” hyperlink
4. Use the interactive map to find your local laboratory (example displayed below)
Figure 45: NHLS website providing laboratory contact detail
appe
ndixD
Page 115
Acc
ess
to a
dd
itio
nal i
nfo
rmat
ion
WHAT TO DOHOW TO DO IT
Embuleni
Ermelo
Ermelo
Ermelo
Kwa Mhlanga
Mapulaneng
Mpumalanga - Management and Admin
Namakgale
Phalaborwa
Philadelphia
Piet Reties
Shongwe
Manager: Mr. Frank Boykie Phiri
Telephone: 0137810632
E-mail: [email protected]
Address: Jeppies Reef Road
Malelane District
Malelane District
Mpumalanga
Show Lab on Map
Print Lab information
Regions
Open BIds
Links
Laboratories
UPCOMING EVENTS
SEP Unipath 2014 Congress
19 Announcement
CSIR International
Convention Centre Pretoria
SHARE THIS PAGE
Share this page with a friend and invite them to our website
Share Page

106
Primary Healthcare Laboratory HANDBOOK
REFERENCES
1. Centers for Disease Control and Prevention; Tuberculosis, Sputum Collection Instructions.
Instructions.pdf SC, editor. Unknown. Atlanta, Georgia: Centers for Disease Control and
Prevention (CDC)
2. National Health Laboratory Service (NHLS) (2013) CMJAH NHLS Handbook.
Johannesburg. pp 148.
3. National Health Laboratory Service (NHLS) (2013) Taking blood from infants for the HIV
PCR test: Standard Operating Procedure. Johannesburg. pp 14.
4. National Health Laboratory Service (NHLS) (2012) TAD Laboratory User Handbook.
18-01-2012 ed. Pretoria. pp 102.
5. National Health Laboratory Service (NHLS) (2014) National Laboratory Handbook.
Sandringham, Johannesburg. pp 162.

107
Primary Healthcare Laboratory HANDBOOK
APPENDICES
APPENDIX APHC ESSENTIAL LABORATORY LIST 108
APPENDIX BDETAILED ESSENTIAL LABORATORY TEST LIST 110
APPENDIX CRAPID TESTS PERFORMED AT THE HEALTH FACILITY 114
APPENDIX DLABORATORY CONTACT LIST 115
APPENDIX EN1 & N2: LABORATORY REQUEST FORMS 122
APPENDIX FN3: SPECIMEN COLLECTION MATERIALS ORDER BOOK 130
APPENDIX GN4: PHC FACILITY SPECIMEN REGISTER 133
APPENDIX HPATIENT FOLDER- CLINICAL CONSULTATION AND LABORATORY RESULTS FORMS 135

108
Primary Healthcare Laboratory HANDBOOKA
PP
EN
DIX
A APPENDIX A PHC Essential Laboratory List
Key:
PHC This test may be requested by all healthcare professionals, i.e. nurse and doctor
PHC with Dr This test may only be requested by a doctor
Test Category
Chemical Pathology
ALP (Alkaline Phosphatase) PHC with Dr
ALT (Alanine Transaminase) PHC
Amylase/Lipase PHC with Dr
Calcium (serum) PHC with Dr
Cholesterol PHC
Creatinine (eGFR) (serum) PHC
CRP (C-reactive protein) PHC with Dr
Folate (serum) PHC with Dr
FT4 (Free Thyroxine 4) PHC with Dr
Gamma GT (GGT) (Serum) PHC with Dr
Glucose PHC
HbA1c (Glycated Haemoglobin) PHC
LDL-Cholesterol (LDL-C) PHC with Dr
Phenytoin PHC with Dr
Pleural effusion Protein PHC with Dr
Potassium (serum) PHC
Prostate-Specific Ag (PSA) PHC with Dr
Sodium (serum) PHC with Dr
Total Bilirubin PHC with Dr
Triglycerides PHC
TSH (Thyroid-stimulating hormone) PHC
Uric Acid (serum) PHC
Urine albumin: creatinine ratio PHC with Dr
Urine protein: creatinine ratio PHC with Dr
Vitamin B12 PHC with Dr
Haematology
Differential count PHC with Dr
Full Blood Count (FBC) PHC with Dr

109
Primary Healthcare Laboratory HANDBOOK
PH
C E
ssen
tial
Lab
ora
tory
Lis
t
Test Category
Haemoglobin PHC with Dr
INR (International Normalized Ratio) PHC with Dr
Platelets PHC with Dr
Red Cell Antibody screen (Coomb’s Test) or the “Direct Antiglobulin Test (DAT)” PHC
White Blood Cell (WBC) PHC
Blood Grouping
ABO (Blood grouping) PHC
Rhesus Factor (Rh) PHC
Microbiology
CRAG (Cryptococcal Antigen test) PHC with Dr
Hepatitis A IgM PHC with Dr
Hepatitis B Surface Ag PHC with Dr
Pleural effusion MCS PHC with Dr
Stool parasites – Bilharzia & other parasites. PHC with Dr
Syphilis Serology PHC
MCS (Microscopy, culture band sensitivity) PHC with Dr
HIV
CD4 Count PHC
HIV Elisa (discordant rapids) PHC
HIV PCR for infants PHC
Viral Load PHC
TB
TB Culture PHC
TB Drug Susceptibility PHC
TB Line Probe Assay (Hain MTBDR) PHC
TB Smear microscopy PHC
X-pert MTB/RIF PHC
Cytopathology
Cytology for aspirates including lymph nodes PHC with Dr
Pap smear PHC

Primary Healthcare Laboratory HANDBOOKA
PP
EN
DIX
B
110
AP
PE
ND
IX B APPENDIX B
Detailed Essential laboratory test list
Test Category Estimated TAT (Hrs)*
Specimen Type
Tube Type
Special Instructions
Specimen Storage Proviso
ABO (Blood grouping) PHC 243 mL clotted blood
Purple A
ALP (Alkaline Phosphatase)
PHC with Dr 243 mL clotted blood
Yellow A
ALT(Alanine Transaminase)
PHC 243 mL clotted blood
Yellow A
Amylase/Lipase PHC with Dr 24-485 mL clotted blood
Yellow A
Calcium (serum) PHC with Dr 245 mL clotted blood
Yellow
Avoid stasis/prolonged tourniquet application.
A
CD4 Count PHC 244 mL EDTA blood
Purple Do not store in refrigerator.
A
Cholesterol PHC 24-485 mL clotted blood
Yellow
Patient should be fasting. Refer to section 2.13.1 (Cholesterol and lipogram)
A
CRAG (Cryptococcal Antigen test)
PHC with Dr 245 ml EDTA Blood
Purple A
Only performed where CD4 <= 100
Creatinine (eGFR) (serum)
PHC 243 mL clotted blood
Yellow A
CRP (C-reactive protein)
PHC with Dr 245 mL clotted blood
Yellow A
Cytology for aspirates including lymph nodes
PHC with Dr
Refer to NHLS National Laboratory Handbook
Differential count PHC with Dr 245 ml EDTA Blood
Purple A
Folate (serum) PHC with Dr 24-484 mL EDTA blood
Yellow A
FT4 (Free Throxine 4) PHC with Dr 24-485 mL clotted blood
Yellow A
To be performed only after TSH levels indicate need for FT4 testing
Full Blood Count (FBC) PHC with Dr 245ml EDTA blood
Purple A
Gamma GT (GGT) (Serum)
PHC with Dr 243 mL clotted blood
Yellow A

Primary Healthcare Laboratory HANDBOOK
Det
aile
d E
ssen
tial
Lab
ora
tory
Tes
t Li
st
111
Test Category Estimated TAT (Hrs)*
Specimen Type
Tube Type
Special Instructions
Specimen Storage Proviso
Haemoglobin PHC with Dr 245ml EDTA blood
Purple A
Only requested following an abnormal Hb performed in the health facility
HbA1c (Glycated Haemoglobin)
PHC 244 mL EDTA blood
Purple A
Hepatitis A IgM PHC with Dr 24-485ml Clotted/EDTA blood
Yellow A
Hepatitis B Surface Ag PHC with Dr 24-485ml Clotted/EDTA blood
Yellow A
HIV Elisa (discordant rapids)
PHC 243 mL clotted blood
Yellow A
Only to be requested when discordant rapid HIV results are obtained for the same patient.
HIV PCR for infants PHC 24-48Dry blood spot (DBS)/EDTA blood
PurpleMinimum volume 500μl. Dedicated tube required.
A
INR (International Normalised Ratio)
PHC with Dr 245ml Sodium Citrate blood
BlueTo reach lab within 24 hours
A
LDL-Cholesterol (LDL-C)
PHC with Dr 243 mL clotted blood
Yellow
Patient should be fasting. Refer to section 2.13.1 (Cholesterol and lipogram)
A
MCS (Microscopy, culture band sensitivity)
PHC with Dr 24-72Refer to PHC Laboratory Handbook
C
CSF is not on the ELL for PHC facilities.
Pap smear PHCUp to 6 weeks
Refer to PHC Laboratory Handbook
B
Phenytoin PHC with Dr 24-485 mL clotted blood
Yellow
IV treatment: 2-4 h after last dose. Oral treatment: Collect specimens at same time of day for serial monitoring.
A

Primary Healthcare Laboratory HANDBOOKA
PP
EN
DIX
B
112
Test Category Estimated TAT (Hrs)*
Specimen Type
Tube Type
Special Instructions
Specimen Storage Proviso
Platelets PHC with Dr 245ml EDTA blood
Purple A
Pleural effusion MCS PHC with Dr 24Pleural effusion Red
Do not use tubes with preservatives
A
Can only be requested by health facilities with X-Ray
Pleural effusion Protein PHC with Dr 24Pleural effusion Red
Do not use tubes with preservatives
A
Can only be requested by health facilities with X-Ray
Potassium (serum) PHC 243 mL clotted blood
YellowAvoid haemolysis and delay in transit time.
A
Prostate-Specific Ag (PSA)
PHC with Dr 245 mL clotted blood
Yellow A
May not to be used as a screening test.
Red Cell Antibody screen (Coomb’s Test) or the “Direct Antiglobulin Test (DAT)”
PHC 245ml EDTA blood
Purple A
Used for detection of antibodies on red cells.
Rhesus Factor (Rh) PHC 243 mL clotted blood
Yellow A
Sodium (serum) PHC with Dr 243 mL clotted blood
Yellow A
Stool parasites – Bilharzia and other parasites
PHC with Dr 24 Stool A
Syphilis Serology PHC 245ml clotted blood
Yellow A
TB Culture PHCBetween 5 days and 6
weeksSputum D
TB Drug Susceptibility PHCBetween 5 days and 6
weeksSputum D
TB Line Probe Assay (Hain MTBDR)
PHC 24-48 Sputum D
TBSmear microscopy PHC 24 Sputum D
Triglycerides PHC 24-485 mL clotted blood
Yellow
Patient should be fasting. Refer to section 2.13.1 (Cholesterol, triglyceride, lipogram, lipoprotein electrophoresis)
A
TSH (Thyroid-stimulating hormone)
PHC 24-483 mL clotted blood
Yellow A

Primary Healthcare Laboratory HANDBOOK
Det
aile
d E
ssen
tial
Lab
ora
tory
Tes
t Li
st
113
Test Category Estimated TAT (Hrs)*
Specimen Type
Tube Type
Special Instructions
Specimen Storage Proviso
Uric Acid (serum) PHC 243 mL clotted blood
Yellow A
Urine albumin:-creatinine ratio
PHC with Dr 24 Urine A
Urine protein:creatinine ratio
PHC with Dr 24 Urine A
Viral Load PHC 24-485ml EDTA/PPT blood
Purple/White
A
Vitamin B12 PHC with Dr 24-485 mL clotted blood
Yellow A
White Blood Cell (WBC) PHC 245ml EDTA blood
Purple A
X-pert MTB/RIF PHC 24 Sputum D
*Estimated TAT (Turn-around-time): Time from specimen leaving the facility to results being available and/or delivered to the facility
Specimen Handling Length of Storage
A
Specimens must be kept away from direct sunlight. Specimens should not be exposed to dramatic temperature fluctuations and vibrations (of particular relevance when being transported).
Where room temperature exceeds 25°C specimens should be stored in the fridge or cooler box (+- 5°C) to preserve specimen integrity. Specimens should not be exposed to dramatic temperature fluctuations.
BWhen the smear has been fixed, inside a slide carrier (envelope), and store at room temperature.
24 hours at room temperature (20-25°C).
CCollect specimens and place into the transport medium provided (where appropriate). Store at room temperature.
24 hours at room temperature (20-25°C). Urine specimens should be stored in the fridge (2-5 °C).
DSpecimens should be collected in clean leak proof containers free from paraffin and other waxes or oils. Specimens should be kept cool during transportation but should not be frozen.
Specimen should be transported immediately at ambient temperature to the nearest local laboratory.Specimens delayed prior to transportation should be stored refrigerated (2-8°C). Specimens should reach the laboratory no later than 48 hours after specimen collection.

114
Primary Healthcare Laboratory HANDBOOKA
PP
EN
DIX
C &
D APPENDIX C Rapid tests performed at the health facility
POC testing might enhance early diagnosis and treatment of patients where there is no
immediate access to a laboratory service. However, healthcare workers must ensure that POC
testing is safe, accurate, appropriate and cost-effective. POC testing should be performed by
competent healthcare workers to deliver accurate test results timely that contribute to patient
management decisions.
Test Category
Haemoglobin (Hb)
Subject to World Health Organisation (WHO) prequalification
HIV (rapid)
Glucose (Glucometer)
Malaria rapid test
Rh ‘D’ (Rhesus factor)

Primary Healthcare Laboratory HANDBOOK
115
Rap
id T
ests
Per
form
ed a
t th
e H
ealt
h Fa
cilit
y/La
bo
rato
ry C
ont
act
ListAPPENDIX D
Laboratory Contact List
Laboratory Telephone Working Hours
Addington (031) 327 2463/2475/2478/2479 24hrs
Aliwal-North (051) 634 2398 08h00-17h00
All Saints (047) 548 1025/4029 08h00-18h00
Appelsbosch (032) 294 8006 07h30-17h00
Bambisana (039) 253 7524 08h00-17h00
Barberton (013) 712 2763 08h00-17h00
Beaufort West (023) 415 1447 08h00-17h00
BelaBela (Warmbaths) (014) 736 2374 08h00-17h00
Benedictine (035) 831-7083/3279 24hrs
Bertha Gxowa (Germiston) (011) 873 0000/0001 08h00-21h00
Bethal (017) 647 2533 08h00-17h00
Bethesda (035) 595 1161 24hrs
Bethlehem (058) 303 5586 08h00-17h00
Bisho (040) 635 0579 08h00-18h00
Bizana (St Patricks) (039) 251 0255 08h00-18h00
Bloemfontein National Stat (051) 405 2552/2438 08h00-17h00
Bloemfontein Receiving Office (051) 411 9940 08h00-17h00
Botlokwa (015) 527 8030 08h00-17h00
Botshabelo (051)534 1610 08h00-17h00
Braamfontein (011) 489 9355 08h00 -17h00
Brits (018) 293 3512 07h30- 18h00
Butterworth(047) 491 8690
(047) 491 025808h00-21h00
Cala (047) 8770357 08h00-18h00
Canzibe (047) 568 8576 08h00-17h00
Carletonville 018 788 6250 08H00 - 21H00
Catherine Booth (035) 474 8408/9849 08h30-20h30
Cecilia Makiwane(Mdantsane) (043) 708 2218 24hrs
Ceza (035) 832 5126 08h00-17h00
Charles Johnson Memorial (034) 271 0665 24hrs
Charlotte Maxeke Johannesburg Academic Hospital (011) 489 8443/8440 24hrs
Chris Hani Baragwanath-Chemistry (011) 489 8781 24hrs
Chris Hani Baragwanath-Haematology (011) 489 8749/8750 24hrs
Chris Hani Baragwanath-Histology (011) 489 8711/8710/8712 08h00-14h30
Chris Hani Baragwanath-Laboratory Support Services (011) 489 8787/8780/8791 24hrs
Chris Hani Baragwanath-Microbiology (011) 489 8740/8733/8736 08h00-18h00
Chris Hani Baragwanath-Satellite Lab (011) 933 9736 24hrs
Christ The King (Ixopo) (039) 834 7521 08h00-17h00
Church of Scotland (033) 493 0968/1124 24hrs
Clairwood (031) 451 5004 07h30-16h00
CN Phatudi (015) 355 4935 08h00-17h00
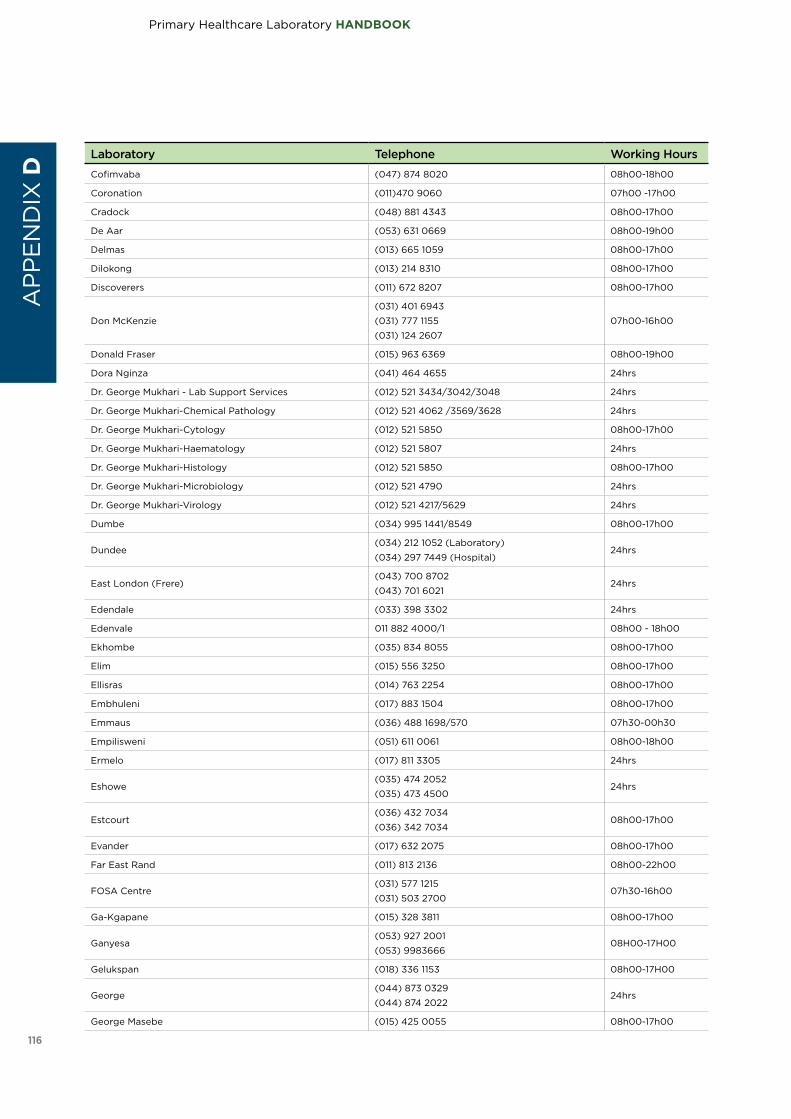
Primary Healthcare Laboratory HANDBOOKA
PP
EN
DIX
D
116
Laboratory Telephone Working Hours
Cofimvaba (047) 874 8020 08h00-18h00
Coronation (011)470 9060 07h00 -17h00
Cradock (048) 881 4343 08h00-17h00
De Aar (053) 631 0669 08h00-19h00
Delmas (013) 665 1059 08h00-17h00
Dilokong (013) 214 8310 08h00-17h00
Discoverers (011) 672 8207 08h00-17h00
Don McKenzie
(031) 401 6943
(031) 777 1155
(031) 124 2607
07h00-16h00
Donald Fraser (015) 963 6369 08h00-19h00
Dora Nginza (041) 464 4655 24hrs
Dr. George Mukhari - Lab Support Services (012) 521 3434/3042/3048 24hrs
Dr. George Mukhari-Chemical Pathology (012) 521 4062 /3569/3628 24hrs
Dr. George Mukhari-Cytology (012) 521 5850 08h00-17h00
Dr. George Mukhari-Haematology (012) 521 5807 24hrs
Dr. George Mukhari-Histology (012) 521 5850 08h00-17h00
Dr. George Mukhari-Microbiology (012) 521 4790 24hrs
Dr. George Mukhari-Virology (012) 521 4217/5629 24hrs
Dumbe (034) 995 1441/8549 08h00-17h00
Dundee(034) 212 1052 (Laboratory)
(034) 297 7449 (Hospital)24hrs
East London (Frere)(043) 700 8702
(043) 701 602124hrs
Edendale (033) 398 3302 24hrs
Edenvale 011 882 4000/1 08h00 - 18h00
Ekhombe (035) 834 8055 08h00-17h00
Elim (015) 556 3250 08h00-17h00
Ellisras (014) 763 2254 08h00-17h00
Embhuleni (017) 883 1504 08h00-17h00
Emmaus (036) 488 1698/570 07h30-00h30
Empilisweni (051) 611 0061 08h00-18h00
Ermelo (017) 811 3305 24hrs
Eshowe(035) 474 2052
(035) 473 450024hrs
Estcourt(036) 432 7034
(036) 342 703408h00-17h00
Evander (017) 632 2075 08h00-17h00
Far East Rand (011) 813 2136 08h00-22h00
FOSA Centre(031) 577 1215
(031) 503 270007h30-16h00
Ga-Kgapane (015) 328 3811 08h00-17h00
Ganyesa(053) 927 2001
(053) 998366608H00-17H00
Gelukspan (018) 336 1153 08h00-17H00
George(044) 873 0329
(044) 874 202224hrs
George Masebe (015) 425 0055 08h00-17h00

Primary Healthcare Laboratory HANDBOOK
Lab
ora
tory
co
ntac
t lis
t
117
Laboratory Telephone Working Hours
Giyani (015) 812 3661 08h00-17h00
GJ Crooks (Scottburgh) (039) 978 7040/7000 08h00-19h00
Glen Grey (047) 878 0121 08h00-18h00
GraaffReinet (049) 892 5195 08h00-17h00
Grahamstown (046) 622 5066 08h00-19h00
Green Point (021) 4179318 24hrs
Greenville (039) 251 3553/3009 08h00-17h00
Greys (033) 345 2070 24hrs
Greytown (033) 413 2056 07h30-17h00
Groblersdal (013) 262 5245 08h00-17h00
Groote Schuur (021) 404 4129 24hrs
Helderberg (Somerset West) (021) 852 3623 08h00-17h00
Helen Joseph (011) 489 0402/0403/0404/0431/1658 24 hours
Helene Franz (015) 505 0102 08h00-17h00
Hermanus (028) 312 1005 8h00 -17h00
Hewu (040) 841 0036/0133 08h00-18h00
Hlabisa (035) 838 1387/1003 08h00-17h00
Hlengisizwe(031) 401 6943
(031) 403 3235Closed at present
Hluhluwe Receiving Office (035) 562 1315 07h30-16h00
Holy Cross (039) 253 7542 08h00-18h00
Humansdorp (042) 200 4261 08h00-17h00
Imbalenhle (033) 398 3302 08h00-17h00
Inanda (031) 510 9866 07h30 - 16h00
InkosiAlbert Luthuli Central Hospital - Anatomical (031) 240 2724 07h30-16h00
InkosiAlbert Luthuli Central Hospital - Chemical Pathology (031) 240 2570 24hrs
InkosiAlbert Luthuli Central Hospital - Cytology (031) 240 2627 07h30-16h00
InkosiAlbert Luthuli Central Hospital - Haematology (031) 240 2682 24hrs
InkosiAlbert Luthuli Central Hospital - Management &
Admin(031) 240 2809/2693 07h30-16h00
InkosiAlbert Luthuli Central Hospital - Microbiology (031) 240 2770 24hrs
InkosiAlbert Luthuli Central Hospital - Virology (031) 240 2800 24hrs
InkosiAlbert Luthuli Central Hospital (First Contact) (031) 240 2693 24hrs
Isilimela (047) 567 5569 08h00-17h00
Itshelejuba (034) 413 1973 08h00-17h00
Jane Furse (013) 265 9514 24hrs
Jubilee (012) 717 8687 24hrs
KabokweniThemba (Themba) (013) 796 0236 08h00-17h00
Kalafong (012) 318 6848 24hrs
Karl Bremer(021) 949 6141
073 762 546508h00-24h00
Khayelitsha(021) 417 9362
(021) 360 452224hrs
Kimberley (053) 833 1641 / 2 24hrs
Kimberley Receiving Office (053) 831-3969/4188 08h00-17h00
King Edward VIII - Chemical (031) 205 6810 24hrs
King Edward VIII - Haematology (031) 205 6564 24hrs

Primary Healthcare Laboratory HANDBOOKA
PP
EN
DIX
D
118
Laboratory Telephone Working Hours
King Edward VIII - Lab Support (031) 205 6812 24hrs
King Edward VIII - Microbiology (031) 360 3189 24hrs
King George V (031) 242 6077/6033/6112 24hrs
Klerksdorp (018) 465 4772 08h00-17h00
Knysna (044) 382 0991 08h00-17h00
Kroonstad (056) 212 2169 08H00-20H00
KwaDabeka(031) 401 6293
(031) 707 466307h00-16h00
KwaMashu (031) 503 2700 24hrs
KwaMashu New (031) 503 2700 24hrs
KwaMhlanga (013) 947 2557 08h00-17h00
KwaMsane (035) 838 1387 09h00-18h00
Ladysmith (036) 637 2111 ext 427 24hrs
Lebowakgomo (015) 632 5347 24hrs
Lehurutshe (018) 363 4148 24hrs
Leratong (011) 410 6344 24 hours
Letaba (015) 303 8513 24hrs
Livingstone (041) 395 6182 24hrs
Louis Trichardt (015) 516 6880 08h00-17h00
Lower Umfolozi(Empangeni) (035) 907 5684/7146 07h30-16h00
Lydenburg (013) 235 4487 07h30-16h00
Madadeni (034) 328 8124 24hrs
Madwaleni (047) 576 9010 08h00-19h00
Mafikeng (018) 3833939 08h00-17h00
Mahatma Gandhi (031) 539 6290 24hrs
Malamulele (015) 851 0068 07h00-18h00
Maluti (Bedford) (039) 256 0547 08h00-17h00
Mamelodi (012) 801 1405 07h00-17h00
Manapo(058) 713 1700
(058) 718 323008h00-17h00
Manguzi (035) 592 0209 24hrs
Mankweng (015) 267 6530 24hrs
Mapulaneng (013) 799 0202 07h00-17h00
Mary Theresa (039) 255 0628/0684 08h00-03h00
Matikwana (013) 708 7010 08h00-17h00
Matlala (013) 264 5109 08h00-17h00
Mbongolwane (035) 476 6242 08h00-17h00
Mecklenburg (015) 619 0435 08h00-17h00
Middelburg (013) 282 5443 08h00-17h00
Midlands Receiving Office (033) 342 2876 07h30-16h00
Mitchell’s Plain (Manenburg/GF Jooste)(021) 371 7921/7626
(021) 377 4300 24hrs
Mmamethlake (012) 721 3867 08h00-22h00
Mokopane (015) 483 4077 08h00-19h00
Montobello (033) 506 0203 07h30-16h00
Moses Kotane (014) 556 3992 08H00-17H00

Primary Healthcare Laboratory HANDBOOK
Lab
ora
tory
co
ntac
t lis
t
119
Laboratory Telephone Working Hours
Mosselbay(044) 873 0329
(044) 690 374508h00-17h00
MosvoldNgwavuma (035) 591 0502 24 hrs
Mount Ayliff (039) 254 0951 08h00-03h00
Mpophomeni (033) 238 0026 Is a Depot
Mseleni (035) 574 1004 24 hrs
Mthatha (047) 502 4189/4922 24hrs
Murchison (039) 687 7950 07h30-16h00
Musina (015) 534 0151 08h00-17h00
Namakgale (015) 769 2359 07h00-17h00
Natalspruit (011) 590 0350 24hrs
Nelspruit (013) 741 1014/1015/4780 24hrs
Nelspruit Receiving Office (013) 752 2053 08H00-17H00
Newcastle (034) 328 0018/0054 08h00-24h00
Newcastle Receiving Office (034) 312 6338 07h30-16h00
Ngwelezana(Empangeni) (035) 794 2941 24hrs
Niemeyer (072) 761 5588 07h00-16h00
Nkandla (035) 833 5042 08h00-17h00
NkonnjeniMahlabathini (035) 873 0571 24hrs
Northdale (033) 387 9035 24hrs
Nylstroom (014) 717 4435 08h00-17h00
Odi (012) 725 2377 24hrs
Osindisweni (032) 541 9200/9236 08h00-16h30
Osindisweni Microscopy Centre (Tongaat)
(032) 944 5054
(032) 5419200
083 5247561
084 4442570
Is a Depot
Oudtshoorn (044) 279 1104 8h00 -17h00
Paarl (021) 860 2746 24hrs
Pelonomi (051) 405 9340 24hrs
Philadelphia (013) 983 0358 08h00-18h00
Pholela (033) 398 3302 07h30-16h00
Pholosong (011) 738 9974 24hrs
Piet Retief (017) 824 1314 07h00-17h00
Pinetown (031) 311 6836 Is a Depot
Polokwane (015) 297 1099 24hrs
Polokwane Receiving Office No lines 07h30-16h30
Port Alfred (046) 624 1047 08h00-17h00
Port Elizabeth (041) 395 6158/6111 24hrs
Port Shepstone (039) 688 6114/6113 24hrs
Potchefstroom (018) 297-5525 24hrs
Potchefstroom Receiving Office (018) 293-3511 08h00-17h00
Potgietersrus (015) 491 2370 08h00-17h00
Pretoria-West (012) 386 2866 08h00 - 17h00
Prince Cyril Zulu(031) 311 3622
(031) 242 611207h30-16h00
Prince Mshiyeni(Umlazi) (031) 906 2803 24hrs

Primary Healthcare Laboratory HANDBOOKA
PP
EN
DIX
D
120
Laboratory Telephone Working Hours
Prince Street (031) 327 6743 07h30-16h00
Queenstown (045) 839 4483 24hrs
Qumbu (047) 553 8013 08h00-20h00
Red Cross(021) 6585231
(021) 417 931924 hrs
Richmond (033) 398 3302 07h30-16h00
Rietvlei (039) 260 0017 08h00-17h00
RK Khan(031) 401 6943
(031) 403 323524hrs
Rustenburg (014) 592 8640 24hrs
Sandringham (NICD)(011) 386 6134
(011) 885 535424hrs
Sasolburg (016) 973 3837 08h00-17h00
Sebokeng (016) 988 1417/1438 24 hours
Sekororo (015) 303 2143 08h00-17h00
Seshego (015) 223 6519 08h00-17h00
Shongwe (013) 781 0632 07h00-17h00
Siloam (015) 973 0453 08h00-17h00
Sizwe (011) 882 4000/4001 Is a depot
Somerset East (042) 243 1465 24hrs
South Rand (011) 681 2068/2060/2076 08:00-16:30
Springbok (027) 712 1099/1169 08h00-18h00
SS Gida (040) 658 0083 08h00-18h00
St Andrews (039) 433 1955 ext 269 24hrs
St Apollinaris (039) 833 8000 07h30-16h30
St Barnabas (047) 568 7769 08h00-19h00
St Elizabeth (039) 253 1238 24hrs
St Marys (035) 450 8231 08h00-17h00
St Ritas 082 906 8745 08h00-17h00
Standerton (017) 712 4011 08h00-17h00
Stanger (032) 552 2553 24hrs
Sundumbili(032) 454 7500
(032) 437 6143/614407h30-16h30
Swartruggens (014) 544 0802 08h00-17h00
Tafalofefe (047) 498 6012 08h00-17h00
Tambo Memorial (011) 917 9605/9606 24hrs
Taung (053) 994 1030 08h00-00h00
Taylor Bequest (Matatiele) (039) 257 0528 08h00-17h00
Taylor Bequest Mount Fletcher (039) 257 0528 08h00-21h00
Tembisa (011) 920 1126/2625 24hrs
Thabazimbi (014) 777 2174 08h00-17h00
Thusong (018) 338 1612 08h00-17h00
Tintswalo (Acornhoek) (013) 795 5151 08h00-17h00
Tonga (013) 780 3630/3621 08h00-17h00
Tongaat (032) 944 5054 07h45-16h15
Tshepong (018) 465 4772 24hrs
Tshilidzini (015) 964 2238 08h00-17h00

Primary Healthcare Laboratory HANDBOOK
Lab
ora
tory
co
ntac
t lis
t
121
Laboratory Telephone Working Hours
Tshwane Academic Division (012) 354 3856/3847 24hrs
Tshwaragano (053) 774 0692 08h00-00h00
Tsolo (Dr.MachupeMphahlele Memorial) (047) 542 6416 08h00-17h00
Tygerberg (021) 938-4904 24hrs
Tzaneen (015) 307 1465 08h00-17h00
Uitenhage (041) 961 0682 24hrs
Umphumulo
(032) 481 4100
Ext: 4236 (Office)
Ext: 4150 (Laboratory)
24hrs
Universitas(051) 448 0500
(051) 405303524hrs
Untunjambili (033) 444 0818 08h00-18h00
Upington (054) 332 9139/9141 08h00-00h00
Usher Memorial( Kokstad)(039) 797 8147
(039) 727 400708h00-17h00
Vereeniging/Kopanong(016) 428 4005
082 657692108:00 - 22h00
Victoria (040) 653 2715 08h00-18h00
Volksrust (017) 735 1994 08h00-17h00
Vredendal (027) 213 3924/3925 08h00-17h00
VryburgHuhudiHuhudi) (053) 927 2001 08h00-00h00
Vryheid(034) 989 5946
(034) 982 211124hrs
Vryheid Receiving Office (034) 980 0283 07h30-16h00
Welkom (057) 396 6200 24hrs
Wentworth(031) 468 2904
(031) 460 500024hrs
West Coast District (Vredenburg) (022) 713 4468 08h00-18h00
WF Knobel (015) 221 1569 08h00-17h00
Willowvale (047) 499 1204 07h00-17h00
Witbank (013) 656 6646 / 6691 24hrs
Witkoppen (011) 705-2438 08:00 - 17h00
Witpoort (014) 769 0197 08h00-17h00
Wolmeransstad (018) 596 1708 07h30-16h30
Worcester (023) 348-1232/1233/1234/1235 24hrs
Yusuf Dadoo (011) 660 7388/7389 08:00-21h00
Zebediela (015) 662 1198 08h00-17h00
Zitulele (047) 575 9551 08h00-20h00

Primary Healthcare Laboratory HANDBOOKA
PP
EN
DIX
E
122
APPENDIX EN1: Laboratory request forms

Primary Healthcare Laboratory HANDBOOK
N1:
PH
C &
N2:
Cyt
olo
gy
Req
uest
Fo
rms
123

Primary Healthcare Laboratory HANDBOOKA
PP
EN
DIX
E
124

Primary Healthcare Laboratory HANDBOOK
N1:
PH
C &
N2:
Cyt
olo
gy
Req
uest
Fo
rms
125
Has this one been updated??

Primary Healthcare Laboratory HANDBOOKA
PP
EN
DIX
E
126
N2: CYTOLOGY REQUEST FORM

Primary Healthcare Laboratory HANDBOOK
N1:
PH
C &
N2:
Cyt
olo
gy
Req
uest
Fo
rms
127

Primary Healthcare Laboratory HANDBOOKA
PP
EN
DIX
E
128

Primary Healthcare Laboratory HANDBOOK
N1:
PH
C &
N2:
Cyt
olo
gy
Req
uest
Fo
rms
129

Primary Healthcare Laboratory HANDBOOKA
PP
EN
DIX
F
130
APPENDIX FN3: PHC Order Book for Specimen collection materials

Primary Healthcare Laboratory HANDBOOK
N3:
PH
C O
rder
Bo
ok
for
Sp
ecim
en C
olle
ctio
n M
ater
ials
131

Primary Healthcare Laboratory HANDBOOKA
PP
EN
DIX
F
132

Primary Healthcare Laboratory HANDBOOK
N4
: PH
C F
acili
ty S
pec
imen
Reg
iste
r
133
APPENDIX GN4: PHC Facility Specimen Register

Primary Healthcare Laboratory HANDBOOK
134
AP
PE
ND
IX G

Primary Healthcare Laboratory HANDBOOK
Pat
ient
Fo
lder
: Clin
ical
Co
nsul
tati
on
and
Lab
ora
tory
Res
ults
Fo
rms
135
APPENDIX HPatient Folder: Clinical Consultation and Laboratory Results Forms

Primary Healthcare Laboratory HANDBOOKA
PP
EN
DIX
H
136

Primary Healthcare Laboratory HANDBOOK
Exa
mp
les:
Inco
rrec
tly
com
ple
ted
form
s
137
APPENDIX IExamples: Incorrectly completed forms
ERROR 1: Blood specimen type indicated even though sputum was collected
for GeneXpert.
ERROR 3: No clinical information
provided, e.g. ?PTB.
ERROR 2: HIV Viral Load
indicated routine monitoring on ART, whilst for CD4 testing the status is Note yet on ART. This is
contradictory information.

Primary Healthcare Laboratory HANDBOOKA
PP
EN
DIX
I
138
ERROR 1: Blood specimen type indicated even though
an MCS was requested.
ERROR 3: No clinical information
provided.
ERROR 2: Specimen and
anatomical site note indicated for
MCS.


CONTACT DETAILSNational Department of Health National Health Laboratory ServicePrivate Bag X828 1 Modderfontein RoadPretoria Sandringham