LAB MANUAL - MGM's JNEC, Aurangabad
45
MGM’s Jawaharlal Nehru Engineering College Aurangabad Affiliated to Dr.B.A.Technological University , Lonere Maharashtra ISO 9001:2015,140001:2015 Certified, AICTE Approved Department of Computer Science & Engineering LAB MANUAL Programme (UG/PG) : UG Year : Second Year Semester : IV Course Code : BTCOL410 Course Title : Operating Systems Laboratory Prepared By Dr.Deepa Deshpande Ms.S.J.Patil Department of Computer Science & Engineering
-
Upload
khangminh22 -
Category
Documents
-
view
1 -
download
0
Transcript of LAB MANUAL - MGM's JNEC, Aurangabad

MGM’s
Jawaharlal Nehru Engineering College Aurangabad Affiliated to Dr.B.A.Technological University , Lonere Maharashtra
ISO 9001:2015,140001:2015 Certified, AICTE Approved
Department of Computer Science & Engineering
LAB MANUAL
Programme (UG/PG) : UG
Year : Second Year
Semester : IV
Course Code : BTCOL410
Course Title : Operating Systems
Laboratory
Prepared By
Dr.Deepa Deshpande
Ms.S.J.Patil Department of Computer Science & Engineering

FOREWORD
It is my great pleasure to present this laboratory manual for
Second year engineering students for the subject of Operating
Systems.
As a student, many of you may be wondering with some of the
questions in your mind regarding the subject and exactly what
has been tried is to answer through this manual.
As you may be aware that MGM has already been awarded with
ISO 9001:2015, 140001:2015 certification and it is our endure
to technically equip our students taking the advantage of the
procedural aspects of ISO Certification.
Faculty members are also advised that covering these aspects in
initial stage itself, will greatly relived them in future as much of
the load will be taken care by the enthusiasm energies of the
students once they are conceptually clear.
Dr. H. H. Shinde
Principal

LABORATORY MANUAL CONTENTS
This manual is intended for the Second year students of
Computer Science and Engineering in the subject of Operating
Systems. This manual typically contains practical/Lab Sessions
related Operating Systems covering various aspects related the
subject to enhanced understanding.
Students are advised to thoroughly go through this manual rather
than only topics mentioned in the syllabus as practical aspects
are the key to understanding and conceptual visualization of
theoretical aspects covered in the books.
Good Luck for your Enjoyable Laboratory Sessions
Dr. Deepa Deshpande Dr. Vijaya Musande
Ms.S.J.Patil
Subject Teacher HOD
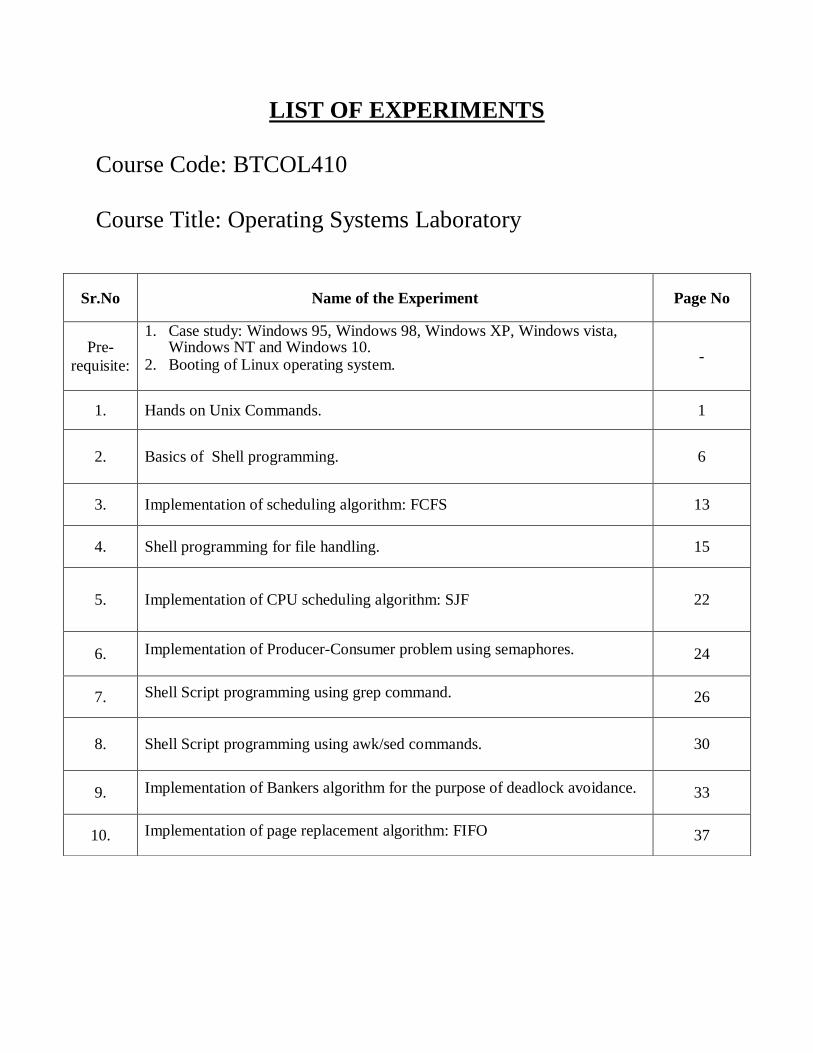
LIST OF EXPERIMENTS
Course Code: BTCOL410
Course Title: Operating Systems Laboratory
Sr.No Name of the Experiment Page No
Pre-
requisite:
1. Case study: Windows 95, Windows 98, Windows XP, Windows vista, Windows NT and Windows 10.
2. Booting of Linux operating system. -
1. Hands on Unix Commands. 1
2. Basics of Shell programming. 6
3. Implementation of scheduling algorithm: FCFS 13
4. Shell programming for file handling. 15
5. Implementation of CPU scheduling algorithm: SJF 22
6. Implementation of Producer-Consumer problem using semaphores. 24
7. Shell Script programming using grep command. 26
8. Shell Script programming using awk/sed commands. 30
9. Implementation of Bankers algorithm for the purpose of deadlock avoidance. 33
10. Implementation of page replacement algorithm: FIFO 37

DOs and DON’Ts in Laboratory:
1. Make entry in the Log Book as soon as you enter the Laboratory.
2. All the students should sit according to their roll numbers starting
from their left to right.
3. All the students are supposed to enter the terminal number in the log
book.
4. Do not change the terminal on which you are working.
5. All the students are expected to get at least the algorithm of the
program/concept to be implemented.
6. Strictly observe the instructions given by the teacher/Lab Instructor.
7. Do not disturb machine Hardware / Software Setup.
Instruction for Laboratory Teachers:
1. Submission related to whatever lab work has been completed should
be done during the next lab session along with signing the index.
2. The promptness of submission should be encouraged by way of
marking and evaluation patterns that will benefit the sincere students.
3. Continuous assessment in the prescribed format must be followed.

HARDWARE AND SOFTWARE REQUIREMENTS
HARDWARE REQUIREMENTS:
INTEL PENTIUM 915 GV
80GB HDD
512MB DDR
SOFTWARE REQUIREMENTS:
UNIX operating system/any flavor of Linux
Turbo C

LABORATORY OUTCOMES
The practical/exercises in this section are psychomotor
domain Learning Outcomes (i.e. subcomponents of the
COs), to be developed and assessed to lead to the
attainment of the competency.
LO-1: Apply UNIX/LINUX operating system basic
commands.
LO-2: Identify and use UNIX/Linux utilities to create and
manage simple file processing operations, organize
directory structures with appropriate security.
LO-3 : Effectively use software development utilities like
gedit, gcc, awk, sed
LO-4: Develop shell scripts to perform complex tasks
LO-5: Implement different management policies like CPU
scheduling, Page replacement, Resource allocation and
classical process synchronization problem etc.

1
Experiment No: 1 Title: Hands on Unix Commands.
Objective:
To understand basic utilities of unix.
To compare basic unix shell with popular shell and to learn the basic
components in constructing shell script.
Analyzing the Problem:
Start the Linux and enter the user name and password.
Now write startx and after that open the terminal.
At the terminal try the different commands and see the output.
Designing the Solution:
At the terminal first perform the command without and with the different
Options available for it.
The exercises in this lab cover the usage of some of the most basic system
utilities that users and administrators alike need to be familiar with. Most of the
commands are used in navigating and manipulating the file system. The file system
is made up of files and directories.
Theory/Description:
1) pwd COMMAND:
pwd - Print Working Directory. pwd command prints the full filename of the
current working directory.
SYNTAX:
pwd [options]
2) cd COMMAND:
cd command is used to change the directory.
SYNTAX:
cd [directory | ~ | ./ | ../ | - ]
3) ls COMMAND:
ls command lists the files and directories under current working directory.
SYNTAX:
ls [OPTIONS]... [FILE]
OPTIONS:

2
-l Lists all the files, directories and their mode, Number of links,
owner of the file, file size, Modified date and time and filename.
-t Lists in order of last modification time.
-a Lists all entries including hidden files.
-d Lists directory files instead of contents.
-p Puts slash at the end of each directories.
-u List in order of last access time.
-i Display inode information.
4) rm COMMAND:
rm linux command is used to remove/delete the file from the directory.
SYNTAX:
rm [options..] [file | directory]
OPTIONS:
-f Remove all files in a directory without prompting the user.
-i Interactive. With this option, rm prompts for confirmation before
removing any files.
5) mv COMMAND:
mv command which is short for move. It is used to move/rename file from one
directory to another. mv command is different from cp command as it
completely removes the file from the source and moves to the directory
specified, where cp command just copies the content from one file to another.
SYNTAX:
mv [-f] [-i] oldname newname
OPTIONS:
-f This will not prompt before overwriting (equivalent to --
reply=yes). mv -f will move the file(s) without prompting even if
it is writing over an existing target.
-i Prompts before overwriting another file.
6) cat COMMAND:
cat linux command concatenates files and print it on the standard output.
SYNTAX:
The Syntax is
cat [OPTIONS] [FILE]...
OPTIONS:
-A Show all.
-b Omits line numbers for blank space in the output.
-E Displays a $ (dollar sign) at the end of each line.
-n Line numbers for all the output lines.

3
7) cmp COMMAND:
cmp linux command compares two files and tells you which line numbers are
different.
SYNTAX:
cmp [options..] file1 file2
OPTIONS:
- c Output differing bytes as characters.
- l Print the byte number (decimal) and the differing byte values
(octal) for each difference.
- s Prints nothing for differing files, return exit status only.
8) cp COMMAND:
cp command copy files from one location to another. If the destination is
an existing file, then the file is overwritten; if the destination is an existing
directory, the file is copied into the directory (the directory is not overwritten).
SYNTAX:
cp [OPTIONS]... SOURCE DEST
10) echo COMMAND:
echo command prints the given input string to standard output.
SYNTAX:
echo [options..] [string]
11) mkdir COMMAND:
mkdir command is used to create one or more directories.
SYNTAX:
mkdir [options] directories
OPTIONS:
-m Set the access mode for the new directories.
-p Create intervening parent directories if they don't exist.
-v Print help message for each directory created.
12) paste COMMAND:
paste command is used to paste the content from one file to another file. It is also
used to set column format for each line.
SYNTAX:
paste [options]
OPTIONS:
-s Paste one file at a time instead of in parallel.
-d Reuse characters from LIST instead of TABs .

4
13) rmdir COMMAND:
rmdir command is used to delete/remove a directory and its subdirectories.
SYNTAX:
rmdir [options..] Directory
OPTIONS:
-p Allow users to remove the directory dir name and its parent
directories which become empty.
14. head COMMAND:
It is the complementary of Tail command. The head command, as the name implies, print
the top N number of data of the given input. By default it prints the first 10 lines of the
specified files. If more than one file name is provided then data from each file is precedes by
its file name.
SYNTAX:
head [OPTION]… [FILE]…
15. tail COMMAND:
It is the complementary of head command.The tail command, as the name implies, print the
last N number of data of the given input. By default it prints the last 10 lines of the specified
files. If more than one file name is provided then data from each file is precedes by its file
name.
SYNTAX:
tail [OPTION]… [FILE]…
16. date COMMAND:
date command is used to display the system date and time. date command is also used to set
date and time of the system. By default the date command displays the date in the time zone
on which unix/linux operating system is configured.You must be the super-user (root) to
change the date and time.
SYNTAX:
date [OPTION]… [+FORMAT]
Conclusion :---------------------------------------------------------------------------------------------

5
VIVA-VOCE QUESTIONS :
1. What is the description for Kernel?
2. What are the main features of UNIX?
3. What is called Shell?
4. What is the general format of UNIX command syntax?
5. Describe the usage and functionality of the command “rm” in UNIX?
6. Describe the term directory in UNIX?
7. What is the command to find today’s date?
8. What is the UNIX command to make a new directory?
9. What is the purpose of “echo” command?
10. What do you understand by UNIX shell?

6
Experiment No: 2 Title: Basics of Shell Programming.
Objective:
To understand shell decision-making in Unix.
To understand shell loops control in Unix.
Theory/Description:
Shell Decision Making
Unix Shell supports conditional statements which are used to perform different actions based
on different conditions. We will now understand two decision-making statements here −
The if...else statement
The case...esac statement
The if...else statements
If else statements are useful decision-making statements which can be used to select an
option from a given set of options.
Unix Shell supports following forms of if…else statement −
if...fi statement
if...else...fi statement
if...elif...else...fi statement
Most of the if statements check relations using relational operators discussed in the previous
chapter.
The case...esac Statement
You can use multiple if...elif statements to perform a multiway branch. However, this is not
always the best solution, especially when all of the branches depend on the value of a single
variable.
Unix Shell supports case...esac statement which handles exactly this situation, and it does so
more efficiently than repeated if...elif statements.

7
The case...esac statement in the Unix shell is very similar to the switch...case statement we
have in other programming languages like C or C++ and PERL, etc.
Shell Loop Types
A loop is a powerful programming tool that enables you to execute a set of commands
repeatedly. In this chapter, we will examine the following types of loops available to shell
programmers −
The while loop
The for loop
The until loop
The select loop
You will use different loops based on the situation. For example, the whileloop executes the
given commands until the given condition remains true; the until loop executes until a given
condition becomes true.
Once you have good programming practice you will gain the expertise and thereby, start
using appropriate loop based on the situation. Here, while and for loops are available in
most of the other programming languages like C, C++ and PERL, etc.
Nesting Loops
All the loops support nesting concept which means you can put one loop inside another
similar one or different loops. This nesting can go up to unlimited number of times based on
your requirement.
Here is an example of nesting while loop. The other loops can be nested based on the
programming requirement in a similar way −
Nesting while Loops
It is possible to use a while loop as part of the body of another while loop.
Syntax
while command1 ; # this is loop1, the outer loop
do
Statement(s) to be executed if command1 is true
while command2 ; # this is loop2, the inner loop

8
do
Statement(s) to be executed if command2 is true
done
Statement(s) to be executed if command1 is true
done
Shell Loop Control
we will learn following two statements that are used to control shell loops−
The break statement
The continue statement
The infinite Loop
All the loops have a limited life and they come out once the condition is false or true
depending on the loop.
A loop may continue forever if the required condition is not met. A loop that executes
forever without terminating executes for an infinite number of times. For this reason, such
loops are called infinite loops.
Example
Here is a simple example that uses the while loop to display the numbers zero to nine −
#!/bin/sh
a=10
until [ $a -lt 10 ]
do
echo $a
a=`expr $a + 1`
done
This loop continues forever because a is always greater than or equal to 10and it is never
less than 10.

9
The break Statement
The break statement is used to terminate the execution of the entire loop, after completing
the execution of all of the lines of code up to the break statement. It then steps down to the
code following the end of the loop.
Syntax
The following break statement is used to come out of a loop −
break
The break command can also be used to exit from a nested loop using this format −
break n
Here n specifies the nth enclosing loop to the exit from.
Example
Here is a simple example which shows that loop terminates as soon as a becomes 5 −
#!/bin/sh
a=0
while [ $a -lt 10 ]
do
echo $a
if [ $a -eq 5 ]
then
break
fi
a=`expr $a + 1`
done
Upon execution, you will receive the following result −
0
1
2

10
3
4
5
Here is a simple example of nested for loop. This script breaks out of both loops if var1
equals 2 and var2 equals 0 −
#!/bin/sh
for var1 in 1 2 3
do
for var2 in 0 5
do
if [ $var1 -eq 2 -a $var2 -eq 0 ]
then
break 2
else
echo "$var1 $var2"
fi
done
done
Upon execution, you will receive the following result. In the inner loop, you have a break
command with the argument 2. This indicates that if a condition is met you should break out
of outer loop and ultimately from the inner loop as well.
1 0
1 5
The continue statement
The continue statement is similar to the break command, except that it causes the current
iteration of the loop to exit, rather than the entire loop.

11
This statement is useful when an error has occurred but you want to try to execute the next
iteration of the loop.
Syntax
continue
Like with the break statement, an integer argument can be given to the continue command to
skip commands from nested loops.
continue n
Here n specifies the nth enclosing loop to continue from.
Example
The following loop makes use of the continue statement which returns from the continue
statement and starts processing the next statement −
#!/bin/sh
NUMS="1 2 3 4 5 6 7"
for NUM in $NUMS
do
Q=`expr $NUM % 2`
if [ $Q -eq 0 ]
then
echo "Number is an even number!!"
continue
fi
echo "Found odd number"
done

12
Program Statements:
1. Program for addition of two numbers.
2. Program for swapping of two numbers.
3. Program to find greatest no. from given 3 numbers.
4. Program to find sum of digits.
5. Program for Fibonacci series.
6. Program to calculate average and percentage of 3 subjects.
7. Program to check whether both strings are same or not.
8. Program to check whether no. is palindrome or not.
Program :
Output ;
Conclusion:-------------------------------------------------------------------------------------------------
VIVA-VOCE QUESTIONS :
1. What are Shell Variables?
2. What are the two types of Shell Variables? Explain in brief.
3. How are shell variables stored? Explain with a simple example.
4. What is the lifespan of a variable inside a shell script?
5. What are Loops and explain three different methods of loops in brief?
6. What is a Break statement and what is it used for?
7. What is Continue statement and what is it used for?

13
Experiment No: 3 Title: Implementation of Scheduling algorithm: FCFS
Objective:
To understand the difference between Preemptive and non preemptive scheduling.
To understand scheduling criteria and implement FCFS scheduling algorithm.
Theory/Description:
Study FCFS scheduling algorithm.
1.Explain Scheduling Criteria.
2.What is Throughput, Turnaround time, waiting time and Response time?
3.FCFS features,Advantages and Disadvantages.
3.Solve one problem using FCFS scheduling algorithm
Algorithm for FCFS scheduling:
Step 1: Start the process
Step 2: Accept the number of processes in the ready Queue
Step 3: For each process in the ready Q, assign the process id and accept the CPU burst time
Step 4: Set the waiting of the first process as ‘0’ and its burst time as its turnaround time
Step 5: for each process in the Ready Q calculate
(a) Waiting time for process(n)= waiting time of process (n-1) + Burst time of process(n-1)
(b) Turnaround time for Process(n)= waiting time of Process(n)+ Burst time for process(n)
Step 6: Calculate (c) Average waiting time = Total waiting Time / Number of process
(d) Average Turnaround time = Total Turnaround Time / Number of process
Step 7: Stop the process.

14
Program :
Output ;
Conclusion:-------------------------------------------------------------------------------------------------
LAB PRACTICE ASSIGNMENT:
Assignment No.1 : CPU Scheduling Assignment : Problems on FCFS
Assignment No.2 : Exercises on Performance evaluation of CPU Scheduling Algorithms.
VIVA-VOCE QUESTIONS :
1. What is Preemptive and non preemptive scheduling?
2. What are the different types of Scheduler?
3. What is Throughput, Turnaround time, waiting time and Response time?
4. Can FCFS be preemptive?
5. Which CPU scheduling algorithm is for real time operating system?
6. Which scheduling algorithm is best?
7. What is the advantage of FCFS CPU scheduling algorithm?

15
Experiment No: 4 Title: Shell programming for file handling.
Objective:
To understand shell programming for file handling in Unix.
To learn and perform shell programming for file handling in Unix.
Theory/Description:
1. head COMMAND:
It is the complementary of Tail command. The head command, as the name implies, print
the top N number of data of the given input. By default it prints the first 10 lines of the
specified files. If more than one file name is provided then data from each file is precedes by
its file name.
SYNTAX:
head [OPTION]… [FILE]…
OPTION:
1. -n num: Prints the first ‘num’ lines instead of first 10 lines. num is mandatory to be
specified in command otherwise it displays an error.
$head –n 5 state.txt
Andhra Pradesh
Arunachal Pradesh
Assam
Bihar
Chhattisgarh
Applications of head Command
1. Print line between M and N lines: For this purpose we use head, tail and pipeline(|)
commands. Command is: head -M file_name | tail -(M-N), since first line takes first M
lines and tail command cuts (M-N)Lines starting from end. Let say from state.txt file
we have to print lines between 10 and 20.
$head –n 20 state.txt | -10
Jharkhand
Karnataka
Kerala
Madhya Pradesh
Maharashtra
Manipur

16
Meghalaya
Mizoram
Nagaland
Odisha
2. How to use head with pipeline(|): The head command can be piped with other commands.
In the following example the output of the ls command is piped to head to show only the
three most recently modified files or folders.
Display all recently modified or recently used files.
$ ls –t
e.txt
d.txt
c.txt
b.txt
a.txt
Cut three most recently used file.
$ ls –t | head –n 3
e.txt
d.txt
c.txt
It can also be piped with one or more filters for additional processing. For example, the sort
filter could be used to sort the three most recently used files or folders in the alphabetic order.
$ ls –t | head –n 3 | sort
c.txt
d.txt
e.txt
There are number of other filters or commands along which we use head command. Mainly,
it can be used for viewing huge log files in Unix.
2. tail COMMAND:
It is the complementary of head command.The tail command, as the name implies, print the
last N number of data of the given input. By default it prints the last 10 lines of the specified
files. If more than one file name is provided then data from each file is precedes by its file
name.
SYNTAX:
tail [OPTION]… [FILE]…
OPTION:

17
1)-n num:
$tail -n file_name
Prints the last ‘num’ lines instead of last 10 lines. num is mandatory to be specified in
command otherwise it displays an error. This command can also be written as without
symbolizing ‘n’ character but ‘-‘ sign is mandatory.
Tail command also comes with an ‘+’ option which is not present in the head command. With
this option tail command prints the data starting from specified line number of the file instead
of end.
For command: tail +n file_name, data will start printing from line number ‘n’ till the end of
the file specified.
$ tail –n 3 state.txt
Uttar Pradesh
Uttarakhand
West Bengal
OR
$ tail -3 state.txt
Uttar Pradesh
Uttarakhand
West Bengal
Applications of tail Command
1. How to use tail with pipes(|): The tail command can be piped with many other commands
of the unix. In the following example output of the tail command is given as input to the sort
command with -r option to sort the last 7 state names coming from file state.txt in the reverse
order.
$ tail –n 7 state.txt
Sikkim
Tamil Nadu
Telangana
Tripura
Uttar Pradesh
Uttarakhand
West Bengal
$ tail –n 7 state.txt | sort –r
West Bengal
Uttarakhand
Uttar Pradesh
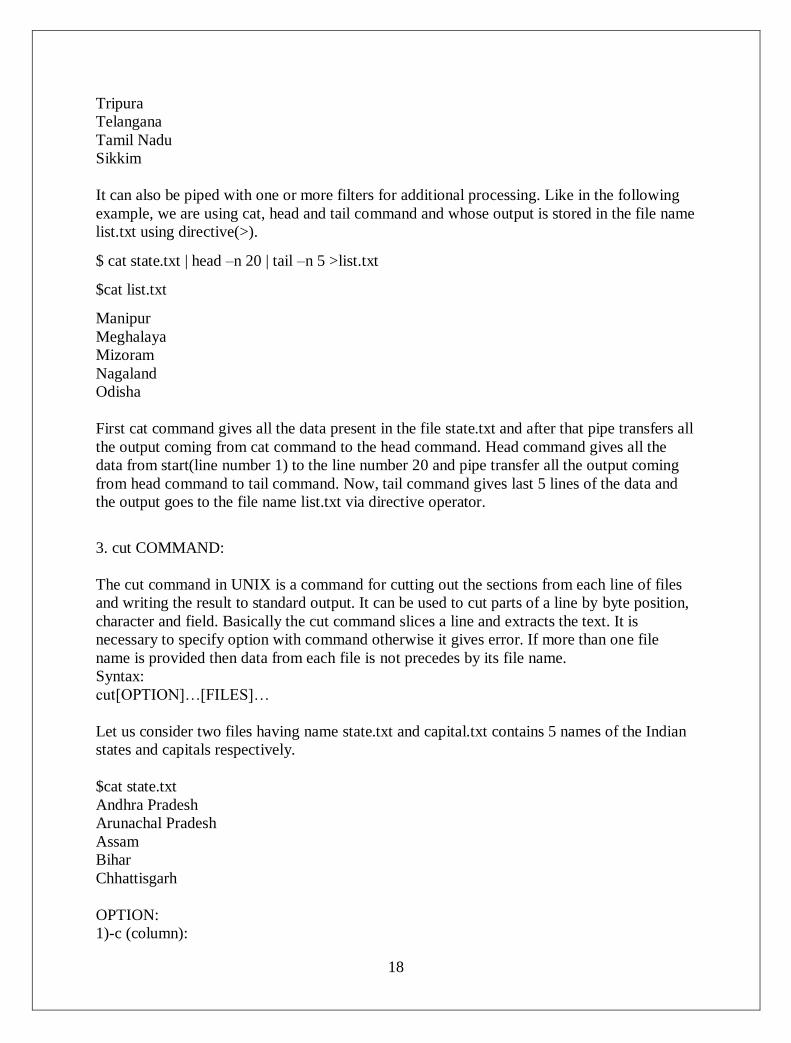
18
Tripura
Telangana
Tamil Nadu
Sikkim
It can also be piped with one or more filters for additional processing. Like in the following
example, we are using cat, head and tail command and whose output is stored in the file name
list.txt using directive(>).
$ cat state.txt | head –n 20 | tail –n 5 >list.txt
$cat list.txt
Manipur
Meghalaya
Mizoram
Nagaland
Odisha
First cat command gives all the data present in the file state.txt and after that pipe transfers all
the output coming from cat command to the head command. Head command gives all the
data from start(line number 1) to the line number 20 and pipe transfer all the output coming
from head command to tail command. Now, tail command gives last 5 lines of the data and
the output goes to the file name list.txt via directive operator.
3. cut COMMAND:
The cut command in UNIX is a command for cutting out the sections from each line of files
and writing the result to standard output. It can be used to cut parts of a line by byte position,
character and field. Basically the cut command slices a line and extracts the text. It is
necessary to specify option with command otherwise it gives error. If more than one file
name is provided then data from each file is not precedes by its file name.
Syntax:
cut[OPTION]…[FILES]…
Let us consider two files having name state.txt and capital.txt contains 5 names of the Indian
states and capitals respectively.
$cat state.txt
Andhra Pradesh
Arunachal Pradesh
Assam
Bihar
Chhattisgarh
OPTION:
1)-c (column):

19
To cut by character use the -c option. This selects the characters given to the -c
option. This can be a list of numbers separated comma or a range of numbers separated by
hyphen(-). Tabs and backspaces are treated as a character. It is necessary to specify list of
character numbers otherwise it gives error with this option.
Syntax:
$cut –c [(k)-(n)/(k),(n)/(n)] filename
Here,k denotes the starting position of the character and n denotes the ending position of the
character in each line, if k and n are separated by “-” otherwise they are only the position of
character in each line from the file taken as an input.
$cut –c 2,5,7 state.txt
nr
rah
sm
ir
hti
2) f (field):
-c option is useful for fixed-length lines. Most unix files doesn’t have fixed-length lines. To
extract the useful information you need to cut by fields rather than columns. List of the fields
number specified must be separated by comma. Ranges are not described with -f
option. cut uses tab as a default field delimiter but can also work with other delimiter by
using -d option.
Note: Space is not considered as delimiter in UNIX.
Syntax:
$cut –d “delimiter” –f (field number) file.txt
Like in the file state.txt fields are separated by space if -d option is not used then it prints
whole line:
$cut –f 1 state.txt
Andhra Pradesh
Arunachal Pradesh
Assam
Bihar
Chhattisgarh
If -d option is used then it considered space as a field separator or delimiter:
$cut –d “ ” –f 1 state.txt
Andhra
Arunachal
Assam
Bihar

20
Chhattisgarh
Command prints field from first to fourth of each line from the file.
Command:
$cut –d “ ” –f 1-4 state.txt
Output:
Andhra Pradesh
Arunachal Pradesh
Assam
Bihar
Chhattisgarh
3. paste COMMAND:
Paste command is one of the useful commands in Unix or Linux operating system. It is used
to join files horizontally (parallel merging) by outputting lines consisting of lines from each
file specified, separated by tab as delimiter, to the standard output. When no file is specified,
or put dash (“-“) instead of file name, paste reads from standard input and gives output as it is
until a interrupt command [Ctrl-c] is given.
Syntax:
paste[OPTION]…[FILES]…
4. sort COMMAND:
SORT command is used to sort a file, arranging the records in a particular order. By default,
the sort command sorts file assuming the contents are ASCII. Using options in sort command,
it can also be used to sort numerically.
The sort command follows these features as stated below:
1. Lines starting with a number will appear before lines starting with a letter.
2. Lines starting with a letter that appears earlier in the alphabet will appear before lines
starting with a letter that appears later in the alphabet.
3. Lines starting with a lowercase letter will appear before lines starting with the same
letter in uppercase.
Syntax :
$ sort filename.txt
OPTION:
1) -n Option :
To sort a file numerically used –n option. -n option is also predefined in unix as the above
options are. This option is used to sort the file with numeric data present inside.
Syntax :
$ sort -n filename.txt

21
2) -nr option :
To sort a file with numeric data in reverse order we can use the combination of two options as
stated below.
Syntax :
$ sort -nr filename.txt
3) -k Option : Unix provides the feature of sorting a table on the basis of any column number
by using -k option.Use the -k option to sort on a certain column.
Syntax :
$ sort –k filename.txt
4) -c option :
This option is used to check if the file given is already sorted or not & checks if a file is
already sorted pass the -c option to sort. This will write to standard output if there are lines
that are out of order.The sort tool can be used to understand if this file is sorted and which
lines are out of order.
Syntax :
$ sort –c filename.txt
5) -u option :
To sort and remove duplicates pass the -u option to sort. This will write a sorted list to
standard output and remove duplicates.
This option is helpful as the duplicates being removed gives us an redundant file.
Syntax :
$ sort –u filename.txt
Conclusion: -------------------------------------------------------------------------------------------------
VIVA-VOCE QUESTIONS :
1. What is Shell Scripting?
2. What is the Importance of writing Shell Scripts?
3. Explain about file permissions.
4. What is a file system?
5. How to perform numeric sort in shell script?

22
Experiment No: 5 Title: Implementation of CPU Scheduling algorithm:SJF
Objective:
To understand the difference between Preemptive and non preemptive scheduling.
To understand scheduling criteria and implement SJF scheduling algorithm.
Theory/Description:
Study SJF scheduling algorithm.
1. Explain Scheduling Criteria.
2. What is Throughput, Turnaround time, waiting time and Response time?
3. SJF features, Advantages and Disadvantages.
3. Solve one problem using SJF preemptive & nonpreemptive scheduling algorithm
Algorithm :
Step 1: Start the process
Step 2: Accept the number of processes in the ready Queue
Step 3: For each process in the ready Q, assign the process id and accept the CPU burst time
Step 4: Start the Ready Q according the shortest Burst time by sorting according to lowest to
highest burst time.
Step 5: Set the waiting time of the first process as ‘0’ and its turnaround time as its burst
time.
Step 6: For each process in the ready queue, calculate
(a) Waiting time for process(n)= waiting time of process (n-1) + Burst time of process(n-1)
(b) Turn around time for Process(n)= waiting time of Process(n)+ Burst time for process(n)
Step 7: Calculate (c) Average waiting time = Total waiting Time / Number of process
(d) Average Turnaround time = Total Turnaround Time / Number of process
Step 7: Stop the process
Program:
Output ;
Conclusion:-------------------------------------------------------------------------------------------------

23
LAB PRACTICE ASSIGNMENT:
Assignment No.1 : CPU Scheduling Assignment : Problems on SJF
Assignment No.2 : Exercises on Performance evaluation of CPU Scheduling Algorithms.
VIVA-VOCE QUESTIONS :
1. What is Preemptive and non preemptive scheduling?
2. What are the different types of Scheduler?
3. What is Throughput, Turnaround time, waiting time and Response time?
4. Can SJF be preemptive?
5. Which CPU scheduling algorithm is for real time operating system?
6. Which scheduling algorithm is best?
7. What is the advantage of SJF CPU scheduling algorithm?

24
Experiment No: 6 Title: Implementation of Producer-Consumer problem using semaphores
Objective:
To explore process synchronization.
To understand how a "bounded buffer" could be used to enable processes to share
memory.
Theory/Description:
Study process symchronization in detail.
1.Explain process synchronization.
2.What is Semaphore?
3.Explain two atomic operations of semaphore used for process synchronization.
3.Explain producer-consumer problem using semaphore.
Describe a technique using a circular buffer that can hold BUFFER_SIZE-1 items. By
using a shared memory location count, the buffer can hold all BUFFER_SIZE items. This
count is initialized to 0 and is incremented every time an item is placed into the buffer and
decremented every time an item is removed from the buffer. The count data item can also be
implemented as a counting semaphore.
The producer can place items into the buffer only if the buffer has a free memory location to
store the item. The producer cannot add items to a full buffer. The consumer can remove
items from the buffer if the buffer is not empty. The consumer must wait to consume items if
the buffer is empty.
The "items" stored in this buffer will be integers. Your producer process will have to insert
random numbers into the buffer. The consumer process will consume a number and detect if
the number is prime.
Algorithm:
Step 1: Start
Step 2: Define the maximum buffer size.
Step 3: Enter the number of producers and consumers.
Step 4: The producer produces the job and put it in the buffer.
Step 5: The consumer takes the job from the buffer.
Step 6: If the buffer is full the producer goes to sleep.
Step 7: If the buffer is empty then consumer goes to sleep.
Step 8: Stop
Program:

25
Output:
Conclusion: -------------------------------------------------------------------------------------------------
VIVA-VOCE QUESTIONS :
1. What is process synchronization?
2. What is Semaphore?
3. What is bounded buffer problem?
4. How Semaphore can be used as synchronization tool?
4. Distinguish between Independent process and co-operative process.

26
Experiment No: 7 Title: Shell Script programming using grep command.
Objective:
To understand shell programming for file handling in Unix.
To learn shell programming for file handling in Unix
Theory/Description:
grep command in Unix/Linux
The grep filter searches a file for a particular pattern of characters, and displays all lines that
contain that pattern. The pattern that is searched in the file is referred to as the regular
expression (grep stands for globally search for regular expression and print out).
Syntax:
grep[options] pattern [files]
Option Description:
-c: This prints only a count of the lines that match a pattern
-h: Display the matched lines, but do not display the filenames.
-i: Ignores, case for matching.
-I: Displays list of a filenames only.
-n: Display the matched lines and their line numbers.
-v: This prints out all the lines that do not matches the pattern.
-e exp: Specifies expression with this option. Can use multiple times.
-f file: Takes patterns from file, one per line.
-E: Treats pattern as an extended regular expression (ERE).
-w: Match whole word.
-o: Print only the matched parts of a matching line, with each such part on a separate output
line.
Sample Commands
Consider the below file as an input.
$cat>file.txt
unix is great os. Unix is opensource. Unix is free os.
learn operating system.
Unix linux which one you choose.
uNIx is easy to learn unix is a multiuser os.Learn unix.unix is a powerful.

27
1. Case insensitive search : The -i option enables to search for a string case insensitively in
the give file. It matches the words like “UNIX”, “Unix”, “unix”.
$grep –i “UNix” file.txt
Output:
unix is great os. Unix is opensource. Unix is free os.
Unix linux which one you choose.
uNIx is easy to learn unix is a multiuser os.Learn unix.unix is a powerful.
2. Displaying the count of number of matches : We can find the number of lines that
matches the given string/pattern
$grep –c “unix” file.txt
Output:
2
3.Display the file names that matches the pattern : We can just display the files that
contains the given string/pattern.
$grep –1 “unix” *
Or
$grep -1 “unix” f1.txt 21.txt f3.txt f4.txt
Output:
file.txt
4. Checking for the whole words in a file : By default, grep matches the given string/pattern
even if it found as a substring in a file. The -w option to grep makes it match only the whole
words.
$grep –w “unix” file.txt
Output:
unix is great os. Unix is opensource. Unix is free os.
uNIx is easy to learn unix is a multiuser os.Learn unix.unix is a powerful.
5. Displaying only the matched pattern : By default, grep displays the entire line which has
the matched string. We can make the grep to display only the matched string by using the -o
option.
$grep –o “unix” file.txt

28
Output:
unix
unix
unix
unix
unix
unix
6. Show line number while displaying the output using grep -n : To show the line number
of file with the line matched.
$grep –n “unix” file.txt
Output:
1:unix is great os. Unix is opensource. Unix is free os.
4:uNIx is easy to learn unix is a multiuser os.Learn unix.unix is a powerful.
7. Inverting the pattern match : You can display the lines that are not matched with the
specified search sting pattern using the -v option.
$grep –v “unix” file.txt
Output:
learn operating system.
Unix linux which one you choose.
8. Matching the lines that start with a string : The ^ regular expression pattern specifies
the start of a line. This can be used in grep to match the lines which start with the given string
or pattern.
$grep “^unix” file.txt
Output:
unix is great os. Unix is opensource. Unix is free os.
9. Matching the lines that end with a string : The $ regular expression pattern specifies the
end of a line. This can be used in grep to match the lines which end with the given string or
pattern.
$grep “os$” file.txt

29
10.Specifies expression with -e option. Can use multiple times :
$grep –e “Agarwal” –e “Aggarwal” –e “Agrawal” file.txt
11. -f file option Takes patterns from file, one per line.
$cat pattern.txt
Agarwal
Aggarwal
Agrawal
$grep –f pattern.txt file.txt
Conclusion:-------------------------------------------------------------------------------------------------
VIVA-VOCE QUESTIONS :
1. Which command is used for searching for a pattern in one or more file(s)?
2. Which symbol is used for matching a single character?
3. Which symbol is used for matching the immediately preceding character?
4. Write a command to print the lines that starts with the word "start"?
5. Write a command to print the lines which end with the word "end"?
6. Which option is used with grep command for ignoring the case in pattern searching?
7. Which option is used for displaying the line numbers containing the pattern along with
lines?

30
Experiment No: 8 Title: Shell Script programming using awk/sed commands.
Objective:
To understand the awk scripts
Theory/Description:
Sed :
sed takes a stream of stdin and pattern matches and returns to stdout the replaced text.
syntax:
– using stdin: cat file | sed ‘command’
– using files: sed ‘command’ file
– common uses:
• 4d : delete line 4
• 2,4d : delete lines 2-4
• 2w foo : write line 2 to file foo
• /here/d : delete line matching here
• /here/,/there/d : delete lines matching here to there
• s/pattern/text/ : switch text matching pattern
• s/pattern/text/g: switch text matching pattern globally
• /pattern/a\text : append line with text after matching pattern
• /pattern/c\text : change line with text for matching pattern
Awk :
The AWK utility is an interpreted programming language typically used as a data extraction
and reporting tool. It is a standard feature of most Unixlike operating Systems. Awk is an
excellent tool for building UNIX/Linux shell scripts. AWK is a Programming language that is
designed for processing textbased data, either in files or data streams or using shells pipes. In
other words you can combine awk with shell scripts or directly use at a shell prompt. The
essential organization of an AWK program follows the form:

31
pattern { action } The pattern specifies when the action is performed. Like most UNIX
utilities, AWK is line oriented. That is, the pattern specifies a test that is performed with each
line read as input. If the condition is true, then the action is taken. The default pattern is
something that matches every line. This is the blank or null pattern. Two other important
patterns are specified by the keywords "BEGIN" and "END." As you might expect, these two
words specify actions to be taken before any lines are read, and after the last line is read. The
AWK program below: BEGIN { print "START" } { print } END { print "STOP" } adds one
line before and one line after the input file. This isn't very useful, but with a simple change,
we can make this into a typical AWK program: BEGIN { print "File\tOwner"," } { print $8,
"\t", $3} END { print " DONE " }
Conclusion:-------------------------------------------------------------------------------------------
LAB PRACTICE ASSIGNMENT:
a) Write a sed command that print lines numbersof lines beginning with “O”
b) Write a sed command that delete digits in the given input file.
c) Write a sed command that delete lines that contain both BEGIN and END
d) Write a sed command that delete lines that contain BEGIN but not END
e) Write a sed command that deletes the first character in each line in a file
f) Write a sed command that deletes the last character in each line in a file
g) Write an awk command to print the lines and line numberin the given input file
h) Write an awk command to print first field and second field only if third field value is
>=50 in the given input file. (input field separator is “:” and output field separator
is “,”)
i) Consider the marks.txt is a file that contains one record per line( comma separate
fields) of the student data in the form of studentid, student name, Telugu marks,
English marks, Maths Marks, Science marks, Social Marks. Write an awk script to
generate result for every students in the form of studentid, studentname, Total
Marks and result. Result is PASS if marks is >=30 in TELUGU and English, and
if marks>=40 in other subjects. Result is fail otherwise

32
VIVA-VOCE QUESTIONS :
1. Write a command to replace the word "bad" with "good" in file?
2. Write a command to replace the word "bad" with "good" globally in a file?
3. Write a command to replace the character '/' with ',' in a file?
4. Write a command to replace the word "apple" with "(apple)" in a file?
5. Write a command to remove the first number on line 5 in file
6. Write a command to remove the first 10 lines from a file?
7. Write a command to duplicate each line in a file?
8. How to run awk command specified in a file?
9. Write a command to print the line number before each line?
10. Write a command to find the total number of lines in a file without using NR

33
Experiment No: 9 Title: Implementation of Bankers algorithm for the purpose of deadlock avoidance.
Objective:
To understand deadlock avoidance.
To learn and implement bankers algorithm for the purpose of deadlock avoidance.
Theory/Description:
Study deadlock in detail.
1.Explain methods for handling deadlocks.
2.Explain bankers algorithm with request-resource and safety algorithm.
3.Solve one problem using bankers algorithm.
Algorithm:
Following Data structures are used to implement the Banker’s Algorithm:
Let ‘n’ be the number of processes in the system and ‘m’ be the number of resources types.
Available :
It is a 1-d array of size ‘m’ indicating the number of available resources of each type.
Available[ j ] = k means there are ‘k’ instances of resource type Rj
Max : It is a 2-d array of size ‘n*m’ that defines the maximum demand of each process in a
system.
Max[ i, j ] = k means process Pi may request at most ‘k’ instances of resource type Rj
Allocation : It is a 2-d array of size ‘n*m’ that defines the number of resources of each type
currently allocated to each process.
Allocation[ i, j ] = k means process Pi is currently allocated ‘k’ instances of resource
type Rj
Need :
It is a 2-d array of size ‘n*m’ that indicates the remaining resource need of each
process.
Need [ i, j ] = k means process Pi currently need ‘k’ instances of resource type Rj
for its execution.
Need [ i, j ] = Max [ i, j ] – Allocation [ i, j ]

34
Banker’s algorithm consist of Safety algorithm and Resource request algorithm
Safety Algorithm
The algorithm for finding out whether or not a system is in a safe state can be described
as follows:
1) Let Work and Finish be vectors of length ‘m’ and ‘n’ respectively.
Initialize: Work = Available
Finish[i] = false; for i=1, 2, 3, 4….n
2) Find an i such that both
a) Finish[i] = false
b) Needi <= Work
if no such i exists goto step (4)
3) Work = Work + Allocation[i]
Finish[i] = true
goto step (2)
4) if Finish [i] = true for all i
then the system is in a safe state
Resource-Request Algorithm Let Requesti be the request array for process Pi. Requesti [j] = k means process Pi wants k
instances of resource type Rj. When a request for resources is made by process Pi, the
following actions are taken:
1) If Requesti <= Needi
Goto step (2) ; otherwise, raise an error condition, since the process has exceeded its
maximum claim.
2) If Requesti <= Available
Goto step (3); otherwise, Pi must wait, since the resources are not available.
3) Have the system pretend to have allocated the requested resources to process Pi by
modifying the state as
follows:
Available = Available – Requesti
Allocationi = Allocationi + Requesti
Needi = Needi– Requesti
35
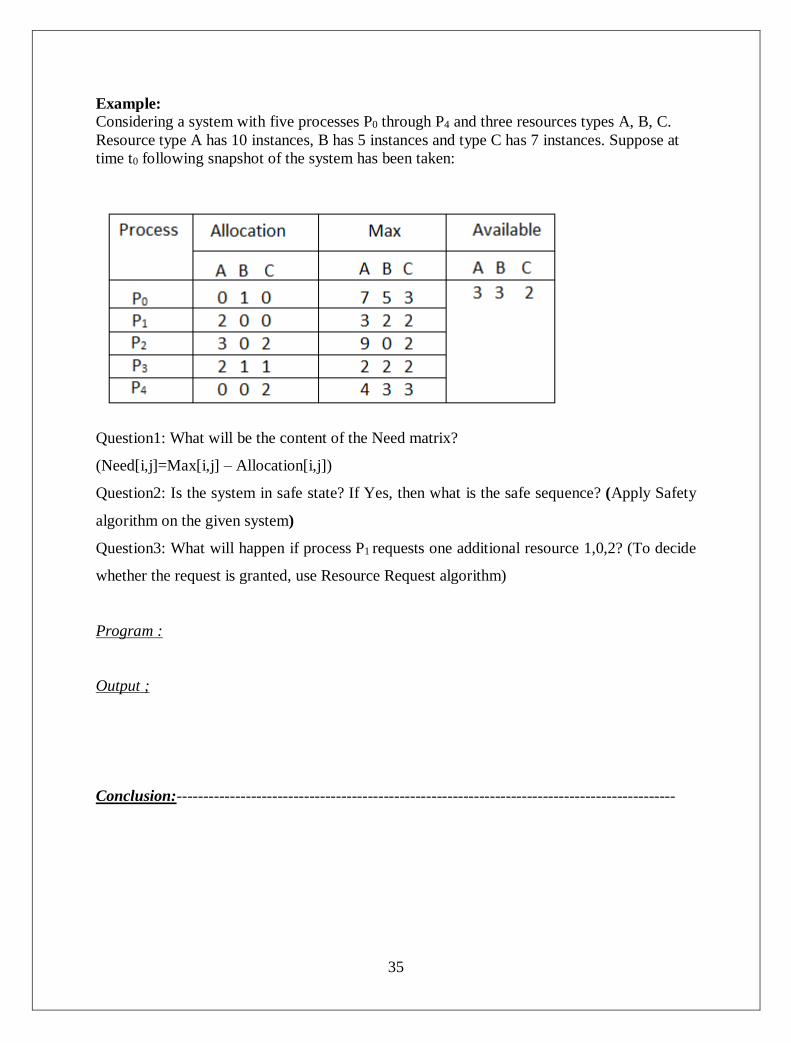
Example: Considering a system with five processes P0 through P4 and three resources types A, B, C.
Resource type A has 10 instances, B has 5 instances and type C has 7 instances. Suppose at
time t0 following snapshot of the system has been taken:
Question1: What will be the content of the Need matrix?
(Need[i,j]=Max[i,j] – Allocation[i,j])
Question2: Is the system in safe state? If Yes, then what is the safe sequence? (Apply Safety
algorithm on the given system)
Question3: What will happen if process P1 requests one additional resource 1,0,2? (To decide
whether the request is granted, use Resource Request algorithm)
Program :
Output ;
Conclusion:----------------------------------------------------------------------------------------------
36
LAB PRACTICE ASSIGNMENT:
Assignment No.1 : Exercise on deadlock avoidance algorithm
VIVA-VOCE QUESTIONS :
1. What do you mean by Deadlocks ?
2. What are the necessary conditions for deadlocks?
3. Which algorithm we need to use for deadlock avoidance?
4. What is safe state?

37
Experiment No: 10 Title: Implementation of page replacement algorithm: FIFO
Objective:
To understand virtual memory management.
To learn and implement page replacement algorithm: FIFO
Theory/Description:
1. Describe the benefits of a virtual memory system.
2. Explain the concepts of demand paging, page-replacement algorithms, and allocation of
page frames.
3. Comparison of page replacement algorithms.
4. Solve one problem using page replacement algorithm:FIFO.
Algorithm:
1. Start the process
2. Declare the size with respect to page length
3. Check the need of replacement from the page to memory
4. Check the need of replacement from old page to new page in memory
5. Form a queue to hold all pages
6. Insert the page require memory into the queue
7. Check for bad replacement and page fault
8. Get the number of processes to be inserted
9. Display the values
10. Stop the process
Program :
Output ;
Conclusion:-------------------------------------------------------------------------------------------------

38
LAB PRACTICE ASSIGNMENT:
Assignment No.1 : Comparison of page replacement algorithms.
VIVA-VOCE QUESTIONS :
1. What are the various page replacement strategies/algorithms?
2. When does a page fault occur?
3. Explain various page replacement strategies/algorithms.
4. Which is the best page replacement algorithm and why? How much time is spent usually in
each phases and why?
5. What is the criteria for the best page replacement algorithm?
6. Explain comparison of page replacement algorithms.