
kato's attack and kill - Kiseido Digital
76
-
Upload
khangminh22 -
Category
Documents
-
view
4 -
download
0
Transcript of kato's attack and kill - Kiseido Digital


KATO'S
ATTACK AND KILL

About the Author
Kato Masao was born in Fukuoka on the 15th March, 1947. In 1959 he entered Kitani Minoru's go school and in 1964 he became sho-dan. In 1973 he was promoted to 8-dan.
In 1967 he scored a magnificent tally of 37 wins and 8 losses and set a record by becoming the first 4-dan to qualify for the Honinbo league. He also won the 2nd Division of the professional grading tournament that year, following up by winning Division 1 in both 1970 and 1971. In 1969 he was challenger for the Honinbo title and was awarded the 5th Shusai prize. In 1975 he was second in the 12th Pro Best Ten tournament. Finally, after eight unsuccessful title challenges, Kato finally won his first title by defeating Otake in the first Gosei title in 1976. In the same year he won the 14th 10-dan title then took the 32nd Honinbo title in 1977. After his second defence of the 10-dan title, in 1978, he was promoted by recommendation to 9-dan. Kato also defended the Gosei title in 1977 and became the 2nd Kisei title challenger. Though he lost 3—4 to Fujisawa Shuko, he continues to dominate the tournament go scene in Japan.

KATO'S
ATTACK AND KILL
by Kato Masao, Honinbo and 10-dan
translated by John Fairbairn
THE ISHI PRESS, INC. Tokyo

Published by The Ishi Press, Inc.
CPO Box 2126 Tokyo, Japan
© Copyright 1978 in Japan by The Ishi Press, Inc. ISBN 4-87187-027-2
All rights reserved according to international law. This book or any parts thereof may not be reproduced in any form without written permission from the publishers.
U.S. and Canadian orders for this book should be sent to: THE ISHI PRESS INTERNATIONAL, INC.
1101 San Antonio Road, Suite 302 Mountain View, California
USA 94043
Originally published in Japanese by the Nihon Ki-in as Ishi no Semekata Koroshikata
(Go Super Books, Vol. 47)
First Printing August 1978 Second Printing February 1987
Printed in Japan by Sokosha Printing Co., Ltd.

PREFACE
Chasing big groups and killing them — this is one of the great delights of go. It is the privilege of every amateur who plays for pleasure, but many people have invented their own styles of attacking. Accordingly, there are countless examples of players attacking and capturing worthless groups only to find that their opponents have sealed them in behind a wall of thickness, or attacking impetuously and failing to secure enough territory.
In the recent publishing boom in the go world there have been many books on josekis or tesujis, but surprisingly few that deal with the crucial principles of attack. This is a deplorable situation for those players who care about knowing how to attack, and that is why I have written this book.
In Chapter 1 we shall study the basic principles of attacking. Chapter 2, which is in question-and-answer form, deals with the practical application of these principles. In Chapter 3 I have introduced several of my own games. These are all attacking games played mostly in the Professional Grading Tournament when I was 4- or 5-dan and all of them end suddenly after hard fighting. If you play these games over, I think you will soon appreciate the essence of attacking play.
I have pitched this book at the level of middle-kyu players and above, but have also tried to make the explanations readily understandable by beginners. I am sure that by reading it you can become a "killer" too.
Early summer, 1975 Kato Masao
— v —

TABLE OF CONTENTS
CHAPTER 1: THE FUNDAMENTALS OF ATTACK . . 1
1. Targets for attack 2
2. Vital points for attack 10
3. Capping 20
4. The knight's move 34
5. Roundabout and splitting attacks . . 48
CHAPTER 2: TEST YOURSELF 77
First Impression — Where to Approach — Direct Action — Attack and Defence on
the Right — Enjoy it! — Attacking an
Extension - Two Vital Points - Handicap
Game (1) — Handicap Game (2) — Attack
or Large-scale Territory — Using Thickness
— A Quiet Move — Attacking in the Open
ing — Splitting Attack
CHAPTER 3: THE BIRTH OF KILLER KATO 137
Game 1: v. Kawamoto Noboru 138
Game 2: v. Sanno Hirotaka 152
Game 3 : v. Miyazaki Hiroshi 162
Game 4: v. Naganuma Shin 172
Game 5: v. Kodama Kunio 183
Game 6: v. Takagi Shoichi 190
Game 7: v. Chino Tadahiko 197
Game 8: v. Magari Reiki 205
— vi —

CHAPTER 1
THE FUNDAMENTALS OF ATTACK
- 1 -

1. TARGETS FOR ATTACK The first thing you must consider is which group to
attack or capture. It is all very well relentlessly attacking one of your opponent's groups and finally capturing it, but the fact is there are some groups that are worth capturing and some that are not. So the first step is to decide on the target for attack.
Example 1. Black to play White has just played at A . Black thus has thirteen
stones in atari above and one stone in atari below. Most people would think straightaway of connecting at 'a', but you must consider the board as a whole before deciding whether this is wise or not.
Example 1. Black to play
- 2 -

Dia. 1 Dia. 2
Dia. 1 (Failure) Black's connection at 1 is without doubt a big move,
worth over 20 points, but it is not the right answer. This lets White capture at 2, so the large group coming up from the lower right-hand corner suddenly becomes completely safe. Mark well that Black 1 is nothing more than an endgame move. Dia. 2 (Aiming at the big group)
Black should resolutely extend to 1 and aim at attacking the large white group. This lets White capture at 2, but then Black 3 is decisive. The deep satisfaction of a decisive attack at the cost of minor losses — this will be one of the major themes of this book.
- 3 -

Example 2. Black to play Restricting yourself just to this part of the board,
decide which target you will attack. You have to choose one of the three points 'a', 'b ' or 'c\ but which one gives the strongest attack?
Example 2. Black to play
Dia. 1 (Failure) Let us start by looking at the pincer Black 1. White's
proper response is to stabilise his group on the right for the time being with 2. Then, although Black can swallow up A , White has enough room to jump into the 3 - 3 point and get compensation in the corner. The result after White 12 is that Black has managed to capture A , but White has done well on both sides and has reduced him to an over-concentrated shape. From White's point of view A is a light stone that he can afford to give up.
Dia. 1
- 4 -

Dia. 2 (Almost correct) Black 1 is always a vital point in this formation and
is usually the correct answer. However, White can make a base by slipping away at 2, and so Black's play is lacking in severity. Later if Black plays 'a', White can maintain his connection at 'b ' and he can also crawl along at 'd' in response to Black 'c'. After the exchange of Black 'c' for White 'd', Black could play elsewhere or continue to press down at V, which cannot be regarded as unsatisfactory for him. Yet there is a better way to play.
Dia. 2 Dia. 3 (Correct)
I would prefer to come in low at 1. If White makes himself safe with 2, Black jumps out to 3, and already White's three-stone group is an ineffectual liability. Compare this with Dia. 1. There the pincer left White enough room to move into the corner on that side. That is not so here.
Dia. 3
- 5 -

Dia. 4 Dia. 5 Dia. 4 (Big profit)
After Black 1 White has no choice but to run away. Nevertheless, if he pushes out at 2, Black 3 is severe. White 4 leaves Black with a cut at 5 and White's position is in ruins. Of course Black now answers White 'a' with 'b'. Dia. 5 (Vulgar style)
White's contact play at 2 first still leads to bad shape; he has done no more that escape the blockade. If White simply plays 4 at 6, Black's hane at 'a' destroys White's shape. Dia. 6 (Two choices)
All things considered, White would probably play at 2 here. However, Black's response, the contact play at 3 followed by the pole connection at 5, is still very strong. Black has a choice of two cutting points and White has no suitable continuation. Black 1 in Dias. 4, 5 and 6 is clearly a very strong move in each case.
Dia. 6
- 6 -

The basic approach to attacking is therefore as follows: 1. Select as your target a heavy group that your
opponent cannot afford to trade for something else;
2. Find the strongest move.
Heavy groups don't grow on trees though. What you need therefore are some positive techniques for making light groups into heavy ones.
Example 3 Dia. 1
Example 3 Black to play White has approached the corner at A and then played
elsewhere. The question now is how to attack this stone, since in itself it is not heavy. Dia. 1 (Trade)
If Black pincers at 1, White will swap the corner for his single stone. Black has thus derived no benefit from his attack. White could also have dealt with this situation by playing 2 at 3, as you no doubt know.
The reason Black got nothing out of his attack is that he was attacking a light stone. Before attacking at 1 Black needs to find some way of making White heavy.
- 7 -

Dia. 2 Dia. 2 (The usual way to attack)
It is better for Black to pincer after making the Black 1 — White 2 exchange. This is the usual way to attack. Once White adds a stone at 2 this group becomes heavy and not only does it become a target for attack, but there is also no room to trade or to make eyes. Nevertheless, for White to ignore Black 1 and to allow a hane at 2 would be insufferable. Example 4 Black to play
This is a continuation of Example 2. You are going to attack the lone white stone on the left, but first you have to make it heavy.
Example 4 Dia. 1 (Live shape)
Black can approach as far as 1. This looks severe, but there is something unsatisfactory about it. White is able to move into the 3-3 point and swap the corner
- 8 -

for his single stone, or he can cope quite easily by attaching at 2. After the sequence up to White 6 the white group has a live shape and Black's thickness is not working properly.
Dia. 1 Dia. 2 (Spoils of the attack)
No doubt you have got the message by now. Black 1, nudging White into adding a stone at 2, and then Black 3 are the right answer. Black 1 serves to prevent the trade in the corner at the 3-3 point and Black 3 blocks White's path to the centre, with the result that White has no choice but to seek life on the edge. Black 5 is adequate, defending and making thickness at the same time, and although after 10 White is almost alive, Black can still tease him with the placement at 'a', whilst the cut at 'b ' has become possible. The spoils of the attack are clear for all to see.
Dia. 2 Latching onto heavy groups, or making light groups
heavy — these are the first steps in attacking.
- 9 -

2. VITAL POINTS FOR ATTACK There are certain vital points that can put the wind
up your opponent straightaway. It is important, once you have decided on your target for attack, to seek out and to hit its vital points. Very often the target will have a definite shape as, for instance, in Example 1.
Everyone knows that Black 1 is the vital point. With this single blow White's group is forced to run for its life, and even if it does manage to escape the effect on other parts of the board will be incalculable.
In this position the best White can do to make eyes is to play 'b' and 'c', but closer inspection reveals that Black 1 makes an eye here into a false one, which is why Black 1 is called the "eye-stealing tesuji". This tesuji has an extremely wide range of application and must come first in our list of vital points.
Example 1
Example 2 Black to play This position is frequently seen in games with six or
more handicap stones. With 1 and 3 White is attempting to reinforce his group and the question is how should Black continue his attack. A great deal will depend on whether or not he finds the vital point.
- 1 0 -

Dia. 1
Example 2
Dia. 2 Dia. 1 (White is spared)
The simple connection at Black 1 allows White to patch up his position at 2 and Black's attack has fizzled out. White 2 is just the right move to make a live shape and, in addition, White can aim at attacking A or invading at 'a'. This is failure for Black. Dia. 2 (Another failure)
This Black 1 looks more severe than the previous diagram, but again White defends at 2 and the attack fizzles out. If Black pushes through at 'a', White can calmly block him at 'b'.
It should now be clear from Dias. 1 and 2 that White 2 is the vital point. The enemy's vital point is your own.
- 1 1 -

Dia. 3 (Bad shape for White) Peeping at Black 1 is the right answer. It is insufferably
bad shape for White to connect at 2; all Black has to do then is to connect at 3. The eyeless white group will have a rough journey on its way out to the centre. Dia. 4 (Good for Black)
Perhaps White might force at 2 before connecting at 4. After this Black will attack at either 'a' or 'b', depending on the surrounding situation, but even in isolation this position is good for Black.
Examples 1 and 2 showed the vital point for playing the eye-stealing tesuji. There is another vital point that you probably know already: "the centre of three stones".
Dia. 3
Dia. 4 Example 3
Black 1 is a case in point. The position has become a little complicated but close examination shows that
- 1 2 -

Black 1 is working with A to make White's eyes false. This is another very important vital point that often appears in actual games. You should check for yourself that no matter where White plays 2 his shape is ruined, forcing him to run away
Example 3 into the centre. Example 4 Black to play
You don't see too many examples of attacking at the vital point in professional games. This is because the opponent defends them in good time. This example is not from one of my own games but is one that I remember.
You are to attack the white group in the lower left-hand corner. Of course playing at 'a' would be useless.
Example 4
- 1 3 -

Dia. 2 Dia. 3 Dia. 1 (Making shape)
If Black plays at a big point instead, White can make shape with 1, which would lead to a rather slow game. White 1 is vital point. Dia. 2 [Insufficient preparation)
Consider, however, what happens if Black takes this vital point straightaway. After White 2 to 6, far from Black being on the attack, his two-stone group has become a heavy liability. If Black 3 cuts at 'a'. White can hane at 'b', and the attack will have lost all its sting. Dia. 3 (The actual game)
The proper order is to exchange 1 for 2 before taking the vital point at 3. Black 1 smacks of vulgar style but it plainly creates the right conditions for playing in the centre of three stones, forcing White to connect at 4 and allowing Black to attack the whole group with 5.
- 1 4 -
Dia. 1

Black 7 foils White's attempt to get out into the centre and the rest of the sequence up to 13 is taking full advantage of the thickness in the top half of the board. If White next plays at 'a', Black will continue the attack with 'b'. Considering that Black has in reserve the cut at 'c' to stir up trouble for the top group, White must be resigned to a hard struggle. Exmple 5 Black to play
Let us look now at a couple of examples of vital points for attack in my own games. In this instance Black has his eyes on the invasion at 'a' and the jump to 'b'. If he plays 'a', however, after White 'c' the prospects are not very clear, and if he plays 'b', White can play 'd', making the game too slow. Therefore, turn your attention to the lower right.
Example 5
- 1 5 -

Dia. 1 Dia. 2 Dia. 3
Dia. 1 (Inadequate) The jump to 1 is without doubt a good point for Black,
but it allows White to stabilise himself with 2. Black's attack will be gone. Dia. 2 (Difficult)
Those of you who thought of the capping play at 1 must have a fair amount of skill. It blocks White's route to the centre and is a common way of attacking on a large scale, but it also lets White poke his head out at 2. The future prospects are then uncertain; Black might end up driving White into Black's own territorial framework. (Note: capping plays are dealt with in the next section.) Dia. 3 (Neat)
This Black 1 is another vital point, this time taking White's base away. However, White can let his two lower stones go and make a neat, light, active shape with the sequence up to 6.
- 1 6 -

Dia. 4 (Large-scale attack) I felt that Black 1 was the best vital point. White will
answer around 2 and then Black can nudge in to 3, making the peep at 5 a forcing move, before jumping out to 7. White will also jump out to 8 and there matters will stand for the time being, but Black can feel satisfied that he has spoilt White's eye shape in sente and has occupied the good point 7.
Later Black can aim at the large-scale attack beginning with 'a', which means that he can now play 9 with this in mind.
Compare this with Dia. 1. Notice how effective the forcing moves Black 1 and 3 are. Above all try to appreciate the concept of large-scale attack.
The subsequent attack will be dealt with in the section on roundabout and splitting attacks.
Dia. 4
- 1 7 -

Example 6 Example 6 Black to play
Looking over the board as a whole it is clear that the white groups on the lower edge can live easily. For the moment there does not seem to be any immediate value in attacking the two-space extension on the right-hand side either. That leaves the four-stone group at the top. This group has rather a silly shape, but where is its vital point? You won't necessarily be able to capture the whole group, but depending on how White responds you should be able to pick up some local profit.
Wedging in at 'a' and connecting at 'c' after White 'b' lets White make a more or less live shape with 'd\ Dia. 1 (Forcing White into bad shape)
Black 1 is the vital point. If White connects at 2, Black blocks at 3. This White 2 is very bad shape, it serves no other purpose than connection, and it does not relieve
- 1 8 -

the attack. No matter how White runs away now, Black 'a' will catch this group and the two-space extension below in a splitting attack.
Dia. 1 Dia. 2. (Sufficient spoils)
In the actual game White answered the peep by pushing out at 2. He really had no option, but Black 3 was then quite adequate. White's line of three stones is not yet out of danger, so that Black can be satisfied with what he has got out of the attack already.
White next tried for complications with 4, but the stolid Black 5 keeps the pressure on by aiming at a three-way splitting attack against the two two-stone groups on the right and the three stones on the left.
Dia. 2
19

3. CAPPING Capping moves are used for two purposes: 1. To erase
an opponent's territorial framework; 2. To attack by blocking the path to the centre. Obviously it is the latter use that we are concerned with here.
Cappping is a very popular technique for attacking because it puts severe pressure on a weak group by cutting off its avenue of retreat, and also because it is applicable to the majority of cases.
Take for instance Example 1. Most people would think of attacking the three white stones by cutting off then-route to the centre with Black 1. With this one move Black can seize the initiative, leaving White with no choice but to run away with a hard fight ahead of him.
Since escape straight into the centre is now impossible, White has to seek safety with either 'a' or 'b'. Naturally you should consider the consequences of these moves.
Example 1
- 2 0 -

Dia. 1 (The knight's move after a cap) Imagine White tries to escape with 1. Black 2 continues
the chase with a knight's move. This sequence of a cap followed by a knight's move is one of the basic patterns of attack. White is forced to push along at 3 and 5, and Black 6 keeps the pressure on. While becoming thick in the centre Black is also solidifying the upper right comer, which shows clearly the effect of the capping move. Dia. 2 (Sealed in)
What about White 1 on the other side? Black 2, testing White's response, is the skilful way to play. If White defends at 3 Black will revert to the knight's move follow-up at 4. If White then jumps to 5, Black will seal him in with 6, and even though White may not die, he is clearly going to suffer.
This particular diagram may have been a little difficult, but you should try to get the feel of attacking with moves like 2,4 and 6 after a cap.
Dia. 1 Dia. 2
- 2 1 -

Example 2 Black to play From one of my own games. It will be obvious at first glance that the focal point for
attack and defence is the lower edge. If Black neglects this area and lets White jump out to 'a', it will be Black who will be on the defensive as his three stone group comes under attack. Having said that, I would imagine the next move is easy to find.
Example 2 Dia. 1 (Capping is correct)
The cap at Black 1 is the only move. This, in effect, is a vital point which suddenly deprives White of his freedom of movement.
White 2, etc. is what followed in the game, the point being that White could not escape to the centre and had to seek life on the edge. Answering White 4 by simply
- 2 2 -

^ Dia. 1 capturing at 5 is quite adequate for Black. With 6 and so on White is wriggling around in an intolerable situation.
Although White manages to live on the edge with 14, the fact that Black has played at 9 has weakened the white group in the lower left corner. Dia. 2. (The attack bears fruit)
Black follows up his attack with 1 and 3 against this other group. The sequence up to 30 brings White life somehow, but only at the expense of being sealed in. With such outside influence it is clear that Black will win.
It is no exaggeration to say that this is all the result of Black 1 in Dia. 1.
Dia. 2
- 2 3 -
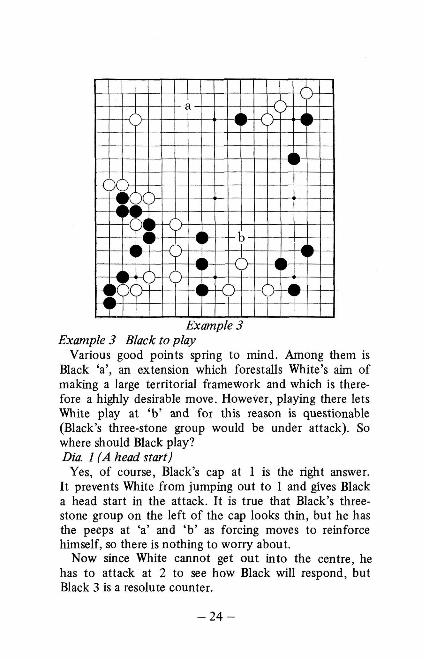
Example 3 Example 3 Black to play
Various good points spring to mind. Among them is Black 'a', an extension which forestalls White's aim of making a large territorial framework and which is therefore a highly desirable move. However, playing there lets White play at 'b ' and for this reason is questionable (Black's three-stone group would be under attack). So where should Black play? Dia. 1 (A head start)
Yes, of course, Black's cap at 1 is the right answer. It prevents White from jumping out to 1 and gives Black a head start in the attack. It is true that Black's three-stone group on the left of the cap looks thin, but he has the peeps at 'a' and 'b ' as forcing moves to reinforce himself, so there is nothing to worry about.
Now since White cannot get out into the centre, he has to attack at 2 to see how Black will respond, but Black 3 is a resolute counter.
- 2 4 -

Dia. 1 Dia. 2 (Too negative)
This Black 1 instead, defending the corner but allowing White to draw back to 2, just gives White a live shape. The cap at Ahas now become a rather pointless move.
Returning to Dia. 1, note the order of playing Black 5 before going back to defend at 7. The forcing move Black 11 is a useful reply to White 10, being the vital point to destroy White's eye shape, but instead of this 11 there is another powerful way for Black to play: Black 14, White V, Black 13. This puts more emphasis on territory.
Black 13 pulls back at just the right time, and after White 14 Black is able to continue his attack. At the risk of digressing somewhat, before you turn the page consider how he might do this.
Dia. 2
- 2 5 -

Dia. 3 (Possible, but ...J Settling the position with
Black 1, sealing White in with 3 and going for a large territory on the right was one of the ways I considered. Perhaps this represents an adequate gain from the attack, but it cannot be good to let White live so easily. Dia. 4 (The actual game)
I played the forcing move at 1 and then 3 to underline the attack. After Black 17 White is in an awful mess. The attack has well
Dia. 3 and truly paid off. White in this game was Takagawa Kaku, whose pre
dilection for capping plays is well known. Here, however, he was hoist with his own petard.
Dia. 4
- 2 6 -

Example 4 Example 4 Black to play
This is from one of my own games; my opponent was Fujisawa Hosai, 9-dan. After a few moves of mimic go the game has settled down to a battle of large territorial frameworks. White has just played at A to see how Black
will respond. How should he play?
Dia. 1 (Feeble) Worrying about territory
and answering at Black 1 is a feeble attitude. After 2 and 4 White has joined his upper and lower stones and the game is as good as over. Dia. 1
- 2 7 -

Dia. 2 Dia. 2 (Virtual connection)
How about chasing White with the knight's move 1? I considered this but rejected it. White can force with 2 and 4, and then no doubt he will play 6 and 8. Since White 'a', Black 'b', White 'c', Black 'd' remains as a forcing sequence, White can virtually guarantee connection to the stones below and the attack will have failed. Dia. 3 (Cap)
I felt Black 1, restricting White's access to the centre, was the right move. If White 2 is at 10, then Black 'a', White 'b', Black 'c' leaves White still without a base. Moreover the white stone A would be on the brink of capture.
White therefore changed his approach and played 2 to 6, at which point Black 7 was a nice move to get in.
Dia. 3
- 2 8 -

After White comes out at 10 it looks as if the attack has spent its force. But wait!
Dia. 4 Dia. 4 (Splitting attack)
The hane of Black 11 sets up a diversion. Since White cannot afford to give up his two stones, he has to help them with 12 and so on. You might wonder what Black is doing, letting White come out 18: Black 'a', White 'b ' is a huge loss. Dia. 5 (Captures)
But what I had in mind was Black 19. If White comes out at 21, Black 20 captures the five white stones.
The move White actually played, 20, lets Black seal him in with 21. After Black captures the white group with 23 and 25 the attack can be regarded as a great success.
Dia. 5
-29-

Example 5 Examples Black to play
This is from a game between two other professionals. The left side is obviously the centre of attention. The question is how to attack White's three stones.
In a similar position on page 17 Black 'a' was the vital point for attack, but in this case White would not answer and would instead jump out to ' b \ Black V is too plain; again White would jump to 'b'. In both cases White would have been let off the hook. Dia. 1 (The actual game)
See the next page. Black 1 is the same old cap. With his path to the centre obstructed White is in an intolerable situation. Dia. 2 (Dangerous)
If White chooses to run away at 1, Black uses the knight's move follow-up to place White in a position of virtual capture.
- 3 0 -

Dia. 1
Dia. 2
Returning to Dia. 1, White is forced to opt for a quick life, even though this means reinforcing Black's territory at 7. In addition Black obtains a solid wall, on the basis of which he can make a large framework with 9. From now on this game will be easy for Black.
This example illustrates a common facet of the attacking cap, namely its use in buiding up a territorial framework.
- 3 1 -

Example 6 Example 6 Black to play
This last example is an easy one. White has just played a cap at A in order to erase Black's framework. This looks like a good move, but whether it is or not depends on how Black answers.
Should he do what the proverb tells him and answer a cap with a knight's move? Or should he counterattack, and if so, how? Naturally you must take Black's thickness roundabout into account. Dia. 1 (Feeble)
Answering with the knight's move 1 is too feeble. After going to the trouble of playing • Black makes no use of it and lets White escape with 2. Black 1 at 'a' is the same.
After the moves in the diagram White can peep at 'b' or attack at 'c' to torment Black to his heart's content.
- 3 2 -
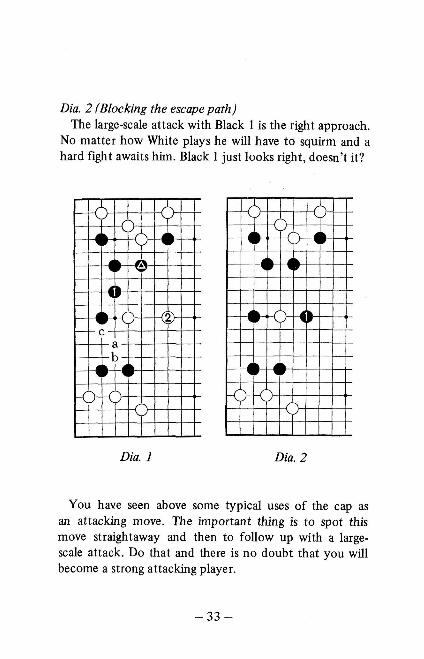
Dia. 2 (Blocking the escape path) The large-scale attack with Black 1 is the right approach.
No matter how White plays he will have to squirm and a hard fight awaits him. Black 1 just looks right, doesn't it?
Dia. 1 Dia. 2
You have seen above some typical uses of the cap as an attacking move. The important thing is to spot this move straightaway and then to follow up with a large-scale attack. Do that and there is no doubt that you will become a strong attacking player.
- 3 3 -

4. THE KNIGHT'S MOVE "Chase with the knight's move, but jump straight
out to escape." So runs the proverb, and in fact like the cap, the knight's move is one of the most widely used attacking techniques.
Whereas the purpose of the cap is primarily to prevent the opponent from getting out to the centre, the subsequent moves depending on whether (and how) the opponent runs away or whether he chooses some other way, the main purpose of the knight's move is to drive the opponent in a certain direction.
Take for instance Example 1. Black 1 is a cap. By playing this way Black gives White the choice of coming out at 'a' or 'b ' and will decide his next move only when he sees which course White adopts. Black 1 is the best move in this case.
Example 2 How about the knight's
move, Black 1? White attaches at 2 and escapes easily. Herein lies the difference between the cap and the knight's move.
Well then, you may ask, in what sort of position does the knight's move work? Example 1
- 3 4 -

Example 2 Example 3 First of all you must have some supporting thickness
in the direction in which your knight's move is chasing the opponent (on the lower edge in Example 2). It is obviously going to be unpleasant for someone to run straight into a brick wall.
Secondly the knight's move itself should help to expand a territorial framework. In Example 2 Black has no room to make a framework on the upper edge because of the white stones A . If these white stones were not there and Black had a stone at 'a', Black 1 would be a good move.
You do not need to satisfy both these conditions in order to attack with the knight's move, but you must satisfy at least one. Example 3 Black to play
White has just invaded at A . How do you attack this stone?
- 3 5 -

Dia. 1 Dia. 2 Dia. 1 (Towards thickness)
First Black interposes the forcing moves 1 and 3 (White has to answer) and then chases White with the knight's move 5. This is the right answer. Black 1 and 3 seal off the escape route at the top and the white stone is virtually captured. The important point to grasp is that, with the knight's move 5, Black is chasing White toward his thickness. Dia. 2 (No attack)
Black 1 occupies a good point, but it does not attack White. White can jump out in step with 2 and 4, and far from attacking White, Black has to play at 'a' to make his own group safe. Even though Black can expect something from his framework at the bottom, this sequence is clearly inferior to that of Dia. 1.
- 3 6 -

Example 4 Dia. 1
Example 4 Black to play The knight's move is of wide application and works in
many kinds of positions. The position here occurs frequently and if you know how to attack the two white stones you are probably around 1 to 3-kyu at least. The problem is, do you attack from above or from the side? Dia. 1 (No follow-up)
The first thing most people would think of would be to block White's route to the centre with Black 1. This, however, lets White make good shape with 2, leaving Black with no follow up. A more severe attack is required.
- 3 7 -

Dia. 2 Dia. 3 Dia. 2 (Attacking from the side)
The knight's move from the side, Black 1, is the most severe attack. It is just the right move. Dia. 3 (Early profit)
White may jump out to 2, but then Black can cut at the waist with 3 and White has no reply. Black can also keep 3 in reserve and attack on a larger scale with 'a'.
Dia. 4 Dia. 5
Dia. 4 (A fight) White therefore would resist by defending at 2 before
jumping out to 4. This is his strongest reply and a fight begins.
- 3 8 -

Dia. 5 (White destroyed) Pushing on at Black 5 is the right continuation. After
White 6 Black can push on even further to 9 before pressing at 11. White has no route to the centre and no room to squirm around on the edge;he is destroyed.
Depending on the position over the rest of the board, Black might also be able to push on yet further by playing 11 at 'a'. At any rate the effect of the knight's move Black 1 in Dia. 2 is quite evident.
Example 5
Example 5 Black to play How should you attack White's two-stone group on the
right? If you have followed the explanations up to now, you will find this easy. You should start by forcing White up against the thickness • .
- 3 9 -

Dia. 1 Dia. 2 Dia. 1 (Two knight's moves)
Of course. The knight's move is the right answer. Even if White runs away to 2, Black can press nicely with another knight's move, Black 3. Dia. 2 (White just helps Black)
If White answers by pushing out with 2 and so on, Black can simply extend with 3 and 5. Black is always one step ahead and his thickness is becoming imposing, which means he can expect a large framework on the lower right-hand side. Black 7 could also be at 'a' to start a fight. Dia. 3 (The cap fails)
The cap at Black 1 fails because it lets White escape in good shape with 2 and 4. Even if Black attacks at 5, White
Dia. 3
- 4 0 -

makes a bamboo joint with 6, which does not do the capping stone any good. Moreover, the thickness stones A are not being used and Black cannot expect much of a framework in the lower right-hand corner either.
Lots of players get confused about whether to attack with a cap or with a knight's move. You will not go far wrong if you just remember that two conditions are necessary for attacking with the knight's move: 1. You must be able to drive your opponent toward your own thickness; 2. You must be able to expect a territorial framework behind the knight's move. And in many cases the knight's move is effective when just one of these conditions is fulfilled.
Example 6
Example 6 Black to play How to attack A ? Knight's move or cap?
- 4 1 -

Dia. 1 (The cap fails) Let us try attacking with the cap Black 1. White will
push through the gap at 2. Black's next move, chasing with the knight's move 3, looks good, but when White pushes along at 4 it is the stone • that is actually under attack. This is obviously a failure for Black. Black 3 at 'a' instead is met by White 'b', again causing the attack to run out of steam.
Dia. 1 Dia. 2 (Correct)
The knight's move. This move fulfils one of the conditions mentioned on the previous page, namely driving toward thickness. If White tries to escape with 2 and 4, Black will play the hane and connection 3 and 5 and continue to attack by driving White up against his thickness.
Dia. 2
- 4 2 -

In this position Black has no prospects of a territorial framework behind the knight's move 1, but it is still a good illustration of the effective use of this technique of attacking.
Example 7 Example 7 Black to play
Where is the strategic point that controls the entire board?
If you consider the two conditions necessary for a knight's move, the one about driving towards thickness does not seem to apply here. This example is all about expanding your own territorial framework by attacking with the knight's move.
The centre of attention is clearly the bottom right-hand corner. You have virtually been given the answer.
- 4 3 -

Dia. 1 Dia. 1 (Missing the vital point)
A move by Black at a big point, say 1, is good in itself, but it cedes the initiative to White. By playing 2 and 4, White not only makes his group safe but also makes severe inroads into Black's framework. Dia. 2 (Strategic point)
Black 1, attacking with the knight's move, is the strategic point controlling the whole board. If White opts for safety with 2, Black can continue the chase with another knight's move 3. With this the whole of the lower left quarter of the board suddenly looks like Black territory and White seems to have been playing on neutral points. The difference from Dia. 1 is enormous.
This Black 1 is a good example of the knight's move being used not as a severe, killing-type move, but as a means of establishing a superior position while attacking.
- 4 4 -

Example 8 Black to play This is again taken from
one of my games. You are asked to attack the white two-space extension on the left, but you must also take into account the framework at the bottom and the shape of the black stones at the top.
Dia. 2
Example 8
- 4 5 -

Dia.l Dia. 1 (The actual game)
I felt that attacking gently with Black 1 was the right move, aiming naturally both at attacking and at expanding my framework. White has to defend with 2. Black 3 and 5 are then timely forcing moves preventing White from making good shape with 'a'.
Black 7 and so on settle the situation in sente before returning to 13 to complete the attack. White has no way into the centre and is forced to live on the left side. The cap at 'b ' instead of Black 13 allows White to play 'c' and does not stop him from getting into the centre; this is a failure.
White later attached at 'd' and eked out a small life, but at the inevitable expense of strengthening Black on the outside. The attack with Black 1 proved to be a great success.
- 4 6 -

Dia. 2(80%) The cap at Black 1 is another move that will occur
immediately to strong players. However, it has the drawback that after 2 and 4 White has not been properly stopped. Even though White will still answer at 6, this is not as good as Dia. 1.
Dia. 3 (The route to the centre is still open) Black may strike at White's shoulder with 1 and then
attach at 3. To be sure this is a standard technique for sealing a group in, but after White connects at 6 a weakness remains at 'a', so that White can easily get out into the centre.
Dia. 2 Dia. 3
- 4 7 -

5. ROUNDABOUT AND SPLITTING ATTACKS
No matter how much you attack a lone weak group it may still live — recall the proverb: 'Big groups never die' — and you may even overstretch yourself and find one of your own groups in danger, an experience shared by all of us. But when your opponent has two or more weak groups, an attack will most certainly pay off.
There are two ways of attacking two or more weak groups: the roundabout attack and the splitting attack. There is not much difference between them but, if a distinction has to be made, it can be said that the roundabout manoeuvre is used not only for attacking, but also for securing life and to form territorial frameworks. In addition, whereas the splitting manoeuvre is used to keep two weak groups under simultaneous attack, the aim of
the roundabout manoeuvre, when used for attack, is to create a diversion against one group in order to be able to attack another. This can best be explained by an example. Example 1 Black to play
This is a pattern that occurs frequently in handicap games. White has just invaded at 1, Black has attacked with 2 and 4 and White has come out at 5. What is the best way to attack the three white
Example 1 stones?
- 4 8 -

Dia. 1 Dia. 2 Dia. 1 (The diversion)
The essential point is for Black to set up a diversion at 1. If White plays hane at 2, Black extends to 3. Dia. 2 (The attack pays off)
If White next pushes out to 4, Black also pushes at 5 and if then White chooses to escape with 6, Black will be happy to play 9 in compensation. If White plays 6 at 9, Black will push at 'a' and then 6 and 'b' are excellent alternatives for him. Dia. 3 (Roundabout manoeuvre I)
If White, in place of the last diagram, first exchanges 1 for 2 and then turns at 3, Black 4 is the vital point to set up a roundabout attack.
Dia. 3
- 4 9 -

Dia. 4 (Roundabout manoeuvre II) Since the atari at 6 is no good for White, 5 is his only
move. In line with the advice of the proverb never to sacrifice a stone by itself, Black adds a stone at 6 and then with 8 develops his roundabout attack. After Black 12 the four white stones are well and truly captured.
There is a distinctive flexibility about roundabout attacks; if the opponent answers the diversion directly you can make a great profit against the main force, but if he leads his main force away, as in Dia. 2, sufficient compensation can be gained at the point of the diversion.
In contrast the splitting attack has a more positive approach than the roundabout attack. Since the actual moves that separate the opponent's weak groups usually join in the attack, they pile on the agony for the player defending.
Dia. 4 Example 2
This example will show how severe a splitting attack can be. White has several thin groups: one in the top right corner, the three stones on the top edge, and the two-space extension on the right. He has just played A to save his weakest group. A large-scale splitting attack by Black will now begin.
- 5 0 -

Example 2
Dia. 1 (The actual game I) Pushing up at Black 1, 3
and 5 is good. After White 6 Black 7 is the vital point, catching White in a three-way splitting attack.
White 8 defends the cutting point, and with 10 White manages to get out into the centre. However...
Dia. 1
- 5 1 -

Dia. 2 (The actual game II) Black jumps to 11, now
attacking the two-space extension on the right. White 12 is inevitable; White would like to reinforce his groups at the top, but if he lets Black play around 'a', the two-stone group on the right will be doomed. Black 13 and so on pick up profit on the way, and then Black continues the attack with 19.
Dia. 2
Dia. 3
- 5 2 -

Dia. 4 Dia. 3 (The actual game III)
After White 20 Black attacks the three-stone group with 21, continuing the chase with 23 and 25. The white groups in the centre are thin and so White reinforces one in sente with 26 and 28 before helping the other with 30. Nevertheless, Black still has designs on the large centre group. Dia. 4 (The actual game IVj
Black's peep at 33 is the vital point. If White 34 connects at 38- instead, Black can still force at 35 before pushing to 41. Even so, White 34 does not relieve the pressure and as the encircling net draws tighter with Black 35 and 37, the white group is only thrashing about. After Black 45 White resigned.
This is a good example of a case when an attack on just one weak group would not have been very effective, but because there were two or more weak groups one could be captured. Let us look at some more examples.
- 5 3 -

Example 3
Example 3 Black to play If a group can be captured it is obviously sensible to
set out and capture it, but if you rush into this without thinking of the consequences you can become unstuck. Never forget the other player — he has his own ideas too.
Here you will notice immediately that the white group at the top is not alive. Consider first of all whether it is wise to try to capture this group directly. If you can see that it cannot in fact be captured by simple means, try a roundabout manoeuvre.
- 5 4 -

Dia. 1 Dia. 1 (Not captured)
If Black 1 and 3 could capture this group the matter would be over. However, there is danger from White's counterattack with 4 and 6 if Black continues in his bid to capture by connecting at 7. This lets White play at 8, which cuts Black in two, leaving him no way to save the situation.
Black's connection at 8 instead of 7 is better but still a failure because White can cut at 7 and live.
Returning to Black 1, it should be noted that if this move is withheld as a threat, plays around 'a' will be forcing moves for Black. It should be possible to exploit this fact.
Dia. 2 Dia. 2 (80%)
What about Black 1? It aims at the contact play 5, but it lacks something. After White lives with 2 and 4, Black 5 does not suppress the vitality of A completely. For a roundabout attack this is not good enough.
- 5 5 -

Dia. 3 (Correct) Going one point further to Black 1 is correct. If White
resists with 2 and 4, Black replies at 3 and 5 and after White 6 Black can capture with 7. Black can now connect at 13 without worrying about White's cut at 'a'. This is all because of the roundabout attack at 1.
If White plays 12 at 'b', then Black 'c' and White 'd' give a ko, but Black gets first chance to take the ko at 12; White has no ko threats and so loses.
Dia. 3 Dia. 4 (Trade)
Consequently White has to make the best of a bad job by trading life with 2 and 4 for Black 5, which strangles the lone white stone. The roundabout attack has been a great success. If you compare this with Dia. 2 I am sure you will agree Black is better off here.
Dia. 4
- 5 6 -

Example 4
Example 4 Black to play This is the continuation of the position on page 19.
The problem is, how do you start a splitting attack against the single white stone and the group above it on the right? You have to separate White and keep him from connecting, but remember that his shape has a certain amount of flexibility. You should also try to make thickness while attacking.
- 5 7 -

Dia. 1 (Failure) Simple separation at 1 is the usual idea, but White can
defend at 2 and not much more can be done. After this, even if Black attacks at 'a', White can jump to 'b ' and the attack seems mild. In addition, even though Black V instead of 1 looks severe, it too is dubious; White 'd', Black 'e', White 2 again and White gets a comfortable position on the lower edge. Let us try some other move.
Dia. 1 Dia. 2 (The shoulder)
It is correct to start with the shoulder attack Black 1. It gives A no scope and is therefore very severe. If White pushes up at 2 and answers Black's block at 3 with the cut at 4 to start a fight, Black blocks again at 5, and then with 7 and 9 leaves himself with the splendid alternatives 'a' and 'b'. White is destroyed.
Dia. 2
- 5 8 -

Dia. 3 Dia. 3 (The actual game I)
In the game White answered Black 1 at 2. The aim of this move is to avoid giving Black extra strength.
It is the best reply, but Black 3 keeps up the attack. It should be clear that because of the forcing move 1, White is unable to connect his groups.
Dia. 4 Dia. 4 (The actual game II)
If White plays 1 at 2, Black will extend to 'a', which will affect the large group above. Consequently White played 1 to sound out Black's response, which was a decisive one at 2 and 4. Black 6 takes away White's eye shape and Black's peep at 8 makes the attack very onesided.
- 5 9 -

Example 5 Example 5 Black to play
The game shown in Dia. 4 on the previous page developed like this. Black's one-sided attack is just about to sound the death knell for White.
You are to win the game with one decisive blow. Obviously you will be aiming at the large white group extending from bottom right to the centre, but depending on White's answer, you should also be prepared to accept profit on the upper side instead.
Moves such as Black 'a', emphasising territory, are no good. White will defend at 'b ' , making the large group safe and tilting the game his way. Dia. 1 (Breaking into the upper side)
In the game Black separated White with 1. White unfortunately could not resist by attaching at 'a', lest Black should answer at 2. The big group in the centre would then not be able to hold out.
- 6 0 -

Dia. 1 White has little choice but to run away at 2, so Black
creates a diversion with the crosscut 3 and 5 to set up a roundabout attack. If White 6 at 9, Black plunges into the top area with the atari at 'b', while White 6 at 'b ' creates problems for White, as Black gives atari at 9. Black 9 leaves White no escape. The attack has been a great success.
Dia. 2 Dia. 2 (Another way)
Black 1 in Dia. 1 was not the only correct answer; this Black 1 is possible too. Again White cannot resist with 'a' (for fear of Black 'b') and since he has to run away at, say, 2, Black 3 and 5 set up the roundabout attack once more. Note that if White 2 is at 'c', Black's peep at 'd' will work.
- 6 1 -

Dia. 3 Dia. 3 (Other possibilities)
Apart from the moves in Dias. 1 and 2, moves such as 'a' or 'b' can also be considered, because White, lumbered with a weak group, cannot resist very strongly. If he defends his centre group, Black can play against A more directly than in Dias. 1 and 2 and perhaps more severely. This is a good example of a roundabout attack.
Dia. 4 Dia. 4 (Dubious)
Black 1, however, though it may be a roundabout attack, is dubious, because it invites White 2. The drawback is that this reinforces White. It should go without saying that even with a roundabout attack you have to find a move appropriate to the situation.
- 6 2 -

Dia. 6 Example Black to play
This is a fairly difficult example, but try at least to grasp the way such problems are approached.
Clearly the target is the group on the lower edge. Inasmuch as it has a connection above and the contact play at 'a' to aim at, this group is not very attackable. Yet by initiating a roundabout attack against the group at the top to determine White's response, a means may be found to attack the lower edge.
- 6 3 -

Dia. 1 (Roundabout attack) Black should start at 1. It may be hard to see how this
will have any effect on the white group below, but this is a characteristic roundabout attack. Playing elsewhere and letting Black strike at 'a' is bad for White, so he must answer. How he should answer is a difficult matter. If his reply is White 'b', Black 'a' makes good shape, and if it is White V, Black has been given a free forcing move. If it is White 'a', Black has various potentially useful threats such as the block at 'd'.
Dia. 2 Dia. 2 (Connection ?)
In the actual game, reluctant to let Black 1 become a forcing move, White counterattacked with 2. The sequence from Black 3 to 9 then went as might be expected.
- 6 4 -
Dia. 1

It looks as if White is going to connect in the centre but, because of the next move by Black, this is not so.
Dia. 3
Dia. 3 (Decisive move) Black 1 is a thunderbolt. If White now plays 'a', Black
cuts at 5 and, because of the unfavourable ladder, White is scuppered. If White plays at 5 a similar result is obtained when Black answers at 'a'.
Given that he has no move around here, White has to think of making two eyes for his group below with 2, but Black 3 is a forcing move, 5 blocks, and the roundabout attack has paid off. White 6 to Black 9 did not secure life, so White then resigned.
- 6 5 -

Example 7 Example 7 Black to play
One of the most important things in the middle game is to know what you can aim at. Where, for instance, are the weak points of White's group on the centre right here? One powerful way of playing would be to chase this group at 'a', forcing White 'b', in order to trap the single white stone in the corner in a roundabout attack. However, I chose to play against this single stone first and to aim at the large group later. Dia. 1 (Aiming at Black 7)
I started with the shoulder attack Black 1. After Black 3, if White plays 'a' Black naturally cuts at 'b'. Also, if White cuts at 5, Black 'a' is sufficient. That leaves White 4. Then when White peeped at 6, I was able to defend the cutting point with 7. This move is also a vigorous
- 6 6 -

attack on the large group. That was what I had secretly been hoping for.
Dia. 1 It might as well as be said straightaway that White 8
was the losing move; it completely justified Black 7. Dia. 2 (Separation and capture)
White 10 is probably an unavoidable answer to Black's peep 9, but then Black 11 is a killer blow, separating White's stones and capturing the seven on the right. No matter whether White plays atari from above or below, he cannot connect both sides at once. Clearly Black's attack has been a great success.
Dia. 2
- 6 7 -

Example 8 Example 8 Black to play
This game is approaching its climax. What is the decisive play to tackle the handful of white stones on the right?
There are two or three possibilities for the next move, yet it is really a question of deciding intuitively whether it is better to capture the two white stones or the three-stone group. Your reading ability will obviously be important too.
The extension to 'a' or the hane at 'b' are by no means bad, but there is a way of capturing the three-stone group through a roundabout attack starting with a diversion against the two stones A.
- 6 8 -

Dia. 1 (Decisive move) Black 1 is the nose tesuji. It is a decisive move. If White
plays hane inside at 2, Black can cut at 3. This is a great success for Black, because White dares not try anything with his two stones in the centre. Dia. 2 (Second decisive move)
In the game White played hane on the outside at 2. Of course there was a reply to this — Black 3, the second decisive move.
Dia. 1 Dia. 2
- 6 9 -