
The centre attack - World Draughts Federation
46
203 In section 4 we reviewed the right wing attack. In this section we will look at some other attacking systems. We begin by looking at the centre attack, with an outpost at <23> (see diagram). After having studied how such an attack should be played we look at the chances when playing against a centre attack. When attacking with an outpost at <22> we have both the classical attack (the opponent has <23> in possession) and the Highland attack (the opponent has no piece at <23>. In a Roozenburg attack the outpost at <24> is combined with a piece at <27> while the opponent occupies <23>. An even more complex situation is the Partie Bonnard. Sometimes the threat of taking a Roozenburg attack is met by a counter attack, the so-called Springer counter attack. This can lead to a centre attack. The systems in this section are pretty complex. After having introduced these systems you probably will need both experience and more game studying to really come to master them. 1. The centre attack 2. Playing against a centre attack 3. The classical attack 4. The Highland attack 5. Playing against a Highland attack 6. Roozenburg 7. Partie Bonnard 8. Springer counter attack
-
Upload
khangminh22 -
Category
Documents
-
view
3 -
download
0
Transcript of The centre attack - World Draughts Federation

203
In section 4 we reviewed the right wing attack. In this section we will look at some other attacking systems. We begin by looking at the centre attack, with an outpost at <23> (see diagram). After having studied how such an attack should be played we look at the chances when playing against a centre attack. When attacking with an outpost at <22> we have both the classical attack (the opponent has <23> in possession) and the Highland attack (the opponent has no piece at <23>. In a Roozenburg attack the outpost at <24> is combined with a piece at <27> while the opponent occupies <23>. An even more complex situation is the Partie Bonnard. Sometimes the threat of taking a Roozenburg attack is met by a counter attack, the so-called Springer counter attack. This can lead to a centre attack. The systems in this section are pretty complex. After having introduced these systems you probably will need both experience and more game studying to really come to master them.
1. The centre attack 2. Playing against a centre attack 3. The classical attack 4. The Highland attack 5. Playing against a Highland attack 6. Roozenburg 7. Partie Bonnard 8. Springer counter attack

204
1.The centre attack
A. Domchev – Valuzhis Black is trailing 3 temps in development. He should play 35… 18 – 23 with a good closed classical position. He probably feared the 36.27 – 22 move but after this move black can play a brilliant sacrifice: 36… 24 – 30!! 37.34 x 25 12 – 17! (threatening 26 – 31 followed by 15 – 20 and 17 x 48 +. 38.22 – 18 13 x 22 creates a new threat: 22 – 27 B+. In the game black allowed his opponent to launch a centre attack, breaking the classical structure.
35… 4 – 9? 36.28 – 23! 19 x 28 37.32 x 23 18 x 29
38.34 x 23 38… 13 – 19 39.23 x 14 9 x 20 is bad because the inactive piece at 15. After 38… 9 – 14 39.37 – 32 Threatening 23 – 18 32 – 27 33 – 29 39 x 6 W+. 39… 11 – 16 40.33 – 29 24 x 33 41.39 x 28 white has a good attack.
38… 13 – 18?
Exercise 1.1 How did white now win with a shot?
L. Sekongo – A. Chizhov Wch 1996
1.33 – 29 17 – 22 2.39 – 33 11 – 17 3.44 – 39 6 – 11 4.50 – 44 1 – 6
5.31 – 26 16 – 21
The start of the fascinating Keller – opening.
6.32 – 28 19 – 23 7.28 x 19 14 x 23 8.35 – 30 10 – 14
The Keller opening usually is continued 9.30 – 24 and black chooses from 9… 21 – 27, 9… 23 – 28 and 9… 5 – 10.
9.40 – 35 14 – 19 10.37 – 32
This poor move gives black the opportunity to change and build a strong centre. Black gains one temp.
10… 21 – 27
11.32 x 21 22 – 28 12.33 x 22 18 x 16 13.29 x 18 12 x 23 14.41 – 37 7 – 12
Black starts building a central pyramid. Changing the piece at 25 will give black 4 more temps, changing the Dirod to - 5. Black will thus be 5 temps ahead in development.
15.46 – 41 13 – 18 16.30 – 25 8 – 13 17.25 x 14 9 x 20 18.37 – 32 5 – 10
19.41 – 37 10 – 14 20.44 – 40 4 – 9 21.47 – 41 2 – 8 22.39 – 33

205
22… 23 – 28!
Black built the central pyramid. The next step is to launch the attack. Because of 21.47 – 41 white can’t exchange the outpost easily.
23.33 x 22 17 x 28 24.32 x 23 19 x 28 25.38 – 32 13 – 19 26.32 x 23 19 x 28 27.35 – 30 18 – 23 28.43 – 38 14 – 19
Now black reinforces the attack by building a strong centre behind the outpost. Notice that black puts many pieces in the 11 – 20 zone.
29.30 – 25 9 – 14 30.37 – 31 11 – 17 31.41 – 37 8 – 13 32.49 – 44 12 – 18 33.44 – 39 20 – 24 34.40 – 35 6 – 11 35.45 – 40 3 – 8 36.34 – 30 8 – 12
Black built a compact position, both controlling 23 and 24. Squares 11 until 19 are all occupied. The next step is getting control over square 27. Dirod is still – 5.
37.40 – 34 16 – 21 38.39 – 33 28 x 39 39.34 x 43 21 – 27 40.31 x 22 18 x 27
Black took all strategic squares. The outpost can be defended horizontally.
41.37 – 32 11 – 16 42.32 x 21 16 x 27 43.42 – 37 23 – 28 44.43 – 39 13 – 18 45.39 – 34 18 – 23 46.37 – 31 17 – 22
Black’s position is superior. He has all strategic squares + <28>. Dirod is still – 5.
47.38 – 32 28 x 37 48.31 x 42 15 – 20 49.42 – 38 24 – 29 50.38 – 32 27 x 38 51.26 – 21 29 x 40 52.35 x 44 23 – 28 53.36 – 31 28 – 32 54.44 – 39 22 – 28 55.31 – 26 38 – 42 56.48 x 37 32 x 41 57.21 – 17 12 x 21 58.26 x 17 41 – 46
White surrendered.
We can summarize black’s strategy as follows:
A. Chzizhov – A. Verchovich Russian championship 1990
1.33 – 29 17 – 22 2.39 – 33 11 – 17 3.44 – 39 6 – 11 4.50 – 44 1 – 6
5.31 – 26 5… 16 – 21 leads to the Keller opening, but black chooses another continuation. 5… 20 – 25 6.35 – 30 19 – 23
7.32 – 28 23 x 32 8.37 x 28 13 – 19 9.36 – 31 9 – 13 10.40 – 35 3 – 9 11.44 – 40 19 – 23 12.28 x 19 14 x 23
White centralizes his pieces, getting ready for an attack. The 41 / 37 / 32 tail is built.
Step 1: Building a strong centre position Step 2: Taking an outpost Step 3: Reinforcing the centre behind the outpost Step 4: Conquering strategic squares Step 5: Finishing off the game

206
13.31 – 27 22 x 31 14.26 x 37 10 – 14 15.37 – 32 17 – 22 16.41 – 37 16 – 21
17.46 – 41 21 – 26
White makes a couple of exchanges getting an outpost at 23. White plays 20.29 – 23 immediately, giving black no time to block the centre-attack by 14 – 19.
18.32 – 28 23 x 32 19.37 x 17 11 x 22 20.29 – 23 18 x 29 21.34 x 23 25 x 34 22.40 x 29 13 – 19 23.41 – 37 19 x 28 24.38 – 32 9 – 13 25.32 x 23 4 – 10
25… 13 – 18 26.35 – 30 4 – 9 27.30 – 24 preventing 9 – 13 gives white a promising attack. Therefore black decides to change the outpost in a few moves and for that matter he builds the 5 / 10 / 14 tail.
26.35 – 30 13 – 19 27.43 – 38 19 x 28 28.38 – 32 8 – 13 29.32 x 23 13 – 19
30.42 – 38 19 x 28 31.38 – 32 2 – 8 32.32 x 23 14 – 19 33.23 x 14 10 x 19
Piece 23 is gone. White wants to take square 24 now in order to keep attacking.
34.45 – 40! 5 – 10 35.40 – 35 12 – 18 36.30 – 24 19 x 30 37.35 x 24 10 – 14
White has got his outpost at <24>. He invented a smart way to get centre square 28.
38.49 – 44! 8 – 13 39.33 – 28! 22 x 33
40.39 x 28
A brilliant move! White uses tactics to get control over the centre. Black can’t attack the outpost by 14 – 19. Exercise 1.2 How does white win after 40… 14 – 19?
40… 7 – 12 41.28 – 23! 6 – 11 42.44 – 39 18 – 22 43.39 – 34 13 – 18

207
White has a good attacking position, but doesn’t control all strategic squares. Therefore he must still battle to win the game.
44.34 – 30 22 – 27 45.30 – 25 11 – 17 46.48 – 42 17 – 22 47.37 – 32 27 x 38
48.42 x 33 22 – 27
White transported a piece to <25> in order to breakthrough with a sacrifice. Piece 47 is a strong defender of the other wing.
49.25 – 20! 14 x 25 50.23 – 19 12 – 17 51.19 – 14 17 – 22
White can’t go on to king by 52.14 – 9 because of 18 – 23 B+. After changing back there is no defence left for black.
52.33 – 28 22 x 33 53.29 x 38 25 – 30 54.24 x 35 15 – 20 55.14 x 25 26 – 31 56.25 – 20 31 – 37 57.38 – 33 27 – 31 58.20 – 14 31 – 36 59.14 – 10 37 – 42
60.47 x 38 36 – 41 61.10 – 4
Black surrendered.
G. Berends – G. Kolk
Black started a strong centre attack.
22… 23 – 28! 23.33 x 22 17 x 28 24.34 – 30 18 – 23 25.38 – 32 13 – 18 26.41 – 36 9 – 13 27.43 – 38 4 – 9
White controls <27>. Black has <23> and <24> in possession. Black’s central pyramid supports his central outpost.
28.38 – 33 12 – 17 Black could have played a strong pseudo sacrifice: 28… 11 – 16! 29.33 x 22 16 – 21 30.27 x 16 18 x 38 31.42 x 33 23 – 29! White can’t play 33 – 28 because of a coup Philippe. This means black gets a very strong outpost at <38>.
29.33 x 22 17 x 28 30.49 – 43 7 – 12 31.43 – 38 2 – 7 32.40 – 34 11 – 17

208
33.38 – 33 17 – 21! 34.27 x 16 3 – 8 35.33 x 22 18 x 38 36.42 x 33 13 – 18
Black uses a similar idea to reach <38>!
37.36 – 31 23 – 29 38.34 x 23 18 x 38 39.31 – 27 12 – 17 40.37 – 32 17 – 21 41.32 x 43 21 x 32 42.45 – 40 9 – 13 43.40 – 34 8 – 12 44.43 – 38 32 x 43 45.39 x 48 13 – 18
Black has complete control over the centre. Piece 15 is not bad in a situation with many pieces at white’s right wing. The game shows why.
46.47 – 42 18 – 23 47.42 – 38 15 – 20!
Threatening to gain a piece by 24 – 29 followed by 20 – 24. White is obliged to go to 33 after which black calculated that the 2 x 2 change results in a winning endgame.
48.38 – 33 23 – 28! 49.33 x 22 24 – 29 50.34 x 23 19 x 17 51.48 – 43 18 – 23 52.39 – 33 17 – 22 53.33 – 29 23 x 34
54.30 x 39 22 – 28
Black wins the endgame in a charming way.
55.35 – 30 28 – 32 56.39 – 33 32 – 37
57.33 – 28 57.33 – 29 37 – 42 58.30 – 24 42 – 48 59.24 x 15 48 – 37 60.29 – 24 14 – 20 61.25 x 14 37 x 5 B+.
57… 37 – 42! 58.28 – 23 42 – 48!
White can’t play 23 – 19.
59.23 – 18 48 – 26 60.18 – 13 26 – 3!
61.13 – 9 is followed by 14 – 19 25 x 23 3 x 18 B+. White surrendered.
R. Smedinga – P. Leijenaar

209
White has strong formations in the centre and occupies <27>, <28> and <29>. Black has no active formations, nor does he possess any strategic square. White can finish the job with a centre attack, but he needs to be patient. If white attacks immediately by 1.28 – 23? 19 x 28 2.32 x 23 black still has a defence left: 13 – 19! 3.38 – 32 19 x 28 4.32 x 23 and now: 1) 4… 16 – 21? 5.27 x 16 18 – 22 6.16 – 11 22 – 27 7.11 – 6 27 – 31 8.23 – 19! 14 x 34 9.6 – 1 31 x 42 10.1 x 47 W+ 2) 4… 14 – 20! 5.44 – 39 16 – 21 6.27 x 16 18 – 22 7.16 – 11 22 – 27 8.11 – 6 27 – 31 and black will escape with a draw.
1.44 – 39! 14 – 20 2.28 – 23! 19 x 28
3.32 x 23
And now black is without a serious defence.
H. Wiersma – A. Gantwarg Wch match 1979
10… 11 – 17!
In this game black performs an important plan, by sacrificing a piece after white attacks piece 28 by 38 – 33.
11.38 – 33 17 – 21 12.33 x 22 20 – 24 13.29 x 20 15 x 24 14.34 – 30 21 – 26
White’s space to play is minimized. He has to give back the piece at 22 sooner or later.
15.42 – 38 10 – 15 16.50 – 45 5 – 10 17.36 – 31 16 – 21 18.27 x 16 18 x 36
White gave back the piece but black has a better position now with a strong piece at <36>. He won the game after white had also missed a winning shot…
V. Doumesh – T. Tanchikuzhina
Exercise 1.3 White to move has a winning plan. Which two moves should she begin with?
S. Nagel – B. Post Exercise 1.4 White can perform a shot getting a king at <2>… Try to find it!

210
A. Schwarzman – E. Dul World championship 2003
Exercise 1.5 White took a great shot. Try to find it!
T. Goedemoed – O. Dijkstra
Exercise 1.6 White won a piece with a shot. How?
P. Jonkers – B. Baksoellah
Exercise 1.7 Black to move performed a shot, gaining a piece. How?
Harm Wiersma

211
2.Playing against a centre attack
A centre attack is not always good. Sometimes the opponent has a strategy to play against the attack.
R. Boomstra – R. Okoneshnikov
White has a sound centre attack, but underestimates the chances of his opponent. He can already play 30 – 24 18 – 22 39 – 34 13 – 19 24 x 13 8 x 28 38 – 32 =. White probably wasn’t satisfied with a draw.
33.45 – 40 11 – 17 34.40 – 35 17 – 22
White can still play 35.30 – 24 7 – 11 36.38 – 33 11 – 16 36… 13 – 19 37.24 x 13 8 x 28 38.36 – 31! followed by 31 – 27 yields a draw. 37.37 – 31! 26 x 37 38.42 x 31 13 – 19 38… 16 – 21? 39.31 – 26 21 – 27 40.23 – 19! 13 x 24 41.29 x 9 18 x 38 42.9 – 3 W+ 39.24 x 13 8 x 28 40.31 – 27 22 x 31 41.38 x 18 31 – 37 and white can defend the position, but still not really satisfying. The best move was 35.38 – 33! If black plays 13 – 19 white changes 37 – 31 followed by 31 – 27 with small advantage. If black plays 35… 7 – 11 36.37 – 31! 26 x 37 37.42 x 31 white has a good position: 1) 37… 11 – 16 38.31 – 27 22 x 31 39.36 x 27 taking all strategic squares. 2) 37… 11 – 17 38.30 – 24! 17 – 21 and as we saw before 31 – 26 followed by 24 – 19 is winning. 3) 37… 22 – 27 38.31 x 22 18 x 27 39.30 – 24 and white has a good attacking position.
35.30 – 25 7 – 11 36.35 – 30 11 – 16
Black gets more and more control over the position.
37.30 – 24 Black forced a kingshot now. Exercise 2.1 How did he do that?
A. Gantwarg – S. Winkel
White has a centre attack, but little space to play, due to black’s strong formations. White has no control over <27> and can’t go to <24> either: 30 – 24 13 – 19 24 x 13 8 x 28 38 – 32 14 – 20 32 x 23 20 – 24 loses a piece for white.
35.30 – 25 13 – 19
Black shouldn’t play 17 – 21 because of 29 – 24 18 x 20 33 – 28 22 x 31 36 x 9 14 x 3 25 x 14 W+. The 36.25 – 20 stick move fails to 14 x 25 37.23 x 14 15 – 20! B+
36.38 – 32 19 x 28 37.32 x 23 8 – 13 38.43 – 38 11 – 16
39.49 – 44?
A terrible mistake. White should have defended his position by playing 39.37 – 32 22 – 27 40.32 x 21 16 x 27 41.33 – 28. The timid

212
49 – 44? gives black absolute control over the left wing.
39… 17 – 21 40.44 – 40 21 – 27 41.38 – 32 27 x 38 42.33 x 42 16 – 21 43.40 – 35 13 – 19 44.42 – 38 19 x 28
45.38 – 32
45… 21 – 27 This continuation is very logical, but 45… 2 – 8 46.32 x 23 8 – 13 might be even better! 1) 47.47 – 42 13 – 19 48.42 – 38 19 x 28 49.35 – 30 21 – 27 50.38 – 33 14 – 19 51.30 – 24 19 x 30 52.25 x 34 15 – 20 53.34 – 30 20 – 25 54.30 – 24 27 – 31 55.36 x 27 22 x 42 56.33 x 13 42 – 48 57.39 – 33 48 – 31 +. 2) 47.39 – 33! 21 – 27 48.47 – 42 15 – 20 49.35 – 30 13 – 19 50.30 – 24 19 x 39 51.24 x 15 39 – 44 52.29 – 24 with a difficult endgame for white.
46.32 x 23 27 – 31 47.36 x 27 22 x 42 48.47 x 38 16 – 21 49.35 – 30 31 – 36 50.30 – 24 36 – 41
51.39 – 33 will bring white a draw: 41 – 47 52.23 – 19! 14 x 34 53.33 – 29 47 x 33 54.29 x 40 33 x 20 55.25 x 14 =.
51.39 – 34? 2 – 8
52.38 – 32 41 – 47? 52… 15 – 20! 53.24 x 15 41 – 47 was winning.
53.24 – 19! 47 x 13 54.25 – 20 18 x 40
55.20 x 7
Draw.
A. de Hoon – S. Winkel Black has a centre attack but in this case it is very weak. Why? Black controls 28 and 23, but has no control over 27 nor 24. If we take a closer look, black suffers from a lack in space. If black is to play, what should he play? The only possible move is 9 – 13. Playing piece 2, 4 or 14 is punished by 21 – 17 W+. If white succeeds in punishing 9 – 13, he will win. Exercise 2.2 What is the winning move for white?
F. Tiemensma – A. van Berkel
White missed the chance to force a tactical win exploiting the weaknesses at <13> and <18>. Exercise 2.3 Can you find the forcing?

213
B. Sjkitkin – A. Schwarzman
Exercise 2.4 How did black win after the played 26.29 – 24?
G. Valneris – A. Georgiev Wch barrage
29.28 – 23 19 x 28 30.32 x 23 15 – 20
31.44 – 40? White should have played 34 – 30 x 30 and after the 20 – 24 exchange the game would have been drawn.
31… 4 – 9! White’s position is blocked. He can’t play 40 – 35 20 – 24 B+1. White won’t get an extra outpost at 24. White lacks space to play.
32.43 – 38 10 – 15 33.49 – 43 17 – 21 34.50 – 45 9 – 13 35.47 – 41 11 – 17
White can’t make the 34 – 30 x 30 change, for black wins a piece by playing 13 – 19.
36.40 – 35 21 – 27
Now at 35 – 30 13 – 19 wins a piece for black. White needs the 29 / 34 / 40 tail to defend his central outpost.
37.45 – 40 17 – 21 38.37 – 32 21 – 26 39.32 x 21 26 x 17 40.35 – 30 17 – 21 41.30 – 24 21 – 27
White has finally reached <24> but still his position is blocked…
42.41 – 37 14 – 19 43.23 x 14 20 x 9 44. 40 – 35 2 – 8
Black won the game.
214
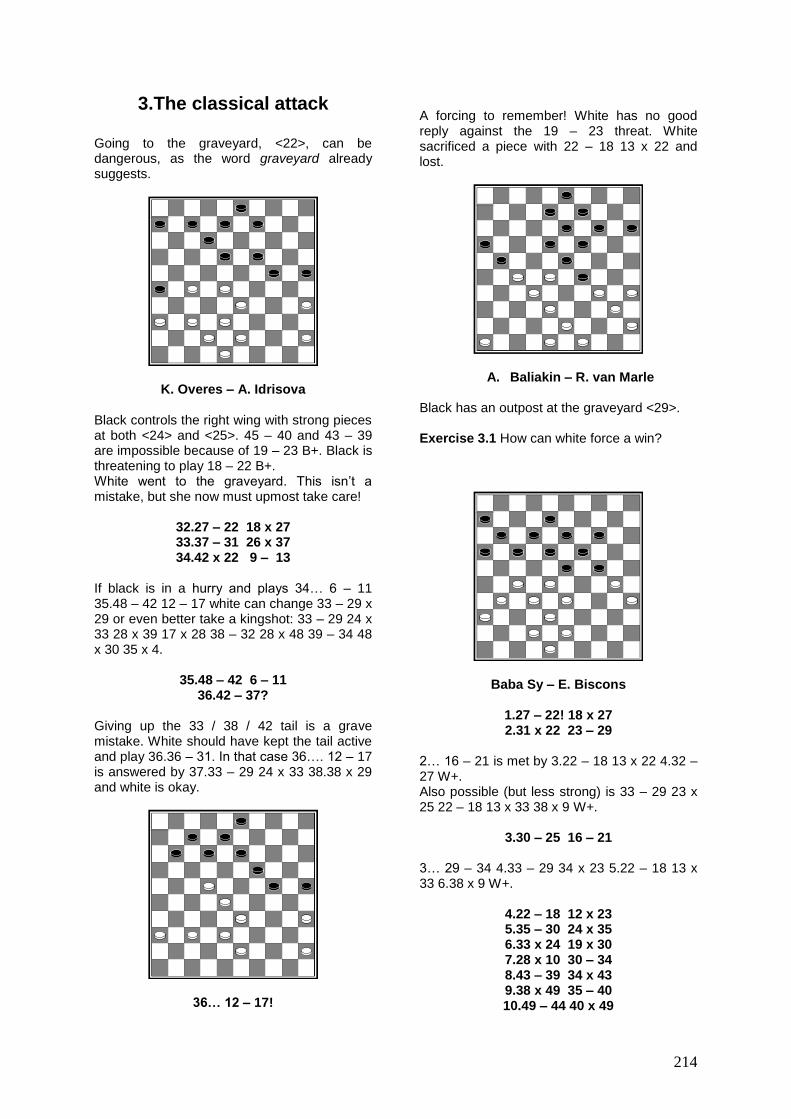
3.The classical attack
Going to the graveyard, <22>, can be dangerous, as the word graveyard already suggests.
K. Overes – A. Idrisova Black controls the right wing with strong pieces at both <24> and <25>. 45 – 40 and 43 – 39 are impossible because of 19 – 23 B+. Black is threatening to play 18 – 22 B+. White went to the graveyard. This isn’t a mistake, but she now must upmost take care!
32.27 – 22 18 x 27 33.37 – 31 26 x 37 34.42 x 22 9 – 13
If black is in a hurry and plays 34… 6 – 11 35.48 – 42 12 – 17 white can change 33 – 29 x 29 or even better take a kingshot: 33 – 29 24 x 33 28 x 39 17 x 28 38 – 32 28 x 48 39 – 34 48 x 30 35 x 4.
35.48 – 42 6 – 11 36.42 – 37?
Giving up the 33 / 38 / 42 tail is a grave mistake. White should have kept the tail active and play 36.36 – 31. In that case 36…. 12 – 17 is answered by 37.33 – 29 24 x 33 38.38 x 29 and white is okay.
36… 12 – 17!
A forcing to remember! White has no good reply against the 19 – 23 threat. White sacrificed a piece with 22 – 18 13 x 22 and lost.
A. Baliakin – R. van Marle
Black has an outpost at the graveyard <29>. Exercise 3.1 How can white force a win?
Baba Sy – E. Biscons
1.27 – 22! 18 x 27 2.31 x 22 23 – 29
2… 16 – 21 is met by 3.22 – 18 13 x 22 4.32 – 27 W+. Also possible (but less strong) is 33 – 29 23 x 25 22 – 18 13 x 33 38 x 9 W+.
3.30 – 25 16 – 21
3… 29 – 34 4.33 – 29 34 x 23 5.22 – 18 13 x 33 6.38 x 9 W+.
4.22 – 18 12 x 23 5.35 – 30 24 x 35 6.33 x 24 19 x 30 7.28 x 10 30 – 34 8.43 – 39 34 x 43 9.38 x 49 35 – 40 10.49 – 44 40 x 49

215
11.10 – 4 49 x 27 12.4 x 31
H. Jansen – J. Bastiaannet
White is going to take advantage of black’s weak right wing with a dangling piece at <7>.
25.33 – 28! 13 – 19 26.27 – 21! 16 x 27
27.31 x 22
The classical attack is very strong, because piece 22 can never be attacked, nor exchanged. 27… 8 – 13 28.34 – 30 3 – 8 29.30 – 25 leads to a hopeless position for black: 29… 17 – 21 30.26 x 17 12 x 21 is met by 31.22 – 18! 13 x 33 32.38 x 20 and piece 20 will go to <15> and break through by a 25 – 20 sacrifice. 29… 24 – 29 gives white the opportunity to make a kingshot. Exercise 3.2 Write down the kingshot for white!
27… 14 – 20 28.38 – 33 8 – 13
28… 9 – 13 29.43 – 38 3 – 9 30.48 – 43! leads to a very unpleasant position for black, for example 30… 20 – 25 31.33 – 29! 24 x 33 32.38 x 18 12 x 23 33.42 – 37 9 – 14 34.26 – 21 17 x 26 35.22 – 17 11 x 33 36.34 – 30 25 x 34 37.43 – 39 33 x 44 38.49 x 20 +
29.42 – 37! 20 – 25 30.36 – 31
Black still can’t play 12 – 18 now because of 43 – 38 18 x 36 34 – 29 23 x 34 37 – 31 36 x 27 32 x 1 +. 30… 3 – 8 gives white another kingshot Exercise 3.3 Write down the kingshot for white!
30… 9 – 14 31.43 – 38
31… 3 – 8 is strongly met by 48 – 42! 31… 3 – 9 32.48 – 42 14 – 20 white wins by playing 33.22 – 18! 13 x 22 34.26 – 21 17 x 26 35.28 x 8 7 – 12 36.8 x 17 11 x 22 37.33 – 29! +. In the game black gave a piece by 17 – 21 and lost.
A. Bulatov – J. Krajenbrink
21… 18 – 23! 22.29 x 18 12 x 23
Threatening 20 – 24 followed by a 24 – 30 23 – 29 coup Philippe. Therefore white closes <42> and <44>. The only way to survive was playing 49 – 43 20 – 24 40 – 35. But white wanted to use the formations at his right wing.
23.47 – 42 20 – 24 24.49 – 44 7 – 12
25.48 – 43
Taking an outpost at <22> can be very strong, especially if the piece at <22> can’t
be attacked.

216
Black plays some strong moves, giving white forced replies.
25… 16 – 21!
26.26 x 17 12 x 21 27.37 – 31 21 – 26 28.31 – 27 11 – 17
Threatening 23 – 29 17 – 22 while 42 – 37 is met by the coup Philippe 17 – 21 24 – 30 23 – 29 19 x 30 6 – 11 8 – 12 13 x 31 B+.
29.27 – 22 26 – 31 30.22 x 11 6 x 17
Threatening 23 – 29 17 – 22 again.
31.42 – 37 31 x 42 32.38 x 47 14 – 20
33.50 – 45 will be answered by the classical attack 24 – 29! 34.33 x 24 20 x 29. White can’t escape anymore: 35.43 – 38 8 – 12 36.34 – 30 12 – 18 37.39 – 33 18 – 22 38.33 x 24 22 x 42 39.47 x 38 17 – 22 40.44 – 39 40.30 – 25 19 x 30 41.25 x 34 is met by 22 – 28 32 – 27 28 – 33 B +
40… 9 – 14 41.40 – 34 3 – 8 42.45 – 40 8 – 12 43.40 – 35 22 – 28 44.32 – 27 14 – 20 B+.
33.47 – 41 8 – 12 34.41 – 36 12 – 18
Black threatens to play 24 – 29 x 29 followed by 29 – 33 now.
The variation 35.36 – 31 24 – 29 36.33 x 24 20 x 29 37.43 – 38 18 – 22 is hopeless for white. White thus gave a piece playing 35.34 – 30 24 x 35 and lost.
Usually it is good to build a compact position with all pieces in contact. This is not always the case, like in this example. If black plays 1… 8 – 12? 2.33 – 28! 3 – 8 white can attack strongly playing 3.27 – 22 18 x 27 4.31 x 22 1) 4… 16 – 21 5.22 – 18! 13 x 44 6.43 – 39 44 x 33 7.38 x 27 W+ 2) 4…. 17 – 21 5.22 – 17 11 x 44 6.43 – 39 44 x 33 7.38 x 7 W+ 3) 4… 14 – 20 5.39 – 33! and black has no good move left. 4) 4… 23 – 29 5.39 – 33 16 – 21 6.42 – 37 12 – 18 7.28 – 23! W+ Exercise 3.4 If black plays 1… 8 – 12 2.33 – 28 17 – 21 white can win in a surprising way. How?
J.M. Ndjofang – H. Wiersma
17.49 – 44? Carelessly played, underestimating black’s classical attack. White could have prevented the 24 – 29 x 29 attack by playing 17.41 – 37. In that case 17… 24 – 29 18.33 x 24 20 x 29 is

217
met by 19.28 – 22 17 x 28 20.27 – 2 16 x 27 21.31 x 24 19 x 30 22.34 x 25 W+1.
17… 24 – 29! 18.33 x 24 20 x 29 19.35 – 30 9 – 14
Exercise 3.5 How does black win after 20.39 – 33?
20.47 – 42 17 – 21 21.41 – 37 21 – 26
22.39 – 33
Instead of defending his outpost, black makes a positional sacrifice. He uses the time white spends on taking piece 29, to occupy <22>, leaving white with no space to play at his left wing.
22… 12 – 17!
23.33 x 24 17 – 22 24.28 x 17 11 x 22 25.44 – 39 8 – 12
White gives back the piece aiming his arrows at <18>. But black will show that this is not a good solution for white by making a breakthrough shot.
26.30 – 25 19 x 30 27.34 – 29 23 x 34 28.30 x 29 22 – 28
29.25 x 34 18 – 22 30.27 x 20 15 x 44 31.32 x 23 44 – 50?
A grave mistake. Black should have played 31… 44 – 49 32.31 – 27 12 – 18! 33.23 x 12 49 – 40 34.34 – 30 40 x 1 with a very good endgame.
32.23 – 18 12 x 23 33.37 – 32 26 x 28 34.43 – 39 50 x 33
35.38 x 18
The game was drawn.
A. Getmanski – A. Georgiev
21.49 – 43 24 – 29! 22.33 x 24 20 x 29
This strong classical attack reduces white’s space to play.
23.35 – 30 10 – 14 24.39 – 33 14 – 20 25.33 x 24 20 x 29 26.43 – 39 9 – 14
After 27.39 – 33 14 – 20 28.33 x 24 20 x 29 29.48 – 43 29.44 – 39 is met by 29 – 33 38 x 29 19 – 24 B+. 29… 4 – 9 30.43 – 39 9 – 14 31.39 – 33 14 – 20 32.33 x 24 20 x 29 the attack at <29>

218
comes to an end, for 44 – 39 is met by 29 – 33 38 x 29 19 – 24 again.
27.48 – 42 21 – 26 28.39 – 33 14 – 20 29.33 x 24 20 x 29 30.30 – 25 7 – 12
White decides to get rid off piece 29, but the exchange will spoil his central position.
31.38 – 33 29 x 38 32.42 x 33 6 – 11
Piece 47 is the only piece left in the Drent zone… He can’t play 47 – 42 because of the Coup Weiss 23 – 29 34 x 14 13 – 19 14 x 23 18 x 47 +. White’s left wing is very weak. Black will exploit this weakness efficiently.
33.34 – 29 23 x 34 34.40 x 29 19 – 24 34.29 x 20 15 x 24
Patience is needed. Black first takes back <24> under control. Now he’s going for <23>.
35.47 – 42 13 – 19 36.42 – 38 18 – 23
White’s left wing looks ugly. At his right flank white has little power too. He decides to gain space by moving to <22>. Black centralizes piece 16 in response.
37.27 – 22 11 – 17 38.22 x 11 16 x 7 39.28 – 22 8 – 13 40.32 – 27 12 – 18 41.22 – 17 7 – 12 42.17 x 8 3 x 12
Although the amount of pieces stuck at white’s left wing, has lowered, it still is weak.
43.44 – 39 1 – 6
White suffers from a lack of space. 44. 27 – 22 18 x 27 45.31 x 22 can’t be played because of 45… 12 – 18! 46.22 – 17 18 – 22 B+.
44.38 – 32 23 – 29 45.45 – 40 29 x 38 46.32 x 43 6 – 11 47.39 – 33 18 – 23
48.43 – 39
48.43 – 38 11 – 16 49.38 – 32 12 – 18 50.33 – 28 4 – 9 51.28 – 22 9 – 14 52.22 – 17 24 – 29 is losing for white too.
48… 11 – 16 49.27 – 22 16 – 21 50.40 – 35 12 – 18
White has no sensible move left and he resigned.

219
Mutual outposts at the graveyard
Both white and black have a classical attack. Exercise 3.6 How can white to move win a piece?
Schokman – F. van Amersfoort
Both players have an outpost at the graveyard. Black to move thought he could win a piece by playing 21 – 27. Exercise 3.7 Why is 21 – 27 losing?
A. Kuyken – V. Agafonov
Position after 1.33 – 28 18 – 23 2.39 – 33 12 – 18 3.31 – 27 7 – 12 4.44 – 39 20 – 24 5.37 – 31 14 – 20 6.41 – 37 2 – 7 7.27 – 22 18 x 27 8.31 x 22 10 – 14 9.34 – 30 16 – 21 10.30 – 25
4 – 10 11.49 – 44 21 – 26 12.47 – 41 24 – 29 13.33 x 24 20 x 29 White launches an attack at piece 29.
14.39 – 33 14 – 20 15.33 x 24 20 x 29 16.44 – 39 10 – 14 17.50 – 44 5 – 10
17… 17 – 21 18.39 – 33 14 – 20 19.25 x 14 9 x 20 20.33 x 24 20 x 29 21.44 – 39: 1) 21… 15 – 20 22.39 – 33 20 – 24 23.22 – 18! 13 x 22 24.28 x 17 11 x 22 25.35 – 30 24 x 44 26.33 x 11 6x 17 27.43 – 39 44 x 33 28.38 x 16 W+ 2) 21… 12 – 18 22.39 – 33 18 x 27 23.33 x 24 19 x 30 24.35 x 24 26 – 31 25.37 x 17 11 x 33 26.38 x 9 27 x 47 27.9 – 4 47 x 20 28.43 – 38 20 x 47 29.36 – 31 47 x 18 30.4 x 36 W+ 17… 14 – 20 18.25 x 14 9 x 20 is met by 19.32 – 27! 23 x 21 20.35 – 30 17 x 28 21.37 – 31 26 x 37 22.41 x 25 winning piece 29. 17… 12 – 18 18.39 – 33 loses a piece for black.
18.35 – 30 18.39 – 33 is met by 19 – 24 B+.
18… 17 – 21
19.40 – 35 12 – 18 20.39 – 33 18 x 27
21.33 x 24
Black will lose a piece after 21… 8 – 12 22.37 – 31 26 x 37 23.42 x 22 12 – 18 24.41 – 37 18 x 27 25.37 – 31 7 – 12 26.31 x 22 12 – 18 27.32 – 27 21 x 32 28.28 x 37 18 x 27 29.37 – 31 W+1.
21… 7 – 12 22.28 – 22 27 x 18

220
23.32 – 28 23 x 32 24.38 x 7
Black resigned.
A. Schwarzman – J.M. Ndjofang
Exercise 3.8 How did white win with a shot?
Jean Marc Ndjofang

221
4.The Highland attack If you take an outpost at <22> while the opponent has no piece at <23> the position is called a Hoogland or Highland attack.
A. Ermakov – J. Bastiaannet
Black has a weak position without any base pieces and no active formations. His position is split. Black’s wings are not connected well. White launches a strong Highland attack.
32.27 – 22 9 – 13 33.31 – 27 13 – 19
Black can’t play 33…12 – 18 34.34 – 30 nor 33… 12 – 17 34.27 – 21 16 x 18 35.28 – 22 W+.
34.36 – 31!
Preventing 8 – 13 35.22 – 17! 11 x 33 36.38 x 29 24 x 33 37.32 – 28 33 x 22 38.27 x 9 W+
34… 20 – 25 35.38 – 33
Now 35… 8 – 13 is met by 22 – 17 (or 22 – 18) 12 x 21 33 – 29 24 x 22 27 x 9 W+. 35… 12 – 17 is punished by the 33 – 29 Kung Fu shot.
35… 15 – 20 36.48 – 43!
Black has no good move left.
Exercise 4.1 How does white punish 12 – 17?
D. Tsinman – A. Novikov
Black has a good central position with strong formations, possessing both <23> and <24>.
44… 17 – 22 45.34 – 30 22 x 31 46.26 x 37 23 – 29!
The Highland attack gives black more space.
47.38 – 32 18 – 23 48.42 – 38? 11 – 17
White should have played 43 – 38, for piece 43 is becoming inactive in the game.
49.39 – 33 12 – 18 50.37 – 31 7 – 11 51.31 – 27 11 – 16
52.43 – 39 52.33 – 28 is punished by the 16 – 21 27 x 16 18 – 22 Dussaut sacrifice.
52… 16 – 21! 53.27 x 16 18 – 22
A nice sacrifice in order to freeze white out. Black also could have played 53… 17 – 22 54.27 – 21 16 x 27 55.32 x 21 22 – 27! 56.21 x 32 18 – 22 57.39 – 34 29 x 40 58.35 x 44 24 x

222
35 50.44 – 39 19 – 24 51.39 – 34 23 – 29 52.34 x 23 35 – 40 B+.
54.39 – 34 29 x 40 55.35 x 44 24 x 35 56.44 – 39 23 – 28 57.32 x 23 19 x 28
And black won.
Lighthart – R. Keller
The immediate 14 – 20 shot will not bring more than a draw.
51… 18 – 22! 52.37 – 31 14 – 20!
Tsjizjow showed the same win in a game against Rybakov.
53.25 x 14 19 x 10 54.30 x 28 10 – 14 55.33 x 24 22 x 42 56.32 – 28 42 – 47 57.31 – 27 47 x 15 58.27 – 22 17 – 21
59.22 – 18
59… 15 – 29! 60.28 – 23 29 – 34 61.35 – 30 34 x 25 62.18 – 13 14 – 19! 63.13 x 24 25 – 9
M. Dolfing – D. Kleinrensink
White has a strong centre with active formations.
18.34 – 30! 3 – 9
After 18… 14 – 19 white can build a very strong construction at his right wing: 19.39 – 34 4 – 9 20.49 – 43 10 – 14 21.43 – 39 18 – 23 22.30 – 25 1 – 7 23.34 – 30 12 – 18 24.39 – 34 7 – 12
Look at the power block at white’s right wing! 25.34 – 29! 23 x 34 26.40 x 20 15 x 24 27.47 – 42! Black can’t play 18 – 23? now, due to 33 – 29! 27… 11 – 17 28.27 – 22 18 x 27 29.31 x 11 6 x 17 30.45 – 40 White is attacking piece 24 again. At 13 – 18 he 12 – 18 he plays 28 – 23! 30… 17 – 21 31.28 – 22! 2 – 7 31… 12 – 18 32.32 – 28 18 x 27 33.37 – 31 26 x 37 34.42 x 22 21 – 26 35.40 – 34 8 – 12 36.28 – 23! W+ 32.22 – 17 21 – 27 33.32 x 21 16 x 27 34.40 – 34 12 x 21 35.37 – 31 26 x 37 36.42 x 22 8 – 12 37.33 – 28! and the 28 – 23 threat is lethal.
19.30 x 19 13 x 24 20.40 – 34 9 – 13 21.49 – 44 4 – 9 22.34 – 30 14 – 20 23.30 x 19 13 x 24 25.45 – 40 9 – 13

223
Giving away control over <9>. Therefore 8 – 13 would have been more logical.
26.40 – 34 11 – 17
27.34 – 30! White hits at <13> again and weakens the heart of black’s defence, before he launches an attack.
27… 17 – 22 28.28 x 17 12 x 21 29.30 x 19 13 x 24 30.27 – 22! 18 x 27 31.31 x 22 8 – 13 32.39 – 34 2 – 8 33.32 – 28 1 – 7
34.38 – 32!
34… 7 – 12 is strongly met by 35.22 – 18 13 x 22 36.28 x 17 20 – 25 36… 12 – 18? 37.44 – 39 21 x 12 38.37 – 31 W+ 36… 21 – 27 37.32 x 21 16 x 27 38.34 – 30 12 x 21 39.30 x 19 gives white a huge advantage. 37.44 – 39! 10 – 14 38.48 – 43 14 – 19 39.36 – 31 with a winning position for white, for example: 21 – 27 39.31 x 22 12 x 21 40.32 – 28 6 – 11 41.22 – 18 8 – 12 42.18 x 7 11 x 2 43.28 – 23 19 x 28 44.33 x 22 and the 34 – 30 threat can’t be parried.
34… 7 – 11 35.44 – 39 11 – 17 36.22 x 11 16 x 7
37.36 – 31 6 – 11
Of course white shouldn’t allow black to retreat edge piece 26 with the centralizing 21 – 27 x 17. White takes <27> in possession again.
38.31 – 27 11 – 16
39.28 – 22! Launching another Highland attack. This time a closed attack (piece 27). Black can’t get rid of piece 22 anymore.
39…. 20 – 25 40.48 – 43 15 – 20 41.33 – 28 10 – 15 42.34 – 30 25 x 34 43.39 x 19 13 x 24
44.43 – 39
Black’s pieces are shattered over the board. His only formation 15 / 20 / 24 isn’t active, because 24 – 30 365 x 24 20 x 29 loses to 28 – 23 +. White’s position is thus winning.
44… 8 – 13 45.39 – 34 20 – 25 46.47 – 42 7 – 12 47.42 – 38 15 – 20
47… 12 – 18 48.38 – 33 15 – 20 49.34 – 29 13 – 19 50.22 x 13 19 x 8 51.27 – 22 8 – 12 52.28 – 23 12 – 17 53.22 x 11 16 x 7 54.23 – 18 W+.
48.38 – 33 13 – 19

224
49.34 – 29 12 – 17 50.22 x 11 16 x 7 51.27 x 16 19 – 23 52.28 x 30 25 x 23
53.35 – 30 Black surrendered.
H. Jansen – S. Kalinov
Black has weak pieces at 9 and 15. White could have profited by launching a closed Highland attack:
1.28 – 22! Exercise 4.2 How does white win after 1… 19 – 23?
1… 12 – 18 2.33 – 28 24 – 29
2… 18 – 23 3.39 – 34 24 – 29 4.35 – 30 29 x 40 5.30 – 24 19 x 30 6.28 x 10 15 x 4 7.25 x 45 W+.
3.35 – 30
Threatening 39 – 33, while 29 – 34 39 – 33 (34 – 40 30 – 24 W+) also loses too for black.
R. Clerc – A. Chizhov Wch match 1997
The best chance for black to win is to play a Highland attack. Because piece 15 isn’t active white should be able to defend.
45… 23 – 29 46.37 – 31 18 – 23
47.31 – 27
Safer is 47.31 – 26! For example 47… 13 – 18 48.32 – 27 11 – 16 49.42 – 37 17 – 22 50.27 – 21! 16 x 27 51.37 – 32 =
47… 13 – 18 48.42 – 37 17 – 22
49.37 – 31? A huge mistake! 49.27 – 21 11 – 16 50.40 – 34! 29 x 40 51.35 x 44 24 x 35 52.44 – 39 16 x 27 53.32 x 21 22 – 27 54.21 x 32 18 – 22 55.37 – 31 would have let to a draw.
49… 11 – 17 50.31 – 26 22 x 31
51.26 x 37
Without pieces 40 en 15, this position is the same as Lighart – Keller.
51… 14 – 20?
52.25 x 14 19 x 10 53.30 x 28 18 – 22 54.33 x 24 22 x 31 55.32 – 27 31 x 22
White lost the endgame after 56.35 – 30? 22 – 28 57.40 – 34 28 – 32 58.34 – 29 32 – 38 59.29 – 23 38 – 43 60.23 – 18 17 – 22 61.18 x 27 43 – 48 and white resigned. White could still have drawn the game by playing 56.40 – 34! and piece 34 will go to king! However, black could have avoided this drawing opportunity. Exercise 4.3 How should black have played on the 51
st move?

225
A. Bulatov – S. Nosevich
Exercise 4.4 White to move could have taken a breakthrough shot. Can you find it?
J. Krajenbrink – H. Jansen Exercise 4.5 White took a winning king shot. How?
Exercise 4.6 White forces the win of a piece.
Herman Hoogland

226
5.Playing against a Highland attack
Baba Sy – A. Slaby
Black has a compact, central position with an outpost at <29>. White’s pieces are surrounding the centre. The best move for black is 28… 17 – 22 attacking <27>…. Black can’t use the 9 / 13 / 18 tail at once, for 18 – 22 27 x 18 13 x 22 is punished by a shot. Exercise 5.1 Which shot do we mean?
28… 15 – 20 29.42 – 37 20 – 24
Now <24> is closed white can try to build a chain-lock, getting pieces at <33> & <34>.
30.27 – 21 A normal move when playing against the Highland-attack. White wants to take control over the left flank.
30… 17 – 22 31.21 – 16 22 – 28 32.37 – 31 28 x 37 33.31 x 42 12 – 17 34.39 – 33! 18 – 22
White takes the chain-lock!
35.36 – 31 14 – 20 37.48 – 43 20 – 25
38.43 – 39
White’s weakness, the gap at <39> is now resolved. Black’s space is minimized.
38… 8 – 12
39.42 – 37 9 – 14 40.47 – 41 13 – 18 41.41 – 36 3 – 8
There is a huge weakness at <13>, so white should take tactics into account. He finished the game with a great shot.
42.26 – 21 17 x 26 43.16 – 11 7 x 16 44.35 – 30 24 x 44 45.33 x 2 44 x 42 46.37 x 48 26 x 37 47.48 – 42 37 x 48 48.2 – 35 48 x 30
49.35 x 10
H. Wiersma – Baba Sy (1963)

227
F. Gordijn – W. de Jong
Black uses tactics in order to prevent the strategically correct 33 – 29 x 29 exchange.
1… 3 – 9! 33 – 29 x 29 is now punished by 25 – 30 34 x 25 15 – 20 25 x 21 16 x 40 B+.
2.36 – 31
It is better to play 34 – 29.
2… 8 – 12 3.31 – 26 2 – 8!
After 4.34 – 29? 16 – 21 5.29 x 20 15 x 24 white has no good move left (check this yourself!). White makes the change to <29> but black will respond in a very strong way, taking over <24> again and using tactics.
4.33 – 29 24 x 33 5.38 x 29 19 – 24 6.29 x 20 15 x 24
7.39 – 33 7.43 – 38 16 – 21 followed by 12 – 18 won’t solve white’s problems.
Black took a shot. Exercise 5.2 Try to find the winning shot for black.
R. van Eijk – W. Bremmer Several tactical possibilities govern this position.
1.37 – 31 26 x 37
2.32 x 41?
Giving black the opportunity to take a shot:
24 – 30! 3.35 x 15 25 – 30 4.34 x 25 4 – 10 5.15 x 4 9 – 14 6.4 x 18 12 x 45
It would have been much better to play 1.36 – 31! 12 – 18: 1) 2.31 – 27 7 – 12 3.48 – 43 4 – 10 (?) 35 – 30! 24 x 35 22 – 17 11 x 31 28 – 23 making king at <4>. 2) 2.33 – 29! 18 x 36 3.37 – 31 24 x 22 4.32 – 27 26 x 37 5.27 x 18 13 x 22 6.42 x 31 36 x 27 7.38 – 32 27 x 38 8.39 – 33 38 x 29 9.34 x 1 with a good endgame for white.
R. Twilhaar - D. de Voogd
White’s attack is not strong. He has a huge weakness at <42>, making his position tactically vulnerable. Black controls the other wing.

228
37 … 20 – 24! 38.34 – 30 25 x 34 39.40 x 20 15 x 24 40.41 – 36 3 – 9!
41.45 – 40
41 … 6 – 11?
Black should have played 24 – 30 42.35 x 24 19 x 30 43.37 – 31 (what else?) 26 x 37 44.32 x 41 12 – 17! 45.22 x 11 6 x 17 and black wins a piece (38 – 33 17 – 21). Exercise 5.3 How could white have escaped after 41… 6 – 11 ?
6.40 – 34 Exercise 5.4 How did black win now?
T. Sijbrands
In this composition of Sijbrands white can force a win in a beautiful way.
1.38 – 32! 9 – 14 Forced because of the 32 – 28 threat.
2.27 – 22! 18 x 49 3.26 – 21 49 x 24 4.21 – 16 29 x 40
5.16 x 18
O. Dijkstra – W. Lep
1… 24 – 30? 2.27 – 22 18 x 27
3.31 x 22 Black has no good move left. 1) 3… 30 – 35 4.47 – 42 35 x 33 5.36 – 31 29 x 40 6.38 x 20 25 x 14 7.45 x 34 W+1. 2) 3… 19 – 24 (or 12 – 18) is followed by 4.32 – 28! 23 x 43 5.34 x 23 43 x 34 40 x 18 3) 3… 3 – 8 or 3… 3 – 9 are met by 4.22 – 18 13 x 22 5.40 – 35 29 x 40 6.35 x 2 (or 35 x 4) +. 3) 3… 6 – 11 (or 7 – 11) 4.22 – 18! 13 x 22 5.40 – 35 29 x 40 6.35 x 13 12 – 18 7.45 x 34 18 x 9 8.34 – 30!! 25 x 43 9.32 – 27 43 x 21 10.26 x 10 +. The answers to other moves you can try to find yourself.
A. Mogiljanski – A. Chizhov
Black’s pieces are positioned well to play against the Highland attack. He can take control over the right wing.
35… 14 – 19

229
Threatening 25 – 30 34 x 25 15 – 20 25 x 23 12 – 18 23 x 12 8 x 48 so white has to close the <39> gap.
36.43 – 39 12 – 18
White can’t go to <17> because of 37.22 – 17 16 – 21! 38.17 – 12 38.17 – 11 21 – 27 loses a piece for white. 38… 8 x 17 39.31 – 27 18 – 22! 40.27 x 16 19 – 23 and because of white’s lack of both formations and space, he is frozen out completely.
37.31 – 27 8 – 12 38.33 – 28 18 – 23 39.39 – 33 12 – 18
Because 50.22 – 17 leads to a bad endgame after the coup Philippe 25 – 30 34 x 25 23 – 29 33 x 24 19 x 30 25 x 34 2 18 – 22 27 x 18 13 x 31, white decides to make a pseudo sacrifice which indeed is white’s best defence. Black can’t keep the piece, but will use the time white spends on gaining the piece back, for launching an attack at white’s weakened right flank.
40.34 – 29 23 x 34 41.50 – 44 25 – 30 42.44 – 40 30 – 35 43.40 x 29 19 – 24 44.29 x 20 15 x 24 45.37 – 31 26 x 37 46.32 x 41 3 – 8 47.27 – 21 18 x 27 48.21 x 32 13 – 19 49.32 – 27 8 – 12 50.27 – 22 9 – 13 51.41 – 37 24 – 30
62.38 – 32?
White collapses. 62.37 – 31 30 – 34 63.31 – 27 is the best defence, for after 35 – 40 64.38 – 32 white threatens to make a draw both by playing 22 – 18 13 x 31 32 – 27 31 x 22 28 x 8 and by 33 – 29 34 x 23 45 x 34 =.
62… 30 – 34
63.32 – 27
63.37 – 31 12 – 18 64.22 – 17 19 – 24 is also very bad for white.
63… 12 – 18!
We’ve already seen that 63… 35 – 40? 64.37 – 32 leads to no more than a draw, but black has more arrows on his bow.
64.22 – 17 35 – 40 65.27 – 21 16 x 27 66.17 – 11 40 – 44
67.11 – 7 Black could have finished the game with 67… 18 – 22! 68.28 x 17 44 – 50 (7 – 1 50 x 6 1 x 40 27 – 32 37 x 28 6 x 35) B+. In the game he played 44 – 50, but after a long, complicated endgame white couldn’t find the draw and black won after all.

230
6.Roozenburg attack
P. Roozenburg – B. Springer
White possesses <24> and <27>, while black occupies <23>. Black always has a piece at <25>, and usually also a piece at <20>. In this case, without a piece at <20>, it is an open Roozenburg attack. In 1945 – when the game was played - the Roozenburg attack was not known yet, so both Roozenburg and Springer had little experience with this system. White shouldn’t play 16.42 – 38? 23 – 28! 17.33 x 11 18 – 23 18.29 x 18 13 x 33 19.39 x 28 1 – 6 B+. A logical move for white is 16.43 – 38, after which a possible variation is: 17 – 21 17.44 – 40 1 – 6 18.49 – 44 6 – 11 19.33 – 28 21 – 26 20.28 x 19 18 – 22 21.27 x 18 12 x 14 22.32 – 28 and white has a right wing attack, a common switch in the Roozenburg system. .
16.41 – 36 17 – 22? Black should have played 17 – 21. Now white can launch an attack at 23 without black being able to take a 2 x 2 change after 33 – 28, because the piece at 27 is gone.
17.43 – 38 22 x 31 18.37 x 26 1 - 6
19.33 – 28! The attack on 23 begins. Without a piece at <27> this is very dangerous for black.
19…. 9 – 14 20.28 x 19 14 x 23 21.38 – 33 16 – 21 22.26 x 17 12 x 21 23.33 – 28 3 – 9 24.28 x 19 9 – 14 25.42 – 38 14 x 23
26.49 – 43
26.38 – 33 would allow black to change 21 – 27 32 x 21 23 – 28 33 x 22 18 x 16 =.
26… 21 – 26 27.38 – 33
27… 7 – 12 Also after 27… 4 – 9 28.33 – 28 9 – 14 29.28 x 19 14 x 23 30.39 – 33 black loses piece 23.
28.33 – 28 12 – 17 29.28 x 19
White won a piece and later the game.
After 1.33 – 28 black can take the 2 x 2 exchange in three different ways, of which only one way is correct: 1) 1.33 – 28 17 – 21? 2.28 x 19 18 – 22 3.27 x 18 12 x 14 4.34 – 30! 25 x 23 5.24 – 19 13 x 24 6.32 – 27 21 x 32 7.37 x 10 W+ 2) 1.33 – 28 6 – 11? 2.28 x 19 18 – 22 3.27 x 18 12 x 14 4.34 – 30 25 x 23 5.32 – 27 20 x 29 6.27 – 21 16 x 27 7.38 – 33 29 x 38 8.43 x 1 W+ 3)1.33 – 28 4 – 10! 2.28 x 19 18 – 22 3.27 x 18 12 x 14 = White can take a kingshot like in variation 2, but after the shot black plays 13 – 18 and the king is caught for only one piece. The difference with the second variation is that piece 6 is still there. In the former variation white can escape with his king to square 6!

231
So white rather plays 4.38 – 33 after which black shouldn’t play 14 – 19? because of 29 – 23! 20 x 27 23 x 5 W+.
M. Monteba – S. Wijker
Tactics are very important in the Roozenburg system. Black successfully tried to trap his opponent playing 22… 11 – 17 23.37 – 31? 26 x 28 24.33 x 11 21 x 32 25.38 x 27 12 – 17 26.11 x 22 23 – 28 27.22 x 33 18 – 23 28.29 x 18 20 x 49 B+. White should have played 23.50 – 45 17 – 22 22 x 31 24.36 x 27 12 – 17 25.24 – 19! 13 x 24 26.34 – 30 24 x 44 27.39 x 50 23 x 34 28.27 – 22 17 x 39 29.39 – 33 39 x 28 30.32 x 1 W+.
M. Lepsic – R. Clerc
Clerc played the beautiful silent move 17… 4 – 10! Although black has no threats, all white’s moves are met by a shot. 1) 18.34 – 29 18 – 23 B+ 2) 18.34 – 30 27 – 32 19.38 x 27 24 – 29 20.33 x 24 22 x 33 21.39 x 28 18 – 22 22.27 x 18 12 x 41 B+ 3) 18.47 – 41 27 – 32 19.38 x 27 24 – 29 B+ 4) 18.37 – 32 17 – 21! 19.26 x 8 3 x 12 20.28 x 8 18 – 22 21.32 x 21 22 – 28 22.33 x 22 24 – 29 23.34 x 23 19 x 48 24.8 x 19 14 x 23 B+
T. Sijbrands – A. Gantwarg 1.32 – 28 19 – 23 2.28 x 19 14 x 23 3.37 – 32 10 – 14 4.35 – 30 20 – 25 5.33 – 29 14 – 19 6.40 – 35 5 – 10 7.41 – 37 10 – 14 8.46 – 41 17 – 22 9.31 – 27 22 x 31 10.36 x 27 11 – 17 11.30 – 24 19 x 30 12.35 x 24 14 – 20
From a well-known opening a Roozenburg attack for white emerges. 12… 14 – 19 13.45 – 40 19 x 30 14.40 – 35 is okay for white.
13.45 – 40 6 – 11
13… 25 – 30 14.34 x 14 23 x 45 15.14 – 10 leads nowhere for black.
14.38 – 33 17 – 21 15.42 – 38 21 – 26
16.41 – 36 11 – 17 17.48 – 42
17… 4 – 10 18.50 – 45 Now black should play 17… 1 – 6! 18.33 – 28 9 – 14! 19.28 x 19 14 x 23 20.38 – 33 6 – 11 21.33 – 28 26 – 31 22.37 x 26 13 – 19 23.24 x 22 3 – 9 24.29 x 18 12 x 23 25.28 x 19 17 x 48 26.36 – 31 11 – 17 27.19 – 14 10 x 19 28.47 – 42 48 x 37 29.31 x 42 7 – 12 30.42 – 38 with a bad position for white, since his distribution of pieces is not good. His left wing is severely weakened. Playing 18.33 – 28 would have prevented this problems for white. If black plays 17… 1 – 6 white can’t play 18.33 – 28 because of 25 – 30! 19.34 x 14 23 x 45

232
20.14 – 10 18 – 23! 21.28 x 19 17 – 22 22.27 x 18 12 x 5 B+1. 17.. 1- 6 should be met by 18.40 – 35 like in Sijbrands – Gantwarg 1990: 17… 1 – 6 18.40 – 35 6 – 11 19.33 – 28 4 – 10 19… 26 – 31 isn’t good, for after 20.37 x 26! 13 – 19 21.24 x 22 4 – 10 22.28 x 19 17 x 48 white replies 23.19 – 14! 10 x 19 24.29 – 24 20 x 40 25.39 – 34 48 x 30 26.35 x 4 W+. 20.28 x 19 9 – 14 21.36 – 31! 14 x 23 22.27 22 18 x 36 23.29 x 9 20 x 40 24.9 – 4 16 – 21 25.4 – 27 11 – 16 26.50 – 45 3 – 9 27.27 x 4 21 – 27 28.32 x 21 16 x 27 29.45 x 34 10 – 14 30.4 x 31 36 x 27 and after a few moves the game was drawn. 18… 17 – 21 19.33 – 28 1 – 6
20.28 x 19 18 – 22 21.27 x 18 12 x 14
Now white simply gets a good right wing attack.
22.32 – 28 14 – 19 23.40 – 35 19 x 30 24.35 x 24 10 – 14 25.45 – 40 14 – 19 26.40 – 35 19 x 30 27.35 x 24 9 – 14 28.44 – 40 14 – 19 29.40 – 35 19 x 30
30.35 x 24 7 – 12 31.38 – 33
White can’t do anything positive against white’s attack. Therefore he decides to get rid of piece 24. White’s position remains better centralized. 31… 13 – 19 32.24 x 13 8 x 19
33.42 – 38 20 – 24 34.29 x 20 15 x 24 35.34 – 29 12 – 17 36.29 x 20 25 x 14 37.36 – 31 17 – 22 38.28 x 17 21 x 12 39.31 – 27 2 – 8 40.39 – 34 8 – 13
41.43 – 39 3 – 9 42.37 – 32 12 – 18
White has a nice position controlling both <27> and <28> and still two base pieces. To prevent black from playing 18 – 22, white goes to <28>. The game becomes classical, but black has problems because his wings aren’t connected well. Black’s pieces don’t really work together well.
43.33 – 28 18 – 23 44.34 – 30 14 – 20 45.30 – 25 20 – 24 46.49 – 44 6 – 11
47.47 – 42
Black is in trouble. He should play 47… 11 – 17 48.42 – 37 9 – 14 49.44 – 40 13 – 18 50.39 – 33 50.38 – 33 is met by the double sacrifice 14 – 20 25 x 14 19 x 10 28 x 30 17 – 22 =. 50… 17 – 21 51.40 – 34 24 – 30 and white can’t win.
13 – 18? 48.42 – 37!
48… 11 – 17 is punished by the Bomb shot: 49.27 – 21 16 x 27 50.32 x 12 23 x 34 51.12 x 3 W+ . Black can’t escape from losing anymore.
48… 9 – 14 49.28 – 22! 23 – 29
Black can’t play 11 – 17 because of 22 x 13! 19 x 8 27 – 21 16 x 27 32 x 3 W+. 50.22 x 13 19 x 8 51.44 – 40 14 – 19
52.39 – 33! 19 – 23

233
After 52… 8 – 13 53.33 – 28 black has no sensible move left.
53.25 – 20! 24 x 15 54.33 x 24 8 – 12 55.40 – 34 11 – 17 56.38 – 33 12 – 18
After a long struggle white has managed to reconquer <24> and is winning the endgame.
57.33 – 28 17 – 21 58.28 x 19 18 – 22 59.27 x 18 21 – 27 60.32 x 21 16 x 27 61.19 – 13 27 – 31 62.37 – 32 31 – 36 63.13 – 8 36 – 41 64.32 – 27 41 – 46
65. 8 – 2 46 - 5 66.34 – 30
Black resigned.
T. Doekbrijder – R. Heusdens
White not always gets a good right wing attack after the 2 x 2 exchange. Sometimes the opponent can successfully attack the outpost at <24>.
15… 4 – 10! 16.38 – 32 10 – 14
Black threatens to play 14 – 19 40 – 35 19 x 30 35 x 24 16 – 21! 27 x 16 25 – 30 34 x 14 23 x 34 39 x 30 9 x 27 B+. After 17.33 – 28 14 – 19 18.40 – 35 19 x 30 19.35 x 24 17 – 21 20.28 x 19 18 – 22 21.27 x 18 12 x 14 22.45 – 40 14 – 19 23.40 – 35 19 x 30 24.35 x 24 9 – 14 white loses his outpost.
17.42 – 38 14 – 19
18.40 – 35 19 x 30 19.35 x 24 17 – 21!
Black just waits for white to play 33 – 28 now. Now black would punish 33 – 28 by 18 – 22 etc. B+. White has just a few moves before he is forced to play 33 – 28. He can’t play at his right wing, because 45 – 40 25 – 30 is bad for him. Of course, 49 – 44? is not possible because of 18 – 22! This is a situation you should avoid when playing ‘Roozenburg'. Piece 29 is always vulnerable in a Roozenburg attack.
20.48 – 42 11 – 17
After 21.33 – 28 21 – 26 22.28 x 19 18 – 22 23.27 x 18 12 x 14 white can’t take the kingshot 34 – 30 25 x 23 32 – 27 20 x 29 27 – 21 16 x 27 38 – 33 29 x 38 43 x 1 for after 13 – 18 the king is caught B+1. 24.45 – 40 is met by the attack at 24 again: 14 – 19 25.40 – 35 19 x 30 26.35 x 24 9 – 14 27.36 – 31 7 – 12! and 14 – 19 at the next move.
21.36 – 31 21 – 26 22.33 – 28 17 – 21 23.28 x 19 18 – 22 24.27 x 18 12 x 14 25.45 – 40 14 – 19 26.40 – 35 19 x 30 27.35 x 24 9 – 14
White lost piece 24 and the game.

234
T. Sijbrands – J. van der Wal White has no base pieces at 47 and 49 anymore. After the break of the Roozenburg he has to defend his outpost by tactical means.
17.33 – 28 4 – 10 18.28 x 19 18 – 22 19.27 x 18 12 x 14 20.32 – 27 21 x 32
21.38 x 27 Threatening 27 – 21 37 – 31 41 x 1 W+.
21… 7 – 12
22.39 – 33!
22… 14 – 19 will be met by the kingshot 23.29 – 23! 19 x 19 24.27 – 22 17 x 28 25.37 – 31 26 x 37 26.41 x 5 and after 26… 12 – 17 27.5 – 41 9 – 14 28.41 x 5 13 – 19 29.5 x 11 6 x 17 it’s a draw. Black however wanted to win…
22… 17 – 21 23.43 – 39 21 x 32 24.37 x 28 14 – 19 25.40 – 35 19 x 30 26.35 x 24 9 – 14
27.42 – 38
27… 14 – 19 is met by 28.29 – 23 20 x 49 29.23 x 5 49 x 23 30.5 x 37 W+.
27… 12 – 18 28.44 – 40 18 – 22
29.28 x 17 14 – 19
This sacrifice is also punished by a king shot.
30.33 – 28 19 x 30 31.17 – 12 8 x 17 32.28 – 22 17 x 28 33.29 – 23 28 x 19 34.39 – 33 30 x 28 35.36 – 31 26 x 37
36.41 x 5 Instead of fighting on black resigned much too early.
R. Keurentjes – T. Goedemoed
17… 9 – 14!
Exercise 6.1 How does black win after 18.33 – 28 ? Black hoped to trap his opponent: 18.24 – 19 13 x 24 19.34 – 30 23 x 34 20.30 x 10. My opponent thought black would then play 4 – 9 =. However, In this latter position, black had prepared a great shot! Exercise 6.2 Try to find this shot. Hint: The shot begins with 20… 25 – 30

235
Drost gambit
G. Valneris – V. Wirny
White has just moved 16.30 – 24. Black answers by playing a system called after Dutch player Frank Drost, who was the first who sacrificed piece 23 with the objective to attack piece 27 in a game against Gantwarg.
16… 14 – 19! Later we will get back to this position and explain why one shouldn’t play the Drost gambit combined with a closed square 20.
17.33 – 28 19 x 30 18.35 x 24 7 – 12 19.28 x 19 17 – 22 20.41 – 36 22 x 31
21.36 x 27
If black plays 21… 12 – 17 and white answers with 22.29 – 23? 18 x 20 23.19 – 14 10 x 19 24.27 – 22 17 x 28 25.32 x 14 white loses a piece after 25… 20 – 24 26.14 – 10 25 – 30! 27.34 x 25 15 – 20 28.25 x14 4 x 15 B+.
21… 6 – 11 22.27 – 22?
White should simply play 22.38 – 33 11 – 17. White can never defend piece 27 horizontally by 33 – 28 because of 15 – 20. This is one reason there should be no black piece at <20>. 23.47 – 41 17 – 22 24.41 – 36 22 x 31 25.36 x 27
1) 25… 12 – 17 26.37 – 31 26 x 28 27.33 x 11 16 x 7 28.27 x 16 9 – 14 with equality. 2) 25… 2 – 7 26.42 – 38 7 – 11 27.40 – 35 11 – 17 28.35 – 30 17 – 22 29.19 – 14 22 x 42 30.14 x 5 with a complicated game.
22… 18 x 27 23.29 – 23 13 – 18 24.34 – 29 9 – 13 25.39 – 33 27 – 31 26.32 – 28 31 – 26
White has a lack of space. He can’t develop his attack and risks being frozen out. With his next move he allows his opponent to make a breakthrough shot.
27.44 – 39? Exercise 6.3 Show the breakthrough shot for black! Let’s go back to move 16 for black now. Let’s see what would have happened if he played 16… 14 – 20 17.33 – 28 7 – 12 18.28 x 19 17 – 22.

236
19.29 – 23! 1) 19… 20 x 29 20.41 – 36 22 x 31 21.36 x 27 13 x 24 22.37 – 31!! 26 x 19 23.34 x 5 21 x 32 24.5 x 37 W+ 2) 19… 22 x 31 20.41 – 36 18 x 29 21.24 x 33 13 x 24 22.36 x 27 with a better position for white.
J. v.d. Borst – A. Baksoellah
Without a piece at <10> the gambit usually isn’t good either.
1… 12 – 17 2.33 – 28 7 – 11 3.28 x 19 17 – 22 4.41 – 36 22 x 31 5.36 x 27 11 – 17 6.46 – 41 17 – 22
Now white has the combination 45 – 40! 22 x 31 19 – 14 9 x 20 32 – 27 21 x 43 42 – 38 31 x 33 29 x 49 20 x 29 34 x 3 W+, and 6… 6 – 11 7.45 – 40 17 – 22 would have been met by 8.19 – 14 9 x 20 9.24 – 19 13 x 33 10.39 x 6 W+.
J. van der Wal – J. van den Borst
20.33 – 28 1 – 7 21.28 x 19 17 – 22 22.40 – 35 22 x 31 23.36 x 27 7 – 12
Exercise 6.4 How did white break through to king?
Jannes van der Wal

237
7.Partie Bonnard
V. Agafonow – Soerkov
20… 17 – 22 21.35 – 30 22 x 31 22.36 x 27 10 – 14
By closing <30> white makes a Partie Bonnard, creating a very complicated game. 22… 11 – 17 23.37 – 31 26 x 28 24.33 x 11 looks bad for black.
23.33 – 28 4 – 10? Black should have played 23… 14 – 19 24.39 – 33 11 – 17 25.37 – 31 26 x 37 26.42 x 31 17 – 21 27.31 – 26 9 – 14 28.26 x 17 12 x 21 with about equal play.
24.28 x 19 14 x 23 25.39 – 33 11 – 17
After 25… 10 – 14 white forces a win playing 26.33 – 28! 14 – 19 27.27 – 22! 18 x 27 28.29 x 18 13 x 33 8.24 x 4 20 – 24 9.33 x 20 15 x 44 10.32 x 21 16 x 27 11.4 x 36 44 – 50 12.42 – 38! and black’s king will be caught at the next move.
26.46 – 41 7 – 11
26… 10 – 14 27.33 – 28 14 – 19 White shouldn’t play 28.27 – 22? 18 x 27 29.29 x 18 13 x 33 30.24 x 4 20 – 24! 27 x 36 = 28.41 – 36 17 – 21 28… 17 – 22? 29.28 x 17 12 x 21 30.27 – 22! 18 x 27 31.29 x 18 etc. + 29.40 – 35 9 – 14 30.43 – 39 12 – 17 31.27 – 22 18 x 27 32.29 x 9 20 x 40 33.45 x 34 14 x 3 34.37 – 31 26 x 37 35.42 x 31 +.
Black’s troops are annihilated by a devastating combination.
27.37 – 31 26 x 39 28.38 – 33 39 x 28 29.27 – 22 18 x 27 30.29 x 7 20 x 29 31.34 x 5 25 x 34
32.40 x 29 Exactly the same combination was performed in Domchev – Lovcik 2000.
A. Schwarzman – R. Heusdens
27… 17 – 22? Black should have played 13 – 19 24 x 22 17 x 30 35 x 24 23 x 34 40 x 29 14 – 19 24 x 13 8 x 19 simplifying the game. In the game white gets a very strong Partie Bonnard.
28.35 – 30! 22 x 31 29.37 x 26!
Exercise 7.1 Why didn’t white take with 29.36 x 27 ?
39… 14 – 19
40.33 – 28! 1 – 6 41.49 – 43!

238
Using the gap at <14> tactically: Exercise 7.2 Why is 16 – 21 not good for black?
41… 3 – 9 42.43 – 38!
Exercise 7.3 What about 42… 16 – 21 now?
42… 11 – 17 43.42 – 37 White could also have played 43.36 – 31 2 – 7 44.42 – 37! 9 – 14 45.31 – 27 7 – 11 46.26 – 21! 17 x 26 47.27 – 22 18 x 27 48.29 x 9 20 x 29 49.32 x 21 16 x 27 50.34 x 23 14 x 3 51.23 x 14 25 x 34 52.40 x 29 W+.
43… 16 – 21 44.37 – 31 17 – 22 45.26 x 17! 22 x 42
46.47 x 38 White’s piece at <17> is very strong. After 46… 9 – 14 47.31 – 27 black resigned. 47… 2 – 7 can be met by 48.27 – 22 18 x 27 49.29 x 9 20 x 29 50.32 x 21 14 x 3 51.40 x 29 25 x 34 52.40 x 29 W+.
G. Merceron – T. Goedemoed
26… 16 – 21 Black creates the Bonnard, hoping for 27.34 – 29 10 – 15 28.29 x 20 15 x 24 29.40 – 34 14 –
20!! 30.25 x 12 13 – 18 31.12 x 23 24 – 29 32.33 x 24 22 x 44 33.49 x 40 8 – 13 34.31 x 22 17 x 46 35.26 x 17 11 x 22 B+.
27.49 – 44 10 – 15? 28.34 – 30
After 28… 8 – 12 29.39 – 34! the answer 18 – 23 is punished by 30.44 – 39 23 x 32 31.33 – 28 22 x 44 32.31 x 22 17 x 28 33.38 x 18 13 x 22 34.40 x 49 W+.
28… 18 – 23
White missed the chance to win the game playing 29.42 – 37!! 23 x 32 30.37 x 28 and it turns out that 24 – 29 works like a boomerang: 30… 24 – 29 31.33 x 24 22 x 42 32.31 x 22 17 x 28 33.26 x 17 11 x 22 34.41 – 37 42 x 31 35.36 x 18 13 x 22 36.24 x 4 W+. 30… 13 – 18 fails to 31.33 – 29 etc. W+ 30… 8 – 12 is punished by 31.28 – 23 19 x 28 32.30 x 8. This means only the poor 30… 11 – 16 is possible with a terrible position for black after 31.40 – 34.
29.40 – 34 23 x 32 30.33 – 29 24 x 33 31.39 x 37 13 – 18
Piece 28 is gone. What remains is an open Bonnard. White doesn’t have any base pieces anymore. Black has no weak pieces at the 1 / 18 diagonal. The position is slightly better for black. A logical variation: 32.37 – 32 8 – 13 33.41 – 37 18 – 23 34.34 – 29 23 x 34 35.30 x 39 19 – 23 and black has a good position.
32.38 – 33 8 – 13 White should play 33.43 – 39 19 – 23 34.33 – 28 23 x 32 35.37 x 28 22 x 33 36.39 x 28 17 – 22 37.26 x 17 22 x 33 38.31 x 22 18 x 27 39.17 – 12 =. In the game he makes a big mistake by keeping the gap at 39 intact.

239
33.34 – 29? Exercise 7.4 Look for the winning shot for black!
H. Wiersma – T. Sijbrands
15… 14 – 20 Improving on a former game against Wim van der Sluis, in which black played 15… 9 – 13? 16.34 – 30! 5 – 10 17.40 – 34 3 – 9 17… 2 – 7 is met by the typical combination 18.28 – 23! 18 x 40 19.33 – 28 22 x 33 20.38 x 18 12 x 23 21.31 x 22 17 x 28 22.26 x 17 11 x 22 23.36 – 31! White can’t attack at once with 50 – 45 because of the 6 – 11 22 – 27 23 – 28 23 x 41 breakthrough. After 23.36 – 31 both 24.32 – 27 and 24.50 – 45 are threatening. Moreover, after 23… 7 – 12 white can also take the 39 – 34 31 – 27 37 x 26 44 x 2 shot. 18.28 – 23! 18 x 40 19.33 – 28 22 x 33 20.38 x 20 14 x 34 21.31 x 22 17 x 28 22.32 x 5 and black resigned.
16.50 – 45 9 – 13 White could have played 16.28 – 23 19 x 28 17.32 x 23 18 x 29 18.34 x 23 if he wanted,
since 18… 24 – 30 19.35 x 24 20 x 18 20.33 – 28 22 x 33 21.31 x 13 etc. leads to equality.
17.34 – 29 20 – 25 18.29 x 20 15 x 24 19.40 – 34 4 – 10
19… 5 – 10 could have been answered by 20.44 – 40 and black can’t take 25 – 30 21.34 x 25 24 – 29 22.33 x 24 22 x 44 23.31 x 22 19 x 30 24.35 x 24 44 x 35 25.43 – 39 18 x 27 26.38 – 33 27 x 20 27.25 x 5. After 19… 4 – 10 20.44 – 40 isn’t possible, but 20.45 – 40 followed by 28 – 23 is a serious plan.
20.34 – 30 25 x 34 21.39 x 30 18 – 23
22.43 – 39
Playing 22… 12 – 18? would allow white to remove piece <28> by playing 23.39 – 34 10 – 14 24.33 – 29 24 x 33 25.28 x 39. This open Bonnard is better for white. Pieces 2 and 8 aren’t active. Black doesn’t close <18> and thus keeps white from changing via 33 – 29 x 39.
22… 3 – 9! 23.39 – 34 2 – 7
24.33 – 29 leads nowhere after 24 x 33 38 x 18 12 x 23 etc.
23.44 – 39 12 – 18 25.49 – 44 7 – 12 26.30 – 25 9 – 14 27.34 – 30 10 – 15 28.39 – 34 5 – 10

240
29.44 – 40
White built the power block, but black has anticipated on that.
29… 23 – 29 30.34 x 23 18 x 29 31.40 – 34 29 x 40 32.45 x 34 15 – 20
33.34 – 29 12 – 18 leads to a freeze out, but white saves his ass with a drawing combination.
33.33 – 29! 33… 22 x 33 34.31 x 22 17 x 28 35.26 x 17 11 x 22 36.30 x 19 33 x 24! 37.19 x 30 also leads to a draw. After 36… 13 x 24? 37.29 – 23 28 x 19 38.38 x 29 24 x 33 39.42 – 38 33 x 31 40.36 x 7 white would win.
33…. 24 x 33
34.38 x 29 22 x 24 35.31 x 22 17 x 28 36.32 x 23 19 x 28 37.30 x 19 13 x 24 38.26 x 17 11 x 22 39.34 – 29 24 x 33 40.42 – 38 33 x 31
41.36 x 7 and after fifteen more moves the game was drawn.
Ron Heusdens (2007)

241
8.Springer counter attack 1.32 – 28 19 – 23 2.28 x 19 14 x 23 3.37 – 32 10 – 14 4.41 – 37 5 – 10 5.35 – 30 20 – 25 6.46 – 41 14 – 19 7.33 – 29 9 – 14 8.40 – 35 3 – 9 9.45 – 40 leads to this position:
9…. 17 – 22 10.31 – 27 22 x 31 11.36 x 27 11 – 17 12.30 – 24 19 x 30 13.35 x 24 leads to a Roozenburg attack for white. Black can prevent this by playing the Springer counter attack: 9…. 23 – 28 10.32 x 23 19 x 28. 11.50 – 45? is a theoretical mistake now. Black plays 11… 16 – 21! 12.31 – 26 21 – 27!
White has to take care for tactics: 1) 13.37 – 31? 28 – 33! 14.31 x 22 18 x 27 15.39 x 28 17 – 21 16.26 x 17 11 x 24 17.30 x 19 14 x 23 B+1. 2) 13.38 – 33 27 – 32 14.33 x 22 18 x 27 15.37 x 28 17 – 21 16.26 x 17 11 x 24 B+1. 3) 13.30 – 24 28 – 33! 14.39 x 28 14 – 19 15.43 – 39 19 x 30 16.35 x 24 15 – 20 17.24 x 15 25 – 30 18.34 x 25 27 – 31 19.36 x 27 18 – 22 20.27 x 18 12 x 23 and black has a better position. 4) 13.38 – 32 27 x 38 14.43 x 23 13 – 19 black is winning back the piece with an advantage. White should thus choose between 11.30 – 24 and 11.39 – 33 28 x 39 12.44 x 33.
Kolk – Faas
12.28 – 23! 13 – 18?
Exercise 8.1 How did white win a piece? Exercise 8.2 How is 12… 14 – 20 punished?
V. Wirny – M. Sjulman
Before white could play 38 – 32 black launched a strong Springer counter attack.
19… 23 – 28!
White can’t attack piece 28 via 38 – 32? due to 18 – 23 29 x 18 13 x 22 32 x 23 20 x 18 B+1.
20.38 – 33 7 – 11 31.33 x 22 17 x 28 32.42 – 38 1 – 7 33.36 – 31 12 – 17
After 34 – 30? 25 x 23 31 – 27 20 x 29 27 – 22 18 x 27 38 – 33 29 x 38 43 x 1 13 – 18! white’s king is trapped.
34.41 – 36 8 – 12 35.31 – 26 3 – 8

242
White’s pieces at his right wing are quite passive. White has little room to play. Black has built strong formations.
36.48 – 42 11 – 16 37.37 – 31 18 – 22
After 37… 16 – 21 38.42 – 37 18 – 22? 39.38 – 32 black would lose a piece! But 38… 17 – 22 39.26 x 17 22 x 11 would still be okay for black.
38.31 – 27 22 x 31 39.26 x 37 12 – 18
Preventing 38 – 32 by 18 – 23 B+ again.
40.37 – 31 18 – 22
41.42 – 37?
Black forces the gain of a piece now. White already had a difficult position. After 41.31 – 26 7 – 12 42.38 – 33 16 – 21 43.42 – 37 1) 43… 21 – 27 44.37 – 31(!) 13 – 18 44… 9 – 14 45.24 – 19! 13 x 24 46.29 – 23 28 x 19 47.33 – 29 24 x 33 48.39 x 28 22 x 33 49.33 x 11 = 45.24 – 19 9 – 14 46.19 x 10 20 – 24 47.29 x 20 25 x 5 with advantage for black 2) 43… 9 – 14 and white must flee into a bad endgame with 44.34 – 30 25 x 23 45.24 – 19 13 x 24 46.33 – 29 24 x 33 47.37 – 32 28 x 37 48.39 x 10 37 – 42 etc.
41… 8 – 12
After 42.38 – 33 16 – 21 31 – 26 21 – 27 black’s position is superior. 42.38 – 32 loses a piece to 7 – 11 43.32 x 23 22 – 27 44.31 x 22 17 x 30 45.40 – 35 12 – 18 46.35 x 24 18 – 23 B+1.
42.40 – 35 28 – 33 43.39 x 28 22 x 42 44.37 x 48 13 – 18 45.44 – 40 18 – 23 46.29 x 18 12 x 23 47.34 – 29 23 x 34 48.40 x 29 9 – 13
Black will gain a piece at the next move by 25 – 30, so white resigned.
A Springer contra attack often leads to a
strong centre-wing-attack.

243
9.Mutual outposts
When both players have an outpost at <24> and <27> we get complex situations. It is possible to write an entire book about this subject. We will discuss some typical ideas that are important in this type of play.
A. Chzizhov – P. Chmiel
Both players have an outpost at their right wing. White holds the centre. He now takes another outpost at <23>, which is pretty dangerous in this situation.
15.28 – 23 9 – 14 16.31 – 26?
This is a severe mistake in this position, for white is tactically frozen out! White could have escaped from a loss, by playing 16.40 – 35 because after 13 – 19 17.24 x 13 8 x 28 18.44 – 40 white wins back the lost piece.
16… 3 – 9!
White has no good move left. 17.37 – 31 is met by 27 – 32 18.38 x 27 22 – 28 19.23 x 32 13 – 19 (another important idea is 18 – 22 27 x 18 12 x 23 29 x 19 20 x 27 31 x 22 17 x 28 B+1) 20.24 x 22 17 x 46 B+. 17.37 – 32 is punished by 22 – 28 18.33 x 31 13 – 19 19.24 x 22 17 x 46 B+.
17.33 – 28 22 x 33 18.39 x 28 isn’t good because of 27 – 32 19.38 x 27 18 – 22 20.27 x 18 13 x 33 21.29 x 38 20 x 18 B+. 17.34 – 30 25 x 34 18.39 x 30 is simply punished by 13 – 19 B+. 17.40 – 35 13 – 19 18.24 x 13 8 x 28 19.38 – 32 19.44 – 40 20 – 24 20.29 x 20 15 x 24 B+1 19… 27 x 38 20.43 x 23 20 – 24 44.29 x 20 18 x 38 45.42 x 33 15 x 24 loses a piece for white.
P. Hoogteijeling – G. Kolk
After having studied the Tsjizjow – Chmiel game I showed my draughts pupil Gerlof Kolk that 9-14 is even better than 5-10 in this position that comes from the opening: 1.33 – 29 19 – 23 2.35 – 30 20 – 25 3.40 – 35 14 – 20 4.44 – 40 10 – 14 5.38 – 33 14 – 19 6.30 – 24 19 x 30 7.35 x 24 17 – 22 8.42 – 38 11 – 17 9.50 – 44 6 – 11 10.32 – 28 23 x 32 11.37 x 28 16 – 21 12.41 – 37 21 – 27 13.46 – 41 9 – 14 14.48 – 42 1 – 6.
15.28 – 23? The mistake we hoped for. White should play 15.31 – 26 or 15.40 – 35. Black forces the win of a piece now.
15… 3 – 9! Contrary to the former game, white cannot escape playing 16.40 – 35 13 – 19 17.24 x 13 8 x 28: At 18.44 – 40 20 – 24 19.29 x 20 15 x 24 follows and 18.35 – 30 is met by 4 – 10!! 19.38 – 32 27 x 38 20.43 x 23 9 – 13 Threatening 22 – 27 B+
21.31 – 27 22 x 31 22.26 x 27 14 – 19! 23.23 x 14 10 x 19 and at the next move black plays 20 – 24 winning a piece.
16.31 – 26 5 – 10! The same situation as in Chzizhov – Chmiel arose. Black won the game.

244
A. Tolchikau – M. Slezak
Black’s best move is 23 – 28! Playing 38 – 32 27 x 38 43 x 23 is not good for white because of 22 – 27 etc.. Therefore white has little space to pay left: 17… 23 – 28 18.44 – 40 1 – 6 19.40 – 35 10 – 14 20.24 – 20 15 x 24 21.29 x 20 11 – 16! And because of the 27 – 32 17 – 21 threat white has to play the ugly 47 – 41, creating a dangling piece at <41>.
17… 1 – 6 18.37 – 32 10 – 14 19.32 x 21 14 – 19
Black makes a counterattack at white’s outpost. After 19… 22 – 28 20.33 x 22 18 x 16 21.29x 18 black shouldn’t take 12 x 23 off course (22.24 – 19 13 x 24 23.34 – 29 W+) but 13 x 22
20.45 – 40 19 x 30 21.40 – 35 11 – 16 22.35 x 24 16 x 27 23.42 – 37 7 – 11
24.48 – 42
Playing 24… 4 – 10 allows black to take a combination after 25.37 – 32? Exercise 9.1 Try to find this kingshot! 24… 4 – 10 opens the base square <4>, giving white the opportunity to take a kingshot: 25.34
– 30 23 x 34 26.24 – 19 13 x 35 27.39 x 30 25 x 34 28.33 – 28 22 x 33 29.31 x 4 but the situation isn’t clear after 33 – 39 30.44 x 33 34 – 40. Black can also play 24… 11 – 16 25.37 – 31 6 – 11 26.32 x 21 16 x 27 27.42 – 37 23 – 28 etc.
24... 23 – 28 25.44 – 40 4 – 10 26.40 – 35 2 – 7
After 26… 9 – 14 white can (also) play 27.26 – 21 1) 27… 27 x 16 28.24 – 20 15 x 24 29.29 x 9 13 x 4 30.31 – 27 22 x 31 31.33 x 13 8 x 19 32.36 x 27 with a small advantage for white. 2) 27… 17 x 26 28.38 – 32 27 x 38 29.43 x 23 14 – 20 30.31 – 27 22 x 31 31.36 x 27 with a good position for white.
Base pieces 2 and 4 are gone, which gives white extra tactical possibilities.
27.26 – 21! 17 x 26
It’s not possible to take 27… 27 x 16 because of 24 – 19 followed by 31 – 27 W+.
28.38 – 32 27 x 38 29.43 x 23 11 – 17
30.47 – 41 White took over the attack and now is aiming arrows at <27>.
30… 6 – 11 31.31 – 27 22 x 31
32.36 x 27
< Diagram > Black should attack piece 27: 32… 17 – 22 33.41 – 36 22 x 31 34.36 x 27 11 – 17 35.27 – 21 17 – 22 36.21 – 16 9 – 14, for example 37.42 – 38 14 – 20 38.49 – 43 22 – 27 39.33 –

245
28 27 – 31 40.39 – 33 31 x 42 41.38 x 47 13 – 19! 42.24 x 11 20 – 24 43.29 x 20 18 x 49 =.
32… 18 – 22?
33.27 x 18 13 x 22 34.49 – 43 11 – 16
White gets to much space for his attack. With the next strong exchange white takes even more space.
35.34 – 30 25 x 34 36.39 x 30 8 – 13 37.30 – 25 7 – 11 38.43 – 39 10 – 14 39.42 – 38 13 – 18?
White could have finished the game easily now: 40.37 – 31! 26 x 46 41.35 – 30 46 x 19 42.24 x 4 +.
40.39 – 34 16 – 21 Black should have tried 40… 22 – 27! 41.34 – 30 14 – 19!! 42.24 x 31 12 – 18 43.23 x 21 16 x 47 and black can still fight on.
41.34 – 30
After 41… 15 – 20 42.24 x 15 9 – 13 43.23 – 19 14 x 34 44.40 x 39 black resigned.
T. Sijbrands – A. Anderson
In one of Sijbrands’ famous blindfold games the master showed a devastating combination.
15.28 – 23!
Black can’t attack the outpost at <23> with 13 – 19 because of 31 – 26 19 x 28 29 – 24 20 x 29 34 x 21 W+1.
15… 3 – 9
White can play 16.30 – 24 13 – 19 17.24 x 13 8 x 28 18.29 – 24 20 x 29 19.34 x 21 17 x 26 20.31 – 27 22 x 31 21.36 x 27 with an advantage for white, but white wants more!
16.31 – 26 11 – 16? Black should have played 20 – 24. White forces a win in an astonishing way now.
17.37 – 32! 7 – 11 18.32 x 21 16 x 27 19.30 – 24 11 – 16
20.33 – 28! 22 x 33 21.38 x 28 18 – 22
After 22.43 – 39 22 x 33 23.39 x 28 13 – 19 24.24 x 13 8 x 19 black would do okay, but white prepared a great surprise for his opponent.
22.34 – 30!! The beginning of a beautiful shot. White can also play 22.41 – 37 22 x 33 23.34 – 30 etc.
22… 25 x 34 23.41 – 37 22 x 33 24.23 – 19 14 x 23
24… 34 x 23 25.38 x 7 2 x 11 loses due to 26.42 – 38 20 x 29 27.37 – 32! 13 x 24 28.32 x 3 11 – 17 29.3 x 21 16 x 27 30.38 – 33 29 x 38 31.43 x 21 W+.
25.29 x 7 2 x 11

246
26.38 x 29 34 x 23 27.44 – 39 20 x 29 28.39 – 33 29 x 38
29.43 x 5
Sijbrands playing blindfold against 28 players (Amsterdam 2009)
Exercise 9.2 What should white pay in this position: 12.31 – 26 or 12.40 – 35 and why?
Exercise 9.3 How should white play. Choose from the following options: A) He should play the attacking move 28 – 23 B) He should take a kingshot with 24 – 19
C) He should play 47 – 41 as a waiting move
Exercise 9.4 Why is it a mistake to defend the outpost with 34 – 30 25 x 34 39 x 30?
Exercise 9.5 Show the way black wins after the following moves: A) 41 – 37 B) 42 – 37 C) 38 – 32 27 x 38 42 x 32

247
Solutions section 5
Lesson 1: The centre attack
1.1 37 – 31 26 x 48 27 – 22 48 x 45 22 x 4 45 x 18 4 x 6 W+ 1.2 44 – 39 19 x 30 37 – 31 26 x 37 48 – 42 37 x 48 28 – 23 48 x 34 23 x 1 34 x 18 1 x 25 W+ 1.3 28 – 23 7 – 12 32 – 27 and black is tactically frozen out: 17 – 22 29 – 24 W+ and 13 – 19 25 – 20 W+ 1.4 37 – 31 26 x 37 27 – 21 17 x 26 28 – 22 ad lib. 34 – 30 ad lib. 30 x 8 2 x 13 33 x 2 W+ 1.5 28 – 22 19 x 17 32 – 28 21 x 23 37 – 31 26 x 46 38 – 32 46 x 28 33 x 2 24 x 33 39 x 17 W+ 1.6 37 – 31 26 x 37 32 x 41 21 x 32 28 x 37 19 x 28 33 x 22 17 x 28 35 – 30 25 x 45 44 – 40 45 x 34 39 x 6 + 1.7 14 – 20 23 x 14 3 – 8 14 x 3 24 – 30 35 x 24 20 x 29 33 x 24 8 – 13 3 x 17 11 x 35 followed by 25 – 30 B+1. Lesson 2: Playing against the centre attack 2.1 13 – 19 24 x 13 8 x 28 38 – 32 4 – 9 32 x 23 22 – 28 23 x 32 14 – 20 25 x 3 12 – 17 3 x 21 16 x 47 B+ 2.2 49 – 44 9 – 13 37 – 32 38 x 37 33 – 28 22 x 24 34 – 29 ad lib. 39 x 17 W+ 2.3 43 – 38 7 – 12 49 – 44 12 – 18 (12 – 17 37 – 31 27 x 36 33 – 29 W+1) 37 – 31 27 x 36 38 – 32 28 x 48 33 – 29 24 x 33 39 x 17 48 x 30 35 x 22 W+ 2.4 14 – 20 23 x 3 20 x 29 33 x 35 13 – 18 3 x 17 11 x 44 B+ Lesson 3: The classical attack 3.1 34 – 30 21 – 26 46 – 41 and black has no good move left, since 8 – 12 is met by 38 – 33 29 x 38 30 – 24 19 x 30 28 x 17 W+ 3.2 25 – 20 14 x 25 32 – 27 23 x 21 42 – 37 17 x 28 26 x 17 ad lib. 38 – 33 ad lib. 43 x 3 W+ 3.3 33 – 29 24 x 33 28 x 39 17 x 28 34 – 29 23 x 34 32 x 3 W+
3.4 31 – 26 3 – 8 (12 – 17 leads to a deadly right wing lock) 26 x 17 11 x 44 27 – 22 18 x 27 32 x 21 16 x 27 43 – 39 44 x 33 38 x 7 W+ 3.5 17 – 21 33 x 24 18 – 22 27 x 20 21 – 26 24 x 13 26 x 46 28 x 19 46 x 25 B+ 3.6 37 – 31 26 x 37 32 x 41 23 x 32 38 x 27 17 x 28 34 x 32 W+ 3.7 21 – 27 32 x 12 23 x 41 36 x 47 8 x 28 47 – 41 26 x 37 41 x 34 W+ 3.8 32 – 27 ad lib. 46 x 37 ad lib. 36 x 47 17 x 28 38 – 33 ad lib. 43 x 23 19 x 28 30 x 10 W+ Lesson 4: The Highland attack 4.1 34 – 30 25 x 34 43 – 39 34 x 43 33 – 29 24 x 33 28 x 48 17 x 28 32 x 25 W+ 4.2 22 – 17 14 – 19 17 x 8 13 x 2 25 – 20 23 – 29 35 – 30 24 x 35 33 x 4 W+ 4.3 18 – 22 37 – 31 14 – 20 25 x 14 19 x 10 30 x 28 10 – 14 33 x 24 22 x 42 B+ 4.4 39 – 33 30 x 39 22 – 17 11 x 22 28 x 17 39 x 28 32 x 14 9 x 20 27 – 21 16 x 27 31 x 22 18 x 27 17 – 11 6x 17 37 – 31 26 x 37 42 x 11 W+ 4.5 28 – 23 19 x 17 34 – 30 35 x 24 37 – 31 26 x 28 33 x 2 24 x 42 2 x 47 W+ 4.6 39 – 33 14 – 20 25 x 14 9 x 20 33 x 24 20 x 29 32 – 28 22 x 33 40 – 34 29 x 40 38 x 9 3 x 14 45 x 34 W+1 Lesson 5: Playing against a Highland attack 5.1 26 – 21 17 x 26 36 – 31 26 x 28 39 – 33 28 x 30 35 x 11 W+ 5.2 13 – 18 22 x 2 12 – 18 2 x 35 9 – 13 35 x 21 16 x 47 B+. 5.3 27 – 21 16 x 27 (18 x 27 28 – 22 26 x 28 32 x 3 W+) 22 x 31 = 5.4 16 – 21 27 x 7 18 x 27 32 x 21 26 x 17 7 x 18 x 31 36 x 27 B+ Lesson 6: The Roozenburg attack 6.1 7 – 11 28 x 10 26 – 31 37 x 26 13 – 19 24 x 22 17 x 46 26 x 17 11 x 31 36 x 27 46 x 5 B+

248
6.2 24 – 19 13 x 24 34 – 30 23 x 34 30 x 10 25 – 30 35 x 24 20 x 29 ad lib. 3 – 9 ad lib. 9 – 14 10 x 19 15 – 20 24 x 15 26 – 31 37 x 26 4 – 10 15 x 4 7 – 11 4 x 22 17 x 50 26 x 17 12 x 43 49 x 38 50 – 28 B+ 6.3 12 – 17 23 x 12 2 – 7 12 x 1 8 – 12 1 x 9 3 x 41 B+ 6.4 27 – 22 18 x 27 38 – 33 27 x 38 24 – 20 25 x 23 29 x 7 38 x 40 7 – 1 and white eventually won the game. Lesson 7: The Partie Bonnard 7.1 18 – 22 = 7.2 16 – 21 26 x 17 11 x 33 29 x 38 20 x 29 32 – 28 23 x 32 34 x 14 25 x 34 40 x 29 W+ 7.3 16 – 21 26 x 17 11 x 33 32 – 28 23 x 43 29 x 49 20 x 29 34 x 23 W+ 7.4 18 – 23 29 x 18 14 – 20 25 x 23 13 – 19 23 x 14 22 x 13 31 x 22 17 x 48 26 x 17 48 x 25 B+ Lesson 8: The Springer counter attack 8.1 24 – 19 18 x 29 33 x 24 14 x 23 34 – 30 25 x 34 40 x 27 21 x 32 37 x 28 W+1 8.2 23 – 18 20 x 29 33 x 24 12 x 23 34 – 30 25 x 34 40 x 27 21 x 32 37 x 28 W+1 Lesson 9: Mutual outposts
9.1 25.37 – 32? 17 – 21 26.26 x 19 18 – 22 27.32 x 21 22 – 28 28.33 x 22 11 – 17 29.22 x 11 6 x 48 + 9.2 12.31 – 26? 3 – 9!! will leave white with no good move (13.37 – 31 27 – 32! 14.28 x 37 18 – 22 15.27 x 18 12 x 23 16.29 x 18 20 x 27 17.31 x 22 17 x 28 Z+1), so he needs to play 12.40 – 35 (after 13 – 19 13.24 x 13 8 x 28 14.44 – 40 white will win the lost piece back). 9.3 28 – 23? Is followed by 27 – 32! 38 x 27 22 – 28! 23 x 32 18 – 22 27 x 18 12 x 23 29 x 18 20 x 27 31 x 22 17 x 28 B+1. Taking the kingshot 24 – 19 14 x 32 34 – 30 25 x 23 33 – 28 22 x 33 39 x 19 13 x 24 31 x 4 leads to an equal amount of pieces after 10 – 14 38 x 27 12 – 18 4 x 22 17 x 28 =. White should play 47 – 41! 1) 14 – 19 34 – 30! 25 x 32 33 – 29 19 x 30 29 – 23 18 x 29 40 – 34 29 x 40 45 x 5 W+
2) 18 – 23 28 x 19 14 x 23 29 x 18 12 x 23 33 – 29! 2.1) 13 – 18 24 – 19 23 x 14 29 – 24 20 x 29 34 x 32 W+ 2.2) 8 – 12 29 x 18 12 x 23 42 – 37 20 x 29 38 – 33 29 x 38 43 x 1 + 2.3) 23 – 28 34 – 30 25 x 23 42 – 37 20 x 29 38 – 33 29 x 38 43 x 5 + 3) 11 – 16 28 – 23! 7 – 11 41 – 37 16 – 21 24 – 19! 13 x 24 33 – 28 W+ 9.4 34 – 30 25 x 34 39 x 30 27 – 31 36 x 18 12 x 32 38 x 27 13 – 18 24 x 22 17 x 50 B+ 9.5 A) 41 – 37? 27 – 32 38 x 27 22 x 31 36 x 27 17 – 22 28 x 17 12 x 41 47 x 36 18 – 23 29 x 18 20 x 47 B+ B) 42 – 37? 18 – 23 28 x 19* 27 – 32 38 x 18 12 x 34 39 x 30 20 x 38 43 x 32 13 x 35 B+1 C) 38 – 32? 27 x 38 43 x 32 17 – 21! 26 x 17 12 x 21 28 x 26 18 – 23 29 x 18 20 x 27 B+1