
JD Edwards EnterpriseOne Tools - Oracle Help Center
162
JD Edwards EnterpriseOne Tools Software Updates Guide Release 9.2
-
Upload
khangminh22 -
Category
Documents
-
view
4 -
download
0
Transcript of JD Edwards EnterpriseOne Tools - Oracle Help Center
JD EdwardsEnterpriseOneTools
Software Updates Guide
Release 9.2

JD Edwards EnterpriseOne ToolsSoftware Updates Guide
Release 9.2
Part Number: E53540-13
Copyright © 2011, 2021, Oracle and/or its affiliates.
This software and related documentation are provided under a license agreement containing restrictions on use and disclosure and are protectedby intellectual property laws. Except as expressly permitted in your license agreement or allowed by law, you may not use, copy, reproduce, translate,broadcast, modify, license, transmit, distribute, exhibit, perform, publish, or display any part, in any form, or by any means. Reverse engineering,disassembly, or decompilation of this software, unless required by law for interoperability, is prohibited.
The information contained herein is subject to change without notice and is not warranted to be error-free. If you find any errors, please reportthem to us in writing.
If this is software or related documentation that is delivered to the U.S. Government or anyone licensing it on behalf of the U.S. Government, thenthe following notice is applicable:
U.S. GOVERNMENT END USERS: Oracle programs (including any operating system, integrated software, any programs embedded, installed oractivated on delivered hardware, and modifications of such programs) and Oracle computer documentation or other Oracle data delivered to oraccessed by U.S. Government end users are "commercial computer software" or "commercial computer software documentation" pursuant to theapplicable Federal Acquisition Regulation and agency-specific supplemental regulations. As such, the use, reproduction, duplication, release, display,disclosure, modification, preparation of derivative works, and/or adaptation of i) Oracle programs (including any operating system, integratedsoftware, any programs embedded, installed or activated on delivered hardware, and modifications of such programs), ii) Oracle computerdocumentation and/or iii) other Oracle data, is subject to the rights and limitations specified in the license contained in the applicable contract. Theterms governing the U.S. Government's use of Oracle cloud services are defined by the applicable contract for such services. No other rights aregranted to the U.S. Government.
This software or hardware is developed for general use in a variety of information management applications. It is not developed or intended foruse in any inherently dangerous applications, including applications that may create a risk of personal injury. If you use this software or hardwarein dangerous applications, then you shall be responsible to take all appropriate fail-safe, backup, redundancy, and other measures to ensure its safeuse. Oracle Corporation and its affiliates disclaim any liability for any damages caused by use of this software or hardware in dangerous applications.
Oracle and Java are registered trademarks of Oracle and/or its affiliates. Other names may be trademarks of their respective owners.
Intel and Intel Inside are trademarks or registered trademarks of Intel Corporation. All SPARC trademarks are used under license and are trademarksor registered trademarks of SPARC International, Inc. AMD, Epyc, and the AMD logo are trademarks or registered trademarks of Advanced MicroDevices. UNIX is a registered trademark of The Open Group.
This software or hardware and documentation may provide access to or information about content, products, and services from third parties. OracleCorporation and its affiliates are not responsible for and expressly disclaim all warranties of any kind with respect to third-party content, products, andservices unless otherwise set forth in an applicable agreement between you and Oracle. Oracle Corporation and its affiliates will not be responsiblefor any loss, costs, or damages incurred due to your access to or use of third-party content, products, or services, except as set forth in an applicableagreement between you and Oracle.

JD Edwards EnterpriseOne ToolsSoftware Updates Guide
Contents
Preface .................................................................................................................................. i
1 Introduction to Software Updates 1Software Update Overview ........................................................................................................................................................... 1
Implementing Software Updates ................................................................................................................................................ 2
2 Preparing for a Software Update 3Understanding the Update Process ........................................................................................................................................... 3
Performing an Impact Analysis ................................................................................................................................................... 3
Knowing what an Update Preserves and Replaces ................................................................................................................ 4
Preparing Environments for Update .......................................................................................................................................... 7
3 Installing Updates on the Deployment Server 13Understanding the Deployment Server Installation .............................................................................................................. 13
Using Update Center to Acquire Updates ............................................................................................................................... 13
Using the Oracle Software Delivery Cloud to Acquire Updates .......................................................................................... 13
Installing the Software Update on the Deployment Server ................................................................................................ 14
4 Using Change Assistant 17Understanding Change Assistant .............................................................................................................................................. 17
Installing the Java Runtime Engine .......................................................................................................................................... 17
Installing Change Assistant ........................................................................................................................................................ 17
Viewing BUG Details ................................................................................................................................................................... 20
First In (Release 9.2.6) ................................................................................................................................................................. 20
Searching for Software Packages ............................................................................................................................................. 20
Working with Packages ............................................................................................................................................................... 26
Working with Batches .................................................................................................................................................................. 31
Deploying UDOs using the Change Assistant (Tools Release 9.2 Update 2) ................................................................... 33
Working with Software Update - Web (Release 9.2.6) ......................................................................................................... 48
5 Running Software Updates 49Understanding Software Updates ............................................................................................................................................ 49

JD Edwards EnterpriseOne ToolsSoftware Updates Guide
Working with the Software Updates ....................................................................................................................................... 49
Starting and Running the Software Updates ........................................................................................................................ 50
Completing the Update .............................................................................................................................................................. 54
6 Using Object Usage Tracking (Release 9.2.1.2) 61Understanding Object Usage Tracking .................................................................................................................................... 61
Working with Object Usage Tracking Configuration (P980042T) ..................................................................................... 61
Working with Object Usage Tracking Detail (P98911) .......................................................................................................... 63
Working with Object Usage Tracking Summary (P98902) ................................................................................................. 63
Working with Summarize Object Usage UBEs (R98902) .................................................................................................... 64
Purging Object Usage Tracking Detail for Applications and Batch Applications (R98911P) ......................................... 65
Purging Business Function Tracking Detail (R98912) .......................................................................................................... 65
Working with Object Usage Tracking Composed EnterpriseOne Page ............................................................................ 66
7 Using the Software Update Impact Analysis Tool 71Understanding the Software Update Impact Analysis Tool ................................................................................................ 71
Working with the Software Update Impact Analysis Tool .................................................................................................... 71
Working with Object Usage for Software Update Impact Analysis ................................................................................... 76
8 Using JD Edwards Compare and Merge Tools 79Understanding JD Edwards EnterpriseOne Compare and Merge Tools .......................................................................... 79
Application Configuration Analyzer ......................................................................................................................................... 79
JD Edwards Visual Compare for UDC Descriptions and Glossary Tool ............................................................................ 93
JD Edwards EnterpriseOne FDA Compare ............................................................................................................................. 94
JD Edwards EnterpriseOne ER Compare ................................................................................................................................ 97
JD Edwards EnterpriseOne RDA Compare (Release 9.2.4.3) ............................................................................................. 101
JD Edwards EnterpriseOne Business View Compare (Release 9.2.4) .............................................................................. 105
JD Edwards EnterpriseOne Table Compare (Release 9.2.4) .............................................................................................. 108
Customization Object Analyzer ................................................................................................................................................ 110
Decustomizer Analysis Report (Release 9.2.3.3) .................................................................................................................. 127
9 Custom Modifications and Packages 133Understanding Custom Modifications and Packages ......................................................................................................... 133
Identifying Custom Modifications Using the Customization Workbench ....................................................................... 133
Retrofitting Custom Modifications .......................................................................................................................................... 141
Using JD Edwards EnterpriseOne Package Management ................................................................................................ 144

JD Edwards EnterpriseOne ToolsSoftware Updates Guide
10 Updating Environments 147Understanding How to Update the Production Environment .......................................................................................... 147
Updating the Production Environment ................................................................................................................................. 147
11 Appendix A - Setting Up Localizations 149Understanding How to Set Up Localizations ....................................................................................................................... 149
Adding the Localization ............................................................................................................................................................ 149
Changing the Revision Level ................................................................................................................................................... 150
Setting Processing Options for R96450 ................................................................................................................................ 150

JD Edwards EnterpriseOne ToolsSoftware Updates Guide

JD Edwards EnterpriseOne ToolsSoftware Updates Guide
Preface
PrefaceWelcome to the JD Edwards EnterpriseOne Tools Software Updates Guide
AudienceThis guide is intended for system administrators and technical consultants who are responsible for working withsoftware updates and Change Assistant.
This guide has been updated for JD Edwards EnterpriseOne Tools releases 9.2.2, 9.2.3.3 and 9.2.4.
Documentation AccessibilityFor information about Oracle's commitment to accessibility, visit the Oracle Accessibility Program website at http://www.oracle.com/pls/topic/lookup?ctx=acc&id=docacc .
Access to Oracle SupportOracle customers that have purchased support have access to electronic support through My Oracle Support. Forinformation, visit http://www.oracle.com/pls/topic/lookup?ctx=acc&id=info or visit http://www.oracle.com/pls/topic/lookup?ctx=acc&id=trs if you are hearing impaired.
Related InformationFor additional information about JD Edwards EnterpriseOne applications, features, content, and training, visit the JDEdwards EnterpriseOne pages on the JD Edwards Resource Library located at:
http://learnjde.com
This guide contains references to server configuration settings that JD Edwards EnterpriseOne stores in configurationfiles (such as jde.ini, jas.ini, jdbj.ini, jdelog.properties, and so on). Beginning with the JD Edwards EnterpriseOne ToolsRelease 8.97, it is highly recommended that you only access and manage these settings for the supported server typesusing the Server Manager program. See the Server Manager Guide.
ConventionsThe following text conventions are used in this document:
Convention Meaning
boldface
Boldface type indicates graphical user interface elements associated with an action, or terms defined intext or the glossary.
italic
Italic type indicates book titles, emphasis, or placeholder variables for which you supply particularvalues.
monospace
Monospace type indicates commands within a paragraph, URLs, code in examples, text that appearson the screen, or text that you enter.
i

JD Edwards EnterpriseOne ToolsSoftware Updates Guide
Preface
ii

JD Edwards EnterpriseOne ToolsSoftware Updates Guide
Chapter 1Introduction to Software Updates
1 Introduction to Software Updates
Software Update Overview JD Edwards EnterpriseOne Software Update distributes the following types of updates.
• Electronic Software Update (ESU) is a fix to a problem reported on a specific JD Edwards EnterpriseOneapplication or report.
• Application Software Update (ASU) is a set of enhancements for a specific functional area of EnterpriseOneapplications.
• Language Update contains the translated language updates associated with a Software Update. This is onlyapplicable to customers that have a base language installed.
• Maintenance Pack (MP) is a group of all currently available fixes and in some cases, enhancements.
• Tools Release is a group of all fixes to JD Edwards EnterpriseOne foundation (System) code.
All are installed on the deployment server, deployed to a path code, merged with custom code as necessary, andvalidated before rollout to production users.
Using My Oracle Support My Oracle Support is your link to customer support functions, the latest release information, and the Update Center.Select the Patches and Downloads tab and JD Edwards Products link to access the Update Center. Link to the UpdateCenter to research and download updates for the entire line of Oracle's JD Edwards EnterpriseOne products.
Using Update Documentation Each software update includes documentation that describes the contents of the update and includes instructionsspecifically related to that update.
For an ESU, the documentation is in the form of an HTML document (JL12345.htm) packaged within the downloador accessible online before downloading. This document includes a list of SARs fixed by the update, the list of objectsmodified in the update and a section detailing special installation instructions to implement the fix. Each ASU andService Pack distribution CD includes a cover letter in PDF format. Read the cover letter before installing the update.
The cover letter includes this information:
• An overview of the installation process.
• Information related to running the update application.
• Manual steps specific to the update (for example, processing option and application setup).
• Other Software Updates that must be applied before or after the Software Update from the CD.
• Any changes to JD Edwards EnterpriseOne Certifications (MTRs) required by this update.
Each Tools Release includes an HTML document detailing SARs fixed by this release, installation instructions, andspecial considerations for this release.
1

JD Edwards EnterpriseOne ToolsSoftware Updates Guide
Chapter 1Introduction to Software Updates
Implementing Software Updates All JD Edwards updates follow this basic process flow:
1. Prepare for the update.2. Acquire the update from the appropriate source.3. Install the update on the deployment server.4. Deploy the update to the Pristine and Development environments.5. Retrofit custom modifications and complete specific tasks relevant to the update.6. Validate the applied update in a safe environment.7. Rollout the update to production users.
2

JD Edwards EnterpriseOne ToolsSoftware Updates Guide
Chapter 2Preparing for a Software Update
2 Preparing for a Software Update
Understanding the Update Process To update JD Edwards EnterpriseOne successfully, complete the following checklist before starting the update process:
• Apply the latest JD Edwards EnterpriseOne Planner ESU prior to applying any JD Edwards EnterpriseOneApplications ESUs in order to ensure that updates are merged as expected.
• Complete a thorough Impact Analysis to consider the benefits and costs of applying each update.
• Prepare the prototype environment.
• Prepare the development environment.
• Check modification and merge flags.
• Backup critical data.
• Verify custom changes in master control tables.
Note:• Using the Software Update Impact Analysis Tool.
Performing an Impact Analysis Before you deploy any update, complete a thorough analysis of the benefits and costs associated with each update.Not all updates are relevant to your business or to the way you conduct your business. Careful planning at this stage iscritical to the success of applying an update. It is recommended that you perform the impact analysis in two phases:
1. Perform a rough cut by reviewing SARs associated with the update. This review will help you determine if theupdate is relevant to your needs.
2. If you determine that an update is relevant, download and install it to your deployment server. Use the ImpactAnalysis tool to conduct a thorough review, or apply and run the update in the Pristine environment (PS900).
The Impact Analysis tool provided with JD Edwards EnterpriseOne helps perform an impact analysis. A key feature ofthis tool is a list of the objects in the update that you have modified. You must reapply the modifications using the JDEdwards ER Compare tool.
Note:• Using the Software Update Impact Analysis Tool
3

JD Edwards EnterpriseOne ToolsSoftware Updates Guide
Chapter 2Preparing for a Software Update
Knowing what an Update Preserves and Replaces This section discusses the considerations that are important if your business requires custom modifications. An updatedoes not change or delete any new JD Edwards EnterpriseOne object you create. However, if you modify a standard JDEdwards EnterpriseOne object or interface to an object, there may be an impact to your modifications when applying anupdate.
These rules describe which of your modifications the update process preserves and which modifications the updatereplaces.
1. "Preserve" means that during an update you do not lose your custom modifications when the software youcurrently have installed automatically merges them with the new JD Edwards EnterpriseOne applicationsshipped with the update. If there is a direct conflict between your specifications and JD Edwards EnterpriseOnespecifications, the update process uses your specifications. When there is no direct conflict between the two,the update process merges the two specifications.
2. "Replace" means the update replaces your modifications and does not merge them into the update. You willneed to redo your custom modifications after the update completes.
Note: If possible, transfer all modifications to one path code. Do this only if you have tested and approvedall modifications or if you have modifications only in development. Having only one environment to updatesignificantly shortens the process.
To ensure an accurate and predictable update, follow these rules as you modify your JD Edwards EnterpriseOne objects.
Interactive Application Rules Do not delete controls, grid columns, or hyperitems on existing JD Edwards EnterpriseOne applications; instead, hide ordisable them. The updates might use these items for calculations or as variables, and deleting them might disable majorfunctionality.
The update process replaces the current application that resides in your Central Object database. Use Oracle's JDEdwards ER Compare to restore custom changes. This set of tools helps you restore custom changes to:
• New hyperitems.
• New controls and their event rules.
• New grid columns.
• Any style changes, such as fonts and colors.
• Any code-generator overrides.
• Data dictionary overrides.
• Location and size changes for controls.
• Sequence changes for tabs or columns.
An update replaces custom forms on existing JD Edwards EnterpriseOne applications.
4

JD Edwards EnterpriseOne ToolsSoftware Updates Guide
Chapter 2Preparing for a Software Update
Report Rules These rules apply to report specifications that were created using Report Design.
An update preserves these changes:
• New reports.
• New objects to existing reports, including:
• Constants.
• Alpha variables.
• Numeric variables.
• Data variables.
• Runtime variables.
• Database variables.
• Dictionary variables.
• Any style changes, such as fonts and colors.
• Location and size changes for objects.
• Data dictionary overrides.
An update replaces custom sections on existing reports.
Application Text Changes An update preserves overrides done in Oracle's JD Edwards EnterpriseOne Form Design Aid (FDA), Report Design, orInteractive or Batch Vocabulary Overrides.
Table Specification Rules An update merges your table specifications from one release level to the next.
An update preserves these changes:
• New tables
• New indexes
An update replaces columns added or removed from existing JD Edwards EnterpriseOne tables. This includes changingfield length, field type, and decimal position.
Instead of adding a new column to an existing JD Edwards EnterpriseOne table, use Oracle's JD Edwards EnterpriseOneTable Design Aid to create a second table that has the same key as the first table and add your modifications to the newtable. Use system codes 55 -59. For custom tag files, be aware of data item changes in the JD Edwards EnterpriseOnedata dictionary. From one release to the next, JD Edwards EnterpriseOne might change certain data item attributes,such as data item size, which can affect data integrity and how data is stored in the database.
5

JD Edwards EnterpriseOne ToolsSoftware Updates Guide
Chapter 2Preparing for a Software Update
For this reason, you might need to use Oracle's JD Edwards EnterpriseOne Table Conversion tool to convert the tagfile data to the new release level. For base tables, the update process takes care of the data dictionary changes byupgrading the JD Edwards EnterpriseOne database to the new release level.
An update preserves custom indices over the custom tag files.
See JD Edwards EnterpriseOne Tools Table Conversion Guide .
Control Table Rules An update merges your control tables during an update using the Change Table process, a delta between the baseproduct and the update, as the basis to do the data merge.
An update preserves these changes:
• Data dictionary custom changes, such as changes to row, column, and glossary text. The update process usesyour data dictionary as the base. If there is a conflict with JD Edwards EnterpriseOne data items, your changesoverride them.
• User-defined codes. The update process merges any new hard-coded JD Edwards EnterpriseOne values.(Values owned by JD Edwards EnterpriseOne are system 90 and higher, and H90 and higher.) The process alsoreports any JD Edwards EnterpriseOne hard-coded values that conflict with your custom values.
• Oracle's JD Edwards EnterpriseOne Workflow. The update process merges any JD Edwards EnterpriseOneadditions, updates, or deleted workflow processes in your data. If there is a conflict with your workflowprocesses, JD Edwards EnterpriseOne overrides them.
Business View Rules Do not remove columns from existing business views. Changing business views that applications use can causeunpredictable results when you run the application. If you need to hide columns, do so at the application design levelusing either FDA or Report Design. Performance is not greatly improved by deleting a few columns from a businessview.
An update preserves these changes:
• New custom business views.
• New columns, joins, or indices to the existing business views.
An update replaces columns that you have removed from JD Edwards EnterpriseOne business views.
Rules for Event Rules An update replaces all modifications that you have made to applications, including custom event rules. Use FDA and ERCompare to restore your customizations after an update.
An update replaces modifications that you have made to JD Edwards event logic in reports, tables, and Named EventRules (NER).
6

JD Edwards EnterpriseOne ToolsSoftware Updates Guide
Chapter 2Preparing for a Software Update
An update preserves new, custom logic that you have added to reports, tables, and NER on events with no previous orcurrent JD Edwards logic.
Data Structure Rules An update preserves all of these custom data structures:
• Forms
• Processing options
• Reports
• Business functions
• Generic text
An update replaces these custom modifications to JD Edwards EnterpriseOne data structures:
• Forms
• Processing options
• Reports
• Business functions
• Generic text
Preparing Environments for Update This section discusses how to:
• Prepare the prototype environment.
• Prepare the development environment.
• Check the modification and merge flags.
• Verify custom changes in master control tables.
• Back up servers and databases.
• Prepare the localization update.
In Tools Release 9.2.5 and later you can use long database passwords. You must perform the software update processwith the Security Server turned on if you are using long database passwords. The system user passwords must bechanged using P98OWSEC or P98LPSEC and you must add security overrides to all data sources prior to applying ESUswith the Security Server turned on. Add security overrides for the following data sources:
• System – 920
• Object Librarian – 920
• Data Dictionary – 920
• Business data, control tables, and versions for each environment
For example, you can add security override as:
• Business Data – TEST
7

JD Edwards EnterpriseOne ToolsSoftware Updates Guide
Chapter 2Preparing for a Software Update
• Control Tables – Test
• Versions – DV920
Note: You cannot specify a password longer than 10 characters if you are using the [DSPWD] section in the jde.ini file.
For more information, see the appendix “Adding a Security Override for Package Build” in the JD EdwardsEnterpriseOne Tools Package Management Guide and the section “Change Default EnterpriseOne System UserPasswords for the Database” in the JD Edwards EnterpriseOne Tools Security Administration Guide.
Preparing the Prototype Environment This table lists the requirements for preparing the prototype environment.
Task Details
Personnel
Installer or system administrator
Logon status
On the deployment server, in the deployment environment, logged on as user JDE with the databasepassword for user JDE.
Prerequisites
None
Concurrent Tasks
None
To make sure you retain all modifications from the base prototype environment, complete these tasks:prototypeenvironmentpreparationpreparing the prototype environmentpreparing to updateprototype environment
• Transfer all tested and approved modifications to the base prototype path code.
• After the transfer finishes, build a prototype package.
• Deploy the prototype package to workstations you want to run at the base release.
• Verify the Central Object Database is large enough to accommodate the update.
Preparing the Development Environment This table lists the requirements to prepare the development environment.
Task Details
Personnel
Installer or system administrator
Logon status
On the deployment server, in the development environment, logged on as user JDE with the databasepassword for user JDE.
Prerequisites
None
8

JD Edwards EnterpriseOne ToolsSoftware Updates Guide
Chapter 2Preparing for a Software Update
Task Details
Concurrent Tasks
None
To make sure you retain all modifications from the base development environment, complete these tasks:preparing thedevelopment environmentdevelopment environmentspreparationpreparing to updatedevelopment environment
• Make sure that all work in progress is checked into the development path code. From a developmentworkstation, use the Promotion Manager or your own query or report to verify that objects are not checked out.
• Build the development package in preparation for deployment to one or more workstations.
Deploy the development package to one or more workstations. You will use these workstations later to help verify thatall modifications were carried forward to the new release.
While you update, you cannot make any modifications (except changes to custom business functions written in Clanguage) to carry forward to the next release.
Verify the Central Object Database is large enough to accommodate the update.
Note:• "Understanding Objects" in the JD Edwards EnterpriseOne Tools Package Management Guide .
• "Building Packages" in the JD Edwards EnterpriseOne Tools Package Management Guide .
Checking Modification and Merge Flags This task ensures that your modifications are carried forward to the new release. Before you update, performthese steps to review or set the modification flags on the Object Librarian records for all modified objects.checkingmodification and merge flagsmodification flagsupdate preparationmerge flagsupdate preparationpreparing toupdatemodification and merge flags
Do not run the Specification merges until you check the flags for all path codes containing modified objects.
Check modification and merge flags: This table lists the requirements for checking modification and merge flags.
Task Details
Personnel
Installer or system administrator
Logon status
On a workstation that accesses Object Librarian tables, or from the deployment server, in thedeployment environment.
Prerequisites
Make sure you have prepared your environments for the update.
Concurrent Tasks
None
9

JD Edwards EnterpriseOne ToolsSoftware Updates Guide
Chapter 2Preparing for a Software Update
Log onto a workstation or to the deployment environment on the deployment server.
From the Advanced Operations (GH9611) menu, select Specification Merge Selection (P98401).
1. On Specification Merge Selection, complete these fields:formsWork with Merge Selections
◦ LocationType the name of the deployment server that contains the central objects specifications.
◦ Path CodeType the name of the associated path code (prototype or development).
2. On the QBE line, type C in the Mod Flag field to list the changed objects, then click Find.3. For each object that appears in the grid, verify that the Mod Flag field is set to C, and the Mrg Opt field is set
to 1 (merge), which ensures that the modifications are merged when the specification merges run during theupdate workbenches.Do not set the Mrg Opt field to 1 unless you want objects merged or saved.
4. When you finish reviewing or modifying the records, click Close.To verify the accuracy of modifications, some additional queries are strongly recommended to avoid missing anymodified objects. For example, SY = 55 - 59.verifying object modifications in new releaseprograms and IDsR9840D(Object Librarian Modifications report)
Note: You can also print Oracle's JD Edwards EnterpriseOne Object Librarian Modifications Report (R9840D),which lists all added and modified objects. After the update finishes, review this report to verify whether the objectmodifications were carried forward to the new release. For more information about the JD Edwards EnterpriseOneObject Librarian Modifications report, see Reports in the Installation Reference Guide.
Verifying Custom Changes in Master Control Tables This table lists the requirements to verify custom changes in master control tables:
Task Details
Personnel
Installer or database administrator
Logon status
On the workstation, for each applicable environment, logged on as user JDE with the databasepassword for user JDE.
Prerequisites
None
Concurrent Tasks
None
1. Verify that these master control tables for the data dictionary reside in a relationaldatabase accessed by the Data Dictionary data source:data dictionarymaster controltablestablesF9200tablesF9202tablesF9203tablesF9207tablesF9210tablesF9211tablesF00165
◦ F9200
10

JD Edwards EnterpriseOne ToolsSoftware Updates Guide
Chapter 2Preparing for a Software Update
◦ F9202
◦ F9203
◦ F9207
◦ F9210
◦ F9211
◦ F9212
◦ F00165 (GT92002)
2. Verify that these master control tables for Solution Explorer tasks reside in a relational database accessedby the Control Tables - Production data source (for production) or Control Tables - CRP (for prototypeenvironments) or Control Tables - Test (for the development environment):
◦ F9000
◦ F9001
◦ F9002
◦ F9005
◦ F9005D
◦ F9006
◦ F9006D
◦ F9020
◦ F9022
◦ F9050tablesF9020menusmaster controltablestablesF9001tablesF9002tablesF9005tablesF9005DtablesF9006tablesF9006DtablesF9020tablesF9022menusmastercontrol tablesmenusmaster control tables
3. Verify that these master control tables for user-defined codes reside in a relational database accessed by theControl Tables - Production data source (for production) or Control Tables - CRP (for prototype environments)or Control Tables - Test (for the development environment).
◦ F0004
◦ F0005
4. Verify that these master control tables for workflow reside in a relational database accessed by the ControlTables - Production data source (for production) or Control Tables - CRP (for prototype environments) orControl Tables - Test (for the development environment).
◦ F98800
◦ F98800D
◦ F98800T
◦ F98810
◦ F98810D
◦ F98811
◦ F98830
◦ F98840
◦ F98845
11

JD Edwards EnterpriseOne ToolsSoftware Updates Guide
Chapter 2Preparing for a Software Update
5. Verify that the media objects queue paths are configured correctly.
Use P98MOQUE from the deployment server in both the JDEPLAN and DEPSRV environments.
Backing Up Servers and Databases Before beginning the software update, back up the entire deployment server, the enterprise server (the completedirectory structure for the base installation), and the Oracle or SQL Server databases.backing up serversdeploymentserverbackuppreparing to updatebacking up servers and databasesenterprise serverbackup
Preparing the Localization update If you are a Localization customer, you must complete all the tasks in Appendix A: Setting Up Localizations. These tasksdescribe how to set up the software to automatically handle all future updates to the localization that are installed byESUs.
12
JD Edwards EnterpriseOne ToolsSoftware Updates Guide
Chapter 3Installing Updates on the Deployment Server
3 Installing Updates on the DeploymentServer
Understanding the Deployment Server Installation
Note: For ASUs, service packs, and tools releases, follow the instructions included with each update.
The Deployment Server is the central hub for distribution of Oracle's JD Edwards EnterpriseOne objects to servers andusers. The update process delivers changes to the deployment server to integrate with that distribution process. Eachupdate type has a slightly different method of completing this task but the outcome is the same.
The installation process for the deployment server includes these tasks:
• Acquiring the update from the Update Center, Oracle Software Delivery Cloud portal.
• Installing the objects from the CDs or the Web.
Using Update Center to Acquire Updates Link to the Update Center through My Oracle Support or use Oracle's JD Edwards EnterpriseOne and World ChangeAssistant from your desktop to acquire all ESUs and updates for other Oracle JD Edwards EnterpriseOne and Worldproducts. JD Edwards EnterpriseOne and World Change Assistant streamlines the update process. This versatile toolsimplifies the installation and deployment of ESUs and other updates.
Note:• Using Change Assistant
Using the Oracle Software Delivery Cloud to AcquireUpdates If you already have JD Edwards EnterpriseOne 9.0 software and want to acquire an update, go to the Oracle SoftwareDelivery Cloud portal at https://edelivery.oracle.com , or contact your local Customer Care Center. The OracleSoftware Delivery Cloud portal enables you to obtain your software electronically. At this portal, you will findinstructions for use, available languages, access to download software, and a list of releases that are available fordownload.
13

JD Edwards EnterpriseOne ToolsSoftware Updates Guide
Chapter 3Installing Updates on the Deployment Server
Installing the Software Update on the Deployment Server The following process installs the software update on the deployment server. This installation may be from a CDor a download from the Update Center via My Oracle Support or JD Edwards EnterpriseOne and World ChangeAssistant.deployment serverinstallationinstallationInstalling update on deployment serverupdatedeployment serverinstallationdeployment serverobjectsinstalling update on deployment server
Before you run the installation program, shut down all programs running on the deployment server that could causeDynamic Link Library (DLL) conflicts (such as Internet Explorer or Adobe Reader).
Note: In order to ensure that updates are merged as expected, it is strongly recommended that you apply the latestJD Edwards EnterpriseOne Planner ESU prior to applying any JD Edwards EnterpriseOne Applications ESUs.
Install the software update on the deployment server: This table lists the requirements for installing the software update on the deployment server:
Action Tasks
Personnel
Installer
Logon status
Logged on to the deployment server with administrator rights. You must log off JD EdwardsEnterpriseOne before completing this task.
Prerequisites
You must create the JDE user.
Concurrent Tasks
None
To install an ESU that was downloaded from the Update Center:
1. Locate the downloaded JLnnnnn.exe file.2. Right-click on the self-extracting executable and click on Run As Administrator. The Client Workstation Setup
Screen appears.3. Click Next, the package size is calculated. The Installation Setup Type appears.4. Click Finish.
To install ASUs from a CD:
1. Insert the setup CD into the CD drive.2. Double-click the InstallManager.exe file. The Installation Setup Screen appears.3. Click Next, and the package size is calculated. The Installation Setup Type appears.4. Click Finish.
14

JD Edwards EnterpriseOne ToolsSoftware Updates Guide
Chapter 3Installing Updates on the Deployment Server
Note:• Using Change Assistant
Note: After completing this step, the update is ready to deploy to an environment. JD Edwards EnterpriseOneupdates (ASU and ESU) are located in a folder under the Planner path code (..\Planner\Package\package name).
Note: Complete your Impact Analysis at this time and then continue with deployment using JD EdwardsEnterpriseOne and World Change Assistant, the JD Edwards EnterpriseOne Software Updates application, or specialinstructions included with your update.
15

JD Edwards EnterpriseOne ToolsSoftware Updates Guide
Chapter 3Installing Updates on the Deployment Server
16

JD Edwards EnterpriseOne ToolsSoftware Updates Guide
Chapter 4Using Change Assistant
4 Using Change Assistant
Understanding Change Assistant The JD Edwards EnterpriseOne and World Change Assistant is a standalone Java application that helps you manage,download, and deploy JD Edwards EnterpriseOne packages. Change Assistant provides a single point of entry tofacilitate administration of software updates and fixes. You can download Change Assistant from the Oracle JD EdwardsEnterpriseOne Update Center by clicking the Download the Change Assistant Application link.
You can access the Update Center by using the following navigation from My Oracle Support:
My Oracle Support | Patches &Updates tab | JD Edwards
Installing the Java Runtime Engine Change Assistant requires a certified JRE. If you do not have an appropriate version of JRE installed, you will not be ableto use Change Assistant. You can download and install the Java Runtime Engine by navigating to the Java website. TheChange Assistant Launch page provides the link to launch the application via Java WebStart.
Note: See the Oracle Technology Network (OTN) for certified versions of JRE: http://www.oracle.com/technetwork/java/javase/overview/index.html
If you have problems after installing the JRE, Oracle recommends that you manually remove all existing JREs and startover.
Installing Change Assistant You download Change Assistant from the Update Center.
When the installation is finished, a Preference wizard opens, prompting you for preferences for setting up ChangeAssistant. If you already have Change Assistant installed, or if the Preference wizard does not appear when installingChange Assistant, you can launch Change Assistant from your desktop. You can change or set up your preferences byselecting Preferences from the Edit menu.
The Preference wizard provides an option for you to choose whether the Preference wizard always appears uponstartup of the tool. If you choose to have the Preference wizard always appear, you are prompted for your Update Centerpassword each time you launch Change Assistant.
To install Change Assistant:
1. Within Update Center, select Electronic Software Updates from the News and Links pane on the left.2. Click the Download the Change Assistant Application link on the Update Center, Electronic Software Updates
web page.
17

JD Edwards EnterpriseOne ToolsSoftware Updates Guide
Chapter 4Using Change Assistant
The JD Edwards EnterpriseOne and World Change Assistant page opens providing information about ChangeAssistant features.
3. Click the "here" link in Step 2, under Installing Change Assistant.
After Change Assistant installs, the Preference wizard opens prompting you for preference information.4. For Update Center Authentication, enter your Update Center access information in these fields:
Field Description
User ID
Enter your Update Center user ID.
Password
Enter your password.
User Name
Enter a user name.
Enter your email address.
Phone
Enter your phone number.
5. If you want to disable the Update Center connection, select the Disable Update Center connection check box.
CAUTION: If you select this check box, you will not be able to search for and download ESUs.
6. If you want to be prompted for your password each time Change Assistant starts, select the Always Prompt atStartup? option.
This option is on all pages of the Preference wizard. If you change your selection on a future page, the changeis reflected on all pages.
7. Click Next to open the next page of the Preference wizard, which prompts you for connection information.8. The system provides default values for these Update Center Connection fields:
◦ Timeout
◦ Number of Retries
Oracle recommends that you use the default values.9. If you access the Update Center through a proxy server that requires authentication, enter this information:
◦ User ID
◦ Password
◦ Domain
10. Click Next to open the next page of the Preference wizard, which prompts you for a directory location fordownloads.
18

JD Edwards EnterpriseOne ToolsSoftware Updates Guide
Chapter 4Using Change Assistant
11. Enter the path to the directory where you want to store downloaded updates.
For example, C:\Change Assistant\Downloads.
This is the root folder for packages that are downloaded from the Update Center. Typically, this is a folder that isshared by all your Update Center users to avoid downloading the same packages multiple times. Packages canbe organized into additional folders under this parent folder.
12. Select the Include Dependencies option to automatically include dependent packages in download anddeployment requests.
13. Select Show News and Links at Startup to automatically display this information each time you launch ChangeAssistant.
If you select this option, the Show News and Links page appears each time you launch Change Assistant. If youdo not select this option, Change Assistant opens with the tree structure. The News and Links page enables youto view content that is downloaded from the Update Center, such as breaking news, planner information, or JDEdwards EnterpriseOne Certifications (MTRs) information.
14. Click Next to open the next page of the Preference wizard, which prompts you for Logging information.15. Enter the directory for the activity Log files.
For example, C:\Change Assistant\Logs.
Deployment activity for downloads is kept in the log file directory. This includes information about downloadtimes and deployment times. This location is also used to hold information that is captured during thedeployment of downloaded packages. You create the download log by searching your local downloads or byretrieving download audit information from the Update Center.
16. Select the Create Download Log from current downloads option if you want the system to automaticallygenerate logs based on downloads in the download folder.
17. Select the Create Download Log from download audit history option if you want to create logs based on theUpdate Center audit history.
18. (Release 9.2.6) Click Next to open the next page of the Preference wizard, which provides AIS Connectioninformation.
19. For AIS authorization, you can select the authorization you prefer. You can select the User and Passwordauthorization type or the Basic authorization type. Enter your authorization information in these fields:
Field Description
User ID
Enter a user ID.
Password
Enter your password.
Environment
Enter the enivironment required by the AIS Server. Leave the field blank if the information is notrequired.
Role
Enter the user role required by the AIS Server. Leave the field blank if the information is notrequired.
URL
Enter the URL to the AIS Server.
19

JD Edwards EnterpriseOne ToolsSoftware Updates Guide
Chapter 4Using Change Assistant
You can use the AIS connection to enable the Analyze Packages option to get a personalized comprehensiveanalysis of the selected packages that use EnterpriseOne data. The summary analysis report connects to theAIS Server and the analysis information is included in the reports generated. You can use this informationto evaluate the changes that can occur based on the objects. You can also verify if the objects have beenpreviously deployed.
Note: For more information on authorization types see, Understanding AIS Authentication in the JD EdwardsEnterpriseOne Tools Application Interface Services Server Reference Guide.
20. Click Next to open the next page of the Preference wizard, which provides licensing information.21. Select the Always Accept option to hide the license agreement during the download process.22. Click Finish.
Change Assistant is now installed on your system with a shortcut available on your desktop.
Viewing BUG Details The View BUG Details option appears within the Change Assistant tree structure. When you select View BUG Details,the BUG Details tab displays in the right pane. Enter the BUG you want to review and click on the Show Details button toretrieve the BUG information.
First In (Release 9.2.6) The First In option appears within the View Bug Details section within the Change Assistant tree structure. Enter theBUG number and click First In to identify in which package the bug first appeared.
You can view which software update the BUG first appeared in. You can also view in a chronological order the list ofpackages in which the bug has appeared.
Searching for Software Packages This section provides an overview of package searches and discusses how to:
• Perform a search.
• Analyze packages.
• Run all queries.
• Save search criteria for future use.
Understanding Package Searches Package searches can be performed in various ways. You can use preexisting queries to find packages, or you cancreate your own query and save it for future use. The preexisting queries are organized by type, release, and businesspurpose within the Search for Packages tree structure under the JD Edwards folder.
20

JD Edwards EnterpriseOne ToolsSoftware Updates Guide
Chapter 4Using Change Assistant
Queries in the JD Edwards folder are updated each time that you launch Change Assistant.
When you choose one of the predefined queries, the system populates the fields in the Search pane. You can updatethese fields as needed or create your own query by populating these fields manually.
If you customize a query, you can save it for future use within the My Queries folder. Queries within the My Queriesfolder are persistent and do not get overwritten. You can configure the predefined queries with date ranges or otherfilters and save these searches in the My Queries folder or any subfolder therein.
You have the ability to run all queries inside a query folder. The queries will be run in the order that they appear in thetree, the results will be displayed on a single tab, and any duplications will be excluded.
You can customize any query folder that you have created under the My Queries folder using the Folder Options dialog.This enables you to designate a folder as an aggregate folder. An aggregate folder enables you to arrange the childqueries in a particular order by simply dragging them to the desired location, while a regular query folder sorts thequeries alphabetically. You can also use the Folder Options dialog to disable searching at the folder level.
Note: When you use the Run All Queries option under an aggregate subfolder of JD Edwards, the results tab onlyallows you to download or download and deploy all of the packages in the order they appear in the grid.
When you perform a search, the results are displayed on the right side of the form. Only the first twenty matches aredisplayed, and the results count is displayed above the grid. You can use the Page at a time button or the All Resultsbutton to continue fetching the results. Each search that you perform creates a new results tab.
Performing a Search Access Change Assistant.
1. Expand the Search for Packages node on the tree.2. If you want to create a new query, use any of these fields on the Search pane to define your query:
Field Value
Type
Specify the type of update you want to search for.
Release
Specify the release for the selected updated type.
Platform
Specify the target platform of the package.
Defect Category
Specify the defect category of a BUG in the package. Valid values are:
◦ All
◦ Memory
◦ Performance
21

JD Edwards EnterpriseOne ToolsSoftware Updates Guide
Chapter 4Using Change Assistant
Field Value
Name
Enter the name of the package. Valid values include a single name with a wildcard (*) and acomma-separated list of exact names.
BUG Number
Enter the name of a BUG contained in the package or a comma-separated list of BUGs.
Object
Enter the name of an object contained in the package. Valid values include a single name with awildcard (*) and a comma-separated list of exact names.
System Code
Enter a system code for a BUG or an object contained within the package. You can also enter acomma-separated list of exact names.
Description
Enter a description for the package or for a BUG or an object contained within the package. Youcan enter a string including wildcards (*).
Search by Dates
Specify whether you want to search over a range of dates or for a duration of time.
◦ Duration: Specify how many days, weeks, or months you would like to include in thesearch.
◦ Range: Specify a From Date and Through Date
3. If you want to use an Oracle JD Edwards predefined query, expand the JD Edwards folder to view a predefinedset of queries and select a search.
4. Update the search criteria as needed to search by type, names, or dates.5. Click the search button above the search criteria to run the search against the Update Center.6. View the search results on the appropriate search tab on the right side of the screen.7. To view details for a specific package, select the package.
The Package Details pane displays detailed information for that package, such as included BUGs, objects, anddependency information.
8. View the package details below the search results by clicking the tab that corresponds to the information thatyou want to view.Select any of these tabs to view more information:
Tab Title Description
BUGs
Displays a list of all of the BUGs included in the package. You can double-click on any of theBUGs to see the BUG details. First In:(Release 9.2.6) You can select the First In option to identify which package the bug firstappeared in.
Objects
Displays a list of all of the objects included in the package.
22

JD Edwards EnterpriseOne ToolsSoftware Updates Guide
Chapter 4Using Change Assistant
Tab Title Description
Objects by BUG
Lists the objects included in the package as well as the BUG with which they are associated. First In:(Release 9.2.6) You can select the First In option to identify which package the bug firstappeared in.
Net Change
Lists the packages that are superseded by the selected package. Select the Compare button tosee a comparison of the selected package and any of the superseded packages.
Dependencies
Lists any other packages upon which the selected package is dependent. These packagesshould be installed before the selected package.
Check Sum
When you select this tab, the system computes the checksum. This can be used afterdownloading a package in order to verify its integrity. The following two checksum algorithmsare used:
◦ MD5
◦ SHA-1
9. To close a specific results tab, right-click it and select Close from the pop-up menu.10. Select Close All Results to close all results tabs.
Analyzing Packages After finding a package, you can perform a net change analysis before you download the package.
To analyze packages:
1. On the search results tab, select the packages that you want to analyze and click the Analyze button.2. If you have selected more than one package and you choose the Analyze with Downloads option from the
Analyze drop-down list box, the selected packages are compared to the superseded list. Next, the most currentdownload found is used to perform the net change analysis by comparing the most current download topreviously downloaded packages.
3. If you select the Summarize All option from the Analyze drop-down list box, Change Assistant will summarizethe selected packages and will not perform a net change comparison.
4. When the analysis finishes processes, a report appears. Review the report.
Any special instructions selected in the Special Instructions option are included in the report.
(Release 9.2.6) You can use the AIS connection to enable the Anaylze Packages option to get a comprehensiveimpact analysis of all the packages that use EnterpriseOne data. The summary analysis report connects to theAIS Server and the analysis information is included in the report generated. You can use this information toevaluate the changes that can occur based on the objects.
You can apply any of the following options for package analysis:
◦ All Packages
23

JD Edwards EnterpriseOne ToolsSoftware Updates Guide
Chapter 4Using Change Assistant
◦ Changed Objects
◦ New BUGs
◦ New Objects
◦ All BUGs
◦ All Objects
◦ Special Instructions
◦ Include BUG and Object Relationships
◦ (Release 9.2.6) Include Dependent Packages.
You can generate the comprehensive impact analysis report in an HTML, an XML, or a Comma SeparatedValues (CSV) format. If you select the CSV format then the report is exported in the form of a spreadsheet.The summary analysis report provides the following information:
◦ A list of selected packages.
◦ The list of changed objects and their details, for example, the date when the object was changed, whenthe object was last deployed, and in which environment. The report also provides information about theobject and its pathcode. The report also helps you identify if an object has been copied and providesinformation regarding the base-object from which the object was copied.
◦ A list of new bugs. You can use this information to compare the new bugs and their information with thesoftware updates history to identify the bugs which have been previously deployed. If a bug is not a partof any package, then it is considered as a new bug which needs to be assessed. By using the Include BUGand Object Relationships option, you can see the objects with which a bug is associated.
◦ All the bugs that are related to the packages. The report also provides information about whether thebugs have been previously deployed.
◦ A list of all the objects related to the packages. You can verify if the objects have been previouslydeployed, and view information with which the packages were deployed.
Note: The Analyze option is available when you are connected to the Update Center or through the AIS connectionusing the EnterpriseOne orchestrations. You can also enable the Analyze Packages option from Working withPackages application and Working with Batches application.
Summarizing Packages After finding a package, you can summarize the package before you download the package. The Summarize Packagesoption enables you to group all the packages by the option you select in a separate list.
To summarize packages:
1. On the Search Results tab, select the packages that you want to summarize and click the Summarize Packagesbutton.
2. If you select the Summarize option from the drop-down list box, Change Assistant summarizes the selectedpackages.
3. Select one of the following options to specify the information type by which you want to summarize thepackages:
◦ BUGsThe First In option enables you to identify in which package or ESU the bug first appeared.
24

JD Edwards EnterpriseOne ToolsSoftware Updates Guide
Chapter 4Using Change Assistant
◦ Objects
◦ Objects by BUG
The First In option enables you to identify in which package or ESU the bug first appeared.
◦ Include Dependent Packages.
4. You can right-click the user interface grid to export or view the data in a print preview mode.5. Click Ok.6. Rick-click the user interface grid and select Export All or Print Preview from the context menu to view the
summarized package information in an Excel or a PDF format, respectively.
Note: You can also enable the Summarize Packages option from Working with Packages application and Workingwith Batches application.
Special Instructions (Release 9.2.6) You can view the special instructions before you download a package.
To view the special instructions:
1. On the Search Results tab, select the packages for which you want to view the special instructions and click theSpecial Instructions button.
2. You can view the following options as special instructions:
◦ All Packages
◦ All BUGs
◦ Special Instructions
◦ (Release 9.2.6) Include Dependent Packages
3. Click Ok. A report is generated with all the selected special instructions. Review the report.
You can generate the report in an HTML, an XML, or a Comma Separated Values (CSV) format. If you select the CSVformat then the report is exported in the form of a spreadsheet.
If you enable the Special Instuctions option while being connected to the AIS Server, the completed tasks are displayedin the report in the form of strikethrough text.
You can access the Work with Special Instructions application (P96700RW) from the Software Updates menu onEnterpriseOne. Access the P96700RW application to review and set the status of each of the special instructions whichhave been listed when the package is analyzed using Change Assistant. The P96700RW application also enables you tomark the completed instructions from the list of instructions.
The summary analysis report shows you the special instructions that have already been completed before the currentpacakage was analyzed.
Note: You can also enable the Special Instructions option from Working with Packages application and Working withBatches application.
25

JD Edwards EnterpriseOne ToolsSoftware Updates Guide
Chapter 4Using Change Assistant
Running All Queries To run all queries:
1. Select the folder for which you want to run the queries.
Note: If the Disable Folder Search check box has been selected within the Query Folder Options, you will notbe able to search at the folder level.
2. Right-click and select Run All Queries to run all the queries in the selected folder and subfolders.
Change Assistant will display the combined results of all the included queries.
Saving Search Criteria for Future Use To save search criteria for future use:
1. Select one of the existing queries under the JD Edwards folder.2. Configure the query as desired.3. Click the Save Query button.4. Specify the folder to save the query in within the My Queries folder.5. Enter a name for the query.6. Click the Save the Query button.
Working with Packages This section provides an overview of package downloads and discusses how to:
• Change the downloads directory.
• Download packages.
• Extract packages.
• Copy packages.
• Perform an impact analysis.
• Use Visual Compare for UDC descriptions and glossaries.
• Delete packages.
• Deploy packages.
Understanding Package Downloads Once you have searched for your packages, the next step is to download the packages. Downloading the packagesmakes them available to work with on your machine. For example, you can extract, transfer, copy, or deploy packagesonce they have been downloaded.
26

JD Edwards EnterpriseOne ToolsSoftware Updates Guide
Chapter 4Using Change Assistant
Your download folder structure appears in Change Assistant under the Work with Packages node. You can organizepackages into subfolders based on release, package type, and platform. This allows for easy browsing, tracking, andmanagement of packages. You could also further categorize the packages based on when they were downloaded.
To view your downloaded packages, select a downloads folder in the tree structure on the left side. The display onthe right changes to display the packages contained in that folder in the Work with Packages grid. By default, onlythe packages that are immediate children of the folder selected in the tree are displayed in the grid. The Descendantsoption on the View menu allows you to display the contents of the selected folder and all the subfolders.
Clicking on the column in the grid header allows you to sort rows in ascending and descending order based on thatcolumn. You can also sort multiple columns by holding the Control key down while clicking on one or more columnheaders. Selected packages can be extracted, deployed, transferred to a different machine, or deleted, using the tool baroptions.
Changing the Downloads Directory To change the downloads directory:
1. Select File, Open Downloads Directory.2. Enter the new downloads directory and click OK.
Note: The downloads directory must have read/write access. To access a PAR file on a CD or from the OracleSoftware Delivery Cloud portal, copy the PAR file to a folder within the current downloads directory, or to afolder with read/write access. Then, change the downloads directory to the folder where you copied the PARfile.
3. To quickly switch back to previously used directories, select File, Recent Home Directories.
Downloading Packages Packages in the Search Results grid are downloaded from the Update Center. The checked boxes in the first columnof the grid specify those updates that have not been downloaded. This status is determined by local information thatis taken from the download log. You can select which packages to download by manually checking or uncheckingthe check boxes in the first column. You can download multiple packages simultaneously by selecting more than onepackage in the Search Results grid.
To download packages:
1. Within the Search Results grid, select the packages you would like to download by placing a check mark in thefirst column.
2. Open the Download drop-down list box by selecting the down arrow next to the Download button.3. To download the selected packages, select either the Download To option or the Download and Deploy To
option from the drop-down list box.
The Download and Deploy To option provides a way to download and deploy all selected packages in one step.
27

JD Edwards EnterpriseOne ToolsSoftware Updates Guide
Chapter 4Using Change Assistant
4. Select your download folder from the list of previously chosen folders or select a new folder to which todownload your packages.
Note: During the download process, you have the ability to pause, resume, and cancel the download usingthe appropriate buttons in the bottom-right corner of the form. You can also view the progress of thedownload in the status bar at the bottom of the form.
5. If you selected to download and deploy in one step, you are prompted to sign into JD Edwards EnterpriseOneand then must enter your specific deployment information before starting the download.
For example, deploying Electronic Software Update (ESU) packages from the JD Edwards EnterpriseOnedeployment server requires the name of the target environment and other deployment options. An additionalinput dialog is displayed to prompt for these options.
Note: You must be on the deployment server in order to deploy the packages.
See Deploying Packages.6. View your downloaded packages by selecting Work with Packages and then Downloads from the tree structure.7. If you think there may have been problems during the download process, you can perform a checksum
validation to ensure the integrity of the downloaded package by selecting the Check Sum tab within thePackage Details pane.
When you select this tab, the system uses 2 algorithms, MD5 and SHA-1, to calculate checksum values for thedownloaded package and compares these values to the original package. A green check mark appears next toeach value if the checksum value for the downloaded package and the original package are the same. If thereis a problem with the integrity of the package, you will see a red universal no symbol over a check mark next tothe value.
Extracting Packages If the downloaded package is a PAR file, you need to extract the contents of the package.
1. Select the Work with Packages node from the tree structure.2. Select the Downloads node, and your downloaded packages appear on the Work with Packages tab.3. Select the package to download and click the Extract button.
When you click the Extract button, the contents of the package appear in a new Extract window in a treestructure or in a tabular form.
4. In the Extract window, select one or more files or folders to be extracted by selecting the corresponding checkbox.
Selecting a folder automatically selects all of its contents.5. To examine a file before extracting it, right-click the tree or grid and select Open/Launch.
Copying Packages To copy packages:
1. On the Work with Packages tab, select the package that you want to copy and click the Copy button.2. Enter the target directory on the Select the Target Location form and click OK.
28

JD Edwards EnterpriseOne ToolsSoftware Updates Guide
Chapter 4Using Change Assistant
Note: The target directory must allow write permission, and cannot be the same as the source directory.
Performing an Impact Analysis To perform an Impact Analysis:
1. On the Work with Packages tab, select the packages for which you would like to perform an impact analysis.2. Click the Impact Analysis button and the system will verify the selected packages as ESUs, extract the impact
analysis document from the package deliverable, and import the impact analysis document into JD EdwardsEnterpriseOne.
3. If you want to import impact analysis documents from the deployment server, select Impact Analysis fromDeployment Server directory from the Impact Analysis drop-down list box.
4. Use the Impact Analysis Tool to review the changes for your selected software updates.
Note: The Impact Analysis option is only available when JD Edwards EnterpriseOne is installed.
Using Visual Compare for UDC Descriptions and Glossaries To use Visual Compare for UDC Descriptions and Glossaries:
1. On the Work with Packages tab, select the packages for which you would like to run Visual Compare.2. On the Impact Analysis drop-down list box, select Visual Compare for UDC Descriptions and Glossary.3. If you want to import impact analysis documents from the deployment server, select Visual Compare for UDC
Descriptions and Glossary from Deployment Server directory from the Impact Analysis drop-down list box.
Change Assistant verifies that the selected packages are ESUs, extracts the automated special instructionsdocument from the package deliverable, and imports only documents containing User Defined Codes orGlossaries into JD Edwards EnterpriseOne.
4. Use the Visual Compare for UDC Descriptions and Glossary Tool to review the changes and accept the changesfor your target environment.
Note: The Visual Compare for UDC Descriptions and Glossary option is only available when JD EdwardsEnterpriseOne is installed.
Deleting Packages To delete packages:
1. Click the Delete button.2. Select Continue in the Delete Confirmation dialog box to delete the selected packages and the corresponding
temporary folders from the local machine.
Note: This process only deletes the file from your machine and does not affect deployment status. If the package wasdeployed, it will not be uninstalled.
29

JD Edwards EnterpriseOne ToolsSoftware Updates Guide
Chapter 4Using Change Assistant
Deploying Packages Before deploying a package, you should check whether the prerequisites or dependencies for the package have beendeployed. This information is displayed on the Dependencies tab.
When you click the Deploy button, the activity log is checked to determine whether any of the selected packageshave been superseded. If so, a list of these packages is displayed. Also, the log is checked to determine whether allprerequisites for the selected packages have been deployed. If not, a list of these dependencies is displayed and you cancontinue or cancel deployment.
To deploy packages:
1. Select Deploy.2. From the Deploy drop-down list menu, select one of these two options:
◦ Deploy
Select Deploy to search for a previous batch for the current object at an "in process" status. The systemwill restart that deployment where it left off or if it cannot find any batches with an "in process" status,it will start a new batch. This is typically used in an Oracle Business Accelerator (OBA) where there is aquestion and answer session that may require input from multiple sessions, but the "logical" sessionremains intact.
◦ New Batch Deploy
Select New Batch Deploy to start deployment of a new batch.3. Select Run All to deploy all of the packages.4. If multiple packages are selected, a new window is launched and the packages are deployed as an aggregate.5. If a single package is selected and if the package is suitable for deployment, one of the following processes will
occur, depending on the type of package that is selected:
◦ If the package is a documentation package, the documentation link is displayed in a new documentationwindow, and clicking the link launches the associated application.
If the link points to an HTML page that resides inside the package itself, it is directly displayed in thewindow.
◦ If the package only contains some files that need to be extracted to the disk, the extract window isdisplayed.
◦ If the package is a PAR file that contains some deployment tasks or is an EXE file, a new window isdisplayed that enables you to view the documentation for these tasks and run them.
Configurations and packages with JD Edwards EnterpriseOne tables or objects are validated for theirrelease level. If the source and target release do not match, a warning is displayed. If you choose to ignorethis warning, you must give careful consideration to changed table formats, object dependencies, and soforth.
During the deployment of configurations that contain versions, the Versions tab appears. Use this tab tochange the version prefix. Enter the From Prefix and the To Prefix values in the grid.
Note: The new prefix string must be the same length as the old prefix.
◦ If the package is an ESU, a new window is displayed that prompts you to select the target deploymentenvironments and the following deployment options:
30

JD Edwards EnterpriseOne ToolsSoftware Updates Guide
Chapter 4Using Change Assistant
Batch Deployment Option Description
Backup
Select the backup check box to create a backup of object specifications included in theupdates. Backups are used with the compare/merge tools to aid the retrofitting processand to examine changes made by the update. Backup is selected by default.
Environment
Select the environments to which you want to deploy the update. It is recommended toapply updates to the Pristine and Development environments using Change Assistant.After retrofitting custom objects, you can transfer the objects to the Prototype andProduction environments using OMW.
Notes
Use this tab to add any runtime notes that you would like displayed on activity reports andduring restart of a deployment.
Skip Spec Merge
Select this option if you would like to skip the spec merge for objects for a particularenvironment.
Skip OMW and Package Build Data
Select this option to skip the creation of OMW projects and package build definitions.
Summary
Select this option to deploy the group automatically with minimal status information.If you do not select this option, you step through each task of the deployment with fullstatus. The manual mode requires clicking the Run or Run All button before starting thedeployment.
Unattended
Select this option to deploy a group of updates in a single process. If you do not select thisoption, you step through each task of the deployment manually (attended mode). Theunattended mode requires no further input after clicking the OK button. The status ofeach update displays as the application runs.
Working with Batches This section provides an overview of batches and discusses how to work with batch details.
Understanding Batches A batch is created for each download, deployment, and delete action taken. All packages selected for the initial actionare preserved in a single link to simplify future tasks with these same packages. You can research all packages that weredownloaded in a batch by right-clicking the batch record. You can also use the Deploy button to deploy all packages thatwere previously downloaded in a batch.
31

JD Edwards EnterpriseOne ToolsSoftware Updates Guide
Chapter 4Using Change Assistant
You can use the following options when you are working with a batch:
• Deploy
To deploy all the packages in the selected batch, click Deploy. If the batch contains one or more ESUs, you willbe prompted to sign into JD Edwards EnterpriseOne.
• Export
This feature is useful when you want to download packages to one machine and deploy them from anothermachine. For example, if your deployment server does not have access to the Update Center, you can downloadpackages to a client and then export the packages to a Jar file. This file can then be copied to the deploymentserver and imported using the Import option.
• Import
This option enables you to import packages to a machine from a jar file that was created using the Exportoption. The application prompts you to select the jar file from which you want to import the packages and tochoose the directory to which you want to import the packages.
• New
You can create a custom batch by clicking the New button on the Work with Batches grid. This enables you togroup the previously downloaded packages together for the purpose of deployment or exporting.
• Delete
Use this option to remove any batches that you do not need. This option removes only the batch information,not the packages themselves.
• Batch Summary
This option generates a summary report of all the actions that were performed on the highlighted batch. Thereport is displayed in the default browser.
Working with Batch Details To work with batch details:
1. Select Work with Batches in the tree structure.
A list of batches will appear in the Batches pane.2. Select the batch that you want to work with.
A list of packages included in that batch will appear in the Batch Details pane.3. To add a package to the batch, select Add Package.4. To remove a package from the batch, select Remove Package.5. To view more information about one of the packages, select the package to highlight it, and select Package
Summary.6. To view a history of actions that were performed on the batch, select the Batch Actions tab.
You can also restart deployment from the Batch Actions tab by clicking the Restart Deployment button.
32

JD Edwards EnterpriseOne ToolsSoftware Updates Guide
Chapter 4Using Change Assistant
Deploying UDOs using the Change Assistant (ToolsRelease 9.2 Update 2) Beginning with 4.0.0.4 version, the Change Assistant supports the deployment of User Defined Object Packages andprovides a Deployment Summary report after a successful deployment.
33

JD Edwards EnterpriseOne ToolsSoftware Updates Guide
Chapter 4Using Change Assistant
To download and deploy the User Defined Object Packages from the Change Assistant:
1. In the Change Assistant, open Search for Packages in the tree structure.
34

JD Edwards EnterpriseOne ToolsSoftware Updates Guide
Chapter 4Using Change Assistant
2. In the Advanced Search tab, select the Type as EnterpriseOne User Defined Objects, the Release Number as 9.2,and the Platform as CLIENT.
Click the Search icon.
3. Select the required User Defined Object Packages you want to download and deploy. You can select single ormultiple packages.
35

JD Edwards EnterpriseOne ToolsSoftware Updates Guide
Chapter 4Using Change Assistant
4. Click the Download icon and then select Download To and Deploy Option, and then select the required folder asshown in the following example.
Note: You can select the Download To option to download the packages to the selected directory. You cannavigate to the Download directory under Work with Packages in the Change Assistant tree structure, andthen deploy the downloaded packages.
36

JD Edwards EnterpriseOne ToolsSoftware Updates Guide
Chapter 4Using Change Assistant
37

JD Edwards EnterpriseOne ToolsSoftware Updates Guide
Chapter 4Using Change Assistant
5. Enter the required credentials in the JDEPLAN environment window.
38

JD Edwards EnterpriseOne ToolsSoftware Updates Guide
Chapter 4Using Change Assistant
39

JD Edwards EnterpriseOne ToolsSoftware Updates Guide
Chapter 4Using Change Assistant
6. Select the Environment in the Environment Selection window, and then click OK.
40

JD Edwards EnterpriseOne ToolsSoftware Updates Guide
Chapter 4Using Change Assistant
41

JD Edwards EnterpriseOne ToolsSoftware Updates Guide
Chapter 4Using Change Assistant
The Change Assistant Deployment Summary window displays the summary of the UDOs deployment as shownin the following examples.
42

JD Edwards EnterpriseOne ToolsSoftware Updates Guide
Chapter 4Using Change Assistant
43

JD Edwards EnterpriseOne ToolsSoftware Updates Guide
Chapter 4Using Change Assistant
7. The User Defined Object Summary Report is displayed after the deployment is successful.
Click the required User Defined Object Package name to see the detailed report.
44

JD Edwards EnterpriseOne ToolsSoftware Updates Guide
Chapter 4Using Change Assistant
45

JD Edwards EnterpriseOne ToolsSoftware Updates Guide
Chapter 4Using Change Assistant
In the User Defined Objects Summary report, the Customized UDOs tab displays the UDOs modified by thecustomer, and the Deployed UDOs tab displays the UDOs that are a part of the deployed packages.
46

JD Edwards EnterpriseOne ToolsSoftware Updates Guide
Chapter 4Using Change Assistant
47

JD Edwards EnterpriseOne ToolsSoftware Updates Guide
Chapter 4Using Change Assistant
Working with Software Update - Web (Release 9.2.6) From the Software Updates menu, select the Work with Software Update - Web application (P96470W). You can usethis application to access the details of a software update. You can also see the list of objects, and bugs for the selectedsoftware update.
To access the details for a software update:
1. Access the Work with Software Update - Web application from GH9612.2. In the Update Name field, enter the name of the software update for which you want to run this application.
Click Find.3. The application will display the software update. Click Select. The application will display all the details of the
software update.4. From the Row menu, click Objects. The application will display the list of objects and object details for the
selected software update.5. From the Row menu, click Bugs. The application will display the list of bugs and their descriptions for the
selected software update.
You can also filter the software updates by date and type using this application.
48

JD Edwards EnterpriseOne ToolsSoftware Updates Guide
Chapter 5Running Software Updates
5 Running Software Updates
Understanding Software Updates After downloading the software update or updates, selecting the update to install, and selecting the environmentto be updated, you choose to run the software update workbenches in either attended or unattended mode.UpdateWorkbenchesWorkbenches, update
It is recommended that you use the JD Edwards EnterpriseOne and World Change Assistant to run software updates.However, if you choose not to use the JD Edwards EnterpriseOne and World Change Assistant (for example, if yourcompany has fire walls that block your access), then use the methods discussed in this chapter to run updates.
You will use Oracle's JD Edwards EnterpriseOne Table Conversion Workbench if you are applying any ApplicationSoftware Update (ASU).
Depending on the contents of the update, these workbenches may run:
• JD Edwards EnterpriseOne Control Table Workbench runs the batch applications for the planned merges thatupdate the data dictionary (DD), user-defined codes (UDCs), menus, and workflow tables. It then updates theF98405 table to reflect completion, and writes a conversion log record to the F984052 Table Conversion HistoryLog.Control Table WorkbenchInstallation Workbenchcontrol tablescontrol tablesInstallation Workbench
• JD Edwards EnterpriseOne Table Conversion Workbench runs the batch application that creates tables andindexes. It then updates the F98405 table to reflect completion, and writes a conversion log record to theF984052 Table Conversion History Log. Table Conversion WorkbenchInstallation Workbenchtable conversion
• JD Edwards EnterpriseOne Specification Table Merge Workbench runs the batch applications that update thespecification tables. It then updates the F98405 table to reflect completion, and writes a conversion log record.The Object Librarian and Versions List merges are now a part of the specification merge.Specification TableMerge Workbenchspecification table mergesInstallation WorkbenchInstallation Workbenchspecification tablemergestablesF98405
• JD Edwards EnterpriseOne Package Workbench transfers the F9603 and F9631 Package Information tablesfrom the Planner data source to the System - 900 data source. It then updates the Package Plan Detail table(F98404) to reflect completion.packagesInstallation WorkbenchInstallation WorkbenchpackagesPackageWorkbenchtablesF9885tablesF9886tablesF9887
Working with the Software Updates The software update application combines a series of individual update workbenches into a single process. You will seeonly the workbenches that apply to your update.Installation Workbenchrunning the Installation Workbench
You can run the workbenches manually (attended mode), or automatically (unattended mode). If you run theworkbenches unattended, you will start the update as described. The status of each individual workbench will display asthe workbench begins. Unattended mode is the default.unattended workbenchattended workbench
49

JD Edwards EnterpriseOne ToolsSoftware Updates Guide
Chapter 5Running Software Updates
Starting and Running the Software Updates This section provides an overview of starting and running the software updates and discusses how to:
• Select environments and start the software.
• Replace language data when running a language update.
• Restore a backup.
Selecting Environments and Starting the Software Update The following procedure lets you select environments and starts the software update workbenches in unattended modeor attended mode. Unattended mode is the default.
In unattended mode, if an error is encountered in any of the individual workbenches, the process stops. Fix the errorand continue. The software update resumes.
This procedure also creates a JD Edwards EnterpriseOne Object Management Workbench (OMW) project, an installationplan, and an update package for this update. In addition, the procedure optionally creates a backup of specs, so that theoriginal specs can be restored if necessary.
Do not lock the deployment server during the software update (for example, with a screen saver password) becausedoing so pauses some processes. In addition, do not minimize any of the workbench forms, or the software update willnot continue to the next workbench form until it is again maximized.
If you use a SQL Server database, be sure that these database options are selected before you start the software update:
• Select Into/Bulk Copy.
• Truncate Log on Checkpoint.
This table lists the requirements for starting the update workbenches:
Task Details
Personnel
Installer
Logon status
On the deployment server, logged on as user JDE with the database password for user JDE, in theJDEPLAN environment.
Prerequisites
Software update installed on the deployment server.
Concurrent Tasks
None
To select the environment and start the update workbenches:
On the deployment server, log on to the JDEPLAN (planner) environment as user JDE with the database password foruser JDE.
50

JD Edwards EnterpriseOne ToolsSoftware Updates Guide
Chapter 5Running Software Updates
From the System Installation Tools menu (GH9612), select Application Software Update, Electronic Software Update, orLanguage Update, depending on the type of update you are installing. SAR 5998893Planner Update - SAR 5998893
1. On Work with Software Updates, select the software update that you want to install. Click Next.
Note: If you want to install more than one update at the same time, you must use the JD EdwardsEnterpriseOne and World Change Assistant. See Using Change Assistant for more information.
The Work with Software Updates panel presents these row exits:
◦ Select
Selects the software update, and puts a check mark in the media object column for the selected row.
◦ Deselect
Deselects the software update, and puts an X in the media object column for the selected row.
◦ Update Detail
Provides more information on the software update
◦ Update Status
Shows the statuses of the processes that run during the software update.
◦ Update Sched Comp
Displays all merges (DD Merge, Spec Merge, and so forth) that are scheduled for the software update.This row exit is not applicable for language updates.
◦ Update Objects
Displays all objects, SARs and dependencies that are part of the software update. Use this exit to checkfor dependent and baseline updates.
Note: If you don't install the correct dependent or baseline updates, the system will display an errormessage.
◦ Update Cntrl Table
Displays all DD, UDCs, Menus, Favorites, Tips of the Day, and Report Director Templates that are deliveredwith the software update. This row exit is not applicable for language updates.
◦ Update Table Changes
Displays table changes delivered with the software update.
◦ Update Index Changes
Displays index changes delivered with the software update.
◦ Update History
Shows the environment and plan history of the software update.
◦ Advanced Setup
The program performs a series of common processes when each software update is run on the firstenvironment. If you want to run these processes on a second environment, however, you must use this
51

JD Edwards EnterpriseOne ToolsSoftware Updates Guide
Chapter 5Running Software Updates
option to select processes that you want to run again. Note that you must clear the check boxes for theprocesses you want to run again.
The Work with Software Updates panel presents these form exits:
◦ Remove Updates
Opens the Software Update Remove form where you can choose packages to remove. You can also selectto remove files only or history and files.
◦ Update Hist. Rpt
Runs a report of all of the software updates that have been applied.2. Double-click the environments where you want the software update installed.3. If you want the software update to run in unattended mode, verify that the Unattended Workbench check box is
selected. Unattended Workbench is checked by default.4. If you want to make a backup of specs, so that the original specs can be restored, select the Backup check box.
Backup is selected by default. This option is not available for language updates.
Note: If you have custom modifications and will be retrofitting these to the new update, it is stronglyrecommended that you make a backup of your original specs. For more information about retrofitting, seeRetrofitting Custom Modifications.
The Backup option creates a backup directory with the path planner\package\software update name\PATHCODE.BAK (for example, \planner\package\JL123456\DV900.BAK). All artifacts for the deliveredobjects (specs, source, include files) are stored in a single file with the extension .PAR. Control tables (datadictionary, UDC, and others) are not backed up. The contents of the backup file may be viewed with the JDEdwards EnterpriseOne Universal Table Browser tool or WinZip.backup optionbacking up specs
52

JD Edwards EnterpriseOne ToolsSoftware Updates Guide
Chapter 5Running Software Updates
5. Select the Create OMW Project and Package Assembly check box if you want to create the OMW project andpackage assembly record for the software update. This option is not available for language updates.
The Software Update Environment Selection panel also presents these row exits:
◦ Select
Selects the environment to be updated, and puts a check mark in the media object column for theselected row.
◦ Deselect
Deselects the environment to be updated, and puts an X in the media object column for the selected row.
◦ Affected Objects
Use this exit to view:
- Objects that will be installed.- SARs that will be installed to a specific path code.- Checked out objects.- Modified objects.- Objects with tokens.
This row exit is not applicable for language updates.
◦ Restore Backup
If backups were performed for a software update for a specific environment, this option restores all specsand business functions. Control tables are not backed up and hence will not be restored. For informationabout restoring a backup, see Restoring a Backup. This row exit is not applicable for language updates.
◦ Delete Backup
Deletes the backup directory created, and frees up disk space. A warning message is displayed if nobackup was performed. This row exit is not applicable for language updates.backup optiondeleting abackup
◦ Advanced Setup
When applying software updates to alternate environments, we recommend that you do not perform thespec merge. Instead, transfer objects using OMW. However, this exit enables you to override this optionand run the spec merge.
Replacing Language Data when Running a Language Update In order to preserve your customized language records, the update process only appends new language records inthe target environment and does not update any existing records. This is the default setting for updates, but you canchange this setting by changing a processing option.
If you do not have any customized language records, you may want to change the processing option value so thatchanges delivered in the language update will replace the current records. Follow these steps to change the processingoption value:
1. After installing language updates on the deployment server, sign onto JD Edwards EnterpriseOne JDEPLAN onthe deployment server.
2. Enter BV in the Fast Path to open the Batch Version application.
53

JD Edwards EnterpriseOne ToolsSoftware Updates Guide
Chapter 5Running Software Updates
3. Find R98403XB and select version XJDE0030.4. Select Processing Options from the Row Menu.5. On the Advanced Tab, enter 'Y' for the following processing option:
Enter a 'Y' to replace duplicate records in the target table, or enter 'N' (or leave blank) to preserve duplicaterecords in the target table.
6. Click OK to save your changes.7. Repeat this process and change the same processing option value to a 'Y' for versions XJDE0031, XJDE0032,
and XJDE0033.8. Enter GH9612 in the Fast Path.9. Run Language Updates to apply the update to the target environment.
Restoring a Backup Use this procedure to restore a backup you made while starting the software update. If you are not restoring a backup,skip this section and proceed to Completing the Update.backup optionrestoring a backuprestoring a backup
You can restore a backup if you selected the Backup check box on the Software Update Environment Selection panel, asdescribed previously.
To restore a backup:
From the System Installation Tools menu (GH9612), select Application Software Update, or Electronic Software Update.The Work with Software Updates panel appears.
1. Select the software update for which you want to restore the backup.2. Click Next. The Software Update Environment Selection panel appears.3. Select the environment for which you want to restore the backup.4. On the Row Exit menu, click Restore Backup. The backup is restored.
This may take several minutes.5. Click Cancel to close the Software Update Environment Selection panel.
Note: The restore process doesn't remove objects that were added through the software update. If you wishto remove the added objects, use the JD Edwards EnterpriseOne Object Management Workbench (OMW)project created by the software update. A list of added objects can be found in the software update specmerge report. If you are restoring objects for a software update that you have already transferred to otherpath codes, make sure you re-transfer the restored specs to the other path codes using OMW. If you wish toremove the added objects in all path codes, use the OMW project created by the software update.
Completing the Update This section provides an overview of the completion process for the attended mode and discusses how to completethese update workbenches:
• Add a Security Override for Running Table Conversions.
• Run Table Conversions.
• Configure your control tables.
• Merge your specification tables.
54

JD Edwards EnterpriseOne ToolsSoftware Updates Guide
Chapter 5Running Software Updates
• Restart the Specification Merge.
• Configure your packages.
• Validate the update.
If you selected the unattended mode, the process begins and all workbenches are completed automatically. In this case,skip the following tasks and continue with "Custom Modifications and Packages."
When the workbenches are complete, an update package must be built.
When the software update begins, status messages appear in the status bar at the bottom of the screen reportingprogress. If an error occurs, the process stops. In this case, click Previous to return to the Work with Software Updatesscreen, and then, on the Row menu, click Update Status. Status messages are displayed.
Adding a Security Override for Running Table Conversions If your database is Oracle, SQL, or DB2 for Linux, UNIX, and Windows database , you must add a security override sothat the table conversion process can drop and recreate a table. Adding a security override must be done by a securityadministrator. To add a security override, you must first add a system user for the data source owner, and then add anoverride for the EnterpriseOne user who will run the table conversion.
To add a system user for the data source owner:
1. In P98OWSEC, select the form exit Add System User.2. On Work with System Users, enter the appropriate data source owner (for example PRODDTA, TESTDTA, or
CRPDTA) in the System User field and select Find.3. If no values are returned, add the data source owner as a system user by selecting Add and completing the
fields on the System User Revisions form:
◦ System User
◦ Data Source
◦ Password
◦ Password Verify
4. Click OK and then Cancel and Close to return to the Work with User Security form.To add an override for an EnterpriseOne user who is going to run the table conversion:
1. On Work with User Security, enter the user who is going to run the table conversion, and select Find.2. Select the Form exit, Add Data Source.3. On Add Data Source, complete the User ID, Data Source, and System User fields.
Note: This override can be deleted once the table conversion has run.
Note: For IBM i , either sign on as a user who has *ALLOBJ rights to the table to be converted or complete the stepsabove, setting up a security override for the EnterpriseOne user so that when they connect to the data source, theyconnect as a system user ( IBM i user profile) who has *ALLOBJ rights to the table.
55

JD Edwards EnterpriseOne ToolsSoftware Updates Guide
Chapter 5Running Software Updates
Running Table Conversions Table conversions are performed after applying the software update to the path code. Review the special instructionsfor the software update that you are applying to see if there are any table conversions.table conversionsrunningconversionstablesrunning conversionsrunning table conversions
Note: You must be signed on as an administrative user who has rights to change security overrides.
To run table conversions:
1. Build and deploy an update package containing the software update changes.2. Install the update package on an administrative client.3. Sign onto the administrative client in the environment that had the changes applied.4. For each table conversion that is going to be run, check which data source contains the base table that the table
conversion is changing. The name of the table should be in the special instructions.5. Add security overrides for the JD Edwards EnterpriseOne user who will run the table conversions.
See Adding a Security Override for Running Table Conversions.6. Go to Batch Versions and verify, on the Properties tab for the table conversions, that the input and output
environments point to the login environment.7. Run the table conversions.8. Review the table conversion logs in the print queue, and verify that the table conversions completed
successfully.
Configuring your Control Tables If you are running the software update in unattended mode, this process is run automatically.
Complete this task to configure your control tables.
1. On Control Table Workbench, the system displays all control table merges in the detail area. From the Formmenu, select Merge All.
2. After each merge finishes, verify the output of the report produced.3. From Control Table Workbench, click Next.reportsControl Table MergesControl Table Merge report
Merging your Specification Tables If you are running the software update in unattended mode, this process is run automatically.
To merge your specification tables:
1. On Specification Table Merge Workbench, from the Form menu, select Merge All.formsSpecification TableMerge Workbench
2. After the merge finishes, verify the output of the report that is produced.reportsSpecification TableMergeSpecification Table Mergereviewing the merge report
3. After all merges complete, click Next.
The Package Workbench form appears.
56

JD Edwards EnterpriseOne ToolsSoftware Updates Guide
Chapter 5Running Software Updates
Restarting the Specification Merge If you are running the software update in unattended mode, this process is run automatically.
If the Specification Merge stops before it completes successfully because the merge of an object fails, you can restart itfrom the point where it stopped. If all merges complete successfully, you can skip this task.restarting the SpecificationMergeSpecification Mergerestarting
To restart the Specification Merge:
This table lists the requirements for restarting the specification merge.
Task Details
Personnel
Installer
Logon status
On the deployment server, logged on as user JDE with the database password for user JDE, in theJDEPLAN environment.
Prerequisites
Specification merge must be stopped.
Concurrent Tasks
None
Before you restart the Specification Merge you must set the status of the failed merge back to Not Processed (zero). Therestarted Specification Merge will skip completed merges and process the failed merge and all subsequent merges.
Use this procedure to set the status of the failed merge back to Not Processed (zero):
From Advanced Operations menu (GH9611) select Specification Merge Status (P98700).
1. On the SpecMerge Status panel, complete these fields:
◦ Package NameEnter the name of the software update.
◦ Source EnvironmentEnter JDEPLAN (the Planner environment).
◦ Target EnvironmentEnter the name of the environment you are updating.
2. Click Find. All objects that are part of the specification merge are displayed.3. Select the object for which the specification merge failed. The object will have a status of 4 (Error) in the Merge
Status column.4. On the Row Exit menu, click Reset Merge Status. The Reset Merge Status panel appears.5. In the New Merge Status field, specify 0 (zero, or Not Processed).6. Click OK.
The object's merge status is changed.7. Click Close.
57

JD Edwards EnterpriseOne ToolsSoftware Updates Guide
Chapter 5Running Software Updates
You can now restart the specification merge.
Configuring your Packages If you are running the software update in unattended mode, this process is run automatically.
Package Workbench transfers the F9603 and F9631 Package Information tables from the Planner data source to theSystem - 900 data source. It then updates the Package Plan Detail table (F98404) to reflect completion.configuring yourpackagesInstallation Workbenchconfiguring your packagesPackage Workbenchconfiguring your packages
If you are running the software update in unattended mode, this process is run automatically.packagesInstallationWorkbenchInstallation WorkbenchpackagesPackage WorkbenchtablesF9885tablesF9886tablesF9887
Item Details
Personnel
Installer
Logon status
On the deployment server, logged on as user JDE with the database password for user JDE, in thedeployment environment (DEP900).
Prerequisites
None
Concurrent Tasks
None
1. On Package Workbench, review your packages.2. From the Form menu, select Configure. The Congratulations form appears.3. Click Finish. The Software Updates History report will appear.
Note: After this screen appears, processing continues to occur in the background. Once completed theprogram displays a message that the update was completed successfully.
After this report appears processing continues in the background. Once this is completed, an UpdateCompletion message appears.
4. Click OK.
Note:• Restarting the Specification Merge.
• Reports in the JD Edwards EnterpriseOne Application Release 9.0 Installation Guide.
Validating the Update After the spec merge process, JD Edwards EnterpriseOne generates the Software Update Report (R96701) that lists theupdated objects and the SARs addressed by the update.
58

JD Edwards EnterpriseOne ToolsSoftware Updates Guide
Chapter 5Running Software Updates
For Tools Release 9.2.1.x and after, if the path code value in the F00942T.emdbsrcflg field is set to 1, this report alsoupdates the Object Librarian Archive Repository (F98780R) and Object Librarian Archive History (F98780H) tables incentral objects.
This report is summarized in a PDF file that opens automatically once the update process is complete. If the spec mergeprocess fails, this report is not created.
To validate the update process, view the R96701 report and note the value of the Object Install Flag for each of theobjects listed in the report:
Object Install Flag Value Description
0
The object was not updated because the existing object in the environment is more recent that theobject in the software update.
1
The object is selected to be applied to the environment. (This is the status of all objects in the listbefore the upgrade starts, but should not be observed when the update process is complete.)
2
Updated object was applied to the environment.
For Tools Release 9.2.1.x and after, also, note the value of the Update Repository Table column for each of the objectslisted in the report:
Update Repository Table Value Description
Not Applicable
The object was not updated by the spec merge so there was no need to save it to the F98780R andF98780H tables.
Updated
The object was updated in the F98780R and F98780H tables in central objects.
Not Updated
There was an error saving the information to the F98780R and F98780H tables.
59

JD Edwards EnterpriseOne ToolsSoftware Updates Guide
Chapter 5Running Software Updates
60

JD Edwards EnterpriseOne ToolsSoftware Updates Guide
Chapter 6Using Object Usage Tracking (Release 9.2.1.2)
6 Using Object Usage Tracking (Release9.2.1.2)
Understanding Object Usage Tracking You perform an object usage tracking analysis to determine the frequency that objects are being used within a pathcode. This information will enable you to determine the objects that need to be validated prior to upgrading or applyingan update to your system.
See the JD Edwards EnterpriseOne Tools Security Administration Guide to secure applications to systemadministrators only.
You can track the usage of the following objects:
• Applications (APPL)
• Batch Applications (UBE)
• Business Functions (BSFN)
Note: Object Usage Tracking is available for JD Edwards EnterpriseOne Application Release 9.0 and later releases.
Working with Object Usage Tracking Configuration(P980042T) Object Usage Tracking is disabled by default. You enable Object Usage Tracking with the Working with Object UsageTracking Configuration (P980042T) application. You must first enable Object Usage Tracking for the system prior toenabling at the path code level.
To activate Object Usage Tracking:
1. Navigate to: EnterpriseOne Menus/ EnterpriseOne Life Cycle Tools/Application Development(GH902)/ObjectUsage Tracking.
2. Click Object Usage Tracking Configuration.
The Revise Object Usage Tracking Enablement form displays the following fields and columns:
System Level Tracking Enabled
Checked - object tracking is enabled at the system level.
Un-checked - Object tracking is disabled at the system level.
Tracking
Green circle - Object tracking is enable for the path code.
61

JD Edwards EnterpriseOne ToolsSoftware Updates Guide
Chapter 6Using Object Usage Tracking (Release 9.2.1.2)
Red Square - object tracking is disabled for the path code.
Path Code
The available path codes.
Description
The path code descriptions.3. Click the System Level Tracking Enabled check box.4. Click the path code row in the Tracking column to enable object usage tracking for that path code.5. Close the application.
Note: You can use Server Manger to restart the HTML Server and Enterprise Server for the changes in ObjectUsage Tracking Configuration to take effect immediately. Otherwise, the configuration changes will not takeeffect until the Object Usage Tracking Configuration is automatically updated on the server every 60 minutes.
Disable / Enable Object Usage Tracking by Object Type (Release9.2.2) You can enable and disable object types through Revise Usage Tracking by Object Type (W980042TC). The UsageTracking Configuration Lists (F98900) table maintains the object types that are disabled and enabled. By default theF98900 table is empty to prevent disruption of current Object Usage Tracking configuration. Applications and batchapplication are enabled for tracking and business functions are disabled until a record is added and set to disable orenable.
To enable or disable an object type for Object Usage Tracking:
1. Navigate to: EnterpriseOne Menus/ EnterpriseOne Life Cycle Tools/Application Development (GH902)/ObjectUsage Tracking.
2. 2Click Object Usage Tracking Configuration.3. Select the path code you want to exclude an object type in.4. On the Row menu, click Object Type Tracking.5. On the Revise Object Type Enablement form click the Tracking column for the object type to want to enable /
disable.
◦ Green Circle = Enabled
◦ Red Square = Disabled
6. Click Close.
Object Exclusion list (Release 9.2.2) You can add and remove object names in the Object Exclusion List (W980042T). When you add object names to thegrid, Object Usage Tracking does not track them. If a business function is in the list and calls another business function,the called business function is tracked unless also added to the Object Exclusion List. The Usage Tracking ConfigurationLists (F98900) table maintains the names of objects in the Object Exclusion List.
62

JD Edwards EnterpriseOne ToolsSoftware Updates Guide
Chapter 6Using Object Usage Tracking (Release 9.2.1.2)
To exclude an object from Object Usage Tracking:
1. Navigate to: EnterpriseOne Menus/ EnterpriseOne Life Cycle Tools/Application Development (GH902)/ObjectUsage Tracking.
2. Click Object Usage Tracking Configuration.3. Select the path code you want to exclude an object in.4. On the Row menu, click Exclusion List.5. Enter the object to be excluded in the grid.6. Click OK.
Copy Path Code You can copy the object type and exclusion list for a path code to another path code.
To copy the tracking configuration of a path code:
1. Navigate to: EnterpriseOne Menus/ EnterpriseOne Life Cycle Tools/Application Development (GH902)/ObjectUsage Tracking.
2. Click Object Usage Tracking Configuration.3. Select the path code you want to copy.4. Click the Copy button on the tool bar.5. In Object Path Search & Select, select the path code you want to copy to.6. Click the Select button on the tool bar.
Working with Object Usage Tracking Detail (P98911) The Object Usage Tracking Detail (P98911) application displays all object usage recorded by the system that has notbeen purged from the Object Usage Tracking Detail (F98911) table. Object usage is any time a tracked object is accessedby a user or the system. Sub-system calls to an object will create only one record. The grid displays the object name, theuser, path code, environment, date, time, and future use columns .You can delete individual or multiple records from thegrid, or use Purge Object Usage Tracking Detail (R98911P) to delete records.
To launch Working with Object Usage Tracking Detail:
1. Navigate to: EnterpriseOne Menus/ EnterpriseOne Life Cycle Tools/Application Development (GH902)/ObjectUsage Tracking.
2. Click Object Usage Tracking Detail.
Note: It is recommended you increase the table size for Object Usage Tracking Detail (F98911).The table sizenecessary will depend on how often you run R98911P.
Working with Object Usage Tracking Summary (P98902)
The Object Usage Tracking Summary (P98902) application displays data from the Object Usage Tracking Summary(F98902) table, which is populated by running the Summarize Object Usage UBE (R98902). Object usage data in this
63

JD Edwards EnterpriseOne ToolsSoftware Updates Guide
Chapter 6Using Object Usage Tracking (Release 9.2.1.2)
table can be summarized by Object Name, Object Name/Form/Version, and/or Product Code. In addition, object usagecounts for each type can be totaled by day, month, or year.
To launch Object Usage Tracking Summary:
1. Navigate to: EnterpriseOne Menus/ EnterpriseOne Life Cycle Tools/Application Development (GH902)/ObjectUsage Tracking.
2. Click Object Usage Tracking Summary.
Working with Summarize Object Usage UBEs (R98902) The Summarize Object Usage UBEs (R98902) populates the F98902 table with data up to the last complete day. Thefollowing four batch versions summarize data in F98902:
• XJDE0001 - Summarize Object Usage by Object Name UBE
• XJDE0002 - Summarize Object Usage by Object Form Version UBE
• XJDE0003 - Summarize Object Usage by Product Code UBE
• XJDE0004 - Summarize Object Usage by Business Function UBE
Each time you run a summarization version, it will summarize the records in the F98911 or F98912 tables based on theObject Tracking Type:
• 01 - Object Name (F98911 and F98912)
• 02 - Object Name/Form/Version (F98911)
• 03 - Product code (F98911 and F98912)
• 04 - object Name/Business Object (F98912)
Each summary will summarize by Tracking Unit:
• 01 - Hours per Day (24)
• 02 - Days per Month (28-31)
• 03 - Months per Year (12)
Each time you run a summarization version, it will add to the existing records for Days per Month and Months per Year,so that it is cumulative from the first time it was executed and it will create new records for:
• Hours per Day for new days
• Days per Month for new months
• Months per year for new years
The first time you run a summarization version, it will summarize to the current date minus 1 for the Object TrackingType version selected.
At the end of the summarization, the UBE adds a LASTSUMMARY record to the F98902 table with Object Tracking Typeof 01, 02, 03, 04 with the current date minus 1. This record will contain a value in the OSOTUT field of how many F98911records were read.
The next time you run the UBE, it will use the LASTSUMMARY date and will only use records from that date to thecurrent date minus 1. Each Object type will have a LASTSUMMARY record.
64

JD Edwards EnterpriseOne ToolsSoftware Updates Guide
Chapter 6Using Object Usage Tracking (Release 9.2.1.2)
To launch Summarize Object Usage UBEs:
1. Navigate to: EnterpriseOne Menus/ EnterpriseOne Life Cycle Tools/Application Development (GH902)/ObjectUsage Tracking.
2. Click Summarize Object Usage by (select a version).
Purging Object Usage Tracking Detail for Applicationsand Batch Applications (R98911P) You purge records from the Object Usage Tracking Detail (F98911) table by running the Purge Object Usage TrackingDetail UBE (R98911P). Complete the following processing options prior to running
Select Tab
Path Code
The path code you want to purge from.
Object Tracking Purge From Date
The date you want the purge to start.
Object Tracking Purge To Date
The date you want the purge to end.
Process Tab
Proof or Final Mode
Blank = Proof Mode
1 = Final Mode
Report View
Blank = View the summary.
1 = View the detail purge records.
Note: It is recommended you run the Purge Object Usage Tracking Detail UBE in proof mode first to verify thesummarization UBEs have been run. Use the Proof mode to generate a report that displays the Path Code, From andTo Dates, Purge Total, and Last Summary Dates for each Tracking Type.
Purging Business Function Tracking Detail (R98912) You purge records from the Business Object Usage Tracking Detail (F98912) table by running the Purge BusinessFunction Tracking Detail UBE (R98912P).
Complete the following processing options prior to running:
65

JD Edwards EnterpriseOne ToolsSoftware Updates Guide
Chapter 6Using Object Usage Tracking (Release 9.2.1.2)
Select Tab
Path Code
The path code you want to purge from.
From Date
The date you want the purge to start.
To Date
The date you want the purge to end.
Process Tab
Proof or Final Mode
Blank = Proof Mode
1 = Final Mode
Working with Object Usage Tracking ComposedEnterpriseOne Page The Object Usage Tracking Composed EnterpriseOne Page (CMP_1701270001JDE) presents four charts for you to use toanalyze Object Usage Tracking data.
Note: The Object Usage Tracking Composed Page is available for JD Edwards EnterpriseOne Applications Release 9.2and later releases.
See the JD Edwards EnterpriseOne Tools Security Administration Guide to secure UDOs to system administratorsonly.
66

JD Edwards EnterpriseOne ToolsSoftware Updates Guide
Chapter 6Using Object Usage Tracking (Release 9.2.1.2)
Usage Count by (Tracking Type) Chart
Use this chart to view object usage for the specified path code. The chart is based the Object Usage Tracking Summarytable (F98902).
Additionally, you can use the drop-down menu on the top of the chart to change the data that the system displays. Youcan select one of the these options:
• Object
• Object/Form/Version
• Product Code
You can use the menu to further filter the data in the chart that the system displays.
The queries associated with the object Usage Tracking Summary table are all filtering on Tracking Unit 01. Any queryyou create for use with this composite page must be filtering on one of the three tracking units. Tracking Unit 01provides the most detail.
Daily Peak Time Usage for (Date) Chart
Use this chart to view daily object usage by path code. The chart is based over the Object Usage Tracking Summarytable (F98902). You can use the input date field in the chart's title to change the date of the data displayed in the chart.
67

JD Edwards EnterpriseOne ToolsSoftware Updates Guide
Chapter 6Using Object Usage Tracking (Release 9.2.1.2)
You can also use the menu to further change the data displayed in the chart.
• The Path Code field determines which path code totals display on the chart. If you select multiple path codes,a separate line for each path code displays on the chart. If you do not select a path code, totals from all pathcodes in the F98902 are displayed in separate lines on the chart by default.
• The Tracking Type field determines the type of summary totals displayed on the chart. For example, objectusage totals may only be summarized in the F98902 by product code, so you will need to select the ProductCode option from this field to view the data in the chart.
Note: If the Universal Time setting in User Preferences is populated, the usage totals displayed on the chart will beadjusted to the account for your time zone offset. This will correctly display the hourly totals according to your day.Otherwise, all hourly totals on the chart are displayed according to Coordinated Universal Time (UTC) regardless ofyour time zone.
Object Usage by Product Code
Use this chart to view object usage totals by Product Code for a specified number of days. The chart is based over theObject Usage Tracking Detail table (F98911) and can show object usage totals for the past seven days.
You can use the menu to further change what data displays in the chart.
• The Path Code field determines which path code totals display on the chart. If you select multiple path codes,product code totals for all selected path codes are combined into a single bar for each date. If you do not selecta path code, usage totals for all path codes in the F98911 display on the chart by default.
• The Number of Days field determines the number of dates appearing on the chart. You can select between oneto seven days in the past.
• The Display Count field determines the number of individual product code totals displaying on the chart. If thechart data contains totals for more product codes than the number specified, the totals beyond this number areaccumulated and displayed under an "Other" category.
Object Usage by Path Code
Use this chart to view object usage totals by path code for a specified number of days. The chart is based over theObject Usage Tracking Detail table (F98911) and can show object usage totals for the past seven days.
You can use the menu to further change the data displaying in the chart.
• The Path Code field determines which path code totals display on the chart. If you select multiple path codes, aseparate totals bar for each selected path code displays on each date. If do not select a path code, usage totalsfor all path codes in the F98911 display on the chart by default.
• The Number of Days field determines the number of dates appearing on the chart. You can select between oneto seven days in the past.
These charts are based on the Object Usage Tracking Detail and Summary tables. By default, the charts are set up torender using predefined queries found in the chart's menu drawer. You can modify the queries to better meet yourrequirements. Additionally, you can add filters in the menu of each chart to further restrict the chart's data. The filtersprovide selection capabilities based on the columns included in the primary table used by each chart. For example, withthe Daily Peak Time Usage chart, you can display hourly totals for a single object by creating a filter to only retrieve datawhere the F98902 Summary ID (OTSUM) column equals the name of the object.
The shared queries are:
• All Supported Types (QRY98902_1702010003JDE)
Tracking Unit = 1
68

JD Edwards EnterpriseOne ToolsSoftware Updates Guide
Chapter 6Using Object Usage Tracking (Release 9.2.1.2)
• Applications (QRY98902_1701300005JDE)
Tracking Unit = 01
OMWOT = APPL
• Applications and Reports (QRY98902_1701300008JDE)
Tracking Unit = 01
OMWOT = APPL or UBE
• Reports (QRY98902_1701300006JDE)
Tracking Unit = 01
OMWOT = UBE
Note: To limit irrelevant objects from appearing in the charts, you can add an exclude into the query, for example; SYnot in (' ','H92','H95','H96U','H96B') and SYR not in (' ','00','UX'). This will limit some tools system codes that you maynot want in your reporting.
69
JD Edwards EnterpriseOne ToolsSoftware Updates Guide
Chapter 6Using Object Usage Tracking (Release 9.2.1.2)
70

JD Edwards EnterpriseOne ToolsSoftware Updates Guide
Chapter 7Using the Software Update Impact Analysis Tool
7 Using the Software Update Impact AnalysisTool
Understanding the Software Update Impact AnalysisTool Oracle's JD Edwards EnterpriseOne Software Update Impact Analysis Tool has been added to help manage yoursoftware update. This tool is used to gauge the level of impact a software update will have on your existing system.Users may access this tool from a client workstation or the deployment server.
You perform an impact analysis when you download ESUs. If you are performing a new installation, or if you areperforming an upgrade, you do not need to do an impact analysis. If you do need to perform an impact analysis, youdo so after you have installed the update on the deployment server, but before you deploy the update to anotherenvironment.
This is a list of features that this tool provides:
• Identification of what Software Action Requests (SARs), objects, and control files will be applied to the system.
• Special instructions for SARs.
• List of objects associations with a SAR.
• List of any dependent software updates.
• Identification of any table conversions within a software update.
It can also be used to manage the application of the software update to your system. A system administrator may assignspecific objects, control files, and SARs to individual users. Users who have been assigned objects can update the statusof approved objects, SARs, and control files that have been assigned to them. They can also keep track of the status oftheir approvals.
The web client version, Object Usage for Software Update Impact Analysis (P96710) is available for JD EdwardsEnterpriseOne Application Release 9.0 and later releases. (Release 9.2.1.2)
Working with the Software Update Impact Analysis Tool Access the JD Edwards EnterpriseOne Software Update Impact Analysis Tool:
1. Logon to a JD Edwards EnterpriseOne client with administrative privileges.2. In the fast path enter GH9612.3. From the Software Updates menu, right-click Software Update Impact Analysis → Prompt For → Values.4. Enter the path to the location of the update.xml file (for example, \\deployment server name
\E900\ImpactAnalysis). Since this utility can be run from a client or the deployment server, it is important thatthe XML files are located in a central location. By default, the XML files will be downloaded to the unc pathprovided in the previous example by the installation of a software update.
5. Click OK.6. From the Software Updates menu (GH9612), select Software Update Impact Analysis (P96710).
71

JD Edwards EnterpriseOne ToolsSoftware Updates Guide
Chapter 7Using the Software Update Impact Analysis Tool
Note: Within this form, a list of earlier analyses are listed in the main work area. This is the core navigationscreen that will enable you to access many of the features available within this tool.
Configuring a New Analysis To configure a new analysis:
1. Click Add.2. When creating a new report complete these fields:
◦ Software Update NameClick the browse button to search for the software update you wish to analyze.Select the desired software update.Click the Select button on the tool bar. This will populate the Software Update Name field in the setupscreen.
◦ DescriptionEnter additional details on this update in this field's text box.
◦ Environment NameEnter the environment to do the analysis on (for example, DV900).
◦ Expected Completion DateEnter the date you anticipate to complete the analysis.
◦ Percent CompleteEnter the percent complete for this update.
◦ Impact Analysis StatusUse the visual assist to select the status of the impact analysis (for example, 03 - In Process, 02 -Configure).
3. Click OK to return to the SU Impact Analysis Master screen.
Analyzing your Software Update Access the JD Edwards EnterpriseOne Software Update Impact Analysis Tool: On the SU Impact Analysis Master screen,highlight the record that was created in the previous steps. Once this is completed click the Analyze row exit.
Note: Once this step has been completed, analysis processing occurs in the background. This processing may takeseveral moments. Once it is completed, a success message will appear in the status bar area.
Reviewing the Results in the Impact Analysis - Master View From the SU Impact Analysis Master screen, select the Master View row exit.
72

JD Edwards EnterpriseOne ToolsSoftware Updates Guide
Chapter 7Using the Software Update Impact Analysis Tool
The overall view of the analysis displays and includes:
• SARs.
• Objects and control files in SARs.
• What objects are affected or merged.
Note: The master view should be accessible to the CNC administrative user only by enforcing security.
Assigning Objects to Users Objects may be assigned to different users within this tool for further analysis.
1. To assign objects to users, select the Assign exit row.2. Highlight the object you wish to assign and click the Select exit row.
A check mark will appear to the left of the item you selected. Multiple records can be selected at once withinthis screen as well.
3. In the Assigned To text box, enter the address book number of the user who will receive the assignment.4. To complete this process, select the Assign option from the row exit.
Notifying Users of Assignments by Email Complete this task to notify users of their assignments by email.
1. Select the Form exit.2. Select one of these row options:
◦ Approval Report
Shows the latest states of what users have done with objects.
◦ Notify all
Sends a global email notification to all users that have been assigned objects (past and present).
◦ Notify today's assigners
Sends an email notification to users who have been assigned today.3. To exit this screen click the Close button. This will take you to the Impact Analysis - Master View.4. Click the Close button again to enter the SU Impact Analysis Master screen.
Viewing any Prerequisites prior to Installing a Software Update Complete this task to view the prerequisites before you update the software.
1. Within the SU Impact Analysis Master screen select the Pre-reqs View exit row.
The Pre-reqs View displays any prerequisites that may be required to apply a software update. Theserequirements may include:
73

JD Edwards EnterpriseOne ToolsSoftware Updates Guide
Chapter 7Using the Software Update Impact Analysis Tool
◦ Base line software updates that are required prior to installing the current software update.
◦ Indicates any quarterly updates that already have the dependent / baseline software update.
◦ Through the Install Status column, it will indicate if an update has been installed.
2. To exit this item, click the Close button to re-enter the SU Impact Analysis Master screen.
Viewing Objects Affected by the Software Update Select the Object View row to display this screen.
Select one of these radio buttons to filter objects:
Objects that will be affected by applying this software update (Default)
Lists all affected objects delivered by the software update.
All objects delivered with this software update
Lists all objects in the software update.
Accepting Assigned Objects Complete this task to accept the assigned objects.
1. In the object window, accept a job by selecting it in the object window.2. Click the Approved exit row.
The administrator might modify these text fields:
◦ Impact Analysis Status
Through a visual assist, various values may be assigned to indicate the status (for example Accept /Completion).
◦ Percent Complete
A percent completed may be assigned to indicate the progress of analyzing the object.3. Click the OK button to return to the Impact Analysis - Object View Screen.4. Click the Close button to return to the main screen (SU Impact Analysis Master)
Viewing SARs Complete this task to view relevant SARs.
1. Click the SAR View row.
Select one of these options:
◦ New SARs delivered
List new SARs available in the software update.
74

JD Edwards EnterpriseOne ToolsSoftware Updates Guide
Chapter 7Using the Software Update Impact Analysis Tool
◦ All SARs deliveredList all SARs in the software update.
◦ View Objects associated with each SARSelect this check box if you wish to view objects associated with a specific SAR.
◦ Special Instructions exit rowList any additional details and special instructions that may be associated with a specific SAR.
2. Click the Close button to return to the Impact Analysis SAR View screen.◦ Approved exit row
Same as noted earlier.3. Click the Close button again to return to the SU Impact Analysis screen.
Viewing Control Files in the Software Update Complete this task to view the Control Files.
1. To access this option, click the Control File View row.The Control File View lists all control files in a software update and will indicate the merge options for individualitems.Select one of these exit row options:
◦ ApprovedSame as indicated earlier.
◦ DetailWhat specifically has changed within a control file.
2. Click the close button to return to the SU Impact Analysis Master screen
Working with the Scheduler View Complete this task to view the scheduled merges and table conversions.
1. Click Scheduler View from the exit row.The Scheduler viewer lists merges and table conversions that will be performed when the software update isexecuted.
2. Click the Close button to return to the SU Impact Analysis Master screen.
Working with the Analyze Report Click the Analyze Report exit row.
This report is a complete summary, in pdf format, of the impact analysis results.
75
JD Edwards EnterpriseOne ToolsSoftware Updates Guide
Chapter 7Using the Software Update Impact Analysis Tool
Working with Object Usage for Software Update ImpactAnalysis The Object Usage for Software Update Impact Analysis application has additional information not available on theSoftware Update Impact Analysis on the development client. The following additional columns exist:
• Customized ObjectsThe number of objects in the ESU that have been customized (checked-out/checked-in).
• Used ObjectsThe number of objects in the ESU that have a record in the Object Usage Tracking Detail table (F98911) orObject Usage Tracking Summary table (F98902).
• Total ObjectsThe total number of objects contained in the ESU.
Note: You need to execute an Impact Analysis for an ESU to populate the columns. The Used Objects columnis populated after Object Usage Tracking is activated in the Object Usage Tracking Configuration (P980042T)application.
The Object Usage View option is only available on the web client version of the Software Update Impact Analysis Master(P96710) application.
To access Object Usage for Software Update Impact Analysis:
1. From the Application Development menu (GH902), select Object Usage Tracking and click Object Usage forSoftware Update Impact Analysis.
2. Select the Object Usage View from the Analysis Views Row exit to display the Impact Analysis - Object UsageView form.
The form has the following fields and table columns:
ESU Name
The name of the ESU Being analyzed.
Path Code
The path code being analyzed.
Total Objects
The total number of objects contained in the ESU.
Customized Objects
The number of objects in the ESU that have been customized (checked-out /checked-in).
Used Objects
The number of objects in the ESU that have a record in the Object Usage Tracking Detail table (F98911) or Object UsageTracking Summary table (F98902).
76

JD Edwards EnterpriseOne ToolsSoftware Updates Guide
Chapter 7Using the Software Update Impact Analysis Tool
OMW Object Name
The unique identifie for the object in the ESU.
Last Patched
The last date this object was updated by an ESU in this path code.
Last Patched ESU Name
The name of the last patched ESU.
Object Customized
Checkmark - Object has been customized (checked-out/checked-in).
Last Customized
The date the object was last customized.
User ID
The User ID of who last checked-in the object.
Object Used
Checkmark - Object has been used.
X - Object has not been used.
Grey Ball Icon - Tracking not supported.
Usage Count
The number of times the object has been accessed.
Last Accessed
The date the object was last accessed.
Note: The Used Objects, Object Used, Usage Count, and Last Accessed field are populated after Object UsageTracking is activated in the Object Usage Tracking Configuration application.
77

JD Edwards EnterpriseOne ToolsSoftware Updates Guide
Chapter 7Using the Software Update Impact Analysis Tool
78

JD Edwards EnterpriseOne ToolsSoftware Updates Guide
Chapter 8Using JD Edwards Compare and Merge Tools
8 Using JD Edwards Compare and Merge Tools
Understanding JD Edwards EnterpriseOne Compare andMerge Tools JD Edwards compare and merge tools enable you to compare two versions of JD Edwards EnterpriseOne objects andnon-code objects, such as versions, UDCs, data dictionary items. Tools Release 9.2.4 and later include and merge toolsfor business views, tables, reports. If you have made custom modifications to business data, forms, or event rules, thecompare and merge tools can help you retrofit your changes or verify that they were carried forward to a new release.Furthermore, you can use these tools anytime you want to compare items between two environments.
Note: The compare and merge tools for RDA, business views, and tables require that the JAS.ini, JDBJ.ini, andMergeTools_JAR.jar files reside in the ..System/Classes directory of the development client. If you are using the OracleDatabase Client, the tnsnames.ora file must also be present in the ..System/Classes local folder on the developmentclient. These files are copied automatically from the Developer Web Client configuration, if it has been installed.
Application Configuration Analyzer Application Configuration AnalyzerThe Application Configuration Analyzer is a set of reports which identify differencesfor processing options, data dictionary (DD) items, and user defined codes (UDCs) between releases or environments.These reports are:
• Version Compare Report
• User Defined Codes Compare Report
• Data Dictionary Compare Report
Note: JD Edwards provides the report templates and report definitions to produce the Application ConfigurationAnalyzer reports using the JD Edwards EnterpriseOne embedded BI Publisher. For information about the embeddedBI Publisher, see "Introduction to BI Publisher for JD Edwards EnterpriseOne" in the JD Edwards EnterpriseOne ToolsBI Publisher for JD Edwards EnterpriseOne Guide .
Version Compare Report Versions Compare ReportreportsVersions CompareThe Version Compare report (R983051N) compares the processingoptions for interactive versions and batch versions between two environments or data sources. Environment (1) andData Source (1) are determined from the current sign on environment. You specify Environment (2) or Data Source (2) ina processing option to indicate the environment or data source to use for comparison.
Before an upgrade, you can compare the versions in the Production and Pristine environments to determine whichversions were added, deleted, or changed. After the upgrade, you can use the report to verify that your modificationswere carried forward to the new release.
79

JD Edwards EnterpriseOne ToolsSoftware Updates Guide
Chapter 8Using JD Edwards Compare and Merge Tools
Another way to use the report is as an audit or validation tool. For example, if a version performs as expected in adevelopment environment but not in a production environment, you can use the Versions Compare report to see ifthere are processing option differences in the two environments.
The comparison report includes both a summary and a detailed section. The detailed section is sorted by system codeand object type.
Processing Options The following processing options enable you to specify the processing for the report.
Environment
1. Enter the Environment (2) that you want to compare.
Specify an environment to compare with the sign on environment. Leave this option blank if you want to compare datasources.
2. Or Enter the Data Source (2) for Versions table F983051.
Specify a data source to compare with the sign on data source. Leave this option blank if you want to compareenvironments.
Options
3. Enter '1' to display all selected versions.Enter '2' to display only 'Processing Option (PO) Data' that aredifferent.Default is to display all versions that are different.
Use this processing option to display all versions, all versions that are different, or only those where the processingoption data is different.
Entering '1' displays all versions, even if there are no differences.
Entering '2' displays batch versions that have different processing option values.
The default (blank) displays:
• Versions that exist in one environment or data source, but not in another.
• Versions with processing option values that are different.
Running the Report To run the Version Compare report:
1. From the Software Compare Tools (GH96111) menu, select Compare Versions.2. Enter values for the processing options.3. Click Submit.
Note: Do not run multiple instances of the Version Compare report simultaneously. The report uses worktable F98881 to build the report data. If two Version Compare reports are running at the same time, theinformation in the reports will not be accurate.
4. Select options for the report definition, and then click Next.5. From Recent Reports on the top menu bar, select Version Compare report.
Note: If the report is not shown in the drop-down list, select View Job Status to monitor the processing of thereport.
80

JD Edwards EnterpriseOne ToolsSoftware Updates Guide
Chapter 8Using JD Edwards Compare and Merge Tools
6. When the report processing is complete, you can view or print the output by selecting either View Job Status orVersion Compare report from the Recent Reports menu.
Reading the Report The Version Compare report identifies differences in the interactive and batch versions between two environments ordata sources. Based on the processing options that you select, the report will identify the following:
• Versions that exist in one environment or data source, but not in the other.
• Processing option values that are different in the compared versions.
Report Components The cover page of the report shows the report title, the date and time of the report, the data sources that werecompared, and the report level of detail that was selected.
The report contains the following components:
• Processing Option Data Changed - Summary by System Code (table)
• Version Differences Detail (horizontal bar graph and table)
• Report summary (text)
Summary by System Code
The summary section displays a table that summarizes the number of versions without processing option data changes,the number of versions with processing option data changes, and the total number of versions for each system code.
Versions Differences Detail
The detail portion of the report is grouped by system code. At the beginning of each system code section, a horizontalbar chart shows the total number of versions with processing option data differences and without processing optiondata differences in that system code.
Each version with differences has a table with the following columns:
Column Heading Description
Result
Describes the result of the comparison. Values are: Only In: The version is only in the location shown in the Data Src column. Different: The versions in the two locations are not identical. PO Data Differ: The version processing option values are different.
Data Src
Data Location (1) or (2)
Version
Version Name An example of a version name is XJDE0001 or VER0003.
Version Title
Version Title An example of a version title is "Mailing Labels for the Eastern Region."
81

JD Edwards EnterpriseOne ToolsSoftware Updates Guide
Chapter 8Using JD Edwards Compare and Merge Tools
Column Heading Description
Security Flag
Values are: 0 - No Security 1 - Medium Security 2 - Medium to Full Security 3 - Full Security
Option Code
Values are: Blank - Disables the processing options for the version. 1 - Blind Execution. The application will use existing processing options without prompting the user. 2 - Prompt for Values. The application will prompt the user for processing options at run time
Check Out Status
Indicates whether the version is checked out in Object Management Workbench. Values are Y or N.
Version Availability
Values are: Y - The version is available for use from the server. N - The version is not available for use from the server.
Processing Option Template Name
Processing Option Template Name An example of a processing option template name is T0018P.
PO Data Differ (Y/N)
Processing Option Data Difference Indicates whether there are differences in the processing option values in the compared versions. Values are Y or N.
Note: To change processing option values shown on the Version Compare report:
• For batch versions, use the Batch Versions (P98305W) application.
• For interactive versions, use the Interactive Versions (P983051) application.
Report Summary The summary at the end of the report displays the names of the environments or data sources that were compared andthe F983051 table mappings. Also included is a record count with the following information:
• Total number of versions selected in each data source.
• Total number of versions that are only in one data source or the other.
82

JD Edwards EnterpriseOne ToolsSoftware Updates Guide
Chapter 8Using JD Edwards Compare and Merge Tools
• Total number of versions that are different.
• Total number of versions with processing option data that is different.
Compare Terms
The terms used in the report are defined as follows:
Term Definition
Only in (1)
Version is only in Data Source (1)
Only in (2)
Version is only in Data Source (2)
Different
Version in Data Source (1) and (2) are not identical.
PO Data Differ - Y
Version processing option values are different.
User Defined Code Compare Report User Defined Codes Compare ReportreportsUser Defined Codes CompareThe User Defined Code Compare report(R960004N) displays differences in the user defined codes (UDCs) in two environments or data sources. Environment(1) and Data Source (1) are determined from the current sign on environment. You specify Environment (2) or DataSource (2) in a processing option to indicate the environment or data source to use for comparison. If data sources arecompared, the F0004 User Defined Code Types and F0005 User Defined Codes tables must exist in both data sourcesfor the comparison to succeed.
Before an upgrade you can compare the UDCs in the Production and Pristine environments to determine which UDCswere added, deleted, or changed. After the upgrade, you can use the report to verify that your UDC modifications werecarried forward to the new release.
Another way to use the report is as an audit or validation tool. For example, if a UDC performs as expected in adevelopment environment but not in a production environment, you can use the User Defined Code Compare report tosee if there are UDC differences in the two environments.
The comparison report includes both summary and detailed sections. The detailed section is sorted by system code,and then by UDC type, such as 01/ST.
Processing Options The following processing options enable you to specify the processing for the report.
Environment
1. Enter the Environment (2) that you want to compare.
Specify an environment to compare with the sign on environment. Leave this option blank if you want to compare datasources.
2. Or Enter the Data Source (2) for User Defined Code (UDC) tables.
83
JD Edwards EnterpriseOne ToolsSoftware Updates Guide
Chapter 8Using JD Edwards Compare and Merge Tools
Specify a data source to compare with the sign on data source. Leave this option blank if you want to compareenvironments. If you are comparing the UDCs in data sources, Data Source (2) must contain the F0004 and F0005 UDCtables.
Options
3. Enter '1' to display all selected UDCs.Default is to display all UDCs that are different.
Entering '1' displays all UDCs, even if there are no differences.
The default (blank) displays:
◦ UDCs with different values.
◦ UDCs that exist in one environment, but not in the other.
Running the Report To run the User Defined Code Compare report:
1. From the Software Compare Tools (GH96111) menu, select Compare User Defined Codes.2. Enter values for the processing options.3. Click Submit.
Note: Do not run multiple instances of the User Defined Code Compare report simultaneously. The reportuses work table F98881 to build the report data. If two User Defined Code Compare reports run at the sametime, the information in the reports will not be accurate.
4. Select options for the report definition, and then click Next.5. From Recent Reports on the top menu bar, select User Defined Codes Compare report.
Note: If the report is not shown in the drop-down list, select View Job Status to monitor the processing of thereport.
6. When the report processing is complete, you can view or print the output by selecting either View Job Status orUser Defined Code Compare report from the Recent Reports menu.
Reading the Report The User Defined Code Compare report identifies differences in the UDCs between two environments or data sources.Based on the processing options that you select, the report will identify the following:
• UDCs that exist in one environment or data source, but not in the other.
• UDCs with different field values.
Report Components The cover page of the report shows the report title, the date and time of the report, the data sources that werecompared, and the report level of detail that was selected.
The report contains the following components:
• Summary by User Defined Code Types (horizontal bar graph).
• Differences by Product Code (table).
• Report summary (text and table)
Summary by Product Code
A horizontal bar graph at the beginning of the report displays the percentage of UDC differences in each product code.
84

JD Edwards EnterpriseOne ToolsSoftware Updates Guide
Chapter 8Using JD Edwards Compare and Merge Tools
Differences by Product Code
The Differences by Product Code portion of the report is grouped by product code. Only the product codes with UDCdifferences display on the report. Under each product code section are UDCs with differences (grouped by UDC, such as01/PH). A table for each UDC or UDC value with differences shows the differences that were found.
For example, an entire UDC, such as 01/PH, could exist in one environment or data source, but not in the other. Or, if theUDC exists in both locations, some of the code values could be different. For instance, the BUSN code within the 01/PHUDC shown in the following example could be missing in one location or have a different value for one of its fields, suchas Description 01.
This is an example of a UDC:
Each UDC with differences displays a table showing the values for the UDC and for any codes within the UDC withdifferences.
The following columns are shown for the UDC:
Column Heading Description
Result
The Result column indicates that the UDC has differences.
Product Code
The UDC's product code.
85

JD Edwards EnterpriseOne ToolsSoftware Updates Guide
Chapter 8Using JD Edwards Compare and Merge Tools
Column Heading Description
Code Types
The UDC type, which is a code that identifies the table that contains user defined codes. For example, for UDC 01/PH the type is PH.
Description
The UDC description.
Code Length
The maximum length of UDC code values.
Second Line (Y/N)
Determines if the Select User Defined Code form will display a second line of description. Valid valuesare:
• Y - Enables the second line of description.
• N - Enables the Select User Defined Code form to display only one line of description.
Numeric (Y/N)
Determines whether a user defined code is numeric or alphanumeric. Valid values are:
• Y - Indicates that the code is numeric and should be right-justified.
• N - Indicates that the code is alphanumeric and should be left-justified.
The following columns are shown for the UDC codes:
Column Heading Description
Result
The Result column displays one of these values:
• UDC Codes Different (<1 or 2>)
• UDC Codes Only in (<1 or 2>)
The 1 or 2 value indicates in which environment or data source the difference was found.
Product Code
The UDC's product code.
Code Types
The UDC type, which is a code that identifies the table that contains user defined codes. For example, for UDC 01/PH the type is PH.
UDC Codes
The code values within the UDC with differences.
Description 01
Values that are different for the Description 01 field are shown in this column.
Description 02
Values that are different for the Description 02 field are shown in this column
Special Handling
Values that are different for the Special Handling field are shown in this column.
Hard Coded Y/N
Values that are different for the Hard Coded field are shown in this column.
86

JD Edwards EnterpriseOne ToolsSoftware Updates Guide
Chapter 8Using JD Edwards Compare and Merge Tools
Note: Use the User Defined Codes (P0004A) application to change UDCs and UDC values.
Report Summary The summary at the end of the report shows the environment or data sources that were compared and the F0004 andF0005 UDC table mappings. Additionally, the report displays a table with the following information for each location:
• Total UDCs (F0004) selected in Data Source (1) and Data Source (2).
• Total UDCs (F0004) only in Data Source (1) and Data Source (2).
• Total UDCs (F0004) that are different.
• Total UDCs (F0005) selected in Data Source (1) and Data Source (2).
• Total UDCs (F0005) only in Data Source (1) and Data Source (2).
• Total UDCs (F0005) that are different.
Compare Terms
The terms used in the report are defined as follows:
Term Definition
Only in (1)
The UDC is only in Data Source (1)
Different
The UDC in Data Source (1) and (2) are not identical.
Only in (2)
The UDC is only in Data Source (2)
Data Dictionary Compare Report Data Dictionary Compare ReportreportsData Dictionary CompareThe Data Dictionary Compare report (R969200N)compares data dictionary items between two environments or data sources. Environment (1) and Data Source (1) aredetermined from the current sign on environment. You specify Environment (2) or Data Source (2) in a processingoption to indicate the environment or data source to use for comparison.
Before an upgrade, you can compare the data dictionary items in the Production and Pristine environments todetermine which items were added, deleted, or changed. After the upgrade, you can use the report to verify that yourmodifications were carried forward to the new release.
Another way to use the report is as an audit or validation tool. For example, if a data dictionary item performs asexpected in a development environment but not in a production environment, you can use the Data DictionaryCompare report to see if the items in the two environments are different.
The report includes both a summary and a detailed section. The detailed section is sorted by system code, and then bythe item alias name within each system code.
Processing Options The following processing options enable you to specify the processing for the report.
87

JD Edwards EnterpriseOne ToolsSoftware Updates Guide
Chapter 8Using JD Edwards Compare and Merge Tools
Environment
1. Enter the Environment (2) that you want to compare.
Specify an environment to compare with the sign on environment. Leave this option blank if you want to compare datasources.
2. Or Enter the Data Source (2) for Data Dictionary tables.
Specify a data source to compare with the sign on data source. Leave this option blank if you want to compareenvironments.
The data dictionary tables that will be used for comparison are F9200, F9203, F9207, F9210, and GT92002.
Options
3. Enter '1' to display all selected DD items.Default is to display all DD items that are different.
Entering '1' displays all selected DD items, even if there are no differences.
The default (blank) displays:
◦ Data dictionary items with different values.
◦ Data dictionary items that exist in one environment, but not in the other.
Running the Report To run the Data Dictionary Compare report:
1. From the Software Compare Tools (GH96111) menu, select Compare Data Dictionary.2. Enter values for the processing options.3. Click Submit.
Note: Do not run multiple instances of the Data Dictionary Compare report simultaneously. The report useswork table F98881 to build the report data. If two Data Dictionary Compare reports run at the same time, theinformation in the reports will not be accurate.
4. Select options for the report definition, and then click Next.5. From Recent Reports on the top menu bar, select Data Dictionary Compare report.
Note: If the report is not shown in the drop-down list, select View Job Status to monitor the processing of thereport.
6. When the report processing is complete, you can view or print the output by selecting either View Job Status orData Dictionary Compare report from the Recent Reports menu.
Reading the Report The Data Dictionary Compare report identifies differences in the data dictionary tables between two environments ordata sources. The following data dictionary tables are compared:
Table Name Description
F9200
Data Item Master
F9203
Data Item Alpha Description
88

JD Edwards EnterpriseOne ToolsSoftware Updates Guide
Chapter 8Using JD Edwards Compare and Merge Tools
Table Name Description
F9207
Error Message Information
F9210
Data Item Specifications
GT92002
Data Dictionary Glossary
Based on the processing options that you select, the report will identify the following:
• Data dictionary items that exist in one environment or data source, but not in the other.
• Values which are different in the compared data dictionary items.
Report Components The cover page of the report shows the report title, the date and time of the report, the data sources that werecompared, and the report level of detail that was selected.
The report contains the following components:
• Summary by Product Code (horizontal bar graph)
• Data item differences (detail tables)
• Report summary (text and table)
Summary by Product Code
The summary displays a horizontal bar graph showing the number of data items with differences in each product codein two environments or data sources. The summary is followed by a detail section, which displays detailed informationabout the items in both locations.
Data Item Differences
The detail section for each product code is sorted by data item aliases. The section consists of a table for each item,which displays the item differences. The information shown in the table differs, depending on whether the datadictionary item is a regular data item or a glossary data item.
Note: If the data item exists only in Environment (2) or Data Source (2), the report lists the item but does not display adetail section for the item.
For more information, see "Understanding the Data Dictionary" in the JD Edwards EnterpriseOne Tools Data DictionaryGuide .
Glossary Data Items
Each glossary item with differences has a table with the following columns:
Column Heading Description
Result
Describes the result of the comparison. DD: The glossary data dictionary items in the two locations are different.
89

JD Edwards EnterpriseOne ToolsSoftware Updates Guide
Chapter 8Using JD Edwards Compare and Merge Tools
Column Heading Description
Glossary Group
The glossary group assigned to the glossary data item in the Data Item Master (F9200) table. The most common glossary groups for glossary data items are E, H, X, or Y, although other types areavailable.
Product Code
The product code assigned to the glossary data item in the Data Item Master (F9200) table.
Product Code Reporting
The product reporting code assigned to the glossary data item in the Data Item Master (F9200) table.
Error Message
Error message tab for F9207.
Program Name
Program name (FRPGM) in F9207.
Error Level
The error level assigned to the glossary data item in the Error Message Information (F9207) table Values are:
• 1 - Error Message
• 2 -Warning Message
• 3 - Information Message
Item Glossary
Item Glossary tab for F9203
Data Item Language Product System Code Scrn/Rpt
Data Item (FRDTAI) for DD Alpha Descriptions F9203 Language (FRLNGP) in F9203 System Code (FRSYR) in F9203 Screen Name (FRSCRN) in F9203
Alpha Description
The description assigned to the glossary data item in the Data Item Alpha Description (F9203) table.
Generic Text Key
The glossary data dictionary item's Generic Text Key.
Glossary Text Change
Indicates differences in the glossary text. Values are:
• A - Glossary text is only in Data Source (1).
• Y - Glossary text in Data Source (1) and (2) are not identical. (Yes, there is a change)
• N - Glossary text in Data Source (1) and (2) are the same. (No changes)
90

JD Edwards EnterpriseOne ToolsSoftware Updates Guide
Chapter 8Using JD Edwards Compare and Merge Tools
Note: To access the values for glossary data items, select any of the following Data Dictionary Design (GH951) menuselections:
• Work with Data Dictionary Items (P92001).
Select Glossary Data Item from the Form menu.
• Error Messages (P92002).
• Workflow Messages (P92002).
• Processing Option Glossaries. (P92002)Regular Data Items
Each regular data item with differences has a table with the following columns:
Column Heading Description
Result
Describes the result of the comparison. Values are:
• Only in (<location>): The data dictionary item is only in the location shown. Values are (1) or (2).
• Different: The data dictionary items in the two locations are different.
Glossary Group
The glossary group assigned to the glossary data item in the Data Item Master (F9200) table. Values are: C, D, K, S, E.
Product Code
The product code assigned to the data item in the Data Item Master (F9200) table.
Product Code Reporting
The product reporting code assigned to the data item in the Data Item Master (F9200) table.
The second portion of the table displays the values for the data item in the two environments or data sources beingcompared. The table shows the data item values for the following categories:
• Item Specifications
• Default Value
• Visual Assist
• Edit Rule
• Display Rule
• Next Number
• Item Glossary
The table, with a side-by-side comparison of the field values in the two locations, enables you to verify all field valuedifferences.
Note: To access the values for regular data dictionary items, select Work with Data Dictionary Items (P92001) fromthe Data Dictionary (GH951) menu.
91

JD Edwards EnterpriseOne ToolsSoftware Updates Guide
Chapter 8Using JD Edwards Compare and Merge Tools
Report Summary The report summary displays the names of the environments or data sources that were compared and the datadictionary table mappings in both locations. Also included is a record count for the following tables:
• Data Item Master (F9200)
◦ Total number of data items selected in each data source.
◦ Total number of data items that are only in Data Source (1) or Data Source (2).
◦ Total number of data items that are different.
• Data Item Alpha Description (F9203)
◦ Total number of data items selected in each data source.
◦ Total number of data items that are only in Data Source (1) or Data Source (2).
◦ Total number of data items that are different.
• Data Dictionary Glossary (GT92002)
◦ Total number of data items that are only in Data Source (1) or Data Source (2).
◦ Total number of data items that are different.
• Error Message Information (F9207)
◦ Total number of data items selected in each data source.
◦ Total number of data items that are only in Data Source (1) or Data Source (2).
◦ Total number of data items that are different.
• Data Item Specifications (F9210)
◦ Total number of data items selected in each data source.
◦ Total number of data items that are only in Data Source (1) or Data Source (2).
◦ Total number of data items that are different.
Compare Terms
Term Definition
Only in (1)
DD is only in Data Source (1)
Different
DD in Data Source (1) and (2) are not identical.
Only in (2)
DD is only in Data Source (2).
A
DD Glossary Text is only in Data Source (1).
Y
DD Glossary Text in Data Source (1) and (2) are not identical. ('Y' means that there is a change)
N DD Glossary Text in Data Source (1) and (2) are the same. (N means that there is no change)
92

JD Edwards EnterpriseOne ToolsSoftware Updates Guide
Chapter 8Using JD Edwards Compare and Merge Tools
Term Definition
JD Edwards Visual Compare for UDC Descriptions andGlossary Tool Visual Compare for UDC Descriptions and Glossary toolJD Edwards EnterpriseOne Visual Compare for UDC Descriptionsand Glossary tool (P96472) enables you to review and apply text updates for Data Dictionary glossaries and UDCs.You can see a side-by-side comparison of the new and old text values, which enables you to choose whether toaccept the changes. When you install an ESU containing UDC Description and Glossary changes, an XML file isextracted to the Special Instructions folder on the deployment server and is located in the following directory: ..\E900\SpecialInstructions. The Visual Compare for UDC Descriptions and Glossary Tool, application P96472, is runfrom an administrative client workstation within JD Edwards EnterpriseOne and applies the changes to the currentenvironment. You must have installed the Planner Update, which contains Software Action Request (SAR) 7481054,completed the special instructions, and built and deployed your package.
To apply DD glossary and UDC description changes:
1. In the Fast Path, enter P96472.2. On Work With Special Instructions, click Add.
On Search and Select Special Instructions, in the Server Share Path field, the path to the Deployment Serverspecial instructions folder appears as the default.
3. If you have moved the folder or if the appropriate folder does not appear, click the browse button, navigate tothe directory that contains the XML file, and select the directory. Click Find.
4. In the grid, click the appropriate ESU, and then click Select.
The data from the new ESU is imported and the application returns to the Work With Special Instructions form.The new ESUs appear in the grid. The Work With Special Instructions form appears. The ESUs appear in thegrid.
5. Select the appropriate ESU.6. Select one of the following options from the Row menu:
◦ Accept: Select this option if you want to accept all updates in the ESU without reviewing them.
◦ Reset Status: Select this option to change the status from Applied to Not Applied or from Reviewed toNot Applied.
Three types of statuses are available:
Status Description
Applied
Applied status appears if you have applied everything contained in the ESU. If you haveapplied parts of the ESU, but not all, then this status will not appear.
Not Applied
This status appears if you have not applied any of the ESU contents.
93

JD Edwards EnterpriseOne ToolsSoftware Updates Guide
Chapter 8Using JD Edwards Compare and Merge Tools
Status Description
Reviewed
This status appears if you have looked at the ESU but not applied any of its contents.
7. Select the UDC Description Option to access the Work with UDC Description Changes form. This option isenabled only if the ESU contains changes to UDC descriptions.
The UDCs are grouped by product code and appear in a list underneath the Available UDC Items folder. Onlythose UDCs that have different descriptions from the ones that already reside in your current environmentappear.
8. You can select individual UDCs, multiple UDCs, or all UDCs. To select all UDCs, click the top-level node locatedunder the Available UDC Items folder. Clicking any node selects all of the UDCs beneath it. To accept the UDCdescriptions, click Accept.
9. You can opt to view all UDCs in the ESU by clicking the All items option. Or, you can opt to view only those itemsthat have not already been reviewed by clicking the Non Reviewed Items option.
10. Click the double-arrow button to accept the UDC description of the currently selected UDC.11. Select the DD Glossary option to access the Work with DD Glossary Changes form. This option is enabled only if
the ESU contains changes to DD glossaries.
The DD items are grouped by product code and appear in a list underneath the Special Instructions folder. Onlythose DD items that have different glossaries from the ones that already reside in your current environmentappear.
12. You can select individual DD items, multiple DD items, or all DD items. To select all DD items, click the top-levelnode located under the Special Instructions folder. Clicking any node selects all of the DD items beneath it. Toaccept the DD glossaries, click Accept.
13. You can opt to view all glossaries in the ESU by clicking the All items option. Or, you can opt to view only thoseitems that have not already been reviewed by clicking the Non Reviewed Items option.
14. Click the double-arrow button to accept the DD glossary of the currently selected DD.15. Select the Preceding ESU option to view a summary of changes previously applied but also contained in the
selected ESU.16. Select the SARs Related option to view all SARs in the selected ESU containing text changes for UDCs and
glossaries.
JD Edwards EnterpriseOne FDA Compare This section contains the following topics:
• Understanding FDA Compare
• Understanding the FDA Compare Color Scheme
• Using FDA Compare
Understanding FDA Compare FDA Compareunderstanding the toolThe FDA Compare tool in Oracle's JD Edwards EnterpriseOne Form Design Aid(FDA) enables you to compare one version of an application to another. You can compare them on the application levelto determine whether forms have been added, deleted, or rearranged and whether the properties have changed. You
94

JD Edwards EnterpriseOne ToolsSoftware Updates Guide
Chapter 8Using JD Edwards Compare and Merge Tools
also can compare the forms in the applications to each other to see whether controls have been added, deleted, orrearranged and whether the properties have changed.
Additionally, you can compare two different applications as well. This feature is useful when you have made a newapplication by copying an existing one and then modifying it. Then, when you upgrade, you can not only compare thebase application to its new counterpart, but also you can compare a custom application.
While working with the target object, you can use all FDA functions except creating new forms. While comparing, youcan change the target object to match the source object. If an object exists in the source but not in the target, you cancopy it to the target. If an object exists in both but is different in some way, you can merge the specifications from thesource to the target to make them identical.
As a software developer, you might use FDA Compare as the final step before checking in the changes to ensure thatyou made all of the changes you intended to make. In this way, you can also make sure that you did not move a controlor make a property change unintentionally.
As an administrator, you might use FDA Compare to see the changes between a software update and the pristineor current implementation. If you have performed a number of customized modifications, you can more carefullyimplement the software changes without fear of ruining the customization.
Understanding the FDA Compare Color Scheme FDA Compare uses colors and letters to highlight the differences between the source and target objects. This table liststhe default colors and their meanings:
Color Meaning
Black
The object exists in both the source and target and is the same in both versions.
Red
The object exists in both the source and target but is not the same in both versions.
Green
The object exists only in the target.
Blue
The object exists only in the source.
In the form workspace, the controls that differ between the versions are marked with a symbol in a color indicating thetype of change. When you click a control, the browsers highlight the changes in specific property values with the samecolor coding. To change the color scheme, select View, User Options.
Note: Nodes in the Application Tree View browser appear in a color if one or more of their children are different.Therefore, while the node itself may not be different, you will find that an object is different when you navigate deeperinto the tree.
95

JD Edwards EnterpriseOne ToolsSoftware Updates Guide
Chapter 8Using JD Edwards Compare and Merge Tools
Using FDA Compare This section discusses how to merge specifications using FDA Compare.
Forms Used To Use FDA Compare
Form Name FormID Navigation Usage
Select SourceObject
NA
Form Design Aid, File, Compare Mode
Enable or disablecompare mode (toggle).When you enablecompare mode, thesystem prompts you toidentify the applicationthat you want to useas the basis for thecomparison.
Merging Specifications Using FDA Compare To merge specifications using FDA Compare:
1. In FDA, open the target application.
This is the application that you have been working on or that your company uses. It is the version of theapplication that you might want to change when you compare it to the source, which is a base version of theapplication.
2. Select a source application (the one to use as the basis for the comparison).3. To change the view properties in the source or target property browser, select one of these options from the
drop-down menu at the bottom of the pane:
◦ All
Displays all the properties and values in alphabetic order for the object including the translationproperties.
◦ Standard
Displays only the standard properties in alphabetic order.
◦ Translation
Displays only the translation properties in alphabetic order.4. Compare the source application properties (on the left) to the local target properties (on the right).5. To merge properties from the source object to the target object, right-click in the property source property
browser and select Merge to Target from the menu.
96

JD Edwards EnterpriseOne ToolsSoftware Updates Guide
Chapter 8Using JD Edwards Compare and Merge Tools
JD Edwards EnterpriseOne ER Compare This section contains the following topics:
• Using JD Edwards ER Compare for Applications and Event Rules
• Working with JD Edwards ER Compare
JD Edwards ER Compare provides a detailed, on-screen comparison of event rules. You can change the target object(your local version) within the utility by moving lines directly from the source. You can also remove or disable lines. Inaddition to providing an on-screen comparison, you can select to print a report detailing the changes as well.
Using JD Edwards ER Compare for Applications and Event Rules ER CompareThis section provides an overview of the JD Edwards ER Compare user interface and discusses how to startJD Edwards ER Compare.
Understanding the JD Edwards ER Compare User Interface JD Edwards ER Compare is a utility that enables you to compare an application on the local workstation (targetapplication) to the source applications defined in:
• The central objects data source of any defined path code.
• A TAM specifications directory.
• An ESU backup.
You can compare applications, reports, table conversions (TC), business functions (BSFN), table event rules (TER), andbusiness services (BSSVs) using the ER Compare User Interface.
97

JD Edwards EnterpriseOne ToolsSoftware Updates Guide
Chapter 8Using JD Edwards Compare and Merge Tools
When you start JD Edwards ER Compare, a tree-structured outline of the application appears on the left. You canchange source locations with the Select Source command under the File menu.
Expand an event node in the tree to display a split window that shows the source ER on the left and correspondingtarget ER on the right. The ER on the right belongs to your local specifications.
The program indicates differences in color, while identical lines are normally displayed in black. Disabled lines aremarked with an exclamation point. You can customize the color coding by selecting the Set Colors command from theView menu.
JD Edwards ER Compare normally displays ID numbers and technical details about the currently selected item in twosmall windows on the status bar. The window on the left annotates the source specification while the window on theright annotates the target specification. This information is superfluous in most cases, and can be deactivated with theShow Object IDs switch under the View menu.
The tool lets you compare a modified application to the original version of that application on the server. JD EdwardsER Compare provides a side-by-side, visual comparison of the event rules for the two applications. Moreover, JDEdwards ER Compare enables you to modify the target ER (your local version) by copying lines directly from the sourceapplication. You can also move, remove, and disable ER lines in the target application. To copy all eligible lines in thecurrent event from source to target, use the Copy All command. To copy all eligible lines in every event from source totarget, use the Auto Merge Application command in the Edit menu.
98

JD Edwards EnterpriseOne ToolsSoftware Updates Guide
Chapter 8Using JD Edwards Compare and Merge Tools
To refresh the comparison, click the Refresh button. A warning message saying 'the source and target specifications areabout to refresh, any unsaved changes will be lost' is displayed when you click the refresh button. You can click OK orCancel as required.
To validate your changes before saving, select the Validate Event Rules command from the File menu. A validation willautomatically occur before you exit the tool if you have saved changes.
Starting JD Edwards ER Compare JD Edwards ER Compare can be started from FDA or directly from OMW.ER Compare toollaunching
When JD Edwards ER Compare starts, a window appears. On this window, entitled Select the Location of SourceSpecifications, select one of these locations:
• Central Objects Path Code
Enter the server location of the source object (the object to which you want to compare the local ER).
• Remote Specifications Location
Enter the TAM location of the source object (the object to which you want to compare the local ER). ESUs aredelivered in a TAM package, so use this method to compare the local ER to an object packaged in an ESU.
• Software Update Backup
After applying a software update, use this tool to retrofit custom ER from the customized copy on the ESUbackup.
Note: Starting JD Edwards ER Compare under FDA freezes all other programs running on your system, includingFDA itself. Finish your work in JD Edwards ER Compare and then exit ER Compare to restore normal operation. Thepurpose of this action is to prevent two programs from potentially modifying the same set of specifications at thesame time.
Working with JD Edwards ER Compare Use the application tree view to identify and display specific application and ER components that have changed. If aparent node is identified as having changed, expand it to see which of its children are different. Expand an event in thetree structure to display its associated code. You can display more than one event at a time.
You can change the target ER with JD Edwards ER Compare. You can also print the ER.
Changing the Target ER Perform any of these actions to change the target ER:
Task Details
To copy selected lines from source totarget
Select the lines to copy and then select Copy Right.
To copy all lines in the current event
See Merging ER in a Single Event.
99

JD Edwards EnterpriseOne ToolsSoftware Updates Guide
Chapter 8Using JD Edwards Compare and Merge Tools
Task Details
To copy all lines in the application
See Merging ER in the Entire Application.
To delete selected lines from the target
Select the lines to delete, and then click Delete.
To enable or disable selected lines in thetarget
Select the lines to enable or disable, and then select Enable/Disable ER.
To undo the previous command
Select Undo.
To redo the previous command
Select Redo.
To reload the last saved version of thespecifications
Select Refresh.
Each command is available from the Edit menu and tool bar.
Note: Use the Shift key to select multiple, contiguous lines and the Ctrl key to select multiple, noncontiguous lines.
When you are copying ER, JD Edwards ER Compare checks ER variable references before copying and automaticallyfixes nonmatching variable IDs. Not only does JD Edwards ER Compare perform validity checking on ER variables, whichare present in almost every ER statement, but it also does many other types of validity checking.
CAUTION: Although JD Edwards ER Compare provides validity checking, which eliminates the largest source ofinvalid ER, you must still be vigilant when using JD Edwards ER Compare. When JD Edwards ER Compare copies ERstatements, it does not check all of the object references in those statements. If the ER statements reference objectsthat do not exist in the target specifications or objects that have different IDs in the source and target specifications,JD Edwards ER Compare may allow the copy operation, which results in invalid ER. Different control IDs are verycommon for controls or objects that were not in the base version of the application. Controls that were added atseparate times to separate versions of the application usually have different control IDs.
When you save changes, your local application specifications are updated. JD Edwards ER Compare prompts you tosave before either of these operations:
• Exit
• Select new source location
Printing You can use the Print command to place a copy of the target ER in a text file. JD Edwards ER Compare will generate thetext file and open it in your default text editor. You can then print the ER from the text editor.
100

JD Edwards EnterpriseOne ToolsSoftware Updates Guide
Chapter 8Using JD Edwards Compare and Merge Tools
Merging ER in a Single Event The Copy All command copies ER lines from the source to the target, but only within the currently displayed event. Thecommand will not delete lines from target ER if they do not exist in the source location. The command also does notnecessarily copy all lines. It does not copy lines that would produce any of these types of invalid ER:
• Duplicate variables.
• Unbalanced IF and ENDIF statements.
• Unbalanced WHILE and ENDWHILE statements.
• Statements referencing an ER variable that is not defined in the target application.
• Statements referencing an ER variable that is defined differently in the target application.
Merging ER in the Entire Application The Auto Merge Application command resides under the Edit menu. It lets you copy ER lines from all events in thesource application to the corresponding events in the target application. It works like the Copy All command, but itworks on all events at once. The command will not delete lines from target ER that do not exist in the source location.The command also attempts to avoid copying lines that would result in invalid ER.
As with any JD Edwards ER Compare command, you might create invalid ER by using the Auto Merge Applicationcommand. As of version 8.98, JD Edwards ER Compare attempts to protect you from this by disabling unsafeoperations. For example, JD Edwards ER Compare prevents the accidental creation of references to undefined ERvariables. However, it does not recognize references to other kinds of undefined objects. Follow the steps recommendedearlier to ensure that your ER remains valid.
Regardless of how you modify the ER, you should validate event rules prior to saving. This command is found under theFile menu. If any ER violations occur, delete the offending lines and use Edit Event Rules to reenter them after you haveexited JD Edwards ER Compare.
JD Edwards EnterpriseOne RDA Compare (Release9.2.4.3) This section contains the following topics:
• Understanding RDA Compare,
• Using RDA Compare,
Understanding RDA Compare The Report Design Aid (RDA) Compare tool in Oracle's JD Edwards EnterpriseOne Batch Application Design enables youto compare and merge one report to another of the same name. You can compare the details of reports to determine ifobjects have been added, deleted, or rearranged and whether the properties have changed.
This is useful when you have made modifications to an EnterpriseOne report and you upgrade, you can compare thebase report to its new counterpart.
101

JD Edwards EnterpriseOne ToolsSoftware Updates Guide
Chapter 8Using JD Edwards Compare and Merge Tools
Use RDA Compare to see the changes between a software update and the pristine or current implementation. If youhave performed a number of customized modifications, you can use the RDA Compare tool to validate and implementyour customization.
RDA Compare will compare the following attributes:
Report
Compares the report interconnect templates.
Section
Only sections with the same section Id are compared. If a section does not have the same type (columnar or group) orbusiness view, it and all child fields will be marked as protected.
• Section Size
• Section Properties
• Color
• Data Sequencing
Field
Fields with the same Id in a section are compared to each other. Fields with different DDICT and/or different data typeswith the same Id will show differences, and are marked protected.
• Field Properties
• Total Types
• Field Style
• Display Length
• Display Decimals
• Edit Code
• Justification
• Display Styles
• Field Position
Note: In columnar section comparisons, field position differences are not marked as different as they are re-sorted and repositioned upon merge from a source to a target and are almost always different because ofthis.
• Font Format
• Field Color
• Text Override
Note: Table Conversions, tabular reports, reports with database mappings are not compared.
Using RDA Compare This section discusses how to compare and merge specifications using RDA Compare.
102

JD Edwards EnterpriseOne ToolsSoftware Updates Guide
Chapter 8Using JD Edwards Compare and Merge Tools
To compare and merge specifications using RDA Compare:
1. Navigate to Object Management Workbench (OMW) from a JD Edwards Development Client.2. Check out the object to be the target. The target object should always be a copy of the object received in an
ESU or Applications Update.3. Click the OMW Design button, click the Design Tools tab and then click the RDA Compare button.4. In the Spec Compare Manager, click the Select Source button. The source objects should be the object version
that has been customized.5. Select the location of the source object under Object Location.
Source objects may be selected from:
Location Fields
Central Objects
Path Code Select the path code. Object Name Select the object name.
Local
Path Code Select the path code. OMW Project (Optional) Select the OMW Project Filters projects for which you are a member. Specifications come from E1Local Object Name Select the object name.
Object History
Path Code Select the path code. Object Name Select the object name. Changed Date Displays the date the object was last modified. Object Release
103

JD Edwards EnterpriseOne ToolsSoftware Updates Guide
Chapter 8Using JD Edwards Compare and Merge Tools
Location Fields
Displays the JD Edwards EnterpriseOne application release.
Package
Path Code Select the path code. Package Name Select the name of the full package build. Object Name Select the object name.
Development Save
SAVE Path Code Select the path code. Save Object Name Select the object name.
file System .par File
PAR File Name Select the file system .par file. Value must include the full path and can be a .par or .zip file.
6. Click the OK button to accept the selection and return to the Spec Compare Manager.
The selected object version will be extracted from the location and validated. This may take some timedepending on the size and location of the object.
Note: It is not recommended to merge a source report to a target report that is not the same report or copyof the same report. Doing so may result in specifications that are not runnable. RDA Compare tool does notprevent you from doing this, however, if you try this, always back up your report specifications to a PAR filefrom OMW so they can be restored.
7. Click the Compare button to display object differences.
The Compare Specifications form displays with the Source on the left pane and Target on the right pane.
The Compare Specifications form enables you to compare and merge the specification differences between thespecifications.
The report name row is highlighted in blue. The rows with red text illustrate where the reports are different.Some rows with differences are not selectable and are protected from merge, and the reason why will be
104

JD Edwards EnterpriseOne ToolsSoftware Updates Guide
Chapter 8Using JD Edwards Compare and Merge Tools
displayed in the cell text of the protected object (or, if the object is a field, in the cell text of its parent sectionobject).
8. Click the OK button to save the merged specifications and exit.
Note: When a new section is merged into a report that did not previously contain that section, the newsection Data Selection will be merged in addition to the above mentioned items. When merging a report,section, or field that has event rules on an event which does not have event rules in the target report theevent rules will be copied from the source to the target. When the target event already has event rules, andthe event rules are not identical, there will be text in the compare cell indicating that the user must also runEvent Rule Compare after merging in the Report Compare Tool to also merge any differences in event rules.
JD Edwards EnterpriseOne Business View Compare(Release 9.2.4) This section contains the following topics:
• Understanding Business View Compare,
• Using Business View Compare,
Understanding Business View Compare The Business View Compare tool in Oracle's JD Edwards EnterpriseOne Business View Design enables you to compareone business view to another to identify. The Compare Specifications form displays the differences in columns andjoins. You can compare the details of business views to determine if columns have been added, deleted, and whetherthe properties have changed.
This is useful when you have made modifications a business view and you upgrade, you can compare the business viewto its new counterpart and merge the specification differences.
Use Business View Compare to see the changes between a software update and the pristine or current implementation.If you have performed a number of customized modifications, you can use the Business View Compare tool to validateand implement your customization.
Using Business View Compare This section discusses how to compare and merge specifications using Business View Compare.
To compare and merge specifications using Business View Compare:
1. Navigate to Object Management Workbench (OMW) from a JD Edwards Development Client.2. Check out the object to be the target. The target object should always be a copy of the object received in an
ESU or Applications Update.3. Click the Business View Design button, click the Design Tools tab and then click the BSSV Compare button.4. In the Spec Compare Manager, click the Select Source button. The source objects should be the object version
that has been customized.
105
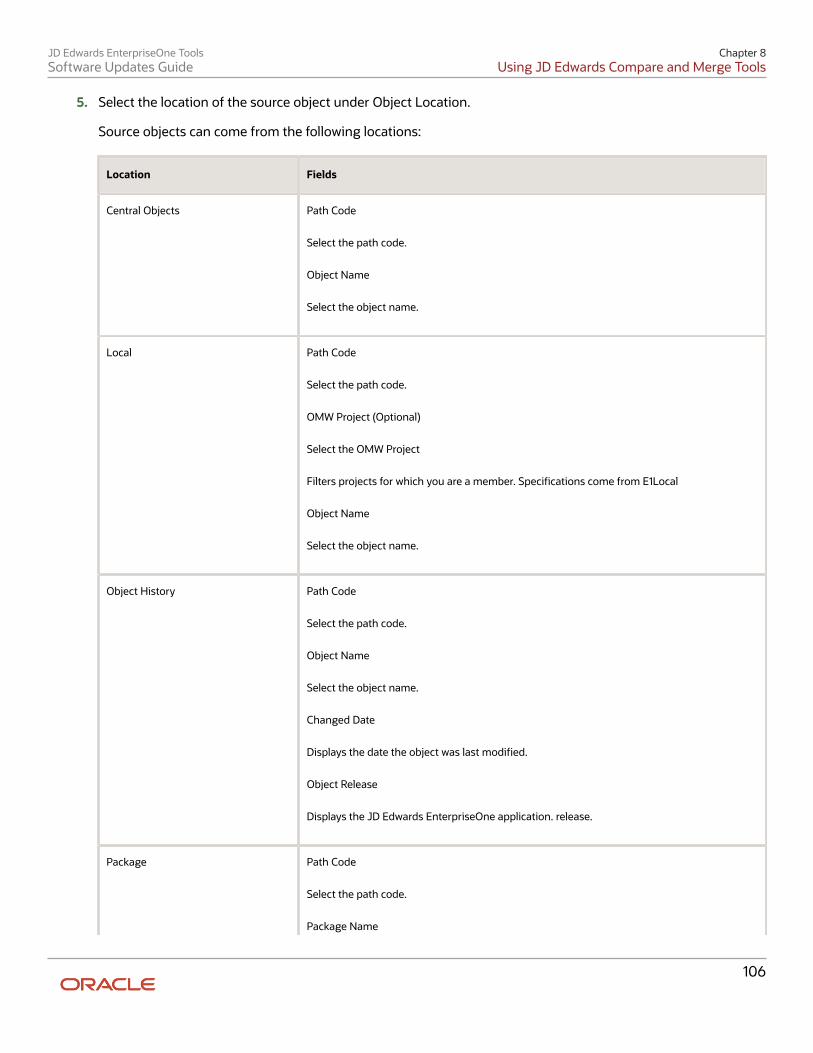
JD Edwards EnterpriseOne ToolsSoftware Updates Guide
Chapter 8Using JD Edwards Compare and Merge Tools
5. Select the location of the source object under Object Location.
Source objects can come from the following locations:
Location Fields
Central Objects
Path Code Select the path code. Object Name Select the object name.
Local
Path Code Select the path code. OMW Project (Optional) Select the OMW Project Filters projects for which you are a member. Specifications come from E1Local Object Name Select the object name.
Object History
Path Code Select the path code. Object Name Select the object name. Changed Date Displays the date the object was last modified. Object Release Displays the JD Edwards EnterpriseOne application. release.
Package
Path Code Select the path code. Package Name
106

JD Edwards EnterpriseOne ToolsSoftware Updates Guide
Chapter 8Using JD Edwards Compare and Merge Tools
Location Fields
Select the name of the full package build. Object Name Select the object name.
Development Save
SAVE Path Code Select the path code. Save Object Name Select the object name.
file System .par File
PAR File Name Select the file system .par file. Value must include the full path and can be a .par or .zip file.
6. Click the OK button to accept the selection and return to the Spec Compare Manager.
The selected object version will be extracted from the location and validated. This may take some timedepending on the size and location of the object.
7. 7. Click the Compare button to compare the specifications.
The Compare Specifications form displays with the Source on the left pane and Target on the right pane.
The Compare Specifications form enables you to compare and merge the specification differences between thetwo selected objects. You can select Source lines and copy them to the Target.
The table definition row is highlighted in blue. The columns that are different, but protected are in red text.The source rows with red text, representing tables, columns, or joins and red background, you can copy to thetarget.
8. Click the Ok button to save the merged specifications and exit.
Note: Business View Compare also merges dependent rows when merging certain elements. For example, merging asource join will also merge the source column and source table if they are not already part of the target specifications.Another example is merging a source table causes the source join and source join-column to be merged if they arenot already part of the target specifications.
107

JD Edwards EnterpriseOne ToolsSoftware Updates Guide
Chapter 8Using JD Edwards Compare and Merge Tools
JD Edwards EnterpriseOne Table Compare (Release9.2.4) This section contains the following topics:
• Understanding Table Indices Compare,
• Using Table Indices Compare,
Understanding Table Indices Compare The Table Compare tool in Oracle's JD Edwards EnterpriseOne Table Design enables you to compare the indexes fromone table to another. You can compare and merge missing indexes or index columns. Table Compare does not mergemissing data columns of the table.
Use Table Compare to see the index changes in a table between a software update and the pristine or currentimplementation. If you have performed a number of customized modifications, you can use the Table Compare tool tovalidate and implement your customization.
Using Table Indices Compare This section discusses how to compare and merge indexes using Table Compare.To compare and merge specificationsusing Table Compare:
1. Navigate to Object Management Workbench (OMW) from a JD Edwards Development Client.2. Check out the object to be the target. The target object should always be a copy of the object received in an
ESU or Applications Update.3. Click the OMW Design button, click the Design Tools tab and then click the Table Compare button.4. In the Spec Compare Manager, click the Select Source button. The source objects should be the object version
that has been customized.5. Select the location of the source object under Object Location.
Source objects can come from the following locations:
Location Fields
Central Objects
Path Code Select the path code. Object Name Select the object name.
Local
Path Code
108

JD Edwards EnterpriseOne ToolsSoftware Updates Guide
Chapter 8Using JD Edwards Compare and Merge Tools
Location Fields
Select the path code. OMW Project (Optional) Select the OMW Project Filters projects for which you are a member. Specifications come from E1Local Object Name Select the object name.
Object History
Path Code Select the path code. Object Name Select the object name. Changed Date Displays the date the object was last modified. Object Release Displays the JD Edwards EnterpriseOne application. release.
Package
Path Code Select the path code. Package Name Select the name of the full package build. Object Name Select the object name.
Development Save
SAVE Path Code Select the path code. Save Object Name Select the object name.
109

JD Edwards EnterpriseOne ToolsSoftware Updates Guide
Chapter 8Using JD Edwards Compare and Merge Tools
Location Fields
file System .par File
PAR File Name Select the file system .par file. Value must include the full path and can be a .par or .zip file.
6. Click the OK button to accept the selection and return to the Spec Compare Manager.
The selected object version will be extracted from the location and validated. This may take some timedepending on the size and location of the object.
7. Click the Compare button to compare the specifications.
The Compare Specifications form displays with the source on the left pane and Target on the right pane.
The Compare Specifications form enables you to compare and merge the specification differences between thetwo selected objects. You can select source lines and copy them to the target.
The table definition row is highlighted in blue. The source rows that are different, but protected are in red text.The Source rows with red text, representing indexes and red background, you can copy to the target.
8. Click the Ok button to save the merged specifications and exit.
Note: Table Compare does not automatically generate the indexes; it only changes the specifications for the tableindices. The table indices and associated header files must be generated through the design tools after the TableCompare merge is complete. The index ids may get changed during the merge process and while the tool attempts tomaintain the index ids, the same maintenance steps associated with introducing new indices must be implementedto ensure EnterpriseOne functions properly (for example, New header files must be generated, new indices mustbe generated and any code relying on the changed indices must be modified or re-built to incorporate the indexchanges). To minimize the number of index id changes, perform all table index merges in a single compare and mergesession.
Customization Object Analyzer This section contains the following topics:
• Object Dataload,
• Release Level Dataload
• Object Customization Summary Report
• Object Customization Detail Report
• Import and Configure Reports and Data Models
• Object Customization Summary Interactive Report
• Object Customization Detail Interactive Report
• Pathcode Comparison Summary Interactive Report
110

JD Edwards EnterpriseOne ToolsSoftware Updates Guide
Chapter 8Using JD Edwards Compare and Merge Tools
• Pathcode Comparison Detail Interactive Report
• Pathcode Comparison Summary Report
• Pathcode Comparison Detail Report
• Troubleshooting Information and Tips
If you are on an older release of JD Edwards EnterpriseOne, you need to identify customizations in order to determinethe impact and level of effort to retrofit the customizations into the newer release of JD Edwards EnterpriseOne.This utility helps to identify the customizations in order to determine the impact and level of effort to retrofit thecustomizations into the newer release of JD Edwards EnterpriseOne.
A review of this information, prior to performing modifications within the software, allows for a smoother and morepredictable upgrade of the EnterpriseOne software. This section details the impact of an upgrade of the EnterpriseOnesoftware on custom objects and custom modifications to standard EnterpriseOne objects.
The Customization Object Analyzer is comprised of a UBE that loads a table and UBEs that read from that table to createeither a summary or detailed report. The UBEs are:
• R9840DL (Object Dataload) loads the F98881CU table in a parent-child hierarchy of object changes with a list ofall JD Edwards EnterpriseOne customized objects.
• R9840RLS (Release Level Object Dataload) - This Data Load UBE takes the Cross Release Pathcodes as inputfrom User from the Processing Options. The Input from the Processing Option can be selected from the VisualAssist. Once the Cross Release Pathcodes are selected and the UBE is submitted to execute, this UBE willload the data into F98881CU table in a parent-child hierarchy of object changes with a list of all JD EdwardsEnterpriseOne customized objects.
• RD9840RS (Object Customization Summary Report - BI Publisher) creates a summary report from the data inthe F98881CU table.
• RD9840RD (Object Customization Detail Report - BI Publisher) creates a detail report from data in theF98881CU table that shows the details of the customizations grouped by various criteria.
• R9840R (Object Customization Summary and Detail Report - Standard Version) creates a summary and detailreport from the data in the F98881CU table.
• R9840R|ZJDE0005 (Object Customization Summary Version) creates a summary report on all of the objectsfrom the data in the F98881CU table. This Summary report can be used to compare the Customized objectsacross pathcodes.
• R9840R|ZJDE0006 (Object Customization Detail Version) creates a Detail report on all of the objects fromthe data in the F98881CU table when executed without Dataselection. This version can also be run with DataSelection to get the Detail report on selected objects.
• R9840R|ZJDE0007 (Object Customization Summary Version By Pathcode) - This version takes two pathcodesas input from processing Options and will generate a Summary report only for the selected Pathcodes fromProcessing Options. This Summary report can be used to compare the Customized objects across pathcodes.
Note: For the pathcodes which will be entered in the Processing Options in the R9840R|ZJDE0007 summaryreport, data should be loaded for those pathcodes using the DataLoad UBE.
Note: JD Edwards provides the RD9840RS and RD9840RD report definitions and report templates to producethe summary and detail reports using the JD Edwards EnterpriseOne embedded BI Publisher. BI Publisher reportsare only available for E812 and later releases. For information about the embedded BI Publisher, see "Introductionto BI Publisher for JD Edwards EnterpriseOne" in the JD Edwards EnterpriseOne Tools BI Publisher for JD EdwardsEnterpriseOne Guide .
111

JD Edwards EnterpriseOne ToolsSoftware Updates Guide
Chapter 8Using JD Edwards Compare and Merge Tools
Objects Captured and Not Captured for Customizations
Currently the APPL, UBE, BSFN, DSTR, BSVW, TBLE object types are captured and all other types of objects are notcaptured. This table lists what specifically is and is not captured within these object types:
Object Type Captured Not Captured
APPL
For applications, the details about the Form Events, Control Events, Grid Column events, Controls andGrid Columns that are added or changed. New objects list all the details, even the hidden itemslike columns, controls and events.
Event Rule changes. Changes in BSFN call from an application, like BSFNparameter changes.
UBE
In UBE templates, changes related to SectionEvents and Control Events that are newly added orchanged. New objects list all the details, even the hidden itemslike columns, controls and sections.
Event Rule changes.
UBE Versions
Changes related to section events, newly addedcontrols, Control Event changes and VersionOverrides.
Event Rule changes.
BSFN
Newly added business functions and the BSFNname and function name that are added.
Changes to the C code. BSFN Parameter changes.
DSTR
Only the data structure name and description.
Internal details of the DSTR variable that are addedor changed, but the report displays that the datastructure has changed.
BSVW
Only the business view name and description.
Internal details of business view changes, but thereport displays that the business view has changed.
TBLE
Existing table new column additions, Indexes andTable Events.
Event Rule changes.
Object Dataload EnterpriseOne records when an object is created or modified (an object is considered modified when it is checked in,regardless of whether or not changes were made). This customization information is loaded into the F98881CU table byusing the R9840DL UBE. A processing option value needs to be set prior to running this UBE.
Note: R9840DL will typically be run by the administrator.
112

JD Edwards EnterpriseOne ToolsSoftware Updates Guide
Chapter 8Using JD Edwards Compare and Merge Tools
Processing Options The following processing options enable you to specify the processing for the data load:
• Enter 0 or Blank to load the data according to data selection without deleting the other existing records whereload will occur after deletion based on data selection.
• Enter 1 to delete all of the existing records from the F98881CU table and load the data still based on dataselection.
Note: Setting the processing option value to 1 means that you want to clean up all of the loaded data and reload itwith the default data selection or data selection based on the user 's needs.
Data Selection Options Users running this UBE need to identify the objects that were added or existing objects that have been changed. Thedefault ZJDE0001 version that is shipped with the template R9840DL is set with the default data selection. This dataselection loads the F98881CU table with all of the object types for all path codes into the F98881CU table.
Running the Object Dataload To run the R9840DL Object Dataload UBE:
1. From the Software Compare Tools (GH96111) menu, select Object Dataload.2. Enter values for the processing options.3. Enter values for the Data Selection.4. Click Submit.
Running the Object Dataload Using Batch Versions To run the R9840DL Object Dataload UBE using Batch Versions:
1. Fast Path to BV.2. Enter R9840DL. Select the ZJDE0001 version.3. Enter values for the processing options.4. Enter the values for the Data Selection.5. Click Submit.
Release Level Dataload EnterpriseOne records when an object is created or modified (an object is considered modified when it is checked in,regardless of whether or not changes were made).
Prerequisite for Release Level Dataload The following configuration must be done on the development client where the Release Level Dataload UBE willexecute:
1. The F00941 table should contain the entries for the Source and Target pathcodes providing all the informationregarding the Environment, Pathcode, Release, etc. for which the USER wants to run the Release level Data loadUBE.For example, if the USER wants to run the Release Level Dataload for pathcodes DV900 and DV910, the F00941table should contain entries for the DV900 and DV910 pathcodes with their corresponding Environments andReleases.
113

JD Edwards EnterpriseOne ToolsSoftware Updates Guide
Chapter 8Using JD Edwards Compare and Merge Tools
If the entry for the Source and Target pathcode with their corresponding Environment and Release is notavailable, then it can be created using the P0094 application.
The following screen captures show examples from the F00941 table displaying the entries for the DV910 andDV900 Pathcodes.
2. The Environments of the Source and Target Pathcodes from the F00941 table should have the entries for thefollowing tables with their corresponding Datasources in OCM, in system and Server Map Datasource:
◦ F9860
◦ F9861
◦ F9862
◦ F00941
◦ F9202
◦ F983051
The following screenshots display the DV900WIN and DV910WN environments with the tables and their correspondingdatasource mappings and Object Status.
114

JD Edwards EnterpriseOne ToolsSoftware Updates Guide
Chapter 8Using JD Edwards Compare and Merge Tools
115

JD Edwards EnterpriseOne ToolsSoftware Updates Guide
Chapter 8Using JD Edwards Compare and Merge Tools
Processing Options This Data Load UBE takes the Cross Release Pathcodes as input from User from the Processing Options. The input fromthe Processing Option can be selected from the Visual Assist. Once the Cross Release Pathcodes are selected and a UBEis submitted to execute, this UBE will then load the customized data into F98881CU table.
A Processing Option value needs to be set prior to running this UBE.
Note: R9840RLS will typically be run by the administrator.
Release Level Data Load Database Specific Prerequisites:
For Oracle Database:
TNSNAMES.ORA should be manually updated with SID of source and target pathcodes.
For example, if a customer is running the release level data load for DV900 and DV910 pathcodes, make sure theTNSNAMES.ORA file is updated with the SID of both the databases of E9.0 and E9.1.
For Other Databases:
Please make sure that the Data Sources of the Source and Target Pathcodes are created in odbcad32 for the followingtables:
• F9860
• F9861
• F9862
• F00941
• F9202
• F983051
Processing Options The following processing options enable you to specify the processing for the data load.
Enter the Source and Target Pathcodes of Different Releases to load the customized data of these Pathcodes into theF98881CU table. Pathcodes can be selected from Visual Assist.
• Enter 0 or Blank to load the data according to data selection without deleting the other existing records whereload will occur after deletion based on data selection.
• Enter 1 to delete all of the existing records from the F98881CU table and load the data still based on dataselection.
Note: Setting the processing option value to 1 means that you want to clean up all of the loaded data and reload itwith the default data selection or data selection based on the user's needs.
Running the Release Level Dataload To run the R9840RLS Release Level Dataload UBE:
1. From the Software Compare Tools (GH96111) menu, select Release Level Dataload.2. Enter values for the processing options.3. Click Submit.
116

JD Edwards EnterpriseOne ToolsSoftware Updates Guide
Chapter 8Using JD Edwards Compare and Merge Tools
Running the Release Level Dataload Using Batch Versions To run the R9840RLS Release Level Dataload UBE using Batch Versions:
1. Fast Path to BV.2. Enter R9840RLS. Select the ZJDE0001 version.3. Enter values for the processing options.4. Click Submit.
Object Customization Summary Report RD9840RS (BI Publisher version) and R8940R (Standard Version) are read-only reports that print the informationavailable in the F98881CU table in a usable format.
This report should be run only after running UBE R9840DL, which loads the F98881CU table. Since the RD9840RS andR9840R reports are based on what is loaded in F98881CU via R9840DL, you need to ensure that table F98881CU hasbeen loaded with what you expect to see in the RD9840RS or R9840R report.
Running the R9840R|ZJDE0005 Object Customization Summary Report
To run the R9840R Object Customization Report:
1. Fast Path to P95620.2. Provide R9840R in Source UBE and click on Find.3. Select ZJDE0005.4. Click on Submit.
Running the R9840R|ZJDE0006 Object Customization Detail Report
To run the R9840R Object Customization Report:
1. Fast Path to P95620.2. Provide R9840R in Source UBE and click on Find.3. Select ZJDE0006.4. Click Submit.5. Provide Data Selection if Detail report is required for selected objects, else run this version without any Data
selection which will give the Output for all the objects in F98881CU table.Running the R9840R|ZJDE0007 Object Customization Summary Report by Pathcode
To run the R9840R Object Customization Report:
1. Fast Path to P95620.2. Provide R9840R in Source UBE and click on Find.3. Select ZJDE0007.4. Click Submit.5. Provide the Source and Target pathcode in Processing Options. Summary report will be generated only for the
provided Source and Target pathcode.
Customizations Summary The Customizations Summary gives an overview of the impact of customizations to the system, and providesinformation to estimate the level of effort needed to retrofit the customizations. This summary sees the system as awhole (all of the data in F98881CU) and is not affected by any data selections the user provides before the run.
117

JD Edwards EnterpriseOne ToolsSoftware Updates Guide
Chapter 8Using JD Edwards Compare and Merge Tools
Note: The quickest way to extract a Summary ONLY report in RD9840RS and the R9840R standard UBE is to give aninvalid data selection so that no data is selected. This is shipped with a default invalid data selection.
The Customizations Summary section contains the following:
Customizations Summary Statement
The Customizations Summary statement contains embedded values (xx) within a sentence. The sentence reads:
System has xx customized objects impacting xx Product Codes.
The Customizations Summary statement section contains the following:
Column Heading Description
System has xx
Refers to the unique count of objects that have been customized.
customized objects impacting
These objects could exist in multiple pathcodes and may have many versions.
xx product codes.
This shows the unique count of all Product Codes affected across all pathcodes.
Summary by Pathcode
This section shows all pathcodes affected by customizations and shows the number of objects affected in eachpathcode. Remember that the same object might have been customized in multiple pathcodes. Thus, the sum of objectsimpacted by pathcode might not be equal to the total number of objects customized. The information is presented inhorizontal bar chart and table format (RD9840RS) and table format (R9840R).
The Summary by Pathcode section has these columns:
Column Heading Description
Pathcodes
Shows all pathcodes affected by customizations.
Number of Objects
Shows number of objects affected in each pathcode.
Summary by Object Type
This section shows all object types affected by customizations and shows the number of objects affected for eachobject type. The summary lists only object types that were affected and not necessarily all EnterpriseOne object types.The information is presented in pie chart format and table format (RD9840RS) and table format (R9840R).
The Summary by Object Type section has these columns:
Column Heading Description
Object Type
Shows all Object Types affected by customizations.
118

JD Edwards EnterpriseOne ToolsSoftware Updates Guide
Chapter 8Using JD Edwards Compare and Merge Tools
Column Heading Description
Number of Objects
Shows number of objects affected for each Object Type.
Summary by Product Code
This section shows all Product Codes affected by customizations and shows the number of objects affected for eachProduct Code. The information is presented in horizontal bar chart format and table format (RD9840RS) and tableformat (R9840R).
The Summary by Product Code section has these columns:
Column Heading Description
Product Code
Shows all Product Codes affected by customizations.
Product Code Description
Shows description of each product code.
Number of Objects
Shows number of objects affected for each Product Code.
Object List
This section shows information for the different types of objects affected by customizations. If the same object wascustomized in multiple pathcodes, the object is listed twice; one time for each path code it was customized in. Thissection does not list versions for objects.
The object list has these columns for each object type:
Column Heading Description
Product Code
Shows all Product Codes affected by customizations.
Pathcode
Shows pathcodes affected by customizations.
Object Name
Shows application affected by customizations.
Object Description
Provides a description of the object.
Customizations Summary R9840R ZJDE0005, ZJDE0007 This Summary report can be used to compare the Customized objects across pathcodes. The sample screen capturebelow shows the Summary report from ZJDE0005, ZJDE0007.
We can see that P0006 is modified in both the pathcodes. It has 1 as a flag under DV910 and PD910, which says object ismodified in both the pathcodes.
• 1 signifies Object changed.
119

JD Edwards EnterpriseOne ToolsSoftware Updates Guide
Chapter 8Using JD Edwards Compare and Merge Tools
• 0 signifies Object not changed.
P01012 is changed in DV910 and not changed in PD910.
Object Customization Detail Report The Customization Detail Report is impacted by data selection. You may choose to see the objects along withcustomizations details by data selecting on the following criteria: Path Code, Object Name, Object Type and ProductCode. Any other data selection might return unexpected results. A new page is created for each object and its version (ifapplicable for UBEs). The change details are printed until all are listed.
RD9840RD - BI Publisher Report Version The Customization Detail Report section in RD9840RD has up to five levels of line items. Each level will be indentedrelative to the previous line level.
Line Item Description
Object Type Type of object.
120

JD Edwards EnterpriseOne ToolsSoftware Updates Guide
Chapter 8Using JD Edwards Compare and Merge Tools
Line Item Description
Pathcode + Product Code
Shows the pathcode for the Object Type. Shows the Product Code for the Object Type.
Object Name
Shows the Object Name and version.
Running the RD9840RD Detail Report
To run the RD9840RD Object Customization Detail Report:
1. From the Software Compare Tools (GH96111) menu, select Object Customization Detail.2. Enter the values for the data selection.3. Click Submit.
R9840R - Standard Report Version The Customization Detail section in R9840R has these columns:
Column Heading Description
Object Type
Type of object.
Product Code
Shows all Product Codes affected by customizations.
Pathcode
Shows pathcodes affected by customizations.
Object Name
Shows application affected by customizations.
Object Description
Provides a description of the object.
The objects are listed by Object Type. The details are shown in a parent child hierarchy where the top-most parent is theobject, followed by 3 children for each change. The 3 children are listed in Child Component 1, Child Component 2, andChild Component 3 order. Each line in the detail identifies one unique change at the lowest level child for that line.
Running the R9840R Detail Report
To run the R9840R Object Customization Detail Report:
1. Navigate to Batch Versions.2. Select R9840R.3. Enter the values for the data selection.4. Click Submit.
121

JD Edwards EnterpriseOne ToolsSoftware Updates Guide
Chapter 8Using JD Edwards Compare and Merge Tools
Import and Configure Reports and Data Models In order to use interactive reports, Oracle BI Publisher and the JD Edwards EnterpriseOne Data Access Driver need to beinstalled, and then Interactive reports and data models need to be imported from the Oracle Update Center and thenconfigured.
Installing Oracle BI Publisher and the Data Access Driver To install Oracle Business Intelligence Enterprise edition (OBIEE) 11g, see: Oracle® Fusion Middleware Installation Guidefor Oracle Business Intelligence 11g Release 1 (11.1.1.5).
To install the JD Edwards EnterpriseOne Data Access Driver, see: JD Edwards EnterpriseOne Tools BI Publisher for JDEdwards EnterpriseOne Guide .
Importing Interactive Reports and Data Models Interactive reports and data models need to be imported from the Oracle Update Center and then configured.
To download reports and data models from the Oracle Update Center:
1. Go to the Oracle Update Center.
https://updatecenter.oracle.com/apps/WebSearch/updatecenter.jsp?action=news&pkgType=06&2. Select the data model files (.xdmz) and report files (.xdoz) that you want to import.3. Once you have imported the files, upload the data model files (.xdmz) and report files (.xdoz) to Target Instance.
To upload the data model file (.xdmz file):
a. Click on Catalog on the toolbar.b. Select any folder where you want to upload this file.c. Click on Upload in the Tasks window.d. Click the Browse button to find the .xdmz file which you copied from target machine.e. After uploading, it will show the data model in that folder. Click on the Edit hyperlink and select a correct
data source and save the data model.
To upload the report file (.xdoz file):
a. Click on Catalog on the toolbar.b. Select the same folder where you saved the data model.c. Click on Upload in the Tasks window.d. Browse the .xdoz file which you copied from target machine.e. After uploading, click on the Edit hyperlink for the report name to open the report in edit mode.f. If there is an associated Data Model, it will display next to Data Model in the top left corner under the
tab title. If the correct one is not displayed, or if the one displayed is in red letters, then re-associate the
122

JD Edwards EnterpriseOne ToolsSoftware Updates Guide
Chapter 8Using JD Edwards Compare and Merge Tools
interactive report with appropriate data model by clicking on the Magnifying Glass on the toolbar, thenselecting the correct data model, then click Open, and then click Save.
The associations are:
Report Data Model
Object Customization Summary
F98881CU_SUMMARY_DM
Object Customization Detail
F98881CU_DETAIL_DM
Pathcode Comparison Summary
F98881CU_PATHCOMP_SU_DM
Pathcode Comparison Detail
F98881CU_DE_DM
Once the data model is associated, it will display on the toolbar in blue letters.g. Click on View Report on the toolbar to run the report.
Object Customization Summary Interactive Report The Object Customization Summary Interactive Report consists of three tabs:
• Summary by Object Type
• Summary by Product Code
• Object List
Summary by Object Type tab The Summary by Object Type tab will display a pie chart that shows the distribution of the object types affected. Thefirst line of the report has a clickable list of pathcodes affected. Clicking on a pathcode will interactively filter the ObjectTypes to show the summary for that pathcode only.
The Object Types available for selection are:
• Application
• Batch Application
• Business Functions
• Business View
• Data Structure
• Table
The Number of Objects table displays the number of object types affected for the selected pathcode or for allpathcodes.
The Object Type Vs Pathcode comparison table is available which tells the impact of each object type in each pathcode.
123

JD Edwards EnterpriseOne ToolsSoftware Updates Guide
Chapter 8Using JD Edwards Compare and Merge Tools
The interactive report can be viewed in different formats. In View Report mode, select the View Report icon on the tabtoolbar and select a viewing option:
• Interactive
• HTML
• PDF (recommended output type)
• RTF
• Excel
• PowerPoint
Summary by Product Code tab The Summary by Product Code tab displays a horizontal bar graph that lists the product codes affected. The first line ofthe report has a clickable list of pathcodes affected. Clicking on a pathcode will interactively filter the Product Codes toshow the summary for that pathcode only.
The Number of Objects table lists the number of objects affected for each product code.
The Product Code Vs Pathcode comparison table is also available at the bottom of the page for cross analysis of objecttypes and pathcodes. The table will display the number of objects per pathcode for each product code.
The interactive report can be viewed in different formats. In View Report mode, select the View Report icon on the tabtoolbar and select a viewing option:
• Interactive
• HTML
• PDF (recommended output type)
• RTF
• Excel
• PowerPoint
Object List tab The object list tab has a summary statement that contains embedded values (xx) within a sentence. The sentence reads:
System has xx customized objects impacting xx Product Codes.
The object list statement section contains the following:
Column Heading Description
System has xx
Refers to the unique count of objects that have been customized.
customized objects impacting
These objects could exist in multiple pathcodes and may have many versions.
xx product codes.
This shows the unique count of all Product Codes affected across all pathcodes.
The Pathcodes Affected section has a list of pathcodes which can be clicked on to filter the report data to that pathcodeonly.
124

JD Edwards EnterpriseOne ToolsSoftware Updates Guide
Chapter 8Using JD Edwards Compare and Merge Tools
The Object Types Affected section has a list of object types which can be clicked on to filter the data shown on thereport. It can also be clicked in combination with any other filters available on the page.
A table presents all of the objects affected by customizations (the list will be affected by any filters in effect). The tabledisplays:
• Object Type
• Pathcode
• Product Code
• Object Name
• Object Description
Object Customization Detail Interactive Report The Object Customization Detail Interactive Report has a Pathcode and Product Code filter on the header whichdetermines which detail information is shown on the page.
After selecting the Pathcode and Product Code, click on Apply to display the details for that combination in the report.Desired objects can be chosen from the Object Name field using the drop down menu. Change details for that objectwill be listed in a parent child relationship for up to three children.
The interactive report can be viewed in different formats. In View Report mode, select the View Report icon on the tabtoolbar and select a viewing option:
• Interactive
• HTML
• PDF (recommended output type)
• RTF
• Excel
• PowerPoint
Pathcode Comparison Summary Interactive Report The Pathcode Comparison Summary Interactive Report compares two pathcodes for the selected product code.The pathcodes and Product Code are selected at the top of the page. Once the selections are applied, an object listcomparing the existence of the object in the chosen pathcodes is displayed along with the total number of instances ofthe objects.
The interactive report can be viewed in different formats. In View Report mode, select the View Report icon on the tabtoolbar and select a viewing option:
• Interactive
• HTML
• PDF (recommended output type)
• RTF
• Excel
125

JD Edwards EnterpriseOne ToolsSoftware Updates Guide
Chapter 8Using JD Edwards Compare and Merge Tools
• PowerPoint
Pathcode Comparison Detail Interactive Report The Pathcode Comparison Detail Interactive Report compares two pathcodes for the selected product code. Thepathcodes and Product Code are selected at the top of the page. Once the selections are applied, the user can choosethe object he is interested in using the Object Name field drop down object list. Once the object is selected, the detail isshown in table format in a parent child hierarchy with changes displayed for up to three children. The changes in the twopathcodes are grouped at the left showing the changes in each pathcode.
The interactive report can be viewed in different formats. In View Report mode, select the View Report icon on the tabtoolbar and select a viewing option:
• Interactive
• HTML
• PDF (recommended output type)
• RTF
• Excel
• PowerPoint
Pathcode Comparison Summary Report The Pathcode Comparison Summary Report can be accessed by executing the XJDE0005 version of R9840R usingBatch Versions (BV). It can also be accessed from the GH96111 menu. No data selection is allowed for this report. Aninvalid data selection is included by default for this version.
The report output is presented in table format. The pathcodes will be listed as column headings horizontally acrossthe table. The object type will be listed vertically in the left column. The table cell where the object type and pathcodeintersect displays the number of instances of the object in each pathcode. A sum of all instances of the object inpathcodes is also available.
Note: The Pathcode Comparison Summary Report is available with Bug# 14767497.
Pathcode Comparison Detail Report The Pathcode Comparison Detail Report can be accessed by executing the XJDE0006 version of R9840R using BatchVersions (BV). It can also be accessed from the GH96111 menu. This report needs a mandatory data selection for up to3 pathcodes. The user may add further data selection based on his preference of object type, product code and objectname.
This report shows a linear comparison of customizations between pathcodes in a format similar to the regular ObjectCustomization detail report. Each section will report on an object within a pathcode. The first line in the section willdisplay the object type and the associated pathcode. The second line will display a description of the object type. Thethird line will display the product code. The lines following will display details that are relevant to the object type.
126

JD Edwards EnterpriseOne ToolsSoftware Updates Guide
Chapter 8Using JD Edwards Compare and Merge Tools
Note: The Pathcode Comparison Detail Report is available with Bug# 14767497.
Troubleshooting Information and Tips Object customizations are captured based on the SIMRGMOD flag in the F9861 table for each pathcode. A check-outand check-in of an object in OMW flags this column as changed even if the object does not have any changes.
When a new object is created or copied, the flag is set to A. When the R9840DL is run with data selection for this object,it is normal for the R9840DL to display the Object Customizations data load failed and No Data selected messages.
The R9840DL/ZJDE0001 version is shipped with a default data selection which captures all objects that are added orchanged. Any other data selection additions should be added to this default data selection.
If the object has been changed but does not appear in the reports, the issue could be that the object is not checked in.The object must be checked in for the changes to be captured. The SISTCE column set to 1 in F9861 indicates that theobject is checked in.
The original UBE template must be checked in for the UBE Version changes or override changes to be reflected in thereport.
Changes for object types BSFN, DSTR and BSVW are shown in the Summary report and not in the Detail report.
If for some reason the R9840DL UBE fails to run on the server, you can run this UBE locally from a development client,which should capture the same data.
The R9840R|ZDE0006 version which prints the detail report will fail when the F98881CU data load has a huge amountof data. This issue is fixed in Bug 17195573 in the 9.1.4 Tools Release.
Decustomizer Analysis Report (Release 9.2.3.3) This section contains the following topics:
• Overview
• Decustomizer Dataload Report
• Decustomizer Analysis Report
Overview The JD Edwards EnterpriseOne Decustomizer Analysis Report enables you to identify the UI customizations that can bereplaced using the personalization and extensibility framework.
A periodic review of the information generated by the report allows you to track the customizations that can bereduced and to stay in sync with the latest updates in JD Edwards EnterpriseOne. Also, you can run this report priorto performing an upgrade to know the number of customizations that can be replaced by using the personalizationframework.
The Decustomizer analysis report identifies the customization done to the Application (APPL) EnterpriseOne objects bycomparing the application between two path codes, which are the source and target path codes. Ensure that the ESU
127

JD Edwards EnterpriseOne ToolsSoftware Updates Guide
Chapter 8Using JD Edwards Compare and Merge Tools
level of the source and target path codes that are being compared are at the same level. For more information see, "ESUHistory (R9672)" in the JD Edwards EnterpriseOne Tools System Administration Guide .
For example, the report scans the EnterpriseOne applications in the Production path code, compares the same withthe Pristine path code, and stores the information pertaining to the specific UI customizations in the JD EdwardsEnterpriseOne table. Also, the source path code should not have any customizations retrofitted in it for the report toidentify the customization done to the APPL objects. Note that the target path code is where the customizations areexpected to be present.
The Decustomizer analysis report contains information of the customizations pertaining only to the APPL object type.The report identifies the Application objects that have been customized and provides detailed information about them.
The Decustomizer analysis report supports Tools and Applications releases 9.1 and 9.2.
Generating the Decustomizer analysis report is a two-step process. The first step involves running a UBE to load thetable. Second step comprises of running a UBE that reads from the table to produce a report in the PDF format.
The UBEs are:
• R9540DC (Decustomizer Dataload Report): It loads the Decustomizer data load table (F98881DC) with a list ofall the customized APPL EnterpriseOne objects. The Decustomizer Dataload UBE takes the path codes as inputfrom Processing Options - Pathcode Details. Once the path codes are selected and the UBE is submitted toexecute, the UBE scans the central objects specs for the source and target path codes, and loads the data intothe F98881DC table in a parent-child hierarchy of object changes with a list of all the customized APPL type ofobjects.
• R9540DCR (Decustomizer Analysis Report): It creates a summary and detail report from the data in theF98881DC table. The report takes the two path codes as input from Processing Options and generates a reportonly for the selected path codes.
The following customizations are specifically captured within the APPL EnterpriseOne object type:
• Forms that have hidden fields or fields removed
• Forms that have changed the tab sequence
• Forms that have changed the labels of the form controls
• Forms that have moved the fields
• Forms that have made the form field as mandatory
• Forms that have inserted additional Business View columns
Decustomizer Dataload Report When an APPL object is customized, EnterpriseOne records the changes in the respective spec repositories. Thiscustomization information is loaded into the F98881DC table by using the R9540DC UBE. The processing option valuesneed to be set prior to running this UBE.
Running the Decustomizer Dataload To run the R9540DC Decustomizer Dataload UBE:
1. Fast Path to BV.2. Enter R9540DC for Batch Application.3. Select the Version.4. In Prompt For, selecy Data Selection.
128

JD Edwards EnterpriseOne ToolsSoftware Updates Guide
Chapter 8Using JD Edwards Compare and Merge Tools
Note: If the Data Selection is not specified, the R9540DC UBE will scan all of the APPL objects that aremarked as customized.
5. Click Submit.6. Enter values for Data Selection.7. Click OK.8. In Path Code Details, enter the values for the Source and Target path codes.
You can use the visual-assist button to select the values for path codes. It is mandatory to specify the values forthe Source and Target path codes.
9. Enter values for the processing options.The following processing options enable you to specify the processing for the data load:
◦ Enter 0 or Blank to load the data according to data selection without deleting the other existing records.
◦ Enter 1 to delete all of the existing records from the F98881DC table and load the data still based on dataselection.
Note: Setting the processing option value to 1 means that you want to clean up all of the loaded data andreload it with the default data selection or data selection based on the user 's needs.
10. Click OK.11. In Report Destination, click OK.
After the path codes are selected and the UBE is submitted to execute, this UBE will then load the customized data intoF98881DC table.
If there are no UI customizations identified in Target path code when compared against the Source path code (pristine),the F98881DC table will be empty and the data load UBE will display the message: The Decustomizer report found nopotential customizations.
Decustomizer Analysis Report The Decustomizer Analysis Report (R9540DCR) gives an overview as well as a detailed summary of customizations tothe Application EnterpriseOne objects. These customizations can be replaced using the personalization framework.R9540DCR is a read-only report that prints the information available in the F98881DC table in a usable format.
This report should be run only after running UBE R9540DC, which loads the F98881DC table. Since the R9540DCRreport is based on what is loaded in F98881DC through R9540DC, you need to ensure that the F98881DC table has beenloaded with the data you want to see in the R9540DCR report.
Running the Decustomizer Analysis Report To run the R9540DCR Decustomizer Analysis Report:
1. Fast Path to BV.2. Enter R9540DCR for Batch Application. Select the Version.
Note: You can skip the data selection step as the UBE only populates the information available in theF98881DC table.
3. Click Submit.4. In Report Destination, click OK.
129

JD Edwards EnterpriseOne ToolsSoftware Updates Guide
Chapter 8Using JD Edwards Compare and Merge Tools
Decustomizations Summary The Decustomizations Summary gives an overview of the impact of customizations to the APPL objects. TheDecustomizations Summary section contains the following:
Decustomizations Summary Statement
The Decustomizations Summary statement contains embedded values (xx) within a sentence. The sentence reads:
System has xx customized objects impacting xx Product Codes.
The Decustomizations Summary statement section contains the following:
Column Heading Description
System has xx
This refers to the unique count of APPL objects that have been customized
customized objects impacting
These objects could have many versions
xx product codes.
This shows the unique count of all Product Codes affected across the selected path codes
Summary by Path Code
This section shows the number of APPL objects affected in the target path code.
The Summary by Path code section has these columns:
Column Heading Description
Source Path code
Shows the source path code
Target Path code
Shows the target path code
Number of Objects
Shows number of objects affected in the target path code
Summary by Object Type
This section shows the object type affected by customizations and shows the number of objects affected for this objecttype. The summary lists only the APPL object type that is affected.
The Summary by Object Type section has these columns:
Column Heading Description
Object Type
Shows the APPL object type affected by customizations
Number of Objects
Shows the number of objects affected for the APPL object type
130

JD Edwards EnterpriseOne ToolsSoftware Updates Guide
Chapter 8Using JD Edwards Compare and Merge Tools
Summary by Product Code
This section shows all Product Codes affected by customizations and shows the number of objects affected for eachProduct Code.
The Summary by Product Code section has these columns:
Column Heading Description
Product Code
Shows all the product codes affected by customizations
Product Code Description
Shows the description of each product code
Number of Objects
Shows the number of objects affected for each product code
Customized Application Objects
This section lists all the Application objects that have been customized. This section does not list versions for theobjects.
The Customized Application Objects list has these columns for each object:
Column Heading Description
Object Name
Shows the application affected by customizations
Product Code
Shows all Product Codes affected by customizations
Source Path code
Shows the source path code
Target Path code
Shows the target path code
ESU Match Status
Show whether the source and target path codes are at the same ESU level for the specific Applicationobject
Object Description
Shows the description of the object
Customizations Detail Report The details are shown in a parent-child hierarchy where the top-most parent is the object, followed by each type ofchange to the APPL objects.
The parent section of the Customization Detail Report has these items.
Column Heading Description
Object Name Shows the object name and version
131

JD Edwards EnterpriseOne ToolsSoftware Updates Guide
Chapter 8Using JD Edwards Compare and Merge Tools
Column Heading Description
Description
Shows the description of the object
Product code
Shows the product code for the object
Source Path code
Shows the source path code
Target Path code
Shows the target path code
ESU Match Status
Show whether the source and target path codes are at the same ESU level for the specific Applicationobject
The child section of the Customization Detail report has these columns.
Column Heading Description
Control Category
Shows the category type
Form Name
Shows the form name
Control Type
Show the type of control
Control Name
Shows the ID of control
Customization Type
Shows the description of each customization
Note:
• Any form control that has simple UI customization along with event rule changes is skipped and a message islogged in jde.log file.
• If the customization involves moving a control that is designated as a tab stop to another tab, changes the tabsequence of both the source tab and target tab pages.
• If the ESU level of the source and target path codes are not at the same level for a specific object, the reportmight indicate that a given customization is present when it is not (i.e. false positive result).
132

JD Edwards EnterpriseOne ToolsSoftware Updates Guide
Chapter 9Custom Modifications and Packages
9 Custom Modifications and Packages
Understanding Custom Modifications and Packages At this point, you are ready to retrofit your custom modifications into the objects delivered in the update. You may alsochoose to apply Oracle's suggested UDC description Data Dictionary glossary changes. This portion of the updateprocess may involve several iterations of retrofitting and testing, so you will also be building update packages to deliverthe modifications to the testing environments. This chapter also explains how to build and test the packages that youwill deploy to the workstations.custom modificationspackagesupdateupdatepackagesupdatecustom modifications
Note: As of Tools Release 9.2, customers could perform custom modifications only after the upgrade process.Beginning with Tools Release 9.2 Update 2, customers can retrofit the custom modifications for the objects that arepart of the deployed ESU bundle.
If you made a backup of original specifications and business functions, you can restore this backup.
See Restoring a Backup.
Identifying Custom Modifications Using theCustomization Workbench The Customization Workbench (P98UCUST) is an application that provides a customer a way of easily identifying andmanaging the merge of EnterpriseOne customized objects that have been changed in the most recent delivery.
To identify custom modifications using the Customization Workbench:
1. Fastpath to OMW.2. Create an OMW project. Make sure that you are a developer on this project and that this project is at a
development status of 21.
133

JD Edwards EnterpriseOne ToolsSoftware Updates Guide
Chapter 9Custom Modifications and Packages
3. Use Fastpath to launch P96UCUST.
Available Form Exits:
◦ Refresh All - calls BSFN to refresh the F96UCUST data based on the merge modification flag in theF9861 table.
◦ Load COA Data - launches batch versions for the Report R9840DL - Object Customizations Data LoadReport.
◦ Launch XRef - will launch the entry point form of the cross reference application in order that the enduser may gather more information about the currently checked in object.
◦ Launch OMW - will Launch OMW (P98220) where more actions can be taken on the object and projectas needed.
134

JD Edwards EnterpriseOne ToolsSoftware Updates Guide
Chapter 9Custom Modifications and Packages
4. If the F96UCUST table has been loaded with customization objects information, then click "Find". Otherwise,click the form exit "Load COA Data". This will take a while for the table to load.
135

JD Edwards EnterpriseOne ToolsSoftware Updates Guide
Chapter 9Custom Modifications and Packages
5. The grid will appear with the data. The counters in the form header will indicate how many objects are completeand how many are still in need of review. Select an object from this list.
136

JD Edwards EnterpriseOne ToolsSoftware Updates Guide
Chapter 9Custom Modifications and Packages
6. An OMW Project Search and Select form will appear. Select the project that you will add the objects to. A popupwindow will appear.
137

JD Edwards EnterpriseOne ToolsSoftware Updates Guide
Chapter 9Custom Modifications and Packages
7. Confirm that you want to check out the object to the project. If you choose "No", you will have the option tocheck out the object later.
138

JD Edwards EnterpriseOne ToolsSoftware Updates Guide
Chapter 9Custom Modifications and Packages
8. Once on the form, there are several options that will change based upon the specific object.
◦ Is the object on the project or not?
◦ Is the object checked out or not?
◦ What is the object type?
9. Perform the tasks necessary to add the appropriate customized objects.
Button Function
Rmv frm Project
Removes the object from the current project.
Add To Project
Will launch the OMW Project Search and Select form to all for the end user to choose the project towhich to add the object.
Check In Will check the object in on the current project.
139

JD Edwards EnterpriseOne ToolsSoftware Updates Guide
Chapter 9Custom Modifications and Packages
Button Function
Check Out
Will check the object out to the current project.
Design
Will launch the appropriate design application for the object type (i.e. FDA for APPL type objects, RDAfor UBE type objects, etc.).
ER Compare
Will launch the ER Compare tool for APPL, UBE and BSFN (NER) type objects. The default comparisonwill be between the local specs and the specs of the login pathcode (both can be modified in the toolonce it is launched).
Build
Available for BSFN type objects.
Launch OMW
Will launch OMW (P98220) where more actions can be taken on the object and project as needed.
OK
When complete and a value of "D' is entered and the OK button clicked, the object will be checked(confirmation pending).
Next/Previous
Will scroll through the records on the previous screen for quick completion.
Field Value
Object Name
The object name.
Path Code
The path code.
Modification Flag
The modification flag with a value of "C" indicates that the object has been customized.
OMW Project Name
Name of the OMW project.
Status
If the object is finished, it can be marked as D - Done. When the object is checked in the number of completed objectswill change.
Available Form Exit:
Cross Reference - for reference purposes, will launch the appropriate cross reference form based on the objectselected.
140

JD Edwards EnterpriseOne ToolsSoftware Updates Guide
Chapter 9Custom Modifications and Packages
Retrofitting Custom Modifications This section provides an overview of retrofitting custom modifications, discusses prerequisites, and discusses how toretrofit custom modifications for:
• Interactive applications
• Reports
• Table conversions
• Tables
• Named event rules
• C business functions
Understanding Retrofitting Custom Modifications Most users modify their software to make the functionality more applicable to their business situations. Whenyou update to a new release, you need to transfer your modifications to the new release.retrofitting custommodificationscustom modificationsretrofitting modificationsupdatecustom modifications
Because re-creating custom modifications each time you update the software would be a laborious process, this chapterexplains how to integrate the custom modifications that you made in your current software into the updated software.This integration, called retrofitting, enables you to refit the customizations that can be merged into each new version ofthe software.
Prerequisites To retrofit modifications, you need a workstation with the upgraded software and the development tools. These toolsenable you to compare the customizations that your current software merged into the new software with any path codein the system. This enables you to easily compare the upgraded modifications with a version of your modificationsbefore the upgrade or with the pristine environment of the new release.
This table lists the requirements to retrofit custom modifications.
Requirement Details
Personnel
A programmer, preferably the same one who did the custom modifications, should perform this task.
Logon status
You must be able to log on to the workstation on which you will retrofit object modifications, typicallyin the development or prototype environment.
Package
The environment must be updated and a package must be built and deployed to the workstation beingused.
Modified Objects
The modified objects must be checked out.
141

JD Edwards EnterpriseOne ToolsSoftware Updates Guide
Chapter 9Custom Modifications and Packages
Requirement Details
See JD Edwards EnterpriseOne Tools Object Management Workbench Guide .
Retrofitting Custom Modifications for an Interactive Application To retrofit custom modifications for an interactive application:
1. From Object Management Workbench (OMW), use Form Design Aid (FDA) to copy custom objects into thetarget application.
You can use Compare Mode, under the File menu, to help with this process. Everything custom must be copiedin FDA, except for Event Rule (ER) variables and ER statements that do not reference any custom objects.
2. Save your changes.3. Within FDA, select Edit and Event Rules.
This option enables you to use EditER to reenter all ER statements that reference any custom objects other thancustom ER variables.
4. Save your work.5. Use the JD Edwards ER Compare tool (ER Compare button in OMW or ER Compare command in FDA) to
compare the updated local specifications (target) with the original, customized (source) specifications.6. Copy ER variables and then ER statements from source to target.
Do not copy any statements that reference objects that existed only in the source (customized) environment.Those should have been created in step 3.
7. Validate the resulting ER. Save and exit JD Edwards ER Compare.8. When you finish retrofitting and testing the modifications, check them back in and rebuild the package.9. Test and fix the modifications, and then rebuild and redeploy the corrected package. Repeat this step until all
the modifications are functioning properly.
Retrofitting Custom Modifications for a Report To retrofit custom modifications for a report:
1. From OMW, use Report Design Aid (RDA) to re-create all custom report objects in the target UBE (universalbatch engine).
2. Within RDA, select Edit and Event Rules.
This option enables you to use EditER to reenter all ER statements that reference custom objects other thancustom ER variables.
3. Save your work.4. Use the JD Edwards ER Compare tool (ER Compare button in OMW) to compare the updated local specifications
(target) with the original, customized (source) specifications.5. Copy ER variables and then ER statements from source to target.
Do not copy any statements that reference objects that existed only in the source (customized) environment.Those should have been created in step 2.
6. Validate the resulting ER. Save and exit JD Edwards ER Compare.
142

JD Edwards EnterpriseOne ToolsSoftware Updates Guide
Chapter 9Custom Modifications and Packages
7. When you finish retrofitting and testing the modifications, check them back in and rebuild the package.8. Test and fix the modifications, and then rebuild and redeploy the corrected package. Repeat this step until all
the modifications are functioning properly.
Retrofitting Custom Modifications for a Table Conversion To retrofit custom modifications for a table conversion (TC):
1. Within OMW, use Table Conversion Design Aid to re-create all custom parts of the target UBE.2. Within Table Conversion Design Aid, click the Advanced ER button within the Mapping dialog.
This option enables you to use EditER to reenter all ER statements that reference custom objects other thancustom ER variables.
3. Use the JD Edwards ER Compare tool (ER Compare button in OMW) to compare the updated local specifications(target) with the original, customized (source) specifications.
4. Copy ER variables and then ER statements from source to target.
Do not copy any statements that reference objects that existed only in the source (customized) environment.Those should have been created in step 2.
5. Validate the resulting ER. Save and exit JD Edwards ER Compare.6. When you finish retrofitting and testing the modifications, check them back in and rebuild the package.7. Test and fix the modifications, and then rebuild and redeploy the corrected package. Repeat this step until all
the modifications are functioning properly.
Retrofitting Custom Modifications for a Table To retrofit custom modifications for a table:
1. Within OMW, on the Design Tools tab, click the Table Trigger Design Aid button and use EditER to reenter all ERstatements that reference custom objects other than custom ER variables.
2. Use the JD Edwards ER Compare tool (ER Compare button in OMW) to compare the updated local specifications(target) with the original, customized (source) specifications.
3. Copy the ER variables and then the ER statements from the source to the target.
Do not copy any statements that reference objects that existed only in the source (customized) environment.Those should have been created in step 1.
4. Validate the resulting ER. Save and exit JD Edwards ER Compare.5. Use the Table Design Aid tool within OMW to update each table that needs further work.6. When you finish retrofitting and testing the modifications, check them back in and rebuild the package.7. Test and fix the modifications, and then rebuild and redeploy the corrected package. Repeat this step until all
the modifications are functioning properly.
Retrofitting Custom Modifications for a Named Event Rule To retrofit custom modifications for a named event rule (NER):
1. Within OMW, use the JD Edwards ER Compare tool to compare the updated local specifications (target) with theoriginal, customized (source) specifications.
143

JD Edwards EnterpriseOne ToolsSoftware Updates Guide
Chapter 9Custom Modifications and Packages
2. Copy the ER variables and then the ER statements from the source to the target.
Do not copy any statements that reference objects that exist only in the source (customized) environment.3. Save and exit JD Edwards ER Compare.4. Use the Business Function Design Aid tool from OMW to select and update each business function that needs
further work.5. Within the Business Function Design Aid tool, select Form and Edit.
The edit option enables you to use EditER to reenter ER statements that reference custom objects. Save yourwork.
6. Validate the resulting ER.7. When you finish retrofitting and testing the modifications, check them back in and rebuild the package.8. Test and fix the modifications, and then rebuild and redeploy the corrected package. Repeat this step until all
the modifications are functioning properly.
Retrofitting Custom Modifications for a C Business Function To retrofit custom modifications for a C business function:
1. Within OMW, use the JD Edwards ER Compare tool to compare the updated local business function source code(target) with the original, customized (source) code.
2. Select Edit, Auto Merge Application to merge the code. Save and exit JD Edwards ER Compare.3. Start the Business Function Design Aid tool from OMW.4. Select Form and Edit to use Microsoft Visual Studio to finish editing the code.5. Select the Build Business Function button in OMW to build the business function.6. When you finish retrofitting and testing the modifications, check them back in and rebuild the package.7. Test and fix the modifications, and then rebuild and redeploy the corrected package. Repeat this step until all
the modifications are functioning properly.
Using JD Edwards EnterpriseOne Package Management The package management process provides a means to create a package, to define and build a package, and to deploypackages to both servers and workstations using a step-by-step director process.
Note: The software update process creates the package definition; you simply build and test the package.
Several instances occur in which you will need to update or set up a workstation or server with the JD EdwardsEnterpriseOne software. You might need to set up a new workstation, deploy custom solutions to all or to selectedusers, create a new path code for development, or deploy a fix.building and deploying workstation packagesdeployingworkstation packagesworkstationsbuilding and deploying packagespackagesworkstations
To include any modifications (changed or added business functions or applications) into a package for deployment toworkstations (for example, DV900FB or DV900PB), you must define and build one of your own.
Note:• "Building Packages" in the JD Edwards EnterpriseOne Tools Package Management Guide .
144

JD Edwards EnterpriseOne ToolsSoftware Updates Guide
Chapter 9Custom Modifications and Packages
145

JD Edwards EnterpriseOne ToolsSoftware Updates Guide
Chapter 9Custom Modifications and Packages
146

JD Edwards EnterpriseOne ToolsSoftware Updates Guide
Chapter 10Updating Environments
10 Updating Environments
Understanding How to Update the ProductionEnvironment Before proceeding with these instructions, you should test the new modifications with a copy of production data inthe prototype environment.updating the production environmentproduction environmentsupdateupdateproductionenvironment
Update the production environment after you update and test development and prototype environments.updating theproduction environmentproduction environmentupdating
Do not include additional environments when updating the live production environment. The purpose of isolating theupdate of production is to minimize production downtime.
Oracle's JD Edwards EnterpriseOne Global Support Center maintains several documents that describe how to manageand promote Software Updates. These documents address many details of the update process and complement thecurrent documentation.
To access these documents, log on to My Oracle Support, and click the Knowledge tab. Perform a search for thefollowing documents:
• Best Practice for Managing Software Updates
• Applying and Promoting Software Updates
• Understanding and Managing Planner ESUs
Updating the Production Environment This section discusses how to:
• Update the production environment.
• Prepare to use the updated production environment.
Updating the Production Environment Using OMW You update the production environment (and other environments) using Oracle's JD Edwards EnterpriseOne ObjectManagement Workbench (OMW).Object Management Workbench (OMW)
The software update process creates an OMW project for this update. To update the production environment, promotethe project in OMW to the appropriate status as defined by the activity rules. (For example, if you are using Oracle'sdefault JD Edwards EnterpriseOne conventions, you can promote a project from Development to Prototype bychanging the status from 21 to 26. For more information about your organization's activity rules, see your JD EdwardsEnterpriseOne administrator.)
147

JD Edwards EnterpriseOne ToolsSoftware Updates Guide
Chapter 10Updating Environments
Note: If the software update process runs the table and index creation batch application (R98407 in F9843) and youare using OMW to promote the project to the production environment, you must manually create and regenerate thetable and index in OMW.
See "Understanding JD Edwards EnterpriseOne OMW Administration" in the JD Edwards EnterpriseOne Tools SystemAdministration Guide .
Preparing to Use the Updated Production Environment After you update the production environment, you create a new package, deploy the new package to a workstation, andtest the modifications there.preparing to use the production environmentproduction environmentpreparing to use
This table lists the requirements to use the updated production environment:
Action Details
Personnel
Installer or system administrator
Logon status
On the enterprise server, logged on as user JDE with the database password for user JDE.
Prerequisites
Run the installation plan for the production environment.
Concurrent Tasks
None
To prepare to use the updated production environment:
1. Create a new package.
See "Building Packages" in the JD Edwards EnterpriseOne Tools Package Management Guide .2. Deploy the new production package to the workstation.3. Surface test the updated production environment.
After you finish testing the environment, you can deploy the package to other workstations.
148

JD Edwards EnterpriseOne ToolsSoftware Updates Guide
Chapter 11Appendix A - Setting Up Localizations
11 Appendix A - Setting Up Localizations
Understanding How to Set Up Localizations To install localizations using Electronic Software Updates (ESUs), the customer should run the Work with Enhancementsapplication and register the localization with the JD Edwards EnterpriseOne Installation system.localizations
When you run the Work with Enhancements application, it registers the localization with the JD Edwards EnterpriseOneInstallation system and enables the software to correctly handle all future updates to the localization. When you registeran enhancement from an ESU, the software update system will correctly apply the ESU to your system.
R96450 is a UBE that enables and disables localization code. When ESUs are shipped out, all localization objects aredisabled in the ESU. The R96450 enables the correct objects based on the enhancement and revision level that youentered in the Work With Enhancements application.
Adding the Localization Complete this task to add the localization to the JD Edwards EnterpriseOne environment.
On the deployment server, sign on to the DEP900 environment.
In the fast path, type P96450.
Note: In order to run the application, you must install the most recent Planner ESU.
1. On Work with Enhancements, click Add.2. On the Edit Enhancement Info screen, complete these fields:
◦ Enhancement TypeType or select ARGENTINA.
◦ RevisionType the revision number of the Quarterly Update that you obtained in the previous task.
◦ DescriptionType a valid description.
3. Click OK.4. Click OK.5. On the Work with Enhancements form, click Enable to run the R96450 enabler.
Note: Click Disable to disable the enhancement type.
6. When the UBE completes, open the generated UBE report, and ensure that the report has not recorded anyerrors. If the report contains errors, forward the report to your GSC representative.This information is also contained in the jde.log.
149

JD Edwards EnterpriseOne ToolsSoftware Updates Guide
Chapter 11Appendix A - Setting Up Localizations
7. If the UBE runs successfully without errors, the Localization should be successfully registered. The software willnow correctly manage the localization for all subsequent software updates.
Once you have registered the localization, you may take ESUs as normal.
Changing the Revision Level Complete this task to update the revision number of the localization.localizationschanging the revision level
1. On the Work With Enhancements browse form, select the row for ARGENTINA.2. Click Select.3. Type the new revision number in the Revision box and press OK.
The program displays a warning message.4. Click OK to synchronize the NER to the new enhancement revision level.
The Enabler automatically runs with the specification merge, R98700. For it to run, you must have anenhancement type set up and the software update must have NERs.
Setting Processing Options for R96450 These values are the default processing options and data selection for the XJDE001 version. You can tell that youare running the XJDE001 version because the P96450 prompts you with the warning that it will run R96450 versionXJDE0001.
The default processing options are:
Environment Name
DV900
Enter the name of the environment for which you want to update the NERs.
Enhancement Operation
E
E indicates that the NER for localization will be enabled.
Generate NER
<blank>
A blank value indicates that the NER source will not be regenerated (for example, you will need to build a full packageand deploy to get the changes to a client workstation).
Level of Detail
0
A value of 0 indicates that only errors and lines changed will be printed on the report.
Proof or Final
150

JD Edwards EnterpriseOne ToolsSoftware Updates Guide
Chapter 11Appendix A - Setting Up Localizations
1
A value of 1 indicates that the UBE will update the NER.
A data selection of 70 means that only NER objects belonging to system code 70 (localization) will be affected.
151
JD Edwards EnterpriseOne ToolsSoftware Updates Guide
Chapter 11Appendix A - Setting Up Localizations
152

JD Edwards EnterpriseOne ToolsSoftware Updates Guide
Glossary
Glossary
central objects merge A process that blends a customer's modifications to the objects in a current release with objects in a new release.
checksum A fixed-size datum computed from an arbitrary block of digital data for the purpose of detecting accidental errors thatmay have been introduced during its transmission or storage. JD Edwards EnterpriseOne uses the checksum to verifythe integrity of packages that have been downloaded by recomputing the checksum of the downloaded package andcomparing it with the checksum of the original package. The procedure that yields the checksum from the data is calleda checksum function or checksum algorithm. JD Edwards EnterpriseOne uses the MD5 and STA-1 checksum algorithms.
Control Table Workbench An application that, during the Installation Workbench processing, runs the batch applications for the planned mergesthat update the data dictionary, user-defined codes, menus, and user override tables.
control tables merge A process that blends a customer's modifications to the control tables with the data that accompanies a new release.
edit rule A method used for formatting and validating user entries against a predefined rule or set of rules.
Object Librarian Merge A process that blends any modifications to the Object Librarian in a previous release into the Object Librarian in a newrelease.
153
JD Edwards EnterpriseOne ToolsSoftware Updates Guide
Glossary
Specification merge A merge that comprises three merges: Object Librarian merge, Versions List merge, and Central Objects merge. Themerges blend customer modifications with data that accompanies a new release.
Specification Table Merge Workbench An application that, during the Installation Workbench process, runs the batch applications that update the specificationtables.
Table Conversion Workbench An interoperability model that enables the exchange of information between JD Edwards EnterpriseOne and third-partysystems using non-JD Edwards EnterpriseOne tables.
User Overrides merge Adds new user override records into a customer's user override table.
Versions List merge The Versions List merge preserves any non-XJDE and non-ZJDE version specifications for objects that are valid in thenew release, as well as their processing options data.
154