JAVA NOTES SYMCA Page 1 of 173 - educlash
173
JAVA NOTES SYMCA Page 1 of 173 UNIT 7 FILE HANDLING IN JAVA INTRODUCTION Java I/O (Input and Output) is used to process the input and produce the output. Java uses the concept of stream to make I/O operation fast. The java.io package contains all the classes required for input and output operations. We can perform file handling in java by Java I/O API. Stream A stream can be defined as a sequence of data. A stream is a sequence of data.In Java a stream is composed of bytes. It's called a stream because it is like a stream of water that continues to flow. In java, 3 streams are created for us automatically. All these streams are attached with console. 1) System.out: standard output stream 2) System.in: standard input stream 3) System.err: standard error stream There are two kinds of Streams – InPutStream − The InputStream is used to read data from a source. OutPutStream − The OutputStream is used for writing data to a destination. Let's see the code to print output and error message to the console. 1. System.out.println("simple message"); 2. System.err.println("error message"); Let's see the code to get input from console. 1. int i=System.in.read();//returns ASCII code of 1st character 2. System.out.println((char)i);//will print the character Standard Streams All the programming languages provide support for standard I/O where the user's program can take input from a keyboard and then produce an output on the computer screen. If you are aware of C or C++ programming languages, then you must be aware of three standard devices STDIN, STDOUT and STDERR. Similarly, Java provides the following three standard streams −
-
Upload
khangminh22 -
Category
Documents
-
view
0 -
download
0
Transcript of JAVA NOTES SYMCA Page 1 of 173 - educlash
JAVA NOTES SYMCA
Page 1 of 173
UNIT 7
FILE HANDLING IN JAVA
INTRODUCTION
Java I/O (Input and Output) is used to process the input and produce the output.
Java uses the concept of stream to make I/O operation fast. The java.io package
contains all the classes required for input and output operations.
We can perform file handling in java by Java I/O API.
Stream
A stream can be defined as a sequence of data.
A stream is a sequence of data.In Java a stream is composed of bytes. It's called a
stream because it is like a stream of water that continues to flow.
In java, 3 streams are created for us automatically. All these streams are attached with
console.
1) System.out: standard output stream
2) System.in: standard input stream
3) System.err: standard error stream
There are two kinds of Streams –
InPutStream − The InputStream is used to read data from a source.
OutPutStream − The OutputStream is used for writing data to a destination.
Let's see the code to print output and error message to the console.
1. System.out.println("simple message");
2. System.err.println("error message");
Let's see the code to get input from console.
1. int i=System.in.read();//returns ASCII code of 1st character
2. System.out.println((char)i);//will print the character
Standard Streams
All the programming languages provide support for standard I/O where the user's program
can take input from a keyboard and then produce an output on the computer screen. If you
are aware of C or C++ programming languages, then you must be aware of three standard
devices STDIN, STDOUT and STDERR. Similarly, Java provides the following three
standard streams −

JAVA NOTES SYMCA
Page 2 of 173
Standard Input − This is used to feed the data to user's program and usually a
keyboard is used as standard input stream and represented as System.in.
Standard Output − This is used to output the data produced by the user's program
and usually a computer screen is used for standard output stream and represented
as System.out.
Standard Error − This is used to output the error data produced by the user's
program and usually a computer screen is used for standard error stream and
represented as System.err.
7.1) INPUT STREAMS AND OUTPUT STREAMS:-
7.1.1) INPUT STREAMS
The InputStream class is the base class (superclass) of all input streams in the Java IO API.
InputStream Subclasses include the FileInputStream, BufferedInputStreamand the
PushbackInputStream among others.
Java InputStream Example
Java InputStream's are used for reading byte based data, one byte at a time. Here is a
Java InputStream example:
InputStreaminputstream = new FileInputStream("c:\\data\\input-text.txt");
int data = inputstream.read();
while(data != -1) {
//do something with data...
doSomethingWithData(data);
data = inputstream.read();
}
inputstream.close();
This example creates a new FileInputStream instance. FileInputStream is a subclass of
InputStream so it is safe to assign an instance of FileInputStream to an InputStream variable
(the inputstream variable).
From Java 7 you can use the try-with-resources construct to make sure the InputStream is
properly closed after use. The link in the previous sentence points to an article that explains
how it works in more detail, but here is a simple example:
try(InputStreaminputstream = new FileInputStream("file.txt") ) { int data = inputstream.read(); while(data != -1){ System.out.print((char) data); data = inputstream.read();

JAVA NOTES SYMCA
Page 3 of 173
} }
Once the executing thread exits the try block, the inputstream variable is closed.
read()
The read() method of an InputStream returns an int which contains the byte value of the byte
read. Here is an InputStream read() example:
int data = inputstream.read();
You can case the returned int to a char like this:
charaChar = (char) data;
Subclasses of InputStream may have alternative read() methods. For instance,
theDataInputStream allows you to read Java primitives like int, long, float, double, boolean
etc. with its corresponding methods readBoolean(), readDouble() etc.
End of Stream
If the read() method returns -1, the end of stream has been reached, meaning there is no more
data to read in the InputStream. That is, -1 as int value, not -1 as byte or short value. There is
a difference here!
When the end of stream has been reached, you can close the InputStream.
read(byte[])
The InputStream class also contains two read() methods which can read data from
the InputStream's source into a byte array. These methods are:
int read(byte[])
int read(byte[], int offset, int length)
Reading an array of bytes at a time is much faster than reading one byte at a time, so when
you can, use these read methods instead of the read() method.
The read(byte[]) method will attempt to read as many bytes into the byte array given as
parameter as the array has space for. The read(byte[]) method returns an int telling how many
bytes were actually read. In case less bytes could be read from the InputStream than
the byte array has space for, the rest of the byte array will contain the same data as it did
before the read started. Remember to inspect the returned int to see how many bytes were
actually read into the byte array.
The read(byte[], int offset, int length) method also reads bytes into a bytearray, but starts
at offset bytes into the array, and reads a maximum of length bytes into the array from that
position. Again, the read(byte[], int offset, int length)method returns an int telling how many

JAVA NOTES SYMCA
Page 4 of 173
bytes were actually read into the array, so remember to check this value before processing the
read bytes.
For both methods, if the end of stream has been reached, the method returns -1 as the number
of bytes read.
Here is an example of how it could looke to use the InputStream's read(byte[])method:
InputStreaminputstream = new FileInputStream("c:\\data\\input-text.txt"); byte[] data = new byte[1024]; intbytesRead = inputstream.read(data); while(bytesRead != -1) { doSomethingWithData(data, bytesRead); bytesRead = inputstream.read(data); } inputstream.close();
First this example create a byte array. Then it creates an int variable namedbytesRead to hold
the number of bytes read for each read(byte[]) call, and immediately assigns bytesRead the
value returned from the first read(byte[]) call.
Inside the while loop the doSomethingWithData() method is called, passing along
the data byte array as well as how many bytes were read into the array as parameters. At the
end of the while loop data is read into the byte array again.
It should not take much imagination to figure out how to use the read(byte[], int offset, int
length) method instead of read(byte[]). You pretty much just replace the read(byte[]) calls
with read(byte[], int offset, int length) calls.
mark() and reset()
The InputStream class has two methods called mark() and reset() which subclasses
of InputStream may or may not support.
If an InputStream subclass supports the mark() and reset() methods, then that subclass should
override the markSupported() to return true. If the markSupported()method
returns false then mark() and reset() are not supported.
The mark() sets a mark internally in the InputStream which marks the point in the stream to
which data has been read so far. The code using the InputStream can then continue reading
data from it. If the code using the InputStream wants to go back to the point in the stream
where the mark was set, the code calls reset() on the InputStream. The InputStream then
"rewinds" and go back to the mark, and start returning (reading) data from that point again.
This will of course result in some data being returned more than once from the InputStream.
The methods mark() and reset() methods are typically used when implementing parsers.
Sometimes a parser may need to read ahead in the InputStream and if the parser doesn't find

JAVA NOTES SYMCA
Page 5 of 173
what it expected, it may need to rewind back and try to match the read data against something
else.
InputStream class
InputStream class is an abstract class. It is the super class of all classes representing an input
stream of bytes.
Useful methods of InputStream
Method Description
1) public abstract int read()throws IOException
reads the next byte of data from the input stream. It returns -1 at the end of file.
2) public int available()throws IOException
returns an estimate of the number of bytes that can be read from the current input stream.
3) public void close()throws IOException
is used to close the current input stream.
InputStream Hierarchy
7.1.2) OUTPUT STREAMS
Java application uses an output stream to write data to a destination, it may be a file,
an array, peripheral device or socket.
The OutputStream class is the base class of all output streams in the Java IO API.
Subclasses include the BufferedOutputStream and the FileOutputStream among
others.

JAVA NOTES SYMCA
Page 6 of 173
write(byte)
The write(byte) method is used to write a single byte to the OutputStream.
The write() method of an OutputStream takes an int which contains the byte value of the byte
to write. Only the first byte of the int value is written. The rest is ignored.
Subclasses of OutputStream may have alternative write() methods. For instance,
theDataOutputStream allows you to write Java primitives like int, long, float, double, boolean
etc. with its corresponding methods writeBoolean(), writeDouble() etc.
Here is an OutputStream write() example:
OutputStream output = new FileOutputStream("c:\\data\\output-text.txt");
while(hasMoreData()) {
int data = getMoreData();
output.write(data);
}
output.close();
This OutputStream write() example first creates a FileOutputStream to which the data will be
written. Then the example enters a while loop. The condition to exit the while loop is the
return value of the method hasMoreData(). The implementation of hasMoreData() is not
shown, but imagine that it returns true if there is more data to write, and false if not.
Inside the while loop the example calls the method getMoreData() to get the next data to
write to the OutputStream, and then writes that data to the OutputStream. The while loop
continues until hasMoreData() returns false.
Note: The proper exception handling has been skipped here for the sake of clarity. To learn
more about correct exception handling, go to Java IO Exception Handling.
write(byte[])
The OutputStream class also has a write(byte[] bytes) method and a write(byte[] bytes, int
offset, int length) which both can write an array or part of an array of bytes to
the OutputStream.
The write(byte[] bytes) method writes all the bytes in the byte array to theOutputStream.
The write(byte[] bytes, int offset, int length) method writes length bytes starting from
index offset from the byte array to the OutputStream.
flush()
The OutputStream's flush() method flushes all data written to the OutputStream to the
underlying data destination. For instance, if the OutputStream is a FileOutputStreamthen
bytes written to the FileOutputStream may not have been fully written to disk yet. The data
might be buffered in memory somewhere, even if your Java code has written it to
JAVA NOTES SYMCA
Page 7 of 173
the FileOutputStream. By calling flush() you can assure that any buffered data will be flushed
(written) to disk (or network, or whatever else the destination of your OutputStream has).
close()
Once you are done writing data to the OutputStream you should close it. You close
anOutputStream by calling its close() method. Since the OutputStream's
various write()methods may throw an IOException, you should close the OutputStream inside
a finally block. Here is a simple OutputStream close()
example:
OutputStream output = null; try{ output = new FileOutputStream("c:\\data\\output-text.txt"); while(hasMoreData()) { int data = getMoreData(); output.write(data); } } finally { if(output != null) { output.close(); } }
This simple example calls the OutputStream close() method inside a finally block. While this
makes sure that the OutputStream is closed, it still does not provide perfect exception
handling.
OutputStream class
OutputStream class is an abstract class. It is the super class of all classes representing an
output stream of bytes. An output stream accepts output bytes and sends them to some sink.
Useful methods of OutputStream
Method Description
1) public void write(int)throws IOException
is used to write a byte to the current output stream.
2) public void write(byte[])throws IOException
is used to write an array of byte to the current output stream.
3) public void flush()throws IOException flushes the current output stream.
4) public void close()throws IOException is used to close the current output stream.

JAVA NOTES SYMCA
Page 8 of 173
OutputStream Hierarchy
Let's understand working of Java OutputStream and InputStream by the figure given
below.
7.2)FileInputStream and FileOutStream
7.2.1)FileInputStream:-
Java FileInputStream class obtains input bytes from a file. It is used for reading byte-oriented
data (streams of raw bytes) such as image data, audio, video etc. You can also read character-
stream data. But, for reading streams of characters, it is recommended to use FileReader
class.

JAVA NOTES SYMCA
Page 9 of 173
This stream is used for reading data from the files. Objects can be created using the
keyword new and there are several types of constructors available.
Following constructor takes a file name as a string to create an input stream object to read
the file −
InputStream f = new FileInputStream("C:/java/hello");
Following constructor takes a file object to create an input stream object to read the file.
First we create a file object using File() method as follows −
File f = new File("C:/java/hello");
InputStream f = new FileInputStream(f);
Java FileInputStream class declaration
Let's see the declaration for java.io.FileInputStream class:
1. public class FileInputStream extends InputStream
Java FileInputStream class methods
Method Description
int available() It is used to return the estimated number of bytes that can be read from the input stream.
int read() It is used to read the byte of data from the input stream.
int read(byte[] b) It is used to read up to b.length bytes of data from the input stream.
int read(byte[] b, int off, intlen)
It is used to read up to len bytes of data from the input stream.
long skip(long x) It is used to skip over and discards x bytes of data from the input stream.
FileChannelgetChannel() It is used to return the unique FileChannel object associated with the file input stream.
FileDescriptorgetFD() It is used to return the FileDescriptor object.
protected void finalize() It is used to ensure that the close method is call when there is no more reference to the file input stream.
void close() It is used to closes the stream.

JAVA NOTES SYMCA
Page 10 of 173
Java FileInputStream example 1: read single character
import java.io.FileInputStream; public class DataStreamExample { public static void main(String args[]){ try{ FileInputStream fin=new FileInputStream("D:\\testout.txt"); int i=fin.read(); System.out.print((char)i); fin.close(); }catch(Exception e){System.out.println(e);} } }
Note: Before running the code, a text file named as "testout.txt" is required to be created. In
this file, we are having following content:
Welcome to MCA
After executing the above program, you will get a single character from the file which is 87
(in byte form). To see the text, you need to convert it into character.
Output:
W
Java FileInputStream example 2: read all characters
package com.MCA;
import java.io.FileInputStream;
public class DataStreamExample {
public static void main(String args[]){
try{
FileInputStream fin=new FileInputStream("D:\\testout.txt");
int i=0;
while((i=fin.read())!=-1){
System.out.print((char)i);
}
fin.close();

JAVA NOTES SYMCA
Page 11 of 173
}catch(Exception e){System.out.println(e);}
}
}
Output:
Welcome to MCA
Once you have InputStream object in hand, then there is a list of helper methods which can
be used to read to stream or to do other operations on the stream.
Sr.No. Method & Description
1 public void close() throws IOException{} This method closes the file output stream. Releases any system resources associated with the file. Throws an IOException.
2
protected void finalize()throws IOException {} This method cleans up the connection to the file. Ensures that the close method of this file output stream is called when there are no more references to this stream. Throws an IOException.
3
public int read(int r)throws IOException{} This method reads the specified byte of data from the InputStream. Returns an int. Returns the next byte of data and -1 will be returned if it's the end of the file.
4
public int read(byte[] r) throws IOException{} This method reads r.length bytes from the input stream into an array. Returns the total number of bytes read. If it is the end of the file, -1 will be returned.
5 public int available() throws IOException{} Gives the number of bytes that can be read from this file input stream. Returns an int.
7.2.2) FileOutputStream
FileOutputStream is used to create a file and write data into it. The stream would
create a file, if it doesn't already exist, before opening it for output.
Java FileOutputStream is an output stream used for writing data to a file.
If you have to write primitive values into a file, use FileOutputStream class. You can
write byte-oriented as well as character-oriented data through FileOutputStream class.
But, for character-oriented data, it is preferred to use FileWriter than
FileOutputStream.
Here are two constructors which can be used to create a FileOutputStream object.

JAVA NOTES SYMCA
Page 12 of 173
Following constructor takes a file name as a string to create an input stream object to
write the file −
OutputStream f = new FileOutputStream("C:/java/hello")
Following constructor takes a file object to create an output stream object to write the
file. First, we create a file object using File() method as follows −
File f = new File("C:/java/hello");
OutputStream f = new FileOutputStream(f);
FileOutputStream class declaration
Let's see the declaration for Java.io.FileOutputStream class:
1. public class FileOutputStream extends OutputStream
FileOutputStream class methods
Method Description
protected void finalize() It is sued to clean up the connection with the file output stream.
void write(byte[] ary) It is used to write ary.length bytes from the byte array to the file output stream.
void write(byte[] ary, int off, intlen)
It is used to write len bytes from the byte array starting at offset off to the file output stream.
void write(int b) It is used to write the specified byte to the file output stream.
FileChannelgetChannel() It is used to return the file channel object associated with the file output stream.
FileDescriptorgetFD() It is used to return the file descriptor associated with the stream.
void close() It is used to closes the file output stream.
Java FileOutputStream Example 1: write byte
import java.io.FileOutputStream; public class FileOutputStreamExample { public static void main(String args[]){ try{ FileOutputStream fout=new FileOutputStream("D:\\testout.txt"); fout.write(65); fout.close();

JAVA NOTES SYMCA
Page 13 of 173
System.out.println("success..."); }catch(Exception e){System.out.println(e);} } }
Output:
Success...
The content of a text file testout.txt is set with the data A.
testout.txt
A
Java FileOutputStream example 2: write string
import java.io.FileOutputStream; public class FileOutputStreamExample { public static void main(String args[]){ try{ FileOutputStream fout=new FileOutputStream("D:\\testout.txt"); String s="Welcome to MCA."; byte b[]=s.getBytes();//converting string into byte array fout.write(b); fout.close(); System.out.println("success..."); }catch(Exception e){System.out.println(e);} } }
Output:
Success...
The content of a text file testout.txt is set with the data Welcome to MCA.
testout.txt
Welcome to MCA.
Once you have OutputStream object in hand, then there is a list of helper methods,
which can be used to write to stream or to do other operations on the stream.
Sr.No. Method & Description
1 public void close() throws IOException{} This method closes the file output stream. Releases any system resources associated with the file. Throws an IOException.

JAVA NOTES SYMCA
Page 14 of 173
2
protected void finalize()throws IOException {} This method cleans up the connection to the file. Ensures that the close method of this file output stream is called when there are no more references to this stream. Throws an IOException.
3 public void write(int w)throws IOException{} This methods writes the specified byte to the output stream.
4 public void write(byte[] w) Writes w.length bytes from the mentioned byte array to the OutputStream.
7.3) BINARY AND CHARACTER STREAMS:-
7.3.1) BINARY STREAM
Overview of binary stream
Binary Stream is led by two classes: InputStream and OutputStream. Following two
classes is a variety of affiliated classes. As for the balance of power, the relationship of binary
stream is more diverse and sophisticated than that of character stream. Regarding JDK1.5 in
binary stream, two classes, LineNumberInputStream and StringBufferInputStream, are
advised not to use because they are deprecated.

JAVA NOTES SYMCA
Page 15 of 173
Example
Following is the example to demonstrate Binary Stream forInputStream and OutputStream −
import java.io.*; publicclassfileStreamTest{ publicstaticvoid main(Stringargs[]){ try{ bytebWrite[]={11,21,3,40,5}; OutputStreamos=newFileOutputStream("test.txt"); for(int x =0; x <bWrite.length; x++){ os.write(bWrite[x]);// writes the bytes } os.close(); InputStreamis=newFileInputStream("test.txt"); int size =is.available(); for(inti=0;i< size;i++){ System.out.print((char)is.read()+" "); } is.close(); }catch(IOException e){ System.out.print("Exception"); } } }
The above code would create file test.txt and would write given numbers in binary format.
Same would be the output on the stdout screen.
7.3.2) CHARACTER STREAM
Java Byte streams are used to perform input and output of 8-bit bytes, whereas
Java Character streams are used to perform input and output for 16-bit unicode. Though
there are many classes related to character streams but the most frequently used classes
are, FileReader and FileWriter. Though internally FileReader uses FileInputStream and
FileWriter uses FileOutputStream but here the major difference is that FileReader reads two
bytes at a time and FileWriter writes two bytes at a time.
We can re-write the above example, which makes the use of these two classes to copy an
input file (having unicode characters) into an output file −
Example
import java.io.*; publicclassCopyFile{ publicstaticvoid main(Stringargs[])throwsIOException{

JAVA NOTES SYMCA
Page 16 of 173
FileReaderin=null; FileWriterout=null; try{ in=newFileReader("input.txt"); out=newFileWriter("output.txt"); int c; while((c =in.read())!=-1){ out.write(c); } }finally{ if(in!=null){ in.close(); } if(out!=null){ out.close(); } } } }
Now let's have a file input.txt with the following content −
This is test for copy file.
As a next step, compile the above program and execute it, which will result in creating
output.txt file with the same content as we have in input.txt. So let's put the above code in
CopyFile.java file and do the following −
$javac CopyFile.java
$java CopyFile
7.4)BUFFERED READER/WRITER
7.41) BUFFERED READER :-
Java BufferedReader class is used to read the text from a character-based input stream. It can
be used to read data line by line by readLine() method. It makes the performance fast. It
inherits Reader class.
The Java.io.BufferedReader class reads text from a character-input stream, buffering
characters so as to provide for the efficient reading of characters, arrays, and lines.Following
are the important points about BufferedReader −
The buffer size may be specified, or the default size may be used.
Each read request made of a Reader causes a corresponding read request to be made
of the underlying character or byte stream.

JAVA NOTES SYMCA
Page 17 of 173
Field
Following are the fields for Java.io.BufferedReader class −
protected Object lock − This is the object used to synchronize operations on this
stream.
Methods inherited
This class inherits methods from the following classes −
Java.io.Reader
Java.io.Object
Java BufferedReader class declaration
Let's see the declaration for Java.io.BufferedReader class:
1. public class BufferedReader extends Reader
Java BufferedReader class constructors
Constructor Description
BufferedReader(Reader rd) It is used to create a buffered character input stream that uses the default size for an input buffer.
BufferedReader(Reader rd, int size)
It is used to create a buffered character input stream that uses the specified size for an input buffer.
Java BufferedReader class methods
Method Description
int read() It is used for reading a single character.
int read(char[] cbuf, int off, intlen)
It is used for reading characters into a portion of an array.
booleanmarkSupported() It is used to test the input stream support for the mark and reset method.
String readLine() It is used for reading a line of text.
boolean ready() It is used to test whether the input stream is ready to be read.

JAVA NOTES SYMCA
Page 18 of 173
long skip(long n) It is used for skipping the characters.
void reset() It repositions the stream at a position the mark method was last called on this input stream.
void mark(intreadAheadLimit) It is used for marking the present position in a stream.
void close() It closes the input stream and releases any of the system resources associated with the stream.
Java BufferedReader Example
In this example, we are reading the data from the text file testout.txt using Java
BufferedReader class.
package com.MCA; import java.io.*; public class BufferedReaderExample { public static void main(String args[])throws Exception{ FileReader fr=new FileReader("D:\\testout.txt"); BufferedReader br=new BufferedReader(fr); int i; while((i=br.read())!=-1){ System.out.print((char)i); } br.close(); fr.close(); } }
Here, we are assuming that you have following data in "testout.txt" file:
Welcome to MCA.
Output:
Welcome to MCA.
Reading data from console by InputStreamReader and BufferedReader
In this example, we are connecting the BufferedReader stream with the InputStreamReader
stream for reading the line by line data from the keyboard.

JAVA NOTES SYMCA
Page 19 of 173
package com.MCA; import java.io.*; public class BufferedReaderExample{ public static void main(String args[])throws Exception{ InputStreamReader r=new InputStreamReader(System.in); BufferedReader br=new BufferedReader(r); System.out.println("Enter your name"); String name=br.readLine(); System.out.println("Welcome "+name); } }
Output:
Enter your name
Nakul Jain
Welcome Nakul Jain
Another example of reading data from console until user writes stop
In this example, we are reading and printing the data until the user prints stop.
package com.MCA; import java.io.*; public class BufferedReaderExample{ public static void main(String args[])throws Exception{ InputStreamReader r=new InputStreamReader(System.in); BufferedReader br=new BufferedReader(r); String name=""; while(!name.equals("stop")){ System.out.println("Enter data: "); name=br.readLine(); System.out.println("data is: "+name); } br.close(); r.close();

JAVA NOTES SYMCA
Page 20 of 173
} }
Output:
Enter data: Nakul
data is: Nakul
Enter data: 12
data is: 12
Enter data: stop
data is: stop
7.4.2)JAVA BUFFERED WRITER
Java BufferedWriter class is used to provide buffering for Writer instances. It makes the
performance fast. It inherits Writer class. The buffering characters are used for providing the
efficient writing of single arrays, characters, and strings.
The Java.io.BufferedWriter class writes text to a character-output stream, buffering
characters so as to provide for the efficient writing of single characters, arrays, and
strings.Following are the important points about BufferedWriter −
The buffer size may be specified, or the default size may be used.
A Writer sends its output immediately to the underlying character or byte stream.
Field
Following are the fields for Java.io.BufferedWriter class −
protected Object lock − This is the object used to synchronize operations on this
stream.
Methods inherited
This class inherits methods from the following classes −
Java.io.Writer
Java.io.Object
Class declaration
Let's see the declaration for Java.io.BufferedWriter class:
1. public class BufferedWriter extends Writer

JAVA NOTES SYMCA
Page 21 of 173
Class constructors
Constructor Description
BufferedWriter(Writer wrt) It is used to create a buffered character output stream that uses the default size for an output buffer.
BufferedWriter(Writer wrt, int size)
It is used to create a buffered character output stream that uses the specified size for an output buffer.
Class methods
Method Description
void newLine() It is used to add a new line by writing a line separator.
void write(int c) It is used to write a single character.
void write(char[] cbuf, int off, intlen) It is used to write a portion of an array of characters.
void write(String s, int off, intlen) It is used to write a portion of a string.
void flush() It is used to flushes the input stream.
void close() It is used to closes the input stream
Example of Java BufferedWriter
Let's see the simple example of writing the data to a text file testout.txt using Java
BufferedWriter.
package com.MCA; import java.io.*; public class BufferedWriterExample { public static void main(String[] args) throws Exception { FileWriter writer = new FileWriter("D:\\testout.txt"); BufferedWriter buffer = new BufferedWriter(writer); buffer.write("Welcome to MCA."); buffer.close(); System.out.println("Success"); } }
Output:
success
JAVA NOTES SYMCA
Page 22 of 173
testout.txt:
Welcome to MCA.
7.5) OBJECT SERIALIZATION IN JAVA
Serialization in java is a mechanism of writing the state of an object into a byte stream.
It is mainly used in Hibernate, RMI, JPA, EJB and JMS technologies.
Java provides a mechanism, called object serialization where an object can be represented as
a sequence of bytes that includes the object's data as well as information about the object's
type and the types of data stored in the object.
After a serialized object has been written into a file, it can be read from the file and
deserialized that is, the type information and bytes that represent the object and its data can
be used to recreate the object in memory.
Most impressive is that the entire process is JVM independent, meaning an object can be
serialized on one platform and deserialized on an entirely different platform.
Classes ObjectInputStream and ObjectOutputStream are high-level streams that contain
the methods for serializing and deserializing an object.
The ObjectOutputStream class contains many write methods for writing various data types,
but one method in particular stands out −
public final void writeObject(Object x) throws IOException
The above method serializes an Object and sends it to the output stream. Similarly, the
ObjectInputStream class contains the following method for deserializing an object −
public final Object readObject() throws IOException, ClassNotFoundException
This method retrieves the next Object out of the stream and deserializes it. The return value
is Object, so you will need to cast it to its appropriate data type.
To demonstrate how serialization works in Java, I am going to use the Employee class that
we discussed early on in the book. Suppose that we have the following Employee class,
which implements the Serializable interface −
Example
publicclassEmployeeimplementsjava.io.Serializable{
publicString name;
publicString address;
publictransientint SSN;

JAVA NOTES SYMCA
Page 23 of 173
publicint number;
publicvoidmailCheck(){
System.out.println("Mailing a check to "+ name +" "+ address);
}
}
Notice that for a class to be serialized successfully, two conditions must be met −
The class must implement the java.io.Serializable interface.
All of the fields in the class must be serializable. If a field is not serializable, it must
be marked transient.
If you are curious to know if a Java Standard Class is serializable or not, check the
documentation for the class. The test is simple: If the class implements java.io.Serializable,
then it is serializable; otherwise, it's not.
Serializing an Object
The ObjectOutputStream class is used to serialize an Object. The following SerializeDemo
program instantiates an Employee object and serializes it to a file.
When the program is done executing, a file named employee.ser is created. The program
does not generate any output, but study the code and try to determine what the program is
doing.
Note − When serializing an object to a file, the standard convention in Java is to give the file
a .ser extension.
Example
import java.io.*;
publicclassSerializeDemo{
publicstaticvoid main(String[]args){
Employee e =newEmployee();
e.name ="Reyan Ali";
e.address="PhokkaKuan, Ambehta Peer";
e.SSN=11122333;
e.number=101;
try{
FileOutputStreamfileOut=
newFileOutputStream("/tmp/employee.ser");
ObjectOutputStreamout=newObjectOutputStream(fileOut);
out.writeObject(e);
out.close();
fileOut.close();
System.out.printf("Serialized data is saved in /tmp/employee.ser");

JAVA NOTES SYMCA
Page 24 of 173
}catch(IOExceptioni){
i.printStackTrace();
}
}
}
Advantage of Java Serialization
It is mainly used to travel object's state on the network (known as marshaling).
java.io.Serializable interface
Serializable is a marker interface (has no data member and method). It is used to "mark" java classes so that objects of these classes may get certain capability. The Cloneable and Remote are also marker interfaces.
It must be implemented by the class whose object you want to persist.
The String class and all the wrapper classes implements java.io.Serializable interface by default.
Let's see the example given below:
import java.io.Serializable;
public class Student implements Serializable{
int id; String name;
public Student(int id, String name) {
this.id = id;
this.name = name; } }

JAVA NOTES SYMCA
Page 25 of 173
In the above example, Student class implements Serializable interface. Now its objects can be
converted into stream.
ObjectOutputStream class
The ObjectOutputStream class is used to write primitive data types and Java objects to an
OutputStream. Only objects that support the java.io.Serializable interface can be written to
streams.
Constructor
1) publicObjectOutputStream(OutputStream out) throws IOException {}creates an
ObjectOutputStream that writes to the specified OutputStream.
Important Methods
Method Description
1) public final void writeObject(Object obj) throws IOException {}
writes the specified object to the ObjectOutputStream.
2) public void flush() throws IOException {} flushes the current output stream.
3) public void close() throws IOException {} closes the current output stream.
Example of Java Serialization
In this example, we are going to serialize the object of Student class. The writeObject()
method of ObjectOutputStream class provides the functionality to serialize the object. We are
saving the state of the object in the file named f.txt.
1. import java.io.*;
2. class Persist{
3. public static void main(String args[])throws Exception{
4. Student s1 =new Student(211,"ravi");
5.
6. FileOutputStream fout=new FileOutputStream("f.txt");
7. ObjectOutputStream out=new ObjectOutputStream(fout);
8.
9. out.writeObject(s1);
10. out.flush();

JAVA NOTES SYMCA
Page 26 of 173
11. System.out.println("success");
12. }
13. }
success
7.6) DESERIALIZATION IN JAVA
Deserialization is the process of reconstructing the object from the serialized state.It is the
reverse operation of serialization.
The following DeserializeDemo program deserializes the Employee object created in the
SerializeDemo program. Study the program and try to determine its output −
Example
import java.io.*;
publicclassDeserializeDemo{
publicstaticvoid main(String[]args){
Employee e =null;
try{
FileInputStreamfileIn=newFileInputStream("/tmp/employee.ser");
ObjectInputStreamin=newObjectInputStream(fileIn);
e =(Employee)in.readObject();
in.close();
fileIn.close();
}catch(IOExceptioni){
i.printStackTrace();
return;
}catch(ClassNotFoundException c){
System.out.println("Employee class not found");
c.printStackTrace();
return;
}
System.out.println("Deserialized Employee...");
System.out.println("Name: "+ e.name);
System.out.println("Address: "+e.address);
System.out.println("SSN: "+e.SSN);
System.out.println("Number: "+e.number);
}
}
This will produce the following result −

JAVA NOTES SYMCA
Page 27 of 173
Output
Deserialized Employee...
Name: Reyan Ali
Address:PhokkaKuan, Ambehta Peer
SSN: 0
Number:101
Here are following important points to be noted −
The try/catch block tries to catch a ClassNotFoundException, which is declared by
the readObject() method. For a JVM to be able to deserialize an object, it must be
able to find the bytecode for the class. If the JVM can't find a class during the
deserialization of an object, it throws a ClassNotFoundException.
Notice that the return value of readObject() is cast to an Employee reference.
The value of the SSN field was 11122333 when the object was serialized, but because
the field is transient, this value was not sent to the output stream. The SSN field of
the deserialized Employee object is 0.
ObjectInputStream class
An ObjectInputStreamdeserializes objects and primitive data written using an
ObjectOutputStream.
Constructor
1) public ObjectInputStream(InputStream in)
throws IOException {}
creates an ObjectInputStream that reads from the specified InputStream.
Important Methods
Method Description
1) public final Object readObject() throws IOException, ClassNotFoundException{}
reads an object from the input stream.
2) public void close() throws IOException {} closesObjectInputStream.
Example of Java Deserialization
import java.io.*;
class Depersist{
public static void main(String args[])throws Exception{

JAVA NOTES SYMCA
Page 28 of 173
ObjectInputStream in=new ObjectInputStream(new FileInputStream("f.txt")); Student s=(Student)in.readObject();
System.out.println(s.id+" "+s.name); in.close(); } } Output :-
211 ravi
Java Serialization with Inheritance (IS-A Relationship)
If a class implements serializable then all its sub classes will also be serializable. Let's see the
example given below:
import java.io.Serializable;
class Person implements Serializable{
int id; String name;
Person(int id, String name) {
this.id = id;
this.name = name; } }
class Student extends Person{ String course;
int fee;
public Student(int id, String name, String course, int fee) {
super(id,name);
this.course=course;
this.fee=fee; } }
Now you can serialize the Student class object that extends the Person class which is
Serializable.Parent class properties are inherited to subclasses so if parent class is
Serializable, subclass would also be.
Java Serialization with Aggregation (HAS-A Relationship)
If a class has a reference of another class, all the references must be Serializable otherwise
serialization process will not be performed. In such case, NotSerializableException is thrown
at runtime.
class Address{ String addressLine,city,state;

JAVA NOTES SYMCA
Page 29 of 173
public Address(String addressLine, String city, String state) {
this.addressLine=addressLine;
this.city=city;
this.state=state; } }
import java.io.Serializable;
public class Student implements Serializable{
int id; String name;
Address address;//HAS-A
public Student(int id, String name) {
this.id = id;
this.name = name; } }
Since Address is not Serializable, you can not serialize the instance of Student class.
Note: All the objects within an object must be Serializable.
Java Serialization with static data member
If there is any static data member in a class, it will not be serialized because static is the part
of class not object.
class Employee implements Serializable{
int id; String name;
static String company="SSS IT Pvt Ltd";//it won't be serialized
public Student(int id, String name) {
this.id = id;
this.name = name; } }
Java Serialization with array or collection
Rule: In case of array or collection, all the objects of array or collection must be serializable.
If any object is not serialiizable, serialization will be failed.

JAVA NOTES SYMCA
Page 30 of 173

JAVA NOTES SYMCA
Page 31 of 173
UNIT 8
EVENT HANDLING AND GUI PROGRAMMING
Q.1) comparison of awt and swing
AWT Swing
AWT stands for Abstract windows toolkit. Swing is also called as JFC’s (Java Foundation classes).
AWT components are called Heavyweight component.
Swings are called light weight component because swing components sits on the top of AWT components and do the work.
AWT components require java.awt package. Swing components require javax.swing package.
AWT components are platform dependent. Swing components are made in purely java and they are platform independent.
This feature is not supported in AWT. We can have different look and feel in Swing.
These feature is not available in AWT. Swing has many advanced features like JTabel, Jtabbed pane which is not available in AWT. Also. Swing components are called "lightweight" because they do not require a native OS object to implement their functionality. JDialog and JFrame are heavyweight, because they do have a peer. So components like JButton, JTextArea, etc., are lightweight because they do not have an OS peer.
With AWT, you have 21 "peers" (one for each control and one for the dialog itself). A "peer" is a widget provided by the operating system, such as a button object or an entry field object.
With Swing, you would have only one peer, the operating system's window object. All of the buttons, entry fields, etc. are drawn by the Swing package on the drawing surface provided by the window object. This is the reason that Swing has more code. It has to draw the button or other control and implement its behavior instead of relying on the host operating system to perform those functions.
AWT is a thin layer of code on top of the OS. Swing is much larger. Swing also has very much richer functionality.
Using AWT, you have to implement a lot of things yourself.
Swing has them built in.

JAVA NOTES SYMCA
Page 32 of 173
Q.2) what is applet
An applet is a Java program that runs in a Web browser. An applet can be a fully functional Java application because it has the entire Java API at its disposal. There are some important differences between an applet and a standalone Java application, including the following −
An applet is a Java class that extends the java.applet.Applet class.
A main() method is not invoked on an applet, and an applet class will not define main().
Applets are designed to be embedded within an HTML page.
When a user views an HTML page that contains an applet, the code for the applet is downloaded to the user's machine.
A JVM is required to view an applet. The JVM can be either a plug-in of the Web browser or a separate runtime environment.
The JVM on the user's machine creates an instance of the applet class and invokes various methods during the applet's lifetime.
Applets have strict security rules that are enforced by the Web browser. The security of an applet is often referred to as sandbox security, comparing the applet to a child playing in a sandbox with various rules that must be followed.
Other classes that the applet needs can be downloaded in a single Java Archive (JAR) file.
Q.3) Applet Classes
The Applet Class
Every applet is an extension of the java.applet.Applet class. The base Applet class provides
methods that a derived Applet class may call to obtain information and services from the
browser context.
These include methods that do the following −
Get applet parameters
Get the network location of the HTML file that contains the applet
Get the network location of the applet class directory
Print a status message in the browser
Fetch an image
Fetch an audio clip
Play an audio clip
Resize the applet
Additionally, the Applet class provides an interface by which the viewer or browser obtains
information about the applet and controls the applet's execution. The viewer may −
Request information about the author, version, and copyright of the applet
Request a description of the parameters the applet recognizes
Initialize the applet
Destroy the applet
Start the applet's execution
Stop the applet's execution
The Applet class provides default implementations of each of these methods. Those
implementations may be overridden as necessary.

JAVA NOTES SYMCA
Page 33 of 173
The "Hello, World" applet is complete as it stands. The only method overridden is the paint
method.
Q.4) Applet API hierarchy
The AWT allows us to use various graphical components. When we start writing any applet
program we essentially import two packages namely - java.awt and java.applet.
The java.applet package contains a class Applet which uses various interfaces such as
AppletContext, AppletStub and AudioCIip. The applet class is an extension of Panel class
belonging to java.awt package.
To create an user friendly graphical interface we need to place various components on GUI
window. There is a Component class from java.awt package which derives several classes for
components. These classed include Check box, Choice, List, buttons and so on. The
Component class in java.awt is an abstract class.
The class hierarchy for Applets is as shown in Fig.
Q.5) Explain Applet Life Cycle
Java applet inherits features from the class Applet. Thus, whenever an applet is created, it
undergoes a series of changes from initialization to destruction. Various stages of
an applet life cycle are depicted in the figure below:

JAVA NOTES SYMCA
Page 34 of 173
Initial State
When a new applet is born or created, it is activated by calling init() method. At this stage,
new objects to the applet are created, initial values are set, images are loaded and the colors
of the images are set. An applet is initialized only once in its lifetime. It's general form is:
public void init( ) //Action to be performed }
Running State
An applet achieves the running state when the system calls the start() method. This occurs as
soon as the applet is initialized. An applet may also start when it is in idle state. At that time,
the start() method is overridden. It's general form is:
public void start( )
{
//Action to be performed
}
Idle State
An applet comes in idle state when its execution has been stopped either implicitly or
explicitly. An applet is implicitly stopped when we leave the page containing the currently
running applet. An applet is explicitly stopped when we call stop() method to stop its
execution. It's general form is:
public void stope
{
//Action to be performed

JAVA NOTES SYMCA
Page 35 of 173
}
Dead State
An applet is in dead state when it has been removed from the memory. This can be done by
using destroy() method. It's general form is:
public void destroy( )
{
//Action to be performed
}
Apart from the above stages, Java applet also possess paint( ) method. This method helps in
drawing, writing and creating colored backgrounds of the applet. It takes an argument of the
graphics class. To use The graphics, it imports the package java.awt.Graphics
Example:
1st Program: Applet program – LifeTest.java
importjava.awt.Graphics;
importjava.applet.Applet;
public class LifeTest extends Applet
{
public void init()
{
System.out.println("init(): applet started");
}
public void start()
{
System.out.println("start(): applet activated");
}
public void paint(Graphics g)
{
System.out.println("paint(): applet running");
}
public void stop()
{
System.out.println("stop(): applet inactivated ");
}
public void destroy()
{
System.out.println("destroy(): applet destroyed");
}
}
2nd Program: HTML Program – Life.html

JAVA NOTES SYMCA
Page 36 of 173
<applet code="LifeTest.class" width="250" height="125">
</applet>
Screenshot of Life.html of Applet Life Cycle
Q.6)Explain Java’s delegation event model
The event model is based on the Event Source and Event Listeners. Event Listener is an
object that receives the messages / events. The Event Source is any object which creates the
message / event. The Event Delegation model is based on – The Event Classes, The Event
Listeners, Event Objects.
There are three participants in event delegation model in Java;
- Event Source – the class which broadcasts the events
- Event Listeners – the classes which receive notifications of events
- Event Object – the class object which describes the event.
An event occurs (like mouse click, key press, etc) which is followed by the event is
broadcasted by the event source by invoking an agreed method on all event listeners. The
event object is passed as argument to the agreed-upon method. Later the event listeners
respond as they fit, like submit a form, displaying a message / alert etc.
Q.7) Event handling mechanisms
What is an Event?
Change in the state of an object is known as event i.e. event describes the change in state of source. Events are generated as result of user interaction with the graphical user interface components. For example, clicking on a button, moving the mouse, entering a character through keyboard,selecting an item from list, scrolling the page are the activities that causes an event to happen.
Types of Event
The events can be broadly classified into two categories:
Foreground Events - Those events which require the direct interaction of user.They
are generated as consequences of a person interacting with the graphical components

JAVA NOTES SYMCA
Page 37 of 173
in Graphical User Interface. For example, clicking on a button, moving the mouse,
entering a character through keyboard,selecting an item from list, scrolling the page
etc.
Background Events - Those events that require the interaction of end user are
known as background events. Operating system interrupts, hardware or software
failure, timer expires, an operation completion are the example of background
events.
What is Event Handling?
Event Handling is the mechanism that controls the event and decides what should happen if
an event occurs. This mechanism have the code which is known as event handler that is
executed when an event occurs. Java Uses the Delegation Event Model to handle the events.
This model defines the standard mechanism to generate and handle the events.Let's have a
brief introduction to this model.
The Delegation Event Model has the following key participants namely:
Source - The source is an object on which event occurs. Source is responsible for
providing information of the occurred event to it's handler. Java provide as with
classes for source object.
Listener - It is also known as event handler.Listener is responsible for generating
response to an event. From java implementation point of view the listener is also an
object. Listener waits until it receives an event. Once the event is received , the
listener process the event an then returns.
The benefit of this approach is that the user interface logic is completely separated from the
logic that generates the event. The user interface element is able to delegate the processing
of an event to the separate piece of code. In this model ,Listener needs to be registered with
the source object so that the listener can receive the event notification. This is an efficient
way of handling the event because the event notifications are sent only to those listener that
want to receive them.
Steps involved in event handling
The User clicks the button and the event is generated.
Now the object of concerned event class is created automatically and information
about the source and the event get populated with in same object.
Event object is forwarded to the method of registered listener class.

JAVA NOTES SYMCA
Page 38 of 173
the method is now get executed and returns.
Points to remember about listener
In order to design a listener class we have to develop some listener interfaces.These
Listener interfaces forecast some public abstract callback methods which must be
implemented by the listener class.
If you do not implement the any if the predefined interfaces then your class can not
act as a listener class for a source object.
Callback Methods
These are the methods that are provided by API provider and are defined by the application
programmer and invoked by the application developer. Here the callback methods represents
an event method. In response to an event java jre will fire callback method. All such
callback methods are provided in listener interfaces.
If a component wants some listener will listen to it's events the the source must register itself
to the listener.
Example of Event Handling
importjava.awt.*;
importjava.awt.event.*;
importjava.applet.*;
importjava.applet.*;
importjava.awt.event.*;
importjava.awt.*;
public class Test extends Applet implements KeyListener
{
String msg="";
public void init()
{
addKeyListener(this);
}
public void keyPressed(KeyEvent k)
{
showStatus("KeyPressed");
}
public void keyReleased(KeyEvent k)
{
showStatus("KeyRealesed");
}
public void keyTyped(KeyEvent k)
{
msg = msg+k.getKeyChar();

JAVA NOTES SYMCA
Page 39 of 173
repaint();
}
public void paint(Graphics g)
{
g.drawString(msg, 20, 40);
}
}
HTML code :
<applet code="Test" width=300, height=100 >
Q.8) Swing components
A component is an independent visual control. Swing Framework contains a large set of
components which provide rich functionalities and allow high level of customization. They
all are derived from JComponent class. All these components are lightweight components.
This class provides some common functionality like pluggable look and feel, support for
accessibility, drag and drop, layout, etc.
A container holds a group of components. It provides a space where a component can be
managed and displayed. Containers are of two types:
1. Top level Containers
o It inherits Component and Container of AWT.
o It cannot be contained within other containers.
o Heavyweight.
o Example: JFrame, JDialog, JApplet
2. Lightweight Containers
o It inherits JComponent class.
o It is a general purpose container.
o It can be used to organize related components together.

JAVA NOTES SYMCA
Page 40 of 173
o Example: JPanel
JButton
JButton class provides functionality of a button. JButton class has three constuctors,
JButton(Icon ic)
JButton(String str)
JButton(String str, Icon ic)
It allows a button to be created using icon, a string or both. JButton supports ActionEvent.
When a button is pressed an ActionEvent is generated.
Example using JButton
importjavax.swing.*;
importjava.awt.event.*;
importjava.awt.*;
public class testswingextendsJFrame
{
testswing()
{
JButton bt1 = new JButton("Yes"); //Creating a Yes Button.
JButton bt2 = new JButton("No"); //Creating a No Button.
setDefaultCloseOperation(JFrame.EXIT_ON_CLOSE) //setting close operation.
setLayout(new FlowLayout()); //setting layout using FlowLayout object
setSize(400, 400); //setting size of Jframe
add(bt1); //adding Yes button to frame.
add(bt2); //adding No button to frame.
setVisible(true);
}
public static void main(String[] args)
{
newtestswing();
}
}

JAVA NOTES SYMCA
Page 41 of 173
JTextField
JTextField is used for taking input of single line of text. It is most widely used text
component. It has three constructors,
JTextField(intcols)
JTextField(String str, intcols)
JTextField(String str)
cols represent the number of columns in text field.
Example using JTextField
importjavax.swing.*;
importjava.awt.event.*;
importjava.awt.*;
public class MyTextFieldextendsJFrame
{
publicMyTextField()
{
JTextFieldjtf = new JTextField(20); //creating JTextField.
add(jtf); //adding JTextField to frame.
setLayout(new FlowLayout());
setDefaultCloseOperation(JFrame.EXIT_ON_CLOSE);
setSize(400, 400);
setVisible(true);
}
public static void main(String[] args)
{
newMyTextField();
}
}

JAVA NOTES SYMCA
Page 42 of 173
JCheckBox
JCheckBox class is used to create checkboxes in frame. Following is constructor for
JCheckBox,
JCheckBox(String str)
Example using JCheckBox
importjavax.swing.*;
importjava.awt.event.*;
importjava.awt.*;
public class Test extendsJFrame
{
public Test()
{
JCheckBoxjcb = new JCheckBox("yes"); //creating JCheckBox.
add(jcb); //adding JCheckBox to frame.
jcb = new JCheckBox("no"); //creating JCheckBox.
add(jcb); //adding JCheckBox to frame.
jcb = new JCheckBox("maybe"); //creating JCheckBox.
add(jcb); //adding JCheckBox to frame.
setLayout(new FlowLayout());
setDefaultCloseOperation(JFrame.EXIT_ON_CLOSE);
setSize(400, 400);
setVisible(true);
}
public static void main(String[] args)
{
new Test();
}
}

JAVA NOTES SYMCA
Page 43 of 173
JRadioButton
Radio button is a group of related button in which only one can be selected. JRadioButton
class is used to create a radio button in Frames. Following is the constructor for
JRadioButton,
JRadioButton(String str)
Example using JRadioButton
importjavax.swing.*;
importjava.awt.event.*;
importjava.awt.*;
public class Test extendsJFrame
{
public Test()
{
JRadioButtonjcb = new JRadioButton("A"); //creating JRadioButton.
add(jcb); //adding JRadioButton to frame.
jcb = new JRadioButton("B"); //creating JRadioButton.
add(jcb); //adding JRadioButton to frame.
jcb = new JRadioButton("C"); //creating JRadioButton.
add(jcb); //adding JRadioButton to frame.
jcb = new JRadioButton("none");
add(jcb);
setLayout(new FlowLayout());
setDefaultCloseOperation(JFrame.EXIT_ON_CLOSE);
setSize(400, 400);
setVisible(true);
}
public static void main(String[] args)
{
new Test();
}
}

JAVA NOTES SYMCA
Page 44 of 173
JComboBox
Combo box is a combination of text fields and drop-down list.JComboBox component is
used to create a combo box in Swing. Following is the constructor for JComboBox,
JComboBox(String arr[])
Example using JComboBox
importjavax.swing.*;
importjava.awt.event.*;
importjava.awt.*;
public class Test extendsJFrame
{
String name[] = {"Abhi","Adam","Alex","Ashkay"}; //list of name.
public Test()
{
JComboBoxjc = new JComboBox(name); //initialzing combo box with list of name.
add(jc); //adding JComboBox to frame.
setLayout(new FlowLayout());
setDefaultCloseOperation(JFrame.EXIT_ON_CLOSE);
setSize(400, 400);
setVisible(true);
}
public static void main(String[] args)
{
new Test();
}
}

JAVA NOTES SYMCA
Page 45 of 173
Q.9) Swing Component Hierarchy- Basic and Advanced Components// not sure
The hierarchy of java swing API is given below.
Swing components and container objects
In Java, a component is the basic user interface object and is found in all Java applications. Components include lists, buttons, panels, and windows. To use components, you need to place them in a container.
A container is a component that holds and manages other components. Containers display components using a layout manager.
Swing components inherit from the javax.Swing.JComponent class, which is the root of the Swing component hierarchy. JComponent, in turn, inherits from the Container class in the Abstract Windowing Toolkit (AWT). So Swing is based on classes inherited from AWT.
Swing provides the following useful top-level containers, all of which inherit from JComponent:

JAVA NOTES SYMCA
Page 46 of 173
JWindow
JWindow is a top-level window that doesn't have any trimmings and can be displayed
anywhere on a desktop. JWindow is a heavyweight component. You usually
use JWindow to create pop-up windows and "splash" screens. JWindow extends
AWT's Window class.
JFrame
JFrame is a top-level window that can contain borders and menu bars. JFrame is a
subclass of JWindow and is thus a heavyweight component. You place a JFrame on
a JWindow. JFrame extends AWT's Frame class.
JDialog
JDialog is a lightweight component that you use to create dialog windows. You can
place dialog windows on a JFrame or JApplet. JDialog extends AWT's Dialog class.
JApplet
JApplet is a container that provides the basis for applets that run within web
browsers. JApplet is a lightweight component that can contain other graphical user
interface (GUI) components. JApplet extends AWT's Applet class.
All Swing components - including the JApplet and JDialog containers - need to be contained
at some level inside a JWindow or JFrame.
Each top-level container depends on another intermediate container called the root, which
provides a number of components to each.

JAVA NOTES SYMCA
Page 47 of 173
JApplet is the root container for Swing applets and JFrame is the root container for a
standalone GUI application.
Once you've created a root container, you can add components and other containers to it
JComponent services
JComponent is the root class for all Swing components such as JPanel, JLabel, and JButton.
This class inherits from the Container class and enables you to add containers and
components to an application.
The JComponent class provides the following functionality features to its subclasses:
Customizing component appearance
Checking component states
Adding event handling
Painting components
Modifying the containment hierarchy
Arranging the layout of components
Retrieving component size and position information
TextComponent Printing
Customizing component appearance
You can change the appearance of a component by setting the border, foreground
color, background color, font, and a cursor to display when moving over the
component.
The most commonly used methods to change the appearance of a component include
the setForeground and setBackground methods, which enable you to set the colors for
a component.
The setForeground method sets the color for a component's text and
the setBackground method sets the color for the background areas of a component.
You can also set a component to be opaque.
JAVA NOTES SYMCA
Page 48 of 173
For example, consider the code used to change the background color of a JLabel -
called label - to black.
The code to change the background color of a label is
label.setBackground(Color.black);
Checking component states
The JComponent class enables you to determine the state of components.
You can add tooltips and specify names for components, using
the setToolTipText and setName methods, respectively.
You can also use the isEnabled method to check whether a component is enabled to
generate events from user input.
You can set a component to be visible using the setVisible method.
You can also determine whether a component is visible onscreen by using
the isShowing method.
Q.10) JApplet
Definition - What does JApplet mean?
JApplet is a java swing public class designed for developers usually written in Java. JApplet
is generally in the form of Java bytecode that runs with the help of a Java virtual machine
(JVM) or Applet viewer from Sun Microsystems. It was first introduced in 1995.
JApplet can also be written in other programming languages and can later be compiled to
Java byte code.
Java applets can be executed on multiple platforms which include Microsoft Windows,
UNIX, Mac OS and Linux. JApplet can also be run as an application, though this would
require a little extra coding. The executable applet is made available on a domain from which
it needs to be downloaded. The communication of the applet is restricted only to this
particular domain.
JApplet extends the class in the form of java.applet.Applet. JApplets are executed in a
tightly-controlled set of resources referred to as sandboxes. This prevents the JApplets from
accessing local data like the clipboard or file system.
The first JApplet implementations were performed by downloading an applet class by class.
Classes contain many small files and so applets were considered to be slow loading
components. Since the introduction of the Java Archive (or simply JAR file), an applet is
aggregated and sent as a single, but larger file.

JAVA NOTES SYMCA
Page 49 of 173
Example of EventHandling in JApplet:
import java.applet.*;
import javax.swing.*;
import java.awt.event.*;
public class EventJApplet extends JApplet implements ActionListener{ JButton b; JTextField tf;
public void init(){
tf=new JTextField();
tf.setBounds(30,40,150,20);
b=new JButton("Click");
b.setBounds(80,150,70,40); add(b);add(tf);
b.addActionListener(this);
setLayout(null); }
public void actionPerformed(ActionEvent e){
tf.setText("Welcome"); } }
In the above example, we have created all the controls in init() method because it is
invoked only once.
myapplet.html
<html> <body>
<applet code="EventJApplet.class" width="300" height="300"> </applet> </body> </html>

JAVA NOTES SYMCA
Page 50 of 173
Q.11) Layout managers
Introduction
Layout means the arrangement of components within the container. In other way we can say
that placing the components at a particular position within the container. The task of
layouting the controls is done automatically by the Layout Manager.
Layout Manager
The layout manager automatically positions all the components within the container. If we
do not use layout manager then also the components are positioned by the default layout
manager. It is possible to layout the controls by hand but it becomes very difficult because
of the following two reasons.
It is very tedious to handle a large number of controls within the container.
Oftenly the width and height information of a component is not given when we need
to arrange them.
Java provide us with various layout manager to position the controls. The properties like
size,shape and arrangement varies from one layout manager to other layout manager. When
the size of the applet or the application window changes the size, shape and arrangement of
the components also changes in response i.e. the layout managers adapt to the dimensions of
appletviewer or the application window.
The layout manager is associated with every Container object. Each layout manager is an
object of the class that implements the LayoutManager interface.
Java LayoutManagers
The LayoutManagers are used to arrange components in a particular manner. LayoutManager
is an interface that is implemented by all the classes of layout managers. There are following
classes that represents the layout managers:
1. java.awt.BorderLayout 2. java.awt.FlowLayout 3. java.awt.GridLayout 4. java.awt.CardLayout 5. java.awt.GridBagLayout 6. javax.swing.BoxLayout 7. javax.swing.GroupLayout 8. javax.swing.ScrollPaneLayout 9. javax.swing.SpringLayout etc.

JAVA NOTES SYMCA
Page 51 of 173
Java BorderLayout
The BorderLayout is used to arrange the components in five regions: north, south, east, west
and center. Each region (area) may contain one component only. It is the default layout of
frame or window. The BorderLayout provides five constants for each region:
1. public static final int NORTH
2. public static final int SOUTH
3. public static final int EAST
4. public static final int WEST
5. public static final int CENTER
Constructors of BorderLayout class:
o BorderLayout(): creates a border layout but with no gaps between the components.
o JBorderLayout(inthgap, intvgap): creates a border layout with the given horizontal
and vertical gaps between the components.
Example of BorderLayout class:
import java.awt.*; import javax.swing.*; public class Border { JFrame f; Border(){ f=new JFrame(); JButton b1=new JButton("NORTH");; JButton b2=new JButton("SOUTH");; JButton b3=new JButton("EAST");;

JAVA NOTES SYMCA
Page 52 of 173
JButton b4=new JButton("WEST");; JButton b5=new JButton("CENTER");; f.add(b1,BorderLayout.NORTH); f.add(b2,BorderLayout.SOUTH); f.add(b3,BorderLayout.EAST); f.add(b4,BorderLayout.WEST); f.add(b5,BorderLayout.CENTER); f.setSize(300,300); f.setVisible(true); } public static void main(String[] args) { new Border(); } }
Java GridLayout
The GridLayout is used to arrange the components in rectangular grid. One component is
displayed in each rectangle.
Constructors of GridLayout class
1. GridLayout(): creates a grid layout with one column per component in a row.
2. GridLayout(int rows, int columns): creates a grid layout with the given rows and
columns but no gaps between the components.
3. GridLayout(int rows, int columns, inthgap, intvgap): creates a grid layout with the
given rows and columns alongwith given horizontal and vertical gaps.
Example of GridLayout class

JAVA NOTES SYMCA
Page 53 of 173
import java.awt.*; import javax.swing.*; public class MyGridLayout{ JFrame f; MyGridLayout(){ f=new JFrame(); JButton b1=new JButton("1"); JButton b2=new JButton("2"); JButton b3=new JButton("3"); JButton b4=new JButton("4"); JButton b5=new JButton("5"); JButton b6=new JButton("6"); JButton b7=new JButton("7"); JButton b8=new JButton("8"); JButton b9=new JButton("9"); f.add(b1);f.add(b2);f.add(b3);f.add(b4);f.add(b5); f.add(b6);f.add(b7);f.add(b8);f.add(b9); f.setLayout(new GridLayout(3,3)); //setting grid layout of 3 rows and 3 columns f.setSize(300,300); f.setVisible(true); } public static void main(String[] args) { new MyGridLayout(); } }
Java FlowLayout
The FlowLayout is used to arrange the components in a line, one after another (in a flow). It
is the default layout of applet or panel.
Fields of FlowLayout class
1. public static final int LEFT
2. public static final int RIGHT
3. public static final int CENTER
4. public static final int LEADING
5. public static final int TRAILING
Constructors of FlowLayout class

JAVA NOTES SYMCA
Page 54 of 173
1. FlowLayout(): creates a flow layout with centered alignment and a default 5 unit
horizontal and vertical gap.
2. FlowLayout(int align): creates a flow layout with the given alignment and a default
5 unit horizontal and vertical gap.
3. FlowLayout(int align, inthgap, intvgap): creates a flow layout with the given
alignment and the given horizontal and vertical gap.
Example of FlowLayout class
import java.awt.*; import javax.swing.*; public class MyFlowLayout{ JFrame f; MyFlowLayout(){ f=new JFrame(); JButton b1=new JButton("1"); JButton b2=new JButton("2"); JButton b3=new JButton("3"); JButton b4=new JButton("4"); JButton b5=new JButton("5"); f.add(b1);f.add(b2);f.add(b3);f.add(b4);f.add(b5); f.setLayout(new FlowLayout(FlowLayout.RIGHT)); //setting flow layout of right alignment f.setSize(300,300); f.setVisible(true); } public static void main(String[] args) { new MyFlowLayout(); }

JAVA NOTES SYMCA
Page 55 of 173
}
Java BoxLayout
The BoxLayout is used to arrange the components either vertically or horizontally. For this
purpose, BoxLayout provides four constants. They are as follows:
Fields of BoxLayout class
1. public static final int X_AXIS
2. public static final int Y_AXIS 3. public static final int LINE_AXIS 4. public static final int PAGE_AXIS
Constructor of BoxLayout class
1. BoxLayout(Container c, int axis): creates a box layout that arranges the components
with the given axis.
Example of BoxLayout class with Y-AXIS:
import java.awt.*; import javax.swing.*; public class BoxLayoutExample1 extends Frame { Button buttons[]; public BoxLayoutExample1 () { buttons = new Button [5]; for (int i = 0;i<5;i++) { buttons[i] = new Button ("Button " + (i + 1));

JAVA NOTES SYMCA
Page 56 of 173
add (buttons[i]); } setLayout (new BoxLayout (this, BoxLayout.Y_AXIS)); setSize(400,400); setVisible(true); } public static void main(String args[]){ BoxLayoutExample1 b=new BoxLayoutExample1(); } }
Example of BoxLayout class with X-AXIS
import java.awt.*; import javax.swing.*; public class BoxLayoutExample2 extends Frame { Button buttons[]; public BoxLayoutExample2() { buttons = new Button [5]; for (int i = 0;i<5;i++) { buttons[i] = new Button ("Button " + (i + 1)); add (buttons[i]); } setLayout (new BoxLayout(this, BoxLayout.X_AXIS)); setSize(400,400); setVisible(true); } public static void main(String args[]){ BoxLayoutExample2 b=new BoxLayoutExample2();
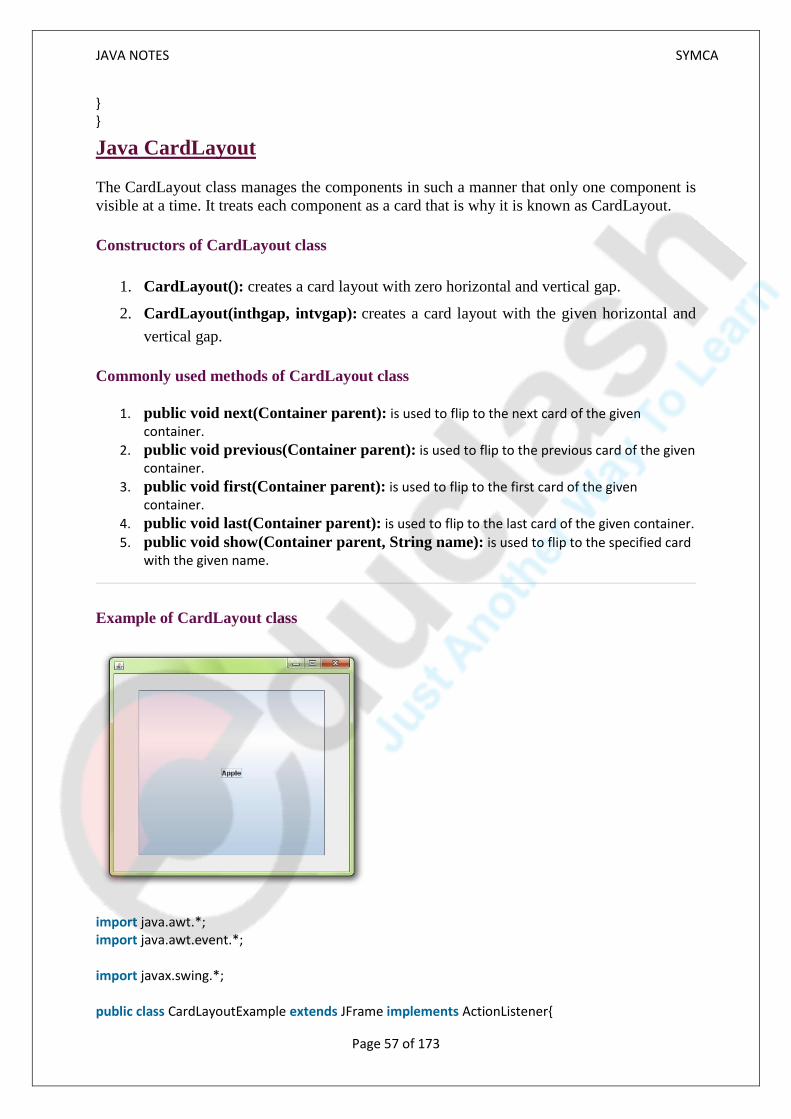
JAVA NOTES SYMCA
Page 57 of 173
} }
Java CardLayout
The CardLayout class manages the components in such a manner that only one component is
visible at a time. It treats each component as a card that is why it is known as CardLayout.
Constructors of CardLayout class
1. CardLayout(): creates a card layout with zero horizontal and vertical gap.
2. CardLayout(inthgap, intvgap): creates a card layout with the given horizontal and
vertical gap.
Commonly used methods of CardLayout class
1. public void next(Container parent): is used to flip to the next card of the given container.
2. public void previous(Container parent): is used to flip to the previous card of the given container.
3. public void first(Container parent): is used to flip to the first card of the given container.
4. public void last(Container parent): is used to flip to the last card of the given container.
5. public void show(Container parent, String name): is used to flip to the specified card with the given name.
Example of CardLayout class
import java.awt.*; import java.awt.event.*; import javax.swing.*; public class CardLayoutExample extends JFrame implements ActionListener{

JAVA NOTES SYMCA
Page 58 of 173
CardLayout card; JButton b1,b2,b3; Container c; CardLayoutExample(){ c=getContentPane(); card=new CardLayout(40,30); //create CardLayout object with 40 hor space and 30 ver space c.setLayout(card); b1=new JButton("Apple"); b2=new JButton("Boy"); b3=new JButton("Cat"); b1.addActionListener(this); b2.addActionListener(this); b3.addActionListener(this); c.add("a",b1);c.add("b",b2);c.add("c",b3); } public void actionPerformed(ActionEvent e) { card.next(c); } public static void main(String[] args) { CardLayoutExample cl=new CardLayoutExample(); cl.setSize(400,400); cl.setVisible(true); cl.setDefaultCloseOperation(EXIT_ON_CLOSE); } }
Q.12) Java Adapter Classes
Adapter class Listener interface
WindowAdapter WindowListener
KeyAdapter KeyListener
MouseAdapter MouseListener
MouseMotionAdapter MouseMotionListener
FocusAdapter FocusListener
JAVA NOTES SYMCA
Page 59 of 173
java.awt.event Adapter classes
Java adapter classes provide the default implementation of listener interfaces. If you inherit
the adapter class, you will not be forced to provide the implementation of all the methods of
listener interfaces. So it saves code.
The adapter classes are found
in java.awt.event, java.awt.dnd and javax.swing.event packages. The Adapter classes with
their corresponding listener interfaces are given below.
java.awt.dnd Adapter classes
Adapter class Listener interface
DragSourceAdapter DragSourceListener
DragTargetAdapter DragTargetListener
javax.swing.event Adapter classes
Adapter class Listener interface
MouseInputAdapter MouseInputListener
InternalFrameAdapter InternalFrameListener
Java WindowAdapter Example import java.awt.*; import java.awt.event.*; public class AdapterExample{ Frame f; AdapterExample(){ f=new Frame("Window Adapter"); f.addWindowListener(new WindowAdapter(){ public void windowClosing(WindowEvent e) { f.dispose(); } }); f.setSize(400,400);
ComponentAdapter ComponentListener
ContainerAdapter ContainerListener
HierarchyBoundsAdapter HierarchyBoundsListener

JAVA NOTES SYMCA
Page 60 of 173
f.setLayout(null); f.setVisible(true); } public static void main(String[] args) { new AdapterExample(); } }
Output:
Java MouseAdapter Example
import java.awt.*;
import java.awt.event.*;
public class MouseAdapterExample extends MouseAdapter{ Frame f; MouseAdapterExample(){
f=new Frame("Mouse Adapter");
f.addMouseListener(this);
f.setSize(300,300);
f.setLayout(null);
f.setVisible(true); }
public void mouseClicked(MouseEvent e) { Graphics g=f.getGraphics(); g.setColor(Color.BLUE);
g.fillOval(e.getX(),e.getY(),30,30); }
public static void main(String[] args) {
new MouseAdapterExample(); } }

JAVA NOTES SYMCA
Page 61 of 173
Output:
Java MouseMotionAdapter Example
import java.awt.*;
import java.awt.event.*;
public class MouseMotionAdapterExample extends MouseMotionAdapter{ Frame f; MouseMotionAdapterExample(){
f=new Frame("Mouse Motion Adapter");
f.addMouseMotionListener(this);
f.setSize(300,300);
f.setLayout(null);
f.setVisible(true); }
public void mouseDragged(MouseEvent e) { Graphics g=f.getGraphics(); g.setColor(Color.ORANGE);
g.fillOval(e.getX(),e.getY(),20,20); }
public static void main(String[] args) {
new MouseMotionAdapterExample(); } }
Output:
Java KeyAdapter Example
import java.awt.*;

JAVA NOTES SYMCA
Page 62 of 173
import java.awt.event.*;
public class KeyAdapterExample extends KeyAdapter{ Label l; TextArea area; Frame f; KeyAdapterExample(){
f=new Frame("Key Adapter");
l=new Label();
l.setBounds(20,50,200,20);
area=new TextArea();
area.setBounds(20,80,300, 300);
area.addKeyListener(this); f.add(l);f.add(area);
f.setSize(400,400);
f.setLayout(null);
f.setVisible(true); }
public void keyReleased(KeyEvent e) { String text=area.getText();
String words[]=text.split("\\s");
l.setText("Words: "+words.length+" Characters:"+text.length()); }
public static void main(String[] args) {
new KeyAdapterExample(); } }
Output:

JAVA NOTES SYMCA
Page 63 of 173
Q) Inner class.
Nested Classes
In Java, just like methods, variables of a class too can have another class as its member.
Writing a class within another is allowed in Java. The class written within is called
the nested class, and the class that holds the inner class is called the outer class.
Syntax
Following is the syntax to write a nested class. Here, the class Outer_Demois the outer class
and the class Inner_Demo is the nested class.
classOuter_Demo {
classNested_Demo {
}
}
Nested classes are divided into two types −
Non-static nested classes − These are the non-static members of a class.
Static nested classes − These are the static members of a class.
Inner Classes (Non-static Nested Classes)
Inner classes are a security mechanism in Java. We know a class cannot be associated with
the access modifier private, but if we have the class as a member of other class, then the
inner class can be made private. And this is also used to access the private members of a
class.
Inner classes are of three types depending on how and where you define them. They are −

JAVA NOTES SYMCA
Page 64 of 173
Inner Class
Method-local Inner Class
Anonymous Inner Class
Inner Class
Creating an inner class is quite simple. You just need to write a class within a class. Unlike a
class, an inner class can be private and once you declare an inner class private, it cannot be
accessed from an object outside the class.
Following is the program to create an inner class and access it. In the given example, we
make the inner class private and access the class through a method.
Example
classOuter_Demo{
intnum;
// inner class
privateclassInner_Demo{
publicvoidprint(){
System.out.println("This is an inner class");
}
}
// Accessing he inner class from the method within
voiddisplay_Inner(){
Inner_Demo inner =newInner_Demo();
inner.print();
}
}
publicclassMy_class{
publicstaticvoid main(Stringargs[]){
// Instantiating the outer class
Outer_Demo outer =newOuter_Demo();
// Accessing the display_Inner() method.
outer.display_Inner();
}
}
Here you can observe that Outer_Demo is the outer class, Inner_Demo is the inner
class, display_Inner() is the method inside which we are instantiating the inner class, and
this method is invoked from the mainmethod.

JAVA NOTES SYMCA
Page 65 of 173
If you compile and execute the above program, you will get the following result −
Output
This is an inner class.
Static Nested Class
A static inner class is a nested class which is a static member of the outer class. It can be
accessed without instantiating the outer class, using other static members. Just like static
members, a static nested class does not have access to the instance variables and methods of
the outer class. The syntax of static nested class is as follows −
Syntax
classMyOuter {
static class Nested_Demo {
}
}
Instantiating a static nested class is a bit different from instantiating an inner class. The
following program shows how to use a static nested class.
Example
publicclassOuter{
staticclassNested_Demo{
publicvoidmy_method(){
System.out.println("This is my nested class");
}
}
publicstaticvoid main(Stringargs[]){
Outer.Nested_Demo nested =newOuter.Nested_Demo();
nested.my_method();
}
}
If you compile and execute the above program, you will get the following result −
Output
This is my nested class

JAVA NOTES SYMCA
Page 66 of 173
UNIT - 9
DATABASE PROGRAMMING
Q.1) JDBC Architecture
The JDBC API supports both two-tier and three-tier processing models for database access
but in general, JDBC Architecture consists of two layers
JDBC API: This provides the application-to-JDBC Manager connection.
JDBC Driver API: This supports the JDBC Manager-to-Driver Connection.
The JDBC API uses a driver manager and database-specific drivers to provide transparent
connectivity to heterogeneous databases.
The JDBC driver manager ensures that the correct driver is used to access each data source.
The driver manager is capable of supporting multiple concurrent drivers connected to
multiple heterogeneous databases.
Following is the architectural diagram, which shows the location of the driver manager with
respect to the JDBC drivers and the Java application −
Figure 1: Two-tier Architecture for Data Access.

JAVA NOTES SYMCA
Page 67 of 173
In the two-tier model, a Java application talks directly to the data source. This requires a
JDBC driver that can communicate with the particular data source being accessed. A user's
commands are delivered to the database or other data source, and the results of those
statements are sent back to the user. The data source may be located on another machine to
which the user is connected via a network. This is referred to as a client/server configuration,
with the user's machine as the client, and the machine housing the data source as the server.
The network can be an intranet, which, for example, connects employees within a
corporation, or it can be the Internet.
In the three-tier model, commands are sent to a "middle tier" of services, which then sends
the commands to the data source. The data source processes the commands and sends the
results back to the middle tier, which then sends them to the user. MIS directors find the
three-tier model very attractive because the middle tier makes it possible to maintain control
over access and the kinds of updates that can be made to corporate data. Another advantage is
that it simplifies the deployment of applications. Finally, in many cases, the three-tier
architecture can provide performance advantages.
Figure 2: Three-tier Architecture for Data Access.
Until recently, the middle tier has often been written in languages such as C or C++, which
offer fast performance. However, with the introduction of optimizing compilers that translate
Java bytecode into efficient machine-specific code and technologies such as Enterprise

JAVA NOTES SYMCA
Page 68 of 173
JavaBeans™, the Java platform is fast becoming the standard platform for middle-tier
development. This is a big plus, making it possible to take advantage of Java's robustness,
multithreading, and security features.
With enterprises increasingly using the Java programming language for writing server code,
the JDBC API is being used more and more in the middle tier of a three-tier architecture.
Some of the features that make JDBC a server technology are its support for connection
pooling, distributed transactions, and disconnected rowsets. The JDBC API is also what
allows access to a data source from a Java middle tier.
Two-Tier Architecture:
The two-tier is based on Client Server architecture. The two-tier architecture is like client
server application. The direct communication takes place between client and server. There is
no intermediate between client and server. Because of tight coupling a 2 tiered application
will run faster.
Two-Tier Architecture
The above figure shows the architecture of two-tier. Here the direct communication between
client and server, there is no intermediate between client and server.
Let’s take a look of real life example of Railway Reservation two-tier architecture:
Let’s consider that first Person is making Railway Reservation for Mumbai to Delhi by
Mumbai Express at Counter No. 1 and at same time second Person is also try to make
Railway reservation of Mumbai to Delhi from Counter No. 2
If staff from Counter No. 1 is searching for availability into system & at the same staff from
Counter No. 2 is also looking for availability of ticket for same day then in this case there is
might be good change of confusion and chaos occurs. There might be chance of lock the
Railway reservation that reserves the first.
But reservations can be making anywhere from the India, then how it is handled?
So here if there is difference of micro seconds for making reservation by staff from Counter
No. 1 & 2 then second request is added into queue. So in this case the Staff is entering data to

JAVA NOTES SYMCA
Page 69 of 173
Client Application and reservation request is sent to the database. The database sends back
the information/data to the client.
In this application the Staff user is an end user who is using Railway reservation application
software. He gives inputs to the application software and it sends requests to Server. So here
both Database and Server are incorporated with each other, so this technology is called as
“Client-Server Technology“.
The Two-tier architecture is divided into two parts:
1) Client Application (Client Tier)
2) Database (Data Tier)
On client application side the code is written for saving the data in the SQL server
database. Client sends the request to server and it process the request & send back with data.
The main problem of two tier architecture is the server cannot respond multiple request same
time, as a result it cause a data integrity issue.
Advantages:
Easy to maintain and modification is bit easy
Communication is faster
Disadvantages:
In two tier architecture application performance will be degrade upon increasing the users.
Cost-ineffective
Three-Tier Architecture:
Three-tier architecture typically comprise a presentation tier, a business or data access tier,
and a data tier. Three layers in the three tier architecture are as follows:
1) Client layer
2) Business layer
3) Data layer
1) Client layer:
It is also called as Presentation layer which contains UI part of our application. This layer is
used for the design purpose where data is presented to the user or input is taken from the user.
For example designing registration form which contains text box, label, button etc.
2) Business layer:
In this layer all business logic written like validation of data, calculations, data insertion etc.
This acts as a interface between Client layer and Data Access Layer. This layer is also called
the intermediary layer helps to make communication faster between client and data layer.
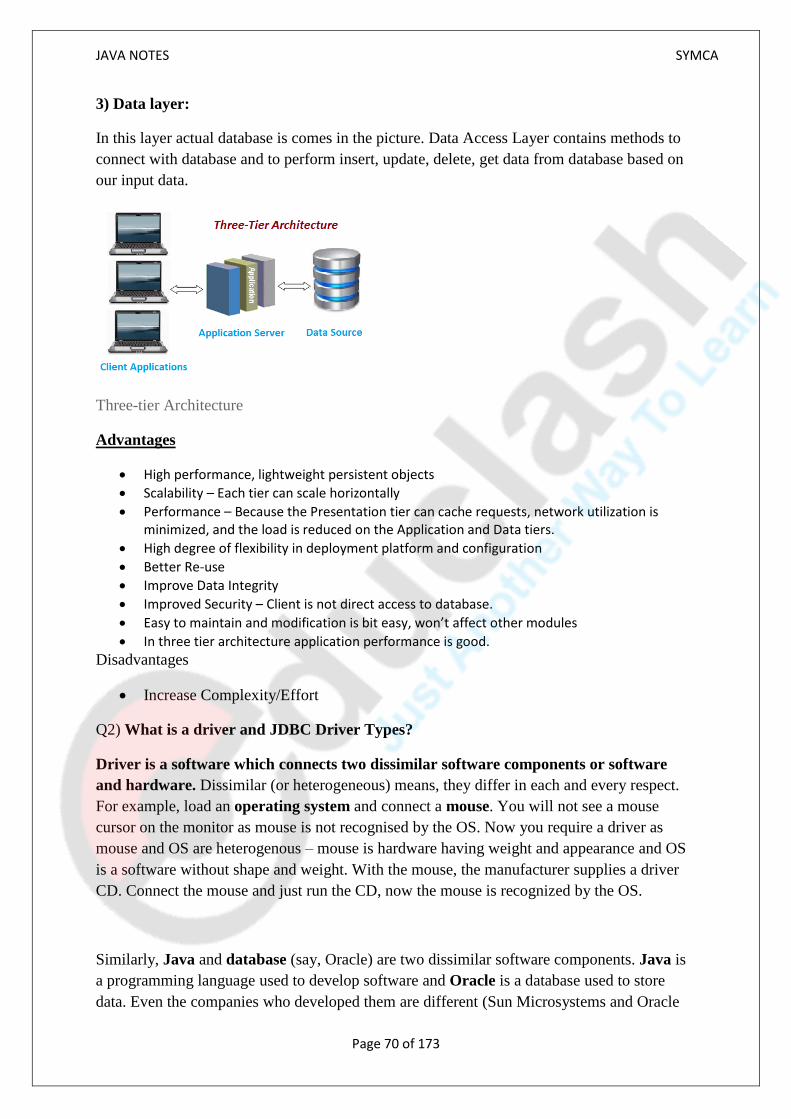
JAVA NOTES SYMCA
Page 70 of 173
3) Data layer:
In this layer actual database is comes in the picture. Data Access Layer contains methods to
connect with database and to perform insert, update, delete, get data from database based on
our input data.
Three-tier Architecture
Advantages
High performance, lightweight persistent objects
Scalability – Each tier can scale horizontally
Performance – Because the Presentation tier can cache requests, network utilization is minimized, and the load is reduced on the Application and Data tiers.
High degree of flexibility in deployment platform and configuration
Better Re-use
Improve Data Integrity
Improved Security – Client is not direct access to database.
Easy to maintain and modification is bit easy, won’t affect other modules
In three tier architecture application performance is good.
Disadvantages
Increase Complexity/Effort
Q2) What is a driver and JDBC Driver Types?
Driver is a software which connects two dissimilar software components or software
and hardware. Dissimilar (or heterogeneous) means, they differ in each and every respect.
For example, load an operating system and connect a mouse. You will not see a mouse
cursor on the monitor as mouse is not recognised by the OS. Now you require a driver as
mouse and OS are heterogenous – mouse is hardware having weight and appearance and OS
is a software without shape and weight. With the mouse, the manufacturer supplies a driver
CD. Connect the mouse and just run the CD, now the mouse is recognized by the OS.
Similarly, Java and database (say, Oracle) are two dissimilar software components. Java is
a programming language used to develop software and Oracle is a database used to store
data. Even the companies who developed them are different (Sun Microsystems and Oracle

JAVA NOTES SYMCA
Page 71 of 173
corporation; by the time JDBC was introduced, Java is not acquired by Oracle corporation).
Now you feel the necessity of a driver. The driver here is called as JDBC driver.
Coming to JDBC drivers, Sun Microsystems identified 4 types of drivers. Each of these types
meets a different application need and also differ in their performance.
All the JDBC Driver Types are discussed here under with diagrams.
Type 1: JDBC-ODBC Bridge, plus ODBC driver
Type 2: Native-API, partly-Java driver
Type 3: JDBC-net, pure Java driver
Type 4: Native-protocol, pure Java driver
Type 1: JDBC-ODBC Bridge, plus ODBC Driver
This first type of bridge driver is supported by the JDBC through JdbcOdbcDriver class
from sun.jdbc.odbc package. This driver bridges with another driver (ODBC driver) to
connect to a database. The disadvantage with this driver is the database client code
and ODBC driver must be installed on every client in an office. This is quiet easy where
systems are confined to a limited area but difficult when the systems are spread apart. By
performance it is the poorestof all four types as it requires many translations between the
JDBC call and finally the SQL statement executed on the database.

JAVA NOTES SYMCA
Page 72 of 173
By performance it is very very slow. This is mostly used in colleges while learning JDBC but
not in realtime (in realtime, Type 4 driver is used). This driver is used with DSN.
Advantage
The JDBC-ODBC Bridge allows access to almost any database, since the database's
Disadvantages
1. Since the Bridge driver is not written fully in Java, Type 1 drivers are not portable.
2. A performance issue is seen as a JDBC call goes through the bridge to the ODBC driver,
then to the database, and this applies even in the reverse process. They are the slowest of all
driver types.
3. The client system requires the ODBC Installation to use the driver.
4. Not good for the Web.
ODBC drivers are already available.
Type 2: Native-API Driver, partly- Java driver
The native-API driver converts JDBC commands into DBMS-specific native calls. This is
much like the restriction of Type 1 drivers. The client must have some binary code loaded on
its machine. These drivers have an advantage over type 1 drivers, because they interface
directly with the database.
Advantage
The distinctive characteristic of type 2 jdbc drivers are that they are typically offer better
performance than the JDBC-ODBC Bridge as the layers of communication (tiers) are less
than that of Type
1 and also it uses Native api which is Database specific.
Disadvantage
1. Native API must be installed in the Client System and hence type 2 drivers cannot be used
for the Internet.
2. Like Type 1 drivers, it’s not written in Java Language which forms a portability issue.
3. If we change the Database we have to change the native api as it is specific to a database
4. Mostly obsolete now
5. Usually not thread safe.

JAVA NOTES SYMCA
Page 73 of 173
Type 3: JDBC – Net, pure Java Driver
The JDBC-Net drivers are a three-tier solution. This type of driver translates JDBC calls into
a database-independent network protocol that is sent to a middleware server. This server, then
translates this DBMS-specific protocol, which is sent to a particular database. The results are
routed back through the middleware server and sent back to the client. This type of solution
makes it possible to implement a pure Java client. It also makes it possible to swap databases
without affecting the client. This is by far the most flexible JDBC solution. The following
figure shows this three-tier solution.
Advantage
1. This driver is server-based, so there is no need for any vendor database library to be
present on client machines.
2. This driver is fully written in Java and hence Portable. It is suitable for the web.
3. There are many opportunities to optimize portability, performance, and scalability.
4. The net protocol can be designed to make the client JDBC driver very small and fast to
load.
5. The type 3 driver typically provides support for features such as caching (connections,
query results, and so on), load balancing, and advanced
system administration such as logging and auditing.
6. This driver is very flexible allows access to multiple databases using one driver.
7. They are the most efficient amongst all driver types.
Disadvantage
It requires another server application to install and maintain. Traversing the recordset may
take longer, since the data comes through the backend server.

JAVA NOTES SYMCA
Page 74 of 173
Type 4: Native-Protocol, pure Java Driver (known as thin driver)
By performance-wise it is the most preferred and is the one used in real time. Performance is
due to the direct conversion of JDBC queries into the database-specific network protocol and
additional transformation of middle layers is eliminated. With this driver, the client (in 3-tier,
the client for a database server is an application server) can connect to the database directly
and is the ideal choice in Intranets. This native-protocol driver is database dependent and is
generally supplied by the database vendors itself (many times, free of cost). This driver is
written entirely using Java language and is commonly known as "thin driver" as less code is
executed and less translations exists (directly translates Java calls to SQL statements). The
following diagrams communications of a Type 4 driver.
This driver is very fast as it executes less code to communicate. For this reason, it is known
asthin driver. It can be used with connection pooling.
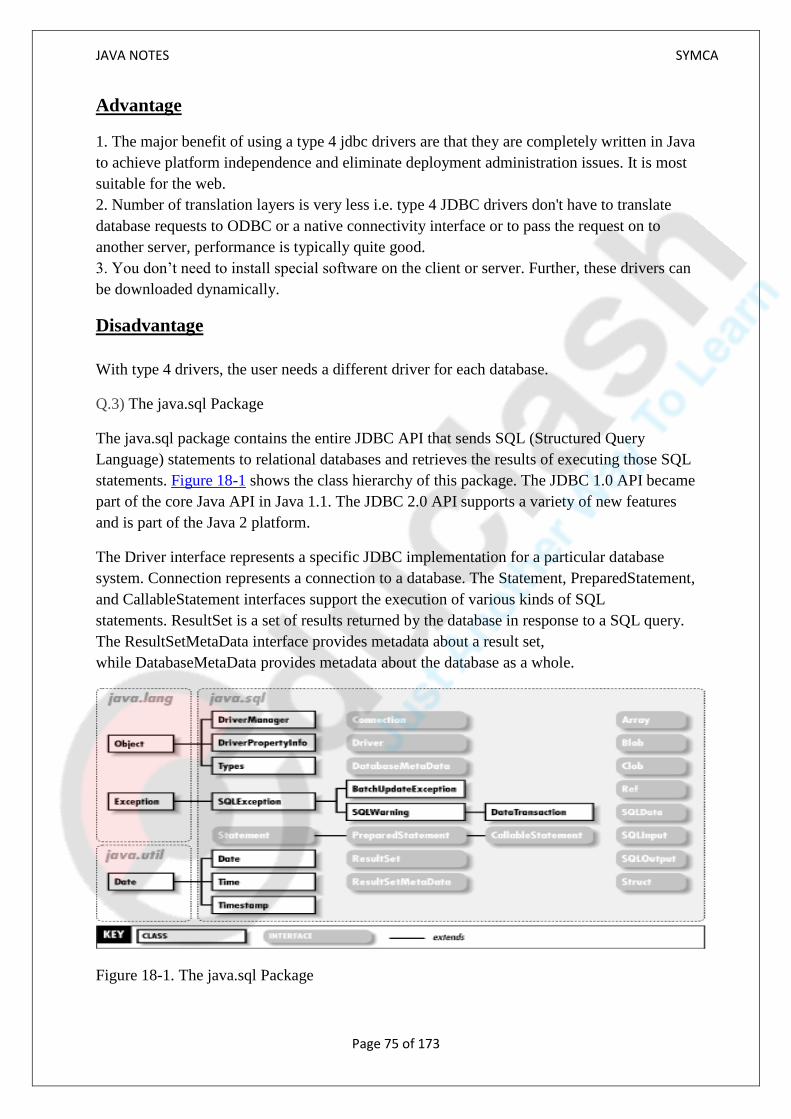
JAVA NOTES SYMCA
Page 75 of 173
Advantage
1. The major benefit of using a type 4 jdbc drivers are that they are completely written in Java
to achieve platform independence and eliminate deployment administration issues. It is most
suitable for the web.
2. Number of translation layers is very less i.e. type 4 JDBC drivers don't have to translate
database requests to ODBC or a native connectivity interface or to pass the request on to
another server, performance is typically quite good.
3. You don’t need to install special software on the client or server. Further, these drivers can
be downloaded dynamically.
Disadvantage
With type 4 drivers, the user needs a different driver for each database.
Q.3) The java.sql Package
The java.sql package contains the entire JDBC API that sends SQL (Structured Query
Language) statements to relational databases and retrieves the results of executing those SQL
statements. Figure 18-1 shows the class hierarchy of this package. The JDBC 1.0 API became
part of the core Java API in Java 1.1. The JDBC 2.0 API supports a variety of new features
and is part of the Java 2 platform.
The Driver interface represents a specific JDBC implementation for a particular database
system. Connection represents a connection to a database. The Statement, PreparedStatement,
and CallableStatement interfaces support the execution of various kinds of SQL
statements. ResultSet is a set of results returned by the database in response to a SQL query.
The ResultSetMetaData interface provides metadata about a result set,
while DatabaseMetaData provides metadata about the database as a whole.
Figure 18-1. The java.sql Package
JAVA NOTES SYMCA
Page 76 of 173
Q.4) Establishing connectivity and working with connection interface
// ye sab practical wala parthailagtanhiaayega theory papermai
5 Steps to connect to the database in java
There are 5 steps to connect any java application with the database in java using JDBC. They
are as follows:
1. Register the driver class 2. Creating connection 3. Creating statement 4. Executing queries 5. Closing connection
1) Register the driver class
The forName() method of Class class is used to register the driver class. This method is used
to dynamically load the driver class.
Syntax of forName() method
public static void forName(String className)throws ClassNotFoundException
Example to register the OracleDriver class
Class.forName("oracle.jdbc.driver.OracleDriver");
2) Create the connection object
The getConnection() method of DriverManager class is used to establish connection with the
database.
Syntax of getConnection() method
1) public static Connection getConnection(String url)throws SQLException
2) public static Connection getConnection(String url,String name,String password)
throws SQLException Example to establish connection with the Oracle database Connection con=DriverManager.getConnection(
"jdbc:oracle:thin:@localhost:1521:xe","system","password");

JAVA NOTES SYMCA
Page 77 of 173
3) Create the Statement object
The createStatement() method of Connection interface is used to create statement. The object
of statement is responsible to execute queries with the database.
Syntax of createStatement() method
public Statement createStatement()throws SQLException
Example to create the statement object
Statement stmt=con.createStatement();
4) Execute the query
The executeQuery() method of Statement interface is used to execute queries to the database.
This method returns the object of ResultSet that can be used to get all the records of a table.
Syntax of executeQuery() method
public ResultSet executeQuery(String sql)throws SQLException
Example to execute query
ResultSet rs=stmt.executeQuery("select * from emp");
while(rs.next()){
System.out.println(rs.getInt(1)+" "+rs.getString(2)); }
5) Close the connection object
By closing connection object statement and ResultSet will be closed automatically. The
close() method of Connection interface is used to close the connection.
Syntax of close() method
public void close()throws SQLException
Example to close connection
con.close();

JAVA NOTES SYMCA
Page 78 of 173
Q.5) Working with statement interface
Statement interface
The Statement interface provides methods to execute queries with the database. The
statement interface is a factory of ResultSet i.e. it provides factory method to get the object of
ResultSet.
Commonly used methods of Statement interface:
The important methods of Statement interface are as follows:
1) publicResultSetexecuteQuery(String sql): is used to execute SELECT query. It returns
the object of ResultSet.
2) public intexecuteUpdate(String sql): is used to execute specified query, it may be create,
drop, insert, update, delete etc.
3) publicboolean execute(String sql): is used to execute queries that may return multiple
results.
4) publicint[] executeBatch(): is used to execute batch of commands.
Example of Statement interface
Let’s see the simple example of Statement interface to insert, update and delete the record.
import java.sql.*;
class FetchRecord{
public static void main(String args[])throws Exception{
Class.forName("oracle.jdbc.driver.OracleDriver");
Connection con=DriverManager.getConnection("jdbc:oracle:thin:@localhost:1521:xe","syst
em","oracle"); Statement stmt=con.createStatement();
//stmt.executeUpdate("insert into emp765 values(33,'Irfan',50000)"); //int result=stmt.executeUpdate("update emp765 set name='Vimal',salary=10000 where
id=33");
int result=stmt.executeUpdate("delete from emp765 where id=33");
System.out.println(result+" records affected"); con.close(); }}
Q.6) Working withPreparedStatement interface
PreparedStatement interface
The PreparedStatement interface is a subinterface of Statement. It is used to execute
parameterized query.

JAVA NOTES SYMCA
Page 79 of 173
Let's see the example of parameterized query:
String sql="insert into emp values(?,?,?)";
As you can see, we are passing parameter (?) for the values. Its value will be set by calling the setter methods of PreparedStatement.
Why use PreparedStatement?
Improves performance: The performance of the application will be faster if you use
PreparedStatement interface because query is compiled only once.
How to get the instance of PreparedStatement?
The prepareStatement() method of Connection interface is used to return the object of
PreparedStatement.
Syntax:
public PreparedStatement prepareStatement(String query)throws SQLException{}
Method Description
public void setInt(intparamIndex, int value)
sets the integer value to the given parameter index.
public void setString(intparamIndex, String value)
sets the String value to the given parameter index.
public void setFloat(intparamIndex, float value)
sets the float value to the given parameter index.
public void setDouble(intparamIndex, double value)
sets the double value to the given parameter index.
public intexecuteUpdate() executes the query. It is used for create, drop, insert, update, delete etc.
public ResultSetexecuteQuery() executes the select query. It returns an instance of ResultSet.

JAVA NOTES SYMCA
Page 80 of 173
Methods of PreparedStatement interface
The important methods of PreparedStatement interface are given below:
Example of PreparedStatement interface that inserts the record
First of all create table as given below:
create table emp(id number(10),name varchar2(50));
Now insert records in this table by the code given below:
import java.sql.*;
class InsertPrepared{
public static void main(String args[]){
try {
Class.forName("oracle.jdbc.driver.OracleDriver");
Connection con=DriverManager.getConnection("jdbc:oracle:thin:@localhost:1521:xe","system",
"oracle");
PreparedStatement stmt=con.prepareStatement("insert into Emp values(?,?)");
stmt.setInt(1,101);//1 specifies the first parameter in the query
stmt.setString(2,"Ratan");
int i=stmt.executeUpdate();
System.out.println(i+" records inserted"); con.close(); }
catch(Exception e) { System.out.println(e); } } }
Q.6) Working with ResultSet interface
JDBC - Result Sets
The SQL statements that read data from a database query, return the data in a result set. The
SELECT statement is the standard way to select rows from a database and view them in a
result set. The java.sql.ResultSet interface represents the result set of a database query.
A ResultSet object maintains a cursor that points to the current row in the result set. The term
"result set" refers to the row and column data contained in a ResultSet object.

JAVA NOTES SYMCA
Page 81 of 173
The methods of the ResultSet interface can be broken down into three categories −
Navigational methods: Used to move the cursor around.
Get methods: Used to view the data in the columns of the current row being pointed by the cursor.
Update methods: Used to update the data in the columns of the current row. The updates can then be updated in the underlying database as well.
The cursor is movable based on the properties of the ResultSet. These properties are
designated when the corresponding Statement that generates the ResultSet is created.
JDBC provides the following connection methods to create statements with desired ResultSet
−
createStatement(intRSType, intRSConcurrency);
prepareStatement(String SQL, intRSType, intRSConcurrency);
prepareCall(String sql, intRSType, intRSConcurrency);
The first argument indicates the type of a ResultSet object and the second argument is one of
two ResultSet constants for specifying whether a result set is read-only or updatable.
Type of ResultSet
The possible RSType are given below. If you do not specify any ResultSet type, you will
automatically get one that is TYPE_FORWARD_ONLY.
Type Description
ResultSet.TYPE_FORWARD_ONLY The cursor can only move forward in the result set.
ResultSet.TYPE_SCROLL_INSENSITIVE The cursor can scroll forward and backward, and the result set is not sensitive to changes made by others to the database that occur after the result set was created.
ResultSet.TYPE_SCROLL_SENSITIVE. The cursor can scroll forward and backward, and the result set is sensitive to changes made by others to the database that occur after the result set was created.
Q.7) Working with ResultSetMetaData interface.
Java ResultSetMetaData Interface
The metadata means data about data i.e. we can get further information from the data.

JAVA NOTES SYMCA
Page 82 of 173
If you have to get metadata of a table like total number of column, column name, column
type etc. ,ResultSetMetaData interface is useful because it provides methods to get metadata
from the ResultSet object.
Commonly used methods of ResultSetMetaData interface
Method Description
public intgetColumnCount()throws SQLException it returns the total number of columns in theResultSet object.
public String getColumnName(int index)throws SQLException
it returns the column name of the specified column index.
public String getColumnTypeName(int index)throws SQLException
it returns the column type name for the specified index.
public String getTableName(int index)throws SQLException
it returns the table name for the specified column index.
How to get the object of ResultSetMetaData:
The getMetaData() method of ResultSet interface returns the object of ResultSetMetaData.
Syntax:
public ResultSetMetaData getMetaData()throws SQLException
Example of ResultSetMetaDatainterface :
import java.sql.*;
class Rsmd{
public static void main(String args[]){
try{
Class.forName("oracle.jdbc.driver.OracleDriver");
Connection con=DriverManager.getConnection(
"jdbc:oracle:thin:@localhost:1521:xe","system","oracle");
PreparedStatement ps=con.prepareStatement("select * from emp");
ResultSet rs=ps.executeQuery();
ResultSetMetaData rsmd=rs.getMetaData();
System.out.println("Total columns: "+rsmd.getColumnCount());
System.out.println("Column Name of 1st column: "+rsmd.getColumnName(1));
System.out.println("Column Type Name of 1st column: "+rsmd.getColumnTypeName(1);
con.close();
}catch(Exception e){ System.out.println(e);}
}

JAVA NOTES SYMCA
Page 83 of 173
}
Output:
Total columns: 2
Column Name of 1st column: ID
Column Type Name of 1st column: NUMBER
Q) Introduction to Servlet
What are Servlets?
Java Servlets are programs that run on a Web or Application server and act as a middle layer
between a requests coming from a Web browser or other HTTP client and databases or
applications on the HTTP server.
Using Servlets, you can collect input from users through web page forms, present records
from a database or another source, and create web pages dynamically.
Java Servlets often serve the same purpose as programs implemented using the Common
Gateway Interface (CGI). But Servlets offer several advantages in comparison with the CGI.
Performance is significantly better.
Servlets execute within the address space of a Web server. It is not necessary to
create a separate process to handle each client request.
Servlets are platform-independent because they are written in Java.
Java security manager on the server enforces a set of restrictions to protect the
resources on a server machine. So servlets are trusted.
The full functionality of the Java class libraries is available to a servlet. It can
communicate with applets, databases, or other software via the sockets and RMI
mechanisms that you have seen already.
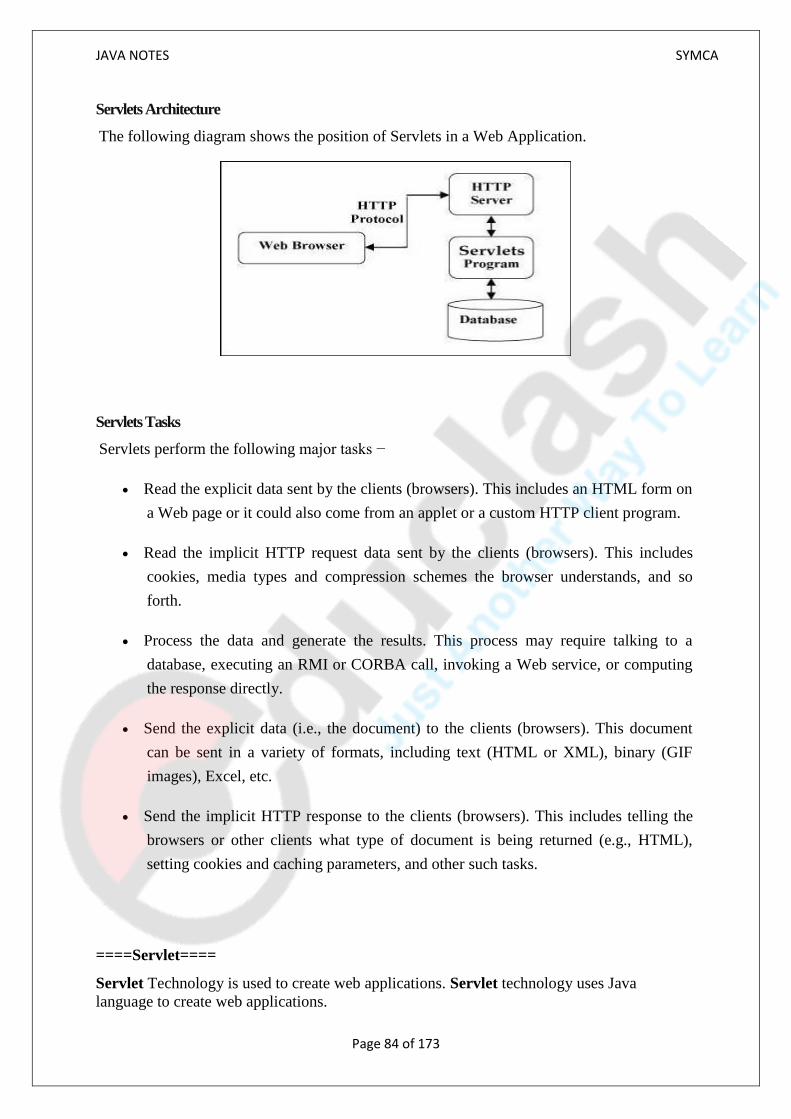
JAVA NOTES SYMCA
Page 84 of 173
Servlets Architecture
The following diagram shows the position of Servlets in a Web Application.
Servlets Tasks
Servlets perform the following major tasks −
Read the explicit data sent by the clients (browsers). This includes an HTML form on
a Web page or it could also come from an applet or a custom HTTP client program.
Read the implicit HTTP request data sent by the clients (browsers). This includes
cookies, media types and compression schemes the browser understands, and so
forth.
Process the data and generate the results. This process may require talking to a
database, executing an RMI or CORBA call, invoking a Web service, or computing
the response directly.
Send the explicit data (i.e., the document) to the clients (browsers). This document
can be sent in a variety of formats, including text (HTML or XML), binary (GIF
images), Excel, etc.
Send the implicit HTTP response to the clients (browsers). This includes telling the
browsers or other clients what type of document is being returned (e.g., HTML),
setting cookies and caching parameters, and other such tasks.
====Servlet====
Servlet Technology is used to create web applications. Servlet technology uses Java
language to create web applications.

JAVA NOTES SYMCA
Page 85 of 173
Web applications are helper applications that resides at web server and build dynamic web
pages. A dynamic page could be anything like a page that randomly chooses picture to
display or even a page that displays the current time.
As Servlet Technology uses Java, web applications made using Servlet
are Secured, Scalable and Robust.
CGI (Common Gateway Interface)
Before Servlets, CGI(Common Gateway Interface) programming was used to create web
applications. Here's how a CGI program works :
User clicks a link that has URL to a dynamic page instead of a static page.
The URL decides which CGI program to execute.
Web Servers run the CGI program in seperate OS shell. The shell includes OS
enviroment and the process to execute code of the CGI program.
The CGI response is sent back to the Web Server, which wraps the response in an HTTP
response and send it back to the web browser.
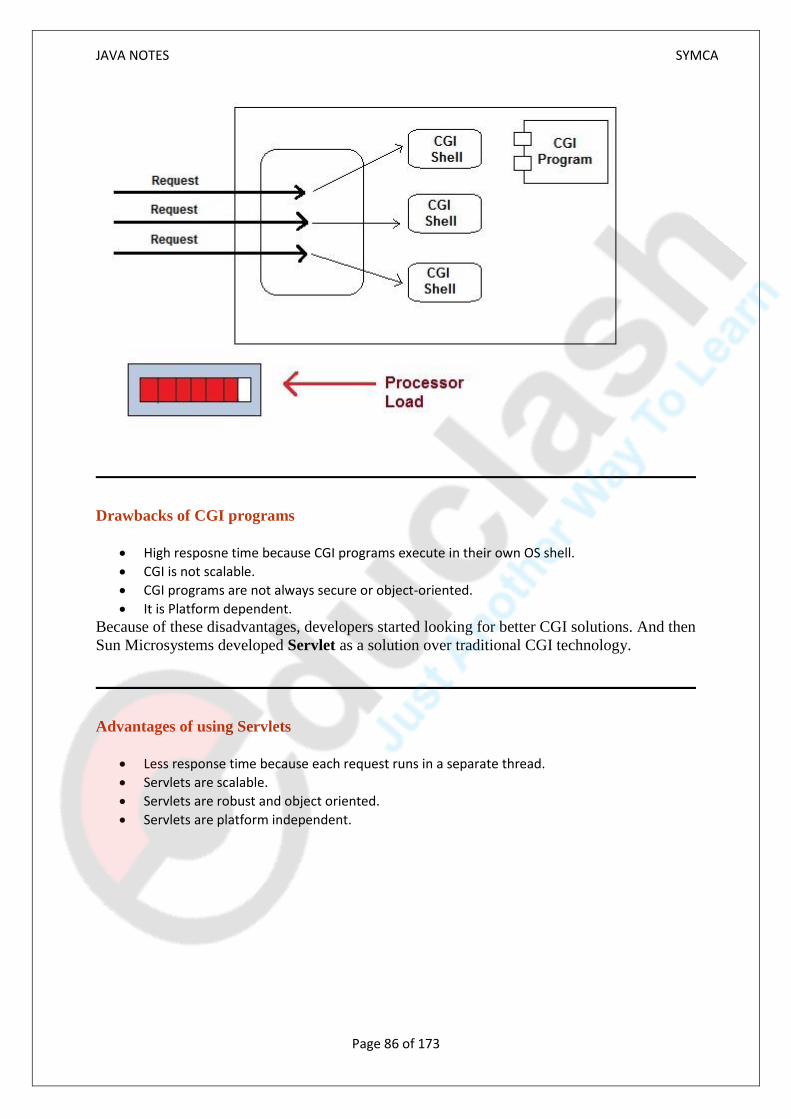
JAVA NOTES SYMCA
Page 86 of 173
Drawbacks of CGI programs
High resposne time because CGI programs execute in their own OS shell.
CGI is not scalable.
CGI programs are not always secure or object-oriented.
It is Platform dependent.
Because of these disadvantages, developers started looking for better CGI solutions. And then
Sun Microsystems developed Servlet as a solution over traditional CGI technology.
Advantages of using Servlets
Less response time because each request runs in a separate thread.
Servlets are scalable.
Servlets are robust and object oriented.
Servlets are platform independent.

JAVA NOTES SYMCA
Page 87 of 173
Q) Difference between servlet and CGI
CGI (Commmon Gateway Interface) :
1. CGI (Common Gateway Interface) is used to provide dynamic content to the user. 2. CGI is used to execute a program that resides in the server to process data or access
databases to produce the relevant dynamic content. 3. Programs that resides in server can be written in native operating system such as C++.
Diagrammatic Representation :
We have listed some problems in CGI technology –
Disadvantages of CGI :
1. For each request CGI Server receives, It creates new Operating System Process. 2. If the number of requests from the client increases then more time it will take to respond to
the request. 3. As programs executed by CGI Script are written in the native languages such as C, C++, perl
which are platform independent.
Servlet :
CGI programs are used to execute programs written inside the native language. But in Servlet
all the programs are compiled into the Java bytecode which is then run in the Java virtual

JAVA NOTES SYMCA
Page 88 of 173
machine.
In Servlet, All the requests coming from the Client are processed with the threads instead of
the OS process.
Servlet Vs CGI :
Let’s differentiate Servlet and CGI –
Servlet CGI (Common Gateway Interface)
Servlets are portable CGI is not portable.
In Servlets each request is handled by lightweight Java Thread
IN CGI each request is handled by heavy weight OS process
In Servlets, Data sharing is possible In CGI, data sharing is not available.
Servlets can link directly to the Web server
CGI cannot directly link to Web server.
Session tracking and caching of previous computations can be performed
Session tracking and caching of previous computations cannot be performed
Automatic parsing and decoding of HTML form data can be performed.
Automatic parsing and decoding of HTML form data cannot be performed.
Servlets can read and Set HTTP Headers CGI cannot read and Set HTTP Headers
Servlets can handle cookies CGI cannot handle cookies
Servlets can track sessions CGI cannot track sessions
Servlets is inexpensive than CGI CGI is more expensive than Servlets

JAVA NOTES SYMCA
Page 89 of 173
Q) Servlet API overview?
The javax.servlet and javax.servlet.http packages represent interfaces and classes for servlet api.
The javax.servlet package contains many interfaces and classes that are used by the servlet or web container. These are not specific to any protocol.
The javax.servlet.http package contains interfaces and classes that are responsible for http requests only.
Let's see what are the interfaces of javax.servlet package.
Interfaces in javax.servlet package
There are many interfaces in javax.servlet package. They are as follows:
1. Servlet 2. ServletRequest 3. ServletResponse 4. RequestDispatcher 5. ServletConfig 6. ServletContext 7. SingleThreadModel 8. Filter 9. FilterConfig 10. FilterChain 11. ServletRequestListener 12. ServletRequestAttributeListener 13. ServletContextListener 14. ServletContextAttributeListener
Classes in javax.servlet package
There are many classes in javax.servlet package. They are as follows:
1. GenericServlet 2. ServletInputStream 3. ServletOutputStream 4. ServletRequestWrapper 5. ServletResponseWrapper 6. ServletRequestEvent 7. ServletContextEvent 8. ServletRequestAttributeEvent 9. ServletContextAttributeEvent 10. ServletException 11. UnavailableException
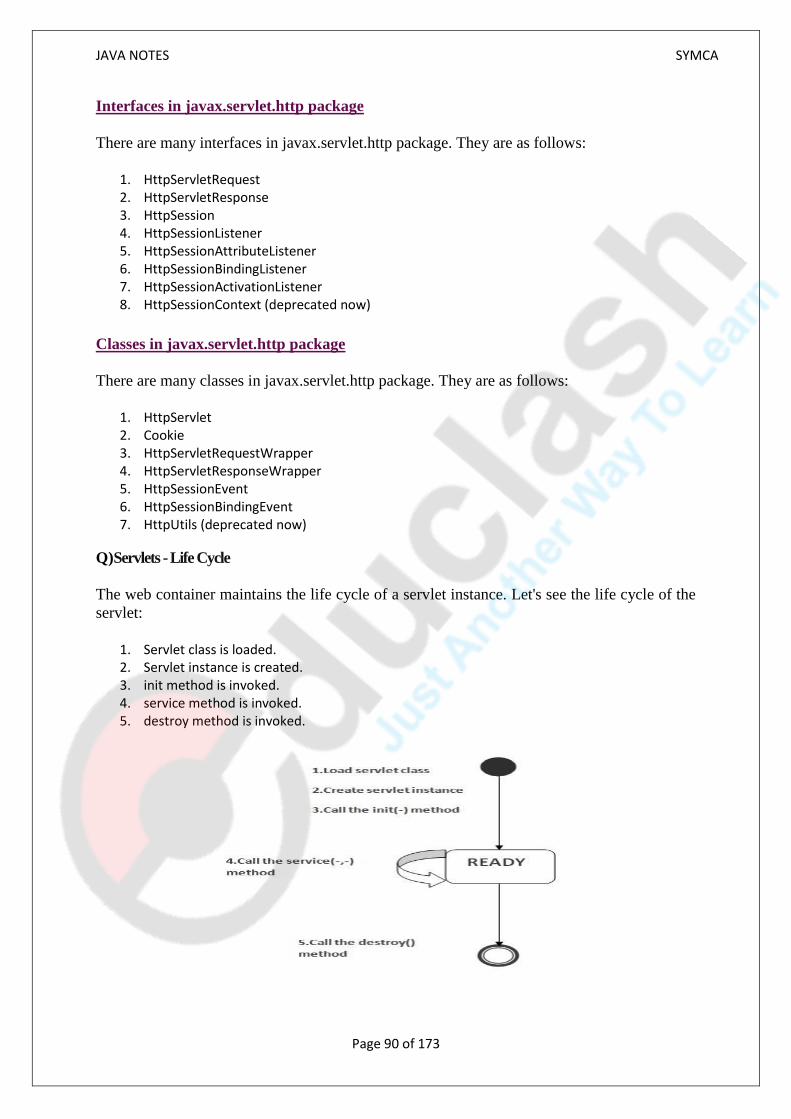
JAVA NOTES SYMCA
Page 90 of 173
Interfaces in javax.servlet.http package
There are many interfaces in javax.servlet.http package. They are as follows:
1. HttpServletRequest 2. HttpServletResponse 3. HttpSession 4. HttpSessionListener 5. HttpSessionAttributeListener 6. HttpSessionBindingListener 7. HttpSessionActivationListener 8. HttpSessionContext (deprecated now)
Classes in javax.servlet.http package
There are many classes in javax.servlet.http package. They are as follows:
1. HttpServlet 2. Cookie 3. HttpServletRequestWrapper 4. HttpServletResponseWrapper 5. HttpSessionEvent 6. HttpSessionBindingEvent 7. HttpUtils (deprecated now)
Q)Servlets - Life Cycle
The web container maintains the life cycle of a servlet instance. Let's see the life cycle of the
servlet:
1. Servlet class is loaded. 2. Servlet instance is created. 3. init method is invoked. 4. service method is invoked. 5. destroy method is invoked.

JAVA NOTES SYMCA
Page 91 of 173
As displayed in the above diagram, there are three states of a servlet: new, ready and end. The
servlet is in new state if servlet instance is created. After invoking the init() method, Servlet
comes in the ready state. In the ready state, servlet performs all the tasks. When the web
container invokes the destroy() method, it shifts to the end state.
1) Servlet class is loaded
The classloader is responsible to load the servlet class. The servlet class is loaded when the
first request for the servlet is received by the web container.
2) Servlet instance is created
The web container creates the instance of a servlet after loading the servlet class. The servlet
instance is created only once in the servlet life cycle.
3) init method is invoked
The web container calls the init method only once after creating the servlet instance. The
init method is used to initialize the servlet. It is the life cycle method of the
javax.servlet.Servlet interface. Syntax of the init method is given below:
The init() Method
The init method is called only once. It is called only when the servlet is created, and not called for any user requests afterwards. So, it is used for one-time initializations, just as with the init method of applets.
The servlet is normally created when a user first invokes a URL corresponding to the servlet, but you can also specify that the servlet be loaded when the server is first started.
When a user invokes a servlet, a single instance of each servlet gets created, with each user request resulting in a new thread that is handed off to doGet or doPost as appropriate. The init() method simply creates or loads some data that will be used throughout the life of the servlet.
The init method definition looks like this −
publicvoidinit()throwsServletException{
// Initialization code...
}
4) service method is invoked
The service() Method
The service() method is the main method to perform the actual task. The servlet container
(i.e. web server) calls the service() method to handle requests coming from the client(
browsers) and to write the formatted response back to the client.

JAVA NOTES SYMCA
Page 92 of 173
Each time the server receives a request for a servlet, the server spawns a new thread and
calls service. The service() method checks the HTTP request type (GET, POST, PUT,
DELETE, etc.) and calls doGet, doPost, doPut, doDelete, etc. methods as appropriate.
Here is the signature of this method −
publicvoid service(ServletRequest request,ServletResponse response)
throwsServletException,IOException{
}
The service () method is called by the container and service method invokes doGe, doPost,
doPut, doDelete, etc. methods as appropriate. So you have nothing to do with service()
method but you override either doGet() or doPost() depending on what type of request you
receive from the client.
The doGet() and doPost() are most frequently used methods with in each service request.
Here is the signature of these two methods.
The doGet() Method
A GET request results from a normal request for a URL or from an HTML form that has no
METHOD specified and it should be handled by doGet() method.
publicvoiddoGet(HttpServletRequest request,HttpServletResponse response)
throwsServletException,IOException{
// Servlet code
}
The doPost() Method
A POST request results from an HTML form that specifically lists POST as the METHOD
and it should be handled by doPost() method.
publicvoiddoPost(HttpServletRequest request,HttpServletResponse response)
throwsServletException,IOException{
// Servlet code
}
5) destroy method is invoked

JAVA NOTES SYMCA
Page 93 of 173
The destroy() Method
The destroy() method is called only once at the end of the life cycle of a servlet. This
method gives your servlet a chance to close database connections, halt background threads,
write cookie lists or hit counts to disk, and perform other such cleanup activities.
After the destroy() method is called, the servlet object is marked for garbage collection. The
destroy method definition looks like this −
publicvoid destroy(){
// Finalization code...
}
Architecture Diagram
The following figure depicts a typical servlet life-cycle scenario.
First the HTTP requests coming to the server are delegated to the servlet container.
The servlet container loads the servlet before invoking the service() method.
Then the servlet container handles multiple requests by spawning multiple threads, each thread executing the service() method of a single instance of the servlet.
Q) GenericServlet
A generic servlet is a protocol independent Servlet that should always override the service()
method to handle the client request. The service() method accepts two arguments
ServletRequest object and ServletResponse object. The request object tells the servlet about
the request made by client while the response object is used to return a response back to the
client.
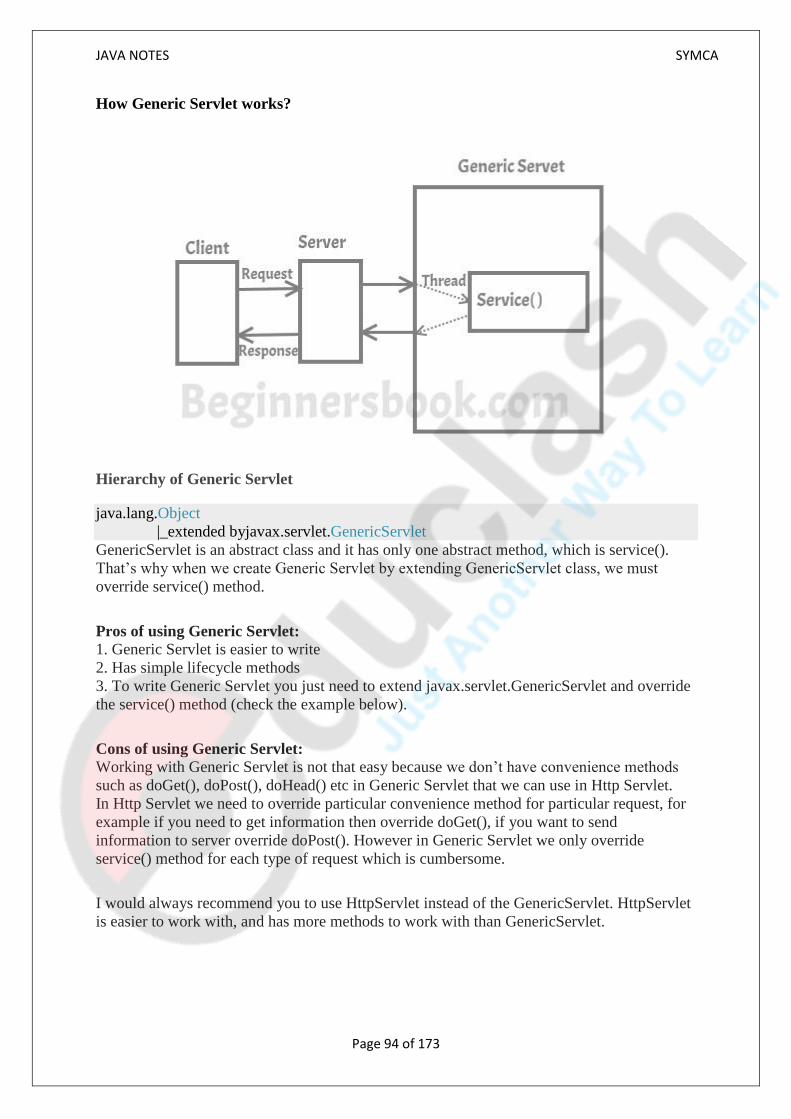
JAVA NOTES SYMCA
Page 94 of 173
How Generic Servlet works?
Hierarchy of Generic Servlet
java.lang.Object
|_extended byjavax.servlet.GenericServlet
GenericServlet is an abstract class and it has only one abstract method, which is service().
That’s why when we create Generic Servlet by extending GenericServlet class, we must
override service() method.
Pros of using Generic Servlet: 1. Generic Servlet is easier to write
2. Has simple lifecycle methods
3. To write Generic Servlet you just need to extend javax.servlet.GenericServlet and override
the service() method (check the example below).
Cons of using Generic Servlet: Working with Generic Servlet is not that easy because we don’t have convenience methods
such as doGet(), doPost(), doHead() etc in Generic Servlet that we can use in Http Servlet.
In Http Servlet we need to override particular convenience method for particular request, for
example if you need to get information then override doGet(), if you want to send
information to server override doPost(). However in Generic Servlet we only override
service() method for each type of request which is cumbersome.
I would always recommend you to use HttpServlet instead of the GenericServlet. HttpServlet
is easier to work with, and has more methods to work with than GenericServlet.

JAVA NOTES SYMCA
Page 95 of 173
Q)HttpServlet
Unlike Generic Servlet, the HTTP Servlet doesn’t override the service() method. Instead it
overrides the doGet() method or doPost() method or both. The doGet() method is used for
getting the information from server while the doPost() method is used for sending
information to the server.
In Http Servlet there is no need to override the service() method because this method
dispatches the Http Requests to the correct method handler, for example if it receives HTTP
GET Request it dispatches the request to the doGet() method.
How Http Servlet works?
As you can see in the diagram below that client (user’s browser) make requests. These
requests can be of any type, for example – Get Request, Post Request, Head Request etc.
Server dispatches these requests to the servlet’s service() method, this method dispatches
these requests to the correct handler for example if it receives Get requests it dispatches it to
the doGet() method.
Hierarchy of Http Servlet
java.lang.Object
|_extended byjavax.servlet.GenericServlet
|_extended byjavax.servlet.http.HttpServlet
I have already discussed in the Generic Servlet article that you should always use HttpServlet
instead of the GenericServlet. HttpServlet is easier to work with, and has more methods to
work with than GenericServlet.

JAVA NOTES SYMCA
Page 96 of 173
Q) diff between GenericServlet and HttpServlet
GENERICSERVLET HTTPSERVLET
Can be used with any protocol (means, can
handle any protocol). Protocol independent.
Should be used with HTTP protocol only (can handle
HTTP specific protocols) . Protocol dependent.
All methods are concrete except service()
method. service() method is abstract method.
All methods are concrete (non-abstract). service() is
non-abstract method.
service() should be overridden being abstract
in super interface. service() method need not be overridden.
It is a must to use service() method as it is a
callback method.
Being service() is non-abstract, it can be replaced by
doGet() or doPost() methods.
Extends Object and implements interfaces
Servlet, ServletConfig and Serializable.
Extends GenericServlet and implements interface
Serializable
Direct subclass of Servet interface. Direct subclass of GenericServlet.
Defined javax.servlet package. Defined javax.servlet.http package.
All the classes and interfaces belonging to
javax.servlet package are protocol
independent.
All the classes and interfaces present in
javax.servlet.http package are protocol dependent
(specific to HTTP).
Not used now-a-days. Used always.

JAVA NOTES SYMCA
Page 97 of 173
Difference between ServletContext vs ServletConfig
Now let’s see difference between ServletContext and ServletConfig in Servlets JSP in tabular
format
Servlet Config Servlet Context
Servlet config object represent single
servlet
It represent whole web application running
on particular JVM and common for all the
servlet
Its like local parameter associated with
particular servlet
Its like global parameter associated with
whole application
It’s a name value pair defined inside the
servlet section of web.xml file so it has
servlet wide scope
ServletContext has application wide scope
so define outside of servlet tag in web.xml
file.
getServletConfig() method is used to get
the config object
getServletContext() method is used to get
the context object.
for example shopping cart of a user is a
specific to particular user so here we can
use servlet config
To get the MIME type of a file or
application session related information is
stored using servlet context object.
ServletConfig
ServletConfig available in javax.servlet.*; package
ServletConfig object is one per servlet class
Object of ServletConfig will be created during initialization process of the servlet
This Config object is public to a particular servlet only
Scope: As long as a servlet is executing, ServletConfig object will be available, it will be destroyed once the servlet execution is completed.
We should give request explicitly, in order to create ServletConfig object for the first time
In web.xml – <init-param> tag will be appear under <servlet-class> tag
ServletContext
ServletContext available in javax.servlet.*; package
ServletContext object is global to entire web application
Object of ServletContext will be created at the time of web application deployment
Scope: As long as web application is executing, ServletContext object will be available, and it will be destroyed once the application is removed from the server.
ServletContext object will be available even before giving the first request
In web.xml – <context-param> tag will be appear under <web-app> tag
ServletConfig Interface
An object of ServletConfig is created by the web container for each servlet. This object can
be used to get configuration information from web.xml file.

JAVA NOTES SYMCA
Page 98 of 173
If the configuration information is modified from the web.xml file, we don't need to change
the servlet. So it is easier to manage the web application if any specific content is modified
from time to time.
Advantage of ServletConfig
The core advantage of ServletConfig is that you don't need to edit the servlet file if
information is modified from the web.xml file.
Methods of ServletConfig interface
1. public String getInitParameter(String name):Returns the parameter value for the
specified parameter name.
2. public Enumeration getInitParameterNames():Returns an enumeration of all the
initialization parameter names.
3. public String getServletName():Returns the name of the servlet.
4. publicServletContextgetServletContext():Returns an object of ServletContext.
How to get the object of ServletConfig
1. getServletConfig() method of Servlet interface returns the object of ServletConfig.
Syntax of getServletConfig() method
public ServletConfig getServletConfig();
Example of getServletConfig() method
ServletConfig config=getServletConfig();
//Now we can call the methods of ServletConfig interface
Example:
In this example, we will use two methods getInitParameter() and getInitParameterNames() to
get all the parameters from web.xml along with their values.
The getInitParameterNames() method returns an enumeration of all parameters names and by
passing those names during the call of getInitParameter() method, we can get the
corresponding parameter value from web.xml.
DemoServlet.java
import java.io.*;
importjavax.servlet.*;

JAVA NOTES SYMCA
Page 99 of 173
importjavax.servlet.http.*;
importjava.util.Enumeration;
publicclassDemoServletextendsHttpServlet{
protectedvoiddoGet(HttpServletRequest request,
HttpServletResponse response)
throwsServletException,IOException
{
response.setContentType("text/html;charset=UTF-8");
PrintWriterpwriter=response.getWriter();
ServletConfigsc=getServletConfig();
Enumeration<String> e=sc.getInitParameterNames();
Stringstr;
while(e.hasMoreElements()){
str=e.nextElement();
pwriter.println("<br>Param Name: "+str);
pwriter.println(" value: "+sc.getInitParameter(str));
}
}
}
web.xml
<web-app>
<display-name>BeginnersBookDemo</display-name>
<welcome-file-list>
<welcome-file>index.html</welcome-file>
</welcome-file-list>
<servlet>
<servlet-name>MyServlet</servlet-name>
<servlet-class>DemoServlet</servlet-class>
<init-param>
<param-name>MyName</param-name>
<param-value>Chaitanya</param-value>
</init-param>
<init-param>
<param-name>MyWebsite</param-name>
<param-value>Beginnersbook.com</param-value>
</init-param>
</servlet>
<servlet-mapping>
<servlet-name>MyServlet</servlet-name>
<url-pattern>/scdemo</url-pattern>
</servlet-mapping>
</web-app>

JAVA NOTES SYMCA
Page 100 of 173
ServletContext Interface
An object of ServletContext is created by the web container at time of deploying the project.
This object can be used to get configuration information from web.xml file. There is only one
ServletContext object per web application.
If any information is shared to many servlet, it is better to provide it from the web.xml file
using the <context-param> element.
Advantage of ServletContext
Easy to maintain if any information is shared to all the servlet, it is better to make it
available for all the servlet. We provide this information from the web.xml file, so if the
information is changed, we don't need to modify the servlet. Thus it removes maintenance
problem.
Usage of ServletContext Interface
There can be a lot of usage of ServletContext object. Some of them are as follows:
1. The object of ServletContext provides an interface between the container and servlet.
2. The ServletContext object can be used to get configuration information from the
web.xml file.
3. The ServletContext object can be used to set, get or remove attribute from the
web.xml file.
4. The ServletContext object can be used to provide inter-application communication.

JAVA NOTES SYMCA
Page 101 of 173
Commonly used methods of ServletContext interface
There is given some commonly used methods of ServletContext interface.
1. public String getInitParameter(String name):Returns the parameter value for
the specified parameter name.
2. public Enumeration getInitParameterNames():Returns the names of the
context's initialization parameters.
3. public void setAttribute(String name,Object object):sets the given object in the
application scope.
4. public Object getAttribute(String name):Returns the attribute for the specified
name.
5. public Enumeration getInitParameterNames():Returns the names of the
context's initialization parameters as an Enumeration of String objects.
6. public void removeAttribute(String name):Removes the attribute with the given
name from the servlet context.
How to get the object of ServletContext interface
1. getServletContext() method of ServletConfig interface returns the object of
ServletContext.
2. getServletContext() method of GenericServlet class returns the object of
ServletContext.
Syntax of getServletContext() method
public ServletContext getServletContext()
Example of getServletContext() method
//We can get the ServletContext object from ServletConfig object ServletContext application=getServletConfig().getServletContext(); //Another convenient way to get the ServletContext object ServletContext application=getServletContext();
ServletContext complete example: To get the initialization parameters
In this example we have two context initialization parameters (user name and user email) in
web.xml file and we are getting the value in Servlet using getInitParameter() method that
returns the value of given parameter.

JAVA NOTES SYMCA
Page 102 of 173
DemoServlet.java
import java.io.*;
importjavax.servlet.*;
importjavax.servlet.http.*;
publicclassDemoServletextendsHttpServlet{
publicvoiddoGet(HttpServletRequestrequest,HttpServletResponse response)
throwsServletException,IOException
{
response.setContentType("text/html");
PrintWriterpwriter=response.getWriter();
//ServletContext object creation
ServletContextscontext=getServletContext();
//fetching values of initialization parameters and printing it
StringuserName=scontext.getInitParameter("uname");
pwriter.println("User name is="+userName);
StringuserEmail=scontext.getInitParameter("email");
pwriter.println("Email Id is="+userEmail);
pwriter.close();
}
}
web.xml
<web-app>
<servlet>
<servlet-name>BeginnersBook</servlet-name>
<servlet-class>DemoServlet</servlet-class>
</servlet>
<context-param>
<param-name>uname</param-name>
<param-value>ChaitanyaSingh</param-value>
</context-param>
<context-param>
<param-name>email</param-name>
<param-value>[email protected]</param-value>
</context-param>
<servlet-mapping>
<servlet-name>BeginnersBook</servlet-name>
<url-pattern>/context</url-pattern>
</servlet-mapping>
</web-app>
Output:

JAVA NOTES SYMCA
Page 103 of 173
Q)Handling HTTP Request and response –GET /
POST method.
Handling GET and POST Requests
To handle HTTP requests in a servlet, extend the HttpServlet class and override the servlet
methods that handle the HTTP requests that your servlet supports. This lesson illustrates the
handling of GET and POST requests. The methods that handle these requests
are doGet and doPost.
Handling GET requests
Handling GET requests involves overriding the doGet method. The following example shows
the BookDetailServlet doing this. The methods discussed in the Requests and
Responses section are shown in bold.
public class BookDetailServlet extends HttpServlet { public void doGet (HttpServletRequest request, HttpServletResponse response) throwsServletException, IOException { ... // set content-type header before accessing the Writer response.setContentType("text/html"); PrintWriter out = response.getWriter(); // then write the response out.println("<html>" + "<head><title>Book Description</title></head>" + ...); //Get the identifier of the book to display String bookId = request.getParameter("bookId"); if (bookId != null) { // and the information about the book and print it ... } out.println("</body></html>"); out.close(); } ... }
The servlet extends the HttpServlet class and overrides the doGet method.
Within the doGet method, the getParameter method gets the servlet's expected argument.

JAVA NOTES SYMCA
Page 104 of 173
To respond to the client, the example doGet method uses a Writer from
the HttpServletResponse object to return text data to the client. Before accessing the writer,
the example sets the content-type header. At the end of the doGetmethod, after the response
has been sent, the Writer is closed.
Handling POST Requests
Handling POST requests involves overriding the doPost method. The following example
shows the ReceiptServlet doing this. Again, the methods discussed in the Requests and
Responses section are shown in bold.
public class ReceiptServlet extends HttpServlet { public void doPost(HttpServletRequest request, HttpServletResponse response) throwsServletException, IOException { ... // set content type header before accessing the Writer response.setContentType("text/html"); PrintWriter out = response.getWriter(); // then write the response out.println("<html>" + "<head><title> Receipt </title>" + ...); out.println("<h3>Thank you for purchasing your books from us " + request.getParameter("cardname") + ...); out.close(); } ... }
The servlet extends the HttpServlet class and overrides the doPost method.
Within the doPost method, the getParameter method gets the servlet's expected argument.
To respond to the client, the example doPost method uses a Writer from
the HttpServletResponse object to return text data to the client. Before accessing the writer
the example sets the content-type header. At the end of the doPostmethod, after the response
has been set, the Writer is closed.

JAVA NOTES SYMCA
Page 105 of 173
Q)RequestDispatcher in Servlet
The RequestDispatcher interface provides the facility of dispatching the request to another
resource it may be html, servlet or jsp. This interface can also be used to include the content
of another resource also. It is one of the way of servlet collaboration.
There are two methods defined in the RequestDispatcher interface.
Methods of RequestDispatcher interface
The RequestDispatcher interface provides two methods. They are:
1. public void forward(ServletRequestrequest,ServletResponse response)throws
ServletException,java.io.IOException:Forwards a request from a servlet to another
resource (servlet, JSP file, or HTML file) on the server.
2. public void include(ServletRequestrequest,ServletResponse response)throws
ServletException,java.io.IOException:Includes the content of a resource (servlet,
JSP page, or HTML file) in the response.
As you see in the above figure, response of second servlet is sent to the client. Response of
the first servlet is not displayed to the user.
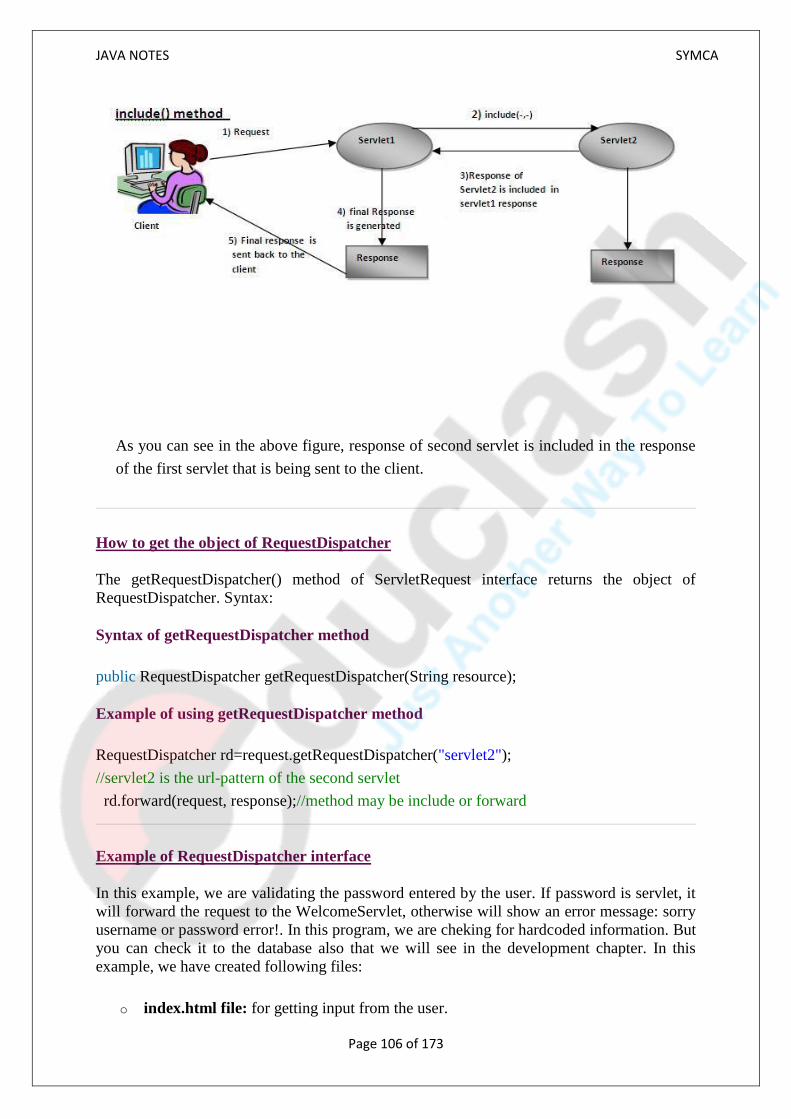
JAVA NOTES SYMCA
Page 106 of 173
As you can see in the above figure, response of second servlet is included in the response
of the first servlet that is being sent to the client.
How to get the object of RequestDispatcher
The getRequestDispatcher() method of ServletRequest interface returns the object of
RequestDispatcher. Syntax:
Syntax of getRequestDispatcher method
public RequestDispatcher getRequestDispatcher(String resource);
Example of using getRequestDispatcher method
RequestDispatcher rd=request.getRequestDispatcher("servlet2");
//servlet2 is the url-pattern of the second servlet
rd.forward(request, response);//method may be include or forward
Example of RequestDispatcher interface
In this example, we are validating the password entered by the user. If password is servlet, it
will forward the request to the WelcomeServlet, otherwise will show an error message: sorry
username or password error!. In this program, we are cheking for hardcoded information. But
you can check it to the database also that we will see in the development chapter. In this
example, we have created following files:
o index.html file: for getting input from the user.

JAVA NOTES SYMCA
Page 107 of 173
o Login.java file: a servlet class for processing the response. If password is servet, it
will forward the request to the welcome servlet.
o WelcomeServlet.java file: a servlet class for displaying the welcome message.
o web.xml file: a deployment descriptor file that contains the information about the
servlet.
index.html
<form action="servlet1" method="post">
Name:<input type="text" name="userName"/><br/>
Password:<input type="password" name="userPass"/><br/>
<input type="submit" value="login"/> </form>
Login.java
import java.io.*;
import javax.servlet.*;
import javax.servlet.http.*;
public class Login extends HttpServlet {
public void doPost(HttpServletRequest request, HttpServletResponse response)
throws ServletException, IOException {
JAVA NOTES SYMCA
Page 108 of 173
response.setContentType("text/html"); PrintWriter out = response.getWriter();
String n=request.getParameter("userName");
String p=request.getParameter("userPass");
if(p.equals("servlet"){
RequestDispatcher rd=request.getRequestDispatcher("servlet2"); rd.forward(request, response); }
else{
out.print("Sorry UserName or Password Error!");
RequestDispatcher rd=request.getRequestDispatcher("/index.html"); rd.include(request, response); } } }
WelcomeServlet.java
import java.io.*;
import javax.servlet.*;
import javax.servlet.http.*;
public class WelcomeServlet extends HttpServlet {
public void doPost(HttpServletRequest request, HttpServletResponse response)
throws ServletException, IOException {
response.setContentType("text/html"); PrintWriter out = response.getWriter();
String n=request.getParameter("userName");
out.print("Welcome "+n); } }
web.xml
<web-app> <servlet> <servlet-name>Login</servlet-name>
<servlet-class>Login</servlet-class> </servlet> <servlet> <servlet-name>WelcomeServlet</servlet-name>

JAVA NOTES SYMCA
Page 109 of 173
<servlet-class>WelcomeServlet</servlet-class> </servlet> <servlet-mapping> <servlet-name>Login</servlet-name> <url-pattern>/servlet1</url-pattern> </servlet-mapping> <servlet-mapping> <servlet-name>WelcomeServlet</servlet-name> <url-pattern>/servlet2</url-pattern> </servlet-mapping> <welcome-file-list> <welcome-file>index.html</welcome-file> </welcome-file-list> </web-app>

JAVA NOTES SYMCA
Page 110 of 173
Q)Cookies in Servlet
A cookie is a small piece of information that is persisted between the multiple client
requests.
A cookie has a name, a single value, and optional attributes such as a comment, path
and domain qualifiers, a maximum age, and a version number.
How Cookie works
By default, each request is considered as a new request. In cookies technique, we add cookie
with response from the servlet. So cookie is stored in the cache of the browser. After that if
request is sent by the user, cookie is added with request by default. Thus, we recognize the
user as the old user.

JAVA NOTES SYMCA
Page 111 of 173
Types of Cookie
There are 2 types of cookies in servlets.
1. Non-persistent cookie
2. Persistent cookie
Non-persistent cookie
It is valid for single session only. It is removed each time when user closes the browser.
Persistent cookie
It is valid for multiple session . It is not removed each time when user closes the browser. It
is removed only if user logout or signout.
Advantage of Cookies
1. Simplest technique of maintaining the state.
2. Cookies are maintained at client side.
Disadvantage of Cookies
1. It will not work if cookie is disabled from the browser.
2. Only textual information can be set in Cookie object.
Note: Gmail uses cookie technique for login. If you disable the cookie, gmail won't
work.
Cookie class
javax.servlet.http.Cookie class provides the functionality of using cookies. It provides a lot
of useful methods for cookies.

JAVA NOTES SYMCA
Page 112 of 173
Constructor of Cookie class
Constructor Description
Cookie() constructs a cookie.
Cookie(String name, String value) constructs a cookie with a specified name and value.
Useful Methods of Cookie class
There are given some commonly used methods of the Cookie class.
Method Description
public void setMaxAge(int expiry) Sets the maximum age of the cookie in seconds.
public String getName() Returns the name of the cookie. The name cannot be changed after creation.
public String getValue() Returns the value of the cookie.
public void setName(String name) changes the name of the cookie.
public void setValue(String value) changes the value of the cookie.
Other methods required for using Cookies
For adding cookie or getting the value from the cookie, we need some methods provided
by other interfaces. They are:
1. public void addCookie(Cookie ck):method of HttpServletResponse interface is
used to add cookie in response object.
2. public Cookie[] getCookies():method of HttpServletRequest interface is used to
return all the cookies from the browser.
How to create Cookie?
Let's see the simple code to create cookie.
1. Cookie ck=new Cookie("user","sonoo jaiswal");//creating cookie object
2. response.addCookie(ck);//adding cookie in the response

JAVA NOTES SYMCA
Page 113 of 173
How to delete Cookie?
Let's see the simple code to delete cookie. It is mainly used to logout or signout the user.
1. Cookie ck=new Cookie("user","");//deleting value of cookie
2. ck.setMaxAge(0);//changing the maximum age to 0 seconds
3. response.addCookie(ck);//adding cookie in the response
How to get Cookies?
Let's see the simple code to get all the cookies.
1. Cookie ck[]=request.getCookies();
2. for(int i=0;i<ck.length;i++){
3. out.print("<br>"+ck[i].getName()+" "+ck[i].getValue());//printing name and value of cookie
4. }
Simple example of Servlet Cookies
In this example, we are storing the name of the user in the cookie object and accessing it in
another servlet. As we know well that session corresponds to the particular user. So if you
access it from too many browsers with different values, you will get the different value.
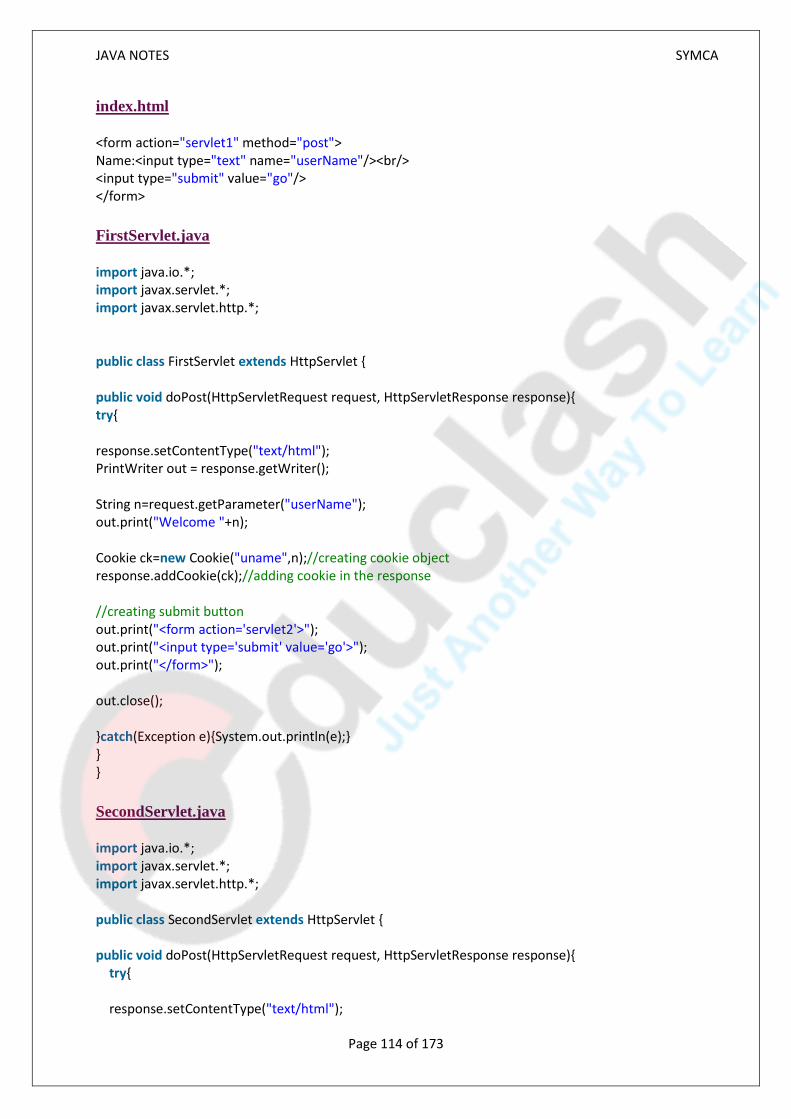
JAVA NOTES SYMCA
Page 114 of 173
index.html
<form action="servlet1" method="post"> Name:<input type="text" name="userName"/><br/> <input type="submit" value="go"/> </form>
FirstServlet.java
import java.io.*; import javax.servlet.*; import javax.servlet.http.*; public class FirstServlet extends HttpServlet { public void doPost(HttpServletRequest request, HttpServletResponse response){ try{ response.setContentType("text/html"); PrintWriter out = response.getWriter(); String n=request.getParameter("userName"); out.print("Welcome "+n); Cookie ck=new Cookie("uname",n);//creating cookie object response.addCookie(ck);//adding cookie in the response //creating submit button out.print("<form action='servlet2'>"); out.print("<input type='submit' value='go'>"); out.print("</form>"); out.close(); }catch(Exception e){System.out.println(e);} } }
SecondServlet.java
import java.io.*; import javax.servlet.*; import javax.servlet.http.*; public class SecondServlet extends HttpServlet { public void doPost(HttpServletRequest request, HttpServletResponse response){ try{ response.setContentType("text/html");

JAVA NOTES SYMCA
Page 115 of 173
PrintWriter out = response.getWriter(); Cookie ck[]=request.getCookies(); out.print("Hello "+ck[0].getValue()); out.close(); }catch(Exception e){System.out.println(e);} } }
web.xml
<web-app> <servlet> <servlet-name>s1</servlet-name> <servlet-class>FirstServlet</servlet-class> </servlet> <servlet-mapping> <servlet-name>s1</servlet-name> <url-pattern>/servlet1</url-pattern> </servlet-mapping> <servlet> <servlet-name>s2</servlet-name> <servlet-class>SecondServlet</servlet-class> </servlet> <servlet-mapping> <servlet-name>s2</servlet-name> <url-pattern>/servlet2</url-pattern> </servlet-mapping> </web-app>

JAVA NOTES SYMCA
Page 116 of 173

JAVA NOTES SYMCA
Page 117 of 173
Q)Servlets - Session Tracking
HTTP is a "stateless" protocol which means each time a client retrieves a Web page, the
client opens a separate connection to the Web server and the server automatically does not
keep any record of previous client request.
Still there are following three ways to maintain session between web client and web server −
There are four techniques used in Session tracking:
1. Cookies
2. Hidden Form Field
3. URL Rewriting
4. HttpSession
Cookies
A webserver can assign a unique session ID as a cookie to each web client and for
subsequent requests from the client they can be recognized using the recieved cookie.
This may not be an effective way because many time browser does not support a cookie, so I
would not recommend to use this procedure to maintain the sessions.
Hidden Form Fields
A web server can send a hidden HTML form field along with a unique session ID as follows
−
<input type = "hidden" name = "sessionid" value = "12345">
This entry means that, when the form is submitted, the specified name and value are
automatically included in the GET or POST data. Each time when web browser sends
request back, then session_id value can be used to keep the track of different web browsers.
This could be an effective way of keeping track of the session but clicking on a regular (<A
HREF...>) hypertext link does not result in a form submission, so hidden form fields also
cannot support general session tracking.
URL Rewriting
You can append some extra data on the end of each URL that identifies the session, and the
server can associate that session identifier with data it has stored about that session.

JAVA NOTES SYMCA
Page 118 of 173
For example, with http://tutorialspoint.com/file.htm;sessionid = 12345, the session identifier
is attached as sessionid = 12345 which can be accessed at the web server to identify the
client.
URL rewriting is a better way to maintain sessions and it works even when browsers don't
support cookies. The drawback of URL re-writing is that you would have to generate every
URL dynamically to assign a session ID, even in case of a simple static HTML page.
The HttpSession Object
Apart from the above mentioned three ways, servlet provides HttpSession Interface which
provides a way to identify a user across more than one page request or visit to a Web site
and to store information about that user.
The servlet container uses this interface to create a session between an HTTP client and an
HTTP server. The session persists for a specified time period, across more than one
connection or page request from the user.
You would get HttpSession object by calling the public method getSession()of
HttpServletRequest, as below −
HttpSession session =request.getSession();
You need to call request.getSession() before you send any document content to the client.
Here is a summary of the important methods available through HttpSession object −
Sr.No. Method & Description
1 public Object getAttribute(String name) This method returns the object bound with the specified name in this session, or null if no object is bound under the name.
2 public Enumeration getAttributeNames() This method returns an Enumeration of String objects containing the names of all the objects bound to this session.
3 public long getCreationTime() This method returns the time when this session was created, measured in milliseconds since midnight January 1, 1970 GMT.
4 public String getId() This method returns a string containing the unique identifier assigned to this session.
5 public long getLastAccessedTime() This method returns the last accessed time of the session, in the format of milliseconds since midnight January 1, 1970 GMT

JAVA NOTES SYMCA
Page 119 of 173
6 public intgetMaxInactiveInterval() This method returns the maximum time interval (seconds), that the servlet container will keep the session open between client accesses.
7 public void invalidate() This method invalidates this session and unbinds any objects bound to it.
8 public booleanisNew( This method returns true if the client does not yet know about the session or if the client chooses not to join the session.
9 public void removeAttribute(String name) This method removes the object bound with the specified name from this session.
10 public void setAttribute(String name, Object value) This method binds an object to this session, using the name specified.
11 public void setMaxInactiveInterval(int interval) This method specifies the time, in seconds, between client requests before the servlet container will invalidate this session.
Q)Diff betn Servlet and JSP
Servlet JSP
1 Servlet is faster than jsp JSP is slower than Servlet because it first translate into java code then compile.
2
In Servlet, if we modify the code then we need recompilation, reloading, restarting the server> It means it is time consuming process.
In JSP, if we do any modifications then just we need to click on refresh button and recompilation, reloading, restart the server is not required.
3 Servlet is a java code. JSP is tag based approach.
4 In Servlet, there is no such method for running JavaScript at client side.
In JSP, we can use the client side validations using running the JavaScript at client side.
5 To run a Servlet you have to make an entry of Servlet mapping into the deployment descriptor file i.e. web.xml file externally.
For running a JSP there is no need to make an entry of Servlet mapping into the web.xml file externally, you may or not make an entry for JSP file as welcome file list.
6 Coding of Servlet is harden than jsp. Coding of jsp is easier than Servlet because it is tag based.
7 In MVC pattern, Servlet plays a controller role.
In MVC pattern, JSP is used for showing output data i.e. in MVC it is a view.
8 Servlet accept all protocol request. JSP will accept only http protocol request.
9 In Servlet, aervice() method need to override.
In JSP no need to override service() method.

JAVA NOTES SYMCA
Page 120 of 173
10 In Servlet, by default session management is not enabled we need to enable explicitly.
In JSP, session management is automatically enabled.
11
In Servlet we do not have implicit object. It means if we want to use an object then we need to get object explicitly form the servlet.
In JSP, we have implicit object support.
12 In Servlet, we need to implement business logic, presentation logic combined.
In JSP, we can separate the business logic from the presentation logic by uses javaBean technology.
13 In Servlet, all package must be imported on top of the servlet.
In JSP, package imported anywhere top, middle and bottom.
Q) Difference Between GET and POST
GET POST
History Parameters remain in browser history because they are part of the URL
Parameters are not saved in browser history.
Bookmarked Can be bookmarked. Can not be bookmarked.
BACK button/re-submit behaviour
GET requests are re-executed but may not be re-submitted to server if the HTML is stored in the browser cache.
The browser usually alerts the user that data will need to be re-submitted.
Encoding type (enctype attribute)
application/x-www-form-urlencoded multipart/form-data or application/x-www-form-urlencoded Use multipart encoding for binary data.
Parameters can send but the parameter data is limited to what we can stuff into the request line (URL). Safest to use less than 2K of parameters, some servers handle up to 64K
Can send parameters, including uploading files, to the server.
Hacked Easier to hack for script kiddies More difficult to hack
Restrictions on form data type
Yes, only ASCII characters allowed. No restrictions. Binary data is also allowed.
Security GET is less secure compared to POST because data sent is part of the URL. So it's saved in browser history and server logs in plaintext.
POST is a little safer than GET because the parameters are not stored in browser history or in web server logs.
Restrictions on form data length
Yes, since form data is in the URL and URL length is restricted. A safe URL length limit is often 2048 characters but varies by browser and web server.
No restrictions

JAVA NOTES SYMCA
Page 121 of 173
Usability GET method should not be used when sending passwords or other sensitive information.
POST method used when sending passwords or other sensitive information.
Visibility GET method is visible to everyone (it will be displayed in the browser's address bar) and has limits on the amount of information to send.
POST method variables are not displayed in the URL.

JAVA NOTES SYMCA
Page 122 of 173
UNIT 11
WEB DEVELOPMENT USING JSP : -
Q.1) Introduction to JSP
JavaServer Pages (JSP) is a technology for developing Webpages that supports
dynamic content. This helps developers insert java code in HTML pages by making
use of special JSP tags, most of which start with <% and end with %>.
A JavaServer Pages component is a type of Java servlet that is designed to fulfill the
role of a user interface for a Java web application. Web developers write JSPs as text
files that combine HTML or XHTML code, XML elements, and embedded JSP
actions and commands.
Using JSP, you can collect input from users through Webpage forms, present records
from a database or another source, and create Webpages dynamically.
JSP tags can be used for a variety of purposes, such as retrieving information from a
database or registering user preferences, accessing JavaBeans components, passing
control between pages, and sharing information between requests, pages etc.
JSP technology is used to create dynamic web applications. JSP pages are easier to
maintain then a Servlet. JSP pages are opposite of Servlets as a servlet adds HTML
code inside Java code, while JSP adds Java code inside HTML using JSP tags.
Everything a Servlet can do, a JSP page can also do it.
JSP enables us to write HTML pages containing tags, inside which we can include
powerful Java programs. Using JSP, one can easily separate Presentation and
Business logic as a web designer can design and update JSP pages creating the
presentation layer and java developer can write server side complex computational
code without concerning the web design. And both the layers can easily interact over
HTTP requests.
In the end a JSP becomes a Servlet
JSP pages are converted into Servlet by the Web Container. The Container translates a JSP
page into servlet class source(.java) file and then compiles into a Java Servlet class.

JAVA NOTES SYMCA
Page 123 of 173
Why JSP is preffered over servlets?
JSP provides an easier way to code dynamic web pages.
JSP does not require additional files like, java class files, web.xml etc
Any change in the JSP code is handled by Web Container(Application server like tomcat), and doesn't require re-compilation.
JSP pages can be directly accessed, and web.xml mapping is not required like in servlets.
There are five different types of scripting elements
Scripting Element Example
Comment <%-- comment --%>
Directive <%@ directive %>
Declaration <%! declarations %>
Scriptlet <% scriplets %>
Expression <%= expression %>
Why Use JSP?
JavaServer Pages often serve the same purpose as programs implemented using
the Common Gateway Interface (CGI). But JSP offers several advantages in comparison
with the CGI.
Performance is significantly better because JSP allows embedding Dynamic Elements
in HTML Pages itself instead of having separate CGI files.
JSP are always compiled before they are processed by the server unlike CGI/Perl
which requires the server to load an interpreter and the target script each time the
page is requested.

JAVA NOTES SYMCA
Page 124 of 173
JavaServer Pages are built on top of the Java Servlets API, so like Servlets, JSP also
has access to all the powerful Enterprise Java APIs, including JDBC, JNDI, EJB,
JAXP, etc.
JSP pages can be used in combination with servlets that handle the business logic, the
model supported by Java servlet template engines.
Finally, JSP is an integral part of Java EE, a complete platform for enterprise class
applications. This means that JSP can play a part in the simplest applications to the most
complex and demanding.
Advantages of JSP
Following table lists out the other advantages of using JSP over other technologies −
vs. Active Server Pages (ASP)
The advantages of JSP are twofold. First, the dynamic part is written in Java, not Visual
Basic or other MS specific language, so it is more powerful and easier to use. Second, it is
portable to other operating systems and non-Microsoft Web servers.
vs. Pure Servlets
It is more convenient to write (and to modify!) regular HTML than to have plenty of println
statements that generate the HTML.
vs. Server-Side Includes (SSI)
SSI is really only intended for simple inclusions, not for "real" programs that use form data,
make database connections, and the like.
vs. JavaScript
JavaScript can generate HTML dynamically on the client but can hardly interact with the
web server to perform complex tasks like database access and image processing etc.
vs. Static HTML
Regular HTML, of course, cannot contain dynamic information.

JAVA NOTES SYMCA
Page 125 of 173
Q.2) what is JSP Architecture?
The web server needs a JSP engine, i.e, a container to process JSP pages. The JSP container
is responsible for intercepting requests for JSP pages. This tutorial makes use of Apache
which has built-in JSP container to support JSP pages development.
A JSP container works with the Web server to provide the runtime environment and other
services a JSP needs. It knows how to understand the special elements that are part of JSPs.
Following diagram shows the position of JSP container and JSP files in a Web application.
JSP Processing
The following steps explain how the web server creates the Webpage using JSP −
As with a normal page, your browser sends an HTTP request to the web server.
The web server recognizes that the HTTP request is for a JSP page and forwards it to
a JSP engine. This is done by using the URL or JSP page which ends
with .jsp instead of .html.
The JSP engine loads the JSP page from disk and converts it into a servlet content.
This conversion is very simple in which all template text is converted to println( )
statements and all JSP elements are converted to Java code. This code implements
the corresponding dynamic behavior of the page.
The JSP engine compiles the servlet into an executable class and forwards the
original request to a servlet engine.

JAVA NOTES SYMCA
Page 126 of 173
A part of the web server called the servlet engine loads the Servlet class and executes
it. During execution, the servlet produces an output in HTML format. The output is
furthur passed on to the web server by the servlet engine inside an HTTP response.
The web server forwards the HTTP response to your browser in terms of static
HTML content.
Finally, the web browser handles the dynamically-generated HTML page inside the
HTTP response exactly as if it were a static page.
All the above mentioned steps can be seen in the following diagram −
Typically, the JSP engine checks to see whether a servlet for a JSP file already exists and
whether the modification date on the JSP is older than the servlet. If the JSP is older than its
generated servlet, the JSP container assumes that the JSP hasn't changed and that the
generated servlet still matches the JSP's contents. This makes the process more efficient than
with the other scripting languages (such as PHP) and therefore faster.
So in a way, a JSP page is really just another way to write a servlet without having to be a
Java programming wiz. Except for the translation phase, a JSP page is handled exactly like a
regular servlet.

JAVA NOTES SYMCA
Page 127 of 173
Q.3) JSP - Lifecycle
A JSP life cycle is defined as the process from its creation till the destruction. This is similar
to a servlet life cycle with an additional step which is required to compile a JSP into servlet.
Paths Followed By JSP
The following are the paths followed by a JSP −
Compilation
Initialization
Execution
Cleanup
The four major phases of a JSP life cycle are very similar to the Servlet Life Cycle.
The four phases have been described below −
JSP Compilation
When a browser asks for a JSP, the JSP engine first checks to see whether it needs to
compile the page. If the page has never been compiled, or if the JSP has been modified since
it was last compiled, the JSP engine compiles the page.
The compilation process involves three steps −
Parsing the JSP.

JAVA NOTES SYMCA
Page 128 of 173
Turning the JSP into a servlet.
Compiling the servlet.
JSP Initialization
When a container loads a JSP it invokes the jspInit() method before servicing any requests.
If you need to perform JSP-specific initialization, override the jspInit() method −
publicvoid jspInit(){
// Initialization code...
}
Typically, initialization is performed only once and as with the servlet init method, you
generally initialize database connections, open files, and create lookup tables in the jspInit
method.
JSP Execution
This phase of the JSP life cycle represents all interactions with requests until the JSP is
destroyed.
Whenever a browser requests a JSP and the page has been loaded and initialized, the JSP
engine invokes the _jspService() method in the JSP.
The _jspService() method takes an HttpServletRequest and an HttpServletResponse as its
parameters as follows −
void _jspService(HttpServletRequest request,HttpServletResponse response){
// Service handling code...
}
The _jspService() method of a JSP is invoked on request basis. This is responsible for
generating the response for that request and this method is also responsible for generating
responses to all seven of the HTTP methods, i.e, GET, POST, DELETE, etc.
JSP Cleanup
The destruction phase of the JSP life cycle represents when a JSP is being removed from use
by a container.
The jspDestroy() method is the JSP equivalent of the destroy method for servlets. Override
jspDestroy when you need to perform any cleanup, such as releasing database connections
or closing open files.

JAVA NOTES SYMCA
Page 129 of 173
The jspDestroy() method has the following form −
publicvoid jspDestroy(){
// Your cleanup code goes here.
Q.4) JSP – Directives
A JSP directive affects the overall structure of the servlet class. It usually has the following
form −
<%@ directive attribute = "value" %>
Directives can have a number of attributes which you can list down as key-value pairs and
separated by commas.
The blanks between the @ symbol and the directive name, and between the last attribute and
the closing %>, are optional.
There are three types of directive tag –
S.No. Directive & Description
1 <%@ page ... %> Defines page-dependent attributes, such as scripting language, error page, and buffering requirements.
2 <%@ include ... %> Includes a file during the translation phase.
3 <%@ taglib ... %> Declares a tag library, containing custom actions, used in the page
JSP - The page Directive
The page directive is used to provide instructions to the container. These instructions pertain
to the current JSP page. You may code page directives anywhere in your JSP page. By
convention, page directives are coded at the top of the JSP page.
Following is the basic syntax of the page directive −
<%@ page attribute = "value" %>
You can write the XML equivalent of the above syntax as follows −

JAVA NOTES SYMCA
Page 130 of 173
<jsp:directive.page attribute = "value" />
Attributes
Following table lists out the attributes associated with the page directive −
S.No. Attribute & Purpose
1 buffer Specifies a buffering model for the output stream.
2 autoFlush Controls the behavior of the servlet output buffer.
3 contentType Defines the character encoding scheme.
4 errorPage Defines the URL of another JSP that reports on Java unchecked runtime exceptions.
5 isErrorPage Indicates if this JSP page is a URL specified by another JSP page's errorPage attribute.
6 extends Specifies a superclass that the generated servlet must extend.
7 import Specifies a list of packages or classes for use in the JSP as the Java import statement does for Java classes.
8 info Defines a string that can be accessed with the servlet's getServletInfo() method.
9 isThreadSafe Defines the threading model for the generated servlet.
10 language Defines the programming language used in the JSP page.
11 session Specifies whether or not the JSP page participates in HTTP sessions
12 isELIgnored Specifies whether or not the EL expression within the JSP page will be ignored.
13 isScriptingEnabled Determines if the scripting elements are allowed for use.

JAVA NOTES SYMCA
Page 131 of 173
The include Directive
The include directive is used to include a file during the translation phase. This directive
tells the container to merge the content of other external files with the current JSP during the
translation phase. You may code the includedirectives anywhere in your JSP page.
The general usage form of this directive is as follows −
<%@ include file = "relative url" >
The filename in the include directive is actually a relative URL. If you just specify a
filename with no associated path, the JSP compiler assumes that the file is in the same
directory as your JSP.
You can write the XML equivalent of the above syntax as follows −
<jsp:directive.include file = "relative url" />
The taglib Directive
The JavaServer Pages API allow you to define custom JSP tags that look like HTML or
XML tags and a tag library is a set of user-defined tags that implement custom behavior.
The taglib directive declares that your JSP page uses a set of custom tags, identifies the
location of the library, and provides means for identifying the custom tags in your JSP page.
The taglib directive follows the syntax given below −
<%@ taglib uri="uri" prefix = "prefixOfTag" >
Here, the uri attribute value resolves to a location the container understands and
the prefix attribute informs a container what bits of markup are custom actions.
You can write the XML equivalent of the above syntax as follows −
<jsp:directive.taglib uri = "uri" prefix = "prefixOfTag" />
Q) What are JSP scripting elements?
JSP scripting elements enable you insert Java code into the servlet that will be generated
from the current JSP page. There are three forms:
Expressions of the form <%= expression%> that are evaluated and inserted into output,
Scriptlets of the form <% code %> that are inserted into the servlets service method, and

JAVA NOTES SYMCA
Page 132 of 173
Declarations of the form <%! code %> that are inserted into the body of the servlet class,
outside of any existing methods.
Expression
The Expression element contains a Java expression that returns a value. This value is then
written to the HTML page. The Expression tag can contain any expression that is valid
according to the Java Language Specification. This includes variables, method calls than
return values or any object that contains a toString() method.
Syntax
<%= Java expression %>
The Java expression is evaluated, converted to a string, and inserted in the page. This
evaluation is performed at run-time (when the page is requested), and thus has full access to
information about the request. For example, the following shows the client host name and
the date/time that the page was requested:
<html>
...
<body>
Your hostname : <%=request.getRemoteHost()%><br>
Current time : <%= new java.util.Date() %>
...
</body>
</html>
Finally, note that XML authors can use an alternative syntax for JSP expressions:
<jsp:expression>
Java Expression
</jsp:expression>
Remember that XML elements, unlike HTML ones, are case sensitive. So be sure to use
lowercase.
Scriptlet
The scriptlet can contain any number of language statements, variable or method
declarations, or expressions that are valid in the page scripting language.
Within a scriptlet, you can do any of the following:
Declare variables or methods to use later in the JSP page.
Write expressions valid in the page scripting language.

JAVA NOTES SYMCA
Page 133 of 173
Use any of the implicit objects or any object declared with a <jsp:useBean> element.
Write any other statement valid in the scripting language used in the JSP page.
Any text, HTML tags, or JSP elements you write must be outside the scriptlet. For example,
<HTML>
<BODY>
<%
// This scriptlet declares and initializes "date"
java.util.Date date = new java.util.Date();
%>
Hello! The time is now
<%
out.println( date );
out.println( "<BR>Your machine's address is " );
out.println( request.getRemoteHost());
%>
</BODY>
</HTML>
Scriptlets are executed at request time, when the JSP container processes the request. If the
scriptlet produces output, the output is stored in the out object.
If you want to use the characters "%>" inside a scriptlet, enter "%\>" instead. Finally, note
that the XML equivalent of <% Code %> is
<jsp:scriptlet>
Code
</jsp:scriptlet>
Declaration
A declaration can consist of either methods or variables, static constants are a good example
of what to put in a declaration.
The JSP you write turns into a class definition. All the scriptlets you write are placed inside
a single method of this class. You can also add variable and method declarations to this
class. You can then use these variables and methods from your scriptlets and expressions.
You can use declarations to declare one or more variables and methods at the class level of
the compiled servlet. The fact that they are declared at class level rather than in the body of
the page is significant. The class members (variables and methods) can then be used by Java
code in the rest of the page.
Syntax
<%! declaration; [ declaration;]+...%>

JAVA NOTES SYMCA
Page 134 of 173
When you write a declaration in a JSP page, remember these rules:
You must end the declaration with a semicolon (the same rule as for a Scriptlet, but the
opposite of an Expression).
<% int i = 0;%>
You can already use variables or methods that are declared in packages imported by the page
directive, without declaring them in a declaration element.
You can declare any number of variables or methods within one declaration element, as long
as you end each declaration with a semicolon. The declaration must be valid in the Java
programming language.
<% int i = 0; long l = 5L; %>
For example,
<%@ page import="java.util.*" %>
<HTML>
<BODY>
<%!
Date getDate()
{
System.out.println( "In getDate() method" );
return new Date();
}
%>
Hello! The time is now <%= getDate() %>
</BODY>
</HTML>
A declaration has translation unit scope, so it is valid in the JSP page and any of its static
include files. A static include file becomes part of the source of the JSP page and is any file
included with an include directive or a static resouce included with a <jsp:include> element.
The scope of a declaration does not include dynamic resources included with <jsp:include>.
As with scriptlets, if you want to use the characters "%>", enter "%\>" instead. Finally, note
that the XML equivalent of <%! Code %> is
<jsp:declaration>
Code
</jsp:declaration>
Q) Default objects in JSP
Note:
Default obj ko he implicit obj bolte hai..
In this chapter, we will discuss the Implicit Objects in JSP. These Objects are the Java
objects that the JSP Container makes available to the developers in each page and the
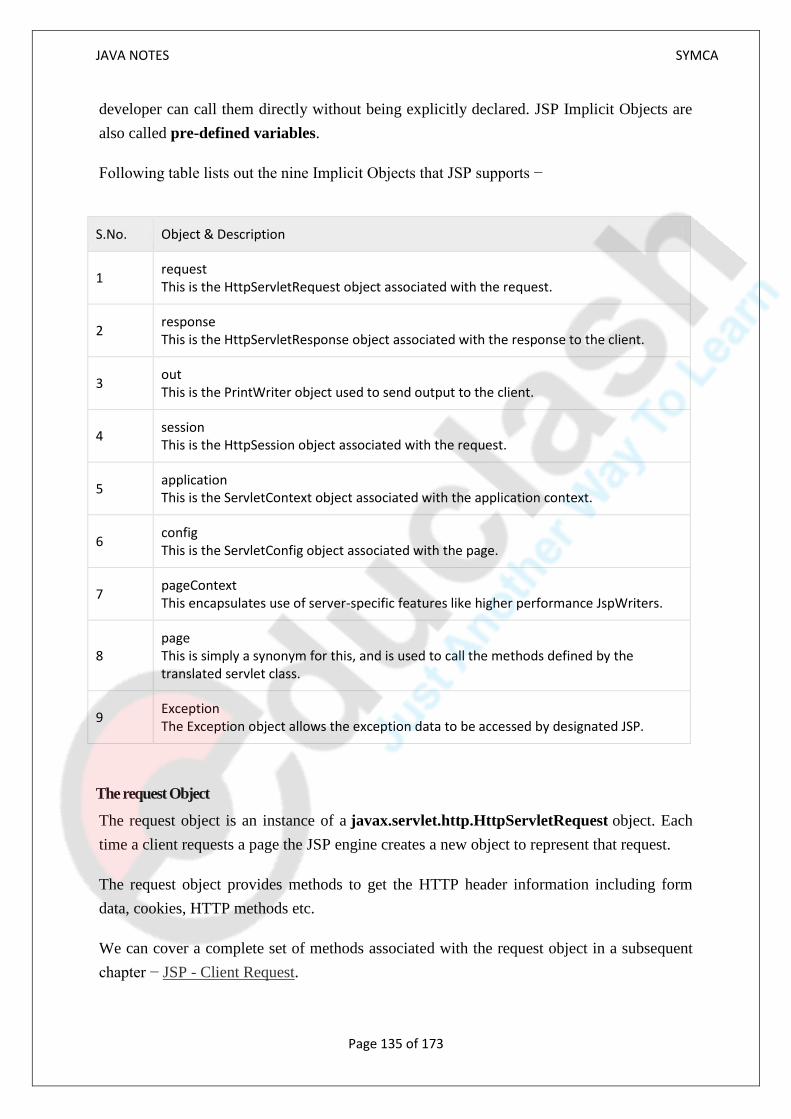
JAVA NOTES SYMCA
Page 135 of 173
developer can call them directly without being explicitly declared. JSP Implicit Objects are
also called pre-defined variables.
Following table lists out the nine Implicit Objects that JSP supports −
S.No. Object & Description
1 request This is the HttpServletRequest object associated with the request.
2 response This is the HttpServletResponse object associated with the response to the client.
3 out This is the PrintWriter object used to send output to the client.
4 session This is the HttpSession object associated with the request.
5 application This is the ServletContext object associated with the application context.
6 config This is the ServletConfig object associated with the page.
7 pageContext This encapsulates use of server-specific features like higher performance JspWriters.
8 page This is simply a synonym for this, and is used to call the methods defined by the translated servlet class.
9 Exception The Exception object allows the exception data to be accessed by designated JSP.
The request Object
The request object is an instance of a javax.servlet.http.HttpServletRequest object. Each
time a client requests a page the JSP engine creates a new object to represent that request.
The request object provides methods to get the HTTP header information including form
data, cookies, HTTP methods etc.
We can cover a complete set of methods associated with the request object in a subsequent
chapter − JSP - Client Request.

JAVA NOTES SYMCA
Page 136 of 173
The response Object
The response object is an instance of a javax.servlet.http.HttpServletResponse object. Just
as the server creates the request object, it also creates an object to represent the response to
the client.
The response object also defines the interfaces that deal with creating new HTTP headers.
Through this object the JSP programmer can add new cookies or date stamps, HTTP status
codes, etc.
We will cover a complete set of methods associated with the response object in a subsequent
chapter − JSP - Server Response.
The out Object
The out implicit object is an instance of a javax.servlet.jsp.JspWriter object and is used to
send content in a response.
The initial JspWriter object is instantiated differently depending on whether the page is
buffered or not. Buffering can be easily turned off by using the buffered = 'false' attribute
of the page directive.
The JspWriter object contains most of the same methods as the java.io.PrintWriter class.
However, JspWriter has some additional methods designed to deal with buffering. Unlike
the PrintWriter object, JspWriter throws IOExceptions.
Following table lists out the important methods that we will use to write boolean char, int,
double, object, String, etc.
S.No. Method & Description
1 out.print(dataType dt) Print a data type value
2 out.println(dataType dt) Print a data type value then terminate the line with new line character.
3 out.flush() Flush the stream.
The session Object
The session object is an instance of javax.servlet.http.HttpSession and behaves exactly the
same way that session objects behave under Java Servlets.

JAVA NOTES SYMCA
Page 137 of 173
The session object is used to track client session between client requests. We will cover the
complete usage of session object in a subsequent chapter − JSP - Session Tracking.
The application Object
The application object is direct wrapper around the ServletContext object for the generated
Servlet and in reality an instance of a javax.servlet.ServletContext object.
This object is a representation of the JSP page through its entire lifecycle. This object is
created when the JSP page is initialized and will be removed when the JSP page is removed
by the jspDestroy() method.
By adding an attribute to application, you can ensure that all JSP files that make up your
web application have access to it.
We will check the use of Application Object in JSP - Hits Counter chapter.
The config Object
The config object is an instantiation of javax.servlet.ServletConfig and is a direct wrapper
around the ServletConfig object for the generated servlet.
This object allows the JSP programmer access to the Servlet or JSP engine initialization
parameters such as the paths or file locations etc.
The following config method is the only one you might ever use, and its usage is trivial −
config.getServletName();
This returns the servlet name, which is the string contained in the <servlet-name> element
defined in the WEB-INF\web.xml file.
The pageContext Object
The pageContext object is an instance of a javax.servlet.jsp.PageContextobject. The
pageContext object is used to represent the entire JSP page.
This object is intended as a means to access information about the page while avoiding most
of the implementation details.
This object stores references to the request and response objects for each request.
The application, config, session, and out objects are derived by accessing attributes of this
object.
The pageContext object also contains information about the directives issued to the JSP
page, including the buffering information, the errorPageURL, and page scope.

JAVA NOTES SYMCA
Page 138 of 173
The PageContext class defines several fields, including PAGE_SCOPE,
REQUEST_SCOPE, SESSION_SCOPE, and APPLICATION_SCOPE, which identify
the four scopes. It also supports more than 40 methods, about half of which are inherited
from the javax.servlet.jsp.JspContext class.
One of the important methods is removeAttribute. This method accepts either one or two
arguments. For example, pageContext.removeAttribute ("attrName") removes the
attribute from all scopes, while the following code only removes it from the page scope −
pageContext.removeAttribute("attrName", PAGE_SCOPE);
The use of pageContext can be checked in JSP - File Uploading chapter.
The page Object
This object is an actual reference to the instance of the page. It can be thought of as an object
that represents the entire JSP page.
The page object is really a direct synonym for the this object.
The exception Object
The exception object is a wrapper containing the exception thrown from the previous page.
It is typically used to generate an appropriate response to the error condition.
Q) JSP Actions
In this chapter, we will discuss Actions in JSP. These actions use constructs in XML syntax
to control the behavior of the servlet engine. You can dynamically insert a file, reuse
JavaBeans components, forward the user to another page, or generate HTML for the Java
plugin.
There is only one syntax for the Action element, as it conforms to the XML standard −
<jsp:action_name attribute = "value" />
Action elements are basically predefined functions. The following table lists out the
available JSP actions −
S.No. Syntax & Purpose
1 jsp:include Includes a file at the time the page is requested.
2 jsp:useBean Finds or instantiates a JavaBean.

JAVA NOTES SYMCA
Page 139 of 173
3 jsp:setProperty Sets the property of a JavaBean.
4 jsp:getProperty Inserts the property of a JavaBean into the output.
5 jsp:forward Forwards the requester to a new page.
6 jsp:plugin Generates browser-specific code that makes an OBJECT or EMBED tag for the Java plugin.
7 jsp:element Defines XML elements dynamically.
8 jsp:attribute Defines dynamically-defined XML element's attribute.
9 jsp:body Defines dynamically-defined XML element's body.
10 jsp:text Used to write template text in JSP pages and documents.
Common Attributes
There are two attributes that are common to all Action elements: the idattribute and
the scope attribute.
Id attribute
The id attribute uniquely identifies the Action element, and allows the action to be
referenced inside the JSP page. If the Action creates an instance of an object, the id value
can be used to reference it through the implicit object PageContext.
Scope attribute
This attribute identifies the lifecycle of the Action element. The id attribute and the scope
attribute are directly related, as the scope attribute determines the lifespan of the object
associated with the id. The scope attribute has four possible values: (a) page, (b)request,
(c)session, and (d) application.
The <jsp:include> Action
This action lets you insert files into the page being generated. The syntax looks like this −
<jsp:include page = "relative URL" flush = "true" />

JAVA NOTES SYMCA
Page 140 of 173
Unlike the include directive, which inserts the file at the time the JSP page is translated into
a servlet, this action inserts the file at the time the page is requested.
Following table lists out the attributes associated with the include action −
S.No. Attribute & Description
1 page The relative URL of the page to be included.
2 flush The boolean attribute determines whether the included resource has its buffer flushed before it is included.
Example
Let us define the following two files (a)date.jsp and (b) main.jsp as follows −
Following is the content of the date.jsp file −
<p>Today's date: <%=(new java.util.Date()).toLocaleString()%></p>
Following is the content of the main.jsp file −
<html>
<head>
<title>The include Action Example</title>
</head>
<body>
<center>
<h2>The include action Example</h2>
<jsp:includepage="date.jsp"flush="true"/>
</center>
</body>
</html>
Let us now keep all these files in the root directory and try to access main.jsp. You will
receive the following output −
The include action Example
Today's date: 12-Sep-2010 14:54:22
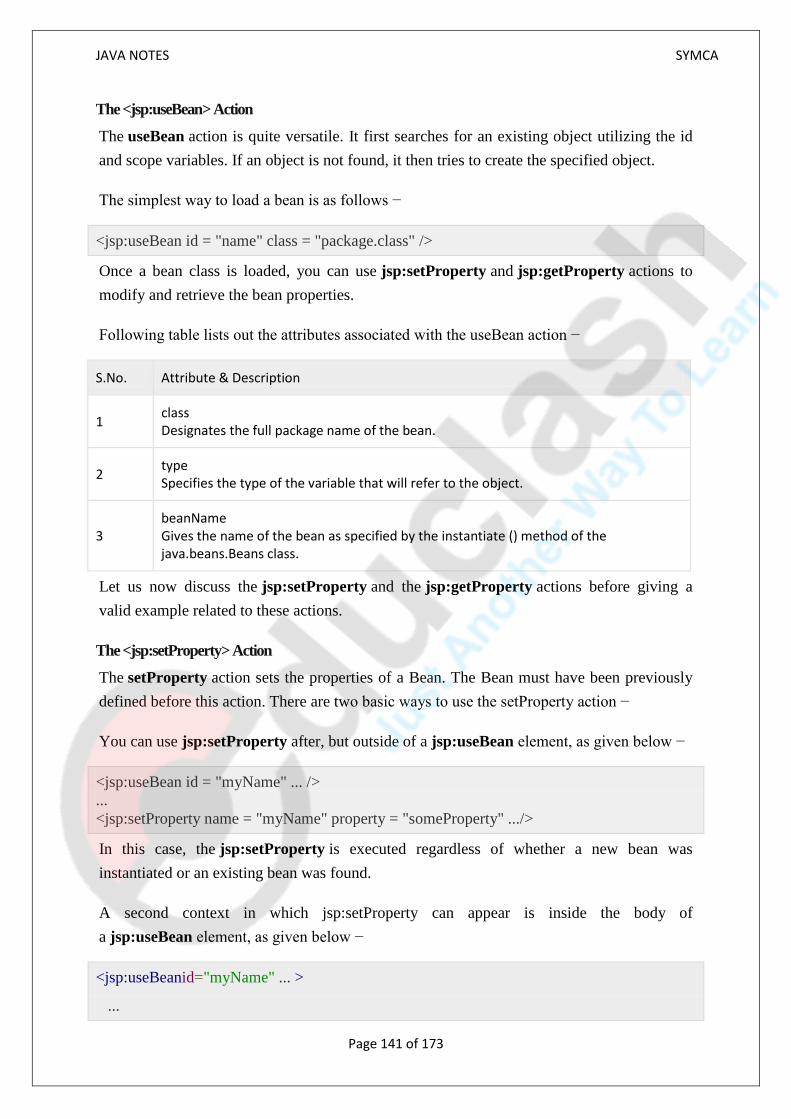
JAVA NOTES SYMCA
Page 141 of 173
The <jsp:useBean> Action
The useBean action is quite versatile. It first searches for an existing object utilizing the id
and scope variables. If an object is not found, it then tries to create the specified object.
The simplest way to load a bean is as follows −
<jsp:useBean id = "name" class = "package.class" />
Once a bean class is loaded, you can use jsp:setProperty and jsp:getProperty actions to
modify and retrieve the bean properties.
Following table lists out the attributes associated with the useBean action −
S.No. Attribute & Description
1 class Designates the full package name of the bean.
2 type Specifies the type of the variable that will refer to the object.
3 beanName Gives the name of the bean as specified by the instantiate () method of the java.beans.Beans class.
Let us now discuss the jsp:setProperty and the jsp:getProperty actions before giving a
valid example related to these actions.
The <jsp:setProperty> Action
The setProperty action sets the properties of a Bean. The Bean must have been previously
defined before this action. There are two basic ways to use the setProperty action −
You can use jsp:setProperty after, but outside of a jsp:useBean element, as given below −
<jsp:useBean id = "myName" ... />
...
<jsp:setProperty name = "myName" property = "someProperty" .../>
In this case, the jsp:setProperty is executed regardless of whether a new bean was
instantiated or an existing bean was found.
A second context in which jsp:setProperty can appear is inside the body of
a jsp:useBean element, as given below −
<jsp:useBeanid="myName" ... >
...

JAVA NOTES SYMCA
Page 142 of 173
<jsp:setPropertyname="myName"property="someProperty" .../>
</jsp:useBean>
Here, the jsp:setProperty is executed only if a new object was instantiated, not if an existing
one was found.
Following table lists out the attributes associated with the setProperty action −
S.No. Attribute & Description
1 name Designates the bean the property of which will be set. The Bean must have been previously defined.
2
property Indicates the property you want to set. A value of "*" means that all request parameters whose names match bean property names will be passed to the appropriate setter methods.
3 value The value that is to be assigned to the given property. The the parameter's value is null, or the parameter does not exist, the setProperty action is ignored.
4 param The param attribute is the name of the request parameter whose value the property is to receive. You can't use both value and param, but it is permissible to use neither.
The <jsp:getProperty> Action
The getProperty action is used to retrieve the value of a given property and converts it to a
string, and finally inserts it into the output.
The getProperty action has only two attributes, both of which are required. The syntax of the
getProperty action is as follows −
<jsp:useBeanid="myName" ... />
...
<jsp:getPropertyname="myName"property="someProperty" .../>

JAVA NOTES SYMCA
Page 143 of 173
Following table lists out the required attributes associated with the getProperty action −
S.No. Attribute & Description
1 name The name of the Bean that has a property to be retrieved. The Bean must have been previously defined.
2 property The property attribute is the name of the Bean property to be retrieved.
Example
Let us define a test bean that will further be used in our example −
/* File: TestBean.java */
package action;
publicclassTestBean{
privateString message ="No message specified";
publicString getMessage(){
return(message);
}
publicvoid setMessage(String message){
this.message = message;
}
}
Compile the above code to the generated TestBean.class file and make sure that you copied
the TestBean.class in C:\apache-tomcat-7.0.2\webapps\WEB-INF\classes\action folder
and the CLASSPATHvariable should also be set to this folder −
Now use the following code in main.jsp file. This loads the bean and sets/gets a simple
String parameter −
<html>
<head>
<title>Using JavaBeans in JSP</title>
</head>
<body>
<center>
<h2>Using JavaBeans in JSP</h2>
<jsp:useBeanid="test"class="action.TestBean"/>
<jsp:setPropertyname="test"property="message"
value="Hello JSP..."/>
<p>Got message....</p>

JAVA NOTES SYMCA
Page 144 of 173
<jsp:getPropertyname="test"property="message"/>
</center>
</body>
</html>
Let us now try to access main.jsp, it would display the following result −
Using JavaBeans in JSP
Got message....
Hello JSP...
The <jsp:forward> Action
The forward action terminates the action of the current page and forwards the request to
another resource such as a static page, another JSP page, or a Java Servlet.
Following is the syntax of the forward action −
<jsp:forward page = "Relative URL" />
Following table lists out the required attributes associated with the forward action −
S.No. Attribute & Description
1 page Should consist of a relative URL of another resource such as a static page, another JSP page, or a Java Servlet.
Example
Let us reuse the following two files (a) date.jsp and (b) main.jsp as follows −
Following is the content of the date.jsp file −
<p>Today's date: <%=(new java.util.Date()).toLocaleString()%></p>
Following is the content of the main.jsp file −
<html>
<head>
<title>The include Action Example</title>
</head>
<body>
<center>
<h2>The include action Example</h2>

JAVA NOTES SYMCA
Page 145 of 173
<jsp:forwardpage="date.jsp"/>
</center>
</body>
</html>
Let us now keep all these files in the root directory and try to access main.jsp. This would
display result something like as below.
Here it discarded the content from the main page and displayed the content from forwarded
page only.
Today's date: 12-Sep-2010 14:54:22
The <jsp:plugin> Action
The plugin action is used to insert Java components into a JSP page. It determines the type
of browser and inserts the <object> or <embed> tags as needed.
If the needed plugin is not present, it downloads the plugin and then executes the Java
component. The Java component can be either an Applet or a JavaBean.
The plugin action has several attributes that correspond to common HTML tags used to
format Java components. The <param> element can also be used to send parameters to the
Applet or Bean.
Following is the typical syntax of using the plugin action −
<jsp:plugintype="applet"codebase="dirname"code="MyApplet.class"
width="60"height="80">
<jsp:paramname="fontcolor"value="red"/>
<jsp:paramname="background"value="black"/>
<jsp:fallback>
Unable to initialize Java Plugin
</jsp:fallback>
</jsp:plugin>
You can try this action using some applet if you are interested. A new element,
the <fallback> element, can be used to specify an error string to be sent to the user in case
the component fails.

JAVA NOTES SYMCA
Page 146 of 173
The <jsp:element> Action
The <jsp:attribute> Action
The <jsp:body> Action
The <jsp:element>, <jsp:attribute> and <jsp:body> actions are used to define XML
elements dynamically. The word dynamically is important, because it means that the XML
elements can be generated at request time rather than statically at compile time.
Following is a simple example to define XML elements dynamically −
<%@page language ="java" contentType ="text/html"%>
<htmlxmlns="http://www.w3c.org/1999/xhtml"
xmlns:jsp="http://java.sun.com/JSP/Page">
<head><title>Generate XML Element</title></head>
<body>
<jsp:elementname="xmlElement">
<jsp:attributename="xmlElementAttr">
Value for the attribute
</jsp:attribute>
<jsp:body>
Body for XML element
</jsp:body>
</jsp:element>
</body>
</html>
This would produce the following HTML code at run time −
<htmlxmlns="http://www.w3c.org/1999/xhtml"xmlns:jsp="http://java.sun.com/JSP/Page">
<head><title>Generate XML Element</title></head>
<body>
<xmlElementxmlElementAttr="Value for the attribute">
Body for XML element </xmlElement>
</body>
</html>

JAVA NOTES SYMCA
Page 147 of 173
The <jsp:text> Action
The <jsp:text> action can be used to write the template text in JSP pages and documents.
Following is the simple syntax for this action −
<jsp:text>Template data</jsp:text>
The body of the template cannot contain other elements; it can only contain text and EL
expressions (Note − EL expressions are explained in a subsequent chapter). Note that in
XML files, you cannot use expressions such as ${whatever > 0}, because the greater than
signs are illegal. Instead, use the gt form, such as ${whatever gt 0} or an alternative is to
embed the value in a CDATA section.
<jsp:text><![CDATA[<br>]]></jsp:text>
If you need to include a DOCTYPE declaration, for instance for XHTML, you must also
use the <jsp:text> element as follows −
<jsp:text><![CDATA[<!DOCTYPE html PUBLIC "-//W3C//DTD XHTML 1.0
Strict//EN"
"DTD/xhtml1-strict.dtd">]]></jsp:text>
<head><title>jsp:text action</title></head>
<body>
<books><book><jsp:text>
Welcome to JSP Programming
</jsp:text></book></books>
</body>
</html>
Q) JSP with beans
A JavaBean is a specially constructed Java class written in the Java and coded according to
the JavaBeans API specifications.
Following are the unique characteristics that distinguish a JavaBean from other Java classes
−
It provides a default, no-argument constructor.
It should be serializable and that which can implement the Serializable interface.
It may have a number of properties which can be read or written.
It may have a number of "getter" and "setter" methods for the properties.
JavaBeans Properties
A JavaBean property is a named attribute that can be accessed by the user of the object. The
attribute can be of any Java data type, including the classes that you define.

JAVA NOTES SYMCA
Page 148 of 173
A JavaBean property may be read, write, read only, or write only. JavaBean properties are
accessed through two methods in the JavaBean's implementation class −
S.No. Method & Description
1 getPropertyName() For example, if property name is firstName, your method name would be getFirstName() to read that property. This method is called accessor.
2 setPropertyName() For example, if property name is firstName, your method name would be setFirstName() to write that property. This method is called mutator.
A read-only attribute will have only a getPropertyName() method, and a write-only
attribute will have only a setPropertyName() method.
JavaBeans Example
Consider a student class with few properties −
package com.tutorialspoint;
publicclassStudentsBeanimplements java.io.Serializable{
privateString firstName =null;
privateString lastName =null;
privateint age =0;
publicStudentsBean(){
}
publicString getFirstName(){
return firstName;
}
publicString getLastName(){
return lastName;
}
publicint getAge(){
return age;
}
publicvoid setFirstName(String firstName){
this.firstName = firstName;
}
publicvoid setLastName(String lastName){
this.lastName = lastName;
}
publicvoid setAge(Integer age){
this.age = age;
}
}

JAVA NOTES SYMCA
Page 149 of 173
Accessing JavaBeans
The useBean action declares a JavaBean for use in a JSP. Once declared, the bean becomes
a scripting variable that can be accessed by both scripting elements and other custom tags
used in the JSP. The full syntax for the useBean tag is as follows −
<jsp:useBean id = "bean's name" scope = "bean's scope" typeSpec/>
Here values for the scope attribute can be a page, request, session or application based on
your requirement. The value of the id attribute may be any value as a long as it is a unique
name among other useBean declarations in the same JSP.
Following example shows how to use the useBean action −
<html>
<head>
<title>useBean Example</title>
</head>
<body>
<jsp:useBeanid="date"class="java.util.Date"/>
<p>The date/time is <%= date %>
</body>
</html>
You will receive the following result − −
The date/time is Thu Sep 30 11:18:11 GST 2010
Accessing JavaBeans Properties
Along with <jsp:useBean...> action, you can use the <jsp:getProperty/>action to access
the get methods and the <jsp:setProperty/> action to access the set methods. Here is the
full syntax −
<jsp:useBeanid="id"class="bean's class"scope="bean's scope">
<jsp:setPropertyname="bean's id"property="property name"
value="value"/>
<jsp:getPropertyname="bean's id"property="property name"/>
...........
</jsp:useBean> The name attribute references the id of a JavaBean previously introduced to the JSP by the useBean action. The property attribute is the name of the getor the set methods that should be invoked. Following example shows how to access the data using the above syntax −
<html>
<head>
<title>get and set properties Example</title>
</head>

JAVA NOTES SYMCA
Page 150 of 173
<body>
<jsp:useBeanid="students"class="com.tutorialspoint.StudentsBean">
<jsp:setPropertyname="students"property="firstName"value="Zara"/>
<jsp:setPropertyname="students"property="lastName"value="Ali"/>
<jsp:setPropertyname="students"property="age"value="10"/>
</jsp:useBean>
<p>Student First Name:
<jsp:getPropertyname="students"property="firstName"/>
</p>
<p>Student Last Name:
<jsp:getPropertyname="students"property="lastName"/>
</p>
<p>Student Age:
<jsp:getPropertyname="students"property="age"/>
</p>
</body>
</html>
Let us make the StudentsBean.class available in CLASSPATH. Access the above JSP. the
following result will be displayed −
Student First Name: Zara
Student Last Name: Ali
Student Age: 10
Q)JSP - Exception Handling
When you are writing a JSP code, you might make coding errors which can occur at any part
of the code. There may occur the following type of errors in your JSP code −
Checked exceptions
A checked exception is an exception that is typically a user error or a problem that cannot be
foreseen by the programmer. For example, if a file is to be opened, but the file cannot be
found, an exception occurs. These exceptions cannot simply be ignored at the time of
compilation.
Runtime exceptions

JAVA NOTES SYMCA
Page 151 of 173
A runtime exception is an exception that probably could have been avoided by the
programmer. As opposed to the checked exceptions, runtime exceptions are ignored at the
time of compliation.
Errors
These are not exceptions at all, but problems that arise beyond the control of the user or the programmer. Errors are typically ignored in your code because you can rarely do anything about an error. For example, if a stack overflow occurs, an error will arise. They are also ignored at the time of compilation.
Exception Handling
Exception Handling is a process of handling exceptional condition that might occur in your
application. Exception Handling in JSP is much easier than Java Technology exception
handling. Although JSP Technology also uses the same exception class objects.
It is quite obvious that you dont want to show error stack trace to any random user surfing
your website. You can't prevent all errors in your application but you can atleast give a user
friendly error response page.
Ways to perform Exception Handling in JSP
JSP provide 3 different ways to perform exception handling:
1. Using isErrorPage and errorPage attribute of page directive.
2. Using <error-page> tag in Deployment Descriptor.
3. Using simple try...catch block.
Example of isErrorPage and errorPage attribute
isErrorPage attribute in page directive officially appoints a JSP page as an error page.
error.jsp

JAVA NOTES SYMCA
Page 152 of 173
errorPage attribute in a page directive informs the Web Container that if an exception occurs
in the current page, forward the request to the specified error page.
sum.jsp
Whenever an exception occurs in sum.jsp page the user is redirected to the error.jsp page,
where either you can display a nice message, or you can also print the exception trace into a
file/database in the background, to check later what caused the error.
Declaring error page in Deployment Descriptor
You can also declare error pages in the DD for the entire Web Apllication. Using <error-
page> tag in the Deployment Descriptor. You can even configure different error pages for
different exception types, or HTTP error code type(503, 500 etc).
Declaring an error page for all type of exception
<error-page>
<exception-type>java.lang.Throwable</exception-type>
<location>/error.jsp</location>
</error-page>
Declaring an error page for more detailed exception
<error-page>
<exception-type>java.lang.ArithmeticException</exception-type>
<location>/error.jsp</location>
</error-page>

JAVA NOTES SYMCA
Page 153 of 173
Declaring an error page based on HTTP Status code
<error-page>
<error-code>404</error-code>
<location>/error.jsp</location>
</error-page>
Using the try...catch block
Using try...catch block is just like how it is used in Core Java.
<html>
<head>
<title>Try...Catch Example</title>
</head>
<body>
<% try{
int i = 100;
i = i / 0;
out.println("The answer is " + i);
}
catch (Exception e){
out.println("An exception occurred: " + e.getMessage());
}
%> </body>
</html>
Q) Session Tracking Techniques
14.1 Overview of JSP Session tracking
In a web application, server may be responding to several clients at a time so session tracking
is a way by which a server can identify the client. As we know HTTP protocol is stateless
which means client needs to open a separate connection every time it interacts with server
and server treats each request as a new request.
Now to identify the client ,server needs to maintain the state and to do so , there are several
session tracking techniques.
14.2 Session Tracking Techniques
There are four techniques which can be used to identify a user session.
a) Cookies
b) Hidden Fields
c) URL Rewriting
d) Session Object

JAVA NOTES SYMCA
Page 154 of 173
With Cookies , Hidden Fields and URL rewriting approaches, client always sends a unique
identifier with each request and server determines the user session based on that unique
identifier where as session tracking approach using Session Object uses the other three
techniques internally.
14.2.1 Cookie
Cookie is a key value pair of information, sent by the server to the browser and then browser
sends back this identifier to the server with every request there on.
There are two types of cookies:
· Session cookies - are temporary cookies and are deleted as soon as user closes the
browser. The next time user visits the same website, server will treat it as a new client as
cookies are already deleted.
· Persistent cookies - remains on hard drive until we delete them or they expire.
If cookie is associated with the client request, server will associate it with corresponding user
session otherwise will create a new unique cookie and send back with response.
We will discuss Cookie in detail in one of the upcoming chapters .
Cookie object can be created using a name value pair. For example we can create a cookie
with name sessionId with a unique value for each client and then can add it in a resposne so
that it will be sent to client:
1
2
Cookie cookie = newCookie(“sessionID”, “some unique value”);
response.addCookie(cookie);
The major disadvantage of cookies is browser provides a way to disable the cookies and in
that case server will not be able to identify the user.If our application uses cookies for session
management and our users disable the cookie , then we will be in a big trouble.
14.2.2 Hidden Field
Hidden fields are similar to other input fields with the only difference is that these fields are
not displayed on the page but its value is sent as other input fields. For example
<input type=”hidden” name=”sessionId” value=”unique value”/>
is a hidden form field which will not displayed to the user but its value will be send to the
server and can be retrieved using request.getParameter(“sessionId”) .
With this approach ,we have to have a logic to generate unique value and HTML does not
allow us to pass a dynamic value which means we cannot use this approach for static pages.
In short with this approach, HTML pages cannot participate in session tracking.
14.2.3 URL Rewriting
URL Rewriting is the approach in which a session (unique) identifier gets appended with
each request URL so server can identify the user session. For example if we apply URL
rewriting on http://localhost:8080/jsp-tutorial/home.jsp , it will become something like

JAVA NOTES SYMCA
Page 155 of 173
?jSessionId=XYZ where jSessionId=XYZ is the attached session identifier and value XYZ
will be used by server to identify the user session.
There are several advantages of URL rewriting over above discussed approaches like it is
browser independent and even if user’s browser does not support cookie or in case user has
disabled cookies, this approach will work.
Another advantage is , we need not to submit extra hidden parameter.
As other approaches, this approach also has some disadvantages like we need to regenerate
every url to append session identifier and this need to keep track of this identifier until the
conversation completes.
14.2.4 Session Object
Session object is representation of a user session. User Session starts when a user opens a
browser and sends the first request to server. Session object is available in all the request (in
entire user session) so attributes stored in Http session in will be available in any servlet or in
a jsp.
When session is created, server generates a unique ID and attach that ID with the session.
Server sends back this Id to the client and there on , browser sends back this ID with every
request of that user to server with which server identifies the user
How to get a Session Object – By calling getSession() API on HttpServletRequest object
(remember this is an implicit object)
a) HttpSession session = request.getSession()
b) HttpSession session = request.getSession(Boolean)
Destroy or Invalidate Session –
This is used to kill user session and specifically used when user logs off. To invalidate the
session use -
session.invalidate();
Other important methods
· Object getAttribute(String attributeName) – this method is used to get the
attribute stored in a session scope by attribute name. Remember the return type is
Object.
· void setAttribute(String attributeName, Object value)- this method is used to
store an attribute in session scope. This method takes two arguments- one is attribute
name and another is value.
· void removeAttribute(String attributeName)- this method is used to remove the
attribute from session.
· public boolean isNew()- This method returns true if server does not found any state
of the client.
Browser session and server sessions are different. Browser session is client session which
starts when you opens browser and destroy on closing of browser where as server session are
maintained at server end.
Let’s discuss Session Tracking using Session Object with the help of examples.

JAVA NOTES SYMCA
Page 156 of 173
14.3 JSP Session Tracking Examples
14.3.1 Printing session info
Write an example to print session Id , session creation time and last accessed time and a
welcome message if client has visited again.
Solution- HttpSession API provides a method getId() which returns the associated session Id
, getCreationTime() to get the session creation time and getLastAccessedTime() to get
session last accessed time. Similarly isNew() method can be used to identify the new users
getLastAccessedTime() and getCreationTime() returns the time as long data type so to
convert it to display format, create a date object passing long value in it.
a) Write sessionInformation.jsp with the below content in WebContent directory which will
get the session object and displays its attributes
<html>
<head>
<title> Display Session Information </title></head>
<%@page import="java.util.Date"%>
<body>
<%
long creationTime = session.getCreationTime();
StringsessionId = session.getId();
long lastAccessedTime = session.getLastAccessedTime();
DatecreateDate= newDate(creationTime);
DatelastAccessedDate= newDate(lastAccessedTime);
StringBuffer buffer = newStringBuffer();
if(session.isNew())
{
buffer.append("<h3>Welcome </h3>");
}
else
{
buffer.append("<h3>Welcome Back!! </h3>");
}
buffer.append("<STRONG> Session ID : </STRONG>"+ sessionId);
buffer.append(" <BR/> ");
buffer.append("<STRONG> Session Creation Time </STRONG>: "+ createDate);
buffer.append(" <BR/> ");
buffer.append("<STRONG> Last Accessed Time : </STRONG>"+
lastAccessedDate);
buffer.append(" <BR/> ");
%>
<%= buffer.toString() %>
</body>
</html>

JAVA NOTES SYMCA
Page 157 of 173
Q) Introduction to custom tags
Creating a Custom Tag
To create a Custom Tag the following components are required :
1. The Tag Handler class which should extend SimpleTagSupport.
2. The Tag Library Descriptor(TLD) file
3. Use the Custom Tag in your JSP file
Tag Handler Class
You can create a Tag Handler class in two different ways:
By implementing one of three interfaces : SimpleTag, Tag or BodyTag, which define methods that are invoked during the life cycle of the tag.
By extending an abstract base class that implements the SimpleTag, Tag,
or BodyTag interfaces. The SimpleTagSupport, TagSupport, and BodyTagSupport classes implement the SimpleTag, Tag andBodyTag interfaces . Extending these classes relieves the tag handler class from having to implement all methods in the interfaces and also provides other convenient functionality.
Tag Library Descriptor
A Tag Library Descriptor is an XML document that contains information about a library as a
whole and about each tag contained in the library. TLDs are used by the web container to
validate the tags and also by JSP page development tools.
Tag library descriptor file must have the extension .tld and must be packaged in the /WEB-
INF/directory or subdirectory of the WAR file or in the /META-INF/ directory or
subdirectory of a tag library packaged in a JAR.
Example of Custom Tag
In our example, we will be creating a Tag Handler class that extends the TagSupport class.
When we extend this class, we have to override the method doStartTag(). There are two other
methods of this class namely doEndTag() and release(), that we can decide to override or not
depending on our requirement.
CountMatches.java
package com.studytonight.taghandler; import java.io.IOException; import javax.servlet.jsp.*; import org.apache.commons.lang.StringUtils; public class CountMatches extends TagSupport {

JAVA NOTES SYMCA
Page 158 of 173
private String inputstring; private String lookupstring; public String getInputstring() { return inputstring; } public void setInputstring(String inputstring) { this.inputstring = inputstring; } public String getLookupstring() { return lookupstring; } public void setLookupstring(String lookupstring) { this.lookupstring = lookupstring; } @Override public int doStartTag() throws JspException { try { JspWriter out = pageContext.getOut(); out.println(StringUtils.countMatches(inputstring, lookupstring)); } catch (IOException e) { e.printStackTrace(); } return SKIP_BODY; } }
In the above code, we have an implementation of the doStartTag() method which is must if
we are extending TagSupport class. We have declared two
variables inputstring and lookupstring. These variables represents the attributes of the
custom tag. We must provide getter and setter for these variables in order to set the values
into these variables that will be provided at the time of using this custom tag. We can also
specify whether these attributes are required or not.
Q)JSP - Standard Tag Library (JSTL)
The JavaServer Pages Standard Tag Library (JSTL) is a collection of useful JSP tags which
encapsulates the core functionality common to many JSP applications.
JSTL has support for common, structural tasks such as iteration and conditionals, tags for
manipulating XML documents, internationalization tags, and SQL tags. It also provides a
framework for integrating the existing custom tags with the JSTL tags.

JAVA NOTES SYMCA
Page 159 of 173
Classification of The JSTL Tags
The JSTL tags can be classified, according to their functions, into the following JSTL tag
library groups that can be used when creating a JSP page −
Core Tags
Formatting tags
SQL tags
XML tags
JSTL Functions
Core Tags
The core group of tags are the most commonly used JSTL tags. Following is the syntax to
include the JSTL Core library in your JSP −
<%@ taglib prefix = "c" uri = "http://java.sun.com/jsp/jstl/core" %>
Following table lists out the core JSTL Tags −
S.No. Tag & Description
1 <c:out> Like <%= ... >, but for expressions.
2 <c:set > Sets the result of an expression evaluation in a 'scope'
3 <c:remove > Removes a scoped variable (from a particular scope, if specified).
4 <c:catch> Catches any Throwable that occurs in its body and optionally exposes it.
5 <c:if> Simple conditional tag which evalutes its body if the supplied condition is true.
6 <c:choose> Simple conditional tag that establishes a context for mutually exclusive conditional operations, marked by <when> and <otherwise>.
7 <c:when> Subtag of <choose> that includes its body if its condition evalutes to 'true'.
8 <c:otherwise >

JAVA NOTES SYMCA
Page 160 of 173
Subtag of <choose> that follows the <when> tags and runs only if all of the prior conditions evaluated to 'false'.
9 <c:import> Retrieves an absolute or relative URL and exposes its contents to either the page, a String in 'var', or a Reader in 'varReader'.
10 <c:forEach > The basic iteration tag, accepting many different collection types and supporting subsetting and other functionality .
11 <c:forTokens> Iterates over tokens, separated by the supplied delimeters.
12 <c:param> Adds a parameter to a containing 'import' tag's URL.
13 <c:redirect > Redirects to a new URL.
14 <c:url> Creates a URL with optional query parameters
Formatting Tags
The JSTL formatting tags are used to format and display text, the date, the time, and
numbers for internationalized Websites. Following is the syntax to include Formatting
library in your JSP −
<%@ taglib prefix = "fmt" uri = "http://java.sun.com/jsp/jstl/fmt" %>
Following table lists out the Formatting JSTL Tags −
S.No. Tag & Description
1 <fmt:formatNumber> To render numerical value with specific precision or format.
2 <fmt:parseNumber> Parses the string representation of a number, currency, or percentage.
3 <fmt:formatDate> Formats a date and/or time using the supplied styles and pattern.
4 <fmt:parseDate> Parses the string representation of a date and/or time
5 <fmt:bundle>

JAVA NOTES SYMCA
Page 161 of 173
Loads a resource bundle to be used by its tag body.
6 <fmt:setLocale> Stores the given locale in the locale configuration variable.
7 <fmt:setBundle> Loads a resource bundle and stores it in the named scoped variable or the bundle configuration variable.
8 <fmt:timeZone> Specifies the time zone for any time formatting or parsing actions nested in its body.
9 <fmt:setTimeZone> Stores the given time zone in the time zone configuration variable
10 <fmt:message> Displays an internationalized message.
11 <fmt:requestEncoding> Sets the request character encoding
SQL Tags
The JSTL SQL tag library provides tags for interacting with relational databases (RDBMSs)
such as Oracle, mySQL, or Microsoft SQL Server.
Following is the syntax to include JSTL SQL library in your JSP −
<%@ taglib prefix = "sql" uri = "http://java.sun.com/jsp/jstl/sql" %>
Following table lists out the SQL JSTL Tags −
S.No. Tag & Description
1 <sql:setDataSource> Creates a simple DataSource suitable only for prototyping
2 <sql:query> Executes the SQL query defined in its body or through the sql attribute.
3 <sql:update> Executes the SQL update defined in its body or through the sql attribute.
4 <sql:param> Sets a parameter in an SQL statement to the specified value.
5 <sql:dateParam> Sets a parameter in an SQL statement to the specified java.util.Date value.
6 <sql:transaction >
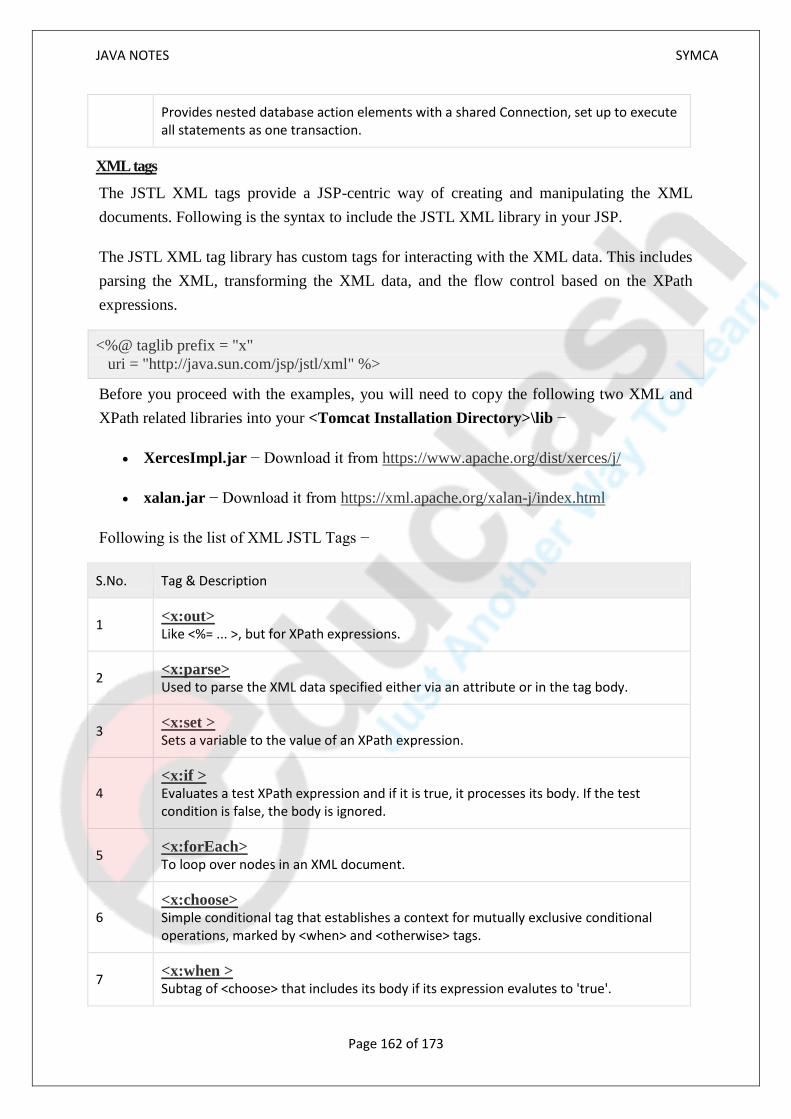
JAVA NOTES SYMCA
Page 162 of 173
Provides nested database action elements with a shared Connection, set up to execute all statements as one transaction.
XML tags
The JSTL XML tags provide a JSP-centric way of creating and manipulating the XML
documents. Following is the syntax to include the JSTL XML library in your JSP.
The JSTL XML tag library has custom tags for interacting with the XML data. This includes
parsing the XML, transforming the XML data, and the flow control based on the XPath
expressions.
<%@ taglib prefix = "x"
uri = "http://java.sun.com/jsp/jstl/xml" %>
Before you proceed with the examples, you will need to copy the following two XML and
XPath related libraries into your <Tomcat Installation Directory>\lib −
XercesImpl.jar − Download it from https://www.apache.org/dist/xerces/j/
xalan.jar − Download it from https://xml.apache.org/xalan-j/index.html
Following is the list of XML JSTL Tags −
S.No. Tag & Description
1 <x:out> Like <%= ... >, but for XPath expressions.
2 <x:parse> Used to parse the XML data specified either via an attribute or in the tag body.
3 <x:set > Sets a variable to the value of an XPath expression.
4 <x:if > Evaluates a test XPath expression and if it is true, it processes its body. If the test condition is false, the body is ignored.
5 <x:forEach> To loop over nodes in an XML document.
6 <x:choose> Simple conditional tag that establishes a context for mutually exclusive conditional operations, marked by <when> and <otherwise> tags.
7 <x:when > Subtag of <choose> that includes its body if its expression evalutes to 'true'.

JAVA NOTES SYMCA
Page 163 of 173
8 <x:otherwise > Subtag of <choose> that follows the <when> tags and runs only if all of the prior conditions evaluates to 'false'.
9 <x:transform > Applies an XSL transformation on a XML document
10 <x:param > Used along with the transform tag to set a parameter in the XSLT stylesheet
JSTL Functions
JSTL includes a number of standard functions, most of which are common string
manipulation functions. Following is the syntax to include JSTL Functions library in your
JSP −
<%@ taglib prefix = "fn"
uri = "http://java.sun.com/jsp/jstl/functions" %>
Following table lists out the various JSTL Functions −
S.No. Function & Description
1 fn:contains() Tests if an input string contains the specified substring.
2 fn:containsIgnoreCase() Tests if an input string contains the specified substring in a case insensitive way.
3 fn:endsWith() Tests if an input string ends with the specified suffix.
4 fn:escapeXml() Escapes characters that can be interpreted as XML markup.
5 fn:indexOf() Returns the index withing a string of the first occurrence of a specified substring.
6 fn:join() Joins all elements of an array into a string.
7 fn:length() Returns the number of items in a collection, or the number of characters in a string.
8 fn:replace() Returns a string resulting from replacing in an input string all occurrences with a given string.

JAVA NOTES SYMCA
Page 164 of 173
9 fn:split() Splits a string into an array of substrings.
10 fn:startsWith() Tests if an input string starts with the specified prefix.
11 fn:substring() Returns a subset of a string.
12 fn:substringAfter() Returns a subset of a string following a specific substring.
13 fn:substringBefore() Returns a subset of a string before a specific substring.
14 fn:toLowerCase() Converts all of the characters of a string to lower case.
15 fn:toUpperCase() Converts all of the characters of a string to upper case.
16 fn:trim() Removes white spaces from both ends of a string.

JAVA NOTES SYMCA
Page 165 of 173
UNIT 12
INTRODUCTION TO SPRING FRAMEWORKS
12.1 INTRODUCTION TO SPRING FRAMEWORK
Spring Framework is a Java platform that provides comprehensive infrastructure
support for developing Java applications. Spring handles the infrastructure so you can
focus on your application.
Spring enables you to build applications from “plain old Java objects” (POJOs) and to
apply enterprise services non-invasively to POJOs. This capability applies to the Java
SE programming model and to full and partial Java EE.
Spring is the most popular application development framework for enterprise Java.
Millions of developers around the world use Spring Framework to create high
performing, easily testable, and reusable code.
Spring framework is an open source Java platform. It was initially written by Rod
Johnson and was first released under the Apache 2.0 license in June 2003.
Spring is lightweight when it comes to size and transparency. The basic version of
spring framework is around 2MB.
The core features of the Spring Framework can be used in developing any Java
application, but there are extensions for building web applications on top of the Java
EE platform. Spring framework targets to make J2EE development easier to use and
promotes good programming practices by enabling a POJO-based programming
model.
Benefits of Using the Spring Framework
Following is the list of few of the great benefits of using Spring Framework −
Spring enables developers to develop enterprise-class applications using POJOs. The benefit of using only POJOs is that you do not need an EJB container product such as an application server but you have the option of using only a robust servlet container such as Tomcat or some commercial product.
Spring is organized in a modular fashion. Even though the number of packages and classes are substantial, you have to worry only about the ones you need and ignore the rest.
Spring does not reinvent the wheel, instead it truly makes use of some of the existing technologies like several ORM frameworks, logging frameworks, JEE, Quartz and JDK timers, and other view technologies.
Testing an application written with Spring is simple because environment-dependent code is moved into this framework. Furthermore, by using JavaBean style POJOs, it becomes easier to use dependency injection for injecting test data.

JAVA NOTES SYMCA
Page 166 of 173
Spring's web framework is a well-designed web MVC framework, which provides a great alternative to web frameworks such as Struts or other over-engineered or less popular web frameworks.
Spring provides a convenient API to translate technology-specific exceptions (thrown by JDBC, Hibernate, or JDO, for example) into consistent, unchecked exceptions.
Lightweight IoC containers tend to be lightweight, especially when compared to EJB containers, for example. This is beneficial for developing and deploying applications on computers with limited memory and CPU resources.
Spring provides a consistent transaction management interface that can scale down to a local transaction (using a single database, for example) and scale up to global transactions (using JTA, for example).
12.1.2 Dependency Injection (DI)
The technology that Spring is most identified with is the Dependency Injection (DI) flavor of Inversion of Control. The Inversion of Control (IoC) is a general concept, and it can be expressed in many different ways. Dependency Injection is merely one concrete example of Inversion of Control.
When writing a complex Java application, application classes should be as independent as possible of other Java classes to increase the possibility to reuse these classes and to test them independently of other classes while unit testing. Dependency Injection helps in gluing these classes together and at the same time keeping them independent.
What is dependency injection exactly? Let's look at these two words separately. Here the dependency part translates into an association between two classes. For example, class A is dependent of class B. Now, let's look at the second part, injection. All this means is, class B will get injected into class A by the IoC.
Dependency injection can happen in the way of passing parameters to the constructor or by post-construction using setter methods.
12.2 SPRING ARCHITECTURE
Spring could potentially be a one-stop shop for all your enterprise applications. However, Spring is modular, allowing you to pick and choose which modules are applicable to you, without having to bring in the rest. The following section provides details about all the modules available in Spring Framework.
The Spring Framework provides about 20 modules which can be used based on an application requirement.

JAVA NOTES SYMCA
Page 167 of 173
These modules are grouped into Core Container, Data Access/Integration, Web, AOP
(Aspect Oriented Programming), as shown in the following diagram:-
Overview of the Spring Framework
MODULES:-
1) Core Container:-
The Core Container consists of the Core, Beans, Context, and Expression Language modules
the details of which are as follows −
The Core module provides the fundamental parts of the framework, including the IoC and Dependency Injection features.
The Bean module provides BeanFactory, which is a sophisticated implementation of the factory pattern.
The Context module builds on the solid base provided by the Core and Beans modules and it is a medium to access any objects defined and configured. The ApplicationContext interface is the focal point of the Context module.
The EL module provides a powerful expression language for querying and manipulating an object graph at runtime.

JAVA NOTES SYMCA
Page 168 of 173
2) Data Access/Integration:-
The Data Access/Integration layer consists of the JDBC, ORM, OXM, JMS and Transaction
modules whose detail is as follows −
The JDBC module provides a JDBC-abstraction layer that removes the need for tedious JDBC related coding.
The ORM module provides integration layers for popular object-relational mapping APIs, including JPA, JDO, Hibernate, and iBatis.
The OXM module provides an abstraction layer that supports Object/XML mapping implementations for JAXB, Castor, XMLBeans, JiBX and XStream.
The Java Messaging Service JMS module contains features for producing and consuming messages.
The Transaction module supports programmatic and declarative transaction management for classes that implement special interfaces and for all your POJOs.
3) Web:-
The Web layer consists of the Web, Web-MVC, Web-Socket, and Web-Portlet modules the
details of which are as follows −
The Web module provides basic web-oriented integration features such as multipart file-upload functionality and the initialization of the IoC container using servlet listeners and a web-oriented application context.
The Web-MVC module contains Spring's Model-View-Controller (MVC) implementation for web applications.
The Web-Socket module provides support for WebSocket-based, two-way communication between the client and the server in web applications.
The Web-Portlet module provides the MVC implementation to be used in a portlet environment and mirrors the functionality of Web-Servlet module.
4) Aspect Oriented Programming (AOP):-
One of the key components of Spring is the Aspect Oriented Programming (AOP) framework. The functions that span multiple points of an application are called cross-cutting concerns and these cross-cutting concerns are conceptually separate from the application's business logic.
There are various common good examples of aspects including logging, declarative transactions, security, caching, etc.
The key unit of modularity in OOP is the class, whereas in AOP the unit of modularity is the aspect.
DI helps you decouple your application objects from each other, while AOP helps you decouple cross-cutting concerns from the objects that they affect.
The AOP module of Spring Framework provides an aspect-oriented programming implementation allowing you to define method-interceptors and point cuts to cleanly decouple code that implements functionality that should be separated.

JAVA NOTES SYMCA
Page 169 of 173
5) Miscellaneous (Other Modules):-
There are few other important modules like Aspects, Instrumentation, Web and Test
modules the details of which are as follows –
The Aspects module provides integration with AspectJ, which is again a powerful and mature AOP framework.
The Instrumentation module provides class instrumentation support and class loader implementations to be used in certain application servers.
The Messaging module provides support for STOMP as the WebSocket sub-protocol to use in applications. It also supports an annotation programming model for routing and processing STOMP messages from WebSocket clients.
The Test module supports the testing of Spring components with JUnit or TestNG frameworks.
12.3 SPRING ASPECT OF OBJECT ORIENTED CONCEPTS
One of the key components of Spring Framework is the Aspect oriented programming (AOP) framework. Aspect-Oriented Programming entails breaking down program logic into distinct parts called so-called concerns.
The functions that span multiple points of an application are called cross-cutting concerns and these cross-cutting concerns are conceptually separate from the application's business logic.
There are various common good examples of aspects like logging, auditing, declarative transactions, security, caching, etc.
The key unit of modularity in OOP is the class, whereas in AOP the unit of modularity is the aspect.
Dependency Injection helps you decouple your application objects from each other and AOP helps you decouple cross-cutting concerns from the objects that they affect. AOP is like triggers in programming languages such as Perl, .NET, Java, and others.
Spring AOP module provides interceptors to intercept an application. For example, when a method is executed, you can add extra functionality before or after the method execution.
12.3.1 AOP Terminologies
Before we start working with AOP, let us become familiar with the AOP concepts and
terminology. These terms are not specific to Spring, rather they are related to AOP.
Sr.No Terms & Description
1 Aspect This is a module which has a set of APIs providing cross-cutting requirements. For example, a logging module would be called AOP aspect for logging. An application can have any number of aspects depending on the requirement.
2 Join point This represents a point in your application where you can plug-in the AOP aspect. You can also say, it is the actual place in the application

JAVA NOTES SYMCA
Page 170 of 173
where an action will be taken using Spring AOP framework.
3 Advice This is the actual action to be taken either before or after the method execution. This is an actual piece of code that is invoked during the program execution by Spring AOP framework.
4 Pointcut This is a set of one or more join points where an advice should be executed. You can specify pointcuts using expressions or patterns as we will see in our AOP examples.
5 Introduction An introduction allows you to add new methods or attributes to the existing classes.
6 Target object The object being advised by one or more aspects. This object will always be a proxied object, also referred to as the advised object.
7 Weaving Weaving is the process of linking aspects with other application types or objects to create an advised object. This can be done at compile time, load time, or at runtime.
12.3.2 Types of Advice
Spring aspects can work with five kinds of advice mentioned as follows −
Sr.No Advice & Description
1 before Run advice before the a method execution.
2 after Run advice after the method execution, regardless of its outcome.
3 after-returning Run advice after the a method execution only if method completes successfully.
4 after-throwing Run advice after the a method execution only if method exits by throwing an exception.
5 around Run advice before and after the advised method is invoked.

JAVA NOTES SYMCA
Page 171 of 173
12.3.3 Custom Aspects Implementation
Spring supports the @AspectJ annotation style approach and the schema-based approach
to implement custom aspects. These two approaches have been explained in detail in the
following sections.
Sr.No Approach & Description
1 XML Schema based Aspects are implemented using the regular classes along with XML based configuration.
2 @AspectJ based @AspectJ refers to a style of declaring aspects as regular Java classes annotated with Java 5 annotations.
WHY SHOULD WE USE AOP ?
It provides the pluggable way to dynamically add the additional concern before, after or
around the actual logic. Suppose there are 10 methods in a class as given below:
class A{
public void m1(){...}
public void m2(){...}
public void m3(){...}
public void m4(){...}
public void m5(){...}
public void n1(){...}
public void n2(){...}
public void p1(){...}
public void p2(){...}
public void p3(){...} }
There are 5 methods that starts from m, 2 methods that starts from n and 3 methods
that starts from p.
Understanding Scenario We have to maintain log and send notification after calling
methods that starts from m.
Problem without AOP We can call methods (that maintains log and sends
notification) from the methods starting with m. In such scenario, we need to write the
code in all the 5 methods.

JAVA NOTES SYMCA
Page 172 of 173
But, if client says in future, that he don't have to send notification, you need to change
all the methods. It leads to the maintenance problem.
Solution with AOP We don't have to call methods from the method. Now we can
define the additional concern like maintaining log, sending notification etc. in the
method of a class. Its entry is given in the xml file.
In future, if client says to remove the notifier functionality, we need to change only in
the xml file. So, maintenance is easy in AOP.
WHERE TO USE AOP ?
AOP is mostly used in following cases:
o to provide declarative enterprise services such as declarative transaction management.
o It allows users to implement custom aspects.
12.3.4AOP CONCEPTS
AOP concepts are as follows:
1) Join Point
2) Point Cuts
1) JOIN POINT:-
- A JoinPoint represents a point in your application where you can plug-in AOP aspect.
You can also say, it is the actual place in the application where an action will be taken
using Spring AOP framework.
- While creating the business logic of the method the additional services are needed to be
injected (which we saw already) at different places or points, we call such points as Join
point. At a join point a new services will be added into the normal flow of a business
method.
- While executing the business method, the services are required at the following 3 places
(generally), we call them as Join Point.
Before business logic of the method starts
After business logic of the method got completed
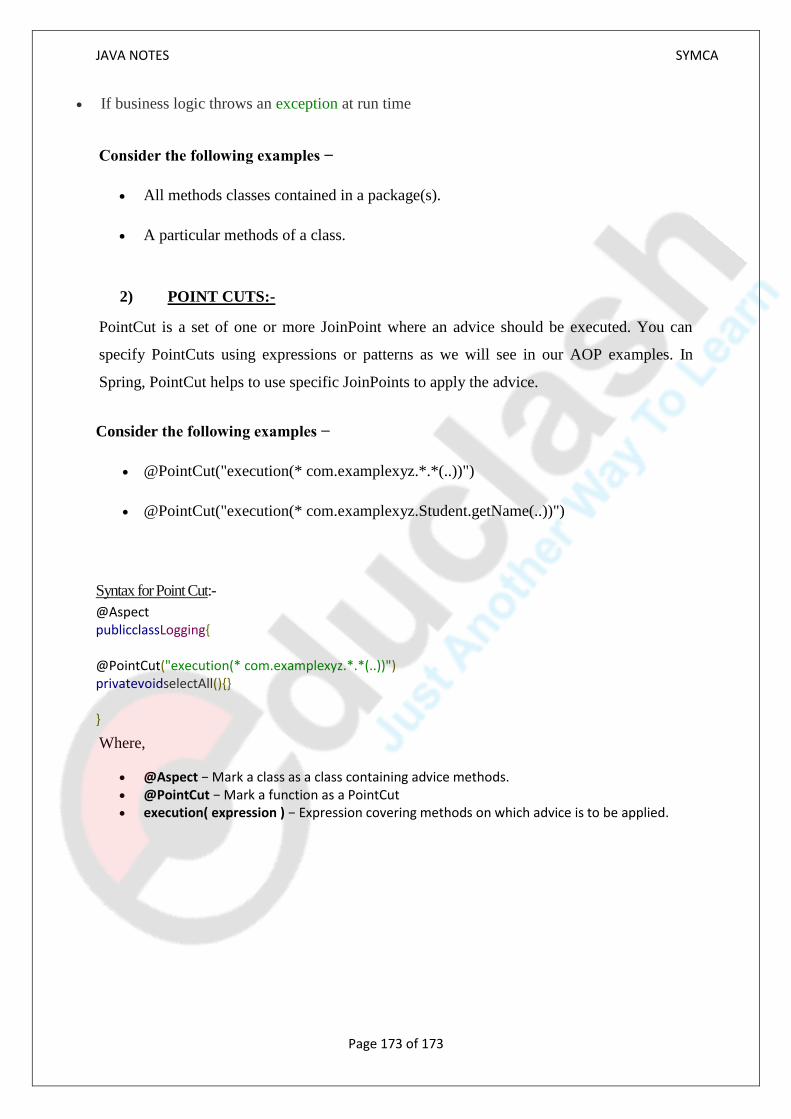
JAVA NOTES SYMCA
Page 173 of 173
If business logic throws an exception at run time
Consider the following examples −
All methods classes contained in a package(s).
A particular methods of a class.
2) POINT CUTS:-
PointCut is a set of one or more JoinPoint where an advice should be executed. You can
specify PointCuts using expressions or patterns as we will see in our AOP examples. In
Spring, PointCut helps to use specific JoinPoints to apply the advice.
Consider the following examples −
@PointCut("execution(* com.examplexyz.*.*(..))")
@PointCut("execution(* com.examplexyz.Student.getName(..))")
Syntax for Point Cut:-
@Aspect publicclassLogging{ @PointCut("execution(* com.examplexyz.*.*(..))") privatevoidselectAll(){} }
Where,
@Aspect − Mark a class as a class containing advice methods. @PointCut − Mark a function as a PointCut execution( expression ) − Expression covering methods on which advice is to be applied.