iTEC on Access® PRO
20
Os seguintes direitos são reservados: • Quaisquer alterações, sem aviso prévio, feitas à funcionalidade ou aparência deste produto invalidarão a garantia. • O uso deste produto em qualquer ambiente ou de qualquer outra forma que não seja especificado aqui também invalidará a garantia. Manual Manuel iTEC on Access® PRO
-
Upload
khangminh22 -
Category
Documents
-
view
3 -
download
0
Transcript of iTEC on Access® PRO

Os seguintes direitos são reservados:
• Quaisquer alterações, sem aviso prévio, feitas à funcionalidade ou aparência deste produto invalidarão a garantia.
• O uso deste produto em qualquer ambiente ou de qualquer outra forma que não seja especificado aqui também invalidará a garantia.
ManualManuel
iTEC on Access® PRO

2 www.itec.com.pt
iTEC on Access Pro
ADVANCED MECHATRONIC SOLUTIONS contolo de acessos | control de acesso | contrôle d’accès
EN
EN
APP InstructionA) Main functions-registration and loginiTEC on Access PRO App is a powerful and handy tool designed to improve the efficien-cy of property management companies. It can be used for check-in management, rent management, housing management, device management, etc. At the same time, the listing information can be shared by email and by Chat platforms.
APP InstallationThe software (iOS version) can be downloaded from the app store, and the Android version can be downloaded from the application store of Google play.
If you forget your passcode, select the phone or email you used to register to retrieve your passcode and reset it.
Login and registrationLog in with your mobile phone number or email account on the login page. The mobile phone number is automatically recog-nized by the system and does not input the country code. If you have forgotten your password, you can go to the passward page to reset your password. When reset the password, you can receive a verification code from your mobile phone and email address. When the account is logged in on the new mobile phone, it needs to be verified. When it is passed, you can log in on the new mobile phone. All the data can be viewed and used on the new mobile phone.
3www.itec.com.pt
iTEC on Access Pro
EN
EN
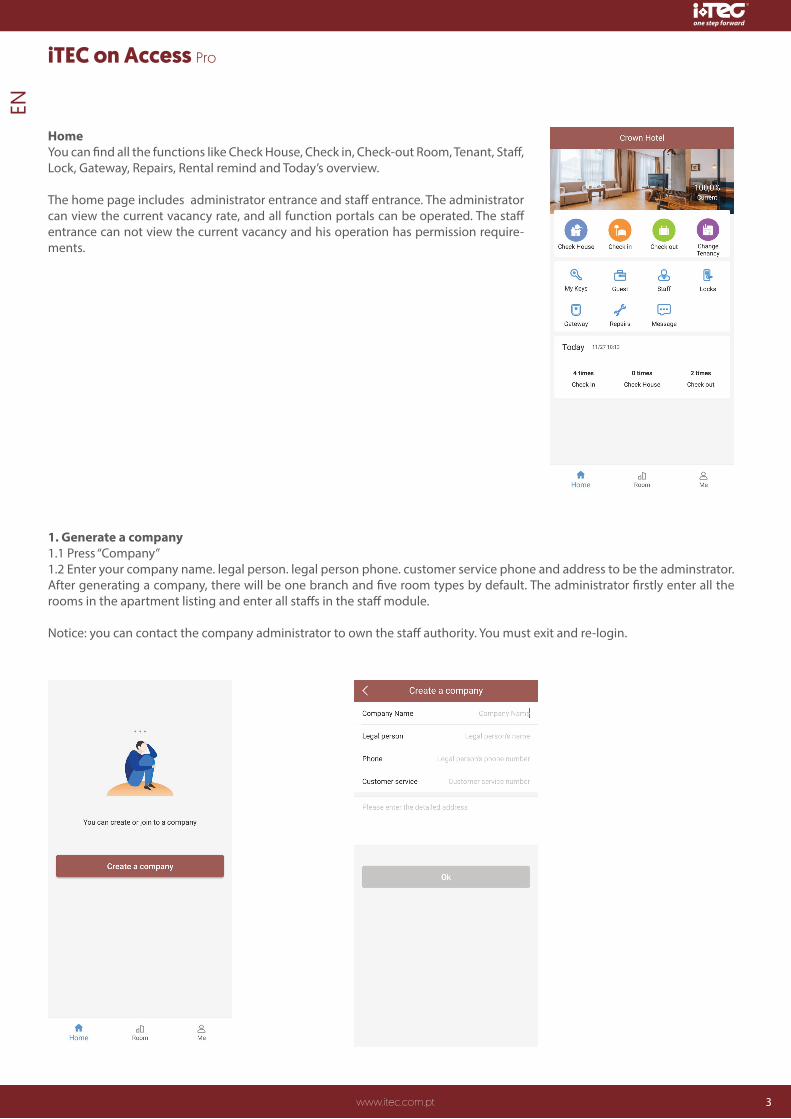
HomeYou can find all the functions like Check House, Check in, Check-out Room, Tenant, Staff, Lock, Gateway, Repairs, Rental remind and Today’s overview.
The home page includes administrator entrance and staff entrance. The administrator can view the current vacancy rate, and all function portals can be operated. The staff entrance can not view the current vacancy and his operation has permission require-ments.
1. Generate a company1.1 Press “Company”1.2 Enter your company name. legal person. legal person phone. customer service phone and address to be the adminstrator. After generating a company, there will be one branch and five room types by default. The administrator firstly enter all the rooms in the apartment listing and enter all staffs in the staff module.
Notice: you can contact the company administrator to own the staff authority. You must exit and re-login.

4 www.itec.com.pt
iTEC on Access Pro
ADVANCED MECHATRONIC SOLUTIONS contolo de acessos | control de acesso | contrôle d’accès
2. Room ListingIn the room listing module, users can add the room edit the room, share the room and check the room. Users can also view check-in records, unlock records and meanwhile manage the hydroelectric gas.
2.1 add a room2.1.1 Press “Room”2.1.2 Press“+”on the upper right corner to enter the room name, rental, erea and address. 2.1.3 Select branch and type.2.1.4 Press “OK”
2.2 Edit the roomThis page includes six modules --- room pictures, smart lock, room’s info, facility, room description and room manage-ment.
2.2.1 Add a room picturePress“+ Add Room pictures‘’Select the picture on “Camera”or“Al-bum”Press “Use Photo”Press “OK”
EN
EN

5www.itec.com.pt
iTEC on Access Pro
2.2.2 Smart lockPress “Edit”Stand beside the lock and touch the key panelPress “Add lock”Select the lock you want to addPress“+”The name of the added lock will appear on the lock listing when succeed. Swipe left or long press can delete the lock.
EN
EN

6 www.itec.com.pt
iTEC on Access Pro
ADVANCED MECHATRONIC SOLUTIONS contolo de acessos | control de acesso | contrôle d’accès
2.2.5 Room descriptionThis module can include the location of the room, the surrounding traffic, the decoration style, the orientation of the house and so on. can help customers better understand room information.
2.2.3 Room’s infoPress “Edit”to modify the original information.2.2.4 FacilityPress “Edit”to select the furniture, living condition and special facility.
Notice: The new added room information will default to the last added room.
EN
EN

7www.itec.com.pt
iTEC on Access Pro
2.3 Check inThe check-in module records all the check-in records for the room, including the tenants who have checked out.
Tenants who have not checked out can click to go to the details page. They can edit the check-in time, modify the tenant infor-mation (except name and phone number), send the e-Key and passcode, and modify the rental and add tenants.
2.4 unlocked recordsThe unlocked records keep all the unlocked records, including the tenants who have checked out before. It will be unable to delete and edit.
EN
EN

8 www.itec.com.pt
iTEC on Access Pro
ADVANCED MECHATRONIC SOLUTIONS contolo de acessos | control de acesso | contrôle d’accès
3 - Check house, Check in and check-out3.1 Check houseWhen the tenant requests to see the house, the apartment selects the room to be seen by clicking on the home page and then select a people to help checking house.If the people you select is not the company staff. You must enter his name and phone number to generate a one-time passcode which can be sent via Wechat and message.
Notice: A room without a smart lock does not have the ability to send the one-time passcode.
3.2 Check in3.2.1 Select the room3.2.2 Enter the check-in time and check-out time3.2.3 Press“Next”
EN
EN
Click to set Ekey.The lock must be an added smart lockThe recipient account must have been registeredEnsure the correct validity period (Active time=check-in time; End time=che-ck-out time).Validity period can be modifiedPress “OK”to send the Ekey
Notice: If there are many smart locks in the room, all the smart lock keys will be sent together when the key is sent.

9www.itec.com.pt
iTEC on Access Pro
EN
EN
Click to set passcodeStart time=check-in time; End time=check-out time. Validity period can be modified.Two passcode types: customized passcode & non-customized passcode. (A customized passcode can be set by user, and a non--custom passcode is automatically generated by smart lock.)Users can choose the passcode type according to their needs.Press “OK”and set successfully
Notice: The passcode can be sent via Wechat and message. The passcode should be the latest one, and the previously generated password cannot be sent.
3.3 Check-outPress “Check-out”moduleChoose roomSelect one to check outPress “Check-out” When checking out, tenant can select if the room is dirty.
Notice: Check-out can be accessed through the check-out entrance on the homepage. You can also skip to check out during the check-in process.

10 www.itec.com.pt
iTEC on Access Pro
ADVANCED MECHATRONIC SOLUTIONS contolo de acessos | control de acesso | contrôle d’accès
4. Lock You can see the“Lock”module on homepage. The lock module is mainly used to mana-ge the smart locks installed in each branch. In this module, the user can search, add, view, delete the lock. Users can also manage Ekey passcode and obtain the empty code. 4.1 Add a lockPress “+”on the upper right cornerEnter the lock name, branch name, and purpose.After finished, it will automatically search for the surrounding Ble.
Notice: the lock has two types (Room’s lock & Public lock). User can choose according his need.
When you confirm the name, branch and type, press “Next”. Please stand beside the lock and touch the key panel. Press “+”icon to add the lock.
Then the app will receive an one-time passcode. Enter the passcode on the lock, and press“#” to verify if the lock is added correctly.
4.2 Locks management
Select the branch and find your lock on the listing.
On this module you can view the lock details, and also to calibrate the lock time, lock up-grade, fault diagnosis, and pair Gateway. The actual manageable function is determined by the lock model.
EN
EN

11www.itec.com.pt
iTEC on Access Pro
4.2.2 Passcode management
This module can view the passcode of the lock, in-cluding time-limited passcode and permanent pass-code.Press “三”on the upper right corner and enter the ac-count passcode to reset. Click on a single passcode to view the sender, the time of the transmission, and the unlocked records.
4.2.1 Key management
The key module can view the electronic key of the lock. Including time-limited keys, per-manent keys. The time-limited key refers to an electronic key with a validity period. The keys to be received and expired cannot be used. The difference between the two is that the keys to be received can be used normally after receiving. Click Reset in the upper right corner. After entering the account password, the electronic key is reset and all keys beco-me invalid.Click on a single key to view the receiver account, sender, sending time, and unlocking operation records of the key.
4.2.3 IC card management
Left slide or long press to name the card, modify the validity period, and delete the card.Click on an IC card to view the cardholder information, and the operation records.
EN
EN
Add an IC cardPress “三”on the upper right cornerSelect “Add”Enter name and set time periodPut the IC card in the collection area of the lock to add it.
Notice:IC cards that have expired cannot be used.

12 www.itec.com.pt
iTEC on Access Pro
ADVANCED MECHATRONIC SOLUTIONS contolo de acessos | control de acesso | contrôle d’accès
4.2.4 Other functions
“Adjust Clock”module makes sure that the lock time is consistent with the actual time. The time will be updated to Local time.
The lock upgrade is used to perfect the lock hardware and fix the bug.
Notice: Fault diagnosis is to analyze the cause of the fault by reading the configuration information in the lock. This operation needs the help of customer service people. Please operate it beside the door.
4.2.5 Gateway If you want to know any Gateway information about this lock, please view the list of gateways pair to the lock.
Notice: More Gateway operations, see “5. Gateway “ page for details.
4.3 Delete lock
Press“三”on the upper right cornerSelect “Delete lock”to delete the lock you wantIf the lock cannot be deleted normally due to Bluetooth damage, lock failure, etc., you can select “Move to trash” to delete.
EN
EN

13www.itec.com.pt
iTEC on Access Pro
5 GatewayYou can find Gateway module on the homepage.
After the gateway is installed, the lock near the gateway can automatically pairsThe smart lock which pairs with gateway can remotely unlock, delete the lock, and delete the passcode
Notice: Locks that do not support remote unlocking are not available for gateway operations
5.1 Add Gateway
Press“+”on the upper right cornerEnter the current WIFISet the name and choose the branchPress “Next”
Keep the Gateway powers on. The red and blue light flashes alternately ->User can pair the Gateway with App.When the page prompts “Connected successfully”, the Bluetooth gateway is added suc-cessfully.
The App is searching for a nearby smart lock and connect.
5.2 Gateway management
After the gateway is successfully added, the user can remotely manage the smart lock, manage the operation record, meanwhi-le manage the key and passcode.
EN
EN

14 www.itec.com.pt
iTEC on Access Pro
ADVANCED MECHATRONIC SOLUTIONS contolo de acessos | control de acesso | contrôle d’accès
6 StaffThe staff module is used to manage the company’s staff information, including user name, mobile phone number, key, lock passcode, and post.
Notice: Only people with Administrator privileges can operate this module.
6.1 New staff
Press“+”on the upper right cornerEnter an account, full name , mobile , post and select branch.
Notice: If a new staff already has a company, the employee needs to withdraw from the original company before adding the new.
6.2 Staff information
On the staff list page, you can view all current staffs of the company. You can left slide to delete the staff.
Click on a staff to view and modify the name, mobile number, key, passcode, post, and more.
The staff mobile number can be dialed directly.
EN
EN

15www.itec.com.pt
iTEC on Access Pro
6.3 Key management
After selecting the key to be granted, press “OK”. The Ekey will be sent to the target staff, who can use the Ekey to unlock the door.
After the key is granted, the administrator can view all the Ekeys. The Admins can continue to select the “grant key” or delete the key through the menu icon in the upper right corner.
After the key is deleted, the staff will no longer be able to unlock using the corresponding key.
6.4 Password management
In the upper right corner menu, you can select “View all” and “Only see password”.Click on a single lock password, you can view all the passwords of the employee and its detailed information, or click “Generate a new password” to send a time-limited password to the employee.
EN
EN
16 www.itec.com.pt
iTEC on Access Pro
ADVANCED MECHATRONIC SOLUTIONS contolo de acessos | control de acesso | contrôle d’accès
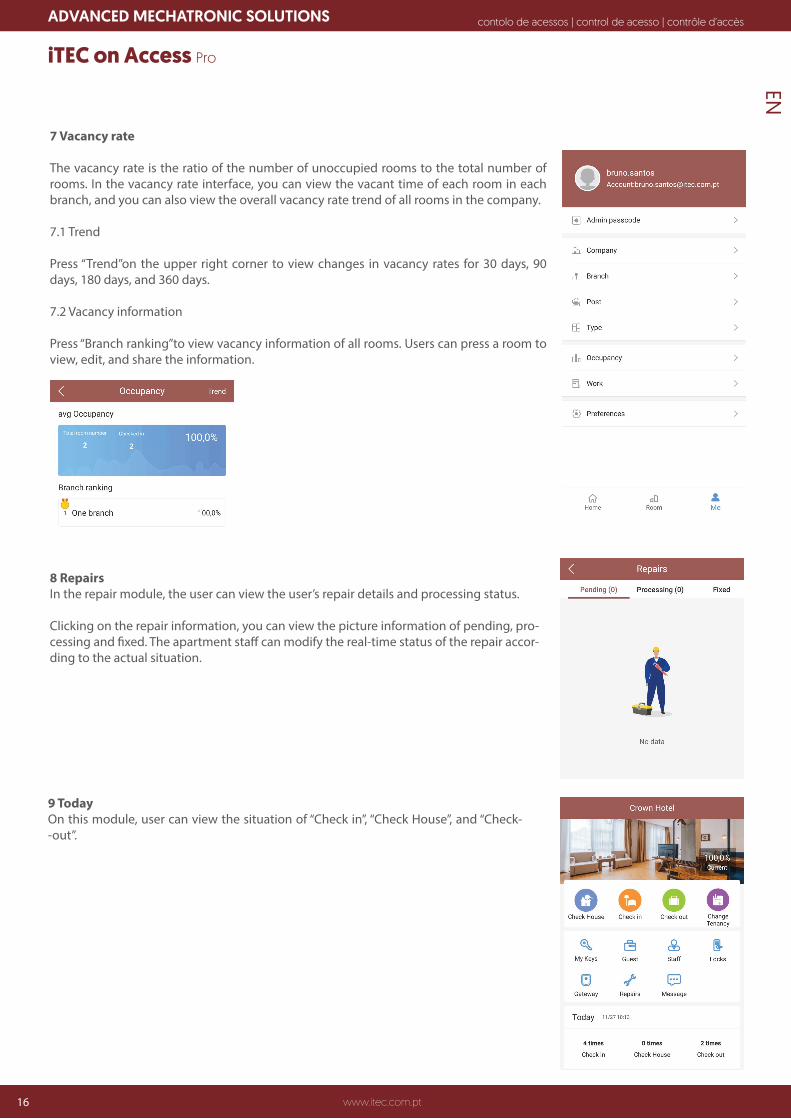
7 Vacancy rate
The vacancy rate is the ratio of the number of unoccupied rooms to the total number of rooms. In the vacancy rate interface, you can view the vacant time of each room in each branch, and you can also view the overall vacancy rate trend of all rooms in the company.
7.1 Trend
Press “Trend”on the upper right corner to view changes in vacancy rates for 30 days, 90 days, 180 days, and 360 days.
7.2 Vacancy information
Press “Branch ranking”to view vacancy information of all rooms. Users can press a room to view, edit, and share the information.
8 RepairsIn the repair module, the user can view the user’s repair details and processing status.
Clicking on the repair information, you can view the picture information of pending, pro-cessing and fixed. The apartment staff can modify the real-time status of the repair accor-ding to the actual situation.
9 TodayOn this module, user can view the situation of “Check in”, “Check House”, and “Check--out”.
EN
EN

17www.itec.com.pt
iTEC on Access Pro
10 MessageAs for administrator, the message module will push the latest updates, such as check-in, smart locks and other messages.
As for staff, the module mainly push the check request, receive the key and passcode. Messages that are not viewed will have a yellow flag alert.
Click on a message to view the details. Press “Edit” on the upper right corner to select all messages. You can also slide left or long press to delete.
11 My Keys & Admin passcodeMy Keys:
Press the room and then press “unlock”to open the door. The second generation lock needs to be unlocked by touching key panel.
Admin passcode: The passcode is classified according to the branch. Enter the passcode on the lock, and press the # key to open the door.
EN
EN
18 www.itec.com.pt
iTEC on Access Pro
ADVANCED MECHATRONIC SOLUTIONS contolo de acessos | control de acesso | contrôle d’accès
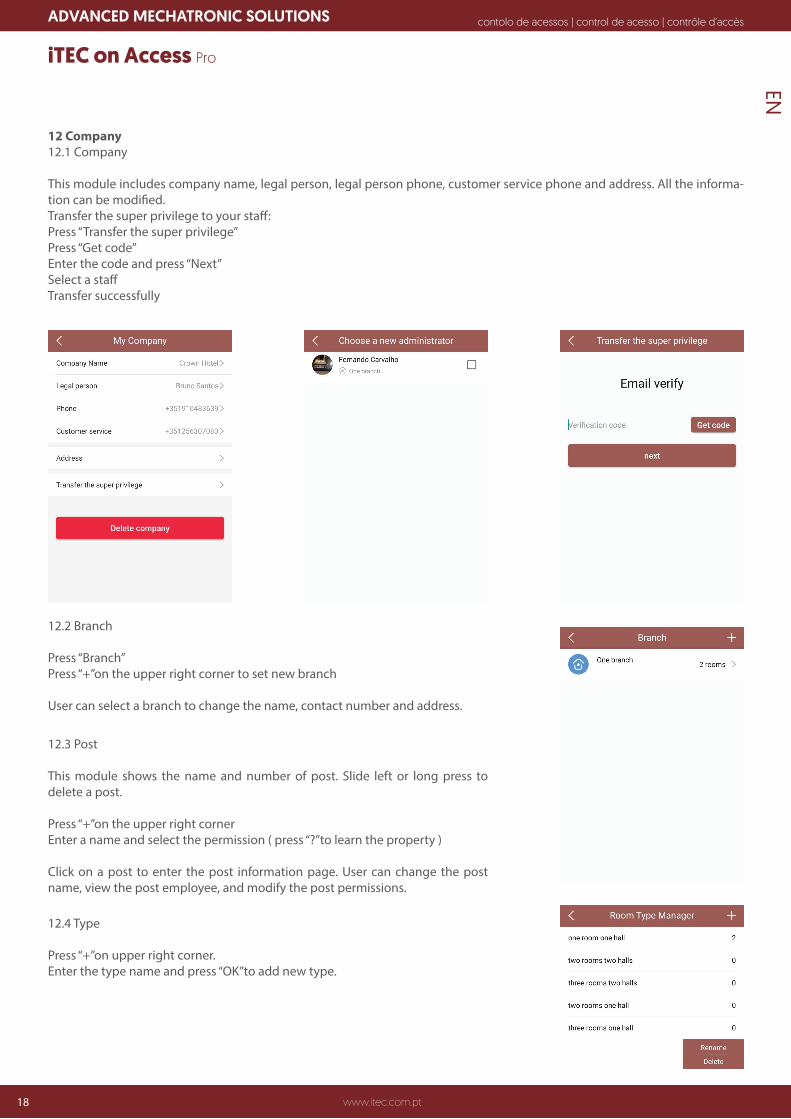
12 Company12.1 Company
This module includes company name, legal person, legal person phone, customer service phone and address. All the informa-tion can be modified.Transfer the super privilege to your staff:Press “Transfer the super privilege”Press “Get code”Enter the code and press “Next”Select a staffTransfer successfully
12.2 Branch
Press “Branch”Press “+”on the upper right corner to set new branch
User can select a branch to change the name, contact number and address.
12.3 Post
This module shows the name and number of post. Slide left or long press to delete a post.
Press “+”on the upper right cornerEnter a name and select the permission ( press “?”to learn the property )
Click on a post to enter the post information page. User can change the post name, view the post employee, and modify the post permissions.
12.4 Type
Press “+”on upper right corner.Enter the type name and press “OK”to add new type.
EN
EN

19www.itec.com.pt
iTEC on Access Pro
Click on a branch to view the vacant rooms in the store and the time of vacancy.
Click on the vacant room and go to the room management page to share the vacant room.
13 Vacancy Rate
The vacancy rate is the ratio of the number of unoccupied rooms to the total number of rooms. User can view average vacancy rates and other information.
The average vacancy rate refers to the average vacancy rate of each branch under the com-pany name. The ranking of the branches is the ranking information of the branches. The vacancy rate is ranked from low to high. The higher the ranking, the higher the occupancy rate.
There has “Max Vacancy”, “Min Vacancy”, “Vacancy”three modules
14 Staff function14.1 Unlock by phone
It contains all the keys sent by the administrator. The key is sorted according to the bran-ch. Click the key that needs to open the door, the door open button will appear.
The second generation lock needs to be unlocked by touching the key panel.
14.2 Admin passcode
This module contains the passcode for all door locks sent by the administrator.
Enter the passcode on the lock, and press “#” key to open the door.
14.3 Setting
This module contains “Send passcode to tenant”, “Prompt tone”, “Vibrate”, “Feedback”, “Ex-piration reminder”, “About us”.
EN
EN

iTEC - AC, Lda.Edifício FeiraPark
Rua do FeiraPark nº504520-632 São João de Ver
Portugal
Telefone: +351 256 30 70 78Telefone: +351 256 30 70 [email protected]