IT SCHOOL - D.A.V. Chennai
100
IT SCHOOL @ Computer Science - Book 5
-
Upload
khangminh22 -
Category
Documents
-
view
1 -
download
0
Transcript of IT SCHOOL - D.A.V. Chennai

IT SCHOOL@Computer Science - Book 5

First Edition published in 2021
This book has been prepared by the Computer Science team of the DAV Group of Schools, Chennai (managed by
the Tamil Nadu Arya Samaj Educational Society).
You are free to copy and redistribute the material in any format or medium. You must give appropriate credit
and you may not use the material for commercial purposes without the permission of the author. If you remix,
transform or build upon the material, you may not distribute the modified material.
This is the first version of the book and could contain not only omissions, but also areas of improvement.
We request the reader to excuse us for the omissions, but please do bring to our notice any feedback for correction
and improvement in subsequent versions. We will remain grateful to you for your support and feedback.
You can write to ‘Tamil Nadu Arya Samaj Educational Society’ 212-213, Avvai Shanmugam Salai, Gopalapuram,
Chennai – 600 086 or email to [email protected]. You may also write to us to seek permission to
print all or only certain chapters of the book.
The Author of this book is solely responsible and liable for its contents including but not limited to the views,
representations, descriptions, statements, information, opinions and references.
IT SCHOOL@Computer Science - Book 5
MRP ` 200/-

PREFACE
Computers play a vital role in the modern world, and even the most basic jobs today involve technology. Therefore,
computer education becomes essential in any student’s development. Expertise in computing enables children
think critically, be more creative and innovative, giving space for collaborative work and individual effort.
The series of books (Class III – IX) aim to holistically develop digital skills, keeping pace with the dynamically
changing industry requirements.
IT education has no boundaries and irrespective of the field of work, each one is expected to have the following
digital skills:
MS Office (MS Word, MS Excel, MS PowerPoint)
Photo / Image Editing
Programming
Website development
The enriched curriculum therefore covers a wide variety of topics across various classes: TUXPAINT; MS Word
2007 (Level I, II & III) ; MS Excel 2007 (Level I, II & III); MS PowerPoint 2007 (Level I & II); Image / Photo editing
software using GIMP 2.8; Scratch Programming; HTML Programming; Web creation tool using WordPress.
The curriculum uses only open source software (freely available on the Internet) installed in Windows 7 Operating
system.
A brief description of every concept and its application / purpose is provided in every lesson with colorful screen
shots. This not only attracts the readers but also gives them an experience of self-learning. ‘Activity Based Learning’
exercises have been included as part of the curriculum.
We hope this text book finds its place in the readers’ library for future references.


INdEx
S No ToPIC PAgE
NuMBER
MS ExCEL 2007 -LEVEL II
1 Introduction To Microsoft Word
2 Text Formatting
3 Ms Word Pictures
4 Ms Word Smart Art
5 Customizing Header, Footer, Adding Page Numbers
6 Ms Word – Inserting Columns And Page Break
7 Ms Word – Inserting A Chart
8 Ms Word – Working With Hyperlinks
9 Ms Word – Working With Tables (Basic Table Creation)
10 Ms Word – Mail Merge
1 Introduction To Scratch Program
2 Working With Code Blocks
3 Controlling Script Execution And Adding Sounds
4 Changing The Backdrop And Editing Costume
5 Sprite Manipulation, Creating Own Sprites
6 Conditional Decision Making Statements
User Skill Typing Tutor


Term - I


9
INTRoduCTIoN To MICRoSoFT WoRdCh
apte
r
11.1 INTRoduCTIoNMicrosoft Word is a sophisticated word processing program that helps you quickly and efficiently create edit and format all the business and personal documents .It can be used to
• Createprofessional-lookingdocumentsthatincorporateimpressivegraphicssuchaschartsanddiagrams.
• Givedocumentsaconsistentlookbyapplyingstylesandthemesthatcontrolthefont,size,color,andeffectsof text and the page background.
• Createpersonalizede-mailmessagesandmailingstomultiplerecipientswithoutrepetitivetyping.
• Makeinformationinlongdocumentsaccessiblebycompilingtablesofcontents,indexes,andbibliographies.
• Safeguardyourdocumentsbygivingpassword.
1.2 ExPLoRINg ThE PARTS oF WoRd WINdoW
Kinect—Microsoft’s motion-sensing X-box controller—actually scans users’
skeletons to identify players.
9

10
ACTIVITY 1
Write down the names of the parts of the window
1.3 oPENINg NEW doCuMENT
A new, blank document always opens when you start Microsoft Word. Suppose you want to start another new document while you are working on a document,
Method 1 Click the home tab and select the New option.
Method 2 Use the shortcut, Press Ctrl + N keys and you will see a new blank document appears.
1.4 oPENINg ExISTINg doCuMENT
To open an existing document for editing follow any one of the methods given below to open an existing document −
Method 1 − Click the home tab and select the open option.

11
Method 2 - Use the shortcut, Press Ctrl + O keys
Method 3 - Press “Windows key + E,” locate your Word document on your computer and double-click it to automatically open the document in Microsoft Word.
Method 4 - Click the home tab and select the Recent option to open the recently closed document.
The Windows key has the Microsoft logo on it and is found between the left Ctrl and Alt keys on the
keyboard. Pressing the Windows key by itself opens the Start menu.
1.5 CLoSINg A doCuMENT IN WoRd When you finish working with a document, you will proceed to close the document. Closing a document removes it from your computer screen. Here are simple methods to close an opened document −
Method 1 − Click the home tab and select the Close option.
Method2 − Click the home tab and select the Exit option.
Method 3 −Use the keyboard shortcut “Ctrl+ W” or “Ctrl+ F4”.
Method 4 – Click on the close button ⊗ on top right corner of the window.
1.6 ENTERINg TExT IN ThE doCuMENTOnce a new document is opened, the text can be typed in the big blank area of the screen. As the characters are typed they appear on the screen and the flashing vertical bar called the insertion point, moves to the right. This insertion point always indicates where the new text will appear. When the text being typed reaches the end of the line, it will automatically wrap the text to the next line. The Enter key should be pressed only at the end of a paragraph or when a blank line is to be inserted.
1.7 SAVINg NEW doCuMENTOnce you are done with typing in your new Word document, to save your document use any one of the following methods.
Method 1
Step 1 − Click the home tab and select the Save As option.
Step 2 − Select a folder where you will like to save the document, Enter the file name which you want to give to your document and Select the Save As option, by default it is the .docx format.
Step 3 − Finally, click on the Save button and your document will be saved with the entered name in the selected folder.
Method 2
Click the home tab and select the Save option and repeat the step 2 and 3 of the Method 1.
If the document is already saved for repeated saving of the document use the keyboard
shortcut Ctrl + S or save icon on the ribbon.

12
1.8 MoVINg ARouNd IN doCuMENTS To move the insertion point to anywhere in the document either the mouse or the keyboard can be used. To move the insertion point with the mouse, the mouse pointer is moved to the required spot and the mouse button is clicked. The insertion point jumps to that spot.
If you open a document that is too long to fit entirely on the screen, you can bring off-screen content into view without changing the location of the cursor by using the vertical scroll bar.
• Clickthescrollarrowstomoveupordownbyoneline.
• Clickaboveorbelowthescrollboxtomoveupordown.
• Dragthescrollboxonthescrollbartodisplaythepartofthedocumentcorrespondingtothelocationofthescroll box.
KEYBoARd ShoRTCuTSTo move the insertion point with the keyboard the arrow keys and other key combination can be used. The following table gives a list of short cut keys.
Cursor movement Key or keyboard shortcut
Left one character Left Arrow
Right one character Right Arrow
Down one line Down Arrow
Up one line Up Arrow
Left one word Ctrl+Left Arrow
Right one word Ctrl+Right Arrow
To the beginning of the current line Home
To the end of the current line End
To the beginning of the current document Ctrl+Home
To the end of the current document Ctrl+End
Up one screen Page Up
Down one screen Page Down
To the beginning of the previous page Ctrl+Page Up
To the beginning of the next page Ctrl+Page Down
The easy way to create content for testing is by using rand() function.
For example, pressing Enter after typing =rand(4,10) will create 4 paragraphs made up of 10 sentences.

13
ACTIVITY 2
Write a few lines on any one of the following topics in a word document and execute the instructions given in options (a) to (f ).
1. My Mother
2. My School
3. My Computer
(a) Open the word document.
(b) Write the text related to one of the above subjects
(c) Save the file.
(d) Use the scroll bar to do up down scrolling.
(e) Place the insertion point in the beginning of the document using key board short cut
(f ) Close the document.
BRAIN dEVELoPER
I. WhICh PART oF ThE WoRd WINdoW hELPS You do ThE FoLLoWINg?
Column A Column B
1. Move up and down the document a. Document area
2. Know how many words are in the document b. Title bar
3. Know the name of the document currently open c. Ruler bar
4. Move to the Page Layout options d. Vertical scroll bar
5. Type text in the document e. Office button
6. Understand the size of your document f. Status bar
7. Do file operations like saving, closing etc. g. Tabs
II. FILL IN ThE BLANKS1. Shortcut to open a document is _________
2. Shortcut to close a document is _________
3. File extension of word document is_________
4. The key which is used to create a paragraph is ___________
5. Ctrl + Right Arrow is used to ____________
Teacher’s Signature

14
2.1 INTRoduCTIoNFormatting makes the document readable and comprehensible to the person reading it. Text Formatting includes making the selected text Bold, Italic, Underline, and changing the Font Style, Size, Colour for changing the appearance of text in the word document.
2.2 SELECTINg TExTEven though the document is built by typing one character at a time, while editing and formatting one always work with words, lines,paragraphs and sometimes with the whole document. For this purpose the text should be selected. For selecting text the mouse or the keyboard can be used.
SELECTINg TExT WITh MouSE1. Place the insertion point at the beginning of the text to be selected.
2. The left mouse button should be clicked, held down and dragged across the text to be selected.When the intended text is selected, the mouse button should be released. To de-select the wrongly selected text a click should be made outside the selected text.
SELECTINg TExT WITh KEYBoARd1. Insertion point is moved to the start of the text to be selected.
2. The Shift key is pressed down and the movement(arrow) keys are
used to highlight the required text.When the Shift key is released, the text is selected.
ShoRTCuTS FoR SELECTINg TExT
Action to be performed To select what
Shift+Arrow Right Extend selection one character to the rightShift+Arrow Left Extend selection one character to the leftShift+End Extend selection to the end of a lineShift+Home Extend selection to the beginning of a lineShift+Arrow Down Extend selection one line down Shift+Arrow Up Extend selection one line upShift+Page Down Extend selection one screen down Shift+Page Up Extend selection one screen upCtrl+A Select the Entire documentF8 Turn Extend Mode on: Extend selection without pressing shift keyCtrl+Shift+f8, and arrow keys Select a vertical block of text in Extended ModeShift+F8 Reduce the size of a selection in Extended ModeEsc Turn extend mode off
Chap
ter
1Chapter
1Chapter
1Chapter
1Chapter
1Chapter
1Chapter
1Chapter
1Chapter
1Chapter
1Chapter
1Chapter
1Chapter
1Chapter
1Chapter
1Chapter
1Chapter
1Chapter
1Chapter
1Chapter
1Chapter
1Chapter
1Chapter
1Chapter
1Chapter
1Chapter
1Chapter
1Chapter
1Chapter
1Chapter
1Chapter
1Chapter
1Chapter
1Chapter
1Chapter
1Chapter
1Chapter
1Chapter
1Chapter
1Chapter
1Chapter
1 TExT FoRMATTINgCh
apte
r
2

15
2.3 MoVINg ThE TExTThe selected text can be easily cut and pasted in the required location.
1. The text to be moved to a new location is selected.
2. HomeCut is selected or select cut icon from the Home tab.
3. Place the Insertion point is where the text is to bepasted.
4. HomePaste is selected or select the Paste icon from the Home tab and paste the text in the new location. The text can be pasted in this way either in the same document or in another document also.
2.4 CoPYINg ThE TExT1. The text to be copied is selected.
2. HomeCopy is selected or copy icon from Home tab is clicked.
3. The insertion point is selected where the copy of the text should
appear and is clicked.
ShoRTCuT KEYS FoR CuT, CoPY ANd PASTE
Ctrl+Z Undo the last actionCtrl+Y Redo the last actionCtrl+C Copy selected text or objectCtrl+X Cut selected text or objectCtrl+V Paste selected text or object
ACTIVITY 1
Type a paragraph about Nature
1. Bold a phrase
2. Highlight the phrase “Nature”
3. Italicize and underline a word.
4. Create a duplicate of the Paragraph
5.Cut one of the Paragraph and paste it in another document. Save the new document as “Nature”.
2.5 FoNT gRouPThe Font group includes various commands such as a Font, Font Size, Grow Font, Shrink Font, Clear Formatting, Bold, Italick, Underline, Strike Through, Subscript, Superscript, Change Case, Text highlight Color and Font Color. Selecting the related icon and apply it on a selected text.

16
The shortcut keys used for doing any one of the above action is listed below.Select the required text or Paragraph.
Display the Font dialog. Ctrl+D, Ctrl+Shift+F
Increase the font size. Ctrl+Shift+Right angle bracket (>)
Decrease the font size. Ctrl+Shift+Left angle bracket (<)
Increase the font size by 1 point. Ctrl+Right bracket (])
Decrease the font size by 1 point. Ctrl+Left bracket ([)
Switch the text between upper case, lower case, and title case. Shift+F3
Change the text to all upper case. Ctrl+Shift+A
Hide the selected text. Ctrl+Shift+H
Apply bold formatting. Ctrl+B
Apply underline formatting. Ctrl+U
Apply underline formatting to the words, but not the spaces. Ctrl+Shift+W
Apply double-underline formatting. Ctrl+Shift+D
Apply italics formatting. Ctrl+I
Apply small caps formatting. Ctrl+Shift+K
Apply subscript formatting. Ctrl+Equal sign (=)
Apply superscript formatting. Ctrl+Shift+Plus sign (+)

17
AcTiviTy 2
1.Open the document “Nature”
2.Select the entire document
3. Select the Comic Sans MS font
4. Select 16 point font size.
5. Type H2+O2=2H20
6.Type (a+b)2=a2+b2+2ab
7.Increase the Font size of the above content
8.Apply different colours for each paragraph.
9. Type “The good man is the friend of all living things”
10. Under line each word of the above sentence at one stroke.
2.6 INSERTINg BuLLETEd oR NuMBEREd LIST When you type 1, a period, a space, and some text, then press Enter, Word automatically starts a numbered list for you. Type * and a space before your text, and Word makes a bulleted list.Ctrl+Shift+L is also used to create a bulleted list.
CREATE A BuLLETEd oR LIST FoR AN ExISTINg TExTSelect the text you want to apply a bullet or list.Go to Home tab and select Bullets or Numbering.You can find different bullet styles and numbering formats by clicking the down arrow next to Bullets or Numbering.
2.7 INSERT WoRdARTWordArt is a quick way to make text stand out with special effects.
1. Click the Insert Tab;
2. Go to Text group and select WordArt button

18
3. Type the text.For example “Happy Birtday” and click outside.
4. Customize your text by selecting the various options from the drawing
tool to get the following result.
AcTiviTy 31.Make a Microsoft Word document. In it, type your name in 5 different Word Art types with different sizes, colors, slants/rotates.2.List any five fruit names using bullets3.Using numbering list list out any five of your favorite games.

19
2.8 PARAgRAPh ALIgNMENT, LINE SPACINg ANd INdENTATIoNOne of the most common changes made to a paragraph is to change the alignment of a paragraph.A paragraph is any text followed by an Enter key. Four types of alignment can be selected from the Home tab.Select the Paragraph and apply any one of the alignment (Left , Right , Center, Justified) .We can also give various spacing between the lines.The Increase Indent and Decrease Indent icons are useful if it isneeded to indent text from the left.Select the required icon from the Paragraph grouping under the Home tab.
The shortcutkeys used for the above actions are
Ctrl+L Align the text to the left.
Ctrl+R Align the text to the right.
Ctrl+J Justify the text.
Ctrl+E Center the text.
Ctrl+M Indents the paragraph.
Ctrl+Shift+M Remove the indent from a paragraph
Ctrl+5 1.5 line spacing
Ctrl+2 Double line spacing
Ctrl+1 Single line spacing
AcTiviTy 4
1. Type a paragraph in a word document.Give an appropriate heading for the paragraph.
2. Center the heading.
3. Align the paragraphto the right and give double line spacing.
4. Indent the first line of the paragraph.

20
Note:-Shift+F5: Jump the previous edit you made in your document.
BRAIN dEVELoPER
I ChooSE ThE BEST ANSWER1. What is the smallest and largest font size available in Font Size tool on formatting toolbar?
(A) 8 and 72 (B) 8 and 68 (C) 6 and 72 (D) 6 and 68
2. A character that is raised and smaller above the baseline is known as
(A) Raised (B) Outlined (C) Capscript (D) Superscript
3. The key that should be pressed to start a new paragraph is
(A) Down Cursor Key (B) Enter Key (C) Shift + Enter (D) Ctrl + Enter
4. The function of Ctrl + B in Ms-Word is (A) It converts selected text into the next larger size of the same font (B) It adds a line break to the document (C) It makes tho selected text bold (D) It applies Italic formatting t the selected text
5. What is the function of CTRL+R in MS-Word (A) Open the Print dialog box (B) Update the current Web page (C) Close the current window (D) None of these
II ANSWER IN oNE LINE
1. Name the common change made for a paragraph.
2. What is the use of Ctrl+E?
3. How will you remove an indent in a paragraph?
4. What are the different ways to to select a text?
5. Which tool helps to customize the wordart?
Teacher’s Signature

21
3.1 INTRoduCTIoNInserting a picture in a Word document makes it more interesting and highlights points raised in the text. There are built-in clip art images for your document. If you have a more specific image in mind, you can insert a picture from a file.
3.2 INSERTINg AN IMAgE uSINg CLIP ART1. Select the Insert tab and Click the Clip Art icon in the Illustrations group.
2. The clip art options appear in the task pane to the right of the document.
3. Enter keywords in the Search for: field that are related to the image you want to insert.
4. Click the drop-down arrow in the Results should be: field.
5. Deselect any types of media you do not want to see.
6. Click Go.
7. Review the results from a clip art search.
Chap
ter
1Chapter
1Chapter
1Chapter
1Chapter
1Chapter
1Chapter
1Chapter
1Chapter
1Chapter
1Chapter
1Chapter
1Chapter
1Chapter
1Chapter
1Chapter
1Chapter
1Chapter
1Chapter
1Chapter
1Chapter
1Chapter
1Chapter
1Chapter
1Chapter
1Chapter
1Chapter
1Chapter
1Chapter
1Chapter
1Chapter
1Chapter
1Chapter
1Chapter
1Chapter
1Chapter
1Chapter
1Chapter
1Chapter
1Chapter
1Chapter
1 MS WoRd –PICTuRESCh
apte
r
3

22
8. Place your insertion point in the document where you want to insert the clip art. Click an image in the Clip Art pane. It will appear in the document.
3.3 INSERT A PICTuRE FRoM A FILE
1. Place your insertion point where you want the image to appear. Select the Insert tab.
2. Click the Picture command in the Illustrations group. The Insert Picture dialog box appears.
3. Select the desired image file, and then click Insert to add it to your document.
To resize an image, click and drag one of the corner sizing handles. The image will change size while keeping the same proportions. If you want to stretch it horizontally or vertically, you can use the side sizing handles.

23
3.4 ChANgINg TExT WRAPPINg SETTINgS
1. Select the image. The Format tab will appear. Click the Format tab.
2. Click the Wrap Text command in the Arrange group.
3. Select the desired menu option. The text will adjust based on the option you have selected.
4. Move the image around to see how the text wraps for each setting.
If you can’t get your text to wrap the way you want, click the Wrap Text command, then select More Layout Options from the menu.
ACTIVITY 1:
1. Open a new document and save it as kitewithoutthread.docx.Type the title as “Kite without thread” and enter the following text.
“Once a father and son went to the kite flying festival. The young son became very happy seeing the sky filled with colorful kites. He too asked his father to get him a kite and a thread with a roller so he can fly a kite too. So, the father went to the shop at the park where the festival was being held. He purchased kites and a roll of thread for his son.”
2. Insert the picture named BoyFatherKite.jpeg below the title of the story
3. Resize the picture so that it looks small.

24
4. Center the picture using the alignment option on the Home tab.
5. Rotate the picture a little to the left by clicking on the green rotate handle and dragging it to the left a little.
6. Square wrap the text around the picture
7. Change the wrapping to In Line with text
8. Apply an orange border with thickness of 3 pts using Picture border- weight. Give a dotted effect to the border using Dashes.
9. Apply the Drop Shadow Reflection effect from picture effect.
10. Crop the picture a little from the bottom crop icon
BRAIN dEVELoPER
dRAW ThE ICoN uSEd /ACTIoN To BE doNE FoR ThE FoLLoWINg
1. Create a new Word document.
2. Insert a clip art image.
3. Insert a picture from a file into the document.
4. Resize the picture.
5. Change the text wrapping setting to In Front of Text.
Teacher’s Signature
Gates and Allen originally
founded Microsoft to
develop and sell BASIC
interpreters for the
Altair 8800 computer.
DiD You Know

25
4.1 INTRoduCTIoNSmartArt allows you to visually communicate information rather than simply using text.
4.2 INSERT A SMARTART1. Place the insertion point in the document where you want to add a graphic.
2. Select the Insert tab and Select the SmartArt command in the Illustrations group. A dialog box appears.
3. Select a category to the left of the dialog box, and preview the SmartArt graphics that appear in the center.
4. Select the desired SmartArt graphic, and then click OK.
MS WoRd – SMARTARTCh
apte
r
4

26
5. To add texts to the SmartArt select the graphic. A border will appear around it with an arrow on the left side.
6. Click the arrow on the left side of the graphic to open the task pane.
7. For each box enter text next to each bullet in the task pane. The information will appear in the graphic and will resize to fit inside of the shape.
8. To add a new shape, press Enter. A new bullet will appear in the task pane, and a new shape will appear in the graphic.
4.3 ChANgINg ThE oRgANIzATIoN oF A SMARTARTTo add a shape to a graphic:
1. Select the graphic. The Design and Format tabs appear on the Ribbon.
2. Select the Design tab. Click the Add Shape command in the Graphics group.
3. Select one of the shapes nearby the desired location where you want to add your new shape.
4. Select Add Shape Before or Add Shape After. If you want to add a superior or a subordinate, select the Add Shape Above or Add Shape Below options.

27
4.4 MoVINg ThE ShAPES1. Select the graphic. The Design and Format tabs appear on the Ribbon.
2. Select the Design tab. Select the shape you want to move.
3. Click the Promote or Demote command in the Create Graphic group.
4. The shape will move up or down by one level.

28
4.5 ModIFYINg ThE APPEARANCE1. Select the graphic. The Design and Format tabs appear on the Ribbon.
2. Click the Design tab. In the SmartArt Styles group, click the More drop-down arrow to view all of the styles.
3. Hover your mouse over each style to see a preview and select the desired one.
4.6 ChANgE CoLouR SChEME oF ThE SMARTART1. Select the graphic. The Design and Format tabs appear on the Ribbon.
2. Select the Design tab.
3. Click the Change Colors command. A drop-down menu appears, showing various colour schemes.
4. Select the desired color scheme.

29
AcTiviTy 1
1. Create a new document.
2. Insert a SmartArt graphic to depict the “Food Groups”.
3. Enter text into the graphic.
4. Change the SmartArt style.
5. Change the colour scheme.
BRAIN dEVELoPER
I ChooSE ThE BEST ANSWER
1. Under what grouping of commands will you find the SmartArt command?
(a) Text
(b) Illustrations
(c) Paragraph
(d) Design
2. Where do you go to add more shapes to your SmartArt Graphic?
(a) SmartArt Tools>Design>Create Graphic Grouping>Add Shape
(b) SmartArt Tools>Format>Add Shape icon
(c) Insert>SmartArt>Add Shape icon
(d) Design>Tools>Add Shape icon
II ANSWER ThE FoLLoWINg
1. What is the use of Smartart?
2. Which command is used to create a graphic group?
Teacher’s Signature

30
MS WoRd – SMARTARTCh
apte
r
55.1 INTRoduCTIoNWhen the documents are longer than one page, normally some type of reference numbers are added on the page. Page numbers are useful to refer a particular page. In addition to it, we can include other text that helps the reader to identify the document. For example, the document title or the author’s name can be included in every page. Rather than typing this information on every page a Header and Footer can be created. Header is an area at the top of page and footer is an area at the bottom of the page.
5.2 To INSERT A hEAdER oR FooTERSelect the Insert tab. Click either the header or Footer command. A drop-down menu will appear.
1. Select Blank from the built-in options drop-down menu to insert a blank header or footer.
2. The header or footer will appear in the document and the design tab will appear on the Ribbon.
3. Type the required information into the header or footer.
4. Click Close header and Footer in the design tab, or hit the Esc key.
After closing the header or footer, it will still be visible, but it will be locked. To edit it again, just double-click anywhere on the header or footer, and it will become unlocked.

31
5.3 AddINg PAgE NuMBERSTo add page numbers to an existing header or footer:
1. Select the header or footer and the design tab will appear.
2. Place the insertion point where you want the page number.
3. Select the Page Number command from the Design tab,
4. Click Current Position and then select the desired style. The page number will appear in the document.
5.4 To INSERT PAgE NuMBERS INTo A NEW hEAdER oR FooTER:1. From the Insert tab, click Page Number. A drop-down menu will appear.
2. Select the desired page number style, and it will appear in your document.

32
5.5 FoRMAT PAgE NuMBERS:
1. Select the header or footer that contains the page number.
2. Select the Page Number command from the Design tab,
3. Click Format Page Numbers.
4. From the Page Number Format dialog box, select the desired Number format and click ok.
5. Next to Start at, enter the number you want start with and click ok.

33
ACTIVITY
Rashmi’s teacher has asked her to create MS Word document consisting of 20 pages. She has to mention her name and roll number on every page as header and footer. She has to mention the page number also in every page of the document. Imagine you are Rashmi and complete the task.
BRAIN dEVELoPER
I FILL IN ThE BLANK
1. The area at the top margin of the document is called ________
2. Header option comes under the group __________
3. The Design tab appears in ____________?
I ChALLENgE!
1. Create a new Word document.
2. Create a Newsprint header.
3. Add a name to the header.
4. Add today’s date to the header.
5. Try adding a page number to the footer.
6. Try restarting the page numbering from 5.
Teacher’s Signature
The first Windows
virus, WinVer 1.4,
hit machines in
1992.

34
INSERTINg CoLuMNS ANd PAgE BREAKCh
apte
r
66.1 INTRoduCTIoNBy default, MS Word creates text in a single column that runs from one margin to the other. We can format text in multiple columns, which are also known as “newspaper columns.” Text usually fills columns in the order in which the columns appear breaking from one column to another only after a column is filled. If we want more control over where columns break, we can insert a column break at a specific location, or we can adjust all columns to have equal lengths. When we use multiple columns, text flows continuously from the bottom of one column to the top of the next column as illustrated below.
6.2 INSERT A CoLuMN1. Select the text you want to format.
2. Click the Page Layout tab.
3. Click the Columns command. A drop-down menu will appear.
4. Select the number of columns you want to insert. The text will be formatted into that number of columns.
To remove the columns, click the Columns command from the Page Layout tab and select One for the number of columns.
6.3 INSERT A CoLuMN BREAK1. Place the insertion point where you want to add the break.
2. Click the Page Layout tab.
3. Click the Breaks command in the Page Setup group. A drop-down menu will appear.
4. Select Column from the list of break types.

35
5. The text will shift to reflect the column break.
ACTIVITY 1
1. Open an existing Word document. Select the text you want to format into columns.
2. Format the selected text into two columns.
3. Add a column break.
6.4 INSERT A PAgE BREAK
A Page Break tells the printing device where to end the current page and begin the next. After the Page Break is inserted into the document, a symbol indicating the page break or “Page Break” is shown, and the cursor is placed on the next page.
1. Place the insertion point where you want the break to appear.
2. Select the Page Layout tab.
3. Click the Breaks command. A menu appears.
4. Click one of the break option to create a break in the document.

36
6.5 dELETE A BREAK:1. From the home tab, click the Show/hide command.
2. double-click the break to select it.
3. Press the Backspace or delete key to delete the break.
ACTIVITY
Open a MS word document. Write the name of your school as the header. Type your name, class and section as the footer. Divide the document into two columns. In the left column, make a plan of all the inter-house activities for a particular month. In the right hand column write a brief description of the activities done.
Microsoft paid just $35,000 to musician Brian Eno to create the
“Microsoft Sound,” originally used as the startup tune for Windows 95. D
id you
Know

37
BRAIN dEVELoPER
I MATCh ThE FoLLoWINg
1. Page setup a. 1
2. Delete a Break b. Page break
3. Column c. Show/Hide
II FILL IN ThE BLANK
1. ------ tells the printing device where to end the current page.
2. Show/Hide option is present in ------ tab.
3. There are -------- number of column setting is available.
Teacher’s Signature
In 1992 then-President George Bush presented Gates with the
National Medal of Technology and Innovation.

38
INSERTINg A ChARTCh
apte
r
77.1 INTRoduCTIoNA graphical representation of data is known as chart. Charts allow users to see what the results of data to better understand and predict current and future data.You can make a chart in Word. Charts allow users to see the meaning behind the numbers, and they make showing comparisons and trends much easier.
1. In your Word document, click InsertChart.
2. Select the type of chart you want, such as column or pie chart, and click oK. (If you’re not sure which to choose, move down the All Charts list to preview each type.)
3. Enter into the spreadsheet that automatically opens with the chart. The chart will update to match the data after the typing is finished into one cell and move to the next.
Edit and customize your chart
1. Click the chart to open Chart Toolsdesign, and choose from many chart styles and types

39
To edit the data, right-click the chart and click Edit data to reopen the spreadsheet. Changes in the spreadsheet show up automatically in the chart. Or, under design, click data Edit data.
1. To edit, change, add, or remove, a specific element of the chart, such as the legend, axis labels, title, data bars, or background etc. Select the chart element you want to change and right click.
For example, select the chart axis .Right click and select Format Axis,
A Format Axis window opens, and you’ll see the different formatting appears. Do the necessary changes.
ACTIVITY
In a document Create a Bar chart in 3D format and Give name for title and legends.

40
BRAIN dEVELoPER
I FILL IN ThE BLANK
1. A graphical representation of data is known as------.
2. DataEdit Data. Is available in ---- tab
3. Right click on the chart and select Format Axis -------- window appears
Teacher’s Signature
Only when Windows 3.0 was
released in 1990 did
Word become successful.

41
WoRKINg WITh hYPERLINKSCh
apte
r
88.1 INTRoduCTIoNWhen you’re online, you use hyperlinks to navigate from one webpage to another. Sometimes a hyperlink will link to a different section of the same page. If you want to include a web address or email address in your Word document, you can format it as a hyperlink for someone else to click.
8.2 hYPERLINKA hyperlink is a word, phrase, or image that you can click on to jump to a new document or a new section within the current document.
Adding hyperlinks to your document can help readers quickly access the information.
8.3 INSERT A hYPERLINK:1. Select the text or image you want to make a hyperlink.
2. Right-click the selected text or image, then click hyperlink. You can also right-click in a blank area of the document and click hyperlink.
3. The Insert hyperlink dialog box will open. You can also get to this dialog box from the Insert tab by clicking hyperlink.
4. If you selected text, the words will appear in the Text to display: field at the top.
5. Type the address you want to link to in the Address: field.
Click oK. The text or image you selected will now be a hyperlink.
You can also insert a hyperlink that links to another portion of the same document by selecting Place in This document from the Insert hyperlink dialog box.

42
To remove a hyperlink:
1. Right-click the hyperlink.
2. Click Remove hyperlink.
1. Create a new document.
2. Type some text, and turn a word or phrase into a hyperlink that links to c:\My Documents\Fun.docx (Fun.docx must already exist)
3. Test the hyperlink by clicking it. The document Fun.docx should open.
4. Remove the hyperlink you just created.

43
BRAIN dEVELoPER
I ANSWER IN A LINE
1. What is a Hyper link?
2. What is the use of hyper link
3. Write the command to create a hyper link
4. Write the command to remove a hyperlink
Teacher’s Signature
Microsoft’s first major deal was
with IBM for their new computer’s
operating system in 1980 which the
company named PC DOS
DidYouKnow?

44
WoRKINg WITh TABLESCh
apte
r
99.1 INTRoduCTIoNA table is a grid with a specified number of rows and columns. A cell is the intersection of a column and a row. A well designed table can help readers to understand the data better.
9.2 TABLEAfter creating a table to type something in a particular cell first the insertion point is moved to the required cell and the required data is typed in it. To move to the desired cell first a click is made inside the cell or the arrow
keys can be used. One can also press Tab key to move forward through
the cells or Shift + Tab to move backward through the cells. By default each cell includes a border.
9.3 INSERT A BLANK TABLE1. Place your insertion point in the document where you want the table to appear.
2. Select the Insert tab. Click the Table command.
3. Hover your mouse over the diagram showing squares to select the number of columns and rows in the table.
4. Click your mouse, and the table appears in the document.
5. You can now place the insertion point anywhere in the table to add text.

45
9.4 Add A RoW ABoVE AN ExISTINg RoW1. Place the insertion point in a row below the location where you want to add a row.
2. Right-click the mouse. A menu appears.
3. Select Insert Insert Rows Above.
4. A new row appears above the insertion point.
Salesperson Print-Rs TV-Rs Web-Rs
Kumar 10,252 25,560 13,745
Naveen 5,550 13,470 27,800
Rakesh 8,547 17,555 8,907
Alice s 13,578 6,789 10,239
You can also add rows below the insertion point. Follow the same steps, but select Insert Rows Below from the menu.
9.5 Add A CoLuMN:1. Place the insertion point in a column adjacent to the location where you want the new column to appear.
2. Right-click the mouse. A menu will appear.

46
3. Select Insert Insert Columns to the Left or Insert Columns to the Right. A new column appears.
9.6 dELETE A RoW oR CoLuMN:1. Select the row or column.
2. Right-click your mouse. A menu will appear.
3. Select delete Cells.
4. Select delete entire row or delete entire column, then click oK.
9.7 APPLY A TABLE STYLE:1. Click anywhere on the table. The design tab will appear on the Ribbon.
2. Select the design tab and locate the Table Styles.
3. Click the More drop-down arrow to see all of the table styles.

47
4. Hover the mouse over the various styles to see a live preview.
5. Select the desired style. The table style will appear in the document.
Salesperson Print-Rs TV-Rs Web-RsKumar 10,252 25,560 13,745Naveen 5,550 13,470 27,800Rakesh 8,547 17,555 8,907Alice s 13,578 6,789 10,239
9.8 ChANgE TABLE STYLE oPTIoNS:Once you’ve chosen a table style, you can turn various options on or off to change the appearance of the table. There are six options: header Row, Total Row, Banded Rows, First Column, Last Column, and Banded Columns.
1. Click anywhere on the table. The design tab will appear.
2. From the design tab, check or uncheck the desired options in the Table Style options group.
9.9 Add BoRdERS To A TABLE:1. Select the cells you want to add a border to.
2. From the design tab, select the desired Line Style, Line Weight, and Pen Color.
3. Click the Borders drop-down arrow.
4. From the drop-down menu, select the desired border type.

48
5. The border will be added to the selected cell.
ACTIVITY
1. Open an existing Word document.
2. Create your time table
3. Apply a table style, and experiment with the table style options
4. Delete a row from the table.
5. Insert a blank table with five rows and four columns.
6. Add borders to the blank table.
BRAIN dEVELoPER
I) ANSWER ThE FoLLoWINg
1. Intersection of row and column is called _______________.
2. To move forward one cell press ______________ .
3. To move backward through a cell press ________________ .
4. By default each cell consist of _________________ .
Teacher’s Signature

49
MAIL MERgECh
apte
r
1010.1 INTRoduCTIoN:Mail merge is a mail automation option available in MS-Office which enables us to write large number of mails within a short span of time using step by step process.
For example; if you want to send mails to all your friends and relatives (say 50 numbers) for your birthday function, a mail invitation you need to write 50 numbers of mails with the same subject with different mailings addresses. Mail merge will simplify your process and it reduces the time for preparing the mails in short time.
10.2 To uSE MAIL MERgE• Createanewdocument.Typealetterinvitingyourfriendforyourbirthdayparty.Placetheinsertionpoint
where you want to include the address.
• ClicktheMailings tab.
• ClicktheStart Mail Merge command.
• SelectStepbyStepMailMergeWizard.
The Mail Merge task pane appears. It contains six main steps to complete.
Step 1: Select the document type as Letters

50
Click Next:
Starting document
Step 2:Select use the current document.
Step 3:Click Next:
Select recipients
Create an address list in an existing file, such as an Excel workbook, or you can type a new address list from within the Mail Merge Wizard. Word can automatically place each address into the document.
1. From the Mail Merge task pane, select use an existing list, then click Browse.

51
2. Locate your file(c:\My documents\LETTERS\ADDRESS LIST.XLSX) in the dialog box and click open.
3. The address list is in an Excel workbook, select the worksheet from the folder My documents\Letters\ADDRESS LIST.XLSX,then click oK.
4. In the Mail Merge Recipients dialog box, check each recipient used in the merge and or uncheck the remaining. click oK to close the dialog box.

52
Step 4: Now From the Mail Merge task pane, click Next: Write your letter .In that select Address block.
Step 5: Preview your letter by clicking Next:
Preview your letters
Step 6: Complete the merging of the letter along with the address by clicking
Next:
Complete the merge
When it’s printed, each copy of the letter will basically be the same, except the recipient data—like the name and address—will be different on each one. You’ll need to add placeholders for the recipient data so Mail Merge knows exactly where to insert data.

53
ACTIVITY
1. Open an existing Word document.
2. Use the Mail Merge Wizard to merge the letter with the recipient list.
3. Place an Address Block at the top of the page and a Greeting line above the body of the letter.
4. Print the document.
BRAIN dEVELoPER
I) ChoSE ThE BEST ANSWER
1. The ability to combine name and addresses with a standard document is called _________
(a) document formatting (b) database management
(c) mail merge (d) form letters
2. Which enables us to send the same letter to different persons?
(a) macros (b) template
(c) mail merge (d) none
3. Which of the following is not essential component to perform a mail merge operation?
(a) Main document (b) Data source
(c) Merge fields (d) Word fields
4. Which of the following is not one of the option in add recipient?
(a) Electronic mail (b) Greeting line
(c) Address book (d) Electronic postage
Teacher’s Signature

54

55
Term - II

56

57
Introduction to Scratch programCh
apte
r
1INTRoduCTIoN
Scratch is a graphical programming language, developed by the Lifelong Kindergarten group at the Massachusetts
Institute of Technology. Children can drag and combine code blocks to make a range of programs, including
animations, stories, musical instruments and games. It’s a bit like the programming equivalent of LOGO!
Scratch allows children to learn coding concepts and create interactive projects without needing to learn a text-
based programming language.
How to start Scratch 2 program?
Step 1: Go to Start.
Step 2: Click on All Programs.
Step 3: Select Scratch 2.
Step 4: The Scratch Window Opens.

58
The components of the scratch window are as follows.
The most basic object in Scratch is the sprite. Sprites appear on the Stage, and their code blocks control their
behavior. The editor automatically starts with a cat sprite for all new projects, but you can add more sprites.
You can program a sprite by adding code blocks to the Scripts Area on the right side of the screen. In Scratch, a
stack of code blocks is called a script.
The text field at the top of the editor contains the project name. After you’ve named your project using a
descriptive name, remember to occasionally save your project by clicking File Save Now from the menu bar
to avoid losing your work if your browser crashes.
You access the code blocks from the Blocks Area in the center. At the top of the Blocks Area are 10 categories of
codeblocks: Motion, Looks, Sound, Pen, Data, Events, Control, Sensing, Operators, and More Blocks.
Each sprite has its own scripts. When you click the sprite in the Sprite List, that sprite’s scripts will display in the
Scripts Area. Select the Scripts tab to display the Scripts Area. The Scripts Area is replaced by the Paint Editor
and Sound Editor when the Costumes and Sounds tabs are selected, respectively.
Clicking the green flag will start your program, and clicking the red stop sign will stop it.
59
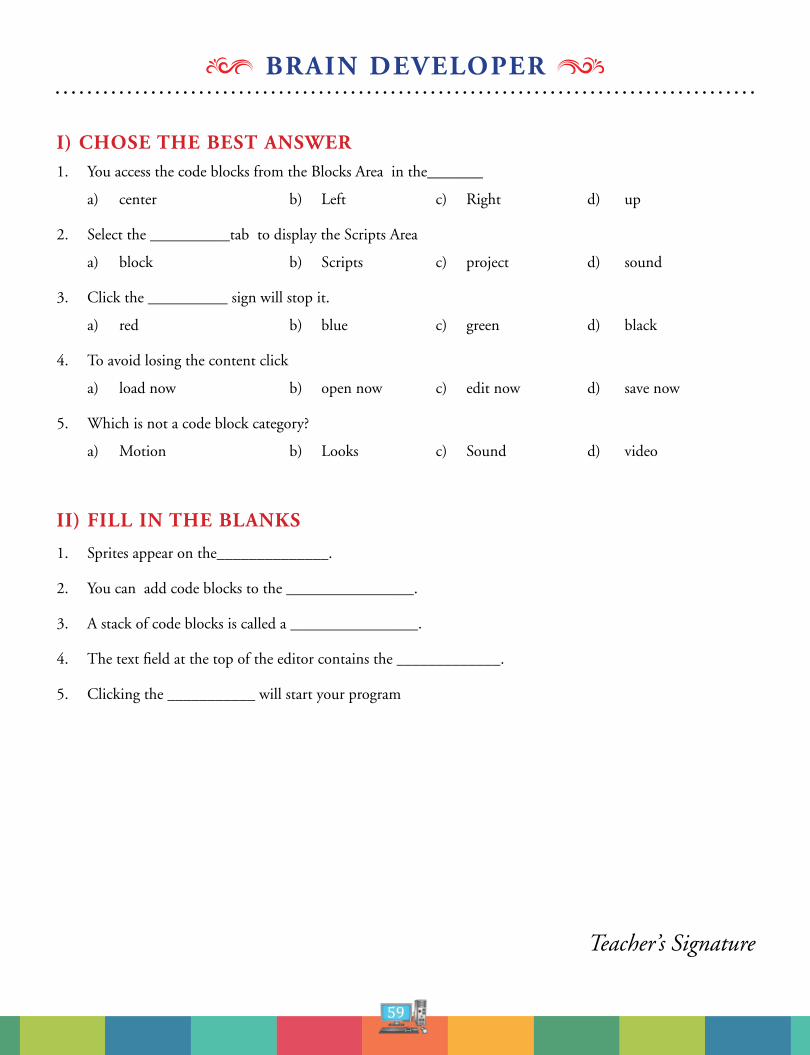
BRAIN dEVELoPER
I) ChoSE ThE BEST ANSWER1. You access the code blocks from the Blocks Area in the_______
a) center b) Left c) Right d) up
2. Select the __________tab to display the Scripts Area
a) block b) Scripts c) project d) sound
3. Click the __________ sign will stop it.
a) red b) blue c) green d) black
4. To avoid losing the content click
a) load now b) open now c) edit now d) save now
5. Which is not a code block category?
a) Motion b) Looks c) Sound d) video
II) FILL IN ThE BLANKS
1. Sprites appear on the______________.
2. You can add code blocks to the ________________.
3. A stack of code blocks is called a ________________.
4. The text field at the top of the editor contains the _____________.
5. Clicking the ___________ will start your program
Teacher’s Signature

60
INTRoduCTIoN:
Blocks are lines or blocks of code which you drag into your project to create a script. Each asset can have more than
one script associated with it, and each script can have as many blocks as you need.
Motion Blocks
Motion blocks are what you use to place your sprites on the stage or move them. They are dark blue. You can only
use motion blocks with sprites, not with the stage.
Looks Blocks
Looks blocks are coloured purple, and they control what your sprites and backdrop look like, how big they are, and
whether they are displayed in front of or behind other assets. Looks blocks also include blocks that let you display
text.
Sound Blocks
Sound blocks are used to add sound. They are coloured pinks.
Pen Blocks
You can use the green Pen blocks to create interactive games where the user can draw on the stage.
data Blocks
Data blocks let you create and manipulate data in your animations and games.
Events Blocks
The brown Events blocks are fundamental to Scratch as without them, nothing will happen. Each script will have
an event at its start which tells the script to run.
WoRKINg WITh CodE BLoCKSCh
apte
r
2
DiD YouKnow
Get help for any block: right-click (Mac Ctrl+click)
on the block

61
Adding Blocks
To create a new code block, drag it from the center Blocks Area to the Scripts Area. The code blocks that have a
notch on top and bump on the bottom are called stack blocks. To snap a stack block together with another stack
block, drag the block close to the bottom of the other. When a white outline appears, drop the block to connect
it to the stack.
Stack blocks can also fit in between blocks. Look carefully at where the white outline appears in the script: this is
where the block will snap into place. This figure shows a wait 1 secs block being moved into the middle of a script:

62
deleting Blocks
To remove blocks, drag them out of the script. If you remove a stack block, you’ll also remove the stack blocks
connected under it. You may need to set aside these blocks if you want to reconnect some of them to the script.
Drag the blocks you want to delete over the center Blocks Area to remove them from the Stage. You can always add
more blocks from the Blocks Area when you need them.
Running Programs
Create the following program by dragging blocks from the Blocks Area to the Scripts Area:
When you click the green flag at the top of the Stage, this program will start. Programs begin at the top block

63
(when green flag clicked) and then run the next code block in the script.
In this example, a speech bubble appears above the sprite and displays the word “Hello!” In the forever loop, the
sprite moves forward 10 steps and then turns counterclockwise by 15 degrees. When the program gets to the last
block, it loops back to the top. All the blocks in the forever block will run in a loop forever. The program stops only
when you click the red stop sign.
BRAIN dEVELoPER
I) MATCh ThE FoLLoWINg 1. MOTION BLOCK – ADDS SOUND
2. LOOKS BLOCK – INTERACTIVE GAMES
3. SOUND BLOCK – MANIPULATE DATA
4. PEN BLOCK – TO MOVE SPRITE
5. DATA BLOCK – PURPLE COLOUR
II) FILL IN ThE BLANKS
1. The brown _________ blocks are fundamental to Scratch.
2. ____________ can also fit in between blocks.
3. The code blocks that have a notch on top and bump on the bottom are called ___________
4. When a__________ outline appears, drop the block to connect it to the stack.
5. The program stops only when you click the________ stop sign.
Teacher’s Signature

64
CoNTRoLLINg SCRIPT ExECuTIoN ANd AddINg SouNdSCh
apte
r
3INTRoduCTIoN
Movement is used to show action. It is easy to make different types of movement on scratch. Goto x y command
is used to move the sprite.
Sound can be added to sprite from sound library so that it adds more effects to the project.
Following the Mouse
It is easy to script an object following the mouse. It is commonly used for top down games. It looks best to set the
rotation style to “Full rotation”.
Top-down Arrow Keys Movement
This command gives the sprite more control over where they move. It is an alternative to the mouse following
command. But this command allows sprite to move horizontally and vertically.

65
Coordinate system of the Scratch window:
• Thecentralcoordinatesofthestagelieson(0,0),withthehorizontaldirectionasX-axisandverticaldirection
as Y.
• Dividedbythecentralcoordinate,therightpartoftheX-axisispositiveX-axis(+),leftnegativeX-axis(-);the
upper part of the Y-axis divided by the central coordinate is positive Y-axis and the lower part Negative Y-axis.
• Thecoordinatesofthe4cornersonthestageare:(-240,180),(240,180),(240,-180),(-240,-180).

66
The following commands move the sprite to the designated coordinates and make the sprite glide.
The following commands and make the sprite move from one place to another and wait for 1 sec and say a
dialogue for 2 seconds.
AddINg SouNd To SPRITE:
To add sound to sprite Click the Sounds tab at the top of the Blocks Area, and then click the Choose sound from
library button under New sound. When the Sound Library window opens, select any sound and click oK.
The cheer sound will now appear as an option for the play sound block you can add it to sprite.

67
Add the following code to the Hoop sprite to make it glide randomly around the top half of the Stage. You’ll need
to create a broadcast message by clicking the when I receive block’s black triangle and selecting new message.
Name the new broadcast message swoosh.
Script makes the spite slide to a new position every second. Script plays the cheer sound and displays
“Swoosh!” when the swoosh broadcast is received.
Change the drum command by dragging each of these sounds and change the code and click the green flag to get
different beats.

68
Press Shift with the Rectangle tool to make a square.
BRAIN dEVELoPER
II) FILL IN ThE BLANKS
1. To add sound to sprite Click the__________ tab.
2. ________ is used to show action.
3. The __________ coordinates of the stage lies on (0,0).
4. Sounds tab is at the ¬¬¬¬¬¬¬¬¬¬¬________of the Blocks Area.
5. __________command allows sprite to move horizontally and vertically.
II ANSWER ThE FoLLoWINg QuESTIoNS
1. How to move the sprite?
2. How the coordinates are divided?
3. How to add sound to sprite?
do IT YouRSELF
Create a scratch project about your hobbies using the commands you have learned.
Teacher’s Signature

69
INTRoduCTIoN
In this lesson we are going to learn how to create backdrops and sprites. There are variety of ways of creating
backdrops and sprites: We can choose them from the Scratch library, we can draw them our self, edit existing ones,
or upload images.
Creating Your ProjectStart by creating your project. Log in to Scratch, and then in the home page, click Create in the admin bar at the
top of the screen.
This will take you to the new project screen:
Give your project a name by typing it into the field immediately above the stage. Scratch will then automatically
save your project with its new title.
Adding Backdropsfor creating backdrops, each of which has an icon:
• Choosebackdropfromlibrary
• Paintnewbackdrop
• Uploadbackdropfromfile
• Newbackdropfromcamera
ChANgINg ThE BACKdRoP ANd EdITINg CoSTuMECh
apte
r
4

70
Adding a Backdrop From the Library
Start by using the library. Click on the left hand icon to view the backdrops library:
Select an image(beach Malibu) and click the oK button.
The cat sprite will now be in front of your background:

71
Earlier the project had a plain white backdrop when you started; it will now have two backdrops. You can view all
of your backdrops by clicking on the Stage (next to your sprites) and then clicking on the Backdrops tab to the
right of the stage. This reveals the backdrops pane:
Here you can add or delete backdrops and edit existing ones. We’re going to delete the unwanted one and then add
two new ones based on the one we’ve just added.

72
deleting a Backdrop
Firstly, click on the white backdrop (backdrop1) and click on the x which will appear to its top right. You’ll now
have just one backdrop.
Copying a Backdrop
Now we’ll copy the existing backdrop to make a second one, which we’ll then edit.
Make sure your backdrop is selected in the backdrops pane, and right-click on it. In the shortcut menu, click
duplicate.
You’ll now have two backdrops which are the same:

73
Editing a Backdrop
Now you need to edit the new backdrop. Select the backdrop called beach-malibu2 and click the Select icon to the left of the backdrop editing pane (it’s second from the bottom and looks like a hand over a dotted rectangle). Select a portion of your backdrop by dragging the mouse over it. Select central portion which is about 75% of the backdrop:
Now drag the handles of that selected portion out to the edge of the backdrop so that it takes up the whole backdrop. You’ll end up with a backdrop that looks like a slightly zoomed in version of the first one.
Note: if you go wrong, just click on Edit and Undo in the admin bar, or delete your backdrop and start again!
Steps to edit the costume of the sprite:
1. Choose the costume button to change to editing mode.
2. Select the name of the costume and apply to the sprite.
3. You can also select from the edit tool to create your own design and colour of the costume.
4. If you want to adjust the display of the colour of the costume, you can increase or decrease per the buttons.
5. To delete a costume we need to choose one from the tray and click the “x” in the right upper hand corner of
the picture.

74
Use pen down block to draw lines.

75
Change the pen colour and size as given above.
Use the code given below and draw the line in various colours.

76
BRAIN dEVELoPER
I) FILL IN ThE BLANKS
1. If you go wrong, just click on Edit and ___________
2. Start by creating your project. Click ____________ in the admin bar at the top of the screen.
3. There are _________ options for creating backdrops, each of which has an icon:
4. Choose the __________ button to change to editing mode
5. Use _________ block to draw lines
II gIVE ANSWERS To ThE FoLLoWINg
1. How to add a backdrop?
2. How to delete a backdrop?
3. How to add costume to a sprite?
Teacher’s Signature
To turn a costume into a separate sprite, right-click (Mac Ctrl+click) and select
“turn into a sprite”.

77
INTRoduCTIoN
Every new project starts with one sprite (the cat) already loaded, but you can also add as many of your own as you
want, or you can edit or delete the cat.
CREATINg SPRITES
As with backdrops, there are four icons for creating a sprite:
• Choosespritefromlibrary
• Paintnewsprite
• Uploadspritefromfile
• Newspritefromcamera
Note that if you want to use a graphics file such as a png to create your sprite, you upload that as a costume, not a
sprite. Sprites are stored as a specific file type which is only usable in Scratch.
CREATINg A SPRITE FRoM ThE LIBRARY
Let’s start with the simplest way of creating a sprite: by importing one from the library.
In the Sprites pane below the stage, click on the icon immediately to the right of the New sprite text, to view the
library:
SPRITE MANIPuLATIoN, CREATINg oWN SPRITESCh
apte
r
5

78
Choose a sprite from the ones on offer: Choose a crab.
Click oK and the new sprite will be added to your project:

79

80
Using paint editor, create and paint your own new sprite as shown above.
Navigate to the portion of the paint editor. The buttons found on this toolbar, reading left to right top to bottom
are: Paint Brush, Eraser, Fill Tool, Rectangle Tool, Ellipse Tool, Line Tool, Text Tool, Selection Tool, Stamp Tool,
and the Eyedropper Tool. Here is a brief break down of what all these tools do.
Paint Brush: This tool allows you to paint freely. You can change colors using the Eyedropper tool or clicking using
the Color Palette located below the toolbar. This tool has varying sizes.
Eraser: This tool allows you to erase drawings you have already made. Like the Paint Brush, you may change its
size.
Fill Tool: The Fill Tool (or Paintbucket) allows you to click somewhere and have everything of the same color that
is adjacent to your cursor filled in a certain color.
Rectangle Tools: With this tool you may draw filled or unfilled rectangles by dragging a box with your cursor.
Ellipse Tool: This tool functions the same as the Rectangle Tool except it creates shapes that are circular or ellip-
tical.
Line Tool: This tool draws lines of your chosen color from the place where you first clicked to your cursor.
Text Tool: This tool allows you to type text in a variety of fonts.
Selection Tool: This tool allows you to select a region of your picture and move it.
Stamp Tool: This tool allows you to select an area and then paste it down again elsewhere by clicking.
Eyedropper Tool: The Eyedropper Tool is used for clicking on a color and then having that become your selected
color.
These are the main tools you will use in the Scratch paint editor.
Now you can change the colour of the spirte by following the steps

81
Drag in the “set color effect” and “change color effect” to change the colour of the sprite you have created.
Choose a backdrop, create a clone of your sprite, and let them race with each other. You can also use the random
blocks from the Operators button as given.
Clone the sprite by dragging in the commands as shown below.

82

83
BRAIN dEVELoPER
I) MATCh ThE FoLLoWINg
A BIMPORT
TAKING PHOTO
CREATE A NEW SPRITE
SPRITE LIBRARY
II) ChooSE ThE BEST ANSWER
1. This tool allows you to paint freely.
a) Paint brush b) eraser c) ellipse d) rectangle
2. This tool allows you to erase drawings you have already made.
a) Paint brush b) eraser c) ellipse d) rectangle
3. With this tool you may draw filled or unfilled rectangles by dragging a box with your cursor.
a) Paint brush b) eraser c) ellipse d) rectangle
4. This tool allows you to type text in a variety of fonts.
a) Text l b) eraser c) ellipse d) rectangle
5. This tool allows you to select an area and then paste it down again elsewhere by clicking.
a) Paint brush b) eraser c) stamp d) rectangle
Teacher’s Signature

84
INTRoduCTIoNIn this chapter we are going to learn about the various decision making statements like loop, Conditional statements
like if.
oNE KEY APPLICATIoNMake sure the pen is down by dragging the pen down block from the pens blocks into the scripts section of the
design environment and double clicking on it.
In the onekey application move 60 corresponds to the forward command and turn 30 to the right command. There
is plenty of scope to draw square, triangles, and hexagons by double clicking on the relevant control block. Right
click on the items to copy them and fit them together to execute a sequence of commands. Copy a collection of
sequences to create the required shapes.
Now manually you can turn around the sprite by using some keys. We are using when – key pressed command.
CoNdITIoNAL dECISIoN MAKINg STATEMENTS6Chapte
r
You can drag in an animated gif.
DiD You Know?

85
CoNdITIoNAL STATEMENTSConditional statements have slots that are shaped with points on either side which evaluate to a true or a false value
and execute if the statement is true. They are found in the controls programming blocks and are used for program
flow with if, repeat, forever, and wait blocks. The conditional part of the statement is found amongst the numbers
and the sensing areas
Conditions
In programming, a condition is something that must be true in order for something to happen. A condition is
thus said to “evaluate to true” or “evaluate to false.” In Scratch, any block whose label says “if,” “when,” or “until”
is a sort of conditional construct.
One such block is:
The construct above is generally known as an “if construct.” With it can we instruct a sprite to say hello only if,
say, the user has depressed the mouse button:
A related construct is the “if-else construct”:

86
With the above construct can we instruct a sprite to say hello or goodbye, depending on whether the user has
depressed the mouse button:
Realize that these constructs can be nested to allow, for example, for three different conditions:
The above construct could be called an “if-else if-else construct”.
Another conditional block is:
Yet another such block is:

87
Sometimes, you want one or more statements to be executed multiple times in a row. To implement this behavior,
we turn our attention to LOOPS.
Loops
In programming, a loop can induce multiple executions of statements. In Scratch, any block whose label begins
with “forever” or “repeat” is a looping construct.
One such block is:
This construct allows us, for instance, to instruct a sprite to meow every other second:
Another block allows you to loop a specific number of times:
And another block allows you to loop until some condition is true:
Conditional statements ask questions about the program state to choose from a set of different sequences of
commands. In Scratch for example, you can determine whether you are at the edge of the stage with the if
touching edge control block

88
hAVE FuN IN doINg ThE FoLLoWINg
Now that it makes crazy moves, let us trace its path!
Tired of blue color? Let us change the colors along the way!
Instead of tracing its path, you want more cats?
Circle of cats!
As it moves & turns, make an impression using stamp!
Extra steps above repeat loop help us to see the whole big circle of cats!

89
Multi-size cat problem!
Cats keep growing until you press s! Then, it becomes small, but they start growing as soon as you release s key.
Now let us select Pencil from sprite library & delete cat. You can delete the cat. Now edit the costume of Pencil
and adjust the size and position so that the tip aligns with + sign.
Now, review this code closely and guess what shape it is going to draw first.

90
Now, modify this code and learn to draw a few other related shapes.
Now try these shapes on your own.
Self assessment:

91
Animation In Scratch
Follow the following steps to make the project:
First you have to setup the stage. Select stage and import ‘Brick Wall 1’ from the Background library form file
menu.
Choose the bat sprite from the library. Delete the panda sprite.
Place the bat above ground as shown in figure.
The bat have two costumes (bat1-a and bat1-b) to make the flying animation of the bat.
Bat Costumes
To change the costume of the bat, you have to use switch costume block from looks palette. In the drop down
menu you will get the option to change the costume to bat1-a or bat1-b.
Switch costume

92
Once you click on the block, it will be highlighted and the command will be executed. To animate the bat at a
certain speed, we will add wait block from control palette for 0.5s. Then, we will again switch costume to bat1-b.
When you click the script, the bat will change costume to bat1-a, wait for 0.5s, switch costume to bat1-b and wait
for 0.5s. This happens only once. Thus we will add forever block from control palette, to repeat the process.
Again for running the script you have to click on the script. To run the script, whenever an action is perform, you
add hat blocks. In this case we will add when flag is clicked block from event palette.
Your animation is ready

93
If you want your animation to move within the frame use the following code.
Other alternative code is

94
BRAIN dEVELoPER
I) FILL IN ThE BLANKS
1. ____________ is a loop statement.
2. ______ statement repeats continuously.
3. _____ statement check the condition.
4. ______ used to move pen.
5. ______ used to write with pen.
do IT YouRSELF
1. Create and wish “happy birthday” through a scratch project to your friend as shown below.
2. Complete the conversation between two Sprite characters regarding conservation of water and use conditional decision making statements to show the effects of not conserving water like changing the backstage to desert, etc.
3. Create a small Scratch project with the sprite 1 as Mike and sprite 2 as a spaceship.Complete the Sprites’ conversation with each other using message command.
4. Make a Cassy dancing sprite project with spotlight stage backdrop and play sound until 30 seconds.
Teacher’s Signature

95
IT SCHOOL@
IT SCHOOL@User Skill
Typing Tutor

96

97
TYPINg TuToR INTRoduCTIoN
The knowledge of touch typing has become inevitable today in the use of computers.
With typing tutor, you can learn touch typing in an easier and simple way.
It is very similar to you that there are 26 letters in English alphabet. All these 26 letters are presented in the computer keyboard too.
But, 26 letters are not arranged in an alphabetical order.
The letters in the keyboard is arranged in QWERTY order.
TYPINg STEPS
Follow the steps below:-
Step 1: First of all place your hand on the keyboard.
Step 2: Place your
Little finger of your left hand gently on the ‘A’
Ring finger on ‘ S ’
Middle finger on ‘ D ’
Index finger for both ‘ F ’ and ‘ G ’
Step 3: Place your
Little finger of your right hand gently on the key semicolon ‘ ; ’
Ring finger on ‘ L ’
Middle finger on ‘ K ‘
Index finger for both ‘ H ’ and ‘ J ’

98
Step 4: Place both your left and right thumbs on the spacebar key.
Lets start typing. Whatever it may be letter or numbers all most all the keys you can see around your fingers.
LEFT hANd FINgERName of the Finger Keys on the Keyboard
Little Finger A
Ring Finger S
Middle Finger D
Index Finger F,G
Thumb Spacebar
RIghT hANd FINgERName of the Finger Keys on the Keyboard
Little Finger ;Ring Finger LMiddle Finger KIndex Finger J,HThumb Spacebar
ThE QWERTY LAYouT
The keys on the keyboard is arranged in QWERTY layout. The layout is referred to us as “QWERTY” because of
the arrangement of the keys in the upper row is QWERTY.

99
hoME RoW
The finger of an experienced typist never “rest” However, if we could ask the fingers where they spend most of their
time, it is over the home row.
When you are still learning to access keyboard, be careful to keep at least one finger of each hand anchored over
the home row.
uPPER RoW / QWERTY RoW
QWERTY Row is located just above the Home row. It contains many number of characters.
LoWER RoW
Lower Row is located just below the home row, contains limited number of keys.
NuMBERS RoW
Numbers Row is located above the upper row, number keys are also available in a separate place at the right side
of the keyboard.
ANChoRINg
Anchoring means to keep a finger in very light contact with its home row key.
During the early stages of learning keyboard, this is necessary for the brain to develop a sense of position for the
hands and fingers.
As you become a more skilled typist, your fingers will automatically move to the correct position of the keys.

100
DiD
Yo
u
Kn
ow