
iOS Application Development
181
Edyta Łukasik Maria Skublewska-Paszkowska iOS Application Development
-
Upload
khangminh22 -
Category
Documents
-
view
4 -
download
0
Transcript of iOS Application Development
Edyta Łukasik Maria Skublewska-Paszkowska
iOS Application Development

iOS Application Development

iOS Application
Development
EDYTA ŁUKASIK MARIA SKUBLEWSKA-PASZKOWSKA
PIPS – Polish Information Processing Society Lublin 2016

Reviewers Šarūnas Packevičius (Kaunas University of Technology, Kaunas,
Lithuania) Sergio Lujan Mora (Alicante University, Alicante, Spain)
Supported by Content:
Project: “Mobile Application Development for Environmental Monitoring – a New Program of Master Studies in English (MADEM)”, FSS/2014/HEI/W/0076 EEA Grants, Norway Grants and national funds under the Scholarship and Training Fund Programme
Printing and publishing:
Project: “Professional Master’s Degree in computer science as a second competence in Central Asia (PROMIS)”, 544319-TEMPUS-1-2013-1-FR-TEMPUS-JPCR EU Tempus Programme
Publisher Polish Information Processing Society
The publication is distributed free of charge ISBN 978-83-936692-2-6

Table of Contents
Introduction ........................................................................................ 7
1. iOS programming........................................................................... 9
2. Objective-C basics .................................................................................... 11
2.1. Data types ................................................................................................. 12
2.2. Instructions ................................................................................................ 25
2.3. Class ......................................................................................................... 37
2.4. Protocols ................................................................................................... 45
2.5. Delegates .................................................................................................. 47
3. Xcode environment ....................................................................... 49 3.1. Creating new project .................................................................................. 50
3.2. Interface Builder ........................................................................................ 56
3.3. Using Simulator ......................................................................................... 60
3.4. Running the software on a device .............................................................. 61
4. iOS system ................................................................................... 63 4.1. Architecture of iOS system......................................................................... 64
4.2. Model-View-Controller ............................................................................... 78
5. Creating the Graphical User Interface .......................................... 81 5.1. Controls ..................................................................................................... 82
5.2. Storyboard ................................................................................................ 107
5.3. Tableviews ............................................................................................... 116

6 iOS Application Development
6. Data Management ....................................................................... 137 6.1. Introduction to the Core Data .................................................................... 138
6.2. Core Data Architecture ............................................................................. 139
6.3. Creating a basic Core Data application ..................................................... 141
6.4. Deleting data ............................................................................................ 153
6.5. Data modification ...................................................................................... 155
7. Map implementation .................................................................... 159 7.1. Frameworks.............................................................................................. 160
7.2. Adding maps to the application ................................................................. 162
7.3. Adding annotations to a map .................................................................... 169
7.4. Distance between points ........................................................................... 171
Bibliography ..................................................................................... 175

Introduction
Recently, rapid technology development causes that mobile devices such as
smartphones, tablets and others are more and more accessible. They often
accompany people during their lives. Nowadays, they have many more functions than
just phoning (e.g. sending emails, accessing to the Internet, navigation or games).
The development of mobile programming can be also observed. More and more
applications are implemented and put into stores where users may download them
and use for their own purposes. Some companies (e.g. stores, banks, navigation
companies) order to create applications for particular mobile platforms. Because of the
fact that software for mobile applications development is accessible, many users may
implement their own applications and use them on their devices. Moreover, they may
share with the created applications by placing them into the proper store.
This book introduces the reader into the basics of mobile programming for iOS
platform. First, the Objective-C language is described in detail. This language is
dedicated for iOS and OS X platforms. Second, the iOS architecture is described.
This knowledge is crucial for Apple mobile applications development. Third, the
implementations of various mobile applications are presented. This book has a lot of
examples that clearly explain the presented issues.

8 iOS Application Development
This book is mostly dedicated to computer science studies students and also the
related fields. However, everyone who would like to learn about mobile programming
for iOS platform may refer to the presented theme.
We would like to thank our families and friends for support and valuable tips. We
are very grateful Ronal E. Day for English improvements. We would like to thank the
reviewers for their work and remarks.
We hope that this book will contribute to acquire the basic knowledge about iOS
programming.
The authors Edyta Łukasik
Maria Skublewska-Paszkowska

iOS programming
iOS programming has become more and more popular. iOS is the operating system
created by Apple Inc. It bases on Mac OX system. The mobile applications are
dedicated for Apple devices such as: iPhones, iPads and iPods touch. There have
been many versions of iOS system. This book presents 8.x version of it.
There are two objective languages that can be used for application development:
Objective-C and swift. The latter was created in 2014 while the former is the language
invented by Apple company. Both languages allow for creating applications for iOS
and OS X systems. This book presents the basics of the Objective-C language.
The application development is not a sophisticated issues. Several elements are
necessary to start iOS programming. First, Mac computer with Intel processor and OS
X version is needed. Second, Xcode software for applications development has to be
download from Mac-App Store. It is free to use. It has to be compatible with the Mac
OS version. Xcode combines: software for programming, Storyboard for defining GUI
and the set of various simulators that can be used for running the applications on the
computer. Third, Apple device is necessary for testing all functionality of the
developed applications.
For installing the created applications or putting them into App Store one more
thing is needed – the participation in iOS Developer Program. It is dedicated for
private persons, companies and universities. Only the latter program is free to use.
There are fees that have to be paid a year.
1

10 iOS Application Development
This book is organised into two parts: about Objective-C language and mobile
programming. The first part conveys the basics of object oriented programming
(OOP). OOP is a methodology of constructing software application composed of class
objects. Each object is characterized by properties and functionalities. The basic data
types and used control instructions are described. The class is a very important term
to understand in the OPP. The class structure and all issues associated with it are
presented. Such the language elements as delegates and protocols will be described.
Moreover, the Xcode software and its functionality is presented. The second part is
about creating mobile applications. The iOS system architecture and the Model-View-
Controller (MVC) pattern are presented. This knowledge is important for properly
understanding of mobile programming. The creation of GUI is described in detail. The
most common controls, storyboard and table views are shown. The Core Data
framework allows for managing data using an object-oriented approach. Development
of a mobile application is presented which shows step by step how to use this
framework for storing, fetching and managing data. A map is the primary way to
display geographic information in mobile applications. Due to a large increase in
mobile devices, such as smartphones and tablets, it is more and more easy to select
the route between two points or just to locate a chosen position. Developers have
a wide range of up-to-date software and tools, such as: developing environment,
libraries and frameworks. The API provides a user interface component called map
view.
The subjects in this book are described theoretically and with examples of codes
and the results.
Objective-C basics
Aim Objective-C language is a tool for development programs for Mac OS, and mobile
applications for iOS. In this chapter, basic data types and used control instructions will
be described. The class structure will be presented - the necessary concept in object
oriented programming. Such the language elements as delegates and protocols will
be described.
Plan 1. Data types
2. Instructions.
3. Classes.
4. Protocols.
5. Delegates.
2

12 iOS Application Development
2.1. DATA TYPES
Objective-C is a programming language used to implement software for OS X and iOS
platforms. It’s a superset of the C programming language. This language provides
object-oriented capabilities and dynamic runtime. It's a convenient tool for defining
classes and methods, as well as adding language-level support for object graph
management and object literals while dynamic typing and binding. This language
provides instructions deferred until runtime. Objects are the most important elements
in OS X or iOS applications. They are instances of Objective-C classes. Some of them
are provided by Cocoa or Cocoa Touch frameworks, others are defined by developer.
All of the standard C scalar (non-object) types like int, float and char can be used
in Objective-C language. There are also additional scalar types available in Cocoa and
Cocoa Touch frameworks, such as NSInteger, NSUInteger and CGFloat, which have
different definitions depending on the architecture target (iOSDL, a.y.w). The scalar
types are used when there isn’t any benefit in using an object to represent a value.
The most important basic data types are types for integer numbers (table 2.1).
Table 2.1. Integer types in Objective-C language
Type Value range
char from -128 to 127 or from 0 to 255
unsigned char from 0 to 255
signed char from -128 to 127
int from -32768 to 32767 or from -2147483648 to 2147483647
unsigned int from 0 to 65535
short from -32768 to 32767
unsigned short from 0 to 65535
long from -2147483648 to 2147483647
unsigned long from 0 to 4294967295
Source: (Tutorialspoint, a.y.)
Objective-C basics 13
NSNumber The hierarchy in types is as follows: NSObject -> NSValue -> NSNumber. Class
NSNumber is a subclass of NSValue that offers the C scalar type values. There are
defined sets of methods for creating and initializing new objects in this class.
The methods which can be implemented to create a new NSNumber object are
(Kochan, 2012, p.312):
+ numberWithBool:
+ numberWithChar:
+ numberWithDouble:
+ numberWithFloat:
+ numberWithInt:
+ numberWithInteger:
+ numberWithLong:
+ numberWithShort:
+ numberWithUnsignedChar:
+ numberWithUnsignedInt:
+ numberWithUnsignedInteger:
+ numberWithUnsignedLong:
+ numberWithUnsignedShort:
The methods for initialization a new NSNumber object are as follows (Kochan,
2012, p.312):
- initWithBool:
- initWithChar:
- initWithDouble:
- initWithFloat:
- initWithInt:
- initWithInteger:
- initWithLong:
- initWithLongLong:
- initWithShort:
- initWithUnsignedChar:
14 iOS Application Development
- initWithUnsignedInt:
- initWithUnsignedInteger:
- initWithUnsignedLong:
- initWithUnsignedShort:
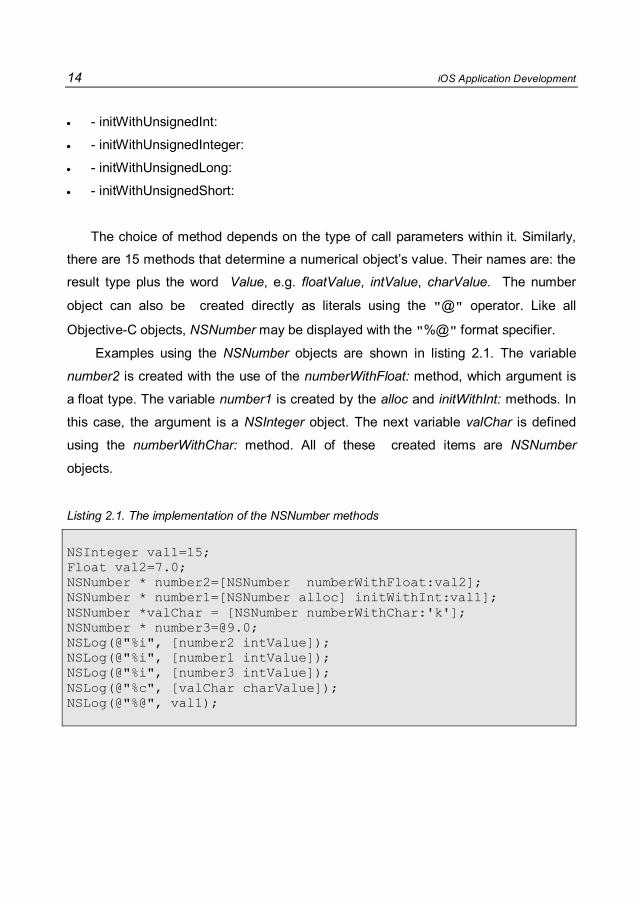
The choice of method depends on the type of call parameters within it. Similarly,
there are 15 methods that determine a numerical object’s value. Their names are: the
result type plus the word Value, e.g. floatValue, intValue, charValue. The number
object can also be created directly as literals using the "@" operator. Like all
Objective-C objects, NSNumber may be displayed with the "%@" format specifier.
Examples using the NSNumber objects are shown in listing 2.1. The variable
number2 is created with the use of the numberWithFloat: method, which argument is
a float type. The variable number1 is created by the alloc and initWithInt: methods. In
this case, the argument is a NSInteger object. The next variable valChar is defined
using the numberWithChar: method. All of these created items are NSNumber
objects.
Listing 2.1. The implementation of the NSNumber methods
NSInteger val1=15; Float val2=7.0; NSNumber * number2=[NSNumber numberWithFloat:val2]; NSNumber * number1=[NSNumber alloc] initWithInt:val1]; NSNumber *valChar = [NSNumber numberWithChar:'k']; NSNumber * [email protected]; NSLog(@"%i", [number2 intValue]); NSLog(@"%i", [number1 intValue]); NSLog(@"%i", [number3 intValue]); NSLog(@"%c", [valChar charValue]); NSLog(@"%@", val1);

Objective-C basics 15
The result of the program presented in listing 2.1 is shown below:
7
15
9
k
There are two methods that compare two NSNumber objects: compare: and
isEqualToNumber:. The implementation of the compare: method has the form
depicted in listing 2.2. It returns the NSComparison object which has got one of the
following sets (Kochan, 2012, p.313):
NSOrderedAscending (<);
NSOrderedSame (==);
NSOrderedDescending (>).
This method isn't convenient but allows for flexibility to the Foundation Framework
classes (ROCT, a.y.b).
Listing 2.2. The implementation of the compare: method
NSNumber *val1 = @77; NSNumber *val2 = @36; NSComparisonResult result = [val1 compare:val2]; if (result == NSOrderedAscending) { NSLog(@"77 < 36"); } else if (result == NSOrderedSame) { NSLog(@"77 == 36"); } else if (result == NSOrderedDescending) {
NSLog(@"77 > 36"); }
NSString There are two types for representing string objects: NSString and its NSMutableString
subclass. The objects created using NSString and NSMutableString are string values.

16 iOS Application Development
The NSString class declares the interface for an object that manages immutable
strings. It is a text that is defined when it is created. Its value cannot be changed
during the program. The NSString is implemented to represent an array of Unicode
characters, in other words, a text string (iOSDL, a.y.k). The NSMutableString object is
a string that can be changed any number of times in the program.
There are a lot of methods to create and initialize NSString objects, string from
file or from URL, combining and dividing strings, finding characters or substrings. The
most useful are (iOSDL, a.y.k):
+ string
- init
- initWithCharacters:length:
- initWithString:
- initWithFormat:
- initWithFormat:arguments:
+ stringWithFormat:
+ stringWithString:
- characterAtIndex:
It can be determined how many characters a string object contains. All NSString
objects have the length property. The implementation of the strings methods is shown
in listing 2.3.
Listing 2.3. The implementation of the methods dedicated for NSString objects
NSString *name = @"Steven"; NSString *surname = @"Jobs"; int year = 1958; NSString *info = [NSString stringWithFormat:@"That's a %@ %@ born in %d!",name, surname, year]; NSLog(@"%@", info); if ([name isEqualToString:@"Steven"]) { NSLog(@"His name is Peter."); } NSLog(@"Length of name %d.", [name length]); NSLog(@"Initials %hu. %hu.", [name characterAtIndex:0],
[surname characterAtIndex:0]);
Objective-C basics 17
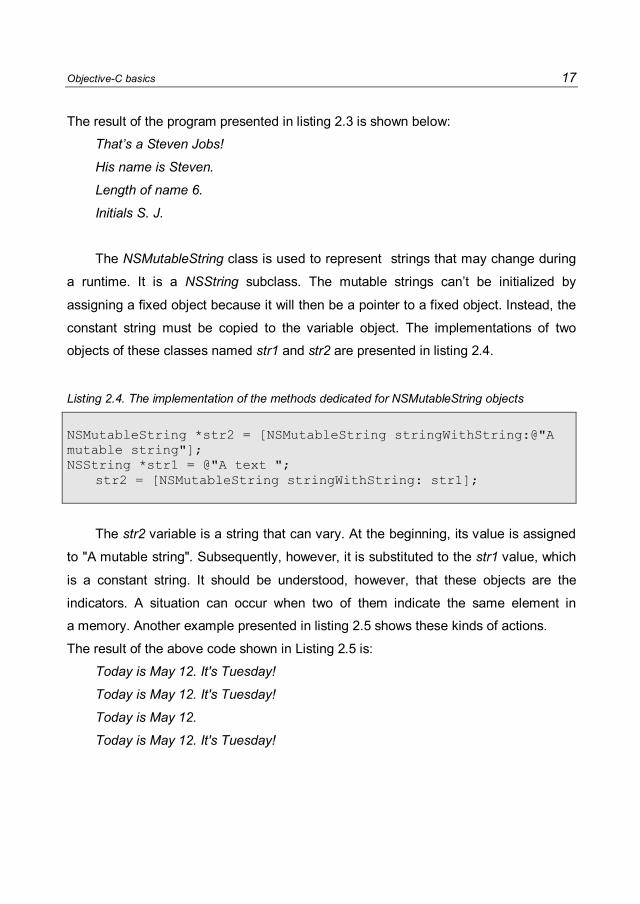
The result of the program presented in listing 2.3 is shown below:
That’s a Steven Jobs!
His name is Steven.
Length of name 6.
Initials S. J.
The NSMutableString class is used to represent strings that may change during
a runtime. It is a NSString subclass. The mutable strings can’t be initialized by
assigning a fixed object because it will then be a pointer to a fixed object. Instead, the
constant string must be copied to the variable object. The implementations of two
objects of these classes named str1 and str2 are presented in listing 2.4.
Listing 2.4. The implementation of the methods dedicated for NSMutableString objects
NSMutableString *str2 = [NSMutableString stringWithString:@"A mutable string"]; NSString *str1 = @"A text ";
str2 = [NSMutableString stringWithString: str1];
The str2 variable is a string that can vary. At the beginning, its value is assigned
to "A mutable string". Subsequently, however, it is substituted to the str1 value, which
is a constant string. It should be understood, however, that these objects are the
indicators. A situation can occur when two of them indicate the same element in
a memory. Another example presented in listing 2.5 shows these kinds of actions.
The result of the above code shown in Listing 2.5 is:
Today is May 12. It's Tuesday!
Today is May 12. It's Tuesday!
Today is May 12.
Today is May 12. It's Tuesday!

18 iOS Application Development
Listing 2.5. The use of NSString objects
NSMutableString *str1; NSMutableString *str2; str1 = [NSMutableString stringWithString: @"Today is May 12."]; str2 = str1; [str2 appendString: @" It's Tuesday!"]; NSLog (@"string1 = %@", str1); NSLog (@"string2 = %@", str2); str1 = [NSMutableString stringWithString: @"Today is May 12."]; str2 = [NSMutableString stringWithString: str1]; [str2 appendString: @" It's Tuesday!"]; NSLog (@"string1 = %@", str1); NSLog (@"string2 = %@", str2);
Type id The id is a generic type dedicated to all objects in Objective-C language. It means that
all types objects can be substituted with this type. The following example presented in
listing 2.6 uses the same object id to store the string and the dictionary types. All
instructions are correct (Kochan, 2012, p.64).
Listing 2.6. The id type implementation
//as the string id ob1 = @"String"; NSLog(@"%@", [ob1 description]); //as the dictionary ob1 = @{@"model": @"Ford", @"year": @1967}; NSLog(@"%@", [ob1 description]);
It is worth mentioning that all Objective-C objects are considered as indicators, so
that, when they are declared, the "*" symbol has to be used. The property of id type
automatically means that the variable is an indicator, so that the star symbol it is not
Objective-C basics 19
necessary. This type is a base of the mechanism of polymorphism and dynamic
binding, so it is quite important in Objective-C.
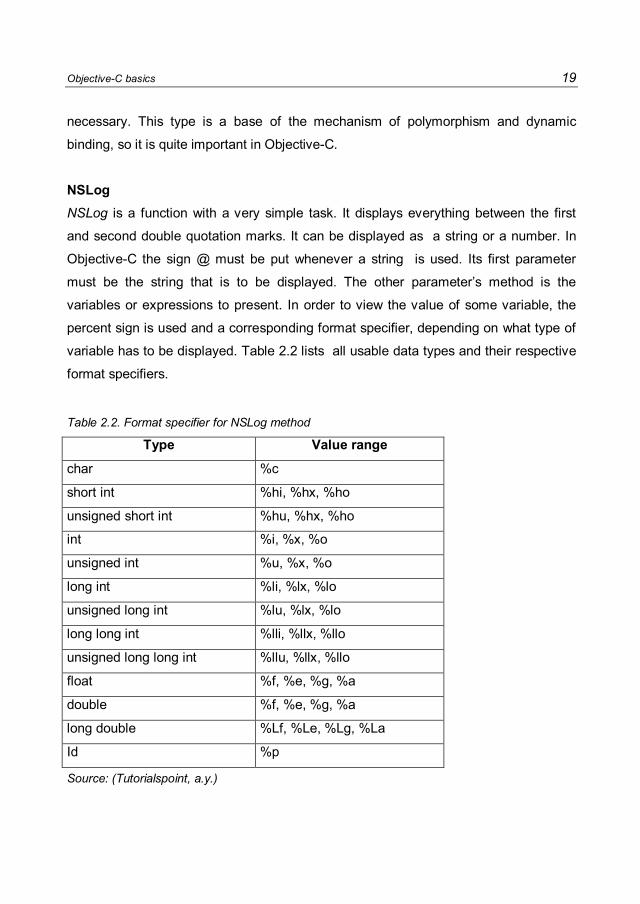
NSLog NSLog is a function with a very simple task. It displays everything between the first
and second double quotation marks. It can be displayed as a string or a number. In
Objective-C the sign @ must be put whenever a string is used. Its first parameter
must be the string that is to be displayed. The other parameter’s method is the
variables or expressions to present. In order to view the value of some variable, the
percent sign is used and a corresponding format specifier, depending on what type of
variable has to be displayed. Table 2.2 lists all usable data types and their respective
format specifiers.
Table 2.2. Format specifier for NSLog method
Type Value range
char %c
short int %hi, %hx, %ho
unsigned short int %hu, %hx, %ho
int %i, %x, %o
unsigned int %u, %x, %o
long int %li, %lx, %lo
unsigned long int %lu, %lx, %lo
long long int %lli, %llx, %llo
unsigned long long int %llu, %llx, %llo
float %f, %e, %g, %a
double %f, %e, %g, %a
long double %Lf, %Le, %Lg, %La
Id %p
Source: (Tutorialspoint, a.y.)
20 iOS Application Development
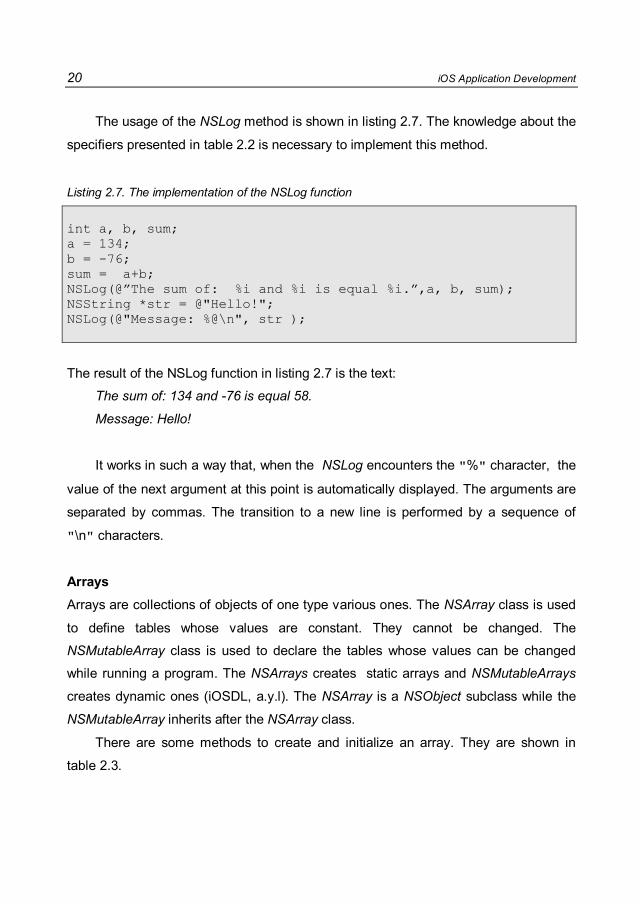
The usage of the NSLog method is shown in listing 2.7. The knowledge about the
specifiers presented in table 2.2 is necessary to implement this method.
Listing 2.7. The implementation of the NSLog function
int a, b, sum; a = 134; b = -76; sum = a+b; NSLog(@”The sum of: %i and %i is equal %i.”,a, b, sum); NSString *str = @"Hello!"; NSLog(@"Message: %@\n", str );
The result of the NSLog function in listing 2.7 is the text:
The sum of: 134 and -76 is equal 58.
Message: Hello!
It works in such a way that, when the NSLog encounters the "%" character, the
value of the next argument at this point is automatically displayed. The arguments are
separated by commas. The transition to a new line is performed by a sequence of
"\n" characters.
Arrays Arrays are collections of objects of one type various ones. The NSArray class is used
to define tables whose values are constant. They cannot be changed. The
NSMutableArray class is used to declare the tables whose values can be changed
while running a program. The NSArrays creates static arrays and NSMutableArrays
creates dynamic ones (iOSDL, a.y.l). The NSArray is a NSObject subclass while the
NSMutableArray inherits after the NSArray class.
There are some methods to create and initialize an array. They are shown in
table 2.3.
Objective-C basics 21
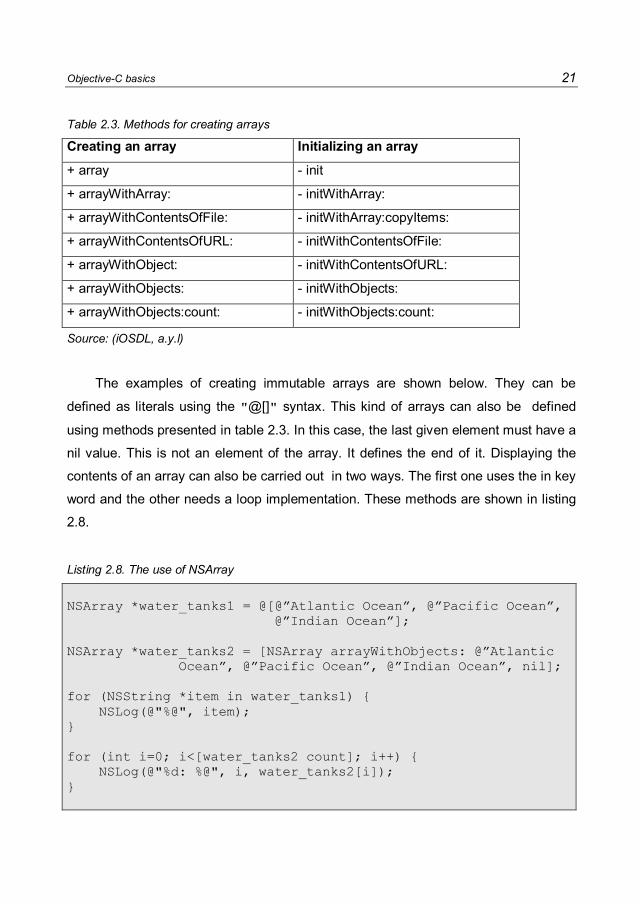
Table 2.3. Methods for creating arrays
Creating an array Initializing an array
+ array - init
+ arrayWithArray: - initWithArray:
+ arrayWithContentsOfFile: - initWithArray:copyItems:
+ arrayWithContentsOfURL: - initWithContentsOfFile:
+ arrayWithObject: - initWithContentsOfURL:
+ arrayWithObjects: - initWithObjects:
+ arrayWithObjects:count: - initWithObjects:count:
Source: (iOSDL, a.y.l)
The examples of creating immutable arrays are shown below. They can be
defined as literals using the "@[]" syntax. This kind of arrays can also be defined
using methods presented in table 2.3. In this case, the last given element must have a
nil value. This is not an element of the array. It defines the end of it. Displaying the
contents of an array can also be carried out in two ways. The first one uses the in key
word and the other needs a loop implementation. These methods are shown in listing
2.8.
Listing 2.8. The use of NSArray
NSArray *water_tanks1 = @[@”Atlantic Ocean”, @”Pacific Ocean”, @”Indian Ocean”]; NSArray *water_tanks2 = [NSArray arrayWithObjects: @”Atlantic Ocean”, @”Pacific Ocean”, @”Indian Ocean”, nil]; for (NSString *item in water_tanks1) { NSLog(@"%@", item); } for (int i=0; i<[water_tanks2 count]; i++) { NSLog(@"%d: %@", i, water_tanks2[i]); }

22 iOS Application Development
There are lots of useful methods for defining an action performed on array
elements. They allow: querying an array, finding objects in an array, comparing the
objects, deriving new arrays and sorting them. The most frequently used methods are
(iOSDL, a.y.l):
objectAtIndex:,which returns the object located at the specified index (element
position);
indexOfObject:, which returns the lowest index whose corresponding array value
is equal to a given object.
There are three properties which are very useful: count, firstObject and lastObject.
During work with the dynamic tables, five major methods that allow for changing
the contents of the arrays can be used. These are (iOSDL, a.y.m):
insertObject:atIndex:, which inserts a given object on the given index into the
array;
removeObjectAtIndex: , which deletes object from the given index, next all objects
which stay beyond index are moved to the index less one;
addObject: , which inserts a given object at the end of the array;
removeLastObject, which deletes last object from the array;
replaceObjectAtIndex:withObject:, which replaces an element in a given index of
a given object. This new object must not be nil.
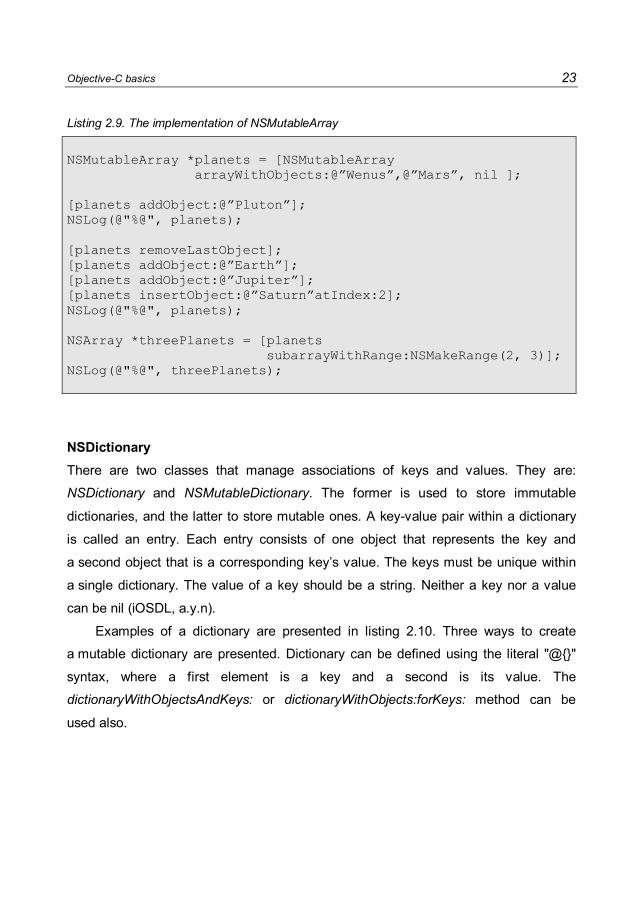
The implementations of the above methods are presented in listing 2.9.
The result of program from listing 2.9 is below:
Wenus Mars Pluton
Wenus Mars Saturn Earth Jupiter
Saturn Earth Jupiter
Objective-C basics 23
Listing 2.9. The implementation of NSMutableArray
NSMutableArray *planets = [NSMutableArray arrayWithObjects:@”Wenus”,@”Mars”, nil ]; [planets addObject:@”Pluton”]; NSLog(@"%@", planets); [planets removeLastObject]; [planets addObject:@”Earth”]; [planets addObject:@”Jupiter”]; [planets insertObject:@”Saturn”atIndex:2]; NSLog(@"%@", planets); NSArray *threePlanets = [planets subarrayWithRange:NSMakeRange(2, 3)]; NSLog(@"%@", threePlanets);
NSDictionary There are two classes that manage associations of keys and values. They are:
NSDictionary and NSMutableDictionary. The former is used to store immutable
dictionaries, and the latter to store mutable ones. A key-value pair within a dictionary
is called an entry. Each entry consists of one object that represents the key and
a second object that is a corresponding key’s value. The keys must be unique within
a single dictionary. The value of a key should be a string. Neither a key nor a value
can be nil (iOSDL, a.y.n).
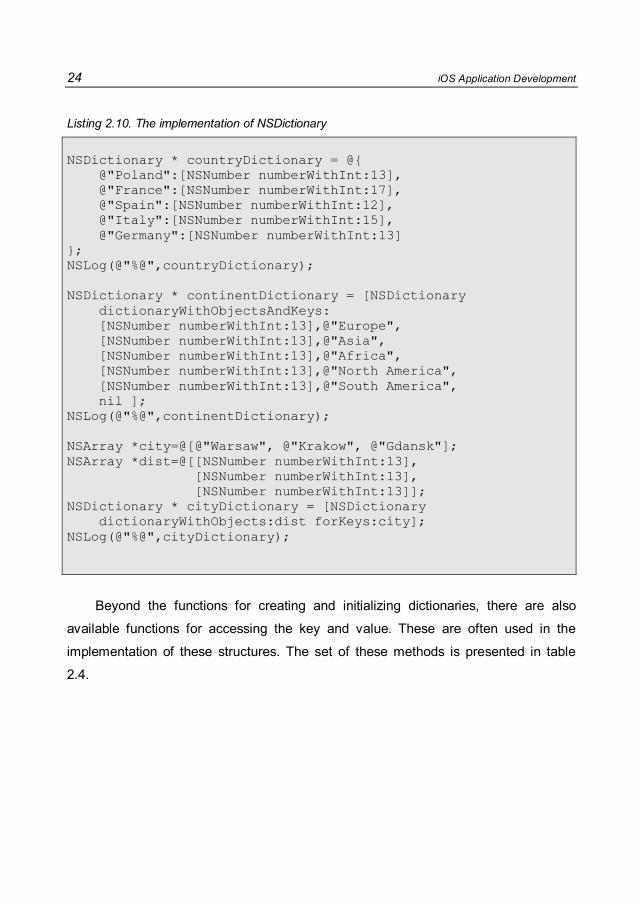
Examples of a dictionary are presented in listing 2.10. Three ways to create
a mutable dictionary are presented. Dictionary can be defined using the literal "@{}"
syntax, where a first element is a key and a second is its value. The
dictionaryWithObjectsAndKeys: or dictionaryWithObjects:forKeys: method can be
used also.
24 iOS Application Development
Listing 2.10. The implementation of NSDictionary
NSDictionary * countryDictionary = @{ @"Poland":[NSNumber numberWithInt:13], @"France":[NSNumber numberWithInt:17], @"Spain":[NSNumber numberWithInt:12], @"Italy":[NSNumber numberWithInt:15], @"Germany":[NSNumber numberWithInt:13] }; NSLog(@"%@",countryDictionary); NSDictionary * continentDictionary = [NSDictionary dictionaryWithObjectsAndKeys: [NSNumber numberWithInt:13],@"Europe", [NSNumber numberWithInt:13],@"Asia", [NSNumber numberWithInt:13],@"Africa", [NSNumber numberWithInt:13],@"North America", [NSNumber numberWithInt:13],@"South America", nil ]; NSLog(@"%@",continentDictionary); NSArray *city=@[@"Warsaw", @"Krakow", @"Gdansk"]; NSArray *dist=@[[NSNumber numberWithInt:13], [NSNumber numberWithInt:13], [NSNumber numberWithInt:13]]; NSDictionary * cityDictionary = [NSDictionary dictionaryWithObjects:dist forKeys:city]; NSLog(@"%@",cityDictionary);
Beyond the functions for creating and initializing dictionaries, there are also
available functions for accessing the key and value. These are often used in the
implementation of these structures. The set of these methods is presented in table
2.4.
Objective-C basics 25
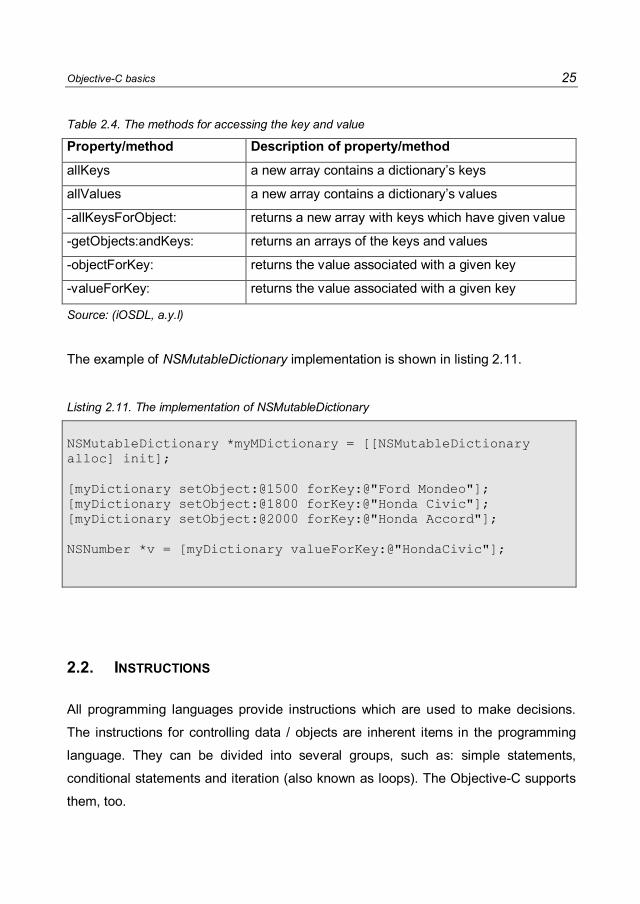
Table 2.4. The methods for accessing the key and value
Property/method Description of property/method
allKeys a new array contains a dictionary’s keys
allValues a new array contains a dictionary’s values
-allKeysForObject: returns a new array with keys which have given value
-getObjects:andKeys: returns an arrays of the keys and values
-objectForKey: returns the value associated with a given key
-valueForKey: returns the value associated with a given key
Source: (iOSDL, a.y.l)
The example of NSMutableDictionary implementation is shown in listing 2.11.
Listing 2.11. The implementation of NSMutableDictionary
NSMutableDictionary *myMDictionary = [[NSMutableDictionary alloc] init]; [myDictionary setObject:@1500 forKey:@"Ford Mondeo"]; [myDictionary setObject:@1800 forKey:@"Honda Civic"]; [myDictionary setObject:@2000 forKey:@"Honda Accord"]; NSNumber *v = [myDictionary valueForKey:@"HondaCivic"];
2.2. INSTRUCTIONS
All programming languages provide instructions which are used to make decisions.
The instructions for controlling data / objects are inherent items in the programming
language. They can be divided into several groups, such as: simple statements,
conditional statements and iteration (also known as loops). The Objective-C supports
them, too.
26 iOS Application Development
Simple statement The most basic operator is an assignment operator which is denoted by the symbol
"=". This operator simply assigns the result of an expression to a variable. It has two
operands. The left hand operand is the variable to which a value is to be assigned.
The right hand operand is the value to be assigned. The right hand operand very often
is an expression to which the result is assigned (Kochan, 2012, p.74).
The most basic expression consists of an operator, two operands and an
assignment. In Objective-C they are all mathematical operators: +, -, /, *, %. They can
be used by two implementations: x = x+5 or x += 5. The latter expression calculates
x+5 and this result sets in variable x. Examples of these expressions are shown in
listing 2.12.
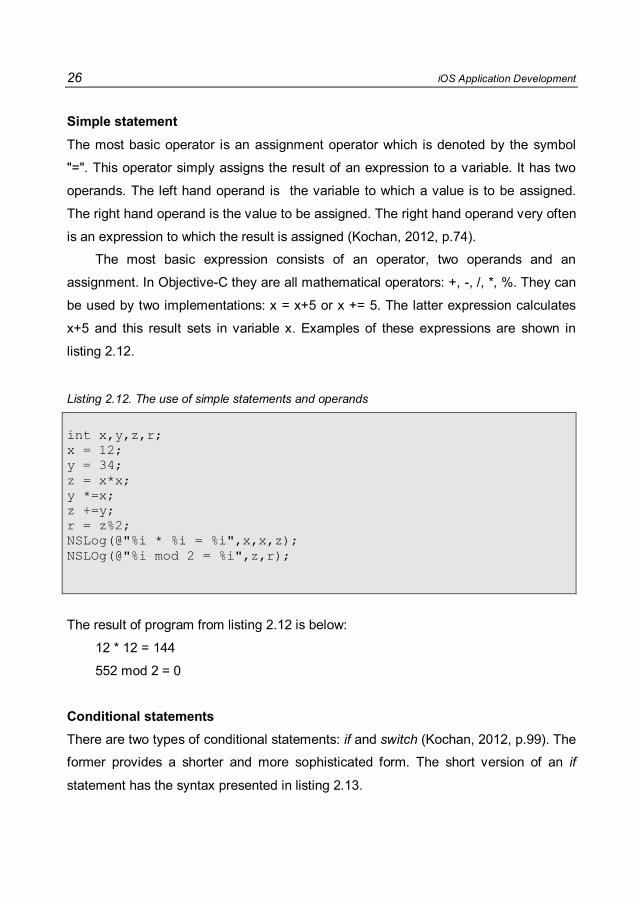
Listing 2.12. The use of simple statements and operands
int x,y,z,r; x = 12; y = 34; z = x*x; y *=x; z +=y; r = z%2; NSLog(@"%i * %i = %i",x,x,z); NSLOg(@"%i mod 2 = %i",z,r);
The result of program from listing 2.12 is below:
12 * 12 = 144
552 mod 2 = 0
Conditional statements There are two types of conditional statements: if and switch (Kochan, 2012, p.99). The
former provides a shorter and more sophisticated form. The short version of an if
statement has the syntax presented in listing 2.13.

Objective-C basics 27
Listing 2.13. The definition of a short IF instruction
if(bool_expression){ one or more statements; }
These statements execute if the bool_expression is true. That expression may
have two states: true or false. If the result of that expression is false, the source code
between two braces is omitted. The statement can have a full form, too, which
definition is shown in listing 2.14. In this case, if the expression is false, the code
placed after the else statement is executed.
Listing 2.14. The definition of a full IF instruction
if(bool_expression){ one or more statements; } else { one or more statements; }
The else instructions can be used more than once. This kind of instruction is
presented in listing 2.15. The following statements executed in the bool expressions
have true value. Only one statement: 1, 2, 3 or 4 is executed in this instruction. If all
bool expressions have false value then statement 4 is executed.
Examples showing the use of an if statement are presented in listings 2.16-2.19.
An example of a short if statement is shown in listing 2.16. The full if one is shown in
listing 2.17. Very often algorithms are needed to use nested if statements. Such an
example is shown in listing 2.18. An example of complex logical conditions is shown in
listing 2.19. They are built using parentheses and logical conjunctions: and signifies
“&&”, or signifies “||” and not signifies “!”.
The result after program (listing 2.16) execution is:
15 is divided by 3.
15 is divided by 5.

28 iOS Application Development
Listing 2.15. The definition of a full IF instruction with more than one else
if(bool_expression1){ statement1; } else if(bool_expression2){ statement2; } else if(bool_expression3){ statement3; } Else { statement4; }
Listing 2.16. The use of a short IF istatement
int a=15; if (a%3==0) { NSLog(@"%d is divided by 3.\n",a); } if (a%5==0) { NSLog(@"%d is divided by 5.\n",a); }
Listing 2.17. The use of an IF statement
int a=15; if (a%3==0) { NSLog(@"%d is divided by 3.\n",a); } else { NSLog(@"%d isn’t divided by 3.\n",a); } if (a%4==0) { NSLog(@"%d is divided by 4.\n",a); } else { NSLog(@"%d isn’t divided by 4.\n",a); }

Objective-C basics 29
The result (listing 2.17) is:
15 is divided by 3.
15 isn’t divided by 4.
Listing 2.18. The use of a nested IF statement
int age = 19; if (age < 10) { NSLog(@"He is an child!"); } else if (age <18) { NSLog(@"He is a teenager!"); } else if (age<63) { NSLog(@"He is an adult!"); } else { NSLog(@"He is a retired."); }
The result is: He is an adult!
Listing 2.19. The example of an IF statement
int main (int argc, char * argv[]) { @autoreleasepool { char c; NSLog (@"Enter a single character:"); scanf (" %c", &c); if ( (c >= 'a' && c <= 'z') || (c >= 'A' && c <= 'Z') ) NSLog (@"It's an alphabetic character."); else if ( c >= '0' && c <= '9' ) NSLog (@"It's a digit."); else NSLog (@"It's a special character."); } return 0; }
The later program (shown in Listing 2.19) analyzes the character that is entered
from the keyboard by the user. It is classified as: letter (a-z or A-Z), digits (0-9) or

30 iOS Application Development
special character. In order to read a single character from the terminal, tag format %c
is used in scanf function.
Switch statement has the syntax presented in listing 2.20.
Listing 2.20. The definition of a switch statement
switch (expression) { case val1: one or more statements; break; case val2: one or more statements; break; case val2: one or more statements; break; default: one or more statements; break; }
The item placed after the switch keyword represents either a value or an
expression which returns a value. It is then compared with the following values placed
after case keywords. They must be of the same type as the switch value. If these
items match (the values are equal), the corresponding instructions placed after the
colon sign are executed. At the beginning of case part, a break statement should be
given. It ends (breaks out) the whole switch statement. If it is missing, the rest of the
conditions are further compared until the next matching value is found. The switch
instruction may have a default section. It is executed if none of the case values
matches the switch expression. This instruction cannot work properly if two or more
case values are the same. They have to vary. However, a set of specific statements
can be associated with more than one case. This is performed by placing case
statements with value and colon and at the end of only one set of instructions to
execute.

Objective-C basics 31
As an example of such a switch statement, you can specify the execution of
multiplying two numbers, if the operator is equal star or lowercase x. It is shown in
listing 2.21.
Listing 2.21. The use of a switch statement
switch ( operator ) { case '*': case 'x': NSLog (@"The multiplication sign was chosen."); break; }
A ternary operator (also known as a conditional operator) provides a shortcut way
of making decisions. The syntax of the ternary operator is shown in listing 2.22.
Listing 2.22. The definition of a ternary operator
[condition] ? [true_expression] : [false_expression]
If the condition result is true then it true expression is executed and its value is
returned. Conversely, if the result was false then the false expression is executed and
returned (Kochan, 2012, p.126).
A conditional expression is often used to assign one of two values to the variable,
depending upon the condition fulfilled. For example, they are given the integer variable
x. If x is smaller than 0, the result will be -1 and else x to power 2. The value of the
result is the value of variable s. It is presented in listing 2.23.

32 iOS Application Development
Listing 2.23. The use of a ternary operator
s = ( x < 0 ) ? -1 : x * x;
It is also possible to use a nested conditional operator. An example of a
calculation sign is shown in listing 2.24.
Listing 2.24. The use of a nested ternary operator
sign = ( number < 0 ) ? -1 : (( number == 0 ) ? 0 : 1);
Relation operators, which are used in logical expressions are presented in table
2.5. Relational operators have a lower priority than the arithmetic ones.
Tabela 2.5. Relations operators
Operator Name
= = equal
!= not equal
< small than
<= not greater than
> greater
>= not smaller than
Source: (Kochan, 2012, p.82)
Loops Loops are very important instructions in programming languages. In Objective-C there
are three types of iterative statements: for, while and do-while.
The most common one is for. Its definition is presented in Listing 2.25.

Objective-C basics 33
Listing 2.25. The definition of for statement
for(initial_instructions; conditional_expression; loop_expressions) { one or more statements; //refrain of loop }
The operation of this manual is as follows (Kochan, 2012, p.81):
1. The initial instructions – one or more are evaluated at the beginning. This
expression usually sets a variable as an index or a counter to initial value.
2. The conditional expression is evaluated. If the value is false, the loop terminates.
Otherwise, instructions in the body of the loop are executed.
3. The loop expressions – one or more are evaluated. They are very often
statements used to change the value of the index variable.
4. Go back to step 2.
The condition placed in a loop (conditional_expression) is a boolean value that
determines if the loop is still valid. If the value of the condition is false at first check,
then instructions in the body will not be executed even once. The condition must be
constructed so as to be able to stop the loop after a finite number of steps.
The initial instructions and the loop expressions aren’t necessary. Then the
definition of the statement is like the one presented in listing 2.26.
Listing 2.26. The definition of for statement
for( ; conditional_expression ; ) { one or more statements; //refrain of loop }
An example of the loop which sums the powers of 5 for k+1 elements (from 0 to
k) is shown in listing 2.27. The algorithm to implement is based on the following
formula: 50+51+52+…+5k.

34 iOS Application Development
Listing 2.27. Summing elements with for loop
int x, sum=0, i, k; // k is given by user for( i=0, x=1; i<=k ; i++, x*=5 ) { sum += x; }
Iterative instructions have many appliances. Another example presents
calculations based on an array of temperature measurements made within 30 days. Its
name is T. As a result the average temperature of the month and the number of days
with negative temperatures should be given. This task is shown in Listing 2.28.
Listing 2.28. The use of for loop and array
float sum=0, ave=0; int i, n=30, negative=0; for( i=1; i<=n ; i++ ) { sum += T[i]; if (T[i]<0) { negative++; } } ave = sum/n; NSLog(@"The average temperature: %f.\n", ave); NSLog(@"The number of days with negative temperatures: %i.\n", negative);
The for loop has to specify the number of iterations (how many times the loop is
executed). There is another kind of loop named while. This instruction is very useful if
the number of iterations is not known in advance. A while loop has a form as
presented in listing 2.29.

Objective-C basics 35
Listing 2.29. The while loop definition
while(conditional_expression) { one or more statements; //refrain of loop }
Each for loop can be implemented with a while one. The implementation of the
same exercise, as in listing 2.27 with the while loop, is presented in Listing 2.30.
Listing 2.30. The use of a while loop
int i, k, x, sum=0; i=0; x=1; while(i<=k) { sum += x; x*=5; i++; }
Instructions in a loop’s chorus may not be executed even once. It happens if the
first value of the conditional expression is false. It is the same situation as in the case
of for loop. However, there is a type of loop where such a situation cannot occur. It is
do-while loop. The syntax of the loop is shown in listing 2.31.
Listing 2.31. The do-while loop definition
do { one or more statements; //refrain of loop } while ( conditional expression );
The do-while loop guarantees performance of one iteration of the loop first,
before the conditional expression will be calculated. From that point, as long as the

36 iOS Application Development
value of conditional expression is true, the loop will continue to execute (Binpress,
a.y.). Implementation of the same exercise, as in listing 2.27 but implemented with the
do-while loop, is presented in listing 2.32.
Listing 2.32. The use of do-while loop
int i, k, x, sum=0; i=0; x=1; do { sum += x; x*=5; i++; } while(i<=k);
There are two useful statements for using loops: the continue statement and
break. When the execution process finds a continue statement inside the refrain of
a loop, it skips all remaining codes in the loop and begins execution once again at the
top of the loop. The break statement stops the current loop and resumes execution
with the code directly after the loop (Techotopia, a.y.a). The use of this technique is
presented in listing 2.33. The product of the odd elements of the array A is calculated
in the above example. If the number is even continue statement is encountered and
jump to loop_expressions is made. Next, the sum of the elements of the array is
calculated, up to 50. Variable n denotes the number of elements in the array A.
Suppose that the array A has the numbers:
23, 12, 6, 3, 7, 9, 10, 2, 4, 13, 5, 20.
The result after program execution is:
The product of odd numbers: 282 555.
The first 5 numbers give the sum 51.
The product is resulted from 23*3*7*9*13*5, the sum from 23+12+6+3+7.

Objective-C basics 37
Listing 2.33. The use of the continue statement
for(i=1, p=1; i<=n; i++) { if(A[i]%2) continue; p *= A[i]; } NSLog(@"The product of odd numbers: %i.\n", p); for(i=1, sum=0; i<=n; i++) { sum += A[i]; if(sum>50) break; } NSLog(@"The first %i numbers give the sum %i.\n", i, sum);
2.3. CLASS
Class is the main element of object oriented programming language. It is often called
user-defined type. A class is used to specify the form of an object. It combines data
representation and methods for manipulating data into one package. Data and
methods within a class are called members of the class (Tutorialspoint, a.y.). It’s
important to note that the name of class must be unique within an application. The
same applies to the included libraries or frameworks. Otherwise, a compiler error will
be generated (iOSDL, a.y.x).
The class definition is a reusable set of properties and behaviors. The properties
correspond to data and behaviors within the methods. Then, it is possible to create an
instance (object) that corresponds to the class in order to interact with those properties
and behaviors. A class’s definition consists of two elements: an interface and an
implementation. They are placed in two separate files. The interface declares both the
public properties and the class methods. The implementation defines the behavior of
the object and its properties (ROCT, a.y.a).
The interface is inside a file which name is identical with the name of the class.
The file has ".h" extension. The interface begins with @interface directive, after which
the class name and the superclass name are specified. They are separated by
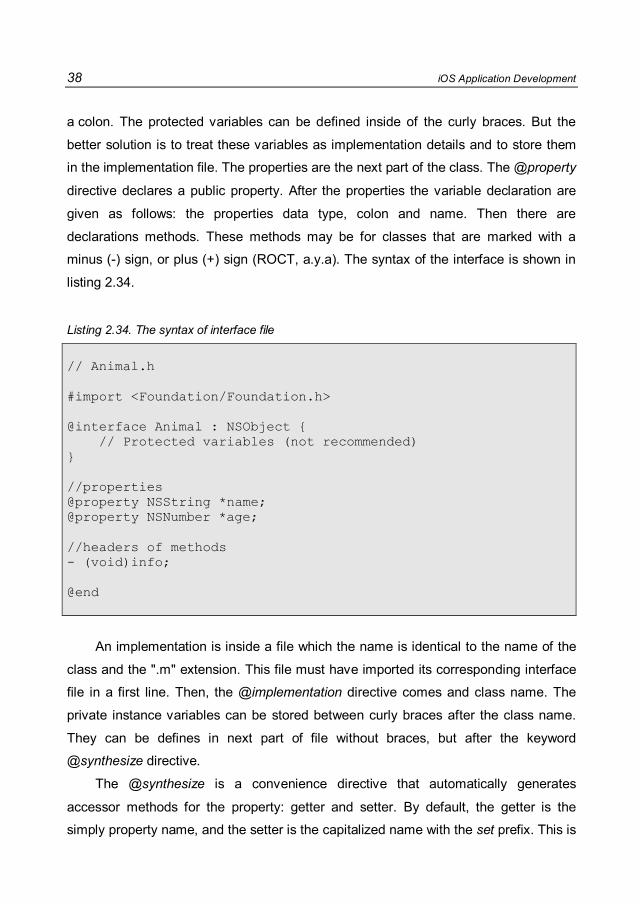
38 iOS Application Development
a colon. The protected variables can be defined inside of the curly braces. But the
better solution is to treat these variables as implementation details and to store them
in the implementation file. The properties are the next part of the class. The @property
directive declares a public property. After the properties the variable declaration are
given as follows: the properties data type, colon and name. Then there are
declarations methods. These methods may be for classes that are marked with a
minus (-) sign, or plus (+) sign (ROCT, a.y.a). The syntax of the interface is shown in
listing 2.34.
Listing 2.34. The syntax of interface file
// Animal.h #import <Foundation/Foundation.h> @interface Animal : NSObject { // Protected variables (not recommended) } //properties @property NSString *name; @property NSNumber *age; //headers of methods - (void)info; @end
An implementation is inside a file which the name is identical to the name of the
class and the ".m" extension. This file must have imported its corresponding interface
file in a first line. Then, the @implementation directive comes and class name. The
private instance variables can be stored between curly braces after the class name.
They can be defines in next part of file without braces, but after the keyword
@synthesize directive.
The @synthesize is a convenience directive that automatically generates
accessor methods for the property: getter and setter. By default, the getter is the
simply property name, and the setter is the capitalized name with the set prefix. This is

Objective-C basics 39
much easier than manually creating accessors for every property. The variable
_nameofproperty of the synthesize statement defines the private instance variable
name to be used for the property (ROCT, a.y.a). The syntax of the implementation is
shown in listing 2.35.
Listing 2.35. The syntax of implementation file
// Animal.m #import "Animal.h" @implementation Animal @synthesize name, age; - (void)info { NSLog(@"The animal %@. It is %@.", name, age); } @end
Kind of methods The Objective-C software is built from a large network of objects. Those objects can
interact with each other by sending messages. In this language terms, one object
sends a message to another object. This is done by calling a method on that object.
Objective-C methods have very specific syntax (iOSDL, a.y.x). It is shown in listing
2.36.
Listing 2.36. Definition of methods
- (return_type) method_name:( argType1 )argName1 continued_names2:( argType2 )argName2 continued_names3:( argType3 )argName3 { //body of the function }

40 iOS Application Development
An Objective-C method declaration includes the parameters as part of its name
and separated colons. The method definition in Objective-C consists of a method
header and a method body. Below are all the parts of a method mentioned
(Tutorialspoint, a.y.):
Return Type: A method may return a value. The return_type is the data type of
the value that function returns. If the return_type is void it means that the method
doesn’t return any value.
Method Name: This is the name of the method. The method name and the
parameter list together constitute the method signature. The first sign in name
must be a letter or an underscore character.
Arguments: An argument is like a placeholder. When a function is invoked, you
pass a value to the argument. This value is referred to as an actual parameter or
an argument. The parameter list refers to the type, order, and number of the
arguments of the method. The arguments are optional; that means that a method
may contain no argument.
Joining Argument: A joining argument is to make it easier to read and to make it
clear while calling it.
Method Body: The method body contains a collection of statements that define
what the method does.
Two example methods are shown in listing 2.37. The first method named
setName: has one parameter of NSString * type which is called n. The second
method’s name is setName: andAge:. It has two parameters: n and a. The values of
parameters aren’t part of method name.
Listing 2.37. Examples of methods
-(void)setName(NSString *)n; -(void)setName(NSString *)n andAge(NSNumber *)a;
The setName: method is a setter. It does not have to be declared in the class.
The implementation of later one is presented in listing 2.38.

Objective-C basics 41
Listing 2.38. Examples of method implementation
-(void)setName(NSString *)n andAge(NSNumber *)a{ name = n; age = a; }
A method declaration tells the compiler about a function name and how to call the
method. It must be inside the class interface. The body of the function is defined inside
class implementation in a separate file. There are two kinds of methods in Objective-
C: the methods that can be used with an object instance or a class. The methods that
begin from sign minus (-) have to be called by an object instance, whereas methods
that begin from sign plus (+) have to be called using class name. For example, in the
NSObject class there are method (Kochan, 2012, p.204):
+ alloc - which returns a new instance of the receiving class;
- init – which returns an initialized object.
The usage of these methods are presented in listing 2.39.
Listing 2.39. The usage of methods
Animal *newAnimal1 = [[ Animal alloc] init]; Animal *newAnimal2 = [ Animal alloc ]; Animal *newAnimal2 = [newAnimal2 init];
An object isn’t ready to be used until it is initialized. The first step of the newly
created object is the memory allocation, the second its initializing. The newAnimal2
object is declared using the two steps what are realized in two statements. The
newAnimal1 object is created as a combination of these two steps in one statement. It
is the call two methods.
Instance of objects A class is used to specify the form of an object. It combines data representation and
methods for manipulating that data into one neat package. The instance of the class is

42 iOS Application Development
its specific existence. It is also named as object. The memory was allocated for it. The
instance has properties which are filled with some data, which contains information
about its condition. An application of the method to a particular object may change its
status.
The examples of creating new object in program are presented in listing 2.40.
Two Animal class objects are created. Properties of the first one are filled in using
setters methods: setName: and setAge:. They are not implemented. They are
available in the list of methods for the Animal object. The setName:andAge: method
which is implemented in the class is used in the second example. The info method is
called on both objects.
Listing 2.40. Main functions
#import <Foundation/Foundation.h> #import "Animal.h" main{ Animal *newAnimal1 = [[ Animal alloc] init]; [newAnimal1 setName:@"Aku"]; [newAnimal1 setAge:@12]; [newAnimal1 info]; Animal *newAnimal2 = [[ Animal alloc] init]; [newAnimal2 setName:@"Hero" andAge:@7]; [newAnimal2 info]; }
The result of the program is:
The animal Aku. It is 12.
The animal Hero. It is 7.
Class inheritance The inheritance is one of the most important concepts of the object oriented
programming. It allows to define a class which is an extension of another class. This
provides an opportunity to reuse the code functionality. Some things do not need to be

Objective-C basics 43
implemented again. While creating a new class, instead of writing completely new
data members and member functions, it’s enough to just point that this class should
inherit from an existing class. This existing class is called the base class, and the new
class is referred to as the derived class. In Objective-C a subclass can only be derived
from a single parent class. This is a concept referred to as single inheritance
(Techotopia, a.y.a).
The inheritance is defined in the interface of the class which will be inherit. Its
syntax is shown in listing 2.41. In this case classA1 is the base class, classA2 is an
extension of the classA1. The classA2 inherits from the classA1.
Listing 2.41. The definition of inheritance
@interface classA2 : classA1 //body of the interface file @end
As an example of inheritance it can use an animal and a dog class. Every dog is
an animal. The base class will be the animal class defines in listings 2.34 - 2.35. It has
properties: name and age. The dog class will inherit from the animal class. The
properties: race and sex will be added to this class. The implementation file of dog
class is presented in listing 2.42.
Listing 2.42. The interface file Dog class
//Dog.h @interface Dog : Animal @property NSString *race; @property NSString *sex; @end

44 iOS Application Development
No methods can remove or subtract through the inheritance. However, the
definition of an inherited method can be changed by overriding it. The new method
with the same name can be implementation in the subclass. This method must have
the same return type and take the same number and type of arguments as the method
which is overridden (Kochan, 2012, p.171). This method in subclass calls the
superclass implementation of this method. Here, the keyword super is used (iOSDL,
a.y.y). The implementation of this idea is shown in listing 2.43.
Listing 2.43. The implementation file Dog class
//Dog.m #import "Dog.h" @implementation Dog @synthesize race, sex; - (void)info { [super info]; NSLog(@"The race dog: %@. It is %@.", race, sex); } @end
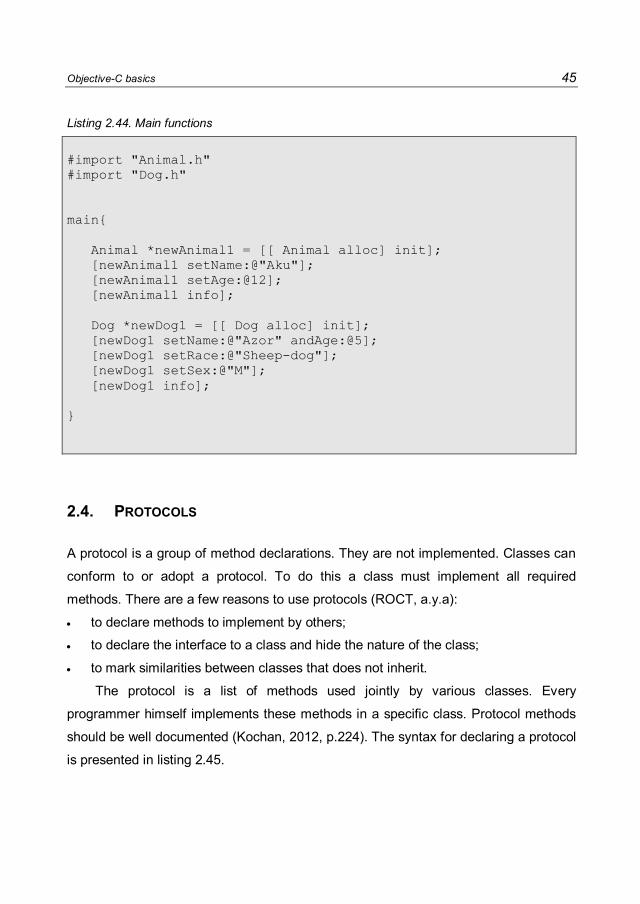
The usage of the Animal class and Dog class objects are shown in the main
program presented in listing 2.44.
The result of the program is:
The animal Aku. It is 12.
The animal Azor. It is 5.
The race dog: Sheep-dog. It is M.
The mechanism of inheritance is indispensable in the design and implement of
the complex applications. It is used at the stage of creating types of objects defined by
the creators of programming environment.
Objective-C basics 45
Listing 2.44. Main functions
#import "Animal.h" #import "Dog.h" main{ Animal *newAnimal1 = [[ Animal alloc] init]; [newAnimal1 setName:@"Aku"]; [newAnimal1 setAge:@12]; [newAnimal1 info]; Dog *newDog1 = [[ Dog alloc] init]; [newDog1 setName:@"Azor" andAge:@5]; [newDog1 setRace:@"Sheep-dog"]; [newDog1 setSex:@"M"]; [newDog1 info]; }
2.4. PROTOCOLS
A protocol is a group of method declarations. They are not implemented. Classes can
conform to or adopt a protocol. To do this a class must implement all required
methods. There are a few reasons to use protocols (ROCT, a.y.a):
to declare methods to implement by others;
to declare the interface to a class and hide the nature of the class;
to mark similarities between classes that does not inherit.
The protocol is a list of methods used jointly by various classes. Every
programmer himself implements these methods in a specific class. Protocol methods
should be well documented (Kochan, 2012, p.224). The syntax for declaring a protocol
is presented in listing 2.45.

46 iOS Application Development
Listing 2.45. The definition of protocol
// NameProtocol.h #import <Foundation/Foundation.h> @protocol NameProtocol <NSObject> @optional //optional methods declaration @required //required methods declaration @end
The protocol must be imported before it is used. It must be in the interface file.
Besides, its name must be written in the header file. This is indicated like inheritance.
The adoption a protocol by a class is presented in listing 2.46. The class can adopt
a few protocols. Each of them must be imported and they are separated by commas in
the header file.
Listing 2.46. The adopt ion of protocol
// NameClass.h #import <Foundation/Foundation.h> //import protocols #import "NameProtocol1.h" #import "NameProtocol2.h" //adding the protocols @interface NameClass : NSObject <NameProtocol1, NameProtocol2> @end

Objective-C basics 47
The declarations of the protocol methods are not placed in the interface file. The
required methods must be added and implemented in implementation file. The
optional methods don’t have to be implemented.
2.5. DELEGATES
The delegates are used together with protocols. A delegation is a cleaner way to
manage code and interactions between objects in an application. It is an option over
creating subclassing. A delegation enables objects to interact with each other without
creating strong interdependencies between them. It makes the designing of
application is flexible. Objects can have a delegate which send (delegate) messages,
slightly alter the behavior of other objects, or pass them data. A delegation allows
objects to send messages to their delegates to do work for them (Kochan, 2012,
p.227).
There are four reasons why an object might want to call upon a delegate: ask if
something should happen, before something unavoidable is going to happen, after
something has occurred and to retrieve data, this is more a data source than
a delegate, but the line between the two are fuzzy.

48 iOS Application Development
This page has been specially left empty

Xcode environment
Aim During the programming the developer has to have the proper ability to use and to
navigate through the chosen development environment. The Xcode tool is such an
application development environment dedicated for Mac OS and iOS. Both desktop
and mobile applications may be created with its use. The Xcode and its functionality is
presented in the following sections of this chapter.
Plan 1. Creating new project.
2. Interface Builder.
3. Using Simulator.
4. Running applications on the devices.
3
50 iOS Application Development
3.1. CREATING NEW PROJECT
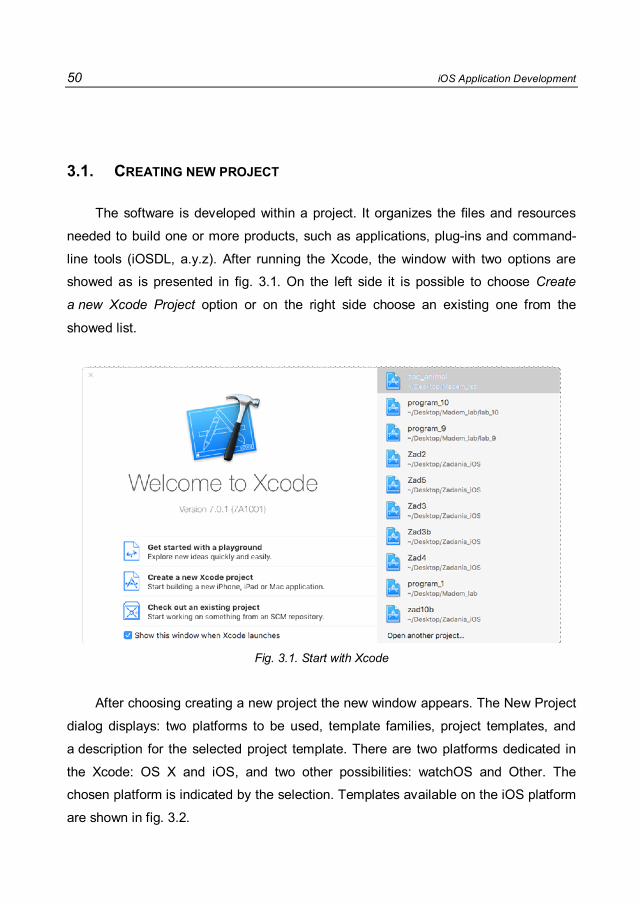
The software is developed within a project. It organizes the files and resources
needed to build one or more products, such as applications, plug-ins and command-
line tools (iOSDL, a.y.z). After running the Xcode, the window with two options are
showed as is presented in fig. 3.1. On the left side it is possible to choose Create
a new Xcode Project option or on the right side choose an existing one from the
showed list.
Fig. 3.1. Start with Xcode
After choosing creating a new project the new window appears. The New Project
dialog displays: two platforms to be used, template families, project templates, and
a description for the selected project template. There are two platforms dedicated in
the Xcode: OS X and iOS, and two other possibilities: watchOS and Other. The
chosen platform is indicated by the selection. Templates available on the iOS platform
are shown in fig. 3.2.

Xcode environment 51
Fig. 3.2. iOS templates in Xcode
The templates in iOS applications are (OLEB, a.y.):
Master-Detail Application - that template is divided into two parts. In the master
interface portion, a table view is used to display collection of objects. In the detail
interface portion, other views are used to display the information about selected
object. It can be extended in a variety of ways (iOSDL, a.y.i);
Single View Application - this one includes a custom view controller, which is
properly installed as the main window’s root view controller;
Tabbed Application – that template sets up an application with a tab bar
controller which displays two tabs. Each of them are represented by another
content view controller. A UITabBarController acts as the storyboard initial view
controller and is connected via relationship segues to its two content view
controllers;
Page-Based Application;
Game.

52 iOS Application Development
The templates in iOS Framework&Library are (OLEB, a.y.):
Cocoa Touch Framework;
Cocoa Touch Static Library.
Templates available on the watchOS, OS platform and Other are shown in fig.
3.3, 3,4 and 3.5 respectively.
Fig. 3.3. watchOS templates in Xcode
In Xcode there are opportunity to create application which are associates with
watch. Three patterns exist – fig. 3.3.
OS X platform provides twelve templates. Command Line Tool is the most useful
of them. For the basic programming (during learning a programming language), the
initial programs are often written in a form of the command-line programs. It let to
focus mainly on language properties and features.

Xcode environment 53
Fig. 3.4. OS X templates in Xcode
Fig. 3.5. Other templates in Xcode
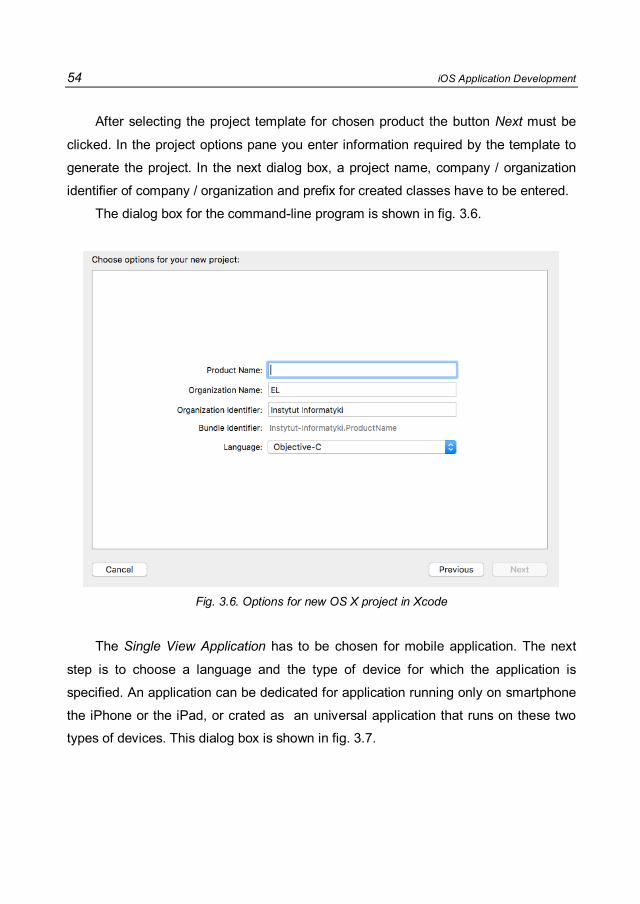
54 iOS Application Development
After selecting the project template for chosen product the button Next must be
clicked. In the project options pane you enter information required by the template to
generate the project. In the next dialog box, a project name, company / organization
identifier of company / organization and prefix for created classes have to be entered.
The dialog box for the command-line program is shown in fig. 3.6.
Fig. 3.6. Options for new OS X project in Xcode
The Single View Application has to be chosen for mobile application. The next
step is to choose a language and the type of device for which the application is
specified. An application can be dedicated for application running only on smartphone
the iPhone or the iPad, or crated as an universal application that runs on these two
types of devices. This dialog box is shown in fig. 3.7.

Xcode environment 55
Fig. 3.7. Options for new iOS project in Xcode
After entering all necessary information, selecting options and their approval,
another dialog box will be shown, where the place of recording and storing project
must be entered. Now the newly created project will be opened in the workspace
window. The sample window is shown in fig. 3.8.

56 iOS Application Development
Fig. 3.8. Workspace window in Xcode
3.2. INTERFACE BUILDER
The Module Interface Builder is a tool integrated with Xcode environment. It allows for
quickly creating a user interface for an application dedicated to platform OS X and
iOS. The created project contains files with the extension .xib, which is an XML file.
When creating a project has been selected application dedicated to one device
(iPhone or iPad), the project will have one such file.
The project window can be divided into several parts (iOSDL, a.y.d):
Toolbar – that contains the project’s name, editor view, schema pop-up menu;
Navigator area - contains files grouped within the folders, provides tools for
viewing and maneuvering through various facets of projects;
Editor area – the main content area, below the toolbar, when opening a file its
content appears in the editor area;
Debug area - provides controls for program execution and debugging, displays
panel for variable, register and status information;

Xcode environment 57
Utilities area – contains Quick Help, file and data inspectors, and pre-tested
resources such as code snippets and media objects.
The common configuration of the main window is presented in the fig. 3.9. The
Toolbar is located in the upper part of window. The Navigator area is on the left side
and the Utilities area is placed on the right. The editor is the largest area in set in the
central point.
Fig. 3.9. Project area in Xcode
The directory tree for project is located in Navigator area. It is very important part
of the project. An example folder is presented in fig. 3.10. After selected a file the
developer is moved to the proper part of the project.

58 iOS Application Development
Fig. 3.10. Directory tree for project in Xcode
At the top right of the workspace window is visualized the Editor. It is shown in fig.
3.11. The content of Editor view, mentioned from the left, are:
Standard editor - a single editor pane is filled with the content of the selected file;
Assistant editor - presents separate editor panes, each one is filled in the
contents of selected file;
Version editor - shows the differences between the selected file in one pane and
another version of that same file in a second pane.
Fig. 3.11. Editor view in Xcode
The Inspector is the next element of Utilities area (iOSDL, a.y.o). The inspector bar
is presented in fig. 3.12. The icons placed on it represent (form the left):
File inspector; Quick Hel inspector; Identity inspector; Attributes inspector;

Xcode environment 59
Size inspector; Connections inspector.
Fig. 3.12. Inspector in Xcode
The Library pane is used for accessing the libraries of resources that are ready to
use within the project. It contains (iOSDL, a.y.o):
File template - templates for common types of files and code constructs;
Code Snippet library - short pieces of source code for use in software;
Object library - interface objects e.g. button, label, view controller;
Media library - graphics, icons, and sound files.
The third tab is the most useful. To use and element, it must be dragged directly
into a .nib file in the Interface Builder editor window. In the bottom part Filter bar is
placed. The typing letters into the text field in the filter bar restricts the items displayed
in the selected library. It is shown in fig. 3.13.
Fig. 3.13. Library in Xcode

60 iOS Application Development
3.3. USING SIMULATOR
The project must be built and run to compile, link, and debug. If the product builds
successfully Xcode runs it and starts a debugging session. Tools for managing and
running schemes are shown in fig. 3.14.
Fig. 3.14. Scheme in Xcode
Running an empty application in simulator is shown in fig. 3.14. A triangle-shaped
icon is used to start the project and the square-shaped icon to stop the project. If the
application does not contain errors, it will appear either on the simulator or on an
actual device. Otherwise, found irregularities will be displayed in the code, such as
incorrect syntax, inconsistent methods like. Before running, the type of simulator must
be selected. There are two types: iPhone and iPad. By clicking on the right side of the
menu, the type of simulator can be chosen. Devices available on simulator are
presented in fig. 3.15.
Fig. 3.15. Devices on simulator in Xcode

Xcode environment 61
Appearance of the application when it be run in the simulator is shown in fig.
3.16.
Fig. 3.16. Empty application running on simulator
3.4. RUNNING THE SOFTWARE ON A DEVICE
If the application is launched on a real device, it must be connected to the computer.
Its user must be a member of the iOS Developer Program and has an Apple ID, which
is necessary to obtain:
certificates;
identifikations,
profiles.
All iOS applications must be signed and secured to run them on the device. The
Xcode uses the information to create the provisioning team profiles during assigning
the project to the team. Next development certificate is created, Xcode records

62 iOS Application Development
connected iOS device or Mac and provisioning profile is installed on the device.
Adding Apple Id to Xcode is in: Xcode -> Preferences -> Accounts.
Follow the steps below:
connect the device on which the applications can be installed;
select a connected device in the project navigator;
run applications;
Xcode first installs the application on device;
if the prompt is displayed whether to sign the application using the keychain,
should be allowed.

iOS system
Aim The knowledge about the iOS architecture is crucial for mobile applications
development. This chapter presents both the iOS architecture and the Model-View-
Controller (MVC) pattern. Each layer of the architecture is described. The frameworks
are shown that belong to the successive layers. The features provided by them are
also presented. Three roles of the MVC pattern are presented as well as the
communication between them.
Plan 1. iOS architecture.
2. Model-View-Controller pattern.
4

64 iOS Application Development
4.1. ARCHITECTURE OF IOS SYSTEM
iOS is the operating system which is installed in mobile touch devices, such as the
iPhone, the iPad and the iPod. This system manages the hardware of the device and
also ensures that the native applications work as they should. Moreover, the operating
system has to manage various applications in a way to ensure the main device can
function as a phone, send and receive emails, and browse the web (iOSDL, a.y.c).
iOS developers need to be familiar with the architecture of the system. The
written code should be clear and easy to understand. They use the iOS Software
Development Kit (SDK), which is a set of tools used to develop and test the created
applications. The applications are developed with the use of the Objective-C language
or swift language (iOSDL, a.y.c),(iOSDL, a.y.b). Native applications are installed on
the device and run by the iOS operating system. That is why applications can be used
by the users all the time, regardless of whether the type of device mode (e.g. Airplane
mode) is turned on or off.
The architecture of the iOS system is complex (iOSDL, a.y.c). It consists of four
layers. The higher ones are used for sophisticated technologies while the lower ones
are for providing basic technologies and functionality. The iOS architecture is
presented in fig. 4.1. Frameworks for each layer are also shown.
During programming the higher layers are usually used because of the object-
oriented language. This makes writing code easy, especially due to an abstraction and
an encapsulation. Developers should use the lower layers as rarely as possible,
mainly when it is necessary to use features that are not included in the higher layers of
the iOS architecture.
Each layer consists of frameworks that can be used by programmers. These
structures provide all the necessary interfaces with classes, methods, functions, types
and constants. They make writing software easier. However, a developer has to be
familiar with the architecture of the iOS system.
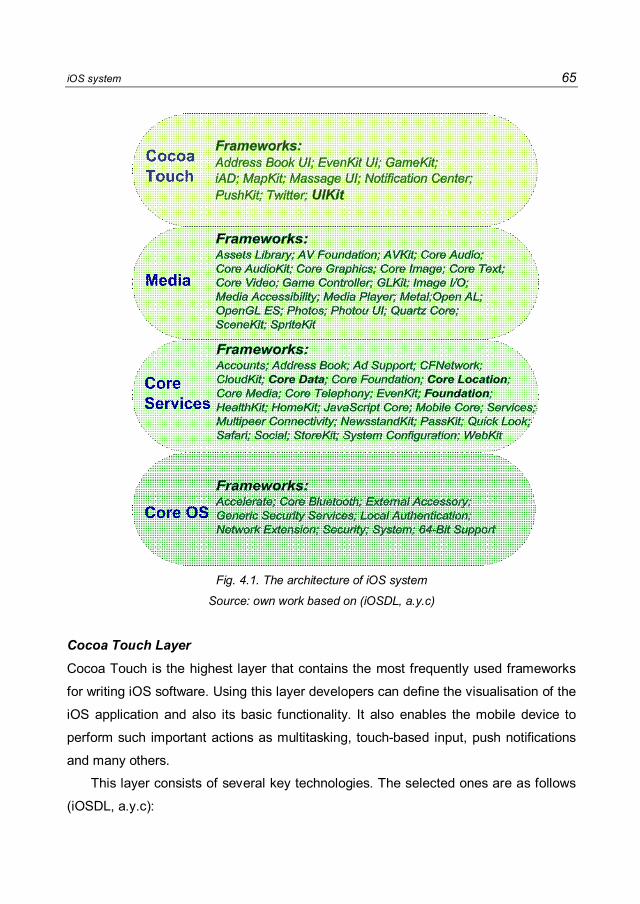
iOS system 65
Fig. 4.1. The architecture of iOS system
Source: own work based on (iOSDL, a.y.c)
Cocoa Touch Layer Cocoa Touch is the highest layer that contains the most frequently used frameworks
for writing iOS software. Using this layer developers can define the visualisation of the
iOS application and also its basic functionality. It also enables the mobile device to
perform such important actions as multitasking, touch-based input, push notifications
and many others.
This layer consists of several key technologies. The selected ones are as follows
(iOSDL, a.y.c):

66 iOS Application Development
App Extension – It is possible to supply extensions. This function is available in
iOS 8. Examples of extensions are:
o share (content with social websites and entities),
o action (do a task with the current content),
o widget (update or enable a task in the Today view of the Notification
Center),
o photo editing (provide editing of a photo or video with the Photo
application),
o document providing (storage of a document that can be accessed by
other applications),
o custom keyboard (a system keyboard can be replaced by a custom
keyboard).
Handoff – is dedicated for iOS and OSX systems. The user can begin some
activity using one device and move with the same activity to another Apple device.
It is necessary that these two devices have the same Apple ID.
Document Picker – provides for access to documents and sharing them among
applications.
AirDrop – is used for sharing photos, documents, URLs and other data between
two nearby devices. This feature is supported by the UIActivityViewController
class. There are various options for sharing content. Content has to be placed into
the Documents/Inbox directory of the application’s home directory. Files are
encrypted for data protection.
TextKit – is a set of classes for text and typography. The text can be adjusted into
paragraphs, columns and pages. This supports creating, editing, displaying, and
storing text.
Multitasking – is used to save the battery. If an application is placed in the
background (by pushing the Home button), it is suspended so that no code is
executed.
Storyboard – is a tool for designing a user interface for the application. All
controls can be put into views. Moreover, all views and view controllers can be
visualized in one content, which helps to understand the logic of the application.

iOS system 67
It is used for defining segue which is a smart way to transfer from one view
controller to another, together with data.
Gesture Recognizers – is used for detecting the common gestures in
applications such as swipe, pinch, tap or double tap. Gesture Recognizers is
attached to the view of the application. It is possible to set the property (e.g. how
many taps have to be made for the gesture to be recognized). Specially defined
action methods are performed after the proper gesture is recognized.
Standard System View Controllers – is used for standard system interfaces. It is
recommended that the system view controllers be used. They are used when:
o contact information is displayed or modified;
o calendar events are created or modified;
o email or SMS messages are composed;
o file contents are opened or previewed;
o pictures are taken or photos are selected from the user’s photo library;
o video clips are created.
The Cocoa Touch Framework consists of the following frameworks (iOSDL, a.y.c):
Address Book UI Framework – is used for contact management, such as creating
a new contact, editing and selecting existing ones. This framework provides the
interface that enables the developer to access a contact by way of the standard
Objective-C interface.
EventKit UI Framework – is used for viewing and editing events related to a
calendar installed in iOS system. This framework provides the view controllers for
a standard system interface. It provides the events based on data taken from the
EvenKit Framework.
GameKit Framework – is used to support the Game Center, for sharing the game
information online. It provides features such as: aliases (create the account),
leader boards (put and get the information about user scorer sending to and taken
from Game Center), matchmaking (or multiplayer games after being logged into
the Game Center), achievements (showing the progress of a player), challenges
(for a friend) and others.
68 iOS Application Development
iAd Framework – is used for adding into applications banners with advertisements.
They are put into a standard view and can be placed wherever the developer
wishes. This framework works together with Apple’s iAd Service for loading,
presenting and handling the tap into them.
MapKit Framework – is used for viewing the map into the application. The map
can be scrollable but also the appearance of the map can be adjusted, such as by
adding annotations or drawing the route between two points. This framework is
integrated into the Maps app and Apple’s map servers. This enables getting the
information about directions (such as for subway routes, walking and driving).
Message UI Framework – is used for creating and sending emails and SMS
messages via an application. This framework provides the view controller interface
with the possibility of setting various pieces of information such as: recipients,
subject, body content and also attachments added to the email. It is possible to
edit the message before it is sent.
Notification Center Framework – is used for creating widgets that display
information in the Notification Center.
PushKit Framework – is used for registration support for VoIP applications. In
order to save the device’s battery, the application pushes notifications about
incoming calls.
Twitter Framework – is used for generating tweets and support for accessing the
Twitter service.
UIKit Framework – is used for building a basic application, enabling its
management and creating its infrastructure. It also provides the user interface with
supporting storyboards and .nib files. This framework also supports a view
controller model for content of a user interface, the objects that represent the
standard views and controls. It supports touch and motion events as well as
multitasking. The application can be integrated with iCloud. The framework also
provides support for external displays, printing, customizing the UIKit controls,
text, web content, cut, copy and paste operations and user interface content
animation. It allows for integrating the application with systems via URL schemas
and framework interfaces, for the Apple Push Notification service, PDF creation,
custom input views (like the mode of the keyboard), creating custom text views

iOS system 69
that interact with the system keyboard and for sharing content through email,
Twitter and Facebook. Moreover it supports such features as : built-in camera,
photo library, device information (name, model), information about battery state,
sensor information and remote control information from attached devices
(headsets).
Media Layer This layer should be used when it is necessary to implement graphical, audio or video
technology into the application (iOSDL, a.y.r). It enables the developer to implement
high quality applications that consists of several technologies and frameworks that
work together with the UIKit view. It is possible to create a standard interface but also
a custom one.
The Media Layer consists of the following graphics technologies (iOSDL, a.y.r):
UIKit graphics – is used for drawing images, Bezier paths and for animating the
view’s content. It also provides efficiently rendering images and text content.
Core Graphics framework – is used for custom 2D vector and image rendering in
a dynamical way.
Core Animation – is used for optimizing animations of the application and for
improving control over the application.
Core Image – is used for management of video and still images.
OpenGL ES and GLKit – is used for rendering 2D and 3D interfaces. It is usually
used for games development.
Metal – is used for getting access to A7 GPU for graphics rendering and
computations.
TextKit and Core Text – is used for typography and text management.
Image I/O – is used for writing and reading the standard image formats.
Photos Library – is used for providing access to photos, videos and media and for
their integration.
The iOS system gives support for applications for both Retina and standard-resolution
displays.

70 iOS Application Development
The Media Layer also allows audio to be added to the application and for
management of the existing ones (iOSDL, a.y.r). It provides frameworks for playing
and recording the audio including built-in sound tracks.
This layer supports the following audio technologies (iOSDL, a.y.r):
Media Player framework – is used for supporting the iTunes library and playing
sound tracks. However, this framework does not provide control of the playback.
AV Foundation – is an interface for recording audio and video. It provides control
of the playback.
OpenAL – is used for getting audio. It is especially implemented in game
applications.
Core Audio – is used to create advanced interfaces for recording and playing
audio.
In order to provide the possibility for creating high level applications, several standards
are supported in the iOS system.
The Media Layer also contains video technologies which can be implemented
into iOS applications (iOSDL, a.y.r). Video includes both static films stored in the
device and streaming them via the Internet. It is possible to record video and store it
in the device. The above features are supported by the following technology (iOSDL,
a.y.r):
UIImagePickerController – is a class that belongs to the UIKit controller. It is used
for selecting media files (e.g. films, pictures) stored in the device.
AVKit – is used for creating simple interfaces dealing with video.
AV Foundation – is used for video playback. It supports a control under the views
of recording video. It can be implemented in augmented reality applications.
Core Media – is used for media management. It possesses low–level data types
and interfaces.
This layer supports many standard video formats.
The technology called AirPlay is for streaming audio and video to Apple TV and
to AirPlay devices (e.g. speakers or receivers). It is supported by several frameworks
(e.g. UIKit, Media Player, AV Foundation and Core Audio) so it is automatically ready
to use in AirPlay.

iOS system 71
The Media Layer provides the following frameworks used to implemented media
technology in iOS applications (iOSDL, a.y.r):
Assets Library Frameworks – is used to gain access to photos and videos stored
in the device. It gives access to albums that contain saved photos or those that
have been imported to the device. The framework also provides saving new media
to these albums.
AV Foundation Framework – is used for handling playing, recording and managing
media (both audio and video) in an advance way. It possesses many classes to
implement an application’s features, such as: editing media content, capturing
media, playing back audio and video, streaming over AirPlay.
AVKit Framework – is used to display video content.
Core Audio – is a set of frameworks that is used for audio management. It is
implemented in order to support generating, recording, mixing and playing audio.
It also provides handling MIDI devices. It consists of the following frameworks:
o CoreAudio.framework;
o AudioToolbox.framework;
o AudioUnit.framework;
o CoreMIDI.framework;
o MediaToolbox.framework.
CoreAudioKit Framework – is used for handling the connections between audio
from various applications.
Core Graphics Framework – is used for creating interfaces based on the vector
2D drawing (antialiased rendering, gradients, images, colors, coordinate-space
transformations, PDF exportation, display, and parsing).
Core Image Framework – is used for implementing fast and efficient filters for
video and still images management (e.g. correct photos, QR code detection). The
big advantage is that original photos are not saved after the changes.
Core Text Framework – is used for doing text operations (e.g. wrapping it) and for
formatting it with various fonts. This framework is implemented when TextKit is
not used.
Core Video Framework – provides the buffer for the Core Media Framework.
72 iOS Application Development
Game Controller Framework – provides the game controller hardware for Apple
devices connected to the device using Bluetooth.
GLKit Framework – is used for creating OpenGL ES applications. It is a set of
frameworks that supports implementing games (creating views, loading textures,
implementing vectors, matrices and quaternions and using shaders).
Image I/O Framework – is used for importing and exporting image data and
metadata.
Media Accessibility Framework – is used for presenting closed-caption content in
media files.
Media Player Framework – is used for playing audio and video directly via an
application. It provides access to the iTunes music library, the ability to play music
from the device and via AirPlay. It also gives information about Display Now
Playing.
Metal Framework – is used for accessing to A7 GPU that provides high
performance for graphics rendering and computations.
Open Audio Library (OpenAL) Framework – is used for positional audio in
applications where high quality audio is required. It is a cross-platform standard.
OpenGL ES Framework – is used for drawing elements in 2D and 3D. This
framework is based upon C language.
Photos Framework – is used for handling photo and video files (also from iCloud).
It is an alternative to the Assets Library framework.
Photos UI Framework – is used for creating extensions for editing image and
video content in Photos applications.
Quartz Core Framework – is used for creating fast and efficient animated views in
real time. It is possible due to the Core Animation interfaces included in the
framework.
SceneKit Framework – is used for creating simple games and user interfaces with
3D graphics. At the beginning it was available only on the OSX platform, but now it
is also available on the iOS system. This framework enables the device, for
example, to simulate gravity, forces, rigid body collisions, and joints.
SpriteKit Framework – is used for creating 2D and 3D games. It supports
rendering, animation, audio and physics simulation engines. Each content is
iOS system 73
places into scenes which can include texture objects, video, shapes and other
effects. The framework also supports an object’s behaviour such as gravity.
Core Services Layer This layer provides the basic and essential features that are used by all applications.
Core Foundation and Foundation are two essential frameworks that define basic data
types. This layer has to be used in order to support features such as location, iCloud,
social media, and networking (iOSDL, a.y.h).
This layer supports following features (iOSDL, a.y.h):
Peer-to-Peer Services – is used for peer-to-peer connections via Bluetooth with
devices that are near.
iCloud Storage – is used for putting documents into an iCloud storage (e.g.
a user’s account). It provides also access to these documents via applications.
The user can modify the items. This feature also protects users’ privacy. There are
three ways of storing items: iCloud document storage (mainly for documents),
iCloud key-value data storage (in order to share data among applications) and
CloudKit storage (for shared items and transferring data).
Block Objects – is a C language construction that can be used both in C and
Objective-C programs. It is used with anonymous functions. Blocks are
implemented such as: delegate methods, the adequate instruction to delegate or
callback functions, handlers for one-time operations, collections, dispatch queues
and asynchronous tasks.
Data Protection – is used for ensuring security (when application deals with
sensitive data) and for the built-in encryption on a device. There are several ways
of protections. For instance, protected files are stored in the device in an
encrypted format. It is security that protects crucial data when the device is locked.
Otherwise, a special decryption key is necessary to open the file.
File-Sahring Support – is used for sharing files in iTunes 9.1 or later. There is
a special directory called Documents in which content may be managed by a user.
Applications based on that feature can verify when new files have been added to
the directory.

74 iOS Application Development
Grand Cenrtal Dispatch (GCD) – is a technology used for an asynchronous
programming model and for low-level tasks (such as implementing timers,
monitoring signals and processing events).
In-App Purchase – is used for building applications for purchasing applications
and iTunes content. The StoreKit framework is implemented in this feature in
order to secure financial transactions using a user’s iTunes account.
SQLite – is used for building the light SQL database to store and manage data.
This database is installed directly on the iOS device. The application does not
need to connect to a remote database stored on a server. This feature is
optimized for use on mobile devices.
XML Support – is used for retrieving elements from an XML document and also for
manipulating its content.
The Core Services Layer provides the following frameworks used to implement
services in iOS applications (iOSDL, a.y.h):
Account Framework – is used to implement a sign-on model for user accounts. It
eliminates the need for separate access to multiple accounts. It is also used for
managing the account authorization process. It can be used together with the
Social framework.
Address Book Framework – is used for getting access to and modifying contact
data. A user’s permission is required to gain access to contacts.
Ad Support Framework – is used for accessing the identifier attached to
advertisements. It also offers the possibility of tracking advertisements.
CFNetwork Framework – is used for network protocols. It is written in C language.
The interface supports communication with FTP and HTTP servers and helps to
resolve DNS hosts.
CloudKit Framework – is used as a way to transfer all types of data from an
application to iCloud and in the opposite direction with the transfer control. It is
possible to store data in a public repository, to which all users have access. The
repository is available even if there is no active or registered iCloud account.
Core Data Framework – is used for managing data that can be stored in a light
database on a mobile device. It can also be applied to create one of the Model

iOS system 75
layers of Model-View-Controller pattern. The schema can be created in a tool
called Interface Builder. The entities are created and ready to use in applications
via this framework. It provides features like: storing objects in a SQLite database,
fetching data into table views, managing the undo/redo operations, validating
values, supporting the relationship between objects, grouping and organizing data
in memory.
Core Foundation Framework – is used for providing basic features for iOS
applications. It supports: collection data types, bundles, string management, date
and time management, raw data block management, preferences management,
URL and stream manipulation, threads and loops, port and socket communication.
Core Location Framework – is used for location and heading information in
applications. Location is based on a GPS system, cell or Wi-Fi radios. The
position in longitude and latitude is computed based on this data. This framework
provides features such as: access to compass-based heading information
embedded in the device (also called a magnetometer), region monitoring based
on a location or Bluetooth beacon, low-power location-monitoring using cell
towers, working together with MapKit in order to improve location quality.
Core Media Framework – is used for low-level media types by the AV Foundation
framework. It is implemented very rarely.
Core Motion Framework – is used for motion based data stored in the device. This
framework gives access to the raw and processed data from an accelerometer
and a gyroscope. This data can be used separately or together. It manages to
compute the device’s rotation and motions of the device.
Core Telephony Framework – is used for integrating the device with phone–based
information (e.g. the cellular service provider or VoIP applications).
EventKit Framework – is used for calendar events on a device. It provides: getting
existing events and reminders from the calendar, adding events to the calendar,
creating reminders, configuring alarms for calendar events. Applications that have
implemented this framework need to possess permission to access the user’s
calendar.
Foundation Framework – is used for providing Objective-C wrappers for features
supported by the Core Foundation Framework.

76 iOS Application Development
HealthKit Framework – is used for managing health and fitness information. Data
can be obtained from an external device (a scale or fitness wristband, for
example) connected to the device (tablet, phone or computer, for example) or
simply by a user inputting the information into an application. This data is stored
in a secure location.
HomeKit Framework – is used for controlling connected external devices in
a user’s home (e.g. to initiate various actions such as turning on the heat).
JavaScript Core Framework – is used for wrapping JavaScript Java objects, for
example, in order to parse JSON data.
Multipeer Connectivity Framework – is used to support devices that are close to
the mobile device and for setting up communication with them without the Internet.
It can be implemented to create multipeer sessions and to transmit data in real
time.
PassKit Framework – is used to provide store coupons, boarding passes, event
tickets and discount cards that are stored in an iOS device. This framework
provides the Objective-C interfaces that are used to access this data.
Safari Services Framework – is used for adding a URL address to a Safari reading
list.
Social Framework – is used for accessing a social media account (e.g. Facebook,
Twitter, Sina and others). It works together with the Account framework.
StoreKit Framework – is used for buying items via an application. It also supports
financial transitions, payments and requests by a user’s iTunes Store account.
System Configuration Framework – is used for the network configuration of
a device.
WebKit Framework – is used for presenting HTML content in an application. It also
supports editing HTML content including CSS. It is also possible to create the
DOM level content of these types of documents.
Core OS Layer This layer provides low-level features that are mostly embedded in the frameworks.
The frameworks of this layer mostly support security and communications with
external hardware accessories (iOSDL, a.y.g).

iOS system 77
The Core OS Layer provides the following frameworks used to implemented
services in iOS applications (iOSDL, a.y.g):
Accelerate Framework – is used for digital signal processing (DSP), linear algebra
and calculations based on image processing. It is optimized for iOS devices.
Core Bluetooth Framework – is used for interaction with Bluetooth low energy
accessories. It supports: scanning for Bluetooth accessories, connecting and
disconnecting them, broadcasting iBeacon information from the iOS devices and
other devices.
External Accessory Framework – is used for communications with hardware
accessories attached to an iOS device. Accessories can be connected both via
Bluetooth or via a 30-pin dock connector. This framework can get information
about the available accessory and also initiate the sessions.
Generic Security Services Framework – is used for implementing security services
in the iOS applications.
Local Authentication Framework – is used for Touch ID in order to authenticate
a user for the purpose of insuring security access to applications and their
content.
Network Extension Framework – is used for configuring and controlling the Virtual
Private Network (VPN). This framework provides creating VPN configurations and
building tunnels.
Security Framework – is used for the security data that an application manages,
such as certificates, public and private keys and trust policies. The framework
provides cryptographically secure, pseudorandom numbers. The certificates and
keys are stored in a secured area in mobile devices.
System – is used for kernel environment, drivers, and low-level UNIX interfaces of
the operating system. This framework provides managing the virtual memory
system, threads, file system, network, and interprocessing communication.
Access to these features is restricted to the chosen framework. This framework
includes the basic library called LibSystem that supports: concurrency,
networking, file-system access, I/O instructions, Bonjour and DNS services, locale
information, memory allocation and math computations.

78 iOS Application Development
64-Bit Support – is used for binary files on s device using a 32-bit architecture.
The iOS 7 system also supports compiling, linking and debugging binaries on
a 64-bit architecture.
4.2. MODEL-VIEW-CONTROLLER
The great number of applications dedicated to the iOS or OS X systems are
implemented with the use of the Model-View-Controller pattern (MVC) (iOSDL, a.y.u).
This pattern assigns objects to one of three roles (layers). These are: model, view and
controller. It also defines the communication between these layers. A very important
aspect is that each role is separated from the others by abstract boundaries through
which the communications flow. The dependencies of three layers are presented in
fig. 4.2.
Fig. 4.2. Structure of MVC pattern
Source: (iOSDL, a.y.u)
The MVC pattern is a central part of a good application project that uses the
Cocoa framework. It provides many advantages for developers. The objects can be
reused several times and their interfaces are better defined than in other patterns.
Moreover, an application with this pattern implemented is more adaptable for adding
other functions. Additionally, many Cocoa technologies and their architectures are
based on the MVC pattern and require its use Each object should be assigned to one
of these three roles.

iOS system 79
Model The model objects encapsulate data and define the logic of an application. They
describe the communication among the data within the model. This kind of object may
represent a figure or a character or a contact in an address book. There are
relationships between objects: one to one or one to many. Most of the data consists
as permanent elements of a program (such as files or database) and should belong to
a model layer after the application launches. These objects may also represent a
problem or a field in the software. Due to this they can be used in a similar field or
problem by developers.
There should be no direct link between model and view layers. The latter layer is
responsible for data visualization and its edition, which means that there should not be
a direct connection between the user interface and the data presenter. The only
communication that should be performed is via a controller layer. The actions done by
the user in a view layer (e.g. creating or modifying the data) are then transferred by
controller objects. The results of this operation are the addition or modification of the
model object. When the model object is modified, the controller object changes the
proper view object.
View The view object has contact with the user (iOSDL, a.y.u). This object reacts on actions
performed by the user. The main purposes of these objects are to display data from
the model and to manage it. The view objects are separated from the model layer and
provide consistency among applications. Both the UIKit and AppKit frameworks
provide a set of view classes. The Interface Builder offers many view objects in the
library that can be easily dragged to a design canvas. These objects are also informed
about the changes which occurred in model data via the controller objects . The latter
are presented to the user – initiated changes in communication.
Controller The controller object works as a connection between one or more view objects of the
application and one or more model objects (presented in fig. 4.2) (iOSDL, a.y.u).
These objects create a link through which the view objects are informed about

80 iOS Application Development
changes in the model objects and the reverse. They can also configure, coordinate
task coordination for applications and manage the lifecycle of other objects.
The controller object interprets the tasks performed by the view objects and
creates new data or modifies it from the model layer. When the model objects change
the controller, objects inform the view objects about the new data or about the data to
be modified.

Creating Graphical User Interface
Aim This chapter introduces the reader to the views and controllers that are implemented
to create the Graphical User Interface (GUI). The most common controls and their
properties are presented. The action methods are showed based on various
examples.
The Storyboard editor is shown, which is used to design the GUI and to create
connections between the controls and the corresponding classes. It is needed for
further implementations. Many iOS applications are based on table views, which is
why this control is presented in detail.
Plan 1. Controls.
2. Storyboard.
3. Building applications using table views.
5

82 iOS Application Development
5.1. CONTROLS
Developers use view controls to build a Graphical User Interface. These controls also
provide the communications between a user and the application. They should be easy
to use so that handling the mobile applications can be as intuitive and familiar as
possible. Most of them are objects of the iOS UIControl class. Thus for programing
their actions the methods of that class are used. Each control has the built in actions
that are special for it. It is possible to define the appearance and behaviour of each
control by setting its proper attributes (iOSDL, a.y.F).
The controls are used for the following purposes (iOSDL, a.y.F):
to interact between the user and application;
to manipulate the content of the application;
to interact between users and their intentions (e.g. to choose the element from the
list).
Very often Interface Builder is used to build the application’s GUI. Interface Builder is
a tool used to edit the application views where the particular controls can be placed on
the design canvas and then used them to develop the application. Each control can be
configured with the use of Attributes Inspectors. However, not all attributes can be set
in this way, but developers may set them programmatically.
Below the most commonly used controls in iOS applications are described.
Text Fields Text Fields are the controls for entering editable text by a user. It is an UTTextFiled
class object (iOSDL, a.y.F), (iOSDL, a.y.M). The text has to be entered as a single
line. Even changing the height of the control has no effect on adding new lines. The
text field is presented in fig. 5.1.
Fig. 5.1. A text field control after dragging to canvas
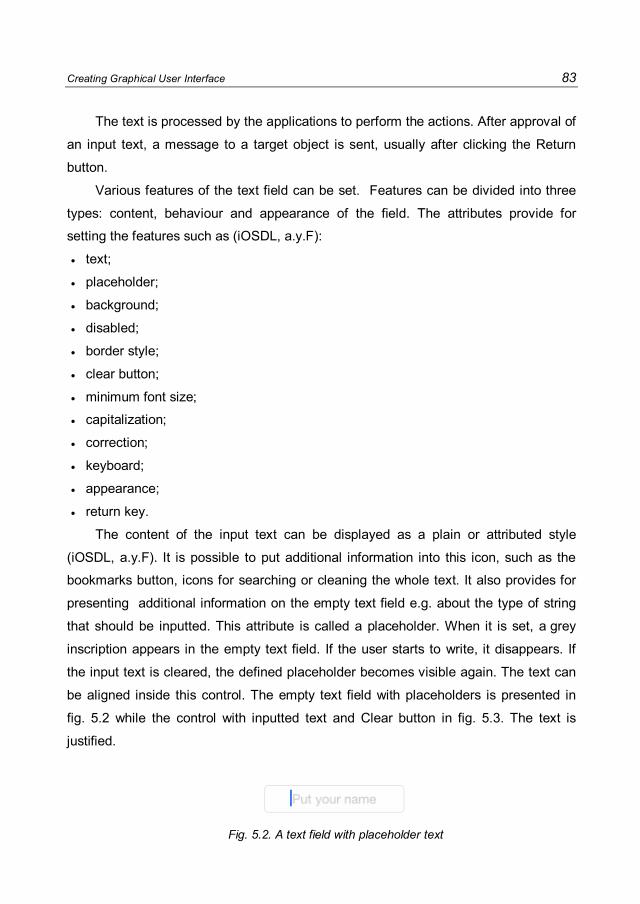
Creating Graphical User Interface 83
The text is processed by the applications to perform the actions. After approval of
an input text, a message to a target object is sent, usually after clicking the Return
button.
Various features of the text field can be set. Features can be divided into three
types: content, behaviour and appearance of the field. The attributes provide for
setting the features such as (iOSDL, a.y.F):
text;
placeholder;
background;
disabled;
border style;
clear button;
minimum font size;
capitalization;
correction;
keyboard;
appearance;
return key.
The content of the input text can be displayed as a plain or attributed style
(iOSDL, a.y.F). It is possible to put additional information into this icon, such as the
bookmarks button, icons for searching or cleaning the whole text. It also provides for
presenting additional information on the empty text field e.g. about the type of string
that should be inputted. This attribute is called a placeholder. When it is set, a grey
inscription appears in the empty text field. If the user starts to write, it disappears. If
the input text is cleared, the defined placeholder becomes visible again. The text can
be aligned inside this control. The empty text field with placeholders is presented in
fig. 5.2 while the control with inputted text and Clear button in fig. 5.3. The text is
justified.
Fig. 5.2. A text field with placeholder text

84 iOS Application Development
Fig. 5.3. A text field with text and Clear button
The appearance of the text field consists of: font, colour, size, alignment, typing
and text attributes. The background of the control can be set.
A boarder for a text field can be added by choosing the Border Style attributes
(iOSDL, a.y.F). There are four styles: UITextBorderStyleRoundedRect,
UITextBorderStyleBezel, UITextBorderStyleLine and UITextBorderStyleNone. They
are presented in fig. 5.4.
RoundedRect Bezel
Line None Fig. 5.4. Boarder styles attribute for a text field
The input text can be displayed as plain or attributed (iOSDL, a.y.F). The first
type provides attributes for the whole text such as: font, size and colour. The second
one supports these attributes for separate characters.
The default font setting is set to Adjusts to Fit which provides that the text inside
field is scaled so that it is displayed inside it (iOSDL, a.y.F). The minimum size of the
font is set to 17.
The background of the text field can be set. One background image can be
defined for the normal state of the text field while the other image for the disabled one
(iOSDL, a.y.F). The text field with background is presented in fig. 5.5.

Creating Graphical User Interface 85
Fig. 5.5.Text field with background tree
The text field is accessible in the default settings. However it can be modified by
changing its attribute for User Interaction Enabled and Adjustable (iOSDL, a.y.F).
After tapping on a text field the keyboard is displayed. There are several types of
them:
default;
ASCII;
numbers and punctuations;
URL;
number pad;
phone pad;
name phone pad;
e-mail;
decimal pad;
Twitter;
Web search.
Four chosen keyboards are presented in fig. 5.6.

86 iOS Application Development
Default decimal pad
Email URL
Fig. 5.6.Text field with four types of keyboards

Creating Graphical User Interface 87
The Return key can be also modified by choosing one of the following:
GO;
Google, Search;
Join;
Next;
Route;
Send;
e-mail;
Done;
and others.
The behaviour of a text field can be set programmatically (iOSDL, a.y.F). The
control needs a delegate object to which messages are sent. The message is sent
when:
the user starts to edit the content of the text field;
the user puts a sign into the text field;
the user ends the content’s edition (after leaving the text field).
The object can be created by holding the pressed Control key and making the
connection with the View Controller. After that, all methods can be implemented and
create the behaviour of the control.
In order to implement methods that use the content of the text fields (or other
controls), it is necessary to create objects in a view controller class. The special
connections used are presented in fig. 5.7. The type of the connection chosen should
be outlets. The name should be given. After the operation a new object is created
which can be used in methods.
Fig. 5.7.Creating the connection between text field and view controller

88 iOS Application Development
The methods presented in listing 5.1 show the code for hiding the keyboard after
choosing the Return key. The myNewtext is the object defined in the outlet
connection.
Listing. 5.1. Hiding keyboard (iOSDL, a.y.C)
-(BOOL)textFieldShouldReturn:(UITextField *)textField { [myNewText resignFirstResponder]; return NO; }
There are controls that are similar to the text field (iOSDL, a.y.F), (iOSDL, a.y.G),
(iOSDL, a.y.H). The first one is a text view which can display more than one line of the
text. The text can be scrolled and modified. The second one is a label which is used to
display a static text. It cannot be modified.
Buttons Buttons are controls used for GUI. They are objects of the UIButton class (iOSDL,
a.y.F), (IOSDL, A.Y.E). They are used for confirmation of various choices or data.
User taps on the button usually cause an implemented method and some actions to
be performed. They have various appearances due to a given button’s destination.
Examples of buttons’ appearances are presented in fig. 5.8.
a) system b) Info light c) contact Fig. 5.8. Button controls
Each button can be modified in Attributes Inspector. However, a few features can
be modified only programmatically. The features that can be changed are:
type;

Creating Graphical User Interface 89
state config;
title;
font;
text color;
shadow color;
image;
background;
shadow offset;
highlight tint;
drawing;
line break;
edges;
others.
The content of a button can be selected in Attribute Inspector. The default type is
a transparent one (as showed in fig. 5.8 a). Otherwise, there are types such as:
system, detail disclosure, info light, info dark, add contact and custom. Some of them,
like detail disclosure, info and add contact, have got a typical graphical interface that
indicates the usage (fig. 5.8 b) and 5.8 c)). Other types have the possibility to insert
the name of the button usually due to its usage in application.
The appearance of a button can be modified using Attribute Inspector. There can
be chosen:
background;
image;
text color;
attributed title.
The button with the above selected features is presented in fig. 5.9.The first figure
presents the button with image. The other’s background is set with image. The second
one has the possibility of adding a title.

90 iOS Application Development
Fig. 5.9. Button with set a) image b) background
There are four states of the button’s appearance: default, highlighted, selected,
and disabled (iOSDL, a.y.F). Each can be changed in Attribute Inspector. The default
state of the button and the selected one are shown in fig. 5.10.
Fig. 5.10. Button’s state a) default b) selected
Behaviour of the button is a very important aspect of creating mobile applications.
In order to implement methods, the connection with View Controller has to be created.
It can be Output, Action or Outlet Collection type. The first type is used when there is a
need to create an object of the button. The developer may change the settings
programmatically. The Action type is used to create methods that are performed after
tapping the button. The creation of the Action connection between the button and View
Controller is presented in fig. 5.11. The name of the method should be given.

Creating Graphical User Interface 91
Fig. 5.11. Defining Action connection
After creation the method appears in VieController.h and VieController.m classes.
The name is the same as that given in defining the connection type. The method is
presented in listing 5.2. Inside it a code should be written which will be performed after
tapping the button.
Listing. 5.2. Method performed after pressing the button
- (IBAction)OKpressed:(id)sender { if ([myNewText.text isEqualToString:@""]) { NSLog(@"Name is missing!"); } else NSLog(myNewText.text); }
The above method verifies whether the user has inserted the name into the text
field named myNewText. If the name isn’t given (the text is empty), the message is
printed using the NSLog statement. Otherwise the name is read from the text field and
written in the console.

92 iOS Application Development
Alerts An alert message can be displayed using the UIAlertView object (iOSDL, a.y.E).
However, in iOS 8 and later versions it is not recommended to use this class.
Developers should use the UIAlertController instead. Each alert has a title and
a message written as text (NSString type). An alert can have buttons (one or more).
After tapping the buttons, the implemented actions are performed. An alert can also
possess text fields where the user can input text.
The basic alert with message and title is presented in fig. 5.12. The code
necessary to implement it is shown in listing 5.3.
Fig. 5.12. A simple alert with title and message
Listing. 5.3. Implementation of a simple alert with title and message
UIAlertController *myNewAlert = [UIAlertController alertControllerWithTitle:@"New message" message:@"Please enter the name" preferredStyle:UIAlertControllerStyleAlert]; [self presentViewController:myNewAlert animated:YES completion:nil];
The new alert is created as an object of the UIAlertController class. The title and
the message displayed in it are defined. The preferred style is also defined.
The alert presented in fig. 5.12 has no buttons. In order to add action buttons to it,
the new objects of UIAlertAction class have to be defined (iOSDL, a.y.D). A handler is
created to perform the actions. The basic alert with one OK button is presented in fig.
5.13. The code to its implementation is shown in listing 5.4.
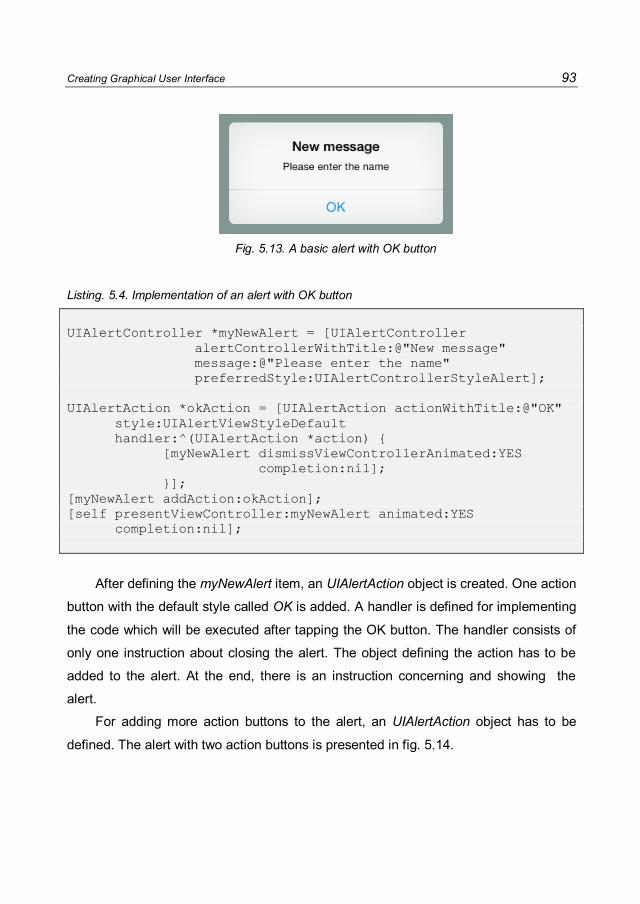
Creating Graphical User Interface 93
Fig. 5.13. A basic alert with OK button
Listing. 5.4. Implementation of an alert with OK button
UIAlertController *myNewAlert = [UIAlertController alertControllerWithTitle:@"New message" message:@"Please enter the name" preferredStyle:UIAlertControllerStyleAlert]; UIAlertAction *okAction = [UIAlertAction actionWithTitle:@"OK" style:UIAlertViewStyleDefault handler:^(UIAlertAction *action) { [myNewAlert dismissViewControllerAnimated:YES completion:nil]; }]; [myNewAlert addAction:okAction]; [self presentViewController:myNewAlert animated:YES completion:nil];
After defining the myNewAlert item, an UIAlertAction object is created. One action
button with the default style called OK is added. A handler is defined for implementing
the code which will be executed after tapping the OK button. The handler consists of
only one instruction about closing the alert. The object defining the action has to be
added to the alert. At the end, there is an instruction concerning and showing the
alert.
For adding more action buttons to the alert, an UIAlertAction object has to be
defined. The alert with two action buttons is presented in fig. 5.14.

94 iOS Application Development
Fig. 5.14. A basic alert with two buttons
The alert can have one or more text fields inside. This kind of alert is presented in
fig. 5.15. It can be added to the alert programmatically using
addTextFieldWithConfigurationHandler handler. Inside it the text field can be modified
(e.g. defining placeholder or other features of the text field). The text can be read and
modified inside handlers of the action buttons. An example of defining this type of
alert is presented in listing 5.5. After tapping the OK button, the text is read and put
into the text field in the main application’s view. Because the text field is the first and
the only control inside the alert, the input string is read from element at 0 index. It is
converted into an NSString object. After this operation the alert is closed.
Fig. 5.15. An alert with a text field

Creating Graphical User Interface 95
Listing. 5.5. Implementation of an alert with a text field
UIAlertController *alertController = [UIAlertController alertControllerWithTitle:@"Alert with text field" message:@"Enter your name" preferredStyle:UIAlertControllerStyleAlert]; [alertController addTextFieldWithConfigurationHandler: ^(UITextField *textField) { //code for text field features }]; UIAlertAction *okAction = [UIAlertAction actionWithTitle:@"OK" style:UIAlertViewStyleDefault handler:^(UIAlertAction *action) { NSString *txt = [[alertController.textFields objectAtIndex:0] text]; myNewText.text = txt; [alertController dismissViewControllerAnimated:YES completion:nil]; }]; [alertController addAction:okAction]; [self presentViewController:alertController animated:YES completion:nil];
Alerts with text fields are often used for inserting data (e.g. login and password).
A user can input both plain and secure text into a text field. This feature is set in the
handler of each text field which is added to the alert. An example of an alert with two
text fields is presented in fig. 5.16. The example source code of the alert’s
implementation is shown in listing 5.6. For each text field a placeholder is added. For
the second one the secure text input is set. The data can be read from these text
fields with the use of handlers for action buttons. The string from the first field can be
read in the same way as the method presented in listing 5.5
([alertController.textFields objectAtIndex:0]). The second field can be
read as the last object.
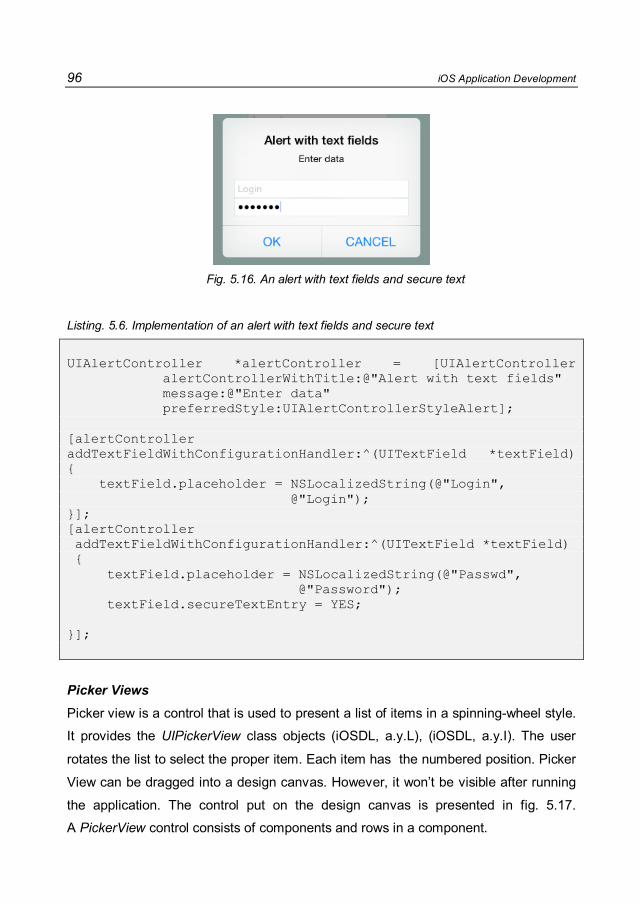
96 iOS Application Development
Fig. 5.16. An alert with text fields and secure text
Listing. 5.6. Implementation of an alert with text fields and secure text
UIAlertController *alertController = [UIAlertController alertControllerWithTitle:@"Alert with text fields" message:@"Enter data" preferredStyle:UIAlertControllerStyleAlert]; [alertController addTextFieldWithConfigurationHandler:^(UITextField *textField) { textField.placeholder = NSLocalizedString(@"Login", @"Login"); }]; [alertController addTextFieldWithConfigurationHandler:^(UITextField *textField) { textField.placeholder = NSLocalizedString(@"Passwd", @"Password"); textField.secureTextEntry = YES; }];
Picker Views Picker view is a control that is used to present a list of items in a spinning-wheel style.
It provides the UIPickerView class objects (iOSDL, a.y.L), (iOSDL, a.y.I). The user
rotates the list to select the proper item. Each item has the numbered position. Picker
View can be dragged into a design canvas. However, it won’t be visible after running
the application. The control put on the design canvas is presented in fig. 5.17.
A PickerView control consists of components and rows in a component.

Creating Graphical User Interface 97
Fig. 5.17. A Picker View control put on design canvas
Using the Attribute Inspector a set feature of the Picker View can be chosen (e.g.
behaviour). It also can be modified programmatically.
In order to ensure the picker view works correctly, a connection between the
control and View Controller is necessary. It is presented in fig. 5.18. Then, the given
name (protectedSpecies) can be used in a source code to implement the picker view.
Moreover, in the header class of a View Controller, a protocol should be added which
is presented in listing 5.7.
Fig. 5.18. A connection between Picker View control and VieController.h
Listing 5.7. Protocol for Picker View
@interface XYZViewController : UIViewController <UIPickerViewDataSource, UIPickerViewDelegate>

98 iOS Application Development
The UIPickerViewDataSource protocol needs an implementation of two methods
(iOSDL, a.y.J):
-(NSInteger) numberOfComponentsInPickerView:(UIPickerView *)pickerView;
-(NSInteger)pickerView:(UIPickerView *)pickerView
numberOfRowsInComponent:(NSInteger)component;
The first method returns the number of components of the list. The second one
returns the number of elements of the list to display.
The implementation of these two methods is presented in listings 5.8 and 5.9.
The first method returns 1 (a static value). The second returns the value that is
dynamic and stands for the number of elements of the NSArray list named
protectedAnimalsList. It has to be declared and its elements are given in a string
format (NSString type). The implementation of this list is presented in listing 5.10.
Listing 5.8. numberOfComponentsInPickerView: method
-(NSInteger)numberOfComponentsInPickerView:(UIPickerView *) pickerView{ return 1; }
Listing 5.9. numberOfRowsInComponent:: method
-(NSInteger)pickerView:(UIPickerView *)pickerView numberOfRowsInComponent:(NSInteger)component{ NSInteger num = 0; if ([pickerView isEqual: protectedSpecies]){ num = [protectedAnimalsList count]; } return num; }

Creating Graphical User Interface 99
Listing 5.10. Implementation of the list
- (void)viewDidLoad { [super viewDidLoad]; protectedAnimalsList = [[NSArray alloc] initWithObjects:@"Chimpanzee",@"Fin Whale", @"Sea Lions", @"Tiger", nil]; }
The above two methods are not enough to implement the source of the data. The
values are not visible in the spinning-wheel. One more method is required to specify
the elements to display. In this example the methods source is taken from the defined
NSArray object presented in listing 5.10. The implementation of the
pickerView:(UIPickerView *)pickerView titleForRow:(NSInteger)row
forComponent:(NSInteger)component: method is shown in listing 5.11. It is
available after adding a delegate to the picker view. For each row a NSString object is
assigned.
Listing 5.11. Indication of the source code for a picker view
- (NSString *)pickerView:(UIPickerView *) pickerView titleForRow:(NSInteger) row forComponent:(NSInteger) component { return protectedAnimalsList[row]; }
The application with implemented methods for the picker view is presented in fig.
5.19. After the application starts, the NSArray list is filled with the given text. Then, the
numberOfRowsInComponent: method reads the list and the picker view is filled in
with data from the defined list.
The rows of the PickerView control can be changed dynamically (iOSDL, a.y.I).
There are two methods for reloading data in that type of control. The first one is called
reloadComponent: and is used to reload (change) rows of a component. The second

100 iOS Application Development
one is called reloadAllComponents: and is used for reloading the roads of all
components.
Fig. 5.19. Application with picker view
It is very useful to be able to perform actions after selecting the row of the
UIPickerView control. A method didSelectRow: is used to implement the function
after selecting the item of the PickerView control. An example of the implementation
of this method is presented in listing 5.12. Selecting one item causes the alert to be
shown with the name read from the picker view’s row. The application using this action
is presented in fig. 5.20. The OK button closes the alert.
Listing 5.12. Implementation of the didSelectRow: method
- (void)pickerView:(UIPickerView *)pickerView didSelectRow: (NSInteger)row inComponent:(NSInteger)component{ NSString *str = [protectedAnimalsList objectAtIndex:row]; NSString *msg = @"Chosen item - "; msg = [msg stringByAppendingString:str]; //alert UIAlertController *alert = [UIAlertController alertControllerWithTitle:@"Info" message:msg preferredStyle:UIAlertControllerStyleAlert]; UIAlertAction *okAction = [UIAlertAction actionWithTitle:@"OK" style:UIAlertViewStyleDefault handler:^(UIAlertAction *action) { [alert dismissViewControllerAnimated:YES completion:nil]; }]; [alert addAction:okAction]; [self presentViewController:alert animated:YES completion:nil]; }

Creating Graphical User Interface 101
Fig. 5.20. Application showing alert after selecting picker view’s item
Date and time The special use of the Picker View control enables the user to display and select the
date and time. The Date Picker is an object of the UIDatePicker class. This control can
display date, time or both (iOSDL, a.y.J). It can be used both to select date/time or to
countdown the timer. The control’s default mode is set to Date and Time. The date is
set to the current one. The control modes, after running the application, are presented
in fig. 5.21.
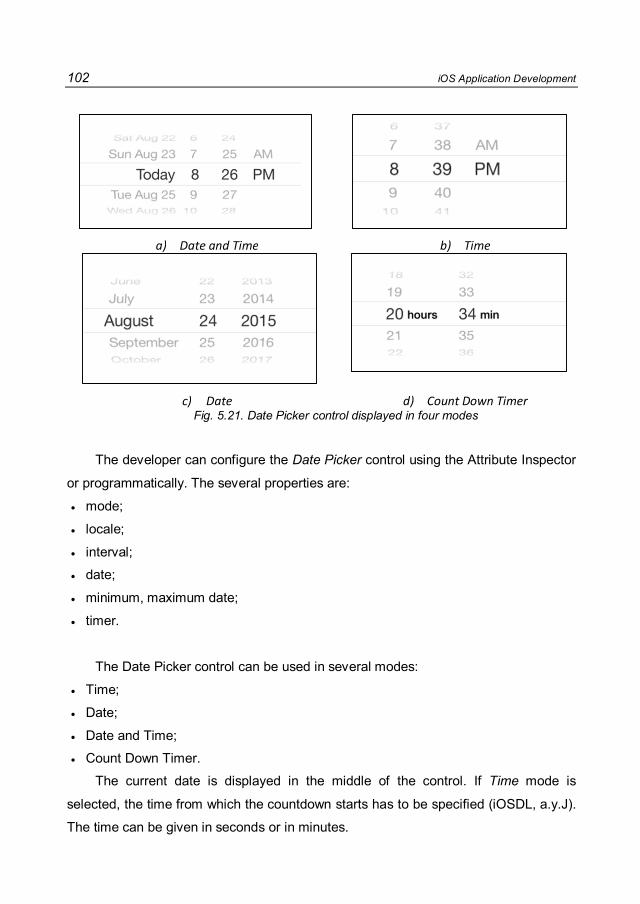
102 iOS Application Development
a) Date and Time b) Time
c) Date d) Count Down Timer Fig. 5.21. Date Picker control displayed in four modes
The developer can configure the Date Picker control using the Attribute Inspector
or programmatically. The several properties are:
mode;
locale;
interval;
date;
minimum, maximum date;
timer.
The Date Picker control can be used in several modes:
Time;
Date;
Date and Time;
Count Down Timer.
The current date is displayed in the middle of the control. If Time mode is
selected, the time from which the countdown starts has to be specified (iOSDL, a.y.J).
The time can be given in seconds or in minutes.
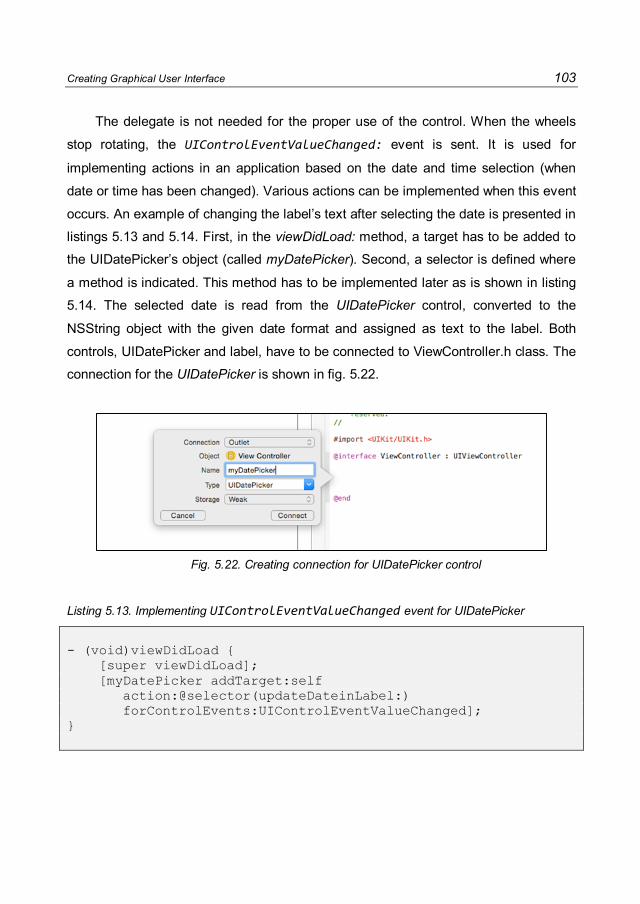
Creating Graphical User Interface 103
The delegate is not needed for the proper use of the control. When the wheels
stop rotating, the UIControlEventValueChanged: event is sent. It is used for
implementing actions in an application based on the date and time selection (when
date or time has been changed). Various actions can be implemented when this event
occurs. An example of changing the label’s text after selecting the date is presented in
listings 5.13 and 5.14. First, in the viewDidLoad: method, a target has to be added to
the UIDatePicker’s object (called myDatePicker). Second, a selector is defined where
a method is indicated. This method has to be implemented later as is shown in listing
5.14. The selected date is read from the UIDatePicker control, converted to the
NSString object with the given date format and assigned as text to the label. Both
controls, UIDatePicker and label, have to be connected to ViewController.h class. The
connection for the UIDatePicker is shown in fig. 5.22.
Fig. 5.22. Creating connection for UIDatePicker control
Listing 5.13. Implementing UIControlEventValueChanged event for UIDatePicker
- (void)viewDidLoad { [super viewDidLoad]; [myDatePicker addTarget:self action:@selector(updateDateinLabel:) forControlEvents:UIControlEventValueChanged]; }

104 iOS Application Development
Listing 5.14. Implementing updateDateinLabel: method
-(void)updateDateinLabel: (id)sender{ NSDate *date = [myDatePicker date]; NSDateFormatter *format = [[NSDateFormatter alloc] init]; [format setDateStyle:NSDateFormatterMediumStyle]; NSString *str = [format stringFromDate:date]; dateLabel.text = str; }
The screen from the application is presented in fig. 5.23. Each time a new date is
selected an event is sent. Then the updateDateinLabel: method is performed and
the label’s text is changed.
Fig. 5.23. Read date from UIDatePicker object

Creating Graphical User Interface 105
Switches Switches are controls for changing between two states (options). They have two
modes: on or off. It is an object of the UISwitch class (iOSDL, a.y.K). The switch
control is presented in fig. 5.24.
Fig. 5.24. UISwitch object in two stages: ON and OFF
This object can be modified using the Attribute Inspector or programmatically.
The switch properties are (iOSDL, a.y.K):
state (ON is the default one);
tint color.
The switch does not need the delegate. The states changes can be monitored
using the UIControlEventValueChanged event. In the viewDidLoad: method a target is
added to the UISwitch object (listing 5.15). If the switch status changes, the
changeStatus: method is performed. It is presented in listing 5.16. The state is read
from the UISwitch object, and the proper text is displayed in a label. The connection
for the UISwitch object has to be created (named mySwitch). The screens of the
application are shown in fig. 5.25.
Listing 5.15. Implementing UIControlEventValueChanged event for UISwitch
- (void)viewDidLoad { [super viewDidLoad]; [mySwitch addTarget:self action:@selector(changeStatus:) forControlEvents:UIControlEventValueChanged]; }

106 iOS Application Development
Listing 5.16. Implementing changeStatus: method
-(void) changeStatus:(id)sender{ if ([mySwitch isOn]) { statusLabel.text = @"is on!"; } else { statusLabel.text = @"is off!"; } }
Fig. 5.25. Application reading UISwitch object’s state

Creating Graphical User Interface 107
5.2. STORYBOARD
Storyboard is an editor for creating the Graphical User Interface (GUI). It is embedded
into Xcode. It uses Interface Builder so creating a new design becomes easy. Using
storyboard the developer may (iOSDL, a.y.a):
create a new view controller;
design the view controller;
create a new scene;
combine various view controllers in order to create the GUI of the application;
create connections between selected scenes using segues;
create special controls that enable moving between scenes.
A scene is a single screen on which all controls are presented to the user. The iPhone
application has only one scene on a screen while the iPad and OSX applications can
be built with more than one scene due to the screen’s size (iOSDL, a.y.a).
Storyboard can be considered as a new way for defining the connections
between various scenes. It enables the developer to display all view controllers and
connections among them in one window. It means that the scenes’ visualization is
presented by storyboard editor. This feature is useful for analysing the application.
The entire GUI of all screens is presented to the developer.
Storyboard also defines the transition from one scene to the other, which is called
a segue. The following types are dedicated for the iOS system (iOSDL, a.y.A):
Show – the content is visualized in detail or on a master screen. If the application
consists of two views-- master and detail-- then the user is lead to the detailed one.
If the application consists of two views of the same kind (master or detail), then the
content is pushed on top of the view controller stack.
Show Detail – the content is visualized in the detailed part. If the application
consists of two views (master and detail), then the current content is replaced by
a new one. If the application consists of two views of the same kind (master or
detail), the current view controller stack is replaced by the content.
Present Modally – the content is visualized in a modal style. It can be used as two
types: UIModalPresentationStyle or UIModalTransitionStyle.
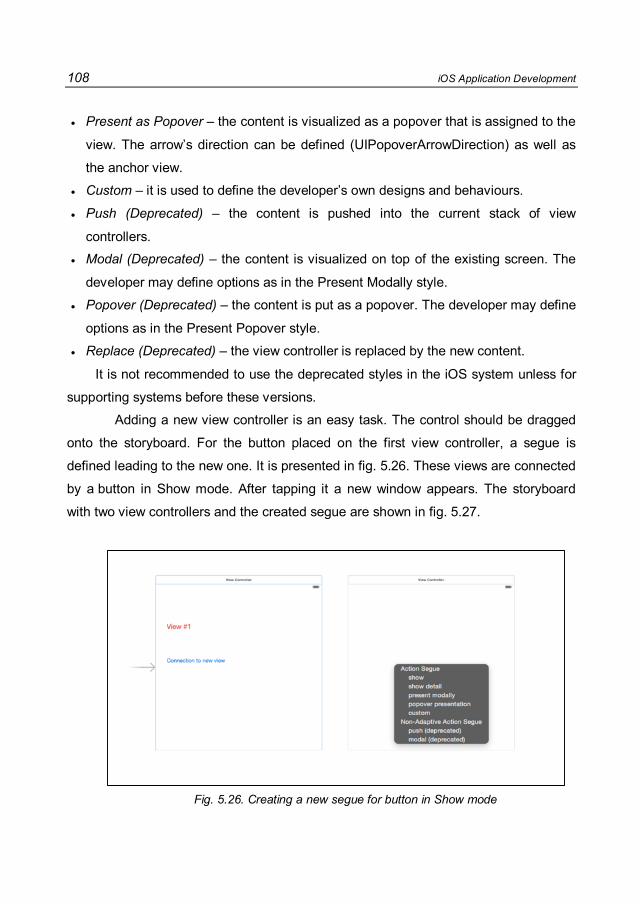
108 iOS Application Development
Present as Popover – the content is visualized as a popover that is assigned to the
view. The arrow’s direction can be defined (UIPopoverArrowDirection) as well as
the anchor view.
Custom – it is used to define the developer’s own designs and behaviours.
Push (Deprecated) – the content is pushed into the current stack of view
controllers.
Modal (Deprecated) – the content is visualized on top of the existing screen. The
developer may define options as in the Present Modally style.
Popover (Deprecated) – the content is put as a popover. The developer may define
options as in the Present Popover style.
Replace (Deprecated) – the view controller is replaced by the new content.
It is not recommended to use the deprecated styles in the iOS system unless for
supporting systems before these versions.
Adding a new view controller is an easy task. The control should be dragged
onto the storyboard. For the button placed on the first view controller, a segue is
defined leading to the new one. It is presented in fig. 5.26. These views are connected
by a button in Show mode. After tapping it a new window appears. The storyboard
with two view controllers and the created segue are shown in fig. 5.27.
Fig. 5.26. Creating a new segue for button in Show mode

Creating Graphical User Interface 109
The presented example does not have any implemented and simple way to return
to the first view. Another button can be added to the second view with a new defined
segue. However, there is a more convenient way to build the set of views using
a navigation controller. It is added to the project from Menu by choosing
Editor→Embed in→NavigationController. The storyboard with changes is presented in
fig. 5.28. A Navigation Item is automatically added to the view controllers. It may be
modified (e.g. adding the title) in Attribute Inspector. Three items to edit are: title,
prompt and name of the back button.
Fig. 5.27. Two view controllers with Show segue
Fig. 5.28. Storyboard with a navigation controller

110 iOS Application Development
Tapping into the button in a launched application causes an opening a new
window. The return button is seen in the second view controller placed on the top left
side. Tapping it the user is moved back to the first view. The screens are presented in
fig. 5.29.
The storyboard consists of three view controllers and one navigation controller. It
is presented in fig. 5.30. A view controller is grey. A main arrow is directed to it. The
other views are connected by segues according to their purpose and functions. They
are presented as arrows with special symbols placed on them. They represent the
mode of the connection. Each segue can be modified by performing a double click on
it. A unique identifier should be added to it which distinguishes it from the others in the
feature’s additional implementation. The segue mode can also be edited.
Two buttons are placed in the first view controller. The first one leads to the
second view while the second one to the third view.
a) first view b) second view
Fig. 5.29. Application with navigation controller

Creating Graphical User Interface 111
Fig. 5.30. A storyboard with 3 view controllers and a navigation controller
The application presented above does not possess the ability to create GUI
behaviours in either the second nor in the third view controller. A new subclass is
needed that inherits after [odd sounding] the UIViewController class. It has to be
added to the project by choosing menu: File→New→New File. First, a template is
selected based on which file will be created. For the iOS system Cocoa Touch Class
should be chosen while for the OS X application – Cocoa Class. Second, the class
options have to be specified such as: name, class and programming language. The
settings are presented in fig. 5.31. Third, a folder has to be indicated where created
files will be saved. It can be the one where the other project classes are kept. Fourth,
two new files are added to the project: the header class and the corresponding
implementation one.

112 iOS Application Development
Fig. 5.31. The options for adding a new class to the project
The new class has to be assigned to the selected view controller in storyboard
using the Identity Inspector. The proper class should be selected from the list of
available ones. It is presented in fig. 5.32. This operation enables the developer to
create connections between the view controller and the assigned class. The actions
and the behaviours can be then implemented.
Fig. 5.32. Assigning class to a view controller
The segues are used not only for defining the connections between views but
also for passing parameters between screens. The view’s content can depend on the
settings or data read from the previous one.
The following application presents the action of passing a text parameter from the
first to the second view. The text is written by the user into the text label. The UILabel

Creating Graphical User Interface 113
object called textLabel is created by defining the connection between the View
Controller and the corresponding class. It is further used in the implementation class
file. However, the most important method concerns passing the read text from the
textLabel to the second view. This action is performed in the prepareForSegue:
method. It is presented in listing 5.17. It consists of two parts. First, the text is read
from the text field and assigned to the NSString object. If the user doesn’t input a text
(it is an empty string), a new text is created revealing it as a string “No input text”.
Second, the transition to the view is executed. A new object is defined that
corresponds to the class assigned to the second view controller (VieCOntroller_2).
That class has to be imported into the implementation file. In that class a NSString
object has to be available where the text is added. An important aspect is to assign
the identifier to the proper segue in storyboard. Selecting the proper segue causes its
attributes to appear. It is presented in fig. 5.33.
Fig. 5.33. Creating an identifier for the segue

114 iOS Application Development
Listing 5.17. Implementation of prepareForSegue: method
-(void)prepareForSegue:(UIStoryboardSegue *)segue sender:(id)sender{ NSString *readStr = enterText.text; if ([readStr isEqualToString:@""]) { readStr =@"No input text"; } if ([segue.identifier isEqualToString:@"segue2"]) { NSLog(@"tu"); ViewController_2 *view2 = [segue destinationViewController]; view2.textView_1= readStr; } }
The transformed text is assigned to the NSString object defined in the
ViewController_2 class (named textView_1). The text field is put into the view and
connected to the corresponding class. The source code of the ViewController_2.h is
presented in listing 5.18. The assigned read value from the previous view controller is
performed in the ViewDidLoad: method. The read value is written as a text property of
the UITextField object. It is shown in listing 5.19.
Listing 5.18. ViewController_2.h
#import <UIKit/UIKit.h> @interface ViewController_2 : UIViewController @property NSString *textView_1; @property (weak, nonatomic) IBOutlet UITextField *readText; //another properties and methods @end
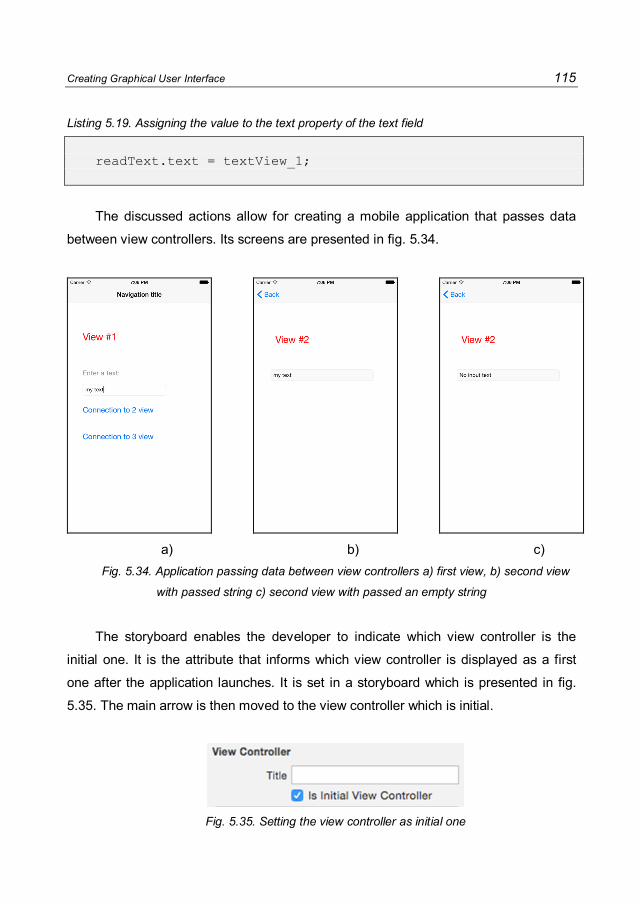
Creating Graphical User Interface 115
Listing 5.19. Assigning the value to the text property of the text field
readText.text = textView_1;
The discussed actions allow for creating a mobile application that passes data
between view controllers. Its screens are presented in fig. 5.34.
a) b) c)
Fig. 5.34. Application passing data between view controllers a) first view, b) second view
with passed string c) second view with passed an empty string
The storyboard enables the developer to indicate which view controller is the
initial one. It is the attribute that informs which view controller is displayed as a first
one after the application launches. It is set in a storyboard which is presented in fig.
5.35. The main arrow is then moved to the view controller which is initial.
Fig. 5.35. Setting the view controller as initial one

116 iOS Application Development
5.3. TABLEVIEWS
Many mobile applications dedicated for iOS system are based on table views. These
are UITableView class objects which are dragged onto the design canvas in Interface
Builder tool using Storyboard editor. This control is used for building the GUI for one
view (screen). It displays data in a vertical list that can be scrolled by the user to see
all items. It consists of one column and many rows. It can either be presented in
a continuous way or be divided into sections. It can display data according to its
assignment. Each section may have a footer and a header. Both text and images can
be placed there. Additionally, one header and one footer for the whole table view can
be added.
The table view is especially used when the displayed data is organised in
a hierarchical way, from the most general to the most detailed. General data is
presented in a list form while the detailed one in other views (in the table views or
simple screens). Another frequent use of this object is to show the data as an indexed
list where each item has an assigned unique number. There are many sources of the
data, such as a NSArray object, a database or others. The mobile applications that
present the list of various options to the user also often use these types of views
(iOSDL, a.y.B).
The dragged table view control in the Storyboard editor is presented in fig. 5.36.
The launched application is shown in fig. 5.37. The list is empty.

Creating Graphical User Interface 117
Fig. 5.36. The UITableView control in Storyboard, b) an empty table view presented in iOS
application
The table view development is available using the UIKit framework. Each element
of the list has a special identifier. The sections are indexed from 0 to n-1, where
n stands for the number of all sections. The rows are numbered inside the sections
from 0 to m-1, where m is the row’s number in the section. This means that the
developer should first read the section’s number and then find the right row (iOSDL,
a.y.B). The application presenting the table view with numbered rows is shown in fig.
5.38 a).

118 iOS Application Development
Fig. 5.37. An empty table view presented in iOS application
a) b)
Fig. 5.38. Application with numbered sections and rows a) plain style b) grouped style

Creating Graphical User Interface 119
The above example (presented in fig. 5.38a) shows the sections merged
altogether into one list. However, the data can be displayed using two various styles:
plain and grouped (iOSDL, a.y.B). The first one shows only one list regardless of the
number of sections. The second one divides the list into smaller parts according to the
amount of the created sections. This means that the sections are separated from each
other by an empty space. If there is only one section defined, the data is still
presented inside one list. The grouped style is illustrated in fig. 5.38 b).
The table view consists of rows. They are UITableViewCell objects. They display
content such as text or images. The cell’s background can be defined as well as the
actions to execute them after tapping it. Special tags called accessories can be placed
on the cells. They possess additional functions such as selecting or setting an option.
The cell has two stages: normal and selected. The properties of each can be defined
by the developer.
The developer may use the default cell or define a custom one. In the default row
there are three properties to use: main label, detail label and image. They allow to
programmatically place the data to each row separately by the use the special
methods. Sometimes it is necessary to define a new cell’s style in Storyboard. Then
the content is added according to the developer’s needs.
Due to the cell’s content the rows can be divided into two types: static cells and
dynamic protocols (iOSDL, a.y.B). The fist style is used to create a table view which
has the known number of rows. The table view’s layout is the same as the one defined
in Storyboard. The second style is for creating one cell with the proper layout. It is
used then as a template for creating other rows in the table view. It works due to the
data source protocol.
The recommended way of creating a new table view is to use Storyboard editor.
The UITableView object is put into the design canvas. Two protocols should be added
so that it can work properly. These are: UITableViewDelegate and
UITableViewDataSource (iOSDL, a.y.B). The first one is used for implementing the
actions that are executed after tapping the row. The second one is for defining the
methods that fill the table view with data. When the table view is launching or
reloading, special methods are also executed. They define the number of sections, the

120 iOS Application Development
number of rows and the source of data (e.g. an array). Two methods are arbitrary and
one is an optional one. They are (iOSDL, a.y.B):
tableView:numberOfRowsInSection: - it returns the number of rows. The number of
them has to be specified for each section separately (e.g. using the switch case
instruction). The number of sections is a parameter within this method. This
method is required.
tableView:cellForRowAtIndexPath: - it creates the new UITableViewCell object,
assigns the data to it and finally returns it. The object specifies the content of the
row and is required. This method has two parameters: tableView and indexPath.
The first one is used to select the proper table view while the second one is for
indicating the number of sections and rows.
numberOfSectionsInTableView: - it returns the number of sections and is optional.
The dependencies among Table View object, Client and Data Source are
presented in fig. 5.39 (iOSDL, a.y.B). The sequences of the proper methods are
illustrated. The table view object is created due to the settings like frame and style
(usually a frame screen). Then the data source and delegate are defined for the table
view. A message is sent to reload the data. The three described methods are
executed in order to obtain the necessary information. Finally, the data is viewed.
The table view creation is presented by an example. The application shows the
protected plants in a scrollable list.
The connection between the table view object placed on the design canvas and
the ViewController.h class is required. Moreover, the data source delegate should be
created. By repeatedly inserting a control button, a line is drawn from the object to the
ViewController icon. From the small menu a data source delegate has to be indicated.
It is presented in fig. 5.40. This operation is important. Without it no data is displayed.
Three methods of this implementation are shown in listings from 5.20 to 5.21. The
first optional step is to define the number of the sections. In this case it is set to one
(listing 5.20). The method has one parameter (tableView) which can be used to
distinguish many table views in the applications. That is why an if instruction is
implemented.
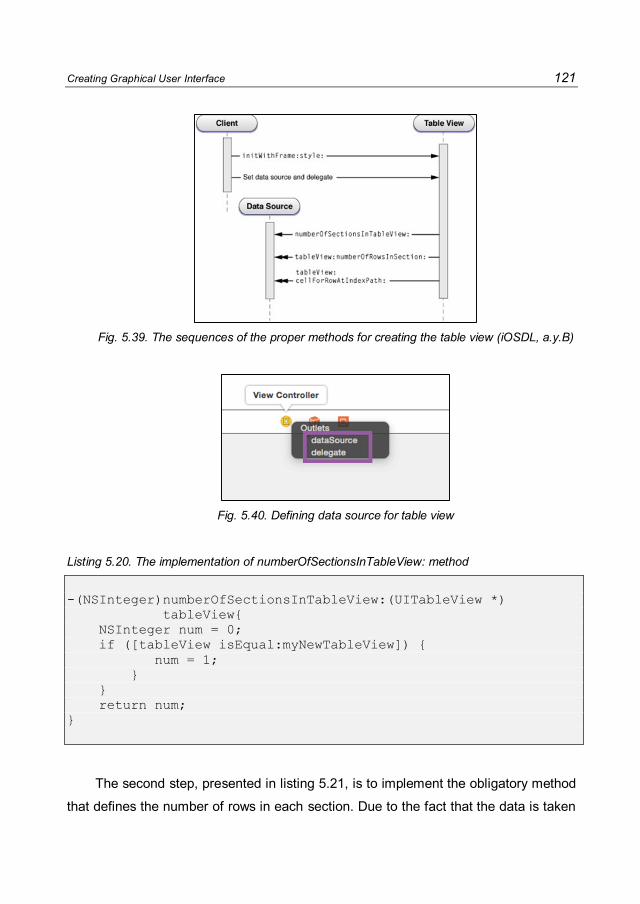
Creating Graphical User Interface 121
Fig. 5.39. The sequences of the proper methods for creating the table view (iOSDL, a.y.B)
Fig. 5.40. Defining data source for table view
Listing 5.20. The implementation of numberOfSectionsInTableView: method
-(NSInteger)numberOfSectionsInTableView:(UITableView *) tableView{ NSInteger num = 0; if ([tableView isEqual:myNewTableView]) { num = 1; } } return num; }
The second step, presented in listing 5.21, is to implement the obligatory method
that defines the number of rows in each section. Due to the fact that the data is taken

122 iOS Application Development
from an array, the number of rows is equal to the array’s elements. This value is read
by the count method. The NSArray definition is shown in listing 5.22.
Listing 5.21. The numberOfRowsInSection: implementation
-(NSInteger)tableView:(UITableView *)tableView numberOfRowsInSection:(NSInteger)section{ return [protectedPlants count]; }
Listing 5.22. The protectedPlants NSArray
protectedPlants = [NSMutableArray arrayWithObjects:@"Lily of the Valley", @"cowslip", @"Aquilegia vulgaris", @"adonis Vernalis", @"Broad orchid", nil];
The final step is to indicate the data source for the each row by implementing the
cellForRowAtIndexPath: method, shown in listing 5.23. The identifier for the whole
table view is defined as a NSArray object. This method returns the UITableViewCell
object. That is why it has to be created (named cellPlants) and assigned to the proper
table view by the identifier. If the object is empty ( its value is equal to nil), the memory
is allocated for it so that the data can be added to it. The default style is assigned to
cellPlants object. After that, the text is added to it by the text label property. The texts
are taken from the defined NSArray object presented in listing 5.22. The item’s
number of that list corresponds to the row’s number in the table view. The proper
object is read from the array using the objectAtIndex: method. The indexPath
parameter has the property named row which gives the information about which cell
should be filled in with data. That is why the whole table view is filled with the proper
data. The application’s screen is presented in fig. 5.41.

Creating Graphical User Interface 123
Listing 5.23 The implementation of cellForRowAtIndexPath: method
-(UITableViewCell *)tableView:(UITableView *)tableView cellForRowAtIndexPath:(NSIndexPath *)indexPath{ static NSString *tableViewId = @"Plants"; UITableViewCell *cellPlants = [tableView dequeueReusableCellWithIdentifier:tableViewId]; if (cellPlants == nil) { cellPlants = [[UITableViewCell alloc] initWithStyle:UITableViewCellStyleDefault reuseIdentifier:tableViewId]; } cellPlants.textLabel.text = [protectedPlants objectAtIndex:indexPath.row]; return cellPlants; }
Fig. 5.41. Application with the names of protected plats
Another useful feature of the table view is adding images to the rows. All cells can
display the same picture or various ones. An image is the default presented on the
right side of the cell. The proper changes should be implemented in the

124 iOS Application Development
cellForRowAtIndexPath: method. However, the images should be added earlier to the
project (single files or within a folder). Their names have to be known. They can be, for
example, added as NSArray objects and, in addition, used similarly to those from the
protectedPlants ones.
The definition of the new protectedPlantsFig NSArray is presented in listing 5.24
while its usage in 5.25. The full image path is added with the name of the folder
(named fig).
The UITableViewCell object has a property called imageView. It is used to display
proper images. Based on the image paths from the protectedPlantsFig NSArray, a
new UIImage object is created and assigned to the row (iOSDL, a.y.B). The table view
with the images is presented in fig. 5.42.
Listing 5.24. Definition of NSArray storing paths to the images
protectedPlantsFig = [NSMutableArray arrayWithObjects:@"fig/lily_1.jpg", @"fig/cowslip.jpg", @"fig/aquilegia_3.jpg",@"fig/adonis_4.jpg", @"fig/orchid_5.jpg", nil];
Listing 5.25. Defining the image to display in cellForRowAtIndexPath: method
cellPlants.imageView.image = [UIImage imageNamed: [protectedPlantsFig objectAtIndex:indexPath.row]];

Creating Graphical User Interface 125
Fig. 5.42. Application with the names and images of protected plats
The header and footer are implemented using the dedicated methods (iOSDL,
a.y.B). They are presented in listings 5.26 and 5.27. Both functions return the name as
a NSString object. If the table view has more than one section, the titles should be
specified for each individually. The application with the defined footer and header is
shown in fig. 5.43.
Listing 5.25. Implementing the header for the table view
-(NSString *)tableView:(UITableView *)tableView titleForHeaderInSection:(NSInteger)section{ return @"Protected Plants"; }
Listing 5.26. Implementing the footer for the table view
-(NSString *)tableView:(UITableView *)tableView titleForFooterInSection:(NSInteger)section{ return @"End of the section - Protected Plants"; }

126 iOS Application Development
Users often tap on the selected cell. Various actions can be implemented there,
such as: presenting details in the different view or table view, selecting the option or
executing any other actions. It is recommended that one use
tableView:didSelectRowAtIndexPath: method to handle them (iOSDL, a.y.B). The
delegate is necessary to ensure that the application works correctly. The delegate is
added in a similar way to that as the data source. An important aspect is that the
selected row should always be deselected.
Fig. 5.43. The table view with the header and the footer
The example presented in listing 5.27 shows an alert revealing which row is
selected by the user.
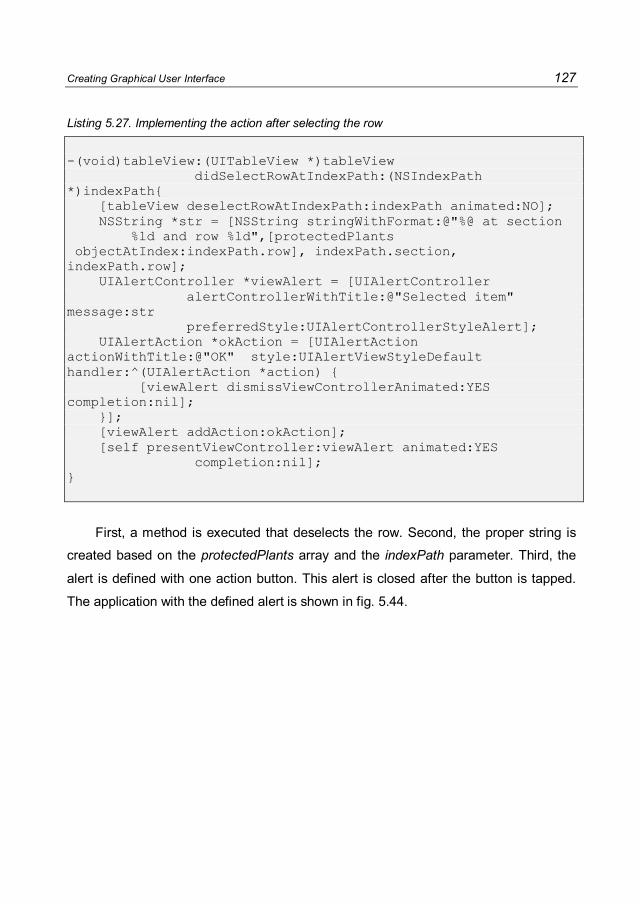
Creating Graphical User Interface 127
Listing 5.27. Implementing the action after selecting the row
-(void)tableView:(UITableView *)tableView didSelectRowAtIndexPath:(NSIndexPath *)indexPath{ [tableView deselectRowAtIndexPath:indexPath animated:NO]; NSString *str = [NSString stringWithFormat:@"%@ at section %ld and row %ld",[protectedPlants objectAtIndex:indexPath.row], indexPath.section, indexPath.row]; UIAlertController *viewAlert = [UIAlertController alertControllerWithTitle:@"Selected item" message:str preferredStyle:UIAlertControllerStyleAlert]; UIAlertAction *okAction = [UIAlertAction actionWithTitle:@"OK" style:UIAlertViewStyleDefault handler:^(UIAlertAction *action) { [viewAlert dismissViewControllerAnimated:YES completion:nil]; }]; [viewAlert addAction:okAction]; [self presentViewController:viewAlert animated:YES completion:nil]; }
First, a method is executed that deselects the row. Second, the proper string is
created based on the protectedPlants array and the indexPath parameter. Third, the
alert is defined with one action button. This alert is closed after the button is tapped.
The application with the defined alert is shown in fig. 5.44.
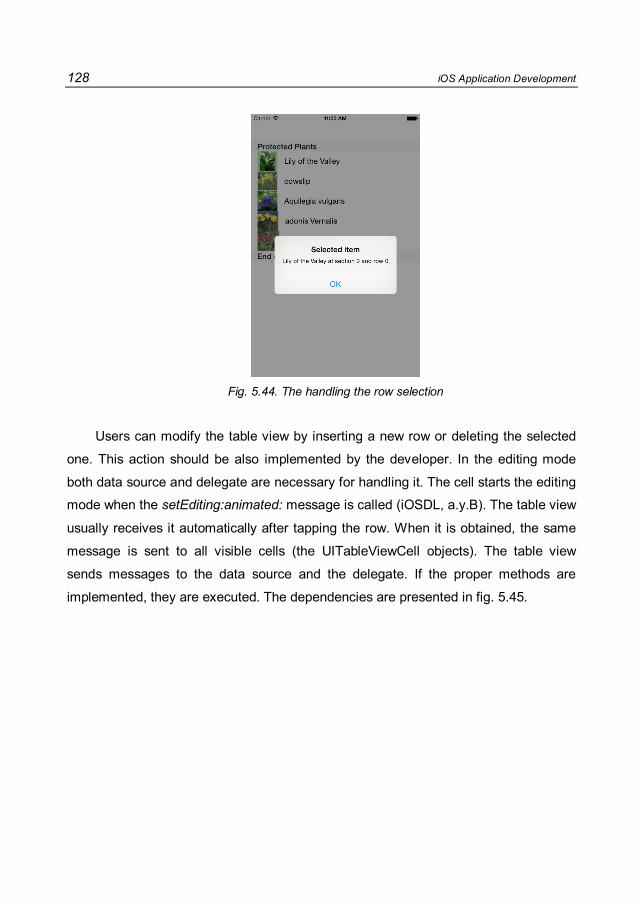
128 iOS Application Development
Fig. 5.44. The handling the row selection
Users can modify the table view by inserting a new row or deleting the selected
one. This action should be also implemented by the developer. In the editing mode
both data source and delegate are necessary for handling it. The cell starts the editing
mode when the setEditing:animated: message is called (iOSDL, a.y.B). The table view
usually receives it automatically after tapping the row. When it is obtained, the same
message is sent to all visible cells (the UITableViewCell objects). The table view
sends messages to the data source and the delegate. If the proper methods are
implemented, they are executed. The dependencies are presented in fig. 5.45.

Creating Graphical User Interface 129
Fig. 5.45. The sequences for inserting or deleting row (iOSDL, a.y.B)
The delete action can be implemented with a swipe gesture. On the right side of
the cell a Delete button appears. When it is tapped, a row is removed from the table
view. Two methods presented in listing 5.28 and 5.29 are necessary to implement this
action. The first function returns a Boolean value (YES) indicating that the row can be
edited.
Listing 5.28. Implementing the canEditRowAtIndexPath: method
-(BOOL)tableView:(UITableView *)tableView canEditRowAtIndexPath:(NSIndexPath *)indexPath{ return YES; }
The second method implements removal of the selected object from the row. The
row’s number is read and, based on this information, the proper objects from two
arrays are deleted. The table view has to be reloaded so that the user sees only the

130 iOS Application Development
remaining data. The application, while deleting the selected row and after the
operation is depicted in fig. 5.46.
Listing 5.29. Implementing the canEditRowAtIndexPath: method
-(void)tableView:(UITableView *)tableView commitEditingStyle:(UITableViewCellEditingStyle) editingStyleforRowAtIndexPath:(NSIndexPath *)indexPath{ if (editingStyle ==UITableViewCellEditingStyleDelete) { [protectedPlants removeObjectAtIndex:indexPath.row]; [protectedPlantsFig removeObjectAtIndex:indexPath.row]; [tableView reloadData]; } }
a) b)
Fig. 5.46. The application a)during the row deleting b) after the delete action

Creating Graphical User Interface 131
The above application is based on the default cell style. However, it is often
necessary to create a custom cell in which the GUI is defined in a Storyboard editor. A
UITableViewCell object has to be dragged onto the design canvas. Then its
appearance can be arranged which best suits the situation. The cell with one
ImageView object and two UILabel objects are shown in fig. 5.47. The former is for
presenting the photo of the plant while the latter for showing a plant’s name and it’s
colour.
A new class must be added to the project so that handling the objects placed on
the cell will be possible. The new class must heritage after the UITableViewCell. The
creation of the class called PlantTableViewClass is depicted in fig. 5.48. The header
and implementation files are added to the project. Then it has to be assigned to the
cell in Storyboard. The proper one is chosen from the list which is presented in fig.
5.49. The above actions enable the developer to create connections between each
object and the new class so that they can be modified programmatically.
Fig. 5.47. The custom cell
The method that fills in the following table view rows with data taken from arrays
has to be modified. Instead of defining the standard UITableViewCell object, the newly
created class is used. However, the header class has to be imported into the project.
The PlantTableViewCell object is then created. Its identifier has to be the same with

132 iOS Application Development
the one placed into the cell’s properties in Storyboard. The object has access to the
image and two labels features. That is why the data can be assigned to them. The
modified method is presented in listing 5.30. The application with a custom cell is
depicted in fig. 5.50.
Fig. 5.48. Adding the new UITableViewCell class
Fig. 5.49. Assigning the class to the cell

Creating Graphical User Interface 133
Listing 5.30. Implementing the cellForRowAtIndexPath: method
-(UITableViewCell *)tableView:(UITableView *)tableView cellForRowAtIndexPath:(NSIndexPath *)indexPath{ static NSString *tableViewId = @"Plants"; PlantTableViewCell *cellPlants = [tableView dequeueReusableCellWithIdentifier:tableViewId]; if (cellPlants == nil) { cellPlants = [[PlantTableViewCell alloc] initWithStyle:UITableViewCellStyleDefault reuseIdentifier:tableViewId]; } cellPlants.plantName.text = [protectedPlants objectAtIndex:indexPath.row]; cellPlants.plantColor.text = [plantColor objectAtIndex:indexPath.row]; cellPlants.plantImg.image = [UIImage imageNamed:[protectedPlantsFig objectAtIndex:indexPath.row]]; return cellPlants; }
Fig. 5.50. Assigning the class to the cell

134 iOS Application Development
A table view can present hierarchical data. The more general information may be
shown in the first view while the more detailed data in the next ones. The first view can
also lead to the details of the chosen item placed in the row. These actions are
implemented with the use of a new UIViewController view which is added to the
design canvas. The proper class (PlantDetailViewController) is created and assigned
to it. The objects can be dragged onto it so that additional information may be seen.
The Show creation between the custom row and the second view controller is
performed. The name is put into it (ShowPlantDetail).
The prepareForSegue: method indicates which data is passed between views. It
is presented in listing 5.31. The number of the tapped row is read from the table view
using the indexPathForSelectedRow property. Then it is easy to take the
corresponding data from two arrays. The plant’s name is passed as the NSString
object. The UIImage object is created and transferred to the new view. The img and
the name objects are defined in the PlantDetailViewController class (the controller of
the destination view) so that the passing data can be assigned to them. The
application, after tapping the fourth row, presents the data depicted in fig. 5.51.
Listing 5.31. Implementing the prepareForSegue: method
-(void)prepareForSegue:(UIStoryboardSegue *)segue sender:(id)sender{ PlantDetailViewController *detail = [segue destinationViewController]; if ([segue.identifier isEqualToString: @"ShowPlantDetail"]){ NSIndexPath *row = [myNewTableView indexPathForSelectedRow]; detail.img = [UIImage imageNamed:[protectedPlantsFig objectAtIndex:row.row]]; detail.name = [protectedPlants objectAtIndex:row.row]; } }

Creating Graphical User Interface 135
There are special controls that can be placed on the right side of each rows. They
are called accessory views. There are three defined styles that can be used in
Storyboard editor or programmatically. They are (iOSDL, a.y.B):
Disclosure indicator – is used for transferring from the more general table view to
the more detailed one. It is an instance of the
UITableViewCellAccessoryDisclosure class.
Detail disclosure – is used for transferring from a table view to another view. The
destination view can be another table view or a simple view. It is an instance of the
UITableViewCellAccessoryDetailDisclosureButton class.
Checkmark – is used for selecting the tapped row. This selection list can handle
checking of one row or multiple rows. It is an instance of the
UITableViewCellAccessoryCheckmark class.
Fig. 5.51. The view with detailed data
In iOS 8 there is one more type: the Detail disclosure. It combines two of the
above styles, i.e. the Disclosure indicator and the Detail disclosure button.
Developers may also define the custom accessory views.

136 iOS Application Development
It is possible to create various segues, one for the cell and another for the
accessory view. Thus, tapping on the row may move the user to another view while
tapping the special control will lead to a different view with other data. When the
connection between two views is defined using Storyboard, the menu is shown. There
are three sections, one for the segue, one for the accessory action and the last for the
non-adaptive selection segue. They are depicted in fig. 5.52. The table views with
various types of these views are presented in fig. 5.53.
Fig. 5.52. The types of connections between two views
Detail disclosure Checkmark Disclosure indicator
Fig. 5.53. Accessory views

Data Management
Aim Mobile applications often use data that is stored directed on the device. The Core
Data framework allows for managing data using an object-oriented approach. This
chapter introduces the reader into this framework’s details. Development of a mobile
application is presented which shows step by step how to use this framework for
storing, fetching and managing data
Plan 1. Introduction to the Data Core framework.
2. Data Core architecture.
3. Creating a basic Data Core application.
4. Deleting data.
5. Data modification.
6

138 iOS Application Development
6.1. INTRODUCTION TO THE CORE DATA
The Core Data framework provides many features for handling data that is organised
as an entity and object graph. The properties are (Nahavandipoor, 2013, p.537):
undo and redo operations except for basic text editing;
object relationships;
reduction of the memory assigned to the application;
automatic validation (e.g. ranges for the values);
schema migration;
GUI synchronization;
support for key-value coding and observing;
support for storing data in the repositories;
creating and executing queries;
merge policies.
It is recommended that one implement the Core Data framework. It supports the
model layer of MVC pattern. That is why the source code is shorter than the one
without this framework. It also provides many features that are optimized for mobile
devices. The security and dealing with errors are embedded into it.
The schema of data can be defined graphically in the Storyboard editor which is
an easy and simply task. The Xcode data modelling tool and Interface Builder is used.
It improves the modelling process but it still needs further programming. Moreover, the
performance of the application can be verified as well as the occurring problem
debugged within this framework.
The developer should remember that this framework is not a typical relationship
database. It also cannot be managed in the same way as in a relational database
management system. However, this framework is suitable for handling data in iOS and
OSX systems. It enables both saving objects into storage and fetching them
(Nahavandipoor, 2013, p.547).
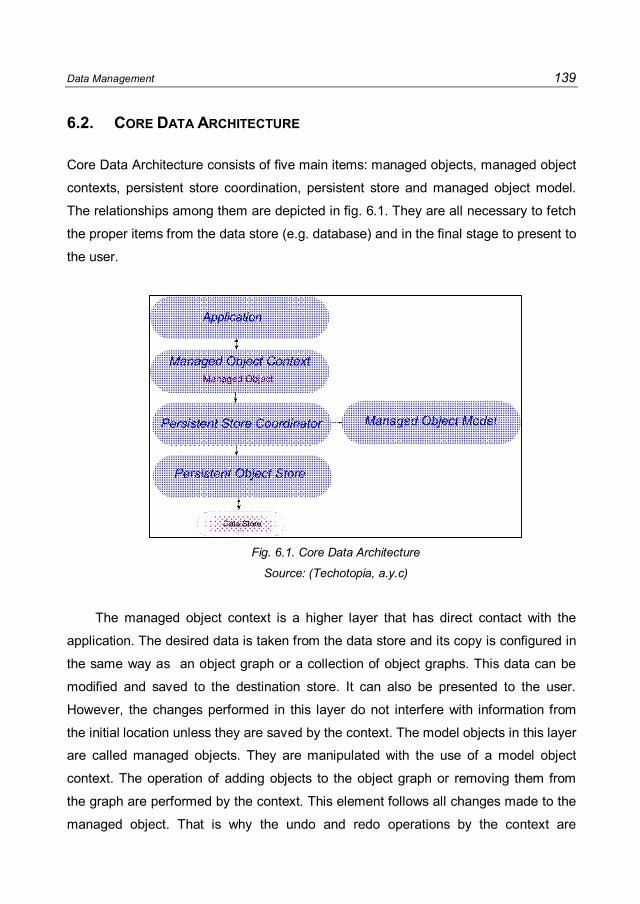
Data Management 139
6.2. CORE DATA ARCHITECTURE
Core Data Architecture consists of five main items: managed objects, managed object
contexts, persistent store coordination, persistent store and managed object model.
The relationships among them are depicted in fig. 6.1. They are all necessary to fetch
the proper items from the data store (e.g. database) and in the final stage to present to
the user.
Fig. 6.1. Core Data Architecture
Source: (Techotopia, a.y.c)
The managed object context is a higher layer that has direct contact with the
application. The desired data is taken from the data store and its copy is configured in
the same way as an object graph or a collection of object graphs. This data can be
modified and saved to the destination store. It can also be presented to the user.
However, the changes performed in this layer do not interfere with information from
the initial location unless they are saved by the context. The model objects in this layer
are called managed objects. They are manipulated with the use of a model object
context. The operation of adding objects to the object graph or removing them from
the graph are performed by the context. This element follows all changes made to the
managed object. That is why the undo and redo operations by the context are
140 iOS Application Development
available. The element also possesses information about all relationships and thus
data integrity is kept. Although there may be many managed object contexts, only one
can correspond to an object of a persistent store. In the opposite way, a persistent
store object can be modified by many contexts.
Fetching information is performed by the managed object context
(Nahavandipoor, 2013, p.539). The fetch is an object which may consist of three
items. First, the entity name is required. Second, optional conditions can be specified
that objects have to match. Third, the sort descriptor objects specify the data order to
be displayed.
The persistent store coordinator belongs to the second layer of the Core Data
framework. It is an intermediary item between the application objects (managed
objects) and the place containing the data (persistent object stores) (Nahavandipoor,
2013, p.546). It creates a stack, and a group of persistent stacks is recognized as one
store. Based on this information a managed object context builds an object graph.
A persistent store coordinator can be assigned to only one managed object model.
A persistent store is the third Core Data layer. Objects that belong to this layer
(persistent object store) have direct contact with the external source of data (e.g. file
or database). These objects communicate between the data in the store and the
managed object. The persistent objects store is used when the location of a new
source of data is defined, especially when the document is saved or opened. Core
Data supports a few file formats that can be used. It is not recommended that one
create any assumption about the kind of source data. This information should be
known only in this layer. It results in changing the type of source into something easy,
and the application architecture remains the same.
SQLite is one type of file that is supported by the Cora Data framework. However,
it doesn’t provide for its own management.
The managed object model is an important aspect of the Core Data framework. It
defines the schema of a model. It also specifies objects that are used to manage data.
It can be created either by using a graphical Data Model Design tool embedded in
Xcode or programmatically. The model consists of entities, classes and relationships
among entities. The entity is defined by a given name (which should be unique in a
schema) and its attributes. If the model has more than one entity. Usually the relations

Data Management 141
are specified that indicate the connections among the data assigned to the entities.
The entity is represented by a class which usually has the same name.
The managed objects which represent the entities belong to either the
NSManagedObject or the NSManagedObject. The NSManagedObject class defines
objects’ properties and their behaviour. The object also has access to the entity’s
name, description and relationships (Nahavandipoor, 2013, p.549).
6.3. CREATING A BASIC CORE DATA APPLICATION
The Xcode provides the necessary tools for creating a new iOS or OSX application
that implements the Core Data framework. The developer may create a new project
based on an empty template and then add all classes, storyboard and data model that
are required to implement all the functions. The project may be based on other types
of templates (e.g. Single View Application). However, an important aspect is to select
an additional Core Data option while defining the initial settings (fig. 6.2). The
functions and tools needed to implement the storing and managing of data are added
to the project.
Fig. 6.2. Creating an application with Core Data
A CoreData.xcdatamodeld is added to the project where the model for storing
data can be created. In the editor entities and relationships between them are defined.

142 iOS Application Development
An entity has a unique name and certain attributes. Names and types have to be
given. The attribute’s name is used to distinguish the objects’ properties within the
entity. Each attribute has an assigned type which specifies what sort of data can be
stored (e.g. string, float numbers or binary data). Properties of the created attributes
can be modified using the Data Model Inspector. An attribute can be set as optional or
transparent; the validation to it can be added or the default value can be specified.
The proper defining of these settings is a key aspect in creating the correct data
model. The entity is created by clicking the Add Entity button, placed at the bottom of
the editor sheet. Within an entity the attributes and relationships are added by clicking
the plus (+) button. They may also be removed from the entity by clicking the minus (-)
button.
If there is more than one entity in the model, they are usually related. The
relationships should also be defined. They show the dependencies between the
entities. Each relationship has its name, the destination entity, the integrity and the
cardinality. The latter specifies the type of the connections: to one or to many
relationships. The integrity describes both whether the connection is inverse or not
and the delete rule which is executed while removing data (iOSDL, a.y.f).
The data model of the application for storing information about birds is presented
in fig. 6.3 and 6.4. It consists of two entities: Bird and Species. The first specifies the
name of a bird, the place where it was observed and its description. Only the latter
attribute is optional. The relationship to the second entity is defined – it is called
toBird. Its type is set to “To One”. The second entity is a dictionary table which
consists of only one attribute. The names of the species are defined within it. It also
has one relationship to the previous entity. It is called toBird. Its type is specified as
“To Many”. It can be observed that both relationships are inversed. The properties of
the desc attribute are presented in fig. 6.5.
The presented settings provide that a new bird that is added has to be related to
one of the species defined in the second entity (Species). This means that a new bird
“knows” to which species it belongs. The relationship means that each bird belongs to
only one species. However, one species may correspond to many birds. The entities
with attributes and relationships may be visualized in a graph which is depicted in fig.
6.6.
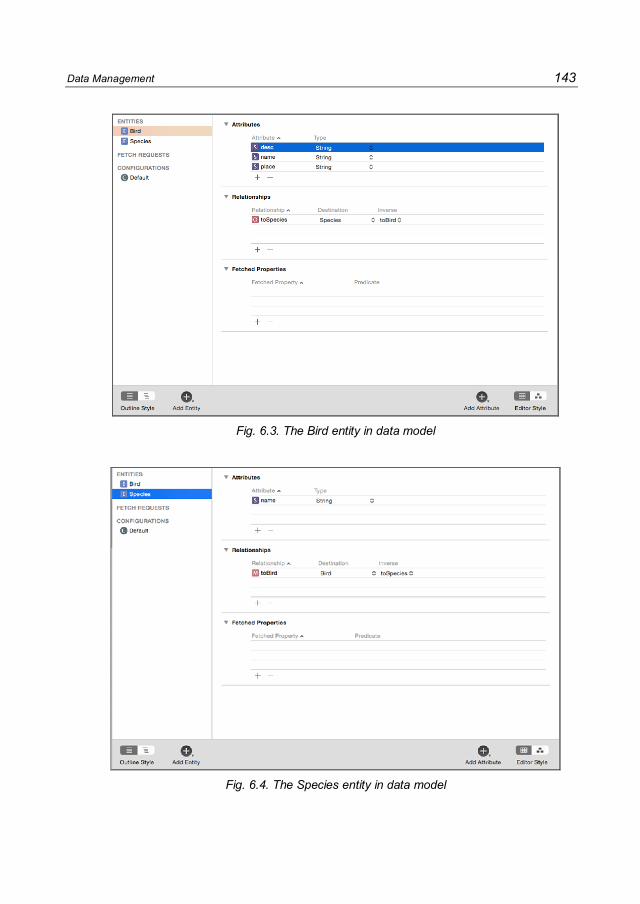
Data Management 143
Fig. 6.3. The Bird entity in data model
Fig. 6.4. The Species entity in data model

144 iOS Application Development
Fig. 6.5. The properties for desc attribute in Bird entity
Fig. 6.6. Graphical visualization of the data model
The next step is to create a GUI of the mobile application. It is specified using
Storyboard editor. At the beginning two functionalities must be implemented. First, the
operation for saving the data given by the user is presented. For this purpose a new
view controller will be created. Second, the stored information is read and revealed to
the user in the main view.
A GUI which consists of two views is presented in fig. 6.7. The navigation
controller is added. The main view has one table view with a custom cell. Three types
of information are presented on it: the bird’s name, the place where it was seen and
category (species) to which it belongs. On the top right there is a plus button. It is

Data Management 145
a bar button item. When its style is set to Add, the plus mark appears instead of the
ordinary button text. The second view is titled Detail. It consists of two text fields, one
text view and one UIPickerView list. The text fields are for placing the data
corresponding to the placeholders put on them. The text view enables the user to put
the bird’s description. It’s an optional item. The list is for presenting the species read
from the data source. On the top view, there are two bar button items: Cancel and
Add. The former returns to the previous view while the latter reads information input by
a user, saves it and also returns to the previous view.
A segue is defined from the plus button in the Bird view to the Detail view. Its
style is set to Present Modally. The latter view enters from the bottom to the top.
Fig. 6.7. GUI consists of two views
The Core Data framework needs to be added to the project and imported into the
classes which use it.
The implementation starts from the Detail view. A new class entitled
DetailBirdViewController is created and added to it. Six connections are defined: four
for the GUI items and two for two actions of the bar buttons. An additional method is
created which returns the managed object context for managing the data. It is
presented in listing 6.1. It creates an object which is necessary to save data and fetch
it. Due to the fact that it is the Core Data Application, the managedObjectContext:
method is created in the AppDelegate class. Then it is used in the described code and
returns the NSManagedObjectContext object (context). It can be implemented in every
class that manages the data using the Data Core framework.
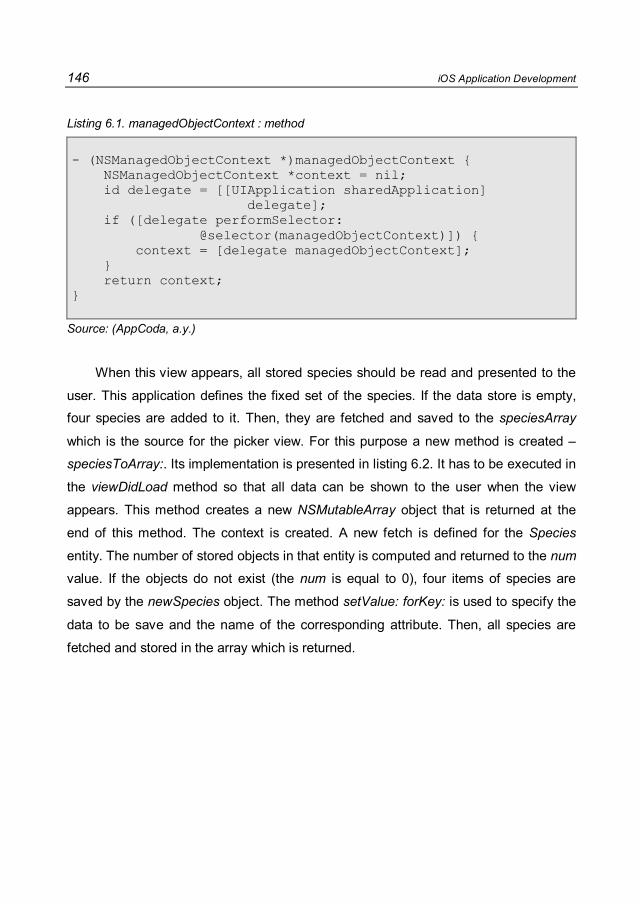
146 iOS Application Development
Listing 6.1. managedObjectContext : method
- (NSManagedObjectContext *)managedObjectContext { NSManagedObjectContext *context = nil; id delegate = [[UIApplication sharedApplication] delegate]; if ([delegate performSelector: @selector(managedObjectContext)]) { context = [delegate managedObjectContext]; } return context; }
Source: (AppCoda, a.y.)
When this view appears, all stored species should be read and presented to the
user. This application defines the fixed set of the species. If the data store is empty,
four species are added to it. Then, they are fetched and saved to the speciesArray
which is the source for the picker view. For this purpose a new method is created –
speciesToArray:. Its implementation is presented in listing 6.2. It has to be executed in
the viewDidLoad method so that all data can be shown to the user when the view
appears. This method creates a new NSMutableArray object that is returned at the
end of this method. The context is created. A new fetch is defined for the Species
entity. The number of stored objects in that entity is computed and returned to the num
value. If the objects do not exist (the num is equal to 0), four items of species are
saved by the newSpecies object. The method setValue: forKey: is used to specify the
data to be save and the name of the corresponding attribute. Then, all species are
fetched and stored in the array which is returned.
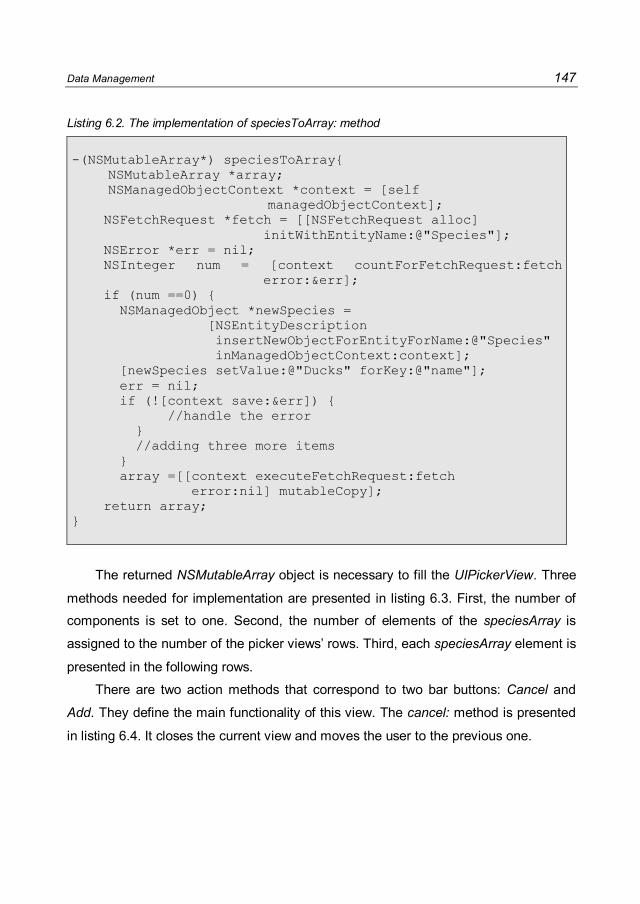
Data Management 147
Listing 6.2. The implementation of speciesToArray: method
-(NSMutableArray*) speciesToArray{
NSMutableArray *array; NSManagedObjectContext *context = [self managedObjectContext];
NSFetchRequest *fetch = [[NSFetchRequest alloc] initWithEntityName:@"Species"]; NSError *err = nil; NSInteger num = [context countForFetchRequest:fetch error:&err]; if (num ==0) { NSManagedObject *newSpecies = [NSEntityDescription insertNewObjectForEntityForName:@"Species" inManagedObjectContext:context]; [newSpecies setValue:@"Ducks" forKey:@"name"]; err = nil; if (![context save:&err]) { //handle the error } //adding three more items } array =[[context executeFetchRequest:fetch error:nil] mutableCopy]; return array; }
The returned NSMutableArray object is necessary to fill the UIPickerView. Three
methods needed for implementation are presented in listing 6.3. First, the number of
components is set to one. Second, the number of elements of the speciesArray is
assigned to the number of the picker views’ rows. Third, each speciesArray element is
presented in the following rows.
There are two action methods that correspond to two bar buttons: Cancel and
Add. They define the main functionality of this view. The cancel: method is presented
in listing 6.4. It closes the current view and moves the user to the previous one.

148 iOS Application Development
Listing 6.3. Picker view implementation
-(NSInteger)numberOfComponentsInPickerView: (UIPickerView *)pickerView{ return 1; } -(NSInteger)pickerView:(UIPickerView *) pickerView numberOfRowsInComponent:(NSInteger)component{ NSInteger num = 0; if ([pickerView isEqual:birdSpeciesPicker]) { num = [speciesArray count]; } return num; } -(NSString *)pickerView:(UIPickerView *)pickerView titleForRow:(NSInteger)row forComponent:(NSInteger)component{ return[[speciesArray objectAtIndex:row] valueForKey:@"name"]; }
Listing 6.4. The cancel: method implementation
- (IBAction)cancel:(id)sender { [self dismissViewControllerAnimated:YES completion: nil]; }
The addBird: method is presented in listing 6.5.The managed object context is
created and corresponds with the Bird entity. The newBird NSManagedObject is
defined by inserting new data into the entity. The setValue: forKey: is used. After the
setValue: a new value is given (e.g. text as a string) that will be saved. After the
forKey: statement, the name of the entity’s attribute must be specified. The values
from two text fields and one text view are read and then added to the corresponding
entity attributes.
The number of the selected row from the picker view is found. Because the index

Data Management 149
of the picker is the same index as that in the corresponding array named
speciesArray, there is no need to fetch all objects from the Species entity. Finding this
index is enough to find the object from speciesArray. That object is assigned to the
NSManagedObject newBird for the key equal to the name of the created relation
(called “toSpecies”). After obtaining all necessary information, the newBird object is
saved. If an error occurs, it should be corrected. At the end, the view is closed and
the user is moved to the main view.
Listing 6.5. The addBird: method
- (IBAction)addBird:(id)sender { NSManagedObjectContext *context = [self managedObjectContext]; NSManagedObject *newBird = [NSEntityDescription insertNewObjectForEntityForName:@"Bird" inManagedObjectContext:context]; [newBird setValue:birdNameTextField.text forKey:@"name"]; [newBird setValue:placeTextField.text forKey:@"place"]; [newBird setValue:birdDescritionTextField.text forKey:@"desc"]; NSInteger nr = [birdSpeciesPicker selectedRowInComponent:0]; [newBird setValue: speciesArray[nr] forKey:@"toSpecies"]; NSError *err = nil; if (![context save:&err]) { // handle the error } [self dismissViewControllerAnimated:YES completion:nil]; }
The application screen for inserting a new data is presented in fig. 6.8.
The above instructions save the new data. In the main view controller, all stored
data should be read and presented to the user in a table view control. The instructions
for fetching the necessary data cannot be placed in the viewDidAppear: method. It is
executed only once when the application launches. The main view is displayed after

150 iOS Application Development
launching it but also after returning from the Detail view. However, the idea is to
present the user the current stored data. This means that, after saving new data and
returning to the main view, all information should be available. That is why another
method should be used.
Fig. 6.8. The view for adding new data
Instructions for fetching all data from the Bird entity are grouped in the
viewWillAppear: method which is presented in listing 6.6. First, a new
NSManagedObjectContext object is created based on the same method as that
presented in listing 6.1. Second, a new NSFetchRequest object is defined where the
name of the entity is specified from which the data will be read. Finally, the fetch is
executed. The read data is stored in the NSMutableArray object called birdsArray.
A good programming practice is to verify whether the array is empty or not. Otherwise,
the developer should correct this error.
The data is fetched in the order how it was saved. The sooner the data is saved,
the higher it is displayed in the table view. The latest elements are at the end of the
table view.

Data Management 151
Listing 6.6. The mplementation of viewWillAppear: method
-(void)viewWillAppear:(BOOL)animated{ NSManagedObjectContext *context = [self managedObjectContext]; NSFetchRequest *fetch = [[NSFetchRequest alloc] initWithEntityName:@"Bird"]; birdsArray =[[context executeFetchRequest:fetch error:nil] mutableCopy]; if(birdsArray == nil) // handle the error }
The created array is the source for the table view. Two methods should be
implemented for displaying the information. They are presented in listings 6.7 to 6.8.
The table view elements are equal to the number counted from the birdsArray.
Listing 6.7. The implementation of numberOfRowsInSection: method
-(NSInteger)tableView:(UITableView *)tableView numberOfRowsInSection:(NSInteger)section{ return birdsArray.count; }
Because the cell is a custom type, the new UITableViewCell class should be
added to the project. The cell is the object of that class. It has three objects:
birdName, place and birdSpecies. For each cell this data is assigned from objects
stored in birdsArray. Each object has information that can be retrieved based on the
attribute names (e.g. name or place). The last information about the type of species is
read with the name of the relationship between two entities: (toSpecies) and the
attribute name in the destination entity (name). The described method returns the cell.
All data is displayed in the table view.

152 iOS Application Development
Listing 6.8. The implementation of cellForRowAtIndexPath: method
-(UITableViewCell *)tableView:(UITableView *)tableView cellForRowAtIndexPath:(NSIndexPath *)indexPath{ static NSString *tableViewId = @"birds"; BirdTableViewCell *cell = [tableView dequeueReusableCellWithIdentifier:tableViewId]; if (cell == nil) { cell = [[BirdTableViewCell alloc] initWithStyle:UITableViewCellStyleDefault reuseIdentifier:tableViewId]; } cell.birdName.text = [[birdsArray objectAtIndex:indexPath.row] valueForKey:@"name"]; cell.place.text= [[birdsArray objectAtIndex:indexPath.row] valueForKey:@"place"]; cell.birdSpecies.text = [[[birdsArray objectAtIndex:indexPath.row] valueForKey:@"toSpecies"] name ]; return cell; }
There is another method called viewDidAppear:. It is executed when the view
becomes active. It should reload data that is presented to the user in the table view. It
consists of only one instruction which is presented in listing 6.9.
Listing 6.9. The implementation of viewDidAppear: method
-(void)viewDidAppear:(BOOL)animated{ [birdTableView reloadData]; }
The application screen for displaying the data is presented in fig. 6.9. It can be
observed that the specified data from the previous view (fig. 6.8) is also presented at
the last position.

Data Management 153
6.4. DELETING DATA
Deleting items with a swipe gesture is an easy to implement. The commitEditingStyle:
is used for this purpose. Its code is presented in listing 6.10. If the cell is in the
deleting style, a delete button appears on the right side of the cell. The above method
includes the code that is executed after tapping the delete button.
Fig. 6.9. The view for displaying data about birds

154 iOS Application Development
Listing 6.10. The implementation of commitEditingStyle: method
-(void)tableView:(UITableView *)tableView commitEditingStyle:(UITableViewCellEditingStyle) editingStyle forRowAtIndexPath: (NSIndexPath *)indexPath{ if (editingStyle == UITableViewCellEditingStyleDelete){ NSManagedObjectContext *contex = [self managedObjectContext]; [contex deleteObject:[birdsArray objectAtIndex:indexPath.row]]; NSError *err; if (![contex save:&err]) { // handle the error } [birdsArray removeObjectAtIndex:indexPath.row]; [tableView reloadData]; } }
Fig. 6.10. Removing the selected item

Data Management 155
The selected item has to be removed both from the table view and from the data
source. The NSManagedObjectContext object is defined. It has an embedded method
for the deleting object (deleteObject:). The removing object has to be specified. All
objects are stored in the birdsArray, so only the proper index has to be specified as
indexPath.row. If an error occurs, it has to be corrected.
The item is also deleting from the table view by use of the removeObjectAtIndex:
method. At the end, the table view has to be reloaded.
The removing the selected object is presented in fig. 6.10.
6.5. DATA MODIFICATION
The selected data can be modified. Tapping the chosen row should cause
another view to be displayed for inserting the changes. It can be either the same view
for adding new items or a new view.
This application uses the same table view. Another segue has to be defined, this
time leading from a cell to that view. This connection is created as a Present Modally
with an identifier called modifyBird. The updated storyboard is presented in fig. 6.11.
Fig. 6.11. Storyboard with two views
This segue is used to implement the action of passing the chosen object from the
main view to the detailed one. Its code is shown in listing 6.11. First, the segue is
recognized by the identifier. Second, the number of the selected cell is computed by

156 iOS Application Development
use of the indexPathForSelectedRow: method for a table view. This function returns
the NSIndexPath object that is also used to find the NSManagedObject from
birdsArray.array. Third, the new object which belongs to the class of the destination
view (DetailBirdViewController) is created. It has to possess an object to which the
selected object can be assigned. It is necessary to remember to import that class.
Listing 6.11. The implementation of cprepareForSegue: method
-(void)prepareForSegue:(UIStoryboardSegue *)segue sender:(id)sender{ if ([[segue identifier] isEqualToString:@"modifyBird"]){ NSIndexPath *ind = [birdTableView indexPathForSelectedRow]; NSManagedObject *chosenBird = [birdsArray objectAtIndex:ind.row]; DetailBirdViewController *destController = [segue destinationViewController]; destController.bird = chosenBird; } }
Listing 6.12.The implementation of viewDidLoad: method
- (void)viewDidLoad { [super viewDidLoad]; speciesArray = [self speciesToArray]; if (bird) { [addButton setTitle:@"Modify"]; [birdNameTextField setText:[bird valueForKey:@"name"]]; [placeTextField setText:[bird valueForKey:@"place"]]; [birdDescritionTextField setText:[bird valueForKey:@"desc"]]; NSInteger ind = [speciesArray indexOfObject:[bird valueForKey:@"toSpecies"]]; [birdSpeciesPicker selectRow:ind inComponent:0 animated:YES]; } }

Data Management 157
The new NSManagedObject object must be added in the destination view
controller class. It’s called bird.
Now, the Detail view has two tasks to perform: adding new data and modifying
the chosen one. When a new object is created, there are empty fields to input data.
When the selected data is modified, all controls have to display the information stored
earlier in the database. This view has to distinguish whether it must add new data or
modify the existing one. It is done by the bird object. If it is not nil (has the assigned
data), the information is displayed. Otherwise, it’s empty and ready for new data. This
functionality is implemented in the viewDidLoad: method which is presented in listing
6.12. Another thing that is modified is the name of the bar button, from Add to Modify.
It is performed with the setTitle: method.
Listing 6.13.The implementation of addBird: method
- (IBAction)addBird:(id)sender { NSManagedObjectContext *context = [self managedObjectContext]; if (bird) { [bird setValue:birdNameTextField.text forKey:@"name"]; [bird setValue:placeTextField.text forKey:@"place"]; [bird setValue:birdDescritionTextField.text forKey:@"desc"]; NSInteger nr = [birdSpeciesPicker selectedRowInComponent:0]; [bird setValue:speciesArray[nr] forKey:@"toSpecies"]; } else { //adding new data } NSError *err = nil; if (![context save:&err]) { // handle the error } [self dismissViewControllerAnimated:YES completion:nil]; }

158 iOS Application Development
All presented data may be modified by the user after tapping the Add button. The
modified addBird: method is shown in the listing 6.13. The bird object is also used to
distinguish these functions. The object is changed by the setValue: forKey: method.
Finally, the object is saved and the view controller is closed.
The screen for modifying the chosen object is presented in fig. 6.12. The changed
data is then visualized in the main view.
Fig. 6.12. Detail view for modification

Map implementation
Aim
A map is the primary way to display geographic information in mobile applications.
Due to a large increase in mobile devices, such as smartphones and tablets, it is more
and more easy to select the route between two points or just to locate a chosen
position. Developers have a wide range of up-to-date software and tools, such as:
developing environment, libraries and frameworks. The API provides a user interface
component called map view. This chapter shows how to create maps and use them.
Plan
1. Frameworks.
2. Adding a map to the application.
3. Adding annotations to map.
4. Calculating distance between points.
7

160 iOS application development
7.1. FRAMEWORKS
There are two important frameworks to be used with maps in the mobile iOS
application. The first is MapKit Framework. It has forty one classes which provide
different approaches and capabilities to use map functionality. MapKit is an API
available on the iPhone and iPad that makes it easy to display maps, leap to
coordinates, show locations, and draw routes (Raywenderlich, a.y.). This framework
provides iOS developers with a simple mechanism for integrating details and
interactive mapping capabilities into the application. It also supports downloading the
coordinates of the geographical space and place marks due to a given coordinate on a
map. This framework refers to four useful protocols (iOSDL, a.y.p):
MKAnnotation,
MKMapViewDelegate,
MKOverlay,
MKReverseGeocoderDelegate.
There are two basic classes which have to be described: MKMapView and
MKMapViewDelegate. The additional improvements of the map in the application are
made possible by using the MKMapView class. It is a subclass of UIView and
provides a canvas onto which map and satellite information may be presented to the
user. The displayed information may be changed manually by the user in the process
of pinching stretching and panning gestures. The second method is programming from
within the application code by action on the MKMapView instance. The current
location of the user can be displayed and tracked on the map. It also has the ability to
add annotations to a map. This takes the form of a pin or a custom image. Each
annotation may have a title and a subtitle that are used to show additional information
about locations on a map. It is possible through the use of the MKAnnotation protocol.
The implementation of the MKMapViewDelegate protocol allows one to receive
information about changes in the user location or part of the displayed map, or, finally
the failure to give an accurate location (Devfright, a.y.).

Maps implementation 161
This MKMapView class includes properties and methods about (iOSDL, a.y.t):
Accessing Map Properties;
Accessing the Delegate;
Manipulating the Visible Portion of the Map;
Configuring the Map’s Appearance;
Displaying the User’s Location;
Annotating the Map;
Managing Annotation Selections;
Accessing Overlays;
Adding and Inserting Overlays;
Converting Map Coordinates;
Adjusting Map Regions and Rectangles.
The MKAnnotation protocol is used to provide annotation-related information to
a map view. This protocol can be adopted in any custom objects that store or
represent annotation data. An object that adopts this protocol must implement the
coordinate property, the other methods are optional (iOSDL, a.y.s).
The MKPointAnnotation class defines a concrete annotation object located at
a specified point. It associates this point on the map with its geographical coordinates.
The MKPointAnnotation object has a coordinate property which is the
CLLocationCoordinate2D object. It is a structure with two fields: latitude and longitude.
They are of the CLLocationDegrees type which is a double type for a real number.
The second important framework needed is CoreLocations. Using this framework
lets one determine the current location or position associated with a device. The
classes and protocols included in this framework may be used to configure and
schedule the trip, to define geographic regions and to monitor their boundaries. It has
nine classes, from which the most important are: CLGeocoder, CLLocation, CLRegion
and implementations of CLLocationManagerDelegate. A CLLocation object contains
the data location which is generated by a CLLocationManager object such as
geographical coordinates and values indicating the accuracy of the measurements. It
defines the CLLocationCoordinate2D structure which contains a latitude and
a longitude parameters.

162 iOS application development
7.2. ADDING MAPS TO THE APPLICATION
To build and create an application in Xcode, a new iOS project may be used with the
Single View Application template. It will be configured for the iPhone which is shown in
the fig. 7.1. Then a name must be granted to the created project as in fig. 7.2.
Fig. 7.1. Creating a new project

Maps implementation 163
Fig. 7.2. Giving a name to a new project
The files, AppDelegate and ViewController, will be created. The frameworks,
MapKit and CoreLocation, must be added to the project. To achieve this, one needs to
select the application target at the top of the project navigator panel, click the button
"+" in the Linked Frameworks and Libraries section, find the framework, select it and
click the button "Add". It is shown in the fig. 7.3.
It is very important to remember to add this framework in the file ViewController.m
by using the import directive. It must be in the first lines of the file. In the file
ViewController.h one must add delegates which are presented in listing 7.1.
MKMapViewDelegate, MKAnnotation, CLLocationManagerDelegate delegates must
be inserted.
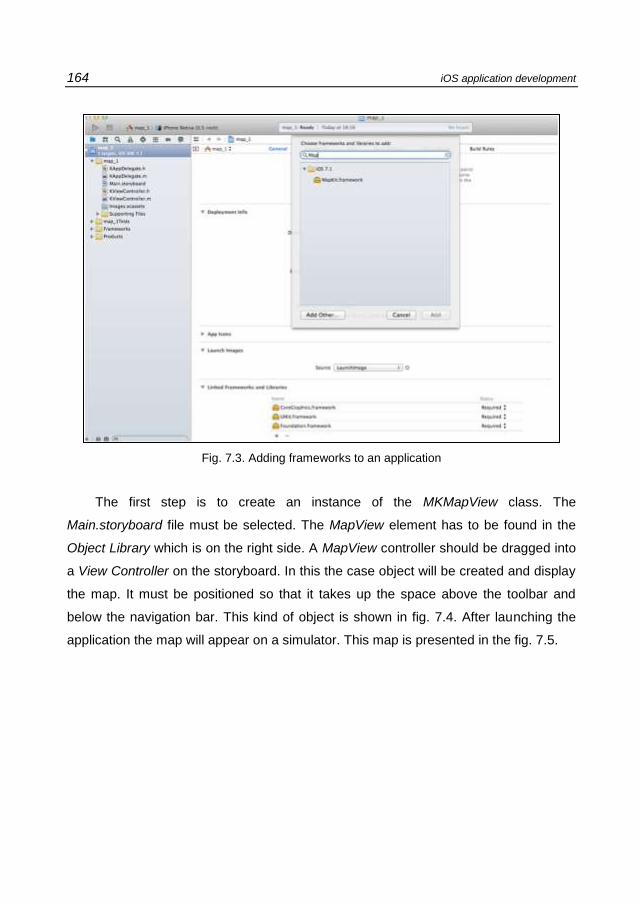
164 iOS application development
Fig. 7.3. Adding frameworks to an application
The first step is to create an instance of the MKMapView class. The
Main.storyboard file must be selected. The MapView element has to be found in the
Object Library which is on the right side. A MapView controller should be dragged into
a View Controller on the storyboard. In this the case object will be created and display
the map. It must be positioned so that it takes up the space above the toolbar and
below the navigation bar. This kind of object is shown in fig. 7.4. After launching the
application the map will appear on a simulator. This map is presented in the fig. 7.5.

Maps implementation 165
Fig. 7.4. Map View controller
Fig. 7.5. Application presenting the map
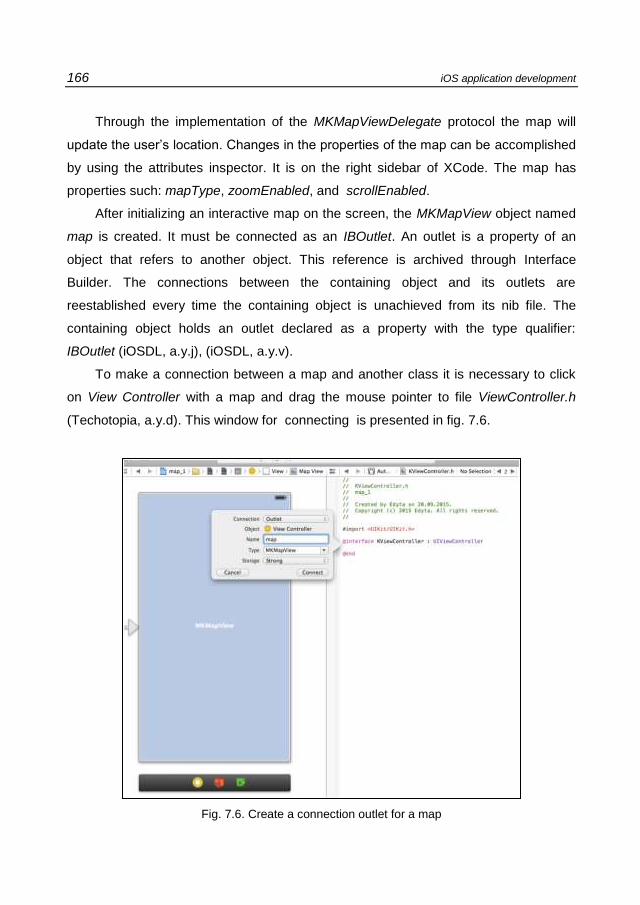
166 iOS application development
Through the implementation of the MKMapViewDelegate protocol the map will
update the user’s location. Changes in the properties of the map can be accomplished
by using the attributes inspector. It is on the right sidebar of XCode. The map has
properties such: mapType, zoomEnabled, and scrollEnabled.
After initializing an interactive map on the screen, the MKMapView object named
map is created. It must be connected as an IBOutlet. An outlet is a property of an
object that refers to another object. This reference is archived through Interface
Builder. The connections between the containing object and its outlets are
reestablished every time the containing object is unachieved from its nib file. The
containing object holds an outlet declared as a property with the type qualifier:
IBOutlet (iOSDL, a.y.j), (iOSDL, a.y.v).
To make a connection between a map and another class it is necessary to click
on View Controller with a map and drag the mouse pointer to file ViewController.h
(Techotopia, a.y.d). This window for connecting is presented in fig. 7.6.
Fig. 7.6. Create a connection outlet for a map
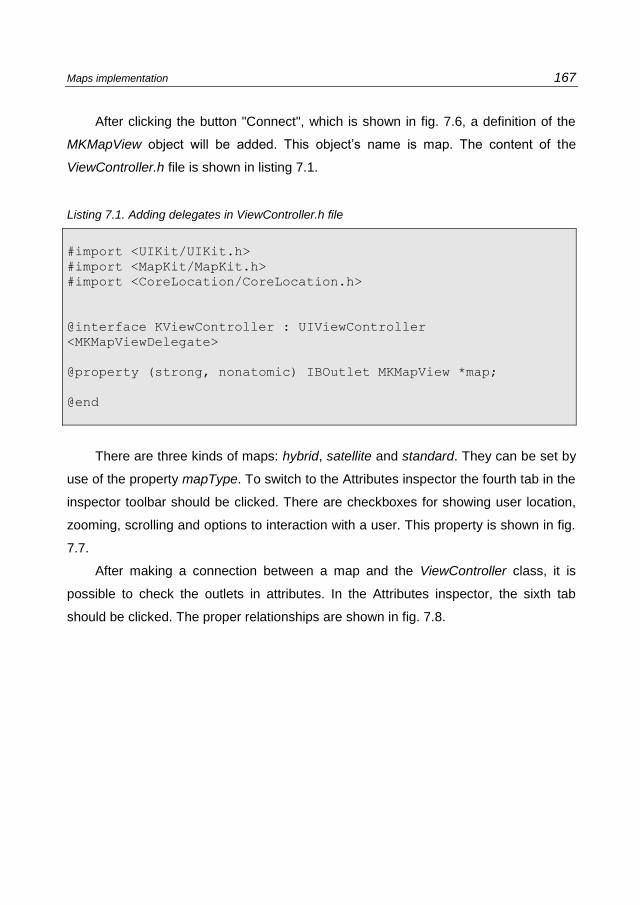
Maps implementation 167
After clicking the button "Connect", which is shown in fig. 7.6, a definition of the
MKMapView object will be added. This object’s name is map. The content of the
ViewController.h file is shown in listing 7.1.
Listing 7.1. Adding delegates in ViewController.h file
#import <UIKit/UIKit.h>
#import <MapKit/MapKit.h>
#import <CoreLocation/CoreLocation.h>
@interface KViewController : UIViewController
<MKMapViewDelegate>
@property (strong, nonatomic) IBOutlet MKMapView *map;
@end
There are three kinds of maps: hybrid, satellite and standard. They can be set by
use of the property mapType. To switch to the Attributes inspector the fourth tab in the
inspector toolbar should be clicked. There are checkboxes for showing user location,
zooming, scrolling and options to interaction with a user. This property is shown in fig.
7.7.
After making a connection between a map and the ViewController class, it is
possible to check the outlets in attributes. In the Attributes inspector, the sixth tab
should be clicked. The proper relationships are shown in fig. 7.8.

168 iOS application development
Fig. 7.7. Attributes inspector for maps
Fig. 7.8. Outlets of a map

Maps implementation 169
7.3. ADDING ANNOTATIONS TO A MAP
Annotations are very often used in conjunction with a map. Applied here the
MKPointAnnotation class can be used to display the current location. The user sees
a red pin placed on a map. It can have a title and a subtitle (Devfright, a.y.).
A coordinate is the most important property of MKPointAnnotation object which
belongs to the CLLocationCoordinate2D class. There are several ways of creating an
annotation object. The first process is to call a method:
CLLocationCoordinate2DMake(latitude, longitude) and to set it as a coordinate
property in the MKPointAnnotation object. The second way is to declare the
CLLocationCoordinate2D type object, to set its properties, latitude and longitude, and
to set it as a coordinate property of the MKPointAnnotation object. It is possible to
create such an object based on a string using the getLocalizationFromString: method.
Additionally, adding an annotation to a map is possible by using either the
addAnnotation: (id<MKAnnotation>) or the addAnnotation: (NSArray *) methods. The
former method adds one point and the latter adds the point’s array. One way of
making an annotation is presented in listing 7.2. The MKPointAnnotation object named
annotation is created. Three properties of this object are set with specific values. The
most important value of the coordinate property has been completed using the
CLLocationCoordinate2DMake: method by specifying known geographic coordinates.
The title and subtitle properties of the annotation object were also set to Lublin and my
city values, respectively. Finally, the annotation object was added to the map object by
using the addAnnotation: method.
The effect of the application is shown in fig. 7.9. After launching the application on
the simulator, a map is seen with a red pin in the given place. After clicking the pin,
its properties are displayed: the title and its subtitle.
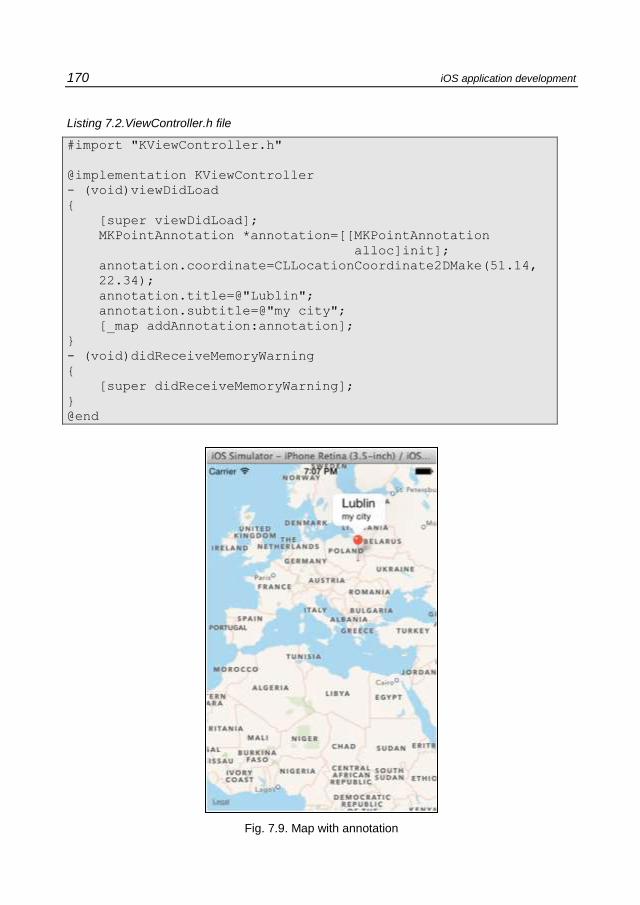
170 iOS application development
Listing 7.2.ViewController.h file
#import "KViewController.h"
@implementation KViewController
- (void)viewDidLoad
{
[super viewDidLoad];
MKPointAnnotation *annotation=[[MKPointAnnotation
alloc]init];
annotation.coordinate=CLLocationCoordinate2DMake(51.14,
22.34);
annotation.title=@"Lublin";
annotation.subtitle=@"my city";
[_map addAnnotation:annotation];
}
- (void)didReceiveMemoryWarning
{
[super didReceiveMemoryWarning];
}
@end
Fig. 7.9. Map with annotation

Maps implementation 171
7.4. DISTANCE BETWEEN POINTS
The discussed frameworks in the previous chapters can be used to calculate the
distance between two given points in a map. It is computed, of course, as the distance
measured in a straight line. For this purpose the distanceFromLocation: method must
be implemented. It returns the distance in meters from the receiver’s location to the
specified destination location (iOSDL, a.y.q). This method is shown in the following
example. Two MKPointAnnotation objects are necessary to indicate two locations.
One UILabel object is needed to present the computed distance between these points.
The interface between the application and its needed objects is shown in listing 7.3.
The GUI designed using Storyboard is presented in fig. 7.10.
Listing 7.3. The content of a file with interface
#import <UIKit/UIKit.h>
#import <MapKit/MapKit.h>
#import <CoreLocation/CoreLocation.h>
@interface KViewController :
UIViewController<MKMapViewDelegate,CLLocationManagerDelegate>
{
UILabel *labelDistance;
MKPointAnnotation *point1;
MKPointAnnotation *point2;
}
@property (strong, nonatomic) IBOutlet MKMapView *map;
@property (strong, nonatomic) IBOutlet UILabel *labelDistance;
@end

172 iOS application development
Fig. 7.10. Storyboard for example application
The first step is to implement the computeDistanceFrom: to: method which has
two parameters CLLocationCoordinate2D type and returns the real number. It is
shown in listing 7.4. This method is called in viewDidLoad method which is presented
in listing 7.5. Its result is converted to kilometers measurement. Centering of the map
with respect to the marked points by using setCenterCoordinate: method is the last
element in the illustrated method. The new calculated point, which has coordinates
equal to the arithmetic average of coordinates of two given points, will be in the center
of the map.

Maps implementation 173
Listing 7.4. Implementation of the distanceFromLocation: method
-(double) computeDistanceFrom: (CLLocationCoordinate2D)
coordFrom to:(CLLocationCoordinate2D) coordTo
{
CLLocation *location1 = [[CLLocation alloc]
initWithLatitude: coordFrom.latitude
longitude:coordFrom.longitude];
CLLocation *location2 = [[CLLocation alloc]
initWithLatitude:coordTo.latitude
longitude:coordTo.longitude];
double dist = [location1
distanceFromLocation:location2];
return dist;
}
The application’s screen is presented in fig. 7.11. There are two pins which are
placed in the given coordinates. The distance in kilometers between those locations is
displayed below the map.
Fig. 7.11. Map with annotations

174 iOS application development
Listing 7.5. Implementation of the calculated distance between two points
-(void)viewDidLoad
{
[super viewDidLoad];
point1 = [[MKPointAnnotation alloc]init];
point2 = [[MKPointAnnotation alloc]init];
point1.coordinate = CLLocationCoordinate2DMake(51.14,
22.34);
point1.title =@"Lublin" ;
NSString *coord = [[NSString alloc] initWithFormat:
@"%f ; %f",point1.coordinate.latitude,
point1.coordinate.longitude];
point1.subtitle= coord;
[self.map addAnnotation:point1];
[self.map setCenterCoordinate:point1.coordinate
animated:YES];
point2.coordinate = CLLocationCoordinate2DMake(54.22,
18.38);
point2.title = @"Gdansk";
NString *coord2 = [[NSString alloc] initWithFormat:
@"%f; %f",point2.coordinate.latitude,
point2.coordinate.longitude];
point2.subtitle= coord2;
[self.map addAnnotation:point2];
[self.map setZoomEnabled:true];
double d = [self computeDistanceFrom:point1.coordinate
to:point2.coordinate];
NSString *dText = [[NSString alloc]initWithFormat:
@"Distance: %.2f km", d/1000];
[labelDistance setText:dText];
map.camera.altitude = d*2.2;
MKPointAnnotation *newPoint = [MKPointAnnotation new];
newPoint.coordinate = CLLocationCoordinate2DMake
((point1.coordinate.latitude +
point2.coordinate.latitude)/2,
(point1.coordinate.longitude +
point2.coordinate.longitude)/2);
[self.map setCenterCoordinate:newPoint.coordinate
animated:YES];
}

BIBLIOGRAPHY
AppCoda (a.y.), Introduction to Core Data: Your First Step to Persistent Data, access 20.08.2015, <http://www.appcoda.com/introduction-to-core-data/>.
Binpress (a.y.), Objective-C Lesson 5: Loops, access 20.06.2015, <http://www.binpress.com/tutorial/objectivec-lesson-5-loops/54>.
Devfright (a.y.), Learn How to Create iOS Apps, access 28.08.2015, <http://www.devfright.com>.
iOSDL iOS Developer Library (a.y.a), About Storyboards, access 12.07.2015, <https://developer.apple.com/library/ios/recipes/xcode_help-IB_storyboard/chapters/AboutStoryboards.html#//apple_ref/doc/uid/TP40014225-CH41-SW1>.
iOSDL iOS Developer Library (a.y.b), About Swift, access 1.07.2015, <https://developer.apple.com/library/ios/documentation/Swift/Conceptual/Swift_Programming_Language/>.
iOSDL iOS Developer Library (a.y.c), About the iOS Technologies, access 1.07.2015, <https://developer.apple.com/library/ios/documentation/Miscellaneous/Conceptual/iPhoneOSTechOverview/Introduction/Introduction.html>.
iOSDL iOS Developer Library (a.y.d), About the Xcode Main Window, access 27.06.2015, <https://developer.apple.com/library/ios/recipes/xcode_help-general/Chapters/Recipe.html#//apple_ref/doc/uid/TP40010548-CH9-SW1>.
iOSDL iOS Developer Library (a.y.e), Class Reference, UIButton, access 14.07.2015, <https://developer.apple.com/library/ios/documentation/UIKit/Reference/UIButton_Class/index.html#//apple_ref/doc/uid/TP40006815>.
iOSDL iOS Developer Library (a.y.f), Core Data Programming Guide, Relationships and Fetched Properties, access 21.08.2015, <https://developer.apple.com/library/mac/documentation/Cocoa/Conceptual/CoreData/Articles/cdRelationships.html>.
iOSDL iOS Developer Library (a.y.g), Core OS Layer, access 2.07.2015, <https://developer.apple.com/library/ios/documentation/Miscellaneous/Conceptual/iPhoneOSTechOverview/CoreOSLayer/CoreOSLayer.html#//apple_ref/doc/uid/TP40007898-CH11-SW1>.
iOSDL iOS Developer Library (a.y.h), Core Services Layer, access 2.07.2015, <https://developer.apple.com/library/ios/documentation/Miscellaneous/Conceptual/iPhoneOSTechOverview/CoreServicesLayer/CoreServicesLayer.html#//apple_ref/doc/uid/TP40007898-CH10-SW5>.
iOSDL iOS Developer Library (a.y.i), Creating a Master-Detail Interface, access 28.06.2015, <https://developer.apple.com/library/mac/documentation/Cocoa/Conceptual/CocoaBindings/Tasks/masterdetail.html>.

176 iOS Application Development
iOSDL iOS Developer Library (a.y.j), Creating and Connecting an outlet, access 29.08.2015, <https://developer.apple.com/library/ios/recipes/xcode_help_interface_builder/articles_connections_bindings/CreatingOutlet.html#//apple_ref/doc/uid/TP40009971-CH15>.
iOSDL iOS Developer Library (a.y.k), Foundation Framework Reference NSString, access 18.06.2015, <https://developer.apple.com/library/mac/documentation/Cocoa/Reference/Foundation/Classes/NSString_Class/index.html#//apple_ref/occ/cl/NSString>.
iOSDL iOS Developer Library (a.y.l), Foundation Framework Reference, NSArray, access 20.06.2015, <https://developer.apple.com/library/ios/documentation/Cocoa/Reference/Foundation/Classes/NSArray_Class/>.
iOSDL iOS Developer Library (a.y.m), Foundation Framework Reference, NSMutable, access 21.06.2015, <https://developer.apple.com/library/ios/documentation/Cocoa/Reference/Foundation/Classes/NSMutableArray_Class/>.
iOSDL iOS Developer Library (a.y.n), Foundation Framework Reference, NSDictionary, access 21.06.2015, <https://developer.apple.com/library/mac/documentation/Cocoa/Reference/Foundation/Classes/NSDictionary_Class/>.
iOSDL iOS Developer Library (a.y.o), Interface Builder Help, access 28.06.2015, <https://developer.apple.com/library/ios/recipes/xcode_help_interface_builder/Chapters/InspectingandConfiguringInterfaceBuilderFiles.html#//apple_ref/doc/uid/TP40009971-CH39-SW1>.
iOSDL iOS Developer Library (a.y.p), Map Kit Framework Reference, access 30.08.2015, <https://developer.apple.com/library/ios/documentation/MapKit/Reference/MapKit_Framework_Reference/_index.html>.
iOSDL iOS Developer Library (a.y.q), Measuring the Distance Between Coordinates, access 30.08.2015, <https://developer.apple.com/library/ios/documentation/CoreLocation/Reference/CLLocation_Class/#//apple_ref/occ/instm/CLLocation/distanceFromLocation:>.
iOSDL iOS Developer Library (a.y.r), Media Layer, access 3.07.2015, <https://developer.apple.com/library/ios/documentation/Miscellaneous/Conceptual/iPhoneOSTechOverview/MediaLayer/MediaLayer.html#//apple_ref/doc/uid/TP40007898-CH9-SW4>.
iOSDL iOS Developer Library (a.y.s), MKAnnotation, access 30.08.2015, <https://developer.apple.com/library//ios/documentation/MapKit/Reference/MKAnnotation_Protocol/index.html#//apple_ref/occ/intf/MKAnnotation>.
iOSDL iOS Developer Library (a.y.t), MKMapView, access 30.08.2015, <https://developer.apple.com/library//ios/documentation/MapKit/Reference/MKMapView_Class/index.html>.
iOSDL iOS Developer Library (a.y.u), Model-View-Controler, access 3.07.2015,

Bibliography 177
<https://developer.apple.com/library/ios/documentation/general/conceptual/devpedia-cocoacore/MVC.html#//apple_ref/doc/uid/TP40008195-CH32-SW1>.
iOSDL iOS Developer Library (a.y.v), Outlets, access 30.08.2015, <https://developer.apple.com/library/ios/documentation/General/Conceptual/CocoaEncyclopedia/Outlets/Outlets.html>.
iOSDL iOS Developer Library (a.y.w), Programming With Objective-C, Values and Collections, access 20.06.2015, <https://developer.apple.com/library/ios/documentation/Cocoa/Conceptual/ProgrammingWithObjectiveC/FoundationTypesandCollections/FoundationTypesandCollections.html>.
iOSDL iOS Developer Library (a.y.x), Programming with Objective-C, Defining Classes, access 25.06.2015, <https://developer.apple.com/library/ios/documentation/Cocoa/Conceptual/ProgrammingWithObjectiveC/DefiningClasses/DefiningClasses.html>.
iOSDL iOS Developer Library (a.y.y), Programming with Objective-C, Working with objects, access 25.06.2015, <https://developer.apple.com/library/mac/documentation/Cocoa/Conceptual/ProgrammingWithObjectiveC/WorkingwithObjects/WorkingwithObjects.html#//apple_ref/doc/uid/TP40011210-CH4-SW1>.
iOSDL iOS Developer Library (a.y.z), Project Navigator Help, access 29.06.2015, <https://developer.apple.com/library/mac/recipes/xcode_help-structure_navigator/articles/Creating_a_Project.html#//apple_ref/doc/uid/TP40009934-CH3-SW1>.
iOSDL iOS Developer Library (a.y.A), Storyboard Seque, access 15.07.2015, <https://developer.apple.com/library/ios/recipes/xcode_help-IB_storyboard/chapters/StoryboardSegue.html>.
iOSDL iOS Developer Library (a.y.B), Table View Programming Guide for iOS, access 18.07.2015, <https://developer.apple.com/library/ios/documentation/UserExperience/Conceptual/TableView_iPhone/AboutTableViewsiPhone/AboutTableViewsiPhone.html>.
iOSDL iOS Developer Library (a.y.C), Text Programming Guide for iOS, access 15.07.2015, <https://developer.apple.com/library/ios/documentation/StringsTextFonts/Conceptual/TextAndWebiPhoneOS/KeyboardManagement/KeyboardManagement.html>.
iOSDL iOS Developer Library (a.y.D), UIAlertAction Class Reference, access 20.07.2015, <https://developer.apple.com/library/ios/documentation/UIKit/Reference/UIAlertAction_Class/>.
iOSDL iOS Developer Library (a.y.E), UIAlertView Class Reference, access 20.07.2015, <https://developer.apple.com/library/ios/documentation/UIKit/Reference/UIAlertView_Class/>.
iOSDL iOS Developer Library (a.y.F), UIKit User Interface Catalog, Text Field, access 13.07.2015,

178 iOS Application Development
<https://developer.apple.com/library/ios/documentation/UserExperience/Conceptual/UIKitUICatalog/UIControl.html>.
iOSDL iOS Developer Library (a.y.G), UIKit User Interface Catalog, Text View, access 13.07.2015, <https://developer.apple.com/library/ios/documentation/UserExperience/Conceptual/UIKitUICatalog/UITextView.html#//apple_ref/doc/uid/TP40012857-UITextView-SW1>.
iOSDL iOS Developer Library (a.y.H), UIKit User Interface Catalog, Labels, access 13.07.2015, <https://developer.apple.com/library/ios/documentation/UserExperience/Conceptual/UIKitUICatalog/UILabel.html#//apple_ref/doc/uid/TP40012857-UILabel-SW1>.
iOSDL iOS Developer Library (a.y.I), UIKit User Interface Catalog, Picker Views, access 15.07.2015, <https://developer.apple.com/library/ios/documentation/UserExperience/Conceptual/UIKitUICatalog/UIPickerView.html>.
iOSDL iOS Developer Library (a.y.J), UIKit User Interface Catalog, Date Pickers, access 16.07.2015, <https://developer.apple.com/library/ios/documentation/UserExperience/Conceptual/UIKitUICatalog/UIDatePicker.html#//apple_ref/doc/uid/TP40012857-UIDatePicker-SW1>.
iOSDL iOS Developer Library (a.y.K), UIKit User Interface Catalog, Switches, access 16.07.2015, <https://developer.apple.com/library/ios/documentation/UserExperience/Conceptual/UIKitUICatalog/UISwitch.html#//apple_ref/doc/uid/TP40012857-UISwitch-SW1>.
iOSDL iOS Developer Library (a.y.L), UIPickerView Class Reference, access 16.07.2015, <https://developer.apple.com/library/prerelease/ios/documentation/UIKit/Reference/UIPickerView_Class/index.html>.
iOSDL iOS Developer Library (a.y.M), UITextField Class Reference, access 13.07.2015, <https://developer.apple.com/library/ios/documentation/UIKit/Reference/UITextField_Class/index.html#//apple_ref/doc/uid/TP40006888>.
Kochan S. (2012), Programming in Objective-C, Warszawa, Wydawnictwo Helion, p.497.
Nahavandipoor V. (2013), iOS5. Programming Cookbook, Gliwice, Wydawnictwo Helion, p. 748.
OLEB (a.y.), Differences Between Xcode Project Templates for iOS Apps, access 25.06.2015, <http://oleb.net/blog/2013/05/xcode-project-templates-difference/>.
Raywenderlich (a.y.), Tutorials for iPhone/iOS Developers and Games, access 29.08.2015, <http://www.raywenderlich.com/21365/introduction-to-mapkit-in-ios-6-tutorial>
ROCT Ry’s Objective-C Tutorial (a.y.a), Classes, access 27.06.2015, <http://rypress.com/tutorials/objective-c/classes>.

Bibliography 179
ROCT Ry’s Objective-C Tutorial (a.y.b), NSNumber, access 22.06.2015, <http://rypress.com/tutorials/objective-c/data-types/nsnumber>.
Techotopia (a.y.a), Objective-C Inheritance, access 27.06.2015, <http://www.techotopia.com/index.php/Objective-C_Inheritance>.
Techotopia (a.y.b), Objective-C Looping, The for Statement, access 24.06.2015, <http://www.techotopia.com/index.php/Objective-C_Looping_-_The_for_Statement>.
Techotopia (a.y.c), Working with iPhone Databases using Core Data, access 20.08.2015, <http://www.techotopia.com/index.php/Working_with_iPhone_Databases_using_Core_Data>.
Techotopia (a.y.d), Working with Maps on iOS7 with MapKit and the MKMapView, access 27.08.2015, <http://www.techotopia.com/index.php/Working_with_Maps_on_iOS_7_with_MapKit_and_the_MKMapView_Class>.
Tutorialspoint (a.y.), Objective-C Classes & Objects, access 28.06.2015, <http://www.tutorialspoint.com/objective_c/objective_c_classes_objects.htm>.

Edyta Łukasik Maria Skublewska-Paszkowska
iOS Application Development The content of this book is the result of “Mobile Application Development for Environmental Monitoring – a New Program of Master Studies in English (MADEM)” project supported by the EEA Grants, Norway Grants and national funds under the Scholarship and Training Fund Programme. It was printed and published within the funds of “Professional Master’s Degree in computer science as a second competence in Central Asia (PROMIS)” project supported by the EU Tempus Project Programme. The book contains the theoretical basis and practical examples of the modern mobile technologies that have appliance in the environmental fields. It introduces the reader into the mobile programming in details.
ISBN 978-83-936692-2-6